

Samsung S730 Users Manual

Notice
The information within this manual is subject to change without notice.
The manufacturer sh all not be held liable for tec hnical or editorial errors or
omissions contained in herein; nor for incidental or consequen tial damages
resulting from the furnishing, performance or use of this material.
No part of this publication may be reproduced, stored in a retrieval system, or
transmitte d, in any form or by any means, mechanical photocop ying, recording or
otherwise, without the prior written permission of the manufacturer.
Product names mentio ned herei n are for ident ifica tio n purposes onl y , and may be
trademarks and/or regis t ered trademark s of th eir respective companies.
1998. All rights reserved
i User’s Manual

Important Safety Instruction
Read all of these instructions, and save these instructions for later use.
•Follow all warnings and instructions marked on the product.
•Unplug th is product from the wall outlet before cleaning. Do not use liquid
cleaner s o r aer osol cleane r s . Us e a damp cloth for cl ean i n g .
•Do not use this product near water. Never spill liquid of any kind on the
product.
•Do not place thi s product on an unstable cart, stand, or table.
•Slots and openings in the cabinet are provided for ventilation. To ensure
reliable operat ion of the product on a bed, sofa, rug, or other simi lar
surface. This produc t should never be placed near or over a radiator or
heat register. This product should not be placed in a built-in installation
unless proper vent ilation is provide d.
•Before connecting this product to a power so urce , check the required
voltage and frequency match the available power source.
•This comput er is powered by an internal battery pack or by an external AC
power source, Which is supplied with the computer. Use of another
battery pack or AC power source may present risk of fire or explosion. To
disconnect the AC power cord and remove the battery pa cks .
•This produ ct is equip ped with a 2-wi re type pl ug. I f you are unab le to ins ert
the plug into the outlet, contact your el ectrician to replace your obsolete
outlet.
•Do not allow anything to rest on the power cord.
•Do not place this product in a location where someone may trip over the
cord.
•If an extensi on cord is used with this prod uct, mak e sure tha t the tot al of the
ampere ratings on the products plugged into the e xtension cord do not
exceed the exte nsion cord ampere rating. Also, make sure that the total of
all products plugged into the wall outlet does not exceed 15 amperes.
•Never push objects of any kind into this product through the cabinet slots,
as they may touch dangerous voltage points or short out parts; that could
result in a risk of fire or electric shock.
•Except as e xplain ed els ewhere i n thi s manual, do not att empt t o servi ce this
product yourself.
•Handle battery with care. If dropped, they may damaged.
•Do not allow the bat tery to be exposed to direct sunl ight for extended
periods of time.
ii

•Do not attempt to disassemble the battery. If the battery is disassembled and
the electro des are exposed to outside, the battery may generate eat and
smoke by chemical reac tion.
•Do not expose the battery to moisture or chemicals.
•Charge the battery only as described in this document.
•Do not short circuit the battery terminals as the resulting high currents can
damage the battery.
•The battery s hould not be used to power other products.
•Do not di spose of a us ed bat ter y in a fire or inc inerat or , as a n explo sion m ay
result.
•The battery s hould be recycled.
•Do not subjec t the battery to tempe r ature should not less than -20 degrees
Centigrade or greater than 50 degrees Centi grade.
•Unplug this product from the wall outlet and refer problems to the service
representative under the following conditions:
- When the power cord or plug is damaged or frayed.
- If liquid has been spilled into product.
- If the product has been exposed to rain or water.
- If the product does not operate normally when the operating
instructions are follo w ed , adjus t o n l y those controls t h at are
covered by the operating instructions. Improper adjustment of
other controls may result in damage.
- If the product exhibits a distinct change in performance.
iii User’s Manual

Battery Disposal
Warning : Do not put rechargeable batteries or products powered by nonremovable rechargeable batteries in the garbage.
Contact your customer service representative for information on how to dispose
of batteries that you cannot use or rechar ge any longer.
Follow all local regulation s when old batteries.
iv

Federal Communications Commission (FCC)
This device complies with Part 15 of the FCC Rules. Operation is subject to the
following two conditions:(1) this device may not cause harmful interference, and
(2) this device must accept any interference received, including interference that
may cause undesired operation.
NOTE:
This equipment has been tested and found to comply with the limits for a Class B
digital device pursuant to Part 15 of the FCC Rules. These limits are designed to
provide reasonable protection against harmful interference in a residential
installati on. This equ ipmen t gener ate us es and c an radi ate ra dio fre quen cy ener gy
and if not installed and used in accordance with the instructions may cause
harmful interference will not occur in a particular installation. If this equipment
does cause harmful interference to radio or television reception, which can be
determined by turning the equipment off and on, the user is encouraged to try to
correct the interference by one or more of the foll owing measures:
•Reorient or relocate the receiving antenna.
•Increase the separation between the equipment and receiver.
•Connect the equipment into an outle t on a circuit differ ent from that to
which the receiver is connected.
•Consult the dealer or an experienced radio/TV technician for help.
v User’s Manual
If necessa ry, the user should consult the dealer or an experienced radio/television
technicia n for additional suggestions. The user may f ind the following bookle t
helpful: "Something About Interference." This is available at FCC local regional
offices. Our company is not responsible for any radio or television interference
caused by unauthorized modifications of this equipment or the substitution or
attachment of connecting cables and equipment ot her than those specified by our
company. The correction will be the responsibi lity of the user. Use only shielded
data cables with this system.

Canadian Radio Interference Regulations
This apparat us doe s not exceed th e c lass B limi ts for radio noi se e missi ons set out
in the radio interference regulations of the Canadian Department of
Communications.
Le présent appareil n’émet pas de bruits radioé lectriques dépassa nt les limites
applic ab le aux appa re ils de la clas s e B p r escrites p ar le règlem en t d e br o u i ll ag e
radioélectrique dicté par le Minist ère des Communictions du Canada.
vi

Ta ble of Contents
Using Your Documentation ......................................................... 1
Special Features of the User’s Manual ............................................................1
Using the Software User Documentation ........................................................2
Introducing Your Computer ....................................................... 3
Using Your Computer for the First Time ..................................5
Installing the Battery .......................................................................................5
Attaching the Power Cord ...............................................................................6
Turning On the Computer ...............................................................................7
Understanding POST .......................................................................................8
Adjusting the LCD Display .............................................................................8
Making Backup Disks ............. ........................................................................8
Turning Off Your Computer ...........................................................................9
Restarting Your Computer ..............................................................................9
Tips fo r U si ng Y o ur Co mputer . ... ......... ... ......... ... .. .......... .. .......... ... .. .......... .. .10
Traveling with Your Computer .....................................................................11
Hand li n g Sp il ls ........... .. .......... .. ... ......... ... ......... ... .. .......... .. .......... ... .. .......... .. .11
Storing the Computer for Long Periods ........................................................12
Using the Keyboard .................................................................... 13
Using the Numeric Keypad ...........................................................................14
Using Special Function Keys ........................................................................15
vii User’s Manual
Using the Touchpad .................................................................... 17
Readin g the System S ta tus Lights ..... ......... ........ ........ ........ ....... 19
Connecting Peripheral Devices .................................................. 21
Using the Floppy Drive ............................................................... 24
Using the CD-ROM Drive .......................................................... 26
Using the Hard Drive ................................................................. 29
Removing the Hard Drive .............................................................................29
Installing a Hard Drive ..................................................................................30
Using the Battery ........................................................................ 31
Charging the Battery ......................................................................................31
Safely Using the Battery ................................................................................32
Removing the Battery ....................................................................................32

Moni to r in g th e B at te r y C ha r g e . .......... .. .......... .. ... .......... .. .......... .. ... ......... ... ...33
Using the Battery Gauge ..........................................................................33
Battery Warnings ...........................................................................................35
Using System Setup .................................................................... 36
Starting System Setup ....................................................................................36
Main M en u ......... ... .. .......... .. .......... .. ... .......... .. .......... .. ... ......... ... ......... ... .. ...... 3 8
Advanced Menu .............................................................................................41
Secur i ty M en u ............ .. .. .......... ... ......... ... .. .......... .. .......... .. ... .......... .. .......... .. .43
Power Menu ...................................................................................................44
Boot M en u ........ .. .......... .. ... .......... .. .......... .. ... ......... ... ......... ... .. .......... .. .......... . 4 6
Exit Menu ......................................................................................................47
Using System Security ................................................................ 48
Creating a Password ......................................................................................48
Deleting a Password ......................................................................................48
Requiring a Password When the Computer Starts ........................................49
Locking the Hard Drive Boot Sector .............................................................49
Locking the Keyboard ...................................................................................49
Using Power Management Options ........................................... 50
Non-Turbo Mode ...........................................................................................50
Standby Mode ....... ............................... .......... .......... ..................... .......... .......51
Rest M o d e .. ......... ... ......... ... .. .......... .. .......... ... .. .......... .. .......... .. ... ......... ... ........ 5 1
Rest Mode Precautions ..................................................................................53
Using PowerProfiler ......................................................................................53
Creating a Save to Disk Partition .............................................. 55
Windows 98 .................................... .......... .......... .......... ..................... .......... ..56
Windows NT .................................... ...................... ............ ...........................57
Changing the Video Configuration ........................................... 59
Resolution and Color Depth ..........................................................................59
Selec ti n g a M o ni t or Ty p e ....... .. ... ......... ... ......... ... .. .......... .. .......... ... .. .......... .. .60
Changing Color Depth and Resolution ..........................................................61
Working with PC Cards ............................................................. 62
Maintaining PC Cards ...................................................................................62
Using PC Cards .............................................................................................63
Windows 98 ............. .......... .................... ..................... .......... .......... .........64
Windows NT ....... .......... .......... .......... ..................... .......... .......... .......... ....64
Upgrading Memory .................................................................... 66
Before You Install Memory .....................................................................66
viii

Installing a Memory Module ...................................................................67
About Drivers and System Resources ....................................... 70
Drivers ....... .............. ............... .............. ............... ...................... .............. ......70
IRQs . ..... .. ..... ..... ..... ..... .. ..... ..... ..... .... ... ..... ..... .... ..... ... ..... .... ..... ... ..... .... ..... ..... . 70
Troubl eshooting .. ............ .......... ............ ........... ............ .......... ..... 73
Operating Problems .......................................................................................73
Infrar e d P ro b lems .. .. ... ......... ... ......... ... .. .......... .. .......... ... .. .......... .. .......... .. ... ...7 5
Specifications ............................................................................... 76
Abbrev iations .... ............ .......... ............ ........... ............ .......... ....... 78
Glossary ....................................................................................... 81
Recording the Computer Hardware Configuration ................86
ix User’s Manual

Using Your Documentation
Congratulations on your purchase of the Notebook computer. Whether you are
new to using a portable computer or are an experienced user , this user’s manual
can help you get the most from your computer.
Special Features of the User’s Manual
Three types of messages with icons appear in the manual:
A note informs you of special circumstances.
A caution wa rns you of possible da m a ge t o equipment.
A warning indicates the possibility of personal injury.
Keys that you need to press to perform certain functions are shown in the manual
enclosed in angle brackets. For example,
<Ctrl>
indicates the control key (Ctrl on the computer’s keyboard).
If you need to pr ess two keys at t he s ame time, th e key n ames a re sho wn joine d by
a plus sign. For example,
<Fn+F11>
means that you should pre ss the Fn key and hold it and then press the F11 key.
If you are new to using computers, see “Glossary”. The “Glos sary” explains
general computing terms that are used in this manual and tells you about some of
the differences between notebook computers and de sktop computers.
Using Your Documentation 1

Using the Software User Documentation
Your computer shipped from the factor y with several s oftware programs insta lled.
The software may include its own online or printed doc umentation. Refer to the
documentation or the Help options in the software for more information.
2 User’s Manual
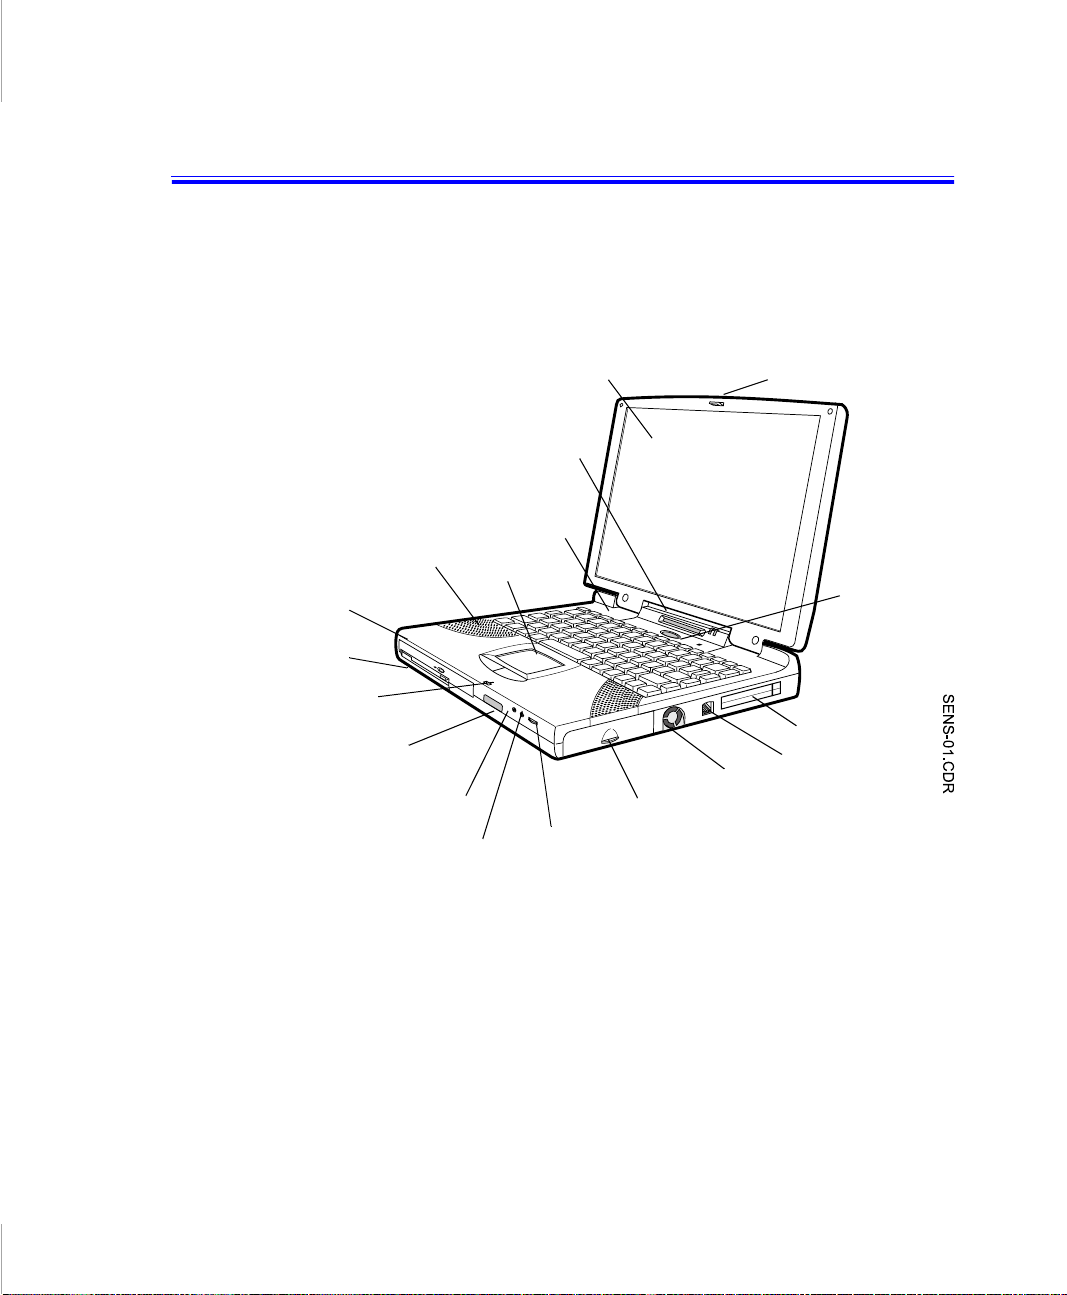
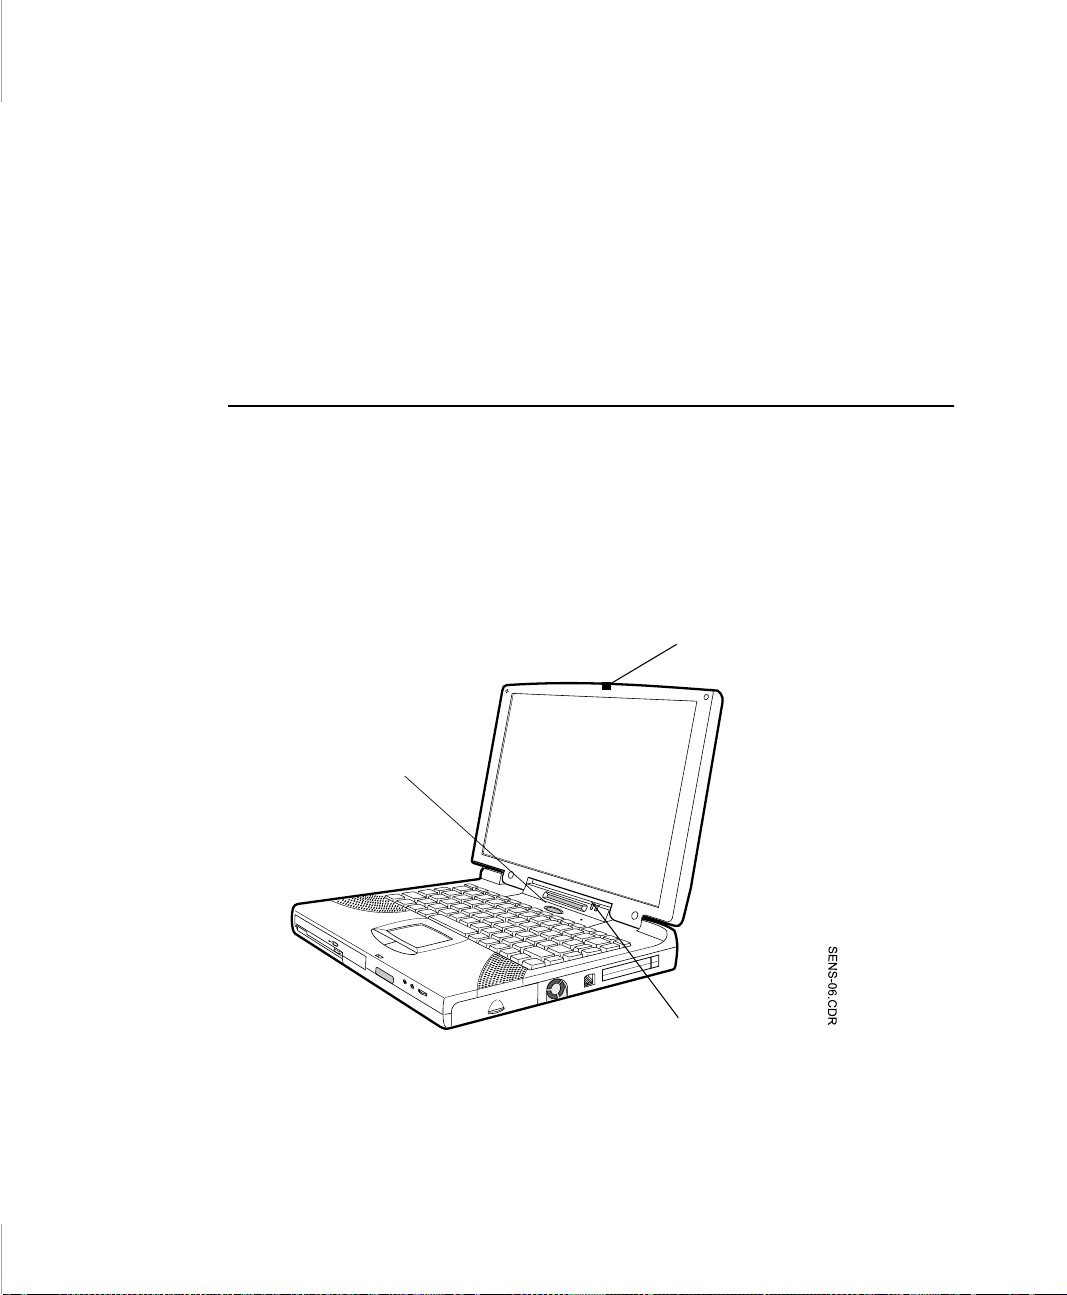
Introducing Your Computer
Your computer is a lightweight portable compute r that includes features to meet
your computing needs at home or on the r oad.
Figures 1 through 3 show you the features of your computer.
CD-ROM
drive
Floppy
drive
Micropho ne
AutoBacklit
External-mic jack
LCD
Status
lights
Smart
Shell
Speaker
Headphone jack
Touchp ad
Battery compartm en t
Volume
control
Figure 1. Front View of Computer
Fan vent
Cover latch
Power button
PC Card compartment
Modem connector
Introducing Your Computer 3
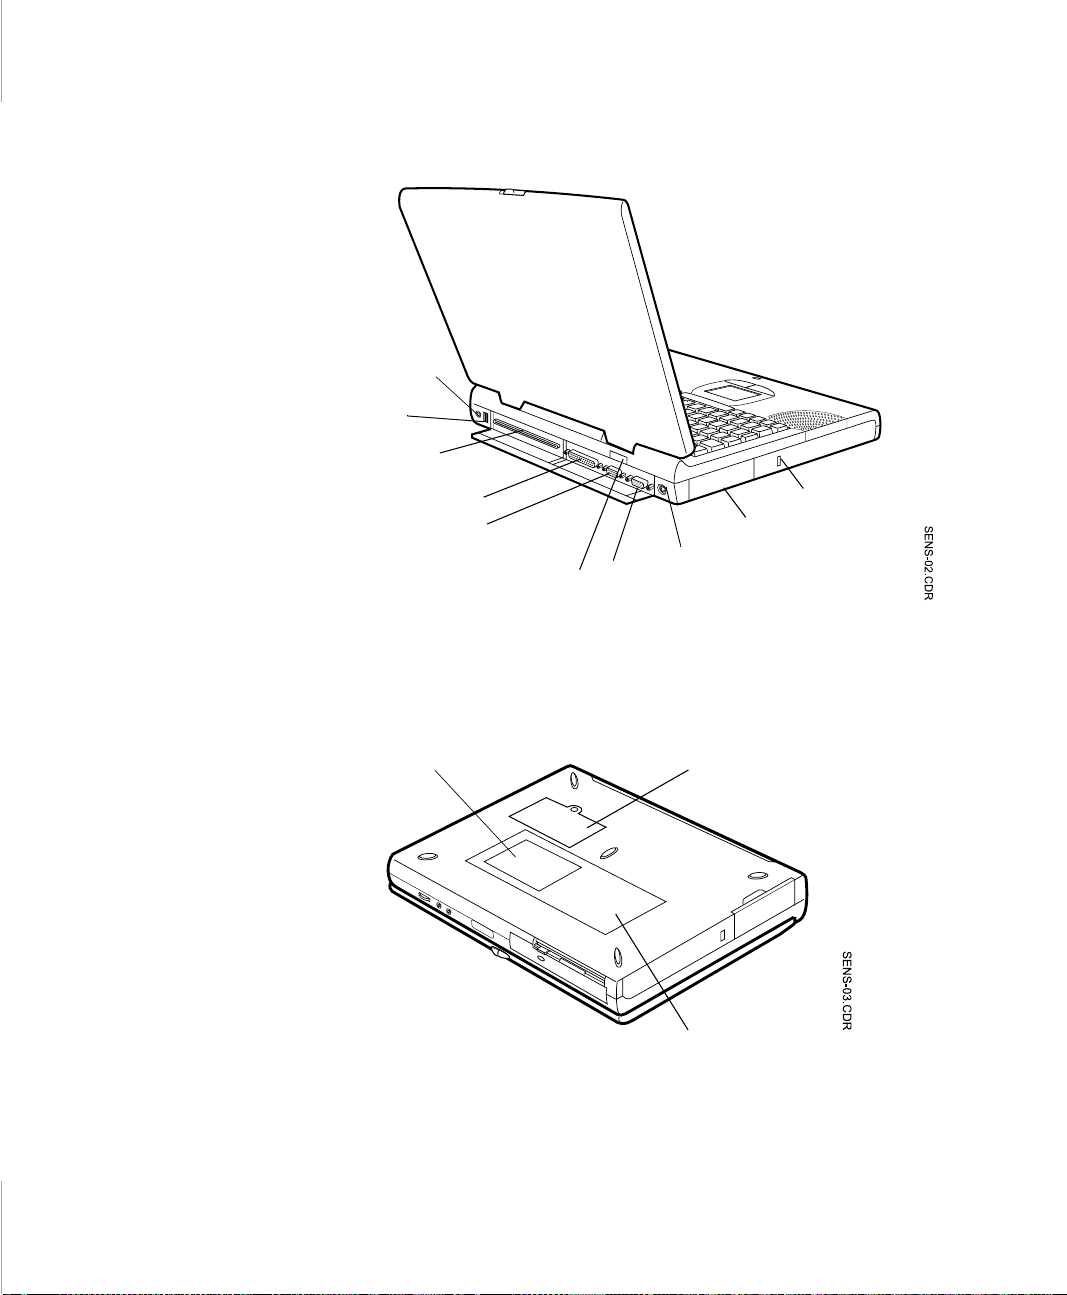
Power Connector
USB port
Docking
connector
Parallel port
Figure 2. Back View of Computer
Serial port
Infrared
port
Video
port
PS/2™
mouse and
keyboard
port
Kensington lock support
Hard drive
compartment
4 User’s Manual
Business card holder
Figure 3. Bottom View of Computer
Memory module
compartment
Label showing
Using Your Computer for the First Time
This section gives you det ailed information on using your computer for the first
time.
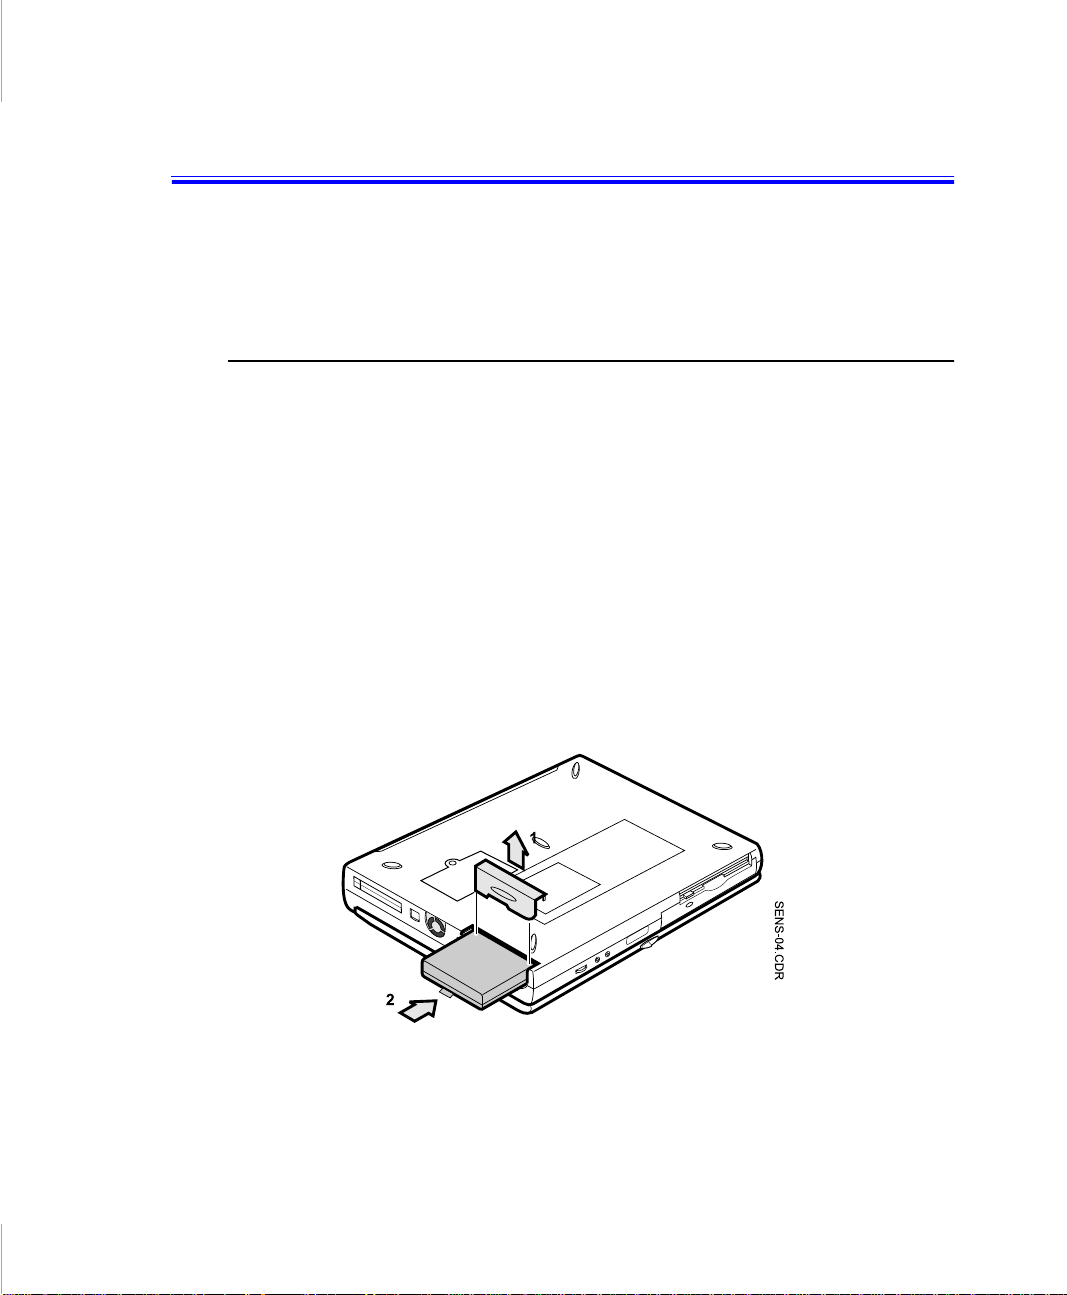
Installing the Battery
Your computer comes wit h the batte ry pack separate from the comput er. To insta ll
the battery pack:
1. With the computer’s power off, close the LCD panel and turn the computer
over so the bottom of the unit face s up.
2. Slide the battery compartment cover straight up and off the computer (Figure
4).
3. Slide the battery pack into the compartment. Make sure the battery is fully
inserted into the compartment.
4. Align the tabs on the battery compartment cover with the slots on the battery
compartment.
5. Push the cover stra ight down until it snaps into place.
Figure 4. Installing the Battery
Using Your Computer for the First Time 5
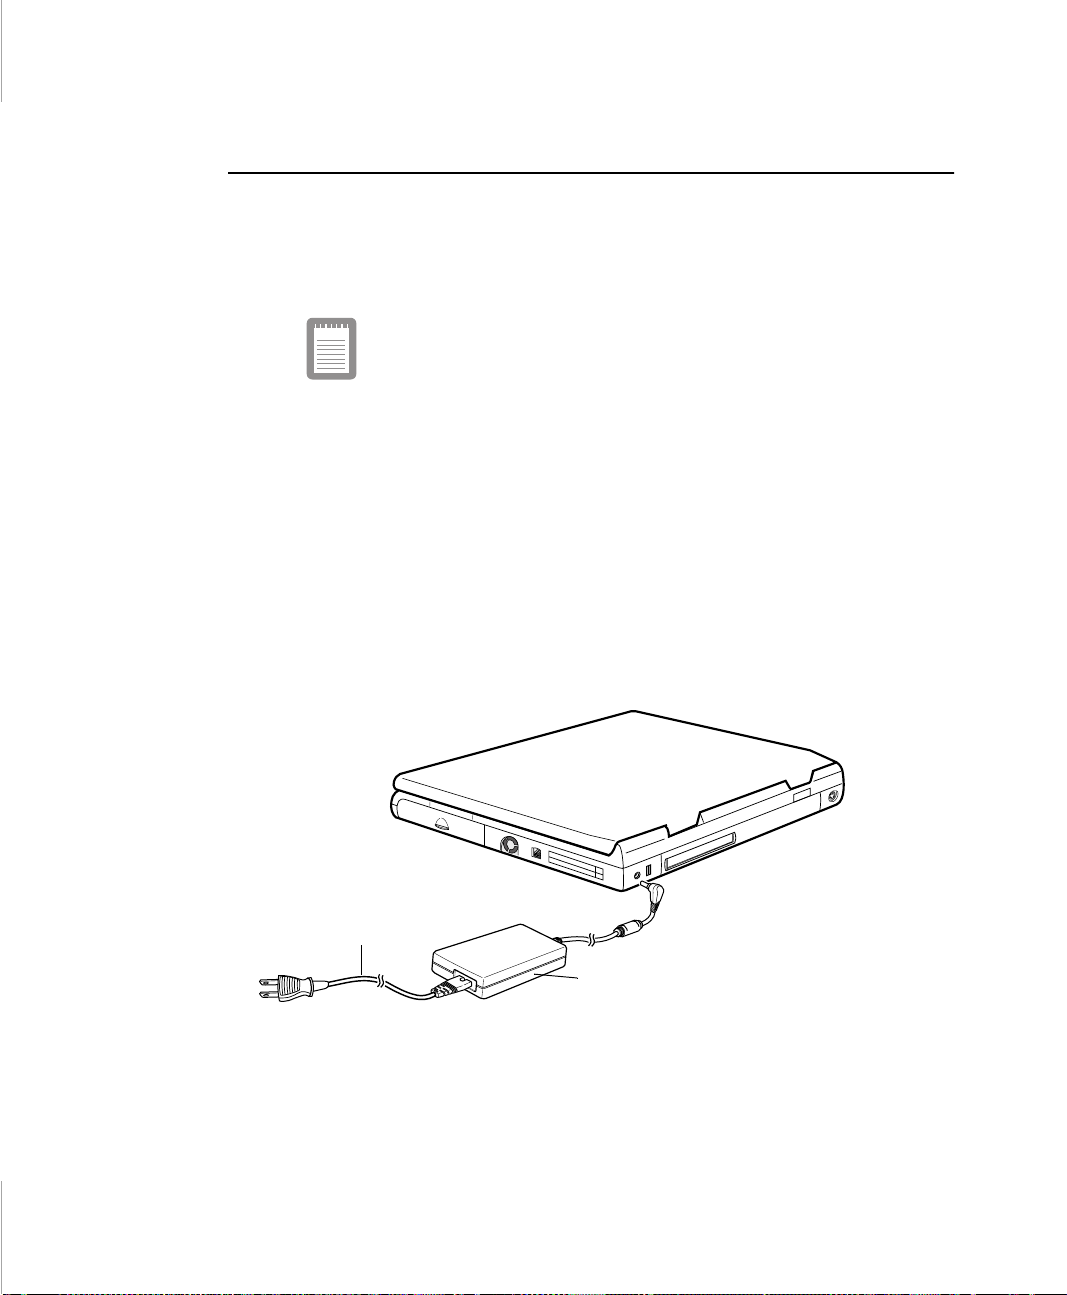
Attaching the Power Cord
Your computer includes an internal AC adapter that powers the computer and
charges the battery when you plug in the power cord. The first time that you use
your computer, ful ly charge the battery by attaching the power cord to the
computer and to an electrical outlet.
All batteries lose their charge if they sit unused for an
extended time period. When not used, battery can discharge
fully in 2 to 3 months.
The battery may have discharged in the time it took for the
computer to go from the factory to you.
To attach th e power cor d :
1. Plug the cord into the power connector on the right side of the computer (Figure
5).
2. Plug the cord into an electrical outle t.
6 User’s Manual
Power connector
Power cord
AC Adapter
Figure 5. Connecting the Power Cord
The battery starts charging as soon as you plug the power cord into an electrical
outlet. The battery charges faster if the computer is turned off during charging.
If the battery is fully depleted and the computer is turned off, the battery charges
in about 2 h ours . If the com puter i s t urne d on, the batt ery charge s i n about 4 hour s.
When the battery is charging, the battery charge light is amber. When the battery
is fully char ged, the light turns green.
See ”Using the Batter y” for more information on usin g your computer’s battery.
Turning On the Computer
To turn on the computer’s power for the first time:
1. Press and hold the cover latches on the sides of the cover.
2. Lift up the cover.
3. Press and then rel ea se the power button (Figure 6).
The power light is on when the computer’s power is on.
Cover latches
Power button
Power light
Figure 6. Turning On the Computer’s Power
Using Your Computer for the First Time 7

Understanding POST
When you turn on your computer, a routine cal led POST (power-on self-test)
automatically runs to test the computer components. Several messages appear on
the screen during POST.
Screen messages are built into the computer to report both normal and abnormal
system conditions. If an error message appears, take any action suggested in the
message. If the message identifies the error condition but does not sugges t any
corrective action, write down the message and contact the manufacturer or an
authorized reseller’s service center for assistance.
After POST is c ompleted, a message appears on screen telling y ou to pr ess any key
to continue. Press a key to finish the start-up procedure.
Adjusting the LCD Display
You may wish to adjust the LCD (liquid-crystal displa y) when you begin using
your computer. A T F T (thin-film transistor) LCD does not require adju stment for
contras t because the co ntras t is set to re main at maxim um. You can adjus t both the
brightness and contrast on a DSTN (double layer super twist nematic) LCD.
To adjust the LCD:
• Press <Fn+Right Arrow> to incre as e the display brightnes s.
• Press <Fn+Left Arrow> to decrease the display brightness.
• Press <Fn+ U p Arro w> to increase the displ ay con trast.
• Press <Fn+Down Arrow> to decrease the display contrast.
Making Backup Disks
Use the Create System Disks Utility in Windows 98 to make backup disks of any
software on your hard driv e. The util ity will st art automat ically when you us e your
computer for the fir st tim e. You can also open the utility by doing the following:
1. Click the Start button on the taskbar.
2. Select Programs.
3. Select Accessories.
8 User’s Manual

4. Select System Tools.
5. Click Backup.
Turning Off Your Computer
If your computer has a Windows operating system, turn off
your comp uter by performing the shu td own procedure
described in this section. Otherwise, you may lose data.
To turn off the computer:
1. Click Start on the taskbar.
2. Click Shut Down.
3. Select the shut down option.
4. Click OK or Yes.
• If the operating system is Windows 98, the computer turns off.
• If the operating system is Windows NT, you receive a shutdown message
and must press the power button to turn off the computer .
Restarting Your Computer
You may need to restart (reboot) your computer when installing hardwa re or
software or if the computer do es not respond to yo ur input. A warm (or soft) boot
prompts you to save your files, turns off the computer, and then restarts the
computer. A cold boot turns off the computer without sa ving your files.
To perform a warm (or soft) boot:
1. Click Start on the taskbar.
2. Click Shut Down.
3. Select the restart option.
4. Click OK or Yes.
5. Save your files if prompted. Your computer reboots.
Using Your Computer for the First Time 9

Do not perform a c ol d bo ot un less your keyboard and
touchpad have no effect and you cannot perform a warm
boot.
When you perform a cold boot, you lose data unless it was
saved to a storage medium.
You can also perform a soft boot by saving your files and pressing
<Ctrl+Alt+Del>. You can perform a cold(or hard) boot by pressing the power
button to turn the computer off, waiting five second, and then pres si ng the power
button to turn the com puter on.
Tips for Using Yo ur Computer
The following information helps you avoid potential problems as you use your
computer:
Do not try to disassemble your computer. Opening the
system chassis voids your warranty. Only an authorized
manufacturer’s service center can replace or add any parts
inside the chassis.
• Follow all the instructions and cautions in your computer user d ocum entation.
• The LCD has a polarized surface and can be damaged easily. To prevent
damage, avoid touching the screen.
• Use only memory modules.
• Because a notebook computer is small and has restricted air flow around
components, it is more likely to overheat than a desktop computer. A fan
inside your co mputer runs when needed to help e liminate some heat. Make
sure the fan vent on the right side of your comput er and the air vent on the left
side are not blocked when you use the computer. (See Fi gure 1 and Figure 2
for the location of the vents.) Occasion ally check the vents and remove any
accumula ted dust on the outside.
• Avoid using or storing the computer in extremely hot or cold areas, such as a
car on a hot day. Keep the computer away from heaters and out of direct
sunlight. Exposure to excessive heat may damage computer components.
10 User’s Manual

If you have left your computer in a hot place, let it cool down slowly to room
temperature (with the LCD panel open) before using it.
• Do not remove the memory-module compartme nt door, or try to install a
memory module when the comput er is on. (Se e Fi gure 3 for t he loca tion of t he
door.)
(For information on installing memory mod ules, see “Memory Modules”.)
• Set up your computer work area to avoid physical strain. Sit with you r back
straight and supported by your chair. Adjust your chair or work table so that
your arms and wrist s can remain in a relaxed position, parallel with the flo or.
Avoid bending or twis ting y our wri sts as you work. Yo ur ha nds shoul d “fl oat”
slightly above the keyboard. Refer to a book on office ergonomics for more
information on setting up your work area.
• Take frequent breaks from working at the computer to rest your eyes and
stretch your muscles.
• Remember to save your data files frequently and to make backup copies of
your files.
Traveling with Your Computer
If you are traveling by airplane, follow these ti ps:
• Take the computer with you as carry-on luggage. Do not check the computer
with your baggage .
• Allow the computer and disks to go through the
X-ray security dev ice s. Do not hand-carry disks through the wal k-through
metal detec tors , which can cause loss of data.
• M ak e sure that th e b at tery is char ge d or th e po w e r cord is easily accessible.
You may be required to turn on the computer for airport security personnel.
• Be prepared to turn off the computer during take off and landing.
Handling Sp ills
Do not spill anythi ng on your computer. The best way to avoid spi lls is to avoid
eating and drinki ng around your computer. If you do spill something on your
computer, turn off your computer, unplug it immediately, and do the following:
Usin g Your Co mputer for the F irst Time 11

• If you spill liquid on the keyboard, drain as much of the liquid from the
keyboard as pos sible. Be careful not to let the liquid drip onto the LCD panel.
Allow the system to dry for s everal days before trying to use it.
• If you spill liquid on an external keyboard or keypad, unplug it and drain as
much of the liquid as possible. Allow the keyboard to sit at room temperature
for a full day before trying to use it.
Sweet liquids leave a sticky residue that may jam the
keyboard despite your efforts to dry it.
• If you spill liquid on the LCD pane l, cle an it i mmediat ely with a so ft clot h and
denatured al cohol. Do not use water, window cleaner, acetone, aromatic
solvent, or dry, rough towels to clean it.
Some liquids damage the polarized LCD screen. If your
screen is damaged, contact your authorized manufacturer’s
service center for a replacement.
Storing the Computer for Long Periods
If possi ble, l eave the pow er co rd conn ected t o th e comput er an d an el ectri cal ou tlet
when the computer is not in use. Thi s helps extend the life of the battery and keeps
the batt er y fully charged.
12 User’s Manual
If you will not be using the computer for a long period of time (a month or more),
you should charge the bat tery until it is comple tely full. After you have done so,
remove the batt er y from the unit.
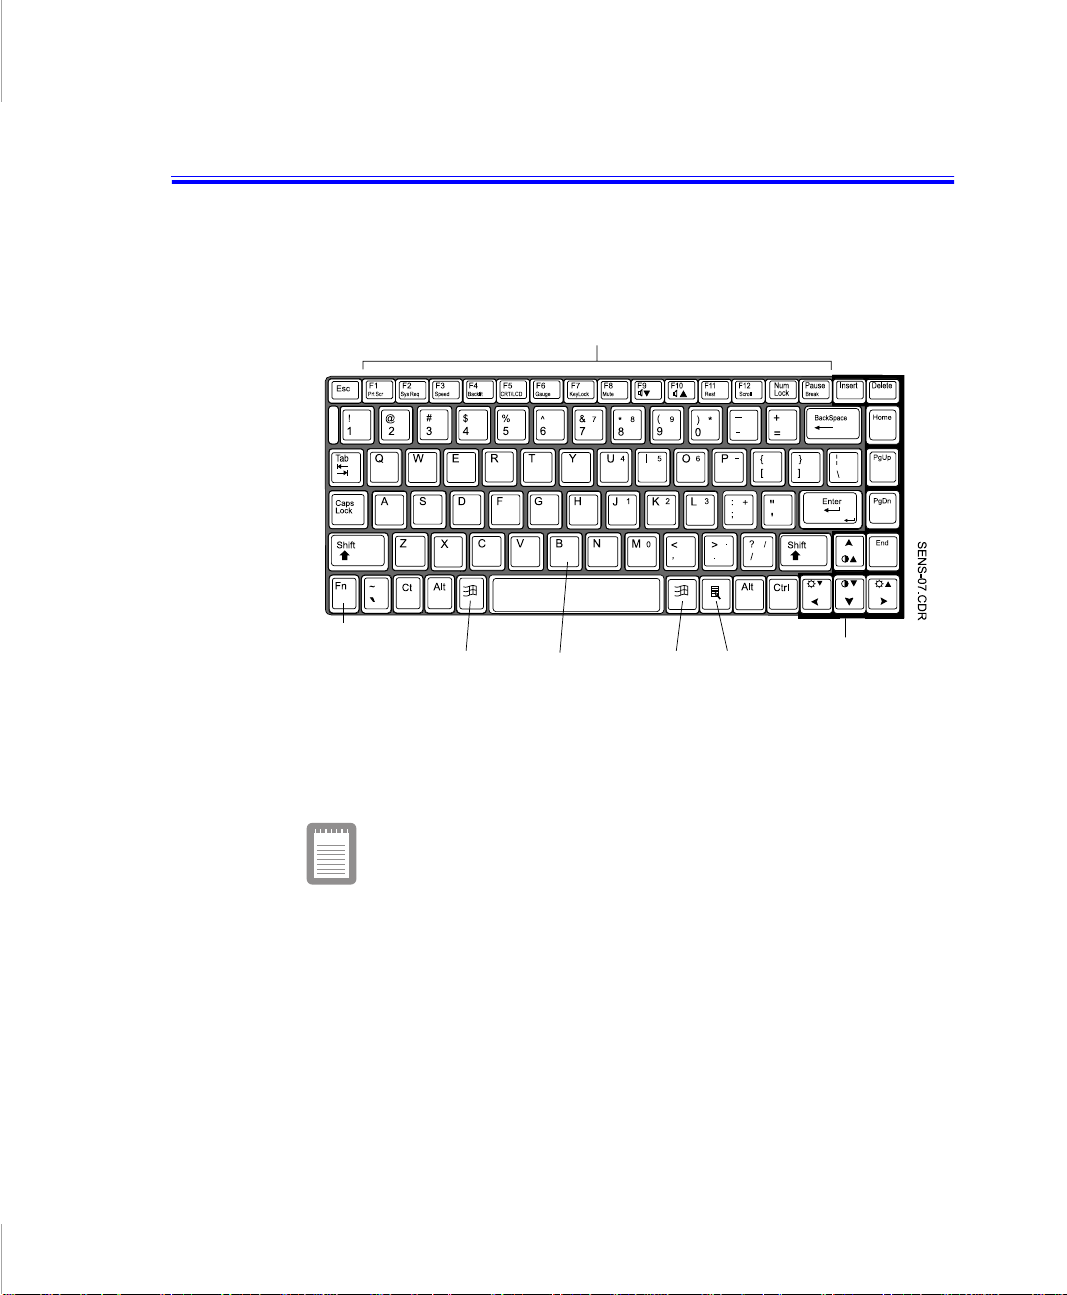
Using the Keyboard
Your computer has an 87/88-key keyboa rd (Figure 7). By pressing designated key
combinations, you can have access to a ll the key functi ons of a full-s ized keyboa rd.
Function keys
<Fn> key
Windows
key
Typewriter
keys
Windows
keys
Cursor-control keys
Figure 7. Keyboard
Although the layout of the keys on your computer’s keyboard
is different from that on a desktop computer’s keyboard, the
keyboard feels like a full-sized keyboard when you use it. The
distance between the keys (the pitch) is the same as on a fullsize keyboard (19 mm). The travel, or space the key goes
down when pressed, is also the same (3 mm).
Using the Keyboard 13
The keys on the keyboard can be grouped into the following cat egories:
• Full-sized typewriter ke ys are arranged like a standard typewriter keyboard
and are used for text e ntry.
• Function keys, when pressed together with the <Fn> key, enable special
functions.
• Cursor control keys move the cursor. They may perform oth er functions,
depending on your software.
• Windows keys open Windows menus.
To clean the computer ke yboard, use slightly damp cot ton swabs. Scrub the keys
and the surface around the keys.
Do not allow liquid to drip into the keyboard or you may
damage the keyboard.
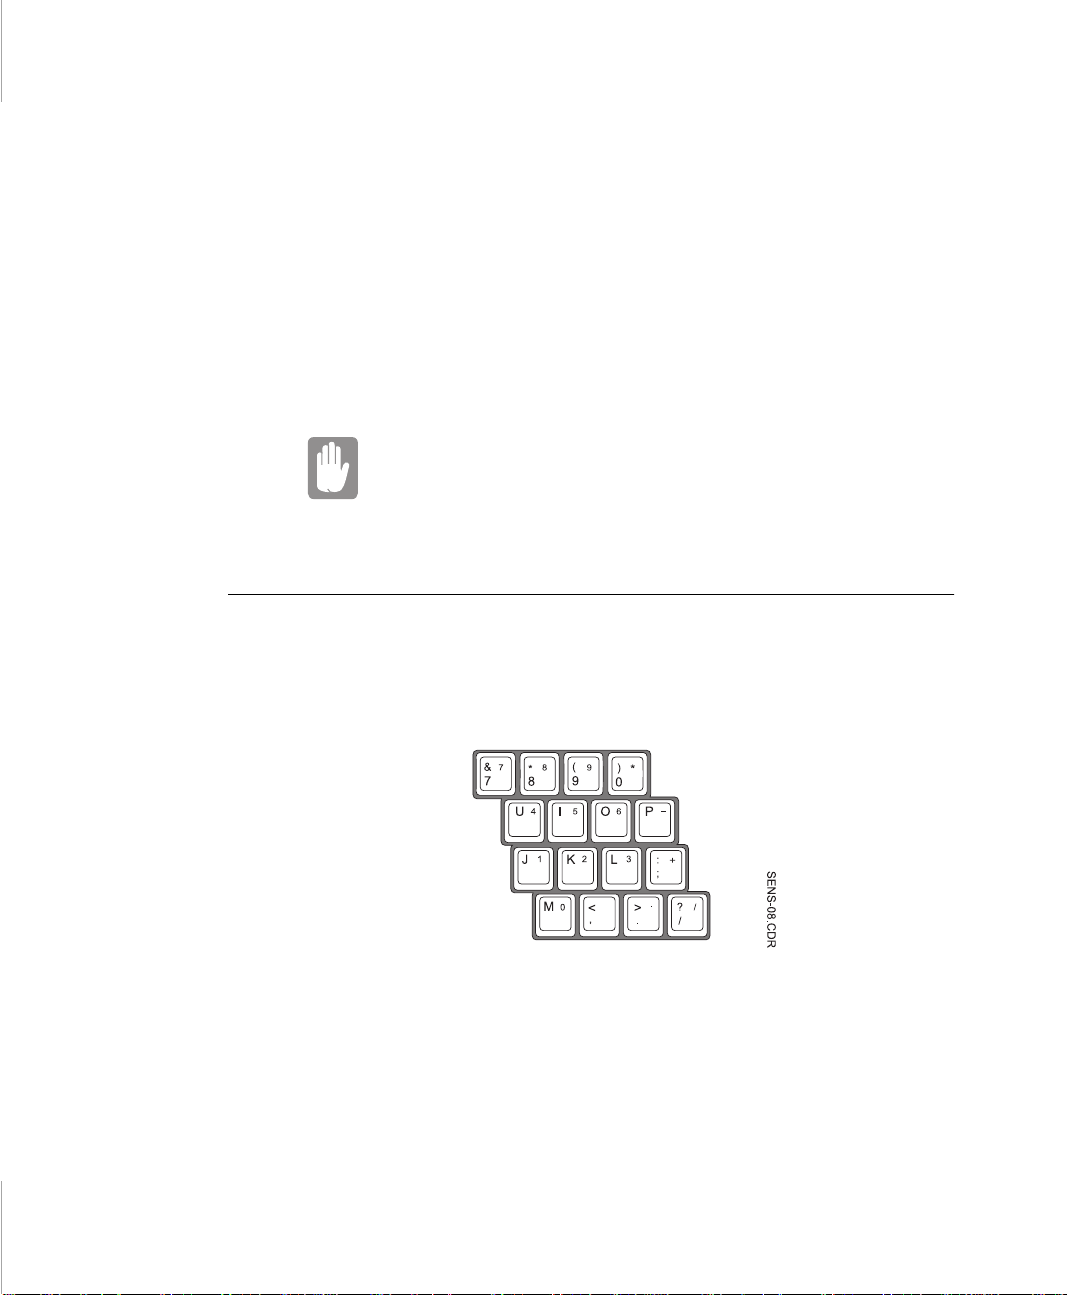
Using the Numeric Keypad
Your keyboard includ es a numeric keypad, which is a gro up of keys that you can
set to type numbers and mathe mat ical symbo ls, suc h as the pl us sign (Figur e 8) . A
number or symbol on the righ t corner of each keypad key shows its numeric
function.
14 User’s Manual
Figure 8. Numeric Keypad
Press <Num Lock> to turn on the embedded numeric keypad. The numeric
functions of the keypad are enabled a nd the Num Lock light turns on. (See F igure
10 for the location of the Num Lock light.)
While the numeric funct ions are enabled, you can temporarily return a key to its
normal function by pres sing <Fn> and the key. For example to type the letter m,
press <Fn+m>.
To turn the numeric keypad off, press <Num Lock> again. The Num Lock light
turns of f.
Using Special Function Keys
The <Fn> key activat es special functio ns when it is pressed in combi nation with
another key. Table 1 shows the special key combinations.
Table 1. Description of Special Function Keys
<Fn> Key
Combination
<Fn+F1>
<Fn+F2>
<Fn+F3>
<Fn+F4>
<Fn+F5>
Function
Print screen:
paste into the Paint program.
System request:
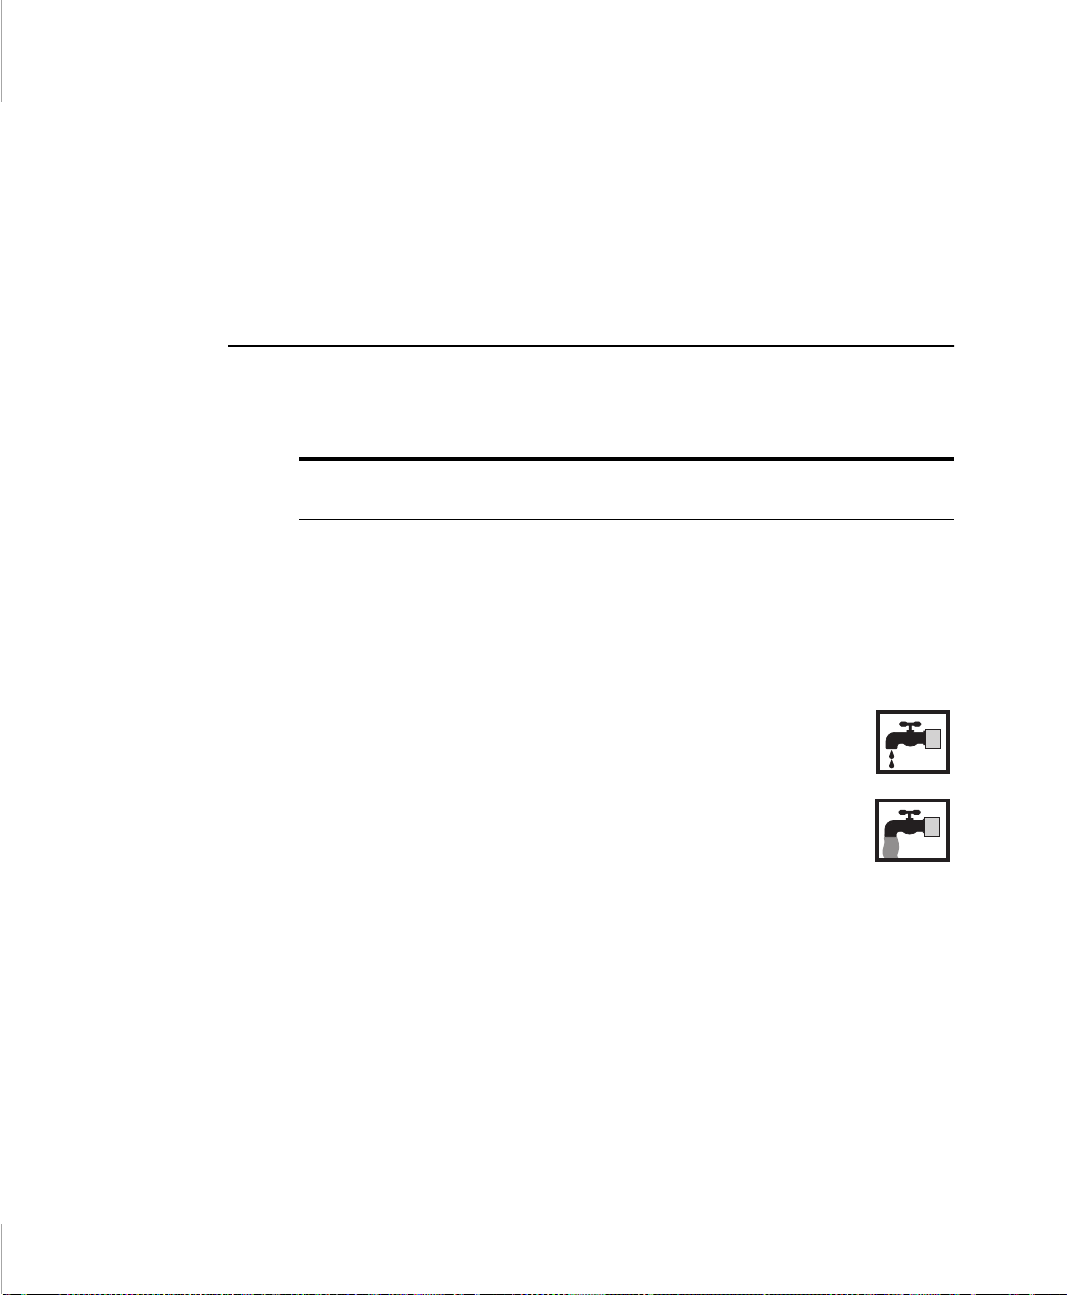
Speed:
options are Turbo and Non-turbo. Press <Fn+F3> to chang e the
Power Saving mode to their next settings. Press <Fn+F3> again
to return the Power Saving mode to their previous settings.
An icon of a dripping water faucet i ndicates that Power
Saving mode is Non-tur bo mode.
An icon of a water f aucet with wat er r unning a t ful l fo rce
indicates th at Power Saving mode is Turbo mode.
This key combinati on changes Power Saving modes only unti l
you turn your computer off and then back on again.
The <Fn+F3> key combi nation function s only when the compute r
is run from the battery . (See ”Power Menu” on page 53 for more
information on power-management settings.)
Backlit
<Fn> key) to turn the LCD displ ay back on.
CRT/LCD:
monitor, and simultaneous display on both the LCD and the
external monitor.
Takes a picture of the open screen, which you can
Reserved for use in software programs.
Enables and disable s the Power Saving mode. The
: Turns the LCD display off. Press any key (except the
Switches the display between the LCD, the extern al
Using the Keyboard 15

<Fn+F6>
<Fn+F7>
<Fn+F8>
<Fn+F9>
<Fn+F10>
<Fn+F11>
<Fn+F12>
<Fn+Up
Arrow>
<Fn+Down
Arrow>
<Fn+Right
Arrow>
<Fn+Left
Arrow>
Gauge:
Displays the battery gauge in the upper-right corner of
your screen. To change the Power Saving mode in System Setup,
press <F1> while the gaug e is di splayed. An icon of a dripping
water faucet indicates that Power Saving mode is Non-turbo
mode. An icon of a water faucet with wat er ru nning at full force
indicates t hat Power Saving mode is Turbo mode. <F1> changes
Power Saving mode only when the computer is run from the
battery. The Power Saving mode you choose remains in force
when you turn off the computer.
The gauge closes in a few secon ds, or you can press <Esc> to
close the gauge. (See ”Monitoring the Battery Charge” on page
33 for more information on the battery gauge. )
KeyLock:
Type your password and press <Enter> to unlock the keyboard.
The <Fn+F7> key combinat ion has no ef fect unless a pas sword is
enabled in System Setup. The Num Lock, Caps Lock, and Scrol l
Lock lights blink when the keyboard is locked.
Mute:
Volume down:
Volume up:
Rest:
operation from rest, press the power button. (See ”Using Power
Management Opti ons” on page 50 f or more informati on about the
rest mode.)
Scroll:
the page up or down while the cursor position does not change.
Pressing <Fn+F12> again turns off the scrolling function.
Contrast up:
not needed on a TFT LCD.
Contrast down:
is not needed on a TFT LCD.
Brightness up:
Brightness down:
Locks the keyboard and activates password protection.
Turns the audio outpu t on and off.
Decreases the audio volume.
Increases the audio volume.
Puts the computer into rest mode. To resume normal
In some applicati ons, sets the cursor-control keys to scr oll
Increases the LCD contrast. Contrast adjus tment is
Decreases the LCD contrast. Contra st adjustment
Increases the LCD brightness.
Decreases the LCD brightness.
16 User’s Manual
When you press a function key combination, the system
sound m ay be temporari l y muted.
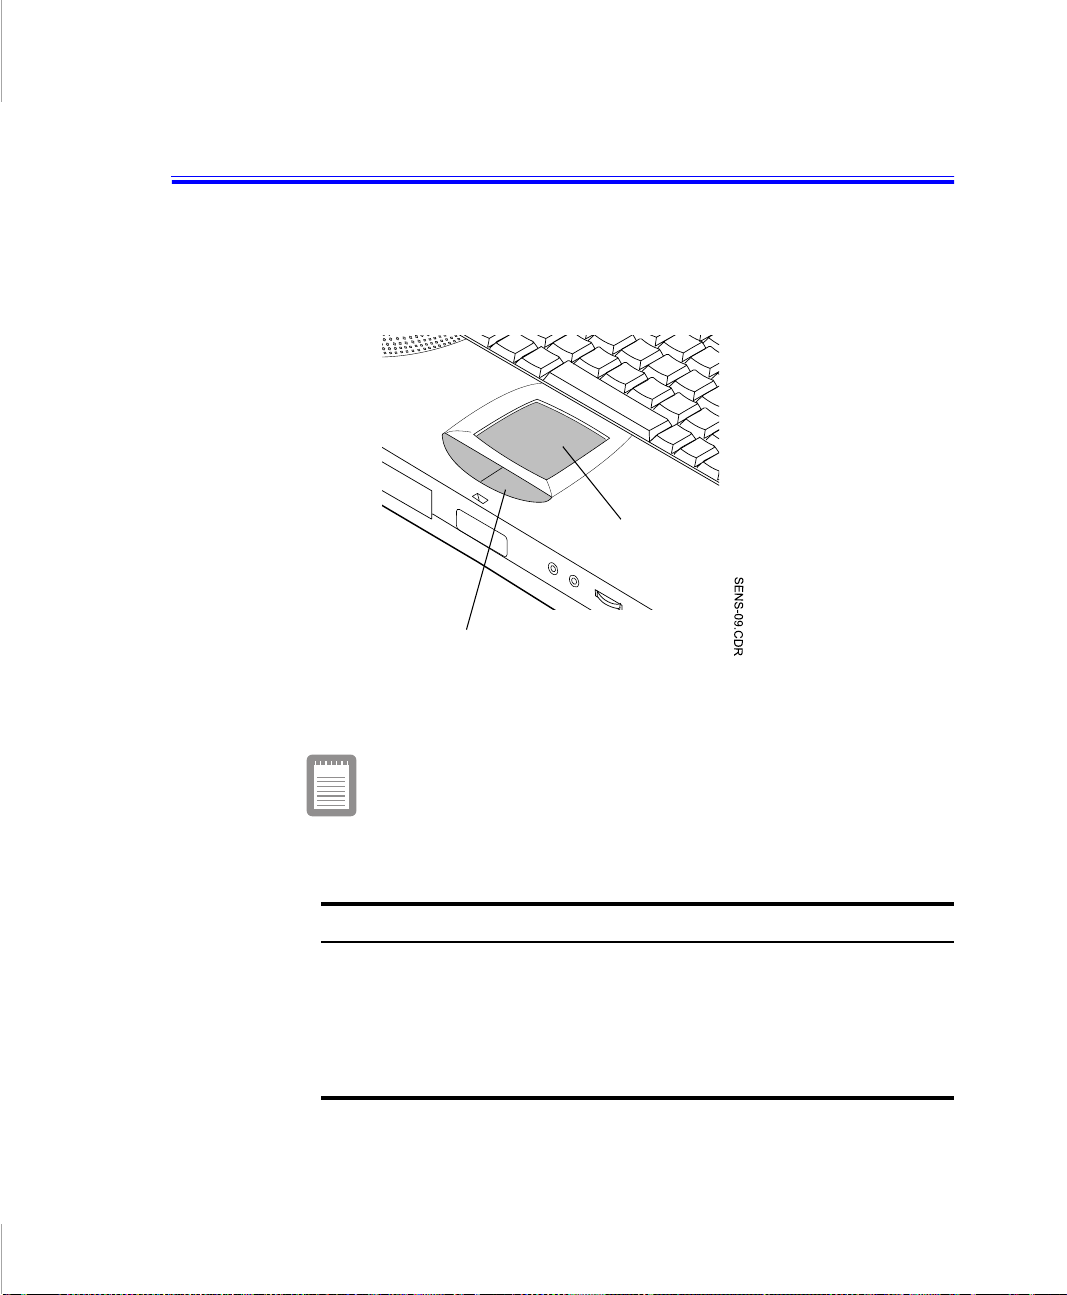
Using the Touchpad
Your computer is equipp ed with a touchpad, which is an integrated-pointing
device that is used to perfo rm standard mouse functions (Figure 9). The touchpad
is an advance d and re li able pointin g de vice tha t works with a tou ch of you r fi nger .
Mouse buttons
Figure 9. Touchpad
Table 2 explains how to use the touchpad.
Touchpad
Press on the touchpad gently. The touchpad responds to light
pressure.
Table 2. Using the Touchpad
Mouse Action How To
Move cursor Place your fing er on th e touchpad and slide your finger
in the direction you want the cursor to move. The faster
you move your finger, the faster the cursor moves
across the screen.
Click Tap the touchpad once wit h your finger.
Double-click Tap the touchpad twice with one finger.
Using the T o uc hp ad 17

You can use the buttons below the touchpad the way you use stan dard mouse
buttons. And you can use three finger mouse by the touchpad driver. Please refer
to System Utility CD enclosed in the box.
For information on attaching and using another pointing device or keyboard with
your computer, see “Connecting Periphera l Devices”.
18 User’s Manual
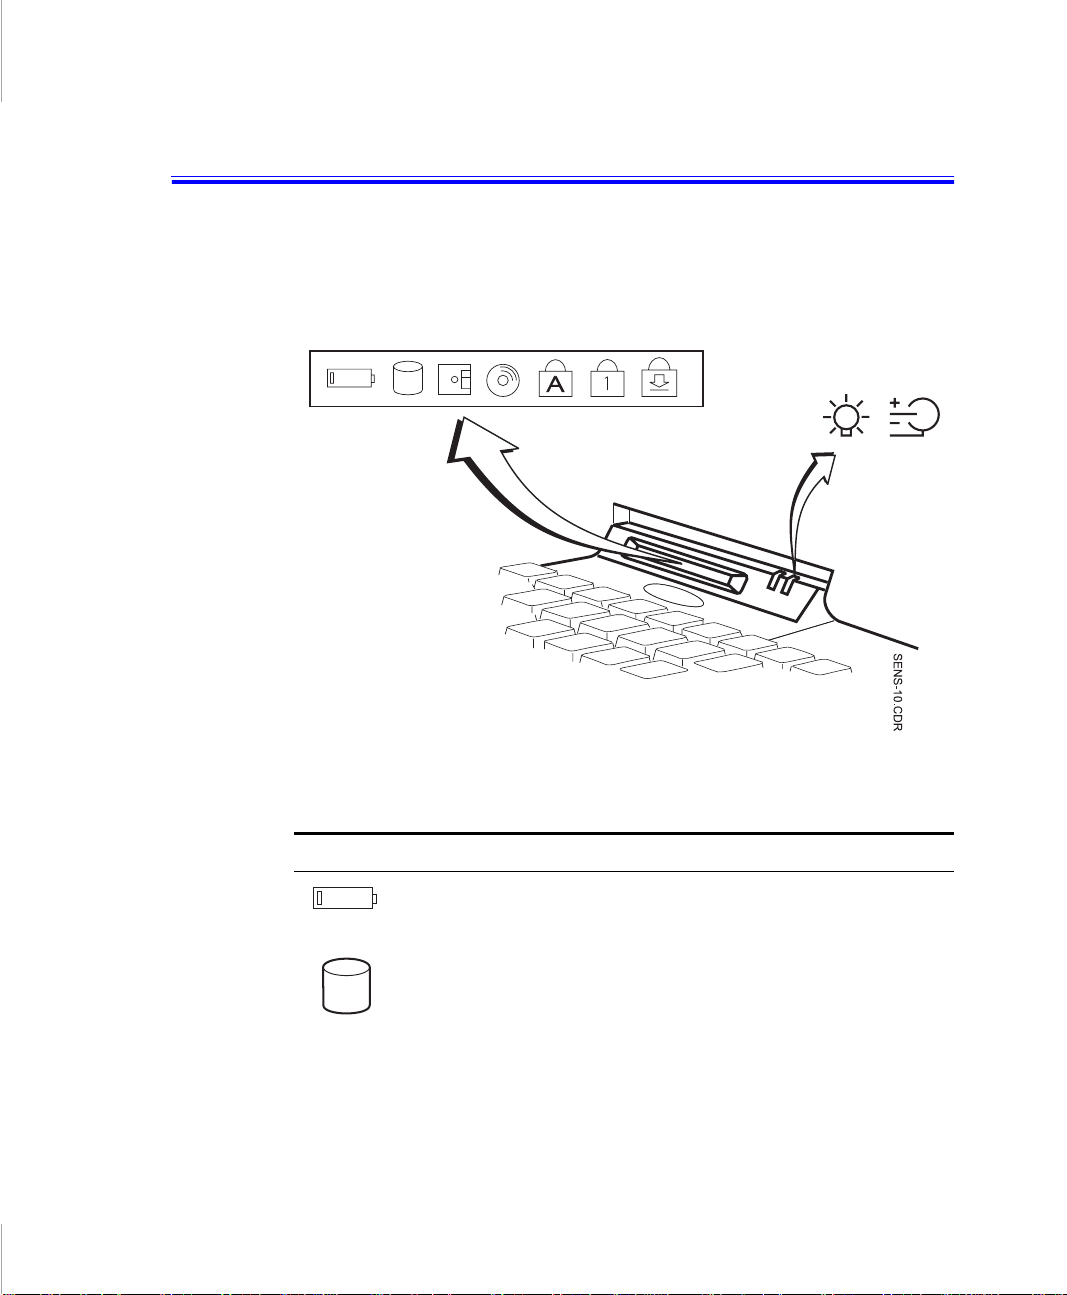
Reading the System Status Lights
System Status lights show the status of computer functions. T he lights appear on
the left edge of the computer (Figure 10). Table 3 describes the meaning of the
lights.
Figure 10. System Status Lights
Table 3. System Status Lights
Icon Function of Light
Batter y low light:
Plug the power cord into the computer and an electrical outlet when
this light is blinking .
Hard disk light:
not turn off the computer when this light is on.
Light is on when the h ard drive is bei ng access ed. Do
Light is blinking when the battery charge is low.
Reading the System Status Lights 19
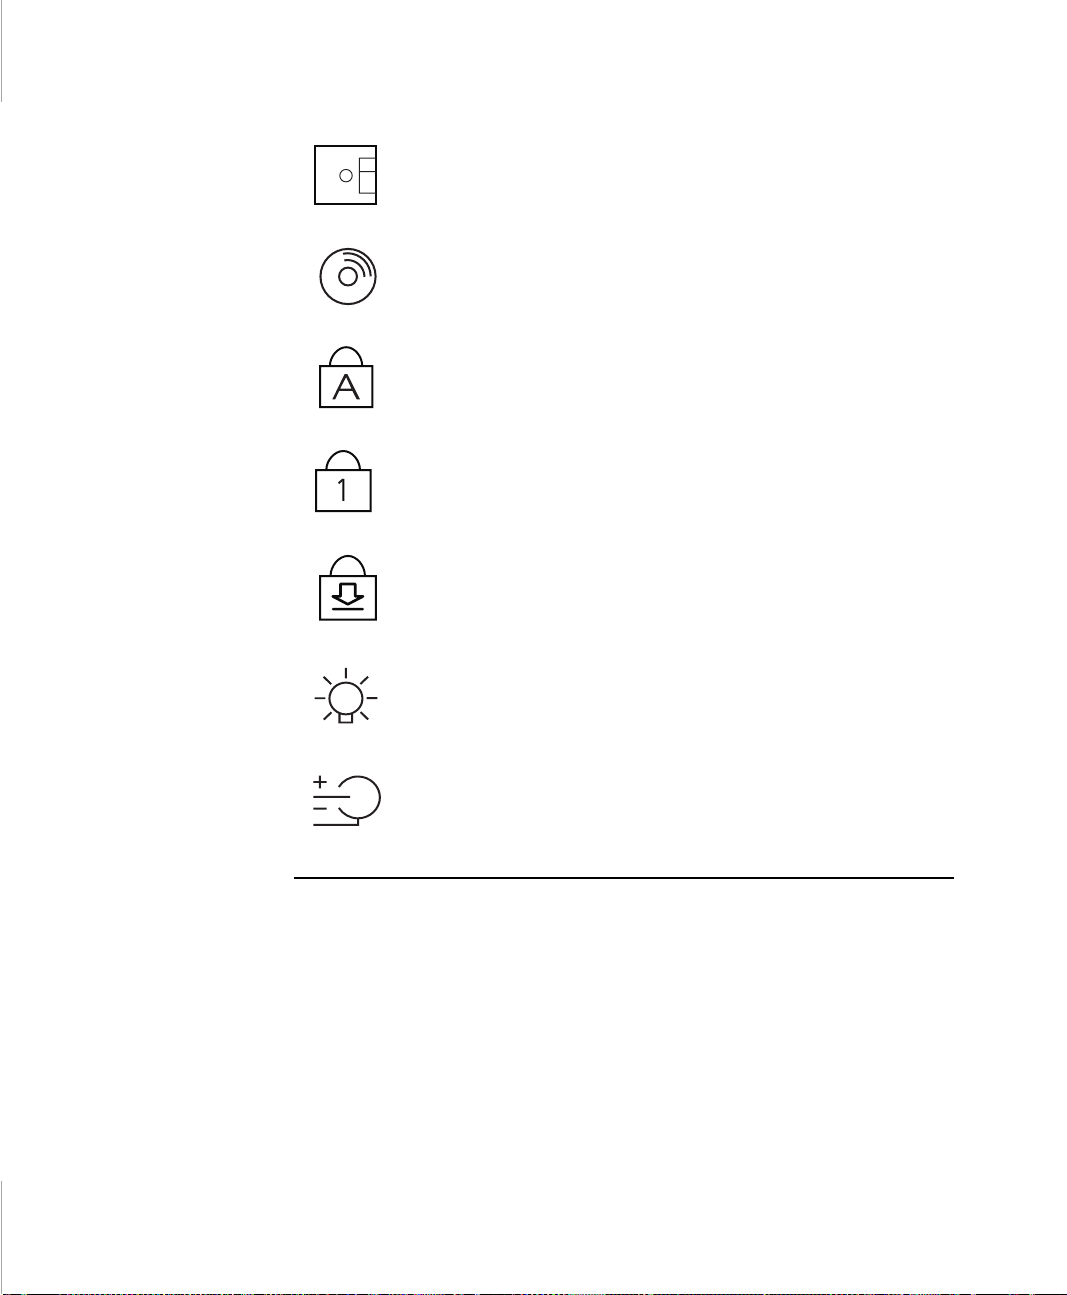
Floppy drive light:
accessed. Do not turn off the computer when this light is on.
Light is on when the floppy dr ive is being
CD-ROM drive light:
accessed. Do not turn off the computer when this light is on.
Caps Lock light:
When the function is act ivated , all alphabet ic cha rac ters yo u type wi ll
be in upper case.
Num Lock light:
activated. See ”Using the Numeric Keypad” for a description of the
keypad.
Scroll Lock ligh t:
The scroll lock functi on affect s cursor movemen t and text scr olling in
some applicatio ns. This is a software specif ic function. Refer to the
appropriate software manuals for a descri ption of the <Scroll> key.
Power light:
amber when the computer is in rest mode. (See ”Rest Mode” for
more information on rest mode.)
Light is green when the computer’s power is on. Light is
Battery charge light:
information abo ut t he battery charge. Light is amber when the
battery is charging normally. Light is green when the battery is fully
charged or is trickl e charging. (See ”Charging the Battery” for more
information about charging the battery.)
Light is on when the CD-ROM drive is being
Light is on when the caps lock function is activa ted.
Light is on when the embedde d num eric keypad is
Light is on when the scr ol l lock function i s ac tivated.
When the power cord is connected, light gives
20 User’s Manual
 Loading...