

Page 1

SGH-S390G
MOBILE PHONE
User Manual
Please read this manual before operating your
phone, and keep it for future reference.
Page 2

Intellectual Property
All Intellectual Property, as defined below, owned by or which is otherwise the
property of Samsung or its respective suppliers relating to the SAMSUNG Phone,
including but not limited to, accessories, parts, or software relating there to (the
“Phone System”), is proprietary to Samsung and protected under federal laws, state
laws, and international treaty provisions. Intellectual Property includes, but is not
limited to, inventions (patentable or unpatentable), patents, trade secrets,
copyrights, software, computer programs, and related documentation and other
works of authorship. You may not infringe or otherwise violate the rights secured by
the Intellectual Property. Moreover, you agree that you will not (and will not attempt
to) modify, prepare derivative works of, reverse engineer, decompile, disassemble,
or otherwise attempt to create source code from the software. No title to or
ownership in the Intellectual Property is transferred to you. All applicable rights of
the Intellectual Property shall remain with SAMSUNG and its suppliers.
S390G_UM_English_UDLB6_PS_033012_F6
Page 3

Open Source Software
Some software components of this product incorporate source code covered under
GNU General Public License (GPL), GNU Lesser General Public License (LGPL),
OpenSSL License, BSD License and other open source licenses. To obtain the
source code covered under the open source licenses, please visit:
http://opensource.samsung.com
.
Disclaimer of Warranties; Exclusion of Liability
EXCEPT AS SET FORTH IN THE EXPRESS WARRANTY CONTAINED ON THE
WARRANTY PAGE ENCLOSED WITH THE PRODUCT, THE PURCHASER TAKES THE
PRODUCT "AS IS", AND SAMSUNG MAKES NO EXPRESS OR IMPLIED WARRANTY OF
ANY KIND WHATSOEVER WITH RESPECT TO THE PRODUCT, INCLUDING BUT NOT
LIMITED TO THE MERCHANTABILITY OF THE PRODUCT OR ITS FITNESS FOR ANY
PARTICULAR PURPOSE OR USE; THE DESIGN, CONDITION OR QUALITY OF THE
PRODUCT; THE PERFORMANCE OF THE PRODUCT; THE WORKMANSHIP OF THE
PRODUCT OR THE COMPONENTS CONTAINED THEREIN; OR COMPLIANCE OF THE
PRODUCT WITH THE REQUIREMENTS OF ANY LAW, RULE, SPECIFICATION OR
CONTRACT PERTAINING THERETO. NOTHING CONTAINED IN THE INSTRUCTION
MANUAL SHALL BE CONSTRUED TO CREATE AN EXPRESS OR IMPLIED WARRANTY
OF ANY KIND WHATSOEVER WITH RESPECT TO THE PRODUCT. IN ADDITION,
SAMSUNG SHALL NOT BE LIABLE FOR ANY DAMAGES OF ANY KIND RESULTING
FROM THE PURCHASE OR USE OF THE PRODUCT OR ARISING FROM THE BREACH
OF THE EXPRESS WARRANTY, INCLUDING INCIDENTAL, SPECIAL OR
CONSEQUENTIAL DAMAGES, OR LOSS OF ANTICIPATED PROFITS OR BENEFITS.
SAMSUNG IS NOT LIABLE FOR PERFORMANCE ISSUES OR INCOMPATIBILITIES
CAUSED BY YOUR EDITING OF REGISTRY SETTINGS, OR YOUR MODIFICATION OF
OPERATING SYSTEM SOFTWARE.
USING CUSTOM OPERATING SYSTEM SOFTWARE MAY CAUSE YOUR DEVICE AND
APPLICATIONS TO WORK IMPROPERLY.
Page 4

Samsung Telecommunications America (STA),
LLC
Headquarters:
1301 E. Lookout Drive
Richardson, TX 75082
Toll Free Tel:
Internet Address:
©
2012 Samsung Telecommunications America, LLC. Samsung is a registered
trademark of Samsung Electronics Co., Ltd.
Do you have questions about your Samsung Mobile Phone?
For 24 hour information and assistance, we offer a new FAQ/ARS System
(Automated Response System) at:
www.samsung.com/us/support
GH68-36865A
Printed in China
Nuance, the Nuance logo, and XT9 are trademarks and/or registered trademarks
of Nuance communications, Inc., and/or its affiliates in the Unitied States and/or
other countries.
microSD™, microSDHC™ and the microSD logo are Trademarks of the SD
Card Association.
The Bluetooth® word mark, figure mark (stylized “B Design”), and combination
mark (Bluetooth word mark and “B Design”) are registered trademarks and are
wholly owned by the Bluetooth SIG.
Wi-Fi®, the Wi-Fi CERTIFIED logo, and the Wi-Fi logo are registered trademarks of
the Wi-Fi Alliance.
http://www.samsung.com
Customer Care Center:
1000 Klein Rd.
Plano, TX 75074
1.888.987.HELP (4357)
Page 5

Table of Contents
Section 1: Getting Started .....................................................5
Understanding this User Manual . . . . . . . . . . . . . . . . . . . . . . . . . . . . . . . . . . . 5
Installing the Battery . . . . . . . . . . . . . . . . . . . . . . . . . . . . . . . . . . . . . . . . . . . . 6
Charging a Battery . . . . . . . . . . . . . . . . . . . . . . . . . . . . . . . . . . . . . . . . . . . . . 9
Switching the Phone On or Off . . . . . . . . . . . . . . . . . . . . . . . . . . . . . . . . . . . 11
Installing the Memory Card . . . . . . . . . . . . . . . . . . . . . . . . . . . . . . . . . . . . . . 11
Locking and Unlocking the Screen . . . . . . . . . . . . . . . . . . . . . . . . . . . . . . . . 12
Setting Up Your Voice Mail . . . . . . . . . . . . . . . . . . . . . . . . . . . . . . . . . . . . . . 12
Section 2: Understanding Your Phone ................................13
Features . . . . . . . . . . . . . . . . . . . . . . . . . . . . . . . . . . . . . . . . . . . . . . . . . . . . 13
Front View . . . . . . . . . . . . . . . . . . . . . . . . . . . . . . . . . . . . . . . . . . . . . . . . . . 14
Side Views . . . . . . . . . . . . . . . . . . . . . . . . . . . . . . . . . . . . . . . . . . . . . . . . . . 17
Back View . . . . . . . . . . . . . . . . . . . . . . . . . . . . . . . . . . . . . . . . . . . . . . . . . . 18
Display Layout . . . . . . . . . . . . . . . . . . . . . . . . . . . . . . . . . . . . . . . . . . . . . . . 18
Icons . . . . . . . . . . . . . . . . . . . . . . . . . . . . . . . . . . . . . . . . . . . . . . . . . . . . . . 19
Backlight . . . . . . . . . . . . . . . . . . . . . . . . . . . . . . . . . . . . . . . . . . . . . . . . . . . 21
Menu Navigation . . . . . . . . . . . . . . . . . . . . . . . . . . . . . . . . . . . . . . . . . . . . . 22
Go to Menu . . . . . . . . . . . . . . . . . . . . . . . . . . . . . . . . . . . . . . . . . . . . . . . . . 23
Section 3: Call Functions .....................................................24
Displaying Your Phone Number . . . . . . . . . . . . . . . . . . . . . . . . . . . . . . . . . . 24
Making a Call . . . . . . . . . . . . . . . . . . . . . . . . . . . . . . . . . . . . . . . . . . . . . . . . 24
Answering a Call . . . . . . . . . . . . . . . . . . . . . . . . . . . . . . . . . . . . . . . . . . . . . 26
Recent Calls . . . . . . . . . . . . . . . . . . . . . . . . . . . . . . . . . . . . . . . . . . . . . . . . . 29
Call Waiting . . . . . . . . . . . . . . . . . . . . . . . . . . . . . . . . . . . . . . . . . . . . . . . . . 31
3-Way Calling (Multi-Party Calling) . . . . . . . . . . . . . . . . . . . . . . . . . . . . . . . . 31
Section 4: Entering Text ......................................................33
Using the QWERTY Keypad . . . . . . . . . . . . . . . . . . . . . . . . . . . . . . . . . . . . . . 33
Changing the Text Input Mode . . . . . . . . . . . . . . . . . . . . . . . . . . . . . . . . . . . 35
1
Page 6

Section 5: Messages ............................................................38
Types of Messages . . . . . . . . . . . . . . . . . . . . . . . . . . . . . . . . . . . . . . . . . . . . 38
Creating and Sending Messages . . . . . . . . . . . . . . . . . . . . . . . . . . . . . . . . . . 39
Viewing New Received Messages . . . . . . . . . . . . . . . . . . . . . . . . . . . . . . . . . 41
Using Message Options . . . . . . . . . . . . . . . . . . . . . . . . . . . . . . . . . . . . . . . . . 41
Deleting Messages . . . . . . . . . . . . . . . . . . . . . . . . . . . . . . . . . . . . . . . . . . . .42
Messages Settings . . . . . . . . . . . . . . . . . . . . . . . . . . . . . . . . . . . . . . . . . . . . 43
Using Email . . . . . . . . . . . . . . . . . . . . . . . . . . . . . . . . . . . . . . . . . . . . . . . . . 45
Section 6: Managing Your Contacts ...................................46
Contacts Settings . . . . . . . . . . . . . . . . . . . . . . . . . . . . . . . . . . . . . . . . . . . . . 46
Adding a New Contact . . . . . . . . . . . . . . . . . . . . . . . . . . . . . . . . . . . . . . . . . 46
Using Contacts . . . . . . . . . . . . . . . . . . . . . . . . . . . . . . . . . . . . . . . . . . . . . . . 51
Contacts Entry Options . . . . . . . . . . . . . . . . . . . . . . . . . . . . . . . . . . . . . . . . . 52
Finding My Own Phone Number . . . . . . . . . . . . . . . . . . . . . . . . . . . . . . . . . . 53
FDN Mode . . . . . . . . . . . . . . . . . . . . . . . . . . . . . . . . . . . . . . . . . . . . . . . . . . 53
Group Settings . . . . . . . . . . . . . . . . . . . . . . . . . . . . . . . . . . . . . . . . . . . . . . . 55
Adding Speed Dial Entries . . . . . . . . . . . . . . . . . . . . . . . . . . . . . . . . . . . . . . . 57
Managing Contacts Entries . . . . . . . . . . . . . . . . . . . . . . . . . . . . . . . . . . . . . .57
Section 7: Browser ..............................................................60
Browser . . . . . . . . . . . . . . . . . . . . . . . . . . . . . . . . . . . . . . . . . . . . . . . . . . . . 60
Home . . . . . . . . . . . . . . . . . . . . . . . . . . . . . . . . . . . . . . . . . . . . . . . . . . . . . . 60
Exiting the Browser . . . . . . . . . . . . . . . . . . . . . . . . . . . . . . . . . . . . . . . . . . . . 61
Navigating the Browser . . . . . . . . . . . . . . . . . . . . . . . . . . . . . . . . . . . . . . . . . 61
Favorites . . . . . . . . . . . . . . . . . . . . . . . . . . . . . . . . . . . . . . . . . . . . . . . . . . . . 61
Enter URL . . . . . . . . . . . . . . . . . . . . . . . . . . . . . . . . . . . . . . . . . . . . . . . . . . .61
Clear Cache . . . . . . . . . . . . . . . . . . . . . . . . . . . . . . . . . . . . . . . . . . . . . . . . . 62
Section 8: My Folder ............................................................63
Memory Card Settings . . . . . . . . . . . . . . . . . . . . . . . . . . . . . . . . . . . . . . . . .63
Audio . . . . . . . . . . . . . . . . . . . . . . . . . . . . . . . . . . . . . . . . . . . . . . . . . . . . . . 64
Games&Apps . . . . . . . . . . . . . . . . . . . . . . . . . . . . . . . . . . . . . . . . . . . . . . . . 65
Pictures . . . . . . . . . . . . . . . . . . . . . . . . . . . . . . . . . . . . . . . . . . . . . . . . . . . . 65
Video . . . . . . . . . . . . . . . . . . . . . . . . . . . . . . . . . . . . . . . . . . . . . . . . . . . . . . 69
2
Page 7

Other Files . . . . . . . . . . . . . . . . . . . . . . . . . . . . . . . . . . . . . . . . . . . . . . . . . . 69
Used Space . . . . . . . . . . . . . . . . . . . . . . . . . . . . . . . . . . . . . . . . . . . . . . . . . 70
Section 9: Applications ........................................................71
Music . . . . . . . . . . . . . . . . . . . . . . . . . . . . . . . . . . . . . . . . . . . . . . . . . . . . . . 71
Tools . . . . . . . . . . . . . . . . . . . . . . . . . . . . . . . . . . . . . . . . . . . . . . . . . . . . . . 77
Section 10: Changing Your Settings ...................................90
Sound Profile . . . . . . . . . . . . . . . . . . . . . . . . . . . . . . . . . . . . . . . . . . . . . . . . 90
Display . . . . . . . . . . . . . . . . . . . . . . . . . . . . . . . . . . . . . . . . . . . . . . . . . . . . . 94
Time and Date . . . . . . . . . . . . . . . . . . . . . . . . . . . . . . . . . . . . . . . . . . . . . . . 95
Phone Settings . . . . . . . . . . . . . . . . . . . . . . . . . . . . . . . . . . . . . . . . . . . . . . . 96
Calls Settings . . . . . . . . . . . . . . . . . . . . . . . . . . . . . . . . . . . . . . . . . . . . . . . 102
Connectivity . . . . . . . . . . . . . . . . . . . . . . . . . . . . . . . . . . . . . . . . . . . . . . . . 103
Configuring Your Phone’s USB Settings . . . . . . . . . . . . . . . . . . . . . . . . . . . 107
Applications Settings . . . . . . . . . . . . . . . . . . . . . . . . . . . . . . . . . . . . . . . . . 108
Memory Management . . . . . . . . . . . . . . . . . . . . . . . . . . . . . . . . . . . . . . . . 110
Section 11: Camera ............................................................113
Using the Camera . . . . . . . . . . . . . . . . . . . . . . . . . . . . . . . . . . . . . . . . . . . . 113
Camera Options . . . . . . . . . . . . . . . . . . . . . . . . . . . . . . . . . . . . . . . . . . . . . 114
Using the Camcorder . . . . . . . . . . . . . . . . . . . . . . . . . . . . . . . . . . . . . . . . . 118
Camcorder Options . . . . . . . . . . . . . . . . . . . . . . . . . . . . . . . . . . . . . . . . . . . 119
Section 12: Health and Safety Information .......................121
Exposure to Radio Frequency (RF) Signals . . . . . . . . . . . . . . . . . . . . . . . . . 121
Specific Absorption Rate (SAR) Certification Information . . . . . . . . . . . . . . . 127
FCC Part 15 Information to User . . . . . . . . . . . . . . . . . . . . . . . . . . . . . . . . . 128
Smart Practices While Driving . . . . . . . . . . . . . . . . . . . . . . . . . . . . . . . . . . 129
Battery Use and Safety . . . . . . . . . . . . . . . . . . . . . . . . . . . . . . . . . . . . . . . . 131
Samsung Mobile Products and Recycling . . . . . . . . . . . . . . . . . . . . . . . . . . 133
UL Certified Travel Charger . . . . . . . . . . . . . . . . . . . . . . . . . . . . . . . . . . . . . 134
Display / Touch-Screen . . . . . . . . . . . . . . . . . . . . . . . . . . . . . . . . . . . . . . . 134
GPS & AGPS . . . . . . . . . . . . . . . . . . . . . . . . . . . . . . . . . . . . . . . . . . . . . . . . 135
Emergency Calls . . . . . . . . . . . . . . . . . . . . . . . . . . . . . . . . . . . . . . . . . . . . . 136
Care and Maintenance . . . . . . . . . . . . . . . . . . . . . . . . . . . . . . . . . . . . . . . . 137
3
Page 8

Responsible Listening . . . . . . . . . . . . . . . . . . . . . . . . . . . . . . . . . . . . . . . . . 138
Operating Environment . . . . . . . . . . . . . . . . . . . . . . . . . . . . . . . . . . . . . . . .141
FCC Hearing Aid Compatibility (HAC) Regulations for Wireless Devices . . . . 143
Restricting Children's Access to Your Mobile Device . . . . . . . . . . . . . . . . . . 146
FCC Notice and Cautions . . . . . . . . . . . . . . . . . . . . . . . . . . . . . . . . . . . . . . . 146
Other Important Safety Information . . . . . . . . . . . . . . . . . . . . . . . . . . . . . . . 146
4
Page 9

Section 1: Getting Started
This section explains how to start using your phone by configuring your hardware
and setting up your voice mail.
Understanding this User Manual
The sections of this manual generally follow the features of your phone.
Before using your phone, see “Health and Safety Information” on page 121.
Special Text
This manual includes notes, tips and warnings, in special text that is set apart to
point out important information, share quick methods for activating features, and to
define terms.
The definitions for these methods are as follows:
•
Notes
: Presents options for the current feature or menu.
•
Tips
: Provides quick methods or useful shortcuts.
•
Important
: Points out important information about the current feature that could affect
performance.
•
Warning
: Brings to your attention important information to prevent loss of data or
functionality, or even prevent damage to your phone.
Text Conventions
This manual provides condensed information about how to use your phone. The
following text conventions are used to represent often-used steps:
➔ Arrows are used to represent successive menu selections.
For example: From the Home screen, press Menu ➔ Settings ➔
Phone ➔ Language.
Getting Started 5
Page 10
Installing the Battery
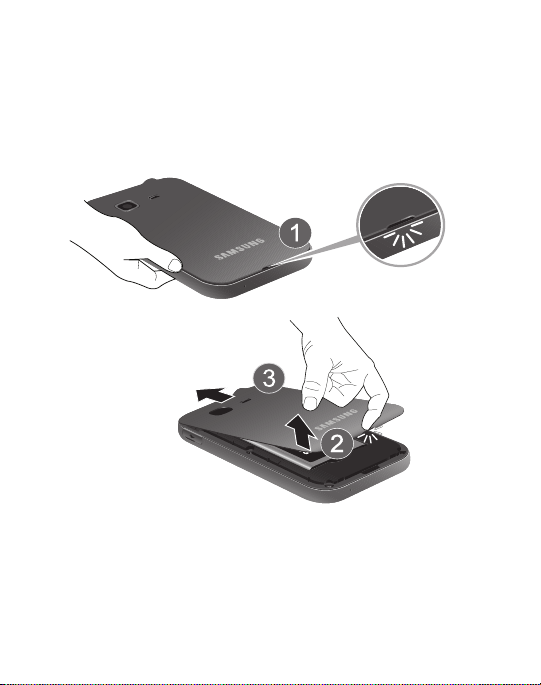
Removing the Battery Cover
1. Remove the battery cover by placing your thumbnail in the slot at the bottom
of the phone (1). If you have fragile nails, use a pointed object.
2. Lift the cover up and off the phone (2).
6
Page 11

Installing the Battery
1. Align the gold contacts of the battery with the contacts in the battery
compartment in the phone (1).
2. Press the battery down until it clicks into place (2). Make sure that the battery
is properly installed before switching on the phone.
Getting Started 7
Page 12
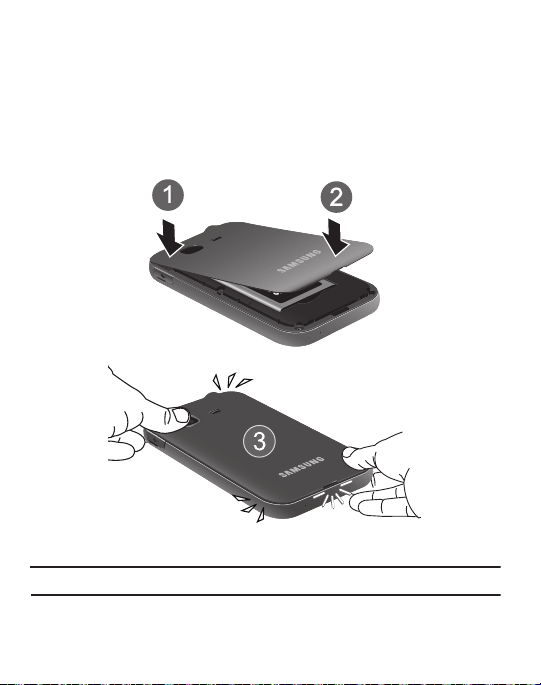
3.
Replace the battery cover onto the back of the phone in the direction shown
by the arrow (1).
4. Press down along the bottom of the phone until you hear a light click (2).
5. Press down firmly along the edges to ensure that the cover is flush with the
phone (3).
Note:
Make sure the battery is properly installed before switching on the phone.
8
Page 13
Charging a Battery
Incorrect
Correct
Your phone is powered by a rechargeable Li-ion battery. The Travel Adapter that
is used to charge the battery, is included with your phone. Use only Samsungapproved batteries and chargers.
You can use the phone while the battery is charging, although doing so requires
additional charging time.
Note:
You must fully charge the battery before using your phone for the first time. A discharged
battery recharges fully in approximately 4 hours.
Note:
Long backlight settings, searching for service, vibrate mode, browser use, and other
variables may reduce the battery’s talk and standby times.
Using the Travel Adapter
With the battery installed, remove the plastic cover of the Power/Accessory
Interface connector on the upper right side of phone.
Getting Started 9
Page 14
Important!:
Verify that the handset battery is installed prior to connection. If the battery is not
properly installed and the wall charger is connected, the handset may power off and
on continuously, preventing proper operation.
1. Plug the data cable into the base piece provided and into the Power/
Accessory Interface connector on your phone.
2. Plug the base piece into a standard AC wall outlet.
3. When the battery is fully charged, the phone displays a message telling you
the battery is full. Remove the connector from the phone.
Note:
Failure to unplug the wall charger before you remove the battery, can cause damage to the
phone.
Warning!:
If your device has a touch screen display, please note that a touch-screen responds best
to a light touch from the pad of your finger or a non-metallic stylus. Using excessive
force or a metallic object when pressing on the touch screen may damage the tempered
glass surface and void the warranty.
Low Battery Indicator
When the battery is weak and only a few minutes of talk time remain, the battery
icon ( ) blinks and the device sounds a warning tone at regular intervals. In
this condition, your phone conserves its remaining battery power by reducing the
backlight’s brightness and entering a dimming mode. For a quick check of your
battery level, glance at the battery charge indicator located in the upper-right
corner of your device’s display. Five bars ( ) indicate a full charge.
When the battery level becomes too low, the phone automatically turns off.
10
Page 15
Switching the Phone On or Off
1. To turn the phone on, press and hold until the phone switches on.
The phone launches the activation splash screen and searches for the
network. Once the network has been found, you can make or receive calls.
2. To turn the phone off, press and hold until the phone switches off.
Note:
The display language is preset to English at the factory. To change the language, press
Menu➔ Settings
➔
Phone
➔
Language
.
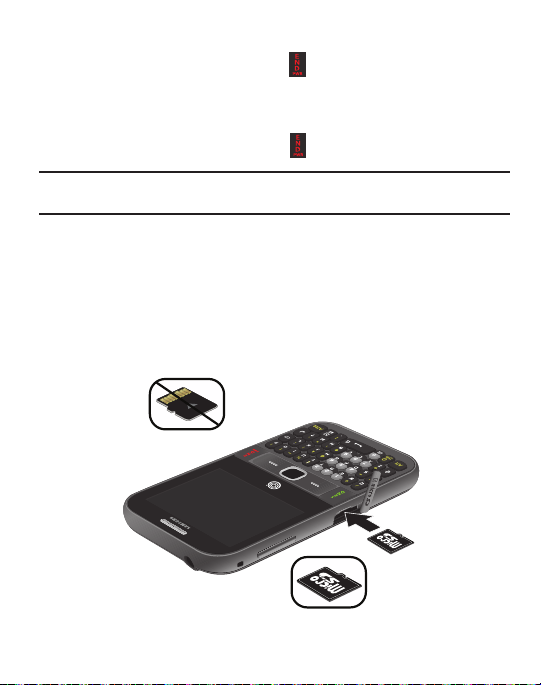
Installing the Memory Card
Your phone supports the use of a memory card (microSD) for data storage of such
things as data, music, pictures, and video files. This type of memory card is
designed for use with this mobile phone and other devices.
1. Push the microSD card into the slot until it clicks.
•
Make sure the microSD gold contact pins face downward and the card is securely
inserted.
Incorrect
Correct
Getting Started 11
Page 16
Locking and Unlocking the Screen
1. To lock the phone screen, press and hold .
2. To unlock the phone screen, press the
OK
soft key.
Note:
The Auto Key Lock feature automatically locks the screen when the screen times out. To
change the default setting, press
Menu➔ Settings
Unlock
soft key and then press the
➔
Phone
➔
Auto Key Lock
.
Setting Up Your Voice Mail
1. In Idle mode, press and hold . You may be prompted to enter a password.
2. Follow the tutorial to create a password, record a greeting, and record
your name.
Note:
These steps may be different depending on your network.
Accessing Your Voice Mail
1. In Idle mode, press and hold .
2. When connected, follow the voice prompts from the voice mail center.
Accessing Your Voice Mail From Another Phone
1. Dial your wireless phone number.
2. When you hear your voicemail greeting, press the asterisk key (*).
3. Enter your passcode using the keypad.
12
Page 17

Section 2: Understanding Your Phone
This section outlines some key features of your phone. It also displays the screen
and the icons that display when the phone is in use.
Features
Your phone is lightweight, easy-to-use and offers many significant features. The
following list outlines a few of the features included in your phone.
•
2.0 Megapixel Camera with 4x Digital Zoom
•
Camcorder
®
•
Bluetooth
Wireless Technology
®
• Wi-Fi
•
User friendly, menu driven access to features and options
•
Display and QWERTY Keypad
•
Sound/Image media capability
•
microSD card compatibility for use in data storage and access.
•
Games & Apps feature to shop, buy, and store games and apps.
•
Email
•
Tools feature provides Camera, Voice Services, Record Audio, Alarms, Calendar, Tasks,
Memo, Calculator, Tip Calculator, Eco Calculator, Converter, World Clock, Timer, Stopwatch,
and SIM App.
Understanding Your Phone 13
Page 18
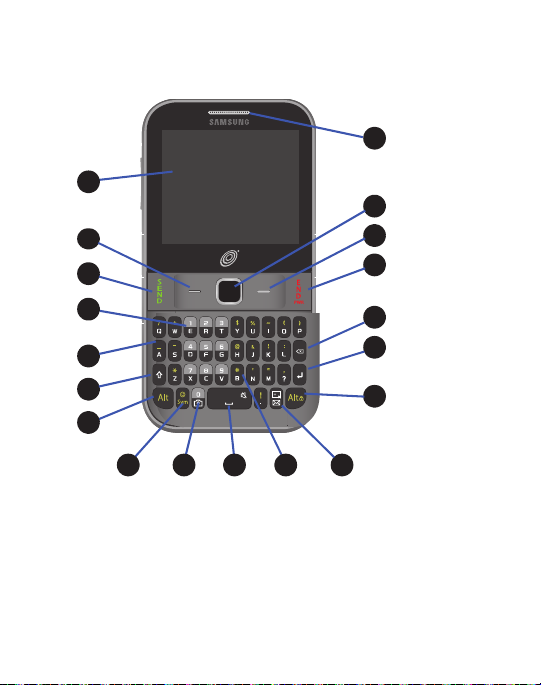
Front View
1
12
1
15
1
14
1
18
1
16
1
19
1
17
1
1
1
1
3
1
4
1
5
1
6
1
7
2
1
13
1
8
1
9110111
The following illustrations show the main elements of your phone.
1. Display:
S
hows information needed to operate your phone: signal strength,
battery level, time and date, and more.
2. Left Soft key: Press to select the option displayed above the Left Soft Key.
3. Send key: Press to make or answer a call. In Idle mode, press and hold to
recall the last number dialed or received.
14
Page 19

Voice mail key: Press and hold for two seconds to automatically dial your
4.
voice mail phone number.
5. QWERTY Keypad: Allows you to enter numbers, letters, and characters using
a full QWERTY keypad interface.
6. Shift key: While entering text, press twice to select Cap Lock. Press once
more to remove Cap Lock.
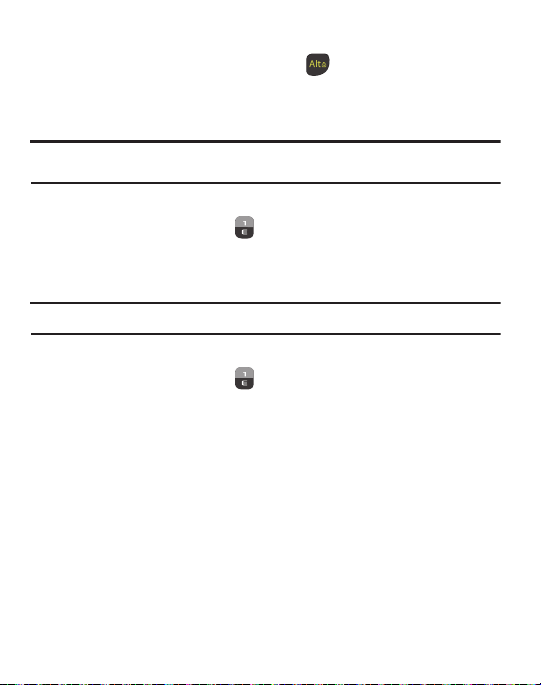
7. Alt key: While entering text, press to enter the numbers and symbols
displayed on the upper half of the keys. Press Alt twice to continue to
enter the numbers and symbols on the top half of the key, until you press
Alt once again.
8. Sym key: While entering text, press to display the symbols grid.
9. Camera key: In Idle mode, press and hold to launch the Camera.
10. Space Bar key: While entering text, press to enter a space. In Idle mode,
press and hold to toggle between the Silent profile and Normal profile.
11. Pound key: In Idle mode, press and hold to toggle between the Silent profile
and Normal profile.
12.
Go to key
: allows you to access applications from the idle screen without
navigating through the main menu icons and sub menus.
13. Alt/Lock key: While entering text, press to enter the numbers and symbols
displayed on the upper half of the keys. Press Alt twice to continue to enter
the numbers and symbols on the top half of the key, until you press Alt once
again. Press and hold to Lock the keypad.
14. Enter key: Press to start a new line when typing a message.
Understanding Your Phone 15
Page 20

15.
Cancel/Clear
key
: Deletes characters from the display. In idle mode, press to
launch the calendar.
16. Power On/Off (END) key: Press to end a call. Press and hold for two seconds
to turn phone on or off. While in the Menu mode, returns phone to Idle mode,
then cancels input.
17. Right Soft key: Press to select the option displayed above the Right Soft Key.
18.
Navigation/OK key
: In menu mode, slide your finger across the navigation pad
to scroll through the menu options. Press to accept the highlighted option.
19. Earpiece: Use during calls to listen to callers.
16
Page 21
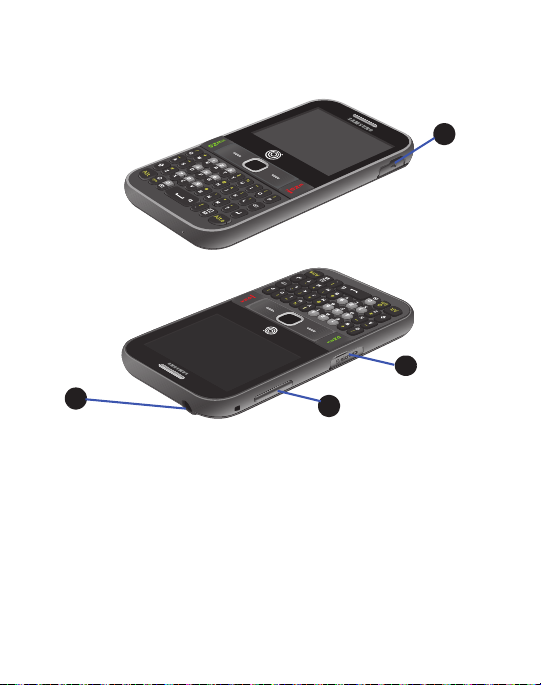
Side Views
1
3
1
2
1
1
1
4
The following illustration shows the side details of your phone.
1.
USB Power/Accessory connector:
Allows you to connect a power cable or
optional accessories such as a USB/data cable.
2. Memory card port: Allows you to install a microSD or microSDHC card.
3.
Volume keys
: From the Home screen, press to adjust volume. During calls or
music playback, press to adjust volume. Press to mute the ringtone of an
incoming call. Press and hold to send an incoming call directly to voicemail.
4.
Earphone jack
to music.
: Allows you to connect a hands-free headset so you can listen
Understanding Your Phone 17
Page 22
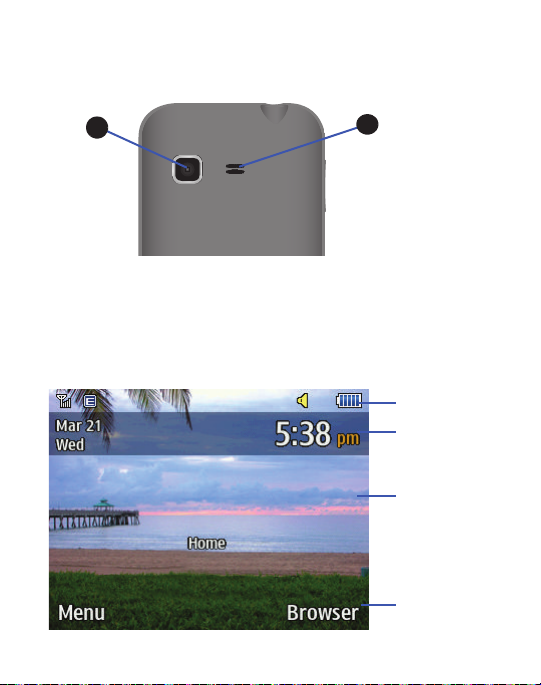
Back View
1
1
1
2
Indicators
Main Display
Soft Key
Time and Date
Indicators
The following illustration shows the back view of the phone with the camera lens.
1.
Camera Lens
2.
External Speaker
: Used to take pictures and shoot videos.
: Allows you to hear music.
Display Layout
Your display screen provides information about the phone’s status and options.
18
Page 23
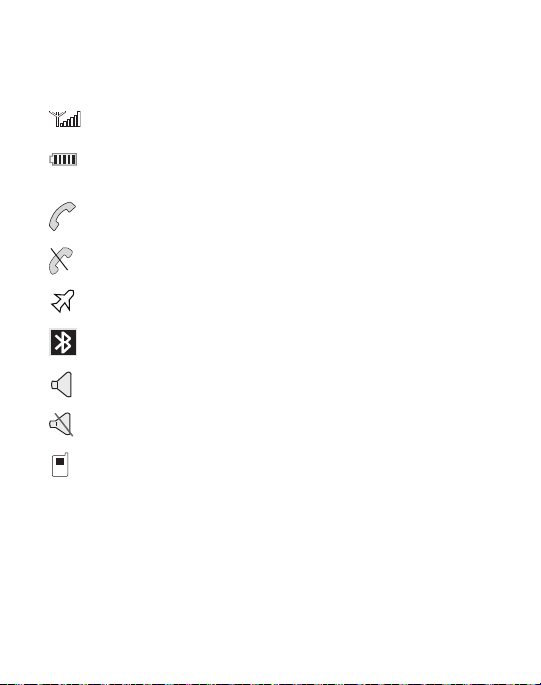
Icons
The following list identifies the symbols on your phone display:
Shows the received signal strength. The greater the number of bars, the
stronger the signal.
Shows the level of your batter y. The more bars you see, the more po wer
remains.
Displays when a call is in progress.
Displays when the phone is not receiving a signal.
Displays when the phone is in Airplane mode.
Displays when Bluetooth wireless technology is active.
Displays when Normal volume control is active.
Displays when Vibration Mode is active.
Displays in the View Tab when you miss a call.
Understanding Your Phone 19
Page 24

View Tab
Displays in the View Tab when you receive a new text or
picture message.
Displays in the View Tab when you receive a new voice mail.
Displays when you set an alarm to ring at a specified time.
20
Page 25

Backlight
A backlight illuminates the internal display and the keypad. When you press any
key, the backlight comes on. It goes off when no keys are pressed within a given
period of time, depending on the setting in the
Backlight Time
menu. The display
turns off after one minute to conserve battery power.
The On setting determines how long the keypad backlight remains on. The Dim
setting determines how long after the keypad backlight goes off that the display
backlight remains lit.
To access the
1. In Idle mode, press Menu ➔ Settings ➔ Display ➔ Light Settings ➔
Backlight
menu:
Backlight Time and press the Select soft key or .
2. Highlight the On option and press
Edit
. Use the Up or Down Navigation key to
select the time the keypad backlight is on. You can choose: 10 Seconds,
Seconds, 1 Minute, 3Minutes or 10 Minutes. Press .
3. Press the
Down
key to highlight the Dim option and press
Edit
. Use the Up or
Down Navigation key to select the time the display backlight remains on
after the keypad backlight times out. You can choose: Off, 5 Seconds,
30 Seconds, 1 Minutes or 3 Minutes.
4. Press Save to retain your settings.
30
Understanding Your Phone 21
Page 26

Menu Navigation
This section explains the menu navigation for your phone. Menus and sub-menus
can be accessed by scrolling using the Navigation key or by using the shortcut
keys.
Accessing a Menu
1. In Idle mode, press the Menu soft key and scroll using the Navigation keys to
reach a main menu item. Press the Select soft key or the key to enter the
menu.
2. If the menu contains sub-menus, you can access them by first highlighting
the option and then by pressing the Select soft key or the key. If the
menu you selected contains further options, repeat this step.
3. To scroll through these menus, press the Up or Down Navigation key or the
Volume key (located on the left side of your phone). Press the Select soft key
or the key to make your selection.
4. To return to the previous menu level, press the Back soft key.
5. To exit the menu without changing the settings, press the key.
Using Shortcut Numbers
Numbered menu items, such as menus, sub-menus, and options can be quickly
accessed by using their shortcut numbers.
In Menu mode, Main Menus can be accessed by pressing the number keys (1 to 0, *
and #) corresponding to their location on the screen.
Example:
Access your message inbox.
1. In Idle mode, press the Menu soft key.
2. Press the key to access Messages.
22
Page 27
Press the key to access Inbox.
3.
Go to Menu
Go to menu allows you to access applications from the idle screen without
navigating through the main menu icons and sub menus. There are twelve available
shortcuts, nine preassigned (Email, Inbox, Create Message, Games&Apps, Music,
Bluetooth, Alarms, Recent Calls, and Airplane Mode), and three empty shortcuts you
can assign (10, 11, and 12).
Note:
To enter 10 for My Menu, enter a 0. To enter 11, enter an asterisk (*). To enter 12, enter the
pound sign (#).
To navigate Go to menu:
1. In Idle mode, press the Go to key ( ), and highlight a shortcut.
2. Press the key to access the selected option.
– or –
Press the
Options
soft key. The following options are available, depending on
whether or not the selected shortcut has been assigned:
Options for assigned shortcuts:
•Open
: open the selected shortcut and displays the submenus, launches the selected
application, or displays a screen.
• Change
: changes the currently selected shortcut and assigns another shortcut to this
field.
•Remove
: removes the selected shortcut from this field.
•Remove all
: removes all the shortcuts from the fields in this menu.
Options for unassigned shortcuts:
•Define
: allows you to choose from a list of applications to assign to the shortcut key.
•Remove all
: removes all the shortcuts from the fields in this menu.
Understanding Your Phone 23
Page 28
Section 3: Call Functions
This section describes how to make or answer a call.
Displaying Your Phone Number
䊳
Press
Menu
➔
Settings ➔ Phone ➔ Own Number
Making a Call
䊳
From the Idle screen, use the keypad to enter the number you wish to call and
press .
Note:
When you activate the
Menu
➔
Settings
(
redials when the person does not answer the call or is on the phone.
➔
Auto Redial
option in the Voice Call menu
Calls
➔
Voice Call
➔
Making an International Call
1. From the Idle screen, press and hold . The + character displays.
2. Use the keypad to enter the country code, area code, and phone number.
•
If you make a mistake, press until the desired numbers are deleted.
3. Press .
Manual Pause Dialing
To manually call a number with pause(s) without storing it in your Contacts list:
1. From the Idle screen, use the keypad to enter the phone number.
2. Press and hold to add a two-second pause (
the additional numbers.
3. Press to make your call.
Tip:
You can create pauses longer than two seconds by entering multiple two-second pauses.
.
Auto Redial
) the phone automatically
P
). Use the keypad to enter
24
Page 29

Correcting an Entered Number
Use the following steps to correct a character entered incorrectly.
1. After entering a number using the keypad:
•
If you make a mistake, press to erase a single character.
•
Press and hold to erase the entire string of numbers.
2. Press to return to the Idle screen.
Ending a Call
䊳
Press the key.
Using the Volume Keys
During a call, use the Volume keys on the left side of the phone to increase or
decrease the earpiece volume.
In Idle mode, use the Volume keys to adjust the ringer volume.
Press one of the volume keys to immediately silence the tone of an incoming call or
alarm.
Making a Call Using Speed Dial
You can assign a shortcut number to a phone number for speed dialing.
1. Press
Menu
➔
Contacts
➔
Speed Dial List
. The
Speed Dial List
screen displays
showing the numbers 1 through 9. The number 1 is reserved for Voice Mail.
2. Highlight an unused number and press
3. Select
4. Highlight a contact to assign to the number and press
5. To make a call using the Speed Dial feature from the Idle screen, press and
Address Book
or
FDN Contacts
.
Options
➔
Assign
.
Select
or the key.
hold the speed dial number. The phone number assigned will automatically be
called.
Call Functions 25
Page 30

Answering a Call
When a call is received, the phone rings and displays the caller phone number or
name, if stored in Contacts.
1. From the Incoming call screen, press or
•
If the
Any Key
option is activated (
Answer
), you can press any key to answer a call except .
2. Press to end the call.
Note:
You can answer a call while using Contacts or other menu feature. After ending the call, the
phone returns to the previously active screen.
Menu
Accept
➔ Settings
.
➔ Calls
➔ General
➔ Call
Placing a Call on Hold
While on a call, you can place the call on hold to answer an incoming call or place a
new call, if your network supports this service. You can place the current call on
hold.
To place a call on hold:
1. While on a call, press
2. Press
Resume
3. Press
Options
Options
➔ Hold
.
to continue the conversation.
➔ End Call
to disconnect.
To make a new call while you have a call in progress:
1. While on a call, press
2. Dial the new phone number or look it up in Contacts.
3. Press to dial the second number.
Options
➔ Hold
.
– or –
Press
Options
➔ New call
to dial the second number.
26
Page 31

Press to end the current call.
4.
– or –
Press
Options
➔ End
Press
Select
and select
or .
Active call, Held call
, or
All calls
.
When you have an active call and a call on hold, you may switch between the
two calls.
To switch between two calls:
1. Press
Options
➔ Swap
.
2. Press to end the current call.
– or –
Press
Options
➔ End
press
Select
and then select
or .
Active call, Held call
, or
All calls
and
In-Call Options
While on a call, you can press the
Spkr on
to put the call on speakerphone, and press the
Mute
soft key to mute the microphone, or press
Options
soft key to access
the following options:
•
Hold
: places the current call on hold.
•
Contacts
: allows you to access your Address Book information.
•
Save to Contacts/View Contact Details
: allows you to view the number’s Address Book
information or save the number as a new entry. This option only appears if the number is in
your address book.
•
New call
: places the current call on hold and then allows you to enter and call
another number.
•
Send Message
: allows you to create and send a new Text or Multimedia Message.
Call Functions 27
Page 32

•
More
:
–
Calendar
: Allows you to temporarily access your calendar while still maintaining the
active call.
–
Memo
: Allows you to access Notes.
–
Send DTMF
: Sends DTMF (Dual Tone Multi-Frequency) tones to the contacts you have
selected. These DTMF tones are sent as a group. The DTMF tones are the tones used in
phones for tone dialling, sounding when you press the number keys. This option is helpful for
entering a password or an account number when you call an automated system, like a
banking service.
•
End call
: Allows you to end the active call.
Using the Speakerphone During an Active Call
While in an active call, it is possible to enable the speakerphone feature.
1. Dial the number and press .
2. Press to activate the speakerphone.
3. Press the
Volume
keys (located on the left side of your phone) to adjust the
volume.
Switching off the Microphone (Mute)
You can temporarily switch your phone microphone off, so that the other person
cannot hear you.
To switch the microphone off temporarily during a call:
1. Press Mute. The option is replaced with Unmute.
2. Press Unmute to deactivate the Mute function and reactivate the
microphone.
28
Page 33

Recent Calls
The phone stores the numbers of the calls you’ve dialed, received, or missed in the
Recent Calls menu.
1. From the Idle Screen, press .
2. Press the
3. Press to dial a highlighted number.
Made
Left
, or
Calls Received
or
Right
Navigation key to display
.
All calls, Missed calls, Calls
Viewing All Calls
1. From the Idle Screen, press to view All Calls in the Recent Calls.
2. Scroll through the list of All Calls. As a call highlights, the details display.
Press to dial the number of the call you are viewing.
3. Highlight a call and press the
• Details
: allows you to view the caller’s name, phone number, time and date called as well
Options
soft key to view the following options:
as the length of the call.
•Call
: allows you to automatically dial the selected number.
• Save to Contacts
: allows you to save the number to your Address Book on either the
phone or SIM card. This option only displays if the number is not already in your Address
Book.
• Send Message
•Delete
• View contact details
: allows you to sent a text or Multimedia message to the caller.
: allows you to delete a selected call or all calls.
: allows you to view the contact’s Address Book information. This
option only appears if the contact is in your address book.
Call Functions 29
Page 34

Viewing Missed Calls
1. From the Idle Screen, briefly press and use the
scroll to the
2. Scroll through the list of missed calls. As the call highlights, the details
Missed Calls
screen. The recently missed calls display.
Right
navigation key to
display. Press to dial the number of the call you are viewing.
3. To move to another call type, press the
Left
or
Right
Navigation key to make
your selection.
Saving a Missed Call to your Address Book
1. From the Idle Screen, briefly press and use the
scroll to the
2. Highlight the desired missed call.
3. Press
Missed Calls
screen.
Options ➔ Save to Contacts
.
Right
navigation key to
Sending a Message to a Missed Call
1. From the Idle Screen, briefly press and use the
scroll to the
2. Highlight the desired missed call.
3. Press
4. From the
Missed Calls
screen.
Options ➔ Send Message
Create Message
screen, highlight the empty text field and use the
.
Right
navigation key to
keypad to type a message.
Deleting a Missed Call
1. From the Idle Screen, briefly press and use the
scroll to the
2. Highlight the desired missed call.
Missed Calls
screen.
Right
navigation key to
30
Page 35

Press
Options
3.
Selected
4. At the
➔ Delete and press the
or
All
.
Delete?
prompt, press
Right
navigation key to choose
Yes
to delete or No to cancel.
Call Waiting
The Call Waiting feature allows you to answer an incoming call while you have a call
in progress, if this service is supported by the network. You must activate Call
Waiting in the settings menu.
1. Press Menu ➔ Settings ➔ Call
2. Press
Options➔ A
ctivate. You are notified of an incoming call by a call waiting
s
➔
Voice Call
➔
Call Waiting
.
tone.
To answer a call with Call Waiting activated, while you have a call in progress:
1. Press to answer the next incoming call. The first call is automatically
placed on hold.
2. To switch between the two calls, press
Swap
places the current call on hold and then activates the previous call.
Options
➔ Swap.
3-Way Calling (Multi-Party Calling)
The 3-Way or Multi-Party feature allows you to answer a series of incoming calls
and place them on hold.
If this service is supported by the network, and the SIM has the feature enabled, all
calls can be joined together. You are notified of an incoming call by a call waiting
tone. To activate the call waiting feature, see “Call Waiting” on page 31.
1. Press to answer the first incoming call.
2. Press to answer the next incoming call. The first call is automatically put
on hold.
Call Functions 31
Page 36

3.
Press ➔ to join with both of your callers, the active call and the call
on hold, in a single multi-party call.
4. Press to end a call.
32
Page 37

Section 4: Entering Text
Navigation
Key
Right Soft
Key
Left Soft
Key
OK/Confirm
This section outlines how to select the desired text entry mode when entering
characters using the QWERTY keyboard-style keypad.
This section also describes how to use the T9 predictive text entry system to reduce
the number of key strokes needed to enter text.
Using the QWERTY Keypad
Your phone has a QWERTY ( ) keypad for entering numbers and
text. You can enter text as you would when using a computer’s keyboard.
Entering Text 33
Page 38

The keys are labelled with the alphabet on the lower half and numbers and symbols
on the upper half. Press the key corresponding to the character you want to enter.
To switch between using the upper case characters and lower case characters,
press . You can move the cursor by scrolling using the Navigation key.
In addition, you can use the following function keys:
Press to delete characters. Press and hold to
delete all text.
Press to start a new line.
Press twice to select CAP LOCK.
Press again to remove CAP LOCK.
Short press inserts a space.
Double press inserts a period and a space.
Press and hold in Idle mode to set phone to Silent
mode.
Press to display the symbols grid.
Press to begin using the alternate characters,
shown in yellow atop a corresponding key. Press
and hold this key to lock the funtion.
This forces all new characters to use alternate
text.
34
Page 39

Changing the Text Input Mode
The available Text Input modes are:
Symbols (Sym)
. Refer to the Text Input mode in the upper right corner of the screen
T9 Predictive Text, Fn (123
numeric),
Abc,
to identify the mode.
•
T9 Predictive Text
: allows your keystrokes to be interpreted according to a built-in
dictionary in the phone to determine the likely word.
•
Abc
: activates the default alphabet keys.
•
Numeric
: activates the number keys.
•
Sym
: displays the symbols table.
Using Abc Mode
To c hang e the Text Inp ut mode, follow these steps:
1. Press once, twice, three, or four times to change the text input mode to
Abc, ABC, 123, or abc.
2. Enter the desired text.
Using SYM (symbol) Mode
Symbol mode enables you to insert symbols and punctuation marks into text.
1. Press the key to display a matrix of symbols. Use the arrow keys to
display more tables.
2. Select the number of the corresponding symbol and press the
OK
soft key to
insert the symbol into the text message.
3. Continue until you are finished composing your message.
and
Entering Text 35
Page 40

Using T9 Predictive Text
The T9 Predictive Text input method is based on a built-in dictionary. A series of
keystrokes is interpreted by the phone using this dictionary to determine the likely
word.
1. Press
Options
➔
Text Mode ➔ T9 Predictive Text
2. Begin entering a word by pressing the 2 to 9 keys. Press each key only once
.
for each letter. The built-in dictionary lists words that match the entered
keystrokes.
3. Example: To enter “Hello”, press
, , , ,
The word that you are typing displays on the screen. The word changes as
you press additional keys.
4. Enter the whole word before editing or deleting the keystrokes.
5. When the word displays correctly, go to step 6.
If the word doesn’t display correctly, press the navigation key up/down to
display alternative word choices.
6. Insert a space by pressing the key and start entering the next word.
36
Page 41

Add a New Word into the T9 Dictionary
1. After pressing the keys corresponding to the word you want to add, you can
search for the word by using the touchpad (up/down).
2. When the last alternative word displays, Spell displays. Press the Spell soft
key.
3. Enter the word you want to add using the ABC mode.
4. Press the Add soft key or the key.
The word is added to the T9 dictionary and becomes the first word for the
associated keypress series.
Note:
This feature may not be available for some languages.
•
To enter alternate text such as periods, hyphens, colons, or parenthesis, press and
then press the corresponding key containing the character.
T9 mode applies grammar rules to ensure that correct punctuation is used.
•
To shift case in T9 mode, short press the key to toggle between, Initial capital, Capital
lock, Lower case, and Numeric.
•
You can move the cursor by using the
Left
and
Right
Navigation keys. To delete letters,
press the key. Press and hold the key to clear the display.
Entering Text 37
Page 42

Section 5: Messages
This section describes how to send or receive different types of messages. It also
includes the features and functionality associated with messaging.
Types of Messages
Your phone provides the following message types:
•
Text Messages
•
Picture Messages
•
Email
•
Voicemail
The Short Message Service (SMS) lets you send and receive text messages to and
from other mobile phones or email addresses. To use this feature, you may need to
subscribe to your service provider’s message service.
The Multimedia Messaging Service (MMS) lets you send and receive multimedia
messages (such as picture messages and video messages) to and from other
mobile phones or email addresses. To use this feature, you may need to subscribe
to your service provider’s multimedia message service.
Important!:
When creating a message, adding an image, a sound file, or a video clip to a text
message changes the message from a text message to a multimedia message.
38
Page 43

Creating and Sending Messages
1. From the Idle screen, press
2. Use the QWERTY keypad to enter a message.
3. Press
Insert
to insert one of the following into your message:
•Picture
: inserts a picture from the Pictures folder.
•Video
: inserts a video from the Videos folder.
• Sound
: allows you to choose an existing audio file from the Audio folder.
• Templates
: allows you to insert pre-written sentences, such as “Call me when you get
Menu
➔
this message”.
•Emoticon
: allows you to add emoticons, such as a happy face to your message.
•Take Picture
: allows you to temporarily exit the message, take a photo with phone’s
camera, and then add it to your message by pressing
• Record Video
: allows you to temporarily exit the message, record a video clip using the
phone’s camera, and then add it to your message by pressing
•Record Sound
: allows you to temporarily exit the message, record an audio clip using the
phone’s microphone, and then add it to your message by pressing
Message
.
• Favorites URL
•Contact Info
message by pressing
4. Review your message and press
: allows you to attach a web URL from your Favorites list.
: allows you to tap on an existing Address Book entry, then add it to your
Select
.
Send to
Messages
.
➔
Create Message
Add
.
Add
.
Options
.
➔ Add to
Messages 39
Page 44

5.
Enter a phone number or email address in the Recipients field.
– or –
Press
Options
➔
Add Recipients
• Recent Contacts
•Contacts
: to select a recipient from your Recent Calls list.
: to select a recipient from your Contacts list (valid entries must have a wireless
and select one of the following:
phone number or email address).
• Groups
: to select a recipient from the Group list.
Attaching Business Card to a Message
To attach your Business Card to an outgoing message, follow these steps:
1. Create a contract entry (the information stored in the entry is used as a
business card).
2. Press
Menu
➔
Contacts
➔
Contacts
.
3. Highlight the contact (the business card) in which you are sending and press
the key.
4. Press
Options
➔
Send Business Card via
5. Select
6. Enter your message.
7. Press
8. Press
Message
and press the key.
Send to
, then add recipient(s).
Send
.
and press the
Right
Navigation key.
40
Page 45

Viewing New Received Messages
1. In Idle mode, new messages are indicated by icons and a
New Message
up.
2. Press the
Note:
If you accidentally exit from this notification screen, navigate to
to access your messages.
3. Your message displays on the screen.
View
button from the
New Message
pop-up.
Menu ➔ Messages
➔
Using Message Options
Message options at the Inbox level differ according to the message type, what you
have done with the message, and whether you are viewing the message.
1. From the Idle screen, press
2. While viewing the list of messages highlight a message and press the
Menu
➔
Messages
➔
Inbox
.
Options
soft key to access the following:
•Reply
: allows you to reply to the message via Text message.
•Call
: allows you to dial the originating message number.
•Delete
: allows you to delete Selected or Multiple messages.
•Forward
: allows you to forward the message.
• Save to Contacts
: allows you to save the recipient or sender’s information from the
message to your Address Book on either the Phone or SIM.
•More
: provides the following options:
–
Move to Phone/Move to SIM Card
phone’s memory. If a message is stored in the phone’s memory, it is then saved to the SIM card.
–
Mark as Read/Mark as Unread
uread.
–
Lock/Unlock
: allows you to lock or unlock a message.
: If a message is stored in the SIM card, it is saved to the
: allows you to identify messages that have been read or
pop-
Inbox
Messages 41
Page 46

Sort by
: allows you to sort the messages in your Inbox by Read/Unread, Recipient, Type,
–
Subject, and size.
Note:
When storing a Contacts entry to the SIM card, only the Name, Number, Group, and Slot
location display initially. To save additional information for a particular contact, such as other
phone numbers, or e-mail, it is important to add new fields to that Contact information. If you
move the SIM card to another phone that does not support additional fields on the SIM card,
the additional information is not available.
Deleting Messages
When your phone’s memory is full, an notification message displays and you cannot
receive any new messages. Use the
Delete
option to erase obsolete messages,
freeing memory for new messages. You can delete the messages either individually
or all at one time.
1. Press
Menu
➔
Messages
➔
Inbox
.
All messages are stored in the Inbox.
2. Select a message to delete and press the key.
3. With the message displayed, press
Options
➔
Delete
and press
Select
or the key.
42
Page 47

Messages Settings
To configure the settings for text messages and multimedia messages:
䊳
Press
Menu
➔
Messages
➔
Messages Settings
.
Text Message
This option allows you to change your Text Message settings. You can change the
following:
•
Delivery Options
•
Email Gateway Address
: select the
Keep a Copy
checkbox to create a checkmark and press
: this option provides information regarding the Email Gateway
Address.
Multimedia Message
The following Multimedia message options are available:
•
Delivery Options
–
Priority
–
Expiration
server.
–
Delivery Time
–
Message Size
–
Keep a Copy
phone.
–
Add My Business Card
•
Receiving Options
:
: you can select the priority level of your messages.
: select the length of time you wish the message you sent to remain on the MMS
: you can set a time delay before the phone sends your messages.
: you can set the maximum allowed size for a multimedia message.
: you specify whether you want to keep a copy of the sent messages on your
: you send your contact information along with your sent messages.
: you can specify the category of messages you want to receive. Allows
you to set the following:
–
Reject Anonymous
anonymous.
–
Reject Advertisement
advertisement.
: allows you to automatically reject messages with a category of
: allows you to automatically reject messages with a category of
Save
.
Messages 43
Page 48

•
Auto Resize Image
–
No Resize
–
100 KB
–
300 KB
–
600 KB
•
Creation Mode
: you can specify that an attached image be resized as follows:
: you can specify that the users creating new media content be given the
following options:
–
Free
: create a multimedia message with no restrictions.
–
Warni ng
: sends a warning when unsupported content is included in a message.
–
Restricted
: prevents you from including unsupported content.
•
Default Style
–
–
–
–
: you can specify the default visual parameters used by this type of message:
Font Color
Font Style
Background Color
Slide Duration
Voicemail
From the Idle screen, press
While listening to a message, press
•
Hold:/New Call
•
Contacts
•
Save to Contacts
•
Noise Suppression On/Off
•
New call
•
Send Message
•
More
: place the message you are listening to on hold or place a new call.
: add the caller to your contacts.
: place a new call.
: send a message to the caller or other recipients.
: allows you to access your calendar, to create a memo or to elect to send
Menu
➔
Messages
Options
to view the following:
: save the caller to your contacts.
: turn Noise Suppression On or Off.
➔
Voicemail
DTMF tones.
•
End call
: select to end the call.
to call your voicemail.
44
Page 49

Using Email
Signing into Your Email
To sign into Email, follow these steps:
1. Press
Menu
➔
Messages ➔ Email
.
– or –
Press
Menu
➔
Email
.
2. Follow on-screen instructions to complete the process.
Messages 45
Page 50

Section 6: Managing Your Contacts
This section describes how to store names and numbers in your Contacts.
Contacts Settings
1. Press
Menu
➔
Contacts
➔
Contacts Settings
2. Press any of the following options to activate a function:
• My Business Card
outgoing messages. For more information, see
Message”
• Save New Contacts to
SIM Card, or Always Ask).
• View Contacts from
All, Phone Memory, or SIM Memory.
• Own Number
• FDN Contacts
•Used Space
your Phone, SIM card, Additional No. 1, and FDN Contacts.
: creates and attaches a virtual business card as an attachment to
on page 40.
: defines the destination for new contact entries (Phone Memory,
: to filter the display of current Contacts entries. Options include:
: to display your current phone number (page 53).
: assigns phone numbers as FDN entries (page 53).
: displays the memory storage al location (total available and remaining) within
Adding a New Contact
Use the following procedure to store a new contact to your Contacts list. New
contacts are stored on your phone by default.
.
“Attaching Business Card to a
46
Page 51

Saving a Number from the Idle screen
1. Press
Menu
➔
Contacts
➔
Add New Contact
. The
Add New Contact
displays.
2. Highlight the
First Name, Last Name
, and
Display Name
fields and use the
QWERTY keypad to enter names for this contact. For more information, refer
to “Entering Text” on page 33.
3. Press the
Mobile,Private
field and use the QWERTY keypad to enter the phone
number for this contact.
4. Highlight the
Landline,Private
field and use the QWERTY keypad to enter the
landline number for this contact.
5. Highlight the
Email, Private
field and use the QWERTY keypad to enter a
private email address for this contact.
6. Highlight the
7. Highlight the
8. Highlight the
9. Select a tone to represent this contact and press
10. Highlight the
Group
field and press . Select a group name and press .
Picture
field and press .
Ringtone
field and press .
Select
.
Notes
field and use the QWERTY keypad to enter a note. For
more information, refer to “Entering Text” on page 33.
11. Press
Options
➔
Save
.
Note:
By default, Contacts are saved on the phone. To copy them to a SIM card, see “Copying an
Entry to the SIM Card” on page 57.
screen
Managing Your Contacts 47
Page 52

Adding More Fields to a Number
While in the process of creating a new entry or editing an existing contact, you can
add additional fields to the entry’s list of information.
1. Press
Menu
➔
Contacts
➔
Contacts
, highlight a contact name and press .
2. Press
Options
➔
Edit
.
3. Press
Options
➔
Add More Fields
4. From the Add Details field, use the
.
Left
or
Right
Navigation key to highlight
the field to add and press Select or . The selected field type displays on
the Edit Contact screen.
5. Enter the information into the new field and press
Options
➔
Save
.
Deleting Fields From a Number
1. Press
Menu
➔
Contacts
➔
Contacts
, highlight a contact name and press .
2. Press
Options
➔
Edit
.
3. Highlight the field to delete and press
Note:
Only certain new fields may be deleted. If you have not added any new fields to the contact,
the
Delete Field
button does not display.
4. Press
Options
➔
Save
.
Options
➔
Delete Field
.
48
Page 53

Saving a Number During a Call
1. During the call press
2. At the prompt, select
•
Select
Update
Options
➔
New
.
Save to Contacts
.
if this was a previously created entry and your are adding the current
number to the previous entry.
3. Select the type of phone number and press
4. Enter the desired information, see “Saving a Number from the Idle screen” on
Select
or .
page 47.
Saving a Number After a Call Has Ended
1. Press to bring up the Recent Calls screen.
2. Highlight a phone number from the list and press
3. From the Select Type screen, press
•
Select
Update
if this was a previously created entry and your are adding the current
New
Options
➔
Save to Contacts
.
number to the previous entry.
4. Enter the desired information. For more information, refer to “Saving a
Number from the Idle screen” on page 47.
.
Managing Your Contacts 49
Page 54

Adding Pauses to Contact Numbers
When you call automated systems, you are often required to enter a password or
account number. Instead of manually entering the numbers each time, you can
store the numbers in your Contacts along with special characters called pauses.
To add a pause to a Contact:
1. Press
Menu
➔
Contacts
➔
Contacts
, highlight a contact name and press .
2. Press
Options
➔
Edit
.
3. Highlight the number type where you want to add the pause.
4. Scroll to where you want to add the pause and press and hold to add a
two-second pause, and use the keypad to enter any additional numbers if
needed.
Tip:
You can create pauses longer than two seconds by entering multiple two-second pauses.
5. Press
Options
➔
Save
to store your changes.
50
Page 55

Using Contacts
Dialing a Number from Contacts
Once you have stored phone numbers in Contacts, you can dial them by using their
SIM card location number or by using the Search field to locate the entry.
Finding a Contacts Entry
You can store phone numbers and their corresponding names onto your SIM card
and phone’s onboard memory. The two locations are physically separate but are
used as a single entity, called the Address Book.
Depending on your particular SIM card, the maximum number of phone numbers
the SIM card can store and how they are stored may differ.
1. In Idle mode, press
2. Use the
Tip:
The Groups tab allows you to locate contacts by group. Use the Left or Right Navigation key to
move between Contacts and Groups.
Up
Menu
➔
Contacts ➔ Contacts
or
Down
Navigation key to locate a contact.
.
3. Press the key or
Options
➔
Call
to call the contact.
Managing Your Contacts 51
Page 56

Contacts Entry Options
To access the Contacts options, follow these steps:
1. Press
Menu
➔
Contacts ➔ Contacts
2. Highlight an entry from the list and press
following:
•View
: allows you to view the details for the currently selected Contacts entry.
• Add New Contact
•Call:
allows you to call a currently selected entry.
• Send Message: allows you to send a text message or a multimedia message to the
selected entry.
•Edit
: allows you to make changes to the contact information.
•Delete
• Send Business Card via
Message, Email, Exchange Email, or Bluetooth.
•More:
list, or access the SIM Management feature.
: allows you to add a new entry.
: provide the option to delte either a Selected, Multiple, or All Contacts entries.
: allows you to send a business card to the selected contact via
allows you to Assign a Speed Dial number, Copy the contact to your FDN Contacts
.
Options
and select from the
– or –
Highlight an entry from the lists, press to reveal the entry details and
press
Options
and select from the following:
•Edit
: allows you toedit the details for the currently active Contacts entry.
• Add New Contact
•Call:
allows you to call a currently selected entry.
• Send Message: allows you to send a text message or a multimedia message to the
selected entry.
•Delete
• Send Business Card via
Message, Email, Exchange Email, or Bluetooth.
52
: allows you to add a new entry.
: provide the option to delte the current entry.
: allows you to send a business card to the selected contact via
Page 57

• Mark as Default Number:
allows you to Change, Save, or Reset the Default number and
Message for a contact.
•More:
allows you to Assign a Speed Dial numbe or Copy the contact to your FDN Cont acts
list.
Finding My Own Phone Number
This function is a memory aid, which you can use to check your own phone number
if you need to do so.
䊳
In Idle mode, press
<voice line #>
Menu
➔
Contacts
➔
Contacts Settings
➔
Own number
➔
.
FDN Mode
FDN (Fixed Dialing Number) mode, if supported by your SIM card, restricts your
outgoing calls to a limited set of phone numbers. When this feature is enabled, you
can make calls only to phone numbers stored in the FDN list on the SIM card.
Note:
FDN Mode must be set to On in the
option before you can add, change, or delete contacts on the FDN List.
Menu
➔
Settings
➔
Phone
➔
Security
➔
Set FDN Mode
Changing the FDN mode Status
1. In Idle mode, press
2. Scroll down to the
3. Select
4. Enter the
Important!:
On
With Fixed Dial Mode enabled, you are NOT able to dial any number other than those
created as FDN numbers.
Menu
➔
Settings
Set FDN Mode
field and press the key.
(to enable fixed dialing) or
PIN2 code
if you selected On.
➔
Phone
➔
Security
.
Off
to disable the option and press
Save
.
Managing Your Contacts 53
Page 58

Creating New FDN Numbers
With the Fixed Dial mode On, follow these procedures:
1. In Idle mode, press
2. Press
Options
3. Enter your PIN2 password and press the key.
Note:
The PIN2 code is provided by your Service Provider.
4. Press
Name
Menu
➔
➔
Create FDN contacts
Contacts ➔ FDN Contacts
.
.
and use the QWERTY keypad to enter a name for this FDN
contact.
5. Press
Phone Number
and use the QWERTY keypad to enter a contact phone
number for this FDN contact.
6. Highlight the SIM card location field and use the QWERTY keypad to enter a
location value for the entry on the SIM card.
7. Press
Options ➔ Save
8. Press to return to Idle mode.
to store the new FDN entry.
54
Page 59

Group Settings
Creating a New Group
1. In Idle mode, press
2. Press
Options ➔ Create group
3. Enter a name for this group in the
4. Press
Options ➔ Group Settings
5. Highlight the
6. Select an image and press
Menu
➔
Contacts ➔ Groups
.
Picture
field and press the key.
Options ➔ Select
New Group
.
.
field and press
or the key. The selected
image displays in the Picture field and displays the name of the image to
the right.
7. Highlight the
8. Highlight an audio file and press
9. Press
10. Press
11. Press to return to Idle mode.
Ringtone
field and press the key.
Options ➔ Save
Back
.
to return to the Contacts.
Options ➔ Select
.
Save
.
Managing Your Contacts 55
Page 60

Adding an Entry to a Group
1. In Idle mode, press
2. Highlight a group entry and press the key.
3. Press
Options
4. Highlight a member from the list or highlight
Menu
➔
Add Member
➔
Contacts ➔ Groups
, then press the key.
.
All
and press
Check
. A
checkmark beside the name indicates adding this person to the group.
5. Press
Add
.
Removing an Entry From a Group
1. In Idle mode, press
2. Highlight a group entry and press the key.
3. Highlight the member to delete from this group and press
4. Highlight a member from the list or highlight
Menu
➔
Contacts ➔ Groups
All
.
and press
Options
Check
➔
. A
checkmark beside the name indicates removing this person from the group.
5. Press the
Remove
soft key.
Renaming a Caller Group
1. In Idle mode, press
2. Highlight the group that you want to rename.
3. Press
Options
4. Backspace over the original name and use the keypad to enter a new name
for this group, then press
➔
Menu
Rename
➔
Contacts ➔ Groups
.
Save
.
.
Remove
.
56
Page 61

Adding Speed Dial Entries
1. In Idle mode, press
2. Highlight a position (2-9) on the keypad in which to assign the speed dial
number and press
3. Select
4. Highlight the contact to assign to the speed dial location and press
Address Book
Menu
➔
Contacts ➔ Speed Dial List
Options ➔ Assign
or
FDN Contacts
.
.
and press the key.
Select
the key. The contact is automatically assigned to the speed dial location.
Managing Contacts Entries
You can copy, delete, and view the memory status for the Phone and SIM entries on
your phone.
Copying an Entry to the SIM Card
Note:
When storing a Contacts entry into the SIM card, note that only the name, phone number,
group, and slot location are initially offered as fields (some SIM cards may allow an address
as well). To save additional information for a particular contact, such as other phone
numbers, or e-mail, it is important to add new fields to that Contact information. It is also
important to note that if you move the SIM card to another phone that does not support
additional fields on the SIM card, this additional information may not be available.
or
1. In Idle mode, press
SIM
.
2. Highlight a member from the list or highlight
3. Press
Copy
Important!:
When copying from the Phone to the SIM card some information may be lost.
4. At the
5. Press to return to Idle mode.
Continue?
.
prompt, press
Menu
➔
Contacts ➔ SIM Management
Yes
to copy the contact, or No to cancel.
All
➔
Copy Contacts to
and press
Check
.
Managing Your Contacts 57
Page 62

Copying an Entr y to the Phone
1. In Idle mode, press
from SIM
. The phone displays a list of your current contacts stored on the SIM
Menu
➔
Contacts ➔ SIM Management
➔
Copy Contacts
card.
Note:
If the entry’s associated Group image has a SIM location icon on it, then the entry exists on
the SIM card. This is the type you can duplicate. If the entry’s associated Group image does
not have a SIM location icon, then this entry currently exists on the phone.
2. Highlight a member from the list and press
3. Repeat Step 3 for each entry you want to copy to the Phone or highlight
Check
.
and press the key to place a checkmark alongside all entries.
4. Press
Copy
.
5. Press to return to Idle mode.
Deleting an Contacts Entry
You can delete a Phone or SIM entry from your phone’s memory.
Deleting an entry from the Phone
1. In Idle mode, press
2. Highlight a contact to delete and press the key.
3. Press
Options
4. At the
Delete Contact?
➔
Delete
Menu
➔
Contacts
.
prompt, press
➔
Contacts
.
Yes
to delete the contact, or No to
cancel.
5. Press to return to Idle mode.
58
All
Page 63

Deleting all entries from the SIM
1. In Idle mode, press
from SIM
2. Highlight a member from the list or highlight
Menu
➔
Contacts ➔ SIM Management
.
checkmark.
3. Press
Delete
.
4. At the prompt, press
5. Press to return to Idle mode.
Yes
to delete the contact, or No to cancel.
➔
Delete Contacts
All
and press to create a
Managing Your Contacts 59
Page 64

Section 7: Browser
This section outlines the Browser features available on your phone. For more
information, contact your service provider.
Browser
Your phone is equipped with Wireless Application Protocol (WAP), a WAP browser
that provides access to the Web using your phone.
To access the Mobile Web browser from the Idle screen, press
Home
To access the Mobile Web directly, press the Browser soft key on the Idle screen.
Your browser connects the phone to the network and loads the browser homepage.
The content of the Browser startup homepage depends on your Wireless Web
service provider.
To scroll through the web pages, use the Up and Down keys.
To go to the startup homepage from any other screen in the Browser, use the
Home option.
Press
Options
to see the following:
•
Open
: go to homepage.
•
Navigate
: choose to
Reload
or go to
Homepage
.
•
Smart-Width View
•
View Favorites
•
Add to Favorites
•
Enter URL
•
Advanced
: allows you viewing options.
: view your favorites list.
: add to your favorites list.
: allows you to enter a URL, the option to add it to your favorites and create a title.
: choose to select from the following options: History, Send URL Via, Save, Saved
Pages, or Page Details.
•
Browser Settings
–
Clear Caches
: provides access to the following settings:
: press to clear.
Menu
➔
Browser
.
60
Page 65

Cookies
: choose options to
–
Reject All
, or
–
Clear Session Storage
–
Preferences
Flash
–
About Browser
Prompt
: choose from options,
.
Empty Cookies
: select option to receive prompt,
: provides information about your browser.
, and options regarding cookies,
Run JavaScript, Display Images, Play Sound
Accept All
Clear session storage? Yes
, and
or No.
Exiting the Browser
䊳
To exit the browser at any time, press the key.
The prompt displays,
Exit Browser? Yes
or No. Make your selection.
Navigating the Browser
1. To scroll through browser items, press the Up or Down Navigation key.
2. To select browser items, press the key.
3. To return to the previous page, press the Back soft key or the key.
4. Press the Back soft key until the startup
Home
page displays.
Favorites
To store a URL address:
䊳
In Idle mode, press Menu ➔ Browser ➔ Options ➔ View Favorites and press
the Select soft key or the key.
Enter URL
This menu allows you to manually enter the URL address of a web site that you wish
to access and to add it to your Favorites.
䊳
In Idle mode, press Menu ➔ Browser ➔ Options ➔ Enter URL and press the
Select soft key or the key.
,
Run
Browser 61
Page 66

Clear Cache
You can clear the information stored in the cache memory, the phone’s temporary
memory that stores the most recently accessed Web pages.
䊳
In Idle mode, press Menu ➔ Browser ➔ Options ➔ Browser Settings ➔ Clear
Cache and press the Select soft key or the key.
62
Page 67

Section 8: My Folder
The topics covered in this section include Audio, Games&Apps, Pictures, Video,
Other Files, and Used Space.
1. Press
Menu
➔
My Folder
.
2. Select from one of the following functions:
Video, Other Files,
3. Highlight the
or
On phone
Used Space
tab or
.
On card
navigation keys to filter the entries based on their current location (
Memory Card
).
Creating a New Folder
1. Press
Menu
➔
My Folder
➔
On card (tab) ➔ Options
2. Use the keypad to create a new name for the folder and press
Memory Card Settings
Using the Memory Card settings menu you can view memory card details, format or
rename the memory card, or turn Bluetooth visibility on.
1. Press
Menu
➔
My Folder
➔
On card (tab) ➔ Options
2. Select one of the following and press the key:
• Memory Card Details
: displays details about the memory card such as Name, Maximum
memory, and Available memory. Press
•Format
: formats the memory card. This will remove all data from the memory card.
•Rename Memory Card
: allows you to rename the memory card. Backspace and enter a
new name for the memory card then press
• Bluetooth Visibility On/Off
Press the
: allows you to enable Bluetooth visibility for this memory card.
key to activate Bluetooth visibility. Press the key again to turn it off.
Audio, Games&Apps, Pictures
tab by moving left or right with the
➔
Create Folder
OK
.
➔
Memory Card Settings
Back
after viewing.
Save
.
Phone
.
,
, or
.
My Folder 63
Page 68

Audio
The
Audio
menu option allows you to shop tones, answer tones, and music using
AppCenter. You can also access previously stored (pre-recorded) audio files from
your internal microSD card.
1. Press
Menu
➔
My Folder
➔
Audio
.
2. Highlight an option (
Ringtones, Music
, or
Recorded Audio
).
Tone s
You can shop, download, and save to your Downloaded Ringtones folder.
1. Press
Menu
➔
My Folder
➔
Audio ➔ Ringtones
. A menu displays to provide
the option of either shopping for tones or selecting from files previously
stored to your phone.
2. Select Buy Ringtones, select a file to download, and follow the on-screen
instructions.
3. From the playback page (containing the playback controls) , press
Set as
and select from the following options:
• Call Ringtone
: allows you to assign the selected ringtone for use with general incoming
Options
calls when no other caller ringtone has been assigned.
• Caller Ringtone
Search contact
•Alarm Tone
: allows you to assign a ringtone to someone in your Contacts list. Select
to find an existing contact or
Create contact
to create a new one.
: allows you to assign the tone to an alarm.
Music
This menu displays all of your purchased songs.
䊳
Press
Menu
➔
My Folder
➔
Audio ➔ Music
.
➔
64
Page 69

Recorded Audio
This menu shows a list of saved voice memos. When a voice memo is recorded and
saved, it is stored in the Recorded Audio folder. To access this menu use the
following steps:
1. Press
Menu
➔
My Folder
➔
Audio ➔ Recorded Audio
2. Select a pre-recorded audio to begin playback.
3. Press
Back
to exit.
Creating a new audio recording
1. Press
Menu
➔
Tools ➔ Record Audio
2. To start recording, press
Record
.
.
.
For more information, refer to “Record Audio” on page 79.
Games&Apps
The
Games&Apps
new games, then save them to the
menu option allows you to shop for games. You can download
Games&Apps
folder.
Pictures
The Pictures menu option allows you to shop for and download new graphics and
save them to your
Pictures
folder. To access the Pictures menu option, use the
following steps:
1. Press
Menu
➔
My Folder
➔
Pictures
.
2. Highlight a picture and press
Options
.
Depending on the type of picture or file the following options may display:
•View
: allows you to view the selected picture.
• Send via
: allows you to send your selection in a message, email, Exchange email, or
via Bluetooth.
•Set as
: allows you to set the selected picture as Wallpaper or as a Caller ID.
My Folder 65
Page 70

•Delete
: delete selected or multiple selected pictures.
•Rename
: allows you to rename your picture file.
•Move
: move selected or multiple selected pictures to your phone or memory card.
•Copy
: copy selected or multiple selected pictures to your phone or memory card.
•Take Photo
• Create Folder
•More
: launches the camera to allow you to take a photo.
: creates a new sub-folder in the Pictures folder.
: provides you with the ability to Lock/Unlock, Sort by or to view the file Properties.
–
Lock/Unlock
–
Bluetooth Visibility
–
Sort by
–
Print via Bluetooth
via Bluetooth.
–
Properties
: lock or unlock selected picture.
: make selected picture or multiple selected pictures visible for Bluetooth.
: sort your pictures by date, type, name, or size.
: allows you to print a selected picture or multiple selected pictures
: provides basic details and media information about selected picture.
Shop Wallpapers
1. Press
Menu
➔
My Folder
➔
Pictures
➔
Buy Graphics
2. Follow the on-screen instructions to purchase the new wallpaper. The file
downloads and stores in the
Pictures
folder.
. AppCenter launches.
Image Features
Highlight an image from the Pictures page and press the key to display the
image.
1. Use the
Left
or
Right
navigation keys to scroll through all the pictures in your
Pictures folder.
2. Press the key to activate Zoom mode. Then use the
to
Zoom in
or
Zoom out
.
Left
or
Right
soft keys
66
Page 71

Press
Options
3.
. Depending on the image type the following options may be
displayed:
• Zoom
: activates Zoom mode so you can use the Left or Right soft keys to Zoom in or
Zoom out.
• Send via
: allows you to send a picture via Multimedia message, Email, Exchange Email,
or via Bluetooth.
•Set as
: allows you to assign the current image as either your current Wallpaper, or as a
Caller ID image used by a specific entry in the Address Book.
•Delete
: allows you to delete the image.
•Rename
: allows you to rename the image.
•Edit image
• Bluetooth visibility
• Slide show
: allows you to edit the image.
: allows you to make the image file visible to a Bluetooth device.
: allows you play a slideshow using the graphics currently available from within
the Pictures folder.
• Print via Bluetooth
•Lock
: allows you to lock/unlock the image file. Lock prevents the image file from deletion.
: allows you to print via Bluetooth to a compatible connected printer.
Unlock allows deletion.
•Properties
Note:
Editing is only available for unlocked images or non DRM images.
: allows you to view the properties of an image.
My Folder 67
Page 72

Editing Images
1. Press
Menu
➔
My Folder
➔
Pictures ➔ <image>
2. Press
Options
➔
Edit image
.
3. Press
Options
and select one of the following:
• Save as
: allows you to save the picture on your phone or memory card.
• Effects
: allows you to choose from among several effects such as:
Partial blur
.
• Adjust
: allows you to adjust
• Transform
•Crop
: allows you to
: allows you to crop the image. Use the Navigation keys to place the red box around
Brightness, Contrast
Resize, Rotate
the image until you center a portion in the box, then press
•Insert
: allows you to add
•Set as
: allows you to assign the current image as either your current
Caller ID
image used by a specific entry in the Address Book.
•Send
: allows you to send this picture via Message, or via Bluetooth.
• Print via Bluetooth
4. Press to return to Idle mode.
Frames, Clip Art, Emoticon
: allows you to print via Bluetooth to a compatible connected printer.
, or
Flip
the image.
, and
and the key.
Filter, Style, Warp
Color
.
Options
➔
, or
Tex t
to the image.
Wallpaper
Crop
, or
.
, or as a
68
Page 73

Video
This menu allows you to manage your video files on your phone and on
your memory card. You can set up folders to save your videos. Press
My Folder➔ Video
•
Play
: allows you to play the selected video.
•
Send via
➔
Options
to select from the following options:
: you can send your video file in a Message, an Email, an Exchange email or by
Menu
➔
Bluetooth.
•
Delete
: delete selected video file(s).
•
Rename
: enter a new name for your video file.
•
Move
: move selected or multiple video files or create a new folder.
•
Copy
: copy selected or multiple video files.
•
Record Video
•
Create Folder
•
More
: record a new video.
: create a new folder for storing video files.
: allows you to lock/unlock, turn on Bluetooth Visibility, Sort by Date, Type, Name or
Size, and view the file properties.
Other Files
This feature provide additional storage of other miscellaneous file types that may
not fit into any of the previous categories.
䊳
Access the Other Files menu by selecting
My Folder
➔
Other Files
.
My Folder 69
Page 74

Used Space
The Used Space menu option allows you to view the usage and available memory
for Audio, Games&Apps, Pictures, Video, and Other Files. To access the Used
Space option, use the following steps:
1. Press
Menu
➔
My Folder
➔
Used Space
.
The memory usage for the different items displays.
2. Highlight
3. Highlight the item you want to delete (to free up memory) and press
Audio, Games&Apps, Pictures, Video
, or
Other Files
press the key. Highlight an item in the list and press
.
Check
Select
to place a
checkmark next to the item.
4. Check
5. Press
6. At the
All
to delete all items.
Delete
.
Delete?
prompt, press
Yes
to delete the item or No to exit.
or
70
Page 75

Section 9: Applications
Your phone includes applications that allow you to use your handset for a variety of
activities.
The Music application can organize and play music files stored on your phone and
memory card. Create playlists, add, rearrange and remove files, and launch the
browser to shop for more music. To access the Music player menu, press
Music
.
The Tools menu provides access to the following: Camera, Voice Services, Record
Audio, Alarms, Calendar, Tasks, Memo, Calculator, Tip Calculator, Eco Calculator,
Converter, World Clock, Timer, and Stopwatch. To access the tools menu, press
Menu
➔
Tools
.
Music
The Music application can organize and play music files stored on your phone and
memory card. Create playlists, add, rearrange and remove files, and launch the
browser to shop for more music.
Launching the Music application allows you to navigate within your Music folders
and select playback material.
1. In Idle mode, press
2. Highlight a folder from the folders available and press the key to open the
folder.
3. Highlight a song and press the key to play the song.
Menu
➔
Music
.
Menu
➔
Applications 71
Page 76

Music Options
The Music options menu configures your phone’s music playing options such as
shuffling the music files, looping music files, and adding songs to the playlist.
1. In Idle mode, press
2. Navigate to a music file and press the key. The music file will begin
Menu
➔
Music
.
to play.
3. Press the
Options
soft key and select one of the
following options:
• Transfer to Bluetooth stereo headset
: transfers the selected music file to a Bluetooth
stereo headset.
• Repeat mode: repeats the currently active song or replays each song in the
current list and as the last song in the list ends, the player replays all of the
songs in the listed order. Select Off, 1, or All.
• Shuffle on /off
: allows you to turn shuffle On or Off. When turned on, t
he current list of
songs are randomly shuffled for playback.
• Add to Playlist
• Send via
: adds the currently active song to either a new or current playlist.
: sends the selected music file in a Message, Email, Exchange Email, via
Bluetooth.
•Properties
: displays properties related to the selected song such as: Artist, Title, Format,
Size, Forwarding, Date created, Track length, Genre, Location, Description, and Track
Number. Properties may differ depending on song.
• Settings
: allows you to set Background playing to on or off, and allows you to set the
Sound effects to Normal, Rock, Pop, Dance, Classic, Jazz, Wide, Dynamic, or Surround.
Sound effects is similar to an Equalizer.
4. Press the
Select
soft key and follow the prompts to set the selected option.
72
Page 77

Playing Music Transferred to the Handset
1. In Idle mode, press
2. Use the Up or Down Navigation key to select the song you want to listen to
Menu
➔
Music
.
and press the key.
Playing Music through a Stereo Bluetooth Device
Your device supports the Stereo Bluetooth profile that when synchronized to a
stereo Bluetooth headset plays music in stereo.
1. Pair your handset to a stereo Bluetooth device.
2. In Idle mode, press
3. Select a song and press the key to play the song.
Menu
➔
Music
.
Playing Music while Using the Phone
The Music application allows you to play music in the background while performing
other tasks on your phone. The music pauses when an incoming call is accepted,
and the music resumes when the call ends. Music continues to play when you
receive a Text Message, Multimedia Message, or an Instant Message.
The other functions you can use are:
•
Call
: make or receive a call (music player is paused)
•
Messaging
: send or receive a text or multimedia message. Music continues to play unless
an audio clip is received as a part of a multimedia message.
•
Mobile Web
•
Games
Note:
: browse the web (music continues to play).
: lets you play games while listening to music.
Playing music and pausing the music player uses the same amount of battery.
Applications 73
Page 78

1.
In Idle mode, press
2. Select a category and press the key.
3. Highlight a song to play and press the key.
4. To minimize the Music application, press the key.
5. Navigate the playback options by using both the Navigation key and .
•
Scroll over the Navigation key (to the right) to highlight the
•
To temporarily stop the music, scroll over the Navigation key to select Pause (and
Menu
➔
Music
.
Rewind
and press .
press .
•
Use the navigation key to highlight the Fast Forward and press to advance to
the next song.
6. While playing the music in Idle mode, you can exit the Music player by
pressing the key.
After the Music Player enables, you can listen to music in the background while
performing other phone functions.
Important!:
When finished using the Music player function, press the key twice to stop the
function and prevent unnecessary battery drain. Pausing the player continues to use
the battery.
74
Page 79

Using Playlists
Playlists are used to assign songs to a list of preferred media which can then be
grouped into a list for later playback. These Playlists can be created via either the
handset’s Music player options menu or from within a 3rd party music application
(such as Windows Media Player) and then downloaded to the handset.
Creating a Playlist
1. In Idle mode, press
2. Enter a playlist name in the
3. Select
4. Select a song or
All Tracks
Menu
➔
Music
➔ Library ➔ Playlists ➔ Create playlist.
Enter Name
and press the
All
from the list and press the to place a check mark next
field and press the
Select
soft key or the key.
Save
soft key.
to the song.
5. Press the
6. To continue creating the playlist, highlight the playlist you just created, press
Options
Add
➔
Add Tracks
soft key.
to continue adding music from your phone or memory
card.
7. Press the key to return to Idle mode.
Applications 75
Page 80

Adding Songs to a Playlist
1. In Idle mode, press
2. Highlight Playlists and press the key.
3. Highlight the previously created playlist.
4. Press the
5. Access the desired category and press the key.
6. Highlight
Menu
➔
Music
➔ Library.
Options
soft key, select Add Tracks and press the key.
All,
an individual song, or multiple songs and press the key to
place a check mark beside your selection.
7. Press the Add soft key and wait for the song to add to the current playlist.
Removing songs from a Playlist
1. In Idle mode, press
2. Highlight Playlists and press the key.
3. Select the playlist and highlight the track to delete.
4. Press the
5. Select either
6. At the
Remove ?
Menu
Options
soft key, scroll to
Selected, Multiple
prompt press the
➔
Music
➔ Library.
Remove
and press the key.
, or
All
songs.
Yes
soft key to remove the song from the
playlist, or press the No soft key to cancel.
7. Press to end.
76
Page 81

Too ls
Camera
For detailed information regarding the use of our phone camera, see“Camera” on
page 113.
Voice Services
The Voice Services application provides the Nuance Voice Recognition software,
an advanced speech recognition software used to activate a variety of functions
on your phone. To access the Voice Services menu, press
Voice Services
Voice Recognition
Nuance Voice Recognition software is an advanced speech recognition software
used to activate a wide variety of functions on your phone. Nuance software
automatically voice activates (up to 1,000 contacts) for voice dialing and searching.
No pre-recording or training needed. Speak a contact name naturally to dial, and
use your voice to look up contacts, launch applications and navigate phone menus.
1. Press
.
Menu
➔ Tools ➔ Voice Services. At the voice prompt,
Command
, you can make your selection from the following list of available
commands:
•
Call <Name or #>
numbers exist (i.e. home, work, or other) say the name and the number type (location).
•
Send Message <Name or #>
•
Lookup <Name>
information stored in the Contacts list.
•
Go To <App>
Voice mail, Contacts, Ringtones, Calendar, Tasks, and Browser.
•
Check <Item>
Messages, Missed Calls, Time, Signal strength, Network, Battery, My Phone Number, and
Volume).
: dials a name or number listed in your contact list. If multiple
: displays the Create Text Message screen.
: allows you use a voice command to locate and display contact
: accesses all the features of your phone if they are activated, such as:
: lets you check your phone's status in the same report (Status,
Menu
➔
Tools
Say a
➔
Applications 77
Page 82

While the
Say a Command
screen displays, you can select from these
two options:
•
Tutorial
: provides examples of how to use the voice commands.
•
Settings
: lists the settings for voice command software such as: Confirmation,
Adaptation, Audio Modes, Speakerphone, and About.
If the phone does not recognize your command, the
Command not recognized
screen displays with two options:
•
Help
: provides instructions on how to use voice commands.
•
Restart:
press and try the command options again.
Speak clearly when giving your command. There is no need for you to speak slowly
or with added emphasis. The voice recognition software has been optimized to
understand your speech in its natural form. If it does not recognize your command
after a few seconds, a voice prompt asks you to repeat the command. If it does not
recognize your command again, the following message displays “Sorry, no match
found,” and voice recognition turns off.
You must end your current Voice Commands call before you can make another call
using Voice Commands. You can only originate the first call in a 3-way call using
Voice Commands.
Voice Recognition Tips
•
Wait for the tone before you speak.
•
Speak clearly and at a normal volume.
•
There is no need to use paused speech. The voice recognition software has been trained to
recognize natural speech, and performs best when you speak naturally.
•
In very noise environments, it may be helpful to use a headset or a Bluetooth headset.
78
Page 83

Contacts List Voice Activation
On startup, Nuance Voice Recognition software reads your Contacts list and voiceactivates all the names.
When you add or change contacts, the software automatically reloads and voiceactivates the list when you add or modify a contact.
Record Audio
Record Audio allows you to record voice memos. It also allows you to send your
audio clip to other people as an attachment of an MMS message. Recording time
will vary based on the available memory within the phone.
1. Press
Menu
➔
Too ls
➔ Record Audio.
2. To start recording, press . Record a memo by speaking into the
microphone.
3. During the recording process you can either press
or
Pause
to temporarily halt the recording. Once the audio recording has
Stop
to stop the recording
stopped, the message is automatically saved.
4. Once stopped, press
•Play
: allows you to play the memo.
•Record
: allows you to save the current memo and begin another session.
• My Voice Clips
• Record Audio Settings
Options
to choose from one of the following options:
: allows you to listen to your audio clips.
: allows you to set the Output Format (amr or mp3), Save Output
to (Phone or Memory Card) and Set the Unlimited Recording option (On or Off).
• Send via
: allows you to send your voice clip to other people using either a Message,
Email, Exchange Email, or to a compatible Bluetooth device.
•Set as
: allows you to set the current memo as a Call Ringtone, a Caller Ringtone for a
specific entry or an Alarm Tone.
•Delete
: allows you to delete the current memo.
Applications 79
Page 84

•More
: displays the following additional options:
–
Rename
: allows you to rename the audio file.
–
Lock/Unlock
: allows you to lock/unlock the Audio file. Lock prevents the audio file from
deletion. Unlock allows deletion.
–
Bluetooth Visibility
–
Properties
Location of the voice memo.
5. Press or press to exit.
: allows you to make the audio file visible to a Bluetooth device.
: displays the Name, Format, Size, Forwarding, Creation Date and Time, and
Alarms
This feature allows you to set an alarm to ring at a specific time.
1. Press
Menu
➔
Tools
➔
Alarms
.
The following options display:
• Wake-up Alarm
•Alarm 1
•Alarm 2
•Alarm 3
•Alarm 4
•Auto Power
2. Select an alarm type and press the key.
: the alarm rings to wake you up at the specified time.
: primary alarm setting.
: secondary alarm setting.
: third alarm setting.
: fourth alarm setting.
: the alarm rings even when the phone is turned off.
– or –
Press
Options ➔ Create Alarm
3. Set the following options:
•Name
: allows you to use a specific name for the alarm. The name you enter will display
.
on the screen when the alarm activates.
• Alarm activation
: use the Left or Right Navigation key to select On or Off.
80
Page 85

•Alarm time
: use the Left or Right Navigation key to highlight the minutes or hours field
and enter a number using the QWERTY keypad. Highlight am/pm and use the Right
Navigation key to change to am or pm. Press
•Alarm type
: sets the way in which the alarm sounds when activated (Melody, Increasing
Save
to save the new values.
Melody, Vibration, Vibration then Melody, Vibration and Melody, and Vibration and
Increasing Melody).
•Alarm tone
• Alarm volume
• Recurrence
: sets the sound file which is played when the alarm is activated.
: adjusts the alarm’s volume (1 - 7).
: use this option to set the repeating status for the alarm by placing a
checkmark alongside those days you would like to use for the current alarm.
Everyday
places a checkmark alongside all days.
• Snooze
: use this option to set a Snooze Duration (Off, 5, 10, 15, 20, or 30 Minutes) and a
Snooze Repetition (1, 2, 3, 5, or 10 Times).
4. Press
Save
to store the alarm details.
Setting Auto Power-up Alarms
You can set the phone to ring the alarm when the time for an alarm comes, even if
the phone is switched off.
1. Press
Menu
➔
Too ls
➔
Alarms
.
2. Highlight
3. Select
Note:
If the menu option is set to Off, and the phone is switched off at the specified time, the alarm
does not ring.
Auto Power
On
and press
and press the key.
Save
.
Applications 81
Page 86

Turning Off an Alarm
To stop the alarm when it rings press or any other external key such as the
Volume key, Camera key, Back key, Soft key, or Send key.
Calendar
The Calendar feature allows you to view the Month, Week, and Day layout views. It
also shows any Missed Alarm Events that occurred.
To display your calendar:
䊳
Press
Menu
➔
Tools
➔
Calendar
. The Calendar displays in the default (Month)
view.
Creating a New Event
1. Press
Menu
➔
Tools
➔
Calendar
.
2. Press
Options ➔ Create
3. Select one of the following event types and press the key.
and press the
Right
Navigation key.
• Appointment
• Anniversary
• Holiday
•Important
•Private
Other options for the Calendar include:
•View
: allows you to view a specified date.
•View By
: allows you to choose between day view or week view.
•Create
: allows you to select an event category: Appointment, Anniversary, Holiday,
Important or Private event.
•Go to
: allows you to go to your today’s calendar or that of a specified date.
82
Page 87

• Event List
: allows you to refer to your scheduled events stored on your calendar according
to the type of event: Appointment, Anniversary, Holiday, Important or Private event.
• Eco Day List
: allows you to add important Eco-friendly holidays and events to your
calendar.
•Delete
: allows you to delete a calendar event. This option only appears if you have added
events to your calendar.
• Settings
: this option allows you to configure the Calendar’s Starting Day and View by
(Month, Week, or Day).
• Missed Alarm Events
•Used Space
: this option displays any missed events.
: this option displays a list of the different Calendar event categories along
with the memory allocation for each.
4. Highlight the
Title
field and use the QWERTY keypad to enter a name for this
specific event (up to 15 characters).
5. Select the
Details
field and enter a description for this event (up to 100
characters).
6. Highlight the
7. Select the
Right
8. Highlight the
9. Select the
10. Highlight the
Start date
field and enter a date for this event to begin.
Start time
field and enter a time for this event to begin. Use the
Navigation key to set am or pm.
End date
field and enter a date for this event to end.
End time
field and enter a time for this event to end.
Location
field and enter a location description for this event (up
to 15 characters).
11. Highlight the
Alarm
check box and press
Check
if you want to set an alarm.
Once selected, all remaining alarm settings are enabled.
12. Highlight the
13. Highlight an alarm tone, press then press
Alarm tone
field and press the key.
Add
.
Applications 83
Page 88

14.
Highlight the
and use the
Repeat
check box and press
Left
or
Right
Navigation key to select the number of repetitions
for this alarm (Daily, Weekly, or Monthly).
15. Select the
Every
field and enter the number of times you want this alarm to
repeat.
16. Highlight the
Except weekends
checkbox and press
work days (weekends) from the event notification.
17. Select the
18. Press
Viewing an Event
1. Press
2. Press the
Until
field and assign an expiration date for this event.
Save
to store the new event.
Menu
➔
Tools
➔
Calendar ➔ Options ➔ Event list
Right
Navigation key and select an event type, then press the
key. The events in the selected category display.
3. Press
Back
or press to exit.
Deleting an Event
1. Press
Menu
➔
Tools
➔
Calendar ➔ Options ➔ Event List
2. Press the
Right
Navigation key and select an event type, then press the
key. The events in the selected category display.
3. Highlight an event to delete and press
Navigation key.
4. Select
5. Press
Selected, Multiple
Back
or press to exit.
, or
all
and press the key.
Check
then scroll to the next field
Check
Options ➔ Delete
to exempt non-
.
.
and press the
Right
84
Page 89

Tas k s
This menu option allows you to create a “to do” entry of tasks which are created in
a similar fashion to previously described Calendar entries.
1. Press
Menu
➔
Too ls
➔
Tas ks
.
2. Press
Options ➔ Create
3. Enter the information into the following fields and press
• Title
: enter a title for this task (up to 15 characters).
• Details
: enter a detailed description for this task (up to 100 characters).
•Start date
: enter a date for this task to begin.
• Due date
: enter a date for this task to end.
•Alarm
: allows you to trigger an alarm for this task. Press Check to select this option.
•Alarm date
•Alarm Time
•Alarm Tone
: enter a date for this alarm (format is MM/DD/YYYY).
: enter a time for this alarm to sound. Press
: allows you to choose an alarm tone. Once selected, navigate to Tones, select
a file, and press
•Priority
: allows you assign the task a priority (1-high, 2-medium, or 3-low).
4. Press
Save
to store the new task.
.
Select
to assign the audio file as the current alarm tone.
Save
:
Save
to assign the new time.
Memo
This option allows you to create memos to add to your events.
1. Press
Menu
➔
Too ls
➔
Memo
.
2. Press
Options ➔ Create
3. Use the keypad to enter a new note and press
.
Options
➔
Save
.
Applications 85
Page 90

Calculator
With this feature, you can use the phone as a calculator. The calculator provides the
basic arithmetic functions; addition, subtraction, multiplication, and division.
1. Press
Menu
➔
Tools
➔
Calculator
.
2. Enter the first number using the keypad.
3. Enter the operation for your calculation by using the Navigation keys to select
the arithmetic function.
4. Enter the second number.
5. To view the result, press .
Tip Calculator
Tip Calculator automatically calculates the following amounts:
•
Gratuity (tip)
•
Individual payment (for groups)
Calculations are based on the total amount of the check, a selected percentage, and
the number of people paying.
1. Press
Menu
➔
Tools
➔
Tip Calculator
2. Highlight the
3. Select the
4. Enter the number of people splitting the bill in the
5. The amount of the
6. Press
Bill
field and use the keypad to enter the total amount of the bill.
Tip (%)
field and use the keypad to change the tip percentage.
Tip ($)
and
Reset
to clear the fields and start over.
You pay
.
displays.
# paying
field.
86
Page 91

Eco Calculator
The Eco Calculator calculates your automobile efficiency in dollars per mile and
miles per gallon. It also calculates the emission of carbon dioxide assuming a gaspowered medium sized vehicle.
1. Press
Menu
➔
Too ls
➔
Eco Calculator
2. In the Distance (mile) field, enter the distance you have driven.
3. In the Fuel ($) field, enter the fuel cost in dollars.
4. In the (gallon) field, enter the amount of fuel you used.
5. Press the key.
6. Select either
View Result
(to show the results of the calulation) or
.
Reset
start over).
Converter
Your phone comes with a built-in conversion application. This conversion menu
provides the following conversion categories:
•
Currency
•
Length
•
Weight
•
Volume
•
Area
•
Temperature
1. Press
Menu
➔
Too ls
➔
Converter
.
2. Select the specific converter function and press the key.
•
Each converter function has a field for the type of unit to convert, and the type of unit to
convert to. An additional field allows you to input the unit amount to convert.
3. Press the
Right
Navigation key to select the desired Unit.
(to
Applications 87
Page 92

4.
Highlight the field below the Unit and enter the value you are converting
From.
5. Highlight the Unit you are converting to and press the
Right
Navigation key to
select the desired Unit.
6. The resulting converted value automatically displays below the second Unit
field.
7. Press
Back
or press to exit.
World Clock
World Clock allows you to view the time of day or night in other parts of the world.
World displays time in the 100 different cities, within all 24 time zones around the
world. The time in your time zone is automatically displayed.
To add another time zone:
1. Press
Menu
➔
Tools
➔
2. Press
Options ➔ Add
3. Press the
Left
World Clock
.
or
Right
Navigation key until you locate the desired global
.
region.
Important!:
Time zones display in Greenwich Mean Time (GMT).
4. Highlight
5. Press
88
Daylight saving
OK
to set the time.
and press the key (if applicable).
Page 93

Deleting a World Clock Entry
1. Press
Menu
➔
Too ls
➔
World Clock
2. Highlight a World Clock entry.
3. Press
4. At the
Options ➔ Delete
Delete?
.
prompt, press
.
Yes
to delete or No to cancel.
Timer
You can use this menu to set a countdown timer. Use a timer to count down to an
event based on a preset time length (hours, minutes, and seconds).
1. Press
Menu
➔
Too ls
➔
Timer
.
2. Press
Set
and use the keypad to enter a countdown time length for the alert
by setting the Hours, Minutes, and Seconds value then press the OK soft key.
3. Press the key to begin the timer.
4. Press the key twice to pause the timer.
Stopwatch
You can use this menu to measure intervals of time.
1. Press
Menu
➔
Too ls
➔
Stopwatch
2. Press
Start
to start the lap counter.
3. Press
Stop
to stop the stopwatch and press
Lap
to mark a unit of time per lap.
You can record multiple lap times.
4. Press
Reset
to erase all times recorded.
Applications 89
Page 94

Section 10: Changing Your Settings
This section describes the Settings menu for your phone. It includes settings for the
following: Sound Profile, Display, Time and Date, Phone, Calls, Connectivity,
Applications Settings, and Memory Mangement.
Sound Profile
The Sound Profile menu allows you to specify how you are informed of incoming
calls and messages as well as other notification sounds your phone can make.
The steps for modifying the
apply similar steps to modify the other sound profiles:
and
Eco
.
Selecting a Profile
1. In Idle mode, select
2. Highlight a profile type and press . The selected profile activates. Choices
include:
•Normal
: default sound profile where the incoming Alert Type is set to melody.
You can modify Normal settings for Call, Message and Phone.
•Silent
: allows you to select mute or vibrate alerts that stop the phone from
making noise, in a theater for example. You can modify Silent settings for Call,
Message and Phone.
•Driving
: allows you to select alerts that you can hear easily while driving. You
can modify Driving settings for Call, Message and Phone.
• Outdoor
: allows you to select alerts that you can hear in outdoor conditions by
adjusting the volume, vibration and the tones. You can modify Outdoor settings
for Call, Message and Phone.
•Eco: allows you to set your phone to the most energy efficient sound
settings.
Normal
sound profile are described in detail. You can
Menu
➔
Settings ➔ Sound Profile
Silent, Driving, Outdoor
.
,
90
Page 95

Editing the Normal - Call Profile
The phone’s profile defaults to Normal where the incoming Alert Type is set to
melody.
1. In Idle mode, select
2. Highlight
3. Highlight the
4. Highlight
5. Select one of the following and press
•Melody
: the phone rings using the ring melody selected in the Call Ringtone menu.
•Vibration
• Vibration then Melody
• Vibration & Melody
6. Highlight
7. Select
one of the listed tones and press .
8. The tone will play. Press the
9. Highlight
10. Use the
Left
Menu
➔
Settings ➔ Sound Profile
Normal
and press
Edit
.
Call
tab.
Call Alert Type
and press .
OK
:
: the phone vibrates.
: the phone vibrates then plays a melody.
: the phone vibrates and plays a melody simultaneously.
Call Ringtone
Ringtone Volume
and press .
Add
soft key to add the tone.
and press .
or
Right
navigation key to adjust the volume level (range is 1-7)
and press OK.
11. Press
Save
to save your selections and return to the Sound Profile menu.
Changing Your Settings 91
Page 96

Editing the Normal - Message Profile
1. In Idle mode, select
2. Highlight
3. Highlight the
4. Highlight
5. Select one of the following:
•Melody
: the phone rings using the ring melody selected in the Message Alert Tone menu.
•Vibration
• Vibration & Melody
•Mute
: the phone is silent and does not play a melody or vibrate.
6. Highlight
7. Select one of the message tones and press . Press
Menu
➔
Settings ➔ Sound Profile
Normal
and press
Edit
.
Message
tab.
Message Alert Type
and press .
: the phone vibrates.
: the phone vibrates and plays a melody simultaneously.
Message Alert Tone
and press .
listen to it first.
8. Highlight
9. Select one of the following and press
10. Highlight
11. Use the
12. Press
Message Aert Repetition
•Once
: repeats the message alert once.
•Periodic
: repeats the message alert periodically.
Message Tone Volume
Left
or
Right
navigation key to adjust the volume level (range is 1-7)
and press
OK
.
Save
to return to the Sound Profile menu.
and press .
OK
.
and press .
Play
if you want to
92
Page 97

Editing the Normal - Phone Profile
1. In Idle mode, select
2. Highlight
3. Highlight the
4. Highlight
Normal
and press
Phone
Keypad Tone
Menu
➔
Settings ➔ Sound Profile
Edit
tab.
and press . Select one of the following tones and
press OK:
•Beep
•Lucid
•Mute
5. Highlight
6. Select one of the following and press
7. Highlight
8. Use the
Power on/off
•Melody
: the phone rings using a pre-set melody.
•Vibration
: the phone vibrates.
• Vibration & Melody
•Mute
: the phone is silent and does not play a melody or vibrate.
and press .
: the phone vibrates and plays a melody simultaneously.
Phone Sound Volume
Left
or
Right
navigation key to adjust the volume level (range is 0-7)
and press OK.
9. Press
Save
to return to the Sound Profile menu.
.
OK
:
and press .
Changing Your Settings 93
Page 98

Display
In this menu, you can change various settings for the display or lighting.
1. In Idle mode, press
Menu
➔ Settings ➔ Display.
The following options are available:
• Wallpaper
: allows you to select
the
Edit
soft key, and scroll through the graphics in your Graphics folder (on the Phone or
on an External Storage Card) to select your wallpaper. Press the
Picture
or
None
. None leaves the wallpaper blank. Press
Select
key to confirm the selection.
•My Theme
: allows you to select from three different themes. Make a selection and press
the
Save
soft key.
• Menu Style: allows you to select whether the phone’s menus are presented in either a
Grid Menu style or List Menu style. Highlight the desired menu and press the
key.
• Light Settings
Note:
Light settings can affect the length of time before battery recharge is necessary.
–
–
: allows you to adjust the Brightness and set the Backlight Time.
Brightness
: allows you to adjust the display brightness for the LCD to see it better in different
lighting conditions. Press the Left or Right Navigation keys to adjust the brightness. Press the
Save
soft key or the key to confirm your selection.
Backlight Time: allows you to select the amount of time for the keypad backlight to remain on
and the length of time for the display backlight to remain dim after the keypad times out.
Highlight the On field and press the key. Then select from 10 Seconds, 30 Seconds, 1
Minute, 3 Minutes, or 10 Minutes for the keypad backlight to remain on. Highlight
press the key. Choose from Off, 5 Seconds, 30 Seconds, 1 Minute, or 3 Minutes and
press OK or the key for the length of time the display remains dim after the keypad
backlight times out. Press the
Save
soft key to save your changes.
soft key or the
Save
soft
Dim
and
94
Page 99

• Dialing Display: allows you to select the properties of those items which are part of the
display such as:
–
Font Type
: allows you to select the font to display. Press the Left or Right Navigation keys to make
your selection. Choose from
confirm your selection.
–
Font Size
: allows you to select a size for the selected font. Press the Left or Right Navigation keys
to make your selection. Choose from
key to confirm your selection.
–
Font Color
: allows you to select a color for the selected font. Press the Left or Right Navigation
keys to make your selection. Choose from
Down Navigation key and select a color choice. Press the
your selection.
–
Background Color
Right Navigation keys to make your selection. Press the
your selection.
•Eco Mode
: allows you to set your display to Backlight duration of 10 sec and LCD
Normal 1
or
Normal 2.
Press the
Save
soft key or the key to
Large, Medium
: allows you to select a color for the background screen. Press the Left or
, or
Small
. Press the
Monochrome, Gradation
Save
soft key or the key to confirm
Save
soft key or the key to confirm
brightness level of 2. These are the most power efficient settings.
Time and Date
This menu allows you to change the current time and date displayed.
1. In Idle mode, select
Menu
➔
Settings ➔ Time and Date
. Automatic is the
default setting and can not be changed, but you can edit the Time and Date
Formats.
2. Highlight the
Time Format
field and press the
Left
or
Right
Navigation key to
change the format (12 Hours or 24 Hours).
3. Highlight the
Date Format
field and press the
Left
or
Right
Navigation key to
change the format (MM/DD/YYYY, DD/MM/YYYY, YYY/MM/DD, or
YYY/DD/MM).
4. Press
Save
to save your settings.
, or
Save
Basic
soft key or the
. Press the
Changing Your Settings 95
Page 100

Phone Settings
You can customize various phone settings.
䊳
In Idle mode, select
Menu
➔
Settings ➔ Phone
.
Language
This menu allows you to select a display language for Text language and Text Input
mode. Choose from Automatic, English, and Español.
1. In Idle mode, select
2. Highlight
3. Highlight one of the following selections and press
•Automatic
Menu
➔
Settings ➔ Phone ➔ Language
Screen text
and press .
(uses the language set on your SIM card).
OK
.
:
• English
•Español
4. Highlight the
5. Highlight one of the following selections and press
Input Language
field and press .
OK
:
• English
•Español
6. Press
Save
to save your settings and return to Phone settings page.
Auto Key Lo ck
The Auto Keypad Lock feature locks your phone when the Backlight turns off. To
modify this feature, follow these steps:
1. In Idle mode, select
2. Highlight
Menu
On
or
Off
and press the key.
➔
Settings ➔ Phone ➔ Auto Key Lock
.
For more information on Backlight settings, see “Display” on page 94.
96
 Loading...