

Page 1

User Manual
S22C550H
S23C550H
S24C550HL
The color and the appearance may differ depending on
the product, and the specifications are subject to
change without prior notice to improve the performance.
BN46-00310A-06
Page 2

Table Of Contents
BEFORE USING THE
PRODUCT
PREPARATIONS 19 Checking the Contents
7 Copyright
7 Icons used in this manual
8 Cleaning
8 Cleaning
9 Securing the Installation Space
9 Precautions for storage
10 Safety Precautions
10 Symbols for safety precautions
11 Electricity and Safety
12 Installation and Safety
14 Operation
18 Correct posture to use the product
19 Removing the Packaging
20 Checking the Components
CONNECTING AND USING
A SOURCE DEVICE
21 Parts
21 Frontal Button
22 Direct Key guide
23 Function Key Guide
25 Reverse Side
26 Installation
26 Attaching the Stand
27 Removing the Stand
28 Adjusting the Product Tilt
29 Anti-theft Lock
30 Before Connecting
30 Pre-connection Checkpoints
30 Connecting the Power
Table Of Contents
2
Page 3

Table Of Contents
31 Connecting and Using a PC
31 Connection Using the D-SUB Cable (Analog
Type)
32 Connection Using an HDMI Cable
32 Connection Using an HDMI-DVI Cable
33 Connecting to Headphones
33 Tidying Up the Connected Cables
34 Changing the sound settings on Windows
35 Driver Installation
36 Setting Optimum Resolution
37 Changing the Resolution Using a PC
SCREEN SETUP 41 Brightness
41 Configuring Brightness
42 Contrast
42 Configuring Contrast
43 Sharpness
43 Configuring Sharpness
44 SAMSUNG MAGIC Bright
44 Configuring SAMSUNG MAGIC Bright
46 SAMSUNG MAGIC Angle
46 Configuring SAMSUNG MAGIC Angle
47 SAMSUNG MAGIC Upscale
47 Configuring SAMSUNG MAGIC Upscale
48 Image Size
48 Changing the Image Size
50 HDMI Black Level
50 Configuring the HDMI Black Level Settings
51 H-Position & V-Position
51 Configuring H-Position & V-Position
52 Coarse
52 Adjusting Coarse
Table Of Contents
3
Page 4

Table Of Contents
53 Fine
53 Adjusting Fine
CONFIGURING TINT 54 Red
54 Configuring Red
55 Green
55 Configuring Green
56 Blue
56 Configuring Blue
57 Color Tone
57 Configuring the Color Tone Settings
58 Gamma
58 Configuring Gamma
COORDINATING OSD 59 Language
59 Changing the Language
60 Menu H-Position & Menu V-Position
60 Configuring Menu H-Position & Menu V-
Position
61 Display Time
61 Configuring Display Time
62 Transparency
62 Changing Transparency
SETUP AND RESET 63 Reset
63 Initializing Settings (Reset)
64 Eco Saving
64 Configuring Eco Saving
65 Off Timer
65 Configuring Off Timer
Table Of Contents
4
Page 5

Table Of Contents
66 Turn Off After
66 Configuring Turn Off After
67 PC/AV Mode
67 Configuring PC/AV Mode
68 Key Repeat Time
68 Configuring Key Repeat Time
69 Source Detection
69 Configuring Source Detection
70 Power LED On
70 Configuring Power LED On
INFORMATION MENU AND
OTHERS
INSTALLING THE
SOFTWARE
TROUBLESHOOTING
GUIDE
71 INFORMATION
71 Displaying INFORMATION
72 Configuring Brightness and Contrast in
the Initial Screen
73 Configuring Volume in the Initial Screen
74 MagicTune
74 What is "MagicTune"?
74 Installing the Software
75 Removing the Software
76 MultiScreen
76 Installing the Software
77 Removing the Software
78 Requirements Before Contacting
Samsung Customer Service Center
78 Testing the Product
78 Checking the Resolution and Frequency
78 Check the following.
81 Q & A
Table Of Contents
5
Page 6

Table Of Contents
SPECIFICATIONS
APPENDIX 88 Contact SAMSUNG WORLD WIDE
83 General
85 PowerSaver
86 Standard Signal Mode Table
94 Responsibility for the Pay Service (Cost
to Customers)
94 Not a product defect
94 A Product damage caused by customer's fault
94 Others
96 Correct Disposal
96 Correct Disposal of This Product (Waste
Electrical & Electronic Equipment)
97 Terminology
INDEX
Table Of Contents
6
Page 7

©
Copyright
The contents of this manual are subject to change without notice to improve quality.
Samsung Electronics owns the copyright for this manual.
Use or reproduction of this manual in parts or entirety without the authorization of Samsung Electronics is
prohibited.
Microsoft and Windows are registered trademarks of Microsoft Corporation.
VESA, DPM and DDC are registered trademarks of the Video Electronics Standards Association.
Before Using the Product
2013 Samsung Electronics
z An administration fee may be charged if either
(a) an engineer is called out at your request and there is no defect in the product
(i.e. where you have failed to read this user manual)
(b) you bring the unit to a repair centre and there is no defect in the product
(i.e. where you have failed to read this user manual).
z The amount of such administration charge will be advised to you before any work or home visit
is carried out.
Icons used in this manual
The following images are for reference only. Real-life situations may
differ from what is shown in the images.
Before Using the Product
7
Page 8

Cleaning
!
Before Using the Product
Cleaning
Exercise care when cleaning as the panel and exterior of advanced LCDs are easily scratched.
Take the following steps when cleaning.
1. Power off the monitor and computer.
2. Disconnect the power cord from the monitor.
Hold the power cable by the plug and do not touch the cable with wet
hands. Otherwise, an electric shock may result.
3. Wipe the monitor with a clean, soft and dry cloth.
z Do not apply a cleaning agent that contains alcohol,
solvent, or surfactant to the monitor.
!
z Do not spray water or detergent directly on the product.
4. Wet a soft and dry cloth in water and wring thoroughly to clean the
exterior of the monitor.
5. Connect the power cord to the product after cleaning the product.
6. Power on the monitor and computer.
Before Using the Product
8
Page 9

Before Using the Product
3.93
inches
(10 cm)
3.93
inches
(10 cm)
3.93 inches(10 cm)
3.93 inches(10 cm)
3.93 inches(10 cm)
Securing the Installation Space
z Ensure some space around the product for ventilation. An internal temperature rise may cause fire
and damage the product. Be sure to allow the amount of space as shown below or greater when
installing the product.
The exterior may differ depending on the product.
Precautions for storage
Be sure to contact Samsung Customer Service Center (page 88) if the inside of the monitor needs
cleaning. (service fee will be charged).
Before Using the Product
9
Page 10

Before Using the Product
Safety Precautions
Caution: TO REDUCE THE RISK OF ELECTRIC SHOCK, DO NOT REMOVE COVER (OR
BACK). THERE ARE NO USER SERVICEABLE PARTS INSIDE. REFER ALL SERVICING TO
This symbol indicates that high voltage is present inside. It is dangerous to
make any kind of contact with any internal part of this product.
This symbol alerts you that important literature concerning operation and
maintenance has been included with this product.
Caution
RISK OF ELECTRIC SHOCK DO NOT OPEN
QUALIFIED PERSONNEL.
Symbols for safety precautions
Warning
Caution
A serious or fatal injury may result if instructions are not followed.
Personal injury or damage to properties may result if instructions are
not followed.
Activities marked by this symbol are prohibited.
Instructions marked by this symbol must be followed.
Before Using the Product
10
Page 11

Before Using the Product
!
!
!
Electricity and Safety
The following images are for reference only. Real-life situations may differ from what is shown in the
images.
Warning
Do not use a damaged power cord or plug, or a loose power socket.
z An electric shock or fire may result.
Do not plug many products into the same power socket.
z Otherwise, the socket may overheat and cause a fire.
Do not touch the power plug with wet hands.
z Otherwise, an electric shock may result.
Insert the power plug all the way in so it is not loose.
z An unstable connection may cause a fire.
Connect the power plug to a grounded power socket (type 1 insulated devices
only).
z An electric shock or injury may result.
Do not bend or pull the power cord with force. Do not weigh the power cord
down with a heavy object.
z A damaged power cord may cause an electric shock or fire.
Do not place the power cord or product near heat sources.
z An electric shock or fire may result.
Remove foreign substances such as dust around the plug pins and power socket
with a dry cloth.
z Otherwise, a fire may result.
Before Using the Product
11
Page 12

Before Using the Product
!
!
!
!
Caution
Do not unplug the power cord when the product is in use.
z The product may become damaged by an electric shock.
Do not use the power cord for products other than authorized products supplied
by Samsung.
z An electric shock or fire may result.
Keep the power socket where the power cord is connected unobstructed.
z If any problem occurs in the product, unplug the power cable to completely
cut the power to the product.
Power to the product cannot be completely cut off with the power button.
Hold the plug when disconnecting the power cord from the power socket.
z An electric shock or fire may result.
Installation and Safety
Warning
DO NOT PLACE CANDLES, INSECT REPELLANTS OR CIGARETTES ON TOP
OF THE PRODUCT. DO NOT INSTALL THE PRODUCT NEAR HEAT SOURCES.
z Otherwise, a fire may result.
Avoid installing the product in a narrow space with bad ventilation, such as a
bookshelf or wall closet.
z Otherwise, a fire may result due to an increased internal temperature.
Keep the plastic packaging bag for the product in a place that cannot be reached
by children.
z Children may suffocate.
Before Using the Product
12
Page 13

Before Using the Product
!
!
Do not install the product on an unstable or vibrating surface (insecure shelf,
sloped surface, etc.).
z The product may fall and break or cause a personal injury.
z Using the product in an area with excess vibration may damage the product
or cause a fire.
Do not install the product in a vehicle or a place exposed to dust, moisture (water
drips, etc.), oil, or smoke.
z An electric shock or fire may result.
Do not expose the product to direct sunlight, heat, or a hot object such as a
stove.
z Otherwise, the product lifespan may be reduced, or a fire may result.
Caution
Do not install the product within the reach of young children.
z The product may fall and injure children.
Edible oil, such as soybean oil, can damage or deform the product. Do not install
the product in a kitchen or near a kitchen counter.
Take care not to drop the product when moving it.
z Otherwise, product failure or personal injury may result.
Do not set down the product on its front.
z The screen may become damaged.
When installing the product on a cabinet or shelf, make sure that the bottom
edge of the front of the product is not protruding.
z The product may fall and break or cause a personal injury.
z Install the product only on cabinets or shelves of the right size.
Before Using the Product
13
Page 14

Before Using the Product
!
SAMSUNG
!
!
!
Put down the product carefully.
z The product may fall and break or cause a personal injury.
Installing the product in an unusual place (a place exposed to a lot of fine
particles, chemical substances or extreme temperatures, or an airport or train
station where the product should operate continuously for an extended period of
time) may seriously affect its performance.
z Be sure to consult Samsung Customer Service Center (page 88) before
installation if you want to install the product at such a place.
Operation
Warning
High voltage runs through the product. Do not attempt to disassemble, repair, or
modify the product on your own.
z An electric shock or fire may result.
z Contact Samsung Customer Service Center (page 88) for repair.
Before moving the product, turn off the power switch and disconnect the power
cable and all other connected cables.
z Otherwise, the power cord may be damaged and a fire or electric shock may
result.
If the product generates a strange noise, a burning smell, or smoke, remove the
power cord immediately and contact Samsung Customer Service Center (page
88).
z An electric shock or fire may result.
Do not let children hang from the product or climb on top of it.
z The product may fall, and your child may become injured or seriously
harmed.
If the product falls or the exterior is damaged, power off the product, remove the
power cord, and contact Samsung Customer Service Center (page 88).
z Otherwise, an electric shock or fire may result.
Do not put a heavy object, toy, or sweets on top of the product.
z The product or heavy objects may fall as children try to reach for the toy or
sweets resulting in a serious injury.
Before Using the Product
14
Page 15

Before Using the Product
!
!
!
GAS
!
100
During a lightning or thunderstorm, power off the product and remove the power
cable.
z An electric shock or fire may result.
Do not drop objects on the product or apply impact.
z An electric shock or fire may result.
Do not move the product by pulling the power cord or any cable.
z Otherwise, the power cable may be damaged and product failure, an electric
shock or fire may result.
If a gas leakage is found, do not touch the product or power plug. Also, ventilate
the area immediately.
z Sparks can cause an explosion or fire.
Do not lift or move the product by the power cord or any cable.
z Otherwise, the power cable may be damaged and product failure, an electric
shock or fire may result.
Do not use or keep combustible spray or an inflammable substance near the
product.
z An explosion or fire may result.
Ensure the vents are not blocked by tablecloths or curtains.
z Otherwise, a fire may result from an increased internal temperature.
Do not insert a metallic object (a chopstick, coin, hair pin, etc.) or inflammable
object (paper, match, etc.) into the vent or ports of the product.
z If water or any foreign substance enters the product, be sure to power off the
product, remove the power cord, and contact Samsung Customer Service
Center (page 88).
z Product failure, an electric shock or fire may result.
Do not place objects containing liquid (vases, pots, bottles, etc) or metallic
objects on top of the product.
z If water or any foreign substance enters the product, be sure to power off the
product, remove the power cord, and contact Samsung Customer Service
Center (page 88).
z Product failure, an electric shock or fire may result.
Before Using the Product
15
Page 16

Before Using the Product
!
-_-
!
!
!
!
Caution
Leaving the screen fixed on a stationary image for an extended period of time
may cause afterimage burn-in or defective pixels.
z If you are not going to use the product for an extended period of time,
activate power-saving mode or a moving-picture screen saver.
Disconnect the power cord from the power socket if you do not plan on using the
product for an extended period of time (vacation, etc).
z Otherwise, a fire may result from accumulated dust, overheating, an electric
shock, or electric leakage.
Use the product at the recommended resolution and frequency.
z Your eyesight may deteriorate.
Do not put DC power adapters together.
z Otherwise, a fire may result.
Remove the plastic bag from the DC power adapter before you use it.
z Otherwise, a fire may result.
Do not let water enter the DC power device or get the device wet.
z An electric shock or fire may result.
z Avoid using the product outdoors where it can be exposed to rain or snow.
z Be careful not to get the DC power adapter wet when you wash the floor.
Do not put the DC power adapter near to any heating apparatus.
z Otherwise, a fire may result.
Keep the DC power adapter in a well-ventilated area.
Looking at the screen too close for an extended period of time can deteriorate
your eyesight.
Before Using the Product
16
Page 17

Before Using the Product
!
!
!
Do not hold the monitor upside-down or move it by holding the stand.
z The product may fall and break or cause a personal injury.
Do not use humidifiers or stoves around the product.
z An electric shock or fire may result.
Rest your eyes for more than 5 minutes for every 1 hour of product use.
z Eye fatigue will be relieved.
Do not touch the screen when the product has been turned on for an extended
period of time as it will become hot.
Store the small accessories used with the product out of reach of children.
Exercise caution when adjusting the product angle or stand height.
z Otherwise, children's fingers or hands may become stuck and injured.
z Tilting the product excessively may cause it to fall and result in personal
injury.
Do not place heavy objects on the product.
z Product failure or personal injure may result.
When using headphones or earphones, do not turn the volume too high.
z Having the sound too loud may damage your hearing.
Before Using the Product
17
Page 18

Before Using the Product
50 cm
Correct posture to use the product
Use the product in the correct posture as follows:
z Straighten your back.
z Allow a distance of 45 to 50 cm between your eye and the screen, and look slightly
downward at the screen.
Keep your eyes directly in front of the screen.
z Adjust the angle so light does not reflect on the screen.
z Keep your forearms perpendicular to your upper arms and level with the back of
your hands.
z Keep your elbows at about a right angle.
z Adjust the height of the product so you can keep your knees bent at 90 degrees or
more, your heels attached to the floor, and your arms lower than your heart.
Before Using the Product
18
Page 19

Preparations
1
1.1 Checking the Contents
1.1.1 Removing the Packaging
1 Open the packaging box. Be careful not to damage the product when you open the packaging with
a sharp instrument.
2 Remove the styrofoam from the product.
3 Check the components and remove the styrofoam and plastic bag.
4 Store the box in a dry area so that it can be used when moving the product in the future.
This image is for reference only.
1 Preparations
19
Page 20

1
Preparations
1.1.2 Checking the Components
z Contact the dealer where you purchased the product if any components are missing.
z The appearance of the components may differ from the images shown.
Components
Quick Setup guide Warranty card
(Not available In some locations)
Power cable DC power adapter D-SUB cable (optional)
HDMI cable (optional) HDMI-DVI cable (optional) Stand base
User Manual
Stand neck
Components may vary depending on the country.
1 Preparations
20
Page 21

Preparations
Function Key Guide
JOG Button
Power LED
Return
LEFT
AUTO
Return
AUTO
Return
DOWN(FRONT)
UP(REAR)
RIGHT
PRESS(ENTER)
1
1.2 Parts
1.2.1 Frontal Button
The color and shape of parts may differ from what is shown. Specifications are subject to change
without notice to improve quality.
Icons Description
JOG Button
(Power LED)
Function Key Guide
Multi directional button that helps navigate.
JOG button is located in the bottom of the screen center, and has 5
directions as UP/DOWN/LEFT/RIGHT/PRESS(ENTER).
This LED is power status indicator and works as
z Power on (Power button): Off
z Power saving mode: Blinking
z Power Off (Power button): On
The power Indicator operation can be swapped by changing in the
menu. (SETUP&RESET Power LED On)
Actual models because of functional variation maybe haven’t this
function.
Press the JOG button when the screen is turned on. The Function Key
Guide will appear. To access the onscreen menu when the guide is
displayed, press the corresponding direction button again.
Function Key Guide may vary depending on the function or product
model. Please refer to the actual product.
1 Preparations
21
Page 22

1
Brightness
Volume
Features
Brightness
Features
Preparations
1.2.2 Direct Key guide
For guidance on shortcut keys, the below OSD (On Screen Display) will be displayed if you move the JOG
button in any direction.
Models with sound option
z UP/DOWN: Adjust Brightness.
z LEFT/RIGHT: Adjust Volume.
z PRESS(ENTER): Display Function Key Guide.
Models without sound option
z UP/DOWN/LEFT/RIGHT: Adjust Brightness.
z PRESS(ENTER): Display Function Key Guide.
1 Preparations
22
Page 23

1
AUTO
Return
SAMSUNG
MAGIC
Preparations
1.2.3 Function Key Guide
To enter the main menu or to use other items, press the JOG button to display the Function Key Guide.
You can exit by pressing the JOG button again.
z UP/DOWN/LEFT/RIGHT: Move to the item you want. The description for each item will appear when
the focus changes.
z PRESS(ENTER): The selected item will be applied.
Icons Description
Selects [ ] to change the input signal by moving the JOG button
in the Function Key Guide screen. A message will appear on the top
left corner of the screen if the input signal has been changed.
z Selects [ ] by moving the JOG button in the function key
guide screen.
The OSD (On Screen Display) of your Monitor’s feature appears.
z OSD control lock: Maintain the current settings, or lock the OSD
control to prevent unintended changes to settings.
Enable/Disable: To lock/unlock the OSD control, press the
LEFT button for 10 seconds when the main menu displayed.
If the OSD control is locked,
Brightness
and INFORMATION
and Contrast and Bright can be adjusted,
can be viewed.
Selects [ ] to adjust the screen settings automatically by
moving the JOG button in the function key guide screen.
z Changing the resolution in Display Properties will activate
the Auto Adjustment function.
z This function is only available in Analog mode.
Selects [ ] to turn the Monitor off by moving the JOG button in the
function key guide screen.
1 Preparations
23
Page 24

1
Preparations
Actual models because of functional variation, Function key guide options will be different.
Please run the corresponding function based on the actual icon and description.
When the monitor displays nothing (i.e. Power saving mode or Non-signal mode), 2 direct keys for
control source and power could be used as below.
JOG Button Power saving/Non-signal mode
UP
Down
PRESS(ENTER) for 2 seconds Power Off
Source Change
1 Preparations
24
Page 25

1
DC14V HDMI IN RGB IN
DC14V HDMI IN RGB IN
DC14V
HDMI IN
RGB IN
Preparations
1.2.4 Reverse Side
The color and shape of parts may differ from what is shown. Specifications are subject to change
without notice to improve quality.
Port Description
Connect to the DC power adapter.
Connect to a source device using an HDMI cable.
The [HDMI IN] terminal is supplied for the HDMI-dedicated
models only.
Connect to a PC using the D-SUB cable.
Connect to an audio output device such as headphones.
This function is only available in HDMI mode.
1 Preparations
25
Page 26

Preparations
1
1.3 Installation
1.3.1 Attaching the Stand
Before assembling the product, place the product down on a flat and stable surface so that the screen
is facing downwards.
Insert the stand neck into the
stand base in the direction
shown in the figure.
Place a soft cloth over the table
to protect the product and
place the product onto the
cloth so that the front of the
product is facing downwards.
Check that the stand neck is
firmly connected.
Hold the main body of the
product with your hand as
shown by the figure.
Push the assembled stand into
the main body in the direction
of the arrow as shown in the
figure.
Tightly fasten the connecting
screw at the bottom of the
stand base.
- Caution
Do not hold the product upside
down only by the stand.
1 Preparations
26
Page 27

1
Preparations
1.3.2 Removing the Stand
Place a soft cloth over the table to protect the product and
place the product onto the cloth so that the front of the product
faces downwards.
While holding the stand neck with one hand, pound the other
fisted hand down onto the top of the stand base in the direction
of the arrow to detach the stand base.
Turn the connecting screw at the bottom of the stand base to
separate it.
Remove the stand neck from the stand base by pulling it in the
direction of the arrow as shown in the figure.
1 Preparations
27
Page 28

1
-1° (±2°) ~ 20° (±2°)
Preparations
1.3.3 Adjusting the Product Tilt
The color and shape of parts may differ from what is shown. Specifications are subject to change
without notice to improve quality.
z You can adjust the tilt of your monitor.
z Hold the lower part of the product and adjust the tilt carefully.
1 Preparations
28
Page 29

1
DC14V HDMI IN RGB IN
Preparations
1.3.4 Anti-theft Lock
An anti-theft lock allows you to use the product securely even in public places. The locking device shape
and locking method depend on the manufacturer. Refer to the user guide provided with your anti-theft
locking device for details. The lock device is sold separately.
The color and shape of parts may differ from what is shown. Specifications are subject to change
without notice to improve quality.
To lock an anti-theft locking device:
1 Fix the cable of your anti-theft locking device to a heavy object such as a desk.
2 Put one end of the cable through the loop on the other end.
3 Insert the Kensington Lock into the security slot on the back of the display.
4 Lock the locking device.
z An anti-theft locking device can be purchased separately.
z Refer to the user guide provided with your anti-theft locking device for details.
z Anti-theft locking devices can be purchased at electronics retailers or online.
1 Preparations
29
Page 30

Connecting and Using a Source Device
DC14V HDMI IN RGB IN
DC14V HDMI IN
RGB IN
DC14V
2
2.1 Before Connecting
2.1.1 Pre-connection Checkpoints
z Before connecting a source device, read the user manual provided with it.
The number and locations of ports on source devices may differ from device to device.
z Do not connect the power cable until all connections are completed.
Connecting the power cable during connection may damage the product.
z Check the types of ports at the back of the product you want to connect.
2.2 Connecting the Power
z Connect the power adapter to [DC14V] jack on the rear of the product.
Connect the power cable to the DC power adapter. Next, connect the DC power adapter to the
product. Plug in the power cable to the power socket.
The input voltage is switched automatically.
2 Connecting and Using a Source Device
30
Page 31
Connecting and Using a Source Device
DC14V HDMI IN
RGB IN
RGB IN
2
2.3 Connecting and Using a PC
Select a connection method suitable for your PC.
Connecting parts may differ in different products.
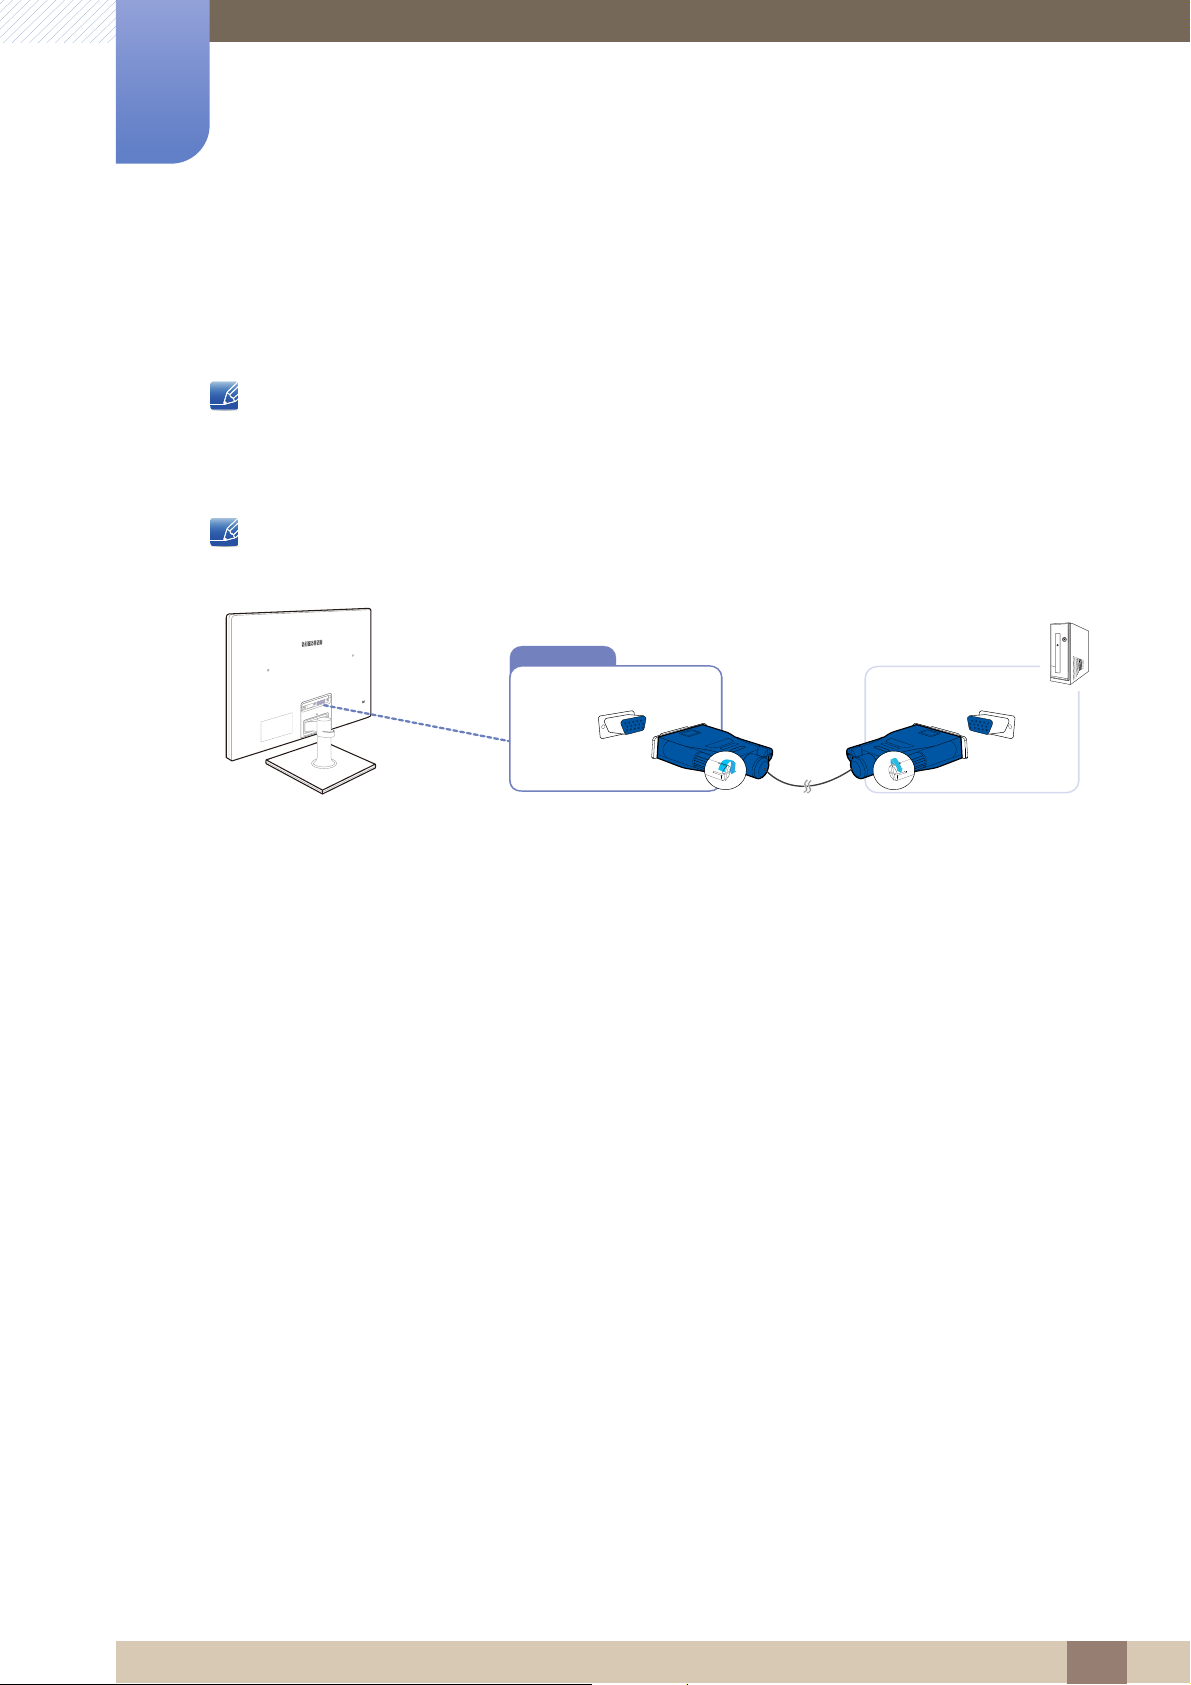
2.3.1 Connection Using the D-SUB Cable (Analog Type)
Do not connect the power cable before connecting all other cables.
Ensure you connect a source device first before connecting the power cable.
1 Connect the D-SUB cable to the [RGB IN] port on the back of the product and the RGB port on the
PC.
2 Connect the DC power adapter to the product and a power socket.
Next, turn on the power switch on the PC.
3 Change the input source to Analog controlling the JOG button UP/DOWN, when input source is not
set.
2 Connecting and Using a Source Device
31
Page 32
2
DC14V HDMI IN
RGB IN
HDMI IN
DC14V HDMI IN RGB IN
HDMI IN
Connecting and Using a Source Device
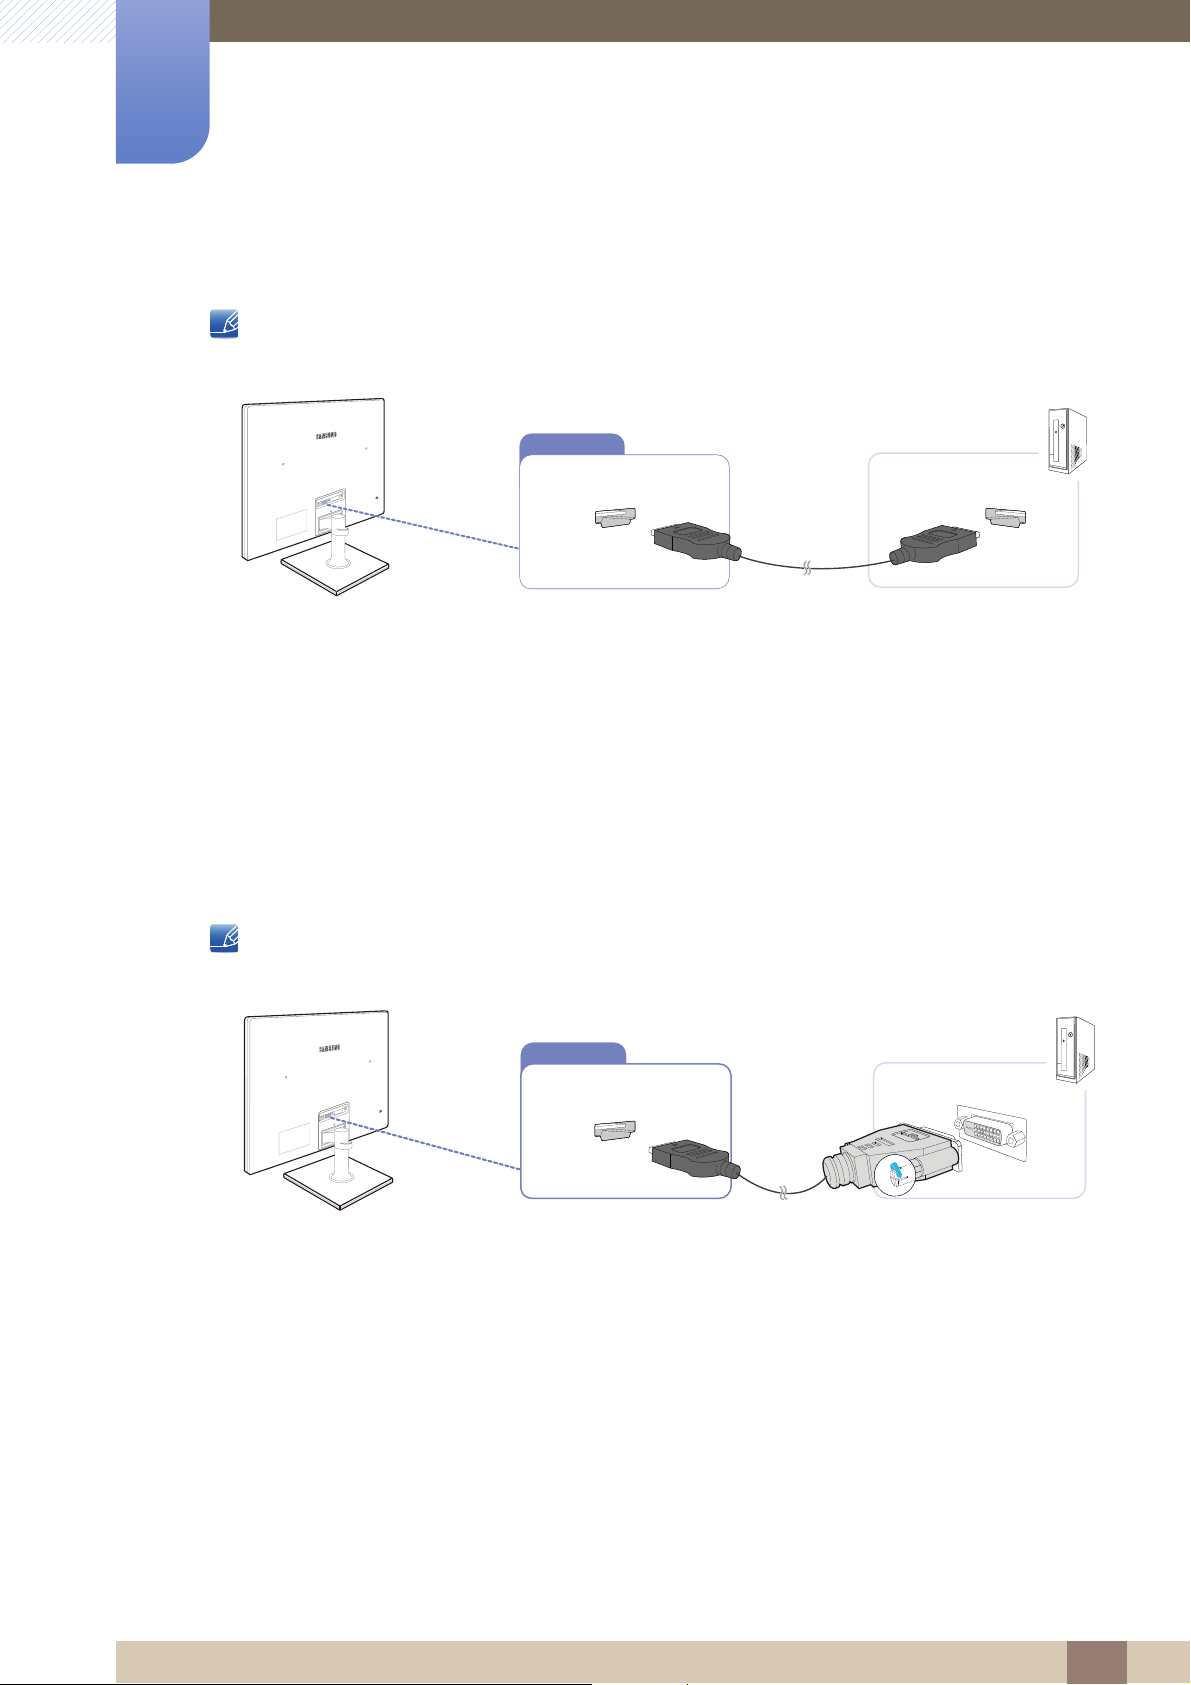
2.3.2 Connection Using an HDMI Cable
Do not connect the power cable before connecting all other cables.
Ensure you connect a source device first before connecting the power cable.
1 Connect the HDMI cable to the [HDMI IN] port on the back of the product and the HDMI port on the
PC.
2 Connect the DC power adapter to the product and a power socket.
Next, turn on the power switch on the PC.
3 Change the input source to HDMI controlling the JOG button UP/DOWN, when input source is not
set.
2.3.3 Connection Using an HDMI-DVI Cable
Do not connect the power cable before connecting all other cables.
Ensure you connect a source device first before connecting the power cable.
1 Connect the HDMI-DVI cable to the [HDMI IN] port on the back of the product and the DVI port on
the PC.
2 Connect the DC power adapter to the product and a power socket.
Next, turn on the power switch on the PC.
3 Change the input source to HDMI controlling the JOG button UP/DOWN, when input source is not
set.
2 Connecting and Using a Source Device
32
Page 33
2
DC14V HDMI IN RGB IN
DVI IN
DC14V HDMI IN RGB IN
Connecting and Using a Source Device
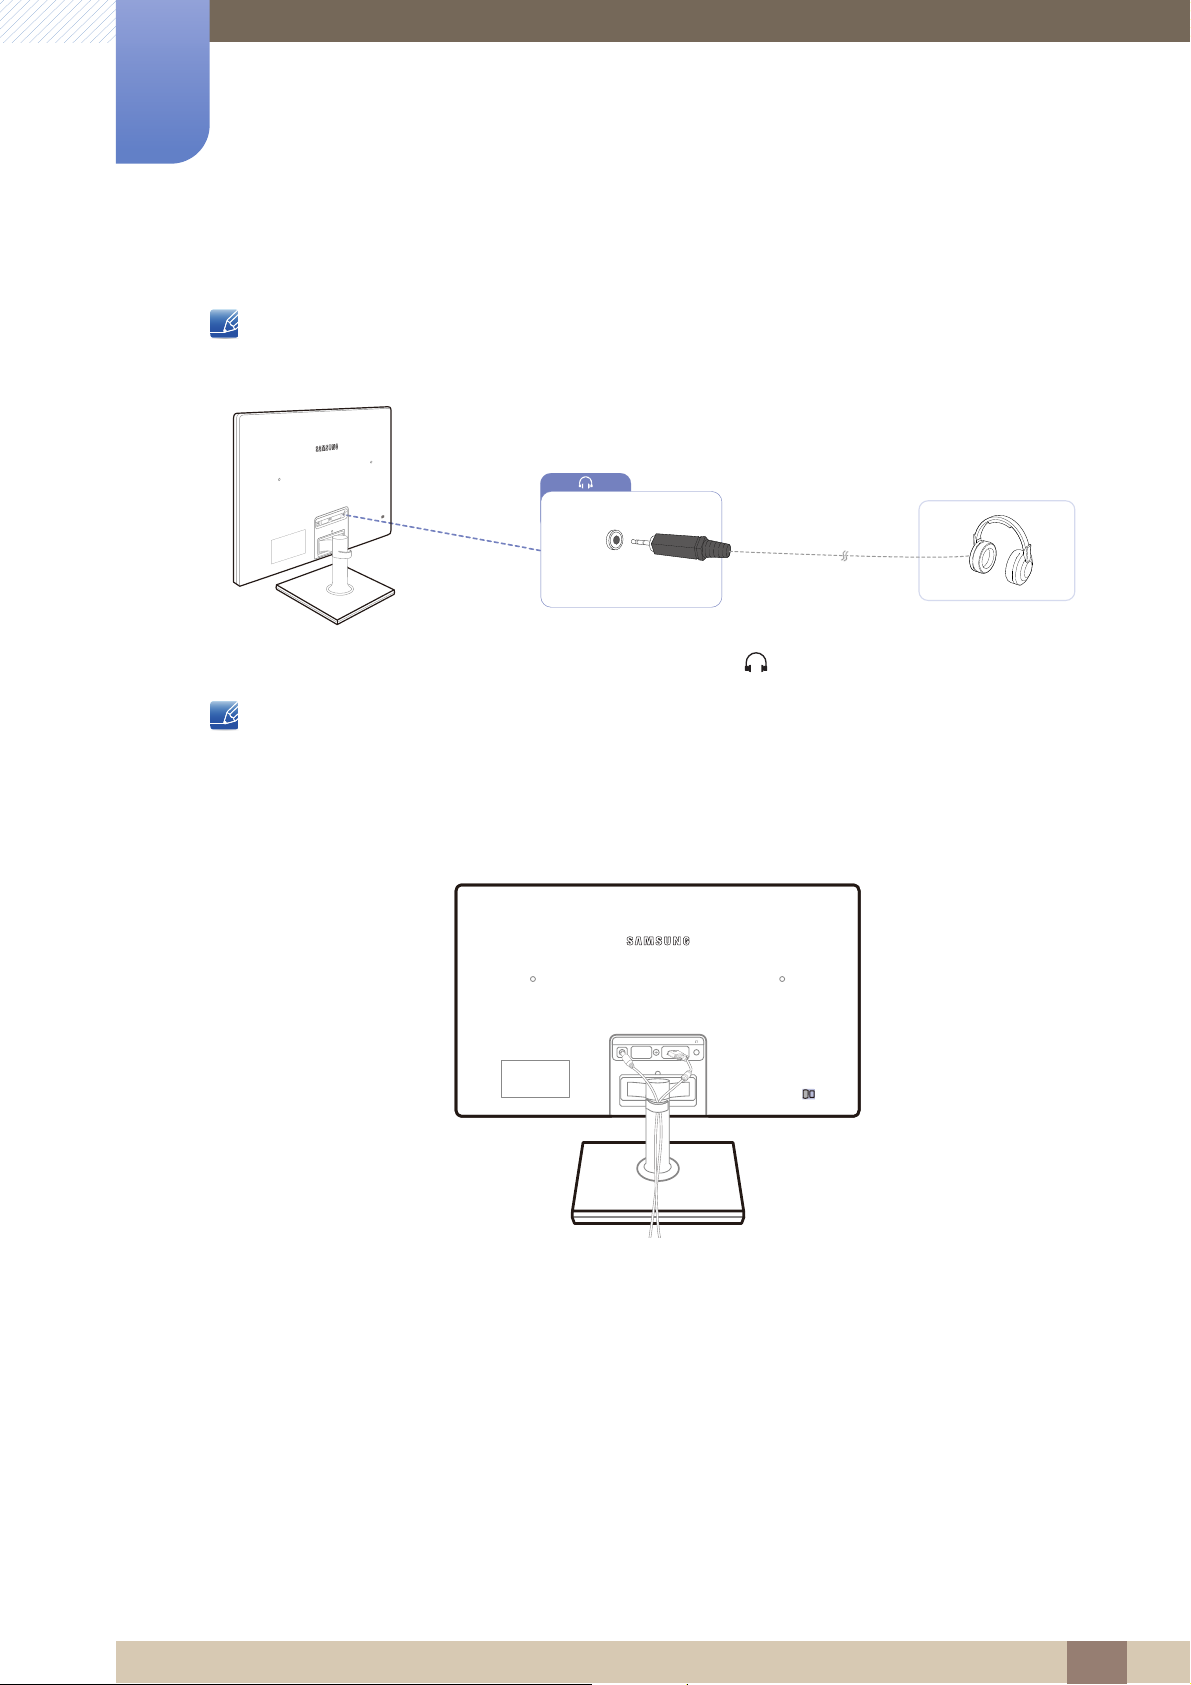
2.3.4 Connecting to Headphones
Do not connect the power cable before connecting all other cables.
Ensure you connect a source device first before connecting the power cable.
1 Connect an audio output device such as headphones to [ ] port on the product.
z This function is only available in HDMI mode.
z The sound could only be heard when using the HDMI-to-HDMI cable.
2.3.5 Tidying Up the Connected Cables
2 Connecting and Using a Source Device
33
Page 34
2
→
→
1
2
3
4
Connecting and Using a Source Device
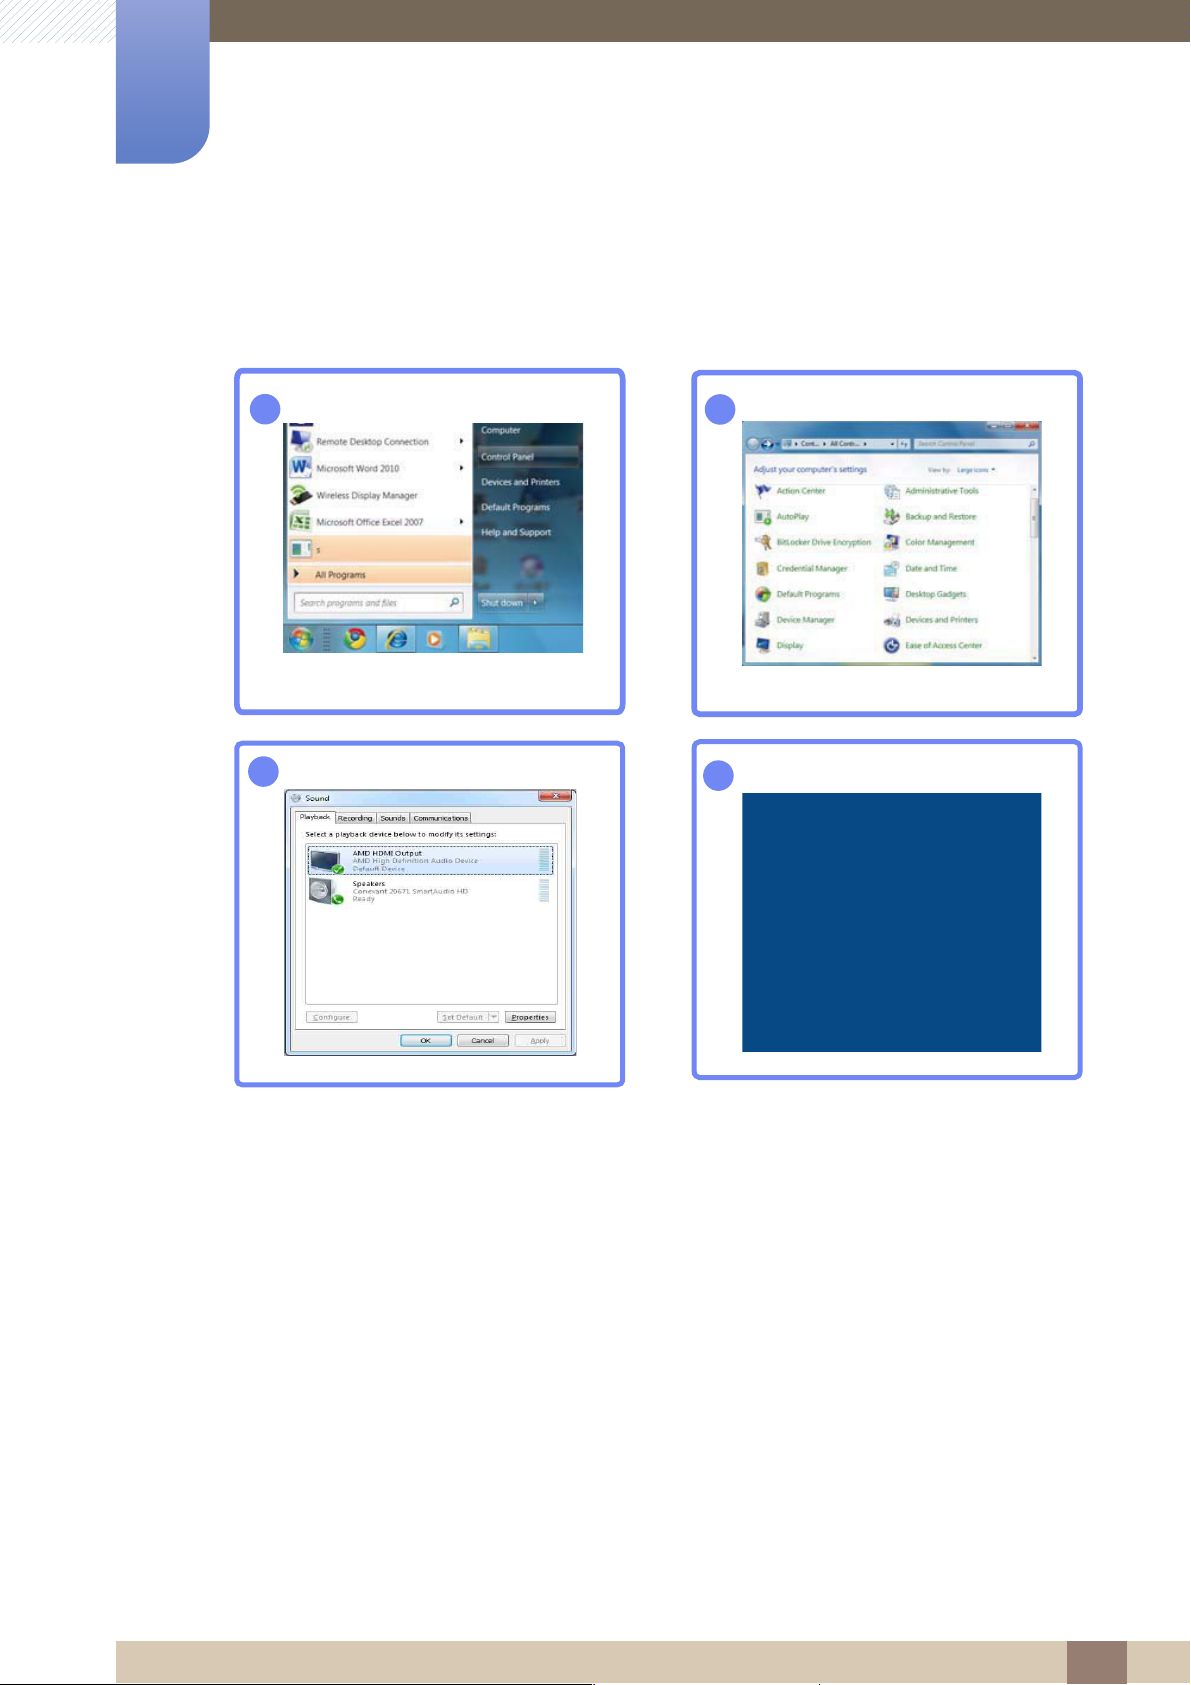
2.3.6 Changing the sound settings on Windows
Control Panel Audio Speaker Speaker Setup
→
2 Connecting and Using a Source Device
34
Page 35
2
Connecting and Using a Source Device
2.3.7 Driver Installation
z You can set the optimum resolution and frequency for this product by installing the corresponding
drivers.
z An installation driver is contained on the CD supplied with the product.
z If the file provided is faulty, visit the Samsung homepage (http://www.samsung.com/) and
download the file.
1 Insert the user manual CD provided with the product into the CD-ROM drive.
2 Click "Windows Driver".
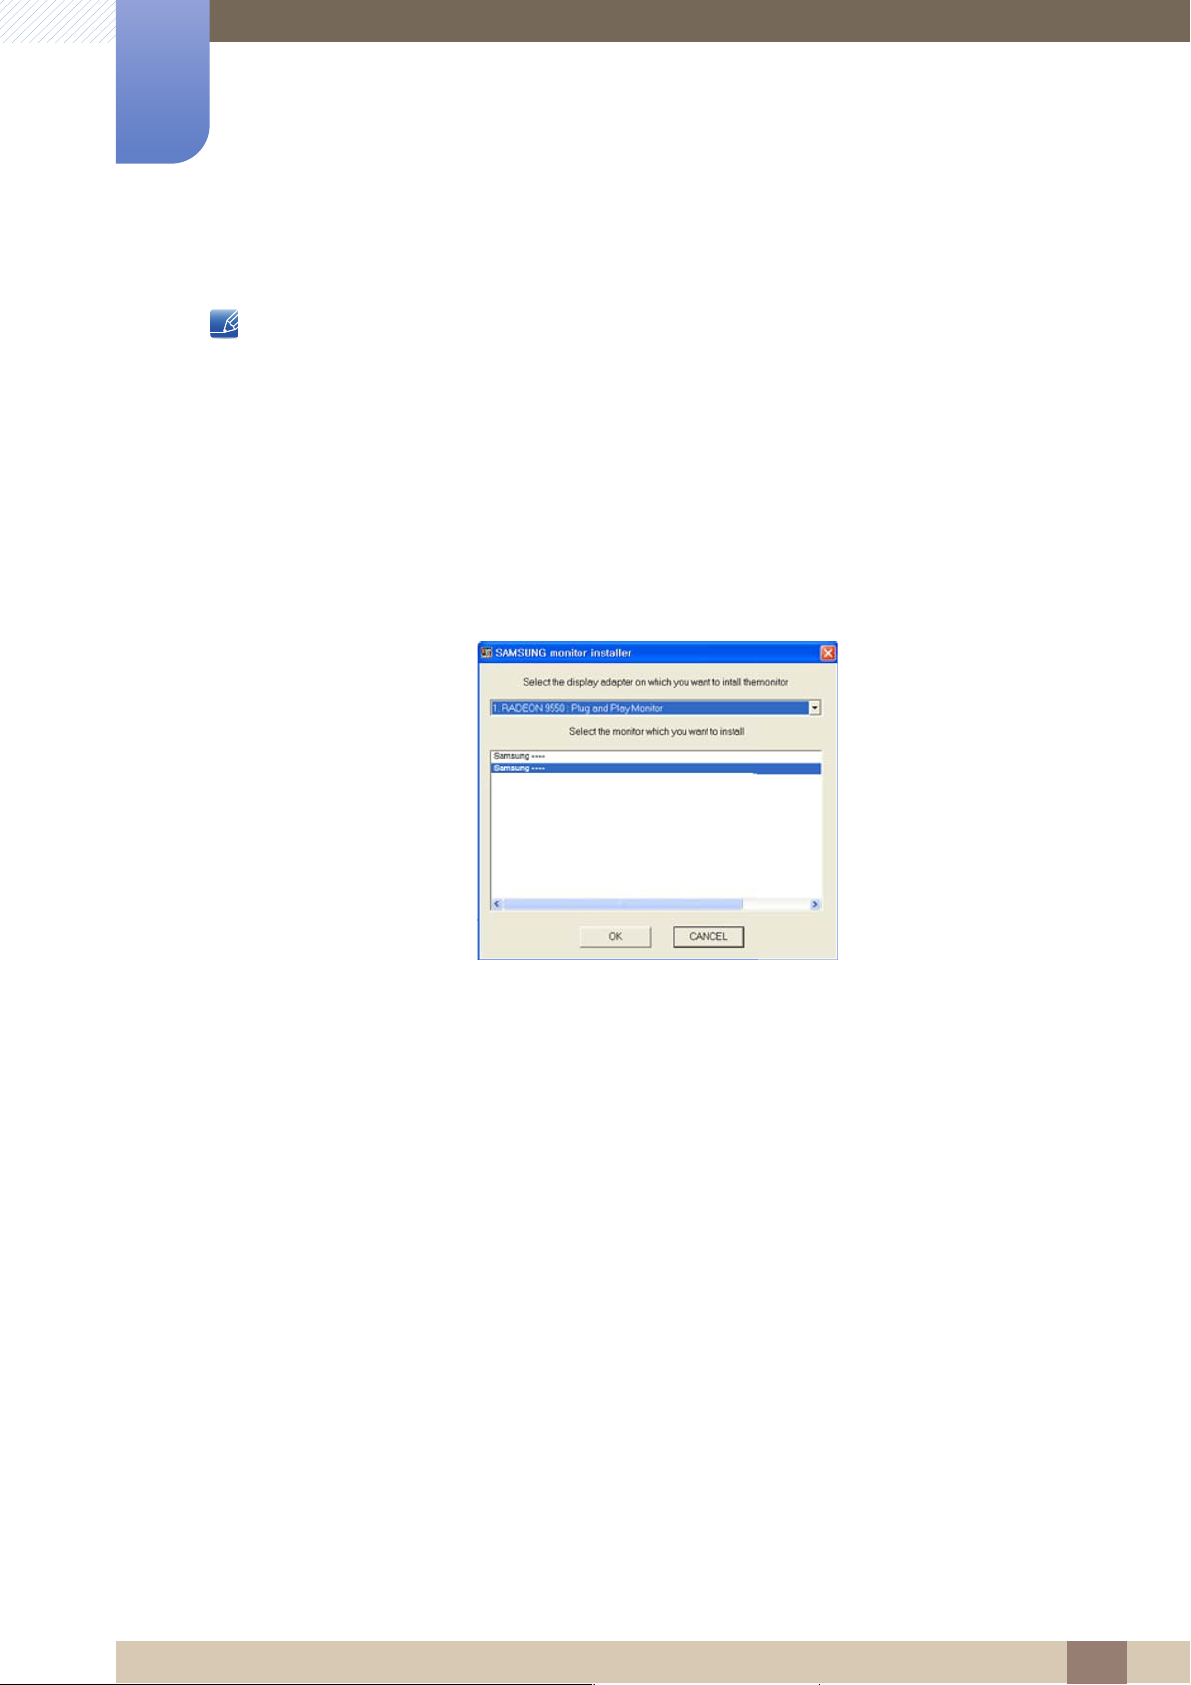
3 Follow the instructions given on the screen to proceed with installation.
4 Select your product model from the list of models.
5 Go to Display Properties and check that the resolution and refresh rate are appropriate.
Refer to your Windows OS manual for further details.
2 Connecting and Using a Source Device
35
Page 36
2
**** x **** **Hz
English
Language
Enter
The optimal resolution for this
monitor is as follows:
Use the above settings to set
the resolution on your PC.
Connecting and Using a Source Device
2.3.8 Setting Optimum Resolution
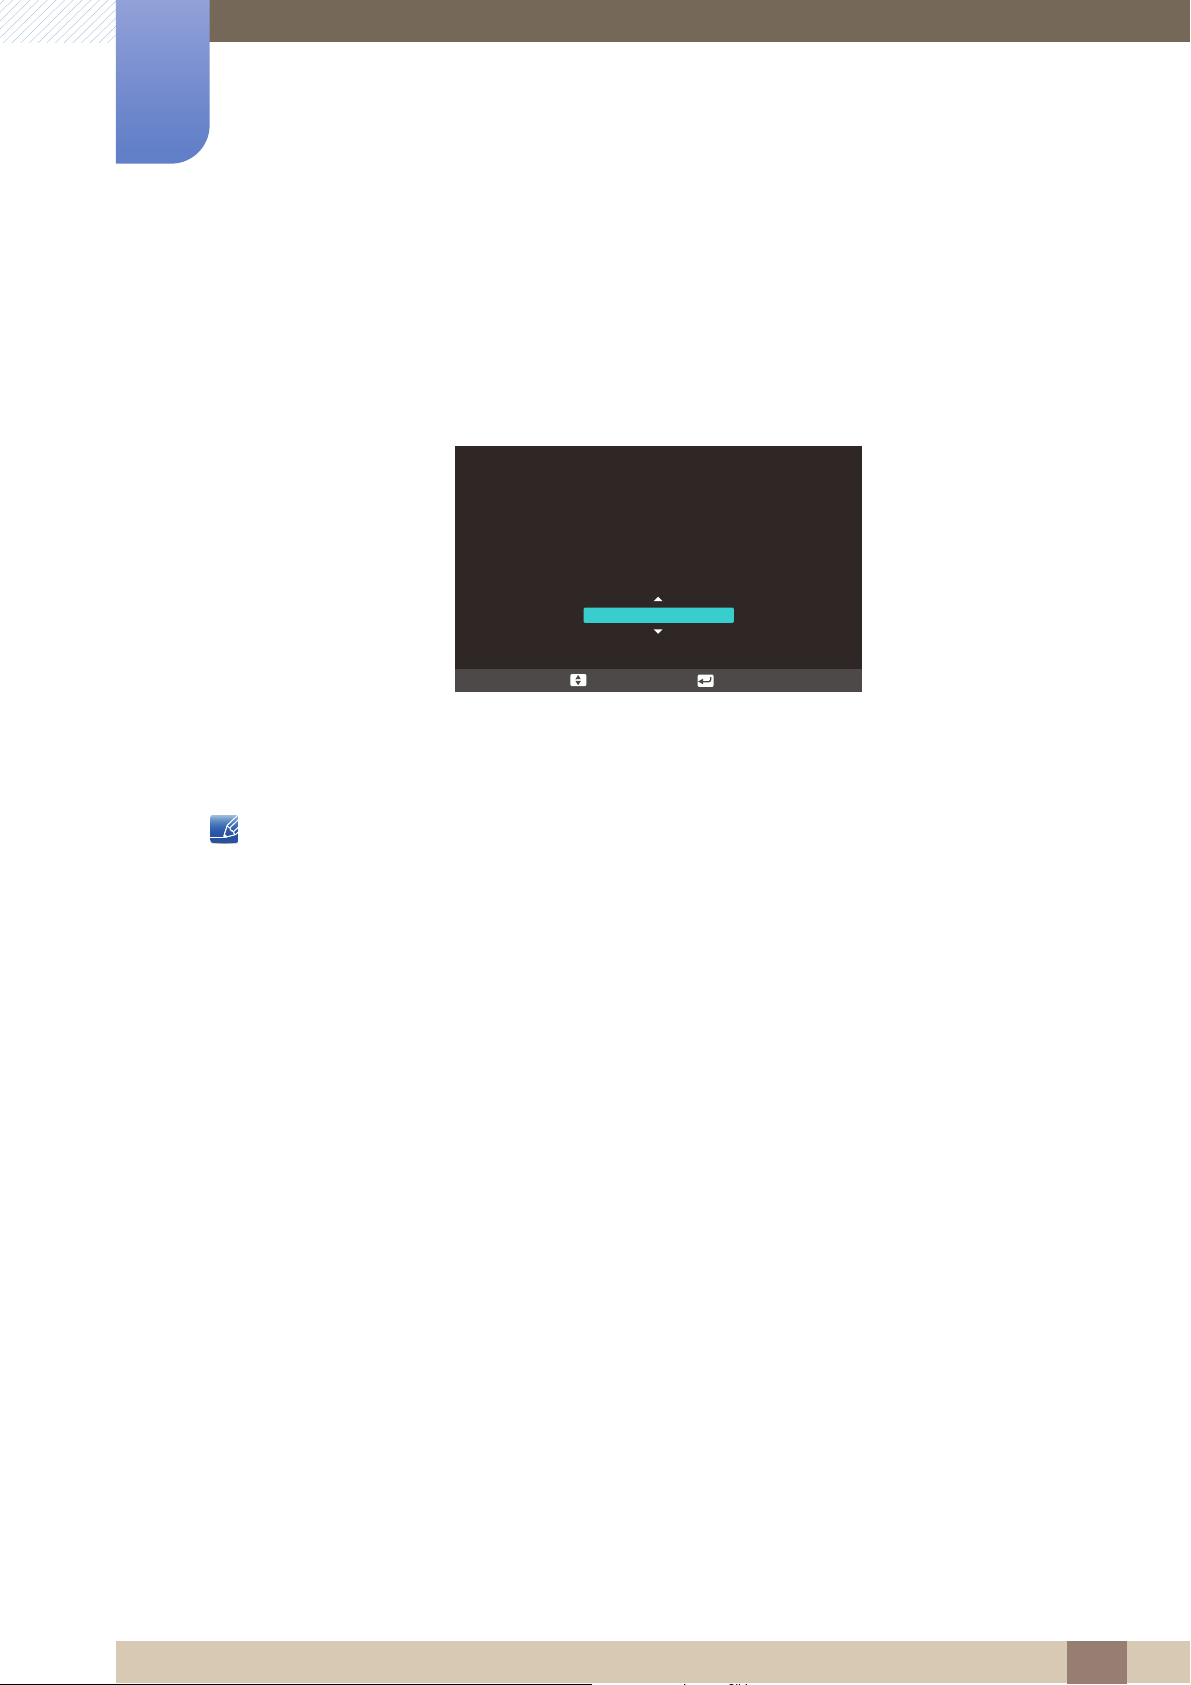
An information message about setting optimum resolution will appear if you power on the product for the
first time after purchase.
Select a language and change the resolution to the optimum value.
1
Select a language by moving the JOG button UP/DOWN. Next, press the JOG button.
2 To hide the information message, press the JOG button.
z If the optimum resolution is not selected, the message will appear up to three times for a specified
time even when the product is turned off and on again.
z The optimum resolution can also be selected in Control Panel on your PC.
2 Connecting and Using a Source Device
36
Page 37
2
→
→
12
3
**** ****
**********
Connecting and Using a Source Device
2.3.9 Changing the Resolution Using a PC
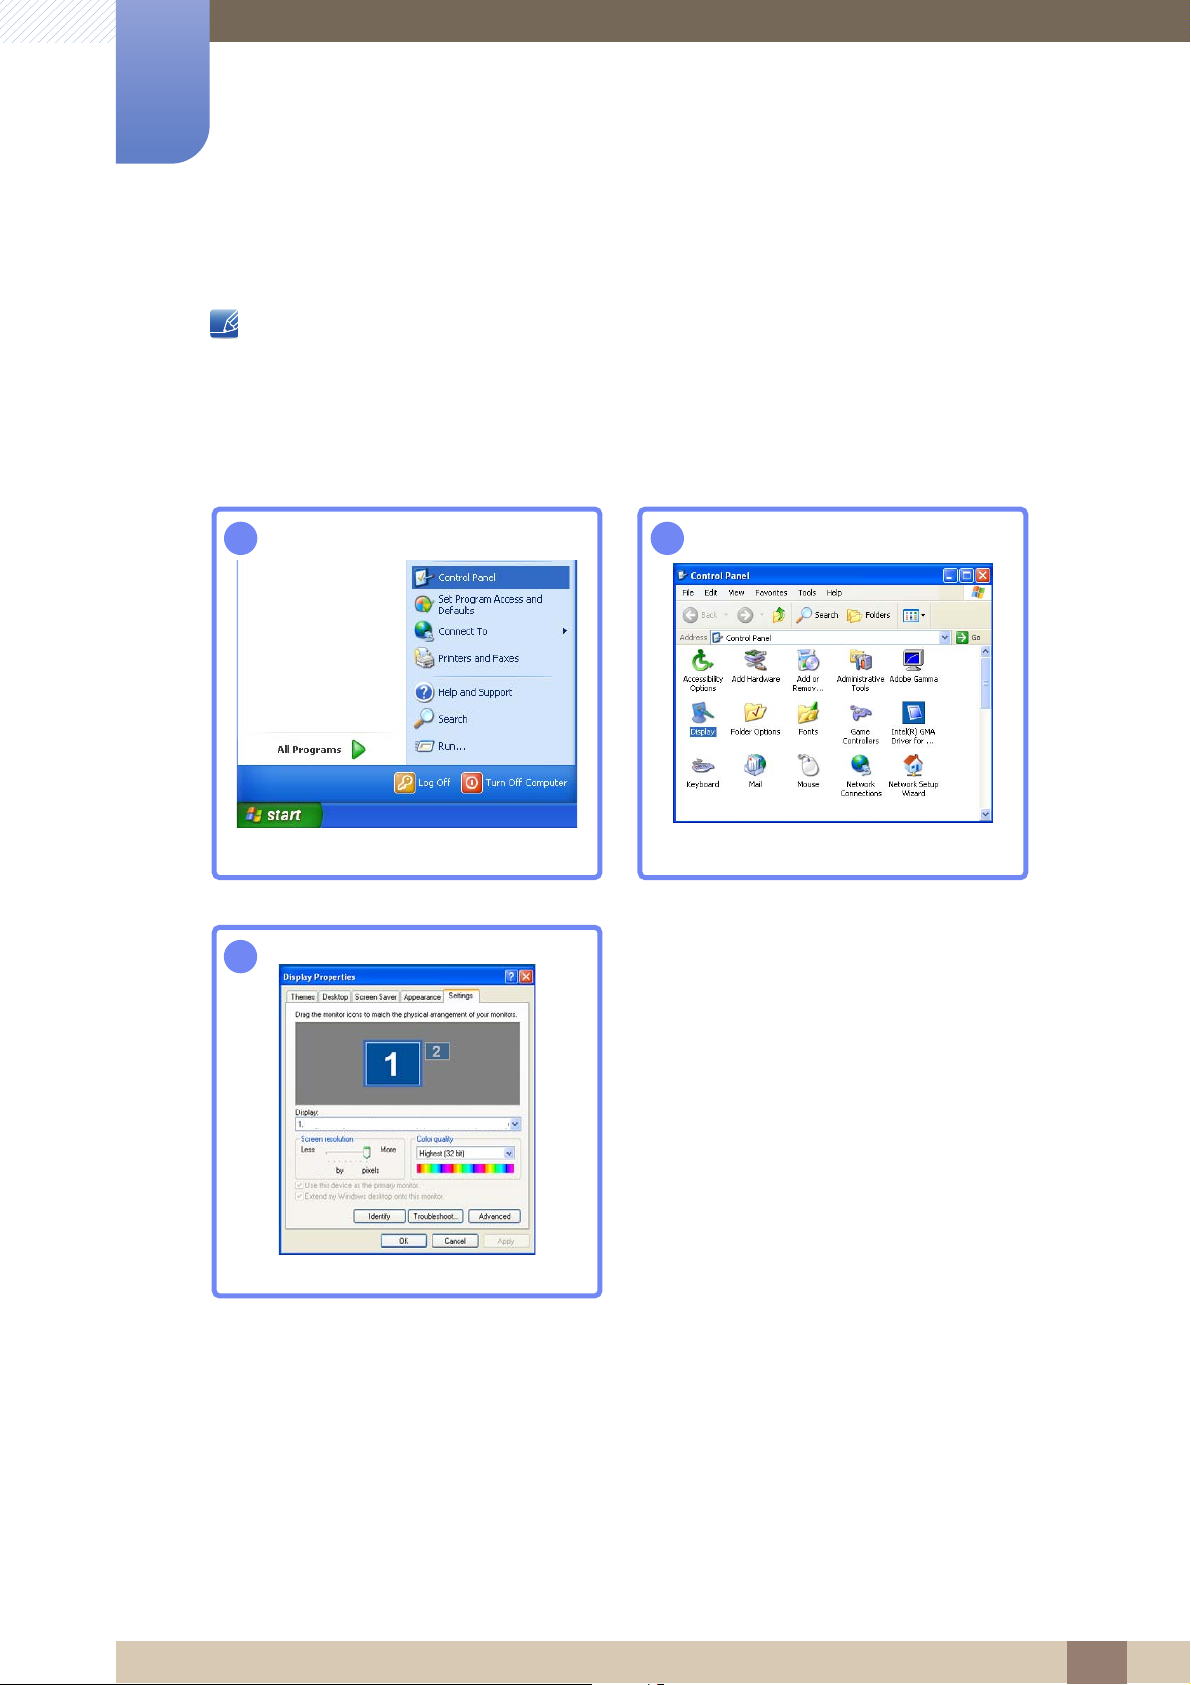
z Adjust the resolution and refresh rate in Control Panel on your PC to obtain optimum picture
quality.
z The picture quality of TFT-LCDs may degrade if the optimum resolution is not selected.
Changing the Resolution on Windows XP
Go to Control Panel Display Settings and change the resolution.
2 Connecting and Using a Source Device
37
Page 38
2
→
→
12
34
***********
***********
Connecting and Using a Source Device
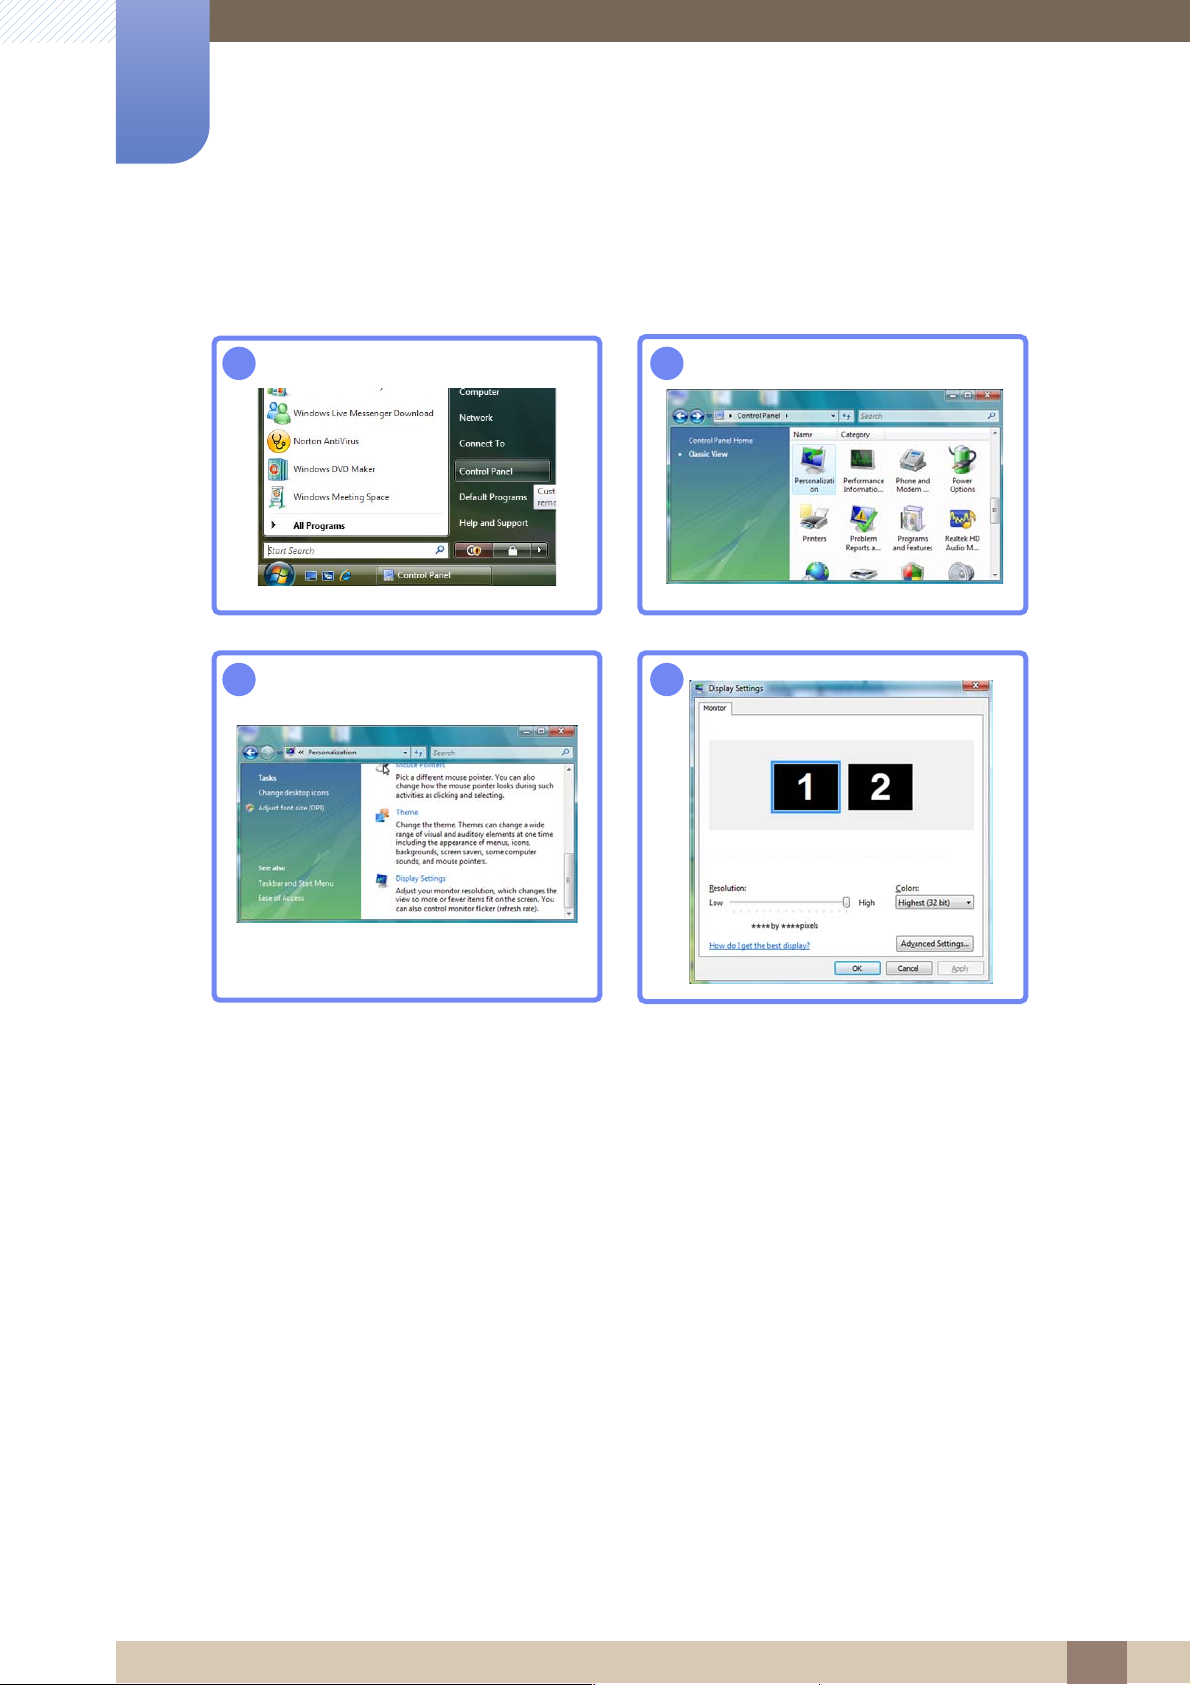
Changing the Resolution on Windows Vista
Go to Control Panel Personalization Display Settings and change the resolution.
2 Connecting and Using a Source Device
38
Page 39
2
→
→
12
34
Connecting and Using a Source Device
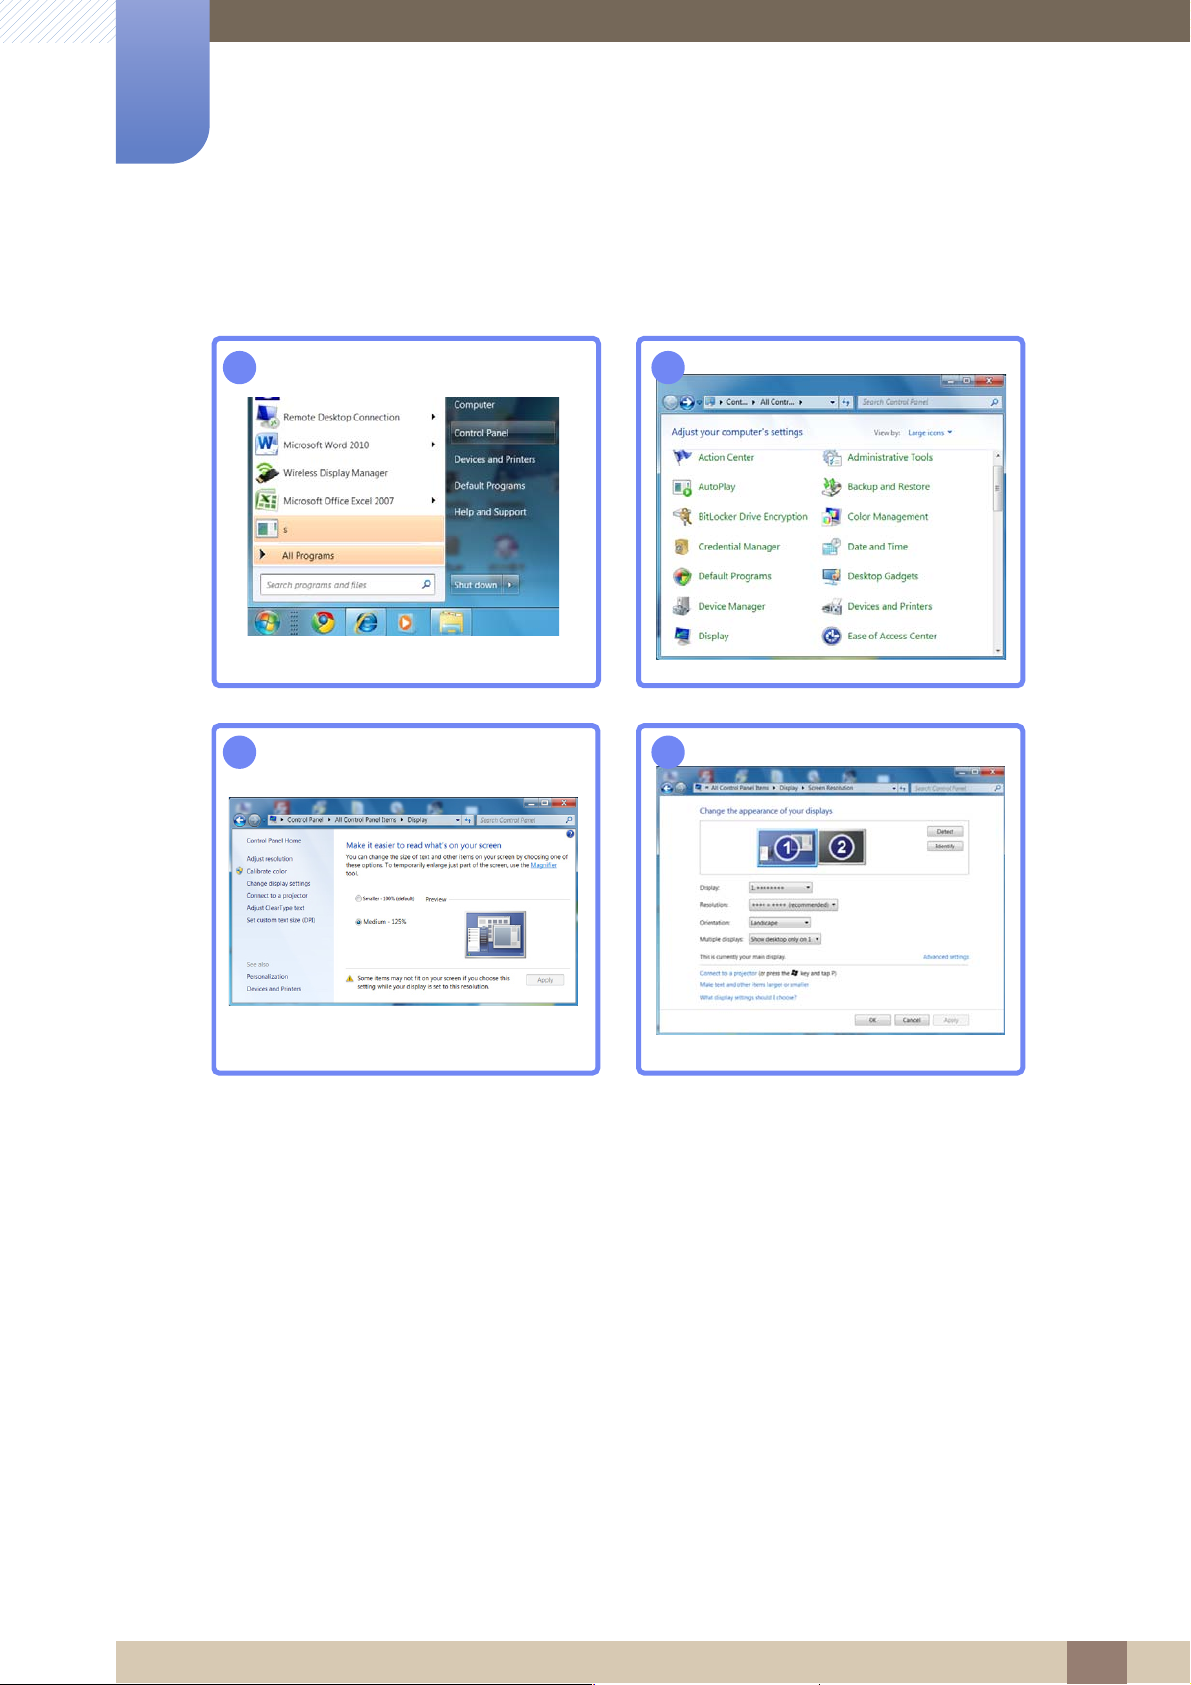
Changing the Resolution on Windows 7
Go to Control Panel Display Screen Resolution and change the resolution.
2 Connecting and Using a Source Device
39
Page 40
2
→
12
34
5
Connecting and Using a Source Device
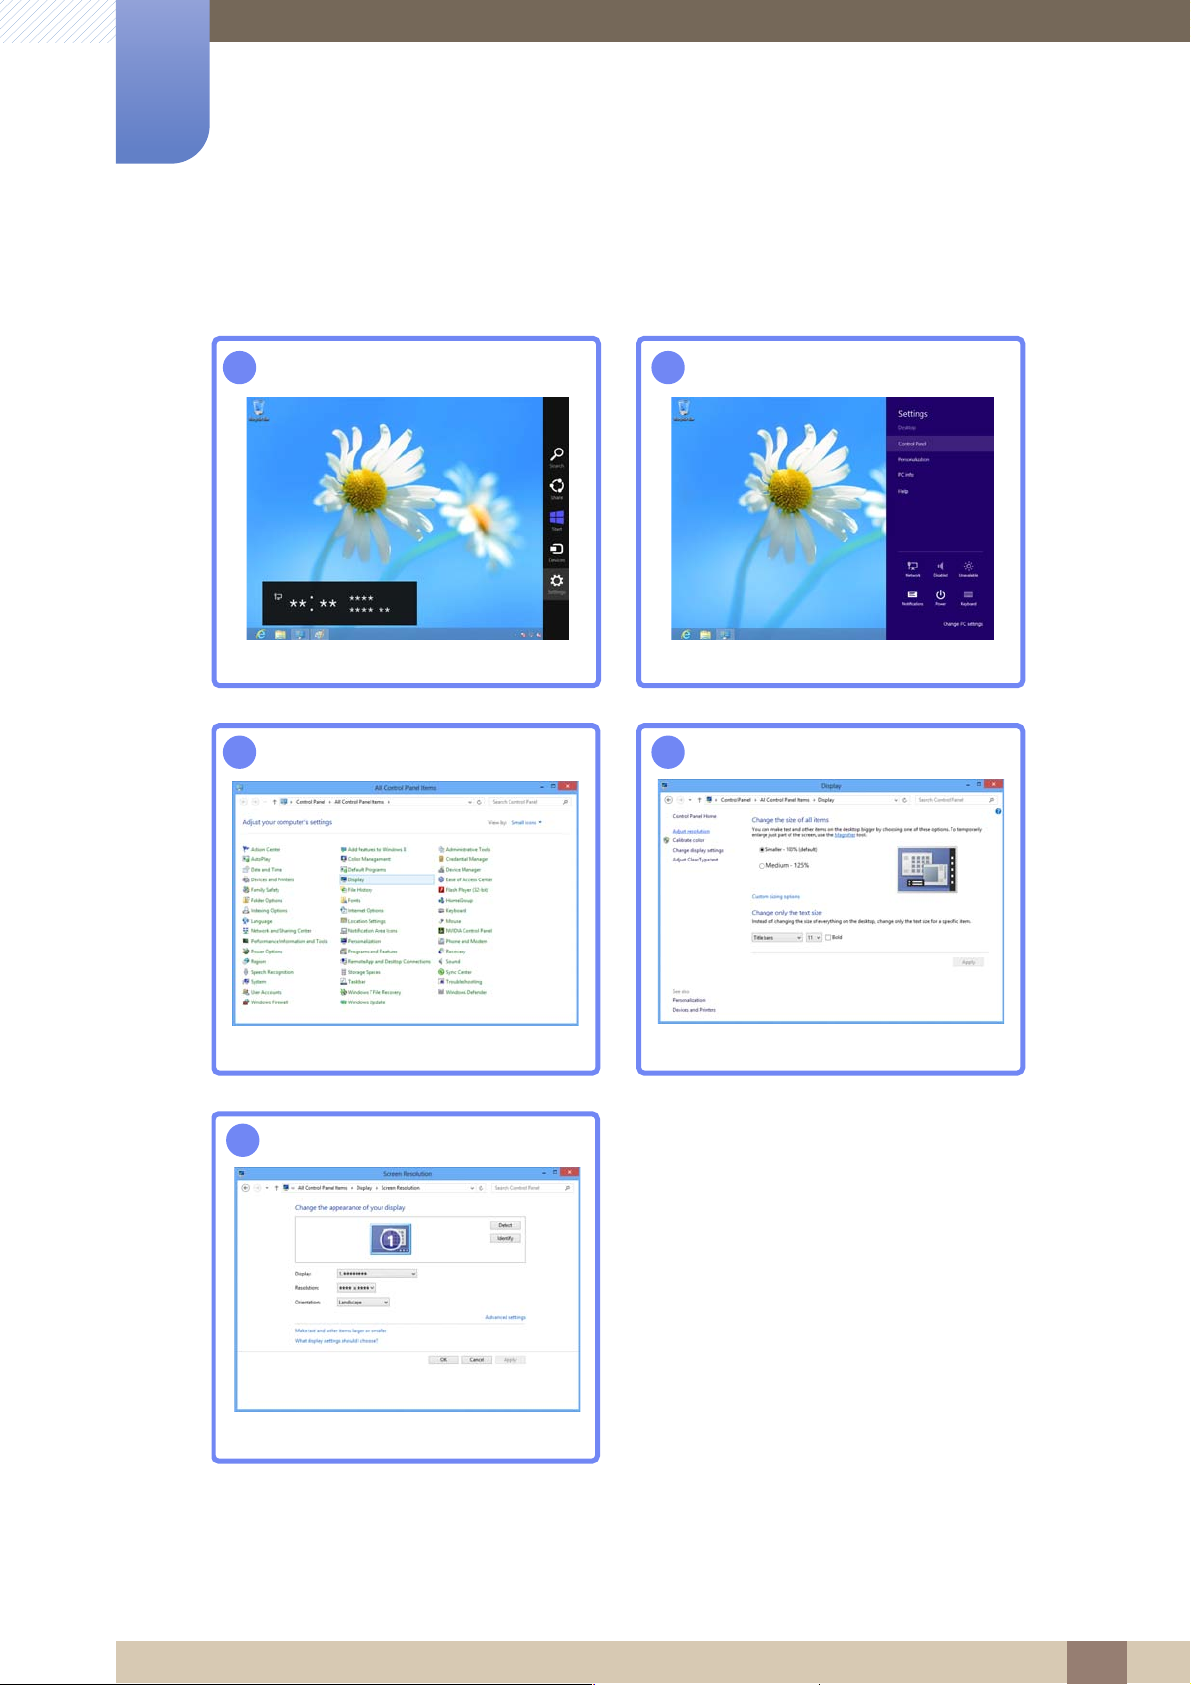
Changing the Resolution on Windows 8
Go to Settings Control Panel Display Screen Resolution and change the resolution.
→ →
2 Connecting and Using a Source Device
40
Page 41
Screen Setup
C
Off
Off
Wide
PICTURE
Brightness
Contrast
Sharpness
Image Size
SAMSUNG
MAGIC
Angle
Custom
SAMSUNG
MAGIC
Bright
SAMSUNG
MAGIC
Upscale
Adjust EnterReturn
3
Configure the screen settings such as brightness.
When configuring the screen settings, refer to the Help bar for assistance. It is found at the
bottom of the menu.
3.1 Brightness
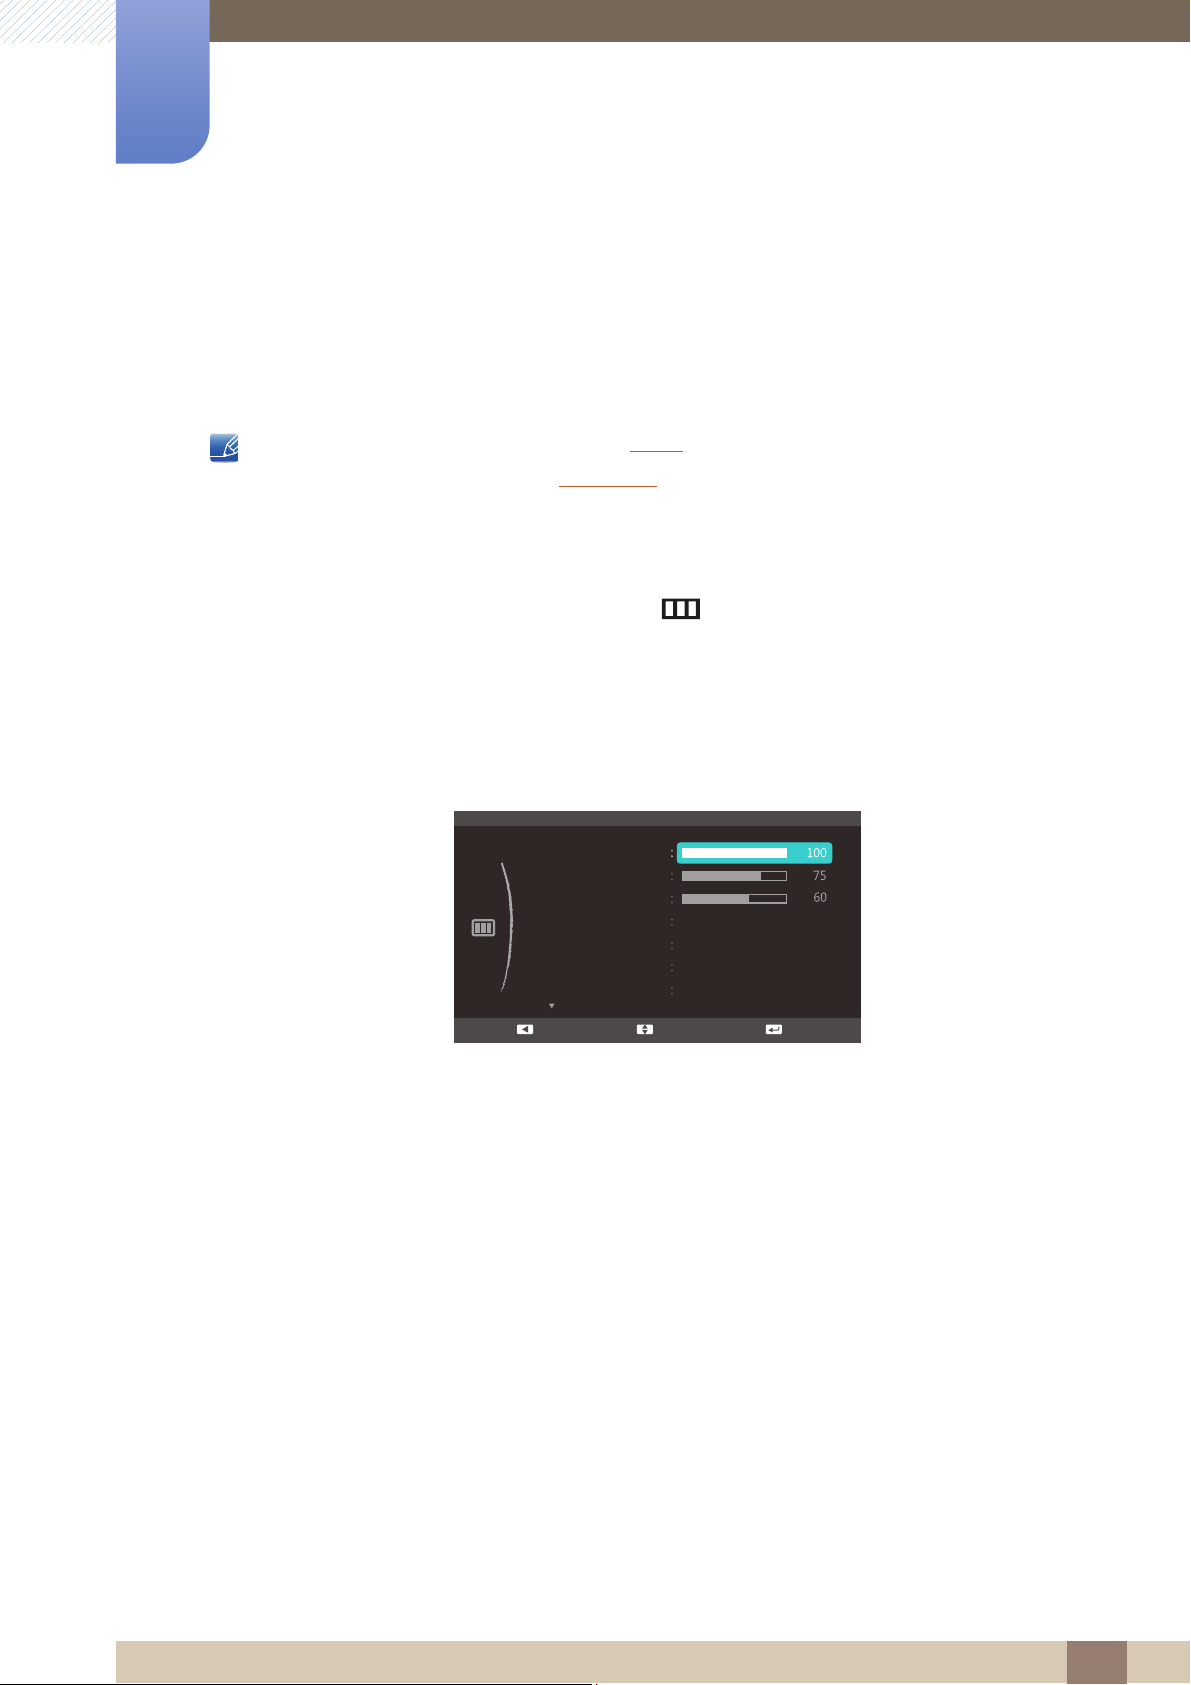
You can adjust the general brightness of the picture. (Range: 0~100)
A higher value will make the picture appear brighter.
z This menu is not available when Bright is set to Dynamic Contrast mode.
z This menu is unavailable when Eco Saving is set.
3.1.1 Configuring Brightness
1 When the Function Key Guide appears, select [] by moving the JOG button UP.
Next, press the JOG button.
SAMSUNG
MAGI
2 Move to PICTURE controlling the JOG button UP/DOWN and press the JOG button.
3 Move to Brightness controlling the JOG button UP/DOWN and press the JOG button.
The following screen will appear.
4 Adjust the Brightness controlling the JOG button UP/DOWN.
5 The selected option will be applied.
3 Screen Setup
41
Page 42
Screen Setup
C
Custom
Off
Wide
PICTURE
Brightness
Contrast
Sharpness
Image Size
SAMSUNG
MAGIC
Bright
SAMSUNG
MAGIC
Upscale
Adjust EnterReturn
Off
SAMSUNG
MAGIC
Angle
3
3.2 Contrast
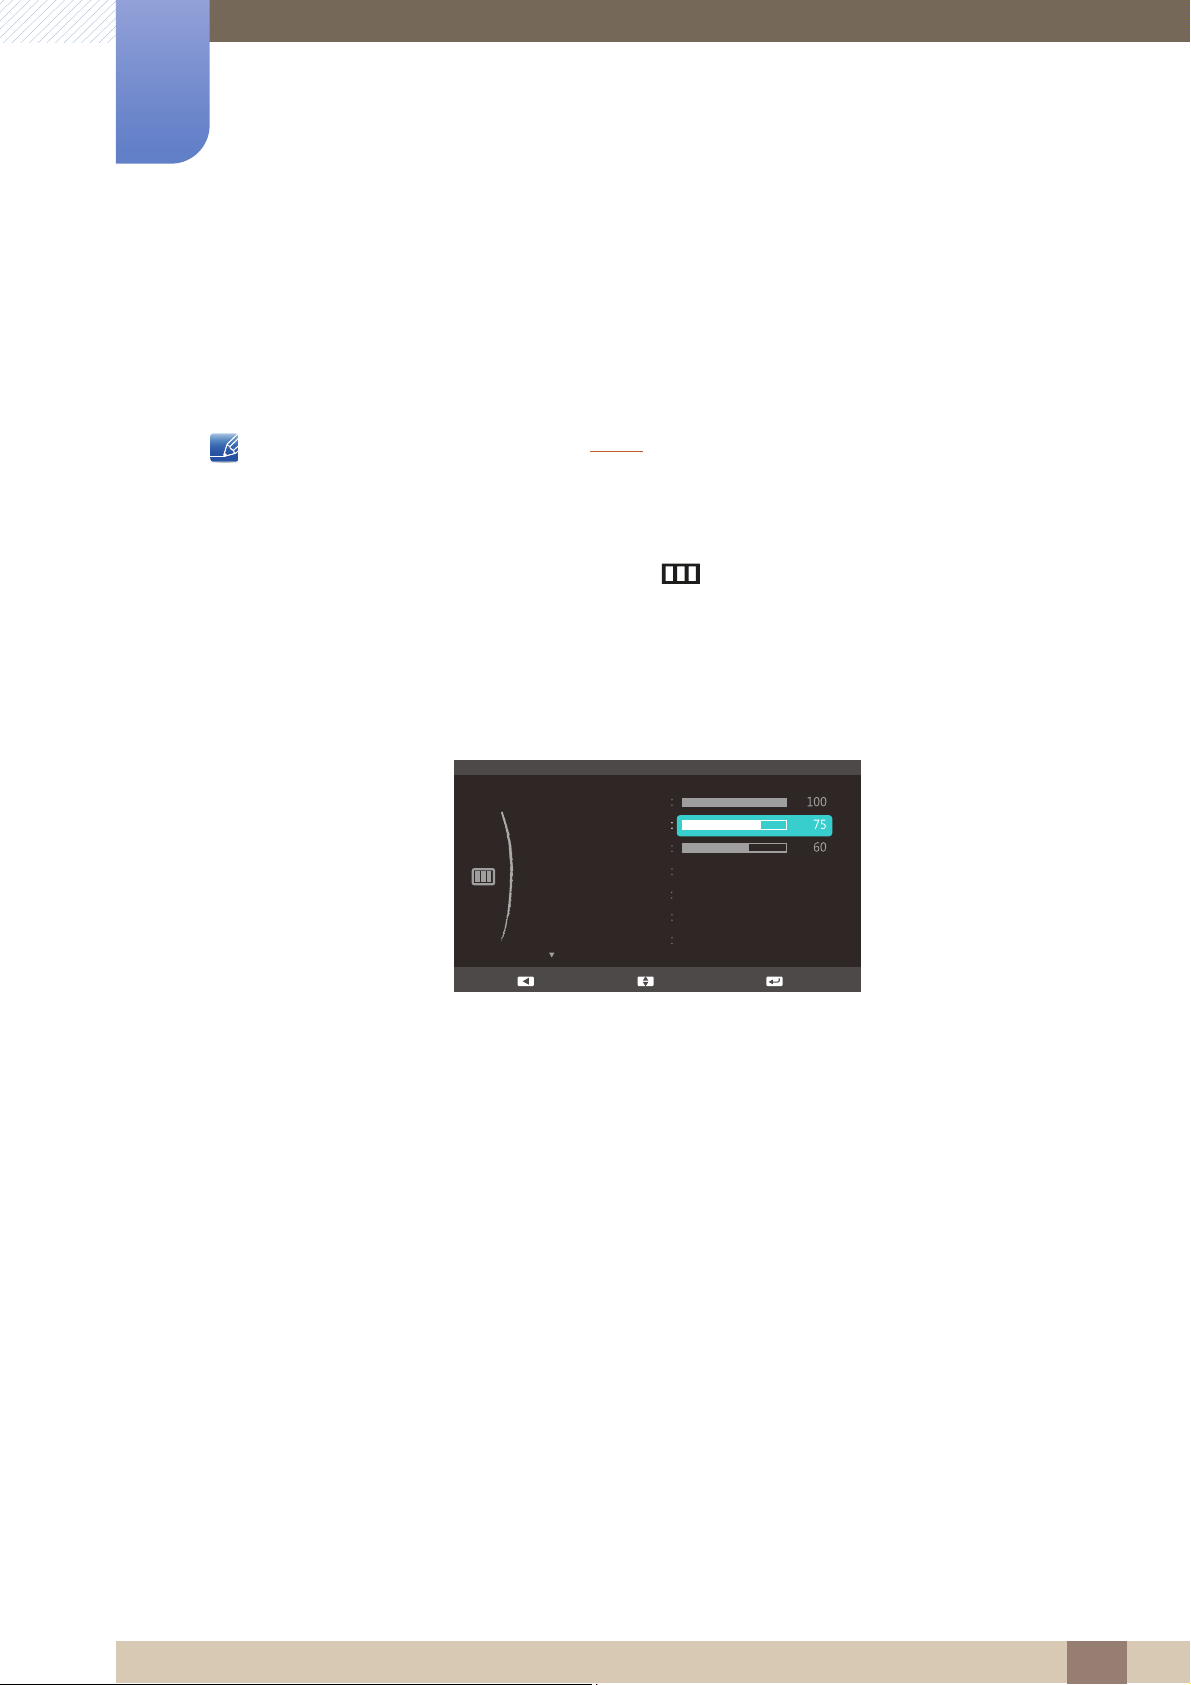
Adjust the contrast between the objects and background. (Range: 0~100)
A higher value will increase the contrast to make the object appear clearer.
This menu is not available when Bright is in Cinema or Dynamic Contrast mode.
3.2.1 Configuring Contrast
1 When the Function Key Guide appears, select [] by moving the JOG button UP.
Next, press the JOG button.
2 Move to PICTURE controlling the JOG button UP/DOWN and press the JOG button.
SAMSUNG
MAGI
3 Move to Contrast controlling the JOG button UP/DOWN and press the JOG button.
The following screen will appear.
4 Adjust the Contrast controlling the JOG button UP/DOWN.
5 The selected option will be applied.
3 Screen Setup
42
Page 43
Screen Setup
C
C
Custom
Off
Wide
PICTURE
Brightness
Contrast
Sharpness
Image Size
SAMSUNG
MAGIC
Bright
SAMSUNG
MAGIC
Upscale
Adjust EnterReturn
Off
SAMSUNG
MAGIC
Angle
3
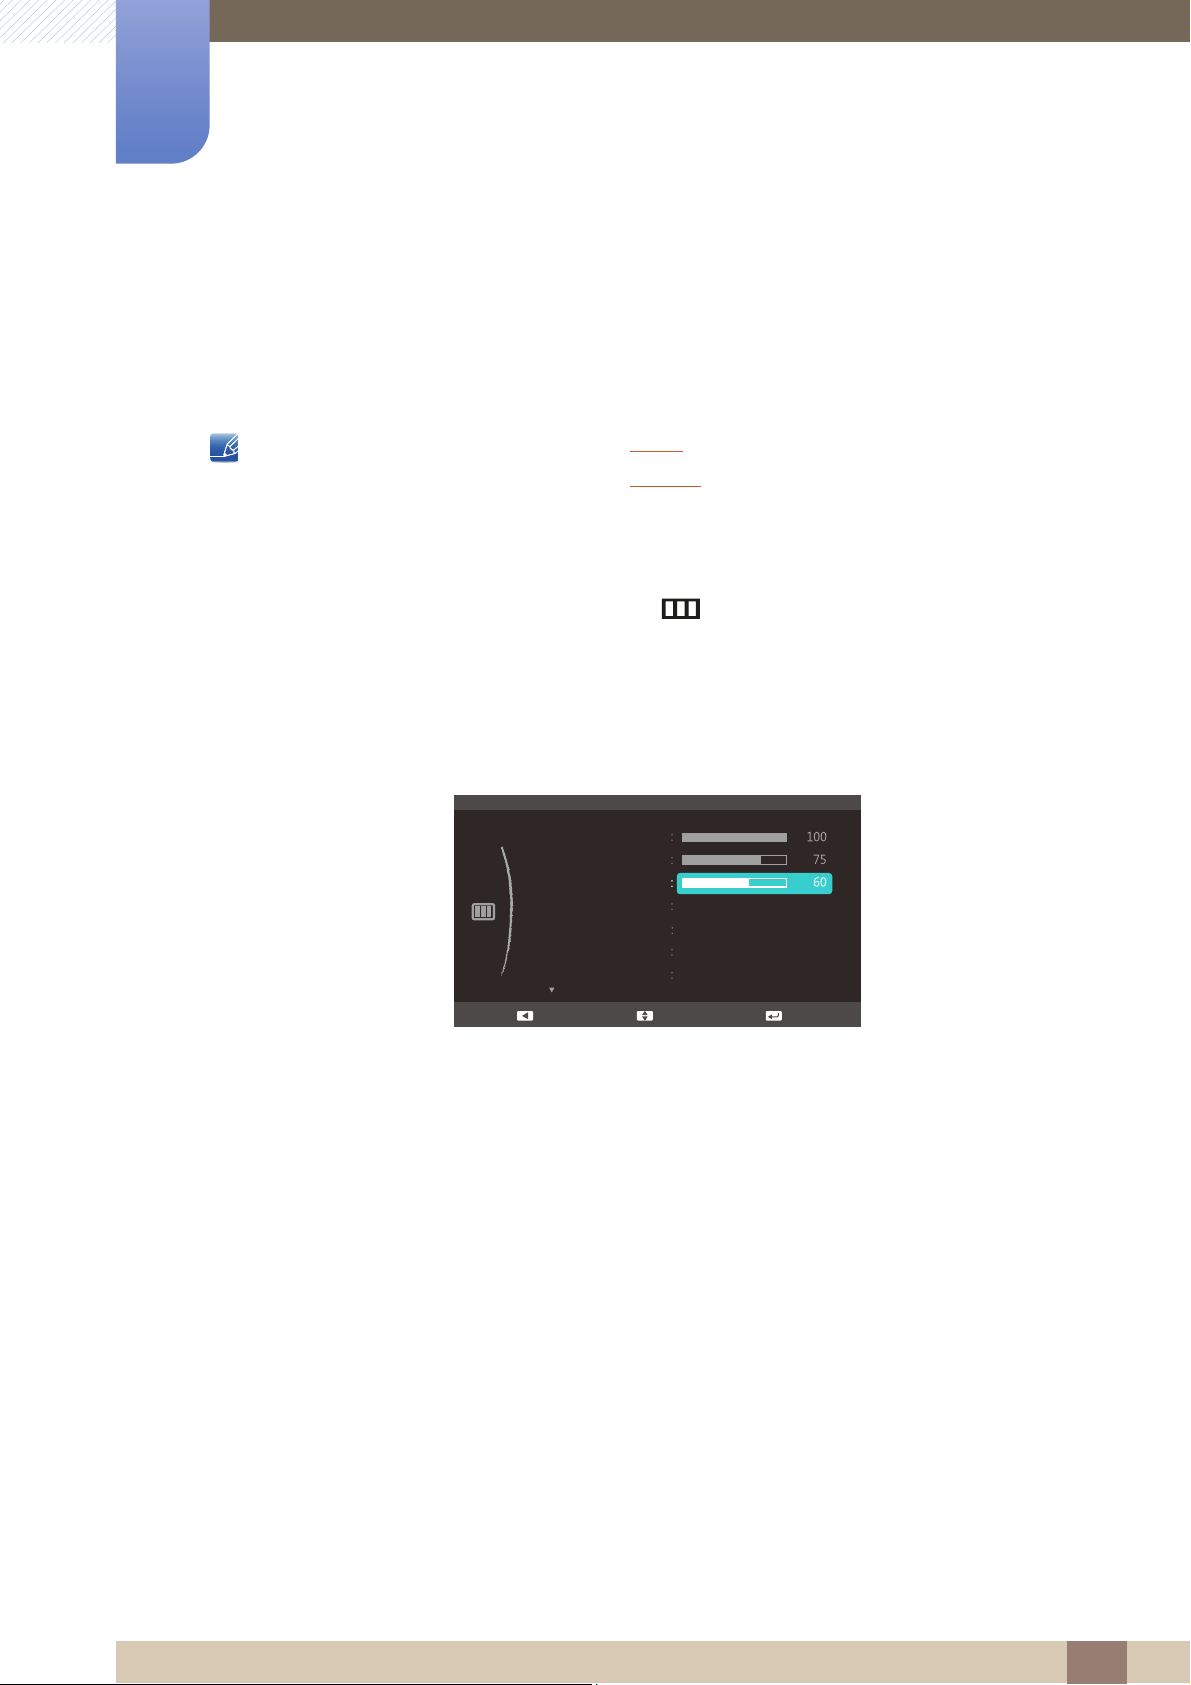
3.3 Sharpness
Make the outline of objects more clear or blurry. (Range: 0~100)
A higher value will make the outline of objects clearer.
z This menu is not available when Bright is in Cinema or Dynamic Contrast mode.
z This menu is not available when Upscale is in Mode1 or Mode2.
3.3.1 Configuring Sharpness
1 When the Function Key Guide appears, select [] by moving the JOG button UP.
Next, press the JOG button.
SAMSUNG
MAGI
SAMSUNG
MAGI
2 Move to PICTURE controlling the JOG button UP/DOWN and press the JOG button.
3 Move to Sharpness controlling the JOG button UP/DOWN and press the JOG button.
The following screen will appear.
4 Adjust the Sharpness controlling the JOG button UP/DOWN.
5 The selected option will be applied.
3 Screen Setup
43
Page 44
Screen Setup
C
SAMSUNG
MAGIC
Custom
Off
Auto
PICTURE
Brightness
Contrast
Sharpness
SAMSUNG
MAGIC
Bright
SAMSUNG
MAGIC
Angle
Custom
Standard
Game
Wide
Image Size
SAMSUNG
MAGIC
Upscale
Cinema
Dynamic Contrast
Move EnterReturn
Custom
PICTURE
Brightness
Contrast
Sharpness
Image Size
SAMSUNG
MAGIC
Bright
MAGIC
Dynamic
Standard
Movie
Custom
Move EnterReturn
SAMSUNG
MAGIC
Angle
Wide
SAMSUNG
MAGIC
Upscale
C
3
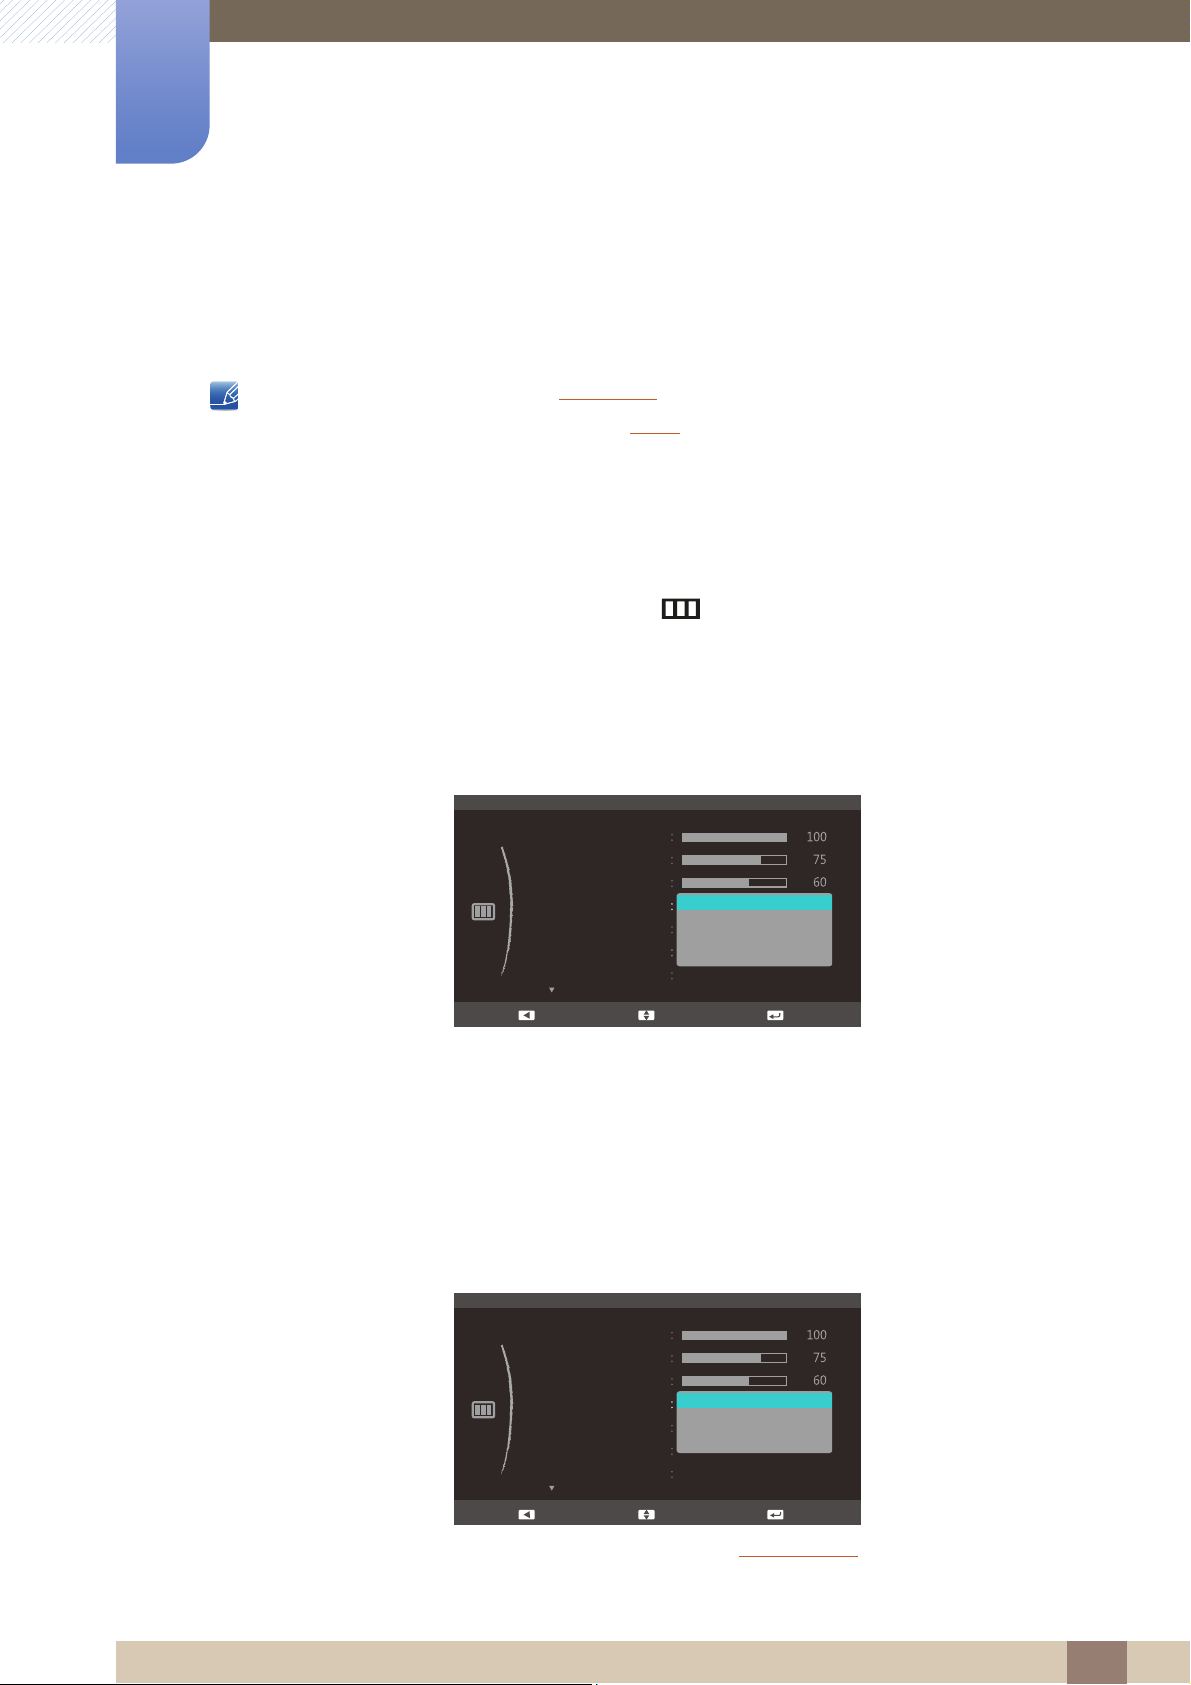
3.4 SAMSUNG MAGIC Bright
This menu provides an optimum picture quality suitable for the environment where the product will be used.
z This menu is unavailable when Eco Saving is set.
z This menu is not available when Angle is enabled.
This feature provides the viewing angle, brightness, and tint to suit your preferences.
3.4.1 Configuring SAMSUNG MAGIC Bright
1 When the Function Key Guide appears, select [] by moving the JOG button UP.
Next, press the JOG button.
SAMSUNG
MAGI
2 Move to PICTURE controlling the JOG button UP/DOWN and press the JOG button.
3 Move to Bright controlling the JOG button UP/DOWN and press the JOG button.
The following screen will appear.
z Custom: Customize the contrast and brightness as required.
z Standard: Obtain a picture quality suitable for editing documents or using Internet.
z Game: Obtain a picture quality suitable for playing games that involve many graphic effects and
dynamic movements.
z Cinema: Obtain the brightness and sharpness of TVs suitable for enjoying video and DVD
content.
z Dynamic Contrast: Obtain balanced brightness through automatic contrast adjustment.
When the external input is connected through HDMI and PC/AV Mode
has four automatic picture settings (Dynamic, Standard, Movie and Custom) that are preset at the
is set to AV, Bright
3 Screen Setup
SAMSUNG
MAGI
44
Page 45

3
Screen Setup
factory. You can activate either Dynamic, Standard, Movie or Custom. You can select Custom
which automatically recalls your personalized picture settings.
z Dynamic: Select this mode to view a sharper image than in Standard mode.
z Standard: Select this mode when the surroundings are bright. This also provides a sharp
image.
z Movie: Select this mode when the surroundings are dark. This will save power and reduce eye
fatigue.
z Custom: Select this mode when you want to adjust the image according to your preferences.
4 Move to the desired option controlling the JOG button UP/DOWN and press the JOG button.
5 The selected option will be applied.
3 Screen Setup
45
Page 46
Screen Setup
C
C
SAMSUNG
MAGIC
Custom
PICTURE
Brightness
Contrast
Sharpness
Image Size
SAMSUNG
MAGIC
Bright
MAGIC
Off
Lean Back Mode 1
Lean Back Mode 2
Standing Mode
Side Mode
Group View
Custom
Move EnterReturn
SAMSUNG
MAGIC
Angle
SAMSUNG
MAGIC
Upscale
1
5 5
4
2
3
1
③
④
⑤
3
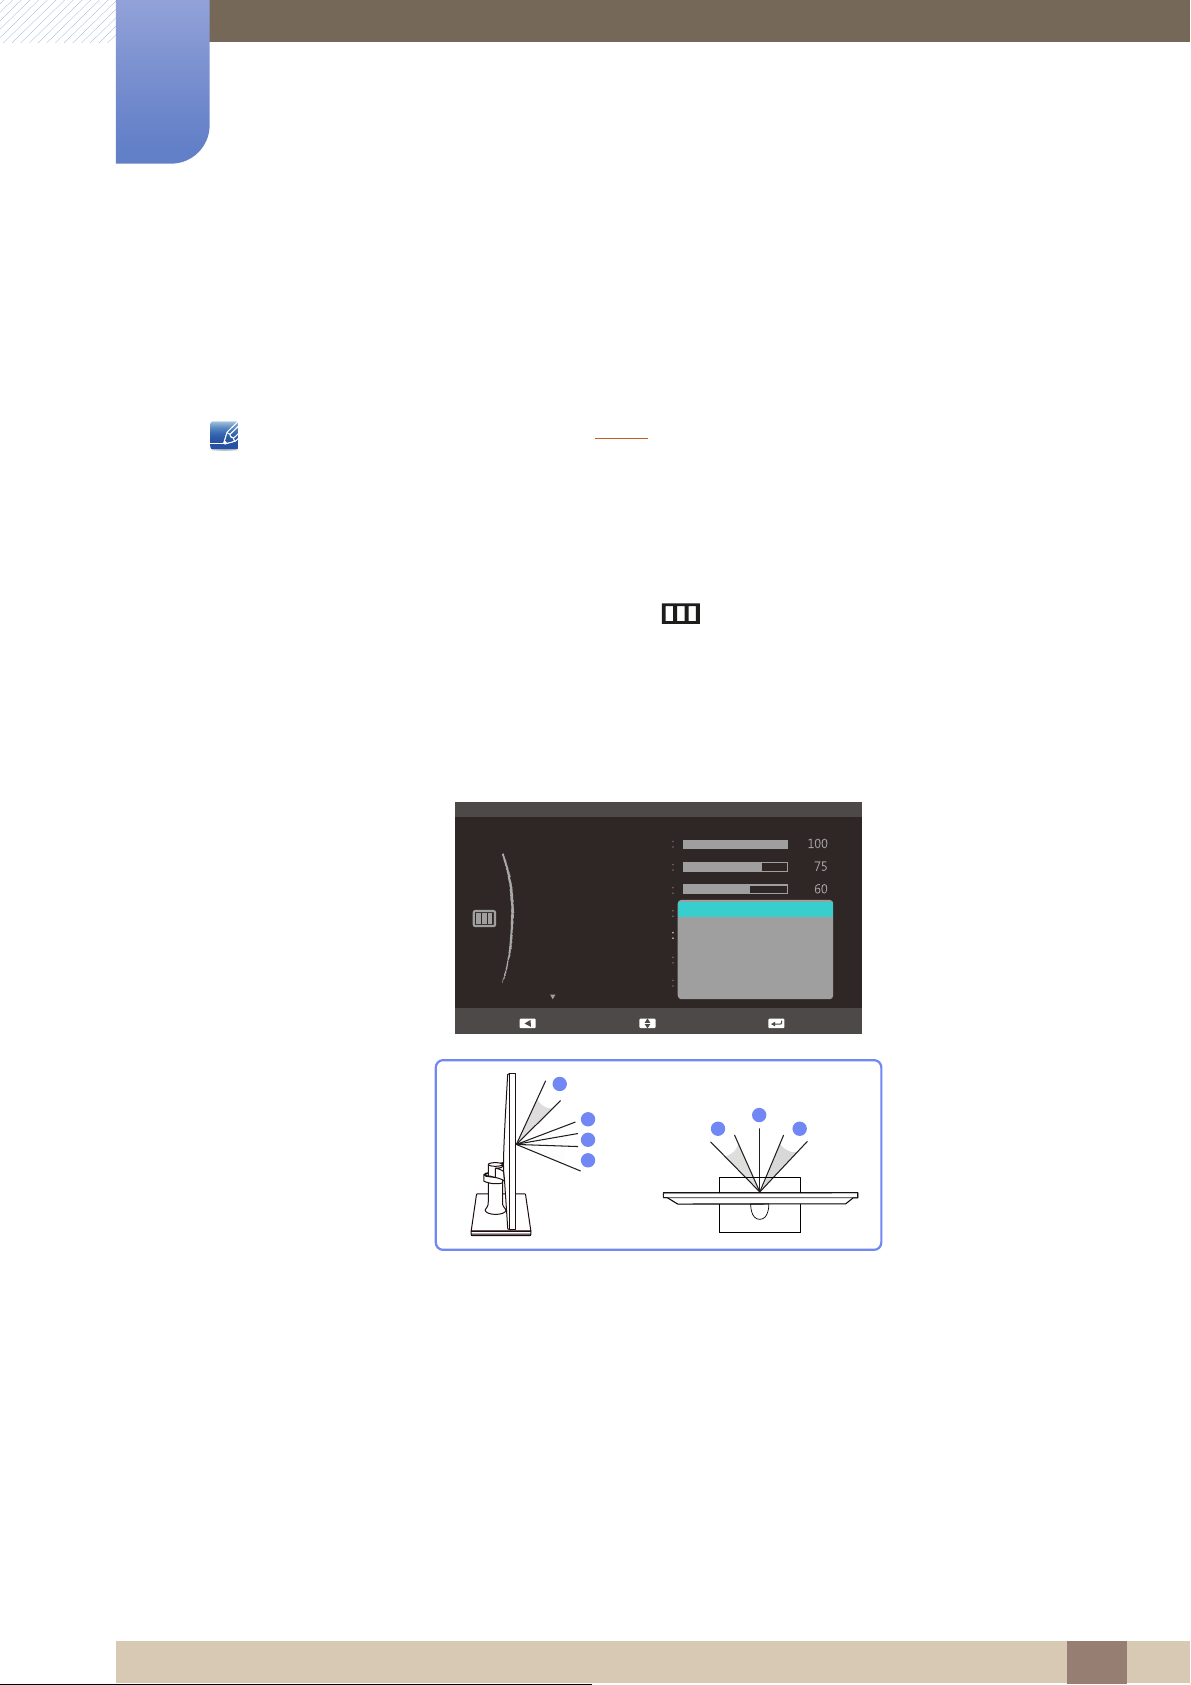
3.5 SAMSUNG MAGIC Angle
SAMSUNG
Angle allows you to configure the settings to obtain the optimum picture quality according to your
MAGI
viewing angle.
This option is not available when Bright is in Cinema or Dynamic Contrast mode.
This feature provides the viewing angle, brightness, and tint to suit your preferences.
3.5.1 Configuring SAMSUNG MAGIC Angle
1 When the Function Key Guide appears, select [] by moving the JOG button UP.
Next, press the JOG button.
SAMSUNG
MAGI
2 Move to PICTURE controlling the JOG button UP/DOWN and press the JOG button.
3 Move to Angle controlling the JOG button UP/DOWN and press the JOG button.
The following screen will appear.
z Off : Select this option to view directly in front of the product.
z Lean Back Mode 1 : Select this option to view from a place slightly lower than the product.
z Lean Back Mode 2 : Select this option to view from a place lower than Lean Back Mode 1.
z Standing Mode : Select this option to view from a place higher than the product.
z Side Mode : Select this option to view from either side of the product.
z Group View: Select this option for more than one viewer to view from places , and .
z Custom: Lean Back Mode 1 will be applied by default if Custom is selected.
4 Move to the desired option controlling the JOG button UP/DOWN and press the JOG button.
5 The selected option will be applied.
①
②
3 Screen Setup
①
④
⑤
46
Page 47
Screen Setup
C
C
SAMSUNG
MAGIC
Custom
Off
Auto
PICTURE
Brightness
Contrast
Sharpness
Image Size
SAMSUNG
MAGIC
Bright
SAMSUNG
MAGIC
Upscale
Off
Mode1
Mode2
Move EnterReturn
Off
SAMSUNG
MAGIC
Angle
3
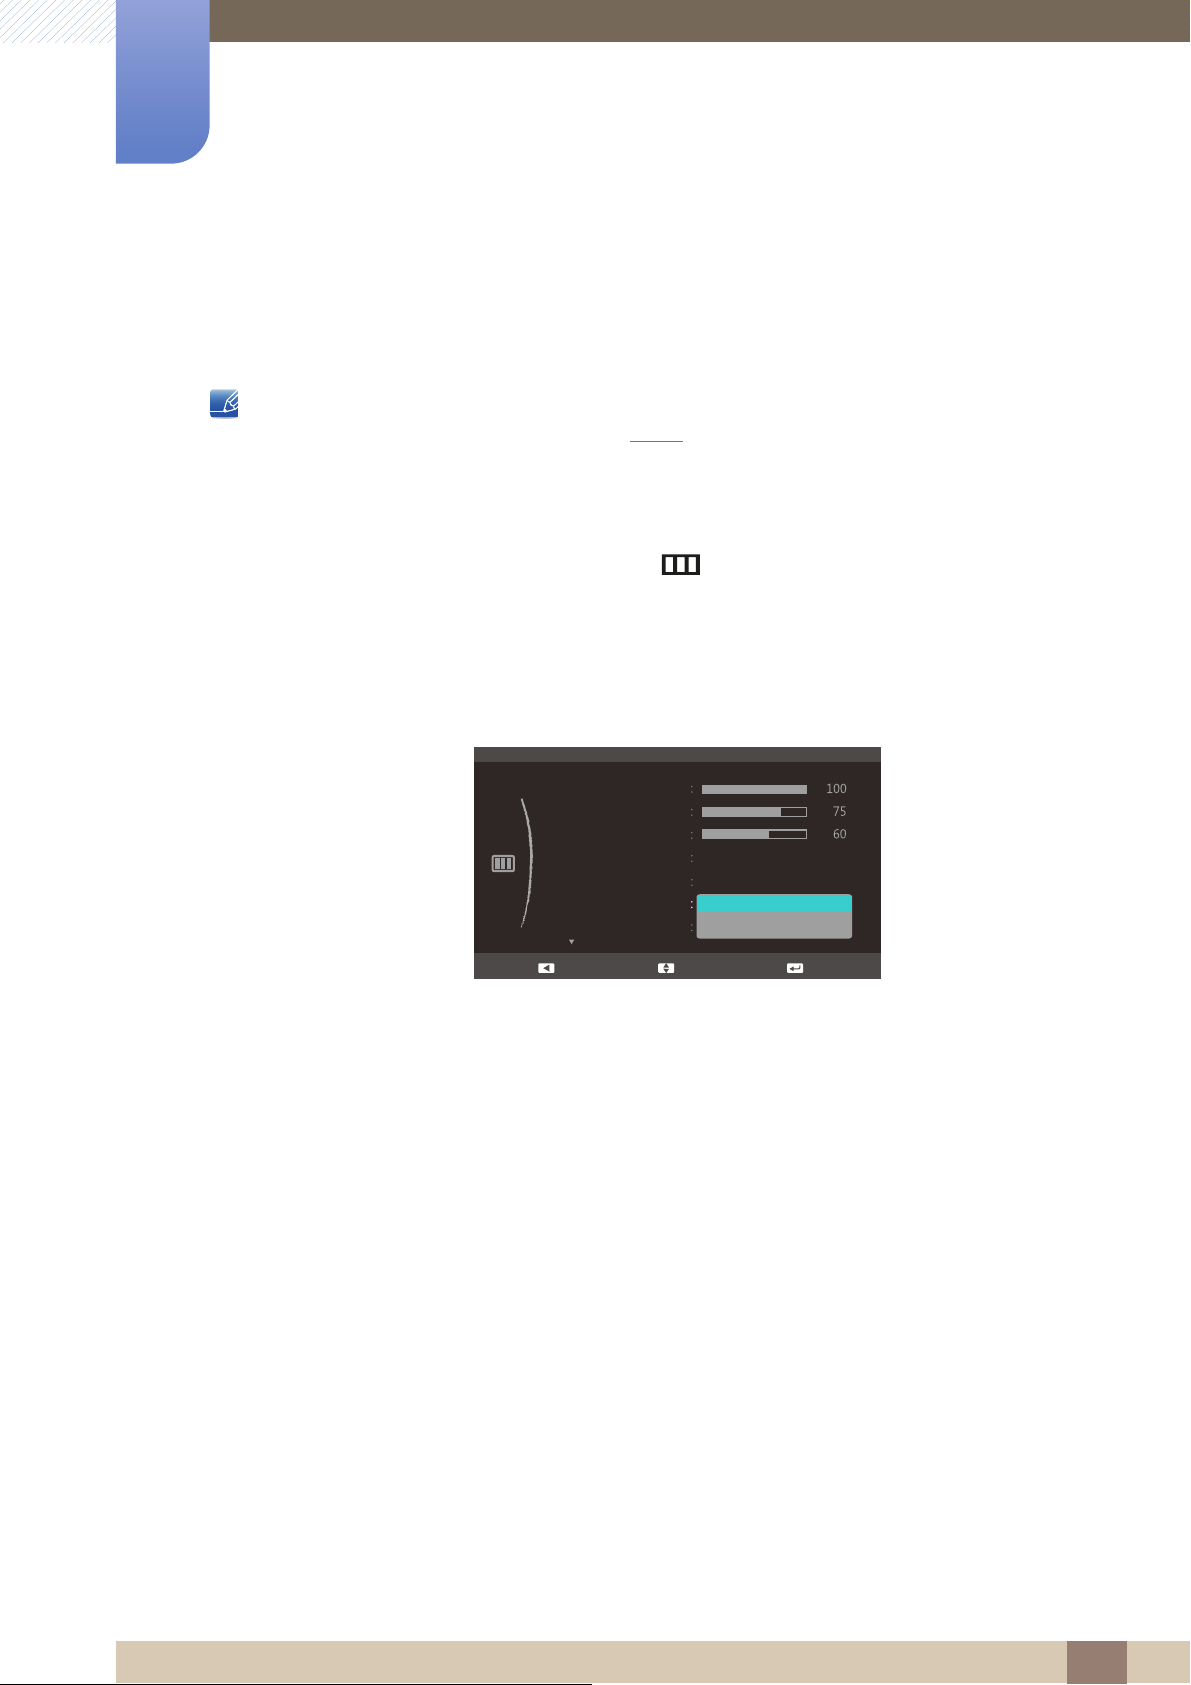
3.6 SAMSUNG MAGIC Upscale
SAMSUNG
Upscale function can enhance the layers of the picture details and the vividness of the picture.
MAGI
z The function has more obvious effects on low-resolution pictures.
z This menu is not available when Bright is in Cinema or Dynamic Contrast mode.
3.6.1 Configuring SAMSUNG MAGIC Upscale
1 When the Function Key Guide appears, select [] by moving the JOG button UP.
Next, press the JOG button.
2 Move to PICTURE controlling the JOG button UP/DOWN and press the JOG button.
SAMSUNG
MAGI
3 Move to Upscale controlling the JOG button UP/DOWN and press the JOG button.
The following screen will appear.
Comparing with Mode1, Mode2 has a stronger effect.
4 Move to the desired option controlling the JOG button UP/DOWN and press the JOG button.
5 The selected option will be applied.
3 Screen Setup
47
Page 48
Screen Setup
Custom
Off
PICTURE
Brightness
Contrast
Sharpness
Image Size
SAMSUNG
MAGIC
Bright
SAMSUNG
MAGIC
Upscale
Auto
Wide
Move EnterReturn
Off
SAMSUNG
MAGIC
Angle
Custom
Off
Auto
PICTURE
Brightness
Contrast
Sharpness
Image Size
SAMSUNG
MAGIC
Bright
SAMSUNG
MAGIC
Upscale
4:3
16:9
Screen Fit
Move EnterReturn
Off
SAMSUNG
MAGIC
Angle
3
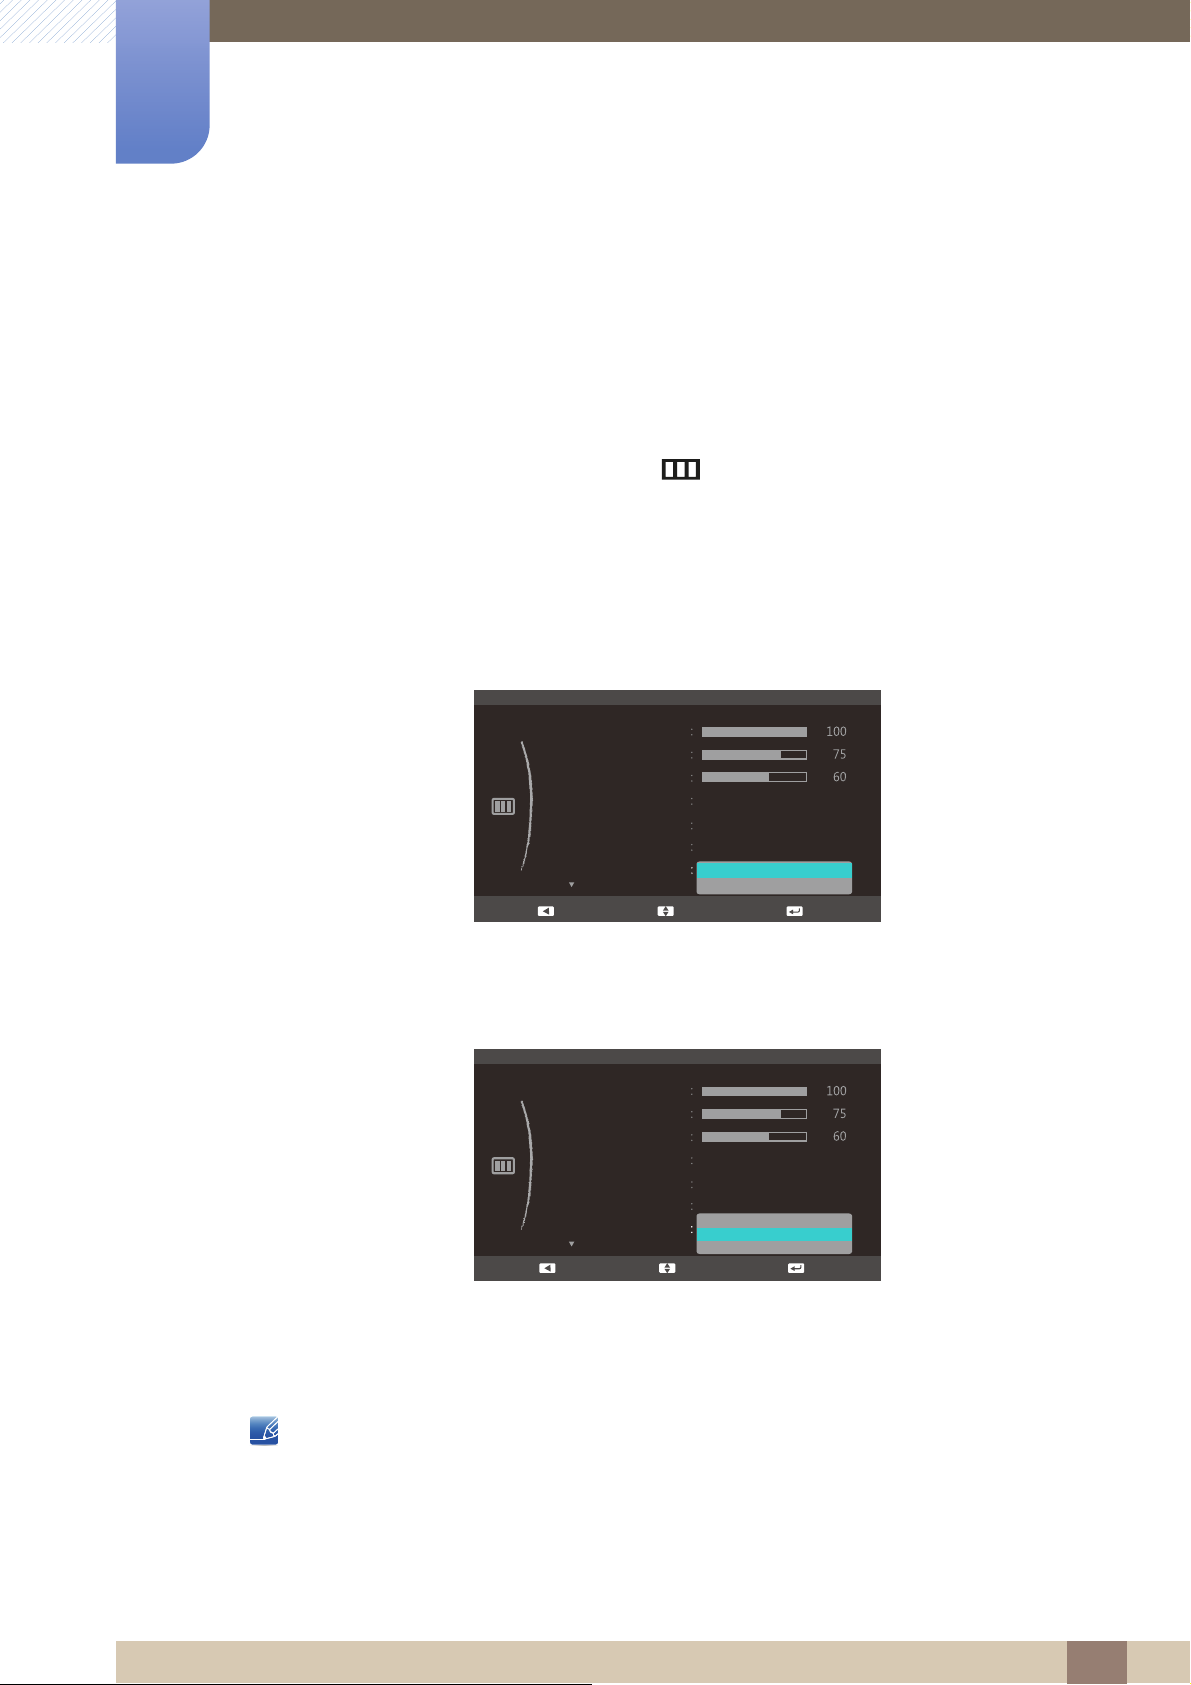
3.7 Image Size
Change the picture size.
3.7.1 Changing the Image Size
1 When the Function Key Guide appears, select [] by moving the JOG button UP.
Next, press the JOG button.
2 Move to PICTURE controlling the JOG button UP/DOWN and press the JOG button.
3 Move to Image Size controlling the JOG button UP/DOWN and press the JOG button.
The following screen will appear.
In PC mode
z Auto: Display the picture according to the aspect ratio of the input source.
z Wide: Display the picture in full screen regardless of the aspect ratio of the input source.
In AV mode
z 4:3: Display the picture with an aspect ratio of 4:3. Suitable for videos and standard broadcasts.
z 16:9: Display the picture with an aspect ratio of 16:9.
z Screen Fit: Display the picture with the original aspect ratio without cutting off.
Changing the screen size is available when the following conditions are satisfied.
z A digital output device is connected using the HDMI cable.
z The input signal is 480p, 576p, 720p, or 1080p and monitor can display normally (Not every
model can support all of these signals.).
3 Screen Setup
48
Page 49

3
Screen Setup
z This can only be set when the external input is connected through HDMI and PC/AV Mode is
set to AV.
4 Move to the desired option controlling the JOG button UP/DOWN and press the JOG button.
5 The selected option will be applied.
3 Screen Setup
49
Page 50
Screen Setup
PICTURE
0
H-Position
V-Position
Coarse
Fine
1936
50
Move EnterReturn
HDMI Black Level
Normal
Low
3
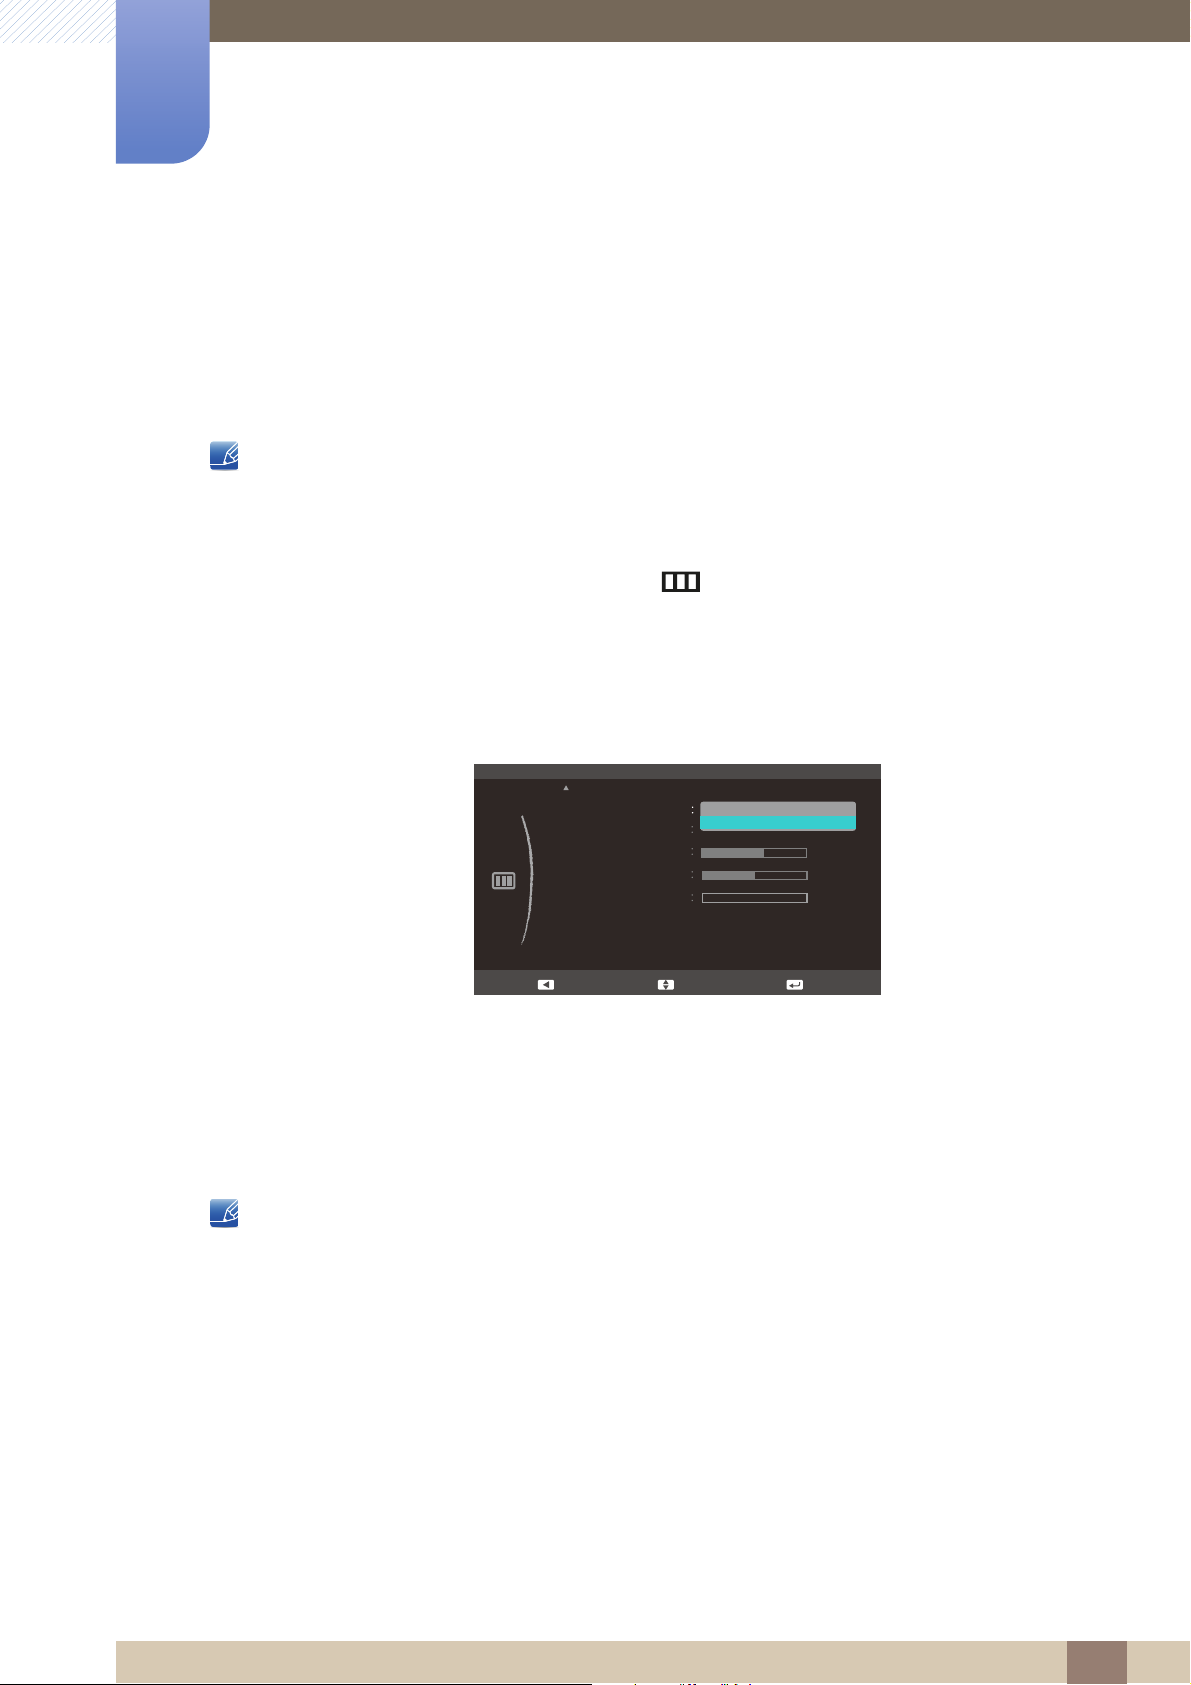
3.8 HDMI Black Level
If a DVD player or set-top box is connected to the product via HDMI, image quality degradation (contrast/
color degradation, black level, etc.) may occur, depending on the connected source device.
If this is the case, correct the degraded
This function is only available in HDMI mode.
3.8.1 Configuring the HDMI Black Level Settings
1 When the Function Key Guide appears, select [] by moving the JOG button UP.
Next, press the JOG button.
picture quality using HDMI Black Level.
2 Move to PICTURE controlling the JOG button UP/DOWN and press the JOG button.
3 Move to HDMI Black Level controlling the JOG button UP/DOWN and press the JOG button.
The following screen will appear.
z Normal: Select this mode when there is no contrast ratio degradation.
z Low: Select this mode to reduce the black level and increase the white level when there is a
contrast ratio degradation.
4 Move to the desired option controlling the JOG button UP/DOWN and press the JOG button.
5 The selected option will be applied.
HDMI Black Level may not be compatible with some source devices.
3 Screen Setup
50
Page 51
Screen Setup
PICTURE
0
HDMI Black Level
H-Position
V-Position
Coarse
Fine
1936
50
50
Adjust EnterReturn
PICTURE
0
HDMI Black Level
H-Position
V-Position
Coarse
Fine
1936
50
50
50
Adjust EnterReturn
3
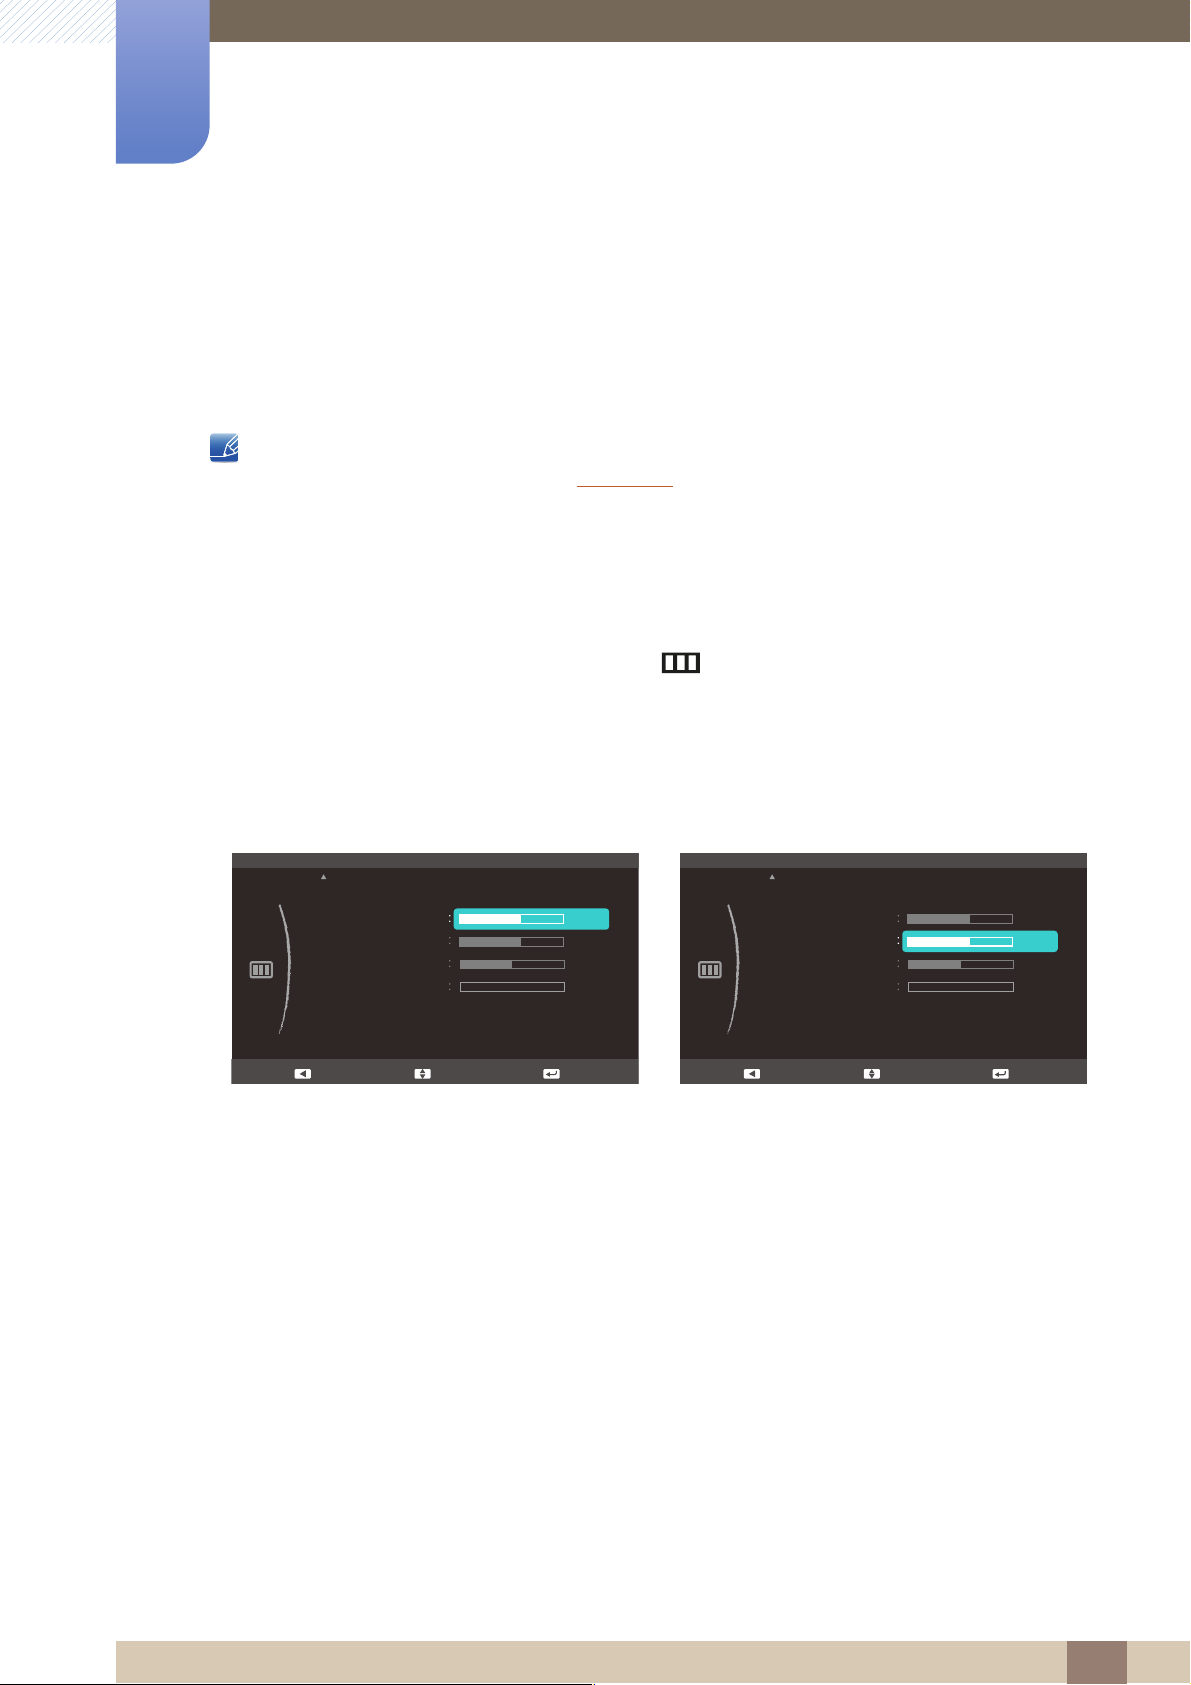
3.9 H-Position & V-Position
H-Position: Move the screen to the left or right.
V-Position: Move the screen up or down.
z This menu is available in Analog mode.
z This menu is only available when Image Size is set to Screen Fit in AV Mode. When a 480P or
576P or 720P or 1080P signal is input in AV mode and the monitor can display normally, select
Screen Fit to adjust horizontal position in 0-6 levels.
3.9.1 Configuring H-Position & V-Position
1 When the Function Key Guide appears, select [] by moving the JOG button UP.
Next, press the JOG button.
2 Move to PICTURE controlling the JOG button UP/DOWN and press the JOG button.
3 Move to the H-Position or V-Position controlling the JOG button UP/DOWN and press the JOG
button. The following screen will appear.
4 Adjust the H-Position or V-Position controlling the JOG button UP/DOWN and press the JOG
button.
5 The selected option will be applied.
3 Screen Setup
51
Page 52
Screen Setup
PICTURE
0
HDMI Black Level
H-Position
V-Position
Coarse
Fine
1936
50
50
50
Adjust EnterReturn
3
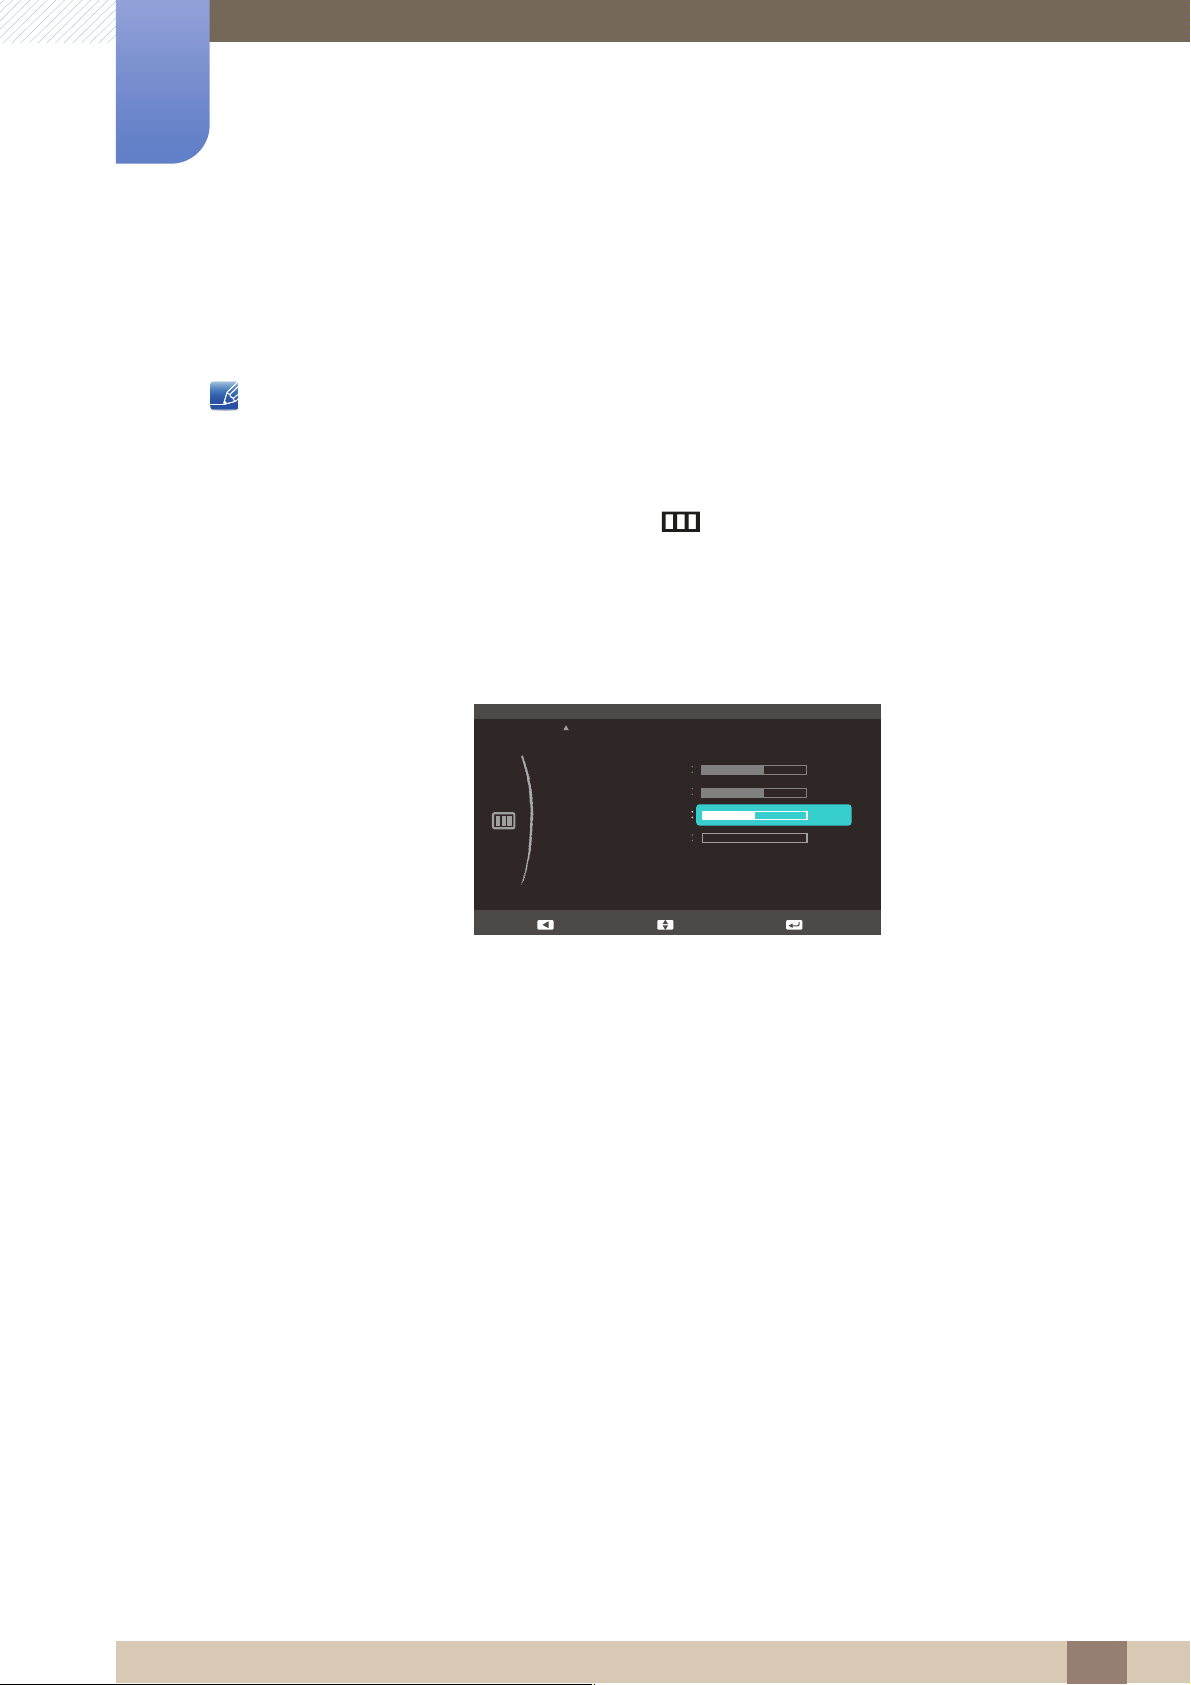
3.10 Coarse
Adjust the screen frequency.
This menu is available in Analog mode only.
3.10.1 Adjusting Coarse
1 When the Function Key Guide appears, select [] by moving the JOG button UP.
Next, press the JOG button.
2 Move to PICTURE controlling the JOG button UP/DOWN and press the JOG button.
3 Move to Coarse controlling the JOG button UP/DOWN and press the JOG button.
The following screen will appear.
4 Adjust the Coarse controlling the JOG button UP/DOWN.
5 The selected option will be applied.
3 Screen Setup
52
Page 53
Screen Setup
PICTURE
0
HDMI Black Level
H-Position
V-Position
Coarse
Fine
1936
50
50
50
Adjust EnterReturn
3
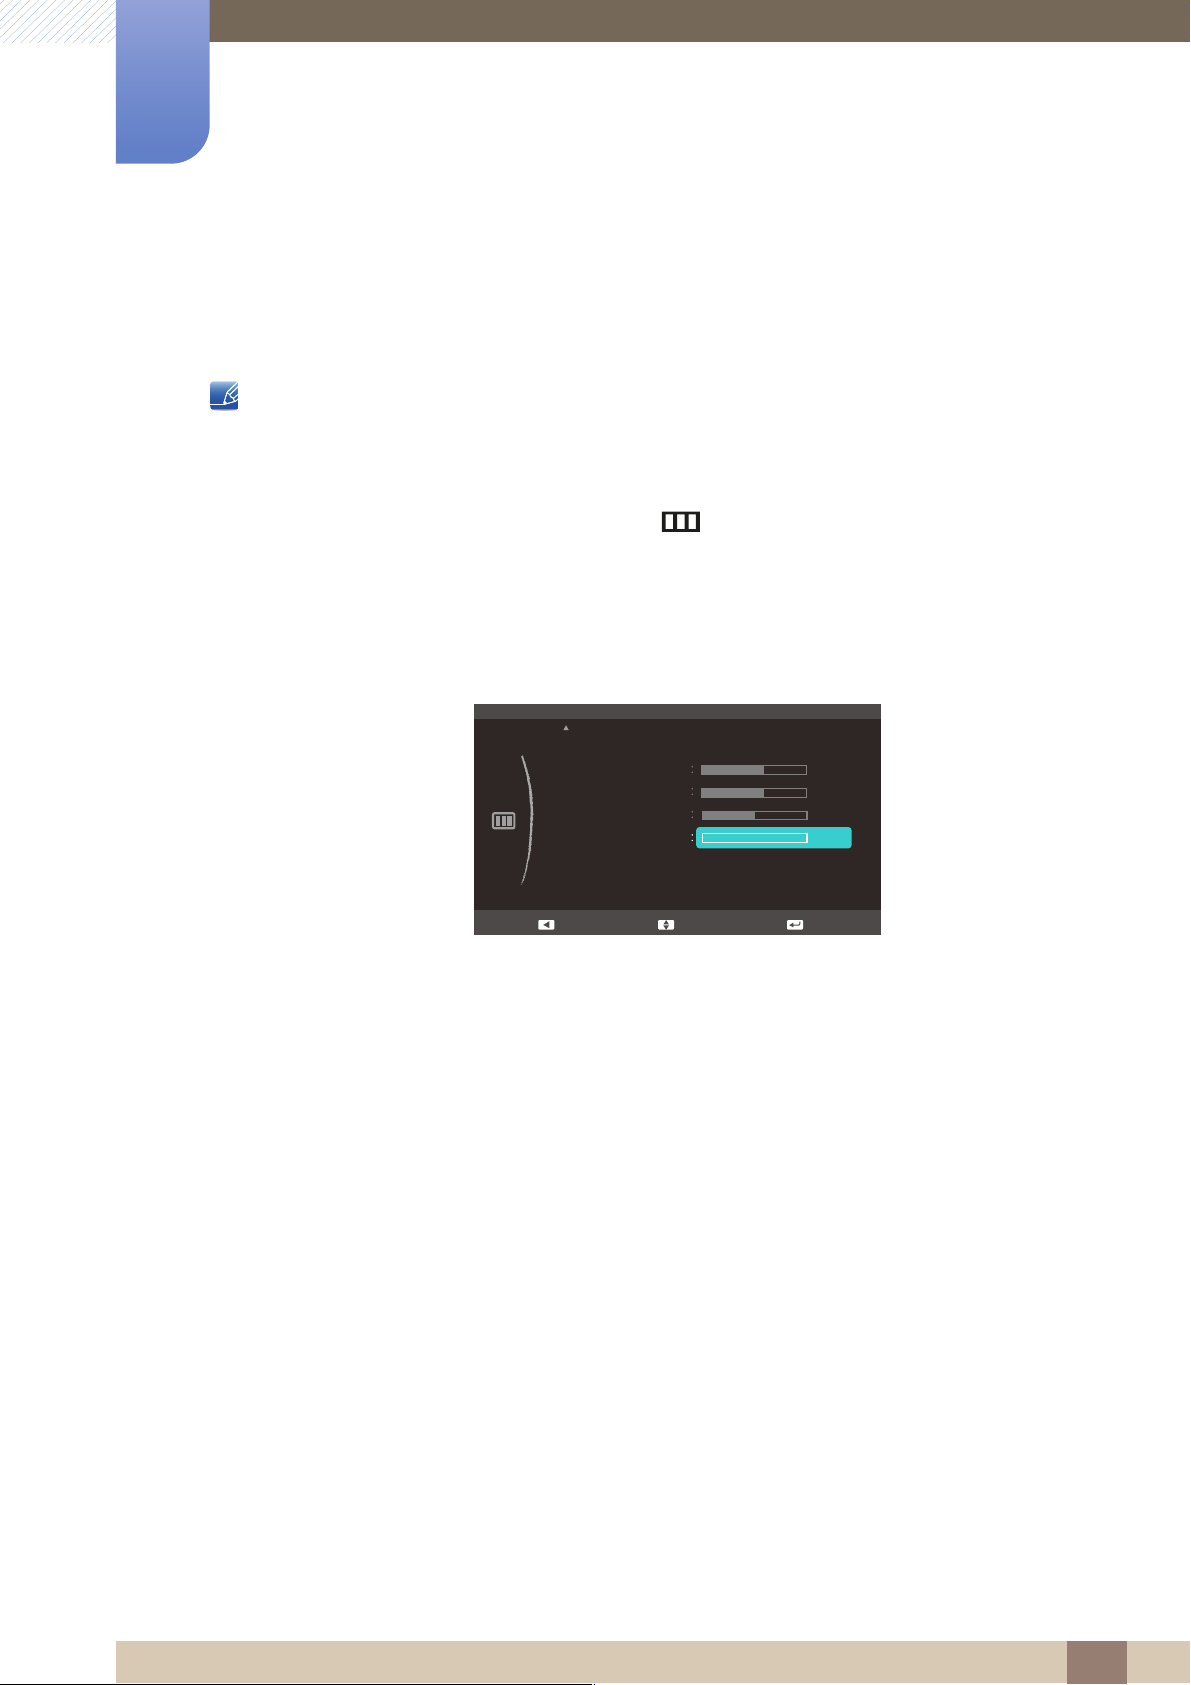
3.11 Fine
Fine-adjust the screen to obtain a vivid picture.
3.11.1 Adjusting Fine
1 When the Function Key Guide appears, select [] by moving the JOG button UP.
Next, press the JOG button.
2 Move to PICTURE controlling the JOG button UP/DOWN and press the JOG button.
3 Move to Fine controlling the JOG button UP/DOWN and press the JOG button.
This menu is available in Analog mode only.
The following screen will appear.
4 Adjust the Fine controlling the JOG button UP/DOWN.
5 The selected option will be applied.
3 Screen Setup
53
Page 54
Configuring Tint
SAMSUNG
MAGIC
COLOR
Red
Green
Blue
Color Tone
Gamma
Mode1
50
50
Normal
50
Adjust EnterReturn
4
Adjust the tint of the screen. This menu is not available when Bright is set to Cinema or
Dynamic Contrast mode.
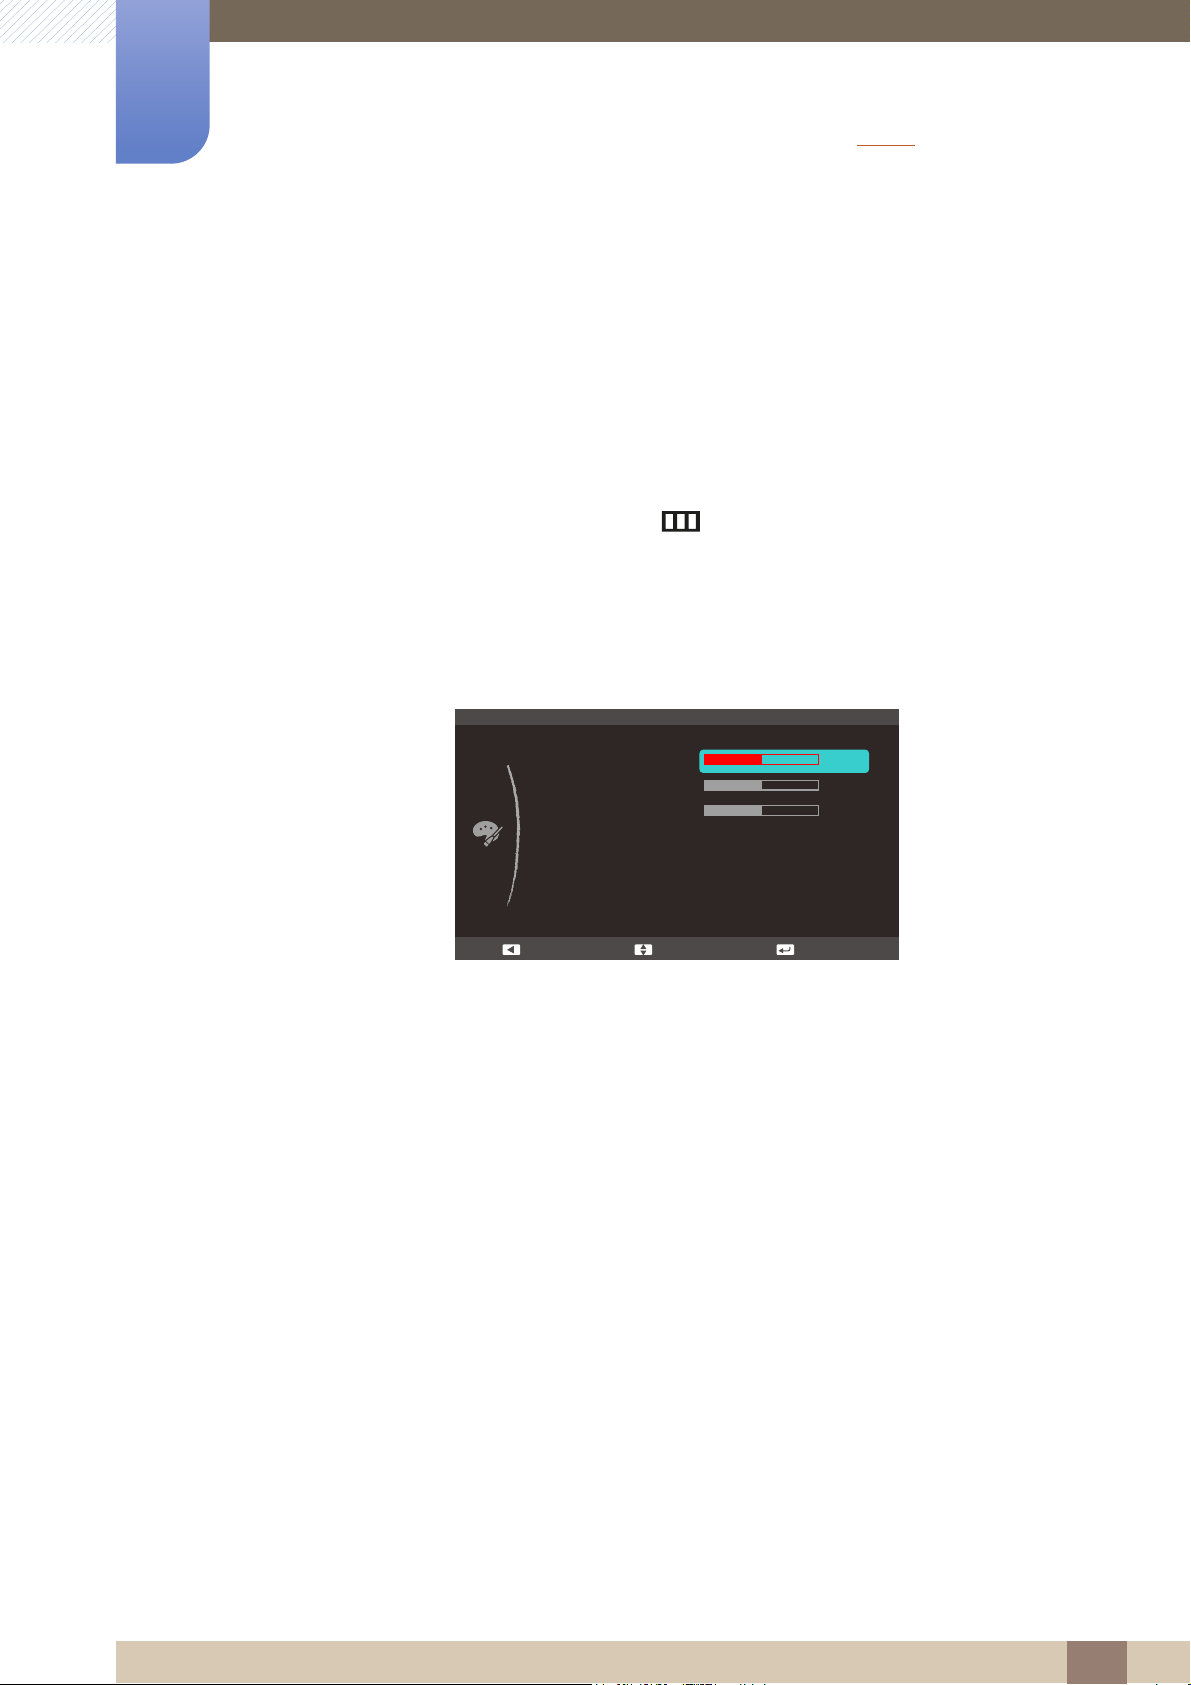
4.1 Red
Adjust the value of the color red in the picture. (Range: 0~100)
A higher value will increase the intensity of the color.
4.1.1 Configuring Red
1 When the Function Key Guide appears, select [] by moving the JOG button UP.
Next, press the JOG button.
2 Move to COLOR controlling the JOG button UP/DOWN and press the JOG button.
3 Move to Red controlling the JOG button UP/DOWN and press the JOG button.
The following screen will appear.
4 Adjust the Red controlling the JOG button UP/DOWN.
5 The selected option will be applied.
4 Configuring Tint
54
Page 55
Configuring Tint
COLOR
Red
Green
Blue
Color Tone
Gamma
Mode1
50
50
Normal
50
Adjust EnterReturn
4
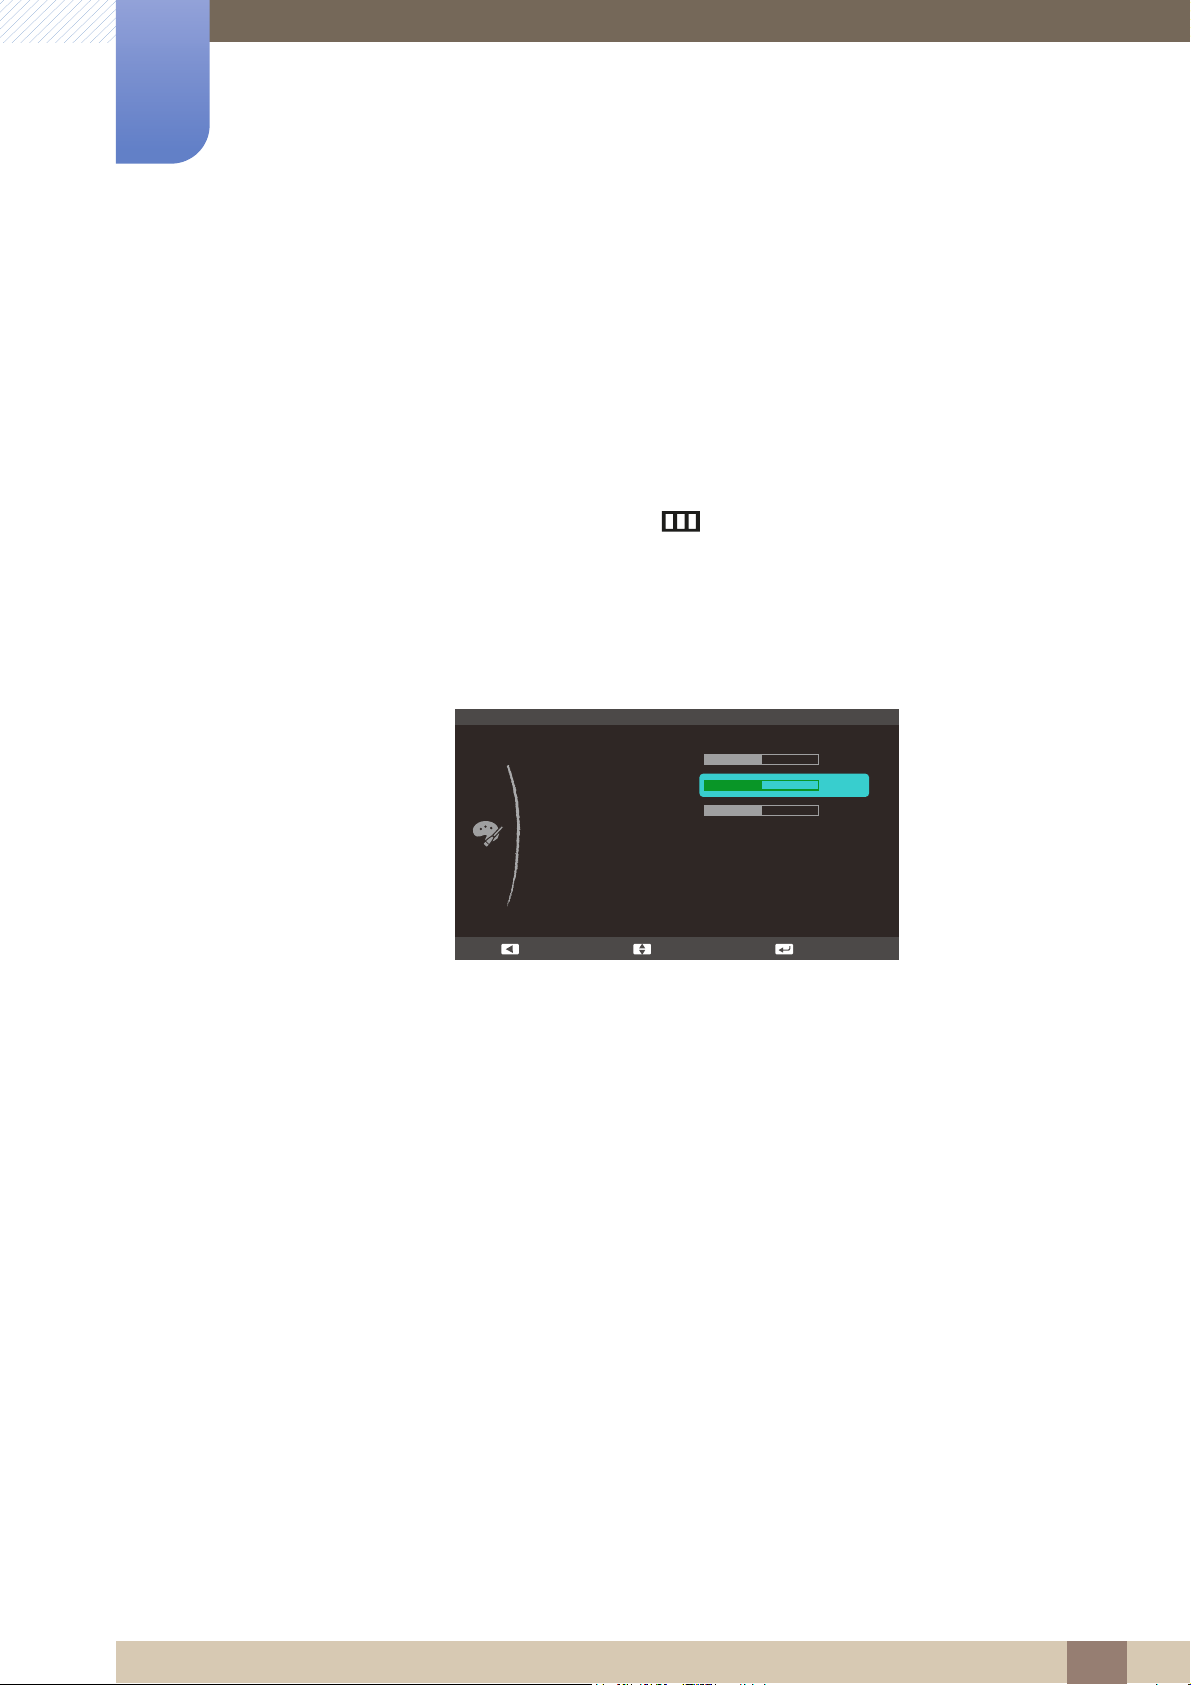
4.2 Green
Adjust the value of the color green in the picture. (Range: 0~100)
A higher value will increase the intensity of the color.
4.2.1 Configuring Green
1 When the Function Key Guide appears, select [] by moving the JOG button UP.
Next, press the JOG button.
2 Move to COLOR controlling the JOG button UP/DOWN and press the JOG button.
3 Move to Green controlling the JOG button UP/DOWN and press the JOG button.
The following screen will appear.
4 Adjust the Green controlling the JOG button UP/DOWN.
5 The selected option will be applied.
4 Configuring Tint
55
Page 56
Configuring Tint
COLOR
Red
Green
Blue
Color Tone
Gamma
0RGH
50
50
Normal
50
Adjust EnterReturn
4
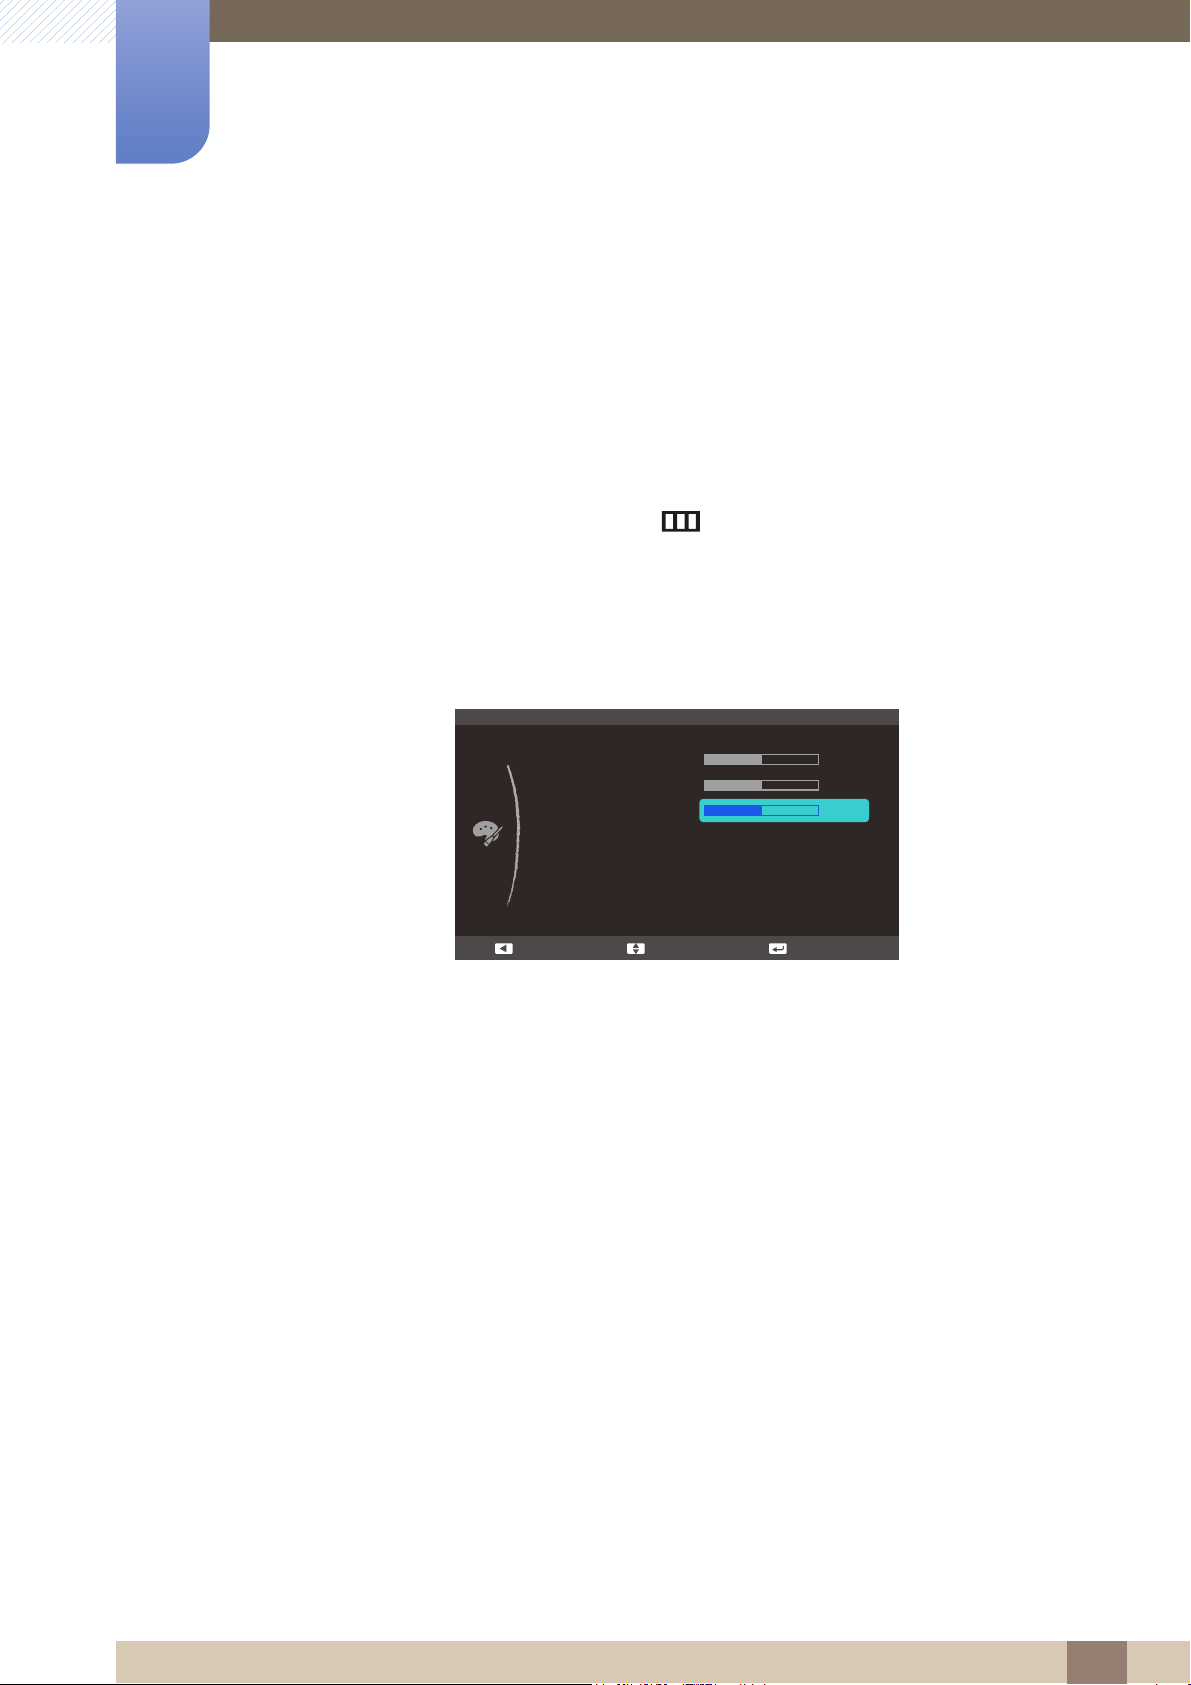
4.3 Blue
Adjust the value of the color blue in the picture. (Range: 0~100)
A higher value will increase the intensity of the color.
4.3.1 Configuring Blue
1 When the Function Key Guide appears, select [] by moving the JOG button UP.
Next, press the JOG button.
2 Move to COLOR controlling the JOG button UP/DOWN and press the JOG button.
3 Move to Blue controlling the JOG button UP/DOWN and press the JOG button.
The following screen will appear.
4 Adjust the Blue controlling the JOG button UP/DOWN.
5 The selected option will be applied.
4 Configuring Tint
56
Page 57
Configuring Tint
C
COLOR
Red
Green
Blue
Color Tone
Gamma
Cool 2
Cool 1
Normal
Warm 1
Warm 2
Custom
50
50
50
Move EnterReturn
4
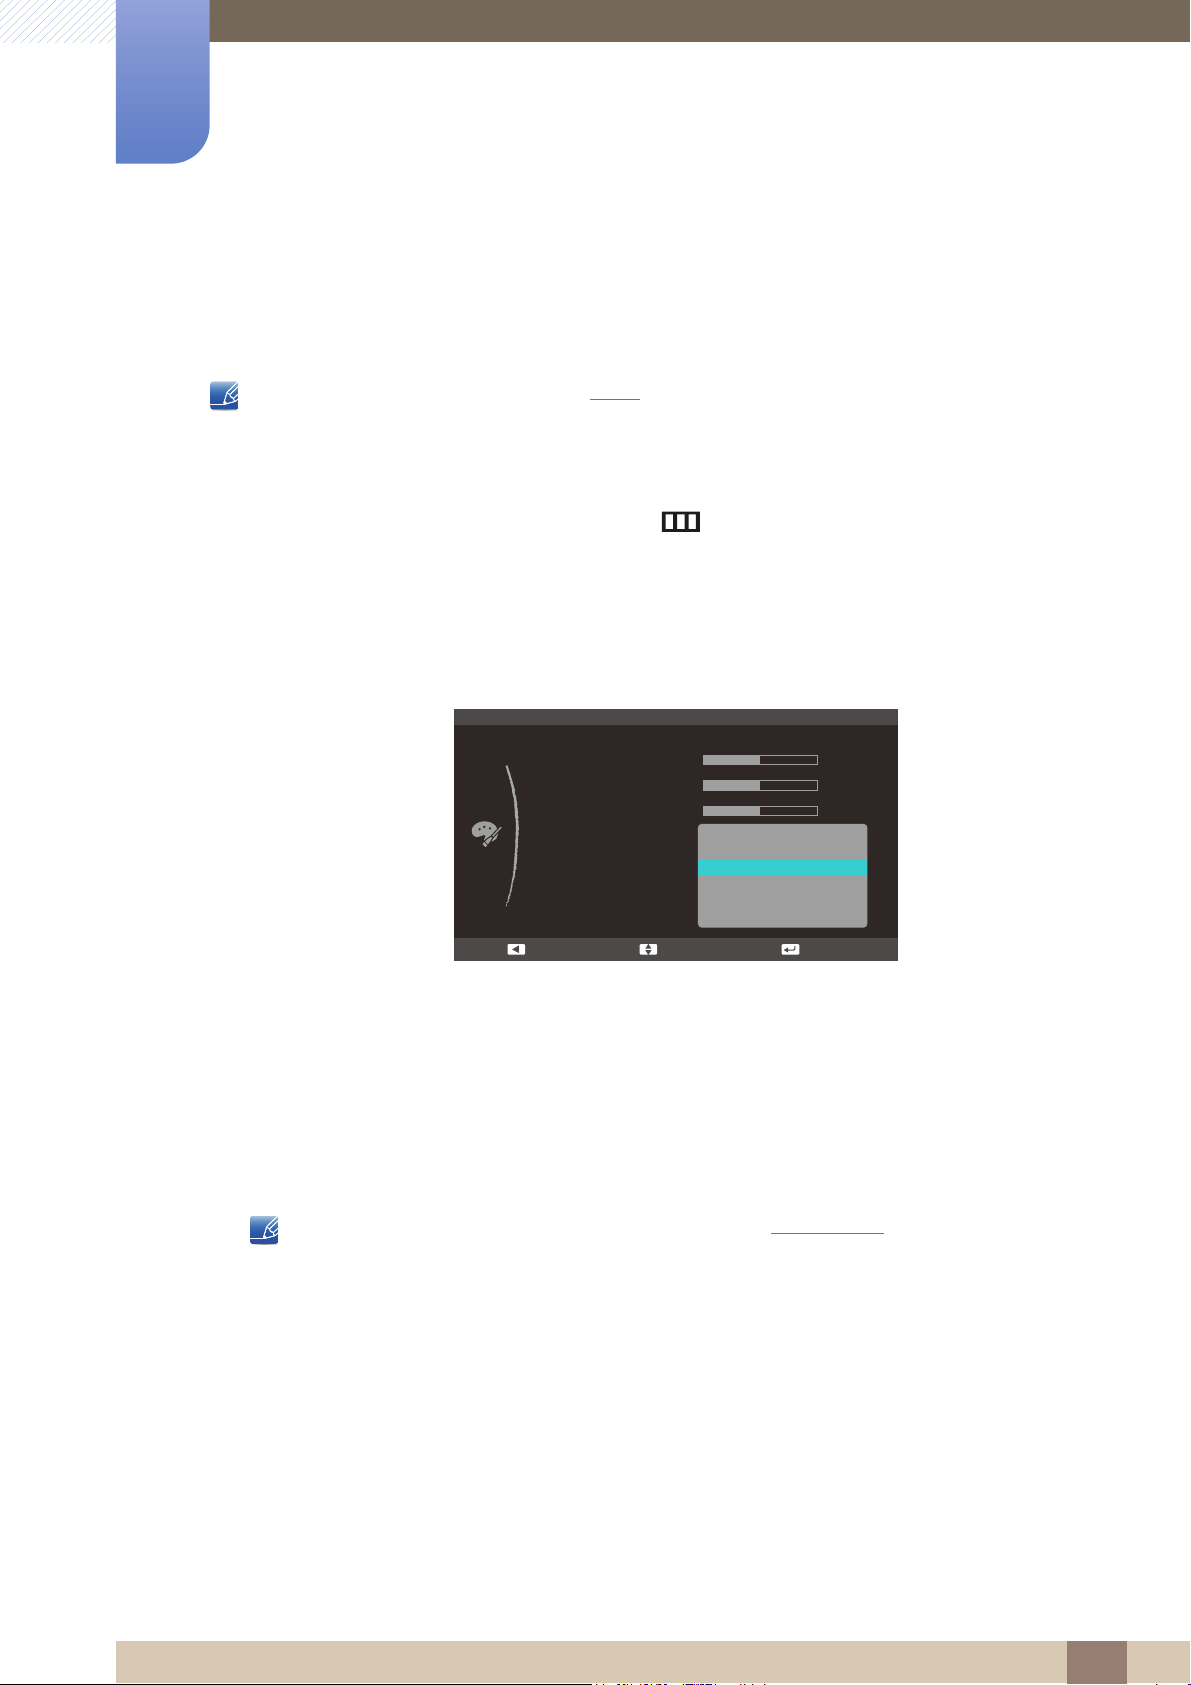
4.4 Color Tone
Adjust the general color tone of the picture.
This menu is not available when Angle is enabled.
4.4.1 Configuring the Color Tone Settings
1 When the Function Key Guide appears, select [] by moving the JOG button UP.
Next, press the JOG button.
2 Move to COLOR controlling the JOG button UP/DOWN and press the JOG button.
3 Move to Color Tone controlling the JOG button UP/DOWN and press the JOG button.
SAMSUNG
MAGI
The following screen will appear.
z Cool 2: Set the color temperature to be cooler than Cool 1.
z Cool 1: Set the color temperature to be cooler than Normal.
z Normal: Display the standard color tone.
z Warm 1: Set the color temperature to be warmer than Normal mode.
z Warm 2: Set the color temperature to be warmer than Warm 1.
z Custom: Customize the color tone.
When the external input is connected through HDMI and PC/AV Mode is set to AV, Color Tone
has four color temperature settings (Cool, Normal, Warm and Custom).
4 Move to the desired option controlling the JOG button UP/DOWN and press the JOG button.
5 The selected option will be applied.
4 Configuring Tint
57
Page 58
Configuring Tint
C
COLOR
Red
Green
Blue
Color Tone
Gamma
Mode1
Mode2
Mode3
50
50
50
Normal
Move EnterReturn
4
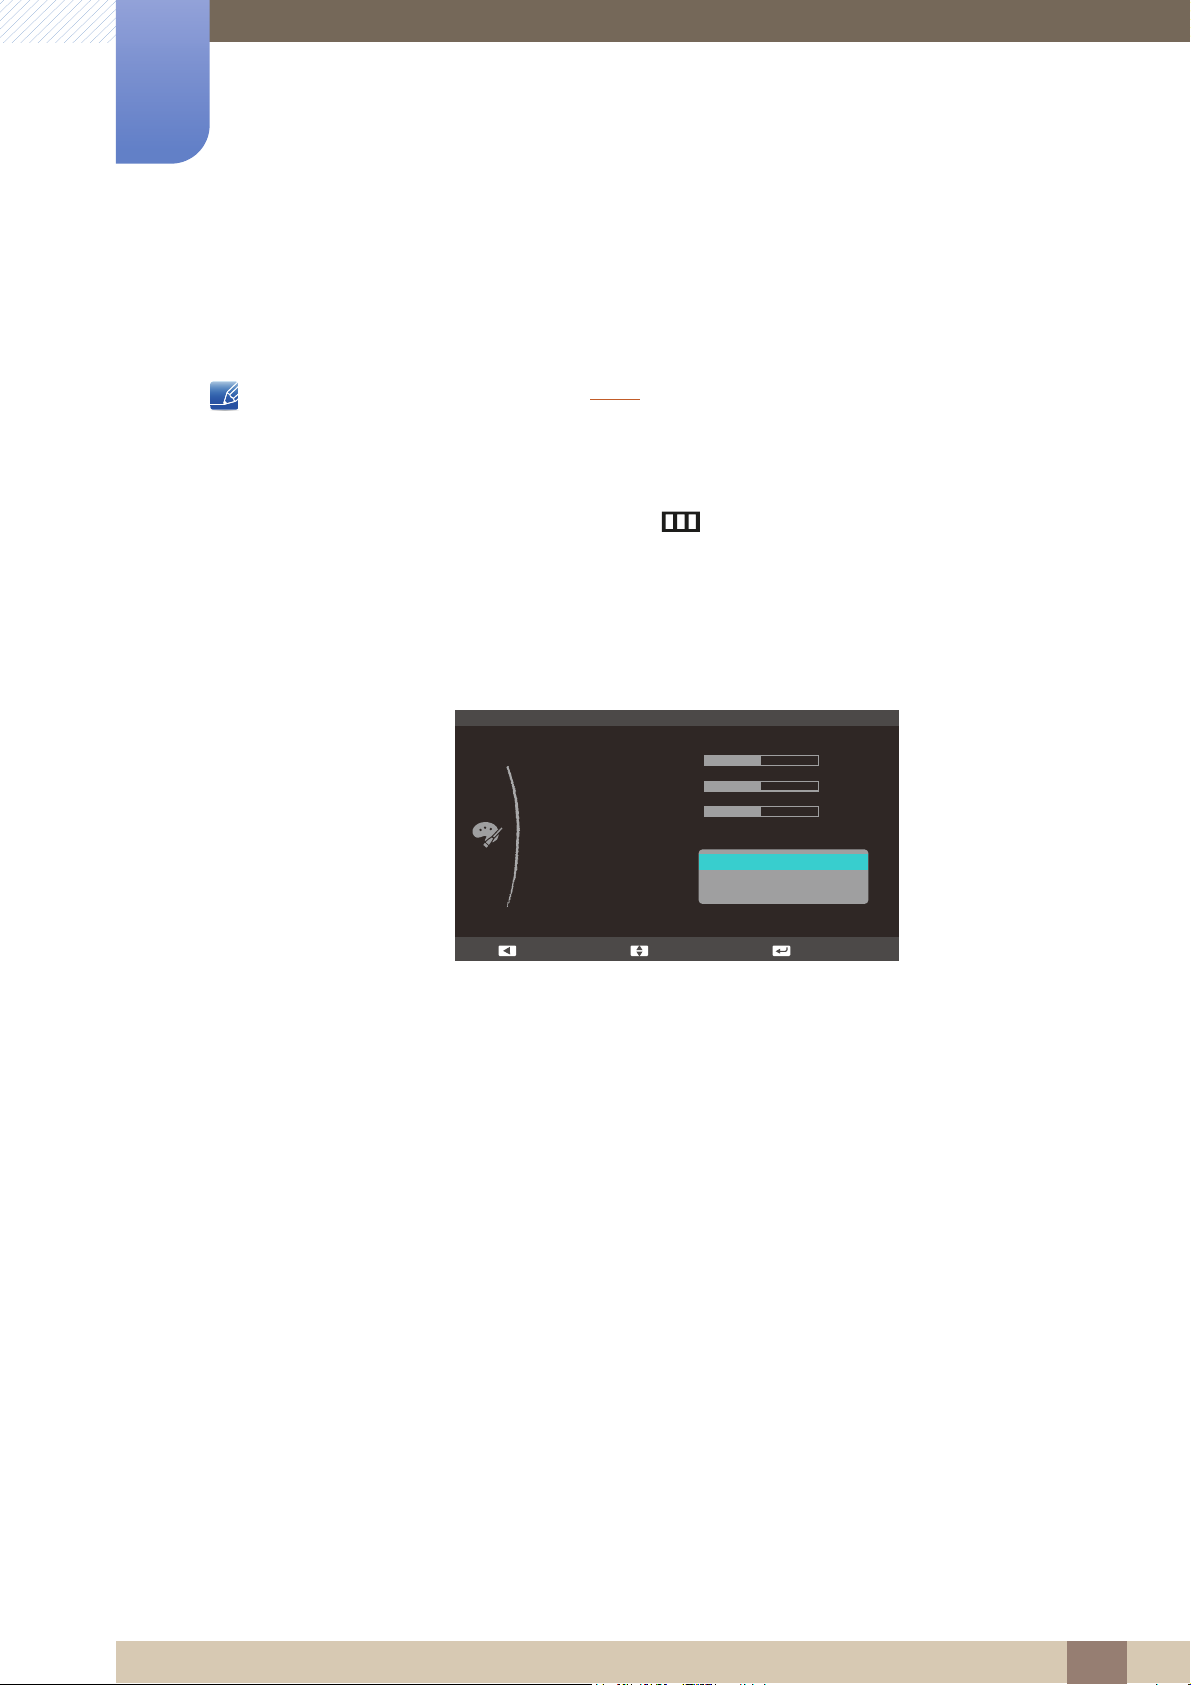
4.5 Gamma
Adjust the mid-range brightness (Gamma) of the picture.
This menu is not available when Angle is enabled.
4.5.1 Configuring Gamma
1 When the Function Key Guide appears, select [] by moving the JOG button UP.
Next, press the JOG button.
2 Move to COLOR controlling the JOG button UP/DOWN and press the JOG button.
3 Move to Gamma controlling the JOG button UP/DOWN and press the JOG button.
SAMSUNG
MAGI
The following screen will appear.
4 Move to the desired option controlling the JOG button UP/DOWN and press the JOG button.
5 The selected option will be applied.
4 Configuring Tint
58
Page 59
Coordinating OSD
MENU SETTINGS
Language
Menu H-Position
Menu V-Position
Display Time
Transparency
'HXWVFK
(QJOLVK
(VSDxRO
)UDQoDLV
,WDOLDQR
0DJ\DU
3ROVNL
3RUWXJXrV
ƧNJLjLjǁƿǀ
6YHQVND
7UNoH
ଞ˲߭
∝䇁
ᣣᧄ⺆
Move EnterReturn
5
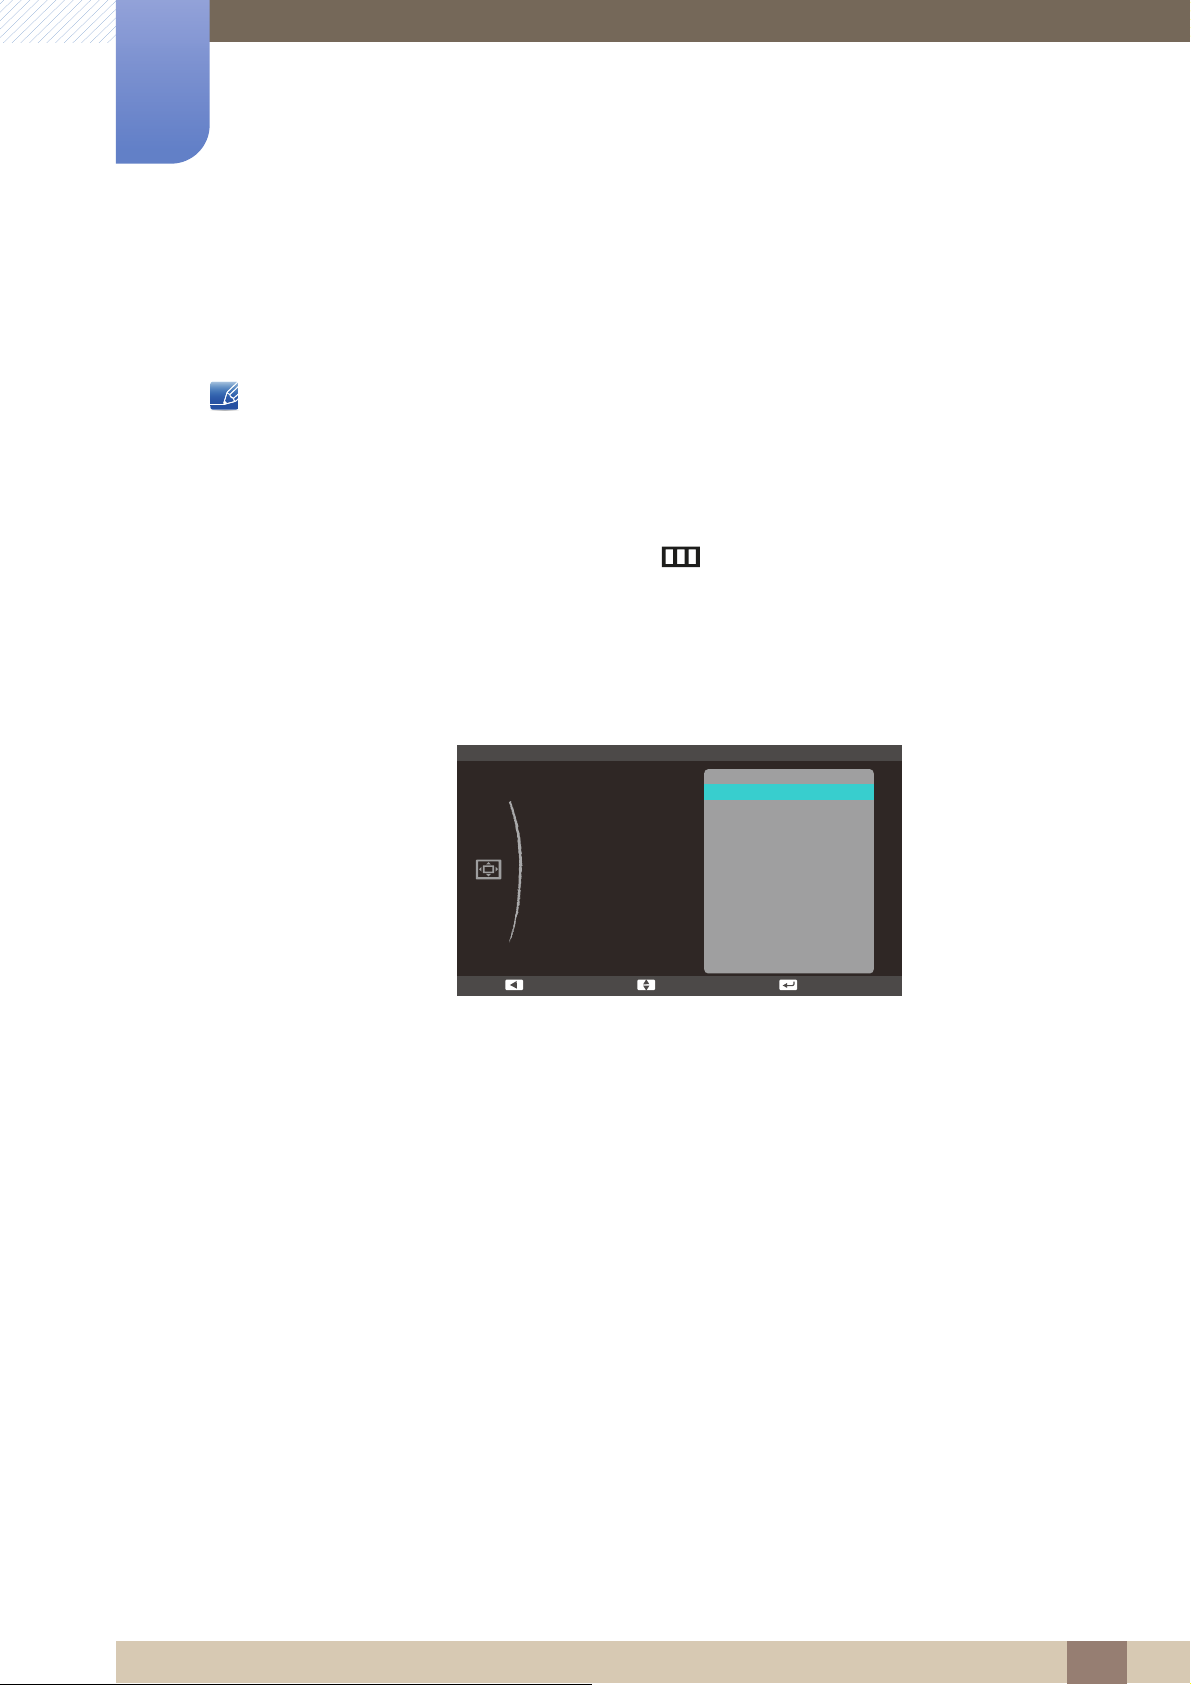
5.1 Language
Set the menu language.
z A change to the language setting will only be applied to the onscreen menu display.
z It will not be applied to other functions on your PC.
5.1.1 Changing the Language
1 When the Function Key Guide appears, select [] by moving the JOG button UP.
Next, press the JOG button.
2 Move to MENU SETTINGS controlling the JOG button UP/DOWN and press the JOG button.
3 Move to Language controlling the JOG button UP/DOWN and press the JOG button.
The following screen will appear.
4 Move to the desired option controlling the JOG button UP/DOWN and press the JOG button.
5 The selected option will be applied.
5 Coordinating OSD
59
Page 60
Coordinating OSD
: English
:
:
: 20 sec
: On
MENU SETTINGS
Language
Menu H-Position
Menu V-Position
Display Time
Transparency
Adjust EnterReturn
: English
:
:
: 20 sec
: On
MENU SETTINGS
Language
Menu H-Position
Menu V-Position
Display Time
Transparency
Adjust EnterReturn
5
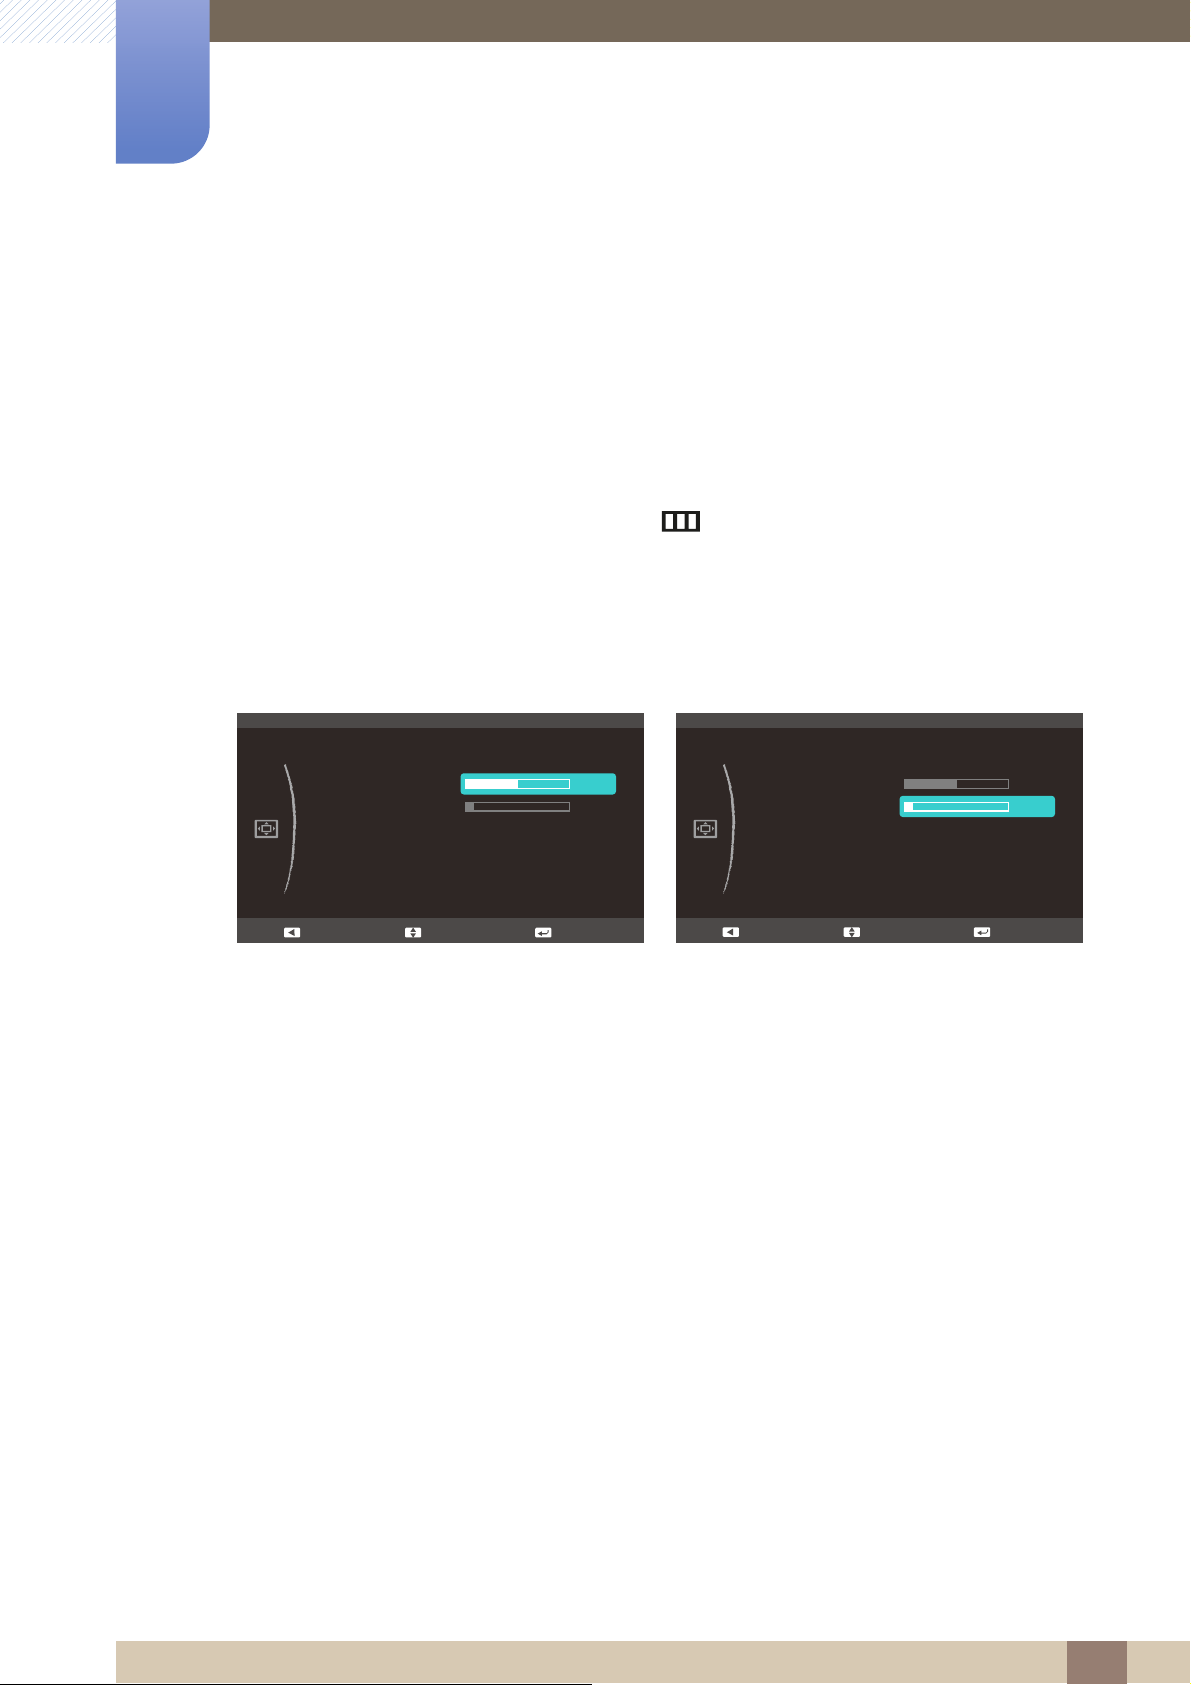
5.2 Menu H-Position & Menu V-Position
Menu H-Position: Move the menu position to the left or right.
Menu V-Position: Move the menu position up or down.
5.2.1 Configuring Menu H-Position & Menu V-Position
1 When the Function Key Guide appears, select [] by moving the JOG button UP.
Next, press the JOG button.
2 Move to MENU SETTINGS controlling the JOG button UP/DOWN and press the JOG button.
3 Move to the Menu H-Position or Menu V-Position controlling the JOG button UP/DOWN and
press the JOG button. The following screen will appear.
4 Adjust the Menu H-Position or Menu V-Position controlling the JOG button UP/DOWN and press
the JOG button.
5 The selected option will be applied.
5 Coordinating OSD
60
Page 61
Coordinating OSD
: English
:
:
: 20 sec
: On
MENU SETTINGS
Language
Menu H-Position
Menu V-Position
Display Time
Transparency
5 sec
10 sec
20 sec
200 sec
Move EnterReturn
5
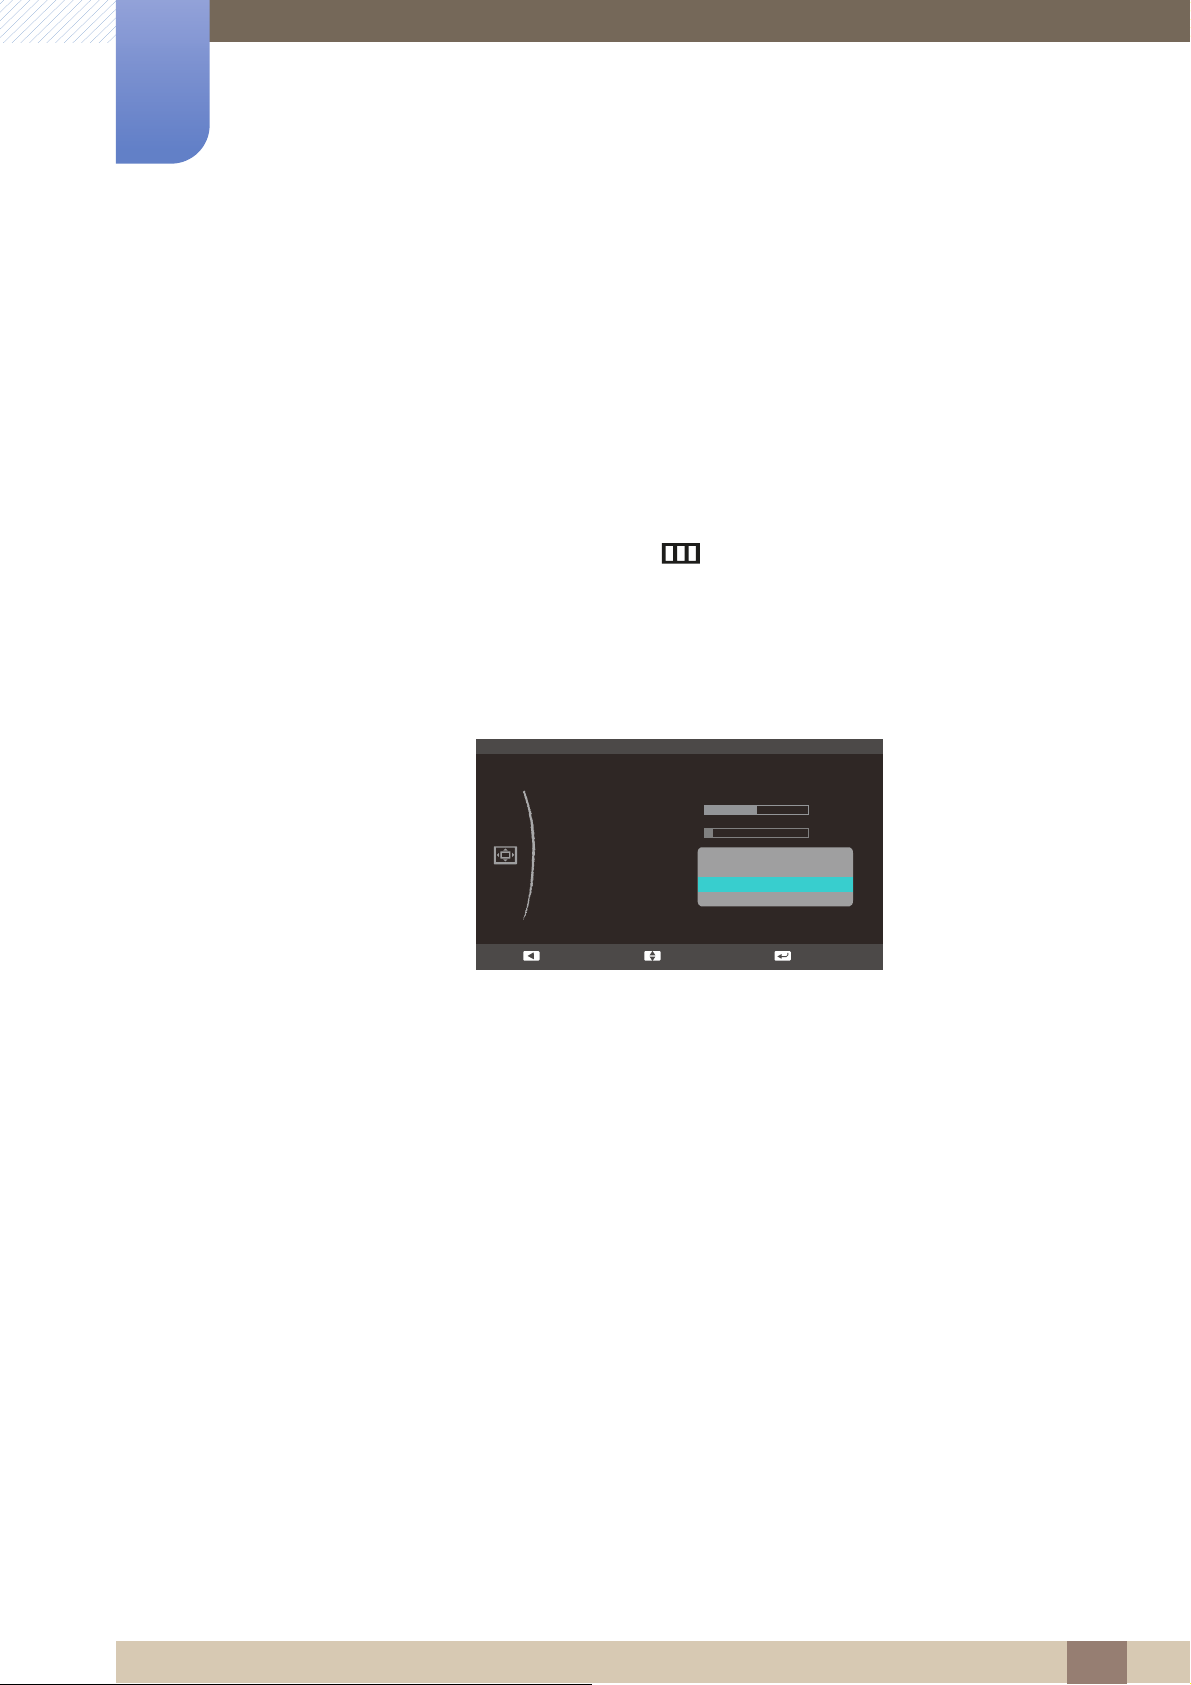
5.3 Display Time
Set the on-screen display (OSD) menu to automatically disappear if the menu is not used for a specified
period of time.
Display Time can be used to specify the time after which you want the OSD menu to disappear.
5.3.1 Configuring Display Time
1 When the Function Key Guide appears, select [] by moving the JOG button UP.
Next, press the JOG button.
2 Move to MENU SETTINGS controlling the JOG button UP/DOWN and press the JOG button.
3 Move to Display Time controlling the JOG button UP/DOWN and press the JOG button.
The following screen will appear
4 Move to the desired option controlling the JOG button UP/DOWN and press the JOG button.
5 The selected option will be applied.
5 Coordinating OSD
61
Page 62
Coordinating OSD
: English
:
:
: 20 sec
: On
MENU SETTINGS
Language
Menu H-Position
Menu V-Position
Display Time
Transparency
2II
2Q
Move EnterReturn
5
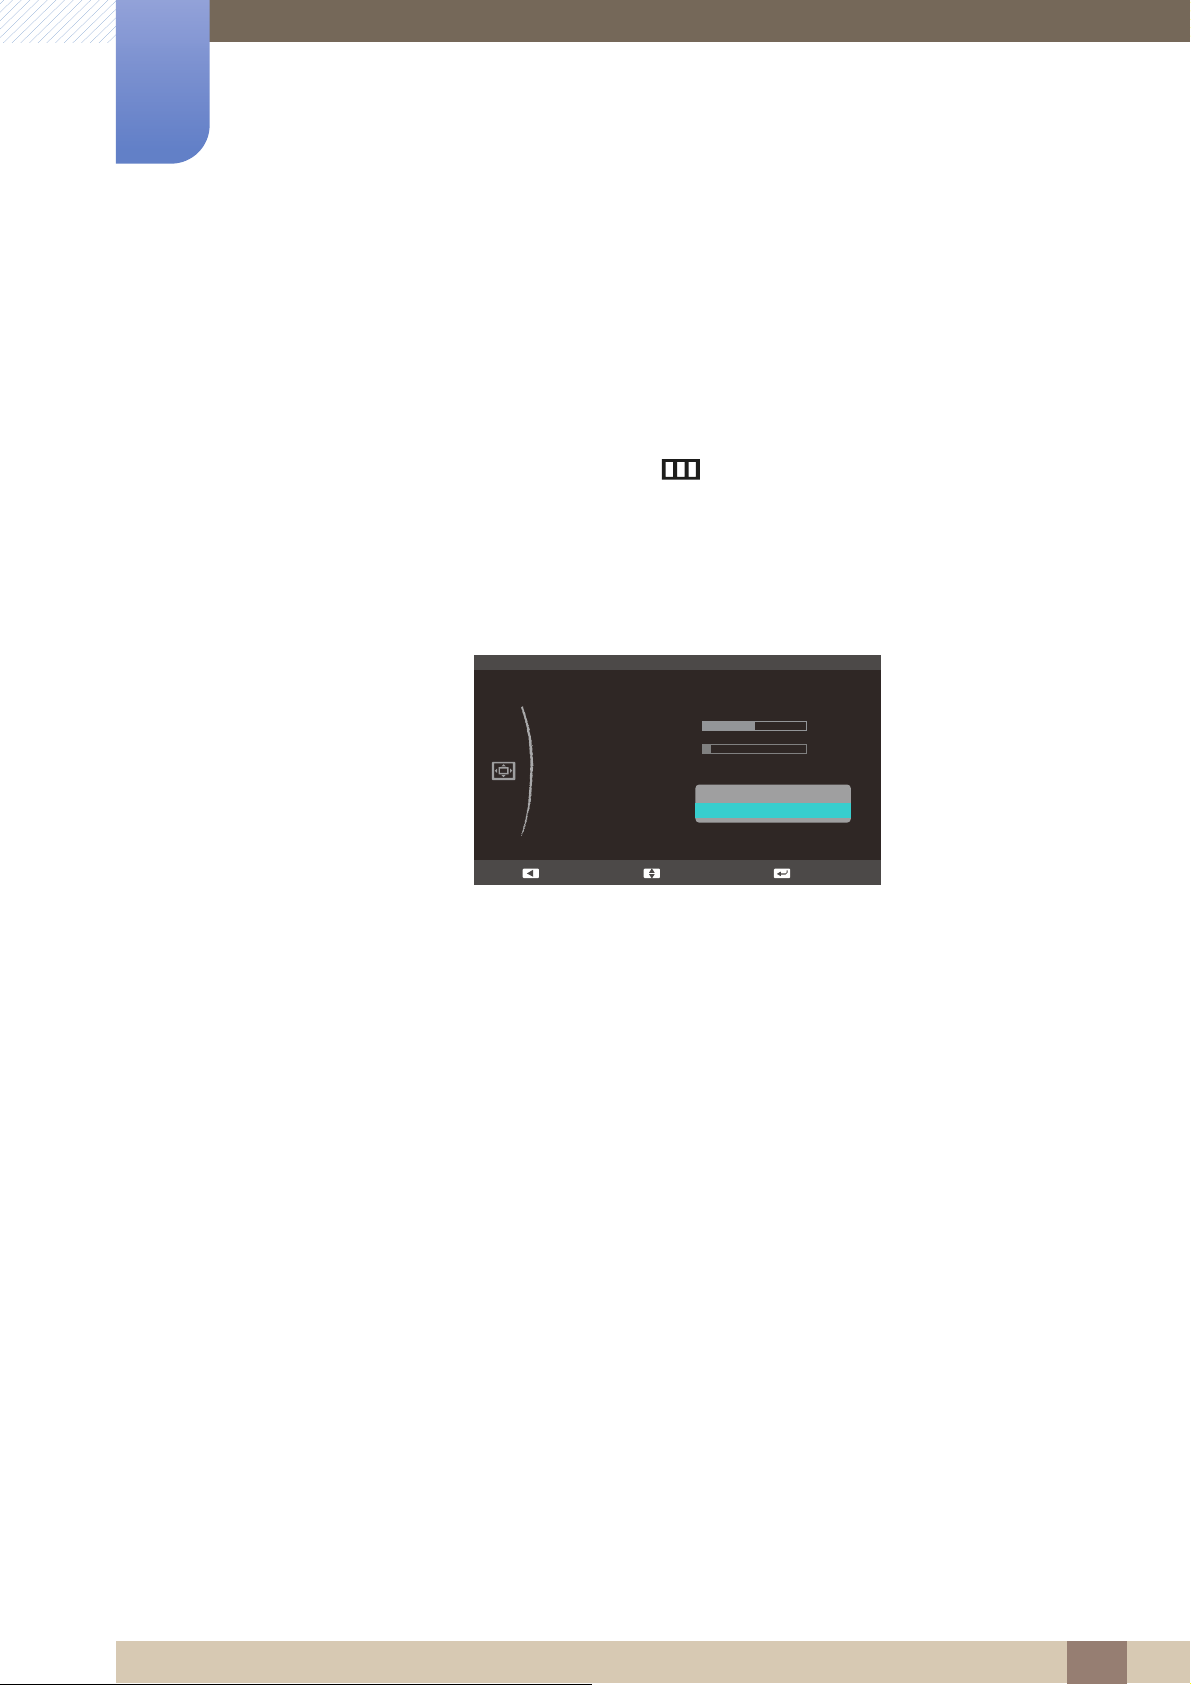
5.4 Transparency
Set the transparency for the menu windows:
5.4.1 Changing Transparency
1 When the Function Key Guide appears, select [] by moving the JOG button UP.
Next, press the JOG button.
2 Move to MENU SETTINGS controlling the JOG button UP/DOWN and press the JOG button.
3 Move to Transparency controlling the JOG button UP/DOWN and press the JOG button.
The following screen will appear.
4 Move to the desired option controlling the JOG button UP/DOWN and press the JOG button.
5 The selected option will be applied.
5 Coordinating OSD
62
Page 63
Setup and Reset
SETUP&RESET
Off
Off
Acceleration
Manual
Reset
Eco Saving
Off Timer
Turn Off After
PC/AV Mode
Key Repeat Time
Source Detection
Return EnterMove
Reset all settings?
Yes 1R
EnterMove
6
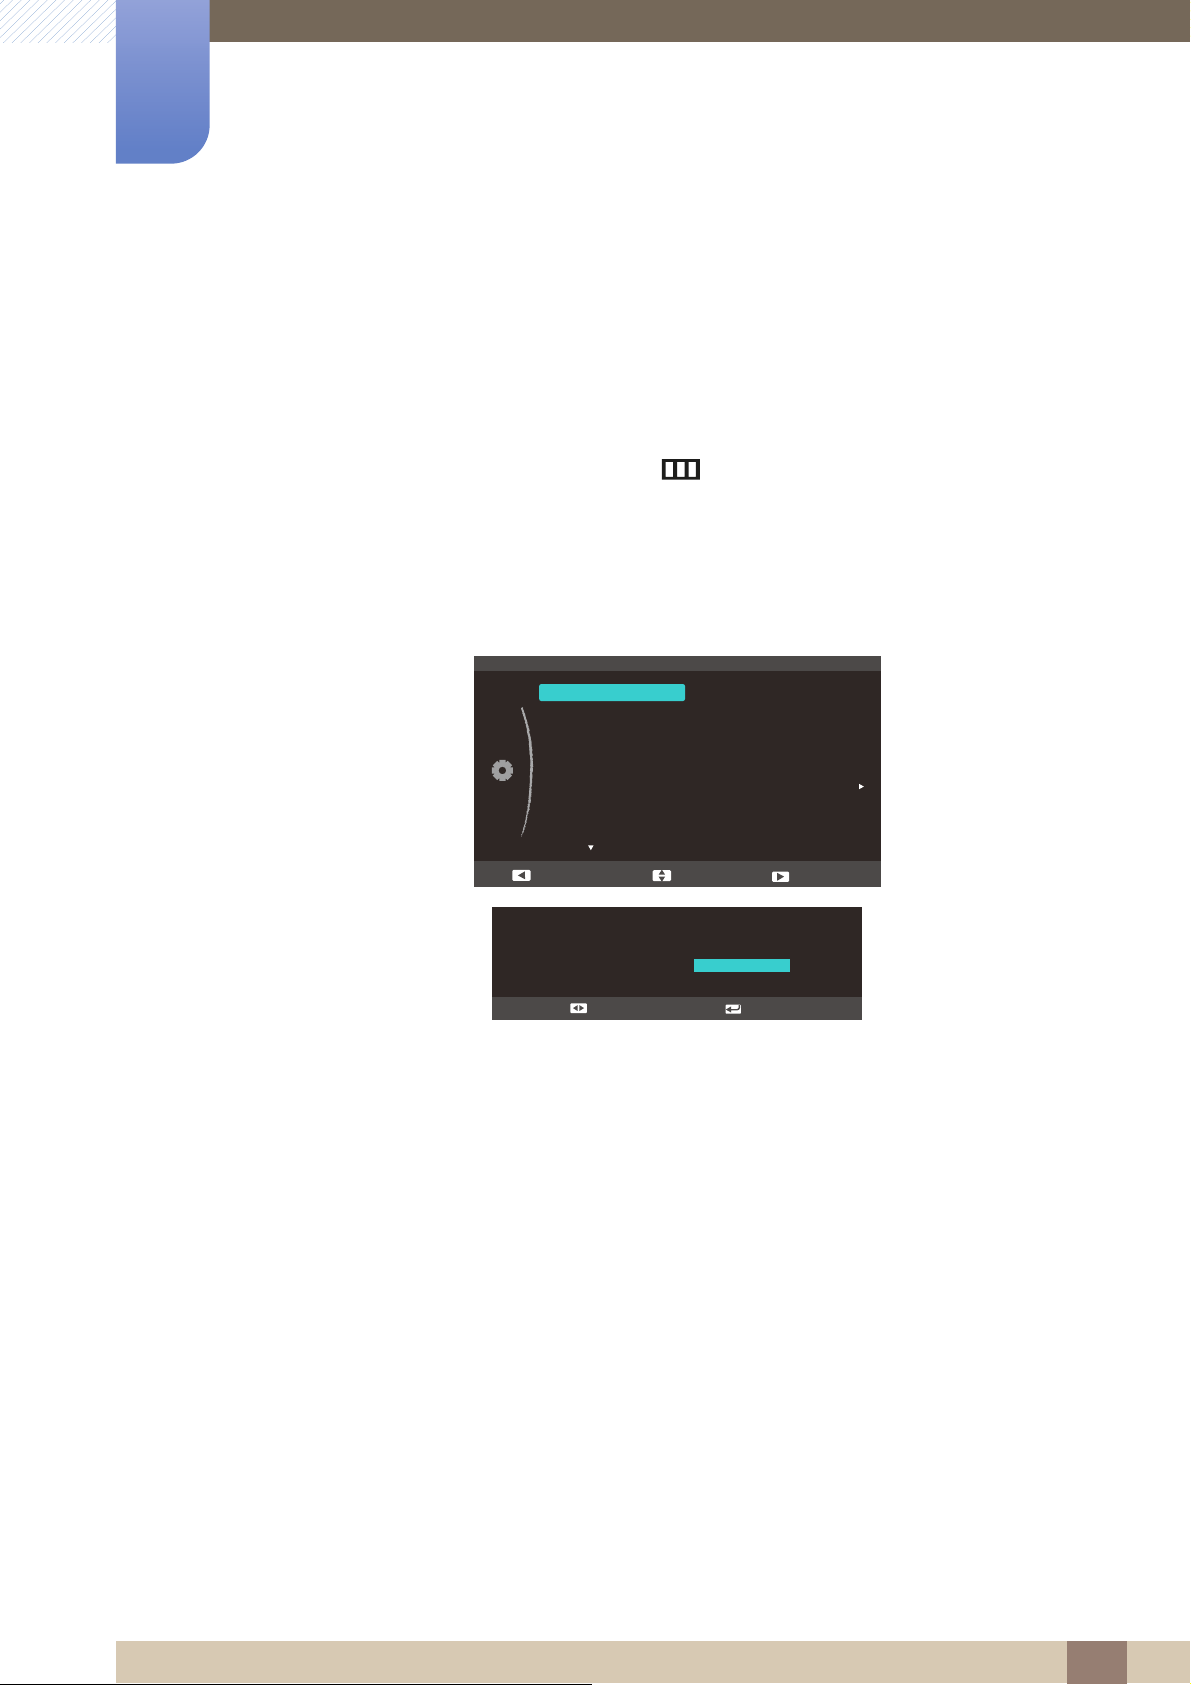
6.1 Reset
Return all the settings for the product to the default factory settings.
6.1.1 Initializing Settings (Reset)
1 When the Function Key Guide appears, select [] by moving the JOG button UP.
Next, press the JOG button.
2 Move to SETUP&RESET controlling the JOG button UP/DOWN and press the JOG button.
3 Move to Reset controlling the JOG button UP/DOWN and press the JOG button.
The following screen will appear.
4 Move to the desired option controlling the JOG button LEFT/RIGHT and press the JOG button.
5 The selected option will be applied.
6 Setup and Reset
63
Page 64
Setup and Reset
C
Off
Off
Acceleration
Manual
Reset
Eco Saving
Off Timer
Turn Off After
PC/AV Mode
Key Repeat Time
Source Detection
ଥࢿ
ଥࢿ
Off
Return EnterMove
SETUP&RESET
Return EnterMove
6
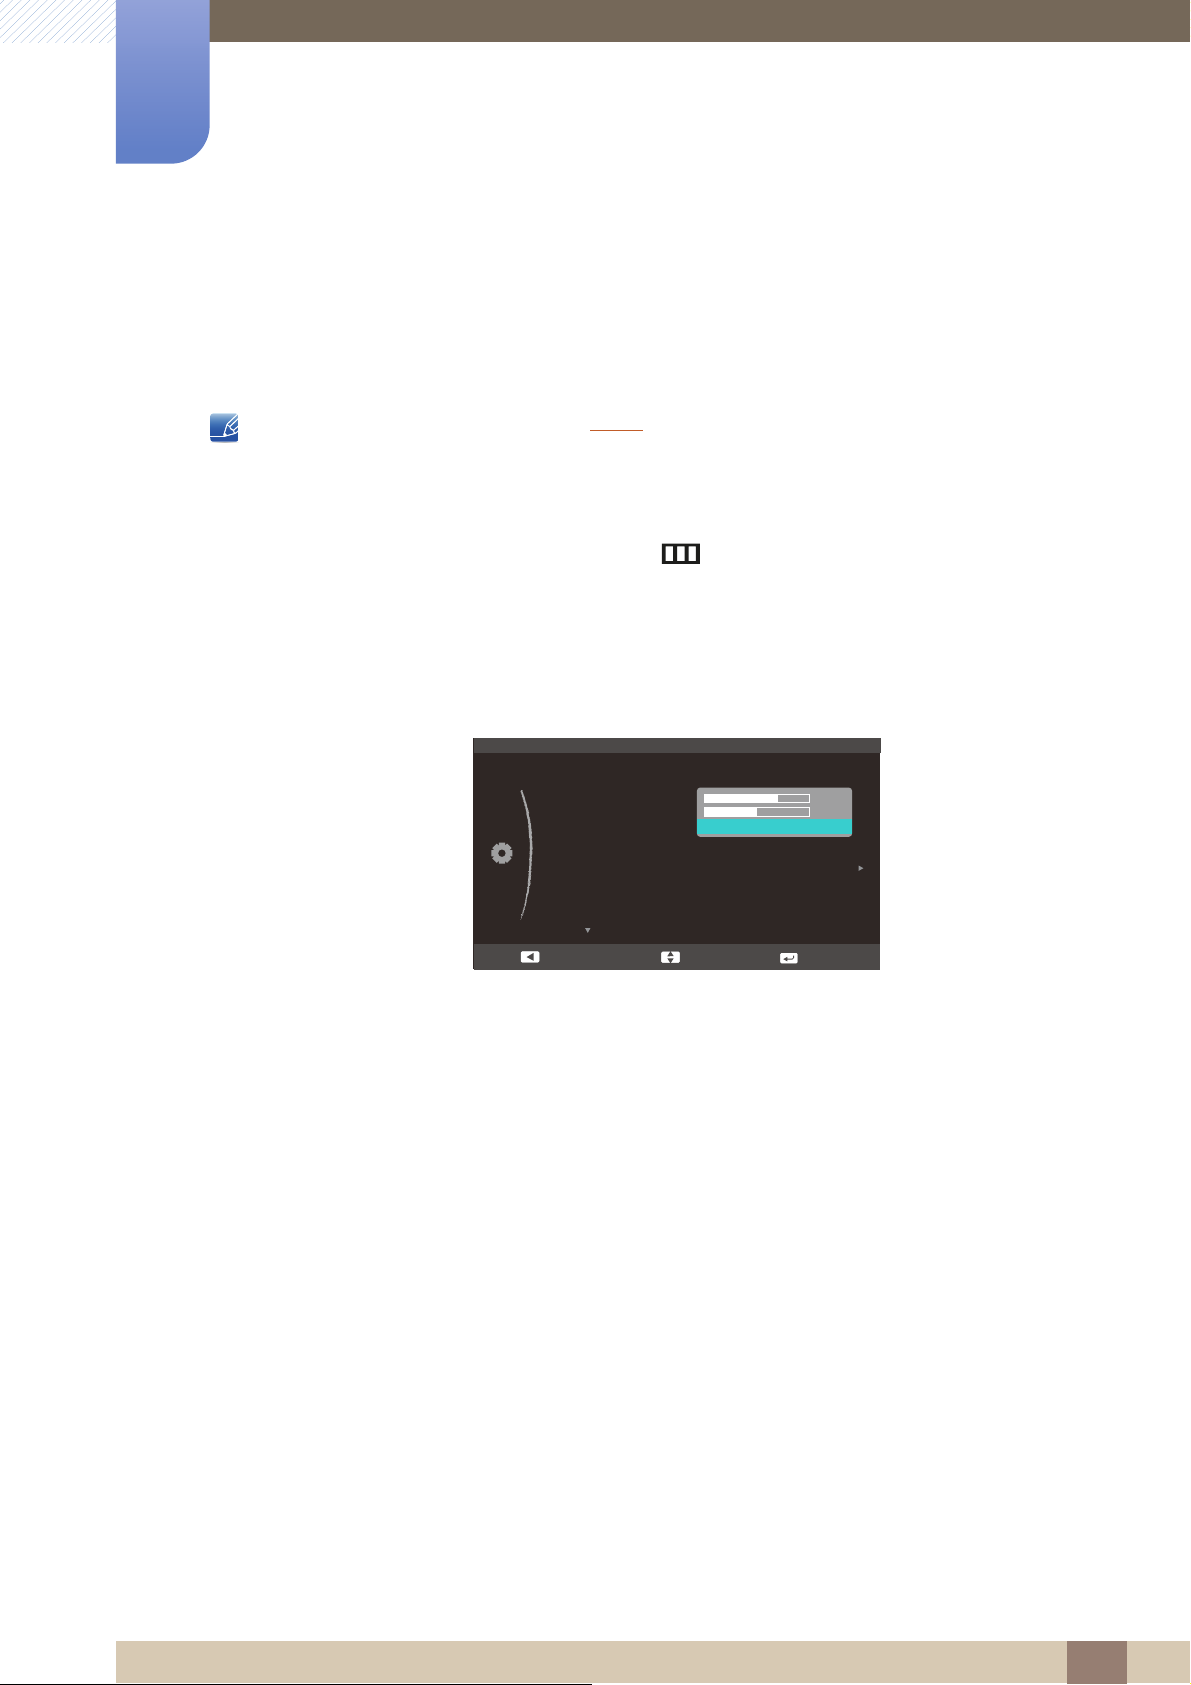
6.2 Eco Saving
The Eco Saving function reduces power consumption by controlling the electric current used by the
monitor panel.
This menu is not available when Bright is in Dynamic Contrast mode.
6.2.1 Configuring Eco Saving
1 When the Function Key Guide appears, select [] by moving the JOG button UP.
Next, press the JOG button.
2 Move to SETUP&RESET controlling the JOG button UP/DOWN and press the JOG button.
SAMSUNG
MAGI
3 Move to Eco Saving controlling the JOG button UP/DOWN and press the JOG button.
The following screen will appear.
z 75%: Change the monitor power consumption to 75% of the default level.
z 50%: Change the monitor power consumption to 50% of the default level.
z Off: Deactivate the Eco Saving function.
4 Move to the desired option controlling the JOG button UP/DOWN and press the JOG button.
5 The selected option will be applied.
6 Setup and Reset
64
Page 65
Setup and Reset
SETUP&RESET
2II
Acceleration
Manual
Reset
Eco Saving
Off Timer
Turn Off After
PC/AV Mode
Key Repeat Time
Source Detection
Off
On
Return EnterMove
6
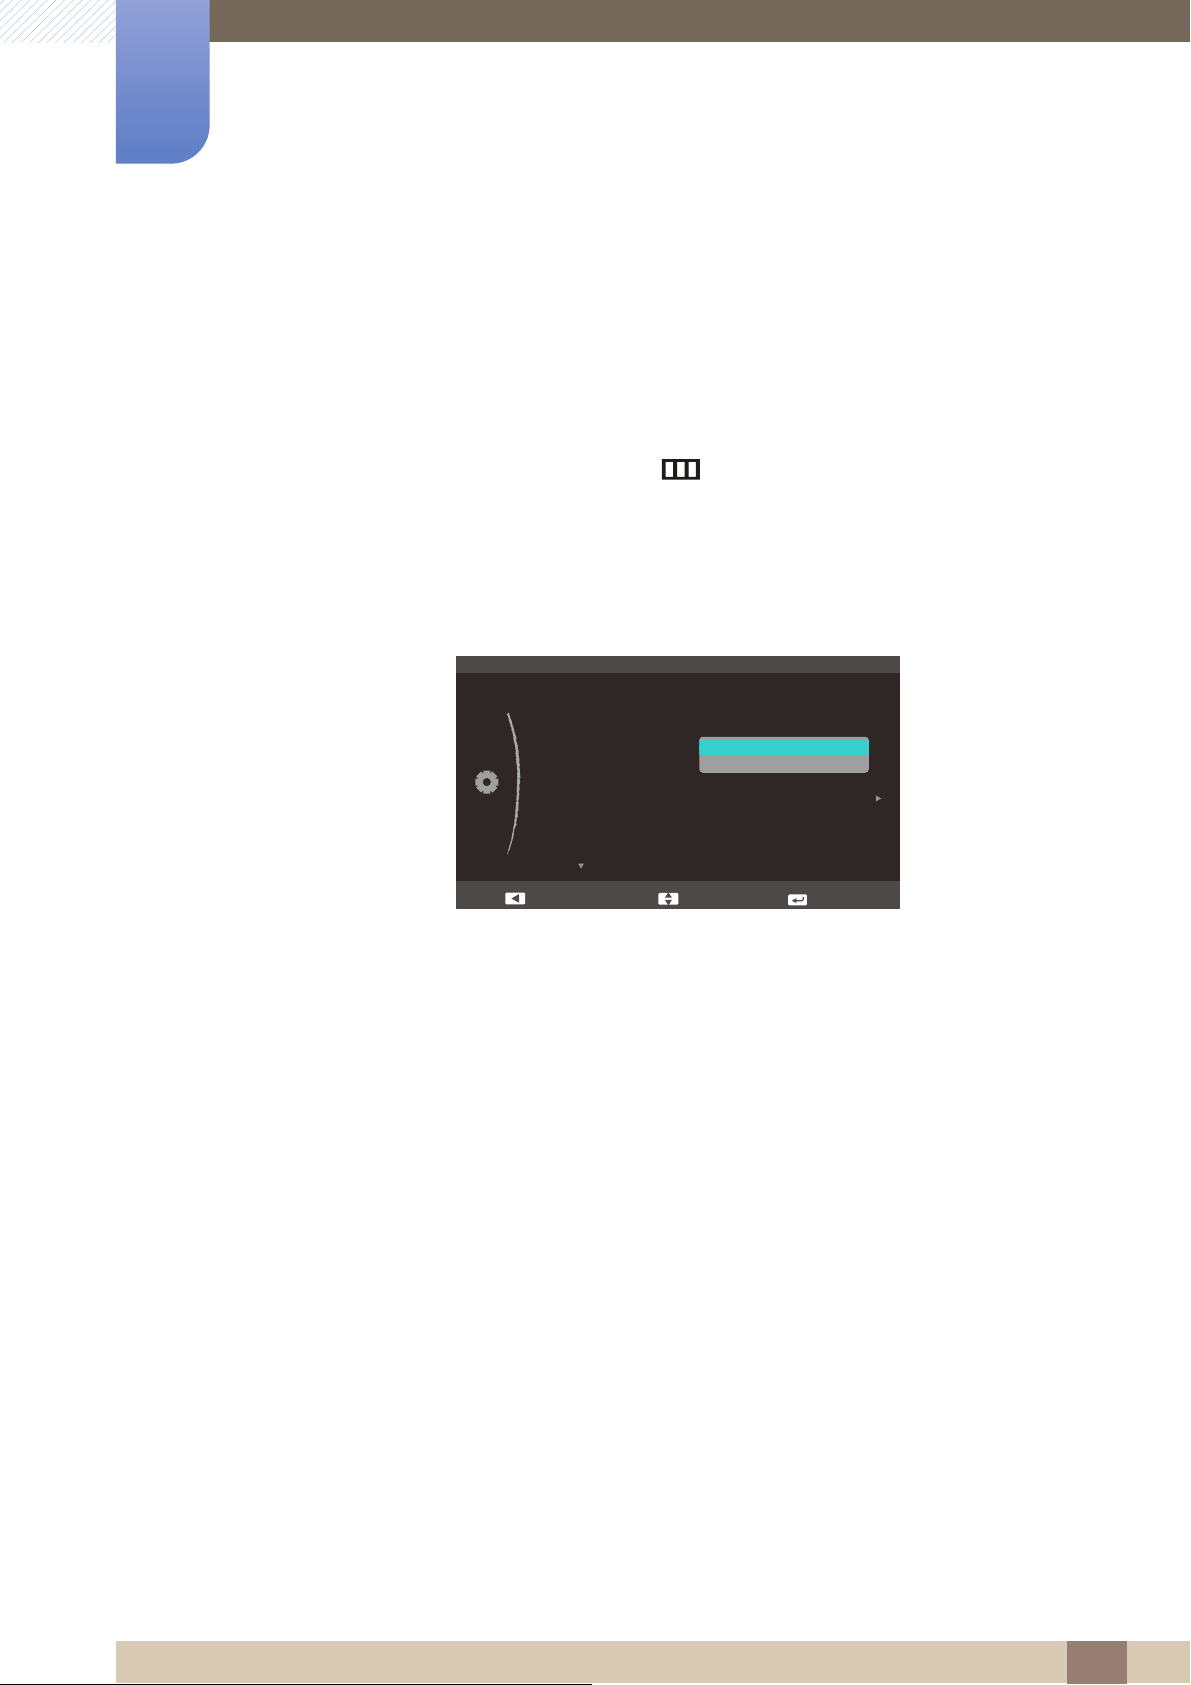
6.3 Off Timer
You can set the product to automatically turn off.
6.3.1 Configuring Off Timer
1 When the Function Key Guide appears, select [] by moving the JOG button UP.
Next, press the JOG button.
2 Move to SETUP&RESET controlling the JOG button UP/DOWN and press the JOG button.
3 Move to Off Timer controlling the JOG button UP/DOWN and press the JOG button.
The following screen will appear.
z Off: Deactivate the off timer so that the product does not power off automatically.
z On: Activate the off timer so that the product powers off automatically.
4 Move to the desired option controlling the JOG button UP/DOWN and press the JOG button.
5 The selected option will be applied.
6 Setup and Reset
65
Page 66
Setup and Reset
SETUP&RESET
Off
Acceleration
Manual
Reset
Eco Saving
Off Timer
Turn Off After
PC/AV Mode
Key Repeat Time
Source Detection
On
Return EnterAdjust
4h
6
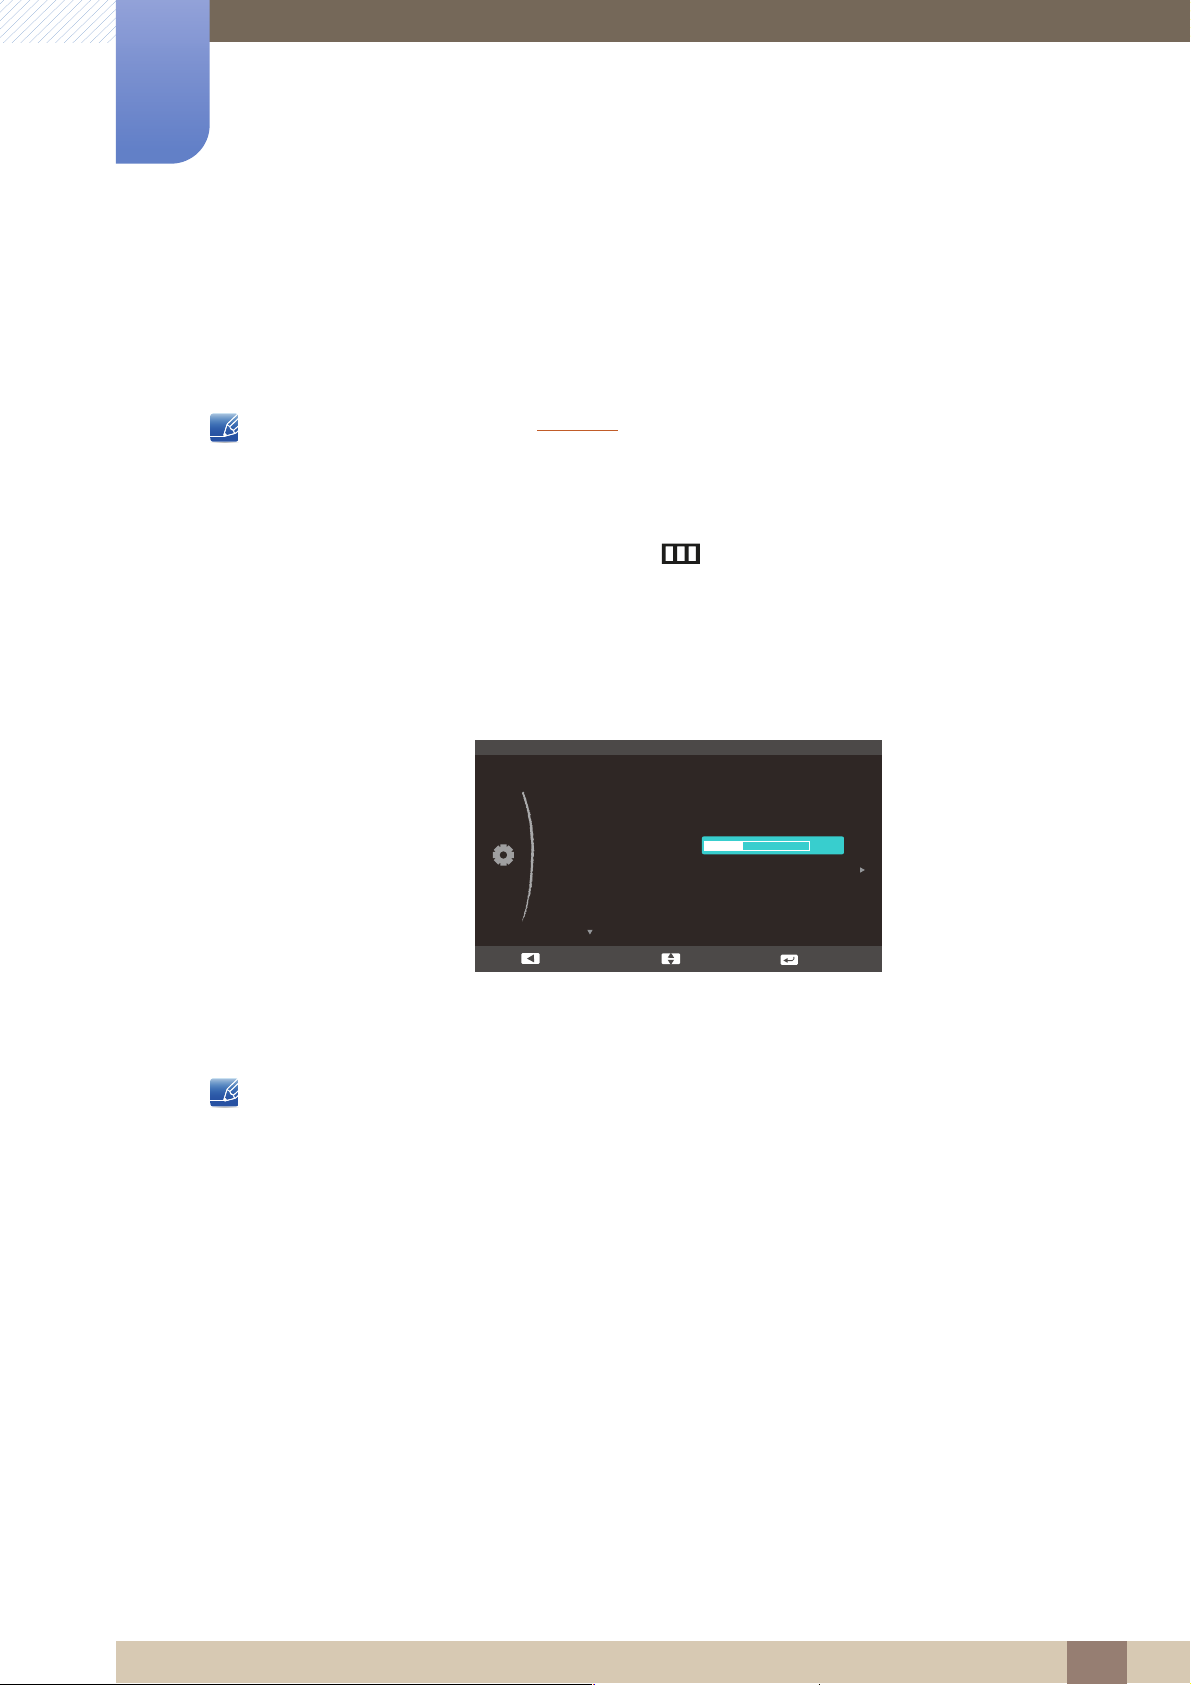
6.4 Turn Off After
The off timer can be set within a range of 1 to 23 hours. The product will automatically power off after the
specified number of hours.
This menu is available only when Off Timer is set to On.
6.4.1 Configuring Turn Off After
1 When the Function Key Guide appears, select [] by moving the JOG button UP.
Next, press the JOG button.
2 Move to SETUP&RESET controlling the JOG button UP/DOWN and press the JOG button.
3 Move to Turn Off After controlling the JOG button UP/DOWN and press the JOG button.
The following screen will appear.
4 Adjust the Turn Off After controlling the JOG button UP/DOWN.
5 The selected option will be applied.
For products for the market in Europe, the Off Timer is set to automatically activate 4 hours after the
product powers on. This is done in accordance with power supply regulations. If you do not want the
timer to activate, go to MENU SETUP&RESET and set Off Timer to Off.
→
6 Setup and Reset
66
Page 67
Setup and Reset
SETUP&RESET
Off
Acceleration
Manual
Reset
Eco Saving
Off Timer
Turn Off After
PC/AV Mode
Key Repeat Time
Source Detection
On
K
Return EnterMove
: PC
AV
ೳ
PC/AV Mode
HDMI
Return EnterMove
6
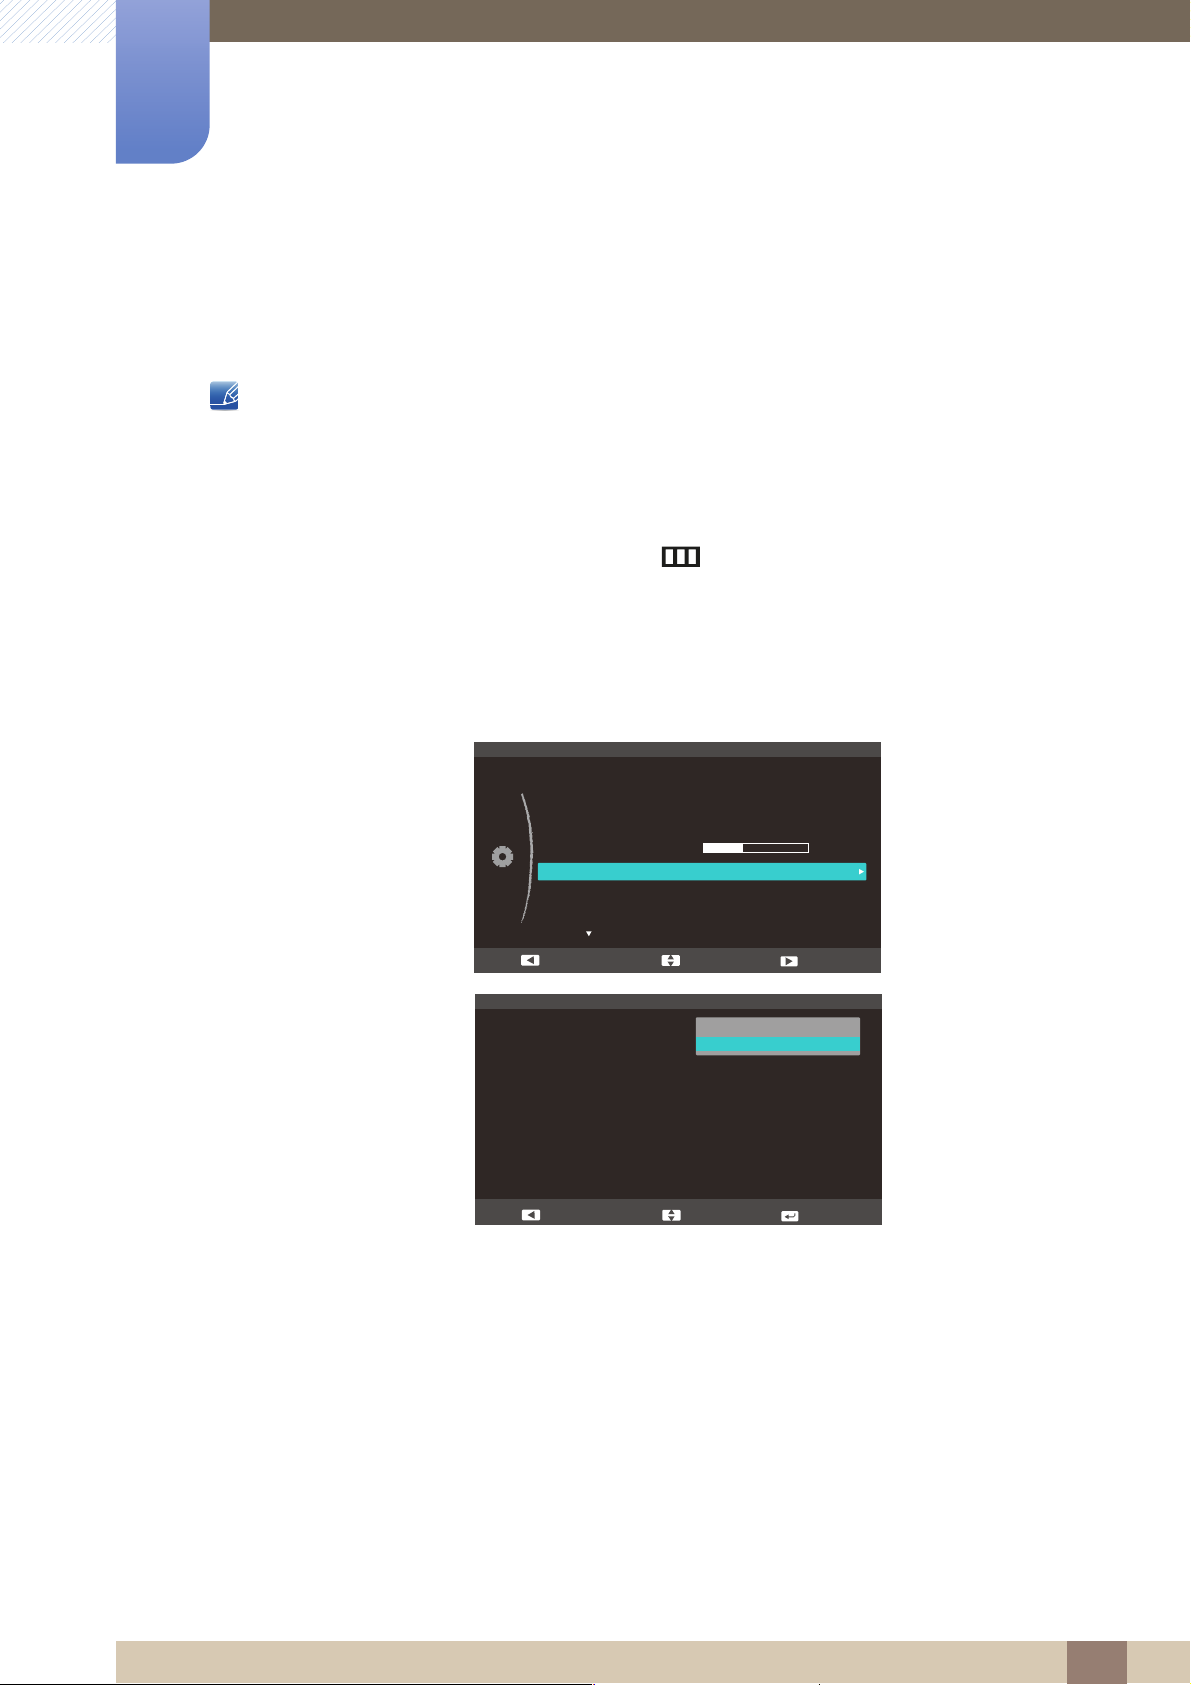
6.5 PC/AV Mode
Set PC/AV Mode to AV. The picture size will be enlarged. This option is useful when you view a movie.
z This function does not support Analog mode.
z Supplied for the wide models only such as 16:9 or 16:10.
6.5.1 Configuring PC/AV Mode
1 When the Function Key Guide appears, select [] by moving the JOG button UP.
Next, press the JOG button.
2 Move to SETUP&RESET controlling the JOG button UP/DOWN and press the JOG button.
3 Move to PC/AV Mode controlling the JOG button UP/DOWN and press the JOG button.
The following screen will appear.
4 Move to the desired option controlling the JOG button UP/DOWN and press the JOG button.
5 The selected option will be applied.
6 Setup and Reset
67
Page 68
Setup and Reset
SETUP&RESET
2II
Acceleration
Manual
Reset
Eco Saving
Off Timer
Turn Off After
PC/AV Mode
Key Repeat Time
Source Detection
2Q
4K
Acceleration
1 sec
2 sec
No Repeat
Return EnterMove
6
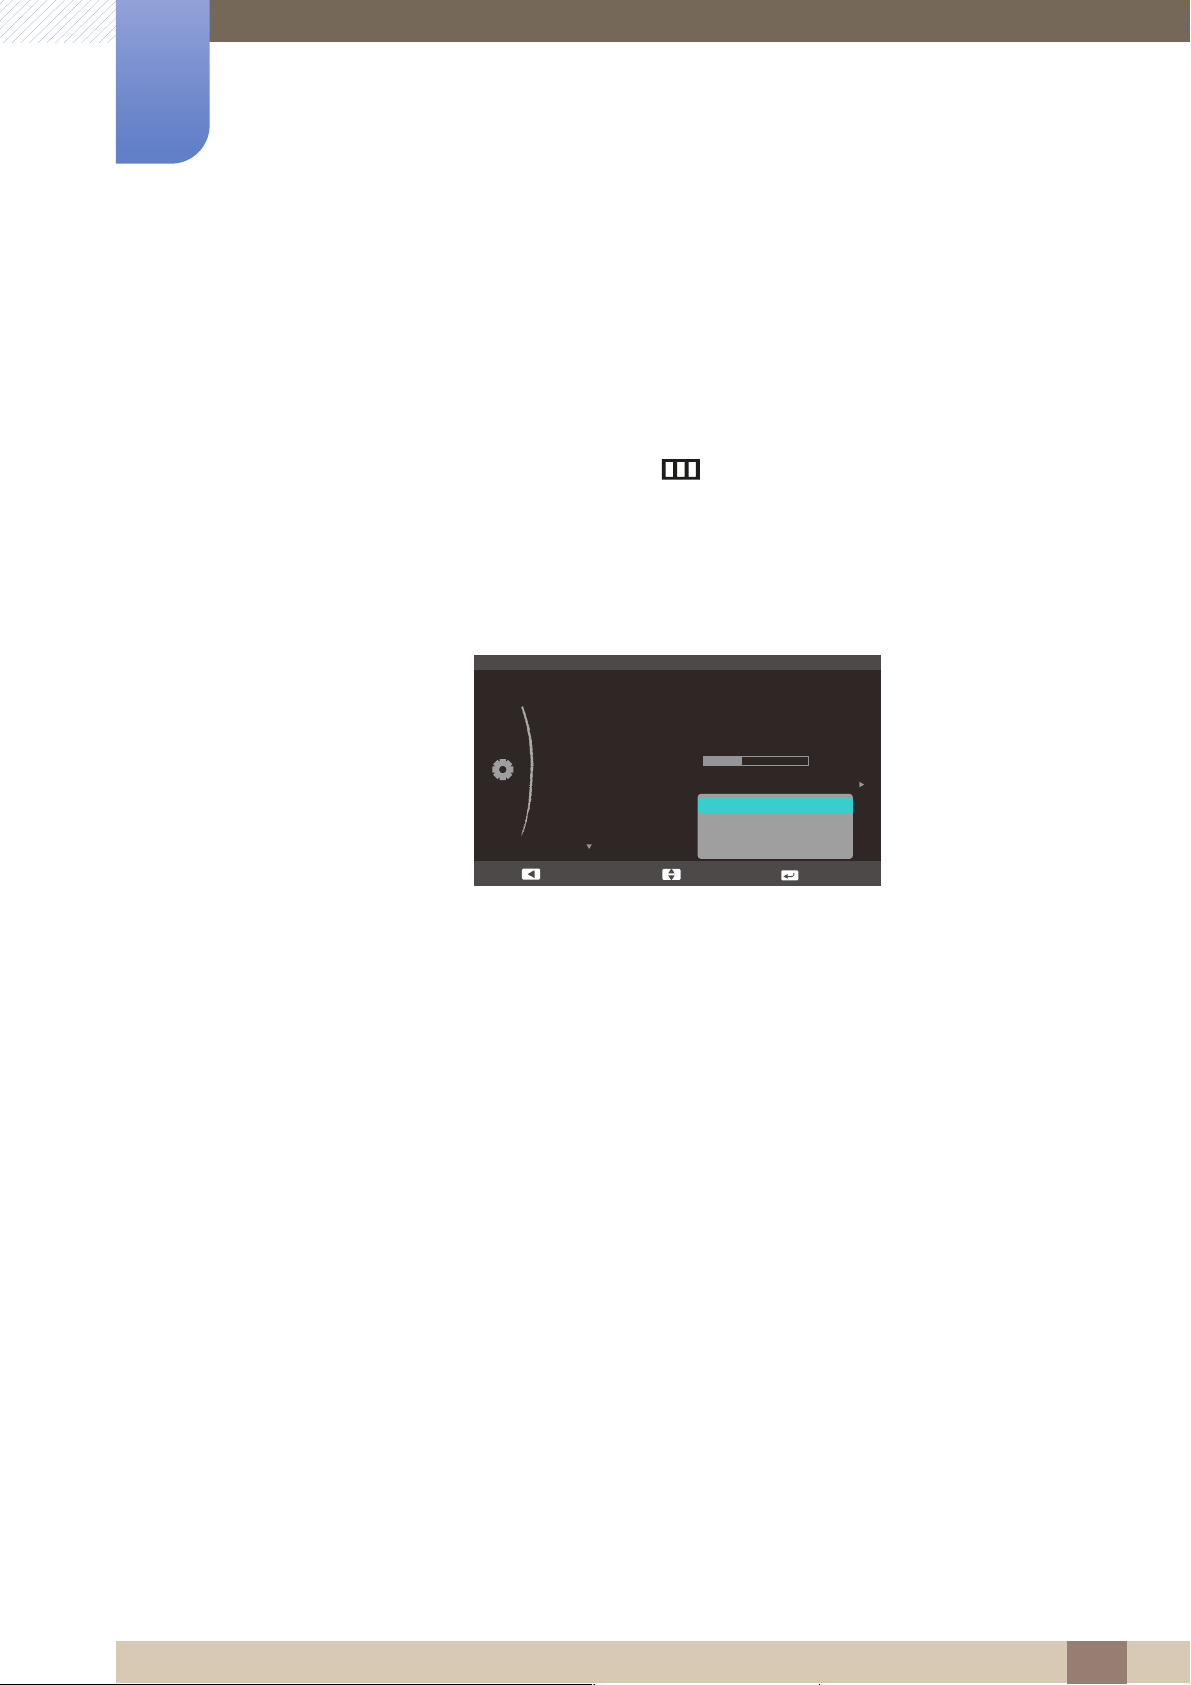
6.6 Key Repeat Time
Control the response rate of a button when the button is pressed.
6.6.1 Configuring Key Repeat Time
1 When the Function Key Guide appears, select [] by moving the JOG button UP.
Next, press the JOG button.
2 Move to SETUP&RESET controlling the JOG button UP/DOWN and press the JOG button.
3 Move to Key Repeat Time controlling the JOG button UP/DOWN and press the JOG button.
The following screen will appear.
z Acceleration, 1 sec, or 2 sec can be selected. If No Repeat is selected, a command responds
only once when a button is pressed.
4 Move to the desired option controlling the JOG button UP/DOWN and press the JOG button.
5 The selected option will be applied.
6 Setup and Reset
68
Page 69
Setup and Reset
SETUP&RESET
Off
Acceleration
Reset
Eco Saving
Off Timer
Turn Off After
PC/AV Mode
Key Repeat Time
Source Detection
On
K
$XWR
0DQXDO
Return EnterMove
6
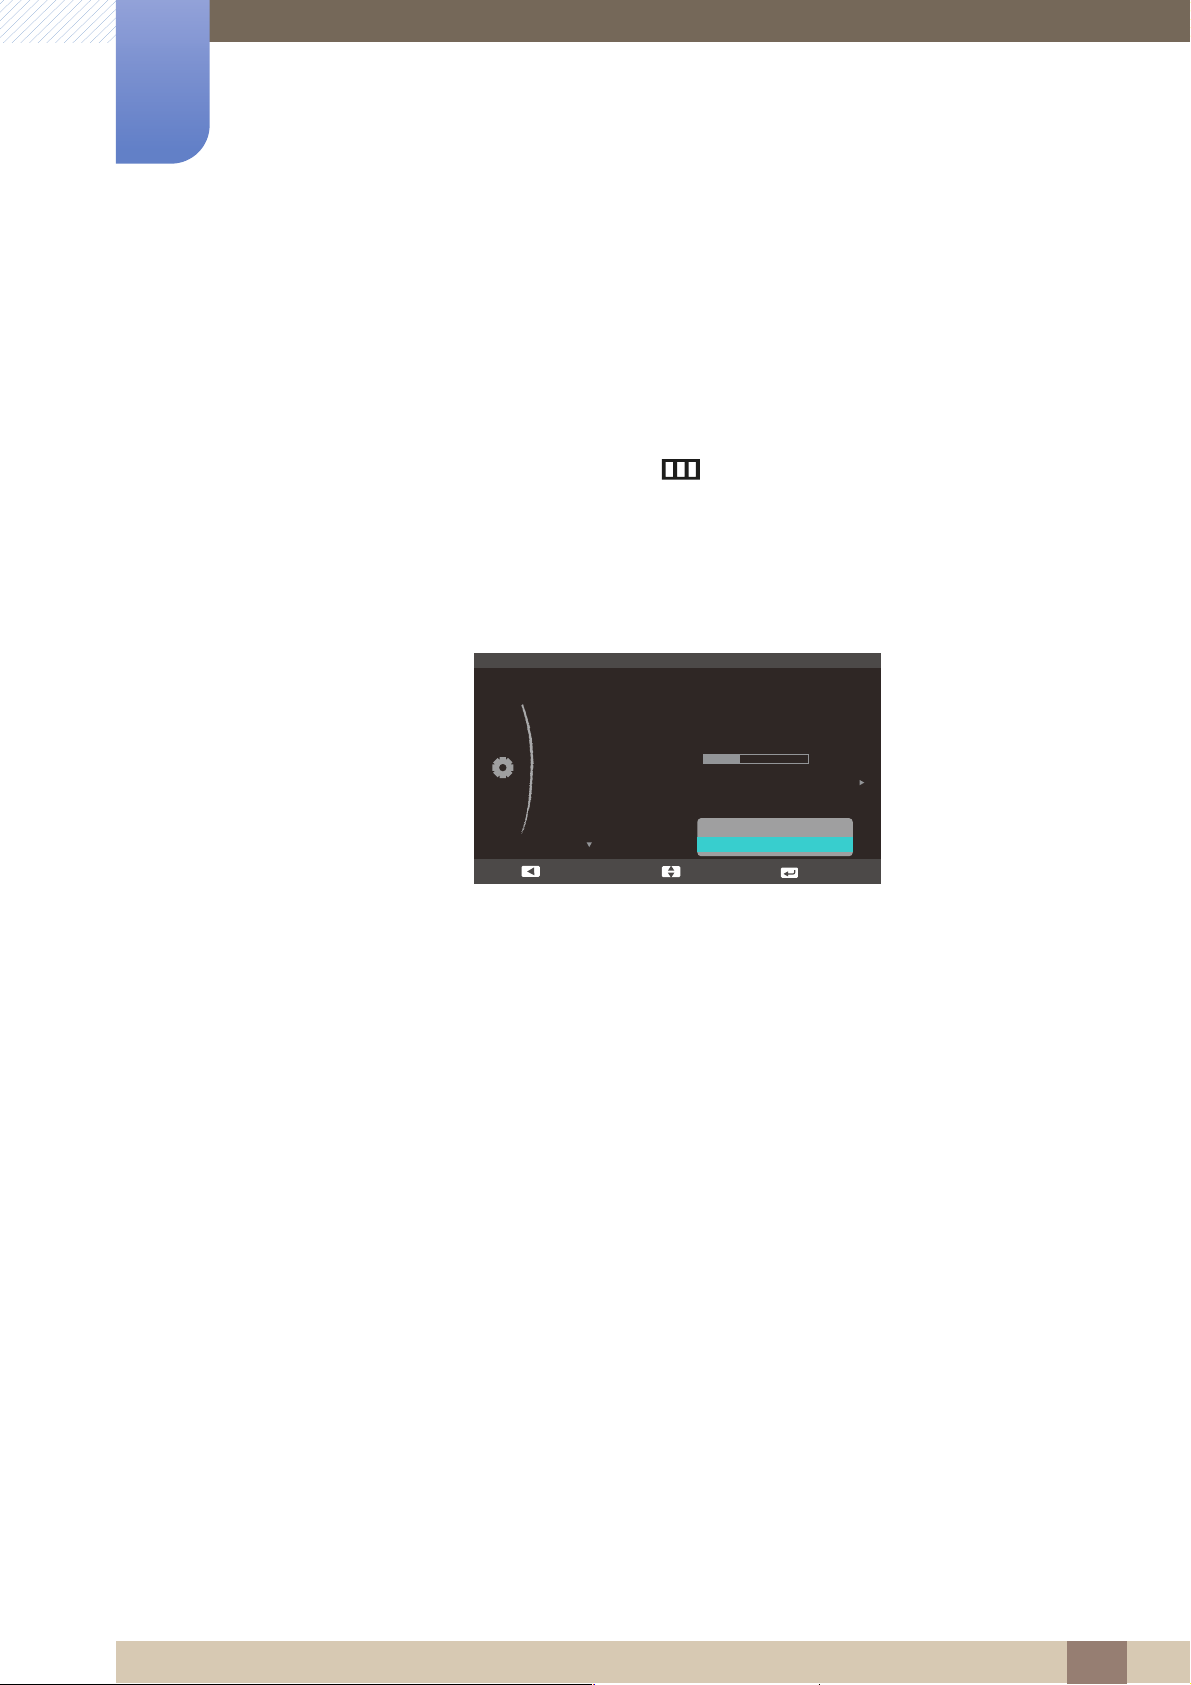
6.7 Source Detection
You can activate Source Detection.
6.7.1 Configuring Source Detection
1 When the Function Key Guide appears, select [] by moving the JOG button UP.
Next, press the JOG button.
2 Move to SETUP&RESET controlling the JOG button UP/DOWN and press the JOG button.
3 Move to Source Detection controlling the JOG button UP/DOWN and press the JOG button.
The following screen will appear.
z Auto: The input source is automatically recognized.
z Manual: Manually select an input source.
4 Move to the desired option controlling the JOG button UP/DOWN and press the JOG button.
5 The selected option will be applied.
6 Setup and Reset
69
Page 70
Setup and Reset
SETUP&RESET
Power LED On
Working
Stand-by
Return EnterMove
6
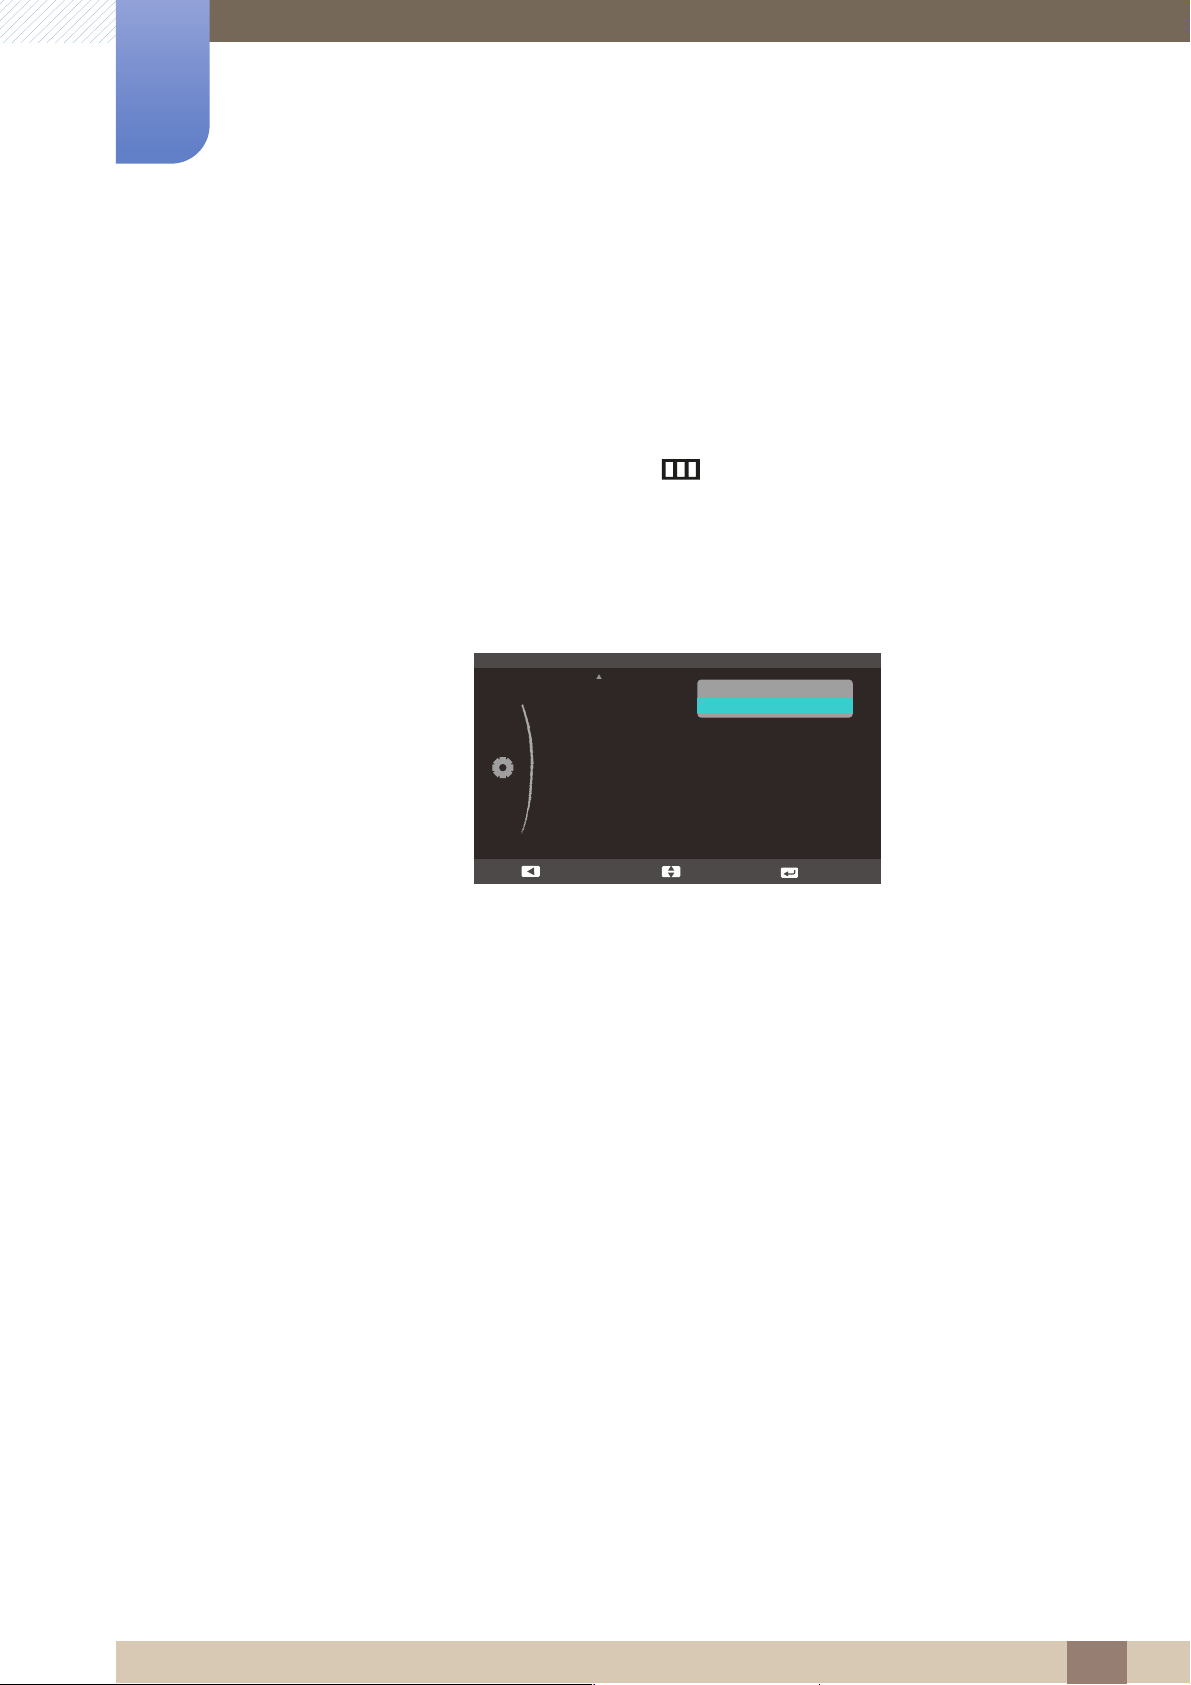
6.8 Power LED On
Configure the settings to enable or disable the power LED located at the lower part of the product.
6.8.1 Configuring Power LED On
1 When the Function Key Guide appears, select [] by moving the JOG button UP.
Next, press the JOG button.
2 Move to SETUP&RESET controlling the JOG button UP/DOWN and press the JOG button.
3 Move to Power LED On controlling the JOG button UP/DOWN and press the JOG button.
The following screen will appear.
z Working: The power LED is on when the product is turned on.
z Stand-by: The power LED is on when the product is turned off.
4 Move to the desired option controlling the JOG button UP/DOWN and press the JOG button.
5 The selected option will be applied.
6 Setup and Reset
70
Page 71
INFORMATION Menu and Others
SETUP&RESET
Exit EnterMove
PICTURE
COLOR
MENU SETTINGS
INFORMATION
Analog
**kHz **Hz NP
**** x ****
Optimal Mode
**** x **** **Hz
7
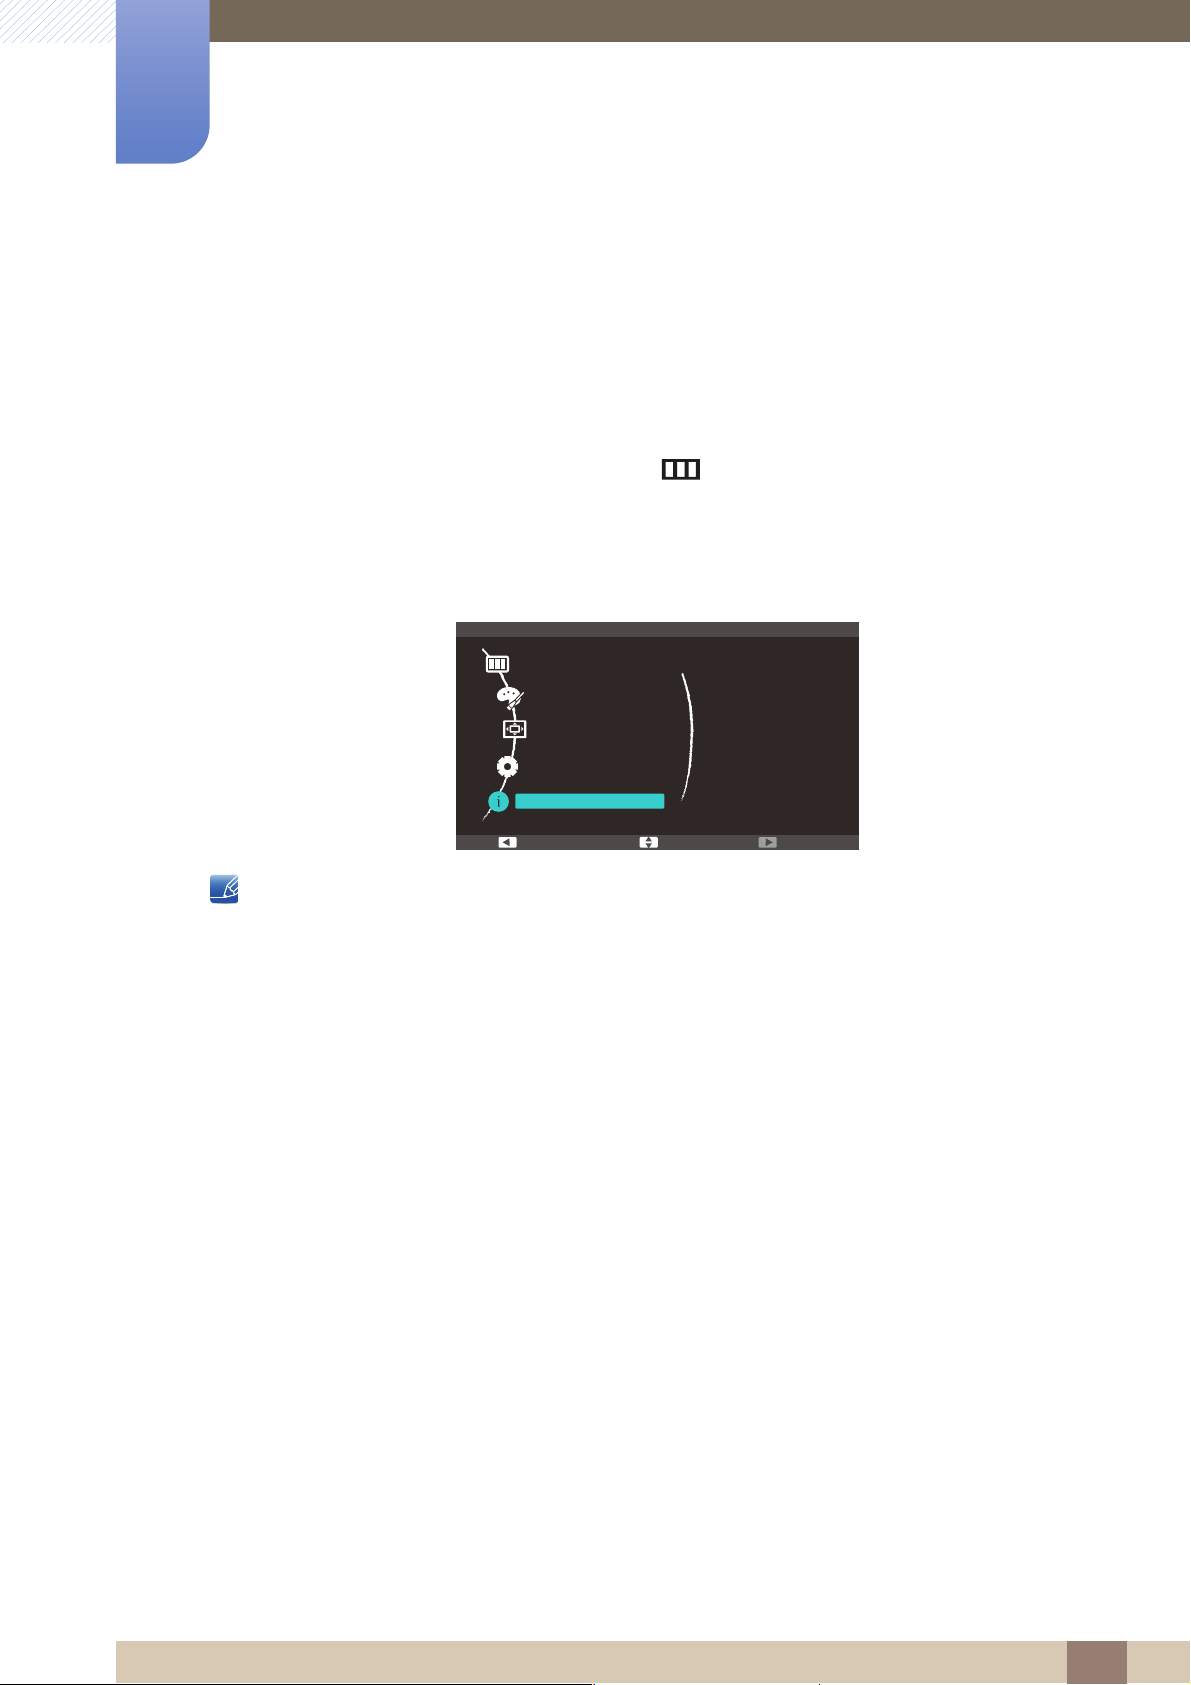
7.1 INFORMATION
View the current input source, frequency and resolution.
7.1.1 Displaying INFORMATION
1 When the Function Key Guide appears, select [] by moving the JOG button UP.
Next, press the JOG button.
2 Move to INFORMATION controlling the JOG button UP/DOWN and press the JOG button.
The following screen will appear.
The displayed menu items may vary depending on the model.
7 INFORMATION Menu and Others
71
Page 72
INFORMATION Menu and Others
EnterAdjust
Brightness
EnterAdjust
Contrast
→
7
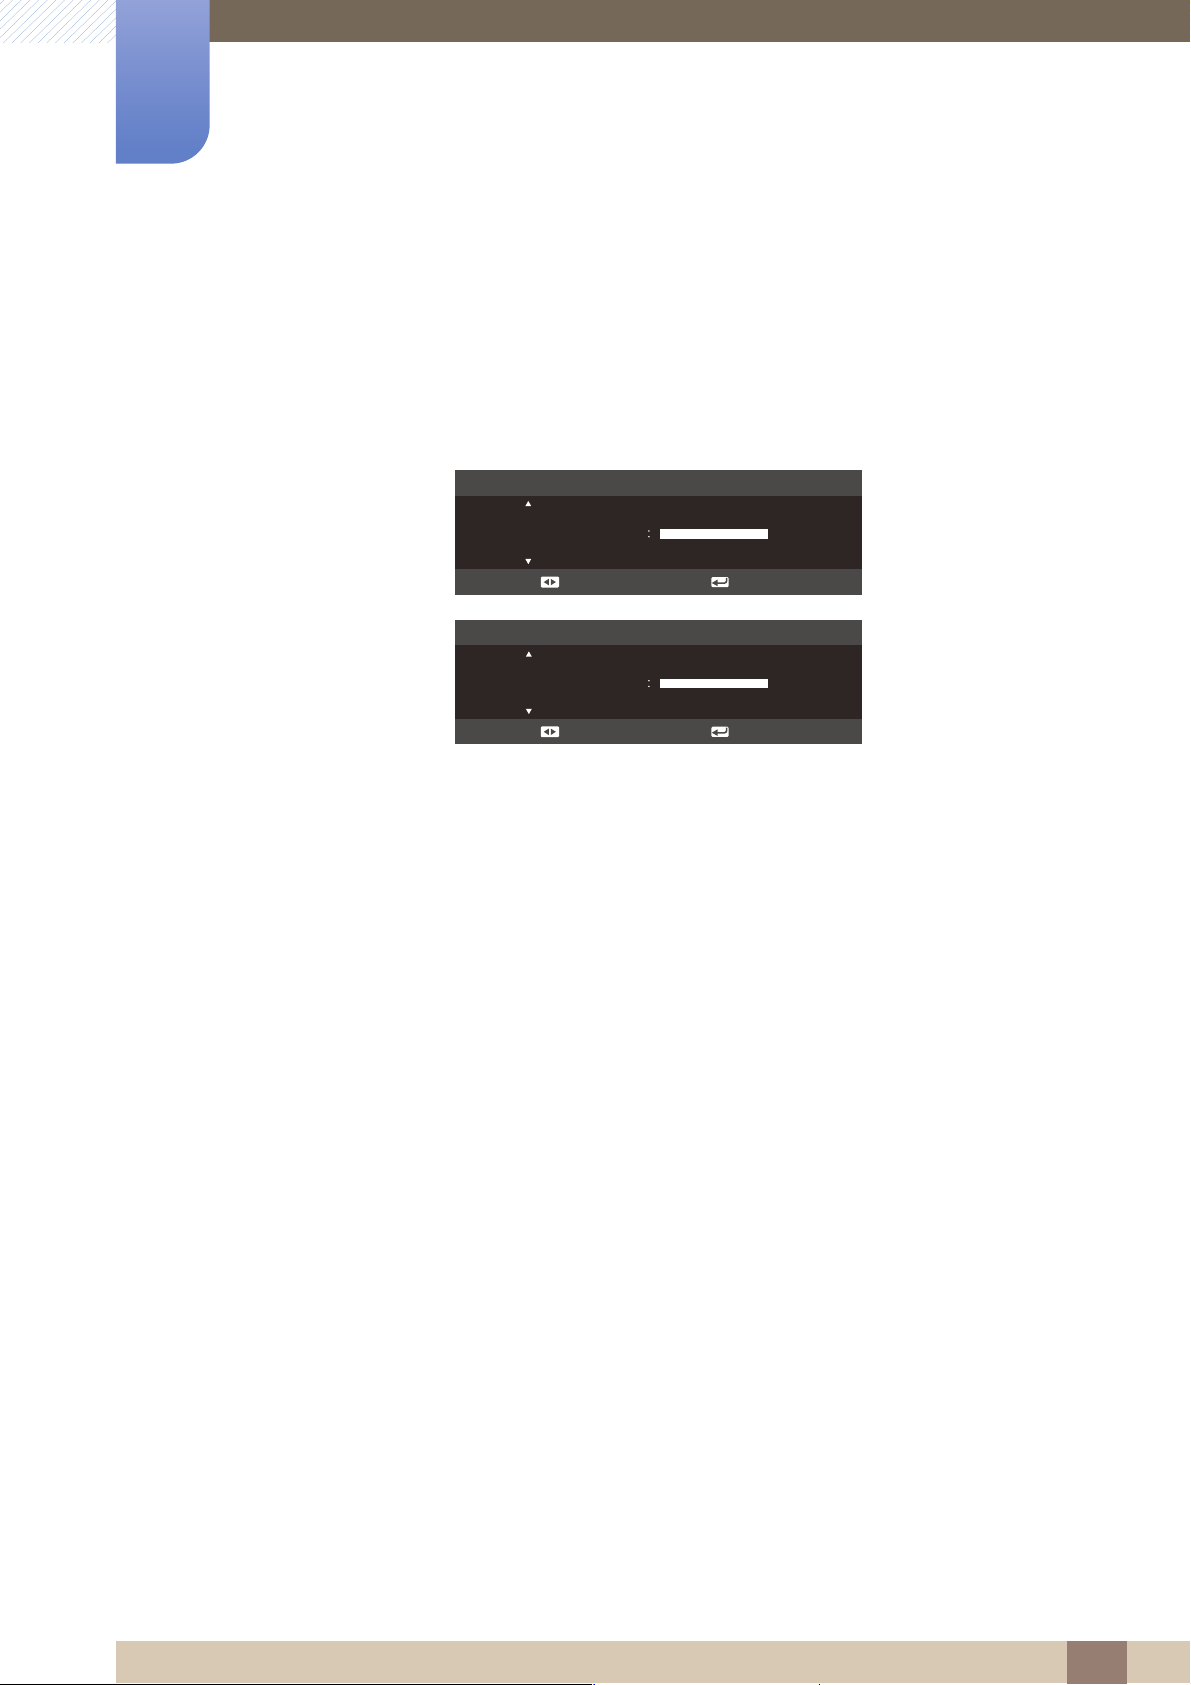
7.2 Configuring Brightness and Contrast in the Initial Screen
Adjust the Brightness and Contrast by moving the JOG button when the Direct Key Guide is displayed
on the screen.
1 When you control the JOG button LEFT/RIGHT, the following screen will appear.
2 Move to Brightness Contrast, Contrast Brightness, controlling the JOG button
UP/DOWN.
3 Adjust the Brightness and Contrast controlling the JOG button LEFT/RIGHT.
→
7 INFORMATION Menu and Others
72
Page 73
INFORMATION Menu and Others
EnterAdjust
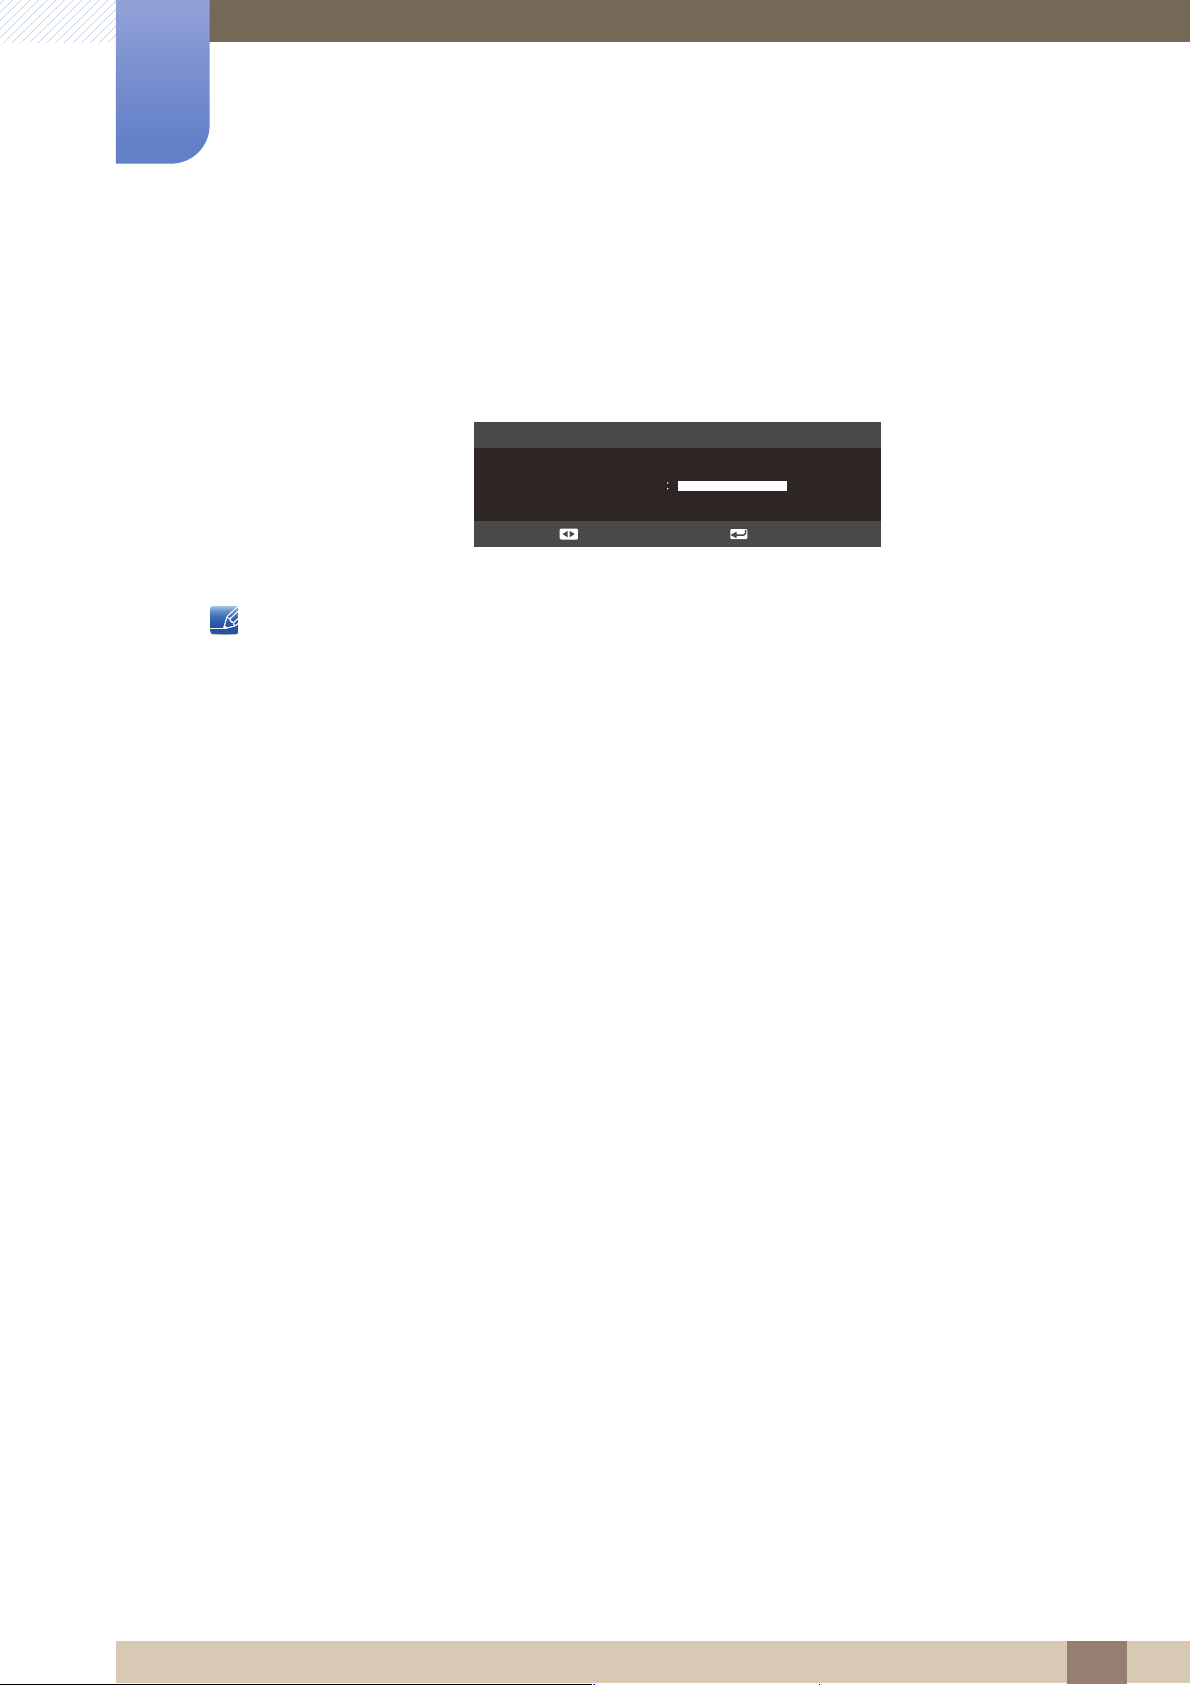
Volume
7
7.3 Configuring Volume in the Initial Screen
Adjust the Volume by moving the JOG button when the Direct Key Guide is displayed on the screen.
1 When you control the JOG button LEFT/RIGHT, the following screen will appear.
2 Adjust the Volume controlling the JOG button LEFT/RIGHT.
This function is only available in HDMI mode.
7 INFORMATION Menu and Others
73
Page 74
Installing the Software
8
8.1 MagicTune
8.1.1 What is "MagicTune"?
"MagicTune" is a software program that helps with monitor adjustments by providing comprehensive
descriptions of monitor functions and easy-to-understand guidelines.
You can adjust the product with the mouse and the keyboard without using the operating buttons of the
product.
8.1.2 Installing the Software
1 Insert the installation CD into the CD-ROM drive.
2 Select the "MagicTune" setup program.
If the pop-up screen for the software installation does not appear on the main screen, find and
double-click the "MagicTune" setup file on the CD-ROM.
3 Select the installation language and click Next.
4 Complete the remaining software installation steps according to the instructions displayed on the
screen.
z The software may not work properly if you do not restart the computer after the installation.
z The "MagicTune" icon may not appear depending on the computer system and the product
specifications.
z If the shortcut icon does not appear, press the F5 key.
Restrictions and Problems with the Installation ("MagicTune™")
The installation of "MagicTune™" may be affected by the Graphics Card, Motherboard and the
Networking Environment.
System Requirements
OS
z Windows XP, Windows Vista, Windows 7, Windows 8
8 Installing the Software
74
Page 75

8
Installing the Software
8.1.3 Removing the Software
You can only remove "MagicTune™" through Add or Remove Programs in Windows.
To remove "MagicTune™", complete the following steps.
1 Click Start select Settings, and select Control Panel from the menu.
For Windows XP, click Start, and select Control Panel from the menu.
2 Double-click the Add or Remove Programs icon in the Control Panel.
3 In the Add/Remove window, find and select "MagicTune™" so that it is highlighted.
4 Click Change or Remove Programs to remove the software.
5 Select Yes to start removing "MagicTune™".
6 Wait until a message box appears informing you that the software has been removed completely.
For technical support, the FAQ (frequently asked questions) or information about the software
upgrade for "MagicTune™", please visit our website (http://www.samsung.com/us/consumer/
learningresources/monitor/magetune/pop_intro.html).
8 Installing the Software
75
Page 76
Installing the Software
MultiScreen
8
8.2 MultiScreen
"MultiScreen" enables users to use the monitor by partitioning multiple sections.
8.2.1 Installing the Software
1 Insert the installation CD into the CD-ROM drive.
2 Select the "MultiScreen" setup program.
3 When the Installation Wizard appears, click Next.
If the pop-up screen for the software installation does not appear on the main screen, find and
double-click the "MultiScreen" setup file on the CD-ROM.
4 Complete the remaining software installation steps according to the instructions displayed on the
screen.
Restrictions and Problems with the Installation ("MultiScreen")
The "MultiScreen" installation may be affected by the Graphics Card, Motherboard and the Networking
Environment.
System Requirements
OS
z Windows™ 2000
z Windows XP Home Edition
z Windows XP Professional
z The software may not work properly if you do not restart the computer after the installation.
z The "MultiScreen" icon may not appear depending on the computer system and the product
specifications.
z If the shortcut icon does not appear, press the F5 key.
z Windows Vista 32Bit
z Windows 7 32Bit
z Windows 8 32Bit
For "MultiScreen", the operating systems Windows 2000 or later is recommended.
8 Installing the Software
76
Page 77

8
Installing the Software
Hardware
z At least 32MB of memory
z At least 60MB of free space on the hard disk drive
8.2.2 Removing the Software
Click Start, select Settings/Control Panel, and then double-click Add or Remove Programs.
Select "MultiScreen" from the program list and click the Add/Delete button.
8 Installing the Software
77
Page 78
Troubleshooting Guide
9
9.1 Requirements Before Contacting Samsung Customer Service Center
9.1.1 Testing the Product
Before calling Samsung Customer Service Center, test your product as follows. If the problem persists,
contact Samsung Customer Service Center.
Check if your product is operating normally by using the product test function.
If the screen is turned off and the power indicator blinks even though the product is properly connected
to a PC, perform a self-diagnosis test.
1 Power off both the PC and product.
2 Disconnect the cables from the product.
3 Power on the product.
4 If the message Check Signal Cable appears, the product is working normally.
9.1.2 Checking the Resolution and Frequency
For a mode that exceeds the supported resolution (refer to "10.3 Standard Signal Mode Table"), the
message Not Optimum Mode will appear for a short time.
9.1.3 Check the following.
The screen keeps switching on and off. Check the cable connection between the product
If the screen remains blank, check the PC system, video controller and cable.
Installation issue (PC mode)
and PC, and ensure the connectors are locked.
(Refer to "2.3 Connecting and Using a PC")
Screen issue
The screen cannot be switched on. Check that the power cable is connected
properly. Check that the power button is switched
on properly.
(Refer to "2.3 Connecting and Using a PC")
9 Troubleshooting Guide
78
Page 79
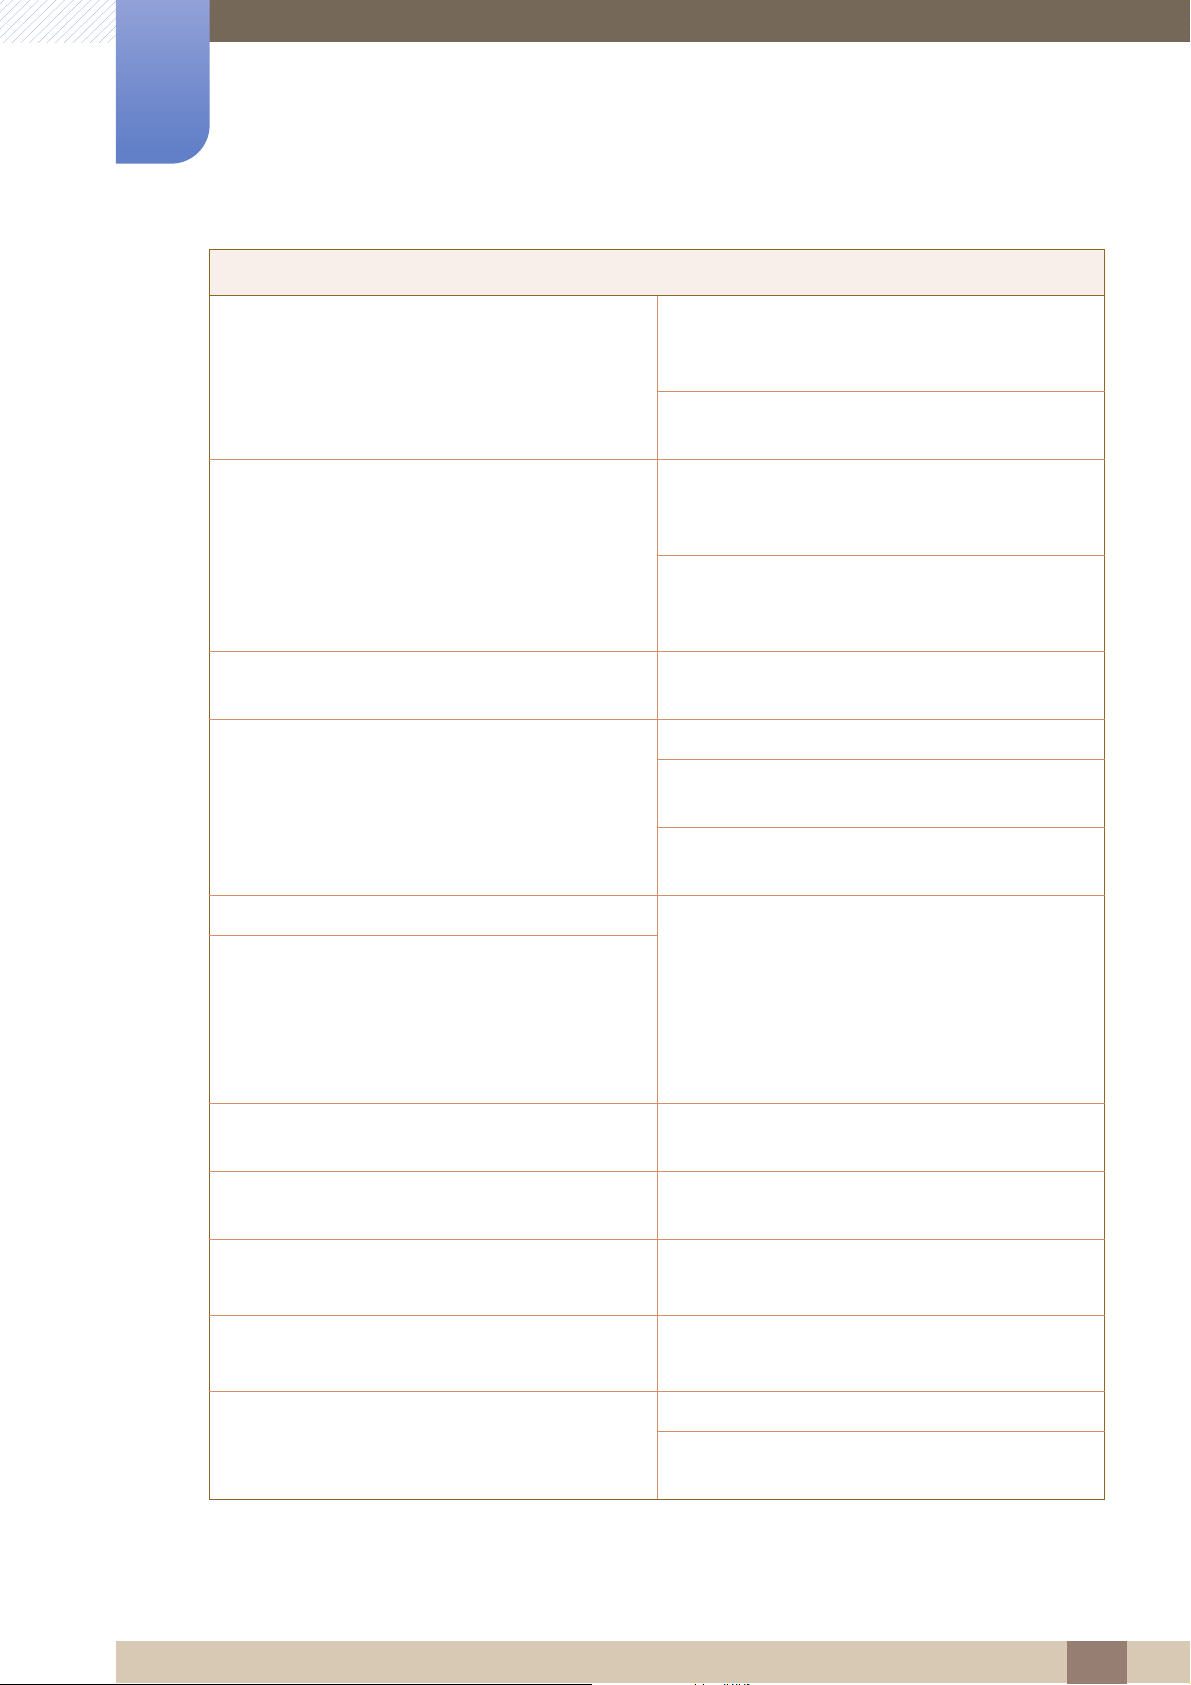
9
Troubleshooting Guide
Screen issue
The message Check Signal Cable appears. Check that the cable is properly connected to the
product.
(Refer to "2.3 Connecting and Using a PC")
Check that the device connected to the product is
powered on.
Not Optimum Mode is displayed. This message appears when the signal from the
graphics card exceeds the maximum resolution or
frequency for the product.
Change the maximum resolution and frequency to
suit the product performance, referring to
Standard Signal Mode Table (page 86).
The images on the screen look distorted. Check the cable connection to the product
(Refer to "2.3 Connecting and Using a PC")
The screen is not clear. The screen is blurry. Adjust Coarse (page 52) and Fine (page 53).
Remove any accessories (video extension cable,
etc.) and try again.
Set the resolution and frequency to the
recommended level. (Refer to "10.1 General")
The screen appears unstable and shaky. Check that the resolution and frequency for the
There are shadows or ghost images left on the
screen.
The screen is too bright. The screen is too dark. Adjust Brightness (page 41) and
Screen color is inconsistent. Change the COLOR settings.
PC are within the range of resolution and
frequency compatible with the product. Next, if
required, change the settings, referring to
Standard Signal Mode Table (page 86) in this
manual and the INFORMATION menu on the
product.
Contrast (page 42).
(Refer to " Configuring Tint")
The colors on the screen have a shadow and are
distorted.
White does not really look white. Change the COLOR settings.
There is no image on the screen and the power
LED blinks every 0.5 to 1 second.
Change the COLOR settings.
(Refer to " Configuring Tint")
(Refer to " Configuring Tint")
The product is operating in power-saving mode.
Press any key on the keyboard or move the
mouse to return to normal operating mode.
9 Troubleshooting Guide
79
Page 80
9
Troubleshooting Guide
Sound issue
There is no sound. Check the connection of the audio cable or adjust
the volume.
Check the volume.
The volume is too low. Adjust the volume.
If the volume is still low after turning it up to the
maximum level, adjust the volume on your PC
sound card or software program.
Source device issue
A beeping sound is heard when my PC is booting. If a beeping sound is heard when your PC is
booting, have your PC serviced.
9 Troubleshooting Guide
80
Page 81
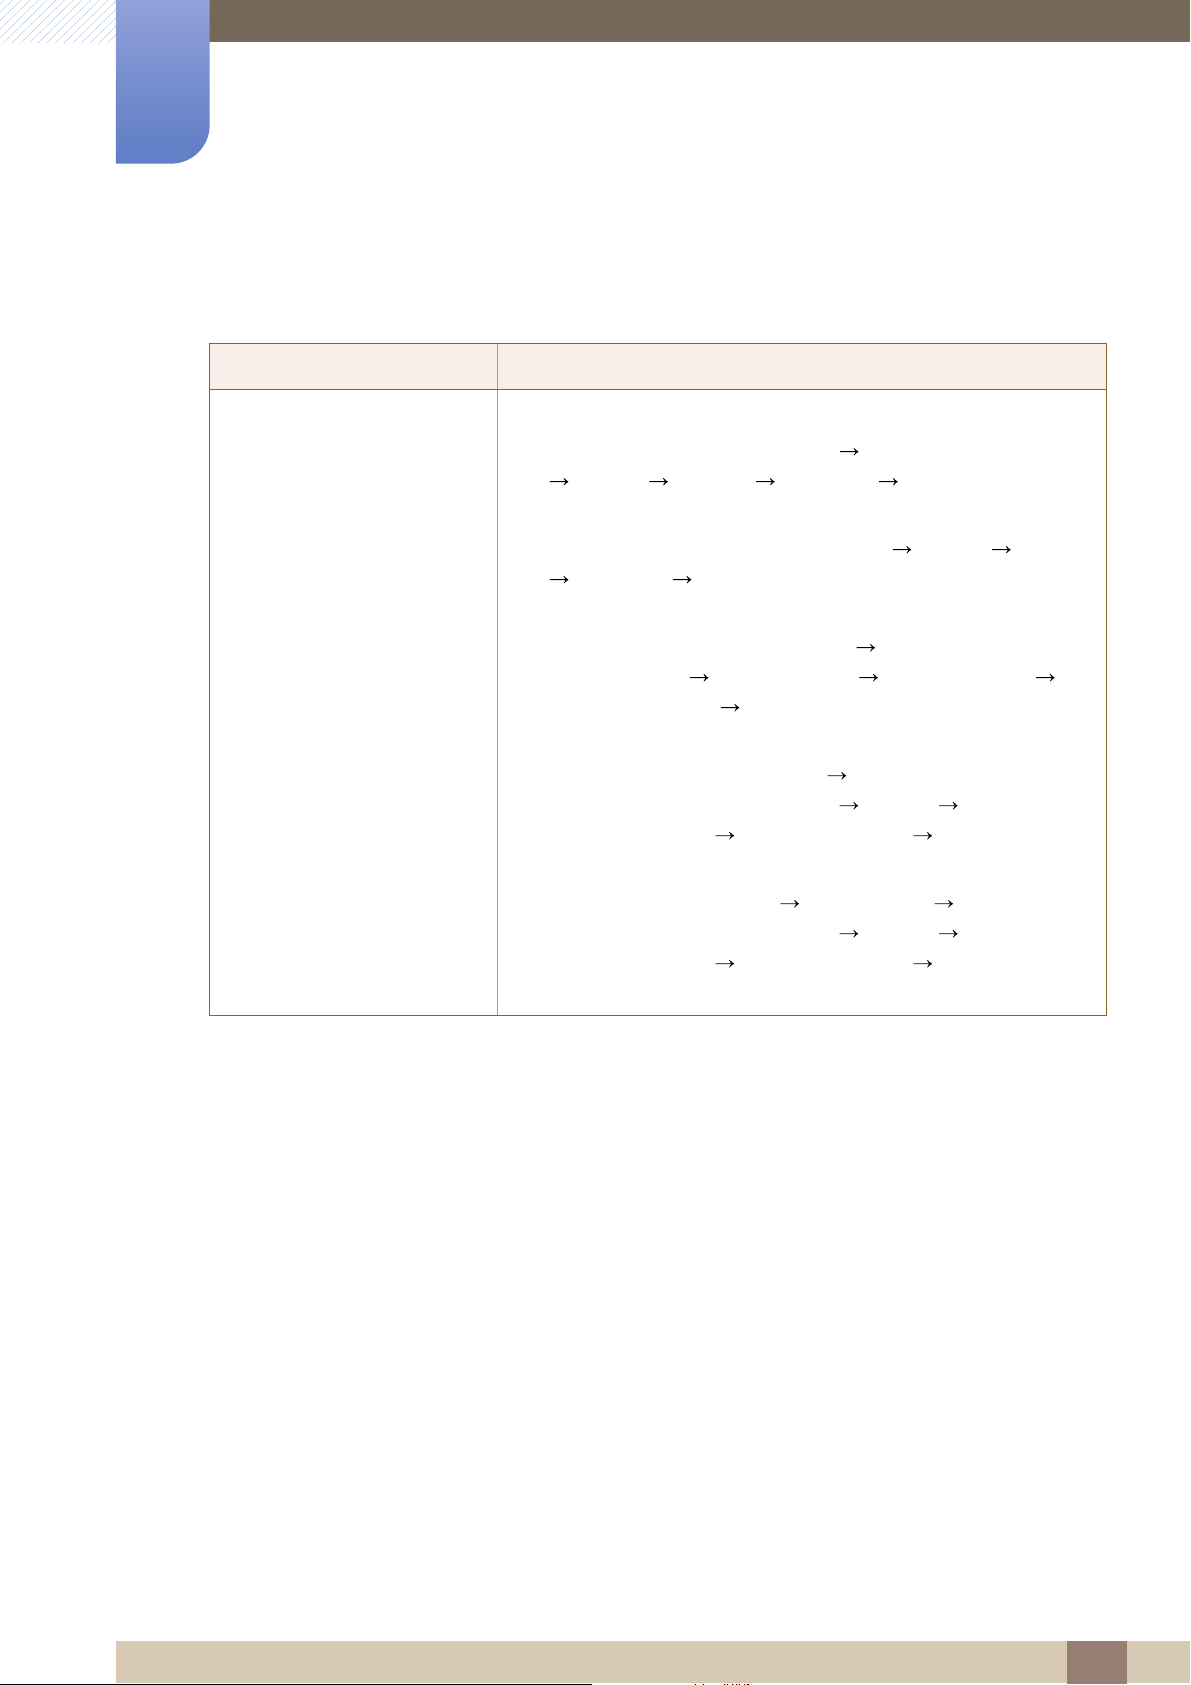
Troubleshooting Guide
9
9.2 Q & A
Question Answer
How can I change the
frequency?
Set the frequency on your graphics card.
z
Windows XP: Go to
Display
Refresh rate
z
Windows ME/2000: Go to
Advanced
Monitor settings
z
Windows Vista: Go to
Personalization
Advanced Settings
Monitor settings
z
Windows 7: Go to
Appearance and Personalization
Screen Resolution
adjust
z
Windows 8: Go to
Appearance and Personalization
Screen Resolution
adjust
Refresh rate
Refresh rate
Control Panel
Settings
under
Monitor settings
Monitor
.
Personalization
.
Control Panel
under
Settings
under
Advanced
Control Panel
, and adjust
Control Panel
Monitor
Advanced settings
Advanced settings
, and adjust
Monitor settings
Control Panel
Monitor settings
Appearance and Themes
Monitor
.
Refresh rate
Appearance and
Display Settings
Display
.
Display
.
, and adjust
Display
Refresh rate
under
Monitor
Monitor
Settings
under
, and
, and
9 Troubleshooting Guide
81
Page 82
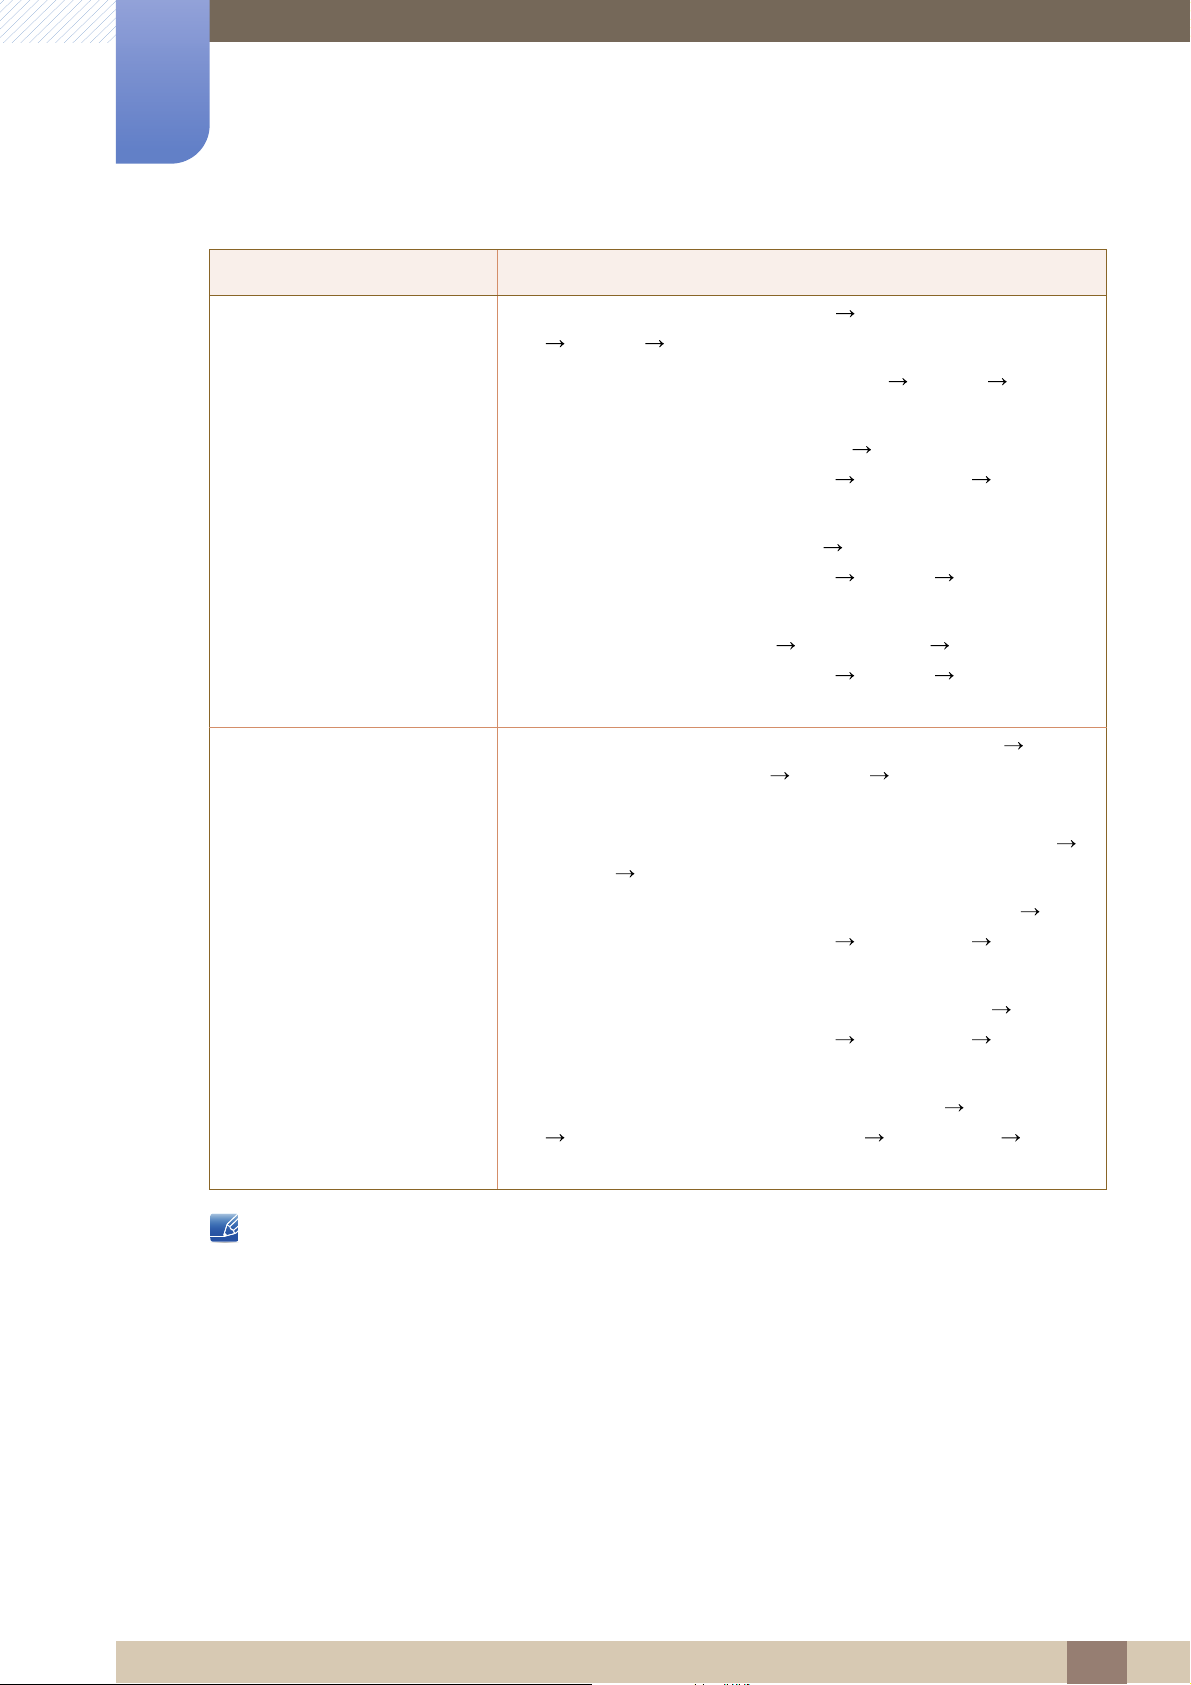
9
Troubleshooting Guide
Question Answer
How can I change the
resolution?
How do I set power-saving
mode?
z
Windows XP: Go to
Display
z
Windows ME/2000: Go to
and adjust the resolution.
z
Windows Vista: Go to
Appearance and Personalization
Display Settings
z
Windows 7: Go to
Appearance and Personalization
Adjust Resolution
z
Windows 8: Go to
Appearance and Personalization
Adjust Resolution
z
Windows XP: Set power-saving mode in
Appearance and Themes
or BIOS SETUP on the PC.
z
Windows ME/2000: Set power-saving mode in
Display
Screen Saver Settings
Control Panel
Settings
, and adjust the resolution.
Control Panel
Control Panel
, and adjust the resolution.
Control Panel
, and adjust the resolution.
Settings
, and adjust the resolution.
Control Panel
Display
or BIOS SETUP on the PC.
Appearance and Themes
Display
Personalize
Display
Display
Control Panel
Screen Saver Settings
Settings
Control Panel
,
z
Windows Vista: Set power-saving mode in
Appearance and Personalization
Screen Saver Settings
z
Windows 7: Set power-saving mode in
Appearance and Personalization
Screen Saver Settings
z
Windows 8: Set power-saving mode in
Appearance and Personalization
Screen Saver Settings
Refer to the user manual for your PC or graphics card for further instructions on adjustment.
or BIOS SETUP on the PC.
or BIOS SETUP on the PC.
or BIOS SETUP on the PC.
Personalize
Control Panel
Personalize
Settings
Control Panel
Control Panel
Personalize
9 Troubleshooting Guide
82
Page 83
Specifications
10
10.1 General
Model Name S22C550H S23C550H S24C550HL
Panel
Synchronization Horizontal
Display Color
Resolution Optimum
Size 21.5 Inches (54 cm) 23 Inches (58 cm) 23.6 Inches (59 cm)
Display
area
Pixel Pitch 0.24825 mm (H) x
Frequency
Vertical
Frequency
Resolution
Maximum
Resolution
476.64 mm (H) x
268.11 mm (V)
18.77 Inches
Inches
10.56
0.24825 mm (V)
0.0098 Inches
0.0098 Inches
30 ~ 81 kHz
56 ~ 75 Hz
16.7 M
1920 x 1080 @ 60 Hz
1920 x 1080 @ 60 Hz
(H) x
(V)
(H) x
(V)
509.76 mm (H) x
286.74 mm (V)
20.07 Inches
Inches
11.29
0.2655 mm (H) x
0.2655 mm (V)
0.0105 Inches
0.0105 Inches
(H) x
(V)
(H) x
(V)
521.28 mm (H) x
293.22 mm (V)
20.52 Inches
Inches
11.54
0.2715 mm (H) x
0.2715 mm (V)
0.0107 Inches
0.0107 Inches
(H) x
(V)
(H) x
(V)
Input Signal, Terminated RGB Analog, HDMI (High Definition Multimedia Interface)
0.7 Vp-p ± 5%
separate H/V sync, Composite, SOG
TTL level (V high ≥ 2.0V, V low ≤ 0.8V)
Maximum Pixel Clock
Power Supply
Signal connectors
148 MHz (Analog, HDMI)
This product supports 100-240 V. Since the standard voltage may differ
from country to country, please check the label on the back of the product.
15 pin-to-15 pin D-sub cable, Detachable
HDMI to DVI Cable, Detachable
HDMI Cable, Detachable
10 Specifications
83
Page 84
10
Specifications
Model Name S22C550H S23C550H S24C550HL
Dimensions
(W x H x D) /
Weight
Environmental
considerations
Plug-and-Play This monitor can be installed and used with any Plug-and-Play
Panel Dots (Pixels) Due to the nature of the manufacturing of this product, approximately 1
Without
Stand
With
Stand
Operating Temperature : 50°F ~ 104°F (10°C ~ 40°C)
Storage Temperature : -4°F ~ 113°F (-20°C ~ 45°C)
507.6 x 312.0 x
100.0 mm / 2.85 kg
20.0 x 12.3
3.9 Inches / 6.28 lbs
507.6
190.0 mm / 3.25 kg
20.0 x 16.1 x
7.5 Inches / 7.17 lbs
Humidity : 10 % – 80 %, non-condensing
Humidity : 5 % – 95 %, non-condensing
compatible systems. Two-way data exchange between the monitor and
PC system optimizes the monitor settings. Monitor installation takes
place automatically. However, you can customize the installation settings
if desired.
pixel per million (1ppm) may be brighter or darker on the LCD panel.
This does not affect product performance.
x
x 407.7 x
546.0 x 329.7 x
100.0 mm / 3.05 kg
21.5 x 13.0
3.9 Inches / 6.72 lbs
546.0
190.0 mm / 3.45 kg
21.5 x 16.8 x
7.5 Inches / 7.60 lbs
x
x 427.5 x
567.8 x 343.0 x
100.0 mm / 3.45 kg
22.4 x 13.5
3.9 Inches / 7.60 lbs
567.8
200.0 mm / 3.85 kg
22.4 x 17.2 x
7.9 Inches / 8.49 lbs
x
x 436.5 x
The above specifications are subject to change without notice to improve quality.
This device is a Class B digital apparatus.
(USA only)
Dispose unwanted electronics through an approved recycler.
To find the nearest recycling location, go to our website:
www.samsung.com/recyclingdirect or call, (877) 278 - 0799
10 Specifications
84
Page 85
Specifications
10
10.2 PowerSaver
The power-saving function of this product reduces power consumption by switching off the screen and
controlling the power LED status if the product is not used for a specified period of time. The power is not
turned off in power-saving mode. To switch the screen back on, press any key on the keyboard or move
the mouse. Power-saving mode functions only when the product is connected to a PC that has a powersaving function.
PowerSaver
Power Indicator Off Blinking On
Power Consumption
(S22C550H)
Power Consumption
(S23C550H)
Power Consumption
(S24C550HL)
z The power consumption level can vary in different operating conditions or when settings are
changed. (S**C550 Model Power saving mode / Power off (Power button) : Max 0.45 watts.)
z ENERGY STAR
Energy Star power is measured with the test method in the current Energy Star
z To reduce the power consumption to 0 watts, turn off the power switch on the back of the product
or disconnect the power cable. Be sure to disconnect the power cable when you will not be using
the product for an extended period of time. To reduce the power consumption to 0 watts when the
power switch is not available, disconnect the power cable.
®
Energy Star
Power Consumption
21 W Typical 0.3 W Typical 0.3 W
22 W Typical 0.3 W Typical 0.3 W
22 W Typical 0.3 W Typical 0.3 W
is a US registered mark of the United States Environmental Protection Agency.
Power saving mode
Power off
(Power button)
®
Standard.
z The power indicator operation can be swapped by changing in the menu.
(SETUP&RESET Power LED On)
Actual models because of functional variation maybe haven’t this function.
10 Specifications
85
Page 86
Specifications
10
10.3 Standard Signal Mode Table
z This product can be set to only one resolution for each screen size to obtain the optimum picture
quality due to the nature of the panel. Therefore, a resolution other than the specified resolution
may degrade the picture quality. To avoid this, it is recommended that you select the optimum
resolution specified for the screen size of your product.
z Check the frequency when you exchange a CDT monitor (connected to a PC) for an LCD monitor.
If the LCD monitor does not support 85Hz, change the vertical frequency to 60Hz using the CDT
monitor before you exchange it with the LCD monitor.
If a signal that belongs to the following standard signal modes is transmitted from your PC, the screen will
automatically be adjusted. If the signal transmitted from the PC does not belong to the standard signal
modes, the screen may be blank even though the power LED turns on. In such a case, change the
settings according to the following table by referring to the graphics card user manual.
S22C550H / S23C550H / S24C550HL
Horizontal
Resolution
IBM, 720 x 400 31.469 70.087 28.322 -/+
MAC, 640 x 480 35.000 66.667 30.240 -/-
MAC, 832 x 624 49.726 74.551 57.284 -/-
MAC, 1152 x 870 68.681 75.062 100.000 -/-
VESA, 640 x 480 31.469 59.940 25.175 -/-
VESA, 640 x 480 37.861 72.809 31.500 -/-
VESA, 640 x 480 37.500 75.000 31.500 -/-
VESA, 800 x 600 35.156 56.250 36.000 +/+
VESA, 800 x 600 37.879 60.317 40.000 +/+
VESA, 800 x 600 48.077 72.188 50.000 +/+
VESA, 800 x 600 46.875 75.000 49.500 +/+
Frequency
(kHz)
Vertical
Frequency
(Hz)
Pixel Clock
(MHz)
Sync Polarity
(H/V)
VESA, 1024 x 768 48.363 60.004 65.000 -/-
VESA, 1024 x 768 56.476 70.069 75.000 -/-
VESA, 1024 x 768 60.023 75.029 78.750 +/+
VESA, 1152 x 864 67.500 75.000 108.000 +/+
VESA, 1280 x 720 45.000 60.000 74.250 +/+
VESA, 1280 x 800 49.702 59.810 83.500 -/+
VESA, 1280 x 1024 63.981 60.020 108.000 +/+
10 Specifications
86
Page 87
10
Specifications
Horizontal
Resolution
VESA, 1280 x 1024 79.976 75.025 135.000 +/+
VESA, 1440 x 900 55.935 59.887 106.500 -/+
VESA, 1600 x 900 (RB) 60.000 60.000 108.000 +/+
VESA, 1680 x 1050 65.290 59.954 146.250 -/+
VESA, 1920 x 1080p 67.500 60.000 148.500 +/+
z Horizontal Frequency
The time required to scan a single line from the left to the right side of the screen is called a
horizontal cycle. The reciprocal number of a horizontal cycle is called horizontal frequency.
Horizontal frequency is measured in kHz.
z Vertical Frequency
Repeating the same picture dozens of times per second allows you to view natural pictures. The
repeat frequency is called "vertical frequency" or "refresh rate" and is indicated in Hz.
Frequency
(kHz)
Vertical
Frequency
(Hz)
Pixel Clock
(MHz)
Sync Polarity
(H/V)
10 Specifications
87
Page 88
Appendix
01-8000 112 112
Bogotá: 6001272
Contact SAMSUNG WORLD WIDE
If you have any questions or comments relating to Samsung products, please contact the SAMSUNG
customer care center.
NORTH AMERICA
U.S.A 1-800-SAMSUNG (726-7864) http://www.samsung.com
CANADA 1-800-SAMSUNG (726-7864) http://www.samsung.com/ca
MEXICO 01-800-SAMSUNG (726-7864) http://www.samsung.com
(English)
http://www.samsung.com/ca_fr
(French)
LATIN AMERICA
ARGENTINE 0800-333-3733 http://www.samsung.com
BOLIVIA 800-10-7260 http://www.samsung.com
BRAZIL 0800-124-421
4004-0000
CHILE 800-SAMSUNG (726-7864)
From mobile 02-24 82 82 00
COLOMBIA
COSTA RICA 0-800-507-7267 http://www.samsung.com/latin
DOMINICA 1-800-751-2676 http://www.samsung.com/latin
http://www.samsung.com
http://www.samsung.com/cl
http://www.samsung.com/co
(Spanish)
http://www.samsung.com/latin_en
(English)
(Spanish)
http://www.samsung.com/latin_en
(English)
ECUADOR 1-800-10-7267 http://www.samsung.com/latin
(Spanish)
http://www.samsung.com/latin_en
(English)
EL SALVADOR 800-6225 http://www.samsung.com/latin
(Spanish)
http://www.samsung.com/latin_en
(English)
Appendix
88
Page 89
Appendix
LATIN AMERICA
GUATEMALA 1-800-299-0013 http://www.samsung.com/latin
(Spanish)
http://www.samsung.com/latin_en
(English)
HONDURAS 800-27919267 http://www.samsung.com/latin
(Spanish)
http://www.samsung.com/latin_en
(English)
JAMAICA 1-800-234-7267 http://www.samsung.com
NICARAGUA 00-1800-5077267 http://www.samsung.com/latin
(Spanish)
http://www.samsung.com/latin_en
(English)
PANAMA 800-7267 http://www.samsung.com/latin
(Spanish)
http://www.samsung.com/latin_en
(English)
PARAGUAY 98005420001 http://www.samsung.com
PERU 0-800-777-08 (Only from landline)
336-8686 (From HHP & landline)
PUERTO RICO 1-800-682-3180 http://www.samsung.com
TRINIDAD & TOBAGO 1-800-SAMSUNG (726-7864) http://www.samsung.com
URUGUAY 40543733 http://www.samsung.com
VENEZUELA 0-800-100-5303 http://www.samsung.com
EUROPE
AUSTRIA 0810 - SAMSUNG
(7267864, € 0.07/min)
http://www.samsung.com
http://www.samsung.com
BELGIUM 02-201-24-18 http://www.samsung.com/be
(Dutch)
http://www.samsung.com/be_fr
(French)
BOSNIA 051 133 1999 http://www.samsung.com
BULGARIA 07001 33 11 , normal tariff http://www.samsung.com
CROATIA 062 SAMSUNG (062 726 786) http://www.samsung.com
Appendix
89
Page 90
Appendix
Samsung Electronics Czech and Slovak, s.r.o.,
Oasis Florenc, Sokolovská 394/17, 180 00, Praha 8
till 8.2.2013 . From 8.2.2013: Samsung Electronics Czech and
Slovak, s.r.o. V Parku 2343/24, 148 00 - Praha 4
0 801-1SAMSUNG(172-678) *
lub +48 22 607-93-33 **
EUROPE
CYPRUS 8009 4000 only from landline
(+30) 210 6897691 from mobile
and land line
CZECH 800 - SAMSUNG (800-726786) http://www.samsung.com
DENMARK 70 70 19 70 http://www.samsung.com
EIRE 0818 717100 http://www.samsung.com
ESTONIA 800-7267 http://www.samsung.com/ee
FINLAND 030-6227 515 http://www.samsung.com
FRANCE 01 48 63 00 00 http://www.samsung.com/fr
GERMANY 0180 5 SAMSUNG bzw.
0180 5 7267864* (*0,14 €/Min. aus
dem dt. Festnetz, aus dem
Mobilfunk max. 0,42 €/Min.)
http://www.samsung.com
http://www.samsung.com
GREECE 80111-SAMSUNG (80111 726
7864) only from land line
(+30) 210 6897691 from mobile
and land line
HUNGARY 06-80-SAMSUNG (726-7864) http://www.samsung.com
ITALIA 800-SAMSUNG (726-7864) http://www.samsung.com
LATVIA 8000-7267 http://www.samsung.com/lv
LITHUANIA 8-800-77777 http://www.samsung.com/lt
LUXEMBURG 261 03 710 http://www.samsung.com
MONTENEGRO 020 405 888 http://www.samsung.com
NETHERLANDS 0900 - SAMSUNG
(0900-7267864) (€ 0,10/Min)
NORWAY 815 56480 http://www.samsung.com
POLAND
http://www.samsung.com
http://www.samsung.com
http://www.samsung.com/pl
Appendix
90
Page 91
Appendix
EUROPE
PORTUGAL 808 20 - SAMSUNG (808 20 7267) http://www.samsung.com
ROMANIA 08008 SAMSUNG (08008 726
7864)
TOLL FREE No.
SERBIA +381 11 321 6899
(old number still active 0700
7267864)
SLOVAKIA 0800 - SAMSUNG (0800-726 786) http://www.samsung.com
SPAIN 902 - 1 - SAMSUNG (902 172 678) http://www.samsung.com
SWEDEN 0771 726 7864 (SAMSUNG) http://www.samsung.com
SWITZERLAND 0848-SAMSUNG
(7267864, CHF 0.08/min)
U.K 0330 SAMSUNG (7267864) http://www.samsung.com
CIS
ARMENIA 0-800-05-555 http://www.samsung.com
http://www.samsung.com
http://www.samsung.com
http://www.samsung.com/ch
(German)
http://www.samsung.com/ch_fr
(French)
AZERBAIJAN 088-55-55-555 http://www.samsung.com
BELARUS 810-800-500-55-500 http://www.samsung.com
GEORGIA 0-800-555-555 http://www.samsung.com
KAZAKHSTAN 8-10-800-500-55-500
(GSM: 7799)
KYRGYZSTAN 00-800-500-55-500 http://www.samsung.com
MOLDOVA 0-800-614-40 http://www.samsung.com
MONGOLIA +7-800-555-55-55 http://www.samsung.com
RUSSIA 8-800-555-55-55 http://www.samsung.com
TADJIKISTAN 8-10-800-500-55-500 http://www.samsung.com
UKRAINE 0-800-502-000 http://www.samsung.com/ua
UZBEKISTAN 8-10-800-500-55-500 http://www.samsung.com
http://www.samsung.com
(Ukrainian)
http://www.samsung.com/ua_ru
(Russian)
Appendix
91
Page 92
Appendix
ASIA PACIFIC
AUSTRALIA 1300 362 603 http://www.samsung.com
CHINA 400-810-5858 http://www.samsung.com
HONG KONG (852) 3698 - 4698 http://www.samsung.com/hk
(Chinese)
http://www.samsung.com/hk_en
(English)
INDIA 1800 3000 8282
1800 266 8282
INDONESIA 0800-112-8888
021-5699-7777
JAPAN 0120-327-527 http://www.samsung.com
MALAYSIA 1800-88-9999 http://www.samsung.com/my
NEW ZEALAND 0800 SAMSUNG (0800 726 786) http://www.samsung.com
PHILIPPINES 1-800-10-SAMSUNG (726-7864)
for PLDT
1-800-3-SAMSUNG (726-7864)
for Digitel
1-800-8-SAMSUNG (726-7864)
for Globe
02-5805777
SINGAPORE 1800-SAMSUNG (726-7864) http://www.samsung.com
TAIWAN 0800-329-999
0266-026-066
http://www.samsung.com/in
http://www.samsung.com/id
http://www.samsung.com/ph
http://www.samsung.com
THAILAND 1800-29-3232
02-689-3232
VIETNAM 1 800 588 889 http://www.samsung.com
MENA
BAHRAIN 8000-4726 http://www.samsung.com/ae
EGYPT 08000-726786 http://www.samsung.com
IRAN 021-8255 http://www.samsung.com
JORDAN 800-22273
065777444
http://www.samsung.com/th
(English)
http://www.samsung.com/ae_ar
(Arabic)
http://www.samsung.com/Levant
(English)
Appendix
92
Page 93
Appendix
MENA
KUWAIT 183-2255 (183-CALL) http://www.samsung.com/ae
(English)
http://www.samsung.com/ae_ar
(Arabic)
MOROCCO 080 100 2255 http://www.samsung.com
OMAN 800-SAMSUNG (726-7864) http://www.samsung.com/ae
(English)
http://www.samsung.com/ae_ar
(Arabic)
QATAR 800-2255 (800-CALL) http://www.samsung.com/ae
(English)
http://www.samsung.com/ae_ar
(Arabic)
SAUDI ARABIA 9200-21230 http://www.samsung.com/sa
(Arabic)
SYRIA 18252273 http://www.samsung.com/Levant
(English)
TURKEY 444 77 11 http://www.samsung.com
U.A.E 800-SAMSUNG (726-7864) http://www.samsung.com
AFRICA
ANGOLA 91-726-7864 http://www.samsung.com
BOTSWANA 0800-726-000 http://www.samsung.com
CAMEROON 7095- 0077 http://www.samsung.com
COTE D’ IVOIRE 8000 0077 http://www.samsung.com
GHANA 0800-10077
0302-200077
http://www.samsung.com
KENYA 0800 545 545 http://www.samsung.com
NAMIBIA 8197267864 http://www.samsung.com
NIGERIA 0800-726-7864 http://www.samsung.com
SENEGAL 800-00-0077 http://www.samsung.com
SOUTH AFRICA 0860-SAMSUNG (726-7864) http://www.samsung.com
TANZANIA 0685 88 99 00 http://www.samsung.com
UGANDA 0800 300 300 http://www.samsung.com
ZAMBIA 211350370 http://www.samsung.com
Appendix
93
Page 94

Appendix
Responsibility for the Pay Service (Cost to Customers)
When the service is requested, in spite of in warranty, we may charge you for a visit from a service
technician in the following cases.
Not a product defect
Cleaning of the product, Adjustment, Explanation, Re-installation and etc.
z If a service technician gives instructions on how to use product or simply adjusts options without
disassembling product.
z If a defect is caused by external environmental factors. (Internet, Antenna, Wired Signal, etc.)
z If a product is reinstalled or devices are connected additionally after installing the purchased product
for the first time.
z If a product is reinstalled to move to a different spot or to move to a different house.
z If customer requests instructions on how to use because of another company's product.
z If customer requests instructions on how to use the network or another company's program.
z If customer requests software installation and setup for the product.
z If a service technician removes/cleans dusts or foreign materials inside of the product.
z If customer requests an installation additionally after purchasing a product through home-shopping
or online.
A Product damage caused by customer's fault
Product damage caused by customer's mishandling or wrong repair
If a product damage is caused by;
z external impact or drop.
z use of supplies or separately sold product unspecified by Samsung.
z repair from a person besides an engineer of outsourcing service company or partner of Samsung
Electronics Co., Ltd.
z remodeling or repairing the product by customer.
z using it with incorrect voltage or non-authorised electrical connections.
z not following the "cautions" in User Manual.
Others
z If product fails by natural disaster. (lightning, fire, earthquake, flood damage, etc)
z If consumable components are all used up. (Battery, Toner, Fluorescent lights, Head, Vibrator,
Lamp, Filter, Ribbon, etc.)
Appendix
94
Page 95

Appendix
If customer requests a service in case the product has no defect, service fee may be charged. So
please read User Manual first.
Appendix
95
Page 96

Appendix
Correct Disposal
Correct Disposal of This Product (Waste Electrical & Electronic Equipment)
(Applicable in countries with separate collection systems)
This marking on the product, accessories or literature indicates that the product and its
electronic accessories (e.g. charger, headset, USB cable) should not be disposed of
with other household waste at the end of their working life. To prevent possible harm to
the environment or human health from uncontrolled waste disposal, please separate
these items from other types of waste and recycle them responsibly to promote the
sustainable reuse of material resources.
Household users should contact either the retailer where they purchased this product,
or their local government office, for details of where and how they can take these items
for environmentally safe recycling.
Business users should contact their supplier and check the terms and conditions of the
purchase contract. This product and its electronic accessories should not be mixed with
other commercial wastes for disposal.
Appendix
96
Page 97

Appendix
Terminology
OSD (On Screen Display)
On screen display (OSD) allows you to customize on-screen settings to optimize the picture quality as
required. You can change the screen brightness, tint, size and many other settings using menus
displayed on the screen.
Gamma
The Gamma menu adjusts the grey scale that represents middle tones on the screen. Adjusting the
brightness brightens the whole screen, but adjusting Gamma only brightens the medium brightness.
Grey scale
Scale refers to levels of color intensity that show variations of color change from darker areas to
brighter areas on the screen. Changes to the screen brightness are expressed with black and white
variation, and grey scale refers to the medium area between black and white. Changing the grey scale
through Gamma adjustment will change the medium brightness on the screen.
Scanning rate
Scanning rate, or refresh rate, refers to the frequency of screen refreshes. Screen data is transmitted
as it refreshes to display an image, although the refreshing is invisible to the naked eye. The number of
screen refreshes is called scanning rate and is measured in Hz. A scanning rate of 60Hz means that
the screen refreshes 60 times per second. The screen scanning rate depends on the performance of
the graphics cards in your PC and monitor.
Horizontal Frequency
Characters or images displayed on the monitor screen consist of numerous dots (pixels). Pixels are
transmitted in horizontal lines, which are then arranged vertically to create an image. The horizontal
frequency is measured in kHz and represents how many times horizontal lines per second are
transmitted and displayed on the monitor screen. A horizontal frequency of 85 means that the
horizontal lines that make up an image are transmitted 85000 times per second. The horizontal
frequency is indicated in 85kHz.
Vertical Frequency
One image is made of numerous horizontal lines. The vertical frequency is measured in Hz and
represents how many images can be created per second by those horizontal lines. A vertical
frequency of 60 means that an image is transmitted 60 times per second. The vertical frequency is
also called "refresh rate" and affects screen flicker.
Appendix
97
Page 98

Appendix
Resolution
Resolution is the number of horizontal pixels and vertical pixels that form a screen. It represents the
level of display detail.
A higher resolution displays a greater amount of information on the screen and is suitable for
performing multiple tasks at the same time.
E.g. A resolution of 1920 x 1080 consists of 1920 horizontal pixels (horizontal resolution) and 1080
vertical lines (vertical resolution).
Plug & Play
The Plug & Play feature allows the automatic exchange of information between a monitor and PC to
produce an optimum display environment.
The monitor uses VESA DDC (international standard) to execute Plug & Play.
Appendix
98
Page 99

Index
A
Appendix 88
B
Before Connecting 30
Blue 56
Brightness 41
C
Checking the Contents 19
Cleaning 8
Coarse 52
Connecting and Using a PC 31
Contact SAMSUNG WORLD WIDE 88
Contrast 42
Copyright 7
Correct Disposal 96
H
HDMI Black Level 50
I
Image Size 48
INFORMATION 71
Installation 26
K
Key Repeat Time 68
L
Language 59
M
MultiScreen 76
Correct posture to use the product 18
D
Display Time 61
E
Eco Saving 64
F
Fine 53
G
Gamma 58
General 83
Green 55
O
Off Timer 65
P
Parts 21
PC/AV Mode 67
Q
Q & A 81
R
Red 54
Requirements Before Contacting Samsung
Customer Service Center
Reset 63
Responsibility for the Pay Service (Cost to
Customers)
94
78
Index
99
Page 100

Index
S
Safety Precautions 10
SAMSUNG MAGIC Angle 46
SAMSUNG MAGIC Bright 44
SAMSUNG MAGIC Upscale 47
Sharpness 43
Source Detection 69
Standard Signal Mode Table 86
T
Transparency 62
Turn Off After 66
Index
100
 Loading...