

Page 1
ENGLISH
FRIDGE/FREEZER
Instruction Manual
Before operating the appliance, please read this
manual thoroughly and retain it for future refererce.
DA99-00478A REV(0.0)
Page 2
GB
Safety Precautions
Before using your fridge/freezer, read the safety precautions below and the instructions in the rest of
the manual. Keep the Instruction Manual in a handy place for future reference and remember to hand
it over to the subsequent owner, if you ever sell the appliance.
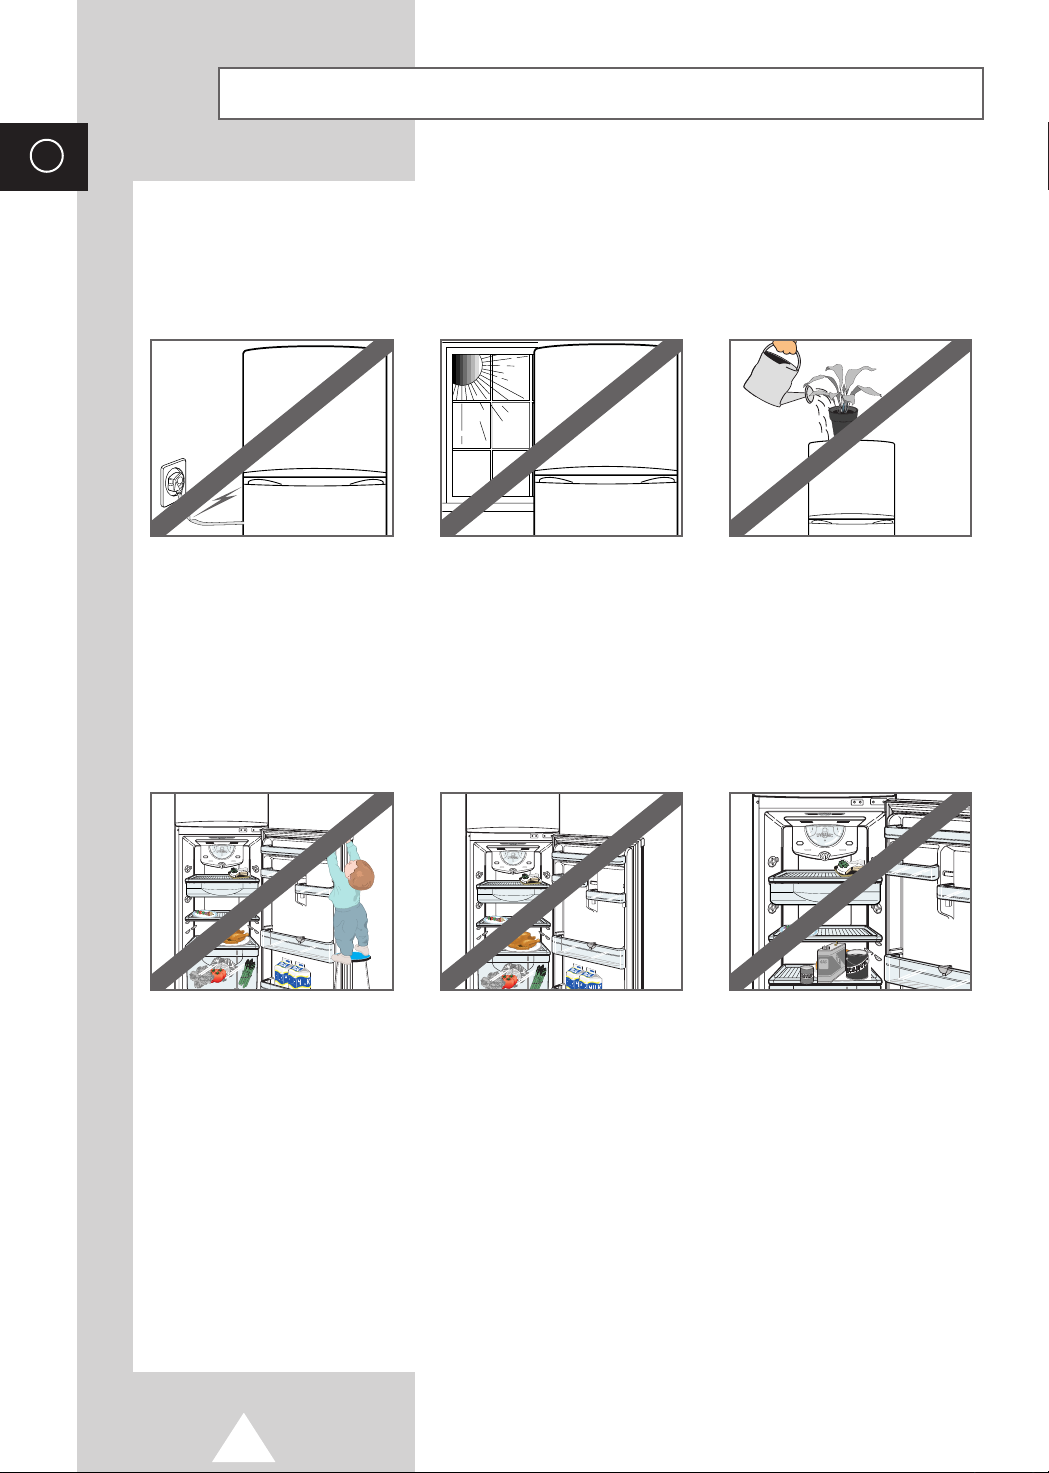
DO NOT use the fridge/freezer if
it is faulty or damaged. Unplug it
from the power supply and call
your local service centre.
If the power cord is damaged,
have it replaced by the manufacturer, an approved service
centre or a qualified electrician.
The appliance must be positioned
so that the plug is accessible after
installation
DO NOT allow children to:
◆ Play in or around the fridge/
freezer
◆ Hang on the refrigerator
door
Children may be injured and the
appliance may be damaged.
The appliance is not intended for
use by young children or infirm
persons without supervision.
DO NOT expose the fridge/
freezer to direct sunlight.
DO NOT install it next to a
source of heat (oven, radiator).
If you must install the fridge/
freezer near a source of heat,
ensure that there is sufficient
insulation between the two
appliances.
To maintain the efficiency of your
fridge/freezer, DO NOT leave the
doors open for any longer than
necessary.
Make sure that the doors are
carefully pushed closed at all
times.
DO NOT allow water to splash or
run on to the back of the fridge/
freezer.
Water impairs the insulation of
the electrical parts and may
cause an electric short circuit or
risk of electric shock.
DO NOT store volatile chemicals,
such as ether and benzene, in
the fridge/freezer. Besides
damaging the food, the fumes
can build up and cause an
explosion.
DO NOT use flammable sprays,
such as lacquer or paint, near
the fridge/freezer.
2
Page 3
Thank you for purchasing a
SAMSUNG fridge/freezer.
Please take the time to read
these instructions, as they will enable
you to take full advantage of your
new appliance.
Contents
◆ SAFETY PRECAUTIONS .............................................................................................. 2
◆ BECOMING FAMILIAR WITH YOUR NEW FRIDGE/FREEZER
■ Main Features................................................................................................ 4
■ Model Specifications...................................................................................... 4
◆ INSTALLING YOUR NEW FRIDGE/FREEZER
■ Choosing Where to Install Your Fridge/Freezer............................................ 5
■ Earthing the Fridge/Freezer........................................................................... 5
■ Preparing Your Fridge/Freezer for Use......................................................... 6
■ Adjusting the Feet.......................................................................................... 6
■ Arranging the Accessories............................................................................. 7
GB
◆ USING YOUR REFRIGERATOR
■ Controlling the Refrigerator Temperature...................................................... 8
■ Storing Food.................................................................................................. 8
■ Using the Chiller Compartment (OPTION).................................................... 9
■ Using the Vegetable Bin................................................................................ 9
◆ USING YOUR FREEZER
■ Controlling the Freezer Temperature ............................................................ 10
■ Freezing Food ............................................................................................... 10
■ Making Ice Cubes.......................................................................................... 11
◆ LOOKING AFTER YOUR FRIDGE/FREEZER
■ Cleaning the Fridge/Freezer.......................................................................... 12
■ Changing the Light Bulb................................................................................ 13
■ Problems and Solutions................................................................................. 14
◆ VIEW OF YOUR FRIDGE/FREEZER............................................................................. 15
3
Page 4
GB
Main Features
Your fridge/freezer is fitted with several useful features, to help you store food as efficiently and as
hygienically as possible.
Feature Description
Auto-defrost When sufficient frost has accumulated in the fridge/freezer, the auto-defrost feature
Bio-deodorizer This integrated ventilation system helps remove odor from the refrigerator, by moving
(OPTION) the air in such a way that smells cannot collect and contaminate the food. The
Chiller compartment The chiller compartment freezes only the surface of the food to help:
(OPTION)
Adjustable shelves The accessories inside your fridge/freezer can be placed in the positions that best suit
and containers your requirements and the food to be stored. The specially large compartments in the
starts up automatically. The frost is thawed and the thaw water is collected in an
evaporation tray, which allows it to evaporate.
This operation is fully automatic and requires no intervention by you.
bio-deodorizer is located at the top of fresh food compartment.
◆ Preserve the taste of the food
◆ Prolong the freshness
bottom of the door are very practical when chilling bottles of drinks for example.
Model Specifications
The instructions in this booklet apply to several models and types.
The main differences between the models concern whether you have:
◆ A chiller compartment / A multi-purpose drawer
Model Number: ––––––––––––
Type: ––––––––––––
Date of Purchase: ––––––––––––
◆ Shelf : Crystal / Wire / Tempered glass
◆ Bio deodorizer
◆ Twist ice maker / Movable ice tray
◆ Vegetable Bin divider, Bottle guide, Dairy box, Wine
rack, Lock & key etc.
Important
These appliances are intended for
household use only. If you wish to
use them for industrial or commercial purposes, you must check that
you comply with all applicable
standards and regulations.
4
Type Models Handle
A
B
The illustrations correspond to type B; there may, therefore, be
slight differences between them and your actual model.
Page 5
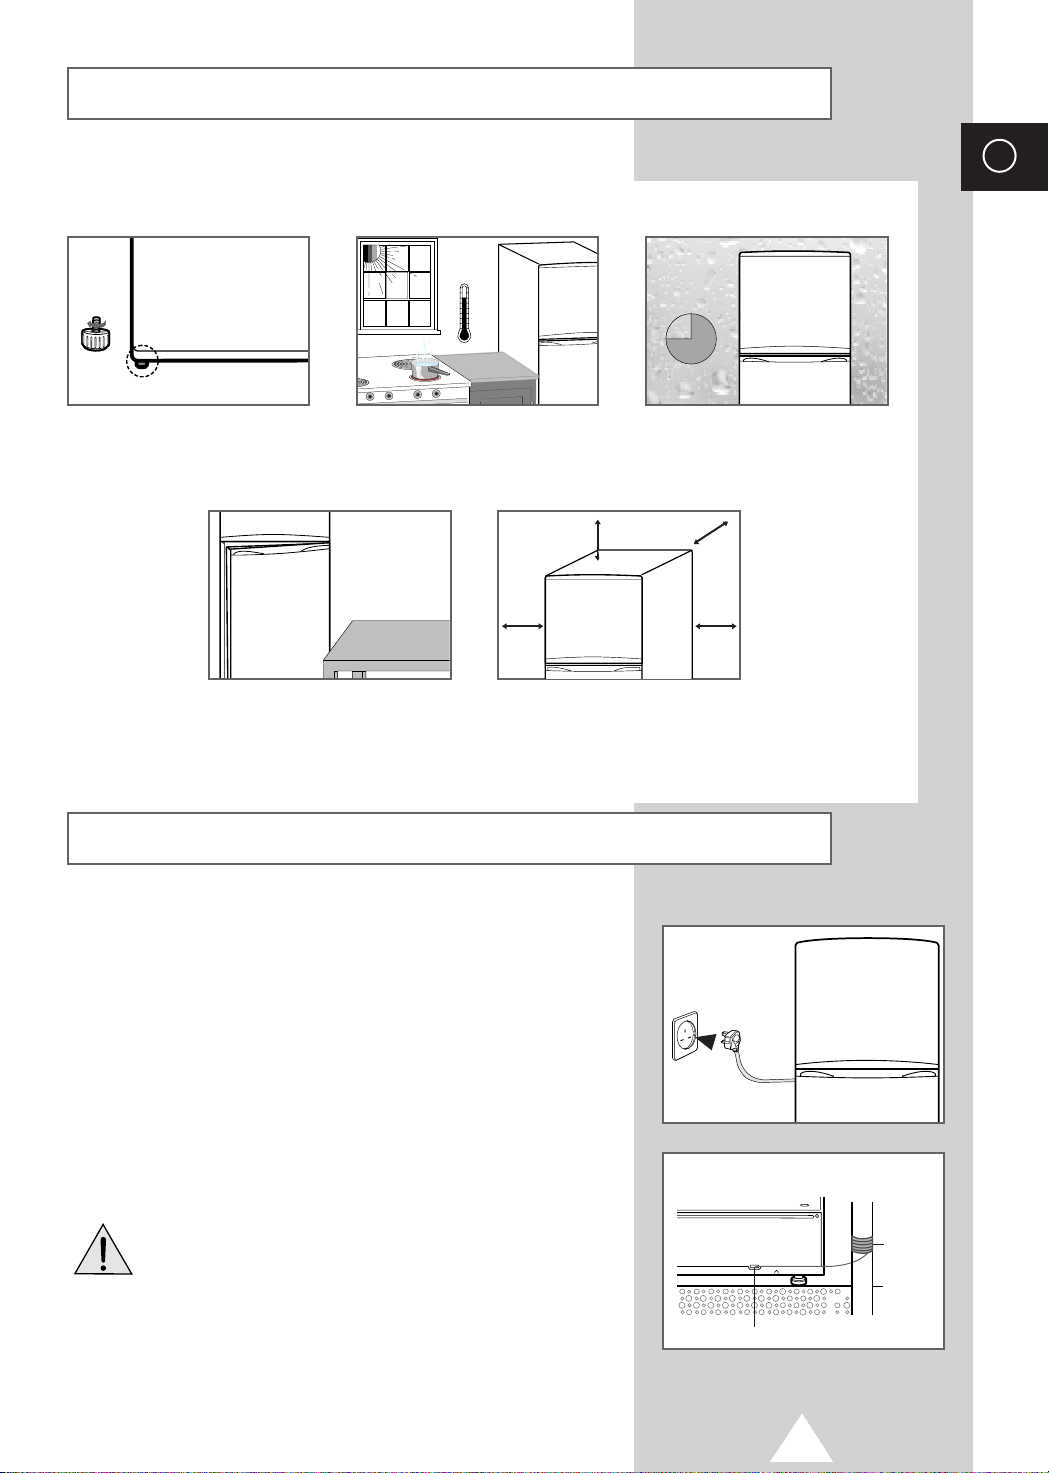
Choosing Where to Install Your Fridge/Freezer
H
75%
Various factors must be taken into account when choosing where to install your fridge/freezer.
30¡ 86¡F
GB
Install the fridge/freezer on a
stable, flat surface. Adjust the
feet if necessary, referring to
Avoid locations in direct sunlight or
near to heaters, radiators, ovens or
cookers.
page 6 for further details.
300 mm 12”
50 mm
2”
Make sure that you can open the
doors freely and without hindrance.
Allow the following clearances
around the fridge/freezer:
◆
50 mm (2 inches) on all sides
◆ 300 mm (12 inches) above
the fridge/freezer
Earthing the Fridge/Freezer
For the personal safety of you and your family, your fridge/freezer
must be:
◆ Plugged into its own individual wall outlet with the
correct voltage and frequency, as indicated inside the
refrigerator door
◆ Properly earthed (do not ground the fridge/freezer with a
telephone line, gas pipe, and so on)
To minimise the possibility of electric shocks from the appliance, the
wall outlet must also be earthed; have it checked by a qualified
electrician. If it is not earthed, it is your personal responsibility and
obligation to have it replaced with a properly earthed outlet, or use a
different power point.
Avoid locations affected by
draughts or dampness.
50 mm
2”
50 mm
2”
If the power cord is damaged, avoid a hazard by
replacing it through the manufacturer or its service
agent or a similarly qualified person.
In case of power plug without ground terminal.
◆ Connect one side of the ground wire (yellow/green
or green color) with the ground screw, another side
of the ground terminal with steel or copper pipe such
as water pipe tap.
Ground screw
5
Ground
cable
Copper
pipe
Page 6
GB
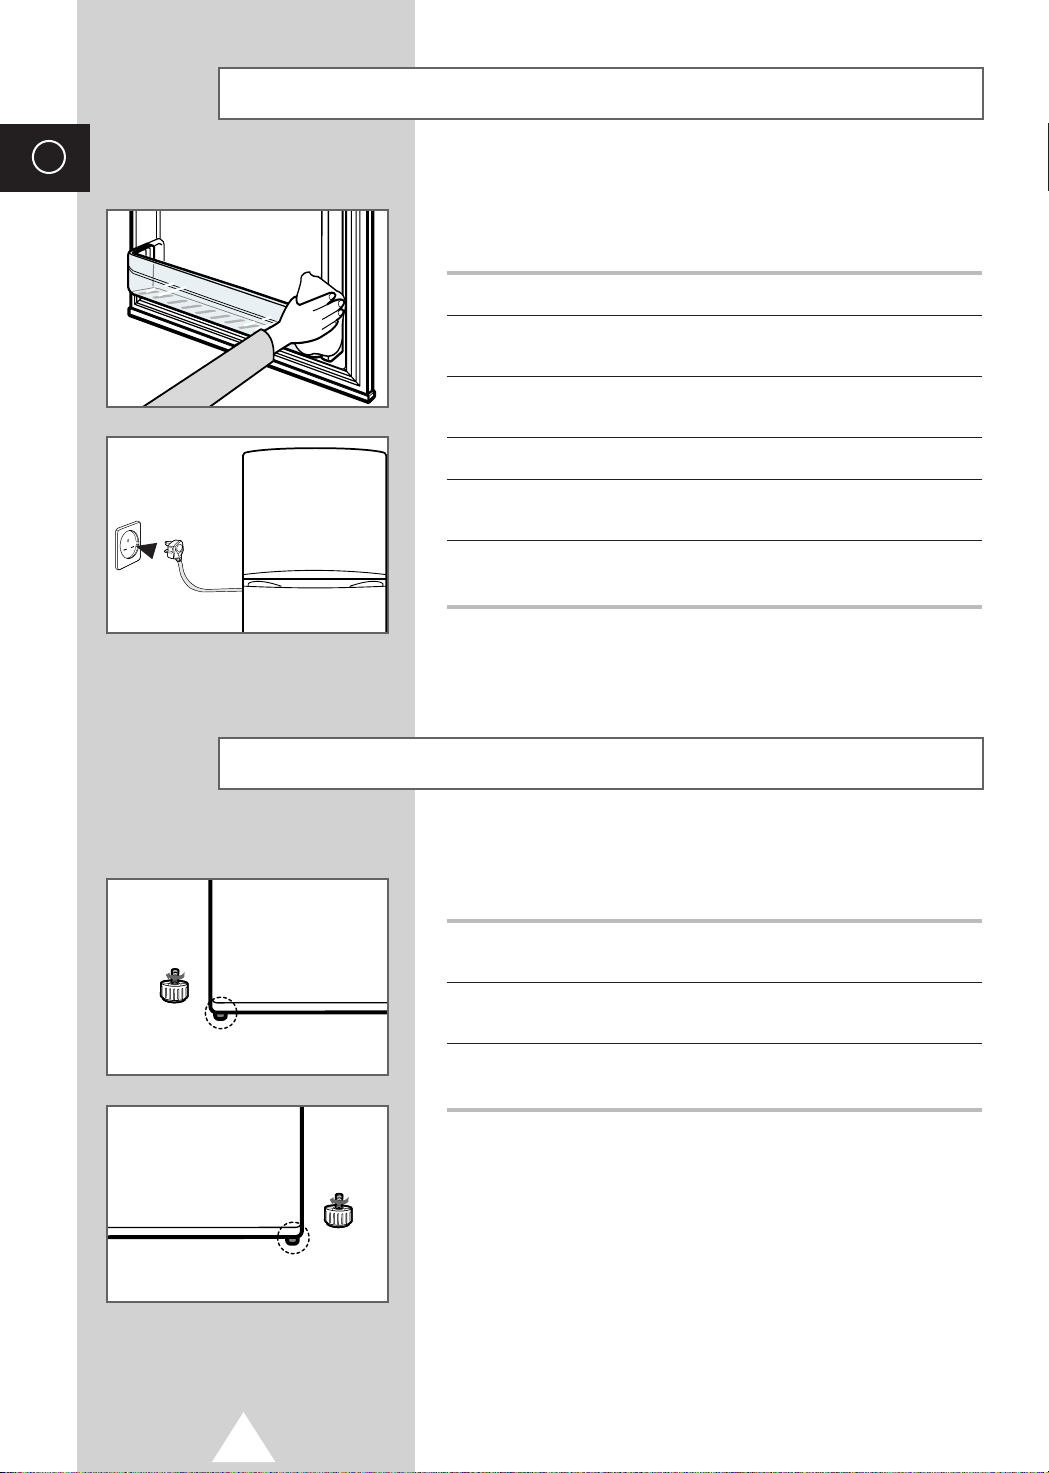
Preparing Your Fridge/Freezer for Use
Once you have chosen the position of your fridge/freezer and
checked that the wall outlet is correctly earthed, proceed as
follows.
1 Make sure that the fridge/freezer is unplugged from the wall outlet.
2 Wipe the appliance clean inside and out with a soft cloth and
warm, soapy water.
3 Allow the fridge/freezer to stabilize for at least one hour before
plugging it in for the first time.
4 Plug the power cord into the appropriate earthed wall outlet.
5 Set the refrigerator and freezer temperatures, referring to pages 8
and 10, respectively for further instructions.
6 Wait for 2-3 hours for the freezer to reach the required tem-
perature, before placing frozen food in the freezer.
Adjusting the Feet
To compensate for an uneven floor surface, you can adjust the feet
on the front of the fridge/freezer.
If the fridge/freezer Then turn the...
leans to the...
Left Left foot anti-clockwise until the fridge/
Right Right foot anti-clockwise until the fridge/
When you store a lot of food in the guards of the doors, it may be
unstable.
In that case, set the front leg parallel to the rear leg.
freezer is level.
freezer is level.
6
Page 7
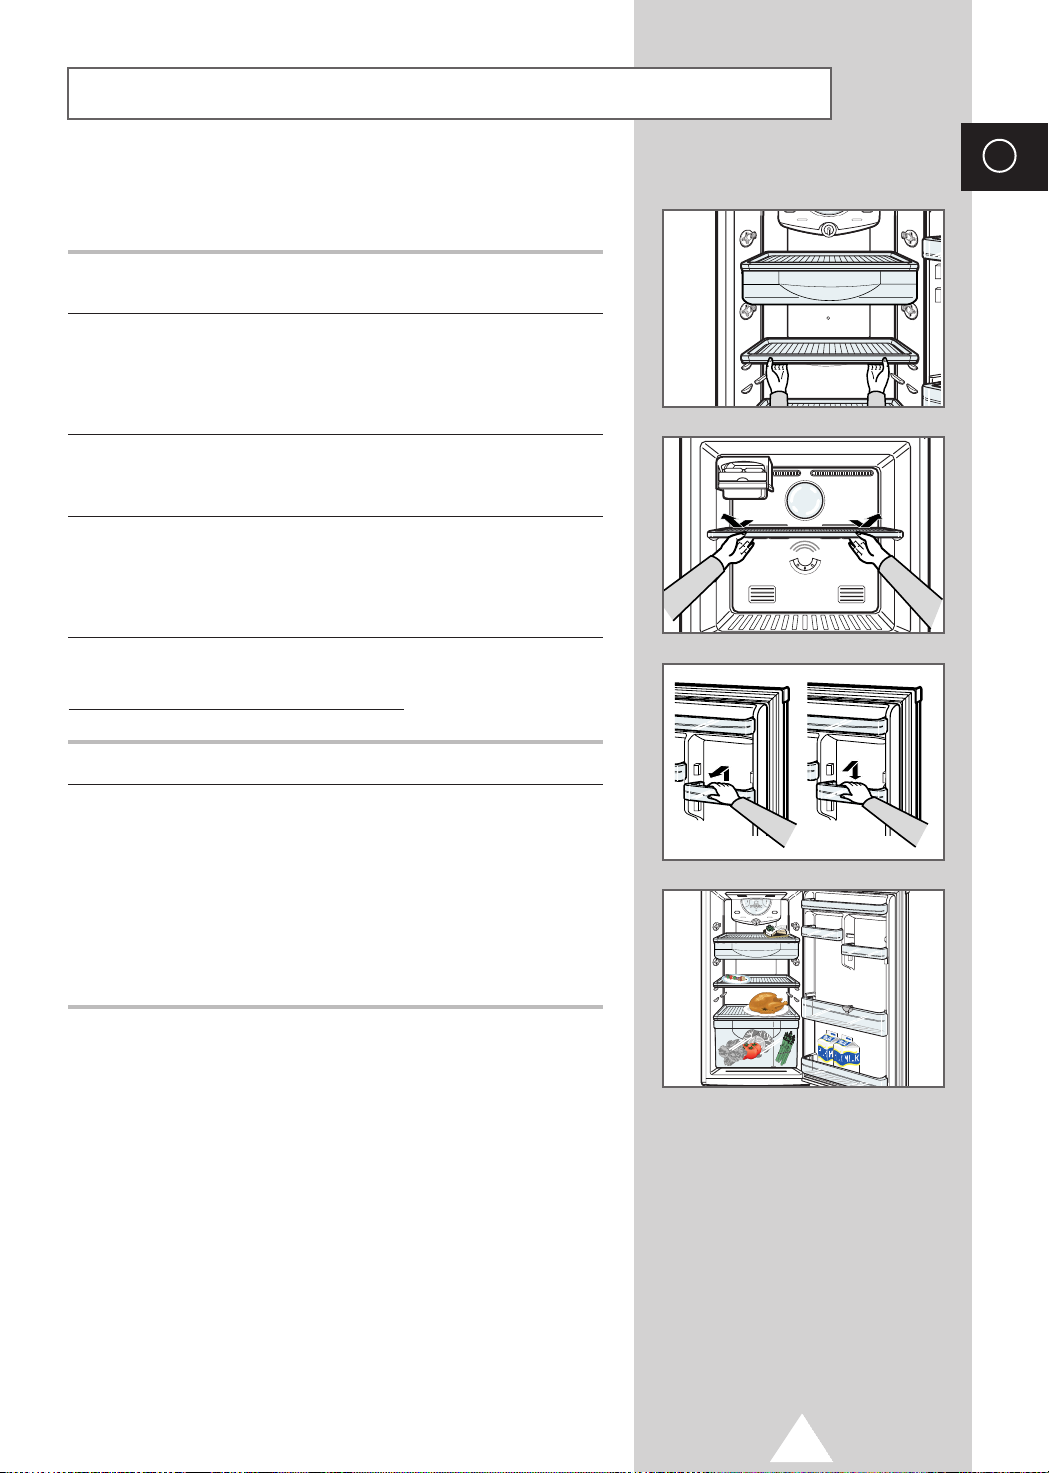
Arranging the Accessories
The shelves and compartments inside the refrigerator can be
rearranged for greater convenience.
To change the Then...
position of...
A crystal shelf / ◆ Pull the shelf towards you until it reaches the
A tempered glass shelf stop
◆ Tilt the front of the shelf up and continue
pulling the shelf towards you
◆ Slide the shelf back into its new position
GB
A wire shelf ◆ Tilt the front of the shelf up
An adjustable door ◆ Lift the compartment upwards to release
pocket the tabs
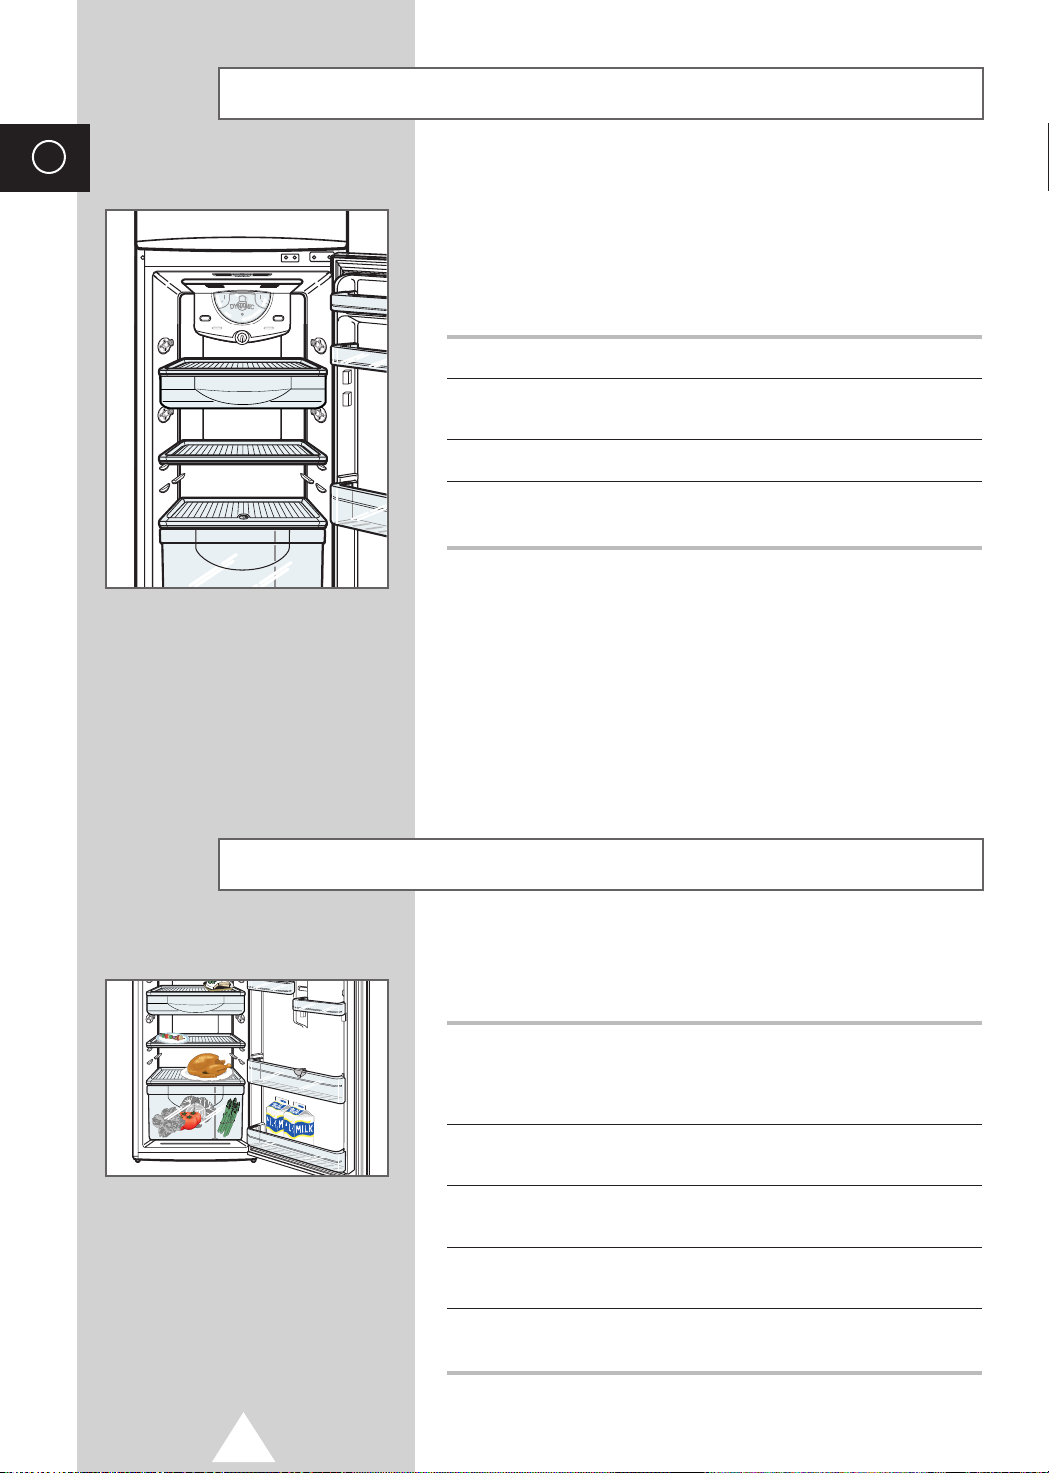
Arrangement Example for the Refrigerator
Accessory Suggested Use
Top shelf Desserts, such as yoghurts
Chiller compartment Meats and fish
Bottom shelf Ready-prepared meals
Vegetable bin Fruit and vegetables
Egg Tray Eggs
Adjustable door pocket Cheese, butter
Bottle pocket Milk, sodas, other drinks
◆ Pull the shelf out towards you
◆ Slide the shelf back into its new position
◆ Remove the compartment from the door
◆ Align the tabs in the new position
◆ Push the compartment down into place
7
Page 8
GB
Controlling the Refrigerator Temperature
When setting the refrigerator temperature, you must take into
account the following factors:
◆◆
The amount of food to be stored
◆◆
The temperature of the room in which the fridge/freezer
is placed
To store... Then set the temperature to...
A large amount of food COLDER
(refrigerator full)
An average amount of food Between COLDER and COLD
A small amount of food COLD
(refrigerator relatively empty)
➢
Depending on the room temperature, you may need to
turn the refrigerator up or down slightly. If it is very low
set the refrigerator temperature to COLD.
In case of being much foods in fresh food
➢
compartment, specially in summer, turn the freezer
temperature dial to “COLDER” to direct more cold air into
the fresh food compartment and the refrigerator
temperature dial to “6~7”.
Setting at “COLD” of the freezer temperature dial, the
fresh food cmpartment will not be cold enough.
Storing Food
8
Follow the recommendations below when storing food in the
refrigerator.
1 Put food in containers with lids or in plastic bags or cover it with
plastic film to prevent:
◆ The food from drying up
◆ Smells from permeating other items of food
2 Allow hot food or drinks to cool before placing them in the
refrigerator.
3 Leave sufficient room between the items and in front of the
ventilation slots to enable the cool air to circulate freely.
4 Try and maintain easy access to the temperature dial in case you
need to adjust the temperature.
5 If you have washed any fruit or vegetables, dry them before
storing them in the vegetable bin.
Page 9
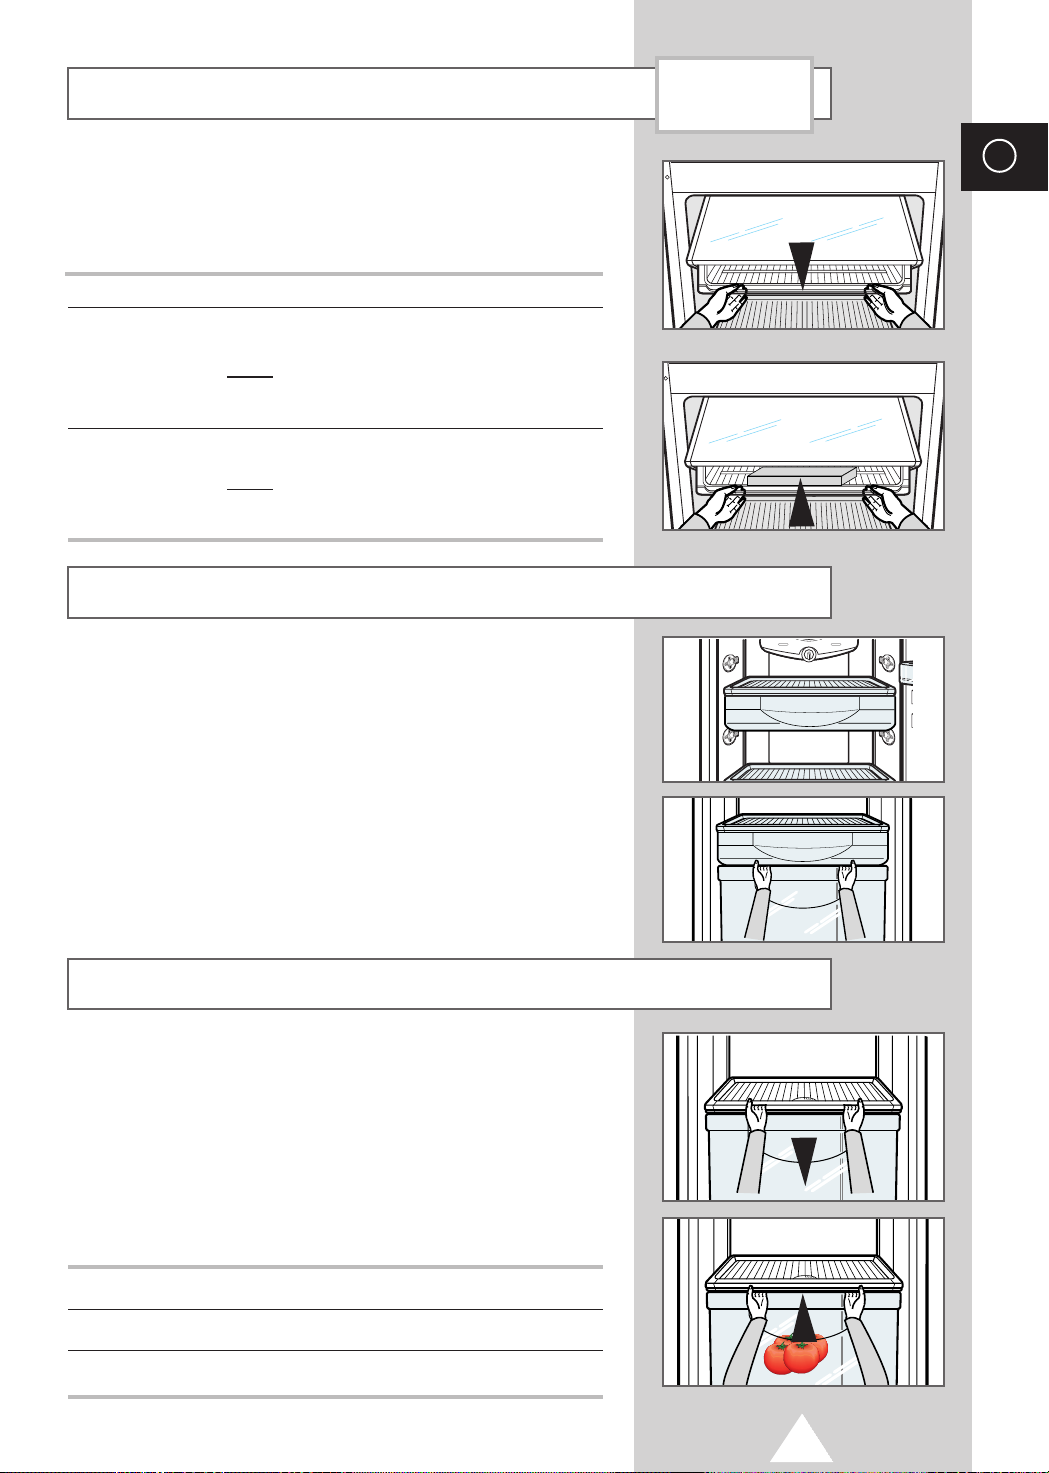
Using the Chiller Compartment
OPTION
The chiller compartment freezes only the surface of the food to help:
◆◆
Preserve the taste of the food
◆◆
Prolong the freshness
Use the chiller compartment to store cheese, meat, fish or any
frozen food to be used quickly.
To... Then...
Open the chiller Pull the chiller compartment towards you.
compartment
Close the chiller Push the chiller compartment back as far as it
compartment will go.
➢
Make sure, however, that the cover is correctly closed before shutting the refrigerator door.
Result
: ◆ The compartment is moved forward
for easy access.
◆ The cover opens automatically.
Result
: The cover closes automatically.
Using the Multi-Purpose Drawer
The multi-purpose drawer can be used as both Chiller compartment and
Vegetable bin by changing the location of drawer.
◆◆
Chiller compartment :
When drawer is placed under the top shelf.
◆◆
Vegetable bin (humidity adjustable):
When drawer is placed between the cover-vegetable and
the vegetable bin (In this case, cover-vegetable must be
placed one-level upward).
GB
Using the Vegetable Bin
The vegetable bin maintains the moisture and freshness of fruit and vegetables by:
◆◆
Protecting the items from direct draughts of cold air
◆◆
Maintaining sufficient humidity to prevent the fruit and
vegetables from drying out
◆◆
The vegetable bin divider allows you separately to store
the fruit and vegetables. (Option).
☛ The vegetable bin is not suitable for tropical fruit
(bananas, pineapple and so on), which is too fragile:
the fruit is damaged and flavour is lost.
To... Then...
Open the vegetable bin Pull it towards you.
Close the vegetable bin Push it back into place.
9
Page 10
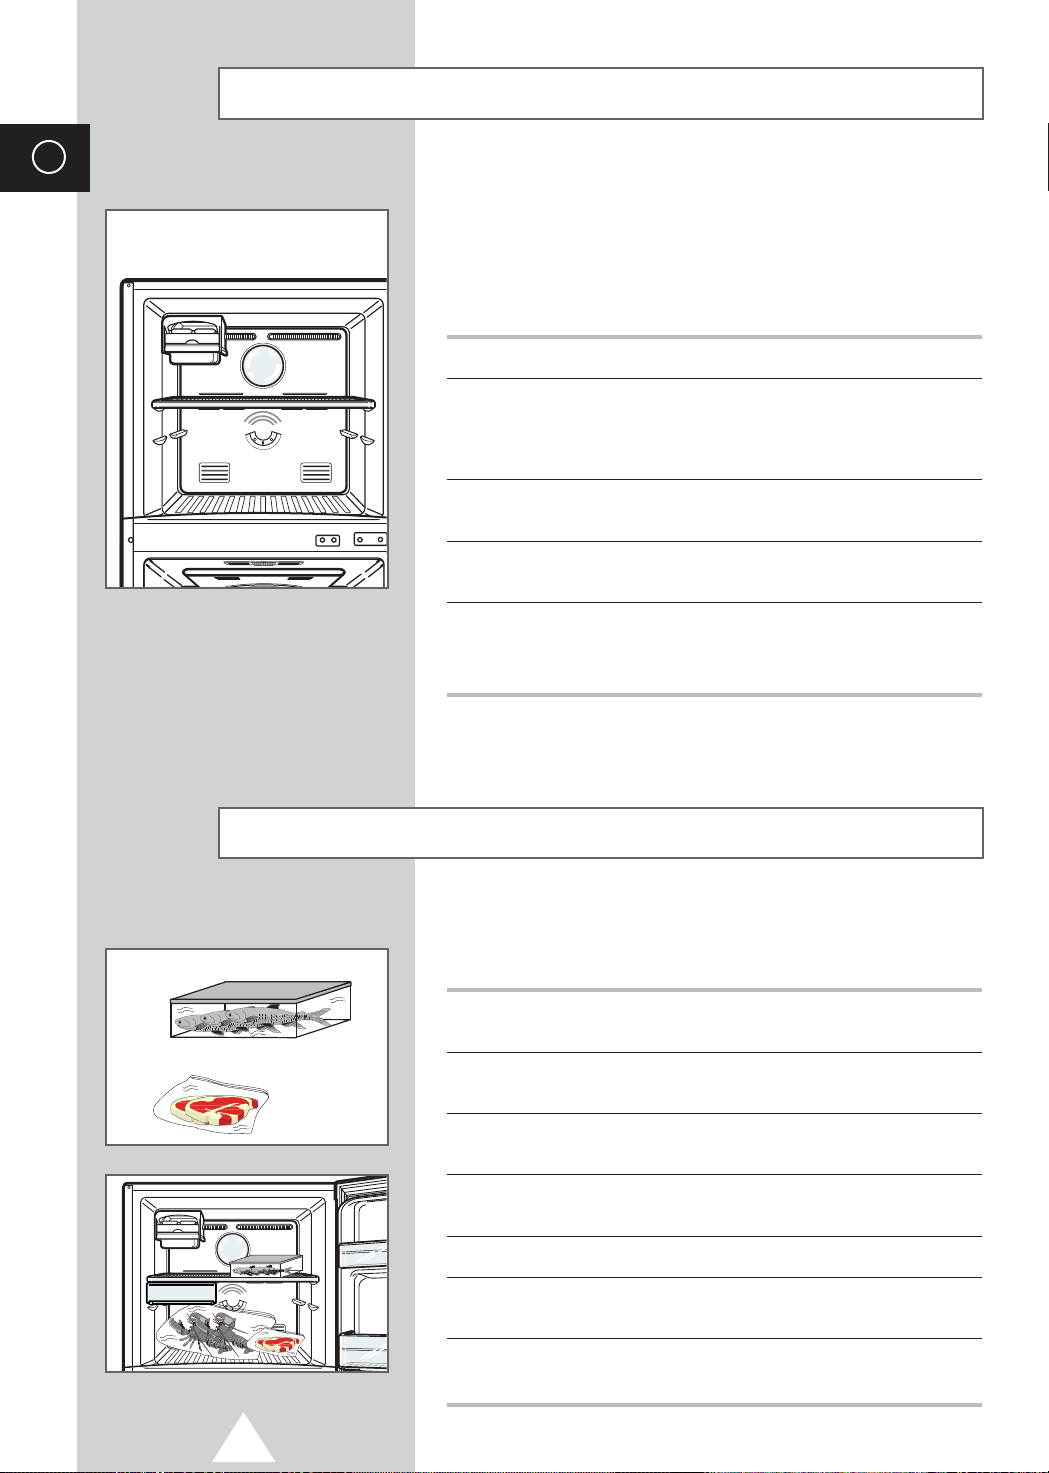
GB
Controlling the Freezer Temperature
When setting the freezer temperature, you must take into account
the following factors:
◆◆
The amount of food to be frozen
◆◆
The temperature of the room in which the fridge/freezer
is placed
To... Then set the temperature to...
◆ Store large quantities QUICK FREEZING
of food (freezer full)
◆ Make ice cubes
◆ Fast-freeze food
Store an average amount NORMALBeten COLDER and COLD
of food
Store a small amount of food QUICK COOLING
(freezer relatively empty)
Put the freezer compartment WINTER
in winter mode when the ambient
temperature drops below 10
ºc.
Freezing Food
➢
Depending on the room temperature, you may need to
turn the freezer up or down slightly.
Follow the recommendations below when storing food in the
freezer.
1 Store food in small quantities or as individual servings, so that you
can defrost as much or as little as you like.
2 Do not refreeze food that has already been frozen and then
defrosted.
3 Put the food to be frozen in containers with lids or in airtight plastic
freezer bags, removing any excess air in the bags.
4 Respect the maximum storage times indicated on pre-packed
frozen food.
5 Do not place food on top of the evaporation slots.
6 Try and maintain easy access to the temperature dial in case you
need to adjust the temperature.
10
7 Leave the door open for as little time as possible. Make sure that it
is properly closed after use.
Page 11
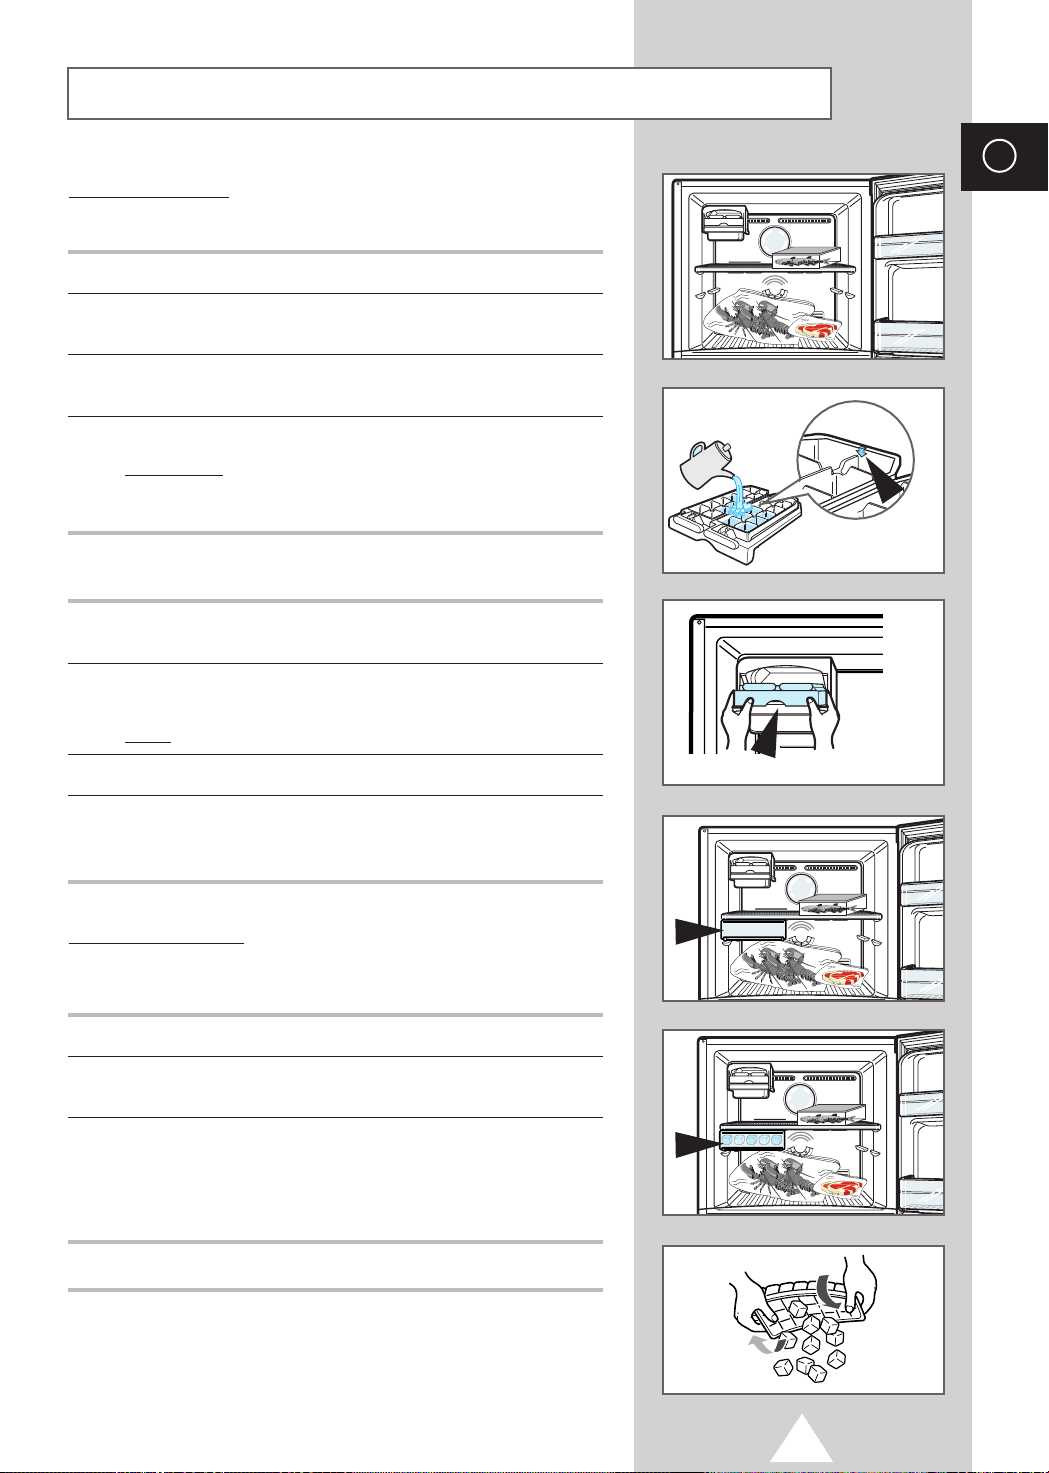
Making Ice Cubes (OPTION)
TWIST ICE MAKER
Making Ice Cubes
1 Remove the ice cube tray by pulling it towards you.
`
2 Fill the tray with water up to the maximum water level marked on
the rear of the tray.
3 Slide the tray back into the holder, taking care not to spill the
water.
4 Wait until the ice cubes are formed.
Freezing time
Removing the Ice Cubes
1 Make sure that the ice cube storage bin is in place under the ice
cube tray. If not, slide it into place.
`
2 Twist one of the levers firmly in the clockwise direction until the
tray twists slightly.
Result
: It is recommended that you wait for about one
hour with the temperature set to QUICK
FREEZING for the ice cubes to form.
: The ice cubes fall into the storage bin.
GB
3 Repeat Step 2 for the other half of the tray, if necessary.
4 Remove the storage bin by:
◆ Lifting it slightly
◆ Pulling it towards you
MOVABLE ICE TRAY
Making ice cubes
1 Remove the ice cube tray by pulling it towards you.
`
2 Fill the tray with water up to the maximum water level marked on
the rear of the tray.
3 Place it under the freezer shelf or on the freezer shelf .
Removing the ice cubes
To remove ice cubes, hold the tray at its ends and twist gently.
11
Page 12
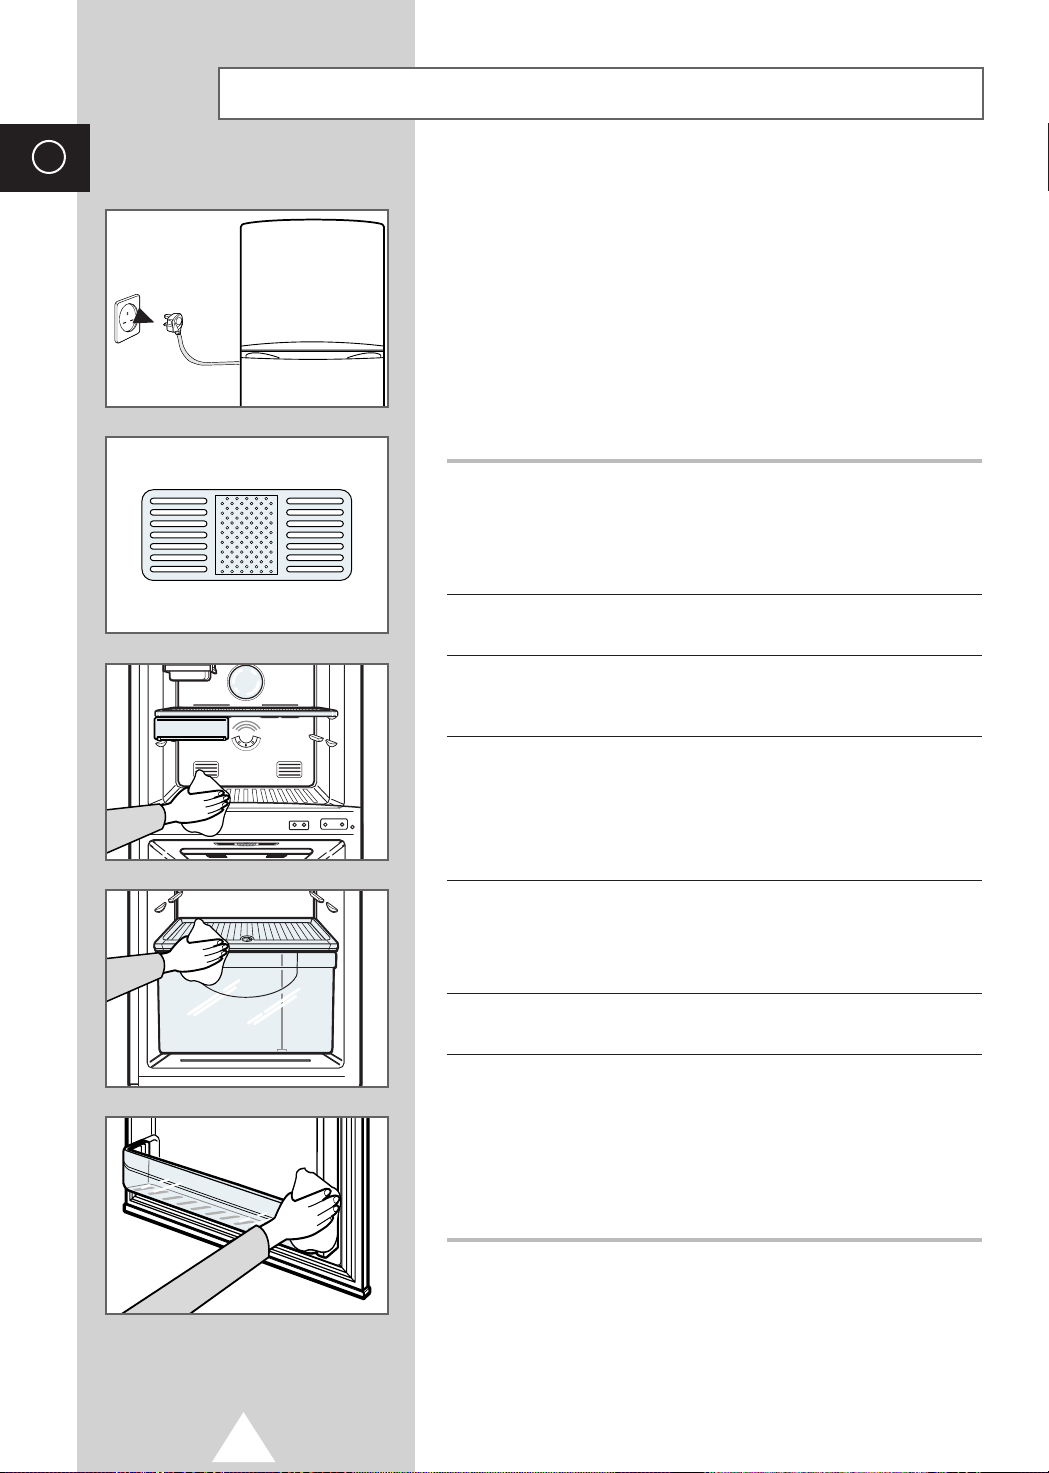
GB
Cleaning the Fridge/Freezer
The following parts of your fridge/freezer should be cleaned
regularly to prevent food particles from building up:
◆◆
Inside and outside surfaces
◆◆
Doors and door seals
◆◆
Accessories (shelves, compartments and ice tray)
☛ ALWAYS ensure that:
◆ The door seals are clean
◆ The doors close properly
1 Whenever possible, unplug the fridge/freezer before cleaning it. If
this is not possible, wring any excess moisture out of your sponge
or cloth before cleaning around the:
◆ Lights
◆ Temperature dials
2 Clean the outside surfaces with a soft cloth and warm, soapy
water. Rinse and dry.
3 Remove the accessories, referring to page 7 for further details, if
necessary. Wash them with a soft cloth or sponge and warm,
soapy water. Rinse and dry them.
4 If the refrigerator has an unpleasant smell:
◆ Remove the bio-deodorizer
◆ Soak the catalyst in pure water
◆ Dry it naturally in sunlight
◆ Put it back into position
5 Wipe the evaporation slots in the freezer with a clean, dry, soft
cloth.
☛ DO NOT allow any food particles to clog up these openings
or frozen food to cover them.
6 Wipe the inside of the fridge/freezer with a soft cloth and warm,
soapy water. Rinse and dry.
7 Carefully clean the door seals with a soft cloth and warm, soapy
water. Rinse and dry.
☛ DO NOT damage the seals in any way and make sure that
no food particles on the seals prevent the door from closing
properly as:
◆ The temperature will not be maintained correctly
◆ Electricity will be wasted
12
Page 13
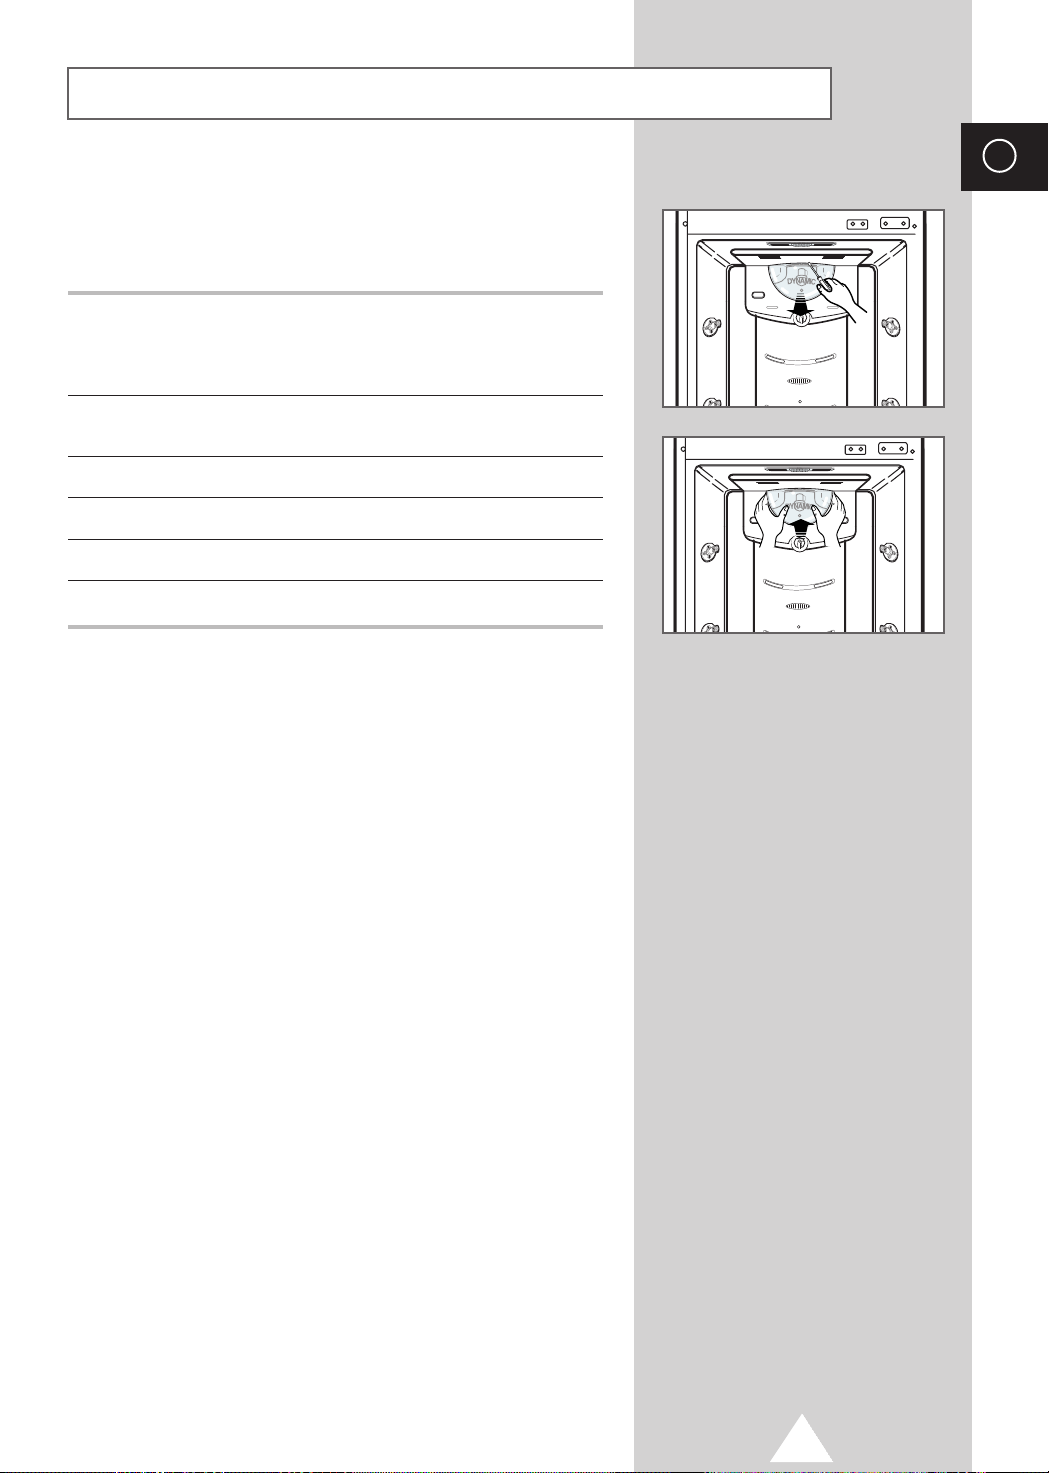
Changing the Light Bulb
Caution : Unplug the refrigerator before replacing light Bulbs.
When you open the refrigerator door, a light comes on to help you
find what you are looking for more easily. If you need to replace
the bulb, proceed as follows.
1 Remove the chiller compartment by:
◆ Pulling it towards you until it meets the stop
◆ Tilting the front up slightly and continuing to pull the
compartment towards you
2 With a flat-bladed screwdriver, prise out the upper part of the light
cover. Pull the cover free.
3 Unscrew and remove the light bulb.
4 Insert new bulb (maximum of 15 W, E14 small screw base).
5 Replace the light cover by pushing it until it clicks back into place.
6 Replace the chiller compartment by sliding it back into position.
GB
13
Page 14
GB
Problems and Solutions
Before contacting the after-sales service, perform the following simple checks. They may save you the
time and expense of an unnecessary call.
Problem Explanation/Solution
The fridge/freezer is not operating at ◆ Check that the fridge/freezer is correctly plugged in.
all and the light does not come on
when you open the refrigerator door
◆ Check that the wall outlet is switched on and working correctly.
Food in the freezer does not freeze ◆
Is the temperature set correctly? If ice cream in the freezer is too soft,
correctly turn the temperature dial towards QUICK FREEZING; if it is too hard, turn
the dial towards QUICK COOLING.
◆ Is the room temperature too high? Is the appliance exposed to
direct sunlight or a source of heat? Change its position if possible.
Food freezes in the refrigerator ◆
Is the temperature set to COLDER? Turn the temperature dial towards
COLD.
◆ Is the room temperature too low? If it is very low, the thermostatic
controls may function incorrectly. Increase the temperature in the room
or move the fridge/freezer to another position.
The fridge/freezer makes unusual ◆ Check that the fridge/freezer is installed on a level, stable surface
noises with sufficient space around it; adjust the front feet if necessary
(see page 6 for further details).
◆ Are there any objects behind or under the fridge/freezer?
◆ Is the noise coming from the compressor or does it sound like
running water (refrigerant circulating)? These noises are normal.
There is a bad smell in the ◆ Is an item of food going bad?
refrigerator or freezer
◆ Is all food stored in sealed containers or covered?
◆ Has dew developed in the vegetable bin? Clean and dry the bin.
◆ Are the evaporation slots at the front of the freezer clogged?
Clean and dry them carefully.
◆ Clean the bio-deodorizer (refer to page 12).
Dew develops in the refrigerator ◆ Have you left the door open for a long time?
◆ Is something preventing the door from closing properly?
Carefully clean and dry the door seals.
◆ Have you stored food or liquids in a container without a cover?
Leave all food and liquids to cool before placing them in the
refrigerator and keep them covered.
Frost develops in the freezer ◆ Have you left the door open for a long time?
◆ Is something preventing the door from closing properly?
Carefully clean and dry the door seals.
◆ Are the evaporation slots at the front of the freezer clogged?
Clean and dry them carefully.
◆ Have you left enough room for the air to circulate? Space the food
out as evenly as possible.
The rear or sides of the fridge/ ◆ Is the room temperature too high or is the fridge/freezer exposed to a
freezer are warm direct source of heat, causing the fridge/freezer to operate intensively?
Move the fridge/freezer to a better position if possible.
◆ Is there an excessively high humidity level in the room? Move the
fridge/freezer to a better position if possible.
If you cannot solve the problem, note:
◆ The nature of the problem and any warranty information
◆ The type and model indicated on the centre of the fridge/freezer
Then contact your local dealer or nearest Samsung after-sales service.
14
Page 15
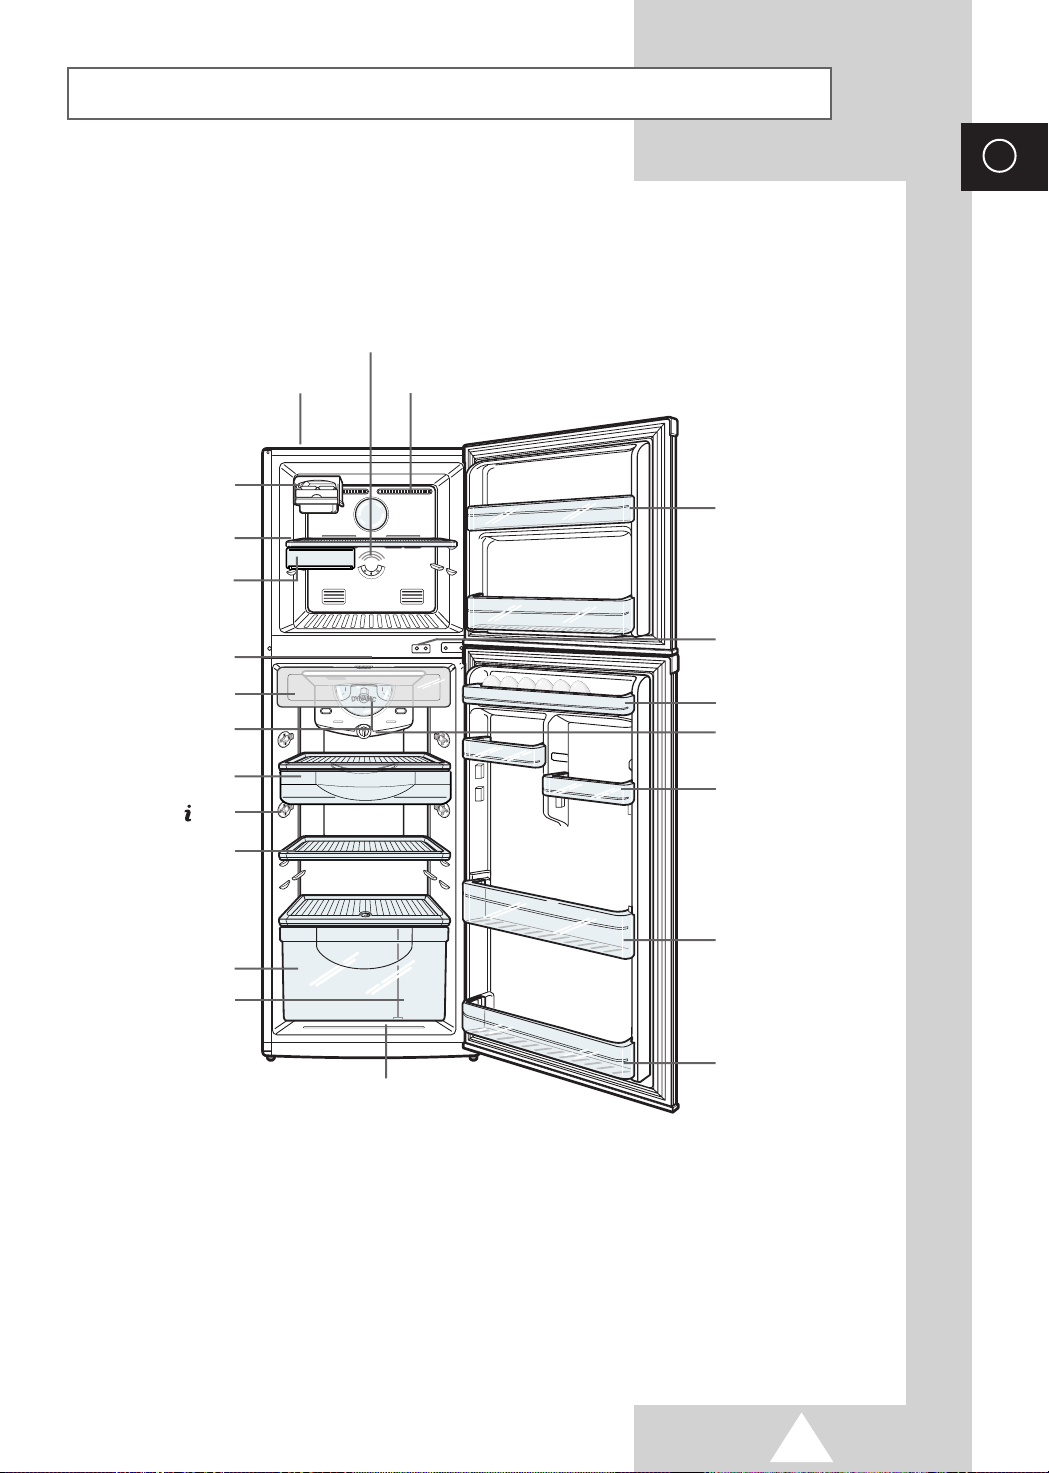
View of Your Fridge/Freezer
FREEZER TEMPERATURE DIAL
GB
TWIST ICE MAKER & ICE
STORAGE BIN (OPTION)
FREEZER SHELF
(crystal or wire depending on
CHILLER COMPARTMENT
MULTI-PURPOSE DRAWER
REFRIGERATOR SHELVES
(Tempered glass, crystal or
VEGETABLE BIN DIVIDER
the model type)
MOVABLE ICE TRAY
(OPTION)
BIO-DEODORIZER
(OPTION)
(OPTION)
LIGHT
(OPTION)
COOL
wire depending on
the model type)
VEGETABLE BIN
FREEZER
VENTILATION SLOTS
DOOR POCKET
DOOR OPEN/CLOSE CONTACT
(light switch for refrigerator)
EGG TRAY
REFRIGERATOR
TEMPERATURE DIAL
ADJUSTABLE DOOR
POCKET
JUMBO DOOR POCKET
REFRIGERATOR
BOTTLE POCKET
15
Page 16
 Loading...