

Samsung RT21M6215SR, RT18M6215SR Installation manual
Refrigerator
Installation manual
RT18M*/RT21M*
Free Standing Appliance
Untitled-6 1 2017-01-26 12:01:01
Contents
Safety information 3
Important safety symbols and precautions: 3
State of California Proposition 65 Warning (US only) 3
Severe warning signs for transportation and site 3
Contents
Installation 4
Connect the water line 4
Install the Auto Ice Maker 9
Troubleshooting 12
Auto Ice Maker 12
Warranty (USA) 13
Warranty Information (CANADA) 15
Limited Warranty for Original Purchaser 15
Obligation to the Original Owner 15
Exclusions of the Warranty 15
English2
Untitled-6 2 2017-01-26 12:01:01
Safety information
Important safety symbols and precautions:
WARNING
Hazards or unsafe practices that may result in severe personal injury or death.
CAUTION
Hazards or unsafe practices that may result in minor personal injury or property damage.
These warning signs are here to prevent injury to you and others.
Please follow them carefully.
After reading this section, keep it in a safe place for future reference.
State of California Proposition 65 Warning (US only)
WARNING : This product contains chemicals known to the State of California to cause
cancer and birth defects or other reproductive harm.
Severe warning signs for transportation and site
WARNING
• When transporting and installing the appliance, care should be taken to ensure that no
parts of the refrigerating circuit are damaged.
- Refrigerant leaking from the pipe work could ignite or cause an eye injury. If a leak
is detected, avoid any naked ames or potential sources of ignition and air the room
in which the appliance is standing for several minutes.
- This appliance contains a small amount of isobutane refrigerant (R-600a), a natural
gas with high environmental compatibility that is, however, also combustible. When
transporting and installing the appliance, care should be taken to ensure that no
parts of the refrigerating circuit are damaged.
Safety information
English 3
Untitled-6 3 2017-01-26 12:01:01

Installation
Installation
Connect the water line
Connect the water line to the ice maker. For the ice maker to operate properly, a water
pressure of 20-125 psi is required. After you have connected the water line, make sure the
water storage tank inside the refrigerator is properly lled.
CAUTION
Do not reuse an old hose set. Use the new hose sets supplied with your refrigerator only.
• The water line installation is not covered by the Warranty of this product. Read carefully
through these instructions to protect your property and prevent possible damage.
• Banging pipes (water banging in the pipes) can cause damage to the refrigerator, and
lead to water leakage or ooding. If you encounter this problem, contact a plumber for
professional assistance.
• To prevent burns and product damage, do not connect the water line to a hot water
source.
• Do not install the water line in areas where temperatures fall below the freezing point.
• When using any electrical device (such as a motorized drill) during installation, be sure
the device is insulated and properly grounded to prevent electric shock.
• All installations must be in accordance with local plumbing code requirements.
• The water lter must be replaced as instructed by the manufacturer or the retailer.
• To purchase additional water lters, contact the manufacturer or the retailer of the lter.
NOTE
• You can purchase the water line installation kit from your retailer. We recommend using
a kit that contains copper tubing and a 6 mm (
• In an area with low water pressure (below 20 psi), you can install a booster pump to
compensate for the low pressure.
1
/4”) compression nut.
English4
Untitled-6 4 2017-01-26 12:01:02

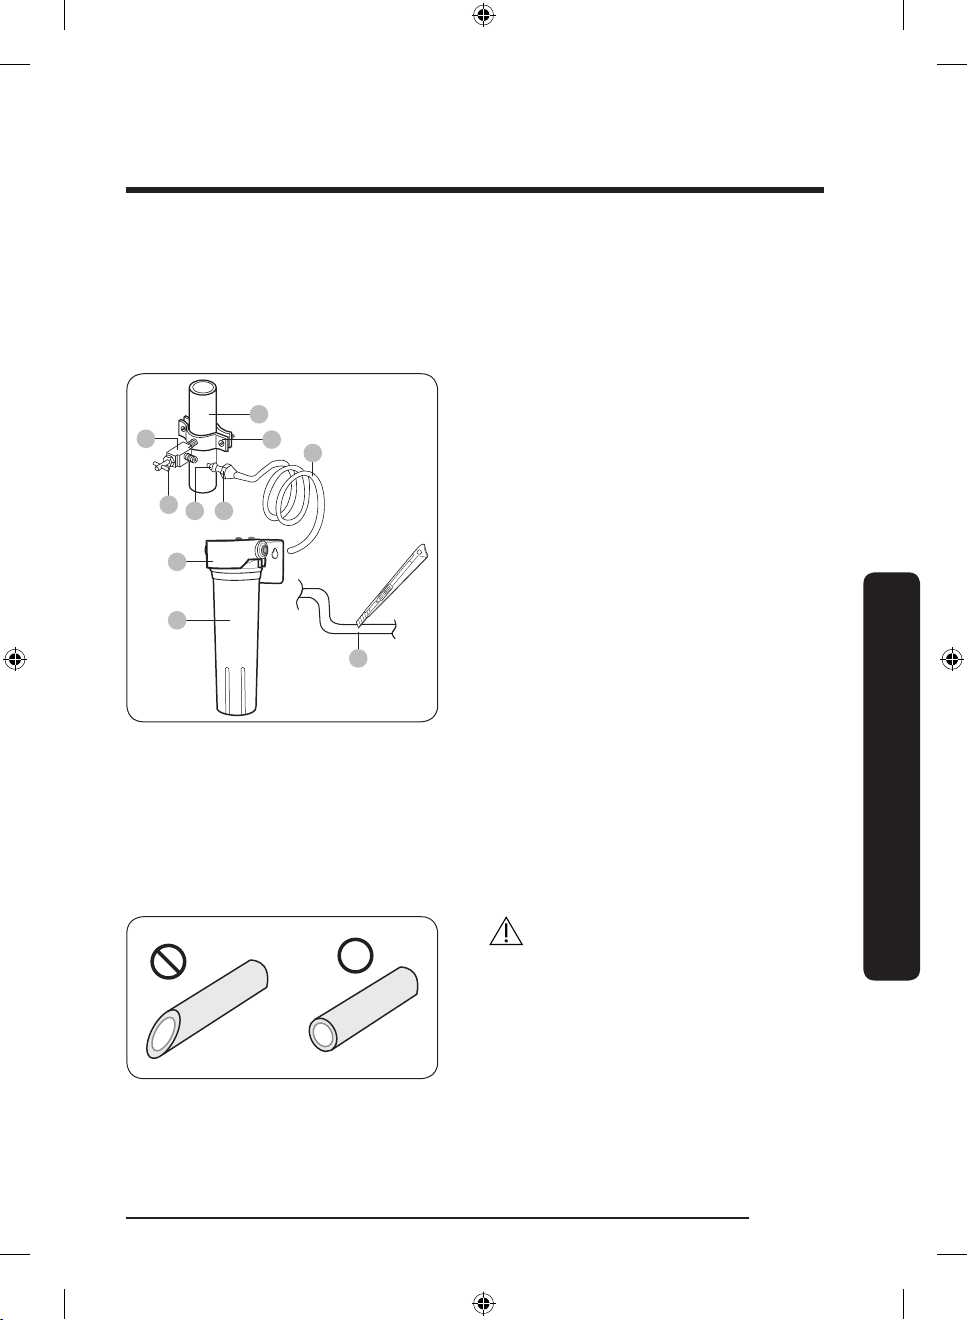
To assemble the water line installation kit
A
B
C
A
B
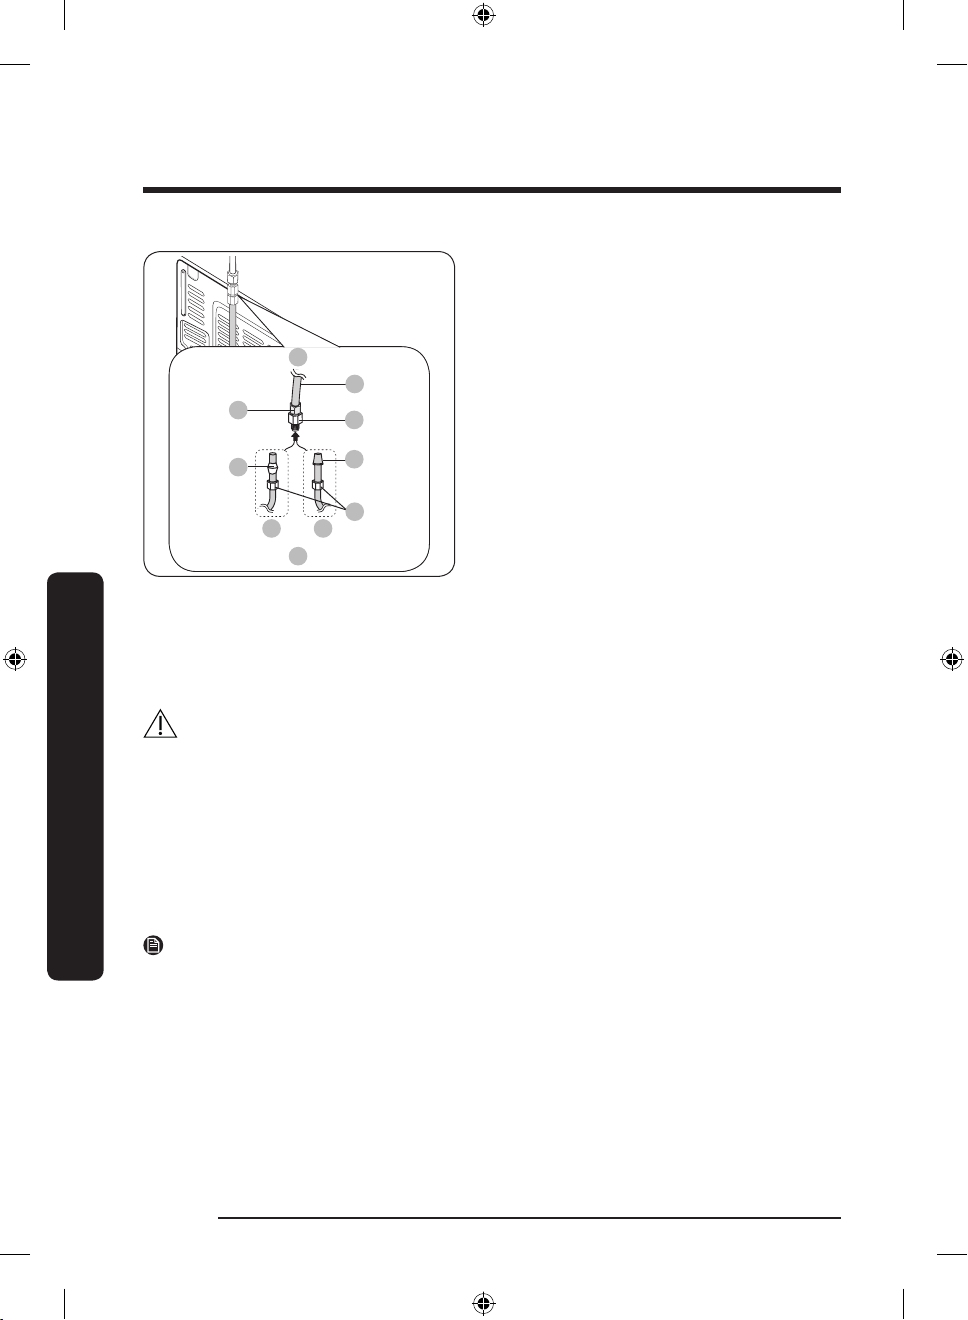
To connect the water line to the refrigerator
1. Shut off the main water source.
2. Insert the pipe clamp (B) and the shut-
off valve (C) into the cold water line (A).
3. Connect the water line installation kit
(A) to the shut-off valve (B).
WARNING
Make sure to connect the water line only to a potable water source.
There are several items you must purchase to complete this connection. You may nd these
items sold as a kit at your local hardware store.
Copper Tubing
Plastic Tubing
Untitled-6 5 2017-01-26 12:01:02
• 1/4” copper tubing
• 1/4” compression nut (1 pc)
• Ferrule (2 pc)
1
/4” plastic tubing Molded end (Bulb)
•
• 1/4” compression nut (1 pc)
Installation
English 5
Installation
A
01
02
03 08
04
05
06
07
B
A. Refrigerator
B. Household water supply line
Installation
01 Compression nut (
1
/4”) (Not supplied)
02 Ferrule (Not supplied)
03 Copper tubing (Not supplied)
04 Plastic tubing (Assembled)
05 Compression tting (Not supplied)
06 Molded end (Bulb)
07 Compression nut (B) (1/4”) (Not
supplied)
08 Plastic tubing (A) (Not supplied)
1. Connect the household water line to the assembled compression tting.
- If you are using copper tubing, slip the compression nut (B) (not supplied) and ferrule
(not supplied) on the copper tubing (not supplied) as shown.
- If you are using plastic tubing (A), insert the molded end (Bulb) of the plastic tubing
(A) into the compression tting.
CAUTION
If you use plastic tubing, (A) do not use it without the molded end (Bulb).
2. Tighten the compression nut (B) onto the compression tting. Do not over-tighten the
compression nut (B).
3. Turn the water on and check for any leakage. If you nd water drops or leakage in
the connection areas, turn off the main water supply. Check the connections and, if
necessary, tighten.
4. After you turn on the refrigerator, let the ice maker makes ice for 1 to 2 days. Over that
period of time, throw out the rst 1 or 2 buckets of ice the ice maker makes to ensure
all impurities have been removed from the water line.
NOTE
If you have to repair or disassemble the water line, cut off
sure you get a snug, leak-free connection.
1
/4“ of the plastic tubing to make
English6
Untitled-6 6 2017-01-26 12:01:02
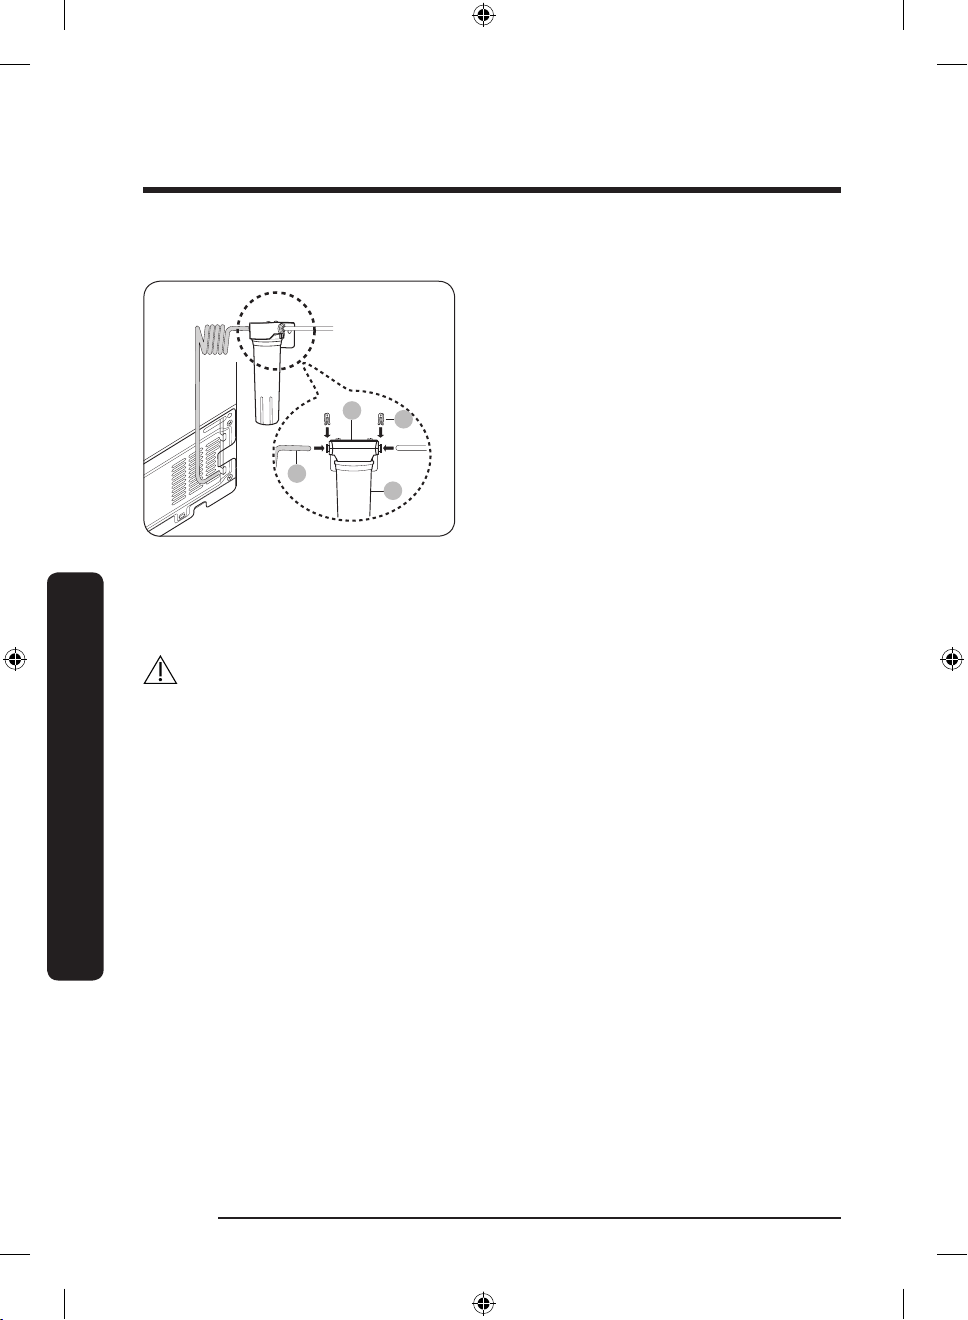
Installing a Water Filter
01
02
03
07
06
05
04
09
10
08
The water lter and the water lter installation kit containing necessary parts illustrated
in this section are not provided. You must purchase the water lter and the water lter
installation kit at a local Samsung service center.
To connect to the water supply line
01 Cold water line
02 Pipe clamp
03 Plastic line
04 Compression nut
05 Compression sleeve
06 Packing nut
07 Shut off valve
08 Filter cartridge
09 Cartridge holder
10 Cut vertically by 90 degrees
1. Shut off the main water line and turn the ice maker off.
2. Locate the nearest cold potable water line.
3. Follow the instructions mentioned in the water lter installation kit.
4. After connecting the water line to the inlet of the cartridge holder with the plastic line
fully inserted, insert and tighten the lter cartridge.
5. Turn on the water line and ush 11 liters of water (approximately 6 minutes) through
the lter before use.
Installation
CAUTION
• The water line must be connected
outside of the refrigerator.
Untitled-6 7 2017-01-26 12:01:02
• Do not use copper lines.
• If cutting the tubing for resizing, make
sure the ends of the tubing are vertically
clean cut.
English 7
Installation
01
02
04
03
Installation
To connect the water line to the refrigerator
01 Cartridge holder
02 Plastic clip
03 Plastic line
04 Filter cartridge
1. Connect the plastic line from the rear of the refrigerator to the outlet of the cartridge
holder until the plastic line is fully inserted.
2. Clamp both ends of the cartridge holder using the plastic clips.
3. Turn the water line on and check for leaks.
CAUTION
• Use only potable water.
• The lter cartridge is not provided. You must purchase it at a local Samsung service
center.
• When moving the refrigerator for line connection, use caution so that you don't step on
the power cord or water line (for the ice maker).
English8
Untitled-6 8 2017-01-26 12:01:03
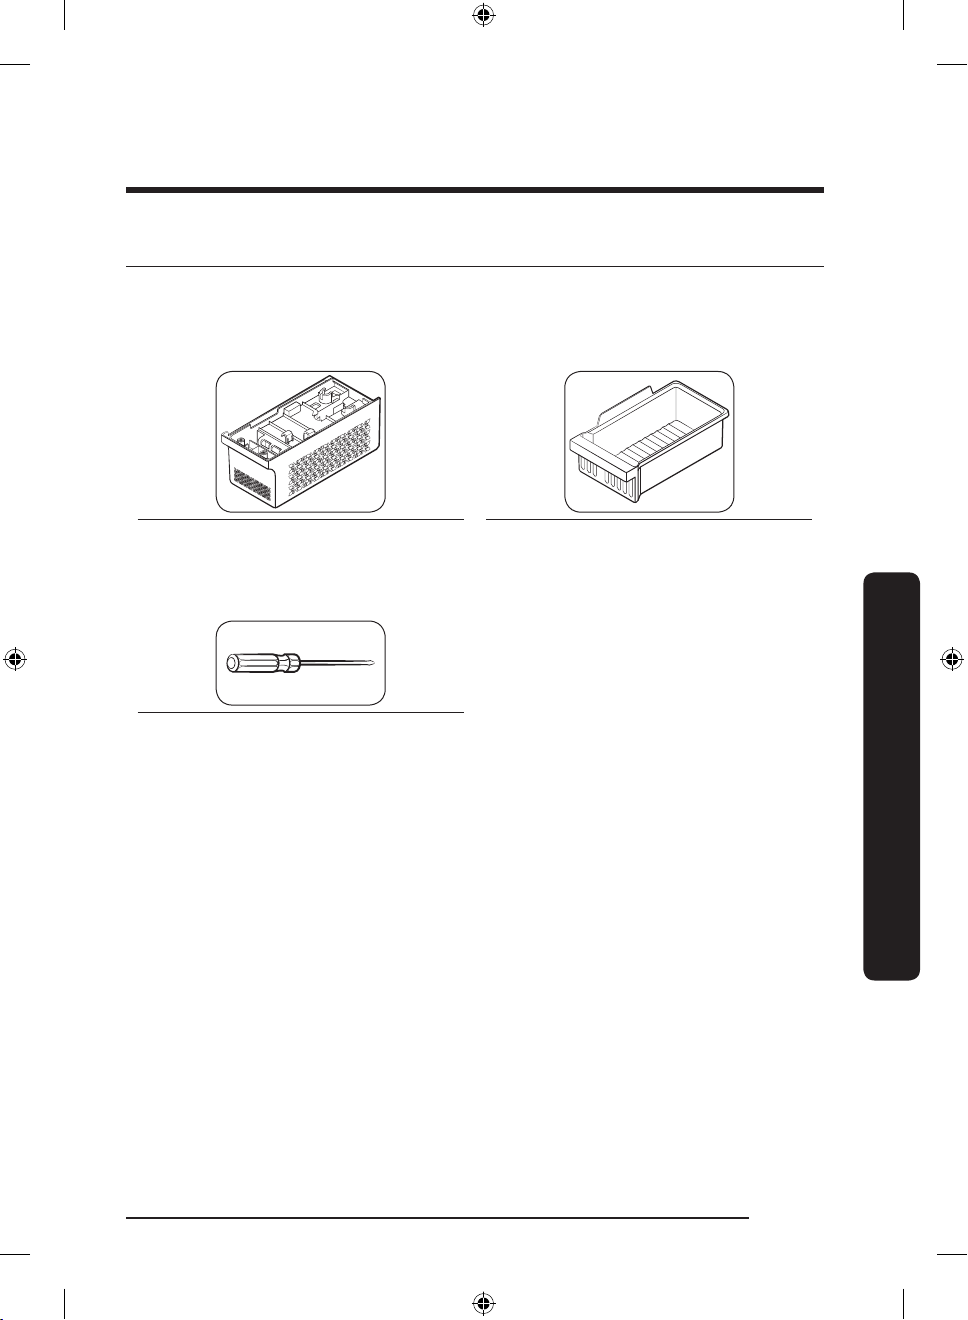
Install the Auto Ice Maker
To purchase a new auto ice maker (part type : RA-TIMO63PP/AA), visit the Samsung
website (www.samsung.com) or contact your retailer.
Ice maker kit
Ice maker Ice bucket
Tools required (not provided)
Phillips screwdriver
English 9
Untitled-6 9 2017-01-26 12:01:03
Installation
Installation
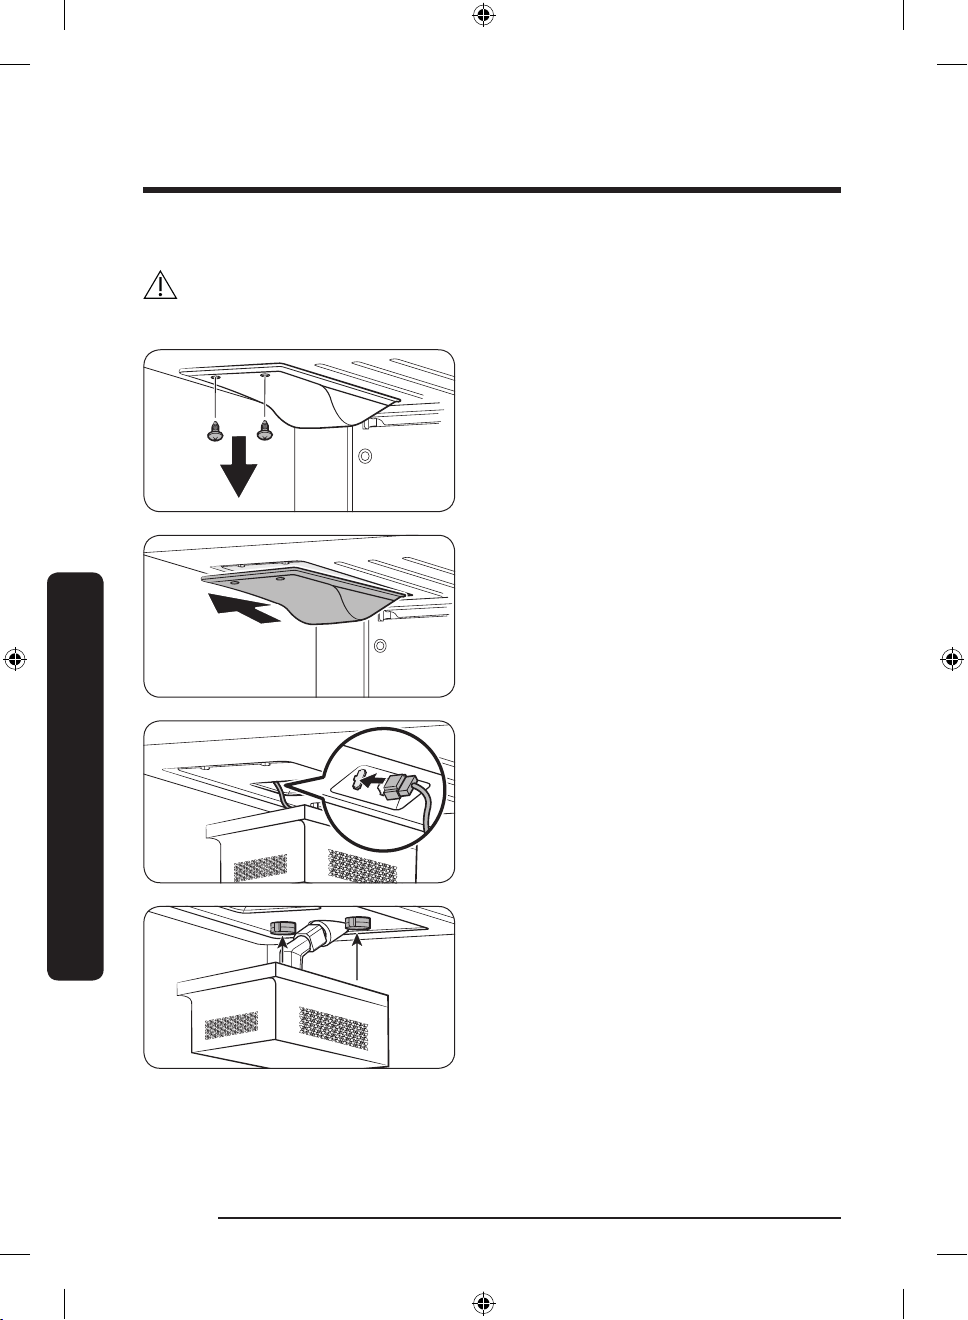
To install the ice maker kit
WARNING
To prevent electrical shock, make sure the refrigerator is turned off before installation.
1. See the gure on the left, and then
locate the cover on the inner upper
corner of the main unit.
2. Remove the screws (x2) from the cover,
and then remove the cover by pulling it
to the front.
Installation
English10
Untitled-6 10 2017-01-26 12:01:03
3. Connect the wire connector of the ice
maker to the socket (marked in the
gure) on the main unit. Make sure the
connector is fully inserted to prevent
system failure.
4. Insert the ice maker into the front side
of the 2 grommets as shown. Then, push
the ice maker inwards to the end. To
prevent deviation of the ice maker, make
sure the ice maker ts into position.
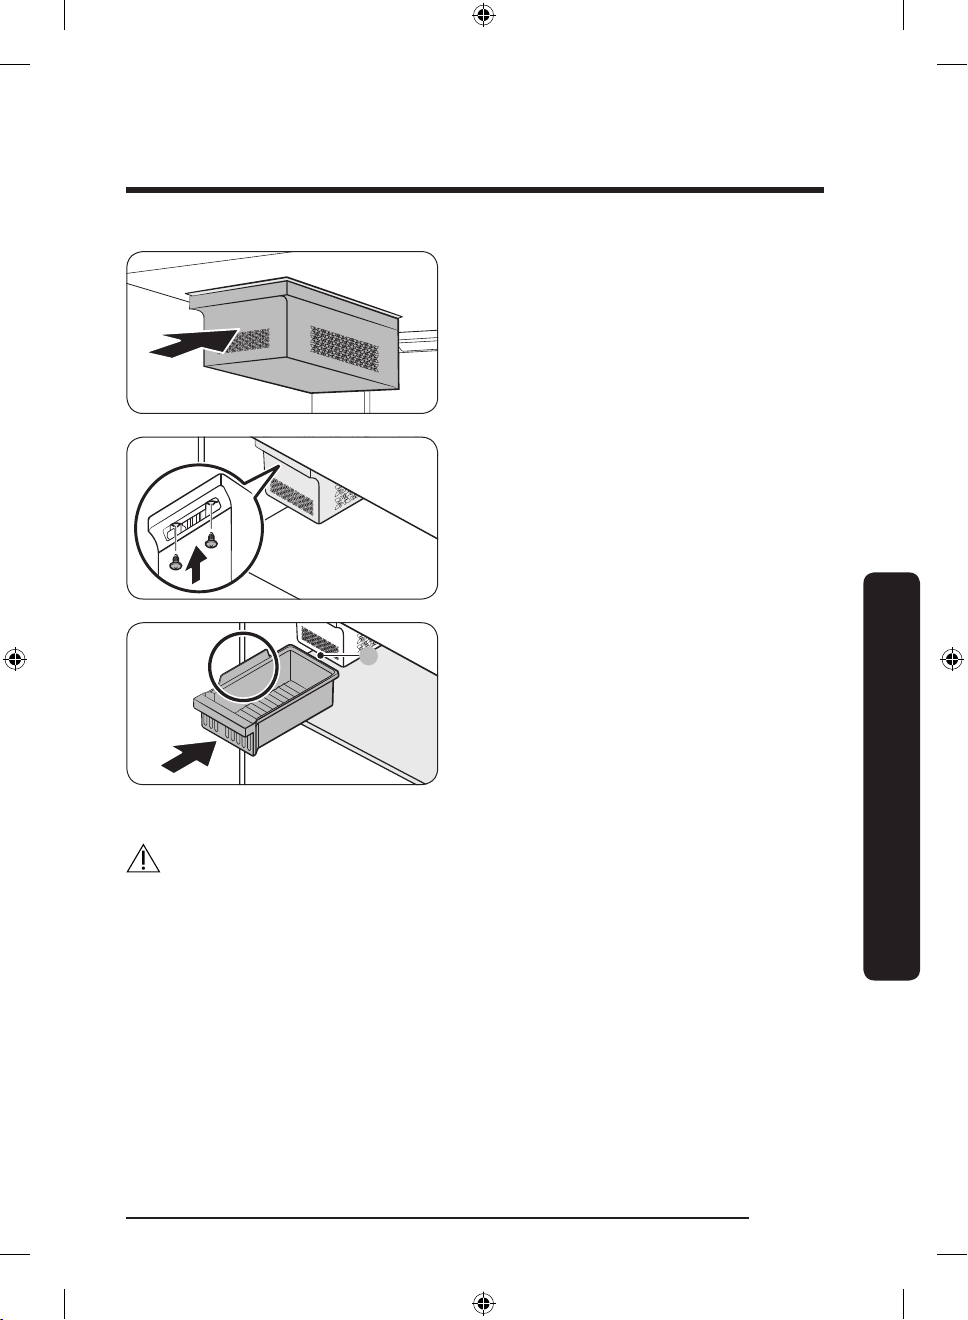
5. Tighten the provided screws (x2) to
A
attach the ice maker rmly to the
refrigerator.
- Make sure the screw holes are
aligned with each other before
tightening the screws.
6. Put the ice bucket on the shelf as shown.
By design, the ice bucket is supposed to
sit behind the ice maker. Otherwise, the
ice cubes from the ice maker will not
collect in the bucket as intended.
7. When installation is complete, turn the
refrigerator on, and then press Test
Switch (A) on the ice maker to check
if the ice maker operates and supplies
water for the ice tray normally.
CAUTION
• If you don’t intend to use the ice maker, or if you are going for a business trip or
vacation, turn off the ice maker.
• Do not turn the ice maker on without the ice bucket in place. The ice cubes produced by
the ice maker will drop into and scatter through out the freezer.
• Noises may occur when the ice maker is making ice or being supplied with water, or
when ice cubes drop into the ice bucket. However, this is not a system failure. When the
ice bucket is full, none of these noises will occur.
• The rst time you use the ice maker, or after you have replaced the water lter, the ice
made by the ice maker may have a carbon residue. If this happens, discard the rst full
load of ice. Note that the carbon residue is harmless to humans.
Installation
English 11
Untitled-6 11 2017-01-26 12:01:04
Troubleshooting
Auto Ice Maker
Symptom Possible causes Solution
• The freezer room is not cold
enough.
• The ice maker is turned off.
The ice maker does
not produce ice.
• The wire connector of the
ice maker is not connected
properly.
• The water line owing to the
ice maker is bent or kinked.
• Make sure the cold air outlet
is not clogged.
• Make sure the ice maker
is turned on. Press and
hold Power Freeze for 3
seconds, and check if the
corresponding indicator
turns on.
• Make sure the wire
connector from the wire
housing is connected
properly.
• Make sure the water line in
the rear of the refrigerator is
not bent or kinked.
Troubleshooting
English12
Untitled-6 12 2017-01-26 12:01:04

Warranty (USA)
LIMITED WARRANTY TO ORIGINAL PURCHASER
This Samsung brand ice maker, as supplied and distributed by Samsung Electronics
America, Inc. (Samsung) and delivered new, in the original carton to the original consumer
purchaser is warranted by Samsung against manufacturing defects in materials and
workmanship for a limited warranty period of:
One (1) year Parts on the ice maker.
This limited warranty begins on the original date of purchase, and is valid only on
products purchased from SAMSUNG or a SAMSUNG authorized reseller and used in the
United States. Before receiving warranty service, SAMSUNG or its agents may require that
you respond to questions designed to assist with diagnosing potential issues and follow
SAMSUNG’s procedures for obtaining warranty service. You must contact SAMSUNG at
the number provided below. Warranty service can only be performed by a SAMSUNG
authorized service center. The original dated bill of sale must be presented upon request
as proof of purchase to SAMSUNG or SAMSUNG’s authorized service center. In the event
SAMSUNG determines, in its sole discretion, that the product is eligible for warranty
service, and subject to the conditions and exceptions stated in this limited warranty,
SAMSUNG will repair or replace this product, at our option and at no charge. SAMSUNG
may, at SAMSUNG’s option, use rebuilt, reconditioned or new parts or components when
repairing the product, or may replace the product with a rebuilt, reconditioned or new
product. If return of the product is required, you must ship the product to the specied
SAMSUNG authorized service center or other address provided by SAMSUNG in its original
or equivalent packaging. You are responsible for the shipping charges. You are advised to
ship any product to SAMSUNG or its designated service center with the benet of tracking
information, as SAMSUNG is not responsible for any damage or loss to the product while in
transit. In the case of replacements, ownership of the original product, parts or components
will be transferred to SAMSUNG and SAMSUNG will not return the original product, parts or
components to you. Replacement product, parts and components assume the remainder of
the original warranty, or ninety (90) days, whichever is longer.
This limited warranty covers manufacturing defects in materials and workmanship
encountered in normal, reasonable, noncommercial use of this product and shall not apply
to the following: damage that occurs in shipment, delivery or installation; damage caused
by applications and uses for which this product is not intended or designed; damage
caused by ordinary wear and tear; product alterations or modications; products with
a serial number that has been removed, defaced, damaged, altered or made illegible;
cosmetic damage or damage to the exterior nish; damage caused by accidents, abuse,
neglect, misuse, mishandling; damage due to liquid spills; re, water, lightning, or other
acts of nature or God; damage that results from the use of products, equipment, systems,
utilities, services, parts, supplies, accessories, applications, installations, repairs, external
wiring or connectors not supplied or authorized by SAMSUNG; damage caused by
connections to incorrect or improper power supply; electrical current uctuations; power
surges; damage caused by failure to follow operating instructions or user manuals or
failure to perform preventive maintenance; product removal and reinstallation; or problems
caused by pest infestations.
SAMSUNG does not warrant uninterrupted or error-free operation of the product.
English 13
Untitled-6 13 2017-01-26 12:01:04

Warranty (USA)
THERE ARE NO EXPRESS WARRANTIES OTHER THAN THOSE LISTED AND DESCRIBED
ABOVE AND ALL OTHER WARRANTIES WHETHER EXPRESS OR IMPLIED, INCLUDING, BUT
NOT LIMITED TO, ANY IMPLIED WARRANTIES OF MERCHANTABILITY OR FITNESS FOR A
PARTICULAR PURPOSE, IS EXPRESSLY DISCLAIMED, AND NO OTHER EXPRESS WARRANTY
OR GUARANTY GIVEN BY ANY PERSON, FIRM OR CORPORATION WITH RESPECT TO THIS
PRODUCT SHALL BE BINDING TO SAMSUNG. SAMSUNG SHALL NOT BE LIABLE FOR LOSS
OF REVENUE OR PROFITS, FAILURE TO REALIZE SAVINGS OR OTHER BENEFITS, OR ANY
OTHER SPECIAL, INCIDENTAL OR CONSEQUENTIAL DAMAGES CAUSED BY THE USE, MISUSE
OR INABILITY TO USE THIS PRODUCT, REGARDLESS OF THE LEGAL THEORY ON WHICH
THE CLAIM IS BASED, AND EVEN IF SAMSUNG HAS BEEN ADVISED OF THE POSSIBILTY OF
SUCH DAMAGES; NOR SHALL RECOVERY OF ANY KIND AGAINST SAMSUNG BE GREATER IN
AMOUNT THAN THE PURCHASE PRICE OF THE PRODUCT SOLD BY SAMSUNG AND CAUSING
THE ALLEGED DAMAGE. WITHOUT LIMITING THE FOREGOING, PURCHASER ASSUMES ALL
RISK AND LIABILITY FOR LOSS, DAMAGE OR INJURY TO PURCHASER AND PURCHASER’S
PROPERTY AND TO OTHER AND THEIR PROPERTY ARISING OUT OF THE USE, MISUSE OR
INABILITY TO USE THIS PRODCUT SOLD BY SAMSUNG NOT CAUSED DIRECTLY BY THE
NEGLIGENCE OF SAMSUNG. THIS LIMITED WARRANTY SHALL NOT EXTEND TO ANYONE
OTHER THAN THE ORIGINAL PURCHASER OF THIS PRODUCT, IS NONTRANSFERABLE AND
STATES YOUR EXCLUSIVE REMEDY.
Some states do not allow limitations on how long an implied warranty lasts, or the
exclusion or limitation of incidental or consequential damages, so the above limitations or
exclusions may not apply to you. This warranty gives you specic rights, and you may also
have other rights, which vary from state to state.
To obtain warranty service, please contact SAMSUNG at:
SAMSUNG CUSTOMER CARE CENTER
Samsung Electronics America, Inc.
85 Challenger Road
Ridgeeld Park, NJ 07660
1-800-SAMSUNG (726-7864)
www.samsung.com/us/support
English14
Untitled-6 14 2017-01-26 12:01:04
Warranty Information (CANADA)
Limited Warranty for Original Purchaser
This Samsung ice maker is warranted by Samsung Electronics Canada Inc. (hereafter
referred to as SECA) against manufacturing defects in material or workmanship for the
following periods:
Parts : 1 year
SECA further warrants that if this product fails to operate properly within the specied
warranty period and the failure is due to defective material, SECA will repair or replace the
ice maker. In-home service is not available in all areas. Contact us to nd out if in-home
service is currently available in your area by using the contact information at the back of
this warranty.
All warranty repairs or replacements must be performed by a SECA Authorized Service
Center. (To nd the nearest SECA Service Center, call 1-800-SAMSUNG (7267864) or visit
our web site at www.samsung.com/ca)
Obligation to the Original Owner
The original dated sales receipt must be retained by the customer and is the only
acceptable proof of purchase. It must be presented to a SECA Authorized Service Center
at the time service is requested before warranty services are rendered. On all carry-in
models, transportation to and from the Authorized Service Center is the responsibility of
the customer.
Exclusions of the Warranty
This warranty does not cover damage due to accident, re, ood, and/or other Acts of God,
misuse, incorrect line voltage, improper installation, improper or unauthorized repairs,
commercial use, or damage that occurs during shipping. Customer adjustments which are
explained in this owners manual are not covered under the terms of this warranty. This
warranty will automatically be voided for any unit found with a missing or altered serial
number. This warranty is valid only on products purchased and used in the Canada.
SAMSUNG CUSTOMER CARE CENTER
Samsung Electronics Canada Inc.
2050 Derry Road West
Mississauga, Ontario L5N 0B9
Canada
1-800-SAMSUNG (726-7864)
www.samsung.com/ca/support (English)
www.samsung.com/ca_fr/support (French)
English 15
Untitled-6 15 2017-01-26 12:01:04
 Loading...