

Page 1
English
Refrigerator
user manual
imagine the possibilities
Thank you for purchasing a Samsung product.
Built-in
This manual is made with 100% recycled paper.
DA68-02935A-04.indb 1 2014. 5. 14. �� 9:38
Page 2

safety information
SAFETY INFORMATION
• Before operating the
appliance, please read this
manual thoroughly and retain
it at a safe place near the
appliance for your future
reference.
• Use this appliance only for
its intended purpose as
described in this instruction
manual.
This appliance is not
intended for use by persons
(including children) with
reduced physical, sensory or
mental capabilities, or lack of
experience and knowledge,
unless they have been given
supervision or instruction
concerning the use of the
appliance by a person
responsible for their safety.
your appliance.
• Because the following
operating instructions
cover various models, the
characteristics of your
refrigerator may differ slightly
from those described in this
manual. All warnings may be
applicable.
If you have any questions
or concerns, contact your
nearest service center or find
help and information on line
at www.samsung.com.
• Warnings and Important
Safety Instructions in this
manual do not cover all
possible conditions and
situations that may occur.
It is your responsibility to use
common sense, caution,
and care when installing,
maintaining, and operating
02_ safety information
DA68-02935A-04.indb 2 2014. 5. 14. �� 9:38
Page 3
Important safety symbols
and precautions:
WARNING
Hazards or unsafe practices
that may result in severe
personal injury or death.
CAUTION
These warning signs are
here to prevent injury to you
and others.
Please follow them carefully.
After reading this section,
keep it in a safe place for
future reference.
Hazards or unsafe practices
that may result in minor
personal injury or property
damage.
Do NOT attempt.
Do NOT disassemble.
Do NOT touch.
Follow directions
explicitly.
Unplug the power plug
from the wall socket.
Make sure the machine
is grounded to prevent
electric shock.
Call the service center for
help.
Note
WARNING
CRITICAL
TRANSPORTATION AND
SITE WARNINGS
• When transporting and
installing the appliance,
care should be taken to
ensure that no parts of
the refrigerant circuit are
damaged.
• R-600a or R-134a is used as
a refrigerant.
Check the compressor label
on the rear of the appliance
or the rating label inside the
refrigerator to see which
refrigerant is used in your
refrigerator.
safety information _03
DA68-02935A-04.indb 3 2014. 5. 14. �� 9:38
Page 4
WARNING
CRITICAL INSTALLATION
WARNINGS
• Do not install this
appliance near a heater
or flammable material.
• Do not spray flammable gas
near the refrigerator.
- There is a risk of explosion or
fire.
• Do not install this appliance
in a humid, oily or dusty
location, or in a location
exposed to direct sunlight or
water (rain drops).
- Exposure can cause
insulation to deteriorate.
Deteriorated insulation on
electrical parts may cause
electric shock or fire.
• Do not place this refrigerator
in direct sunlight or expose to
the heat from stoves, room
heaters, or other appliances.
• Do not plug several
appliances into the same
multiple power board.
The refrigerator should
always be plugged into its
own individual electrical
outlet which has a voltage
rating that matches the
voltage on the rating plate.
04_ safety information
- This provides the best
performance and also
prevents overloading house
wiring circuits, which could
cause a fire hazard from
overheated wires.
• If the wall socket is loose, do
not insert the power plug.
- There is a risk of electric
shock or fire.
• Do not use a cord that
shows cracks or abrasion
damage along its length or at
either end.
• Do not bend the power cord
excessively or place heavy
articles on it.
• Do not use aerosols near the
refrigerator.
- Aerosols used near the
refrigerator may cause an
explosion or fire.
• Do not install this appliance
in a location where gas may
leak.
- This may result in an electric
shock or fire.
• We strongly
recommend you use
a qualified technician
or service company to
install or service the
refrigerator.
DA68-02935A-04.indb 4 2014. 5. 14. �� 9:38
Page 5
- Failing to do so may result
in an electric shock, fire,
explosion, problems with the
product, or injury.
• This refrigerator must be
properly installed and located
in accordance with the
manual before it is used.
• Connect the power plug in
the proper position with the
cord hanging down.
- If you connect the power
plug upside down, the wire
can get cut off and a cause
fire or an electric shock.
• Make sure that the power
plug is not squashed or
damaged by the back of the
refrigerator.
• When moving the refrigerator,
be careful not to roll over or
damage the power cord.
- This constitutes a fire hazard.
• The appliance must be
positioned so that the plug is
accessible after installation.
• The refrigerator must be
safely grounded.
- Always make sure that
you have grounded the
refrigerator before attempting
to investigate or repair any
part of the appliance. Power
leakages can cause severe
electric shock.
• Never use gas pipes,
telephone lines, or other
potential lightning attractors
as an electrical ground.
- Improper use of the
grounding plug can result
in a risk of electric shock.
If it is necessary to use an
extension cord, use only a
3-wire extension cord that
has a 3-blade grounding plug
and a 3-slot receptacle that
will accept the plug on the
appliance.
The marked rating of the
extension cord should be
AC115-120V, 10A, or
more.
If a grounding adapter
is used, make sure the
receptacle box is fully
grounded.
• Plug the power plug into the
wall socket firmly.
Do not use a damaged
power plug, damaged power
cord, or loose wall socket.
- This may result in an electric
shock or fire.
• Do not modify the
refrigerator. Unauthorized
modifications can cause
safety information _05
DA68-02935A-04.indb 5 2014. 5. 14. �� 9:38
Page 6
safety problems.
To reverse an unauthorized
modification, we will charge
the full cost of parts and
labor.
• If the power cord is
damaged, have it
replaced immediately by
the manufacturer or its
service agent.
• The fuse on the refrigerator
must be changed by a
qualified technician or service
company.
- Failing to do so may result in
an electric shock or personal
injury.
• Never stare directly at the UV
LED lamp for long periods of
time.
- This may result in eye strain
due to the ultraviolet rays.
may not work correctly.
• Keep the ventilation space in
the appliance enclosure or
mounting structure clear of
obstructions.
• Allow the appliance to stand
for 2 hours after installation.
• We strongly recommend you
use a qualified technician or
service company to install
the refrigerator.
- Failing to do so may result
in an electric shock, fire,
explosion, problems with the
product, or injury.
• Do not stand on top of the
appliance or place objects
(such as laundry, lighted
candles, lighted cigarettes,
dishes, chemicals, metal
objects, etc.) on the
appliance.
- This may result in an electric
shock, fire, problems with the
product, or injury.
CAUTION
INSTALLATION CAUTIONS
• Allow sufficient space
around the refrigerator
and install it on a flat
surface.
- If your refrigerator is not level,
the internal cooling system
06_ safety information
DA68-02935A-04.indb 6 2014. 5. 14. �� 9:38
Page 7

WARNING
CRITICAL USAGE
WARNINGS
• Do not insert the power
plug with wet hands.
- This may result in an electric
shock.
• Do not store articles on the
top of the appliance.
- When you open or close the
door, the articles may fall and
cause personal injury and/or
material damage.
• Do not put items filled with
water on the refrigerator.
- If spilled, there is a risk of fire
or electric shock.
• Do not let children hang on
the door. Serious injury can
occur.
• Do not leave the doors of
the refrigerator open while
the refrigerator is unattended
and do not let children enter
the refrigerator.
• Do not allow babies or
children go inside the drawer.
- It can cause death from
suffocation by entrapment or
personal injury.
• Do not sit on the Freezer
door.
- The door may be broken and
cause a personal injury.
• If you removed the divider
from the drawer to clean it
or to perform some other
action, you must reinstall
the drawer divider using the
provided screws afterwards
to prevent children from
becoming entrapped.
• Children should be
supervised to ensure that
they do not play with the
appliance.
- Keep fingers out of “pinch
point” areas.
Clearances between the
doors and cabinet are
necessarily small.
Be careful when you open
the doors when children are
in the area.
• Never put fingers or other
objects into the dispenser
hole, ice chute, or ice maker
bucket.
- It may cause personal injury
or material damage.
• Do not insert hands, feet
or metal objects (such
as knives, etc.) into the
bottom or the back of the
refrigerator.
- This may result in an electric
shock or injury.
safety information _07
DA68-02935A-04.indb 7 2014. 5. 14. �� 9:38
Page 8

- Any sharp edges may cause
personal injury
stored in the freezer with wet
hands.
• Do not store volatile or
flammable substances such
as benzene, thinner, alcohol,
ether, or LP gas in the
refrigerator.
- The storage of any of such
products may cause an
explosion.
• Do not store low
temperature-sensitive
pharmaceutical products,
scientific materials, or other
low temperature-sensitive
products in the refrigerator.
- Products that require
strict temperature controls
must not be stored in the
refrigerator.
• Do not place or use electrical
appliances inside the
refrigerator, unless they are of
a type recommended by the
manufacturer.
• Do not use a hair dryer to dry
the inside of the refrigerator.
Do not place a lighted candle
in the refrigerator to remove
bad odors.
- This may result in an electric
shock or fire.
• Do not touch the inside walls
of the freezer or products
08_ safety information
- This may cause frostbite.
• Do not use mechanical
devices or any other means
to accelerate the defrosting
process, other than those
recommended by the
manufacturer.
• Do not damage the
refrigerant circuit.
• This product is intended
only for the storage
of food in a domestic
environment.
• Bottles should be stored
tightly together so that they
do not fall out.
• If you detect a gas leak,
avoid any naked flames or
potential sources of ignition
and air the room in which
the appliance is standing for
several minutes.
• In the event of a gas leak
(such as propane gas, LP
gas, etc.), ventilate the room
immediately without touching
the power plug.
Do not touch the appliance
or power cord.
- Do not use a ventilating fan.
- A spark may result in an
DA68-02935A-04.indb 8 2014. 5. 14. �� 9:38
Page 9
explosion or fire.
• Use only the LED Lamps
provided by the manufacturer
or a Samsung service center.
• Children should be
supervised to ensure that
they do not play with and/or
climb into the appliance.
• Do not attempt to
repair, disassemble, or
modify the appliance
yourself.
• Do not use any fuse (such as
cooper, steel wire, etc.) other
than the standard fuse.
• If your appliance needs to
be repaired or reinstalled,
contact your nearest service
center.
• If you experience difficulty
when changing the light,
contact service agent.
• If the products is equipped
with an LED Lamp, do not
disassemble the Lamp Cover
and LED Lamp yourself.
- Please contact the nearest
Samsung service center.
• If any foreign substance
such as water or dust enters
the mechanical or electrical
sections of the refrigerator
while you are cleaning it,
unplug the power plug
and contact your nearest
Samsung service center.
- There is a risk of fire.
- Failing to do so may result
in an electric shock, fire,
problems with the product,
or injury.
• If the appliance
generates a strange
noise, a burning smell,
or smoke, unplug the
power plug immediately
and contact your
nearest service center.
- Failing to do so may result in
an electric or fire hazards.
safety information _09
DA68-02935A-04.indb 9 2014. 5. 14. �� 9:38
Page 10
CAUTION
USAGE CAUTIONS
• To get the best
performance from the
product:
- Do not place food too close
to the vents at the rear of the
appliance. This can obstruct
free air circulation in the
refrigerator compartment.
- Wrap the food up properly or
place it in airtight containers
before putting it into the
refrigerator.
- Do not put food you have
just put into the freezer near
already frozen food.
• Do not place carbonated
or fizzy drinks in the freezer
compartment.
Do not put bottles or glass
containers in the freezer.
- When the contents freeze,
the glass may break and
cause personal injury and
property damage.
• Do not change or modify
the functionality of the
refrigerator.
- Changes or modifications
may result in a personal injury
and/or property damage.
Any changes or modifications
10_ safety information
performed by a 3rd party on
this completed appliance are
not covered under Samsung
warranty service. Samsung
is not responsible for any
safety problems, injuries, or
damage resulting from 3rd
party modifications.
• Do not block air holes.
- If the air holes are blocked,
especially with a plastic bag,
the refrigerator can be over
cooled. If this cooling period
lasts too long, the water filter
may break and cause water
leakage.
• Please observe maximum
storage times and expiration
dates of frozen goods.
• If you won’t be using the
refrigerator for a very long
period of time, (3 weeks or
more) empty the refrigerator,
unplug it, close the water
valve, wipe excess moisture
from the inside walls, and
leave the doors open to
prevent odors and mold.
• Fill the water tank and ice
cube tray with potable water
only.
- Do not fill the tank with tea or
a sports drink.
This may damage the
DA68-02935A-04.indb 10 2014. 5. 14. �� 9:38
Page 11
refrigerator.
• Use only the ice-maker
provided with the refrigerator.
• The water supply to this
refrigerator must be installed/
connected by a suitably
qualified person and
connected to a potable water
supply only.
• To operate the ice-maker
properly, water pressure of
138~862kPa (1.4~8.8 kgf/
m³) is required.
• Do not spray volatile material
such as insecticide onto the
surface of the appliance.
- As well as being harmful to
humans, it may also result
in an electric shock, fire or
problems with the product.
• Do not apply strong shock
or excessive force onto the
surface of glass.
- Broken glass may result
in a personal injury and/or
property damage.
CAUTION
CLEANING AND
MAINTENANCE
CAUTIONS
• Before cleaning
or performing
maintenance, unplug
the appliance from the
wall socket.
- Failing to do so may result in
an electric shock or fire.
• Do not spray water directly
on the inside or outside the
refrigerator.
- There is a risk of fire or
electric shock.
• Do not use or place any
substances sensitive
to temperature such
as inflammable sprays,
inflammable objects, dry ice,
medicine, or chemicals near
the refrigerator.
Do not keep volatile or
inflammable objects or
substances (benzene,
thinner, propane gas, etc.) in
the refrigerator.
- This refrigerator is for storing
food only.
- This may result in a fire or an
explosion.
• Do not spray cleaning
safety information _11
DA68-02935A-04.indb 11 2014. 5. 14. �� 9:38
Page 12

products directly on the
display.
- Printed letters on the display
may come off.
• Remove any foreign matter
or dust from the power plug
pins using a dry cloth.
Do not use a wet or damp
cloth when cleaning the plug.
- Otherwise there is a risk of
fire or electric shock.
• Never put fingers or objects
such as knives, etc. into the
dispenser hole or ice chute.
- This may cause personal
injury or material damage.
• Unplug the refrigerator
before cleaning
and performing
maintenance.
WARNING
• This product contains
chemicals known to the
State of California to cause
cancer and reproductive
toxicity.
12_ safety information
DA68-02935A-04.indb 12 2014. 5. 14. �� 9:38
Page 13
WARNING
CRITICAL DISPOSAL
WARNINGS
• DANGER : Risk of child
entrapment. Before you
throw away your old
refrigerator or freezer:
- Take off the doors and door
latch.
- Leave the shelves in place
so that children cannot easily
climb inside.
- Children trapped inside
a refrigerator can hurt
themselves or suffocate to
death.
• Please dispose of the
packaging material from this
product in an environmentally
friendly manner.
• Ensure that none of the
pipes on the back of the
appliance are damaged prior
to disposal.
• R-600a or R-134a is used as
a refrigerant.
Check the compressor
label on the front top of the
appliance or the rating label
inside the refrigerator to see
which refrigerant is used for
your refrigerator.
When this product contains
flammable gas (Refrigerant
R-600a), contact your local
authorities regarding the safe
disposal of this product.
Cyclopentane is used as an
insulation blowing gas.
Consequently, the insulation
material in the refrigerator
requires special disposal
procedures.
Please contact your local
authorities in regard to the
environmentally safe disposal
of this product.
Ensure that none of the
pipes on the back of the
appliances are damaged
prior to disposal.
• When disposing of this
product or other refrigerators,
remove the door/door seals
and door latch so that small
children or animals cannot
become trapped inside.
Leave the shelves in place so
that children may not easily
climb inside. Children should
be supervised to ensure that
they do not play with the old
refrigerator.
- Children trapped inside
a refrigerator can hurt
themselves or suffocate to
death.
safety information _13
DA68-02935A-04.indb 13 2014. 5. 14. �� 9:38
Page 14
• Please dispose of the
packaging material for this
product in an environmentally
friendly manner.
• Keep all packaging materials
well out of the reach of
children, as packaging
materials can be dangerous
to children.
- If a child places a bag over
his or her head, the child
could suffocate.
ADDITIONAL TIPS
FOR PROPER USAGE
• In the event of a power
failure, call the local office of
your electric company and
ask how long it is going to
last.
- Most power failures that are
corrected within an hour
or two will not affect your
refrigerator temperatures.
However, you should
minimize the number of door
openings while the power is
off.
- Should the power failure last
more than 24 hours, remove
all frozen food.
• If keys are provided with the
refrigerator, the keys should
be kept out of the reach of
children and not be in the
vicinity of the appliance.
• The appliance might not
operate consistently (frozen
contents can thaw or
temperatures can become
too warm in the frozen food
compartment) when sited for
an extended period of time in
a location where ambient air
temperatures are constantly
below the temperatures
for which the appliance is
designed.
• Do not store food which
spoils easily at low
temperature, such as
bananas and melons.
• Your appliance is frost free,
which means there is no
need to manually defrost
your appliance. This will be
carried out automatically.
• Temperature rise during
defrosting complies with ISO
requirements.
However, if you want to
prevent an undue rise in the
temperature of the frozen
food while the appliance
defrosts, wrap the frozen
food in several layers of
newspaper.
14_ safety information
DA68-02935A-04.indb 14 2014. 5. 14. �� 9:38
Page 15

• Any increase in the
temperature of frozen food
during defrosting can shorten
its storage life.
• Do not re-freeze frozen foods
that have thawed completely.
Saving Energy Tips
- Install the appliance in a
cool, dry room with adequate
ventilation.
Ensure that it is not exposed
to direct sunlight and never
put it near a direct source of
heat (a radiator, for example).
- Never block any vents or
grilles on the appliance.
up you’ll have in the freezer.
- Provide sufficient clearance
to the right, left, back, and
top when installing for air
circulation.
This will help reduce power
consumption and keep your
energy bills lower.
- Allow warm food to cool
down before placing it in the
appliance.
- Put frozen food in the
refrigerator to thaw.
You can then use the low
temperatures of the frozen
products to cool food in the
refrigerator.
- Do not keep the door of
the appliance open for too
long when putting food in or
taking food out.
The shorter the time the door
is open, the less frost build-
safety information _15
DA68-02935A-04.indb 15 2014. 5. 14. �� 9:38
Page 16

1. Regulatory Notice
1.1 FCC Notice
FCC CAUTION:
CAUTION
Any changes or modifications not expressly approved by the party responsible for compliance could void
the user’s authority to operate the equipment.
Contains Transmitter Module FCC ID: A3LDNURS11
This device complies with Part 15 of FCC Rules. Operation is Subject to following two conditions:
(1) This device may not cause harmful interference, and
(2) This device must accept any interference received including interference that cause undesired
operation.
For product available in the USA/Canada market, only channel 1~11 can be operated.
Selection of other channels is not possible.
FCC STATEMENT:
This equipment has been tested and found to comply within the limits for a Class B digital device,
pursuant to part 15 of the FCC Rules. These limits are designed to provide reasonable protection against
harmful interference in a residential installation.
This equipment generates, uses, and can radiate radio frequency energy and, if not installed and used
in accordance with the instructions, may cause harmful interference to radio communications. However,
there is no guarantee that interference will not occur in a particular installation. If this equipment does
cause harmful interference to radio or television reception, which can be determined by turning the
equipment off and on, the user is encouraged to try to correct the interference by one or more of the
following measures:
• Reorient or relocate the receiving antenna
• Increase the separation between the equipment and receiver
• Connect the equipment into an outlet on a different circuit from that to which the receiver is connected
• Consult the dealer or an experienced radio/TV technician for help.
FCC RADIATION EXPOSURE STATEMENT:
This equipment complies with FCC radiation exposure limits set forth for an uncontrolled environment.
This equipment should be installed and operated with a minimum distance of 20cm between the radiator
and your body. This device and its antenna(s) must not be co-located or operation in conjunction with any
other antenna or transmitter.
SAVE THESE INSTRUCTIONS
16_ safety information
DA68-02935A-04.indb 16 2014. 5. 14. �� 9:38
Page 17

1. Regulatory Notice
1.2 IC Notice
Contains Transmitter Module IC: 649E-DNURS11
The term “IC” before the radio certification number only signifies that Industry Canada technical
specifications were met. Operation is subject to the following two conditions : (1) this device may not
cause interference, and (2) this device must accept any interference, including interference that may
cause undesired operation of the device.
This Class B digital apparatus complies with Canadian ICES-003.
Cet appareil numérique de la classe B est conforme á la norme NMB-003 du Canada.
For product available in the USA/Canada market, only channel 1~11 can be operated.
Selection of other channels is not possible.
IC RADIATION EXPOSURE STATEMENT:
This equipment complies with IC RSS-102 radiation exposure limits set forth for an uncontrolled
environment. This equipment should be installed and operated with minimum distance 20cm between the
radiator & your body. This device and its antenna(s) must not be co-located or operation in conjunction
with any other antenna or transmitter.
SAVE THESE INSTRUCTIONS
contents
SETTING UP YOUR SIDE-BY-SIDE REFRIGERATOR …………………………… 18
OPERATING THE SAMSUNG SIDE-BY-SIDE REFRIGERATOR…………………23
TROUBLESHOOTING ……………………………………………………………… 100
safety information _17
DA68-02935A-04.indb 17 2014. 5. 14. �� 9:38
Page 18
Setting up your side-by-side
refrigerator
INSTALLATION REQUIREMENTS
The installation location you choose must meet the
requirements listed in this section.
Selecting an installation place
• Check the refrigerator’s dimensions in the table
below before you begin to install it and confirm
it can clear all the doors on its way to the
installation location.
- If the refrigerator cannot clear the doors, you
cannot install it.
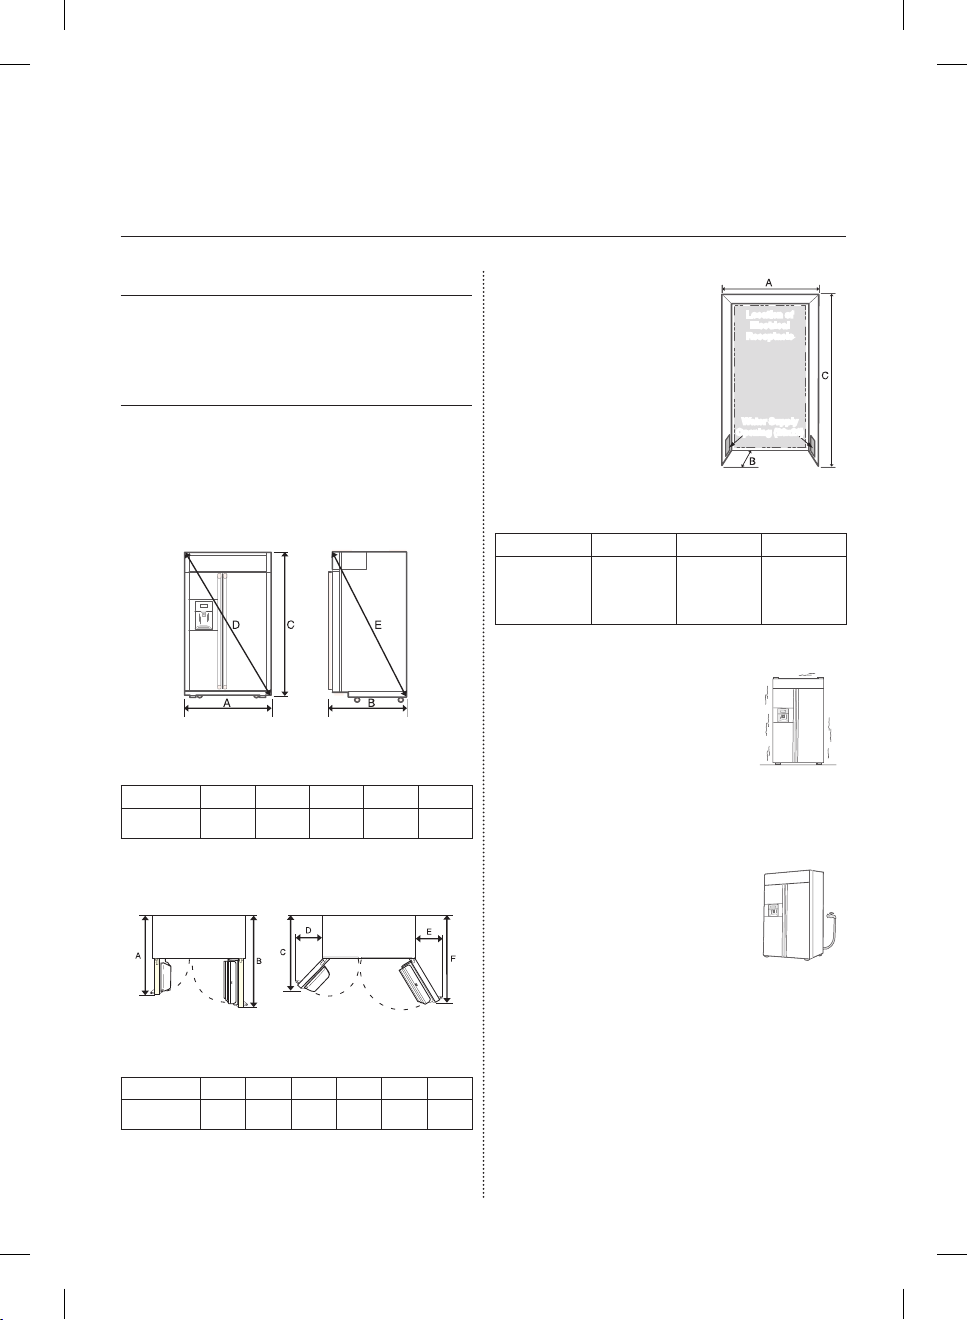
Front and side dimensions
(inches)
Model A B C D E
RS27FDBTNSR/*
48”
(1219 mm)
28.5
(724 mm)82(2083mm)
92.1
(2340mm)
85.9
(2182mm)
• Allow sufficient space on
the right, left, back, and
top for air circulation.
- If there is not enough
space, you cannot install
the refrigerator.
Enclosure dimensions
Model A B C
RS27FDBTNSR/*
48
(1219mm)
27.6
(701mm)
• Confirm that the floor is flat.
- If the refrigerator is installed on
an uneven floor, it will cause
vibration and noise.
• Confirm that the floor can
support the weight of the
refrigerator and the food inside
(1102.3lb (500kg) total).
Location of
Electrical
Receptacle
Water Supply
Opening (20x20)
83.5 Min,
84.3 Max
(2121mm Min,
2141mm Max)
(inches)
• Confirm that the refrigerator will
Door 90º Open Door 130º Open
be within reach of a grounded
wall outlet.
• If the refrigerator is a dispenser
model, confirm that it will be
within easy reach of a water
supply and that the humidity in
the location is low.
Dimensions with doors open
Model A B C D E F
RS27FDBTNSR/*
44.5
(1129mm)
52.5
(1333mm)
40.6
(1032mm)
14.4
(365mm)
(510mm)
20.1
(inches)
46.3
(1176mm)
- The refrigerator needs easy
access to a water supply for the
water and ice dispensers.
18_ setting up
DA68-02935A-04.indb 18 2014. 5. 14. �� 9:38
Page 19
• Avoid a location that is very
hot or extremely cold.
- Confirm that the location
has ambient temperatures
between 41ºF and 110ºF.
(5ºC and 43ºC)
- If you install the refrigerator in a location with
extremely cold or hot ambient temperatures, it
could malfunction, causing its cooling capacity
to decrease and its power consumption to
increase.
Ground the product
The refrigerator must be properly grounded to
prevent any power leakages or electric shocks.
To ground the refrigerator, plug it in to a grounded,
three blade wall outlet.
If the outlet in the installation location cannot
accept a three blade, grounded plug, have a
qualified electrician replace the current outlet with a
three blade grounded outlet.
Improper use of the grounding plug can result in
a risk of electric shock. If it is necessary to use
an extension cord, use only a 3-wire extension
cord that has a 3-blade grounding plug and a
3-slot receptacle that will accept the plug on the
refrigerator.
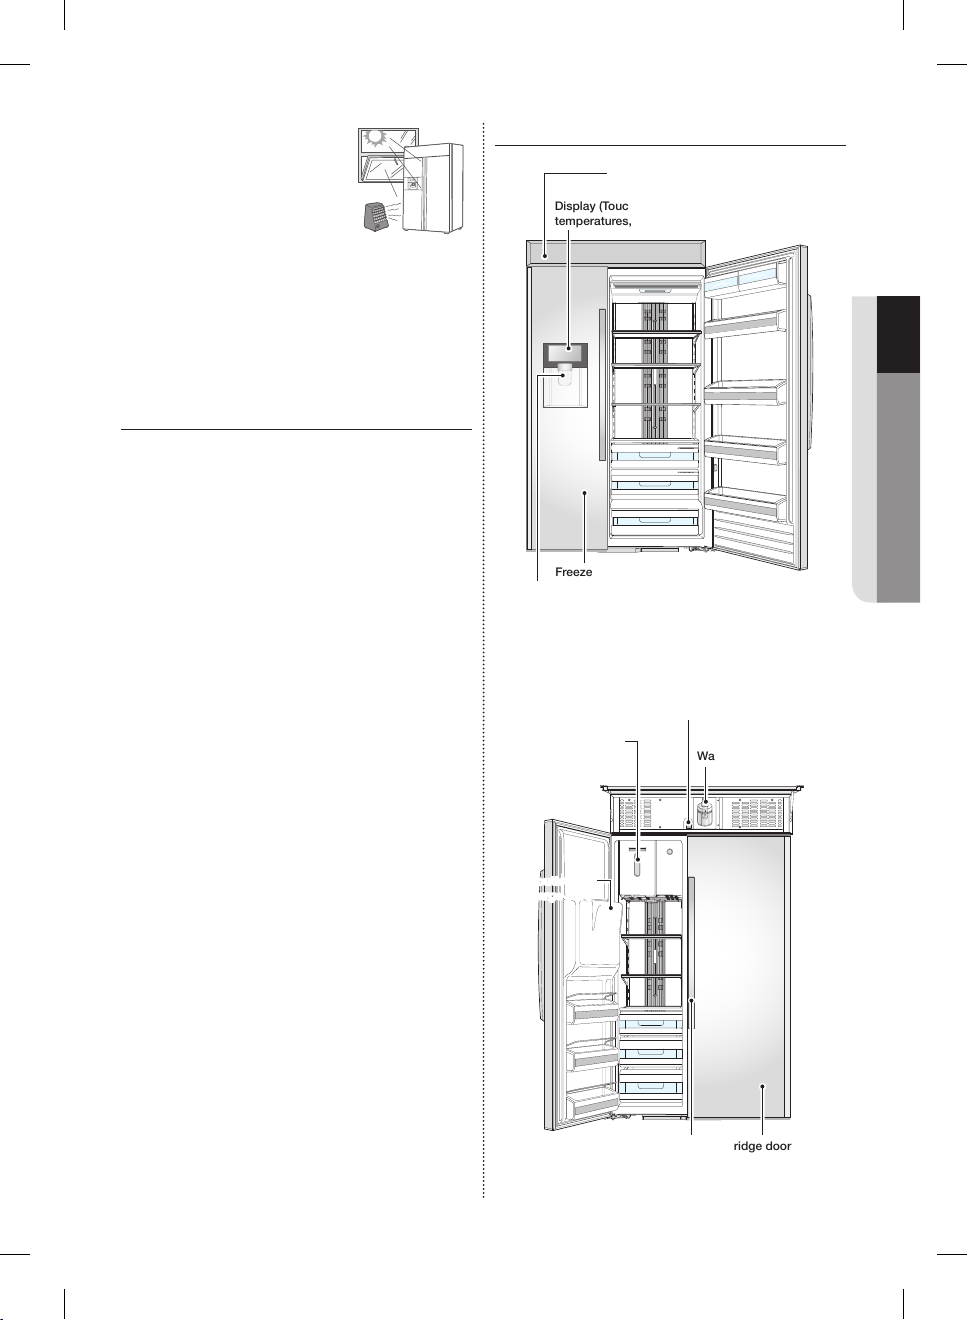
REFRIGERATOR PARTS
Unit grill
Display (Touch Screen) : Displays time, refrigerator
temperatures, built in apps, etc.
Freezer door
Water/ice supplier (dispenser) : Supplies cold water purified by
the purification filter or supplies ice made by the ice-maker.
Power switch : Switches the refrigerator on or off.
Ice storage : Makes
and stores ice.
Water purification filter
01 SETTING UP
The marked rating of the extension cord should be
AC115-120V, 10A, or more.
If a you use a grounding adapter, make sure the
receptacle box is fully grounded.
Caution: Never use gas pipes, telephone lines, or
Ice outlet (Ice
discharge port)
other potential lightning attractors as an electrical
ground.
Handle Fridge door
setting up _19
DA68-02935A-04.indb 19 2014. 5. 14. �� 9:38
Page 20
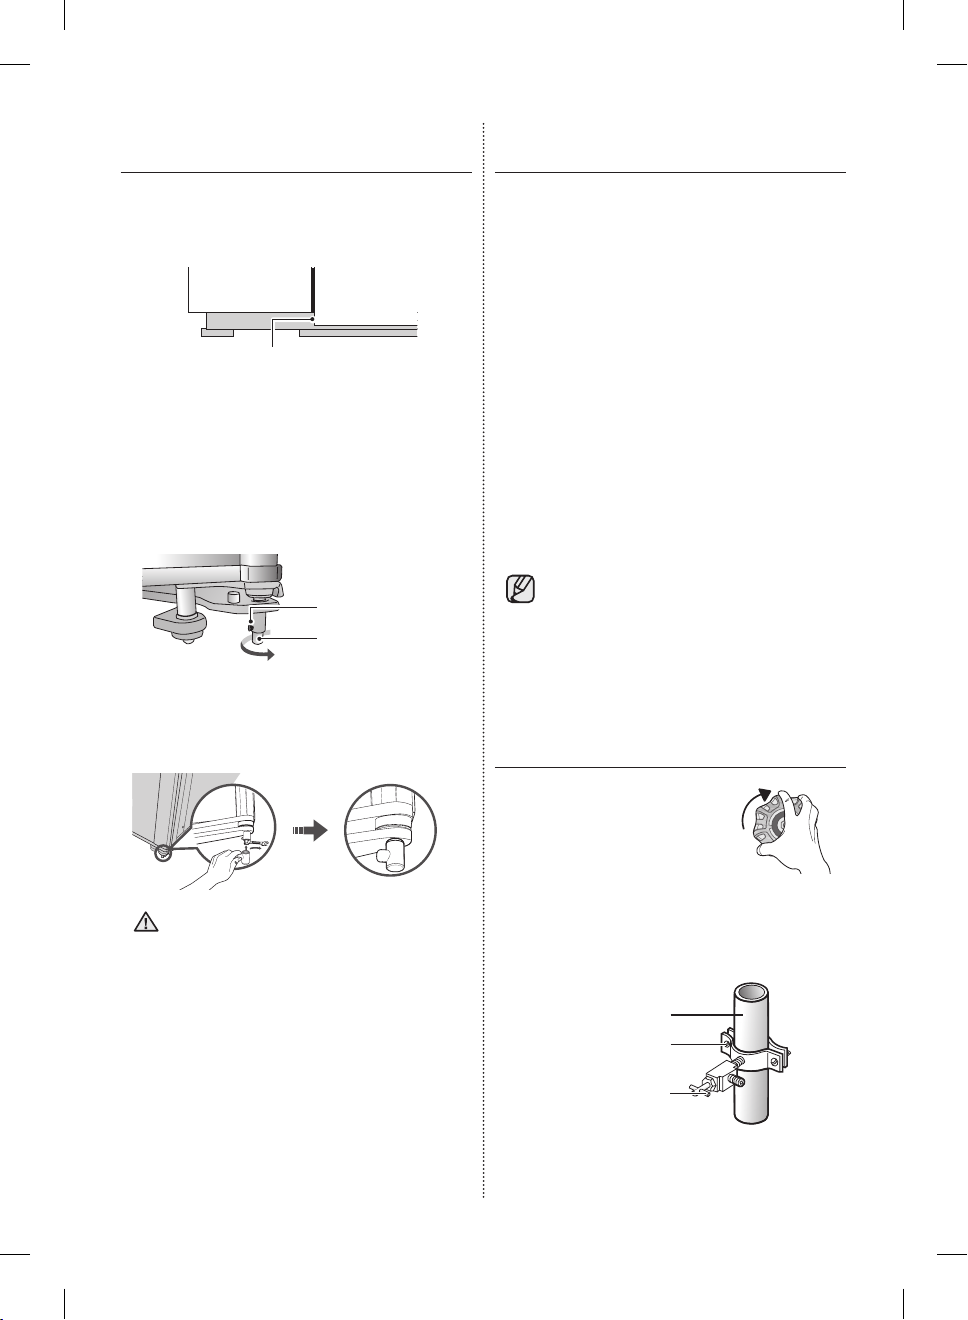
ALIGNING THE HEIGHTS OF THE
REFRIGERATOR DOORS
If the Fridge door is lower than the Freezer door,
adjust the door height by turning the door height
adjustment bolt at the bottom of the Fridge door.
Height difference
• Turning it counter clockwise increases the
height of the door and turning it clockwise
decreases the height of the door.
• Loosen the screw (1), turn the adjusting bolt
(2) with a spanner to align the door height to
the Freezer door and then fix it by fastening the
screw (1).
(1) Screw
(2) Adjusting bolt
• After adjusting the height, be sure to install the
protective rubber inserts as shown in the figure
to protect your feet from injury.
INSTALLING THE WATER
DISPENSER LINE
A water dispenser with a filter is one of the helpful
features on your new refrigerator.
To help promote better health, the water filter
removes unwanted particles from your water.
However, it does not sterilize or destroy
microorganisms.
You may need to purchase a water purifying
system to do that.
The water line also connects to the ice maker.
For the ice maker to operate properly, water
pressure of 20-125psi (138 ~ 862kPa) is required.
If the refrigerator is installed in an area with low
water pressure (below 20 psi), you can install a
booster pump to compensate for the low pressure.
After you have connected the water line, make
sure the water storage tank inside the refrigerator
is properly filled.
To do this, press the water dispenser lever until the
water runs from the water outlet.
Water line installation kits are available at
extra cost from your dealer.
We recommend using a water line
installation kit that contains copper tubing
and ¼” compression nut.
Connecting to the water supply line
1. First, shut off the main water
supply.
If you increase the height of the Fridge
CAUTION
door by too much, the switch may be
damaged or the door may not close
2. Locate the nearest cold water drinking line and
install the pipe clamp and shut off valve.
properly.
Cold water line
Pipe clamp
Shut off valve
20_ setting up
DA68-02935A-04.indb 20 2014. 5. 14. �� 9:38
Page 21
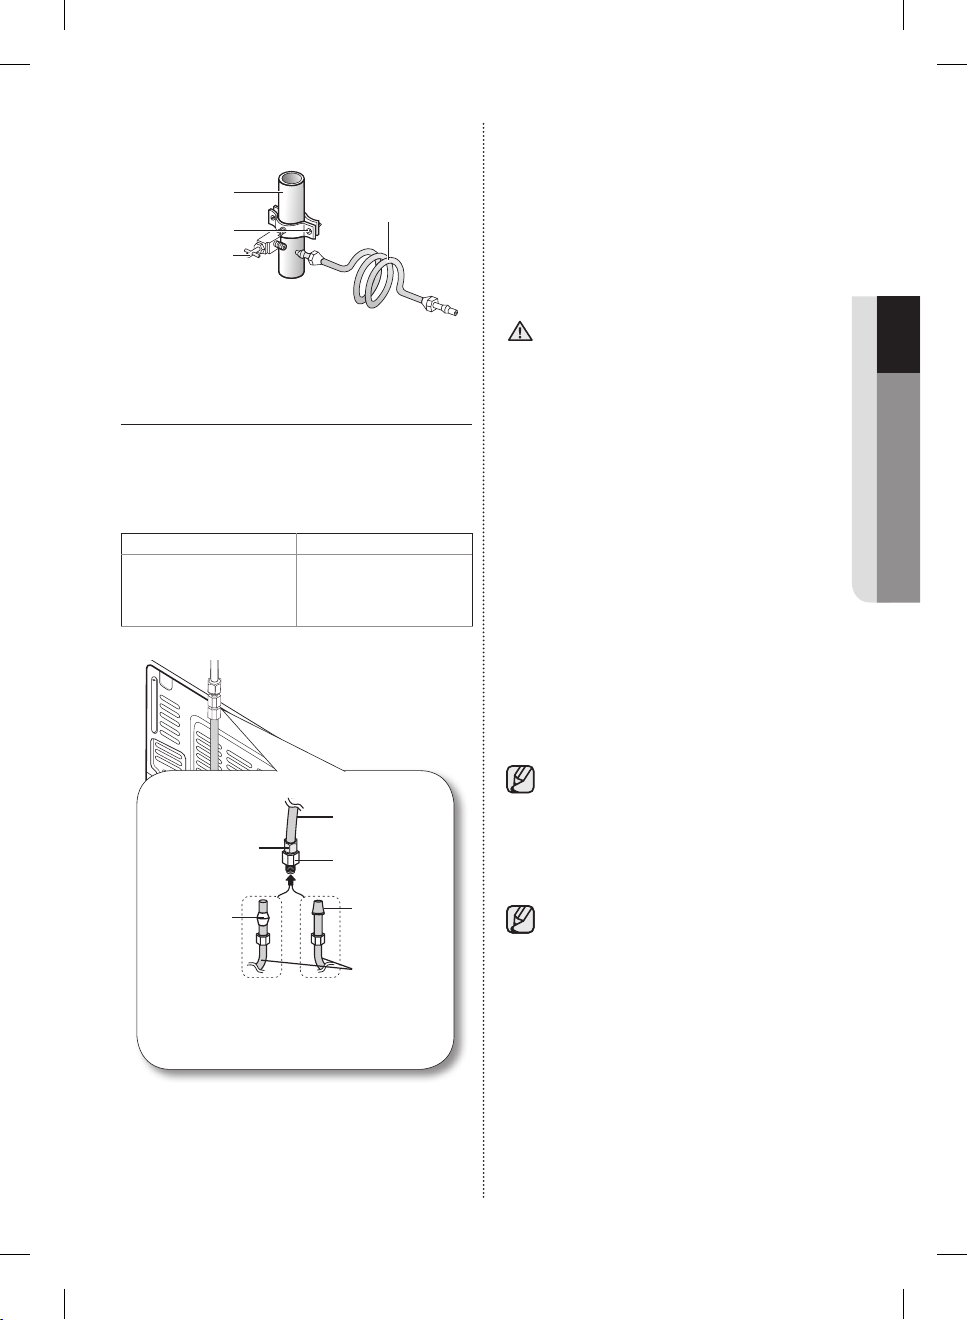
3. Connect the water line installation kit to the
shut off valve.
Cold water line
Water line installation kit
Pipe clamp
Shut off valve
1. Connect the household water line to the
assembled compression fitting.
- If you are using copper tubing, slip the
compression nut (B) (not supplied) and
ferrule (not supplied) on the copper tubing (not
supplied) as shown.
- If you are using plastic tubing (B) , insert the
molded end (Bulb) of the plastic tubing (B) into
the compression fitting.
Do not use without the molded end (Bulb)
CAUTION
of the plastic tubing (B).
01 SETTING UP
Connecting the water supply line to
the refrigerator.
There are several items that you need to purchase
to complete this connection.
You may find these items sold as a kit at your local
hardware store.
Use Copper Tubing Use Plastic Tubing
• ¼” copper tubing
• ¼” compression nut
(1pc)
• Ferrule (2pc)
Compression Nut
(1/4”) (Assembled)
Ferrule
(Not supplied)
Copper tubing
(Not supplied)
Household water supply line
• ¼” plastic tubing
→ Molded end (Bulb)
• ¼” compression nut
(1pc)
Refrigerator
Plastic Tubing
(Assembled)
Compression
Fitting (Assembled)
Plastic tubing (B)
or
(Not supplied)
Molded end
(Bulb)
Compression
nut (B) (1/4”)
(Not supplied)
2. Tighten the compression nut (B) onto the
compression fitting.
Do not over-tighten the compression nut (B) .
3. Turn the water on and check for any leakage.
If you find water drops or leakage in the
connection areas, turn off the main water
supply. Check the connections and, if
necessary, tighten.
4. Flush 1 gallon of water through the filter before
drinking or using the water from the refrigerator.
(Flush approximately 6 minutes.) To flush, press
a large glass or cup against the water dispenser
lever. Fill the glass, empty it into the kitchen sink
after it is filled, and then repeat.
5. After you turn on the refrigerator, let the ice
maker make ice for 1 to 2 days. Over that
period of time, throw out the first 1 or 2 buckets
of ice the freezer makes to ensure all impurities
have been removed from the water line.
Only connect the water line to a drinkable
water source.
If you have to repair or disassemble the water line,
cut off 1/4“ of the plastic tubing to make sure you
get a snug, leak-free connection.
You can test the water line quickly using a
paper cup. Under normal conditions, the
water dispenser can fill a 5.75 oz. (170cc)
cup in about 10 seconds.
setting up _21
DA68-02935A-04.indb 21 2014. 5. 14. �� 9:38
Page 22

START UP POINTERS
For a better experience, read the following pointers
before using the refrigerator.
• New refrigerators can sometimes smell of
plastic.
If a plastic smell comes from your new
refrigerator:
- Open the refrigerator doors and air the inside.
- Remove all the adhesive tape strips to eliminate
any chemical smells.
• When storing food for the first time:
- Plug in the refrigerator, and then let it cool down
for 2 to 3 hours before placing food inside.
- When you place food in the refrigerator before
it cools enough, food smells can permeate the
inner liners.
• When you first start up a new refrigerator, the
sound of the compressor and motor can be
loud.
- When starting up a new refrigerator, the
compressor and the motor operate at high
rpm to cool down the freezer and the fridge
compartments quickly, generating a slight
noise.
- When the refrigerator gets to the set
temperature and reaches a stable state, the
noise decreases.
• If the power goes off:
- Keep the doors closed.
- If the power does not come back on for 2~3
hours in the summer, the cool temperature
inside will be maintained.
• If an alarm goes off during operation.
- If any one of the doors remains open at a more
than 15 degree angle for more than 2 minutes,
the refrigerator sounds an alarm indicating that
a door is open.
When installing, servicing, or cleaning
CAUTION
behind the refrigerator, be sure to pull the
unit straight out. Push it straight back in
after finishing.
22_ setting up
DA68-02935A-04.indb 22 2014. 5. 14. �� 9:38
Page 23

Operating the SAMSUNG sideby-side refrigerator
DISPLAY PANEL RESTRICTIONS AND ALERTS
1. English is a default language for the Display.
Languages not supported are not displayed on the screen.
2. Periodic updates of Weather or News will cause network traffic even when you are not using the
Display.
3. When software updates become available, Samsung automatically updates the refrigerator software
and then issues an alert which appears on your Display.
4. Please note that the relevant licensor (content provider) retains sole discretion as to what content is
made available through the various refrigerator applications.
Furthermore, each licensor retains the sole right to remove any such content that the licensor may
cease to offer through the refrigerator application. In such case, the licensor may send a written
notice to the user with regards to the removal of content.
DIGITAL PANEL
CPU NEXELL CPU OS Linux 2.6.28
RAM 256 MB LCD 8" TFT-LCD (800*480)
ROM 512 MB NETWORKS IEEE802.11b/g/n
USING FOR THE FIRST TIME
• When you use the product for the first time after
installation, the Time Zone Setting screen appears on
the Display Panel.
You need to select your time zone to use Google
Calendar and the Twitter service correctly.
• After you select the time zone and press the [Save]
button, the Home Screen appears on the Display
Panel. The Time Zone Setting screen may appear
again after a software update.
02 OPERATING
operating _23
DA68-02935A-04.indb 23 2014. 5. 14. �� 9:38
Page 24
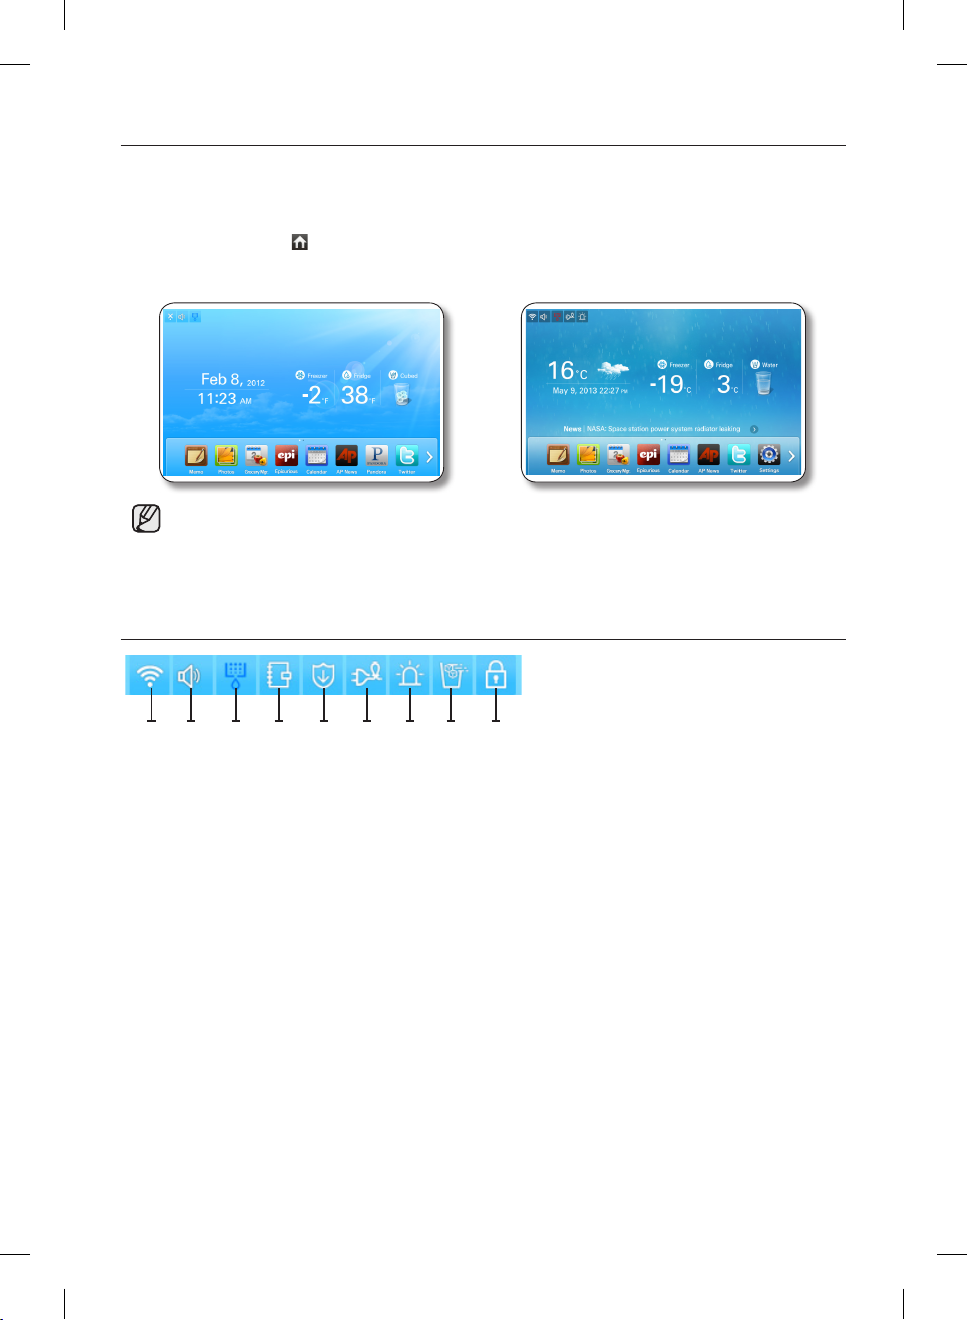
HOME SCREEN
• The Home screen is the starting point for all functions. In the center of the Home screen, basic
refrigerator information such as Time, Date, Weather, Temperature, and Dispenser Selection appears.
The indicator icons at the top left of the screen display information about the refrigerator’s status.
The Menu icons on the bottom of the screen start various applications or functions.
When you select the ( ) on any menu, the screen returns to the Home screen immediately.
USA CANADA
USA uses the Fahrenheit temperature scale whereas Canada uses the Celsius temperature scale.
Indicator Icons (At the left-top of the Screen)
1 2 3 4 5 6 7 8 9
1. Network Signal Strength : 5 Level
(off - 1 - 2 - 3 - 4)
2. Volume Level : 5 Level (off - 1 - 2 - 3 - 4)
3. Filter Status : 3 Level (blue - pink - red)
4. Schedule Alarm
24_ operating
DA68-02935A-04.indb 24 2014. 5. 14. �� 9:38
5. S/W Update Notice
6. Energy Saver
7. Door Alarm
8. Quick Ice Making
9. Dispenser Lock
Page 25
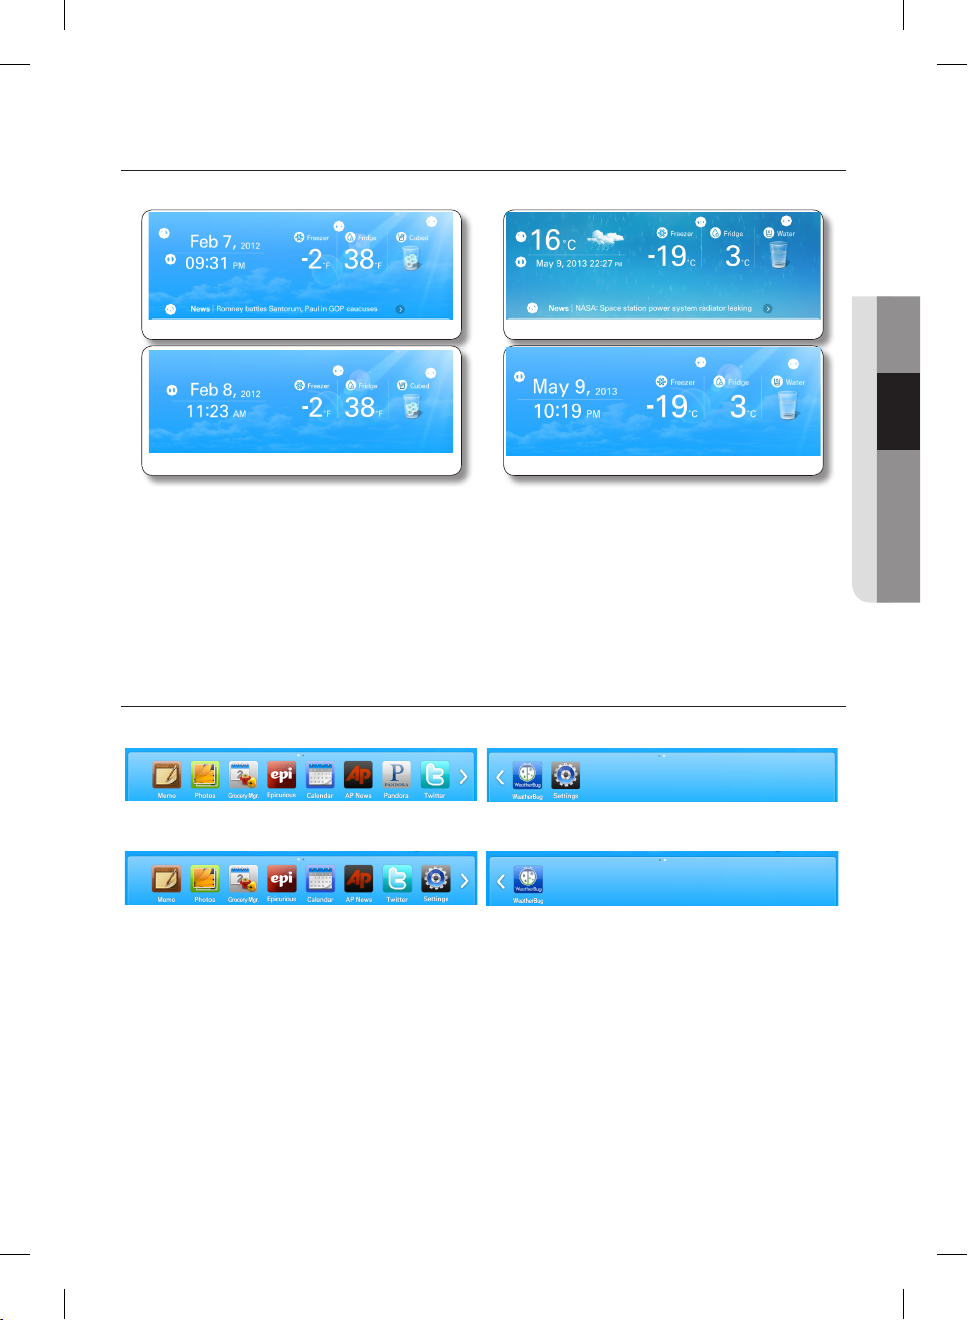
Date/Time, Freezer/Fridge temperature, Dispenser selection, Current weather
(At the center of the Screen), News (At the bottom of the Screen)
USA CANADA
④
①
②
③
④
①
②
③
⑤
<Wireless network connected>
①
<Wireless network disconnected>
②
③
⑤
<Wireless network connected>
①
<Wireless network disconnected>
②
1. Date/Time : Indicates the current date and time.
2. Freezer temperature : Displays the current freezer temperature.
When you press the freezer temperature, the temperature setting screen appears.
3. Dispenser : Displays the current status of the dispenser.
When you press the current status of the dispenser, the ice type selection screen appears.
4. Fridge temperature : Displays the current fridge temperature.
When you press the fridge temperature, the temperature setting screen appears.
At the bottom of the Screen : Menu Icons
USA
CANADA
02 OPERATING
③
1. Memo : Lets you create, save, or check memos.
2. Photos : Lets you manage stored photos and import photos from external devices such as memory
cards or mobile phones and from the Internet.
3. Grocery Manager : Lets you manage food items by location, storage date, and expiration date.
4. Epicurious : Lets you view recipes and create shopping lists for the recipes you select.
5. Calendar : Lets you view the schedule you stored in Google Calendar.
6. AP News : Displays the news from one of 11 categories you select.
7. Pandora : Plays music provided by the Pandora Internet radio service. (Only for USA)
8. Twitter : Displays Twitter messages.
9. WeatherBug : Displays the current weather and weather forecast.
10. Settings : Lets you set the refrigerator’s basic functions such as Energy Saver, Door Alarm, Time, etc.
operating _25
DA68-02935A-04.indb 25 2014. 5. 14. �� 9:38
Page 26
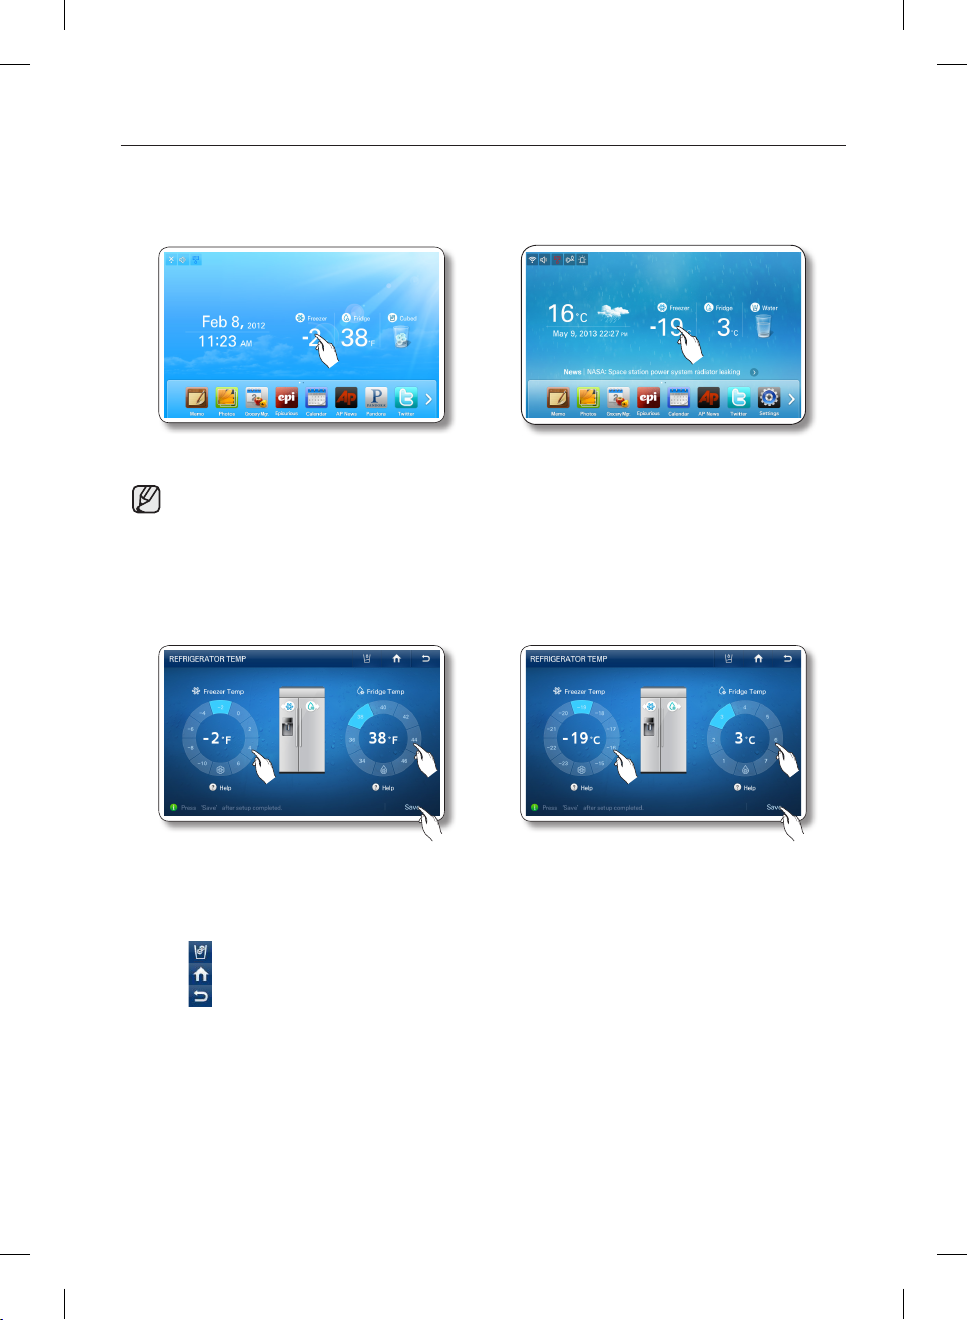
SETTING THE FREEZER / FRIDGE TEMPERATURE
The temperature control allows you to set the freezer and the fridge temperatures.
Use the following instructions to change and set these temperatures.
USA CANADA
1. Select the Freezer/Fridge temperature on the Home screen.
• When you store ice cream at a temperature above 4°F (-16°C) in the freezer, it may melt.
2. Choose a freezer and/or fridge temperature using the temperature buttons, and then select the [Save]
button.
USA CANADA
The freezer/fridge can be set to the following temperatures:
• Freezer : Fahrenheit : -10°F ~ 6°F (Default: -2°F), Celsius : -23°C ~ -15°C (Default : -19°C)
• Fridge : Fahrenheit : 34°F ~ 46°F (Default: 38°F), Celsius : 1°C ~ 7°C (Default : 3°C)
Function Icons on the upper right of the Display function screen:
: Press to set the dispenser type. (Cubed / Crushed / Water)
: Press to go to the Home screen.
: Press to display the preview screen.
26_ operating
DA68-02935A-04.indb 26 2014. 5. 14. �� 9:38
Page 27
• The freezer or fridge temperature may change depending on how often you open and close the
door, the food quantity, the ambient temperature, etc.
• Temperatures vary in each food storage section in the freezer and fridge compartments.
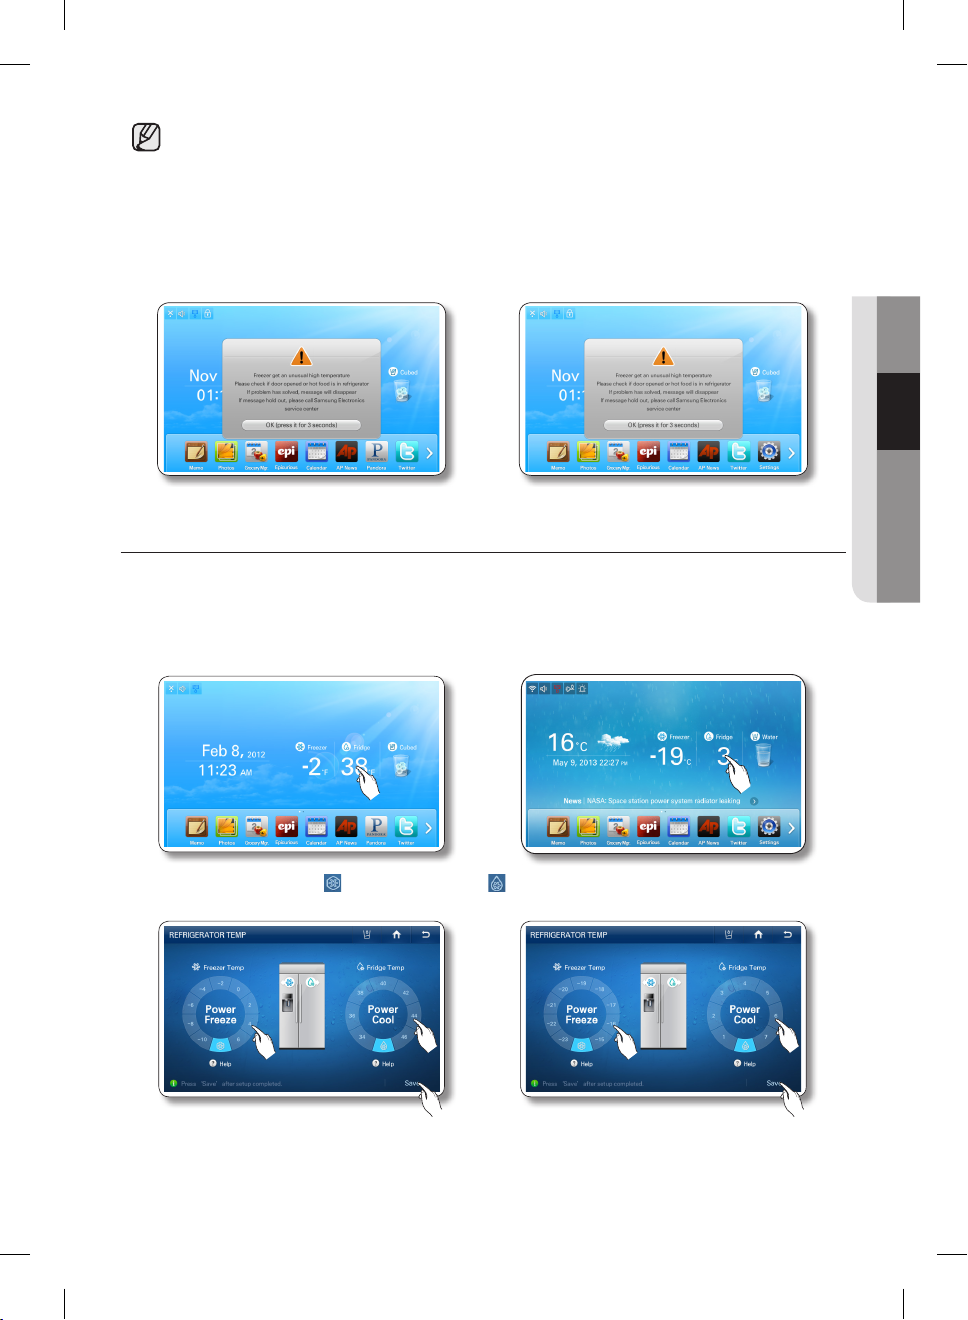
• If the room temperature becomes unusually warm, it can cause temperatures in the Fridge
and Freezer to rise abnormally. If this occurs, the screen will display the “Abnormally High
Temperature” pop-up. When the temperatures return to normal, the pop-up will close
automatically. If the room temperature returns to normal and the pop-up does not close
automatically within a few hours, please contact your nearest repair center.
USA CANADA
SETTING THE POWER FREEZE / POWER COOL
You can use the Power Freeze and Power Cool functions to lower the temperature of the freezer and
fridge compartments quickly. To use the Power Freeze or Power Cool function, follow these steps:
1. Touch the Freezer/Fridge temperature on the Home screen.
USA CANADA
02 OPERATING
2. Select the Power Freezer ( ) and/or Power Cool ( ) button(s), and then press the [Save] button.
USA CANADA
operating _27
DA68-02935A-04.indb 27 2014. 5. 14. �� 9:38
Page 28
• To cancel the Power Freeze and the Power Cool, select a Temperature Setting button.
• Energy consumption increases during Power Freeze and/or Power Cool usage.
• If you select the question icon ( ), the function description screen pops up.
Press the [OK] button on the popup screen to re-display the Temperature Display Screen.
• When you turn on Power Freeze/Power Cool, the refrigerator’s compressor speeds up and is
louder than during normal operation.
• Power Freeze will turn off automatically after a certain period of time, and the freezer
temperature will return to its previous setting.
• Power Cool will turn off automatically after a certain period of time, and the fridge temperature
will return to its previous setting.
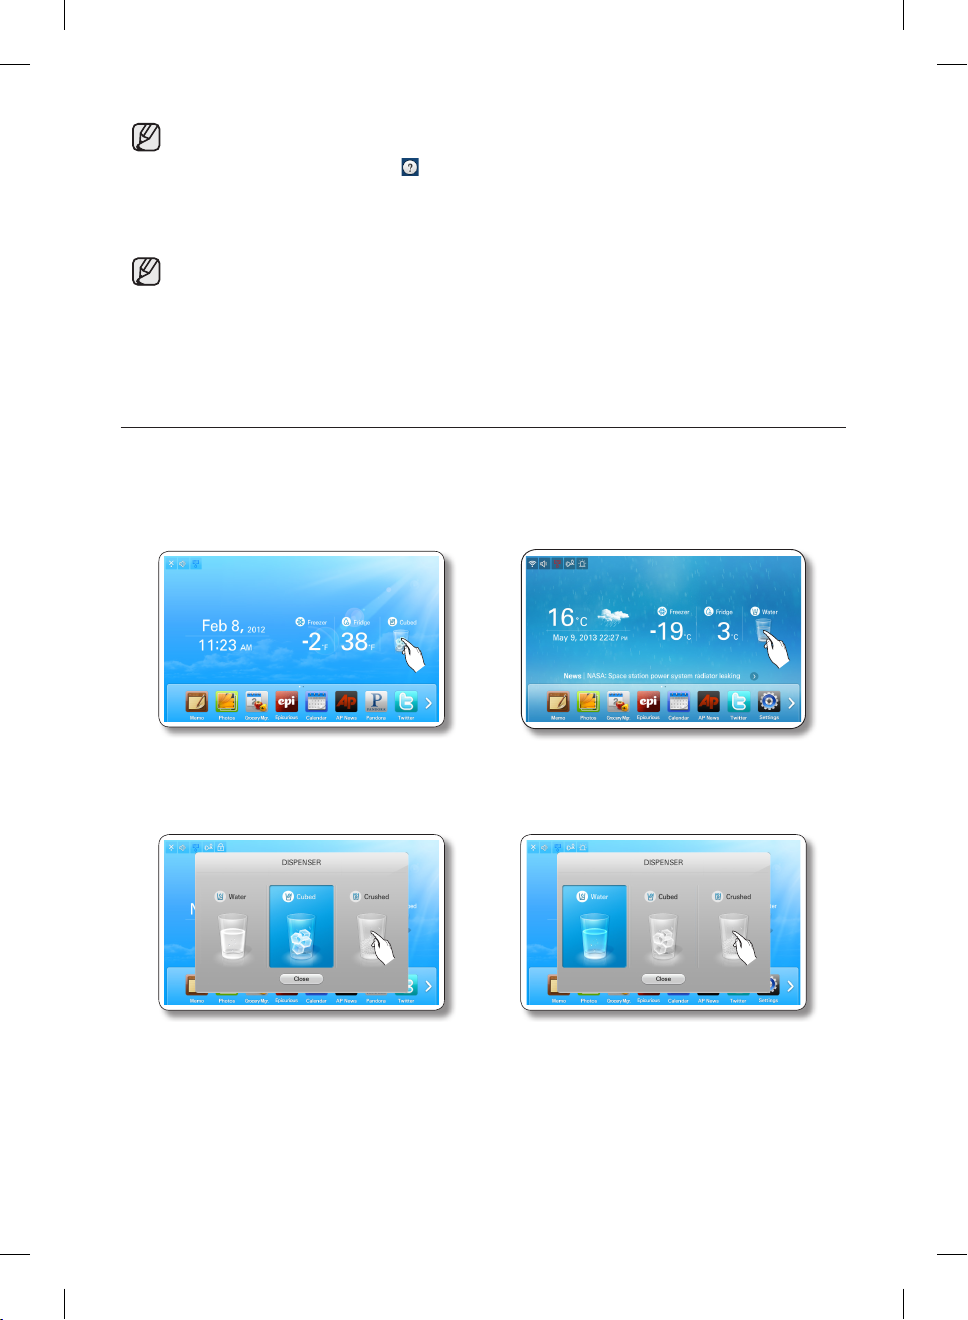
SETTING THE DISPENSER
You can select the ice type and water.
1. Touch Dispenser Status on the Home screen. The Dispenser pop-up appears.
USA CANADA
2. Touch the desired dispenser type, and then press the [Close] button.
USA CANADA
28_ operating
DA68-02935A-04.indb 28 2014. 5. 14. �� 9:38
Page 29
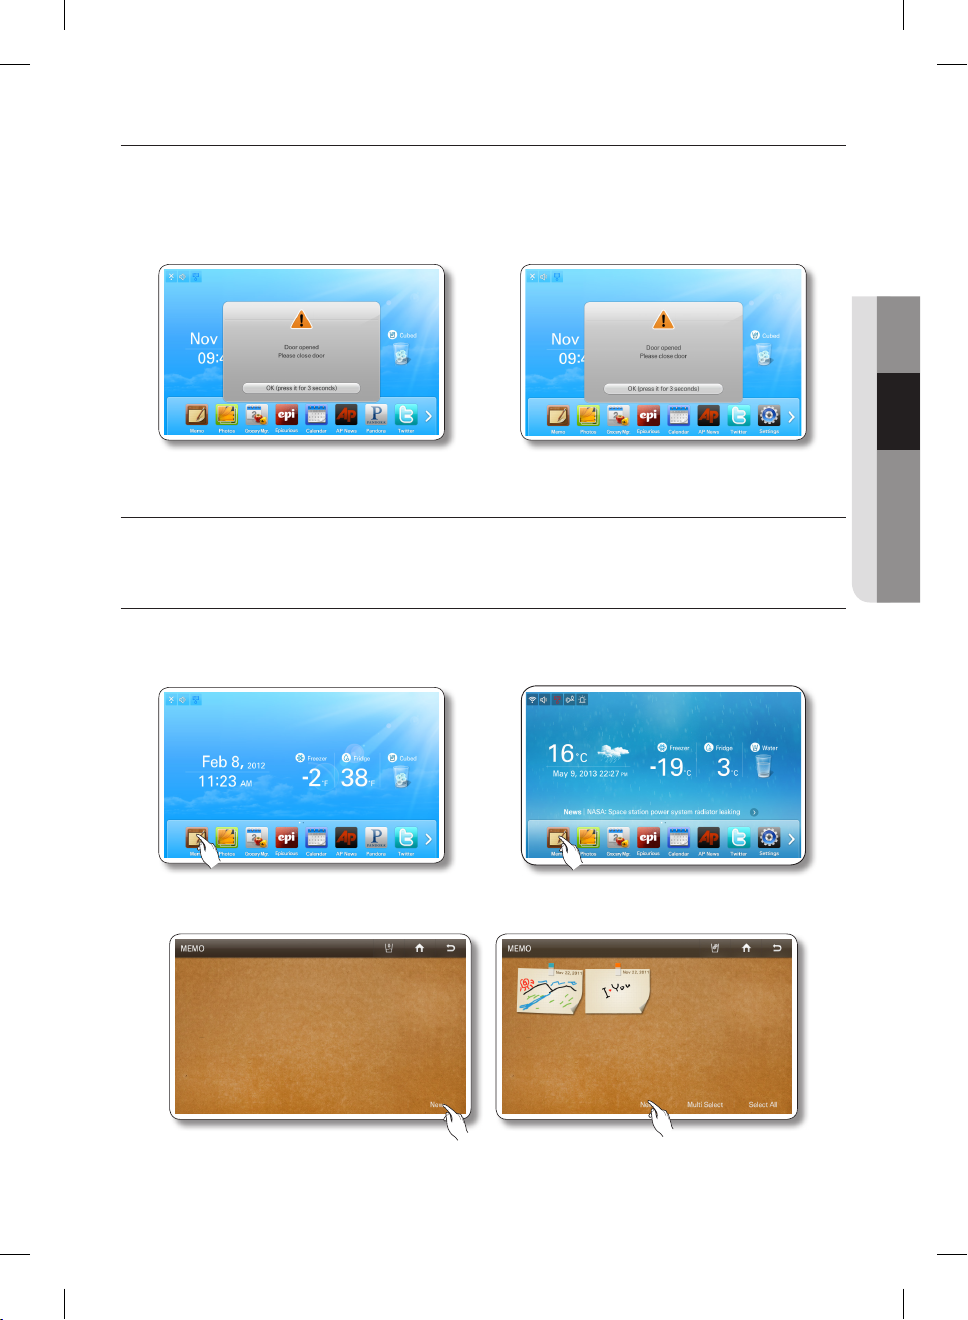
DOOR OPEN ALARM
If the fridge / freezer door remains open more than 2 minutes, a warning window pops up accompanied
by alarm sounds. The alarm repeats every minute and only stops when you close both doors. If you set
Door Alarm to OFF in the Settings menu, the alarm does not operate.
USA CANADA
MEMO
You can use the Memo function to leave a memo for yourself or someone else.
How to leave a new memo.
1. Select the [Memo] button on the Home screen.
USA CANADA
02 OPERATING
2. Select the [New] button.
operating _29
DA68-02935A-04.indb 29 2014. 5. 14. �� 9:38
Page 30

3. Select the memo tools you want by touching the tool
buttons above the memo entry area.
The tools are described below.
• : Select to input a memo in pen mode.
Use your finger or a smooth-tipped stylus.
• : Select to input a memo in keyboard mode.
• : Select to erase a memo.
• : Select pen or erase thickness.
• : Select pen color.
• You can save up to 80 memos.
• To use the Keyboard, press the Keyboard icon, and then touch
where you want the memo to begin.
The keyboard pops up on the Display.
The number of characters you can input with the Keyboard
is limited to the number of characters that will fit in the memo
entry area.
4. Press the [Save] button after you have completed your memo.
• If you want to display the memo on the Home screen, select the [Attach to Home Screen]
button, and then select the [Save] button. See below.
USA
CANADA
30_ operating
DA68-02935A-04.indb 30 2014. 5. 14. �� 9:38
Page 31

• You can “put away” the memo being displayed on the Home screen by pressing the [Detach
from Home Screen] button or hide it temporarily by pressing the [Hide] button.
USA
CANADA
How to display memos.
1. Select the Memo button on the Home screen.
02 OPERATING
USA CANADA
operating _31
DA68-02935A-04.indb 31 2014. 5. 14. �� 9:38
Page 32

To view multiple memos, continue here.
2. Select the memo you want to display. 2. To view multiple memos, press the [Multi
Select] button.
• When you select the [Select All] button, the
Multi Selection screen appears.
• When there are multiple pages with many
memos, there will be page number on the
Multi-Select mode lets you select a
number of memos and then view them
one after another by pressing the or
buttons.
bottom of the screen. If you select a page
number, the screen shifts to that page.
• The memo(s) being displayed on the Home screen is indicated with the red tack.
• The written memos appear as thumbnails.
You can change the order of the written memos by dragging and dropping.
3. View the saved memo. 3. Select the memos you want to view.
• In the Detail View screen, you can delete the
memo or attach it to or detach it from the
Home screen.
• When you select the [Select All] button, all the
memos on the current page will be selected
and the [Select All] button will shift to the
[Unselect All] button.
• To exit the Multi Select screen, press the
[Cancel] button.
• When there are multiple pages with many
memos, there will be page numbers on the
bottom of the screen. If you press a page
number, the screen shifts to that page.
32_ operating
DA68-02935A-04.indb 32 2014. 5. 14. �� 9:38
Page 33

4. Select the [View Selected] button.
5. Check the saved memo by using the and
buttons. Each time you press the or
button, the next memo in sequence appears.
• In the Detail View screen, you can delete a
memo or attach it to or detach it from the
Home screen.
02 OPERATING
operating _33
DA68-02935A-04.indb 33 2014. 5. 14. �� 9:38
Page 34

How to delete memos.
1. Select the [Memo] button on the Home screen.
USA CANADA
To delete multiple memos, continue here.
2. Select the memo you want to delete. 2. To delete multiple memos, select the [Multi
Select] button.
3. Press the [Delete] button. 3. Select the memos you want to delete.
34_ operating
DA68-02935A-04.indb 34 2014. 5. 14. �� 9:38
Page 35

4. Press the [Yes] button. 4. Press the [Delete] button.
5. Press the [Yes] button.
PHOTOS
You can upload photos from a Memory card, a DLNA device, or Picasa Web Album into My Album on
your refrigerator.
02 OPERATING
How to Copy Photos from a Memory Card to My Album
1. Pull out the cover over the card slot and move it to the side.
2. Insert the memory card (SD/SDHC/MMC/HS MMC) with saved images into the card slot.
The “Memory card is connected.” message appears on the screen.
operating _35
DA68-02935A-04.indb 35 2014. 5. 14. �� 9:38
Page 36

• The Memory slot is only for SD/SDHC/MMC/HS MMC type memory cards.
• The slot can read only JPEG (JPG) images.
• The Panel has a capacity of about 300 photos.
• When saving photos from a memory card to the panel, the refrigerator automatically changes
the photo size to 800 x 480 pixels, regardless of the original size.
• If there are many photos saved on the Memory card, it will take awhile for the preview function
to load.
• If the Memory Card is removed while transferring images, My Album only shows the images that
have transferred completely.
If no images have completely transferred, the Display returns to the Photos screen.
• The saved images are fit to the screen size.
Depending on the size of an image, there may be black bars on the top or sides.
• A Memory Card is not supplied with the refrigerator.
• The refrigerator may not be able to read your SD/SDHC/MMC/HS MMC memory card,
depending on the type of card it is.
3. Select the [Photos] button on the Home screen.
USA CANADA
4. Select [Memory Card] on the Photos list.
36_ operating
DA68-02935A-04.indb 36 2014. 5. 14. �� 9:38
Page 37

5. Select the photo you want to save to My
Album.
5. To store multiple photos, press the [Multi
Select] button.
• When you select the [Select All] button, the
Multi Selection screen appears.
• When there are multiple pages with many
photos, there will be page numbers on the
bottom of the screen. If you select the page
number, the screen shifts to that page.
• This function also applies to the <All Share>
and <Picasa Web Album> functions.
• When there are folders in the Memory Card, the folder icons will appear on the screen.
• When you select a folder, you will see the photos stored in it.
• When you are in a sub-folder, you can move up to the folder that contains sub-folder by selecting
the “..” icon on the sub-folder.
02 OPERATING
6. Press the [Save To My Album] button. 6. Select all the photos you want to save to My
Album.
operating _37
DA68-02935A-04.indb 37 2014. 5. 14. �� 9:38
Page 38

• When you select a photo, its detail information
will appear.
7. While the photo uploads from the Memory
Card, the “Save To My Album” popup
appears on the screen.
• When you select the [Select All] button, all the
photos on the current page are selected and
the [Select All] button shifts to the [Unselect All]
button.
• When you press the [View Selected] button,
you will see its larger version.
• To exit the Multi Select screen, press the
[Cancel] button.
• To delete the check mark on a selected photo,
touch the photo again.
• When there are multiple pages with many
photos, there will be page numbers on the
bottom of the screen.
• If you have photos selected and move to
another folder, the selected photos will be
automatically unselected.
• When you touch the folder name above the
thumb-nails (Preview Photos), the screen
displays that folder.
• This function also applies to the <All Share>
and <Picasa Web Album> functions.
7. Press the [Save To My Album] button.
• Larger photo sizes will take longer to upload.
8. While the photos upload from the Memory
Card, the “Save To My Album” popup
appears on the screen.
• Larger photo sizes will take longer to upload.
9. After the upload is complete, take the Memory Card out of the slot.
38_ operating
DA68-02935A-04.indb 38 2014. 5. 14. �� 9:38
Page 39

How to upload photos from a DLNA device to My Album (All Share)
• This function is only available when the refrigerator is connected to your wireless network
(Wi-Fi).
1. Select the [Photos] button on the Home screen.
USA CANADA
2. Select [All Share] on the Photos list, and then connect the
DLNA device to the same wireless AP as the refrigerator.
3. In the All Share list, select the DLNA device you want to
connect.
• If the DLNA device you want to connect does not
appear, press the [Refresh] button several times to
detect it.
02 OPERATING
• The device you want to connect must have a DLNA function installed with a DLNA (Digital
Living Network Alliance) certificate.
• The display supports resolutions up to 4096 x 2048 (16 mega-pixels).
When the number of pixels on either the vertical or horizontal axis of a photo exceeds 4,096 or
its resolution is changed, the display may not support it.
4. Select the desired folder.
operating _39
DA68-02935A-04.indb 39 2014. 5. 14. �� 9:38
Page 40

• When you are in a sub-folder, you can move up to the folder that contains sub-folder by selecting
the “..” icon on the sub-folder.
5. Select the photo you want to save to My
Album.
5. To store multiple photos, press the [Multi
Select] button.
6. Press the [Save To My Album] button. 6. Select the photos you want to save to My
Album.
7. While the photo uploads from the DLNA
7. Press the [Save To My Album] button.
device, the “Save To My Album” popup
appears on the screen.
8. While the photos upload from the DLNA
device, the “Save To My Album” popup
appears on the screen.
40_ operating
DA68-02935A-04.indb 40 2014. 5. 14. �� 9:38
Page 41

• Larger photo sizes will take longer to upload.
• The wireless network is used to transmit photos from the DLNA device. The transmission may
not always work properly depending on the network conditions.
• When you select a photo, its detail information will appear.
How to save photos in the Picasa Web Album to My Album.
[Public Photos]
You can download and store public photos from Google Picasa Web Album.
• This function is only available when the refrigerator is connected to your wireless network
(Wi-Fi).
1. Select the [Photos] button on the Home screen.
USA CANADA
2. Select [Picasa Web Album] in the Photos list.
02 OPERATING
3. Select the photo you want to save to My
Album.
DA68-02935A-04.indb 41 2014. 5. 14. �� 9:38
3. To store multiple photos, select the [Multi
Select] button.
operating _41
Page 42

4. Press the [Save To My Album] button. 4. Select the photos you want to save to My
Album.
5. While the photo downloads from Picasa
5. Press the [Save To My Album] button.
Web Album, the “Save To My Album” popup
appears on the screen.
6. While the photos download from Picasa
Web Album, the “Save To My Album” popup
appears on the screen.
• When you select a photo, its detail information will appear.
• Larger photos will take longer to upload.
• Depending on the status of the wireless network, the download may not always work.
[Personal Photos]
You can download and store personal photos from Google Picasa Web Album.
• This function is available only when the refrigerator is connected to your wireless network
(Wi-Fi).
• To use this function, you must have a Google account.
1. Select the [Photos] button on the Home screen.
USA CANADA
42_ operating
DA68-02935A-04.indb 42 2014. 5. 14. �� 9:38
Page 43

2. Select [Picasa Web Album] in the Photos list.
3. Press the [Sign In] button.
• When you have an account with Google Picasa
(http://picasaweb.google.com), you can see the
photos you uploaded to Picasa by logging into your
account.
4. Select the Email input box, and then enter your Google account ID using the on-screen keyboard.
Select the Password input box, and then enter your Google password using the on-screen
keyboard.
02 OPERATING
5. Press the [Sign In] button.
• If you check the ‘Stay signed in’ box, the refrigerator will store the account for faster future log-ins.
6. Select a web album which has photos you want to store
in My Album.
• If you press the [Sign Out] button, the Display returns
to the Picasa public photos screen.
• If you choose the Explore tab in the right upper
corner, the screen displays the public photos screen.
operating _43
DA68-02935A-04.indb 43 2014. 5. 14. �� 9:38
Page 44

7. Select the photo you want to save to My
Album.
7. To store multiple photos, select the [Multi
Select] button.
8. Press the [Save To My Album] button. 8. Select the photos you want to save to My
Album.
9. While the photo downloads from Picasa
9. Press the [Save To My Album] button.
Web Album, the “Save To My Album” popup
appears on the screen.
10. While the photo downloads from Picasa
Web Album, the “Save To My Album” popup
appears on the screen.
• When you select a photo, its detail information will appear.
• Larger photos will take longer to upload.
44_ operating
DA68-02935A-04.indb 44 2014. 5. 14. �� 9:38
Page 45

How to run a slide show.
1. Select the [Photos] button on the Home screen.
USA CANADA
2. Select [My Album] in the Photos list.
3. Select the [Multi Select] button.
02 OPERATING
4. Select the photos you want for the slide show, and then
press the [View Selected] button.
(Select more than two photos.)
• When you select a photo, its detail information will
appear.
5. Select the [Slide Show] button.
• Depending on a photo’s size (Width x Height), the
screen may display blank bars on the top or sides of
the image.
operating _45
DA68-02935A-04.indb 45 2014. 5. 14. �� 9:38
Page 46

6. The slide show starts. Select the screen to change the view option.
• The slide show runs once. When it finishes, the view options appear on the screen.
• By selecting the or button, you can move to the previous or next photo.
• Select the button to run the slide show again.
7. To change the screen transition effect of the slide show,
select the button.
8. Select the desired slide show transition effects, and then
press the [OK] button.
• You can preview the selected effect on the left side
of the screen.
• The Random effect runs the photos in a random
order.
9. To change the screen transition time, select the
button.
46_ operating
DA68-02935A-04.indb 46 2014. 5. 14. �� 9:38
Page 47

10. Use the and buttons to change the slide show
transition time, and then press the [OK] button.
11. To change the order of the photos in the slide show, select
the button.
12. Select [Normal] or [Shuffle], and then press the [OK]
button.
02 OPERATING
operating _47
DA68-02935A-04.indb 47 2014. 5. 14. �� 9:38
Page 48

How to rotate photos.
1. Select [My Album] in the Photos list.
2. Select the photo you want to rotate. 2. Select the [Multi Select] button to rotate
3. Select the -90° Rotate or 90° Rotate button. 3. Select the photos you want to rotate, and
multiple photos.
then press the [View Selected] button.
4. After selecting the photos you want to rotate,
select the -90° Rotate or 90° Rotate button.
• The system automatically stores the rotated photos, replacing the original photos.
48_ operating
DA68-02935A-04.indb 48 2014. 5. 14. �� 9:38
Page 49

Saving photos to a memory card.
1. Insert a memory card into the refrigerator’s memory card slot.
2. Select [My Album] in the Photos list.
02 OPERATING
3. Select the photo you want to save. 3. To save multiple photos, select the [Multi
4. Press the [Save To Memory Card] button. 4. Select the photos you want to save, and then
5. While the photos are being saved, “Save To Memory Card” appears on the screen.
• You must insert a memory card into the memory card slot to use this function.
Select] button.
press the [Save To Memory Card] button.
operating _49
DA68-02935A-04.indb 49 2014. 5. 14. �� 9:38
Page 50

How to delete photos.
1. Select [My Album] in the Photos list.
2. Select the photo you want to delete. 2. To delete multiple photos, press the [Multi
3. Press the [Delete] button. 3. Select the photos you want to delete, and
4. Press the [Yes] button. 4. Press the [Yes] button.
Select] button.
then press the [Delete] button.
• There are 10 photos that have been pre-loaded by Samsung.
These photos explain product features and cannot be deleted.
50_ operating
DA68-02935A-04.indb 50 2014. 5. 14. �� 9:38
Page 51

GROCERY MANAGER
You can save the purchase date and expiration date of your food before storing it in the fridge and then
easily check how long food has been stored at a later time.
Additionally, you can easily see what food items are stored and where they are located in the refrigerator.
How to add food
1. Select the [Grocery Manager] button on the Home screen.
USA CANADA
2. Select the [Add Food] button at the bottom right.
02 OPERATING
[No food is stored] [Food is stored]
3. Select and hold one of the food images displayed on
the right. Then, drag & drop it into the location on the
refrigerator image where it will be stored. Be sure to keep
your finger on the food image until it is in place.
• The storage area for the refrigerator is divided into 4
sections. The added food is displayed as an icon in
the refrigerator image.
• To change the location of a stored item, press and
hold the food image, and then drag & drop it to
another location within the refrigerator image.
• If you select a food icon added to the refrigerator and
drag & drop it outside of the refrigerator, the food item
is deleted.
• The refrigerator section and the quantity of added
food items are displayed at the bottom of the
refrigerator image.
• You can store up to 15 kinds of food and ‘freshness’
durations.
operating _51
DA68-02935A-04.indb 51 2014. 5. 14. �� 9:38
Page 52

4. The ‘Purchase Date’ and ‘Expiration Date’ are displayed
at the bottom of the screen.
The Purchase Date is automatically set to today, the
Expiration Date is automatically set to the last day of the
freshness duration.
To change the Purchase Date, touch the appropriate
section on the screen, and then enter the new date.
• You can also select a date by using the [+] and [-] buttons.
However, the Purchase Date must always be earlier than the Expiration Date.
5. Select the date, and then press [Save] button.
• To select additional food items, repeat steps 2 to 5.
6. Press the [OK] button after you have completed the date settings.
Press the [Save] button to save your settings.
• You can save up to 50 grocery items.
52_ operating
DA68-02935A-04.indb 52 2014. 5. 14. �� 9:38
Page 53

How to use the Grocery Manager
1. Select the [Grocery Manager] button on the Home screen.
All food items are displayed as icons in their stored locations within the refrigerator image on the left.
They are also listed on the right side of the screen.
USA
CANADA
2. Select a storage section in the refrigerator image to display the food stored in that section on the
right side of screen. Select the storage section again (deselect it) to list all the food items stored in
the refrigerator on the right side of the screen.
02 OPERATING
3. Select one of the stored food icons on the right side of the screen to identify where it is located in
the refrigerator. The purchase and expiration dates of the item will also be displayed.
• An expiration date can be set up to 999 days.
• You cannot modify the purchase date and expiration
date of the food in the Grocery Manager screen.
operating _53
DA68-02935A-04.indb 53 2014. 5. 14. �� 9:38
Page 54

How to delete food
1. Select the [Grocery Manager] button on the Home screen.
USA CANADA
2. Select the food, and then select the [Delete] button.
• To select all the stored food items, select the [Delete
all] button.
3. Select the [Yes] button to complete.
54_ operating
DA68-02935A-04.indb 54 2014. 5. 14. �� 9:38
Page 55

How to set a Reminder
1. Select the [Grocery Manager] button on the Home screen, and then select the [Set Reminder]
button.
USA
CANADA
2. Select the Reminder options you want, and then select
the [OK] button.
02 OPERATING
• A reminder is set based on the Expiration Date of the
stored food. A reminder window appears when the
scheduled duration has passed.
• If more than one item is set to the same Reminder
value (except [None]), the reminder window appears
at 6:00 AM, 11:00 AM, and 5:00 PM.
operating _55
DA68-02935A-04.indb 55 2014. 5. 14. �� 9:38
Page 56

EPICURIOUS
With the Epicurious service, you can easily to find various recipes by ingredient, season, occasion, or
category.
• This function is only available when the refrigerator is connected to your wireless network
(Wi-Fi).
How to use the Featured Recipes function
1. Select the [Epicurious] button on the Home screen.
• There will be a 4-second commercial ad when you start Epicurious.
USA CANADA
2. Select [Featured Recipes] on the Epicurious list.
3. Select a Featured Recipes category.
The screen displays a list of recipes.
4. Select a recipe. The screen displays the recipe ingredients
and other details.
• The popularity of a recipe is indicated by the number
of forks. Four forks is the highest.
• : Select to show recipes in the last used order.
• : Select to show in order of photo information.
• : Select to show recipes in order of popularity.
• : Select to show recipes in alphabetical order.
56_ operating
DA68-02935A-04.indb 56 2014. 5. 14. �� 9:38
Page 57

5. Press the [Favorite] button to add a recipe to your favorite list.
Press the [Shopping List] button to make a shopping list for a recipe.
6. Select the [Preparation] tab on the top of the page to view the recipe’s step by step preparation
instructions.
7. Select the [Review] tab on the top of the page to see reviews of the recipe by other users.
02 OPERATING
8. Select the [About] tab on the top of the page to view information about the author of the recipe.
operating _57
DA68-02935A-04.indb 57 2014. 5. 14. �� 9:38
Page 58

How to use Recipe Search by Ingredient.
1. Select [Recipe Search by Ingredient] on the Epicurious list.
2. Select the [Food] or [Drink] button, and then select the
[Food]/[Drink] type on the left of screen.
Next, select an ingredient icon on the right.
• When you select an ingredient icon, the number of
recipes using that ingredient appears on the bottom
of the page.
• You can select multiple ingredient icons.
3. Select the [View Recipe Results] button.
4. Select the recipe you want. The screen displays the ingredients and other detail information.
5. Select the [Favorite] button to add the recipe to your Favorites list.
Select the [Shopping] List button to view a shopping list for the recipe.
58_ operating
DA68-02935A-04.indb 58 2014. 5. 14. �� 9:38
Page 59

How to use My Favorites.
1. Select [My Favorites] on the Epicurious list.
• You can store up to 100 favorite recipes.
2. Select the recipe you want.
• Select the A-Z button on the right to arrange the favorites in the alphabetical order.
• Select a recipe, and then select the [Delete] button to delete the recipe from your Favorites List.
How to use My Shopping List.
1. Select [My Shopping List] on the Epicurious list.
• Displays the ingredients for recipes you select so you
can create shopping lists.
• You can store up to 100 shopping lists.
02 OPERATING
2. Select the recipe or recipes you want.
operating _59
DA68-02935A-04.indb 59 2014. 5. 14. �� 9:38
Page 60

3. Select the [View Combined Shopping List]
button.
3. Select the [View Shopping List] button.
4. The screen displays the combined ingredient
list for all the recipes you selected.
4. Select a recipe on the left of screen.
The screen displays the ingredient list for the
recipe you selected.
CALENDAR
Displays the calendar from Google Calendar.
• This function is only available when the refrigerator is connected to your wireless network
(Wi-Fi).
• To use the Calendar function, you need a Google account.
• The Calendar schedule supports dates from Jan 1970 to Dec 2037.
How to view the Google Calendar.
1. Select the [Calendar] button on the Home screen.
USA CANADA
60_ operating
DA68-02935A-04.indb 60 2014. 5. 14. �� 9:39
Page 61

2. Select the Email input box, and then enter your Google account ID using the on-screen keyboard.
Select the Password input box, and then enter your password using the on-screen keyboard.
3. Press the [Sign in] button.
• If you check the ‘Stay signed in’ box, the refrigerator
will store the account for faster future log-ins.
• If you do not have a Google account, you can get one
at http://calendar.google.com.
• In the Email section, enter your Google account ID in
this format: UserID@gmail.com.
4. To view your schedule, select a date. The screen displays
the daily schedule for the date you selected.
• You cannot modify or erase the Google Calendar
schedule through the refrigerator Display screen.
• The display color of each scheduled event is the
same as that in the Google Calendar application.
• Press the left / right direction arrows to check the
Monthly Schedule.
• When there are more than 4 events within a day, the calendar indicates the excess with “+1
more”.
• The schedule updates every 30 minutes.
02 OPERATING
5. Press the event you want to view. The event you selected appears on the screen.
operating _61
DA68-02935A-04.indb 61 2014. 5. 14. �� 9:39
Page 62

How to manage Shared Calendar
1. Select [Other Calendar].
2. Select a [Show] or [Hide] button.
• You can show or hide schedules from your Google
Web Calendar subscription list using the Other
Calendar List screen.
• If you change the Show / Hide setting here, it does
not change in the subscription list and the Show /
Hide setting on the Google Web Calendar.
3. Select the [Apply] button.
The Google Calendar re-appears with the displayed
schedule changed according to your selections.
62_ operating
DA68-02935A-04.indb 62 2014. 5. 14. �� 9:39
Page 63

How to create an event
1. Select the [Create event] button on the Calendar screen.
• You must be logged in onyour primary Gmail email
address (***@gmail.com) to use the Create an event
feature.
To view the primary email address:
1. Log in to www.google.com.
2. Access Gmail.
3. Click the e-mail address on the upper right side of
the screen ( ***@gmail.com). A drop down window appears.
4. Click Account.
5. Look under [Email addresses and usernames] for the email address identified as the Primary
email.
2. Enter the Event Title, Date and Time, Location (Where), and Description in the corresponding entry
fields using the screen keyboard.
02 OPERATING
3. To set a reminder for a scheduled event, select the Reminders input box, and then select one of the
Reminder options.
4. When all settings are complete, select [Save].
operating _63
DA68-02935A-04.indb 63 2014. 5. 14. �� 9:39
Page 64

WEATHERBUG
The Internet weather service provides current and weekly weather information by region.
• This function is only available when the refrigerator is connected to your wireless network
(Wi-Fi).
How to add your Region to Weatherbug
1. Select the [WeatherBug] button on the Home screen.
• There will be a 4-second commercial ad when you start the WeatherBug.
USA CANADA
2. Select the region search bar on the top left of the screen.
3. Select the [+] button in the upper right corner of screen.
4. Enter your location or zipcode (US Only) using the
onscreen keyboard, and then press the [OK] button.
64_ operating
DA68-02935A-04.indb 64 2014. 5. 14. �� 9:39
Page 65

5. Select your location.
6. Select a local weather station.
7. Select the “ ” button on the top right of the screen.
8. The display screen shows your local weather.
USA CANADA
02 OPERATING
operating _65
DA68-02935A-04.indb 65 2014. 5. 14. �� 9:39
Page 66

How to view today’s weather.
1. Select the [WeatherBug] button on the Home screen.
• There will be a 4-second commercial ad when you start the WeatherBug.
USA CANADA
2. The Weatherbug screen at right appears displaying your local weather.
• If you select Active Alerts, the screen displays weather alerts.
USA CANADA
3. Select [So Far Today]. The screen displays the current weather detail information.
USA
CANADA
66_ operating
DA68-02935A-04.indb 66 2014. 5. 14. �� 9:39
Page 67

How to add other Regions to Weatherbug
1. Select the region search bar on the top left of the screen.
USA CANADA
2. The current region information appears on the screen.
3. Select the [+] button in the upper right corner of the
screen.
02 OPERATING
4. Enter the location name or zipcode (US Only) using the
on-screen keyboard, and then press the [OK] button.
5. Select the desired location.
operating _67
DA68-02935A-04.indb 67 2014. 5. 14. �� 9:39
Page 68

6. Select the desired local weather station.
7. Press the button on the top right of the screen.
8. The screen displays the weather for the location you selected.
How to view Weather Information for a Region
1. Select the desired location on the location list.
2. Press the back ( ) button in the upper right corner. The screen displays the weather for the location
you selected.
USA
CANADA
68_ operating
DA68-02935A-04.indb 68 2014. 5. 14. �� 9:39
Page 69

How to delete Regions from Weatherbug
1. Select the [edit] button in the upper right corner of screen.
2. Select the check box on the left of the location you want
to delete, and then select the Delete button.
02 OPERATING
operating _69
DA68-02935A-04.indb 69 2014. 5. 14. �� 9:39
Page 70

How to view weather forecasts.
1. Select the [Forecast] button or Tonight’s Forecast.
USA CANADA
2. Select the desired forecast on the forecast list. The screen displays detailed forecast information.
USA
CANADA
• The forecast screen lists weather forecasts for 7 days.
• It shows the day, the Day / Night (US weather only), the weather condition icon, the
temperature and the weather description.
• If you select the [Conditions] button on the lower right, the screen displays the current weather
information.
70_ operating
DA68-02935A-04.indb 70 2014. 5. 14. �� 9:39
Page 71

AP NEWS
The Internet news service provides current news in up to 11 categories.
• This function is only available when the refrigerator is connected to your wireless network
(Wi-Fi).
How to view news from AP News.
1. Select the [Ap News] button on the Home screen.
USA CANADA
2. Select a news category.
• When you select a category on the left, the screen displays the major news for that category.
3. Select the desired article.
02 OPERATING
operating _71
DA68-02935A-04.indb 71 2014. 5. 14. �� 9:39
Page 72

• To see all the photos related to the article, select the main photo in the detail news article.
To view the article in detail, visit http://www.ap.org on your mobile phone or PC.
4. To see all the photos related to the article, select the main photo in the detail news article.
• Select the and buttons on the top right of the article to view other articles.
5. Select a photo to enlarge it.
• Press the and buttons to see other photos in enlarged view.
72_ operating
DA68-02935A-04.indb 72 2014. 5. 14. �� 9:39
Page 73

PANDORA (ONLY FOR USA)
• This function is only available when the refrigerator is connected to your wireless network
(Wi-Fi).
• Through the Pandora service, you can enjoy your favorite songs free of charge.
• The song selections are based on the analysis data collected by Pandora’s Music Genome
Project. Your individual song selections - used as feedback - can affect Pandora’s next song
selection.
How to Activate and Use Pandora Internet radio.
1. Select the [Pandora] button on the Home screen.
2. Select the ‘ I’m new to Pandora’ text. An Activation Code screen pops up. On your PC, go to the
web site shown in the pop-up and use the Code to set up and activate your Pandora account.
When done, Select the [Continue] button.
3. Select the Email input box. Enter your Pandora account ID using the on-screen keyboard.
Select the Password input box. Enter your Pandora password using the on-screen keyboard.
02 OPERATING
• If you do not have a Pandora account, you can create one at http://www.pandora.com.
• In the Email input box, enter your Pandora account ID, for example, UserID@gmail.com.
operating _73
DA68-02935A-04.indb 73 2014. 5. 14. �� 9:39
Page 74

4. Press the [Sign in] button.
• If you forget your password, press the “I forgot my
password” button to get an email with your password
sent to the email address you registered with
Pandora.
5. Select a station from the list on the left.
• Pandora supports up to 100 stations
• You can create stations at www.pandora.com or
through mobile devices that support Pandora.
• If you select other stations, you can to play the
selected songs in those stations.
6. When you select the Bookmark button ( ) while playing a
song, the song is added to the Song Bookmark List. You
can view this list at the Pandora site.
• By bookmarking favorite songs, you can view the
song list and purchase albums with those songs on
the [Your Profile] page at www.pandora.com.
7. If you like a song that’s playing, select the Thumb Up ( )
button. Otherwise, select the Thumb Down ( ) button.
• When you select the Thumb Up button, Pandora
creates a station with songs similar to the song you
approved.
74_ operating
DA68-02935A-04.indb 74 2014. 5. 14. �� 9:39
Page 75

8. To put the currently playing song on hold, press the hold
( ) button.
9. To play the next song, press the Next ( ) button.
• Unfortunately, our music licenses force us to limit the
number of songs you can skip in an hour.
10. Press the speaker ( ) button to adjust the volume.
02 OPERATING
operating _75
DA68-02935A-04.indb 75 2014. 5. 14. �� 9:39
Page 76

How to Create a Station in Pandora
1. Select the [Create Station] button at the bottom of the
Pandora screen.
2. Select the blank space next to “Artist of Song” to bring up the Keyboard window.
Enter the artist’s name to add a station.
3. After selecting the station you want among the searched
stations, press the [OK] button.
4. Confirm the newly added station on the left of the Screen.
76_ operating
DA68-02935A-04.indb 76 2014. 5. 14. �� 9:39
Page 77

TWITTER
• This function is only available when the refrigerator is connected to your wireless network
(Wi-Fi).
• You can’t write a tweet while using this function.
How to view Twitter.
1. Select the [Twitter] button on the Home screen.
USA CANADA
2. Select the Email input box. Enter your Twitter account ID using the on-screen keyboard.
Select the Password input box. Enter your Twitter password using the on-screen keyboard.
02 OPERATING
3. Press the [Sign in] button.
• If you do not have a Twitter account, you can create
one at http://twitter.com.
• In the Email section, enter your Twitter account ID, for
example, UserID@gmail.com.
• If you select the ‘Stay signed in’ check box, you
do not need to log in each time to enter the Twitter
menu.
• If the system time is not set exactly, login may fail.
If login fails, set the current time correctly at Settings
→ Time/Date, and then retry.
4. The Tweet list screen appears. This page displays your
following tweeters up-to-date information including their
photos, comment previews, and listed dates.
operating _77
DA68-02935A-04.indb 77 2014. 5. 14. �� 9:39
Page 78

5. Press a tweet on the tweet list and you can see the detail
information.
• When selecting the List View on the Detail View
screen, the screen changes to the Twit List.
6. Select the i button on the right of the screen to see detail
information about the follower/followee.
SCREENSAVER THEME
Select the themes for the Display screen screensaver.
1. Select the [Settings] button.
2. Select the [Screensaver Theme] on the Settings list.
USA
CANADA
78_ operating
DA68-02935A-04.indb 78 2014. 5. 14. �� 9:39
Page 79

3. Select the theme(s) you want to use in the screensaver,
and then press the [Save] button.
• The Clock and Photo themes are the default themes.
You cannot deselect them.
• The themes you select may not display if the data
underlying them is not ready or unavailable.
ENERGY SAVER
Turns the Energy Saver function on and off. When the Energy
Saver is on, the power consumption decreases.
1. Select the Energy Saver ON or OFF buttons on the
Settings list.
• The Energy Saver function is pre-set to ON in the
factory.
• If condensation or water drops appear on the doors,
turn the Energy Saver mode off.
DOOR ALARM
Turns the Door Alarm on and off.
1. Select the Door Alarm ON or OFF buttons on the Settings
list.
02 OPERATING
• If the door alarm is set to ON, an alarm beeps if any
door is left open for more than two minutes.
• The beeping stops when you close the door. The
door alarm function is pre-set to ON in the factory.
DISPENSER LOCK
When you activate the Dispenser Lock function, the dispenser
will not work.
1. Select the Dispenser Lock ON or OFF buttons on the
Settings list.
• If you select the Dispenser Lock ON button, the Lock
icon ( ) appears in the upper left corner of the Home
screen.
• If you suddenly can not use the dispenser, check
whether the Dispenser Lock function is on.
operating _79
DA68-02935A-04.indb 79 2014. 5. 14. �� 9:39
Page 80

QUICK ICE MAKING
Use this function to make ice quickly.
1. Select the [Quick Ice Making] ON or OFF button on the
Settings list.
• When the fast freeze function is turned on, the ( )
icon is displayed on the home screen.
• Quick Ice Making will be turned off automatically after 48 hours of operation.
WATER FILTER
The Water Filter status icon on the Home screen enables you to check the current status of the water
filter. Follow the instructions below to check and/or replace the water filter.
USA
CANADA
1. Check the water filter status in the Settings list or indicator icons on the upper left of Home screen.
• Good (Blue) : The filter does not need replacement. It is normal.
• Order (Pink) : The filter needs replacement. Order a new filter.
• Replace (Red) : The filter needs replacement immediately.
80_ operating
DA68-02935A-04.indb 80 2014. 5. 14. �� 9:39
Page 81

2. If the status reads “Order” or “Replace,” select the Water Filter on the Settings list to access the
replacement instructions.
USA CANADA
3. Follow instructions in the Water Filter replacement guide to replace the Water Filter.
• Touch the button to move to the next page of the instructions.
- Step by step instructions are also available on page 95.
4. When the replacement is done, touch and hold ‘Replace’ on the upper right side for 3 or more
seconds to reset the water filter indicator.
02 OPERATING
DO NOT use the water or ice dispenser without a water filter cartridge. You can block the water
CAUTION
line or damage the dispenser.
• Be sure to flush the dispenser thoroughly to prevent the dispenser from dripping.
If water drips from the dispenser, it means that there is still air in the line.
• For a replacement water filter, visit your local home improvement center or Samsung’s official
on-line parts distributor at http://www.samsungparts.com.
Be sure the replacement water filter has the SAMSUNG logo on the box and on the water filter.
operating _81
DA68-02935A-04.indb 81 2014. 5. 14. �� 9:39
Page 82

LANGUAGE (ONLY FOR CANADA)
You can select the default language.
1. Press the button in the right bottom corner of the Settings list.
2. Select the preferred language on the Settings list.
After selection, the default language will be changed automatically.
• If a content provider does not support the language you selected, the language of that content
will not change after your language selection.
DISPLAY
Lets you set the brightness of the LCD and the running time of the Screensaver.
1. Press the button in the right bottom corner of the Settings list.
2. Select [Display] in the Settings list.
USA
CANADA
3. Select the Brightness level and/or Screensaver Running Time you
want, and then press the [Save] button.
• After 60 seconds, the Screen Saver runs for the time you set,
and then the LCD panel turns off.
82_ operating
DA68-02935A-04.indb 82 2014. 5. 14. �� 9:39
Page 83

VOLUME
Lets you control the volume of the alert sounds.
1. Press the button in the bottom right corner of the Settings list.
2. Select [Volume] in the Settings list.
USA
CANADA
3. Select a volume level button to change the alert sound level.
4. Press the [Save] button to set the new volume level.
02 OPERATING
• An alert sounds whenever a button is touched or a message window or menu list appears.
TIMEZONE
You must select your time zone to use Google Calendar and the Twitter service correctly.
To select your time zone, follow these steps:
1. Press the button in the bottom right corner of the Settings list. The Time Zone Setting screen
appears.
operating _83
DA68-02935A-04.indb 83 2014. 5. 14. �� 9:39
Page 84

USA
CANADA
2. Select [Timezone] in the Settings list.
3. To save the new time zone, press the [Save] button.
• The Time Zone Setting screen may appear again
automatically after a software update.
TIME SETTING
Lets you set the current time.
1. Press the button in the bottom right corner of the Settings list.
2. Select [Time] in the Settings list.
USA
CANADA
84_ operating
DA68-02935A-04.indb 84 2014. 5. 14. �� 9:39
Page 85

3. Press the and buttons to revise the time settings, and then
press the [Save] button.
• If the current time is incorrect, you may not be able to use
Twitter.
DATE SETTING
Lets you set the current date.
1. Press the button in the bottom right corner of the Settings list.
2. Select [Date] in the Settings list.
USA
CANADA
3. Use the and buttons to revise the month.
4. Select the desired day, and then press the [Save] button.
• If the current date is incorrect, you may not be able to use
Twitter.
02 OPERATING
WI-FI
Lets you turn the refrigerator’s connection to your wireless network on and off.
1. Press the button in the right bottom corner of the Settings list.
2. Select [Wi-Fi] in the Settings list.
3. Select ON or OFF.
operating _85
DA68-02935A-04.indb 85 2014. 5. 14. �� 9:39
Page 86

USA
CANADA
WI-FI NETWORKS
When you set Wi-Fi ON, (see above) the refrigerator’s wireless network function searches for a wireless
AP to connect to.
• In addition to the router installed in your home, your refrigerator can detect other wireless
CAUTION
routers installed in nearby houses or offices while connecting to your wireless network.
It is illegal to use another’s router without permission and can be subject to severe penalties.
Consequently, you should connect the refrigerator only to your own wireless router or to routers
for which you have permission.
1. Press the button in the bottom right corner of the Settings list.
2. Select [Wi-Fi Networks] in the Settings list.
USA
CANADA
86_ operating
DA68-02935A-04.indb 86 2014. 5. 14. �� 9:39
Page 87

3. Select the wireless AP you want to connect to.
• : Locked with Security Code
• : Signal Strength
• You can check the MAC address of the Fridge on the bottom
of the Screen.
• If there are no APs showing on the screen, press the [Search] menu at the bottom.
• Depending on the wireless AP type, the refrigerator may not make a connection.
We recommended you use a wireless AP that supports IEEE802.11b/g/n.
• If you don’t have a wireless router, please contact your Internet provider or purchase and install
one yourself.
• If you can’t remember the name of your wireless network system (SSID) or its security code,
please see the user manual of your router.
• Radio frequency signals can interfere with any the wireless network system and they may affect
the network performance of your refrigerator.
• Obstacles such as concrete walls and metallic doors, and radio and microwave interference
from devices such as microwave ovens can affect the operation of your wireless network
system.
• Depending on the type and location of your wireless network system and the surrounding
environment, the range and quality of your wireless network may vary.
4. If your wireless network has a security code, enter the security
code, and then press the [OK] button. In most cases, after you
have entered the security code, the refrigerator acquires the
Network addresses it needs (IP Address, Subnet Mask, Gateway,
and DNS) to connect to the network. If it does not or you need to
enter these values manually, go to Step 6.
5. After the refrigerator has connected to your network, you can select the [IP Address] button on the
Wi-Fi Networks screen to view the current IP address and Gateway values.
02 OPERATING
operating _87
DA68-02935A-04.indb 87 2014. 5. 14. �� 9:39
Page 88

6. If you need to enter the IP Address, Subnet Mask, Gateway, and DNS manually, press the [User
Config] button on the IP Address screen. Then, select the [IP Address], [Subnet Mask], [Gateway],
and [DNS] buttons in turn and, using the keypad, enter the appropriate values. When you are done
with each entry, select the [OK] button on the keypad.
7. After entering the values for all four parameters, press the
[Apply] button.
TEMPERATURE UNIT CONVERTER
Lets you set the temperature display to Fahrenheit or Centigrade. The unit you select applies to the
Freezer / Fridge set temperature and the temperature displayed by the Weather function.
1. Press the button in the bottom right corner of the Settings list.
2. Select the Temperature Unit Converter °C or °F button in the Settings list.
USA
CANADA
88_ operating
DA68-02935A-04.indb 88 2014. 5. 14. �� 9:39
Page 89

DISPENSER LIGHT
Lets you set the operation of the dispenser lamp light.
1. Press the button in the bottom right corner of the Settings list.
2. Select [Dispenser Light] in the Settings list.
USA
CANADA
3. Select the desired dispenser light status, and then press the [Save] button.
• On : The Dispenser lamp is always on.
• Auto : The Dispenser lamp lights up when you use the Dispenser. When you release the
Dispenser lever, the light goes off in 5 seconds.
• Off : The Dispenser lamp does not light up when you use the Dispenser.
02 OPERATING
operating _89
DA68-02935A-04.indb 89 2014. 5. 14. �� 9:39
Page 90

THE COOLING OFF FUNCTION
The Cooling Off function shuts off the cooling mechanism in the freezer and fridge compartments, but
does not shut off the electrical power to the refrigerator.
This function is only used to demo refrigerator models on showroom floors.
1. Press the button in the bottom right corner of the Settings list.
USA
CANADA
2. Select the Cooling Off ON or OFF button in the settings list.
• If you select the Cooling Off ON button, the Home screen will display “OFF” on the freezer/
fridge temperature displays, the refrigerator selector functions will be deactivated, and the
refrigerator and freezer will not get cold.)
3. If you select the [ON] button, the message window below appears.
4. Press the [Yes] button for more than 3 seconds to confirm.
90_ operating
DA68-02935A-04.indb 90 2014. 5. 14. �� 9:39
Page 91

TOUCH SCREEN CORRECTION
You can calibrate the stylus touch point to best meet your needs.
To adjust the stylus touch point on the touch screen:
1. Press the button in the right bottom corner of the Settings list.
2. Select [Touch Screen Correction] in the Settings list.
USA
CANADA
3. Press the [Yes] button. A screen appears with pointer instructions on the top.
4. Press down lightly on the center of the “+” mark. Repeat as the “+” mark moves across the screen.
• If you do not press the center of the [+] properly, the cross mark appears repeatedly.
02 OPERATING
If you cannot run the Touch Screen Correction function in Settings because the touch screen input point
is incorrect:
1. Press and hold the Epicurious icon on the home screen for 5 seconds.
This will launch the select screen calibration function.
2. The screen will display a series of cross icons.
Press the exact center of each cross icon as it appears on the screen.
operating _91
DA68-02935A-04.indb 91 2014. 5. 14. �� 9:39
Page 92

USA
CANADA
S/W UPDATE
Lets you check the current software version and update it to new software when available.
1. Press the button in the bottom right corner of the Settings list.
2. Select [S/W Update] in the Settings list.
USA
CANADA
92_ operating
DA68-02935A-04.indb 92 2014. 5. 14. �� 9:39
Page 93

• The software update is provided through the wireless network. When updated software is
available, the [Upgrade] button on the bottom right corner of the screen is activated.
When you press the [Upgrade] button, the upgraded starts almost immediately (in about 10
seconds). When the update is complete, the “Upgrade completed.” message appears on the
screen. Press the [Reboot] button in the “Upgrade completed.” message to finish the update.
• Open Source License Notice - This product uses open source software.
The Open Source Licenses are available on the product menu.
Press [License Information] button to see the detail information.
02 OPERATING
operating _93
DA68-02935A-04.indb 93 2014. 5. 14. �� 9:39
Page 94

USING THE ICE/WATER
DISPENSER
1. Selecting the function
- In the home screen, select the dispenser icon.
In screens other than the home screen, select
the small dispenser icon ( ) at the top
right.
USA
CANADA
- Select a function and touch the close button.
USA
CANADA
2. Dispensing ice or water
- To dispense ice, press the lever
slightly with the cup.
The cubed ice is in the shape of
half moons and the crushed ice
consists of fragments of the cubed
ice.
When you dispense ice, move the cup close
to the dispenser so that ice does not fall onto
the floor.
- To dispense water, also press the lever with the
cup slightly.
To dispense both water and ice, dispense ice
first and then dispense water.
• Do not dispense ice into a thin glass cup
CAUTION
3. Dispenser tips
- Discard 6 cups of water before drinking any
- Even if the refrigerator is running continuously,
- You can dispense up to 6 cups of cold water at
- After installing the refrigerator, ice is produced
- The required time to generate ice may differ
- If you do not dispense ice frequently, the
or ceramic container.
This may result in the ice breaking the
glass or ceramic container.
• If discolored ice is dispensed, stop using
the product and contact the Samsung
Electronics service center.
Press the central part of the lever when
you dispense ice or water.
The lower part of the lever will not be
activated.
water when using the product for the first time.
The water dispensed at first may have a plastic
smell.
the water dispensed at first may not be cold.
If you dispense ice and then water, you can
make the water cold.
once, and then dispense cold water again after
2~3 hours.
after about 12 hours.
depending on the number of times the door is
opened and the operating conditions.
ice may melt and stick together, and the ice
dispenser may not work properly.
In this case, remove any ice stuck in the ice
storage bin.
94_ operating
DA68-02935A-04.indb 94 2014. 5. 14. �� 9:39
Page 95

• Not dispensing ice for long periods may cause
ice clumps in the ice bucket.
- Lift up and pull out the ice bucket to discard
remaining clumps.
- When replacing the bucket, be sure to press it
firmly into place.
HOW TO REPLACE THE WATER
FILTER
What Does the Water Filter Do?
The water filter filters out impurities
that may be in tap water including
pathogens, insecticides, organic
compounds, and mercury.
It also filters out excess chlorine,
removing the taste and smell of
chlorine from the water.
Filtrate and Purifying Effect
- The filtrate in the water filter is made of
activated charcoal.
- The filter is NSF (National Science Foundation)
certified, and meets the standard requirements
for food safety and filter effectiveness listed in
NSF 42 and 53. See the table below.
Certification
Standard
NSF 42 Smell, Chloride
NSF 53
• When to Replace the Filter
- - When the Filter Status Indicator on the display
turns from blue to pink, it is time to replace the
filter.
If the Indicator turns from pink to red, replace
the filter immediately.
- You can purchase a replacement filter from your
nearest authorized Samsung service center,
authorized Samsung retailer, or on line at www.
samsungparts.com.
Remove Capacity
Pathogens, insecticide, asbestos, slime,
benzol, organic compounds, mercury
How To Replace Water-Purifying Filter
To reduce the risk of water damage
WARNING
to your property DO NOT use generic
brands of water filers in your SAMSUNG
Refrigerator. USE ONLY SAMSUNG
BRAND WATER FILTERS.
SAMSUNG will not be legally responsible
for any damage, including, but not limited
to property damage caused by water
leakage from use of a generic water filter.
SAMSUNG Refrigerators are designed to
work ONLY WITH SAMSUNG Water Filter.
1. Remove the old water filter.
- Open the unit grill in the upper part of
refrigerator, rotate the filter 90° to the left to
unlock it, and then pull it down.
Place a bucket or bowl a little bit bigger
than the filter under the filter to catch any
water that drips when you separate the
filter from the refrigerator.
2. Unpack the new filter, and then peel off the red
protective cap.
3. Put an installation date sticker on the new filter.
Example) If installing it in October, put on the
`OCT 10’ sticker.
4. Install the new filter.
- Insert the filter into the filter
holder and then rotate it 90° to
the right to lock it. Make sure to
line up the the indicator line ( )
with Lock ( ) sign.
- Close the unit grill, and then
press the ice-maker test button
to check if water flows out.
- We recommend you dispense
water for about 2 minutes (2
quarts or 2 liters) when you
install or replace a filter to flush
the water line.
- After replacing the filter, touch
and hold ‘Replace’ on the upper
right side of the Water Filter
screen for 3 or more seconds
to reset the water filter indicator.
See page 80 and 81 for details.
Unlock
Lock
02 OPERATING
operating _95
DA68-02935A-04.indb 95 2014. 5. 14. �� 9:39
Page 96

HOW TO CLEAN AND TAKE CARE
OF THE PRODUCT
• Inside refrigerator /
Accessories
- Wipe with a clean cloth
lightly dampened with
water or mild liquid dish
detergent.
• Do not use brushes or scouring pads to wipe
the inside or outside of the refrigerator.
• Make sure to set the power switch to the
O(OFF) position before cleaning the refrigerator
to prevent the possibility of electric shock or
fire. Set the power switch to the l(ON) position
after cleaning is complete.
• Door gasket
- Wipe with a clean cloth
lightly dampened with mild
liquid dish detergent and
clean the grooves with
cotton balls.
• Dispenser
- After wiping with a wet cloth,
wipe dry with a dry cloth.
- If the spill shelf is stained,
wipe with a clean cloth lightly
dampened with vinegar.
• How to get rid of odors.
- Wipe down the interior of the fridge using a soft
cloth dipped in a mild solution of warm water
and bicarbonate of soda.
• How to remove mold on door gaskets.
- Brush with a toothbrush dampened with pure
dish detergent. It is difficult to scrub off the
mold once it becomes black.
Care must be taken not to damage the
gaskets.
If you do not intend to use your
refrigerator for a long period of time, empty
the fridge, open the grille panel, set the
power switch to O (OFF), and then wipe
the compartments and walls with a dry
cloth or towel. Leave the doors open so
that the fridge dries completely.
• Do not spray water directly on the
CAUTION
96_ operating
refrigerator. There is a risk of explosion,
electric shock, or fire.
Do not clean with benzene, thinner,
bleach, alcohol, or acetone.
You can damage the refrigerator’s
surfaces.
Disassembling for cleaning
Before cleaning the refrigerator, flip the grille panel
up as shown in the figure and set the power switch
to O (OFF).
To prevent electric shock, disassemble the
refrigerator only when it is turned off.
Water tends to gather inside and flow down to the
bottom.
After cleaning, be sure to wipe the components
inside dry with a dry cloth, and then re-assemble.
• Veggie/Fruit Box
- Hold it with one hand, then
pull it forward while lifting it
up slightly to remove.
• Veggie Box Lid
- Tilt the lid up in front, then
pull it forward and out of
the refrigerator.
Take out the mid glass after
removing the veggie box.
• Dairy Bin
- Flip up the dairy bin cover
and remove it while pushing
it back.
- Hold the dairy bin with both
hands and lift it up and out
of the door.
DA68-02935A-04.indb 96 2014. 5. 14. �� 9:39
Page 97

• Freeze r/Fridge Door Bin
- Hold it with both hands and
lift it up and out of the door.
• Freezer/Fridge Shelves
- Tilt the shelf up in front,
then lift it up and out of the
tracks on the rear wall of
refrigerator.
• When the refrigerator is not in use, or
when you clean it, open the grille panel,
set the power switch to the O(OFF) and
dry the compartments with their doors
open.
• Please contact our service center to replace
the LED lamps. Do not replace the LED lamps
yourself. There is a risk of electric shock.
02 OPERATING
operating _97
DA68-02935A-04.indb 97 2014. 5. 14. �� 9:39
Page 98

FOOD STORAGE TIPS
Foods Refrigerator Freezer Storage Tips
DAIRY PRODUCTS
Butter 2-3 Weeks 6-9 Months Wrap or cover tightly.
Check date code. Most milk and similar products
Milk 1-2 Weeks Not recommended
Cream Cheese, cheese
food, and cheese spread
Hard Cheese (unopened) 3-4 Months 6 Months
Hard Cheese (opened) 2 Months Not recommended
Cottage Cheese 10-15 Days Not recommended
Cream 7-10 Days 2 Months Check date code. Most yogurt, creams, and
Sour Cream 2 Weeks Not recommended
Cream Dips (opened) 1 Week Not recommended
Yogurt 10-14 Days Not recommended
Frozen Yogurt na 2 Months
EGGS
Eggs (uncooked) 3-4 Weeks Not recommended
Eggs (cooked) 1 Week Not recommended Store in covered container
Leftover egg dishes 3-4 Days Not recommended Store in covered container
FRESH FRUITS
Apples 1 Month Not recommended
Bananas 2-4 Days Not recommended
Peaches, Melons, Pears,
Avocados
Berries and Cherries 2-3 Days 12 Months
Apricots 3-5 Days Not recommended
Grapes 2-5 Days na
Pineapple (un-cut) 2-3 Days Not recommended
Pineapple (cut) 5-7 Days 6-12 Months
Citrus 1-2 Weeks Not recommended Store uncovered.
Juice 6 Days Not recommended
Frozen Juice Thawing only 12 Months Check date code. Do not re-freeze.
FISH AND SHELLFISH
Fish
Fatty Fish (mackerel, trout,
salmon)
Lean Fish (cod, flounder,
etc)
Frozen or Breaded na 3 Months
2-4 Weeks Not recommended
3-5 Days Not recommended
1-2 Days 2-3 Months
1-2 Days 6 Months
are sold in date-coded cartons that indicate a
products’s peak freshness. Re-seal with cap or
wrap tightly. Do not return unused portions to
original container.
Check date code. Keep all cheese tightly packed
in moisture proof wrap
similar products are sold in date-coded cartons
that indicate a product’s peak freshness. Re-seal
or cover tightly. Do not return unused portions to
original container.
Check date code. Keep covered.
Check date code. Store eggs in coldest part of
refrigerator and in their original container.
If storing in refrigerator, do not wash fruit before
storing. Store in moisture resistant bags or
containers. Wrap cut fruits. Some fruits darken
when refrigerated.
Check date code and re-seal in original container.
Do not return unused portions to original container.
Keep in original wrapper and store in coldest
part of refrigerator. Package in vapor-proof and
moisture proof wrap for freezer. Freeze at 0ºF (or
-18°C ). Thaw in refrigerator or check date code.
Freeze in original packaging.
98_ operating
DA68-02935A-04.indb 98 2014. 5. 14. �� 9:39
Page 99

Foods Refrigerator Freezer Storage Tips
Shellfish
Shrimp (uncooked) 1-2 Days 12 Months
Crab 3-5 Days 10 Months
Cooked Fish or Shellfish 2-3 Days 3 Months
MEAT
Fresh, Uncooked
Chops 2-4 Days 6-12 Months
Ground 1 Day 3-4 Months
Roast 2-4 Days 6-12 Months
Bacon 1-2 Weeks 1-2 Months
Sausage 1-2 Days 1-2 Months
Steak 2-4 Days 6-9 Months
Poultry 1 Day 12 Months
Lunch meat 3-5 Days 1 Month
Cooked
Meat 2-3 Days 2-3 Months
Poultry 2-3 Days 4-5 Months
Ham 1-2 weeks 1-2 Months
To freeze, package in vapor-proof and moistureproof container.
Check date code for use. Store in coldest part
of refrigerator in original packaging. Package in
moisture-proof and vapor-proof container for
freezing. Recommended refrigerator temperature
33ºF to 36ºF (or 1°C to 2°C ) and freezer temperature 0ºF to 2ºF (or -18°C to -16°C )
Check date code for use. Store in coldest part
of refrigerator in original packaging. Package in
moisture-proof and vapor-proof container for
freezing.
Sources:
American Meat Institute Foundation. 1994. Yellow pages: answers to predictable questions consumers
ask about meat and poultry. American Meat Institute Food Marketing Institute. 1999. The food keeper.
Food Marketing Institute, Washington, D.C. Freeland-Graves, J.H. and G.C. Peckham. 1996. Foundations
of food preparation, 6th ed. Prentice-Hall, Inc. Englewood Cliffs, NJ. Hillers, V.N. 1993. Storing foods at
home. Washington State University Cooperative Extension, Pullman, WA. Publ. EB 1205.
National Restaurant Association. 2001. Be cool-chill out! Refrigerate promptly. National Restaurant
Association Education Foundation¼s International Food Safety Council, Washington, D.C. USDA. 1997.
Basics for handling food safely. U.S. Department of Agriculture, Food Safety and Inspection Service,
Washington, D.C.
02 OPERATING
operating _99
DA68-02935A-04.indb 99 2014. 5. 14. �� 9:39
Page 100

troubleshooting
PROBLEM POSSIBLE CAUSES WHAT TO DO
Fridge or freezer
compartment too
warm.
(Low cooling
power)
Frozen food
in fridge
compartment.
Vibration or rattling
sounds.
Refrigerator has
odor.
Ice cubes have
odor.
Water dispenser
does not work.
Master power control set to O(OFF). Switch on the power (“I” pressed).
Refrigerator is unplugged. Plug in the power plug again.
Temperature controls set at the warmest
setting.
Refrigerator installed in a place exposed
to direct sunlight and in the vicinity of
heater.
Fridge control setting is too cold. Press the temperature control button and
Refrigerator installed in a too cold place. When the ambient temperature is lower
Food containing lots of water is placed
closer to the cold air discharging port.
The floor is slanted or it is not firm
enough.
There is something blocking ventilation in
the machine compartment on the top.
Dishes are stored without being wrapped
in plastic.
Meat, fish and chicken are put in the
refrigerator without plastic packing.
Foods are stored for too long. Foods stored for a long time could have
Ice cubes are made with tap water. Water could contain chlorine which has a
Interior of refrigerator needs cleaning. Clean the interior of the refrigerator
Ice storage bin needs cleaning. Wipe the surface of the ice bin frequently.
Food dropped on the shelf. Wipe it away completely.
Water supply line is turned off. Turn on water supply.
Water supply line is not connected
properly.
Press the FRE. TEMP/REF. TEMP button
and set it colder.
Keep the refrigerator away from direct
sunlight and heating appliances.
set to a warmer setting.
than 41ºF (5ºC), food can become
frozen.
Put food containing lots of water on the
front part of the self.
Move the refrigerator and put it on a hard
level floor.
If there is anything blocking ventilation,
remove it.
Make sure to put lids on containers and/or
wrap food in plastic.
Put them in clean plastic bags and seal
the bags before storing them.
odors.
distinctive odor.
Make ice with filtered water.
frequently to remove food smells.
Review the installation manual or contact
our service center.
100_ troubleshooting
DA68-02935A-04.indb 100 2014. 5. 14. �� 9:39
 Loading...