

Samsung RS2577SW/XAA, RS2577SL/XAA, RS2555SW/XAA, RS2555SL/XAA, RS2533SW/XAA Owner’s Manual
...Page 1

SIDEBYSIDE
REFRIGERATOR
Write the model and serial number here:
Model#
Serial#
Findthese numbers on a label of the
refrigeratorcabinetat the lefthand-sidewall.
OWNER'SMANUALANDINSTALLATION
SAFETY WARNING SIGNS ...............................................................2
OPERATING INSTRUCTIONS ........................................................4
SETTINGUPTHE REFRIGERATOR........................................................4
MAJORFEATURES.....................................................................................4
CONTROLPANEL.......................................................................................5
DIGITAL PANEL..........................................................................................6
TEMPERATURECONTROL ......................................................................7
ICEand COLDWATERDISPENSER.........................................................7
SHELVESandBINS.....................................................................................8
FOODSTORAGEGUIDE...........................................................................9
CoolSelectZoneTMDrawerGUIDE.............................................................11
REMOVINGTHE FREEZERACCESSORIES.........................................13
REMOVINGTHE REFRIGERATORACCESSORIES............................13
BEVERAGESTATION(RS2577)..............................................................14
CLEANINGTHE ACCESSORIES.............................................................14
CHANGINGTHE INTERIORLIGHT.........................................................15
WATERFILTER..........................................................................................16
DOORS.......................................................................................................16
RS2533SW
RS2555SW
RS2555SL
RS2577SW
RS2577SL
CONTENTS
INSTALLATION INSTRUCTIONS ................................................17
INSTALLATIONOFTHE REFRIGERATOR............................................17
REMOVINGTHE REFRIGERATORDOORS.........................................18
REATTACHINGTHE REFRIGERATORDOORS....................................21
ADJUSTINGTHECLEARANCEBETWEENTHE DOORS....................24
CHECKINGTHE WATERDISPENSERLINE..........................................26
INSTALLINGTHEWATERDISPENSERLINE........................................26
TROUBLESHOOTING...............................................................................30
CONSUMER SUPPORT ....................................................................31
WARRANTY...............................................................................................31
In the US.for questions about features,
operation/performance, parts, accesories or service, call:
1-800-726-7864 (1-800-SAMSUNG), FAX:1-973-601-6001
www.samsungusa.com
DA68-00500T REV(0.1)
Page 2

• Beforeoperating the appliance, please read this manualthoroughly and retainit foryour reference.
//_ • Because these following operatinginstructionscover various models, the characteristicsof yourrefrigeratormay differslightlyfrom those described inthis manual
WARNING
•Theapplianceisnotintendedforuse by childrenorinfirmpersonswithoutadultsupervision.
•Childrenshouldbe supervisedto ensurethattheydo notplaywiththeappliance.
CAUTION/WARNINGSUSED OTHERSIGNS USED
Q Represents something you must NOT do.
Represents something you must NOT
/k
WARNING
Indicates that a danger of
death or serious injury exists.
disassemble.
Represents something you must NOT touch.
O Represents something you must follow.
i_ Indicates that you must disconnect the
power plug from the socket.
Represents a ground is needed to prevent
O electric shock.
/k
CAUTION
Indicates that a risk of
personal injury or material
damage exists.
It is recommended that this sentence be
handled by service man.
Because these warning signs are to prevent injury from users or other persons, please follow
safety warning signs. After reading the warning signs, keep them in a safe place for future refer-
ence.
Donotstorevolatileorflammablesubstancesinthe
//_ WARNING SIGNS
Donotplugseveralappliancesintothe same multiple
Q receptical.
•Thiscouldcauseoverheatingandthe risk offire.
Makesurethatthepowerplugis notsquashedor dam-
agedby thebackofthe refrigerator.
•A damagedpowerplug mayoverheatandcausefire.
Donotdirectlyspraywaterinside oroutsidetherefrig-
erator/freezer.
•Thereisa riskofelectricshock.
Donotuseaerosolsneartherefrigerator.
•Thereisa riskd explosionorfire.
Donotbendthe powercordexcessivelyor place
heaveyarticlesonit.
•Thisconstitutesafirehazard.Ifthe powercordisdam-
aged,haveit replacedimmediatelybythe manufacturer
or itsserviceagent.
Donot insertthepowerplugwithwethands.
•Youmayreceivean electricshock.
Donotputa containerfilledwithwaterontherefrigera-
tor.
• If spilled,thereis a riskoffireor electricshock.
Donot installthe refrigeratorin adampplaceor a
placewhereit may comeincontactwithwater.
• Deterioratedinsulationofthe electricalpartsmaycause
electricshockor fire.
refrigerator.
•Thestorageof benzene,thinner,alcohol,ether,LPgasand
othersuchproductsmaycauseexplosions.
Donotdisassembleor repairtherefrigeratorbyyourself.
•You run the risk of causing a fire,malfunctionsand/or
personalinjury.
Pullthe power plug outof the socket before chang-
ing the interior lightof the refrigerator.
• Otherwise,there is a risk of electric shock.
Ifyou wishto dispose of the refrigerator/ freezerthrow
it away after first removing the doors and seals.
• Do so in a way that it isnot possiblefor achild to remain
trapped inside.
The refrigerator must be grounded.
O
• You must groundthe refrigeratorto preventany power
leakagesor electric shockscaused by current leakage
from the refrigerator.
Never use gas pipes, telephonelines or other poten-
O
tiallightening rods as ground.
• Improperuseof thegroundplug canresultin ariskof
electricshock.If itis necessaryto usean extentioncord,
useonlya 3-wireextentioncordthat hasa 3-bladeground
pluganda 3-slot receptaclethatwill accepttheplugonthe
appliance.Themarkedratingof theextensioncordshould
beAC 115V~120V,10A,or more.ifagroundingadapteris
used,makesurethe receptacleboxisfullygrounded.
2
Page 3

//_ CAUTION SIGNS
Q o not overfill the refrigeratorwith food.
•When you open the door, an item may fall out and cause
personalinjury or material damage.
Donot put bottlesorglasscontainersinthe freezer.
•When the contentsfreeze, the glass may breakand
cause personalinjury.
Ifthe wall socket is loose, do not insertthe power
plug.
•There is a riskof electric shock or fire.
Q Donotdisconnectthe powercord bypullingonit.
•Damageto thecord maycausea short-circuit,fire
and/orelectricshock.
•If the powercord isdamaged,itmustbe replacedby
the manufacturer,acertifiedserviceagentor qualified
servicepersonnel.
Do not store articles on the top of the appliance.
•Whenyouopen or closethedoor,thearticlesmayfall
andcausepersonalinjuryand/ormaterialdamage.
Do not store pharmaceuticals products, scientific
materialsand temperature-sensitive products in
the refrigerator.
•Productsthatrequirestricttemperaturecontrolsmust
not bestoredin therefrigerator.
Do not let childrenhang on the door.If not, a seri-
ous injury may occur.
Ifyou sense pharmaceuticals smells or smoke, pull
out the power plug immediatelyand contactyour
SAMSUNGElectronics service center.
f
Donotusea wet ordampclothwhencleaning
@
the plug.Removeanyforeign matteror dustfrom
the powerplugpins.
•Otherwisethereisa riskoffire.
• Ifthe refrigeratorisdisconnectedfromthe power
supply,you shouldwaitfor at leastfiveminutes
beforepluggingitback.
_, If the refrigeratorisnotto be usedfor a long
periodoftime,pullout thepowerplug.
• Deteriorationin theinsulationmaycausefire.
Donottouchtheinsidewalls ofthefreezeror
®
productsstoredin thefreezerwithwethands.
•It may causefrostbite.
Do not insertyour hands into the bottom area
underthe appliance.
•Anysharpedgesmaycausepersonalinjury.
Neverput fingers or other objects into the
dispenser hole and icechute. It may cause per-
sonalinjuryor materialdamage
Page 4

Once you have performedthe followingsteps,your refrigeratorshould befully operational.If not, check
the powersupply and electricitysource. Ifyou haveany questions,contactyour 8AMSUNG
service center.
Placethe refigeratorin an appropriateloca-
tion withreasonableclearancebetweenthe
wall andthe refigerator.
(referto installationinstructionsin this man-
nal)
When the refrigerator is plugged in,
the interior light should come on when
you open the doors.
Twin Cooling System
• The refrigerator and the freezer have two evaporators. Given this
independent system, the freezer and the refrigerator are cooled
individually as required and are, therefore, more efficient. Food odor
from the refrigerator does not affect food in the freezer due to sepa-
rate of air flow circulation.
Multi-Flow System
• Cool air circulates through multiple vents on every shelf level. This
provides even distribution of cooling inside cabinets to keep your
food fresh longer.
Setthe temperaturecontrolto the coldest
temperatureandwait for an hour.The
freezershould getslightly chilled andthe
motor shouldrun smoothly.
Oncethe refrigeratortemperatureissuffi-
cientlylow, youcan storefood in the
refrigerator.Afterstarting the refrigerator,it
takesa few hoursto reach the appropriate
temperature.
Xtra Space TM
• Vertical room next to the ice maker in the freezer provides space
for pizza etc.
Door Alarm
•A beeper reminds if you the door is left open.
Xtra Fresh TM
• Optimized humidity control keeps vegetables & fruits fresh.
Deodorizer
• Reusable twin deodorizers keep the refrigerator air fresh and
odor free.
CoolSelect Zone TM Drawer(RS2555, RS2577)
• User can select Quick Cool, Thaw, or Soft Freeze to quickly chill
items, thaw items, or keep meat and cheeses fresh longer. Select
Cool or Chill to control the temperature of the drawer.
4
Page 5

RS2533
PowerFreeze SAMSUNG PowerCool
Ice Watel
RS2555, RS2577
Child Lock
iiiiiiiiiiiiiiiiiiiii_,
FREEZER TEME BUTTON
Toset the freezer temperature,press
the button repeatedly tochange the set
temperaturein sequence between
8°Fand -14°F.
POWER FREEZERBUTTON
peeds up the freezingprocess in
the freezer,
ICETYPE BUTTON
Use thisbutton to choose Cubedor
Crushed Iceor Ice off.
I FRIDGE TEMP.BUTTON
Toset the fridge temperature, press the button
repeatedlyto change the set temperature in
sequencebetween 34°F and 46°F.
POWER COOL BUTTON I
[ Speeds up the coo ng process nthe refrigerator I
CHILD LOCK BUTTON
When this button is pressed for 3 sec., the Power
Freeze, PowerCool, FreezerTemp.and Fridge
Temp.are locked and can not be modified.The
WaterandIce dispensersare not lockedthey can
stillbe used.
_J
Page 6

or
RS2533
RS2555,RS2577
Freezer Temp. indicates the current freezer temperature.
Fridge Temp. indicates the current refrigerator temperature.
Quick Cool, Thaw, and Select show the status of the CoolSelect ZoneTM Drawer
l-,ower I-reeze
• This light is on when you press the Power Freeze button.
Press this button to quickly return the freezer to the set temperature.
r_ • if you need much ice, you can get ice faster.
• Press the button again to cancel the Power Freezer mode.
Power Cool •
This light is on when you press the Power Cool button.
I _ Press the button to quickly return the refrigerator to the set temperature.
! • Press the button again to cancel the Power Cool mode.
" er • "_
This light indicates the recyclable twin deodorizers are in operation.
_ • Recycle the,honeycomb cartridge once or twice a year (see "Cleaning the
Accessories secuon)
e,
I Crushed Ice and Ice M
\ I / IceType Press the Ice Type button in seqence to choose
/ __ _ _ Bright icon indicates the ice type is currently chosen.
_.,___'/ _13/ " ICE " Cubed Ice, Crushed Ice or Ice Off to stop making ice.
/Cu_e_ Crushed Ice Off
_ OFF •
• When the green light changes to orange, it is time to replace the water filter.
If indicator is red, quick replacement is strongly recommended.
• When the water filer is replaced, reset the indicator by pressing the Ice Type
button and the Child Lock buttons simultaneously for 3 seconds.
• To turn off this indicator off, press the Ice Type and Child Lock buttons simulta-
neously for 5 seconds.
6
Page 7

Freezer
• Thefreezertemperaturecan be setbetween
8°F and -14°F.
• Press the Freezer Temp. button repeatedly untilthe
desiredset temperatureis shown inthe temperature
display.
• The temperaturedisplay changesin sequence
between8°F and -14°F.Whenthe display reaches
8°F,it returnsto -14°F.
• After five seconds, thedisplay revertsto the actual
freezer temperature.Theunitwill thenwork to adjust
to the new desiredtemperature.
• When ice cream isstored above 4°Fin freezer,it maymelt.
/k
WARNING
• The temperatured the freezer or the refrigeratorrisesfrom frequentopenings,when sweeping
and from warm food.This may causethe digitaldisplay to blink. Thedigitaldisplay willstop
blinkingwhen thefreezer and refrigeratorreturn to the normaltemperature.
Refrigerator
• The refrigeratortemperaturecan be set between
46°F and 34°F.
• Pressthe Fridge Temp.button repeatedlyuntilthe
desiredtemperature is shown inthe temperaturedis-
play.
• The temperaturedisplay changesin sequenceand
reverts inthe same way asthe freezer.
Ice Dispenser
The icemakerproduces10 cubesatonceand about
120cubesa day automatically.Thisquantitymay beinflu-
encedby factorssuchasthefreezertemperature,Power
Freezefunctionandthenumberd dooropenings.When
yourrefrigeratoris pluggedin,theCubedicemode is
automaticallyselected.
Pressthe Ice Type button to select the type of ice:
• Cubed ice :_: '_ _ •
• Crushed ice _/-_ _ •
• No ice
(_ If the Ice remains in the Ice bucket, the
NOTE cubed ice is obtained.
Push the ice dispenser lever with a cup.
• Place a cup in line with the dispenser lever the
dispenser to prevent the ice from jumping out.
\ i/
//1\ \
For Cubed ice
i
/=\
For Crushed ice
\_ _ :_::• No ice
// \\
For ice off
Water Dispenser
The capacityof the water tank isapproximely 0.3gal.
Cold Water
• Push the water dispenser lever with a cup.
• If you have just installed the refrigerator,throw
away the first six glassfuls of water to flush out
impurities in the water supply system.
/k
CAUTION
If you have a long vacation or business trip
and won't use the water or ice dispensers,
close the water valve. Otherwise, leakage
of water may occur.
iiiiiiiiiiiiiiiiiiiii_.
Never put fingers or any other objects in the
NOTE dispenser opening. It may cause injury.
Page 8

Freezer
Xtra SpaceTM
DoorBin --
Ice Maker-
Light
Ice Chute
Glass Shelf --
WireShelf
LightSwitch --
Tilt Pockets
'_ Wire Drawers
E
z
RS2533Model
Refrigerator
Water Filter
Light(upper)
Spill-proofglass Shelf
Light Switch
FoldableShelf (RS2577)
Twin Deodorizer
Egg Container
CoolSelectZoneTM Drawer
( ChilledBin for RS2533)
Vegetable& FruitDrawers
Front Leg Cover
RS2577Model
with CoolSelectZoneTM
-- DairyCompartment
-- Wine Rack (RS2577)
-- GallonDoorBin
-- BeverageStation(RS2577)
-- Lights(lower)(RS2555,2577)
-- Gallon DoorBins
RS2555Model
with CoolSelectZoneTM
Door BinTopLips
8
Page 9

FROZEN FOOD STORAGE IN FREEZER
Xtra SpaceTM
• Can be usedfor frozenfoodssuch aspizza, pasta,burri tos,
and fajitas.
• Inorder to prevent odor penetrationto the ice,storedfood
should bewrapped securely.
...... TemperedGlass Shelf( Wire Shelf)
• Can be usedto storeall typesof frozenfood.
Door Bin(Tilt Pocket)
• Can be usedfor smallpackagesof frozen food.
PlasticsDrawer(Wire Drawer )
• Can be usedto store meatand dry foods.Storedfood should
be wrappedsecurely usingfoil or other suitablewrapping
materialsor containers.
...... Icechute
DOnot putyourfingers,hands oranYotherinsuitable objects inthe ChUteor ice'maker buckeL
WARNING
Asthis may resultin personal injuryormaterial damagel
Page 10

CHILLED FOOD STORAGE IN REFRIGERATOR
TemperedSpill ProofGlassShelf
• Can be usedto storeall types of chilledfood.
• Safeand hardto break resistant.
• Circular marks on the glass surfaceare a normalphenomenon.
Chilled Binor CoolSelectZoneTM Drawer
• Helpsto preserve thetaste offood and prolongs its freshness.Use
tostore cheese,meat, poultry,fish or anyotherfoods used quickly.
iiii 8.............
iiiiii ............
Fruit & VegetableDrawer(Upperand Lower)
• Isused to storefruits andvegetables.
• This drawer is airtight.Optimizedhumiditycontrol designhelps to
preservethefreshness of the stored vegetables and fruits.
DairyCompartment
• Can be usedto storebutter,margarineand cheese.
Gallon Door Bins
• Can be usedto storefoods in small packages,such asmilkand
yogurt.
BeverageStation(R82577)
• Can be usedto storethe frequentlyuseditems, such as canned
beverages andsnacks and allowsaccess tothese itemswithout
openingthe refrigeratordoor.
(_ Bottlesshould be stored tightly together so that they do not fall out.
NOTE
Egg Container
13
• Put eggsin the containerand placethem onthe shelf.
iiiiit4
WARNING
Wine Rack(R82577)
• Placeyour wine bottle on the rack to maintaintheir taste.
• If you have a long vacation planned, you must decide to empty the refrigerator and turn it off. Wipe
excess moisture from the inside and leave the doors open. Otherwise,odor and mold may develop.
10
Page 11

"Select" Button (RS2555, RS2577)
iiiiiil_......... SoftFreeze
• When "SoftFreeze"ischosen, the temperatureon the
digtalpanel displays23°F(-5°C)regardlessof theset
temperatured the refrigerator.
• "Soft-Freeze"temperaturehelps keep meatsandfishes
fresh longer.
• Can cut meat easily withoutdrips.
2
Chill
• When "Chill"is chosen,the temperatured the CoolSe-
lectZoneTM Draweris kept at 30°F(-1°C)regardlessd
the setrefrigeratortemperature.
• "Chill"temperature helpskeep meator fish fresh longer.
Cool
.............................:'7 _"
_ck Cool
• When"coor' ischosen, the temperaturewill be the
same asthe settemperatureof the refrigerator.The digi-
tal panelshowsthe same temperature asthatd the dis-
playpanel.
• For"Cool,"the CoolSelectZoneTM Drawer allowsextra
refrigeratorspace.
\ t .
-_)Freeze
z'_\Ohil I
_ _Select
Soft
11
Page 12

"Quick Cool" Button
• Youcan usethe Quick Coolfeaturewith the CoolSelectZoneTM.
• "QuickCool" allows 1~3cannedbeveragesto coolwithin 60 min.
• Tocancelthis option, pressthe "Quick Cool"buttonagain.
CoolSelectZoneTM returnsto the previoustemperature.
• When"QuickCool"ends, it returnsto the "Cool"temperatureset-
ting.
\_ck Cool
NOTE
Dependingon the beverages,the cool-downtime may vary.
• For"QuickCool"option,food stored in the CoolSelectZoneTM
Drawershouldbe removed.
NOTE
"Thaw" Button
• Drips loss andqualitydeteriorationof meatsreducesthe fresh-
ness d foods.
• After "Thaw"is selected,warm and cold air is alternatelysup-
plied intothe CoolSelectZoneTM Drawer.
• Dependingon theweight d meat, thawing time can be selected
for 4 hrs, 6 hrs, 10 hrs, and 12 hrs sequentially.
• When"Thaw"ends, CoolSelectZoneTM displayreturns to "chill"
condition.
• Tocancelthis option, press any button except "Thaw".
• Theapproximatethawingtime of meat andfish are shown
below.(Basedon linch thickness)
_o Soft
Freeze
Ohill
N
Freeze
_ Soft
, Chill
b Cool
_ Select
el
Select
ckCool
Thaw Time 4 hours 6 hours 10hours 12hours
Weight 0.8Ib 1.3Ib 1.7Ib 2.2Ib
Dependingon the size andthickness of meatand fish, the thawing time mayvary.
NOTE
NOTE
The aboveweight representsthe totalweight offood inthe CoolSelectZone Drawer.
Ex)The total thawingtime for 1.3lb frozen beefand 0.8 lb frozenchickenwill be 10hours.
• With the "Thaw"option,foodstoredin the CoolSelectZoneTM Drawershouldbe removed.
12
TM
Page 13

GlassShelf
Ice Maker Bucket
......• Removethe bucket by lifting up and pullingout.
• Pulltheshelfoutasfaras
itgoes.Thenliftitupand
removeit.
Front Leg Cover
Door Bin
• Holdthedoor binwith both
hands andthen lift itup.
Plastic Drawer(WireDrawer)
• Removethe drawer by
pulling itout and liftingit up Ib ........................:..fill
slightly. /
1 Spill Proof GlassShelf
• Pullthe shelf out asfar as itwill go. Thenlift it up and remove itsoftly.
Vegetable& Fruit Drawer
iiii!i!i2_........
• Removethe drawer byholding the handle,pullingthe drawer out and lifting it up smoothly..
• Removethe optimized humiditycontrolcover bypulling ittowards you.
5
• Open the freezer and refriger-
ator doors,removethree
screws and detach the cover.
• Toreassemblethe cover leg
front, putit back to original
position and tightenthe threescrews.
• Do not useexcessive forcewhen
NOTE removingthe cover. It may causean
injury.
.......Gallon Door Bin
• Holdthe binwith bothhands and remove itby lifting it up.
......Wine Rack
• Itis attachedto the cabinetwall. To removewine rack,slidethe
wine rackinthe direction d the arrow asshown.
• Simply take the rackout d thetabs.
L_=-I • Before removingthefreezerandrefrigeratoraccessories,pleasemovethestoredfoodsto otherspace.
NOTE
13
Page 14

Toopenthe BeverageStationTM,holdthe BeverageStationTMdoorhandleand pullit downward.
• TheBeverageStationTMisconvenient
andreducesenergyconsumption,
becauseyoudo notneedtoopen
• It is recommendedthatyouuse the
BeverageStationTMforstoringmost
frequentlyneededfoods
therefrigeratordoortoaccessstored
beveragesandsnacks.
• The door of the Beverage StationTM should never be removed.The Beverage StationTM cannotfunction if its door
is missing.
• When closing the Beverage StationTM door, be careful not to putyourhands or fingers aroundthe doorframe
WARNING
where they can be caught or injured.
• When you use the open door as a tray,do not place heavy objects on it. Do notallow childrento
hang on the door because there is a risk of personalinjury or material damage.
• When you open the beveragestationtMdoor, be careful not tohit childrenhead.
Interior
• Clean the accessorieswith a milddetergent,then wipeout witha drycloth.
• After washingthe accessories,make surethat they aredry before usingthem again.
Exterior
• Wipethe digital panel and displaypanelwith a cleancloth.
• Thedoors and handlesshould be cleanedwith a mild detergentand cloth. Drythem with a
clean cloth.
• Theexteriorpartd refrigeratorshould be polishedonce ortwice a year.
Rear
• Use a vacuum cleaner to removedust once or twice a year.
Iceand water dispenser (R82555, R82577)
• Use a damp cloth to clean the iceand water dispenser.Then wipe itout witha dry cloth.
• Tokeepdrainage griddry,do not touch ice andwater dispenser.
BeverageStationTM(R82577)
• Use a damp cloth to clean the BeverageStationTM.Then wipe itout with a dry cloth.
Rubberdoor seals
• Ifthe rubberdoor seals aredirty,the doorwill not close properly,The refrigeratorwill not be
able to functionefficiently.Clean the doorswitha milddetergentand damp cloth.Thenwipe
with a dry cloth.
//_ • Donot spraythe refrigeratorwith water.It may cause a death by an electricshock.
• Donot clean it with benzene,thinner or car detergent.It maycause a fire.
WARNING
14
Page 15

TwinDeodorizer
• Removethecoverwith afiat bladescrewdriverasshown.
• Takeoutthe cartridgefromthecoverandsoakitin cleanandwarmwater
atleastthan4 hrs.Completelydryoutthe cartridgewith sunlightforat least8hrsin
anopenarea.
• Repeatthisprocessonceor twicea year.
• If it isdriedin a confinedarea,odor maybespreadtothatarea.
NOTE • Keepthechildrenawayfromyellowwater,they maydrinkwater.
Before changing the interior light, unplug the refrigeratorfrom the power supply. Ifyou
have difficulty in changing the light, contact your service center.
WARNING
INTERIORLIGHTIN THE REFRIGERATOR.
Upper
Pull outthe screwcap (_
removethe screw.
and
Pushthe lamp cover inthe
directionof the arrows. _ ............
idge
After changingthe bulb,
reattachthe lightcover
and screw it inagain.
Lower (RS2555,RS2577)
1.............Pulloutthe screwcap and
removethe screw.
Takethe lampcoveroutin iiiii_............
thedircotion of the arrows.
15
After changingthe bulb,
reattachthe lightcover
and screw it again.
Page 16

INTERIORLIGHTIN THE FREEZER.
The freezer light is located in the bottom of the auger motor case.
Use a screwdriver to remove
the lightcover ((_).
To replace freezer and refrigerator light bulbs (Bulb size E14, 30 watts), please contact
NOTE
ADDRESS : SAMSUNG ELECTRONICS AMERICA, INC.
TELEPHONE : 1-800-SAMSUNG FAX : 1-973-601-6001
Light bulb part no: 4713-001145
:2, Change the bulb with a new
one (@)
SERVICE DIVISION
400 VALLEY ROAD, SUITE 201, MT. ARLINGTON, NJ 07856
Reattach the light cover
The water "Filter Indicator" light
• "Filter Indicator" light lets you know when it is time change your water filter cartridge. The light
will change from green to orange. This tells you that it is almost time to change the current cartridge.
It is recommended that you replace the cartridge when the light changes to red.
(see "Install the water filter" section for more informmation)
Using the dispenser without the water filter
• You can not use the water and ice dispenser without a water filter cartridge because the water line
blocks at water supply.
Ordering replacement filters
•To order more water filter cartridges, call 1-800-SAMSUNG and ask for accessory Part # DA29-
00003A or contact your authorized Samsung dealer.
The refrigerator doors have a special door opening and closing feature to make sure that the doors
close all the way and are securely sealed.
When opening the door, it will only open so far. After reaching a certain point, it will remain open.
When the door is partially open, it will close automatically.
16
Page 17

Checking the Dimensions of your Entrance Door
Check the dimensions of your entrance door to determine whether the refrigerator can pass
through it.
Model RS2533, RS2555, RS2577
25.2
36
69
70
35
29
Dimension
(inch)
Capacity (Cu. Ft)
Case Height
Depth
Width
without Hinge
with Hinge
with door
withoutdoor
Selecting the Location for the Refrigerator
• Select a location with easy access to the water supply.
• Select a location with enough space for the refrigerator.
• Select a location without direct exposure to sunlight.
• Before disassembl ng the freezer door: the Water supply !ine needs to be disconnected;
aT (if not the water supply line can be damage&)
NOTE • See ,Separating the water supply line from the refrigerator" on the next page,
Allow sufficientspaceto circulatethe air at the internalcooling system.
• Whenrefrigeratorhas notenough space, the internalcooling systemmay not work correctly.
@
NOTE
1 inch 1
1 inch
0.1 inch
Allow clearancetothe right, left, backand top when installingtherefrigerator.
This has the advantageof reducingpower consumption.
17
Page 18

When you can remave the doors if,you can remove the doors.
Removing the Front Leg Cover
Open the freezer and refrigerator doors, and then take off the front leg cover by turning the
three screws counter-clockwise.
FRONT LEG COVER
/
_. SCREW
_ tj
L_
Separating the Water Supply Line from the Refrigerator
1) Remove the screw from clamp (®).
2) Remove the water tube by pressing the coupler (@) and pulling the water tube (qb)away.
NOTE
Donotcutthewatertubebutseparateitfromthecoupler.
18
Page 19
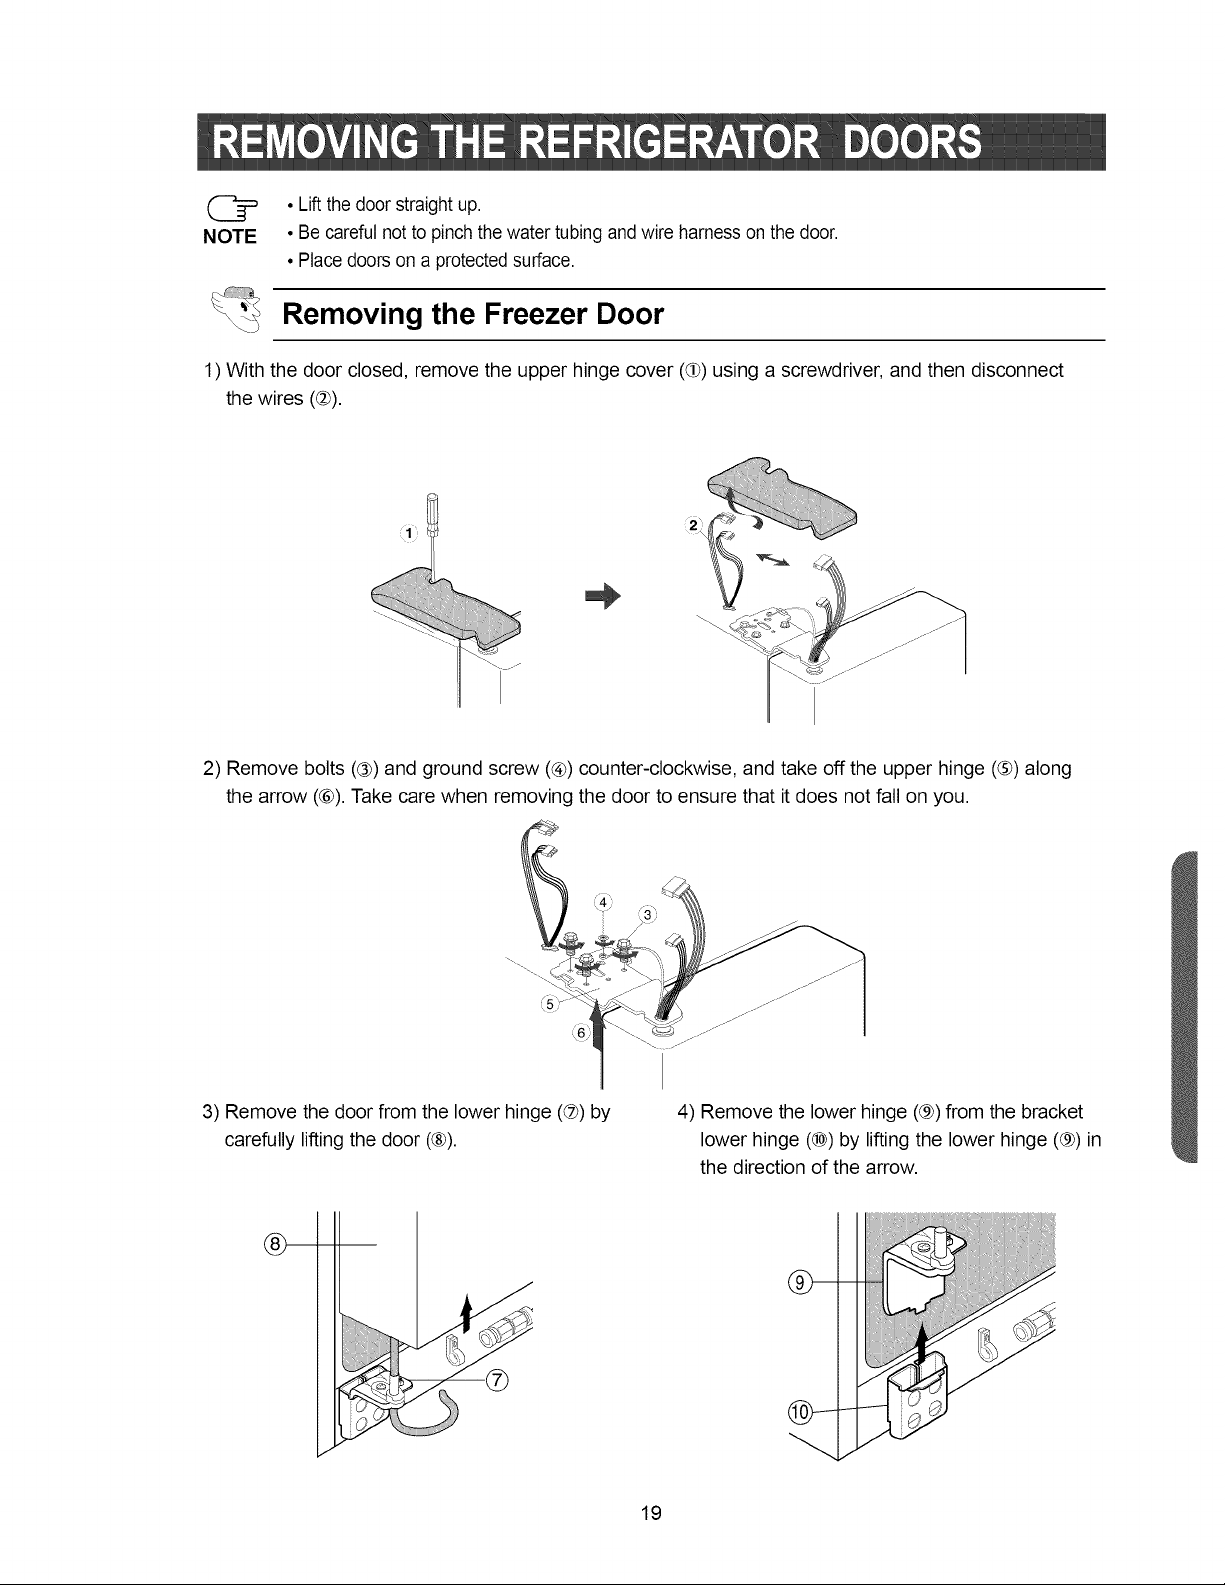
•Liftthedoorstraightup.
NOTE
•Becarefulnottopinchthewatertubingandwireharnessonthedoor.
•Placedoorsonaprotectedsurface.
Removing the Freezer Door
1) With the door closed, remove the upper hinge cover (qb)using a screwdriver, and then disconnect
the wires (@).
i
2) Remove bolts (®) and ground screw (®) counter-clockwise, and take off the upper hinge (®) along
the arrow (®). Take care when removing the door to ensure that it does not fall on you.
3) Remove the door from the lower hinge (@) by
carefully lifting the door (®).
®
4) Remove the lower hinge (®) from the bracket
lower hinge (®) by lifting the lower hinge (®) in
the direction of the arrow.
19
Page 20

Removing the Refrigerator Door
1) With the door closed, remove the upper hinge cover (qb)using a screwdriver, and then disconnect
the wires (@).
I
2) Remove bolts (®) and ground screw (@) counter-clockwise, and take off the upper hinge (®) in the
direction of the arrow (®). Take care when removing the door to ensure that it does not fall on you.
3) Remove the door from the lower hinge (@) by
lifting the door (®).
\\\\\\
J
4) Remove the lower hinge (®) from the bracket
lower hinge (®) by lifting the lower hinge (®) in
the direction of the arrow.
--®
2O
Page 21

Reattaching the Freezer Door
1) Insert the lower hinge (qb)in the bracket lower
hinge (@).
2) Reattach the freezer door by inserting the hose
(®) in the lower side of the door into the hole in
the lower hinge (®) and pulling the hose down.
d:P
3) Insert the upper hinge shaft (®) into the hole (®). After levelling between the upper hinge hole (@) and
the hole of the cabinet (®). Reattach bolts (®) and screw (®) in a clockwise direction.
(9
4) Connect the wires. 5) Put the front part of the upper hinge cover (@)on
the front part of the upper hinge (@) and reattach
from the front part of the upper hinge cover first.
21
Page 22
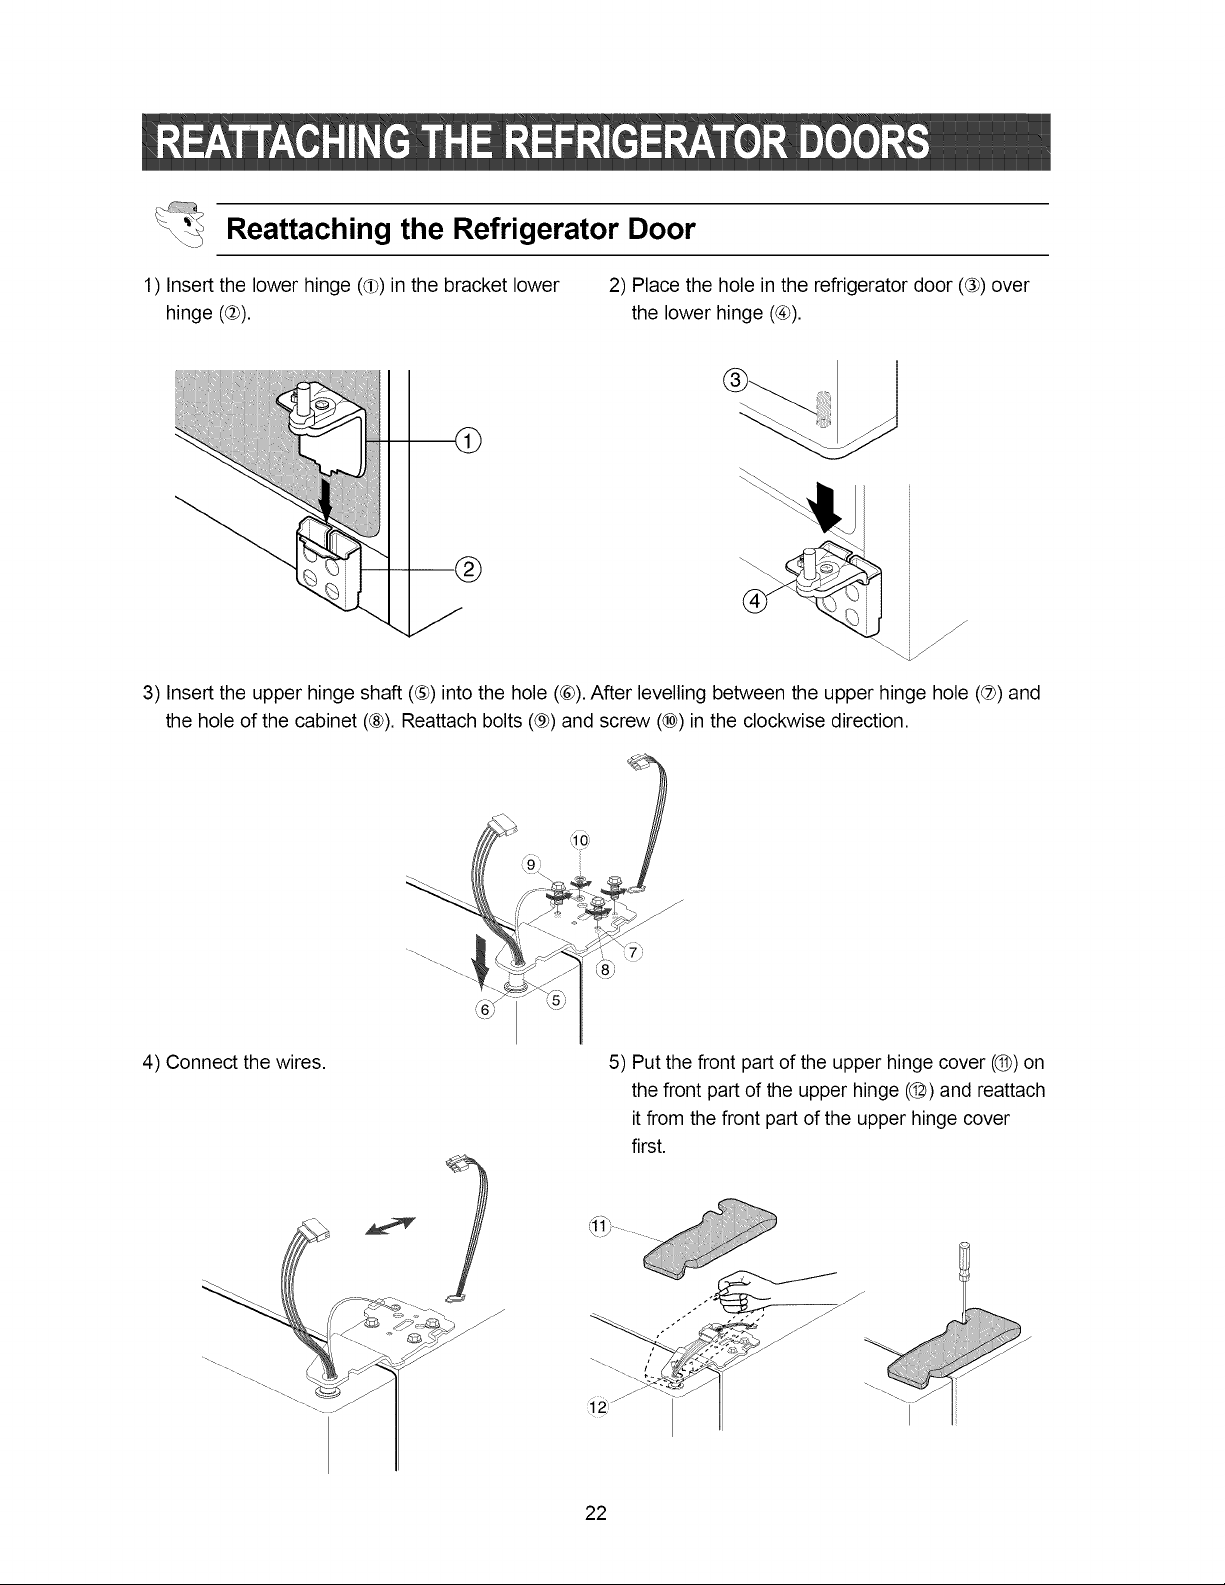
Reattaching the Refrigerator Door
Insert the lower hinge (qb)in the bracket lower
hinge (®).
2) Place the hole in the refrigerator door (®) over
the lower hinge (®).
J
3) Insert the upper hinge shaft (®) into the hole (®). After levelling between the upper hinge hole (@) and
the hole of the cabinet (®). Reattach bolts (®) and screw (®) in the clockwise direction.
4) Connect the wires. 5) Put the front part of the upper hinge cover ((_) on
the front part of the upper hinge ((_) and reattach
it from the front part of the upper hinge cover
first.
22
Page 23
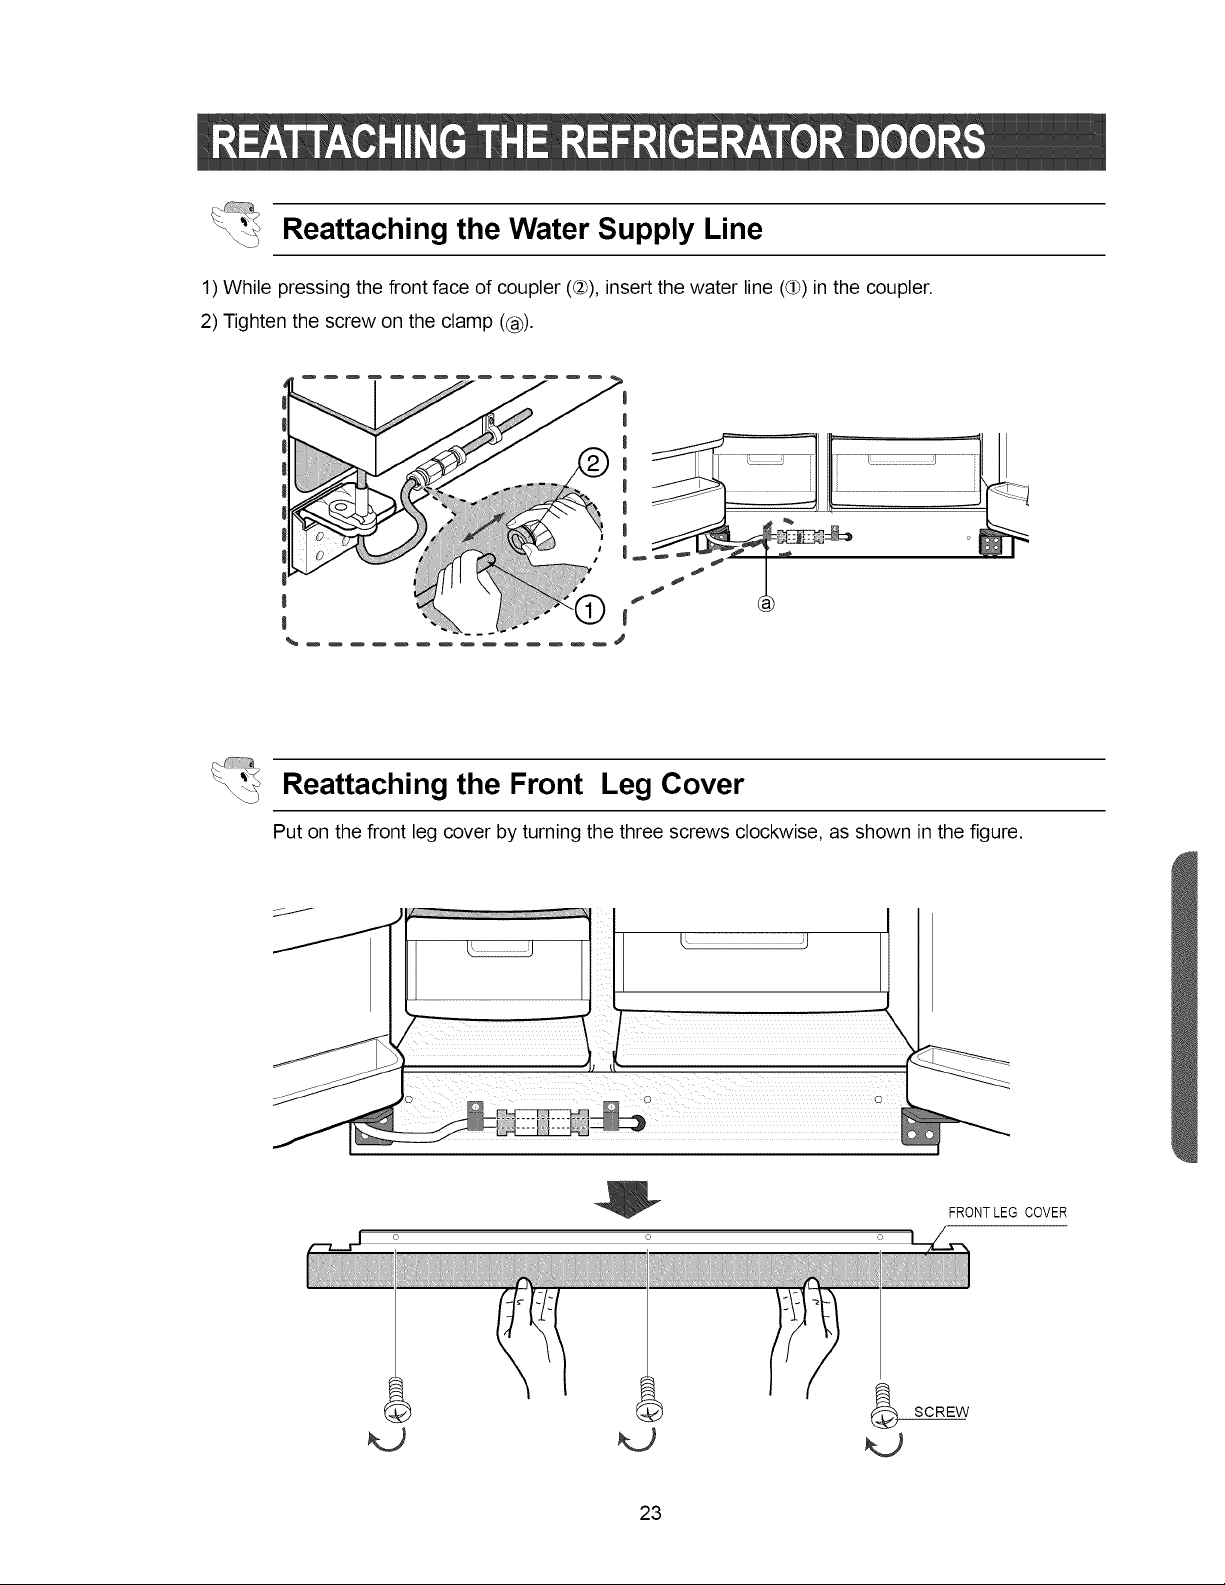
Reattaching the Water Supply Line
1) While pressing the front face of coupler (@), insert the water line (qb)in the coupler.
2) Tighten the screw on the clamp (®).
I
Reattaching the Front Leg Cover
Put on the front leg cover by turning the three screws clockwise, as shown in the figure.
FRONT LEG COVER
SCREW
23
Page 24
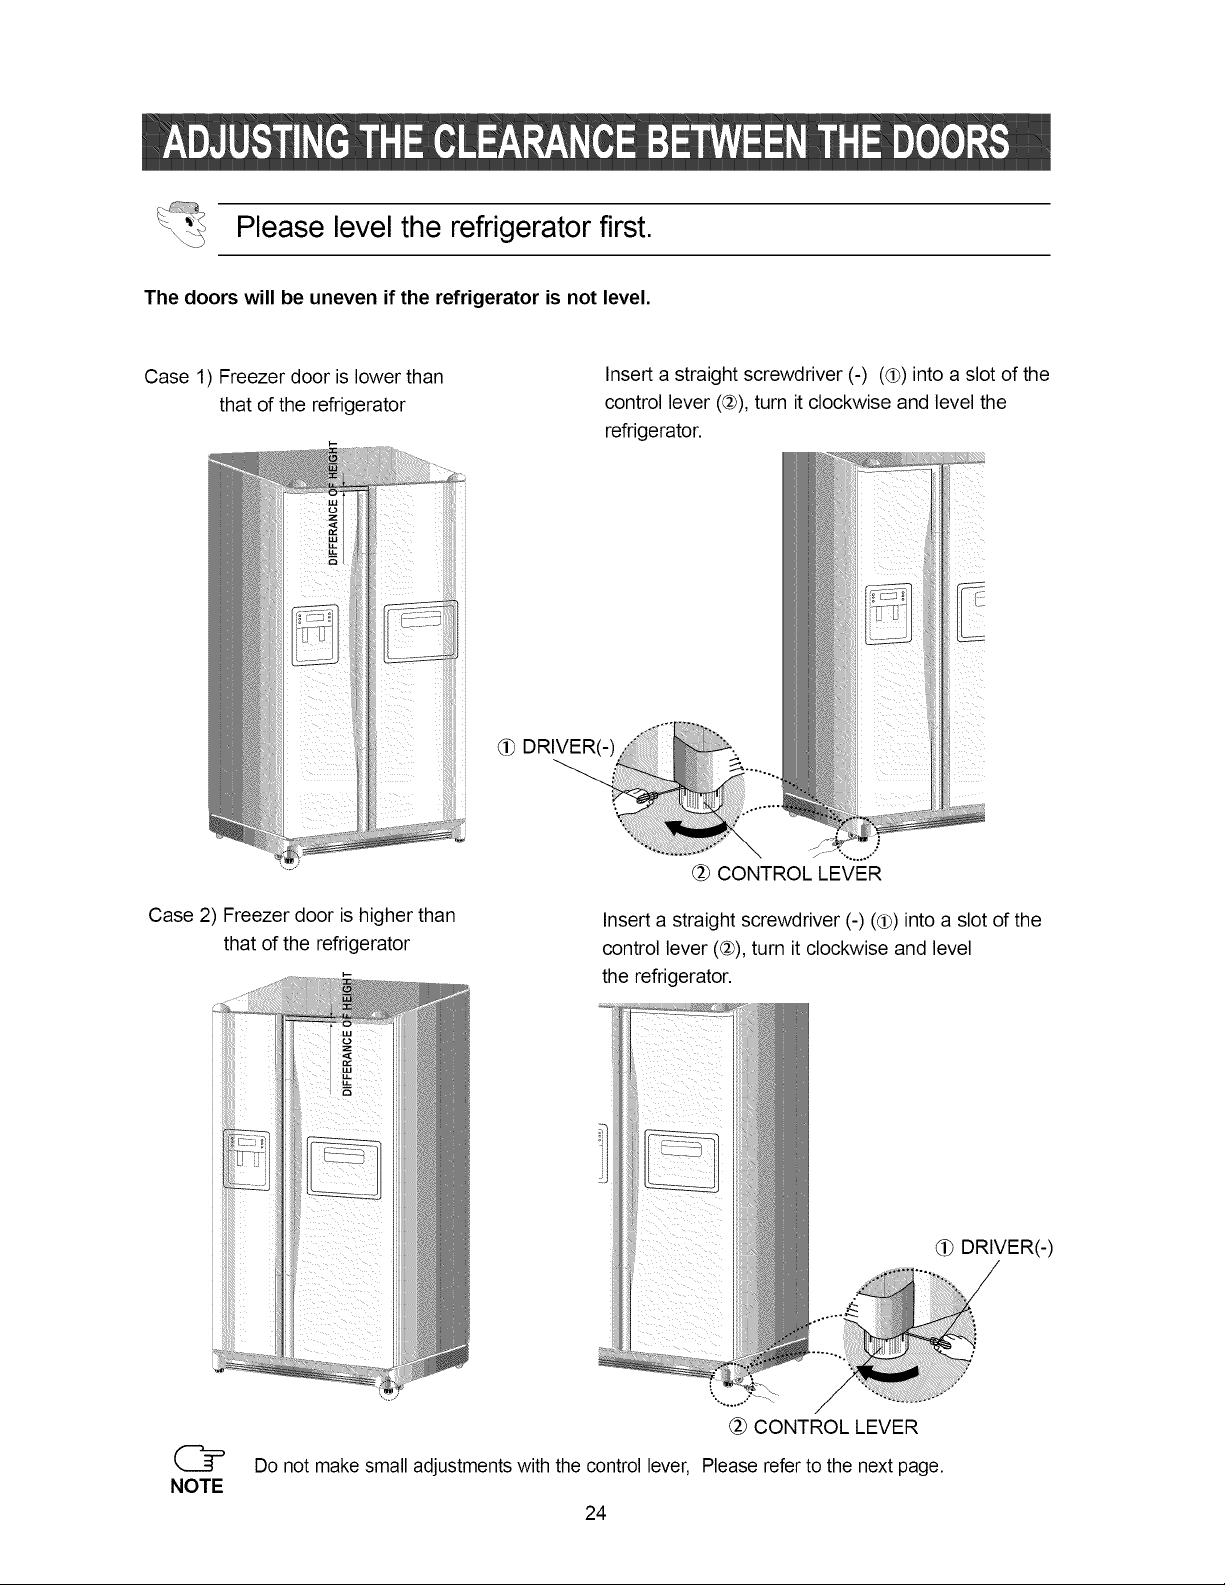
Please level the refrigerator first.
The doors will be uneven if the refrigerator is not level.
Case 1) Freezer door is lower than
that of the refrigerator
-.,j
Case 2) Freezer door is higher than
that of the refrigerator
Insert a straight screwdriver (-) (¢) into a slot of the
control lever (@),turn it clockwise and level the
refrigerator.
DRIVER(-)
°.,°°.J
(_ CONTROL LEVER
Insert a straight screwdriver (-) (¢) into a slot of the
control lever (@),turn it clockwise and level
the refrigerator.
NOTE
DRIVER(-)
(_ CONTROL LEVER
Do not make small adjustments with the control lever, Please refer to the next page.
24
Page 25
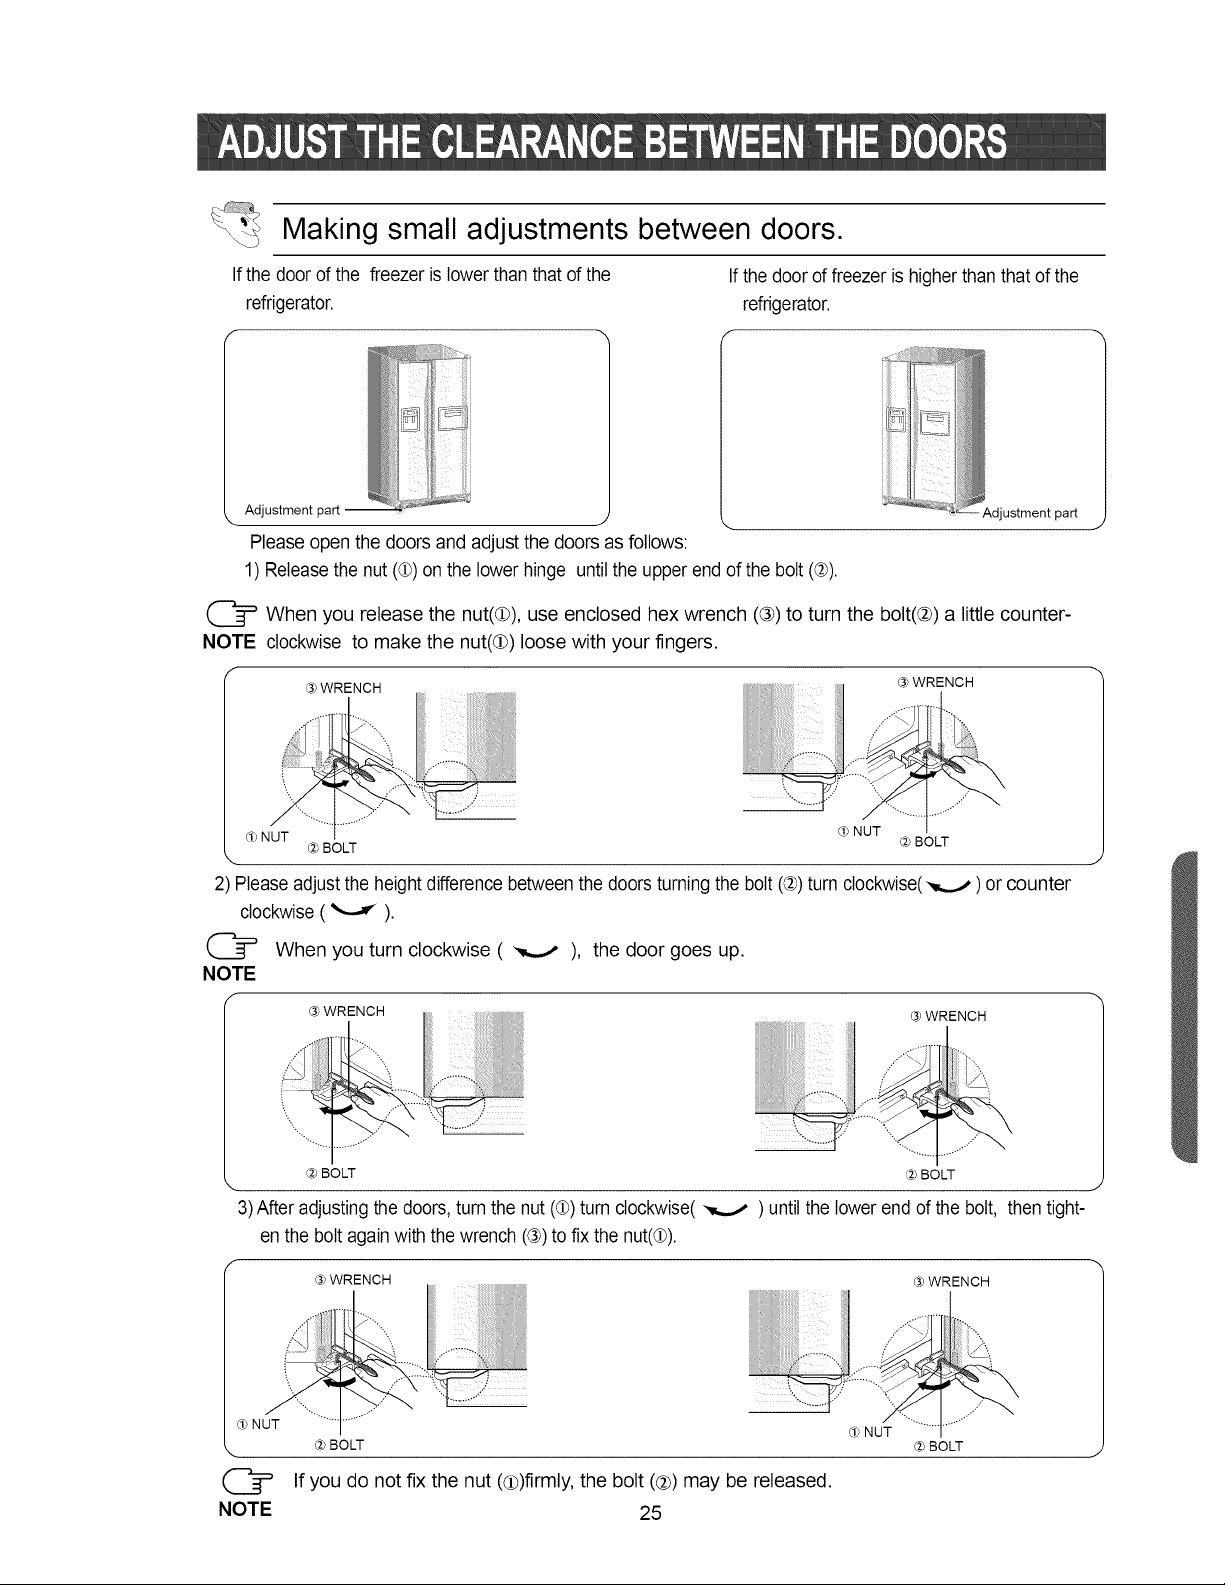
Making small adjustments between doors.
If the doorof the freezer islowerthan that of the If the door of freezer is higherthan that of the
refrigerator, refrigerator.
f _, f
J
tdjustment part
Pleaseopen the doors and adjustthe doors as follows:
1) Releasethe nut (@)onthe lowerhinge untilthe upperend of the bolt (@).
(_ When you release the nut(@), use enclosed hex wrench (@)to turn the bolt(@) a little counter-
NOTE clockwise to make the nut(@) loose with your fingers.
F
® WRENCH ® WRENCH
.j "'..
d_ NUT #) BOLT @ BOLT
d) NUT
2) Please adjust the height difference between the doors turning the bolt ((_)turn clockwise(_ ) or counter
clockwise( _ ).
(_ When you turn clockwise ( _ ), the door goes up.
NOTE
f
® WRENCH ® WRENCH
.. ;./ ,,.
..... ..- .. ......
#) BOLT #) BOLT
3)After adjusting the doors, turn the nut (@)turn clockwise( _ ) until the lower end of the bolt, then tight-
en the bolt again with the wrench (3_)to fixthe nut(_)).
f
d) NUT
cr
NOTE
® WRENCH ® WRENCH
@BOLT
dh NUT
#) BOLT
If you do not fix the nut (@)firmly,the bolt (@)may be released.
25
Page 26

1) In order to operate the ice maker properly, water pressure of 20 ~125 psi is required.
In this range a 170 cc paper cup can be filled in 10 secs.
2) The water filter removes particles. It does not sterilize or destroy any micro-organisms.
3) If the refrigerator is installed in area with low water pressure (below 20psi), you should install a boost-
er pump to compensate for the low pressure.
4) Ensure the water storage tank inside the refrigerator is properly filled initially, push the water dis
penser lever until the water runs from the outlet.
(_= A universal water supply kit is available at extra cost from your dealer. The refrigerator manufac-
NOTE turer recommends using a water supply kit containing copper tubing.
Connecting to water supply line
1) Shut off the main water supply and turn the Ice maker to
the off position.
2) Locate the nearest cold drinking water line.
3) Follow the instructions in the ice maker installation kit.
1. Cold Water pipe
2. Pipe Clamp.
3.Copper Tubing
4,Compression Nut
5.Compression Sleeve
&Shut Off Valve
7,Packing Nut,
6 5 4
26
Page 27

Connect the water tube to the refrigerator.
1 Connect to the 3/16" white plastic tube on the back of the
refrigerator.
2) Slip the compression nut onto the white plastic tube.
3) Screw the union into the white plastic tube and tighten the
compression nut.
@ Do not overtighten the compression nut.
NOTE
4) Silp the compression sleeve and compression nut on copper
tubing as shown. Tighten the comperssion nut onto the union.
5) Turn water on and check for any leakege.
Nut
'_J_ Union
}leeve
Nut
C_
NOTE
Waterline must be connected to potable water only
Install the water filter.
1) As shown, the fixed cap separate in the refrigerator by rotating it
counterclockwise.
Remove the water filter from the box and put a month indicator
sticker on the filter as shown.
2) Write the month you installed the filter on the label.
EX) If the water filter was installed in March, put "MAR"
3) Remove the protective cap then position and insert the
filter as ishown.
4) Slowly turn the water filter clockwise 90° to align
the indication mark on the cover, locking the filter in posi
tion. Do not overtighten.
SEPARATION
OF RED
, r-q ,
\ \
'_2") _ COVER FILTER
NOTE
'J) _N
I _, IxW_THLOCKPOSmON
STICKER
(MONTH INDICATION)
Please check that the indication line aligns with the lock position.
27
Page 28

Removeanyresidualmatterinsidethewatersupplylineafterinstallingfilter.
1) Turn on the main water supply & shut-off valve of the water
supply line.
2) Run water through the dispenser until the water runs clear
(6~7 minutes). This will clean the water supply system and
clear air from the lines.
3) Additional flushing may be required in some households.
4) Open the refrigerator door and check if water leaks around
the water filter.
•A newly-installed water filter cartridge may cause water to briefly spurt from the dispenser.
NOTE ° Before reinstalling the water filter, remove the wine rack (RS2577).
ICE
WATER
Check the amount of water supplied to the ice tray.
1) Lift up (@) and pull out (@)the ice maker bucket in the freezer.
2) When you press the test button, the ice cube container is
filled with water from the water supply tap.
Check the amount of water (see the illustration below).
If the water level is too low,
the ice cubes will be small.
CHECK THE WATER LEVEL
This is not a problem with the ice maker
but of the water pressure in
the pipe, and occurs frequently.
When this problem occurs, use
the following steps to check the
amount of water supplied.
\
ICE MAKER
TOO H IGH_'_
28
Page 29

Adjust the amount of water supplied.
1) In order to set the display panel to the option mode, press the Freeze
Temp. and Power Cool buttons at the same time for about 12 seconds
until the temperature display panel switches to the option mode and you
hear a beep.
2) A number under "Fridge Temp." corresponds to the option number. Press
the Fridge Temp. button to increase the number and the Power Cool but-
ton to decrease the number. Set the option number 3.
-- Option number
3) Now, you have to select the "Input Data" to control the water supply time.
Press the Freeze Temp. button to increase the value. Press the Power
Freeze button to decrease the value.
Choose the right amount of water supplied to the ice tray
4) Wait until the display panel automatically switches back to the control
mode.
inputData WaterSupplyTime(sec)
00 5
01 4
O2 3
O3 6
O4 7
O5 8
06 9
07 10
08 12
09 13
10 15
11 17
12 19
13 21
14 23
15 25
Input Data
5) Check the amount of water supplied to the ice tray as shown
......__ o "_ .....
PTIMU__M CHECK THE WATER LEVEL
29
Page 30

The refrigerator does not work at all or it does not
chill sufficiently
° Check that the power plug isproperly connected.
° Isthe temperature control onthe display panel set to
the correct temperature? Try seting it to a lower tem-
perature.
° Isthe refrigerator in direct sunlight or located near a
heat source?
• Is the back of the refrigerator too close to the wall?
The food in the refrigerator is frozen
° Isthe temperature control onthe display panel set to
the correct temperature? Try seting it to a warmer
temperature.
° Isthe temperature in the room too low?
° Did you store the food with a high water content in
the coldest part of the refrigerator.
You can hear unusual noise or sounds
° Check that the floor is levelled and stable.
° Isthe backof the refrigerator too near to the wall?
° Wasanything dropped behind or under the refrigera-
tor?
° A "ticking" sound may be heardfrom inside the
refrigerator, but this is normal. This occurs because
various accessories are contracted or expanded.
The front corners and sides of the cabinet are hot;
condensation occurs.
° Anti-condensators are installedin the front corners of
the refrigerator to prevent condensation.
° Condensation can occur when you leave the door
open for a long time.
Ice is not dispensed
° Did you stop the ice making function?
° Isthere any ice inthe icestorage unit?
° Isthe water line connected and the shut-off valve
open?
° Isthe freezer temperature toowarm?
(Set the temperature lower)
° Did you wait for 12 hours after installationof the
water supply line before makingice?
You can hear water bubbling in the refrigerator
•The bubblingcomes from the refrigerant circulating in
the refrigerator and is normal.
There is a bad smell in the refrigerator
•Wrap strong smelling food so that it is airtight.
Throw away any rotten food.
Frost forms on the wall of the freezer
• Is the air vent blocked?
•Allow sufficient space between the foods stored for
efficient air circulation.
• Is the door closed properly?
No water is supplied
• Is the water line connected and the shut-off valve
open?
• Is the water supply line crushed?
• Is the water tank frozen because the refrigerator tem-
perature is too low? Select a warmer setting on the
display panel.
3O
Page 31

SAMSUNG REFRIGERATOR
(18 Cubic Feet and Larger Capacity)
This SAMSUNGbrandproduct,as supplied anddistributedbySamsung ElectronicsAmerica,Inc. (SAMSUNG)and deliverednew,
in the originalcarton to the originalconsumerpurchaser,is warrantedby SAMSUNGagainst manufacturingdefectsin materials
andworkmanshipfor alimitedwarranty periodof:
One(1) Year Parts and Labor on Refrigerator
Five(5)Years Partsand Laboron Sealed RefrigerationSystem Only*
(*Compressor,evaporator,condenser,drier, connectingtubing)
This limitedwarranty beginson the original date of purchase,and is valid only on productspurchased and used in the United
States. To receivewarranty service,the purchasermust contactSAMSUNG for problemdeterminationandservice procedures.
Warrantyservice can only be performedby a SAMSUNGauthorizedservice center. The originaldated billof sale mustbe
presentedupon requestas proof of purchasetoSAMSUNG or SAMSUNG'sauthorizedservice center.
SAMSUNGwill repairor replace any partfoundto bedefective,at our optionand at no charge as stipulated herein,with new or
reconditionedpartsduring the limitedwarranty period specifiedabove. All replacedpartsandproducts become the property of
SAMSUNGand must be returnedto SAMSUNG Replacementpartsand productsassume the remainingoriginalwarranty,or
ninety(90)days,whichever is longer.
In-homeservicewill be providedduring the warranty laborperiod subject toavailabilitywithinthe contiguous UnitedStates. In-
home service is notavailable in all areas. To receivein-homeservice,the product must be unobstructedand accessiblefrom floor
levelto service personnel. Ifduringin-home service repaircannot be completed,it may be necessaryto remove, repairand return
the product. If in-homeservice is unavailable,SAMSUNG may elect, atour option,to providefor transportationof our choice to
andfrom a SAMSUNGauthorizedservice center. Otherwise,transportationto and from theSAMSUNGauthorizedservice center
is the responsibilityof the purchaser.
This limitedwarrantycovers manufacturingdefects in materialsand workmanshipencounteredin normal,noncommercialused
this product,and shallnot applyto the following, including,but not limitedto: damage which occursinshipment;delivery and
installation;applicationsand usesforwhich this product was not intended;altered productor serial numbers;cosmetic damage or
exteriorfinish;accidents,abuse, neglect,fire, water,lightningor other acts of nature;use of products,equipment,systems, utilities,
services,parts,supplies, accessories,applications,installations,repairs,externalplumbing and leaks,external wiring,circuit
breakers,fuses or connectors notsuppliedand authorizedby SAMSUNG,or which damagethis productor resultin service
problems; incorrectelectrical linevoltage,fluctuationsand surges; customeradjustmentsand failureto follow operating instructions
cleaning,maintenanceand environmentalinstructionsthat are coveredand prescribedin the instructionbook;lossoffood due to
spoilage;consumable itemsincludingfilters and light bulbs.
THEREARE NO EXPRESSWARRANTIES OTHERTHANTHOSE LISTEDAND DESCRIBEDABOVE,AND NO WARRANTIES
WHETHER EXPRESSOR IMPLIED,INCLUDING,BUT NOT LIMITED TO,ANY IMPLIEDWARRANTIESOF
MERCHANTABILITYOR FITNESS FORA PARTICULARPURPOSE, SHALLAPPLYAFTER THE EXPRESSWARRANTY
PERIODSSTATEDABOVE,AND NO OTHER EXPRESS WARRANTYOR GUARANTY GIVEN BYANY PERSON, FIRMOR
CORPORATIONWITH RESPECTTO THIS PRODUCTSHALL BE BINDINGON SAMSUNG. SAMSUNG SHALL NOT BE
LIABLEFOR LOSS OF REVENUEOR PROFITS,FAILURETO REALIZESAVINGS OR OTHER BENEFITS,ORANY OTHER
SPECIAL, INCIDENTALORCONSEQUENTIALDAMAGESCAUSED BY THE USE,MISUSEOR INABILITY TO USETHIS
PRODUCT,REGARDLESSOFTHE LEGALTHEORY ON WHICH THE CLAIM IS BASED,AND EVEN IF SAMSUNGHAS BEEN
ADVISED OF THE POSSIBILITYOF SUCH DAMAGES. NOR SHALLRECOVERYOFANY KINDAGAINST SAMSUNGBE
GREATERINAMOUNT THAN THE PURCHASEPRICE OF THE PRODUCT SOLD BYSAMSUNGAND CAUSINGTHE
ALLEGED DAMAGE. WITHOUTLIMITING THE FOREGOING,PURCHASERASSUMESALL RISKAND LIABILITYFOR LOSS,
DAMAGEOR INJURY TO PURCHASERAND PURCHASER'SPROPERTYAND TO OTHERSANDTHEIR PROPERTY
ARISING OUTOF THE USE,MISUSEOR INABILITYTO USE THIS PRODUCT SOLD BY SAMSUNGNOT CAUSED DIRECTLY
BYTHE NEGLIGENCEOF SAMSUNG. THIS LIMITEDWARRANTY SHALL NOT EXTEND TOANYONE OTHERTHAN THE
ORIGINAL PURCHASEROF THIS PRODUCT,ISNONTRANSFERABLEANDSTATESYOUR EXCLUSIVEREMEDY,
Some states do notallow limitationson how long an implied warrantylasts,or the exclusionor limitationd incidentalor
consequentialdamages, sothe above limitationsor exclusionsmay not apply to you. Thiswarranty givesyou specificlegalrights,
andyou may also haveotherrights,which vary from stateto state.
Toobtain warranty service, please contactSAMSUNG at:
SAMSUNG CUSTOMERCARE CENTER
400Valley Road,Suite 201, Mt.Arlington,NJ 07856, Tel:973-601-6000,Fax:973-601-6001
1-800-SAMSUNG(1-800-726-7864)and www.SAMSUNGUSA.com
061002
Page 32

ADDRESS : SAMSUNG ELECTRONICS AMERICA, INC.
SERVICE DIVISION
400 VALLEY ROAD, SUITE 201, MT. ARLINGTON, NJ 07856
TELEPHONE: 1-800-SAMSUNG(1-800-726-7864) FAX: 1-973-601-6001
ELECTRONICS
 Loading...