

Samsung RS2666SW/XAA, RS2644SW/XAA, RS2644SL/XAA, RS2622SW/XAA, RS2545SH/XAA Owner’s Manual
...Page 1
E
Writethe modeland serial number here:
Model#
Serial #
Findthese numberson a label of the
refrigerator's cabinet on the left hand-side wall.
'SMANUAL
SAFETY WARNING SIGNS ...............................................................2
OPERATING INSTRUCTIONS ........................................................4
SETTINGUPTHE REFRIGERATOR........................................................4
MAJORFEATURES.....................................................................................4
CONTROLPANEL.......................................................................................5
DIGITAL PANEL..........................................................................................6
TEMPERATURECONTROL ......................................................................7
ICEand COLD WATERDISPENSER.........................................................7
SHELVESandBINS.....................................................................................8
FOODSTORAGEGUIDE...........................................................................9
CooISelectZoneTM DrawerGUIDE.............................................................11
REMOVINGTHE FREEZERACCESSORIES.........................................13
REMOVINGTHE REFRIGERATORACCESSORIES..............................13
BEVERAGESTATIONTM (RS666/2777).....................................................14
CLEANINGTHEACCESSORIES.............................................................14
CHANGINGTHE INTERIORLIGHT.........................................................15
WATERFILTER..........................................................................................16
DOORS.......................................................................................................16
CONTENTS
RS2544SL
RS2622SW
RS2644SL
RS2666SL
TALLATION
RS2545SH
RS2644SW
RS2666SW
RS2777SL
INSTALLATIONINSTRUCTIONS................................................17
INSTALLATIONOFTHE REFRIGERATOR............................................17
REMOVINGTHE REFRIGERATORDOORS...........................................18
REATTACHINGTHE REFRIGERATORDOORS.....................................21
LEVELINGREFRIGERATOR....................................................................24
ADJUSTINGTHECLEARANCEBETWEENTHE DOORS....................25
CHECKINGTHEWATERDISPENSERLINE..........................................26
INSTALLINGTHEWATERDISPENSERLINE........................................26
TROUBLESHOOTING...............................................................................29
CONSUMER SUPPORT ....................................................................30
WARRANTY...............................................................................................30
Inthe U.S.for questions aboutfeatures,
operation/performance, parts, accesories or service, call:
1-800-726-7864 (1-800-SAMSUNG)
www.samsung.com
DA68-00500W REV(1.3)
Page 2

• Beforeoperatingtheappliance,pleasereadandretainthismanualthoroughlyforyour reference.
• Becausethesefollowingoperatinginstructionscovervariousmodels,thecharacteristicsof yourrefrigerator
maydifferslightlyfromthosedescribedinthismanual.
•Theapplianceisnotintendedforuse bychildrenorinfirmpersonswithoutadultsupervision.
WARNING
•Childrenshouldbesupervisedto ensurethattheydonotplaywiththeappliance.
CAUTION/WARNINGSUSED OTHERSIGNS USED
Q Represents something you must NOT do.
Represents something you must NOT
(_ disassemble.
(_) Represents something you must NOTtouch.
WARNING
Indicates that a danger of
death or serious injury exists.
O Represents something you must follow.
_: Indicates that you must disconnect the
power plug from the socket.
Represents that a ground is needed to pre-
O vent electric shock.
CAUTION
Indicates that a risk of
personal injury or material
damage exists.
It is recommended that this should be han-
dled by a service center.
Because these warning signs are to prevent injury to from users or other persons, please follow
safety warning signs. After reading the warning signs, keep them in a safe place for future refer-
ence.
Donot storevolatile orflammable substancesin the
/_ WARNING SIGNS
Donotplugseveralappliancesintothesame multiple
Q receptacle.
• Thiscouldcauseoverheatingandthe riskoffire.
Makesurethat the powerplugis not squashedordam-
agedby thebackof the refrigerator.
• A damagedpowerplugmayoverheatand causefire.
Do not directly spraywater inside or outside the refrig-
erator/ freezer.
• Thereisa riskofelectricshock.
Donotuseaerosolsnearthe refrigerator.
• Thereisa riskofexplosionorfire.
Do not bend the power cord excessively or place
heavyarticles on it.
• Thisconstitutesa firehazard.If the powercordisdam-
aged,haveit replacedimmediatelybythe manufacturer
or itsserviceagent.
Do not insert the power plug with wet hands.
• Youmayreceiveanelectricshock.
Do not put acontainer filled with water on the refrigera-
tor.
• Ifspilled,thereis a riskoffireor electricshock.
Do not install the refrigerator in a damp place or a
placewhere it may come in contact with water.
• Deterioratedinsulationofthe electricalpartsmaycause
electricshockor fire.
refrigerator.
• The storageof benzene,thinner,alcohol,ether,LPgas and
othersuchproductsmaycauseexplosions.
Donot disassembleor repairthe refrigerator by yourself.
• You run the riskof causing a fire, malfunctionsand/or
personal injury.
Pull the power plug out of the socket before chang-
ing the refrigerator's interior light.
• Otherwise,thereis a riskof electric shock.
_, If you wish to dispose of the refrigerator, throw it away
by first removing the doors and seals.
• Do so in a way thatit is not possible for a child to remain
trapped inside.
O he refrigerator must be grounded.
* You must ground the refrigeratorto preventany power
leakagesor electric shockscaused by current leakage
from the refrigerator.
O Never use gas pipes, telephone lines or other poten-
tial lightening rods as ground.
• Improperuseofthe groundplugcan resultin ariskof
electricshock.If itis necessaryto usean extensioncord,
useonlya 3-wireextensioncordthathas a3-bladeground
pluganda 3-slot receptaclethat willacceptthe plugonthe
appliance.Themarkedratingof theextensioncordshould
beAC 115V~120V,10A,or more.If a groundingadapteris
used,makesurethe receptaclebox isfullygrounded.
Page 3
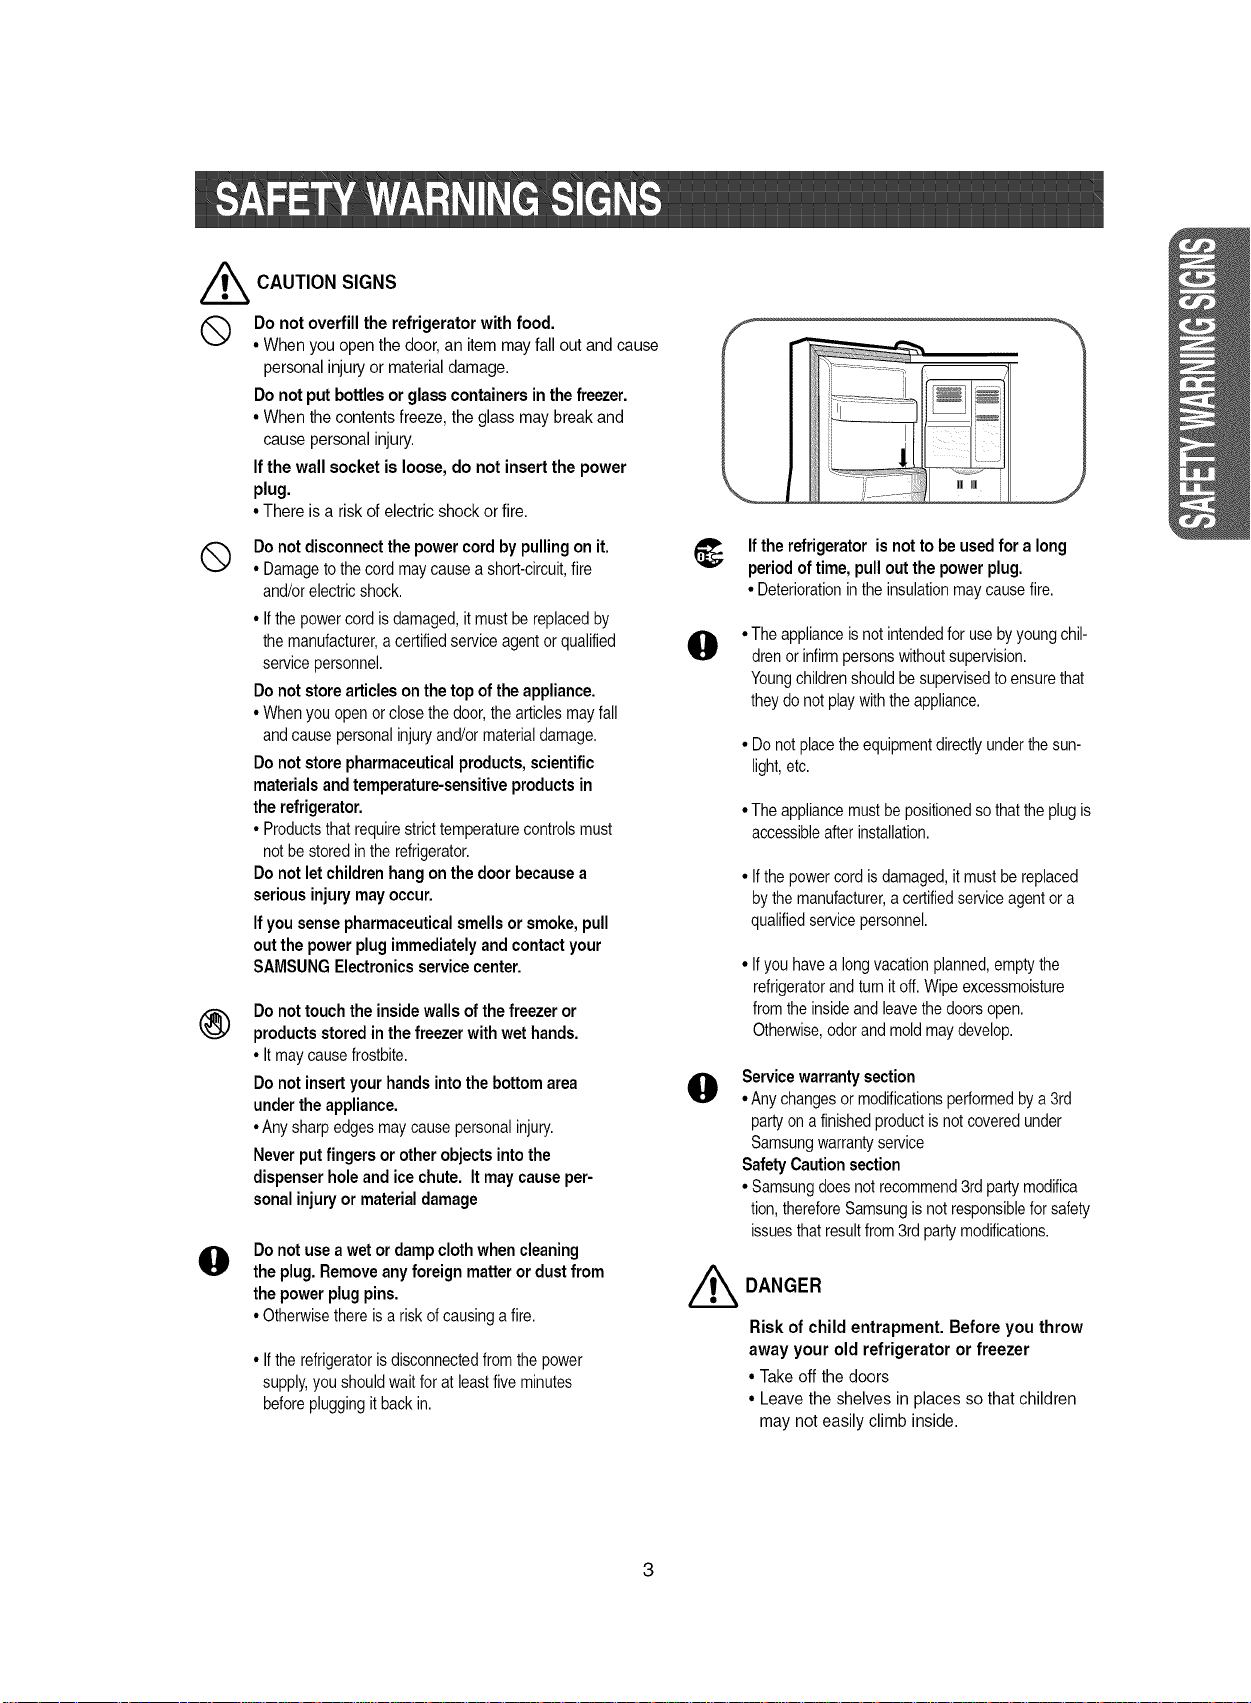
//_ CAUTION SIGNS
Q Donot overfillthe refrigeratorwith food.
• When you open thedoor, an item may fall out and cause
personalinjuryor materialdamage.
Donot put bottlesorglass containersinthe freezer.
• When thecontents freeze, the glass may break and
cause personalinjury.
If the wall socket is loose, do not insert the power
plug.
• There is a risk of electricshockor fire.
Donot disconnectthe powercordby pullingon it.
®
• Damageto thecord maycauseashort-circuit,fire
and/orelectricshock.
• Ifthe powercord isdamaged,itmustbe replacedby
the manufacturer,a certifiedserviceagentor qualified
servicepersonnel.
Do not store articles on the top of the appliance.
• Whenyou openorclose thedoor,thearticlesmayfall
andcause personalinjuryand/ormaterialdamage.
Do not store pharmaceuticalproducts, scientific
materials and temperature-sensitive products in
the refrigerator.
• Productsthat requirestricttemperaturecontrolsmust
not bestoredinthe refrigerator.
Do not let children hang on the door because a
seriousinjurymayoccur.
If yousense pharmaceuticalsmellsor smoke,pull
outthe powerplugimmediatelyand contactyour
SAMSUNGElectronicsservicecenter.
Do nottouchthe insidewalls ofthe freezeror
®
productsstoredinthe freezerwithwet hands.
• Itmaycausefrostbite.
Do not insert your hands into the bottom area
under the appliance.
• Any sharpedgesmaycausepersonalinjury.
Neverput fingers or other objects into the
dispenser hole and ice chute. It may cause per-
sonal injury or materialdamage
Donot usea wetor dampclothwhencleaning
@
the plug.Removeanyforeign matterordustfrom
the powerplugpins.
• Otherwisethereisa risk of causinga fire.
• Ifthe refrigeratorisdisconnectedfromthepower
supply,youshouldwaitfor at leastfiveminutes
beforepluggingitbackin.
Ifthe refrigeratoris notto be usedfor a long
periodoftime, pullout thepowerplug.
• Deteriorationinthe insulationmaycausefire.
•Theapplianceisnotintendedforusebyyoung chil-
@
0
drenor infirmpersonswithoutsupervision.
Youngchildrenshouldbesupervisedtoensurethat
theydonot playwiththeappliance.
• Donotplacetheequipmentdirectlyunderthe sun-
light,etc.
•Theappliancemustbepositionedso thatthe plugis
accessibleafterinstallation.
• Ifthe powercord isdamaged,itmust bereplaced
bythe manufacturer,a certifiedserviceagentor a
qualifiedservicepersonnel.
• Ifyou havea longvacationplanned,emptythe
refrigeratorandturn itoff. Wipeexcessmoisture
fromtheinsideand leavethe doorsopen.
Otherwise,odorandmoldmaydevelop.
Servicewarranty section
•Anychangesormodificationsperformedbya 3rd
partyon a finishedproductisnotcoveredunder
Samsungwarrantyservice
SafetyCaution section
•Samsungdoesnotrecommend3rdpartymodifica
tion,thereforeSamsungisnotresponsiblefor safety
issuesthatresultfrom3rd partymodifications.
DANGER
Risk of child entrapment. Before you throw
away your old refrigerator or freezer
• Take off the doors
• Leave the shelves in places so that children
may not easily climb inside.
Page 4
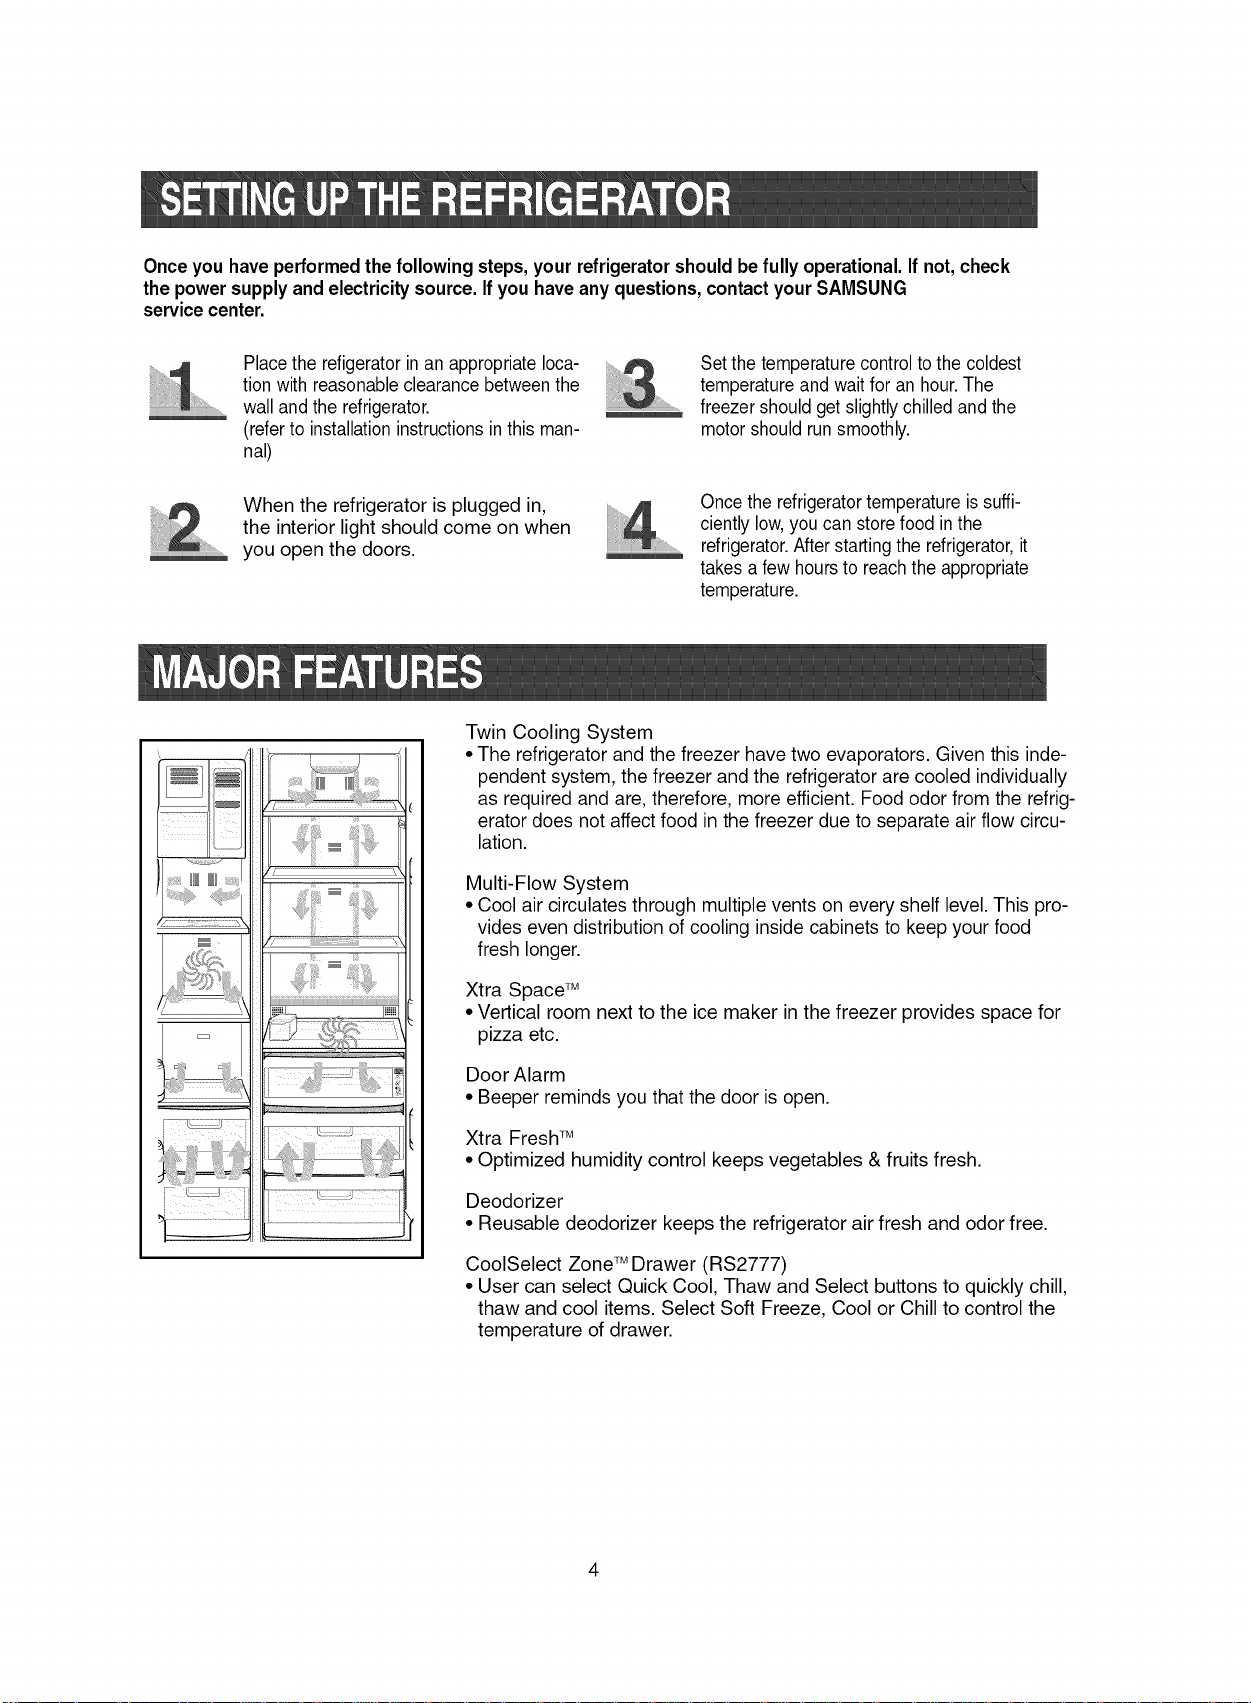
Onceyou have performedthe following steps,your refrigeratorshouldbe fully operational.If not,check
the powersupply and electricitysource. Ifyou have any questions,contactyour SAMSUNG
service center.
Placethe refigeratorin an appropriate loca-
tion with reasonableclearance betweenthe
wall and the refrigerator.
(referto installationinstructionsin this man-
nal)
When the refrigerator is plugged in,
the interior light should come on when
you open the doors.
Twin Cooling System
• The refrigerator and the freezer have two evaporators. Given this inde-
pendent system, the freezer and the refrigerator are cooled individually
as required and are, therefore, more efficient. Food odor from the refrig-
erator does not affect food in the freezer due to separate air flow circu-
lation.
Multi-Flow System
• Cool air circulates through multiple vents on every shelf level. This pro-
vides even distribution of cooling inside cabinets to keep your food
fresh longer.
Setthe temperaturecontrolto the coldest
temperatureand wait for an hour.The
.........
freezer should getslightlychilledand the
motor shouldrun smoothly.
Oncethe refrigeratortemperatureissuffi-
cientlylow,you can storefood in the
refrigerator.Afterstartingthe refrigerator,it
takes a few hoursto reachthe appropriate
temperature.
Xtra Space TM
• Vertical room next to the ice maker in the freezer provides space for
pizza etc.
Door Alarm
• Beeper reminds you that the door is open.
Xtra Fresh TM
• Optimized humidity control keeps vegetables & fruits fresh.
Deodorizer
• Reusable deodorizer keeps the refrigerator air fresh and odor free.
CoolSelect ZoneTM Drawer (RS2777)
• User can select Quick Cool, Thaw and Select buttons to quickly chill,
thaw and cool items. Select Soft Freeze, Cool or Chill to control the
temperature of drawer.
Page 5
RS2544/I
FreezerTem
RS2777
r_
Ice'[
Ice Wi
FREEZERTEMP.BUTTON
Toset the freezer temperature,press
the button repeatedly to change the set
temperature in sequence between
8°F and -14°E
Speeds upthe freezingprocess in the
freezer.
I OWER FREEZE BUTTON
ICE TYPE BUTTON
Use thisbutton to choose Cubed or
Crushed Iceor Ice off.
FRIDGE TEMP.BUTTON
Toset thefridge temperature,press the button
repeatedlyto change the set temperature in
sequencebetween 34°F and 46°E
POWER COOL BUTTON JSpeeds up the cooling process in the refrigerator
CHILD LOCK BUTTON
When this button is pressed for 3 sec., the Power Freeze,
PowerCool, Freezer Temp.and Fridge Temp.are lockedand
can not be modified. The Water and Icedispensers are not
lockedand can still be used. Tocancelthisfunction, press
Child Lock buttonagain.
Page 6
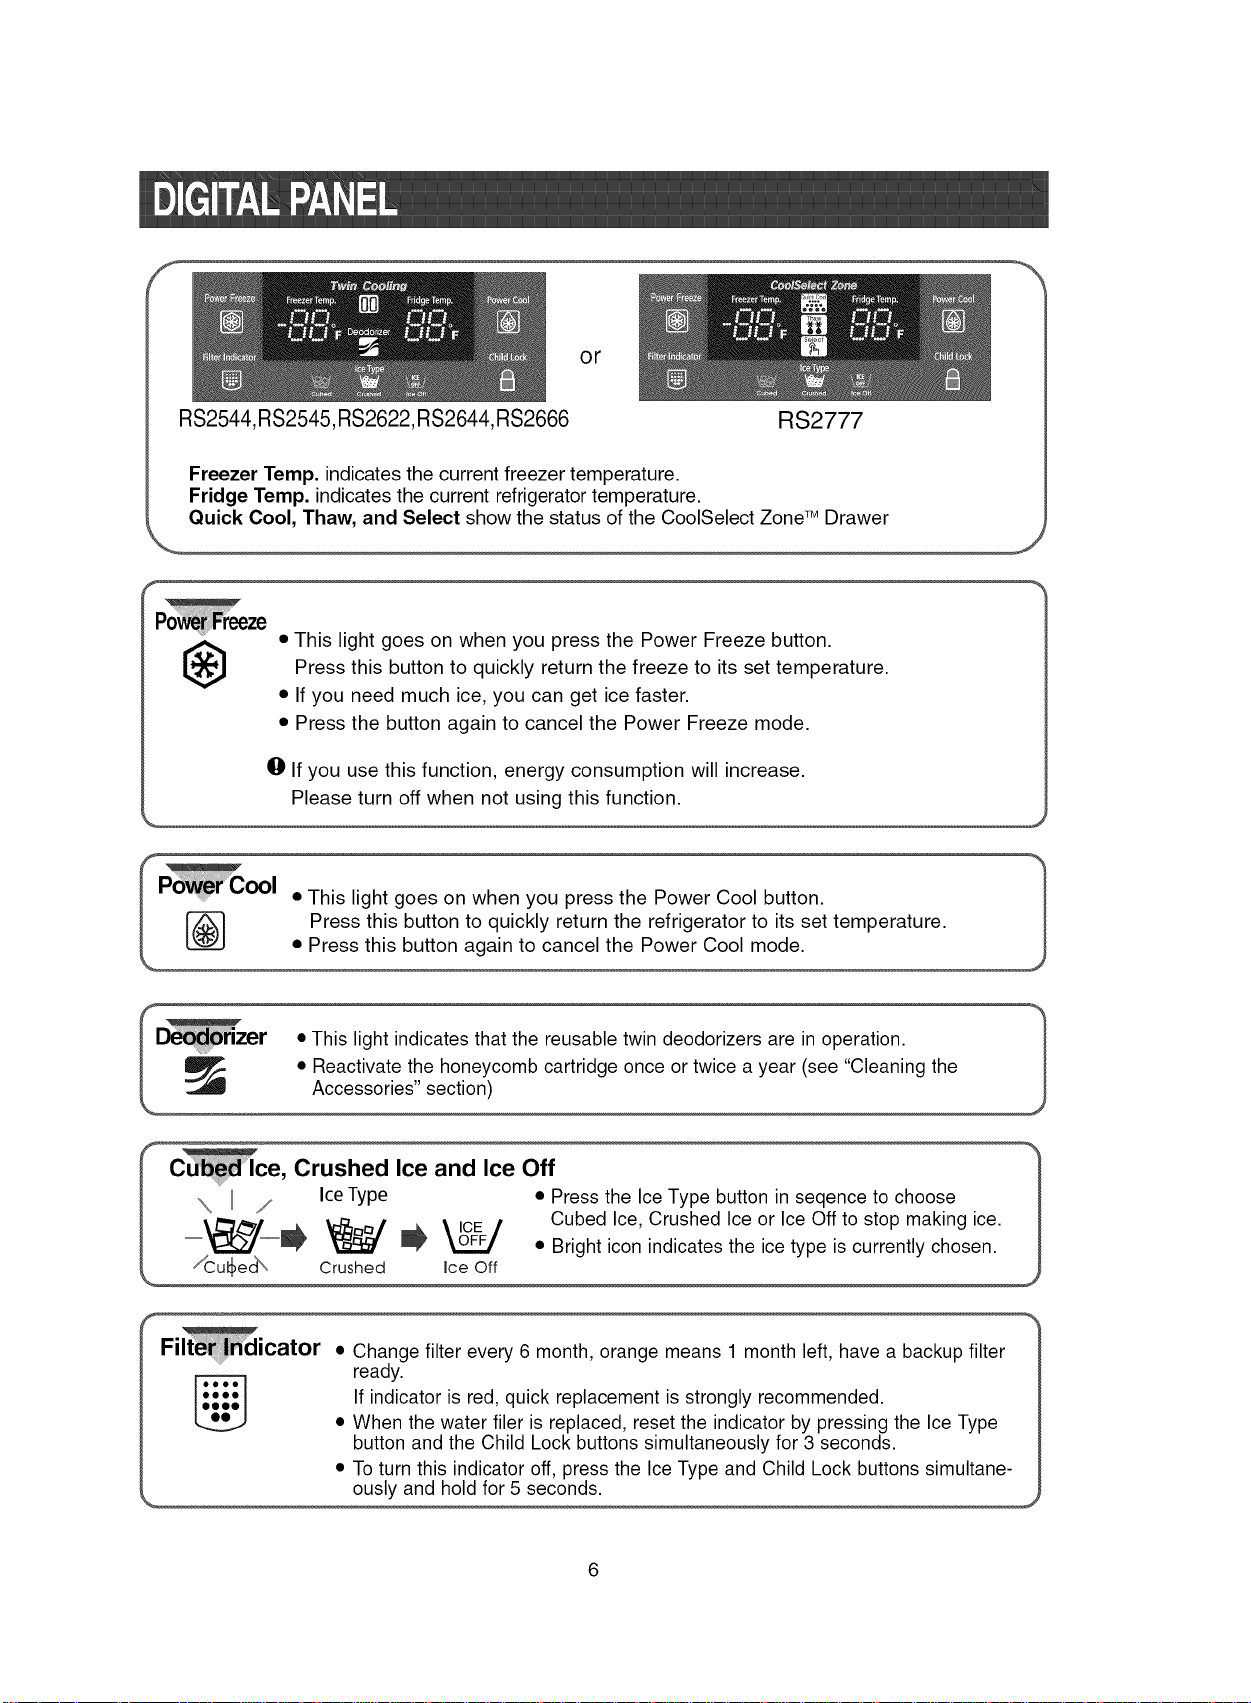
or
R$2544, RS2545,RS2622,R$2644, RS2666 RS2777
Freezer Temp. indicates the current freezer temperature.
Fridge Temp. indicates the current refrigerator temperature.
Quick Cool, Thaw, and Select show the status of the CoolSelect Zone TM Drawer
• This light goes on when you press the Power Freeze button.
®
Press this button to quickly return the freeze to its set temperature.
• If you need much ice, you can get ice faster.
• Press the button again to cancel the Power Freeze mode.
O If you use this function, energy consumption will increase.
Please turn off when not using this function.
Power Cool •
/ r_ Press this button to quickly return the refrigerator to its set temperature.
I _ • Reactivate the honeycomb cartridge once or twice ayear (see "Cleaning the _
I CUb_ I e, Crushed Ice and Ice Off
_.._i _/ -- ICE -- Cubed Ice, Crushed Ice or Ice Off to stop making ice.
--__ _ _ _ • Bright icon indicates the ice type is currently chosen.
/Cut_e_ Crushed Ice Off
Fi icator
This light goes on when you press the Power Cool button.
• Press this button again to cancel the Power Cool mode.
r • This light indicates that the reusable twin deodorizers are in operation.
Accessories" section)
/ IceType • Press the Ice Type button in seqence to choose
• Change filter every 6 month, orange means 1 month left, have a backup filter
ready.
If indicator is red, quick replacement is strongly recommended.
• When the water filer is replaced, reset the indicator by pressing the Ice Type
button and the Child Lock buttons simultaneously for 3 seconds.
• To turn this indicator off, press the Ice Type and Child Lock buttons simultane-
ously and hold for 5 seconds.
Page 7
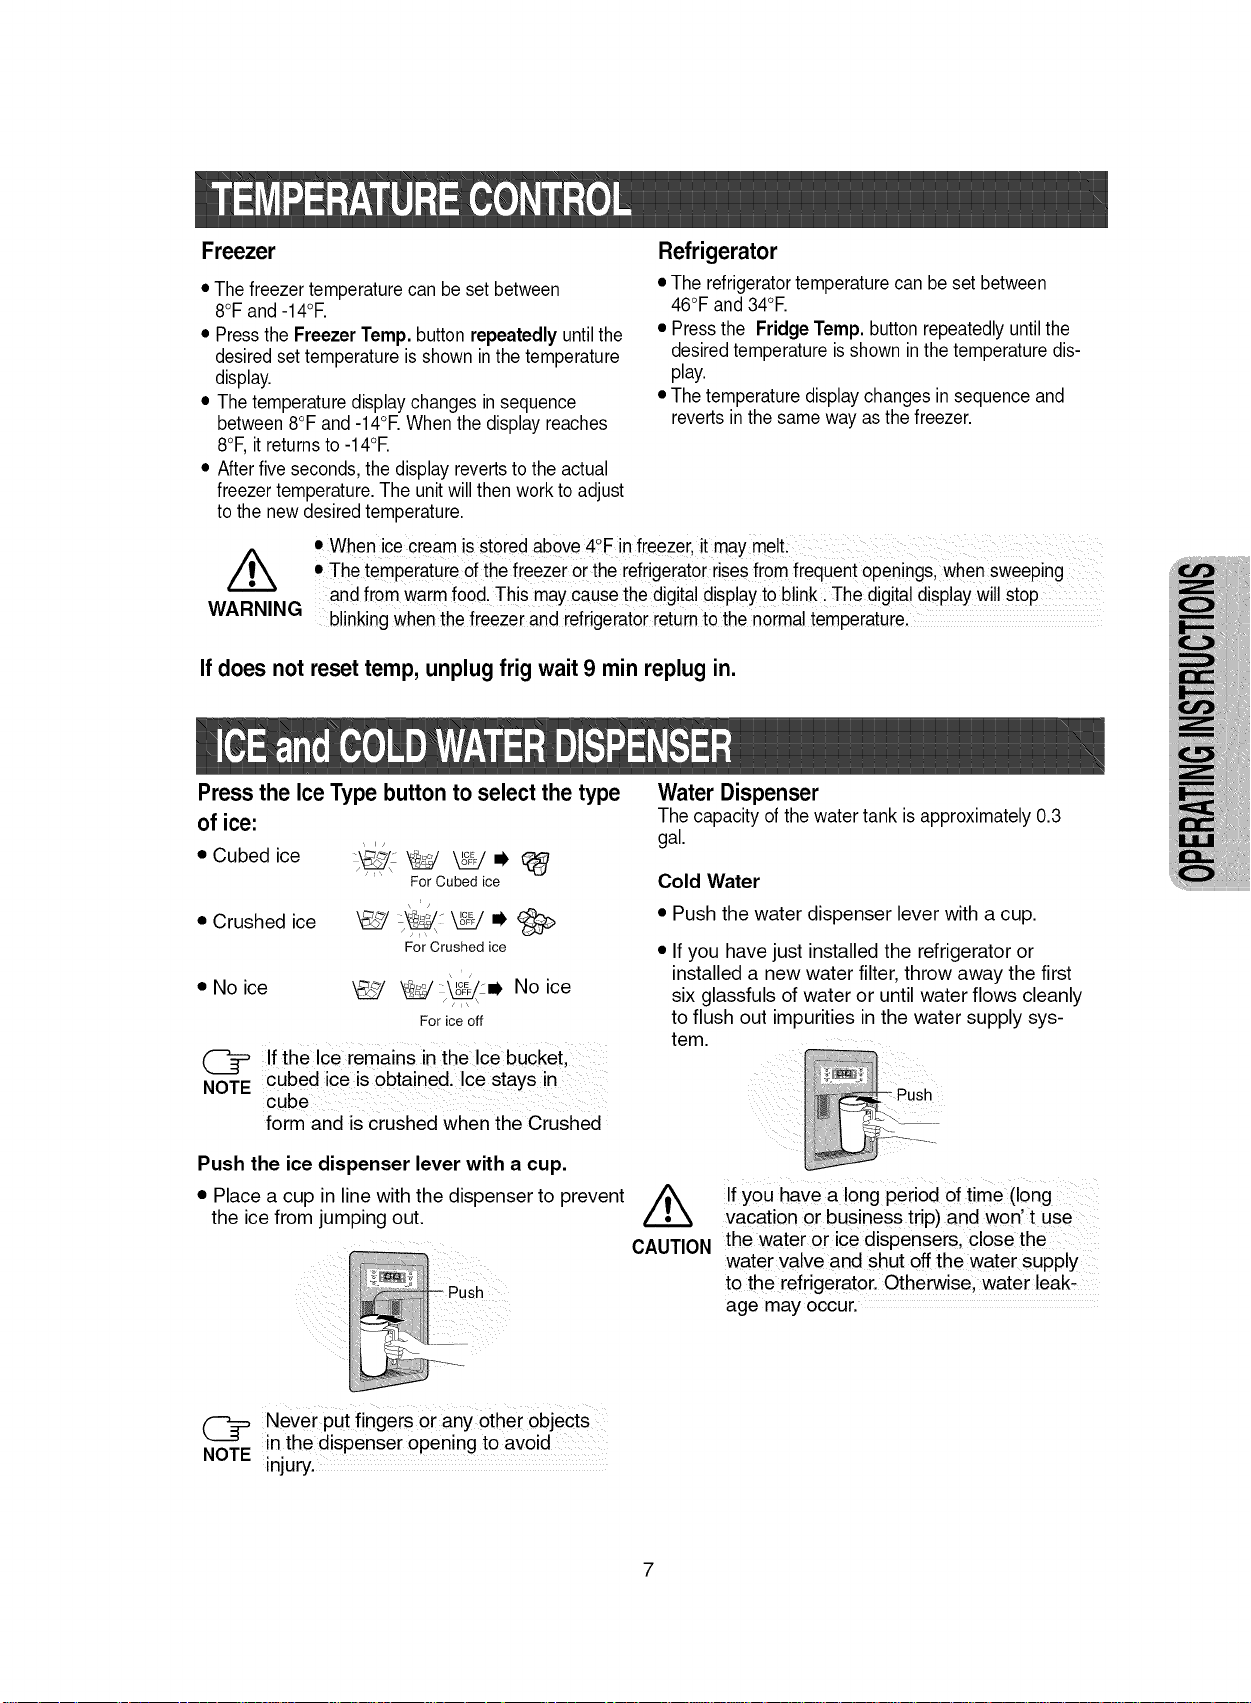
Freezer
• Thefreezer temperature can be set between
8°Fand -14°R
• Pressthe Freezer Temp. button repeatedly untilthe
desiredset temperatureis shown inthe temperature
display.
• The temperaturedisplay changes in sequence
between 8°F and -14°R When the display reaches
8°F,it returnsto -14°E
• Afterfive seconds,the display revertsto the actual
freezer temperature.The unitwill then workto adjust
to the newdesiredtemperature.
• When ce cream s stored above 4°F n freezer, t maymet
/k
WARNING
• The temperature ofthe freezer or therefrigerator risesfrom frequent openings,whensweeping
and from warmfood, This maycause thedigital displaytoblink i The digital display Will stoP
blinking when thefreezer and refrigeratorieturn to the normaltempeiaturel
Refrigerator
• The refrigeratortemperature canbe set between
46°Fand 34°R
• Pressthe Fridge Temp. button repeatedlyuntilthe
desiredtemperature isshown inthe temperaturedis-
play.
• Thetemperaturedisplay changes insequence and
revertsinthe same way asthefreezer.
If does not reset temp, unplug frig wait 9 min replug in.
Press the Ice Type button to select the type
of ice:
\ i/
• Cubed ice }_,_, _ _ i,
• Crushed ice \_ _ ml,
• No ice _/ _ No ice
If the Ice remains in the Ice bucket,
NOTE
Push the ice dispenser lever with a cup.
• Place a cup in line with the dispenser to prevent
cubed ice is obtained. Ice stays in
cube
form and is crushed when the Crushed
the ice from jumping out.
For Cubed ice
\ =/
For Crushed ice
For ice off
Water Dispenser
The capacity of the watertank is approximately 0.3
gal.
Cold Water
• Push the water dispenser lever with a cup.
• Ifyou have just installed the refrigerator or
installed a new water filter, throw away the first
six glassfuls of water or until water flows cleanly
to flush out impurities in the water supply sys-
tem.
ush
/k
CAUTION
If you have a long period of time (long
vacation or business trip) and won' t use
the water or ice dispensers, close the
water valve and shut offthe water supply
to the refrigerator. Otherwise. water leak-
age may occur.
Never put fingers or any other objeCts
(_= in the dispenser opening to avoid ......
NOTE
Injury.
Page 8
Freezer
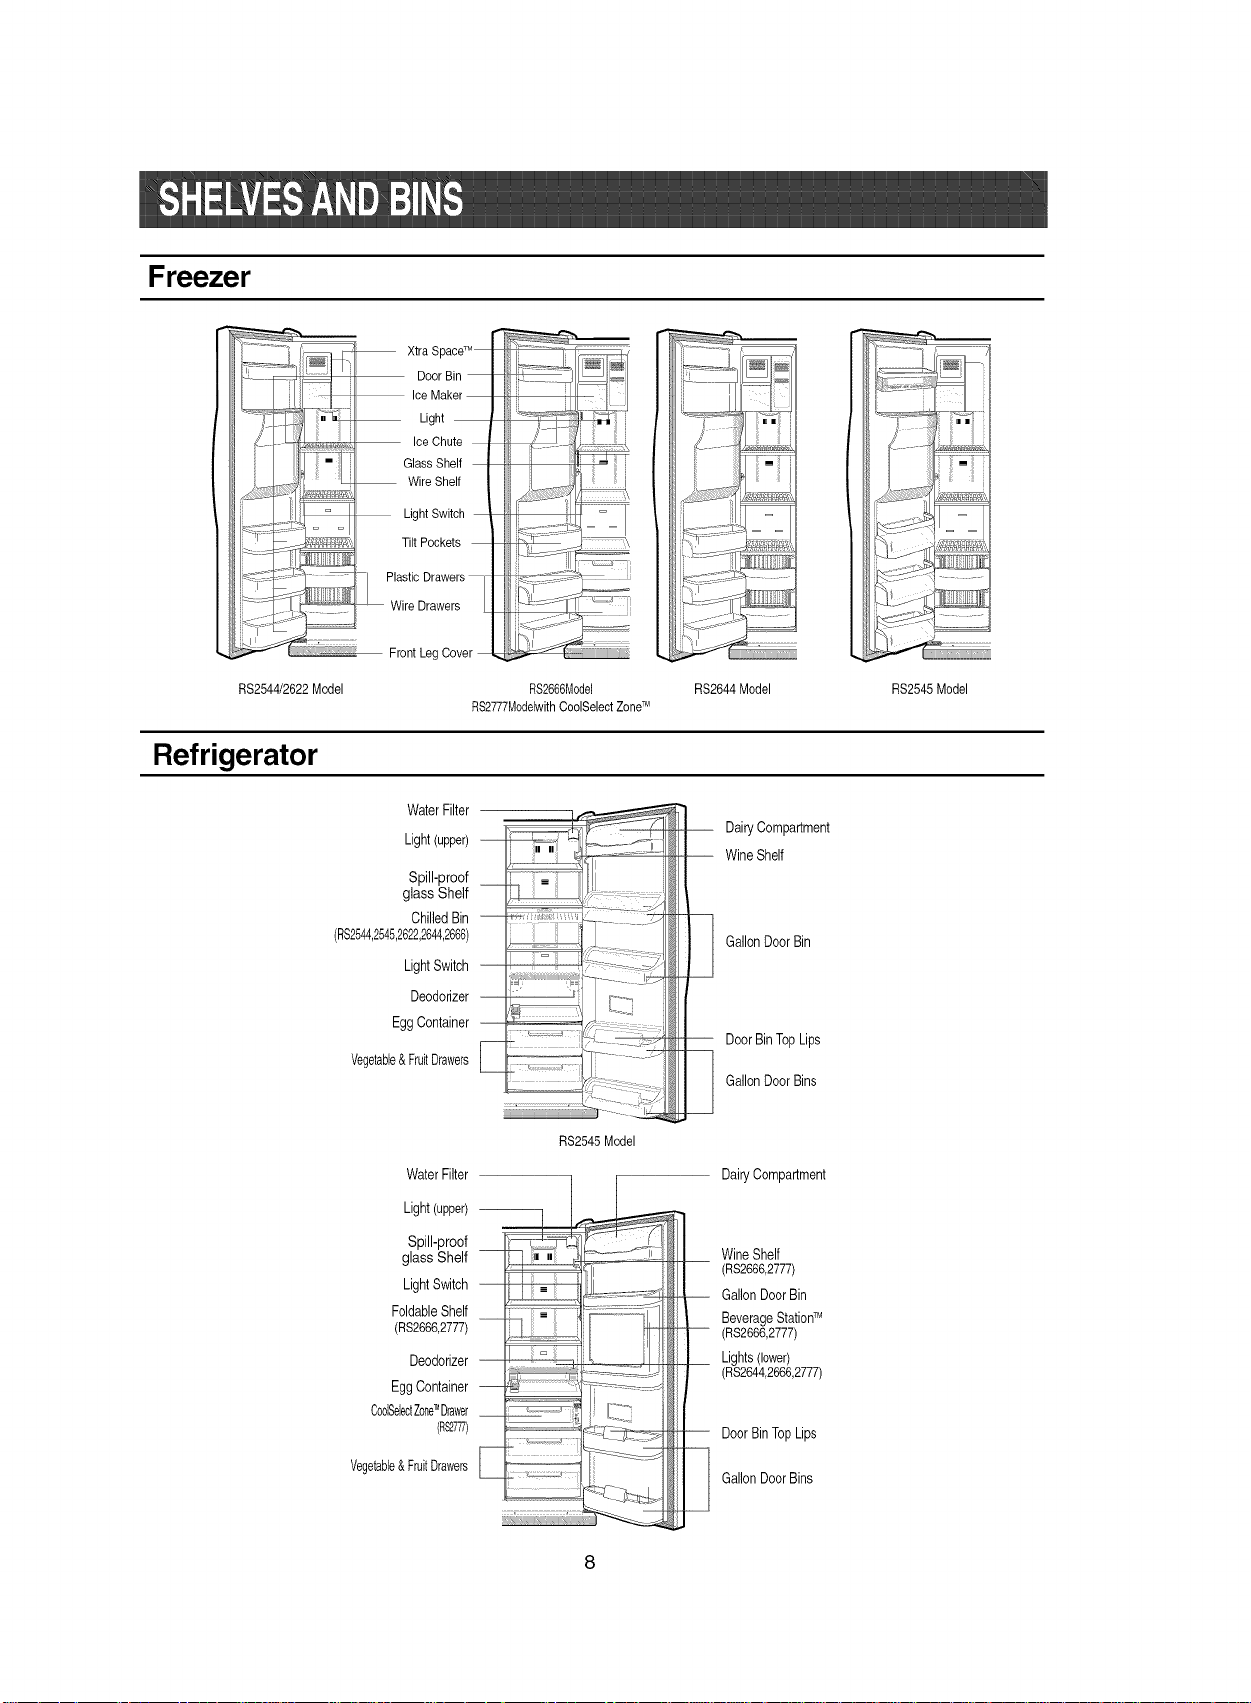
RS2544/2622Model RS2666Model
Refrigerator
RS2777ModelwithCoolSelectZoneTM
WaterFilter
Light(upper)
Spill-proof
glass Shelf
ChilledBin
(RS2544,2545,262226442666)
LightSwitch
Deodorizer
EggContainer
Vegetable&FruitDrawers
WaterFilter
Light(upper)--
Spill-proof
glassShelf
LightSwitch
FoldableShelf
(RS2666,2777)
Deodorizer
EggContainer
CooISelectZoneTMDrawer
(RS2777)
Vegetable&FruitDrawers
_"_'_':_i__''/'__i:
::::
RS2545 Model
i_i::
RS2644Model
DairyCompartment
WineShelf
GallonDoorBin
DoorBinTopLips
GallonDoorBins
DairyCompartment
WineShelf
(RS2666,2777)
-- GallonDoorBin
Beverage StationTM
-- (RS2666,2777)
__ Lights (lower)
(RS2644,2666,2777)
-- DoorBinTopLips
GallonDoorBins
RS2545 Model
Page 9
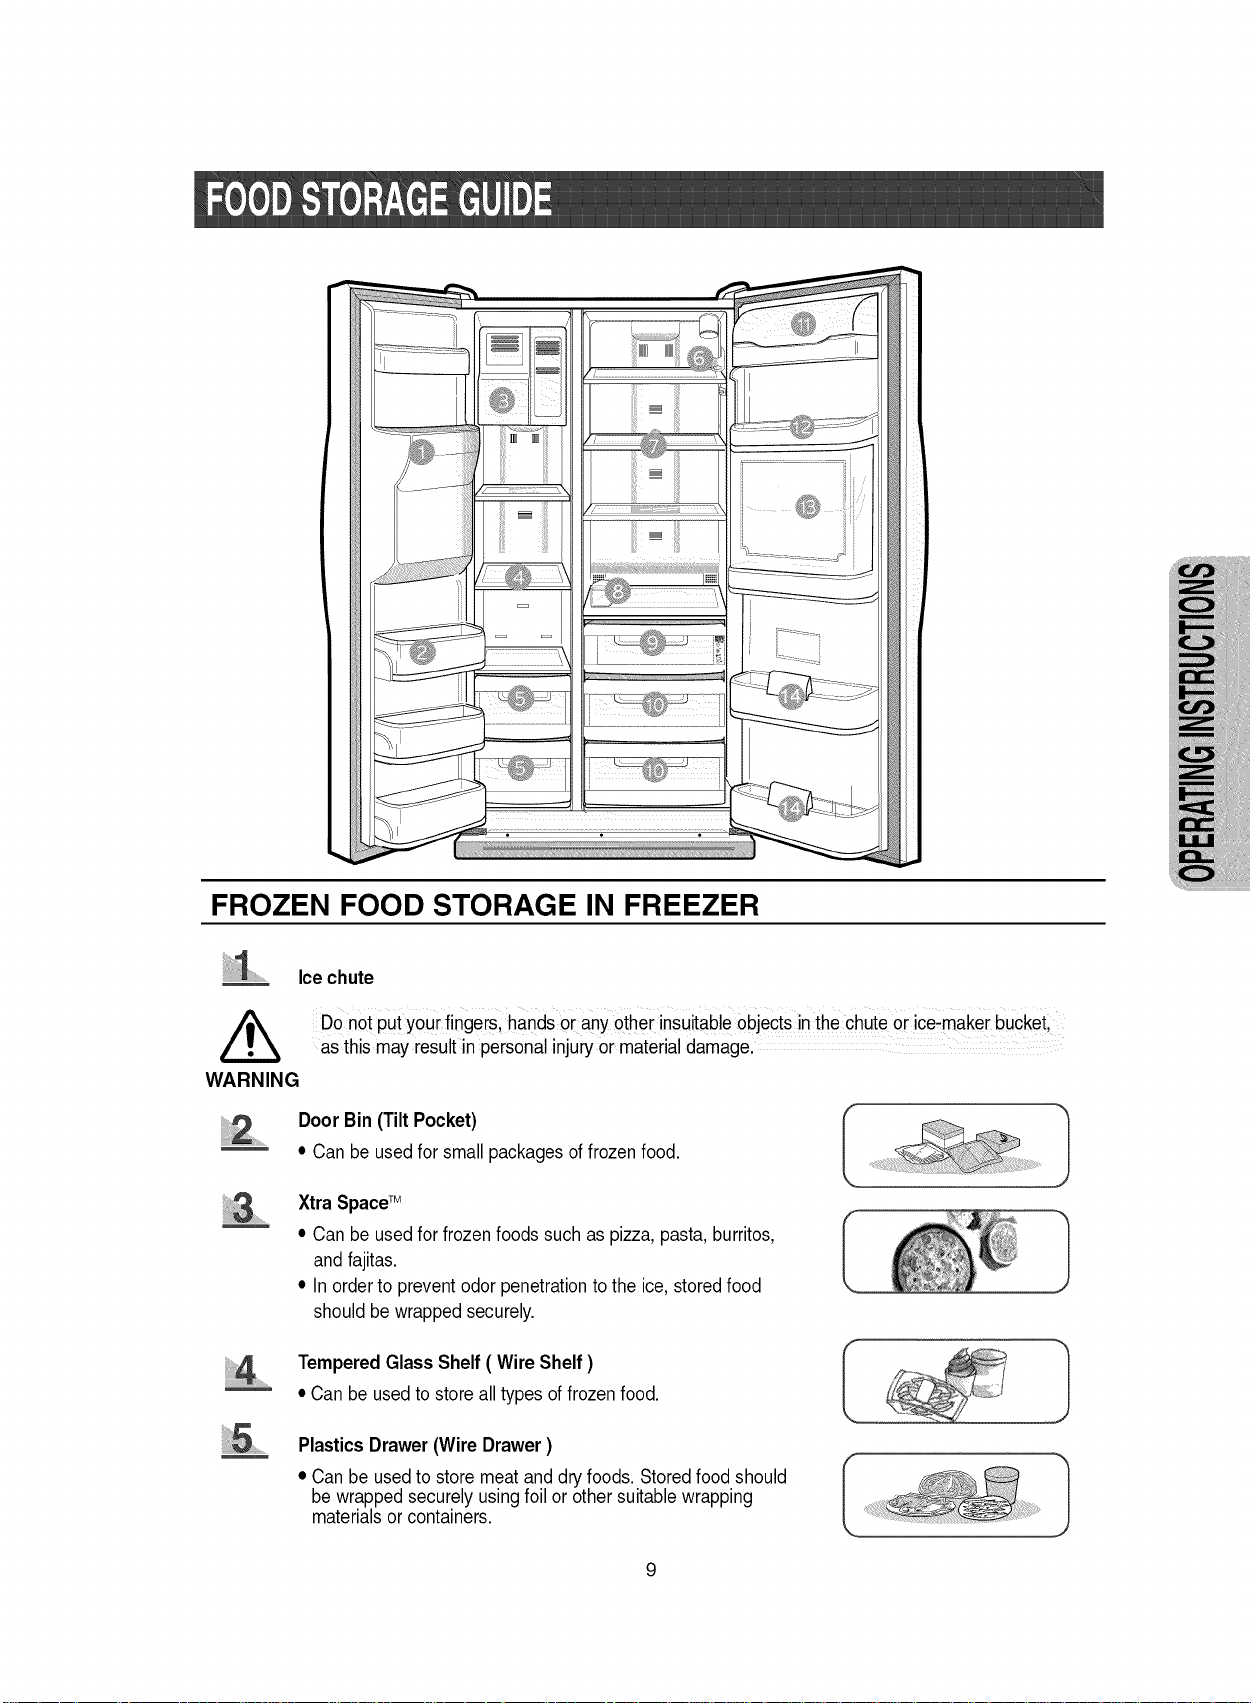
FROZEN FOOD STORAGE IN FREEZER
....,cechute
DOnot pUt youi tingers,hands o[ anyother insuitableObjectsinthe chute Orice,maker bucketl
as this may result in personal injuryor materialdamage.
WARNING
,,,,,,,,,_....... Door Bin(Tilt Pocket)
• Can be usedfor small packagesoffrozen food.
XtraSpace TM
• Can be usedfor frozenfoods such as pizza,pasta,burritos,
and fajitas.
• In orderto prevent odor penetrationtothe ice,stored food
should be wrappedsecurely.
Tempered Glass Shelf (Wire Shelf )
• Can be usedto store all types offrozen food.
PlasticsDrawer(Wire Drawer)
• Canbe usedto store meat and dryfoods. Storedfood should
be wrappedsecurelyusingfoil or othersuitablewrapping
materialsor containers.
Page 10
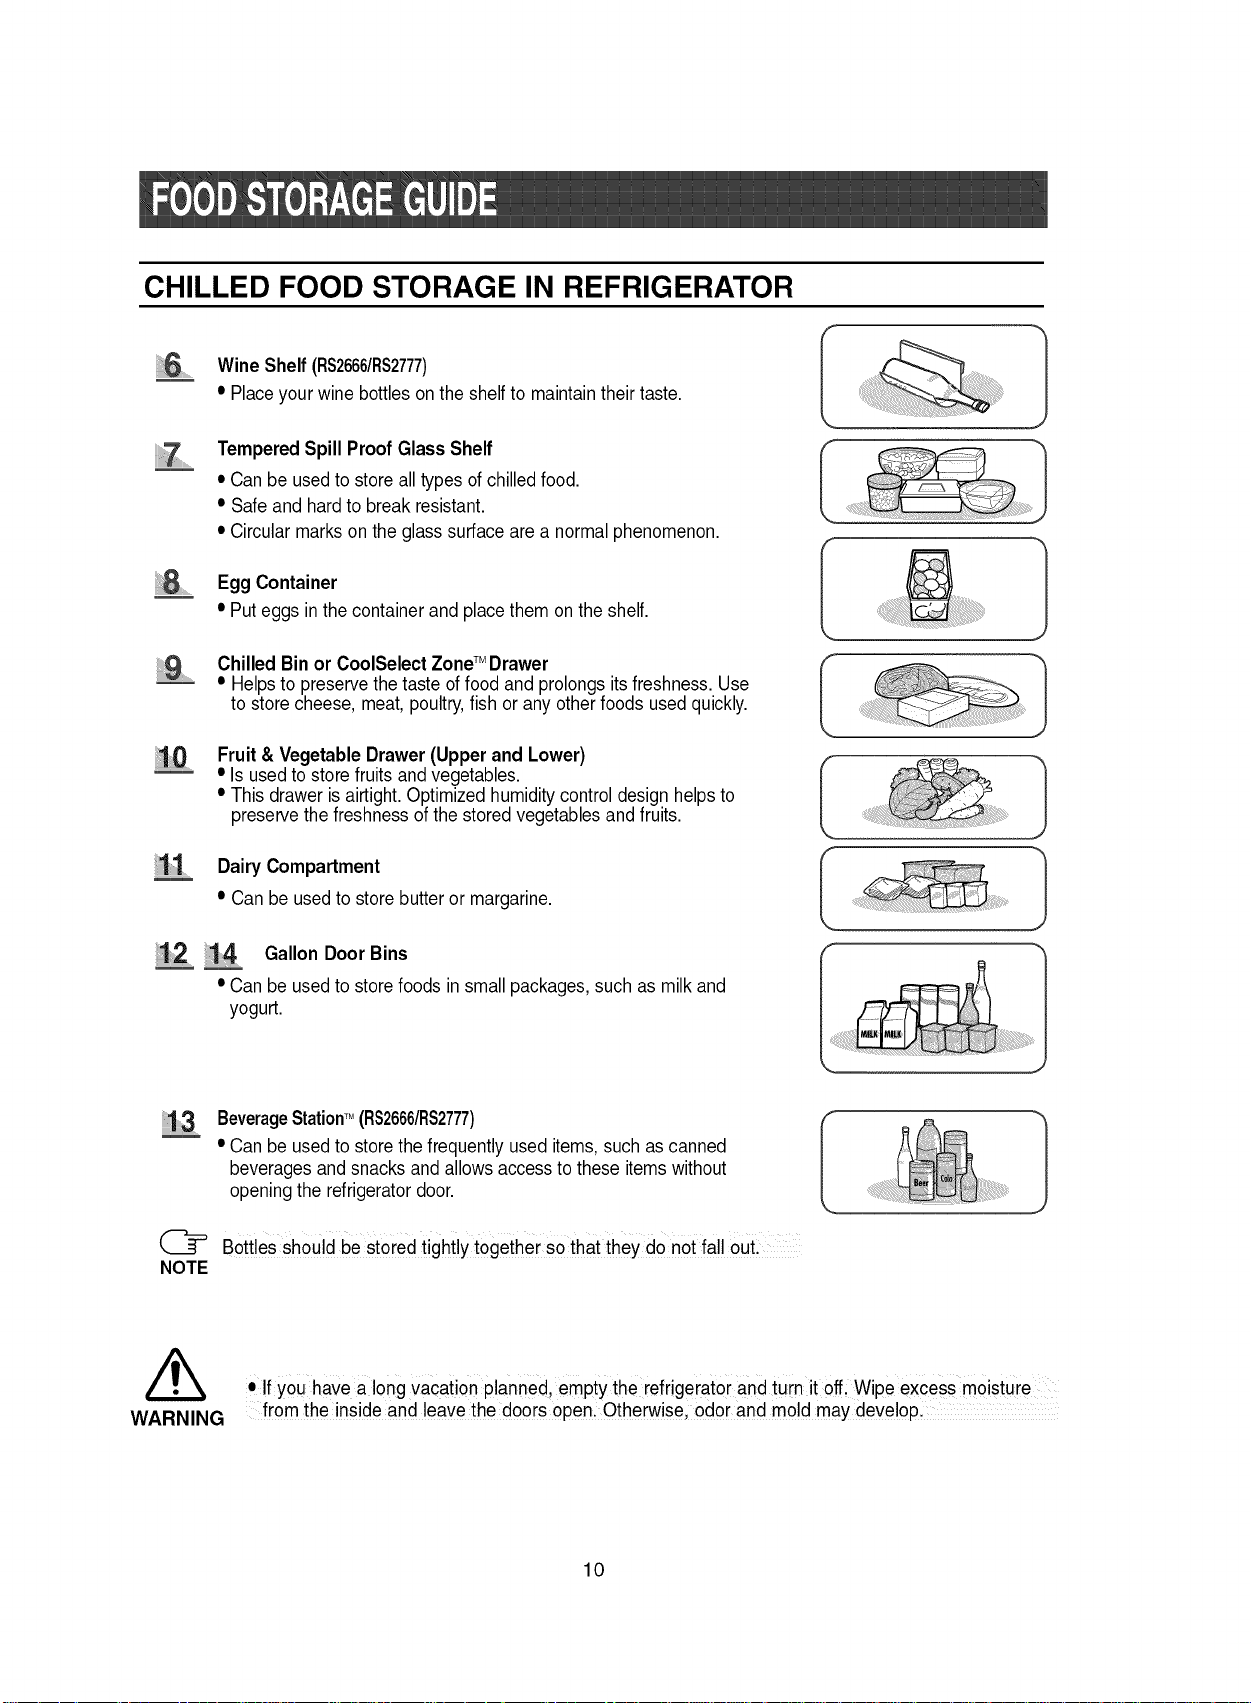
CHILLED FOOD STORAGE IN REFRIGERATOR
Wine Shelf (RS2666/RS2777)
• Placeyourwine bottleson the shelf to maintaintheirtaste.
TemperedSpill ProofGlass Shelf
• Canbe usedto store all types ofchilled food.
• Safe and hard to break resistant.
• Circularmarkson the glasssurfaceare a normalphenomenon.
Egg Container
• Puteggs in the containerand placethem onthe shelf.
.........Chilled Binor CoolSelect ZoneTM Drawer
• Helpsto preservethe tasteof food and prolongsits freshness. Use
to store cheese,meat,poultry,fish or any otherfoods usedquickly.
Fruit& Vegetable Drawer (Upperand Lower)
• Isusedto store fruitsand vegetables.
• Thisdrawer isairtight.Optimized humiditycontroldesign helpsto
preservethe freshness of the stored vegetablesand fruits.
..... DairyCompartment
• Can be usedto store butter or margarine.
12 Gallon Door Bins
• Canbe usedto storefoods in small packages,such as milk and
yogurt.
BeverageStationTM (RS2666/RS2777)
• Canbe usedto storethe frequentlyused items,such as canned
beveragesand snacks and allows accessto these itemswithout
openingthe refrigeratordoor.
@
NOTE
/k
WARNING
Bottles should be stored tightly together so that they do n0tfall out:
• IfYouhave along Vacation planned,empty the refrigerator and turn itoff; Wipe excess moistuie
from the inside and leave the doors open, Otherwise,odor and mold may develop,
10
Page 11

"Quick Cool" Button
• Youcan use the Quick Coolfeature with the CoolSelect ZoneTM.
• "QuickCool" allows 1-3 canned beveragesto cool within 60 min.
• Tocancelthis option,press the "QuickCool"button again.
CoolSelectZoneTM returnsto the previoustemperature.
• When "QuickCool" ends, it returnsto the "Cool"temperatureset-
ting.
_k Cool
@
NOTE
@
NOTE
DependingOnthe beverages,thec0ol-down time mayvary
For Quick Coo!option;the food Storedinthe Co01Select
ZoneTM Drawershould be removed.
"Thaw" Button
Drips loss and quality deteriorationof meatsreducesthe fresh-
nessof foods.
After 'q-haw"isselected, warm and coldair is alternatelysup-
plied intothe CoolSelectZoneTM Drawer.
Dependingon the weight of meat,thawing time can be selected
for 4 hrs, 6 hrs, 10 hrs,and 12 hrssequentially,keepingthe
meatpartiallyfrozen.
When 'q-haw"ends,the CoolSelectZoneTM displayreturnsto
"chill"condition.
When 'q-haw"ends, meatsare in a half-frozenstateso it is easy
to cut them for cooking.
Tocancelthis option,press any button except'q-haw".
The approximatethawingtimes of meat and fish are shown
below. (Basedon linch thickness'
_o S°ft
Freeze
Chill
ol
Select
Cool
NOTE
NOTE
Thaw Time
Weight
Dependingonthe size and thicknessof the meat and fish,the thawing timemay vary.
The ab0vechart repreSentsthetotal weight of fo0d in the C0olSe!ectZone!MDrawer.
Ex)The total thawing time for 1:3Ib frozen beefand 0.8Ib frozen chicken willbe 10 hours.
• With the ,Thaw,!optionselected,food storedin the Co01SelectZoneTM Drawer Shouldbe removed.
4 hours 6 hours
0.8Ib 1.3Ib
11
10hours 12hours
1.7Ib 2.2Ib
Page 12

"Select" Button (RS2777)
iiii!i!ii:t_,,..............SoffFreeze
• When "SoftFreeze"is selected,thetemperature on the
digital paneldisplays23°F(-5°C),regardlessofthe set
temperatureof the refrigerator.
• "SoftFreeze"temperaturehelps keep meat and fish
fresh for longer.
Chill
• When"Chill" isselected,the temperatureof the CoolSe-
lect ZoneTM Drawer is kept at 30°F(-1°C),regardlessof
the set refrigeratortemperature.
• "Chill"temperaturehelps keep meat orfish fresh for
longer.
iiii!i!i ..............
Cool
• When "Cool"is selected,thetemperaturewill be the
same as the set temperatureof the refrigerator.The digi-
tal panel showsthe same temperatureas that of the dis-
play panel.
• When using "Cool",the CoolSelectZoneTM Drawer allows
extra refrigeratorspace.
12
Page 13

Glass Shelf
iiiiiiiii t,,,.........
• Pull the shelf outas far as
it goes.Then lift it up and
remove it.
Door Bin
iiiiiiii ........
• Hold the door bin with both
hands andthen lift itup.
Ice Maker Bucket
iiiiiiii4.........
• Remove the bucketby lifting up and pulling out.
Front Leg Cover
iiiiiiii5.............
• Open thefreezer and refriger-
ator doors, removethree
screws and detachthe cover.
• To reassemblethe cover leg
front,put it backto original
position andtighten the threescrews.
Plastic Drawer (Wire
Drawer)
• Remove the drawerby
pulling itout and slightly lift-
ing it up.
Spill ProofGlass Shelf
• Pullthe shelf out asfar as itwill go.Then lift it up and gentlyremove it.
Vegetable& Fruit Drawer
......
• Removethe drawerby holdingthe handle, pullingthe drawer out and lifting itup smoothly.
• Removethe optimizedhumiditycontrolcover by pulling ittowards you.
......Gallon Door Bin
• Holdthe binwith both hands and remove itby lifting it up.
......WineShelf
• It isattachedtothe cabinet wall.To removethewineshelf, slide it inthe direction
ofthe arrowasshown.
• Simplytake the shelf out of the tabs.
(_P DOnot useeXcessiveforce when
NOTE removingthe cover.It may cause an
injury. ..................................................................................
NOTE
' Beforeremovingthefreezerandrefrigeratoraccessorieslpleasemovethe storedfoodsto otherSpacel
13
Page 14

Toopenthe BeverageStationTM, holdthe BeverageStationTM doorhandleandpullit downward.
• TheBeverageStationTM isconvenient
andreducesenergyconsumption,
becauseyoudo notneedto open
therefrigeratordoorto accessstored
beveragesandsnacks.
• The door of the Beverage StationTM should neverbe removed.The Beverage StationTM cannot function if its door
is missing.
• When closingthe Beverage StationTM door. be careful notto putyour hands or fingers aroundthe doorframe
WARNING
Interior
• Cleanthe accessorieswith a mild detergent,then wipe outwith a drycloth.
• Afterwashingthe accessories,make surethat they are drybefore usingthem again.
Exterior
• Wipe the digitalpanel and display panelwith a clean cloth.
•The surface ofdoors, handles and cabinet shouldbe cleanedwith a milddetergent andsoft
cloth,then wipe off the surfacewith a dry cloth.
- Do not use Benzene,Thinner or cloroxfor cleaning
- Do not spraywater directlyon the surface ofthe refrigeratorwhile cleaning.
•The exteriorpart of the refrigeratorshould be polishedonce ortwice a year.
where they can be caughtor injured
• When you use the open door as a tray, do not placeheavy objectson it. Do not allowchildren to
hangon the door becausethere is a riskof personal injury or materialdamage.
• When you open the beveragestationZMdoor,becareful not to hit childrenshead.
• Do not overfillthe shelf above it may prevent airflow.
• It isrecommendedthatyouusethe
BeverageStationTM forstoringmost
frequentlyneededfoods
Rear
• Use a vacuum cleanerto removedust once or twice ayear.
• Donot removecover,riskof shock.
WARNING
Ice and water dispenser
• Use a damp clothto clean the iceand water dispenser.Then wipe itout with a dry cloth.
•To keepdrainage grid dry,do nottouch iceand water dispenser.
BeverageStationTM (RS2666/ RS2777)
• Use a damp clothto clean the BeverageStationTM. Then wipe it out with a dry cloth.
Rubber door seals
• If the rubber doorseals are dirty,the door will not close properly,The refrigeratorwillnot be
able tofunction efficiently.Cleanthe doorswith a milddetergentand damp cloth.Then wipe
with a dry cloth.
/5,
WARNING • Donot spray the refrigeratorwith water.It maycause a death by an electricshock.
• Do not clean it withbenzene,thinner orcar detergentl It maycause a fire,
14
Page 15

TwinDeodorizer
• Removethecoverwithaflatbladescrewdriverasshown.
•Takeoutthecartridgefromthecoverandsoakitincleanandwarmwaterforatleast
4hrs.Completelydryoutthecartridgeinsunlightforatleast8hrsinanopenarea.
• Repeatthisprocessonceortwiceayear.
@ ' If caitridgesisdriedina confinedaiealthere maybe Someodoi.
NOTE eKeepchi!drenawayfrom containmentedwater,
idge
//_ Bef0re Changing the interior light, unplug the refrigeratorfrom the power supply, if y0u
WARNING
have difficulty in changing the light, contact your service center.
INTERIORLIGHTIN THE REFRIGERATOR.
Upper
...........Pull outthe screwcap
removethe screw.
Lower (RS2644,RS2666,RS2777)
.........Pull outthe screwcap and Takethe lampcover out in
removethe screw. _ the direction ofthe arrows.
and
.........Pushthe lampcover inthe
directionofthe arrows.
After changingthe bulb,
reattachthe lightcover
and screw it in again.
After changingthe bulb,
reattachthe lightcover
and screw it again.
15
Page 16

INTERIORLIGHTINTHE FREEZER.
The freezer light is located in the bottom of the auger motor case.
Use a screwdriver to remove .... Changethe bulb with a new ............
the lightcover ((_). _ one (@)
@
NOTE
The water "Filter Indicator" light
• "Filter Indicator'' light lets you know when it is time change your water filter cartridge. The light
will change from green to orange. This tells you that it is almost time to change the current cartridge.
It is recommended that you replace the cartridge when the light changes to red.
(see "Install the water filter'' section for more information)
Replacement bulbs for bothfreezer and fridge are available from
your local h0me improvement or electronics store.
Use replacement bulb size E17, maximum 30 watts.
Reattach the light cover
• If you install water filter, throw away this first six glassfulls of water filter, or till water flows clearly to
flush not impurities in the water supply system.
Using the dispenser without the water filter
•You can not use the water and ice dispenser without a water filter cartridge because the water line
blocks at water supply.
Ordering replacement filters
• To order more water filter cartridges, call 1-800-SAMSUNG and ask for accessory Part # DA29-
00003A or contact your authorized Samsung dealer.
The refrigerator doors have a special door opening and closing feature to make sure that they close all
the way and are securely sealed.
When opening the door, it will only open so far. After reaching a certain point, it will remain open.
When the door is partially open, it will close automatically.
Units should be properly installed & leveled warning about magnetic doors.
16
Page 17

Checking the Dimensions of your Entrance Door
Check the dimensions of your entrance door to determine whether the refrigerator can pass
through it.
Model RS2622/2644/2666 RS2777
Capacity (Cu. Ft)
Width
without Hinge
with Hinge
with door
Dimension
(inch)
Case Height
Depth withoutdoor
Selecting the Location for the Refrigerator
• Select a location with easy access to the water supply.
• Select a location with enough space for the refrigerator.
• Select a location without direct exposure to sunlight.
• Select a location with level floor or close to it.
(If not, the water supply line can be damaged.) ....
•See "Separating the water supply line from the refrigerator'! on the next pagel
RS2544
RS2545
25.2
36"
69"
70"
28"
26.1
36"
69"
70"
30"
27.2
36"
69"
70"
37"
30"
Allow sufficientspace to circulatethe air at the internal coolingsystem.
•When the refrigeratordoes not haveenough space,the internalcoolingsystem may notwork correctly.
1 inch i
_1 inch
O.1 inch
• Allow clearancetothe rightlleftl backand top when nstallingthe refrigerator.
This hasthe advantageof reducing power consumptionl
* Donot installthe refrigeratorwherethetemperaturewill go below50°F(!0°C),
17
Page 18

Removing the Front Leg Cover
Open the freezer and refrigerator doors, and then take off the front leg cover by turning the
three screws counter-clockwise.
FRONT LEG COVER
Separating the Water Supply Line from the Refrigerator
1) Remove the screw from clamp (®).
2) Remove the water tube by pressing the coupler (@)and pulling the water tube (dP)away.
NOTE
DonotCutthewatertubebutseparateitfromtheCoupler.
18
Page 19

(_= ' Liftthedoorstra!ghtup,
NOTE
•Be carefulnot to Pinchthe water tubingand wireharnesson the door.
• Place doorson a protectedsurface.
Removing the Freezer Door
1) With the door closed, remove the upper hinge cover (@_)using a screwdriver, and then disconnect
the wires (@).
1 }
2) Remove hinge screws (@) and ground screw (@)counter-clockwise, and take off the upper hinge (®)
along the arrow (@).Be careful when removing the door to ensure that it does not fall on you.
3) Remove the door from the lower hinge (®) by
carefully lifting the door (®).
4) Remove the lower hinge (@)from the bracket
lower hinge (®) by lifting the lower hinge (@) in
the direction of the arrow.
19
Page 20

Removing the Refrigerator Door
1) With the door closed, remove the upper hinge cover (@) using a screwdriver, and then disconnect
the wires (@).
1
/
I
2) Remove hinge screws (@)and ground screw (@) counter-clockwise, and take off the upper hinge
(@)in the direction of the arrow (@). Be careful when removing the door to ensure that it does not fall
on you.
3) Remove the door from the lower hinge (®) by
lifting the door (@).
ii!}!i;!il;i)
4) Remove the lower hinge (@)from the bracket in
(®) by lifting the lower hinge (@)the direction of
the arrow.
=®
20
Page 21

Reattaching the Freezer Door
Insert the lower hinge (®) in the bracket lower
hinge (@).
2) Reattach the freezer door by inserting the hose
(®) in the lower side of the door into the hole in
the lower hinge (%) and pulling the hose down.
Y
i_ii_ii,ii_'i.......,,_iiiiiiili_iii,iiiii!!i!iiii!lii!iiiiii!ijiiiiliiiiiiii!_,,,"""
iiiiiii!_ii'iiiiiiiiii_S'iiiiii!iiiiiiiii_i;_'_"........._" "
./
\'\4\
3) Insert the upper hinge shaft (®) into the hole (_h).After levelling between the upper hinge hole (®) and
the hole of the cabinet (®). Reattach hinge screws (®) and gound screw (®) in a clockwise direction.
4) Connect the wires. 5) Put the front part of the upper hinge cover (@)on
the front part of the upper hinge (@) and reattach
from the front part of the upper hinge cover first.
21
Page 22

Reattaching the Refrigerator Door
1) Insert the lower hinge (_) in the bracket lower 2) Place the hole in the refrigerator door (®) over
hinge (@). the lower hinge (_4h).
/
J
J
J
3) Insert the upper hinge shaft (®) into the hole (_h).After levelling between the upper hinge hole (®) and
the hole of the cabinet (®). Reattach hinge screws (®) and gound screw (®) in the clockwise direction.
4) Connect the wires. 5) Put the front part of the upper hinge cover (@)on
the front part of the upper hinge (@) and reattach
it from the front part of the upper hinge cover
first.
j
/
22
Page 23

Reattaching the Water Supply Line
1) While pressing the front face of coupler (@),insert the water line (@) in the coupler.
2) Tighten the screw on the clamp (®).
1
,#
Reattaching the Front Leg Cover
NOTE
Put on the front leg cover by turning the three screws clockwise, as shown in the figure.
Before attaching check water connector and 6 glassesto checkfor leakage;
FRONT LEG COVER
23
SCREW
Page 24

Make sure the refrigerator is level before adjusting its doors.
The doors will be uneven if the refrigerator is not level.
NOTE
The front of refrigeratorisadjustablel
Case 1) Freezer door is lower than
that of the refrigerator
Insert a flat-blade screwdriver (-) (d_)into a slot of
the control lever (@),turn it clockwise and level the
refrigerator.
!i!i!i!i!i!i!_
(_ DRIVER(-), ; iiii :
@ CONTROL LEVER
Case 2) Freezer door is higher than
that of the refrigerator
_iiiiiiiiiiiiiii
iiiiiiiiiiiii!iiii
iiiiiiiiiiiiiii
_iiiiiiiiiiiiiii
iiiiiiiiiiiiiii
iiiiiiiiiiiiiii
iiiiiiiiiiiiiii
DOnot make small adjustments with thecontrol lever, PleaSe refer to the next pagel
Insert a flat-blade screwdriver (-) (d_)into a slot of
the control lever (@),turn it clockwise and level
the refrigerator.
(_ DRIVER(-)
24
Page 25

L...._9- AboutLevelingfirsE
NOTE
Making small adjustments between doors.
Ifthe door of the freezer is lower thanthat of the
refrigerator.
Ifthe door of freezer is higherthanthat of the
refrigerator.
!]
Adjustment part
\djustment part
Please open the doors and adjust then as follows:
1) Releasethe nut(d)) onthe lower hinge until it reachesthe upper end ofthe bolt (@).
@
NOTE
when you release the nut(C), use enclosed heX wrench (@)to turn the bolt(@)in a slightly
counterclockwise direction. This will enable you to turn the nut(@) loose with your fingers.
d, NUT
,'_;,NUT ,'2',BOLT (2,BOLT
2) Please adjustthe heightdifferencebetweenthe doorsby turning the bolt (@)clockwise( _ ) or counter
clockwise( _ ).
@ when you turn cl0ckwise (-,_,,._)i the d0orgoes upl
NOTE
,;, WRENCH
,_ WRENCH
(_2XlBOLT (_2XlBOLT
3) After adjusting the doors, the nut ((_)turn clockwise ( "_J ) until it reaches the lower end ofthe bolt, then
tightenthe bolt again with thewrench (®)to fix the nut(@).
f
,'_:,NUT
\ (2:,BOLT
,;, WRENCH ,_ WRENCH
....._ii_ii/iii_i_!i!i_iiiii. ,
::.
d;, NUT
12:,BOLT
If y0Udo not fix the nut (@)firmly,the bolt (@)maybe releaSed.
NOTE
25
J
i
Page 26

1)Inordertooperatetheicemakerproperly,waterpressureof20N125psi isrequired.
Inthisrangea 170ccpapercupcanbefilledin10secs.
2)Thewaterfilterremovesparticles.Itdoesnotsterilizeordestroyanymicro-organisms.
3)Iftherefrigeratorisinstalledinanareawithlowwaterpressure(below20psi),youshouldinstalla
boosterpumptocompensateforthelowpressure.
4)Ensurethewaterstoragetankinsidetherefrigeratorisproperlyfilledinitially.Pushthewaterdis-
penserleveruntilthewaterrunsfromtheoutlet.
@ Waterlineinstallationkitis availableatextracostfromyourdealer.Therefrigeratormanufactur_
NOTE errecommendsusingawatersupplykitcontainingcoppertubing.
Connecting to water supply line
- Shut off the main water supply line and turn
the Ice maker to the off position.
- Locate the nearest cold drinking water line.
- Follow the instructions in the ice maker
installation kit.
- After connecting the water supply with water
filter, turn on water supply and flush 4 or
more gallons into a bucket to clear the water
filter
1. Cold Water line
2. Pipe Clamp.
3. Water Line Installation Kit
4. Shut Off Valve
26
Page 27

Connect the water line to the refrigerator.
1) Slip the compression nut through the provided
plastic tubing.
2) Tighten the compression nut onto 1/4"
comprression fitting.
@ Do not overtightenthe compressionnut.
NOTE
Ferrule ,,
(Purchased),,*
• Using Copper Tubing
- Slip the compression nut and ferrule on cop-
per tubing as shown.
• Using Plastic Tubing
- Insert the molded end of the plastic tubing
into the compression fitting.
3) Tighten the compression nut onto the com-
(Purchased) (Purchased)
pression fitting.
4) Turn water on and check for any leakage.
@
NOTE
Waterline must be connected to drinkable water onyl
Cut off 1/4 inch of the provided plastic tubing squarely to prevent leaks when reconnect.
Install the water filter.
1) As shown, the fixed cap separates from the refrigerator by rotat-
ing it counterclockwise.
Remove the water filter from the box and put a month indicator
sticker on the filter as shown.
I Refrigerat°r I
_',, CompressionNut(1/4")
*, (Provided)
4_ , CompressionFitting
_S , (Provided)
11-
i
; CompressionNut(I/4")
(Purchased)
PlasticTubing
I Household Water Line I
(_ Keep the cap(A)in a safeplace forrecapping' whenyou will
NOTE notuse the f!lter.
2) If the water filter was installed in March, put on the "SEP" sticker.
3) Remove the protective cap then position and insert the
filter as shown.
4) Slowly turn the water filter clockwise 90° to align
the indication mark on the cover, locking the filter in posi
tion. Do not overtighten.
SEPARATION
OF RED
STICKER
(MONTH INDICATION)
@
NOTE
please check that the indication line aligns with the lock position.
27
____ ALIGN THE INDICATION MARK
TH LOCKPOSITION.
Page 28

Removeanyresidualmatterinsidethewatersupplylineafterinstallingfilter.
1) Turn on the main water supply & shut-off the valve of the
water supply line.
2) Run water through the dispenser until the water runs clear
(6-7 minutes). This will clean the water supply system and
clear air from the lines.
3) Additional flushing may be required in some households.
4) Open the refrigerator door and check if water leaks around
the water filter.
•A newly_installedwater filter cartridge may cause water to briefly spUrtfrom the disPenserl
NOTE ° Before reinstalling the water filter, remove the wine shelf (RS2666/2777). ..........
ICE- --WATER
Check the amount of water supplied to the ice tray.
1) Lift up (L#)and pull out (@)the ice maker bucket in the freezer.
ICE MAKER
2) When you press the test button, the ice cube container is
filled with water from the water supply tap.
Check the amount of water (see the illustration below).
If the water level is too low, CHECKTHEWATERLEVEL
the ice cubes will be small.
This is not a problem with the ice maker
but of the water pressure in
the pipe, and occurs frequently.
When this problem occurs, contact
the dealer service center to check the
amount of water supplied.
TOO HIG_--,_
t O T OM
28
Page 29

The refrigerator does not work at all or itdoes not
chill sufficiently
• Check that the power plugis properly connected.
• Isthe temperature control on the display panel set to
the correct temperature? Try setting itto a lower
temperature.
• Isthe refrigerator in direct sunlight or located near a
heat source?
• Is the back ofthe refrigerator too close to the wall?
The food inthe refrigerator is frozen
• Isthetemperature control on the display panel set to
the correct temperature? Try setting itto awarmer
temperature.
• Isthe temperature inthe room too low?
• Did you store the food with a high water content in
the coldest part of the refrigerator?
You hear unusual noise or sounds
• Check that the floor is leveled and stable.
• Isthe back of the refrigerator too close to the wall?
• Wasanything dropped behind or under the refrigera-
tor?
• A"ticking" sound may be heard from insidethe
refrigerator,this is normal. This occurs because vari-
ous accessories are contracted or expanded.
The front corners and sides of the cabinet are hot;
condensation occurs.
• Anti-condensators are installed in the front corners of
the refrigeratorto prevent condensation.
• Condensation can occur when you leave the door
open for a long time.
Ice is not dispensed
• Did you stop the ice making function?
• Isthere any ice in the ice storage unit?
• Isthe water line connected and the shut-off valve
open?
• Isthe freezer temperature too warm?
(Set the temperature lower)
• Did you wait for 12 hours after installation of the
water supply line before making ice?
You can hear water bubbling in the refrigerator
•The bubbling comes from the refrigerant circulating in
the refrigerator and is normal.
There is a bad smell in the refrigerator
• Wrap strong smelling food so that it is airtight.
Throw away any rotten food.
Frostforms on the walls of the freezer
• Is the air vent blocked?
•Allow sufficient space between the foods stored for
efficient air circulation.
• Is the door closed properly?
No water is supplied
• Is thewater line connected and the shut-off valve
open?
• Is the water supply line crushed?
• Is the water tank frozen because the refrigerator tem-
perature is too low? Select a warmer setting on the
display panel.
29
Page 30

SAMSUNG REFRIGERATOR
(18 Cubic Feet and Larger Capacity)
This SAMSUNG brandproduct,as suppliedand distributedby SamsungElectronicsAmerica, Inc.(SAMSUNG)anddelivered new,
in the originalcartonto the original consumer purchaser,is warranted bySAMSUNGagainst manufacturingdefectsin materials
andworkmanshipfora limitedwarrantyperiod of:
One(1) Year Partsand Laboron Refrigerator
Five(5) Years Partsand Labor on Sealed RefrigerationSystem Only*
(*Compressor,evaporator,condenser,drier, connecting tubing)
This limitedwarrantybegins on the originaldate of purchase,and is valid only on productspurchasedand used in the United
States. Toreceivewarrantyservice,the purchaser must contactSAMSUNG for problemdeterminationand service procedures.
Warrantyservice canonly be performedby a SAMSUNGauthorizedservice center. The original datedbill of sale must be
presentedupon requestas proofof purchaseto SAMSUNG or SAMSUNG'sauthorizedservicecenter.
SAMSUNGwill repairor replaceany partfound to be defective,atour optionand at no charge as stipulatedherein,with newor
reconditionedpartsduring the limited warrantyperiodspecifiedabove. All replacedparts and products becomethe propertyof
SAMSUNGand must be returned to SAMSUNG. Replacementpartsand products assumethe remainingoriginal warranty,or
ninety(90)days, whicheveris longer.
In-homeservice will be provided duringthewarrantylabor period subjectto availabilitywithinthe contiguousUnited States.In-
home serviceis not availablein all areas. To receive in-home service,the productmust be unobstructedand accessible from floor
levelto service personnel. Ifduring in-homeservicerepaircannotbe completed,it may be necessary to remove,repair and return
the product. If in-homeserviceis unavailable,SAMSUNG mayelect, at our option, to provide for transportationof our choiceto
andfroma SAMSUNG authorized servicecenter. Otherwise,transportationto andfrom the SAMSUNG authorizedservice center
isthe responsibilityof the purchaser.
This limitedwarrantycovers manufacturingdefects in materialsand workmanshipencounteredin normal,noncommercialuseof
thisproduct, andshallnot apply to thefollowing, including,but not limitedto: damagewhich occurs in shipment;deliveryand
installation;applicationsanduses for which thisproductwas not intended;altered productor serialnumbers; cosmeticdamageor
exteriorfinish;accidents,abuse, neglect,fire, water,lightningor other actsof nature;use of products,equipment,systems,utilities,
services,parts, supplies,accessories,applications,installations,repairs,externalplumbing and leaks,external wiring, circuit
breakers,fuses or connectorsnot suppliedandauthorizedbySAMSUNG, or which damage thisproduct or resultin service
problems;incorrectelectrical linevoltage,fluctuationsand surges;customeradjustmentsand failureto follow operatinginstructions,
cleaning,maintenanceand environmentalinstructionsthatare covered and prescribed inthe instructionbook; loss of food due to
spoilage;consumable items includingfiltersand lightbulbs.
THEREARE NO EXPRESSWARRANTIES OTHERTHAN THOSE LISTEDAND DESCRIBEDABOVE,AND NO WARRANTIES
WHETHEREXPRESS OR IMPLIED, INCLUDING,BUT NOT LIMITEDTO,ANYIMPLIEDWARRANTIES OF
MERCHANTABILITYOR FITNESSFORA PARTICULARPURPOSE,SHALLAPPLYAFTER THE EXPRESSWARRANTY
PERIODSSTATEDABOVE,AND NOOTHER EXPRESSWARRANTYOR GUARANTY GIVEN BY ANY PERSON, FIRM OR
CORPORATIONWITH RESPECTTO THIS PRODUCTSHALLBEBINDING ON SAMSUNG. SAMSUNGSHALLNOT BE
LIABLE FOR LOSSOF REVENUEOR PROFITS,FAILURETO REALIZESAVINGSOR OTHER BENEFITS,OR ANY OTHER
SPECIAL,INCIDENTALOR CONSEQUENTIALDAMAGESCAUSED BYTHE USE,MISUSE OR INABILITYTO USE THIS
PRODUCT,REGARDLESSOF THE LEGALTHEORY ONWHICH THE CLAIM ISBASED,AND EVEN IF SAMSUNGHAS BEEN
ADVISEDOF THE POSSIBILITYOF SUCH DAMAGES. NORSHALLRECOVERYOF ANY KINDAGAINST SAMSUNG BE
GREATERINAMOUNT THANTHE PURCHASE PRICEOF THE PRODUCT SOLD BYSAMSUNG AND CAUSINGTHE
ALLEGEDDAMAGE. WITHOUT LIMITINGTHE FOREGOING, PURCHASERASSUMESALL RISKAND LIABILITYFOR LOSS,
DAMAGEOR INJURYTO PURCHASERAND PURCHASER'S PROPERTYAND TO OTHERSAND THEIR PROPERTY
ARISINGOUT OF THE USE, MISUSE OR INABILITYTO USETHIS PRODUCT SOLDBY SAMSUNG NOTCAUSED DIRECTLY
BYTHE NEGLIGENCEOF SAMSUNG. THIS LIMITED WARRANTYSHALL NOTEXTEND TO ANYONEOTHER THAN THE
ORIGINALPURCHASEROF THIS PRODUCT,IS NONTRANSFERABLEAND STATESYOUR EXCLUSIVEREMEDY.
Somestates do not allow limitationson how longan impliedwarrantylasts,or the exclusion or limitationof incidental or
consequentialdamages,so the above limitationsor exclusions may notapply to you. This warranty givesyou specificlegal rights,
andyou may alsohave other rights, whichvary from state to state.
Toobtain warrantyservice, please contactSAMSUNG at:
SAMSUNGCUSTOMERCARE CENTER
SamsungElectronicsAmerica,Inc. 105ChallengerRoad RidgefieldPark NJ07660-0511
1-800-SAMSUNG(1-800-726-7864)and www.SAMSUNG.com
061002
30
Page 31

f
Page 32

If you have any questions or comments relating to Samsung products,
please contact the SAMSUNG customer care center.
Samsung Electronics America, Inc.
105 Challenger Road Ridgefield Park, NJ 07660-0511
1-800- SAM SUNG (1-800-726-7864)
www.samsung.com
 Loading...