

Samsung RS2556BB/XAA-00, RS2578BB/XAA, RS2534BB/XAA, RS2578WW/XAA-00, RS2578SH/XAA-00 Owner’s Manual
...Page 1

SIDEBYSIDE
REFRIGERATOR
Write the model and serial number here:
Model#
Serial #
Findthese numbers ona label ofthe
refrigeratorcabinetat the lefthand-sidewall.
OWNER'SMANUALANDINSTALLATION
SAFETY WARNING SIGNS ...............................................................2
OPERATING INSTRUCTIONS ........................................................4
SETTINGUPTHE REFRIGERATOR.........................................................4
MAJORFEATURES.....................................................................................4
CONTROLPANEL........................................................................................5
DIGITAL PANEL...........................................................................................6
TEMPERATURECONTROL.......................................................................7
ICEand COLDWATERDISPENSER.........................................................7
SHELVESand BINS.....................................................................................8
FOODSTORAGEGUIDE...........................................................................9
CoolSelectZoneTMDrawerGUIDE.............................................................11
REMOVINGTHE FREEZERACCESSORIES..........................................13
REMOVINGTHE REFRIGERATORACCESSORIES.............................13
BEVERAGESTATIONTM(RS2578)............................................................14
CLEANINGTHE ACCESSORIES.............................................................14
CHANGINGTHE INTERIORLIGHT.........................................................15
WATERFILTER..........................................................................................16
DOORS.......................................................................................................16
RS2534VVVVRS2534VQ
RS2556VVVVRS2556BB
RS2556SH RS2578VVV
RS2578BB RS2578SH
CONTENTS
INSTALLATION INSTRUCTIONS ................................................17
INSTALLATIONOFTHE REFRIGERATOR.............................................17
REMOVINGTHE REFRIGERATORDOORS..........................................18
REATTACHINGTHEREFRIGERATORDOORS....................................21
ADJUSTINGTHECLEARANCEBETWEENTHEDOORS....................24
CHECKINGTHEWATERDISPENSERLINE...........................................26
INSTALLINGTHEWATERDISPENSERLINE.........................................26
TROUBLESHOOTING...............................................................................29
CONSUMER SUPPORT ....................................................................30
WARRANTY...............................................................................................30
Inthe U.S.for questions about features,
operation/performance, parts, accesories or service, call:
1-800-726-7864 (1-800-SAMSUNG), FAX:l-973-601-6001
www.samsungusa.com
DA68-00500Y RE
Page 2
• Beforeoperatingthe appliance,please read this manualthoroughly and retain itfor your reference.
,/_ • Because these followingoperating instructionscover various models, the characteristicsof yourrefrigeratormay differ slightlyfrom those described inthis manual
WARNING •The applianceis notintendedforusebychildrenor infirmpersonswithoutadultsupervision.
•Childrenshouldbe supervisedto ensurethattheydo not playwiththeappliance.
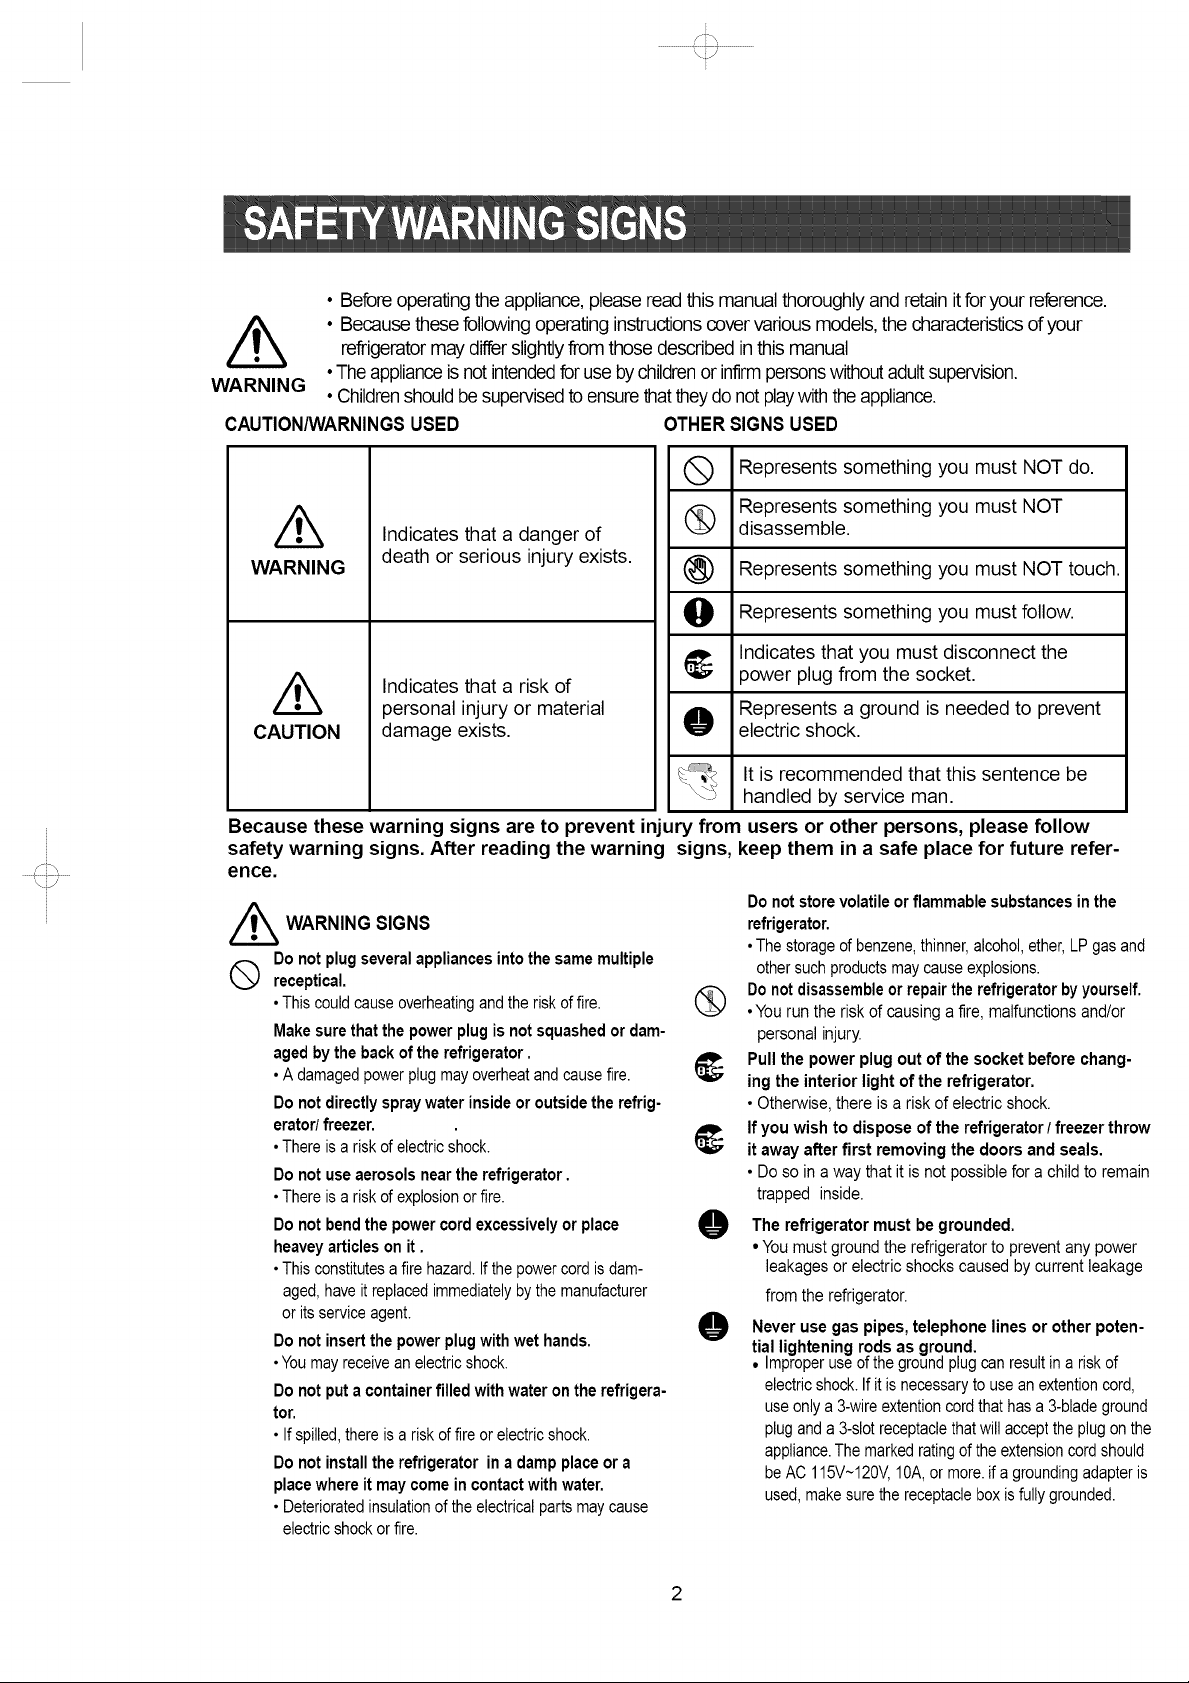
CAUTION/WARNINGSUSED OTHERSIGNS USED
Q Represents something you must NOT do.
Represents something you must NOT
disassemble.
Represents something you must NOT touch.
WARNING
Indicates that a danger of
death or serious injury exists.
O Represents something you must follow.
t_ Indicates that you must disconnect the
power plug from the socket.
Represents a ground is needed to prevent
O electric shock.
/k
CAUTION
Indicates that a risk of
personal injury or material
damage exists.
It is recommended that this sentence be
handled by service man.
Because these warning signs are to prevent injury from users or other persons, please follow
safety warning signs. After reading the warning signs, keep them in a safe place for future refer-
ence.
Donotstorevolatileorflammablesubstancesinthe
_ WARNING SIGNS
Donot plugseveralappliancesinto thesame multiple
Q receptical.
•Thiscouldcauseoverheatingand theriskoffire.
Makesurethatthepowerplugis notsquashedor dam-
agedby thebackofthe refrigerator.
•A damagedpowerplugmayoverheatandcausefire.
Do not directly spraywater inside or outside the refrig-
erator/freezer.
•Thereisarisk ofelectricshock.
Donot useaerosolsnear the refrigerator.
•Thereisarisk ofexplosionor fire.
Donot bendthe powercordexcessively or place
heaveyarticles onit.
•Thisconstitutesa fire hazard.If thepowercord isdam-
aged,haveit replacedimmediatelybythemanufacturer
or itsserviceagent.
Donot insertthepowerplugwithwet hands.
•Youmayreceiveanelectricshock.
Do not put a container filled with water on the refrigera-
tor.
• If spilled,there isa riskoffire orelectricshock.
Do not install the refrigerator in adamp placeor a
placewhere it maycomein contactwith water.
• Deterioratedinsulationof theelectricalpartsmaycause
electricshockor fire.
refrigerator.
•Thestorageofbenzene,thinner,alcohol,ether,LPgasand
othersuchproductsmaycauseexplosions.
Donotdisassembleor repairthe refrigeratorbyyourself.
•Yourun the riskof causing afire, malfunctionsand/or
personalinjury.
(_ Pullthe power plug out of the socket before chang-
ing the interior light of the refrigerator.
• Otherwise,there is a risk of electric shock.
_, If you wish to dispose of the refrigerator / freezerthrow
it away after first removing the doors and seals.
• Do so in a way that it is not possiblefora child to remain
trapped inside.
The refrigerator must begrounded.
0
• Youmust ground the refrigeratorto preventany power
leakagesor electric shockscaused bycurrent leakage
from the refrigerator.
Never use gas pipes,telephone lines or other poten-
0
tial lighteningrods as ground.
• Improperuseof thegroundplug canresultin ariskof
electricshock.If it is necessaryto useanextentioncord,
useonlya 3-wireextentioncordthat hasa 3-bladeground
pluganda 3-slotreceptaclethatwill accepttheplugonthe
appliance.Themarkedratingof theextensioncordshould
beAC 115V~120V,10A,or more.ifa groundingadapteris
used,makesurethe receptacleboxisfully grounded.
Page 3
CAUTIONSIGNS
Donot overfill the refrigerator with food.
•When you open the door, an item mayfall out and cause
personalinjury or material damage.
Do not put bottles or glasscontainersin the freezer.
•When the contentsfreeze, the glass may break and
causepersonalinjury.
Ifthe wall socket is loose, do not insert the power
plug.
•There is a riskof electric shockor fire.
Q Donotdisconnectthe powercordby pullingon it.
• Damagetothecordmaycauseashort-circuit,fire
and/orelectricshock.
• Ifthe powercord isdamaged,itmustbe replacedby
the manufacturer,acertifiedserviceagentorqualified
servicepersonnel.
Donotstorearticleson thetopof theappliance.
• Whenyou openor closethe door,thearticlesmayfall
andcausepersonalinjuryand/ormaterialdamage.
Do not store pharmaceuticals products, scientific
materials andtemperature-sensitive products in
the refrigerator.
• Productsthat requirestricttemperaturecontrolsmust
notbestoredin therefrigerator.
Do not let childrenhang on the door.Ifnot, a seri-
ous injury may occur.
Ifyou sense pharmaceuticals smells or smoke, pull
out the power plug immediatelyand contactyour
SAMSUNGElectronics service center.
Donottouchthe insidewalls ofthefreezeror
®
productsstoredinthe freezerwith wet hands.
• It maycausefrostbite.
Donot insertyour handsinto thebottomarea
undertheappliance.
• Anysharpedgesmaycause personalinjury.
Neverput fingers or other objects into the
dispenser hole and icechute. It maycause per-
sonal injury or material damage
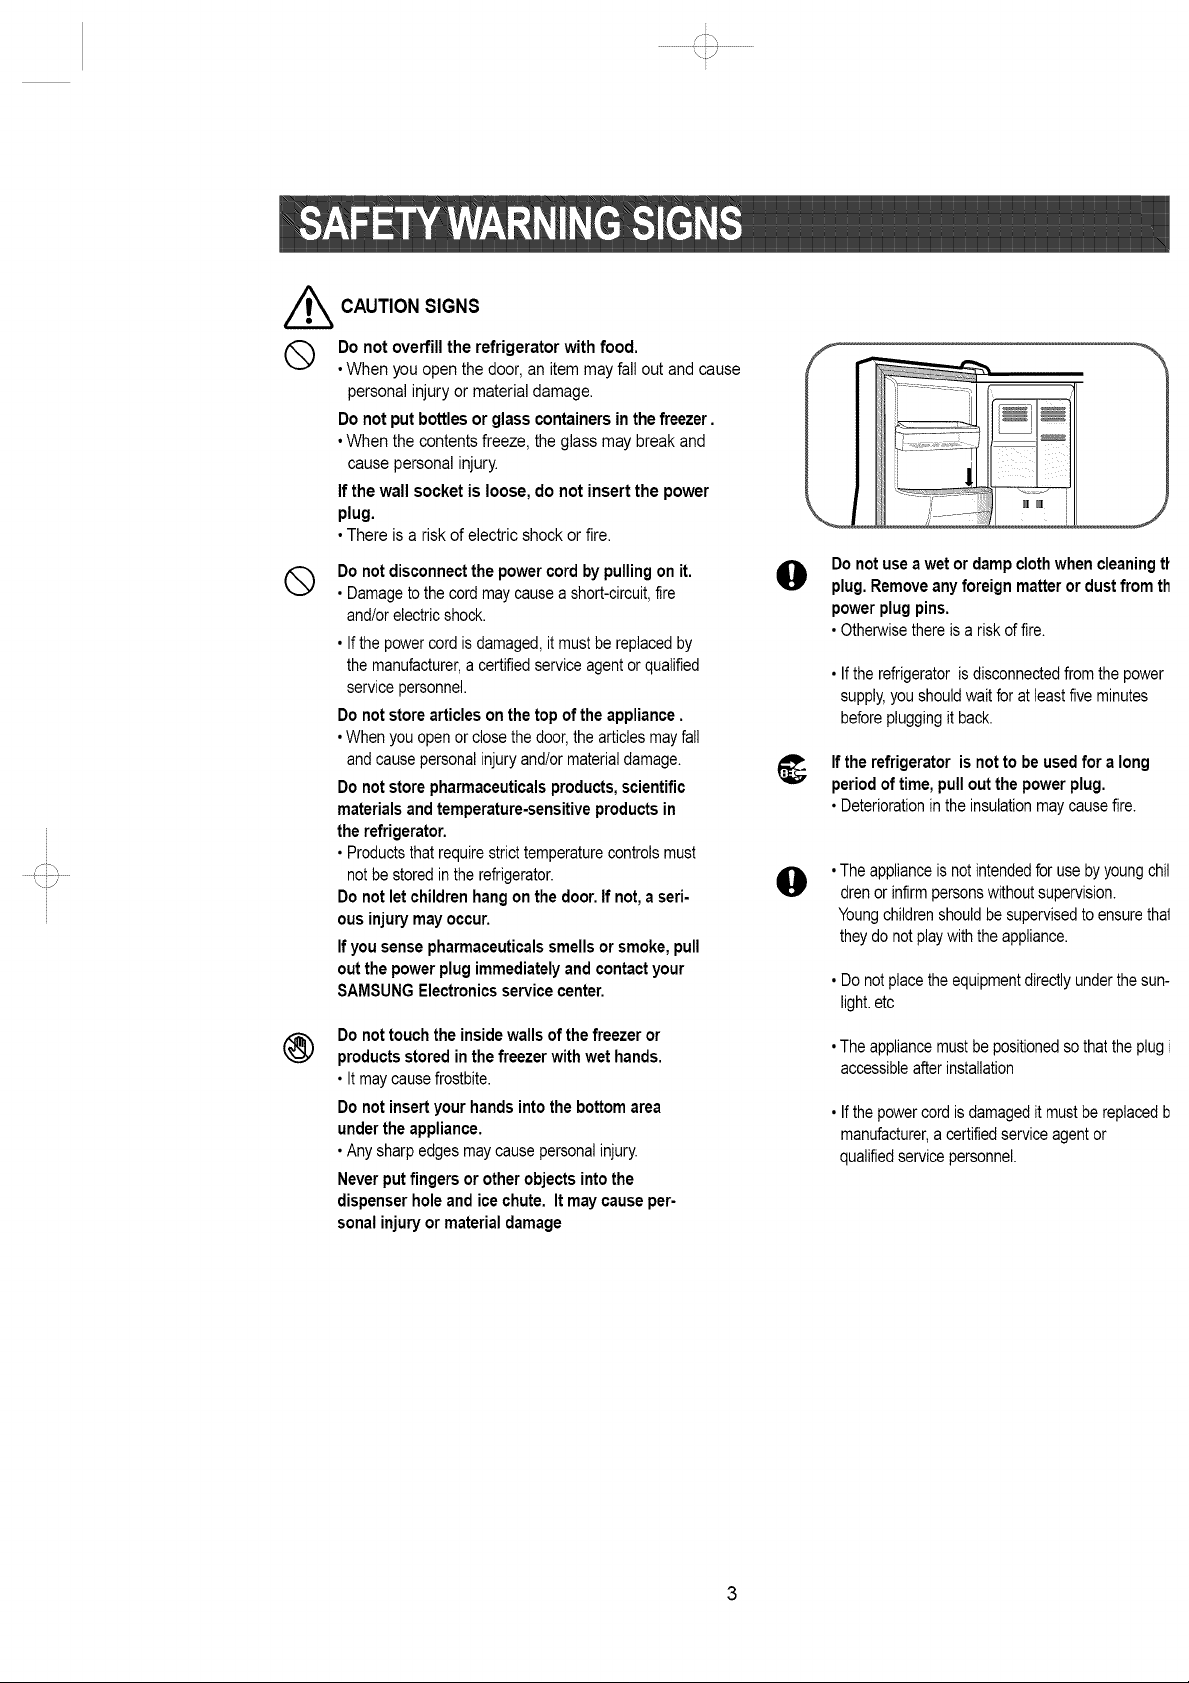
Donotusea wet ordampclothwhen cleaningtt
@
plug.Removeanyforeign matterordust from th
powerplugpins.
•Otherwisethereisa riskoffire.
• Ifthe refrigeratorisdisconnectedfromthe power
supply,youshouldwaitfor atleastfive minutes
beforepluggingitback.
_; If the refrigeratoris notto be usedfor along
periodof time,pullout thepowerplug.
•Deteriorationintheinsulationmaycausefire.
•Theapplianceis notintendedforuse byyoungchil
@
drenor infirmpersonswithoutsupervision.
Youngchildrenshouldbe supervisedto ensurethai
theydonotplaywiththeappliance.
•Do notplacetheequipmentdirectlyunderthesun-
light,etc
•Theappliancemustbe positionedso thattheplug
accessibleafterinstallation
• Ifthe powercordisdamagedit mustbereplacedb
manufacturer,acertifiedserviceagentor
qualifiedservicepersonnel.
Page 4
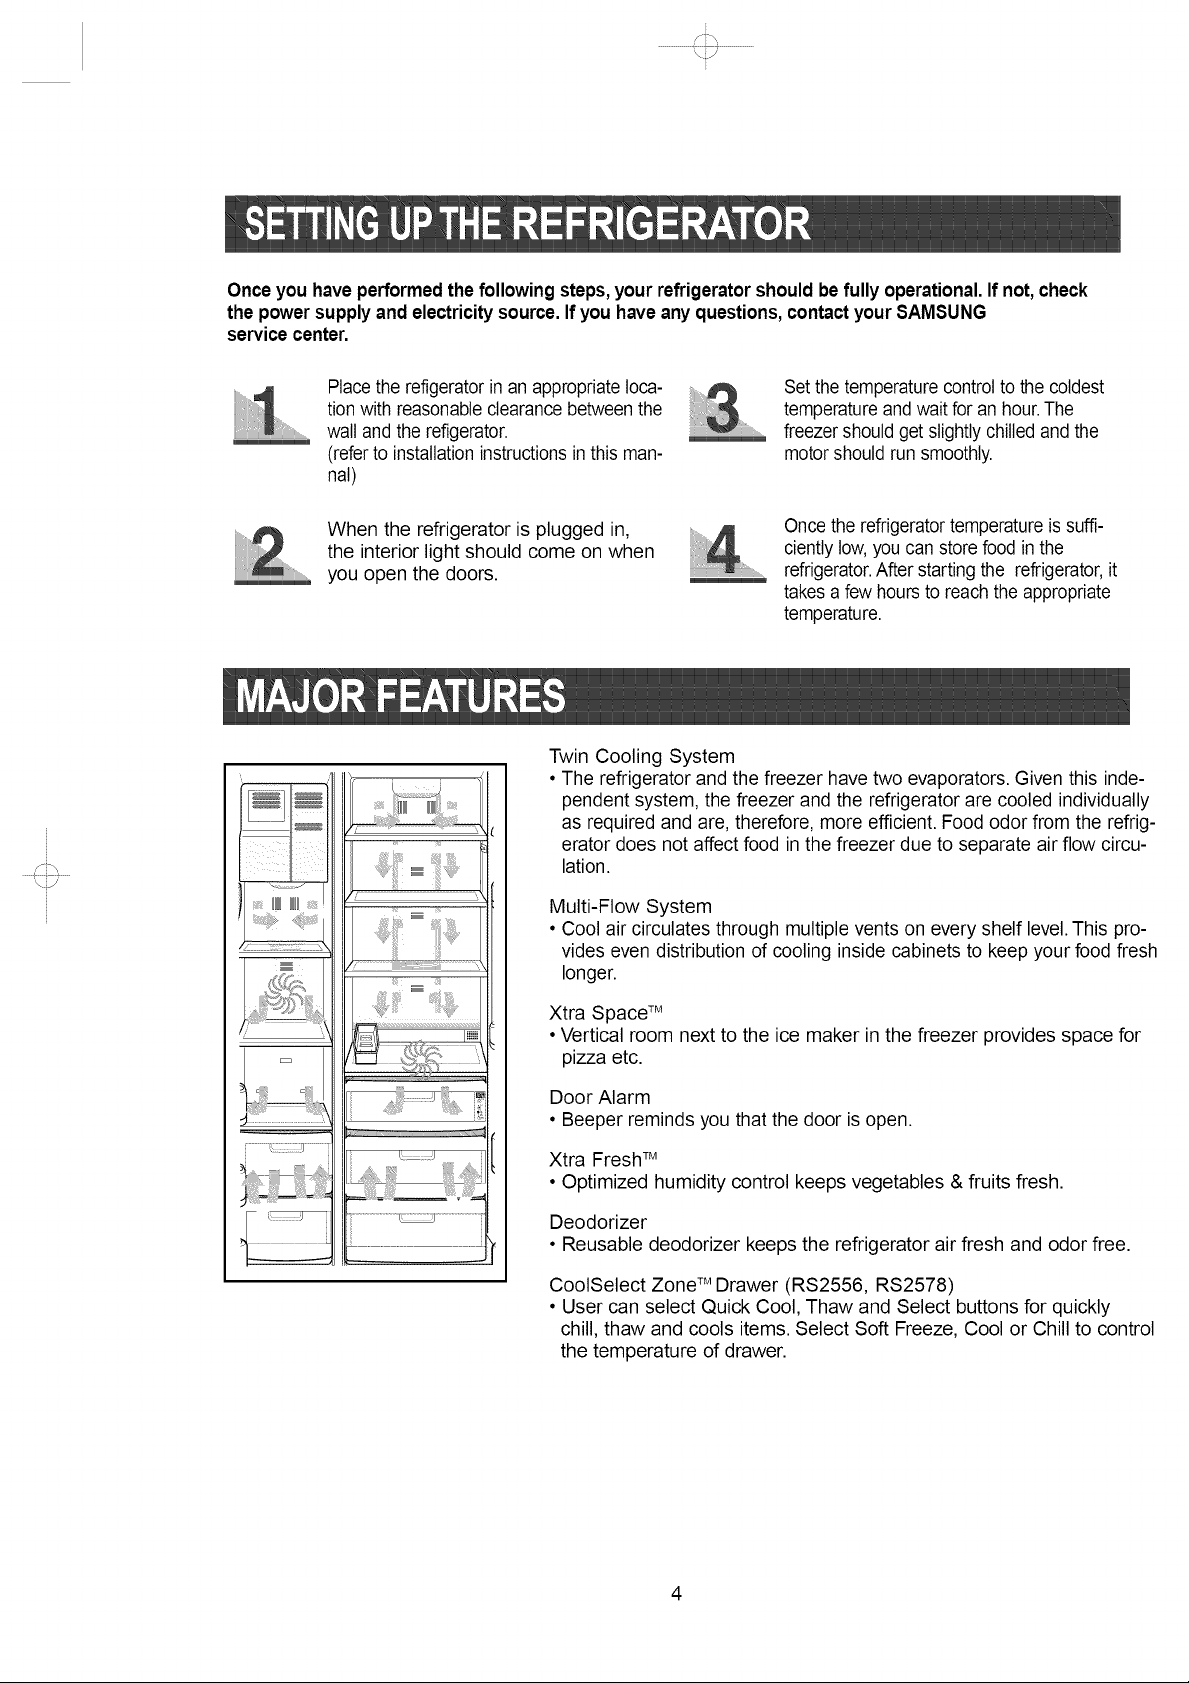
Onceyou haveperformed thefollowing steps,your refrigeratorshouldbe fully operational.If not,check
the powersupply and electricitysource.If you haveany questions,contactyour 8AMSUNG
service center.
Set thetemperaturecontrolto the coldest
il tion withreasonableclearancebetweenthe
Placethe refigeratorin an appropriateloca-li 3
wall andthe reflgerator. .........
(referto installationinstructionsin this man-
nal)
temperatureandwait for an hour.The
freezershould getslightly chilledandthe
motor shouldrun smoothly.
;i_i!!i!ii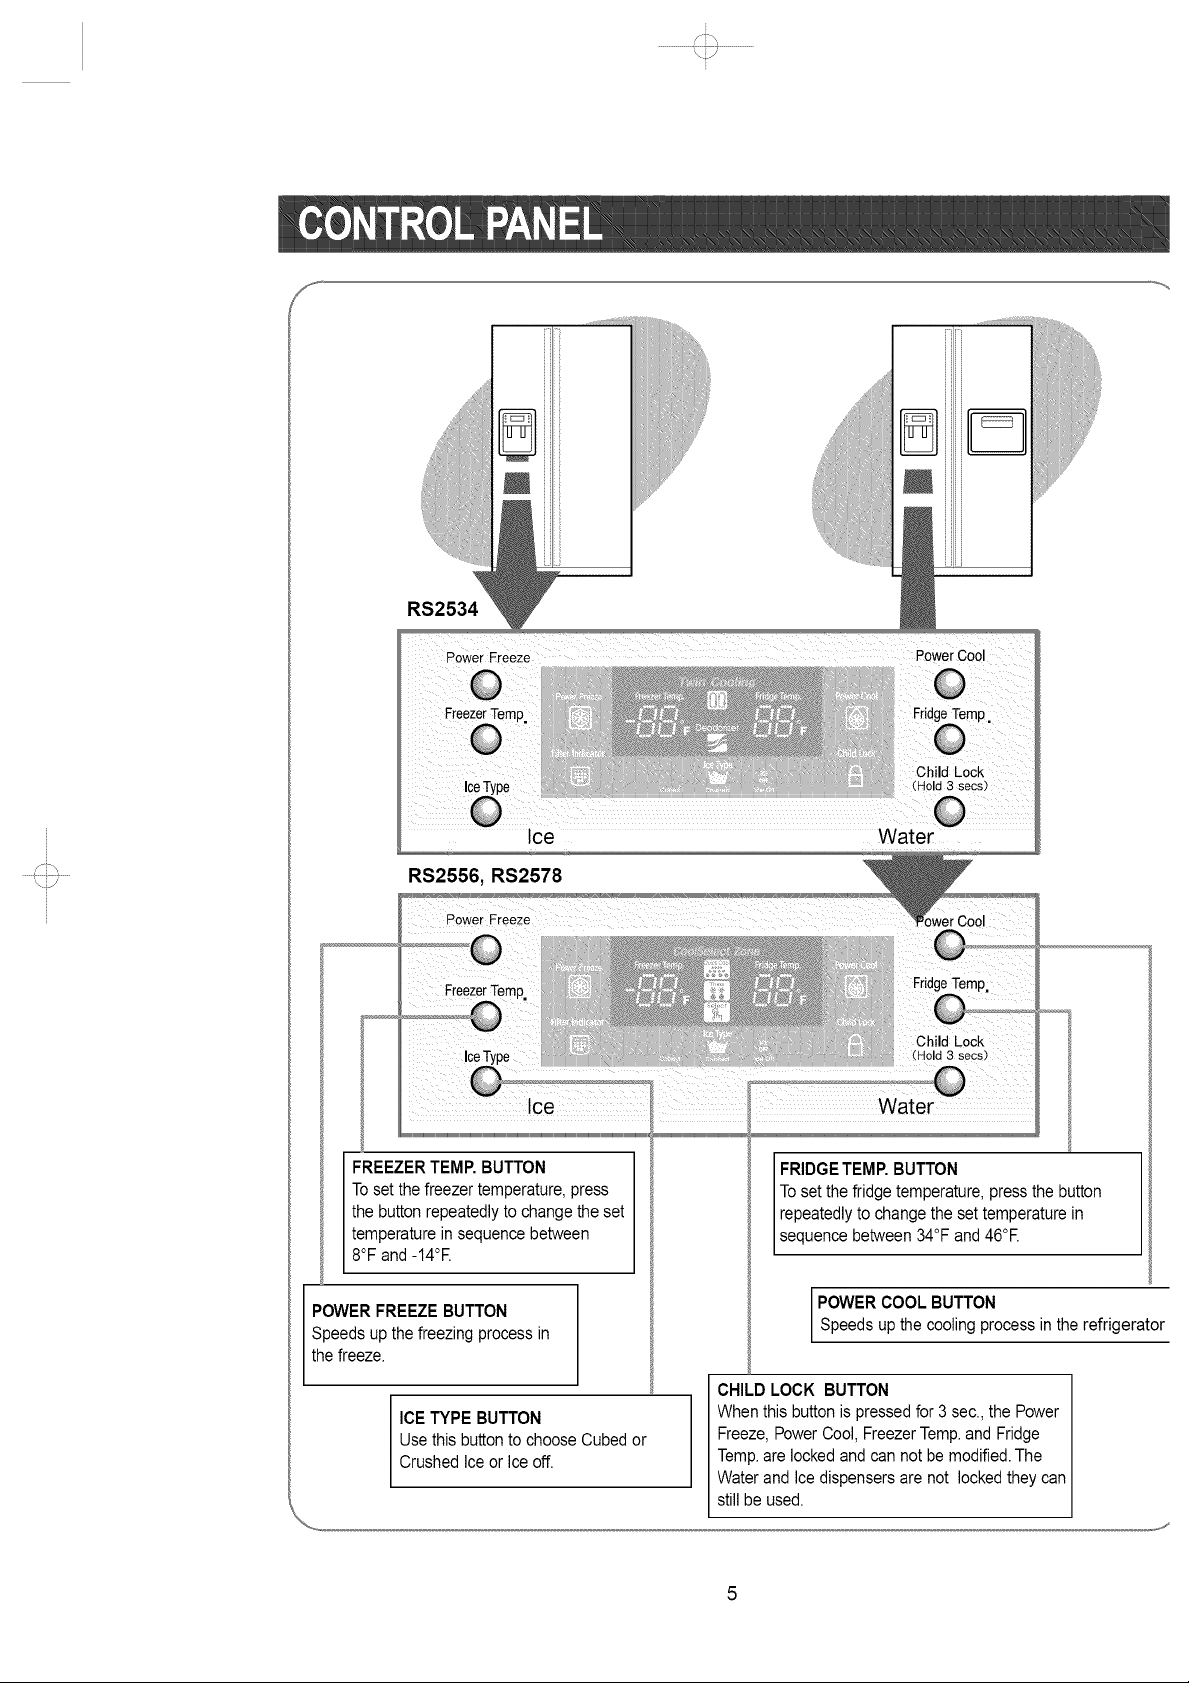
RS2534
Power Freeze
Child Lock
Hold 3 secs)
Toset the freezer temperature,press
the button repeatedly tochange the set
temperaturein sequence between
8°Fand -14°E
POWER FREEZE BUTTON
peeds up the freezingprocess in
the freeze,
ICETYPE BUTTON
Use thisbutton to choose Cubedor
Crushed Iceor Ice off.
Toset the fridge temperature, press the button
repeatedlyto change the set temperature in
sequencebetween 34°F and 46°E
POWER COOL BUTTON
Speeds up the cooling process in the refrigerator
CHILD LOCK BUTTON
Whenthis button is pressed for 3 sec.,the Power
Freeze,PowerCool, FreezerTemp.andFridge
Temp.are lockedandcan not be modified.The
Waterand Ice dispensersare not lockedthey can
stillbe used.
Page 6
or
RS2534
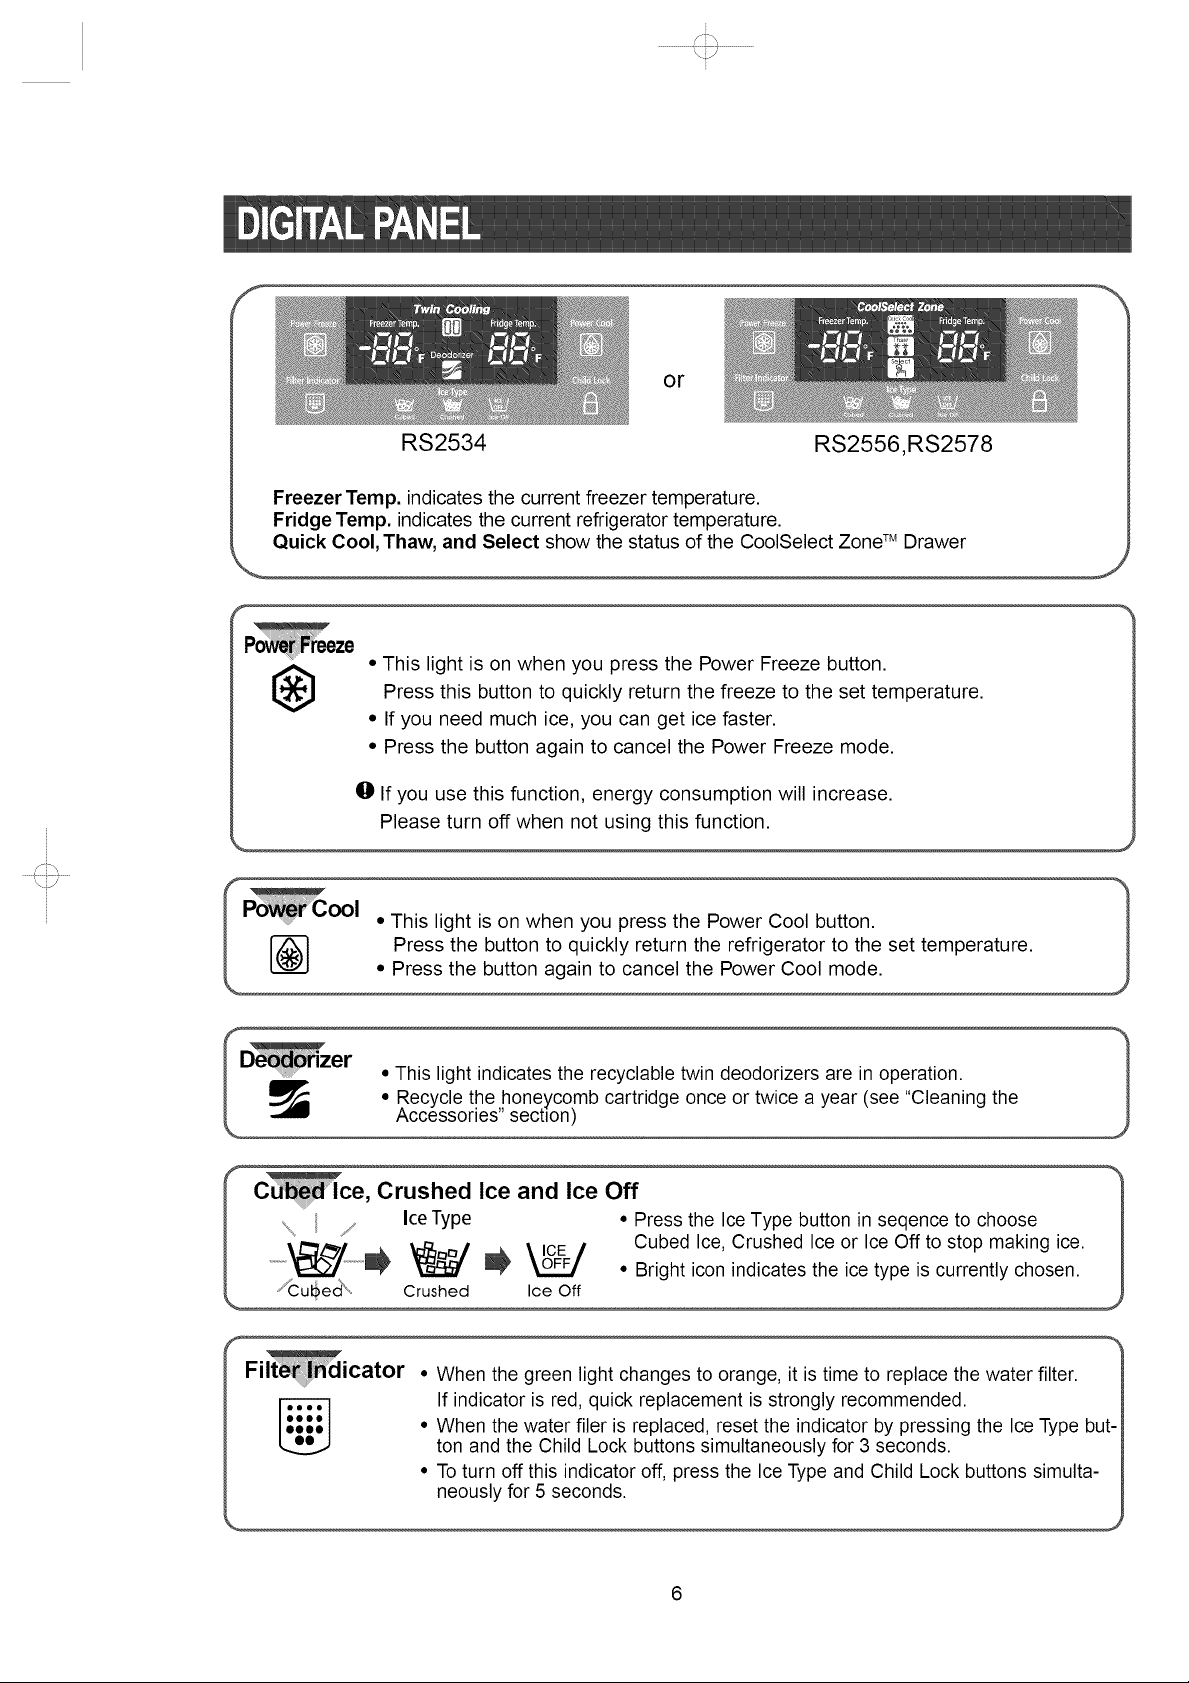
Freezer Temp. indicates the current freezer temperature.
Fridge Temp. indicates the current refrigerator temperature.
Quick Cool, Thaw, and Select show the status of the CoolSelect ZoneTM Drawer
• This light is on when you press the Power Freeze button.
®
rCool .
i,_, This light is on when you press the Power Cool button.
_ Press the button to quickly return the refrigerator to the set temperature.
Press this button to quickly return the freeze to the set temperature.
• If you need much ice, you can get ice faster.
• Press the button again to cancel the Power Freeze mode.
O If you use this function, energy consumption will increase.
Please turn off when not using this function.
• Press the button again to cancel the Power Cool mode.
RS2556,RS2578
.....' ..... This light indicates the recyclable twin deodorizers are in operation.
_ Recycle the honeycomb cartridge once or twice a year (see Cleaning the
Accessories" secuon)
Cd_'lce, Crushed Ice and Ice Off
,, Ice Type • Press the IceType button in seqence to choose m
Cubed Ice, Crushed Ice or Ice Off to stop making ice.
Fi icator
• When the green light changes to orange, it is time to replace the water filter.
If indicator is red, quick replacement is strongly recommended.
• When the water filer is replaced, reset the indicator by pressing the Ice Type but-
ton and the Child Lock buttons simultaneously for 3 seconds.
• To turn off this indicator off, press the Ice Type and Child Lock buttons simulta-
neously for 5 seconds.
Page 7

\fJ
Freezer
• Thefreezertemperaturecan be set between
8°F and-14°R
• Pressthe FreezerTemp. button repeatedly until the
desiredset temperatureis shown in the temperature
display.
• The temperaturedisplay changesin sequence
between 8°F and -14°RWhen thedisplay reaches
8°F,it returnsto -14°R
• After five seconds,the displayreverts to the actual
freezer temperature.The unitwill thenwork to adjust to
the newdesiredtemperature.
• When ice creamis storedabove4°F infreezer,it may melt,
/k
WARNING
i•The temperatureof thef[eezer or the refrigeratorrisesfr0mfrequent 0Penings,when sweeping
and from warm food.This maycause the digital displayto blink iThe digitaldisplaywill stop
blinkingwhen thefreezer and refrigerat0rreturn to the n0rma temperature
Press the IceType button to select the type
of ice:
• Cubed ice :_ _ _ _
// \\
For Cubed ice
Refrigerator
• The refrigeratortemperaturecan be set between
46°F and 34°R
• Pressthe FridgeTemp.button repeatedlyuntilthe
desiredtemperature is shownin the temperaturedis-
play.
• The temperaturedisplaychanges insequence and
revertsin the same wayas thefreezer.
Water Dispenser
The capacityof the water tank isapproximately0.3 gal.
Cold Water
• Crushed ice
For Crushed ice
• No ice
For ice off
If the Ice remains in the Ice bucket, the
NOTE cubed ice is obtained.
Push the ice dispenser lever with a cup.
• Place a cup in line with the dispenser lever the
dispenser to prevent the ice from jumping out.
@ Never putfingers or any other objects in the
NOTE dispenser opening, It may cause injury.
i, No ice
• Push the water dispenser lever with a cup.
• If you have just installed the refrigerator, throw
away the first six glassfuls of water to flush out
impurities in the water supply system.
/k
CAUTION
If you have a long vacation or business trif
and won't use the water or ice dispensers
close the water valve. Otherwise, leakage
of water may occur.
Page 8
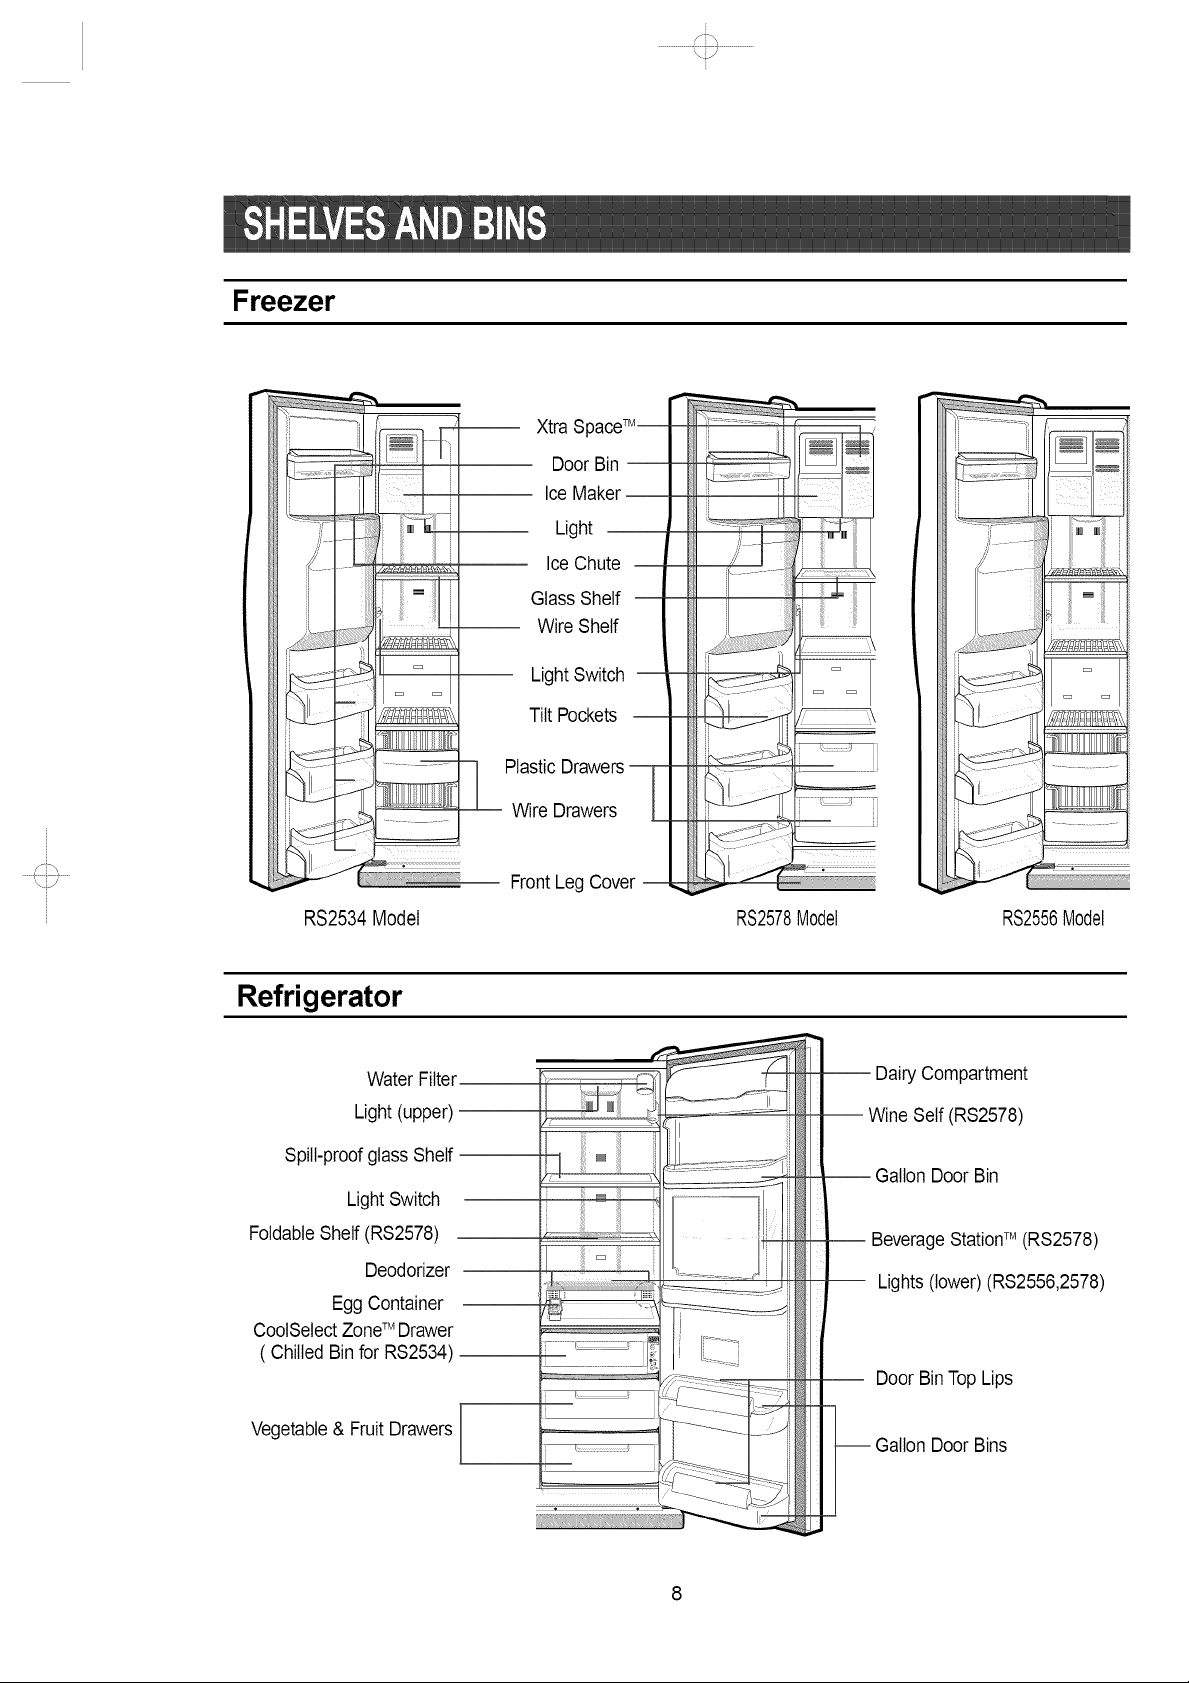
Freezer
--I-_-- Xtra SpaceTM-
_M DoorBin
i I_J _ IceMaker
:" L_ Ice Chute
i I GlassShelf
!,.._._.......... L WireShelf
= LightSwitch --
-i F_i;ICDrDi;wrelS-_
Light =
Tilt Pockets --
RS2534Model RS2578Model RS2556Model
Refrigerator
Water Filter
Light(upper)
Spill-proofglass Shelf
LightSwitch
FoldableShelf (RS2578)
Deodorizer
Egg Container
CoolSelectZoneTM Drawer
( Chilled Binfor RS2534)
Vegetable& FruitDrawers
Front Leg Cover --
-- Dairy Compartment
-- Wine Self(RS2578)
-- Gallon DoorBin
-- BeverageStationTM (RS2578)
Lights (lower)(RS2556,2578)
-- Door BinTopLips
-- Gallon Door Bins
Page 9

\fJ
FROZEN FOOD STORAGE IN FREEZER
:1
2,, TemperedGlassShelf(Wire Shelf)
/k
WARNING
XtraSpaceTM
• Can be usedforfrozen foods such as pizza, pasta,burri tos,
and fajitas.
• Inorder to preventodor penetrationto the ice,stored food
shouldbe wrapped securely.
• Can be usedto storeall typesof frozenfood.
Door Bin(Tilt Pocket)
• Can be usedforsmall packagesof frozenfood.
PlasticsDrawer(Wire Drawer)
• Can be usedto store meatand dry foods.Storedfood should
be wrappedsecurelyusing foil or other suitablewrapping
materialsor containers.
Icechute
Donot putyour fingers,handsor anyother insuitableobjectsin thechute Orice,maker bucketl
this may reSUltin personalinjurYOrmaterialdamagel
Page 10

i
\fJ
CHILLED FOOD STORAGE IN REFRIGERATOR
TemperedSpill ProofGlassShelf
• Can be usedto storeall types of chilledfood.
• Safeandhard to breakresistant.
• Circular marks on the glass surfaceare a normal phenomenon.
iiliiZ,,,......
iilQ ii!2 GallonDoor Bins
i
Chilled Binor CoolSelectZoneTM Drawer
• Helpsto preserve thetaste offood and prolongs its freshness.Use
tostore cheese,meat, poultry,fish or any otherfoods usedquickly.
Fruit & VegetableDrawer (Upperand Lower)
• Is used tostorefruits and vegetables.
• This drawer is airtight.Optimized humiditycontroldesignhelps to
preservethe freshnessof the stored vegetables andfruits.
DairyCompartment
• Canbe usedto store butter,margarineand cheezefor short period.
• Can be usedto storefoods in small packages,suchas milkand
yogurt.
BeverageStationTM (R82578)
• Can be usedto storethe frequentlyuseditems,such as canned
beveragesand snacksand allowsaccesstothese itemswithout
opening therefrigeratordoor.
B0ttles should be st0red tightly t0gether sothat they d0 not fall OUL
/k
WARNING
Egg Container
• Put eggsin the container andplacethemon the shelf.
Wine Shelf (R82578)
• Placeyourwine bottle on the shelf to maintaintheir taste.
" If you have a long vacationplanned, you must decide to empty the refrigerator and turn itoff.wipe
excess moisture from the inside and leave the doors open. Otherwise,odor and mold maydevelop.
10
Page 11

\fJ
"Select" Button (RS2556, RS2578)
Soft Freeze
• When "SoftFreeze"ischosen, the temperatureon the
digtalpanel displays23°F(-5°C)regardlessofthe set
temperatured the refrigerator.
• "Soft-Freeze"temperature helpskeepmeats andfishes
fresh longer.
• Can cut meat easilywithoutdrips.
2
Chill
• When "Chill"ischosen,the temperatured the CoolSe-
lectZoneTM Draweris keptat 30°F(-1°C)regardlessd
the setrefrigeratortemperature.
• "Chill"temperaturehelps keepmeat orfish fresh longer.
iiii!il .............
Cool
• When"coor' is chosen,the temperaturewill be the same
asthe set temperature d the refrigerator.Thedigital
panelshows thesame temperature as that d the display
panel.
• For"Cool,"the CoolSelectZoneTM Drawer allowsextra
refrigeratorspace.
11
Page 12

"Quick Cool" Button
• Youcanuse the QuickCool feature with the CoolSelectZoneTM.
• "QuickCool"allows 1~3 canned beveragesto coolwithin 60 min.
• Tocancelthis option, pressthe "QuickCool"button again.
CoolSelectZoneTM returns to the previoustemperature.
• When"QuickCool"ends, it returnsto the "Cool"temperatureset-
ting.
O QuickCool
\ ,/
@
NOTE
Depending0n the beverages,thecool'd0wn time may vaiyl
• For"QuickCool,'option,food storedin theCoolSelect Zone_M
Drawershouldbe removed.
NOTE
"Thaw" Button
• Drips loss and qualitydeteriorationd meatsreducesthe fresh-
ness d foods.
• After "Thaw" isselected,warm and cold air is alternatelysup-
plied intothe CoolSelectZoneTM Drawer.
• Dependingonthe weightd meat, thawingtime canbe selected
for 4 hrs,6 hrs, 10hrs, and 12 hrssequentially.
• When"Thaw"ends, CoolSelectZoneTMdisplayreturns to "chill"
condition.
• Tocancelthis option, press any buttonexcept"Thaw".
• Theapproximatethawing time of meatandfish are shown
below.(Basedon linch thickness)
= _ Soft
Freeze
(2 Chill
_) Select
Thaw
Soft
Freeze
Chill
Cool
_ Select
ckCool
@
NOTE
NOTE
Thaw Time
Weight
4 hours
0.8Ib
6 hours 10hours 12hours
1.3Ib 1.7Ib 2.2Ib
Depending onthes ze and thicknessofmeat and fish,thethawingtime mayvary.
The above weight represents the total weight of food n the CoolSelect 7one Drawer.
TM
Ex)The totalthawing time for 1.3Ibfrozen beefand 0.8 Ibfrozen chickenwill be 10 hours. ........
, With the!'Thaw"option,food stored in theCoolSelectZoneTMDrawershouldbe removed.
12
Page 13

Glass Shelf
• Pullthe shelf out asfar as
itgoes.Then lift it up and
remove it.
Door Bin
iiii!iiii2....
• Holdthe door binwith both
hands andthen liftit up.
Plastic Drawer(Wire Drawer)
iiiiiii ............
12........
• Removethe drawer by
slightly.pUllingitout and liftingit up _.:,:..................;._
..... Spill Proof Glass Shelf
• Pullthe shelf out asfar as itwill go.Then lift it up and removeitsoftly.
Vegetable& Fruit Drawer
• Removethe drawer byholding the handle,pullingthe draweroutand liftingit upsmoothly..
• Removethe optimized humiditycontrolcover bypulling ittowardsyou.
Ice Maker Bucket
........
• Removethe bucketby liftingup and pulling
Front LegCover
iiiiiiii 5,..............
• Open the freezer and refriger-
ator doors,removethree
screws and detach the cover.
• Toreassemblethe coverleg
front,put it back to original
position andtighten the threescrews.
(_ , Donot use excessiveforce When
NOTE removing the cover.It may cause an
injury.
Gallon Door Bin
• Holdthe binwith bothhands and removeit by lifting itup.
...........Wine Shelf
• Itis attachedto the cabinetwall.Toremovewine shelf,slide the
wineshelf inthe directiond the arrowas shown.
• Simply take the shelf out of thetabs.
NOTE
' Before removingthefreezerandrefrigeratora_ssorieS, pleasemovethestoredfoodstOOtherSpace:
13
Page 14

Toopenthe BeverageStationTM, holdtheBeverageStationTM doorhandleand pullitdownward.
•The BeverageStationTM isconvenient
andreducesenergyconsumption,
becauseyoudo notneedto open
•It isrecommendedthatyouusethe
BeverageStationTM forstoringmost
frequentlyneededfoods
therefrigeratordoortoaccessstored
beveragesandsnacks.
' The door of the BeverageStationTM should never be removed.The BeverageStationTM cannotfunction if its door
is missing_
,When closingthe BeverageStationTM door, be careful not to put your hands or fingers aroundthe door frame
WARNING
where they Canbe caught or injured.
• When you usethe open doorasa tray,do not place heavy objectson it.Do not allow childrento
hang onthe door becausethere is a riskof personalinjury or materialdamage. ....................................
•When you openthe beveragestationTM door, be careful notto hit children head.
Interior
• Clean the accessorieswith a milddetergent,then wipe outwith adry cloth.
• After washingthe accessories,makesure thatthey aredry beforeusingthem again.
Exterior
• Wipethe digital panel and displaypanel with a clean cloth.
•The surfaceof doors, handles andcabinet should be cleanedwith a mild detergentand soft
cloth,then wipe off the surfacewitha dry cloth.
- Donot use Benzene,Thinner and clorox forcleaning
- Donot spraywater directlyonthe surfaceof refrigeratorwhile cleaning.
•The exteriorpartof refrigeratorshould be polishedonce or twice a year.
Rear
• Use a vacuum cleaner to removedust onceor twice a year.
Iceand water dispenser
• Use a damp cloth to clean the ice andwater dispenser.Then wipe itoutwith adry cloth.
• Tokeepdrainage grid dry,do nottouch iceand water dispenser.
BeverageStationTM (R82578)
• Use a damp cloth to clean the BeverageStationTM. Thenwipe itoutwith adry cloth.
Rubber door seals
• Ifthe rubberdoor seals aredirty,the door will notclose properly,The refrigeratorwill not be
able tofunctionefficiently.Clean the doorswith a milddetergent anddamp cloth.Then wipe
with a dry cloth.
//_ • Donot spray the refrigeratorwithwater,It may cause a death byan electricshock.
• Do n0t cleanitWithbenzene;thinneror car detergenLit maycause a firel
WARNING
14
Page 15

TwinDeodorizer
• Removethecoverwitha fiatbladescrewdriveras shown.
•Takeoutthe cartridgefromthecoverand soakitin cleanandwarmwater
atleastmorethan4 hrs.Completelydryoutthe cartridgewithsunlightfor at least8 hrs
in anopenarea.
• Repeatthisprocessonceor twicea year.
(_= °If itisdriedina confinedarea,odor maybespreadtothat areal
NOTE • Keepthe childrenawayfromyellowwater,they maydrinkwater.
/t,,
WARNING
Before changing the interior light, unplug the refrigeratorfrom the power supply. If you
have difficulty in changing the light, contact your service center.
INTERIORLIGHTINTHE REFRIGERATOR.
.....
dge
Upper
.......Pullout the screw cap (_ and 2 Pushthe lamp coverin the
removethe screw, directionof the arrows.
Lower (RS2556,RS2578)
Pullout the screw cap and
removethe screw.
Takethe lamp coverout in the
directionof the arrows. _ ............
After changingthe bulb,
8 .........
reattachthe lightcover
and screw itin again.
After changingthe bulb,
reattachthe lightcover
and screw itagain.
15
Page 16

INTERIORLIGHTINTHE FREEZER.
The freezer light is located in the bottom of the auger motor case.
1 ............
Use a screwdriver to remove ............Change the bulb with a new ..........
the lightcover ((_). _ one @)
(_ Replacement bulbs for both the freezer and refrigerator are at retail outlets such as Wal-mart, The Home
NOTE Use reP!acement bu!b size E!7, maximum 30 watts,
The water "Filter Indicator" light
• "Filter Indicator" light lets you know when it is time change your water filter cartridge. The light
will change from green to orange. This tells you that it is almost time to change the current cartridge.
It is recommended that you replace the cartridge when the light changes to red.
(see "Install the water filter" section for more informmation)
Reattach the light cover
Using the dispenser without the water filter
• You can not use the water and ice dispenser without a water filter cartridge because the water line
blocks at water supply.
Ordering replacement filters
•To order more water filter cartridges, call 1-800-SAMSUNG and ask for accessory Part # DA29-
00003A or contact your authorized Samsung dealer.
The refrigerator doors have a special door opening and closing feature to make sure that the doors
close all the way and are securely sealed.
When opening the door, it will only open so far. After reaching a certain point, it will remain open.
When the door is partially open, it will close automatically.
16
Page 17

Checking the Dimensions of your Entrance Door
Check the dimensions of your entrance door to determine whether the refrigerator can pass
through it.
Model RS2534, RS2556, RS2578
Dimension
(inch)
@
NOTE
Capacity (Cu. Ft)
Width
Case Height
Depth withoutdoor
without Hinge
with Hinge
with door
25.2
36
69
70
35
28
Selecting the Location for the Refrigerator
• Select a location with easy access to the water supply.
• Select a location with enough space for the refrigerator.
• Select a location without direct exposure to sunlight.
• Before disassembling the freezer doOr,the water supply line needs to be disconnected:
(If not, the water supply line can be damaged:)
• See "Separating the water supply line from the refrigerator"on the next page.
Allow sufficientspaceto circulatethe air at the internal coolingsystem.
•When refrigeratorhas notenough space, the internalcooling systemmay notwork correctly.
1 inch
1 inch
0.1 inch
Allow clearanceto the right,left,back andtopwhen installingthe refrigerator.
This has the advantageof reducingpowerconsumption.
17
Page 18

Removing the Front Leg Cover
Open the freezer and refrigerator doors, and then take off the front leg cover by turning the
three screws counter-clockwise.
FRONT LEG COVER
SCREW
L_ L_ L_
Separating the Water Supply Line from the Refrigerator
1) Remove the screw from clamp (®).
2) Remove the water tube by pressing the coupler (@) and pulling the water tube (qb)away.
@
NOTE
DOnotCuttheWatertubebutseparateitfromthecoupler:
18
Page 19

NOTE , Be _reful notto pinch the water tubingand wire harnesson thedoor.
• Placedoorson aprotectedsurface:
Removing the Freezer Door
1) With the door closed, remove the upper hinge cover (d)) using a screwdriver, and then disconnect
the wires (@).
2) Remove hinge screws (®) and ground screw (®) counter-clockwise, and take off the upper hinge (®)
along the arrow (®). Take care when removing the door to ensure that it does not fall on you.
3) Remove the door from the lower hinge (@)by
carefully lifting the door (®).
4) Remove the lower hinge (®) from the bracket
lower hinge (®) by lifting the lower hinge (®) i
the direction of the arrow.
19
Page 20

Removing the Refrigerator Door
1) With the door closed, remove the upper hinge cover (d))using a screwdriver, and then disconnect
the wires (_)).
1
I
2) Remove hinge screws (®) and ground screw (®) counter-clockwise, and take off the upper hinge
(®) in the direction of the arrow (®).Take care when removing the door to ensure that it does not fall
on you.
3) Remove the door from the lower hinge (@) by
lifting the door (®).
-\\
f
/-
\
4) Remove the lower hinge (®) from the bracket
lower hinge (®) by lifting the lower hinge (®) in
the direction of the arrow.
--®
2O
Page 21

Reattaching the Freezer Door
1) Insert the lower hinge (qb)in the bracket lower
hinge (@).
2) Reattach the freezer door by inserting the ho._
(®) in the lower side of the door into the hole iv
the lower hinge (®) and pulling the hose down
Y
dP
3) Insert the upper hinge shaft (®) into the hole (®). After levelling between the upper hinge hole (@)anc
the hole of the cabinet (®). Reattach hinge screws (®) and gound screw (®) in a clockwise direction.
-@
4) Connect the wires. 5) Put the front part of the upper hinge cover ((_)
the front part of the upper hinge (_) and reatta
from the front part of the upper hinge cover firs
21
Page 22

Reattaching the Refrigerator Door
1) Insert the lower hinge (qb)in the bracket lower 2) Place the hole in the refrigerator door (®) over
hinge (@). the lower hinge (®).
f
3) Insert the upper hinge shaft (®) into the hole (®). After levelling between the upper hinge hole (@)and
the hole of the cabinet (®). Reattach hinge screws (®) and gound screw (®) in the clockwise direction.
4) Connect the wires. 5) Put the front part of the upper hinge cover ((_) on
the front part of the upper hinge ((_) and reattach
it from the front part of the upper hinge cover
first.
22
Page 23

Reattaching the Water Supply Line
1) While pressing the front face of coupler (@), insert the water line (qb)in the coupler.
2) Tighten the screw on the clamp (®).
I
J
Reattaching the Front Leg Cover
Put on the front leg cover by turning the three screws clockwise, as shown in the figure.
FRONT LEG COVER
SCREW
23
Page 24

Please level the refrigerator first.
The doors will be uneven if the refrigerator is not level.
Case 1) Freezer door is lower than
that of the refrigerator
Case 2) Freezer door is higher than
that of the refrigerator
Insert a flat-blade screwdriver (-) (¢) into a slot of
the control lever (@),turn it clockwise and level the
refrigerator.
Insert a flat-blade screwdriver (-) (¢) into a slot of
the control lever (@), turn it clockwise and level
the refrigerator.
@
NOTE
':'. .....::.:::i:::::"
%.°°°°.,"
@ CONTROL LEVER
Donot make small adjustments with the control lever, Please refer to the next paget
24
DRIVER(-)
Page 25

Making small adjustments between doors.
If thedoor of the freezer is lowerthanthat of the
refrigerator.
Adjustment part --
J
If thedoor of freezer is higherthanthat ofthe
refrigerator.
\djustment part
Pleaseopen the doors and adjustthe doors as follows:
1) Release the nut (@)on the lower hinge until the upper end of the bolt ((_).
@ When yoU release the nut(C), use enclosed hex WrenCh(®) to turn the bolt(@)a little counter:
NOTE clockwise to makethe nut(@) loose with your fingers.
® WRENCH
® NUT @ BOLT @ BOLT
® WRENCH
d) NUT
2) Please adjust the height difference between the doors turning the bolt ((_) turn clockwise(_ ) or counter
clockwise( _ ).
(_= when you turn clockwise (v), the door goes up.
NOTE
f
\
3) After adjusting the doors, turn the nut (@)turn clockwise
® WRENCH ® WRENCH
#) BOLT
@ BOLT
) until the lower end of the bolt, then tight-
en the bolt again with the wrench ((_) to fixthe nut(@).
f
NUT
\
(2r
NOTE
® WRENCH
@BOLT @ BOLT
d) NUT
If you do not fix the nut ((9)firmly, the bolt (@) maybe released:
25
® WRENCH
Page 26

\fJ
1) In order to operate the ice maker properly, water pressure of 20 ~125 psi is required.
In this range a 170 cc paper cup can be filled in 10 secs.
2) The water filter removes particles. It does not sterilize or destroy any micro-organisms.
3) If the refrigerator is installed in area with low water pressure (below 20psi), you should install a boost-
er pump to compensate for the low pressure.
4) Ensure the water storage tank inside the refrigerator is properly filled initially. Push the water dis
penser lever until the water runs from the outlet.
(_p A universal water supply kit is available at extra c0st from Your dealer: The refrigerator manufac:
NOTE turer recommends using a water supply kit containing copper tubing.
26
Page 27

Connect the water line to the refrigerator.
1) Slip the compression nut and plastic ferrule
through the plastic tube.
2) After inserting the sleeve, tighten the compres-
sion nut onto 1/4" compression fitting(union).
@ Do not overtighten the compression
NOTE nut.
s_ _ _
• "" " Compression Nut
,: Ferrule
i
' _ Sleeve
"" _ Compression fitting
3) Slip the compression ferrule and nut on cop-
per (or plastic) tubing as shown.
Tighten the comperssion nut onto the com-
pression fitting(union).
4) Turn water on and check for any leakege.
@
NOTE
Install the water filter.
1) As shown, the fixed cap separates from the refrigerator by rotating
it counterclockwise.
Remove the water filter from the box and put a month indicator
sticker on the filter as shown.
@ Keep the cap(A)in a safe place for recapping, when
NOTE you will not use the filteri
2) If the water filter was installed in March, put on the "SEP" sticker.
3) Remove the protective cap then position and insert the
filter as shown.
4) Slowly turn the water filter clockwise 90° to align
the indication mark on the cover, locking the filter in posi
tion. Do not overtighten.
",, 2. ,_ Ferrule .
',, _ ,--_7_ Compression Nut
r--q
C
NOTE
SEPARATION
OF RED
s_
L1j
t ALIGN THE INDICATION MARK
STICKER
(MONTH iNDICATiON)
please check that the indication line aligns With the lock positionl
27
WITH LOCK POSITION.
L
Page 28

\fJ
Removeanyresidualmatterinsidethewatersupplylineafterinstallingfilter.
1) Turn on the main water supply & shut-off valve of the water
supply line.
2) Run water through the dispenser until the water runs clear
(6~7 minutes). This will clean the water supply system and
clear air from the lines.
3) Additional flushing may be required in some households.
4) Open the refrigerator door and check if water leaks around
the water filter.
ICE--
--WATER
•A newly-installed water filter cartridge may cause water to briefly spu_ from the dispenser.
NOTE • Before reinstalling the water filter, remove the wine self (RS2578). ............
Check the amount of water supplied to the ice tray.
1) Lift up (@) and pull out (@)the ice maker bucket in the freezer.
ICE MAKER --
2) When you press the test button, the ice cube container is
filled with water from the water supply tap.
Check the amount of water (see the illustration below).
If the water level is too low,
the ice cubes will be small.
This is not a problem with the ice maker
but of the water pressure in
the pipe, and occurs frequently.
When this problem occurs, contact
the dealer service center to check the
amount of water supplied.
CHECK THE WATER
28
Page 29

The refrigerator does notwork at all or it does not
chill sufficiently
° Check that the power plug is properly connected.
° Is the temperature control on the display panel set to
the correct temperature? Try setting it to a lower tem-
perature.
° Is the refrigerator in direct sunlight or located near a
heat source?
• Is the back of the refrigerator too close to the wall?
The food in the refrigerator is frozen
° Is the temperature control on the display panel set to
the correct temperature? Try setting it to a warmer
temperature.
° Is the temperature in the room too low?
° Did you store the food with a high water content in
the coldest part of the refrigerator.
You can hear unusual noise or sounds
° Check that the floor is levelled and stable.
° Is the back of the refrigerator too near to the wall?
° Was anything dropped behind or under the refrigera-
tor?
° A "ticking"sound may be heard from inside the refrig-
erator, but this is normal. This occurs because vari-
ous accessories are contracted or expanded.
The front corners and sides of the cabinet are hot;
condensation occurs.
• Anti-condensators are installed in thefront corners of
the refrigerator to prevent condensation.
° Condensation can occur when you leavethe door
open for a long time.
Ice is not dispensed
• Did you stop the ice makingfunction?
° Is there any ice in the ice storage unit?
° Is thewater line connected and the shut-off valve
open?
° Is thefreezer temperature too warm?
(Set the temperature lower)
° Did you wait for 12 hours after installation of the
water supply line before making ice?
You can hear water bubbling in the refrigerator
•The bubblingcomes from the refrigerant circulating in
the refrigerator and is normal.
There is a bad smell in the refrigerator
•Wrap strong smelling food so that it is airtight.
Throw away any rotten food.
Frost forms on the wall of the freezer
• Is the air vent blocked?
•Allow sufficient space between the foods stored for
efficient air circulation.
• Is the door closed properly?
No water is supplied
• Is the water line connected and the shut-off valve
open?
• Is the water supply line crushed?
• Is the water tank frozen because the refrigerator tem-
perature is too low? Select a warmer setting on the
display panel.
29
Page 30

SAMSUNG REFRIGERATOR
(18 Cubic Feet and Larger Capacity)
This SAMSUNGbrandproduct,as suppliedanddistributedby SamsungElectronicsAmerica, Inc. (SAMSUNG)and deliverednew,
in the originalcarton to the originalconsumerpurchaser,is warrantedby SAMSUNG againstmanufacturingdefectsin materials
andworkmanshipfora limitedwarranty period of:
One(1)Year Parts and Labor on Refrigerator
Five(5)Years Partsand Laboron Sealed RefrigerationSystemOnly*
(*Compressor,evaporator,condenser,drier, connecting tubing)
This limitedwarrantybegins on the original dateof purchase,and is valid onlyon productspurchasedand used in the United
States. To receivewarranty service,the purchaser must contactSAMSUNG for problemdeterminationandservice procedures.
Warrantyservice can onlybe performed by a SAMSUNGauthorized service center. The original dated billof sale mustbe
presentedupon requestas proofof purchase to SAMSUNG or SAMSUNG'sauthorizedservice center.
SAMSUNGwill repairor replaceany partfound to be defective,at our option andat no chargeas stipulated herein,with new or
reconditionedparts during the limitedwarranty period specifiedabove. All replacedparts and productsbecome the property of
SAMSUNGand must be returnedto SAMSUNG Replacementpartsand productsassumethe remainingoriginalwarranty,or
ninety(90)days, whicheverislonger.
In-homeservice will be providedduring thewarranty labor period subjectto availabilitywithinthe contiguous UnitedStates.In-
homeservice is not available inall areas. To receivein-homeservice,the product mustbe unobstructedand accessiblefrom floor
levelto service personnel. Ifduringin-homeservice repaircannot be completed,it may be necessaryto remove,repair and return
the product. If in-homeservice is unavailable,SAMSUNG mayelect, at our option, to providefor transportationof our choice to
andfrom aSAMSUNGauthorized servicecenter. Otherwise,transportationto and from the SAMSUNGauthorizedservice center
isthe responsibilityof the purchaser.
This limitedwarrantycovers manufacturingdefectsin materialsand workmanship encounteredinnormal,noncommercialuse of
thisproduct, andshall notapply to thefollowing, including,but not limitedto: damagewhichoccurs in shipment;deliveryand
installation;applicationsandusesforwhich this productwas not intended;alteredproduct or serial numbers;cosmeticdamageor
exteriorfinish;accidents,abuse,neglect,fire, water, lightningor other actsof nature;use ofproducts,equipment, systems, utilities,
services,parts,supplies,accessories,applications,installations,repairs,external plumbing and leaks,external wiring,circuit
breakers,fusesor connectorsnotsuppliedand authorizedbySAMSUNG, orwhich damage this productor result in service
problems;incorrectelectrical linevoltage,fluctuations and surges;customeradjustmentsand failureto followoperatinginstructions,
cleaning,maintenanceand environmentalinstructionsthat are covered andprescribedin the instructionbook; loss offood due to
spoilage;consumable itemsincludingfilters and light bulbs.
THEREARE NO EXPRESSWARRANTIESOTHERTHANTHOSE LISTEDAND DESCRIBED ABOVE,AND NOWARRANTIES
WHETHEREXPRESS OR IMPLIED,INCLUDING,BUT NOTLIMITEDTO,ANY IMPLIEDWARRANTIES OF
MERCHANTABILITYOR FITNESS FORA PARTICULARPURPOSE,SHALL APPLYAFTER THE EXPRESSWARRANTY
PERIODSSTATEDABOVE,AND NO OTHER EXPRESSWARRANTY OR GUARANTYGIVEN BY ANY PERSON, FIRMOR
CORPORATIONWITH RESPECTTOTHIS PRODUCT SHALL BE BINDINGON SAMSUNG. SAMSUNG SHALLNOT BE
LIABLE FORLOSS OF REVENUE OR PROFITS,FAILURETO REALIZE SAVINGSOR OTHER BENEFITS,OR ANY OTHER
SPECIAL,INCIDENTALOR CONSEQUENTIALDAMAGESCAUSED BYTHE USE,MISUSE OR INABILITYTO USETHIS
PRODUCT,REGARDLESSOFTHE LEGALTHEORY ON WHICHTHE CLAIM IS BASED,AND EVENIF SAMSUNG HAS BEEN
ADVISEDOFTHE POSSIBILITYOF SUCH DAMAGES. NOR SHALL RECOVERYOF ANY KINDAGAINST SAMSUNGBE
GREATERINAMOUNT THANTHE PURCHASE PRICE OF THE PRODUCT SOLD BY SAMSUNG AND CAUSINGTHE
ALLEGEDDAMAGE. WITHOUT LIMITINGTHE FOREGOING,PURCHASERASSUMES ALL RISKAND LIABILITYFORLOSS,
DAMAGEOR INJURYTOPURCHASERAND PURCHASER'SPROPERTYAND TO OTHERSAND THEIR PROPERTY
ARISINGOUT OF THE USE,MISUSE OR INABILITYTO USE THIS PRODUCT SOLD BY SAMSUNGNOT CAUSED DIRECTLY
BYTHE NEGLIGENCE OF SAMSUNG. THIS LIMITEDWARRANTYSHALL NOT EXTENDTO ANYONEOTHERTHAN THE
ORIGINAL PURCHASEROFTHIS PRODUCT,ISNONTRANSFERABLEAND STATESYOUR EXCLUSIVEREMEDY,
Somestates do not allow limitationson how longan impliedwarrantylasts, or the exclusionor limitationd incidentalor
consequentialdamages,so the above limitationsor exclusionsmay not applyto you. This warranty givesyou specificlegalrights,
andyou mayalso haveother rights,which varyfrom stateto state.
Toobtain warrantyservice, pleasecontact SAMSUNGat:
SAMSUNGCUSTOMERCARE CENTER
400Valley Road,Suite 201, Mt.Arlington,NJ 07856,Tel:973-601-6000,Fax:973-601-6001
1-800-SAMSUNG(1-800-726-7864)andwww.SAMSUNGUSA.com
061002
30
Page 31

Page 32

ADDRESS : SAMSUNG ELECTRONICS AMERICA, INC.
SERVICE DIVISION
400 VALLEY ROAD, SUITE 201, MT. ARLINGTON, NJ 07856
TELEPHONE : 1-800-SAMSU NG(1-800-726-7864) FAX : 1-973-601-6001
ELECTRONICS
 Loading...