

Samsung RL55VQBRS Premium 2m Fridge Freezer, RL55VTEBG Premium 2m Fridge Freezer, RL52VPBTS User Manual
English
Refrigerator
user manual
imagine the possibilities
Thank you for purchasing a Samsung product.
To receive a more complete service,
please register your product at
www.samsung.com/register
Free Standing Appliance
This manual is made with 100% recycled paper.
DA99-02116L(0.7).indb 01DA99-02116L(0.7).indb 01 2012.8.17 9:10:25 AM2012.8.17 9:10:25 AM
02_ safety information
SAFETY INFORMATION
Before operating the appliance, please read this •
manual thoroughly and retain it at a safe place
near the appliance for your future reference.
Use this appliance only for its intended purpose •
as described in this instruction manual.
This appliance is not intended for use by persons
(including children) with reduced physical, sensory
or mental capabilities, or lack of experience
and knowledge, unless they have been given
supervision or instruction concerning use of the
appliance by a person responsible for their safety.
Warnings and Important Safety Instructions in this •
manual do not cover all possible conditions and
situations that may occur.
It is your responsibility to use common sense,
caution, and care when installing, maintaining,
and operating your appliance.
Because these following operating instructions •
cover various models, the characteristics of
your refrigerator may differ slightly from those
described in this manual and not all warning
signs may be applicable.
If you have any questions or concerns, contact
your nearest service center or fi nd help and
information online at www.samsung.com.
Important safety symbols and
precautions :
WARNING
Hazards or unsafe practices that may
result in severe personal injury or
death.
CAUTION
Hazards or unsafe practices that may
result in minor personal injury or
property damage.
Do NOT attempt.
Do NOT disassemble.
Do NOT touch.
Follow directions carefully.
Unplug the power plug from the wall
socket.
Make sure the machine is grounded to
prevent electric shock.
Call the contact center for help.
Note.
These warning signs are here to prevent injury to you
and others.
Please follow them explicitly.
After reading this section, keep it in a safe place for
future reference.
CE Notice
This product has been determined to be in
compliance with the Low Voltage Directive
(2006/95/EC), the Electromagnetic Compatibility
Directive (2004/108/EC) and the Eco-Design
Directive(2009/125/EC) implemented by Regulation
(EC) No 643/2009 of the European Union.
SEVERE WARNING SIGNS
FOR TRANSPORTATION
AND SITE
When transporting and installing the •
appliance, care should be taken to ensure
that no parts of the refrigerating circuit are
damaged.
Refrigerant leaking from the pipe work could ignite or cause an eye injury.
If a leak is detected, avoid any naked fl ames or
potential sources of ignition and air the room
in which the appliance is standing for several
minutes.
In order to avoid the creation of a fl ammable •
gas-air mixture if a leak in the refrigerating
circuit occurs, the size of the room in which the
appliance may be sited depends on the amount
of refrigerant used.
Never start up an appliance showing any signs of •
damage. If in doubt, consult your dealer.
The room where the refrigerator will be sited must
be 1m³ in size for every 8g of R600a refrigerant
inside the appliance.
The amount of refrigerant in your particular
appliance is shown on the identifi cation plate
inside the appliance.
safety information
WARNING
DA99-02116L(0.7).indb 02DA99-02116L(0.7).indb 02 2012.8.17 9:10:27 AM2012.8.17 9:10:27 AM
safety information _03
SEVERE WARNING SIGNS
FOR INSTALLATION
Do not install the refrigerator in a damp •
place or place where it may come in
contact with water.
Deteriorated insulation of electrical parts may cause an electric shock or fi re.
Do not place this refrigerator in direct sunlight or •
expose to the heat from stoves, room heaters or
other appliance.
Do not plug several appliances into the same •
multiple power board.
The refrigerator should always be plugged into
its own individual electrical which has a voltage
rating that matched the rating plate.
This provides the best performance and also prevents overloading house wiring circuits, which
could cause a fi re hazard from overheated wires.
If the wall socket is loose, do not insert the power •
plug.
There is a risk of electric shock of fi re. Do not use a cord that shows cracks or abrasion •
damage along its length or at either end.
Do not bend the power cord excessively or place •
heavy articles on it.
Do not use aerosols near the refrigerator.•
Aerosols used near the refrigerator may cause an explosion or fi re.
This refrigerator must be properly installed •
and located in accordance with the manual
before it is used.
Connect the power plug in proper position with •
the cord hanging down.
If you connect the power plug upside down, wire can get cut off and cause fi re or electric shock.
Make sure that the power plug is not squashed •
or damaged by the back of the refrigerator.
When moving the refrigerator, be careful not to •
roll over or damage the power cord.
This constitutes a fi re hazard. The appliance must be positioned so that the •
plug is accessible after installation.
The refrigerator must be grounded.•
You must ground the refrigerator to -
prevent any power leakages or electric
shocks caused by current leakage from
the refrigerator.
Never use gas pipes, telephone lines or other •
potential lightening rods as ground.
Improper use of the ground plug can result in electric shock.
If the power cord is damaged, have it •
replaced immediately by the manufacturer
or its service agent.
The fuse on the refrigerator must be changed by •
a qualifi ed technician or service company.
Failing to do so may result in electric shock or personal injury.
CAUTION SIGNS FOR
INSTALLATION
Keep ventilation opening in the appliance •
enclosure or mounting structure clear of
obstruction.
Allow the appliance to stand for 2 hours after •
installation.
SEVERE WARNING SIGNS
FOR USING
Do not insert the power plug with wet •
hands.
Do not store articles on the top of the appliance.•
When you open or close the door, the articles may fall and cause personal injury and/or material
damage.
WARNING
CAUTION
WARNING
DA99-02116L(0.7).indb 03DA99-02116L(0.7).indb 03 2012.8.17 9:10:27 AM2012.8.17 9:10:27 AM
04_ safety information
SEVERE WARNING SIGNS
FOR USING (CONT’D)
Do not put items fi lled with water on the •
refrigerator.
If spilled, there is a risk of fi re or electric shock. Do not let children hang on the door.•
Failure to do so may cause serious personal injury.
Do not leave the doors of the refrigerator open •
while the refrigerator is unattended and do not let
children enter inside of the refrigerator.
There is a risk of children entrapment and serious personal injury because of low temperature.
Never put fi ngers or other objects into the •
dispenser hole.
Failure to do so may cause personal injury or material damage.
Do not store volatile or fl ammable substances •
such as benzene, thinner, alcohol, ether or LP
gas in the refrigerator.
The storage of any of such products may cause explosions.
Do not store low temperature-sensitive •
pharmaceuticals products, scientifi c materials or
other low temperature-sensitive products in the
refrigerator.
Products that require strict temperature controls must not be stored in the refrigerator.
Do not place or use electrical appliance inside •
the refrigerator, unless they are of a type
recommended by the manufacturer.
Do not use a hair dryer to dry the inside of the •
refrigerator.
Do not place a lighted candle in the refrigerator
for removing bad odors.
This may result in electric shock or fi re. Do not touch the inside walls of the freezer or •
products stored in the freezer with wet hands.
This may cause frostbite. Do not use mechanical devices or any other •
means to accelerate the defrosting process, other
than those recommended by the manufacturer.
Do not damage the refrigerant circuit.•
This product is intended only for the •
storage of food in a domestic environment.
Bottles should be stored tightly together so that •
they do not fall out.
If a gas leak is detected, avoid any naked fl ames •
or potential sources of ignition and air the room
in which the appliance is standing for several
minutes.
Use only the LED Lamps provided by •
manufacturer or service agents.
Children should be supervised to ensure that they •
do not play with and/or climb into the appliance.
Do not disassemble or repair the •
refrigerator by yourself.
You run risk of causing a fi re, malfunction and/or personal injury.
In case of malfunction, please contact your
service agents.
If the appliance generates a strange noise, •
a burning or smell or smoke, unplug the
power plug immediately and contact your
nearest service center.
Failing to do so may result in electric or fi re hazards.
Keep ventilation opening in the appliance
enclosure or mounting structure clear of
obstruction.
If you experience diffi culty when changing the •
light, contact service agents.
If the products equipped with LED Lamp, do •
not disassemble Lamp Cover and LED Lamp by
yourself.
Please contact your service agents. If any dust or water is in refrigerator, pull •
out power plug and contact your Samsung
Electronics service center.
There is a risk of fi re. -
CAUTION SIGNS FOR
USING
To get best performance of product,•
Do not place foods too closely in front of -
the vents at the rear of the appliance as
it can obstruct free air circulation in the
refrigerator compartment.
Wrap the food up properly or place it in airtight containers before put it into the refrigerator.
Do not place carbonated or fi zzy drinks in the •
freezer compartment.
Do not put bottles or glass containers in the
freezer.
When the contents freeze, the glass may break and cause personal injury and property damage.
CAUTION
WARNING
DA99-02116L(0.7).indb 04DA99-02116L(0.7).indb 04 2012.8.17 9:10:27 AM2012.8.17 9:10:27 AM
safety information _05
Do not change the functionality of or modify the •
refrigerator.
Changes or modifi cations may result in personal injury and/or property damage.
Any changes or modifi cations performed by a
3rd party on this completed appliance is neither
covered under Samsung warranty service, nor
is Samsung responsible for safety issues and
damages that result from 3rd party modifi cations.
Do not block air holes.•
If the air holes are blocked, especially with a plastic bag, the refrigerator can be over cooled.
If this cooling period lasts too long, the water fi lter
may break and cause water leakage.
Do not put any newly introduced food for freezing near to already frozen food.
Please observe maximum storage times and •
expiry dates of frozen goods.
Fill water tank, ice tray, water cubes only with •
potable water.
CAUTION SIGNS
FOR CLEANING AND
MAINTENANCE
Do not directly spray water inside or •
outside the refrigerator.
There is a risk of fi re or electric shock. Do not spray infl ammable gas near the •
refrigerator.
There is a risk of explosion or fi re. Do not spray cleaning products directly on the •
display.
Printed letters on the display may come off. -
Remove any foreign matter or dust from •
the power plug pins.
But do not use a wet or damp cloth when
cleaning the plug, remove any foreign
material or dust from the power plug pins.
Otherwise there is a risk of fi re or electric shock. -
Unplug the refrigerator before cleaning and •
performing maintenance.
SEVERE WARNING SIGNS
FOR DISPOSAL
Ensure that none of the pipes on the back •
of the appliance are damaged prior to
disposal.
R600a or R134a is used as a refrigerant.•
Check the compressor label on the rear of the
appliance or the rating label inside the refrigerator
to see which refrigerant is used for your
refrigerator.
When this product contains fl ammable gas
(Refrigerant R600a), contact your local authority
in regard to safe disposal of this product.
Cyclopentane is used as an insulation blowing
gas. The gases in insulation material require
special disposal procedure.
Please contact your local authorities in regard to
the environmentally safe disposal of this product.
Ensure that none of the pipes on the back of the
appliances are damaged prior to disposal.
The pipes shall be broke in the open space.
If the appliance contains iso-butane refrigerant •
(R600a), a natural gas with high environmental
compatibility that is, however, also combustible.
When transporting and installing the appliance,
care should be taken to ensure that no parts of
the refrigerating circuit are damaged.
When disposing of this product or other •
refrigerators, remove the door/door seals, door
latch so that small children or animals cannot
become trapped inside.
Leave the shelves in place so that children may
not easily climb inside.
Children should be supervised to ensure that they
do not play with the old appliance.
Please dispose of the packaging material for this •
product in an environmentally friendly manner.
CAUTION
WARNING
DA99-02116L(0.7).indb 05DA99-02116L(0.7).indb 05 2012.8.17 9:10:28 AM2012.8.17 9:10:28 AM
06_ safety information
ADDITIONAL TIPS FOR
PROPER USAGE
In the event of a power failure, call the local offi ce •
of your Electricity Company and ask how long it
is going to last.
Most power failures that are corrected within an hour or two will not affect your refrigerator
temperatures.
However, you should minimize the number of
door openings while the power is off.
Should the power failure last more than 24 hours, remove all frozen foods.
If keys are provided with the refrigerator, the keys •
should be kept out of the reach of children and
not in vicinity of the appliance.
The appliance might not operate consistently •
(possibility of temperature becoming too warm
in refrigerator) when sited for an extended period
of time below the cold end of the range of
temperature for which the refrigerating appliance
is designed.
Do not store food which spoils easily at low •
temperature, such as bananas, melons.
Your appliance is frost free, which means there is •
no need to manually defrost your appliance, as
this will be carried out automatically.
Temperature rising during the defrost can comply •
with ISO requirement.
But if you want to prevent an undue rise in the
temperature of the frozen food while defrosting
the appliance, please wrap the frozen food in
several layers of newspaper.
Any increase in temperature of frozen food during •
defrosting can shorten its storage life.
Saving Energy Tips
Install the appliance in a cool, dry room with adequate ventilation.
Ensure that it is not exposed to direct sunlight
and never put it near a direct source of heat
(radiator, for example).
Never block any vents or grilles on the appliance. Allow warm food to cool down before placing it in the appliance.
Put frozen food in the refrigerator to thaw. You can then use the low temperatures of the
frozen products to cool food in the refrigerator.
Do not keep the door of the appliance open for too long when putting food in or taking food out.
The shorter time for which the door is open, the
less ice will form in the freezer.
Clean the rear of the refrigerator regularly. Dust increases energy consumption.
Do not set temperature colder than necessary. Ensure suffi cient air exhaust at the refrigerator base and at the back wall of the refrigerator.
Do not cover air vent openings.
Allow clearance to the right, left, back and top when installing.
This will help reduce power consumption and
keep your energy bills lower.
contents
SETTING UP YOUR REFRIGERATOR ………………………………………………………………………… 07
OPERATING YOUR REFRIGERATOR ………………………………………………………………………… 13
TROUBLESHOOTING …………………………………………………………………………………………… 19
DA99-02116L(0.7).indb 06DA99-02116L(0.7).indb 06 2012.8.17 9:10:28 AM2012.8.17 9:10:28 AM
setting up _07
01 SETTING UP
GETTING READY TO INSTALL
THE REFRIGERATOR
Congratulations on your purchase of this Samsung
Refrigerator.
We hope you enjoy state-of-the-art features and
effi ciencies that this new appliance offers.
This refrigerator must be properly installed and •
located in accordance with the manual before it
is used.
Use this appliance only for its intended purpose •
as described in this instruction manual.
We strongly recommend that any servicing be •
performed by a qualifi ed individual.
Please dispose of the packaging material for this •
product in an environmentally friendly manner.
Pull the power plug out of the socket before
changing the interior light of the refrigerator.
Otherwise, there is a risk of electric shock. -
Selecting the best location for the
refrigerator
A location without direct exposure to sunlight.•
A location with fl at fl oor surface.•
A location with enough space for the refrigerator •
door to open easily.
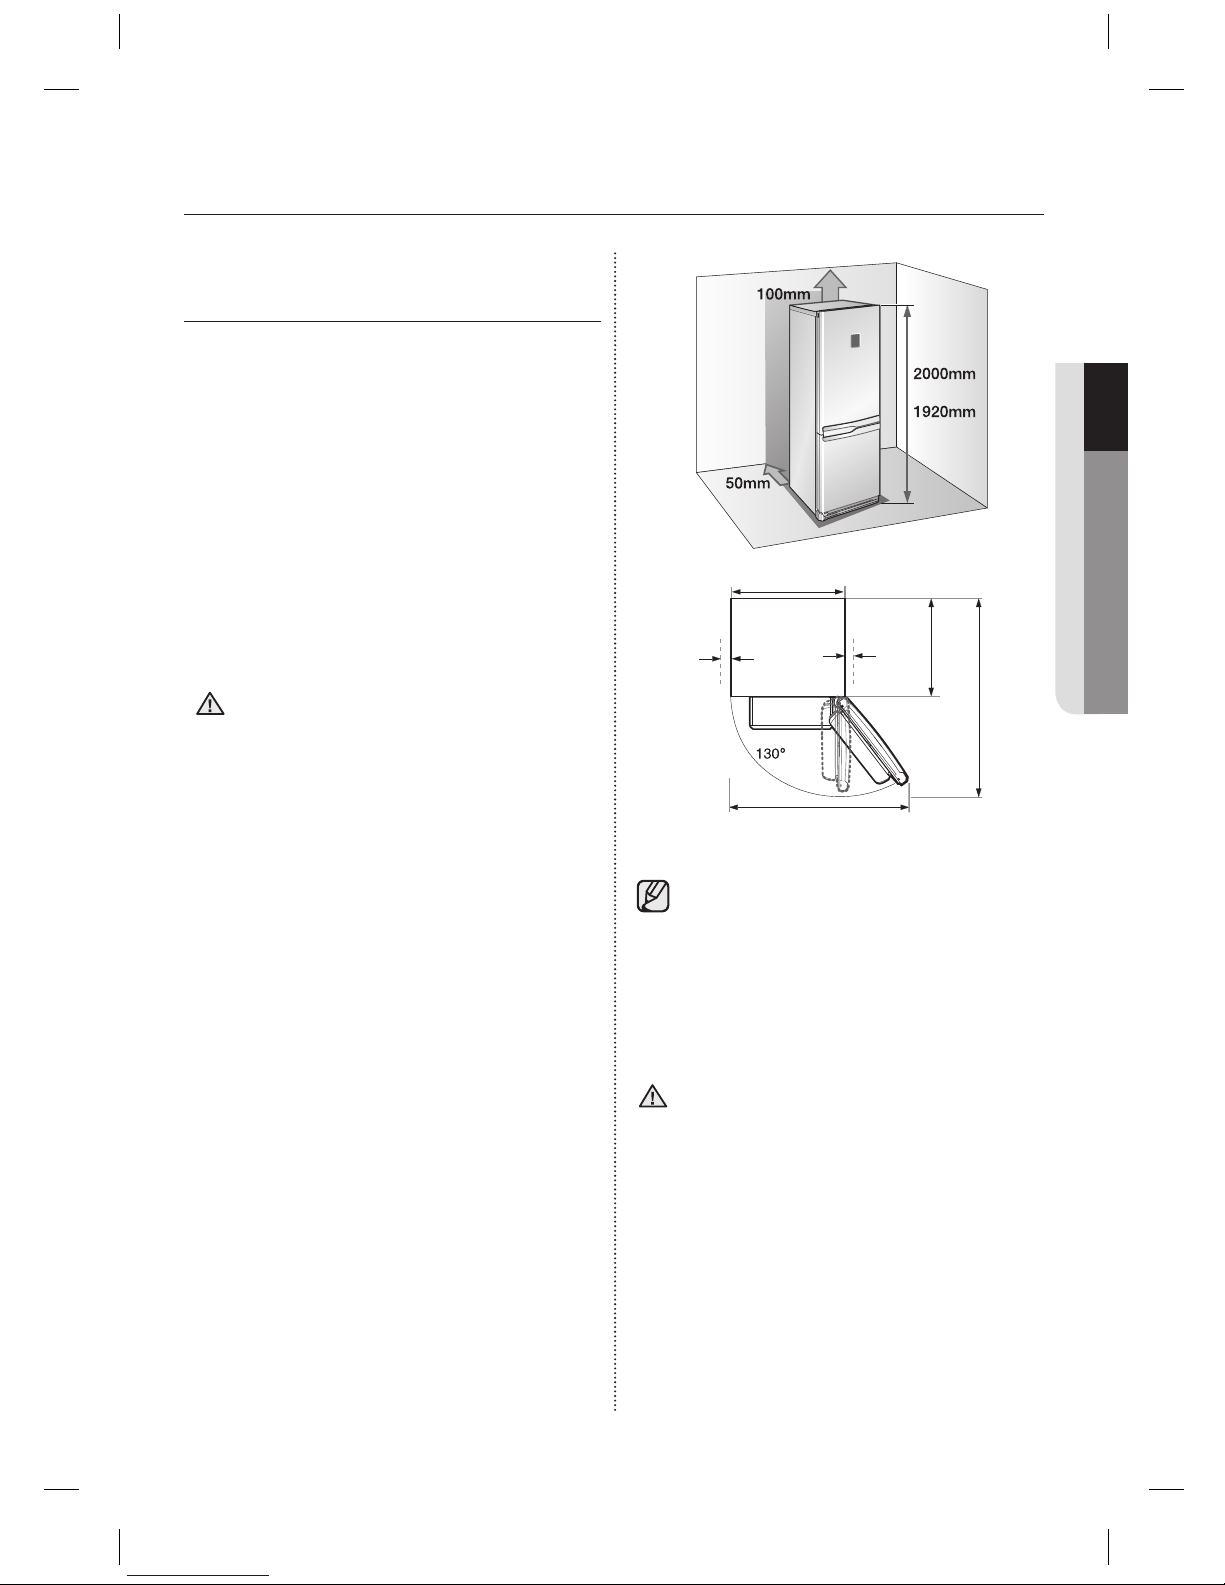
Allow suffi cient space to the right, left, back and •
top for air circulation.
If the refrigerator does not have enough space,
the internal cooling system may not work
properly.
Please ensure that appliance can be moved freely •
in the event of maintenance & service.
Height of the product may be different •
depending on the models.
Allow clearance to the right, left, back and top •
when installing.
This will help reduce power consumption and
keep your energy bills lower.
Do not install the refrigerator in a place with the •
temperature lower than 10°C.
Pull the unit straight out when installing,
servicing or cleaning behind the refrigerator
and push it straight back after work is
complete.
Make sure your fl oor can support fully
loaded refrigerator.
setting up your refrigerator
CAUTION
or
960mm
50mm
50mm
1,165mm
600mm
560mm
at least
at least
WARNING
DA99-02116L(0.7).indb 07DA99-02116L(0.7).indb 07 2012.8.17 9:10:28 AM2012.8.17 9:10:28 AM
08_ setting up
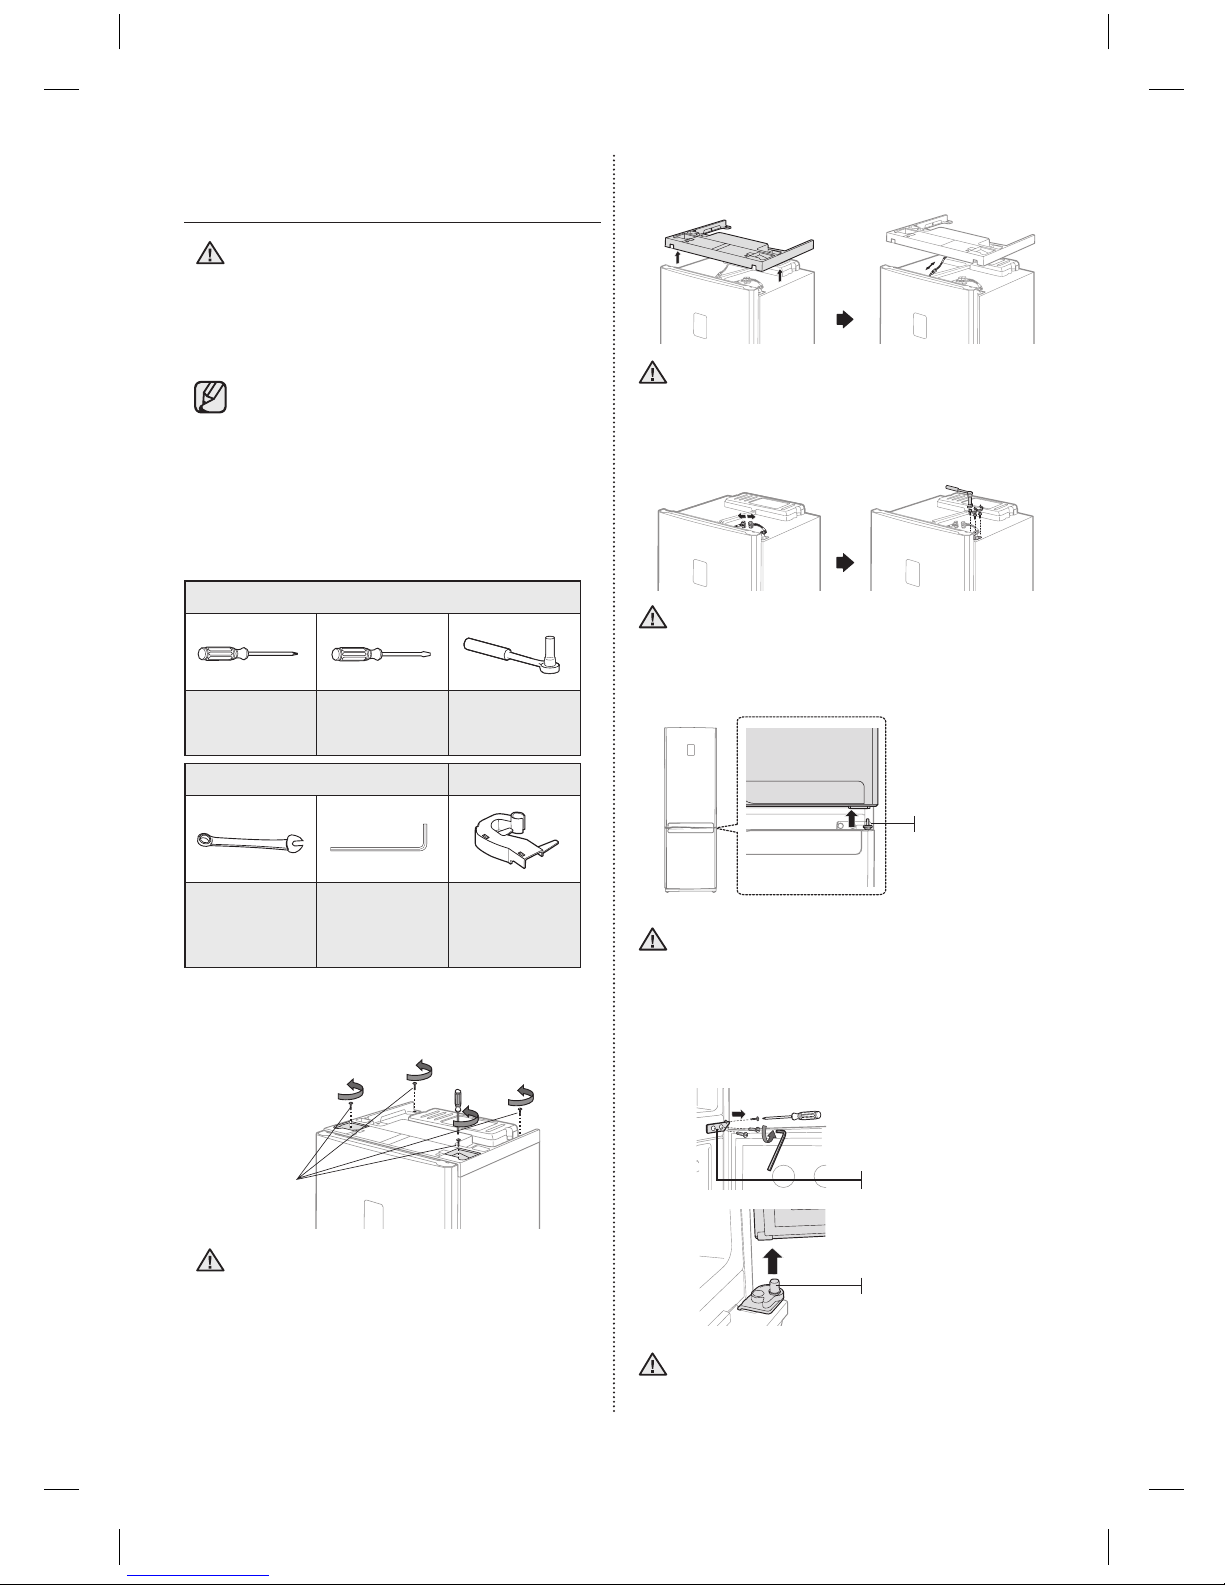
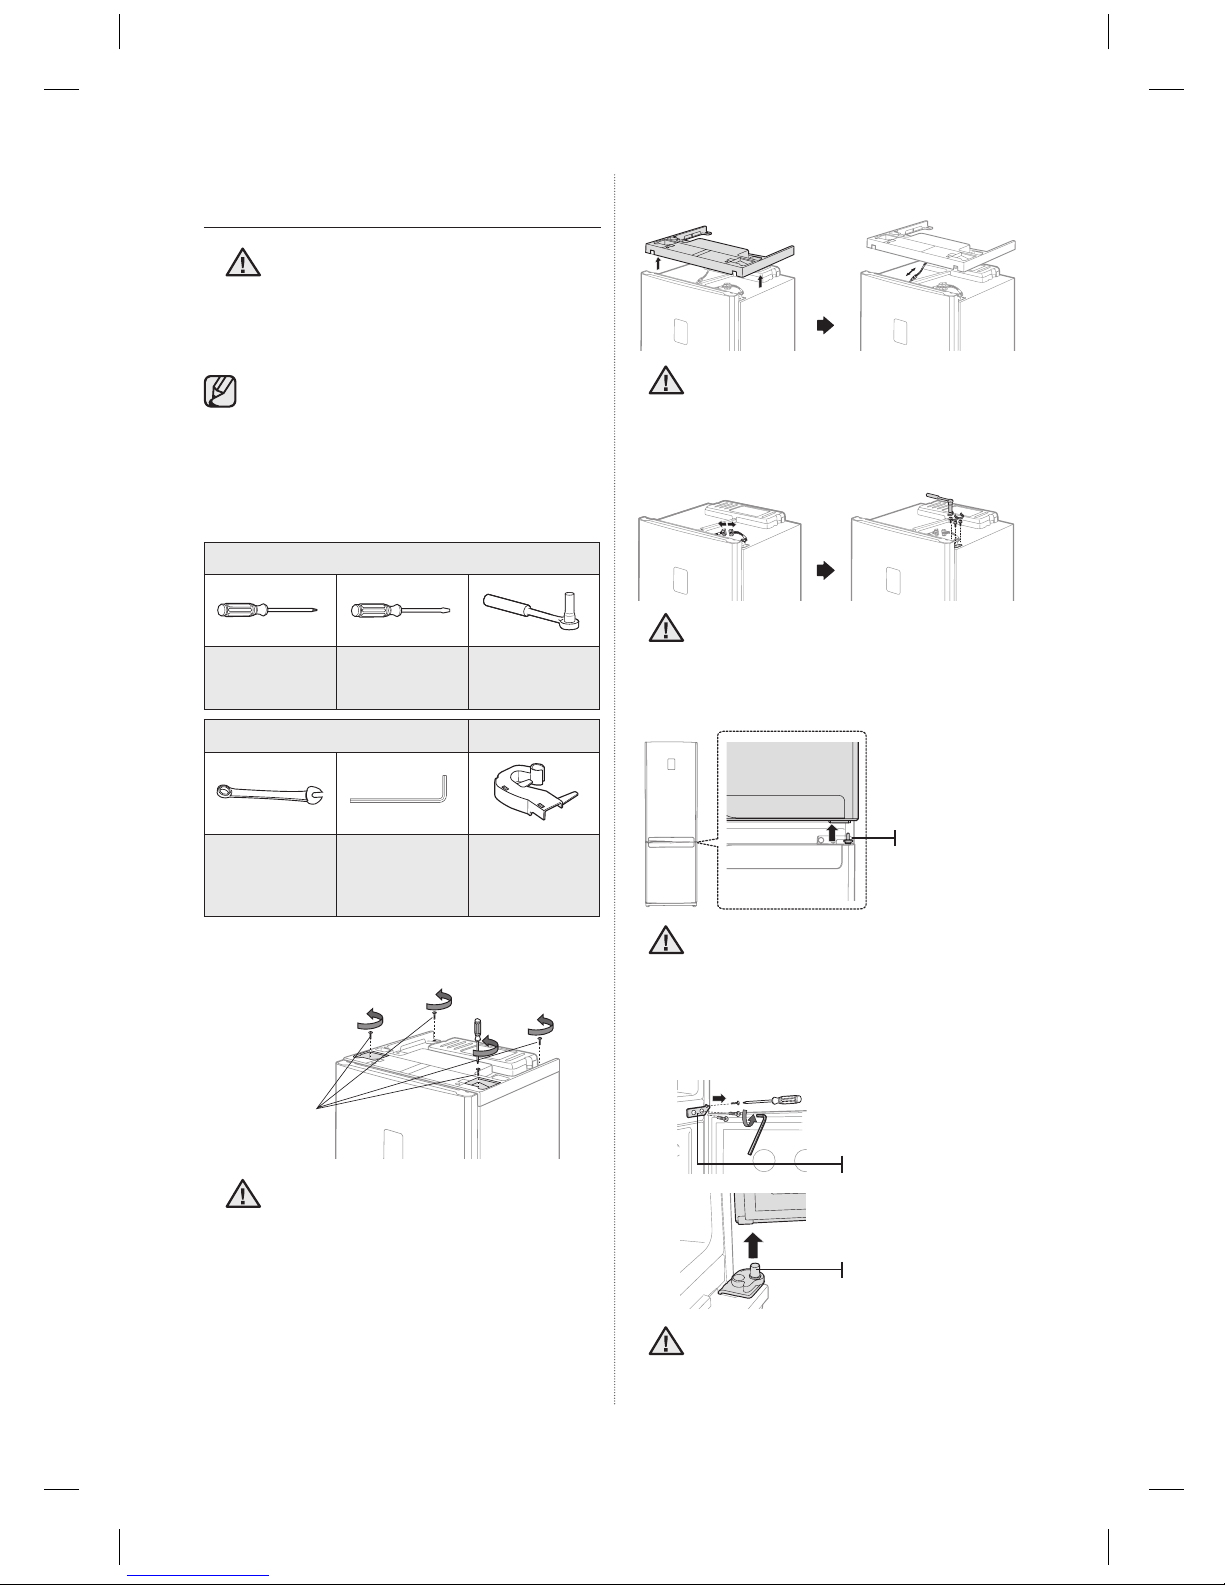
Remove the Top cover. Make sure to disconnect 2.
the wire underneath the Top cover.
Be careful not to damage the electrical wires
when removing the Top cover.
Disconnect the wire and then remove 3 bolts on 3.
the top of the refrigerator.
Make sure the Fridge door is closed fi rmly.
Remove the Fridge door from the Middle hinge 4.
by carefully lifting the door straight up.
Fridge door is heavy, be careful not to injure
yourself when removing the Fridge door.
Disassemble the Middle hinge by removing 2 5.
bolts and a screw on the right side.
Remove the Freezer door from the Bottom hinge
by carefully lifting the door straight up.
Freezer door is heavy, be careful not to
injure yourself when removing the Freezer
door.
REVERSING THE
REFRIGERATOR DOOR
Samsung recommends that reversing of
the door opening is only completed by
Samsung approved Service providers.
This will be on a chargeable basis and at the
customers expense.
Any damage caused while attempting to
reverse the door opening is not covered
under the appliance manufactures warranty.
Any repairs requested due to this
circumstance will be completed on a
chargeable basis at the customers expense.
Required Tools
Not provided
Phillips Head
Driver (+)
Flat Head
Driver (-)
10mm Socket
Wrench
(for bolts)
Not provided Additional part
11mm Wrench
(for hinge shaft)
3/16” Allen
Wrench
(for middle
hinge)
Top Left
Hinge Cover
(Underneath the
Top Cover)
Remove 4 screws on the Top cover of the 1.
refrigerator.
Make sure your refrigerator is unplugged
before handling electrical wires.
Screw
WARNING
WARNING
Middle hinge
Middle hinge
Bottom hinge
CAUTION
CAUTION
CAUTION
CAUTION
DA99-02116L(0.7).indb 08DA99-02116L(0.7).indb 08 2012.8.17 9:10:28 AM2012.8.17 9:10:28 AM
setting up _09
01 SETTING UP
Switch the side of bottom hinge cap and then 10.
attach the Front leg cover on the bottom of the
refrigerator.
Switch the side of the Middle hinge cap,11.
Screw cap and a Screw from left to the right side.
Remove the screw on the bottom right side of 12.
the Freezer door.
Switch the Door stopper and the Hinge grommet
from the right to the left.
Switch the Hinge grommet and the Grommet cap on 13.
the top of the Freezer door.
REVERSING THE
REFRIGERATOR DOOR
(CONT’D)
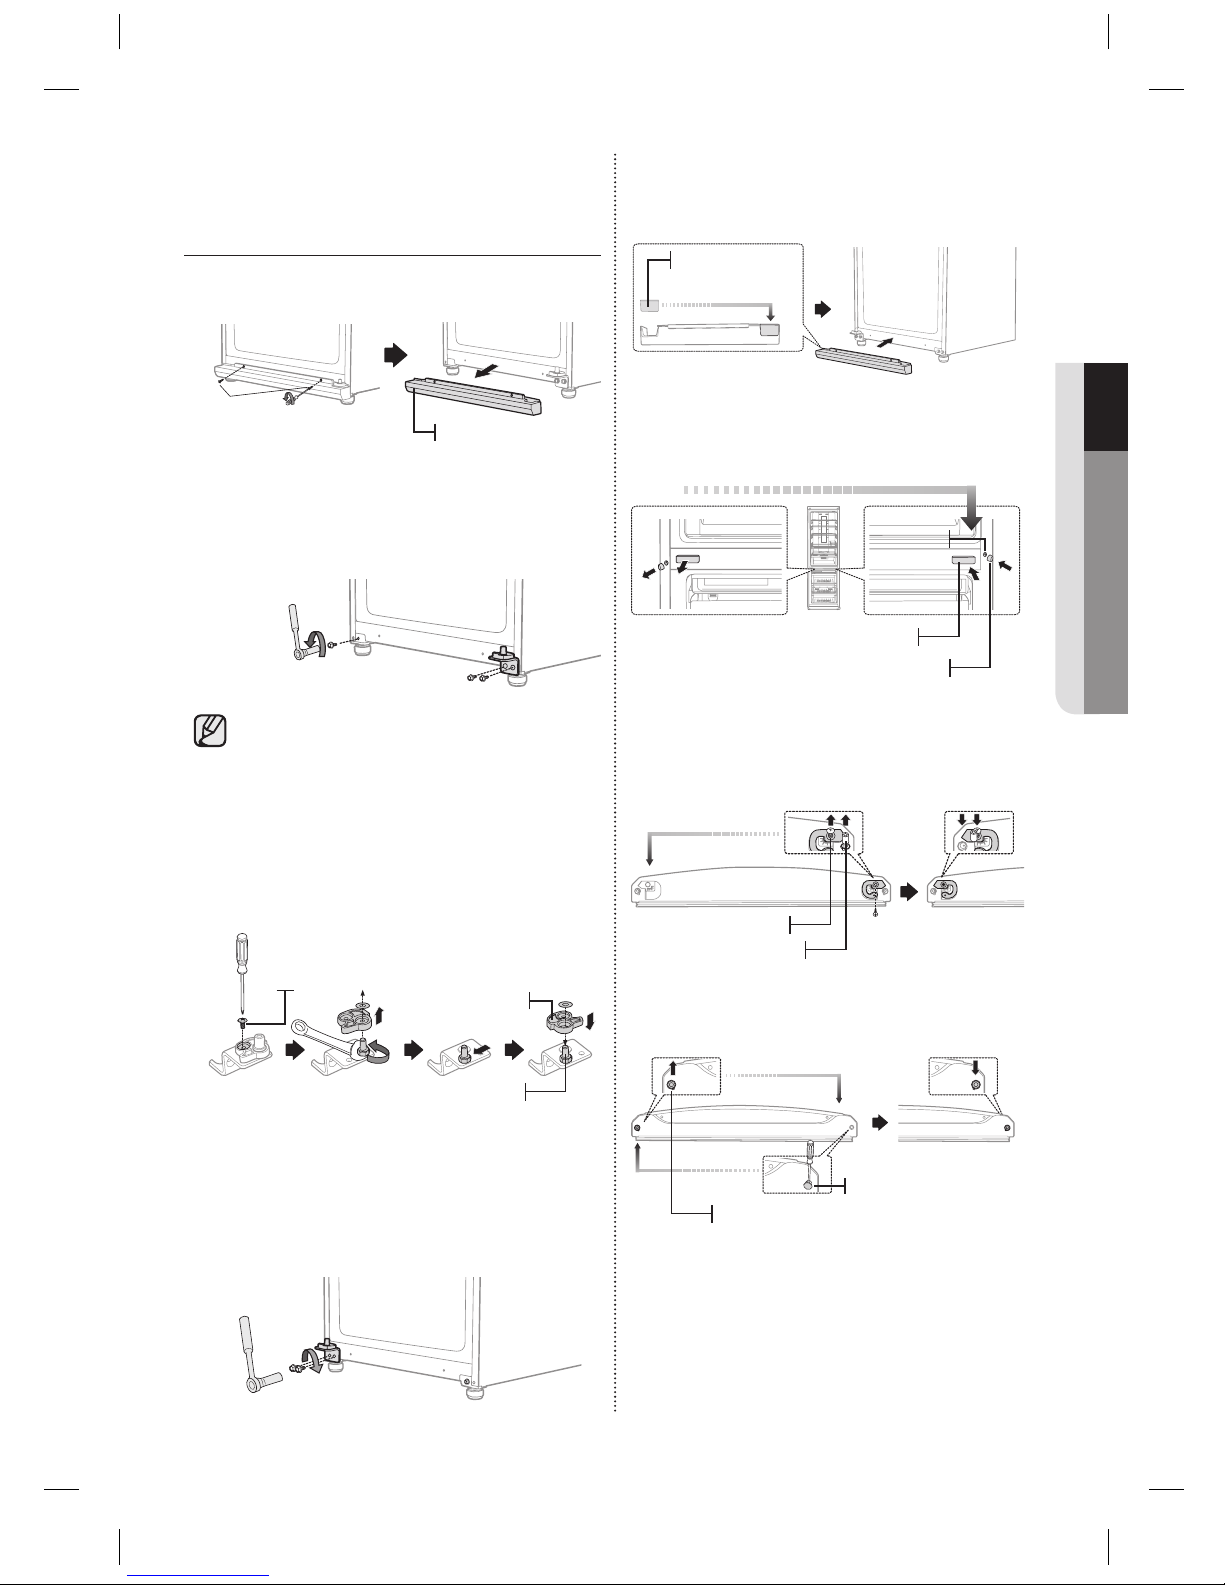
Separate the Front leg cover after removing 2 6.
screws.
Unscrew 2 bolts tightening the Bottom hinge 7.
and also unscrew a bolt on the left side by the
front leg where removed Bottom hinge will be
attached.
Before removing the Bottom hinge, slightly
turn the front legs clockwise for easier
disassembling and assembling.
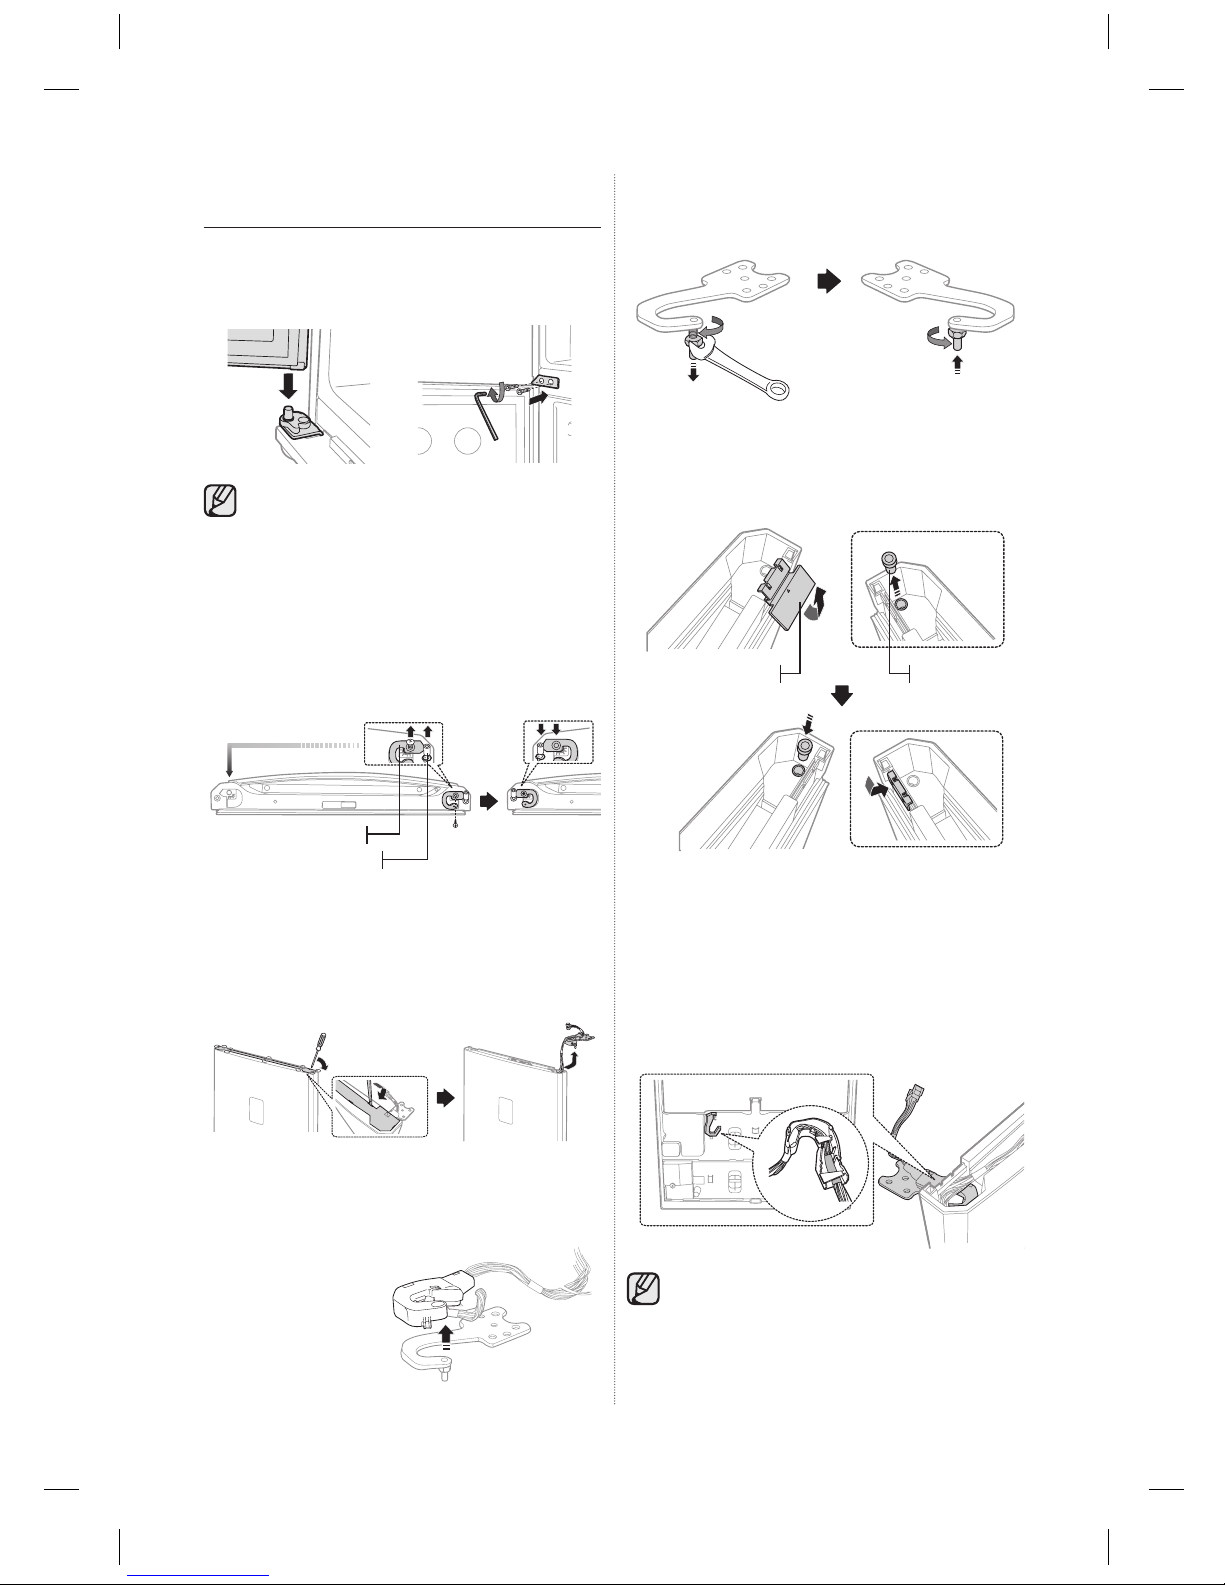
Switch the position of the Bottom hinge shaft. 8.
Remove the screw on the Auto guide and remove
the Bottom hinge shaft with 11mm wrench.
Attach the Bottom hinge shaft on the left and put
the reversed Auto Guide back.
Attach the Bottom hinge on the bottom left side 9.
of the refrigerator where a bolt was previously
removed in step 8.
Screw remaining bolt on the bottom right side of
the refrigerator for the future usage.
Screw
Front leg cover
10mm
10mm
Bottom hinge shaft
Auto guide
Screw
Bottom hinge
cap
Screw cap
Middle hinge cap
Screw
Screw
Hinge grommet
Door stopper
Hinge grommet
Grommet cap
DA99-02116L(0.7).indb 09DA99-02116L(0.7).indb 09 2012.8.17 9:10:29 AM2012.8.17 9:10:29 AM

10_ setting up
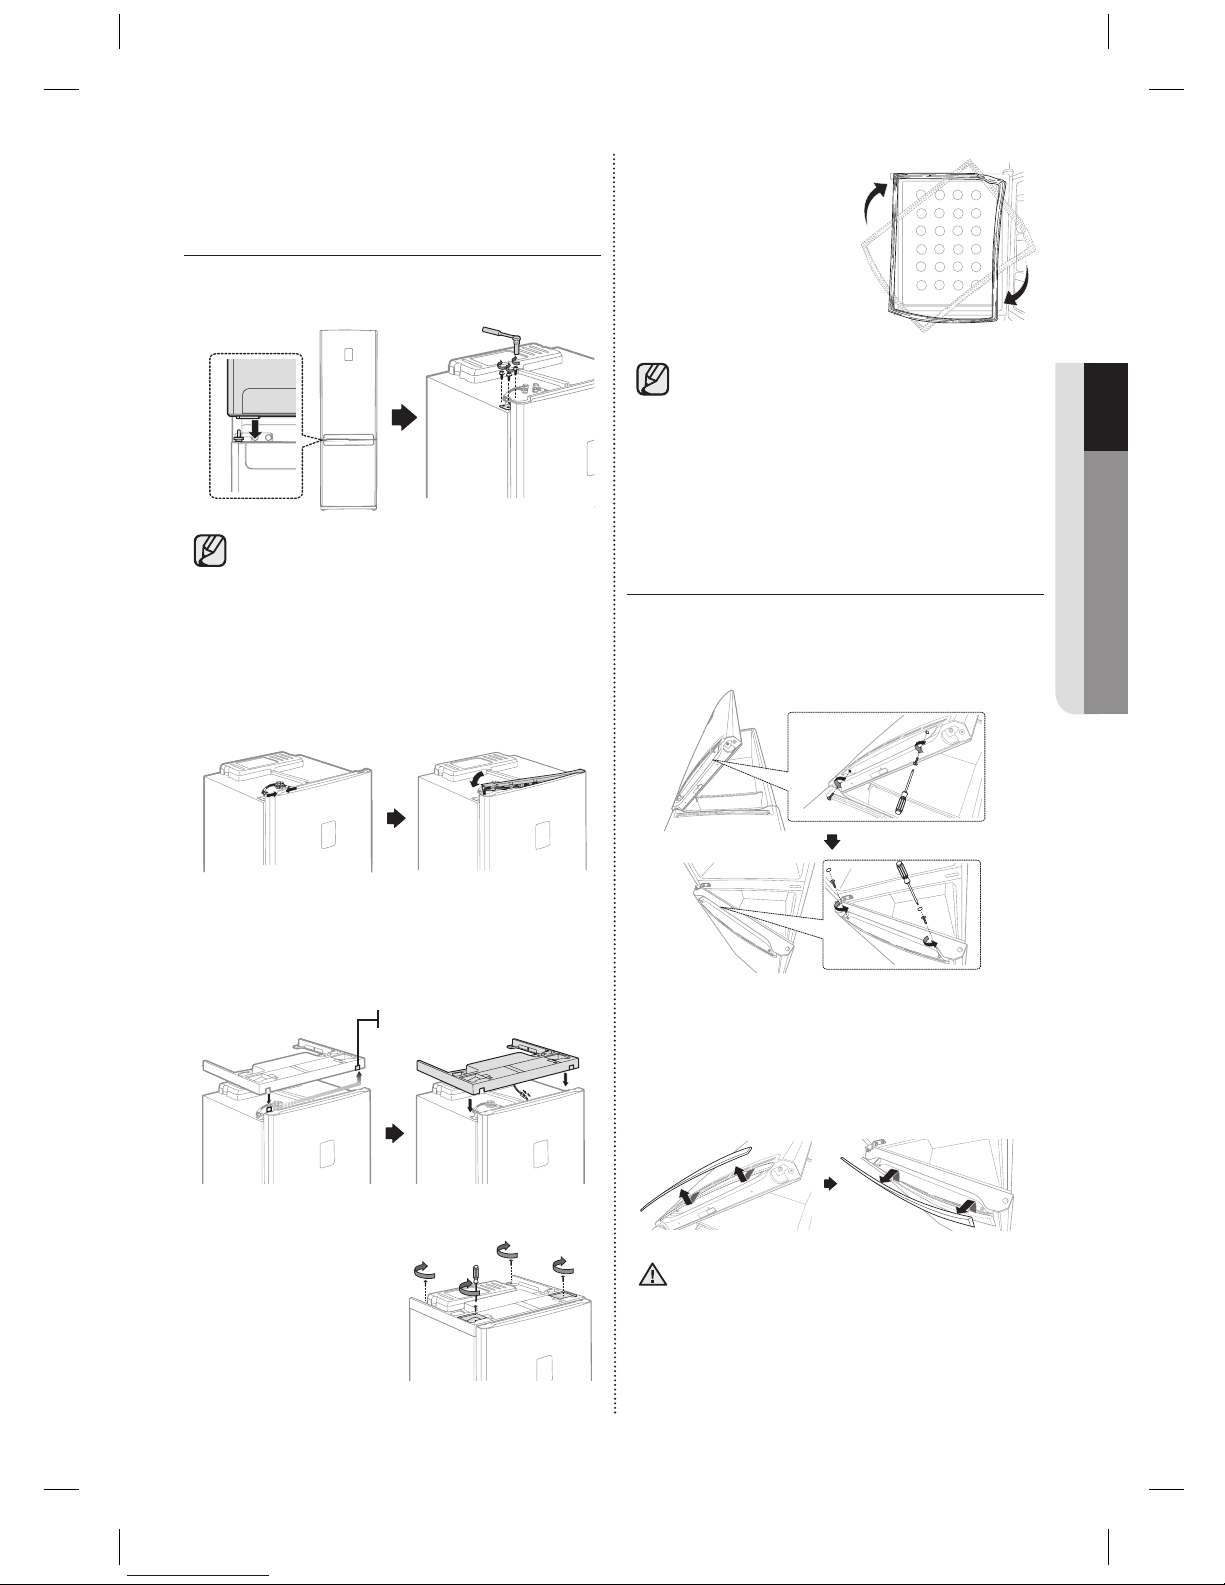
Use 11mm wrench to separate the Top hinge 18.
shaft. Flip the Top hinge and reattach the Top
hinge shaft.
Switch the side of the Door cap and the Hinge 19.
grommet on the top of the Fridge door.
Reassemble the Top hinge by reversing the step 20.
19. (Make sure to use the Top left hinge cover
which can be found underneath the Top table.)
Put the assembled hinge on the left side of the
fridge door.
Make sure that red tape on the wire is
positioned on the end of the Top left hinge
cover.
REVERSING THE
REFRIGERATOR DOOR
(CONT’D)
Carefully put the Freezer door back on.14.
Assemble the Middle hinge with 2 bolts on the
left side.
A screw will be remained after reversing
freezer door. And it does not affect
performance of the refrigerator.
Remove the screw on the bottom right side of 15.
the Fridge door.
Switch the Door stopper and the Hinge grommet
from the right to the left.
Remove the Wire cover on the top of the Fridge 16.
door with fl at head driver and then take out the
Top hinge and wires from right side of Fridge
door.
Detach the Top right hinge cover from the Top 17.
hinge and pull the wires out from the Top right
hinge cover.
Hinge grommet
Door stopper
Door cap
Hinge
grommet
DA99-02116L(0.7).indb 10DA99-02116L(0.7).indb 10 2012.8.17 9:10:30 AM2012.8.17 9:10:30 AM
setting up _11
01 SETTING UP
Detach the Fridge and 25.
the Freezer door gaskets
and then attach them
after rotating them 180˚.
After reversing the doors, make sure
the Fridge and Freezer door gaskets are
properly arranged. If not, there might
be a noise or dew formed which affects
perfomance of the refrigerator.
REVERSING THE DOOR
HANDLE (TYPE A)
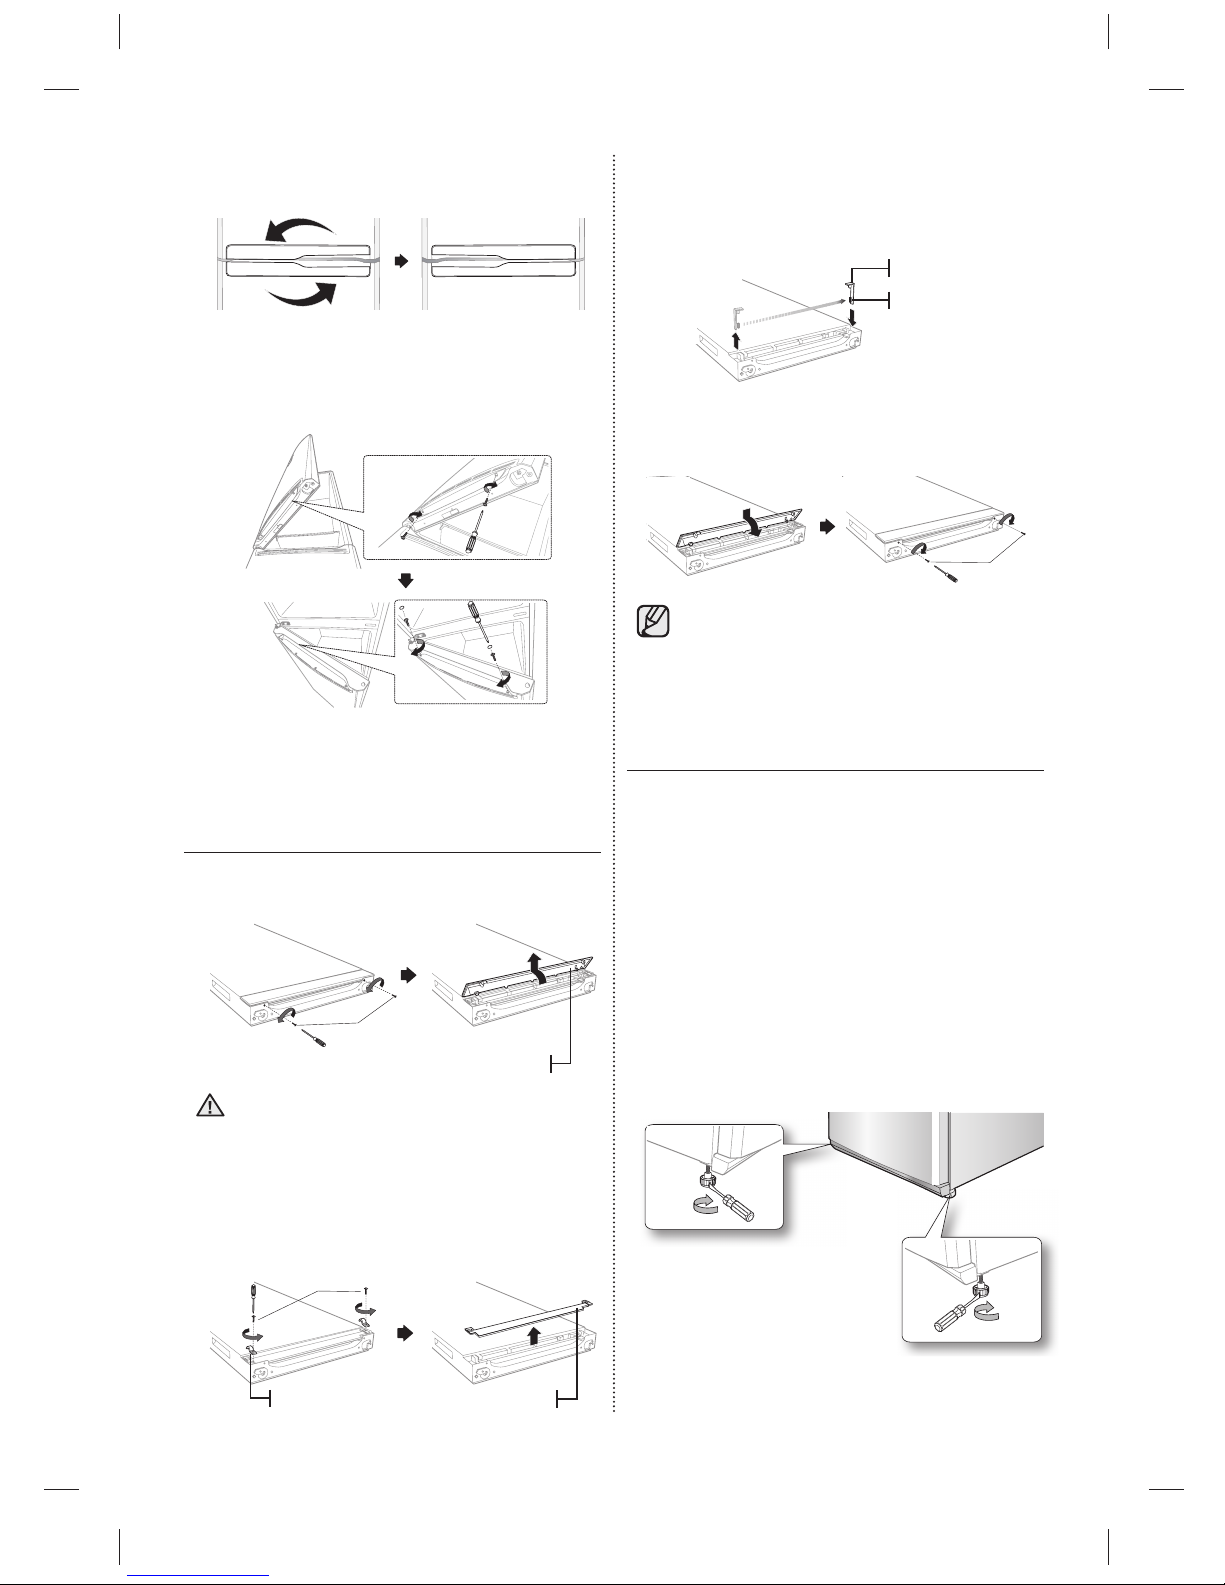
Remove 2 screws underneath the Fridge door 1.
and then take off 2 Cap sheets and remove 2
screws on the Freezer door.
Slightly push down the Fridge handle and then 2.
remove it by pulling it toward to you.
Slightly push up the Freezer handle and then
remove it by pulling it toward to you.
Disassemble the door handle carefully. Hooks
inside of the door handles can break easily.
REVERSING THE
REFRIGERATOR DOOR
(CONT’D)
Carefully put the Fridge door back on.21.
Then tighten 3 bolts to assemble the Top hinge.
You must reverse the Type B door handle •
before putting the Fridge door back.
Please refer to page 12.
For Door handle Type A, make sure to •
switch the door handle after reversing the
door.
Connect wires and then assemble the Wire cover 22.
on the top of the Fridge door.
Change the position of the Top hinge cap. 23.
Connect the wire under the Top cover and put
the Top cover back to its original position.
Tighten 4 screws back 24.
to its place.
Top hinge cap
CAUTION
DA99-02116L(0.7).indb 11DA99-02116L(0.7).indb 11 2012.8.17 9:10:30 AM2012.8.17 9:10:30 AM
12_ setting up
Change the positions of the Handle slider and 3.
spring from the left side to the right side.
Make sure to change position of the Handle slider
cap from the right side to the left side.
Assemble the door handle by following step 2 4.
and 1 in reverse order.
This procedure must be done before
‘Reversing the Refrigerator Door’ step 23.
LEVELLING THE
REFRIGERATOR
If the front of the appliance is slightly higher than
the rear, the door can be opened and closed more
easily.
Turn the adjusting legs clockwise to raise and
counter-clockwise to lower the height.
Case 1) The appliance tilts down to the left.
Turn the left adjusting leg in the direction of the •
arrow until the appliance is level.
Case 2) The appliance tilts down to the right.
Turn the right adjusting leg in the direction of the •
arrow until the appliance is level.
Assemble the handles after switching the side of 3.
the Fridge handle and the Freezer handle.
Tighten 2 screws underneath the Fridge door and 4.
then assemble 2 screws and 2 Cap sheets on
the Freezer door.
REVERSING THE DOOR
HANDLE (TYPE B)
Remove 2 screws underneath the Fridge door 1.
and then pull the Handle cover.
Disassemble the Handle cover carefully.
Hooks inside of the Handle cover can break
easily.
Remove 2 screws on the Handle grommets. 2.
Remove the Handle grommets and disassemble
the Easy handle.
Screw
Cover handle
Screw
handleGrommet
Spring
Slider
Screw
WARNING
DA99-02116L(0.7).indb 12DA99-02116L(0.7).indb 12 2012.8.17 9:10:30 AM2012.8.17 9:10:30 AM
operating _13
02 OPERATING
CHECKING THE CONTROL
PANEL
Each time you press the button, a short
beep will sound.
USING THE CONTROL PANEL
(TYPE A)
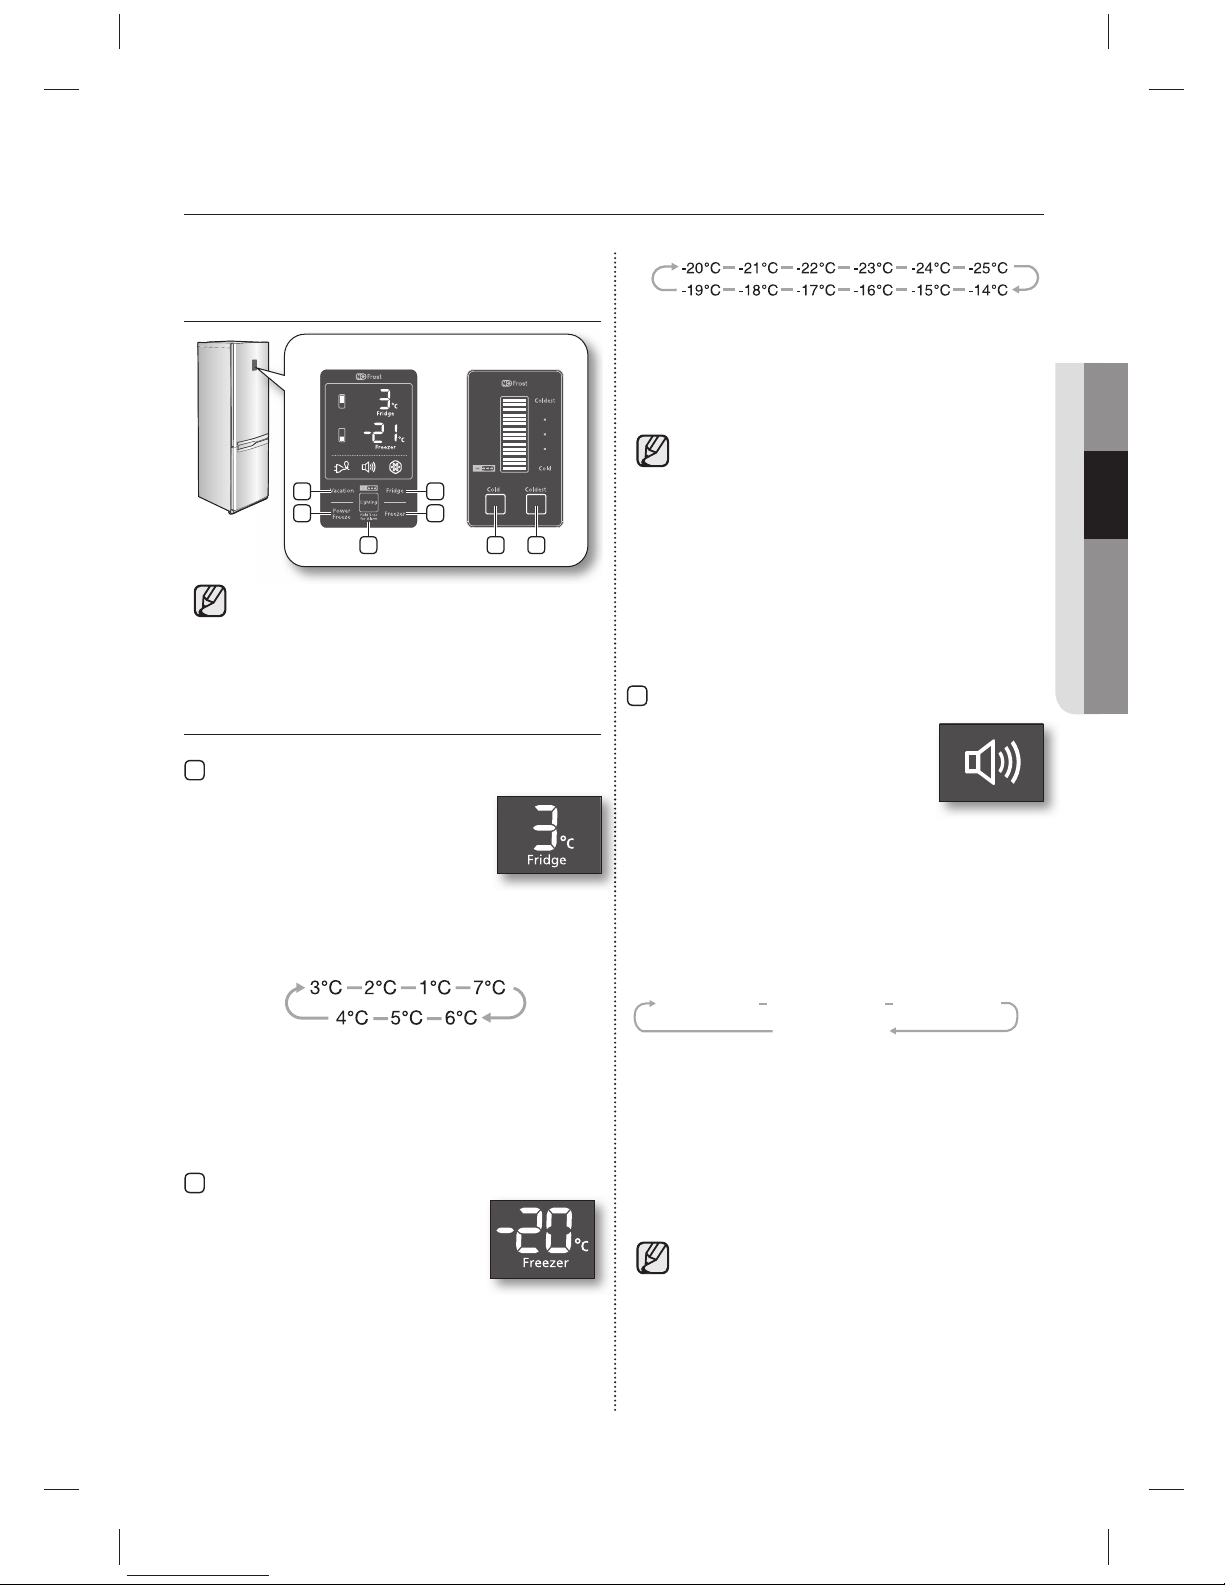
1
Fridge
Touch the Fridge button to set the
fridge to desired temperature from
the range between 1°C and 7°C.
Default set temperature is set on 3°C
and each time you press the Fridge
button, temperature will change in following order
and temperature indicator will display the desired
temperature.
When the temperature setting is done, the set
temperature is displayed initially for 5 seconds and
then indicator will display the actual temperature of
the fridge.
2
Freezer
Touch the Freezer button to set
the freezer to desired temperature
from the range between -14°C and
-25°C. Default set temperature is
set on -20°C and each time you touch the Freezer
button, temperature will change in following order
and temperature indicator will display the desired
temperature.
When the temperature setting is done, the set
temperature is displayed initially for 5 seconds and
then indicator will display the actual temperature of
the freezer.
Fridge or Freezer temp indicator will blink
when temperature in the fridge or freezer
compartment goes up dramatically by
storing warm food or frequent door opening.
(Fridge or Freezer temperature indicator will
stop blinking when temperature in the fridge
or freezer is become normal.
If temperature indicator does not stop
blinking after several hours, please contact
your service center.
3
Lighting (Hold 3sec for Alarm)
Touch the Lighting button to activate
the Lighting Function and the light
underneath fridge door will be on.
The light keeps on while Lighting
function is activated.
If you want to adjust the brightness of the light,
touch the Lighting button again.
(Adjusting brightness may not be available
depending on the models.)
To deactivate the Lighting function, touch the
Lighting button again until the light is off.
Touch the Lighting button for longer than 3 seconds
to activate the Alarm function.
Alarm indicator will light up and the refrigerator will
alert you with alarm sound if the refrigerator door is
kept open for longer than 2 minutes.
To deactivate the Alarm function, touch the Lighting
button for longer than 3 seconds.
Lighting activated : Light stay on.•
Lighting deactivated : If you open the •
freezer door with the fridge door closed
the Light will be turned on.
operating your refrigerator
(TYPE A)
4
5
1
2
3
(TYPE B)
2 1
Light off
Light off
Light on
Light on
(Bright)
(Bright)
Light on
Light on
(Medium)
(Medium)
Light on
Light on
(Dark)
(Dark)
DA99-02116L(0.7).indb 13DA99-02116L(0.7).indb 13 2012.8.17 9:10:33 AM2012.8.17 9:10:33 AM
14_ operating
USING THE CONTROL PANEL
(TYPE B)
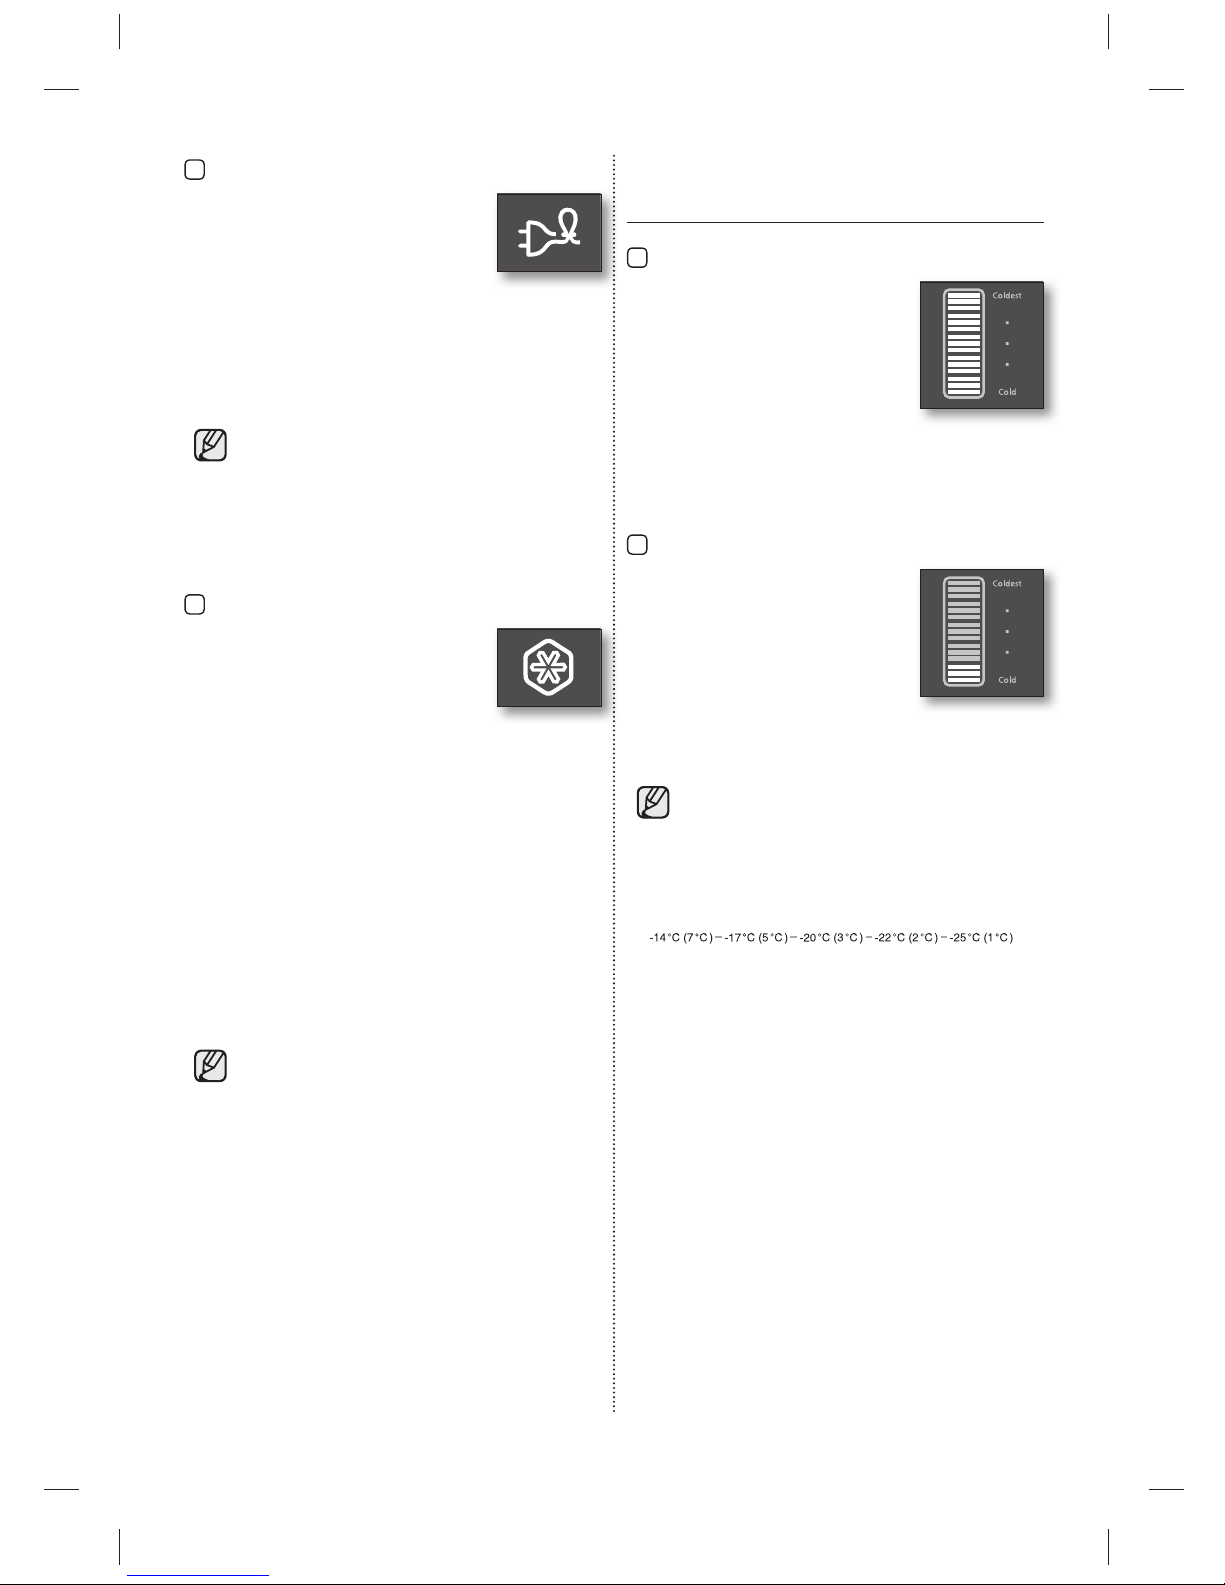
1
Coldest
Press the Coldest button one or
more times to lower the temperature
of the refrigerator.
Temperature indicator will change
from cold to coldest.
Default set temperature is the Midpoint temperature.
When all lights are on, the temperature is at its
coldest.
2
Cold
Press the Cold button one or more
times to raise the temperature of the
refrigerator.
Temperature indicator will change
from coldest to cold.
Default set temperature is the Midpoint temperature.
When one light is on, the temperature is at its cold.
There are fi ve temperature settings, •
represented by fi ve indicator lights.
The freezer temperature will be adjusted •
automatically according to the refrigerator
temperature (as stated in below).
If you need to freeze large amount of food stuff, •
set the temperature of refrigerator as the coldest
temperature at least 24 hours before.
Temp indicator will blink when temperature •
in the fridge or freezer compartment goes up
dramatically by storing warm food or frequent
door opening.
Temperature indicator will stop blinking when
temperature in the fridge or freezer becomes
normal.
If temperature indicator does not stop blinking
after several hours, please contact your service
center.
4
Vacation
Touch the Vacation button to activate
the Vacation function.
Vacation indicator will light up and the
refrigerator will set the temperature to
15°C to minimize the power consumption when you
are going on a long vacation or business trip or you
do not need to use the refrigerator.
While Vacation function is activated, freezer
compartment remains on.
Vacation function will be automatically •
deactivated if you adjust fridge temperature
while Vacation function is on.
Make sure to remove foods in the fridge •
compartment before using Vacation
function.
5
Power Freeze
Touch the Power Freeze button to
activate the Power Freeze function.
Power Freeze indicator will light up and
the refrigerator will speed up the time
to needed to freeze products in the freezer.
Power freeze function will be activated for 72 hours
and freezer indicator will display -25°C.
The Power Freeze function switches off
automatically.
When the Power Freeze process is completed, the
Power freeze indicator switches off and the freezer
switches back to the previous temperature setting.
When you use this function, the energy consumption
will increase.
To deactivate the Power Freeze function, touch the
Power Freeze button again.
If you need to freeze large amount of food
stuff, activate Power Freeze function at least
24 hours before.
Cold Coldest
Temperature of Freezer(Fridge)
DA99-02116L(0.7).indb 14DA99-02116L(0.7).indb 14 2012.8.17 9:10:36 AM2012.8.17 9:10:36 AM

operating _15
02 OPERATING
CHECKING THE CONTROL
PANEL (TYPE C)
1
HOME
You can go to the home screen with the main
functions of the refrigerator.
2
ALARM
The alarm will alert you if the refrigerator door is
kept open for longer than 2 minutes.
To cancel the alarm, touch the Alarm button again.
You can activate/deactivate the Child Lock function
by touching this button for 3 seconds.
3
LIGHTING
You can turn the lighting underneath the fridge door
on or off.
4
SLIDE
SHOW
You can use this function to see images saved in
the Photo Album.
For more information about using Control •
panel (Type C), refer to LCD Control
Manual enclosed with this manual.
If you need to freeze large amount of food •
stuff, activate Power Freeze function at
least 24 hours before.
Some of the feature such as Water Tank, •
Cool Select Zone, Cooler Zone and
Photosynthetic Fresh can be different and
may not be available depending on the
model.
To get more space in the freezer, you can •
remove
1
and 2 drawers.
It does not affect thermal and mechanical
characteristics.
A declared storage volume of the freezer
compartment is calculated with these parts
removed.
1
2
1
2
4
3
DA99-02116L(0.7).indb 15DA99-02116L(0.7).indb 15 2012.8.17 9:10:37 AM2012.8.17 9:10:37 AM

16_ operating
Danger of explosion
The coldest parts of the refrigerator is the •
rear panel.
This is the best place to store delicate
foodstuffs.
Glass bottles containing liquids should never •
be stored in the freezer as the glass can shatter
when the contents freeze.
USING THE FOLDABLE SHELF
You can fold the foldable
shelf if you need to
accommodate taller
containers or products on
the shelf underneath.
Slightly lift up the shelf 1.
and slide it inward.
Lift up the tucked shelf towards the rear wall.2.
You can simply pull the folded shelf in reverse 3.
procedure to use the fully extended shelf.
Shelf can fall out, handle with care when
using or cleaing the shelf.
USING THE WATER DISPENSER
Filling the water
You can fi ll the water with the
water tank sitting inside of the
refrigerator or you can remove
the water tank to fi ll the water.
Open the round cap and 1.
fi ll the water tank up with
drinking water.
Do not fi ll up the water tank •
too much (just over 4.2
liters).
As it could overfl ow when
the door opens and closes.
Close the round cap by pushing down on it until 2.
it clicks into place.
Do not put anything other than water in the
water tank.
USING COOL SELECT ZONE™
You can store various foods such as cheese, meat,
poultry fi sh and other foods at ideal temperature to
preserve the taste of food.
Quick Cool
If you want to cool down food quickly, store •
food in Cool Select Zone and press Quick Cool
button.
Cool Select Zone will cool food for 60 minutes. •
When Quick Cool mode is completed,•
the Cool Select Zone drawer will automatically
set the mode to Cool.
Soft Freeze
When you select Soft Freeze mode, temperature •
of the Cool Select Zone will be set on -5°C.
Zero Zone
When you select Zero Zone mode, temperature •
of the Cool Select Zone will be set on 0°C.
Cool
When you select Cool mode, temperature of the •
Cool Select Zone will be set on 3°C.
MAKING ICE
Fill the tray up to 80% with 1.
water level.
Place the ice tray in the top 2.
freezer drawer.
Wait until the ice cubes are 3.
formed.
Twist the ice tray slightly to 4.
take out the ice cubes.
Freezing time
It is recommended that you wait for about
1~2 hour with the temperature set to Power
Freeze for the ice cubes to form.
CAUTION
CAUTION
CAUTION
DA99-02116L(0.7).indb 16DA99-02116L(0.7).indb 16 2012.8.17 9:10:38 AM2012.8.17 9:10:38 AM
operating _17
02 OPERATING
When the water dispenser is not used
Fix the Dispenser cock tightly into the dispenser 1.
hole.
When the Dispenser cock is pulled out for a •
long time, Refrigerator may not operate properly
because cold air will leak.
Place a Variety guard in the location of the Water 2.
tank and store beverage bottle.
Two 1.5 liter bottles can be placed.•
USING THE PHOTOSYNTHETIC
FRESH (OPTIONAL)
Feature of photosynthetic fresh LED
Plants breathe only without light.
However, if there is light, plants can breathe and
photosynthesize at the same time.
Therefore, if you keep the vegetables in dark
refrigerator, they continue breathing and it makes
organic matter in vegetables decrease and wither
more quickly.
If you keep vegetables and fruits in fresh safe
drawer, you can keep them fresher because they
can breathe and photosynthesize in there at the
same time.
Do not look directly at the Photosynthetic
Fresh LED for a long time.
It may cause an eye trouble.
Operating photosynthetic fresh
Photosyn thetic Fresh •
LED is installed on the
back of the fresh safe
drawer.
It keeps vegetable and
fruits stored in fresh
safe drawer fresher by
providing light.
To maximize the effect, keep the vegetables and •
fruits in the transparent vinyl bag or itself.
Effect may decrease if vegetables and fruits are in
the opaque boxes, containers or black vinyl bag.
Getting water from the dispenser
Place a glass underneath the 1.
water outlet.
Push it gently against the water 2.
dispenser lever with your glass.
Make sure the glass is in •
line with the dispenser to
prevent the water from
splashing out.
Water dispenser may not be available depending •
on the model.
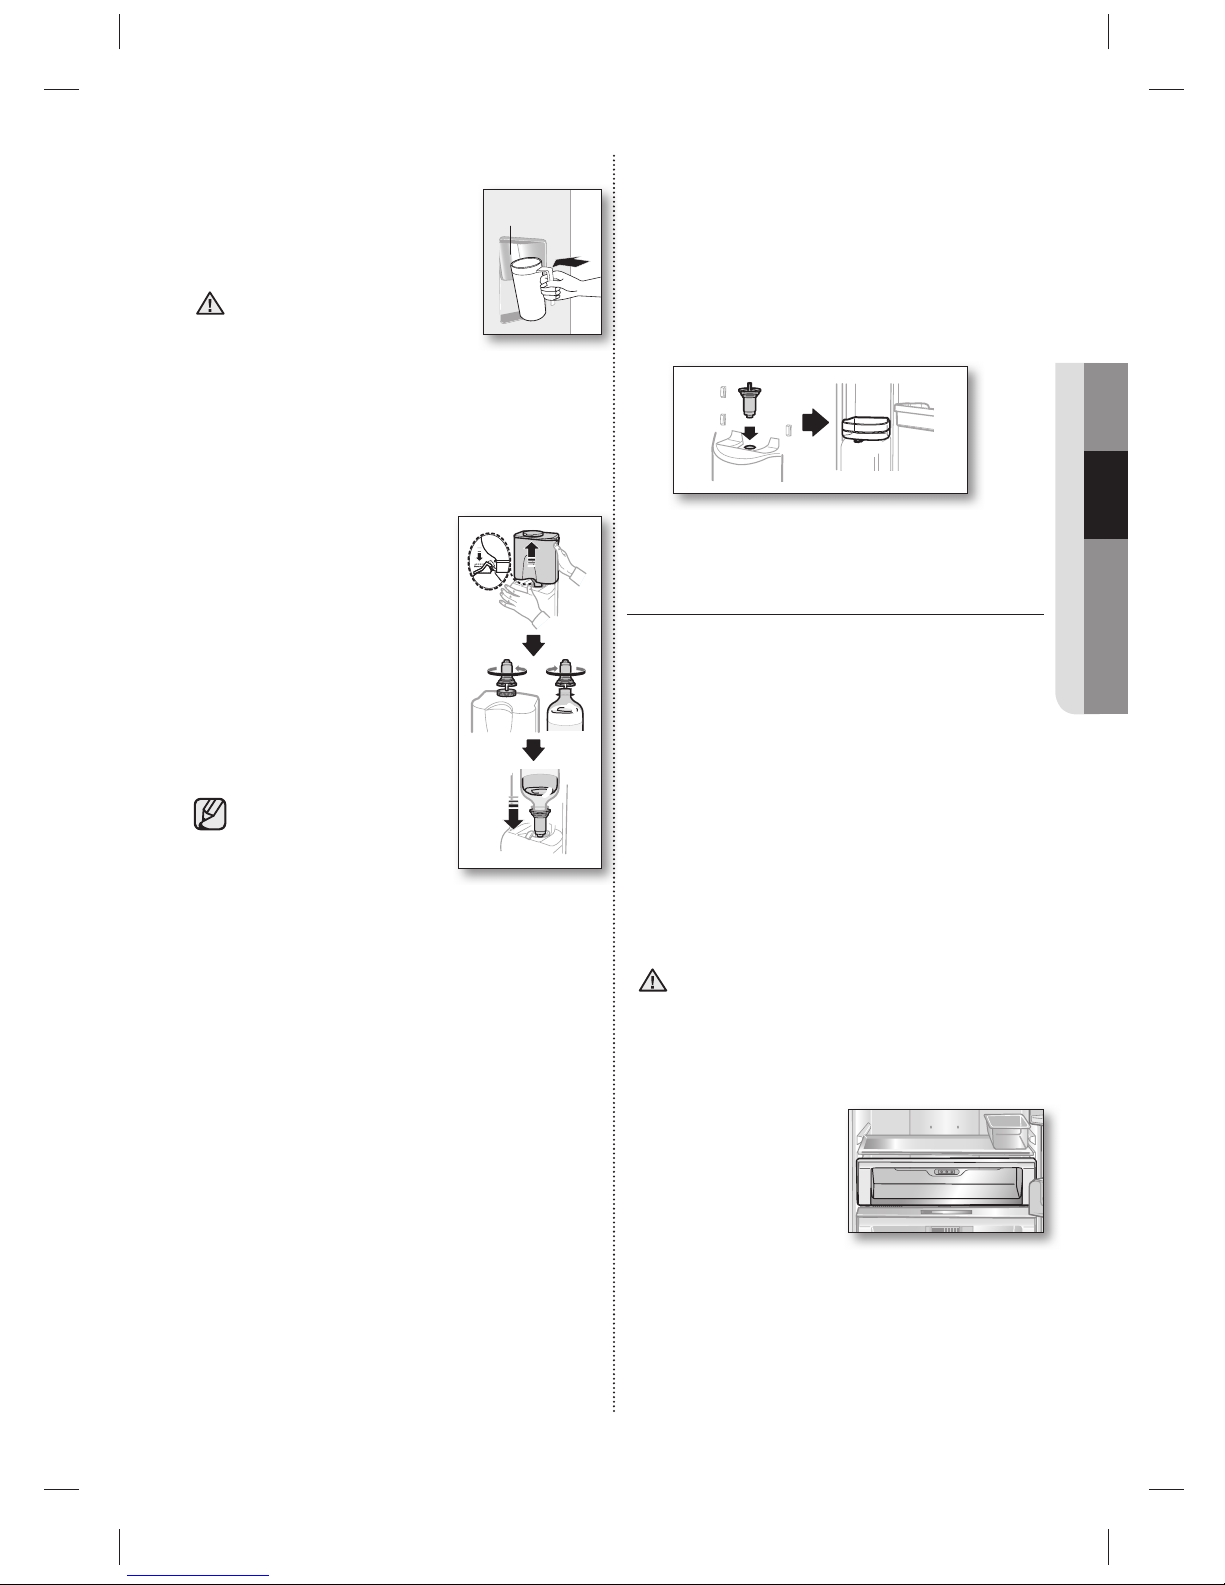
Installing a regular bottle
Press the fi xing lever, lift the 1.
Water tank upwards and
remove it.
Remove the Dispenser cock 2.
from the Water tank.
Put the Dispenser cock on the 3.
regular mineral water bottle
and rotate them clockwise to
lock the Dispenser cock.
Put the water bottle with 4.
the Dispenser cock in the
dispenser hole.
Gurgling sounds may •
be heard when air
enters the water bottle
from regular mineral
water or beverage bottles.
Some regular mineral water or beverage•
bottles may not fi t the Dispenser cock
depending on their size.
If water does not come out satisfactorily •
when you press the lever, press the lever again.
Do not use carbonated drinks.•
When you press the lever, beverage may
spurt out due to the pressure of carbonic gas
accumulated in the upper part of beverage bottle.
For better hygiene, beverages with a high sugar •
content (juice, soft drinks) are not recommended.
You can use bottled mineral water or boiled •
tap water as long as it does not contains any
particles.
Push
CAUTION
CAUTION
DA99-02116L(0.7).indb 17DA99-02116L(0.7).indb 17 2012.8.17 9:10:40 AM2012.8.17 9:10:40 AM
18_ operating
Cooler zone
Press the locking device on the rear left and right
side of the cooler zone cover and pull the cooler
zone cover to remove it.
To get the best energy effi ciency of this
product, please leave all selves, drawers
and baskets on their original position like as
illustration in page (15).
CLEANING THE REFRIGERATOR
Do not use benzene, thinner, or Clorox,
Chloride for cleaning.
They may damage the surface of the
appliance and may cause a fi re.
Do not spray the refrigerator with water
while it is plugged in, as it may cause an
electric shock.
Do not clean the refrigerator with benzene,
thinner or car detergent for risk of fi re.
REPLACING THE LED LAMP
When the interior or exterior LED lamp has gone out,
do not disassemble the lamp cover and LED lamp
by yourself.
Please contact your service agents.
Photosynthetic Fresh LED is always on when the •
fridge door is opened.
LED will turn on and off repeatedly when the door
is closed.
In winter time, if you set the desired
temperature of fridge as 1°C and store
vegetables for a long time, vegetables can
be frozen.
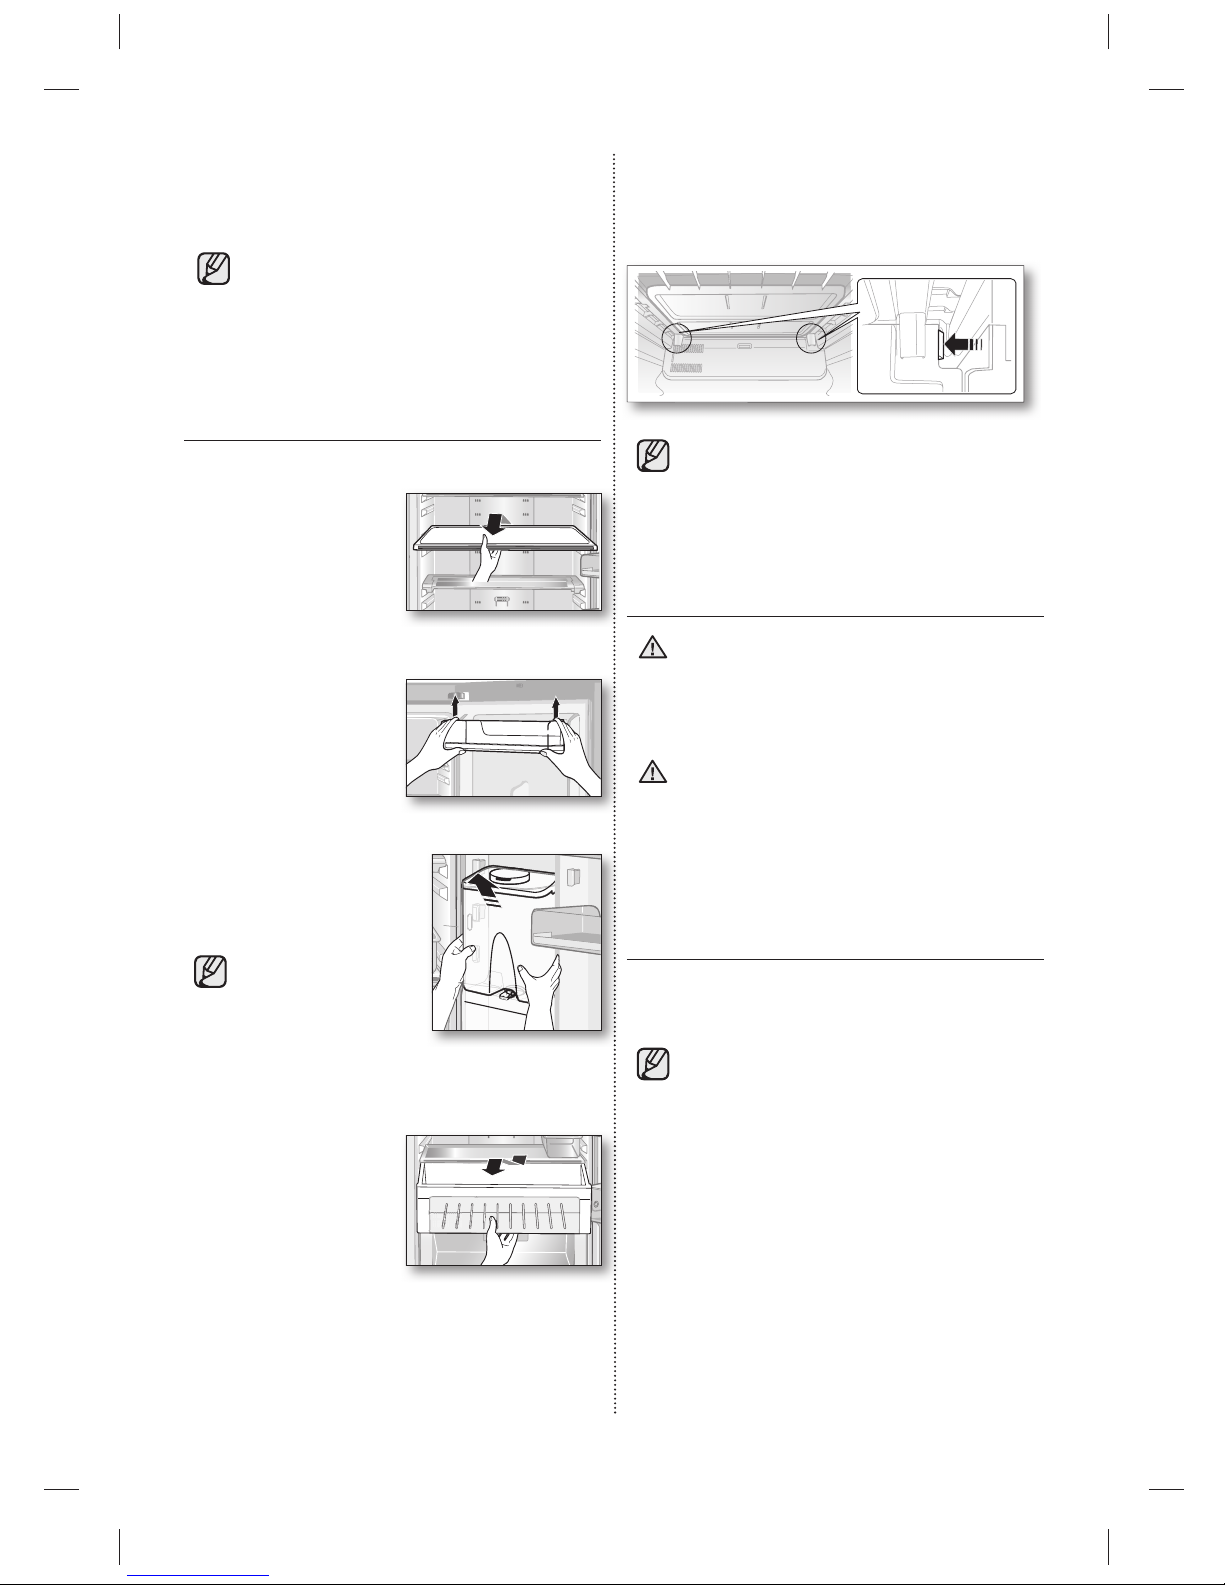
REMOVING THE INTERIOR
PARTS
Shelves
Gently lift up the shelves
with both hands and pull it
toward you. (Glass shelf/
Foldable shelf)
Door guards
Firmly grab the door
guards with both hands
and lift it up gently to
remove the door guards.
Water tank
Firmly grab the water tank
with both hands and lift it up
towards you gently to remove
the water tanks.
Water tank may
not be available
depending on the
model.
Drawers
Pull the drawers out fully
then slightly lift it up to
remove the drawers. (Fresh
safe drawer / Cool select
zone drawer / Cooler zone
drawer / Freezer Drawers )
WARNING
CAUTION
DA99-02116L(0.7).indb 18DA99-02116L(0.7).indb 18 2012.8.17 9:10:41 AM2012.8.17 9:10:41 AM
troubleshooting _19
03 TROUBLESHOOTING
troubleshooting
PROBLEM SOLUTION
The appliance is not
operating at all or the
temperature is too high.
Check if the power plug is correctly connected.•
Is the temperature control on the front panel correctly set?•
Does sun shine on the appliance or are there any heat sources nearby?•
Is the back of the appliance too close to the wall?•
The food in the
refrigerator is frozen.
Is the temperature control on the front panel set to the coldest •
temperature?
Is the surrounding temperature too low?•
There are unusual
noises.
Check if the appliance is installed on a stable and even fl oor.•
Is the back of the appliance too close to the wall?•
Have any foreign objects fallen behind or under the appliance?•
Is the noise coming from the compressor in the appliance?•
A ticking sound occurs when the various accessories contract or •
expand.
The front corners
and sides of the
appliance are warm and
condensation starts to
form.
Heat-proof pipes are installed in the front corners of the appliance to •
prevent condensation from forming.
When the surrounding temperature rises, this may not always be
effective. However, this is not abnormal.
In very humid weather, condensation may form on the outer surface of •
the appliance when the moisture in the air comes into contact with the
cool surface of the appliance.
You can hear a liquid
bubbling in the
appliance.
This is the refrigerant, which cools the inside of the appliance.•
There is a bad smell
inside the appliance.
Is there any spoiled food inside of the refrigerator? •
Make sure that strong smelling food (for example, fi sh) is wrapped so •
that it is airtight.
Clean out your refrigerator periodically and throw away any spoiled or •
suspect food.
There is a layer of frost
on the appliances walls.
Are the air outlet vents blocked by food stored inside the refrigerator?•
Space the food out as much as possible to improve ventilation.•
Is the door fully closed?•
Condensation forms on
the inside wall of the
appliance and around
vegetables.
Food with a high water content is stored uncovered with a high humidity •
level or the door has been left open for a long time.
Store the food with a cover or in sealed containers.•
DA99-02116L(0.7).indb 19DA99-02116L(0.7).indb 19 2012.8.17 9:10:42 AM2012.8.17 9:10:42 AM
Ambient Room Temperature Limits
This fridge/freezer is designed to operate in ambient temperatures specifi ed by its temperature class marked
on the rating plate.
Internal temperatures may be affected by such factors as the location of the fridge/freezer, ambient
temperature and the frequency with which you open the door.
Adjust the temperature as required to compensate for these factors.
Class Symbol Ambient Temperature range(°C)
Extended Temperate SN +10 to +32
Temperate N +16 to +32
Subtropical ST +16 to +38
Tropical T +16 to +43
English
Correct Disposal of This Product
(Waste Electrical & Electronic Equipment)
(Applicable in countries with separate collection systems)
This marking on the product, accessories or literature indicates that the product and its electronic
accessories (e.g. charger, headset, USB cable) should not be disposed of with other household
waste at the end of their working life. To prevent possible harm to the environment or human
health from uncontrolled waste disposal, please separate these items from other types of waste
and recycle them responsibly to promote the sustainable reuse of material resources.
Household users should contact either the retailer where they purchased this product, or their local government offi ce, for details of where and how they can take these items for environmentally
safe recycling.
Business users should contact their supplier and check the terms and conditions of the purchase
contract. This product and its electronic accessories should not be mixed with other commercial
wastes for disposal.
DA99-02116L(0.7).indb 20DA99-02116L(0.7).indb 20 2012.8.17 9:10:42 AM2012.8.17 9:10:42 AM
Lodówka
instrukcja obsługi
wyobraź sobie nieograniczone możliwości
Dziękujemy za zakup produktu fi rmy Samsung.
Aby móc korzystać z pełnych możliwości
serwisowych, prosimy o zarejestrowanie urządzenia
na stronie
www.samsung.com/register
Polski
Urządzenie wolno stojące
Niniejsza instrukcja została wydrukowana w całości na papierze makulaturowym.
DA99-02116L(0.7).indb 1DA99-02116L(0.7).indb 1 2012.8.17 9:10:42 AM2012.8.17 9:10:42 AM
2_ zalecenia bezpieczeństwa
ZALECENIA BEZPIECZEŃSTWA
•
Przed przystąpieniem do eksploatacji tego
urządzenia należy dokładnie zapoznać się z
niniejszą instrukcją obsługi i zachować ją w
pobliżu urządzenia na wypadek korzystania z niej
w przyszłości.
• Niniejsze urządzenie, należy wykorzystywać
wyłącznie do celów, dla których zostało ono
zaprojektowane i które zostały opisane w
niniejszej instrukcji obsługi. To urządzenie nie
jest przeznaczone do użycia przez osoby
(również dzieci) ze zmniejszonymi możliwościami
fi zycznymi, sensorycznymi lub psychicznymi,
osoby bez doświadczenia lub wiedzy, chyba,
że znajdują się pod nadzorem lub zostały
poinstruowane odnośnie obsługi urządzenia przez
osobę odpowiedzialną za ich bezpieczeństwo.
• Ostrzeżenia i ważne zalecenia bezpieczeństwa
przedstawione w tej instrukcji obsługi nie
obejmują wszystkich sytuacji i warunków, jakie
mogą wystąpić podczas korzystania z lodówki.
Użytkownik jest odpowiedzialny za kierowanie
się zdrowym rozsądkiem i stosowaniem środków
ostrożności w czasie instalacji, konserwacji i
obsługi produktu.
• Ponieważ niniejsza instrukcja obsługi dotyczy
różnych modeli lodówek, niektóre dane dotyczące
Twojego urządzenia mogą się nieznacznie różnić
od tych opisanych w instrukcji i nie wszystkie
znaki ostrzegawcze mogą mieć zastosowanie
do Twojej lodówki. W przypadku pytań lub uwag
odnoszących się do produktu fi rmy Samsung,
należy skontaktować się z najbliższym Centrum
serwisowym lub skorzystać ze strony internetowej
www.samsung.com.
Ważne symbole bezpieczeństwa i
środki ostrożności:
OSTRZEŻENIE
Niebezpieczne i ryzykowne
działania, które mogą doprowadzić
do obrażeń lub śmierci.
PRZESTROGA
Niebezpieczne i ryzykowne działania,
które mogą doprowadzić do niezbyt
poważnych obrażeń i uszkodzenia
mienia.
NIE próbuj.
NIE demontuj.
NIE dotykaj.
Postępuj zgodnie z zaleceniami.
Wyjmij wtyczkę z gniazdka.
Aby zapobiec porażeniu prądem,
należy upewnić się, że urządzenie
zostało uziemione.
W celu uzyskania pomocy, należy
zadzwonić do Centrum serwisowego.
Uwaga.
Te symbole ostrzegawcze mają na celu ochronę
użytkownika i osoby postronne przed ryzykiem
obrażeń.
Należy ich kategorycznie przestrzegać.
Po zapoznaniu się z tymi informacjami, należy
je zachować w bezpiecznym miejscu do
późniejszego wglądu.
Oznaczenie CE
Produkt niniejszy został zatwierdzony jako zgodny z
postanowieniami dyrektyw: Low Voltage (2006/95/
EC), EMC (2004/108/EC) oraz Eco-Design
(2009/125/EC) określonymi przez regulację Unii
Europejskiej (EC) Nr 643/2009.
SZCZEGÓLNIE WAŻNE
ZNAKI OSTRZEGAWCZE
DOTYCZĄCE TRANSPORTU
I LOKALIZACJI
• Podczas transportu lub w trakcie
instalowania urządzenia należy zachować
szczególną ostrożność, aby nie uszkodzić
żadnego elementu obiegu chłodzącego.
- Gaz wyciekający z układu chłodniczego może
wybuchnąć, zapalić się lub spowodować uraz
oczu. W przypadku wykrycia wycieku, należy
unikać kontaktu z ogniem i przedmiotami
mogącymi spowodować wybuch. Należy
przewietrzyć przez kilka minut pomieszczenie, w
którym znajduje się urządzenie.
• Aby uniknąć utworzenia się mieszanki zapalnej
gazu z powietrzem w przypadku wycieku gazu z
układu chłodniczego, należy ustawić urządzenie
w pomieszczeniu wystarczająco dużym, aby
jego powierzchnia była dostosowana do ilości
stosowanego czynnika chłodzącego.
• Nigdy nie należy uruchamiać urządzenia
noszącego znaki uszkodzenia. W przypadku
wątpliwości, należy skontaktować się ze
OSTRZEŻENIE
zalecenia bezpieczeństwa
DA99-02116L(0.7).indb Sec2:2DA99-02116L(0.7).indb Sec2:2 2012.8.17 9:10:42 AM2012.8.17 9:10:42 AM
zalecenia bezpieczeństwa _3
sprzedawcą. Pomieszczenie, w którym będzie stała
lodówka musi mieć powierzchnię 1m³ dla każdych
8 g gazu chłodzącego R600a zastosowanego w
urządzeniu. Ilość czynnika chłodzącego użytego
w lodówce jest podana na tabliczce znamionowej
znajdującej się w jej wnętrzu.
WAŻNE OSTRZEŻENIA
DOTYCZĄCE MONTAŻU
URZĄDZENIA
• Nie należy ustawiać lodówki w wilgotnym
miejscu lub w miejscach, w których istnieje
ryzyko kontaktu z wodą.
- Uszkodzona izolacja części elektrycznych może
spowodować pożar lub porażenie prądem.
• Nie należy ustawiać lodówki w bezpośrednim
zasięgu promieni słonecznych lub w pobliżu
kuchenek, grzejników lub innych urządzeń
emitujących ciepło.
• Nie należy podłączać kilku urządzeń do gniazda
z zastosowanym rozgałęziaczem. Lodówka jako
jedyna powinna być podłączona do gniazda
elektrycznego o napięciu znamionowym
odpowiadającemu wartości wskazanej na
tabliczce znamionowej.
- Zapewnia to najlepsze warunki pracy urządzenia
oraz zapobiega przeciążeniu obwodu
elektrycznego, które mogłoby spowodować
przegrzanie przewodów i pożar.
•
Jeśli gniazdo zasilające jest luźno zamocowane,
nie należy podłączać do niego wtyczki zasilającej.
- Istnieje ryzyko porażenia prądem lub pożaru.
• Nie należy używać popękanego lub przetartego
wzdłuż lub na końcówkach przewodu.
• Nie należy nadmiernie zaginać przewodu
zasilającego lub ustawiać na nim ciężkich
przedmiotów.
• Nie należy używać w pobliżu lodówki środków w
aerozolu.
- Nieprzestrzeganie zalecenia może doprowadzić
do wybuchu i pożaru.
• Przed rozpoczęciem eksploatacji, lodówka
musi być odpowiednio ustawiona i
zainstalowana, zgodnie z dostarczoną instrukcją.
• Podłączyć wtyczkę w prawidłowej pozycji z
przewodem opuszczonym w dół.
- Podłączenie wtyczki do góry nogami może
doprowadzić do przecięcia przewodu i
spowodować porażenie prądem lub pożar.
• Należy sprawdzić, czy wtyczka nie jest zbyt
dociśnięta, zmiażdżona lub uszkodzona przez
tył lodówki.
• Przesuwając lodówkę, należy uważać, aby nie
przemieszczać jej po przewodzie zasilającym i
aby go nie uszkodzić.
- Stwarza to ryzyko pożaru.
• Należy tak ustawić urządzenie, aby po jego
instalacji był swobodny dostęp do wtyczki
zasilającej w gnieździe zasilania.
• Lodówka musi być uziemiona.
- Należy uziemić lodówkę, aby zapobiec
upływowi prądu z urządzenia i uniknąć porażenia
prądem.
• Nigdy nie wolno używać rur gazowych, linii
telefonicznych lub instalacji piorunochronów jako
uziemienia dla lodówki.
- Niewłaściwe użycie wtyczki uziemienia może
spowodować porażenie elektryczne.
• Jeśli przewód zasilający został uszkodzony,
należy go natychmiast wymienić kontaktując
się ze sprzedawcą lub wykwalifi kowanym agentem
serwisowym.
• Bezpiecznik lodówki może być wymieniany tylko
przez wykwalifi kowanego technika lub fi rmę.
- Nieprzestrzeganie zalecenia może doprowadzić
do porażenia prądem i obrażeń.
OSTRZEŻENIA
DOTYCZĄCE MONTAŻU
LODÓWKI
•
Nie należy zasłaniać otworów wentylacyjnych
i elementów montażowych urządzenia.
• Po dokonaniu instalacji należy pozostawić
urządzenie bez włączania na 2 godziny.
WAŻNE OSTRZEŻENIA
DOTYCZĄCE UŻYWANIA
URZĄDZENIA
• Nie należy podłączać wtyczki zasilającej
mokrymi rękami.
• Nie należy ustawiać żadnych przedmiotów na
lodówce.
- Podczas otwierania i zamykania drzwi
urządzenia, przedmioty mogą spaść i zranić
kogoś i/lub doprowadzić do uszkodzenia
urządzenia.
OSTRZEŻENIE
PRZESTROGA
OSTRZEŻENIE
DA99-02116L(0.7).indb Sec2:3DA99-02116L(0.7).indb Sec2:3 2012.8.17 9:10:43 AM2012.8.17 9:10:43 AM
4_ zalecenia bezpieczeństwa
WAŻNE OSTRZEŻENIA
DOTYCZĄCE UŻYWANIA
URZĄDZENIA (CD.)
• Nie należy umieszczać na lodówce
zbiornika wypełnionego wodą.
- W przypadku rozlania wody istnieje ryzyko pożaru
lub porażenia elektrycznego.
• Nie wolno pozwalać, aby dzieci „wieszały się” na
drzwiach.
- Nieprzestrzeganie zalecenia może doprowadzić
do obrażeń.
• Nie należy pozostawiać otwartych drzwi lodówki,
kiedy lodówka jest pozostawiana bez nadzoru
nie należy pozwolić dzieciom wchodzić do
wnętrza lodówki.
- Istnieje ryzyko uwięzienia dziecka i poważnych
obrażeń z powodu niskiej temperatury.
• Nigdy nie należy wkładać palców lub innych
przedmiotów do otworu dystrybutora wody.
- Nieprzestrzeganie zalecenia może doprowadzić
do obrażeń i uszkodzenia lodówki.
•
Nie należy przechowywać w lodówce ulatniających
się i łatwopalnych substancji takich jak benzen,
rozpuszczalnik, alkohol, eter i gaz płynny.
- Nieprzestrzeganie zalecenia może doprowadzić
do wybuchu.
• Nie należy przechowywać w lodówce
wrażliwych na niskie temperatury produktów
farmaceutycznych, materiałów do zastosowań
naukowych lub innych produktów wrażliwych na
niskie temperatury.
- Produktów wymagających ścisłej kontroli
temperatury nie wolno przechowywać w takiej
lodówce.
• Nie należy wkładać lub używać wewnątrz
lodówki żadnych urządzeń elektrycznych chyba,
że są to urządzenia zalecane przez producenta.
• Nie należy używać suszarki do wysuszenia
wnętrza lodówki. Nie należy umieszczać w
lodówce zapalonej świecy w celu usunięcia
nieprzyjemnych zapachów.
- Może to doprowadzić do porażenia prądem lub
pożaru.
• Nie należy dotykać wewnętrznych
ścianek zamrażarki lub produktów w niej
przechowywanych mokrymi rękami.
- Może to spowodować odmrożenie rąk.
• Nie należy używać żadnych urządzeń, ani
żadnych innych środków przyspieszających
proces rozmrażania, niż te zalecane przez
producenta.
• Nie należy uszkodzić obwodu układu
chłodniczego.
• Ten produkt jest przeznaczony tylko do
przechowywania produktów spożywczych w
gospodarstwie domowym.
• Butelki należy przechowywać ustawione ściśle
koło siebie, tak aby nie wypadały.
• W razie wykrycia wycieku gazu, należy unikać
kontaktu z ogniem i przedmiotami mogącymi
spowodować wybuch. Należy przewietrzyć przez
kilka minut pomieszczenie, w którym znajduje się
urządzenie.
• Używać tylko lamp LED dostarczonych przez
producenta lub jego przedstawiciela.
• Należy pilnować, aby dzieci nie używały
urządzenia do zabawy i/lub nie wchodziły na
urządzenie.
• Nie należy podejmować próby samodzielnej
naprawy lub demontażu lodówki.
-
Grozi to ryzykiem pożaru, nieprawidłową pracą
urządzenia i/lub ryzykiem odniesienia obrażeń.
W razie awarii, należy skontaktować się z
przedstawicielem serwisowym.
• Jeżeli z urządzenia wydobywa się dziwny
hałas, pali się lub wydobywa się z niego
dym, należy odłączyć natychmiast urządzenie od
zasilania i skontaktować się z najbliższym Centrum
serwisowym.
- Nieprzestrzeganie zalecenia może doprowadzić
do porażenia prądem lub pożaru. Nie należy
zasłaniać otworów wentylacyjnych i elementów
montażowych urządzenia.
• W przypadku trudności z wymianą żarówki,
należy skontaktować się z przedstawicielem
serwisowym.
• Jeżeli produkt jest wyposażony w lampę LED,
nie należy samodzielnie demontować pokrywy
lampy i lampy LED.
- Należy skontaktować się z przedstawicielem
serwisowym.
• Jeżeli w lodówce znajduje się pył lub woda,
należy wyciągnąć wtyczkę i skontaktować
się z Centrum serwisowym fi rmy Samsung
Electronics.
- Istnieje ryzyko pożaru.
OSTRZEŻENIA
DOTYCZĄCE UŻYCIA
• Aby zapewnić najlepsze warunki dla
przechowywanych produktów spożywczych,
- Nie należy zastawiać produktami spożywczymi
otworów wentylacyjnych, znajdujących się w
tylnej części urządzenia. Mogą one utrudniać
obieg powietrza w przedziale lodówki.
-
Produkty spożywcze przed włożeniem do lodówki
należy dobrze zapakować lub zamknąć w
szczelnych pojemnikach.
PRZESTROGA
OSTRZEŻENIE
DA99-02116L(0.7).indb Sec2:4DA99-02116L(0.7).indb Sec2:4 2012.8.17 9:10:43 AM2012.8.17 9:10:43 AM
zalecenia bezpieczeństwa _5
• Nie należy wkładać do przedziału zamrażarki
napojów gazowanych lub musujących.
Nie należy wkładać butelek lub szklanych
pojemników do zamrażalnika.
- Podczas procesu zamrażania zawartości,
szkło może pęknąć i doprowadzić do obrażeń i
uszkodzenia mienia.
• Nie należy zmieniać i modyfi kować lodówki.
- Nieprzestrzeganie zalecenia może doprowadzić
do obrażeń i/lub uszkodzenia mienia.
Wszystkie zmiany i modyfi kacje wykonane
przez osoby trzecie nie są objęte serwisem
gwarancyjnym Samsung. Firma Samsung
nie ponosi odpowiedzialności za powstałe w
wyniku modyfi kacji osób trzecich problemy z
bezpieczeństwem oraz uszkodzenia urządzenia.
• Nie należy blokować otworów wentylacyjnych.
- Zablokowanie otworów wentylacyjnych np.
workiem plastikowym może doprowadzić do
nadmiernego schłodzenia lodówki.
Jeżeli taki okres nadmiernego schłodzenia
będzie trwał zbyt długo, może doprowadzić do
uszkodzenia fi ltra i wycieku wody.
- Nie należy umieszczać produktów
przeznaczonych do zamrożenia blisko
produktów już zamrożonych.
• Należy przestrzegać maksymalnego okresu
przechowywania i terminu ważności dla
zamrożonych produktów spożywczych.
•
Napełniać zbiornik wody, tacę na lód tylko wodą pitną.
OSTRZEŻENIA DOTYCZĄCE
CZYSZCZENIA I KONSERWACJI
• Nie należy bezpośrednio rozpylać wody
we wnętrzu urządzenia lub na lodówkę z
zewnątrz.
- Grozi to ryzykiem powstania pożaru lub
porażeniem elektrycznym.
• Nie należy rozpylać łatwopalnych gazów w
pobliżu lodówki.
- Istnieje ryzyko spowodowania wybuchu lub
pożaru.
• Nie należy pryskać środkiem czyszczącym
bezpośrednio na wyświetlacz.
- Może to doprowadzić do zgaśnięcia liter
wyświetlanych na wyświetlaczu.
•
Należy usuwać kurz lub zanieczyszczenia
znajdujące się na bolcach wtyczki zasilającej.
Nie należy używać mokrej lub wilgotnej ścierki do
czyszczenia wtyczki zasilającej. Należy usunąć wszystkie
zanieczyszczenia i kurz z bolców suchą ścierką.
- Nieprzestrzeganie zalecenia może doprowadzić
do pożaru lub porażenia prądem.
• Przed rozpoczęciem czyszczenia i
konserwacją należy odłączyć lodówkę od
zasilania.
OSTRZEŻENIA DOTYCZĄCE
PRAWIDŁOWEGO USUWANIA
• Należy się upewnić, czy rury układu
chłodniczego znajdujące się z tyłu
urządzenia przeznaczonego do usunięcia, nie
zostały uszkodzone.
• W zależności od typu lodówki, jako czynnik
chłodniczy może być użyty gaz R600a lub
R134a. Aby dowiedzieć się, który czynnik
zastosowano w urządzeniu, należy sprawdzić
etykietę sprężarki, znajdującą się na tylnej
ściance urządzenia lub tabliczkę znamionową
znajdującą się wewnątrz lodówki.
Jeśli produkt zawiera łatwopalny gaz (czynnik
chłodzący R600a), należy skontaktować
się z lokalnym urzędem miasta lub gminy,
aby uzyskać informacje dotyczące sposobu
właściwego usunięcia urządzenia.
Cyklopentan, używany do izolacji jest gazem
wybuchowym. Gazy w materiale izolacyjnym
wymagają specjalnej procedury usunięcia.
Informacje na temat bezpiecznego usuwania
tego urządzenia można uzyskać w lokalnym
urzędzie. Należy się upewnić, czy kanały układu
chłodniczego znajdujące się z tyłu urządzenia
przeznaczonego do usunięcia, nie zostały
uszkodzone. Kanały powinno się niszczyć na
otwartej przestrzeni.
• Jeżeli urządzenie zawiera izobutan (R600a), jest
to naturalny gaz o dużym stopniu biodegradacji,
palny. Podczas transportu lub w trakcie
instalowania urządzenia należy zachować
szczególną ostrożność, aby nie uszkodzić
żadnego elementu obiegu chłodzącego.
• Przed usunięciem każdej lodówki, należy
zdjąć drzwi/uszczelki drzwi i rączki, uchwyty
do drzwi, aby uniknąć ryzyka zamknięcia
się dzieci lub zwierząt wewnątrz urządzenia.
Należy pozostawić półki na miejscu, aby
uniemożliwić wchodzenie dzieci do wnętrza
urządzenia. Należy pilnować, aby dzieci nie
używały urządzenia do zabawy.
• Opakowania urządzenia należy usunąć w
sposób zgodny z przepisami dotyczącymi
ochrony środowiska naturalnego.
PRZESTROGA
OSTRZEŻENIE
DA99-02116L(0.7).indb Sec2:5DA99-02116L(0.7).indb Sec2:5 2012.8.17 9:10:43 AM2012.8.17 9:10:43 AM
6_ zalecenia bezpieczeństwa
spis treści
USTAWIENIE LODÓWKI ·················································································7
OBSŁUGA LODÓWKI ·····················································································13
ROZWIĄZYWANIE PROBLEMÓW ·································································19
DODATKOWE WSKAZÓWKI
DOTYCZĄCE WŁAŚCIWEGO
UŻYWANIA URZĄDZENIA
• W przypadku przerwy w dopływie prądu
elektrycznego należy skontaktować się z
lokalnym rejonem energetycznym i dowiedzieć
się o czas jej trwania.
- Jedno- lub dwugodzinna przerwa w dostawie
prądu elektrycznego nie ma wpływu na zmianę
temperatury w lodówce.
Należy jednak ograniczyć częstotliwość
otwierania drzwi lodówki podczas przerwy w
dopływie prądu.
- W przypadku przerwy dłuższej niż 24 godziny,
należy wyjąć z urządzenia wszystkie zamrożone
produkty spożywcze.
• Jeśli lodówka posiada opcję zamykania na
kluczyk, to kluczyk należy przechowywać poza
zasięgiem dzieci, nie w pobliżu urządzenia.
• Urządzenie może pracować nieregularnie
(ewentualny wzrost temperatury w lodówce),
jeśli zostanie umieszczone przez dłuższy czas
w środowisku, gdzie temperatura otoczenia
przekracza dopuszczalny limit, dla którego
urządzenie zostało zaprojektowane.
• Nie należy przechowywać w lodówce produktów
nieodpornych na niskie temperatury, takich jak
banany czy melony.
• Twoja lodówka jest urządzeniem bezszronowym,
co oznacza, że nie ma potrzeby manualnego
rozmrażania urządzenia.
Lodówka usuwa szron automatycznie.
•
Wzrost temperatury w lodówce podczas
rozmrażania jest procesem zgodnym z
zaleceniami ISO. Jednakże, jeśli chce się
zapobiec niepożądanemu wzrostowi temperatury
zamrożonych produktów spożywczych, należy je
owinąć w kilka warstw papieru.
• Każdy wzrost temperatury zamrożonych
produktów spożywczych podczas procesu
rozmrażania może skrócić czas przechowywania
tych produktów.
Wskazówki dotyczące oszczędności
energii
- Należy ustawić urządzenie w chłodnym,
suchym, dobrze przewietrzanym pomieszczeniu.
Należy upewnić się, czy nie znajduje się ono w
bezpośrednim zasięgu promieni słonecznych i
nigdy, nie należy ustawiać go w pobliżu źródła
ciepła (na przykład, grzejników).
- Nigdy, nie należy zastawiać otworów wlotu i
wylotu powietrza urządzenia.
- Należy gorące potrawy i napoje ochłodzić przed
włożeniem do urządzenia.
- Mrożonki przeznaczone do rozmrożenia,
należy włożyć do chłodziarki. Niska
temperatura mrożonek przyczyni się jeszcze
do oziębienia produktów spożywczych w nim
przechowywanych.
- Nie należy otwierać drzwi na zbyt długi okres
czasu. Im krócej otwarte są drzwi urządzenia,
tym mniej szronu i lodu zbierze się na ściankach
zamrażarki.
- Regularnie usuwaj zanieczyszczenia z tylnej
części lodówki. Kurz zwiększa zużycie energii.
-
Nie ustawiaj temperatury niższej niż to konieczne.
- Upewnij się, że odpływ powietrza u podstawy
i z tyłu lodówki jest wystarczający. Nie należy
przykrywać otworów wentylacyjnych.
- Upewnij się, że podczas montażu dostępna
jest odpowiednia ilość miejsca od góry, z tyłu,
z prawej i lewej strony. Pomoże to zredukować
zużycie energii i obniży rachunki za prąd.
DA99-02116L(0.7).indb Sec2:6DA99-02116L(0.7).indb Sec2:6 2012.8.17 9:10:43 AM2012.8.17 9:10:43 AM

ustawienie _7
01 USTAWIENIE
PRZYGOTOWANIE LODÓWKI DO
INSTALACJI
Gratulujemy zakupu lodówki Samsung. Mamy
nadzieję, że wiele wyjątkowych funkcji oraz znakomita
wydajność jaką oferuje nowe urządzenie dadzą
Państwu pełną satysfakcję.
• Przed rozpoczęciem eksploatacji, lodówka musi
być odpowiednio ustawiona i zainstalowana,
zgodnie z dostarczoną instrukcją.
• Niniejsze urządzenie, należy wykorzystywać
wyłącznie do celów, dla których zostało ono
zaprojektowane i które zostały opisane w niniejszej
instrukcji obsługi.
• Wszelkiego typu naprawy powinny być
dokonywane tylko przez wykwalifi kowany personel
serwisu.
• Opakowania urządzenia należy usunąć w sposób
zgodny z przepisami dotyczącymi ochrony
środowiska naturalnego.
Przed wymianą żarówki oświetlającej
wnętrze chłodziarki należy odłączyć
urządzenie od źródła zasilania.
- W przeciwnym razie istnieje ryzyko porażenia
prądem.
Wybór najlepszego miejsca dla
lodówki
• Miejsce poza bezpośrednim zasięgiem promieni
słonecznych.
• Miejsce na płaskim podłożu.
• Należy wybrać miejsce z wystarczającą ilością
przestrzeni, pozwalającą na swobodne otwieranie
drzwi lodówki.
• Pozostaw wolne miejsce dla cyrkulacji powietrza: z
prawej, lewej strony, z tyłu oraz od góry urządzenia.
Bez wystarczającej ilości miejsca, wewnętrzny
układ chłodzenia lodówki może nie działać w
prawidłowy sposób.
• Należy zapewnić, aby urządzenie można było
łatwy wyjąć na wypadek potrzeby konserwacji lub
serwisu.
• Wysokość produktu może różnić się zależnie
od modelu.
• Instalując lodówkę, należy zapewnić jej wolną
przestrzeń z prawej i lewej strony oraz z tyłu
i z góry. Stosowanie się do tego zalecenia
zapewni zmniejszenie zużycia energii
elektrycznej i tym samym niższe rachunki za
prąd.
• Nie należy instalować lodówki w miejscu,
w którym temperatura może spaść poniżej
10°C.
W czasie instalacji, serwisowania i
czyszczenia miejsca za lodówką, należy
pociągnąć lodówkę w linii prostej i w linii
prostej umieścić z powrotem na miejscu.
Należy upewnić się, że podłoga jest w stanie
udźwignąć załadowaną lodówkę.
ustawienie lodówki
OSTRZEŻENIE
PRZESTROGA
lub
960mm
50mm
50mm
1,165mm
600mm
560mm
co najmniej
co
najmniej
DA99-02116L(0.7).indb Sec4:7DA99-02116L(0.7).indb Sec4:7 2012.8.17 9:10:43 AM2012.8.17 9:10:43 AM
8_ ustawienie
RZMIANA USTAWIENIA DRZWI
LODÓWKI
Zalecamy, aby drzwi zostały przełożone
przez pracowników autoryzowanego
serwisu fi rmy Samsung. Usługa
przełożenia drzwi jest płatna, a jej koszty
pokrywa klient.
Gwarancja nie obejmuje pokrycia kosztów
związanych z uszkodzeniami, jakie mogą
powstać w trakcie przekładania drzwi.
Wszelkie naprawy związane z wyżej opisaną
sytuacją są płatne, a ich koszty pokrywa klient.
Potrzebne narzędzia
Brak w zestawie
Wkrętak
Phillips(+)
Wkrętak
płaski (-)
Klucz
nasadowy 10
mm (do śrub)
Brak w zestawie
Dodatkowa część
Klucz 11 mm
(do trzonu
zawiasu)
Klucz imbusowy
3/16” (do
zawiasu
środkowego)
Osłona górnego
lewego zawiasu
(pod osłoną
górną)
1. Odkręcić 4 śruby znajdujące się na górnej osłonie
lodówki.
Przed rozpoczęciem manipulacji
przewodami elektrycznymi należy
odłączyć lodówkę od zasilania.
2. Zdjąć górną osłonę. Odłączyć przewód znajdujący
się pod górną osłoną.
Uważać, aby nie uszkodzić przewodów
elektrycznych podczas zdejmowania
górnej osłony.
3. Odłączyć przewód i odkręcić 3 sworznie
znajdujące się na górze lodówki.
Sprawdzić, czy drzwi lodówki są dobrze
zamknięte.
4. Zdjąć drzwi ze środkowego zawiasu ostrożnie
unosząc je pionowo.
Drzwi lodówki są ciężkie. Należy uważać, żeby
nie zranić się nimi podczas zdejmowania.
5. Zdemontować środkowy zawias, odkręcając 2
sworznie i śrubę znajdujące się po prawej stronie.
Zdjąć drzwi zamrażalnika z dolnego zawiasu
ostrożnie unosząc je pionowo.
Drzwi zamrażalnika są ciężkie.
Należy uważać, żeby nie zranić się nimi
podczas zdejmowania.
OSTRZEŻENIE
OSTRZEŻENIE
Śruby
PRZESTROGA
PRZESTROGA
Środkowy
zawias
PRZESTROGA
PRZESTROGA
Środkowy zawias
Dolny zawias
DA99-02116L(0.7).indb Sec4:8DA99-02116L(0.7).indb Sec4:8 2012.8.17 9:10:43 AM2012.8.17 9:10:43 AM

ustawienie _9
01 USTAWIENIE
RZMIANA USTAWIENIA DRZWI
LODÓWKI (CD.)
6. Odkręcić 2 śruby i zdjąć pokrywę przednich nóg
lodówki.
7. Odkręcić 2 sworznie zabezpieczające zawias dolny
oraz sworzeń po lewej stronie przedniej nogi, gdzie
zamontowany zostanie wymontowany zawias
dolny.
Przed demontażem zawiasu dolnego należy
lekko przekręcić przednie nogi w kierunku
zgodnym z ruchem wskazówek zegara, aby
ułatwić ich demontaż i montaż.
8. Zmienić położenie wału zawiasu dolnego.
Odkręcić śrubę na automatycznej prowadnicy i
za pomocą klucza 11 mm odkręcić wał zawiasu
dolnego. Przymocować wał zawiasu dolnego
po lewej stronie i z powrotem zamontować
odwróconą automatyczną prowadnicę.
9. Przymocować zawias dolny u dołu, po lewej
stronie lodówki, w miejscu w którym został
odkręcony sworzeń w etapie 8. Wkręcić pozostały
sworzeń u dołu, z prawej strony lodówki.
10. Zmienić stronę osłony dolnego zawiasu, a
następnie zamontować osłonę przedniej nogi u
dołu lodówki.
11. Zmienić stronę osłony środkowego zawiasu,
wkręcić osłonę i śrubę od lewej do prawej strony.
12. Odkręcić śrubę znajdującą się u dołu po prawej
stronie drzwi zamrażalnika. Odwrócić ogranicznik
drzwi i pierścień zawiasu z prawej na lewą stronę.
13. Odwrócić pierścień zawiasu i osłonę pierścienia
znajdujące się u góry drzwi zamrażalnika.
Śruba
Przykrywa przednich
nóg lodówki
10mm
10mm
Wał dolnego
zawiasu
Automatyczna
prowadnica
Śruba
Osłona dolnego
zawiasu
Osłona śruby
Osłona środkowego zawiasu
Śruba
Śruba
Pierścień zawiasu
Ogranicznik drzwi
Pierścień zawiasu
Osłona pierścienia
DA99-02116L(0.7).indb Sec4:9DA99-02116L(0.7).indb Sec4:9 2012.8.17 9:10:44 AM2012.8.17 9:10:44 AM
10_ ustawienie
ZMIANA USTAWIENIA DRZWI
LODÓWKI (CD.)
14.
Ostrożnie założyć z powrotem drzwi zamrażalnika.
Za pomocą 2 sworzni zamontować zawias
środkowy po lewej stronie.
Po zamontowaniu drzwi zamrażalnika zostanie
jedna śruba.
Nie ma to wpływu na pracę lodówki.
15. Odkręcić śrubę u dołu po prawej stronie drzwi
zamrażalnika.
Zmienić położenie ogranicznika drzwi i pierścienia
zawiasu z prawej na lewą stronę.
16. Za pomocą wkrętaka płaskiego zdjąć osłonę
przewodów u góry drzwi lodówki, a następnie
zdjąć zawias górny i przewody z prawej strony
drzwi lodówki.
17. Zdjąć osłonę górnego prawego zawiasu i
wyciągnąć z niej przewody.
18. Za pomocą klucza 11 mm wyjąć wał górnego
zawiasu. Obrócić górny zawias ponownie
zamontować wał.
19. Odwrócić na drugą stronę osłonę drzwi i
pierścień zawiasu u góry drzwi lodówki.
20. Zamontować ponownie górny zawias wykonując
w odwrotnej kolejności czynności etapu 19.
(Pamiętać o założeniu osłony górnego lewego
zawiasu, znajdującej się pod górnym modułem.)
Umieścić złożony zawias po lewej stronie drzwi
lodówki.
Sprawdzić, czy czerwona taśma na przewodzie
jest umieszczona na Końcu osłony górnego
lewego zawiasu.
Pierścień zawiasu
Ogranicznik drzwi
Osłona drzwi
Pierścień
zawiasu
DA99-02116L(0.7).indb Sec4:10DA99-02116L(0.7).indb Sec4:10 2012.8.17 9:10:44 AM2012.8.17 9:10:44 AM
 Loading...