

Page 1
Refrigerator
User manual
RF27T5201**/RF27T5241**
Free Standing Appliance
Untitled-7 1 11/11/2020 2:12:19 PM
Page 2
Contents
Safety information 3
What you need to know about the safety instructions 3
Important safety symbols and precautions: 4
State of California Proposition 65 Warning 4
Important safety precautions 4
Contents
Severe warning signs for transportation and site 6
Critical installation warnings 6
Installation cautions 8
Critical usage warnings 8
Usage cautions 11
Cleaning cautions 12
Critical disposal warnings 13
Installation 14
Refrigerator at a glance 14
Step-by-step installation 16
Operations 35
Main panel 35
Dispenser panel 42
Special features 43
Maintenance 45
Handling and care 45
Cleaning 50
Replacement 51
Troubleshooting 53
General 53
Do you hear abnormal sounds from the refrigerator? 57
LIMITED WARRANTY (U.S.A.) 59
SAMSUNG REFRIGERATOR 59
Warranty Information (CANADA) 62
If your refrigerator needs service 62
Limited Warranty for Original Purchaser 62
Obligation to the Original Owner 63
Exclusions of the Warranty 63
English2
Untitled-7 2 11/11/2020 2:12:19 PM
Page 3
Safety information
Before using your new Samsung Refrigerator, please read this manual thoroughly to ensure
that you know how to operate the features and functions that your new appliance offers
safely and efciently.
What you need to know about the safety instructions
• This appliance is not intended for use by persons (including children) with reduced
physical, sensory or mental capabilities, or lack of experience and knowledge, unless
they have been given supervision or instruction concerning use of the appliance by a
person responsible for their safety. Children should be supervised to ensure that they
do not play with the appliance.
• Because the following instructions cover various models, the characteristics of your
refrigerator may differ slightly from the refrigerator described in this manual.
• If you have any question, contact us at 1-800-SAMSUNG or nd help and information
online at www.samsung.com.
• Refrigerant squirting out of the pipes could ignite or cause an eye injury. When
refrigerant leaks from the pipe, avoid any naked ames and move anything ammable
away from the product and ventilate the room immediately.
- Failing to do so may result in re or explosion.
• Improper use of the grounding plug can result in a risk of electric shock. If it is
necessary to use an extension cord, use only a 3-wire extension cord that has a 3-blade
grounding plug and a 3-slot receptacle that will accept the plug on the appliance.
The marked rating of the extension cord should be AC 115-120 V, 10 A, or more. If a
grounding adapter is used, make sure the receptacle box is fully grounded.
Safety information
English 3
Untitled-7 3 11/11/2020 2:12:19 PM
Page 4
Safety information
Important safety symbols and precautions:
Please follow all safety instructions in this manual. This manual uses the following safety
symbols.
WARNING
Hazards or unsafe practices that may result in severe personal injury, property damage,
and/or death.
Safety information
CAUTION
Hazards or unsafe practices that may result in severe personal injury and/or property
damage.
NOTE
Useful information that helps users understand or benet from the refrigerator.
These warning signs are here to prevent injury to you and others.
Please follow them carefully.
After reading this section, keep it in a safe place for future reference.
State of California Proposition 65 Warning
WARNING
Cancer and Reproductive Harm - www.P65Warnings.ca.gov.
Important safety precautions
Warning; Risk of re / ammable materials
WARNING
• R-600a is used as a refrigerant. This product contains ammable gas (Refrigerant
R-600a), contact your local authority in regard to safe disposal of this product.
• In order to avoid the creation of a ammable gas-air mixture if a leak in the
refrigerating circuit occurs, the size of the room in which the appliance may be sited
depends on the amount of refrigerant used. The room must be 35.3 ft³ in size for every
8 g of R-600a refrigerant inside the appliance.
• The installation location should not be exposed to direct sunlight and not placed near
any electric appliance or heat source, e.g. stove, oven or hob, radiator, etc.
English4
Untitled-7 4 11/11/2020 2:12:20 PM
Page 5

• If you use two products side by side, for safety reason, be sure to use certied products
in explosive gas atmospheres.
• Never start up an appliance showing any signs of damage. If in doubt, consult your
dealer.
• If the supply cord is damaged, it must be replaced by the manufacturer, its service agent
or similarly qualied persons in order to avoid a hazard.
• The socket must be easily accessible so that the appliance can be quickly disconnected
from the supply in an emergency. It must be outside the area of the rear of the
appliance.
• Do not store explosive substances such as aerosol cans with a ammable propellant in
this appliance.
• New hose-sets supplied with the appliance are to be used and that old hose-sets should
not be reused.
• When positioning the appliance, ensure the supply cord is not trapped or damaged.
• Do not locate multiple portable socket-outlets or portable power supplies at the rear of
the appliance.
WARNING
• Fill with potable water only.
• Keep ventilation openings, in the appliance enclosure or in the built-in structure, clear of
obstruction.
• Do not use mechanical devices or other means to accelerate the defrosting process,
other than those recommended by the manufacturer.
• Do not damage the refrigerant circuit.
• Do not use electrical appliances inside the food storage compartments of The appliance,
unless they are of the type recommended by the manufacturer.
• Connect to potable water supply only.
WARNING
• Risk of child entrapment. Before you throw away your old refrigerator or freezer:
- Take off the doors.
- Leave the shelves in place so that children may not easily climb inside.
Safety information
This appliance is intended to be used in household and similar applications such
as
• staff kitchen areas in shops, ofces and other working environments;
• farm houses and by clients in hotels, motels and other residential type environments;
• bed and breakfast type environments;
• catering and similar non-retail applications.
English 5
Untitled-7 5 11/11/2020 2:12:20 PM
Page 6

Safety information
Safety information
Severe warning signs for transportation and site
WARNING
• When transporting and installing the appliance, care should be taken to ensure that no
parts of the refrigerating circuit are damaged.
- Refrigerant leaking from the pipe work could ignite or cause an eye injury. If a leak
is detected, avoid any naked ames or potential sources of ignition and air the room
in which the appliance is standing for several minutes.
- This appliance contains a small amount of isobutane refrigerant (R-600a), a natural
gas with high environmental compatibility that is, however, also ammable.
Critical installation warnings
WARNING
• Do not install the refrigerator in a damp location or place where it may come in contact
with water.
- Deteriorated insulation on electrical parts may cause an electric shock or re.
• Do not place this refrigerator in direct sunlight or expose it to the heat from stoves,
room heaters, or other appliances.
• Do not plug several appliances and the refrigerator into the same multiple power strip.
The refrigerator should always be plugged into its own individual electrical outlet which
has a voltage rating that matches the voltage listed on the refrigerator’s rating plate.
- This provides the best performance and also prevents overloading of house wiring
circuits, which could overheat the wires and cause a re hazard.
• If the wall socket is loose, do not insert the power plug.
- There is a risk of electric shock or re.
• Do not use a power cord that has cracks or abrasion damage along its length or at
either end.
• Do not bend the power cord excessively or place heavy objects on it.
• Do not pull or excessively bend the power cord.
• Do not twist or tie the power cord.
• Do not hook the power cord over a metal object, place a heavy object on the power
cord, insert the power cord between objects, or push the power cord into the space
behind the appliance.
• When moving the refrigerator, be careful not to roll over or damage the power cord.
- This may result in an electric shock or re.
• Never unplug your refrigerator by pulling on the power cord. Always grip the plug
rmly and pull straight out from the outlet.
- Damage to the cord may cause a short-circuit, re, and/or electric shock.
• Do not install this appliance near a heater or ammable material.
• Do not install this appliance in a location where gas may leak.
- This may result in an electric shock or re.
• This refrigerator must be properly located and installed in accordance with the
instructions in this manual before you use it.
English6
Untitled-7 6 11/11/2020 2:12:20 PM
Page 7

• Connect the power plug in the proper position with the cord hanging down.
- If you connect the power plug upside down, the wire can get cut off and cause a re
or electric shock.
• Make sure that the power plug is not crushed or damaged by the back of the
refrigerator.
• Keep the packing materials out of reach of children.
- There is a risk of death from suffocation if a child puts the packing materials on his
or her head.
• The appliance must be positioned so that the plug is accessible after installation.
- Failing to do so may result in an electric shock or re due to electric leakage.
• Do not install this appliance in a humid, oily or dusty location, or in a location exposed
to direct sunlight or to water (rain drops).
- Deteriorated insulation on electrical parts may cause an electric shock or re.
• If large amounts of dust or water enter the refrigerator, disconnect the power plug and
contact a Samsung Electronics service center.
- Otherwise there is a risk of re.
• Do not stand on top of the appliance or place objects (such as laundry, lighted candles,
lighted cigarettes, dishes, chemicals, metal objects, etc.) on the appliance.
- This may result in an electric shock, re, problems with the product, or injury.
• You need to remove all the protective plastic lm before you initially plug the product
in.
• Children should be supervised to ensure that they do not play with the snap rings used
for door adjustment or the water tube clips.
- There is risk of death by suffocation if a child swallows a snap ring or water tube
clip. Keep the snap rings and water tube clips out of children's reach.
• The refrigerator must be safely grounded.
- Always make sure that you have grounded the refrigerator before attempting to
investigate or repair any part of the appliance. Power leakages can cause severe
electric shock.
• Never use gas pipes, telephone lines, or other potential lightning attractors as an
electrical ground.
- You must ground the refrigerator to prevent any power leakages or electric shocks
caused by current leakage from the refrigerator.
- Current leakage may result in an electric shock, re, explosion, or problems with the
product.
• Plug the power plug into the wall socket rmly. Do not use a damaged power plug,
damaged power cord, or loose wall socket.
- This may result in an electric shock or re.
• Only a qualied technician or service company should be allowed to change the fuse in
the refrigerator.
- Failing to do so may result in an electric shock or personal injury.
Safety information
English 7
Untitled-7 7 11/11/2020 2:12:20 PM
Page 8
Safety information
Safety information
Installation cautions
CAUTION
• Allow sufcient space around the refrigerator and install it on a at surface.
- Keep the ventilation space in the appliance enclosure or mounting structure clear of
obstructions.
• After you have installed the refrigerator and turned it on, allow the appliance to stand
for 2 hours before loading it with food.
• It is strongly recommended you have a qualied technician or service company install
the refrigerator.
- Failing to do so may result in an electric shock, re, explosion, problems with the
product, or injury.
• Overloading one door may make the refrigerator fall, causing physical injury.
Critical usage warnings
WARNING
• Do not insert the power plug into a wall socket with wet hands.
- This may result in an electric shock.
• Do not store articles on the top of the appliance.
- When you open or close the door, the articles may fall and cause personal injury
and/or material damage.
• Do not insert hands, feet, or metal objects (such as chopsticks, etc.) into the bottom or
the back of the refrigerator.
- This may result in an electric shock or injury.
- Any sharp edges may cause a personal injury.
• Do not touch the inside walls of the freezer or products stored in the freezer with wet
hands.
- This may cause frostbite.
• Do not put a container lled with water on the refrigerator.
- If spilled, there is a risk of re or electric shock.
• Do not keep volatile or ammable objects or substances (benzene, thinner, propane gas,
alcohol, ether, LP gas, and other such products) in the refrigerator.
- This refrigerator is for storing food only.
- This may result in re or explosion.
• Children should be supervised to ensure that they do not play with the appliance.
- Keep ngers out of “pinch point” areas. Clearances between the doors and cabinet
are necessarily small. Be careful when you open the doors if children are in the area.
• Do not let children hang on the door or door bins. A serious injury may occur.
• Do not let children go inside the refrigerator. They could become trapped.
• Do not insert your hands into the area under the appliance.
- Any sharp edges may cause personal injury.
English8
Untitled-7 8 11/11/2020 2:12:20 PM
Page 9

• Do not store pharmaceutical products, scientic materials, or temperature sensitive
products in the refrigerator.
- Products that require strict temperature controls must not be stored in the
refrigerator.
• Do not place or use electrical appliances inside the refrigerator/freezer, unless they are
of a type recommended by the manufacturer.
• If you smell smoke, pull out the power plug immediately, and then contact a Samsung
Electronics service center.
• If large amounts of dust or water enter the refrigerator, disconnect the power plug and
contact your Samsung Electronics service center.
- Otherwise there is a risk of re.
• Do not let children step on a drawer.
- The drawer may break and cause them to slip.
• Do not leave the doors of the refrigerator open while the refrigerator is unattended and
do not let children enter the refrigerator.
• Do not allow babies or children to go into a drawer.
- It can cause death from suffocation by entrapment or personal injury.
• Do not overll the refrigerator with food.
- When you open the door, an item may fall out and cause personal injury or material
damage.
• Do not spray volatile material such as insecticide onto the surface of the appliance.
- As well as being harmful to humans, it may also result in an electric shock, re, or
problems with the product.
• Never put ngers or any objects into the water dispenser outlet, ice chute, or ice maker
bucket.
- It may cause a personal injury or material damage.
• Do not use or place any substances sensitive to temperature such as ammable sprays,
ammable objects, dry ice, medicine, or chemicals near or inside the refrigerator.
• Do not use a hair dryer to dry the inside of the refrigerator. Do not place a lighted
candle in the refrigerator to remove bad odors.
- This may result in an electric shock or re.
• Fill the water tank and ice cube trays with potable water only (tap water, mineral water,
or puried water).
- Do not ll the tank with tea, juice, or a sports drink. They can damage the
refrigerator.
• Do not stand on top of the appliance or place objects (such as laundry, lighted candles,
lighted cigarettes, dishes, chemicals, metal objects, etc.) on the appliance. This may
result in an electric shock, re, problems with the product, or injury. Do not put a
container lled with water on the appliance.
- If spilled, there is a risk of re or electric shock.
• Never stare directly at the UV LED lamp for long periods of time.
- This may result in eye strain due to the ultraviolet rays.
• Do not put a fridge shelf into the refrigerator upside down. The shelf stopper will not
work.
- The glass shelf could fall and cause personal injury.
• Keep ngers out of “pinch point” areas. Clearances between the doors and cabinet are
necessarily small. Be careful when you open the doors if children are in the area.
Safety information
English 9
Untitled-7 9 11/11/2020 2:12:20 PM
Page 10

Safety information
Safety information
• If a gas leak is detected, avoid any naked ames or potential sources of ignition, and air
the room in which the appliance is standing for several minutes.
- Do not touch the appliance or power cord.
- Do not use a ventilating fan.
- A spark may result in an explosion or re.
• Use only the LED Lamps provided by the manufacturer or its service agents.
• Bottles should be stored tightly together so that they do not fall over or out.
• This product is intended only for the storage of food in a domestic environment.
• Never put ngers or any objects into the water dispenser outlet, ice chute, or ice maker
bucket.
- This can cause a personal injury or material damage.
• Do not attempt to repair, disassemble, or modify the refrigerator yourself.
- Unauthorized modications can cause safety problems. To reverse an unauthorized
modication, we will charge the full cost of parts and labor.
• Do not use any fuse (such as cooper, steel wire, etc.) other than a standard fuse.
• If your refrigerator needs to be repaired or reinstalled, contact your nearest Samsung
service center.
- Failing to do so may result in an electric shock, re, problems with the product, or
injury.
• If the interior or exterior LED lamp has gone out, contact your nearest Samsung service
center.
• If the refrigerator emits a burning smell or smoke, unplug the refrigerator immediately
and contact a Samsung service center.
- Failing to do so may result in an electric or re hazards.
• Pull the power plug out of the socket before changing the interior lamps of the
refrigerator.
- Otherwise, there is a risk of electric shock.
• If you experience difculty changing a non-LED light, contact a Samsung service center.
• If the product is equipped with LED lamps, do not disassemble the Lamp Covers and
LED lamps yourself.
- Contact a Samsung service center.
• Plug the power plug into the wall socket rmly.
• Do not use a damaged power plug, damaged power cord, or loose wall socket.
- This may result in an electric shock or re.
English10
Untitled-7 10 11/11/2020 2:12:20 PM
Page 11

Usage cautions
CAUTION
• Do not re-freeze frozen foods that have thawed completely.
• Use only the ice maker provided with the refrigerator.
• To get the best performance from the product:
- Do not place food too close to the vents at the rear of the refrigerator as this can
obstruct free air circulation in the refrigerator compartment.
- Wrap food up properly or place it in airtight containers before putting it into the
refrigerator.
- Please observe maximum storage times and expiration dates of frozen goods.
• Do not put glass containers or bottles or carbonated beverages into the freezer.
- The container may freeze and break, and this may result in injury.
• Service Warranty and Modication.
- Any changes or modications performed by a 3rd party on this nished appliance
are not covered under Samsung warranty service, nor is Samsung responsible for
safety issues that result from 3rd party modications.
• Do not block the air vents inside the refrigerator.
- If the air vents are blocked, especially with a plastic bag, the refrigerator can be over
cooled. If a cooling period lasts too long, the water lter may break and cause water
leakage.
• If the refrigerator is disconnected from the power supply, you should wait for at least
ve minutes before plugging it back in.
• If large amounts of water enter the refrigerator, pull out the power plug and contact a
Samsung service center.
• Do not strike or apply excessive force to any glass surface.
- Broken glass may result in a personal injury and/or property damage.
• Fill the water tank and ice cube trays with potable water only (tap water, mineral water,
or puried water).
- Do not ll the tank with tea, juice, or a sports drink. They can damage the
refrigerator.
• If the refrigerator is ooded, shut off the power to the refrigerator and contact your
nearest Samsung service center.
- There is a risk of electric shock or re.
• Do not keep vegetable oil in your refrigerator’s door bins. The oil can solidify, making it
foul-tasting and difcult to use. In addition, the open container can leak and the leaked
oil can cause the door bin to crack. After opening an oil container, it is best to keep the
container in a cool and shaded place such as a cupboard or pantry.
- Examples of vegetable oil: olive oil, corn oil, grape-seed oil, etc.
Safety information
English 11
Untitled-7 11 11/11/2020 2:12:21 PM
Page 12
Safety information
Safety information
Cleaning cautions
CAUTION
• Do not spray water directly on the inside or outside of the refrigerator.
- There is a risk of re or electric shock.
• Do not use a hair dryer to dry the inside of the refrigerator.
• Do not place a lighted candle in the refrigerator to remove bad odors.
- This may result in an electric shock or re.
• Do not spray cleaning products directly on the display.
- Printed letters on the display may come off.
• If any foreign substance such as water has entered the appliance, unplug the power
plug and contact your nearest Samsung service center.
- Failing to do so may result in an electric shock or re.
• Use a clean, dry cloth to remove any foreign matter or dust from the power plug blades.
Do not use a wet or damp cloth when cleaning the plug.
- Otherwise, there is a risk of re or electric shock.
• Do not clean the appliance by spraying water directly onto it.
• Do not use benzene, thinner, or Clorox (bleach) to clean the refrigerator.
- They may damage the surface of the appliance and may cause a re.
• Never put ngers or any objects into the dispenser outlet.
- This can cause a personal injury or material damage.
• Before cleaning or performing maintenance, unplug the appliance from the wall socket.
- Failing to do so may result in an electric shock or re.
• Use a clean sponge or soft cloth and a mild detergent in warm water to clean the
refrigerator.
• Do not use abrasive or harsh cleansers such as window sprays, scouring cleansers,
ammable uids, muriatic acid, cleaning waxes, concentrated detergents, bleaches, or
cleansers containing petroleum products on exterior surfaces (doors and cabinet), plastic
parts, door and interior liners, and gaskets.
- These can scratch or damage the material.
• Do not clean glass shelves or covers with warm water when they are cold. Glass shelves
and covers may break if exposed to sudden temperature changes or impacts such as
bumping or dropping.
English12
Untitled-7 12 11/11/2020 2:12:21 PM
Page 13

Critical disposal warnings
WARNING
• Children trapped inside a refrigerator can hurt themselves or suffocate to death.
• Please dispose of the packaging material from this product in an environmentally
friendly manner.
• Ensure that none of the pipes on the back of the refrigerator are damaged prior to
disposal.
• This product contains R-600a, a ammable gas, which is used as the refrigerant. Contact
your local authorities regarding safe disposal of this product.
• When disposing of this refrigerator, remove the door/door seals and door latch so that
small children or animals cannot become trapped inside. Children should be supervised
to ensure that they do not play with the appliance.
- If trapped inside, the child could be injured or suffocate to death.
• Cyclopentane is used in the insulation. The gases in the insulation material require
a special disposal procedure. Please contact your local authorities in regard to the
environmentally safe disposal of this product.
• Keep all packaging materials well out of the reach of children, as packaging materials
can be dangerous to children.
- If a child places a bag over his or her head, the child could suffocate.
Safety information
English 13
Untitled-7 13 11/11/2020 2:12:21 PM
Page 14
01
02
04
07
03
06
05
08
Installation
Installation
Follow these instructions carefully to ensure a proper installation of this refrigerator and to
prevent accidents before using it.
WARNING
• Use the refrigerator only for its intended purpose as described in this manual.
• Any servicing must be performed by a qualied technician.
• Dispose of the product packaging material in compliance with the local regulations.
• To prevent electric shock, unplug the power plug before servicing or replacing parts.
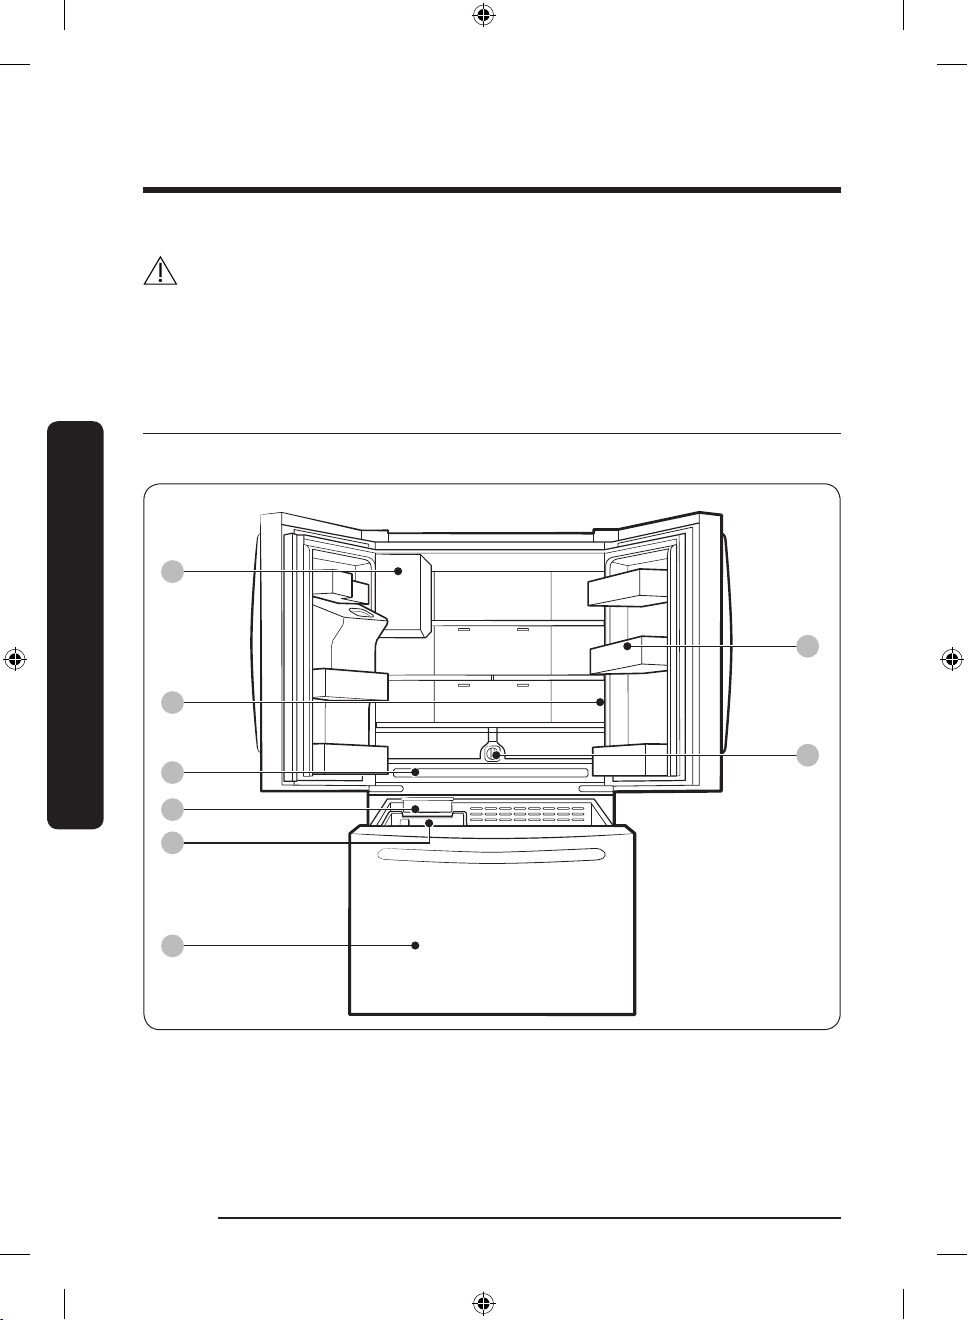
Refrigerator at a glance
The actual refrigerator and provided component parts of your refrigerator may differ from
the illustrations in this manual, depending on the model and the country.
English14
Untitled-7 14 11/11/2020 2:12:21 PM
Page 15
01 Auto Ice Maker 02 Main panel
03 Wide Pantry 04 Freezer
05 Door bins 06 Water lter
07 Ice Maker * 08 Ice bucket *
* applicable models only
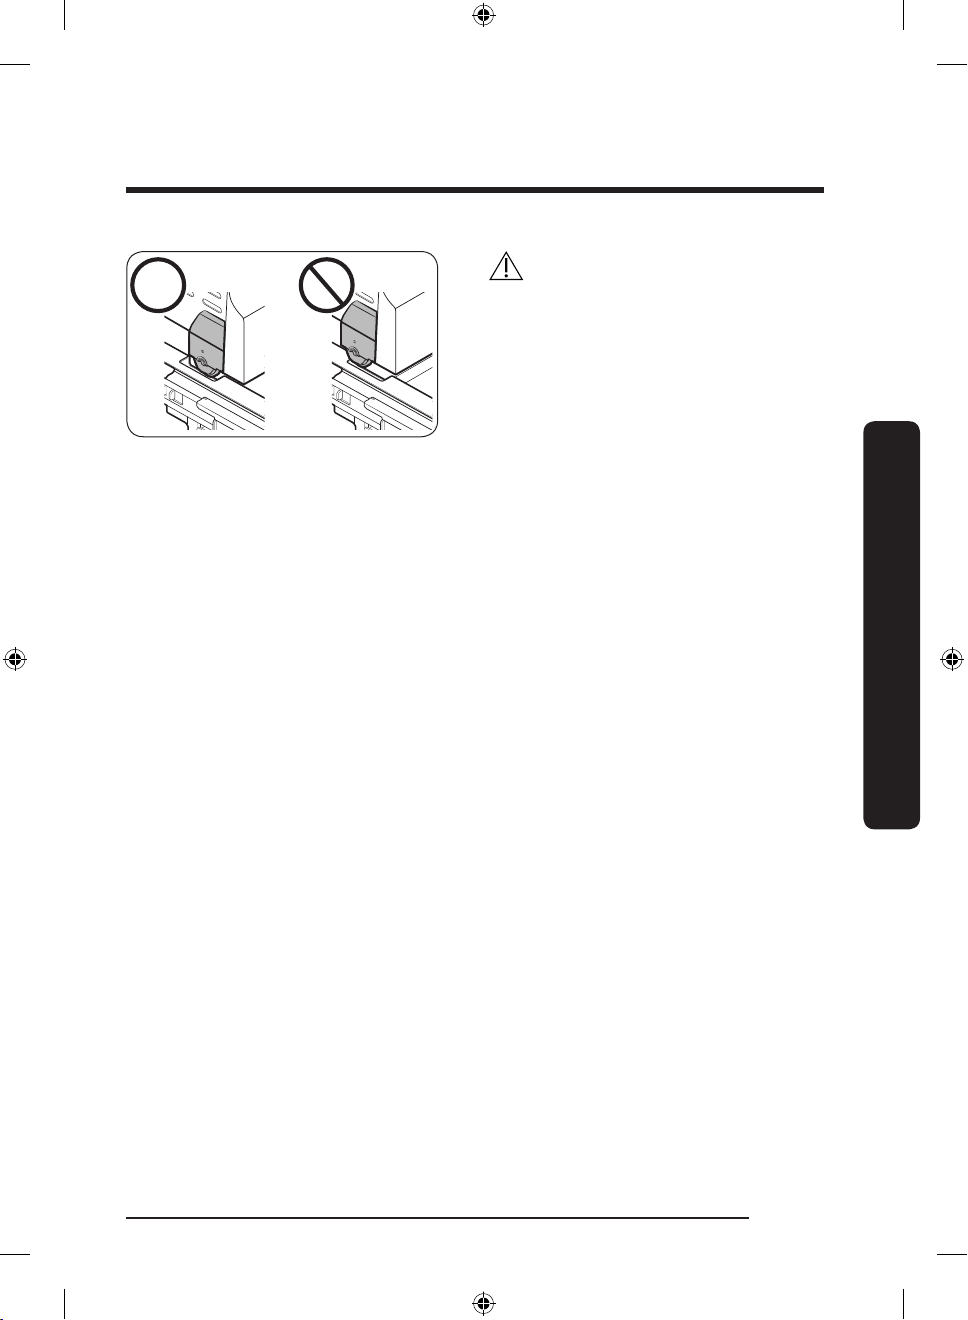
NOTE
• For energy efciency, keep all shelves, drawers, and baskets in their original positions.
• When closing the door, make sure the vertical hinged section is in the correct position
to avoid scratching the other door.
• If the vertical hinged section is reversed, put it back into the correct position, and then
close the door.
• Moisture may form at times on the vertical hinged section.
• If you close a door forcefully, the other door may open.
• When a door is opened, the interlock switch automatically disables the auger motor of
the ice maker for safety reasons.
• If the internal or external LED lamp is out of order, contact a local Samsung service
center.
• If the door is left open for too long, the top internal LED will blink. This is normal.
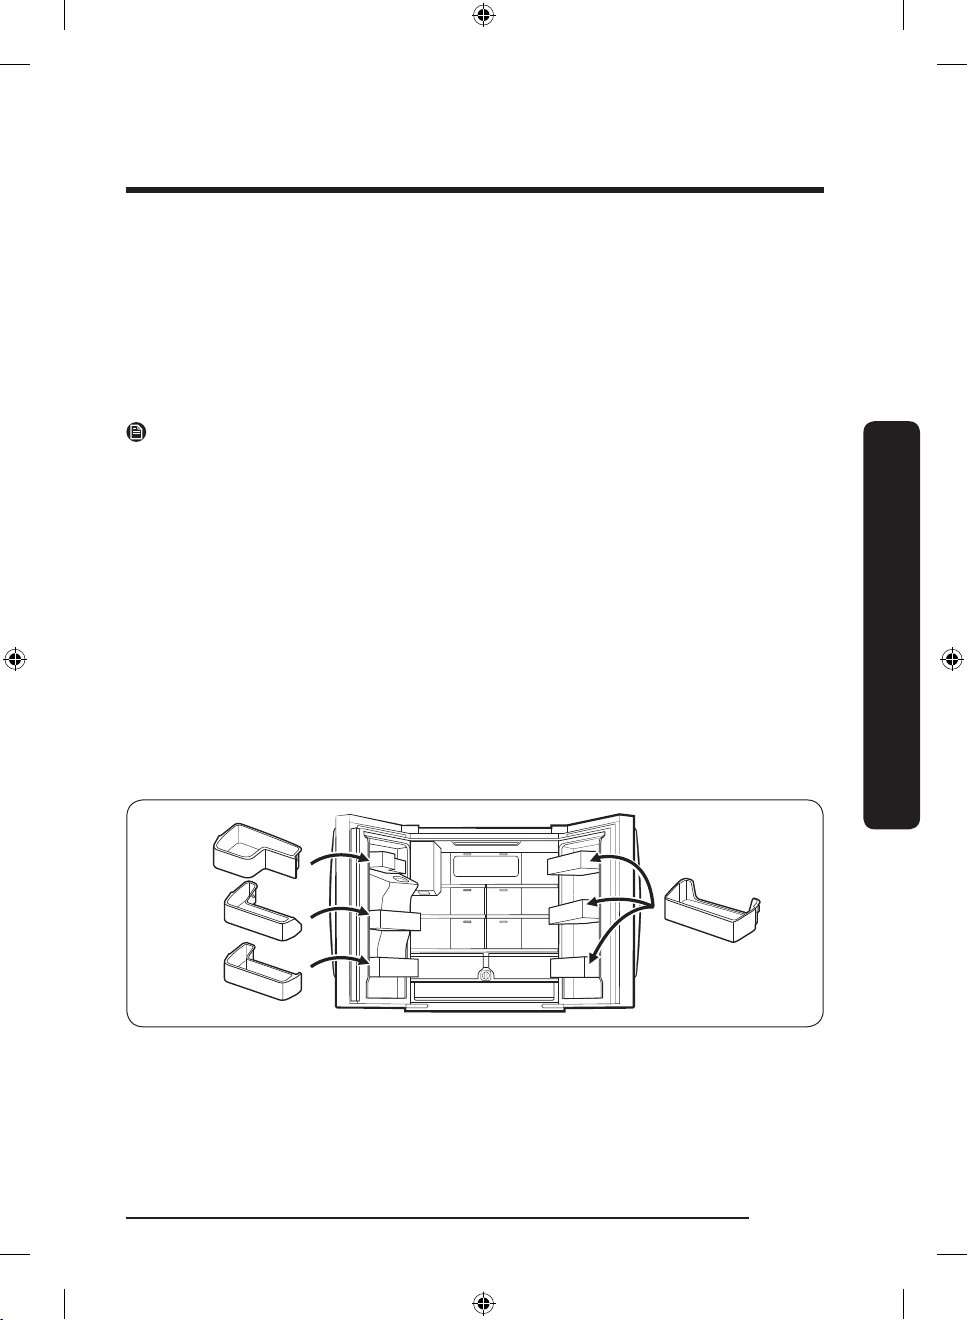
Door bins (applicable models only)
Your refrigerator ships with door bins of different types and sizes. If the door bins for your
refrigerator were packaged separately, use the gure below to help you position the bins
properly.
The number of door bins provided may differ with the model.
Installation
English 15
Untitled-7 15 11/11/2020 2:12:21 PM
Page 16
Installation
Installation
Step-by-step installation
STEP 1 Select a site
Select a site that:
• Has a solid, level surface without carpeting or ooring that may obstruct ventilation
• Is away from direct sunlight
• Has adequate room for opening and closing the door
• Is away from any heat sources
• Provides room for maintenance and servicing
• Has a temperature range between 50 °F (10 °C) and 109 °F (43 °C)
CAUTION
• If your refrigerator is equipped with an ice maker, provide extra space at the rear of the
refrigerator for the water line connection.
• When you install the refrigerator next to a xed wall, you must provide a minimum
clearance of 3
NOTE
To facilitate moving your refrigerator to its nal location, be sure to measure the width
and height of doorways, thresholds, ceilings, stairways, and anything else that needs to be
taken into consideration to ensure you can move your refrigerator safely. The following
diagram illustrates the exact height and depth (factory specications) of your refrigerator.
3
/4" (95 mm) from the wall to allow the door to swing open.
English16
Untitled-7 16 11/11/2020 2:12:21 PM
Page 17
C
D
E
B
A
01
02 02
04
03
05
06
09 10
07
08
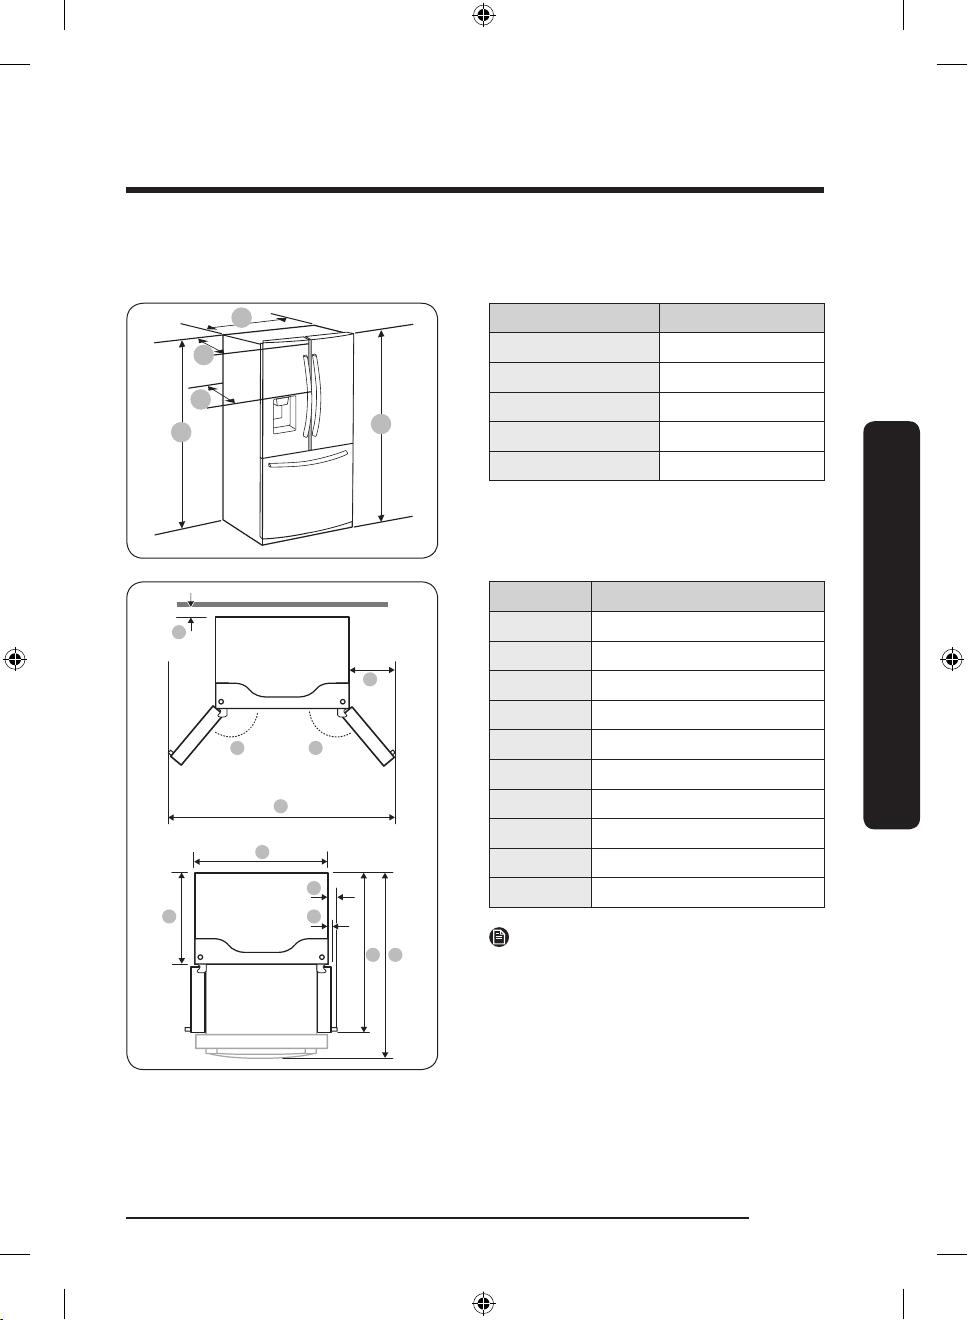
Clearance
See the following gures and tables for space requirements for installation.
Model RF27*
Depth “A” 32
Width “B” 35
Height “C” 68
Overall Height “D” 70" (1777 mm)
Depth “E” 35
Model RF27*
01 2" (50 mm)
02 130°
03 62
04 13
05 35
06 28
07 3
08 1
09 47
10 51
NOTE
The measurements in the table above
may differ slightly from the actual
measurements, depending on the
measuring and rounding method.
7
/8" (836 mm)
3
/4" (908 mm)
7
/8" (1749 mm)
3
/8" (898 mm)
2
/8" (1581 mm)
2
/8" (337 mm)
3
/4" (908 mm)
7
/8" (735 mm)
5
/8" (93 mm)
7
/8" (47 mm)
2
/8" (1201 mm)
7
/8" (1318 mm)
Installation
Untitled-7 17 11/11/2020 2:12:22 PM
English 17
Page 18
Installation
Installation
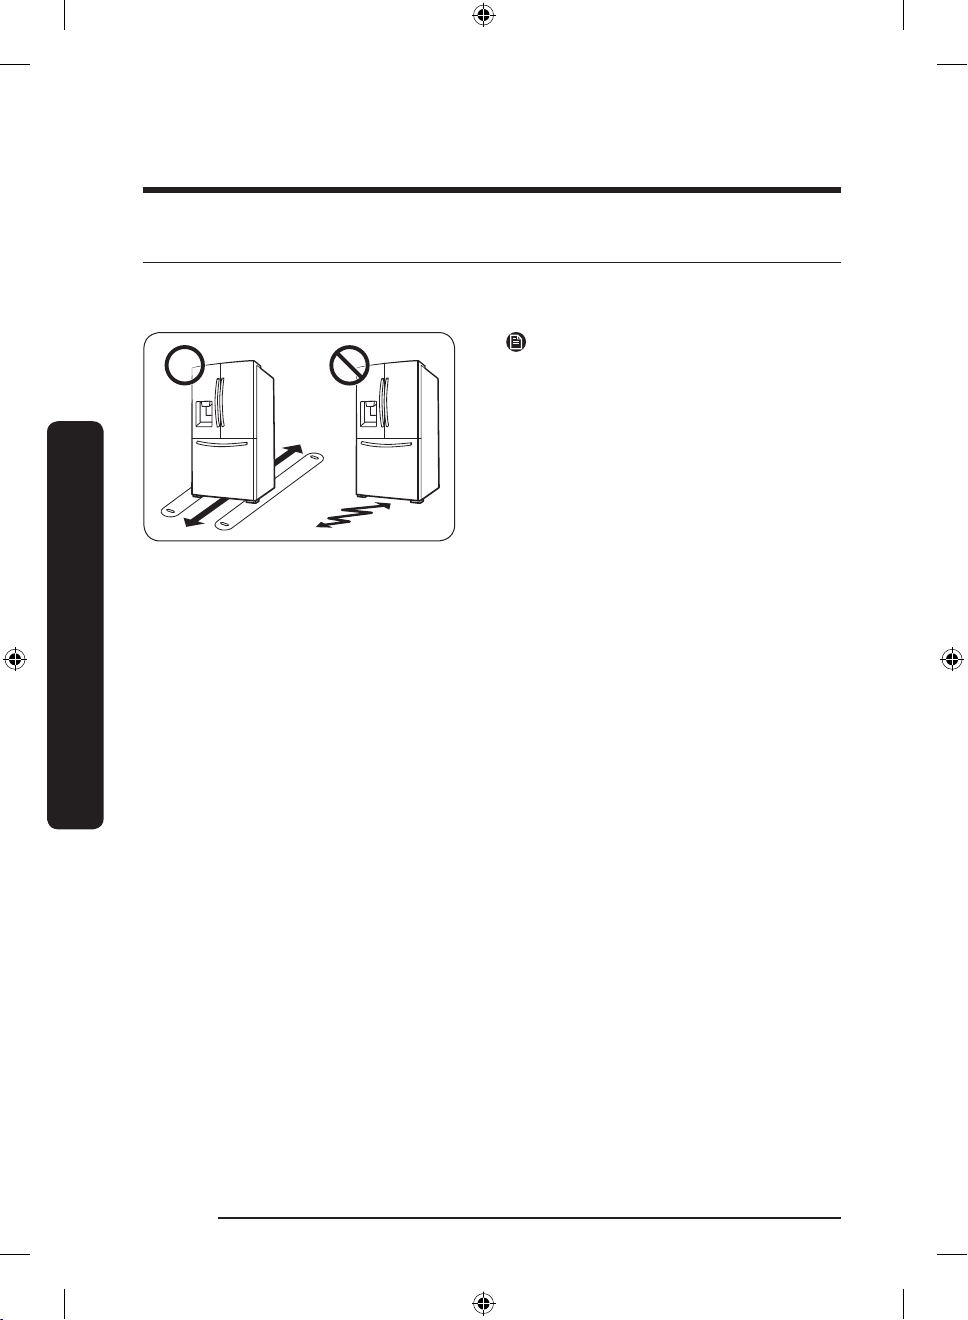
STEP 2 Flooring
If the refrigerator cannot pass through the entrance due to its size, see STEP 3 Door
removal for entrance.
NOTE
To prevent oor damage, make sure the
front leveling legs are in the upright
position.
• The surface you install the refrigerator
on must support a fully loaded
refrigerator.
• To protect the oor, put a large piece
of cardboard along the path to the
refrigerator's nal installation location.
• Once the refrigerator is in its nal
position, do not move it unless
necessary to protect the oor. If you
have to move the refrigerator, place
thick paper or cloth such as old carpets
along the path of movement.
English18
Untitled-7 18 11/11/2020 2:12:22 PM
Page 19
STEP 3 Door removal for entrance
If the refrigerator cannot pass through the entrance to your home or kitchen due to its
size, follow these instructions to remove and then re-install the refrigerator's doors. If you
do not need to remove the doors, go to page 26 to continue the installation procedure.
WARNING
Unplug the power cord of the refrigerator before removing the doors.
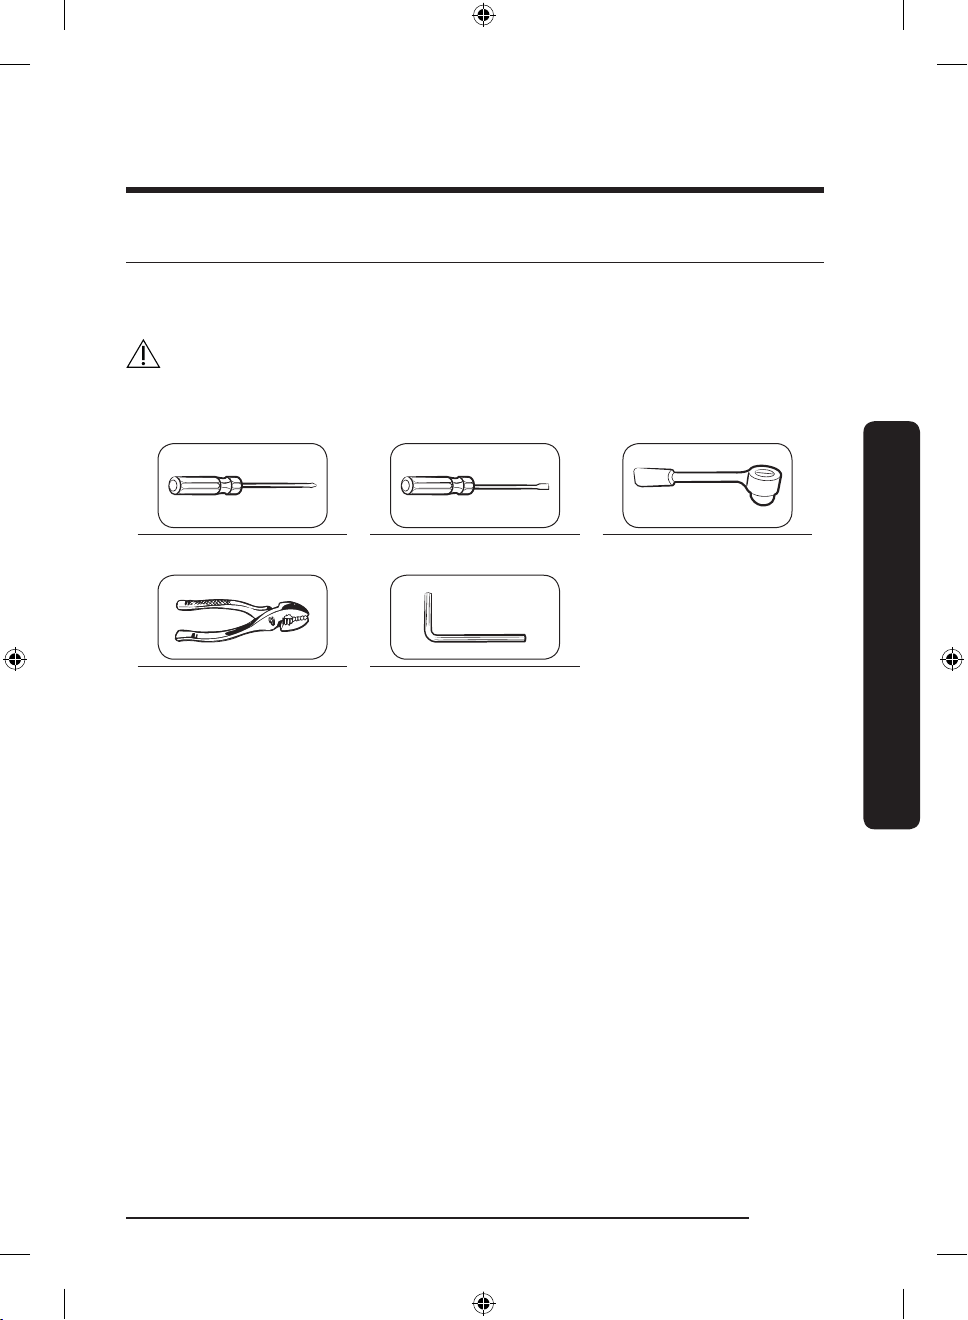
Tools required (not provided)
Phillips screwdriver Flat-head screwdriver Socket wrench 3/8" (10 mm)
Pliers Allen wrench 1/4" (5 mm)
Installation
English 19
Untitled-7 19 11/11/2020 2:12:23 PM
Page 20
Installation
Installation
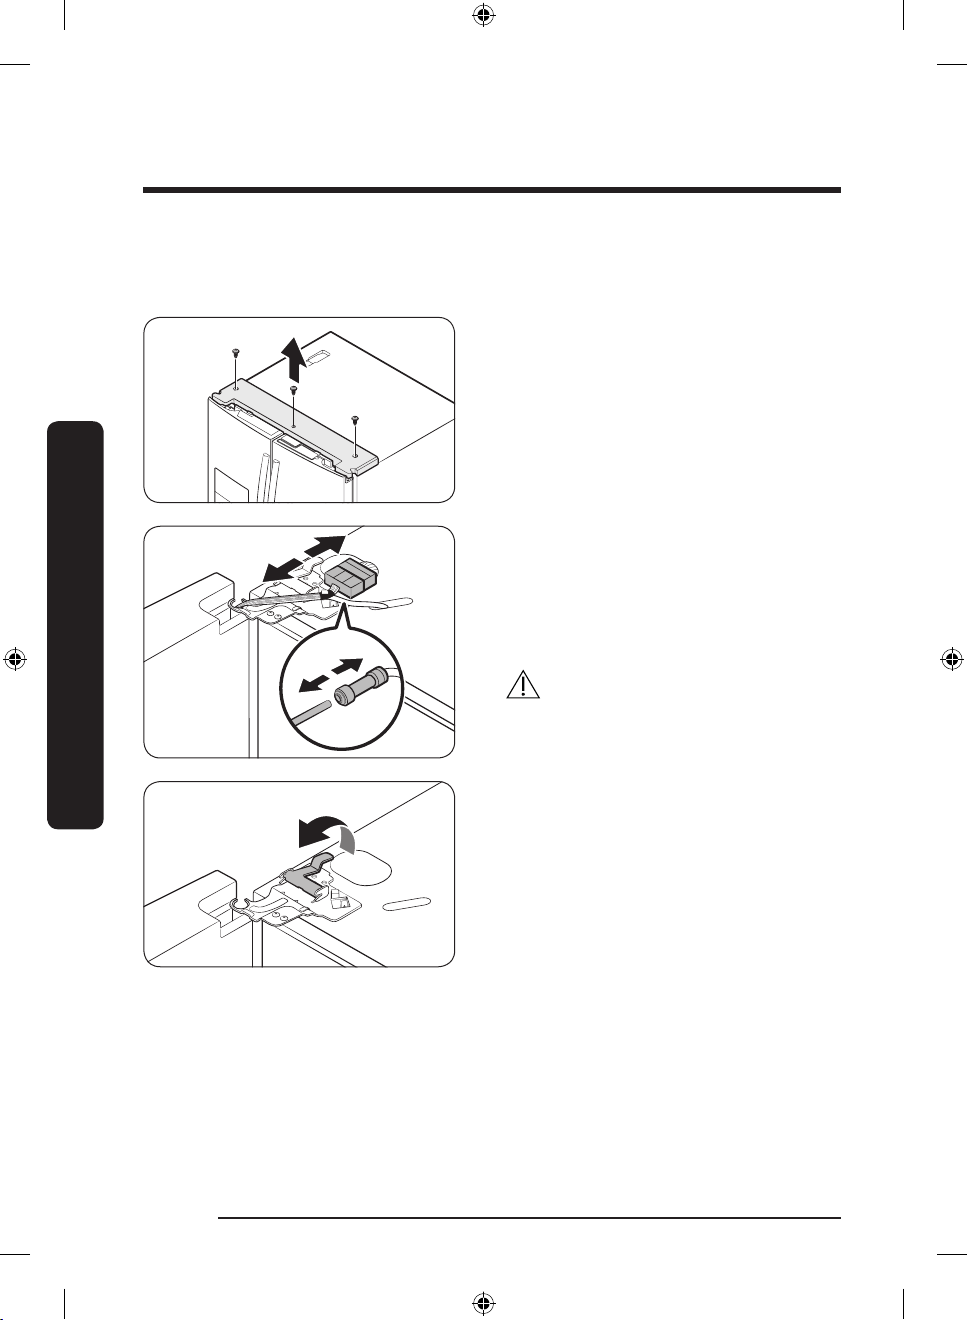
Detach the fridge doors
Left door
1. With the doors closed, use a Phillips
head screwdriver to remove the screws
(x3) in the top cover.
2. Disconnect the wires and the water tube
from the left-side door. Do the following
sequentially:
• Decouple the connector.
• While holding down one end of the
water line coupler, disconnect the water
tube.
CAUTION
Keep the water tube clips out of children’s
reach.
3. Gently draw up the clamp. To prevent
nger injuries, do not apply a sudden
force to the clamp.
English20
Untitled-7 20 11/11/2020 2:12:24 PM
Page 21
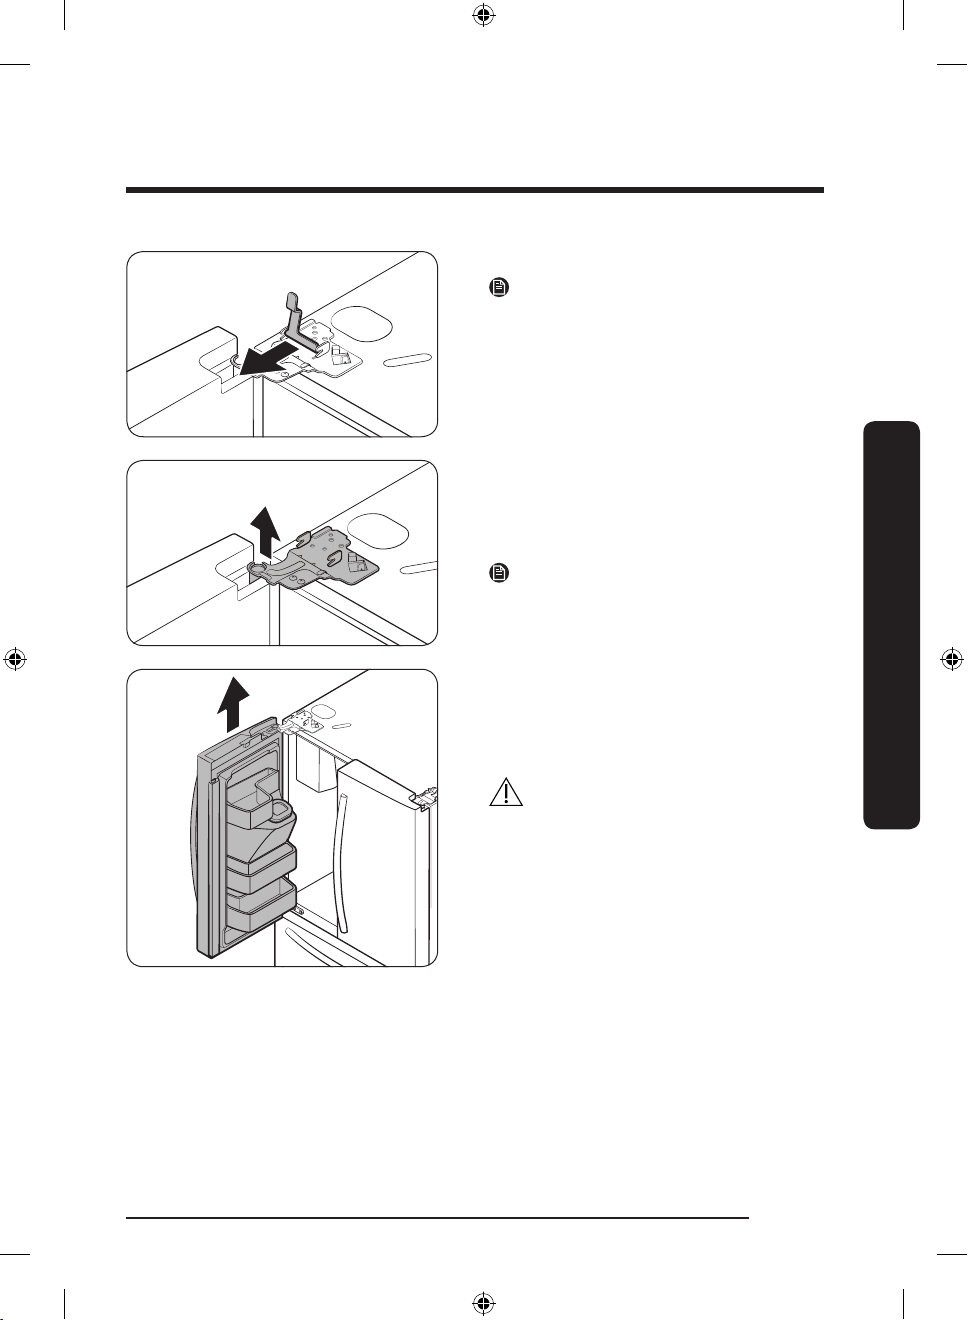
4. Pull the clamp to remove it.
NOTE
Be careful not to drop the clamp on the
oor.
5. Open the door 90 degrees. While
holding the door, pull up and remove
the top hinge. Be careful not to damage
the connector wires when you remove
the hinge.
NOTE
Be careful not to drop the hinge on the
oor.
6. Gently pull up the door vertically to
remove. Do not apply excessive force
to the door. The door may fall, causing
physical injury.
7. Lay the door down on a at surface.
CAUTION
Please put the door down slowly to prevent
scratches.
Installation
English 21
Untitled-7 21 11/11/2020 2:12:24 PM
Page 22

Installation
Installation
Right door
1. Gently draw up the clamp. To prevent
nger injuries, do not apply a sudden
force to the clamp.
2. Pull the clamp to remove it.
NOTE
Be careful not to drop the clamp on the
oor.
3. Open the door 90 degrees. While
holding the door, pull up and remove
the top hinge. Be careful not to damage
the connector wires when you remove
the hinge.
NOTE
Be careful not to drop the hinge on the
oor.
English22
Untitled-7 22 11/11/2020 2:12:25 PM
Page 23
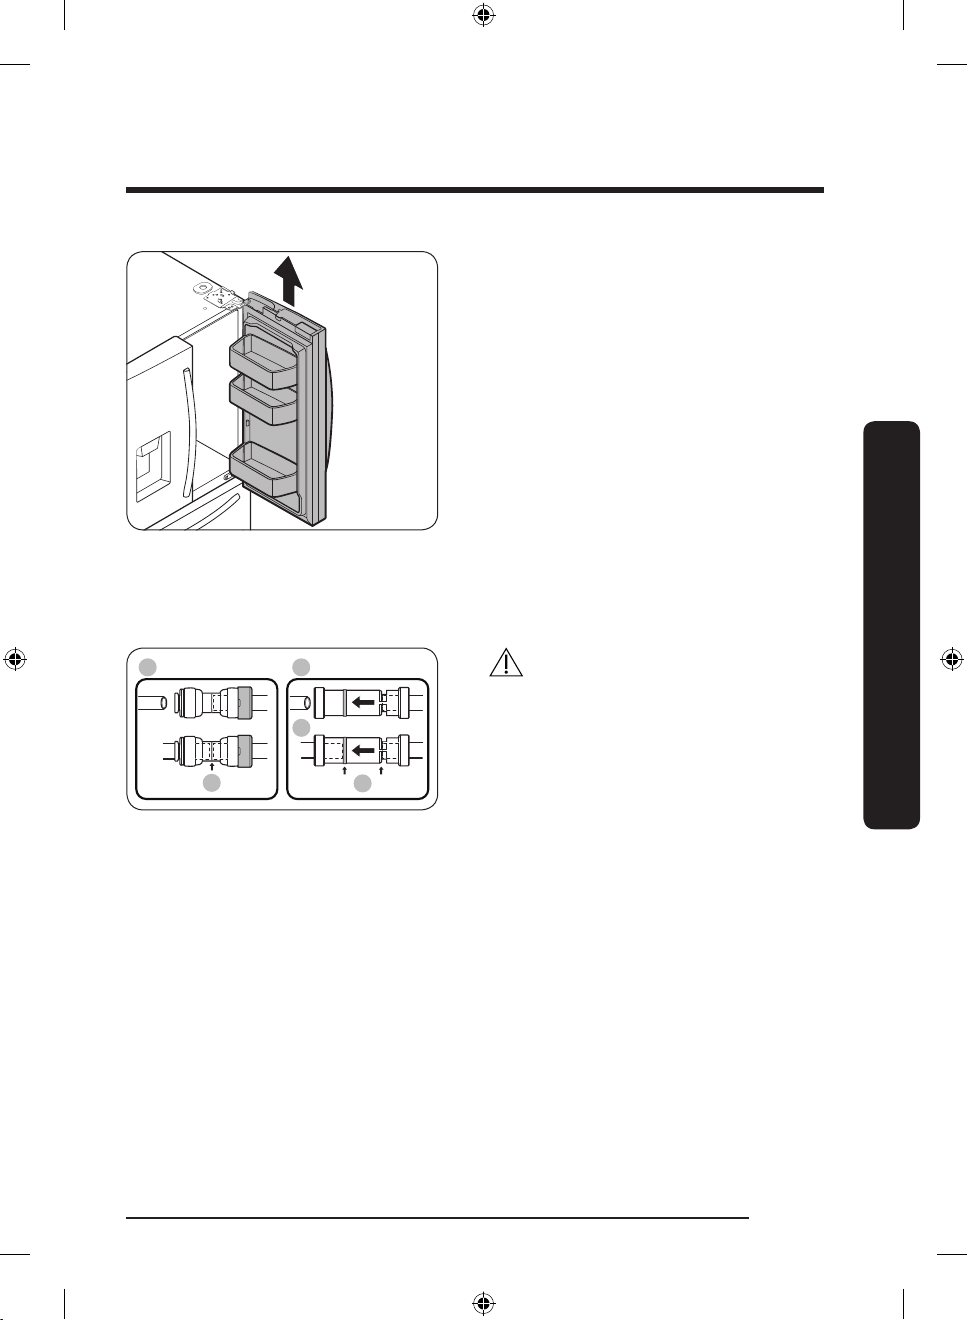
4. Gently pull up the door vertically to
A
01
02
03
B
remove. Do not apply excessive force
to the door. The door may fall, causing
physical injury.
5. Lay the door down on a at surface.
To reattach the fridge door
After you have moved the refrigerator to its nal location, reattach the doors by following
the removal instructions in reverse order.
CAUTION
To prevent water leaks from the dispenser,
the water line must be fully connected.
Make sure both tubes of the water line are
inserted fully to the center of transparent
coupler (A) or the guidelines (B).
01 Dispenser
02 Center of transparent coupler
03 Guidelines
Installation
English 23
Untitled-7 23 11/11/2020 2:12:26 PM
Page 24
Installation
Installation
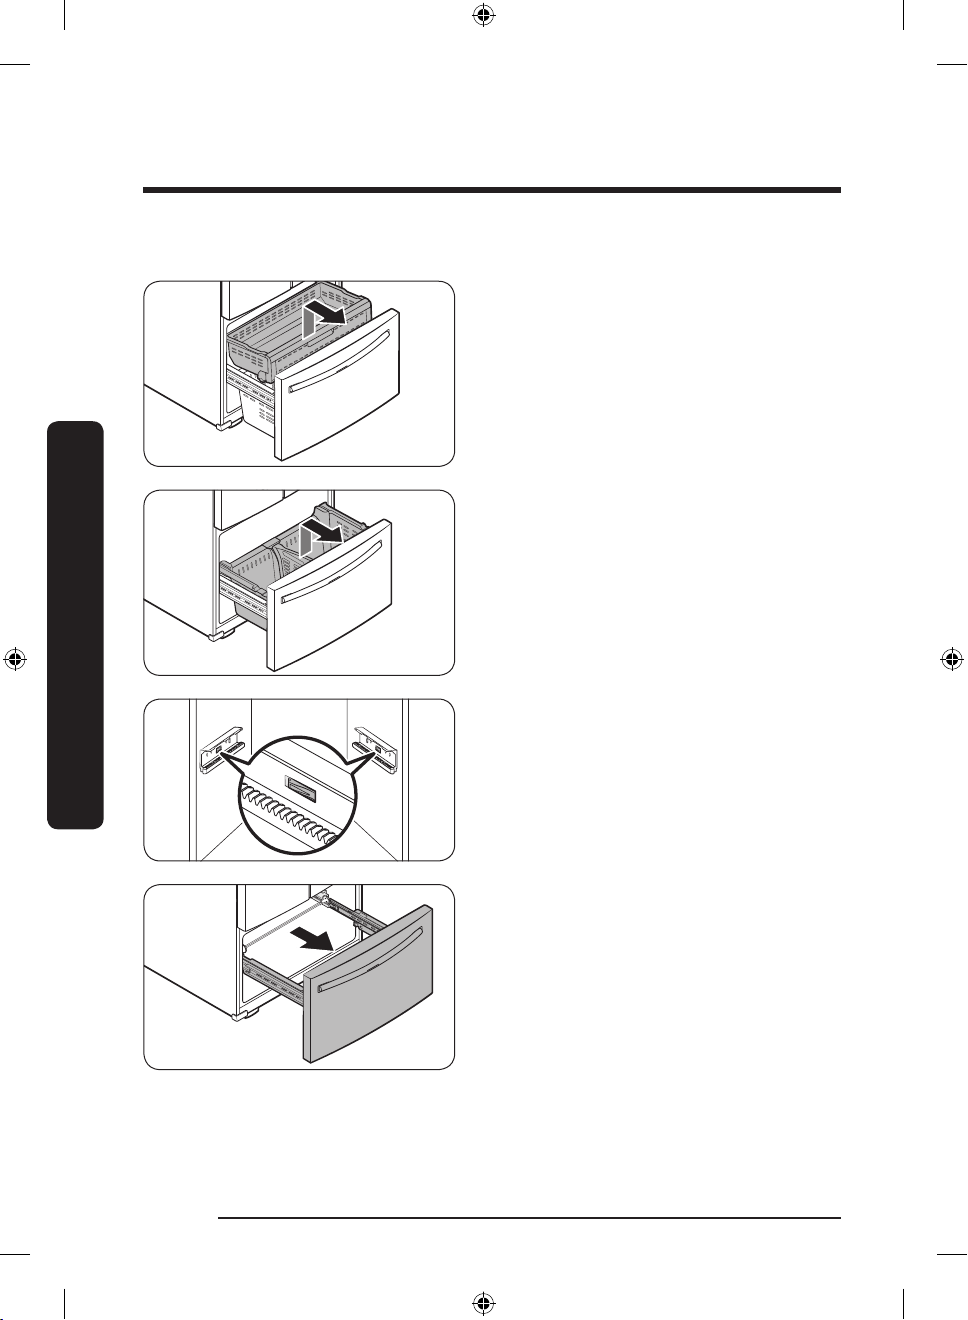
To detach the freezer drawer
1. Lift up the front of the upper basket and
pull to remove.
2. Then, pull up to remove the lower
basket from the rail assembly.
3. Press down the hooks to unlock the rail
assembly.
4. While holding the upper area of the
freezer drawer front, slide the drawer
out all the way to remove the freezer
drawer from the rail assembly.
English24
Untitled-7 24 11/11/2020 2:12:26 PM
Page 25
CAUTION
• Be careful not to scratch or dent the rail
assembly.
• Make sure you mount the freezer
baskets in the correct position.
Otherwise, the door will not open or
close properly, which causes frost to
build up.
• Do not store too much food in the
freezer drawer. This prevents the freezer
drawer from closing properly, resulting
in frost buildup.
To reattach the freezer drawer
Once the refrigerator is in or near its nal location, re-attach the freezer drawer by
following the directions in the reverse order of removal.
Installation
English 25
Untitled-7 25 11/11/2020 2:12:27 PM
Page 26

Installation
Installation
STEP 4 Leveling the refrigerator
CAUTION
• When installed, the refrigerator must be leveled on a at, solid oor. Not leveling the
refrigerator can cause damage to the refrigerator or physical injury.
• Leveling must be performed with the refrigerator empty. Make sure no food items are
inside the refrigerator.
• For safety reasons, adjust the front a little higher than the rear.
Level the refrigerator using the special screws (levelers) on the front legs. Use a at-head
screwdriver to turn the levelers.
• To adjust the height of the left side:
Insert a at-head screwdriver into the
leveler of the left side front leg. Turn the
leveler clockwise to raise the left side or
turn it counterclockwise to lower.
• To adjust the height of the right side:
Insert a at-head screwdriver into the
leveler of the right side front leg. Turn
the leveler clockwise to raise the right
side or turn it counterclockwise to lower.
English26
Untitled-7 26 11/11/2020 2:12:27 PM
Page 27
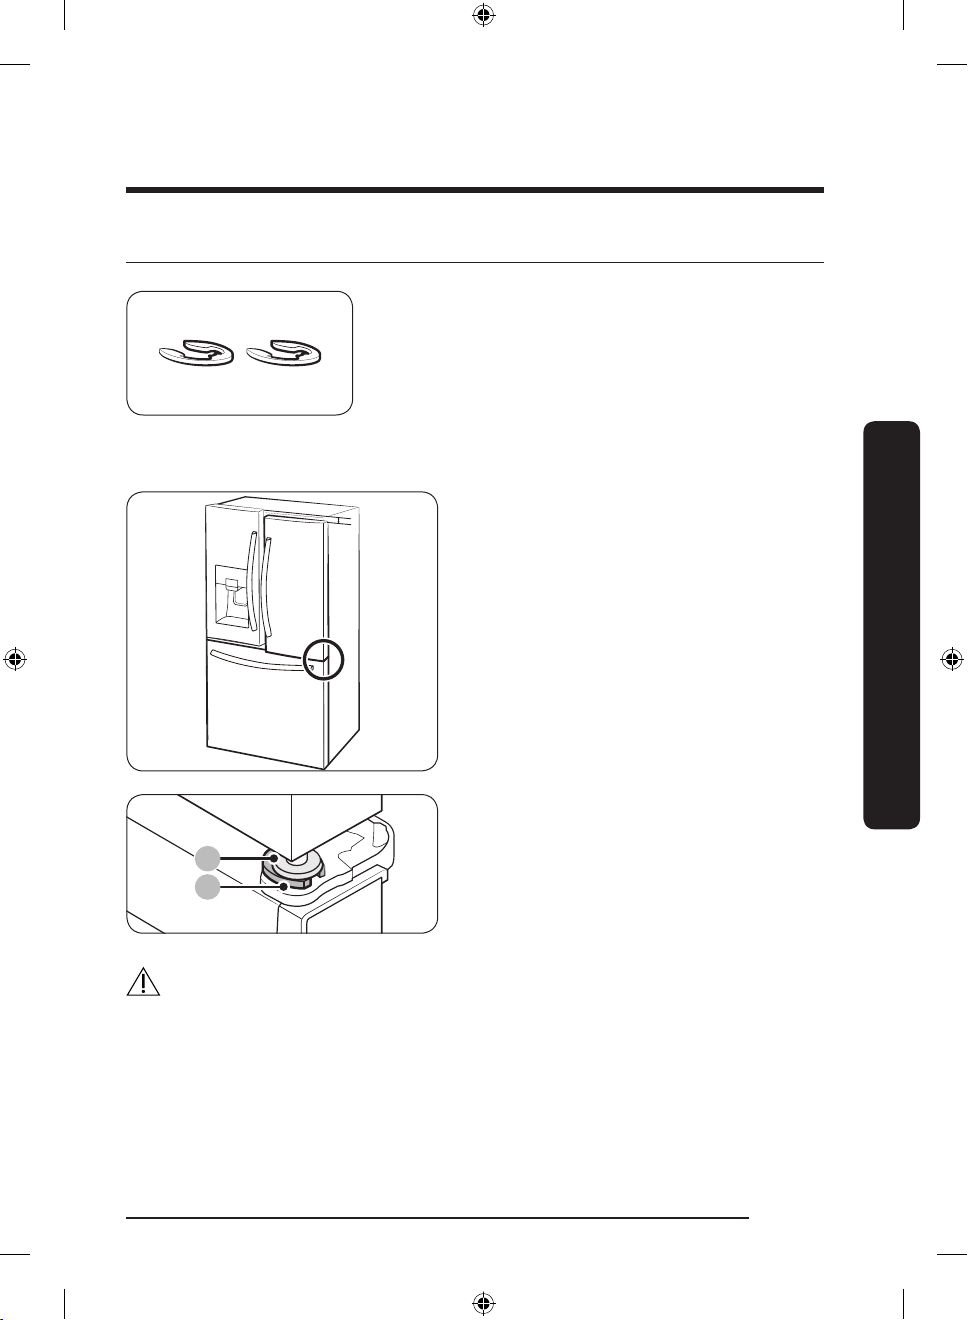
STEP 5 Adjust the door height and the door gap
9
Snap rings
The height of a door can be adjusted using the provided
snap rings, which come in 4 different sizes (1 mm,
1.5 mm, 2 mm, and 2.5 mm).
To adjust the height of a door
1. Check the height difference between the
doors, and then lift up and hold the door
with the lower height.
2. Insert a suitable-sized snap ring (A)
between the door grommet (B) and the
hinge as shown.
Installation
CAUTION
• Insert only one snap ring. If you insert two or more snap rings, the rings may slip out or
make a rubbing noise.
• Keep the snap rings out of children’s reach and keep them for future use.
• Do not raise the door too much. The door can contact and damage the top cover.
English 27
Untitled-7 27 11/11/2020 2:12:28 PM
Page 28
Installation
1
2
3
2
Installation
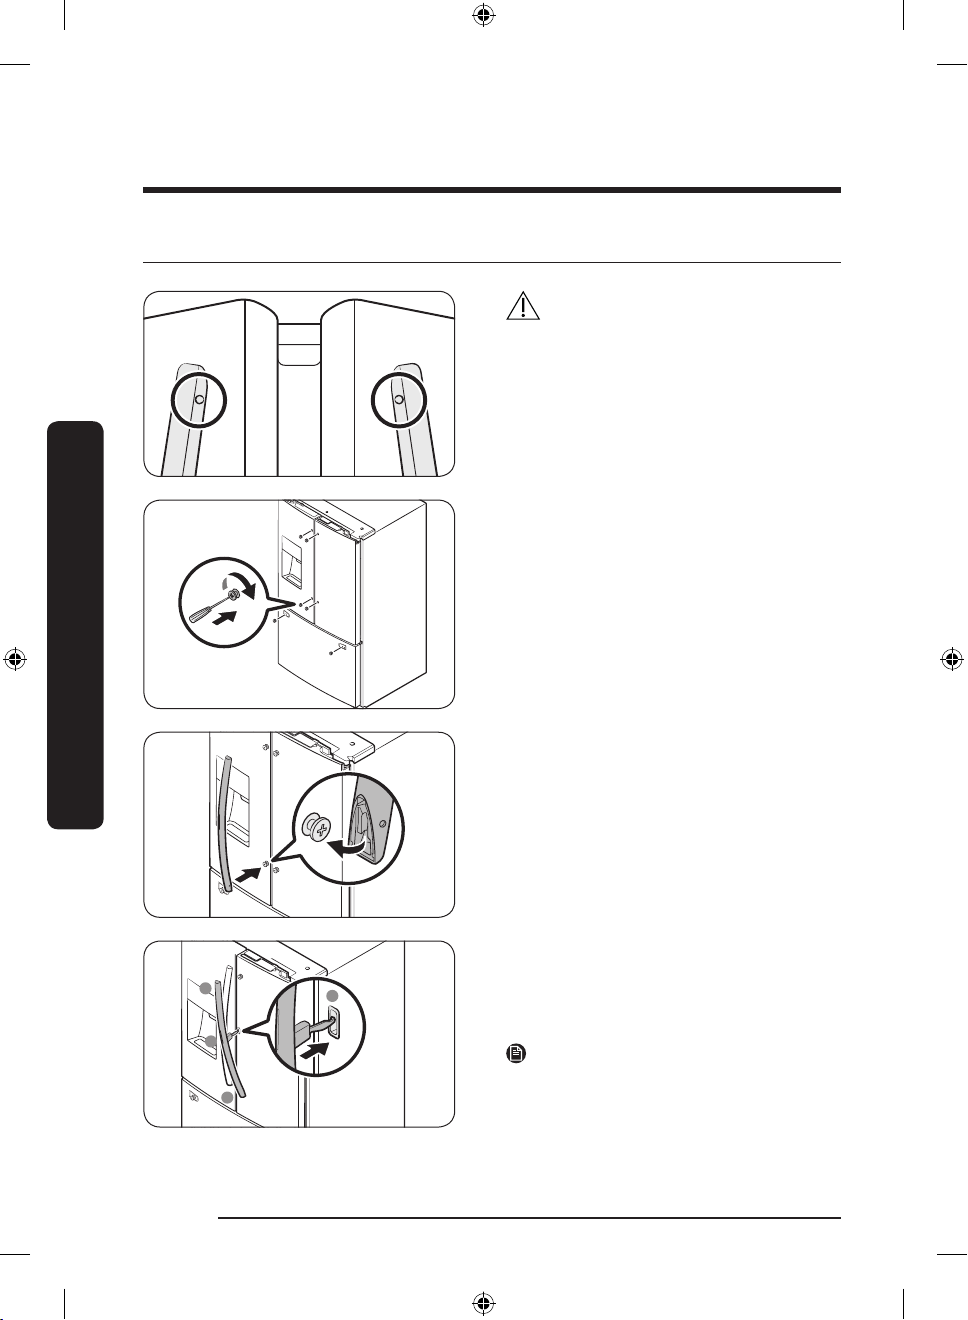
STEP 6 Attach the handles
CAUTION
The refrigerator handles must be oriented
in the correct direction.
• The fridge handles must be attached so
that the holes on each face each other.
• The freezer handle must be attached so
that its hole faces downwards.
1. Using a Phillips screwdriver, attach the
handle screws to the refrigerator, two
for each handle respectively, as shown
in the illustration to the left.
2. Attach the handle to the handle screws
on the door.
For type B handle: Insert the hook on the
middle of the handle to its designated hole
on the door, and then place the upper and
lower part of the handles to the handle
screws.
NOTE
The design of the right side door handle
may differ depending on your model.
Untitled-7 28 11/11/2020 2:12:29 PM
English28
Page 29
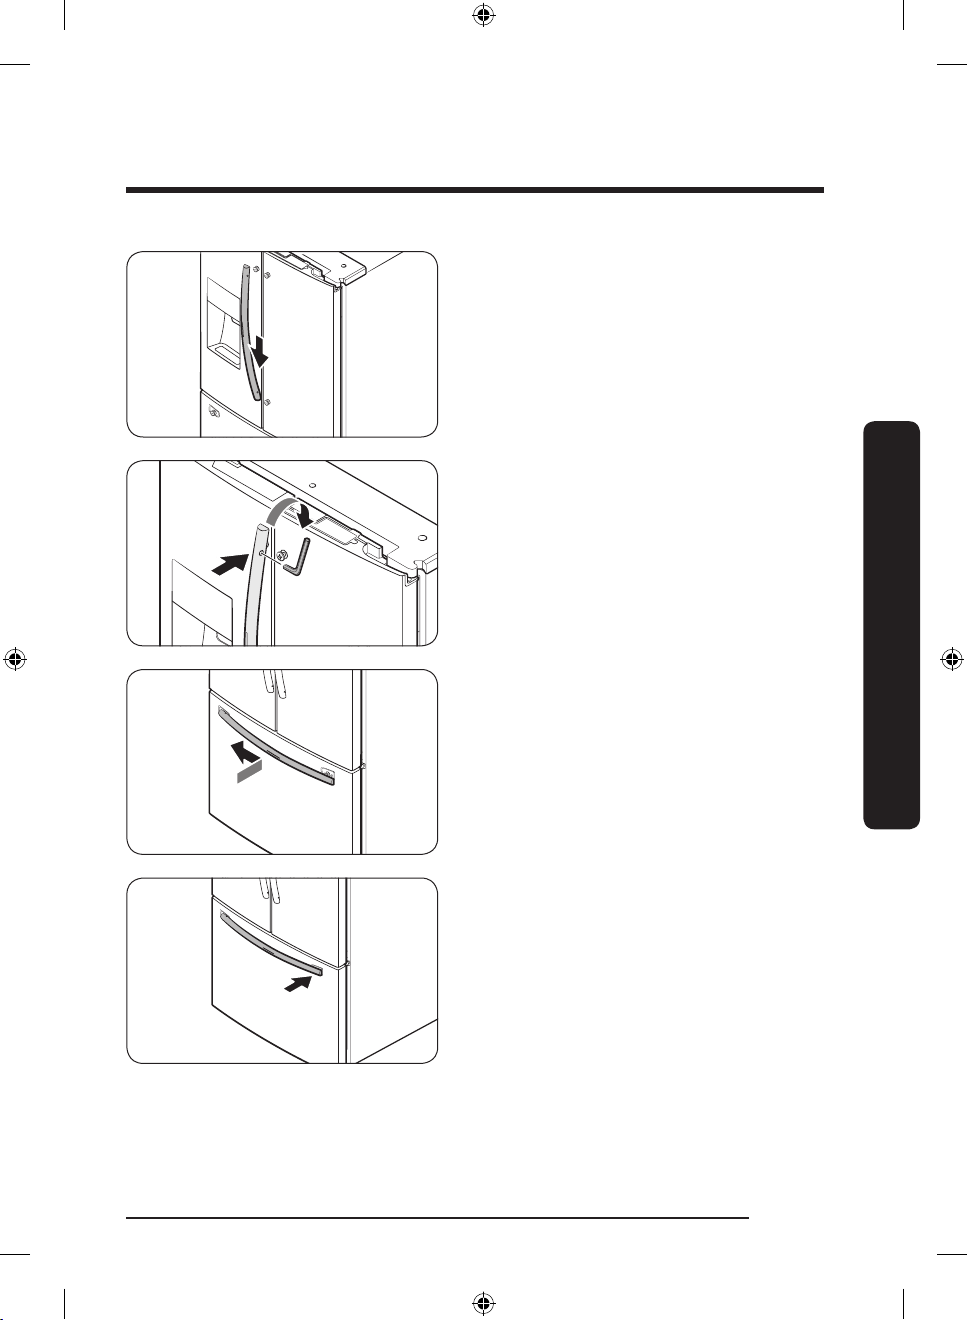
3. Push the handle down.
4. Insert the supplied wrench into the
handle hole, and then turn it clockwise
to tighten.
5. Repeat Steps 2 through 4 with the
second refrigerator door handle.
6. To attach the freezer handle to the
refrigerator, rst place the left side of
the freezer handle onto the left handle
screw, and then push it to the left.
Installation
7. Then, place the right side of the freezer
handle onto the right handle screw.
English 29
Untitled-7 29 11/11/2020 2:12:30 PM
Page 30
Installation
Installation
8. Insert the supplied wrench into the
handle hole, and then turn it clockwise
to tighten.
English30
Untitled-7 30 11/11/2020 2:12:30 PM
Page 31

STEP 7 Connect the water dispenser line
A
B
C
A
B
A water dispenser with a lter is one of the helpful features on your new refrigerator. To
help promote better health, the water lter removes unwanted particles from your water.
However, it does not sterilize or destroy microorganisms. You may need to purchase a
water purifying system to do that.
The water line also connects to the ice maker. For the ice maker to operate properly, water
pressure of 30 to 120 psi (206 to 827 kPa) psi is required.
If the refrigerator is installed in an area with low water pressure (below 30 psi / 206 kPa),
you can install a booster pump to compensate for the low pressure.
After you have connected the water line, make sure the water storage tank inside the
refrigerator is properly lled. To do this, press the water dispenser lever until water runs
from the water outlet.
NOTE
• Water line installation kits are available at extra cost from your retailer. We recommend
using a water line installation kit that contains copper tubing and a
compression nut.
1. Shut off the main water source.
2. Insert the pipe clamp (B) and the shutoff
valve (C) into the cold water line (A).
3. Connect the water line installation kit
(A) to the shutoff valve (B).
1
/4" (6 mm)
Installation
Untitled-7 31 11/11/2020 2:12:30 PM
English 31
Page 32

Installation
A
01
02
03 08
04
05
06
07
B
C
Connect the water supply line to the refrigerator
There are several items you must purchase to complete this connection. You may nd these
items sold as a kit at your local hardware store.
Installation
Copper Tubing
Plastic Tubing
• 1/4" copper tubing
• 1/4" compression nut (1 pc)
• Ferrule (2 pc)
1
/4" plastic tubing Molded end (Bulb)
•
• 1/4" compression nut (1 pc)
A. Refrigerator
B. Household water supply line
C. Water Line: must be kept straight.
01 Compression Nut (
02 Ferrule (Not supplied)
03 Copper tubing (Not supplied)
04 Plastic Tubing (Assembled)
05 Compression Fitting (Assembled)
06 Molded end (Bulb)
07 Compression nut (1/4") (Not supplied)
08 Plastic Tubing (Not supplied)
NOTE
If you have to relocate the refrigerator
after connecting the water line (C), make
sure the joined section of the water line is
straight.
1
/4") (Assembled)
English32
Untitled-7 32 11/11/2020 2:12:31 PM
Page 33

CAUTION
Do not mount the water lter on any part
of the refrigerator. This may damage the
refrigerator.
1. Connect the household water line to the assembled compression tting.
- If you are using copper tubing, slip the compression nut (07) (not supplied) and
ferrule (not supplied) on the copper tubing (not supplied) as shown.
- If you are using plastic tubing (08), insert the molded end (Bulb) of the plastic tubing
(08) into the compression tting.
CAUTION
• If you use plastic tubing (08), do not use it without the molded end (Bulb).
• Leaving the water line disconnected may cause the water valve to produce a buzzing
sound over time. If this is the case, make sure that the ice making function is turned
“OFF” and do not attempt to use the water dispenser.
2. Tighten the compression nut (07) onto the compression tting. Do not over-tighten the
compression nut (07).
3. Turn the water on and check for any leakage. If you nd water drops or leakage in
the connection areas, turn off the main water supply. Check the connections and, if
necessary, tighten.
4. Flush 1 gallon of water through the lter before drinking or using the water from the
refrigerator. (Flush approximately 6 minutes.) To ush, press a large glass or cup against
the water dispenser lever. Fill the glass, empty it, and then repeat.
5. After you turn on the refrigerator, let the ice maker make ice for 1 to 2 days. Over that
period of time, throw out the rst 1 or 2 buckets of ice the ice maker makes to ensure
all impurities have been removed from the water line.
NOTE
Only connect the water line to a potable water source.
• If you have to repair or disassemble the water line, cut off
make sure you get a snug, leak-free connection.
• You can test the water line quickly using a paper cup. Under normal conditions, the
water dispenser can ll a 5 3/4 oz. (170 cc) cup in about 10 seconds.
1
/4“ of the plastic tubing to
Installation
English 33
Untitled-7 33 11/11/2020 2:12:31 PM
Page 34

Installation
Installation
STEP 8 Initial settings
By completing the following steps, the refrigerator should be fully functioning.
1. Plug the power cord into the wall socket to turn the refrigerator on.
2. Open the door, and check if the interior light lights up.
3. Set the temperature to the coldest setting, and wait for about an hour. Then, the freezer
will be slightly chilled, and the motor should be running smoothly.
4. Wait until the refrigerator reaches the set temperature. Now the refrigerator is ready
for use.
STEP 9 Final check
When installation is complete, conrm that:
• The refrigerator is plugged into an electrical outlet and grounded properly.
• The refrigerator is installed on a at, level surface with a reasonable clearance from
walls and cabinets.
• The refrigerator is level and is sitting rmly on the oor.
• The door opens and closes freely, and the interior light turns on automatically when you
open the door.
English34
Untitled-7 34 11/11/2020 2:12:31 PM
Page 35

Operations
Main panel
RF27T5201** RF27T5241**
01
02 07
03
04
05
07
06
01 Fridge / °F °C 02 Power Cool
03 Freezer / Power Freeze 04 Ice Maker / Filter Reset *
05 Water/Ice / Dispenser Lock 06 Door Alarm / Control Lock
01
02 07
03
04
05
07
06
Operations
07 Sabbath Mode
* applicable models only
English 35
Untitled-7 35 11/11/2020 2:12:32 PM
Page 36

Operations
Operations
NOTE
• When you change the temperature on the panel, the panel displays the actual
temperature inside the refrigerator until the temperature matches the temperature you
set. Then, the panel displays the new set temperature. Note that it will take time for the
refrigerator to reach the new temperature. This is normal. During this time, you do not
need to set the temperature again.
• To ensure optimal performance, we recommend setting the temperature to 0 °F (-18 °C)
for the freezer, and 37 °F (3 °C) for the fridge.
• The temperature in the refrigerator may rise if you open the door frequently or put
a large amount of food into the refrigerator. If this happens, the temperature display
blinks until the refrigerator returns to the specied temperature settings.
• If a communication error occurs between the temperature display and the main
controller, this blinking continues for an extended time. Contact a local Samsung service
center for technical assistance.
• The display of the main panel turns on only if the door is opened and turns off if the
door is closed.
• If you set Control Lock on the main panel, the main panel locks automatically 1 minute
after inactivity.
01 Fridge / °F °C (3 sec)
You can use the Fridge button to set the fridge temperature.
Fridge
°F °C
• Press Fridge repeatedly to select a desired temperature between
34 °F (1 °C) and 44 °F (7 °C).
- The temperature indicator displays the currently set or
selected temperature.
You can also use the Fridge button to switch the temperature scale
between Celsius and Fahrenheit.
To switch the temperature scale, press and hold Fridge for
3 seconds to change the current temperature scale.
02 Power Cool
Power Cool speeds up the cooling process at maximum fan speed. This is useful to quickly
cool food that spoils quickly, or after the door is left open for some time. The fridge keeps
running at full speed for several hours and then returns to the previous temperature.
Press and hold Power Cool for 3 seconds.
The corresponding indicator (
process for you.
English36
Untitled-7 36 11/11/2020 2:12:32 PM
) lights up, and the refrigerator will speed up the cooling
Page 37

03 Freezer / Power Freeze (3 sec)
Freezer
Power Freeze
The Freezer button can be used to set the freezer temperature, or
to activate Power Freeze. Available temperatures are between 5 °F
(-15 °C) and -8 °F (-23 °C).
Power Freeze speeds up the freezing process at maximum fan
speed. The freezer keeps running at full speed for 50 hours and
then returns to the previous temperature.
• To activate Power Freeze, press and hold Freezer for 3 seconds.
The corresponding indicator (
) lights up, and the refrigerator
will speed up the freezing process for you.
• To deactivate, press and hold Freezer for 3 seconds again. The
freezer returns to the previous temperature setting.
• To freeze large amounts of food, activate Power Freeze for at
least 20 hours before putting food in the freezer.
NOTE
Using Power Freeze increases power consumption. Make sure you
turn it off and return to the previous temperature if you do not
intend to use it.
Operations
English 37
Untitled-7 37 11/11/2020 2:12:32 PM
Page 38

Operations
Operations
04 Ice Maker / Filter Reset (3 sec)
Press Ice Maker to turn the ice maker on or off.
The ice maker has 3 indicators (
• When the ice maker operates, the corresponding indicator (
• When the Rapid Ice function operates, the corresponding
indicator ( & ) turns on.
• When the ice maker is turned off, the corresponding indicator
( ) turns on. In this case, ice making is disabled
even if you press the Cubed Ice or Crushed Ice buttons on the
dispenser panel. To enable ice making, you must turn the ice
maker on.
NOTE
• If the fridge part ice maker is turned off, it will turn on if you
press and hold the ice lever for more than 5 seconds.
• When
faster than when indicator is on alone.
Ice Maker
• When is on, amount of ice making increases to double.
Turn off Rapid Ice to save energy.
Twin Ice-Maker models only (RF27T5241** )
• When the fridge part ice maker operates with Rapid Ice on, the
corresponding indicator ( ) turns on.
• When the fridge part ice maker operates with Rapid Ice off, the
corresponding indicator ( ) turns off.
) to indicate its operating status.
/ /
) turns on.
& indicators are on, ice making is
• When the fridge part ice maker operates, the corresponding
indicator ( ) turns on.
• When the fridge part ice maker is turned off, the corresponding
indicator (
• When the freezer part ice maker operates, the corresponding
indicator ( ) turns on.
• When the freezer part ice maker is turned off, the corresponding
indicator ( ) turns off.
English38
Untitled-7 38 11/11/2020 2:12:34 PM
) turns off.
Page 39

After about 6 months (and typically, about 300 gallons (1200 L) of
water), the Filter indicator blinks red for several seconds when you
open the door, reminding you that the lter needs to be replaced.
When this happens, replace the lter, and then press and hold Ice
Maker for 3 seconds. The lter lifecycle will be reset and the Filter
indicator turns off.
Filter Reset
NOTE
• Some regions have relatively large amounts of lime in their
water. This can reduce the lifecycle of the lter. In these areas,
you will have to replace the water lter more often than
specied above.
• If water is not dispensing properly, the water lter is most likely
clogged. Replace the water lter.
05 Water/Ice / Dispenser Lock (3 sec)
Water/Ice
Dispenser Lock
(Dispenser panel /
Dispenser lever)
You can dispense chilled water, cubed ice, or crushed ice. To
dispense, press Water/Ice. The corresponding indicator turns on.
To prevent use of the dispenser panel buttons and the dispenser
lever, press and hold Water/Ice for more than 3 seconds.
If you press and hold the button again for more than 3 seconds, the
dispenser lock will be deactivated.
NOTE
• The Dispenser Lock on the dispenser panel does not affect the
controls on the main panel. To lock the main panel, use the
Control Lock function on the main panel.
• If you press Water/Ice for 3 seconds when both control lock and
dispenser lock are active, you will deactivate both control lock
and dispenser lock.
Operations
English 39
Untitled-7 39 11/11/2020 2:12:34 PM
Page 40

Operations
Operations
06 Door Alarm / Control Lock (3 sec)
If the door is left open for more than 2 minutes, an alarm will sound
and the alarm indicator will blink. You can toggle the alarm on and
off by pressing Door Alarm. The alarm is enabled by factory default.
Door Alarm
Control Lock
If the door is left open for 5 minutes, internal lights (in the fridge
and freezer) will blink for 10 seconds and then turn on. The whole
process will be repeated every minute for 5 minutes. This is to alert
hearing-impaired users that a door is open. Note that this function
is normal.
To prevent accidental setting changes, press and hold Door Alarm
for 3 seconds. The main panel will be disabled and the Lock
indicator (
When Control Lock is on, the indicator blinks if any button on the
main panel is pressed.
If you press and hold the button again for more than 3 seconds,
Control Lock will be deactivated.
However, Control Lock will be reactivated if no button is pressed
within 1 minute.
NOTE
Control Lock on the main panel does not affect the dispenser. The
dispenser operates independently and so does the dispenser lever.
To lock the dispenser and the dispenser lever, use the Dispenser
Lock function.
) will turn on.
English40
Untitled-7 40 11/11/2020 2:12:34 PM
Page 41

07 Sabbath Mode
The Sabbath mode stays active for 85 hours once it is activated. After that, it will be
deactivated automatically.
• To activate Sabbath Mode, press and hold Door Alarm and Water/Ice simultaneously for
5 seconds. When the refrigerator is in Sabbath mode, the buttons, the display, and the
internal lights do not function. The refrigerator and freezer, however, continue to cool.
• To deactivate Sabbath Mode, press and hold Door Alarm and Water/Ice simultaneously
again for 5 seconds.
NOTE
• If the refrigerator powers off and restarts (for example, if there is a power failure),
the Sabbath mode remains active. To end Sabbath Mode, you must deactivate it as
described above.
• Controls must be unlocked before activating Sabbath mode.
08 Cooling Off
Cooling Off mode (also called Shop mode) is designed for use by retailers when they are
displaying refrigerators on a retail oor.
In Cooling Off mode, the refrigerator’s fan motor and lights operate normally, but the
compressors do not run so neither the refrigerator nor the freezer become cold.
To enter or exit the Cooling Off mode, press and hold Fridge and Power Cool
simultaneously for 6 seconds. Then, when the display blinks, press Door Alarm.
When the Cooling Off mode is on, the refrigerator chime sounds, and the refrigerator
shows “0” on the fridge temperature display and “FF” on the freezer temperature display.
Operations
English 41
Untitled-7 41 11/11/2020 2:12:34 PM
Page 42

Operations
01 02 03
Dispenser panel
01 Water / Lock 02 Cubed Ice
03 Crushed Ice
01 Water / Lock (3 sec)
Operations
Water
Lock
(Dispenser panel /
Dispenser lever)
02 Cubed Ice
Cubed Ice
03 Crushed Ice
Crushed Ice
English42
To dispense chilled water, press Water. The corresponding indicator
turns on.
To prevent the use of the dispenser panel buttons and the dispenser
lever, press and hold Water for more than 3 seconds.
If you press and hold the button again for more than 3 seconds, the
dispenser lock will be deactivated.
When dispenser lock is on, the indicator blinks if any button on the
dispenser panel is pressed or the dispenser lever is pressed.
NOTE
The Lock on the dispenser panel does not affect the controls on the
main panel. To lock the main panel, use the Control Lock function on
the main panel.
Press Cubed Ice to dispense cubed ice. The corresponding indicator
turns on.
Press Crushed Ice to dispense crushed ice. The corresponding
indicator turns on.
Untitled-7 42 11/11/2020 2:12:34 PM
Page 43

Special features
Water/Ice dispenser
Using the dispenser, you can dispense water with or without ice.
The water dispenser offers 3 options: chilled water, cubed ice, and crushed ice. To dispense
chilled water, press Water on the dispenser panel. Put a water glass under the dispenser,
and then push the dispenser lever.
To dispense water with ice
1. With the Ice Maker enabled, press Cubed
Ice or Crushed Ice to select the ice type.
2. Put a water glass under the dispenser,
and then push the dispenser lever with
the glass. Ice will be dispensed from the
dispenser.
3. Press Water to select water.
4. Push the dispenser lever with the
glass. Water will be dispensed from the
dispenser.
NOTE
• The dispenser will stop dispensing if you keep pushing the dispenser lever for about 1
minute. To dispense more water, release and push the lever again.
• Make sure the glass is in line with the dispenser to prevent the dispensed water from
spilling out.
• If you do not use the water dispenser for 2-3 days, the dispensed water may have an
abnormal smell or taste. This is not a system failure. Discard the rst 1-2 glasses of
water.
Ice maker
The refrigerator has a built-in ice maker that automatically dispenses ice so that you can
enjoy ltered water with cubed or crushed ice.
Ice making
After you have installed your refrigerator and plugged it in, follow these instructions to
ensure proper ice making and to keep the ice bucket full of ice:
1. Let the refrigerator operate for at least 24 hours to ensure optimal performance.
2. Dispense the rst 4 to 6 ice cubes into a glass.
3. Wait another 8 hours and dispense another 4 to 6 ice cubes.
4. Then, wait another 16 hours and dispense the rst glass-full of ice.
NOTE
• If you consume all the ice at once, you must wait 8 hours before dispensing the rst 4
to 6 cubes. This ensures that the ice bucket is lled with ice properly.
• Ice cubes generated rapidly may look white, which is normal.
English 43
Operations
Untitled-7 43 11/11/2020 2:12:35 PM
Page 44

Operations
Operations
Diagnosis
If ice does not dispense, rst check the ice
maker.
1. Press Test on the side of the ice maker.
You will hear a chime (ding-dong) when
you press the button.
2. You will hear another chime if the ice
maker is operating properly.
CAUTION
• If the ice making chime rings repeatedly, contact your waterline installer or a local
Samsung service center.
• Do not press Test repeatedly after the ice tray is lled with ice or water. Water may
overow or ice may jam.
• Do not put food in the ice bucket. The frozen food may damage the ice maker, especially
when you open or close the door.
• When the refrigerator recovers power after a power failure, the ice bucket may contain
a mix of melted and jammed ice cubes, which can prevent the ice maker from working
properly. To prevent this, make sure to empty the ice bucket so the ice bucket can rell
with fresh, loose ice cubes.
• Do not put ngers or any objects into the dispenser outlet or the ice maker. This can
cause physical injury or property damage.
• When reinserting the ice maker tray, make sure that the tray is properly centered at the
entrance. Otherwise, the tray can get stuck.
If You Turn the Ice Maker Off
If you press and hold Ice Maker for more than 3 seconds to turn the ice maker off, make
sure to remove all ice cubes from the ice bucket. Remaining ice cubes may clump together,
making it difcult to remove them.
To remove the ice bucket, see the Ice bucket (applicable models only) section on page 45.
NOTE
• Removal of the ice bucket does not affect the thermal and mechanical performance of
the refrigerator.
Water clouding
Water supplied to the refrigerator ows through a core alkaline lter. During this ltering
process, the water pressure of the water increases and the water becomes saturated with
oxygen and nitrogen. This causes the water to look misty or cloudy temporarily when
dispensed. This is normal and the water will look clear after a few seconds.
English44
Untitled-7 44 11/11/2020 2:12:35 PM
Page 45

Maintenance
A
Handling and care
Ice bucket (applicable models only)
If you do not dispense ice for an extended period, ice may form clumps inside the bucket.
If this happens, remove and empty the ice bucket.
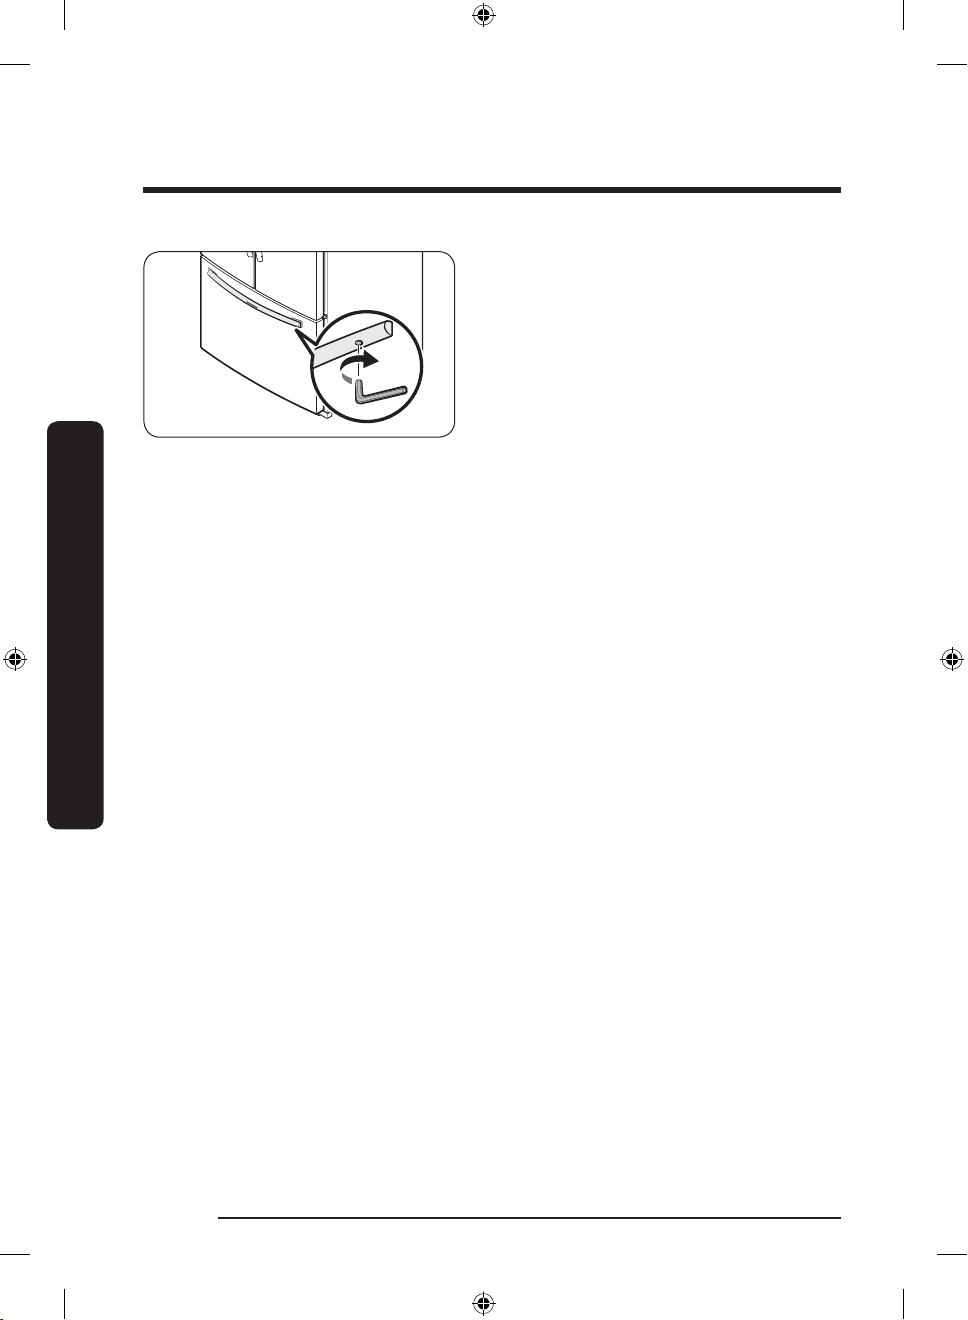
1. To remove the ice bucket, gently lift
it up, and then pull it out slowly while
holding the bottom of the bucket with
one hand and the side with the other
hand.
2. Empty the bucket.
3. When done, put the bucket back into
position. If the bucket does not t in,
turn the helix screw 90 degrees, and
then try again.
If the ice bucket is not rmly inserted,
turn the Helix (A) 90 degrees, and then try
again.
CAUTION
• Do not apply excessive force to the bucket cover. The cover may break.
• Do not forcefully close the door. Water may spill over the ice maker.
• To prevent injury, make sure to clean up any ice or water that has fallen on the oor.
• To prevent accidents or injury, do not let children play with the water dispenser or the
ice maker.
• Do not put your hand or an object into the ice chute. This may cause physical injury or
product damage.
English 45
Untitled-7 45 11/11/2020 2:12:36 PM
Maintenance
Page 46

Maintenance
• Use only the provided ice bucket. Third-party ice buckets may cause a system failure.
NOTE
• The water pressure required for ice making is between 30 to 120 psi (206 to 827 kPa).
• Noise from the ice maker as it produces ice during the ice making process is normal.
• While the door is open, neither the ice maker nor the water dispenser operates.
Fridge shelves
The appearance of the shelves differs by model.
• To remove a shelf, fully open the
corresponding door. Hold the front of
the shelf, and then gently lift up and
slide out.
NOTE
Do not lift up the shelf fully when
removing or reinserting the shelf. The rear
wall of the fridge room can be dented.
• To reinsert, hold the shelf at an angle
so the front is higher than the back, and
then insert the top hook into the top
shelf notch. Then, lower the shelf and
insert the bottom shelf hook into the
bottom shelf notch.
Maintenance
CAUTION
• The tempered glass shelves are heavy.
Use caution when removing them.
• The shelf must be inserted correctly. Do
not insert upside down.
• Glass containers may scratch the surface
of glass shelves.
English46
Untitled-7 46 11/11/2020 2:12:36 PM
Page 47

Door bins
• To remove the door bin, hold the front
sides of the bin, and then gently lift up
to remove.
• To reinsert, insert the door bin slightly
above its nal location making sure that
the back of the bin is against the door.
Hold the rear of the door bin with both
hands, and then press down so that it
ts snugly.
CAUTION
• Do not remove a bin that is lled with
food. Empty the bin beforehand.
• Use caution when opening the door if
the bottom bin contains larger bottles,
which may fall over.
• Do not allow children to play with the
bins. Sharp corners of the bin may cause
injury.
Maintenance
English 47
Untitled-7 47 11/11/2020 2:12:37 PM
Page 48

Maintenance
Fridge drawers
Vegetable / fruit drawers
Wide Pantry
Gently lift up the front of the drawer and
slide out.
• We recommend that you remove the
door bins before removing the drawer.
This is to prevent damage to the door
bins.
• To reinsert, insert the drawer into the
frame rails and then slide inward.
• To remove, fully open the Wide Pantry.
Then, slightly lift the front side and pull
straight out.
• To reinsert, push the rails to the back of
the refrigerator. Then, place the Wide
Pantry onto the rails and slide it back
until it is in place.
Maintenance
Freezer baskets
Lower ice bucket (applicable models only)
1. Fully open the freezer drawer.
English48
Untitled-7 48 11/11/2020 2:12:37 PM
Page 49

Upper basket
Lower basket
2. Lift the lower ice bucket to remove.
• To remove, fully slide open the freezer
drawer. Lift up the front of the upper
basket and pull to remove.
• To reinsert, align the front wheels of the
upper basket with the end of the lower
basket. Slide the upper basket to the
front.
• To remove, rst remove the upper
basket. Then, tilt up the front of the
lower basket to pull out.
• To reinsert, put the basket onto the rail
assembly rear side rst.
Maintenance
CAUTION
• Do not twist the basket when removing or reinserting the basket. The basket can be
scratched.
• To prevent physical injury, property damage, or suffocation, keep children away from
freezer baskets that have been removed.
• Do not remove the divider.
• Put the wheels of the upper basket on the end of the rails of the lower basket. Then,
slide the upper basket all the way to the front. Otherwise, the drawer will not open or
close properly, which will cause frost to build up.
English 49
Untitled-7 49 11/11/2020 2:12:38 PM
Page 50

Maintenance
Cleaning
Interior and exterior
WARNING
• Do not use benzene, thinner, home/car detergent, or Clorox™ to clean the refrigerator.
They may damage the surface of the refrigerator and cause a re.
• Do not spray water onto the refrigerator. This may cause electric shock.
Regularly use a dry cloth to remove all foreign substances such as dust or water from the
power plug terminals and contact points.
1. Unplug the power cord.
2. Use a moistened, soft, lint-free cloth or paper towel to clean the refrigerator’s interior
and exterior.
3. When done, use a dry cloth or paper towel to dry well.
4. Plug in the power cord.
Ice / Water dispenser
CAUTION
When crushed ice is selected, some residual ice chips may collect in the ice chute. To
prevent this, remove the residual ice from the chute using a soft, clean cloth.
Rubber seals
If the rubber seals of a door become dirty, the door may not close properly and reducing
refrigerator performance and efciency. Use a mild detergent and damp cloth to clean the
Maintenance
rubber seals. Then, dry well with a cloth.
Rear panel
To keep cords and exposed parts of the
rear panel free of dirt, vacuum the panel
once or twice a year.
CAUTION
Do not remove the rear panel cover. Electric shock may occur.
English50
Untitled-7 50 11/11/2020 2:12:38 PM
Page 51

Replacement
Water lter
WARNING
• Do not use third-party water lters. Use only Samsung-provided or -approved lters.
• Unapproved lters may leak and damage the refrigerator, causing electric shock.
Samsung is not responsible for any damage that may occur from use of third-party
water lters.
The Filter Reset indicator (
lter. Before replacing the lter, make sure the water supply line is shut off.
) turns red to let you know it is time to replace the water
1. Shut off the water supply line.
2. Turn the knob of the lter cartridge
90 degrees counterclockwise (1/4 turn).
The lter cartridge unlocks.
3. Pull out to remove the cartridge.
- If the water lter is severely
contaminated, the cartridge may not
be easy to remove. If that is the case,
use force to remove the cartridge.
- To prevent water leaks from the lter
opening, pull the cartridge straight
out while removing it.
4. Insert a new lter cartridge. Use only
Samsung-provided or approved lters.
Maintenance
5. Turn the cartridge knob clockwise to
lock into place.
6. Press and hold Ice Maker on the main
panel for 3 seconds to reset the life
cycle detector. The Filter Reset indicator
(
) turns off.
7. When you are done replacing the lter,
open the water valve and run water
through the dispenser for about 7
minutes. This is to remove impurities
and air from the water line.
English 51
Untitled-7 51 11/11/2020 2:12:39 PM
Page 52

Maintenance
NOTE
• A newly installed lter may cause the water dispenser to spurt water briey. This is
because air has entered the waterline.
• The replacement process may cause the water dispenser to drip for a short period of
time. If it drips, simply wipe up any water on the oor with a dry towel.
Reverse osmosis water ltration system
The water pressure of the water supply system to a reverse osmosis water ltration
system must be between 30 to 120 psi (206 to 827 kPa).
The water pressure of the reverse osmosis water ltration system to the refrigerator’s
cold water line must be at least 40 psi (276 kPa). If the water pressure is below these
specications:
• Check if the sediment lter in the reverse osmosis system is blocked. Replace the lter
if necessary.
• Rell the water tank in the reverse osmosis system with water.
• If your refrigerator has a water lter, it may further reduce the water pressure when
used in conjunction with a reverse osmosis system. Remove the water lter.
For more information or servicing, contact a licensed plumbing professional.
Ordering a new lter
To purchase a new water lter, contact a local Samsung service center or visit www.
samsungparts.com on the web.
LED Lamps
To replace the lamps of the refrigerator, contact a local Samsung service center.
WARNING
Maintenance
• The lamps are not user-serviceable. Do not attempt to replace a lamp yourself. This can
cause electric shock.
English52
Untitled-7 52 11/11/2020 2:12:39 PM
Page 53

Troubleshooting
Before calling for service, review the symptoms and recommended solutions below. If
none of the suggested solutions resolve your problem, please visit our website at www.
samsung.com or call Samsung Customer Care at 1-800-SAMSUNG (726-7864). Note that
you will be charged for any service visits in which no defects were found.
General
Temperature
Symptom Possible causes Solution
Fridge/freezer
does not operate.
Fridge/freezer
temperature is
warm.
Fridge/freezer is
over-cooling.
• Power cord is not plugged in
properly.
• Temperature control is not
set correctly.
• Refrigerator is located near a
heat source or direct sunlight.
• Not enough clearance
between refrigerator and
nearby walls or cabinets.
• Energy Saver mode is
activated.
• The refrigerator is
overloaded. Food is blocking
the refrigerator vents.
• Temperature control is not
set correctly.
• Properly plug in the power
cord.
• Set the temperature lower.
• Keep the refrigerator away
from direct sunlight or a heat
source.
• Make sure there is a gap of
at least 2.5 inches (5 cm)
between the refrigerator
back and sides and any
nearby walls or cabinets.
• Deactivate Energy Saver
mode.
• Do not overload the
refrigerator. Do not allow
food to block vents.
• Set the temperature higher.
English 53
Untitled-7 53 11/11/2020 2:12:39 PM
Troubleshooting
Page 54

Troubleshooting
Symptom Possible causes Solution
• To prevent condensation
from forming, the
refrigerator has heat-proof
piping in the front corners.
If the ambient temperature
rises, this equipment may not
Interior wall is hot.
• Refrigerator has heat-proof
piping in the interior wall.
Odors
Symptom Possible causes Solution
Refrigerator has
odors.
• Spoiled food.
• Food with strong odors.
work effectively. This is not a
system failure.
• Clean the refrigerator and
remove any spoiled food.
• Make sure strong smelling
food is wrapped airtight.
Frost
Symptom Possible causes Solution
Troubleshooting
Untitled-7 54 11/11/2020 2:12:39 PM
Frost around the
vents.
Frost on interior
walls.
English54
• Food is blocking the vents.
• Door is not closed properly.
• Make sure no food blocks the
refrigerator vents.
• Make sure food does not
block the door. Clean the
door gasket.
Page 55

Condensation
Symptom Possible causes Solution
• Remove the moisture and
do not leave a door open for
extended periods of time.
• Make sure food is wrapped
airtight.
Condensation
forms on the
interior walls.
• If door is left open, moisture
enters the refrigerator.
• Food with high moisture
content.
Water/ice (dispenser models only)
Symptom Possible causes Solution
Water ow is
weaker than
normal.
Ice maker makes a
buzzing sound.
Ice maker does not
make ice.
• Water pressure is too low.
• The ice maker function is
activated, but the water
supply to the refrigerator has
not been connected.
• Ice maker has just been
installed.
• Freezer temperature is too
high.
• Dispenser panel Lock is
activated.
• Ice maker is off. • Turn on the ice maker.
• Make sure the water pressure
is between 30 to 120 psi
(206 to 827 kPa).
• Press Ice Maker.
• You must wait for 12 hours
for the refrigerator to make
ice.
• Set the freezer temperature
below 0 °F (-18 °C) or -4 °F
(-20 °C) in warm ambient air.
• Deactivate dispenser panel
Lock.
Troubleshooting
English 55
Untitled-7 55 11/11/2020 2:12:39 PM
Page 56

Troubleshooting
Symptom Possible causes Solution
• Ice may jam if the ice
dispenser is not used for a
long time (approx. 3 weeks).
• Ice bucket is not properly
inserted.
Ice does not
dispense.
• Water line is not connected
properly or water supply is
not on.
• Water line is not connected
properly or water supply is
not on.
• If you won't be using the
refrigerator for a long time,
empty the ice bucket and
turn off the ice maker.
• Make sure the ice bucket is
properly inserted.
• Check if the water line is
installed correctly. Check if
the water line stop cock is
closed.
• Check if the water line is
installed correctly. Check if
the water line stop cock is
closed.
Water does not
dispense.
Troubleshooting
English56
Untitled-7 56 11/11/2020 2:12:40 PM
• Dispenser panel Lock is
activated.
• A third-party water lter was
installed.
• Water lter indicator turns
on or blinks.
• Deactivate dispenser panel
Lock.
• Use only Samsung-provided
or approved lters.
• Unapproved lters may leak
and damage the refrigerator.
• Replace the water lter. After
replacing, reset the lter
indicator sensor.
Page 57

Do you hear abnormal sounds from the refrigerator?
Clicking!
or Chirping!
Buzzing!
SSSRRR!
Whir!
Before calling for service, review the information below. If you still have questions about
sounds your refrigerator is making, please call Samsung Customer Care at 1-800-SAMSUNG
(726-7864). Note that you will be charged for any service visits related to normal
operating sounds in which no defects were found.
These sounds are normal.
• When starting or ending an operation, the refrigerator may make sounds similar to a
car engine ignition. As the operation stabilizes, the sounds will decrease.
• While the fan is operating, these sounds may occur. When the refrigerator reaches the
set temperature, the fan sound will stop.
English 57
Untitled-7 57 11/11/2020 2:12:40 PM
Troubleshooting
Page 58

Troubleshooting
HiSS!
Bubbling!
Cracking!
• During a defrost cycle, water may drip on the defrost heater, causing sizzling sounds.
• As the refrigerator cools or freezes, refrigerant gas moves through sealed pipes, causing
bubbling sounds.
• As the refrigerator temperature increases or decreases, plastic parts contract and
expand, creating knocking noises. These noises occur during the defrosting cycle or
when electronic parts are working.
Troubleshooting
• For ice maker models: When the water valve opens to ll the ice maker, you may hear a
buzzing sound.
• Due to pressure equalizing when you open and close the refrigerator door, you may
hear a whooshing sound.
English58
Untitled-7 58 11/11/2020 2:12:41 PM
Page 59

LIMITED WARRANTY (U.S.A.)
SAMSUNG REFRIGERATOR
LIMITED WARRANTY TO ORIGINAL CONSUMER PURCHASER WITH PROOF OF
PURCHASE
This SAMSUNG brand product, as supplied and distributed by Samsung Electronics
America, Inc. (SAMSUNG) and delivered new, in the original carton to the original consumer
purchaser, is warranted by SAMSUNG against manufacturing defects in materials or
workmanship for the limited warranty period of:
One (1) year parts and labor
Five (5) years parts and labor on Sealed Refrigeration System Only (Compressor,
Evaporator, Condenser, Drier, and Connecting Tubing)
Ten (10) years part and Five (5) years labor on Digital Inverter Compressor Only
This limited warranty is valid only on products purchased and used in the United States
that have been installed, operated, and maintained according to the instructions attached
to or furnished with the product. To receive warranty service, the purchaser must contact
SAMSUNG at the address or phone number provided below for problem determination and
service procedures. Warranty service can only be performed by a SAMSUNG authorized
service center. The original dated bill of sale must be presented upon request as proof
of purchase to SAMSUNG or SAMSUNG’s authorized service center to receive warranty
service.
SAMSUNG will provide in-home service within the contiguous United States during the
warranty period at no charge, subject to availability of SAMSUNG authorized servicers
within the customer’s geographic area. If in-home service is not available, SAMSUNG may
elect, at its option, to provide transportation of the product to and from an authorized
service center. If the product is located in an area where service by a SAMSUNG authorized
servicer is not available, you may be responsible for a trip charge or required to bring the
product to a SAMSUNG authorized service center for service.
To receive in-home service, product must be unobstructed and accessible to the service
agent.
During the applicable warranty period, a product will be repaired, replaced, or the purchase
price refunded, at the sole option of SAMSUNG. SAMSUNG may use new or reconditioned
parts in repairing a product, or replace the product with a new or reconditioned product.
Replacement parts and products are warranted for the remaining portion of the original
product’s warranty or ninety (90) days, whichever is longer. All replaced parts and products
are the property of SAMSUNG and you must return them to SAMSUNG.
English 59
Untitled-7 59 11/11/2020 2:12:41 PM
Page 60

LIMITED WARRANTY (U.S.A.)
This limited warranty covers manufacturing defects in materials or workmanship
encountered in normal household, noncommercial use of this product and shall not
cover the following: damage that occurs in shipment, delivery, installation, and uses for
which this product was not intended; damage caused by unauthorized modication or
alteration of the product; product where the original factory serial numbers have been
removed, defaced, changed in any way, or cannot be readily determined; cosmetic damage
including scratches, dents, chips, and other damage to the product’s nishes; damage
caused by abuse, misuse, pest infestations, accident, re, oods, or other acts of nature or
God; damage caused by use of equipment, utilities, services, parts, supplies, accessories,
applications, installations, repairs, external wiring or connectors not supplied or authorized
by SAMSUNG; damage caused by incorrect electrical line current, voltage, uctuations
and surges; damage caused by failure to operate and maintain the product according
to instructions; in-home instruction on how to use your product; and service to correct
installation not in accordance with electrical or plumbing codes or correction of household
electrical or plumbing (i.e., house wiring, fuses, or water inlet hoses). The cost of repair or
replacement under these excluded circumstances shall be the customer’s responsibility.
Visits by an authorized servicer to explain product functions, maintenance or installation
are not covered by this limited warranty. Please contact SAMSUNG at the number below
for assistance with any of these issues.
EXCLUSION OF IMPLIED WARRANTIES
IMPLIED WARRANTIES, INCLUDING THE IMPLIED WARRANTIES OF MERCHANTABILITY OR
FITNESS FOR A PARTICULAR PURPOSE, ARE LIMITED TO ONE YEAR OR THE SHORTEST
PERIOD ALLOWED BY LAW. Some states do not allow limitations on how long an implied
warranty lasts, so the above limitations or exclusions may not apply to you. This warranty
gives you specic rights, and you may also have other rights, which vary from state to
state.
English60
Untitled-7 60 11/11/2020 2:12:41 PM
Page 61

LIMITATION OF REMEDIES
YOUR SOLE AND EXCLUSIVE REMEDY IS PRODUCT REPAIR, PRODUCT REPLACEMENT,
OR REFUND OF THE PURCHASE PRICE AT SAMSUNG’S OPTION, AS PROVIDED IN THIS
LIMITED WARRANTY. SAMSUNG SHALL NOT BE LIABLE FOR SPECIAL, INCIDENTAL OR
CONSEQUENTIAL DAMAGES, INCLUDING BUT NOT LIMITED TO TIME AWAY FROM WORK,
HOTELS AND/OR RESTAURANT MEALS, REMODELING EXPENSES, LOSS OF REVENUE OR
PROFITS, FAILURE TO REALIZE SAVINGS OR OTHER BENEFITS REGARDLESS OF THE LEGAL
THEORY ON WHICH THE CLAIM IS BASED, AND EVEN IF SAMSUNG HAS BEEN ADVISED OF
THE POSSIBILITY OF SUCH DAMAGES. Some states do not allow exclusion or limitation of
incidental or consequential damages, so the above limitations or exclusions may not apply
to you. This warranty gives you specic rights, and you may also have other rights, which
vary from state to state.
SAMSUNG does not warrant uninterrupted or error-free operation of the product. No
warranty or guarantee given by any other person, rm, or corporation with respect to this
product shall be binding on SAMSUNG.
To obtain warranty service, please contact SAMSUNG at:
Samsung Electronics America, Inc.
85 Challenger Road
Ridgeeld Park, NJ 07660
1-800-SAMSUNG (726-7864)
www.samsung.com/us/support
English 61
Untitled-7 61 11/11/2020 2:12:41 PM
Page 62

Warranty Information (CANADA)
If your refrigerator needs service
Do not hesitate to call any Samsung Authorized Service Center nearby giving them your
name, address and telephone number if your product is not functioning properly.
Limited Warranty for Original Purchaser
This Samsung product is warranted by Samsung Electronics Canada Inc. (hereafter referred
to as SECA) against manufacturing defects in material or workmanship for the following
periods:
Labor : 1 year (in-home)
Parts : 1 year
Inverter Compressor : 10 years (Part only)
SECA further warrants that if this product fails to operate properly within the specied
warranty period and the failure is due to improper workmanship or defective material,
SECA will repair or replace the product at its option. In-home service is not available in all
areas. Contact us to nd out if in-home service is currently available in your area by using
the contact information at the back of this warranty.
All warranty repairs or part replacements must be performed by a SECA Authorized Service
Center. (To nd the nearest SECA Service Center, call 1-800-SAMSUNG (7267864) or visit
our web site at www.samsung.com/ca)
English62
Untitled-7 62 11/11/2020 2:12:41 PM
Page 63

Obligation to the Original Owner
The original dated sales receipt must be retained by the customer and is the only
acceptable proof of purchase. It must be presented to a SECA Authorized Service Center
at the time service is requested before warranty services are rendered. On all carry-in
models, transportation to and from the Authorized Service Center is the responsibility of
the customer.
Exclusions of the Warranty
This warranty does not cover damage due to accident, re, ood, and/or other Acts of God,
misuse, incorrect line voltage, improper installation, improper or unauthorized repairs,
commercial use, or damage that occurs during shipping. Customer adjustments which are
explained in this owners manual are not covered under the terms of this warranty. This
warranty will automatically be voided for any unit found with a missing or altered serial
number. This warranty is valid only on products purchased and used in Canada.
SAMSUNG CUSTOMER CARE CENTER
Samsung Electronics Canada Inc.
2050 Derry Road West
Mississauga, Ontario L5N 0B9
Canada
1-800-SAMSUNG (726-7864)
www.samsung.com/ca/support (English)
www.samsung.com/ca_fr/support (French)
English 63
Untitled-7 63 11/11/2020 2:12:41 PM
Page 64

Scan the QR code* or visit
www.samsung.com/spsn
s
to view our helpful
How-to Videos and Live Show
* Requires reader to be installed on your
smartphone
Contact SAMSUNG WORLD WIDE
If you have any questions or comments relating to Samsung products, please contact the
SAMSUNG Customer Care Center.
Country Contact Center Web Site
U.S.A
CANADA
1-800-SAMSUNG (726-7864)
1-844-SAM-PAYS (726-7297)
1-800-SAMSUNG(726-7864)
1-844-SAM-PAYS (726-7297)
www.samsung.com/us/support
www.samsung.com/ca/support (English)
www.samsung.com/ca_fr/support (French)
DA68-04012A-02
Untitled-7 64 11/11/2020 2:12:42 PM
Page 65

Refrigerador
Manual del usuario
RF27T5201**/RF27T5241**
Electrodoméstico independiente
Untitled-8 1 11/11/2020 2:19:11 PM
Page 66

Contenido
Contenido
Información sobre seguridad 3
Qué debe saber sobre las instrucciones de seguridad 3
Símbolos y advertencias de seguridad importantes: 4
Advertencia sobre la State of California Proposition 65 4
Precauciones importantes de seguridad 4
Señales de advertencia importantes para el transporte y el emplazamiento 6
Advertencias muy importantes para la instalación 6
Precauciones para la instalación 8
Advertencias muy importantes para el uso 8
Precauciones de uso 11
Precauciones para la limpieza 12
Advertencias muy importantes para la eliminación de residuos 13
Instalación 14
Descripción breve del refrigerador 14
Instalación paso a paso 16
Funcionamiento 34
Panel principal 34
Panel del dispensador 41
Funciones especiales 42
Mantenimiento 44
Manipulación y cuidado 44
Limpieza 49
Reemplazo 50
Solución de problemas 52
General 52
¿Se oyen ruidos anómalos procedentes del refrigerador? 56
GARANTÍA LIMITADA (EE.UU.) 58
REFRIGERADOR SAMSUNG 58
Español2
Untitled-8 2 11/11/2020 2:19:11 PM
Page 67

Información sobre seguridad
Antes de utilizar su nuevo refrigerador Samsung, lea detenidamente este manual a n de aprender a usar
las funciones que ofrece de manera segura y eciente.
Qué debe saber sobre las instrucciones de seguridad
• Este electrodoméstico no debe ser utilizado por personas (incluidos niños) con capacidades mentales,
sensoriales o físicas reducidas, o por personas que carezcan de experiencia y de conocimientos, a
menos que se encuentren bajo supervisión o hayan recibido las instrucciones de uso por parte de un
responsable de su seguridad. Se deberá vigilar a los niños para asegurarse de que no jueguen con el
electrodoméstico.
• Debido a que las siguientes instrucciones corresponden a diversos modelos, es posible que las
características de su refrigerador dieran ligeramente de las que se describen en este manual.
• Si tiene alguna duda, comuníquese al 1-800-SAMSUNG o encuentre ayuda e información en línea en
www.samsung.com.
• Si el refrigerante sale por los tubos, este podría incendiarse o dañar los ojos. Si hay pérdida de
refrigerante del tubo, manténgalo alejado de las llamas, aparte cualquier material inamable del
producto y ventile la habitación inmediatamente.
- No seguir esta recomendación puede causar riesgos de incendio o explosión.
• El uso inapropiado de la conexión a tierra puede traer como consecuencia un riesgo de descarga
eléctrica. Si necesita usar un cable de extensión, use solo uno de 3 hilos con un enchufe que tenga
una tercera punta para el polo a tierra; la toma de corriente deberá tener 3 ranuras para adaptarse al
enchufe del electrodoméstico. La potencia indicada en el cable de extensión debe ser CA 115-120 V,
10 A o superior. Si se utiliza un adaptador de tierra, asegúrese de que el receptáculo esté conectado
correctamente a tierra.
Información sobre seguridad
Español 3
Untitled-8 3 11/11/2020 2:19:11 PM
Page 68

Información sobre seguridad
Información sobre seguridad
Símbolos y advertencias de seguridad importantes:
Sírvase seguir todas las instrucciones de seguridad del presente manual. En el presente manual se utilizan
los siguientes símbolos de seguridad.
ADVERTENCIA
Riesgos o prácticas inseguras que pueden causar graves lesiones personales, daños a la propiedad y/o
incluso la muerte.
PRECAUCIÓN
Riesgos o prácticas inseguras que pueden causar lesiones personales leves y/o daños materiales.
NOTA
Información útil que ayuda a los usuarios a comprender u obtener benecios del refrigerador.
Estas señales de advertencia se incluyen aquí para evitar que usted o terceros sufran lesiones.
Sígalas atentamente.
Después de leer esta sección, consérvela en un lugar seguro para referencia futura.
Advertencia sobre la State of California Proposition 65
ADVERTENCIA
Cáncer y Daño Reproductivo - www.P65Warnings.ca.gov.
Precauciones importantes de seguridad
Advertencia: riesgo de incendio/materiales
inamables
ADVERTENCIA
• Se utiliza R-600a como refrigerante. Este producto contiene gas inamable (Refrigerante R-600a),
comuníquese con las autoridades locales para desechar este producto en forma segura.
• Para evitar la creación de una mezcla de gas-aire inamable en caso de una pérdida en el circuito
del refrigerante, el tamaño del lugar en el que se coloca el refrigerador depende de la cantidad
de refrigerante utilizado. El lugar debe tener 35.3 pies³ por cada 8 g de refrigerante R-600a en el
electrodoméstico.
• La ubicación de instalación no debe estar expuesta a la luz solar directa ni cerca de ningún
electrodoméstico o fuente de calor, tales como estufas, hornos u hornillas, radiadores, etc.
Español4
Untitled-8 4 11/11/2020 2:19:12 PM
Page 69

• Si coloca dos productos uno junto al otro, por razones de seguridad, asegúrese de utilizar productos
certicados en atmósferas de gas explosivas.
• Nunca debe poner en marcha un electrodoméstico que presente signos de haber sido dañado. Si tiene
alguna inquietud, consulte a su distribuidor.
• Si el cable de alimentación está dañado, debe ser reemplazado por el fabricante, su agente de servicios
o personas igualmente calicadas para evitar riesgos.
• Debe poder accederse al tomacorriente con facilidad para que el electrodoméstico pueda
desenchufarse de la alimentación en caso de emergencia. Debe encontrarse fuera de la zona trasera del
electrodoméstico.
• No almacene sustancias explosivas como latas de aerosoles con gases propelentes inamables en este
electrodoméstico.
• Se deben utilizar las mangueras nuevas provistas con el electrodoméstico y no reutilizar las mangueras
antiguas.
• Cuando instale el electrodoméstico, asegúrese de que el cable de alimentación no esté atrapado ni
dañado.
• No ubique varias regletas de tomacorrientes portátiles o unidades de alimentación móviles en la parte
trasera del electrodoméstico.
ADVERTENCIA
• Llenar únicamente con agua potable.
• Mantenga las aberturas de ventilación del gabinete o estructura incorporada del electrodoméstico libres
de obstrucciones.
• No utilice dispositivos mecánicos ni cualquier otro medio para acelerar el proceso de descongelamiento
que no sean aquellos recomendados por el fabricante.
• No dañe el circuito del refrigerante.
• No utilice electrodomésticos eléctricos dentro de los compartimientos de almacenamiento de alimentos
del electrodoméstico, a menos que sean del tipo recomendado por el fabricante.
• Conéctelo solamente a un suministro de agua potable.
ADVERTENCIA
• Existe el riesgo de que los niños queden encerrados. Antes de desechar su antiguo refrigerador o
congelador:
- Retire las puertas.
- Deje los estantes en su lugar de manera tal que los niños no puedan trepar fácilmente.
Información sobre seguridad
Este electrodoméstico está diseñado para uso doméstico y en lugares como
• zonas de cocina de tiendas, ocinas y otros entornos de trabajo
• granjas y zonas de uso de los clientes en hoteles, moteles u otros entornos de tipo residencial
• hospederías;
• banqueterías y eventos en instalaciones no minorista similares
Español 5
Untitled-8 5 11/11/2020 2:19:12 PM
Page 70

Información sobre seguridad
Información sobre seguridad
Señales de advertencia importantes para el transporte y el emplazamiento
ADVERTENCIA
• Al transportar e instalar el electrodoméstico deberá tener cuidado de no dañar ninguna de las piezas
del circuito del refrigerante.
- La pérdida de refrigerante del tubo podría incendiarse o dañar los ojos. Si se detecta una fuga,
manténgalo alejado de las llamas o de posibles fuentes de inamación y ventile durante varios
minutos el ambiente en el que se encuentra la unidad.
- El electrodoméstico contiene una pequeña cantidad de refrigerante de isobutano (R-600a), un gas
natural con alta compatibilidad ambiental, no obstante también inamable.
Advertencias muy importantes para la instalación
ADVERTENCIA
• No instale el refrigerador en un lugar húmedo o donde pueda entrar en contacto con agua.
- El aislamiento deciente de las piezas eléctricas puede provocar una descarga eléctrica o un
incendio.
• No exponga este refrigerador a la luz solar directa ni al calor de estufas, calefactores u otros
electrodomésticos.
• No enchufe varios electrodomésticos y el refrigerador en la misma toma múltiple. El refrigerador debe
conectarse siempre a un tomacorriente individual cuyo voltaje nominal coincida con el que se especica
en la placa de voltaje del refrigerador.
- De esta manera se obtiene el mejor desempeño y también se evita que se sobrecarguen los
circuitos del cableado de la casa, lo que podría sobrecalentar los cables y provocar un riesgo de
incendio.
• Si el tomacorriente está ojo, no conecte el enchufe.
- Existe el riesgo de que se produzca una descarga eléctrica o un incendio.
• No utilice un cable de alimentación que esté dañado o gastado en su extensión o en cualquiera de los
extremos.
• No doble excesivamente el cable de alimentación ni coloque objetos pesados sobre él.
• No tire del cable de alimentación ni lo doble excesivamente.
• No retuerza ni amarre el cable de alimentación.
• No coloque el cable de alimentación sobre un objeto metálico; no coloque sobre él ningún objeto
pesado; no lo coloque entre objetos ni lo empuje hacia el espacio que hay detrás del electrodoméstico.
• Al mover el refrigerador, tenga cuidado de no enroscar ni dañar el cable de alimentación.
- Esto podría causar una descarga eléctrica o un incendio.
• Nunca desenchufe el refrigerador jalando el cable de alimentación. Siempre sostenga el enchufe con
rmeza y jale para extraerlo del tomacorriente.
- Los daños al cable pueden provocar un cortocircuito, un incendio o una descarga eléctrica.
• No instale este electrodoméstico cerca de calefactores o materiales inamables.
• No instale este electrodoméstico en un lugar donde pueda haber fugas de gas.
- Esto podría causar una descarga eléctrica o un incendio.
• Antes de usarse, el refrigerador debe ubicarse e instalarse de manera apropiada de acuerdo con las
instrucciones de este manual.
Español6
Untitled-8 6 11/11/2020 2:19:12 PM
Page 71

• Conecte el enchufe en la posición correcta con el cable colgando hacia abajo.
- Si conecta el enchufe al revés, el cable puede cortarse y provocar un incendio o una descarga
eléctrica.
• Asegúrese de que el enchufe no esté aplastado ni haya sido dañado por la parte posterior del
refrigerador.
• Mantenga los materiales de empaque fuera del alcance de los niños.
- Existe el riesgo de muerte por asxia si un niño se coloca los materiales de empaque en la cabeza.
• El electrodoméstico debe colocarse de manera tal que se pueda acceder al enchufe después de la
instalación.
- No seguir esta recomendación puede causar una descarga eléctrica o un incendio debido a una
fuga de electricidad.
• No instale este electrodoméstico en un lugar húmedo, engrasado o sucio, o en un sitio con exposición
directa al sol o al agua (lluvia).
- El aislamiento deciente de las piezas eléctricas puede provocar una descarga eléctrica o un
incendio.
• Si ingresaran grandes cantidades de polvo o agua al refrigerador, desenchufe el cable de alimentación y
comuníquese con un Centro de Servicio de Samsung Electronics.
- Si no lo hace, existe el riesgo de que se produzca un incendio.
• No se pare sobre el electrodoméstico ni le coloque objetos encima (tales como ropa, velas o cigarrillos
encendidos, platos, productos químicos, objetos metálicos, etc.).
- Esto podría causar una descarga eléctrica, un incendio, problemas con el producto o lesiones.
• Es necesario quitar toda la película plástica protectora antes de enchufar el producto por primera vez.
• Se deberá vigilar a los niños para asegurarse de que no jueguen con los anillos elásticos utilizados para
el ajuste de la puerta o con las grapas del tubo de agua.
- Existe riesgo de muerte por asxia si un niño se traga un anillo elástico o una grapa del tubo de
agua. Mantenga los anillos elásticos y las grapas del tubo de agua fuera del alcance de los niños.
• El refrigerador debe estar conectado a tierra de manera segura.
- Siempre asegúrese de haber conectado el refrigerador a tierra antes de intentar examinar o reparar
alguna pieza. Las fugas de energía pueden provocar una descarga eléctrica grave.
• Nunca utilice como conexión a tierra tubos de gas, líneas telefónicas ni otras posibles fuentes de
atracción de rayos.
- El refrigerador debe estar conectado a tierra para evitar cualquier fuga de energía o descarga
eléctrica provocada por fugas de corriente del refrigerador.
- La fuga de corriente podría causar descargas eléctricas, incendios, explosiones o problemas con el
producto.
• Conecte bien el enchufe a la toma de pared. No utilice enchufes o cables de alimentación dañados ni
enchufes de pared ojos.
- Esto podría causar una descarga eléctrica o un incendio.
• Únicamente un técnico calicado o compañía de reparaciones debe estar autorizado para cambiar el
fusible del refrigerador.
- No seguir esta recomendación, podría causar una descarga eléctrica o lesiones.
Información sobre seguridad
Español 7
Untitled-8 7 11/11/2020 2:19:12 PM
Page 72

Información sobre seguridad
Información sobre seguridad
Precauciones para la instalación
PRECAUCIÓN
• Deje espacio suciente alrededor del refrigerador e instálelo sobre una supercie plana.
- Mantenga libre de obstáculos el espacio de ventilación en el gabinete o la estructura de montaje
del electrodoméstico.
• Una vez que haya instalado el refrigerador y lo haya encendido, permita que funcione durante 2 horas
antes de cargarlo con alimentos.
• Se recomienda que el refrigerador sea instalado por un técnico calicado o una compañía de servicios.
- No seguir esta recomendación puede causar descargas eléctricas, incendios, explosiones, problemas
con el producto o lesiones.
• Sobrecargar una de las puertas puede ocasionar la caída del refrigerador y provocar lesiones
personales.
Advertencias muy importantes para el uso
ADVERTENCIA
• No conecte el enchufe en un tomacorriente con las manos mojadas.
- Esto podría causar una descarga eléctrica.
• No coloque objetos en la parte superior de la unidad.
- Cada vez que abra o cierre la puerta, estos podrían caerse y provocar lesiones personales o daños
materiales.
• No coloque las manos, los pies ni objetos metálicos (tales como palillos chinos, etc.) en la parte inferior
o posterior del refrigerador.
- Esto podría causar una descarga eléctrica o lesiones personales.
- Algunos bordes losos podrían provocar lesiones personales.
• No toque las paredes internas del congelador ni los productos almacenados en este con las manos
mojadas.
- Esto puede provocar quemaduras por frío.
• No coloque un recipiente con agua sobre el refrigerador.
- Si se derrama, existe el riesgo de que se produzca un incendio o una descarga eléctrica.
• No almacene sustancias u objetos volátiles o inamables (benceno, solvente, gas propano, alcohol, éter,
gas LP ni cualquier otro producto de este tipo) en el refrigerador.
- Este refrigerador se debe utilizar solo para almacenar alimentos.
- Esto podría causar un incendio o una explosión.
• Se deberá vigilar a los niños para asegurarse de que no jueguen con el electrodoméstico.
- Aleje los dedos de los puntos de agarre. Los espacios entre las puertas y el gabinete son
inevitablemente pequeños. Abra las puertas con cuidado si hay niños cerca.
• No permita que los niños se cuelguen de la puerta ni de los compartimientos de la puerta. Pueden
producirse lesiones graves.
• No permita que los niños ingresen al refrigerador. Podrían quedar atrapados.
• No coloque las manos debajo del electrodoméstico.
- Es posible que algunas puntas losas le provoquen lesiones.
Español8
Untitled-8 8 11/11/2020 2:19:13 PM
Page 73

• No almacene en el refrigerador productos farmacéuticos, materiales cientícos ni productos sensibles a
la temperatura.
- No se deben almacenar productos que requieran controles estrictos de temperatura.
• No coloque ni utilice aparatos eléctricos dentro del refrigerador/congelador, a menos que sean del tipo
recomendado por el fabricante.
• En caso de sentir olor a humo, desconecte el enchufe de inmediato y comuníquese con un Centro de
Servicio de Samsung Electronics.
• Si ingresaran grandes cantidades de polvo o agua al refrigerador, desenchufe el cable de alimentación y
comuníquese con el Centro de Servicio de Samsung Electronics.
- Si no lo hace, existe el riesgo de que se produzca un incendio.
• No permita que los niños se paren sobre un cajón.
- El cajón se puede romper y los niños pueden caerse.
• No deje las puertas del refrigerador abiertas si el refrigerador no está siendo vigilado y no permita que
los niños ingresen en el refrigerador.
• No permita que los bebés ni los niños ingresen al cajón.
- Esto puede provocar muerte por asxia debido al encierro o lesiones personales.
• No sobrecargue el refrigerador con comida.
- Cuando abra la puerta, algún elemento podría caerse y provocar lesiones personales o daños
materiales.
• No pulverice material volátil, tal como un insecticida, sobre la supercie del electrodoméstico.
- Además de ser perjudicial para los seres humanos, puede causar una descarga eléctrica, un
incendio o problemas con el producto.
• Nunca coloque los dedos ni otros objetos en el oricio del dispensador de agua, en el recipiente de
hielo o en la cubeta de la fábrica de hielo.
- Esto puede provocar lesiones personales o daños materiales.
• No utilice ni coloque ninguna sustancia sensible a la temperatura, tales como pulverizadores
inamables, objetos inamables, hielo seco, medicamentos o productos químicos, cerca o dentro del
refrigerador.
• No utilice un secador de cabello para secar el interior del refrigerador. No coloque velas encendidas en
el refrigerador para eliminar los malos olores.
- Esto podría causar una descarga eléctrica o un incendio.
• Llene el tanque de agua y la charola para el hielo solamente con agua potable (agua de la llave, agua
mineral o agua puricada).
- No llene el tanque con té, jugo ni bebidas isotónicas. Pueden dañar el refrigerador.
• No se pare sobre el electrodoméstico ni le coloque objetos encima (tales como ropa, velas o cigarrillos
encendidos, platos, productos químicos, objetos metálicos, etc.). Esto podría causar una descarga
eléctrica, un incendio, problemas con el producto o lesiones. No coloque un recipiente con agua sobre el
electrodoméstico.
- Si se derrama, existe el riesgo de que se produzca un incendio o una descarga eléctrica.
• No mire jamente la lámpara LED UV durante mucho tiempo.
- Los rayos ultravioletas podrían dañarle la visión.
• No coloque el estante del refrigerador al revés. El tope del estante no funcionará.
- El estante de vidrio puede caerse y provocar lesiones.
• Aleje los dedos de los puntos de agarre. Los espacios entre las puertas y el gabinete son
inevitablemente pequeños. Abra las puertas con cuidado si hay niños cerca.
• Si se detecta una fuga de gas, evite las llamas o posibles fuentes de ignición y ventile durante varios
minutos la habitación en la que se encuentra el electrodoméstico.
- No toque el electrodoméstico ni el cable de alimentación.
Información sobre seguridad
Español 9
Untitled-8 9 11/11/2020 2:19:13 PM
Page 74

Información sobre seguridad
Información sobre seguridad
- No utilice un ventilador.
- Una chispa puede provocar una explosión o un incendio.
• Utilice solamente lámparas LED proporcionadas por el fabricante o sus agentes de servicio técnico.
• Las botellas se deben almacenar una junto a otra de manera tal que no se tumben ni se caigan.
• Este producto se debe utilizar solo para almacenar alimentos en un entorno doméstico.
• Nunca coloque los dedos ni otros objetos en el oricio del dispensador de agua, en el recipiente de
hielo o en la cubeta de la fábrica de hielo.
- Puede provocar lesiones personales o daños materiales.
• No intente reparar, desensamblar ni modicar el refrigerador por su cuenta.
- Las modicaciones que no han sido autorizadas pueden provocar problemas de seguridad. Para
revertir una modicación no autorizada, cobraremos el costo completo de las piezas y mano de
obra.
• No utilice ningún fusible (tales como los de alambres de acero, de cobre, etc.) que no sea un fusible
estándar.
• Si es necesario reparar o volver a instalar el refrigerador, comuníquese con su Centro de Servicio
Samsung más cercano.
- No seguir esta recomendación puede causar una descarga eléctrica, un incendio, problemas con el
producto o lesiones.
• Si la lámpara LED interior o exterior se ha apagado, comuníquese con el Centro de Servicio más
cercano.
• En caso de sentir olor a quemado o a humo en el refrigerador, desenchúfelo de inmediato y
comuníquese con un Centro de Servicio Samsung.
- No seguir esta recomendación podría causar una descarga eléctrica o un incendio.
• Desenchufe el refrigerador antes de cambiar las lámparas internas.
- Si no lo hace, existe el riesgo de que se produzca una descarga eléctrica.
• Si le resulta difícil cambiar una luz que no sea de LED, comuníquese con un Centro de Servicio de
Samsung.
• Si el producto cuenta con lámparas LED, no desensamble las cubiertas de la lámpara y las lámparas LED
usted mismo.
- Comuníquese con un Centro de Servicio de Samsung.
• Conecte bien el enchufe a la toma de pared.
• No utilice enchufes o cables de alimentación dañados ni enchufes de pared ojos.
- Esto podría causar una descarga eléctrica o un incendio.
Español10
Untitled-8 10 11/11/2020 2:19:13 PM
Page 75

Precauciones de uso
PRECAUCIÓN
• No vuelva a congelar alimentos que se hayan descongelado completamente.
• Utilice solamente la fábrica de hielo del refrigerador.
• Para obtener el mejor desempeño del producto:
- No coloque alimentos muy cerca de las rejillas de ventilación en la parte posterior del refrigerador,
ya que pueden obstruir la libre circulación del aire en el compartimiento del refrigerador.
- Envuelva los alimentos adecuadamente o colóquelos en recipientes herméticos antes de
almacenarlos en el refrigerador.
- Cumpla con los tiempos máximos de almacenamiento y las fechas de vencimiento de los alimentos
congelados.
• No coloque recipientes ni botellas de vidrio ni bebidas carbonatadas en el congelador.
- El recipiente puede congelarse y romperse, y esto puede ocasionar lesiones.
• Garantía de servicio y modicación.
- El servicio de garantía de Samsung no cubre los cambios o las modicaciones realizadas por un
tercero a este electrodoméstico; Samsung tampoco es responsable de los problemas relacionados
con la seguridad que puedan surgir a causa de modicaciones hechas por terceros.
• No obstruya las rejillas de ventilación dentro del refrigerador.
- Si las rejillas de ventilación están tapadas, en particular con una bolsa de plástico, el refrigerador
se puede sobrecongelar. Si el período de enfriamiento es demasiado prolongado, el ltro de agua
puede romperse y provocar fugas de agua.
• Si se desconecta el refrigerador del suministro de energía, espere al menos cinco minutos antes de
volver a enchufarlo.
• Si entraran grandes cantidades de agua al refrigerador, desenchúfelo y comuníquese con un Centro de
Servicio Samsung.
• No golpee ni aplique una fuerza excesiva sobre ninguna supercie de vidrio.
- Un vidrio roto puede causar lesiones personales o daños materiales.
• Llene el tanque de agua y la charola para el hielo solamente con agua potable (agua de la llave, agua
mineral o agua puricada).
- No llene el tanque con té, jugo ni bebidas isotónicas. Pueden dañar el refrigerador.
• Si el refrigerador se inunda, desconecte la alimentación del refrigerador y comuníquese con el centro de
servicios Samsung más cercano.
- Existe el riesgo de que se produzca una descarga eléctrica o un incendio.
• No guarde aceite vegetal en los compartimientos de la puerta del refrigerador. El aceite puede
solidicarse, y modicar su sabor y la facilidad de uso. Asimismo, el envase abierto puede gotear y el
aceite vertido puede causar grietas en el compartimiento de la puerta. Una vez abierto un envase de
aceite, es mejor almacenarlo en un lugar fresco y a la sombra, como un armario o alacena.
- Ejemplos de aceite vegetal: aceite de oliva, de maíz, de semilla de uva, etc.
Información sobre seguridad
Español 11
Untitled-8 11 11/11/2020 2:19:13 PM
Page 76

Información sobre seguridad
Información sobre seguridad
Precauciones para la limpieza
PRECAUCIÓN
• No pulverice con agua directamente dentro o fuera del refrigerador.
- Existe el riesgo de que se produzca un incendio o una descarga eléctrica.
• No utilice un secador de cabello para secar el interior del refrigerador.
• No coloque velas encendidas en el refrigerador para eliminar los malos olores.
- Esto podría causar una descarga eléctrica o un incendio.
• No rocíe productos de limpieza directamente sobre el visor.
- Las letras impresas en el visor pueden borrarse.
• Si cualquier sustancia extraña, tal como agua, ingresa en el refrigerador, desenchúfelo y comuníquese
con su Centro de Servicio Samsung más cercano.
- No seguir esta recomendación podría causar una descarga eléctrica o un incendio.
• Use un paño seco y limpio para retirar cualquier sustancia extraña o polvo de las clavijas del enchufe.
No utilice un paño mojado ni húmedo para limpiar el enchufe.
- De lo contrario, existe el riesgo de que se produzca un incendio o una descarga eléctrica.
• No limpie el refrigerador rociando agua directamente sobre él.
• No limpie el refrigerador con benceno, disolvente o Clorox (blanqueador).
- Pueden dañar la supercie del refrigerador y provocar un incendio.
• Nunca coloque los dedos ni otros objetos en la salida del dispensador.
- Puede provocar lesiones personales o daños materiales.
• Antes de limpiar o realizar el mantenimiento, desenchufe el refrigerador del enchufe de pared.
- No seguir esta recomendación podría causar una descarga eléctrica o un incendio.
• Utilice una esponja limpia o un paño suave y un detergente neutro disuelto en agua templada para
limpiar el refrigerador.
• No utilice limpiadores abrasivos ni muy fuertes, como limpiacristales, limpiadores corrosivos,
líquidos inamables, ácido clorhídrico, ceras limpiadoras, detergentes concentrados, blanqueadores o
limpiadores que contengan petróleo en las supercies externas (puertas y paneles), piezas de plástico,
revestimientos de puertas e interiores y juntas.
- Pueden rayar o dañar el material.
• No limpie con agua caliente los estantes o las cubiertas de vidrio cuando estén fríos. Los estantes y las
cubiertas de vidrio pueden romperse si se exponen a cambios bruscos de temperatura o a impactos
como golpes o caídas.
Español12
Untitled-8 12 11/11/2020 2:19:13 PM
Page 77

Advertencias muy importantes para la eliminación de residuos
ADVERTENCIA
• Si algún niño queda atrapado dentro del refrigerador, puede lastimarse o asxiarse hasta morir.
• Deseche el material de empaque de este producto de forma tal que no resulte nocivo para el medio
ambiente.
• Asegúrese de que ninguno de los tubos que se encuentran en la parte trasera del refrigerador estén
dañados antes de desecharlos.
• Este producto contiene R-600a, un gas inamable, que se utiliza como refrigerante. Comuníquese con
las autoridades locales para desechar este producto de manera segura.
• Cuando deseche este refrigerador, retire los burletes y los pestillos de las puertas de manera tal que los
niños pequeños o los animales no puedan quedar atrapados en el interior. Se deberá vigilar a los niños
para asegurarse de que no jueguen con el electrodoméstico.
- Si quedan atrapados dentro, los niños pueden lesionarse o sofocarse hasta morir.
• Se utiliza ciclopentano como aislante. Los gases del material de aislamiento requieren un procedimiento
especial para desecharlos. Comuníquese con las autoridades locales para desechar este producto de
manera que no resulte nocivo para el medio ambiente.
• Mantenga los materiales de empaque fuera del alcance de los niños, ya que pueden ser peligrosos para
ellos.
- Si un niño se coloca una bolsa en la cabeza, puede asxiarse.
Información sobre seguridad
Español 13
Untitled-8 13 11/11/2020 2:19:13 PM
Page 78

01
02
04
07
03
06
05
08
Instalación
Instalación
Siga las instrucciones cuidadosamente a n de garantizar la instalación adecuada del refrigerador y de
evitar accidentes antes de utilizarlo.
ADVERTENCIA
• Utilice el refrigerador solamente para su uso previsto como se describe en este manual.
• Todas las reparaciones deben estar a cargo de un técnico calicado.
• Descarte el material de empaque del producto de acuerdo con la normativa local.
• A n de evitar descargas eléctricas, desconecte el enchufe antes de realizar trabajos de mantenimiento
o reemplazo de piezas.
Descripción breve del refrigerador
El refrigerador y los componentes provistos pueden diferir de las ilustraciones en este manual según el
modelo y el país.
Español14
Untitled-8 14 11/11/2020 2:19:13 PM
Page 79

01 Fábrica de hielo automática 02 Panel principal
03 Cajón ancho 04 Congelador
05 Compartimientos de las puertas 06 Filtro de agua
07 Fábrica de hielo * 08 Cubeta de hielo *
* solo para los modelos correspondientes
NOTA
• Para una mayor eciencia energética, asegúrese de que todos los estantes, cajones y canastos estén en
su posición original.
• Al cerrar la puerta, asegúrese de que la sección de la bisagra vertical se encuentre en la posición
correcta para impedir que se raye con la otra puerta.
• Si la sección de la bisagra vertical está invertida, colóquela en la posición correcta y cierre la puerta.
• Algunas veces puede aparecer humedad en esta sección de la bisagra vertical.
• Si cierra una puerta por la fuerza, la otra puerta puede abrirse.
• Cuando se abre una puerta, el disyuntor desactiva automáticamente el motor sinfín de la fábrica de
hielo por razones de seguridad.
• Si la lámpara LED interna o externa no funcionan, comuníquese con un centro de servicio Samsung.
• Si la puerta quedara abierta demasiado tiempo, el LED interno superior titilará. Esto es normal.
Compartimientos de las puertas (solo para los modelos correspondientes)
Su refrigerador se despacha con compartimientos de las puertas de distintos tipos y tamaños. Si los
compartimientos de las puertas de su refrigerador se empacaron por separado, utilice la siguiente gura
como guía para colocarlos correctamente.
El número de compartimientos provistos puede variar dependiendo del modelo.
Instalación
Español 15
Untitled-8 15 11/11/2020 2:19:13 PM
Page 80

Instalación
Instalación
Instalación paso a paso
PASO 1 Seleccione un lugar
Seleccione un lugar que:
• Tenga una supercie sólida, nivelada sin alfombrado ni pisos que puedan obstruir la ventilación
• Esté alejado de la luz solar directa
• Cuente con el lugar adecuado para abrir y cerrar la puerta
• Esté alejado de las fuentes de calor
• Cuente con lugar para realizar mantenimiento y reparaciones
• Cuente con un rango de temperatura de entre 50 °F (10 °C) y 109 °F (43 °C)
PRECAUCIÓN
• Si su refrigerador cuenta con una fábrica de hielo, asegúrese de dejar un espacio adicional en la parte
posterior del refrigerador para la conexión de la tubería de agua.
• Si se instala el refrigerador junto a una pared ja, debe dejar una distancia mínima de 3
entre el refrigerador y la pared para poder abrir la puerta.
NOTA
Para facilitar el desplazamiento del refrigerador hasta su ubicación nal, asegúrese de medir el ancho y el
alto de las entradas, los umbrales, los techos, las escaleras, y todo lo que deba considerarse para garantizar
que el refrigerador pueda trasladarse de manera segura. El siguiente diagrama ilustra la altura y la
profundidad exactas de su refrigerador (especicaciones de fábrica).
3
/4" (95 mm)
Español16
Untitled-8 16 11/11/2020 2:19:14 PM
Page 81

Espacio libre
C
D
E
B
A
01
02 02
04
03
05
06
09 10
07
08
Consulte las siguientes cifras y tablas para conocer los requisitos de espacio para la instalación.
Modelo RF27*
7
Profundidad “A” 32
Ancho “B” 35
Altura “C” 68
/8" (836 mm)
3
/4" (908 mm)
7
/8" (1749 mm)
Altura total “D” 70" (1777 mm)
3
Profundidad “E” 35
/8" (898 mm)
Modelo RF27*
Instalación
01 2" (50 mm)
02 130°
2
03 62
04 13
05 35
06 28
07 3
08 1
09 47
10 51
NOTA
/8" (1581 mm)
2
/8" (337 mm)
3
/4" (908 mm)
7
/8" (735 mm)
5
/8" (93 mm)
7
/8" (47 mm)
2
/8" (1201 mm)
7
/8" (1318 mm)
Las medidas de la tabla anterior pueden variar
ligeramente de las medidas reales según el método
de medición y redondeo.
Español 17
Untitled-8 17 11/11/2020 2:19:14 PM
Page 82

Instalación
Instalación
PASO 2 Piso
Si el refrigerador no pasa por la puerta por su tamaño, consulte PASO 3 Extracción de la puerta para la
entrada.
NOTA
Para evitar que se dañe el piso, asegúrese de
que las patas de nivelación delanteras estén en
posición vertical.
• La supercie sobre la que se instalará el
refrigerador debe soportar un refrigerador
completamente cargado.
• A n de proteger el piso, coloque un trozo de
cartón por el recorrido del refrigerador hasta su
ubicación nal.
• Una vez que el refrigerador esté en su posición
nal, no lo mueva a menos que sea necesario
a n de proteger el piso. Si debe hacerlo,
utilice un papel grueso o tela, como una
alfombra vieja, en el recorrido por el que se lo
desplazará.
Español18
Untitled-8 18 11/11/2020 2:19:14 PM
Page 83

PASO 3 Extracción de la puerta para la entrada
Si el refrigerador no pasa por la entrada de su casa o de la cocina por una cuestión de tamaño, siga estas
instrucciones para extraer y colocar nuevamente las puertas del refrigerador. Si no necesita retirar las
puertas, vaya a la página 25 para continuar con el procedimiento de instalación.
ADVERTENCIA
Desenchufe el cable de alimentación del refrigerador antes de retirar las puertas.
Herramientas necesarias (no provistas)
Destornillador Phillips Destornillador de cabeza plana Llave de tubo 3/8" (10 mm)
Pinzas Llave Allen 1/4" (5 mm)
Instalación
Español 19
Untitled-8 19 11/11/2020 2:19:15 PM
Page 84

Instalación
Instalación
Retire las puertas del refrigerador
Puerta izquierda
1. Con las puertas cerradas, utilice un
destornillador de cabeza Phillips para extraer
los tornillos (x3) de la cubierta superior.
2. Desconecte los cables y el tubo de agua de la
puerta izquierda. Haga lo siguiente en orden:
• Desconecte el conector.
• Sosteniendo un extremo del acoplador de la
tubería de agua, desconecte el tubo de agua.
PRECAUCIÓN
Mantenga las grapas del tubo de agua fuera del
alcance de los niños.
3. Levante suavemente la abrazadera. A n de
evitar lesiones en los dedos, no aplique fuerza
repentinamente sobre la abrazadera.
Español20
Untitled-8 20 11/11/2020 2:19:16 PM
Page 85

4. Jale la abrazadera para retirarla.
NOTA
Tenga cuidado de no dejar caer la abrazadera.
5. Abra la puerta a 90 grados. Mientras sostiene
la puerta, levante y retire la bisagra superior.
Tenga cuidado de no dañar los cables de los
conectores al retirar la bisagra.
NOTA
Tenga cuidado de no dejar caer la bisagra.
6. Suavemente levante la puerta en sentido
vertical para retirarla. No use fuerza excesiva.
La puerta puede caerse y provocarle lesiones.
7. Coloque la puerta en una supercie plana.
PRECAUCIÓN
Coloque la puerta lentamente para evitar rayones.
Instalación
Español 21
Untitled-8 21 11/11/2020 2:19:17 PM
Page 86

Instalación
Instalación
Puerta derecha
1. Levante suavemente la abrazadera. A n de
evitar lesiones en los dedos, no aplique fuerza
repentinamente sobre la abrazadera.
2. Jale la abrazadera para retirarla.
NOTA
Tenga cuidado de no dejar caer la abrazadera.
3. Abra la puerta a 90 grados. Mientras sostiene
la puerta, levante y retire la bisagra superior.
Tenga cuidado de no dañar los cables de los
conectores al retirar la bisagra.
NOTA
Tenga cuidado de no dejar caer la bisagra.
Español22
Untitled-8 22 11/11/2020 2:19:18 PM
Page 87

4. Suavemente levante la puerta en sentido
A
01
02
03
B
vertical para retirarla. No use fuerza excesiva.
La puerta puede caerse y provocarle lesiones.
5. Coloque la puerta en una supercie plana.
Para colocar nuevamente la puerta del refrigerador
Una vez que haya instalado el refrigerador en su ubicación nal, vuelva a colocar las puertas siguiendo las
instrucciones para retirar las puertas en orden inverso.
PRECAUCIÓN
Para evitar fugas de agua del dispensador, la
tubería de agua debe estar completamente
conectada. Asegúrese de que ambos tubos de la
tubería de agua estén insertados completamente
en el centro del acoplador transparente (A) o las
marcas de guía (B).
01 Dispensador
02 Centro del acoplador transparente
03 Marcas de guía
Para retirar el cajón del congelador
1. Levante la parte delantera de la cesta superior
y jale para retirarla.
Instalación
Español 23
Untitled-8 23 11/11/2020 2:19:18 PM
Page 88

Instalación
Instalación
2. Luego levante la cesta inferior para retirarla del
conjunto de riel.
3. Presione los ganchos para desbloquear el
conjunto de riel.
4. Mientras sostiene la parte superior del frente
del cajón del congelador, deslícelo hacia afuera
para retirar el cajón del congelador del conjunto
de riel.
PRECAUCIÓN
• Tenga cuidado de no rayar ni abollar el
conjunto de riel.
• Asegúrese de instalar las cestas del congelador
en la posición correcta. De lo contrario,
la puerta no podrá abrirse ni cerrarse
correctamente, lo que provocará la acumulación
de escarcha.
• No almacene demasiados alimentos en el
cajón del congelador. Esto hará que el cajón
del congelador no se cierre correctamente y se
acumule escarcha.
Español24
Untitled-8 24 11/11/2020 2:19:19 PM
Page 89

Para colocar nuevamente el cajón del congelador
Una vez que el refrigerador esté instalado en su ubicación nal, vuelva a colocar el cajón del congelador
siguiendo las indicaciones anteriores en el orden inverso.
PASO 4 Nivelación del refrigerador
PRECAUCIÓN
• Una vez instalado, el refrigerador debe estar nivelado sobre un piso plano y sólido. No nivelar el
refrigerador puede provocar daños al refrigerador o lesiones personales.
• La nivelación debe realizarse con el refrigerador vacío. Asegúrese de que no haya alimentos dentro del
refrigerador.
• Por razones de seguridad, ajuste la parte delantera un poco más elevada que la parte trasera.
Nivele el refrigerador usando los tornillos especiales (niveladores) en las patas delanteras. Use un
destornillador plano para girar los niveladores.
• Para ajustar la altura del lado izquierdo: Inserte
un destornillador plano en el nivelador de
la pata delantera del lado izquierdo. Gire el
nivelador en el sentido de las agujas del reloj
para elevar el lado izquierdo o en el sentido
contrario para bajarlo.
• Para ajustar la altura del lado derecho: Inserte
un destornillador plano en el nivelador de
la pata delantera del lado derecho. Gire el
nivelador en el sentido de las agujas del reloj
para elevar el lado derecho o en el sentido
contrario para bajarlo.
Instalación
Español 25
Untitled-8 25 11/11/2020 2:19:19 PM
Page 90

Instalación
9
Instalación
PASO 5 Ajuste de la altura de la puerta y del espacio de la puerta
Anillos elásticos
Es posible ajustar la altura de la puerta mediante los anillos elásticos
provistos que vienen en 4 tamaños diferentes (1 mm, 1.5 mm, 2 mm
y 2.5 mm).
Para ajustar la altura de una puerta
1. Controle la diferencia de altura entre las
puertas y luego eleve y sostenga la puerta más
baja.
2. Inserte un anillo elástico (A) del tamaño
adecuado entre el anillo de caucho (B) de la
puerta y la bisagra como se ilustra.
PRECAUCIÓN
• Inserte solo un anillo elástico. Colocar dos o más anillos elásticos puede hacer que se deslicen o hagan
ruido por el rozamiento.
• Mantenga los anillos elásticos fuera del alcance de los niños y consérvelos para uso futuro.
• No eleve la puerta en demasía. La puerta puede entrar en contacto y dañar la cubierta superior.
Español26
Untitled-8 26 11/11/2020 2:19:20 PM
Page 91

PASO 6 Instalación de las manijas
1
2
3
2
PRECAUCIÓN
Las manijas del refrigerador deben estar
orientadas en la dirección correcta.
• Las manijas del refrigerador deben instalarse
de manera tal que los oricios queden
enfrentados.
• La manija del congelador debe instalarse de
manera tal que su oricio quede orientado
hacia abajo.
1. Con un destornillador Phillips je los tornillos
de las manijas al refrigerador, dos para cada
una respectivamente, como se muestra en la
ilustración de la izquierda.
Instalación
2. Ajuste la manija a los tornillos de la manija en
la puerta.
Para manija tipo B: Inserte el gancho a la mitad de
la manija en el oricio designado en la puerta y,
luego, coloque la parte superior e inferior de las
manijas en los tornillos de la manija.
NOTA
El diseño de la manija de la puerta del lado
derecho puede variar según el modelo.
Untitled-8 27 11/11/2020 2:19:21 PM
Español 27
Page 92

Instalación
Instalación
3. Empuje la manija hacia abajo.
4. Inserte la llave provista en el oricio de la
manija y gírela en el sentido de las agujas del
reloj para ajustarla.
5. Repita los pasos 2 a 4 con la manija de la
segunda puerta del refrigerador.
6. Para ajustar la manija del congelador en el
refrigerador, primero coloque la parte izquierda
de la manija del congelador sobre el tornillo
izquierdo de la manija y, luego, empújela hacia
la izquierda.
7. Luego, coloque la parte derecha de la manija
de congelador sobre el tornillo derecho de la
manija.
Español28
Untitled-8 28 11/11/2020 2:19:22 PM
Page 93

8. Inserte la llave provista en el oricio de la
manija y gírela en el sentido de las agujas del
reloj para ajustarla.
Instalación
Español 29
Untitled-8 29 11/11/2020 2:19:22 PM
Page 94

Instalación
A
B
C
A
B
Instalación
PASO 7 Conectar la tubería del dispensador de agua
El dispensador de agua con ltro es una de las funciones útiles de su nuevo refrigerador. Con el n de
promover la buena salud, el ltro de agua elimina las partículas no deseadas del agua. No obstante, no la
esteriliza ni destruye los microorganismos. Para eso, necesita adquirir un sistema de puricación de agua.
La tubería del agua también se conecta a la fábrica de hielo. Para que la fábrica de hielo funcione
correctamente, se requiere una presión de agua de entre 30 y 120 psi (206 y 827 kPa).
Si el refrigerador se instala en una zona con baja presión de agua (inferior a 30 psi/206 kPa), puede
instalar una bomba cebadora para compensar la baja presión.
Una vez conectada la tubería de agua, asegúrese de que el tanque de almacenamiento de agua dentro del
refrigerador esté lleno. Para hacerlo, presione la palanca del dispensador de agua hasta que salga el agua
por la salida.
NOTA
• Su distribuidor podrá ofrecerle los equipos de instalación de tuberías de agua disponibles a un costo
adicional. Recomendamos utilizar un equipo de instalación de tubería de agua que contenga tubería de
cobre y una tuerca de compresión de
1
/4" (6 mm).
1. Cierre el suministro de agua principal.
2. Inserte la abrazadera (B) y la válvula de cierre
(C) en la tubería de agua fría (A).
3. Conecte el equipo de instalación de la tubería
de agua (A) a la válvula de cierre (B).
Untitled-8 30 11/11/2020 2:19:23 PM
Español30
Page 95

Conecte la tubería de suministro de agua al refrigerador
A
01
02
03 08
04
05
06
07
B
C
Para llevar a cabo la conexión, necesita adquirir varios elementos. Posiblemente su ferretería local los
venda todos juntos en un equipo.
Tubería de cobre
Tubería de plástico
• Tubería de cobre de 1/4"
• Tuerca de compresión de 1/4" (1 pc)
• Férula (2)
1
• Tubería de plástico de
/4" Extremo moldeado (bulbo)
• Tuerca de compresión de 1/4" (1 pc)
A. Refrigerador
B. Tubería de suministro del agua corriente
C. Tubería de agua: debe mantenerse recta.
01 Tuerca de compresión (
02 Férula (No provista)
03 Tubería de cobre (no provista)
04 Tubería de plástico (ensamblada)
05 Acople de compresión (ensamblado)
06 Extremo moldeado (bulbo)
07 Tuerca de compresión (1/4”) (no provista)
08 Tubería de plástico (no provista)
NOTA
Si debe reubicar el refrigerador después de
conectar la tubería de agua (C), asegúrese de que
la sección de la unión de la tubería se mantenga
recta.
1
/4") (ensamblada)
Instalación
Untitled-8 31 11/11/2020 2:19:23 PM
Español 31
Page 96

Instalación
PRECAUCIÓN
No instale el ltro de agua en ninguna parte del
refrigerador. Esto podría dañar el refrigerador.
1. Conecte la tubería de agua corriente al acople de compresión ensamblado.
- Si utiliza una tubería de cobre, deslice la tuerca de compresión (07) (no provista) y la férula (no
provista) por la tubería de cobre (no provista) como se muestra en el gráco.
- Si utiliza una tubería de plástico (08), inserte el extremo moldeado (bulbo) de la tubería de plástico
(08) en el acople de compresión.
Instalación
PRECAUCIÓN
• Si utiliza una tubería de plástico (08), no la use sin el extremo moldeado (bulbo).
• Dejar la tubería de agua desconectada puede causar que con el tiempo la válvula de agua emita un
zumbido. En este caso, asegúrese de desactivar la fábrica de hielo colocándola en “OFF” y no intente
usar el dispensador de agua.
2. Ajuste la tuerca de compresión (07) sobre el acople de compresión. No ajuste demasiado la tuerca de
compresión (07).
3. Abra el agua y verique si hay alguna fuga. Si encuentra gotas o fugas de agua en las zonas de las
conexiones, cierre el suministro de agua principal. Revise las conexiones y, de ser necesario, ajústelas.
4. Haga correr 1 galón de agua a través del ltro antes de beber o de utilizar el agua del refrigerador. (El
agua debe correr unos 6 minutos.) Para hacer correr el agua, presione la palanca del dispensador de
agua con un vaso o una taza grandes. Llene el vaso, vacíelo y luego repita la operación.
5. Tras poner en funcionamiento el refrigerador, deje que la fábrica de hielo haga hielo durante 1 o 2
días. Pasado este tiempo, deseche las primeras 1 o 2 cubetas de hielo que hace la fábrica de hielo para
asegurarse de que se hayan eliminado todas las impurezas de la tubería de agua.
NOTA
Conecte solamente la tubería de agua a una fuente de agua potable.
• Si debe reparar o desensamblar la tubería de agua, recorte
de que la conexión sea perfecta y libre de pérdidas.
• Puede probar rápidamente la tubería del agua con un vaso de papel. En condiciones normales, el
dispensador de agua puede llenar un vaso de 5 3/4 oz. (170 cc) en aproximadamente 10 segundos.
1
/4" de la tubería de plástico para asegurarse
Español32
Untitled-8 32 11/11/2020 2:19:24 PM
Page 97

PASO 8 Conguración inicial
Al completar los siguientes pasos, el refrigerador quedará en perfectas condiciones de funcionamiento.
1. Enchufe el cable de alimentación al tomacorriente para encender el refrigerador.
2. Abra la puerta y verique que la luz interna se encienda.
3. Coloque la temperatura en el valor más frío y espere una hora. Luego, el congelador comenzará a
enfriarse y el motor funcionará adecuadamente.
4. Espere a que el refrigerador llegue a la temperatura congurada. Ahora el refrigerador estará listo para
usar.
PASO 9 Vericación nal
Una vez nalizada la instalación, conrme que:
• El refrigerador esté enchufado al tomacorriente y correctamente conectado a tierra.
• El refrigerador esté instalado sobre una supercie plana y nivelada con un espacio libre razonable con
respecto a paredes y gabinetes.
• El refrigerador esté nivelado y apoyado rmemente en el piso.
• La puerta se abre y cierra libremente y la luz interior se enciende automáticamente al abrir la puerta.
Instalación
Español 33
Untitled-8 33 11/11/2020 2:19:24 PM
Page 98

Funcionamiento
Panel principal
RF27T5201** RF27T5241**
01
02 07
03
Funcionamiento
04
05
06
07
01
02 07
03
04
05
07
06
01 Fridge (Refrigerador) / °F °C 02 Power Cool (Refrigeración rápida)
03 Freezer (Congelador) /
Power Freeze (Congelación rápida)
04 Ice Maker (Fabrica de hielo) /
Filter Reset (Restablecer ltro) *
05 Water/Ice (Agua/Hielo) /
Dispenser Lock (Bloqueo del dispensador)
06 Door Alarm (Alarma de la puerta) /
Control Lock (Bloqueo del control)
07 Modo Shabat
* solo para los modelos correspondientes
Español34
Untitled-8 34 11/11/2020 2:19:24 PM
Page 99

NOTA
• Cuando cambia la temperatura del panel, este muestra la temperatura actual dentro del refrigerador
hasta que se alcanza la temperatura que ha congurado. Luego el panel muestra la nueva temperatura
congurada. Tenga en cuenta que el refrigerador necesita un tiempo para alcanzar la nueva
temperatura. Esto es normal. Durante este tiempo, no es necesario restablecer la temperatura.
• A n de garantizar un desempeño óptimo, recomendamos congurar la temperatura entre 0 °F (-18 °C)
para el congelador y 37 °F (3 °C) para el refrigerador.
• La temperatura del refrigerador puede aumentar si abre la puerta con frecuencia o si se coloca una gran
cantidad de alimentos dentro de este. Si esto ocurriera, el visor de temperatura parpadeará hasta que el
refrigerador regrese al ajuste de temperatura especicado.
• Si se produce un error de comunicación entre el visor de temperatura y el regulador principal, es
posible que el parpadeo continúe durante un período prolongado. Comuníquese con un centro de
servicios Samsung local para recibir asistencia técnica.
• El visor del panel principal solo se enciende si la puerta está abierta, y se apaga cuando la puerta se
cierra.
• Si activa el Bloqueo del control en el panel principal, este se bloquea automáticamente después de 1
minuto de inactividad.
01 Refrigerador / °F °C (3 s)
Puede usar el botón Fridge (Refrigerador) para congurar la temperatura del
refrigerador.
Fridge (Refrigerador)
• Presione Fridge (Refrigerador) varias veces para seleccionar una
temperatura deseada entre 34 °F (1 °C) y 44 °F (7 °C).
- El indicador de temperatura le muestra la temperatura congurada o
seleccionada actualmente.
También puede utilizar el botón Fridge (Refrigerador) para modicar la escala
de temperatura de Celsius a Fahrenheit.
°F °C
Para cambiar la escala de temperatura, mantenga presionado Fridge
(Refrigerador) durante 3 segundos para modicar la escala de temperatura
actual.
Funcionamiento
02 Refrigeración rápida
Refrigeración rápida acelera el proceso de enfriamiento utilizando la velocidad máxima del ventilador.
Esta función resulta de utilidad para refrigerar rápidamente alimentos que se echan a perder rápidamente
o después de que la puerta permanece abierta durante un tiempo determinado. El refrigerador funciona a
máxima velocidad durante varias horas antes de volver a la temperatura previa.
Mantenga presionado Power Cool (Refrigeración rápida) durante 3 segundos.
Se enciende el indicador correspondiente (
), y el refrigerador acelerará el proceso de enfriamiento.
Español 35
Untitled-8 35 11/11/2020 2:19:25 PM
Page 100

Funcionamiento
03 Congelador / Congelación rápida (3 s)
Freezer (Congelador)
Power Freeze
(Congelación rápida)
Funcionamiento
El botón Freezer (Congelador) puede utilizarse para congurar la temperatura
del congelador o para activar Congelación rápida. Las temperaturas disponibles
están entre 5 °F (-15 °C) y -8 °F (-23 °C).
Congelación rápida acelera el proceso de congelación con la velocidad máxima
del ventilador. El congelador funciona a máxima velocidad durante 50 horas
antes de volver a la temperatura previa.
• Para activar Congelación rápida, mantenga presionado Freezer (Congelador)
por 3 segundos. Se enciende el indicador correspondiente (
refrigerador acelerará el proceso de congelación.
• Para desactivar, mantenga presionado nuevamente Freezer (Congelador)
por 3 segundos. El congelador vuelve a la temperatura congurada
anteriormente.
• Para congelar una gran cantidad de alimentos, active Congelación rápida
como mínimo 20 horas antes de poner alimentos en el congelador.
NOTA
Utilizar Congelación rápida aumenta el consumo energético. Asegúrese de
apagar la función y volver a la temperatura anterior si no tiene intenciones de
utilizarla.
), y el
Español36
Untitled-8 36 11/11/2020 2:19:25 PM
 Loading...