

Page 1

www.samsung.com
Page 2

USER
MANUAL
SM-R324
Printed in Korea
GH68-48025A Rev.1.0
English (EU). 05/2017
Page 3

About the Gear VR
The Samsung Gear VR allows you to enjoy 2D, 3D, and 360-degree
content by connecting it with your mobile device.
You can also view webpages and your own 360-degree images or
videos. Connect other devices, such as controllers (included), game
controllers, or headsets (sold separately), with the mobile device for
a more immersive experience.
2
Page 4

Table of Contents
Read me first
Getting started
7 Package contents
8 Device layout
17 Connecting the mobile
device and wearing the Gear
VR
32 Preparing the controller for
use
37 Installing the Gear VR app
(Oculus) and connecting the
controller
Basics
47 Using the Gear VR's
touchpad
49 Using the controller
52 Moving the pointer or the
screen
53 Selecting items
53 Using the Universal menu
56 Downloading apps and
content
57 Viewing notifications
received on the mobile
device
3
Page 5

Table of Contents
Viewing content
59 Viewing content on the
Oculus Home screen
63 Viewing content on the
mobile device
66 Viewing online content
Health and safety
warnings
Safety information
Appendix
89 Troubleshooting
4
Page 6

Read me first
•
Please read this manual before using the Samsung Gear VR (also
referred to as Gear VR) to ensure safe and proper use.
•
To prevent injury or damage to your devices, read the health
and safety warnings and information before using the Gear VR.
•
Use the Gear VR for its intended purpose only. Using the Gear
VR for other purposes may result in injury.
•
The Gear VR cannot be operated by itself. To use the Gear VR,
connect a mobile device to it. Visit
list of compatible mobile devices.
•
To use a mobile device with the Gear VR, upgrade the mobile
device's software to the latest version.
•
Some languages or content may not be available depending on
the region or network.
•
To view the open source licence for the Gear VR, refer to
opensource.samsung.com
www.samsung.com
.
to see a
5
Page 7

Read me first
Instructional icons
Warning: situations that could cause injury to yourself or
others
Caution: situations that could cause damage to your device
or other equipment
Notice: notes, usage tips, or additional information
6
Page 8

Getting started
Package contents
Check the product box for the following items:
•
Gear VR, top strap, main strap, Micro USB connector, Micro
USB device holder (for replacement), controller, wrist strap,
controller holder, two AAA batteries, and user manual
•
The items supplied with the device and any available
accessories may vary depending on the region or service
provider.
•
The supplied items are designed only for this device and
may not be compatible with other devices.
•
Appearances and specifications are subject to change
without prior notice.
•
Use only Samsung-approved accessories. Using unapproved
accessories may cause performance problems and
malfunctions that are not covered by the warranty.
•
Availability of all accessories is subject to change depending
entirely on manufacturing companies. For more information
about available accessories, refer to the Samsung website.
7
Page 9
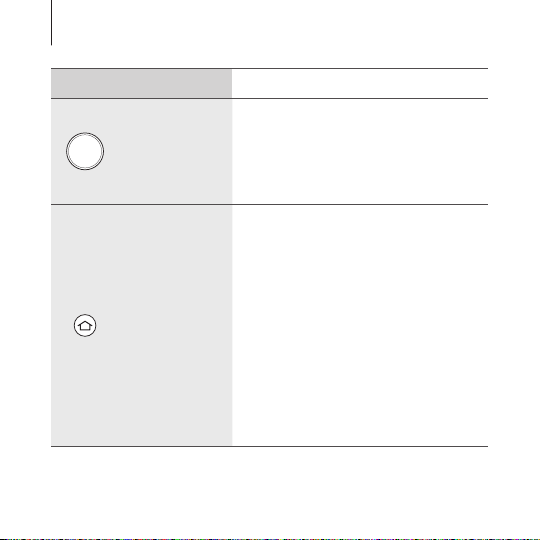
Getting started
Focus
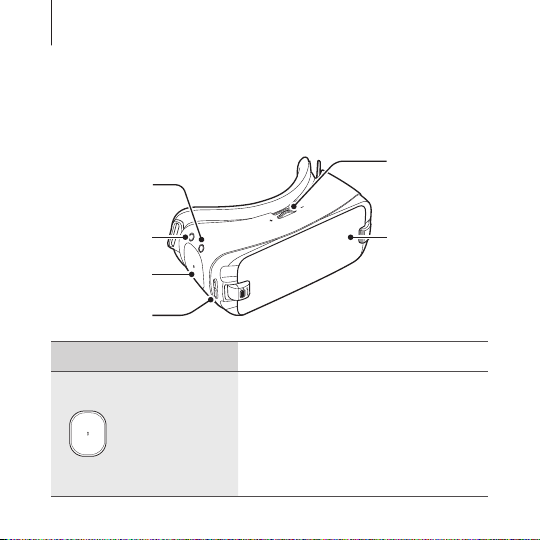
Device layout
Gear VR
Back key
Home key
Touchpad
Volume key
Touchpad and keys Function
•
Tap to select an item. You can
move to the next or previous
Touchpad
8
item by swiping forwards or
backwards. For more information,
refer to Using the Gear VR's
touchpad. (p. 47)
adjustment
wheel
Front cover
Page 10
Getting started
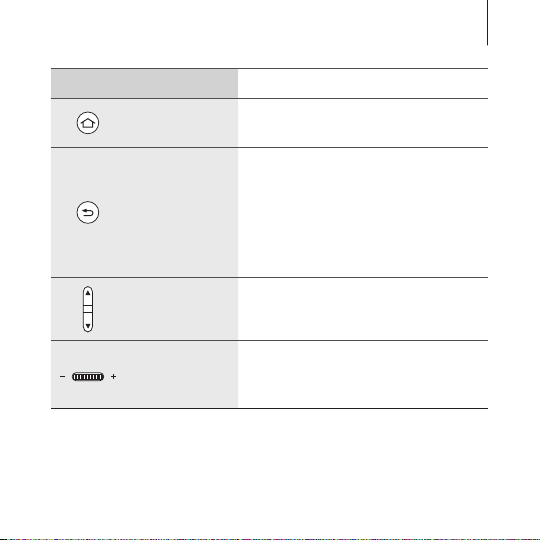
Touchpad and keys Function
•
Home
Press to return to the Oculus
Home screen.
•
Press to return to the previous
screen.
•
Back
Press and hold to open the
Universal menu. You can view
the status of the Gear VR and
configure settings.
•
Volume
Press to adjust the Gear VR
volume.
Focus
adjustment
wheel
•
Rotate to focus by adjusting the
distance between the mobile
device and the Gear VR's lenses.
9
Page 11

Getting started
Main strap loop
Top strap loop
Device holder
Multipurpose
cushioning
10
(left)
jack (USB
Type-C)
Foam
Main strap loop
Device holder
(right)
Proximity
sensor
Lenses
Page 12
Getting started
•
The Gear VR does not require charging as it is powered
using the mobile device’s battery.
•
You can charge your mobile device by connecting a
charger to the Gear VR's multipurpose jack. Use only
Samsung-approved chargers. Unapproved chargers can
cause the mobile device's battery to explode or damage
your devices.
−
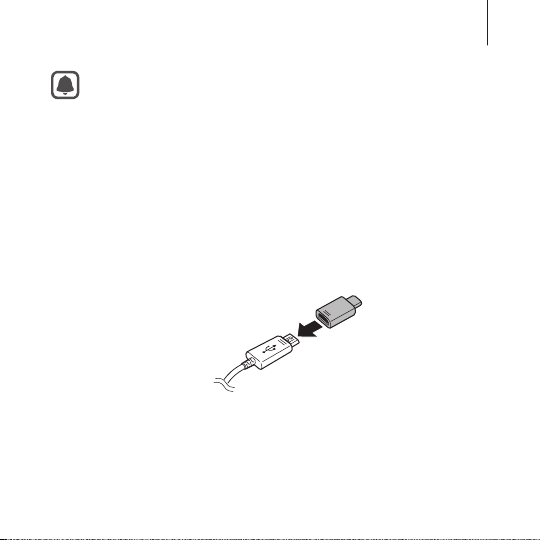
If you use a Micro USB charger, connect a Micro USB
connector before plugging the charger into the
Gear VR. The Micro USB connector is only for battery
charging.
11
Page 13

Getting started
−
If you use the Gear VR while the charger is connected
to the Gear VR's multipurpose jack, it is powered by the
charger and does not use the mobile device's battery.
When you use content that has high power demand
(more than 1 A) while the charger is connected,
the Gear VR uses two power sources. In high power
demand situations, the Gear VR is powered by the
charger and the mobile device's battery at the same
time.
−
If the Gear VR is not used while the charger is
connected, the mobile device's battery will be charged.
−
If the Gear VR is connected to or disconnected from
the charger while the Gear VR is being used, the image
on the screen may be briefly inactive. During this
period, the screen recalibrates and the Gear VR may not
recognise your head movements.
•
To save energy, unplug the charger when not in use. The
charger does not have a power switch, so you must unplug
the charger from the electric socket when not in use to
avoid wasting power. The charger should remain close to
the electric socket and easily accessible while charging.
12
Page 14
Getting started
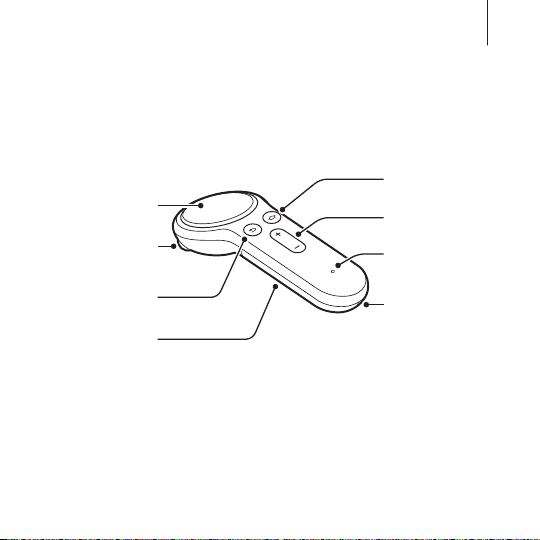
Home key
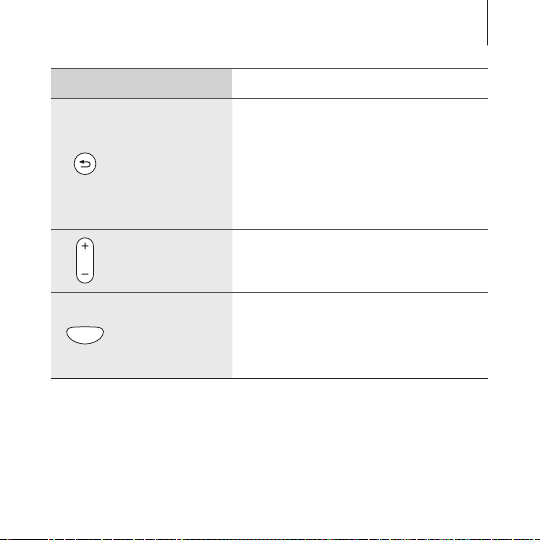
Controller
You can connect the controller to a mobile device connected with
a Gear VR via Bluetooth. Control various Gear VR features with the
controller keys and touchpad.
Touchpad
Trigger
Back key
Battery cover
Volume key
Indicator light
Wrist strap
connection hole
13
Page 15
Getting started
Touchpad and keys Function
•
Press to select an item. You can
move to the next or previous item
Touchpad
by swiping to the left or right. For
more information, refer to Using
the controller. (p. 49)
When the controller is not
connected with a Gear VR:
•
Press and hold to enter Bluetooth
pairing mode.
When the controller is connected
Home
with a Gear VR:
•
Press to return to the Oculus
Home screen.
•
Press and hold to reorient the
controller's pointer direction
when it is off-centre.
14
Page 16
Getting started
Touchpad and keys Function
•
Press to return to the previous
screen.
•
Back
Press and hold to open the
Universal menu. You can view
the status of the Gear VR and
configure settings.
•
Volume
Trigger
Press to adjust the Gear VR
volume.
•
Press to select an item or use it
as a trigger when playing certain
games. Its function may vary
depending on the launched apps.
15
Page 17
Getting started
Indicator light
Colour Status
Flashes red, green, and
blue
Flashes blue three times
Flashes blue one time
•
The controller is in Bluetooth
pairing mode.
•
Bluetooth is connected.
•
Sleep mode is deactivated.
Band and mode
Band and mode Output power
Bluetooth 2.4 GHz 13 dBm
Declaration of Conformity
Samsung Electronics declares that this device complies with
the essential requirements and relevant provisions of Directive
2014/53/EU.
www.samsung.com/mobile_doc
Go to
Conformity.
16
to view the Declaration of
Page 18

Getting started
Connecting the mobile device and wearing the Gear VR
•
Do not put on the Gear VR when you are wearing glasses.
Doing so may cause facial injuries. If you need corrective
lenses, it is recommended that you wear contact lenses
when using the Gear VR.
•
If you are farsighted or there is a big difference between
your left and right eyes' vision, wear corrective lenses
before using the Gear VR.
•
Factory lens protectors are pre-installed on the Gear VR.
Remove the lens protectors before you use the Gear VR so
you can see clearly.
•
Keep the lenses clean and protect them from getting
scratched. If the lenses get dirty or steam up, clean them
with the lens cleaning cloth.
17
Page 19

Getting started
•
The foam cushioning may get dirty if your face is sweating
while you are wearing the Gear VR. Do not try to wash the
foam cushioning. Remove the polluted foam cushioning
from the Gear VR and attach a new one.
•
The touchpad works only while you are wearing the Gear
VR.
•
A proximity sensor inside the Gear VR detects the position
of your face. When wearing the Gear VR, the mobile
device's screen will turn on and the Gear VR's touchpad
will be activated. When you are not wearing the Gear VR,
do not place objects near the proximity sensor inside the
Gear VR. Doing so may cause the mobile device's screen to
remain on and drain its battery.
18
Page 20
Getting started
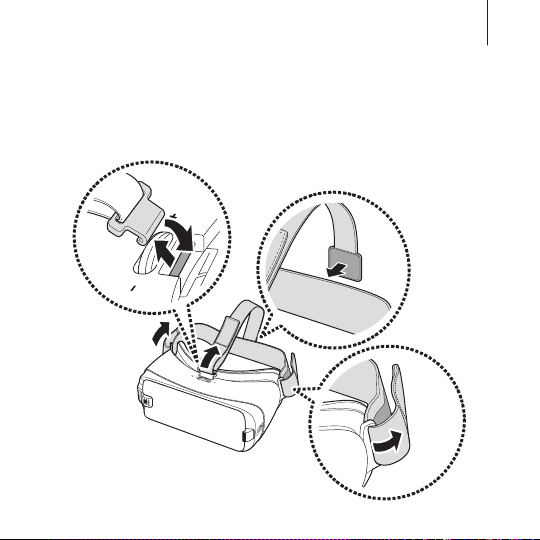
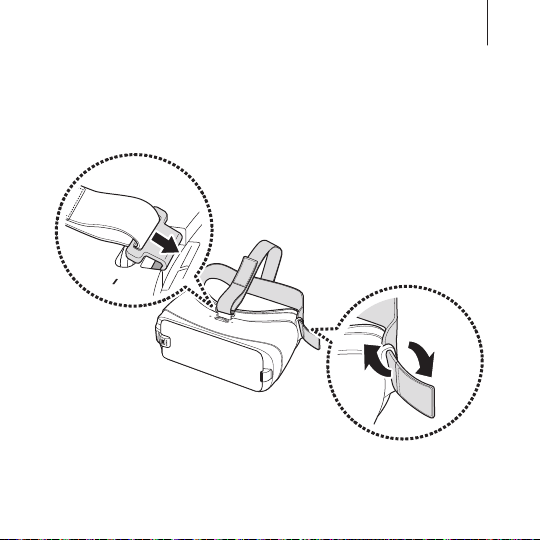
Connecting straps
Insert the ends of the straps through the strap loops on the
1
Gear VR and use the velcro to fasten each end.
19
Page 21
Getting started
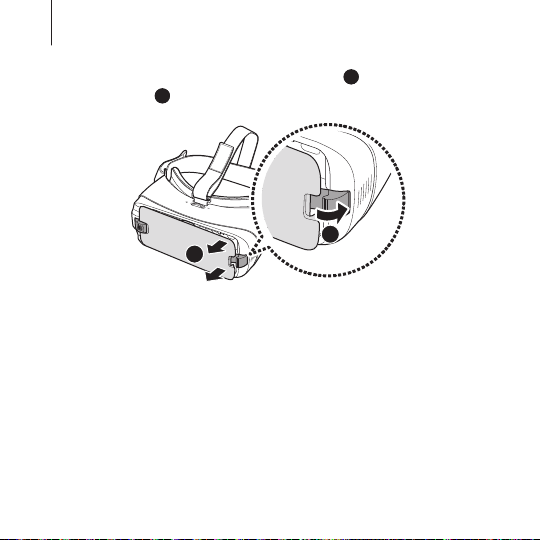
1
Pull the device holder (right) to the right (
2
front cover (
20
2
).
2
1
) then remove the
Page 22
Getting started
Removing straps
Remove the top strap by pulling its loop towards the foam
cushioning. Then, remove the main strap from the Gear VR.
21
Page 23
Getting started
Replacing the device holder
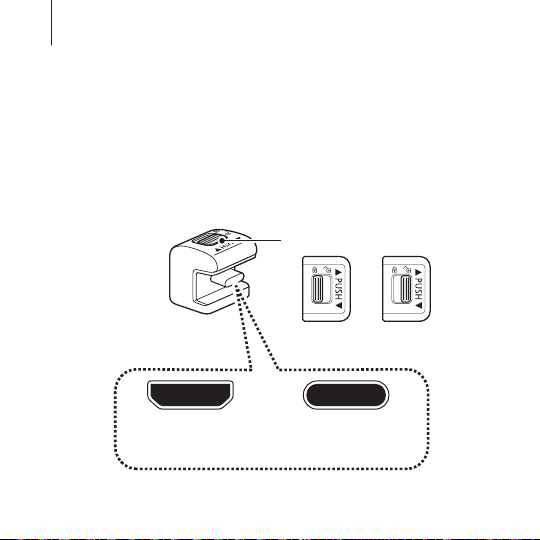
The USB Type-C device holder is attached to the Gear VR by default.
If your mobile device's multipurpose jack is USB Type-C, you can
connect the mobile device to the Gear VR. If your mobile device's
multipurpose jack is Micro USB, replace the device holder with the
Micro USB device holder before connecting your mobile device to
the Gear VR.
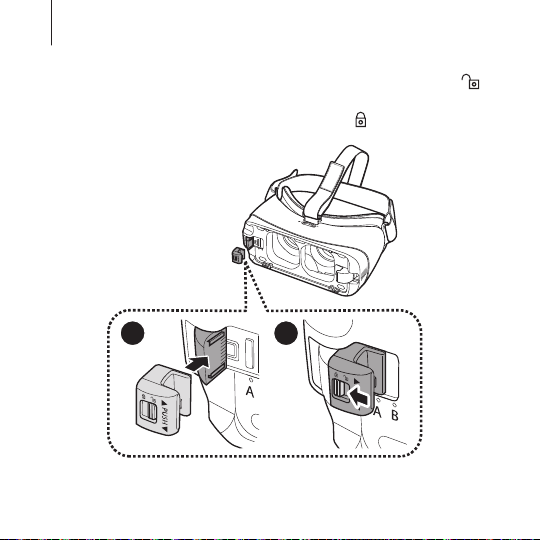
Device holder lock switch
Locked Unlocked
22
Micro USB
device holder
USB Type-C
device holder
Page 24
Getting started
Slide the lock switch to the position and remove the device
1
holder from the Gear VR.
1 2
Lock switch
23
Page 25
Getting started
Select another device holder. While the lock switch is in the
2
position, slide the device holder into the holder slot. Then, lock
the holder by sliding the lock switch to the
position.
1 2
24
Page 26

Getting started
•
Do not slide the device holder into the holder slot while
the lock switch is in the
position. This may damage the
lock switch's latch.
•
Ensure that you lock the device holder by sliding the lock
switch to the
position. If not, the mobile device may
accidentally separate from the Gear VR and be damaged.
25
Page 27
Getting started
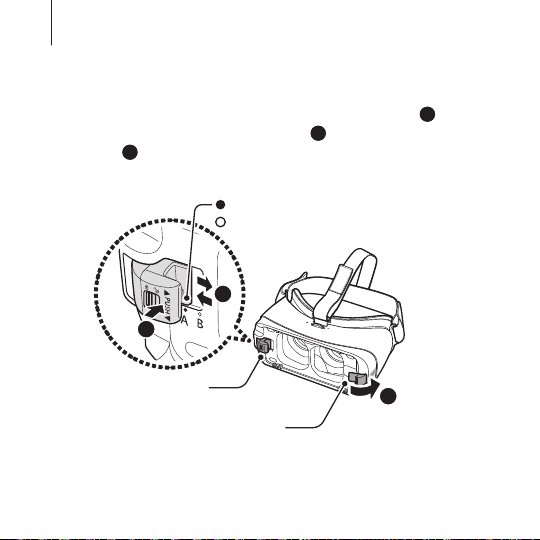
3
2
Position A
Connecting the mobile device
Pull the device holder (right) to the right thoroughly (
1
push the device holder (left) gently (
3
A or B (
you want to use.
) depending on the size of the mobile device's screen
Position B: For smaller devices.
2
) and slide it to position
: For larger devices.
1
). Then,
Device holder (left)
Device holder (right)
Unlatch the device holder (left).
2
26
1
Page 28
Getting started
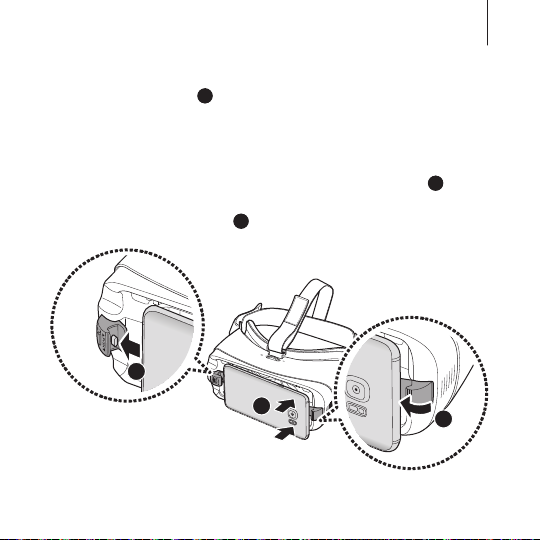
3
While the mobile device is on, connect it to the connector on
3
the device holder (
1
).
The mobile device will emit a sound when it is connected to
the Gear VR properly.
Insert the mobile device into the centre of the Gear VR and
gently push the mobile device until it locks into place (
device holder (right) will return to the previous position and
3
hold the mobile device (
1
).
2
2
). The
27
Page 29
Getting started
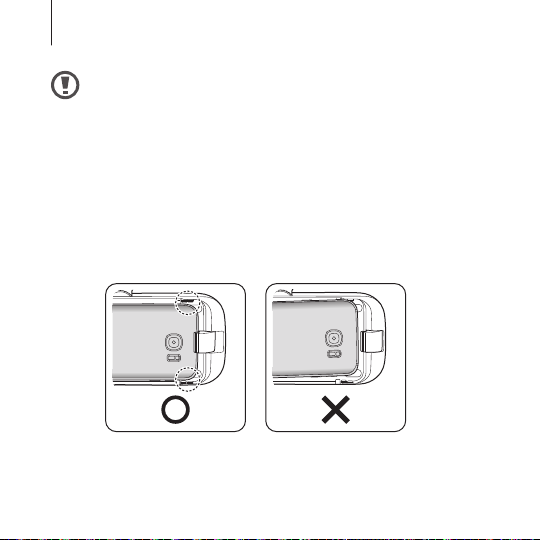
•
Do not forcefully insert the connector into the mobile
device. Doing so may damage the connector.
•
Do not twist or bend the Gear VR’s connector when you
connect or disconnect the mobile device. Doing so may
damage the connector.
•
Push the mobile device into the Gear VR firmly until it locks
in place. If it is not securely locked, the mobile device may
accidentally separate from the Gear VR and be damaged.
•
If you insert the mobile device tilted to one side, it may
cause discomfort.
28
Page 30

Getting started
If the sound is not emitted when you insert the Gear VR's
connector into the mobile device, the Gear VR may not have
recognised it. Unlock the mobile device's screen before
using the Gear VR.
Wearing the Gear VR
Place the Gear VR on your head and adjust the length of the top
strap and the main strap.
29
Page 31

Getting started
Do not walk or drive while wearing the Gear VR. Always be
aware of your surroundings while using the Gear VR to avoid
injuring yourself or others.
•
Wear the Gear VR properly. If you wear the Gear VR tilted to
one side, it may cause discomfort.
•
If the screen shifts to the left or right, check if the device
holder (left) is in the correct position. Reconnect your
mobile device after sliding the device holder (left) to
position A or B according to the size of your mobile
device's screen.
•
When the screen is tilted, adjust the Gear VR until the
screen becomes clear.
•
To use a headset or a Bluetooth headset while using
the Gear VR, connect it to your mobile device before
connecting the mobile device to the Gear VR. Headsets
and Bluetooth headsets are sold separately.
•
To control the Gear VR with your controller, connect the
controller to the mobile device you attached to the Gear
VR. (p. 41)
30
Page 32

Getting started
1
Separating the devices
Separate the mobile device from the Gear VR when you finish using
it.
1
Pull the device holder (right) to the right (
2
mobile device (
).
2
Replace the front cover when you finish using the Gear VR.
), and remove the
31
Page 33

Getting started
Preparing the controller for use
Connecting the wrist strap
When you connect the wrist strap to your controller, you can use
the controller safely without dropping it.
While pressing on the backside of the controller, slide the
1
battery cover in the direction shown below to open it.
Do not bend or twist the battery cover excessively. Doing so
may damage the battery cover.
32
Page 34

Insert the wrist strap loop into the wrist strap connection hole
2
1
2
and attach it to the hook to secure it.
Installing the batteries
Insert batteries with the positive and negative terminals
1
properly aligned with the + and - symbols on the controller.
Getting started
33
Page 35

Getting started
Place the battery cover on the controller and slide the battery
2
cover back until it clicks back into place.
•
If the indicator light flashes red while using the controller,
replace the batteries.
•
Do not recharge the provided batteries (AAA batteries).
34
Page 36

Getting started
Using the controller holder
You can attach the controller holder to the Gear VR's main strap to
store your controller when not using it.
Thread the Gear VR's main strap through the controller holder.
1
35
Page 37

Getting started
Put your controller in the controller holder to store it.
2
Insert the controller into the controller holder properly. If
it is not securely inserted, the controller may accidentally
separate from the controller holder and become damaged.
If you do not use the controller for an extended period, store
the controller after removing the batteries.
36
Page 38

Getting started
Installing the Gear VR app (Oculus) and connecting the controller
To use the Gear VR, you must manually install the Gear VR app
(Oculus). Also, connect the controller to your mobile device before
controlling the Gear VR. When you connect the mobile device to
the Gear VR for the first time, the Gear VR app (Oculus) installation
and controller connection will start automatically.
•
Before installing the app, ensure that the mobile device is
connected to a Wi-Fi or mobile network.
•
The installation method or screens may differ depending
on the app version.
Connect the mobile device to the Gear VR.
1
When a voice prompt requests you to separate the mobile
2
device from the Gear VR, remove the mobile device.
The Gear VR app (Oculus) installation screen will appear on the
mobile device.
37
Page 39

Getting started
On the Gear VR app (Oculus) installation screen, tap START.
3
Read and agree to the health and safety warnings, and the
4
terms and conditions in the End User Licence Agreement
(EULA), and then tap NEXT.
Tap INSTALL to install the default VR apps.
5
Tap Start.
6
Enter the account information, following the on-screen
7
instructions and tap Create Account to create an Oculus
account.
If you already have an Oculus account, tap Sign In and sign in
to it.
Your Oculus account will be used when using apps and content
provided by Oculus.
38
Page 40

Getting started
Tap Add Payment Method to register your card for making
8
payments when you download paid VR apps or games from
the Oculus Store.
Follow the on-screen instructions to connect the controller and
9
choose the hand you will use the controller with.
•
If the controller is not detected, press and hold the
controller's Home key to re-enter Bluetooth pairing mode.
•
The next time you connect the controller, you can connect
it to your mobile device on your mobile device's setting
screen or the Gear VR app (Oculus). (p. 42, p. 41)
39
Page 41

Getting started
Reconnect your mobile device to the Gear VR and place the
10
Gear VR on your head.
When you sign in to your Oculus account, a tutorial will start.
After viewing the tutorial, the Oculus Home screen will appear.
Control the Gear VR with the controller's keys and touchpad.
•
A proximity sensor inside the Gear VR detects the position
of your face. When you wear the Gear VR, the screen
unlocks and you can use the touchpad.
•
The 3D viewing experience may vary depending on your
visual acuity.
•
Unlock your mobile device before using the Gear VR.
•
If the screen appears tilted or skewed while using the Gear
VR, take it off. Then, place the Gear VR on a flat surface
with the lenses facing forwards and the Focus adjustment
wheel at the top. Wait 5–7 seconds before using it again.
40
Page 42

Getting started
Connecting the controller with the Gear VR app
(Oculus)
Press and hold the controller's Home key to enter Bluetooth
1
pairing mode.
The indicator light will flash red, green, and blue.
On the Gear VR app (Oculus), tap and select the controller
2
menu to connect the controller.
The indicator light will flash blue three times.
The way for connecting the controller can be changed
depending on the Oculus service.
Reconnect your mobile device to the Gear VR and wear the
3
Gear VR.
Control the Gear VR with the controller's keys and touchpad.
41
Page 43

Getting started
Connecting the controller via Bluetooth
You can connect the controller via Bluetooth only on mobile
devices running Android 6.0 or higher. If you cannot connect
the controller via Bluetooth, connect it with the Gear VR app
(Oculus).
Press and hold the controller's Home key to enter Bluetooth
1
pairing mode.
The indicator light will flash red, green, and blue.
After activating your mobile device's Bluetooth feature, tap
2
Gear VR Controller(0000) on the list of available devices to
complete Bluetooth pairing.
42
Page 44

Getting started
The indicator light will flash blue three times.
The PIN for the controller is the four-digit number in
parenthesis displayed on the mobile device’s Bluetooth
settings screen. The number differs depending on the
controller.
Reconnect your mobile device to the Gear VR and place the
3
Gear VR on your head.
Control the Gear VR with the controller's keys and touchpad.
43
Page 45

Getting started
Disconnecting and reconnecting the controller
If you remove the Gear VR from your head or the current
connection ends, the controller enters sleep mode. Press the
controller's trigger, touchpad, or any keys to deactivate sleep mode
and re-enter Bluetooth pairing mode.
The controller will be reconnected to the previous mobile device
automatically.
•
If the controller and the mobile device are not kept within
the Bluetooth connection range, the controller will be
disconnected.
•
If the batteries are removed from the controller or the
Bluetooth feature is deactivated in the mobile device, the
controller will be disconnected.
•
If the Bluetooth connection is lost due to a problem with
the connected mobile device, access the Bluetooth menu
on the mobile device to pair the devices again.
•
If your controller is not functioning properly, take it and
the Gear VR to a Samsung Service Centre.
44
Page 46

Getting started
Notices for using Bluetooth
Bluetooth is a wireless technology standard that uses a 2.4 GHz
frequency to connect to various devices over short distances. It can
connect and exchange data with other Bluetooth enabled devices,
such as mobile devices, computers, printers, and other digital home
appliances, without connecting via cables.
•
To avoid problems when connecting your controller to another
device, place the devices close to each other.
•
Ensure that your controller and the other Bluetooth device are
within the maximum Bluetooth range. The distance may vary
depending on the environment the devices are used in.
•
Ensure that there are no obstacles between the controller and
a connected device, including human bodies, walls, corners, or
fences.
•
Do not touch the Bluetooth antenna of a connected device.
•
Bluetooth uses the same frequency as some industrial, scientific,
medical, and low power products and interference may occur
when making connections near these types of products.
45
Page 47

Getting started
•
Some devices, especially those that are not tested or approved
by the Bluetooth SIG, may be incompatible with your controller.
•
Do not use the Bluetooth feature for illegal purposes
(for example, pirating copies of files or illegally tapping
communications for commercial purposes).
46
Page 48

Basics
Using the Gear VR's touchpad
The touchpad is located under the Back key and the Home key. Use
the touchpad to select items or to control the Gear VR.
To avoid damaging the Gear VR's touchpad, do not tap it
with anything sharp.
•
A proximity sensor in the Gear VR detects the position of
your face and activates the touchpad. When you are not
wearing the Gear VR, the touchpad will not work.
•
The touchpad functions may vary by app.
Tapping
•
Select an item.
•
While playing a video, show available
features.
47
Page 49

Basics
Swiping forwards or backwards
•
Move to the next or previous item.
•
Scroll right or left on a list.
•
Reject an incoming call.
Swiping upwards or downwards
•
Scroll up or down on a webpage or list.
•
While viewing an image, enlarge or
reduce its size.
Some apps may not support upwards or downwards
swiping actions.
48
Page 50

Basics
Using the controller
Control the Gear VR by moving your wrist in any direction to move
the pointer and use the touchpad to select items.
To avoid damaging the controller's touchpad, do not tap it
with anything sharp.
•
To use the controller, connect it to your mobile device.
•
The controller functions may vary by app.
Pressing
•
Select an item.
•
While playing a video, show available
features.
49
Page 51

50
Basics
Moving
•
Move your wrist to move the pointer
left, right, up, and down on the screen.
Swiping to the left or right
•
Move to the next or previous item.
•
Scroll right or left on a list.
•
Reject an incoming call.
Page 52

Basics
Swiping upwards or downwards
•
Scroll up or down on a webpage or list.
•
While viewing an image, enlarge or
reduce its size.
Some apps may not allow you to
use the swipe function.
Using the trigger
•
Press to select an item or use it as a
trigger when playing certain games. Its
function may vary depending on the
launched apps.
51
Page 53

Basics
Moving the pointer or the screen
The Gear VR recognises your head movements. Move your head in
any direction to move the pointer or the screen.
To control the Gear VR with your controller, move your wrist in any
direction to move the pointer.
•
The pointer is located in the centre of the screen. Some
apps and content may not display the pointer at all times.
•
Depending on the app, there may be screen movement
restrictions.
52
Page 54

Basics
Selecting items
You can select items by moving your head and then tapping the
Gear VR's touchpad. You can also select items by moving your
controller with your wrist and then pressing the touchpad.
Move the pointer to the item you want. When the border of
the item is highlighted, tap the Gear VR's touchpad or press the
controller's touchpad to select it.
Using the Universal menu
You can use the Universal menu to configure settings for the Gear
VR and to capture the Gear VR's screen. Also, you can view the
current time, remaining battery power, and more.
Press and hold the Gear VR's Back key or the controller's Back key
to open the Universal menu. To return to the previous screen, press
the Gear VR's Back key or the controller's Back key.
53
Page 55

Basics
•
: Return to the Oculus Home screen.
•
: View your Oculus account profile.
•
: View your friends list and check the friend request. You can
invite your friends to the party room and play games and watch
videos together.
•
: View incoming call and message notifications.
•
: Display setting options.
−
: Adjust the volume.
−
: Adjust the brightness.
54
Page 56

−
: Align the screen with the current direction you are
facing.
−
: Choose the hand you will use the controller with.
−
: Set the Gear VR to turn pop-up messages on or off for
incoming calls and notifications.
−
: Activate or deactivate the Bluetooth feature.
−
: Activate or deactivate the Wi-Fi feature.
•
: Display utility options.
−
: Capture the Gear VR's screen.
−
: Record the Gear VR's screen.
−
: Activate the mobile device's rear camera to see outside
the Gear VR. To deactivate the camera, select the Turn
Camera Off icon.
•
These features may not be available in some apps to
protect their copyright.
•
The Universal menu screen may appear differently
depending on the Oculus service.
Basics
55
Page 57

Basics
Downloading apps and content
Launch the Oculus Store app and download various apps and
content, such as 360-degree videos or photos.
On the Oculus Home screen, select Store. Select the app or content
you want to download. Then, select Free or Download, or select
the button that shows the app’s price, then follow the on-screen
instructions to confirm the download.
Removing apps
To remove a downloaded app, select Library → next to the app
you want to delete. Select Uninstall.
56
Page 58

Basics
Viewing notifications received on the mobile device
Viewing caller information or rejecting calls
If you receive a call while you are using the Gear VR, a pop-up
message is displayed on the screen. You can view the caller
information or reject the call.
To answer a call, separate the mobile device from the Gear VR and
answer the call on the mobile device
To reject a call, swipe backwards or forwards on the Gear VR's
touchpad or swipe to the left or right on the controller's touchpad.
The mobile device may become hotter than normal when
it is used with the Gear VR. This situation occurs especially
if you use the device to watch video or play games for an
extended period. Answering a call when the mobile device
is hot may cause minor burns to your face or ear. To avoid
burns, remove the mobile device and wait for it to cool
down. If you have to answer calls while it is still hot, connect
a headset or use the speakerphone.
57
Page 59

Basics
The Gear VR blocks pop-up messages for incoming calls
when you block pop-up messages for incoming calls or
other notifications. You can turn on pop-up messages in the
Universal menu. (p. 55)
Viewing notifications
While using the Gear VR, you can check general notifications,
such as events, messages, and alarms. When a notification comes
in, a pop-up message is displayed on the screen. To see more
notification details, check them on the mobile device after you
separate it from the Gear VR.
The Gear VR blocks pop-up messages for notifications
when you block pop-up messages for incoming calls or
other notifications. You can turn on pop-up messages in the
Universal menu. (p. 55)
58
Page 60

Viewing content
Viewing content on the Oculus Home screen
Oculus Home screen
When you connect your mobile device to the Gear VR and wear
the Gear VR, you will see the Oculus Home screen. On the Oculus
Home screen, select an app or content to view various 2D, 3D, or
360-degree content. While using the Gear VR, press the Gear VR's
Home key or the controller's Home key to return to the Oculus
Home screen.
59
Page 61

Viewing content
Recommendations
Recent
apps
The Oculus Home screen may appear differently depending
on the Oculus service.
Library
View the content and apps you downloaded from the Oculus Store.
On the Oculus Home screen, select Library. Move to the content or
app you want to use and select it.
60
Friends list
Page 62

Viewing content
Oculus Video
Enjoy various videos and 3D movies in your own virtual movie
theatre.
You can also view 360-degree videos, as well as 2D or 3D videos,
saved in your mobile device.
If the video app is not installed as a default app, download it from
the Oculus Store.
On the Oculus Home screen, select Library → video.
1
Select a category and a video.
2
Move your head in any direction or use the controller to watch
3
the videos from various angles.
Swipe backwards or forwards on the Gear VR's touchpad or
swipe to the left or right on the controller's touchpad to rewind
or fast-forward.
While watching videos, tap the Gear VR's touchpad or press the
controller's touchpad to use the following features:
•
/ : Pause and resume playback.
•
: Return to the playlist.
61
Page 63

Viewing content
Oculus 360 photos
View recommended 360-degree images, 3D art images, and other
various images.
You can also view 360-degree images saved in your mobile device.
If the 360 photos app is not installed as a default app, download it
from the Oculus Store.
On the Oculus Home screen, select Library → 360 photos.
1
Select a category and an image.
2
Move your head in any direction to view the images from
3
various angles.
Swipe backwards or forwards on the Gear VR's touchpad or
swipe to the left or right on the controller's touchpad to view
the previous or next image.
62
Page 64

Viewing content
Viewing content on the mobile device
View images and videos saved in your mobile device. You can also
enjoy 2D and 3D videos with subtitles and stereophonic sound, as
well as 360-degree content captured by 360 cameras, such as the
Gear 360.
If the Samsung Gallery app is not installed as a default app,
download it from the Oculus Store.
→
On the Oculus Home screen, select Library
Playing videos
Select a video and play it.
Swipe backwards or forwards on the Gear VR's touchpad or swipe
to the left or right on the controller's touchpad to rewind or fastforward.
While watching videos, tap the Gear VR's touchpad or press the
controller's touchpad to use the following features:
•
/ : Pause and resume playback.
•
/ : Move to the previous or next video.
•
: Select a video from the video list.
Samsung Gallery.
63
Page 65

Viewing content
•
: Select a view mode.
−
2D: View the video in 2D.
−
180°: View 180-degree videos.
−
360°: View 360-degree videos.
−
3D SBS/3D TB/360° 3D SBS/360° 3D TB/180° 3D SBS/180°
3D TB: View the 3D video in 3D.
•
: Select whether to display subtitles.
•
: Select whether to display the background image of
Samsung Gallery while watching the video.
Viewing images
Select an image.
Swipe backwards or forwards on the Gear VR's touchpad or swipe
to the left or right on the controller's touchpad to view the previous
or next image.
To enlarge or reduce the size of the image, swipe upwards or
downwards on the Gear VR's touchpad or controller's touchpad.
64
Page 66

Viewing content
To reorient the screen in the direction you are currently facing,
press the Gear VR's Back key or the controller's Back key twice.
While viewing images, tap the Gear VR's touchpad or press the
controller's touchpad to use the following features:
•
/ : View the next or previous image.
•
: View the images as a slide show.
•
: Select the view mode.
−
2D: View 2D images.
−
360: View 360-degree images.
−
Panorama: View panorama images.
•
: Rotate the image.
•
: Select whether to display the background image of
Samsung Gallery while viewing the image.
65
Page 67

Viewing content
Viewing online content
Using the Samsung Internet app, you can view Internet content
and videos on webpages.
Download the Samsung Internet app from the Oculus Store and
launch the app to view online content.
66
Page 68

Health and safety warnings
•
These health & safety warnings are periodically updated for
accuracy and completeness. Check
for the latest version.
HEALTH & SAFETY WARNINGS: To reduce the risk of personal
injury, discomfort or property damage, please ensure that
all users of the Gear VR read the warnings below carefully
before using the Gear VR.
Before Using the Gear VR
•
Read and follow all setup and operating instructions provided
with the Gear VR.
•
Review the hardware and software recommendations for use of
the Gear VR. Risk of discomfort may increase if recommended
hardware and software is not used.
www.oculus.com/warnings
67
Page 69

Health and safety warnings
•
Your Gear VR is not designed for use with any ineligible device,
accessory and/or software. Use of an ineligible device, accessory
and/or software may result in injury to you or others, and
may cause performance issues or damage to your system and
related services.
•
A comfortable virtual reality experience requires an unimpaired
sense of motion and balance. Do not use the Gear VR when
you are tired, need sleep, are under the influence of alcohol
or drugs, are hung-over, have digestive problems, are under
emotional stress or anxiety, or when suffering from cold, flu,
headaches, migraines, or earaches, as this can increase your
susceptibility to adverse symptoms.
•
We recommend seeing a doctor before using the Gear VR if
you are pregnant, elderly, have pre-existing binocular vision
abnormalities or psychiatric disorders, or suffer from a heart
condition or other serious medical condition.
68
Page 70

Health and safety warnings
Seizures
Some people (about 1 in 4000) may have severe dizziness, seizures,
epileptic seizures or blackouts triggered by light flashes or patterns,
and this may occur while they are watching TV, playing video
games or experiencing virtual reality, even if they have never
had a seizure or blackout before or have no history of seizures or
epilepsy. Such seizures are more common in children and young
people under the age of 20. Anyone who has had a seizure, loss
of awareness, or other symptom linked to an epileptic condition
should see a doctor before using the Gear VR.
69
Page 71

Health and safety warnings
Children
The Gear VR should not be used by children under the age of 13, as
young children are in a critical period in visual development. Adults
should monitor children (age 13 and older) who are using or have
used the Gear VR for any of the symptoms described below, and
should limit the time children spend using the Gear VR and ensure
they take breaks during use. Prolonged use should be avoided, as
this could negatively impact hand-eye coordination, balance, and
multi-tasking ability. Adults should monitor children closely during
and after use of the Gear VR for any decrease in these abilities.
70
Page 72

Health and safety warnings
General Precautions
To reduce the risk of injury or discomfort you should always follow
these instructions and observe these precautions while using the
Gear VR.
•
Use Only In A Safe Environment: The Gear VR produces an
immersive virtual reality experience that distracts you from and
completely blocks your view of your actual surroundings.
−
Always be aware of your surroundings before beginning use
and while using the Gear VR. Use caution to avoid injury.
−
Use of the Gear VR may cause loss of balance.
−
Remember that the objects you see in the virtual
environment do not exist in the real environment, so don’t sit
or stand on them or use them for support.
−
For the safest experience, remain seated or stationary when
using the Gear VR.
−
Serious injuries can occur from tripping, running into or
striking walls, furniture or other objects, so clear an area for
safe use before using the Gear VR.
71
Page 73

Health and safety warnings
−
Take special care to ensure that you are not near other
people, objects, stairs, balconies, open doorways, windows,
furniture, open flames, ceiling fans or light fixtures or other
items that you can bump into or knock down when using—
or immediately after using—the Gear VR.
−
Remove any tripping hazards from the area before using the
Gear VR.
−
Remember that while using the Gear VR you may be unaware
that people and pets may enter your immediate area.
−
Do not handle sharp or otherwise dangerous objects while
using the Gear VR.
−
Never wear the Gear VR in situations that require attention,
such as walking, bicycling, or driving.
•
Make sure the Gear VR is level and secured comfortably on your
head, and that you see a single, clear image.
72
Page 74

Health and safety warnings
•
Ease into the use of the Gear VR to allow your body to adjust;
use for only a few minutes at a time at first, and only increase
the amount of time using the Gear VR gradually as you grow
accustomed to virtual reality. Looking around and using
the input device when first entering virtual reality can help
you adjust to any small differences between your real-world
movements and the resulting virtual reality experience.
•
Do not use the Gear VR while in a moving vehicle such as a car,
bus, or train, as this can increase your susceptibility to adverse
symptoms.
•
Take at least a 10 to 15 minute break every 30 minutes, even
if you don’t think you need it. Each person is different, so take
more frequent and longer breaks if you feel discomfort. You
should decide what works best for you.
•
The Gear VR may be equipped with a “pass-through” feature
which permits you to temporarily see your surroundings for
brief real world interaction. You should always remove the Gear
VR for any situation that requires attention or coordination.
73
Page 75

Health and safety warnings
•
Listening to sound at high volumes can cause irreparable
damage to your hearing. Background noise, as well as
continued exposure to high volume levels, can make sounds
seem quieter than they actually are. Due to the immersive
nature of the virtual reality experience, do not use the Gear
VR with the sound at a high volume so that you can maintain
awareness of your surroundings and reduce the risk of hearing
damage.
Discomfort
•
Immediately discontinue use if anyone using the Gear VR
experiences any of the following symptoms: seizures; loss of
awareness; eye strain; eye or muscle twitching; involuntary
movements; altered, blurred, or double vision or other visual
abnormalities; dizziness; disorientation; impaired balance;
impaired hand-eye coordination; excessive sweating; increased
salivation; nausea; lightheadedness; discomfort or pain in the
head or eyes; drowsiness; fatigue; or any symptoms similar to
motion sickness.
74
Page 76

Health and safety warnings
•
Just as with the symptoms people can experience after they
disembark a cruise ship, symptoms of virtual reality exposure
can persist and become more apparent hours after use. These
post-use symptoms can include the symptoms above, as well as
excessive drowsiness and decreased ability to multi-task. These
symptoms may put you at an increased risk of injury when
engaging in normal activities in the real world.
•
Do not drive, operate machinery, or engage in other visually
or physically demanding activities that have potentially
serious consequences (i.e., activities in which experiencing any
symptoms could lead to death, personal injury, or damage to
property), or other activities that require unimpaired balance
and hand-eye coordination (such as playing sports or riding a
bicycle, etc.) until you have fully recovered from any symptoms.
75
Page 77

Health and safety warnings
•
Do not use the Gear VR until all symptoms have completely
subsided for several hours. Make sure you have properly
configured the Gear VR before resuming use.
•
Be mindful of the type of content that you were using prior to
the onset of any symptoms because you may be more prone to
symptoms based upon the content being used.
•
See a doctor if you have serious and/or persistent symptoms.
Repetitive Stress Injury
Using the Gear VR can make your muscles, joints or skin hurt. If any
part of your body becomes tired or sore while using the Gear VR,
or if you feel symptoms such as tingling, numbness, burning or
stiffness, stop and rest for several hours before using the Gear VR
again. If you continue to have any of the above symptoms or other
discomfort during or after play, stop using the Gear VR and see a
doctor.
76
Page 78

Health and safety warnings
Interference with Medical Devices
The Gear VR contains magnets and can emit radio waves.
These can affect the operation of nearby electronics, including
cardiac pacemakers hearing aids and defibrillators. If you have a
pacemaker or other implanted medical device, do not use the Gear
VR without first consulting your doctor or the manufacturer of your
medical device. Maintain a safe distance between the Gear VR and
your medical devices, and stop using the Gear VR if you observe a
persistent interference with your medical device.
Controller
•
Your Gear VR may have come with a third-party controller.
•
Consult the manufacturer for health and safety warnings for the
controller.
•
Always use included wrist straps with controllers to secure the
controller to your wrist when in use.
77
Page 79

Health and safety warnings
Batteries
•
CHOKING HAZARD. The controllers are not toys. They contain
batteries, which are small parts. Keep away from children
under 3.
•
DO NOT INGEST ANY BATTERY. CHEMICAL BURN HAZARD.
•
If a battery is swallowed, it can cause severe internal burns and
potential perforation of esophagus in just 2 hours and can lead
to death. Keep batteries out of reach of children.
•
If the battery compartment does not close securely, stop using
the product and keep it away from children.
•
Risk of fire. Batteries could cause thermal event or leak if
installed backwards, disassembled, overcharged, punctured,
crushed, mixed with used or other battery types, or directly
exposed to fire or high temperature. Do not recharge
disposable batteries. Replace all batteries in a single device at
the same time.
•
Keep in original package until ready to use. Properly dispose of
used batteries promptly.
78
Page 80

Health and safety warnings
•
Do not allow conductive materials to touch the battery
terminals on the devices. Keep batteries dry and avoid water
intrusion.
•
Do not disassemble, pierce, or attempt to modify batteries.
Electrical Shock
To reduce risk of electric shock:
•
Do not modify or open any of the components provided.
•
Do not use the product if any cable is damaged or any wires are
exposed.
If a power adapter is provided:
•
Do not expose the power adapter to liquid or moisture.
•
Unplug the power adapter before cleaning, and clean only with
a dry cloth.
•
Keep the power adapter away from open flames and other heat
sources.
•
Use only the power adapter provided with the Gear VR.
79
Page 81

Health and safety warnings
Damaged or Broken Device
•
Do not use your device if any part is broken or damaged.
•
Do not attempt to repair any part of your device yourself.
Repairs should only be made by an authorized servicer.
Contagious Conditions
To avoid transferring contagious conditions (like pink eye), do
not share the Gear VR with persons with contagious conditions,
infections or diseases, particularly of the eyes, skin or scalp. The
Gear VR should be cleaned between each use with skin-friendly
antibacterial wipes (particularly the lenses) and dried with a
microfiber cloth.
80
Page 82

Health and safety warnings
Skin Irritation
The Gear VR is worn next to your skin and scalp. Stop using the
Gear VR if you notice swelling, itchiness, or other irritation. If
symptoms persist, contact a doctor.
To avoid damage to the Gear VR
•
Do not leave the Gear VR in direct sunlight. Exposure to direct
sunlight can damage the Gear VR.
•
Do not shine a laser or external light source through the lenses
as it may damage the screen.
•
Store components in their storage case when not in use to
minimize unintentional damage or environmental exposure.
81
Page 83

Safety information
To prevent injury to yourself and others or damage to your
device, read the safety information about your device
before using it.
Use the device for its intended purpose only.
Do not drop or cause an impact to the charger or the
device.
Do not use or store your device in areas with high
concentrations of dust or airborne materials.
Dust or foreign materials can cause your device to malfunction.
Do not allow the device’s connector to contact conductors,
such as liquid, dust, metal filings, and pencil leads.
Contact with conductors may cause a short circuit or corrosion at
the connector and result in explosion, fire, or damage to the device.
82
Page 84

Safety information
Do not bite or suck the device.
Children or animals can choke on small parts.
Do not insert the device or supplied accessories into the
eyes, ears, or mouth.
Doing so may cause suffocation or serious injuries.
Do not expose the device to heavy smoke or fumes.
Doing so may damage the outside of the device or cause it to
malfunction.
Keep your device dry.
Humidity and liquids may damage the parts or electronic circuits in
your device.
83
Page 85

Safety information
The device can be used in locations with an ambient
temperature of 0 °C to 35 °C. You can store the device at an
ambient temperature of -20 °C to 50 °C. Using or storing the
device outside of the recommended temperature ranges
may damage the device or reduce the battery’s lifespan.
Do not store your device in very hot areas such as inside a car in the
summertime. Doing so may cause the screen to malfunction, result
in damage to the device, or cause the battery to explode.
Do not look directly at bright light while you are wearing
the device without the mobile device inserted. Doing so
may damage your eyesight.
Do not use the device if errors occur. Continued use of
the device after errors occur may result in discomfort or
personal injury.
If you are allergic to the paint or metal parts on the device,
you may experience itching, eczema, or swelling of the
skin. If this happens, stop using the device and consult your
physician.
84
Page 86

Safety information
Do not use your device in a hospital, on an aircraft, or in
any automobile that can be affected by radio frequencies.
Doing so may cause malfunctions of equipment and may
result in injury or damage to property.
When connecting the device to other devices via Bluetooth,
avoid using your device within 15 cm of pacemakers, if
possible, as your device can interfere with pacemakers.
Protect your hearing and ears when using a headset.
•
Excessive exposure to loud sounds can cause
hearing damage.
•
Always turn the volume down before plugging the
earphones into an audio source and use only the
minimum volume setting necessary to hear music.
•
Ensure the headset cable is not twisted around nearby objects.
Do not use the device if it is cracked or broken.
Broken glass or acrylic could cause injury to your hands and face.
Take the device to a Samsung Service Centre to have it repaired.
85
Page 87

Safety information
Use manufacturer-approved batteries, chargers,
accessories, and supplies.
Samsung cannot be responsible for the user’s safety when using
accessories or supplies that are not approved by Samsung.
Do not disassemble, modify, or repair your device.
Any changes or modifications to your device can void your
manufacturer’s warranty. If your device needs servicing, take your
device to a Samsung Service Centre.
When cleaning your device, mind the following.
•
Wipe the device and its lens with a clean soft cloth or a cotton
swab.
•
Do not use chemicals or detergents. Doing so may discolour or
corrode the outside the device.
•
Do not wash the foam cushioning. Doing so may cause the foam
cushioning to deteriorate.
86
Page 88

Safety information
Handle and dispose of the device and charger with care.
•
Never place the battery or device on or in heating devices, such
as microwave ovens, stoves, or radiators.
•
Never crush or puncture the device.
Allow only qualified personnel to service your device.
Allowing unqualified personnel to service your device may result in
damage to your device and will void your manufacturer’s warranty.
Correct disposal of this product
(Waste Electrical & Electronic Equipment)
(Applicable in countries with separate collection
systems)
This marking on the product, accessories or literature
indicates that the product and its electronic accessories
disposed of with other household waste.
(e.g. charger, headset, USB cable) should not be
87
Page 89

Safety information
To prevent possible harm to the environment or human health
from uncontrolled waste disposal, please separate these items from
other types of waste and recycle them responsibly to promote the
sustainable reuse of material resources.
Household users should contact either the retailer where they
purchased this product, or their local government office, for details
of where and how they can take these items for environmentally
safe recycling.
Business users should contact their supplier and check the terms
and conditions of the purchase contract. This product and its
electronic accessories should not be mixed with other commercial
wastes for disposal.
This product is RoHS compliant.
For information on Samsung’s environmental commitments
and product-specific regulatory obligations, e.g. REACH, WEEE,
Batteries, visit
samsung.com/uk/aboutsamsung/
samsungelectronics/corporatecitizenship/data_corner.html
88
Page 90

Appendix
Troubleshooting
Before contacting a Samsung Service Centre, please attempt the
following solutions. Some situations may not apply to your device.
If the tips below do not solve the problem, contact a Samsung
Service Centre.
The Oculus Home screen does not appear when
the mobile device is connected to the Gear VR
•
Ensure that the mobile device is properly connected to the Gear
VR.
•
Ensure that the mobile device is turned on.
•
Ensure that you install the Gear VR app (Oculus) for the Gear VR
on the mobile device. (p. 37)
•
Ensure that the mobile device’s battery is fully charged.
89
Page 91

Appendix
The mobile device is hot to the touch
When using apps that require a higher amount of power than
normal or when using apps on your device for an extended period,
the mobile device may feel hot to the touch. When the Gear VR
detects a high temperature, a message appears on the screen
warning you to stop wearing the Gear VR and to wait for it to cool
down. Stop using the Gear VR until the mobile device cools down,
and then resume use. This is normal and should not affect the
mobile device's lifespan or performance.
The image on the screen looks tilted or skewed
Remove the Gear VR and place it on a flat surface with the lenses
facing forwards and the Focus adjustment wheel at the top. Wait
5–7 seconds before using it again.
The image on the screen is moving randomly
The Gear VR can be affected by magnetic interference created by
items, such as computers, TVs, or electric cables. Avoid using the
Gear VR in areas affected by magnetic interference.
90
Page 92

Appendix
The screen is out of focus
•
Ensure that the Gear VR is correctly placed on your face.
•
Rotate the Focus adjustment wheel until the screen looks clear.
The screen shifts to the left or right
Ensure that the device holder (left) is in the correct position.
Reconnect your mobile device after sliding the device holder (left)
to position A or B according to the size of your mobile device's
screen. (p. 26)
The image on the screen is shaking
•
Disconnect the mobile device from the Gear VR and then
reconnect it.
•
Restart the mobile device.
91
Page 93

Appendix
The controller, game controller, or Bluetooth
headset do not work
•
Ensure that the Bluetooth device is connected to the mobile
device.
•
Ensure that the mobile device and the other Bluetooth device
are within the maximum Bluetooth range.
•
Ensure that the battery of the Bluetooth device that you are
connecting to is fully charged.
•
If your controller is not functioning properly, take it and the
Gear VR to a Samsung Service Centre.
92
Page 94

Copyright
Copyright © 2017 Samsung Electronics
This manual is protected under international copyright laws.
No part of this manual may be reproduced, distributed, translated,
or transmitted in any form or by any means, electronic or
mechanical, including photocopying, recording, or storing in any
information storage and retrieval system, without the prior written
permission of Samsung Electronics.
Trademarks
•
SAMSUNG and the SAMSUNG logo are registered trademarks of
Samsung Electronics.
•
Bluetooth® is a registered trademark of Bluetooth SIG, Inc.
worldwide.
•
All other trademarks and copyrights are the property of their
respective owners.
 Loading...