

Page 1

Washing Machine
Owner’s Instructions
B1445A(V/S)
B1245A(V/S)
B1045A(V/S)
R1245A(V/S)
R1045A(V/S)
F1245A(V/S)
F1045A(V/S)
Register your product at
www.samsung.com/global/register
Code No.: DC68-02158F-GB
Page 2
Safety Precautions
Congratulations on your purchase of this Samsung washing machine. These Owner's
Instructions contain valuable information on the installation, use, and care of this appliance.
Please take the time to read these instructions so that you can take full advantage of the
washing machine's features and enjoy this appliance for many years to come.
Before using the appliance
• Packing materials can be dangerous to children; keep all packing material (plastic bags,
polystyrene, etc.) well out of the reach of children.
• The appliance is designed for home use only.
• Make sure that water and electrical connections are made by qualified technicians,
observing the manufacturer's instructions (see "Installing the Washing Machine") and
local safety regulations.
• All packaging and shipping bolts must be removed before the appliance is used. Serious
damage may occur if they are not removed. See "Removing the shipping bolts".
• Before washing clothes for the first time, you must run a complete cycle without clothes.
See "Washing for the first time".
Safety instructions
• Before cleaning or carrying out maintenance, unplug the appliance from the electrical
outlet or set the (On/Off) button to Off.
• Make sure that the pockets of all clothing to be washed are empty.
Hard, sharp objects, such as coins, safety pins, nails, screws, or stones can cause extensive
damage to the appliance.
• Always unplug the appliance and turn off the water after use.
• Before you open the door of the appliance, check that the water has drained. Do not
open the door if you can still see water.
• Pets and small children may climb into the appliance. Check the appliance before each
use.
• The glass door becomes very hot during the washing cycle. Keep children away from
the appliance while it is in use.
• Do not attempt to repair the appliance yourself. Repairs made by inexperienced or
unqualified persons may cause injury and/or make more serious repairs to the appliance
necessary.
• If the plug (power supply cord) is damaged, it must be replaced by the manufacturer or
its service agent or a similarly qualified person in order to avoid a hazard.
• This appliance should only be serviced by an authorized service center, and only
genuine spare parts should be used.
• This appliance is not intended for use by young children or infirm persons unless they
have been adequately supervised by a responsible person to ensure that they can use the
appliance safely. Young children should be supervised to ensure that they do not play
with the appliance.
• This appliance has to be connected to the plug endurable to proper power consumption.
• This appliance has to be positioned so that the plug is accessible after installation.
• Do not use processed water containing oil, cream or lotion, which is usually found in
skin-care shops or massage clinics. Otherwise this will cause the packing to be
deformed, which causes a malfunction or water leak.
• A stainless washing tube does not usually rust. However if some metal such as a hair pin
is left in the tube for an extended time, the tube could rust. Do not leave water or bleach
containing chlorine in the tube for an extended period of time. Do not regularly use or
leave water containing iron in the tube for an extended period of time. If rust starts
appearing on the surface of the tube, apply a cleansing agent (neutral) to the surface and
use a sponge or soft cloth to clean it. (Under no circumstances use a metal brush)
This marking shown on the product or its literature, indicates that it should not be disposed with other
household wastes at the end of its working life. To prevent possible harm to the environment or human health
from uncontrolled waste disposal, please separate this from other types of wastes and recycle it responsibly to
promote the sustainable reuse of material resources.
Household users should contact either the retailer where they purchased this product, or their local
government office, for details of where and how they can take this item for environmentally safe recycling.
Business users should contact their supplier and check the terms and conditions of the purchase contract. This product
should not be mixed with other commercial wastes for disposal.
●
SAVE THESE INSTRUCTIONS
Page 3

Table of Contents
Safety Precautions------------------------------------------- inside cover
lnstalling the Washing Machine
Unpacking the washing machine ----------------------------------------------------2
Overview of the washing machine --------------------------------------------------2
Selecting a location -------------------------------------------------------------------- 3
Adjusting the leveling feet ------------------------------------------------------------3
Removing the shipping bolts --------------------------------------------------------3
Connecting the water supply hose(option) -------------------------------------- 3
Connecting the water supply hose ------------------------------------------------- 4
Positioning the drain hose ----------------------------------------------------------- 4
Plugging in the machine -------------------------------------------------------------5
------------------------------------------2
Washing a Load of Laundry ------------------------------------------------ 6
Overview of the control panel ------------------------------------------------------ 6
Washing for the first time ------------------------------------------------------------- 8
Putting detergent in the washing machine --------------------------------------- 8
Washing clothes using Fuzzy Logic ----------------------------------------------- 9
Washing clothes manually --------------------------------------------------------- 10
Using delay start --------------------------------------------------------------------- 10
Washing tips and hints ------------------------------------------------------------- 11
Maintaining the Washing Machine --------------------------------- 12
Draining the washing machine in an emergency ----------------------------- 12
Repairing a frozen washing machine -------------------------------------------- 12
Cleaning the exterior ---------------------------------------------------------------- 12
Cleaning the detergent drawer and recess ----------------------------------- 13
Cleaning the debris filter ------------------------------------------------------------ 13
Cleaning the water hose mesh filter --------------------------------------------- 14
T r oubleshooting ----------------------------------------------------------------- 15
Problems and solutions ------------------------------------------------------------ 15
Understanding error messages --------------------------------------------------- 15
Programme chart ------------------------------------------------------------- 16
Appendix
Fabric care chart --------------------------------------------------------------------- 18
Electrical warnings ------------------------------------------------------------------ 18
Protecting the environment ------------------------------------------------------- 19
Declaration of conformity --------------------------------------------------------- 19
Specification -------------------------------------------------------------------------- 19
------------------------------------------------------------------------------ 18
SAMSUNG
Washing Machine Owner’s Instructions 1
Page 4
Installing the Washing Machine
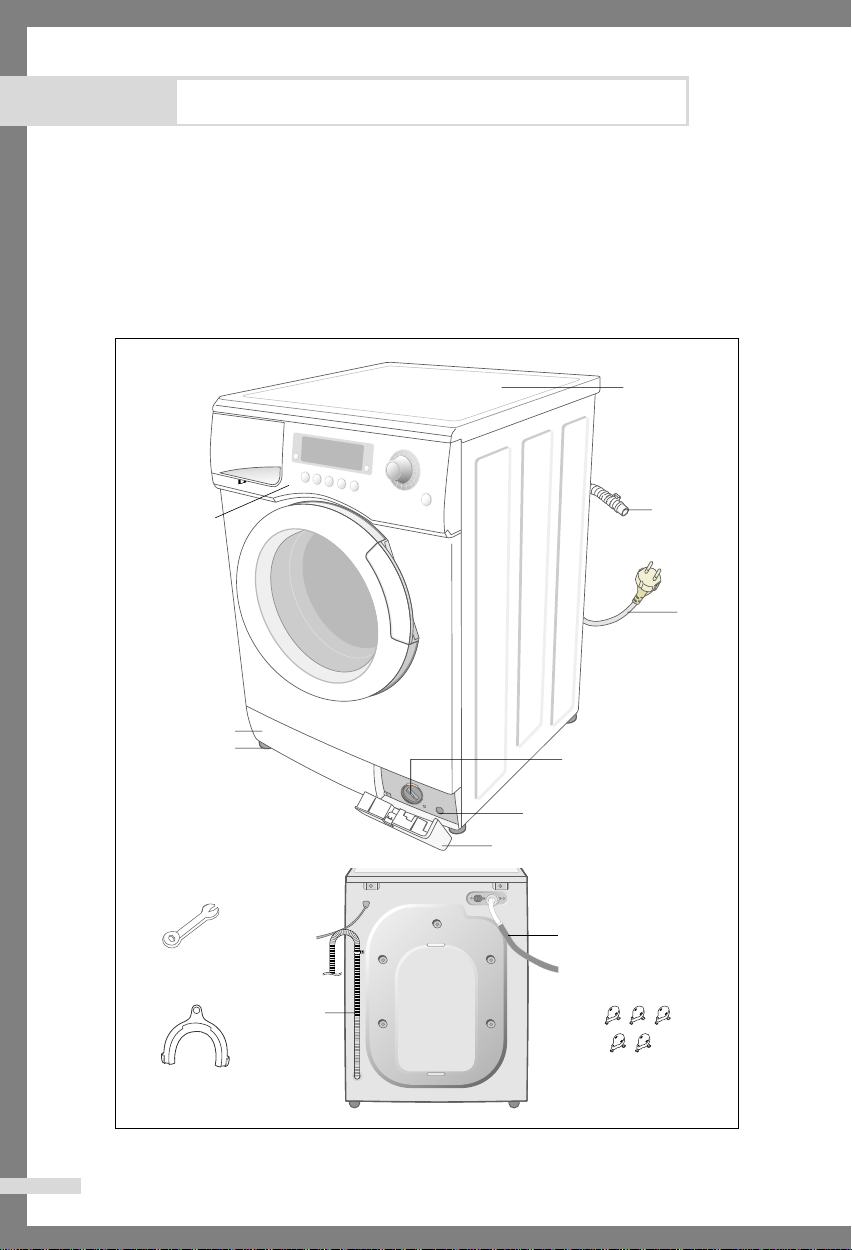
Unpacking the Washing Machine
Unpack your washing machine and inspect it for shipping damage. Also make sure that
you have received all of the items shown below. If the washing machine was damaged
during shipping or you do not have all of the items, contact your Samsung dealer
immediately.
Overview of the washing machine
Worktop
Detergent
Control panel
drawer
Door
Drain Hose
Plug
2
SAMSUNG
Base cover
Adjustable feet
Wrench
Drain hose
Hose guide
Washing Machine Owner’s Instructions
Debris filter
Emergency drain
tube
Filter-cover
Cold Water
supply hose
Bolt hole
covers
Page 5
Installing the Washing Machine
1
2
3
Selecting a location
Before you install the washing machine, select a location with the following characteristics:
• A hard, level surface (if the surface is uneven, see "Adjusting the leveling feet," below)
• Away from direct sunlight.
• Adequate ventilation
• Room temperature that will not fall below 0 ˚C
• Away from sources of heat such as coal or gas
Make sure that the washing machine does not stand on its power cord.
Ventilation openings must not be obstructed by carpeting when the washing machine is
installed on a carpeted floor.
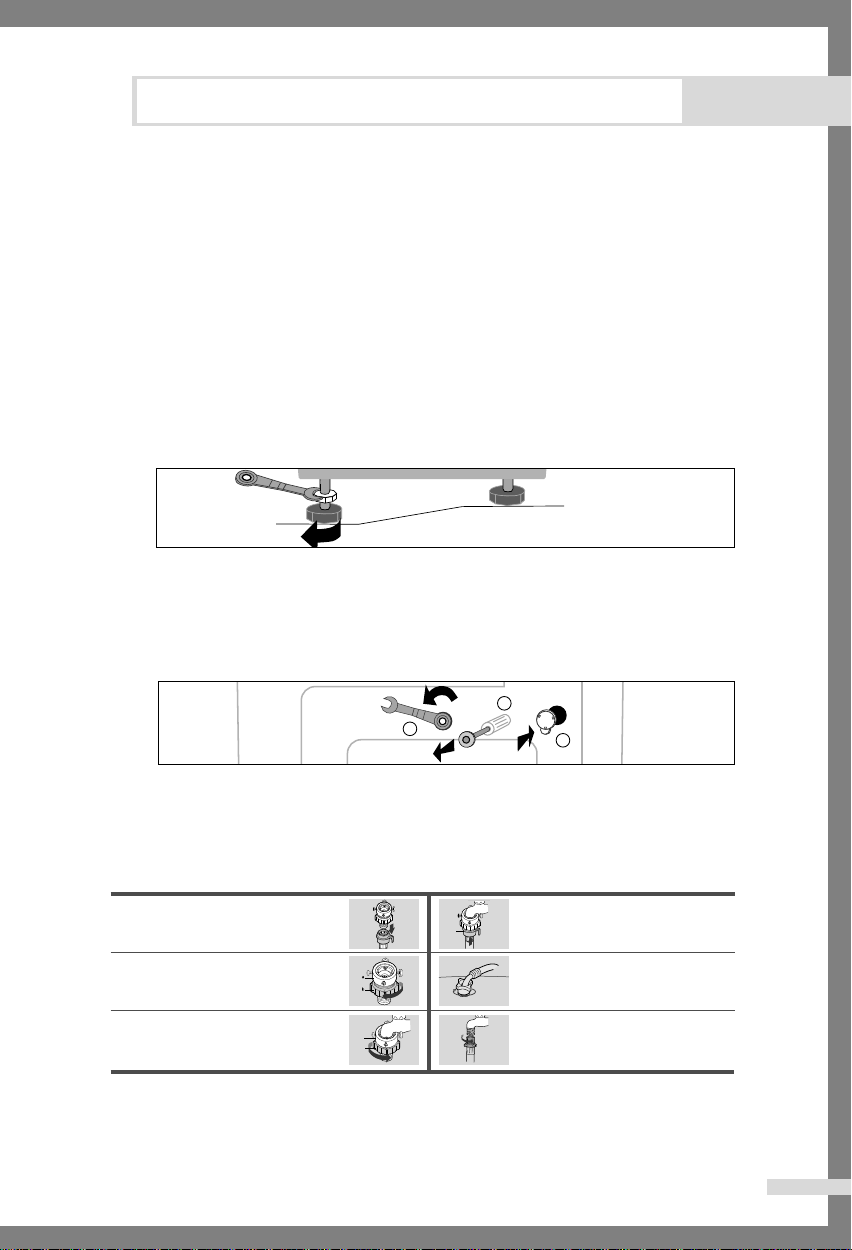
Adjusting the leveling feet
If the floor is uneven, adjust the feet (do not insert pieces of wood or any other objects under
the feet):
1. Loosen the leg bolt by turning it with your hand until it is at the desired height.
2. Tighten the locking nut by turning it with the supplied wrench.
• Place the washer on a sturdy, flat surface.
If the washer is placed on an uneven or weak surface, noise or vibration occurs.
(Only a l degrees angle is allowed.)
Removing the shipping bolts
Before using the washing machine, you must remove the five shipping bolts from the back
of the unit. To remove the bolts:
1. Loosen all bolts with the supplied wrench before removing them.
2. Take each bolt head and pull it through the wide part of the hole.
Repeat for each bolt.
3. Fill the holes with the supplied plastic covers.
4. Keep the shipping bolts for future use.
Connecting the water supply hose(Option)
1. Remove the adaptor from the
water supply hose.
2. First, using a “+” type screw driver, loosen the
four screws on the adaptor. Next, take the
adaptor and turn part(b) following the arrow until
there is a 5mm gap.
3. Connect adaptor to the water tap by tightening
the screws firmly.
Then, turn part (b) following the arrow and put(a)
and (b) together.
NOTICE After completing connection, if water leaks from the hose, then repeat the same steps. Use
the most conventional type of faucet for water supply. In case the faucet is square or too
big, remove the spacing ring before inserting the faucet into the adaptor.
a
b
c
4. Connect the water supply hose to the adaptor.
Pull down part (c) of the water supply hose.
When you release part (c) the hose automatically
connects to the adaptor making a ’click’ sound.
5. Connect the other end of the water supply hose
to the inlet water valve at the top of the washer.
Screw the hose clockwise all the way in.
•
If the water tap has a screw type faucet, connect
the water supply hose to the tap as shown.
SAMSUNG
Washing Machine Owner’s Instructions 3
Page 6

Installing the Washing Machine
Connecting the water supply hose
The water supply hose must be connected to the washing machine at one end and to the
water faucet at the other. Do not stretch the water supply hose. If the hose is too short and
you do not wish to move the water faucet, replace the hose with a longer, high pressure
hose.
To connect the water supply hose:
1. Take the L-shaped arm fitting for the cold
water supply hose and connect to the cold
water supply intake on the back of the
machine. Tighten by hand.
2. Connect the other end of the cold water supply hose to your sink's cold water faucet and
tighten it by hand. If necessary, you can reposition the water supply hose at the washing
machine end by loosening the fitting, rotating the hose, and retightening the fitting.
Option: 1. Take the red L-shaped arm fitting for the hot water supply hose and connect
to the red hot water supply intake on the back of the machine. Tighten by
hand.
2. Connect the other end of the hot water supply hose to your sink's hot water
faucet and tighten it by hand.
3. Use a Y-piece if you only want to use cold water.
Note: The appliance is to be connected to the water mains using new hose-sets and that
old hose-sets should not be used.
Positioning the drain hose
The end of the drain hose may be positioned in three ways:
Over the edge of a sink
The drain hose must be placed at a height of
between 60 and 90 cm. To keep the drain hose
spout bent, use the supplied plastic hose
guide. Secure the guide to the wall with a
hook or to the faucet with a piece of string to
prevent the drain hose from moving.
ln a sink drain pipe branch
The drain pipe branch must be above the sink siphon so that the end of the hose is at least
60 cm above the ground.
ln a drain pipe
Samsung recommends that you use a 65 cm high vertical pipe; it must be no shorter than 60
cm and no longer than 90 cm.
4
SAMSUNG
Washing Machine Owner’s Instructions
Page 7
Installing the Washing Machine
Plugging in the machine
For European Users. You will NOT need to ground the plug of the washing machine.
For U.S. Users. You MUST ground the plug of the washing machine.
Check with a licensed electrician before using the machine to make sure it is properly
grounded.
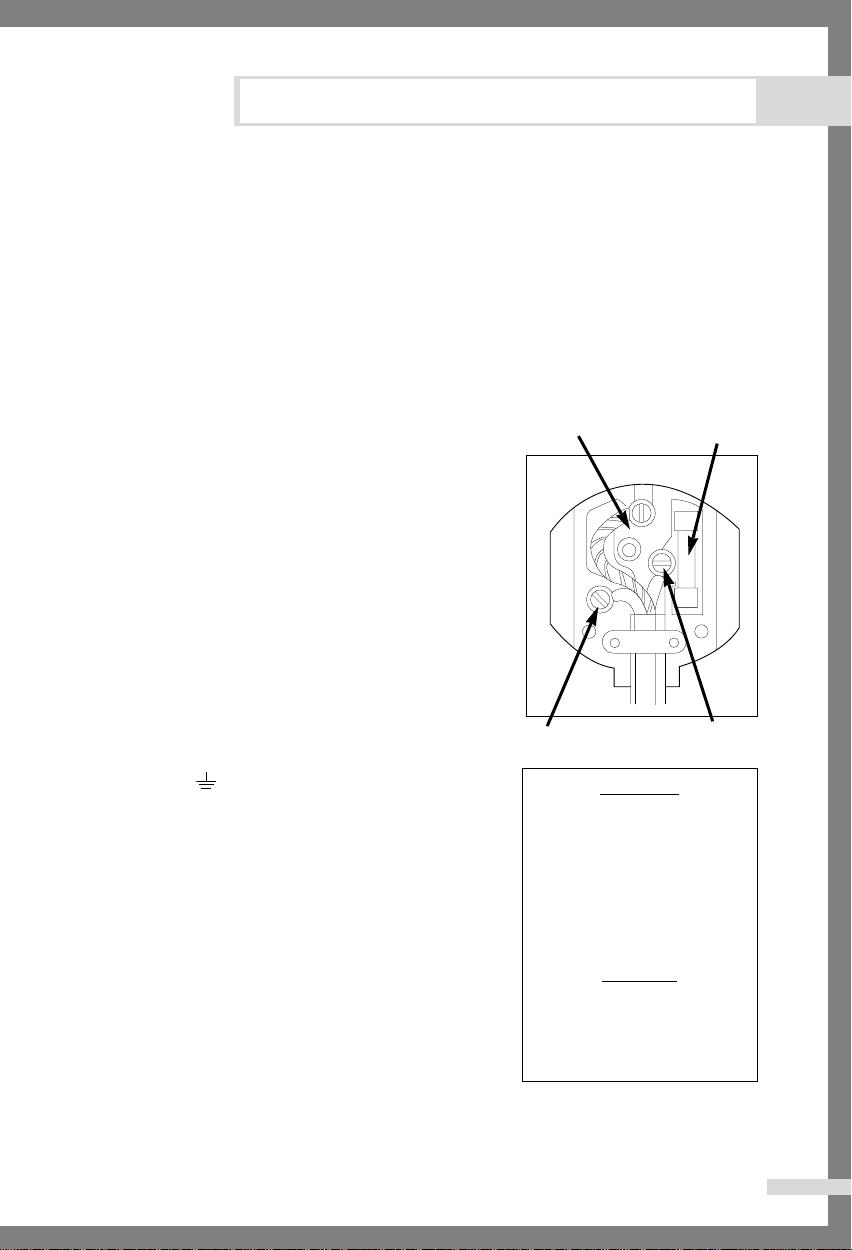
For U.K. Users.
Wiring lnstructions
WARNING THIS APPLIANCE MUST BE EARTHED.
This appliance must be earthed. In the event of an
electrical short circuit, earthing reduces the risk of electric
shock providing an escape wire for the electric current.
The appliance is equipped with a mains lead which
includes an earth wire for connecting to the earth terminal of
your mains plug.
The plug must be plugged into a socket that is properly
installed and earthed.
*The wires in this mains lead are coloured in accordance
with the following code:
• Green and yellow : Earth
• Blue : Neutral
• Brown : Live
• AS the colours of the wires in the mains lead of this
appliance may not correspond with the coloured
markings indentifying the terminals in your plug,
proceed as follows.
• Connect the green and yellow wire to the terminal
in the plug marked with the letter E or the earth
symbol ( ) or coloured green or green-andyellow.
• Connect the blue wire to the terminal marked
with the letter N or coloured black.
• Connect the brown wire to the terminal marked
with the letter L or coloured red.
* Consult a qualified electrician or service technician if
in doubt about any of these instructions.
The manufacturer of this washing machine will
not accept any liability for damage to persons or
material for non observance of these requirements.
There are no user serviceable parts inside the
washing machine and if the mains lead of this
appliance is damaged, it must only be replaced by
qualified service personnel approved by the
manufacturer because special tools are required.
GREEN AND
YELLOW
BLUE
WARNING
Ensure that the plug and power
cord are not damaged before use. If
you have any reason to remove the
moulded plug from this appliance,
immediately remove the fuse and
dispose of the plug.
Do not connect the plug to a mains
socket under any circumstances as
there is a danger of electric shock.
CIRCUITS
Your washing machine should be
operated on a separate circuit
from other appliances. Failure to
do this may cause the circuit
breaker to trip or the fuse to blow.
13 AMP
FUSE
BROWN
SAMSUNG
Washing Machine Owner’s Instructions 5
Page 8
Washing a Load of Laundry
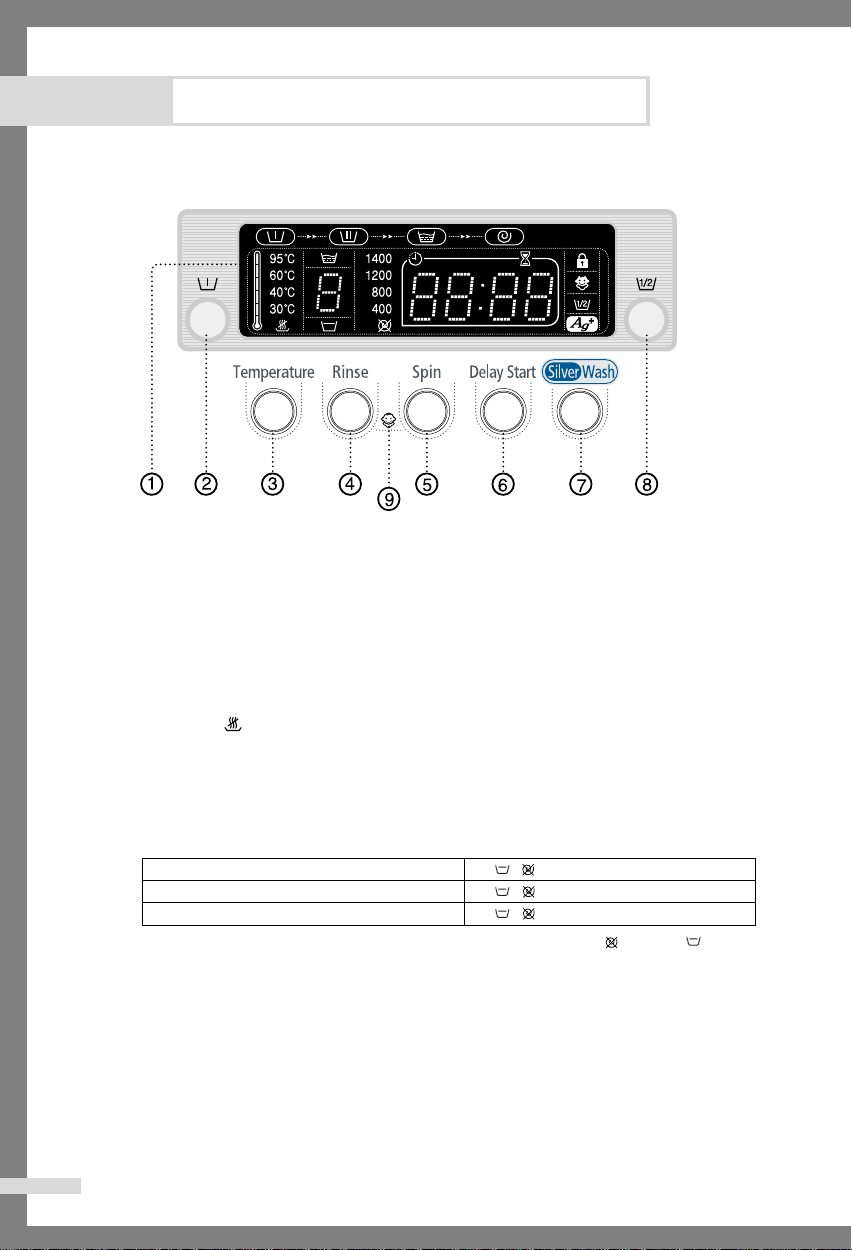
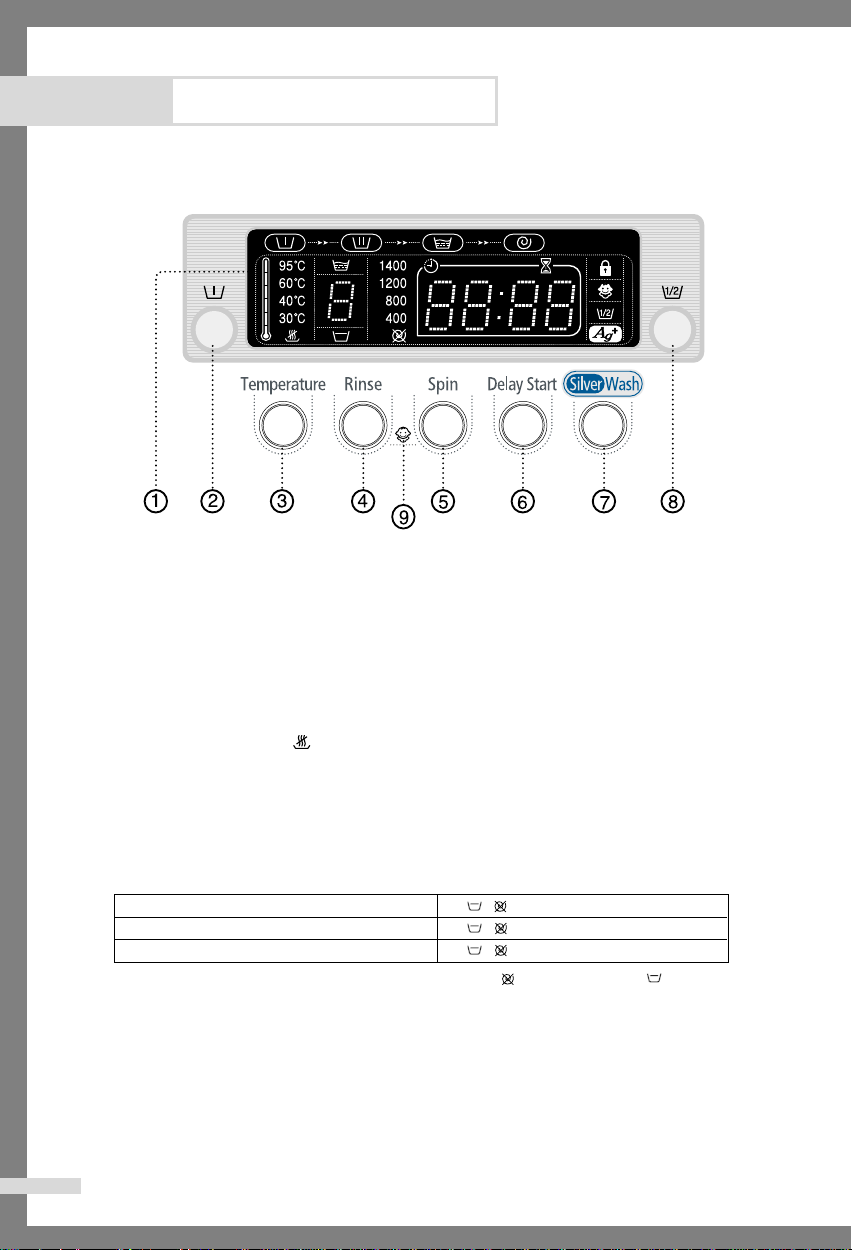
Overview of the control panel
1. Digital graphic display
Displays the remaining wash cycle time,all of washing information and error messages.
2. Prewash selection button
Press the button to select pre-wash. Pre-wash is available only with Cotton, Coloureds,
Synthetics, Delicates,baby programs.
3. Temperature selection button
Press the button repeatedly to cycle through the available water temperature options
(cold water( ), 30 ˚C, 40 ˚C , 60 ˚C and 95 ˚C).
4. Rinse selection button
Press the rinse button to add rinse cycles. Maximum number of rinse cycles is five.
5. Spin selection button
Press the button repeatedly to cycle through the available spin speed options.
B1445A(V/S)
B1245A(V/S)/R1245A(V/S)/F1245A(V/S)
B1045A(V/S)/R1045A(V/S)/F1045A(V/S)
No spin
The laundry remains in the drum without being spun after the final drain
Rinse Hold
The laundry remains soaking in the final rinse water.
Before the laundry can be unloaded, either “Drain” or the “Spin” program must be run.
6. Delay Start selection button
Press the button repeatedly to cycle through the available delayed start options (from 3
hour to 24 hours in one hour increments).
Displayed hours means the time of finished washing-cycle.
6
SAMSUNG
Washing Machine Owner’s Instructions
, 400, 800, 1200, 1400 rpm
,
, 400, 800, 1000, 1200 rpm
,
, 400, 600, 800, 1000 rpm
,
: no spin, : rinse hold
Page 9
Washing a Load of Laundry
7. Silver Nano selection button
Silver Nano water is supplied in washing as well as the last rinse, featuring sterilization
and antibacterial coating.
8. Half Load selection button
Press the button in case of half load(about 1~4kg) washing. This function saves washing
time and energy.
9. Child Lock selection button
This is a button for preventing children from manipulating the washing machine.
On/Off - To set the program on: Press the Start/Pause button to turn on the washing
machine. Press and hold down the [Rinse] + [Spin] button for 2-3 seconds. It can only be
activated when the machine is turned on. Once you set the baby program on while in
washing, no button is activated until you set if off. Even the POWER button will not be
activated. The Baby Program lamp lights on. To set the program off: Press and hold down
the [Rinse] + [Spin] button again for 2-3 seconds, then the lamp lights off and is set off.
Note: Check out the Baby Program button first when no button is activated while the
washing machine is working.
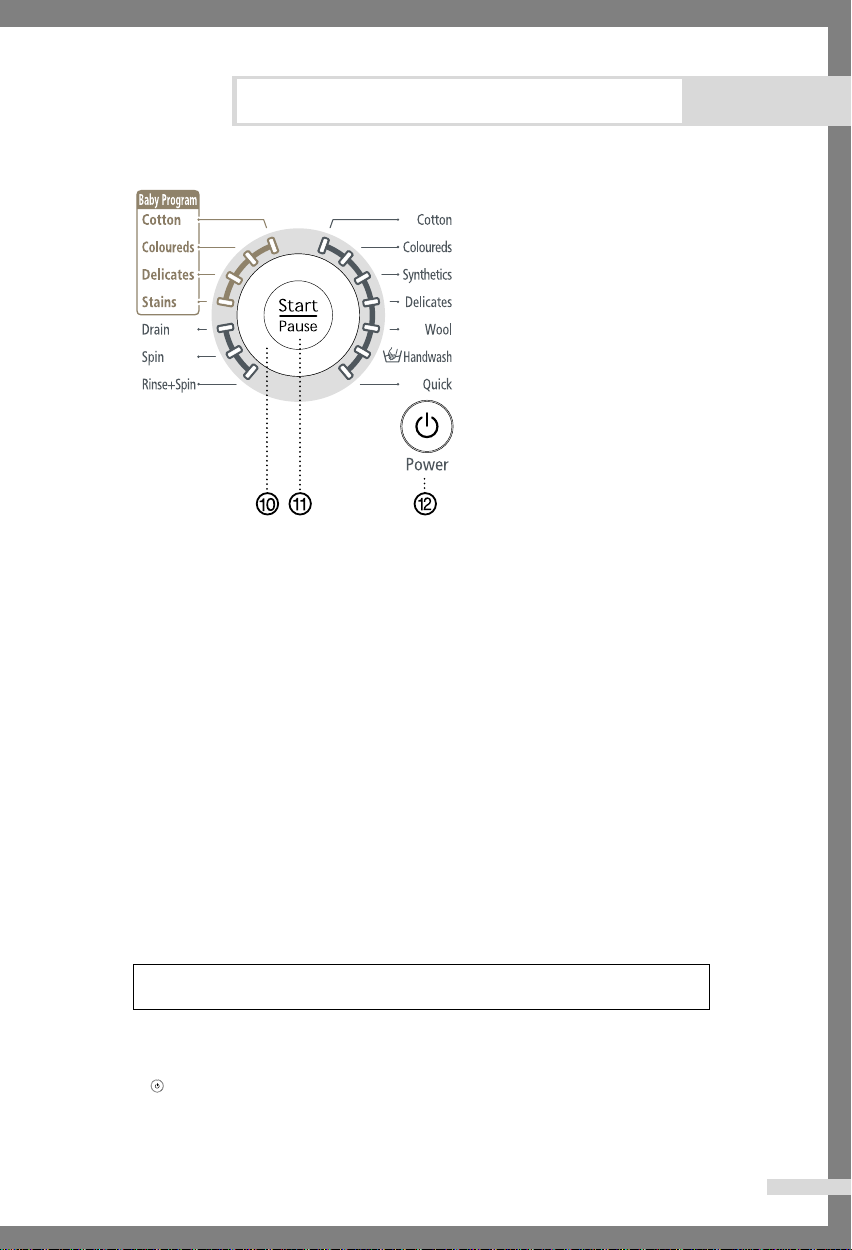
10. Fuzzy Control dial
Turn the dial to select one of the 14 available wash programs.
Cotton, Coloureds, Synthetics, Delicates, Wool, Hand wash, Quick,
Rinse+Spin, Spin, Drain, Baby Program(Stains, Delicates, Coloreds, Cotton)
11. Start/Pause selection button
Press to pause and restart programs.
12. (On/Off) selection button
Press once to turn the washing machine on, press again to turn the washing machine off.
If the washing machine power is left on for longer than 10 minutes without any buttons
being touched, the power automatically turns off.
SAMSUNG
Washing Machine Owner’s Instructions 7
Page 10
Washing a Load of Laundry
Washing for the first time
Before washing clothes for the first time, you must run a complete cycle without clothes.
To do this:
1. Press the (On/Off) button.
2. Pour a little detergent into compartment in the
detergent drawer.
3. Turn on the water supply to the washing machine.
4. Press the Temperature button repeatedly until
40 ˚C is displayed.
5. Press the Start/Pause button.
This will remove any water from the manufacturer’s
•
test run remaining in the machine.
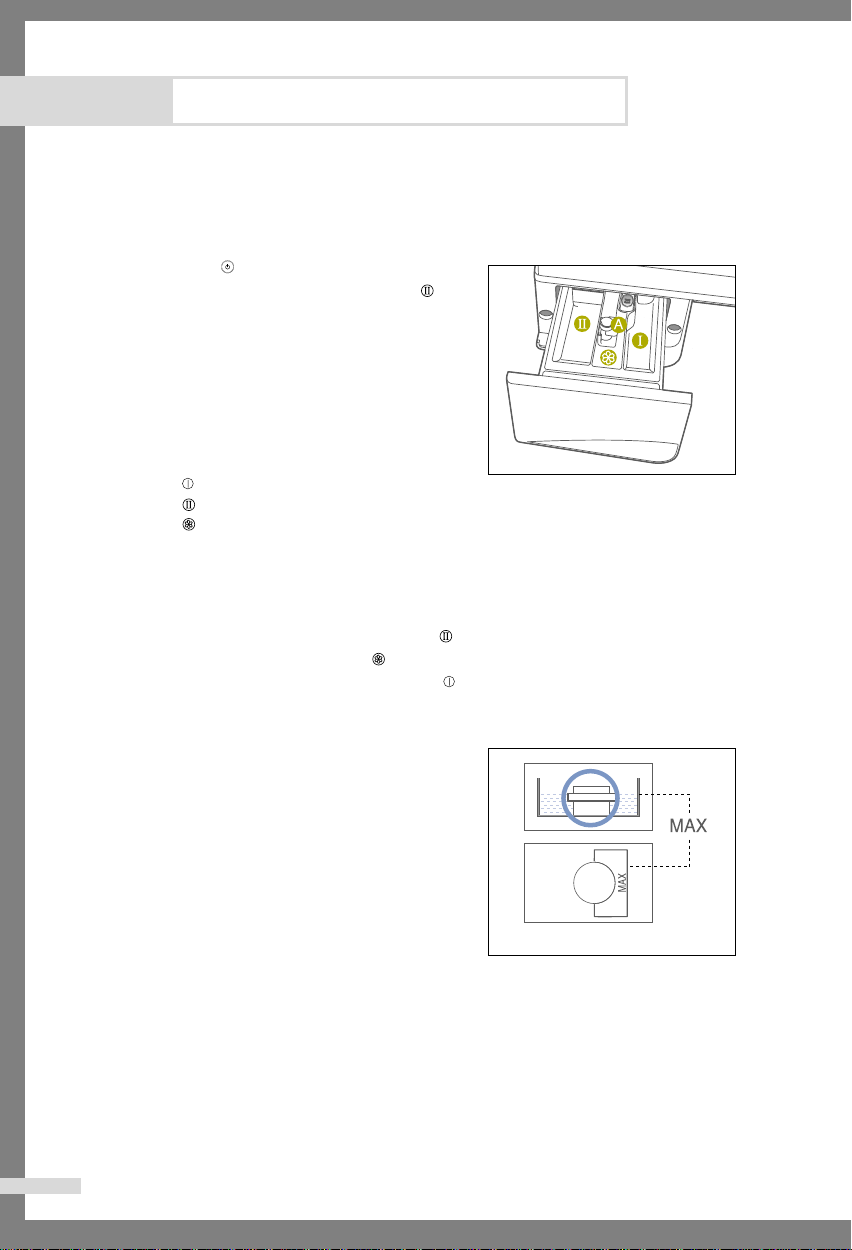
Dispender :Detergent for prewash or starch.
Dispenser : Detergent for main wash, water softener,pre-soaking agent, bleach and stain removal product.
Dispenser : Additives,e.g.fabric softener or former (fill no higher than lower edge of insert “ A”)
Putting detergent in the washing machine
1. Pull out the detergent drawer.
2. Add laundry detergent into compartment .
3. Add softener into compartment (if you desire).
4. Add prewash detergent into compartment (if you desire).
Caution :
Concentrated or thick fabric softener and
conditioner must be diluted with a little water
before being poured into the dispenser (prevents
the overflow from becoming blocked.)
8
SAMSUNG
Washing Machine Owner’s Instructions
Page 11
Washing a Load of Laundry
Washing clothes using Fuzzy Logic
Your new washing machine makes washing clothes easy, using Samsung's "Fuzzy Logic"
automatic control system. When you select a wash program, the machine will set the correct
temperature, washing time, and washing speed.
To wash clothes using the Fuzzy Logic programs:
1. Turn on your sink's water faucet.
2. Press the (On/Off) button.
3. Open the door.
4. Load the articles one at a time loosely into the drum, without overfilling.
5. Close the door.
6. Add the detergent, softener, and pre-wash detergent (if necessary) into the appropriate
compartment.
Note: Pre-wash is only available when washing Duvet, Bedding, Towel, Curtain,
Cotton, Coloureds, Synthetics and Delicates programs.
It is only necessary if your clothing is heavily soiled.
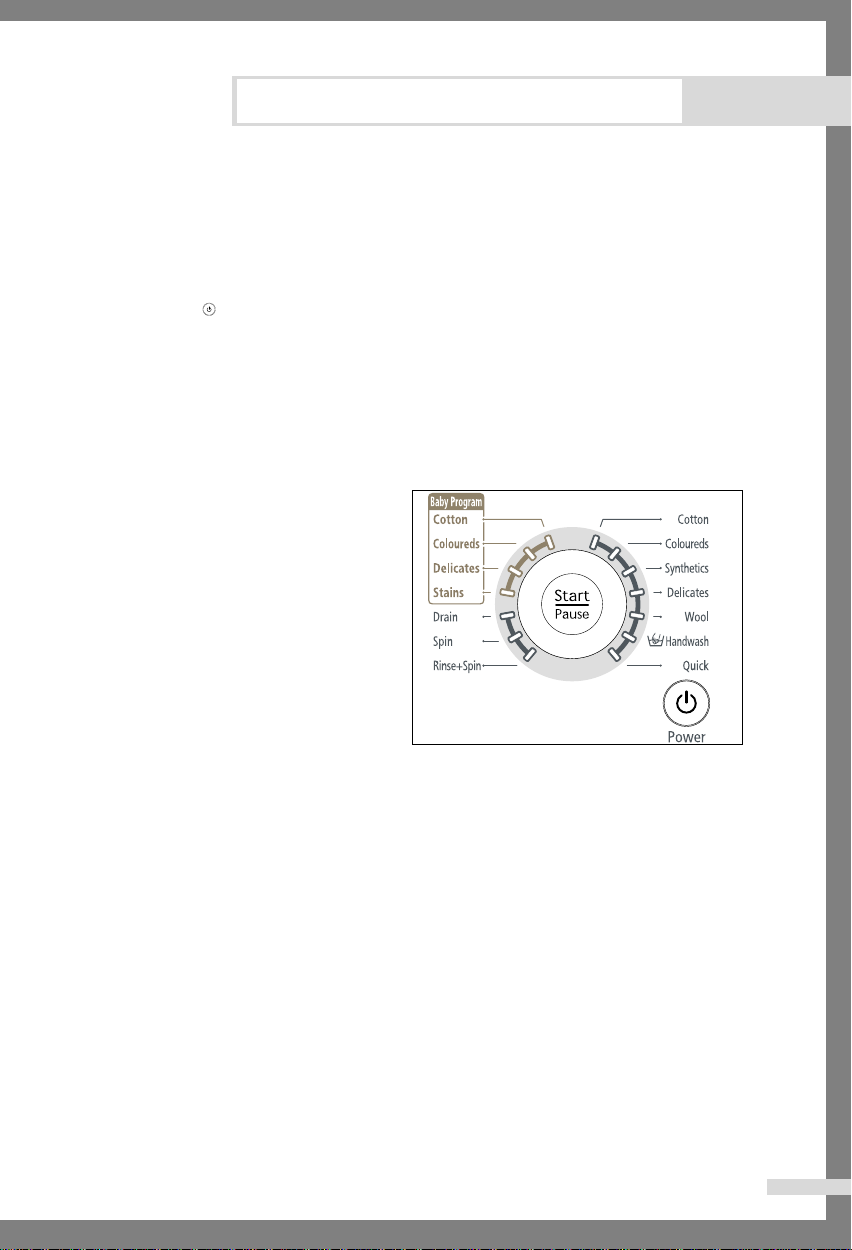
7. Turn the Fuzzy Control dial to select the
appropriate program for the type of
clothes Cotton, Coloureds, Synthetics,
Delicates, Wool, Hand wash, Quick,
Rinse+Spin, Spin, Drain, Baby
Program(Stains, Delicates, Coloreds,
Cotton)
You will see the indicators light up on
the control panel.
8. At this time, you can control the wash temperature, rinsing times, spin speed, delay time
by pressing the appropriate option button.
9. Press the Start/Pause button on the Fuzzy Control dial and the wash cycle will begin.
The process indicator will light up and the remaining time for the cycle will appear in the
display.
When the cycle is finished:
After the total cycle has finished, the power will turn off automatically.
1. Open the door.
Note: The door will not open untill 3 minutes after the machine stops or the power turns
off.
2. Remove laundry.
SAMSUNG
Washing Machine Owner’s Instructions 9
Page 12

Washing a Load of Laundry
Washing clothes manually
You can wash clothes manually without using the Fuzzy Logic feature. To do so:
1. Turn the water supply on.
2. Press the (On/Off) button on the washing machine.
3. Open the door.
4. Load the articles one at a time loosely into the drum, without overfilling.
5. Close the door.
6. Put the detergent and, if necessary, softener or prewash detergent, in the appropriate
compartments.
7. Press the Temperature button to select the temperature
(cold water, 30˚C, 40˚C, 60˚C, 95˚C)
8. Press to rinse button to select the required number of rinse cycles.
Maximum number of rinse cycles is five.
The washing duration will be prolonged accordingly.
9. Press the Spin button to select the spin speed.
Note: The rinse hold program allows you to take clothes that are dripping wet
out of the washing machine.
: No Spin, : Rinse Hold.
10. Press the button repeatedly to cycle through the available delayed start options
(from 3 hour to 24 hours in one hour increments). Displayed hours means the time
of finished washing-cycle.
11. Press the Start/Pause button and the machine will begin the cycle.
Using Delay Start
You can set the washing machine to finish your wash automatically at a later time, choosing
from 3 to 24 hour delay (in 1 hour increments). Displayed hours means the time of finished
washing-cycle.
To do this:
1. Manually or automatically set your washing machine for the type of clothes you are
washing.
2. Press the Delay Start button repeatedly until the delay time is set.
3. Press the Start/Pause button. The Delay Start indicator will light, and the clock will
begin counting down until it reaches your finish time.
4. To cancel Delay Start, press the (On/Off) button, then turn the washing machine
on again.
10
SAMSUNG
Washing Machine Owner’s Instructions
Page 13
Washing a Load of Laundry
Washing tips and hints
Sorting your laundry : Sort your laundry according to the following characteristics:
Type of fabric care label symbol : Sort laundry into cottons, mixed fibers, synthetics,
•
silks, wools and rayon.
Colour : Divide whites and colours. Wash new, coloured items separately.
•
Size: Placing items of different sizes in the same load will improve the washing action.
•
Sensitivity: Wash delicate items separately, using the Delicate wash program for pure
•
new wool, curtains and silk articles. Check the labels on the items you are washing or
refer to the fabric care chart in the appendix.
Emptying pockets : Coins, safety pins and similar items can damage linen, the
washing machine drum, and the water tank.
Securing fasteners : Close zippers and fasten buttons or hooks; loose belts or ribbons
should be tied together.
Prewashing cotton : Your new washing machine, combined with modern detergents,
will give perfect washing results, thus saving energy, time, water and detergent. However,
if your cotton is particularly dirty, use a prewash with a protein-based detergent.
Determining load capacity: Do not overload the washing machine or your laundry
may not wash properly. Use the chart below to determine the load capacity for the type of
laundry you are washing.
Fabric Type Load Capacity
B1445A(V/S)/B1245A(V/S)/ R1245A(V/S) F1245A(V/S)
Coloured/cotton
-average/lightly soiled 6.0 kg 5.2 kg 4.5 kg
-heavily soiled 6.0 kg 5.2 kg 4.5 kg
Synthetics 3.0 kg 3.0 kg 3.0 kg
Delicates 2.5 kg 2.0 kg 2.0 kg
Wools 2.0 kg 1.5 kg 1.5 kg
Detergent tips: The type of detergent you should use is based on the type of fabric
(cotton, synthetic, delicate items, wool), colour, wash temperature, degree and type of
soiling. Always use "low suds" laundry soap, which is designed for automatic washing
machines.
Follow the detergent manufacturer's recommendations based upon the weight of the
laundry, the degree of soiling, and the hardness of the water in your area. If you do not
know how hard your water is, ask your water authority.
B1045A(V/S) R1045A(V/S) F1045A(V/S)
Note: Keep detergents and additives in a safe, dry place out of the reach of children.
SAMSUNG
Washing Machine Owner’s Instructions 11
Page 14
Maintaining the Washing Machine
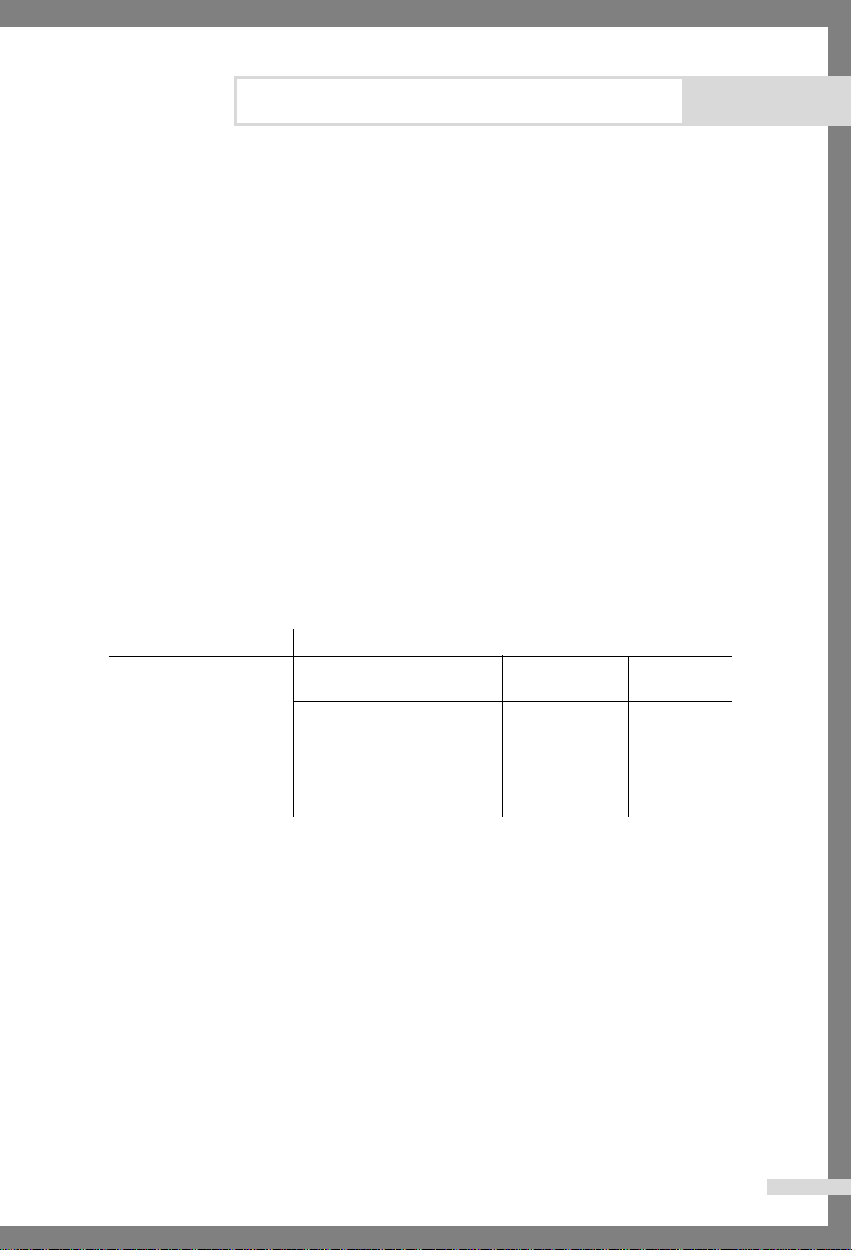
Draining the washing machine in an emergency
B1445A(V/S)/B1245A(V/S)/B1045A(V/S)
1. Unplug the washing machine
from the power supply.
2. Open the filter-cover by using
a coin or a key.
3. Unscrew the emergency drain cap
by turning left. Grip the cap on the
end of the emergency drain tube
and slowly pull it out about 15 cm.
4. Allow all the water to flow into a bowl.
5. Reinsert the drain tube and screw the cap back on.
6. Replace the filter-cover.
Repairing a frozen washing machine
If the temperature drops below freezing and your washing machine is frozen:
1. Unplug the washing machine.
2. Pour warm water on the source faucet to loosen the water supply hose.
3. Remove the water supply hose and soak it in warm water.
4. Pour warm water into the washing machine drum and let it sit for 10 minutes.
5. Reconnect the water supply hose to the water faucet and check if the water supply
and drain operations are normal.
Cleaning the exterior
1. Wipe the washing machine surfaces, including the control panel, with a soft cloth
and non-abrasive household detergents.
2. Use a soft cloth to dry the surfaces.
3. Do not pour water on the washing machine.
12
SAMSUNG
Washing Machine Owner’s Instructions
Page 15
Maintaining the Washing Machine
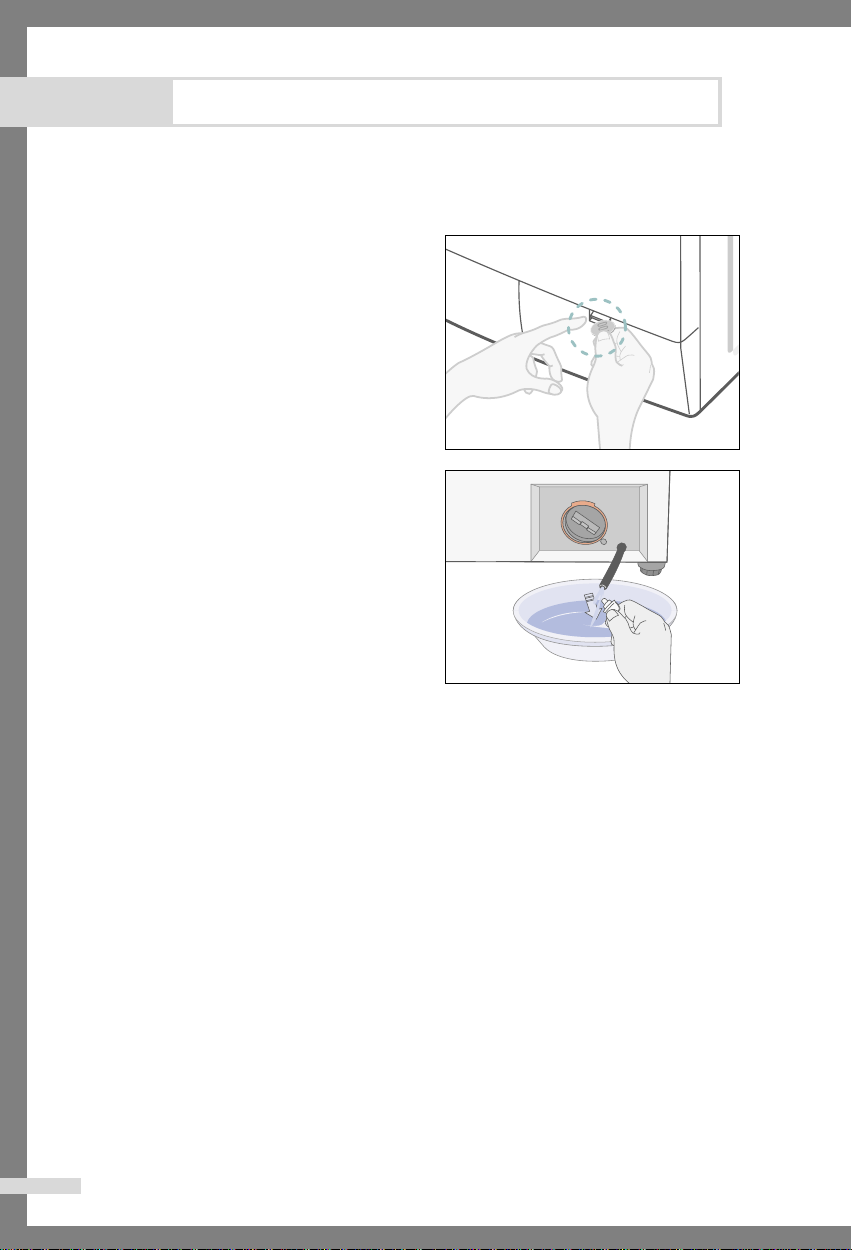
Cleaning the detergent drawer and recess
1. Press the release lever on the inside
of the detergent drawer and pull it out.
2. Remove the cap from compartment .
3. Wash all of the parts under running water.
4. Clean the drawer recess with an old toothbrush.
5. Reinsert the cap (Pushing it firmly into place)
and replace the liquid detergent divider into the drawer.
6. Push the drawer back into place.
7. Run a rinse program without any laundry in the drum.
Cleaning the debris filter
Clean the debris filter 5 or 6 times a year, or when you see the following error message on
the display:
1. Open the filter-cover,
See “Draining the washing machine in an emergency" on page 12.
2. Unscrew emergency drain cap by turning left and drain off all the water.
See "Draining the washing machine in an emergency" on page 12.
3. Unscrew the filter cap and take it out.
4. Wash any dirt or other material from the filter. Make sure the drain pump propeller
behind the filter is not blocked. Replace the filter cap.
5. Replace the filter-cover.
SAMSUNG
Washing Machine Owner’s Instructions 13
Page 16
Maintaining the Washing Machine
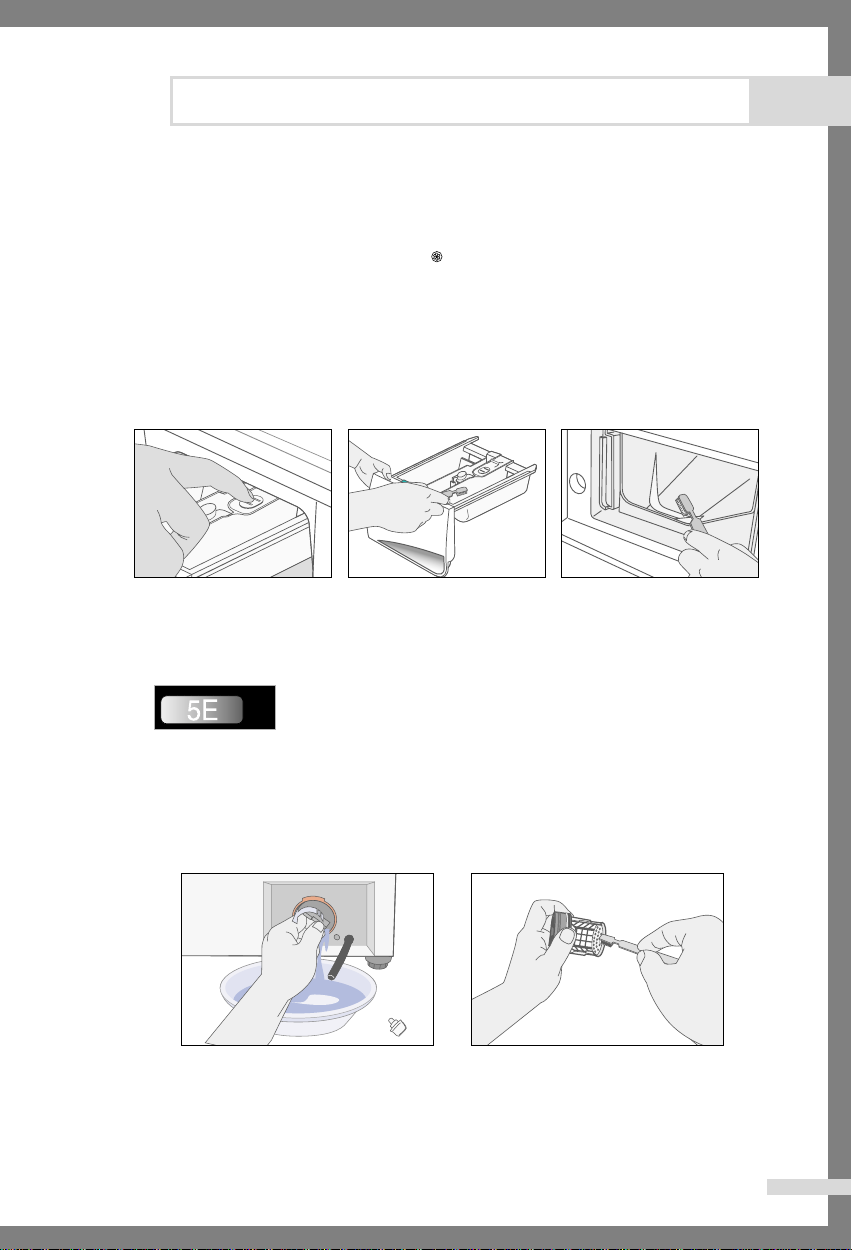
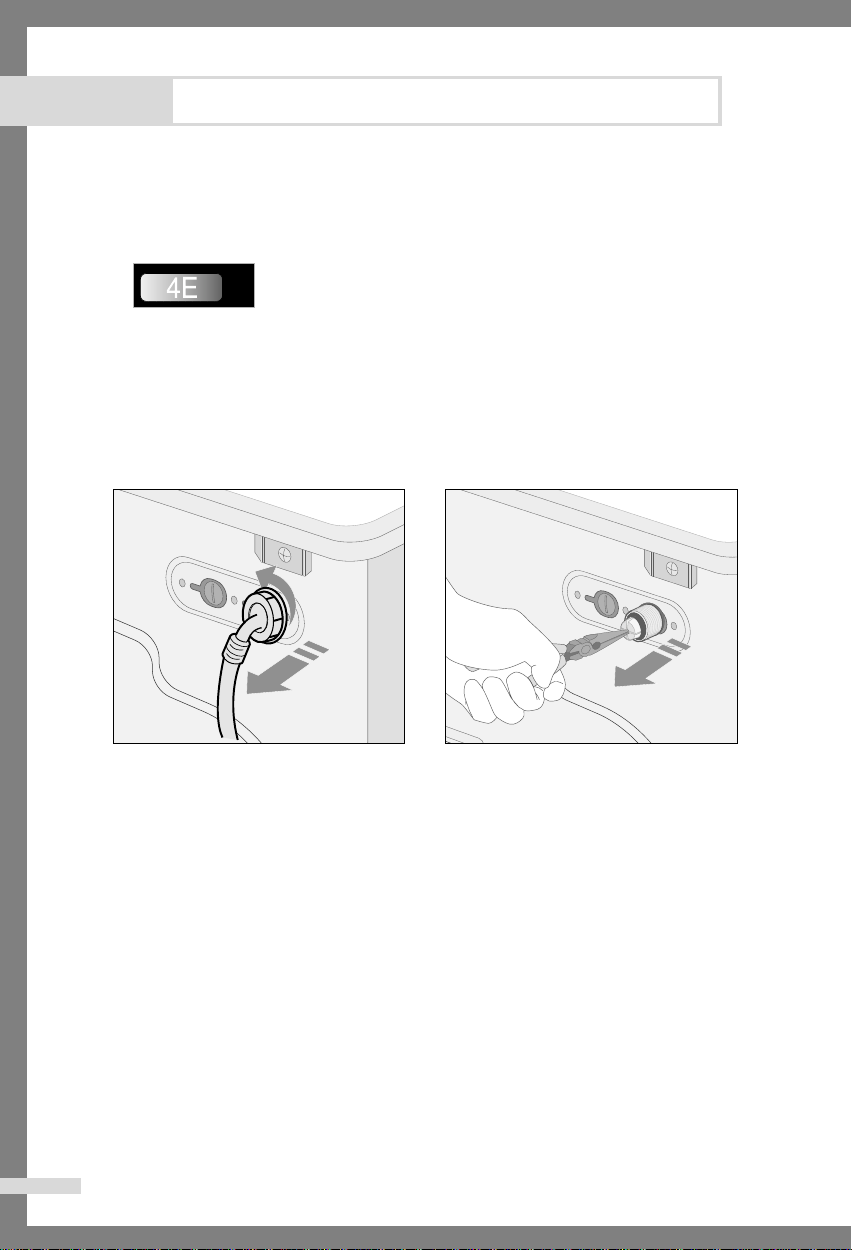
Cleaning the water hose mesh filter
You should clean the water hose mesh filter at least one time per year, or when you see the
following error message on the display:
To do this:
1. Turn off the water source to the washing machine.
2. Unscrew the hose from the back of the washing machine.
3. With a pair of pliers, gently pull out the mesh filter from the end of the hose and rinse
it under water until clean. Also clean the inside and outside of the threaded
connector.
4. Push the filter back into place.
5. Screw the hose back onto the washing machine.
6. Turn on the faucet and make sure the connections are watertight.
14
SAMSUNG
Washing Machine Owner’s Instructions
Page 17
Troubleshooting
Problems and solutions
The washing machine will not start
• Make sure the door is firmly closed.
• Make sure the washing machine is plugged in.
• Make sure the water source faucet is turned on.
• Make sure to press the Start/Pause button.
No water or insufficient water supply
• Make sure the water source faucet is turned on.
• Make sure the water source hose is not frozen.
• Make sure the water intake hose is not bent.
• Make sure the filter on the water intake hose is not clogged.
Detergent remains in the detergent drawer after the wash
program is complete
• Make sure the washing machine is running with sufficient water pressure.
• Put the detergents in the inner parts of the detergent drawer(away from the
outside edges).
Washing machine vibrates or is too noisy
• Make sure the washing machine is set on a level surface. If the surface is not level,
adjust the washing machine feet to level the appliance (see page 3).
• Make sure that the shipping bolts are removed (see page 3).
• Make sure the washing machine is not touching any other object.
• Make sure the laundry load is balanced.
The washing machine does not drain and/or spin
• Make sure the drain hose is not squashed or bent.
• Make sure the debris filter is not clogged
(see page 14).
The Door does not open
• The door will not open until 3 minutes after the machine stops or the power turns off.
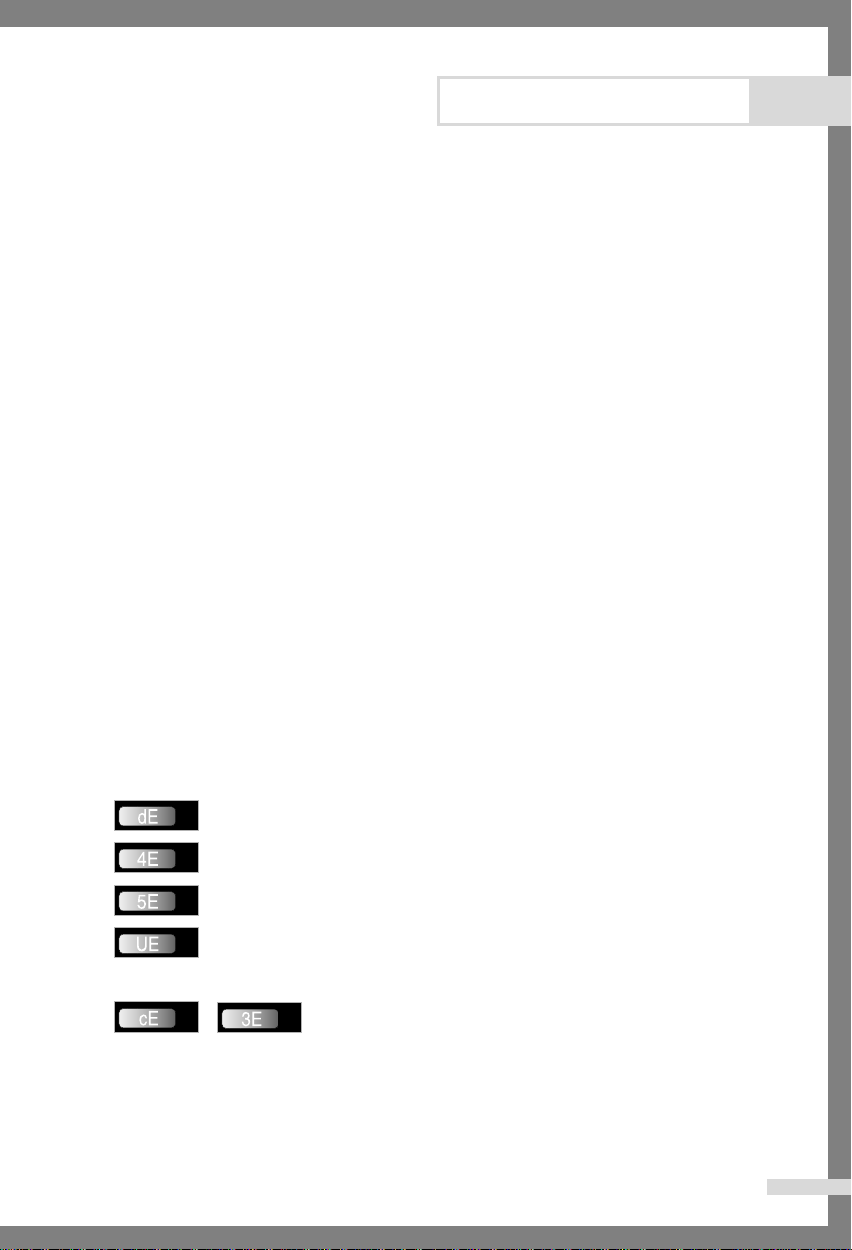
Understanding error messages
Error displayed Solution
• Close the door.
• Make sure the source water faucet is turned on.
• Check the water pressure.
• Clean the debris filter.
• Make sure the drainage hose is installed correctly.
• Laundry load is unbalanced; loosen any tangled laundry.
If only one item of clothing needs washing, such as a bathrobe or
jeans, the final spin result might be unsatisfactory and an "UE"
error message will be shown in the display window.
• Call after-sales service.
Before contacting After-Sales service:
1. Try to remedy the problem (See "Troubleshooting" on this page).
2. Restart the programme to see if the fault is repeated.
3. If the malfunction persists, call after-sales service and describe the problem.
SAMSUNG
Washing Machine Owner’s Instructions 15
Page 18
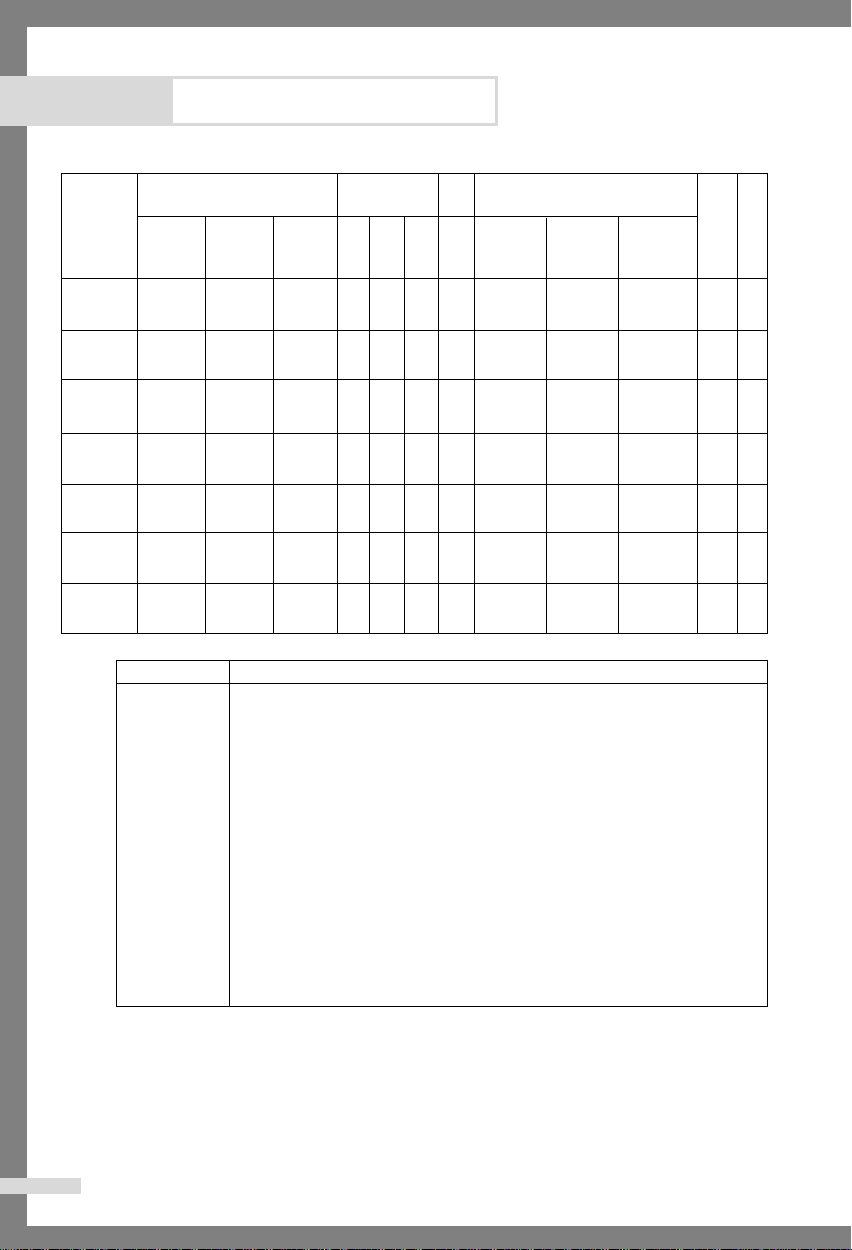
Programme Chart
(
✽
user option)
DETERGENT
AND ADDITIVES
Pre-
wash
wash
PRO-
GRAM
Max load
B1445A(V/S)
B1245A(V/S)
B1045A(V/S)
(kg)
R1245A(V/S)
R1045A(V/S)
F1245A(V/S)
F1045A(V/S)
Cotton 6.0 5.2 4.5 ✽ yes ✽ 95 1400 1200 1000 ✽✽
Coloureds 6.0 5.2 4.5 ✽ yes ✽ 60 1400 1200 1000 ✽✽
Synthetics 3.0 3.0 3.0 ✽ yes ✽ 60 800 800 800 ✽✽
Delicates 2.5 2.5 2.0 ✽ yes ✽ 40 800 800 600 ✽✽
Wool 2.0 1.5 1.5 - yes ✽ 40 400 400 400 ✽✽
Handwash 2.0 1.5 1.5 - yes ✽ 40 400 400 400 ✽✽
Sof-
tener
Tem
(˚C)
Max
Spin Speed(MAX)rpm
B1445A(V/S)
B1245A(V/S)
R1245A(V/S)
F1245A(V/S)
B1045A(V/S)
R1045A(V/S)
F1045A(V/S)
Delay
start
Half
Load
Quick
2.0 1.5 1.5 - yes ✽ 60 1400 1200 1000 ✽✽
PROGRAM Type of WASH
Cotton Averagely or lightly soiled cottons, bed linen, table linen, underwear, towels,
shirts, etc.
Coloureds Averagely or lightly soiled cottons, bed linen, table linen, underwear, towels,
shirts, etc.
Synthetics Averagely or lightly soiled blouses, shirts, etc., Made of polyester
(diolen, trevira), polyamide (perlon, nylon) or other similar blends.
Delicates Delicate curtains, dresses, skirts, shirts and blouses.
Wool Only machine washable woolens with pure new wool label.
Handwash
Quick
Very light wash course like hand wash.
Lightly soiled cottons or linen blouses, shirts, dark coloured terry cloth,
coloured linen articles, jeans, etc.
1. Programme with prewash lasts approx. 15 minutes longer.
2. The programme duration data has been measured under the conditions specified in
Standard IEC 456.
3. Consumption in individual homes may differ from the values given in the table
due to variations in the pressure and temperature of the water supply, the load and
the type of laundry.
16
SAMSUNG
Washing Machine Owner’s Instructions
Page 19
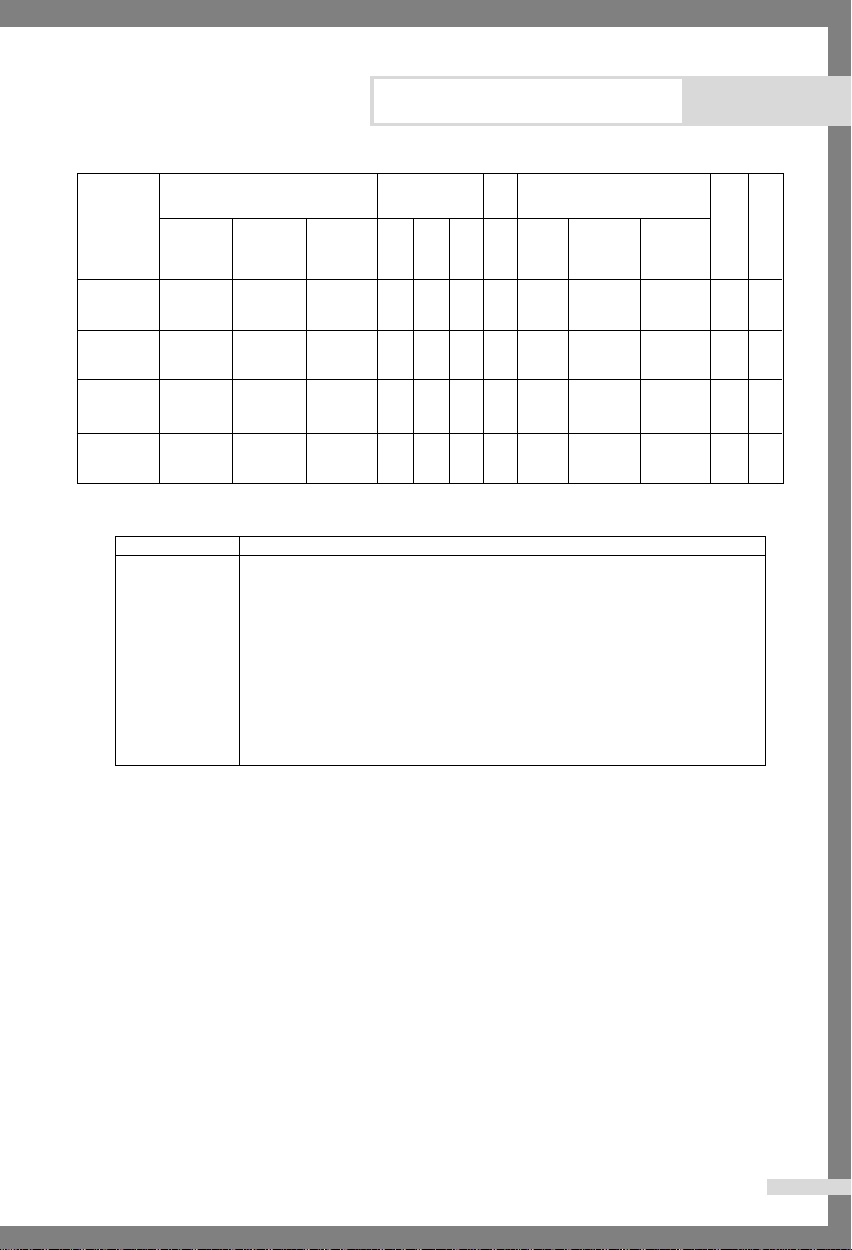
Programme Chart
(
✽
user option)
DETERGENT
AND ADDITIVES
Pre-
wash
wash
PRO-
GRAM
Max load
B1445A(V/S)
B1245A(V/S)
B1045A(V/S)
(kg)
R1245A(V/S)
R1045A(V/S)
F1245A(V/S)
F1045A(V/S)
Baby Cotton 6.0 5.2 4.5 ✽ yes ✽ 95 1400 1200 1000 ✽✽
Sof-
tener
Tem
Spin Speed(MAX)rpm
(˚C)
B1245A(V/S)
B1445A
Max
(V/S)
R1245A(V/S)
F1245A(V/S)
B1045A(V/S)
R1045A(V/S)
F1045A(V/S)
Delay
start
Half
Load
Baby
Coloureds
Baby
Delicates
6.0 5.2 4.5 ✽ yes ✽ 60 1400 1200 1000 ✽✽
2.5 2.0 2.0 ✽ yes ✽ 60 800 800 600 ✽✽
Baby Stains 6.0 5.2 4.5 ✽ yes ✽ 40 1400 1200 1000 ✽✽
PROGRAM Type of WASH
Baby Cotton Averagely or lightly soiled baby cottons, bed linen, table linen, underwear,
towels, shirts, etc.
Baby Coloureds Averagely or lightly soiled baby cottons, bed linen, table linen, underwear,
towels, shirts, etc.
Baby Delicates Delicate baby dresses, skirts, shirts and blouses.
Baby Stains Stains on cottons, bed lined, underwear, towels, etc. caused by food spills and
urine.
SAMSUNG
Washing Machine Owner’s Instructions 17
Page 20
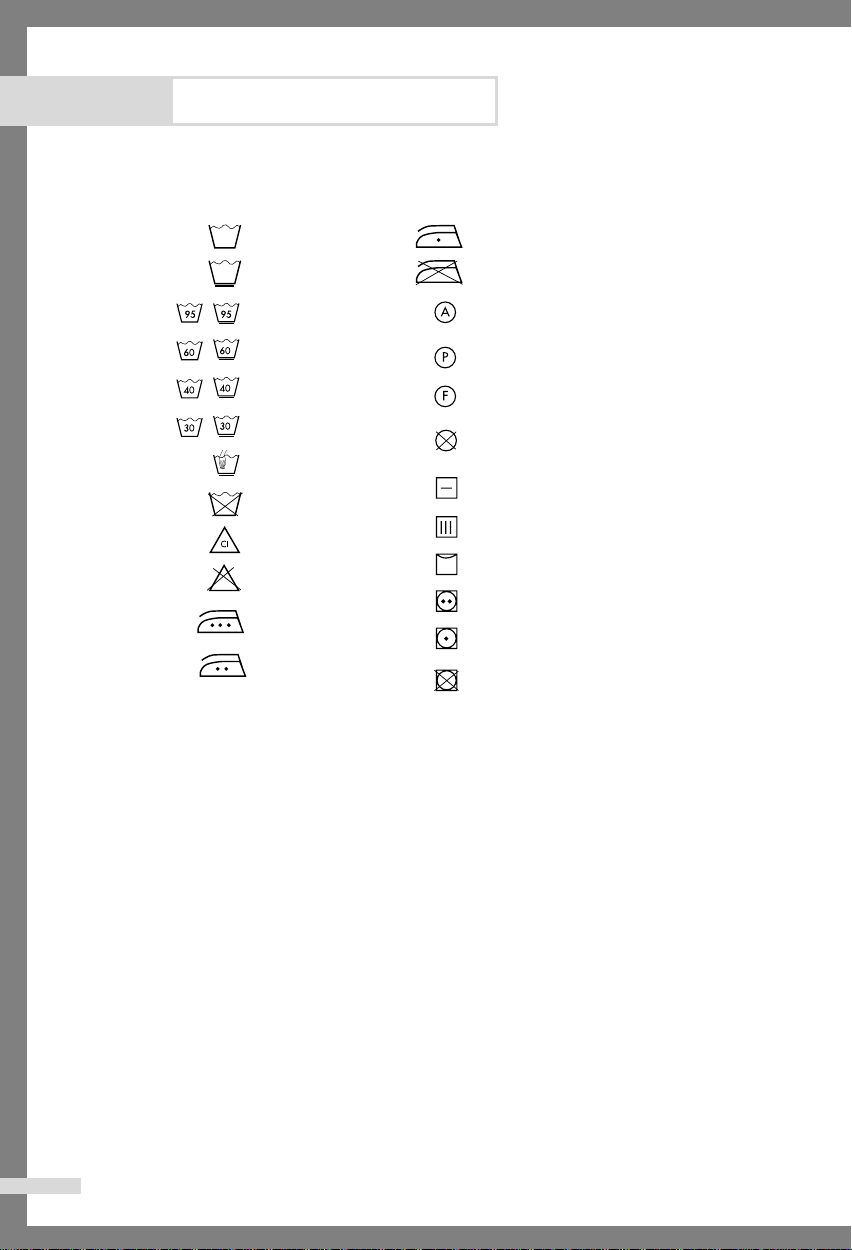
Fabric care chart
Appendix
Resistant material
Delicate fabric
Item may be washed at 95 ˚C
Item may be washed at 60 ˚C
Item may be washed at 40 ˚C
Item may be washed at 30 ˚C
Item may be hand washed
Dry clean only
Can be bleached in cold water
Do not bleach
Can be ironed at 200 ˚C max
Can be ironed at 150 ˚C max
Can be ironed at 100 ˚C max
Do not iron
Can be dry cleaned using any solvent
Dry clean with perchloride, lighter fuel,
pure alcohol or R113 only
Dry clean with aviation fuel,
pure alcohol or R113 only
Do not dry clean
Dry flat
Can be hung to dry
Dry on clothes hanger
Tumble dry, normal heat
Tumble dry, reduced heat
Do not tumble dry
Electrical warnings
To reduce the risk of fire, electrical shock, and other injuries, keep these safety precautions in
mind:
• Operate the appliance only from the type of power source indicated on the marking
label. If you are not sure of the type of power supplied to your home, consult your
appliance dealer or local power company.
• Use only a grounded or polarized outlet. For your safety, this appliance is equipped
with a polarized alternating current line plug having one blade wider than the other.
This plug will fit into the power outlet only one way. If you are unable to insert the
plug fully into the outlet, try reversing the plug. If the plug still doesn't fit, contact
your electrician to replace your outlet.
• Protect the power cord. Power supply cords should be routed so that they are
unlikely to be walked on or pinched by items placed on or against them. Pay
particular attention to cords at plugs, convenience receptacles, and the point where
they exit from the unit.
• Do not overload the wall outlet or extension cords. Overloading can result in fire or
electric shock.
18
SAMSUNG
Washing Machine Owner’s Instructions
Page 21
Appendix
Protecting the environment
• This appliance is manufactured from recyclable materials. If you decide to dispose of
this appliance, please observe local waste disposal regulations. Cut off the power
cord so that the appliance cannot be connected to a power source. Remove the door
so that animals and small children cannot get trapped inside the appliance.
• Do not exceed the detergent quantities recommended in the detergent manu-
facturers' instructions.
• Use stain removal products and bleaches before the wash cycle only when strictly
necessary.
• Save water and electricity by only washing full loads (the exact amount depends
upon the program used).
Declaration of conformity
This appliance complies with European safety standards, EC directive 93/68 and EN
Standard 60335.
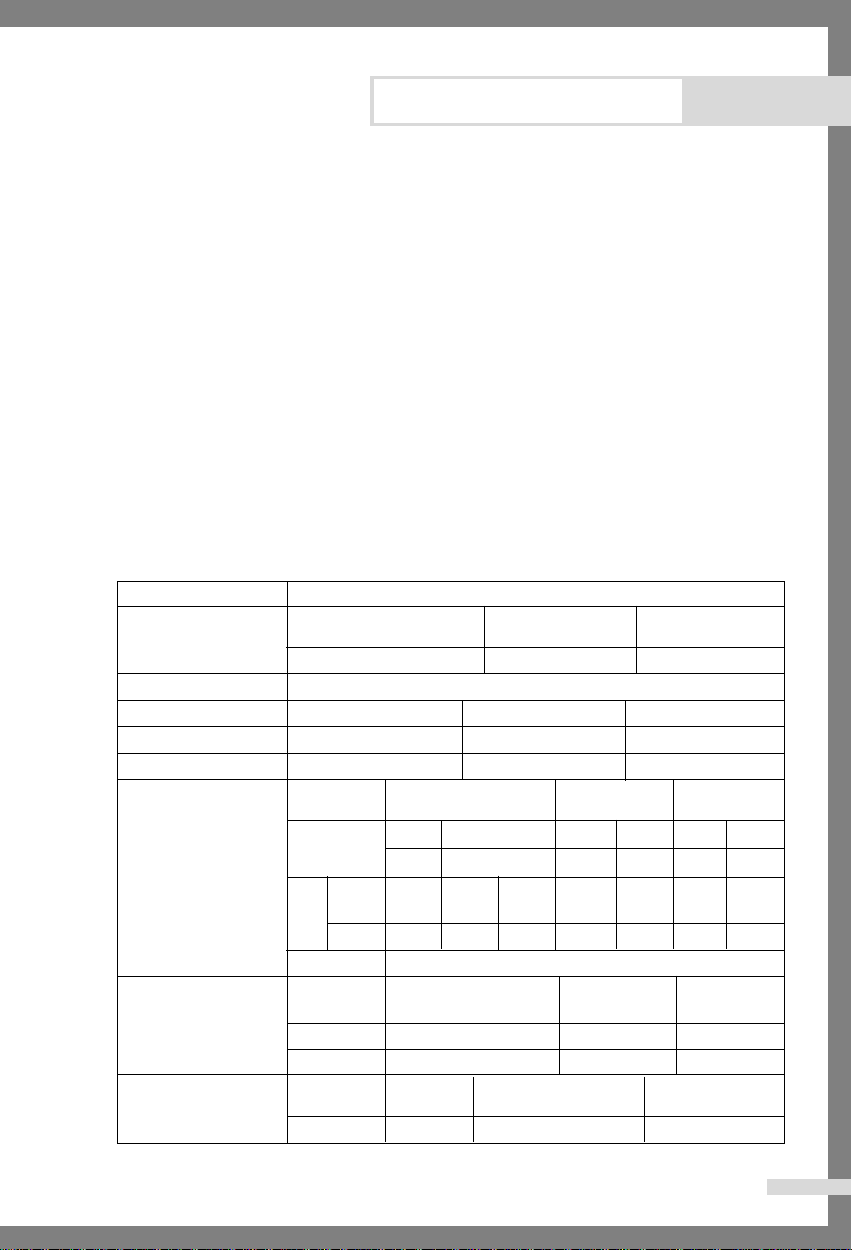
Specification
TYPE FRONT LOADING WASHER
R1245A(V/S),
R1045A(V/S)
50 kPa ~ 800 kPa
49L
66kg
5.2kg (DRY LAUNDRY)
R1245A(V/S),
R1045A(V/S)
2000W
2400W
B1045A
B1245A
(V/S)
(V/S)
500W 250W
500W 220W
2.5kg
1.0kg
R1245A(V/S),F1245A(V/S)
220V 1900W
240V 2200W
R1245AV
(V/S)
550W 500W
34W
R1245A(V/S),
R1045A(V/S)
B1245A(V/S),
F1245A(V/S),
F1045A(V/S)
62kg
4.5kg (DRY LAUNDRY)
F1245A(V/S),
F1045A(V/S)
220V 1800W
240V 2100W
R1045A
F1245A
(V/S)
(V/S)
F1245A(V/S),
F1045A(V/S)
2.1kg
0.9kg
B1045A(V/S),R1045A
(V/S),F1045A(V/S)
1.9kg
0.8kg
DIMENSION
WATER PRESSUERE
WATER VOLUME
NET WEIGHT
WASH and SPIN CAPACITY
POWER
CONSUMPTION
PACKAGE Wt
SPIN REVOLUTION
B1445A(V/S),B1245A(V/S),
B1045A(V/S)
W598mm × D550mm ×H844mm W598mm × D404mm ×H844mmW598mm × D450mm ×H844mm
54L 48L
75kg
6.0kg (DRY LAUNDRY)
MODEL
WASHING AND
HEATING
SPIN
PUMPING
MODEL
PAPER
PLASTIC
MODEL
B1445A(V/S),B1245A(V/S),
B1045A(V/S)
220V
240V
B1445A
MODEL
(V/S)
230V 550W
B1445A(V/S),B1245A(V/S),
B1045A(V/S)
B1445A(V/S)
1400rpm 1200 1000
F1045A
(V/S)
SAMSUNG
Washing Machine Owner’s Instructions 19
Page 22

IN CASE THE NEED FOR
SERVICING ARISES
-Don't hesitate to call any AS center nearby
with your name, address, telephone number,
model number and serial number of your machine
when anything wrong with your product occurs.
Page 23

WaschmaschinenBedienungsanleitung
B1445A(V/S)
B1245A(V/S)
B1045A(V/S)
R1245A(V/S)
R1045A(V/S)
F1245A(V/S)
F1045A(V/S)
Produkt registrieren und gewinnen unter
www.samsung.com/global/register
Code No.: DC68-02158F-GR
Page 24
Wichtige Hinweise
Wir freuen uns, dass Sie sich für eine Samsung-Waschmaschine entschieden haben.
Die vorliegende Bedienungsanleitung enthält wichtige Informationen bezüglich des Anschlusses, der Verwendung
und der Pflege dieses Gerätes. Bitte nehmen Sie sich die Zeit, die Anweisungen sorgfältig durchzulesen. Auf diese
Weise lernen Sie alle Vorteile und Funktionen Ihrer Waschmaschine kennen und können sie optimal nutzen.
Bevor Sie das Gerät in Betrieb nehmen
• Verpackungsmaterialien können eine Gefahr für Kinder darstellen. Entfernen Sie deshalb alle
Verpackungsmaterialien (Kunststoffbeutel, Styropor usw.) aus der Reichweite von Kindern.
• Das Gerät dient nur zur Verwendung im häuslichen Bereich.
• Stellen Sie sicher, dass Strom- und Wasseranschluss des Geräts von Fachpersonal durchgeführt werden.
Beim Anschluss müssen sowohl die gesetzlichen Sicherheitsauflagen als auch die Herstelleranweisungen
(siehe Hinweise zu Wasser- und Stromanschluss auf Seite 4 und 5) beachtet werden.
• Entfernen Sie vor Inbetriebnahme der Waschmaschine unbedingt das gesamte Verpackungsmaterial und
alle Transportsicherungen. Andernfalls können ernsthafte Schäden am Gerät entstehen. Siehe
“Transportsicherungen entfernen” auf Seite 3.
• Bevor Sie das erste Mal Wäsche waschen, muss die Waschmaschine zunächst einmal einen kompletten
Waschzyklus ohne Wäschefüllung durchlaufen. Siehe “Vor dem ersten Waschgang” auf Seite 9.
Vorsichtsmaßnahmen
• Bevor Sie das Gerät reinigen bzw. vor dem Durchführen von Wartungsarbeiten ziehen Sie den Netzstecker des
Geräts aus der Steckdose oder schalten das Gerät mit der Netztaste aus.
• Überprüfen Sie vor dem Waschen, dass die Taschen aller zu waschenden Kleidungsstücke geleert sind. Harte bzw.
scharfe Gegenstände wie Münzen, Sicherheitsnadeln, Nägel, Schrauben oder Steine können schwere Schäden an
Ihrer Waschmaschine verursachen.
• Drehen Sie nach der Verwendung des Gerätes stets den Wasserhahn zu.
• Überprüfen Sie vor dem Öffnen der Gerätetür, ob das Waschwasser abgepumpt wurde. Öffnen Sie niemals die
Gerätetür, solange Sie im Inneren der Waschmaschine noch Wasser sehen.
• Kleine Kinder und Haustiere können ins Trommelinnere klettern. Überprüfen Sie deshalb zur Sicherheit die
Trommel des Geräts vor jeder Benutzung.
• Der Glaseinsatz der Gerätetür kann während des Waschbetriebs sehr heiß werden. Halten Sie deshalb Kinder von
der laufenden Waschmaschine fern.
• Achten Sie darauf, dass Wartungs- und Reparaturarbeiten nur von qualifizierten Kundendiensttechnikern
durchgeführt werden, wobei nur Original-Ersatzteile verwendet werden sollten. Nicht von Fachleuten
vorgenommene Reparaturen können ernsthafte Schäden verursachen und/oder größere Reparaturen an der
Waschmaschine nötig machen.
• Falls der Stecker oder das Netzkabel beschädigt sind, müssen diese vom Hersteller oder vom Kundendienst bzw.
von einer ähnlich qualifizierten Person ausgewechselt werden, um Gefahren zu vermeiden.
• Dieses Gerät sollte nicht von Kindern oder gebrechlichen Personen bedient werden, wenn keine angemessene
Aufsicht durch eine verantwortliche Person gegeben ist, die darauf achtet, dass die Personen das Gerät gefahrlos
handhaben. Kleinere Kinder sollten beaufsichtigt werden, so dass sie nicht mit dem Gerät spielen.
• Dieses Gerät sollte nicht von Kindern oder gebrechlichen Personen bedient werden, wenn keine angemessene
Aufsicht durch eine verantwortliche Person gegeben ist, die darauf achtet, dass die Personen das Gerät gefahrlos
handhaben. Kleinere Kinder sollten beaufsichtigt werden, um sicherzustellen, dass sie nicht mit dem Gerät spielen.
• Um eine korrekte Stromaufnahme zu gewährleisten, muss das Gerät mit einem geeigneten Anschluss verbunden
sein.
• Das Gerät muss so aufgestellt werden, dass der Stecker nach der Installation frei zugänglich ist.
• Verwenden Sie kein Wasser, das Öle, Cremes oder Lotionen enthält. Solches Wasser wird häufig in Kosmetik- oder
Massagesalons verwendet. Andernfalls können sich die Dichtungen verformen, was zu Fehlfunktionen und Lecks
führen kann.
• Waschtrommeln aus Edelstahl sind in der Regel rostfrei. Wenn jedoch Metallobjekte, wie z.B. Haarspangen, längere
Zeit in der Waschtrommel verbleiben, kann dies zu einem Rosten der Trommel führen. Lassen Sie kein
chlorhaltiges Wasser oder Chlorbleiche über einen längeren Zeitraum in der Trommel stehen. Vermeiden Sie es,
regelmäßig eisenhaltiges Wasser zu verwenden oder über einen längeren Zeitraum in der Trommel zu belassen.
Sollte sich doch einmal Rost auf Oberfläche der Trommel bilden, entfernen Sie diesen mit pH-neutralem
Spühlmittel und einem Schwamm oder weichem Tuch. (Verwenden Sie unter keinen Umständen eine Stahlbürste.)
●
BEWAHREN SIE DIE BEDIENUNGSANLEITUNG AUF.
Page 25

Inhaltsverzeichnis
Wichtige Hinweise---------------------------------Einband-Innenseite
lnstallation
Waschmaschine auspacken -------------------------------------------------------------- 2
Ihre Waschmaschine auf einen Blick ---------------------------------------------- 2
Standort wählen------------------------------------------------------------------------- 3
Stellfüße ausrichten -------------------------------------------------------------------- 3
Transportsicherungen entfernen---------------------------------------------------- 3
Wasserzufuhrschlauch (optional) anschließen---------------------------------- 3
Wasserzufuhrschlauch anschließen ----------------------------------------------- 4
Wasserabfluss-Schlauch anschließen--------------------------------------------- 4
Waschmaschine an das Stromnetz anschließen------------------------------- 5
------------------------------------------------------------------------------ 2
Waschbetrieb------------------------------------------------------------------------- 6
Übersicht über das Bedienfeld ------------------------------------------------------ 6
Vor dem ersten Waschgang --------------------------------------------------------- 8
Waschmittel einfüllen ------------------------------------------------------------------ 8
Waschen mit Fuzzy-Logic ------------------------------------------------------------ 9
Mit manuellen Einstellungen waschen------------------------------------------- 10
Waschstartzeit einstellen------------------------------------------------------------ 10
Tipps und Hinweise zum Waschen----------------------------------------------- 11
Reinigung und Pflege----------------------------------------------------------- 12
Restwasser manuell aus der Waschmaschine ablassen------------------------- 12
Wenn die Waschmaschine eingefroren ist-------------------------------------- 12
Außenflächen der Waschmaschine reinigen----------------------------------- 12
Waschmittelbehälter reinigen ------------------------------------------------------ 13
Fremdkörperfalle reinigen----------------------------------------------------------- 13
Sieb am Wasserzulauf reinigen --------------------------------------------------- 14
Fehlersuche-------------------------------------------------------------------------- 15
Probleme und Lösungen ----------------------------------------------------------------- 15
Fehlermeldungen--------------------------------------------------------------------------- 15
Übersicht über die Waschprogramme----------------------------- 16
Anhang
Erklärung der Pflegesymbole------------------------------------------------------------ 18
Wichtige Hinweise zum Netzanschluss------------------------------------------ 18
Umweltschutz-Hinweise------------------------------------------------------------- 19
Konformitätshinweise ---------------------------------------------------------------- 19
Technische Daten--------------------------------------------------------------------- 19
---------------------------------------------------------------------------------- 18
SAMSUNG
Waschmaschinen-Bedienungsanleitung 1
Page 26

Installation
Waschmaschine auspacken
Packen Sie Ihre Waschmaschine aus und überprüfen Sie das Gerät auf Transportschäden.
Stellen Sie sicher, dass alle unten abgebildeten Zubehörteile mitgeliefert wurden. Falls ein
Transportschaden vorliegt oder falls Zubehörteile fehlen, setzen Sie sich bitte umgehend mit
Ihrem Fachhändler in Verbindung.
Ihre Waschmaschine auf einen Blick
Arbeitsfläche
Waschmittelbehälter
Detergent
Bedienfeld
drawer
Door
Gerätetür
Abfluss-Schlauch
Netzkabel mit
Stecker
Schutzleiste
Stellfüße
Schraubenschlüssel
Schlauchführung
2
SAMSUNG
Fremdkörperfalle
RestwasserablassSchlauch
Filterabdeckung
Wasserzufuhrschlauch
AbflussSchlauch
Kunststoffabdeckungen für
Transportsicherungsöffnungen
Waschmaschinen-Bedienungsanleitung
Page 27

Installation
1
2
3
Standort wählen
Bevor Sie die Waschmaschine anschließen, wählen Sie einen Standort mit den folgenden Eigenschaften:
•
harte, ebene Stellfläche (falls die Stellfläche uneben ist, siehe Abschnitt “Stellfüße ausrichten” unten)
• möglichst weit entfernt von direktem Sonnenlicht
• angemessene Belüftung
• Raumtemperatur darf nicht unter 0°C fallen
• möglichst weit entfernt von Wärmequellen (Heizungen etc.)
Stellen Sie sicher, dass die Füße der Waschmaschine nicht auf dem Netzkabel stehen. Wenn die
Waschmaschine auf einem mit Teppichboden ausgelegtem Boden steht, überprüfen Sie, dass die
Ventilations- und Belüftungsöffnungen nicht durch Teppichmaterial verdeckt werden.
Stellfüße ausrichten
Falls die Stellfläche leicht uneben ist, können Sie die Füße des Geräts so einstellen, dass die Waschmaschine
stabil und gerade steht. Schieben Sie keine Holzkeile oder sonstige Gegenstände unter die Füße.
1. Drehen Sie den Fuß von Hand nach rechts oder links, bis Sie auf der gewünschten
Höhe angelangt sind.
2. Fixieren Sie den Fuß in dieser Position, indem Sie die Fixiermutter mit dem
mitgelieferten Schraubenschlüssel festziehen.
• Waschmaschine auf eine feste, flache Oberfläche stellen
Wird die Waschmaschine auf eine unebene oder nicht ausreichend feste Oberfläche gestellt, werden
Geräusche und Schwingungen erzeugt. (Ein Neigungswinkel von maximal 1 Grad ist zulässig.)
T ransportsicherungen entfernen
Bevor Sie Ihre Waschmaschine in Betrieb nehmen, müssen Sie die fünf Transportsicherungsbolzen
auf der Rückseite des Gerätes entfernen. Gehen Sie wie folgt vor:
1. Lockern Sie die Schraube mit dem mitgelieferten Schraubenschlüssel.
2. Lösen Sie die Schraube von Hand und ziehen Sie den Sicherungsbolzen durch die
Aussparung aus dem Gerät. Wiederholen Sie diesen Vorgang für die anderen vier
Transportsicherungen.
3. Verschließen Sie die Aussparungen mit den mitgelieferten Kunststoffabdeckungen.
4. Bewahren Sie die Transportsicherungen für den zukünftigen Gebrauch auf.
Wasserzufuhrschlauch (optional) anschließen
1. Entfernen Sie den Adapter vom
Wasserzufuhrschlauch.
2. Lösen Sie zuerst mit einem Kreuzschlitz-Schraubendreher
die vier Schrauben am Adapter. Drehen Sie anschließend
Teil (b) des Adapters in Pfeilrichtung, bis ein 5 mm großer
Abstand zwischen Teil (a) und Teil (b) vorhanden ist.
3. Schließen Sie den Adapter an den Wasserhahn an,
und ziehen Sie die Schrauben fest an. Drehen Sie
anschließend Teil (b) in Pfeilrichtung, bis Teil (a)
und (b) fest verbunden sind.
HINWEIS :
Wenn der Schlauch nach dem Anschließen lecken sollte, wiederholen Sie die oben aufgeführten Schritte. Verwenden Sie für die
Wasserzufuhr möglichst einen konventionellen Wasserhahn. Wenn der Hahn einen quadratischen Querschnitt aufweist oder einen
zu großen Durchmesser besitzt, entfernen Sie den Einlegering aus dem Adapter, bevor Sie den Adapter an den Hahn anschließen.
c
a
b
SAMSUNG
4. Schließen Sie den Wasserzufuhrschlauch an den Adapter
an. Ziehen Sie Teil (c) des Wasserzufuhrschlauchs nach
unten. Wenn Sie Teil (c) loslassen, rastet der Schlauch
automatisch mit einem Klickgeräusch im Adapter ein.
5. Schließen Sie das andere Ende des Wasserzufuhrschlauchs
an das Wassereinlaufventil auf der Oberseite der
Waschmaschine an. Schrauben Sie den Schlauch im
Uhrzeigersinn vollständig hinein.
•
Wenn der Wasserhahn über ein Gewinde verfügt,
schließen Sie den Wasserzufuhrschlauch wie in
der Abbildung dargestellt an.
Waschmaschinen-Bedienungsanleitung 3
Page 28
Installation
Wasserzufuhrschlauch anschließen
Schließen Sie ein Ende des Wasserzufuhrschlauchs an die Waschmaschine und das andere Ende
an die Wasserleitung an. Achten Sie darauf, dass der Wasserzufuhrschlauch nicht gedehnt wird.
Falls der Schlauch zu kurz ist, verwenden Sie einen längeren Hochdruckschlauch.
Zum Anschließen des Wasserzufuhrschlauchs gehen Sie wie folgt vor:
1. Schließen Sie das L-förmige Ende des
Wasserzufuhrschlauchs an den Wasserzulauf
an der Waschmaschinen-Rückseite an.
Drehen Sie die Schraubverbindung von
Hand fest.
2.
Schließen Sie das andere Ende des Schlauchs an den entsprechenden Anschluss der KaltwasserLeitung an. Schrauben Sie den Anschluss von Hand fest. Sofern notwendig, können Sie den
Anschluss des Wasserzufuhrschlauchs am Waschmaschinen-Zulauf drehen, indem Sie die
Schraubverbindung lockern, den Schlauch drehen und den Anschluss wieder festschrauben.
Option: 1. Schließen Sie das rote L-förmige Ende des Warmwasser-Zufuhrschlauchs an
Hinweis: Zum Anschluss an die Hauptwasserleitung dürfen nur neue Schläuche
den roten Warmwasserzulauf an der Waschmaschinen-Rückseite an. Drehen
Sie die Schraubverbindung von Hand fest.
2. Schließen Sie das andere Ende des Warmwasser-Zufuhrschlauchs an den
entsprechenden Anschluss der Warmwasser-Leitung an. Schrauben Sie den
Anschluss von Hand fest.
3. Verwenden Sie ein Y-Verbindungsstück, wenn Sie ausschließlich kaltes
Wasser verwenden möchten.
verwendet werden.
Wasserabfluss-Schlauch anschließen
Sie können das andere Ende des Abfluss-Schlauchs auf drei unterschiedliche Arten anschließen:
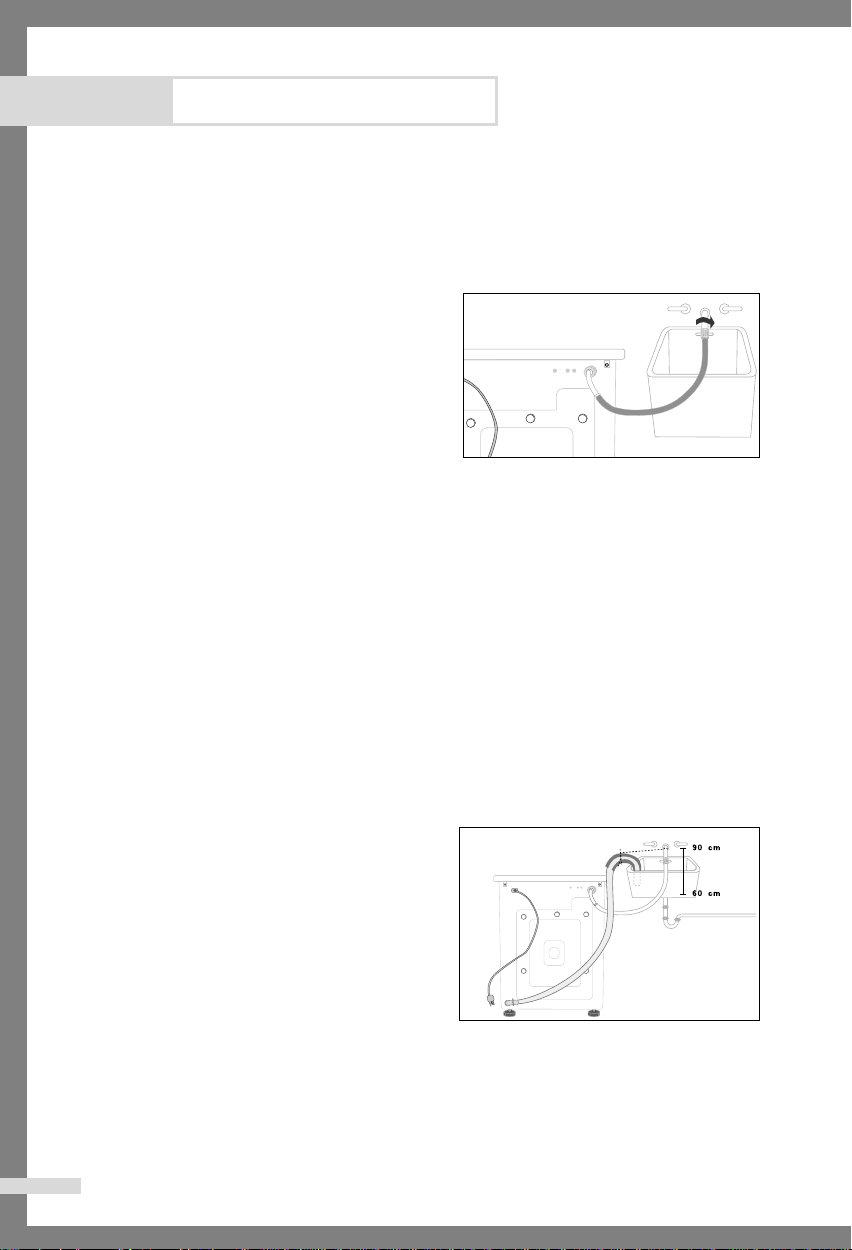
Schlauch in ein Spülbecken hängen
Hängen Sie den Abfluss-Schlauch in einer Höhe
von 60 bis 90 cm über den Rand eines
Spülbeckens. Setzen Sie das Schlauchende dazu
in die mitgelieferte Kunststoff-Schlauchführung
ein. Befestigen Sie die Schlauchführung mit
einem Haken an der Wand oder fixieren Sie die
Schlauchführung auf andere Weise, so dass der
Schlauch nicht aus dem Becken rutschen kann.
Schlauch mit Anschluss am Abflussrohr verbinden
Verbinden Sie den Abfluss-Schlauch mit dem Anschluss-Stück (Siphon) des Abflussrohrs unterhalb
der Spüle. Das Ende des Abfluss-Schlauchs muss mindestens 60 cm über dem Fußboden liegen.
Schlauch in ein Abflussrohr einleiten
Samsung empfiehlt die Verwendung eines 65 cm langen vertikalen Rohres. Das Rohr darf
nicht kürzer als 60 cm und nicht länger als 90 cm sein.
4
SAMSUNG
Waschmaschinen-Bedienungsanleitung
Page 29
Installation
Waschmaschine an das Stromnetz anschließen
Für Benutzer in Europa.
Für Benutzer in den USA.
Der Stecker der Waschmaschine muss
Der Stecker der Waschmaschine
NICHT
MUSS
geerdet werden.
geerdet werden.
Lassen Sie vor Inbetriebnahme der Maschine den ordnungsgemäßen Zustand der Erdung von einem
Elektriker überprüfen.
Für Benutzer in Großbritannien.
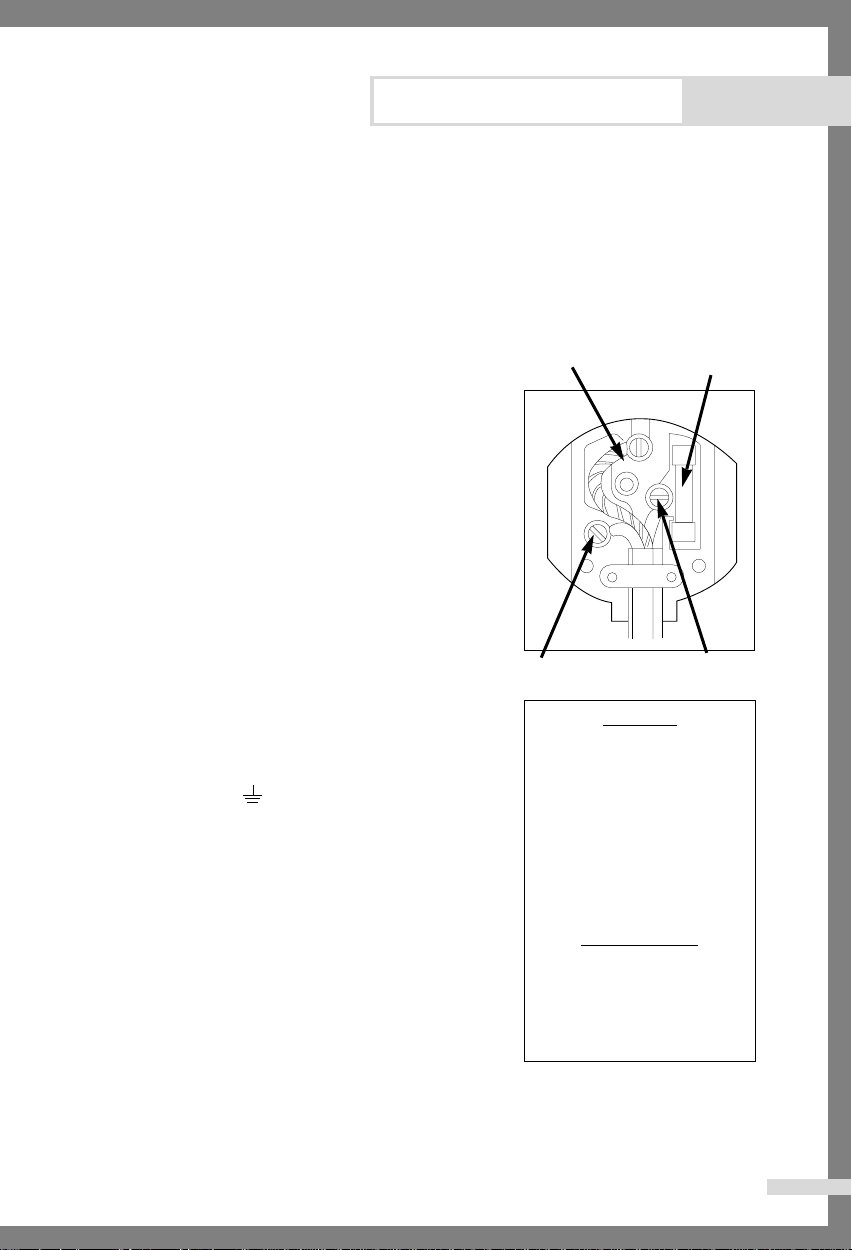
Schaltungsanweisungen
WARNUNG: DIESES GERÄT MUSS GEERDET SEIN.
GRÜN UND
GELB
13-ASICHERUNG
Dieses Gerät muss geerdet sein. Bei einem elektrischen
Kurzschluss verringert die Erdung das Risiko eines elektrischen
Schlages durch einen Sicherheitsleiter, über den der elektrische
Strom abfließen kann.
Das Gerät verfügt über ein Netzanschlusskabel mit
Schutzkontakt zum Anschluss an die Erdklemme des
Netzsteckers.
Der Netzstecker muss an eine ordnungsgemäß installierte und
geerdete Steckdose angeschlossen werden.
* Die Drähte dieses Netzanschlusskabels sind wie folgt
farbkodiert:
•
Grün und gelb : Schutzleiter
•
Blau : Neutralleiter
•
Braun : Phasenleiter
•
DA die Farben der Adern im Netzanschlusskabel dieses
BLAU
BRAUN
Geräts möglicherweise nicht mit den Farbkodierungen der
Anschlussklemmen des Steckers übereinstimmen, gehen Sie
wie folgt vor.
•
Schließen Sie den grün-gelben Draht an die Anschlussklemme
im Stecker an, die mit dem Buchstaben "E" bzw. dem
Erdungssymbol ( ) beschriftet oder grün bzw. grün-gelb
markiert ist.
•
Schließen Sie den blauen Draht an die Anschlussklemme an,
die mit dem Buchstaben "N" beschriftet bzw. schwarz
markiert ist.
• Schließen Sie den braunen Draht an die
Anschlussklemme an, die mit dem Buchstaben "L"
Vergewissern Sie sich, dass Stecker und
Netzkabel in einwandfreiem Zustand
sind. Wenn Sie aus irgendeinem Grund
den formgepressten Stecker vom Gerät
entfernen müssen, schalten Sie zuerst
die Sicherung aus und entfernen dann
den Stecker.
Stecken Sie unter keinen Umständen
den Stecker in eine Steckdose, wenn die
Gefahr eines elektrischen Schlages
besteht.
WARNUNG
beschriftet bzw. rot markiert ist.
* Wenn Sie Schwierigkeiten mit diesen Anweisungen haben,
wenden Sie sich an einen Elektriker.
Der Hersteller dieser Waschmaschine übernimmt keine
Haftung für Schäden an Personen oder Gegenständen infolge
einer Nichtbeachtung dieser Anforderungen.
In dem Gerät sind keine vom Benutzer wartbaren Teile
enthalten. Wenn das Netzanschlusskabel dieses Geräts
STROMKREISE
Die Waschmaschine sollte an einem
eigenen Stromkreis, getrennt von
anderen Geräten, betrieben werden.
Andernfalls kann es zum Auslösen des
Leistungsschutzschalters oder zum
Durchbrennen der Sicherung kommen.
beschädigt ist, darf es nur von qualifizierten, vom Hersteller
autorisierten Technikern ausgetauscht werden, da dazu
Spezialwerkzeuge erforderlich sind.
SAMSUNG
Waschmaschinen-Bedienungsanleitung 5
Page 30
Waschbetrieb
Übersicht über das Bedienfeld
1. Grafische Digitalanzeige
Zeigt die Restzeit für den laufenden Waschvorgang, alle Waschinformationen sowie
Fehlermeldungen an.
2. Taste "Vorwäsche"
Drücken Sie diese Taste, um die Option Vorwäsche auszuwählen. Die Option
Vorwäsche ist nur bei den Waschprogrammen Baumwolle, Buntwäsche, Synthetik,
Feinwäsche und Baby-Programm verfügbar.
3. Temperaturwahltaste (Temperature)
Drücken Sie so oft diese Taste, bis die gewünschte Waschtemperatur im Display
angezeigt wird (kalt ( ), 30 °C, 40 °C, 60 °C oder 95 °C).
4. Taste "Spülen" (Rinse)
Drücken Sie die Taste Spülen, um einen zusätzlichen Spülgang durchzuführen. Es
können maximal 5 Spülgänge durchgeführt werden.
5. Taste "Schleudern" (Spin)
Drücken Sie so oft diese Taste, bis die gewünschte Schleudergeschwindigkeit im
Display angezeigt wird.
B1445A(V/S)
B1245A(V/S)/R1245A(V/S)/F1245A(V/S)
B1045A(V/S)/R1045A(V/S) /F1045A(V/S)
Ohne Schleudern
Nach dem letzten Abpumpen wird kein Schleudergang mehr durchgeführt.
Spülstopp
Die Wäsche bleibt im letzten Spülwasser.
Vor dem Herausnehmen der Wäsche müssen Sie das Programm Abpumpen oder Schleudern auswählen.
6. Taste "Startzeitvorwahl" (Delay Start)
Drücken Sie diese Taste so oft, bis die gewünschte Startverzögerungseinstellung
angezeigt wird (Verzögerung von 3 bis 24 Stunden in Schritten von einer Stunde).
Die angezeigten Stunden beziehen sich auf das Ende des Waschvorgangs.
, 400, 800, 1200, 1400 U/min
,
, 400, 800, 1000, 1200 U/min
,
, 400, 600, 800, 1000 U/min
,
: Ohne Schleudern, : Spülstopp
6
SAMSUNG
Waschmaschinen-Bedienungsanleitung
Page 31

Waschbetrieb
7. Taste "Silver Wasch"
Sowohl beim Waschen als auch beim letzten Spülgang werden dem Wasser SilberNanopartikel hinzugesetzt, die die Wäsche desinfizieren und mit einer antibakteriellen
Schutzschicht versehen.
8. Auswahltaste für halb geladene Waschmaschine
Drücken Sie diese Taste, wenn Sie nur mit halb beladener Waschmaschinentrommel (ca. 1
bis 4 kg Wäsche) waschen. Mit dieser Funktion können Sie die Dauer des Waschvorgangs
verringern und Energie sparen.
9. Auswahltaste für Kindersicherung
Mit dieser Taste können Sie verhindern, dass Kinder die Einstellung der Waschmaschine verstellen.
Ein/Aus - So aktivieren Sie das Programm: Drücken Sie die Start/Pause-Taste, um die
Waschmaschine einzuschalten. Halten Sie die Taste Spülen + Schleudern 2 bis 3 Sekunden lang
gedrückt. Dieses Programm kann nur bei eingeschalteter Maschine aktiviert werden. Wenn die
Kindersicherung beim Waschvorgang aktiviert ist, reagieren die Tasten erst nach Deaktivieren der
Sicherung wieder. Auch die Netztaste ist deaktiviert. Die Kindersicherungs-LED leuchtet. So
deaktivieren Sie das Programm: Halten Sie die Taste Spülen+ Schleudern erneut 2 bis 3 Sekunden
lang gedrückt. Die Kindersicherungs-LED erlischt und das Programm ist deaktiviert.
Hinweis: Überprüfen Sie als Erstes die Kindersicherungstaste, wenn die Tasten nicht
10. Fuzzy-Control-Programmwahlschalter
Drehen Sie den Programmwahlschalter, um eines der 14 verfügbaren Waschprogramme
auszuwählen.
11. Start/Pause-Taste
Drücken Sie diese Taste, um das gewählte Programm zu starten bzw. ein laufendes
Programm zu unterbrechen.
12. Ein/Aus-Taste
Drücken Sie diese Taste, um die Waschmaschine ein- bzw. wieder auszuschalten.
Wenn das Gerät 10 Minuten eingeschaltet war, ohne dass ein Waschprogramm läuft oder
eine Taste gedrückt wurde, schaltet es sich automatisch aus.
reagieren, während die Waschmaschine in Betrieb ist.
Cotton (Baumwolle), Coloureds (Buntwäsche), Synthetics (Synthetik), Delicates (Feinwäsche), Wool (Wolle), Hand wash
(Handwäsche), Quick (Kurzprogramm), Rinse+Spin (Spülen+Schleudern), Spin (Schleudern), Drain (Abpumpen), Baby
Program (Baby-Programm) [ Stains (Flecken), Delicates (Feinwäsche), Coloreds (Buntwäsche), Cotton (Baumwolle) ]
SAMSUNG
Waschmaschinen-Bedienungsanleitung 7
Page 32

Waschbetrieb
Vor dem ersten W aschgang
Bevor Sie das erste Mal Wäsche waschen, muss die Waschmaschine zunächst einmal einen
kompletten Waschzyklus ohne Wäschefüllung durchlaufen. Dazu gehen Sie wie folgt vor:
1. Drücken Sie die Ein/Aus-Taste .
2. Füllen Sie Waschmittel in die Kammer im
Waschmittelbehälter.
3. Drehen Sie den Wasserhahn am Wasserzulauf der
Waschmaschine auf.
4. Drücken Sie so oft die Temperaturwahltaste, bis
im Display die Waschtemperatur 40°C angezeigt
wird.
5. Drücken Sie die Start/Pause-Taste.
Damit wird Wasser entfernt, das nach dem Test
•
beim Hersteller in der Maschine verblieben sein
könnte.
Kammer : Waschmittel für Vorwäsche oder Stärke.
Kammer : Waschmittel für Hauptwaschgang, Wasserenthärter, Einweichmittel,
Kammer : Zusatzstoffe, wie z.B. Weichspüler oder Formspüler (beim Auffüllen sollte die
Bleichmittel und Fleckentfernungsprodukte.
untere Kante der Einlage “A” nicht überschritten werden)
Waschmittel einfüllen
1. Ziehen Sie den Waschmittelbehälter aus.
2. Geben Sie das Waschmittel in die Kammer zu .
3. Geben Sie den Weichspüler in die Kammer zu (wenn Sie möchten).
4. Geben Sie das Waschmittel für die Vorwäsche in die Kammer zu (wenn Sie
möchten).
Achtung :
Konzentrierte oder dicke Weichspüler und Balsame müssen mit Wasser verdünnt werden
und erst dann in die entsprechende Kammer
zugegeben werden. (Auf dieser Weise verhindern Sie
die Verstopfung der Überlaufrinne.)
8
SAMSUNG
Waschmaschinen-Bedienungsanleitung
Page 33

Waschbetrieb
Waschen mit Fuzzy-Logic
Das Fuzzy-Logic-System Ihrer neuen Waschmaschine vereinfacht das Waschen erheblich.
Dieses System bietet eine automatische Steuerung von Waschprogrammen. Wenn Sie ein
Waschprogramm wählen, stellt die Maschine selbsttätig die richtige Waschtemperatur, Zeit
und Geschwindigkeit ein.
Wenn Sie Wäsche mit Fuzzy-Logic-System waschen möchten:
1. Drehen Sie den Wasserhahn für den Wasserzulauf der Waschmaschine auf.
2. Drücken Sie die Ein/Aus-Taste .
3. Öffnen Sie die Gerätetür.
4. Legen Sie die Wäsche in die Waschtrommel ein.
5. Schließen Sie die Gerätetür.
6. Geben Sie Waschmittel, Weichspüler und ggf. Waschmittel für die Vorwäsche in die
entsprechenden Waschmittelkammern.
Hinweis:Vorwäsche ist nur bei den Waschgängen: Decken, Bettwäsche, Handtücher,
7.
Stellen Sie mit dem Fuzzy-Logic-
Programmwahlschalter das für Ihre
Wäsche geeignete Waschprogramm ein:
Baumwolle, Buntwäsche, Synthetik,
Feinwäsche, Wolle, Handwäsche,
Kurzprogramm, Spülen+Schleudern,
Schleudern, Abpumpen, Baby-Programm
(Flecken, Feinwäsche, Buntwäsche,
Baumwolle)
Die Anzeige des gewählten
Waschprogramms leuchtet.
Gardinen, Baumwolle, Buntwäsche, Synthetik und Feinwäsche verfügbar.
8. Sie können jetzt die Waschtemperatur, die Schleudergeschwindigkeit und die Startzeit
mit der entsprechenden Taste angeben.
9. Starten Sie den Waschvorgang, indem Sie die Start/Pause-Taste drücken.
Die Anzeige Startzeitvorwahl blinkt. Der Timer läuft, bis die eingestellte Zeit
abgelaufen ist; dann beginnt der Waschvorgang.
Waschmaschine nochmals öffnen vor Waschstart
Innerhalb der ersten 5 Minuten nach dem Start können Sie noch Wäsche einlegen oder
entnehmen. Wenn Sie die Start/Pause-Taste drücken, wird die Tür sofort entriegelt.
Wenn sich in der Trommel sehr heißes bzw. zu viel Wasser befindet, kann die Tür nicht
mehr geöffnet werden.
Nachdem die Tür geschlossen ist, drücken Sie erneut die Start/Pause-Taste, um den
Waschvorgang fortzusetzen.
Nach Beendigung des Waschvorgangs:
Zehn Minuten nach Abschluss des Waschzyklus wird der Strom automatisch ausgeschaltet.
1. Öffnen Sie die Gerätetür.
Hinweis:Die Tür kann erst drei Minuten nach dem Ende des Waschvorgangs oder dem
Ausschalten der Stromversorgung geöffnet werden.
2. Nehmen Sie die Wäsche aus der Waschtrommel heraus.
SAMSUNG
Waschmaschinen-Bedienungsanleitung 9
Page 34

Waschbetrieb
Mit manuellen Einstellungen waschen
Sie können die Einstellungen für den Waschvorgang auch manuell wählen, ohne die FuzzyLogic-Programme zu verwenden. Gehen Sie dazu wie folgt vor:
1. Drehen Sie den Wasserhahn auf.
2. Drücken Sie die Ein/Aus-Taste , um die Waschmaschine einzuschalten.
3. Drücken Sie die Taste Tür.
4. Öffnen Sie die Gerätetür.
5. Legen Sie die Wäsche in die Waschtrommel ein.
6. Schließen Sie die Gerätetür.
7. Geben Sie Waschmittel, Weichspüler und ggf. Waschmittel für die Vorwäsche in die
entsprechenden Waschmittelkammern.
8.
Drücken Sie die Taste Spülen, um die gewünschte Anzahl von Spülgängen auszuwählen.
Sie können bis zu fünf Spülgänge auswählen.
Die Dauer des Waschgangs wird entsprechend verlängert.
9. Drücken Sie so oft die Taste Schleudern, bis die gewünschte
Schleudergeschwindigkeit im Display angezeigt wird.
Hinweis: Wenn Sie die Option Spülstopp wählen, können Sie Kleidungsstücke im
tropfnassen Zustand aus der Maschine nehmen.
: ohne Schleudern, : Spülstopp.
10. Drücken Sie die Taste Startzeitvorwahl mehrmals, bis die gewünschte
Startzeitvorwahl-Einstellung angezeigt wird. Sie können eine Verzögerung von
3 bis 24 Stunden in Schritten von einer Stunde angeben. Die im Display
angezeigte Zeit entspricht der Endzeit des eingestellten Waschgangs.
11. Drücken Sie die Start/Pause-Taste, um den Waschvorgang zu starten.
Waschstartzeit einstellen
Sie können eine Zeit von 3 Stunden bis 24 Stunden einstellen, nach deren Ablauf der
Waschvorgang abgeschlossen sein soll. Die im Display angezeigte Zeit entspricht der
Endzeit des eingestellten Waschgangs.
Dazu gehen Sie wie folgt vor:
1. Stellen Sie das gewünschte Waschprogramm manuell oder mit dem
Programmwahlschalter ein.
2. Drücken Sie so oft die Taste Startzeitvorwahl, bis im Display die gewünschte Endzeit
angezeigt wird, nach deren Ablauf der Waschvorgang abgeschlossen sein soll.
3. Drücken Sie die Start/Pause-Taste. Die Anzeige Startzeitvorwahl blinkt. Der Timer
läuft, bis die eingestellte Zeit erreicht ist; dann beginnt der Waschvorgang.
4. Wenn Sie die Startzeitvorwahl wieder löschen möchten, drücken Sie die Ein/Aus-
Taste . Anschließend schalten Sie die Waschmaschine wieder ein.
10
SAMSUNG
Waschmaschinen-Bedienungsanleitung
Page 35

Waschbetrieb
Tipps und Hinweise zum Waschen
Sortieren der Wäsche: Sortieren Sie die Schmutzwäsche nach folgenden Kriterien:
Pflegesymbole/Gewebeart: Sortieren Sie die Wäsche nach Gewebeart in Baumwolle,
•
Mischgewebe, synthetische Gewebe, Seide, Wollstoffe und Rayon.
Farbe: Trennen Sie weiße Wäsche von der Buntwäsche. Waschen Sie neue bunte
•
Wäschestücke getrennt.
Größe: Wenn Sie Wäschestücke unterschiedlicher Größe zusammen waschen,
•
verbessert sich die Waschleistung und damit auch die Waschwirkung.
Empfindlichkeit: Waschen Sie empfindliche Textilien (z. B. reine Schurwolle, Gardinen
•
und Bekleidungsteile aus Seide, soweit maschinenwaschbar) separat und stellen Sie
dazu das Waschprogramm für Feinwäsche ein. Überprüfen Sie vor dem Waschen die
Etiketten mit den Pflegesymbolen an den Wäschestücken. Eine Erklärung der
Pflegesymbole finden Sie auf der Seite 20. Weitere Informationen zu den
Waschprogrammen siehe Seite 18.
Entleeren der Taschen: Münzen, Sicherheitsnadeln und ähnliche Gegenstände
können außer den Wäschestücken auch die Trommel der Waschmaschine und den
Laugenbehälter beschädigen.
Verschlüsse: Achten Sie beim Waschen von Wäschestücken mit Schnallen, Haken oder
Druckknöpfen darauf, dass lose Teile zusammengeknotet werden, so dass sie nicht
hängenbleiben können. Dies gilt auch für Gürtel.
Vorwäsche bei Baumwollgeweben: Ihre neue Waschmaschine, in Verbindung
mit einem modernen Vollwaschmittel verwendet, erzielt schon von sich aus perfekte
Waschergebnisse und spart damit Energie, Zeit, Wasser und Waschmittel. Bei besonders
stark verschmutzten Wäschestücken aus Baumwollgewebe empfiehlt es sich jedoch, das
Vorwaschprogramm zusammen mit einem Waschmittel auf Protein-Basis einzusetzen.
Füllmenge: Überladen Sie die Waschmaschine nicht, sonst wird die Wäsche nicht richtig
sauber. Die folgende kleine Tabelle enthält Angaben zur Füllmenge für verschiedene
Gewebearten.
Gewebeart Füllmenge
B1445A(V/S)/B1245A(V/S)/ R1245A(V/S)/ F1245A(V/S)/
Buntwäsche/Baumwolle
- leicht bis mittelmäßig
verschmutzt 6,0 kg 5,2 kg 4,5 kg
- stark verschmutzt 6,0 kg 5,2 kg 4,5 kg
Synthetik 3,0 kg 3,0 kg 3,0 kg
Feinwäsche 2,5 kg 2,0 kg 2,0 kg
Wolle 2,0 kg 1,5 kg 1,5 kg
B1045A(V/S)/ R1045A(V/S) F1045A(V/S)
Tipps zum Waschmittel: Wählen Sie das geeignete Waschmittel nach folgenden
Gesichtspunkten aus: Gewebeart (Baumwolle, synthetische Gewebe, Feinwäsche, Wolle),
weiße Wäsche, Buntwäsche, Waschtemperatur, Verschmutzungsgrad und -typ. Verwenden
Sie stets speziell für Waschmaschinen entwickelte Waschmittel mit geringer
Schaumbildung.
Folgen Sie den Anweisungen des Waschmittel-Herstellers in Bezug auf das Gesamtgewicht
der zu waschenden Schmutzwäsche, des Verschmutzungs- und des Wasserhärtegrades in
Ihrer Gegend. Im Zweifelsfall kann das Wasserwerk darüber Auskunft geben, welchen
Härtegrad das Wasser hat.
Hinweis:
Bewahren Sie Waschmittel und Zusätze an einem sicheren, kühlen Ort außerhalb der
Reichweite von Kindern auf.
SAMSUNG
Waschmaschinen-Bedienungsanleitung 11
Page 36

Reinigung und Pflege
Restwasser manuell aus der Waschmaschine ablassen
B1445A(V/S)/B1245A(V/S)/B1045A(V/S)
1. Ziehen Sie den Netzstecker der
Waschmaschine aus der Steckdose.
2. Entfernen Sie die Filterabdeckung
unten rechts an der Waschmaschinen
vorsichtig, indem Sie sie mit einem
Schraubendreher o.ä. abhebeln.
Drehen Sie den Verschluss des
3.
Restwasser-Ablass-Schlauchs nach
links, um ihn zu lösen. Ziehen Sie
den Schlauch am Verschluss
langsam und vorsichtig etwa 20 cm
heraus.
4. Lassen Sie das Restwasser in eine flache Schale ab.
5. Schieben Sie den Restwasser-Ablass-Schlauch vorsichtig wieder in seine
ursprüngliche Position im Gerät. Befestigen Sie den Verschluss, indem Sie ihn nach
rechts drehen.
6. Setzen Sie die Abdeckung wieder auf.
Wenn die Waschmaschine eingefr oren ist
Falls die Temperatur am Aufstellort der Waschmaschine so weit gefallen ist, dass Restwasser
in der Maschine gefroren ist, gehen Sie wie folgt vor.
1. Ziehen Sie den Netzstecker der Waschmaschine aus der Steckdose.
2. Gießen Sie warmes Wasser auf den Anschluss am Wasserzulauf, um den
Wasserzufuhrschlauch lösen zu können.
3. Nehmen Sie den Wasserzufuhrschlauch ab und legen Sie ihn in warmes Wasser.
4. Gießen Sie warmes Wasser in die Waschmaschinentrommel, und lassen Sie es 10
Minuten lang einwirken.
5. Schließen Sie den Wasserzufuhrschlauch wieder an die Waschmaschine und den
Wasserzulauf an. Überprüfen Sie, ob Wasserzufuhr und Wasserableitung normal
funktionieren.
Außenflächen der Waschmaschine reinigen
1. Wischen Sie die Außenflächen und das Bedienfeld der Waschmaschine mit einem
angefeuchteten weichen Lappen ab. Verwenden Sie keine scheuernden
Reinigungsmittel, diese können die Oberfläche zerkratzen.
2. Wischen Sie mit einem trockenen weichen Lappen nach.
3. Gießen Sie kein Wasser auf bzw. über die Waschmaschine.
12
SAMSUNG
Waschmaschinen-Bedienungsanleitung
Page 37

Reinigung und Pflege
Waschmittelbehälter reinigen
1. Drücken Sie den Entriegelungshebel im Inneren des Waschmittelbehälters.
Ziehen Sie den Waschmittelbehälter dann ganz aus dem Gerät heraus.
2. Ziehen Sie das Abflusselement in der Kammer nach oben ab.
3. Waschen Sie alle Teile unter fließendem Wasser.
4. Reinigen Sie die Kammern des Waschmittelbehälters mit einer alten Zahnbürste.
5. Setzen Sie das Abflusselement und die Trennwand für Flüssigwaschmittel wieder in
der Originalposition ein.
6. Schieben Sie den Waschmittelbehälter wieder in die Waschmaschine.
7. Lassen Sie bei leerer Trommel ein Spülprogramm durchlaufen.
Fremdkörperfalle reinigen
Reinigen Sie die Fremdkörperfalle 5-6 Mal im Jahr oder wenn die folgende Fehlermeldung
auf dem Display erscheint:
1. Entfernen Sie die Abdeckung rechts unten an der Waschmaschinen-Vorderseite.
Siehe Abschnitt “Restwasser manuell aus der Waschmaschine ablassen” auf Seite 12.
2. Drehen Sie den Verschluss des Restwasser-Ablassschlauchs nach links, um ihn zu
lösen. Lassen Sie danach das Wasser ab. Siehe Abschnitt “Restwasser manuell aus der
Waschmaschine ablassen” auf Seite 12.
3. Drehen Sie die Fremdkörperfalle nach links und nehmen Sie sie heraus.
4. Reinigen Sie die Fremdkörperfalle von Schmutz und sonstigen Verunreinigungen.
Vergewissern Sie sich, dass das Flügelrad der Pumpe hinter dem Filter nicht blockiert
ist. Setzen Sie die Fremdkörperfalle wieder ein und schrauben Sie sie fest.
5. Setzen Sie die Abdeckung wieder auf.
SAMSUNG
Waschmaschinen-Bedienungsanleitung 13
Page 38

Reinigung und Pflege
Sieb am Wasserzulauf reinigen
Reinigen Sie das Sieb am Wasserzulauf einmal im Jahr oder wenn Sie folgende
Fehlermeldung im Display sehen:
Dazu gehen Sie wie folgt vor:
1. Stellen Sie die Wasserzufuhr zur Waschmaschine ab.
2. Lösen Sie die Schraubverbindung des Wasserzufuhrschlauchs an der
Waschmaschinen-Rückseite.
3. Ergreifen Sie das Sieb im blauen Zulaufanschluss der Waschmaschine mit einer
Flachzange, und ziehen Sie es vorsichtig heraus. Spülen Sie es unter fließendem
Wasser so lange ab, bis es ganz sauber ist. Reinigen Sie auch die Innen- und
Außenseite des blauen Zulaufanschlusses.
4. Schieben Sie das Sieb wieder in den Zulaufanschluss.
5. Schrauben Sie den Wasserzufuhrschlauch wieder am Zulaufanschluss fest.
6. Drehen Sie den Hahn der Wasserzufuhr auf. Überprüfen Sie, ob der Anschluss dicht
ist.
14
SAMSUNG
Waschmaschinen-Bedienungsanleitung
Page 39

Fehlersuche
Probleme und Lösungen
Die Waschmaschine startet nicht.
• Ist die Gerätetür fest geschlossen?
• Ist die Waschmaschine an eine Steckdose angeschlossen?
• Ist der Wasserhahn am Wasserzulauf aufgedreht?
• Haben Sie die Start/Pause-Taste gedrückt?
Kein Wasser oder unzureichende Wasserzufuhr.
• Überprüfen Sie, ob der Wasserhahn am Wasserzulauf aufgedreht ist.
• Überprüfen Sie, ob der Wasserzufuhrschlauch eingefroren ist.
• Überprüfen Sie, ob der Wasserzufuhrschlauch geknickt ist.
• Überprüfen Sie, ob das Sieb am Wasserzulauf verstopft ist.
Das Waschmittel wurde beim Waschvorgang gar nicht oder nicht
vollständig aus dem Waschmittelbehälter ausgespült.
• Überprüfen Sie, ob die Waschmaschine mit ausreichend Wasserdruck läuft.
•
Geben Sie das Waschmittel in die Mitte der jeweiligen Kammer, möglichst weit entfernt vom Rand.
Die Waschmaschine vibriert oder läuft zu geräuschvoll.
• Stellen Sie sicher, dass die Waschmaschine gerade steht. Falls die Stellfläche uneben ist,
können Sie die Stellfüße entsprechend regulieren (siehe Seite 3).
• Überprüfen Sie, ob alle Transportsicherungen entfernt wurden (siehe Seite 3).
• Berührt die Waschmaschine andere Geräte oder Gegenstände?
•
Überprüfen Sie, ob die Wäsche in der Trommel verteilt ist oder einseitig auf der Trommel aufliegt.
Das Wasser wird nicht abgepumpt, oder die Schleuder funktioniert
nicht.
•
Überprüfen Sie, ob der Abfluss-Schlauch vielleicht geknickt oder zusammengedrückt ist.
•
Überprüfen Sie, ob der Schmutzfilter verstopft oder das Propellerrad blockiert ist (siehe Seite 14).
Die Taste Tür funktioniert nicht.
•
Die Tür kann erst drei Minuten nach dem Abschalten der Waschmaschine oder der
Stromversorgung geöffnet werden.
Fehlermeldungen
Dargestellter Fehler Lösung
Schließen Sie die Gerätetür.
•
Überprüfen Sie, ob der Wasserhahn am Wasserzulauf aufgedreht ist.
• Prüfen Sie den Wasserdruck.
• Reinigen Sie die Fremdkörperfalle.
• Überprüfen Sie, ob der Abfluss-Schlauch korrekt installiert ist.
• Die Wäsche ist ungleich verteilt; lösen Sie eventuell verfangene
Kleidungsstücke.
Wenn Sie nur einen einzelnen Kleidungsstück waschen möchten, wie
z.B. einen Bademantel oder Jeans-Hosen, könnte der Schleudervorgang
nicht zufriedenstellend ausgeführt werden und die Fehlermeldung
“UE” erscheint auf dem Display.
• Wenden Sie sich an unseren Kundendienst.
Bevor Sie sich über Ihren Fachhändler an den Kundendienst wenden:
1. Versuchen Sie, das Problem anhand der obigen Hinweise selbst zu lösen (siehe
“Probleme und Lösungen” und “Fehlermeldungen”).
2. Starten Sie das Programm, um zu sehen, ob sich der Fehler wiederholt.
3. Falls der Fehler erneut auftritt, setzen Sie sich mit dem Kundendienst in Verbindung.
SAMSUNG
Waschmaschinen-Bedienungsanleitung 15
Page 40

Programm
Übersicht über die Waschprogramme
(
✽
Max. Wäsche-menge
(in kg)
B1445A(V/S)
R1245A(V/S)
B1245A(V/S)
R1045A(V/S)
B1045A(V/S)
F1245A(V/S)
F1045A(V/S)
Waschmittel und
Weichspüler
Haupt-
Vor-
waschgang
wäsche
Weichspülen
Max. Schleudergeschwindigkeit
Temp.
(in °C)
Max
B1445A(V/S)
(U/min)
B1245A(V/S)
R1245A(V/S)
F1245A(V/S)
B1045A(V/S)
R1045A(V/S)
F1045A(V/S)
Benutzer optional)
Startzeit-
Halbe
vorwahl
Beladung
Baumwolle/
weiss
Baumwolle/
bunt
Synthetik
Feinwäsche
Wolle
Handwäsche
Kurzprogramm
6,0 5,2 4,5 ✽ ja ✽ 95 1400 1200 1000 ✽✽
6,0 5,2 4,5 ✽ ja ✽ 60 1400 1200 1000 ✽✽
3,0 3,0 3,0 ✽ ja ✽ 60 800 800 800 ✽✽
2,5 2,5 2,0 ✽ ja ✽ 40 800 800 600 ✽✽
2,0 1,5 1,5 - ja ✽ 40 400 400 400 ✽✽
2,0 1,5 1,5 - ja ✽ 40 400 400 400 ✽✽
2,0 1,5 1,5 - ja ✽ 60 1400 1200 1000 ✽✽
Programm Geeignet für
Baumwolle/ durchschnittlich oder leicht verschmutzte Baumwollsachen, Bettwäsche,
weiss Tischtücher, Unterwäsche, Handtücher, Hemden usw.
Baumwolle/ durchschnittlich oder leicht verschmutzte Baumwollsachen, Bettwäsche,
bunt Tischtücher, Unterwäsche, Handtücher, Hemden usw.
Synthetik leicht oder durchschnittlich verschmutzte Blusen, Hemden usw. aus
Polyester (Diolen, Trevira), Polyamid (Perlon, Nylon) oder ähnliche
Mischgewebe.
Feinwäsche empfindliche Vorhangstoffe, Kleider, Röcke, Hemden und Blusen.
Wolle in der Waschmaschine waschbare Wollstoffe mit Etikett “Reine
Schurwolle”.
Handwäsche vergleichbar mit Handwäsche, besonders schonender Waschgang.
Kurzprogramm leicht verschmutzte Baumwollsachen oder Leinenblusen, Hemden,
dunkelfarbige Frottee-Stoffe, bunte Leinenartikel, Jeans usw.
1. Mit Vorwäsche verlängert sich das Waschprogramm um etwa 15 Minuten.
2. Die Programmdauer wurde entsprechend der Norm IEC 456 ermittelt.
3. Da die in der Tabelle oben und in den technischen Daten angegebenen Werte z. T. von
Bedingungen wie Wasserdruck, Temperatur, Wäschemenge usw. abhängen, können je
nach Bedingungen leicht abweichende Werte auftreten.
16
SAMSUNG
Waschmaschinen-Bedienungsanleitung
Page 41

Programm
Baby
Baumwolle
Baby
Buntwäsche
Übersicht über die Waschprogramme
(
✽
Benutzer optional)
Temp.
Max. Wäsche-menge
(in kg)
R1245A(V/S)
B1445A(V/S)
B1245A(V/S)
R1045A(V/S)
B1045A(V/S)
F1245A(V/S)
F1045A(V/S)
Waschmittel und
Weichspüler
Haupt-
Vor-
waschgang
wäsche
Weichspülen
6,0 5,2 4,5 ✽ ja ✽ 95 1400 1200 1000 ✽✽
6,0 5,2 4,5 ✽ ja ✽ 60 1400 1200 1000 ✽✽
Max. Schleudergeschwindigkeit
(in °C)
Max
B1445A(V/S)
(U/min)
B1245A(V/S)
R1245A(V/S)
F1245A(V/S)
B1045A(V/S)
R1045A(V/S)
F1045A(V/S)
Startzeit-
vorwahl
Beladung
Halbe
Baby
Feinwäsche
Baby Flecken
2,5 2,0 2,0 ✽ ja ✽ 60 800 800 600 ✽✽
6,0 5,2 4,5 ✽ ja ✽ 40 1400 1200 1000 ✽✽
Programm Geeignet für
Baby Baumwolle durchschnittlich oder leicht verschmutzte Baby-Baumwollsachen,
Bettwäsche, Tischtücher, Unterwäsche, Handtücher, Hemden usw.
Baby Buntwäsche durchschnittlich oder leicht verschmutzte Baby-Baumwollsachen,
Bettwäsche, Tischtücher, Unterwäsche, Handtücher, Hemden usw.
Baby Feinwäsche empfindliche Baby-Kleider, -Röcke, -Hemden und -Blusen
Baby Flecken E ssensreste- und Urinflecken auf Baby-Baumwollsachen,
Bettwäsche, Unterwäsche, Handtüchern usw.
SAMSUNG
Waschmaschinen-Bedienungsanleitung 17
Page 42

Anhang
Erklärung der Pflegesymbole
Normalwaschgang
Schonwaschgang
Kann bei 95˚C gewaschen
werden
Kann bei 60˚C gewaschen
werden
Kann bei 40˚C gewaschen
werden
Kann bei 30˚C gewaschen
werden
Handwäsche
Nicht waschen
(nur chem. Reinigung)
Chlorbleiche möglich
Chlorbleiche nicht möglich
Heiß bügeln (max. 200˚C)
Mäßig heiß bügeln
(max. 150˚C)
Nicht heiß bügeln (max. 100˚C)
Nicht bügeln
Chem. Reinigung mit allen Lösemitteln
möglich
Chem. Reinigung mit Feuerzeugbenzin,
reinem Alkohol oder R113
Chem. Reinigung mit Kerosin,
reinem Alkohol oder R113
Keine chem. Reinigung möglich
Liegend trocknen
Kann zum Trocknen aufgehängt werden
Zum Trocknen auf einen Kleiderbügel hängen
Wäschetrockner: Trocken mit
normaler Temperatureinstellung
Wäschetrockner: Trocken mit
reduzierter Temperatureinstellung
Trocknen im Wäschetrockner nicht möglich
Wichtige Hinweise zum Netzanschluss
Zur Verringerung der Gefahr von Brandschäden und -verletzungen, elektrischen Schlägen
und anderen Verletzungen beachten Sie bitte folgende Sicherheitsregeln:
• Schließen Sie die Waschmaschine nur an die Art von Stromquelle an, die auf dem
Typenschild spezifiziert ist. Sollten Sie die Daten Ihrer Stromversorgung nicht
kennen, erkundigen Sie sich bei Ihrem Fachhändler oder dem örtlichen
Elektrizitätswerk.
• Schützen Sie Ihr Netzkabel. Generell sollten Netzkabel mit dafür vorgesehenen
Klammern fixiert werden, um zu vermeiden, dass jemand versehentlich auf sie tritt
oder dass sie durch Gegenstände abgequetscht werden. Achten Sie besonders auf
den Zustand der Kabel am Stecker, an Gehäusen und am Austritt aus dem Gerät.
• Schließen Sie keine zu hohen Verbrauchsquellen an die Steckdose oder an
Verlängerungskabel an. Ansonsten besteht die Gefahr von Bränden oder elektrischen
Schlägen.
18
SAMSUNG
Waschmaschinen-Bedienungsanleitung
Page 43

Anhang
Umweltschutz-Hinweise
• Dieses Gerät ist aus wiederverwertbaren Materialien hergestellt. Beachten Sie bitte
die geltenden Normen und Gesetze, wenn Sie Altgeräte entsorgen. Schneiden Sie das
Netzkabel durch, damit die Waschmaschine nicht mehr an eine Stromquelle
angeschlossen werden kann. Entfernen Sie die Gerätetür, um zu verhindern, dass
spielende Kinder sich versehentlich in der Trommel einschließen.
• Dosieren Sie Waschmittel sparsam. Überschreiten Sie die auf den
Waschmittelpackungen angegebene empfohlene Waschmittelmenge nicht.
• Verwenden Sie nur dann Fleckentferner und Bleichmittel, wenn es unbedingt
notwendig ist.
• Waschen Sie möglichst immer die volle für das jeweilige Waschprogramm
angegebene Wäschemenge (siehe “Maximale Wäschemenge” auf Seite 17 und 18).
Auf diese Weise nutzen Sie die Waschmaschine optimal und sparen Wasser und
Strom.
Konformitätshinweise
Das Gerät entspricht den europäischen Sicherheitsnormen sowie der EG-Richtlinie 93/68
und der Norm EN 60335.
Technische Daten
Typ
Abmessungen
B1445A(V/S),B1245A(V/S),B1045A(V/S)
B598mm × T550mm ×H844mm
Wasserdruck
WASSERVERBRAUCH
NETTOGEWICHT
Wasch- und Schleuderkapazität
6,0kg (Trockenwäsche)
Modell
Waschen und
Aufheizen
Leistungsaufnahme
Schleu-
dern
Pumpen
Modell
Wasserverbrauch
Papier
Kunststoff
Schleuder-Drehzahl
Modell
U/min
Modell
230V 550W
Waschmaschine mit Frontzuladung
F1245A(V/S),F1045A(V/S)R1245A(V/S),R1045A(V/S)
B598mm × T450mm ×H844mm
B598mm × T404mm ×H844mm
50 kPa ~ 800 kPa
54L 48L
75kg
B1445A(V/S),B1245A(V/S),B1045A(V/S)
220V
240V
B1445A(V/S)
B1245A(V/S)
49L
66kg
5,2kg (Trockenwäsche)
R1245A(V/S),R1045A(V/S)
2000W
2400W
B1045A(V/S)
500W 250W
220V 1900W
240V 2200W
R1245A(V/S)
500W 220W
550W 500W
62kg
4,5kg (Trockenwäsche)
F1245A(V/S),F1045A(V/S)
220V 1800W
240V 2100W
R1045A(V/S)
F1245A(V/S)
34W
B1445A(V/S),B1245A(V/S),B1045A(V/S)
2,5kg
1,0kg
B1245A(V/S),R1245A(V/S),F1245A(V/S)
B1445A(V/S)
1400
R1245A(V/S),R1045A(V/S)
F1245A(V/S),F1045A(V/S)
2,1kg
0,9kg
B1045A(V/S),R1045A(V/S),F1045A(V/S)
1200 1000
1,9kg
0,8kg
F1045A(V/S)
SAMSUNG
Waschmaschinen-Bedienungsanleitung 19
Page 44

Falls Sie Hilfe vom
Kundendienst benötigen:
-Bei Funktionsstörungen wenden Sie sich an ein
Kundendienstzentrum in Ihrer Nähe und geben
Ihren Namen, Ihre Adresse und Telefonnummer
sowie die Modell- und Seriennummer des
Wäschetrockners an.
Page 45

Указания за потребителя
на перална машина
B1445A(V/S)
B1245A(V/S)
B1045A(V/S)
R1245A(V/S)
R1045A(V/S)
F1245A(V/S)
F1045A(V/S)
Code No.: DC68-02158F-Bulgarian
Page 46

Предпазни мерки
Поздравления за вашата покупка на тази перална машина Samsung. Настоящите Указания за потребителя
съдържат ценна информация за монтирането, използването и грижата за този уред. Моля отделете време да ги
прочетете, за да можете да се възползвате напълно от възможностите на пералната машина и да й се радвате в
течение на много години.
Преди да използвате уреда
• Опаковъчните материали могат да бъдат опасни за деца; пазете опаковъчния материал (пластмасови
торби, полистирол и др.) извън достъпа на деца.
• Уредът е предназначен само за домашна употреба.
• Уверете се, че връзките към водопроводната мрежа и към електрическата инсталация са извършени
от квалифицирани техници при спазване на указанията на производителя (вижте „Инсталиране на
пералната машина”) и при спазване на местните предписания за безопасност.
• Всички болтове, използвани при опаковането и транспорта трябва да бъдат отстранени преди употреба
на уреда. Ако това изискване не бъде спазено, може да настъпи сериозна повреда. Вижте „Отстраняване на
болтовете, използвани при транспорта”.
• Преди първото пране на дрехи трябва да проведете една пълна програма на пране без дрехи. Виж “Първо
ползване на пералнята”.
Указания за безопасност
• Преди почистване или при провеждане на поддръжка на уреда трябва да го изключите от мрежовото
захранване или да поставите бутона (Вкл./Изкл.) в положение Изкл.
• Уверете се, че джобовете на всички дрехи, които ще се перат, са празни. Твърди, остри предмети като
монети, безопасни игли, гвоздеи, болтове или камъни могат значително да увредят уреда.
• След употреба винаги изключвайте уреда от захранващата мрежа и изключвайте подаването на вода.
• Преди да отворите люка на уреда проверете дали водата е източена. Не отваряйте люка, ако все още
виждате вода.
• Домашни любимци или малки деца могат да се покатерят и влязат в уреда. Проверявайте го преди всяка
употреба.
• Стъкленият люк се нагрява силно по време на прането. Не допускайте деца в близост до уреда, когато той
работи.
• Не се опитвайте да поправяте уреда сами. Поправки, извършени от неопитни или неквалифицирани лица
биха могли да доведат до нараняване и/или да направят необходими още по-сериозни ремонтни дейности
по уреда.
• Ако щепселът (шнурът за захранване) е повреден, той трябва да бъде подменен от производителя или
негов сервизен агент или от подобно квалифицирано лице, за да се избегне всякакъв риск.
• Този уред трябва да бъде обслужван само от упълномощен сервизен център, като бъдат използвани само
оригинални резервни части.
• Този уред не е предназначен за употреба от малки деца или немощни лица, освен при наличие на
съответен надзор от отговорно лице, за да се гарантира, че те могат да използват уреда безопасно.
Малките деца трябва да бъдат надзиравани, за да се гарантира, че няма да си играят с уреда.
• Този уред трябва да бъде свързан към щепсел с достатъчна издръжливост, за да се гарантира неговата
консумация на електроенергия.
• Този уред трябва да бъде поставен така, че щепселът да бъде достъпен след инсталирането му.
• Не използвайте обработена вода, съдържаща мазнини, крем или лосион, която обикновено се продава в
магазините за грижи за кожата или клиниките за масаж.
- Това може да деформира опаковката, което да предизвика неизправност или протичане на вода. Тръба
за промиване от неръждаема стомана нормално не може да ръждяса. Ако обаче в тръбата за по-дълго
време остане метален предмет като фиба, тръбата може да ръждяса.
• Не оставяйте вода или избелител, съдържащ хлор, в тръбата за дълъг период от време.
- Като правило не използвайте и не оставяйте в тръбата за дълъг период от време вода, съдържаща
желязо.
- Ако по повърхността на тръбата започне да се появява ръжда, използвайте препарат за почистване
(неутрален) и гъба или мека кърпа, за да я почистите.
(В никакъв случай не използвайте метална четка.)
Това обозначение на продукта или съпътстващите го материали означава, че той не бива да бъде
изхвърлян заедно с другите битови отпадъци след края на полезния му живот. За да се предотврати
възможно увреждане на околната среда или човешки живот от безконтролното изхвърляне на
отпадъци, моля, отделяйте такива продукти от другите видове отпадъци и го рециклирайте,
демонстрирайки отговорно отношение към насърчаването на устойчива многократна употреба на
При употреба за битови нужди трябва да се свържете с продавача на дребно, от когото сте закупили продукта
или с местните власти за подробности относно това къде и как можете да предадете продукта за безопасно
рециклиране.
При употреба за стопански нужди трябва да се свържете с доставчика си и да проверите реда и условията в
договора за закупуване. Този продукт не трябва да се смесва с други отпадъци на работното място.
материални ресурси.
2 SAMSUNG Указания за потребителя на перална машина
• ЗАПАЗЕТЕ ТЕЗИ УКАЗАНИЯ
Page 47

Съдържание
Предпазни мерки . . . . . . . . . . . . . . . . . . . . . . . . . . . . . . . вътрешна корица
Инсталиране на пералната машина . . . . . . . . . . . . . . . . . . . . . . . . . . . . .2
Разопаковане на пералната машина . . . . . . . . . . . . . . . . . . . . . . . . . . . . . . . . . . . . . . 2
Описание на пералната машината. . . . . . . . . . . . . . . . . . . . . . . . . . . . . . . . . . . . . . . . 2
Избор на място. . . . . . . . . . . . . . . . . . . . . . . . . . . . . . . . . . . . . . . . . . . . . . . . . . . . . . . . 3
Регулиране на нивелиращите крачета . . . . . . . . . . . . . . . . . . . . . . . . . . . . . . . . . . . . . 3
Отстраняване на болтовете, използвани при транспорта . . . . . . . . . . . . . . . . . . . . . 3
Свързване на маркуча за подаване на вода (опция). . . . . . . . . . . . . . . . . . . . . . . . . . 3
Свързване на маркуча за подаване на вода . . . . . . . . . . . . . . . . . . . . . . . . . . . . . . . . 4
Разполагане на маркуча за отвеждане на вода. . . . . . . . . . . . . . . . . . . . . . . . . . . . . . 4
Включване на машината . . . . . . . . . . . . . . . . . . . . . . . . . . . . . . . . . . . . . . . . . . . . . . . .5
Инструкции за електрическо свързване. . . . . . . . . . . . . . . . . . . . . . . . . . . . . . . . . . . . 5
Изпиране на партида пране . . . . . . . . . . . . . . . . . . . . . . . . . . . . . . . . . . . .6
Описание на панела за управление . . . . . . . . . . . . . . . . . . . . . . . . . . . . . . . . . . . . . . . 6
Първо ползване на пералнята . . . . . . . . . . . . . . . . . . . . . . . . . . . . . . . . . . . . . . . . . . . 8
Поставяне на перилен препарат в пералната машина. . . . . . . . . . . . . . . . . . . . . . . . 8
Пране на дрехи с използване на Fuzzy Logic. . . . . . . . . . . . . . . . . . . . . . . . . . . . . . . .9
Изпиране на дрехи с ръчно програмиране . . . . . . . . . . . . . . . . . . . . . . . . . . . . . . . .10
Използване на Delay Start (Забавено пускане) . . . . . . . . . . . . . . . . . . . . . . . . . . . . . 10
Съвети и препоръки при прането . . . . . . . . . . . . . . . . . . . . . . . . . . . . . . . . . . . . . . . . 11
Поддръжка на пералната машина . . . . . . . . . . . . . . . . . . . . . . . . . . . . . .12
Източване на пералната машина при авария . . . . . . . . . . . . . . . . . . . . . . . . . . . . . . 12
Поправка на замръзнала перална машина . . . . . . . . . . . . . . . . . . . . . . . . . . . . . . . . 12
Почистване на външните повърхности. . . . . . . . . . . . . . . . . . . . . . . . . . . . . . . . . . . . 12
Почистване на ваничката за перилен препарат и отвора за нея . . . . . . . . . . . . . . .13
Почистване на филтъра за механични частици . . . . . . . . . . . . . . . . . . . . . . . . . . . . 13
Почистване на мрежестия филтър на маркуча за вода . . . . . . . . . . . . . . . . . . . . . .14
Отстраняване на неизправности . . . . . . . . . . . . . . . . . . . . . . . . . . . . . . .15
Проблеми и решения . . . . . . . . . . . . . . . . . . . . . . . . . . . . . . . . . . . . . . . . . . . . . . . . . . 15
Разбиране на съобщенията за грешка. . . . . . . . . . . . . . . . . . . . . . . . . . . . . . . . . . . . 15
Таблица с програми. . . . . . . . . . . . . . . . . . . . . . . . . . . . . . . . . . . . . . . . . .16
Приложение . . . . . . . . . . . . . . . . . . . . . . . . . . . . . . . . . . . . . . . . . . . . . . . .18
Таблица със символите на производителите на текстил . . . . . . . . . . . . . . . . . . . . . 18
Предупреждения, свързани с ел. захранването . . . . . . . . . . . . . . . . . . . . . . . . . . . . 18
Опазване на околната среда. . . . . . . . . . . . . . . . . . . . . . . . . . . . . . . . . . . . . . . . . . . . 19
Декларация за съответствие. . . . . . . . . . . . . . . . . . . . . . . . . . . . . . . . . . . . . . . . . . . . 19
Техническа характеристика. . . . . . . . . . . . . . . . . . . . . . . . . . . . . . . . . . . . . . . . . . . . . 19
SAMSUNG Указания за потребителя на перална машина 1
Page 48

Инсталиране на пералната машина
Разопаковане на пералната машина
Разопаковайте своята перална машина и я проверете за дефект, настъпил по време на транспорта.
Също така се уверете, че сте получили всички позиции, посочени по-долу. Ако пералната машина е
била повредена по време на транспорта или ако не сте получили всички изброени позиции, свържете се
незабавно с вашия дилър на Samsung.
Описание на пералната машината
Горен плот на
машината
Ваничка за
перилни средства
Маркуч за
Панел за
управление
отвеждане на
водата
Капак на дъното
Крачета за
регулиране
Гаечен ключ
Водач на маркуча
Люк
Маркуч за
отвеждане
на водата
Щепсел
Филтър за
механични частици
Тръба за аварийно изпразване
Капак на филтъра
Маркуч за
подаване на
студена вода
Капачки за
отворите на
болтовете
2 SAMSUNG Указания за потребителя на перална машина
Page 49

Инсталиране на пералната машина
Избор на място
Преди да монтирате машината, изберете за тази цел място, което да отговаря на следните изисквания:
• Твърда, равна повърхност (ако повърхността не е равна, вижте „Регулиране на нивелиращите
крачета” по-долу).
• Далеч от директна слънчева светлина.
• Да има достатъчно проветряване.
• Температурата в помещението не трябва да пада под 0 °C.
• Далеч от източници на топлина, като въглища или газ.
Уверете се, че пералната машина не е поставена върху захранващия кабел. Отворите за вентилация не
трябва да бъдат закривани от подовата настилка, когато машината е монтирана върху под, покрит с
някаква настилка.
Регулиране на нивелиращите крачета
Ако подът е неравен, регулирайте нивелиращите крачета (не подпъхвайте дъсчици или други предмети
под крачетата:
1. Развинтете болта на крачето на ръка, докато той дойде до желаната височина.
2. Затегнете контрагайката, като за въртенето й използвате доставения гаечен ключ.
• Поставете пералната машина върху стабилна, плоска повърхност.
Ако пералната машина е монтирана върху неравна или нестабилна повърхност, при работата й възниква
шум или вибрация. (Допустим е само 1 градус ъглово отклонение).
Отстраняване на болтовете, използвани при транспорта
Преди да използвате машината, трябва да отстраните петте болта, използвани за укрепване при
транспорта и разположени в задната й част. За тази цел:
2
1
3
1. Развийте всички болтове преди отстраняването им, като за целта използвате доставения гаечен
ключ.
2. Захванете главата на всеки болт и го изтеглете през широката част на отверстието. Повторете
операцията за всеки болт.
3. Получилите се отвори запушете с доставените пластмасови капачки.
4. Запазете болтовете за евентуално използване в бъдеще.
Свързване на маркуча за подаване на вода (опция)
1. Свалете адаптора от маркуча за
подаване на вода..
2. Първо развийте четирите винта
на адаптора, като из-ползвате кръстата
отвертка. След това вземете адап-тора
и завъртете детайла „b”, като спазвате
посоката на стрелката, докато се получи
хлабина от 5 мм..
3. Свържете адаптора към крана за
вода, като затегнете здраво винтовете.
След това завъртете детайла (b), като
спазвате посоката на стрелката и
свържете (a) и (b)..
a
b
c
ЗАБЕЛЕЖКА: Ако след извършване на свързването се забелязва изтичане на вода от маркуча,
изброените по-горе стъпки трябва да бъдат повторени. Използвайте най-обикновен кран
за вода. В случай, че кранът е квадратен или твърде голям, отстранете дистанционния
пръстен преди да поставите крана в адаптора.
SAMSUNG Указания за потребителя на перална машина 3
4. Свържете маркуча за подаване на вода
към адапто-ра. Изтеглете надолу детайл
(с) на маркуча. Когато освободите детайл
(с), маркучът автоматично се свързва с
адаптора, като издава щракващ звук..
5. Свържете другия край на маркуча към
клапана за подаване на вода в горната част
на пералната машина. Завинтете докрай
маркуча по посока на часовниковата
стрелка..
Ако кранът за вода има накрайник с резба,
свържете маркуча за подаване на вода
както е показано..
Page 50

Инсталиране на пералната машина
Свързване на маркуча за подаване на вода
Маркучът за подаване на вода трябва да бъде свързан към пералната машина в единия си край и към
крана за вода в другия си край. Не опъвайте маркуча за подаване на вода. Ако маркучът е твърде къс
и вие не желаете да премествате крана за вода, подменете маркуча с по-дълъг, пригоден за работа под
високо налягане.
За да свържете маркуча за подаване на вода:
1. Вземете накрайника на маркуча за подаване на
вода с форма на буква L иго свържете с входния
накрайник за подаване на студена вода на гърба
на машината. Затегнете ръчно.
2. Ако е необходимо, можете да промените
положението на маркуча за подаване на вода в
края му при пералната машина като разхлабите
фитинга, завъртите маркуча и отново затегнете
фитинга.
Пример: 1. Вземете накрайника на маркуча
Забележка: Уредът трябва да бъде свързан към водопроводната мрежа като бъдат използвани
Разполагане на маркуча за отвеждане на вода
Краят на маркуча за отвеждане на вода може да бъде
разположен по три начина:
Над ръба на мивка
За да се задържи изпускателния край на маркуча в
огънато положение, използвайте доставения заедно с
машината пластмасов водач. Фиксирайте водача към
стената с една кука или към крана посредством парче
шнур, за да предотвратите изместването на маркуча.
В отклонение от канализационната
тръба на мивката
Отклонението на канализационната тръба трябва да
се намира над сифона на мивката по такъв начин, че
краят на маркуча да е най-малко над нивото на пода.
В канализационна тръба
Samsung препоръчва да използвате вертикална тръба с височина 65 см; тя не трябва да бъде по-къса от
60 см и по-дълга от 90 см.
за подаване на гореща вода
с форма на буква L и го свържете с червения входен накрайник за подаване на
гореща вода на гърба на машината. Затегнете на ръка.
2. Свържете другия край на маркуча за подаване на гореща вода към крана за гореща
вода на вашата мивка и го затегнете на ръка.
3. Използвайте детайл с форма на Y, ако желаете да използвате само студена вода.
само нови маркучи. Не трябва да бъдат използвани стари маркучи.
4 SAMSUNG Указания за потребителя на перална машина
Page 51

Инсталиране на пералната машина
Включване на машината
За потребители в Европа. НЕ Е необходимо да заземите щепсела на пералната машина.
За потребители в САЩ. Вие ТРЯБВА да заземите щепсела на пералната машина.
Проверете заедно с лицензиран електротехник правилното заземяване на машината, преди да я включите в работа.
За потребители във Великобритания.
Инструкции за електрическо свързване
ВНИМАНИЕ: ТОЗИ УРЕД ТРЯБВА ДА БЪДЕ ЗАЗЕМЕН.
Този уред трябва да бъде заземен. В случай на късо съединение
в електрическата верига заземяването намалява риска от токов
удар, ако е осигурен отвеждащ електрическия ток проводник.
Уредът е снабден с електрически захранващ кабел, който включва
проводник за свързване със заземяващата клема на вашия
щепсел.
Щепселът трябва да бъде включен в контакт, който е монтиран и
заземен правилно.
* Жиците во приклучниот кабел се обоени на следниот начин:
• Зелен и жълт : Земя
• Син : Неутрално
• Кафяв : Фаза
Тъй като цветовете на проводниците в захранващия кабел могат
да не отговарят на цветните маркировки, обозначаващи клемите
във вашия щепсел, постъпете по следния начин:
• Свържете зеления и жълт проводник към клемата в щепсела,
обозначена с буква Е или със символа (
оцветена зелено или зелено + жълто.
) (земя) или
• Свържете синия проводник към клемата, обозначена с буква
N или оцветена в черно.
• Свържете кафявия проводник към клемата, обозначена с
буква L или оцветена червено.
* Консултирайте се с квалифициран електротехник или
със сервизен техник, ако се съмнявате за някои от тези
инструкции.
Производителят на тази перална машина няма да приеме
никаква отговорност за вреда, нанесена на лица или
материал при неспазване на тези изисквания. В пералната
машина няма никакви детайли, които да могат да бъдат
обслужвани от потребителя и ако електрическият
захранващ кабел е повреден, той трябва да бъде подменен
само от квалифициран сервизен персонал, одобрен от
производителя, защото за целта се изискват специални
инструменти.
ЗЕЛЕН И ЖЪЛТ
СИН
ПРЕДУПРЕДУВАЊЕ
Пред употреба проверете дали се
оштетени приклучниот кабел и
штекерот. Доколку поради некоја
причина сакате од апаратот да го
извадите фабрички вградениот
приклучен кабел, веднаш извадете го
осигурувачот и ставете го кабелот на
безбедно место. Во никој случај не го
приклучувајте приклучниот кабел во
штекерот зашто постои опасност од
електричен удар.
ЕЛЕКТРИЧЕСКИ ВЕРИГИ
Вашата перална машина трябва да
бъде включена към електрическа
верига, отделна от други уреди.
Неизпълнението на това предписание
може да доведе до изключване
на прекъсвача на веригата или до
изгаряне на стопяемия предпазител.
СТОПЯЕМ
ПРЕДПАЗИТЕЛ
13 АМПЕРА
КАФЯВ
SAMSUNG Указания за потребителя на перална машина 5
Page 52

Изпиране на партида пране
Описание на панела за управление
Температура Плакнене Центрифуга Забавено
пускане
Пране Silver
1. Дигитален графичен дисплей
Показва останалото време от програмата за пране, цялата информация за изпирането и съобщения
за грешка.
2. Бутон за избиране на предпране
Натиснете бутона за да изберете предпране. Предпрането е възможно само при програмите за
изпиране на: Cotton (Памук), Coloureds (Цветно), Synthetics (Синтетично), Delicates (Фино) и Baby
program (Програма бебе).
3. Бутон Temperature (Температура)
Натиснете бутона последователно, за да преминете през програмите на наличните температурни
опции (студена вода ( ), 30 °C, 40 °C, 60 °C и 95 °C).
4. Бутон Rinse (Изплакване)
Натиснете този бутон, за да добавите програми за изплакване. Максималният брой на програмите
е пет.
5. Бутон Spin (Центрофуга)
Натиснете бутона неколкократно, за да преминете през програмите на наличните опции за скорост
на центрофугиране.
B1445A(V/S)
B1245A(V/S), R1245A(V/S), F1245A(V/S)
B1045A(V/S), R1045A(V/S) ,F1045A(V/S)
Без центрофугиране
Прането остава в барабана, без да бъде центрофугирано след окончателното отвеждане на водата.
Задържане на изплакването
Прането остава накиснато във водата от последното изплакване. Преди изваждане на
прането трябва да бъде проведена или програма “Drain” (Източване) или програма “Spin”
(Центрофугиране).
, , 400, 800, 1200, 1400 об./мин.
, , 400, 800, 1000, 1200 об./мин.
, , 400, 600, 800, 1000 об./мин.
: без центрофугиране, : задържане на изплакването
6. Бутон Delay Start (Забавено пускане)
Натиснете бутона последователно, за да преминете през наличните програми за забавено пускане
(от 3 часа до 24 часа на интервали през 1 час).
Показаните часове означават времето на завършване на програмата за изпиране.
6 SAMSUNG Указания за потребителя на перална машина
Page 53

Изпиране на партида пране
Програма бебе
Памук
Цветно
Фино
Петна
Източване
Центрофуга
Плакнене + центрофуга
Памук
Цветно
Синтетично
Фино
Вълна
Ръчно пране
Бързо
Захранване
7. Бутон за избор на Silver Nano
По време на прането, както и на окончателното изплакване се подава вода Silver Nano,
характеризираща се със стерилизиращо и антибактериално покриване.
8. Бутон за избор на половин пране
Натиснете бутона, ако ще се пере половината от нормалното количество (т.е. около 1 до 4 кг). Тази
функция съкращава времето на изпиране и спестява енергия.
9. Бутон за избор Блокировка дете
Това е бутон, който предотвратява манипулирането на машината от деца.
Вкл./Изкл. – За да включите програмата: Натиснете бутона Старт/Пауза за включване на
пералната машина. Натиснете и задръжте в това положение бутона [Rinse (Изплакване)] + [Spin
(Центрофугиране)] в течение на 2 – 3 секунди. Бутонът може да се задейства само когато машината
е включена. След като веднъж сте включили тази програма в процеса на прането, нито един бутон
не може да бъде задействан, докато не я изключите. Не може да бъде задействан дори бутонът
Power (Захранване). Индикаторната лампа Baby Program (Програма бебе) свети.
За да изключите програмата: Натиснете и задръжте отново бутона [Rinse (Изплакване)] +
[Spin (Центрофугиране)] в течение на 2 – 3 секунди, след което лампата загасва и програмата се
изключва.
Забележка: Проверете първо бутона Baby Program (Програма бебе), когато не е задействан
никакъв бутон и машината работи.
10. Програматор Fuzzy
Завъртете програматора, за да изберете една от 14-те налични програми за пране.
Cotton (Памук), Coloureds (Цветно), Synthetics (Синтетично), Delicates (Фино), Wool
(Вълна), Hand wash (Ръчно пране), Quick (Бързо), Rinse+Spin (Плакнене + центрофуга), Spin
(Центрофуга), Drain (Източване), Baby Program (Програма бебе) [Stains (Петна), Delicates
(Фино), Coloreds (Цветно), Cotton (Памук)]
11. Бутон Старт/Пауза
Натиснете за пауза и рестартиране на програми.
12. Бутон Вкл./Изкл.
Натиснете еднократно за включване на машината, повторно за изключването й. Ако пералната
машина е оставена включена за повече от 10 мину ти, без да бъдат задействани някакви други
бутони, електрозахранването автоматично се изключва.
SAMSUNG Указания за потребителя на перална машина 7
Page 54
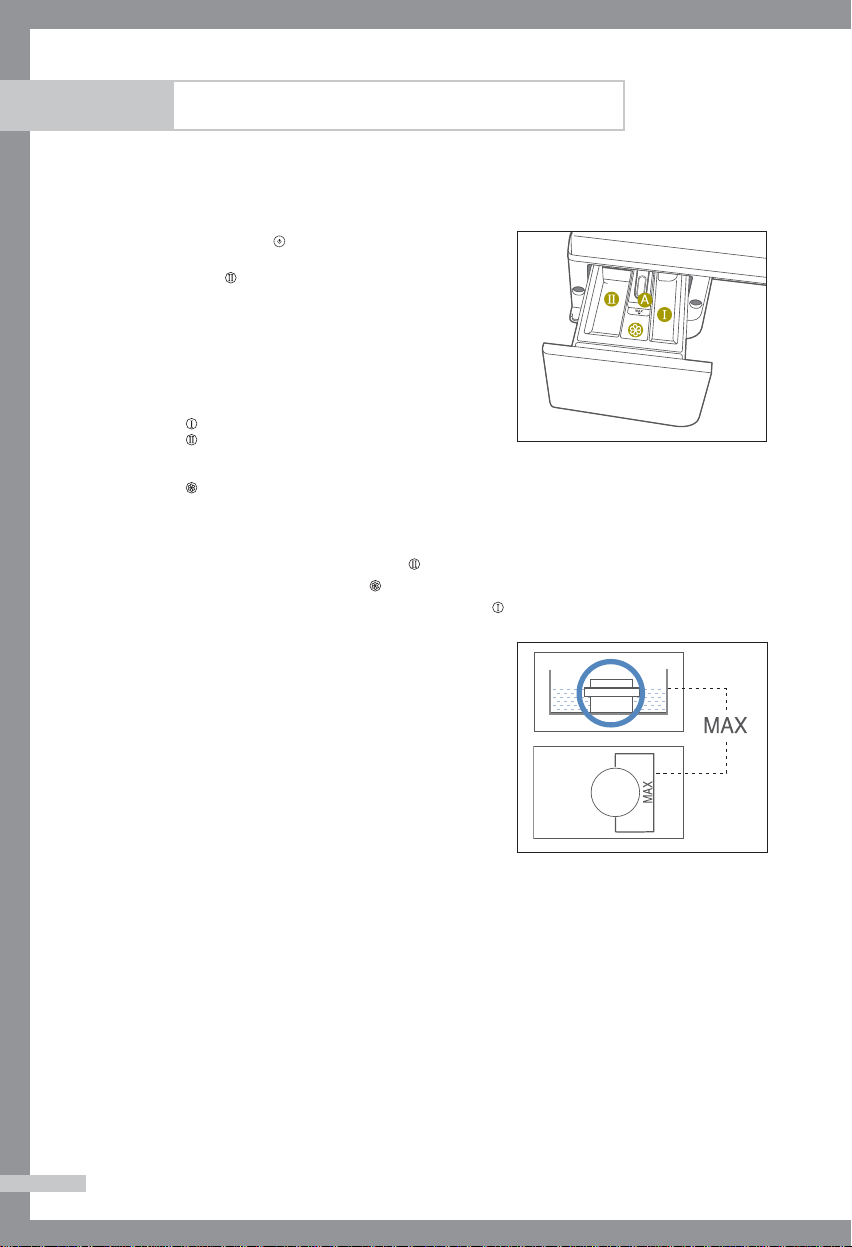
Изпиране на партида пране
Първо ползване на пералнята
Преди да ползвате пералнята за първи път трябва да изпълните една пълна програма на пране без дрехи.
За да направите това:
1. Натиснете бутона
2. Сложете малко количество перилен препарат в
отделение
3. Включете подаването на вода към пералната машина.
4. Натиснете неколкократно бутон Temperature
(Температура) до показване на 40 °C.
5. Натиснете бутона Стаpт/Пауза.
• Това ще отстрани всякаква вода, останала от
пробната работа в завода на производителя.
Отделение : Перилен препарат за предпране или колосване.
Отделение
за вода, средство за предварително накисване, избелващо средство и
продукти за отстраняване на петна.
Отделение
: Перилен препарат за основно изпиране, омекотител
: Добавки, например омекотител или фиксатор на тъканите (не пълнете над долния ръб на вложка “А”)
Поставяне на перилен препарат в пералната машина
1. Изтеглете ваничката за перилния препарат.
2. Добавете перилен препарат в отделение
3. Добавете омекотител в отделение
4. Добавете перилен препарат за предпране в отделение
Внимание:
Концентрираният или гъст омекотител и кондиционер
трябва да бъдат разредени с малко вода, преди да бъдат
налети в отделението (това предпазва преливника от
задръстване).
(Вкл./Изкл.).
на ваничката за перилни препарати.
.
(ако желаете).
(ако желаете).
8 SAMSUNG Указания за потребителя на перална машина
Page 55

Изпиране на партида пране
Пране на дрехи с използване на Fuzzy Logic
Вашата нова перална машина прави прането на дрехи лесно, като използва автоматичната система за
регулиране “Fuzzy Logic”на Samsung. Когато Вие изберете програма за изпиране, машината ще зададе
правилните температура, време и скорост за изпиране.
За да перете дрехи, използвайки програмите Fuzzy Logic:
1. Включете крана за подаване на вода на вашата мивка.
2. Натиснете бутона
3. Отворете люка.
4. Поставете отделните изделия свободно в барабана едно по едно, без да го препълвате.
5. Затворете люка.
6. Добавете перилен препарат, омекотител и перилен препарат за предпране (ако е необходимо) в
съответното отделение.
Забележка: Предпране е възможно само тогава, когато се изпълняват програмите за пухени
7. Завъртете програматора, за да изберете
подходящата програма за вида на дрехите:
Cotton (Памук), Coloureds (Цветно),
Synthetics (Синтетично), D(Фино),
Wool (Вълна), Hand wash(Ръчно пране),
Quick (Бързо), Rinse+Spin (Плакнене +
центрофуга), Spin (Центрофуга), Drain
(Източване), Baby Program (Програма бебе)
[Stains (Петна), Delicates (Фино), Coloreds
(Цветно), Cotton (Памук)].
Индикаторните лампи ще светнат върху
панела за управление.
8. В това време чрез натискане на съответните
бутони можете да зададете температу-рата
на изпиране, времената за изплакване,
скоростта на центрофугиране, времето на
забавяне при включване на програмата чрез
натискане на съответните бутони.
9. Натиснете бутона Старт/Пауза върху програматора и програмата за изпиране ще започне.
Индикаторната лампа ще светне и времето до приключване на програмата ще се появи на
дисплея.
Когато програмата завърши:
След приключване на цялата програма електрозахранването ще се прекъсне автоматично.
1. Отворете люка.
Забележка: Люкът не може да бъде отворен по-рано от 3 минути след спиране на
2. Извадете прането.
(Вкл./Изкл.).
изделия, спално бельо, кърпи, завеси, памучни, цветни, синтетични и фини
изделия. Тази програма е необходима само когато прането ви е силно замърсено.
електрозахранването.
SAMSUNG Указания за потребителя на перална машина 9
Page 56

Изпиране на партида пране
Изпиране на дрехи с ръчно програмиране
Вие можете да перете дрехи и с ръчно програмиране, без да използвате свойството Fuzzy Logic на
програматора. За да направите това:
1. Включете подаването на водата.
2. Натиснете бутона
3. Отворете люка.
4. Поставете отделните изделия свободно в барабана едно по едно, без да го препълвате.
5. Затворете люка.
6. Поставете в съответните отделения перилен препарат и ако е необходимо, омекотител или
перилен препарат за предпране.
7. Натиснете бутона Temperature (Температура) (студена вода, 30 °C, 40 °C, 60 °C, 95 °C).
8. Натиснете бутона Rinse (Изплакване) за избор на желания брой цикли на изплакване.
Максималният им брой е пет. Продължителността на изпирането ще бъде съответно увеличена.
9. Натиснете бутона Spin (Центрофуга), за да изберете скоростта на центрофугиране.
Забележка: Програмата за задържане на изплакването ви позволява да извадите от пералната
10. Натиснете бутона неколкократно, за да преминете през наличните опции за забавено пускане (от
3 часа до 24 часа на интервали през един час). Часовете, които се изписват означават времето на
завършване на програмата за изпиране.
11. Натиснете бутона Старт/Пауза и машината ще започне да изпълнява програмата.
Използване на Delay Start (Забавено пускане)
Можете да настроите пералната машина да завърши автоматично прането по-късно, като изберете
период от 3 часа до 24 часа (на интервали през един час). Часовете, които се изписват означават времето
на завършване на програмата за изпиране.
За да направите това:
1. Ръчно или автоматично настройте вашата перална машина съобразно на типа дрехи, които ще
перете.
2. Натиснете неколкократно бутона Delay Start (Забавено пускане), докато бъде настроено времето
на забавяне.
3. Натиснете бутона Старт/Пауза. Индикаторната лампа за Delay Start (Забавено пускане) ще светне
и часовникът ще започне да отброява назад времето, докато достигне зададеното от вас крайно
време.
4. За да отмените забавеното пускане натиснете бутона (Вкл./Изкл.), след това включете отново
пералната машина.
(Вкл./Изкл.) на пералната машина.
дрехи, които са съвсем мокри.
: без центрофуга, : задържане на изплакването.
10 SAMSUNG Указания за потребителя на перална машина
Page 57

Изпиране на партида пране
Съвети и препоръки при прането
Сортирайте вашето пране: Сортирайте вашето пране в съответствие със следните
особености:
• Вид на материал, символи върху етикетите: Сортирайте прането в зависимост от вида на
тъканите – памук, смесени влакна, синтетика, коприна, вълна и изкуствени.
Сортирайте по цвят: Разделете белите и цветни дрехи. Изперете новите, цветни изделия отделно.
•
•
Размер: Поставянето на изделия с различен размер в едно зареждане на пералната ще подобри
изпирането.
Чувствителност: Перете фините изделия отделно, като използвате програмата Delicate (Фино) за
•
чиста вълна, пердета и копринени изделия. Проверете етикетите върху изделията, които ще перете
или направете справка с приложената таблица със знаци на производителите на текстил.
Изпразване на джобовете: Забравени в джобовете монети, безопасни игли и подобни неща могат да
повредят бельото, барабана на пералната машина и резервоара за вода.
Обезопасяване на закопчалките: Закопчайте ципове, копчета и кукички, свободните колани и ленти
трябва да бъдат завързани заедно.
Предпране на памук: Вашата нова перална машина, в комбинация с модерните перилни препарати
ще покаже отлични резултати при прането, като при това пести енергия, вода и перилен препарат.
В случай, обаче, че памучното пране е силно замърсено, използвайте предпране с перилен препарат,
съдържащ протеини.
Определяне количеството пране: Не претоварвайте пералната машина, защото в противен случай
прането може да не бъде изпрано достатъчно добре. Използвайте таблицата по-долу, за да определите
количеството пране, подлежащо на изпиране в зависимост от неговия вид.
Вид на материала Количество пране
Цветно/памук
- средно/леко замърсено 6,0 кг 5,2 кг 4,5 кг
- силно замърсено 6,0 кг 5,2 кг 4,5 кг
Синтетично 3,0 кг 3,0 кг 3,0 кг
Фино 2,5 кг 2,0 кг 2,0 кг
Вълнени изделия 2,0 кг 1,5 кг 1,5 кг
B1445A(V/S), B1245A(V/S),
B1045A(V/S)
Съвети по отношение на перилния препарат: The type of detergent you should use is based on the
type of fabric (cotton, synthetic, delicate items, wool), colour, wash temperature, degree and type of soiling.
Always use “low suds” laundry soap, which is designed for automatic washing machines.
Спазвайте указанията на производителя на перилния препарат, базирани на теглото на партидата пране,
степента на замърсяване, както и на твърдостта на водата във вашия район. Ако не знаете каква е
твърдостта на водата, запитайте вашата водоснабдителна служба.
Забележка: Съхранявайте перилните препарати и тези за допълнителна обработка на надеждно, сухо
място, недостъпно за деца.
R1245A(V/S), R1045A(V/S) F1245A(V/S), F1045A(V/S)
SAMSUNG Указания за потребителя на перална машина 11
Page 58

Поддръжка на пералната машина
Източване на пералната машина при авария
B1445A(V/S), B1245A(V/S), B1045A(V/S)
1. Извадете щепсела на пералната машина от
контакта.
2. Отворете капака на филтъра, като използвате
монета или ключ.
3. Развинтете капачката за аварийно източване,
като я въртите наляво. Хванете капачката в края
на тръбата зааварийно източване и бавно я
изтеглете на около 15 см.
4. Оставете всичкото количество вода да изтече в един съд.
5. Поставете отново тръбата за аварийно източване и завинтете обратно капачката.
6. Поставете капака на филтъра на мястото му.
Поправка на замръзнала перална машина
Ако температурата падне под точката на замръзване и вашата перална машина е замръзнала:
1. Извадете щепсела на пералната машина.
2. Налейте топла вода върху крана за вода, за да освободите маркуча за подаване на вода.
3. Свалете маркуча за подаване на вода и го накиснете в топла вода.
4. Налейте топла вода в барабана на пералната машина и я оставете да престои там 10 минути.
5. Свържете отново маркуча за подаване на вода към водния кран и проверете дали подаването и
отвеждането на вода действат нормално.
Почистване на външните повърхности
1. Избърсвайте повърхностите на пералната машина, включително панела за управление, с мека
кърпа и неабразивни домакински миещи препарати.
2. Използвайте мека кърпа за подсушаване на повърхностите.
3. Не разливайте вода върху пералната машина.
12 SAMSUNG Указания за потребителя на перална машина
Page 59

Поддръжка на пералната машина
Почистване на ваничката за перилен препарат и отвора за нея
1. Натиснете лоста за освобождаване от вътрешната страна на ваничката за перилен препарат и я
изтеглете навън.
2. Отстранете капачката от отделение
3. Измийте всички детайли с течаща вода.
4. Почистете отвора за ваничката със стара четка за зъби.
5. Поставете отново капачката (притискайки я здраво на мястото й) и поставете обратно на
мястото му във ваничката разделителят за течен перилен препарат.
6. Поставете обратно ваничката на мястото й.
7. Пуснете програма на изплакване, без да слагате пране в барабана.
Почистване на филтъра за механични частици
Почиствайте филтъра за механични частици 5 до 6 пъти годишно или когато видите следващото
съобщение за грешка върху дисплея –
1. Отворете капака на филтъра. Вижте „Източване на пералната машина при авария” на стр. 12.
2. Развийте капачката за аварийно източване, като я завъртите наляво и източите всичкото
количество вода.
Вижте „Източване на пералната машина при авария” на стр. 12.
3. Развийте капачката на филтъра и я извадете.
.
4. Измийте всяко замърсяване или друг материал от филтъра. Уверете се, че пропелерът на помпата
за източване, разположен зад филтъра, не е блокирал. Поставете капачката на филтъра на
мястото й.
5. Поставете капака на филтъра на мястото му.
SAMSUNG Указания за потребителя на перална машина 13
Page 60

Поддръжка на пералната машина
Почистване на мрежестия филтър на маркуча за вода
Трябва да почиствате мрежестия филтър на маркуча за вода най-малко веднъж годишно или когато
видите, че върху дисплея се появи следното съобщение за грешка
За да направите това:
1. Изключете източника за подаване на вода към пералната машина.
2. Развийте маркуча от задната страна на пералната машина.
3. С помощта на плоски клещи изтеглете внимателно мрежестия филтър от края на маркуча и го
изплакнете с вода до почистване. Почистете също така вътрешната и външна страна на резбовия
съединител.
4. Поставете обратно филтъра на мястото му.
5. Завинтете обратно маркуча в пералната машина.
6. Завъртете крана и се уверете, че съединенията са плътни.
14 SAMSUNG Указания за потребителя на перална машина
Page 61

Отстраняване на неизправности
Проблеми и решения
Пералната машина не започва да работи
• Уверете се, че люкът е затворен плътно.
• Уверете се, че щепселът на пералната машина е пъхнат в контакта.
• Уверете се, че кранът за подаване на вода е отворен.
• Уверете се, че бутонът Старт/Пауза е натиснат.
Липса или недостатъчно подаване на вода
• Уверете се, че кранът за подаване на вода е отворен.
• Уверете се, че маркучът за подаване на вода не е замръзнал.
• Уверете се, че маркучът за подаване на вода не е прегънат.
• Уверете се, че филтърът на маркуча за подаване на вода не е задръстен.
Във ваничката остава перилен препарат, след като програмата за изпиране
е приключила
• Уверете се, че пералната машина работи с достатъчно налягане на водата.
• Поставете перилните препарати във вътрешните части на ваничката (далеч от външните ръбове).
Пералната машина вибрира или е твърде шумна
• Уверете се, че пералната машина е разположена върху равна повърхност. Ако повърх-ността не е
равна, регулирайте крачетата й, за да нивелирате уреда (вижте стр. 3).
• Уверете се, че болтовете използвани при транспорта, са отстранени (виж стр. 3).
• Уверете се, че пералната машина не се опира до друг предмет.
• Уверете се, че товарът от прането е балансиран.
Пералната машина не източва и/или не центрофугира
• Уверете се, че маркучът за източване не е смачкан или прегънат.
• Уверете се, че филтърът за механични частици не е задръстен (виж стр. 13).
Люкът не се отваря
• Люкът не може да бъде отворен до 3 минути след спиране на машината или изключване на ел.
захранването.
Разбиране на съобщенията за грешка
Показана грешка Решение
• Затворете люка..
• Уверете се, че кранът за подаване на вода е включен.
• Проверете налягането на водата..
• Почистете филтъра за механични частици.
• Уверете се, че маркучът за източване е монтиран правилно..
• Товарът от пране не е балансиран; освободете заплетеното пране.
Ако само едно изделие се нуждае от пране, например една хавлия
или джинси, крайният резултат от центрофугирането може да бъде
незадоволителен и на прозорчето на дисплея да се появи съобщение за
грешка “UE”..
• Повикайте следпродажбената сервизна служба..
Преди да се свържете със следпродажбената сервизна служба:
1. Опитайте се да отстраните проблема (Вижте „Отстраняване на неизправности” на тази страница).
2. Пуснете повторно програмата, за да видите дали проблемът се повтаря.
Ако неправилното действие продължава, свържете се със службата за следпродажбен сервиз и опишете
проблема.
SAMSUNG Указания за потребителя на перална машина 15
Page 62

Таблица с програми
(✽ опция на потребителя)
Макс товар
Програма
Cotton
Памук
Coloureds
Цветно
Synthetics
Синтетично
Delicates
Фино
Wool
Вълна
Handwash
Ръчно пране
Quick
Бързо
B1445A(V/S),
B1245A(V/S),
B1045A(V/S)
(кг)
R1245A(V/S),
R1045A(V/S)
6,0 5,2 4,5
6,0 5,2 4,5
3,0 3,0 3,0
2,5 2,5 2,0
2,0 1,5 1,5 - да
2,0 1,5 1,5 - да
2,0 1.5 1.5 - да
Програма Вид пране
Cotton
Памук
Coloureds
Цветно
Synthetics
Синтетика
Delicates
Фино
Wool
Вълна
Hand wash
Ръчно пране
Quick
Бързо
Средно или леко замърсени памучни изделия, спално бельо, покривки за маса, долно
бельо, кърпи, ризи, и т.н.
Средно или леко замърсени памучни изделия, спално бельо, покривки за маса, долно
бельо, кърпи, ризи, и т.н.
Средно или леко замърсени блузи, ризи, и т.н. Произведени от полиестер (диолен,
тревира), полиамид (перлон, найлон) или други подобни смеси.
Фини пердета, рокли, поли, ризи и блузи.
Само подлежащи на пране в перална машина вълнени изделия с етикет за чиста
вълна.
Много лек режим на пране като ръчно пране.
Леко замърсени памучни или ленени блузи, ризи, тъмно оцветена кадифена материя,
цветни ленени изделия, джинси и т.н.
1. Програмата с предпране трае ок. 15 мин. по-дълго.
2. Данните за продължителност на програмата са измерени при спазване на
условията, определени в Стандарт IEC 456.
3. Разходът в отделните домакинства може да се различава от стойностите в
таблицата поради различия в налягането и температурата на подаваната вода,
количеството и вида на прането.
Перилен препарат и добавъчни
препарати
F1245A(V/S),
Предпране Пране Омекотител Макс B1445A(V/S)
F1045A(V/S)
да
✽
да
✽
да
✽
да
✽
Темп.
Скорост на центрофугиране
(˚C)
95 1400 1200 1000
✽
60 1400 1200 1000
✽
60 800 800 800
✽
40 800 800 600
✽
40 400 400 400
✽
40 400 400 400
✽
60 1400 1200 1000
✽
(макс. об./мин)
B1245A(V/S),
R1245A(V/S),
F1245A(V/S)
B1045A(V/S),
R1045A(V/S),
F1045A(V/S)
Забавено
пускане
✽✽
✽✽
✽✽
✽✽
✽✽
✽✽
✽ ✽
Половин
пране
16 SAMSUNG Указания за потребителя на перална машина
Page 63

Програма
Baby Cotton
Бебе - памук
Baby Coloureds
Бебе - цветно
Baby Delicates
Бебе - фино
Baby Stains
Бебе - петна
Макс товар
(кг)
B1445A(V/S),
R1245A(V/S),
B1245A(V/S),
R1045A(V/S)
B1045A(V/S)
6,0 5,2 4,5
6,0 5,2 4,5
2,5 2,0 2,0
6,0 5,2 4,5
F1245A(V/S),
Перилен препарат и добавъчни
препарати
Предпране Пране Омекотител Maкс B1445A(V/S)
F1045A(V/S)
да
✽
да
✽
да
✽
да
✽
✽
✽
✽
✽
Програма Вид пране
Baby Cotton
Бебешко памучно
Baby Coloureds
Бебешко цветно
Baby Delicates
Бебешко фино
Baby Stains
Бебешко петна
Средно или леко замърсени бебешки памучни изделия, спално бельо, покривки за
маса, долно бельо, кърпи, ризи и т.н.
Средно или леко замърсени бебешки памучни изделия, спално бельо, покривки за
маса, долно бельо, кърпи, ризи и т.н.
Фини бебешки рокли, поли, ризи и блузи.
Петна върху памучни изделия, спално бельо, долно бельо, кърпи и др., причинени
от излята храна и урина.
Таблица с програми
( ✽ опция на потребителя)
Темп.
Скорост на центрофугиране
(˚C)
95 1400 1200 1000
60 1400 1200 1000
60 800 800 600
40 1400 1200 1000
(макс. об./мин)
B1245A(V/S),
R1245A(V/S),
F1245A(V/S)
B1045A(V/S),
R1045A(V/S),
F1045A(V/S)
Забавено
Половин
пускане
пране
✽✽
✽✽
✽✽
✽✽
SAMSUNG Указания за потребителя на перална машина 17
Page 64

Приложение
Таблица със символите на производителите на текстил
Устойчив материал Може да бъде гладено при 100 °C макс.
Фин текстил Не гладете
Изделието може да се пере при 95 °C
Изделието може да се пере при 60 °C
Изделието може да се пере при 40 °C
Изделието може да се пере при 30 °C Не подлежи на химическо чистене
Изделието следва да се пере ръчно Суши се в легнало положение
Само химическо чистене Може да се суши окачено
Може да бъде избелвано в студена вода Може да се суши окачено на закачалка
Не избелвайте Сушилня при нормална топлина
Може да бъде гладено при 200 °C
макс.
Може да бъде гладено при 150 °C
макс.
Предупреждения, свързани с ел. захранването
За да се намали опасността от пожар, токов удар и други наранявания съблюдавайте тези предпазни
мерки за безопасност:
• Захранването на уреда да става само от източника на енергия, указан на маркиращия етикет. Ако не
сте сигурни относно типа на енергия, с която е захранен вашия дом, консултирайте се с продавача
на уреда или с местното електроснабдително дружество.
• За потребители във Великобритания: Използвайте само заземен контакт или такъв с полюси.
За осигуряване на вашата безопасност този уред е снабден с щепсел с полюси за променлив ток,
като единият щепсел е по-широк от другия. Това позволява щепселът да влезе в контакта само по
един начин. Ако не можете да поставите щепсела изцяло в контакта, опитайте се отново, като го
обърнете. Ако щепселът пак не влиза, повикайте своя електротехник да подмени контакта.
• Пазете захранващия шнур. Шнуровете на захранването трябва да са поставени така, че да не могат
да бъдат настъпвани или да бъдат притиснати от предмети, разположени върху или срещу тях.
Обърнете специално внимание на проводниците в щепселите, буксите и на мястото, където те
излизат от уреда.
• Не претоварвайте контакта или удължителните кабели. Това може да доведе до пожар или токов
удар.
Може да бъде химически почиствано с
използването на разтворител
Сухо химическо почистване само с перхлорид,
бензин за запалка, чист спирт или R113
Сухо химическо почистване само с авиационно
гориво, чист спирт или R113
Сушилня при намалена топлина
Не сушете в сушилня
18 SAMSUNG Указания за потребителя на перална машина
Page 65

Приложение
Опазване на околната среда
• Този уред е произведен от материали, които подлежат на рециклиране. Ако решите да изхвърлите
този уред, молим да спазвате местните предписания за унищожаване на отпадъци. Прекъснете
шнура така, че уредът да не може да бъде свързан към електрическото захранване. Отстранете
люка, за да не могат животни и малки деца да попаднат и се окажат затворени в уреда.
• Не превишавайте количествата перилен препарат, препоръчвани в инструкциите на производителя
му.
• Използвайте препарати за отстраняване на петна и избелващи средства преди програмата за
изпиране само тогава, когато това е необходимо.
• Пестете вода и електричество, като перете само при пълно натоварване (при това точното
количество зависи от използваната програма).
Декларация за съответствие
Този уред съответства на европейските стандарти за безопасност, на директива EC 93/68 и на стандарт
EN 60335.
Техническа характеристика
Тип Перална машина с предно зареждане
Размер
(Ш × Д × В, мм)
Налягане на
водата
Обем на водата 54 л
Тегло нето 75 кг 66 кг 62 кг
Капацитет
при пране и
центрофугиране
Разход на енергия
Тегло на
опаковката
Скорост на
центрофугиране
B1445A(V/S), B1245A(V/S),
B1045A(V/S)
598 × 550 × 844 598 × 450 × 844 598 × 404 × 844
6,0 кг (сухо пране) 5,2 кг (сухо пране) 4,5 кг (сухо пране)
Модел
Пране и нагряване
Центро-
фуга
Изпомпване
Модел
Хартия
Пластмаса
Модел
об./мин 1400 1200 1000
B1445A(V/S), B1245A(V/S), B1045A(V/S) R1245A(V/S), R1045A(V/S) F1245A(V/S), F1045A(V/S)
220 V 2000 W 220 V 1900 W 220 V 1800 W
240 V 2400 W 240 V 2200 W 240 V 2100 W
B1445A(V/S) B1245A(V/S) B1045A(V/S) R1245A(V/S) R1045A(V/S) F1245A(V/S) F1045A(V/S)
Модел
230 V 550 W 500 W 500 W 550 W 500 W 250 W 220 W
B1445A(V/S), B1245A(V/S), B1045A(V/S) R1245A(V/S), R1045A(V/S) F1245A(V/S), F1045A(V/S)
B1445A(V/S)
R1245A(V/S), R1045A(V/S) F1245A(V/S), F1045A(V/S)
50 kPa ~ 800 kPa
49 л 48 л
34W
2,5 кг 2,1 кг 1,9 кг
1,0 кг 0,9 кг 0,8 кг
B1245A(V/S), R1245A(V/S),
F1245A(V/S)
B1045A(V/S), R1045A(V/S), F1045A(V/S)
SAMSUNG Указания за потребителя на перална машина 19
Page 66

В СЛУЧАЙ, ЧЕ ВЪЗНИКНЕ
НЕОБХОДИМОСТ ОТ СЕРВИЗ
- Ако с вашия продукт се случи нещо
нередно не се колебайте да позвъните
на всеки център за следпродажбено
обслужване, намиращ се наблизо,
като съобщите вашето име, адрес, тел.
номер, номер на модел и сериен номер
на пералната машина.
Page 67

Maşini de spălat
Instrucţiuni de folosire
B1445A(V/S)
B1245A(V/S)
B1045A(V/S)
R1245A(V/S)
R1045A(V/S)
F1245A(V/S)
F1045A(V/S)
Code No.: DC68-02158F-Romanian
Page 68

Informaţii importante
Ne bucurăm că aţi optat pentru o maşină de spălat Samsung. Următoarele Instrucţiuni de folosire conţin informaţii
importante privind conexiunile, utilizarea şi întreţinerea aparatului. Vă rugăm să vă faceţi timp să citiţi cu atenţie aceste
Instrucţiuni. În acest mod veţi descoperi toate avantajele şi funcţiile maşinii dumneavoastră de spălat şi veţi putea să o folosiţi
optim.
Înainte de punerea în funcţiune a aparatului
• Materialele de ambalare pot constitui un pericol pentru copii. Din acest motiv, nu lăsaţi materialele folosite la
ambalare (benzile din plastic, polistirenul expandat etc.) la îndemâna copiilor.
• Aparatul este de uz exclusiv casnic.
• Asiguraţi-vă că legarea aparatului la curent electric şi la apă este făcută de personal califi cat. Legăturile trebuie să fi e
făcute în conformitate cu normele legale şi cu indicaţiile producătorului (a se vedea „Instalarea”).
• Înainte de punerea în funcţiune a maşinii de spălat, îndepărtaţi neapărat toate materialele folosite la ambalare şi la
securizarea transportului. În caz contrar, se pot produce daune aparatului. A se vedea „Îndepărtarea şuruburilor de
siguranţă pentru transport”.
• Înainte de a spăla rufe prima dată, maşina de spălat trebuie să parcurgă mai întâi un ciclu complet de spălare, fără rufe.
A se vedea „Spălarea pentru prima dată”.
Măsuri de siguranţă
• Înainte de curăţarea aparatului sau înainte de efectuarea operaţiunilor de întreţinere scoateţi ştecherul aparatului din
priză sau închideţi aparatul folosind tasta Pornit / Oprit.
• Înainte de spălare verifi caţi ca toate buzunarele obiectelor ce urmează a fi spălate să fi e goale. Obiectele dure
sau ascuţite, cum ar fi monedele, acele de siguranţă, acele, şuruburile sau pietrele pot cauza daune grave maşinii
dumneavoastră de spălat.
• După folosire, întotdeauna scoateţi ştecherul maşinii din priză şi închideţi robinetul de apă.
• Verifi caţi, înainte de a deschide uşa aparatului, dacă toată apa de spălare a fost evacuată. Niciodată să nu deschideţi uşa
aparatului dacă înăuntrul maşinii de spălat mai vedeţi încă apă.
• Copii mici sau animalele de casă se pot ascunde în cilindrul maşinii (tamburul). Din acest motiv, verifi caţi cilindrul
înaintea fi ecărei folosiri.
• În timpul spălării, geamul de sticlă al uşii aparatului se poate încălzi foarte puternic. Din acest motiv, nu lăsaţi copii în
apropierea maşinii în timpul funcţionării.
• Aveţi grijă ca lucrările de întreţinere şi reparaţii să fi e efectuate numai de personal tehnic aparţinând atelierului de
service aferent, deoarece trebuie folosite numai piese de schimb originale. Reparaţiile efectuate de personal necalifi cat
pot cauza accidente sau pot provoca stricăciuni şi mai mari.
• În cazul în care ştecherul sau cablul de alimentare sunt defecte, pentru a evita pericolele, înlocuirea lor trebuie
efectuată de către personal califi cat, aparţinând furnizorului sau atelierului de service.
• Acest aparat nu trebuie folosit de către copii sau persoane infi rme, decât sub atenta supraveghere a unei persoane
responsabile, care să aibă grijă ca aparatul să fi e folosit fără pericol. Trebuie avut grijă să nu se joace copii cu acest
aparat.
• Acest echipament nu trebuie utilizat de către copii sau persoane cu handicap decât sub supravegherea unei persoane
responsabile, care se poate asigura că aceştia utilizează echipamentul în siguranţă. Copiii mici nu trebuie lăsaţi să se
joace cu echipamentul.
• Acest echipament trebuie conectat la o priză care să poată face faţă consumului electric al acestuia.
• Echipamentul trebuie instalat astfel încât priza să poată fi accesibilă după instalare.
• Nu utilizaţi ape reziduale de tipul celor care se găsesc în mod obişnuit în saloanele de cosmetică şi masaj (cu conţinut
de ulei, cremă sau loţiuni de piele).
- Riscaţi să deterioraţi stratul protector, caz în care pot apărea defecţiuni sau pierderi de etanşeitate.
• Tuburile din inox în general nu ruginesc. Totuşi, dacă în tub ajung obiect metalice (de ex. agrafe) care rămân acolo o
perioadă mai lungă de timp, tubul ar putea rugini.
- Nu lăsaţi apă sau soluţii cu conţinut ridicat de clor în tub pentru o perioadă mai lungă de timp.
- Nu utilizaţi regulat şi nu lăsaţi în tub apă cu conţinut ridicat de fi er pentru o perioadă mai lungă de timp.
- Dacă apare rugină pe suprafaţa tubului, aplicaţi un agent de curăţare neutru pe suprafaţă şi utilizaţi un burete sau o
cârpă moale pentru a o îndepărta.
(Sub nici o formă nu utilizaţi perii de sârmă)
Marcajele de pe acest produs sau menţionate în instrucţiunile sale de folosire indică faptul că produsul nu trebuie
aruncat împreună cu alte rezuduuri din gospodărie atunci când nu mai este în stare de funcţionare. Pentru a
preveni posibile efecte dăunătoare asupra mediului înconjurător sau a sănătăţii oamenilor datorate evacuării
necontrolate a reziduurilor, vă rugăm să separaţi acest produs de alte tipuri de rezuduuri şi să-l reciclaţi în mod
responsabil pentru a promova refolosirea resurselor materiale.
Utilizatorii casnici sunt rugaţi să ia legătura fi e cu distribuitorul de la care au achiziţionat acest produs, fi e cu autorităţile
locale, pentru a primi informaţii cu privire la locul şi modul în care pot depozita acest produs în vederea reciclării sale
ecologice.
Utilizatorii instituţionali sunt rugaţi să ia legătura cu furnizorul şi să verifi ce condiţiile stipulate în contractul de vânzare.
Acest produs nu trebuie amestecat cu alte reziduuri de natură comercială.
2 SAMSUNG Maşini de spălat – Instrucţiuni de folosire
• PĂSTRAŢI ACESTE INSTRUCŢIUNI DE FOLOSIRE.
Page 69

CUPRINS
Informaţii importante . . . . . . . . . . . . . . . . . . . . . . . . . . . . .pagină interioară
Instalarea. . . . . . . . . . . . . . . . . . . . . . . . . . . . . . . . . . . . . . . . . . . . . . . . . . . .2
Dezambalarea maşinii de spălat . . . . . . . . . . . . . . . . . . . . . . . . . . . . . . . . . . . . . . . . . . . 2
Maşina dumneavoastră de spălat – privire generală . . . . . . . . . . . . . . . . . . . . . . . . . . . .2
Alegerea locului de instalare . . . . . . . . . . . . . . . . . . . . . . . . . . . . . . . . . . . . . . . . . . . . . . 3
Reglarea picioarelor de sprijin . . . . . . . . . . . . . . . . . . . . . . . . . . . . . . . . . . . . . . . . . . . . . 3
Îndepărtarea şuruburilor de siguranţă pentru transport . . . . . . . . . . . . . . . . . . . . . . . . . . 3
Conectarea furtunului de alimentare cu apă (Variantă) . . . . . . . . . . . . . . . . . . . . . . . . . .3
Conectarea furtunului de alimentare cu apă . . . . . . . . . . . . . . . . . . . . . . . . . . . . . . . . . . 4
Poziţionarea furtunului de evacuare a apei . . . . . . . . . . . . . . . . . . . . . . . . . . . . . . . . . . . 4
Conectarea la reţeaua de curent electric . . . . . . . . . . . . . . . . . . . . . . . . . . . . . . . . . . . . . 5
Instrucţiuni de cablare . . . . . . . . . . . . . . . . . . . . . . . . . . . . . . . . . . . . . . . . . . . . . . . . . . . 5
Spălarea . . . . . . . . . . . . . . . . . . . . . . . . . . . . . . . . . . . . . . . . . . . . . . . . . . . . .6
Privire generală asupra panoului de control . . . . . . . . . . . . . . . . . . . . . . . . . . . . . . . . . . 6
Spălarea pentru prima dată . . . . . . . . . . . . . . . . . . . . . . . . . . . . . . . . . . . . . . . . . . . . . . . 8
Introducerea detergentului în maşina de spălat. . . . . . . . . . . . . . . . . . . . . . . . . . . . . . . . 8
Spălarea hainelor folosind Logica Fuzzy . . . . . . . . . . . . . . . . . . . . . . . . . . . . . . . . . . . . .9
Reglarea manuală . . . . . . . . . . . . . . . . . . . . . . . . . . . . . . . . . . . . . . . . . . . . . . . . . . . . . 10
Pornirea după un anumit timp . . . . . . . . . . . . . . . . . . . . . . . . . . . . . . . . . . . . . . . . . . . . 10
Sfaturi utile pentru spălare . . . . . . . . . . . . . . . . . . . . . . . . . . . . . . . . . . . . . . . . . . . . . . . 11
Întreţinerea maşinii de spălat . . . . . . . . . . . . . . . . . . . . . . . . . . . . . . . . . . .12
Golirea maşinii în caz de urgenţă. . . . . . . . . . . . . . . . . . . . . . . . . . . . . . . . . . . . . . . . . . 12
În caz că maşina de spălat a îngheţat . . . . . . . . . . . . . . . . . . . . . . . . . . . . . . . . . . . . . . 12
Curăţarea exteriorului. . . . . . . . . . . . . . . . . . . . . . . . . . . . . . . . . . . . . . . . . . . . . . . . . . . 12
Curăţirea sertarului pentru detergenţi şi a compartimentelor sale . . . . . . . . . . . . . . . . .13
Curăţarea fi ltrului pentru impurităţi. . . . . . . . . . . . . . . . . . . . . . . . . . . . . . . . . . . . . . . . . 13
Curăţirea sitei pentru furtunul de apă. . . . . . . . . . . . . . . . . . . . . . . . . . . . . . . . . . . . . . . 14
Remedierea defecţiunilor . . . . . . . . . . . . . . . . . . . . . . . . . . . . . . . . . . . . . .15
Probleme şi soluţii . . . . . . . . . . . . . . . . . . . . . . . . . . . . . . . . . . . . . . . . . . . . . . . . . . . . . 15
Înţelegerea mesajelor de eroare . . . . . . . . . . . . . . . . . . . . . . . . . . . . . . . . . . . . . . . . . . 15
Programe pentru spălare – privire generală . . . . . . . . . . . . . . . . . . . . . . . .16
Anexă . . . . . . . . . . . . . . . . . . . . . . . . . . . . . . . . . . . . . . . . . . . . . . . . . . . . . .18
Instrucţiuni pentru protejarea materialelor . . . . . . . . . . . . . . . . . . . . . . . . . . . . . . . . . . . 18
Precauţii electrice. . . . . . . . . . . . . . . . . . . . . . . . . . . . . . . . . . . . . . . . . . . . . . . . . . . . . . 18
Protecţia mediului. . . . . . . . . . . . . . . . . . . . . . . . . . . . . . . . . . . . . . . . . . . . . . . . . . . . . . 19
Declaraţie de conformitate . . . . . . . . . . . . . . . . . . . . . . . . . . . . . . . . . . . . . . . . . . . . . . . 19
Specifi caţii . . . . . . . . . . . . . . . . . . . . . . . . . . . . . . . . . . . . . . . . . . . . . . . . . . . . . . . . . . . 19
SAMSUNG Maşini de spălat – Instrucţiuni de folosire 1
Page 70

Instalarea
Dezambalarea maşinii de spălat
Îndepărtaţi ambalajul maşinii dumneavoastră de spălat şi verifi caţi dacă s-au produs daune în timpul transportului.
Asiguraţi-vă că au fost livrate toate componentele prezentate mai jos. În cazul în care aparatul s-a deteriorat în timpul
transportului sau lipsesc componente, luaţi legătura imediat cu magazinul de specialitate.
Maşina dumneavoastră de spălat – privire generală
Suprafaţă de lucru
Sertar
detergent
Panou de
comandă
Furtun evacuare
apă
Panou de acoperire inferior
Picioruşe reglabile
Cheie fi xă
evacuare
Ghidaj furtun
Furtun
apă
Uşă
Cablu de alimentare
cu ştecher
Filtru impurităţi
Ştuţ de golire în caz de
urgenţă
Capac fi ltru
Furtun alimentare
cu apă
Capace din plastic
2 SAMSUNG Maşini de spălat – Instrucţiuni de folosire
Page 71

Instalarea
Alegerea locului de instalare
Înainte de instalarea maşinii de spălat, alegeţi un loc cu următoarele caracteristici:
• suprafaţă dură, orizontală (dacă suprafaţa nu este orizontală, a se vedea „Reglarea picioarelor de sprijin”, de mai
jos)
• la adăpost lumină solară directă
• ventilare corespunzătoare
• temperatura încăperii să nu scadă niciodată sub 0 °C.
• departe de surse de căldură (de ex. sobe).
Asiguraţi-vă că maşina de spălat nu stă pe cablul de alimentare cu curent electric.
În cazul în care maşina de spălat se aşează pe un covor sau mochetă, fantele pentru ventilare sau aerisire nu trebuie să
fi e obturate de acestea.
Reglarea picioarelor de sprijin
În cazul în care suprafaţa nu este orizontală, reglaţi picioarele de sprijin astfel încât maşina să fi e stabilă şi orizontală.
Nu introduceţi piese de lemn sau alte obiecte sub picioare.
1. Răsuciţi manual picioarele, spre stânga sau spre dreapta, până se ajunge la înălţimea dorită.
2. Fixaţi picioarele în această poziţie, strângând piuliţa de fi xare cu ajutorul cheii fi xe livrate.
• Amplasaţi maşina de spălat pe o suprafaţă solidă, plană
Dacă maşina de spălat este amplasată pe o suprafaţă care nu este plană sau sufi cient de solidă, pot apărea vibraţii sau
zgomote (se admite o deviere de maxim un grad).
Îndepărtarea şuruburilor de siguranţă pentru transport
Înainte de folosi maşina de spălat, trebuie să îndepărtaţi cele cinci şuruburi de siguranţă, afl ate în partea din spate a
maşinii. Pentru a îndepărta şuruburile:
2
1
3
1. Desfaceţi şuruburile, folosind cheia fi xă livrată.
2. Apucaţi şurubul de cap şi trageţi-l prin orifi ciul din aparat. Repetaţi aceste operaţiuni pentru fi ecare şurub.
3. Astupaţi găurile rămase, folosind capacele din plastic livrate.
4. Păstraţi şuruburile pentru folosirea ulterioară.
Conectarea furtunului de alimentare cu apă (Variantă)
1. Îndepărtaţi adaptorul de pe furtunul de
alimentare cu apă..
2. Mai întâi, folosind o şurubelniţă în cruce,
slăbiţi cele patru şuruburi de pe adaptor. Apoi
luaţi adaptorul şi răsuciţi partea (b) în sensul
săgeţii, până rămâne un spaţiu de 5 mm..
3. Conectaţi adaptorul la robinetul de apă,
prin strângerea puternică a şuruburilor.
Apoi, răsuciţi partea (b) în sensul săgeţii şi
uniţi părţile (a) şi (b)..
a
b
c
NOTĂ: Dacă, după ce aţi efectuat conectarea, mai curge apă pe lângă furtun, repetaţi aceeaşi paşi. Folosiţi
robinete de apă convenţionale. În cazul în care capătul robinetului are secţiunea pătrată sau este prea mare,
îndepărtaţi inelul distanţier înainte de a introduce capul robinetului în adaptor.
SAMSUNG Maşini de spălat – Instrucţiuni de folosire 3
4. Conectaţi furtunul de alimentare cu apă
la adaptor. Trageţi în jos partea (c) a furtunului
de alimentare cu apă. Când eliberaţi partea (c),
furtunul se conectează automat la adaptor, şi veţi
auzi un „clic”..
5. Conectaţi celălalt capăt al furtunului de
alimen-tare cu apă la racordul de intrare a apei,
afl at în partea superioară a maşinii de spălat.
Înşurubaţi furtunul rotind complet, până la
limită..
Dacă robinetul de apă are capătul fi letat,
conectaţi furtunul de alimentare cu apă ca în
fi gura alăturată..
Page 72

Instalarea
Conectarea furtunului de alimentare cu apă
Furtunul de alimentare cu apă rece trebuie să fi e conectat la maşina de spălat (un capăt) şi la robinetul de apă rece
(celălalt capăt). Nu forţaţi (întindeţi) furtunul de alimentare cu apă. Dacă furtunul este prea scurt şi dacă nu doriţi să
mutaţi robinetul de apă, înlocuiţi furtunul cu un alt furtun de presiune înaltă, mai lung.
Pentru a conecta furtunul de alimentare cu apă:
1. Luaţi capătul în formă de „L” al furtunului de
alimentare cu apă şi conectaţi-l la racordul de apă
rece, afl at în partea din spate a maşinii de spălat.
Strângeţi manual piuliţa olandeză.
2. Conectaţi celălalt capăt al furtunului de apă rece la
robinetul de apă rece şi strângeţi-l manual. Dacă este
necesar, puteţi repoziţiona furtunul de alimentare cu
apă racordul maşinii de spălat prin slăbirea piuliţei,
răsucind furtunul şi apoi strângând din nou piuliţa.
Variantă: 1. Luaţi capătul roşu, în formă de „L” al
Notă: Aparatul trebuie să fi e conectat la sursele de apă folosind doar furtunuri noi. Nu folosiţi furtunuri
Poziţionarea furtunului de evacuare a apei
Capătul furtunului de evacuare a apei poate fi poziţionat în trei moduri:
Peste marginea chiuvetei
Furtunul de evacuare trebuie amplasat la o înălţime între 60
şi 90 cm. Pentru a ţine acapătul furtunului, folosiţi ghidajul
din plastic livrat. Prindeţi ghidajul de perete cu ajutorul unui
cârlig, sau de robinet, astfel încât furtunul să nu se poată
mişca.
Într-o ţeavă de scurgere de la chiuvetă
Ţeava de scurgere trebuie să fi e deasupra sifonului, astfel
încât capătul furtunului să fi e la cel puţin 60 cm deasupra
pardoselii.
Într-o ţeavă de scurgere
Samsung vă recomandă să folosiţi o ţeavă verticală cu înălţimea de 65 cm. Ea nu trebuie să fi e mai scurtă de 60 cm şi
mai lungă de 90 cm.
furtunului de alimentare cu apă caldă
şi conectaţi-l la racordul de intrare a apei calde, afl at în partea din spate a maşinii de spălat.
Strângeţi manual piuliţa olandeză.
2. Conectaţi celălalt capăt al furtunului de apă caldă la robinetul de apă caldă şi strângeţi-l
manual.
3. Folosiţi un racord în formă de „Y” dacă doriţi să folosiţi doar apă rece.
vechi.
4 SAMSUNG Maşini de spălat – Instrucţiuni de folosire
Page 73

Instalarea
Conectarea la reţeaua de curent electric
Pentru utilizatorii din Europa: Ştecherul folosit NU TREBUIE să fi e cu pământare.
Pentru utilizatorii din S.U.A.: Ştecherul folosit TREBUIE să fi e cu pământare.
Înainte de folosirea maşinii de spălat verifi caţi, împreună cu un electrician autorizat, ca pământarea să fi e făcută corespunzător.
Pentru utilizatorii din Marea Britanie:
Instrucţiuni de cablare
ATENŢIE: ACEST APARAT TREBUIE SĂ FIE LEGAT LA PĂMÂNT.
Acest aparat trebuie să fi e legat la pământ. În cazul unui scurt circuit
electric, pământarea reduce riscurile de electrocutare, asigurând o cale de
scurgere pentru curentul electric. Aparatul este echipat cu un cablu de
curent care cuprinde şi un fi r pentru conectarea la pământarea ştecherului
dumneavoastră.
Ştecherul trebuie introdus într-o priză instalată corespunzător şi cu
pământare.
* Firele din cablul electric sunt colorate în conformitate cu următorul
cod:
• Verde şi galben : Pământ
• Albastru : Nul
• Maro : Fază
În cazul în care culorile fi relor din cablul de alimentare a aparatului nu
corespund cu marcajele colorate de pe bornele ştecherului dumneavoastră,
procedaţi după cum urmează:
• Conectaţi fi rul verde şi galben la borna marcată cu litera E sau cu
simbolul de pământare (
galben.
) sau colorată în verde sau în verde şi
• Conectaţi fi rul albastru la borna marcată cu N sau colorată în
negru.
• Conectaţi fi rul maro la borna marcată cu litera L sau colorată în
roşu.
* În caz de dubiu asupra oricăreia dintre aceste instrucţiuni,
consultaţi un electrician califi cat sau un tehnician de la atelierul de
service.
Producătorul acestei maşini de spălat nu îşi asumă nici o
răspundere pentru daunele provo-cate peroanelor sau bunurilor, ca
urmare a nerespectării acestor solicitări. Înăuntrul maşinii de spălat
nu se afl ă nici o piesă care să poată fi reparată de către utilizator. În
cazul în care cablul de alimentare cu curent electric este deteriorat,
acesta trebuie să fi e înlocuit doar de către personal de service
califi cat şi aprobat de către producător, deoarece este nevoie de
unelte speciale.
VERDE ŞI GALBEN
ALBASTRU MARO
Înainte de folosire, asiguraţi-vă că
ştecherul şi cablul de alimentare cu curent
electric nu sunt deteriorate. Dacă aveţi
vreun motiv să înlocuiţi ştecherul turnat al
acestui aparat, mai întâi scoateţi siguranţa
şi apoi îndepărtaţi ştecherul.
În cazul în care s-ar putea produce
accidente sau electrocutări, nu intro-duceţi
în nici un caz ştecherul în priză.
Maşina dumneavoastră de spălat trebuie
să fi e alimentată cu curent de pe alt
circuit, separate faţă de alte aparate.
În caz contrar fi e se va declanşa
întrerupătorul de circuit, fi e se va arde
siguranţa.
CIRCUITE
ATENŢIE
SIGURANŢĂ DE
13 A
SAMSUNG Maşini de spălat – Instrucţiuni de folosire 5
Page 74

Spălarea
Privire generală asupra panoului de control
Temperatură Clătire Centrifugare Întârzierea
pornirii
Spălare cu
nanoparticule de
argint
1. Afi şaj grafi c digital
Afi şează timpul rămas dintr-un ciclu de spălare, toate informaţiile privind spălarea şi mesajele de eroare.
2. Tasta a prespălării
Apăsaţi tasta pentru a selecta prespălarea. Prespălarea este disponibilă numai pentru programele Cotton
(Bumbac), Coloureds (Colorate), Synthetics (Sintetice), Delicates (Delicate), Baby (Bebe).
3. Tasta a temperaturii (Temperature)
Apăsaţi tasta de câte ori este nevoie pentru a afi şa temperatura dorită pentru apă(apă rece 30 °C, 40 °C, 60
°C şi 95 °C).
4. Tasta a clătirii (Rinse)
Apăsaţi tasta pentru a mai adăuga cicluri de operaţii de clătire. Numărul maxim de cicluri de clătire este de
cinci.
5. Tasta a centrifugării (Spin)
Apăsaţi tasta de mai multe ori, până când pe afi şaj apare turaţia dorită (rpm = rotaţii pe minut)
B1445A(V/S)
B1245A(V/S), R1245A(V/S), F1245A(V/S)
B1045A(V/S), R1045A(V/S) ,F1045A(V/S)
, , 400, 800, 1200, 1400 rpm
, , 400, 800, 1000, 1200 rpm.
, , 400, 600, 800, 1200 rpm.
: fără centrifugare, : clătirea oprită
Fără centrifugare
Rufele rămân în tambur fără a mai fi centrifugate după ultima evacuare a apei.
Clătirea oprită
Rufele rămân înmuiate în ultima apă de clătire. Înainte ca rufele să fi e scoase din maşină trebuie să fi e efectuat
unul din programele “Evacuare apă” sau “Centrifugare”.
6. Tasta pentru pornire după un anumit timp (Delay Start)
Apăsaţi această tastă de atâtea ori până când pe afi şaj apare timpul când va avea loc pornirea programată (de la
3 la 24 ore, din oră în oră).
Orele afi şate semnifi că momentul de terminare a ciclului de spălare.
6 SAMSUNG Maşini de spălat – Instrucţiuni de folosire
Page 75

Spălarea
Program Bebe
Bumbac
Colorate
Delicate
Pete
Evacuare apă
Centrifugare
Clătire+Centrifugare
Bumbac
Colorate
Sintetice
Delicate
Lână
Spălare manuală
Rapid
Pornit / Oprit
7. Tasta pentru spălarea cu nanoparticule de argint
Apa cu nanoparticule de argint este folosită atât în timpul spălării cât şi la ultima clătire, asigurând astfel
sterilizarea cât şi protecţia antibacteriană.
8. Tasta pentru o jumătate de încărcătură
Apăsaţi această tastă dacă aveţi de spălat doar o jumătate (circa 1 – 4 kg) dintr-o încărcătură normală. Această
funcţie economiseşte timp şi energie.
9. Tasta de protejare a copiilor
Această tastă îi împiedică pe copii să manipuleze maşina de spălat.
Activarea / Dezactivarea programului – Pentru a activa acest program: Apăsaţi tasta de Start/Pauză pentru
a porni maşina de spălat. Apăsaţi şi ţineţi apăsată tasta [Clătire] + [Centrifugare] timp de 2 – 3 secunde.
Programul poate fi activat doar când maşina este pornită. După ce aţi activat programul de protejare a copiilor
în timpul spălării, nici un alt tastă nu va mai fi activă (nici chiar tasta Pornit / Oprit), până când nu veţi
dezactiva programul. Când programul este activ, LED-ul „Protejarea copiilor” luminează. Pentru a dezactiva
acest program: Apăsaţi şi ţineţi apăsată din nou tasta [Clătire] + [Centrifugare] timp de 2 – 3 secunde. LED-ul
„Protejarea copiilor” nu mai luminează iar programul este dezactivat.
Notă: În cazul în care, în timpul funcţionării maşinii, constataţi că nici o tastă nu mai funcţionează, verifi caţi
mai întâi dacă programul pentru protejarea copiilor este activat.
10. Selectorul pentru Control Fuzzy
Rotiţi comutatorul pentru a selecta unul din cele 14 programe de spălare disponibile:
Cotton (Bumbac), Coloureds (Colorate), Synthetics (Sintetice), Delicates (Delicate), Wool (Lână), Hand
wash (Spălare manuală), Quick (Rapid), Rinse + Spin (Clătire + Centrifugare), Spin (Centrifugare), Drain
(Evacuare apă), Baby Program (Program Bebe) [Stains (Pete), Delicates (Delicate), Coloureds (Colorate),
Cotton (Bumbac)]
11. Tasta Start / Pauză
Apăsaţi pentru a face o pauză şi apoi a reporni programele.
12. Tasta Pornit / Oprit
Apăsaţi o dată pentru a porni maşina, apăsaţi din nou pentru a o opri. Dacă se întrerupe alimentarea maşinii
cu curent electric pentru mai mult de 10 minute, fără a fi atinsă nici o tastă, alimentarea cu curent electric se
opreşte automat.
SAMSUNG Maşini de spălat – Instrucţiuni de folosire 7
Page 76

Spălarea
Spălarea pentru prima dată
Înainte de a spăla haine pentru prima dată, maşina trebuie să parcurgă un ciclu întreg, fără haine. Pentru aceasta:
1. Apăsaţi tasta
2. Turnaţi puţin detergent în compartimentul
pentru detergenţi.
3. Deschideţi alimentarea cu apă a maşinii de spălat.
4. Apăsaţi tasta de temperatură de atâtea ori, până când se
afi şează valoarea de 40 °C.
5. Apăsaţi tasta Start / Pauză
• Astfel se va elimina orice urmă de apă rămasă în urma
verifi cărilor efectuate de producător.
Compartimentul : Detergent pentru prespălare sau amidon
Compartimentul
pentru scoaterea petelor
Compartimentul
Introducerea detergentului în maşina de spălat
1. Deschideţi sertarul pentru detergenţi.
2. Adăugaţi detergent pentru rufe în compartimentul
3. Adăugaţi emolient în compartimentul
4. Adăugaţi detergent pentru prespălare în compartimentul
Atenţie:
Emolientul sau balsamul concentrat sau vâscos trebuie diluate cu
puţină apă înainte de a fi turnate în cment (în acest mod împiedicaţi
blocarea orifi ciuluipreaplin).
(Pornit / Oprit).
al sertarului
: Detergent pentru spălarea principală, dedurizant pentru apă, agent de pre-înmuiere, înălbitor sau produse
: Aditivi, cum ar fi emolienţi sau apret (nu umpleţi mai sus de partea inferioară a dispozitivului „A”)
.
(dacă doriţi).
(dacă doriţi).
8 SAMSUNG Maşini de spălat – Instrucţiuni de folosire
Page 77

Spălarea
Spălarea hainelor folosind Logica Fuzzy
Noua dumneavoastră maşină de spălat face ca spălarea hainelor să fi e uşoară, folosind sistemul automat de control
elaborat de Samsung, pe bază de Logică Fuzzy. Când selectaţi un program de spălare maşina îşi va alege singură
temperatura corectă, timpul de spălare şi viteza de spălare.
Pentru a spăla haine folosind programele bazate pe Logica Fuzzy:
1. Deschideţi robinetul de alimentare de la reţeaua de apă (chiuvetă).
2. Apăsaţi tasta
3. Deschideţi uşa.
4. Introduceţi rufele una câte una, fără a apăsa şi fără a supraîncărca.
5. Închideţi uşa.
6. Adăugaţi detergent, emolient şi detergent pentru prespălare (dacă este necesar) în compartimentele
corespunzătoare.
Notă: Prespălarea este posibilă numai pentru programele: Duvet (Cuvertură), Bedding (Aşternut), Towel
7. Răsuciţi comutatorul Control Fuzzy pentru a
selecta programul adecvat fi ecărui tip de rufe:
Cotton (Bumbac), Coloureds (Colorate),
Synthetics (Sintetice), Delicates (Delicate), Wool
(Lână), Hand wash (Spălare manuală), Quick
(Rapid), Rinse+Spin (Clătire + Centrifugare),
Spin (Centrifugare), Drain (Evacuare apă),
Baby Program (Program Bebe) [Stains (Pete),
Delicates (Delicate), Coloureds (Colorate), Cotton
(Bumbac)].
Veţi vedea că indicatoarele de pe panoul de control
luminează.
8. În acest moment puteţi regla temperatura de
spălare, timpii de clătire, viteza de centrifugare,
pornirea după un anumit timp, apăsând tastele
corespunzătoare.
9. Apăsaţi tasta Start / Pauză de pe comutatorul
pentru Control Fuzzy; ciclul de spălare va începe.
Indicatorul de proces va lumina iar pe afi şaj va apărea timpul rămas până la terminarea ciclului.
Când ciclul s-a terminat:
După ce s-a terminat întreg ciclul, alimentarea cu curent electric se opreşte automat.
1. Deschideţi uşa.
Notă: Uşa nu se va deschide mai devreme de 3 minute după oprirea maşinii sau după oprirea curentului
2. Scoateţi rufele.
(Pornit / Oprit).
(Prosop), Curtain (Perdele), Cotton (Bumbac), Coloureds (Colorate), Synthetics (Sintetice),
Delicates (Delicate). Este necesară doar dacă rufele sunt foarte murdare.
electric.
SAMSUNG Maşini de spălat – Instrucţiuni de folosire 9
Page 78

Spălarea
Reglarea manuală
Puteţi regla parametrii de spălare şi manual, fără a folosi programul bazat pe Logica Fuzzy. Pentru aceasta:
1. Deschideţi robinetul de alimentare de la reţeaua de apă.
2. Apăsaţi tasta
3. Deschideţi uşa.
4. Introduceţi rufele una câte una, fără a apăsa şi fără a supraîncărca.
5. Închideţi uşa.
6. Adăugaţi detergent, emolient şi detergent pentru prespălare (dacă este necesar) în compartimentele
corespunzătoare.
7. Apăsaţi tasta pentru temperatură pentru a selecta temperatura dorită (apă rece, 30 °C, 40 °C, 60 °C, 95 °C).
8. Apăsaţi tasta pentru clătire pentru a alege numărul dorit de cicluri de clătire. Numărul maxim de cicluri de
clătire este de cinci. Durata de spălare se va prelungi în mod corespunzător.
9. Apăsaţi tasta pentru centrifugare pentru a alege viteza de centrifugare.
Notă: Programul de oprire a clătirii vă permite să scoateţi rufele ude din maşină.
10. Dacă este cazul, apăsaţi tasta de pornire după un anumit timp, de câte ori este nevoie, pentru a alege
momentul de începere a spălării (de la 3 la 24 ore, din oră în oră). Valoarea afi şată reprezintă timpul de
terminare a ciclului de spălare.
11. Apăsaţi tasta Start / Pauză; maşina îşi va începe ciclul.
Pornirea după un anumit timp
Puteţi programa maşina să termine spălarea automat, după un anumit timp, alegând valori de la 3 la 24 ore (din oră
în oră). Valoarea afi şată reprezintă timpul de terminare a ciclului de spălare. Pentru aceasta:
Pentru aceasta:
1. Programaţi maşina de spălat, manual sau automat, pentru tipul de rufe pe care le spălaţi.
2. Apăsaţi tasta de pornire după un anumit timp de atâtea ori până când apare valoarea dorită.
3. Apăsaţi tasta Start / Pauză. Indicatorul de pornire întârziată va lumina iar ceasul va începe numărătoarea
inversă, până când se va ajunge la timpul de fi nalizare.
4. Pentru a anula programul de pornire după un anumit timp apăsaţi tasta (Pornit / Oprit), apoi porniţi
maşina din nou.
(Pornit / Oprit).
: fără centrifugare, : clătirea oprită.
10 SAMSUNG Maşini de spălat – Instrucţiuni de folosire
Page 79

Spălarea
Sfaturi utile pentru spălare
Sortarea rufelor: Sortaţi rufele în funcţie de următoarele caracteristici:
• Tipul de simbol de pe eticheta referitoare la protejarea materialului: Sortaţi rufele în: bumbac, fi bre în
amestec, sintetice, mătase, lână, mătase artifi cială.
Culoarea: Separaţi rufele albe de cele colorate. Spălaţi separat rufele colorate, noi.
•
Dimensiunea: Dacă în maşina de spălat se introduc rufe cu dimensiuni diferite, spălarea va fi mai efi cientă.
•
Sensibilitatea: Spălaţi articolele delicate separat, folosind programul de spălare Delicate pentru lână pură nouă,
•
perdele şi articole din mătase. Verifi caţi etichetele articolelor pe care le spălaţi sau consultaţi Instrucţiunile de
protejare a materialelor, afl ate în anexă.
Golirea buzunarelor: Monedele, acele de siguranţă şi obiectele similare pot deteriora rufele, tamburul maşinii sau
rezervorul de apă.
Elementele de închidere: Închideţi fermoarele, încheiaţi nasturii sau cârligele; curelele sau cordoanele trebuie să
aibă capetele unite.
Prespălarea bumbacului: Noua dumneavoastră maşină de spălat, împreună cu detergenţii moderni vor realiza
o spălare perfectă, incluzând şi economia de energie, timp, apă şi detergent. Totuşi, dacă articolele de bumbac sunt
foarte murdare, folosiţi un detergent pentru prespălare, pe bază de proteine.
Determinarea cantităţii de rufe pentru spălat: Nu supraîncărcaţi maşina de spălat: maşina dumneavoastră
s-ar putea să nu spele corespunzător. Folosiţi tabelul de mai jos pentru a determina capacitatea de încărcare pentru
fi ecare tip de rufe pe care le spălaţi.
Tipul de material Capacitatea de încărcare
Colorate/bumbac
– mediu/puţin murdare 6,0 kg 5,2 kg 4,5 kg
– foarte murdare 6,0 kg 5,2 kg 4,5 kg
Sintetice 3,0 kg 3,0 kg 3,0 kg
Delicate 2,5 kg 2,0 kg 2,0 kg
Lână 2,0 kg 1,5 kg 1,5 kg
B1445A(V/S), B1245A(V/S),
B1045A(V/S)
Sfaturi pentru detergenţi: Tipul de detergent pe care trebuie să îl folosiţi depinde de tipul de material
(bumbac, fi bre sintetice, articole delicate, lână), culoare, temperatura de spălare, gradul şi tipul de murdărire. Folosiţi
întotdeauna detergenţi cu spumare redusă, concepuţi special pentru maşinile automate de spălat.
Urmaţi recomandările producătorului detergentului, ţinând cont de cantitatea de rufe, gradul de murdărire şi de
duritatea apei din zona dumneavoastră. Dacă nu ştiţi care este duritatea apei, întrebaţi autoritatea competentă privind
apele.
Notă: Păstraţi detergenţii la loc uscat şi sigur; nu îi lăsaţi la îndemâna copiilor.
R1245A(V/S), R1045A(V/S) F1245A(V/S), F1045A(V/S)
SAMSUNG Maşini de spălat – Instrucţiuni de folosire 11
Page 80

Întreţinerea maşinii de spălat
Golirea maşinii în caz de urgenţă
B1445A(V/S), B1245A(V/S), B1045A(V/S)
1. Scoateţi ştecherul maşinii de spălat din priză.
2. Deschideţi capacul fi ltrului, folosind o monedă sau o
cheie.
3. Desfaceţi capacul ştuţului pentru golirea în caz de
urgenţă, prin rotire spre stânga. Îndepărtaţi-l şi puneţil cu atenţie la distanţa de aprox. 15 cm.
4. Lăsaţi apa să se scurgă în vasul de sub ştuţ.
5. Puneţi la loc capacul ştuţului şi strângeţi-l, prin rotire.
6. Puneţi la loc capacul fi ltrului.
În caz că maşina de spălat a îngheţat
Dacă temperatura coboară sub punctul de îngheţ şi dacă maşina dumneavoastră de spălat a îngheţat:
1. Scoateţi ştecherul maşinii din priză.
2. Turnaţi apă caldă pe robinetul de alimentare a maşinii, pentru a dezgheţa capătul furtunului de alimentare.
3. Scoateţi furtunul de alimentare cu apă şi introduceţi-l în apă caldă.
4. Turnaţi apă caldă în tamburul maşinii de spălat şi lăsaţi să stea aşa timp de 10 minute.
5. Conectaţi la loc furtunul de alimentare cu apă la robinet şi verifi caţi dacă alimentarea cu apă şi evacuarea apei
decurg normal.
Curăţarea exteriorului
1. Ştergeţi suprafeţele maşinii de spălat, inclusiv panoul de control, folosind o cârpă moale şi detergenţi casnici
neabrazivi.
2. Folosiţi o cârpă moale pentru a usca suprafeţele.
3. Nu turnaţi apă pe maşina de spălat.
12 SAMSUNG Maşini de spălat – Instrucţiuni de folosire
Page 81

Întreţinerea maşinii de spălat
Curăţirea sertarului pentru detergenţi şi a compartimentelor sale
1. Apăsaţi resortul dinăuntrul sertarului pentru detergenţi şi scoateţi sertarul din maşină.
2. Scoateţi capacul din compartimentul
3. Spălaţi toate componentele cu jet de apă.
4. Curăţaţi compartimentele folosind o perie veche de dinţi.
5. Puneţi capacul la loc (împingeţi-l puternic) şi puneţi la loc separatorul de detergent lichid în sertar.
6. Împingeţi sertarul la loc.
7. Efectuaţi un program de clătire fără nici o rufă în tambur.
Curăţarea fi ltrului pentru impurităţi
Curăţaţi fi ltrul pentru impurităţi de 5 sau 6 ori pe an sau când vedeţi că pe afi şaj apare următorul mesaj de eroare:
1. Deschideţi capacul fi ltrului. A se vedea „Golirea maşinii în caz de urgenţă”, la pagina 12.
2. Desfaceţi capacul ştuţului pentru golirea în caz de urgenţă prin rotire spre stânga şi lăsaţi să se scurgă toată
apa.
A se vedea „Golirea maşinii în caz de urgenţă”, la pagina 12.
3. Desfaceţi dopul fi ltrului şi scoateţi-l.
.
4. Îndepărtaţi prin spălare toată murdăria sau orice material de pe fi ltru. Aveţi grijă ca elicea pompei de evacuare
din spatele pompei să nu fi e blocată. Puneţi la loc dopul fi ltrului.
5. Puneţi la loc capacul fi ltrului.
SAMSUNG Maşini de spălat – Instrucţiuni de folosire 13
Page 82
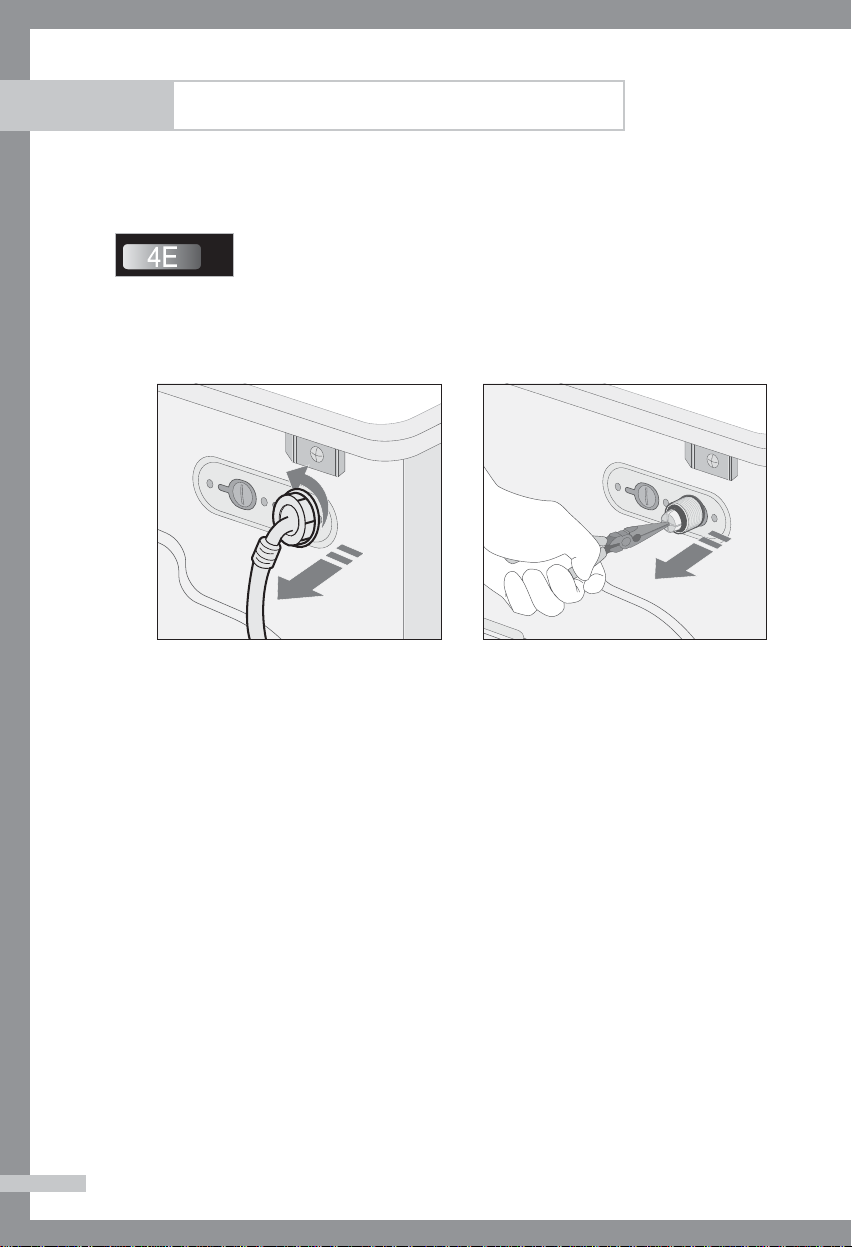
Întreţinerea maşinii de spălat
Curăţirea sitei pentru furtunul de apă
Ar trebui să curăţaţi sita pentru furtunul de apă cel puţin o dată pe an sau când vedeţi că pe afi şaj apare următorul
mesaj de eroare:
Pentru aceasta:
1. Închideţi alimentarea cu apă a maşinii de spălat.
2. Desfaceţi prin rotire furtunul din spatele maşinii de spălat.
3. Cu un cleşte cu vârf ascuţit, trageţi cu grijă afară sita afl ată la capătul racordului şi clătiţi-o cu apă până se
curăţă. Totodată curăţaţi interiorul şi exteriorul racordului.
4. Puneţi sita înapoi la loc.
5. Fixaţi prin rotire furtunul, în spatele maşinii de spălat.
6. Deschideţi robinetul de alimentare cu apă şi verifi caţi dacă racordarea este etanşă.
14 SAMSUNG Maşini de spălat – Instrucţiuni de folosire
Page 83

Remedierea defecţiunilor
Probleme şi soluţii
Maşina de spălat nu porneşte
• Verifi caţi dacă uşa este închisă bine.
• Verifi caţi dacă ştecherul maşinii de spălat este introdus în priză.
• Verifi caţi dacă robinetul de alimentare cu apă este deschis.
• Verifi caţi dacă aţi apăsat tasta Start / Pauză.
Lipsă apă sau alimentare insufi cientă
• Verifi caţi dacă robinetul de alimentare cu apă este deschis.
• Verifi caţi dacă furtunul de alimentare cu apă este îngheţat.
• Verifi caţi dacă furtunul de alimentare cu apă nu este prea îndoit.
• Verifi caţi dacă sita de la racordul de alimentare cu apă nu este colmatată.
Detergentul rămâne în sertarul pentru detergenţi după ce programul de spălare
s-a terminat
• Verifi caţi dacă presiunea apei de alimentare a maşinii de spălat este sufi cientă.
• Puneţi detergentul în interiorul sertarului, departe de colţurile exterioare.
Maşina de spălat vibrează sau este prea zgomotoasă
• Verifi caţi dacă maşina de spălat se afl ă pe o suprafaţă dreaptă. Dacă suprafaţa nu este dreaptă, reglaţi picioarele
maşinii de spălat până când maşina ajunge în poziţie perfect plană (a se vedea pagina 3).
• Verifi caţi dacă şuruburile folosite pentru transport au fost îndepărtate (a se vedea pagina 3).
• Verifi caţi ca maşina de spălat să nu atingă nici un alt obiect.
• Verifi caţi dacă încărcătura de rufe este echilibrată.
Maşina de spălat nu evacuează apa şi / sau nu centrifughează
• Verifi caţi dacă furtunul de evacuare nu este prea îndoit sau ştrangulat.
• Verifi caţi dacă fi ltrul pentru impurităţi nu este colmatat (a se vedea pagina 13).
Uşa nu se deschide
• Uşa nu se deschide decât la 3 minute după ce maşina se opreşte sau după ce alimentarea cu curent electric a
încetat.
Înţelegerea mesajelor de eroare
Eroarea afi şată Soluţia
• Închideţi uşa
• Verifi caţi dacă robinetul de alimentare cu apă este deschis.
• Verifi caţi presiunea apei..
• Curăţaţi fi ltrul pentru impurităţi.
• Verifi caţi dacă furtunul de evacuare a apei este instalat corect..
• Încărcătura de rufe este ne-echilibrată. Scoateţi rufa care provoacă acest dezechilibru.
Dacă se spală doar o piesă de îmbrăcăminte, cum ar fi un halat de baie sau blugi,
centrifugarea fi nala poate să fi e nesatisfăcătoare iar pe fereastra afi şajului va apărea
mesajul de eroare “UE”..
• Chemaţi atelierul de service post-vânzare..
Înainte de a contacta Atelierul de service post-vânzare:
1. Încercaţi să remediaţi problema (A se vedea „Remedierea defecţiunilor”, de pe această pagină.
2. Porniţi din nou programul, pentru a vedea dacă se repetă eroarea.
Dacă defecţiunea persistă, chemaţi Atelierul de service post-garanţie şi descrieţi problema.
SAMSUNG Maşini de spălat – Instrucţiuni de folosire 15
Page 84

Programe pentru spălare – privire generală
(✽ opţional)
Program
Cotton
(Bumbac)
Coloureds
(Colorate)
Synthetics
(Sintetice)
Delicates
(Delicate)
Wool
(Lână)
Handwash
(Spălare
manuală)
Quick
(Rapid)
Încărcarea maximă
(kg)
B1445A(V/S),
R1245A(V/S),
B1245A(V/S),
B1045A(V/S)
6,0 5,2 4,5
6,0 5,2 4,5
3,0 3,0 3,0
2,5 2,5 2,0
2,0 1,5 1,5 - da
2,0 1,5 1,5 - da
2,0 1,5 1,5 - da
R1045A(V/S)
F1245A(V/S),
F1045A(V/S)
Detergent şi aditivi
Prespălare Spălare Emolient Max B1445A(V/S)
da
✽
da
✽
da
✽
da
✽
Program Tipul de rufe
Cotton
(Bumbac)
Coloureds
(Colorate)
Synthetics
(Sintetice)
Delicates
(Delicate)
Wool
(Lână)
Hand wash
(Spălare
manuală)
Quick
(Rapid)
Obiecte de bumbac cu grad redus sau mediu de murdărire, aşternuturi de pat, feţe de masă,
lenjerie intimă, prosoape, cămăşi etc.
Obiecte de bumbac cu grad redus sau mediu de murdărire, aşternuturi de pat, feţe de masă,
lenjerie intimă, prosoape, cămăşi etc.
Bluze, cămăşi etc., cu grad redus sau mediu de murdărire, din poliester (diolen, trevira),
poliamidă (perlon, nylon) sau amestecuri similare.
Perdele fi ne, rochii, fuste, cămăşi şi bluze.
Doar obiectele din lână pură, care pot fi spălate cu maşina (a se vedea eticheta).
Spălare foarte uşoara, asemănătoare celei manuale.
Obiecte puţin murdare din bumbac sau bluze de in, cămăşi, obiecte fl auşate colorate închis,
obiecte colorate din in, blugi etc.
1. Programul cu prespălare durează cu aprox. 15 minute mai mult.
2. Timpul de executare a programelor a fost determinat în condiţiile specifi cate în standardul
IEC 456.
3. Consumul în gospodărie poate diferi faţă de valorile date în tabel, în funcţie de variaţiile
de presiune şi temperatură a apei de alimentare, sau de cantitatea şi tipul de rufe.
Temp.
(˚C)
95 1400 1200 1000
✽
60 1400 1200 1000
✽
60 800 800 800
✽
40 800 800 600
✽
40 400 400 400
✽
40 400 400 400
✽
60 1400 1200 1000
✽
Viteza de centrifugare
(rpm max.)
B1245A(V/S),
R1245A(V/S),
F1245A(V/S)
B1045A(V/S),
R1045A(V/S),
F1045A(V/S)
Pornire
Jumătate de
întârziată
încărcătură
✽✽
✽✽
✽✽
✽✽
✽✽
✽✽
✽ ✽
16 SAMSUNG Maşini de spălat – Instrucţiuni de folosire
Page 85

Programe pentru spălare – privire generală
Încărcarea maximă
Program
Baby Cotton
(Bumbac Bebe)
Baby Coloureds
(Colorate Bebe)
Baby Delicates
(Delicate Bebe)
Baby Stains
(Pete Bebe)
B1445A(V/S),
B1245A(V/S),
B1045A(V/S)
(kg)
R1245A(V/S),
F1245A(V/S),
R1045A(V/S)
F1045A(V/S)
6,0 5,2 4,5
6,0 5,2 4,5
2,5 2,0 2,0
6,0 5,2 4,5
Program Tipul de rufe
Baby Cotton
(Bumbac Bebe)
Baby Coloureds
(Colorate Bebe)
Baby Delicates
(Delicate Bebe)
Baby Stains
(Pete Bebe)
Obiecte de bumbac cu grad redus sau mediu de murdărire, aşternuturi de pat, feţe de masă,
lenjerie intimă, prosoape, cămăşi etc.
Obiecte de bumbac cu grad redus sau mediu de murdărire, aşternuturi de pat, feţe de masă,
lenjerie intimă, prosoape, cămăşi etc.
Hăinuţe delicate pentru bebeluşi, fuste, cămăşi şi bluze.
Pete pe materiale de bumbac, aşternuturi, lenjerie intimă, prosoape, cauzate de mâncare sau
urină.
Detergent şi aditivi
Prespălare Spălare Emolient Max B1445A(V/S)
da
✽
da
✽
da
✽
da
✽
Temp.
(˚C)
95 1400 1200 1000
✽
60 1400 1200 1000
✽
60 800 800 600
✽
40 1400 1200 1000
✽
Viteza de centrifugare
(rpm max.)
B1245A(V/S),
R1245A(V/S),
F1245A(V/S)
B1045A(V/S),
R1045A(V/S),
F1045A(V/S)
( ✽ opţional)
Pornire
Jumătate de
întârziată
încărcătură
✽✽
✽✽
✽✽
✽✽
SAMSUNG Maşini de spălat – Instrucţiuni de folosire 17
Page 86

Anexă
Instrucţiuni pentru protejarea materialelor
Material rezistent Poate fi călcat la max. 100 °C
Material delicat A nu se călca
Obiectul poate fi spălat la 95 °C Poate fi curăţit chimic cu orice solvent
Obiectul poate fi spălat la 60 °C
Obiectul poate fi spălat la 40 °C
Obiectul poate fi spălat la 30 °C Nu se curăţă chimic
Obiectul poate fi spălat manual Uscare culcat, întins
Nu se spală (doar curăţire chimică) Poate fi agăţat pentru uscare
Se poate albi în apă rece Uscare pe umeraş
Curăţire chimică doar cu perclorură, benzină uşoară,
alcool pur sau R113
Curăţire chimică doar cu kerosen, alcool pur sau
R113
A nu se albi
Poate fi călcat la max. 200 °C
Poate fi călcat la max. 150 °C Nu se usucă în maşina de uscat rufe
Uscare mecanică (în maşina de uscat rufe),
temperatură normală
Uscare mecanică (în maşina de uscat rufe),
temperatură redusă
Precauţii electrice
Pentru a reduce riscul de incendiu, de electrocutare sau de accidente, reţineţi aceste instrucţiuni de protecţie:
• Alimentaţi aparatul doar de la sursa de curent electric indicată pe eticheta de marcare. Dacă nu sunteţi sigur de
tipul de curent electric furnizat acasă la dumneavoastră, consultaţi vânzătorul aparatului sau compania locală de
electricitate.
• Pentru utilizatorii din Marea Britanie: Folosiţi doar prize polarizate sau cu pământare. Pentru siguranţa dvs.,
acest aparat este echipat cu un ştecher polarizat, pentru curent alternativ, având o lamelă mai lată decât cealaltă.
Acest ştecher va intra în priză doar într-un singur mod. Dacă nu puteţi introduce complet ştecherul în priză,
încercaţi să introduceţi ştecherul invers. Dacă ştecherul tot nu se potriveşte, contactaţi un electrician care să
înlocuiască priza.
• Protejaţi cablul de curent electric. Cablurile de curent trebuie să fi e pozate astfel încât să nu fi e călcate sau
înţepate de diferite obiecte. Acordaţi o grijă specială locurilor în care cablul intră în ştecher, în aparat sau unde
iese din aparat.
• Nu supraîncărcaţi priza de perete cu prea multe cabluri. Supraîncărcarea poate provoca incendii sau
electrocutarea.
18 SAMSUNG Maşini de spălat – Instrucţiuni de folosire
Page 87

Anexă
Protecţia mediului
• Acest aparat este fabricat din materiale reciclabile. Dacă v-aţi decis să aruncaţi acest aparat, vă rugăm să
respectaţi regulile locale privind deşeurile. Tăiaţi cablul de alimentare, astfel încât aparatul să nu mai poată fi
conectat la vreo sursă de curent electric. Demontaţi uşa, astfel încât copii sau animalele mici să nu se poată
bloca înăuntru.
• Nu depăşiţi cantitatea de detergent recomandată de instrucţiunile producătorului detergentului.
• Folosiţi agenţi de îndepărtare a petelor sau de albire înainte de ciclul de spălare doar atunci când e neapărată
nevoie.
• Economisiţi apa şi electricitatea doar încărcând complet maşina de spălat (cantitatea exactă depinde de
programul folosit).
Declaraţie de conformitate
Acest aparat corespunde standardelor europene de siguranţă, Directivei CE nr. 93/68 şi Standardului EN 60335.
Specifi caţii
Tip Maşină de spălat cu încărcare frontală
Dimensiuni
(L × l × H, mm)
Presiune apă
Volum apă 54 l
Greutate netă 75 kg 66 kg 62 kg
Capacitate
de spălare şi
centrifugare
Consum de
energie
Greutatea
ambalajului
Turaţie centrifugă
B1445A(V/S), B1245A(V/S),
B1045A(V/S)
598 × 550 × 844 598 × 450 × 844 598 × 404 × 844
6,0 kg (rufe uscate) 5,2 kg (rufe uscate) 4,5 kg (rufe uscate)
Model
Spălare şi încălzire
Centrifugare
Pompare
Model
Hârtie
Plastic
Model
rpm 1400 1200 1000
B1445A(V/S), B1245A(V/S), B1045A(V/S) R1245A(V/S), R1045A(V/S) F1245A(V/S), F1045A(V/S)
220 V 2000 W 220 V 1900 W 220 V 1800 W
240 V 2400 W 240 V 2200 W 240 V 2100 W
B1445A(V/S) B1245A(V/S) B1045A(V/S) R1245A(V/S) R1045A(V/S) F1245A(V/S) F1045A(V/S)
Модел
230 V 550 W 500 W 500 W 550 W 500 W 250 W 220 W
B1445A(V/S), B1245A(V/S), B1045A(V/S) R1245A(V/S), R1045A(V/S) F1245A(V/S), F1045A(V/S)
B1445A(V/S)
R1245A(V/S), R1045A(V/S) F1245A(V/S), F1045A(V/S)
50 kPa ~ 800 kPa
49 l 48 l
34 W
2,5 kg 2,1 kg 1,9 kg
1,0 kg 0,9 kg 0,8 kg
B1245A(V/S), R1245A(V/S),
F1245A(V/S)
B1045A(V/S), R1045A(V/S), F1045A(V/S)
SAMSUNG Maşini de spălat – Instrucţiuni de folosire 19
Page 88

ÎN CAZUL ÎN CARE ESTE
NEVOIE DE REPARAŢII
- În cazul în care maşina de spălat nu
funcţionează cum trebuie, nu ezitaţi să
apelaţi la orice atelier service afl at în
apropierea locuinţei Dvs., dând numele,
adresa, numărul de telefon, numărul
modelului şi numărul de serie al maşinii
dumneavoastră.
Page 89

Navodila za uporabo
pralnega stroja
B1445A(V/S)
B1245A(V/S)
B1045A(V/S)
R1245A(V/S)
R1045A(V/S)
F1245A(V/S)
F1045A(V/S)
Code No.: DC68-02158F-Slovenian
Page 90

Varnostni ukrepi
Čestitamo Vam za nakup tega pralnega stroja Samsung. Ta navodila za uporabo vsebujejo važne informacije za
inštaliranje, uporabo in nego tega stroja. Prosimo, da si vzamete čas in preberete ta navodila tako, da boste lahko
izkoristili vse prednosti in funkcije pralnega stroja in uživali pri uporabi stroja še mnoga leta.
Pred uporabo stroja
• Embalažni material je lahko nevaren za otroke, zato odstranite ves embalažni material (plastične vreče,
polistiren, itd.) izven dosega otrok.
• Stroj je namenjen samo za uporabo v gospodinjstvu.
• Zagotovite, da bo priklop vode in elektrike izvršila strokovno usposobljena oseba ob upoštevanju navodil
proizvajalca (glej »Inštaliranje pralnega stroja«) in lokalnih varnostnih predpisov.
• Pred uporabo stroja je potrebno odstraniti vso embalažo in transportne varovalne vijake. Če jih ne odstranite,
lahko pride do resnih poškodb na stroju. Glej »Odstranitev transportnih varovalnih vijakov«.
• Pred prvim pranjem perila morate izvršiti celotni postopek pranja brez perila. Glej »Prvo pranje«.
Varnostni napotki
• Pred čiščenjem ali izvajanjem vzdrževanja odklopite kabel za dovod električnega toka ali postavite gumb
(Vklop/Izklop) na Izklop.
• Pred pranjem preverite, če so izpraznjeni vsi žepi na oblačilih, ki jih boste prali. Trdi, ostri predmeti kot so n.pr.
kovanci, zaponke, žeblji, vijaki ali kamni, lahko povzročijo veliko škodo na stroju.
• Po uporabi zmeraj izključite stroj in zaprite pipo za dovod vode.
• Pred odpiranjem vrat stroja preverite, če se v stroju ne nahaja voda. Ne odpirajte vrat, če opazite vodo v stroju.
• Domače živali in majhni otroci lahko splezajo v stroj. Preverite stroj pred vsako uporabo.
• Steklena vrata stroja se med postopkom pranja zelo segrejejo. Med uporabo stroja se naj otroci ne zadržujejo v
bližini stroja.
• Ne poskušajte sami popravljati stroja. Popravila, ki jih izvajajo neizkušene ali strokovno neusposobljene osebe,
lahko povzročijo poškodbe oseb in/ali potrebo po zahtevnejših popravilih na stroju.
• Če je električni vtikač (električni priključni kabel) poškodovan, ga mora zamenjati proizvajalec ali serviser ali
podobno strokovno usposobljena oseba tako, da ne bo izključena nevarnost poškodb.
• Servisiranje tega stroja sme izvajati samo pooblaščena servisna delavnica in uporabljati je dovoljeno samo
originalne nadomestne dele.
• Te naprave ne smejo uporabljati majhni otroci ali slabotne osebe, razen če jih ustrezno nadzira odgovorna
oseba, ki zagotovi varno uporabo naprave. Majhne otroke morate nadzirati, da se ne bi igrali z napravo.
• To napravo morate priključiti v vtičnico, ki bo zdržala energijske zahteve naprave.
• To napravo morate postaviti tako, da je po namestitvi mogoče doseči vtičnico.
• Ne uporabljajte obdelane vode, ki vsebuje olje, kremo ali losjon, ki ga lahko dobite v trgovinah za nego kože ali
masažnih salonih.
- To lahko povzroči deformacije embalaže, kar nato povzroči okvare ali puščanje vode.
• Nerjaveča pralna cev ponavadi ne rjavi. Če pa je v cevi dalj časa kovinski delec, kot je sponka za lase, cev lahko
začne rjaveti.
- V cevi ne puščajte dlje časa vode ali belila, ki vsebuje klor.
- Ne uporabljajte redno vode, ki vsebuje železo, niti je v cevi ne puščajte dlje časa.
- Če se na površini cevi začne pojavljati rja, na površino nanesite čistilno sredstvo (nevtralno) in jo obrišite z
gobo ali mehko krpo.
(V nobenem primeru ne uporabite kovinske krtače)
Oznaka na izdelku ali spremljevalni dokumentaciji pomeni, da ga na koncu uporabne dobe ne smemo
odstranjevati skupaj z drugimi gospodinjskimi odpadki. Da bi preprečili morebitno tveganje za okolje ali
zdravje človeka zaradi nenadzorovanega odstranjevanja odpadkov, izdelek ločite od drugih vrst odpadkov
in ga odgovorno reciklirajte ter tako spodbudite trajnostno ponovno uporabo materialnih virov.
Uporabniki v gospodinjstvih naj za podrobnosti o tem, kam in kako lahko odnesejo ta izdelek na okolju varno
recikliranje, pokličejo trgovino, kjer so izdelek kupili, ali lokalni vladni urad.
Podjetja naj pokličejo dobavitelja in preverijo pogoje nabavne pogodbe. Tega izdelka pri odstranjevanju ne smete
mešati z drugimi gospodarskimi odpadki.
2 SAMSUNG Navodila za uporabo pralnega stroja
• SHRANITE TA NAVODILA ZA UPORABO
Page 91

Vsebina
Varnostni ukrepi . . . . . . . . . . . . . . . . . . . . . . . . . . . . . . . . . . notranji pokrov
Inštaliranje pralnega stroja . . . . . . . . . . . . . . . . . . . . . . . . . . . . . . . . . . . . . .2
Odstranitev embalaže iz pralnega stroja . . . . . . . . . . . . . . . . . . . . . . . . . . . . . . . . . . . . . 2
Prikaz pralnega stroja . . . . . . . . . . . . . . . . . . . . . . . . . . . . . . . . . . . . . . . . . . . . . . . . . . .2
Izbira mesta postavitve stroja. . . . . . . . . . . . . . . . . . . . . . . . . . . . . . . . . . . . . . . . . . . . . . 3
Nastavitev nastavljivega podnožja. . . . . . . . . . . . . . . . . . . . . . . . . . . . . . . . . . . . . . . . . . 3
Odstranitev transportnih varovalnih vijakov . . . . . . . . . . . . . . . . . . . . . . . . . . . . . . . . . . .3
Priklop cevi za dovod vode (opcija) . . . . . . . . . . . . . . . . . . . . . . . . . . . . . . . . . . . . . . . . . 3
Priklop cevi za dovod vode . . . . . . . . . . . . . . . . . . . . . . . . . . . . . . . . . . . . . . . . . . . . . . .4
Namestitev odvodne cevi. . . . . . . . . . . . . . . . . . . . . . . . . . . . . . . . . . . . . . . . . . . . . . . . . 4
Priklop stroja na električno omrežje . . . . . . . . . . . . . . . . . . . . . . . . . . . . . . . . . . . . . . . . . 5
Navodila za priključek električnih žic . . . . . . . . . . . . . . . . . . . . . . . . . . . . . . . . . . . . . . . . 5
Pranje . . . . . . . . . . . . . . . . . . . . . . . . . . . . . . . . . . . . . . . . . . . . . . . . . . . . . . .6
Pregled kontrolne plošče . . . . . . . . . . . . . . . . . . . . . . . . . . . . . . . . . . . . . . . . . . . . . . . . . 6
Prvo pranje. . . . . . . . . . . . . . . . . . . . . . . . . . . . . . . . . . . . . . . . . . . . . . . . . . . . . . . . . . . . 8
Polnjenje pralnega sredstva v pralni stroj . . . . . . . . . . . . . . . . . . . . . . . . . . . . . . . . . . . .8
Pranje perila z uporabo Fuzzy Logic . . . . . . . . . . . . . . . . . . . . . . . . . . . . . . . . . . . . . . . . 9
Ročno pranje oblačil. . . . . . . . . . . . . . . . . . . . . . . . . . . . . . . . . . . . . . . . . . . . . . . . . . . . 10
Uporaba funkcije zamika vklopa . . . . . . . . . . . . . . . . . . . . . . . . . . . . . . . . . . . . . . . . . .10
Koristni nasveti za pranje. . . . . . . . . . . . . . . . . . . . . . . . . . . . . . . . . . . . . . . . . . . . . . . . 11
Vzdrževanje pralnega stroja . . . . . . . . . . . . . . . . . . . . . . . . . . . . . . . . . . . .12
Izpust vode iz pralnega stroja v nujnem primeru . . . . . . . . . . . . . . . . . . . . . . . . . . . . . . 12
Popravilo zamrznjenega pralnega stroja . . . . . . . . . . . . . . . . . . . . . . . . . . . . . . . . . . . . 12
Čiščenje zunanjih površin pralnega stroja . . . . . . . . . . . . . . . . . . . . . . . . . . . . . . . . . . . 12
Čiščenje predala za pralno sredstvo . . . . . . . . . . . . . . . . . . . . . . . . . . . . . . . . . . . . . . . 13
Čiščenje fi ltra . . . . . . . . . . . . . . . . . . . . . . . . . . . . . . . . . . . . . . . . . . . . . . . . . . . . . . . . . 13
Čiščenje mrežastega fi ltra cevi za dovod vode . . . . . . . . . . . . . . . . . . . . . . . . . . . . . . . 14
Odprava motenj . . . . . . . . . . . . . . . . . . . . . . . . . . . . . . . . . . . . . . . . . . . . . .15
Problemi in rešitve . . . . . . . . . . . . . . . . . . . . . . . . . . . . . . . . . . . . . . . . . . . . . . . . . . . . . 15
Sporočila o motnjah . . . . . . . . . . . . . . . . . . . . . . . . . . . . . . . . . . . . . . . . . . . . . . . . . . . .15
Tabela programov . . . . . . . . . . . . . . . . . . . . . . . . . . . . . . . . . . . . . . . . . . . .16
Priloga . . . . . . . . . . . . . . . . . . . . . . . . . . . . . . . . . . . . . . . . . . . . . . . . . . . . .18
Tabela simbolov za nego tkanin. . . . . . . . . . . . . . . . . . . . . . . . . . . . . . . . . . . . . . . . . . . 18
Električna opozorila . . . . . . . . . . . . . . . . . . . . . . . . . . . . . . . . . . . . . . . . . . . . . . . . . . . . 18
Zaščita okolja . . . . . . . . . . . . . . . . . . . . . . . . . . . . . . . . . . . . . . . . . . . . . . . . . . . . . . . . . 19
Izjava o skladnosti . . . . . . . . . . . . . . . . . . . . . . . . . . . . . . . . . . . . . . . . . . . . . . . . . . . . . 19
Specifi kacije . . . . . . . . . . . . . . . . . . . . . . . . . . . . . . . . . . . . . . . . . . . . . . . . . . . . . . . . . .19
SAMSUNG Navodila za uporabo pralnega stroja 1
Page 92

Inštaliranje pralnega stroja
Odstranitev embalaže iz pralnega stroja
Odstranite embalažo iz Vašega pralnega stroja in preglejte stroj zaradi eventualnih poškodb med transportom.
Preverite tudi, če so dobavljeni vsi spodaj na sliki prikazani deli opreme stroja. Če se je pralni stroj poškodoval med
transportom, se nemudoma obrnite na Vašega prodajalca proizvodov Samsung.
Prikaz pralnega stroja
Delovna površina
Predal zapralna
sredstva
Kontrolna plošča
Nastavljivo podnožje
Ključ
Vodilo cevi
Pokrov
Odvodna cev
Vrata
Filter za delčkeč
Zasilna izpustna cev
Pokrov fi ltra
Cev za dovod
hladne vode
Plastični pokrovi za
luknje transportnih
varovalnih vijakov
Odvodna cev
Vtikač
2 SAMSUNG Navodila za uporabo pralnega stroja
Page 93

Inštaliranje pralnega stroja
Izbira mesta postavitve stroja
Preden inštalirate pralni stroj, izberite mesto postavitve s sledečimi karakteristikami:
• Trda, ravna površina (če površina ni ravna, glej »Nastavitev nastavljivega podnožja« v nadaljevanju).
• Izven območja neposredne sončne svetlobe.
• Zadostno prezračevanje.
• Sobna temperatura, ki ne pade pod 0 °C.
• Proč od virov toplote kot je n.pr. gretje na premog ali plin.
Prepričajte se, da ne bo stal pralni stroj na električnem priključnem kablu.
Prezračevalne odprtine ne smejo biti zaprte s preprogo, če je pralni stroj inštalirani na tleh, kjer se nahaja preproga.
Nastavitev nastavljivega podnožja
Če tla niso ravna, izvršite nastavitev podnožja pralnega stroja (ne postavljajte kosov lesa ali drugih predmetov pod
noge pralnega stroja):
1. Z roko obračajte nastavljivo nogo tako, da dosežete želeno višino.
2. Zategnite matico s priloženim ključem.
• Postavite pralni stroj na čvrsto, ravno površino.
Če je pralni stroj nameščen na neravni ali nezadostno čvrsti površini, bo prihajalo do hrupa ali vibracij med
obratovanjem stroja. (Stroj je lahko nagnjen samo do največ 1 stopinje.)
Odstranitev transportnih varovalnih vijakov
Pred uporabo pralnega stroja morate odstraniti pet transportnih vijakov iz zadnjega dela stroja. V namen odstranitve
vijakov:
2
1
3
1. Najprej odvijte vse vijake s priloženim ključem.
2. Primite vsaki vijak za glavo in ga potegnite skozi luknjo. To ponovite pri vsakem vijaku.
3. Luknje zaprite s priloženimi plastičnimi pokrovi.
4. Shranite transportne varovalne vijake za kasnejšo uporabo.
Priklop cevi za dovod vode (opcija)
1. Odstranite adapter iz cevi za dovod vode..
c
2. Z izvijačem vrste »+« najprej odvijte štiri
vijake na adapterju. Potem vzemite adapter
in obrnite del (b) v smeri puščice tako, da bo
obstajal razmak 5 mm..
3. Priključite adapter na vodno pipo tako,
da čvrsto zategnete vijake.
Potem obrnite del (b) v smeri puščice in
sestavite (a) in (b) skupaj..
a
b
NAPOTEK Ko ste izvršili priklop in, če ugotovite, da cev ne tesni, ponovite zgoraj navedene korake montaže. Za
dovod vode uporabite najobičajnejšo pipo. V primeru, da je pipa kvadratna ali prevelika, odstranite
vložni obroč pred vstavljanjem pipe na adapter.
4. Priključite cev za dovod vode na adapter.
Iz cevi za dovod vode potegnite dol del (c). Ko
sprostite del (c), se cev avtomatsko priključi na
adapter tako, da zaslišite ‘klik’..
5. Priključitedrugi konec cevi za dovod vode
na ventil za dovod vode na vrhu pralnega stroja.
Do konca privijte cev v smeri urinega kazalca..
Če je vodna pipa opremljena z navojem,
priključite cev za dovod vode na pipo kot je
prikazano na sliki..
SAMSUNG Navodila za uporabo pralnega stroja 3
Page 94

Inštaliranje pralnega stroja
Priklop cevi za dovod vode
Cev za priklop vode mora biti priključena na enem koncu na pralni stroj in na drugem koncu na vodovodno pipo.
Ne raztegujte cevi za dovod vode. Če je cev prekratka in ne želite prestavljati vodovodne pipe, zamenjajte cev z daljšo,
visokotlačno cevjo.
Za priklop cevi za dovod vode:
1. Priključite konec cevi za dovod vode v obliki L na
priključek za dovod hladne vode na zadnji strani
pralnega stroja. Zategnite z roko.
2. Priključite drugi konec cevi za dovod hladne vode
na odgovarjajoči priključek za dovod hladne vode in
zategnite z roko. Po potrebi lahko prestavite cev za
dovod vode na koncu pralnega stroja tako, da odvijete
priključek za dovod vode, obrnete cev in ponovno
zategnete priključek za dovod vode.
Opcija: 1. Priključite rdeči konec cevi za dovod
Opomba: Pralni stroj morate priključiti na vodovodno omrežje z uporabo nove garniture cevi. Ne
Namestitev odvodne cevi
Konec odvodne cevi lahko namestite na tri načine:
Cev obesite na pomivalno korito
Odvodna cev mora biti postavljena na višini med 60 in 90
cm. Vstavite konec odvodne cevi v priloženo plastično vodilo
cevi. Pritrdite vodilo cevi na steno s kljuko ali uporabite
vrvico za pritrditev tako, da ne bo mogla cev zdrsniti iz
korita.
Na odtočno cev pomivalnega korita
Priključite odvodno cev na odtočno cev sifona pomivalnega
korita tako, da se bo konec cevi nahajal na višini najmanj
60 cm.
Namestitev odvodne cevi v vodni odtok
Samsung priporoča, da uporabite 65 cm dolgo navpično cev, ki pa ne sme biti krajša kot 60 cm in ne daljša kot 90
cm.
tople vode v obliki L na rdeči ventil
za dovod tople vode na zadnji strani pralnega stroja. Zategnite z roko.
2. Priključite drugi konec cevi za dovod tople vode na odgovarjajoči priključek za toplo vodo in
zategnite z roko.
3. Uporabite priključni komad Y, če želite uporabljati samo hladno vodo.
uporabljajte starih garnitur cevi.
4 SAMSUNG Navodila za uporabo pralnega stroja
Page 95

Inštaliranje pralnega stroja
Priklop stroja na električno omrežje
Za uporabnike v Evropi. Vtikač pralnega stroja NE rabi biti ozemljen.
Za uporabnike v ZDA. Vtikač pralnega stroja MORA biti ozemljen.
Pred uporabo stroja naj pooblaščeni elektrikar preveri pravilno ozemljitev pralnega stroja.
Za uporabnike v Veliki Britaniji.
Navodila za priključek električnih žic
OPOZORILO! TA PRALNI STROJ MORA BITI OZEMLJEN.
Ta pralni stroj mora biti ozemljen. V primeru električnega kratkega
stika, zmanjša ozemljitev nevarnost električnega udara preko varnostnega
vodnika. Pralni stroj je opremljeni z električnim priključnim kablom, ki
vsebuje zaščitni kontakt s priključkom na ozemljitveno sponko na Vašem
električnem vtikaču.
Vtikač mora biti priključeni na ustrezno ozemljeno in inštalirano
električno priključno vtičnico.
* Žice tega električnega priključnega kabla so označene s sledečimi
barvnimi kodami:
• zelena in rumena : zemlja
• modra : ničla
• rjava : faza
Lahko, da se barve žic električnega priključnega kabla tega pralnega stroja
ne bi skladale z barvnimi oznakami priključnih sponk vtikača. V takšnem
primeru postopajte na sledeči način.
• Priključite zeleno in rumeno žico na priključno sponko na vtikaču
označeno s črko E ali s simbolom za ozemljitev (
zeleno ali zeleno in rumeno.
• Priključite modro žico na priključno sponko označeno s črko N ali
obarvano črno.
• Priključite rjavo žico na priključno sponko označeno s črko L ali
obarvano rdeče.
* V primeru dvoma glede teh navodil se posvetujte s strokovno
usposobljenim elektrikarjem ali s tehnikom za servisiranje.
Proizvajalec tega pralnega stroja ne nosi odgovornosti za poškodbe
oseb ali stvari v primeru neupoštevanja le-teh zahtev. Če se
poškoduje omrežni priključni kabel tega pralnega stroja, ga sme
zamenjati samo strokovno usposobljeni in s strani proizvajalca
pooblaščeni tehnik, ker je za zamenjavo kabla potrebno posebno
orodje.
) ali obarvano
ZELENA IN RUMENA
MODRA
Pred uporabo se prepričajte, če vtikač
in električni priključni kabel nista
poškodovana. Če morate iz kakršnegakoli
razloga odstraniti uliti vtikač iz tega
pralnega stroja, najprej izklopite varovalko
in potem odstranite vtikač.
V nobenem primeru ne priključujte vtikača
na omrežno električno vtičnico, če obstaja
nevarnost električnega udara.
Vaš pralni stroj mora biti priključeni na
lastni, od drugih naprav ločeni električni
tokokrog. V nasprotnem lahko pride do
sprožanja močnostnega varnostnega
stikala ali do pregoretja varovalke.
OPOZORILO
ELEKTRIČNI TOKOKROGI
VAROVALKA 13 A
RJAVA
SAMSUNG Navodila za uporabo pralnega stroja 5
Page 96

Pranje
Pregled kontrolne plošče
Temperatura Izpiranje Centrifugiranje
Zamik
vklopa
1. Digitalni grafi čni zaslon
Prikazuje preostali čas postopka pranja, vse informacije o pranju in sporočila o motnjah.
2. Gumb za predpranje
Pritisnite gumb za izbiro predpranja. Predpranje je možno izbrati samo za programe: Bombaž (Cotton), Pisano
perilo (Coloureds), Sintetika (Synthetics), Občutljivo perilo (Delicates), Otroški program (Baby Program).
3. Gumb za nastavitev temperature (Temperature)
Pritiskajte gumb tolikokrat, da lahko na zaslonu izberete želeno temperaturo vode za pranje (hladna voda
30 °C, 40 °C, 60 °C in 95 °C).
4. Gumb za izpiranje (Rinse)
Pritisnite gumb za izpiranje, da dodate postopek izpiranja. Izberete lahko največ pet postopkov izpiranja.
5. Gumb za centrifugiranje (Spin)
Pritiskajte gumb za centrifugiranje tolikokrat, da lahko na zaslonu izberete želeno hitrost centrifugiranja.
B1445A(V/S)
B1245A(V/S), R1245A(V/S), F1245A(V/S)
B1045A(V/S), R1045A(V/S) ,F1045A(V/S)
Brez centrifugiranja
Perilo ostane v bobnu brez centrifugiranja po končnem črpanju.
Zaustavitev izpiranja
Perilo ostane namočeno v vodi za končno izpiranje. Preden vzamete perilo iz bobna, morate izbrati program
»Črpanje« ali »Centrifugiranje«.
, , 400, 800, 1200, 1400 vrtlj./min..
, , 400, 800, 1000, 1200 vrtlj./min..
, , 400, 600, 800, 1000 vrtlj./min..
: brez centrifugiranja, : zaustavitev izpiranja
6. Gumb za nastavitev zamika vklopa (Delay Start)
Pritiskajte gumb tolikokrat, da lahko nastavite na zaslonu čas zamika vklopa (zamik vklopa po urah med 3 in
24 urami).
Prikazane ure pomenijo čas končanja postopka pranja.
6 SAMSUNG Navodila za uporabo pralnega stroja
Page 97

Pranje
Otroški program
Bombaž
Pisano perilo
Občutljivo perilo
Madež
Izčrpavanje vode
Centrifugiranje
Izpiranje+centrifugiranje
Bombaž
Pisano perilo
Sintetika
Občutljivo perilo
Volna
Ročno pranje
Hitro pranje
Električni tok
7. Gumb Silver Nano
Voda Silver Nano se dodaja perilu med pranjem ter končnem izpiranju zaradi dezinfekcije in antibakterijske
zaščite perila.
8. Gumb za nastavitev polovičnega polnjenja
Pritisnite gumb v primeru polovičnega polnjenja bobna (okrog 1~4 kg). Ta funkcija skrajša čas pranja in
varčuje z energijo.
9. Varnostna funkcija za otroke
S tem gumbom lahko preprečite, da bi otroci prestavljali nastavitve pralnega stroja.
Za aktiviranje programa: Pritisnite gumb Start/Pavza, da vključite pralni stroj. Pritisnite in držite 2 – 3 sekunde
vključeni gumb [Rinse] + [Spin] (izpiranje) + (centrifugiranje). To funkcijo lahko aktivirate samo, ko je stroj
vključeni. Če vključite varnostno funkcijo za otroke med delovanjem stroja, ni možno aktivirati nobene tipke,
dokler ne izključite varnostne funkcije za otroke. Tudi gumba Power ne morete aktivirati dokler gori lučka
Baby Program (varnostna funkcija za otroke).
Če želite deaktivirati to funkcijo, ponovno pritisnite in držite 2 – 3 sekunde gumb [Rinse] + [Spin] (izpiranje)
+ (centrifugiranje) in lučka ugasne in funkcija je deaktivirana.
Opomba: Če med delovanjem pralnega stroja ne reagirajo gumbi, najprej preverite gumb za varnostno
funkcijo za otroke.
10. Programsko stikalo Fuzzy Control
Obračajte stikalo, da izberete enega od 14 razpoložljivih programov pranja.
Bombaž (Cotton), Pisano perilo (Coloureds), Sintetika (Synthetics), Občutljivo perilo (Delicates), Volna
(Wool), Ročno pranje (Hand wash), Hitro pranje (Quick), Izpiranje+Centrifugiranje (Rinse+Spin),
Centrifugiranje (Spin), Izčrpavanje vode (Drain), Varnostna funkcija za otroke [madeži (Stains), občutljivo
perilo (Delicates), pisano perilo (Coloureds), bombaž (Cotton)]
11. Gumb Start/Pavza
Pritisnite gumb Pavza in ponovno zaženite programe.
12. Gumb (Vklop/Izklop)
Pritisnite enkrat, da vključite pralni stroj, pritisnite ponovno, da izključite pralni stroj. Če je ta gumb za vklop
pralnega stroja vključen več kot 10 minut brez, da bi se dotaknili drugih gumbov, se bo stroj avtomatsko
izključil.
SAMSUNG Navodila za uporabo pralnega stroja 7
Page 98

Pranje
Prvo pranje
Pred prvim pranjem oblačil morate izvršiti celotni postopek pranja brez oblačil. To storite na sledeči način:
1. Pritisnite gumb
2. Dajte nekaj pralnega sredstva v predelek
sredstvo.
3. Odprite dovod vode v pralni stroj.
4. Pritisnite gumb Temperatura tolikokrat, da se prikaže na
zaslonu 40 °C.
5. Pritisnite gumb Start/Pavza.
• Na ta način boste odstranili ostanke vode, ki bi lahko
ostali v stroju po poizkusnem zagonu stroja, ki ga je izvršil
proizvajalec.
Predelek : Pralno sredstvo za predpranje ali škrobljenje.
: Pralno sredstvo za glavno pranje, mehčalec vode, mehčalno
Predelek
sredstvo, belilo in sredstva za odstranjevanje madežev.
: Dodatki, n.pr. mehčalec vlaken (napolnite samo do spodnjega roba vložka »A«)
Predelek
Polnjenje pralnega sredstva v pralni stroj
1. Izvlecite predal za pralno sredstvo.
2. Dajte pralno sredstvo v predelek
3. Dajte mehčalec v predelek
4. Dajte pralno sredstvo za predpranje v predelek
Pozor:
Koncentrirane ali goste mehčalce in balzamska sredstva je potrebno
predhodno razredčiti z nekaj vode in šele potem naliti v predelek
predala za pralno sredstvo. (Na ta način preprečite zamašitev
pretočnega kanala.)
(Vklop/Izklop).
predala za pralno
.
(če želite).
(če želite).
8 SAMSUNG Navodila za uporabo pralnega stroja
Page 99

Pranje
Pranje perila z uporabo Fuzzy Logic
Vaš novi pralni stroj omogoča enostavnejše pranje z uporabo Samsungovega avtomatskega sistema krmiljenja
programov pranja »Fuzzy Logic«. Ko izberete program pranja, bo stroj sam nastavil odgovarjajočo temperaturo, čas
pranja in hitrost pranja.
Če želite prati s pomočjo programov Fuzzy Logic, postopajte na sledeči način:
1. Odprite pipo za dovod vode v pralni stroj.
2. Pritisnite gumb
3. Odprite vrata.
4. Napolnite boben pralnega stroja s perilom, vendar ne prekomerno.
5. Zaprite vrata.
6. V odgovarjajoče predelke predala za pralna sredstva napolnite pralno sredstvo, mehčalec in pralno sredstvo za
predpranje (po potrebi).
Opomba: Predpranje je na razpolago samo za programe za pranje odej, posteljnine, robcev, zaves,
7. Obračajte stikalo Fuzzy Control, da izberete
ustrezni program za vrsto perila: bombaž, pisano
perilo, sintetika, občutljivo perilo, volna, ročno
pranje, hitro pranje, izpiranje+centrifugiranje
, centrifugiranje, izčrpavanje vode, varnostna
funkcija za otroke (madeži, občutljivo perilo,
pisano perilo, bombaž).
Na kontrolni plošči se prižge lučka za izbrani
program pranja.
8. Sedaj lahko z ustreznim gumbom nastavite
temperaturo pranja, čas izplaknjevanja, hitrost
centrifugiranja, časovni zamik.
9. Pritisnite gumb Start/Pavza na stikalu Fuzzy
Control in začel se bo postopek pranja. Lučka, ki
ponazarja proces pranja, se prižge in na zaslonu se
prikaže preostanek časa za dokončanje postopka
pranja.
Ko se postopek pranja konča:
Ko se postopek pranja v celoti konča, se stroj avtomatsko izključi.
1. Odprite vrata.
Opomba: Vrata ni možno odpreti 3 minute po zaustavitvi ali izklopu stroja.
2. Vzemite ven perilo.
(Vklop/Izklop).
bombaža, pisanega perila, sintetike in občutljivega perila. To je potrebno samo, če so oblačila
ali perilo zelo umazana.
SAMSUNG Navodila za uporabo pralnega stroja 9
Page 100

Pranje
Ročno pranje oblačil
Oblačila lahko perete ročno brez uporabe funkcije Fuzzy Logic. V ta namen postopajte na sledeči način:
1. Odprite dovod vode.
2. Pritisnite gumb
3. Odprite vrata.
4. Napolnite boben pralnega stroja s perilom, vendar ne prekomerno.
5. Zaprite vrata.
6. V odgovarjajoče predelke predala za pralna sredstva napolnite pralno sredstvo, mehčalec in pralno sredstvo za
predpranje.
7. Pritisnite gumb Temperatura, da nastavite temperaturo pranja (hladna voda, 30 °C, 40 °C, 60 °C, 95 °C).
8. Pritisnite gumb za izpiranje, da izberete potrebno število postopkov izpiranja. Največje možno število
postopkov izpiranja je pet. Trajanje pranja se bo ustrezno podaljšalo.
9. Pritisnite gumb Centrifugiranje, da izberete hitrost centrifugiranja.
Opomba: Program zaustavitve izpiranja Vam omogoča, da vzamete iz pralnega stroja še mokra oblačila.
10. Večkrat pritisnite gumb, da izberete opcije zamika časa pranja, katere so na razpolago (po urah med 3 in 24
urami). Prikazane ure pomenijo čas končanja postopka pranja.
11. Pritisnite gumb Start/Pavza in stroj bo začel s postopkom pranja.
Uporaba funkcije zamika vklopa
Pralni stroj lahko nastavite tako, da bo avtomatsko končal pranje kasneje in sicer z zamikom 3 do 24 ur (v časovnih
korakih po 1 uro). Prikazane ure pomenijo čas končanja postopka pranja.
V ta namen postopajte na sledeči način:
1. Ročno ali avtomatsko nastavite Vaš pralni stroj na vrsto oblačil, ki jih perete.
2. Pritisnite gumb za zamik časa vklopa tolikokrat, da nastavite želeni čas zamika vklopa.
3. Pritisnite gumb Start/Pavza. Prižge se lučka za funkcijo zamika vklopa in ura začne odštevati čas dokler ne
doseže časa končanja postopka pranja.
4. Če želite brisati zamik časa vklopa, pritisnite (Vklop/Izklop) in potem ponovno vključite pralni stroj.
(Vklop/Izklop) na pralnem stroju.
: brez centrifugiranja, : zaustavitev izpiranja.
10 SAMSUNG Navodila za uporabo pralnega stroja
 Loading...