

Page 1

imagine the possibilities
Thank you for purchasing this Samsung product.
To receive more complete service, please register
your product at
www.samsung.com/global/register
Model Serial No.
BN68-01757B-00
Contact SAMSUNG WORLD-WIDE
If you have any questions or comments relating to Samsung products, please contact the SAMSUNG customer care centre.
Plasma TV
user manual
Country
Customer Care Centre
Web Site
AUSTRIA 0810 - SAMSUNG(7267864, € 0.07/min) www.samsung.com/at
BELGIUM 02 201 2418 www.samsung.com/be
CZECH REPUBLIC
800 - SAMSUNG (800-726786) www.samsung.com/cz
Samsung Zrt., česká organizační složka, Oasis Florenc, Sokolovská394/17, 180 00, Praha 8
DENMARK 8 - SAMSUNG(7267864) www.samsung.com/dk
EIRE 0818 717 100 www.samsung.com/ie
ESTONIA 800-7267 www.samsung.ee
FINLAND
30 - 6227 515
www.samsung.com/fi
FRANCE
3260 SAMSUNG(7267864, € 0,15/Min)
0825 08 65 65 (€ 0.15/Min)
www.samsung.com/fr
GERMANY 01805 - SAMSUNG(7267864, € 0.14/Min) www.samsung.de
HUNGARY 06 - 80 - SAMSUNG(7267864) www.samsung.com/hu
ITALIA 800 - SAMSUNG(7267864) www.samsung.com/it
KAZAKHSTAN 8-10-800-500-55-500 www.samsung.com/kz_ru
KYRGYZSTAN 00-800-500-55-500
LATVIA 8000-7267 www.samsung.com/lv
LITHUANIA 8-800-77777 www.samsung.lt
LUXEMBURG 02 261 03 710 www.samsung.com/lu
NETHERLANDS 0900 - SAMSUNG(7267864, € 0.10/Min) www.samsung.com/nl
NORWAY 3 - SAMSUNG(7267864) www.samsung.com/no
POLAND
0 - 801 - 1SAMSUNG(172678)
022 - 607 - 93 - 33
www.samsung.com/pl
PORTUGAL 808 20 - SAMSUNG(7267864) www.samsung.com/pt
RUSSIA 8-800-555-55-55 www.samsung.ru
SLOVAKIA 0800 - SAMSUNG(7267864) www.samsung.com/sk
SPAIN 902 - 1 - SAMSUNG (902 172 678) www.samsung.com/es
SWEDEN 075 - SAMSUNG(726 78 64) www.samsung.com/se
Switzerland 0848 - SAMSUNG(7267864, CHF 0.08/min) www.samsung.com/ch
TADJIKISTAN 8-10-800-500-55-500
Turkey 444 77 11 www.samsung.com/tr
U.K 0845 SAMSUNG(7267864) www.samsung.com/uk
UKRAINE 8-800-502-0000 www.samsung.ua
UZBEKISTAN 8-10-800-500-55-500 www.samsung.com/kz_ru
BN68-01757B-Eng.indb 1 2008-08-29 오후 3:29:49
Page 2
English - 2
© 2008 Samsung Electronics Co., Ltd. All rights reserved.
User Instructions
Screen Image retention
Do not display a still image (such as on a video game or when hooking up a PC to this PDP) on the plasma monitor panel for
more than 2 hours as it can cause screen image retention. This image retention is also known as “screen burn”. To avoid such
image retention, reduce the degree of brightness and contrast of the screen when displaying a still image.
Height
The PDP can normally operate only under 2000m in height. It might abnormally function at a place over 2000m in height so do
not install and operate there.
Heat on the top of the PDP TV
The top side of the product may be hot after long period of use as heat dissipates from the panel through the vent hole in the
upper part of the product. This is normal and does not indicate any defect or operation failure of the product. However, children
should be prevented from touching the upper part of the product.
The product is making a ‘cracking’ noise.
A ‘cracking’ noise may occur when the product contracts or expands due to a change of surrounding environment such as
temperature or humidity. This is normal and not a defect of the unit.
Cell Defects
The PDP uses a panel consisting of 1,230,000(SD-level) to 3,150,000(HD-level) pixels which require sophisticated technology
to produce. However, there may be few bright or dark pixels on the screen. These pixels will have no impact on the
performance of the product.
Avoid operating the TV at temperatures below 5°C(41°F)
A still image displayed too long may cause permanent damage to the PDP Panel.
Watching the PDP TV in 4:3 format for a long period of time may leave traces of borders displayed on
the left, right and centre of the screen caused by the difference of light emission on the screen. Playing a
DVD or a game console may cause similar effect to the screen. Damages caused by the above effect are
not covered by the Warranty.
Afterimage on the Screen.
Displaying still images from Video games and PC for longer than a certain period of time may produce partial afterimages.
To prevent this effect, reduce the ‘brightness’ and ‘contrast’ when displaying still images.
Warranty
- Warranty does not cover any damage caused by image retention.
- Burn-in is not covered by the warranty.
Installation
Be sure to contact an authorized service centre, when installing your set in a location with heavy dust, high or low
temperatures, high humidity, chemical substance and where it operates continually such as the airport, the train station etc.
Failure to do so may cause a serious damage to your set.
Digital TV (DVB-T) Notice
1. FUNCTIONALITIES RELATED TO DIGITAL TV (DVB) ARE ONLY AVAILABLE IN COUNTRIES OR AREAS WHERE
DVB-T (MPEG2 AND MPEG4 AVC) DIGITAL TERRESTRIAL SIGNALS ARE BROADCAST. DVB-T is the European
consortium standard for the broadcast transmission of digital terrestrial television. Please check with your local dealer
about the availability of DVB-T service in your area.
2.
Although this TV set meets the current DVB-T standards as of [August, 2008], compatibility with future DVB-T digital
terrestrial broadcast cannot be guaranteed.
3. Some Digital TV functions may not be available or operate correctly in some countries or regions.
4. For more information, please contact your local SAMSUNG customer care centre.
Contact SAMSUNG WORLDWIDE
If you have any questions or comments relating to Samsung products, please contact the SAMSUNG
customer care centre. (See back cover for more informations.)
Page 3

Connecting and Preparing Your TV
User Instructions .................................................................2
Checking Parts ....................................................................4
Using the Stand-Base .........................................................4
How to assemble the Stand-Base
(depending on the model) ...................................................4
Viewing the Control Panel ...................................................5
Viewing the Connection Panel.............................................6
Remote Control ...................................................................8
Installing Batteries in the Remote Control ...........................9
Switching On and Off...........................................................9
Placing Your Television in Standby Mode ............................9
Viewing the Menus ............................................................10
Using the TOOLS Button ...................................................10
Using the Wheel button .....................................................10
Plug & Play Feature ..........................................................11
Channel Control
Storing Channels and channel .........................................11
Managing Channels ..........................................................15
Picture Control
Changing and Resetting the Picture Settings ....................16
Viewing Picture-in-Picture .................................................20
Setting up the TV with your PC .........................................20
PC Display .........................................................................21
Sound Control
Changing the Sound Standard ..........................................22
Selecting the Sound Mode ................................................23
Function Description
Conguring the Setup Menu ..............................................24
Setting the Time ................................................................27
Network Connection ..........................................................28
Network Setup ...................................................................30
Source List / Edit Name .....................................................32
Product Guide ...................................................................32
WISELINK Pro
Connecting a USB Device .................................................33
Using the WISELINK Pro Function ....................................34
Using and Sorting Photo List .............................................36
Viewing a Photo or Slide Show .........................................37
Using and Sorting the Music List .......................................39
Playing a Music .................................................................40
Using and Sorting the Movie List .......................................41
Playing a Movie File ..........................................................42
Deleting the Photo/Music/Movie File .................................43
Picture/Music Settings Using WISELINK Pro ....................44
Using the Setup Menu .......................................................44
■
■
■
■
■
■
■
■
■
■
■
■
■
■
■
■
■
■
■
■
■
■
■
■
■
■
■
■
■
■
■
■
■
■
■
■
■
■
■
WISELINK Pro-DLNA
Setting the DLNA Network .................................................45
Installing the DLNA Application .........................................45
Using the DLNA Application ..............................................47
Using the DLNA Function ..................................................50
Content Library
Activating the Content Library ...........................................51
Using the Content Library ..................................................52
Using Additional Content Using External USB Memory
Storage ..............................................................................53
About Anynet
+
Connecting Anynet+ Devices ............................................54
Setting Up Anynet+............................................................55
Scanning and Switching between Anynet+ Devices..........55
Recording ..........................................................................56
Listening through a Receiver (Home theater) ...................57
Troubleshooting for Anynet+ ............................................57
InfoLive
Using InfoLive ....................................................................58
Using the Weather Service ................................................59
Using the News Service ....................................................59
Using the Stock Service ....................................................60
InfoLive Setup ...................................................................61
Recommendations for Use
Teletext Feature .................................................................62
Wall Mount Kit Specications (VESA) ...............................63
Auto Wall-Mount Adjustment (Sold separately) ................64
Preparing before installing Wall- Mount on the wall ..........65
Securing the TV to the Wall ...............................................65
Troubleshooting .................................................................66
Specications ....................................................................67
Additional Terms of Service ...............................................68
■
■
■
■
■
■
■
■
■
■
■
■
■
■
■
■
■
■
■
■
■
■
■
■
■
■
English
Contents
N O T
Symbol Press Note One-Touch Button TOOLS
English - 3
Page 4
English - 4
Connecting and Preparing Your TV
Using the Stand-Base
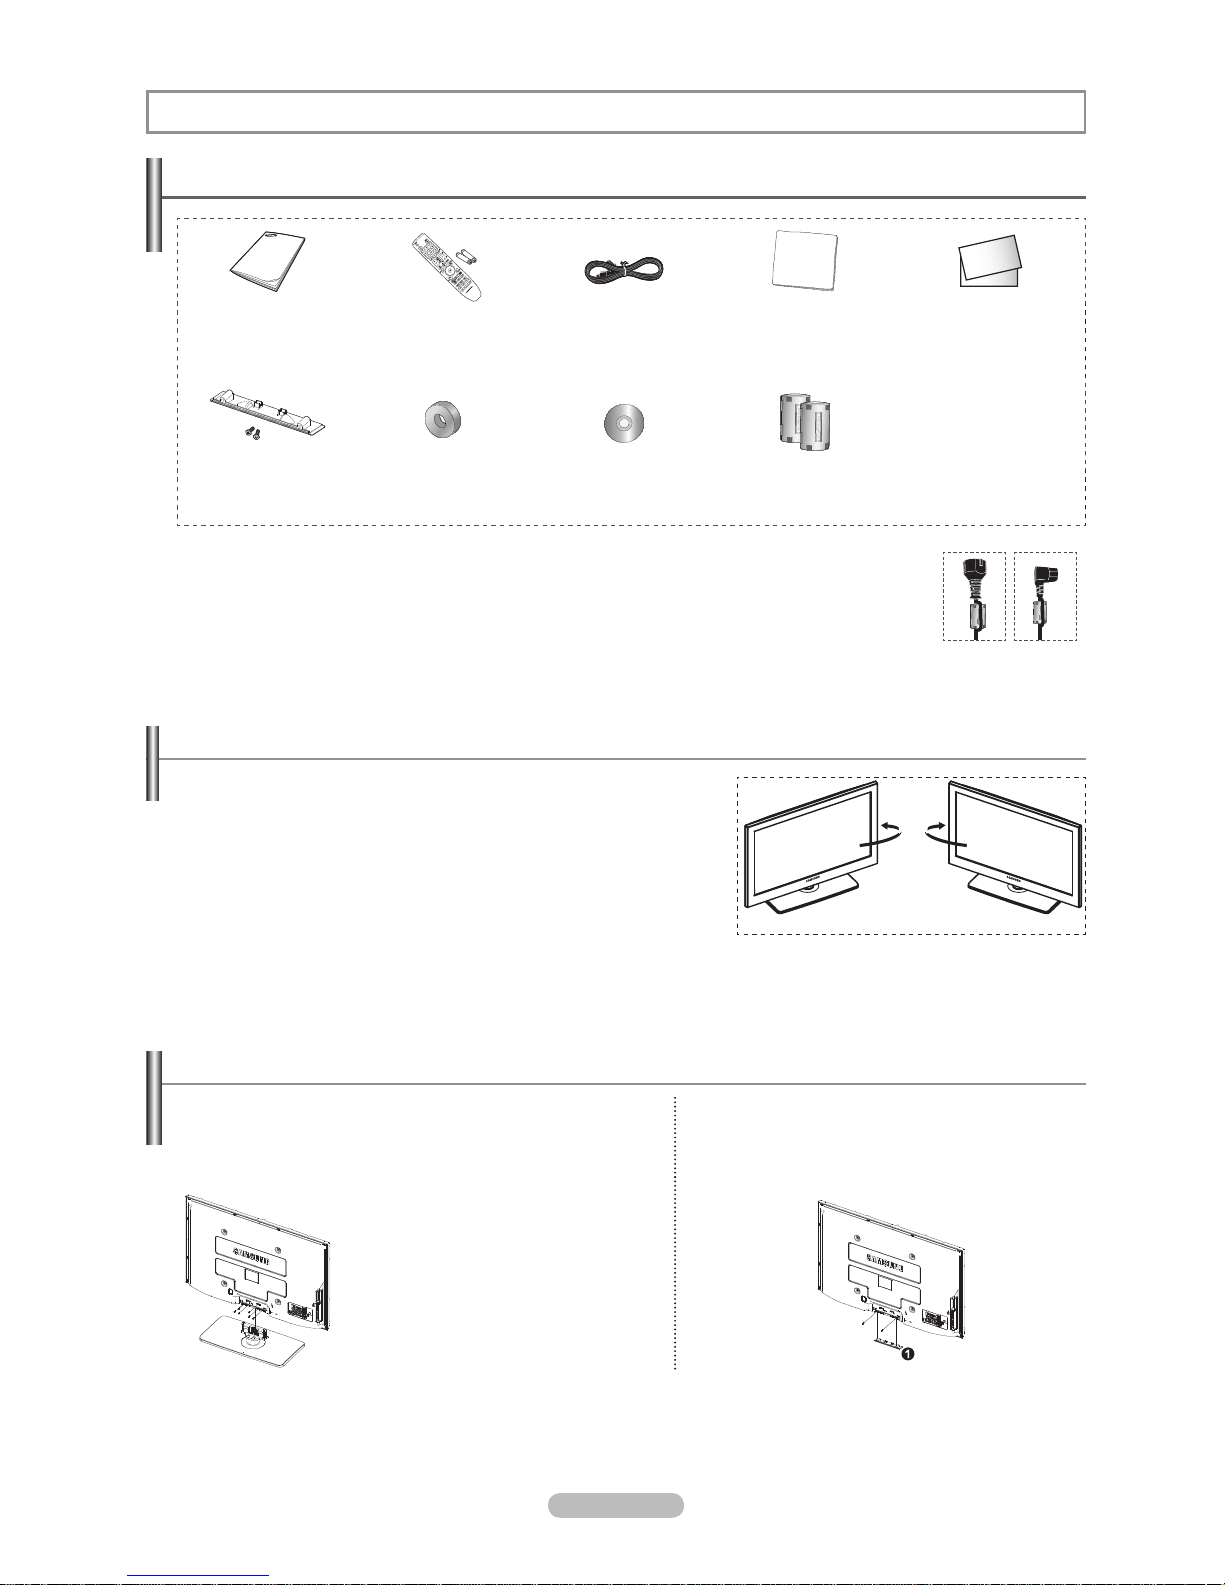
Two or more people should carry the PDP. Never lay the PDP on the floor
because of possible damage to the screen. Always keep the PDP upright.
The PDP can rotate 20 degrees in right and left directions.
N
N
How to assemble the Stand-Base (depending on the model)
Using the 6 screws for securing the stand base and the monitor, firmly
attach the monitor to the stand base.
(The exterior of the set may be different than the picture.)
In case of installing your TV on the wall, close the
cover (1) on the stand-base connection part using two
screws for hiding.
Warning
Firmly secure the stand to the TV
before moving it, as the stand may
fall and could cause serious injury.
Two or more people should carry the TV.
Never lay the TV on the floor because of
possible damage to the screen.
Always store the TV upright.
N
-20° ~ 20°
Checking Parts
Owner’s Instructions Remote Control/
AAA Batteries
Power Cord Cloth-Clean Warranty Card/
Safety Guide Manual
(Not available in all locations)
Cover-Bottom / Screws (2ea)
(PS50A766)
Holder-Ring (4ea)
(Refer to page 65)
Program CD Ferrite Core for Power
Cord (2ea)
Ferrite Core (Power Cord)
The ferrite core is used to shield the cable from interference. When connecting a cable, open the ferrite
core and clip it around the cable near the plug.
N
Page 5
English - 5
Viewing the Control Panel
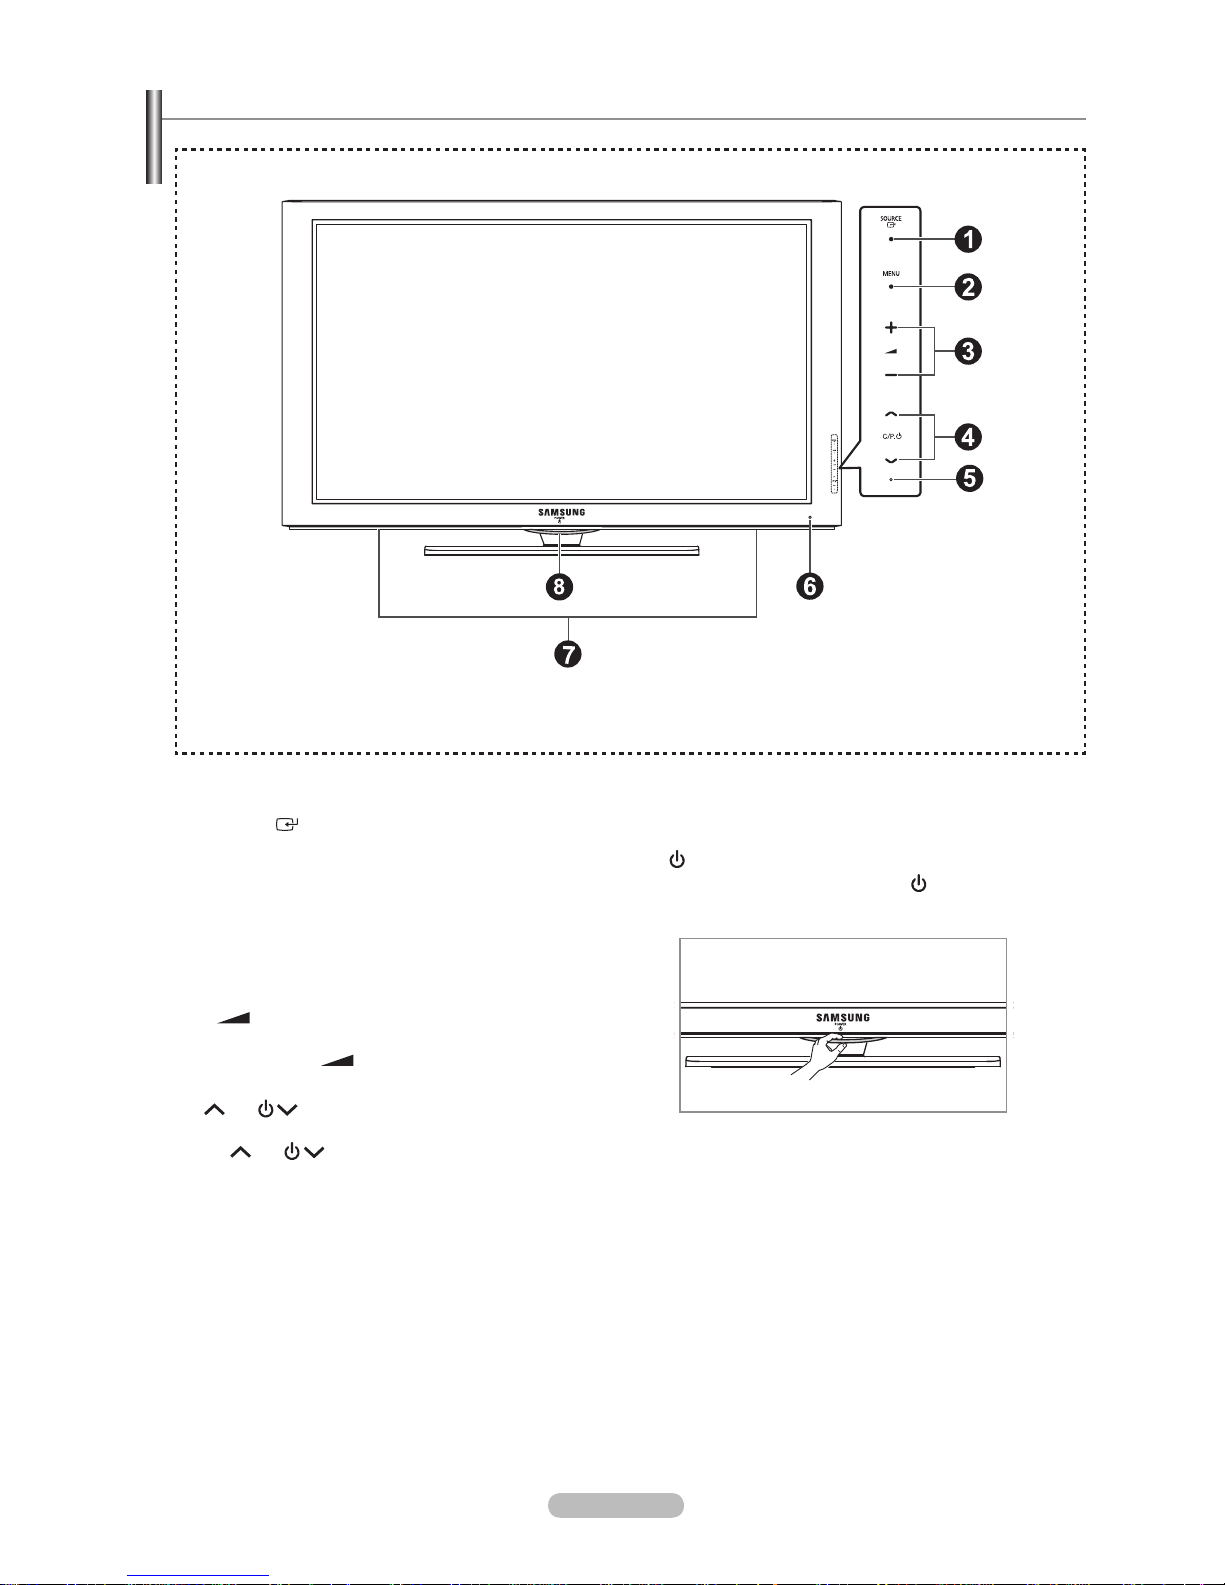
1
SOURCE
Toggles between all the available input sources
(TV, Ext1, Ext2, AV, S-Video, Component, PC, HDMI1,
HDMI2/DVI
, HDMI3, HDMI4, USB, DLNA).
In the on-screen menu, use this button as you would
use the ENTER button on the remote control.
2
MENU
Press to see an on-screen menu of your TV’s features.
3
– +
Press to decrease or increase the volume. In the on-screen
menu, use the – + buttons as you would use the ◄
and ► buttons on the remote control.
4
C/P.
Press to change channels. In the on-screen menu, use
the C/P. buttons as you would use the ▲ and ▼
buttons on the remote control.
5
POWER INDICATOR
Blinks and turns off when the power is on and lights up in
stand-by mode.
6
REMOTE CONTROL SENSOR
Aim the remote control towards this spot on the TV.
N
7
SPEAKERS
8 (
POWER)
Touch the silver sensor below the (
) mark to turn the TV
on and off.
The product colour and shape may vary depending on the model.
N
Front Panel buttons
Touch each button to
operate.
Silver sensor
Page 6
English - 6
Viewing the Connection Panel
Whenever you connect an audio or video system to your set, ensure that all elements are switched off.
When connecting an external device, match the colour of the connection terminal to the cable.
N
N
Rear Panel
Cable Television
Network
or
or
or
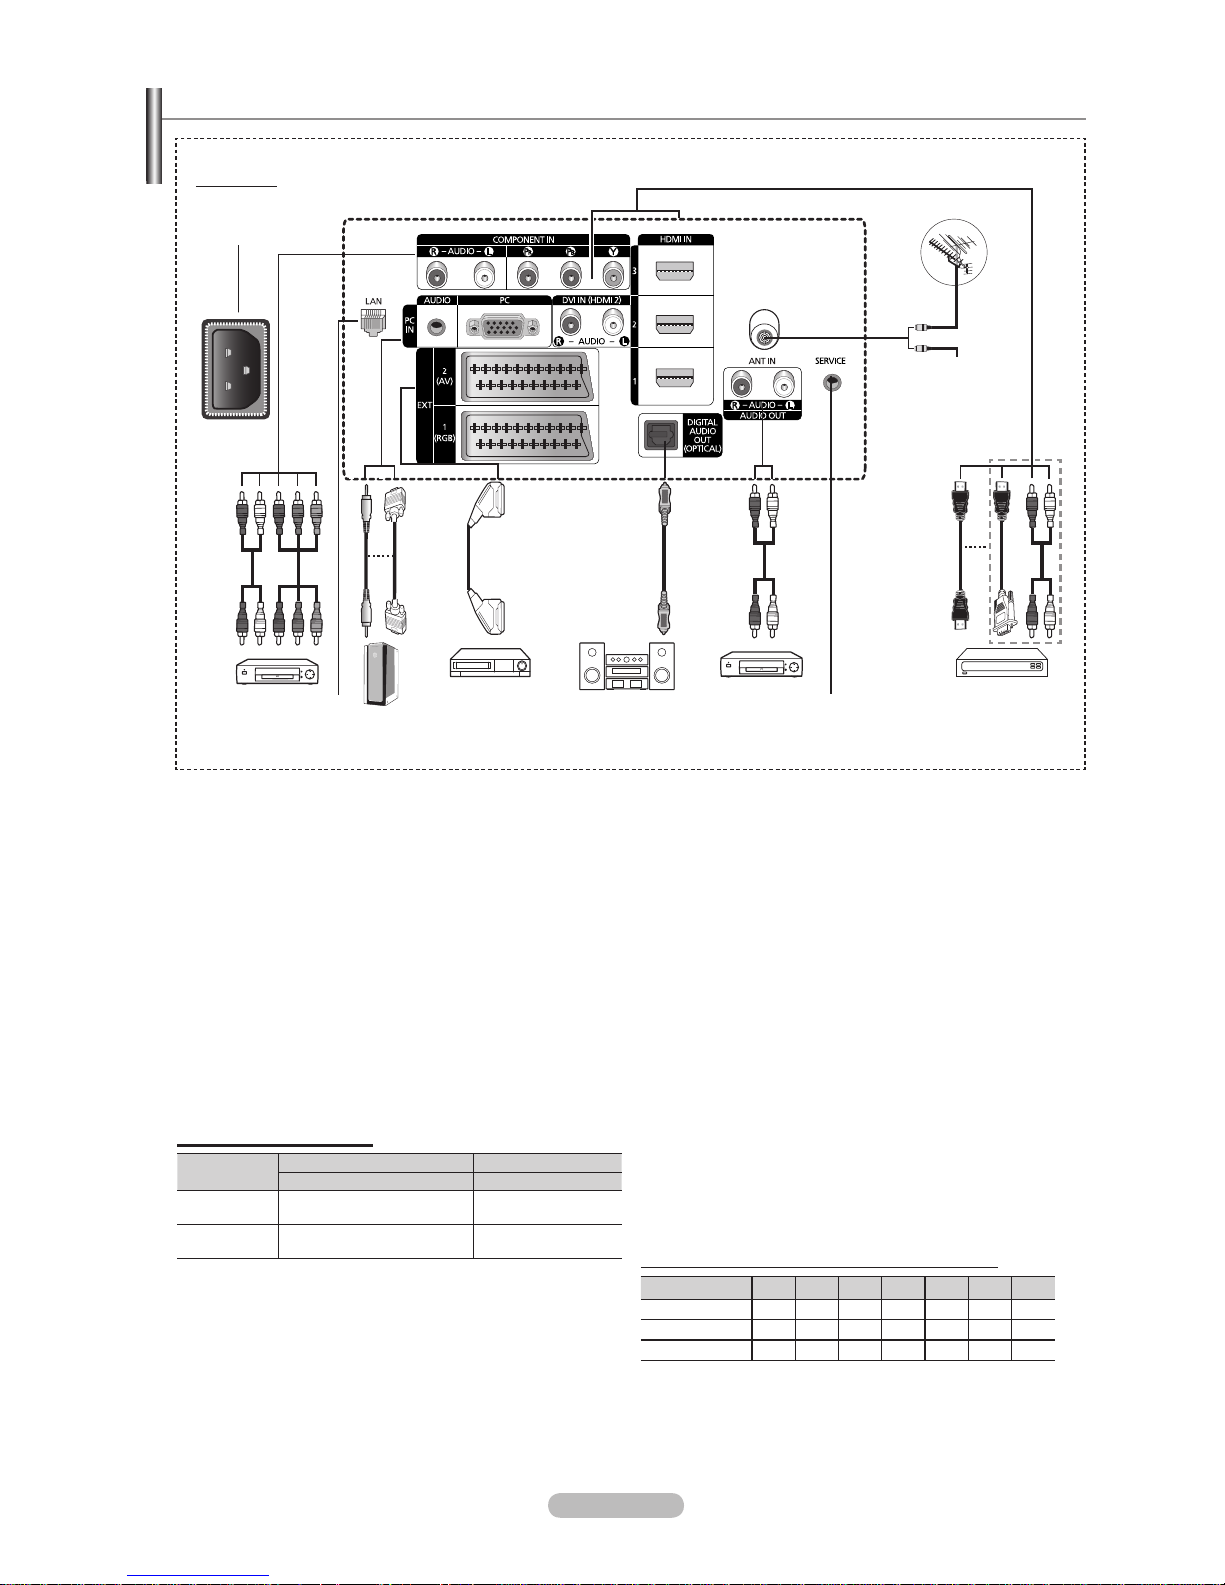
1
5 7 96
0
83 4
The product colour and shape may vary depending on the model.
N
1
POWER IN
Connect the supplied power cord.
2
COMPONENT IN
Audio (AUDIO L/R) and video (Y/P
B/PR) inputs for
Component.
3
LAN
Connect a LAN cable to this port to connect to the Network.
4
PC IN(PC) / AUDIO
Connect to the video and audio output jack on your PC.
5
EXT 1, EXT 2
Inputs or outputs for external devices, such as VCR, DVD,
video game device or video disc players.
Input/Output Specification
Connector
Input Output
Video Audio(L/R) RGB
Video + Audio(L/R)
EXT 1 ✔ ✔ ✔
Only TV or DTV output is
available.
EXT 2 ✔ ✔ Output you can choose.
6
DIGITAL AUDIO OUT (OPTICAL)
Connect to a Digital Audio Component.
7
AUDIO OUT(AUDIO R/L)
Connect RCA audio signals from the TV to an external
source, such as Audio equipment.
8
SERVICE
Connector for service.
9
HDMI IN 1, 2, 3
- No additional Audio connection is needed for an HDMI to
HDMI connection.
- When using an HDMI/DVI cable connection, you must
use the HDMI IN 2 jack.
What is HDMI?
-
High Definition Multimedia interface allows the
transmission of high definition digital video data and
multiple channels of digital audio.
- The HDMI/DVI terminal supports DVI connection to
an extended device with the appropriate cable (not
supplied). The difference between HDMI and DVI is
that the HDMI device is smaller in size, has the HDCP
(High Bandwidth Digital Copy Protection) coding feature
installed, and supports multi - channel digital audio.
DVI IN(HDMI2) AUDIO L/R
DVI audio outputs for external devices.
0
ANT IN
75Ω Coaxial connector for Aerial/Cable Network.
Supported modes for HDMI/DVI and Component
480i 480p 576i 576p 720p 1080i 1080p
HDMI/DVI 50Hz X X X O O O O
HDMI/DVI 60Hz X O X X O O O
Component O O O O O O O
N
2
Page 7
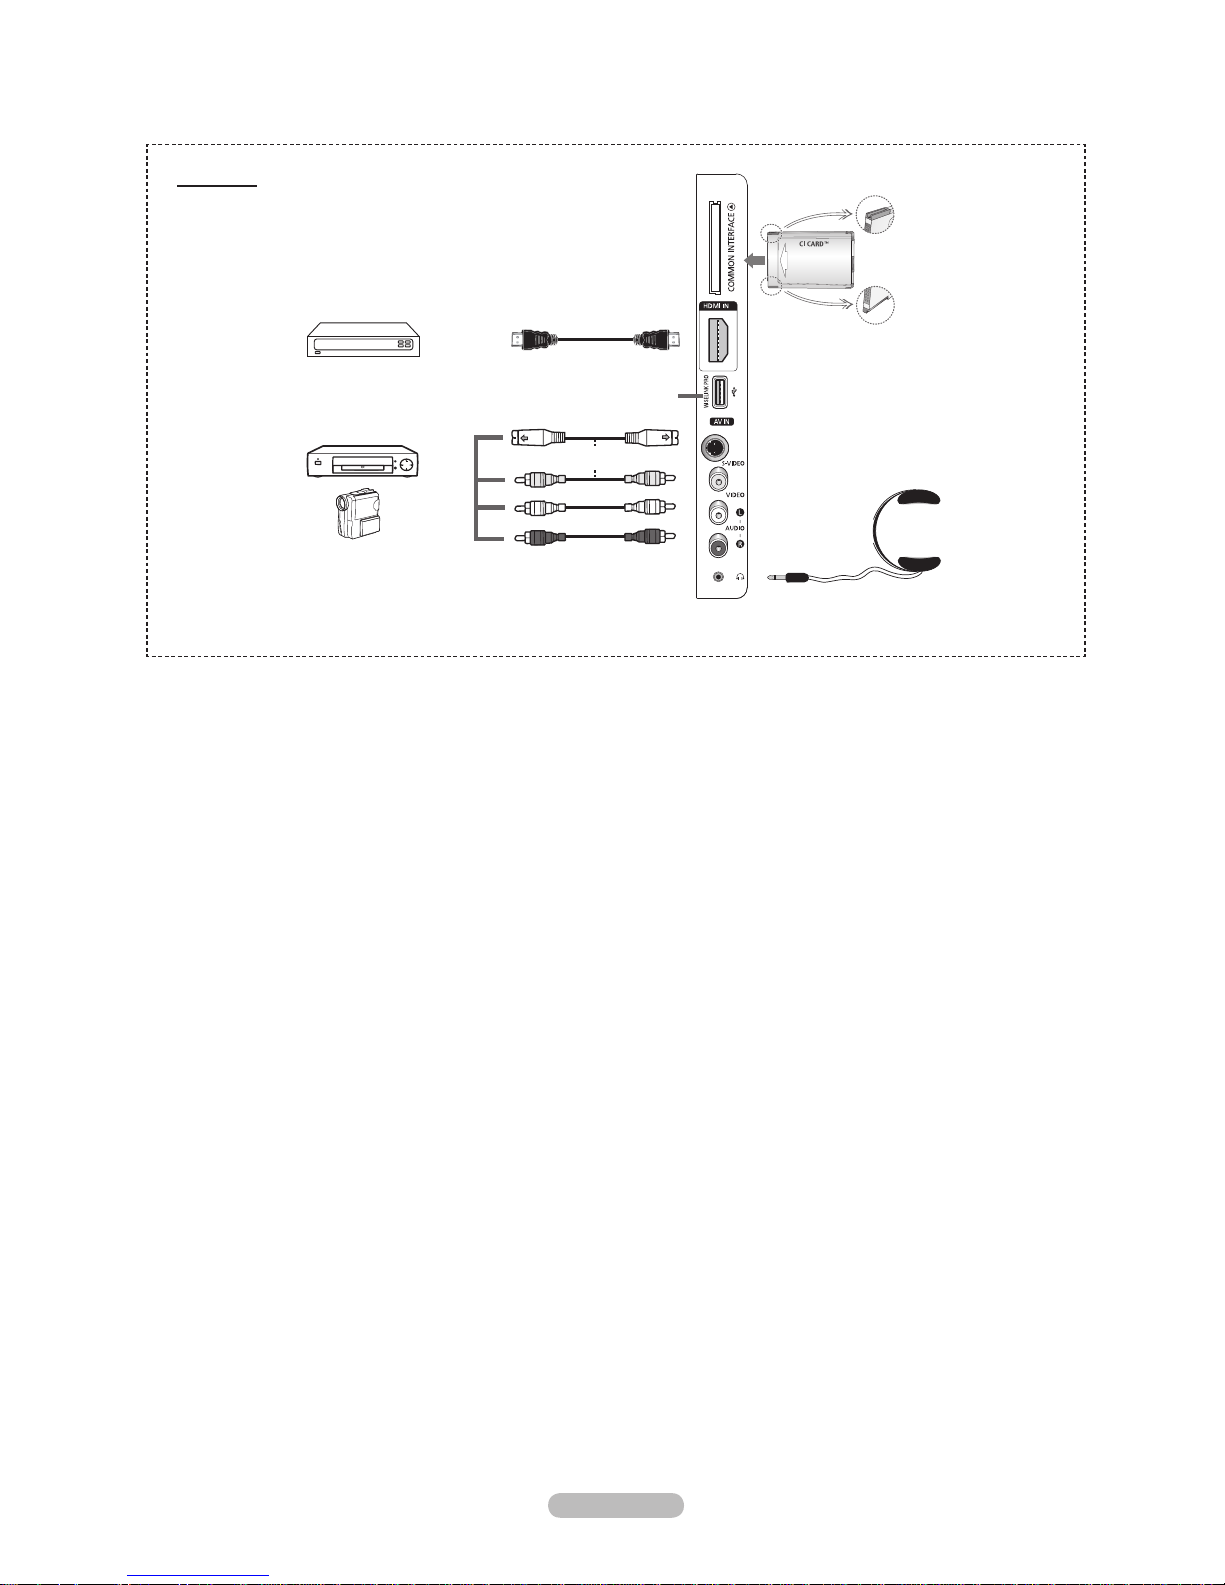
English - 7
1
COMMON INTERFACE Slot
Insert CI (Common Interface) card into the slot.
(refer to page 26)
− When not inserting
CI CARD in some channels, Scramble
Signal is displayed on the screen.
− The pairing information containing a telephone number, CI
CARD ID, Host ID, and other information will be displayed
in about 2~3 minutes. If an error message is displayed,
please contact your service provider.
− When the channel information configuration has finished,
the message Updating Completed is displayed, indicating
that the channel list is now updated.
Insert the CI-Card in the direction marked on it.
2
HDMI IN 4
Connect to the HDMI jack of a device with HDMI output.
3
WISELINK PRO
Connect a USB mass storage device to view and play photo
files (JPEG), audio files (MP3) and movie files.
You can connect to SAMSUNG’s network wirelessly.
4
S-VIDEO or VIDEO / AUDIO L/R
Video (S-Video or Video) and audio inputs for external
devices, such as a camcorder or VCR.
N
5
HEADPHONES JACK
You can connect a set of headphones if you wish to
watch a television programme without disturbing the
other people in the room.
Prolonged use of headphones at a high volume may
damage your hearing.
N
The product colour and shape may vary depending on the model.
N
Side Panel
or
4
5
3
2
1
4
Page 8

English - 8
Remote Control
You can use the remote control up to a distance of about 23 feet from the TV.
The performance of the remote control may be affected by bright light.
N
1
POWER button
(turns the TV on and off)
2
Selects the TV mode directly.
3
Number buttons for direct channel
access
4
One or more digit channel selection
5
Temporary sound switch-off
6
Available source selection
7
Volume increase
Volume decrease
8
Electronic Program Guide (EPG)
display
9
Use to quickly select frequently used
functions.
0
Control the cursor in the menu
!
Use to see information on the
current broadcast
@
Use these buttons in the Channel
list and WISELINK, etc.
$
Press to select the optional display
and sound modes for sports, cinema
and games.
%
Use these buttons in the Channel
list, WISELINK Pro and Anynet+.
^
ON/OFF
Press to backlight the buttons on the
remote. This function is convenient
for using at night or when the room
is dark. (Using the remote control
with the ON/OFF( ) light button set
to On will reduce the battery usage
time.)
&
Previous channel
*
Next channel
Previous channel
(
Displays the main on-screen menu
)
This function enables you to view
and play photo (JPEG) , audio
files (MP3) and movie files from an
external device.
a
Returns to the previous menu
b
Exit the on-screen menu
c
Press to use the News, Stock
Market and Weather Forecast
information services available over
the network.
d Use this when connecting a
SAMSUNG DMA (Digital Media
Adapter) device through an HDMI
interface and switching to DMA
mode.
(The DMA button is optional.) For
more information on the operating
procedures, refer to the user manual
of the DMA. This button is available
when Anynet+(HDMI-CEC) is On
(see page 55)
e
This function enables you to view
Content Library.
f
Digital subtitle display
Teletext Functions
2
Exit from the teletext display
(depending on the model)
6
Teletext mode selection (LIST/
FLOF)
8
Teletext store
9
Teletext size
!
Teletext reveal
@
Fastext topic selection
#
Teletext display/mix both teletext
information and the normal
broadcast
&
Teletext sub page
*
P :Teletext next page
P :Teletext previous page
(
Teletext index
a
Teletext hold
b
Teletext cancel
Page 9

English - 9
Installing Batteries in the Remote Control
1.
Lift the cover at the back of the remote control upward as shown in the gure.
2.
Install two AAA size batteries.
Make sure to match the ‘+’ and ‘–’ ends of the batteries with the diagram
inside the compartment.
3.
Close the cover.
Remove the batteries and store them in a cool, dry place if you won’t be
using the remote control for a long time.
Using the remote control with the ON / OFF @ light button set to on will
reduce the battery usage time.
If the remote control doesn’t work, check the following:
1. Is the TV power on?
2. Are the plus and minus ends of the batteries reversed?
3. Are the batteries drained?
4. Is there a power outage or is the power cord unplugged?
5. Is there a special uorescent light or neon sign nearby?
N
Switching On and Off
The mains lead is attached to the rear of your set.
1.
Plug the mains lead into an appropriate socket.
The standby indicator lights up on your set.
2.
Press the POWERP button on your set.
You also can press the POWERP button or the TV button on the remote control to turn the TV on.
The programme that you were watching last is reselected automatically.
3.
Press the numeric button (0~9) or channel up / down (< / >) button on the remote control or >C/P.P< button on your
set.
When you switch the set on for the very rst time, you will be asked to choose language in which the menus are to be
displayed.
4.
To switch your set off, press the POWERP button again.
Placing Your Television in Standby Mode
Your set can be placed in standby mode in order to reduce the power consumption. The standby mode can be useful when you
wish to interrupt viewing temporarily (during a meal, for example).
1.
Press the POWERP button on the remote control.
The screen is turned off and a red standby indicator appears on your set.
2.
To switch your set back on, simply press the POWERP, numeric buttons (0~9), TV button or channel up / down (< / >)
button again.
Do not leave your set in standby mode for long periods of time (when you are away on holiday, for example). It is best to
unplug the set from the mains and aerial.
N
N
N
N
N
N
N
N
N
Page 10
English - 10
Viewing the Menus
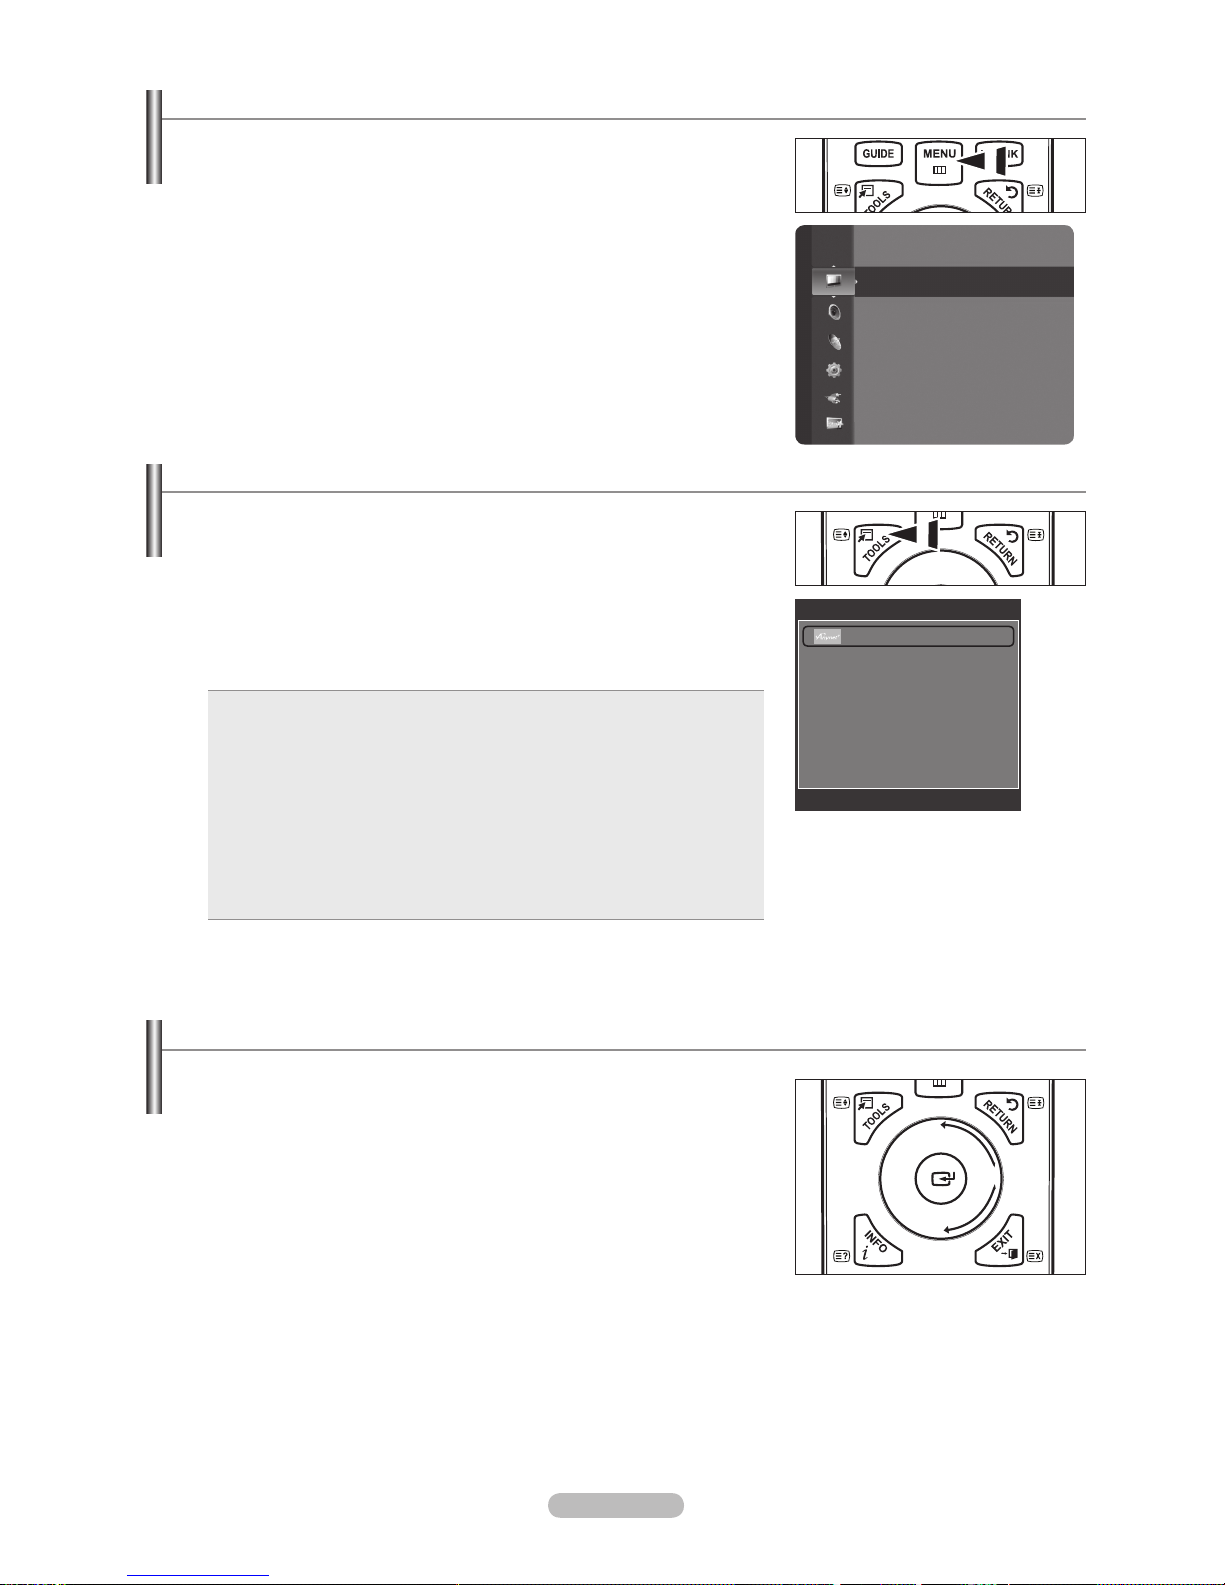
1. With the power on, press the MENU button. The main menu appears on the
screen. The menu’s left side has icons: Picture, Sound, Channel, Setup, Input,
Application.
2.
Press the ▲ or ▼ button to select one of the icons. Then press the ENTERE
button to access the icon’s sub-menu.
3.
Press the EXIT button to exit.
The on-screen menus disappear from the screen after about one minute.
Using the TOOLS Button
You can use the TOOLS button to select your frequently used functions quickly and
easily. The Tools menu changes depending on which external input mode you are
viewing.
1.
Press the TOOLS button. The Tools menu will appear.
2.
Press the ▲ or ▼ button to select a menu, then press the ENTERE button.
3.
Press the ▲ / ▼ / ◄ / ► / ENTERE buttons to display, change, or use the
selected items. For a more detailed description of each function, refer to the
corresponding page.
Anynet+ (HDMI-CEC): see page 54
Picture Size: see page 18
Picture Mode: see page 16
Sound Mode: see page 22
Sleep Timer: see page 27
SRS TS XT: see page 22
Energy Saving: see page 26
Dual l ll: see page 23
PIP: see page 20
Auto Adjustment: see page 20
•
•
•
•
•
•
•
•
•
•
Using the Wheel button
To increase the channel number, turn the wheel clockwise when the Channel
Display is displayed. To decrease the channel number, turn the wheel
counterclockwise.
To turn the volume up, turn the wheel clockwise when the Volume
Control window is displayed. To turn the volume down, turn the wheel
counterclockwise.
To move to a lower menu, turn the wheel clockwise when the menu Display is
displayed. To move to a higher menu, turn the wheel counterclockwise.
N
Mode
:
Standard
Cell Light : 7
Contrast : 95
Brightness : 45
Sharpness : 50
Colour : 50
Tint (G / R) : G50 / R50
Detailed Settings
Picture
Tools
Anynet+ (HDMI-CEC)
Picture Size : Auto Wide
Picture Mode : Standard
Sound Mode : Custom
Sleep Timer : Off
SRS TS XT : Off
Energy Saving : Off
Dual l ll : Mono
U
Move E Enter e Exit
Page 11

English - 11
Plug & Play Feature
When the TV is initially powered on, basic settings proceed automatically and subsequently.
1.
Press the POWER button on the remote control. The message Valitse
valikkokieli, myymälädemo, kanavat ja kellonaika. is displayed.
2.
Press the ENTER
E
button, then Valitse kuvaruutuvalikon kieli. menu is
automatically displayed. Press the ENTER
E
button.
3.
Select the appropriate language by pressing the ▲ or ▼ button. Press the
ENTER
E
button to conrm your choice.
4.
Press the ◄ or ► button to select Store Demo or Home Use, then the ENTER
E
button.
We recommend setting the TV to Home Use mode for the best picture in your home environment.
Store Demo mode is only intended for use in retail environments.
If the unit is accidentally set to Store Demo mode and you want to return to Home Use (Standard): Press the Volume
button on the TV. When the volume OSD is displayed, press and hold the MENU button on the TV for 5 seconds.
The Screen Saver is activated if there is no remote control key input for longer than 1 minute while Plug & Play is
running.
The Screen Saver is activated if there is no operating signal for longer than 15 minutes.
5.
Press the ENTERE button. Select the appropriate country by pressing the ▲ or ▼ button. Press the ENTERE button to
conrm your choice.
6.
Press the ▲ or ▼ button to select the channel source to memorize. Press the ENTER
E
button to select Start.
Digital & Analogue: Digital and Analogue channels.
Digital: Digital channels.
Analogue: Analogue channels.
7.
Press the ▲ or ▼ button to memorize the channels of the selected connection, then press the ENTERE button.
Air: Air antenna signal.
Cable: Cable antenna signal.
The channel search will start and end automatically.
Press the ENTER
E
button at any time to interrupt the memorization process.
After all the available channels are stored, the message Set the Clock Mode. is displayed.
8.
Press the ENTERE button. Press the ▲ or ▼ button to select Auto, then Press the ENTERE button.
If you select Manual, Set current date and time is displayed. (See page 27)
If you have received a digital signal, the time will be set automatically. If
not, see page 27 to set the clock.
9.
The message Enjoy your viewing is displayed. When you have nished, press
the ENTER
E
button.
If you want to reset this feature...
1.
Press the MENU button to display the menu. Press the ▲ or ▼ button to select
Setup, then press the ENTER
E
button.
2.
Press the ENTER
E
button again to select Plug & Play.
3.
Enter your 4 digit PIN number. The default PIN number of a new TV set is
‘0-0-0-0’.
If you want to change PIN number, refer to 23 page.
The Plug & Play feature is only available in the TV mode.
N
N
N
N
N
N
N
N
N
N
N
N
N
N
Channel Control
Storing Channels and channel
Country
Analogue Channel: You can change the country for analogue channels.
Digital Channel: You can change the country for digital channels.
The PIN number input screen appears. Enter your 4 digit PIN number.
❑
N
Setup
Plug & Play ►
Language : English
Time
Network Selection : Cable
Wireless Network Setup
Cable Network Setup
Child Lock : On
Change PIN
Channel
Country
►
Auto Store
Manual Store
Full Guide
Mini Guide
Default Guide : Mini Guide
Channel List
Channel Mode : Added Ch.
Plug & Play
Valitse valikkokieli, myymälädemo, kanavat ja kellonaika.
OK
E Hyväksy
Page 12

English - 12
Auto Store
You can scan for the frequency ranges available to you (and availability depends on your country). Automatically allocated
programme numbers may not correspond to actual or desired programme numbers.
Digital & Analogue: Digital and Analogue channels.
Digital: Digital channels.
Analogue: Analogue channels.
You can memorize the channels of the selected connection.
Air: Air antenna signal.
Cable: Cable antenna signal.
Scans for all channels with active broadcast stations and stores them in the TV’s memory.
If you want to stop Auto Store, press the ENTER
E
button.
The Stop Auto Store? message will be displayed.
Select Yes by pressing the ◄ or ► button, then press the ENTER
E
button.
If a channel is locked using the Child Lock function, the PIN input window appears.
Digital & Analogue / Digital
The update procedures differ depending on the selected Country.
Update the channel list by selecting an appropriate option.
When the Country was set to Finland
Cable: Scans cable channels.
Air: Scans aerial channels.
This product cannot scan both cable and aerial channels at the sametime.
When it has nished, the number of scanned services will be displayed.
The existing favourite channel list will not be deleted when the channel list is updated.
When the Country was set to Sweden, or Denmark
When selecting Cable:
Frequency: Displays the frequency for the channel. (Differs in each country)
Modulation: Displays available modulation values.
Symbol Rate: Displays available symbol rates.
Network ID: Displays the network identication code.
Press the red button to start the scan for digital services. When it has nished, channels are updated in the channel list.
When selecting Air:
Press the ENTERE button to select Start.
Manual Store
Scans for a channel manually and stores it in the TV’s memory.
If a channel is locked using the Child Lock function, the PIN input window appears.
Digital Channel
Manual store for digital channels.
When the Country was set to Finland
Press the ▲ or ▼ button to select Cable or Air, then press the ENTERE button.
When selecting Cable:
Frequency: Displays the frequency for the channel. (Differs in each country)
Modulation: Displays available modulation values.
Symbol Rate: Displays available symbol rates.
Press the ENTERE button to start the scan for digital services.
When it has nished, channels are updated in the channel list.
When selecting Air:
Channel: Channel “21” to “69” in sequence are displayed (depending on the country)
Frequency: The frequency available in the Channel group is displayed.
Bandwidth: The available bandwidths are 8 MHz.
Press the ENTERE button to start the scan for digital services.
When it has nished, channels are updated in the channel list.
❑
•
•
•
•
•
N
N
N
N
N
•
-
-
N
N
N
•
N
-
-
-
-
N
❑
N
N
•
N
-
-
-
N
-
-
-
Page 13

English - 13
When the Country was set to Sweden, Denmark, or Norway
Channel: Channel “21” to “69” in sequence are displayed (depending on the country)
Frequency: The frequency available in the Channel group is displayed.
Bandwidth: The available bandwidths are 8 MHz.
Press the ENTERE button to start the scan for digital services.
When it has nished, channels are updated in the channel list.
Analogue Channel
Manual store for analogue channel.
Programme (Programme number to be assigned to a channel): Sets the programme number using the ▲, ▼ or number
(0~9) buttons.
ColourSystem→Auto/PAL/SECAM/NTSC4.43
: Sets the colour system value using the ▲ or ▼ button.
Sound System → BG / DK / I / L: Sets the sound system value using the ▲ or ▼ button.
Channel (When you know the number of the channel to be stored): Press the ▲ or ▼ button to select C (Air channel) or S
(Cable channel). Press the ► button, then press the ▲, ▼ or number (0~9) buttons to select the required number.
You can also select the channel number directly by pressing the number (0~9) buttons.
If there is abnormal sound or no sound, reselect the sound standard required.
Search (When you do not know the channel numbers): Press the ▲ or ▼ button to start the search. The tuner scans the
frequency range until the rst channel or the channel that you selected is received on the screen.
Store (When you store the channel and associated programme number): Set to OK by pressing the ENTER
E
button.
Channel mode
P (Programme mode): When completing tuning, the broadcasting stations in your area have been assigned to position
numbers from P00 to P99. You can select a channel by entering the position number in this mode.
C (Air channel mode): You can select a channel by entering the assigned number to each air broadcasting station in
this mode.
S (Cable channel mode): You can select a channel by entering the assigned number for each cable channel in this
mode.
Full Guide / Mini Guide
The EPG (Electronic Programme Guide) information is provided by the broadcasters. Programme entries may appear blank
or out of date as a result of the information broadcast on a given channel. The display will dynamically update as soon as new
information becomes available.
For the detailed procedures on using Full Guide and Mini Guide, refer to
the descriptions on page 13.
You can also display the guide menu simply by pressing the GUIDE button.
(To congure the Default Guide, refer to the descriptions.)
Full Guide:
Displays the programme information as time ordered One hour segments. Two hours of programme information
is displayed which may be scrolled forwards or backwards in time.
Mini Guide:
The information of each programme is displayed by each line on the current channel Mini Guide screen from
the current programme onwards according to the programme starting time order.
Default Guide
Mini Guide / Full Guide:
You can decide whether to display either the Mini Guide or the Full Guide when the GUIDE
button on the remote control is pressed.
Channel List
For the detailed procedures on using the Channel List, refer to the descriptions on pages 15~16.
Channel Mode
When the press the P >/< button, Channels will be switched within the selected channel list.
Added Ch.: Channels will be switched within the memorized channel list.
Favourite Ch.: Channels will be switched within the favourite channel list.
•
-
-
-
•
•
•
•
N
N
•
•
N
-
-
-
❑
N
O
❑
❑
❑
Page 14

English - 14
Fine Tune
If the reception is clear, you do not have to ne tune the channel, as this is done automatically during the search and store
operation. If the signal is weak or distorted, you may have to ne tune the channel manually.
Fine tuned channels that have been saved are marked with an asterisk * on the right-hand side of the channel number in
the channel banner.
To reset the ne-tuning, select Reset by pressing the ▲ or ▼ button and then press the ENTER
E
button.
Only Analogue TV channels can be ne tuned.
Signal Information
You can get information about the signal status.
If the signal status is poor, the Weak or No Signal message is displayed.
While viewing a Digital channel, this function can be selected.
The technical information for signal status is displayed.
- Frequency / Service ID / Multiplex / Network / Bit error level / Signal Strength
Using the Full / Mini Guide
▲/▼/◄/►,
(ENTER)
Select a programme by pressing the ▲/▼/◄/► button.
If the next progrmme is selected, it is scheduled with the clock icon displayed. If the ENTERE button
is pressed again, press the ▲/▼/◄/► button to select Cancel Schedules, the scheduling is canceled
with the clock icon gone.
For details about scheduling programmes, refer to the section.
RED Toggle between the Mini Guide or Full Guide.
GREEN
Full Guide: Scroll backwards quickly (24 hours).
Mini Guide: Display next page quickly.
YELLOW
Full Guide: Scroll forwards quickly (24 hours).
Mini Guide: Display previous page quickly.
BLUE Exit the guide.
INFO
INFO button for the detailed information. Channel Number, Running Time, Status Bar, Parental Level,
Video Quality Information (HD/SD), Sound Modes, Subtitle or Teletext, languages of Subtitle or Teletext
and brief summary of the highlighted programme are included on the detailed information. “…” will be
appeared if the summary is long.
❑
N
N
N
❑
N
N
N
Full Guide
DTV Cable 900 f tn 2:10 Tue 1 Jun
Freshmen On Campus
2:00 - 2:30
No Detailed Information
Today 2:00 - 3:00 3:00 - 4:00
Mint Extra
Loaded
Fresh 40 with Dynamite MC
The Distillery
Smash Hits! Sunday
900 f tn
901 ITV Play
902 Kerrang!
903 Kiss
903 oneword
903 Smash Hits!
▼
Street Hypn..
Kisstory
No Information
No Information
No Information
Freshmen O..
Watch
Information
Mini Guide +24 Hours Exit
Mini Guide DTV Cable 900 f tn
Street Hypnosis
Booze Britain
2:00
2:30
5:00
▼
Freshmen On Campus
Watch
Information
Full Guide Next Page Exit
Page 15

English - 15
Managing Channels
Using this menu, you can Add / Delete or set Favourite channels and use the
programme guide for digital broadcasts.
Select a channel in the All Channels, Added Channels ,Favourites or
Programmed screen by pressing the ▲ / ▼ buttons, and pressing the
ENTERE button. Then you can watch the selected channel.
All Channels:
Shows all currently available channels.
Added Channels:
Shows all added channels.
Favourites:
Shows all favourite channels.
Programmed:
Shows all current reserved programmes.
Using the Colour buttons with the Channel List
Red (Channel Type): Toggle between your TV, Radio, Data / Other and All.
Green (Zoom): Enlarges or shrinks a channel number.
Yellow (Select): Selects multiple channel lists.
TOOLS (Option): Displays the Delete (or Add), Add to Favourite (or Delete
from Favourite), Lock (or Unlock), Timer Viewing, Edit Channel Name,
Sort, Edit Channel Number, Select All, Deselect All or Auto Store menu.
(The Options menus may differ depending on the situation.)
Channel Status Display Icons
A
An Analogue channel.
c
A channel selected by pressing the yellow button.
♥
A channel set as a Favourite.
(
A programme currently being broadcast.
\
A locked channel.
)
A reserved programme
Channel List Option Menu (in All Channels / Added Channels / Favourites)
Press the TOOLS button to use the option menu.
Option menu items may differ depending on the channel status.
Add / Delete
You can delete or add a channel to display the channels you want.
All deleted channels will be shown on All Channels menu.
A gray-coloured channel indicates the channel has been deleted.
The Add menu only appears for deleted channels.
You can also delete a channel in the Added Channels or Favourite menu
in the same manner.
Add to Favourite / Delete from Favourite
You can set channels you watch frequently as favourites.
The ♥ symbol will be displayed and the channel will be set as a favourite.
All favourite channels will be shown on Favourite menu.
Lock / Unlock
You can lock a channel so that the channel cannot be selected and viewed. This function is available only when the Child
Lock is set to on. (see page 24)
The PIN number input screen appears. Enter your 4 digit PIN number.
The default PIN number of a new TV set is 0-0-0-0. You can change the PIN, by selecting Change PIN from the menu.
The \ symbol will be displayed and the channel will be locked.
Timer Viewing
If you reserve a programme you want to watch, the channel is automatically switched to the reserved channel in the Channel
List; even when you are watching another channel. To reserve a programme , set the current time rst. (See page 27.)
Only memorized channels can be reserved.
You can set the channel, month, day, year, hour and minute directly by pressing the number buttons on the remote
control.
Reserving a programme will be shown on Programmed menu.
Digital Programme Guide and Viewing Reservation
When a digital channel is selected, and you press the ► button, the Programme Guide for the channel appears. You can
reserve a programme according to the procedures described above.
N
N
-
-
-
-
N
N
N
N
N
N
N
N
N
N
N
N
N
N
N
N
Channel
Mini Guide
Default Guide : Mini Guide
Channel List
Channel Mode : Added Ch.
Fine Tune
Signal Information
824 UKTV Gold
825 UKTV style
A 1 C --
A 2 C
--
A 3 ♥ C
--
A 4 C
--
A 5 C
--
A 6 C
--
A 7 C
--
A 8 C
--
Added Channels
All
Channel Type Zoom Select
Option
824 UKTV Gold
825 UKTV style
A 1 C --
A 2 C
--
A 3 C
--
A 4 C
--
A 5 C
--
A 6 C
--
A 7 C
--
A 8 C
--
All Channels
All
Channel Type Zoom Select
Option
Delete
Add to Favourite
Lock
Timer Viewing
Edit Channel Name
Sort
▼
Page 16

English - 16
Edit Channel Name (only analogue channel)
Channels can labeled so that their call letters appear whenever the channel is selected.
The names of digital broadcasting channels are automatically assigned and cannot be labeled.
Edit Channel Number (only digital channel)
You can also edit the channel number by pressing the number buttons on the remote control.
Sort
This operation allows you to change the programme numbers of the stored channels. This operation may be necessary after
using the auto store.
The function is only available in Analouge.
Select All / Deselect All
Select All: You can select all the channels in the channel list.
Deselect All: You can deselect all the selected channels in the channel list.
You can perform the add / delete, add to Favourites / delete from Favourites, or lock / unlock function for multiple
channels at the same time. Select the required channels and press the yellow button to set all the selected channels at
the same time.
The c mark appears to the left of the selected channels.
You can only select Deselect All when there is a selected channel.
Auto Store
For further details on setting up options, refer to page 11.
If a channel is locked using the Child Lock function, the PIN input window appears.
Channel List Option Menu (in Programmed )
You can view, modify or delete a reservation.
Press the TOOLS button to use the option menu.
Change Info: Select to change a viewing reservation.
Cancel Schedules: Select to cancel a viewing reservation.
Information: Select to view a viewing reservation. (You can also change
the reservation information.)
Select All: Select all reserved programmes.
N
N
•
•
N
N
N
N
N
N
Picture Control
Changing and Resetting the Picture Settings
Mode
You can select the type of picture which best corresponds to your viewing
requirements.
Dynamic: Selects the picture for high-definition in a bright room.
Standard: Selects the picture for the optimum display in a normal
environment.
Movie: Selects the picture for viewing movies in a dark room.
Press the TOOLS button to display Tools menu.
You can also set the picture mode by selecting Tools→PictureMode.
Cell Light / Contrast / Brightness / Sharpness / Colour / Tint(G/R)
Your television has several setting options that allow you to control the picture quality.
Cell Light: Adjusts the pixel brightness. 10 is brightest.
Contrast: Adjusts the contrast level of the picture.
Brightness: Adjusts the brightness level of the picture.
Sharpness: Adjusts the edge definition of the picture.
Colour: Adjusts Colour saturation of the picture.
❑
T
❑
Programmed
1 / 1 / 2008
13:59 5 TV1 Quincy, M.E
18:59 2 TV3 The Equalizer
20:59 2 TV3 McMillan & Wife
21:59 2 TV3 M.Spillane’s mike Hammer
Change Info
Cancel Schedules
Information
Select All
All
Channel Type Zoom Select
Option Information
Mode : Standard
►
Cell Light : 7
Contrast : 95
Brightness : 45
Sharpness : 50
Colour : 50
Tint(G/R) : G50 / R50
Detailed Settings
Picture
Page 17

English - 17
Tint(G/R): Adjusts the Colour tint of the picture.
Select a picture mode to be adjusted rst. The adjusted values are saved for each picture mode.
When you make changes to Cell Light, Contrast, Brightness, Sharpness, Colour or Tint(G/R), the OSD will be
adjusted accordingly.
In Analogue TV, Ext., AV, S-Video modes of the PAL system, you cannot use the Tint Function.
In PC mode, you can only make changes to Cell Light, Contrast and Brightness.
Settings can be adjusted and stored for each external device you have connected to an input of the TV.
The energy consumed during use can be signicantly reduced if the level of brightness of the picture is reduced, and then
this will reduce the overall running cost.
Detailed Settings
Samsung’s new TVs allow you to make even more precise picture settings than
previous models. See below to adjust detailed picture settings.
Detailed Settings is available in Standard or Movie mode.
In PC mode, you can only make changes to Dynamic Contrast, Gamma
and White Balance from among the Detailed Settings items.
BlackAdjust→Off/Low/Medium/High
You can select the black level on the screen to adjust the screen depth.
DynamicContrast→Off/Low/Medium/High
You can adjust the screen contrast so that the optimal contrast is provided.
Gamma
You can adjust the Primary Colour (Red, Green, Blue) Intensity.
Colour Space
Colour Space is a colour matrix composed of red, green and blue colours. Select your favourite Colour Space to experience
the most natural colour.
Auto: Auto Colour Space automatically adjusts to the most natural colour tone based on programme sources.
Native: Native Colour Space offers deep and rich colour tone.
Custom: Adjusts the colour range to suit your preference.
Customizing the Colour Space
Colour→Red/Green/Blue/Yellow/Cyan/Magenta
Adjusts the Colour range to suit your preference. Colour is available when Colour Space is set to Custom.
Red / Green / Blue: In Colour, you can adjust the RGB values for the selected colour.
Reset: Resets the colour space to the default values.
White Balance
You can adjust the colour temperature for more natural picture colours.
R-Offset / G-Offset / B-Offset / R-Gain / G-Gain / B-Gain: Changing the adjustment value will refresh the adjusted screen.
Reset: The previously adjusted white balance will be reset to the factory defaults.
Flesh Tone
You can emphasize the pink Flesh Tone in the picture.
Changing the adjustment value will refresh the adjusted screen.
EdgeEnhancement→Off/On
You can emphasize object boundaries in the picture.
xvYCC→Off/On
Setting the xvYCC mode to on increases detail and colour space when watching movies from an external device (i.e. DVD
player).
xvYCC is available when the picture mode is set to Movie, and the external input is set to HDMI or Component mode.
If xvYCC function is active, PIP cannot be selected.
Picture Options
In PC mode, you can only make changes to the Colour Tone, Size and
Screen Burn Protection from among the items in Picture Options.
Colour Tone→Cool2 / Cool1 / Normal / Warm1 / Warm2
You can select the most comfortable colour tone to your eyes.
The adjusted values are stored according to the selected Picture mode.
Warm1 or Warm2 is only activated when the picture mode is Movie.
N
N
N
N
N
N
❑
N
N
•
•
•
N
-
-
-
-
•
•
N
N
N
❑
N
N
N
Colour : 50
Tint (G / R) : G50 / R50
DetailedSettings ►
Picture Options
Picture Reset
Picture
Tint (G / R) : G50 / R50
Detailed Settings
PictureOptions ►
Picture Reset
Picture
Page 18

English - 18
Size
You can select the picture size which best corresponds to your viewing requirements.
Press the TOOLS button to display Tools menu.
You can also set the size by selecting Tools→PictureSize.
Auto Wide: Automatically adjusts the picture size to the 16:9 aspect ratio.
16:9
: Adjusts the picture size to 16:9 appropriate for DVDs or wide broadcasting.
Wide Zoom: Magnify the size of the picture more than 4:3.
Zoom: Magnies the 16:9 wide picture (in the vertical direction) to t the screen size.
4:3: This is the default setting for a video movie or normal broadcasting.
Just Scan: Use the function to see the full image without any cutoff when HDMI (720p / 1080i / 1080p)
or Component (1080i / 1080p) signals are input.
Depending on the input source, the picture size options may vary.
The items available may differ depending on the selected mode.
In PC Mode, only 16:9 and 4:3 mode can be adjusted.
Settings can be adjusted and stored for each external device you have connected to an input of the TV.
Temporary image retention may occur when viewing a static image on the set for more than two hours.
Wide Zoom: Press the ► button to select Position, then press the ENTER
E
button. Press the ▲ or ▼ button to
move the screen up / down. Then press the ENTER
E
button.
Zoom: Press the ► button to select Position, then press the ENTER
E
button. Press the ▲ or ▼ button to move the
picture up and down. Then press the ENTER
E
button. Press the ► button to select Size, then press the ENTER
E
button. Press the ▲ or ▼ button to magnify or reduce the picture size in the vertical direction. Then press the
ENTER
E
button.
After selecting Just Scan in HDMI (1080i / 1080p) or Component (1080i / 1080p) mode: Select Position by pressing
the ◄ or ►button. Use the ▲, ▼, ◄ or ► button to move the picture.
Reset: Press the ◄ or ► button to select Reset, then press the ENTER
E
button. You can initialize the setting.
If you use the Just Scan function with HDMI 720p input, 1 line will be cut at the top, bottom, left and right as in the
overscan function.
When Double ( , ) mode has been set in PIP, the Picture Size cannot be set.
Screen Mode→16:9 / Wide Zoom / Zoom / 4:3
When setting the picture size to Auto Wide in a 16:9 wide TV, you can determine the picture size you want to see the 4:3
WSS (Wide Screen Service) image or nothing. Each individual European country requires different picture size so this function
is intended for users to select it.
16:9
: Sets the picture to 16:9 wide mode.
Wide Zoom: Magnify the size of the picture more than 4:3.
Zoom: Magnify the size of the picture vertically on screen.
4:3: Sets the picture to 4:3 normal mode.
This function is available in Auto Wide mode.
This function is not available in PC, Component or HDMI mode.
Digital NR→Off / Low / Medium / High / Auto
If the broadcast signal received by your TV is weak, you can activate the Digital Noise Reduction feature to help reduce any
static and ghosting that may appear on the screen.
When the signal is weak, select one of the other options until the best picture is displayed.
DNIe→Off / Demo / On
This TV includes the DNIe function so as to provide a high visual quality. If you set DNIe to on, you can view the screen with
the DNIe feature activated. If you set the DNIe to Demo, you can view the applied DNIe and normal pictures on the screen, for
demonstration purposes. Using this function, you can view the difference in the visual quality.
DNIe™ (Digital Natural Image engine)
DNIe™
This feature brings you more detailed image with 3D noise reduction, detail enhancement, contrast enhancement and white
enhancement. New image compensation Algorithm gives brighter, clearer, more detailed image to you. DNIe™ technology will
t every signal into your eyes.
This function is not available in Movie and Standard mode.
HDMI Black Level→Normal / Low
You can directly select the black level on the screen to adjust the screen depth.
This function is active only when the external input connects to HDMI (RGB signals).
T
•
•
•
•
•
•
N
N
N
N
N
N
N
N
N
N
N
•
•
•
•
N
N
N
N
N
N
Page 19

English - 19
Real100HzDemo→Off/On
You can get a clear distinction between Real 100Hz and 50Hz, especially when watching fast moving scenes. Therefore, when
seeing slow moving scenes, you will not be able to distinguish between Real 100Hz and 50Hz. Demo 100Hz works only with
50Hz signal. Real 100Hz demo mode is provided for shop demonstration with special pictures.
Movie Plus→Off / Low / Medium / High / Demo
You can view more natural skin and clear text even in fast moving scenes.
Use this function when watching movies.
This function is not available in Wide Zoom and Zoom modes.
This function is not available when PIP is set to On.
It is not supported in HDMI 1080p/24Hz, 25Hz, 30Hz mode.
Blue Only Mode→Off / On
This function is for AV device measurement experts. This function displays the blue signal only by removing the red and
green signals from the video signal so as to provide a Blue Filter effect that is used to adjust the Colour and Tint of video
equipment such as DVD players, Home Theaters, etc. Using this function, you can adjust the Colour and Tint to preferred
values appropriate to the signal level of each video device using the Red / Green / Blue / Cyan / Magenta / Yellow Colour Bar
Patterns, without using an additional Blue Filter.
Blue Only Mode is available when the picture mode is set to Movie or Standard.
Screen Burn Protection
To reduce the possibility of screen burn, this unit is equipped with screen burn prevention technology. This technology enables
you to set picture movement up/down (Vertical Line) and side to side (Horizontal Dot). The Time setting allows you to program
the time between movement of the picture in minutes.
Pixel Shift: Using this function, you can minutely move pixels on the PDP in horizontal or vertical direction to minimize after
image on the screen.
Set Pixel Shift to On by pressing the ▲ or ▼ button, then press the ENTERE button.
Select the required option by pressing the ▲ or ▼ button, then press the ENTERE button.
Available options: Horizontal Dot, Vertical Line, Time.
Optimum condition for pixel shift;
PC TV/Ext/AV/Component/HDMI
Horizontal Dot 4 4
Vertical Line 4 4
Time (minute) 4 2 min
The Pixel Shift value may differ depending on the monitor size (inches) and mode.
This function is not available in the Just Scan mode.
All White: This function helps remove after images on the screen by changing the colour of pixels to white. Use this
function when there are remaining after images or symbols on the screen especially when you displayed a still image on the
screen for a long time.
Scrolling: This function helps remove after images on the screen by moving all the pixels on the PDP according to a
pattern Use this function when there are remaining after images or symbols on the screen especially when you displayed a
still image on the screen for a long time.
Side Gray: When you watch TV with the screen ratio of 4:3, the screen is prevented from any damage by adjusting the
white balance on both extreme left and right sides.
Dark: When you set the screen ratio to 4:3, it darkens the left and right sides.
Light: When you set the screen ratio to 4:3, it brightens the left and right sides.
PictureReset→ResetPictureMode/Cancel
Resets all picture settings to the default values.
Select a picture mode to be reset. The reset is performed for each picture mode.
N
N
N
N
N
•
N
N
N
N
N
N
•
•
•
-
-
❑
N
Page 20

English - 20
Viewing Picture-in-Picture
You can display a sub picture within the main picture of set programme or video
input. In this way, you can watch the picture of set programme or video input from
any connected equipment while watching the main picture.
You may notice that the picture in the PIP window becomes slightly unnatural
when you use the main screen to view a game or karaoke.
Press the TOOLS button to display Tools menu.
You can also congure PIP related settings by selecting Tools→PIP.
PIP→Off / On
You can activate or deactivate the PIP function.
Main picture Sub picture
Component
HDMI 1, HDMI2/DVI, HDMI 3,
HDMI 4
PC
TV, Ext.1, Ext.2, AV
Source
You can select a source of the sub-picture.
Size → / /
You can select a size of the sub-picture.
If main picture is in HDMI mode, Size is available.
Position → / / /
You can select a position of the sub-picture.
In Double ( , ) mode, Position cannot be selected.
Channel
You can select a channel of the sub-picture only when the Source is set to TV.
Press the TOOLS button to display Tools menu.
You can also set the picture mode by selecting Tools→PIP
N
T
❑
N
N
T
Setting up the TV with your PC
Preset: Press the SOURCE button to select PC mode.
Auto Adjustment
Auto Adjustment allows the PC screen of set to self-adjust to the incoming PC
video signal. The values of ne, coarse and position are adjusted automatically.
This function does not work in DVI-HDMI mode.
Press the TOOLS button to display Tools menu.
You can also set the Auto Adjustment by selecting Tools→Auto
Adjustment.
Screen
Coarse / Fine:
The purpose of picture quality adjustment is to remove or reduce picture noise. If the noise is not removed
by Fine-tuning alone, then adjust the frequency as best as possible (Coarse) and Fine-tune again. After the noise has been
reduced, readjust the picture so that it is aligned on the center of screen.
PC Position:
Adjust the PC’s screen positioning if it does not t the TV screen.
Press the ▲ or ▼ button to adjusting the
Vertical-Position. Press the ◄ or ► button to adjust the Horizontal-Position.
Image Reset:
You can replace all image settings with the factory default values.
N
❑
N
T
❑
Setup
Entertainment : Off
Energy Saving : Off
PIP ►
Software Upgrade
Common Interface
PIP
PIP : On
Source : TV
Size :
Position :
Channel : ATV 11
L
Move E Enter R Return
Brightness : 45
Sharpness : 50
Auto Adjustment
►
Screen
Detailed Settings
Picture Options
Picture Reset
Picture
Page 21
English - 21
PC Display
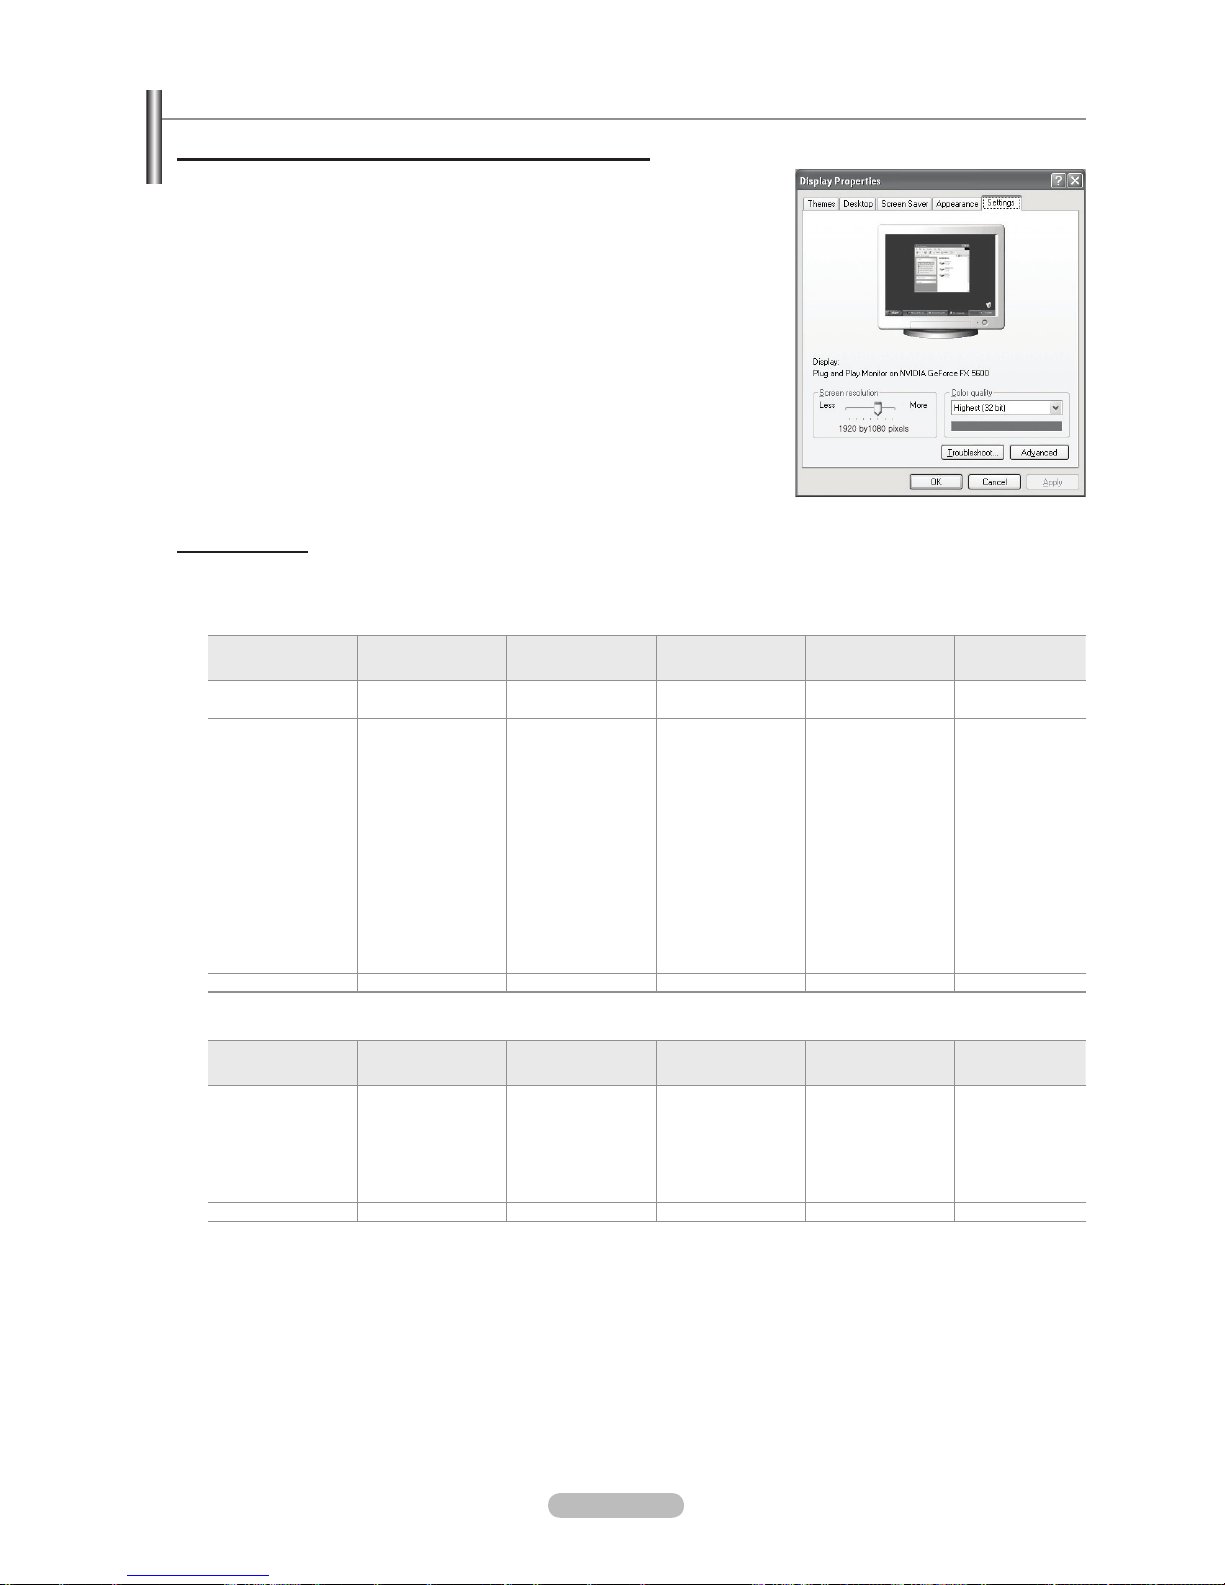
Setting Up Your PC Software (Based on Windows XP)
The Windows display-settings for a typical computer are shown below. The actual
screens on your PC will probably be different, depending upon your particular
version of Windows and your particular video card. However, even if your actual
screens look different, the same basic set-up information will apply in almost all
cases. (If not, contact your computer manufacturer or Samsung Dealer.)
1.
First, click on ‘Control Panel’ on the Windows start menu.
2.
When the control panel window appears, click on ‘Appearance and Themes’
and a display dialog-box will appear.
3.
When the control panel window appears, click on ‘Display’ and a display dialogbox will appear.
4.
Navigate to the ‘Settings’ tab on the display dialog-box.
The correct size setting (resolution)
Optimum: 1920 X 1080 pixels
If a vertical-frequency option exists on your display settings dialog box, the
correct value is ‘60’ or ‘60 Hz’. Otherwise, just click ‘OK’ and exit the dialog box.
Display Modes
Both screen position and size will vary depending on the type of PC monitor and its resolution.
The resolutions in the table are recommended.
D-Sub Input
Mode Resolution
Horizontal
Frequency (kHz)
Vertical Frequency
(Hz)
Pixel Clock
Frequency (MHz)
Sync Polarity
(H / V)
IBM
640 x 350
720 x 400
31.469
31.469
70.086
70.087
25.175
28.322
+ / -
- / +
VESA
640 x 480
640 x 480
640 x 480
800 x 600
800 x 600
800 x 600
1024 x 768
1024 x 768
1024 x 768
1280 x 1024
1280 x 1024
1360 x 768
1600 x 1200
31.469
37.861
37.500
37.879
48.077
46.875
48.363
56.476
60.023
63.981
79.976
47.712
75.000
59.940
72.809
75.000
60.317
72.188
75.000
60.004
70.069
75.029
60.020
75.025
60.015
60.000
25.175
31.500
31.500
40.000
50.000
49.500
65.000
75.000
78.750
108.000
135.000
85.500
162.000
- / -
- / -
- / + / +
+ / +
+ / +
- / -
- / + / +
+ / +
+ / +
+ / +
+ / +
CVT 1920 x 1080RB 66.587 59.934 138.500 + / -
HDMI / DVI Input
Mode Resolution
Horizontal
Frequency (kHz)
Vertical Frequency
(Hz)
Pixel Clock
Frequency (MHz)
Sync Polarity
(H / V)
VESA
640 x 480
800 x 600
1024 x 768
1280 x 1024
1360 x 768
1600 x 1200
31.469
37.879
48.363
63.981
47.712
75.000
59.940
60.317
60.004
60.020
60.015
60.000
25.175
40.000
65.000
108.000
85.500
162.000
- / + / +
- / + / +
+ / +
+ / +
CEA 1920 x 1080p 67.500 60.000 148.500 + / +
When using an HDMI / DVI cable connection, you must use the HDMI IN 2 jack.
The interlace mode is not supported.
The set might operate abnormally if a non-standard video format is selected.
Separate and Composite modes are supported. SOG is not supported.
Too long or low quality VGA cable can cause picture noise at high resolution modes (1920x1080).
N
N
N
N
N
Page 22

English - 22
Sound Control
Changing the Sound Standard
Mode→Standard/Music/Movie/Speech/Custom
You can select the type of special sound effect to be used when watching a
given broadcast.
Press the TOOLS button to display Tools menu.
You can also congure the sound mode by selecting Tools→Sound
Mode.
Equalizer
The sound settings can be adjusted to suit your personal preferences.
Mode: You can select a sound mode to suit your personal preferences.
Balance: Controls the balance between the right and left speakers.
100Hz / 300Hz / 1kHz / 3kHz / 10kHz (Bandwidth Adjustment): To adjust the level of different bandwidth frequencies
Reset: Resets the equalizer settings to the default values.
SRSTruSurroundXT→Off/On
TruSurround XT is a patented SRS technology that solves the problem of playing 5.1 multichannel content over two speakers.
TruSurround delivers a compelling, virtual surround sound experience through any two-speaker playback system, including
internal television speakers. It is fully compatible with all multichannel formats.
Press the TOOLS button to display Tools menu.
You can also set the SRS TruSurround XT by selecting Tools→SRSTSXT.
TruSurround XT, SRS and Symbol are trademarks of SRS Labs, Inc. TruSurround XT
technology is incorporated under license from SRS Labs, Inc.
Audio Language
You can change the default value for audio languages. Displays the language information for the incoming stream.
While viewing a digital channel, this function can be selected.
You can only select the language among the actual languages being broadcast.
AudioFormat→MPEG/DolbyDigital
When sound is emitted from both the main speaker and the audio receiver, a sound echo may occur due to the decoding
speed difference between the main speaker and the audio receiver. In this case, use the TV Speaker function.
While viewing a digital channel, this function can be selected.
You can only select the language among the actual languages being broadcast.
Manufactured under license from Dolby Laboratories.
Dolby and the double-D symbol are trademarks of Dolby Laboratories.
Audio Description
This is an auxiliary audio function that provides an additional audio track for visually challenged persons. This function handles
the Audio Stream for the AD (Audio Description), when it is sent along with the Main audio from the broadcaster. Users can
turn the Audio Description On or Off and control the volume.
AudioDescription→Off/On: Turn the audio description function on or off.
Volume: You can adjust the audio description volume.
Volume is active when Audio Description is set to On.
While viewing a Digital channel, this function can be selected.
❑
T
❑
❑
T
❑
N
N
❑
N
N
❑
N
N
Mode : Custom
►
Equalizer
SRS TruSurround XT : Off
Audio Language : ---Audio Format : ----
Audio Description
Auto Volume : Off
Select Speaker : TV Speaker
Sound
Page 23
English - 23
Auto Volume→Off/On
Each broadcasting station has its own signal conditions, and so it is not easy
to adjust the volume every time the channel is changed. This feature lets you
automatically adjust the volume of the desired channel by lowering the sound
output when the modulation signal is high or by raising the sound output when
the modulation signal is low.
SelectSpeaker→ExternalSpeaker/TVSpeaker
If you want to hear the sound through separate speakers, cancel the internal
amplier.
The – +, MUTE buttons do not operate when the TV Speaker is set to Off.
If you select External Speaker in the Select Speaker menu, the sound settings will be limited.
TV's Internal Speakers Audio Out (Optical, L / R Out) to Sound System
TV / Ext. / AV / S-Video / Component / PC / HDMI TV / Ext. / AV / S-Video / Component / PC / HDMI
TV Speaker Speaker Output Sound Output
External Speaker Mute Sound Output
Video No Signal Mute Mute
Sound Select
When the PIP feature is activated, you can listen to the sound of the sub (PIP) picture.
Main: Used to listen to the sound of the main picture.
Sub: Used to listen to the sound of the sub picture.
Press the TOOLS button to display Tools menu.
You can also set the sound of the sub picture by selecting Tools→PIP→SoundSelect.
Sound Reset
Reset All / Reset Sound Mode / Cancel:
You can restore the Sound settings to the factory defaults.
❑
❑
N
N
❑
T
❑
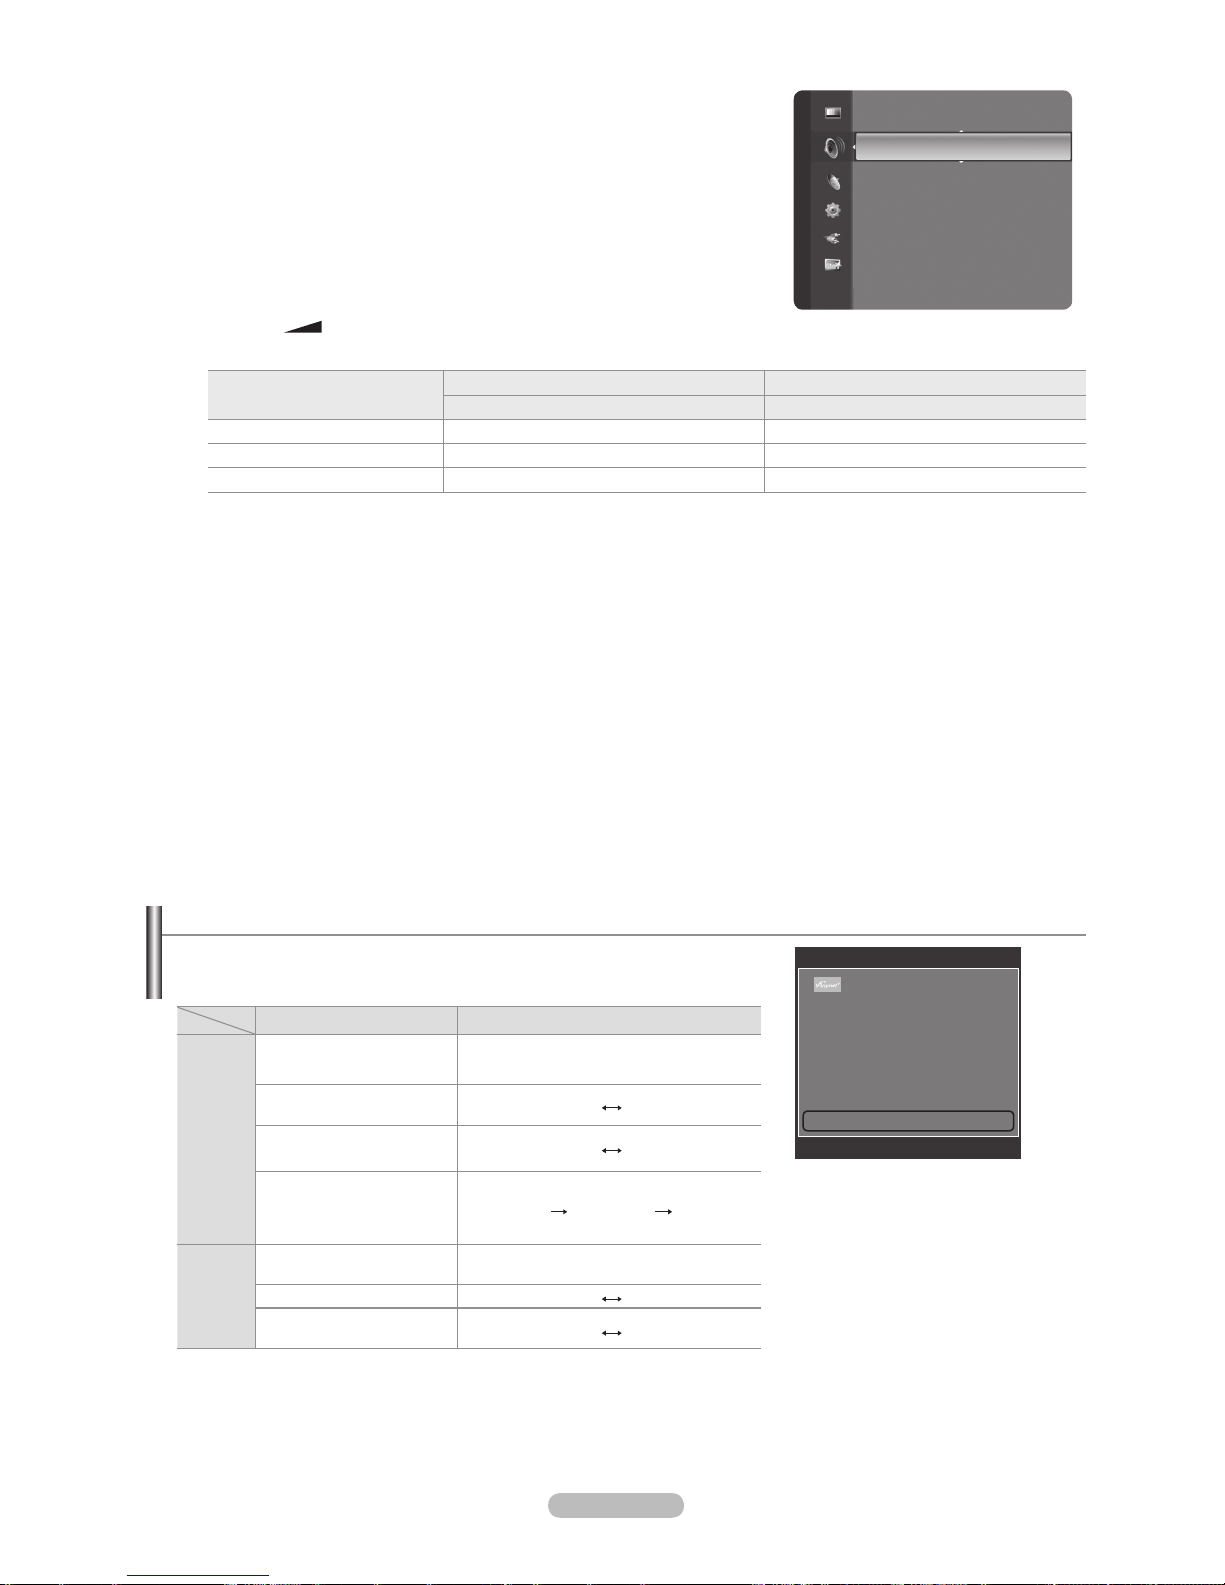
Selecting the Sound Mode
You can set the sound mode in the Tools menu. When you set to Dual l ll, the
current sound mode is displayed on the screen.
Type of broadcast
On-screen indication
NICAM
Stereo
Regular broadcast
(Standard audio)
Mono (Normal use)
Regular + NICAM Mono
NICAM
Mono
(Normal)
NICAM-Stereo
NICAM
Stereo
Mono
(Normal)
NICAM Dual-I/II
NICAM
Dual-1
NICAM
Dual-2
Mono
(Normal)
A2
Stereo
Regular broadcast
(Standard audio)
Mono (Normal use)
Bilingual or DUAL-I/II
Dual I Dual II
Stereo Stereo
Mono
(Forced mono)
If the stereo signal is weak and an automatic switching occurs, then switch to the mono.
This function is only activated in stereo sound signal. It is deactivated in mono sound signal.
This function is only available in TV mode.
N
N
N
Tools
Anynet+ (HDMI-CEC)
Picture Size : Auto Wide
Picture Mode : Standard
Sound Mode : Custom
Sleep Timer : Off
SRS TS XT : Off
Energy Saving : Off
Dual l ll ◄ Mono ►
U
Move L Adjust e Exit
Select Speaker : TV Speaker
Sound Select : Main
SoundReset ►
Sound
Page 24
English - 24
ConguringtheSetupMenu
Language
You can set the menu language.
ChildLock→Off/On
This feature allows you to prevent unauthorized users, such as children, from
watching unsuitable programmes by muting out video and audio.
Before the setup screen appears, the PIN number input screen appears.
Enter your 4 digit PIN number.
The default PIN number of a new TV set is 0-0-0-0. You can change the
PIN by selecting Change PIN from the menu.
You can lock some channels in Channel List. (refer to page 16)
Child Lock is available only in TV mode.
Change PIN
You can change your personal ID number that is required to set up the TV.
Before the setup screen appears, the PIN number input screen appears. Enter your 4 digit PIN number.
The default PIN number of a new TV set is 0-0-0-0.
If you forget the PIN code, press the remote control buttons in the following sequence, which resets the PIN to 0-0-0-0:
POWER (Off), MUTE, 8, 2, 4, POWER (On).
ParentalLock→ParentalRating
This feature allows you to prevent unauthorized users, such as children, from watching unsuitable programmes by a 4-digit
PIN (Personal Identication Number) code that is dened by the user.
In the Parental Rating screen, congure the parental ratings.
Before the setup screen appears, the PIN number input screen appears. Enter your 4 digit PIN number.
The default PIN number of a new TV set is 0-0-0-0. You can change the PIN by selecting Change PIN from the menu.
When the parental ratings are set, the \ symbol is displayed.
Allow All: Press to unlock all TV ratings.
Block All: Press to lock all TV ratings.
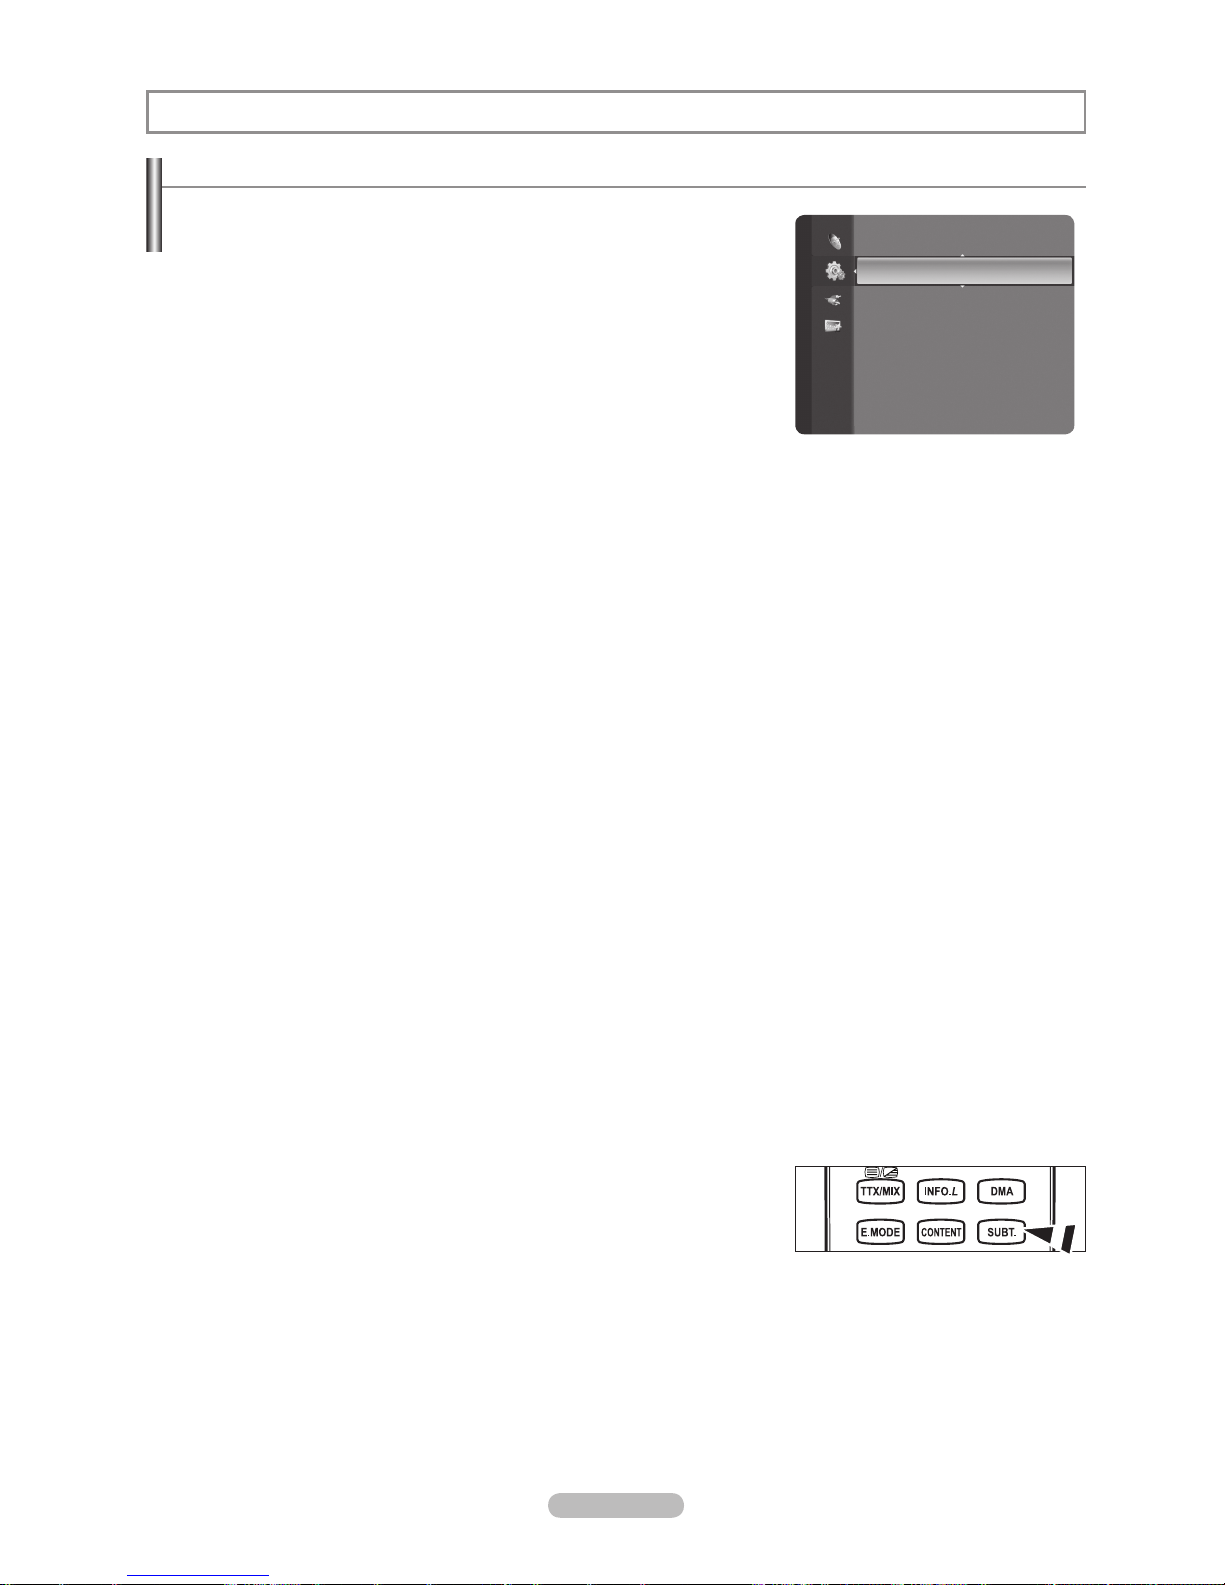
Subtitle
You can activate and deactivate the subtitles. Use this menu to set the Subtitle Mode. Normal under the menu is the basic
subtitle and Hard of hearing is the subtitle for a hearing-impaired person.
Subtitle→Off/On: Switches subtitles off or on.
Mode→Normal/Hardofhearing
: Sets the subtitle mode.
Subtitle Language: Set the subtitle language.
If the programme you are watching does not support the Hard of hearing function, Normal automatically activates even
though Hard of hearing mode is selected.
English is the default in cases where the selected language is unavailable in the broadcast.
You can select these options simply by pressing the SUBT. button on the remote control.
Teletext Language
You can set the Teletext language by selecting the language type.
English is the default in cases where the selected language is unavailable
in the broadcast.
❑
❑
N
N
N
N
❑
N
N
N
❑
-
N
N
N
N
❑
N
N
N
❑
N
Function Description
Setup
Plug & Play
Language : English ►
Time
Network Selection : Cable
Wireless Network Setup
Cable Network Setup
Child Lock : On
Change PIN
Parental Lock
Page 25

English - 25
Preference
Primary Audio Language / Secondary Audio Language / Primary Subtitle Language / Secondary Subtitle Language /
Primary Teletext Language / Secondary Teletext Language
Using this feature, users can select one of the languages. The language selected here is the default when the user selects a
channel.
If you change the language setting, the Subtitle Language, Audio Language, and the Teletext Language of the Language
menu are automatically changed to the selected language.
The Subtitle Language, Audio Language, and the Teletext Language of the Language menu show a list of languages
supported by the current channel and the selection is highlighted. If you change this language setting, the new selection is
only valid for the current channel. The changed setting does not change the setting of the Primary Subtitle Language, Primary
Audio Language, or the Primary Teletext Language of the Preference menu.
LightEffect→Off/InStandby/WatchingTV/Always
You can turn on/off the blue LED on the front of TV according to the situation. Use it for saving power or when the LED dazzles
your eyes.
Off: The blue LED is always off.
In Standby: The blue LED lights while in Standby mode and it turns off when your TV is turned on.
Watching TV: The blue LED lights when watching TV and it turns off when your TV is turned off.
Always: The blue LED always lights.
Set the Light Effect to Off to reduce the power consumption.
Melody
Off / Low / Medium / High
The TV power on / off melody sound can be adjusted.
The Melody does not play
When no sound is output from the TV because the MUTE button has been pressed.
When no sound is output from the TV because the – (Volume) button has been pressed.
When the TV is turned off by Sleep Timer function.
Entertainment
The Entertainment mode enables you to select the optimal display and sound for sports, cinema and games.
Off: Switches the Entertainment function off.
Sports: Provides the optimal picture and sound quality for sports.
Cinema: Provides the optimal picture and sound quality for movie watching. You can experience a richer picture and
enhanced sound.
Game: Provides the optimal picture and sound quality for games. This mode accelerates the playing speed when
using an external game console connected to the TV.
If you set any of the three Entertainment modes to On, the settings will be locked and can not be adjusted. In addition,
Picture and Sound mode settings are not allowed. If you want to make Picture and Sound mode adjustments, the
Entertainment mode must be turned off.
The Entertainment settings are saved for each input source.
The Entertainment mode is not available at PC source
You can press the E.MODE button on the remote control repeatedly to change
the Entertainment setting.
❑
❑
N
❑
N
-
-
-
❑
N
N
N
O
Page 26

English - 26
Energy Saving
This feature adjusts the brightness of the TV in order to reduce power consumption. When watching TV at night, set the
Energy Saving mode option to High to reduce eye fatigue as well as power consumption.
Off: Turns off the energy saving function.
Low: Sets the TV to low energy saving mode.
Medium: Sets the TV to medium energy saving mode.
High: Sets the TV to high energy saving mode.
Press the TOOLS button to display Tools menu.
You can also set the Energy Saving option by selecting Tools→EnergySaving.
Software Upgrade
To keep your product up-to-date with new Digital Television features then
software upgrades are periodically broadcast as part of the normal Television
signal. It will automatically detect these signals and display the software
upgrade banner. You are given the option to install the upgrade.
By USB
Insert a USB drive containing the rmware upgrade into TV. Please be careful
to not disconnect the power or remove the USB drive while upgrades are being
applied. The TV will turn off and turn on automatically after completing the
rmware upgrade. Please check the rmware version after the upgrades are complete. When software is upgraded, video and
audio settings you have made will return to their default (factory) settings. We recommend you write down your settings so that
you can easily reset them after the upgrade.
By Channel
Upgrades the software using the broadcasting signal.
Standby Mode Upgrade
To continue software upgrade with master power on, Select On by pressing the ▲ or ▼ button. 45 minutes after entering
standby mode, a manual upgrade is automatically conducted. Since the power of the unit is turned on internally, the screen
may be on slightly for the product. This phenomenon may continue for more than 1 hour until the software upgrade is
completed.
Alternative Software
To display the software version information.
Common Interface
Installing the CI Card
a. Purchase the CI CAM module by visiting your nearest dealer or by phone.
b. Insert the CI CARD into the CAM in the direction of the arrow until it ts.
c. Insert the CAM with the CI CARD installed into the common interface slot.
Insert the CAM in the direction of the arrow, right up to the end so that it is
parallel with the slot.
d. Check if you can see a picture on a scrambled signal channel.
CI Menu
This enables the user to select from the CAM-provided menu.
Select the CI Menu based on the menu PC Card.
Application Info.
This contains information on CAM inserted in the CI slot and displays it.
The Application Info inserting is about the CI CARD. You can install the CAM
anytime whether the TV is ON or OFF.
1. Purchase the CI CAM module by visiting your nearest dealer or by phone.
2. Insert the CI CARD into the CAM in the direction of the arrow until it ts.
3. Insert the CAM with the CI CARD installed into the common interface slot. (Insert the CAM in the direction of the arrow, right
up to the end so that it is parallel with the slot.)
4. Check if you can see a picture on a scrambled signal channel.
❑
T
❑
❑
N
4
TV Side Panel
USB Drive
Page 27

English - 27
Setting the Time
Clock
Setting the clock is necessary in order to use the various timer features of the
TV.
The current time will appear every time you press the INFO button.
If you disconnect the power cord, you have to set the clock again.
Clock Mode
You can set up the current time manually or automatically.
Auto: Set the current time automatically using the time from the digital
broadcast.
Manual: Set the current time to a manually specied time.
Clock Set
You can set the current time manually.
Set up this item when you have set Clock Mode to Manual.
You can set the day, month, year, hour, minute directly by pressing the
number buttons on the remote control.
SleepTimer→Off/30min/60min/90min/120min/150min
/ 180 min
The sleep timer automatically shuts off the TV after a preset time (30, 60, 90,
120, 150 and 180 minutes).
The TV automatically switches to standby mode when the timer reaches 0.
To cancel the Sleep Timer function, select Off.
Press the TOOLS button to display Tools menu.
You can also set the sleep timer by selecting Tools→SleepTimer.
Timer 1 / Timer 2 / Timer 3
Three different on / off timer settings can be made.
On Time:
Set the hour, minute, and Activate / Inactivate.
(To activate timer with the setting you’ve chosen, set to Activate.)
Off Time:
Set the hour, minute, and Activate / Inactivate.
(To activate timer with the setting you’ve chosen, set to Activate.)
Volume:
Set the required volume level.
Contents:
When the On Timer is active, you can turn on a specic channel or play back contents such as photo or audio
les.
TV / USB: Select TV or USB. (Make sure that an USB device is connected to your TV.)
Antenna: Select ATV or DTV.
Channel: Select the desired channel.
Music: Select the folder containing MP3 les on the USB device.
Photo: Select the folder containing JPEG les on the USB device.
Repeat:
Select Once, Everyday, Mon~Fri, Mon~Sat, Sat~Sun, or Manual.
When Manual is selected, press the ► button to select the desired day of the week. Press the ENTER
E
button over the
desired day and the c mark will appear.
You must set the clock rst.
You can set the hour, minute and channel by pressing the number buttons on the remote control.
Auto Power Off
When you set the timer On, the television will eventually turn off, if no controls are operated for 3 hours after the TV was
turned on by the timer. This function is only available in timer On mode and prevents overheating, which may occur if a TV is
on for too long time.
❑
N
N
•
•
N
N
❑
N
N
T
❑
•
•
•
•
•
N
N
N
N
Setup
Plug & Play
Language : English
Time ►
Network Selection : Cable
Wireless Network Setup
Cable Network Setup
Child Lock : On
Change PIN
Parental Lock
Subtitle
Time
Clock : -- : --
►
Sleep Timer : Off
Timer 1 : Inactivated
Timer 2 : Inactivated
Timer 3 : Inactivated
U
Move E Enter R Return
Page 28
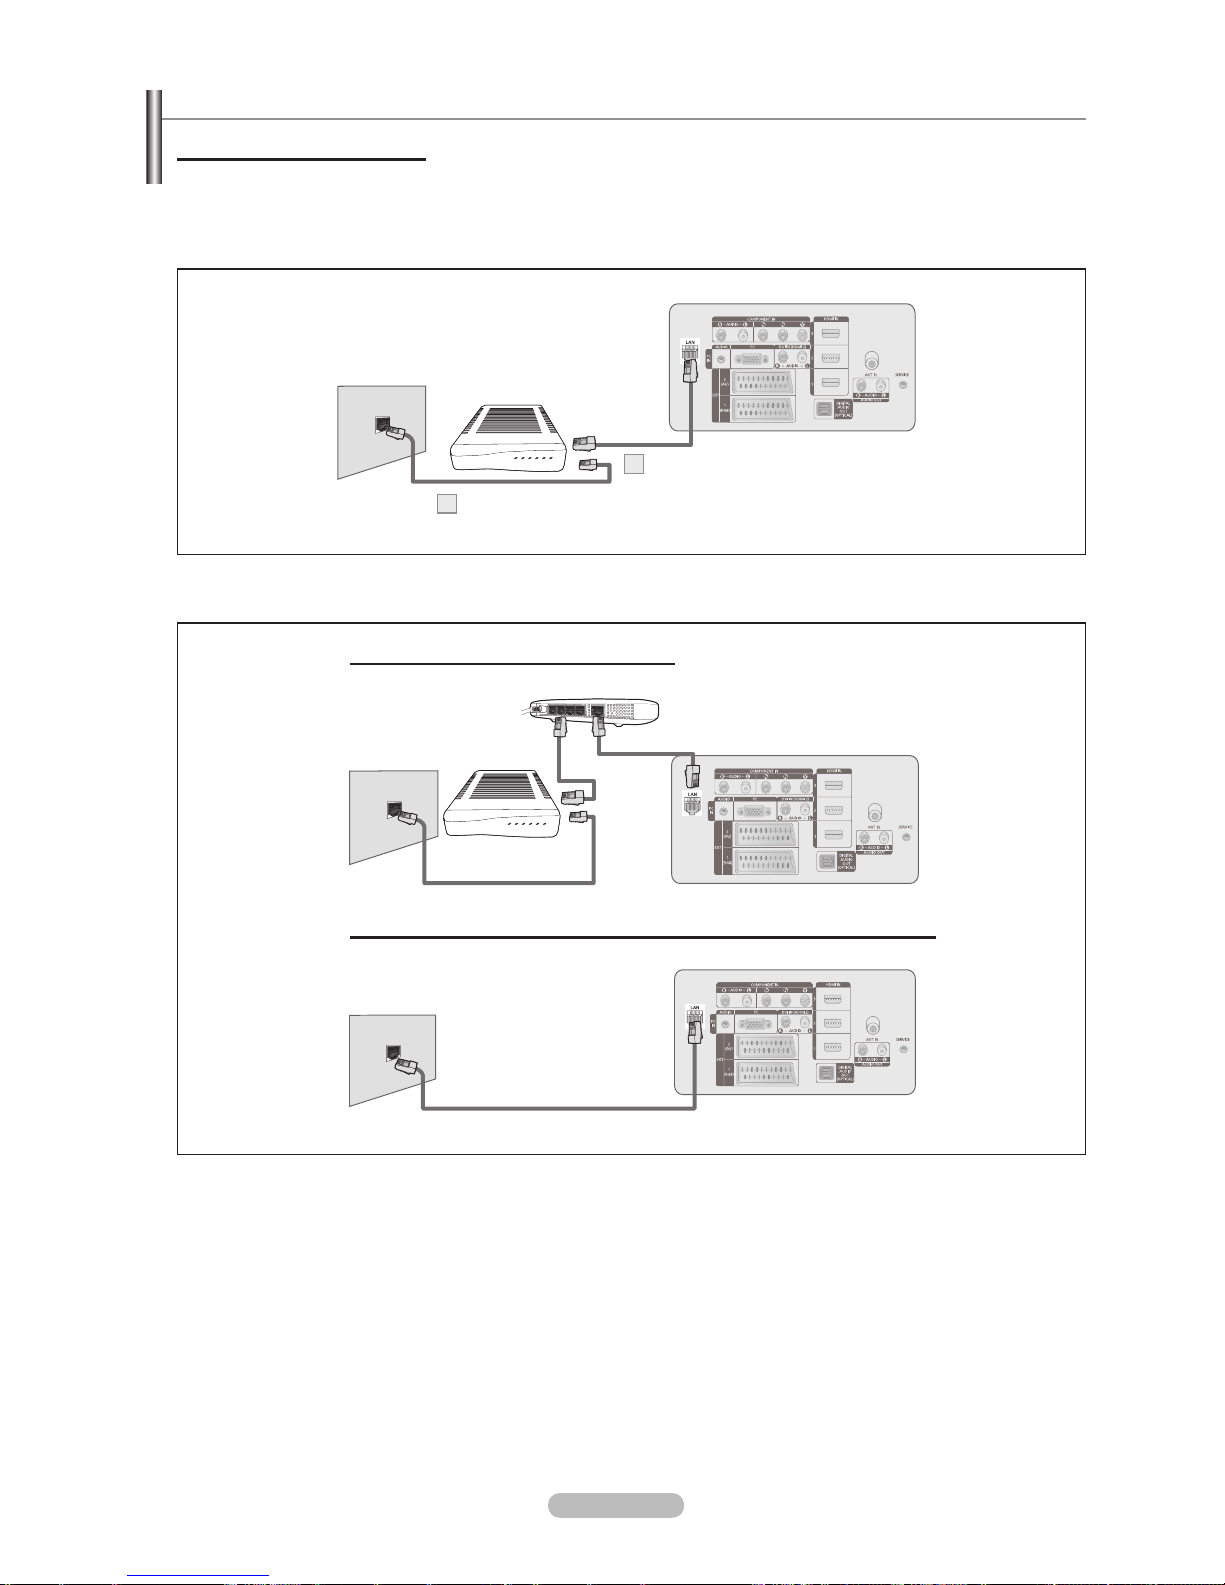
English - 28
Network Connection
Network Connection - Cable
Cable Connection for a DHCP Environment
The procedures to set up the network using Dynamic Host Conguration Protocol (DHCP) are described below. Since an IP
address, subnet mask, gateway, and DNS are automatically allocated when DHCP is selected, you do not have to enter them
manually.
1. Connect the [LAN] port on the rear panel of the TV and the external modem with a LAN Cable.
2.
Connect the LAN port on the wall and the external modem with a Modem Cable.
The terminals (the position of the port and the type) of the external device may differ depending on the manufacturer.
If the IP address allocation by the DHCP server has failed, turn the external modem off, turn it on again after at least 10
seconds and then try again.
For the connections between the external modem and the Sharer (Router), refer to the owner’s manual of the corresponding
product.
You can connect the TV to the LAN directly without connecting it through a Sharer (Router).
You cannot use a manual-connection-type ADSL modem becaus;e it does not support DHCP. You have to use an automatic-
connection-type ADSL modem.
N
N
N
N
N
TV Rear Panel
The Modem Port
on the Wall
Modem Cable
2
External Modem
(ADSL/VDSL/Cable TV)
LAN Cable
1
You can connect the LAN port and the TV directly depending on your network status.
TV Rear Panel
LAN Cable
The LAN Port
on the Wall
You can connect the LAN via a Sharer (Router).
TV Rear Panel
The Modem Port
on the Wall
External Modem
(ADSL/VDSL/
Cable TV)
IP Sharer
LAN Cable
Modem Cable
LAN Cable
Page 29
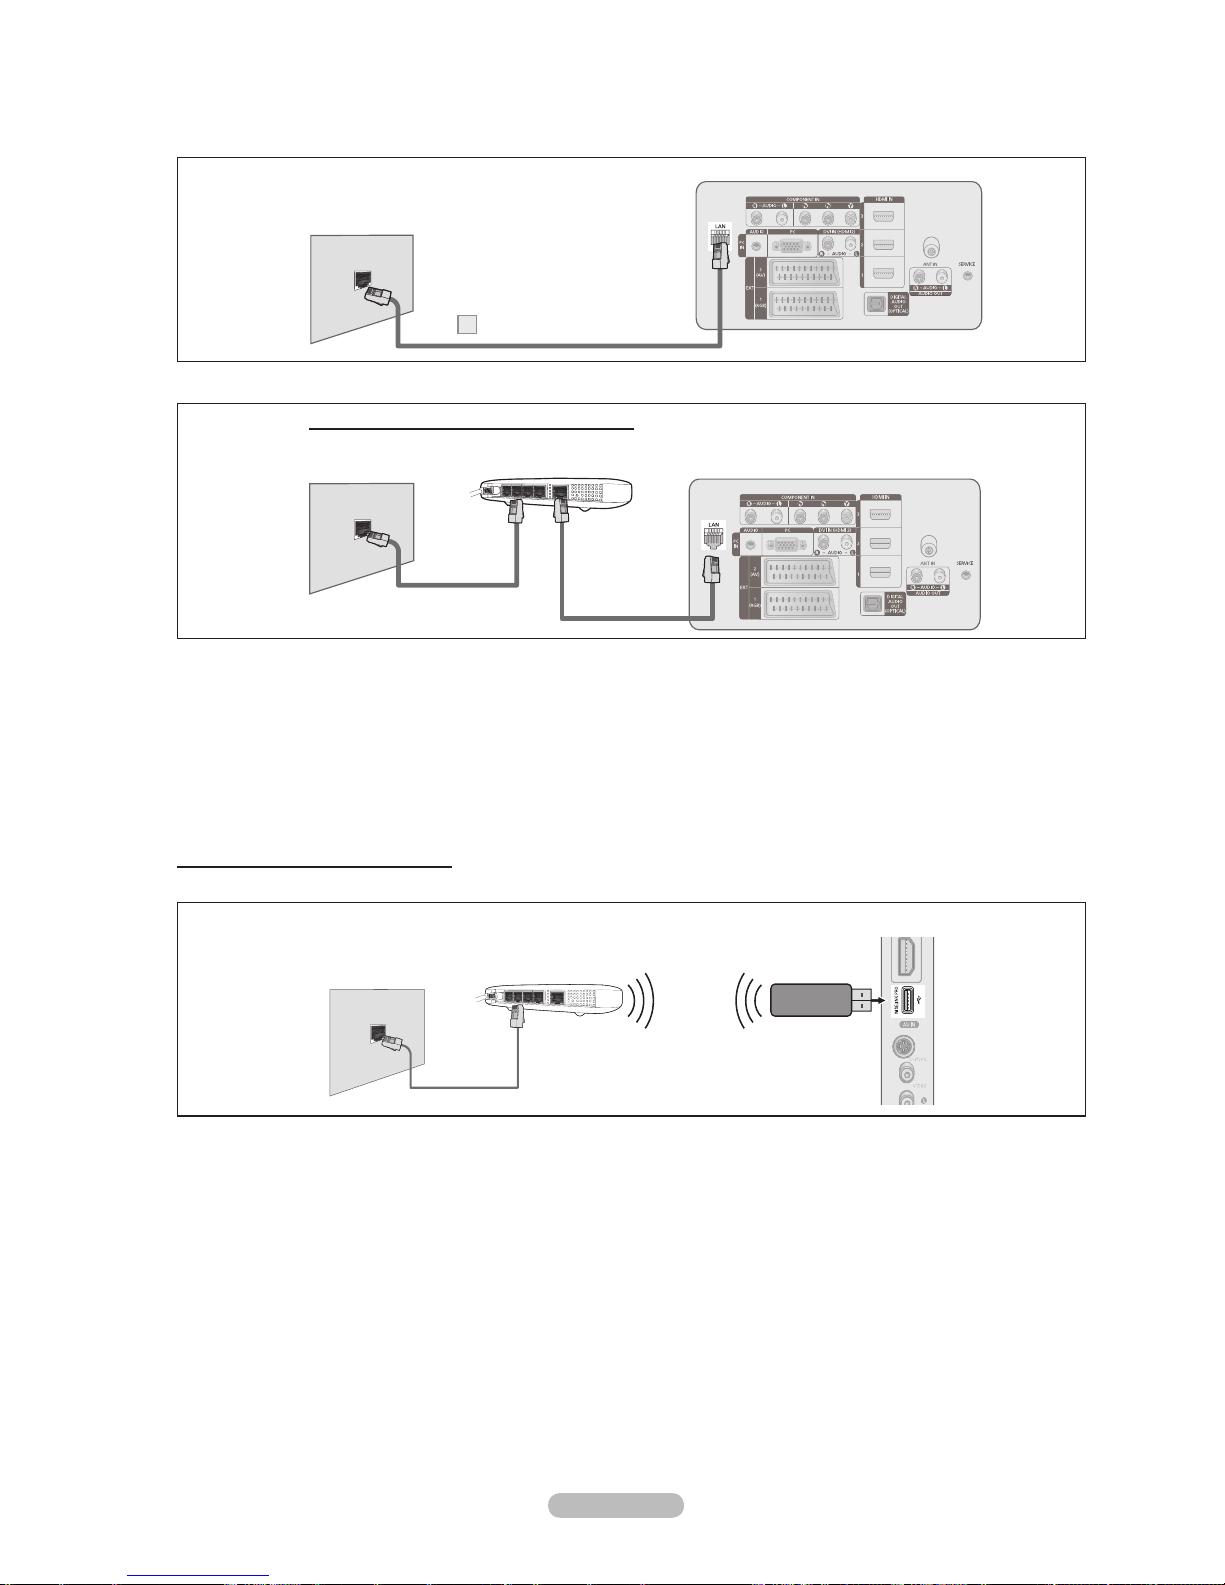
English - 29
LAN Connection for Static IP Environment
The procedures to set up the network using a static IP address are described below. You have to manually enter the IP
address, subnet mask, gateway, and DNS that are provided by your Internet Service Provider (ISP).
1. Connect the [LAN] port on the rear panel of the TV and the LAN port on the wall using the LAN cable.
The terminals (the position of the port and the type) of the external device may differ depending on the manufacturer.
If you are using a static IP address, your ISP will inform you of the IP address, subnet mask, gateway, and DNS. You must
enter these values to complete the network settings. If you do not know the values, ask your network administrator.
For the information on how to congure and connect a Sharer (Router), refer to the owner’s manual for the corresponding
product.
You can connect the TV to the LAN directly without connecting it through a Sharer (Router).
If you use an IP Sharer (IP Router) that supports DHCP, you can set up the device as either DHCP or static IP.
For the procedures to use a static IP address, ask your Internet Service Provider.
Network Connection - Wireless
You can connect to the network wirelessly through a wireless IP sharer.
1. Connect the ‘Samsung Wireless LAN Adapter for InfoLive’ into the Wiselink terminal of the TV.
You must use the ‘Samsung Wireless LAN Adapter for InfoLive’(WIS-08BG) to use a wireless network.
The ‘Samsung Wireless LAN Adapter for InfoLive’ is sold separately. Contact a Samsung Electronics agent or service center
for purchasing.
To use a wireless network, your TV must be connected to a wireless IP sharer.
If the wireless IP sharer supports DHCP, you TV can use a DHCP or static IP address to connect to the wireless network.
You must use a wireless IP sharer that supports IEEE 802.11 B or IEEE 802.11G.
If the wireless IP sharer allows you to turn on / off the Ping connection function, turn it on.
Set the wireless IP sharer to Infrastructure mode. Ad-hoc mode is not supported.
Select a channel for the wireless IP sharer that is not currently being used. If the channel set for the wireless IP sharer is
currently being used by another device nearby, this will result in interference and communications may fail.
When applying the security key for the AP (wireless IP sharer), only the following is supported.
1) Authentication Mode : WEP, WPAPSK, WPA2PSK
2) Encryption Type : WEP, TKIP, AES
If you apply a security system other than the systems listed above, it will not work with the TV.
N
N
N
N
N
N
N
N
N
N
N
N
N
N
N
TV Rear Panel
LAN Cable
1
The LAN Port
on the Wall
TV Rear Panel
LAN Cable
IP Sharer
LAN Cable
The LAN Port
on the Wall
You can connect the LAN via a Sharer (Router).
TV Side Panel
Samsung Wireless LAN
Adapter for InfoLive
LAN Cable
Wireless IP sharer
The LAN Port
on the Wall
Page 30

English - 30
Network Setup
Network Selection
Select Cable or Wireless as the method to connect to the network.
The menu is activated only if the ‘Samsung Wireless LAN Adapter’ for
InfoLive’ is connected.
Cable:
Connect to network using a cable.
Wireless:
Connect to network wirelessly.
Cable Network Setup
InternetProtocolSetup→AutoSetup/ManualSetup
Network Test:
You can test or conrm the network connection status after setting up the network.
When unable to connect to a wired network
If your Internet service provider has registered the MAC address of the device used to connect to the Internet for the rst
time and authenticates the MAC address each time you connect to the Internet, your TV may not be able to connect to
the Internet as the MAC address differs from that of the device (PC) used to connect to the Internet the rst time. In this
case, ask your Internet service provider about the procedures to connect devices other than your PC (such as your TV) to
the Internet. If your Internet service provider requires an ID or password to connect to the Internet (network), your TV may
not be able to connect to the Internet. In this case, you have to enter your ID or password when connecting to the Internet
using an Internet Sharer (Router).
The internet connection may fail due to a rewall problem. In this case, contact your Internet service provider. If you
cannot connect to the Internet even if you have followed the procedures of your Internet service provider, please contact a
Samsung Electronics Service Center.
Wireless Network Setup
InternetProtocolSetup→AutoSetup/ManualSetup
Network Test: You can test or confirm the network connection status after setting up the network.
When unable to connect to a wireless network
Your TV may fail to locate an AP that is congured as a private SSID type. In this case, please change the AP settings and
try again. If your Internet service provider has registered the MAC address of the device used to connect to the Internet
for the rst time and authenticates the MAC address each time you connect to the Internet, your TV may not be able to
connect to the Internet as the MAC address differs from that of the device (PC) used to connect to the Internet the rst
time. In this case, ask your Internet service provider about the procedures to connect devices other than your PC (such
as your TV) to the Internet. If you cannot connect to the Internet even if you have followed the procedures of your Internet
service provider, please contact a Samsung Electronics Service Center.
Select Access Point:
You can select the IP sharer to use when using a wireless network.
If a wireless Access Point is not in the Access Point list, press the Red button.
When the connection is made, you will be returned to the screen automatically.
If you selected an Access Point that requires security authentication, enter the security key.
If you have selected an Access Point with a security authentication:
The Security Key input screen appears.
Enter the security key and press the ENTERE button.
Using the Remote Control Buttons on the Security Key Input Screen.
Setup Screen can be different depending on the security types.
Button Operations
▲/▼/◄/►,
(Wheel)
Moves the selection up/down/left/right.
(ENTER)
Enters (Inputs) the selected character.
Red button
Switch between Upper- and Lower-Case Letters
Green button
You can delete an already entered character.
Blue button
Press this button to nish entering the security key.
❑
N
❑
N
❑
N
N
N
N
N
-
-
-
N
Setup
Language : English
Time
NetworkSelection :Cable ►
Wireless Network Setup
Cable Network Setup
Child Lock : On
Change PIN
Parental Lock
Subtitle
Teletext Language : - - - -
Page 31

English - 31
Cable Network Setup-Auto Setup
If you connect the LAN cable and it supports DHCP, the Internet Protocol (IP) Settings are automatically congured. Please check
if the LAN cable is connected. (See page 28)
1.
Set Network Selection to Cable.
2.
Select Cable Network Setup.
3.
Set Internet Protocol Setup to Auto Setup.
4.
Select Network Test to check the network connectivity.
Cable Network Setup-Manual Setup
To connect the TV to the LAN using a static IP address, you must set up the Internet Protocol (IP). Please check if the LAN cable is
connected. (See page 28)
1.
Set Network Selection to Cable.
2.
Select Cable Network Setup.
3.
Set Internet Protocol Setup to Manual Setup.
4.
Set up IP Address, Subnet Mask, Gateway and DNS Server.
Press the number buttons on the remote control when you set the Network manually.
5. Select Network Test to check the network connectivity.
Wireless Network Setup-Auto Setup
The menu is activated only if the ‘Samsung Wireless LAN Adapter for InfoLive’ is connected. (See page 29)
If you connect the LAN cable and it supports DHCP, the Internet Protocol (IP) Settings are automatically congured. The wireless
IP sharer to be connected to this product must support DHCP.
1.
Set Network Selection to Wireless.
2.
Select Wireless Network Setup.
3.
Set Internet Protocol Setup to Auto Setup.
4.
Select an AP through Select Access Point.
5.
Select Network Test to check the network connectivity.
Wireless Network Setup-Manual Setup
The menu is activated only if the ‘Samsung Wireless LAN Adapter for InfoLive’ is connected. (See page 29)
1.
Set Network Selection to Wireless.
2.
Select Wireless Network Setup.
3.
Set Internet Protocol Setup to Manual Setup.
4.
Select an AP through Select Access Point.
5.
Select Network Test to check the network connectivity.
N
Page 32
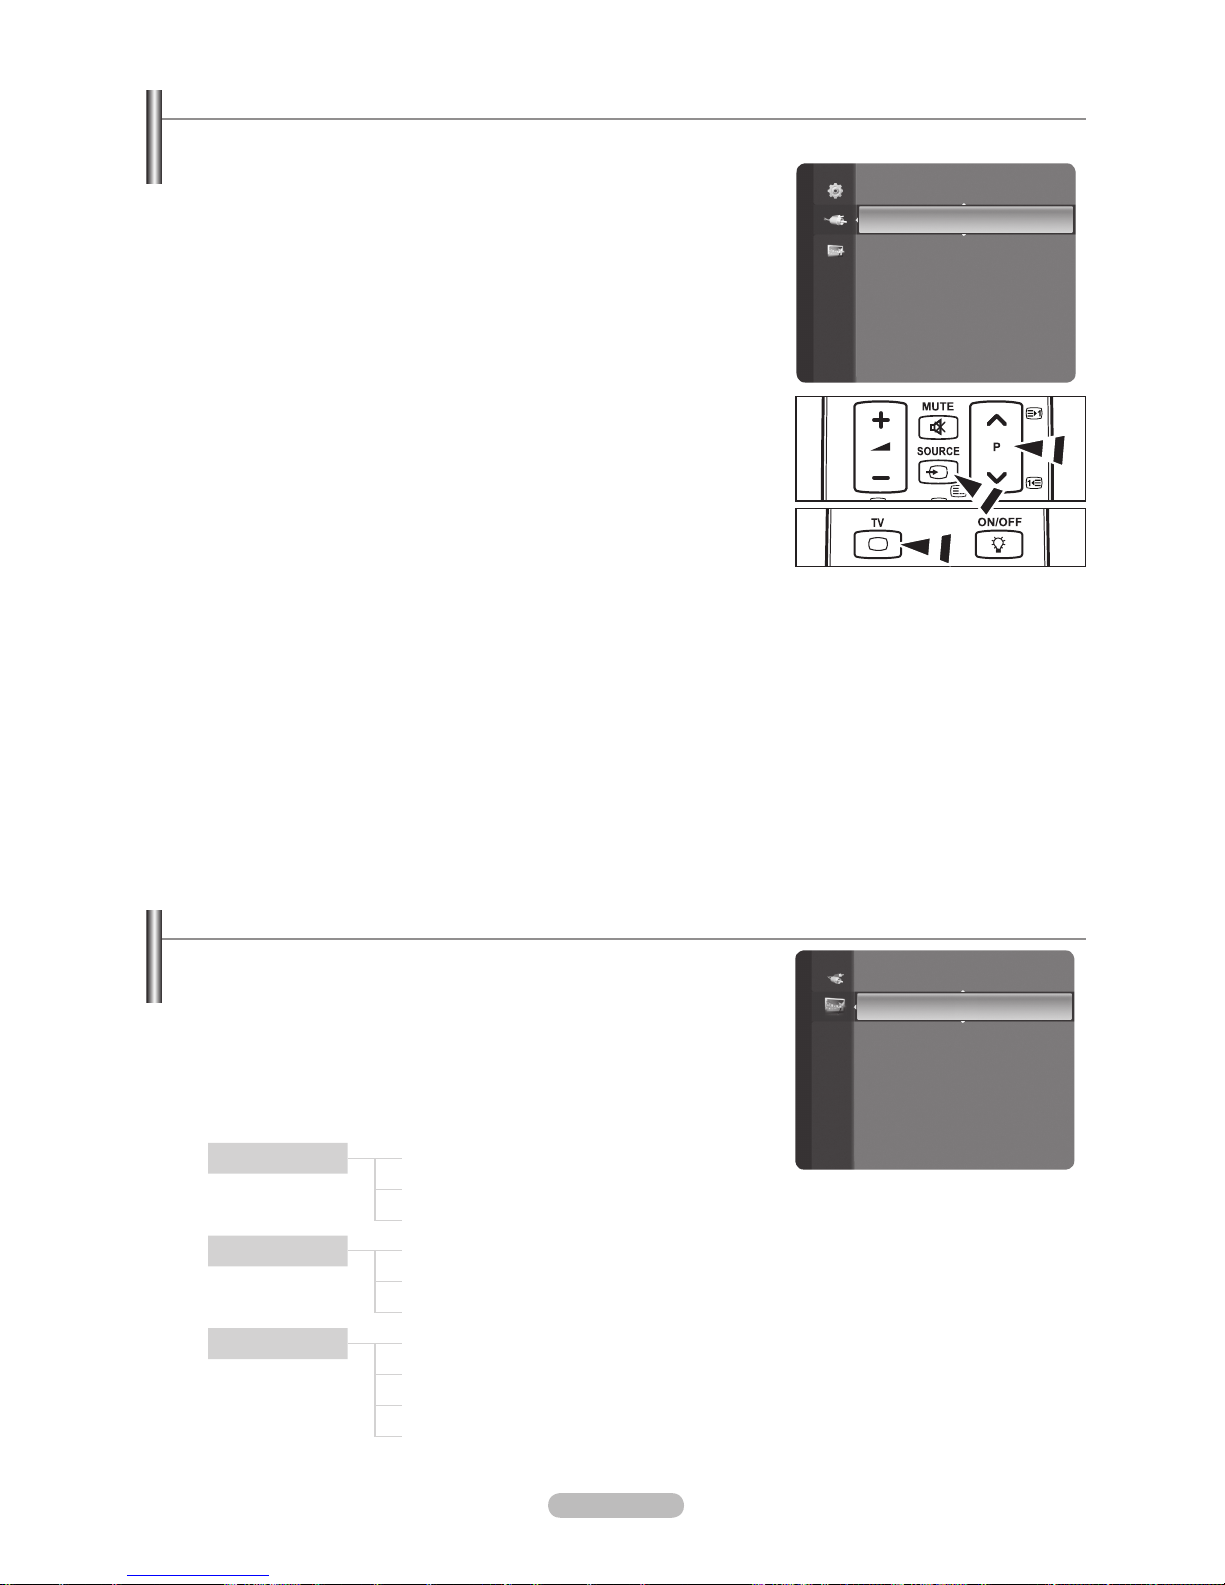
English - 32
Source List / Edit Name
Source List
Use to select TV or other external input sources such as DVD players or Cable
Box / Satellite receivers (Set-Top Box) connected to the TV. Use to select the
input source of your choice.
TV, Ext.1, Ext.2, AV, S-Video, Component, PC, HDMI1, HDMI2 / DVI,
HDMI3, HDMI4, USB, DLNA.
You can choose only those external devices that are connected to the TV.
In the Source List, connected inputs will be highlighted and sorted to the
top. Inputs that are not connected will be sorted to the bottom.
Using the Colour buttons on the remote with the Source list
Red (Refresh): Refreshes the connecting external devices.
TOOLS (Option): Displays the Edit Name and Information menus.
Press the SOURCE button on the remote control to view an external signal
source. TV mode can be selected by pressing the TV button, number
buttons (0~9), and the P < / > button on the remote control.
Edit Name
VCR / DVD / Cable STB / Satellite STB / PVR STB / AV Receiver / Game / Camcorder / PC / TV / IPTV / Blu-Ray / HD
DVD / DMA
Name the device connected to the input jacks to make your input source selection easier.
When a PC with a resolution of 1920 x 1080@60Hz is connected to the HDMI IN 2 port, you should set the HDMI2 / DVI
mode to PC in the Edit Name of the Input mode.
❑
N
N
-
-
O
❑
N
Product Guide
The Product Guide gives you information on the most important features of this TV.
1.
Press the MENU button to display the menu. Press the ▲ or ▼ button to select
Application, then press the ENTERE button.
2.
Press the ▲ or ▼ button to select Product Guide, then press the ENTERE
button.
3.
Press the ◄ or ► button to select a Guide (Picture Quality, Entertainment or
Connectivity) and press the ENTERE button.
4.
You can navigate the Product Guide screen by using the ◄ and ► buttons.
Picture Quality Full HD 1080p
Ultra FilterBright
Real 100Hz(50") / 100Hz Dual Scan(63")
Entertainment InfoLive
Content Library
Entertainment Mode
Connectivity WISELINK Pro
DLNA
4HDMI
Anynet+
5.
Press the EXIT button to exit.
Source List
Edit Name
Input
Application
Content Library
InfoLive
ProductGuide ►
Page 33
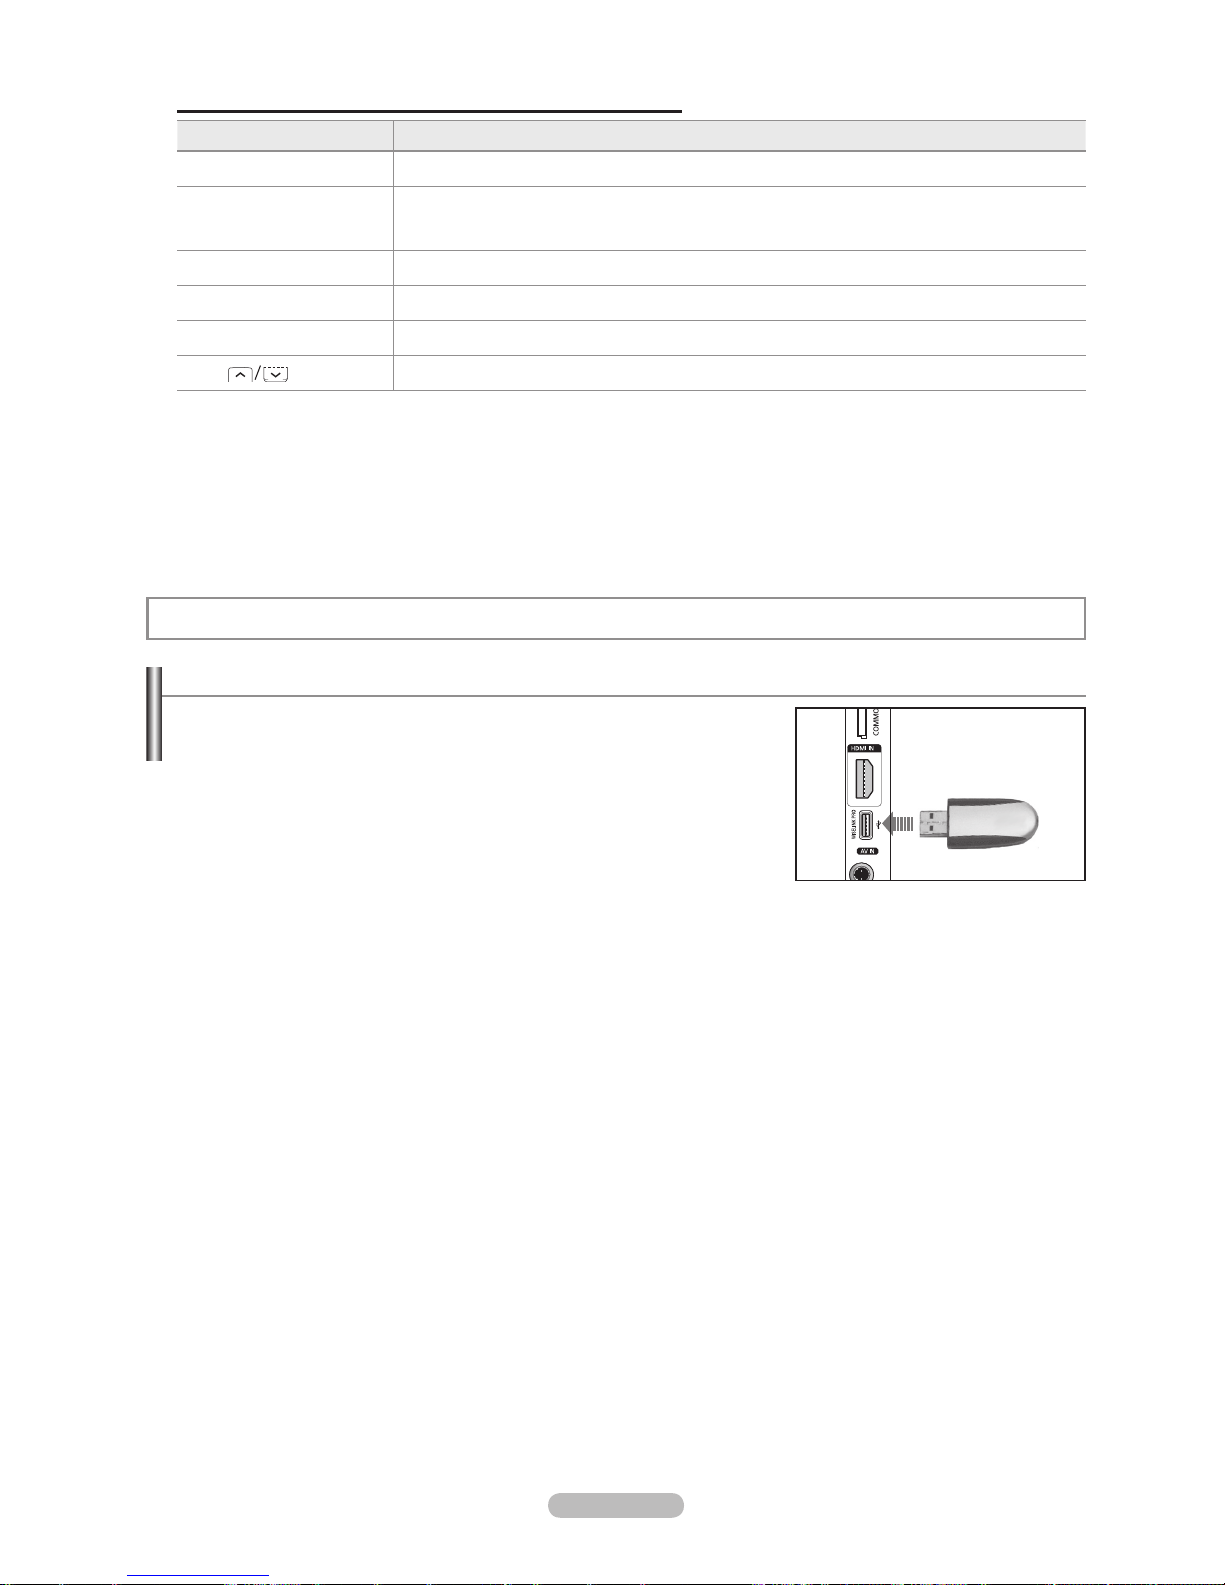
English - 33
WISELINK Pro
Connecting a USB Device
1. Press the POWER button to turn the TV on.
2.
Connect a USB device containing photo, music and/or movie les to the
WISELINK Pro jack (USB jack) on the side of the TV.
If you enter the WISELINK Pro mode with no USB device connected the
message ‘No external storage device found. Check the connection status.’
will appear. In this case, insert the USB device, exit the screen by pressing
the W.LINK button on the remote control and enter the WISELINK Pro screen
again.
MTP (Media Transfer Protocol) is not supported.
The le system only supports FAT16/32 (The NTFS le system is not supported).
Certain types of USB Digital camera and audio devices may not be compatible with this TV.
WISELINK Pro only supports USB Mass Storage Class devices (MSC). MSC is a Mass Storage Class Bulk-Only Transport
device. Examples of MSC are Thumb drives and Flash Card Readers (Both USB HDD and HUB are not supported.)
Please connect directly to the USB port of your TV. If you are using a separate cable connection, there may be a USB
compatibility problem.
Before connecting your device to the TV, please back up your les to prevent them from damage or loss of data. SAMSUNG is
not responsible for any data le damage or data loss.
Do not disconnect the USB device while it is loading.
MSC supports MP3 and JPEG les, while a PTP device supports JPEG les only.
The sequential JPEG format is supported.
The higher the resolution of the image, the longer it takes to display on the screen.
The maximum supported JPEG resolution is 15360X8640 pixels.
For unsupported or corrupted les, the Not Supported File Format message is displayed.
If the number of photo les exceeds 4000 (or the number of music les exceeds 3000), any les exceeding the 4000 limit may
not be displayed in the Photo List (or Music List).
MP3 les with DRM that have been downloaded from a non-free site cannot be played. Digital Rights Management (DRM)
is a technology that supports the creation of content, the distribution and management of the content in an integrated and
comprehensive way, including the protection of the rights and interests of the content providers, the prevention of the illegal
copying of contents, as well as managing billings and settlements.
When moving to a photo, loading may take a few seconds. At this point, the loading icon will appear at the screen.
N
N
N
N
N
N
N
N
N
N
N
N
N
N
N
N
Using the Remote Control Button in Product Guide Menu
Button Operations
Yellow button Shows the contents of the Product Guide sequentially. (AutoPlay)
▲/▼/◄/►
(Wheel)
Move the cursor and select an item.
ENTER
E
Select the currently selected item.
RETURN Return to the previous menu.
EXIT Stop the current function and return to the Product Guide main menu.
P
,
PRE-CH
Stop Product Guide mode and Returns to TV mode
4
TV Side Panel
USB Drive
Page 34
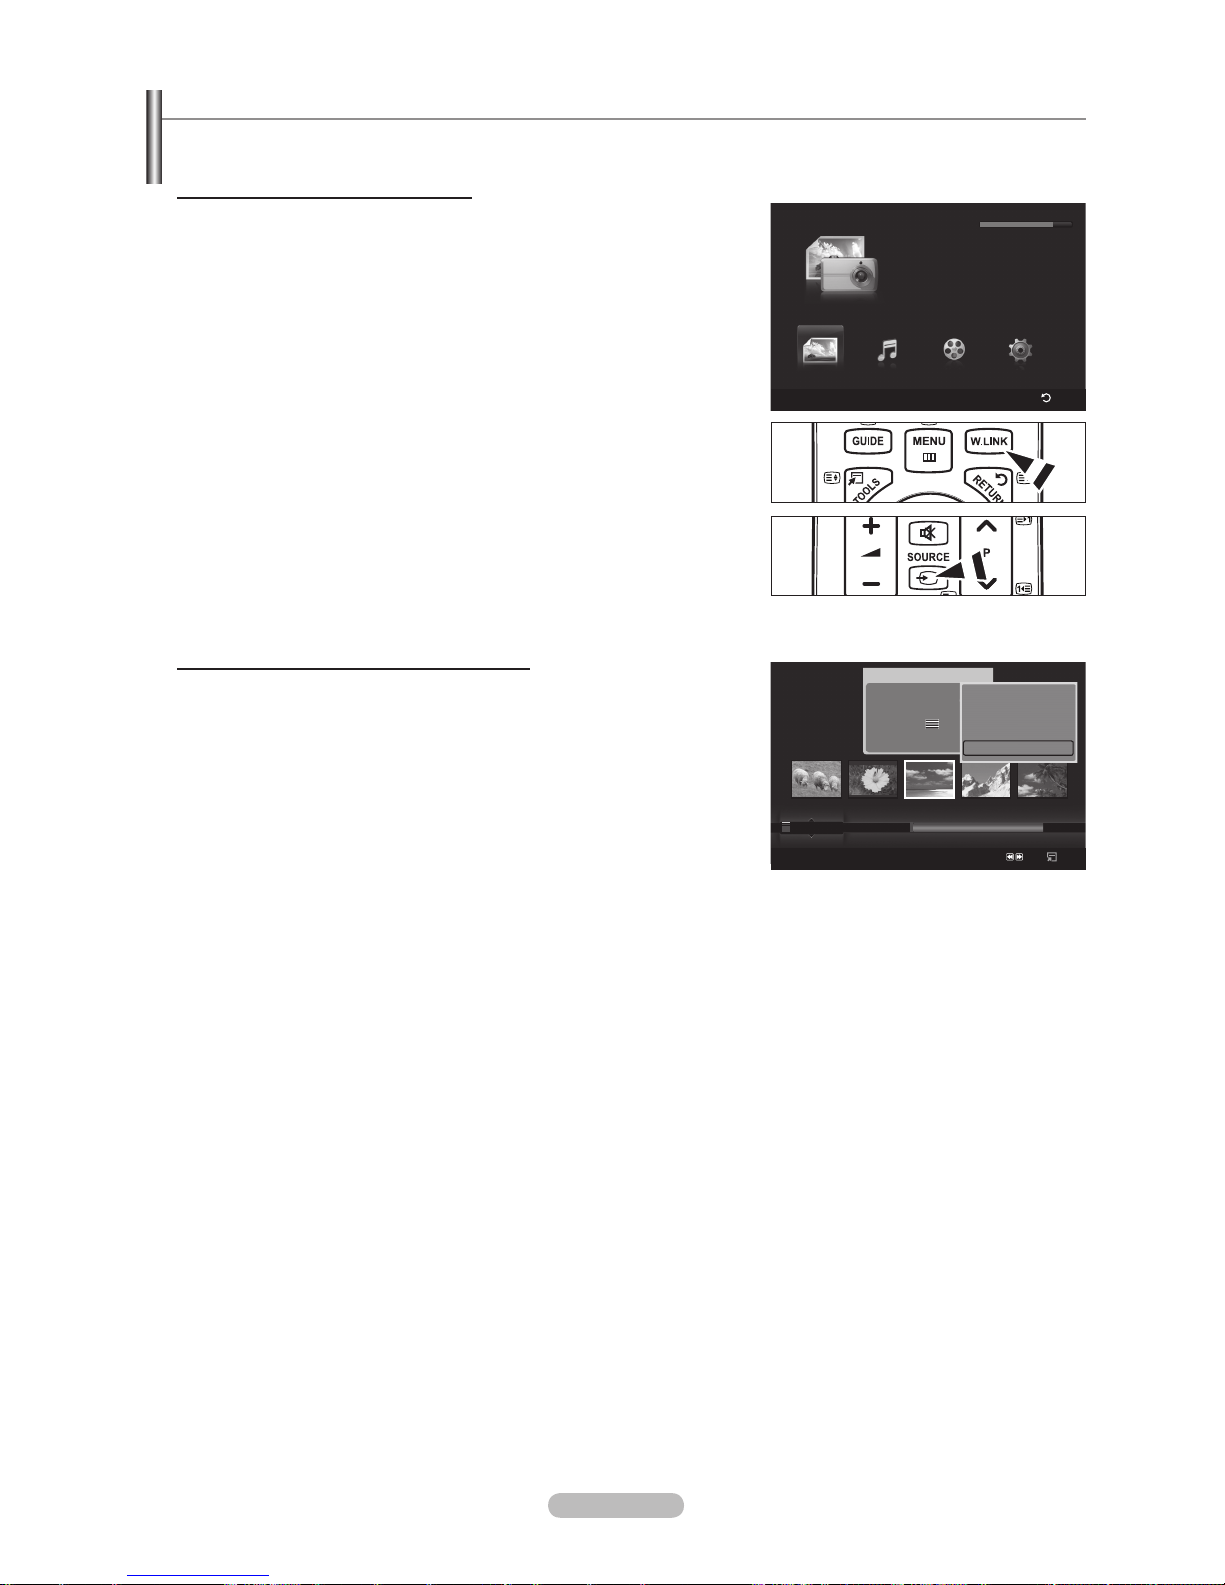
English - 34
Using the WISELINK Pro Function
This function enables you to view and listen to photo, music and/or movie les saved on a USB Mass Storage Class (MSC) device.
Entering the WISELINK Pro Menu
1. Press the MENU button. Press the ▲ or ▼ button to select Application, then
press the ENTERE button.
2.
Press the ▲ or ▼ button to select WISELINK Pro, then press the ENTER
E
button.
The WISELINK Pro menu is displayed.
Press the W.LINK button on the remote control to display the WISELINK
Pro menu.
Press the SOURCE button on the remote control repeatedly to select USB
or DLNA, then press the ENTERE button.
3.
Press the Red button, then press the ▲ or ▼ button to select the
corresponding USB Memory Device (i.e. if connected through a hub). Press the
ENTERE button.
This function differs depending on the USB Memory Device/ DLNA device
connected to TV.
The selected USB device name appears at the bottom left of the screen.
4.
Press the ◄ or ► button to select an icon (Photo, Music, Movie, Setup), then
press the ENTERE button. To exit WISELINK Pro mode, press the W.LINK
button on the remote control.
You can enjoy game movies. (Not support game program)
Removing a USB Memory Device Safely
You can remove the device safely from the TV.
1.
Press the TOOLS button in the WISELINK Pro le list screen, or while a
SlideShow or music le is being played.
2.
Press the ▲ or ▼ button to select Remove Safely, then press the ENTER
E
button.
3.
Remove the USB device from the TV.
N
O
O
N
N
N
Photo
SUM
Device
Favourites Settings
Select
Jump
Option
image_1.jpg
Month : Jan
Date : Jan.01.2008
Color : Gray
Composition :
Folder : P-other
Favourites :
★ ★ ★
Preference
Monthly
Timeline
Jan Nov
▲
▲
Play Current Group
Delete
Information
Remove Safely
WISELINK Pro
Photo
SUM
Device Return
Music Setup
PHOTO
SUM
851.98MB/995.00MB Free
Movie
Page 35
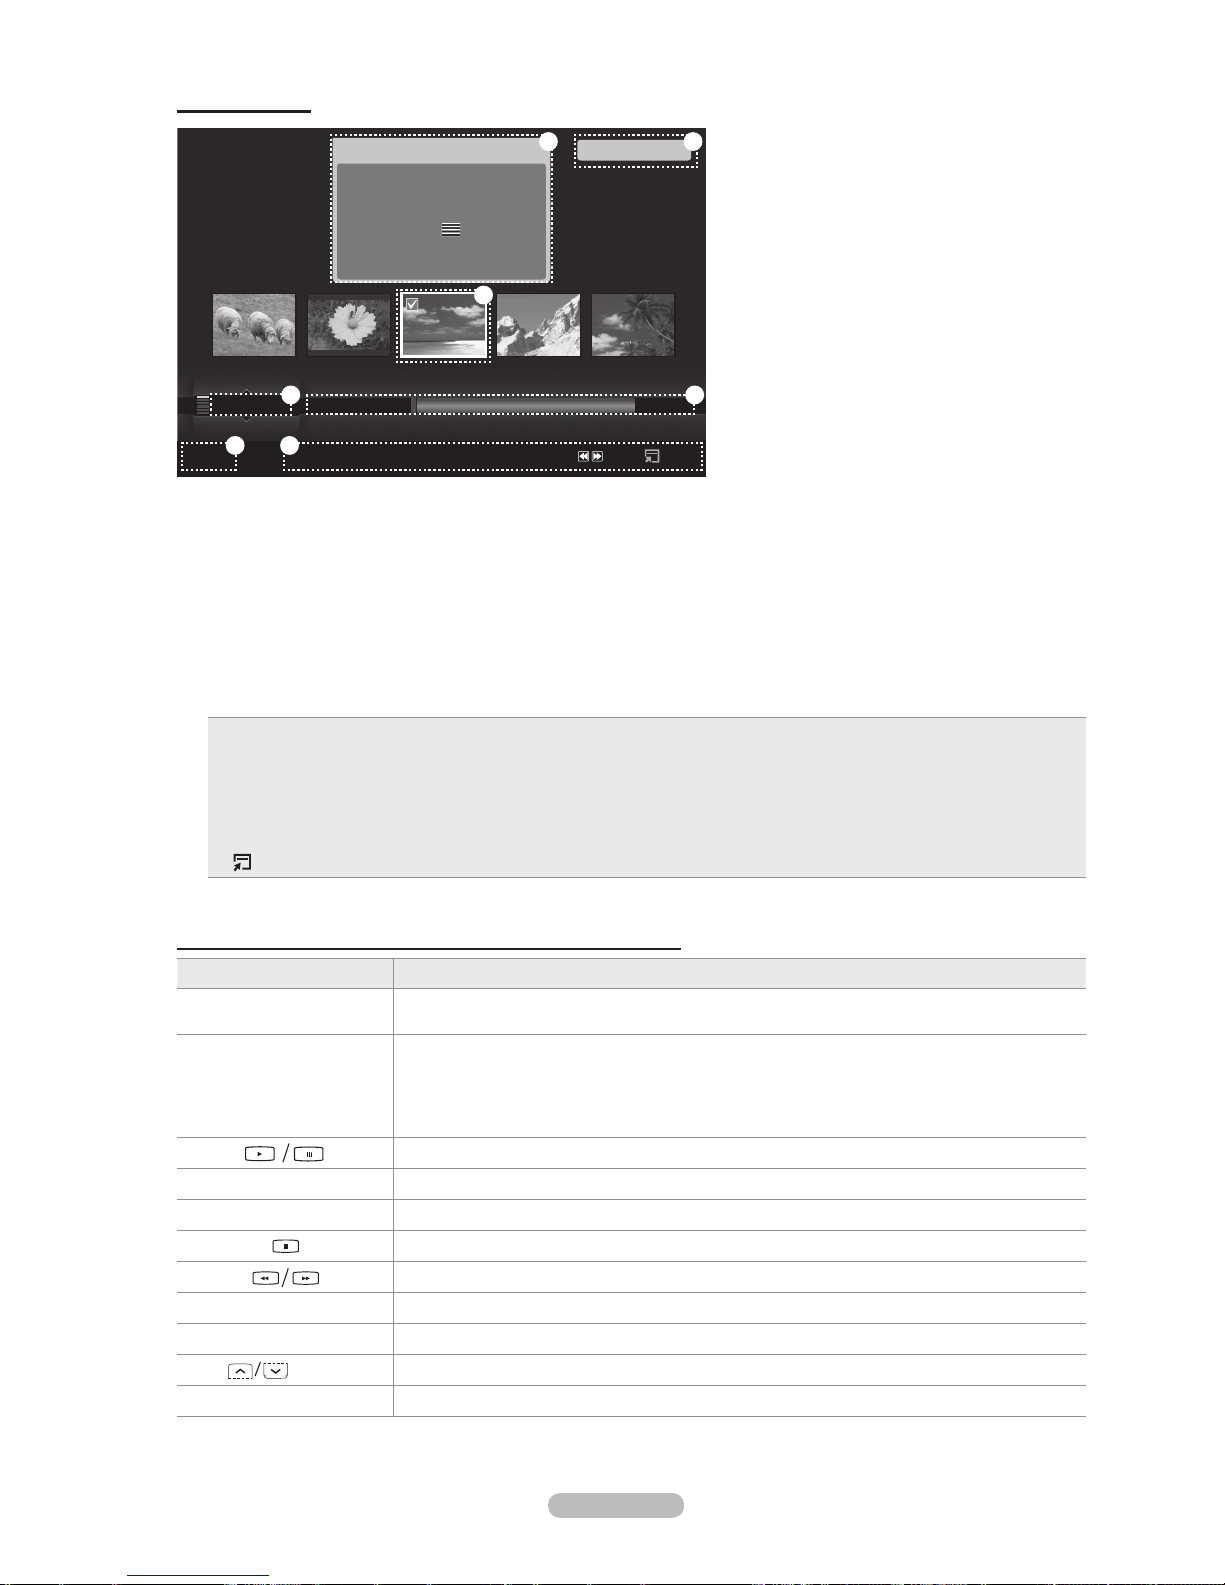
English - 35
Screen Display
1. Currently selected le: The currently selected le is highlighted. Photo and movie les are displayed as thumbnail images.
2.
Information Window: Shows information about the currently selected le. There is a separate information window for photo and
movie les only. For music les, the le information is also displayed in the location where the le is displayed.
3.
Current Sort Standard: This eld shows the current standard for sorting les. Press the ▲ or ▼ button to change the standard
for sorting les.
4.
View Groups: Shows the sorting groups. The sorting group including the currently selected photo is highlighted.
5.
Current Device: Shows the currently selected device name. Press the Red button to select a device.
6.
Item Selection Information: Shows the number of photos that are selected by pressing the Yellow button.
7.
Help Items
Red (Device) button: Selects a connected device.
Green (Favourites Settings) button: Changes the Favourites Settings for the selected le. Press this button repeatedly
until the desired value appears.
Yellow (Select) button: Selects le from the le list. Selected les are marked with a symbol c. Press the yellow button
again to cancel a le selection.
πµ (Jump) button: Jumps to the previous sorting group/Jumps to the next sorting group.
TOOLS
(Option) button: Displays the option menus. (The option menu changes according to the current status.)
•
•
•
•
•
Using the Remote Control Button in WISELINK Pro Menu
Button Operations
▲/▼/◄/►
(Wheel)
Move the cursor and select an item.
ENTER
E
Select the currently selected item.
While playing a slide show, movie, or music le:
- Pressing the ENTERE button during play pauses the play.
- Pressing the ENTERE button during pause resumes the play.
Play or pause the Slide Show or Music le.
RETURN Return to the previous menu.
TOOLS Run various functions from the Photo, Music and Movie menus.
Stop the current slide show, Music or Movie le.
Jump to previous group/Jump to next group.
INFO Show le information.
W.LINK Exit WISELINK Pro mode.
P
,
PRE-CH
Stop WISELINK Pro mode and Returns to TV mode.
EXIT Stop the current function and return to the WISELINK Pro main menu.
Photo
SUM
Device
Favourites Settings
Select
Jump
Option
image_1.jpg
Month : Jan
Date : Jan.01.2008
Color : Gray
Composition :
Folder : P-other
Favourites :
★ ★ ★
Preference
Monthly
Timeline
Jan Nov
▲
1File(s) Selected
2 6
1
3 4
5 7
Page 36
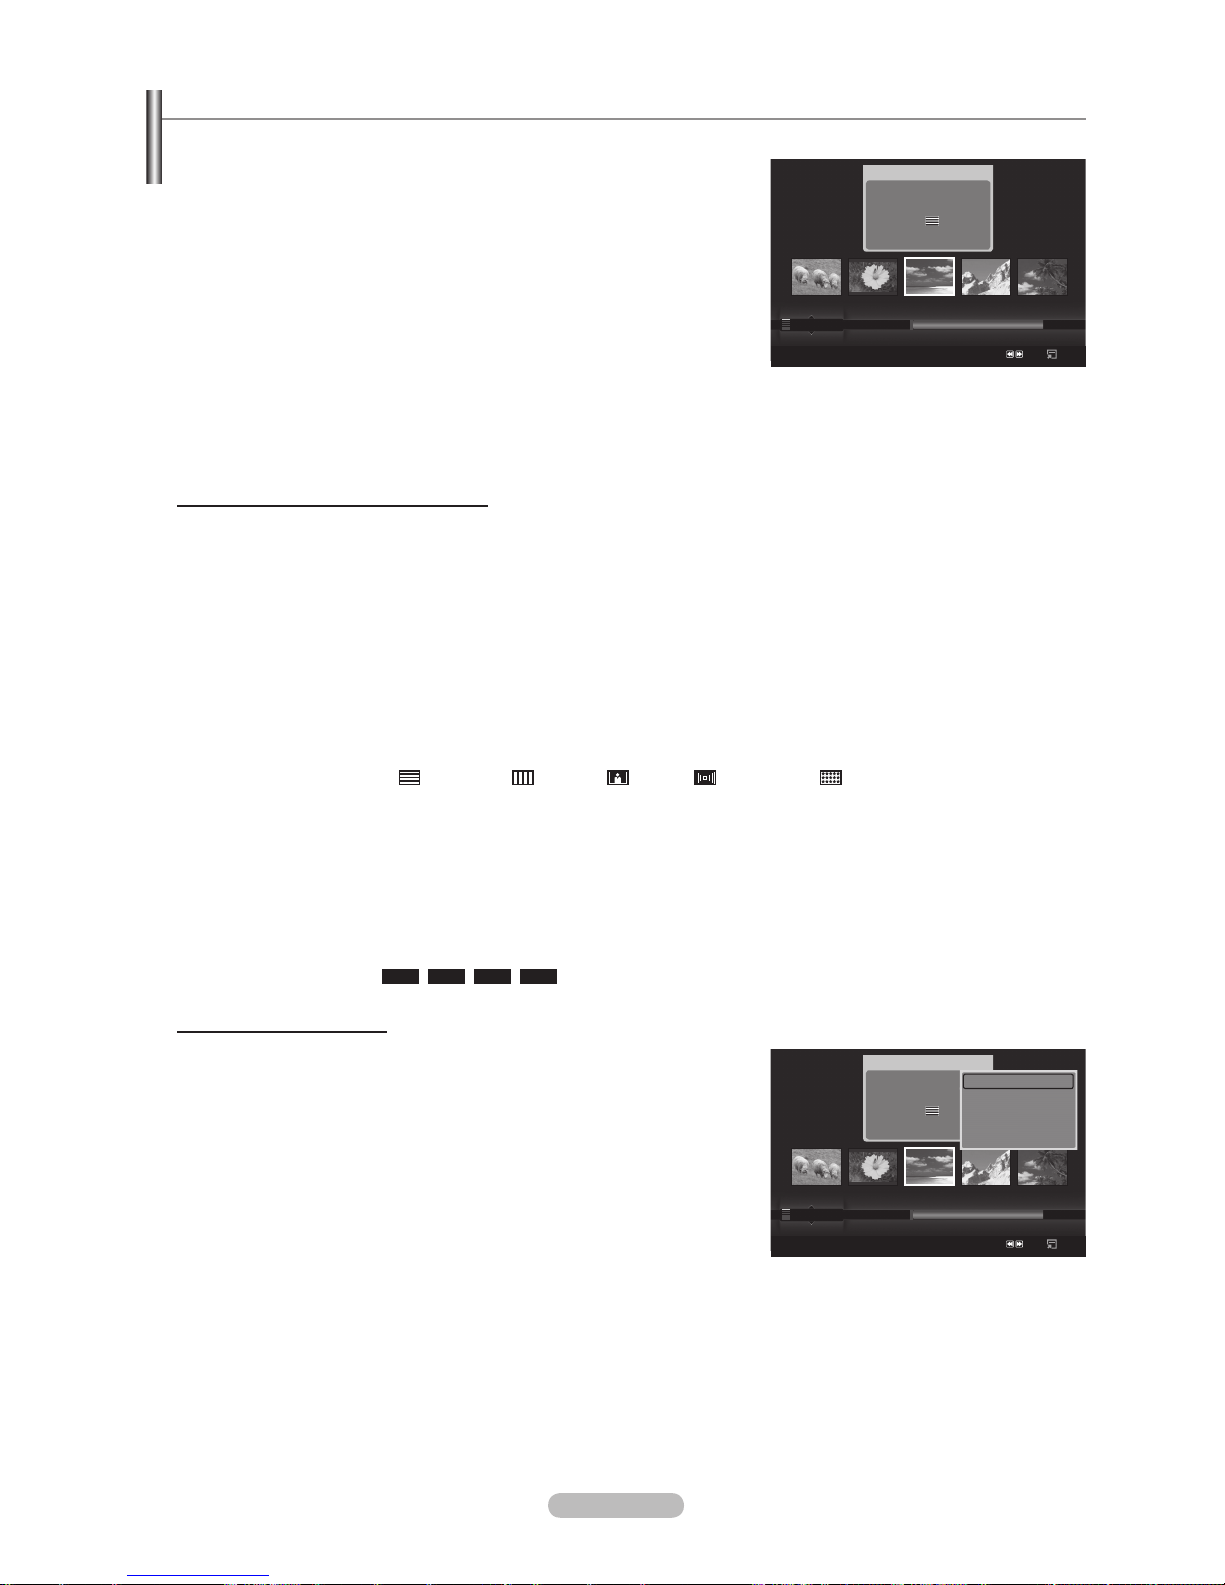
English - 36
Using and Sorting Photo List
You can sort photos in the Photo List by a particular standard.
1.
Press the ▲ or ▼ button to select a sorting standard in the Photo list.
The photos are sorted according to the newly selected sorting standard.
To move to the previous/next group, press the π (REW) or µ (FF)
button.
2.
Press the ∂ (Play)/ENTERE button to start the Slide Show in the order
selected by the user.
The information of a photo le is automatically set.
The Color and Composition information extracted from a photo le
may be different from the user’s expectations.
Photo information is automatically set. You can change the Color,
Composition, and Favourites.
Photos for which information cannot be displayed are set as
Unclassied.
PTP does not support folder sort mode.
Sorting Standard for the Photo List
Monthly
It sorts and shows photos in the le by month. It sorts only by month (from January to December) regardless of year.
Timeline
It sorts and shows photos by date. It sorts by year and month from the earliest photo.
Color
It sorts photos by color. You can change the photo color information.
Color options: Red, Yellow, Green, Blue, Magenta, Black, Gray, Unclassied.
Composition
It sorts photos by composition. You can change the compositional information of photos.
Composition options: (horizontal), (vertical), (object), (perspective), (pattern), Unclassied.
Folder
It sorts photos by folder. If there are many folders in USB, the photos les are shown in order in each folder. The photo le in
the Root folder is shown rst and the others are shown in alphabetical order by name.
Preference
It Sorts photos by preference (Favourites). You can change the photo preferences.
Changing the Favourites Settings.
Select the desired photo in the Photo list, then press the Green button repeatedly until the desired setting appears.
Favourites options:
★ ★ ★, ★ ★ ★, ★ ★ ★, ★ ★ ★
Photo List Option Menu
Slide Show
Using this menu, you can play a SlideShow using the photo les on the USB
memory device.
Play Current Group
Using this menu, you can play a SlideShow using only the photo les in the
currently selected sorting group.
Delete
Using this menu, you can delete the selected photo les.
Change Group
You can change the Color and Composition information of photo les.
The group information of the current le is updated and the le is moved to the new group.
To change the information of multiple les, select the les you want by pressing the yellow button.
N
N
N
N
N
N
N
N
N
N
N
N
N
Photo
SUM
Device
Favourites Settings
Select
Jump
Option
image_1.jpg
Month : Jan
Date : Jan.01.2008
Color : Gray
Composition :
Folder : P-other
Favourites :
★ ★ ★
Preference
Monthly
Timeline
Jan Nov
▲
Photo
SUM
Device
Favourites Settings
Select
Jump
Option
image_1.jpg
Month : Jan
Date : Jan.01.2008
Color : Gray
Composition :
Folder : P-other
Favourites :
★ ★ ★
Preference
Monthly
Timeline
Jan Nov
▲
Slide Show
Play Current Group
Delete
Information
▼
Page 37
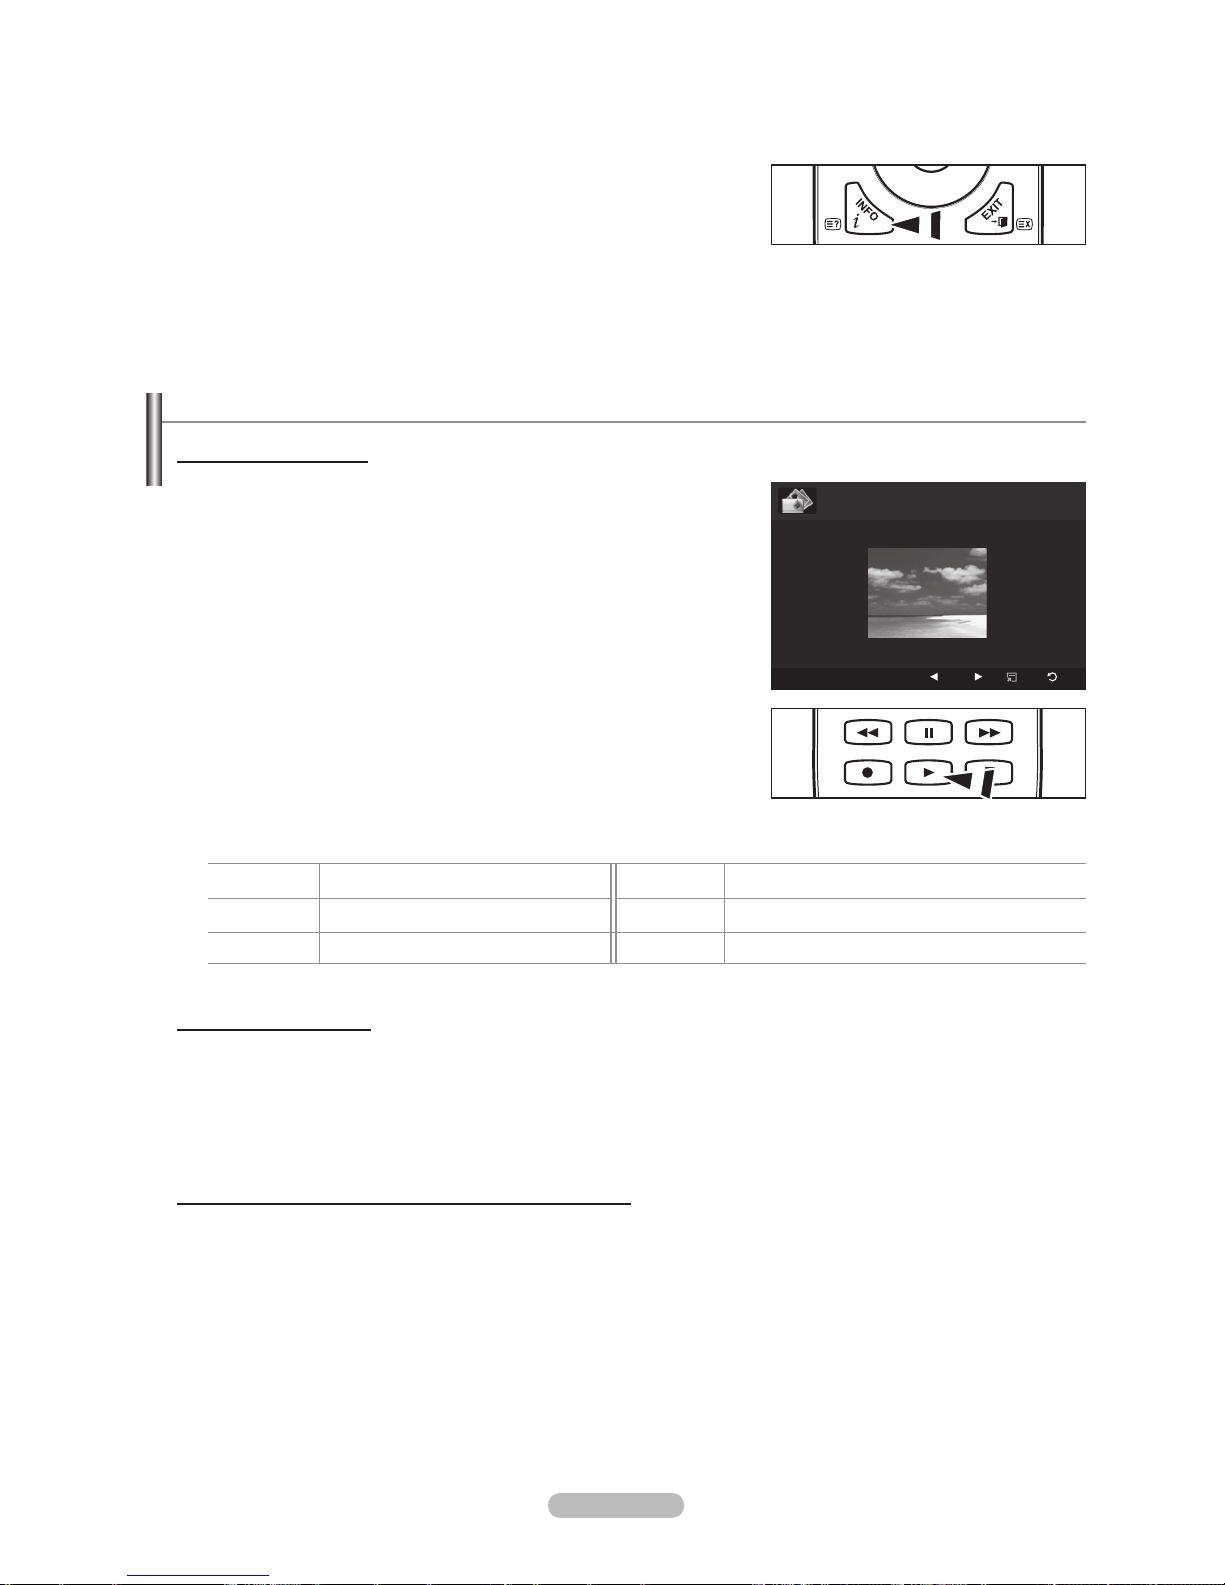
English - 37
Information
The photo le information including the name, the size, the resolution, the date modied and the path is displayed.
You can view the information of photo les during a SlideShow using the same procedures.
Alternatively, select a photo from the photo list and press the INFO button
to view the information.
Remove Safely
You can remove the device safely from the TV.
N
O
Viewing a Photo or Slide Show
Viewing a Slide Show
1. Press the ◄ or ► button to select the desired photo in the Photo list.
2.
Press the TOOLS button.
3.
Press the ▲ or ▼ button to select Slide Show, then press the ENTER
E
button.
All les in the photo list will be used for the Slide Show.
During the slide show, les are displayed in order from the currently shown
le.
The Slide Show progresses in the order sorted in the Photo list.
Music les can be automatically played during the Slide Show if the
Background Music is set to On. (Refer to page 38).
While a photo list is displayed, press the ∂(Play)/ENTERE button
on the remote control to start slide show.
SlideShow Control Buttons
ENTER
E
Play/Pauses the Slide Show.
∫
Exit Slide Show and return to the photo list.
∂
Play the Slide Show. TOOLS Run various functions from the Photo menus.
∑
Pause the Slide Show.
π/µ
Change the SlideShow playing speed.
Playing current group
1. Press the ▲ or ▼ button to select a sorting standard. (Monthly, Timeline, Color, Composition, Folder, Preference)
2.
Press the π (REW) or µ (FF) button to select the desired group.
3.
Press the TOOLS button.
4.
Press the ▲ or ▼ button to select Play Current Group, then press the ENTERE button.
Only the photos in the sorting group including the selected les will be used for the Slide Show.
ToperformaSlideShowwithonlytheselectedles
1. Press the ◄ or ► button to select the desired photo in the Photo list.
2 .
Press the yellow button. Repeat the above operation to select multiple photos.
The c mark appears to the left of the selected photo.
If you select one le, the SlideShow will not be performed.
To deselect all selected les, press the TOOLS button and select Deselect All.
3.
Press the ∂ (Play)/ENTERE button.
The selected les will be used for the Slide Show.
N
N
N
N
O
N
N
N
N
N
O
SUM
E Pause Previous Next Option Return
►
Normal20/22 image_1.jpg 440x440 2.0KB 2008/1/1
Page 38

English - 38
Slide Show Option Menu
Stop Slide Show / Start Slide Show
You can start or stop a SlideShow.
Rotate
You can rotate photos saved on a USB memory device.
Whenever you press the ◄ button, it rotates by 270˚, 180˚, 90˚, and 0˚.
Whenever you press the ► button, it rotates by 90˚, 180˚, 270˚, and 0˚.
Zoom
You can magnify photos saved on a USB memory device. (x1 → x2 → x4)
To move the enlarged photo image, press the ENTERE button, then
press the ▲/▼/◄/► buttons. Note that when the enlarged picture
is smaller than the original screen size, the location change function
doesn’t work.
The enlarged le is not saved.
If you have select Rotate, the Zoom deactivated.
Slide Show Speed
You can select the slide show speed.
You can select the Slide Show speed only during a slide show.
You can also change the speed of the Slide Show by pressing the π (REW) or µ (FF) button during the Slide Show.
BackgroundMusic→On/Off
If you set Background Music to On, the background music will be played when viewing photos one by one or in a Slide
Show.
If you set Background Music to On, a screen appears immediately where you can set the Background Music.
To use this feature, there must be music and photo les stored on the USB device.
Background Music Setting
You can select background music when watching a SlideShow.
If you turn off the Background Music, even if the Background Music Settings have been set up, the background music
will not be played.
Loading music les is needed to change BGM mode. Play music les in music category to load.
BGMMode→Mood/SelectedFile/Shufe
BGMMood→Energetic/Rhythmical/Sad/Exciting/Calm
If you set BGM Mode to Mood, you can select a mood.
You cannot select a mood not part of the music les on the USB memory device.
Select Music File
If you set BGM Mode to Selected File, you can select a music le.
Picture Setting / Sound Setting
Refer to page 44.
Information
The photo le information is displayed.
Remove Safely
You can remove the device safely from the TV.
N
N
N
N
N
N
N
N
N
•
•
N
N
•
N
Tools
Stop Slide Show
Rotate
Zoom
Slide Show Speed : Normal
Background Music : Off
Background Music Setting
Picture Setting
Sound Setting
Information
U
Move E Enter e Exit
Page 39
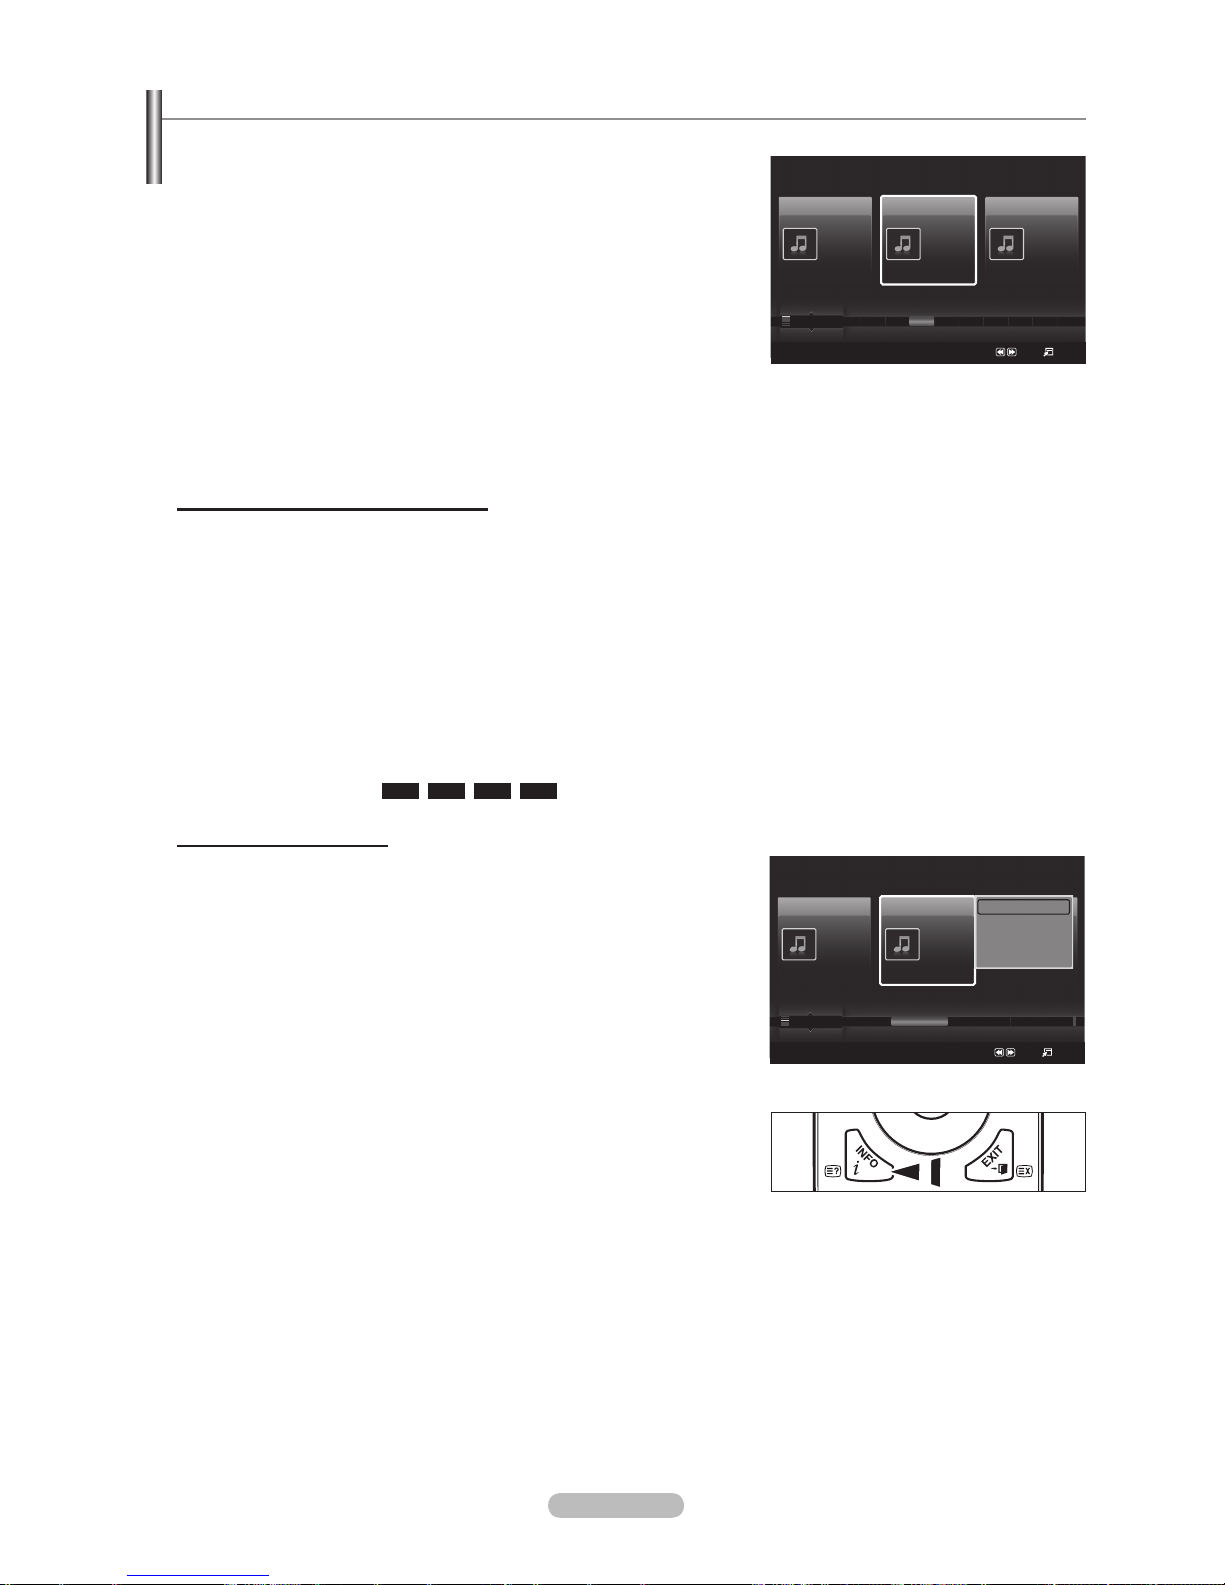
English - 39
Using and Sorting the Music List
You can sort music les in the Music List by a particular standard.
1.
Press the ▲ or ▼ button to select a sorting standard in the Music list.
Music les are sorted according to the newly selected sorting standard.
To move to the previous/next group, press the π (REW) or µ (FF)
button.
2.
Press the ENTERE button to start playing music in the order selected by
the user.
The information of the music les is automatically set.
The Mood information extracted from a music le may differ from the
expectations of the user.
Music information is automatically set. You can change the Mood and
Favourites.
Music les for which information cannot be displayed are set to Unclassied.
If there is no title information for a music le, the lename is displayed.
If no information is available for the Genre, Artist, Album, or Year, the corresponding item is displayed as blank.
Sorting Standard for the Music List
Title: It sorts the Music titles in alphabetical order, and shows the music file.
Artist: It sorts the music file by artist in alphabetical order.
Mood: It sorts music files by the mood. You can change the music mood information.
Mood options: Energetic, Rhythmical, Sad, Exciting, Calm, Unclassied
Genre: It sorts music files by the genre.
Folder: It sorts music files by the folder. If there are many folders in USB, the files are shown in order in each folder.
The music file in the Root folder is shown first and the others are shown in alphabetical order by name.
Preference: It sorts music files by preference (Favourites). You can change the music files preferences.
Changing the Favourites Settings
Select the desired music le in the Music list, then press the Green button repeatedly until the desired setting appears.
To change the information of multiple les, select les by pressing the yellow button.
Favourites options:
★ ★ ★, ★ ★ ★, ★ ★ ★, ★ ★ ★
Music List Option Menu
Play Current Group: Using this menu, you can only play music files in
the currently selected sorting group.
Delete: Using this menu, you can delete the selected music files.
Change Group: You can change the mood information of music files.
The group information of the current file is updated and the file is
moved to the new group.
To change the information of multiple les, select les by pressing the
yellow button.
Information: The music file information including the name, the size,
the date modified and the path is displayed.
You can view the information of music les during a SlideShow using
the same procedures.
Alternatively, select a music le from the music list and press the INFO
button to view the information.
Remove Safely: You can remove the device safely from the TV.
N
N
N
N
N
N
N
N
N
N
N
N
N
N
O
Music
SUM
Device
Favourites Settings
Select
Jump
Option
Preference
Title
Artist
Energetic ★ ★ ★
Jee
Album 1
2005
Pop
Thanks
Sad ★ ★ ★
Darby
Album 2
2005
Pop
I Love You
Calm ★ ★ ★
Catherine
Album 3
2005
Pop
Better than yesterday
F G H I J L P S T V
▲
Music
SUM
Device
Favourites Settings
Select
Jump
Option
Artist
Mood
Genre
Sad ★ ★ ★
Jee
Album 1
2005
Pop
Thanks
Sad ★ ★ ★
Darby
Album 2
2005
Pop
I Love You
Exciting ★ ★ ★
Catherine
Album 3
2005
Pop
Better than yesterday
Rhythmical Sad Exciting Calm ...
▲
Play Current Group
Delete
Change Group
Information
▼
Page 40
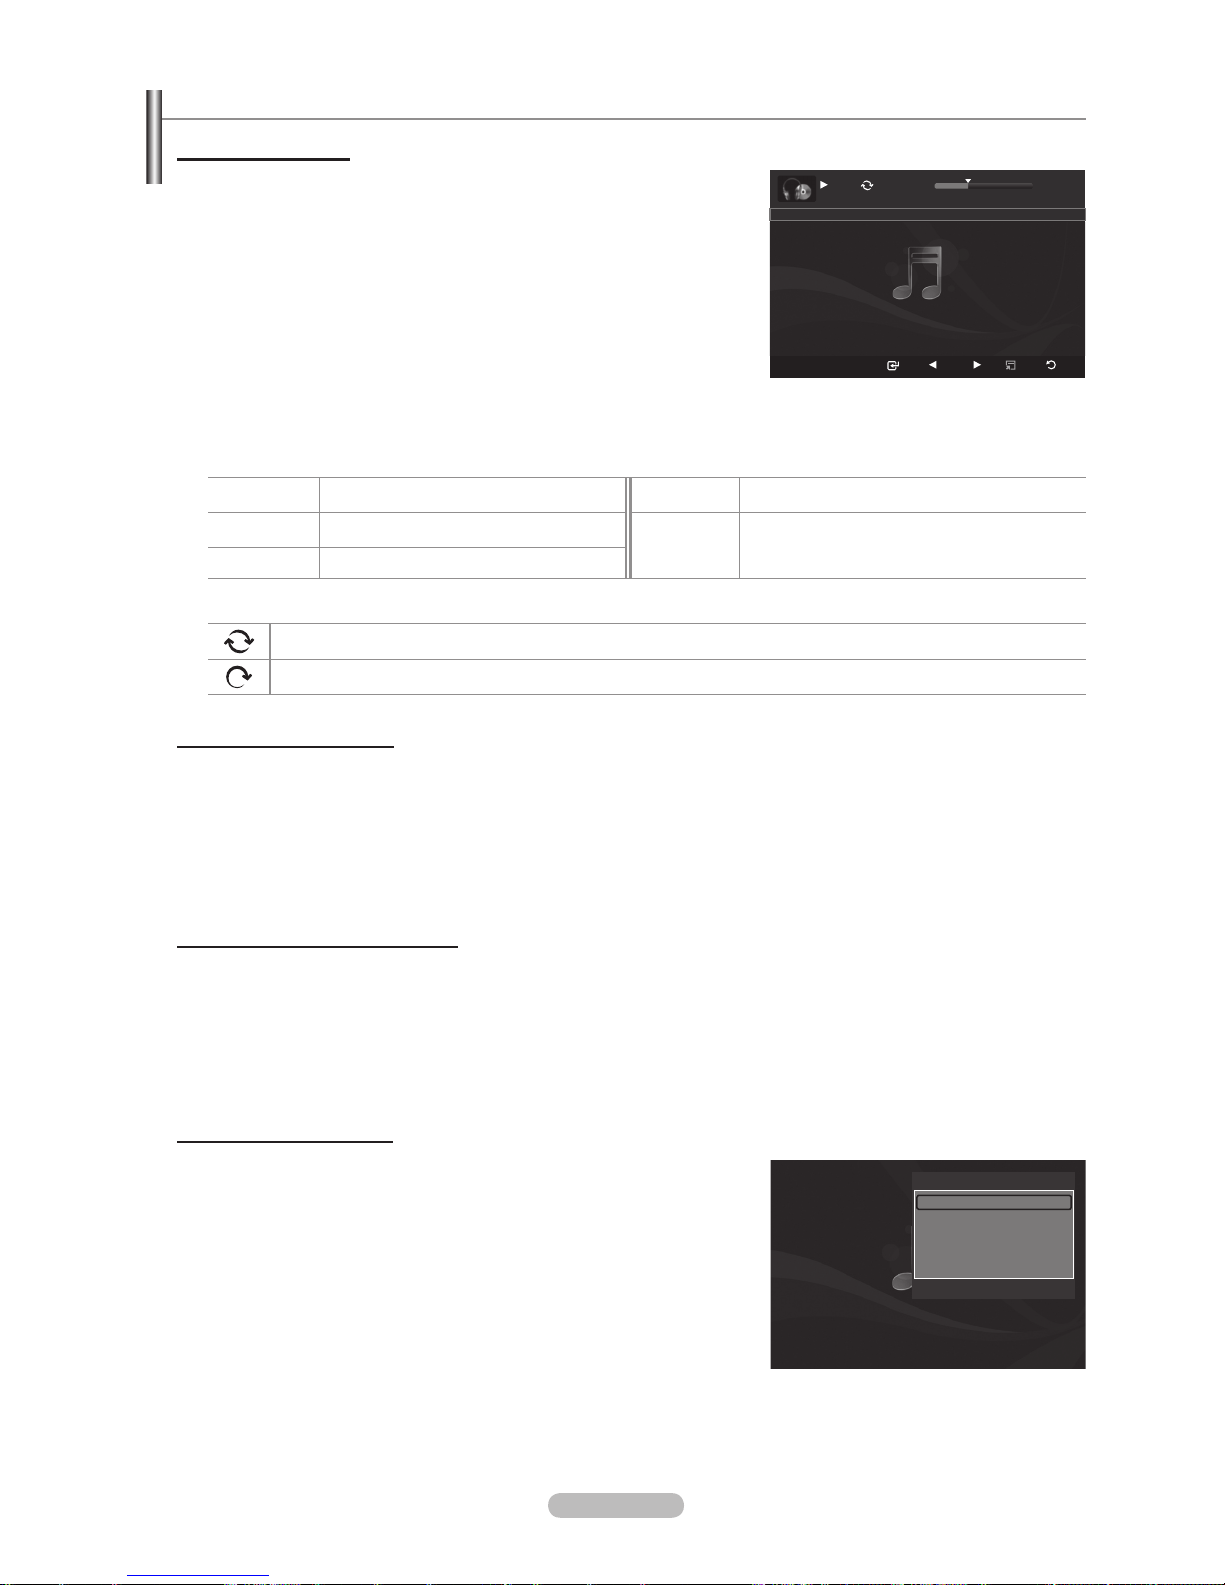
English - 40
Playing a Music
Playingamusicle
1. Pressing the ◄ or ► button to select a music le to be played.
2.
Press the ∂ (Play)/ENTERE button.
This menu only shows les with the MP3 le extension. Files with other
le extensions are not displayed, even if they are saved on the same
USB device.
π
(REW) or µ (FF) buttons do not function during play.
The selected le is displayed at the top with its playing time.
To adjust the music volume, press the volume button on the remote
control. To mute the sound, press the MUTE button on the remote
control.
The playing duration of a music le may be displayed as ‘00:00:00’ if its playing time information is not found at the start of
the le.
Music Play Control Buttons
ENTER
E
Play/Pauses the music le.
∫
Exit play mode and return to the music list.
∂
Play the music le
TOOLS Run various functions from the Music menus.
∑
Pause the music le
Music function information icon
When all music les in the folder (or the selected le) are repeated. Repeat Mode is On.
When all music les in the folder (or the selected le) are played once. Repeat Mode is Off.
Playing the music group
1. Press the ▲ or ▼ button to select a sorting standard.
(
Title, Artist, Mood, Genre, Folder, Preference)
2.
Press the π (REW) or µ (FF) button to select the desired group.
3.
Press the TOOLS button.
4.
Press the ▲ or ▼ button to select Play Current Group, then press the ENTERE button.
The music les in the sorting group including the selected le are played.
Playingtheselectedmusicles
1. Press the ◄ or ► button to select the desired music le in the music list.
2.
Press the yellow button. Repeat the above operation to select multiple music les.
The c mark appears to the left of the selected music le.
3.
Press the ∂ (Play)/ENTERE button.
Only the selected le is played.
Music Play Option Menu
RepeatMode→On/Off
You can play music les repeatedly.
Picture Setting / Sound Setting
Refer to page 44.
Information
The music le information is displayed.
Remove Safely
You can remove the device safely from the TV.
N
N
N
N
N
N
N
N
N
N
SUM
Pause Previous Next Option Return
7/14 00:01:15 00:05:41
I Love You
Tools
Repeat Mode
◄ On ►
Picture Setting
Sound Setting
Information
Remove Safely
U
Move L Adjust e Exit
Page 41
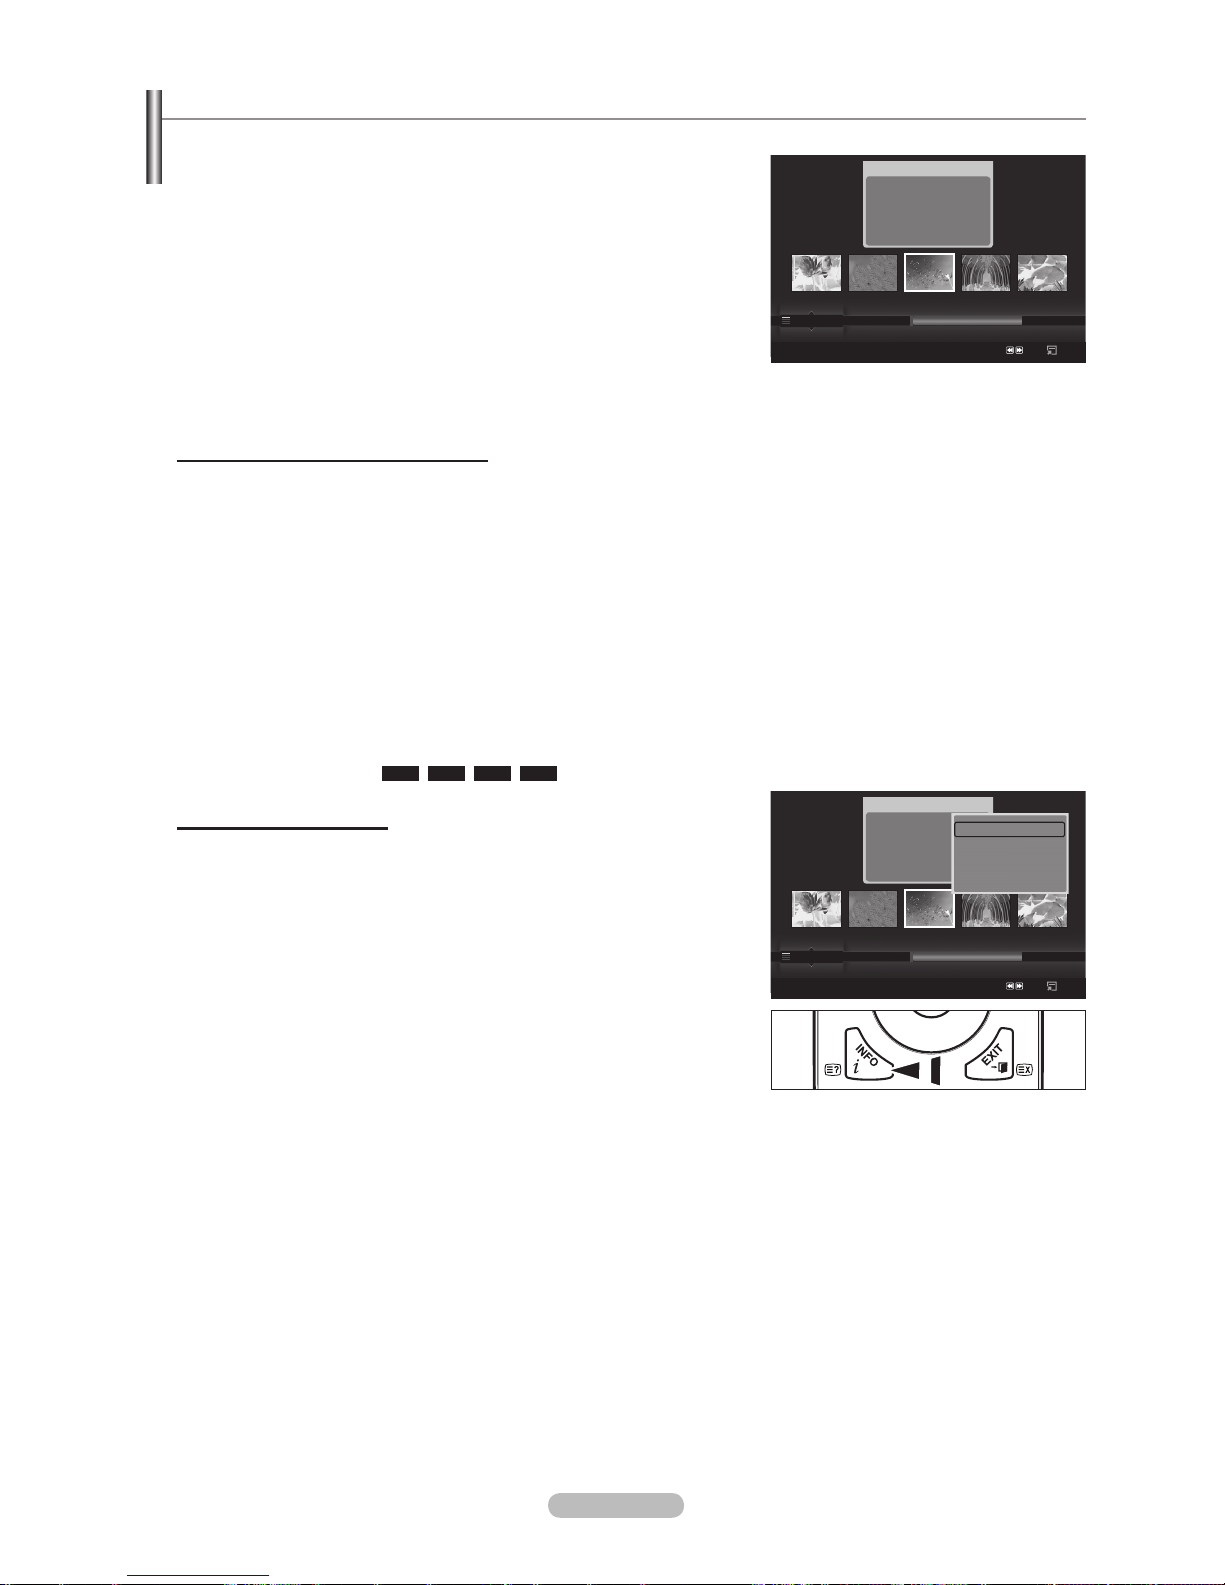
English - 41
Using and Sorting the Movie List
You can sort movies in the Movie List by a particular standard.
1.
Press the ▲ or ▼ button to select a sorting standard in the Movie list.
The movie les are sorted according to the newly selected sorting
standard.
To move to the previous/next group, press the π (REW) or µ (FF)
button.
Movie doesn't support subtitles.
(for example, not support smi, srt and sub les, etc and not support
subtitles included in movie les)
2.
Press the ∂ (Play)/ENTERE button to play the movie in the order
selected by the user.
The movies are sorted according to the newly selected sorting standard.
Movie information is automatically set. You can change the Favorites.
Sorting Standard for the Movie List
Title
It sorts and displays the Movie titles in symbol/Number/alphabet/special order.
Timeline
It sorts and shows movies by date. It sorts by year and month from the earliest movie.
Folder
If there are many folders in USB, the movies les are shown in order in each folder. The movie le in the Root folder is shown
rst and the others are shown in alphabetical order by name.
Preference
It sorts movies by preference. (favourites) You can change the movie preferences.
Changing the Favourites Settings
Select the desired movie le in the movie list, then press the Green button repeatedly until the desired setting appears.
Favourites options:
★ ★ ★, ★ ★ ★, ★ ★ ★, ★ ★ ★
Movie List Option Menu
Play Current Group
Using this menu, you can only play movie les in the currently selected
sorting group.
Delete
Using this menu, you can delete the selected movie les.
Information
The movie le information including the order of the le in the current
directory, the name, the size, the date modied and the path is displayed.
Alternatively, select a movie le from the movie list and press the INFO
button to view the information.
Remove Safely
You can remove the device safely from the TV.
N
N
N
N
N
N
N
O
Movie
SUM
Device
Favourites Settings
Select
Jump
Option
movie_1.jpg
Date : Jan.01.2008
Folder : movie-folder
Favourites :
★ ★ ★
Preference
Title
Timeline
A M
SYMBOL
▲
□
ENG
Movie
SUM
Device
Favourites Settings
Select
Jump
Option
movie_1.jpg
Date : Jan.01.2008
Folder : movie-folder
Favourites :
★ ★ ★
Preference
Title
Timeline
A M
SYMBOL
▲
□
ENG
Play Current Group
Delete
Information
Remove Safely
Page 42
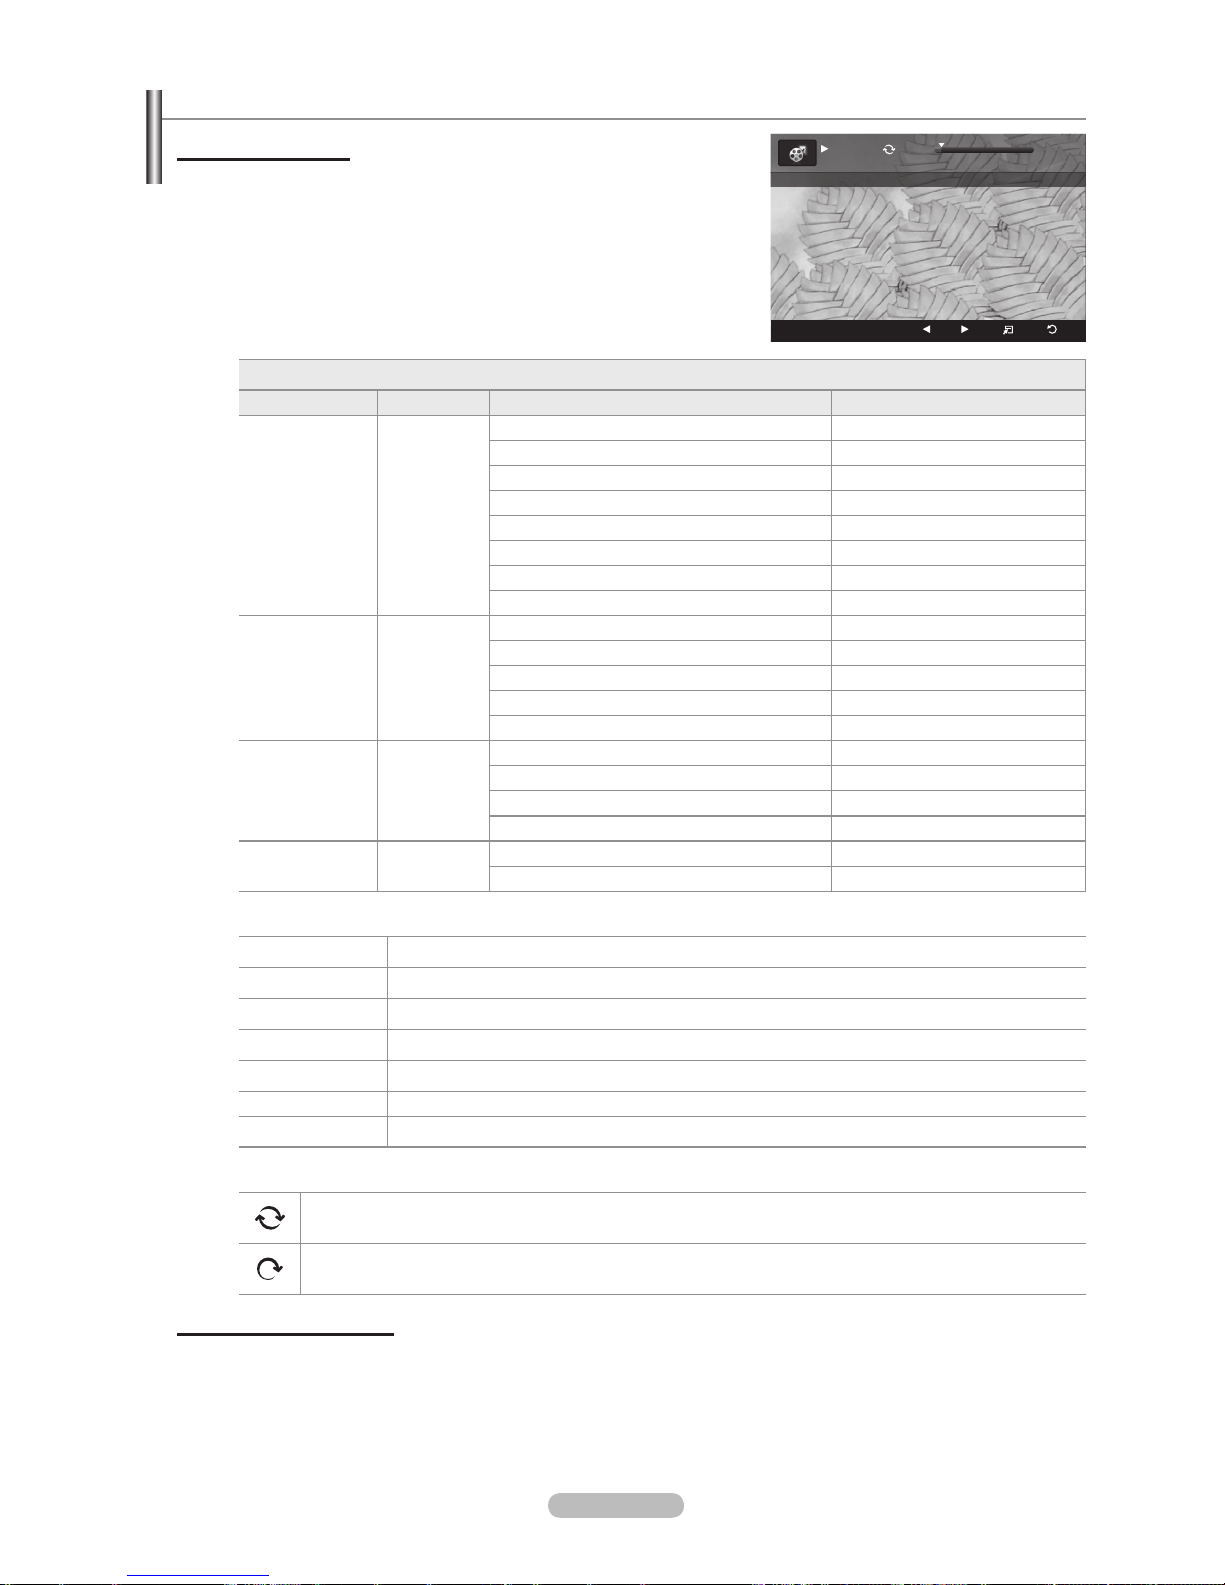
English - 42
Playing a Movie File
Playingamoviele
1. Pressing the ◄ or ► button to select a movie to be played.
2. Press the ∂ (Play)/ENTERE button.
The selected le is played.
The selected le is displayed at the top with its playing time.
The playing duration of a movie le may be displayed as ‘00:00:00’ if its
playing time information is not found at the start of the le.
Supported Video Formats
Video Codec
File Extention Container Video Decoder Max Resolution Sti
*.avi AVI
XviD 720x576
MPEG1 720x576
MPEG2 720x576
H.264 BP 1920x1088
H.264 BP 1920x1088
H.264 HP 1920x1088
MPEG-4 SP 720x576
MPEG-4 ASP 720x576
*.mp4 MP4
H.264 BP 1920x1088
H.264 MP 1920x1088
H.264 HP 1920x1088
MPEG-4 SP 720x576
MPEG-4 ASP 720x576
*.mpg
PS
MPEG1 (Program Stream) 1920x1088
*.mpeg MPEG2 (Program Stream) 1920x1088
*.vro MPEG2 VOB 1920x1088
*.vob MPEG2 VRO 1920x1088
others
(ts)
TS
MPEG2 (Transport Stream) 1920x1088
H.264 (Transport Stream) 1920x1088
Video Play Control Buttons
ENTER
E
Play/Pauses the movie le
∂
Play the movie le
∑
Pause the movie le
∫
Exit play mode and return to the movie list.
TOOLS
Run various functions from the movie menus.
◄/► Skip forwards or backwards through the movie le in 20 second intervals.
▲/▼ Play the next le or the previous le.
Movie function information icon
When all movie les in the folder (or the selected le) are repeated.
Repeat Mode is On.
When all movie les in the folder (or the selected le) are played once.
Repeat Mode is Off.
Playing the movie group
1. Press the ▲ or ▼ button to select a sorting standard. (Title, Timeline, Folder, Preference)
2. Press the π (REW) or µ (FF) button to select the desired group.
3. Press the TOOLS button.
4. Press the ▲ or ▼ button to select Play Current Group, then press the ENTERE button.
N
N
N
N
N
N
SUM
E
Pause -20sec +20sec Option
Return
1/5 00:00:48 00:23:05
ABC.avi
Page 43
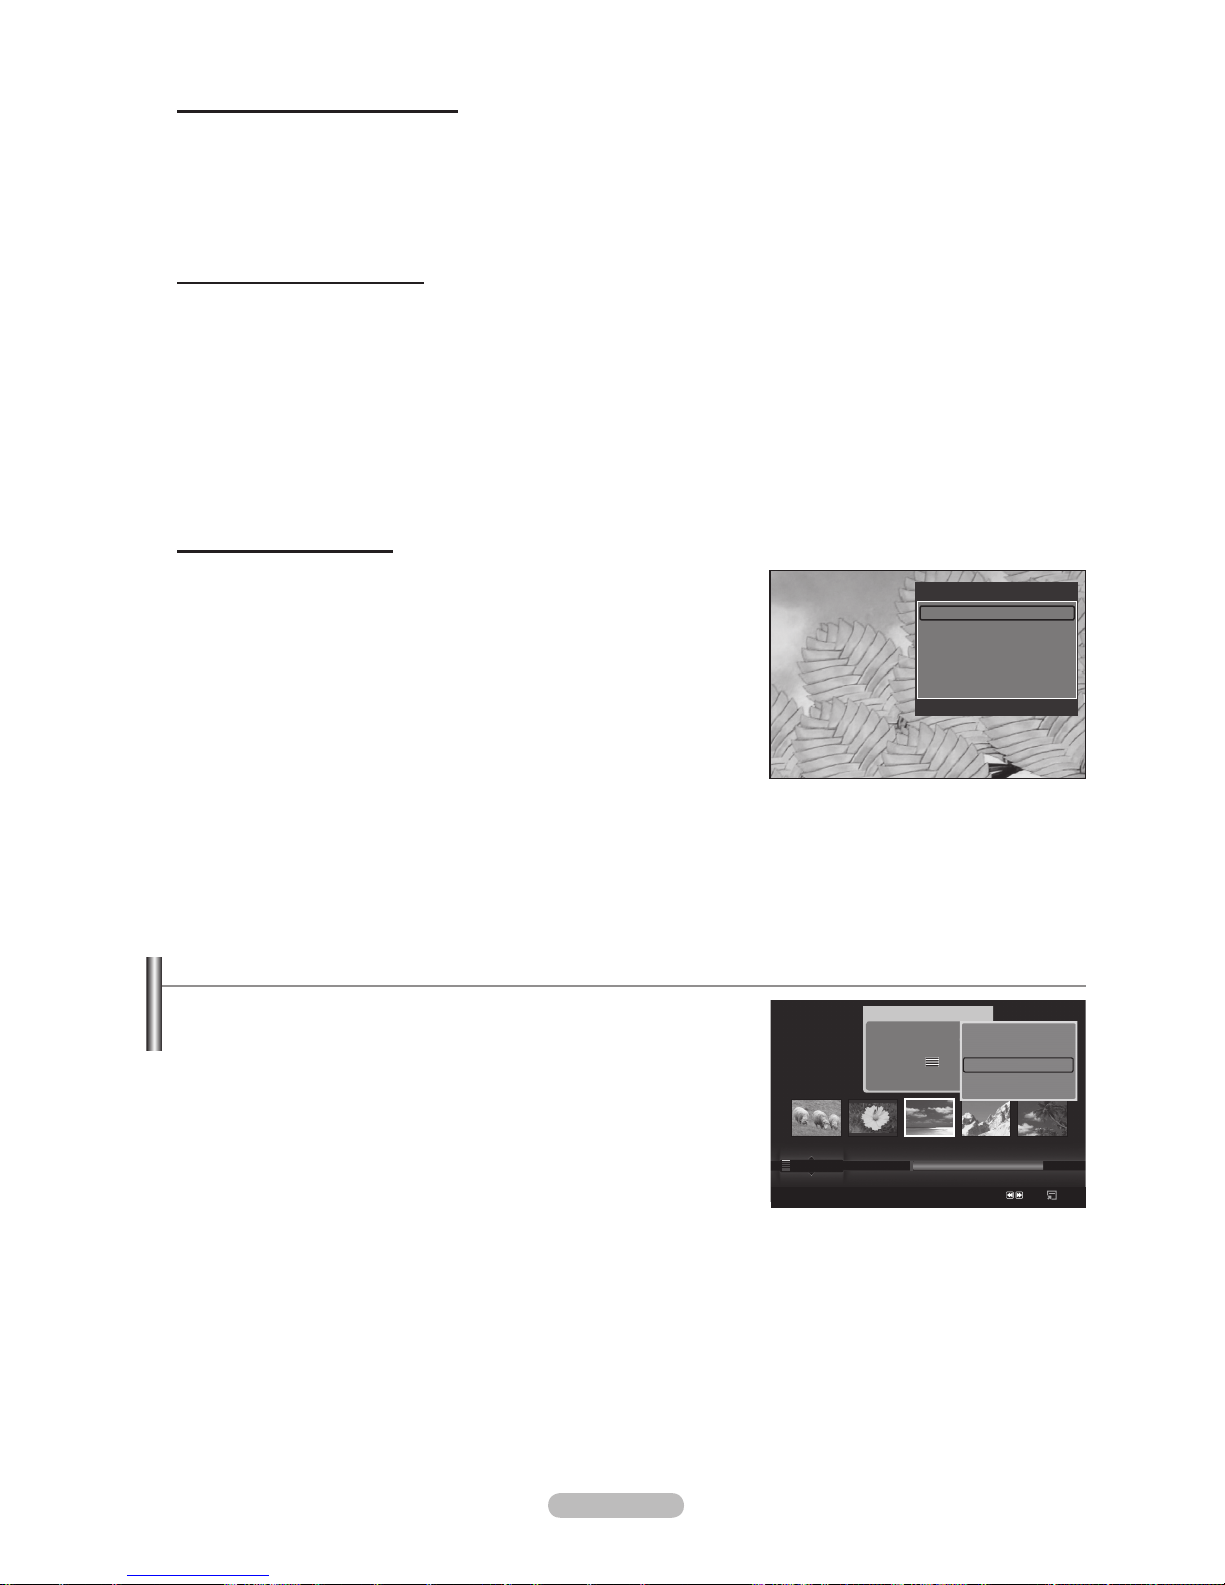
English - 43
Playingtheselectedmovieles
1. Press the ◄ or ► button to select the desired movie le in the movie list.
2.
Press the yellow button. Repeat the above operation to select multiple movie les.
The cmark appears to the left of the selected movie le.
3.
Press the ∂ (Play)/ENTERE button.
Only the selected le is played.
Playing movie continuously
If you exit playing movie, playing it continuously later is possible.
With Play continuously function, you can watch movie without watching again from beginning or bothering searching.
1.
Select movie le you want to Play continuously by pressing ◄ or ► button from the Movie List.
2.
Press the ∂ (Play)/ENTERE button.
3.
Select play continuously by pressing Blue button.
Movie will begin to play from where it was stopped being played.
If Cont. movie play help function was set On, a pop-up message will appear when you play movie le you want to Play
continuously. (Refer to page 44)
4.
To exit WISELINK Pro mode, press the W.LINK button on the remote control.
Movie Play Option Menu
Repeat Mode
You can play the movie repeatedly.
Picture Setting / Sound Setting
Refer to page 44.
Picture Size
Fit: Play video at the TV screen size.
Original: Play video at the original size.
Information
The movie le information is displayed.
Remove Safely
You can remove the device safely from the TV.
N
N
N
N
•
•
Deleting the Photo/Music/Movie File
1. Press the ◄ or ► button to select the desired le in the Photo/Music/Movie
list.
To delete multiple les, select les by pressing the yellow button.
2.
Press the TOOLS button.
3.
Press the ▲ or ▼ button to select Delete (or Delete Selected File), then
press the ENTERE button.
4.
Press the ◄ or ► button to select OK, then press the ENTERE button.
The le is deleted.
When a read-only le is deleted, the ThisFileisread-onlyle.Delete
it? message appear.
Read-only les among multiple les cannot be deleted.
If you select Cancel, the deletion is cancelled.
While removing les, don’t remove the USB memory device.
You cannot remove the PTP-connected digital camera picture les.
You cannot recover deleted photo/music/movie les.
N
N
N
N
N
N
N
N
Tools
Repeat Mode ◄ On ►
Picture Setting
Sound Setting
Picture Size : Fit
Information
Remove Safely
U
Move L Adjust e Exit
Photo
SUM
Device
Favourites Settings
Select
Jump
Option
image_1.jpg
Month : Jan
Date : Jan.01.2008
Color : Gray
Composition :
Folder : P-other
Favourites :
★ ★ ★
Preference
Monthly
Timeline
Jan Nov
▲
Slide Show
Play Current Group
Delete
Information
▼
Page 44
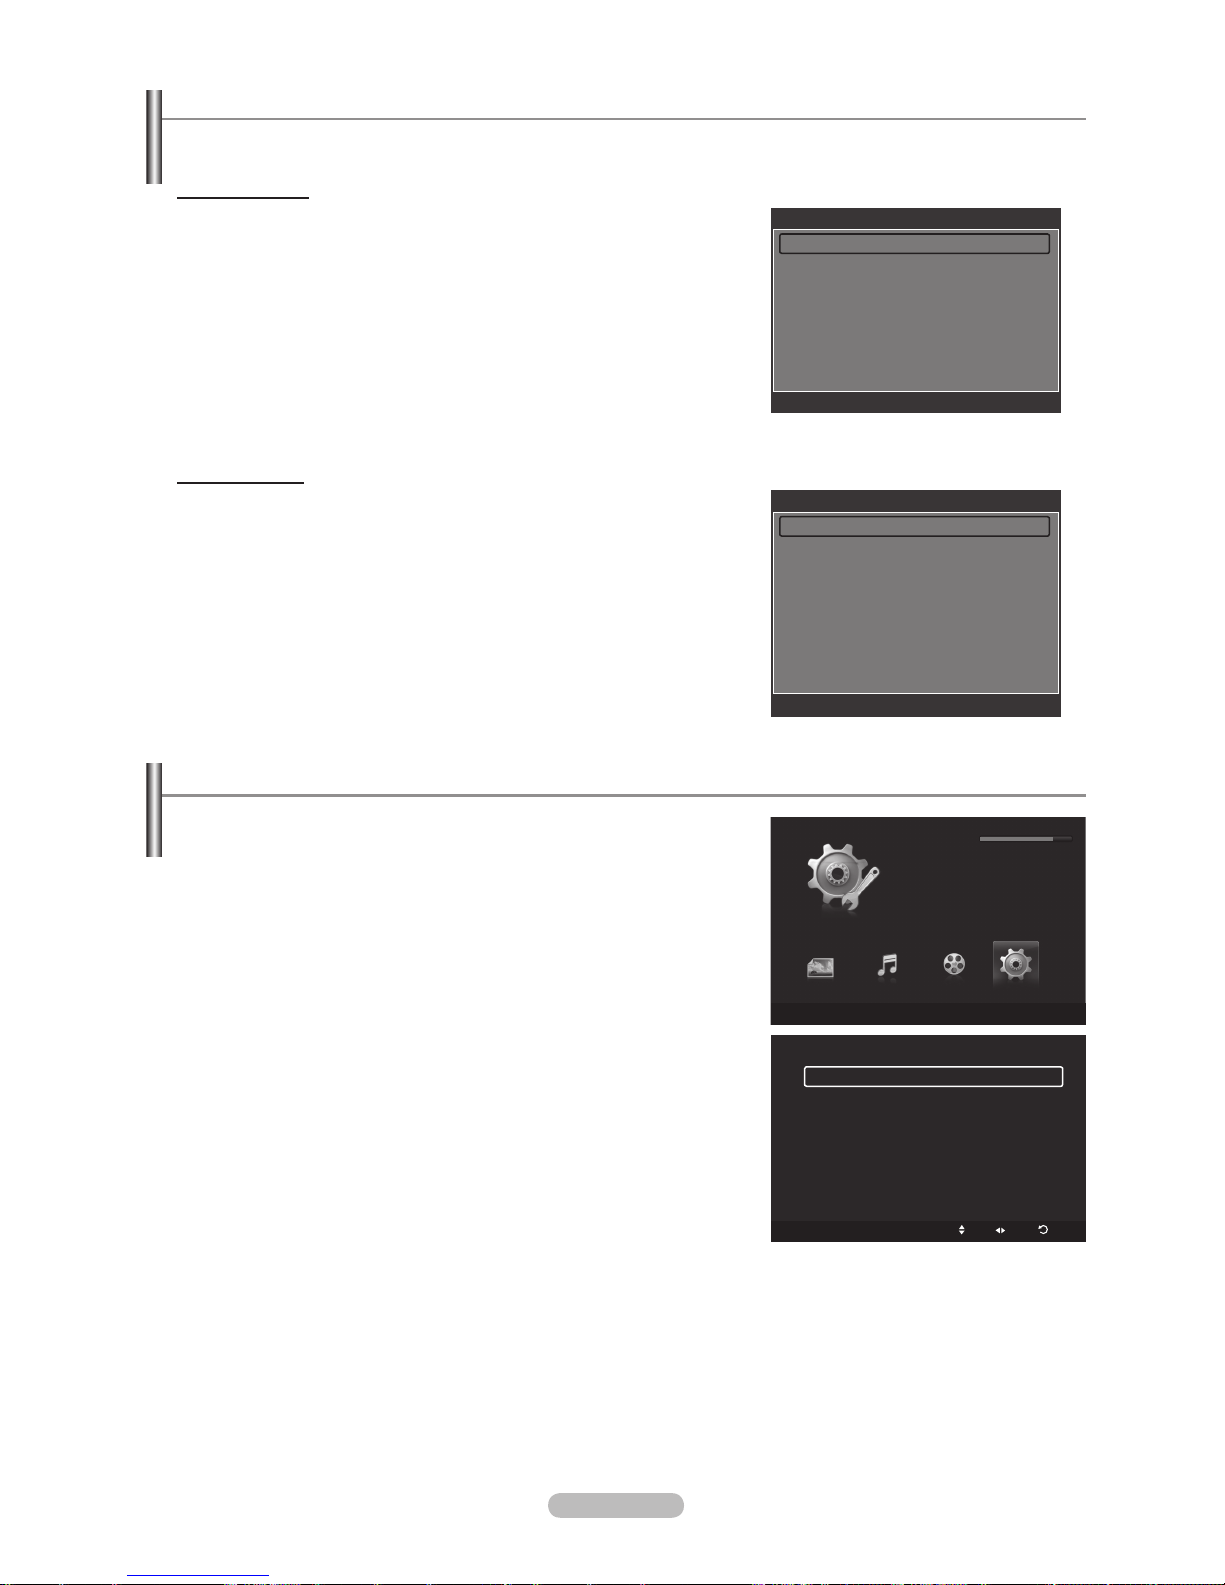
English - 44
Picture/Music Settings Using WISELINK Pro
When watching a SlideShow or listening to music using WISELINK Pro, you can set the picture and sound.
Picture Setting
1. Press the TOOLS button during a Slide Show or while music is playing.
2.
Press the ▲ or ▼ button to select Picture Setting.
3.
Press the ◄ or ► button to select the Picture Mode (Dynamic, Standard,
or Movie).
4.
Press the ▲ or ▼ button to move to an item. (Contrast, Brightness, Color,
Dynamic Contrast, Black Adjust, or Reset)
Select Reset to initialize the picture settings.
5.
Press the ◄ or ► button to adjust the settings.
For more information on the picture settings, refer to pages 16~19.
Sound Setting
1. Press the TOOLS button during a Slide Show or while music is playing.
2.
Press the ▲ or ▼ button to select Sound Setting.
3.
Press the ◄ o r ► button to select the Sound Mode. (Standard, Music,
Movie, Speech, or Custom)
4.
Press the ▲ or ▼ button to move to an item.
Select Reset to initialize the sound settings.
5.
Press the ◄ or ► button to adjust the settings.
For more information on the sound settings, refer to page 22~23.
Using the Setup Menu
Setup displays the user settings of the WISELINK Pro menu.
1.
Press the W.LINK button on the remote control to display the WISELINK
Pro menu.
2.
Press the ◄ or ► button to select Setup, then press the ENTERE button.
3.
Press the ▲ or ▼ button to select the desired option.
4 .
Press the ◄ or ► button to select the option, then press the ENTER
E
button.
To exit WISELINK Pro mode, press the W.LINK button on the remote
control.
SlideShowSpeed→Fast/Slow/Normal
Select to control the slide show speed.
MusicRepeatMode→On/Off
Select to repeatedly play music les.
MovieRepeatMode→On/Off
Select to repeatedly play movie les.
Cont. movie play help
→On/Off
Select to display the help pop-up message for continuous movie playback.
ScreenSaverRunTime→1min/3min/5min
Select to set the waiting time before the screen saver appears.
Information
Select to viewing the information of the connected device.
Remove Safely
You can remove the device safely from the TV.
N
N
N
N
N
Setup
SUM
Device Move Adjust Return
Slide Show Speed ◄ Normal ►
Music Repeat Mode : On
Movie Repeat Mode : On
Cont. movie play help : On
Screen Saver Run Time : 3 min
Information
Remove Safely
WISELINK Pro
Photo
SUM
Device e Exit
Music Setup
SETUP
SUM
851.98MB/995.00MB Free
Movie
Picture Setting
Picture Mode ◄ Standard ►
Contrast : 90
Brightness : 45
Color : 50
Dynamic Contrast : Off
Black Adjust : Off
Reset
U
Move L Adjust E Enter R Return
Sound Setting
Sound Mode ◄ Custom ►
Balance : L50 R50
100Hz : 0
300Hz : 0
1KHz : 0
3KHz : 0
10KHz : 0
Reset
U
Move L Adjust E Enter R Return
Page 45

English - 45
WISELINK Pro-DLNA
Setting the DLNA Network
DLNA allows you to watch videos and pictures saved on your PC on your TV through a network connection in Wiselink Pro mode.
This removes the need to copy them to a USB storage device and then connect the device to your TV. To use DLNA, the TV must
be connected to the network and the DLNA application must be installed on your PC.
Network Connections Diagram
1. Connect the [LAN] port on the rear panel of the TV to the external modem with a LAN Cable.
2.
Connect the PC to which the “DLNA PC Share Manager” programme will be installed and the external modem using a LAN
cable.
3.
Connect the LAN port on the wall and the external modem with a Modem Cable.
Connecting to the Network
1. When connecting to the network is complete, set up the network on the TV.
A Wireless Internet connection does not support DLNA.
Three parts(subnet address) before the TV and PC IP addresses should be same. The last part (host address) should be
changed. (e.g. IP Address: 123.456.789.** )
2.
Run a Network Test to check the network settings.
Installing the DLNA Application
To play content on the PC on the TV, you have to rst install the application.
System Requirements
1. Insert the Programme CD supplied with this TV into your PC.
2.
20MB of free hard disk space is needed for the programme installation.
If you share les, up to 20MB of hard disk drive space is required for each 100 les.
If you cancel le sharing, the hard disk drive space used for the thumbnail information is also freed.
Supported Formats
1. Image: JPEG (jpg, jpeg)
2.
Audio: MP3 (mp3)
3.
Video: MPEG1(mpg, mpeg), MPEG2 PS/TS(mpg, mpeg, trp, ts, tp), divx(mpg, mpeg, avi), MPEG4/H.264 (mpg, mpeg)
N
N
N
N
TV
External Modem
(ADSL/VDSL/Cable TV)
LAN
PC
LAN
1
2
3
Page 46
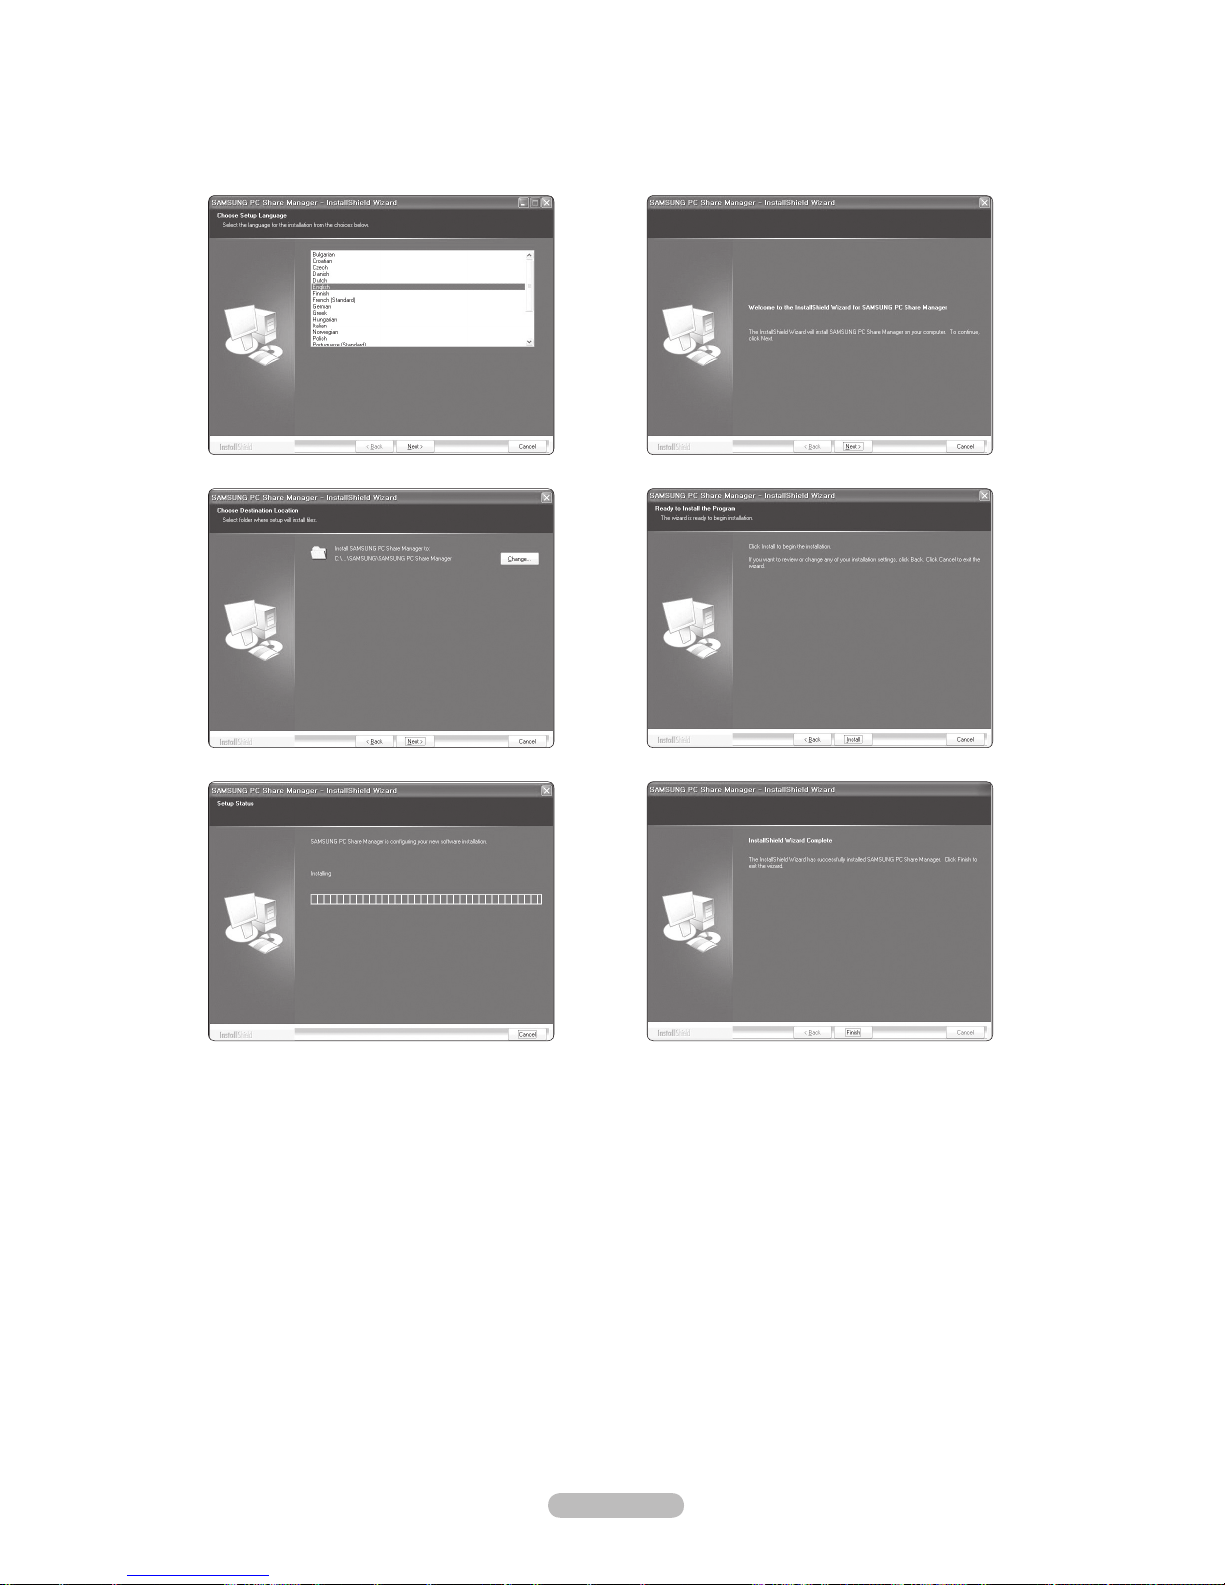
English - 46
Install the application
1. Run the Setup.exe le on the Programme CD supplied with the product.
Alternatively, you can download the le from www.samsung.com.
2.
Install the SAMSUNG PC Share Manager as shown in the gures below.
► ►
► ►
►
3. When the installation is complete, the PC Share Manager icon appears on your Desktop.
Double-click the icon to run the programme.
N
N
Page 47
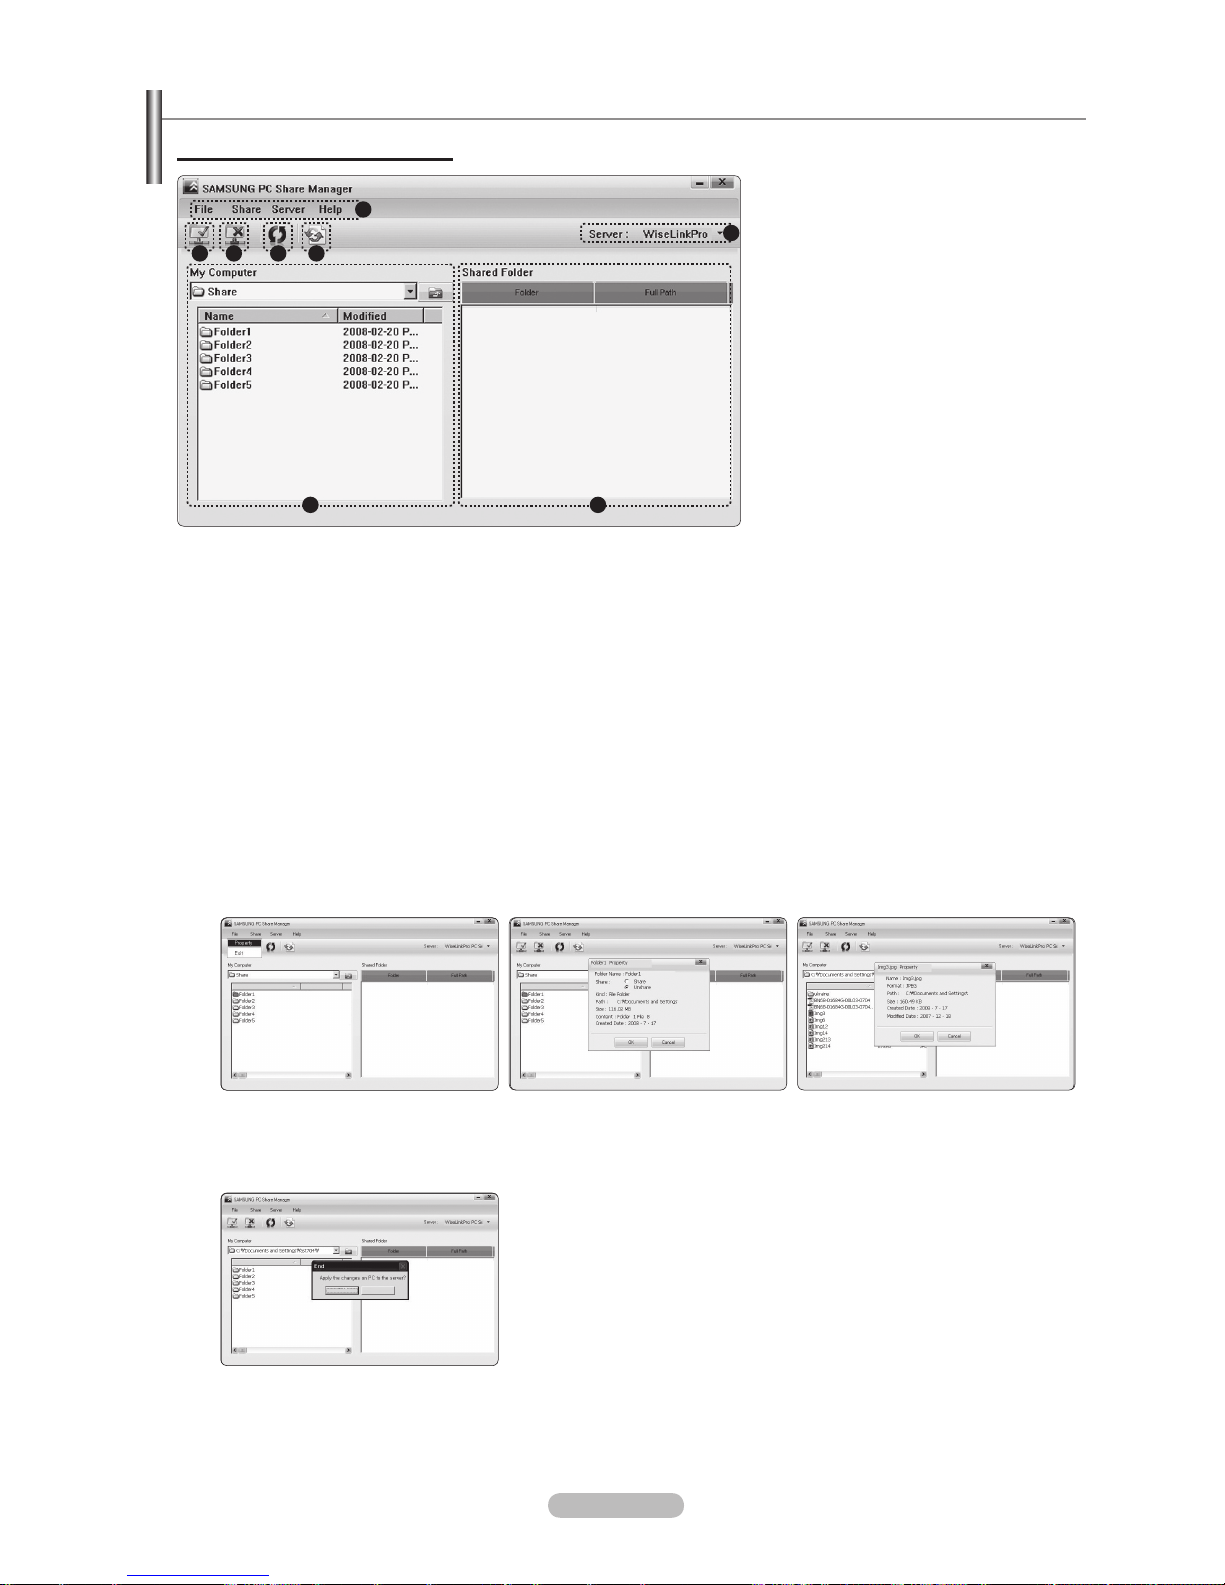
English - 47
Using the DLNA Application
The Programme Screen Layout
1. Menus: The following application menus are provided : File, Share, Server, and Help.
2.
Click to share the selected PC server folder.
3.
Click to cancel sharing.
4.
Click to refresh the PC folder and les.
5.
Click to synchronize the share status.
6.
The folders and les of the PC to be shared are listed.
7.
Folders shared by the user are listed.
8.
PC server name shown on the device list of the WISELINK Pro: Click to change the name.
File
Property: Shows information on the selected file or folder.
Method 1: Select a le or folder and select the File menu and then select the Property sub-menu.
Method 2
: Select a le or folder, right-click over the selected le or folder and then select Property from the pop-up menu.
<Method 1> <Method 2>
Name Modied
Name
Name
Name
Name
Name
Exit: Exits the DLNA application.
If you select Exit without applying the changes after changing the shared status, a message will appear asking if you want to
apply the changed settings to the PC. Select Yes to apply the changes and exit the application.
Name Modied
Name
Name
Name
Yes No
❑
-
-
1
2 3 4 5
6 7
8
Page 48
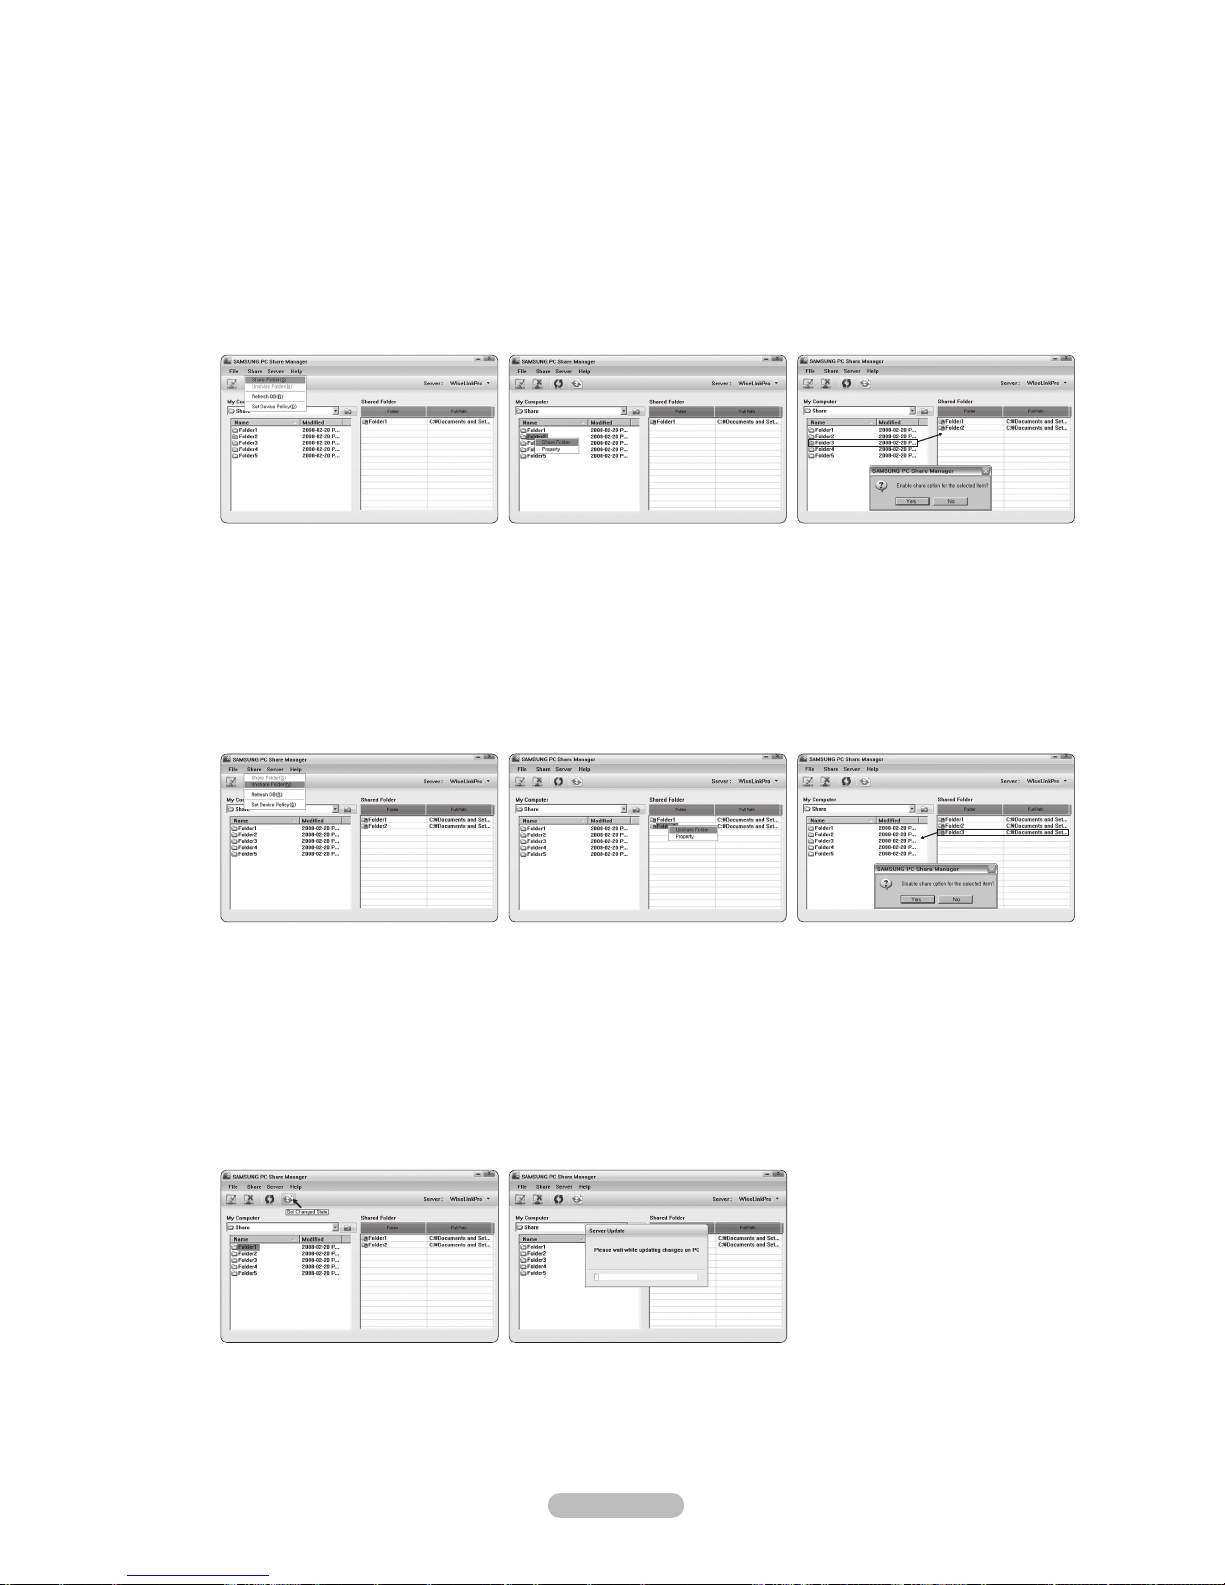
English - 48
Share
Sharing a Folder
You can share a folder from your PC to the TV. The maximum number of folders that can be shared is 32.
Your PC will operate as a server to the TV.
Method 1: Select a folder in My Computer, select the Share menu and then select the Share Folder sub-menu.
Method 2
: Select a folder in My Computer, right-click over the selected folder and then select Share Folder from the pop-
up menu.
Method 3: Locate the mouse pointer over a folder in the My Computer folder list in the left pane and drag&drop the folder
into the Shared Folders pane. If a message appears asking you to conrm the shared folder, select Yes.
<Method 1> <Method 2> <Method 3>
Cancelling a Shared Folder
You can cancel a shared folder on your PC. Select a folder from the Shared Folder pane and select Unshare Folder.
Method 1: Select a folder from the Shared Folder pane, select the Share menu and then select Unshare Folder.
Method 2
: Select a folder from the Shared Folder pane, right-click over the selected folder and then select Unshare Folder
from the pop-up menu.
Method 3: Locate the mouse pointer over a folder in the Shared Folder pane and drag&drop the folder into the My
Computer pane. If a message appears asking you to conrm the cancelation, select Yes.
<Method 1> <Method 2> <Method 3>
Applying the Current Settings
Perform this when synchronization is necessary due to a new shared folder or canceling a shared folder. The Set Changed
State menu applies changes to shared folders to the data saved with the PC share programme.
Since applying changes to the internal data is a time-consuming process, this function enables users to apply changes to the
data only when required.
Until the Set Changed State menu is selected, the changed state of the shared folder is not applied to the server.
Changes to the shared folders are not applied to your PC until you select the Set Changed State menu.
Method 1: Select the Share menu and select the Refresh DB sub-menu.
Method 2
: Click the Set Changed State icon.
❑
N
-
-
-
-
-
-
-
-
Page 49

English - 49
Setting the Access Permission
To enable the TV to nd your PC, the TV must be set to Set Device Policy in the Access Permission Settings window. In
addition, the PC server and the TV must be on the same subnet.
Method: Select the Share menu and select Set Device Policy. Rejected items are represented in gray. You can change the
access permissions by using the Allow Accept / Deny button. To delete an item, select the item and select Delete Item.
Server
Server
You can run or stop using your PC as a server.
Start Server at Windows start
You can determine whether to start the PC server automatically when Windows starts.
Change server name
You can rename the PC server. Enter a new name and click OK. The new name will appear at the top right of the window and
will appear on the TV.
Help
Version
The programme version information message box appears.
-
❑
❑
Page 50

English - 50
Using the DLNA Function
Using the DLNA Menu
DLNA (Digital Living Network Alliance) enables content saved on a DLNA server
(usually your PC) connected to your TV or over a network to be played.
Wiselink Pro enables playing content saved on a USB memory device connected
to the TV, while DLNA enables playing content saved on a DLNA server (your
PC) connected to your TV or over the network. The procedures to use the
content are the same as those for WISELINK Pro.
If you install the PC share manager programme supplied with the TV onto a PC,
you can have the PC perform the role of a DLNA server over the network.
1.
Press the W.LINK button on the remote control to display the DLNA menu.
2.
Press the ◄ or ►button to select an icon (Photo, Music, Movie, Setup), then
press the ENTERE button.
To exit DLNA mode, press the W.LINK button on the remote control.
Photo
Photo List option menu
Sorting Photo List/Viewing the Information/Rotating the Photo le/Viewing a Slide Show
During a Slide Show option menu
Play & Pause/Slide Show Speed/Zoom/Rotate
Music
Music List option menu
Sorting Music List/Viewing the Information/Playing a music le
Music Play Option Menu
Play & Pause/Repeat Mode
Movie
Movie List option menu
Sorting Movie List/Viewing the Information/Playing a Movie le
Movie Play Option Menu
Play & Pause/Repeat Mode
Setup
Slide Show Speed/Music Repeat Mode/Movie Repeat Mode/Cont. movie play help/Screen Saver Run Time/Information
DLNA does not support the following functions.
The Background Music and Background Music Setting functions.
Sorting les by preference in the Photo, Music, and Movie folders.
The Change Group Info function.
The Delete function.
The Safe Remove function.
The π (REW)/µ (FF) button functions while a movie is playing.
The Skip (◄/► button) or Pause function may not work while a movie is playing for the DLNA of other manufacturers,
depending on the corresponding content information.
The playing time may not be displayed while a movie is playing.
N
❑
❑
❑
❑
N
-
-
-
-
-
-
N
N
WISELINK Pro
Photo
SUM
Device e Exit
Music Setup
PHOTO
DLNA : Server
Movie
Page 51
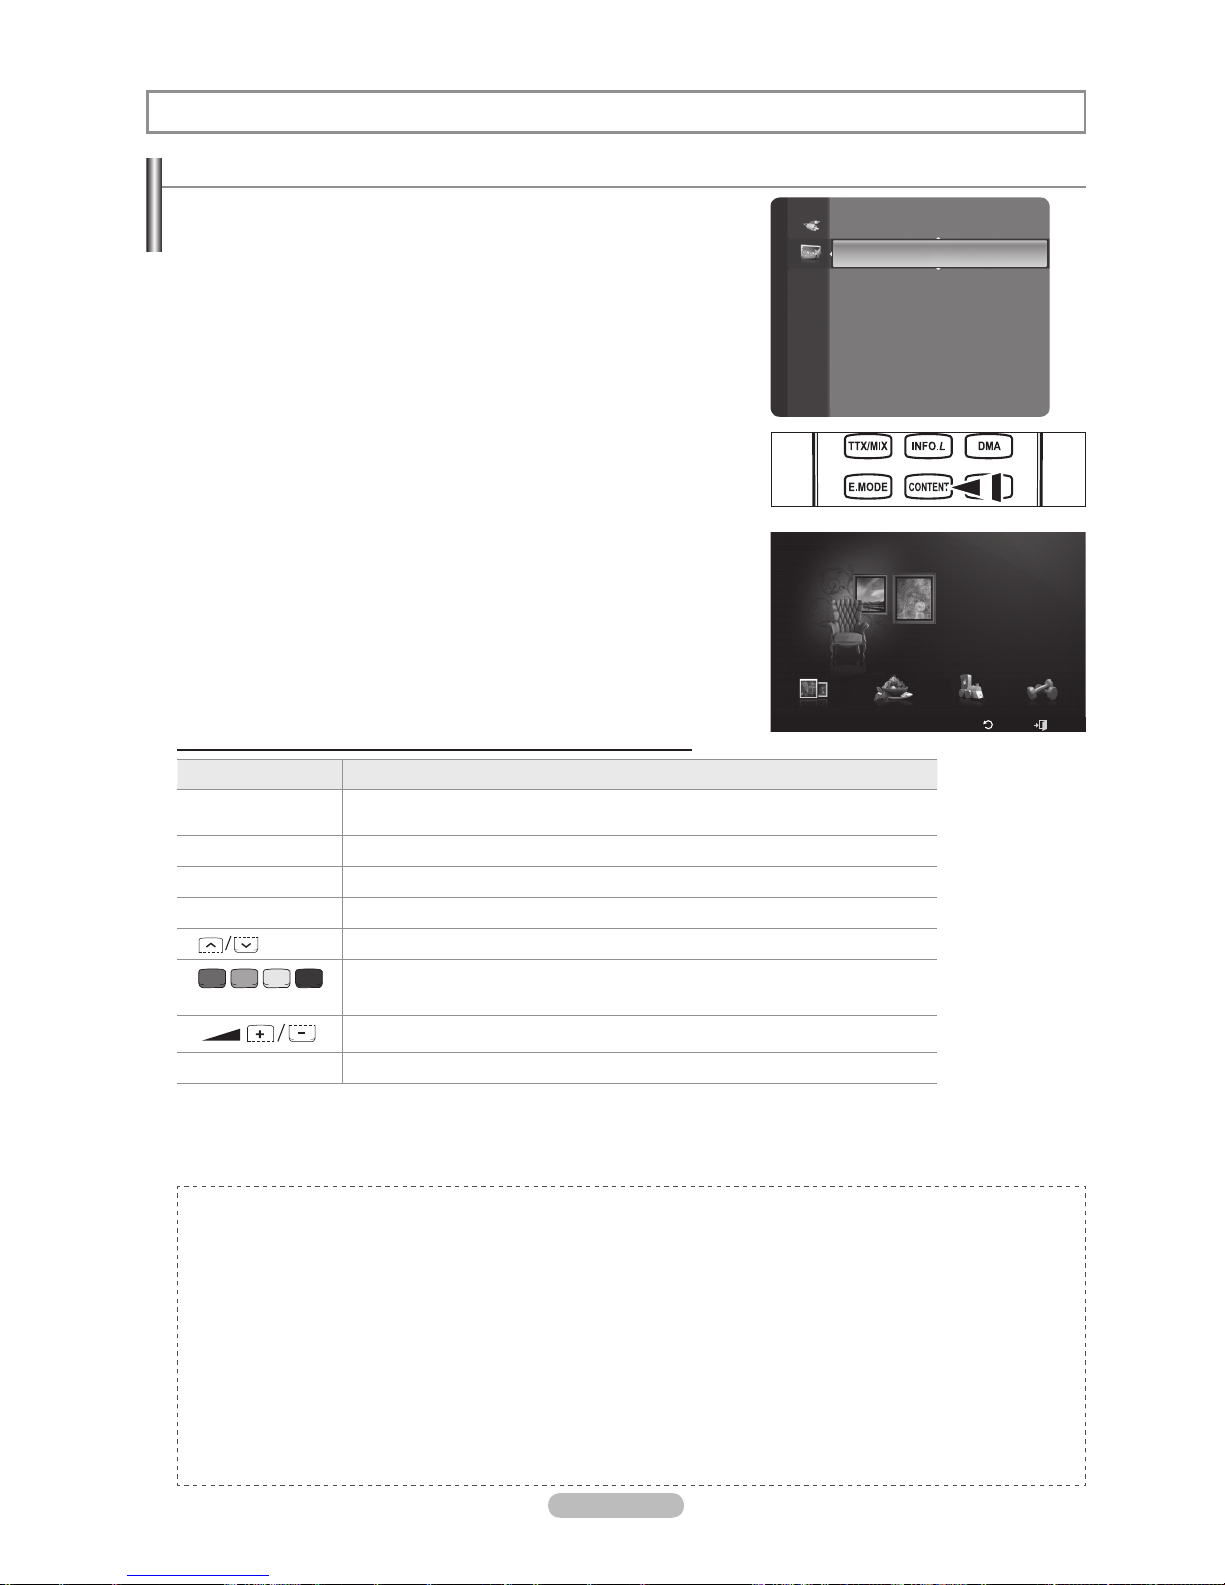
English - 51
Activating the Content Library
The Content Library enables you to view or play the built-in contents on the TV
or stored on your USB device. The Delete, Move and Update functions will not
work with the built-in content on the TV.
1.
Press the MENU button. Press the ▲ or ▼ button to select Application,
then press the ENTERE button.
2.
Press the ▲ or ▼ button to select Content Library, then press the
ENTERE button.
The Content Library main menu is displayed.
Press the CONTENT button on the remote control to display the Content
Library main menu.
3.
Press the ◄ or ► button to select an icon (Gallery, Cooking, Children,
Fitness), then press the ENTERE button.
The selected item will be run.
Refer to the explanation for the button in the display when the user uses
the button while content is running.
Using the Remote Control Button in Content Library Menu
Button Operations
▲/▼/◄/►
(Wheel)
Move the cursor and select an item.
ENTER
E
Select the currently selected item.
RETURN Return to the previous menu.
EXIT Stop the current function and return to the Content Library main menu.
P
,
PRE-CH
Stop Content Library mode and Returns to TV mode.
(colour button)
Button that provide functions are described on the corresponding page.
You can control the volume of the played content.
CONTENT Exit Content Library mode.
If you press the Volume or MUTE button, no OSD is displayed, but the function operates accordingly.
CONTENTS LIBRARY CONTAINS TEXT, GRAPHICS, IMAGES, MULTIMEDIA, AND OTHER MATERIALS FOR
INFORMATIONAL AND PROMOTIONAL PURPOSES ONLY. MATERIALS IN CONTENTS LIBRARY HAS BEEN
MODIFIED AND KEEPS BEING REVISED AND UPDATED. THE MATERIALS IN THE CONTENTS LIBRARY MAY NOT
BE SUITABLE FOR ALL AUDIENCES.
INFORMATION IN THE CONTENTS LIBRARY IS PROVIDED “AS IS.” ALTHOUGH THE INFORMATION PROVIDED
TO YOU IN THE CONTENTS LIBRARY IS OBTAINED OR COMPLIED FROM SOURCES WE BELIEVE TO BE
RELIABLE, SAMSUNG CANNOT AND DOES NOT GUARANTEE THE ACCURACY, VALIDITY, TIMELINESS OR
COMPLETENESS OF ANY INFORMATION OR DATA MADE AVAILABLE TO YOU FOR ANY PARTICULAR PURPOSE.
UNDER NO CIRCUMSTANCES, INCLUDING NEGLIGENCE, SHALL SAMSUNG BE HELD LIABLE, WHETHER IN
CONTRACT OR TORT, FOR ANY DIRECT, INDIRECT, INCIDENTAL, SPECIAL OR CONSEQUENTIAL DAMAGES,
ATTORNEY FEES, EXPENSES, OR ANY OTHER DAMAGES WHATSOEVER ARISING OUT OF, OR IN CONNECTION
WITH, ANY INFORMATION CONTAINED IN, OR THE USE OF, THE CONTENTS LIBRARY, EVEN IF ADVISED OF THE
POSSIBILITY OF SUCH DAMAGES.
N
N
N
N
N
N
Content Library
Application
WISELINK Pro
Anynet+ (HDMI-CEC)
ContentLibrary ►
InfoLive
Product Guide
Setup
USB
Return
Exit
Cooking Children Fitness
Gallery
Gallery
Content Library
Page 52

English - 52
Using the Content Library
Gallery
Art/Relaxation/Party:
This function plays a SlideShow with high resolution images and background music and produces
various atmospheres. Using the Gallery function of the TV, you can change your home atmosphere.
Press the yellow button to playback all imageries.
There is default music for each for the Art, Relaxation, and Party options.
Press INFO button to see the credit and detail information in English for the imagery. Press INFO button again or press
► button for the credit information to go away (currently, the credit supports English only).
The copyrights of the Gallery contents and all issues related to them are reserved by Gallery Player, Inc.
For additional Gallery contents, check for information through www.samsung.com. Please refer to the Using Additional
Content Using External USB Memory Storage section to see how to play additional imagery.
Cooking
Starters/Main Courses/Desserts:
You can view various recipes that you can then easily follow step by step. Enjoy these
contents which give you great ideas for meals.
The recipes introduced in the Cooking contents on the Samsung TV are based on recipes published by Anness
Publishing.
The copyrights of the Cooking contents and all issues related to them are reserved by Practical Pictures.
Children
Story/Song/Play:
This is educational and interactive content that children can watch repeatedly. Enjoy existing stories,
songs and games with the Boowa and Kwala characters.
The copyrights of the Children contents and issues related to them are reserved by UpToTen.
Fitness
Basic Stretches/Massage:
This is benecial health management content that provides stretching and massage exercises
that can be enjoyed by the whole family.
This is benecial health management content that provides stretching and massage exercises that can be enjoyed by the
whole family. The Basic Stretches contents for the Samsung TV are based on the book Stretching by Suzanne Martin
which is published by DK and the Massage contents are based on the books published by Anness Publishing.
The copyrights to Basic Stretches are reserved by the DK Publishing Company. The copyrights to the Massage content
are reserved by Practical Pictures. All issues related to copyrights are reserved by the corresponding company.
Using the Remote Control Button in Fitness menu
Button Operations
◄/►
(Wheel)
View to previous step/View to next step
ENTER
E
Play or pause (in Basic and Advanced Stretches)
Screen Saver Run Time
Select to set the waiting time before the screen saver appears.
Press the yellow button to select Setup in the Content Library main menu.
❑
N
N
N
N
N
❑
N
N
❑
N
❑
N
N
❑
Page 53
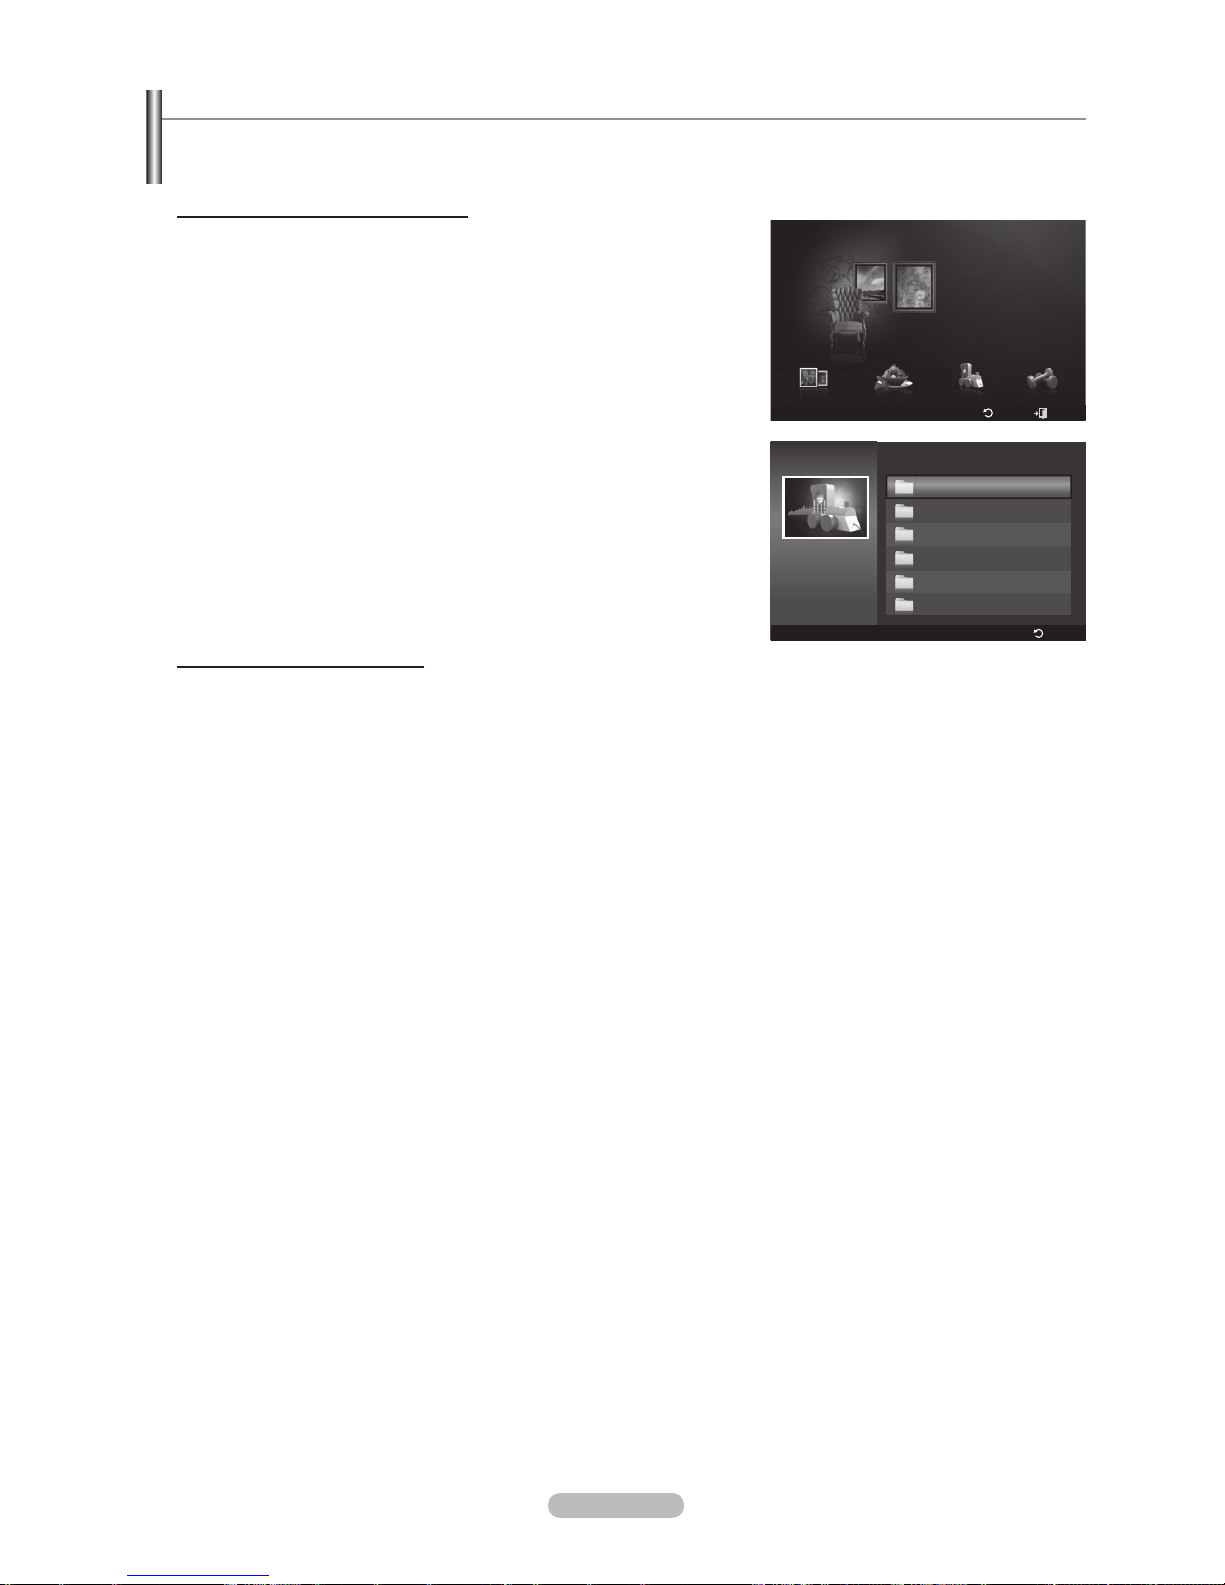
English - 53
Using Additional Content Using External USB Memory Storage
You can download contents onto a USB memory device and play them on your TV. (The contents on the external USB device are
played directly without being copied to the built-in Flash memory of the TV.)
Playing and Exiting New Content
1. Press the Red button in the Content Library main menu.
The USB Browser main screen is displayed.
A list of les saved on the USB device is displayed.
2. Press the ▲ or ▼ button to move to the le (or folder) you want to play. Press
the ENTERE button.
The selected content is played.
The use of contents is the same as in using the TV memory contents.
To return to the USB browser main screen, press the EXIT button.
To exit Content Library mode, press the P>/< button on the remote
control.
Content Library only supports USB Mass Storage Class devices
(MSC). MSC is a Mass Storage Class Bulk-Only Transport device.
Examples of MSC are Thumb drives and Flash Card Readers (Both
USB HDD and HUB are not supported.)
Downloading New Contents
New content other than the built-in contents will be provided via the Samsung.com website with or without charge.
Downloading Content
1. Visit the www.samsung.com website and open the Content Library page.
2. Enter the product number (UDN, Unique Device Number) when it is asked.
3. Select a content item in the Contents Download page.
4. Download the contents onto the USB memory device.
Content Library only supports USB Mass Storage Class devices (MSC). MSC is a Mass Storage Class Bulk-Only
Transport device. Examples of MSC are Thumb drives and Flash Card Readers (Both USB HDD and HUB are not
supported.)
5. Go to Content Library main menu by pressing CONTENT button or choosing Content Library (Menu → Application →
Content Library)
6. Plug the USB memory into USB port on the side of the TV.
Finding a product number (Unique Device Number, UDN)
1. Insert the USB memory into the USB port on the side of the TV.
2. In the USB Browser main screen, press the Green button (Show UDN).
3. The 18-digit number on the screen is the product code.
Provided Content
Additional contents are available on www.samsung.com.
N
N
N
N
N
N
N
N
-
Setup
USB
Return
Exit
Cooking Children Fitness
Gallery
Gallery
Content Library
TV Memory
Show UDN
Return
Content Library
USB
<<
1/1 >>
Fitness
Children
Cooking
Gallery
Living
Children
▼ ▲
Others
Sub Item : 2
Page 54
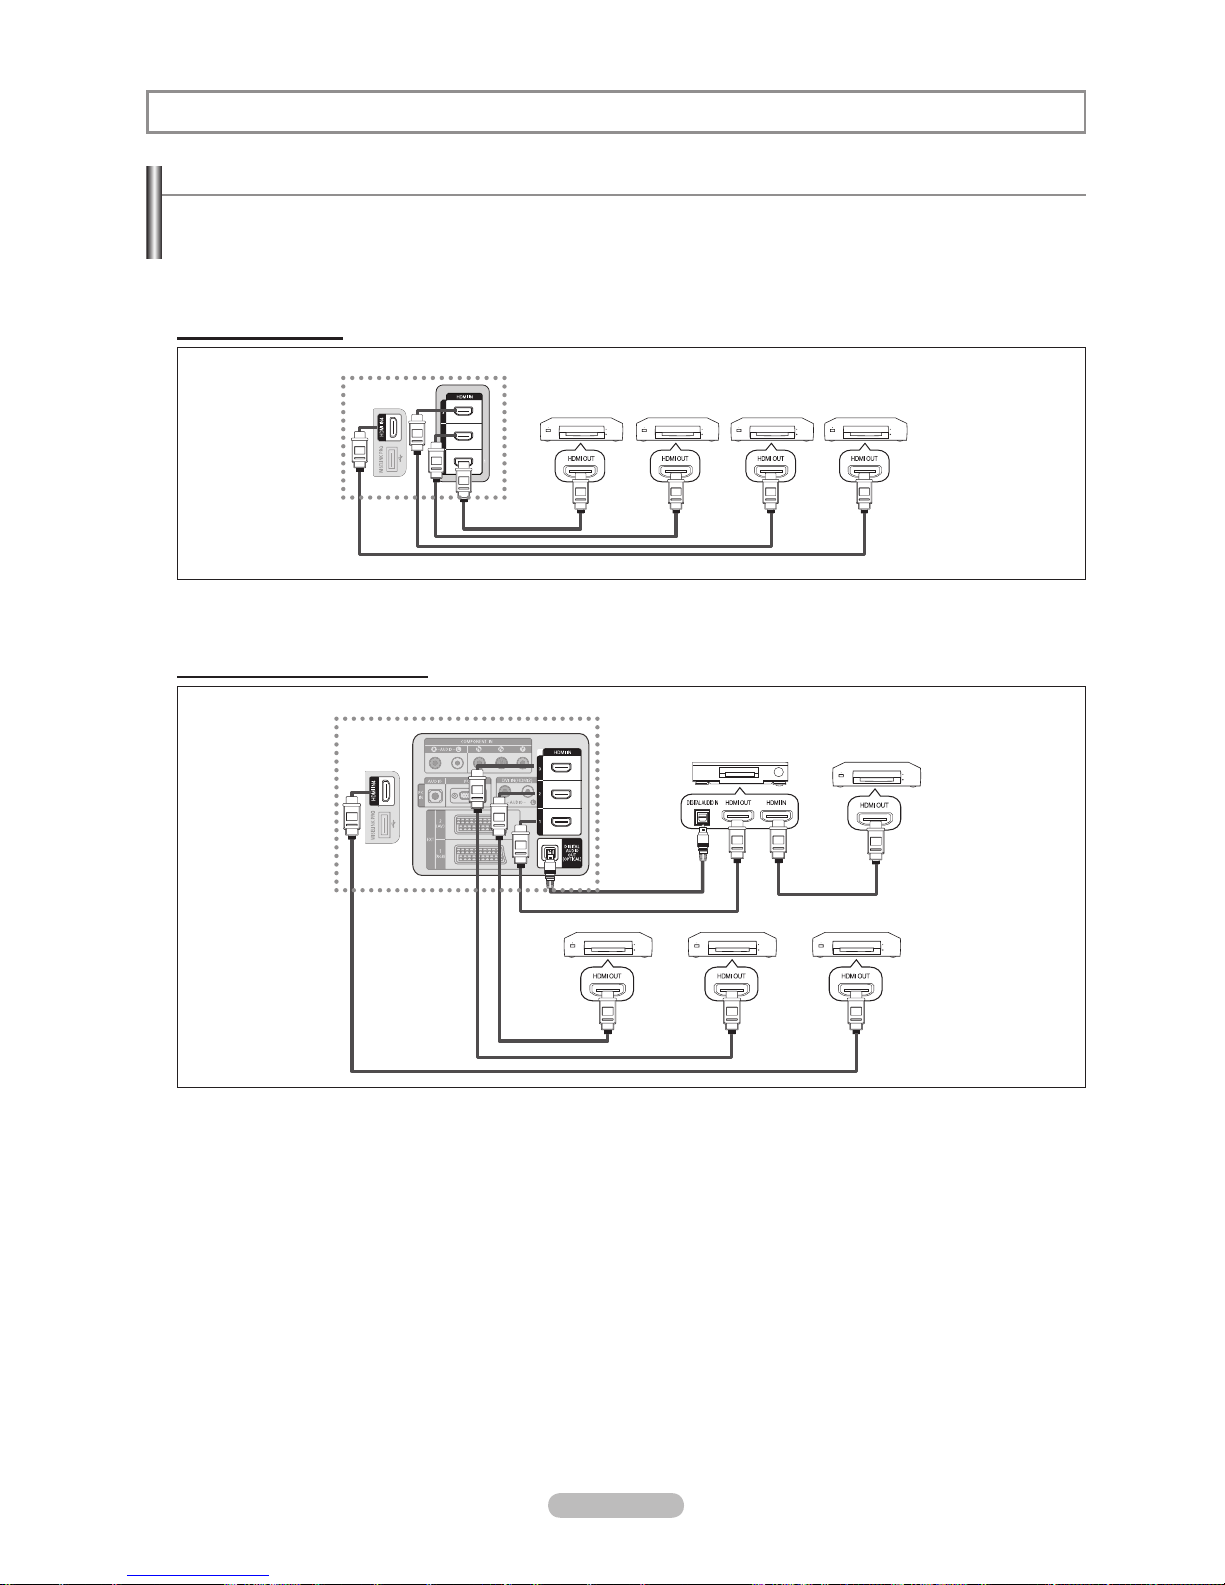
English - 54
Connecting Anynet+ Devices
Anynet+ is a function that enables you to control all connected Samsung devices that support Anynet+ with your Samsung TV’s
remote.
The Anynet+ system can be used only with Samsung devices that have the Anynet+ feature. To be sure your Samsung device has
this feature, check if there is an Anynet+ logo on it.
To connect to a TV
1. Connect the [HDMI 1], [HDMI 2], [HDMI 3] or [HDMI 4] jack on the TV and the HDMI OUT jack of the corresponding Anynet+
device using an HDMI cable.
To connect to Home Theater
1. Connect the [HDMI 1], [HDMI 2], [HDMI 3] or [HDMI 4] jack on the TV and the HDMI OUT jack of the corresponding Anynet+
device using an HDMI cable.
2. Connect the HDMI IN jack of the home theater and the HDMI OUT jack of the corresponding Anynet+ device using an HDMI
cable.
Connect the Optical cable between the Digital Audio Out (Optical) jack on your TV and the Digital Audio Input on the Home
Theater.
When following the connection above, the Optical jack only outputs 2 channel audio. You will only hear sound from the Home
Theater’s Front Left and Right speakers and the subwoofer. If you want to hear 5.1 channel audio, connect the Digital Audio
Out (Optical) jack on the DVD player or Cable/Satellite Box (ie Anynet Device 1 or 2) directly to the Ampli er or Home Theater,
not the TV.
Connect only one Home Theater.
You can connect an Anynet+ device using the HDMI 1.3 cable. Some HDMI cables may not support Anynet+ functions.
Anynet+ works when the AV device supporting Anynet+ is in the Standby or On status.
Anynet+ supports up to 12 AV devices in total. Note that you can connect up to 3 devices of the same type.
N
N
N
N
N
N
About Anynet
+
Anynet+
Device 1
Anynet+
Device 2
Anynet+
Device 3
TV
HDMI 1.3 Cable
HDMI 1.3 Cable
HDMI 1.3 Cable
HDMI 1.3 Cable
Anynet+
Device 4
TV
Anynet+ Device 1
Anynet+ Device 2 Anynet+ Device 3
HDMI 1.3 Cable
HDMI 1.3 Cable
HDMI 1.3 Cable
HDMI 1.3 Cable
Home Theatre
Anynet+ Device 4
HDMI 1.3 Cable
Optical Cable
Page 55
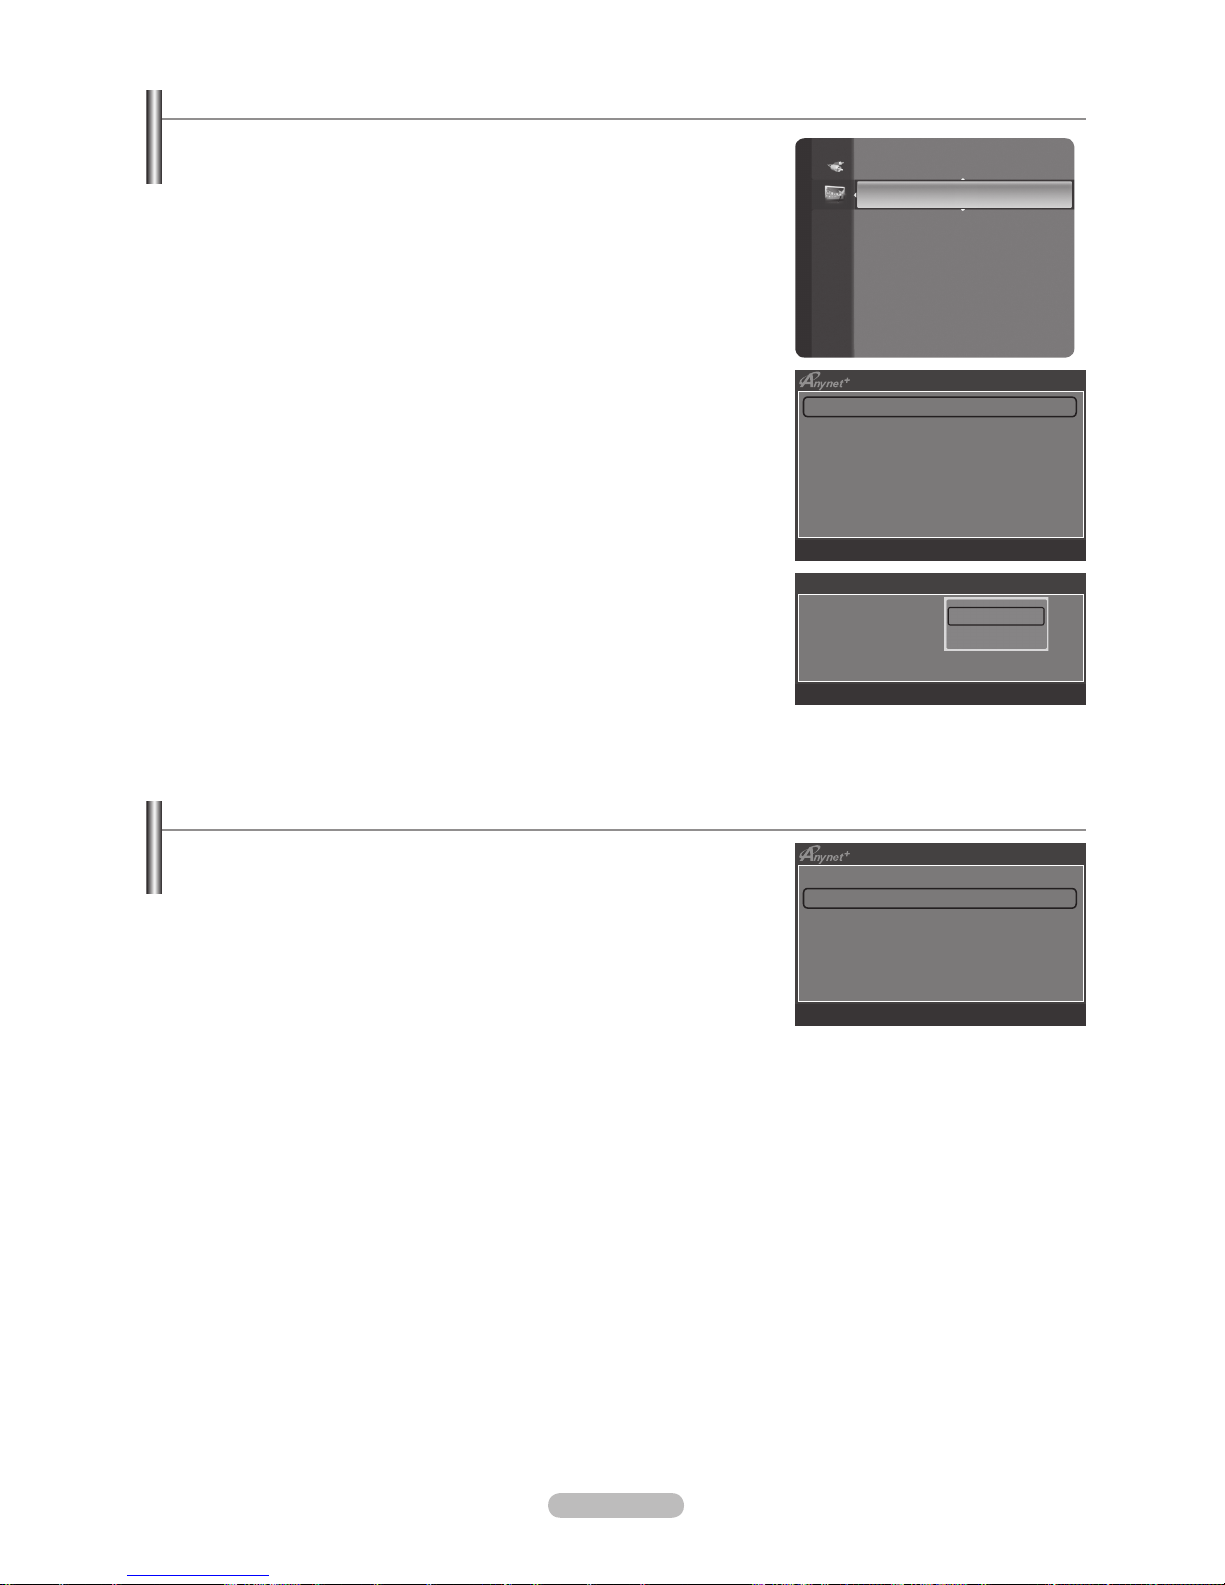
English - 55
Setting Up Anynet+
Anynet+(HDMI-CEC)
Tools→Anynet+(HDMI-CEC) performs the same function.
Setup
Anynet
+
(HDMI-CEC)→Off/On
: To use the Anynet+ Function, Anynet+
(HDMI-CEC) must be set to On.
When the Anynet+ (HDMI-CEC) function is disabled, all the Anynet+
related operations are deactivated.
AutoTurnOff→No/Yes
: Setting an Anynet+ Device to turn Off
Automatically when the TV is Turned Off
The active source on the TV remote must be set to TV to use the
Anynet+ function.
If you set Auto Turn Off to Yes, connected external devices are also
turned off when the TV is turned off. If an external device is still recording,
it may or may not turn off.
❑
•
N
•
N
N
Scanning and Switching between Anynet+ Devices
1. Press the TOOLS button. Press the ENTERE button to select Anynet+
(HDMI-CEC).
2.
Press the ▲ or ▼ button to select Device List, then press the ENTERE
button.
Anynet+ devices connected to the TV are listed. If you cannot nd a device
you want, press the red button to scan for devices.
Only when you set Anynet+ (HDMI-CEC) to On in the Setup menu, the
Device List menu appears.
3.
Press the ▲ or ▼ button to select to a particular device and press the
ENTERE button. It is switched to the selected device.
Switching to the selected devices may take up to 2 minutes. You cannot cancel the operation during the switching operation.
The time required to scan for devices is determined by the number of connected devices.
When the device scan is complete, the number of devices found are not displayed.
Although the TV automatically searches the device list when the TV is turned on via the power button, devices connected to
the TV when the TV is on or under some conditions are not automatically displayed in the device list. Press the red button to
search for the connected device.
If you have selected external input mode by pressing the SOURCE button, you cannot use the Anynet+ function. Make sure to
switch to an Anynet+ device by using the Device List.
N
N
N
N
N
N
N
Application
WISELINK Pro
Anynet+(HDMI-CEC) ►
Content Library
InfoLive
Product Guide
Device List
Setup
U
Move E Enter R Return
View TV
Device List
Recording : DVDR
DVDR Operation
Receiver : On
Setup
U
Move E Enter R Return
Anynet+ (HDMI-CEC) : ON
Auto Turn Off : Yes
U
Move E Enter R Return
Set up
Off
On
Page 56
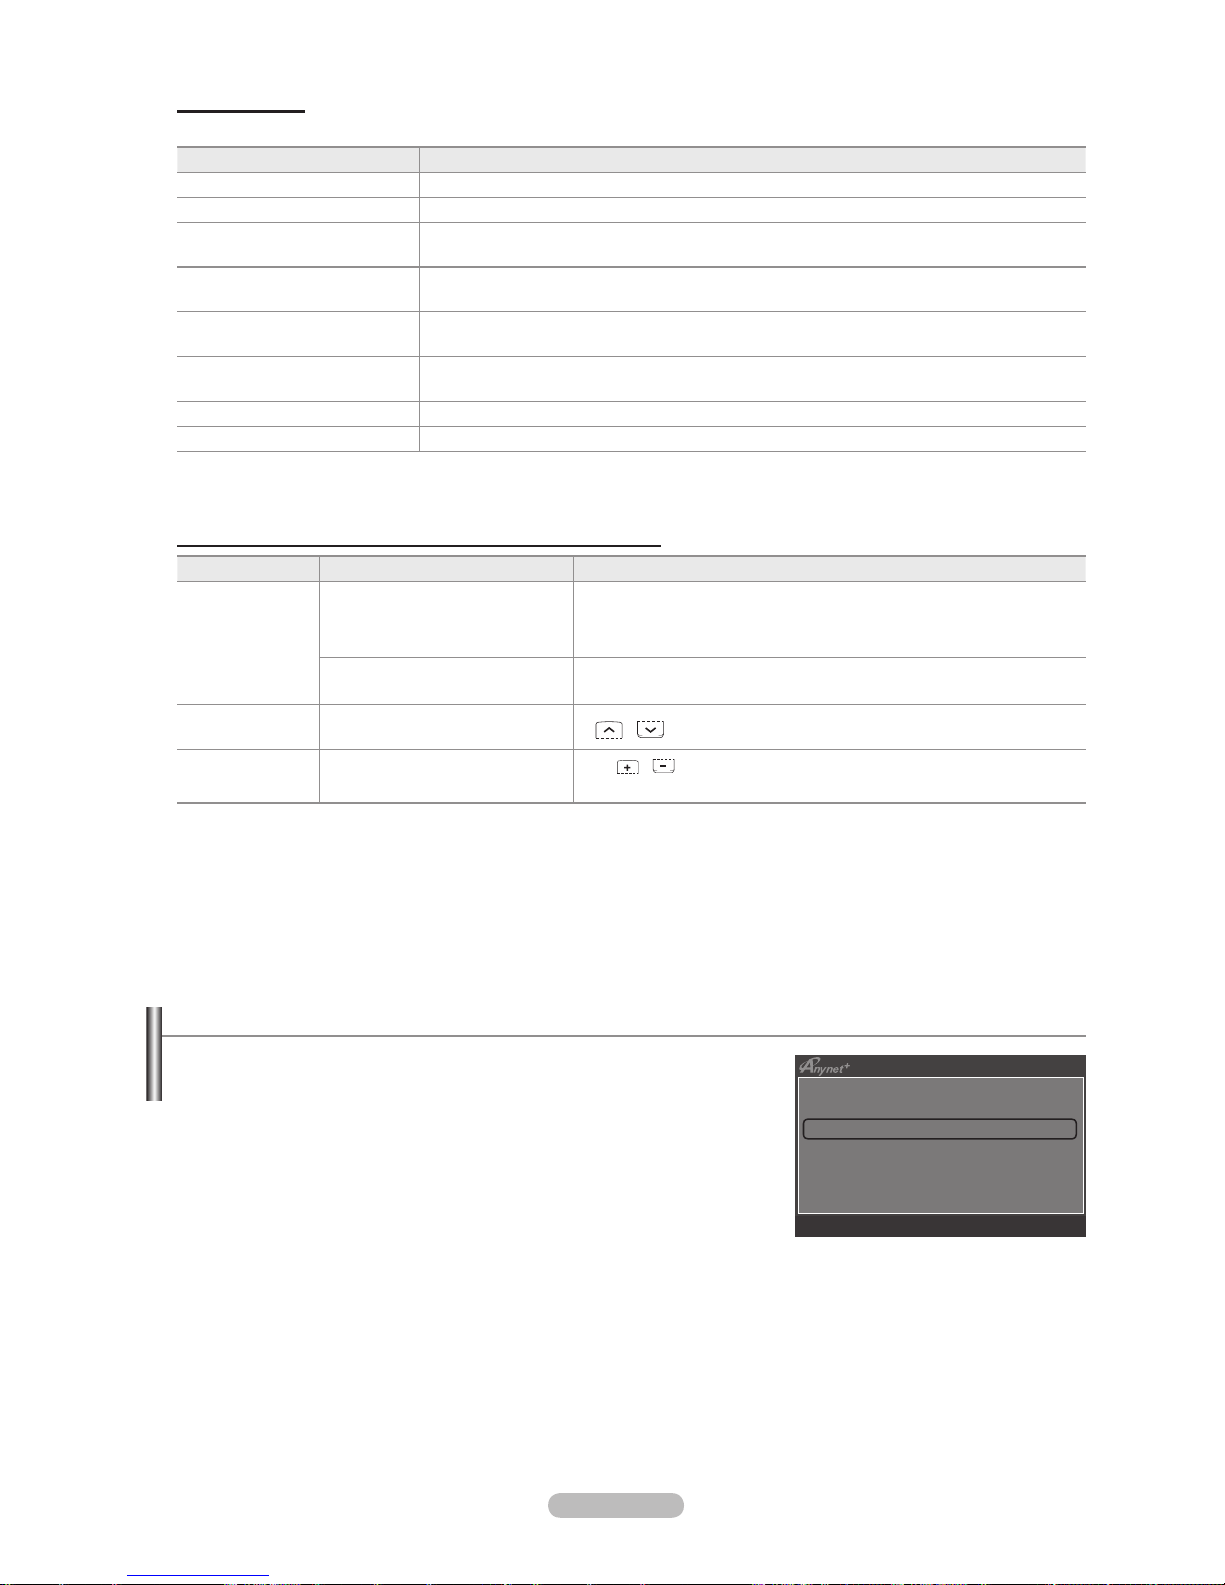
English - 56
Anynet+ Menu
The Anynet+ menu changes depending on the type and status of the Anynet+ devices connected to the TV.
Anynet+ Menu Description
View TV Anynet+ mode changes to TV broadcast mode.
Device List Shows the Anynet+ device list.
(device_name) Menu Shows the connected device menus. E.g. If a DVD recorder is connected, the disc menu of
the DVD recorder will appear.
(device_name) Operation Shows the play menu of the connected device. E.g. If a DVD recorder is connected, the play
menu of the DVD recorder will appear.
Record: (*recorder) Starts recording immediately using the recorder. (This is only available for devices that
support the recording function.)
(*recorder) Reserve Recording Enables reserving a recording for the recorder. (This is only available for devices that support
the recording reservation function.)
Stop Recording: (*recorder) Stops recording.
Receiver Sound is played through the receiver.
If more than one recording device is connected, they are displayed as (*recorder) and if only one recording device is
connected, it will be represented as (*device_name).
TV Remote Control Buttons Available in Anynet+ Mode
Device Type Operating Status Available Buttons
Anynet+ Device
After switching to the device, when
the menu of the corresponding
device is displayed on the screen.
Numeric buttons
▲/▼/◄/►/ENTERE
buttons
Colour buttons / EXIT button
After switching to the device, while
playing a le
π
(Backward search) / µ(Forward search) ∫(Stop) / ∂(Play) /
∑
(Pause)
Device with builtin Tuner
After switching to the device, when
you are watching a TV programme
P / button
Audio Device When Receiver is activated
VOL / button
MUTE button
The Anynet+ function only works when the active source on the TV remote control is set to TV.
The ∏ button works only while in the recordable state.
You cannot control Anynet+ devices using the buttons on the TV. You can control Anynet+ devices only using the TV remote
control.
The TV remote control may not work under certain conditions. In this case, reselect the Anynet+ device.
The Anynet+ functions do not operate with other manufacturers’ products.
The π, µ operations may differ depending on the device.
Recording
You can make a recording of a TV programme using a Samsung recorder.
1.
Press the TOOLS button. Press the ENTERE button to select Anynet+
(HDMI-CEC).
2.
Press the ▲ or ▼ button to select Recording: (device_name), then press the
ENTERE button. Recording begins.
When there is more than one recording device
When multiple recording devices are connected, the recording devices are
listed. Press the ▲ or ▼ button to select a recording device and press the
ENTERE button. Recording begins.
When the recording device is not displayed
Select Device List and press the red button to search devices.
3. Press the EXIT button to exit.
You can record the source streams by selecting Recording: (device_name).
Pressing the ∏ button will record whatever you are currently watching. If you are watching video from another device, the video
from the device is recorded.
Before recording, check whether the antenna jack is properly connected to the recording device. To properly connect an
antenna to a recording device, refer to the recording device’s users manual.
N
N
N
N
N
N
N
N
N
N
N
N
View TV
Device List
Recording : DVDR
DVDR Operation
Receiver : On
Setup
U
Move E Enter R Return
Page 57

English - 57
Listening through a Receiver (Home theater)
You can listen to sound through a receiver instead of the TV speaker.
1.
Press the TOOLS button. Press the ENTERE button to select Anynet+
(HDMI-CEC).
2.
Press the ▲ or ▼ button to select Receiver. Press the ◄ or ► button to select
On or Off.
3.
Press the EXIT button to exit.
If your receiver supports audio only, it may not appear in the device list.
The receiver will work when you have properly connected the Optical IN jack of
the receiver to the Optical Out jack of the TV.
When the receiver (home theater) is set to On, you can hear sound output from the TV’s Optical jack. When the TV is
displaying a DTV(air) signal, the TV will send out 5.1 channel sound to the Home theater receiver. When the source is a digital
component such as a DVD and is connected to the TV via HDMI, only 2 channel sound will be heard from the Home Theater
receiver.
When using the WISELINK Pro feature, sound may not output properly through the receiver.
When listening through the receiver, there are restrictions for using the PIP and audio-related (MTS, Preferred language)
menus.
If there is a power interruption to the TV when the Receiver is set to On (by disconnecting the power cord or a power failure),
the Select Speaker may be set to External Speaker when you turn the TV on again. (see page 23)
Troubleshooting for Anynet+
Symptom Solution
Anynet+ does not work. Check if the device is an Anynet+ device. The Anynet+ system supports Anynet+ devices only.
Connect only one receiver (home theater).
Check if the Anynet+ device power cord is properly connected.
Check the Anynet+ device’s Video/Audio/HDMI 1.3 cable connections.
Check whether Anynet+ (HDMI-CEC) is set to On in the Anynet+ setup menu.
Check whether the TV remote control is in TV mode.
Check whether it is Anynet+ exclusive remote control.
Anynet+ doesn’t work in certain situations. (Searching channels, Operating WISELINK Pro, Plug
& Play, etc.)
When connecting or removing the HDMI 1.3 cable, please make sure to search devices again or
turn your TV off and on again.
Check if the Anynet+ Function of Anynet+ device is set on.
•
•
•
•
•
•
•
•
•
•
I want to start Anynet+. Check if the Anynet+ device is properly connected to the TV and check if the Anynet+ (HDMI-
CEC) is set to On in the Anynet+ Setup menu.
Press the TV button on the TV remote control to switch to TV. Then press the TOOLS button to
show the Anynet+ menu and select a menu you want.
•
•
I want to exit Anynet+. Select View TV in the Anynet+ menu.
Press the SOURCE button on the TV remote control and select a device other than Anynet+
devices.
Press P >/< and PRE-CH to change the TV mode.
(Note that the channel button operates only when a tuner-embedded Anynet+ device is not
connected.)
•
•
•
•
The message Connecting
to Anynet+ device...
appears on the screen.
You cannot use the remote control when you are conguring Anynet+ or switching to a view
mode.
Use the remote control when the Anynet+ setting or switching to view mode is complete.
•
•
The Anynet+ device does
not play.
You cannot use the play function when Plug & Play is in progress.
The connected device is
not displayed.
Check whether or not the device supports Anynet+ functions.
Check whether or not the HDMI 1.3 cable is properly connected.
Check whether Anynet+ (HDMI-CEC) is set to On in the Anynet+ setup menu.
Search Anynet+ devices again.
You can connect an Anynet+ device using the HDMI 1.3 cable only. Some HDMI cables may not
support Anynet+ functions.
If it is terminated by an abnormal situation such as disconnecting the HDMI cable or power cord
or a power failure, please repeat the device scan.
•
•
•
•
•
•
The TV programme cannot
be recorded.
Check whether the antenna jack on the recording device is properly connected.
The TV sound is not output
through the receiver.
Connect the optical cable between TV and the receiver.
N
N
N
N
N
N
View TV
Device List
Recording : DVDR
DVDR Operation
Receiver ◄ On ►
Setup
U
Move L Adjust R Return
Page 58
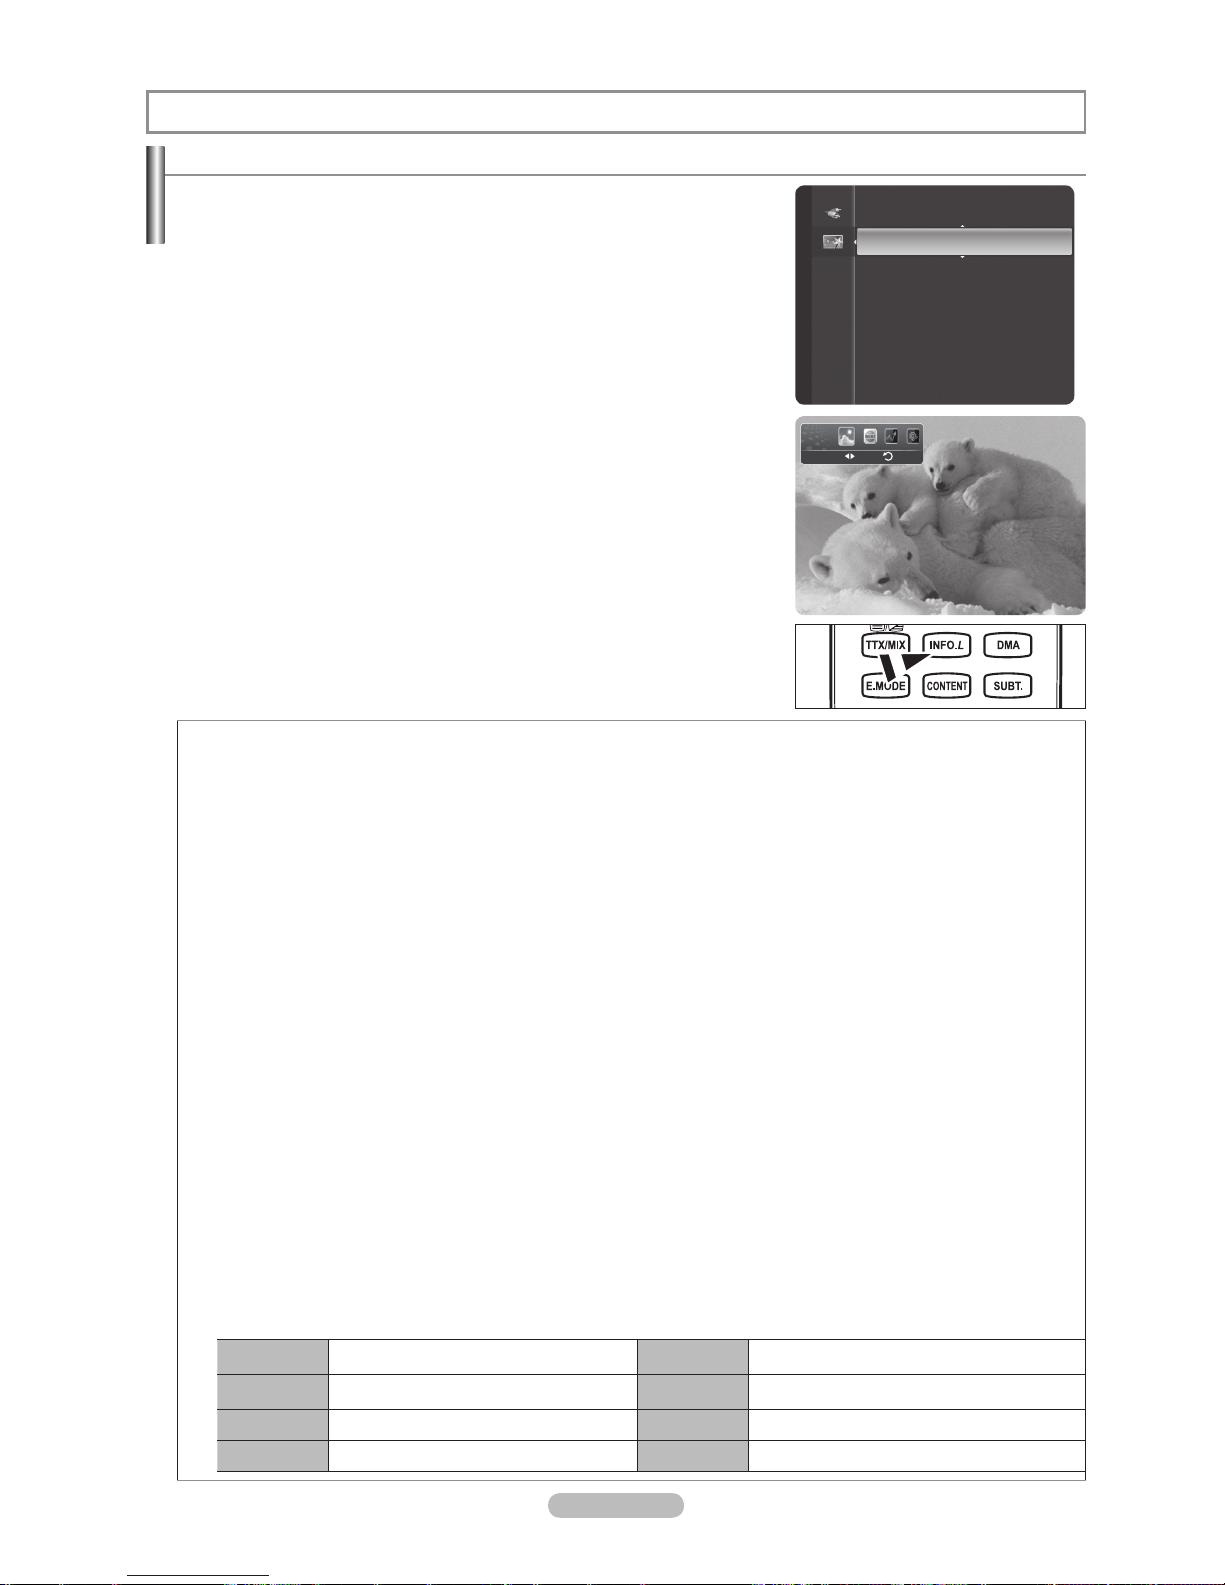
English - 58
Using InfoLive
You can view news, stock market and weather information services using SAMSUNG’s
InfoLive service.
Set up the network. (Refer to pages 28~29)
InfoLive is available only in UK, France, Germany, Italy, Spain, Norway, Sweden,
Denmark, Finland and Russia. Country is selected depending on the country
which is set in Plug & Play.
1. Press the MENU button to display the menu.
Press the ▲ or ▼ button to select Application, then press the ENTERE button.
2. Press the ▲ or ▼ button to select
InfoLive, then press the ENTERE
button.
3. Press the ◄ or ► button to select a service (Weather, News, Stocks or Setup)
and press the ENTERE button.
You can select and view more than one service at the same time only for
‘News (without detailed information)’, ‘Weather-Today’s Weather’, and
‘Stocks-Favorite Stocks, Market Summary’.
Press the
INFO.L
button on the remote control to display the InfoLive menu.
ALL THE MATERIALS AVAILABLE THROUGH INFOLIVE [‘INFOLIVE CONTENT’] ARE THE PROPERTY OF THE
ORIGINATOR OF THE CONTENT [“CONTENT OWNER’] AND/OR ITS AFFILIATES OR LICENSORS, AND ARE PROTECTED
BY COPYRIGHT, TRADEMARK, AND OTHER INTELLECTUAL PROPERTY LAWS. ALL INFOLIVE CONTENT IS PROVIDED
SOLELY FOR YOUR PERSONAL NONCOMMERCIAL USE. YOU MAY NOT USE ANY INFOLIVE CONTENT IN A MANNER
THAT CONSTITUTES AN INFRINGEMENT OF THE CONTENT OWNERS’ RIGHTS OR THAT HAS NOT BEEN AUTHORIZED
BY THE CONTENT OWNER. MORE SPECIFICALLY, UNLESS EXPLICITLY AUTHORIZED IN THIS DISCLAIMER OR BY
THE CONTENT OWNER, YOU MAY NOT MODIFY, COPY, REPRODUCE, REPUBLISH, UPLOAD, POST, TRANSMIT,
TRANSLATE, SELL, CREATE DERIVATIVE WORKS, EXPLOIT, OR DISTRIBUTE IN ANY MANNER OR MEDIUM
(INCLUDING BY EMAIL OR OTHER ELECTRONIC MEANS) ANY INFOLIVE CONTENT OR ANY OTHER MATERIAL FROM
THE INFOLIVE SERVICE. CONTENT PROVIDED CONTENT OWNERS IN CONNECTION WITH THE INFOLIVE SERVICE
MAY BE TIME-DELAYED AS SPECIFIED BY THE CONTENT OWNER AND/OR ITS AFFILIATES.
INFOLIVE IS PROVIDED THROUGH AGREEMENT BETWEEN SAMSUNG AND THE CONTENT OWNER. INFOLIVE MAY
BE TERMINATED OR INTERUPTED AT ANY TIME BY EITHER SAMSUNG OR THE CONTENT PROVIDER OR THROUGH
TERMINATION OF THE AGREEMENT BETWEEN THEM. UNDER NO CIRCUMSTANCES, INCLUDING NEGLIGENCE,
SHALL SAMSUNG OR THE CONTENT PROVIDER BE HELD LIABLE, WHETHER IN CONTRACT OR TORT, FOR ANY
DIRECT, INDIRECT, INCIDENTAL, SPECIAL OR CONSEQUENTIAL DAMAGES, ATTORNEY FEES, EXPENSES, OR
ANY OTHER DAMAGES WHATSOEVER ARISING OUT OF, OR IN CONNECTION WITH, SUCH TERMINATION OR
INTERUPTION. SINCE CONTENT TRANSMITTED VIA INFOLIVE IS RECEIVED BY MEANS OF NETWORKS AND
TRANSMISSION FACILITIES OVER WHICH SAMSUNG HAS NO CONTROL, SAMSUNG EXPRESSLY DISCLAIMS ANY
RESPONSIBILITY OR LIABILITY FOR ANY INTERRUPTION OR SUSPENSION OF INTERLINK SERVICE OR FOR THE
ABSENCE OF CONTENT RESULTING THEREFROM. INFORMATION IN THE INFOLIVE IS PROVIDED “AS IS,”AND
CONSEQUENTLY, SAMSUNG DOES NOT WARRANT THE INFORMATION SO PROVIDED, EITHER EXPRESSLY OR
IMPLIEDLY, FOR ANY PARTICULAR PURPOSE; AND SAMSUNG EXPRESSLY DISCLAIMS ANY IMPLIED WARRANTIES,
INCLUDING BUT NOT LIMITED TO, WARRANTIES OF MERCHANTABILITY OR FITNESS FOR A PARTICULAR PURPOSE.
SAMSUNG DOES NOT GUARANTEE THE ACCURACY, VALIDITY, TIMELINESS, LEGALITY, OR COMPLETENESS OF ANY
INFORMATION OR DATA MADE AVAILABLE THROUGH INFOLIVE FOR ANY PARTICULAR PURPOSE AND UNDER NO
CIRCUMSTANCES, INCLUDING NEGLIGENCE, SHALL SAMSUNG BE HELD LIABLE, WHETHER IN CONTRACT OR TORT,
FOR ANY DIRECT, INDIRECT, INCIDENTAL, SPECIAL OR CONSEQUENTIAL DAMAGES, ATTORNEY FEES, EXPENSES,
OR ANY OTHER DAMAGES WHATSOEVER ARISING OUT OF, OR IN CONNECTION WITH, ANY INFORMATION
CONTAINED IN, OR AS A RESULT OF THE USE OF INFOLIVE BY YOU OR ANY THIRD PARTY, EVEN IF ADVISED OF THE
POSSIBILITY OF SUCH DAMAGES.
ACCESS TO INFOLIVE IS SUBJECT TO THE YAHOO’S TERMS OF SERVICE AVAILABLE ON PAGE 68.
YAHOO TERMS OF SERVICE IN **LANGUAGE** ARE AVAILABLE ON THE WEB AT **ADDRESS**.
French
http://fr.docs.yahoo.com/info/utos.html
Swedish
http://se.docs.yahoo.com/seterms.html
German
http://de.docs.yahoo.com/info/utos.html
Danish
http://dk.docs.yahoo.com/termsofservice.html
Italian
http://it.docs.yahoo.com/info/utos.html
Finnish
http://.docs.yahoo.com/info/terms/?fr=sfp
Spanish
http://es.docs.yahoo.com/info/utos.html
N
N
N
N
N
O
InfoLive
Application
Anynet+ (HDMI-CEC)
Content Library
InfoLive
Product Guide
Weather
Return
Move
Page 59

English - 59
Using the News Service
The news provider may be changed in the future.
1. Press the INFO.L button on the remote control.
2.
Press the ◄ or ► button to move to the News service and press the ENTERE
button.
Press the ENTERE button to view the detailed article.
Press the ◄ or ► button to view the previous or next article.
3. Press the Red button while using the service to change the News service Option.
4. Press ▲ or ▼ button and select News service option.
The News service option changes depending on the provided web service.
To exit the News service, press the Blue button.
To exit the InfoLive service, press the EXIT button.
N
N
N
N
N
N
Using the Weather Service
1. Press the INFO.L button on the remote control.
2.
Press the ◄ or ► button to move to the Weather service and press the
ENTERE button.
Set up the Region
3.
Press the Yellow button. Press the ▲ or ▼ button to select the initial letter (A~Z) of
the location you want, then press the ENTERE button.
4. Press the ► button to move to the Category. Press the ▲ or ▼ button to select
the location you want and press the ENTERE button.
You can check the weather of the selected region.
Set up Weather Option
5.
Press the Red button while using the service to change the Weather service
option.
6.
Press ▲ or ▼ button and select Weather option.
To exit the Weather service, press the Blue button.
To exit the InfoLive service, press the EXIT button.
N
N
N
GM turns 100 with focus on future
Enter Options Close
GM turns 100 with focus on future
Options
News
Business
Entertainment
Sports
Select Return
Sarreguemines
-00°C
Options Location Close
Sarreguemines
-00°C
Options
Today’s Weather
Weekly Forecast
ReturnSelect
Weather
Return
Move
Weather
Return
Move
News
Return
Move
News
Return
Move
Page 60

English - 60
Using the Stock Service
1. Press the INFO.L button on the remote control.
2. Press the ◄ or ► button to move to the
Stocks service and press the ENTERE
button.
3. Press the Red button while using the service to change the Stocks service option.
4. Press ▲ or ▼ button and select Stocks service option, then press the ENTERE
button.
Stock quotes delayed up to 20 minutes. The delay time can vary depending on
country.
To exit the Stocks service, press the Blue button.
To exit the InfoLive service, press the EXIT button.
Market Summary: Major indices are toggled and the entire index, amount of up or down, and % are displayed.
Stocks & News: The Favorite stock information and major indices and Financial news are displayed.
N
N
N
Stocks
Return
Move
29/7 Tue AMEX C.. 2134.37
0:10 GMT 17.64 ▼ 0.82%
Quotes delayed at least 20 minutes.
Brought to by Yahoo! Finance
Options Close
Page 61
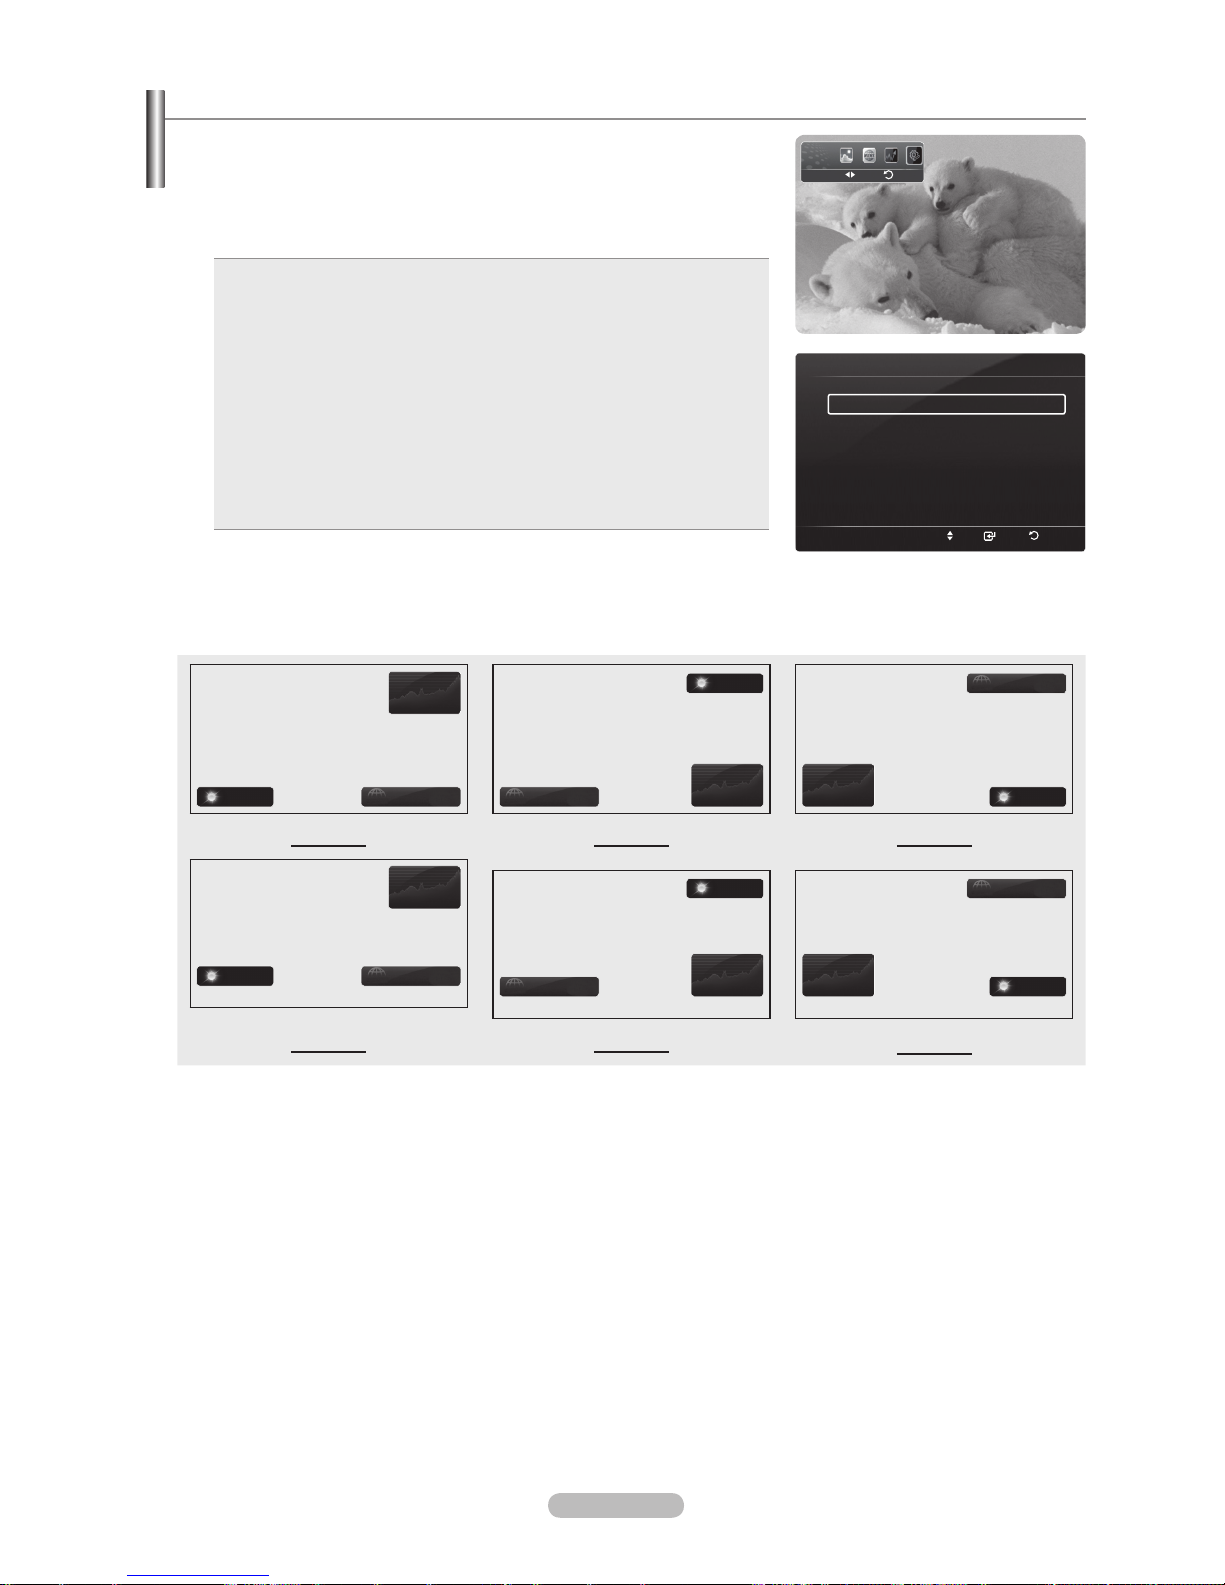
English - 61
InfoLive Setup
1. Press the INFO.L button on the remote control.
2.
Press the ◄ or ► button to select Setup, then press the ENTERE button.
3.
Press the ▲ or ▼ button to select the desired option. (Auto Launch, Display
Time, Font Size, Background Color, InfoLive’s Position)
4.
Press the ▲ or ▼ button to select an option, then press the ENTERE button.
Auto Launch: Determines whether to launch InfoLink automatically
when the TV is turned on. You can select either Off or On.
Display Time: Determines the time to display the service on the TV
screen. You can select :10 minutes, 20 minutes, 1 hour, or Always.
Font Size: You can select letter size Standard or Large through
InfoLink service.
Background Colour: You can select the Background Colours (black,
blue, red, grean, gray) of InfoLink service. The colour is applied to each
service, option and setup window.
InfoLink’s Position: You can set the position of each InfoLink service
on the screen. You can select from six preset InfoLink positions
(Position 1~Position 6).
•
•
•
•
•
To exit the Setup service, press the RETURN button.
To exit the InfoLive service, press the EXIT button.
InfoLive’s Position
Stocks
Weather News
Weather
News
Stocks
News
Stocks
Weather
Position 1 Position 2 Position 3
Stocks
Weather News
Weather
News
Stocks
News
Stocks
Weather
Position 4 Position 5 Position 6
N
N
InfoLive’s Setup
Move Select Return
Auto Launch : Off
Display Time : 10 minutes
Font Size : Standard
Background Color : Black
InfoLive’s Position
Setup
Return
Move
Page 62
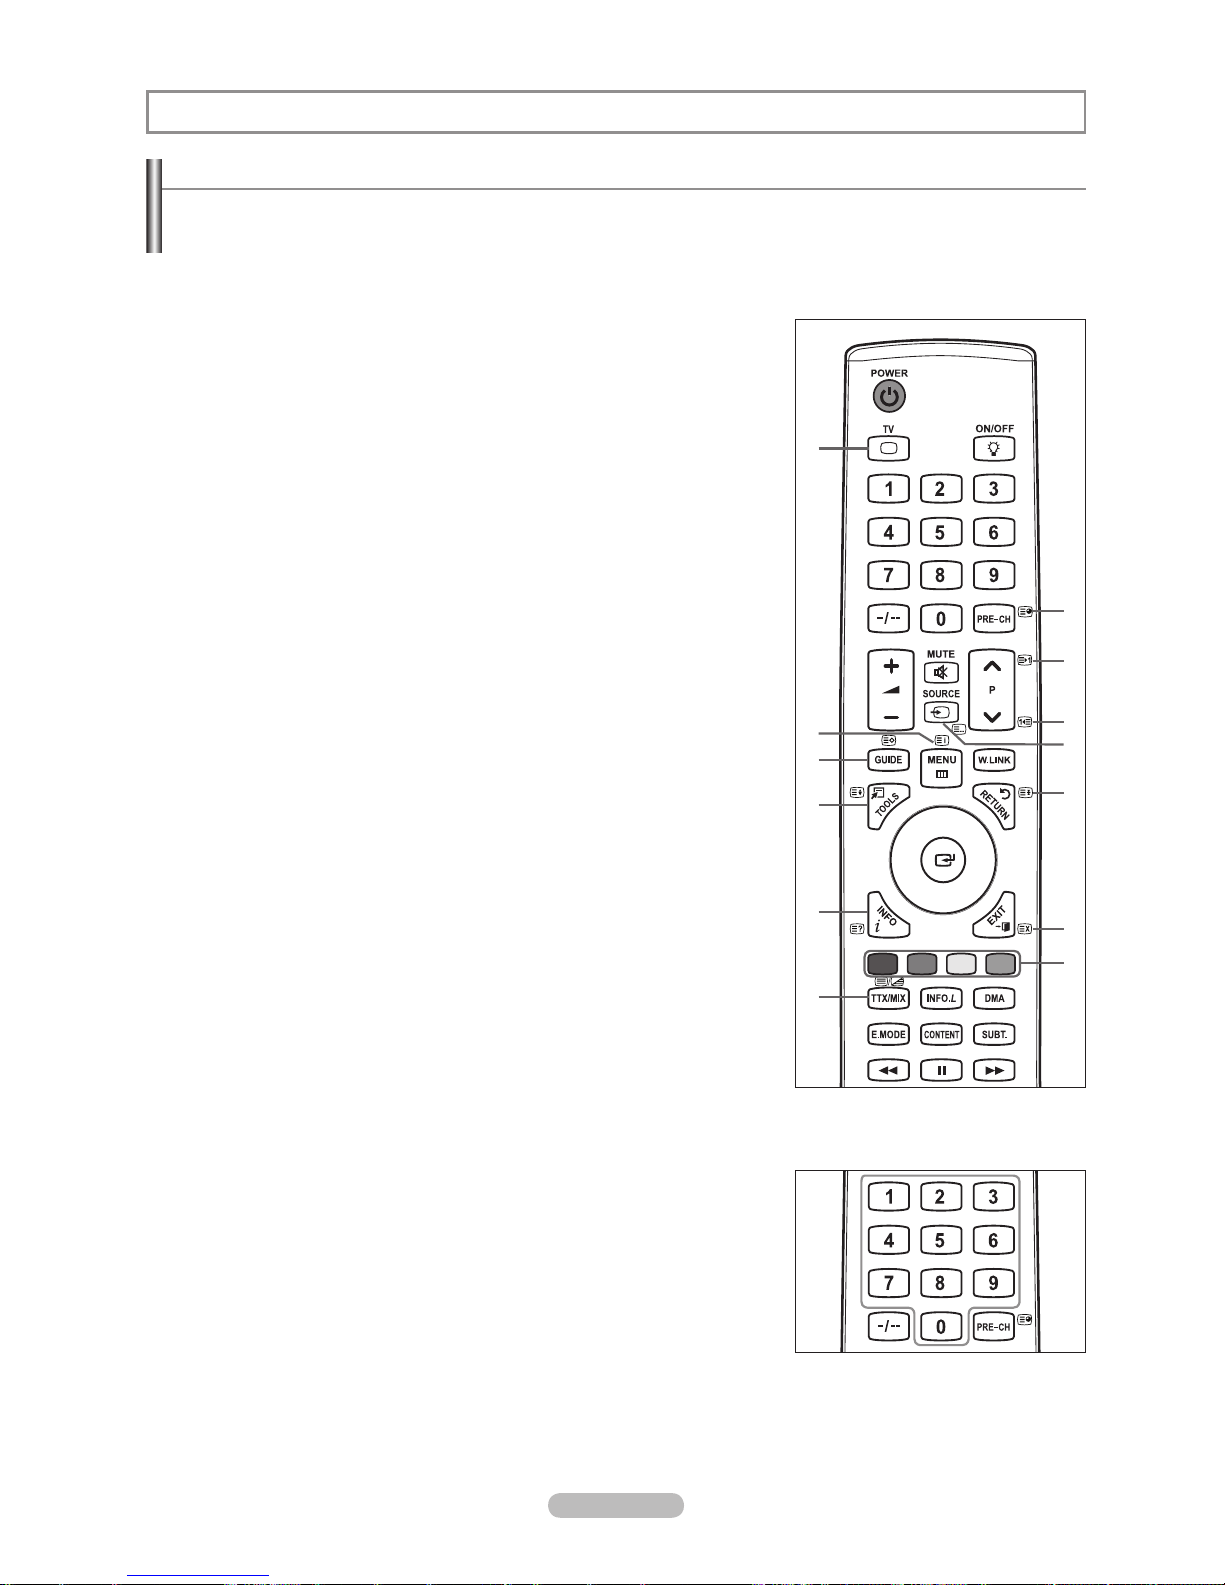
English - 62
Recommendations for Use
Teletext Feature
Most television stations provide written information services via Teletext. The index page of the teletext service gives you
information on how to use the service. In addition, you can select various options to suit your requirements by using the remote
control buttons.
For teletext information to be displayed correctly, channel reception must be stable. Otherwise, information may be missing or
some pages may not be displayed.
1
: (exit)
Exit from the teletext display.
2
6 (index)
Used to display the index (contents) page at any time while you are viewing
teletext.
3
8 (store)
Used to store the teletext pages.
4
4 (size)
Press to display the double-size letters in the upper half of the screen. For lower
half of the screen, press it again. To display normal screen, press it once again.
5
5 (reveal)
Used to display the hidden text (answers to quiz games, for example). To display
normal screen, press it again.
6
/ (teletext on/mix)
Press to activate teletext mode after selecting the channel providing the teletext
service. Press it twice to overlap the teletext with the current broadcasting screen.
7
1 (sub-page)
Used to display the available sub-page.
8
2 (page up)
Used to display the next teletext page.
9
3 (page down)
Used to display the previous teletext page.
0
0 (mode)
Press to select the teletext mode (LIST/FLOF). If you press it in the LIST mode,
it switches into the List save mode. In the List save mode, you can save teletext
page into list using the 8(store) button.
!
9 (hold)
Used to hold the display on a given page if the selected page is linked with several
secondary pages which follow on automatically. To resume, press it again.
@
7 (cancel)
Used to display the broadcast when searching for a page.
#
Colour buttons (red/green/yellow/blue)
If the FASTEXT system is used by a broadcasting company, the different topics
covered on a teletext page are colour-coded and can be selected by pressing the
coloured buttons. Press one of them corresponding to the required. The page is
displayed with other coloured information that can be selected in the same way. To
display the previous or next page, press the corresponding coloured button.
You can change teletext pages by pressing the numeric buttons on the remote
control.
N
N
1
3
4
5
6
2
7
8
9
0
!
@
#
Page 63
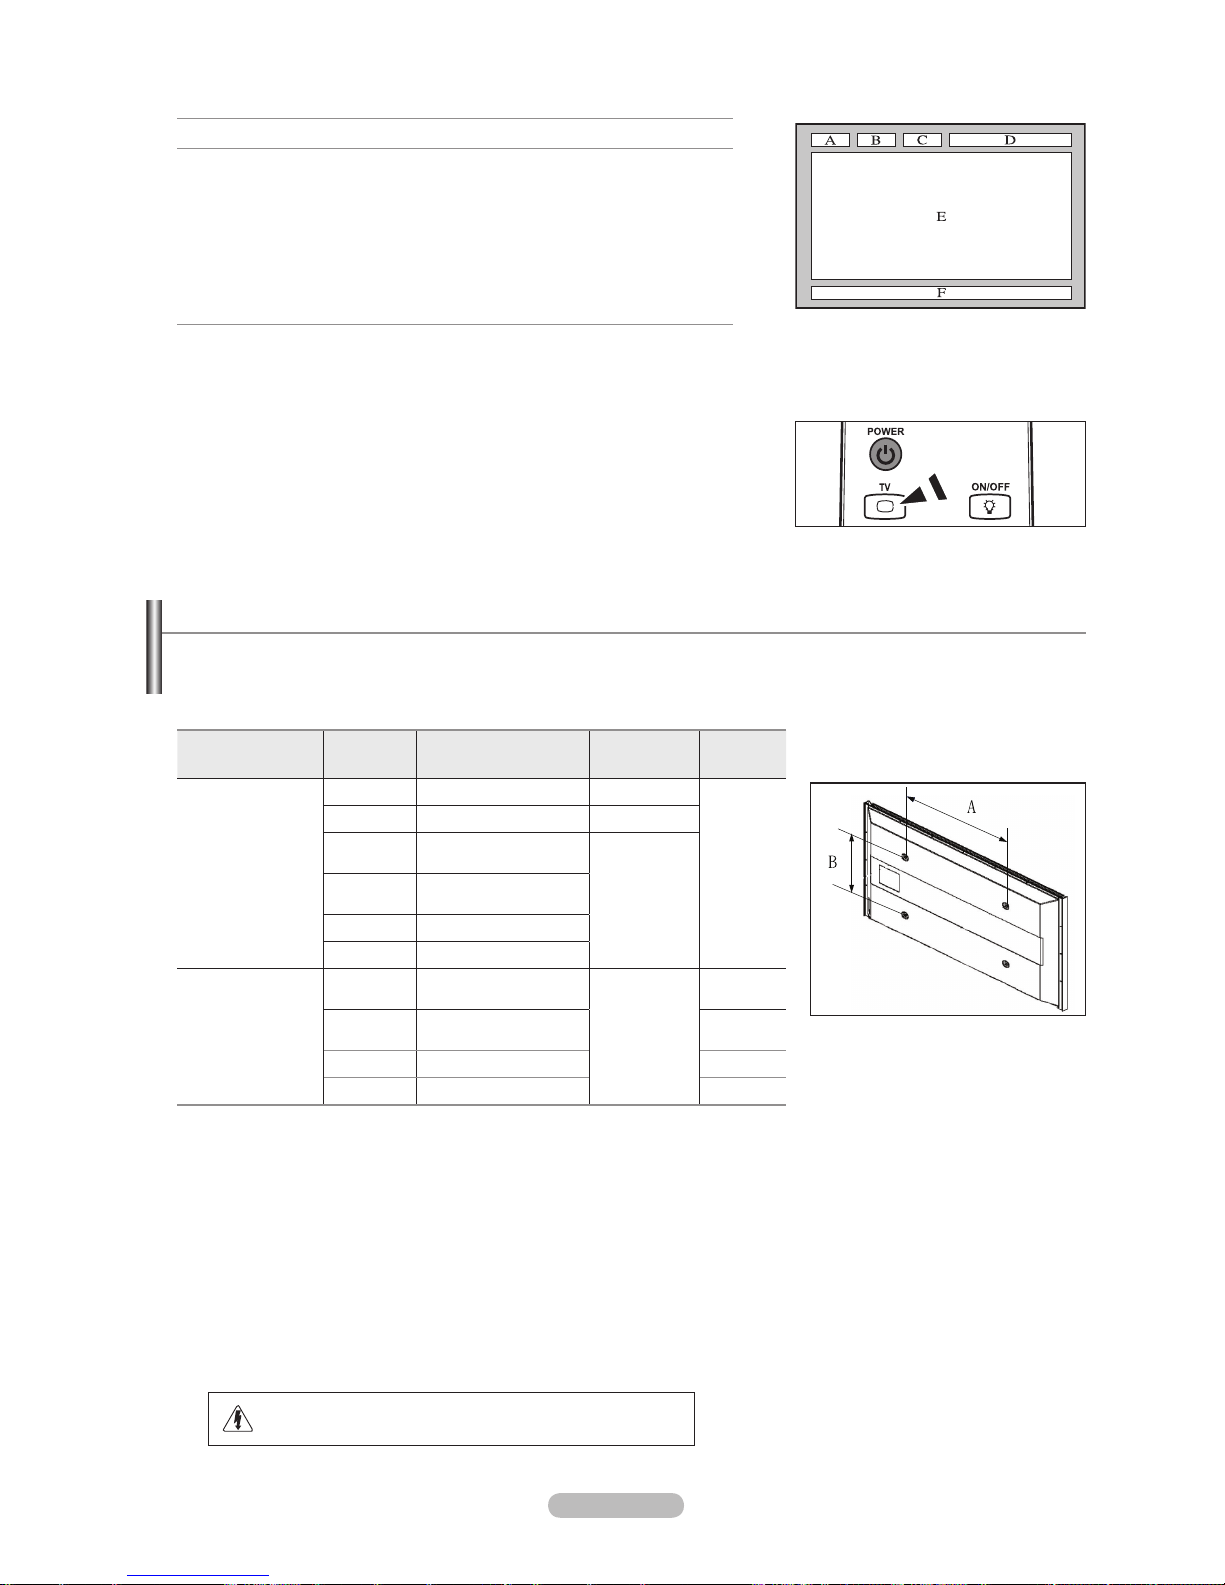
English - 63
The teletext pages are organized according to six categories:
Part Contents
A Selected page number.
B Broadcasting channel identity.
C Current page number or search indications.
D Date and time.
E Text.
F Status information.
FASTEXT information.
Teletext information is often divided between several pages displayed in sequence,
which can be accessed by:
Entering the page number
Selecting a title in a list
Selecting a coloured heading (FASTEXT system)
Press the TV button to exit from the teletext display.
N
-
-
-
O
WallMountKitSpecications(VESA)
Install your wall mount on a solid wall perpendicular to the oor.
When attaching to other building materials, please contact your nearest dealer.
If installed on a ceiling or slanted wall, it may fall and result in severe personal injury.
Product Family inch VESA Spec. (A * B)
Standard
Screw
Quantity
LCD-TV
23 ~ 26 200 * 100 M4
4
32 ~ 40 200 * 200 M6
46 ~ 52
400 * 400
600 * 400
M8
57
700 * 400
(No VESA)
57 ~ 70 800 * 400
80 ~ 1400 * 800
PDP-TV
42 ~ 58
400 * 400
600 * 400
M8
4
63
676 * 407
(No VESA)
6
63 ~ 70 800 * 400 4
80 ~ 1400 * 800 4
We provided the standard dimensions for wall mount kits as shown in the table above.
When purchasing our wall mount kit, a detailed installation manual and all parts necessary for assembly are provided.
Do not use screws longer than the standard dimension, as they may cause damage to the inside of the TV set.
For wall mounts that do not comply with the VESA standard screw specifications, the length of the screws may differ
depending on their specifications.
Do not use screws that do not comply with the VESA standard screw specifications.
Do not use fasten the screws too strongly, this may damage the product or cause the product to fall, leading to personal injury.
Samsung is not liable for these kinds of accidents.
Samsung is not liable for product damage or personal injury when a non-VESA or non-specified wall mount is used or the
consumer fails to follow the product installation instructions.
Our 57” and 63” models do not comply with VESA Specifications. Therefore, you should use our dedicated wall mount kit for
this model.
Do not exceed 15 degrees tilt when mounting this TV.
Do not install your Wall Mount Kit while your TV is turned on.
It may result in personal injury due to electric shock.
N
N
N
N
N
N
N
N
Page 64
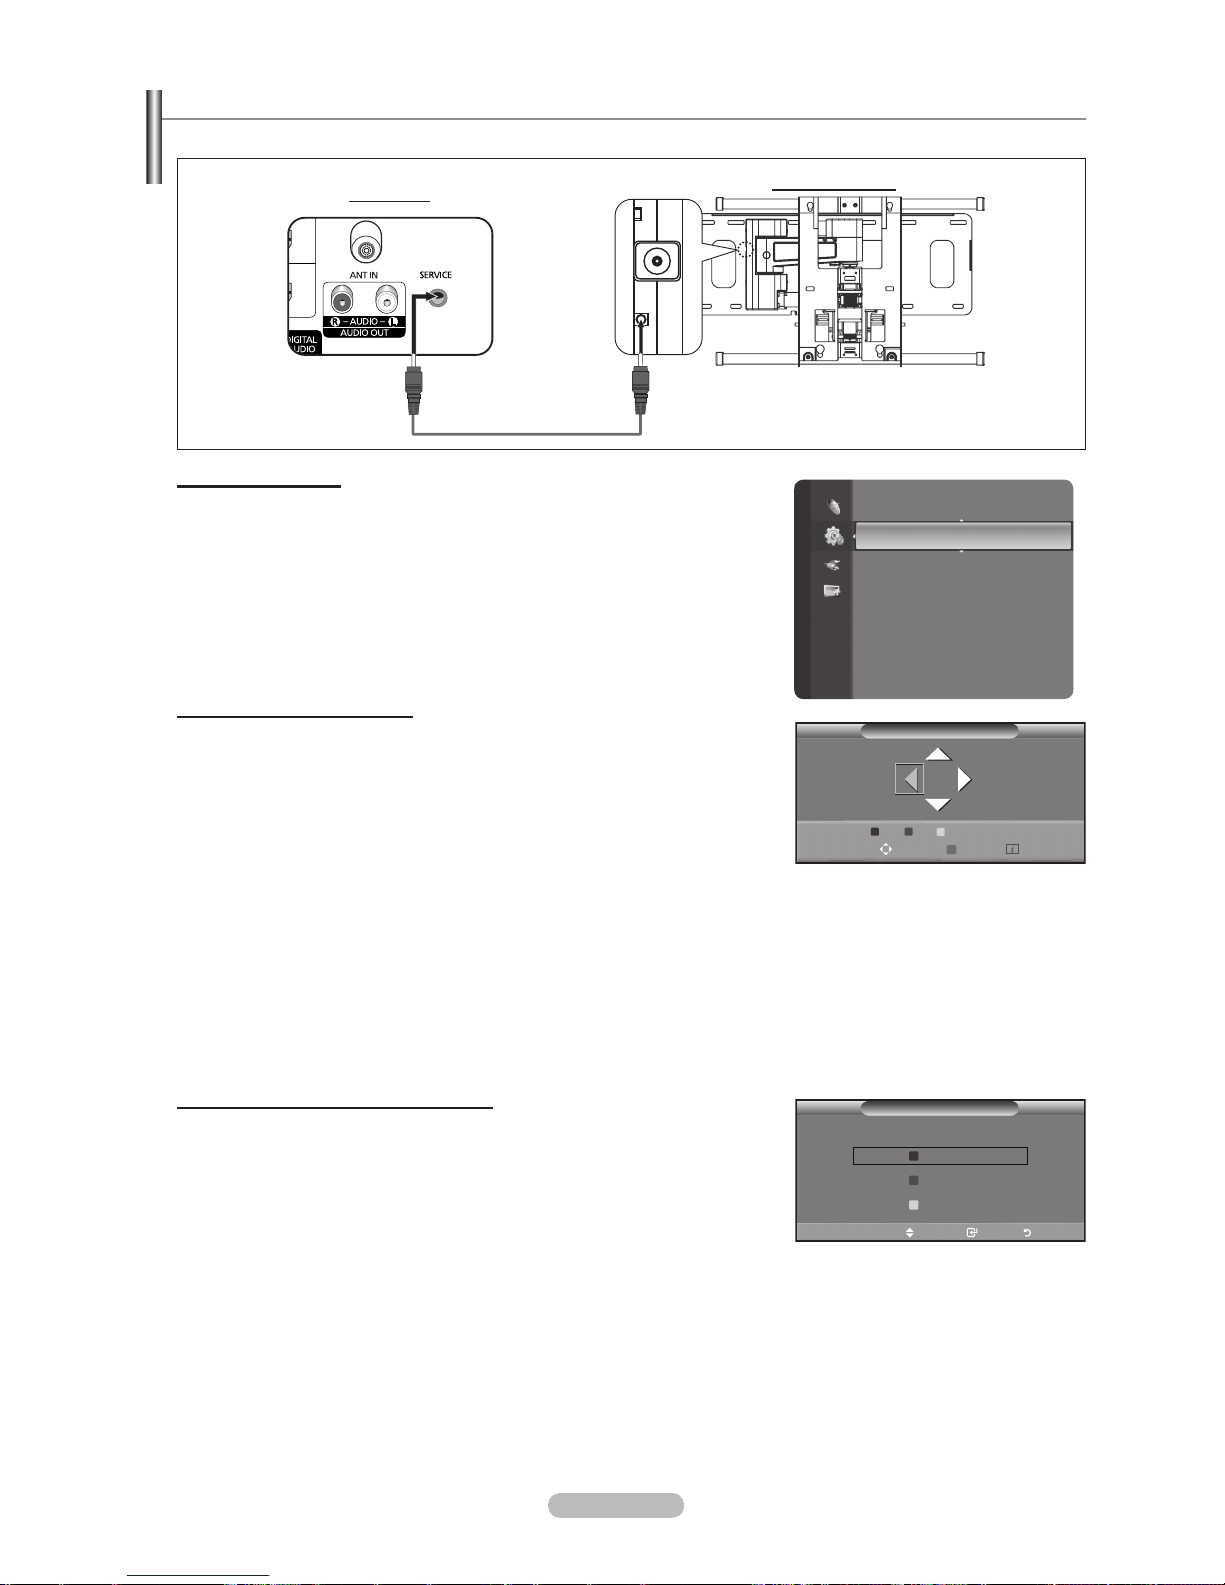
English - 64
Auto Wall-Mount Adjustment (Sold separately) (Depending on the model)
Once the auto wall mount is installed, your TV’s position can be easily adjusted.
Entering the menu
1. Press the ▲, ▼, ◄ or ► button on your remote control.
The Wall Mount Adjustment screen is displayed.
If the Auto Wall-Mount screen is not displayed when clicking on a direction
button while watching your TV, use the menu to display that screen.
Press the MENU button to display the menu. Press the ▲ or ▼ button to
select Setup, then press the ENTERE button.
Press the ▲ or ▼ button to select Wall-Mount Adjustment, then press
the ENTERE button.
Remembering the Position
2. Adjust to the desired position using the ▲,▼,◄,► buttons.
If you press an arrow button when no OSD is displayed on the TV screen,
the Adjustment screen appears.
Press the INFO button to reset. Press the ◄ or ► button to select Yes,
then press the ENTERE button. The position is initialized to the default
setting.
3.
Press the blue button. Press the ▲ and ▼ buttons to select a save mode from
either Position 1, Position 2 or Position 3 in order to save the current position.
To not save the current position, press the RETURN button.
When selecting a save mode, you cannot use the Colour buttons.
4.
Press the ENTERE button to save.
When Position1 is selected, the message Current position saved as Position1 is displayed.
5.
Press the ENTERE button.
The saved Position appears on the left side of the OSD.
Moving to the remembered position
1. Complete Step 1 of Entering the menu.
2.
Pressing a Colour (Red, Green, Yellow) button moves the auto wall mount to the
saved position.
You can move the wall mount to one of the 3 pre-set positions by pressing
the Red (Position 1), Green (Position 2) or Yellow (Position 3) buttons.
If you adjust the Position after moving to a pre-set position, the position
display will disappear.
For installation, refer to the Installation Manual provided with the wall mount.
For product installation and the installation and moving of the wall mount, make sure to consult a specialized installation
company.
This installation manual is to be used when attaching the wall mount to a wall. When attaching to other building materials,
please contact your nearest dealer.
The auto wall mount will not work when Anynet+ or WISELINK Pro is operating.
N
N
-
-
N
N
N
O
N
N
N
N
N
N
N
N
Setup
Preference
Light Effect : Watching TV
Wall-Mount Adjustment ►
Melody : Off
Entertainment : Off
Energy Saving : Off
PIP
Software Upgrade
Common Interface
Wall-Mount Adjustment
Position 1 2 3
Adjust Save Centre
Save
Select a mode to save.
Move Enter Return
Position1
Position2
Position3
Serial Cable(1P to 1P)(Not supplied)
Rear Panel
Auto Wall-Mount
Page 65
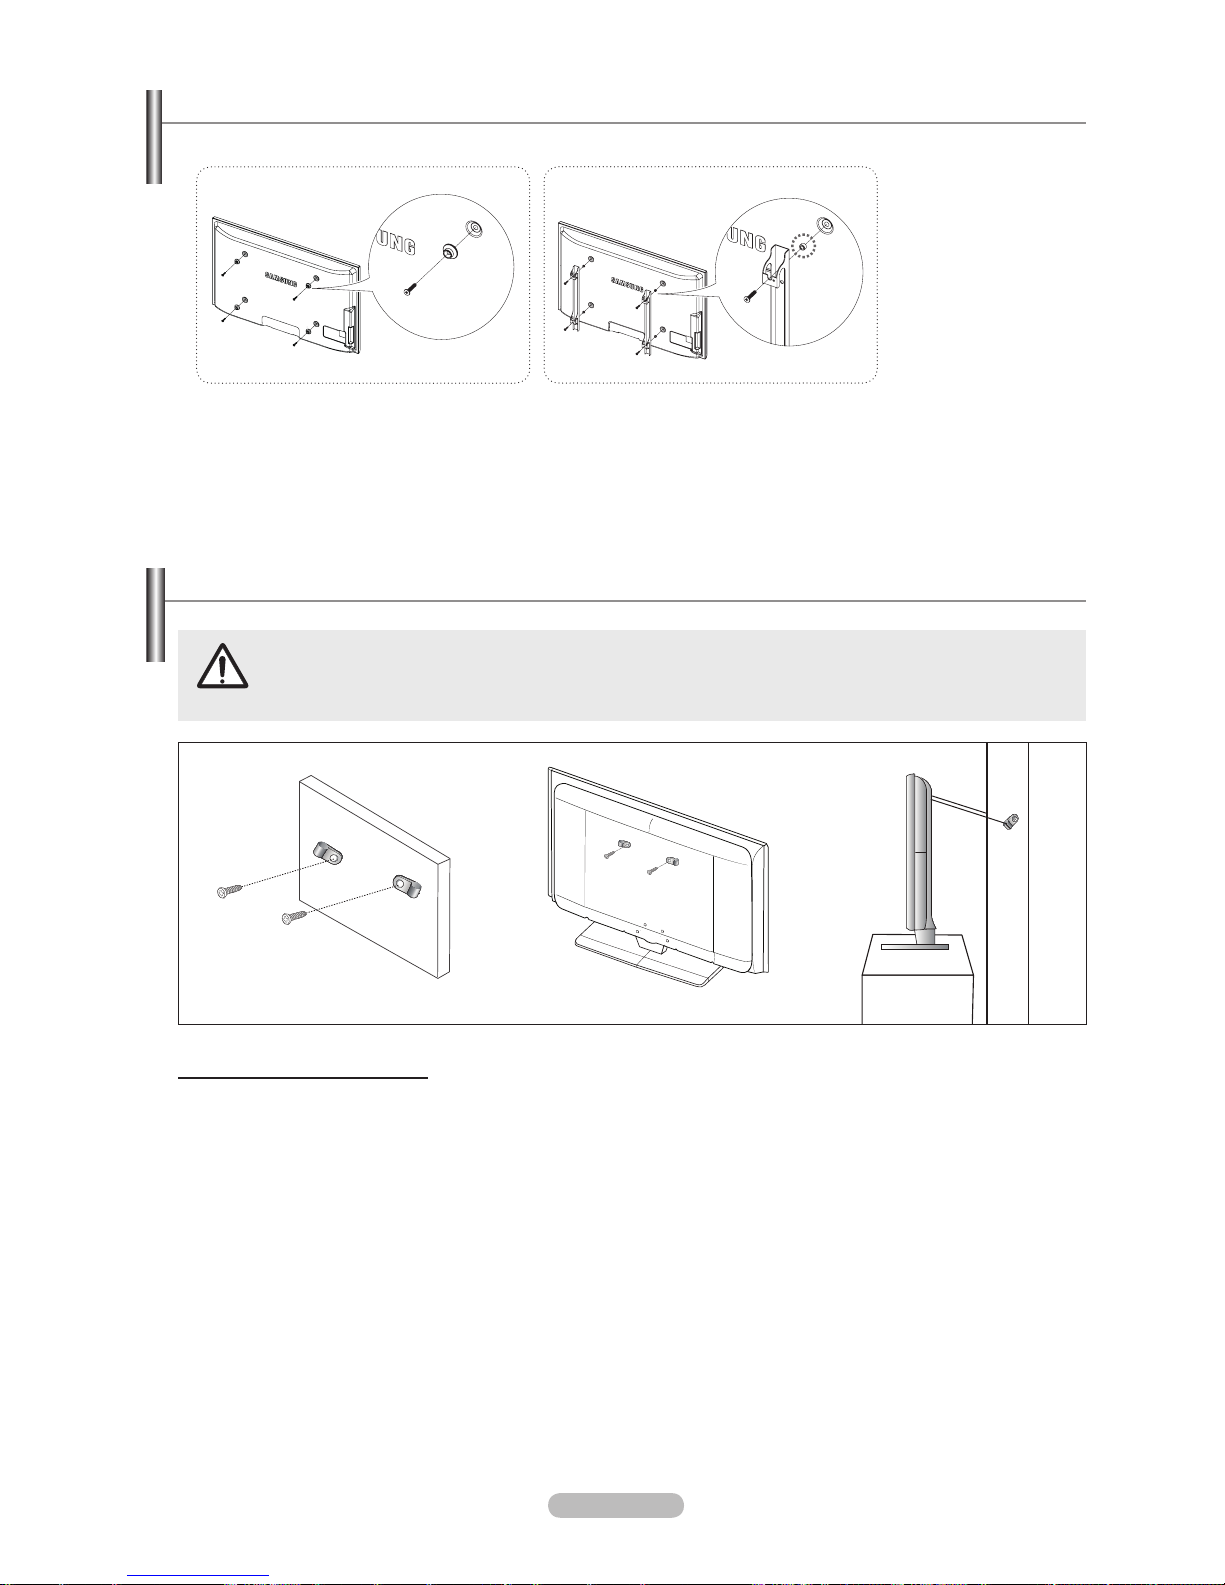
English - 65
Preparing before installing Wall- Mount on the wall
1. Install Wall Mount with the torque range of 15kgf·cm or less. Make sure that parts can be damaged if the torque is out of the
specied range.
2.
Accessory Kit contains Holder–Ring [①] for installing other company’s Wall-Mount on Samsung TV. (Case B)
Case A. Installing SAMSUNG Wall-Mount Case B. Installing other company’s Wall-Mount
Pulling, pushing, or climbing on the TV may cause the TV to fall. In particular, ensure your children do not hang
over or destabilize the TV; doing so may cause the TV to tip over, causing serious injuries or death. Follow all
safety precautions provided on the included Safety Flyer. For added stability, install the anti-fall device for safety
purposes, as follows.
To avoid the TV from falling:
1. Put the screws into the clamps and rmly fasten them onto the wall. Conrm that the screws have been rmly installed onto
the wall.
You may need additional material such as an anchor depending on the type of wall.
Since the necessary clamps, screws, and string are not supplied, please purchase these additionally.
2.
Remove the screws from the center back of the TV, put the screws into the clamps, and then fasten the screws onto the TV
again.
Screws may not be supplied with the product. In this case, please purchase the screws of the following specifications.
3.
Connect the clamps xed onto the TV and the clamps xed onto the wall with a strong string and then tie the string tightly.
Install the TV near to the wall so that it does not fall backwards
.
It is safe to connect the string so that the clamps fixed on the wall are equal to or lower than the clamps fixed on the TV.
Untie the string before moving the TV.
4.
Verify all connections are properly secured. Periodically check connections for any sign of fatigue for failure. If you have any
doubt about the security of your connections,contact a professional installer.
N
N
N
N
N
N
Securing the TV to the Wall
Wall
Wall
Page 66
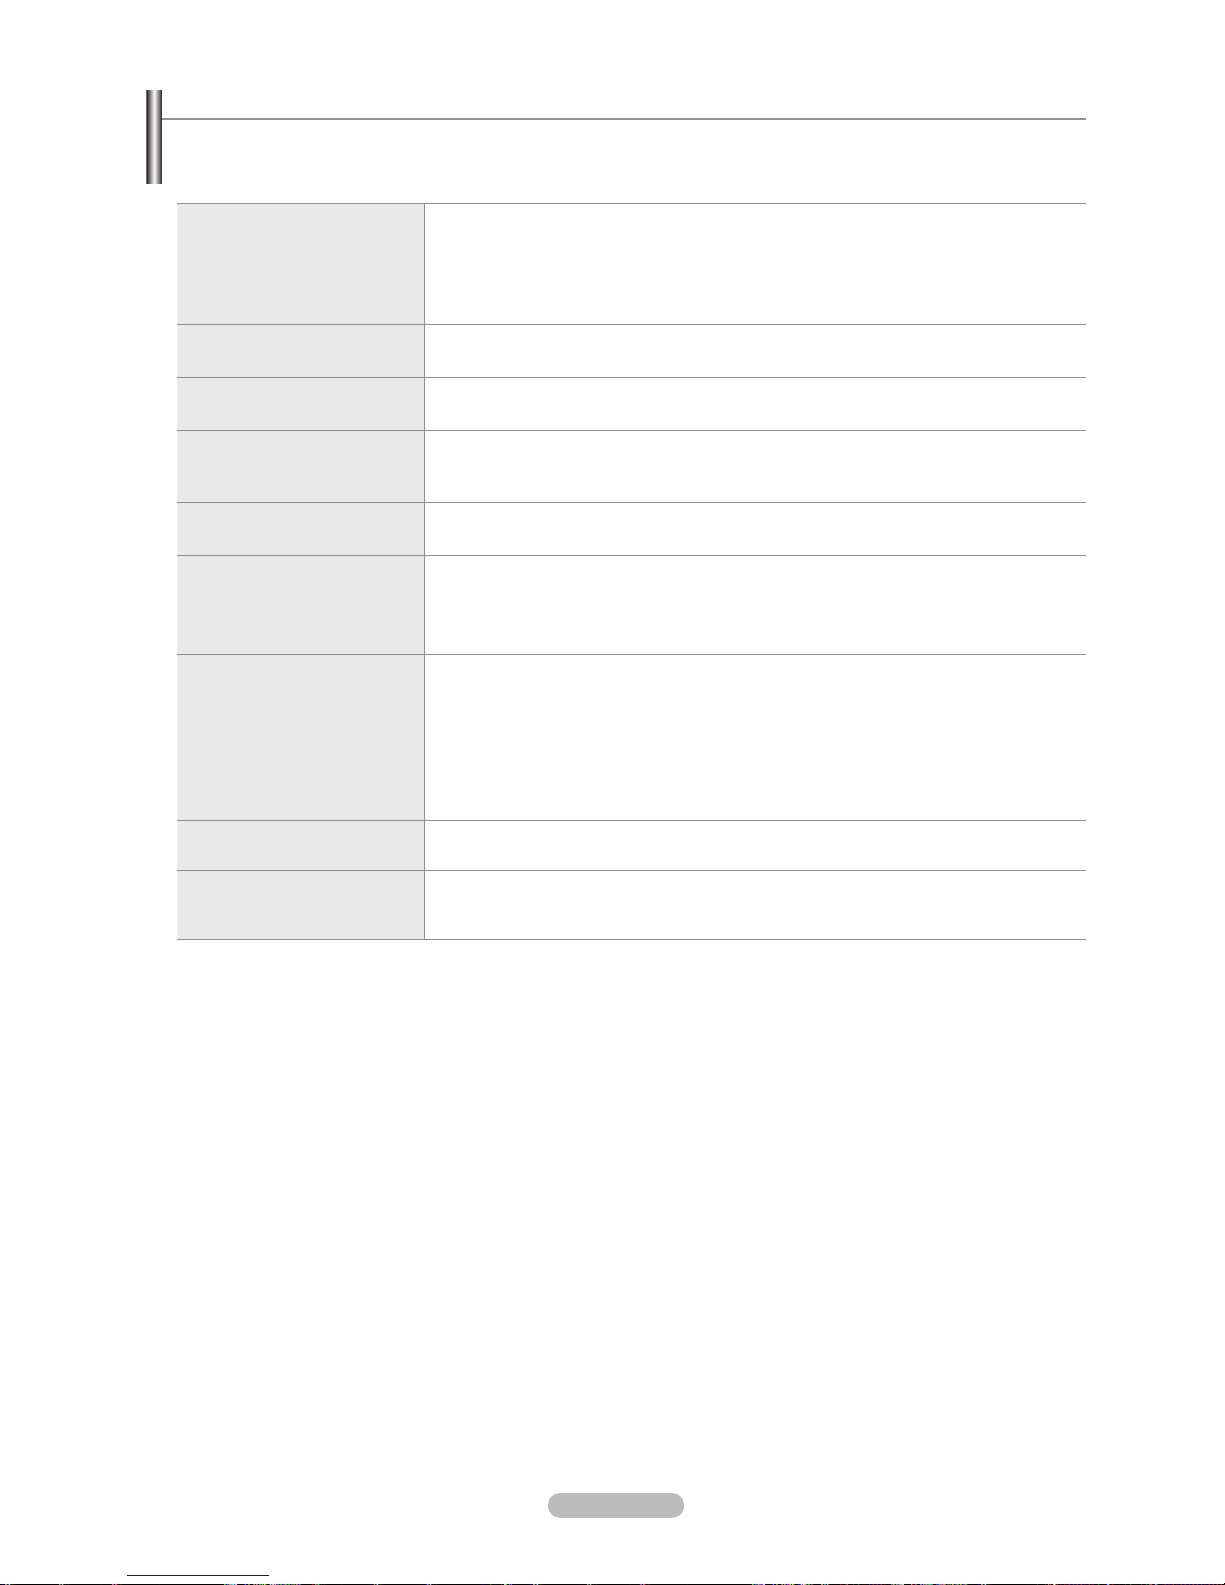
English - 66
Troubleshooting
Before contacting the Samsung after-sales service, perform the following simple checks.
If you cannot solve the problem using the instructions below, note the model and serial number of the television and contact your
local dealer.
No sound or picture Check that the mains lead has been connected to a wall socket.
Check that you have pressed the button on your set.
Check the picture contrast and brightness settings.
Check the volume.
Check if Select Speaker is set to External Speaker.
•
•
•
•
•
Normal picture but no sound Check the volume.
Check whether the MUTEM button has been pressed on the remote control.
•
•
No picture or black and white
picture
Adjust the colour settings.
Check that the broadcast system selected is correct.
•
•
Sound and picture interference Try to identify the electrical appliance that is affecting the television, then move it further
away.
Plug the television into a different main socket.
•
•
Blurred or snowy picture,
distorted sound
Check the direction, location and connections of your aerial.
This interference often occurs due to the use of an indoor aerial.
•
•
Remote control malfunctions Replace the remote control batteries.
Clean the upper edge of the remote control (transmission window).
Check that the + and – ends of the batteries are inserted correctly.
Check that the batteries are drained.
•
•
•
•
Screen is black and power
indicator light blinks steadily
On your computer check; Power, Signal Cable.
The TV is using its power management system.
Move the computer’s mouse or press any key on the keyboard.
On your equipment check (STB, DVD, etc) ; Power, Signal Cable.
The TV is using its power management system.
Press the Source button on the panel or remote control.
Turn the TV off and on.
•
•
•
•
•
•
•
The damaged picture appears in
the corner of the screen.
If Just Scan is selected in some external devices, the damaged picture may appear in the
corner of the screen. This symptom is caused by external devices, not TV.
•
The "Resets all settings to
the default values" message
appears.
This appears when you press and hold the EXIT button for a while. The product settings
are reset to the factory defaults.
•
Page 67
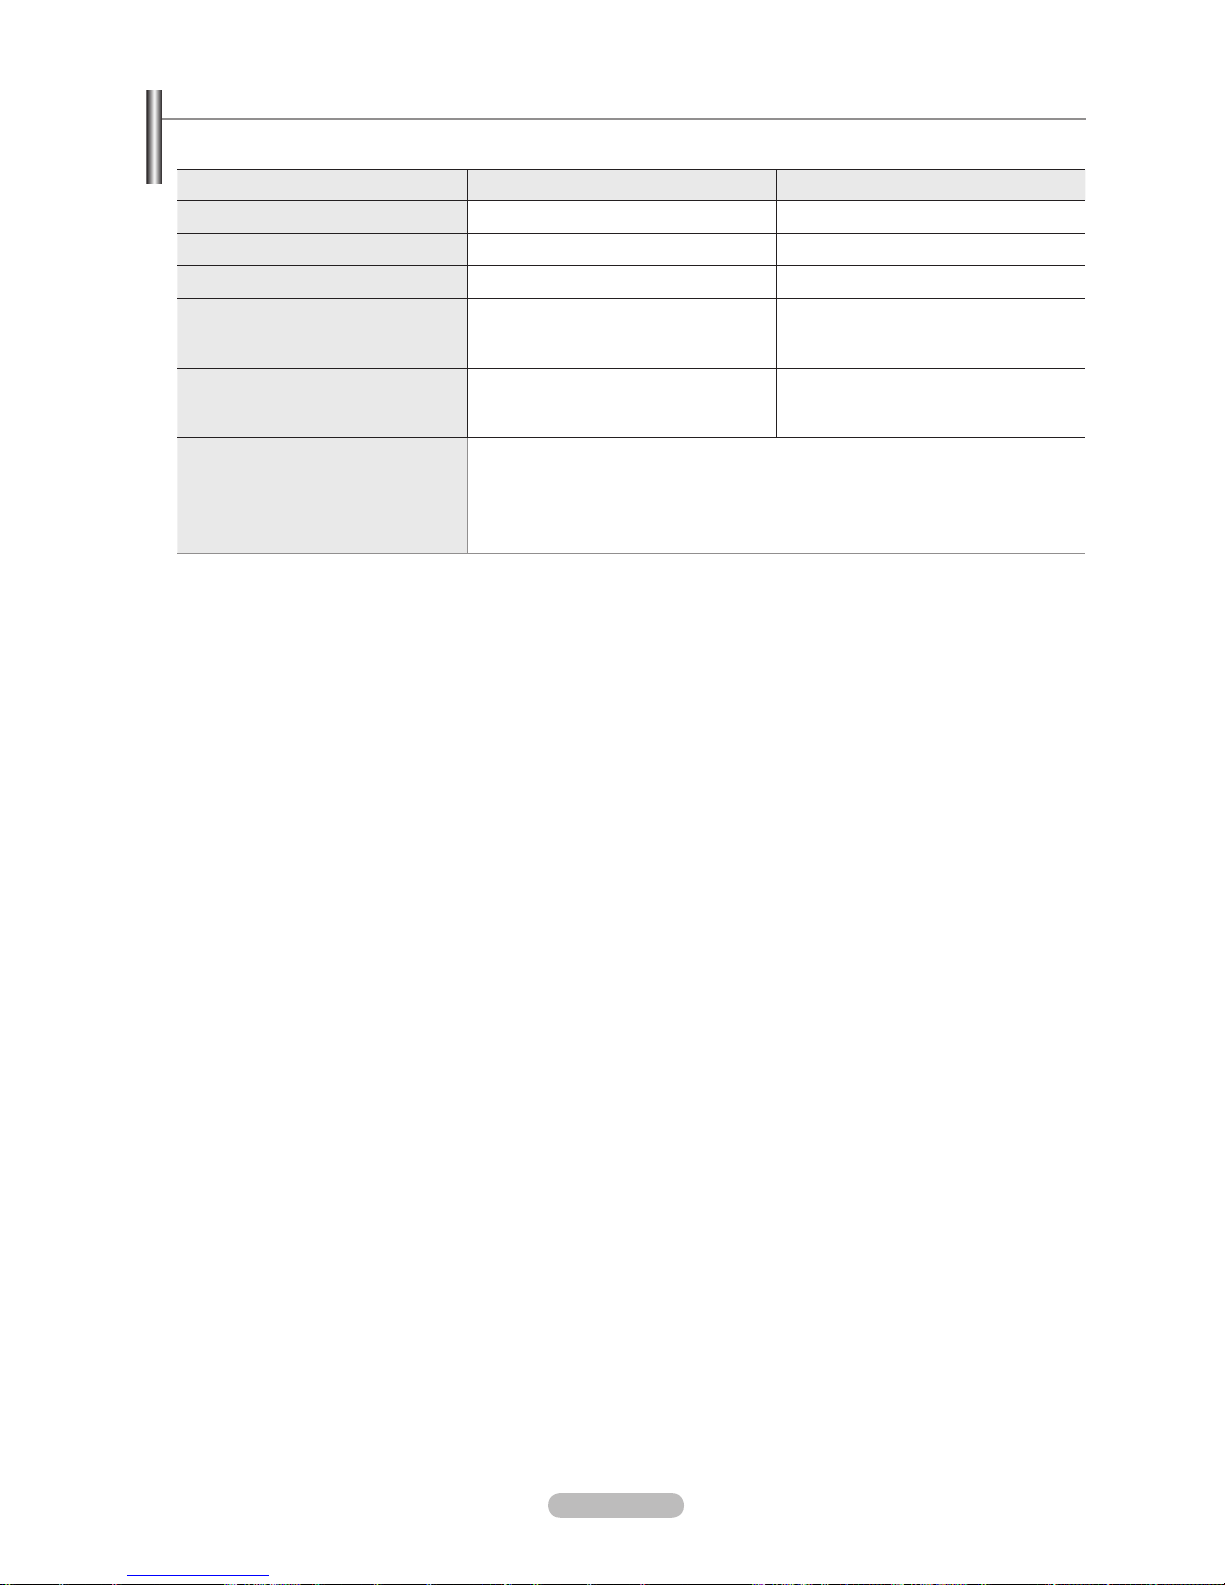
English - 67
Specications
The descriptions and characteristics in this booklet are given for information purposes only and are subject to modification without
notice.
Model Name PS50A766 PS63A766
Screen Size (Diagonal)
50 inch 63 inch
PC Resolution (Optimum)
1920 x 1080 @ 60 Hz 1920 x 1080 @ 60 Hz
Sound (Output) 10 W x 2 15 W x 2
Dimension (WxHxD)
Body
With stand
1240 x 766 x 96 mm
1240 x 830 x 315 mm
1531 x 932 x 99 mm
1531 x 1005 x 418 mm
Weight
Body
With stand
39 kg
44 kg
67 kg
84 kg
Environmental Considerations
Operating Temperature
Operating Humidity
Storage Temperature
Storage Humidity
50 °F to 104 °F (10 °C to 40 °C)
10% to 80%, non-condensing
-4 °F to 113 °F (-20 °C to 45 °C)
5% to 95%, non-condensing
This device is a Class B digital apparatus.
Design and specications are subject to change without prior notice.
For the power supply and Power Consumption, refer to the label attached to the product.
N
N
N
Page 68

Additional Terms of Service
1. ACCEPTANCE OF TERMS
Welcome to Yahoo! UK & Ireland. Yahoo! UK Limited (“Yahoo!”) provides its service to you, subject to the following Terms
of Service (“TOS”), which may be updated by Yahoo! from time to time without notice to you. You should review the TOS
periodically for changes at: http://uk.docs.yahoo.com/info/terms.html.
In addition, when using particular Yahoo! services, you and Yahoo! shall be subject to any guidelines and rules applicable
to such services which may be posted by Yahoo! from time to time. All such guides and rules are hereby incorporated by
reference into the TOS. In most cases the guides and rules are specic to a particular part of the Service and will assist you
in applying the TOS to that part, but to the extent of any inconsistency between the TOS and any guide or rule, the TOS will
prevail. Yahoo! may also offer services from time to time that are governed by other terms of service. In such cases the other
terms of service will be posted on the relevant service to which they apply.
2.
DESCRIPTION OF SERVICE
Yahoo! currently provides users with access to a rich collection of on-line resources, including, various communications
tools, online forums, shopping services, personalised content and branded programming through its network of properties
(the “Service”). Unless explicitly stated otherwise, any new features that augment or enhance the current Service, including
the release of new Yahoo! properties, shall be subject to the TOS. You acknowledge and agree that the Service is provided
“AS IS” and that Yahoo! assumes no responsibility for the timeliness, deletion, mis-delivery or failure to store any user
communications or personalisation settings.
In order to use the Service, you must obtain access to the World Wide Web, either directly or through devices that access
web-based content, and pay any service and/or telephony fees associated with such access. In addition, you must provide
all equipment necessary to make such connection to the World Wide Web, including a computer and modem or other access
device. Please be aware that Yahoo! has created certain areas on the Service that contain adult or mature content. You must
be at least 18 years of age to access and view such areas.
3.
YOUR REGISTRATION OBLIGATIONS AND SUPERVISING CHILDREN
In consideration of your use of the Service, you agree to: (a) provide true, accurate, current and complete information about
yourself as prompted by the Service’s registration form (such information being the “Registration Data”) and (b) maintain and
promptly update the Registration Data to keep it true, accurate, current and complete. If you provide any information that is
untrue, inaccurate, not current or incomplete, or Yahoo! has reasonable grounds to suspect that such information is untrue,
inaccurate, not current or incomplete, Yahoo! has the right to suspend or terminate your account and refuse any and all
current or future use of the Service (or any portion thereof).
Yahoo! is concerned about the safety and privacy of all its users, particularly children. For this reason, parents who wish to
allow their children access to the Service should assist them in setting up any relevant accounts and supervise their access
to the Service. By allowing your child access to the Service, they will be able to access all of the Services including, email,
message boards, groups, instant messages and chat (among others). Please remember that the Service is designed to appeal
to a broad audience. Accordingly, as the legal guardian, it is your responsibility to determine whether any of the Services
and/or Content (as dened in Section 6 below) are appropriate for your child.
4.
YAHOO! PRIVACY POLICY
Registration Data and certain other information about you is subject to our Privacy Policy. For more information, please see
our full privacy policy at http://privacy.yahoo.com/privacy/uk
5.
MEMBER ACCOUNT, PASSWORD AND SECURITY
You will receive a password and account designation upon completing the Service’s registration process. You are responsible
for maintaining the condentiality of the password and account, and are fully responsible for all activities that occur under your
password or account. You agree to (a) immediately notify Yahoo! of any unauthorised use of your password or account and
any other breach of security, and (b) ensure that you exit from your account at the end of each session. Yahoo! cannot and will
not be liable for any loss or damage arising from your failure to comply with this Section 5.
6.
MEMBER CONDUCT
You acknowledge that all information, data, text, software, music, sound, photographs, graphics, video, messages and other
materials (“Content”), whether publicly posted or privately transmitted, are the sole responsibility of the person from which
such Content originated. This means that you, and not Yahoo! are entirely responsible for all Content that you upload, post,
email or otherwise transmit via the Service. Yahoo! does not control the Content posted via the Service and, as such, does not
guarantee the accuracy, integrity or quality of such Content. You acknowledge that by using the Service, you may be exposed
to Content that is offensive, indecent or objectionable. Under no circumstances will Yahoo! be liable in any way for any
Content, including, but not limited to, for any errors or omissions in any Content, or for any loss or damage of any kind incurred
as a result of the use of any Content posted, emailed or otherwise transmitted via the Service.
You agree to not use the Service to:
a. upload, post, email or otherwise transmit any Content that is unlawful, harmful, threatening, abusive, harassing,
tortious, defamatory, vulgar, obscene, libellous, invasive of another’s privacy, hateful, or racially, ethnically or otherwise
objectionable;
b. harm minors in any way;
c. impersonate any person or entity, including, but not limited to, a Yahoo! official, forum leader, guide or host, or falsely
state or otherwise misrepresent your affiliation with a person or entity;
d. forge headers or otherwise manipulate identifiers in order to disguise the origin of any Content transmitted through the
Service;
e. upload, post, email or otherwise transmit any Content that you do not have a right to transmit under any law or under
contractual or fiduciary relationships (such as inside information, proprietary and confidential information learned or
disclosed as part of employment relationships or under nondisclosure agreements);
Page 69

f. upload, post, email or otherwise transmit any Content that infringes any patent, trademark, trade secret, copyright or
other proprietary rights (“Rights”) of any party;
g. upload, post, email or otherwise transmit any unsolicited or unauthorised advertising, promotional materials, “junk mail,”
“spam,” “chain letters,” “pyramid schemes,” or any other form of solicitation, except in those areas (such as shopping
rooms) that are designated for such purpose;
h. upload, post, email or otherwise transmit any material that contains software viruses or any other computer code, files
or programs designed to interrupt, damage, destroy or limit the functionality of any computer software or hardware or
telecommunications equipment;
i. disrupt the normal flow of dialogue, cause a screen to “scroll” faster than other users of the Service are able to type, or
otherwise act in a manner that negatively affects other users’ ability to engage in real time exchanges;
j. interfere with or disrupt the Service or servers or networks connected to the Service, or disobey any requirements,
procedures, policies or regulations of networks connected to the Service;
k. intentionally or unintentionally violate any applicable law or regulation including, but not limited to, regulations
promulgated by any securities exchange;
l. “stalk” or otherwise harass another; or
m. extract, collect, process, combine or store personal data about other users.
You acknowledge that Yahoo! has no obligation to monitor Content. Yahoo! and its designees shall have the right (but not the
obligation) in their sole discretion to refuse, move or remove any Content that is available via the Service that violates the TOS
or is otherwise objectionable. You agree that you must evaluate, and bear all risks associated with, the use of any Content,
including any reliance on the accuracy, completeness, or usefulness of such Content.
You agree that Yahoo! may access, preserve, and disclose your account information and Content: (a) to its afliated
companies worldwide for the purpose of providing the Content to you in an efcient manner; (b) for the purpose of properly
administering your account in accordance with the standard operating procedures of Yahoo! or its afliated companies; and (c)
if required to do so by law or in the good faith belief that any such access, preservation or disclosure is reasonably necessary
to: (i) comply with legal process; (ii) enforce the TOS; (iii) respond to claims that any Content violates the rights of third-parties;
(iv) respond to your requests for customer service; or (v) protect the rights, property, or personal safety of Yahoo!, its users
and the public.
You acknowledge that the technical processing and transmission of the Service, including your Content, may involve
transmissions over various networks and changes to conform and adapt to technical requirements of connecting networks or
devices. Yahoo! reserves the right to terminate your access to some or all parts of its Service if you withdraw your consent in
this paragraph at any time.
7. SPECIAL ADMONITIONS FOR INTERNATIONAL USE
Recognising the global nature of the Internet, you agree to comply with all local laws and rules regarding online conduct
and acceptable Content. Specically, you agree to comply with all applicable laws regarding the transmission of technical
data exported from the United Kingdom, the United States and the country in which you reside (if different from the
aforementioned). When you are on any international Yahoo! property, you are bound by the Terms of Service and applicable
laws governing that Yahoo! property.
8. PUBLIC CONTENT POSTED TO YAHOO!
a. For purposes of the TOS, “publicly accessible areas” of the Service are those accessible by the general public. By way
of example, a publicly accessible area of the Service would include public Yahoo! Groups, Yahoo! Answers and Yahoo!
Message Boards, but would not include unlisted Yahoo! Groups or private Yahoo! communication services such as
Yahoo! Mail or Yahoo! Messenger. You acknowledge that you are solely responsible for any personal data or information
that you choose to disclose and make publicly accessible via the Service, and that under no circumstances will Yahoo!
be liable in any way for the disclosure and public accessibility of such personal data or information. You acknowledge
that any personal data or information (or any other Content) posted to publicly accessible areas may remain publicly
accessible indefinitely.
b. With respect to Content you elect to post for inclusion in publicly accessible areas of Yahoo! Groups or that consists
of photos or other graphics you elect to post to any other publicly accessible area of the Service, you grant Yahoo! a
world-wide, royalty free and non-exclusive licence to reproduce, modify, adapt and publish such Content on the Service
solely for the purpose of displaying, distributing and promoting the specific Yahoo! Group to which such Content was
submitted, or, in the case of photos or graphics, solely for the purpose for which such photo or graphic was submitted to
the Service. This licence exists only for as long as you elect to continue to include such Content on the Service and shall
be terminated at the time you delete such Content from the Service.
c. With respect to all other Content you elect to post to other publicly accessible areas of the Service, you grant Yahoo! the
royalty-free, perpetual, irrevocable, non-exclusive and fully sub-licensable right and licence to use, reproduce, modify,
adapt, publish, translate, create derivative works from, distribute, perform and display such Content (in whole or part)
worldwide and/or to incorporate it in other works in any form, media, or technology now known or later developed.
9. INDEMNITY
You agree to indemnify and hold Yahoo! and its subsidiaries, afliates, ofcers, agents, co-branders and other partners, and
employees, harmless from any claim or demand, including reasonable attorneys’ fees, made by any third party due to or
arising out of Content you submit, post to or transmit through the Service, your use of the Service, your connection to the
Service, your violation of the TOS, or your violation of any rights of another.
10. NO RESALE OF SERVICE
You agree not to reproduce, duplicate, copy, sell, resell or exploit for any commercial purposes, any portion of the Service, use
of the Service, or access to the Service.
Page 70

11. GENERAL PRACTICES REGARDING USE AND STORAGE
You acknowledge that Yahoo! may establish general practices and limits concerning use of the Service, including with out
limitation the maximum number of days that email messages, message board postings or other uploaded Content will be
retained by the Service, the maximum number of email messages that may be sent from or received by an account on
the Service, the maximum size of any email message that may be sent from or received by an account on the Service,
the maximum disk space that will be allotted on Yahoo’s servers on your behalf, and the maximum number of times (and
the maximum duration for which) you may access the Service in a given period of time. You agree that Yahoo! has no
responsibility or liability for the deletion or failure to store any messages and other communications or other Content
maintained or transmitted by the Service. You acknowledge that Yahoo! reserves the right to log off accounts that are inactive
for an extended period of time. You further acknowledge that Yahoo! reserves the right to change these general practices and
limits at any time, in its sole discretion, with or without notice.
12. MODIFICATIONS TO SERVICE
Yahoo! reserves the right at any time and from time to time to modify or discontinue, temporarily or permanently, the Service
(or any part thereof) with or without notice. You agree that Yahoo! shall not be liable to you or to any third party for any
modication, suspension or discontinuance of the Service.
13. TERMINATION
You agree that Yahoo! in its sole discretion, may terminate your password, account (or any part thereof) or use of t he
Service, and remove and discard any Content within the Service, for any reason, including, without limitation, for lack of use
or if Yahoo! believes that you have violated or acted inconsistently with the letter or spirit of the TOS. Yahoo! may also in
its sole discretion and at any time discontinue providing the Service, or any part thereof, with or without notice. You agree
that any termination of your access to the Service under any provision of this TOS may be effected without prior notice, and
acknowledge and agree that Yahoo! may immediately deactivate or delete your account and all related information and les
in your account and/or bar any further access to such les or the Service. Further, you agree that Yahoo! shall not be liable to
you or any third-party for any termination of your access to the Service.
14. DEALINGS WITH ADVERTISERS AND MERCHANTS
Your correspondence or business dealings with, or participation in promotions of, advertisers and merchants found on or
through the Service, including payment and delivery of related goods or services, and any other terms, conditions, warranties
or representations associated with such dealings, are solely between you and such advertiser or merchant. To the fullest
extent permitted by applicable law, you agree that: (a) Yahoo! shall not be responsible or liable for any loss or damage of
any kind incurred as the result of any such dealings or as the result of the presence of such advertisers and merchants on
the Service, and (b) any orders placed by you on, and any product specications and product availability appearing on,
the Service (including, without limitation, Yahoo! Shopping) are subject to conrmation by, and the terms and conditions of
business of, the relevant Merchant.
15. LINKS
The Service may provide, or third parties may provide, links to other World Wide Web sites or resources. Because Yahoo!
has no control over such sites and resources, you acknowledge and agree that Yahoo! is not responsible for the availability of
such external sites or resources, and does not endorse and is not responsible or liable for any Content, advertising, products,
or other materials on or available from such sites or resources. You further acknowledge and agree that Yahoo! shall not be
responsible or liable, directly or indirectly, for any damage or loss caused or alleged to be caused by or in connection with use
of or reliance on any such Content, goods or services available on or through any such site or resource.
16. YAHOO’S PROPRIETARY RIGHTS
You acknowledge and agree that the Service and any necessary software used in connection with the Service (“Software
“) contain proprietary and condential information that is protected by applicable intellectual property and other laws. You
further acknowledge and agree that Content contained in sponsor advertisements or information presented to you through
the Service or advertisers is protected by copyrights, trademarks, service marks, patents or other proprietary rights and laws.
Except as expressly authorised by Yahoo! or advertisers, you agree not to modify, rent, lease, loan, sell, distribute or create
derivative works based on the Service or the Software, in whole or in part.
Yahoo! grants you a personal, non-transferable and non-exclusive right and licence to use the object code of its Software
on a single computer; provided that you do not (and do not allow any third party to) copy, modify, create a derivative work
of, reverse engineer, reverse assemble or otherwise attempt to discover any source code, sell, assign, sublicence, grant a
security interest in or otherwise transfer any right in the Software. The foregoing is subject to applicable statute and other
express law. You agree not to modify the Software in any manner or form, or to use modied versions of the Software,
including (without limitation) for the purpose of obtaining unauthorised access to the Service. You agree not to access the
Service by any means other than through the interface that is provided by Yahoo! for use in accessing the Service.
17. DISCLAIMERS
YOU EXPRESSLY ACKNOWLEDGE AND AGREE THAT:
a. YOUR USE OF THE SERVICE IS AT YOUR SOLE RISK. THE SERVICE IS PROVIDED ON AN “AS IS” AND “AS
AVAILABLE” BASIS. TO TH E FULLEST EXTENT PERMITTED BY APPLICABLE LAW, YAHOO! EXPRESSLY
DISCLAIMS ALL WARRANTIES, CONDITIONS AND OTHER TERMS OF ANY KIND, WHETHER EXPRESS OR
IMPLIED, INCLUDING, BUT NOT LIMITED TO ANY IMPLIED TERM OF MERCHANTABILITY, SATISFACTORY Q
UALITY, FITNESS FOR A PARTICULAR PURPOSE, AND ANY TERM AS TO THE PROVISION OF SERVICES TO
A STANDARD OF REASONABLE CARE AND SKILL OR AS TO NON-INFRINGEMENT OF ANY INTELLECTUAL
PROPERTY RIGHT.
b. YAHOO! MAKES NO WARRANTY OR REPRESENTATION THAT (i) THE SERVICE WILL MEET YOUR
REQUIREMENTS, (ii) THE SERVICE WILL BE UNINTERRUPTED, TIMELY, SECURE, OR ERROR-FREE, (iii) THE
RESULTS THAT MAY BE OBTAINED FROM THE USE OF THE SERVICE WIL L BE ACCURATE OR RELIABLE, (iv)
THE QUALITY OF ANY PRODUCTS, SERVICES, INFORMATION, OR OTHER MATERIAL PURCHASED OR OBTA
INED BY YOU THROUGH THE SERVICE WILL MEET YOUR EXPECTATIONS, AND (V) ANY ERRORS IN THE
SOFTWARE WILL BE CORRECTED.
Page 71

C. ANY MATERIAL DOWNLOADED OR OTHERWISE OBTAINED THROUGH THE USE OF THE SERVICE IS DONE
AT YOUR OWN DISCRETION AND RIS K AND THAT YOU WILL BE SOLELY RESPONSIBLE FOR ANY DAMAGE
TO YOUR COMPUTER SYSTEM OR LOSS OF DATA THAT RESULTS FROM THE DOWNLOAD OF ANY SUCH
MATERIAL.
D. NO ADVICE OR INFORMATION, WHETHER ORAL OR WRITTEN, OBTAINED BY YOU FROM YAHOO! OR THROUGH
OR FROM THE SERVICE SHALL CREATE ANY WARRANTY OR OTHER OBLIGATION NOT EXPRESSLY STATED IN
THE TOS.
18. LIMITATION OF LIABILITY
YOU EXPRESSLY ACKNOWLEDGE AND AGREE THAT YAHOO! SHALL NOT BE LIABLE FOR ANY DIRECT, INDIRECT,
INCIDENTAL, SPECIAL, CONSEQUENTIAL OR EXEMPLARY DAMAGES, INCLUDING BUT NOT LIMITED TO, DAMAGES
FOR LOSS OF PROFITS, GOODWILL, USE, DATA OR OTHER INTANGIBLE LOSSES (EVEN IF YAHOO! HAS BEEN
ADVISED OF THE POSSIBILITY OF SUCH DAMAGES), RESULTING FROM: (i) THE USE OR THE INABILITY TO
USE THE SERVICE; (ii) THE COST OF PROCUREMENT OF SUBSTITUTE GOODS AND SERVICES RESULTING
FROM ANY GOODS, DATA, INFORMATION OR SERVICES PURCHASED OR OBTAINED OR MESSAGES RECEIVED
OR TRANSACTIONS ENTERED INTO THROUGH OR FROM THE SERVICE; (iii) UNAUTHORIZED ACCESS TO OR
ALTERATION OF YOUR TRANSMISSIONS OR DATA; (iv) STATEMENTS OR CONDUCT OF ANY THIRD PARTY ON THE
SERVICE; OR (v) ANY OTHER MATTER RELATING TO THE SERVICE.
YOU AGREE THAT REGARDLESS OF ANY STATUTE OR LAW TO THE CONTRARY, ANY CLAIM OR CAUSE OF ACTION
ARISING OUT OF OR RELA TED TO USE OF THE SERVICE OF THESE TOS MUST BE FILED WITHIN ONE (1) YEAR
AFTER SUCH CLAIM OR CAUSE OF ACTION AROSE OR BE FOREVER BARRED.
19. EXCLUSIONS AND LIMITATIONS
SOME JURISDICTIONS DO NOT ALLOW THE EXCLUSION OF CERTAIN WARRANTIES OR THE LIMITATION OR
EXCLUSION OF LIABILITY FOR INCIDENTAL OR CONSEQUENTIAL DAMAGES. ACCORDINGLY, SOME OF THE ABOVE
LIMITATIONS OF SECTIONS 17 AND 18 MAY NOT APPLY TO YOU.
IN PARTICULAR, NOTHING IN THESE TOS SHALL AFFECT THE STATUTORY RIGHTS OF ANY CONSUMER OR
EXCLUDE OR RESTRICT ANY LIA BIITY FOR DEATH OR PERSONAL INJURY ARISING FROM THE NEGLIGENCE OR
FRAUD OF YAHOO!.
20. SPECIAL ADMONITION FOR SERVICES RELATING TO FINANCIAL MATTERS
If you intend to create or join any service, receive or request any news, messages, alerts or other information from the Service
concerning companies, stock quotes, investments or securities, please read the above Sections 17 and 18 again. They go
doubly for you. In addition, for this type of information particularly, the phrase “Let the investor beware” is apt. The Service is
provided for informational purposes only, and no Content included in the Service is intended for trading or investing purposes.
Yahoo! shall not be responsible or liable for the accuracy, usefulness or availability of any information transmitted via the
Service, and shall not be responsible or liable for any trading or investment decisions made based on such information.
21. NOTICE
Notices to you may be made via either email or regular mail. The Service may also provide notices of changes to the TOS or
other matters by displaying notices or links to notices to you generally on the Service.
22. TRADEMARK INFORMATION
Yahoo!, the Yahoo! logo, Yahoo! in Chinese Characters, Yahooligans!, the Yahooligans! logo, YAHOO! KIDS, Yahoo! Kids
logo, the “Jumpin Y Guy” logo, Do you Yahoo!?, Y!, Y! stylised, My Yahoo!, Eyeballs design, Homework Answers, The
Scoop, Get Local, the Worlds Favorite Internet Guide, the Sunglasses design, e Café Yahoo!, Viaweb, Shop Find, EZSpree,
EZWheels, I Shops, Permission Marketing, Yoyodyne, Get Rich Click, and Geocities trademarks and service marks, and
other Yahoo! logos and product and service names are trademarks of Yahoo! Inc. (the “Yahoo! Marks”). Without Yahoo’s prior
permission, you agree not to display or use in any manner, the Yahoo! Marks.
23. COPYRIGHTS and COPYRIGHT AGENTS
Yahoo! respects the intellectual property of others, and we ask our users to do the same. If you believe that any of your
intellectual property rights have been infringed on the Service, please go to our copyright policy to report the problem.
24. GENERAL INFORMATION
These TOS (including the guides and rules referred to herein) constitute the entire agreement between you and Yahoo! and
govern your use of the Service, superseding any prior agreements between you and Yahoo! You also may be subject to
additional terms and conditions that may apply when you use afliate services, third-party content or third-party software. The
TOS and the relationship between you and Yahoo! shall be governed by the laws of England. You and Yahoo! agree to submit
to the exclusive jurisdiction of the English courts. Any failure by Yahoo! to exercise or enforce any right or provision of the TOS
shall not constitute a waiver of such right or provision. If any provision of the TOS is found by a court of competent jurisdiction
to be invalid, the parties nevertheless agree that the court should endeavour to give effect to the parties’ intentions as reected
in the provision, and the other provisions of the TOS remain in full force and effect.
Neither you nor Yahoo! may assign or transfer any rights or obligations under these TOS without the prior written consent of
the other party, except that Yahoo! shall be entitled to assign or transfer any or all of its rights and obligations (without your
prior consent) to any of its afliated companies.
The section titles in the TOS are for convenience only and have no legal or contractual effect. No Right of Survivorship and
Non-Transferability. You agree that your Yahoo! account is non-transferable and any rights to your Yahoo! ID or contents
within your account terminate upon your death. Any free account that has not been used for a certain period of time may be
terminated and all contents therein permanently deleted in line with Yahoo!’s policy.
25. VIOLATIONS
Please report any violations of the TOS to Yahoo! Customer Care.
Page 72

This page is intentionally
left blank.
Page 73
Correct Disposal of This Product
(Waste Electrical & Electronic Equipment)
(Applicable in the European Union and other European countries with
separate collection systems)
This marking shown on the product or its literature, indicates that it
should not be disposed with other household wastes at the end of its
working life.
To prevent possible harm to the environment or human health from
uncontrolled waste disposal, please separate this from other types of
wastes and recycle it responsibly to promote the sustainable reuse of
material resources.
Household users should contact either the retailer where they
purchased this product, or their local government office, for details
of where and how they can take this item for environmentally safe
recycling.
Business users should contact their supplier and check the terms and
conditions of the purchase contract. This product should not be mixed
with other commercial wastes for disposal.
Page 74
Svenska - 2
Användaranvisningar
Bilden på skärmen behålls
Visa inte en stillbild (från t.ex. ett videospel, eller när du ansluter en dator till den här plasmabildskärmen) på
plasmabildskärmen i mer än 2 timmar, eftersom detta kan medföra att bilden på skärmen behålls. Att bilden på skärmen
behålls kallas även ”bildskärmsbränning”. Du kan undvika att bilden behålls genom att minska på ljusstyrkan och kontrasten
på bildskärmen när du visar stillbilder.
Höjd
Plasmabildskärmen fungerar i normala fall endast på höjder under 2 000 m. På höjder över 2 000 m kan det hända att den
inte fungerar som den ska. Du bör därför undvika att installera och använda den på sådana höjder.
Värme ovanpå plasmaskärmen
Observera att produktens ovandel kan bli varm efter långvarig användning, eftersom värmen passerar genom den övre
ventilen i skärmen. Detta är helt normalt och beror inte på något fel på produkten. Barn ska dock inte röra vid produktens
ovansida.
Det hörs ett ‘sprucket’ ljud från produkten
Ett ’sprucket’ ljud kan uppstå om produkten dras ihop eller vidgas något beroende på exempelvis temperaturväxlingar eller
ändrar luftfuktighet. Det här är normalt och beror inte på något fel på produkten.
Defekta celler
Plasmaskärmen består av en panel med 1 230 000 (SD-level) till 3 150 000(HD-level) pixlar, vilket kräver en väl utvecklad
teknik. Det kan dock finnas några få mörka eller ljusa pixlar på skärmen. Dessa pixlar har ingen inverkan på produktens
prestanda.
Undvik att använda TV:n i temperaturer som understiger 5°C(41°F)
En stillbild som visas för länge på skärmen kan orsaka permanenta skador på plasmaskärmen.
Om du använder formatet 4:3 för länge kan det bli spår av marginalerna som till vänster, höger och i mitten
av skärmen och som orsakas av ljusstyrkan. Om du spelar en DVD eller ett spel kan det orsaka liknande
effekter på skärmen. Skador som orsakas av det som beskrivs ovan täcks inte av garantin.
Kvarvarande bild på skärmen
Om du visar stillbilder från TV- och dataspel under för långa perioder kan det göra att det ligger kvar rester av bilden sedan.
För att förhindra detta ska du minska på ljusstyrka och kontrast vid visning av stillbilder.
Garanti
- Garantin täcker inga skador som orsakas av att bilden behålls.
- Bildskärmsbränning täcks inte av garantin.
Installation
Kontakta ett auktoriserat servicecenter när du skall installera din skärm på en plats som är dammig, har höga eller låga
temperaturer, hög luftfuktighet, har kemisk påverkan eller där den används dygnet runt, som exempelvis på en flygplats eller
en tågstation etc.
Meddelande för digital-TV (DVB-T)
1. FUNKTIONER RELATERADE TILL DIGITAL-TV (DVB) FINNS ENDAST TILLGÄNGLIGA I LÄNDER ELLER OMRÅDEN
DÄR DVB-T (MPEG2 OCH MPEG4 AVC) SÄNDS VIA DIGITALA MARKSÄNDNINGAR.
DVB-T är den europeiska
konsortiumstandarden för sändning av digital markbunden TV. Kontrollera med din lokala återförsäljare om DVB-T-tjänsten
är tillgänglig i din region.
2.
Trots att den här TV:n uppfyller aktuella DVB-T-standarden enligt [augusti, 2008], kan kompatibilitet med framtida, digitala
DVB-T-sändningar inte garanteras.
3.
Vissa digitala TV-funktioner kanske inte är tillgängliga eller fungerar som de ska i vissa länder eller regioner.
4.
För ytterligare information, kontakta ditt lokala kundcenter för SAMSUNG.
Kontakta SAMSUNG WORLDWIDE
Om du har några frågor eller kommentarer angående Samsungs produkter, kontakta SAMSUNG:s kundtjänst. (Se bakre
omslaget för ytterligare information).
© 2008 Samsung Electronics Co., Ltd. All rights reserved.
Page 75

Svenska - 3
Svenska
N O T
Symbol Tryck på Obs! Entrycksknapp TOOL-knapp
Svenska - 3
Innehåll
Ansluta och förbereda TV:n
Användaranvisningar ...........................................................2
Kontrollera delar ..................................................................4
Att använda stativ ................................................................4
Så här monterar du stativet (modellberoende) ....................4
Visa kontrollpanelen ............................................................5
Visa kontrollpanelen ............................................................6
Fjärrkontroll .........................................................................8
Sätta i batterier i fjärrkontrollen ...........................................9
Slå på och stänga av ...........................................................9
Sätta TV:n i vänteläge .........................................................9
Visa menyerna...................................................................10
Använda knappen TOOLS ................................................10
Använda ratten ..................................................................10
Plug & Play-funktion ..........................................................11
Kanalstyrning
Lagra kanaler ...................................................................11
Hantera kanaler .................................................................15
Bildkontroll
Ändra och återställa bildinställningar .................................16
isa bild-i-bilden (PIP) .........................................................20
Installera TV:n med datorn ................................................20
Datorskärm ........................................................................21
Ljudstyrning
Ändra ljudstandard ............................................................22
Välja ljudläge .....................................................................23
Beskrivning av funktioner
Använda inställningsmenyn ...............................................24
Ställa klockan ....................................................................27
Nätverksanslutning ............................................................28
Nätverksinställning ............................................................30
Källa / Ändra namn ............................................................32
Product Guide ...................................................................32
WISELINK Pro
Ansluta en USB-enhet .......................................................33
Använda funktionen WISELINK Pro ..................................34
Använda och sortera fotolistan ..........................................36
Visa en bild eller ett bildspel .............................................37
Använda och sortera musiklistan ......................................39
Spela upp musik ...............................................................40
Använda och sortera lmlistan ..........................................41
Spela upp en lml ...........................................................42
Ta bort bild-/musik-/lml ..................................................43
Inställningar för bild/musik med WISELINK Pro ................44
Använda inställningsmenyn ...............................................44
■
■
■
■
■
■
■
■
■
■
■
■
■
■
■
■
■
■
■
■
■
■
■
■
■
■
■
■
■
■
■
■
■
■
■
■
■
■
■
WISELINK Pro-DLNA
Ställa in DLNA-nätverk ......................................................45
Installera DLNA-program ...................................................45
Använda DLNA-program ...................................................47
Använda DLNA-funktionen ................................................50
Content Library
Aktivera Content Library ....................................................51
Aktivera Content Library ....................................................52
Använda extra innehåll med externt USB-minne ..............53
Om Anynet+
Ansluta Anynet+-enheter ...................................................54
Installera Anynet+ .............................................................55
Söka och växla mellan Anynet+-enheter ...........................55
Inspelning ..........................................................................56
Lyssna med en mottagare (hemmabio) .............................57
Felsökning för Anynet+ .....................................................57
InfoLive
Använda InfoLive ...............................................................58
Använda vädertjänsten ......................................................59
Använda nyhetstjänsten ....................................................59
Använda börstjänsten ........................................................60
InfoLive-inställningar .........................................................61
Rekommendationer för användning
Text-tv-funktionen ..............................................................62
Specikationer för väggmonteringssats (VESA) ...............63
Justering av väggfäste (Säljs separat) .............................64
Förberedelse innan installation av väggstativet
på väggen ..........................................................................65
Montera TV:n mot väggen .................................................65
Felsökning .........................................................................66
Specikationer ...................................................................67
■
■
■
■
■
■
■
■
■
■
■
■
■
■
■
■
■
■
■
■
■
■
■
■
■
Page 76
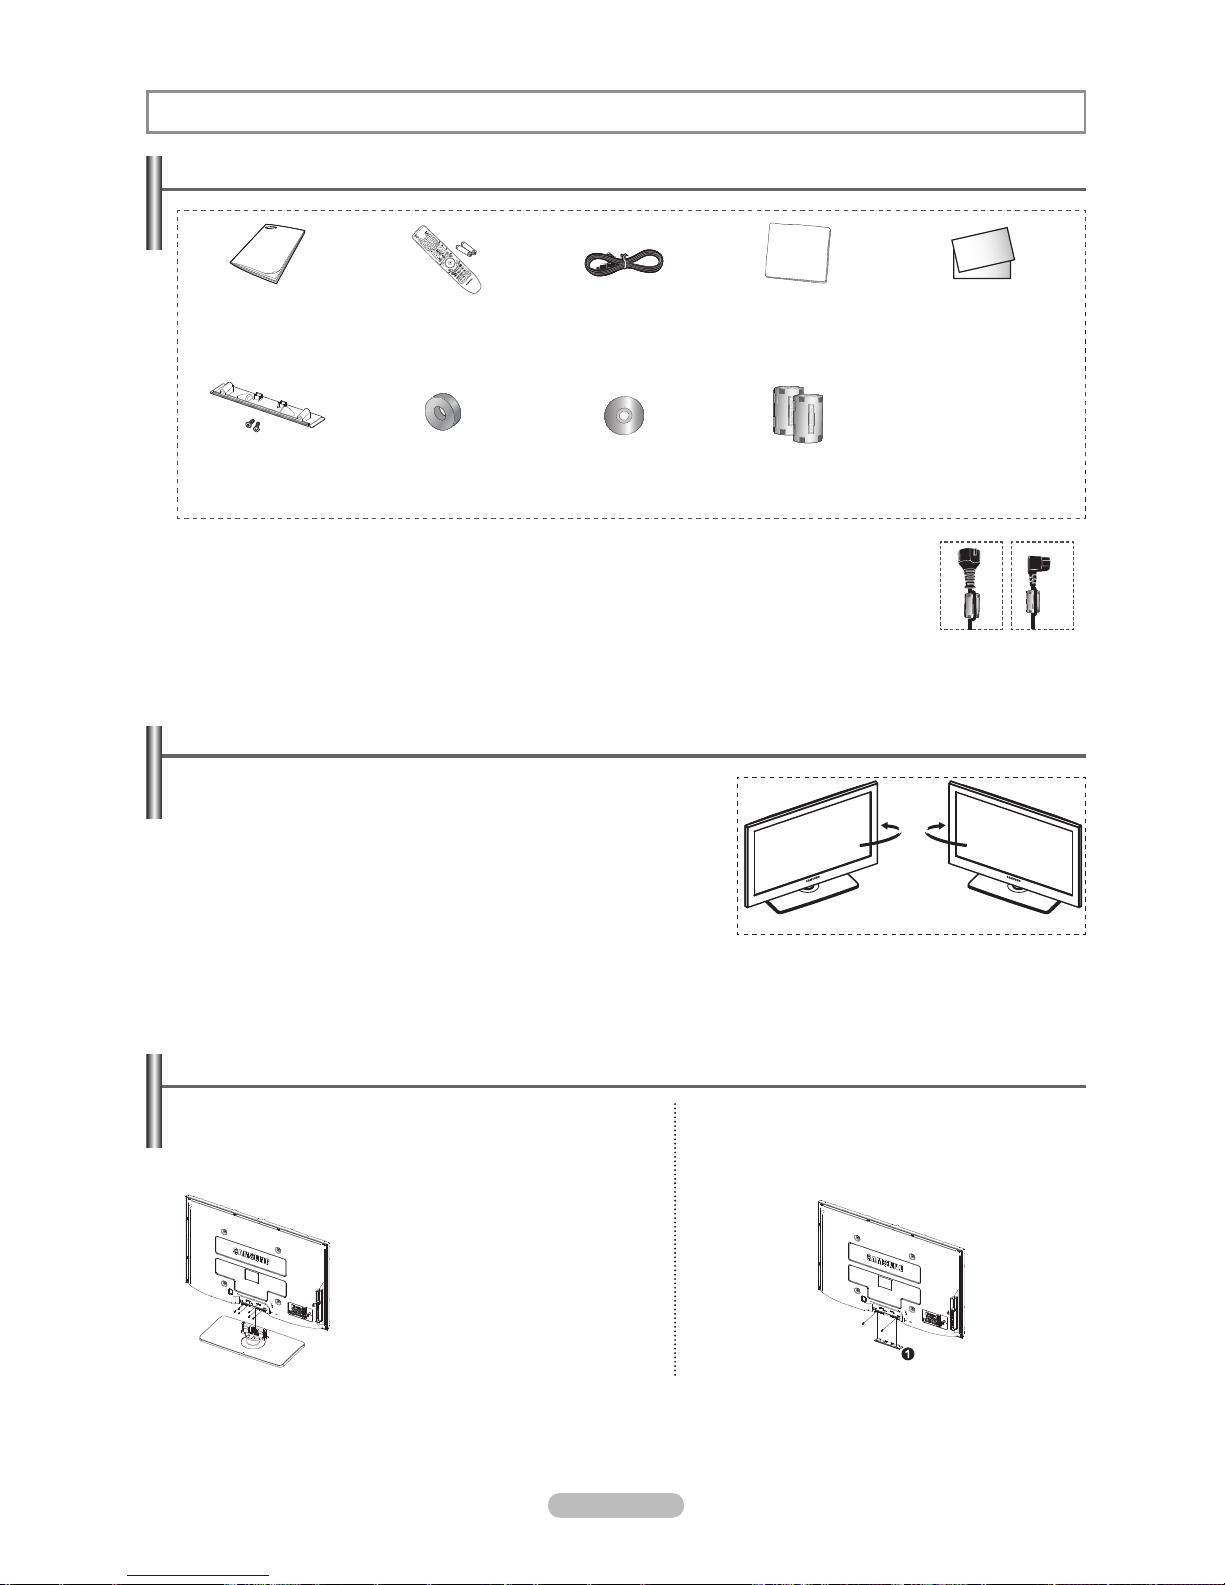
Svenska - 4
Kontrollera delar
Användarhandbok Fjärrkontroll/
AAA-batterier
Nätsladd Rengöring med trasa Garantibevis/
Säkerhetsmanual
(inte tillgänglig på alla platser)
Nedre kåpa/skruvar (2ea)
(PS50A766)
Ring till hållare (4ea)
(se sidan 65)
Program-CD Ferritkärna för
strömkabel
(2ea)
Ferritkärna (Nätsladd)
Ferritkärnorna används för att skydda kablarna mot störningar. När du ansluter en kabel öppnar du
ferritkärnan och klämmer den kring kabeln nära kontakten.
Att använda stativ
Två eller fler personer bör bära plasmabildskärmen. Lägg aldrig
plasmabildskärmen på golvet på grund av risk för skada på skärmen. Se
till att plasmabildskärmen alltid är i upprätt läge.
Det går att rotera plasmabildskärmen 20 grader i höger och vänster
riktning.
N
N
N
Ansluta och förbereda TV:n
Så här monterar du stativet (modellberoende)
Använd 6 skruvar för att säkra stativet i skärmen och fäst den
ordentligt i basen.
(Utrustningens utsida kan skilja sig från den på bilden.)
Vid montering på väggen, stäng luckan (1) på basens
anslutningsdel med två skruvar.
Varning
Fäst stativet ordentligt i TV:n innan du flyttar
den, eftersom stativet kan falla och orsaka
allvarlig skada.
Två eller fler personer bör bära
plasmabildskärmen. Lägg aldrig
plasmabildskärmen på golvet på grund av
risk för skada på skärmen.
Förvara den alltid upprätt.
N
-20° ~ 20°
Page 77
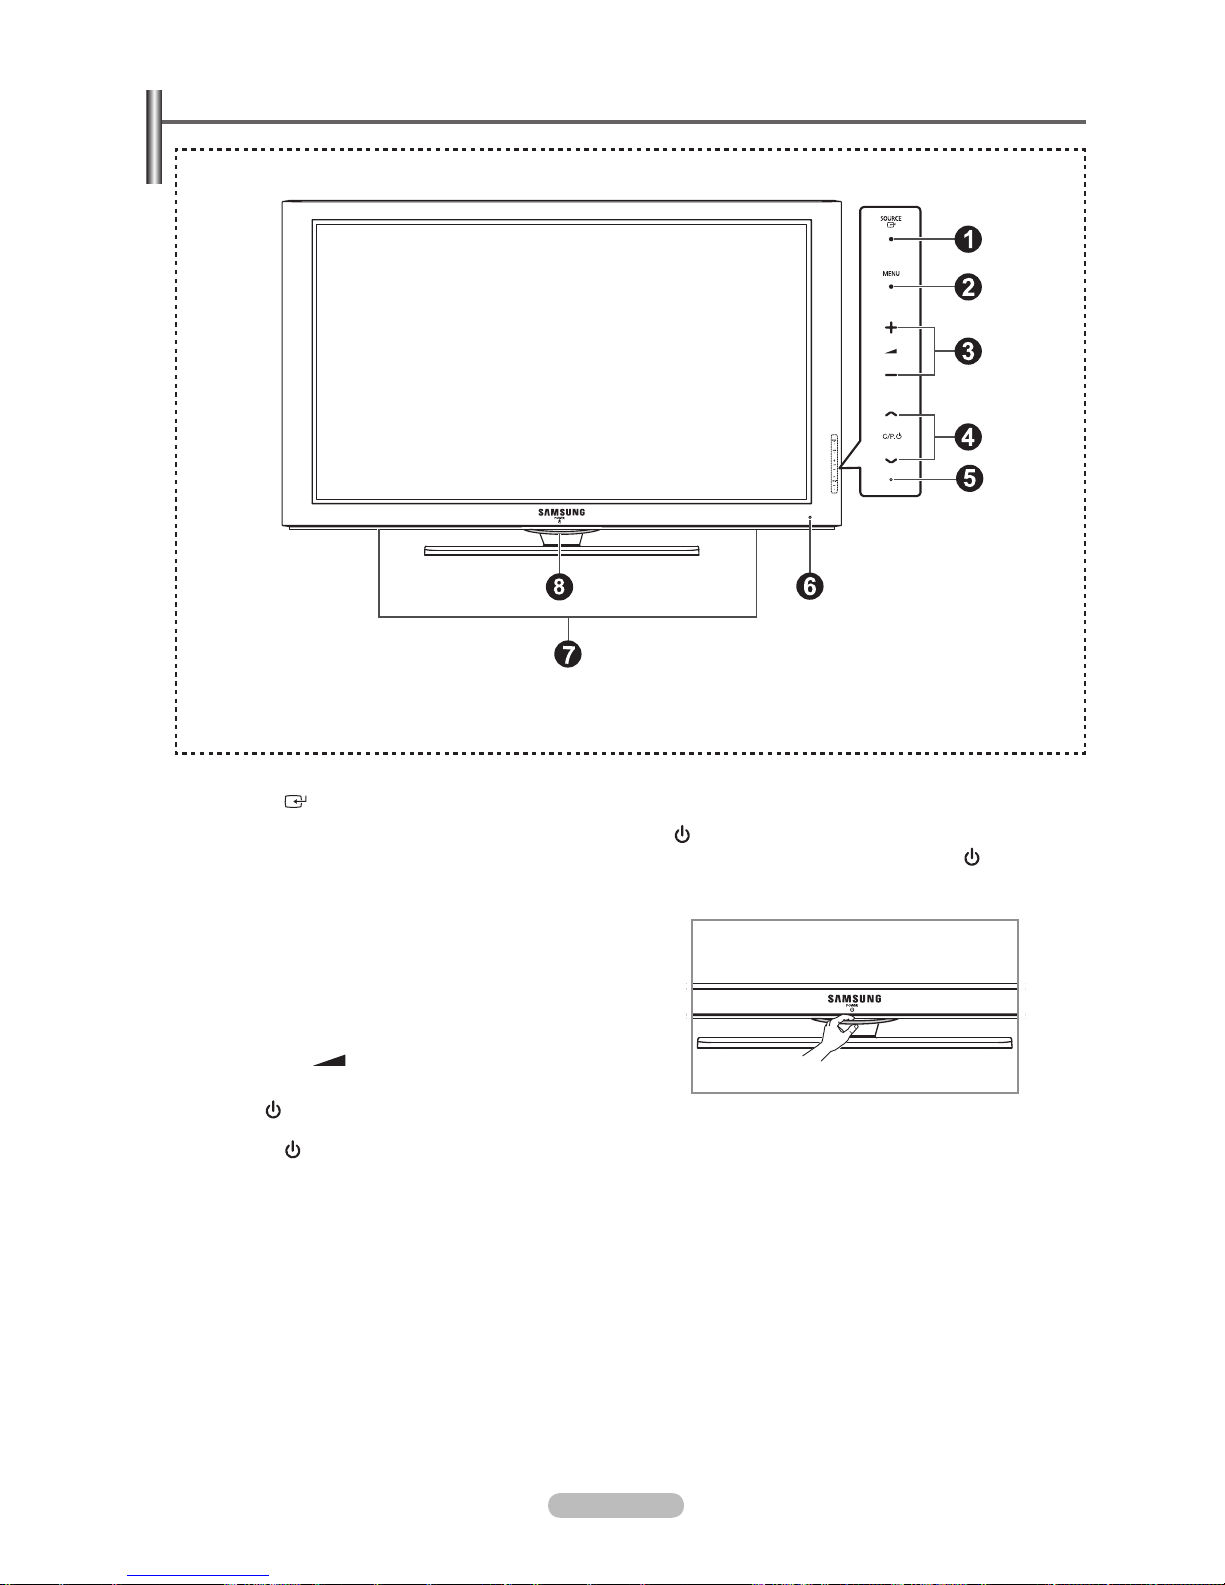
Svenska - 5
1
SOURCE
Växla mellan alla tillgängliga ingångskällor
(TV, Ext1, Ext2, AV, S-Video, Component, PC,
HDMI1, HDMI2/DVI, HDMI3, HDMI4, USB, DLNA).
Använd den här knappen på skärmmenyn när du
använder knappen ENTER på fjärrkontrollen
2
MENU
Tryck här om du vill se en skärmmeny med TV:ns
funktioner.
3
– = +
Tryck för minska eller attöka volymen. I skärmmenyn
använder du – + -knapparna på samma sätt som
◄ och ► på fjärrkontrollen.
4
< C/P.
>
Tryck här när du vill byta kanal. I skärmmenyn använder
du < C/P. > .-knapparna så som du använder
▲ och ▼ på fjärrkontrollen.
5
STRÖMINDIKATOR
Blinkar och stängs av när strömmen är på och tänds i
viloläge
6
MOTTAGARE FÖR FJÄRRKONTROLLEN
Rikta fjärrkontrollen mot den här punkten på TV:n.
N
7
HÖGTALARE
8
(POWER)
Rör silversensorn nedanför markeringen ( ) för att slå på
eller av TV:n.
Visa kontrollpanelen
Produktens färg och form kan variera beroende på modell.
N
Knappar på frontpanelen
Rör vid knappen för respektive
funktion.
Silversensor
Page 78
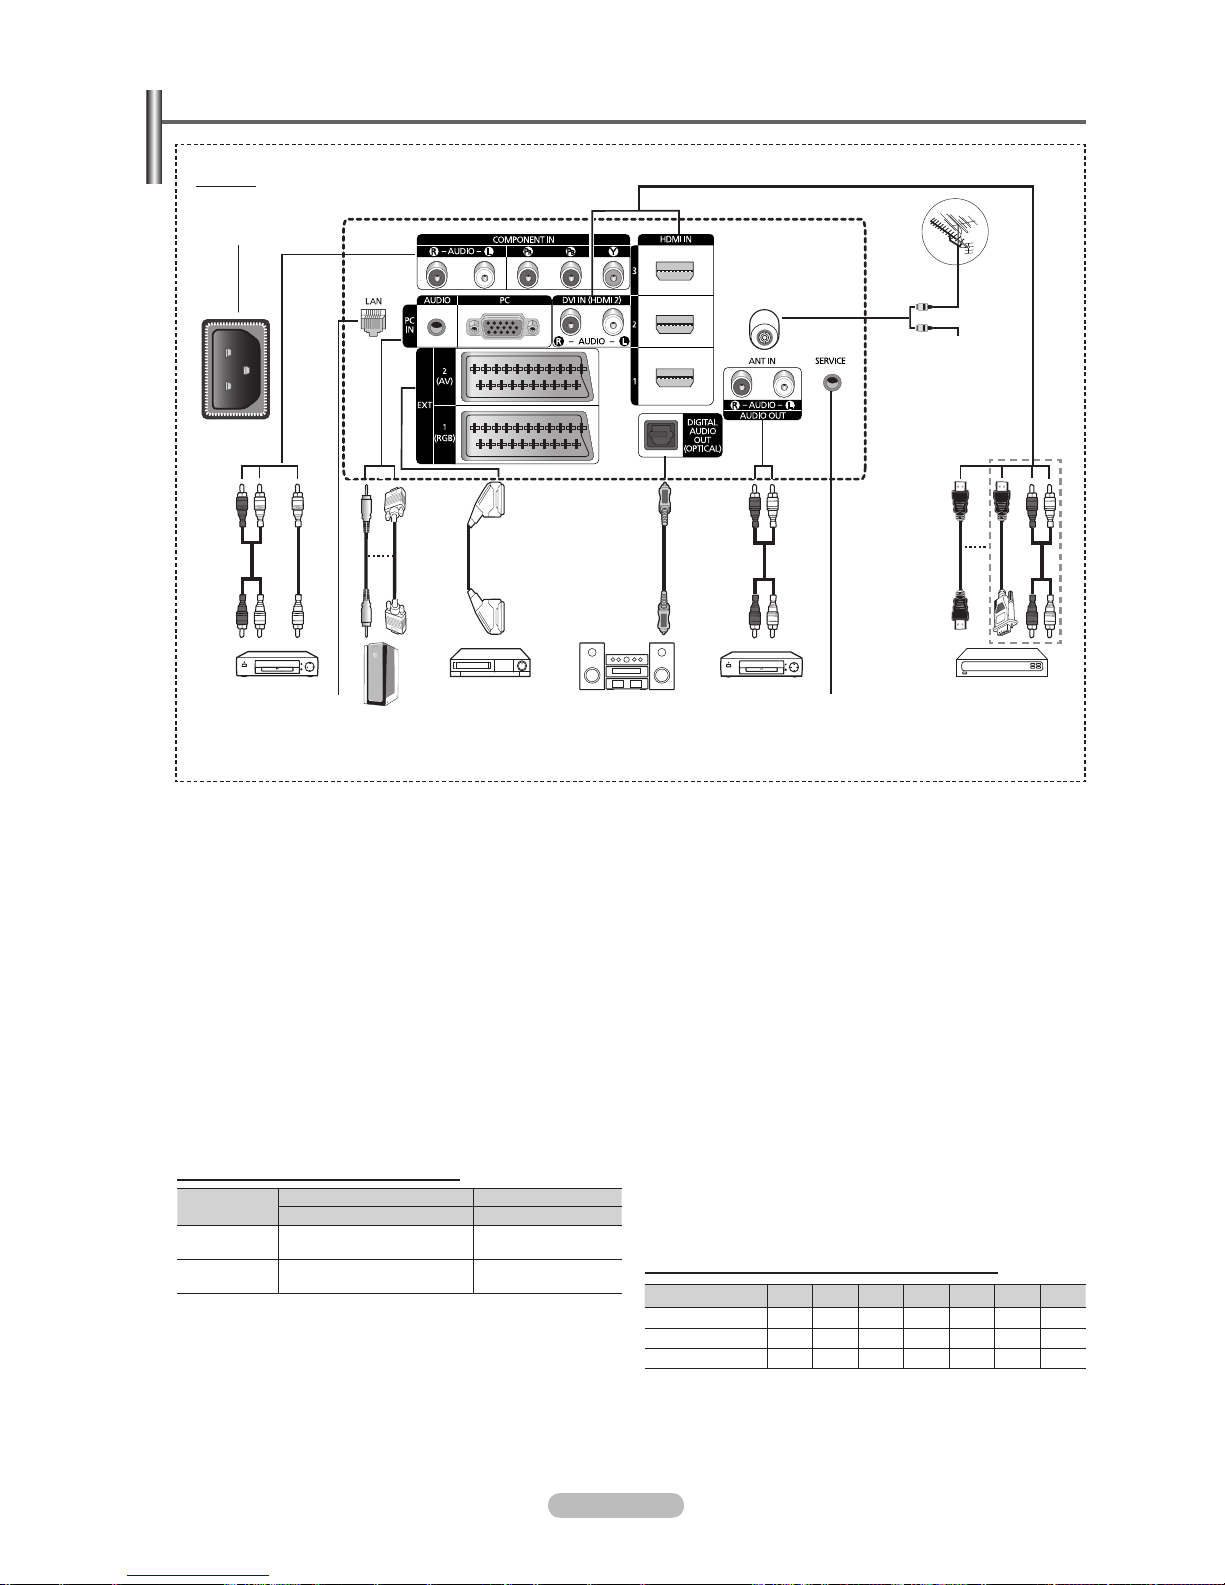
Svenska - 6
Visa kontrollpanelen
Baksida
Kabel-TV-nät
eller
eller
eller
1
5 7 96
0
83 4
2
Produktens färg och form kan variera beroende på modell.
N
Varje gång du ansluter ett ljud- eller videosystem till apparaten ska du se till att alla delar är avstängda.
När du ansluter till en extern enhet skall du matcha färgen på anslutningen med den på kabeln.
N
N
1
POWER IN
Anslut den medföljande nätsladden.
2
COMPONENT IN
Ljud (AUDIO (V)/(H)) och video (Y/PB/PR) ingångar till
Component.
3
LAN
Anslut en nätverkskabel till den här porten för att ansluta
till nätverket.
4
PC IN(PC) / AUDIO
Anslut till video- och ljudutgången på datorn.
5
EXT 1, EXT 2
Ingångar eller utgångar för externa enheter, t.ex.
videobandspelare, DVD, videospelsenheter eller video
disc-spelare.
Ingångar/utgångar specifikation
Kontakt
Ingång Utgång
Video Ljud (V/H) RGB
Video + ljud (V/H)
EXT 1
✔ ✔ ✔
Enbart TV- eller DTV-
utgången är tillgänglig.
EXT 2
✔ ✔
Utgång som du
kan välja.
6
DIGITAL AUDIO OUT (OPTICAL)
Anslut till en digital ljudkomponent.
7
AUDIO OUT(AUDIO R/L)
Anslut RCA-signaler från TV:n till en extern källa, t.ex.
ljudutrustning.
8
SERVICE
− Kontakt för service.
9
HDMI IN 1,2,3
− Ingen ytterligare ljudanslutning krävs för en HDMI till
HDMI-anslutning.
− När du använder en anslutning med HDMI/DVI -kabel
måste du använda uttaget HDMI IN 2.
Vad är HDMI?
−
High Definition Multimedia interface gör det
möjligt att överföra digital bildinformation av
högdefinitionstyp och flera kanaler med digitalt ljud.
− HDMI/DVI-terminalen stöder DVI-anslutning till
en extra enhet med lämplig kabel (medföljer ej).
Skillnaden mellan HDMI och DVI är att HDMIenheten är mindre till storleken, har HDCP(High
Bandwidth Digital Copy Protection)-kodning och
stödjer flerkanals digitalt ljud.
DVI IN (HDMI 2) AUDIO R/L
DVI-utgångar för externa enheter.
0
ANT IN
75Ω Koaxialkontakt för antenn/kabel-tv-nät.
Lägen som stöds för HDMI/DVI och Component
480i 480p 576i 576p 720p 1080i 1080p
HDMI/DVI 50Hz X X X O O O O
HDMI/DVI 60Hz X O X X O O O
Component O O O O O O O
N
Page 79
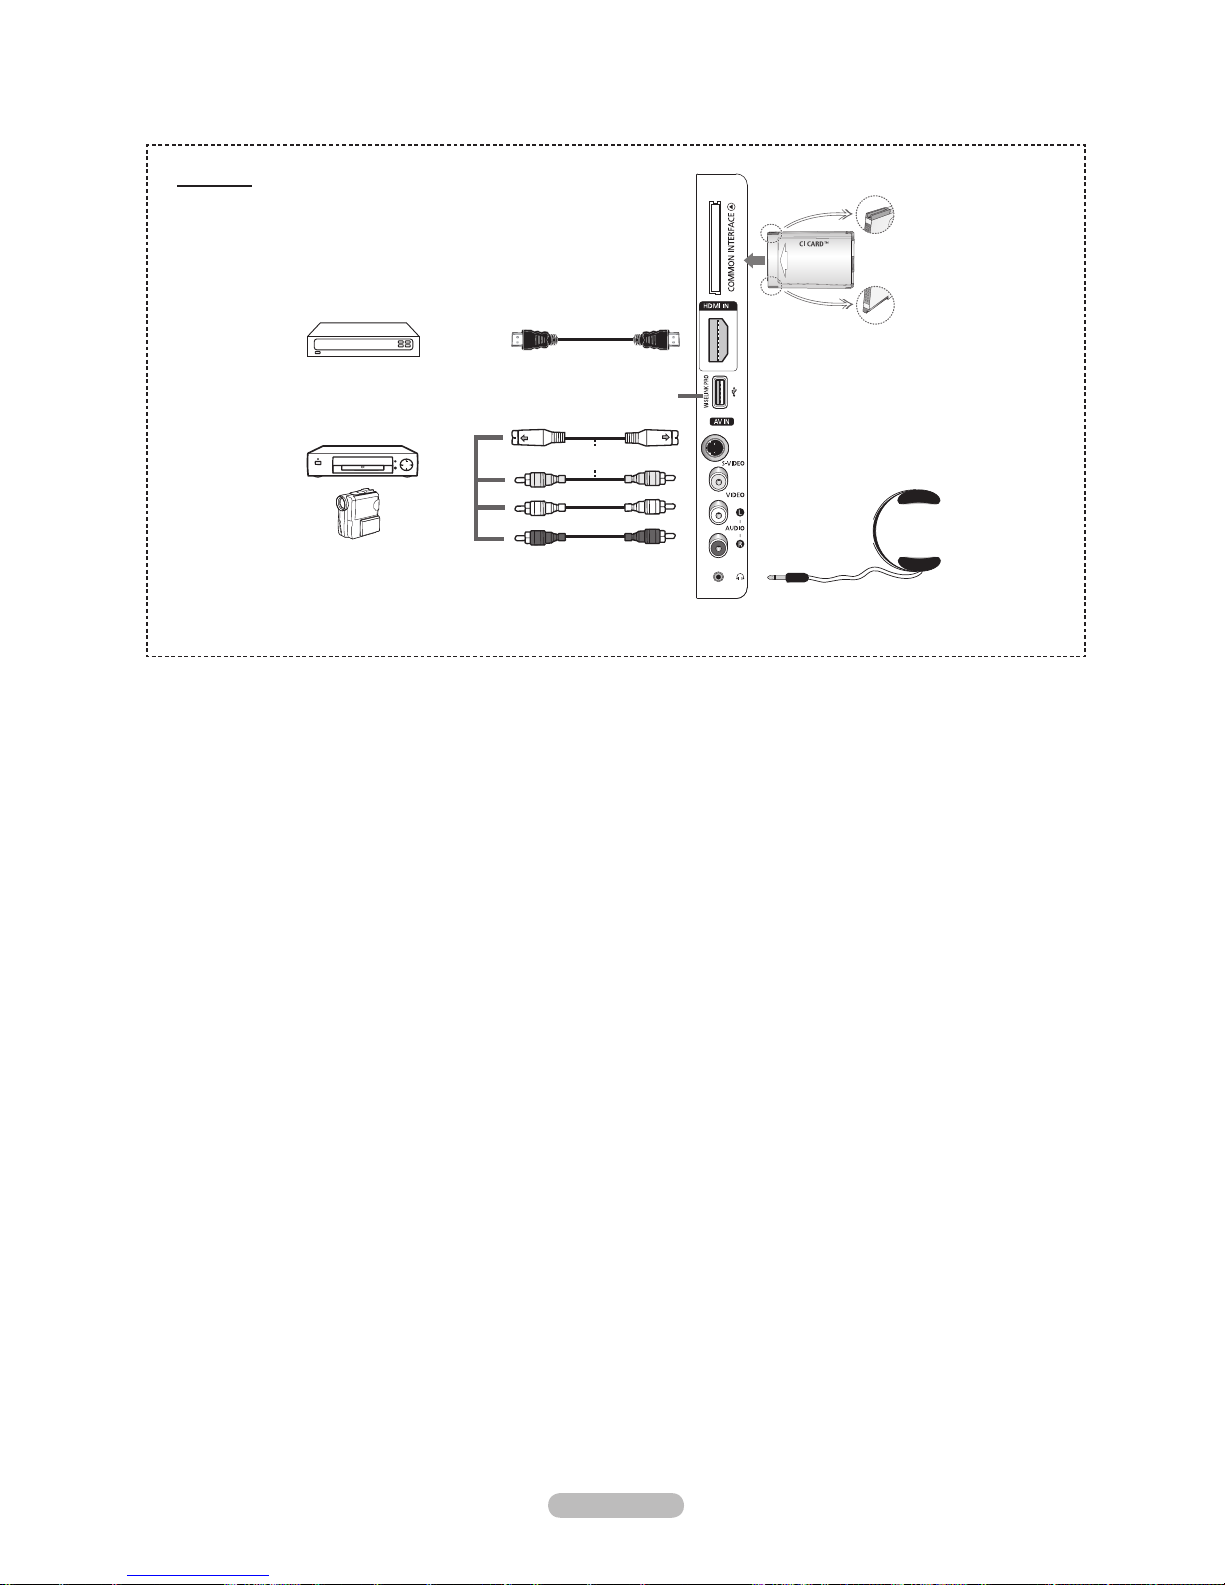
Svenska - 7
Produktens färg och form kan variera beroende på modell.
N
Sidopanel
eller
4
5
3
2
1
4
1
Plats för COMMON INTERFACE
ISätt ett CI(Common Interface)-kort i kortplatsen.
(läs mer om detta på sidan 26)
− Om
CI-kortet inte sitter i visas Kodad signal
på vissa kanaler på tv-skärmen.
− Information som bland annat omfattar ett
telefonnummer, CI-kortets ID, värd-ID visas i ungefär
2-3 minuter. Om ett felmeddelande visas kontaktar du
tjänsteleverantören.
− Närkonfigurationen av kanalinformationen slutförts
visas meddelandet uppdateringen klar, vilket innebär
att kanallistan uppdaterats.
Sätt i CI-kortet i pilens riktning.
2
HDMI IN 4
Anslut till HDMI-uttaget på en enhet med HDMI-utgång.
3
WISELINK PRO
Anslut en USB-lagringsplats för att visa bildfiler (JPEG),
spela upp ljudfiler (MP3) och filmfiler.
Du kan ansluta till SAMSUNGs nätverk trådlöst.
4
S-VIDEO eller VIDEO / AUDIO L/R
Video (S-Video eller Video) och ljudingångar för externa
enheter, t.ex. videokameror eller video.
N
5
HÖRLURSUTTAG
Du kan ansluta ett par hörlurar till tv:n om du vill titta på ett
tv-program utan att störa andra i rummet.
Långvarig användning av hörlurar på hög volym kan
skada din hörsel.
N
Page 80

Svenska - 8
Fjärrkontroll
Du kan använda fjärrkontrollen på ett avstånd på omkring 23 fot från TV:n.
Fjärrkontrollens funktion kan påverkas av starkt ljus.
N
1
POWER-knappen
(slår på och stänger av TV:n)
2
Väljer TV-läge direkt
3
Sifferknappar för direkt åtkomst till
kanaler
4
Välja en- eller flersiffrig kanal
5
Stänga av ljudet tillfälligt
6
Välja tillgängliga källor
7
Öka volymen
Sänka volymen
8
Visar EPG (elektronisk
programguide)
9
Använd för att snabbt välja ofta
använda funktioner.
0
Flytta markören i menyn
!
Använd denna för att se information
om aktuell sändning
@
Använd de här knapparna i
kanallistan och WISELINK Pro etc.
$
Tryck för att välja tillvalsdisplay och
ljudlägen för idrott, bio och spel.
%
Använd de här knapparna i
kanallistan, WISELINK Pro och
Anynet+.
^
ON/OFF
Tryck för att tända knappljuset på
fjärrkontrollen. Den här funktionen
är bekväm vid användning på natten
eller om det är mörkt i rummet. (Vid
användning av fjärrkontrollen med
knappen ON/OFF ( ) i läget På
(On) minskas batteritiden.)
&
Föregående kanal
*
Nästa kanal
Föregående kanal
(
Visar huvudmenyn för skärmmenyn
)
Den här funktionen gör det möjligt för
dig att visa och spela upp bild- och
ljudfiler (JPEG), ljudfiler (MP3) och
filmfiler från en extern enhet.
a
Går tillbaka till föregående meny
b
Avsluta skärmmenyn
c
Tryck här för att använda någon av
informationstjänsterna för nyheter,
börs eller väderprognos som finns
tillgängliga i nätverket.
d
Använd det här alternativet vid
anslutning av en SAMSUNG DMA
(Digital Media Adapter)-enhet
genom ett HDMI-gränssnitt och
växla till DMA-läge. (DMA-knappen
är tillval.) För mer information
om användningsmetoder, se
bruksanvisningen för DMA. Den här
knappen är tillgänglig när funktionen
Anynet+ (HDMI-CEC) är i läget På
(se sidan 55).
e
Med den här funktionen kan du visa
Content Library.
f
Visar digitala undertexter
Text-tv-funktioner
2
Avsluta text-tv-läge
(modellberoende)
6
Text-tv val av läge (LIST/FLOF
(Lista/Flof))
8
Text-tv lagra
9
Text-tv storlek
!
Text-tv visa
@
Text-tv Ämnesval
#
Text-tv visning/blanda både text-tv-
information och normalt tv-program
&
Underordnad Text-tv-sida
*
P :Text-tv nästa sida
P : Text-tv föregående sida
(
Index för text-tv
a
Text-tv lås
b
Avbryta text-tv
Page 81
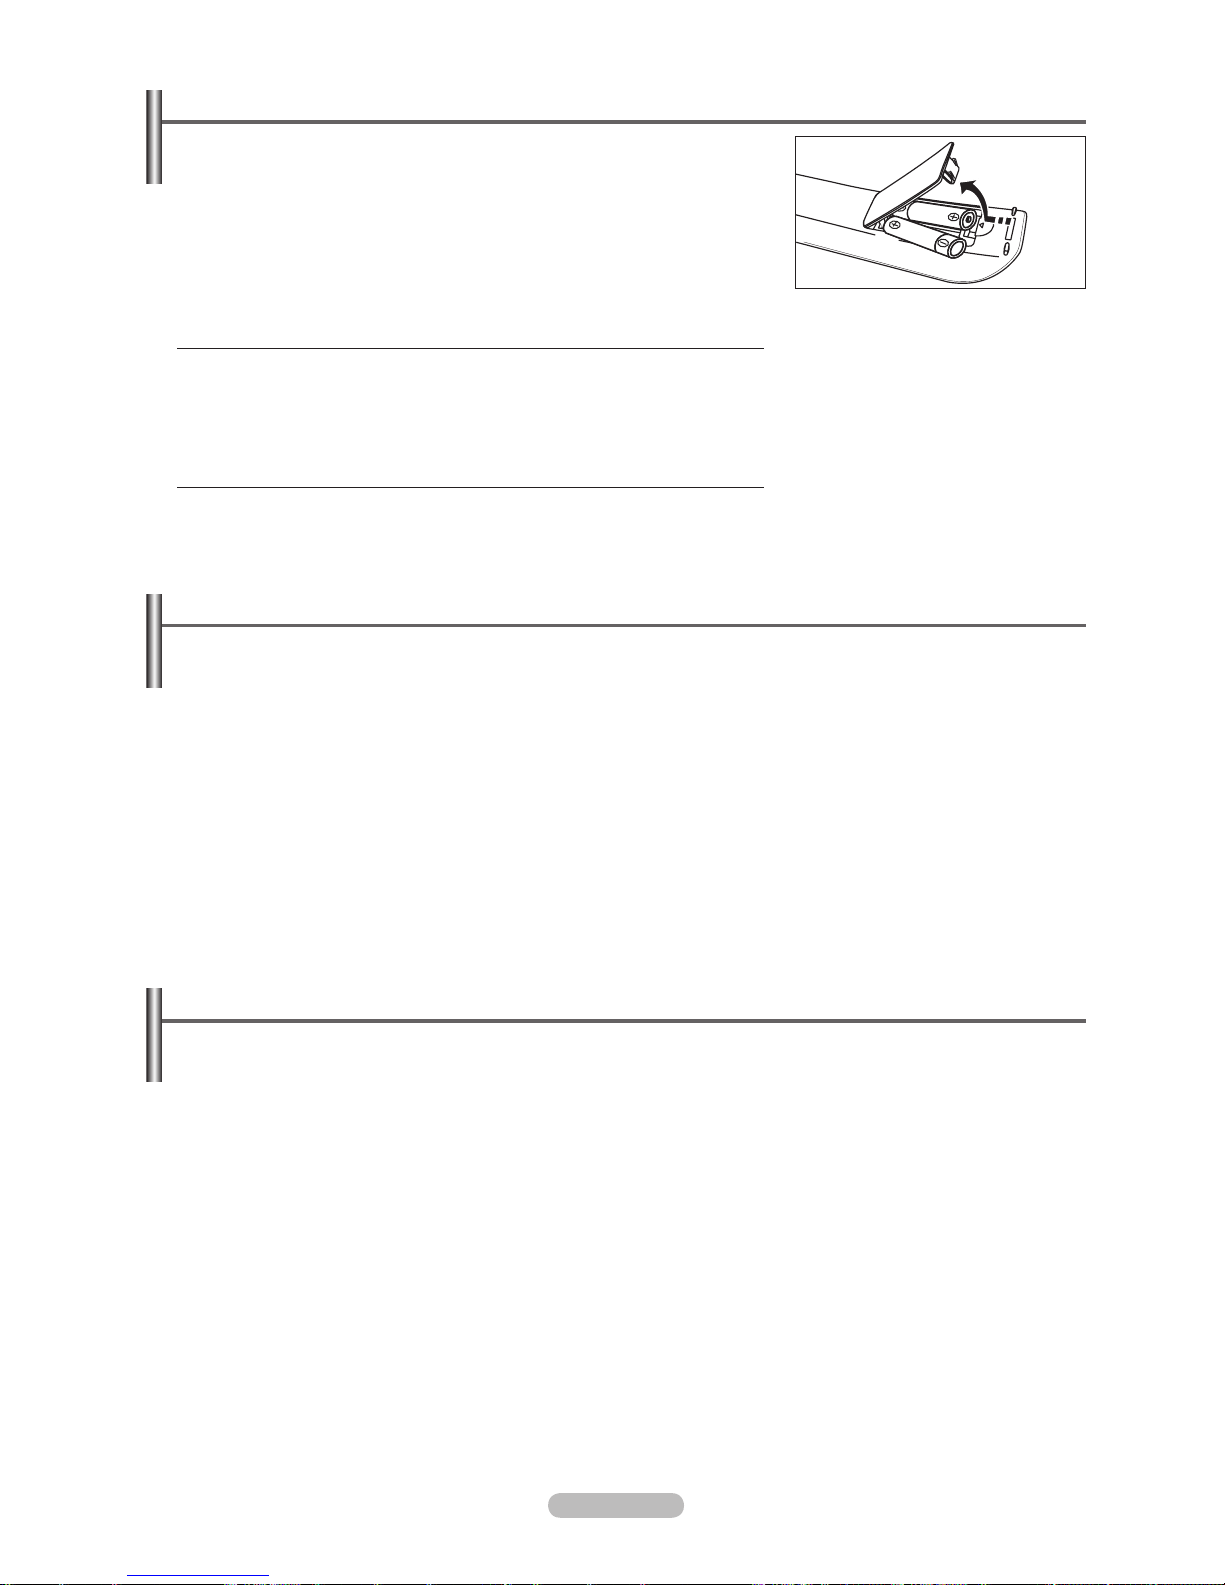
Svenska - 9
Sätta i batterier i fjärrkontrollen
1. Lyft luckan på baksidan av fjärrkontrollen uppåt, se bilden.
2.
Sätt i två stycken AAA-batterier.
Kontrollera att “+”- och “–”-polerna på batterierna stämmer överens med
diagrammet i facket.
3.
Stäng
skyddet
.
Om du inte ska använda fjärrkontrollen under en längre tid kan du ta ur
batterierna och förvara dem på en sval och torr plats.
Vid användning av fjärrkontrollen med knappen ON / OFF @ i läget På
minskas batteritiden.
Om fjärrkontrollen inte fungerar! Kontrollera följande:
1. Är TV:n påslagen?
2. Är plus- och minuspolerna på batteriet felvända?
3. Är batterierna tomma?
4. Är det strömavbrott eller är nätsladden urdragen?
5. Finns det någon speciell lysrörsbelysning eller neonskylt i närheten?
N
Slå på och stänga av
Nätsladden är fäst på baksidan av apparaten.
1.
Sätt
i nätkontakten i ett lämpligt vägguttag.
Standby-indikatorn tänds på din utrustning.
2.
Tryck
på knappen POWERP på utrustningen.
Du kan även trycka på knappen
POWERP eller TV på fjärrkontrollen för att slå på TV:n.
Kanalen du senast tittade på väljs automatiskt.
3.
Tryck
på de numeriska knapparna (0~9) eller på en kanalväljarknapp upp/ner
(<
/ >) på fjärrkontrollen eller på knappen
>C/P.P<
på apparaten.
När du slår på TV-apparaten för första gången ombeds du välja vilket språk som du vill att menyerna ska visas på.
4.
Tryck
på knappen
POWERP igen för att stänga av enheten.
Sätta TV:n i vänteläge
Du kan sänka effektförbrukningen genom att ställa apparaten i vänteläge. Vänteläget är användbart när du vill stänga av tillfälligt
(t.ex. under en måltid).
1.
Tryck
på knappen
POWERP på fjärrkontrollen.
Bildskärmen släcks och en röd standby-lampa tänds på apparatens framsida.
2.
När
du vill koppla på TV:n igen trycker du bara på
POWERP, en siffra (0~9), TV eller en kanalväljarknapp (< / >).
Låt inte apparaten vara i vänteläget under en längre tid (t.ex. när du är på semester). Det bästa är att dra ur nät- och
antennkontakterna.
N
N
N
N
N
N
N
N
N
Page 82
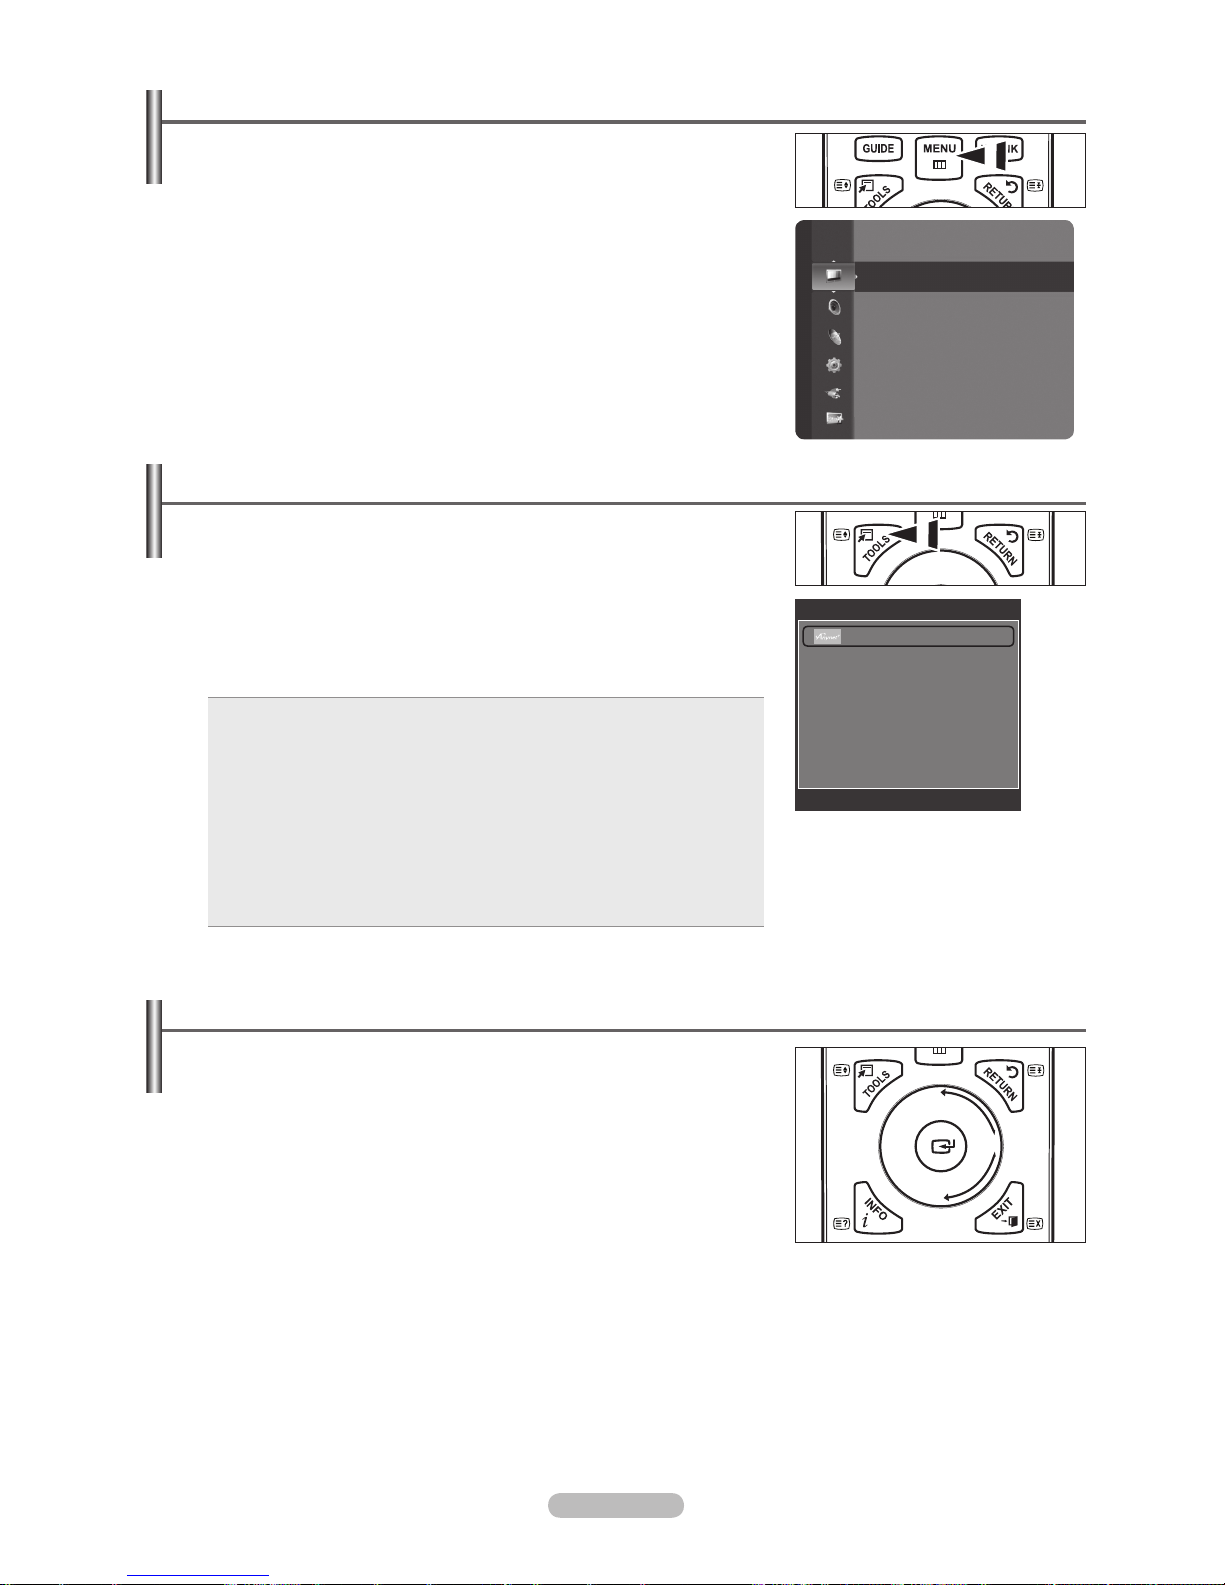
Svenska - 10
Visa menyerna
1.
När
strömmen är på trycker du på knappen MENU. Huvudmenyn visas på
skärmen. Menyns vänstra sida har ikoner: Bild, ljud, kanal, inställningar, ingång,
program.
2.
Tryck
på knapparna ▲ eller ▼ för att välja en av de fem funktionerna. Tryck
sedan på knappen
ENTERE för att välja underfunktionerna.
3.
Tryck
på EXIT-knappen när du vill avsluta.
Skärmmenyn försvinner från skärmen efter omkring en minut.
Använda knappen TOOLS
Du kan använda knappen TOOLS för att välja ofta använda funktioner snabbt och
enkelt. Menyn Verktyg ändras beroende på vilken extern ingångsskälla du visar.
1.
Tryck på knappen TOOLS Menyn Verktyg visas.
2.
Tryck på knappen ▲ eller ▼ för att välja en meny.
3.
Tryck på knapparna ▲/▼/◄/►/ENTERE för att visa, ändra eller använda de
markerade posterna. För en mer detaljerad beskrivning av varje funktion, se
överensstämmande sida.
Anynet+ (HDMI-CEC): se sidan 54
Bildstorlek: se sidan 18
Bildläge: se sidan 16
Ljudläge: se sidane 22
Sovtimer: se sidan 27
SRS TS XT: se sidan 22
Energispar: se sidan 26
Dubbel l ll: se sidan 23
BIB: se sidan 20
Autojustering: se sidan 20
•
•
•
•
•
•
•
•
•
•
Använda ratten
Räkna uppåt bland kanalnumren genom att vrida ratten medurs när
kanalskärmen visas. Räkna nedåt bland kanalnumren genom att vrida ratten
moturs.
Öka volymen genom att vrida ratten medurs medan fönstret för volymkontroll
visas. Sänk volymen genom att vrida ratten moturs.
Gå till en lägre meny genom att vrida ratten medurs när menyskärmen visas. Gå
till en högre meny genom att vrida ratten moturs.
N
Läge
:
Standard
Cellängd : 7
Kontrast : 95
Ljusstyrka : 45
Skärpa : 50
Färg : 50
Ton (G / R) : G50 / R50
Fininställningar
Bild
Verktyg
Anynet+ (HDMI-CEC)
Bildstorlek : Auto Wide
Bildläge : Standard
Ljudläge : Personlig
Sovtimer : Av
SRS TS XT : Av
Energispar : Av
Dubbel l ll : Mono
U
Flytta E Öppna e Avsluta
Page 83
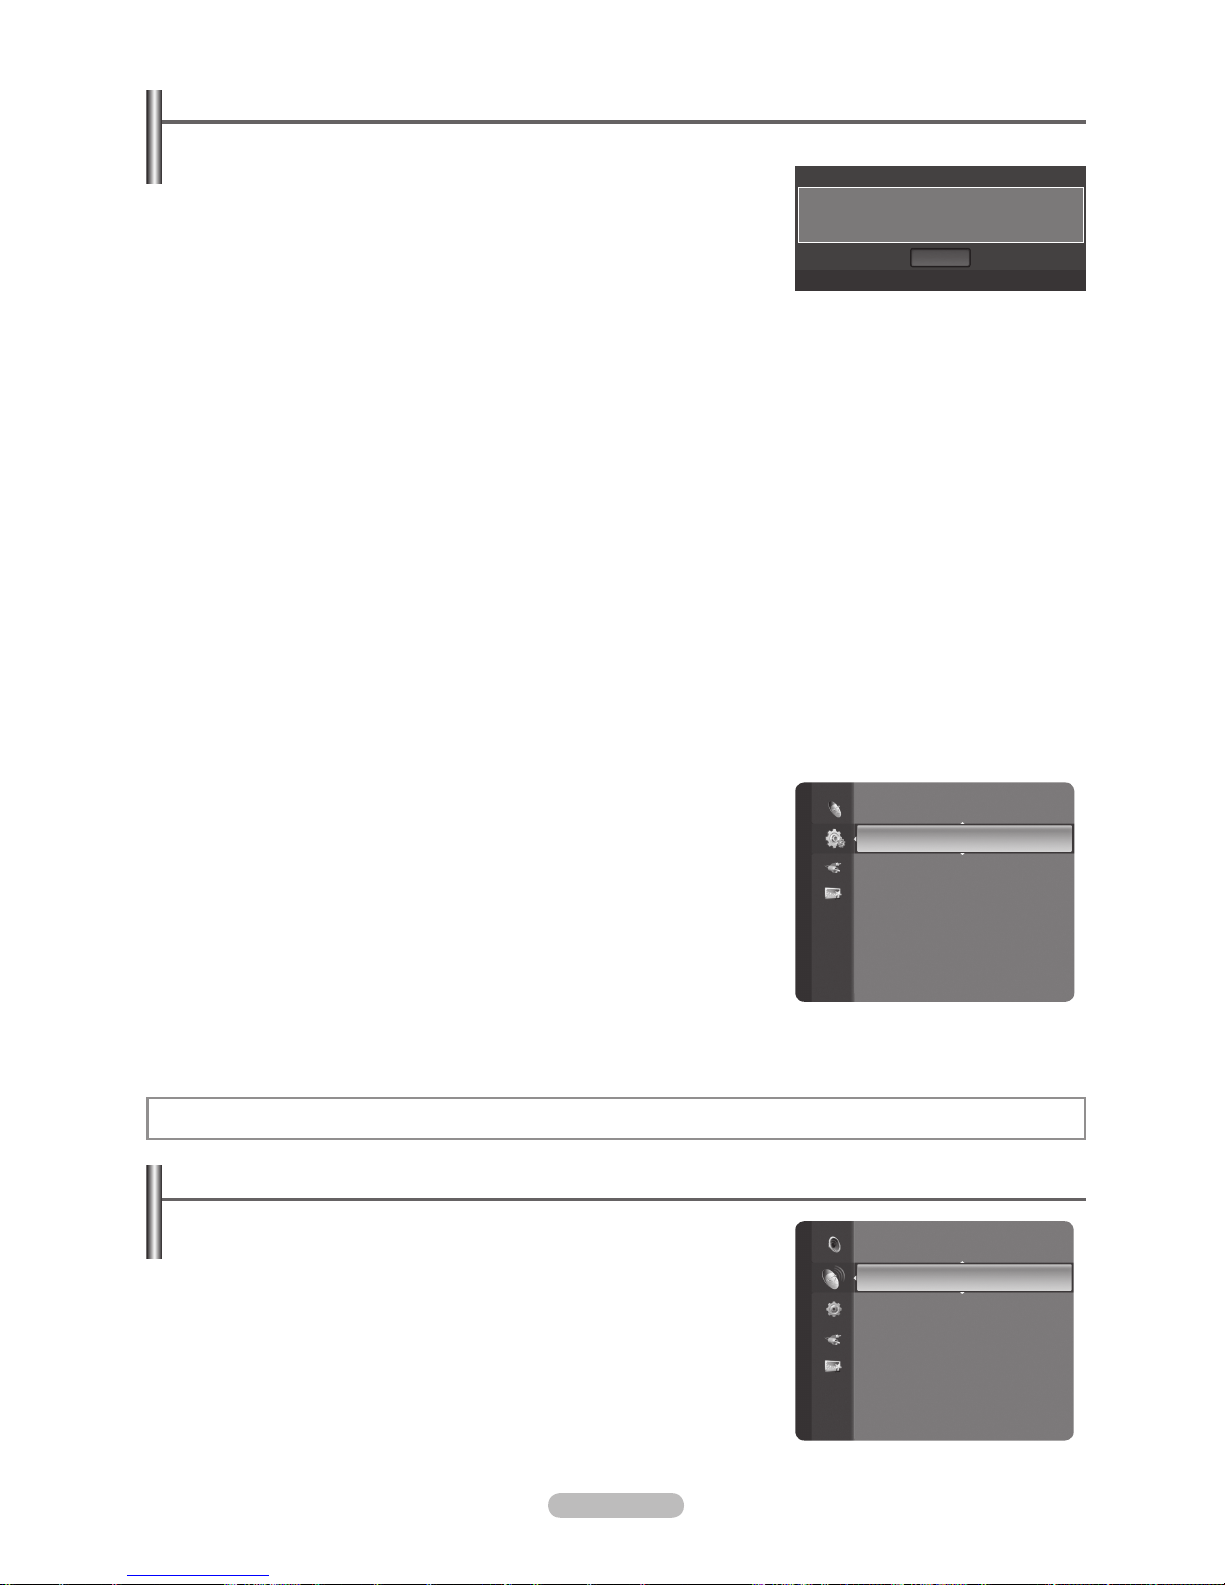
Svenska - 11
Plug & Play-funktion
När tv:n slås på för första gången visas era grundinställningar automatiskt.
1.
Tryck på knappen POWER på fjärrkontrollen. Meddelandet
Valitse
valikkokieli,
myymälädemo, kanavat ja kellonaika. visas.
2.
Tryck på knappen ENTER
E
så visas menyn
Välj
språk för OSD.
automatiskt. Tryck på knappen ENTER
E
.
3.
Välj språk genom att trycka på knappen ▲ eller ▼. Tryck på knappen
ENTER
E
för att bekräfta valet.
4.
Tryck på knappen ◄ eller ► för att välja
Butiksdemo
eller
Hemmabruk
och sedan på ENTER
E
.
Du rekommenderas att ställa in din TV på läget Hemmabruk för att få bästa bild för hemmiljö.
Butiksdemo
är endast avsett för användning i återförsäljarmiljö.
Om enheten oavsiktligt försätts i läget
Butiksdemo
och du vill återgå till Hemmabruk (Standard): Tryck på
volymknappen på TV:n. När skärmmenyn för volym visas trycker du och håller ned knappen MENU på TV:n i 5 sekunder.
Skärmsläckaren aktiveras om det inte nns någon fjärrkontrollingång längre än en minut under tiden Plug & Play körs.
Skärmsläckaren aktiveras om det inte förekommer någon användningssignal i mer än 15 minuter.
5.
Tryck på knappen ENTERE. Välj språk genom att trycka på knappen ▲ eller ▼. Tryck på knappen ENTERE för att
bekräfta valet.
6.
Tryck på knappen ▲ eller ▼ för att välja önskad källista att memorera. Tryck på knappen ENTER
E
för att välja Start.
Digital och Analog: Digitala och analoga kanaler.
Digital: Digitala kanaler.
Analog: Analoga kanaler.
7.
Tryck
på knappen ▲ eller ▼ för att memorera kanalerna för den valda anslutningen och tryck sedan på knappen ENTER.
Ant: Atmosfärantennsignal.
Kabel: Kabelantennsignal.
Kanalsökningen börjar och avslutas automatiskt.
Tryck på ENTERE när som helst för att avbryta lagringsprocessen.
Efter att de tillgängliga kanalerna är lagrade visas meddelandet Ställ in klockläge.
8. Tryck på knappen ENTERE . Tryck på knappen ▲ eller ▼ för att välja
Auto
och tryck sedan på ENTERE.
Om du väljer Manuellt, visas Ställ in aktuellt datum och aktuell tid. (Se sidan 27)
Om du har tagit emot en digital signal ställs tiden automatiskt. Om inte, se
sidan 27 för att ställa klockan.
9.
Meddelandet
Ha
en trevlig stund visas. Tryck på knappen ENTER
E
när du
är klar.
Om du vill återställa denna funktion ...
1.
Tryck på knappen MENU för att visa menyn. Tryck på knappen ▲ eller ▼ för att
välja
Inställning
och tryck sedan på ENTER
E
.
2.
Tryck på knappen ENTER
E
igen för att välja Plug & Play.
3.
Ange ditt 4-siffriga PIN-nummer. Standard-PIN för en ny TV är ‘0-0-0-0’.
N
N
N
N
N
N
N
N
N
N
N
N
Kanalstyrning
Lagra kanaler
Land
Analog kanal: Du kan ändra land för analoga kanaler.
Digital kanal: Du kan ändra land för digitala kanaler.
Inmatningsskärmen för PIN-nummer visas. Ange ditt 4-siffriga PIN-nummer.
❑
N
Plug & Play
Valitse valikkokieli, myymälädemo, kanavat ja kellonaika.
OK
E Öppna
Inställning
Plug & Play ►
Språk : Svenska
Tid
Nätverksval : Kabel
Trådlös nätverksinstallation
Kabelnätsinstallation
Barnlås : På
Ändra PIN
Channel
Land
►
Autolagra
Lagra manuellt
Hel guide
Miniguide
Standardguide : Miniguide
Kanallista
Kanalläge : Tillagda kanaler
Page 84

Svenska - 12
Autolagra
Du kan avsöka frekvensområdena som nns tillgängliga (tillgången beror på vilket land du bor i). Automatiskt tilldelade
programnummer överensstämmer kanske inte med faktiska eller önskade programnummer.
Digital och Analog: Digitala och analoga kanaler.
Digital: Digitala kanaler.
Analog: Analoga kanaler.
Du kan memorera kanalerna för vald anslutning.
Ant: Atmosfärantennsignal.
Kabel: Kabelantennsignal.
Söker alla kanaler med aktiva sändningsstationer och lagrar dem i TV:ns minne.
Om du vill avbryta Auto Store trycker du på knappen ENTER
E
.
Meddelandet Stoppa Autolagring? visas.
Välj Yes genom att trycka på knappen ◄ eller ► och tryck sedan på ENTER
E
.
Om en kanal är låst med funktionen Barnlås visas PIN-inmatningsfönstret.
Digital & Analogue / Digital
Uppdateringsprocessen varierar beroende på valt Land.
Uppdatera kanallistan genom att välja lämpligt alternativ.
Om Land är inställt som Finland
Kabel: Söker efter kabelkanaler.
Ant: Söker luftburna antenner.
Den här produkten kan inte söka efter både kabelkanaler och luftburna antenner samtidigt.
När den slutförts visas antalet hittade tjänster.
Den befintliga favoritkanallistan tas inte bort när kanallistan uppdateras.
Om Land är inställt som Sverige eller Danmark
När du väljer Kabel:
Frekvens: Visar kanalens frekvens. (Skiljer sig åt för varje land)
Modulering: Visar tillgängliga modulationsvärden.
Symbolhastighet: Visar tillgängliga symbolhastigheter.
Nätverks-ID: Visar nätverksidentieringskoden.
Tryck på den röda knappen för att påbörja sökningen efter digitala tjänster. När den slutförts uppdateras
kanalerna i kanallistan.
När du väljer Ant:
Tryck på knappen ENTERE för att välja Start.
Lagra manuellt
Söker en kanal manuellt och lagrar den i TV:ns minne.
Om en kanal är låst med funktionen Barnlås visas PIN-inmatningsfönstret.
Digital kanal
Manuell lagring av digitala kanaler.
Om Land är inställt som Finland
Tryck på knappen ▲ eller ▼ för att välja Kabel eller Aerial och tryck sedan på knappen ENTERE.
När du väljer Kabel:
Frekvens: Visar kanalens frekvens. (Skiljer sig åt för varje land)
Modulering: Visar tillgängliga modulationsvärden.
Symbolhastighet: Visar tillgängliga symbolhastigheter.
Tryck på knappen ENTERE för att påbörja sökningen efter digitala tjänster.
När den slutförts uppdateras kanalerna i kanallistan.
När du väljer Aerial:
Kanal: Kanal ”21” till ”69” visas (landsberoende).
Frekvens: Den tillgängliga frekvensen i Channel-gruppen (kanal) visas.
Bandbredd: Tillgängliga bandbredder är 8 MHz.
Tryck på knappen ENTERE för att påbörja sökningen efter digitala tjänster.
När den slutförts uppdateras kanalerna i kanallistan.
❑
•
•
•
•
•
N
N
N
N
N
•
-
-
N
N
N
•
N
-
-
-
-
N
❑
N
N
•
N
-
-
-
N
-
-
-
Page 85

Svenska - 13
När Land är inställt som Sverige, Danmark eller Norge
Kanal: Kanal ”21” till ”69” visas (landsberoende).
Frekvens: Den tillgängliga frekvensen i Channel-gruppen (kanal) visas.
Bandbredd: Tillgängliga bandbredder är 8 MHz.
Tryck på knappen ENTERE för att påbörja sökningen efter digitala tjänster.
När den slutförts uppdateras kanalerna i kanallistan.
Analog kanal
Manuell lagring av analoga kanaler.
Program (Programnummer som tilldelas en kanal) Ställ in kanalnummer med ▲, ▼ eller nummerknapparna (0~9).
Färgsystem→Auto/PAL/SECAM/NTSC4.43
: Ange färgsystemsvärde med knappen ▲ eller ▼.
Ljudsystem → BG / DK / I / L: Ange ljudsystemsvärde med knappen ▲ eller ▼.
Kanal (När du vet numret på den kanal som ska lagras) Tryck på knappen ▲ eller ▼ för att välja C (luftburen kanal) eller S
(kabelkanal). Tryck på knappen ► och sedan på ▲, ▼ eller nummerknapparna (0~9) för att välja önskat nummer.
Du kan också välja kanalnumret direkt genom att trycka på sifferknapparna (0~9).
Om du inte hör något ljud eller om ljudet är onormalt väljer du ett annat ljudsystem.
Sök (Om du inte känner till kanalnumren): Starta sökningen genom att trycka på knapparna ▲ eller ▼. Kanalväljaren
avsöker frekvensområdet tills den första kanalen eller kanalen du valt tas emot på skärmen.
Lagra (När du vill lagra kanalen och det tilldelade programnumret): Ställ in på OK genom att trycka på knappen
ENTER
E
.
Kanalläge
P (Programläge): När du är klar med inställningen har sändarna i ditt område tilldelats positionsnummer
från P00 till maximalt P99. Du kan välja en kanal genom att ange positionsnumret i det här läget.
C (Markkanalläge): Du kan välja en kanal genom att ange det tilldelade numret för varje TV-sändare i
detta läge.
S (Kabelkanalläge): Du kan välja en kanal genom att ange det tilldelade numret för varje kabelkanal i
detta läge.
Hel guide / Miniguide
EPG-information (elektronisk programguide) ställs till förfogande av den som sänder kanalen. Programposter kan visas tomma
eller utan att vara uppdaterade beroende på den information som sänds för en viss kanal. Visningen uppdateras dynamiskt så
snart ny information nns tillgänglig.
För detaljerade anvisningar om hur du använder Hel guide och Miniguide, se beskrivningar på sidan 13.
Du kan även visa guidemenyn genom att trycka på knappen GUIDE. (Om
du vill kongurera Standardguide nns en beskrivning på sidan 14.)
Hel guide
: Visar programinformation i kronologiska segment i timmar. Två
timmars programinformation visas. Du kan bläddra bakåt och framåt i
informationen.
Miniguide
: Informationen för varje program visas på varje rad på den aktuella kanalskärmen för Mini Guide från det
aktuella programmet och framåt enligt programmets starttid.
Standardguide
Miniguide
/
Hel guide
: Du kan bestämma dig för att visa antingen
Miniguide
eller
Hel guide
när knappen GUIDE på
fjärrkontrollen är intryckt.
Kanallista
För detaljerade anvisningar om hur du använder Kanallista, se beskrivningarna på sidorna 15~16.
Kanalläge
När du trycker på knappen P >/<, växlar kanaler inom den valda kanallistan.
Tillagda kanaler: Kanaler växlar inom den lagrade kanallistan.
Favoritkanaler: Kanaler växlar inom favoritkanallistan.
•
-
-
-
•
•
•
•
N
N
•
•
N
-
-
-
❑
N
O
❑
❑
❑
Page 86
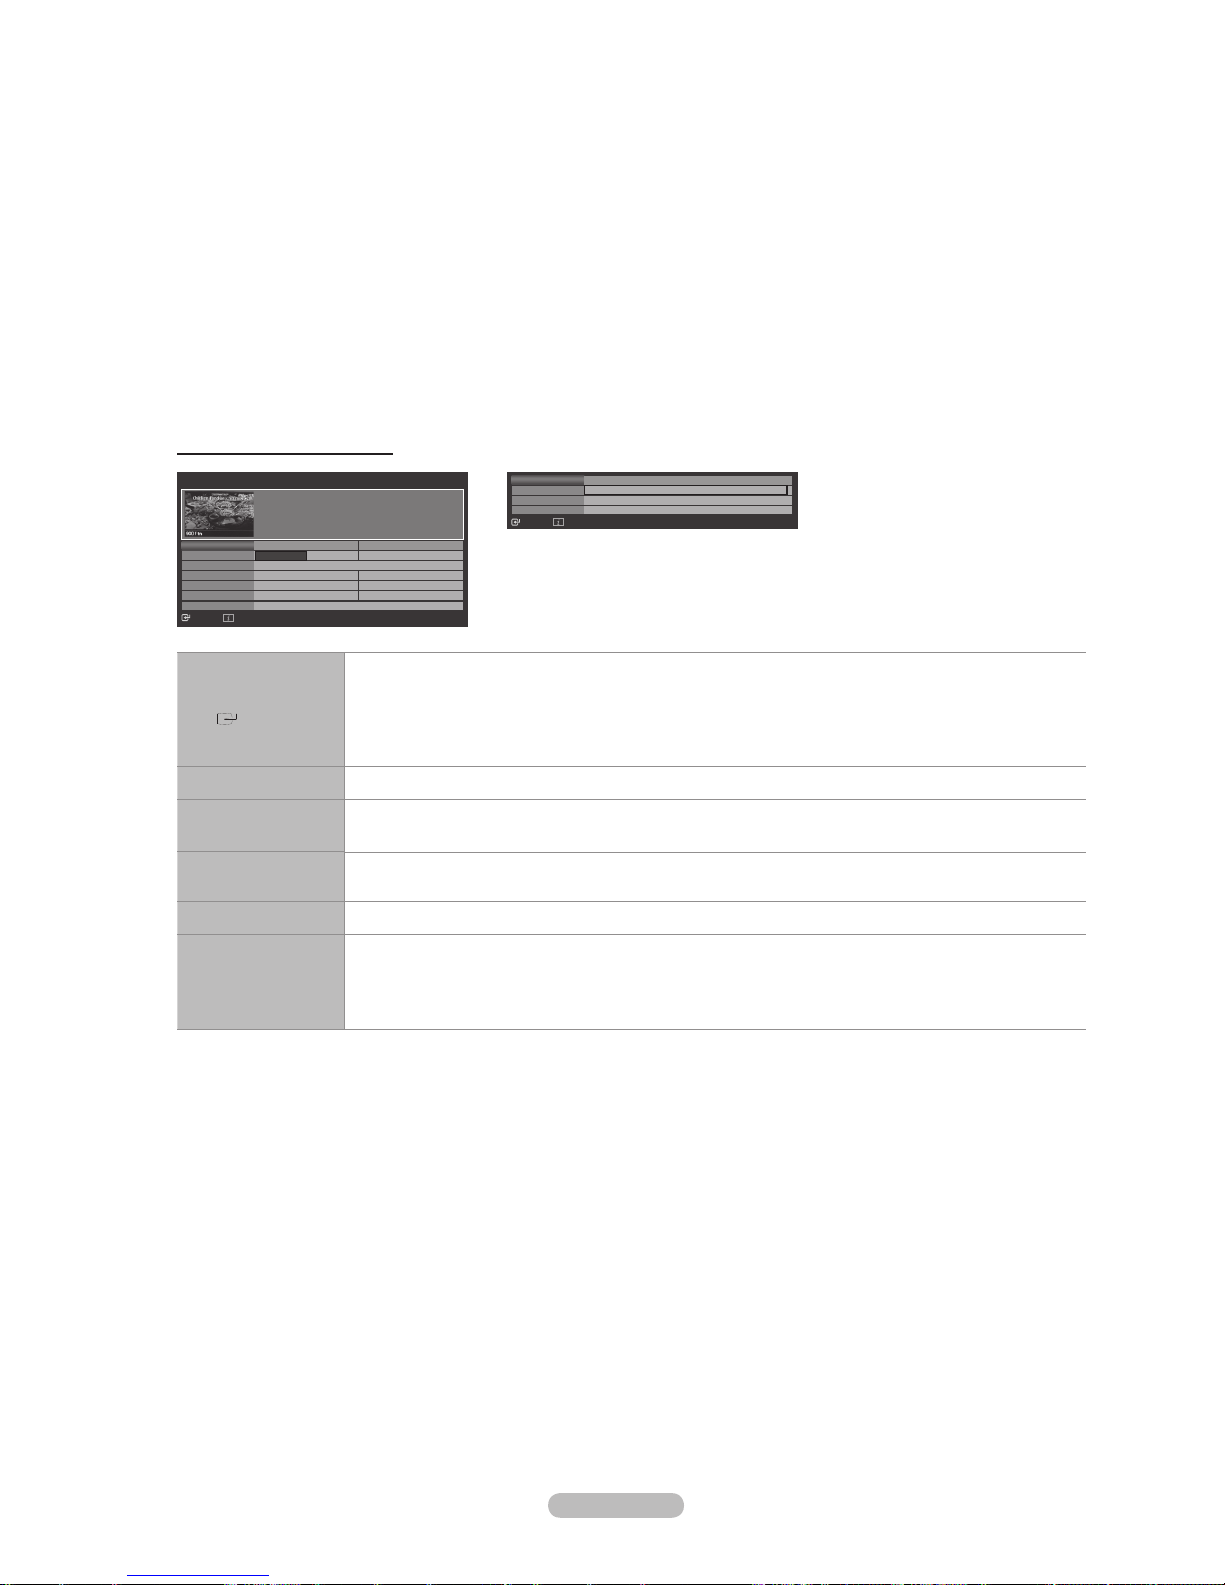
Svenska - 14
Fininst.
Om mottagningen är tydlig behöver du inte ninställa kanalen. Detta görs automatiskt vid sökning och lagring. Om signalen är
svag eller förvrängd kan du behöva ninställa kanalen manuellt.
Fininställda kanaler som har sparats markeras med en asterisk * till höger om kanalnumret i kanallisten.
Om du vill återställa ninställningen väljer du Återställ genom att trycka på knappen ▲ eller ▼ och sedan trycka på
ENTER
E
.
Bara analoga TV-kanaler kan ninställas.
Signalinformation
Du kan få information om signalstatusen.
Om signalstatusen är dålig visas meddelandet Svag eller ingen signal.
Vid visning av en digital kanal kan den här funktionen väljas.
Teknisk information för signalstatus visas
- Frekvens / Service ID / Multiplex / Network / Bitfelsnivå / Signalstyrka
Använda Hel / Miniguide
▲/▼/◄/►,
(ENTER)
Välj önskat program genom att trycka på knappen ▲/▼/◄/►.
Om nästa program valts schemaläggs det med en klockikon. Om knappen ENTER trycks in igen
trycker du på knappen ▲/▼/◄/► för att välja Avbryt scheman. Schemaläggningen avbryts och
klockikonen försvinner.
För information om schemaläggning av program, se nästa sida.
RÖD Växla mellan Miniguide och Hel guide.
GRÖN
Hel guide: Bläddra snabbt bakåt (24 timmar).
Miniguide: Visar nästa sida snabbt.
GUL
Hel guide: Bläddra snabbt framåt (24 timmar).
Miniguide: Visar föregående sida snabbt.
BLÅ Avsluta guiden.
INFO
INFO-knappen för detaljerad information. Bland informationen visas kanalnummer, programlängd,
statusfält, föräldraklassicering, information om bildkvalitet (HD/SD), ljudlägen, undertext eller text-
tv, språk för undertexten eller text-tv och en kortfattad sammanfattning av det valda programmet.
“…” visas om sammanfattningen är lång.
❑
N
N
N
❑
N
N
N
Miniguide
DTV Cable 900 f tn
Street Hypnosis
Booze Britain
2:00
2:30
5:00
▼
Freshmen On Campus
Titta
Information
Hel guide Nästa sida Avsluta
Hel guide
DTV Cable 900 f tn 2:10 Tue 1 Jun
Freshmen On Campus
2:00 - 2:30
No Detailed Information
Today
2:00 - 3:00
3:00 - 4:00
Mint Extra
Loaded
Fresh 40 with Dynamite MC
The Distillery
Smash Hits! Sunday
900 f tn
901 ITV Play
902 Kerrang!
903 Kiss
903 oneword
903 Smash Hits!
▼
Street Hypn..
Kisstory
No Information
No Information
No Information
Freshmen O..
Titta
Information
Miniguide +24 Timmar Avsluta
Page 87
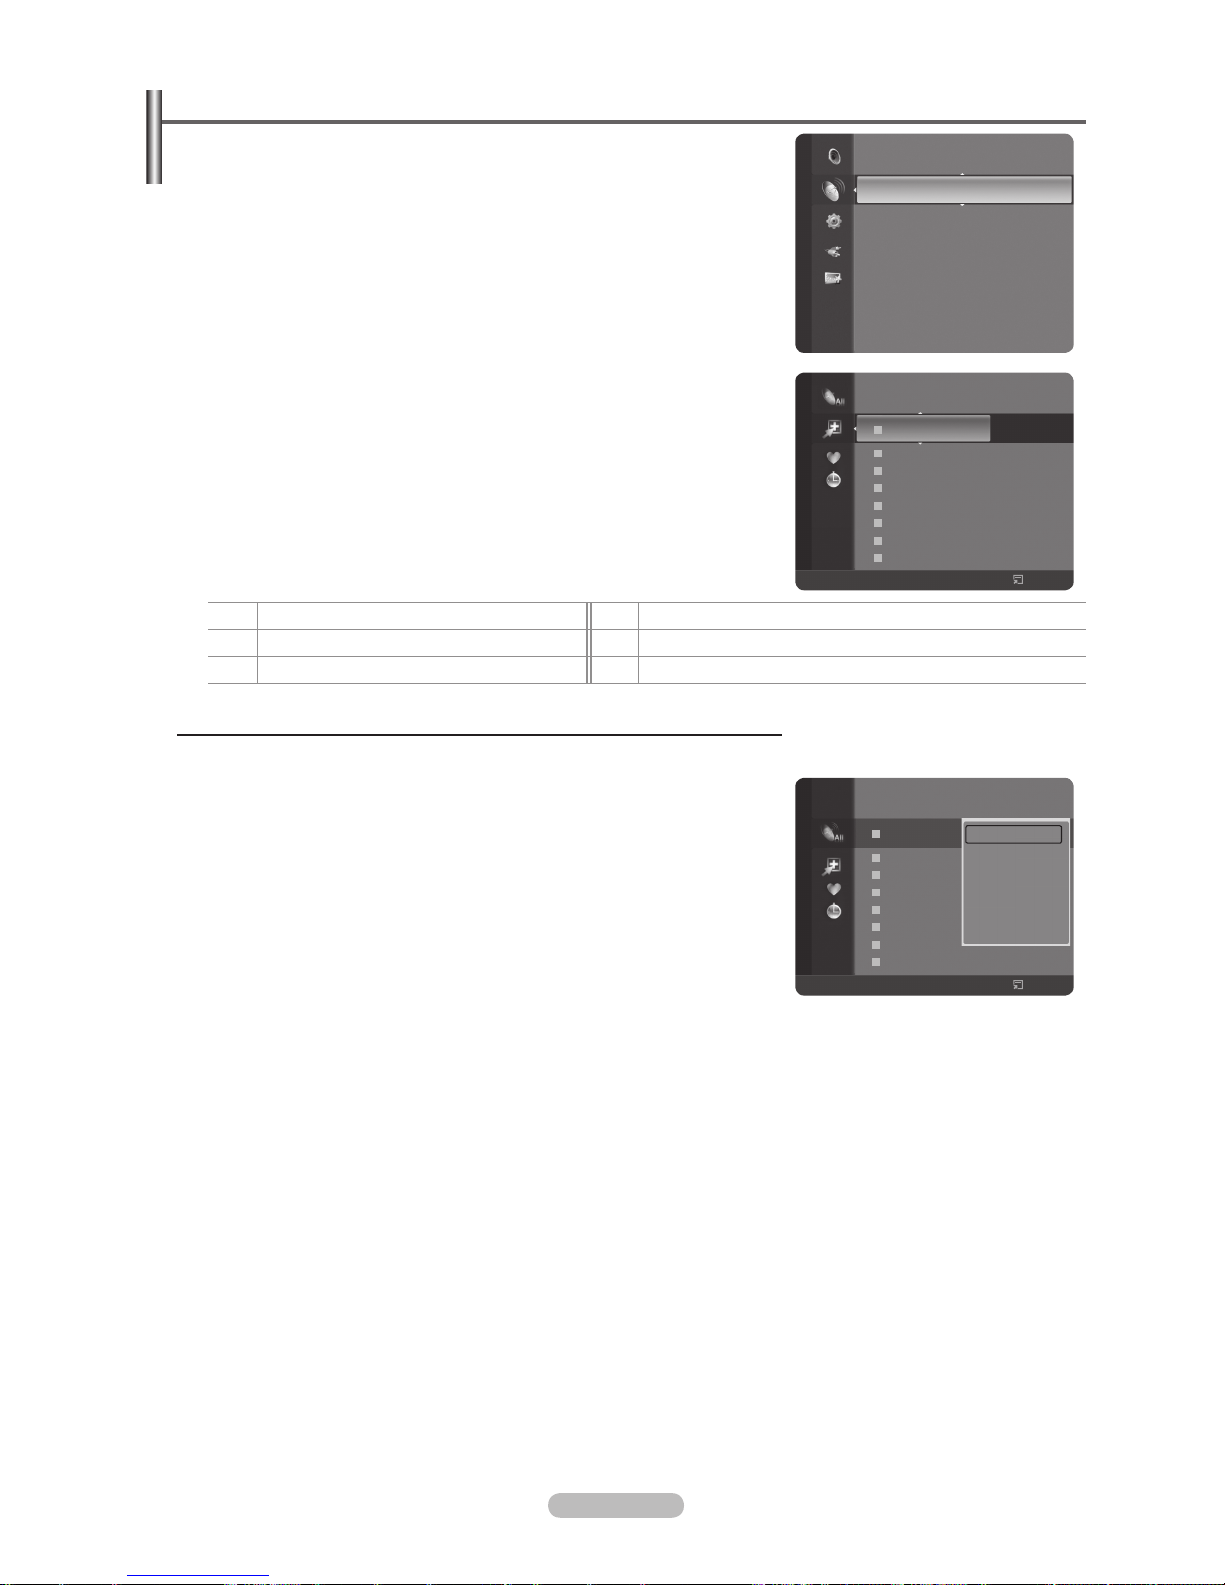
Svenska - 15
Hantera kanaler
Genom att använda den här menyn kan du lägga till, ta bort eller ange
favoritkanaler och använda programguiden för digitala sändningar.
Välj en kanal i skärmvisningen Alla kanaler, Tillagda kanaler, Favorit eller
Programmerad genom att trycka på knapparna ▲ / ▼, tryck sedan på knappen
ENTERE.
Alla kanaler
: Visa alla tillgängliga kanaler.
Tillagda kanaler: Visar alla tillagda kanaler.
Favorit
: Visar alla favoritkanaler.
Programmerad: Visar alla aktuella reserverade program.
Använda färgknappar med kanallistan
Röd (Kanaltyp): Växla mellan din TV, Radio, Data / annat och Alla.
Grön (Zoom): Förstorar eller förminskar ett kanalnummer.
Gul (Välj): Väljer era kanallistor.
TOOLS (Alternativ): Visar Ta bort (or Lägg till), Lägg till i Favorit (eller Ta
bort från Favorit), Lås (eller Lås upp), Timervisning, Redigera kanalnamn,
Sortera, Redigera kanalnummer, Markera alla, Avmarkera alla eller
Autolagra. (Alternativmenyn kan se olika ut beroende på situation.)
Ikoner för kanalstatus
A
En analog kanal.
c
Välj en kanal genom att trycka på den gula knappen.
♥
En kanal ställs in som favorit.
(
Ett program som sänds.
\
En låst kanal.
)
Ett reserverat program.
Alternativmeny för kanallista (i alla kanaler/tillagda kanaler/favoriter)
Tryck på knappen TOOLS för att använda alternativmenyn.
Alternativmenyn kan variera beroende på kanalstatus.
Lägg till / Ta bort
Du kan ta bort eller lägga till en kanal för att visa de kanaler du önskar.
Alla raderade kanaler visas på menyn Alla kanaler.
En gråfärgad kanal indikerar att kanalen har raderats.
Menyn
Lägg till
visas bara för borttagna kanaler.
Du kan också ta bort en kanal till menyn Tillagda kanaler och Favorit på
samma sätt.
Lägg till i Favorit / Ta bort från Favorit
Du kan ange kanaler du tittar mycket på som favoriter.
Symbolen ♥ visas och kanalen ställs in som favorit.
Alla favoritkanaler visas på menyn Favorit.
Lås / Lås upp
Du kan låsa en kanal så att kanalen inte kan väljas och visas. Den här funktionen är bara tillgänglig när Barnlås är inställt på
På. (se sidan 24)
Inmatningsskärmen för PIN-nummer visas. Ange ditt 4-siffriga PIN-nummer.
Standard-PIN för en ny TV är “0-0-0-0”. Du kan ändra PIN, genom att välja Ändra PIN på menyn.
Symbolen \ visas och kanalen låses.
Timervisning
Om du reserverar ett program du vill titta på växlar kanalen automatiskt till den reserverade kanalen i kanallistan; även när du
tittar på en annan kanal. För att reservera ett program ställer du in den aktuella tiden först. (se sidan 27)
Endast lagrade kanaler kan reserveras.
Du kan ställa in kanal, månad, dag, år, timme och minut direkt genom att trycka på sifferknapparna på fjärrkontrollen.
Om du reserverar ett program visas det på menyn Programmerad.
Digital programguide och visningsreservation
När en digital kanal markeras och du trycker på knappen ► visas programguiden för kanalen. Du kan reservera ett
program enligt procedurerna som beskrivs ovan.
N
N
-
-
-
-
N
N
N
N
N
N
N
N
N
N
N
N
N
N
N
N
Kanal
Miniguide
Standardguide : Miniguide
Kanallista
Kanalläge : Tillagda kanaler
Fininst.
Informacije o signalu
824 UKTV Gold
825 UKTV style
A 1 C --
A 2 C
--
A 3 ♥ C
--
A 4 C
--
A 5 C
--
A 6 C
--
A 7 C
--
A 8 C
--
Tillagda kanaler
Alla
Kanaltyp
Zoom Välj
Alternativ
824 UKTV Gold
825 UKTV style
A 1 C --
A 2 C
--
A 3 C
--
A 4 C
--
A 5 C
--
A 6 C
--
A 7 C
--
A 8 C
--
Alla kanaler
Alla
Kanaltyp
Zoom Välj
Alternativ
Ta bort
Lägg till i Favorit
Lås
Timervisning
Redigera kanalnamn
Sortera
▼
Page 88

Svenska - 16
Redigera kanalnamn (endast analog kanal)
Kanaler kan etiketteras så att alla anropsbokstäver visas när kanalen markeras.
Namnen på digitala kanaler tilldelas automatiskt och kan inte etiketteras.
Redigera kanalnummer (endast digital kanal)
Du kan också redigera ett kanalnummer genom att trycka på sifferknapparna på fjärrkontrollen.
Sortera
Med den här funktionen kan du ändra programnumren på lagrade kanaler. Det kan vara nödvändigt när du har använt den
automatiska lagringen.
Den här funktionen är endast tillgänglig för analoga kanaler.
Markera alla / Avmarkera alla
Markera alla
: Du kan markera alla kanalerna i kanallistan.
Avmarkera alla
: Du kan avmarkera alla markerade kanalerna i kanallistan.
Du kan utföra åtgärder som att Lägg till / Ta bort, Lägg till i Favorit / Ta bort från Favorit, eller Lås / Lås upp era kanaler
samtidigt. Välj kanaler och tryck på den gula knappen för att ange alla valda kanaler samtidigt.
Markeringen c visas till vänster om de valda kanalerna.
Du kan bara välja Avmarkera alla när det nns en vald kanal
Autolagra
Ytterligare information om inställningsalternativen nns på sidan 11.
Om en kanal är låst med funktionen Barnlås visas PIN-inmatningsfönstret.
Alternativmeny för kanallista (i Programmerad )
Du kan visa, modiera eller ta bort en reservation.
Tryck på knappen TOOLS för att använda alternativmenyn.
Ändra info: Välj att ändra en visningsreservation.
Avbryt scheman: Välj att avbryta en visningsreservation.
Information: Välj att visa en visningsreservation.
(Du kan också ändra reservationsinformation.)
Markera alla: Välj alla reserverade program.
N
N
•
•
N
N
N
N
N
N
Bildkontroll
Ändra och återställa bildinställningar
Läge
Du kan välja den bildtyp som bäst motsvarar dina krav på TV-tittandet.
Dynamisk: Väljer en mer högupplöst bild för ljus miljö.
Standard: Väljer en optimal bildkvalitet för normal miljö.
Film: Väljer en optimal bildkvalitet för mörk miljö.
Tryck på knappen TOOLS för att visa menyn Verktyg. Du kan också ställa
in bildläge genom att välja Verktyg → Bildläge.
Cellängd / Kontrast / Ljusstyrka / Skärpa / Färg / Ton(G/R)
Denna tv-apparat har ett antal inställningsalternativ för att ange bildkvaliteten:
Cellängd: Ändrar ljusstyrkan på pixlarna. 10 är ljusast.
Kontrast: Justerar bildens kontrastnivå.
Ljusstyrka: Justerar bildens ljusstyrka.
Skärpa: Justerar bildens kantvisning.
Färg: Justerar färgmättnaden i bilden.
❑
T
❑
Programmerad
1 / 1 / 2008
13:59 5 TV1 Quincy, M.E
18:59 2 TV3 The Equalizer
20:59 2 TV3 McMillan & Wife
21:59 2 TV3 M.Spillane’s mike Hammer
Ändra info
Avbryt scheman
Information
Markera alla
Alla
kanaltyp Zoom Välj
Alternativ
Information
Läge : Standard
►
Cellängd : 7
Kontrast : 95
Ljusstyrka : 45
Skärpa : 50
Färg : 50
Ton(G/R) : G50 / R50
Fininställningar
Bild
Page 89

Svenska - 17
Ton(G/R): Justerar färgtonen i bilden.
Väljer ett bildläge som ska justeras först. Justerade värden sparas för varje bildläge.
När du gör ändringar för Cellängd, Kontrast, Ljusstyrka, Skärpa, Färg eller Ton(G/R), justeras OSD-menyn i enlighet
med det.
I lägena för analog TV, Ext., AV, S-Video på PAL-systemet, kan du inte använda funktionen Tint.
I PC-läge kan du bara göra ändringar för Cellängd, Kontrast och Ljusstyrka.
Inställningar kan justeras och lagras för varje extern enhet du har anslutit till en ingång för TV:n.
Energin som förbrukas under användning kan avsevärt minskas om bildens ljusstyrka minskar och detta minskar de totala
driftskostnaderna.
Fininställningar
Samsungs nya TV-apparater gör det möjligt för dig att få ännu exaktare
bildinställningar än på tidigare modeller. Se nedan hur du justerar detaljerade
bildinställningar.
Fininställningar är tillgängligt i lägena Standard och Film.
I PC-läge kan du bara göra ändringar för Dynamisk kontr., Gamma och
Vitbalans bland alternativen för Fininställningar.
Justeringavsvart→Av/Låg/Medium/Hög
Du kan välja svartnivå på skärmen för att justera skärmdjupet.
Dynamisk kontr. → Av / Låg / Medium / Hög
Du kan justera skärmens kontrast så att du får optimal nivå.
Gamma
Du kan justera intensiteten primär färg (röd, grön, blå).
Färgområde
Colour Space är en färgmatrix som består av röda, gröna och blå färger. Välj ditt favoritfärgområde för att uppleva de mest
naturliga färgerna.
Auto: Auto färgområde anpassar automatiskt till naturliga färgtoner baserat på programkällor.
Ursprunglig: Ursprungligt färgområde erbjuder djupa och fylliga färgtoner.
Personlig: Anpassar färgområdet för att passa dina önskemål.
Anpassa Färgområde
Färg→Röd/Grön/Blå/Gul/Cyan/Magenta
Anpassar färgområdet för att passa dina önskemål. Färg är tillgängligt när Färgområde är inställt på
Personlig.
Röd / Grön / Blå: I Färg kan du justera RGB-värdena för vald färg.
Återställ: Återställer färgområdet till standardvärden.
Vitbalans
Du kan justera färgtemperaturen för naturliga färger i bilderna.
R-Offset/G-Offset/B-Offset/R-Gain/G-Gain/B-Gain: Om du ändrar justeringsvärdet uppdateras den modierade skärmen.
Reset: Den tidigare justerade vitbalansen återställs till fabriksstandard.
Hudfärg
Du kan förstärka den rosafärgade ’hudtonen’ i bilden.
Om du ändrar justeringsvärdet uppdateras den modierade skärmen.
Kantförbättring → Av / På
Du kan förstärka motivets gränser i bilden.
xvYCC→Av / På
Genom att ställa in läget xvYCC till På blir bilden med detaljerad och färgområdet ökar vid visning av lmer på en extern enhet
(exempelvis DVD-spelare).
xvYCC
är tillgängligt när bildläget är inställt på Film och den externa ingången är inställd på HDMI eller Component.
Om funktionen
xvYCC
är aktiv går det inte att välja PIP.
Bildalternativ
I PC-läget kan du bara göra ändringar för Färgton, Storlek och
Inbränningsskydd bland alternativen i Bildalternativ.
Färgton→Sval2 / Sval1 / Normal / Varm1 / Varm2
Du kan välja den färgton som känns bekvämast.
De justerade värdena lagras enligt det valda läget för Bild.
Varm1
och
Varm2
är bara aktiverade när bildläget är Film.
N
N
N
N
N
N
❑
N
N
•
•
•
N
-
-
-
-
•
•
N
N
N
N
❑
N
N
N
Färg : 50
Ton (G / R) : G50 / R50
Fininställningar ►
Bildalternativ
Bildåterställning
Bild
Ton (G / R) : G50 / R50
Fininställningar
Bildalternativ ►
Bildåterställning
Bild
Page 90

Svenska - 18
Storlek
Du kan välja det bildformat som stämmer bäst överens med dina krav.
Tryck på knappen TOOLS för att visa menyn Verktyg.
Du kan också ställa in storlek genom att välja Verktyg→Bildstorlek.
Auto Wide: Justerar automatiskt bildstorleken till formatet 16:9.
16:9
: Justerar bildstorleken till 16:9 som är riktigt för DVD eller bredbildssändningar.
Bredzoom: Förstora bilden mer än 4:3.
Zoom: Förstorar 16:9-bredbilden (i vertikal riktning) för att passa skärmstorleken.
4:3: Detta är standardinställningen för en videolm eller normal sändning.
Skanna: Använd den här funktionen när du vill se hela bilden utan att den blir beskuren när signalingången är HDMI
(720p/1080i/1080p) eller Component (1080i/1080p).
Alternativen för bildstorleken kan variera beroende på storleken på källan för indata.
De tillgängliga alternativen kan variera beroende på valt läge.
I PC-läge kan bara lägena 16:9 och 4:3 justeras.
Inställningar kan justeras och lagras för varje extern enhet du har anslutit till en ingång för TV:n.
Bilden kan tillfälligt ligga kvar om du visar en statisk bild på enheten i mer än två timmar.
Bredzoom: Tryck på knappen ► för att välja Position och tryck sedan på knappen ENTER
E
. Använd knapparna
▲ eller ▼ för att ytta bilden upp eller ner. Tryck på knappen ENTER
E
.
Zoom: Tryck på knappen ► för att välja Position och tryck sedan på knappen ENTER
E
. Använd knapparna ▲ eller
▼ för att ytta bilden upp eller ner. Tryck på knappen ENTER
E
. Tryck på knappen ► för att välja
Storlek
och tryck
sedan på knappen ENTER
E
. När du gjort valet använder du knapparna ▲ eller ▼ för att förstora eller förminska
bildstorleken vertikalt. Tryck på knappen ENTER
E
.
Efter val av Skanna i läget HDMI (1080i/1080p) eller Component (1080i/1080p): Välj Position genom att trycka på
knappen ◄ eller ►. Använd knappen ▲, ▼, ◄ eller ► för att ytta bilden.
Reset: Tryck på knappen ◄ eller ► för att välja Återställ och tryck sedan på knappen ENTER
E
. Du kan initiera
inställningen.
Om du använder Skanna med ingången HDMI 720p kommer en (1) rad att beskäras överst, underst, till vänster och till
höger som i överskanningsfunktionen.
När det dubbla läget ( , ) har ställts in för PIP, går det inte att ange bildstorlek.
Skärmläge→16:9 / Bredzoom / Zoom / 4:3
Vid inställning av bildstorleken till Auto Wide i läget 16:9, kan du avgöra bildstorleken du vill visa för bilden 4:3 WSS (Wide
Screen Service) eller ingenting. Varje separat land i Europa kräver olika bildstorlek så den här funktionen är avsedd för
användare som väljer den.
16:9
: Ställer in bilden i läget 16:9.
Bredzoom
: Förstora bilden mer än 4:3.
Zoom: Förstorar bilden lodrätt på bildskärmen.
4:3: Ställer in bilden i läge 4:3 normal.
Funktionen är tillgänglig i läget Auto Wide .
Funktionen är inte tillgänglig i läget PC, Component och HDMI.
Brusreducer.→Av / Låg / Medium / Hög / Auto
Om sändningssignalen som din TV tar emot är för svag kan du aktivera digital brusreducering för att bidra till att minska
statiska bilder och spökbilder som kan visas på skärmen.
När signalen är svag väljer du ett av alternativen tills den bästa bilden visas.
DNIe→Av / Demo / Låg
Den här TV:n är försedd med en DNIe-funktion så att du kan få högre bildkvalitet. Om du aktiverar DNIe kan du visa bilden
med DNIe-funktionen aktiverad. Om du ställer in DNIe på Demo, kan du visa en DNIe-bild och en normal bild på skärmen i
förhandsvisningssyfte. Använd den här funktionen om du vill se skillnaden när det gäller bildkvalitet.
DNIe™ (Digital Natural Image engine)
DNIe™
Denna funktion ger dig mer detaljerade bilder med 3D brusreducering, förbättring av detaljer, kontrast och vithet. Ny algoritm
för bildkompensation ger dig en skarpare, klarare och mer detaljerad bild. DNIe™-tekniken anpassar alla signaler efter din
syn.
Funktionen är inte tillgänglig i lägena Film och Standard.
HDMIsvart→Normal / Låg
Du kan direkt ange justering av svart på skärmen för att justera skärmdjupet.
Den här funktionen är endast aktiv när den externa ingången ansluter till HDMI (RGB-signalerna).
T
•
•
•
•
•
•
N
N
N
N
N
N
N
N
N
N
N
•
•
•
•
N
N
N
N
N
N
Page 91

Svenska - 19
Verklig100HzDemo→Av/På
Det blir en klar skillnad mellan Verklig 100Hz och 50Hz, speciellt vid sportevenemang. Det är ingen skillnad mellan Verklig
100Hz och 50Hz när du pausar eller visar en stillbild. Demo 100Hz fungerar endast med 50Hz-signal. Demoläget för verklig
100Hz erbjuds för butiksdemonstration med specialbilder.
Filmplus→Av/Låg/Medium/Hög/Demo
Du kan visa naturligare hudton och klarare text, även i snabbt rörliga scener.
Använd den här funktionen när du tittar på filmer.
Den här funktionen är inte tillgänglig i läget Bredzoom och Zoom.
Den här funktionen är inte tillgänglig när BIB är inställt på På.
Stöds ej i läge HDMI 1080p/24Hz, 25Hz, 30Hz.
Blåttläge→Av / Låg
Den här funktionen är för AV-enhetsmätningsexperter. Den här funktionen visar blå signal endast genom att avlägsna röda och
gröna signaler från videosignalen, för att erbjuda en blå ltereffekt som används för att justera färg och ton för videoutrustning,
såsom DVD-spelare, hemmabio etc. Genom att använda den här funktionen kan du justera färg och ton för önskade värden
som är lämpliga för signalnivån för varje videoenhet vid användning med röda/gröna/blå/cyan/magenta/gula färgmönster, utan
att använda ett extra blått lter.
Blått läge
är tillgängligt när bildläget är inställt på Film eller Standard.
Inbränningsskydd
För att minska risken för bildskärmsinbränning är den här enheten utrustad med teknik för inbränningsskydd. Den här
tekniken gör att du kan ställa in bildrörelsen upp/ned (vertikala linjer) och sida/sida (horisontala punkter). Tidsinställningen gör så att du kan programmera tiden mellan bildens rörelser i minuter.
Pixelskiftning: Med den här funktionen kan du flytta pixlarna minutvis på bildskärmen horisontellt eller vertikalt för att
minimera antalet rester av bilden som blir kvar på skärmen.
Ställ in Pixelskiftning som On genom att trycka på knappen ▲ eller ▼ och tryck sedan på knappen ENTER.
Välj önskat alternativ genom att trycka på knappen ▲ eller ▼ och tryck sedan på knappen ENTER.
Tillgängliga alternativ: Vågrät punkt, Vertikal linje, Tid.
Optimala villkor för pixelskiftning;
PC TV/Ext/AV/Component/HDMI
Vågrät punkt 4 4
Vertikal linje 4 4
Tid (minut) 4 2 min
Värdet för Pixel Shift kan variera beroende på skärmens storlek (tum) och läge.
Funktionen är inte tillgänglig i läget Endast skan.
Helvit: Den här funktionen hjälper till att ta bort bilder som har blivit kvar på skärmen genom att ändra pixelfärgen
till vit. Använd den här funktionen när det finns en bild eller en symbol kvar på skärmen, speciellt när du har visat en
stillbild på skärmen under en längre tid.
Rullande: Den här funktionen hjälper till att ta bort bilder som blivit kvar på skärmen genom att flytta alla pixlar på
PDP:n enligt ett mönster. Använd den här funktionen när det finns en bild eller en symbol kvar på skärmen, speciellt
när du har visat en stillbild på skärmen under en längre tid.
Sidofärg: När du tittar på TV med skärmförhållandet 4:3, skyddas skärmen från skada genom att justera vitbalansen
på både vänster och höger sida.
Mörk: När du ställer in skärmförhållandet till 4:3 blir höger och vänster sida mörkare.
Ljus: När du ställer in skärmförhållandet till 4:3 blir höger och vänster sida ljusare.
Bildåterställning→Återställbildläge/Avbryt
Återställer alla bildinställningar till standardvärde.
Välj ett bildläge som ska återställas. Återställningsfunktionen nns för varje bildläge.
N
N
N
N
N
•
N
N
N
N
N
N
•
•
•
-
-
❑
N
Page 92
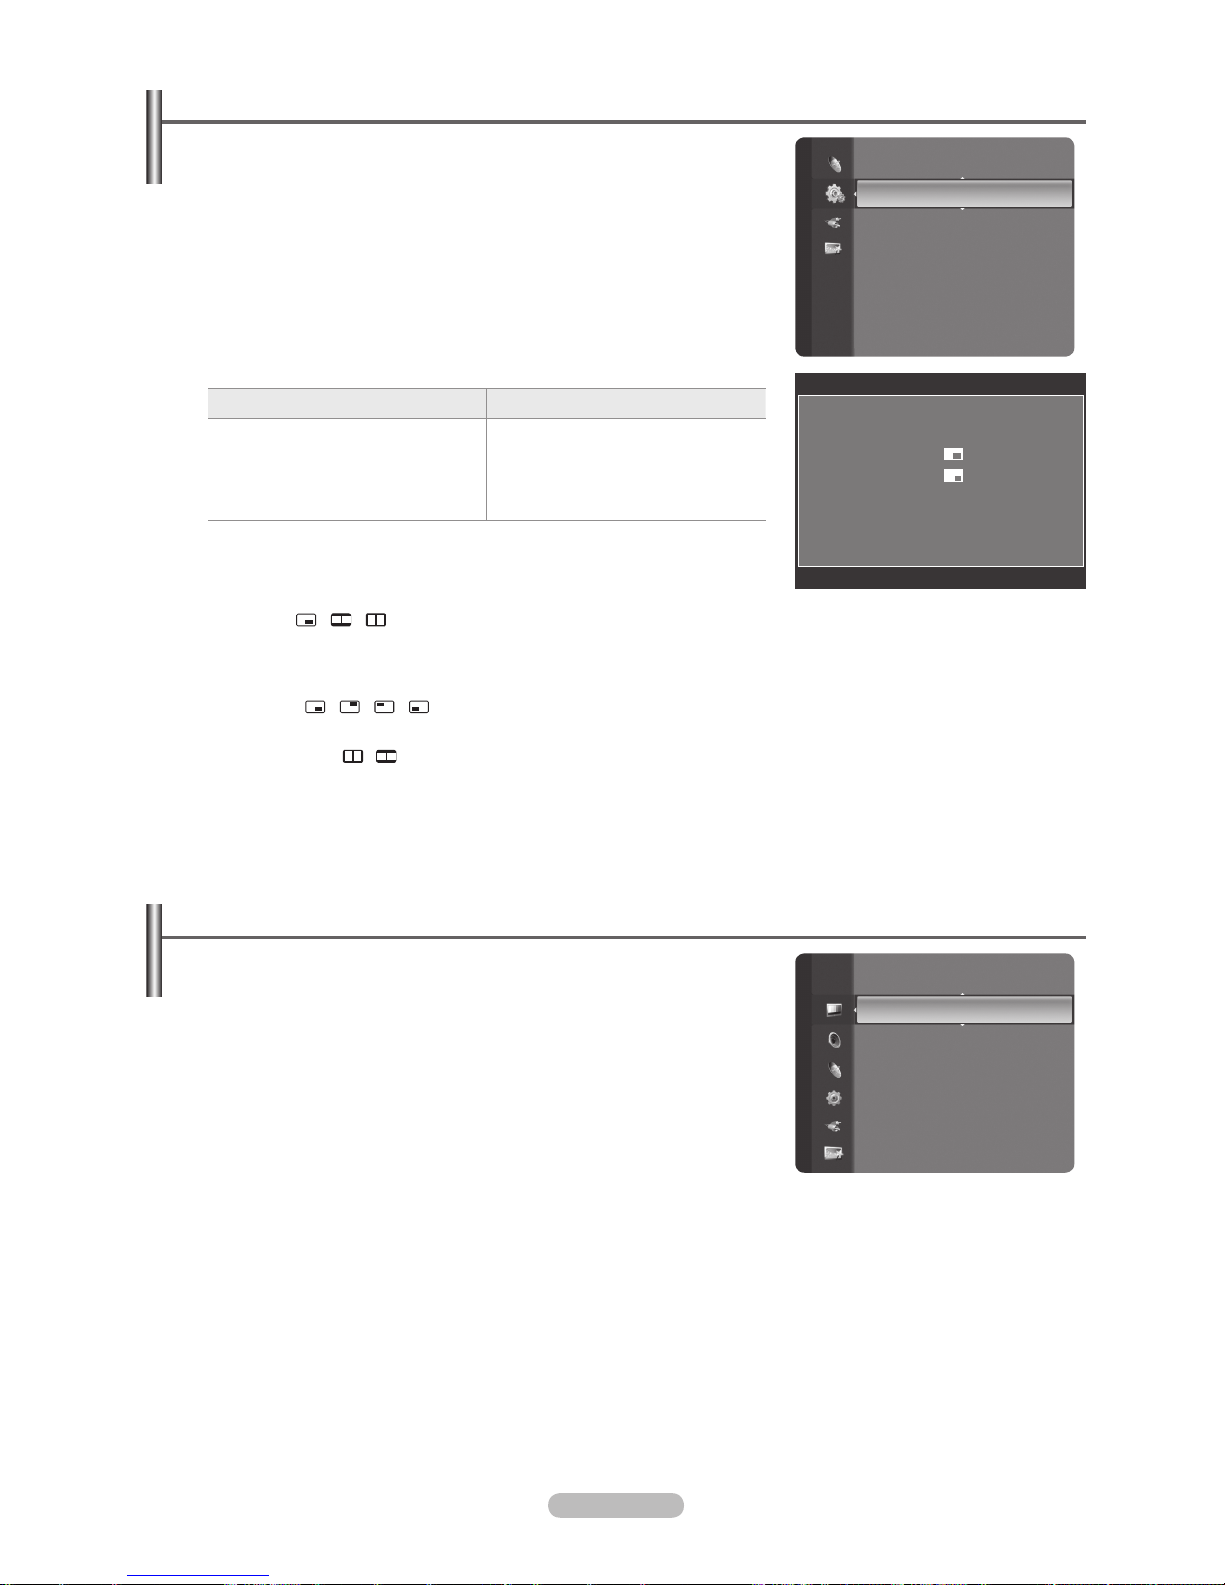
Svenska - 20
isa bild-i-bilden (PIP)
Du kan visa en underbild inne i huvudbilden för ett TV-program eller en videoingång.
På det här sättet kan du titta på en bild från valfri ansluten utrustning samtidigt som
du tittar på huvudbilden.
Du kan märka en viss onaturlighet i underbildsfönstret när du använder
huvudskärmen för att visa ett spel eller karaoke.
Tryck på knappen TOOLS för att visa menyn Verktyg.
Du kan också kongurera PIP-relaterade inställningar genom att välja
Verktyg→BIB.
BIB→Av/På
Du kan aktivera eller avaktivera BIB-funktionen.
Huvudbild Underbild
Component
HDMI 1, HDMI / DVI 2, HDMI 3,
HDMI 4
PC
TV, Ext.1, Ext.2, AV
Källa
Du kan välja en källa för underbilden.
Storlek → / /
Du kan välja storlek för underbilden.
Om huvudbilden är i läget HDMI, är
Storlek
tillgängligt.
Position → / / /
Du kan välja ett läge för underbilden.
I dubbelläget ( , ) kan Position inte väljas.
Kanal
Du kan endast välja kanal för underbilden när Källa är inställt på TV.
Tryck på knappen
TOOLS för att visa menyn Verktyg.
Du kan även ställa in bildläget genom att välja Verktyg→BIB
N
T
❑
N
N
T
Inställning
Underhållning : Av
Energispar : Av
BIB ►
Programuppgradering
Common Interface
BIB
BIB : På
Källa : TV
Storlek :
Position :
Kanal : ATV 11
L
Flytta E Öppna R Tillbaka
Installera TV:n med datorn
Förinställning: Tryck på knappen SOURCE och välj PC-läget.
Autojustering
Med funktionen autojustering kan PC-skärmen ställa in sig automatiskt efter
den ingående PC- videosignalen. Värdena för nt, grovt och position justeras
automatiskt.
Den här funktionen fungerar inte i DVI-HDMI-läge.
Tryck på knappen TOOLS för att visa menyn Verktyg.
Du kan också ställa in autojustering genom att välja
Verktyg → Autojustering.
Skärm
Grov / Fin: Meningen med inställningen av bildkvaliteten är att avlägsna eller reducera bildbrus. Om inte störningen
försvinner vid fininställningen, justera då frekvensinställningen (grov) och gör sedan om fininställningen. När störningen
har reducerats, ställer du in bilden igen så att den är placerad mitt på bildskärmen.
PC Position: Justera Pc:ns skärmläge om den inte stämmer överens med TV-skärmen. Tryck på knappen ▲ eller ▼
för att ställa in önskad vertikal-position. Tryck på knappen ◄ eller ► för att ställa in önskad horisontal-position.
Återställ bild: Alla bildinställningar kan ersättas med fabriksinställningarna.
N
❑
N
T
❑
Ljusstyrka : 45
Skärpa : 50
Autojustering
►
Skärm
Fininställningar
Bildalternativ
Bildåterställning
Bild
Page 93
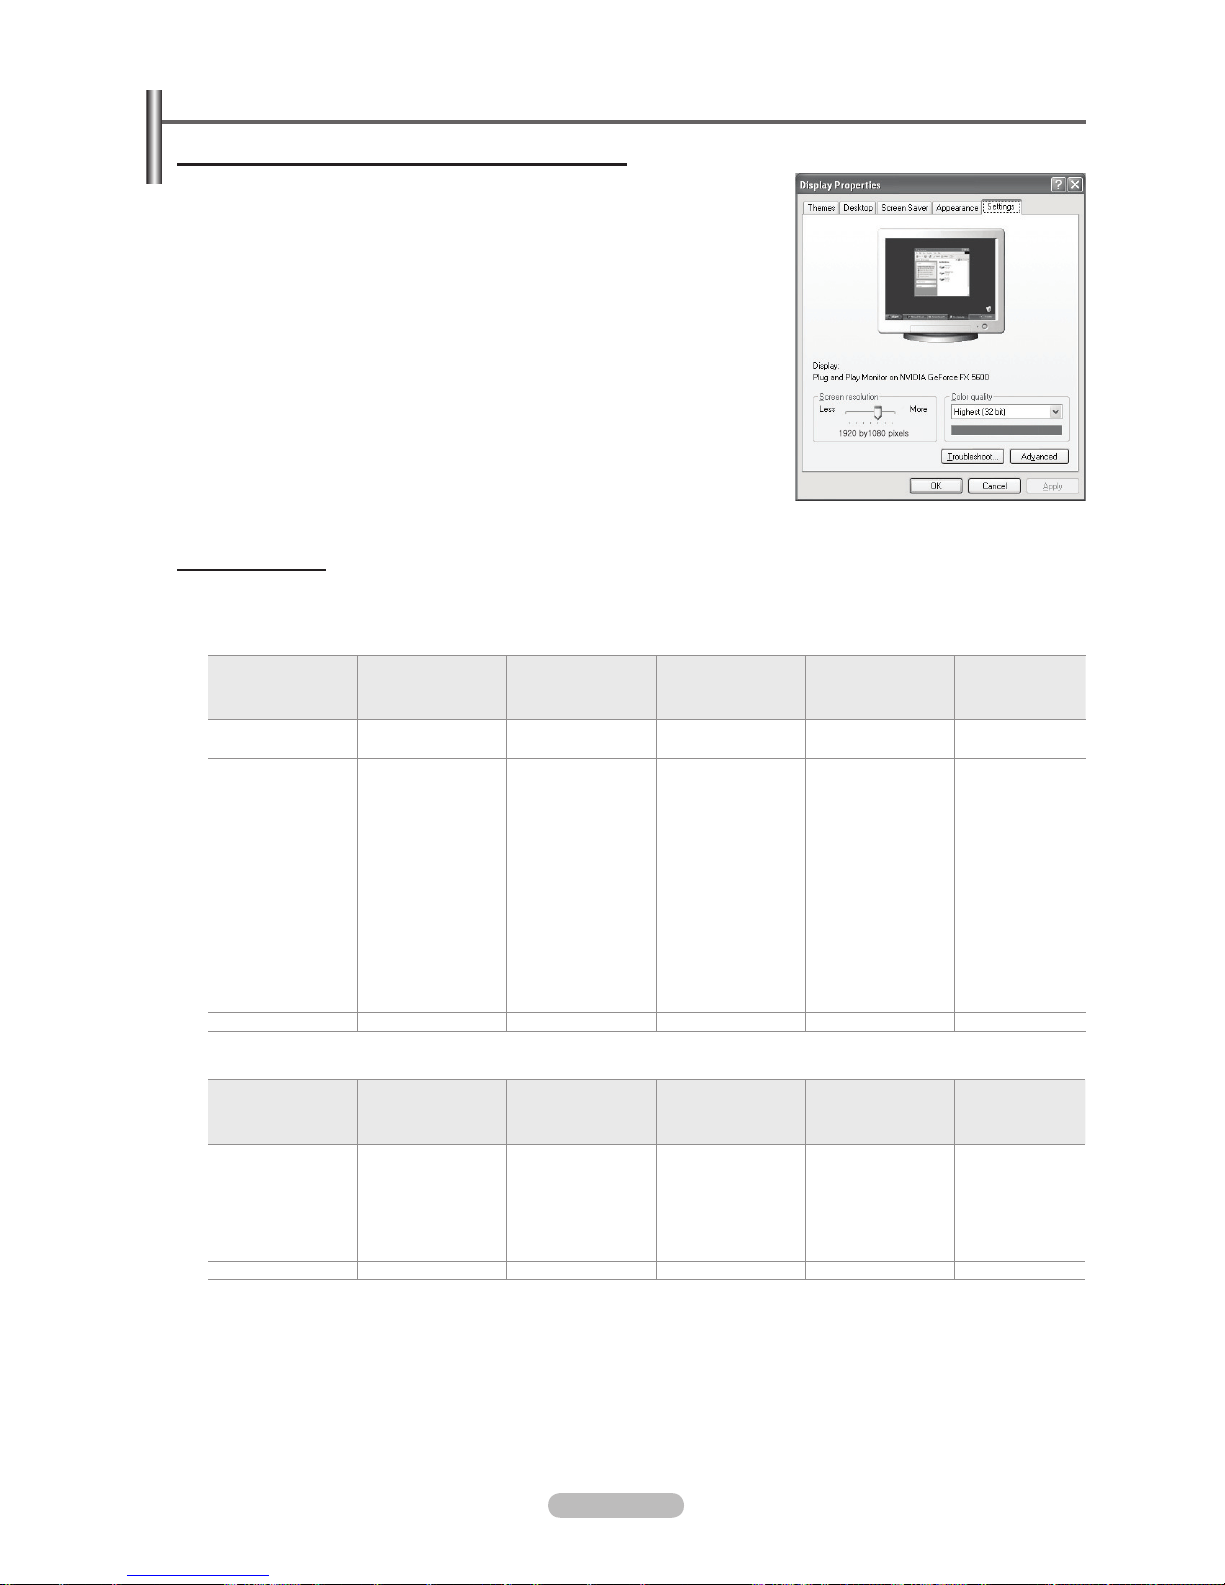
Svenska - 21
Datorskärm
Installera programvaran (baserad på Windows XP)
Windows bildskärmsinställningar för en typisk dator visas nedan. Fönstren som
visas på din dator skiljer sig troligtvis från dessa, beroende på vilken Windowsversion och vilket videokort som du använder. Men även om fönstren ser annorlunda
ut på din dator gäller samma grundläggande information om installationen för nästan
allt. (Om inte kontaktar du din datortillverkare eller din Samsung-återförsäljare.)
1. Klicka först på ‘Kontrollpanelen’ på Windows startmeny.
2. När fönstret för kontrollpanelen visas klickar du på ”Utseende och teman”. En
dialogruta för bildskärmen visas.
3. När fönstret för kontrollpanelen visas klickar du på ”Bildskärm”. En
dialogruta för bildskärmen visas.
4. Gå till fliken ”Inställningar” i bildskärmens dialogruta.
Korrekt storleksinställning (upplösning):
Optimal: 1920 x 1080 pixlar
Om det nns ett alternativ för vertikal frekvens i dialogrutan för
bildskärmsinställningar, är det korrekta värdet “60” eller “60 Hz”. I annat fall
klickar du bara på “OK” och lämnar dialogrutan.
Bildskärmslägen
Både bildskärmsläge och format varierar beroende på vilken datorbildskärm som används och på dess upplösning.
Upplösningen i tabellen rekommenderas.
D-Sub-ingång
Mode Upplösning
Horisontell
Frekvens (kHz)
Vertikal Frekvens
(Hz)
Pixlar,
Klockhastighet
(MHz)
Synkpolaritet
(H/V)
IBM
640 x 350
720 x 400
31.469
31.469
70.086
70.087
25.175
28.322
+ / -
- / +
VESA
640 x 480
640 x 480
640 x 480
800 x 600
800 x 600
800 x 600
1024 x 768
1024 x 768
1024 x 768
1280 x 1024
1280 x 1024
1360 x 768
1600 x 1200
31.469
37.861
37.500
37.879
48.077
46.875
48.363
56.476
60.023
63.981
79.976
47.712
75.000
59.940
72.809
75.000
60.317
72.188
75.000
60.004
70.069
75.029
60.020
75.025
60.015
60.000
25.175
31.500
31.500
40.000
50.000
49.500
65.000
75.000
78.750
108.000
135.000
85.500
162.000
- / -
- / -
- / + / +
+ / +
+ / +
- / -
- / + / +
+ / +
+ / +
+ / +
+ / +
CVT 1920 x 1080RB 66.587 59.934 138.500 + / -
HDMI/DVI-ingång
Mode Upplösning
Horisontell
Frekvens (kHz)
Vertikal Frekvens
(Hz)
Pixlar,
Klockhastighet
(MHz)
Synkpolaritet
(H/V)
VESA
640 x 480
800 x 600
1024 x 768
1280 x 1024
1360 x 768
1600 x 1200
31.469
37.879
48.363
63.981
47.712
75.000
59.940
60.317
60.004
60.020
60.015
60.000
25.175
40.000
65.000
108.000
85.500
162.000
- / + / +
- / + / +
+ / +
+ / +
CEA 1920 x 1080p 67.500 60.000 148.500 + / +
Vid användning av en HDMI-/DVI-kabelanslutning måste du använda uttaget HDMI IN 2.
Läget för radsprång kan inte användas.
Om ett videoformat som inte är standard väljs, kan det hända att enheten inte fungerar som den ska.
Separat läge och Composite-läge stöds. SOG stöds inte.
En VGA-kabel som är för lång eller ger för låg kvalitet kan orsaka brus i bilden i höga upplösningslägen (1920x1080).
N
N
N
N
N
Page 94
Svenska - 22
Ljudstyrning
Ändra ljudstandard
Läge→Standard/Musik/Film/Tal/Personlig
Du kan välja vilken speciell ljudeffekt som ska användas när du ser på ett visst
TV-program.
Tryck på knappen TOOLS för att visa menyn Verktyg.
Du kan också ställa in ljudläge genom att välja Verktyg → Ljudläge.
Equalizer
Du kan ställa in ljudet efter dina egna önskemål.
Läge: Du kan välja ett ljudläge för att passa dina personliga inställningar.
Balans: Kontrollerar balansen mellan höger och vänster högtalare.
100Hz / 300Hz / 1kHz / 3kHz / 10kHz (bandbreddsjustering): Justera nivån för olika bandbreddsfrekvenser
Återställ: Återställer alla equalizerinställningar till standardvärde.
SRSTruSurroundXT→Av/På
TruSurround XT är en patenterad SRS-teknik som gör det möjligt att spela 5.1 erkanalsinnehåll i två högtalare. TruSurround
ger en påtagbar och virtuell ljudupplevelse genom högtalarsystem med två högtalare, inklusive inbyggda TV-högtalare. Det är
helt kompatibelt med samtliga erkanalsformat.
Tryck på knappen TOOLS för att visa menyn Verktyg.
Du kan också ställa in SRS TruSurround XT genom att välja Verktyg → SRS TS XT.
TruSurround XT, SRS och symbolen är varumärken som tillhör SRS Labs, Inc.
TruSurround XT-teknik är införlivad under licensen från SRS Labs, Inc.
❑
T
❑
❑
T
Språk för ljud
Du kan ändra standardinställning för ljudspråk. Visar språkinformation för den inkommande signalen.
Vid visning av en digital kanal kan den här funktionen väljas.
Du kan bara välja språk bland de faktiska språk som sänds.
Ljudformat→MPEG/DolbyDigital
När ljudet sänds ut från både huvudhögtalaren och ljudmottagaren kan det uppstå ett eko på grund av dekoderhastigheten
mellan huvudhögtalare och ljudmottagare. I så fall ska du använda funktionen TV-högtalare.
Vid visning av en digital kanal kan den här funktionen väljas.
Du kan bara välja språk bland de faktiska språk som sänds.
Tillverkas på licens av Dolby Laboratories. Dolby och den dubbla D-symbolen är varumärken
som tillhör Dolby Laboratories.
Ljudbeskrivning
Det här är en hjälpfunktion för ljud som erbjuder ytterligare ett ljudspår för personer med synproblem. Funktionen hanterar
ljudströmmen för Ljudbeskrivning (AD (Audio Description)), när den skickas med Main audio (huvudljud) från avsändaren.
Användare kan slå av eller på Ljudbeskrivning (Audio Description) och kontrollera volymen.
Ljudbeskrivning→
Av / På
: Slår av och på funktionen för ljudbeskrivning.
Volym: Du kan justera volymen för ljudbeskrivningen.
Volym är tillgängligt när
Ljudbeskrivning
är inställt på På.
Vid visning av en digital kanal kan den här funktionen väljas.
❑
N
N
❑
N
N
❑
N
N
Läge : Personlig
►
Equalizer
SRS TruSurround XT : Av
Språk för ljud : ---Ljudformat : ---Ljudbeskrivning
Auto volym : Av
Välj högtalare : TV-högtalare
Ljud
Page 95
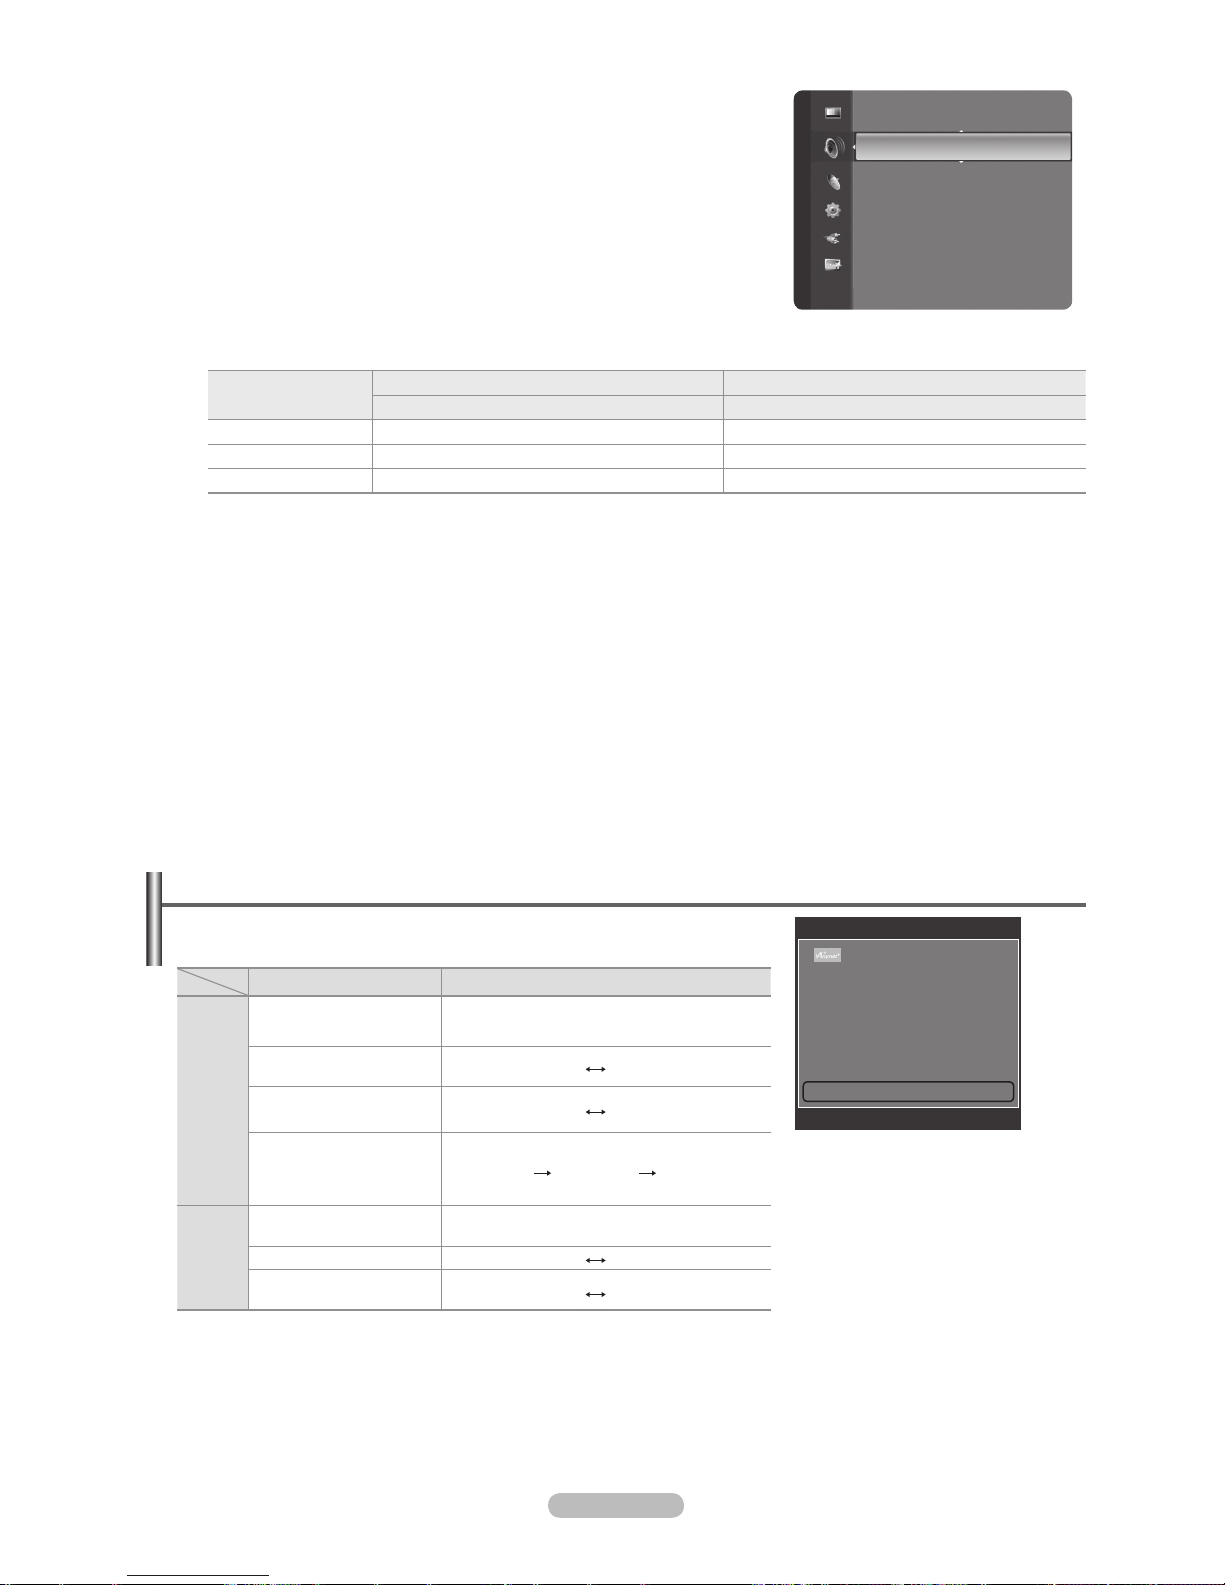
Svenska - 23
Autovolym→Av/På
Varje program har sina egna signalförhållanden, vilket innebär att du måste
ändra volymen varje gång du byter kanal. Med automatisk volyminställning
justeras volymen automatiskt för önskad kanal genom att sänka ljudet när
modulationssignalen är hög eller höja ljudet när modulationssignalen är låg.
Väljhögtalare→Externhögtalare/TV-högtalare
Koppla från den inbyggda förstärkaren om du vill höra ljudet genom separata
högtalare.
Knapparna – = +, MUTE kan ej användas när TV-högtalare är inställt
som Av.
Om du väljer Extern högtalare på menyn Välj högtalare begränsas ljudinställningarna.
TV:ns inbyggda högtalare Ljud ut (optisk, V/H ut) för ljudsystem
TV / Ext./AV/S-Video/Component/PC/HDMI TV / Ext./AV/S-Video/Component/PC/HDMI
TV-högtalare
Högtalarutgång Ljudutgång
Extern högtalare Avstängning Ljudutgång
Ingen videosignal Avstängning Avstängning
Ljudval
När funktionen BIB är aktiverad kan du lyssna på ljudet i den underordnade bilden.
Huvudbild: Används för att lyssna på huvudbildens ljud.
Underbild: Används för att lyssna på den underordnade bildens ljud.
Tryck på knappen TOOLS för att visa menyn Verktyg.
Du kan också ställa in ljudet för underbilden genom att välja Verktyg → BIB → Ljudval.
Ljudåterställning
Återställ alla / Återställ ljudläge / Avbryt: Du kan återställa ljudinställningarna till fabriksstandard.
❑
❑
N
N
❑
T
❑
Välja ljudläge
Du kan ställa in ljudläget på menyn Verktyg. När du ställer in Dubbel I-II visas det
aktuella ljudläget på skärmen.
Sändningstyp
indikation på skärmen
NICAM
Stereo
Vanlig sändning
(Standardljud)
Mono (Normal användning)
Vanlig + NICAM Mono
NICAM
Mono
(Normal)
NICAM Stereo
NICAM
Stereo
Mono
(Normal)
NICAM Dual-I/II
NICAM
Dubbel-1
NICAM
Dubbel-2
Mono
(Normal)
A2
Stereo
Vanlig sändning
(Standardljud)
Mono (Normal användning)
Tvåspråkigt eller DUAL-I/II
Dual I Dual II
Stereo Stereo
Mono
(Tvångsstyrd mono)
Om stereosignalen är svag och automatisk växling förekommer, byter du till mono.
Den här funktionen är bara aktiverad i stereoljudsignal. Den avaktiveras i monoljudsignal.
Funktionen är endast tillgänglig i TV-läge.
N
N
N
Välj högtalare : TV-högtalare
Ljudval : Huvudbild
Ljudåterställning ►
Ljud
Verktyg
Anynet+ (HDMI-CEC)
Bildstorlek : Auto Wide
Bildläge : Standard
Ljudläge : Personlig
Sovtimer : Av
SRS TS XT : Av
Energispar : Av
Dubbel l ll ◄ Mono ►
U
Flytta L Ändra e Avsluta
Page 96

Svenska - 24
Använda inställningsmenyn
Språk
Du kan ange menyspråk.
Barnlås→Av/På
Den här funktionen gör att du kan förhindra obehöriga användare, t.ex. barn,
från att titta på olämpliga program genom att stänga av video och ljud.
Innan inställningsskärmen visas ser du en inmatningsskärm för PINnummer. Ange ditt 4-siffriga PIN-nummer.
Standard-PIN för en ny TV är 0-0-0-0. Du kan ändra PIN, genom att välja
Ändra PIN på menyn.
Du kan låsa vissa kanaler i kanallistan. (läs mer på sidan 16)
Barnlås är bara tillgängligt i TV-läge.
Ändra PIN
Du kan ändra ditt personliga ID-nummer som krävs för att ställa in TV:n.
Innan inställningsskärmen visas ser du en inmatningsskärm för PIN-nummer. Ange ditt 4-siffriga PIN-nummer.
Standard-PIN för en ny TV är 0-0-0-0.
Om du har glömt PIN-koden trycker du på fjärrkontrollens knappar i följande ordning, detta återställer PIN-koden till 0-0-0-
0. POWER (Off), MUTE, 8, 2, 4, POWER (On).
Barnlås→Låsnivå
Den här funktionen gör det möjligt att förhindra att obehöriga användare, t.ex. barn, tittar på olämpliga program med en 4siffrig PIN-kod, som anges av användaren.
Kongurera inställningarna på skärmen Låsnivå.
Innan inställningsskärmen visas ser du en inmatningsskärm för PIN-nummer. Ange ditt 4-siffriga PIN-nummer.
Standard-PIN för en ny TV är 0-0-0-0. Du kan ändra PIN, genom att välja Ändra PIN på menyn.
När du har gjort inställningarna visas symbolen \.
Tillåt alla: Tryck här för att låsa upp alla TV-inställningarna gällande begränsningar.
Spärra alla: Tryck här för att låsa alla TV-inställningarna gällande begränsningar.
Undertext
Du kan aktivera och inaktivera undertexter. Använd den här menyn för att ställa in läge för undertexter. Normal i den här
menyn är vanliga undertexter och Hörselskadad är textning för personer med nedsatt hörsel.
Undertext→
Av / På
: Slår på och av undertexter.
Läge→Normal/Hörselskadad
: Ställer in läge för undertext.
Textningsspråk: Ställer in språk för undertext.
Om programmet du tittar på saknar stöd för funktionen Hörselskadad aktiveras Normal automatiskt även om Hörselskadad
har valts.
Engelska är standard om det valda språket saknas för sändningen.
Du kan välja de här alternativen genom att trycka på knappen SUBT. på fjärrkontrollen.
Text-TV-språk
Du kan ange text-tv-språk genom att välja språktyp.
Engelska är standard om det valda språket saknas för sändningen.
❑
❑
N
N
N
N
❑
N
N
N
❑
-
N
N
N
N
❑
N
N
N
❑
N
Beskrivning av funktioner
Inställning
Plug & Play
Språk : Svenska ►
Tid
Nätverksval : Kabel
Trådlös nätverksinstallation
Kabelnätsinstallation
Barnlås : På
Ändra PIN
Barnlås
Page 97

Svenska - 25
Inställning
Huvudspråk för ljud / Andraspråk för ljud / Huvudspråk för textning / Andraspråk för textning / Huvudspråk för text-tv /
Andraspråk för text-tv
Genom att använda den här funktionen kan användare välja ett av språken. Det valda språket blir standardspråk när
användaren väljer kanal.
Om du ändrar språkinställning, ändras språk för undertext, språk för ljud och språk för text-tv i språkmenyn.
Språk för undertext, för ljud och text-tv visar en lista över de språk som stöds av aktuell kanal och markerar valen. Om du
ändrar den här språkinställningen gäller den endast aktuell kanal. De ändrade inställningarna ändrar inte inställningarna för
Första språk för undertext, Första språk för ljud eller första språk för text-tv i inställningsmenyn.
Ljuseffekt→Av/Standby-lägepå/TV-lägepå/Alltid
Du kan slå på eller av den blå lysdioden på TV:ns framsida, beroende på situation. Använd den för att spara ström eller när
lysdioden stör dina ögon.
Av: Den blå lysdioden är alltid avslagen.
Standby-läge på
: Den blå lysdioden lyser när den är i Standby-läge och den slås av när TV:n slås på.
TV-läge på
: Den blå lysdioden tänds när du tittar på TV och slås av när TV:n stängs av.
Alltid: Den blå lysdioden lyser alltid.
Stäng av ljuseffekten för att minska energiförbrukningen.
Melodi
Av / Låg / Medium / Hög
TV:ns melodiljud kan justeras.
Melodin spelas inte.
När inget ljud sänds ut från TV:n, eftersom MUTE-knappen är intryckt.
När inget ljud sänds ut från TV:n eftersom volymknappen – = har tryckts in.
När TV:n slås av via Sovtimer funktion.
Underhållning
Läget Underhållning gör det möjligt för dig att välja optimalt skärmljud för sport, bio och spel.
Av: Slår av funktionen Underhållning.
Sport: Erbjuder optimal bild- och ljudkvalitet för sport.
Bio: Erbjuder optimal bild- och ljudkvalitet för filmvisning. Du kan njuta av djupare bild och förstärkt ljud.
Spel: Erbjuder optimal bild- och ljudkvalitet för spel. Det här läget accelererar uppspelningshastigheten vid användning
av en extern spelkonsol som är ansluten till TV:n.
Om du ställer in något av de tre lägena för Underhållning till på kommer inställningarna att låsas och kan inte justeras.
Dessutom är inte lägesinställningarna för bild och ljud inte tillåtna. Om du vill göra justeringar av bild- och ljudläget måste läget
för Underhållning slås av.
Inställningarna för Underhållning sparas för varje ingångskälla.
Läget Underhållning är inte aktiverat i läget PC.
Du kan trycka på knappen E.MODE på fjärrkontrollen era gånger för att ändra
inställningen för Underhållning.
❑
❑
N
❑
N
-
-
-
❑
N
N
N
O
Page 98
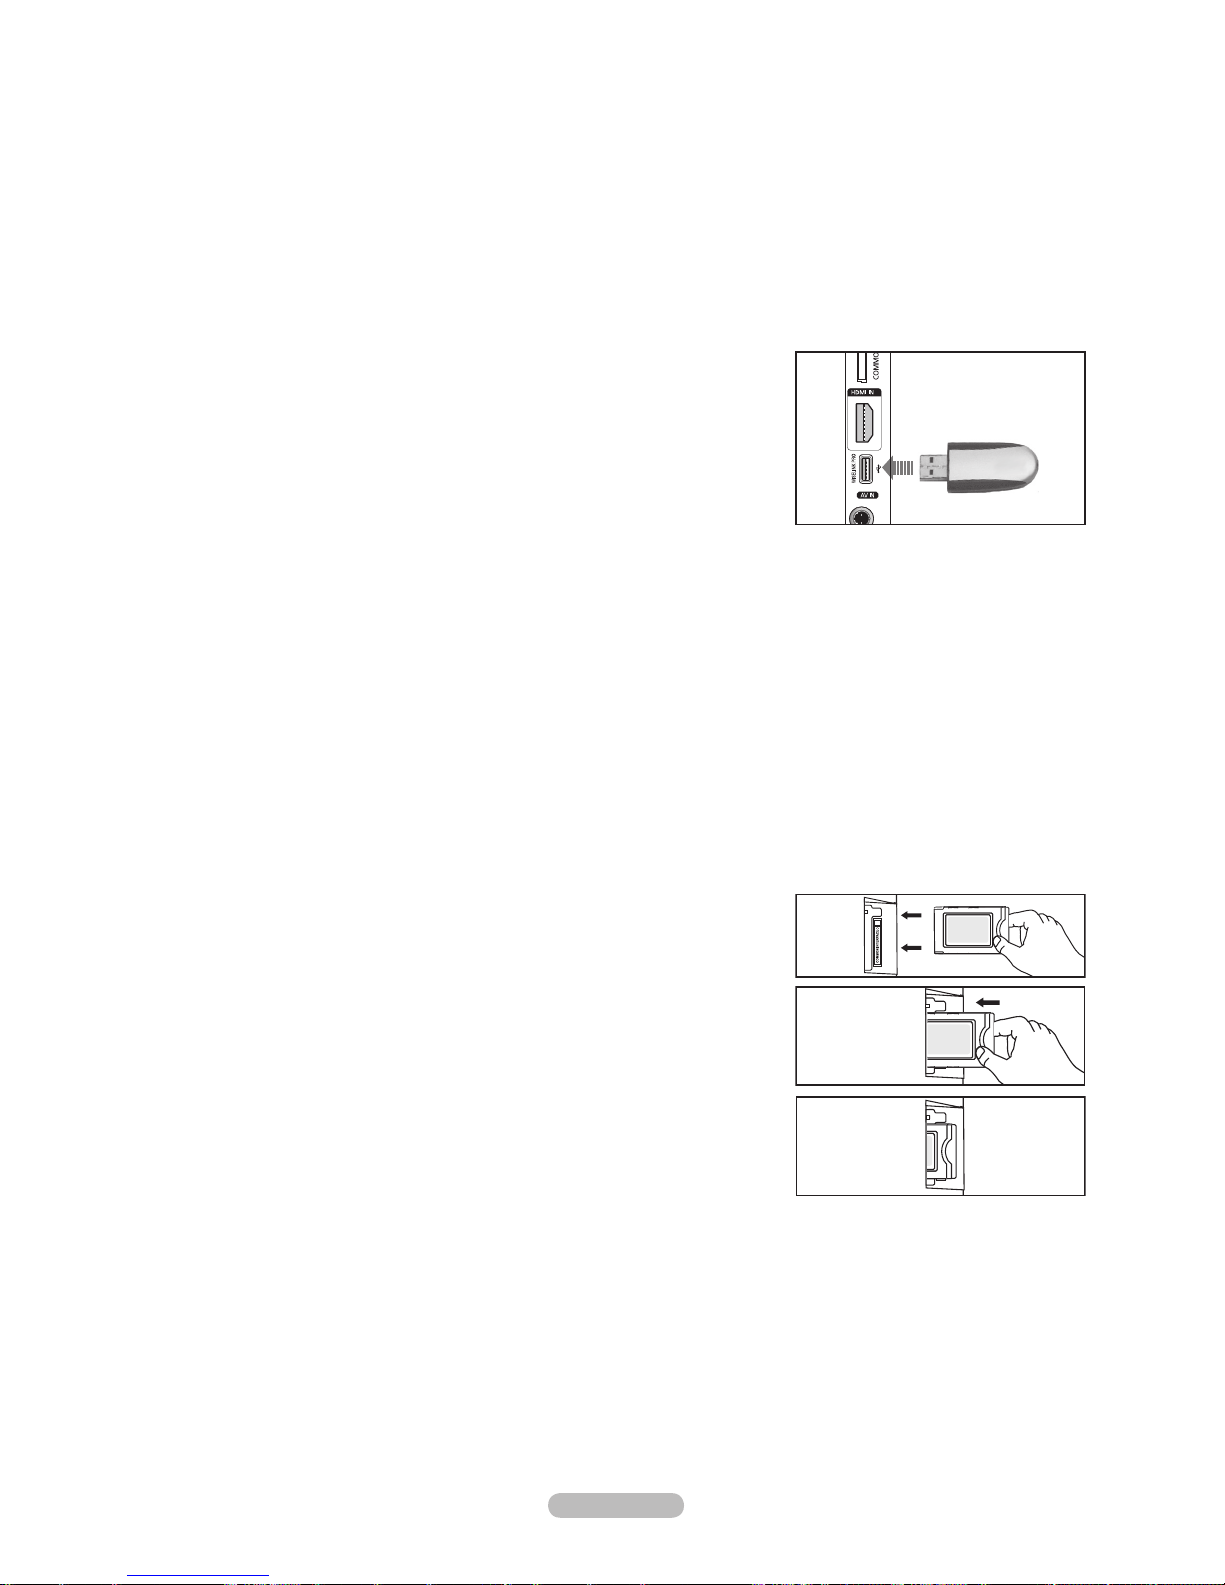
Svenska - 26
Energispar
Den här funktionen används för att justera ljusstyrkan för TV:n för att ge minskad energiförbrukning. När du tittar på TV på
kvällen ställer du in lägesalternativet Energispar till Hög för att minska effekten av trötta ögon samt energiförbrukningen.
Av: Slår av energisparfunktionen.
Låg: Ställer in TV:n på energisparläge.
Medium: Ställer in TV:n på mediumenergisparläge.
Hög: Ställer in TV:n på högt energisparläge.
Tryck på knappen TOOLS för att visa menyn Verktyg.
Du kan också ställa in energisparläge genom att välja Verktyg→Energispar.
Programuppgradering
Uppgraderingar av programvaran sänds regelbundet ut som en del av den
vanliga tv-signalen så att du kan hålla din produkt uppdaterad med nya digitaltv-funktioner. Tv:n känner automatiskt av dessa signaler och visar fältet för
uppdatering av programvara. Du kan välja att installera uppgraderingen.
Via USB
Sätt i en USB-enhet som innehåller rmwareuppgradering i TV:n. Var försiktig
så att du inte kopplar ur strömmen eller plockar bort USB-enheten förrän
uppgraderingarna har verkställts. TV:n slås av och på automatiskt efter att
rmware-uppgraderingen är klar. Kontrollera rmware-versionen efter att
uppgraderingen har slutförts. När programvaran har uppgraderats återgår video- och audioinställningar till fabriksstandard. Vi
rekommenderar att du skriver ned de inställningar du har gjort så att du enkelt kan återställa dem efter uppgraderingen.
Via kanal
Uppgraderar programvaran med sändningssignalen.
Vänteläge uppgradering
För att fortsätta programvaruuppgraderingen med huvudström på väljer du On genom att trycka på ▲ eller ▼. 45 minuter efter
att du har gått in i standbyläge genomförs en manuell uppgradering automatiskt. Eftersom enhetens ström slås på internt, kan
skärmen lysa svagt. Det här fenomenet kan fortsätta i mer än 1 timme, tills uppgraderingen är klar.
Alternativt program
Visa versionsinformation för programvaran.
Common Interface
Installera CI-kort
a. Köp CI CAM-modulen genom att besöka närmsta handlare eller beställ
den via telefon.
b. Sätt in CI-kortet i din CAM i pilens riktning tills det sitter på plats.
c. Sätt in din CAM med det installerade CI-kortet i common interface-plat-
sen.
Sätt in din CAM i pilens riktning, så långt in som möjligt så att den är
parallell med porten.
d. Kontrollera om du kan se bilder på en kodad kanal.
CI Menu
Här kan användaren välja alternativ på CAM-menyn.
Välj CI-menyn från menyn PC Card (pc-kort).
Application Info.
Här nns information om den CAM som sitter i CI-porten.
Applikationsinformationen om insättning rör CI-kortet. Du kan installera en CAM när som helst, oavsett om tv:n är på eller av.
1. Köp CI CAM-modulen genom att besöka närmsta handlare eller beställ den via telefon.
2. Sätt in CI-kortet i din CAM i pilens riktning tills det sitter på plats.
3. Sätt in din CAM med det installerade CI-kortet i ”common interface”-porten. (Sätt in din CAM i pilens riktning, så långt in
som möjligt så att den är parallell med porten.)
4. Kontrollera om du kan se bilder på en kodad kanal.
❑
T
❑
❑
N
4
TV:ns sidopanel
USB-enhet
Page 99

Svenska - 27
Ställa klockan
Klocka
Det är nödvändigt att ställa klockan för att använda olika timerfunktioner på TV:n
Den aktuella tiden visas varje gång du trycker på knappen INFO.
Om du drar ur strömsladden måste du ställa klockan igen.
Klockläge
Du kan ställa in aktuell tid manuellt eller automatiskt.
Auto: Ställ in aktuell tid automatiskt genom att använda tiden från den
digitala sändningen.
Manuellt: Ställ in aktuell tid till en manuellt angiven tid.
Ställ klockan
Du kan ställa den aktuella tiden manuellt.
Ställ in det här alternativet när du har angett Klockläge till Manuellt.
Du kan ställa in månad, dag, år, timme och minut direkt genom att trycka på
sifferknapparna på fjärrkontrollen.
Sovtimer→Av/30min./60min./90min./120min./150min.
/ 180 min.
Timern stänger automatiskt av TV:n efter en förinställd tid (30, 60, 90, 120, 150
och 180 minuter).
TV:n går automatiskt över till viloläget (standby) när timern når 0.
Om du vill avbryta funktionen Sovtimer väljer du Av.
Tryck på knappen TOOLS för att visa menyn Verktyg.
Du kan också ställa in viloläge genom att välja Verktyg → Sovtimer.
Timer 1 / Timer 2 / Timer 3
Tre olika timerinställningar kan göras för på/av.
Påslagningstid:
Välj timme, minut och aktivera/inaktivera.
(För att aktivera timern med önskad inställning, ställ in den på Aktivera.)
Avstängningstid:
Välj timme, minut och aktivera/inaktivera.
(För att aktivera timern med önskad inställning, ställ in den på Aktivera.)
Volym:
Välj önskad ljudnivå.
Innehåll:
När On Timer är aktiverad kan du slå på en speciell kanal eller spela upp innehåll såsom bild- och ljudfiler.
TV / USB: Välj TV eller USB. (Se till att en USB-enhet är ansluten till din TV.)
Antenn: Välj ATV eller DTV.
Kanal: Välj önskad kanal.
Musik: Välj den mapp som innehåller MP3-ler på USB-enheten.
Foto: Välj den mapp som innehåller JPEG-ler på USB-enheten.
Upprepa:
Välj En gång, Alla Dagar, Mån-Fre, Mån-Lör, Lör-Sön eller Manuellt.
När Manuellt har valts trycker du på knappen ► för att välja önskad veckodag. Tryck på knappen ENTER
E
över
önskad dag så visas markeringen c.
Ställ in klockan först!
Du kan ställa in timmar, minuter och kanal direkt genom att trycka på sifferknapparna på fjärrkontrollen.
Autoavstängning
När timern är inställd till On kommer tv:n att stängas av om inga kontroller används under 3 timmar efter det att tv:n slagits
på av timern. Den här funktionen är endast tillgänglig i timerläget “On” och förhindrar överhettning, vilket kan uppstå om
bildskärmen är påslagen för länge.
❑
N
N
•
•
N
N
❑
N
N
T
❑
•
•
•
•
•
N
N
N
N
Inställning
Plug & Play
Språk : English
Tid ►
Nätverksval : Kabel
Trådlös nätverksinstallation
Inställningar för kabelnät
Barnlås : På
Ändra PIN
Barnlås
Undertext
Tid
Klocka : -- : --
►
Sovtimer : Av
Timer 1 : Inaktiverad
Timer 2 : Inaktiverad
Timer 3 : Inaktiverad
U
Flytta E Öppna R Tillbaka
Page 100
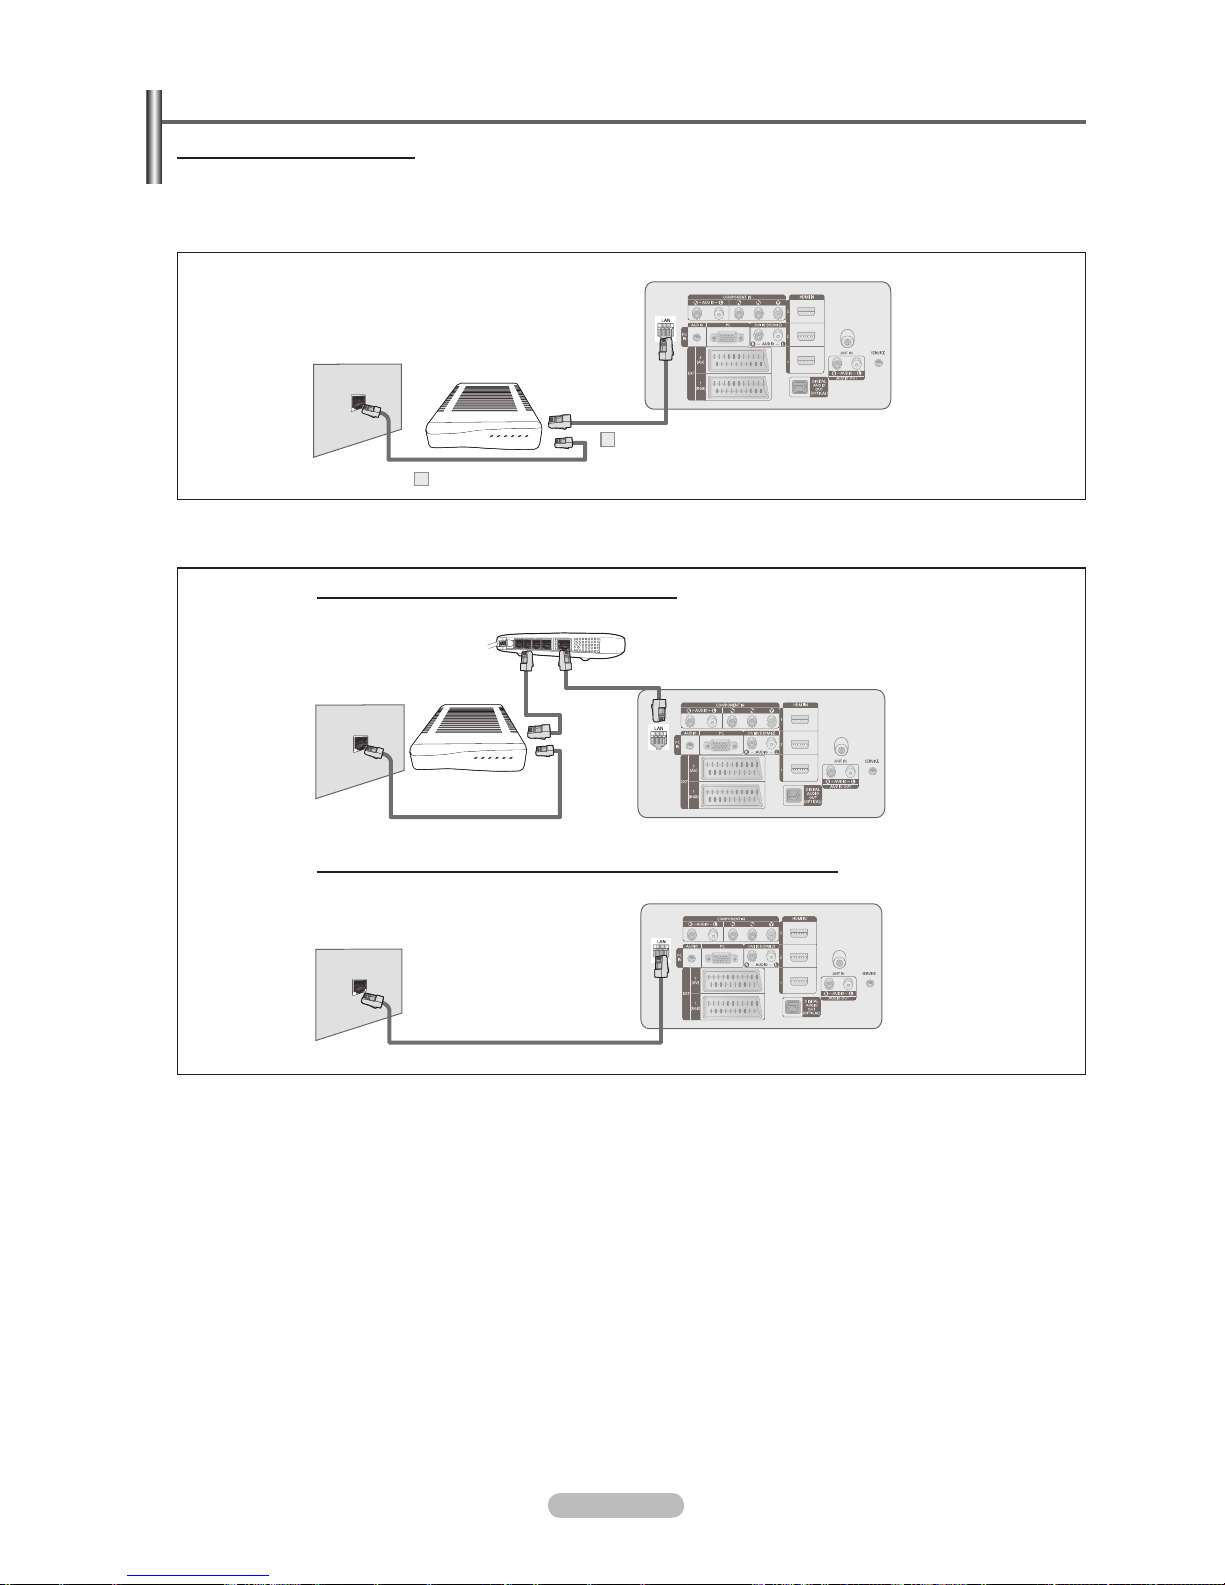
Svenska - 28
Nätverksanslutning
Nätverksanslutning - kabel
Kabelanslutning för DHCP-miljö
Metoderna för att installera nätverket med Dynamic Host Conguration Protocol (DHCP) beskrivs nedan. Eftersom en IP-
adress, nätmask, gateway och DNS automatiskt allokeras när DHCP väljs behöver du inte ange dem manuellt.
1. Anslut porten [LAN] på TV:ns bakre panel till det externa modemet med en nätverkskabel.
2.
Anslut nätverksporten på väggen och det externa modemet med en modemkabel.
Terminalerna (positionen på porten och typen) på den externa enheten kan variera beroende på tillverkare.
Om IP-adressens allokering enligt DHCP-server har misslyckats vrider du av det externa modemet, slår på det igen och efter
minst 10 sekunder och försöker sedan igen.
För anslutningar mellan det externa modemet och routern, se bruksanvisningen för överensstämmande produkt.
Du kan ansluta TV till nätverk direkt utan att ansluta den genom en router.
Du kan inte använda en manuell anslutning av typen ADSL-modem, eftersom den inte stöder DHCP. Du måste använda ett
ADSL-modem av automatisk typ.
N
N
N
N
N
TV-apparatens baksida
Modemport på
väggen
Modemkabel
2
Externt modem
(ADSL/VDSL/kabel-TV)
Nätverkskabel
1
Du kan ansluta nätverksporten och TV:n direkt beroende på nätverksstatus.
TV-apparatens baksida
Nätverkskabel
Nätverksport på
väggen
Du kan ansluta i det trådlösa nätverket via en router.
TV-apparatens baksida
Modemport på
väggen
Externt modem
(ADSL/VDSL/
kabel-TV)
IP-router
Nätverkskabel
Modemkabel
Nätverkskabel
 Loading...