


E-MANUAL
Thank you for purchasing this Samsung product.
To receive more complete service, please register
your product at
www.samsung.com/register
Model______________ Serial No.______________

Contents
Channel Menu
• ConnectingtheTV 1
• UsingtheChannelMenu 12
• MemorisingChannels 42
• OtherFeatures 47
Basic Feature
• ChangingthePresetPictureMode 49
• AdjustingPictureSettings 52
• ChangingthePictureSize 57
• ChangingthePictureOptions 67
• UsingtheTVwithYourPC 87
• ChangingthePresetSoundMode 91
• AdjustingSoundSettings 93
Preference Features
• ConnectingtotheNetwork 103
• SettingupaWiredNetwork 120
• SettinguptheWirelessNetwork 133
• Managingthe
NetworkConnectedDevices 161
• SettingtheTime 173
• BlockingProgrammes 187
• EconomicalSolutions 190
• PictureInPicture(PIP) 195
• UsingtheTVwitha
KeyboardandaMouse 200
• OtherFeatures 209
• SupportMenu 224

Advanced Features
∫
Usingthe3Dfunction 249
•
ℓ
∫
•
Smart Hub 263
∫
•
CustomizingtheHomeScreen 289
∫
•
UsingSamsung Apps 320
ℓ
∫
•
Search 331
ℓ
∫
•
Your Video 339
ℓ
∫
•
Family Story 356
ℓ
∫
•
Fitness 410
ℓ
∫
•
Kids 421
ℓ
∫
•
Web Browser 436
ℓ
∫
•
Skype 466
ℓ
∫
•
AllShare Play 470
• UsingtheAllSharePlay 496
ℓ
∫
•
My list(InAllShare Play) 500
ℓ
∫
•
Videos(InAllShare Play) 513
ℓ
∫
•
Photos(InAllShare Play) 532
ℓ
∫
•
Music(InAllShare Play) 549
• UsingtheDLNAFunction 563
ℓ
∫
•
Anynet+ (HDMI-CEC) 574

Other Information
ℓ
∫
Troubleshooting 591
•
• PictureQuality(Troubleshooting) 592
• SoundQuality(Troubleshooting) 600
• NoPicture/NoVideo(Troubleshooting) 605
• Aerial(Air/Cable)Connection
(Troubleshooting) 609
• PCConnection(Troubleshooting) 612
• NetworkConnection(Troubleshooting) 613
• Others(Troubleshooting) 614
• Anynet+(HDMI-CEC)(Troubleshooting) 627
• AllSharePlay(Troubleshooting) 635
• SmartHub(Troubleshooting) 636
• WebBrowser(Troubleshooting) 638
ℓ
∫
•
SupportedSubtitleand
AllSharePlayfileformats 647
ℓ
•
TeletextFeature 656
ℓ
•
Anti-theftKensingtonLock 662
ℓ
•
Licence 667

Connecting the TV
Connecting to an Antenna
<TV>
or
The displayed image may differ depending on the model.

<TV>
or
The displayed image may differ depending on the model.
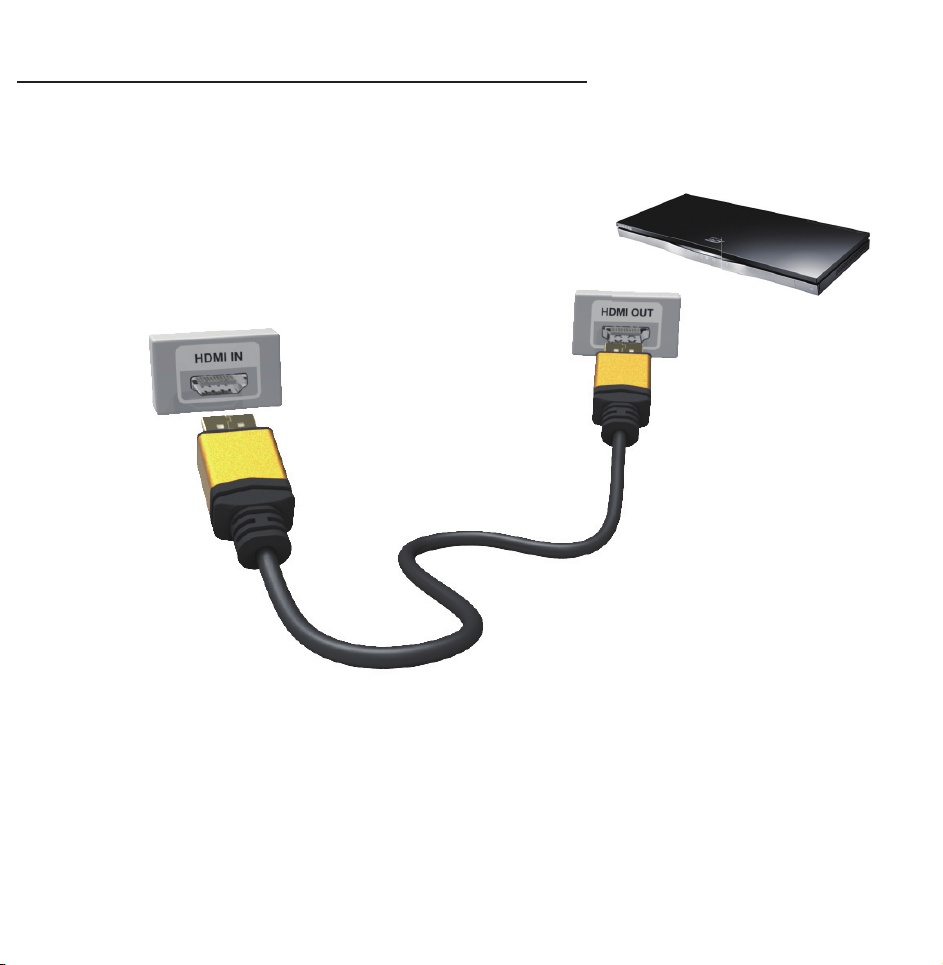
Connecting to an AV Device
Using a HDMI (up to 1080p)
<TV>
The displayed image may differ depending on the model.
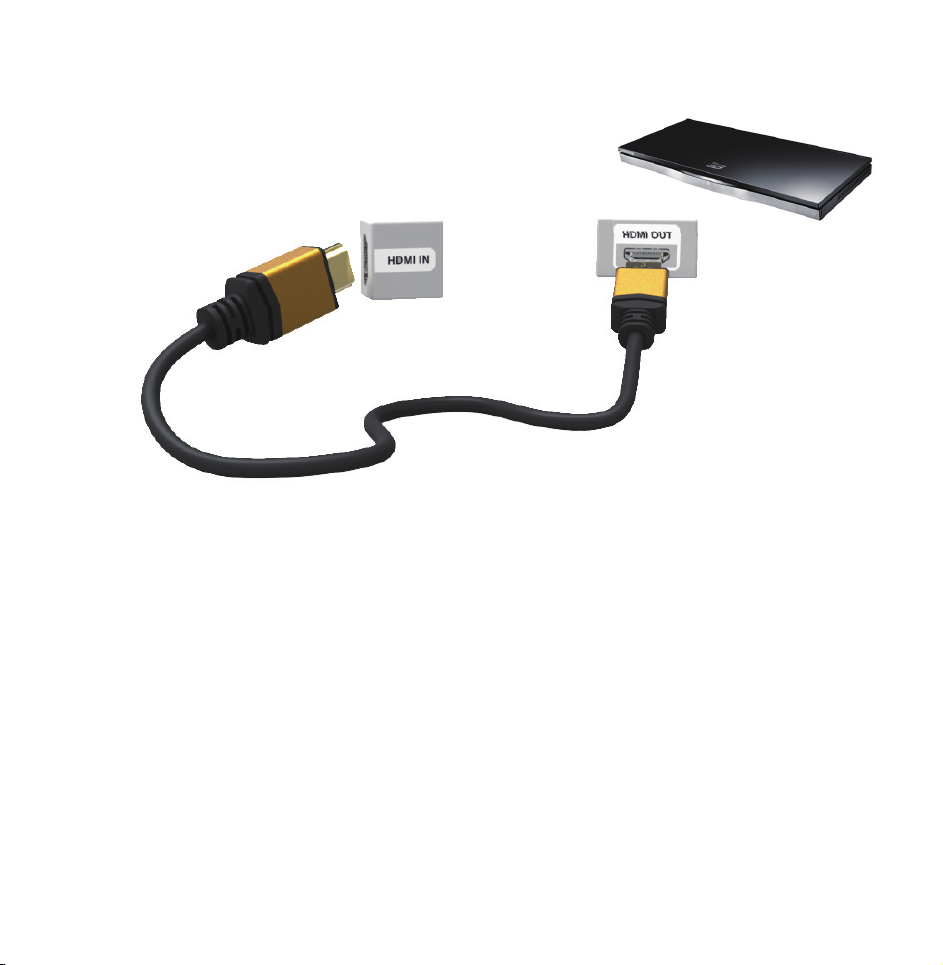
<TV>
The displayed image may differ depending on the model.
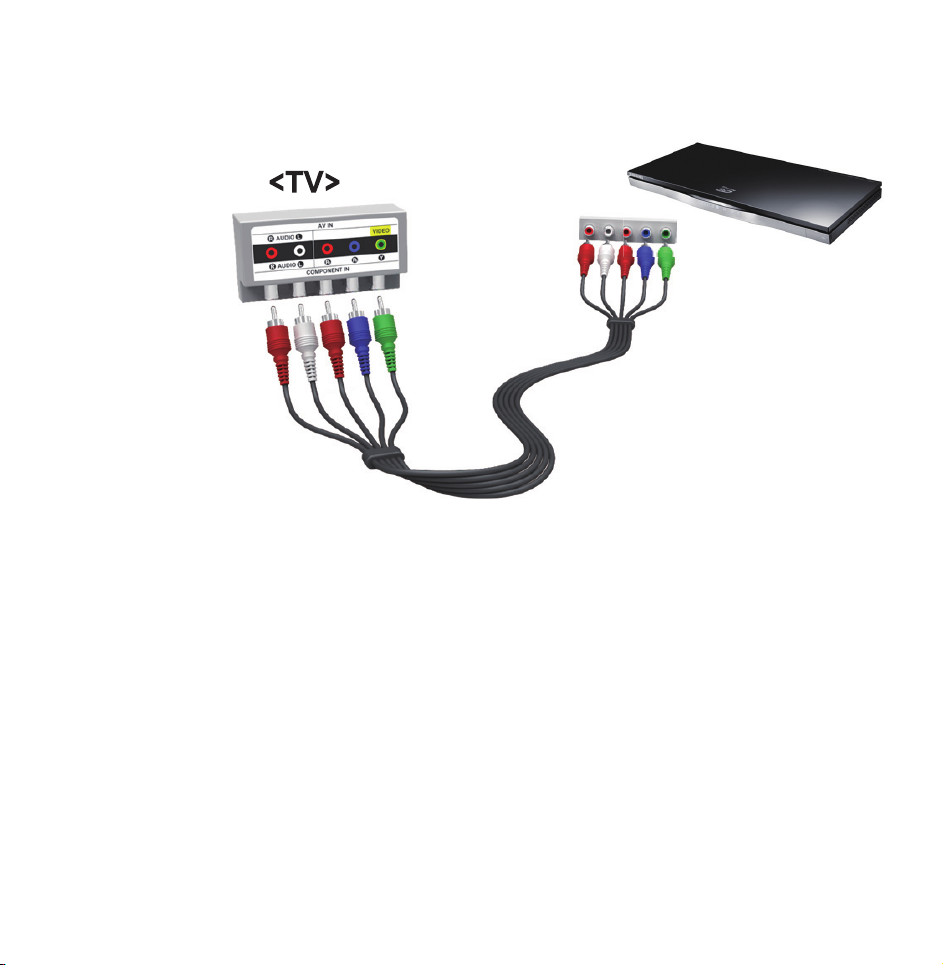
Using a Component (up to 1080p)
<TV>
<TV>
The displayed image may differ depending on the model.

<TV>
The displayed image may differ depending on the model.

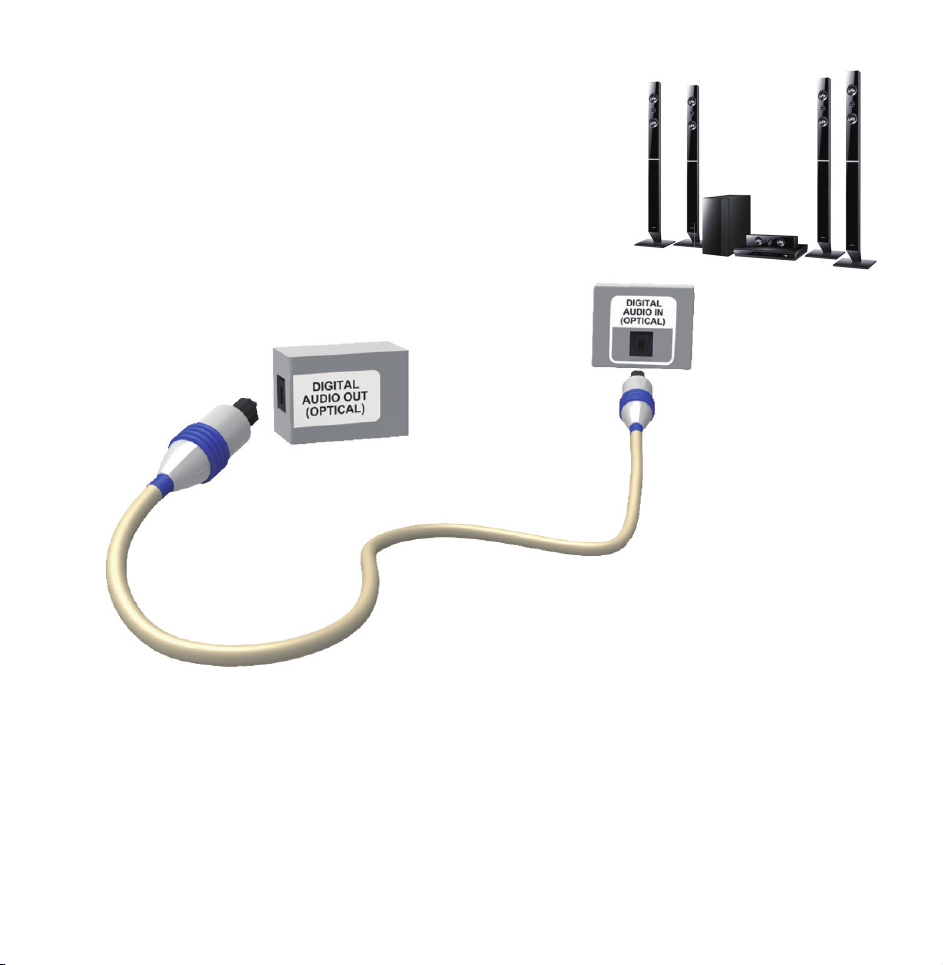
Connecting to an Audio device
<TV>
Using an Optical (Digital) Connection
<TV>
The displayed image may differ depending on the
model.
<TV>
The displayed image may differ depending on the
model.

Using a Headphone Connection
for LED TV
<TV>
The displayed image may differ depending on the model.
Connecting to a PC

Using an HDMI/DVI Cable
<TV>
The displayed image may differ depending on the model.

<TV>
<TV>
The displayed image may differ depending on the model.

Using the Channel Menu
Press the Smart Hub to select the menu
you want to use. Each screen will be
displayed.
Channel
Channel
→
™
Using this function, you can delete
channels, set favourite channels and
edit the channel name for analogue
broadcasts.

●
All
Shows all channels.
●
Favourites 1 – Favourites 5
Shows all favourite channels, in up to
five groups. Each group has separate
channels.
N
The TV displays favourites only if
you have added favourites using Edit
Favourites in the Tools menu.
N
If the highlight located in the
Favourites 1 – Favourites 5 category,

you can change the name of
category by selecting b using your
remote.
●
Recently Viewed
Shows the most recently viewed
channels.
●
Most viewed
Shows the most frequently viewed
channels.
Using the coloured and function buttons

with Channel
●
Delete
b
Delete the selected channel(s).
●
Information
`
Displays details of the selected channel.
●
Page
k
Scrolls the channel list to the next or
previous page.
●
Select / Deselect
E
Selects or deselects a channel.
●
Tools
T

Displays the option menu.
●
Return
R
Returns to the previous menu.
Using the Tools menu with the Channel
●
Edit Favourites
Lets you assign channels you watch
frequently to a favourites group and
remove channels from a favourites
group. You access Edit Favourites on
the Tools menu.

Select Edit Favourites. The Edit
1.
Favourites screen appears.
Select
2.
using your remote. The
a
selected channel will be added to the
favourite group.
N
Also, you can select a channel in
the Edit Favourites screen.
N
You can add a favourite channel
to any one of the groups. To
change favourites group, select }
using your remote. Each time you

select
, a favourites group will
}
be changed.
When done, select OK. The channel
3.
is made a favourite and is assigned
to the favourites group you selected.
N
On the Channel screen, the TV
displays the “
” symbol next
to the channel, indicating it is a
favourite.
●
Lock / Unlock
Lock a channel so that the channel

cannot be selected and viewed.
N
This function is available only when
the Channel Lock is set to On.
●
Rename channel
Lets you assign a name of up to five
characters to an analogue channel. For
example, Food, Golf, etc. This makes it
easier to find and select the channel.
●
Edit Channel Number
Edit the channel number by select the
numbers.

N
This function may not be supported
depending on the region.
●
Channel Info
Displays information of channel signal.
The item may differ depending on
channel.
●
Delete
Delete a channel to display the
channels you want.
●
Select All / Deselect All
Select all channels in the list. / Deselect

all channels you selected.
To delete a channel from a Category
list on the Channel screen, follow these
steps:
Select a category that contains the
1.
channel you want to delete.
Select a channel in the category list.
2.
A
mark appears to the left of the
c
channel.
N
You can select more than one

channel.
N
If you select the selected channel
again, a
Open the Tools menu using your
3.
mark disappears.
c
remote.
Select Delete. The message Delete
4.
the selected channels?. Select OK.
N
You can delete the selected channel
immediately by selecting b using
your remote.
N
When you delete a channel in the

Recently Viewed or Most viewed
category, the channel will disappear
from that category list, but it is not
deleted from any of the other lists.
To set channels as favourites, follow
these steps:
Select the All category.
1.
Select a channel. A
2.
c
to the left of the channel.
N
You can select more than one
mark appears

channel.
N
If you select the selected channel
again, a
Open the Tools menu using your
3.
c
mark disappears.
remote.
Select the Edit Favourites. The Edit
4.
Favourites screen appears.
Select
5.
using your remote. The
a
selected channel will be moved to
the favourite group.
N
Also, you can select a channel in

the Edit Favourites screen.
N
You can add a favourite channel
to any one of the groups. To
change favourites group, select }
using your remote. Each time you
select
, a favourites group will
}
be changed.
When done, select OK. The channel is
6.
made as a favourite and is assigned
to the favourite group you selected.
N
The TV displays the “ ” symbol

next to the channel, indicating it
is a favourite.
Using the coloured and function
buttons with Edit Favourites
●
On the Edit Favourites screen, you
can use these functions buttons:
–
Add
a
Add selected channels to the
Favourites group.
–
Change Fav.
}

Change the favourites group.
Each time you select } using
your remote, the favourites group
changes.
–
–
Ÿ
R
Go To
Move to the Highlight to a channel
number immediately by pressing
the number button using your
remote.
Return
Returns to the previous menu.

●
When you highlight a favourite
channel in a favourites group on the
Edit Favourites screen, you can use
these options:
–
Delete
a
Delete the selected channel.
–
Change order
b
Change the favourite group list
order.
–
Copy
{
Copy a selected channel to other

favourites groups.
–
–
Change Fav.
}
Change the favourites group.
Each time you select } using
your remote, the favourites group
changes.
Ÿ
Go To
Move to the Highlight to a channel
number immediately by pressing
the number button using your
remote.

–
Return
R
Returns to the previous menu.
To remove a channel from a favourites
group, follow these steps:
Select the favourite’s group category.
1.
Select a channel in the favourites
2.
group. A
mark appears to the left
c
of the channel.
N
You can select more than one
channel.

N
If you select the selected channel
again, a
Open the Tools menu using your
3.
mark disappears.
c
remote.
Select Delete. The message Do you
4.
want to delete the selected item(s)?
appears.
Select OK. The message Deleted the
5.
selected item(s). appears.
N
You can delete the selected
channel from the list of favourites

group immediately using the b
function.
Display Icons Used in the Channel screens
: An analogue channel.
: A channel selected.
c
: A favourite channel.
: A locked channel.
Schedule Manager
Schedule Manager
→
™

Using this function, you can set
the TV to display a desired channel
automatically on a day and at a time of
your choice.
N
You must set the current time first
using the Time
Clock function
→
in the System menu to use this
function.
To use Schedule Viewing, follow these
steps:

On the Schedule Manager screen,
1.
select a using your remote.
Set Channel, Repeat, and Start Time.
2.
●
Channel
Select Channel to view the channel
numbers. Select the desired channel.
N
You can only select memorised
channels.
N
You can also enter the channel
number directly using the number
buttons on the remote control.

●
Repeat
Select Once, Manual, Sat~Sun,
Mon~Fri or Everyday. If you select
Manual, you can set the day you
want.
N
The
mark indicates a day you’
c
ve selected.
Date: You can set a desired date.
N
Date is available only when you
select Once in Repeat.
●
Start Time

You can set the start time you want.
When done, select the OK, The
3.
selected channel is scheduled for
viewing.
N
On the Schedule Manager screen,
you can view a list of Schedule
Viewing.
To delete an item in a list of scheduled
viewings, follow these step:
On the Schedule Manager screen,
1.

highlight an item you want to delete.
Open the Tools menu using your
2.
remote.
Select the Cancel schedule. The
3.
Cancel selected list(s)? message
appears.
Select Yes. The selected schedule is
4.
cancelled.
N
If you press the INFO button
after Highlighting an item, the
Information screen appears. On

the Information screen, you can
change or cancel the Schedule
Viewing.
Cancel Schedule: Cancel the
Schedule Viewing.
Edit Schedule: Change the
Schedule Viewing.
Return: Return to the previous
screen.
Channel List

Using this function, you can view the
channel list, programme information,
favourite channel, and manage of
Schedule Viewing.
Press the CH LIST button. The
1.
Channel List screen is displayed
immediately.
Change a channel or channel list
2.
mode.
Using the coloured and function buttons

with the Channel List
N
If you press the INFO button, the
TV displays details of the selected
programme.
●
Ch. Mode
lr
Move to the type of channels you want
to display on the Channel List screen.
●
Watch
E
Watches the channel you select.
●
Page
k
Move to next or previous page.

Channel Status Display Icons
: An analogue channel.
: A reserved programme.
: A locked channel.

Memorising Channels
Area
Menu
Select your country so that the TV can
correctly auto-tune the broadcasting
channels.
Auto Tuning
Menu
Channel
→
Channel
→
Area
→
Auto Tuning
→
Scans for a channel automatically and

stores in the TV.
N
Automatically allocated programme
numbers may not correspond
to actual or desired programme
numbers. If a channel is locked using
the Channel Lock function, the PIN
input window appears.
Manual Tuning
Menu
Channel
→
Scans for a channel manually and
Manual Tuning
→

stores in the TV.
N
If a channel is locked using the
Channel Lock function, the PIN input
window appears.
N
This function may not be supported
depending on the region.
Select the New.
1.
Set the Programme, Colour System,
2.
Sound System, Channel and Search.
Select the Store. When scanning has
3.
finished, a channel is updated in the

channel list.
Channel mode
●
P (programme mode): When tuning is
complete, the broadcasting stations
in your area have been assigned to
position numbers from P0 to P99.
You can select a channel by entering
the position number in this mode.
●
C (aerial channel mode) / S (cable
channel mode): These two modes
allow you to select a channel by

entering the assigned number for
each aerial broadcasting station or
cable channel.

Other Features
Fine Tune
Menu
If the reception is clear, you do not
have to fine tune the channel, as this is
done automatically during the search
and store operation. If the signal is
weak or distorted, fine tune the channel
manually. Scroll to the left or right until
the image is clear.
Channel
→
Fine Tune
→

N
Settings are applied to the channel
you’re currently watching.
N
Fine tuned channels that have been
saved are marked with an asterisk “*”
on the right-hand side of the channel
number in the channel banner.
N
To reset the fine-tuning, select the
Reset.

Changing the Preset Picture Mode
Picture Mode
Menu
Picture modes apply preset adjustments
to the picture.
N
●
Dynamic
Picture
→
When your TV is connected to a PC
Picture Mode
→
via an HDMI to DVI cable, you can
only select Entertain and Standard.
Suitable for a bright room.

●
Standard
Suitable for a normal environment.
●
Natural
Series
for LED TV
/ Relax
for PDP 6500
Suitable for reducing eye strain.
●
Movie
Suitable for watching movies in a dark
room.
●
Entertain
Suitable for watching movies and
games.

N
Only available when the TV is
connected to a PC via an HDMI to
DVI cable.

Adjusting Picture Settings
Backlight
Menu
Picture
→
Adjusts the pixel brightness. 20 is the
brightest setting.
Contrast
Menu
Picture
→
for LED TV
Backlight / Cell Light
→
Contrast
→
/ Cell Light
for PDP TV
Adjusts contrast level. Values closer to
100 mean bigger light/dark contrast.

Brightness
Menu
Adjusts brightness level. Values closer
to 100 mean brighter screen.
Sharpness
Menu
Adjusts sharpness of picture. Values
Picture
→
Picture
→
Brightness
→
Sharpness
→
closer to 100 mean a sharp image.

Colour
Menu
Picture
→
Adjusts colour saturation level. Values
closer to 100 mean more intense
colours.
Tint (G/R)
Menu
Picture
→
Colour
→
Tint (G/R)
→
N
In analogue TV, AV modes of the PAL
system, the Tint (G/R) function is not
available.

Adjusts tint levels for green and red.
Values closer to 100 mean greater
intensity for that colour.
To adjust picture quality, follow these steps:
Select an option you want to adjust.
1.
When you select an option, a slider
screen appears.
Adjust the option value using your
2.
remote.
N
When you change an option value,

the change will affect the OSD menu
also.
N
When your TV is connected to a PC
via an HDMI to DVI cable Colour and
Tint (G/R) are not available.
N
You can adjust and store settings for
each external device connected to
the TV.
N
Lowering picture brightness reduces
power consumption.

Changing the Picture Size
Screen Adjustment
Menu
Using this function, you can select
various picture size and aspect ratio
options.
●
Picture Size
Your cable box / satellite receiver may
have its own set of screen sizes as
Picture
→
Screen Adjustment
→
well. However, we highly recommend

you use your TV's 16:9 mode most of
the time.
16:9: Adjusts the picture size to 16:9 for
DVDs or wide broadcasting.
Wide Zoom: Magnifies the picture size
more than 4:3.
Zoom: Magnifies the 16:9 wide pictures
vertically to fit the screen size.
4:3: The default setting for a movie or
normal broadcasting.
N
Do not watch in 4:3 format for a long

time. Traces of borders displayed
on the left, right and centre of the
screen may cause image retention
(screen burn) which is not covered
by the warranty.
Screen Fit: Displays the full image
without any cut-off when HDMI (720p
/ 1080i / 1080p) or Component (1080i /
1080p) signals are inputted.
Smart View 1: Reduces the 16:9 picture
by 50%
for LED TV

Smart View 2: Reduces the 16:9 picture
by 25%
N
Smart View 1 and Smart View 2 is
for LED TV
enabled only in HDMI mode.
N
The picture size can vary when
you play content from Videos in
AllShare Play depending on the input
resolution.
●
Zoom/position
Adjusts the picture zoom and position.
Zoom is only available if Picture Size is

set to Zoom. Position is only available
if Picture Size is set to Wide Zoom,
Zoom, or Screen Fit.
To use the Zoom function after
selecting Zoom, follow these steps:
Select Zoom.
1.
On the Zoom/position screen, select
2.
Zoom, and then zoom in or zoom out
using your remote.
When done, select Zoom again, and
3.

then select Close.
To reset the picture, press Reset.
4.
To use the Position function after
selecting Wide Zoom, Zoom or Screen
Fit, follow these steps:
Select the Position.
1.
On the Position screen, select
2.
Position, and then move the picture
to position you want using your
remote.

When done, select Position again,
3.
and then select Close.
To reset the picture position, select
4.
Reset.
Picture Sizes available by Input Source:
–ATV, AV: 16:9, Wide Zoom, Zoom,
4:3
–Component (480i, 480p, 576i, 576p):
16:9, Wide Zoom, Zoom, 4:3
–Component (720p): 16:9, Wide

Zoom, Zoom, 4:3
–Component (1080i, 1080p): 16:9,
Wide Zoom, Zoom, 4:3, Screen Fit
–HDMI (720p, 1080i, 1080p): 16:9,
Wide Zoom, Zoom, 4:3, Screen Fit,
Smart View 1
2
for LED TV
N
Depending on the input source, the
for LED TV
, Smart View
picture size options may vary.
N
The available items may differ
depending on the selected mode.

N
HD (High Definition): 16:9 -
1080i/1080p (1920x1080), 720p
(1280x720)
N
You can adjust and store settings
for each external device you have
connected to an input on the TV.
Select the Source, and then adjust
the settings.
●
4:3 Screen Size
(Depending on the country)
Available only when picture size is set

to Auto Wide. You can determine the
desired picture size at the 4:3 WSS
(Wide Screen Service) size or the
original size.
N
Not available in Component or HDMI
mode.

Changing the Picture Options
Advanced Settings
Menu
Using this function, you can configure
advanced picture settings to create
your preferred picture.
N
Picture
→
Advanced Settings is available only
Advanced Settings
→
when the Picture Mode is set to
Standard or Movie mode.
N
When connecting a PC using an

HDMI-DVI cable, you can only
make changes to White Balance and
Gamma.
●
Dynamic Contrast
Adjusts the screen contrast.
●
Black Tone
Select the black level to adjust the
screen depth.
●
Flesh Tone
Emphasizes pink “Flesh Tone.”
●
RGB Only Mode

Displays the Red, Green and Blue
colours so you can make fine
adjustments to hue and saturation.
●
Colour Space
(Auto / Native / Custom)
Adjusts the range and variety of colours
(the colour space) available to create
images.
N
for LED 6200 - 6800 Series and PDP 6500
series
To adjust Colour, Red, Green,
Blue and Reset, set the Colour Space

to Custom.
●
White Balance
Adjusts the colour temperature for a
more natural picture.
R-Offset / G-Offset / B-Offset:
Adjusts each colour’s (red, green, blue)
darkness.
R-Gain / G-Gain / B-Gain: Adjusts each
colour’s (red, green, blue) brightness.
Reset: Resets the White Balance to its
default settings.

●
10p White Balance
for LED 4500 - 5600 Series and PDP 550 Series
This function is not supported.
Lets you control the white balance
by adjusting the red, green, and blue
brightness in 10 point intervals.
N
Available when the Picture Mode is
set to Movie. Available for all video
:
sources.
N
Some external devices may not
support this function.

Interval: Select the interval to adjust.
Red: Adjusts the red level.
Green: Adjusts the green level.
Blue: Adjusts the blue level.
Reset: Resets the 10p White Balance to
its default settings.
●
Gamma
Adjusts the primary colour intensity.
●
Expert Pattern
for LED 4500 - 5600 Series and PDP 550 Series
This function is not supported.
:

Use the Expert Pattern function to
calibrate the picture. If the OSD menu
disappears or a menu other than the
Picture menu is opened, the TV saves
the calibration and the Expert Pattern
screen disappears.
Off: Turns the Expert Pattern function
of f.
Pattern1: This test screen demonstrates
the effect of your display settings on
shades of grey and black.

Pattern2: This test screen demonstrates
the effect of your display settings on
colours.
N
After selecting Pattern1 or Pattern2,
you can adjust any of the advanced
settings for the effect you desire.
N
While the Expert Pattern is running,
N
●
xvYCC
the TV does not output sound.
Only enabled in Component, and
HDMI modes.

for LED 4500 - 5600 Series and PDP 550 Series
:
This function is not supported.
Setting xvYCC on increases picture
detail and enlarges the colour space
when you are watching movies input
from an external device (e.g. BD/DVD
player) connected to the TV’s HDMI or
Component IN jacks.
N
Available only when you set
the Picture Mode to Movie and
the external input to HDMI or

Component.
N
Some external devices may not
support this function.
●
Motion Lighting
Reduces power consumption by
reducing screen brightness when the
picture on the screen is in motion.
N
This feature is not supported in 3D
mode.
N
Only available in Standard mode.
N
When you change the Backlight

for LED TV
Contrast, or Brightness, the TV sets
Motion Lighting to Off.
Picture Options
/ Cell Light
for PDP TV
,
Menu
Using this function, you can configure
additional picture settings to suit your
preference.
N
Picture
→
When your TV is connected to a PC
Picture Options
→
via an HDMI to DVI cable, you can

only make changes to Colour Tone.
●
Colour Tone
Select the colour temperature.
N
Warm1 or Warm2 will be deactivated
when the Picture Mode is set to
Dynamic.
N
You can adjust and store settings for
each external device connected to an
input on the TV. Select the Source
and then adjust the settings.
●
Digital Noise Filter

If the broadcast signal received by your
TV is weak, you can activate the Digital
Noise Filter feature to reduce any static
and ghosting that may appear on the
screen.
Auto Visualisation: When changing
analogue channels, displays signal
strength.
N
When the signal is weak, try all the
options until the TV displays the best
picture.

N
When the bar is green, you are
receiving the best possible signal.
●
MPEG Noise Filter
Reduces MPEG noise to provide
improved picture quality.
●
HDMI Black Level
Lets you adjust the screen depth by
selecting a black level.
N
Available only in HDMI mode.
●
Film Mode
Sets the TV so that it senses and then

processes film signals from all sources
automatically and adjusts the picture
for optimum quality.
N
Available in TV, AV, Component (480i
/ 1080i) and HDMI (1080i).
●
Motion Plus
for LED 6200 series and above
Removes drag from fast scenes with
a lot of movement to provide a clearer
picture.
N
The Info screen on your TV displays
the resolution and frequency of the

incoming signal (60Hz), but not the
frequency the TV is generating for
the image it is displaying by using
Motion Plus function.
N
If noise occurs on the screen, please
set up the Motion Plus to Off. If
Motion Plus is Custom, you can
set up the Blur Reduction, Judder
Reduction or Reset manually.
N
If Motion Plus is Demo, you can
compare the difference of on and off

modes.
Blur Reduction: Adjusts the blur
reduction level from video sources.
Judder Reduction: Adjusts the judder
reduction level from video sources
when playing films.
Reset: Reset the custom settings to the
factory defaults.
N
The info screen on your TV displays
the resolution and frequency of
the incoming video signal (60 Hz).

This displayed frequency is not the
frequency of the picture the TV is
displaying when you have Motion
Plus on.
N
If noise occurs on the screen, please
set Motion Plus to Off. If Motion Plus
is set to Custom, you can control
Blur Reduction and Judder Reduction
manually and use Reset to reset both
to their default settings.
N
If Motion Plus is set to Demo, you

can compare the difference between
a picture with Motion Plus On and
Motion Plus Off.
●
LED Motion Plus
for LED TV
for LED 4500 Series
supported.
Removes drag from fast scenes with
a lot of movement to provide a clear
picture.
Reset Picture
: This function is not

Menu
Resets your current picture mode to its
default settings.
Picture
→
Reset Picture
→

Using the TV with Your PC
Using Your TV as a Computer (PC)
Display
Entering the Video Settings (Based on
Windows 7)
For your TV to work properly as a
computer display, you must enter the
correct video settings after you have
connected the TV to your PC.
N
Depending on your version of

Windows and your video card, the
procedure on your PC will probably
differ slightly from the procedure
presented here.
N
However, the same basic information
will apply in most cases. (If not,
contact your computer manufacturer
or Samsung Dealer.)
Click “Control Panel” on the
1.
Windows start menu.
Click “Appearance and Themes”
2.

in the “Control Panel” window. A
dialogue box appears.
Click “Display”. Another display
3.
dialogue box appears.
Click the “Settings” tab on the
4.
display dialogue box.
–On the Settings tab, set the
correct resolution (screen size).
The optimal resolution for this TV
is 1920 x 1080.
–If a vertical-frequency option

exists on your display settings
dialogue box, select “60” or “60
Hz”. Otherwise, just click “OK”
and exit the dialogue box.

Changing the Preset Sound Mode
Sound Mode
Menu
Sound modes apply preset adjustments
to the sound.
N
●
Standard
Selects the normal sound mode.
Sound
→
If Speaker Select is set to External
Sound Mode
→
Speaker, Sound Mode is disabled.
●
Music

Emphasizes music over voices.
●
Movie
Provides the best sound for movies.
●
Clear Voice
Emphasizes voices over other sounds.
●
Amplify
Increase the intensity of high-frequency
sound to provide a better listening
experience for the hearing impaired.

Adjusting Sound Settings
Sound Effect
Menu
N
N
●
SRS TruSurround HD
This function provides a virtual 5.1
Sound
→
If Speaker Select is set to External
Sound Effect
→
Speaker, Sound Effect is disabled.
Available only when the Sound Mode
is set to Standard.
channel surround sound experience

through a pair of speakers using HRTF
(Head Related Transfer Function)
technology.
●
SRS TruDialog
This function allows you to increase
the intensity of voices over background
music or sound effects so that dialogue
can be heard more clearly.
●
Equaliser
The Equaliser displays a series of
sliders. Use the arrow buttons to select

a slider, and then change the slider’s
value. To Reset the Equaliser, select
Reset. A pop-up appears asking if you
want to reset. Select Yes. To exit, select
Close.
Balance L/R: Adjusts the balance
between the left and right speaker.
100Hz / 300Hz / 1kHz / 3kHz / 10kHz
(Bandwidth Adjustment): Adjusts the
volume level of specific bandwidth
frequencies.

Reset: Resets the Equaliser to its default
settings.
SPDIF Output
Menu
SPDIF (Sony Philips Digital InterFace) is
used to provide digital sound, reducing
interference going to speakers and
various digital devices such as a DVD
player.
●
Audio Format
Sound
→
SPDIF Output
→
 Loading...