


E-MANUAL
Contact SAMSUNG WORLDWIDE
If you have any questions or comments relating to Samsung products, please contact the SAMSUNG customer care centre.
Country
ALBANIA 42 27 5755 www.samsung.com
AUSTRIA 0810 - SAMSUNG (7267864, € 0.07/min) www.samsung.com
BELGIUM 02-201-24-18 www.samsung.com/be (Dutch)
BOSNIA 05 133 1999 www.samsung.com
BULGARIA 07001 33 11 www.samsung.com
CROATIA 062 SAMSUNG (062 726 7864) www.samsung.com
CZECH 800 - SAMSUNG (800-726786) www.samsung.com
DENMARK 70 70 19 70 www.samsung.com
FINLAND 030 - 6227 515 www.samsung.com
FRANCE 01 48 63 00 00 www.samsung.com
GERMANY 01805 - SAMSUNG (726-7864 € 0,14/Min) www.samsung.com
CYPRUS From landline : 8009 4000 www.samsung.com
GREECE From landline : 80111-SAMSUNG (7267864)
HUNGARY 06-80-SAMSUNG(726-7864) www.samsung.com
ITALIA 800-SAMSUNG(726-7864) www.samsung.com
KOSOVO +381 0113216899 www.samsung.com
LUXEMBURG 261 03 710 www.samsung.com
MACEDONIA 023 207 777 www.samsung.com
MONTENEGRO 020 405 888 www.samsung.com
NETHERLANDS 0900-SAMSUNG (0900-7267864) (€ 0,10/Min) www.samsung.com
NORWAY 815-56 480 www.samsung.com
POLAND 0 801-1SAMSUNG(172-678)
PORTUGAL 808 20-SAMSUNG (808 20 7267) www.samsung.com
RUMANIA From landline : 08010-SAMSUNG (7267864)
SERBIA 0700 Samsung (0700 726 7864) www.samsung.com
SLOVAKIA 0800 - SAMSUNG (0800-726 786) www.samsung.com/sk
SPAIN 902 - 1 - SAMSUNG (902 172 678) www.samsung.com
SWEDEN 0771 726 7864 (SAMSUNG) www.samsung.com
SWITZERLAND 0848 - SAMSUNG(7267864, CHF 0.08/min) www.samsung.com/ch
U.K 0330 SAMSUNG (7267864) www.samsung.com
EIRE 0818 717100 www.samsung.com
LITHUANIA 8-800-77777 www.samsung.com
LATVIA 8000-7267 www.samsung.com
ESTONIA 800-7267 www.samsung.com
TURKEY 444 77 11 www.samsung.com
Customer Care Centre
Samsung Electronics Czech and Slovak, s.r.o., Oasis Florenc, Sokolovská 394/17, 180 00, Praha 8
From landline & mobile : (+30) 210 6897691
+48 22 607-93-33
From landline & mobile : (+40) 21 206 01 10
Web Site
www.samsung.com/be_fr (French)
www.samsung.com
www.samsung.com
www.samsung.com
www.samsung.com/ch_fr (French)
Plasma TV
user manual
© 2012 Samsung Electronics Co., Ltd. All rights reserved.
Thank you for purchasing this Samsung product.
To receive more complete service, please register
your product at
www.samsung.com/register
Model _____________ Serial No. _____________
BN68-04068F-01

For more information on how to use e-Manual (p. 9)
Figures and illustrations in this User Manual are provided for reference only and may differ from actual product appearance. Product
design and specifications may be changed without notice.
Digital TV notice
1. Functionalities related to Digital TV (DVB) are only available in countries/areas where DVB-T (MPEG2 and MPEG4 AVC) digital terrestrial
signals are broadcasted or where you are able to access to a compatible DVB-C (MPEG2 and MPEG4 AAC) cable-TV service. Please
check with your local dealer the possibility to receive DVB-T or DVB-C signal.
2. DVB-T is the DVB European consortium standard for the broadcast transmission of digital terrestrial television and DVB-C is that for the
broadcast transmission of digital TV over cable. However, some differentiated features like EPG (Electric Programme Guide), VOD (Video On
Demand) and so on, are not included in this specification. So, they cannot be workable at this moment.
3. Although this TV set meets the latest DVB-T and DVB-C standards, as of [August, 2008], the compatibility with future DVB-T digital
terrestrial and DVB-C digital cable broadcasts cannot be guaranteed.
4. Depending on the countries/areas where this TV set is used some cable-TV providers may charge an additional fee for such a service and
you may be required to agree to terms and conditions of their business.
5. Some Digital TV functions might be unavailable in some countries or regions and DVB-C might not work correctly with some cable service
providers.
6. For more information, please contact your local Samsung customer care centre.
The reception quality of TV may be affected due to differences in broadcasting method between the countries. Please check the TV
✎
performance in the local SAMSUNG Authorized Dealer, or the Samsung Call Centre whether it can be improved by reconfiguring TV
setting or not.
User Instructions
• Screen Image retention
Do not display a still image (such as on a video game) on the plasma display panel for more than several minutes as it can cause screen
image retention. This image retention is also known as “screen burn”. To avoid such image retention, reduce the degree of brightness and
contrast of the screen when displaying a still image.
• Heat on the top of the Plasma TV
The top side of the product may be hot after long periods of use as heat dissipates from the panel through the vent hole in the upper part of
the product.
This is normal and does not indicate any defect or operation failure of the product.
However, children should be prevented from touching the upper part of the product.
• The product is making a “cracking” noise.
A “cracking” noise may occur when the product contracts or expands due to a change in the surrounding environment such as
temperature or humidity. This is normal and not a defect of the unit.
• Cell Defects
The PDP uses a panel consisting of 2,360,000(HD-level) to 6,221,000(FHD-level) pixels which require sophisticated technology to produce.
However, there may be a few bright or dark pixels on the screen. These pixels will have no impact on the performance of the product.
• Avoid operating the TV at temperatures below 41°F (5°C)
• A still image displayed too long may cause permanent damage to the PDP Panel.
Watching the Plasma TV in 4:3 format for a long period of time may leave traces of borders displayed on the left, right
and centre of the screen caused by the difference of light emission on the screen. Playing a DVD or a game console may
cause similar effects to the screen.
Damages caused by the above effect are not covered by the Warranty.
• After-images on the Screen.
Displaying still images from Video games and PC for longer than a certain period of time may produce partial after-images.
To prevent this effect, reduce the “brightness” and “contrast” when displaying still images for a long time.
• Warranty
Warranty does not cover any damage caused by image retention.
Burn-in is not covered by the warranty.
Correct Disposal of This Product (Waste Electrical & Electronic Equipment)
(Applicable in the European Union and other European countries with separate collection systems)
This marking on the product, accessories or literature indicates that the product and its electronic accessories (e.g. charger, headset, USB cable) should
not be disposed of with other household waste at the end of their working life. To prevent possible harm to the environment or human health from
uncontrolled waste disposal, please separate these items from other types of waste and recycle them responsibly to promote the sustainable reuse of
material resources. Household users should contact either the retailer where they purchased this product, or their local government office, for details
of where and how they can take these items for environmentally safe recycling. Business users should contact their supplier and check the terms and
conditions of the purchase contract. This product and its electronic accessories should not be mixed with other commercial wastes for disposal.
Correct disposal of batteries in this product
(Applicable in the European Union and other European countries with separate battery return systems)
This marking on the battery, manual or packaging indicates that the batteries in this product should not be disposed of with other household
waste at the end of their working life. Where marked, the chemical symbols Hg, Cd or Pb indicate that the battery contains mercury, cadmium
or lead above the reference levels in EC Directive 2006/66. If batteries are not properly disposed of, these substances can cause harm to human
health or the environment. To protect natural resources and to promote material reuse, please separate batteries from other types of waste and
recycle them through your local, free battery return system.
English - 2

Accessories
B
✎
Please make sure the following items are included with your TV. If any items are missing, contact your dealer.
✎
The items’ colours and shapes may vary depending on the models.
✎
Cables not included in the package contents can be purchased separately.
• Remote Control & Batteries (AAA x 2) • Power Cord
• Owner’s Instructions • Cleaning Cloth
• Warranty Card / Safety Guide (Not available in some locations)
Ferrite Core (1EA)
✎
Ferrite Core for Power Cord: The ferrite cores are used to shield the cables from interference.
When connecting a cable, open the ferrite core and clip it around the cable near the plug as
shown in the figure.
A Maximum distance between the ferrite core and the end of the cord inserted in the TV: 3/4
x
inches
✎
An administration fee may be charged if either
(a) an engineer is called out at your request and there is no defect in the product
(i.e. where you have failed to read this user manual)
(b) you bring the unit to a repair centre and there is no defect in the product
(i.e. where you have failed to read this user manual)
✎
The amount of such administration charge will be advised to you before any work or home visit is carried out.
A
Power Cord
English - 3

Using the TV’s Controller (Panel Key)
TV Controller is a multi directional button that
helps navigate without remote control.
✎
Some functions which require a PIN code
may not be available.
✎
The product colour and shape may vary
depending on the model.
✎
Exits the menu when pressing the controller
more than 1 second.
✎
When selecting the function by moving
the controller to the up/down/left/right
directions, be sure not to press the
controller. If you press it first, you cannot
operate it to move the up/down/left/right
directions.
Power on Turns the TV on by pressing the controller in standby mode.
Adjusting the volume Adjusts the volume by moving the controller from side to side when the power is on.
Selecting a channel Selects a channel by moving the controller up and down when the power is on.
Using the function menu Press the controller when the power is on, then the function menu screen appears. If
Using the Menu
Selecting the Source Selects the Source( ) by moving the controller in the function menu screen. The
Selecting the Contents Home Selects the Contents Home( ) by moving the controller in the function menu
Power Off
you press it again, the function menu screen disappears.
Selects the MENU(m) by moving the controller in the function menu screen. The
OSD(On Screen Display) of your TV’s feature appears.
Source list screen appears.
screen. The Contents Home main screen appears.
Selects the Power Off(P) to turn the TV off by moving the controller in the function
menu screen.
Left
Down (Front)
Right
Up (Rear)
TV Controller
Function menu
Return
Remote control sensor
Standby mode
Do not leave your TV in standby mode for long periods of time (when you are away on a holiday, for example). A small amount of
electric power is still consumed even when the power button is turned off. It is best to unplug the power cord.
Securing the Installation Space
Keep the required distances between the product and other objects (e.g. walls) to ensure proper ventilation.
Failing to do so may result in fire or a problem with the product due to an increase in the internal temperature of the product.
✎
When using a stand or wall-mount, use parts provided by Samsung Electronics only.
If you use parts provided by another manufacturer, it may result in a problem with the product or an injury due to the product
x
falling.
✎
The appearance may differ depending on the product.
✎
Be careful when you contact the TV because some parts can be somewhat hot.
Installation with a stand. Installation with a wall-mount.
10 cm
10 cm10 cm
10 cm
10 cm
10 cm
10 cm
English - 4
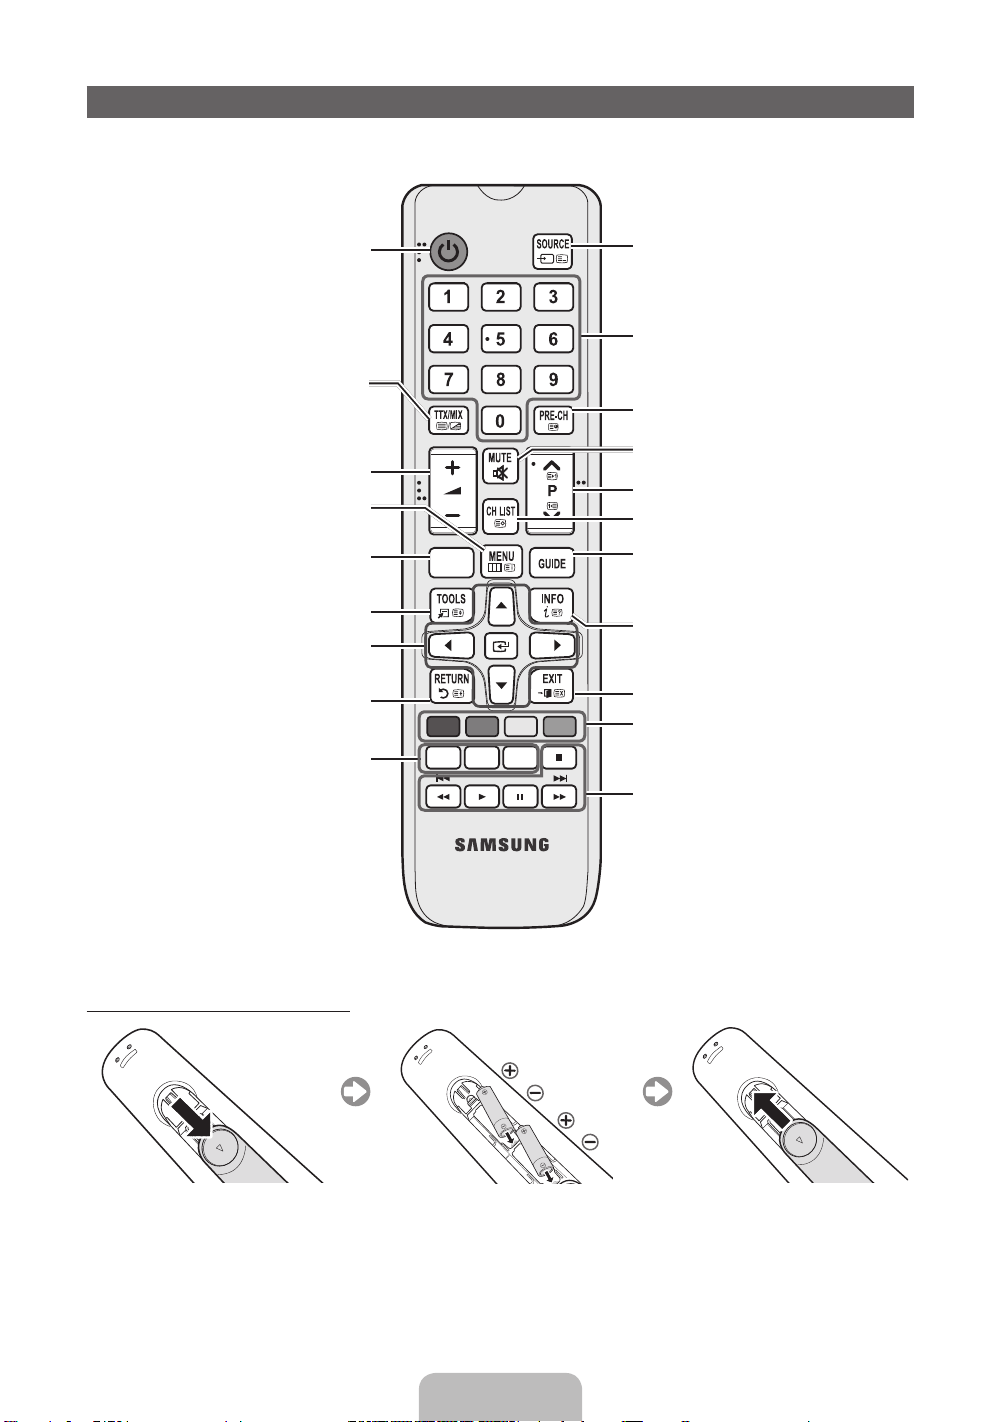
Viewing the Remote Control
✎
This is a special remote control for the visually impaired persons and has Braille points on the Power, Channel, and Volume
buttons.
Turns the TV on and off.
Alternately select Teletext ON, Double, Mix
or OFF.
Adjusts the volume.
Displays the main on-screen menu.
Views the Contents Home.
Quickly select frequently used functions.
Selects the on-screen menu items and
changes the values seen on the menu.
Returns to the previous menu.
E-MANUAL: Displays the e-Manual
guide. (p. 9)
P.SIZE: Selects the picture size.
AD/SUBT.: Audio Description selection.
(Not available in some locations) / Displays
digital subtitles.
CONTENT
A B C D
E-MANUAL
P.SIZE
AD/SUBT.
Displays and selects the available video
sources.
Press to directly access to channels.
Returns to the previous channel.
Cuts off the sound temporarily.
Changes channels.
Displays channel lists on the screen.
Displays the EPG (Electronic Programme
Guide).
Displays information on the TV screen.
Exits the menu.
Use these buttons according to the direction
on screen.
Use these buttons in a specific feature.
For details, refer to the e-Manual.
Installing batteries (Battery size: AAA)
English - 5

Initial Setup
When the TV is initially powered on, a sequence of on-screen prompts will assist in configuring basic settings. Press the POWERP
button. Setup is available only when the source is set to TV.
1. Menu Language: Selecting a menu language
Press the ▲ or ▼ button, then press the ENTERE button.
Select the desired OSD (On Screen Display) language.
2. Use Mode: Selecting Store Demo or Home Use
Press the ▲ or ▼ button, then press the ENTERE button.
Select the Home Use mode. Store Demo mode is for retail environments.
✎
When pressing TV controller, the function menu screen appears. Select the MENU(m) and press it more than 5 seconds
using the controller. The Store Demo mode is set.
✎
Cancel the Store Demo by selecting Source( ) and pressing it more than 5 seconds.
✎
Store Demo is only for shop display. If you select it, several functions are not able to use. Please select Home Use when you
watch at home.
3. Country (Depending on the country): Selecting a country
Press the ▲ or ▼ button, then press the ENTERE button.
Select the appropriate country.
4. Auto Tuning (Step 1): Selecting how you watch your TV
Let’s find and store channels on your TV. Do you need to search for channels?
• Yes, I need to.: Memorises all of the available channels using RF cable.
• No, I don’t need to.: You don’t need to use Auto Tuning to find channels.
5. Auto Tuning (Step 2): Selecting a search options
Select the desired broadcasting signal and antenna source. Press the ▲/▼/◄/► button, then press the ENTERE button.
When setting the antenna source to Cable, a step appears allowing you to assign numerical values (channel frequencies) to the
channels. For more information, refer to Channel → Auto Tuning.
✎
Press the ENTERE button at any time to interrupt the memorisation process.
✎
See e-Manual chapter “Retuning Channels > Auto Tuning”
6. Clock: Setting the Clock Mode
• Auto: Set the current time automatically.
• Manual: Allows you to manually set the current date and time.
7. Time Zone (Depending on the country): Setting your Time Zone
This step is only available when the clock mode is set to Auto.
• Auto: Set the time zone automatically.
• Manual: Set the time zone manually.
✎
If you selected Manual, you can select whether to turn DST (Daylight Savings Time) On or Off. (Depending on the
country)
8. Setup Complete
Press the ENTERE button.
✎
The completed settings are displayed.
If You Want to Reset This Feature...
Select System - Setup (Initial Setup). Enter your 4 digit PIN number. The default PIN number is “0-0-0-0”. If you want to change the
PIN number, use the Change PIN function.
You should do Setup (MENU → System) again at home although you did in shop.
✎
If you forget the PIN code, press the remote control buttons in the following sequence in Standby mode, which resets the PIN to
“0-0-0-0”: MUTE → 8 → 2 → 4 → POWER (on)
English - 6
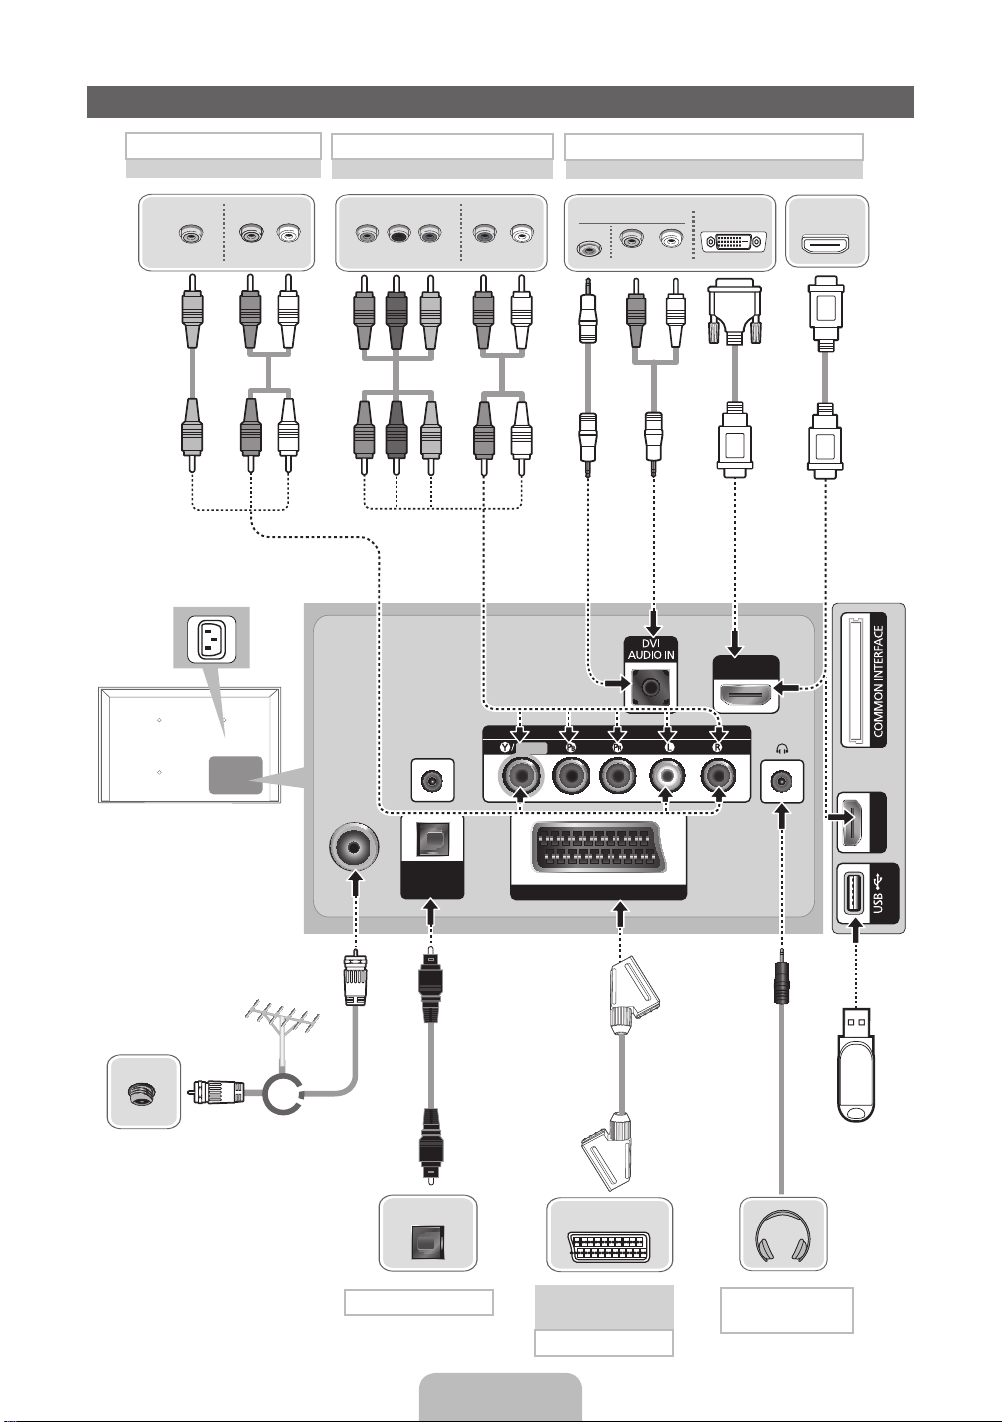
Connections
AV connection
BD Player
VIDEO OUT
Y
Y
✎
It supports both
Component and AV
connection in one
port.
AUDIO OUT
R-AUDIO-L
R
W
WR
Component connection
BD Player
COMPONENT OUT
PRP
R B RG
R B
Y
B
R
G
AUDIO OUT
R-AUDIO-L
R
W
WR
HDMI, HDMI/DVI connection
BD Player / PC
AUDIO OUT
PC
R-AUDIO-L
R
W
DVI OUT
HDMI IN 1
(DVI)
HDMI OUT
TV Side Panel
TV Rear Panel
✎
The position of port may
differ depending on the
model.
VHF/UHF Antenna
Cable
or
✎
The PDP device may interfere with
an amateur radio or AM radio.
✎
When using two-way radio mobile
and portable units or amateur radio
or AM radio near by your TV, this
may cause the TV to malfunction.
ANT IN
AUDIO OUT
OPTICAL
Audio connection
SERVICE
DIGITAL
(OPTICAL)
COMPONENT / AV IN
VIDEO
EXT (RGB)
VCR or DVD
SCART connection
AUDIO
HDMI IN 2
(5V 0.5A)
USB
EXT
Headphone
connection
English - 7
Display Modes (HDMI/DVI Input)
Optimal resolution is 1920 x 1080@60Hz. See specification page for full available resolution.
SERVICE
SERVICE
✎✎
NOTE
• For HDMI/DVI cable connection, you must use the HDMI IN 1(DVI) port.
• The interlace mode is not supported.
• The set might operate abnormally if a non-standard video format is selected.
• Separate and Composite modes are supported. SOG(Sync On Green) is not supported.
• PC(D-Sub) input is not supported.
• Connecting through the HDMI cable may not be supported depending on the PC.
• The headphone jack supports only the 3 conductor tip-ring-sleeve (TRS) type.
Connector for service only.
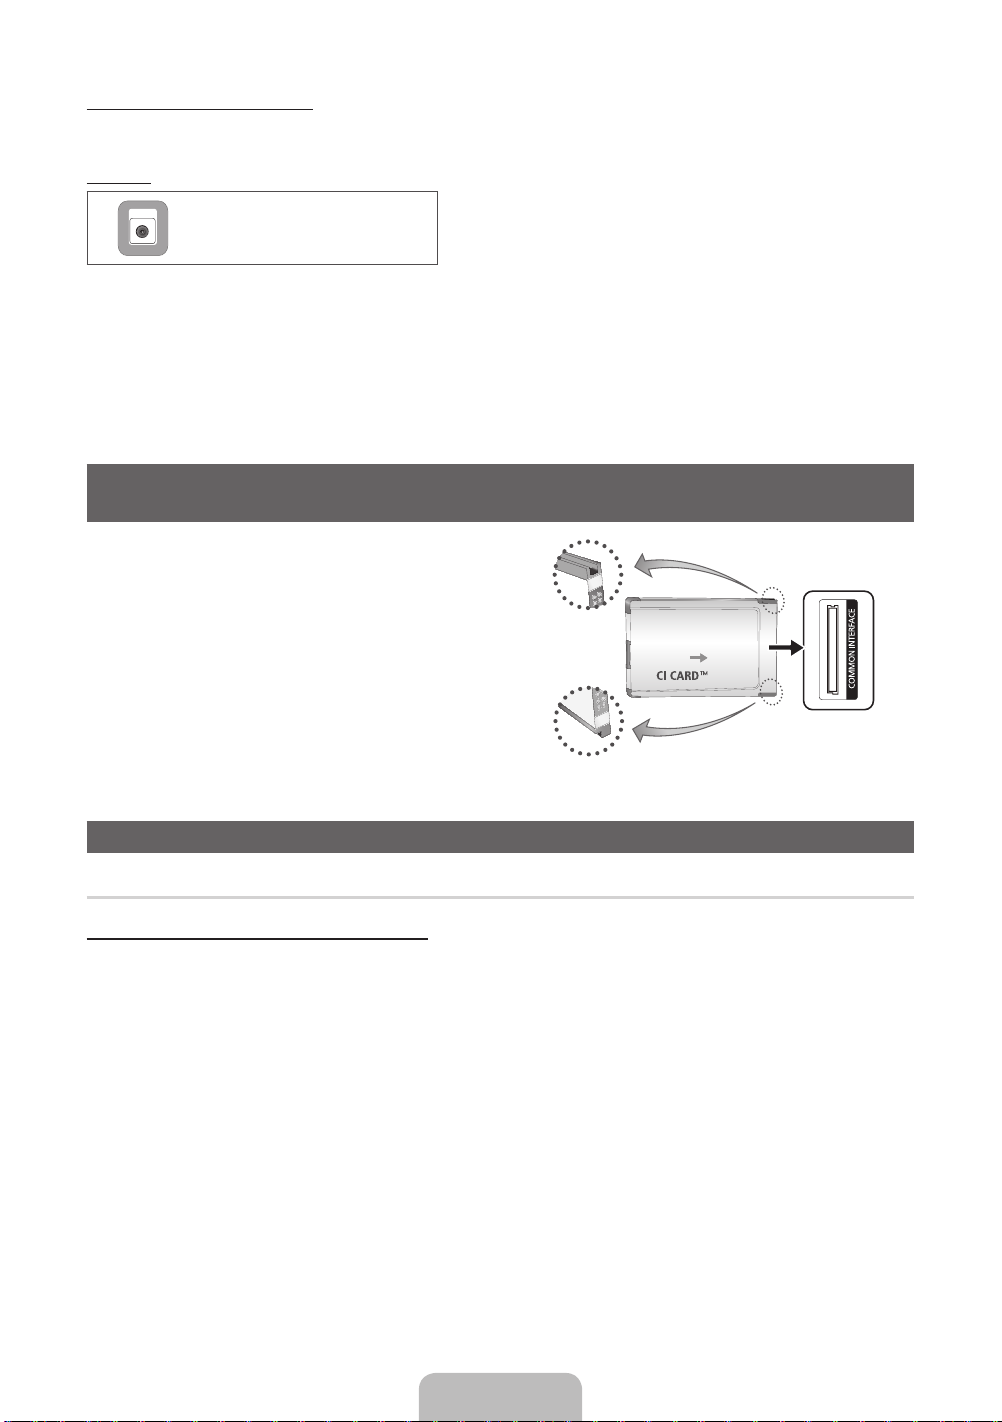
Connecting to a COMMON INTERFACE slot
(Your TV viewing Card Slot)
To watch paid channels, the “CI or CI+ CARD” must be inserted.
• If you do not insert the “CI or CI+ CARD”, some channels will display
the message “Scrambled Signal”.
• The pairing information containing a telephone number, the “CI or CI+
CARD” ID the Host ID and other information will be displayed in about
2~3 minutes. If an error message is displayed, please contact your
service provider.
• When the configuration of channel information has finished, the
message “Updating Completed” is displayed, indicating the channel
list is updated.
TV Side Panel
y The image may differ depending on the
model.
Changing the Input Source
Source
TV / Ext. / HDMI1/DVI / HDMI2 / AV / Component
Use to select TV or other external input sources such as DVD / Blu-ray players / cable box / STB satellite receiver connected to the TV.
✎
In the displaying Source list, connected inputs will be highlighted.
✎
PC(D-Sub) input is not supported. If you want to connect PC to the TV, use HDMI1/DVI input.
✎
Ext. always stays activated.
✎
Press the TOOLS button.
• Edit Name
You can set an external input sources name you want.
– When connecting a PC to the HDMI IN 1(DVI) port with HDMI cable, you should set the TV to PC mode under Edit Name.
– When connecting a PC to the HDMI IN 1(DVI) port with HDMI to DVI cable, you should set the TV to DVI PC mode under
Edit Name.
– When connecting an AV devices to the HDMI IN 1(DVI) port with HDMI to DVI cable, you should set the TV to DVI Devices
mode under Edit Name.
• Information
You can see detailed information about the connected external device.
English - 8
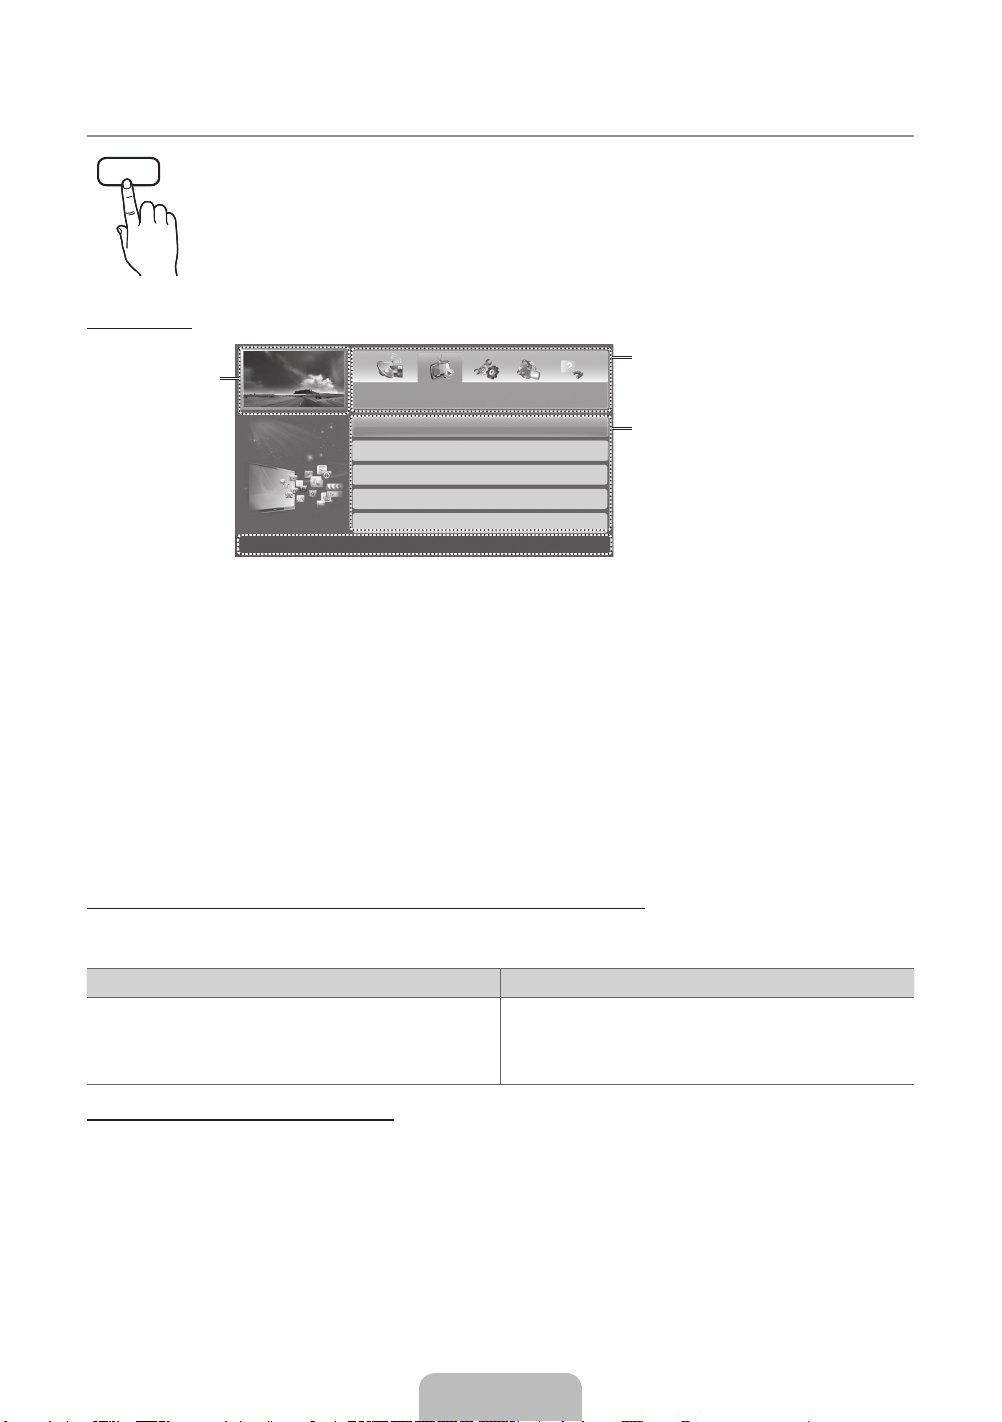
How to use the e-Manual
E-MANUAL
Screen Display
Currently displayed
video, TV
Programme, etc.
You can find instructions about your TV’s features in the e-Manual in your TV. To use, press the E-MANUAL button
on your remote. Move the cursor using the up/down/right/left buttons to highlight a category, then a topic, and then
press the ENTERE button. The e-Manual displays the page you want to see.
You can also access it through the menu:
MENUm → Support → e-Manual → ENTERE
O
✎
To return to the e-Manual main menu, press the E-MANUAL button on the remote.
The category list. Press ◄ or ► button to
Basic Features
Changing the Preset Picture Mode
Adjusting Picture Settings
Changing the Picture Options
Changing the Preset Sound Mode
Adjusting Sound Settings
}
Index E Enter e Exit
Operation Buttons
}
Index: Displays the index screen.
E
Enter: Selects a category or sub-menu.
e
Exit: Exit the e-Manual.
<Viewing the Contents>
a
Try now: Displays the OSD menu that corresponds to the topic. To return to the e-Manual screen, press
the E-MANUAL button.
b
Home: Moves to the e-Manual home screen.
L
Page: Moves to previous or next page.
{ Zoom: Magnifies a screen.
– Select the Zoom, and then press ENTER
magnified screen by using the ▲ or ▼ buttons. To return to the screen to normal size, press the
RETURN button.
E
select the category you want.
Displays the sub-menu list. Use the arrow
buttons on your remote to move the cursor.
Press ENTER
menu you want.
to magnify the screen. You can scroll through the
E
button to select the sub-
How to toggle between an e-Manual topic and the corresponding OSD menu(s).
✎
This function is not enabled in some menus.
✎
You cannot use the Try now function if the menu is not activated.
Method 1 Method 2
1. If you want to use the menu that corresponds to an e-Manual
topic, press the red button to select Try now.
2. To return to the e-Manual screen, press the E-MANUAL button.
1. Press the ENTERE button when a topic is displayed. “Are
you sure?” appears. Select Yes, and then press the ENTERE
button. The OSD window appears.
2. To return to the e-Manual screen, press the E-MANUAL button.
How to search for a topic on the index page
✎
This function may not be supported depending on the language.
1. If you want to search a keyword, press the blue button to select Index.
2. Press the ◄ or ► button to select a character order you want.
3. Press the ▲ or ▼ button to select a keyword you want to see, and then press the ENTERE button.
4. You can view the corresponding e-Manual instruction screen.
✎
To close the Index screen, press the RETURN button.
English - 9

Installing the Wall Mount
The wall mount kit (sold separately) allows you to mount the TV
on the wall. For detailed information on installing the wall mount,
see the instructions provided with the wall mount. Contact a
technician for assistance when installing the wall mount bracket.
We do not advice you to do it yourself.
Samsung Electronics is not responsible for any damage to the
product or injury to yourself or others if you elect to install the TV
on your own.
Wall Mount Kit Specifications (VESA)
✎
Wall mount kit is not supplied but sold separately.
Install your wall mount on a solid wall perpendicular to the floor.
When attaching to other building materials, please contact your
nearest dealer. If installed on a ceiling or slanted wall, it may fall
and result in severe personal injury.
✎
NOTE
Standard dimensions for wall mount kits are shown in
x
the table below.
When purchasing our wall mount kit, a detailed
x
installation manual and all parts necessary for assembly
are provided.
Do not use screws that do not comply with the VESA
x
standard screw specifications.
Do not use screws longer than the standard dimension,
x
as they may cause damage to the inside of the TV set.
For wall mounts that do not comply with the VESA
x
standard screw specifications, the length of the screws
may differ depending on their specifications.
Do not fasten the screws too strongly, this may damage
x
the product or cause the product to fall, leading to
personal injury. Samsung is not liable for these kinds of
accidents.
Samsung is not liable for product damage or personal
x
injury when a non-VESA or non-specified wall mount
is used or the consumer fails to follow the product
installation instructions.
Do not exceed 15 degrees tilt when mounting this TV.
x
inches
43~51 400 X 400
60~64 600 X 400
VESA Spec.
(A * B)
Do not install your Wall Mount
Kit while your TV is turned on.
It may result in personal injury
due to electric shock.
Standard
Screw
M8 4
Quantity
Securing the TV to the Wall
Caution: Pulling, pushing, or climbing onto the TV
may cause the TV to fall. In particular, ensure that
your children do not hang over or destabilize the TV;
doing so may cause the TV to tip over, resulting in
serious injuries or death. Follow all safety precautions
provided on the included Safety Flyer. For added
stability, install the anti-fall device for safety
purposes, as follows.
To avoid the TV from falling
1. Put the screws into the clamps and firmly fasten them onto the
wall. Confirm that the screws have been firmly installed onto the
wall.
✎
You may need additional material such as an anchor
depending on the type of wall.
✎
Since the necessary clamps, screws, and string are
not supplied, please purchase these additionally.
2. Remove the screws from the centre back of the TV, put the
screws into the clamps, and then fasten the screws onto the TV
again.
✎
Screws may not be supplied with the product. In this
case, please purchase the screws of the following
specifications.
3. Connect the clamps fixed onto the TV and the clamps fixed onto
the wall with a strong string and then tie the string tightly.
✎
NOTE
• Install the TV near to the wall so that it does not fall
backwards.
• It is safe to connect the string so that the clamps
fixed on the wall are equal to or lower than the
clamps fixed on the TV.
• Untie the string before moving the TV.
4. Verify all connections are properly secured. Periodically check
connections for any sign of fatigue for failure. If you have
any doubt about the security of your connections, contact a
professional installer.
English - 10
Troubleshooting
If the TV seems to have a problem, first try this list of possible problems and solutions. If none of these troubleshooting tips
apply, visit “www.samsung.com”, then click on Support, or call Samsung customer service centre.
Issues
• Make sure the AC power cord is securely plugged in to the wall outlet and the TV.
• Make sure the wall outlet is working.
• Try pressing the POWER button on the TV to make sure the problem is not the remote. If the TV turns on, refer to “Remote
control does not work” below.
Issues
• Check cable connections (remove and reconnect all cables connected to the TV and external devices).
• Set your external device’s (Cable/Set top Box, DVD, Blu-ray etc) video outputs to match the connections to the TV input. For
example, if an external device’s output is HDMI, it should be connected to an HDMI input on the TV.
• Make sure your connected devices are powered on.
• Be sure to select the TV’s correct source by pressing the SOURCE button on the remote control.
• Reboot the connected device by reconnecting the device’s power cable.
Issues
• Replace the remote control batteries with the poles (+/–) in the right direction.
• Clean the sensor’s transmission window on the remote.
• Try pointing the remote directly at the TV from 5~6 feet away.
Issues
• Program the Cable/Set top box remote control to operate the TV. Refer to the Cable/Set user manual for the SAMSUNG TV code.
✎
You can keep your TV as optimum condition to upgrade the latest firmware on web site (www.samsung.com → Support →
Downloads) by USB.
The TV will not turn on.
There is no picture/video.
The remote control does not work.
The cable/set top box remote control doesn’t turn the TV on or off, or adjust the volume.
Licence
Storage and Maintenance
✎
If you remove the attached sticker on the TV screen, clean the residues and then watch TV.
✎
The exterior and screen of the product can get scratched during cleaning. Be sure to wipe the exterior and screen carefully
using the cloth provided or a soft cloth to prevent scratches.
Do not spray water directly onto the product. Any liquid that goes
into the product may cause a failure, fire, or electric shock.
Clean the product with a soft cloth dapped in a small amount of
water. Do not use a flammable liquid (e.g. benzene, thinners) or a
cleaning agent.
English - 11
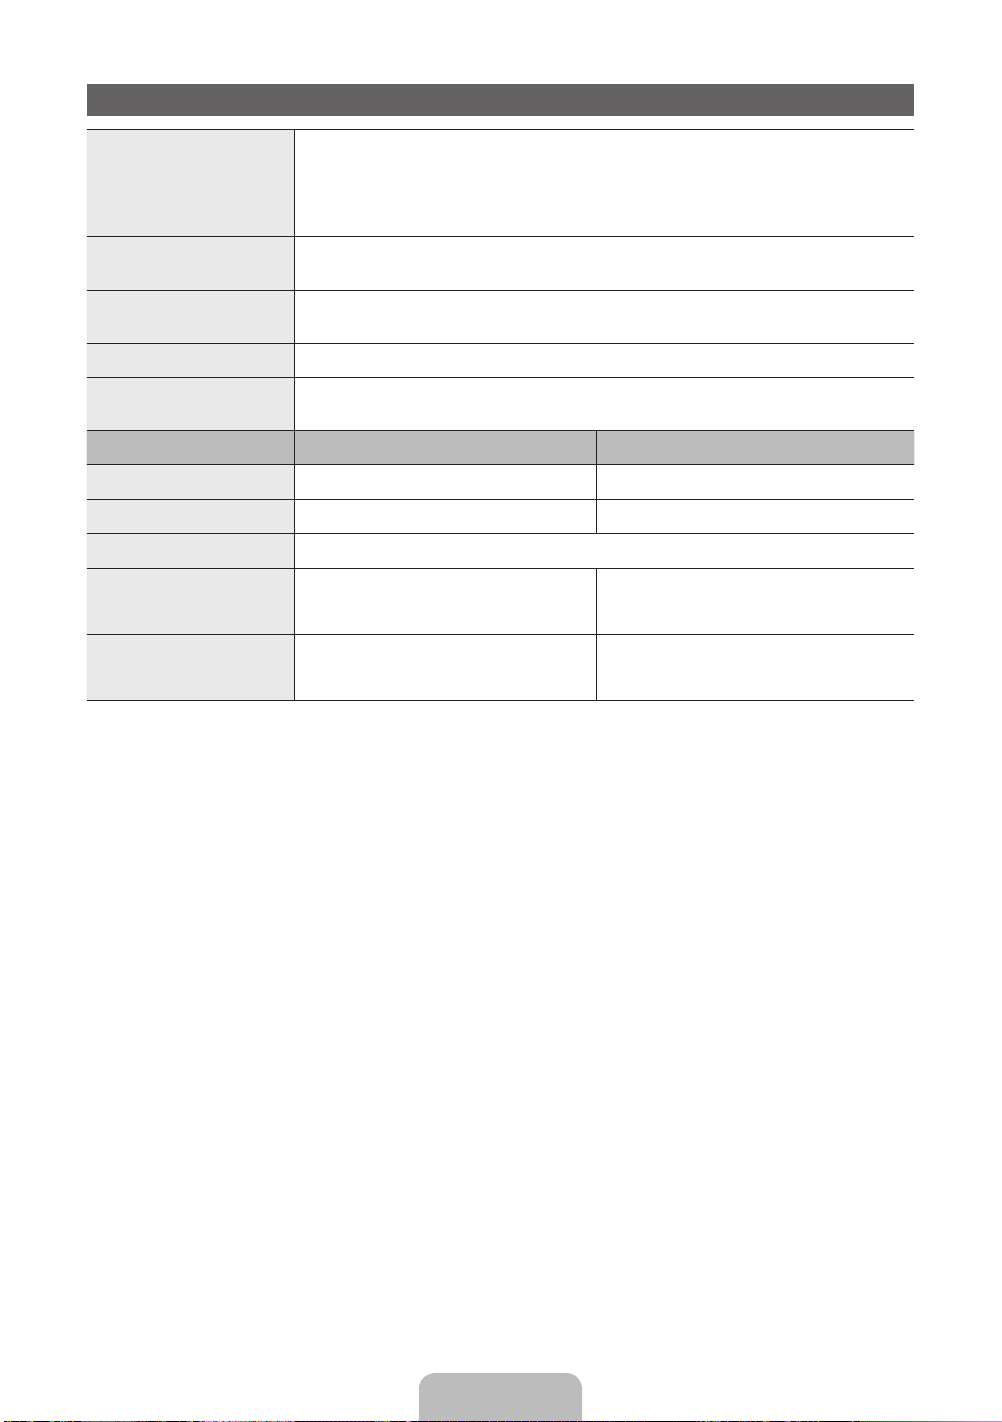
Specifications
10°C 40°C 50°F 104°F
10°C 40°C 50°F 104°F
-20°C 45°C -4°F 113°F
Environmental Considerations
Operating Temperature
Operating Humidity
Storage Temperature
Storage Humidity
TV System Analogue: B/G, D/K, L, I (Depending on your country selection)
Colour/Video System Analogue: PAL, SECAM, NTSC-4.43, NTSC-3.58, PAL60
Sound System BG, DK, L, NICAM, MPEG1, DD, DD+, HEAAC
HDMI IN Video: 1080 24p, 1080p, 1080i, 720p, 576p, 480p
Model Name PS51E535 PS60E535
Display Resolution 1920 X 1080 1920 X 1080 (Black & White)
Screen Size
Sound (Output) 10W X 2
Dimensions (WxDxH)
Body
With stand
Weight
Without Stand
With Stand
✎
Design and specifications are subject to change without prior notice.
✎
For information about power supply, and more about power consumption, refer to the label attached to the product.
✎
Typical power consumption is measured according to IEC 62087 Ed.2
Digital: MPEG-2 MP@ML, MPEG-4, H.264/AVC MP@L3, MP@L4.0, HP@L4.0
Audio: 2Ch Linear PCM 32/44.1/48kHz, 16/20/24bits.
inches
1187.8 X 56.0 X 706.6 (mm)
1187.8 X 252.0 X 781.9 (mm)
19.6 kg
22.1 kg
to
(
10% to 80%, non-condensing
to
5% to 95%, non-condensing
Digital: DVB-T/DVB-C
to
(
to
1389.3 X 56.0 X 828.2 (mm)
1389.3 X 330.0 X 907.9 (mm)
)
)
inches
28.3 kg
32.6 kg
English - 12
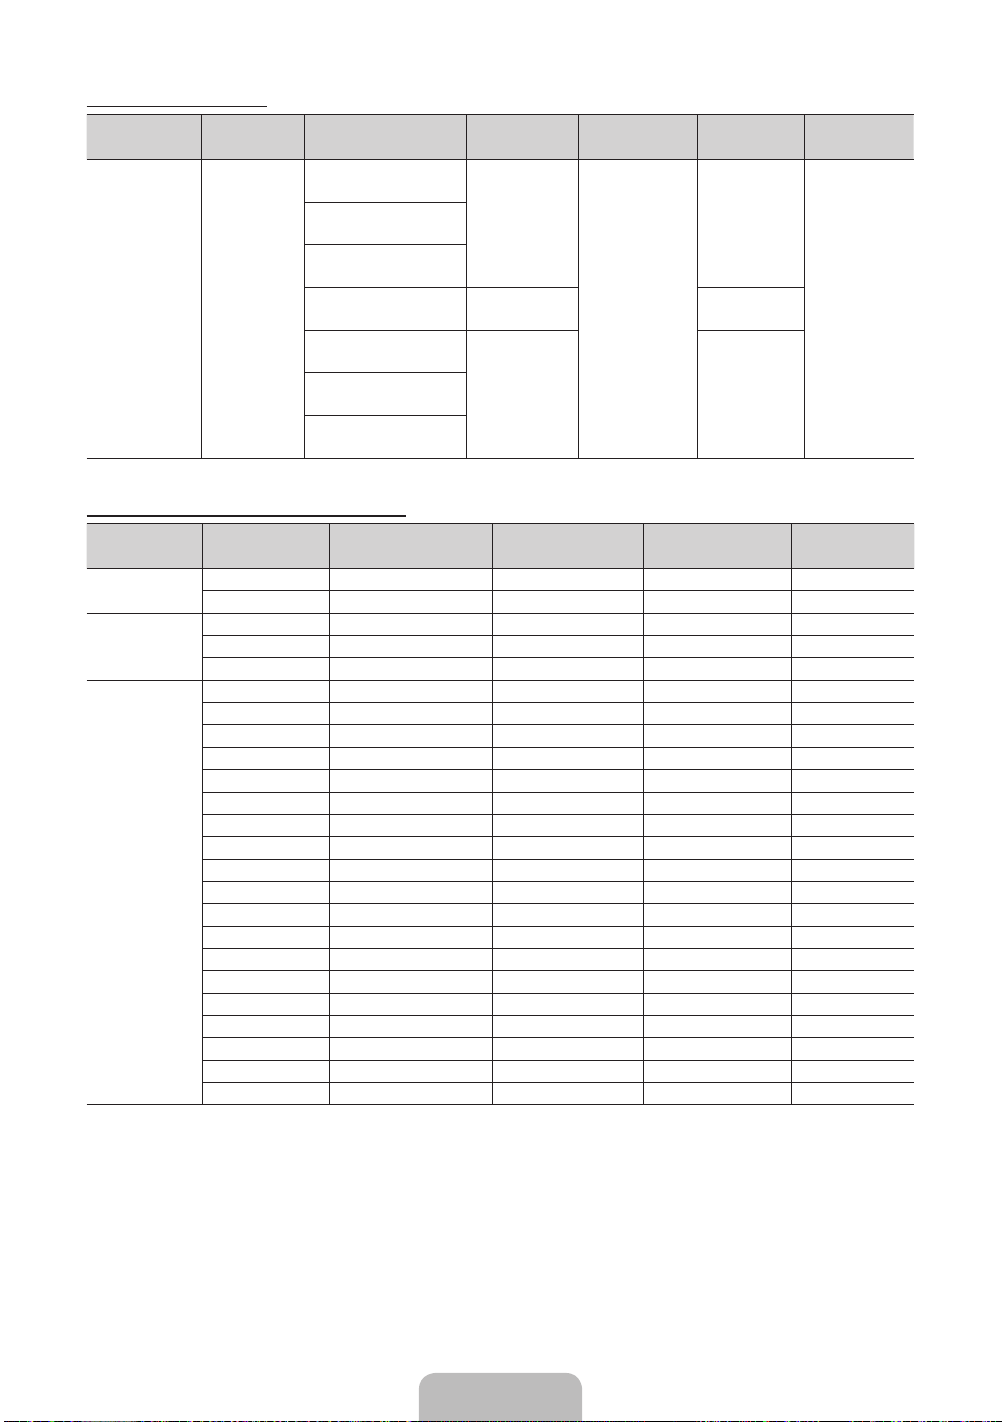
Supported Video Formats
File Extention Container Video Codec Resolution Frame rate (fps) Bit rate (Mbps) Audio Codec
*.avi
*.mkv
*.asf
*.wmv
*.mp4
*.3gp
*.vro
*.mpg
*.mpeg
*.ts
*.tp
*.trp
*.m2ts
*.mts
*.divx
AVI
MKV
ASF
MP4
3GP
VRO
VOB
PS
TS
DivX 3.11/4.x/5.x/6.1
MPEG4 SP/ASP
H.264 BP/MP/HP
Motion JPEG 640 x 480 8
Window Media Video v9
MPEG2
MPEG1
1920 x 1080
1920 x 1080 30
Full available resolution: 1920 X 1080 @ 60 Hz
Mode Resolution Horizontal Frequency (KHz) Vertical Frequency (Hz)
IBM
MAC
VESA DMT
640 x 350 31.469 70.086 25.175 +/-
720 x 400 31.469 70.087 28.322 -/+
640 x 480 35.000 66.667 30.240 -/-
832 x 624 49.726 74.551 57.284 -/-
1152 x 870 68.681 75.062 100.000 -/-
640 x 480 31.469 59.940 25.175 -/-
640 x 480 37.861 72.809 31.500 -/-
640 x 480 37.500 75.000 31.500 -/-
800 x 600 37.879 60.317 40.000 +/+
800 x 600 48.077 72.188 50.000 +/+
800 x 600 46.875 75.000 49.500 +/+
1024 x 768 48.363 60.004 65.000 -/-
1024 x 768 56.476 70.069 75.000 -/-
1024 x 768 60.023 75.029 78.750 +/+
1152 x 864 67.500 75.000 108.000 +/+
1280 x 720 45.000 60.000 74.250 +/+
1280 x 800 49.702 59.810 83.500 -/+
1280 x 1024 63.981 60.020 108.000 +/+
1280 x 1024 79.976 75.025 135.000 +/+
1366 x 768 47.712 59.790 85.500 +/+
1440 x 900 55.935 59.887 106.500 -/+
1600 x 900RB 60.000 60.000 108.000 +/+
1680 x 1050 65.290 59.954 146.250 -/+
1920 x 1080 67.500 60.000 148.500 +/+
6~30
Pixel Clock Frequency
(MHz)
30
AC3
LPCM
ADMPCM
(IMA, MS)
AAC
HE-AAC
WMA
DD+
MPEG
(MP3)
DTS Core
Sync Polarity (H / V)
English - 13

Mer information om hur du använder e-Manual (sid. 9)
Siffror och bilder i den här bruksanvisningen är endast till för referens och kan skilja sig från den verkliga produkten. Produktdesign
och -specifikationer kan ändras utan föregående meddelande.
Digital-TV-meddelande
1. Funktionalitet som är relaterat till Digital TV(DVB) är endast tillgängligt i länder/områden där DVB-T (MPEG2 och MPEG4 AVC) digitala
signaler sänds eller där du har åtkomst till en kompatibel DVB-C(MPEG2 och MPEG4 AAC) kabel-tv-tjänst. Kontakta din lokala återförsäljare
angående möjligheten att ta emot DVB-T- eller DVB-C-signal.
2. DVB-T är DVB EU-konsortiumstandard för sändningen av digital, satellit-tv och DVB-C är sändning av TV via kabel. Vissa skilda funktioner
som EPG (Electric Programme Guide), VOD (Video On Demand) etc. är inte inkluderade i den här specifikationen. De fungerar inte just nu.
3. Även om den här TV:n uppfyller de senaste standarderna för DVB-T och DVB-C [augusti, 2008] kan inte framtida kompatibilitet med DVB-T
digital markbunden sändning och DVB-C digitalkabelsändning garanteras.
4. Beroende på vilket land/område som TV:n används i kan vissa kabel-tv-leverantörer ta extra avgifter för en sådan tjänst och du kanske
måste ingå ett avtal med företaget.
5. Vissa digital-TV-funktioner kanske inte är tillgängliga i vissa länder eller regioner och DVB-C kanske inte fungerar som det ska med alla
kabel-tv-leverantörer.
6. För ytterligare information, kontakta ditt lokala kundcenter för Samsung.
TV:ns mottagningskvalitet kan variera beroende på olika sändningssätt i olika länder. Kontrollera TV:ns prestanda hos din lokala
✎
auktoriserade återförsäljare för SAMSUNG eller hos Samsungs kundcenter för att se om den kan förbättras genom att omkonfigurera
TV-inställningarna.
Användaranvisningar
• Inbränning
Visa inte en stillbild (exempelvis vid TV-spel) på plasmabildskärmen i mer än några minuter, eftersom det kan leda till att bilden ligger kvar på
skärmen. Att bilden på skärmen ligger kvar kallas även ”inbränning”. Du kan undvika inbränning genom att minska bildskärmens ljusstyrka
och kontrast när du visar stillbilder.
• Ovansidan av plasma-TV:n är varm
Observera att produktens ovansida kan bli varm efter långvarig användning, eftersom värmen avges genom ventilationshålet på produktens
ovansida.
Detta är helt normalt och beror inte på något fel på produkten.
Barn ska dock inte röra vid produktens ovansida.
• Det hörs ett ”knakande” ljud från produkten.
Ett ”knakande” ljud kan uppstå om produkten dras ihop eller vidgas något beroende på exempelvis temperaturväxlingar eller ändringar i
luftfuktigheten. Det är normalt och beror inte på något fel på produkten.
• Defekta celler
Plasmabildskärmen består av en panel med 2360000 (HD-nivå) till 6221000 (FHD-nivå) pixlar, vilket kräver en väl utvecklad teknik. Det
kan dock finnas några få mörka eller ljusa pixlar på skärmen. Dessa pixlar har ingen inverkan på produktens prestanda.
• Undvik att använda TV:n i temperaturer som understiger 5°C
• En stillbild som visas för länge på skärmen kan orsaka permanenta skador på plasmabildskärmen.
Om plasma-TV:n används i 4:3-format under en längre tid kan skillnaden i ljusstrålning på skärmen lämna spår av kanterna
som visas till vänster, höger och i mitten på skärmen. Om du spelar en DVD eller ett spel kan det orsaka liknande effekter
på skärmen.
Skador som orsakas av det som beskrivs ovan täcks inte av garantin.
• Efterbilder på skärmen.
Visning av stillbilder från tv-spel och datorer längre stunder kan skapa delvisa efterbilder.
För att förhindra detta ska du minska på "ljusstyrka" och "kontrast" vid visning av stillbilder under längre tid.
• Garanti
Garantin täcker inga skador som orsakas av efterbilder.
Inbränning täcks inte av garantin.
Korrekt avfallshantering av produkten (Elektriska och elektroniska produkter)
(Gäller inom EU och andra europeiska länder med särskilda återvinningssystem)
Denna markering på produkten, tillbehören och i manualen anger att produkten och de elektroniska tillbehören (t.ex. laddare, headset, USB-kabel) inte
bör sorteras tillsammans med annat hushållsavfall när de kasseras. Till förebyggande av skada på miljö och hälsa bör dessa föremål hanteras separat
för ändamålsenlig återvinning av beståndsdelarna. Hushållsanvändare bör kontakta den återförsäljare som sålt produkten eller sin kommun för vidare
information om var och hur produkten och tillbehören kan återvinnas på ett miljösäkert sätt. Företagsanvändare bör kontakta leverantören samt verifiera
angivna villkor i köpekontraktet. Produkten och de elektroniska tillbehören bör inte hanteras tillsammans med annat kommersiellt avfall.
Korrekt avfallshantering av batterierna i denna produkt
(Gäller EU och andra europeiska länder med särskild batteriåtervinning)
Denna markering på batteriet, i manualen eller på förpackningen anger att batterierna i denna produkt inte bör slängas tillsammans med annat
hushållsavfall. De kemiska symbolerna Hg, Cd eller Pb visar i förekommande fall att batterierna innehåller kvicksilver, kadmium eller bly i mängder
överstigande de gränsvärden som anges i EU-direktivet 2006/66. Om batterierna inte slängs på ett ansvarsfullt sätt kan dessa substanser utgöra
en fara för hälsa eller miljö. Hjälp till att skydda naturresurser och bidra till materialåtervinning genom att sortera batterierna separat från annat
avfall och lämna in dem på en återvinningsstation.
Svenska - 2

Tillbehör
B
✎
Försäkra dig om att följande delar följer med din TV. Kontakta din återförsäljare om det saknas något.
✎
Produktens färg och form kan variera beroende på modell.
✎
Kablar som inte medföljer i förpackningen kan köpas separat.
• Fjärrkontroll och batterier (AAA x 2) • Strömsladd
• Bruksanvisning • Rengöringstrasa
• Garantibevis / Säkerhetsmanual (inte tillgänglig på alla platser)
Ferritkärna (1EA)
✎
Ferritkärna för strömkabel: Ferritkärnorna används för att skydda kablarna mot störningar. När du
ansluter en kabel öppnar du ferritkärnan och klämmer den kring kabeln nära kontakten så som
visas på bilden.
A Maximalt avstånd mellan ferritkärnan och änden av kabeln som sitter i TV:n: 3/4 tum
x
✎
En administrationsavgift kan tillkomma om
(a) en tekniker tillkallas och det inte är något fel på produkten
(t.ex. om du inte har läst den här bruksanvisningen),
(b) du tar med produkten till ett reparationscenter och det inte finns något fel på produkten
(t.ex. om du inte har läst den här bruksanvisningen),
✎
Du informeras om beloppet för en dylik administrationsavgift innan det att arbetet eller hembesöket genomförs.
A
Strömsladd
Svenska - 3

Använda TV:ns kontroll (panelknapp)
Styrspaken på TV:n är en riktningsknapp för
navigering utan fjärrkontrollen.
✎
Vissa funktioner som kräver en PIN-kod är
eventuellt inte tillgängliga.
✎
Produktens färg och form kan variera
beroende på modell.
✎
Menyn stängs om du trycker på styrspaken
längre än 1 sekund.
✎
När du väljer funktionen genom att flytta
kontrollen uppåt/nedåt/åt vänster/åt
höger ska du se till att du inte trycker på
kontrollen. Om du trycker på den först kan
du inte använda den för att gå i riktningarna
uppåt/nedåt/åt vänster/åt höger.
Slå på Tryck på styrspaken medan TV:n är i vänteläge för att slå på den.
Justera volymen För styrspaken från sida till sida medan TV:n är på för att justera volymen.
Välja en kanal För spaken upp eller ned medan TV:n är på för att välja en kanal.
Använda funktionsmenyn Tryck på styrspaken medan TV:n är på för att visa funktionsmenyn. Om du trycker på
Använda menyn
Välja källan Använd styrspaken för att välja Källa( ) i funktionsmenyn. Listan Källa visas.
Välja Innehåll – hem Använd styrspaken för att välja Innehåll – hem( ) i funktionsmenyn.
Stänga av
Vänster
den igen döljs funktionsmenyn.
Använd styrspaken till att välja MENY(m) i funktionsmenyn. Skärmmenyn (OSD) för
TV:ns funktioner visas.
Huvudskärmen för Innehåll – hem visas.
Använd styrspaken till att välja Ström av(m) i funktionsmenyn för att slå av TV:n.
Ned (framåt)
Höger
Upp (bakåt)
Styrspaken på TV:n
Funktionsmenyn
Tillbaka
Mottagare för fjärrkontrollen
Standbyläge
Låt inte TV:n vara i standbyläget under en längre tid (t.ex. när du är på semester). Apparaten drar ström även när strömknappen är
avstängd. Det bästa är att dra ur strömsladden.
Säkra installationsutrymmet
Se till att hålla angivet avstånd mellan produkten och andra föremål (t.ex. väggar) för att ventilationen ska vara tillräcklig.
Om detta inte följs kan det orsaka brand eller produktproblem på grund av för hög inre temperatur i produkten.
✎
När du använder ett stativ eller ett väggstativ ska du endast använda delar som tillhandahålls av Samsung Electronics.
Om du använder delar från en annan tillverkare kan det orsaka problem med produkten eller skador på grund av att
x
produkten faller.
✎
Utseendet kan skilja sig beroende på produkt.
✎
Var försiktig när du tar i TV:n, eftersom vissa delar kan vara mycket varma.
Installation med stativ. Installation med väggfäste.
10 cm
10 cm10 cm
10 cm
10 cm
10 cm
10 cm
Svenska - 4

Översikt över fjärrkontrollen
✎
Detta är en särskild fjärrkontroll för synskadade, den har blindskrift på knappen Power samt på kanal- och volymknapparna.
Slår på och stänger av TV:n
Alternativt väljer du text-tv PÅ, dubbel, mix
eller AV.
Justerar volymen.
Visar skärmmenyn.
Visar Innehåll – hem.
Välj enkelt funktioner som används ofta.
Väljer menyalternativ på skärmen och ändrar de
värden som visas på menyn.
Återgår till föregående meny.
E-MANUAL: Visar e-Manual-guiden.
(sid. 9)
P.SIZE: Väljer Bildstorlek.
AD/SUBT.: Val av ljudbeskrivning. (Ej
tillgängligt överallt) / Visar digital undertext.
CONTENT
A B C D
E-MANUAL
P.SIZE
AD/SUBT.
Visar och väljer tillgängliga videokällor.
Tryck för direkt åtkomst till kanalerna.
Går tillbaka till föregående kanal.
Stänger av ljudet tillfälligt.
Byter kanal.
Visar kanallistan på skärmen.
Visar EPG-information (Elektronisk
programguide).
Visar information på TV-skärmen.
Stänger menyn.
Använd de här knapparna enligt instruktionerna
på skärmen.
Använd de här knapparna i en specifik
funktion.
Mer information finns i e-Manual.
Sätta i batterier (batteristorlek: AAA)
Svenska - 5

Grundinställning
När TV:n slås på första gången visas en sekvens med uppmaningar på skärmen som hjälper dig att konfigurera grundinställningarna.
Tryck på knappen POWERP. Inställning är bara tillgängligt när källan är inställd på TV.
1. Menyspråk: Välja menyspråk
Tryck på knappen ▲ eller ▼ och sedan på knappen ENTERE.
Välj önskat skärmspråk (OSD-språk).
2. Användarläge: Välja Butiksdemo eller Hemmabruk
Tryck på knappen ▲ eller ▼ och sedan på knappen ENTERE.
Välj läget Hemmabruk. Läget Butiksdemo är avsett för återförsäljarmiljöer.
✎
När du trycker på TV-styrspaken visas funktionsmenyn. Använd styrspaken till att välja MENY(m) och tryck sedan på den i
över 5 sekunder. Läget Butiksdemo ställs in.
✎
Inaktivera Butiksdemo genom att välja Källa( ) och sedan trycka på styrspaken i över 5 sekunder.
✎
Butiksdemo är endast till för butiksvisning Om du väljer det går flera av funktionerna inte att använda. Välj Hemmabruk när
du använder TV:n hemma.
3. Land (landsberoende): Välja land
Tryck på knappen ▲ eller ▼ och sedan på knappen ENTERE.
Välj land.
4. Autoinställning (steg 1): Välja hur du tittar på TV:n
Låt oss hitta och spara kanaler på din TV. Vill du söka efter kanaler?
• Ja, jag behöver söka efter kanaler.: Memorera alla kanaler som finns tillgängliga via RF-kabel.
• Nej, Jag behöver inte söka efter kanaler: Du behöver inte använda autoinställning för att söka kanaler.
5. Autoinställning (steg 2): Välja alternativ för sökning
Välj önskad sändningssignal och antennkälla. Tryck först på knappen ▲/▼/◄/► och sedan på knappen ENTERE.
Om du ställer in antennkällan som Kabel visas ett steg där du kan tilldela kanalerna numeriska värden (kanalfrekvenser). För mer
information, se Kanal → Autoinställning.
✎
Tryck på knappen ENTERE när som helst för att avbryta memoreringsprocessen.
✎
Se kapitlet e-Manual ”Söka om kanaler > Autoinställning”
6. Klocka: Ställa in Klockläge
• Auto: Ställa in den aktuella tiden manuellt.
• Manuellt: Ställa in aktuellt datum och aktuell tid manuellt.
7. Tidszon (beroende på land): Ställa in tidszonen
Det här steget är endast tillgänglig när klockläget är inställt som Auto.
• Auto: Ställa in tidszonen automatiskt.
• Manuellt: Ställa in tidszonen manuellt.
✎
Om du har valt Manuellt kan du välja om du vill slå På eller Av DST (sommartid). (landsberoende)
8. Installation klar
Tryck på knappen ENTERE.
✎
De slutförda inställningarna visas.
Så här återställer du den här funktionen:
Välj System - Inställning (grundinställning). Ange din 4-siffriga PIN-kod. Standard-PIN-koden är ”0-0-0-0”. Om du vill ändra PIN-koden
använder du funktionen Ändra PIN.
Du ska göra Inställning (MENU → System) igen hemma trots att du gjorde det i butiken.
✎
Om du har glömt PIN-koden kan du återställa PIN-koden till "0-0-0-0" genom att trycka på fjärrkontrollens knappar i följande
ordning: MUTE → 8 → 2 → 4 → POWER (på)
Svenska - 6

Anslutningar
AV-anslutning
BD-spelare
VIDEO OUT
Y
Y
✎
Läget stöder både
komponent- och AVanslutning i en port.
AUDIO OUT
R-AUDIO-L
R
W
WR
Komponentanslutning
BD-spelare
COMPONENT OUT
PRP
R B RG
R B
Y
B
R
G
AUDIO OUT
R-AUDIO-L
R
W
WR
HDMI, HDMI/DVI-anslutning
BD-spelare / PC
AUDIO OUT
PC
R-AUDIO-L
R
W
DVI OUT
HDMI IN 1
(DVI)
HDMI OUT
TV-sidopanel
TV:ns bakpanel
✎
Portarnas placering kan
ANT IN
variera beroende på
modell.
VHF/UHF-antenn
Kabel
eller
✎
PDP-enheten kan utsända störningar för
amatörradio och AM-radio.
✎
Vid användning med tvåvägs radiomobil
och bärbara enheter eller amatörradio
eller AM-radio nära TV:n kan detta göra
att TV:n inte fungerar som den ska.
✎
Utrustning som är kopplad till
skyddsjord via jordat vägguttag och/
eller via annan utrustning och samtidigt
är kopplad till kabel-TV nät kan i vissa
fall medfőra risk főr brand.
SERVICE
DIGITAL
AUDIO OUT
(OPTICAL)
OPTICAL
Ljudanslutning
COMPONENT / AV IN
VIDEO
EXT (RGB)
VHS eller DVD
SCART-anslutning
AUDIO
HDMI IN 2
(5V 0.5A)
USB
EXT
Hörlurarslutning
Svenska - 7

Visningslägen (HDMI-/DVI-ingång)
Optimal upplösning är 1920 X 1080 @ 60Hz. Se specifikationssidan för fullt tillgänglig upplösning.
SERVICE
SERVICE
✎✎
OBS!
• Vid en HDMI-/DVI-kabelanslutning måste du använda HDMI IN 1(DVI)-porten.
• Läget för radsprång kan inte användas.
• Om ett videoformat som inte är standard väljs, kan det hända att enheten inte fungerar som den ska.
• Separat läge och kompositläge stöds. SOG(Sync On Green) stöds inte.
• PC-ingång (D-Sub) stöds inte.
• Anslutning genom HDMI-kabeln kanske inte stöds beroende på datorn.
• Hörlursuttaget stöder bara TRS-kabel med 3 ledare (Tip Ring Sleeve).
Anslutning enbart för service
Ansluta till en COMMON INTERFACE-plats
(din kortplats för TV-visning)
För att kunna titta på betalkanaler måste ”CI eller CI+ CARD” matas in.
• Om du inte matar in ”CI eller CI+ CARD” kommer vissa kanaler att
visa meddelandet ”Förvrängd signal”.
• Information som bland annat omfattar ett telefonnummer, ”CI eller CI+
CARD” ID, värd-ID och annan information som visas i ungefär 2-3
minuter. Om ett felmeddelande visas kontaktar du tjänsteleverantören.
• När konfigurationen av kanalinformationen slutförts visas
meddelandet ”Updating Completed”, vilket innebär att kanallistan
uppdaterats.
y Bilden som visas kan variera beroende på
modell.
TV-sidopanel
Ändra ingångskällan
Källa
TV / Ext. / HDMI1/DVI / HDMI2 / AV / Component
Används för att välja TV eller annan extern ingångskälla såsom DVD/Blu-ray-spelare/kabelbox/STB satellitmottagare som är ansluten till
TV:n.
✎
Vid visning av listan Källa markeras anslutna ingångar.
✎
PC-ingång (D-Sub) stöds inte. Om du vill ansluta datorn till TV:n ska du använda en HDMI1/DVI-ingång.
✎
Ext. är alltid aktiverat.
✎
Tryck på knappen TOOLS.
• Ändra namn
Du kan ställa in önskat namn för en extern ingångskälla.
– När du ansluter en dator till porten HDMI IN 1(DVI) med HDMI-kabeln ska du ställa in TV:n på läget PC under Ändra
namn.
– När du ansluter en dator till porten HDMI IN 1(DVI) med HDMI- till DVI-kabeln ska du ställa in TV:n på läget DVI PC under
Ändra namn.
– När du ansluter en AV-enhet till porten HDMI IN 1(DVI) med HDMI- till DVI-kabeln ska du ställa in TV:n på läget DVI-
enheter under Ändra namn.
• Information
Du kan se detaljerad information om den anslutna externa enheten.
Svenska - 8

Visa e-Manual
E-MANUAL
Skärmvisning
Aktuell video,
aktuellt TV-program
Du ser instruktioner om TV:ns funktioner i e-Manual på din TV. Tryck på knappen E-MANUAL på fjärrkontrollen för
att använda e-Manual. Flytta markören med pilknapparna uppåt/nedåt/höger/vänster för att markera en kategori
och sedan ett ämne och tryck sedan på knappen ENTERE. e-Manual visar sidan du vill se.
Du kan också öppna e-Manual direkt via menyn.
MENUm → Support → e-Manual → ENTERE
O
✎
För att återgå till huvudmenyn för e-Manual trycker du på knappen E-MANUAL på fjärrkontrollen.
Kategorilistan. Tryck på knappen ◄ eller ►
för att välja den kategori du vill ha.
Visar undermenylistan. Använd pilknapparna
på fjärrkontrollen för att flytta markören.
Tryck på knappen ENTER
den undermeny du vill ha.
för att förstora skärmen. Du kan bläddra igenom
E
för att välja
etc.
Funktionsknappar
}
Index: Visa indexskärmen.
E
Enter: Välja en kategori eller undermeny.
e
Avsluta: Stänger e-Manual.
<Visa innehållet>
a
Försök nu: Visa skärmspråksmenyn som överensstämmer med ämnet. För att återgå till skärmen för
b
Startsida: Öppna startsidan för e-Manual.
L
Sida: Gå till föregående eller nästa sida.
{ Zoom: Förstorar en skärm.
– Välj Zoom och tryck på knappen ENTER
Grundfunktioner
Ändra det förinställda bildläget
Ändra bildinställningar
Ändra bildalternativen
Ändra förinställt ljudläge
Ändra ljudinställningar
}
Index E Enter e Avsluta
e-Manual trycker du på knappen E-MANUAL.
den förstorade skärmen genom att använda knapparna ▲ eller ▼. För att återgå till skärmen för
normal storlek trycker du på knappen RETURN.
E
Växla mellan e-Manual och överensstämmande meny(er).
✎
Den här funktionen är inte aktiverad i vissa menyer.
✎
Du kan inte använda funktionen Försök nu om menyn inte aktiveras.
Metod 1 Metod 2
1. Om du vill använda menyn som överensstämmer med ett ämne
i e-Manual trycker du på den röda knappen för att välja Försök
nu.
2. För att återgå till skärmen för e-Manual, trycker du på knappen
E-MANUAL.
1. Tryck på knappen ENTERE när ett ämne visas. “Vill du utföra
detta?” visas. Välj Ja, och tryck sedan på knappen ENTERE.
Skärmspråksfönstret visas.
2. För att återgå till skärmen för e-Manual, trycker du på knappen
E-MANUAL.
Så här söker du ett ämne på index-sidan
✎
Den här funktionen kanske inte stöds beroende på språk.
1. Om du vill söka efter ett nyckelord trycker du på den blå knappen för att öppna skärmen Index.
2. Tryck på ◄ eller ► för att välja en önskad teckenordning.
3. Tryck på knappen ▲ eller ▼ för att välja ett nyckelord du vill se och tryck sedan på knappen ENTERE.
4. Du kan visa motsvarande instruktionsskärm för e-manualen.
✎
Om du vill stänga skärmen för Index ska du trycka på knappen RETURN.
Svenska - 9

Installera väggfästet
Objekt för väggmontering (säljs separat) gör det möjligt för dig
att montera TV:n på väggen. För detaljerad information om hur
du utför en väggmontering, se de medföljande anvisningarna
för väggmontering. Kontakta en tekniker för montering av
väggfästet. Vi rekommenderar inte att du gör detta själv.
Samsung Electronics är inte ansvarigt för skador på produkten
eller personskada på dig själv eller andra om du väljer att
montera TV:n själv.
Specifikationer för väggmonteringssats (VESA)
✎
Väggmonteringssatsen medföljer inte utan säljs separat.
Installera väggfästet på en fast vägg som är helt lodrät mot
golvet. Vid montering i andra byggmaterial, kontakta närmaste
återförsäljare. Om den har installerats i ett tak eller en vägg som
lutar kan det resultera i allvarlig personskada.
✎
OBS!
Standardmåtten för väggfästessatser visas i tabellen
x
nedan.
Vid köp av vår väggmonteringssats, medföljer en
x
detaljerad installationsmanual och alla nödvändiga delar
för montering.
Använd inte skruvar som inte efterlever VESA-standard
x
för skruvspecifikationer.
Använd inte skruvar som är längre än standardmåtten,
x
eftersom de kan orsaka skada inne i TV:n.
För väggmonteringar som inte överensstämmer med
x
VESA-standard för skruvspecifikationer kan skruvarnas
längd variera beroende på specifikationerna.
Fäst inte skruvarna för hårt, då det kan skada produkten
x
eller göra att den ramlar ned och leda till personskada.
Samsung ansvarar inte för den här typen av olyckor.
Samsung ansvarar inte för produkt- eller personskada
x
som uppstår till följd av att en väggmontering som inte
är VESA-certifierad används eller om kunden underlåter
att följa produktinstallationsbeskrivningarna.
Överskrid inte 15 graders lutning vid montering av den
x
här TV:n.
Montera TV:n på väggen
Varning!: Om du drar i, trycker på eller klättrar på
TV:n kan det göra att den faller ned. Se till att barn
inte hänger på eller ruckar på TV:n; om de gör det
kan det göra att TV:n välter och detta kan leda till
allvarlig skada eller till och med dödsfall. Följ alla
säkerhetsanvisningar som medföljer i säkerhetsflyern.
För ökad stabilitet, installera antifallenheten, enligt
följande.
Så här gör du för att undvika att TV:n faller ned:
1. Skruva i skruvarna ordentligt i klämmorna och dra åt dem mot
väggen. Se till att skruvarna har skruvats fast ordentligt i väggen.
✎
Det kan krävas ytterligare material, såsom
förankringar, beroende på typ av vägg.
✎
Eftersom nödvändiga klämmor, skruvar och band inte
medföljer måste dessa köpas separat.
2. Ta bort skruvarna från TV:ns baksida i mitten, skruva fast dem i
klämmorna och dra sedan åt skruvarna i TV:n igen.
✎
Skruvar kanske inte medföljer produkten. I så fall ska
du köpa skruvar med följande specifikationer.
3. Anslut klämmorna ordentligt på TV:n och dra sedan åt med ett
starkt band och knyt bandet ordenligt.
✎
OBS!
• Installera TV:n ordentligt på väggen så att den inte
faller ned baklänges.
• Det är säkert att ansluta bandet så att klämmorna
som sitter fast i väggen är i samma nivå eller lägre än
klämmorna som sitter fast i TV:n.
• Knyt upp bandet innan du flyttar på TV:n.
4. Se till att alla anslutningar sitter fast ordentligt. Kontrollera
anslutningarna så att det inte finns någon risk att de släpper eller
sitter för löst. Om du har frågor angående säkerheten avseende
dina anslutningar ska du kontakta en professionell fackman.
tum
43~51 400 X 400
60~64 600 X 400
VESA-spec. (A
* B)
Installera inte
väggmonteringssatsen när
TV:n är påslagen. Det kan leda
till personskada på grund av
elektriska stötar.
Standardskruv Kvantitet
M8 4
Svenska - 1010

Felsökning
Om TV:n verkar ha ett problem ska du först försöka lista ut möjliga problem och lösningar. Om inget av dessa felsökningstips
hjälper ska du besöka "www.samsung.com" och klicka på Support eller kontakta ett kundtjänstcenter för Samsung.
Problem
• Se till att strömsladden sitter fast i ordentligt i vägguttaget och TV:n.
• Kontrollera att det finns ström i vägguttaget.
• Prova att trycka på POWER-knappen på TV:n för att se till problemet inte är fjärrkontrollen. Om TV:n slås på ska du se avsnittet
"Fjärrkontrollen fungerar inte" nedan.
Problem
• Kontrollera kabelanslutningarna (ta ur och koppla in alla kablar på TV:n och de externa enheterna).
• Ställ in din externa enhets (kabel-/digital-tv-box, DVD, Blu-ray etc) videoutgång för att matcha anslutningarna till TV-ingången. Om
exempelvis en utgång för en extern enhet är HDMI, ska den anslutas till en HDMI-ingång på TV:n.
• Se till att de anslutna enheterna är påslagna.
• Se till att välja TV:ns rätta källa genom att trycka på knappen SOURCE på TV:ns fjärrkontroll.
• Starta om den anslutna enheten genom att återansluta enhetens strömkabel.
Problem
• Byt fjärrkontrollens batterier och sätt polerna (+/–) åt rätt håll.
• Rengör sensorns sändningsfönster på fjärrkontrollen.
• Prova att rikta fjärrkontrollen direkt mot TV på 5~6 fots avstånd.
Problem
• Programmera kabel-tv-boxens fjärrkontroll så att den även fungerar till TV:n. Mer information om SAMSUNG TV-kod finns i
bruksanvisningen till kabel-tv-boxen.
✎
Du kan hålla TV:n på optimal nivå genom att uppgradera till senaste fasta programvara på webbplatsen (www.samsung.com →
Support → Filarkiv) via USB.
TV:n slås inte på.
Det finns ingen bild/video.
Fjärrkontrollen fungerar inte.
Kabelboxens fjärrkontroll slår inte på eller av TV:n, eller så justeras inte volymen.
Licens
Förvaring och skötsel
✎
Om du tar bort etiketten som sitter på TV-skärmen kan det sitta kvar rester som ska avlägsnas innan du tittar på TV.
✎
Exteriören och skärmen på produkten kan repas under rengöring. Se till att du torkar av utsidan och skärmen försiktigt med
den medföljande trasan, eller en mjuk trasa, för att förhindra repor.
Spraya inte vatten rakt på produkten. All vätska som tränger in i
produkten kan orsaka fel, brand och elektrisk kortslutning.
Rengör produkten med en mjuk trasa som har doppats i lite
vatten. Använd inte antändbara vätskor (t.e.x bensen, tinner) eller
ett rengöringsmedel.
Svenska - 1111

Specifikationer
10°C 40°C 50°F 104°F
10°C 40°C 50°F 104°F
-20°C 45°C -4°F 113°F
Miljöfaktorer
Temperatur vid drift
Luftfuktighet vid drift
Temperatur vid förvaring
Luftfuktighet vid förvaring
TV-system Analogt: B/G, D/K, L, I (beroende på val av land)
Färg-/videosystem Analogt: PAL, SECAM, NTSC-4.43, NTSC-3.58, PAL60
Ljudsystem BG, DK, L, NICAM, MPEG1, DD, DD+, HEAAC
HDMI IN Video: 1080 24p, 1080p, 1080i, 720p, 576p, 480p
Modellnamn PS51E535 PS60E535
Upplösning 1920 X 1080 1920 X 1080 (Svartvit)
Skärmstorlek
Ljud (utgång) 10W X 2
Mått (BxDxH)
Stomme
Med stativ
Vikt
Utan stativ
Med stativ
✎
Design och specifikationer kan ändras utan föregående meddelande.
✎
Effektspecifikationer och effektförbrukningen finns på etiketten som sitter på produkten.
✎
Den normala strömförbrukningen mäts i enlighet med IEC 62087 Ed.2
Digital: MPEG-2 MP@ML, MPEG-4, H.264/AVC MP@L3, MP@L4.0, HP@L4.0
Ljud: 2Ch linjär PCM 32/44.1/48kHz, 16/20/24 bitar.
tum
1187,8 X 56,0 X 706,6 (mm)
1187,8 X 252,0 X 781,9 (mm)
19,6 kg
22,1 kg
till
(
10% till 80%, icke kondenserande
till
5% till 95%, icke kondenserande
Digital: DVB-T/DVB-C
till
(
)
till
1389,3 X 56,0 X 828,2 (mm)
1389,3 X 330,0 X 907,9 (mm)
)
tum
28,3 kg
32,6 kg
Svenska - 1212

Videoformat som stöds
Filtillägg Innehåll Video Codec Upplösning
Ramhastighet
(fps)
Bithastighet
(Mbps)
Audio Codec
*.avi
*.mkv
*.asf
*.wmv
*.mp4
*.3gp
*.vro
*.mpg
*.mpeg
*.ts
*.tp
*.trp
*.m2ts
*.mts
*.divx
AVI
MKV
ASF
MP4
3GP
VRO
VOB
PS
TS
DivX 3.11/4.x/5.x/6.1
MPEG4 SP/ASP
H.264 BP/MP/HP
Motion JPEG 640 x 480 8
Window Media Video v9
MPEG2
MPEG1
1920 x 1080
1920 x 1080 30
Fullt tillgänglig upplösning: 1920 X 1080 @ 60 Hz
Läge Upplösning Horisontal frekvens (kHz) Vertikal frekvens (Hz)
IBM
MAC
VESA DMT
640 x 350 31.469 70.086 25.175 +/-
720 x 400 31.469 70.087 28.322 -/+
640 x 480 35.000 66.667 30.240 -/-
832 x 624 49.726 74.551 57.284 -/-
1152 x 870 68.681 75.062 100.000 -/-
640 x 480 31.469 59.940 25.175 -/-
640 x 480 37.861 72.809 31.500 -/-
640 x 480 37.500 75.000 31.500 -/-
800 x 600 37.879 60.317 40.000 +/+
800 x 600 48.077 72.188 50.000 +/+
800 x 600 46.875 75.000 49.500 +/+
1024 x 768 48.363 60.004 65.000 -/-
1024 x 768 56.476 70.069 75.000 -/-
1024 x 768 60.023 75.029 78.750 +/+
1152 x 864 67.500 75.000 108.000 +/+
1280 x 720 45.000 60.000 74.250 +/+
1280 x 800 49.702 59.810 83.500 -/+
1280 x 1024 63.981 60.020 108.000 +/+
1280 x 1024 79.976 75.025 135.000 +/+
1366 x 768 47.712 59.790 85.500 +/+
1440 x 900 55.935 59.887 106.500 -/+
1600 x 900RB 60.000 60.000 108.000 +/+
1680 x 1050 65.290 59.954 146.250 -/+
1920 x 1080 67.500 60.000 148.500 +/+
6~30
Pixlar, klockhastighet
(MHz)
30
AC3
LPCM
ADMPCM
(IMA, MS)
AAC
HE-AAC
WMA
DD+
MPEG
(MP3)
DTS Core
Synkpolaritet (H/V)
Svenska - 1313

For flere informationer om, hvordan du bruger e-Manual Vejl. (s. 9)
Figurer og illustrationer i denne brugervejledning er kun til reference og kan afvige fra produktets virkelige udseende. Produktdesign
og -specifikationer kan ændres uden forudgående varsel.
Bemærkning om digitalt tv
1. Funktionaliteter, der vedrører digitalt tv (DVB) er kun tilgængelige i lande/områder, hvor DVB-T (MPEG2 og MPEG4 AVC) jordbaserede
digitale signaler udsendes, eller hvor du kan få adgang til en kompatibel DVB-C (MPEG2 og MPEG4 AAC) kabel-tv-tjeneste. Undersøg hos
din lokale forhandler muligheden for at modtage DVB-T- eller DVB-C-signaler.
2. DVB-T er det europæiske DVB-konsortiums standard for udsendelse af digitale jordbaserede tv-transmissioner, og DVB-C er det samme
for udsendelse af digitale tv-transmissioner via kabel. Men en række forskellige funktioner, som f.eks. EPG (Electric Programme Guide),
VOD (Video On Demand) mv., er ikke inkluderet i denne specifikation. Derfor fungerer de ikke i øjeblikket.
3. Selvom dette tv opfylder de nyeste DVB-T- og DVB-C-standarder pr. [august 2008], kan kompatibilitet med fremtidigt digitalt terrestrisk tv
(DVB-T) og kabel-tv (DVB-C) ikke garanteres.
4. Afhængigt af de lande/områder, hvor dette tv-apparat anvendes, opkræver visse kabel-tv-operatører et ekstra gebyr for en sådan tjeneste,
og du skal muligvis acceptere deres vilkår og betingelser for deres virksomhed.
5. Visse digital tv-funktioner er ikke tilgængelige i visse lande eller områder, og DVB-C fungerer måske ikke korrekt med nogle leverandører.
6. For flere informationer bedes du kontakte dit lokale Samsung kundeservicecenter.
Tv'ets modtagekvalitet er muligvis påvirket på grund af de forskellige landes udsendelsesmetoder. Kontakt SAMSUNG-forhandleren eller
✎
Samsungs Kundeservice for at undersøge, om tv'ets ydelse kan forbedres ved at omkonfigurere tv'ets opsætning.
Brugsanvisninger
• Indbrænding af skærmbillede
Lad ikke et stillbillede (f.eks. i et computerspil) blive stående på plasmaskærmen i mere end et par minutter, da der ellers kan opstå en
indbrænding af billedet. Denne billedindbrænding kaldes også "screen burn". For at undgå dette skal lysstyrken og kontrasten ved visning
af et stillbillede reduceres.
• Varme oven på plasma-tv'et
Den øverste side af produktet kan være varm efter længere tids brug, da der afgives varme fra panelet gennem ventilationshullet i den
øverste del af produktet.
Dette er normalt og angiver ikke en mangel eller driftsfejl i produktet.
Børn bør imidlertid forhindres i at røre ved den øverste del af produktet.
• Produktet laver en “klakkende” lyd.
En “klakkende” lyd kan være forårsaget af, at produktet trækker sig sammen eller udvider sig på grund af ændringer i det omgivende miljø,
såsom ændringer i temperatur eller fugtighed. Dette er normalt og ikke en fejl ved enheden.
• Celledefekter
Plasma-tv´et anvender et panel, der består af 2.360.000 (HD-niveau) til 6.221.000 (FHD-niveau) pixels, hvilket kræver avanceret teknologi at
producere. Der kan imidlertid være nogle få lyse eller mørke pixels på skærmen. Disse pixels har ingen indflydelse på produktets ydeevne.
• Undlad at lade tv'et køre ved temperaturer under 5 °C
• Et stillbillede, der vises for længe kan medføre permanent beskadigelse af plasmapanelet.
Hvis du ser på plasma-tv'et i formatet 4:3 i længere tid ad gangen, kan det medføre, at der vises kanter i venstre og højre
side samt midt på skærmen som følge af forskel i skærmens lysafgivelse. Brug af en dvd eller en spillekonsol kan medføre
lignende effekter på skærmen.
Beskadigelse forårsaget af ovenstående dækkes ikke af forsikringen.
• Efterbilleder på skærmen.
Visning af stillbilleder fra videospil og pc i længere end en bestemt tid kan medføre delvise efterbilleder.
For at forhindre dette kan du reducere “lysstyrke” og “kontrast”, når du viser stillbilleder i længere tid.
• Garanti
Garantien dækker ikke defekter forårsaget af billedindbrænding.
Screen burn dækkes ikke af garantien.
Korrekt bortskaffelse af dette produkt (elektrisk & elektronisk udstyr)
(Gælder i EU og andre europæiske lande med separate indsamlingssystemer)
Mærket på dette produkt, på tilbehør eller i den medfølgende dokumentation betyder, at produktet og elektronisk tilbehør hertil (f.eks. oplader, hovedsæt,
USB-ledning) ikke må bortskaffes sammen med almindeligt husholdningsaffald efter endt levetid. For at undgå skadelige miljø- eller sundhedspåvirkninger
på grund af ukontrolleret affaldsbortskaffelse skal ovennævnte bortskaffes særskilt fra andet affald og indleveres behørigt til fremme for bæredygtig
materialegenvinding. Forbrugere bedes kontakte forhandleren, hvor de har købt produktet, eller kommunen for oplysning om, hvor og hvordan de
kan indlevere ovennævnte med henblik på miljøforsvarlig genvinding. Virksomheder bedes kontakte leverandøren og læse betingelserne og vilkårene i
købekontrakten. Dette produkt og elektronisk tilbehør hertil bør ikke bortskaffes sammen med andet erhvervsaffald.
Korrekt bortskaffelse af batterierne i dette produkt
(Gælder i EU og andre europæiske lande med særlige retursystemer for batterier)
Mærket på batteriet, dokumentationen eller emballagen betyder, at batterierne i dette produkt efter endt levetid ikke må bortskaffes sammen med
andet husholdningsaffald. Mærkning med de kemiske symboler Hg, Cd eller Pb betyder, at batteriet indeholder kviksølv, cadmium eller bly over
grænseværdierne i EU-direktiv 2006/66. Hvis batterierne ikke bortskaffes korrekt, kan disse stoffer være skadelige for menneskers helbred eller
for miljøet. For at beskytte naturens ressourcer og fremme genbrug, skal batterier holdes adskilt fra andre typer affald og genanvendes via dit
lokale, gratis batteriretursystem.
Dansk - 2

Tilbehør
B
✎
Kontrollér, at følgende dele leveres sammen med dit tv. Kontakt forhandleren, hvis der mangler nogle dele.
✎
Farve og form på elementer kan variere fra model til model.
✎
Kabler, der ikke følger med i pakken, kan købes separat.
• Fjernbetjening og batterier (2 x AAA) • Strømkabel
• Brugervejledning • Rengøringsklud
• Garantikort/sikkerhedsvejledning (ikke tilgængelig alle steder)
Ferritkerne (1 stk.)
✎
Ferritkerne til strømkabel: Ferritkernen anvendes til at afskærme kablerne mod forstyrrelser. Ved
tilslutning af et kabel skal ferritkernen åbnes og samles omkring kablet tæt ved stikket som vist på
figuren.
A Maksimal afstand mellem ferritkernen og den ende af kablet, der skal sættes i tv'et: 2 cm
x
✎
Der opkræves muligvis et administrationsgebyr, hvis
(a) en tekniker tilkaldes på din foranledning, og der ikke er nogen fejl ved produktet
(f.eks. hvis du ikke har læst denne brugervejledning),
(b) du indleverer enheden til et servicecenter, og der ikke er nogen fejl ved produktet
(f.eks. hvis du ikke har læst denne brugervejledning),
✎
Du får oplyst administrationsgebyrets beløb, inden noget arbejde eller besøg i hjemmet udføres.
A
Strømkabel
Dansk - 3

Brug af tv’ets controller (paneltast)
Tv-controlleren er en knap med flere
retninger, der hjælper til med at navigere uden
fjernbetjeningen.
✎
Visse funktioner, der kræver en PIN-kode,
er muligvis ikke tilgængelige.
✎
Produktets farve og form kan variere fra
model til model.
✎
Afslutter menuen, når du trykker på
controlleren i mere end 1 sekund.
✎
Ved valg af funktionen til at flytte
controlleren op/ned/til venstre/til højre skal
du passe på ikke at trykke på controlleren.
Hvis du trykker på den først, kan du ikke
betjene den for at flytte op/ned/til venstre/
til højre.
Tænd Tænder for tv'et, når du trykker på controlleren i standbytilstand.
Justering af lydstyrken Justerer lydstyrken ved at bevæge controlleren fra side til side, når der er tændt.
Valg af kanal Vælger en kanal ved at bevæge controlleren op og ned, når der er tændt.
Brug af funktionsmenuen Tryk på controlleren, når der er tændt, hvorefter funktionsmenuen vises på skærmen.
Brug af menuen
Valg af kilde Vælger Kilde( ) ved at bevæge controlleren på funktionsmenuen på skærmen.
Valg af Indhold Hjem Vælger Indhold Hjem( ) ved at bevæge controlleren på funktionsmenuen på
Sluk
Venstre
Hvis du trykker igen, forsvinder funktionsmenuen fra skærmen.
Vælger MENU(m) ved at bevæge controlleren på funktionsmenuen på skærmen.
Skærmvisningen (OSD) vises på dit tv.
Listen Kilde vises på skærmen.
skærmen. Hovedskærmen Indhold Hjem vises.
Vælger Sluk(P) for at slukke tv'et ved at bevæge controlleren på funktionsmenuen på
skærmen.
Ned (front)
Højre
Op (bag)
Tv-controller
Funktionsmenu
Retur
Fjernbetjeningssensor
Standby-tilstand
Tv'et må ikke være i standby i længere tid ad gangen (for eksempel mens du er på ferie). Der bruges stadig en lille smule strøm, når
strømknappen er slukket. Det er bedst at tage ledningen ud.
Sikring af installationspladsen
Overhold de krævede afstande mellem produktet og andre genstande (f.eks. vægge) for at sikre korrekt ventilation.
I modsat fald kan det medføre brand eller et problem med produktet pga. en øget indre temperatur i produktet.
✎
Når du anvender et stativ eller vægbeslag, bør du kun anvende dele leveret af Samsung Electronics.
Hvis du anvender dele leveret af en anden producent, kan det medføre problemer med produktet eller personskade, fordi
x
produktet falder ned eller vælter.
✎
Udseendet kan være anderledes. Det afhænger af produktet.
✎
Pas på, når du rører ved tv'et, da nogle dele kan blive ganske varme.
Montering med stativ. Montering med vægbeslag.
10 cm
10 cm10 cm
10 cm
10 cm
10 cm
10 cm
Dansk - 4

Visning af fjernbetjeningen
✎
Dette er en særlig fjernbetjening til synshandicappede, som har Braille-punkter på knapperne Power, Channel og Volume.
Tænder og slukker for fjernsynet.
Alternativt kan du vælge Tekst-tv TIL,
Dobbelt, Opdelt eller FRA.
Justerer lydstyrken.
Viser hovedskærmmenuen.
Viser Indhold Hjem.
Lynvalg af de mest anvendte funktioner.
Vælger elementer på skærmmenuen og
ændrer de værdier, der vises på menuen.
Vender tilbage til den forrige menu.
E-MANUAL: Viser e-Manual
Vejledningen. (s. 9)
P.SIZE: Vælger billedstørrelse.
AD/SUBT.: Valg af lydbeskrivelse. (Ikke
tilgængelig visse steder) / viser digitale
undertekster.
CONTENT
A B C D
E-MANUAL
P.SIZE
AD/SUBT.
Viser og vælger de tilgængelige videokilder.
Tryk for direkte adgang til kanalerne.
Går tilbage til den forrige kanal.
Afbryder lyden midlertidigt.
Skifter kanaler.
Viser kanallister på skærmen.
Viser EPG (Electronic Programme Guide).
Viser information på tv-skærmen.
Afslutter menuen.
Brug disse knapper i forhold til retningen på
skærmen.
Brug disse knapper i en specifik funktion.
Se E-vejledningen for at få flere oplysninger.
Installering af batterier (Batteristørrelse: AAA)
Dansk - 5

Første indstilling
Når du tænder for tv'et første gang, vises der en række instruktioner på skærmen, som hjælper dig med at konfigurere de
grundlæggende indstillinger. Tryk på knappen POWERP. Indstillinger er kun tilgængelig, når kilden er indstillet til Tv.
1. Menusprog: Valg af et menusprog
Tryk på knappen ▲ eller ▼, og tryk derefter på knappen ENTERE.
Vælg det ønskede sprog til skærmmenuen (OSD = On Screen Display).
2. Brug: Valg af tilstanden Butikdemo eller Hjemmebrug
Tryk på knappen ▲ eller ▼, og tryk derefter på knappen ENTERE.
Vælg tilstanden Hjemmebrug. Butikdemo er til brug i butikker.
✎
Når du trykker på tv-controlleren, vises funktionsmenuen på skærmen. Vælg MENU(m), og tryk på den i mere end 5
sekunder med controlleren. Tilstanden Butikdemo er valgt.
✎
Annuller Butikdemo ved at vælge Kilde( ) og trykke på den i mere end 5 sekunder.
✎
Butikdemo er kun til brug i butikker. Hvis du vælger den, er der flere funktioner, der ikke ikke kan bruges. Vælg Hjemmebrug,
når du ser tv derhjemme.
3. Land (afhænger af landet): Valg af et land
Tryk på knappen ▲ eller ▼, og tryk derefter på knappen ENTERE.
Vælg det relevante land.
4. Automatisk søgning (trin 1): Vælg, hvorledes du modtager tv
Lad os finde og gemme nogle kanaler på dit tv. Har du brug for at søge efter kanaler?
• Ja, det har jeg.: Gemmer alle kanaler, der kan modtages vha. et antennekabel.
• Nej, det har jeg ikke.: Du behøver ikke bruge Automatisk tuning for at finde kanaler.
5. Automatisk søgning (trin 2): Vælger en søgemulighed
Vælg det ønskede tv-signal og den ønskede antennekilde. Tryk på knappen ▲/▼/◄/► , og tryk derefter på knappen ENTERE.
Når du indstiller antennekilden til Kabel, vises et trin, hvor du kan tildele talværdier (kanalfrekvenser) til kanalerne. For flere
informationer skal du se Kanal → Automatisk søgning.
✎
Tryk når som helst på knappen ENTERE for at afbryde lagringsprocessen.
✎
Se e-Manual-kapitlet “Ny indstilling af kanaler > Automatisk søgning”
6. Ur: Indstilling af urtilstanden
• Auto: Indstiller det aktuelle klokkeslæt automatisk.
• Manuel: Du kan indstille den aktuelle dato og det aktuelle klokkeslæt manuelt.
7. Tidszone (afhængigt af landet): Indstilling af din tidszone
Dette trin er kun tilgængelig, når urtilstanden er indstillet til Auto.
• Auto: Indstiller tidszonen automatisk.
• Manuel: Indstiller tidszonen manuelt.
✎
Hvis du valgte Manuel, kan du vælge, om du vil indstille sommertid til Til eller Fra. (afhængigt af land)
8. Opsætning udført
Tryk på knappen ENTERE.
✎
De færdige indstillinger vises.
Hvis du ønsker at nulstille denne funktion...
Vælg System - Indstillinger (første indstilling). Indtast din fircifrede PIN-kode. Standard-PIN-koden er “0-0-0-0”. Hvis du vil ændre PINkoden, skal du anvende funktionen Skift PIN.
Du bør bruge Indstillinger (MENU → System) igen derhjemme, selvom du gjorde det i butikken.
✎
Hvis du glemmer din PIN-kode, skal du trykke på fjernbetjeningens knapper i følgende rækkefølge, der nulstiller PIN-koden til
“0-0-0-0”: MUTE → 8 → 2 → 4 → POWER (Til)
Dansk - 6

Tilslutninger
AV-forbindelse
BD-afspiller
VIDEO OUT
Y
Y
✎
Det understøtter
både Komponentog AV-tilslutning til
én port.
AUDIO OUT
R-AUDIO-L
R
W
WR
Komponenttilslutning
BD-afspiller
COMPONENT OUT
PRP
R B RG
R B
Y
B
R
G
AUDIO OUT
R-AUDIO-L
R
W
WR
HDMI, HDMI/DVI-forbindelse
BD-afspiller / PC
AUDIO OUT
PC
R-AUDIO-L
R
W
DVI OUT
HDMI IN 1
(DVI)
HDMI OUT
Tv'ets
sidepanel
Tv´et set bagfra.
✎
Placeringen af porten
kan variere afhængigt af
modellen.
VHF/UHF-antenne
Kabel
eller
✎
Plasmaenheden kan måske
forstyrre amatørradio eller AMradio.
✎
Ved brug af tovejs radiomobile
og transportable enheder eller
amatørradio eller AM-radio tæt på
dit tv, kan dette medføre fejlfunktion
på tv’et.
ANT IN
Tilslutning af lyd
SERVICE
DIGITAL
AUDIO OUT
(OPTICAL)
OPTICAL
COMPONENT / AV IN
VIDEO
EXT (RGB)
EXT
Videooptager eller dvd
SCART-tilslutning
AUDIO
HDMI IN 2
(5V 0.5A)
USB
Tilslutning
hovedtelefoner
Dansk - 7

Visningstilstande (HDMI/DVI-input)
Den optimale opløsning er 1920 x 1080 ved 60 Hz. Se specifikationssiden for den fulde, mulige opløsning.
SERVICE
SERVICE
✎✎
BEMÆRK!
• For en HDMI/DVI-kabelforbindelse skal du bruge HDMI IN 1(DVI)-stikket.
• Tilstanden Interlace understøttes ikke.
• Apparatet kan vise et unormalt billede, hvis der vælges andet end et standardvideoformat.
• Tilstandene Separate og Composite understøttes ikke. SOG(Sync On Green) understøttes ikke.
• Pc-input(D-Sub) understøttes ikke.
• Tilslutning via HDMI-kablet understøttes muligvis ikke. Det afhænger af din pc.
• Hovedtelefonstikket understøtter kun stik af TRS-typen(Tip-Ring-Sleve) med 3 ledere.
Stik udelukkende til service.
Tilslutning til et FÆLLES INTERFACE-slot
(dit kortslot til tv-visning)
Hvis du vil se betalingskanaler, skal et “CI eller CI+ CARD” være isat.
• Hvis du ikke isætter et “CI eller CI+ CARD”, viser nogle kanaler
meddelelsen “Forvrænget signal”.
• Clearinginformationerne omfatter et telefonnummer, “CI eller
CI+ CARD” Host-ID og andre informationer og vises i ca. 2-3
minutter. Hvis der vises en fejlmeddelelse, skal du kontakte din
serviceleverandør.
• Når konfigurationen af kanalinformationen er færdig, vises
meddelelsen "Opdatering færdig", som indikerer, at kanallisten nu er
opdateret.
y Billedet kan variere afhængigt af modellen.
Tv'ets sidepanel
Ændring af indgangskilde
Kilde
Tv / Ekstern / HDMI1/DVI / HDMI2 / AV / Komponent
Bruges til at vælge TV eller andre indgangskilder, som f.eks. dvd/Blu-ray-afspillere/kabelboks/STB-satellitmodtager, der er tilsluttet tv'et.
✎
I den viste Kilde-liste er tilsluttede indgange fremhævet.
✎
Pc-input (D-Sub) understøttes ikke. Hvis du vil slutte pc’en til tv’et: Brug indgangen HDMI1/DVI.
✎
Ekstern forbliver altid aktiveret.
✎
Tryk på knappen TOOLS.
• Rediger navn
Du kan indstille ønskede navne til indgangskilder.
– Når en pc sluttes til HDMI IN 1(DVI)-stikket med et HDMI-kabel, skal du indstille tv´et til tilstanden PC under Rediger navn.
– Når en pc sluttes til HDMI IN 1(DVI)-stikket med et HDMI til DVI-kabel, skal du indstille tv´et til tilstanden DVI PC under
Rediger navn.
– Når AV-enheder sluttes til HDMI IN 1(DVI)-stikket med et HDMI til DVI-kabel, skal du indstille tv´et til tilstanden DVI-
enheder under Rediger navn.
• Information
Du kan se detaljerede oplysninger om den tilsluttede eksterne enhed.
Dansk - 8

Sådan vises e-Manual Vejledningen
E-MANUAL
Skærmvisning
Video, tv-program
osv., der vises for
Du kan finde instruktioner om dit tv’s funktioner i din e-Manual i dit tv. Tryk på knappen E-MANUAL på din
fjernbetjening for at anvende den. Flyt markøren ved hjælp af knapperne op/ned/højre/venstre for at fremhæve en
kategori, derefter et emne, og tryk dernæst på knappen ENTERE. e-Manual Vejledningen viser den side, som du
vil se.
Der er også adgang via menuen:
MENUm → Support → e-Manual → ENTERE
O
✎
For at vende tilbage til hovedmenuen i e-Manual Vejledningen skal du trykke på knappen E-MANUAL på
fjernbetjeningen.
Kategorilisten. Tryk på knappen ◄ eller ►
for at vælge den ønskede kategori.
Viser listen af undermenuer. Flyt
markøren ved hjælp af pileknapperne
på fjernbetjeningen. Tryk på knappen
E
ENTER
undermenu.
for at vælge den ønskede
tiden.
Betjening af knapper
}
Indeks: Viser indeksskærmen.
E
Enter: Vælger en kategori eller undermenu.
e
Afslut: Afslut e-Manual Vejledningen..
<Visning af indholdet>
a
Prøv nu: Viser den OSD-menu, der svarer til emnet. For at vende tilbage til skærmbilledet e-Manual, skal
b
Hjem: Går til startskærmen for e-Manual.
L
Side: Går til forrige eller næste side.
{ Zoom: Forstørrer en skærm.
Grundlæggende funktioner
Ændring af den forudindstillede billedtilstand
Justering af billedindstillinger
Ændring af billedindstillingerne
Ændring af den forudindstillede lydtilstand
Justering af lydindstillinger
}
Indeks E Enter e Afslut
du trykke på knappen E-MANUAL.
E
– Vælg Zoom, og tryk på ENTER
forstørrede skærm med knapperne ▲ eller ▼. Tryk på knappen RETURN for at vende tilbage til
den forrige menuskærm.
for at forstørre skærmen. Du kan rulle op og ned på den
Sådan skifter du mellem emner i e-Manual Vejledningen og den eller de tilsvarende OSD-menuer.
✎
Denne funktion er ikke aktiveret i visse menuer.
✎
Du kan ikke bruge funktionen Prøv nu, hvis menuen ikke er aktiveret.
Metode 1 Metode 2
1. Hvis du vil bruge den menu, der svarer til et emne i ,e-Manual
Vejl., skal du trykke på den røde knap for at vælge Prøv nu.
2. For at vende tilbage til skærmbilledet e-Manual, skal du trykke
på knappen E-MANUAL.
1. Tryk på knappen ENTERE, når et emne vises. “Vil du udføre
dette?” vises. Vælg Ja, og tryk derefter på knappen ENTERE.
OSD-vinduet vises.
2. For at vende tilbage til skærmbilledet e-Manual, skal du trykke
på knappen E-MANUAL.
Sådan søger du et emne på indekssiden
✎
Denne funktion understøttes måske ikke. Det afhænger af sproget.
1. Hvis du ønsker at søge efter et ord, skal du trykke på den blå knap for at vælge Indeks.
2. Tryk på knappen ◄ eller ► for at vælge den ønskede kanal.
3. Tryk på knappen ▲ eller ▼ for at vælge et søgeord, du gerne vil se, og tryk derefter på knappen ENTERE.
4. Du kan se den tilsvarende instruktionsskærm i e-Manualen.
✎
For at lukke skærmbilledet Indeks skal du trykke på knappen RETURN.
Dansk - 9

Installation af vægbeslag
Med et vægbeslag (sælges separat) kan du montere dit tv
på væggen. For detaljerede informationer om installation af
vægbeslaget skal du se de instruktioner, der leveres med
vægbeslaget. Kontakt en tekniker for hjælp til installation af
vægbeslaget. Vi anbefaler ikke, at du gør det selv.
Samsung Electronics er ikke ansvarlig for nogen skade på
produktet eller personskade, hvis du vælger at installere tv’et
selv.
Specifikationer for vægbeslag (VESA)
✎
Vægbeslaget medfølger ikke, men sælges separat.
Monter vægbeslaget på en fast væg, som er vinkelret med
gulvet. Ved fastgøring på andre byggematerialer skal du kontakte
din nærmeste forhandler. Hvis det monteres i et loft eller på en
skrå væg, kan det falde ned og medfører personskade.
✎
BEMÆRK!
Standarddimensioner til vægbeslag ses i tabellen
x
nedenfor.
Når du køber vores vægmonteringsbeslag, medfølger
x
en detaljeret installationsvejledning og alle nødvendige
dele til samlingen.
Du må ikke anvende skruer, som ikke opfylder VESA-
x
standardens skruespecifikationer.
Brug ikke skruer, der er længere end
x
standarddimensionen, da lange skruer kan medføre
skade inde i tv'et.
For vægbeslag, som ikke opfylder VESA-standardens
x
skruespecifikationer, kan længden af skruerne variere,
afhængigt af deres specifikationer.
Skruerne må ikke skrues for stramt, da det kan
x
forårsage en beskadigelse af produktet. Produktet kan
også falde ned og medføre personskade. Samsung er
ikke ansvarlig for uheld af denne type.
Samsung er ikke ansvarlig for beskadigelse af produkter
x
eller personskade, hvis der anvendes andre vægbeslag
end VESA eller ikke-specificerede vægbeslag, eller
forbrugeren ikke følger installationsvejledningen for
produktet.
Dette tv-apparat må ikke vippes mere end 15 grader,
x
når det monteres.
Fastgørelse af tv’et til væggen
Forsigtig: Hvis du trækker, skubber eller klatrer på
tv´et, kan det falde ned. I særdeleshed skal du sørge
for, at dine børn ikke hænger på eller destabiliserer
tv´et. Hvis de gør det, kan det medføre, at tv´et
vælter og medføre alvorlig personskade eller død.
Følg alle de sikkerhedsforskrifter, der findes i den
medfølgende sikkerhedsbrochure. For forøget
stabilitet kan du af sikkerhedsmæssige hensyn
installere en enhed, der forhindrer, at enheden vælter,
således.
For at forhindre at tv’et vælter
1. Anbring skruerne i klammerne, og fastgør dem forsvarligt til
væggen. Kontroller, at skruerne er monteret forsvarligt i væggen.
✎
Du har måske brug for ekstra materiale, som f.eks. et
anker, afhængigt af væggens type.
✎
Da disse nødvendige klammer, skruer og bånd ikke
medfølger, skal du købe dem separat.
2. Fjern skruerne fra midten af tv'ets bagside, sæt skruerne i
klammerne, og fastgør herefter skruerne til tv’et igen.
✎
Skruer følger muligvis ikke med produktet. I
det tilfælde skal du købe skruer med følgende
specifikationer.
3. Forbind klammerne, der er fastgjort på tv’et, og klammerne, der
er fastgjort på væggen, med et stærkt bånd, og bind det stramt.
✎
BEMÆRK!
• Placer tv´et tæt på væggen, så det ikke vælter
bagover.
• Det er sikkert at forbinde båndene, når de klammer,
der er monteret på væggen, har samme eller lavere
højde end de klammer, der er monteret på tv´et.
• Fjern båndene, inden du fjerner tv´et.
4. Kontroller, at alle forbindelser er sikre. Kontroller med
regelmæssige mellemrum for tegne på anstrengelse eller fejl.
Hvis du har betænkeligheder med sikkerheden af din montering,
skal du kontakte en professionel installatør.
tommer
43~51 400 x 400
60~64 600 x 400
VESA-spec.
(A * B)
Monter ikke dit
vægmonteringssæt, mens dit
tv er tændt. Det kan medføre
personskade pga. elektrisk
stød.
Standardskrue Mængde
M8 4
Dansk - 1010

Fejlfinding
Prøv først denne liste med mulige problemer og løsninger, hvis der synes at være et problem med dit tv. Hvis ingen af
fejlfindingstippene gælder for dit tv, skal du besøge “www.samsung.com”, og dernæst klikke på Support, eller kontakte
Samsungs kundeservicecenter.
Problem
• Sørg for, at strømkablet er sluttet korrekt til både stikkontakten og tv'et.
• Kontroller, at der er strøm i stikkontakten.
• Prøv at trykke på knappen POWER på tv'et for at sikre, at problemet ikke er fjernbetjeningen. Se “Fjernbetjeningen fungerer ikke”
nedenfor, hvis tv'et tændes.
Problem
• Kontroller kabeltilslutningerne. (Fjern og gentilslut alle kabler tilsluttet tv'et og eksterne enheder.)
• Indstil dine eksterne enheders (kabel/set-top-boks, dvd, Blu-ray mv.) videoudgang, så de svarer til tilslutningerne på tv-
indgangen. Hvis en ekstern enheds udgang f.eks. er HDMI, skal den tilsluttes en HDMI-indgang på tv'et.
• Sørg for, at der er tændt for dine tilsluttede enheder.
• Sørg for at vælge den korrekte indgang på tv'et ved at trykke på knappen SOURCE på tv'ets fjernbetjening.
• Genstart den tilsluttede enhed ved at gentilslutte enhedens strømkabel.
Problem
• Udskift fjernbetjeningens batterier med polerne (+/–) anbragt i den rigtige retning.
• Rens sensorens sendervindue på fjernbetjeningen.
• Forsøg at rette fjernbetjeningen direkte mod tv'et med en afstand på 1,5 ~ 2 m.
Problem
• Programmer fjernbetjeningen til kabel/set-top-boksen til at kunne styre tv'et. Se i brugervejledningen til kabel/set-top-boksen for
koden til Samsung-tv.
✎
For at holde dit tv i optimal stand, bør du opgradere det med det nyeste firmware fra websitet (www.samsung.com → Support
→ Filarkiv) med USB.
Skærmen vil ikke tænde.
Der er intet billede/ingen video.
Fjernbetjeningen fungerer ikke.
Fjernbetjeningen til kabel/set-top-boksen tænder eller slukker ikke for tv'et eller justerer ikke lydstyrken.
Licens
Opbevaring og vedligeholdelse
✎
Hvis di fjerner etiketten, der sikker på tv-skærmen, så rengør for rester, og se derefter tv.
✎
Produktets ydre og skærm kan blive ridset under rengøring. For at undgå ridser: Sørg for at aftørre ydersiden og skærmen
forsigtigt med den medfølgende klud eller en blød klud.
Spray ikke vand direkte på produktet. Enhver væske, der kommer
ind i produktet, kan medføre fejl, brand eller elektrisk stød.
Rengør produktet med en blød klud fugtet med en lille smule
vand. Brug ikke brændbare væsker (som f.eks. benzen, fortynder)
eller rengøringsmidler.
Dansk - 1111

Specifikationer
10°C 40°C 50°F 104°F
10°C 40°C 50°F 104°F
-20°C 45°C -4°F 113°F
Miljømæssige betragtninger
Driftstemperatur
Driftsfugtighed
Opbevaringstemperatur
Opbevaringsfugtighed
Tv-system Analog: B/G, D/K, L, I (afhængigt af dit landevalg)
Farve-/videosystem Analog: PAL, SECAM, NTSC-4.43, NTSC-3.58, PAL60
Lydsystem BG, DK, L, NICAM, MPEG1, DD, DD+, HEAAC
HDMI IN Video: 1080 24p, 1080p, 1080i, 720p, 576p, 480p
Modelnavn PS51E535 PS60E535
Skærmopløsning 1920 X 1080 1920 X 1080 (Sort/hvid)
Skærmstørrelse
Lydudgang 10W X 2
Dimensioner (BxDxH)
Hovedenhed
Med sokkel
Vægt
Uden sokkel
Med sokkel
✎
Design og specifikationer kan ændres uden forudgående varsel.
✎
For informationer om strømforsyningen og mere om energiforbrug henvises der til mærkaten, der er påklæbet
produktet.
✎
Typisk strømforbrug er målt i overensstemmelse med IEC 62087 Ed.2
Digital: MPEG-2 MP@ML, MPEG-4, H.264/AVC MP@L3, MP@L4.0, HP@L4.0
Lyd: Tokanals Lineær PCM 32/44,1/48 kHz, 16/20/24 bit.
tommer
1187,8 X 56,0 X 706,6 (mm)
1187,8 X 252,0 X 781,9 (mm)
19,6 kg
22,1 kg
til
(
til
10% til 80%, ikke-kondenserende
til
5% til 95%, ikke-kondenserende
Digital: DVB-T/DVB-C
(
)
til
1389,3 X 56,0 X 828,2 (mm)
1389,3 X 330,0 X 907,9 (mm)
)
tommer
28,3 kg
32,6 kg
Dansk - 1212

Understøttede videoformater
Filtype Format Video-codec Opløsning
Billedhastighed
(bill./sek.)
Bithastighed
(Mbps)
Lyd-codec
*.avi
*.mkv
*.asf
*.wmv
*.mp4
*.3gp
*.vro
*.mpg
*.mpeg
*.ts
*.tp
*.trp
*.m2ts
*.mts
*.divx
AVI
MKV
ASF
MP4
3GP
VRO
VOB
PS
TS
DivX 3.11/4.x/5.x/6.1
MPEG4 SP/ASP
H.264 BP/MP/HP
Motion JPEG 640 x 480 8
Window Media Video v9
MPEG2
MPEG1
1920 x 1080
6~30
1920 x 1080 30
30
AC3
LPCM
ADMPCM
(IMA, MS)
AAC
HE-AAC
WMA
DD+
MPEG
(MP3)
DTS Core
Fuld, mulig opløsning: 1920 x 1080 ved 60 Hz
Tilstand Opløsning Horisontal frekvens (kHz) Vertikal frekvens (Hz) Pixel clockfrekvens (MHz) Synkroniseringspolaritet (H/V)
IBM
MAC
VESA DMT
640 x 350 31.469 70.086 25.175 +/-
720 x 400 31.469 70.087 28.322 -/+
640 x 480 35.000 66.667 30.240 -/-
832 x 624 49.726 74.551 57.284 -/-
1152 x 870 68.681 75.062 100.000 -/-
640 x 480 31.469 59.940 25.175 -/-
640 x 480 37.861 72.809 31.500 -/-
640 x 480 37.500 75.000 31.500 -/-
800 x 600 37.879 60.317 40.000 +/+
800 x 600 48.077 72.188 50.000 +/+
800 x 600 46.875 75.000 49.500 +/+
1024 x 768 48.363 60.004 65.000 -/-
1024 x 768 56.476 70.069 75.000 -/-
1024 x 768 60.023 75.029 78.750 +/+
1152 x 864 67.500 75.000 108.000 +/+
1280 x 720 45.000 60.000 74.250 +/+
1280 x 800 49.702 59.810 83.500 -/+
1280 x 1024 63.981 60.020 108.000 +/+
1280 x 1024 79.976 75.025 135.000 +/+
1366 x 768 47.712 59.790 85.500 +/+
1440 x 900 55.935 59.887 106.500 -/+
1600 x 900RB 60.000 60.000 108.000 +/+
1680 x 1050 65.290 59.954 146.250 -/+
1920 x 1080 67.500 60.000 148.500 +/+
Dansk - 1313

For mer informasjon om bruk av e-brukerveiledning (s. 9)
Figurer og illustrasjoner i denne brukerhåndboken er bare til referanse og kan være forskjellig fra faktisk produktutseende.
Produktdesign og -spesifikasjoner kan endres uten forvarsel.
Digital-TV-merknad
1. Funksjoner som er forbundet med digital-TV (DVB) er bare tilgjengelige i land eller områder hvor det sendes digitale bakkesignaler av typen
DVB-T (MPEG2 og MPEG4 AVC) eller hvor du har tilgang til en kabel-TV-tjeneste som er kompatibel med DVB-C (MPEG2 og MPEG4
AAC). Kontakt din lokale forhandler og forhør deg om muligheten til å motta DVB-T- eller DVB-C-signal.
2. DVB-T er den felles europeiske DVB-betegnelsen for den sendte overføringen av digital bakke-TV og DVB-C er betegnelsen for den sendte
overføringen av digital-TV over kabel. Men noen forskjellige funksjoner som EPG (elektronisk programguide), VOD (Video On Demand) og så
videre, er ikke inkludert i denne spesifikasjonen. Så for øyeblikket fungerer de ikke.
3. Selv om denne TV-en følger de nyeste DVB-T- og DVB-C-standardene fra [august 2008], kan ikke kompatibiliteten med fremtidige sendte
overføringer med DVB-T digital bakke-TV og DVB-C digital kabel-TV garanteres.
4. Avhengig av landene eller områdene hvor denne TV-en brukes kan noen kabel-TV-leverandører kreve en ekstra avgift for en slik tjeneste, og
du kan måtte samtykke i firmaets betingelser og vilkår.
5. Noen digital-TV-funksjoner kan være utilgjengelige i noen land eller regioner og DVB-C fungerer kanskje ikke riktig med noen kabel-TVleverandører.
6. Du får mer informasjon ved å kontakte ditt lokale Samsung-kundesenter.
Mottakskvaliteten til TV-en kan påvirkes av forskjellige kringkastingsmetoder i forskjellige land. Spør hos den lokale autoriserte
✎
SAMSUNG-forhandleren eller Samsungs callsenter om TV-ytelsen kan forbedres ved å rekonfigurere TV-innstillingen eller ikke.
Brukerveiledning
• Ekkobilde
Ikke vis et stillbilde (som et videospill) på plasmaskjermen i mer enn noen få minutter siden det kan forårsake et ekkobilde. Denne effekten
er også kjent som “screen burn”, det vil si at skjermbildet brenner seg fast. Du kan unngå dette ved å redusere lysstyrken og kontrastnivået
på skjermen når du viser stillbilder.
• Varme på toppen av plasmaskjermen
Vær oppmerksom på at toppen kan være varm når produktet har vært i bruk lenge, fordi varmen spres fra panelet gjennom luftehullet
øverst på produktet.
Dette er normalt, og indikerer ikke at det er feil på produktet.
Barn bør imidlertid ikke berøre den øvre delen av produktet.
• Det kommer en klikkelyd fra produktet.
Klikkelyden kan oppstå når produktet trekker seg sammen eller utvider seg på grunn av omliggende miljøendringer, for eksempel
temperatur eller fuktighet. Dette er normalt, og betyr ikke at det er feil på enheten.
• Cellefeil
Plasmaskjermen bruker et panel som består av 2360000 piksler (HD-nivå) til 6 221 000 piksler (FHD-nivå), som krever avansert teknologi.
Det kan imidlertid være noen lyse eller mørke piksler på skjermen. Disse pikslene har ingen innvirkning på produktets ytelse.
• Unngå å bruke TV-en ved temperaturer under 5 °C (41 °F)
• Hvis et stillestående bilde vises over for lang tid, kan det føre til permanent skade på plasmaskjermen.
Hvis plasma-TV-en brukes til visning i 4:3-format over lengre tid, kan det føre til at det oppstår linjer til venstre, høyre og i
midten av skjermen på grunn av forskjellig lysutslipp på skjermen. Avspilling av en DVD eller bruk av spillkonsoller kan ha
en lignende innvirkning på skjermen.
Skader forårsaket av effekten ovenfor, dekkes ikke av garantien.
• Restbilder på skjermen.
Hvis spill og annet settes på pause i en lengre periode enn det som er anbefalt, kan dette gi en etterbildeeffekt.
Du kan hindre dette ved å redusere innstillingene for lysstyrke og kontrast når du viser stillbilder over lang tid.
• Garanti
Garantien omfatter ikke skader som skyldes etterbilde.
"Burn-in" dekkes ikke av garantien.
Kaste produktet på riktig måte (Avhending av elektrisk og elektronisk utstyr)
(Gjelder i EU og i andre europeiske land med avfallssortering)
Dette merket på produktet, tilbehøret eller i dokumentasjonen indikerer at produktet og det elektroniske tilbehøret (f.eks. lader, hodetelefon, USBkabel) ikke skal kastes som vanlig husholdingsavfall når det ikke lenger er i bruk. For å unngå skade på miljøet eller menneskers helse som følge av
ukontrollert avfall, må disse elementene skilles fra andre typer avfall og resirkuleres på en ansvarlig måte som fremmer gjenbruk av materialressurser.
Husholdingsbrukere kontakter forhandleren der produktet ble kjøpt eller de lokale renovasjonsmyndighetene for å få informasjon om miljømessig sikker
resirkulering. Firmabrukere kontakter leverandøren og kontrollerer betingelsene i kjøpskontrakten. Dette produktet og dets elektriske tilbehør må ikke
blandes med annet kommersielt avfall.
Kaste batteriene i produktet på riktig måte
(Gjelder i EU og i andre europeiske land med systemer for batterireturnering)
Dette merket på produktet, veiledningen eller emballasjen indikerer at batteriene i dette produktet ikke skal kastes som vanlig husholdingsavfall
når det ikke lenger er i bruk. Der det er merket, angir de kjemiske symbolene Hg, Cd eller Pb at batteriet inneholder kvikksølv, kadmium eller bly
over referansenivåene i EC-direktiv 2006/66. Hvis batteriene ikke avhendes på riktig måte, kan innholdet skade miljøet eller menneskers helse.
For å beskytte naturressurser og fremme materialgjenbruk må du separere batterier fra andre typer avfall og resirkulere dem gjennom ditt gratis,
lokale system for batterireturnering.
Norsk - 2

Tilbehør
B
✎
Vennligst kontroller at følgende deler følger med TVen. Kontakt forhandleren hvis det mangler noen deler.
✎
Elementenes farge og utforming kan variere, avhengig av modell.
✎
Kabler som ikke er inkludert i pakkeinnholdet, kan kjøpes separat.
• Fjernkontroll og batterier (AAA x 2) • Strømledning
• Brukerhåndbok • Rengjøringsklut
• Garantikort / Sikkerhetsveiledning (ikke tilgjengelig alle steder)
Ferittkjerne (1 stk.)
✎
Ferrittkjerne for strømledning: Ferrittkjernene blir brukt til å skjerme kablene mot interferens. Når
du kobler til en kabel, må du åpne ferrittkjernen og klemme den rundt kabelen nær pluggen, som
vist på figuren.
A Maksimumsavstand mellom ferrittkjernen og enden av ledningen som er koblet til TV-en: 3/4
x
tommer
✎
Det kan tilkomme et administrasjonsgebyr hvis enten
(a) en tekniker tilkalles på din forespørsel og det er ingen feil på produktet
(dvs. når du ikke har lest denne brukerhåndboken)
(b) du tar med enheten til reparasjonssenteret og det er ingen feil på produktet
(dvs. når du ikke har lest denne brukerhåndboken)
✎
Du vil bli informert om hvor mye dette administrasjonsgebyret vil komme på, før noe arbeid eller hjemmebesøk utføres.
A
Strømledning
Norsk - 3

Bruke TV-kontrollen (paneltast)
TV-kontroll er er retningstast som hjelper deg
med å navigere uten fjernkontrollen.
✎
Noen funksjoner som krever en PIN-kode,
er kanskje ikke tilgjengelige.
✎
Produktets farge og utforming kan variere,
avhengig av modell.
✎
Går ut av menyen når du trykker på
kontrollen i mer enn 1 sekund.
✎
Når du velger funksjonen ved å bevege
kontrollen opp/ned/til venstre/til høyre,
må du passe på at du ikke trykker på
kontrollen. Hvis du trykker på den først, kan
du ikke bruke den til å bevege opp/ned/til
venstre/til høyre.
Strøm på Slår på TVen ved å trykke på kontrolleren i standbymodus.
Justere volumet Justerer volumet ved å bevege kontrollen fra side til side når strømmen er på.
Velge en kanal Velger en kanal ved å bevege kontrollen opp og ned når strømmen er på.
Bruke funksjonsmenyen Trykk på kontrollen når strømmen er på, og deretter vises funksjonsmenyskjermen.
Bruke menyen
Velge kilde Velger Kilde( ) ved å bevege fjernkontrollen i funksjonsmenyskjermen. Kilde-
Velge Innhold hjem Velger Innhold hjem( ) ved å bevege fjernkontrollen i funksjonsmenyskjermen.
Strøm av
Venstre
Hvis du trykker på den igjen, forsvinner funksjonsmenyskjermen.
Velger MENY(m) ved å bevege fjernkontrollen i funksjonsmenyskjermen.
Skjermmenyen til TVens funksjon vises.
listeskjermen vises.
Innhold hjem-hovedskjermen vises.
Velger Slå av(P) for å slå av TVen ved å bevege fjernkontrollen i
funksjonsmenyskjermen.
Ned (foran)
Høyre
Opp (bak)
TV-kontroll
Funksjonsmeny
Tilbake
Sensor for fjernkontroll
Standbymodus
Ikke la TV-en stå i standby-modus i lang tid (for eksempel når du er på ferie). Det forbrukes fremdeles litt elektrisk strøm selv når På/
Av-knappen er slått av. Det er best å koble fra strømledningen.
Sikre installasjonsområdet
Hold nødvendig avstand mellom produktet og andre gjenstander (f.eks. vegger) for å sikre skikkelig ventilasjon.
Hvis du ikke gjør det, kan det føre til brann eller problemer med produktet på grunn av en økning i den interne temperaturen til
produktet.
✎
Når du bruker et stativ eller veggfeste, må du kun bruke deler fra Samsung Electronics.
Hvis du bruker deler fra andre produsenter, kan det føre til problemer med produktet eller personskader på grunn av at
x
produktet faller.
✎
Utseendet kan variere avhengig av produktet.
✎
Vær forsiktig når du tar på TV-en siden noen deler kan være varme.
Installasjon med et stativ. Installasjon med et veggfeste.
10 cm
10 cm10 cm
10 cm
10 cm
10 cm
10 cm
Norsk - 4

Oversikt over fjernkontrollen
✎
Dette er en spesiell fjernkontroll for synshemmede, med Braille-punkter på strøm-, kanal- og volum-knappene.
Slår TV-en på og av.
Du kan også velge tekst-TV PÅ, dobbel,
blandet eller AV.
Justerer volumet.
Viser hovedmenyen på skjermen.
Viser Innhold hjem.
Velg ofte brukte funksjoner raskt.
Velger elementene på skjermmenyen og endrer
verdiene som vises på menyen.
Går tilbake til forrige meny.
E-MANUAL: Viser e-brukerveiledningen.
(s. 9)
P.SIZE: Velger bildestørrelsen.
AD/SUBT.: Valg av lydbeskrivelse. (Ikke
tilgjengelig alle steder) / Viser digitale
undertekster.
CONTENT
A B C D
E-MANUAL
P.SIZE
AD/SUBT.
Viser og velger tilgjengelige videokilder.
Trykk for å få direkte tilgang til kanaler.
Går tilbake til forrige kanal.
Demper lyden midlertidig.
Endrer kanal.
Viser kanallister på skjermen.
Viser EPG (elektronisk programguide).
Viser informasjon på TV-skjermen.
Går ut av menyen.
Bruk disse knappene i henhold til retningen på
skjermen.
Bruk disse knappene med en bestemt
funksjon.
Se i e-brukerveiledningen for mer informasjon.
Installere batterier (Batteristørrelse: AAA)
Norsk - 5

Første oppsett
Første gang TV-en slås på, vises en rekke instruksjoner på skjermen som hjelper deg i å konfigurere grunnleggende innstillinger. Trykk
på POWERP-knappen. Oppsett er bare tilgjengelig når kilde er satt til TV.
1. Menyspråk: Velger et menyspråk
Trykk på ▲ eller ▼ og trykk deretter på ENTERE-knappen.
Velg ønsket språk på skjermmenyen.
2. Bruk modus: Velge Butikkdemo eller Hjemmebruk
Trykk på ▲ eller ▼ og trykk deretter på ENTERE-knappen.
Velg modusen Hjemmebruk. Butikkdemo-modusen er beregnet på butikker o.l.
✎
Når du trykker på TV-kontrollen vises funksjonsmenyen. Velg MENY(m) og trykk i mer enn 5 sekunder med kontrollen.
Butikkdemo-modus angis.
✎
Avbryt Butikkdemo ved å velge Kilde( ) og trykke i mer enn 5 sekunder.
✎
Butikkdemo er bare for visning i butikken. Hvis du velger dette, vil flere funksjoner være utilgjengelige. Velg Hjemmebruk når
du ser på hjemmefra.
3. Land (Avhengig av landet): Velge et land
Trykk på ▲ eller ▼ og trykk deretter på ENTERE-knappen.
Velg riktig land.
4. Autoinnstilling (Trinn 1): Velge hvordan du ser på TVen
La oss finne og lagre kanaler på din TV. Trenger du å søke etter kanaler?
• Ja, jeg trenger.: Lagrer alle de tilgjengelige kanalene ved hjelp av RF-kabel.
• Nei, trenger ikke.: Du trenger ikke å bruke Autoinnstilling for å finne kanaler.
5. Autoinnstilling (Trinn 2): Velge søkealternativer
Velg ønsket kringkastingssignal og antennekilde. Trykk på ▲/▼/◄/► og trykk deretter på ENTERE-knappen.
Når du angir kanalkilden til Kabel, vises et trinn som lar deg tilordne numeriske verdier (kanalfrekvenser) til kanalene. Du finner mer
informasjon under Kanal → Autoinnstilling.
✎
Trykk på ENTERE-knappen dersom du vil avbryte lagringsprosessen.
✎
Se e-Manual i kapitlet “Stille inn kanaler på nytt > Autoinnstilling”
6. Klokke: Stille inn Klokkemodus
• Auto: Angi gjeldende klokkeslett automatisk.
• Manuell: Lar deg angi gjeldende dato og klokkeslett manuelt.
7. Tidssone (avhengig av landet): Stille inn tidssone
Dette trinnet er bare tilgjengelig når klokkemodus er angitt til Auto.
• Auto: Angi tidssonen automatisk.
• Manuell: Angi tidssonen manuelt.
✎
Hvis du valgte Manuell, kan du velge om du vil slå DST (sommertid) På eller Av. (Avhengig av landet)
8. Oppsett fullført
Trykk på ENTERE-knappen.
✎
De fullførte innstillingene vises.
Slik tilbakestiller du denne funksjonen:
Velg System - Oppsett (Første oppsett). Angi din 4-sifrede PIN-kode. Standard PIN-kode er "0-0-0-0." Hvis du vil endre PIN-koden,
bruker du funksjonen Endre PIN-kode.
Du bør gjøre Oppsett (MENU → System) på nytt hjemme selv om du gjorde det i butikken.
✎
Hvis du glemmer PIN-koden, trykker du på fjernkontrollens knapper i rekkefølgen nedenfor, Da tilbakestilles PIN-koden til “0-00-0”: MUTE → 8 → 2 → 4 → POWER (på)
Norsk - 6

Tilkoblinger
AV-tilkobling
BD-spiller
VIDEO OUT
Y
Y
✎
Den støtter både
Komponent- og AVtilkobling i én port.
AUDIO OUT
R-AUDIO-L
R
W
WR
Komponenttilkobling
BD-spiller
COMPONENT OUT
PRP
R B RG
R B
Y
B
R
G
AUDIO OUT
R-AUDIO-L
R
W
WR
HDMI, HDMI/DVI-tilkobling
BD-spiller / PC
AUDIO OUT
PC
R-AUDIO-L
R
W
DVI OUT
HDMI IN 1
(DVI)
HDMI OUT
TV-sidepanel
TV-bakpanel
✎
Plasseringen av porten
ANT IN
kan variere avhengig av
modellen.
VHF/UHF-antenne
Kabel
eller
✎
PDP-enheten kan forstyrre en amatørradio eller
AM-radio.
✎
Når du bruker toveis radiomobil og bærbare
enheter eller amatørradio eller AM-radio i
nærheten av TV-en, kan dette føre til feil på TV-en.
✎
“Utstyr som er koplet til beskyttelsesjord via
nettplugg og/eller via annet jordtilkoplet utstyr
– og er tilkoplet et kabel-TV nett, kan forårsake
brannfare. For å unngå dette skal det ved
tilkopling av utstyret til kabel-TV nettet installeres
en galvanisk isolator mellom utstyret og kabel-TV
nettet.”
SERVICE
DIGITAL
AUDIO OUT
(OPTICAL)
OPTICAL
Lydtilkobling
COMPONENT / AV IN
VIDEO
EXT (RGB)
EXT
Videospiller eller DVD
SCART-tilkobling
AUDIO
HDMI IN 2
(5V 0.5A)
USB
Hodetelefonertilkobling
Norsk - 7

Skjermmoduser (HDMI/DVI-inngang)
Optimal oppløsning er 1920 x 1080@60 Hz. Se spesifikasjonssiden for fullstendig tilgjengelig oppløsning.
SERVICE
SERVICE
✎✎
MERK
• Når du bruker en HDMI/DVI-kabeltilkobling, må du bruke kontakten HDMI IN 1(DVI).
• Linjesprangmodus støttes ikke.
• Det kan hende at systemet ikke fungerer normalt hvis du velger et videoformat som ikke er standard.
• Separat og sammensatt modus støttes. SOG(Sync On Green) støttes ikke.
• PC(D-Sub)-inngang støttes ikke.
• Det kan hende at tilkobling gjennom HDMI-kabelen ikke støttes avhengig av PC-en.
• Hodetelefonkontakten støtter kun TRS-plugger med 3 ledere.
Brukes bare for service.
Koble til et FELLES INNGANG-spor
(TVens visningskortspor)
For å se på betalingskanaler må "CI eller CI+ CARD" være satt inn.
• Hvis du ikke setter inn "CI eller CI+ CARD", vil noen kanaler vise
meldingen "Kryptert signal".
• Paringsinformasjonen som inneholder et telefonnummer, "CI
eller CI+ CARD", ID, verts-ID og annen informasjon, vises i
omtrent 2~3 minutter. Hvis det vises en feilmelding, kontakter du
tjenesteleverandøren.
• Når konfigurasjonen av kanalinformasjon er ferdig, vises meldingen
"Oppdatering fullført" som angir at kanallisten er oppdatert.
y Bildet kan variere avhengig av modellen.
TV-sidepanel
Endre inndatakilden
Kilde
TV / Ekst. / HDMI1/DVI / HDMI2 / AV / Komponent
Bruk for å velge TV eller andre eksterne inndatakilder som en DVD-spiller / Blu-Ray-spiller / kabelboks / satellittmottaker for digitalboks
som er koblet til TV-en.
✎
I Kilde-listen som vises, er tilkoblede inndatakilder uthevet.
✎
PC(D-Sub)-inngang støttes ikke. Hvis du ønsker å koble PC-en til TV-en, bruker du HDMI1/DVI-inngangen.
✎
Ekst. er alltid aktivert.
✎
Trykk på TOOLS-knappen.
• Rediger navn
Du kan angi navnet på en ekstern inngangskilde som du ønsker.
– Når du kobler en PC til HDMI IN 1(DVI)-porten via en HDMI-kabel, bør du angi TV-en til PC-modus under Rediger navn.
– Når du kobler en PC til HDMI IN 1(DVI)-porten via en HDMI-til-DVI-kabel, bør du angi TV-en til DVI PC-modus under
Rediger navn.
– Når du kobler en AV-enhet til HDMI IN 1(DVI)-porten med en HDMI til DVI-kabel, bør du angi TV-en til modusen DVI-
enheter under Rediger navn.
• Informasjon
Du kan se detaljert informasjon om den tilkoblede eksterne enheten.
Norsk - 8

Slik viser du e-Manual
E-MANUAL
Skjermvisning
Gjeldende viste
video, TV-program
Du finner instruksjoner om funksjonene til TV-en i e-Manual på TV-en. For å bruke trykker du på E-MANUALknappen på fjernkontrollen. Flytt markøren med Opp/Ned/Høyre/Venstre-knappene for å fremheve en kategori og
så et emne, og trykk deretter på ENTERE-knappen. e-Manual viser siden du vil se.
Du kan også få tilgang gjennom menyen:
MENUm → Kundesupport → e-Manual → ENTERE
O
✎
Når du vil gå tilbake til hovedmenyen i e-Manual, trykker du på E-MANUAL-knappen på fjernkontrollen.
Kategorilisten. Trykk på ◄- eller ►-knappen
for å velge ønsket kategori.
Viser undermenylisten. Bruk pilknappene
på fjernkontrollen til å flytte markøren. Trykk
på ENTER
ønskede undermenyen.
for å forstørre skjermen. Du kan bla gjennom den
E
-knappen for å velge den
osv.
Driftsknapper
}
Indeks: Viser indeksskjermen.
E
Enter: Velger en kategori eller undermeny.
e
Avslutt: Avslutt e-Manual.
<Vise innholdet>
a
Prøv nå: Viser OSD-menyen som tilsvarer emnet. Når du vil gå tilbake til skjermen i e-Manual, trykker du
b
Hjem: Går til startskjermen i e-Manual.
L
Side: Går til forrige eller neste side.
{ Zoom: Forstørrer en skjerm.
– Velg Zoom, og trykk deretter på ENTER
Grunnleggende funksjoner
Endre forhåndsinnstilt bildemodus
Justere bildeinnstillinger
Endre Bildealternativer
Endre forhåndsinnstilt lydmodus
Justere lydinnstillinger
}
Indeks E Enter e Avslutt
på E-MANUAL-knappen.
forstørrede skjermen ved å bruke ▲- eller ▼-knappene. Hvis du returnere skjermen til normal
størrelse, trykker du på RETURN-knappen.
E
Slik veksler du mellom E-brukerveiledningen og tilsvarende OSD-meny(er).
✎
Denne funksjonen er ikke aktivert i enkelte menyer.
✎
Du kan ikke bruke Prøv nå-funksjonen hvis menyen ikke er aktivert.
Metode 1 Metode 2
1. Hvis du vil bruke menyen som tilsvarer et emne i e-Manual,
trykker du den røde knappen for å velge Prøv nå.
2. Når du vil gå tilbake til skjermen i e-Manual, trykker du på
E-MANUAL-knappen.
1. Trykk på ENTERE-knappen når et emne blir vist. “Vil du
utføre dette?” vises. Velg Ja, og trykk deretter på ENTERE-
knappen. Skjermmenyvinduet vises.
2. Når du vil gå tilbake til skjermen i e-Manual, trykker du på
E-MANUAL-knappen.
Slik søker du etter et emne på indekssiden
✎
Avhengig av språket støttes kanskje ikke denne funksjonen.
1. Hvis du vil søke etter et nøkkelord, velger du Indeks ved å trykke den blå knappen.
2. Trykk ◄ eller ► for å velge en tegnrekkefølge du ønsker.
3. Trykk ▲ eller ▼ for å velge et nøkkelord du vil se, og trykk deretter ENTERE-knappen.
4. Du ser den tilsvarende instruksjonsskjermen i E-brukerveiledningen.
✎
Du lukker Indeks-skjermen ved å trykke på RETURN-knappen.
Norsk - 9

Montere veggfestet
Med veggfestesettet (selges separat) kan du montere TV-en
på veggen. Du finner detaljert informasjon om montering av
veggfestet i monteringsanvisningen for veggfestet. Kontakt en
tekniker for å få hjelp til montering av veggbraketten. Vi råder deg
ikke til å gjøre dette selv.
Samsung Electronics er ikke ansvarlig for skader som måtte
oppstå på produktet, eller personskader, som følge av at du selv
installerer TV-en.
Spesifikasjoner for veggfestesett (VESA)
✎
Veggfestesett medfølger ikke, men selges separat.
Monter veggfestet på en solid vegg vinkelrett med gulvet. Ta
kontakt med nærmeste forhandler hvis du skal montere festet i
andre byggmaterialer. Hvis den monteres på et tak eller en skjev
vegg, kan den falle og føre til alvorlige personskader.
✎
MERK
Standard dimensjoner for veggfestesett vises i tabellen
x
nedenfor.
Ved innkjøp av veggfestesettet medfølger en detaljert
x
monteringsanvisning og alle nødvendige deler.
Ikke bruk skruer som ikke samsvarer med VESA-
x
standarden for skruespesifikasjoner.
Unngå å bruke skruer som er lenger enn
x
standardskruene. Dette kan føre til skade inne i TV-en.
For veggfester som ikke samsvarer med VESA-
x
standarden for skruespesifikasjoner, kan lengden på
skruene variere avhengig av spesifikasjonene.
Ikke fest skruene for stramt, da dette kan skade
x
produktet eller føre til at det faller og skade personer.
Samsung er ikke ansvarlig for denne typen ulykker.
Samsung er ikke ansvarlig for produktskader eller
x
personskader som oppstår som en følge av bruk
av et ikke-VESA- eller ikkespesifisert-veggfeste
eller at forbrukeren ikke følger instruksjonene for
produktinstallasjon.
Ikke overstig 15 grader helling når du monterer denne
x
TV-en.
Feste TV-en til veggen
Forsiktig: Hvis du drar i, dytter på eller klatrer på
TV-en, kan den falle. Pass særlig på at ikke barn
henger over eller destabiliserer TV-en. Dette kan
gjøre at TV-en tipper over og fører til alvorlige skader
eller død. Følg alle sikkerhetsforanstaltninger i det
medfølgende sikkerhetsarket. For ytterligere stabilitet
installerer du antifallenheten av sikkerhetsmessige
årsaker, som følger:
Slik hindrer du TV-en i å falle
1. Sett skruene i klemmene og fest dem skikkelig til veggen.
Kontroller at skruene har blitt skikkelig festet i veggen.
✎
Det kan hende du trenger ekstramateriell, som et
anker, avhengig av veggtypen.
✎
Siden de nødvendige skruene, klemmene og strengen
ikke følger med, må du kjøpe disse i tillegg.
2. Fjern skruene fra midten bak på TV-en, fest skruene i klemmene
og fest deretter skruene på TV-en igjen.
✎
Det kan hende at det ikke følger skruer med
produktet. Hvis dette er tilfellet, kjøper du skruene
etter følgende spesifikasjoner:
3. Sett sammen klemmene som er festet på TV-en og klemmene
som er festet i veggen, med en sterk streng og knyt deretter
strengen stramt.
✎
MERK
• Installer TV-en nær veggen slik at den ikke faller
bakover.
• Det er trygt å feste strengen slik at klemmene som
er festet i veggen, er i lik høyde som eller lavere enn
klemmene som er festet på TV-en.
• Fjern strengen før du flytter TV-en.
4. Kontroller at alle tilkoblinger er skikkelig sikret. Kontroller
tilkoblinger periodevis for tegn på slitasje eller feil. Hvis du er i tvil
om sikkerheten til dine tilkoblinger, kontakter du en profesjonell
installatør.
tommer
43~51 400 X 400
60~64 600 X 400
VESA-spes.
(A * B)
Ikke installer veggfestesettet
mens TV-en din står på. Det
kan føre til personskade på
grunn av elektrisk støt.
Standardskrue Mengde
M8 4
Norsk - 1010

Feilsøking
Hvis TV-en ser ut til å ha et problem, må du først prøve denne listen over mulige problemer og løsninger. Hvis ingen av disse
feilsøkingstipsene hjelper, går du til “www.samsung.com” og klikker på Support, eller tar kontakt med Samsungs kundesenter.
Problemer
• Sørg for at strømkabelen er satt ordentlig inn i stikkontakten og TV-en.
• Sørg for at stikkontakten virker.
• Prøv å trykke på POWER-knappen på TV-en for å kontrollere at problemet ikke er fjernkontrollen Hvis TV-en slår seg på, ser du
under "Fjernkontrollen fungerer ikke" nedenfor.
Problemer
• Kontroller kabeltilkoblingene (ta alle kablene som er koblet til TV-en og eksterne enheter ut, og sett dem inn igjen).
• Kontroller at utgangssignalene fra den eksterne enheten (kabel-/digitalboks, DVD, Blu-ray osv.), samsvarer med TV-signalet. Hvis
for eksempel en ekstern enhets utgangssignaler er HDMI, bør den kobles til en HDMI-kontakt på TV-en.
• Sørg for at de tilkoblede enhetene er slått på.
• Velg riktig TV-kilde ved å trykke på SOURCE-knappen på TV-ens fjernkontroll.
• Start den tilkoblede enheten på nytt ved å koble til enhetens strømkabel igjen.
Problemer
• Bytt ut fjernkontrollens batterier med riktig polaritet (+/–) i riktig retning.
• Rens overføringsvinduet for sensoren på på fjernkontrollen.
• Stå 150–180 cm fra TV-en og rett fjernkontrollen direkte mot den.
Problemer
• Programmer fjernkontrollen for kabel-/digitalboksen slik at du kan betjene TV-en med den. Se brukerhåndboken for kabel-/
digitalboksen for informasjon om SAMSUNG TV-koden.
✎
Du kan beholde TVens optimale tilstand for å oppgradere den nyeste fastvaren på nettsiden (www.samsung.com →
Kundesupport → Nedlastinger) via USB.
TV-en vil ikke slå seg på.
Det er ikke noe bilde/video.
Fjernkontrollen fungerer ikke.
Kabel-/digitalboksens fjernkontroll slår ikke TV-en på eller av eller justerer volumet.
Lisens
Oppbevaring og vedlikehold
✎
Hvis du fjerner klistremerket på TV-skjermen, rengjør du restene før du ser på TV.
✎
Produktets utside og skjerm kan få riper under rengjøring. Sørg for å tørke av utsiden og skjermen nøye med kluten som
følger med eller en myk klut for å hindre riper.
Ikke spray vann direkte på produktet. Hvis det kommer væske inn
i produktet, kan det føre til feil, brann eller elektrisk støt.
Rengjør produktet med en myk klut dyppet i litt vann. Ikke bruk
brennbar væske (f.eks. benzen, tynnere) eller rensemiddel.
Norsk - 1111

Spesifikasjoner
10°C 40°C 50°F 104°F
10°C 40°C 50°F 104°F
-20°C 45°C -4°F 113°F
Miljøhensyn
Driftstemperatur
Luftfuktighet ved drift
Lagringstemperatur
Luftfuktighet ved lagring
TV-system Analog: B/G, D/K, L, I (avhengig av ditt valg av land)
Farge-/videosystem Analog: PAL, SECAM, NTSC-4.43, NTSC-3.58, PAL60
Lydsystem BG, DK, L, NICAM, MPEG1, DD, DD+, HEAAC
HDMI IN Video: 1080 24p, 1080p, 1080i, 720p, 576p, 480p
Modellnavn PS51E535 PS60E535
Skjermoppløsning 1920 X 1080 1920 X 1080 (Svart/hvitt)
Skjermstørrelse
Lyd (utgang) 10W X 2
Dimensjoner (BxDxH)
Hoveddel
Med stativ
Vekt
Uten stativ
Med stativ
✎
Design og spesifikasjoner kan endres uten forvarsel.
✎
Du finner informasjon om strømforsyningen og strømforbruket på etiketten som er festet på produktet.
✎
Vanlig strømforbruk måles i henhold til IEC 62087 utg.2
Digital: MPEG-2 MP@ML, MPEG-4, H.264/AVC MP@L3, MP@L4.0, HP@L4.0
Lyd: 2-kanals lineær PCM 32/44.1/48 kHz, 16/20/24-biter.
tommer
1187,8 X 56,0 X 706,6 (mm)
1187,8 X 252,0 X 781,9 (mm)
19,6 kg
22,1 kg
til
(
til
10% til 80%, ikke-kondenserende
til
5% til 95%, ikke-kondenserende
Digital: DVB-T/DVB-C
(
)
til
1389,3 X 56,0 X 828,2 (mm)
1389,3 X 330,0 X 907,9 (mm)
)
tommer
28,3 kg
32,6 kg
Norsk - 1212

Støttede videoformater
Filendelse Beholder Videokodek Oppløsning
Bildehastighet
(fps)
Bithastighet
(Mbps)
Lydkodek
*.avi
*.mkv
*.asf
*.wmv
*.mp4
*.3gp
*.vro
*.mpg
*.mpeg
*.ts
*.tp
*.trp
*.m2ts
*.mts
*.divx
AVI
MKV
ASF
MP4
3GP
VRO
VOB
PS
TS
DivX 3.11/4.x/5.x/6.1
MPEG4 SP/ASP
H.264 BP/MP/HP
Motion JPEG 640 x 480 8
Window Media Video v9
MPEG2
MPEG1
1920 x 1080
1920 x 1080 30
Fullstendig tilgjengelig oppløsning: 1920 X 1080 @ 60 Hz
Modus Oppløsning Horisontal frekvens (kHz) Vertikal frekvens (Hz)
IBM
MAC
VESA DMT
640 x 350 31.469 70.086 25.175 +/-
720 x 400 31.469 70.087 28.322 -/+
640 x 480 35.000 66.667 30.240 -/-
832 x 624 49.726 74.551 57.284 -/-
1152 x 870 68.681 75.062 100.000 -/-
640 x 480 31.469 59.940 25.175 -/-
640 x 480 37.861 72.809 31.500 -/-
640 x 480 37.500 75.000 31.500 -/-
800 x 600 37.879 60.317 40.000 +/+
800 x 600 48.077 72.188 50.000 +/+
800 x 600 46.875 75.000 49.500 +/+
1024 x 768 48.363 60.004 65.000 -/-
1024 x 768 56.476 70.069 75.000 -/-
1024 x 768 60.023 75.029 78.750 +/+
1152 x 864 67.500 75.000 108.000 +/+
1280 x 720 45.000 60.000 74.250 +/+
1280 x 800 49.702 59.810 83.500 -/+
1280 x 1024 63.981 60.020 108.000 +/+
1280 x 1024 79.976 75.025 135.000 +/+
1366 x 768 47.712 59.790 85.500 +/+
1440 x 900 55.935 59.887 106.500 -/+
1600 x 900RB 60.000 60.000 108.000 +/+
1680 x 1050 65.290 59.954 146.250 -/+
1920 x 1080 67.500 60.000 148.500 +/+
6~30
Klokkefrekvens for piksler
(MHz)
30
AC3
LPCM
ADMPCM
(IMA, MS)
AAC
HE-AAC
WMA
DD+
MPEG
(MP3)
DTS Core
Synk.polaritet (H / V)
Norsk - 1313

Lisätietoja e-Manualin käytöstä (s. 9)
Tämän käyttöoppaan kuvat ja piirrokset ovat vain viitteellisiä ja ne saattavat olla erilaisia kuin varsinainen tuote. Tuotteen ulkoasu ja
tekniset ominaisuudet saattavat muuttua ilman erillistä ilmoitusta.
Huomautus digitaalisesta televisiosta
1. Digitaaliseen televisioon (DVB) liittyvät toiminnot ovat käytettävissä vain niissä maissa tai niillä alueilla, joilla lähetetään maanpäällistä
digitaalista DVB-T-signaalia (MPEG2 ja MPEG4 AVC) tai joissa voit käyttää yhteensopivaa DVB-C-kaapelitelevisiopalvelua (MPEG2 ja
MPEG4 AAC). Tarkista DVB-T- ja DVB-C-signaalien saatavuus paikalliselta jälleenmyyjältä.
2. DVB-T on eurooppalainen digitaalisen maanpäällisen televisiolähetysjärjestelmän standardi ja DVB-C taas digitaalisen kaapelitelevision
vastaava standardi. Jotkin erityispalvelut, esim. EPG (elektroninen ohjelmaopas), VOD (tilausvideo) jne. eivät kuitenkaan sisälly tähän
standardiin. Tästä syystä niitä ei voida toistaiseksi käyttää.
3. Vaikka tämä televisiovastaanotin täyttää tämänhetkiset DVB-T- ja DVB-C-standardit [elokuu 2008], yhteensopivuutta tulevaisuuden
digitaalisten maanpäällisten DVB-T-lähetysten tai DVB-C-kaapelilähetysten kanssa ei voida taata.
4. Joissakin maissa ja alueilla kaapelitelevisiopalveluiden tarjoajat saattavat veloittaa lisämaksun tällaisista palveluista ja sinua saatetaan myös
pyytää hyväksymään heidän määrittelemänsä palveluehdot.
5. Jotkin digitaalitelevision toiminnot eivät ole käytettävissä joissakin maissa ja DVB-C ei saata toimia oikein joidenkin kaapeliyhtiöiden
järjestelmissä.
6. Jos sinulla on jotakin kysyttävää, ota yhteyttä lähimpään Samsungin asiakaspalveluun.
Eri maissa käytettävien lähetysjärjestelmien erot saattavat vaikuttaa televisiolähetysten vastaanoton laatuun. Tarkista lähimmältä
✎
SAMSUNGin valtuuttamalta jälleenmyyjältä tai Samsungin teknisestä tuesta, voiko television suorituskykyä parantaa jollakin tavoin
muuttamalla sen asetuksia.
Ohjeita käyttäjälle
• Näytön jäännöskuva
Älä jätä plasmanäyttöön pysäytyskuvaa (esim. videopelissä) kuin korkeintaan joiksikin minuuteiksi, jottei kuva jäisi kuvaruutuun
jäännöskuvaksi. Jäännöskuva tunnetaan myös kuvan "palamisena" kuvaruutuun. Kun kuvaruudussa on pysäytyskuva, vähennä kirkkautta ja
kontrastia, jottei jäännöskuvaa pääsisi muodostumaan.
• Plasmatelevision yläosa kuumenee
Television yläosa voi olla kuuma pitkään kestäneen katselun jälkeen, sillä yläosan tuuletusaukosta vapautuu lämpöä.
Tämä on normaalia eikä tarkoita, että laitteessa tai sen toiminnassa olisi vikaa.
Lasten ei kuitenkaan saa antaa koskea television yläosaan.
• Televisiosta kuuluu naksahduksia.
Televisiosta voi kuulua naksahduksia, kun se kutistuu tai laajenee käyttöympäristön lämpötilan tai kosteuden muuttuessa. Tämä on
normaalia eikä tarkoita, että laitteessa olisi vikaa.
• Vialliset kennot
Plasmatelevision paneelissa on 2360000 (teräväpiirtotasolla) - 6221000 (täysteräväpiirtotasolla) kuvapistettä, mikä edellyttää pitkälle
kehitettyä tekniikkaa. Kuvaruudussa saattaa kuitenkin näkyä muutamia kirkkaita tai tummia kuvapisteitä. Nämä kuvapisteet eivät vaikuta
laitteen suorituskykyyn.
• Älä käytä televisiota alle 5 °C:n (41 °F:n) lämpötilassa
• Jos pysäytyskuvaa näytetään liian pitkään, plasmapaneeli voi vaurioitua pysyvästi.
Plasmatelevision pitkäaikainen katselu 4:3-kuvasuhteella saattaa jättää kuvaruudun vasemmalle ja oikealle reunalle
sekä keskelle reunuksia, jotka johtuvat valon säteilyn eroavuuksista kuvaruudulla. DVD-levyn toistaminen tai konsolipelin
pelaaminen voi vaikuttaa kuvaruutuun samalla tavoin.
Takuu ei kata tästä ilmiöstä johtuvia vaurioita.
• Kuvaruudun jälkikuvat.
Videopelien ja tietokoneen pysäytyskuvien näyttäminen kuvaruudulla kauemmin kuin tietyn aikaa saattaa aiheuttaa osittaisia jälkikuvia.
Voit ehkäistä tätä ilmiötä vähentämällä kuvaruudun kirkkautta ja kontrastia, jos katselet pysäytyskuvia pitkään.
• Takuu
Takuu ei kata jäännöskuvan aiheuttamaa vahinkoa.
Takuu ei kata kuvan palamisilmiötä.
Laitteen oikea hävittämistapa (sähkö- ja elektroniikkalaiteromu)
(Voimassa Euroopan unionissa ja muissa Euroopan maissa, joissa jätteitä lajitellaan.)
Jos laitteessa, sen lisätarvikkeissa tai sen mukana tulevissa asiakirjoissa on tämä merkki, se tarkoittaa, että laitetta ja sen elektronisia lisätarvikkeita (esim.
laturia, kuulokkeita tai USB-kaapelia) ei saa hävittää kotitalousjätteen mukana, kun laitteet tulevat elinkaarensa päähän. Älä hävitä näitä osia muiden
jätteiden mukana, sillä tämä voi saastuttaa luontoa ja aiheuttaa terveysriskejä. Kierrätä nämä osat vastuullisesti edistääksesi materiaalien uusiokäyttöä.
Kotitalouskäyttäjien tulisi ottaa yhteyttä joko tuotteen myyneeseen jälleenmyyjään tai paikalliseen ympäristöviranomaiseen, jotka antavat lisätietoja osien
turvallisista kierrätysmahdollisuuksista. Yritysasiakkaiden tulisi ottaa yhteyttä jälleenmyyjään ja tarkistaa ostosopimuksen ehdot. Tätä laitetta ja sen
elektronisia lisätarvikkeita ei tule hävittää muun yritysjätteen seassa.
Laitteen akkujen ja paristojen oikea hävittämistapa
(Voimassa Euroopan unionissa ja muissa Euroopan maissa, joissa paristoja kierrätetään.)
Jos akussa tai paristossa, käyttöoppaassa tai pakkauksessa on tämä merkki, se tarkoittaa, että akkuja ja paristoja ei saa hävittää
kotitalousjätteen mukana, kun ne tulevat elinkaarensa päähän. Kemialliset merkinnät Hg, Cd tai Pb ilmaisevat, että akku tai paristo sisältää
elohopeaa, kadmiumia tai lyijyä yli Euroopan yhteisön direktiivin 2006/66 vertailutasojen. Jos akkuja tai paristoja ei hävitetä asianmukaisesti, nämä
ainesosat saattavat vahingoittaa ihmisten terveyttä tai luontoa. Luonnonvarojen suojelemiseksi ja materiaalien uudelleenkäytön edistämiseksi
erottele akut tai paristot muusta jätteestä ja toimita ne maksuttomaan paikalliseen keräyspisteeseen.
Suomi - 2

Lisätarvikkeet
B
✎
Varmista, että television mukana toimitetaan seuraavat osat. Jos osia puuttuu, ota yhteyttä jälleenmyyjään.
✎
Osien väri ja muoto voivat vaihdella mallista riippuen.
✎
Voit hankkia erikseen sellaiset johdot, jotka eivät sisälly toimitukseen.
• Kaukosäädin ja paristot (AAA, 2 kpl) • Virtajohto
• Omistajan ohjeet • Puhdistusliina
• Takuukortti ja turvallisuusopas (ei saatavissa kaikkialla)
Ferriittisydän (1 kpl)
✎
Virtajohdon ferriittisydän: Ferriittisydämillä suojataan johtoja häiriöiltä. Kun kytket johtoa, avaa
ferriittisydän ja kiinnitä se johdon ympärille lähelle pistoketta kuvan osoittamalla tavalla.
A Ferriittisydämen ja televisioon liitetyn virtajohdon pään välinen enimmäisetäisyys: 3/4 tuumaa
x
✎
Palvelumaksu voidaan periä, jos
(a) huoltomies saapuu pyynnöstäsi, mutta tuotteessa ei ole vikaa
(esim. et ole lukenut tätä käyttöohjetta)
(b) tuot laitteen huoltokeskukseen, mutta tuotteessa ei ole vikaa
(esim. et ole lukenut tätä käyttöohjetta)
✎
Palvelumaksun suuruudesta ilmoitetaan sinulle ennen töihin ryhtymistä tai asentajan vierailua kotonasi.
A
Virtajohto
Suomi - 3

Television ohjaimen käyttö (panelin painike)
TV:n säädin on suuntapainike, jonka avulla
valikkoja voi selata ilman kaukosäädintä.
✎
Jotkin PIN-koodia vaativat toiminnot eivät
välttämättä ole käytettävissä.
✎
Tuotteen väri ja muoto voivat vaihdella
mallista riippuen.
✎
Voit poistua valikosta painamalla säädintä
yli sekunnin ajan.
✎
Varmista, ettet paina säädintä, kun
valitset toimintoa siirtämällä säädintä ylös,
alas, vasemmalle tai oikealle. Jos painat
säädintä ensin, et voi siirtyä sillä ylös, alas,
vasemmalle ja oikealle.
Virran kytkeminen Kytke televisio päälle painamalla säädintä valmiustilassa.
Äänenvoimakkuuden säätö Säädä äänenvoimakkuutta kääntämällä säädintä sivulta toiselle virran ollessa päällä.
Kanavan valitseminen Valitse kanava kääntämällä säädintä ylös- tai alaspäin virran ollessa päällä.
Toimintovalikon käyttö Tuo toimintovalikko näkyviin painamalla säädintä virran ollessa päällä. Jos painat
Valikon käyttö
Kuvalähteen valitseminen Valitse Lähde( ) siirtämällä säädintä toimintovalikossa. Lähde-luettelo ilmestyy
Sisällön etusivun valitseminen Valitse Sisällön etusivu( ) siirtämällä säädintä toimintovalikossa. Päävalikko
Virran katkaiseminen Kytke televisio pois päältä valitsemalla säätimellä toimintovalikon kohta Katkaise
Vasemmalle
säädintä uudelleen, valikko piilotetaan.
Valitse VALIKKO(m) siirtämällä säädintä toimintovalikossa. Television toimintojen
kuvaruutuvalikko tulee näkyviin.
näkyviin.
Sisällön etusivu ilmestyy näkyviin.
virta(P).
Alas (eteen)
Oikealle
Ylös (taakse)
TV:n säädin
Toimintovalikko
Palaa
Kaukosäätimen sensori
Valmiustila
Älä jätä televisiota valmiustilaan pitkäksi ajaksi (esimerkiksi loman ajaksi). Laite kuluttaa pienen määrän sähkövirtaa myös silloin, kun se
on sammutettu virtapainikkeesta. On parempi irrottaa virtajohto pistorasiasta.
Asennusalueen turvaaminen
Pidä laitteen ja muiden kohteiden (esim. seinien) väli riittävänä, jotta ilma pääsee kiertämään.
Jos et toimi näin, laitteen sisäinen lämpötila voi nousta liian korkeaksi ja seurauksena saattaa olla tulipalo tai laitevaurio.
✎
Jos käytät jalustaa tai seinätelinettä, käytä vain Samsung Electronicsin toimittamia osia.
Jos käytät jonkin muun valmistajan toimittamia osia, laitteen kanssa voi esiintyä ongelmia tai se saattaa pudota ja aiheuttaa
x
vammoja.
✎
Laitteen ulkonäkö voi vaihdella.
✎
Ole varovainen, kun kosketat televisiota, sillä jotkin sen osat voivat olla kuumia.
Asennus jalustan kanssa. Asennus seinätelineen kanssa.
10 cm
10 cm10 cm
10 cm
10 cm
10 cm
10 cm
Suomi - 4

Kaukosäädin
✎
Tämä on erityinen kaukosäädin näkövammaisille, ja sen Power-, Channel- ja Volume-painikkeissa on sokeainkirjoitusta.
Kytkee television päälle ja pois päältä.
Valitse vuorotellen teksti-tv PÄÄLLE,
kaksoiskuva, samanaikainen katselu tai POIS
PÄÄLTÄ.
Säätää äänenvoimakkuutta.
Näyttää pääkuvaruutuvalikon.
Näyttää Sisällön etusivu -valikon.
Valitse nopeasti usein käyttämiäsi toimintoja.
Valitsee kohteita kuvaruutuvalikosta ja säätää
valikossa näkyviä arvoja.
Palaa edelliseen valikkoon.
E-MANUAL: Näytä e-Manual-opas. (s. 9)
P.SIZE: Valitse kuvakoko.
AD/SUBT.: Kuvailutulkkauksen valinta. (Ei
saatavissa kaikkialla.) / Näyttää digitaalisen
tekstityksen.
CONTENT
A B C D
E-MANUAL
P.SIZE
AD/SUBT.
Näyttää ja valitsee käytettävissä olevat
kuvalähteet.
Siirry suoraan kanaville painamalla näitä
painikkeita.
Palaa edelliselle kanavalle.
Mykistää äänen tilapäisesti.
Vaihtaa kanavaa.
Näyttää kanavaluettelon kuvaruudulla.
Näyttää elektronisen ohjelmaoppaan (EPG).
Näyttää tietoja TV-näytössä.
Poistuu valikosta.
Käytä näitä painikkeita kuvaruudun ohjeiden
mukaisesti.
Näitä painikkeita erikoistoiminnossa.
Saat lisätietoja e-Manual-oppaasta.
Paristojen asentaminen (paristokoko: AAA)
Suomi - 5

Alkuasetukset
Kun televisio kytketään päälle ensimmäistä kertaa, näytöllä näkyvät toimintaohjeet auttavat sinua perusasetusten tekemisessä. Paina
POWERP -painiketta. Asetukset-toiminto on käytettävissä vain, kun lähteeksi on asetettu TV.
1. Valikon kieli: Valikon kielen valitseminen
Paina ensin ▲- tai ▼-painiketta ja sen jälkeen ENTERE.
Valitse kuvaruutuvalikolle haluamasi kieli.
2. Käyttötila: Myymälädemo- tai Kotikäyttö-tilojen valitseminen
Paina ensin ▲- tai ▼-painiketta ja sen jälkeen ENTERE.
Valitse tilaksi Kotikäyttö. Myymälädemo-tila on tarkoitettu käytettäväksi myymälöissä.
✎
Toimintovalikko piilotetaan, kun painat TV:n säädintä. Valitse VALIKKO(m) ja pidä säädintä painettuna yli 5 sekunnin ajan.
Myymälädemo-tila on asetettu.
✎
Peru Myymälädemo valitsemalla Lähde( ) ja pitämällä säädintä painettuna yli 5 sekunnin ajan.
✎
Myymälädemo on tarkoitettu vain myymäläkäyttöön. Jos valitset sen, monet toiminnot eivät näy. Valitse Kotikäyttö, kun
katsot kotona.
3. Maa (maakohtainen): Maan valitseminen
Paina ensin ▲- tai ▼-painiketta ja sen jälkeen ENTERE.
Valitse haluamasi maa.
4. Automaattinen viritys (vaihe 1): Television katselutavan valitseminen
Etsitään ja tallennetaan kanavia televisioosi. Haetaanko kanavia?
• Kyllä: Tallentaa kaikki RF-kaapelin kautta saatavilla olevat kanavat.
• Ei: Kanavahakuun ei tarvitse käyttää automaattista viritystä.
5. Automaattinen viritys (vaihe 2): Hakuasetusten valinta
Valitse haluamasi lähetyssignaali ja antennilähde. Paina ensin ▲/▼/◄/►-painiketta ja sen jälkeen ENTERE-painiketta.
Jos valitset antennilähteeksi asetuksen Kaapeli, voit seuraavassa vaiheessa asettaa kanavien arvot (kanavataajuudet) numeroina.
Saat lisätietoja kohdasta Kanava → Automaattinen viritys.
✎
Voit keskeyttää tallennuksen milloin tahansa painamalla ENTERE-painiketta.
✎
Tutustu e-Manual-oppaan lukuun ”Kanavien virittäminen uudelleen > Automaattinen viritys”
6. Kello: Kellon tilan asettaminen
• Autom.: Aseta oikea aika automaattisesti.
• Manuaal.: Voit asettaa päivämäärän ja kellonajan manuaalisesti.
7. Aikavyöhyke (maakohtainen): Aikavyöhykkeen asettaminen
Tämän voi tehdä vain silloin, kun kellon tilana on Autom..
• Autom.: Aseta aikavyöhyke automaattisesti.
• Manuaal.: Aseta aikavyöhyke manuaalisesti.
✎
Jos valitsit Manuaal., voit valita, asetatko kesäajan tilaan Käytössä vai Pois. (Maakohtainen.)
8. Asetukset ovat valmiit
Paina ENTERE-painiketta.
✎
Valmiit asetukset tulevat näkyviin.
Jos haluat asettaa tämän toiminnon uudelleen...
Valitse Järjestelmä - Asetukset (alkuasetukset). Syötä nelinumeroinen PIN-koodi. Oletuskoodi on "0-0-0-0". Jos haluat muuttaa PINkoodia, käytä Vaihda PIN -toimintoa.
Asetukset (MENU → Järjestelmä) on tehtävä myös kotona, vaikka ne olisi tehty jo myymälässä.
✎
Jos unohdat PIN-koodin, voit palauttaa sen oletusnumerosarjaksi ”0-0-0-0” painamalla kaukosäätimen painikkeita seuraavassa
järjestyksessä: MUTE → 8 → 2 → 4 → POWER (käytössä)
Suomi - 6

Liitännät
AV-liitäntä
BD-toistin
VIDEO OUT
Y
Y
✎
Yhteen liittimeen
voi tehdä sekä
komponentti- että
AV-liitännän.
AUDIO OUT
R-AUDIO-L
R
W
WR
Komponenttiliitäntä
BD-toistin
COMPONENT OUT
PRP
R B RG
R B
Y
B
R
G
AUDIO OUT
R-AUDIO-L
R
W
WR
AUDIO OUT
PC
HDMI, HDMI/DVI-liitäntä
BD-toistin / PC
DVI OUT
R-AUDIO-L
R
W
HDMI IN 1
(DVI)
HDMI OUT
Television
sivupaneeli
Television takapaneeli
✎
Liittimen sijainti voi
vaihdella eri malleissa.
VHF/UHF-antenni
Kaapeli
tai
✎
Plasmanäytöt saattavat
aiheuttaa häiriöitä
radioamatöörivastaanottimissa tai
AM-radioissa.
✎
Jos television lähellä
käytetään radiopuhelimia,
radioamatöörilaitteita tai AMradiota, televisio saattaa toimia
väärin.
ANT IN
SERVICE
DIGITAL
AUDIO OUT
(OPTICAL)
OPTICAL
Ääniliitäntä
COMPONENT / AV IN
VIDEO
EXT (RGB)
EXT
Videonauhuri tai DVD
AUDIO
HDMI IN 2
(5V 0.5A)
USB
Kuulokkeetiyhteys
Suomi - 7
SCART-liitäntä

Näyttötilat (HDMI/DVI-tulo)
Ihanteellinen tarkkuus on 1920 x 1080 / 60 Hz. Tarkista kaikki käytettävissä olevat tarkkuudet teknisistä tiedoista.
SERVICE
SERVICE
✎✎
HUOMAUTUS
• Sinun täytyy käyttää HDMI IN 1(DVI) -liitintä HDMI/DVI-kaapeliliitännälle.
• Lomitustilaa ei tueta.
• Televisio ei välttämättä toimi oikein, jos kuvamuodoksi valitaan jokin tavallisesta poikkeava muoto.
• Televisio tukee erillis- ja komposiittitiloja. SOGia (Sync On Green) ei tueta.
• PC-tuloliitäntää (D-liitin) ei tueta.
• Kaikki tietokoneet eivät tue HDMI-kaapelin käyttöä.
• Kuulokeliitäntä tukee vain 3-johtimista TRS-tyyppistä liitintä.
Tämä liitin on vain huoltoa varten.
YL. LIITÄNTÄ -korttipaikkaan kytkeminen
(television katselukortin korttipaikka)
Jos haluat katsella maksullisia kanavia, sinun täytyy asettaa CI- tai
CI+-kortti sille varattuun paikkaan.
• Jos et aseta CI- tai CI+-korttia korttipaikkaan, joillakin kanavilla näkyy
viesti: "Salattu signaali".
• Yhdistämistiedot eli puhelinnumero, CI- tai CI+-kortin tunnus,
isäntälaitteen tunnus ja muita tietoja tulee näkyviin noin 2–3
minuutin kuluessa. Jos ruudulle tulee virheilmoitus, ota yhteyttä
palveluntarjoajaan.
• Kun kanavatietojen määritys on valmis, ruudulle ilmestyy viesti:
"Päivitys suoritettu". Tämä tarkoittaa, että kanavaluettelo on päivitetty.
y Kuva voi vaihdella mallista riippuen.
Television sivupaneeli
Kuvalähteen muuttaminen
Lähde
TV / Ulk. / HDMI1/DVI / HDMI2 / AV / Komponentti
Valitse televisio tai jokin televisioon kytkettävä ulkoinen kuvalähde, esim. DVD- tai Blu-ray-soitin, kaapelisovitin tai satelliittivastaanotin
(STB).
✎
Kytketyt laitteet näytetään korostettuina kohdassa Lähde-luettelossa.
✎
PC-tuloliitäntää (D-liitin) ei tueta. Jos haluat kytkeä televisioon tietokoneen, käytä HDMI1/DVI-tuloliitäntää.
✎
Ulk. pysyy jatkuvasti aktiivisena.
✎
Paina TOOLS-painiketta.
• Nimen muokkaus
Voit antaa ulkoiselle kuvalähteelle haluamasi nimen.
– Jos liität tietokoneen HDMI IN 1(DVI)-porttiin HDMI-kaapelilla, televisio pitää asettaa PC-tilaan Nimen muokkaus
-asetuksessa.
– Jos liität tietokoneen HDMI IN 1(DVI)-porttiin HDMI-kaapelilla, televisio pitää asettaa DVI PC-tilaan Nimen muokkaus
-asetuksessa.
– Jos liität AV-laitteita HDMI IN 1(DVI)-porttiin HDMI-DVI-kaapelilla, televisio pitää asettaa DVI-laitteet-tilaan Nimen
muokkaus -asetuksessa.
• Tiedot
Saat tarkempia tietoja kytketystä ulkoisesta laitteesta.
Suomi - 8

e-Manual tarkastelu
E-MANUAL
Näyttö
Parhaillaan
näytettävä video,
televisio-ohjelma
Television ominaisuuksia kuvaavia ohjeita voi katsoa television e-Manual-oppaasta. Se avautuu, kun painat
kaukosäätimen E-MANUAL-painiketta. Korosta haluamasi luokka siirtämällä kohdistinta ylös/alas/oikea/vasen
-painikkeilla, valitse sen jälkeen aihe ja paina lopuksi ENTERE-painiketta. e-Manual näyttää haluamasi sivun.
e-Manual avautuu myös valikon kautta.
MENUm → Tuki → e-Manual → ENTERE
O
✎
Kun haluat palata takaisin e-Manual päävalikkoon, paina kaukosäätimen E-MANUAL-painiketta.
Luokkaluettelo. Valitse haluamasi luokka
painamalla ◄- tai ►-painiketta.
Näyttää alivalikkoluettelon. Siirrä kohdistinta
kaukosäätimen nuolipainikkeilla. Valitse
haluamasi alivalikko painamalla ENTER
painiketta.
E
-painiketta. Voit vierittää suurennettua
jne.
Toimintapainikkeet
}
Hakemisto: Näyttää hakemistoikkunan.
E
Hyväksy: Valitse luokka tai alivalikko.
e
Poistu: Poistu e-Manual.
<Sisällön katselu>
a
Yritä nyt: Näyttää aihetta vastaavan kuvaruutuvalikon. Palaa takaisin e-Manual-näyttöön painamalla
b
Koti: Siirtyy e-Manual-aloitusikkunaan.
L
Sivu: Siirry edelliselle tai seuraavalle sivulle.
{ Zoom: Suurentaa näyttöä.
– Valitse Zoom ja suurenna näyttöä painamalla ENTER
Perusominaisuudet
Esiasetetun kuvatilan muuttaminen
Kuva-asetusten muuttaminen
Kuvavalintojen muuttaminen
Esiasetetun äänitilan muuttaminen
Ääniasetusten säätäminen
}
Hakemisto E Hyväksy e Poistu
E-MANUAL-painiketta.
näyttöä käyttämällä ▲- tai ▼-painiketta. Palaa normaalikokoiseen näyttöön painamalla RETURNpainiketta.
E
-
Siirtyminen e-Manualin aiheen ja vastaavien kuvaruutuvalikoiden välillä.
✎
Tämä toiminto ei ole käytettävissä kaikissa valikoissa.
✎
Et voi käyttää Yritä nyt -toimintoa, jos valikko ei ole aktivoituna.
Tapa 1 Tapa 2
1. Jos haluat käyttää valikkoa, joka vastaa e-Manual aihetta, valitse
Yritä nyt painamalla punaista painiketta.
2. Palaa takaisin e-Manual-näyttöön painamalla E-MANUAL-
painiketta.
1. Paina ENTERE -painiketta, kun aihe on näkyvissä. Näyttöön
tulee ilmoitus "Haluatko suorittaa tämän?". Valitse Kyllä ja
paina sen jälkeen ENTERE -painiketta. Kuvaruutuvalikko tulee
näkyviin.
2. Palaa takaisin e-Manual-näyttöön painamalla E-MANUAL-
painiketta.
Aiheen hakeminen hakemistosivulla
✎
Jotkin kielet eivät tue tätä toimintoa.
1. Jos haluat etsiä hakusanoja, valitse Hakemisto sinisellä painikkeella.
2. Valitse haluamasi järjestys merkeille painamalla ◄- tai ►-painiketta.
3. Valitse ▲- tai ▼-painikkeella se hakusana, jonka haluat näyttää, ja paina sen jälkeen ENTERE-painiketta.
4. Näet hakusanaa vastaavan e-Manualin ohjesivun.
✎
Sulje Hakemisto-näyttö painamalla RETURN -painiketta.
Suomi - 9

Seinätelineen asentaminen
Voit kiinnittää television seinälle (erikseen myytävällä)
seinäkiinnikkeellä. Seinäkiinnikkeen tarkat asennusohjeet löytyvät
sen mukana toimitetusta ohjeesta. Pyydä teknikkoa asentamaan
seinäkiinnike. Emme suosittele tekemään tätä itse.
Samsung Electronics ei vastaa laitevaurioista eikä itsesi tai
muiden henkilöiden vammoista, jos asennat television itse.
Seinäkiinnikkeen asennussarjan tiedot (VESA)
✎
Seinäkiinnikkeen asennussarjaa ei tule tuotteen mukana,
vaan se on myytävänä erikseen.
Asenna seinäkiinnike vankalle seinälle, joka on kohtisuorassa
lattiaa kohti. Ota yhteyttä lähimpään jälleenmyyjään, jos kiinnike
asennetaan johonkin muuhun rakennusmateriaaliin. Jos kiinnike
asennetaan kattoon tai kaltevalle seinälle, se saattaa pudota ja
aiheuttaa vakavia henkilövahinkoja.
✎
HUOMAUTUS
Seinäkiinnikkeiden vakiomitat esitetään alla olevassa
x
taulukossa.
Seinäkiinnikkeiden asennussarjat sisältävät
x
yksityiskohtaisen asennusoppaan ja kaikki tarvittavat
osat.
Älä käytä VESA:n ruuvistandardeista poikkeavia ruuveja.
x
Älä käytä vakioruuveja pidempiä ruuveja, sillä ne voivat
x
vahingoittaa television sisäisiä osia.
Jos asennettavassa seinäkiinnikkeessä ei käytetä VESA-
x
standardin mukaisia ruuveja, kiinnitykseen käytettävät
ruuvit voivat poiketa tavallisista ruuveista.
Älä kiristä ruuveja liian kireälle, sillä laite voi vahingoittua
x
tai pudota ja aiheuttaa henkilövahinkoja. Samsung ei ole
vastuussa tämänkaltaisista vahingoista.
Samsung ei ole vastuussa laitevaurioista tai
x
henkilövahingoista, jos muita kuin VESA-standardien
mukaisia seinätelineitä käytetään tai jos käyttäjä ei
noudata laitteen asennusohjeita.
Älä asenna televisiota yli 15 asteen kaltevuuskulmaan.
x
tuumaa
43~51 400 x 400
60~64 600 x 400
VESA-standardi
(A * B)
Älä asenna seinäkiinnikettä,
kun televisioon on kytketty
virta. Tästä voi seurata
sähköisku ja henkilövahinkoja.
Vakioruuvi Määrä
M8 4
Television kiinnittäminen seinään
Varoitus: Television vetäminen, työntäminen tai siinä
kiipeily saattavat aiheuttaa sen putoamisen. Varmista
erityisesti, etteivät lapset leiki televisiolla tai horjuta
sen tasapainoa, sillä tämä voi aiheuttaa television
kaatumisen ja vakavia henkilövahinkoja tai kuoleman.
Noudata kaikkia mukana toimitetun turvaoppaan
turvallisuusohjeita. Turvallisuuden kannalta lisää
vakautta saat asentamalla putoamisen estävän
laitteen seuraavien ohjeiden mukaisesti.
Näin estät television putoamisen
1. Aseta ruuvit kiinnikkeisiin ja kiristä ne kiinni seinään. Varmista,
että ruuvit ovat tukevasti kiinni seinässä.
✎
Saatat tarvita seinän rakenteesta riippuen lisää
kiinnitystarvikkeita, esim. ruuvitulppia.
✎
Koska tarvittavat kiinnikkeet, ruuvit ja vaijeri tai ketju
eivät kuulu toimitukseen, hanki ne erikseen.
2. Irrota television takana keskellä olevat ruuvit. Aseta ruuvit
kiinnikkeisiin ja kiinnitä ne sitten takaisin televisioon.
✎
Ruuveja ei välttämättä toimiteta laitteen mukana. Jos
näin on, hanki oheisten teknisten tietojen mukaiset
ruuvit.
3. Yhdistä televisioon ja seinään kiinnitetyt kiinnikkeet toisiinsa
kestävällä ketjulla tai vaijerilla ja sido vaijeri tiukasti kiinni.
✎
HUOMAUTUS
• Asenna televisio lähelle seinää, jotta se ei kaatuisi
taaksepäin.
• Ketjun tai vaijerin yhdistäminen on turvallista niin, että
seinässä olevat kiinnikkeet ovat samalla tasolla tai
alempana kuin television kiinnikkeet.
• Irrota ketju tai vaijeri ennen television siirtämistä.
4. Varmista, että kaikki kiinnitykset on tehty kunnolla. Tarkista
ajoittain, ettei kiinnityksissä ole merkkejä rapistumisesta, jotteivät
ne pettäisi. Jos sinulla on pienintäkään epäilystä kiinnitysten
turvallisuudesta, ota yhteyttä ammattitaitoiseen asentajaan.
Suomi - 1010

Vianmääritys
Jos televisiossa tuntuu olevan jokin ongelma, kokeile ensin tässä luettelossa esitettyjä ratkaisuja. Jos mikään näistä
vianetsinnän vinkeistä ei auta, käy osoitteessa www.samsung.com ja napsauta tukivalikkoa tai soita Samsungin
asiakaspalveluun.
Ongelmat
• Varmista, että virtajohto on kunnolla kiinni pistorasiassa ja televisiossa.
• Varmista, että pistorasia toimii.
• Tarkista television POWER-painiketta painamalla, että kaukosäätimessä ei ole vikaa. Jos televisio käynnistyy, katso alta löytyvää
kohtaa kohtaa "Kaukosäädin ei toimi".
Ongelmat
• Tarkista kaapeliliitännät (irrota ja kytke kaikki television ja ulkoisten laitteiden johdot uudelleen).
• Aseta ulkoisten laitteiden (kaapelisovitin/digisovitin, DVD, Blu-ray jne.) videolähdöt vastaamaan television tuloliitäntöjä. Jos
esimerkiksi ulkoisen laitteen lähtöliitäntänä on HDMI, se täytyy kytkeä television HDMI-tuloliitäntään.
• Varmista, että kytketyt laitteet ovat päällä.
• Valitse televisiosta oikea lähde painamalla television kaukosäätimen SOURCE -painiketta.
• Käynnistä kytketty laite uudelleen kiinnittämällä laitteen virtajohto uudelleen.
Ongelmat
• Vaihda kaukosäätimen paristot ja aseta ne niin, että niiden napaisuudet (+/–) ovat oikein.
• Puhdista kaukosäätimen anturin ikkuna.
• Yritä suunnata kaukosäädin 1,5–1,8 metrin etäisyydeltä suoraan televisioon.
Ongelmat
• Ohjelmoi kaapeli- tai digisovittimen kaukosäädin niin, että sillä voi hallita televisiota. Tarkista SAMSUNGin television koodi kaapelitai digisovittimen käyttöoppaasta.
✎
Voit pitää television parhaassa kunnossa päivittämällä laiteohjelmiston USB-muistilla uusimpaan versioon verkkosivuilta (www.
samsung.com → Tuki → Tiedosto-arkisto).
Television virta ei kytkeydy päälle.
Televisiossa ei ole kuvaa eikä videokuvaa.
Kaukosäädin ei toimi.
Kaapeli- tai digisovittimen kaukosäädin ei käynnistä eikä sammuta televisiota eikä säädä äänenvoimakkuutta.
Lisenssi
Säilytys ja kunnossapito
✎
Jos poistat television kuvaruutuun kiinnitetyn tarran, puhdista sen jättämä jälki ennen television katselua.
✎
Laitteen ulkopinta ja näyttö voivat naarmuuntua puhdistuksen aikana. Pyyhi laitteen ulkopinnat ja kuvaruutu varovaisesti
käyttämällä joko laitteen mukana toimitettua tai jotakin muuta pehmeää liinaa, jottei laite naarmuuntuisi.
Älä suihkuta vettä suoraan laitteeseen. Jos laitteen sisälle pääsee
mitä tahansa nestettä, seurauksena voi olla laitevika, tulipalo tai
sähköisku.
Puhdista laite ainoastaan pehmeällä, pieneen määrään vettä
kostutetulla kankaalla. Älä käytä syttyvää nestettä, kuten
bentseeniä tai ohenteita, tai puhdistusainetta.
Suomi - 1111

Tekniset tiedot
10°C 40°C 50°F 104°F
10°C 40°C 50°F 104°F
-20°C 45°C -4°F 113°F
Käyttö- ja säilytysympäristö
Käyttölämpötila
Käyttötilan ilmankosteus
Säilytyslämpötila
Säilytystilan ilmankosteus
Televisiojärjestelmä Analoginen: B/G, D/K, L, I (maavalinnoista riippuen)
Väri-/kuvajärjestelmä Analoginen: PAL, SECAM, NTSC-4.43, NTSC-3.58, PAL60
Äänijärjestelmä BG, DK, L, NICAM, MPEG1, DD, DD+, HEAAC
HDMI IN Video: 1080 24p, 1080p, 1080i, 720p, 576p, 480p
Mallin nimi PS51E535 PS60E535
Näytön erottelutarkkuus 1920 X 1080 1920 X 1080 (Mustavalkoinen)
Kuvaruudun koko
Ääni (Lähtö) 10W X 2
Mitat (l x s x k)
Runko
Jalustan kanssa
Paino
Ilman jalustaa
Jalustan kanssa
✎
Ulkoasua ja teknisiä tietoja voidaan muuttaa ilman ennakkoilmoitusta.
✎
Saat lisätietoja virtalähteestä ja virrankulutuksesta laitteeseen kiinnitetystä tarrasta.
✎
Tyypillinen virrankulutus on mitattu IEC 62087 Ed.2:n mukaisesti.
Digitaalinen: MPEG-2 MP@ML, MPEG-4, H.264/AVC MP@L3, MP@L4.0, HP@L4.0
Ääni: 2-kanavainen lineaarinen PCM 32/44,1/48 kHz, 16/20/24 bittiä.
tuumaa
1187,8 X 56,0 X 706,6 (mm)
1187,8 X 252,0 X 781,9 (mm)
19,6 kg
22,1 kg
–
(
10–80 %, tiivistymätön
–
5–95 %, tiivistymätön
Digitaalinen: DVB-T/DVB-C
–
(
–
1389,3 X 56,0 X 828,2 (mm)
1389,3 X 330,0 X 907,9 (mm)
)
)
tuumaa
28,3 kg
32,6 kg
Suomi - 1212

Tuetut kuvamuodot
Tiedostotyyppi Tallennusmuoto Videokoodekki Tarkkuus Kuvanopeus (fps)
Bittinopeus
(Mbps)
Äänikoodekki
*.avi
*.mkv
*.asf
*.wmv
*.mp4
*.3gp
*.vro
*.mpg
*.mpeg
*.ts
*.tp
*.trp
*.m2ts
*.mts
*.divx
AVI
MKV
ASF
MP4
3GP
VRO
VOB
PS
TS
DivX 3.11/4.x/5.x/6.1
MPEG4 SP/ASP
H.264 BP/MP/HP
Motion JPEG 640 x 480 8
Window Media Video v9
MPEG2
MPEG1
1920 x 1080
6~30
1920 x 1080 30
Suurin käytettävissä oleva tarkkuus: 1920x1080/60 Hz
Tila Tarkkuus Vaakataajuus (kHz) Pystytaajuus (Hz) Pikselikellotaajuus (MHz)
IBM
MAC
VESA DMT
640 x 350 31.469 70.086 25.175 +/-
720 x 400 31.469 70.087 28.322 -/+
640 x 480 35.000 66.667 30.240 -/-
832 x 624 49.726 74.551 57.284 -/-
1152 x 870 68.681 75.062 100.000 -/-
640 x 480 31.469 59.940 25.175 -/-
640 x 480 37.861 72.809 31.500 -/-
640 x 480 37.500 75.000 31.500 -/-
800 x 600 37.879 60.317 40.000 +/+
800 x 600 48.077 72.188 50.000 +/+
800 x 600 46.875 75.000 49.500 +/+
1024 x 768 48.363 60.004 65.000 -/-
1024 x 768 56.476 70.069 75.000 -/-
1024 x 768 60.023 75.029 78.750 +/+
1152 x 864 67.500 75.000 108.000 +/+
1280 x 720 45.000 60.000 74.250 +/+
1280 x 800 49.702 59.810 83.500 -/+
1280 x 1024 63.981 60.020 108.000 +/+
1280 x 1024 79.976 75.025 135.000 +/+
1366 x 768 47.712 59.790 85.500 +/+
1440 x 900 55.935 59.887 106.500 -/+
1600 x 900RB 60.000 60.000 108.000 +/+
1680 x 1050 65.290 59.954 146.250 -/+
1920 x 1080 67.500 60.000 148.500 +/+
30
AC3
LPCM
ADMPCM
(IMA, MS)
AAC
HE-AAC
WMA
DD+
MPEG
(MP3)
DTS Core
Tahdistuksen
polaarisuus (H/V)
Suomi - 1313
 Loading...