

Page 1
Contact SAMSUNG WORLD-WIDE
If you have any questions or comments relating to Samsung products,
please contact the SAMSUNG customer care center.
Contate a SAMSUNG EM TODO O MUNDO
Caso tenha dúvidas ou comentários sobre os produtos da Samsung, entre em
contato com o centro de atendimento ao cliente da SAMSUNG.
Contacte con SAMSUNG WORLD-WIDE
Si tiene alguna pregunta o comentario referente a nuestros productos,
por favor contacte con nuestro Servicio de Atención al Cliente.
Country
ARGENTINE
BRAZIL
CHILE
COLOMBIA
COSTA RICA
ECUADOR
EL SALVADOR
GUATEMALA
JAMAICA
MEXICO
PANAMA
PUERTO RICO
REP. DOMINICA
TRINIDAD & TOBAGO
VENEZUELA
Customer Care Center
0800-333-3733
4004-0000
800-726-7864 (SAMSUNG)
01-8000-112-112
0-800-507-7267
1-800-10-7267
800-6225
1-800-299-0013
1-800-234-7267
01-800-SAMSUNG (7267864)
800-7267
1-800-682-3180
1-800-751-2676
1-800-7267-864
0-800-100-5303
Web Site
www.samsung.com/ar
www.samsung.com/br
www.samsung.com/cl
www.samsung.com/co
www.samsung.com/latin
www.samsung.com/latin
www.samsung.com/latin
www.samsung.com/latin
www.samsung.com/latin
www.samsung.com/mx
www.samsung.com/latin
www.samsung.com/latin
www.samsung.com/latin
www.samsung.com/latin
www.samsung.com/latin
PL-42C91HP
PL-42Q91HP
PL-50C91H
PL-50Q91HP
PL-42C71HP
PLASMA DISPLAY
BN68-01183X-00
Owner’s
Instructions
Register your product at www.samsung.com/global/register
Record your Model and Serial number here for future reference.
■
Model ________________ ■Serial No. ________________
Page 2

Important Warranty Information Regarding Television Format Viewing
Wide screen format PDP Displays (16:9, the aspect ratio of the screen width to height) are primarily designed to view wide
screen format full-motion video. The images displayed on them should primarily be in the wide screen 16:9 ratio format,
or expanded to fill the screen if your model offers this feature and the images are constantly moving. Displaying stationary
graphics and images on screen, such as the dark side-bars on nonexpanded standard format television video and
programming, should be limited to no more than 5% of the total television viewing per week.
Additionally, viewing other stationary images and text such as stock market reports, video game displays, station logos,
web sites or computer graphics and patterns, should be limited as described above for all televisions. Displaying stationary
images that exceed the above guidelines can cause uneven aging of PDP Displays that leave subtle, but permanent
burned-in ghost images in the PDP picture. To avoid this, vary the programming and images, and primarily display
full screen moving images, not stationary patterns or dark bars.
On PDP models that offer picture sizing features, use these controls to view different formats as a full screen picture.
Be careful in the selection and duration of television formats used for viewing. Uneven PDP aging as a result of format
selection and use, as well as burned-in images, are not covered by your Samsung limited warranty.
© 2007 Samsung Electronics Co., Ltd. All rights reserved.
English-2
Page 3
User Instructions
Screen Image retention
Do not display a still image (such as on a video game) on the plasma display panel for more than several minutes
as it can cause screen image retention. This image retention is also known as “screen burn”. To avoid such image
retention, refer to page 25 of this manual to reduce the degree of brightness and contrast of the screen when
displaying a still image.
Altitude
The PDP can only operate normally at heights under 6500ft.
Heat on the top of the PDP TV
The top side of the product may be hot after long period of use as heat dissipates from the panel through the vent
hole in the upper part of the product.
This is normal and does not indicate any defect or operation failure of the product.
However, children should be prevented from touching the upper part of the product.
The product is making a ‘cracking’ noise.
A ‘cracking’ noise may occur when the product contracts or expands due to a change of surrounding environment
such as temperature or humidity. This is normal and not a defect of the unit.
Cell Defects
The PDP uses a panel consisting of 1,230,000(SD-level) to 3,150,000(HD-level) pixels which require sophisticated
technology to produce. However, there may be a few bright or dark pixels on the screen. These pixels will have no
impact on the performance of the product.
Avoid operating the TV at temperatures below 5°C (41°F)
A still image displayed too long may cause permanent damage to the PDP Panel.
Watching the PDP TV in 4:3 format for a long period of time may leave traces of borders
displayed on the left, right and center of the screen caused by the difference of light
emission on the screen.
Playing a DVD or a game console may cause similar effect to the screen.
Damages caused by the above effect are not covered by the Warranty.
Afterimage on the Screen.
Displaying still images from Video games and PC for longer than a certain period of time may produce partial
after-images.
To prevent this effect, reduce the ‘brightness’ and ‘contrast’ when displaying still images for a long time.
Warranty
Warranty does not cover any damage caused by image retention.
Burn-in is not covered by the warranty.
English-3
Page 4
Contents
GENERAL INFORMATION
List of Features................................................................... 5
Accessories ........................................................................ 5
Viewing the Control Panel .................................................. 6
Viewing the Connection Panel............................................ 7
Remote Control................................................................... 8
Installing Batteries in the Remote Control.......................... 9
CONNECTIONS
Connecting VHF and UHF Antennas.................................. 9
Connecting Cable TV ......................................................... 10
Connecting a VCR.............................................................. 11
Connecting an S-VHS VCR................................................ 11
Connecting a Camcorder.................................................... 12
Connecting a DVD Player/Set-Top Box.............................. 12
Connecting a DVD Player/Set-Top Box via DVI................. 12
Connecting a DVD Player/Set-Top Box via HDMI.............. 13
Connecting an Amplifier/DVD Home Theater..................... 13
Connecting a PC ................................................................ 14
OPERATION
Turning the TV On and Off ................................................ 15
Plug & Play Feature............................................................ 15
Changing Channels ............................................................ 16
Adjusting the Volume.......................................................... 17
Viewing the Display ............................................................ 17
Viewing the Menus ............................................................. 17
Memorizing the Channels................................................... 18
Setting Up Your Remote Control ........................................ 19
To Select the Source .......................................................... 24
To Edit the Input Source Name .......................................... 24
PICTURE CONTROL
Using Automatic Picture Settings................................... 25
Configuring Detailed Settings on the Picture................. 26
Changing the Screen Size ............................................. 27
Digital Noise Reduction.................................................. 28
Active Color.................................................................... 28
DNIe (Digital Natural Image engine).............................. 29
Freezing the Current Picture.......................................... 29
SOUND CONTROL
Using Automatic Sound Settings ................................... 30
Customizing the Sound.................................................. 30
Setting the TruSurround XT........................................... 31
Choosing a Multi-Channel Sound (MTS) Track............. 31
Automatic Volume Control ............................................ 32
Selecting the Internal Mute ............................................ 32
Listening to the Sound of the Sub (PIP) Picture............ 32
CHANNEL CONTROL
Adding / Locking Channels ............................................ 33
Fine Tuning Analog Channels........................................ 34
Setting the Color System ............................................... 34
PC DISPLAY
Using Your TV as a Computer (PC) Display.................. 35
Display Modes................................................................ 35
Setting up the TV with your PC ..................................... 36
Setting the Home Theater PC........................................ 37
TIME SETTING
Setting the Clock............................................................ 38
Setting the Sleep Timer ................................................. 39
Setting the On/Off Timer................................................ 40
FUNCTION DESCRIPTION
Selecting a Menu Language .......................................... 41
Viewing Closed Captions............................................... 41
Using the Game Mode................................................... 42
Setting the Blue Screen Mode....................................... 43
Setting the On/Off Melody.............................................. 43
Setting the Light Effect................................................... 43
Using the Energy Saving Feature.................................. 44
Preventing Screen Burn-in............................................. 44
Reducing the Effects of Screen Burn............................. 45
Setting the HDMI Black Level........................................ 45
Setting the AV Color System.......................................... 46
Wall-Mount Adjustment (Sold separately)...................... 46
Viewing Picture-in-Picture.............................................. 47
ABOUT ANYNET+ (PL-42Q91HP/50Q91HP)
What is Anynet+?........................................................... 49
Connecting Anynet+ Devices ......................................... 49
Setting Up Anynet+........................................................ 50
Scanning and Switching between Anynet+ Devices...... 50
Recording....................................................................... 51
Listening through a Receiver (Home theater)................ 52
Check Points before Requesting Service ...................... 52
APPENDIX
Identifying Problems ..................................................... 53
Wall Mount Kit Specifications (VESA)............................ 54
How to assemble the Stand-Base
(depending on the model).............................................. 55
Specifications ................................................................. 55
Symbol Press Important Note One-Touch
➢
Button
English-4
Page 5
General Information
List of Features
Adjustable picture settings that can be stored in the TV’s memory.
Automatic timer to turn the TV on and off.
Aspecial sleep timer.
Remote Control
The supplied remote can be used to operate the TV as well as most DVD players, Set-top boxes, Cable Boxes and VCRs.
Excellent Picture Quality
-
DNIe technology provides life-like clear images.
SRS TruSurround XT
-
SRS TruSurround XT provides a virtual Dolby surround system.
Anynet+ (PL-42Q91HP/50Q91HP models only)
-
AV network system (Anynet) that enables you to easily control Samsung audio-video(AV) devices from this TV.
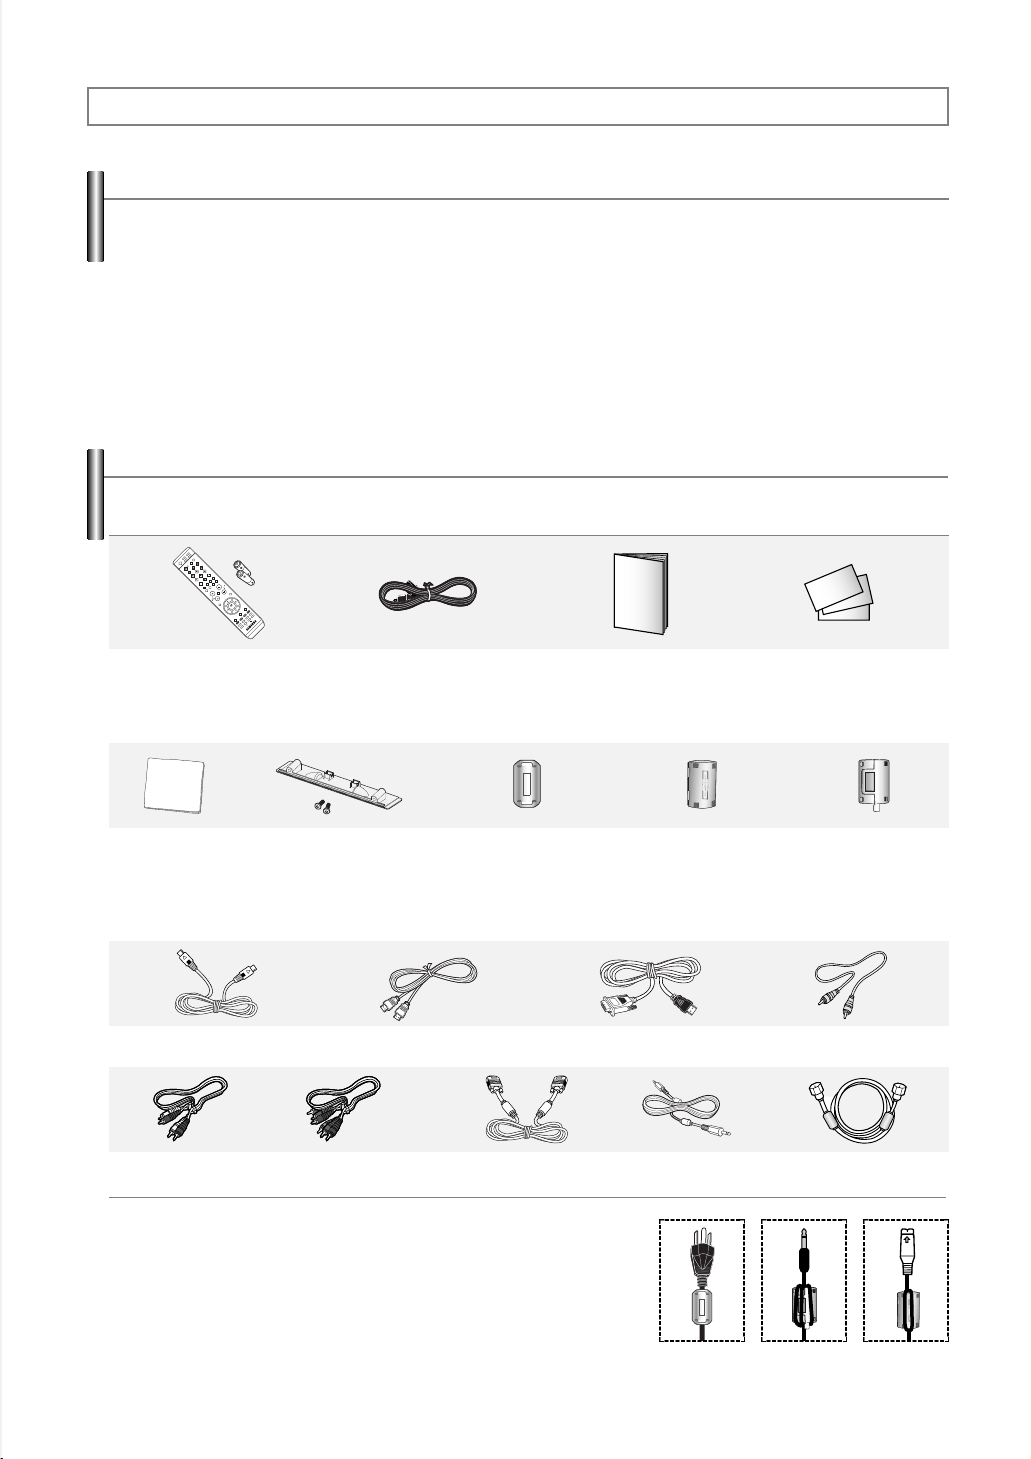
Accessories
Please make sure the following items are included with your TV.
If any items are missing, contact your dealer.
Remote Control /
AAA Batteries
Cloth-Clean Ferrite Core for
The following parts are sold separately and are available at most electronics stores.
S-Video Cable HDMI Cable HDMI/DVI Cable Video Cable
➢
Ferrite Core (Power Cord, Audio/Video Cable, S-Video Cable, Headphone)
The ferrite cores are used to shield the cables from interference.
When connecting a cable, open the ferrite core and clip it around the cable near
the plug.
Cover-Bottom / Screws (2ea)
(PL-42C91HP/42Q91HP/
50C91H/50Q91HP,
Refer to page 55)
Power Cord
Ferrite Core for
Power Cord
(3301-001110)
PC Cable PC Audio Cable Antenna Cable Component CablesAudio Cables
Owner’s Instructions Warranty Card /
Ferrite Core for
Side-AV / S-Video
(3301-001305)
Registration Card /
Safety Guide Manual
(Not available in all locations)
Headphone
(3301-001456)
English-5
Page 6
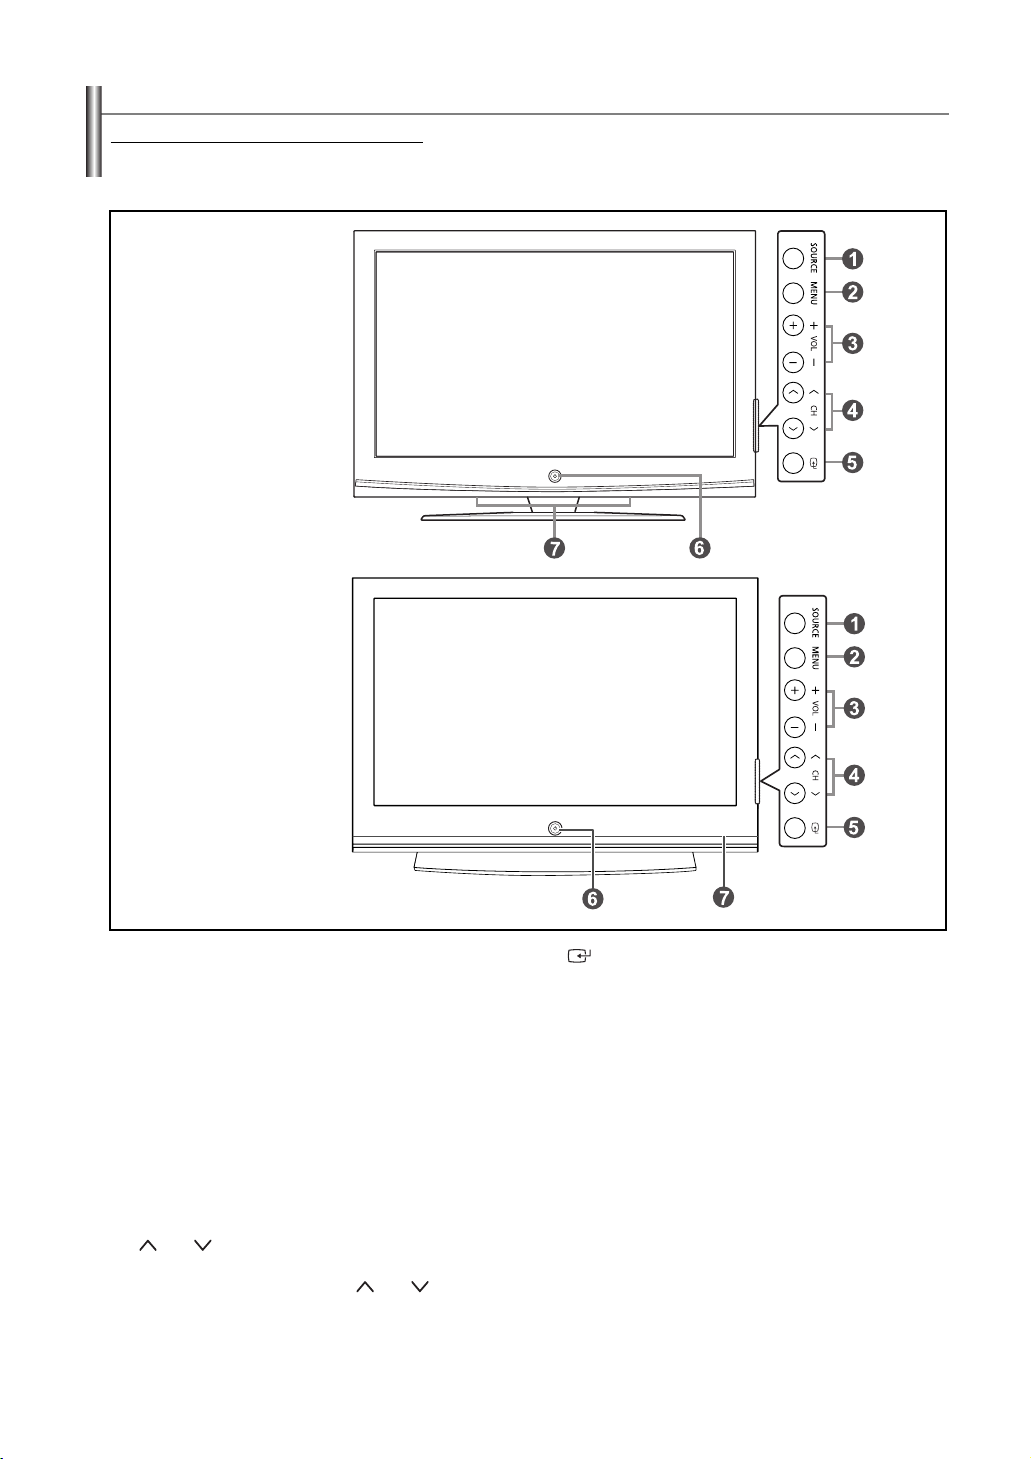
Viewing the Control Panel
Buttons on the Lower-Right Par
The buttons on the lower-right panel control your TV’s basic features, including the on-screen menu.
To use the more advanced features, you must use the remote control. The product color and shape may vary depending on the model.
PL-42C91HP/42Q91HP/
50C91H/50Q91HP
PL-42C71HP
t of the Panel
Œ
SOURCE
Toggles between all the available input sources
(TV, AV1, AV2, S-Video, Component1, Component2,
PC, HDMI).
➢
In case of PL-42Q91HP/50Q91HP models, the Source List
displays HDMI1 and HDMI2 instead of HDMI.
´
MENU
Press to see an on-screen menu of your TV’s features.
ˇ + VOL –
Press to increase or decrease the volume.
In the on-screen menu, use the
you would use the œœand √√buttons on the remote
control.
¨ CH
Press to change channels.
In the on-screen menu, use the
you would use the ……and††buttons on the remote
control.
+ VOL –
CH
buttons as
buttons as
English-6
ˆ
(ENTER)
Press to confirm a selection.
Ø
POWER
Press to turn the TV on and off.
Power Indicator
Blinks and turns off when the power is on and lights up
in stand-by mode.
Remote Control Sensor
Aim the remote control towards this spot on the TV.
∏
Speakers
Page 7
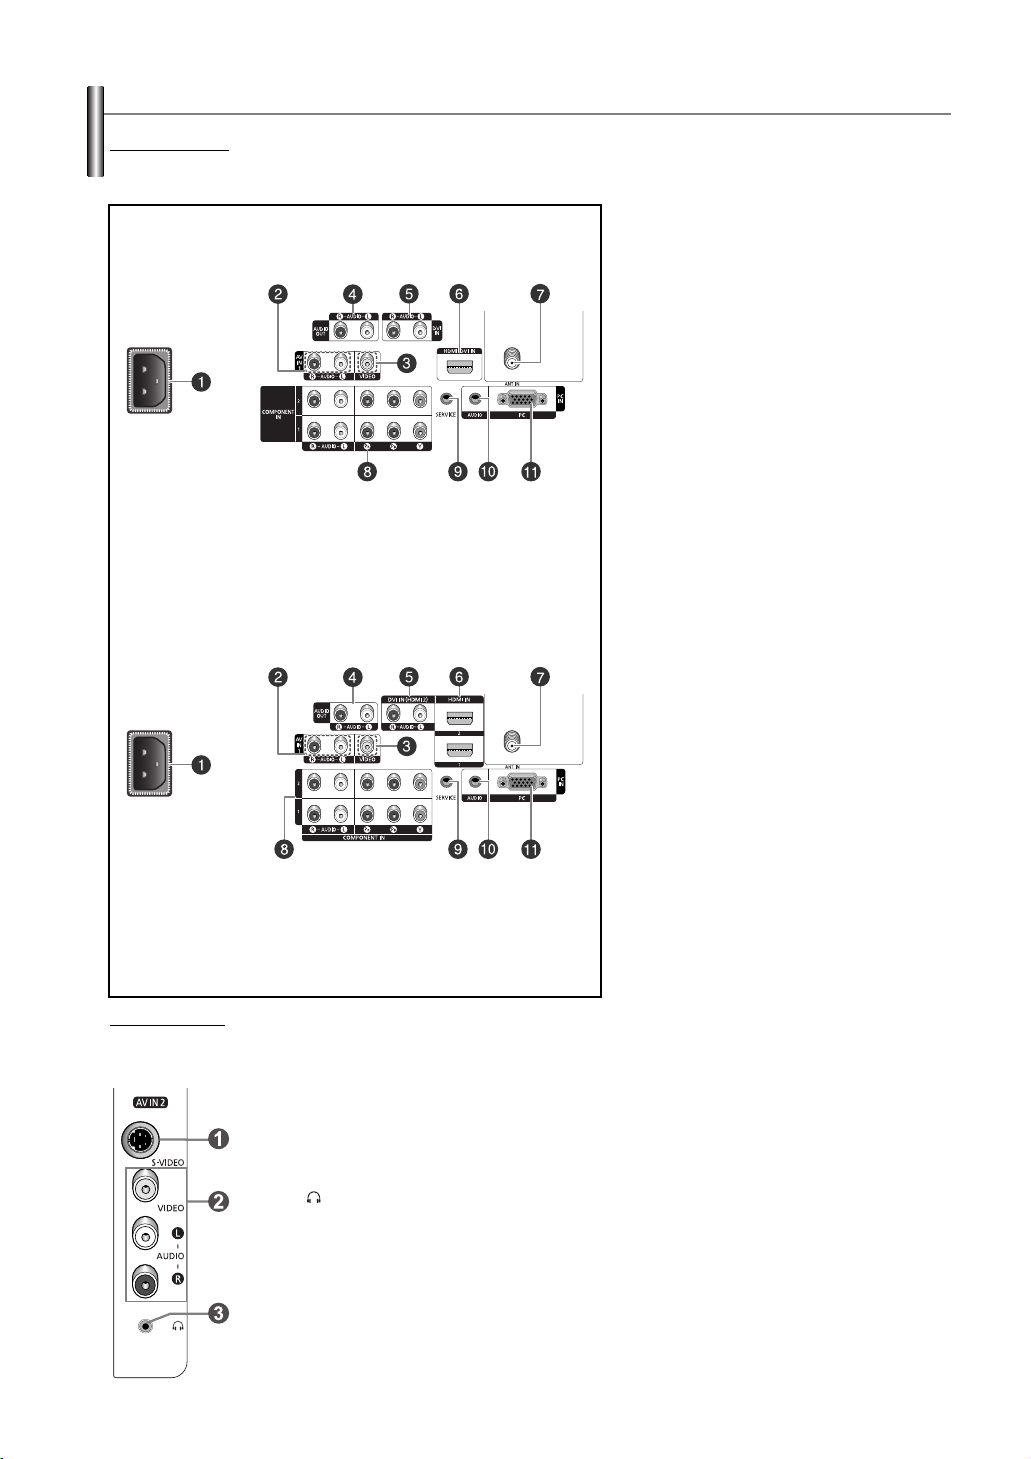
Viewing the Connection Panel
Rear Panel Jacks
Use the rear panel jacks to connect A/V components that will be connected continuously, such as VCR or DVD players.
For more information on connecting equipment, see pages 9-14. The product color and shape may vary depending on the model.
Œ
POWER IN
PL-42C91HP/50C91H/42C71HP
PL-42Q91HP/50Q91HP
Side Panel Jacks
Use the right side panel jacks to connect a component that is used only occasionally, such as a camcorder or video game. (See page 12)
The product color and shape may vary depending on the model.
Connect the supplied power cord.
´
AUDIO-R/L (AV IN 1)
Audio inputs for external devices, such as a
camcorder or VCR.
ˇ
VIDEO (AV IN 1)
Video input for external devices, such as a
camcorder or VCR.
¨
AUDIO OUT (AUDIO-R/L)
Audio outputs for external devices.
ˆ
DVI IN (AUDIO-R/L)
Connect to the DVI audio output jack of an
external device.
➢
In case of PL-42Q91HP/50Q91HP models,
only the HDMI IN 2 jack is compatible with
DVI.
Ø
HDMI/DVI IN
Connect to the HDMI jack of a device with
HDMI output.
This input can also be used as a DVI
connection with separate analog audio
inputs. (In case of PL-42Q91HP/50Q91HP
models, only the HDMI IN 2 jack is
compatible with DVI.)
An optional HDMI/DVI cable will be
necessary to make this connection.
When using an optional HDMI/DVI adapter,
the DVI analog audio inputs on your TV
allow you to receive left and right audio from
your DVI device. (Not compatible with PC)
∏
ANT IN
75Ω Coaxial connector for Air/Cable
Network.
”
COMPONENT IN 1, 2
Video (Y/PB/PR) and audio (R-AUDIO-L)
component inputs.
’
SERVICE
These jacks are for service purposes only.
˝
PC AUDIO IN
Connect to the audio output jack on your
PC.
Ô
PC IN
Connect to the video output jack on your
PC.
Œ
S-VIDEO IN
S-Video input for external devices with an S-Video output.
´
AV IN 2
Video and audio inputs for external devices.
ˇ
HEADPHONE
You can connect a set of headphones if you wish to watch a television program without
disturbing other people in the room.
English-7
Page 8
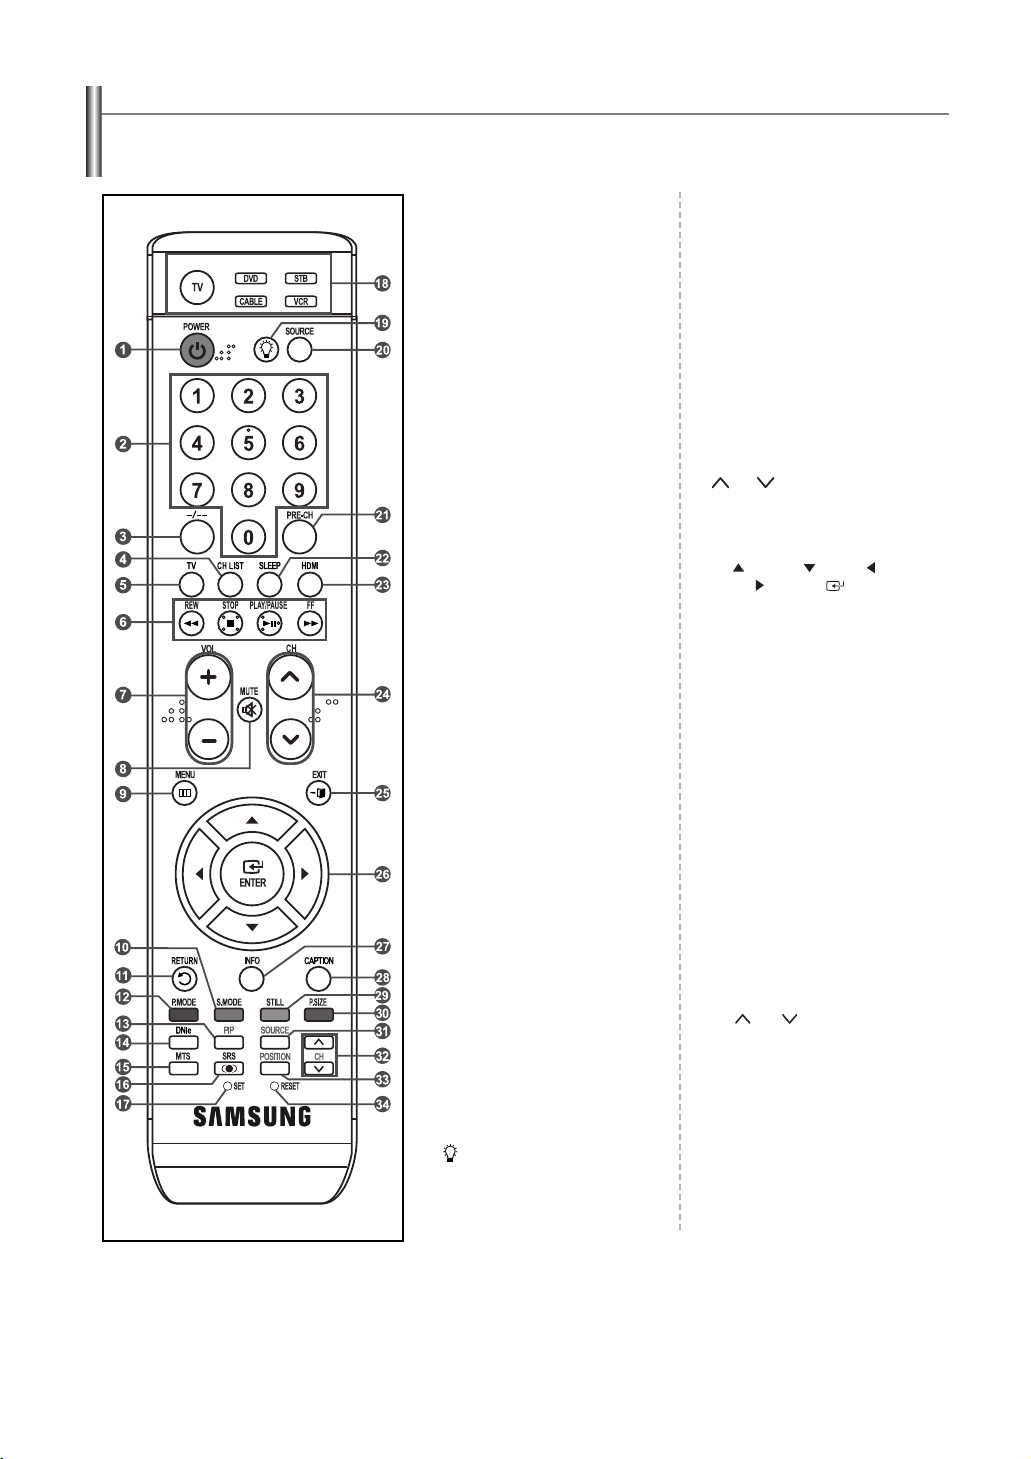
Remote Control
You can use the remote control up to a distance of about 23 feet from the TV. When using the remote, always point it directly at the TV.
You can also use your remote control to operate your VCR, Cable box, DVD player, or Set-Top Box.
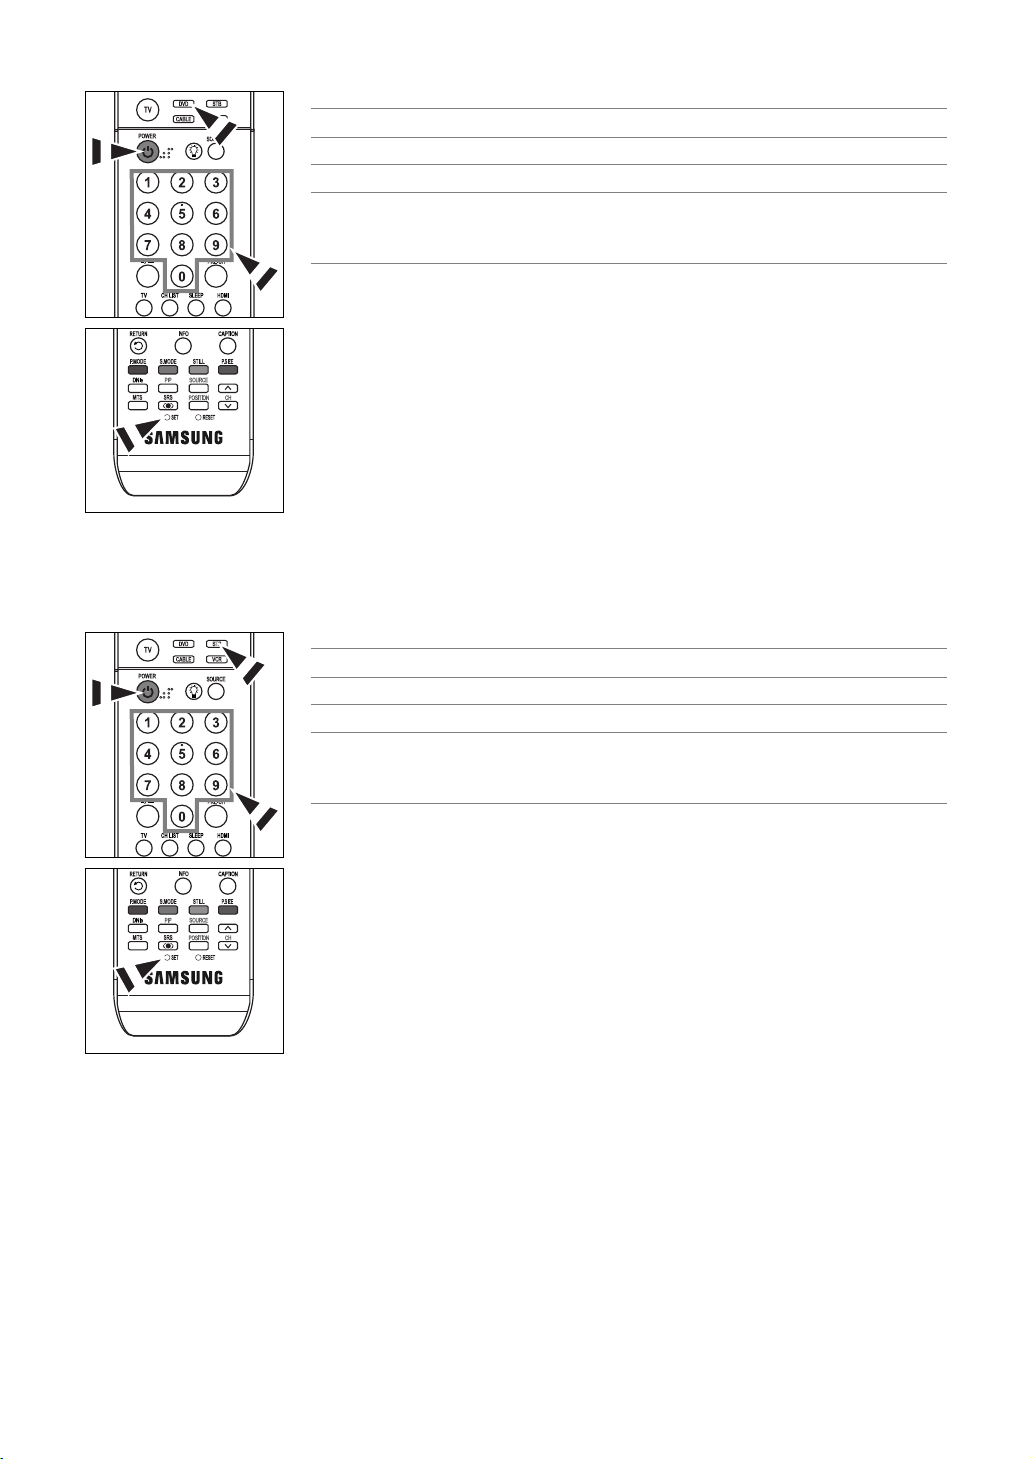
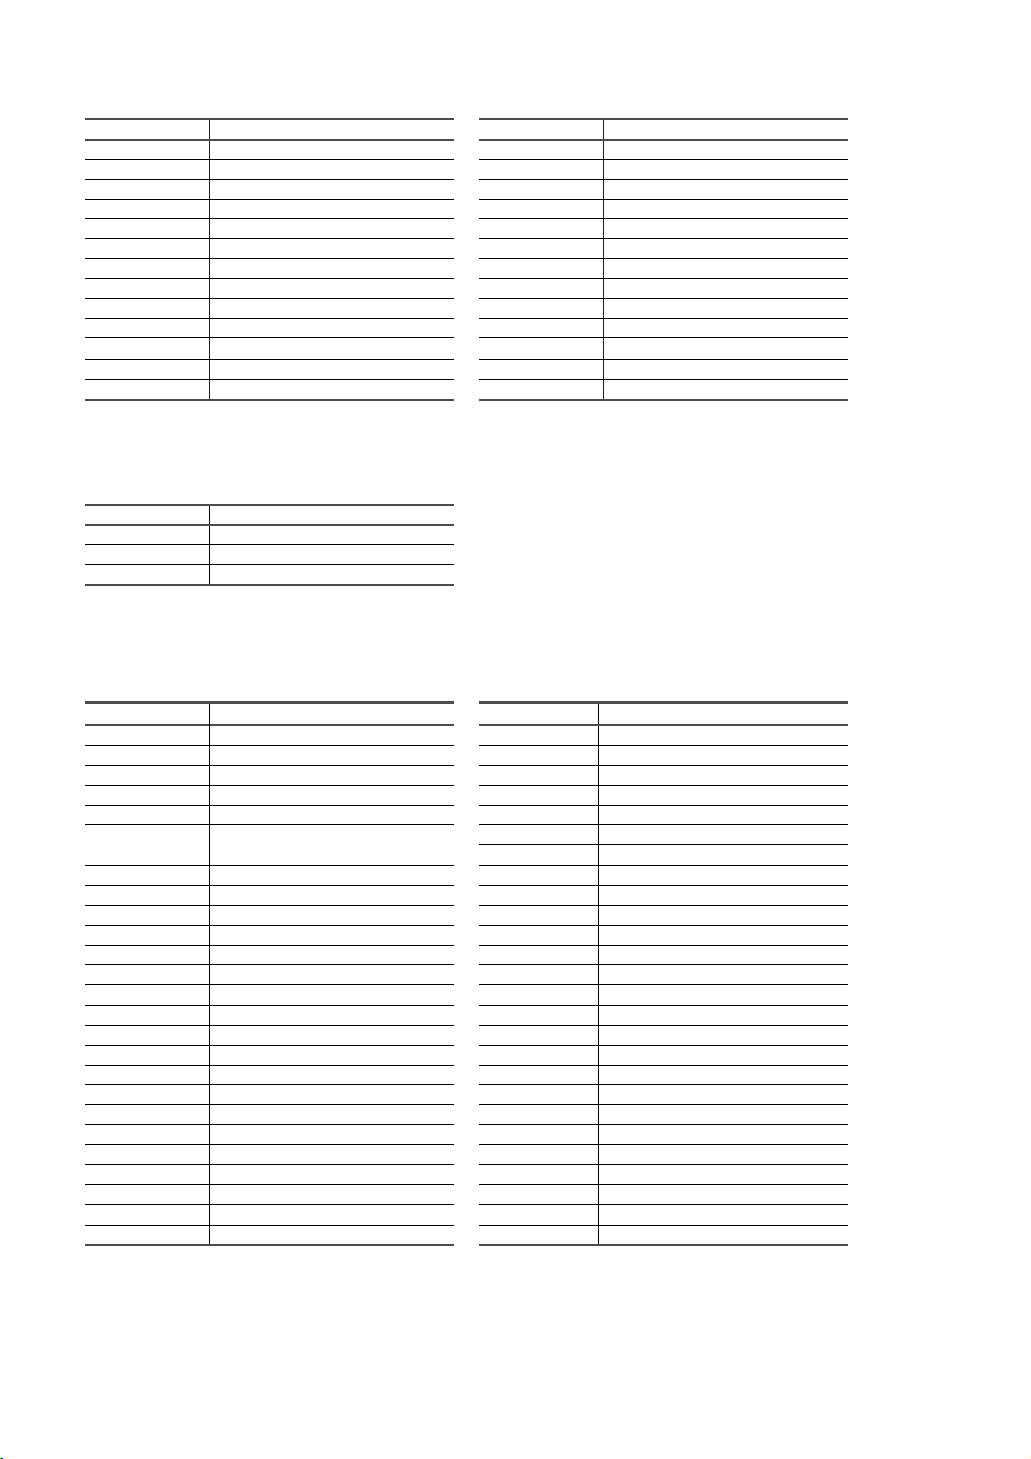
ΠPOWER
Turns the TV on and off.
´ NUMERIC BUTTONS
Press to directly select a channel.
ˇ-/
--
Use to select a channel over 100.
For example, for channel 122,
press “-”, then “2”, then “2”.
¨ CH LIST
Used to display Channel Lists on the
screen.
ˆ TV
Selects the TV mode directly.
Ø VCR/DVD Functions
- Rewind
- Stop
- Play/Pause
- Fast Forward
∏
VOL +, VOL –
Press to increase or decrease the
volume.
” MUTE
Press to temporarily cut off the sound.
’ MENU
Displays the main on-screen menu.
˝ S.MODE
Press to select the sound mode.
Ô RETURN
Returns to the previous menu.
P. MODE
Press to select the picture mode.
Ò PIP
Picture-in Picture ON/OFF.
Ú DNIe (Digital Natural Image engine)
Activates DNIe Demo mode.
Æ MTS
Press to choose Stereo, Mono or
Separate Audio Program
(SAP broadcast).
ı SRS
Selects SRS TruSurround XT mode.
˜ SET
Sets the remote to control your
TV, VCR, Cable, DVD, or Set-Top Box.
¯ TV / DVD / STB / CABLE / VCR
Press to operate your TV,
DVD, STB, CABLE (box), or VCR.
˘
Press to activate the backlight of the
VOL, CH, and the active source button
(TV, DVD, CABLE, STB, VCR) on the
remote control.
¿ SOURCE
Press to display all of the available
video sources.
¸ PRE-CH
Tunes to the previous channel.
˛ SLEEP
Press to select a preset time interval for
automatic shut off.
◊ HDMI (PL-42C91HP/50C91H/42C71HP
models only)
Selects the HDMI mode directly.
REC (PL-42Q91HP/50Q91HP models
only)
Use to make a recording.
± CH
Press to change channels.
≠ EXIT
Press to exit the menu.
– UP / DOWN / LEFT /
RIGHT / ENTER
Use to select on-screen menu items
and change menu values.
— INFO
Press to display information on the TV
screen.
÷ CAPTION
models only)
Controls the caption decoder.
Anynet+ (PL-42Q91HP/50Q91HP
models only)
Runs the Anynet+ view functions and
sets up Anynet+ devices.
® STILL
Press to stop the action during a
particular scene.
Press again to resume normal video.
∑ P.SIZE
Press to change the screen size.
µ SOURCE
Press to select a signal from an
external source in PIP.
¥ CH , CH
Displays the available channels in
sequence. (These buttons change
channels in the PIP window only.)
≥ POSITION
Change the position of the PIP screen.
≤ RESET
When your remote does not work,
change the batteries and press the
RESET button for 2-3 seconds
before use.
(PL-42C91HP/50C91H/42C71HP
➢ This is a special remote control for the visually impaired person, and has Braille points on
the POWER, Channel, Volume, STOP and PLAY/PAUSE buttons.
➢
The performance of the remote control may be affected by bright light.
➢
The illustration of the remote control shown in this manual has been created based on the
PL-42C91HP model.
English-8
Page 9
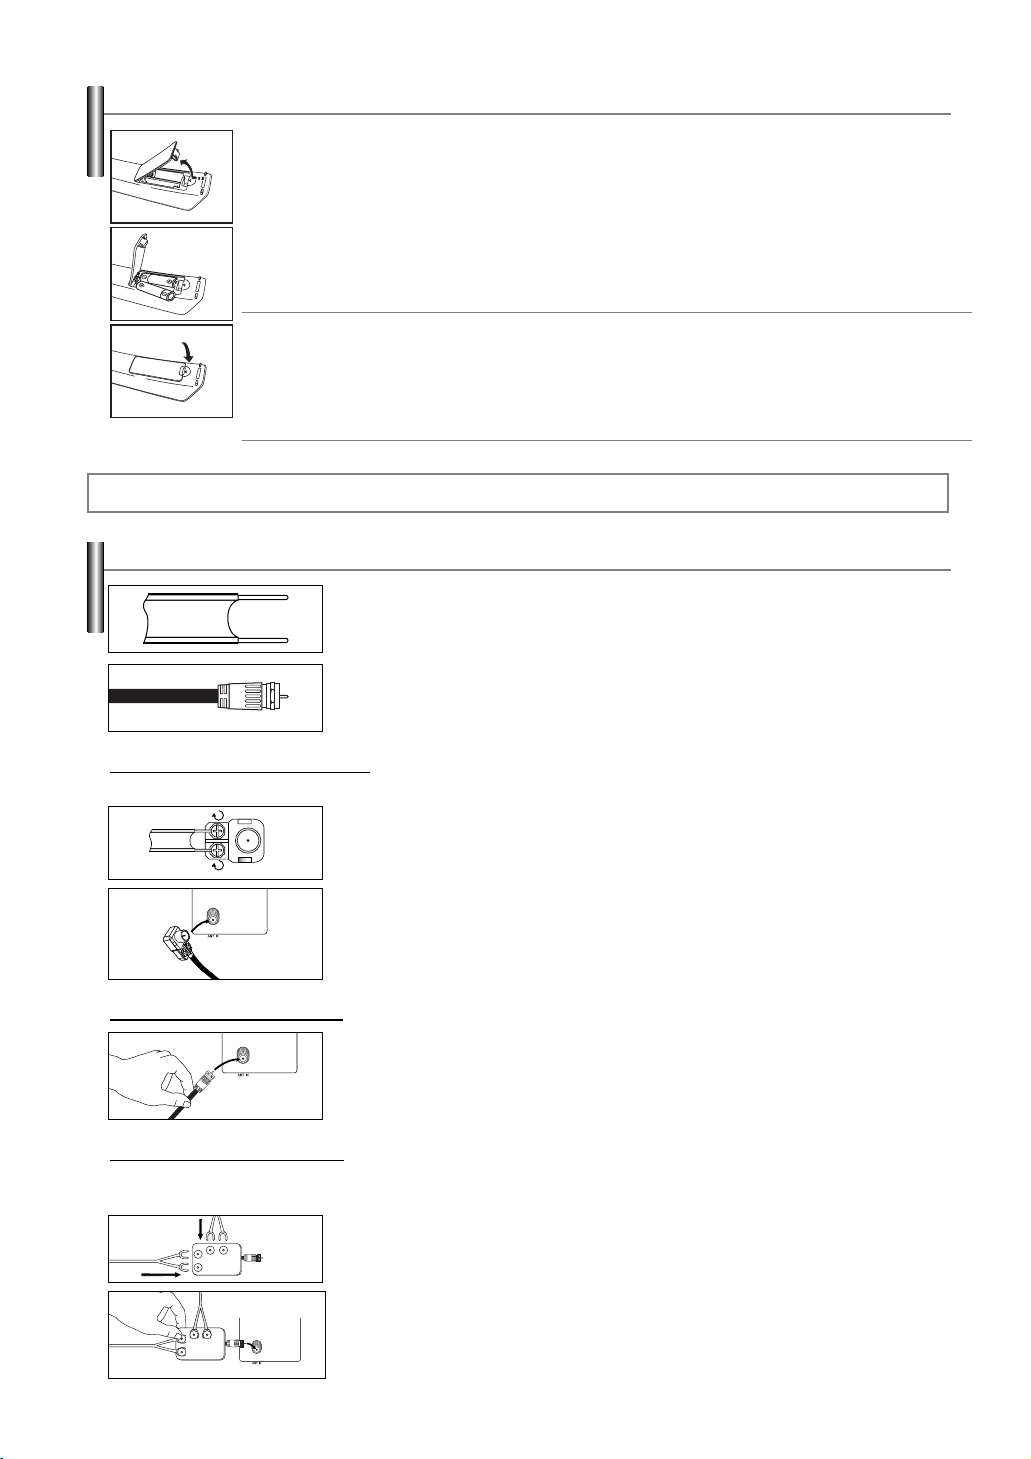
Installing Batteries in the Remote Control
1. Lift the cover at the back of the remote control upward as shown in the figure.
2. Install two AAA size batteries.
➢
Make sure to match the “+” and “–” ends of the batteries with the diagram inside the compartment.
➢
Do not mix battery types, i.e. alkaline and manganese.
3. Replace the cover.
➢
Remove the batteries and store them in a cool and dry place if you won’t be using the remote control for a long time.
The remote control can be used up to about 23 feet from the TV.
(Assuming typical TV usage, the batteries last for about one year.)
➢
If the remote control doesn’t work, check the following:
1. Is the TV power on?
2. Are the plus and minus ends of the batteries reversed?
3. Are the batteries drained?
4. Is there a power outage, or is the power cord unplugged?
5. Is there a special fluorescent light or neon sign nearby?
Connections
Connecting VHF and UHF Antennas
If your antenna has a set of leads that look like this, see “Antennas with 300 ΩFlat Twin Leads”
below.
If your antenna has one lead that looks like this, see “Antennas with 75 ΩRound Leads”.
If you have two antennas, see “Separate VHF and UHF Antennas”.
Antennas with 300 Ω Flat
Twin Leads
If you are using an off-air antenna (such as a roof antenna or “rabbit ears”) that has 300 Ωtwin flat leads, follow the directions below.
1. Place the wires from the twin leads under the screws on a 300-75Ωadapter
(not supplied).
Use a screwdriver to tighten the screws.
2. Plug the adaptor into the ANT IN terminal on the back of the TV.
Antennas with 75 Ω Round Leads
1. Plug the antenna lead into the ANT IN terminal on the back of the TV.
Separate VHF and UHF Antennas
If you have two separate antennas for your TV (one VHF and one UHF), you must combine the two antenna signals before connecting
the antennas to the TV. This procedure requires an optional combiner-adaptor (available at most electronics shops).
1. Connect both antenna leads to the combiner.
UHF
VHF
2. Plug the combiner into the ANT IN terminal on the bottom of the back panel.
UHF
VHF
English-9
Page 10
Connecting Cable TV
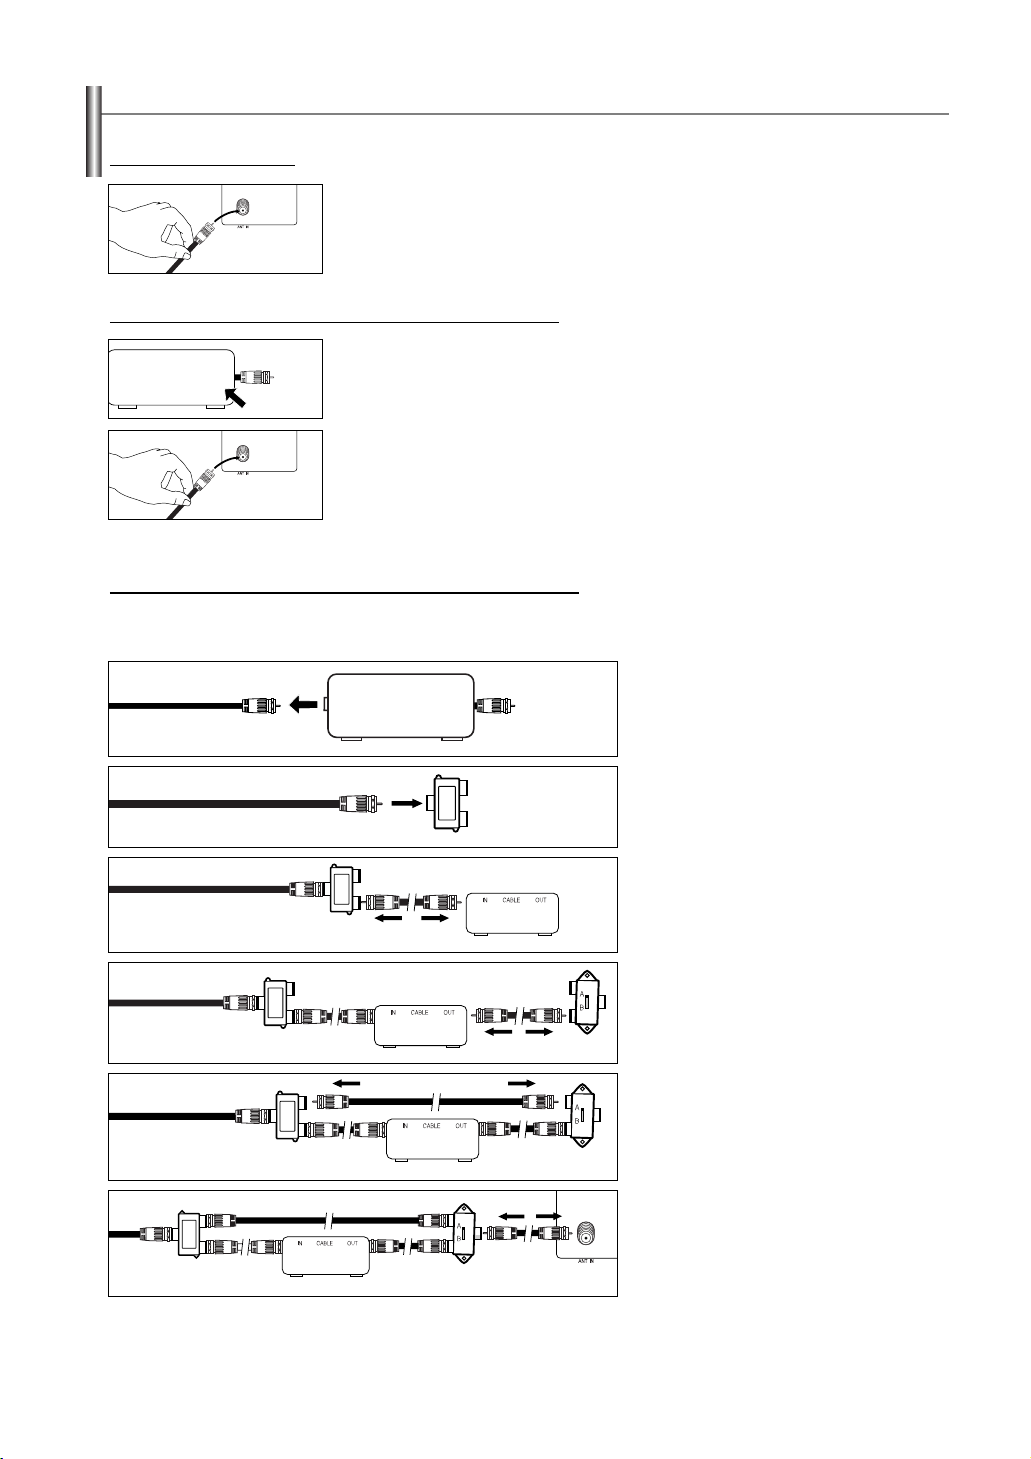
To connect to a cable TV system, follow the instructions below.
Cable without a Cable Box
1. Plug the incoming cable into the ANT IN terminal on the back of the TV.
Because this TV is cable-ready, you do not need a cable box to view unscrambled cable channels.
➢
Connecting to a Cable Box that Descrambles All Channels
1. Find the cable that is connected to the ANT OUT terminal on your cable box.
This terminal might be labeled “ANT OUT”, “VHF OUT” or simply, “OUT”.
ANT IN
ANT OUT
Connecting to a Cable Box that Descrambles Some Channels
If your cable box descrambles only some channels (such as premium channels), follow the instructions below. You will need a two-way
splitter, an RF (A/B) switch, and four lengths of Antenna cable. (These items are available at most electronics stores.)
➢
2. Connect the other end of this cable to the ANT IN terminal on the back of the TV.
1. Find and disconnect the cable that is
ANT IN
connected to the ANT IN terminal on your
cable box.
This terminal might be labeled “ANT IN”,
➢
“VHF IN” or simply, “IN”.
2. Connect this cable to a two-way splitter.
Incoming
cable
Splitter
3. Connect an Antenna cable between an
OUTPUT terminal on the splitter and the
Incoming
cable
Splitter
Cable Box
IN terminal on the cable box.
4. Connect an Antenna cable between the
ANT OUT terminal on the cable box and
Incoming
cable
Splitter
Cable Box
RF (A/B)
Switch
the B–IN terminal on the RF(A/B) switch.
5. Connect another cable between the other
OUT terminal on the splitter and the A–IN
Incoming
cable
Splitter
Cable Box
RF (A/B)
Switch
TV Rear
terminal on the RF (A/B) switch.
6. Connect the last Antenna cable between the
OUT terminal on the RF (A/B) switch and
Incoming
cable
Splitter
Cable Box
RF (A/B)
Switch
After you have made this connection, set the A/B switch to the “A” position for normal viewing. Set the A/B switch to the “B” position to view scrambled
channels. (When you set the A/B switch to “B”, you will need to tune your TV to the cable box’s output channel, which is usually channel 3 or 4.)
the ANT IN terminal on the rear of the TV.
English-10
Page 11
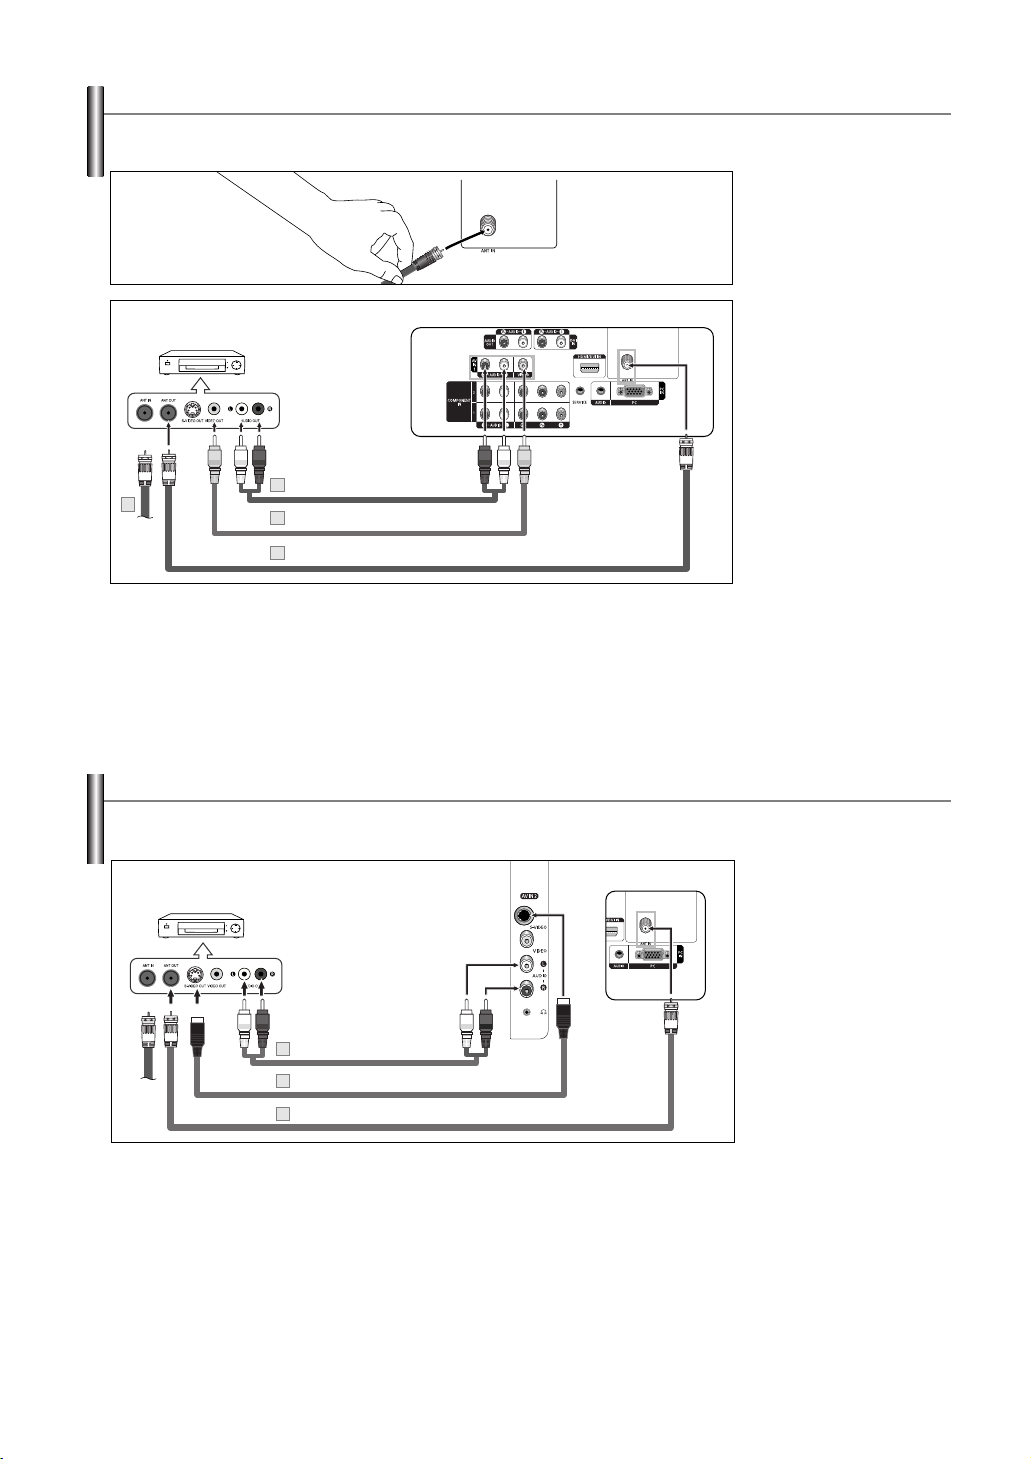
Connecting a VCR
These instructions assume that you have already connected your TV to an antenna or a cable TV system (according to the instructions on
pages 9-10). Skip step 1 if you have not yet connected to an antenna or a cable system.
1. Unplug the cable or antenna
from the back of the TV.
2. Connect the cable or antenna
to the ANT IN terminal on the
back of the VCR.
3. Connect an Antenna Cable
TV Rear Panel
VCR
5
2
➢
Each VCR has a different back panel configuration.
➢
When connecting a VCR, match the color of the connection terminal to the cable.
➢
The illustration for connecting jacks on the rear shown in this manual has been created based on
the PL-42C91HP model. Even though the jack configuration is different from your model, the
connection method is the same as in the illustration.
Audio Cable (Not supplied)
4
Video Cable (Not supplied)
3
Antenna Cable (Not supplied)
between the ANT OUT
terminal on the VCR and the
ANT IN terminal on the TV.
4. Connect a Video Cable
between the VIDEO OUT jack
on the VCR and the AV IN 1
[VIDEO] jack on the TV.
5. Connect Audio Cables
between the AUDIO OUT
jacks on the VCR and the
AV IN 1 [R-AUDIO-L] jacks
on the TV.
➢
If you have a “mono”
(non-stereo) VCR, use a
Y-connector (not supplied) to
hook up to the right and left
audio input jacks of the TV.
If your VCR is stereo, you
must connect two cables.
Connecting an S-VHS VCR
Your Samsung TV can be connected to an S-Video signal from an S-VHS VCR.
(This connection delivers a better picture as compared to a standard VHS VCR.)
TV Rear PanelTV Side Panel
VCR
3
Audio Cable (Not supplied)
S-Video Cable (Not supplied)
2
1
Antenna Cable (Not supplied)
An S-Video cable is usually included with an S-VHS VCR. (If not, check your local electronics store.)
➢
Each S-VHS VCR has a different back panel configuration.
➢
When connecting an S-VHS VCR, match the color of the connection terminal to the cable.
➢
Some games may be displayed with a cut off picture when the TV is connected to a game player.
➢
The illustration for connecting jacks on the rear shown in this manual has been created based on
the PL-42C91HP model. Even though the jack configuration is different from your model, the
connection method is the same as in the illustration.
1. To begin, follow steps 1–3
in the previous section to
connect the antenna or
cable to your VCR and
your TV.
2. Connect an S-Video Cable
between the S-VIDEO OUT
jack on the VCR and the
AV IN 2 [S-VIDEO] jack on
the TV.
3. Connect Audio Cables
between the AUDIO OUT
jacks on the VCR and the
AV IN 2 [R-AUDIO-L] jacks
on the TV.
English-11
Page 12
Connecting a Camcorder
The side panel jacks on your TV make it easy to connect a camcorder to your TV.
They allow you to view the camcorder tapes without using a VCR
TV Side Panel
1. Connect a Video Cable
(or S-Video Cable) between
1
Camcorder
S-Video Cable (Not supplied)
or
Video Cable (Not supplied)
1
2
Audio Cable (Not supplied)
the AV IN 2 [VIDEO]
(or S-VIDEO) jack on the
TV and the VIDEO OUT
jack on the camcorder.
2. Connect Audio Cables
between the AV IN 2
[R-AUDIO-L] jacks on the
TV and the AUDIO OUT
➢
Each Camcorder has a different back panel configuration.
➢
When connecting a Camcorder, match the color of the connection terminal to the cable.
jacks on the camcorder.
Connecting a DVD Player/Set-Top Box
The rear panel jacks on your TV make it easy to connect a DVD player/Set-Top Box to your TV.
1. Connect a Component
DVD Player / Set-Top Box
2
Audio Cable (Not supplied)
Component Cable (Not supplied)
1
➢
Component video separates the video into Y (Luminance (brightness)), P
for enhanced video quality.
Be sure to match the component video and audio connections.
For example, if connecting the video cable to COMPONENT IN, connect the audio cable to COMPONENT IN also.
➢
Each DVD player/Set-top box has a different back panel configuration.
➢
When connecting a DVD player/Set-top box, match the color of the connection terminal to the cable.
➢
The illustration for connecting jacks on the rear shown in this manual has been created based on the PL-42C91HP model.
Even though the jack configuration is different from your model, the connection method is the same as in the illustration.
TV Rear Panel
B
(Blue) and PR(Red)
Cables between the
COMPONENT IN 1 [Y, P
R](or COMPONENT IN 2
P
[Y, PB, P
and the COMPONENT OUT
[Y, P
player/Set-Top Box.
2. Connect Audio Cables
between the COMPONENT
IN 1 [R-AUDIO-L](or
COMPONENT IN 2
[R-AUDIO-L]) jacks on the
TV and the AUDIO OUT
jacks on the DVD player/
Set-Top Box.
R]) jacks on the TV
B, P
R] jacks on the DVD
B
,
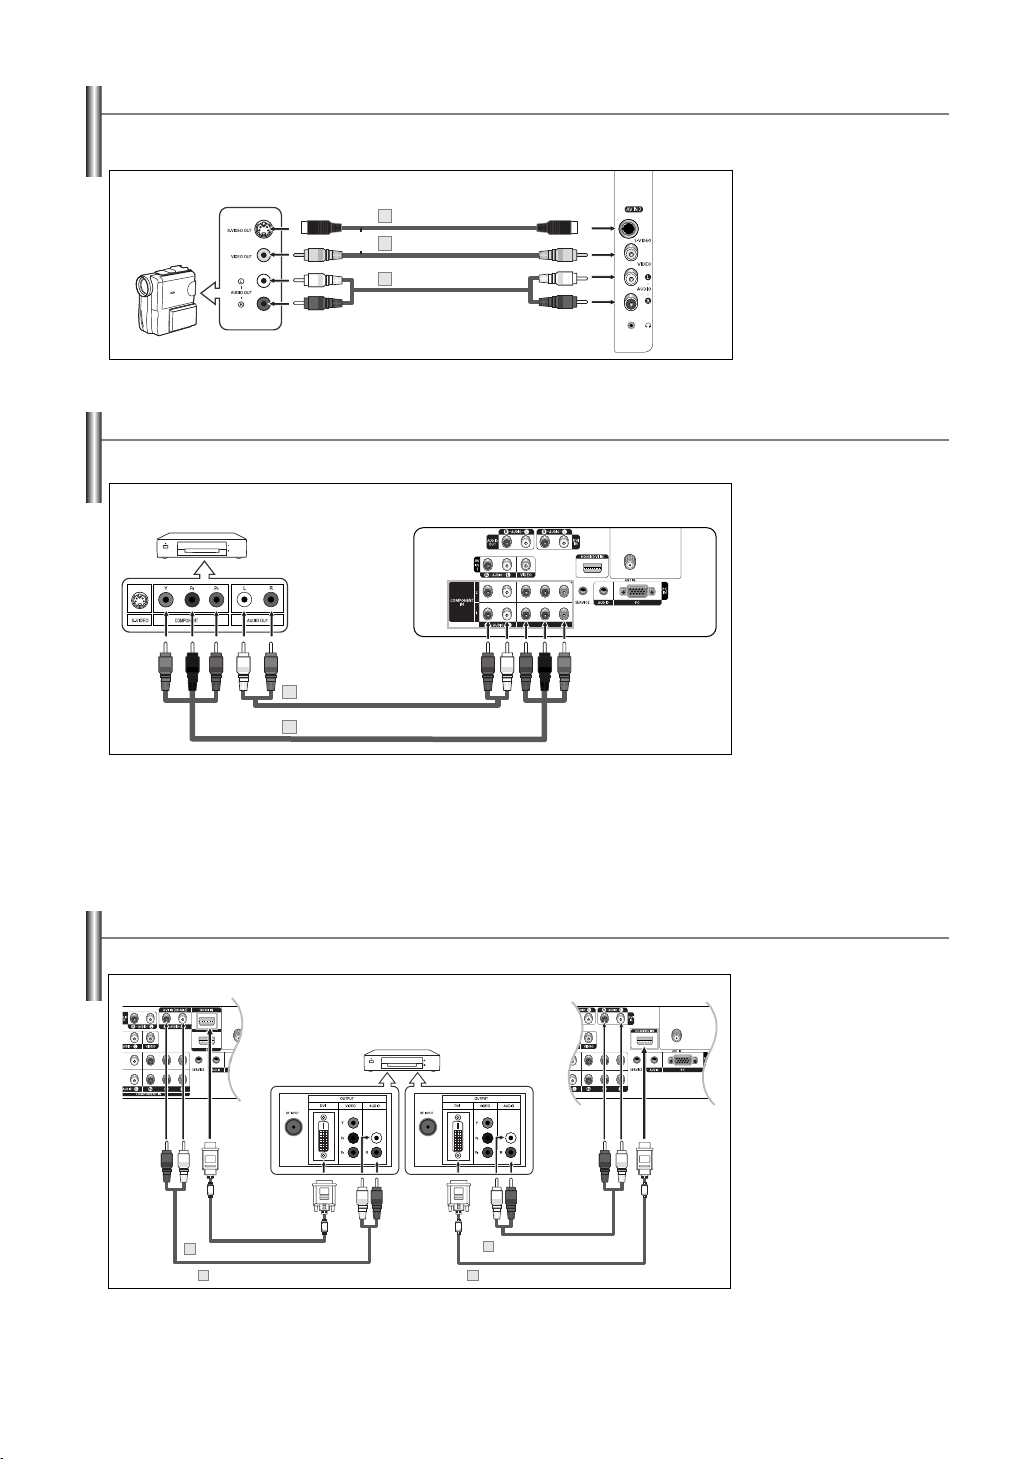
Connecting a DVD Player/Set-Top Box via DVI
This connection can only be made if there is a DVI Output jack on the external device.
TV Rear Panel (PL-42C91HP/50C91H/42C71HP)TV Rear Panel (PL-42Q91HP/50Q91HP)
DVD Player / Set-Top Box
2
1
DVI to HDMI Cable (Not supplied)
2
Audio Cable (Not supplied)
➢
Each DVD player/Set-top box has a different back panel configuration.
➢
When connecting a DVD player/Set-top box, match the color of the connection terminal to the cable.
➢
In case of PL-42Q91HP/50Q91HP models, only the HDMI IN 2 jack is compatible with DVI.
Audio Cable (Not supplied)
1
DVI to HDMI Cable (Not supplied)
English-12
1. Connect a DVI to HDMI
Cable or DVI-HDMI Adapter
between the HDMI/DVI IN
(or HDMI IN 2) jack on the
TV and the DVI OUT jack on
the DVD player/Set-Top Box.
2. Connect Audio Cables
between the DVI IN
[R-AUDIO-L] jack on the
TV and the AUDIO OUT
jacks on the DVD player/
Set-Top Box.
Page 13
Connecting a DVD Player/Set-Top Box via HDMI
This connection can only be made if there is an HDMI Output jack on the external device.
TV Rear Panel (PL-42Q91HP/50Q91HP)
DVD Player/Set-Top Box
TV Rear Panel (PL-42C91HP/50C91H/42C71HP)
Connect an HDMI Cable
1.
between the
HDMI/DVI IN
(or HDMI IN 1, 2)
and the HDMI OUT on the
DVD player/Set-Top Box.
on the TV
1
HDMI Cable (Not supplied)
1
HDMI Cable (Not supplied)
What is HDMI?
• HDMI, or high-definition multimedia interface, is a next-generation interface that enables
the transmission of the digital audio and video signals using a single cable without
compression.
• “Multimedia interface” is a more accurate name for it especially because it allows
multiple channels of digital audio (5.1 channels).
The difference between HDMI and DVI is that the HDMI device is smaller in size, has
the HDCP (High Bandwidth Digital Copy Protection) coding feature installed, and
supports multi-channel digital audio.
➢
Each
➢
➢
➢
DVD player/Set-top box
When connecting a
When connecting via HDMI, you do not need to connect Audio Cables. You only need to connect Audio
cables when connecting via HDMI/DVI.
If no video signal, turn Off your DVD player/Set-top box and turn it On again.
DVD player/Set-top box
has a different back panel configuration.
, match the color of the connection terminal to the cable.
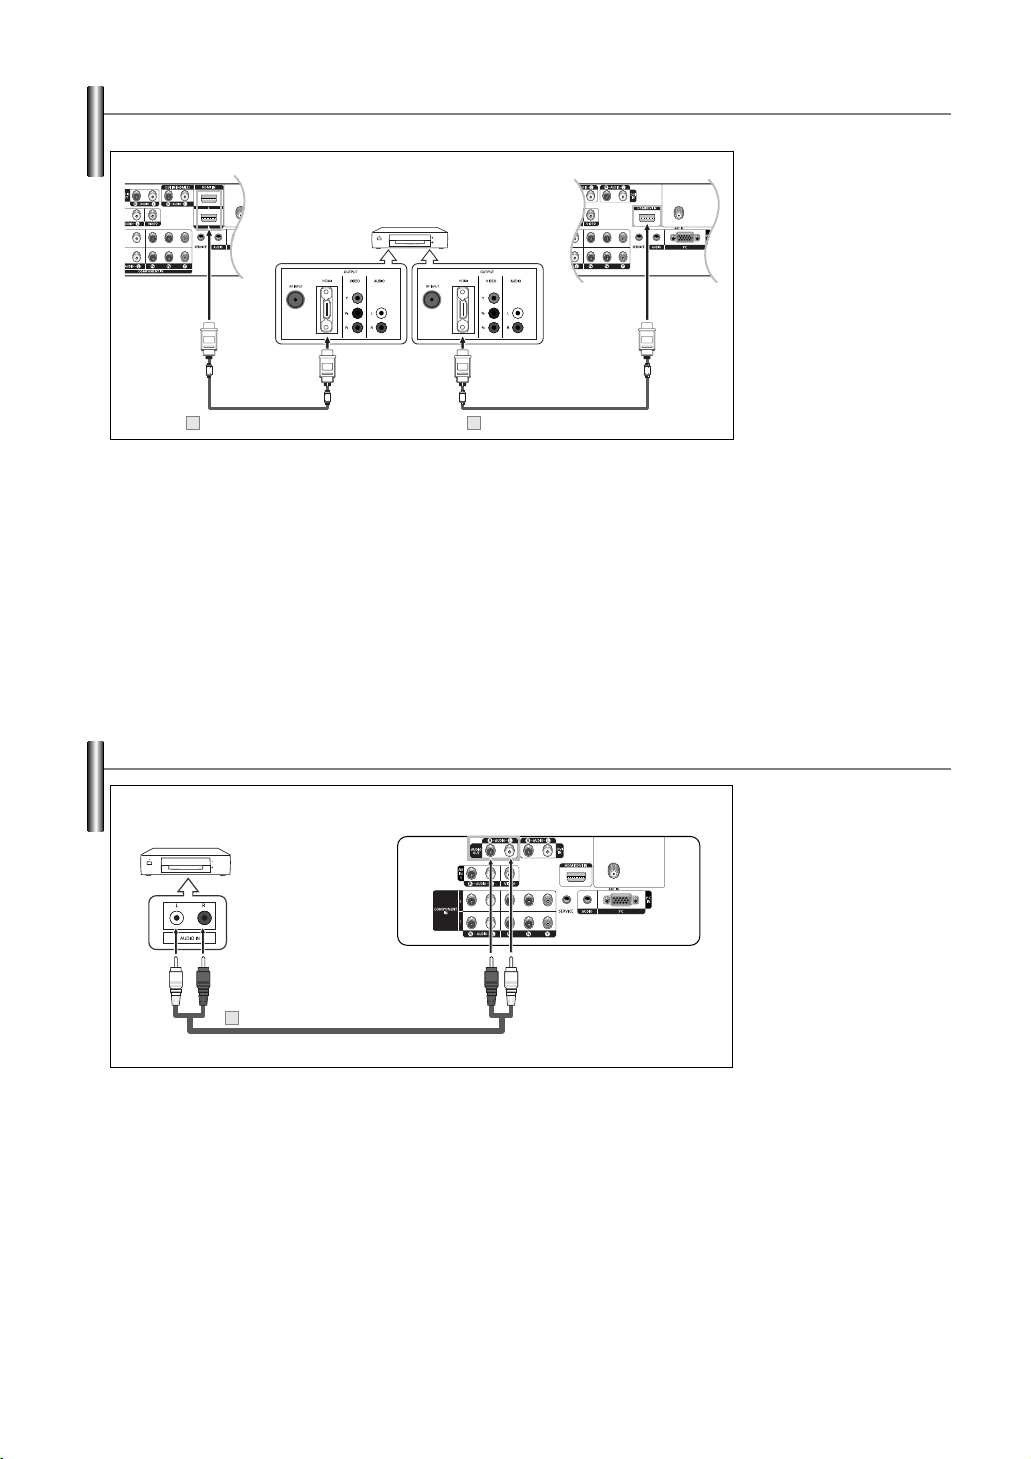
Connecting an Amplifier/DVD Home Theater
Amplifier/DVD Home Theater
1
Audio Cable (Not supplied)
TV Rear Panel
1. Connect Audio Cables
between the AUDIO OUT
[R-AUDIO-L] on the TV
and AUDIO IN on the
Amplifier/DVD Home
Theater.
When an audio amplifier is
connected to the “AUDIO
OUT [R-AUDIO-L]”
terminals: Decrease the
gain (volume) of the TV,
and adjust the volume level
with the Amplifier’s volume
control.
➢
Each Amplifier/DVD Home Theater has a different back panel configuration.
➢
When connecting an Amplifier/DVD Home Theater, match the color of the connection terminal to
the cable.
➢
The illustration for connecting jacks on the rear shown in this manual has been created based on the
PL-42C91HP model. Even though the jack configuration is different from your model, the connection
method is the same as in the illustration.
English-13
Page 14
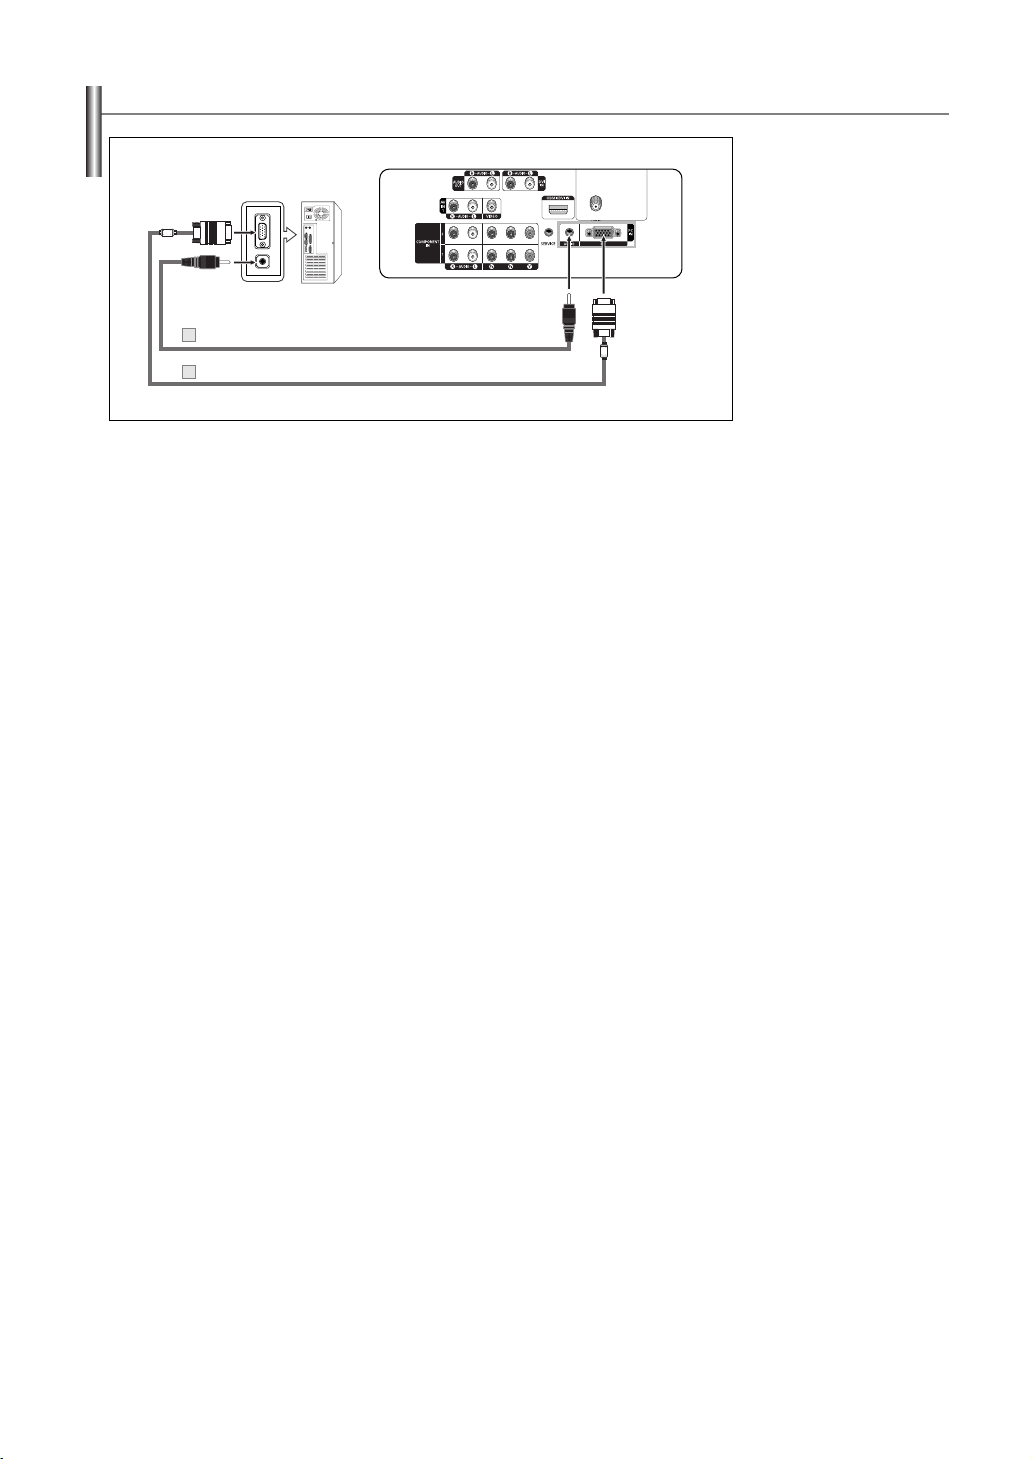
Connecting a PC
TV Rear Panel
PC
2
PC Audio Cable (Not supplied)
1
D-Sub Cable (Not supplied)
➢
Each PC has a different back panel configuration.
➢
When connecting a PC, match the color of the connection terminal to the cable.
➢
The HDMI/DVI jacks do not support PC connection.
➢
The illustration for connecting jacks on the rear shown in this manual has been created based on the
PL-42C91HP model. Even though the jack configuration is different from your model, the connection
method is the same as in the illustration.
1. Connect a D-Sub Cable
between PC IN [PC]
jack on the TV and the
PC output jack on your
computer.
2. Connect a PC Audio Cable
between PC IN [AUDIO]
jack on the TV and the
Audio Out jack of the sound
card on your computer.
English-14
Page 15
Operation
Turning the TV On and Off
Press the POWER button on the remote control.
You can also use the POWER button on the TV.
➢
It may take a while when your TV starts.
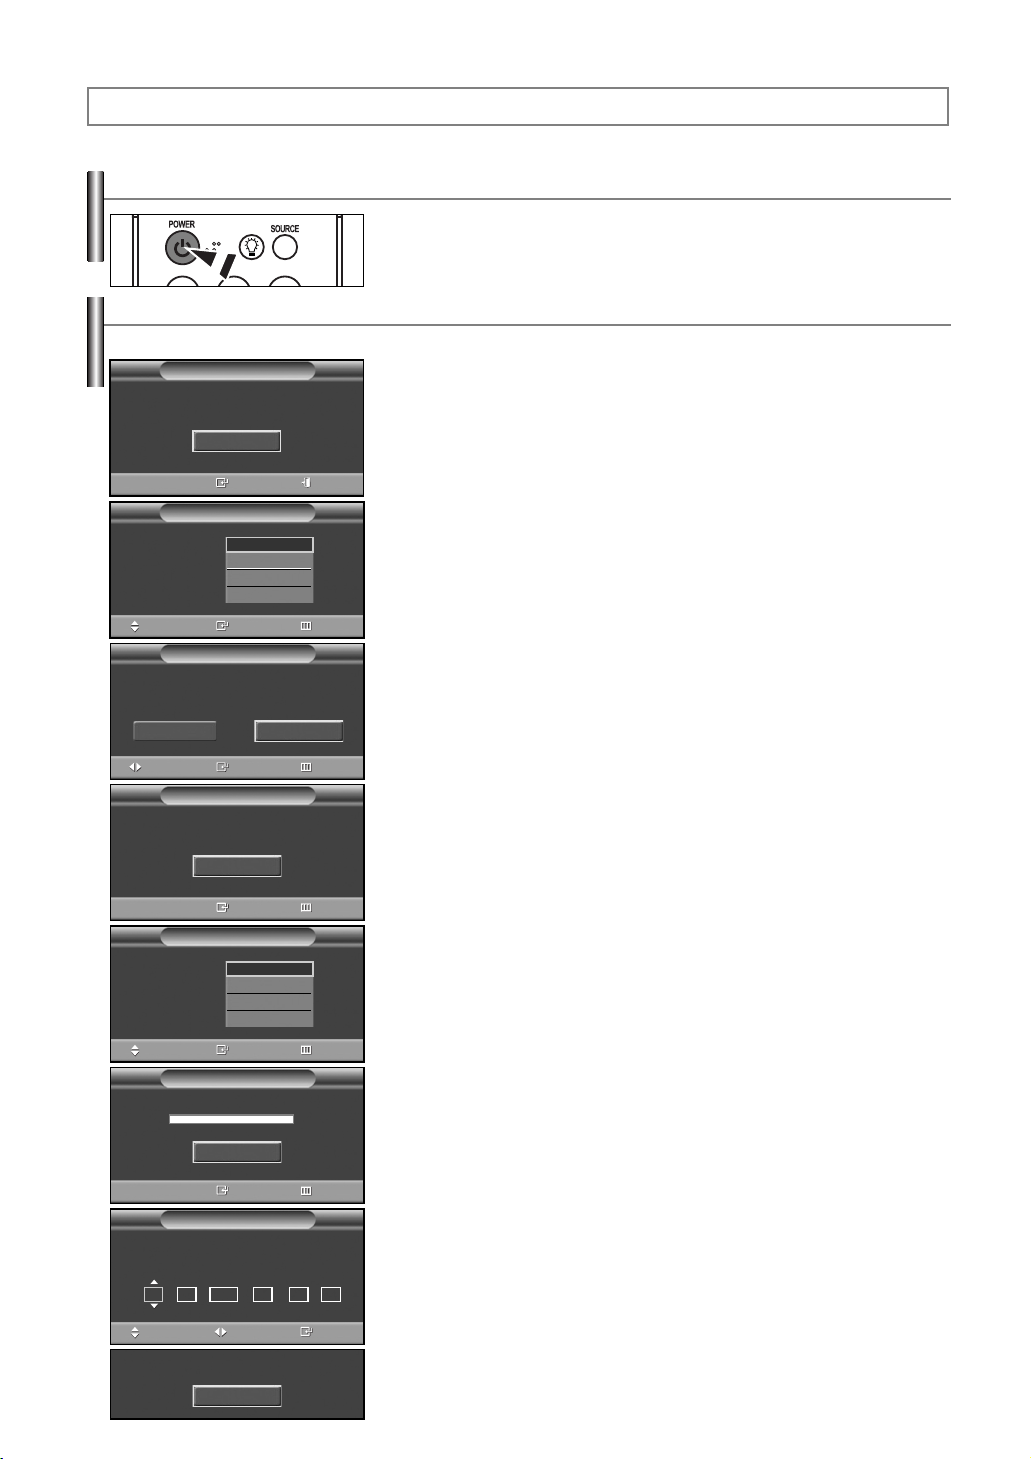
Plug & Play Feature
When the TV is initially powered On, basic customer settings proceed automatically and subsequently:
Plug & Play
Start Plug & Play.
OK
Enter Exit
Plug & Play
Language
Select Home Mode
when installing this TV at home.
Shop
Move
Check antenna input.
English
Français
Español
Português
Enter SkipMove
Plug & Play
Enter Skip
Plug & Play
OK
Home
1. Press the POWER button on the remote control.
The message “Start Plug & Play.” is displayed.
Press the ENTER button to select “OK”. The Language menu is displayed.
➢
The Language menu will automatically appear after several seconds, even if the
ENTER button is not pressed.
2. Select the appropriate language by pressing the ……or ††button.
Press the ENTER button to confirm your choice, then “Select Home Mode when
installing this TV at home.” menu is automatically displayed.
3. Press the œ or √ button to select “Shop” or “Home”, then press the ENTER button.
“Select the language of the OSD” menu is automatically displayed.
The message “Check antenna input.” is displayed.
➢
The default selection is “Home”.
➢
We recommend setting the TV to Home mode for the best picture in your home
environment.
➢
Shop mode is only intended for use in retail environments.
➢
If the unit is accidentally set to Shop mode and you want to return to Dynamic (Home)
mode, press the Volume button and then hold down the MENU button for five seconds
on the TV panel.
➢
The message Check antenna input will automatically appear after several seconds, even if
the ENTER button is not pressed.
4. Press the ENTER button to select “OK”. The menu to select signal source is
displayed.
5. Select the correct signal source (Air, STD, HRC, and IRC) by pressing the
……
or ††button, then press the ENTER button.
Enter Skip
Plug & Play
Enter SkipMove
Plug & Play
Start
Enter
Plug & Play
OK
Air
STD
HRC
IRC
Air 3
Skip
EnterAdjust Move
Air/Cable
Auto Program
Clock Set
Month Day Year Hour Minute am/pm
01 01 2007 12 : 00 am
Enjoy your watching.
6. To start the channel search, press the ENTER button.
➢
The search will end automatically. Channels are sorted and stored in an order which
reflects their position in the frequency range (with lowest first and highest last).
When it has finished, the Clock Set menu is displayed.
➢
To stop the search before it has finished or return to normal viewing, press the
MENU button.
7. Press the ENTER button.
Press the œ or √ button to move to the Month, Day, Year, Hour, Minute, or am/pm.
Set the date and time you want by pressing the … or † button, then press the
ENTER button.
➢
You can set the Month, Day, Year, Hour, and Minute directly by pressing the number
buttons on the remote control.
8. When it has finished, the message “Enjoy your watching.” is displayed, and the
channels which have been stored can be viewed.
Continued...
English-15
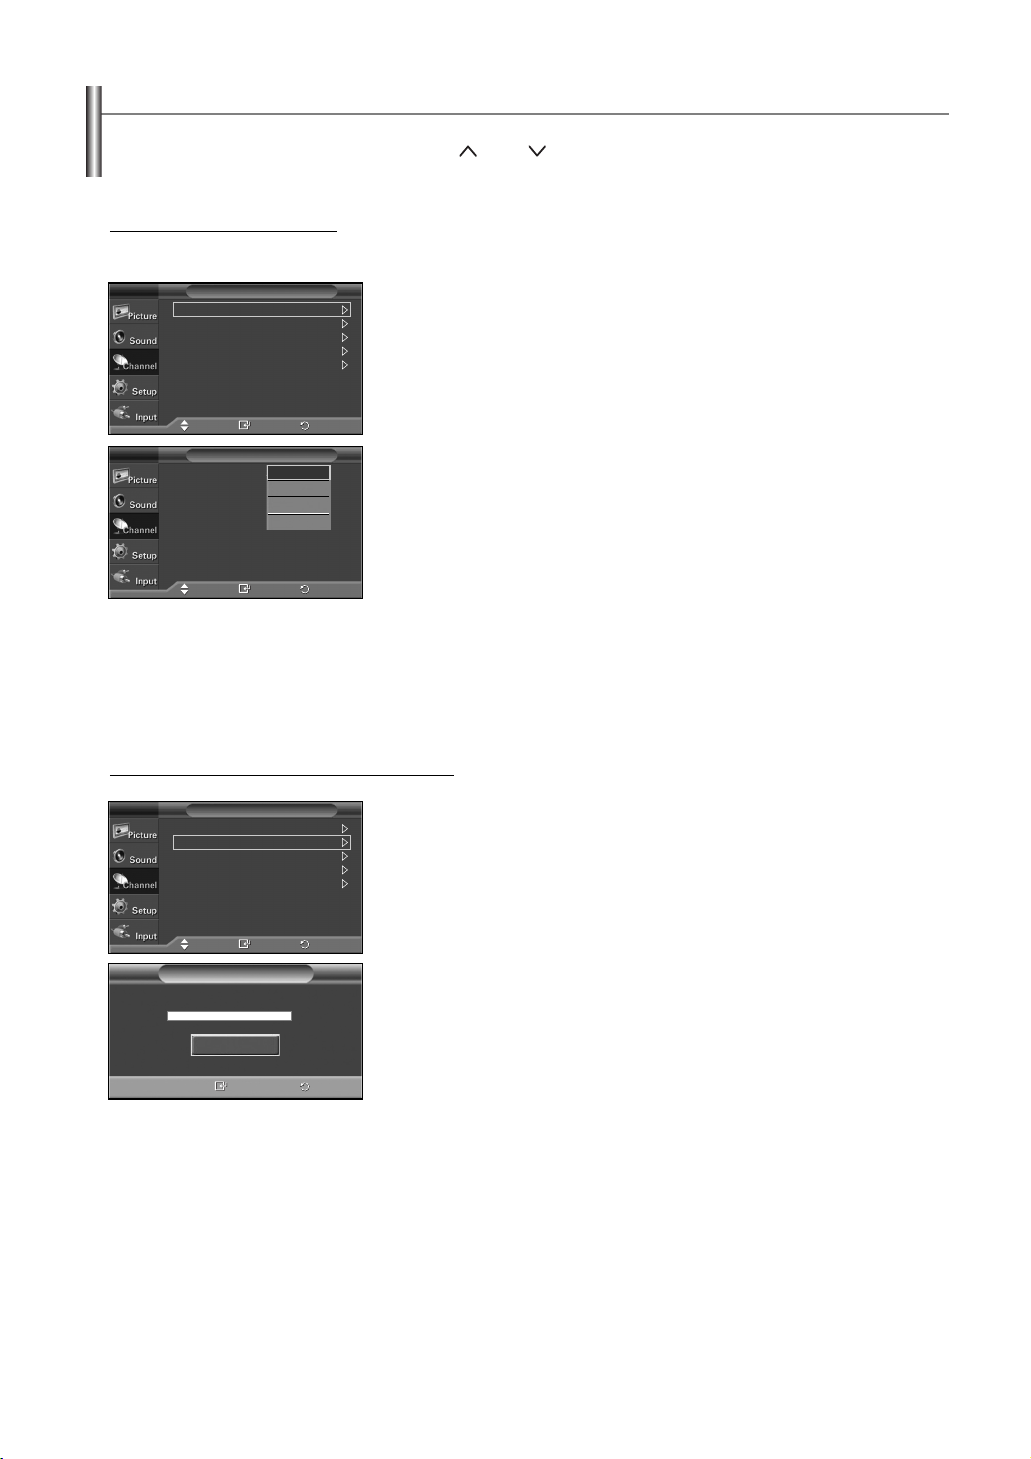
Page 16

If you want to r
TV
eset this feature...
Plug & Play
Language : English
Time
Caption
Game Mode : Off
Blue Screen : Off
Melody : Off
Setup
More
Move Enter Return
Plug & Play
Start Plug & Play.
OK
Enter Return
1. Press the MENU button to display the menu.
Press the ……or ††button to select “Setup”, then press the ENTER button.
2. Press the ENTER button to select “Plug & Play”.
For further details on setting up options, refer to the page 15.
➢
Plug & Play can only be accessed in the TV mode.
Changing Channels
Using the Channel Buttons
1. Press the CH or CH button to change channels.
➢
When you press the CH or CH button, the TV changes channels in sequence.
You will see all the channels that the TV has memorized. (The TV must have memorized
at least three channels). You will not see channels that were either erased or not
memorized. See page 18 to memorize channels.
Using the Number Buttons
Use the number buttons to quickly tune to any channel.
1. Press the number buttons to go directly to a channel.
For example, to select channel 27, press “2,” then “7.”
The TV will change channels when you press the second number.
Using the “-/--” Button
1. To select a channel over 100, for channel 122, press “-”, then “2”, then “2”.
Using the PRE-CH Button to select the Previous Channel
1. Press the PRE-CH button.
The TV will switch to the last channel viewed.
➢
To quickly switch between two channels that are far apart, tune to one channel, then use
the number button to select the second channel. Then use the PRE-CH button to quickly
alternate between them.
English-16
Page 17

Adjusting the Volume
1. Press the
VOL +
or
VOL –
button to increase or decrease the volume.
Using the MUTE Button
At any time, you can cut off the sound using the MUTE button.
1. Press MUTE and the sound cuts off.
The word “Mute” will appear in the lower-left corner of the screen.
2. To turn mute off, press the MUTE button again, or simply press the
VOL +
or
VOL –
button.
Viewing the Display
The display identifies the current channel and the status of certain audio-video settings.
Air 3
Mono
Picture : Dynamic
Sound : Custom
MTS : Stereo
SRS TS XT : Off
12 : 00 am
1. Press the INFO button on the remote control.
The TV will display the channel, the type of sound, and the status of certain
picture and sound settings.
Viewing the Menus
TV
Source List : TV
Edit Name
Input
Move Enter Return
Press the INFO button once more or wait approximately 10 seconds and it disappears
automatically.
1. With the power on, press the MENU button.
The main menu appears on the screen. Its left side has five icons:
Picture, Sound, Channel, Setup, Input.
2. Use the ……or ††button to select one of the five icons.
Then press the ENTER button to access the icon’s sub-menu.
3. Press the EXIT button to exit.
It takes about one minute until the on-screen menu disappears.
➢
English-17
Page 18
Memorizing the Channels
Your TV can memorize and store all of the available channels for both “off-air” (air) and cable channels.
After the available channels are memorized, use the CH or CH button to scan through the channels.
This eliminates the need to change channels by entering the channel digits. There are three steps for memorizing channels:
selecting a broadcast source, memorizing the channels (automatic) and adding and deleting channels (manual).
Selecting the Video Signal-source
Before your television can begin memorizing the available channels, you must specify the type of signal source that is connected to the
TV (i.e. an air or a cable system).
TV
TV
Air/Cable : Air
Auto Program
Channel Manager
Fine Tune
Color System : Auto
Air/Cable : Air
Auto Program
Channel Manager
Fine Tune
Color System : Auto
Channel
Move Enter Return
Channel
Air
STD
HRC
IRC
Move Enter
Return
1. Press the MENU button to display the menu.
Press the ……or ††button to select “Channel”, then press the ENTER button.
2. Press the ENTER button select “Air/Cable”.
Press the ……or ††button to select “Air”, “STD”, “HRC” or “IRC”, then press the
ENTER button.
➢
If you are using an Air antenna, leave “Air” displayed. If you are using a cable antenna,
press the ……or ††button to display the type of cable system: “STD”, “HRC” or “IRC”.
(If you are not sure which type of cable system you have, contact your cable company).
Press the EXIT button to exit.
➢
STD, HRC and IRC identify various types of cable TV systems. Contact your local cable
company to identify the type of cable system that exists in your particular area. At this
point the signal source has been selected.
Storing Channels in Memory (Automatic Method)
TV
Air/Cable : Air
Auto Program
Channel Manager
Fine Tune
Color System : Auto
Channel
Move Enter
Auto Program
Start
Enter
Return
Air 3
Return
1. Press the MENU button to display the menu
Press the ……or ††button to select “Channel”, then press the ENTER button.
2. Press the ……or ††button to select “Auto Program”, then press the ENTER button.
3. Press the ENTER button.
The TV will begin memorizing all of the available channels.
After all the available channels are stored, the Auto program menu reappears.
Press the EXIT button to exit.
➢
• All available analog channels are automatically stored in memory.
• It takes approximately 3 to 10 minutes to memorize channels.
.
English-18
Page 19
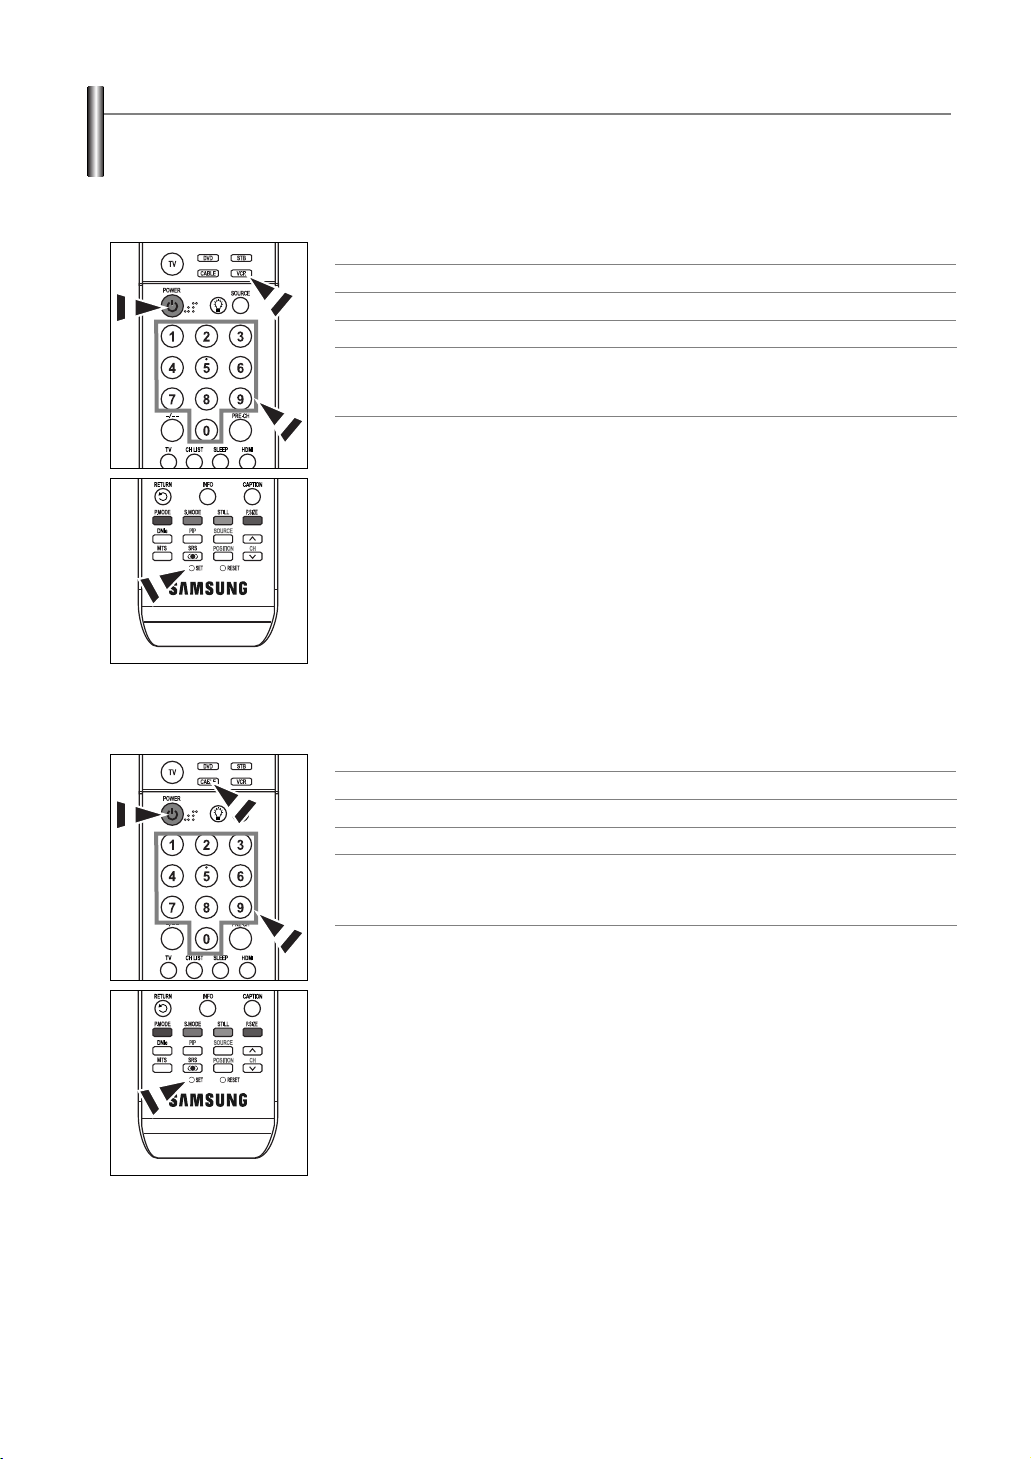
Setting Up Your Remote Control
After your remote control has been properly set up, your remote control can operate in five different modes: TV, VCR, Cable, DVD, or
Set-Top Box.
Pressing the corresponding button on the remote control allows you to switch between these modes, and control whichever piece of
equipment you choose.
The remote control might not be compatible with all DVD Players, VCRs, Cable boxes, and Set-Top Boxes.
➢
Setting Up the Remote to Operate Your VCR
1.
Turn off your VCR.
2.
Press the VCR button on your TV’s remote control.
3.
Press the SET button on your TV’s remote control.
4.
Using the number buttons on your remote control, enter three digits of the VCR code listed on
page 21 of this manual for your brand of VCR. Make sure you enter three digits of the code,
even if the first digit is a “0”. (If more than one code is listed, try the first one.)
5.
Press the POWER button on the remote control. Your VCR should turn on if your remote is
set up correctly.
If your VCR does not turn on after set-up, repeat steps 2, 3 and 4, but try one of the other codes
listed for your brand of VCR. If no other codes are listed, try each VCR code, 000 through 080.
Note on Using Remote Control Modes: VCR
When your remote control is in “VCR” mode, the volume buttons still control your TV’s volume.
Setting Up the Remote to Operate Your Cable Box
1.
Turn off your cable box.
2.
Press the CABLE button on your TV’s remote control.
3.
Press the SET button on your TV’s remote control.
4.
Using the number buttons on your remote control, enter three digits of the cable box code
listed on page 22 of this manual for your brand of cable box. Make sure you enter three digits
of the code, even if the first digit is a “0”. (If more than one code is listed, try the first one.)
5.
Press the POWER button on the remote control.
Your cable box should turn on if your remote is set up correctly.
If your cable box does not turn on after set-up, repeat steps 2, 3 and 4, but try one of the other
codes listed for your brand of cable box. If no other codes are listed, try each code,
000 through 046.
Note on Using Remote Control Modes: Cable Box
When your remote control is in “CABLE” mode, the volume buttons still control your TV’s volume.
English-19
Continued...
Page 20
Setting Up the Remote to Operate Your DVD
1.
Turn off your DVD.
2.
Press the DVD button on your TV’s remote control.
3.
Press the SET button on your TV’s remote control.
4.
Using the number buttons on your remote control, enter three digits of the DVD code listed on
page 23 of this manual for your brand of DVD. Make sure you enter three digits of the code,
even if the first digit is a “0”. (If more than one code is listed, try the first one.)
5.
Press the POWER button on the remote control.
Your DVD should turn on if your remote is set up correctly.
If your DVD does not turn on after set-up, repeat steps 2, 3 and 4, but try one of the other codes
listed for your brand of DVD. If no other codes are listed, try each code, 000 through 141.
Note on Using Remote Control Modes: DVD
When your remote control is in “DVD” mode, the volume buttons still control your TV’s volume.
Setting Up the Remote to Operate Your Set Top Box
1.
Turn off your STB.
2.
Press the STB button on your TV’s remote control.
3.
Press the SET button on your TV’s remote control.
4.
Using the number buttons on your remote control, enter three digits of the STB code listed on
page 22 of this manual for your brand of STB. Make sure you enter three digits of the code, even
if the first digit is a “0”. (If more than one code is listed, try the first one.)
5.
Press the POWER button on the remote control.
Your STB should turn on if your remote is set up correctly.
If your STB does not turn on after set-up, repeat steps 2, 3 and 4, but try one of the other codes
listed for your brand of STB. If no other codes are listed, try each code, 000 through 074.
Note on Using Remote Control Modes: STB
When your remote control is in “STB” mode, the volume buttons still control your TV’s volume.
Continued...
English-20
Page 21

Remote Contr
ol Codes
VCR
Brand
SAMSUNG
ADMIRAL
AIWA
AKAI
AUDIO DYNAMICS
BELL&HOWELL
BROKSONIC
CANDLE
CANON
CITIZEN
COLORTYME
CRAIG
CURTIS MATHES
DAEWOO
DB
DIMENSIA
DYNATECH
ELECTROHOME
EMERSON
FISHER
FUNAI
GENERAL ELECTRIC
GO VIDEO
LG(Goldstar)
HARMAN KARDON
HITACHI
INSTANT REPLAY
JC PENNEY
JCL
KENWOOD
KLH
LIOYD
LOGIK
LXI
JVC
MAGNAVOX
MARANTZ
MARTA
KONIA
ORION
MEI
MEMOREX
MGA
MIDLAND
MINOLTA
Code
000 001 002 003 004 005 077 078 079
020
025
004 027 032
007 026
018
022
002 003 006 008 015 055
021 056
002 003 006 008 015 055
007
002 024
002 007 008 017 021 025 056 064 066
003 010 011 012 013 014 015 016
007 026
017
025
034
001 003 006 021 022 025 030 032 034 040 047 050
052 060 063 065 066 067 069 073
018 024 028 029 048 051 061
025
002 005 017 021 056
002
006 007 008 009 010
007
019 025 041 042 074
021
002 007 018 019 021 026 037 041 054 056
007 008 018 021 026 037
007 008 018 026 037
070
025
038
025
081 082 083
021 056 059
007 008 018 021 026 037 062
006
036
073 074 075 076
021
006 021 024 025
034
005
019 041 075
Brand
MITSUBISHI
MONTGOMERY WARD
MTC
MULTITECH
NEC
OPTIMUS
PANASONIC
PENTAX
PENTEX RESEARCH+
PHILCO
PHILIPS
PIONEER
PORTLAND
PROSCAN
QUARTZ
QUASAR
RADIO SHACK/REALISTIC
RCA
SANSUI
SANYO
SCOTT
SEARS
SHARP
SHIMTOM
SIGNATURE
SONY
SYLVANIA
SYMPHONIC
TANDY
TAS H IKA
TATUNG
TEAC
TECHNICS
TEKNIKA
TMK
TOSHIBA
TOTEVISION
UNITECH
VECTOR RESEARCH
VICTOR
VIDEO CONCEPTS
VIDEOSONIC
WARDS
YAMAHA
ZENITH
Code
019 034 041 046
020
002 025
002 005 025 038
007 008 018 026 037 062 064
020
021 056 071 072
019 041 075
008
021 056 059
021 080
019 026 039 053
015 049 055
017
018
021 056
006 018 020 021 024 025 029 034 048 056
002 017 019 021 035 041 043 057 068 076
026
018 024
003 047 052 067
006 018 019 024 028 029 041 048 051
020 034 045 015
027 033 038 058
025
027 033 044
021 025 056 059
025
018 025
006
037
025 037 068
021
006 021 025 031
066
003 019 029 051 052
002 006
002
007 026
026
007 026
002
002 003 006 019 020 021 024 025 034 038 041
007 008 018 026 037
023 027 033
English-21
Continued...
Page 22
CABLE BOX
Brand
SAMSUNG
GI
HAMLIN
HITACHI
JERROLD
MACOM
MAGNAVOX
OAK
PANASONIC
PHILIPS
PIONEER
RCA
REGAL
Code
000 001 002 003 004 005 006 007
041
003 024 031
025 030
038 039
025 030
019 023 028
026
003 022 027 037 044
019 021 023 028
004 018 020 044
014 022 040
003
SAMSUNG SET-TOP BOX
Product
Ground wave STB
CABLE STB
Satellite STB
Code
000 001 002 008 013
000 004 008 013
000 003 008 013
Brand
REGENCY
SA
SCIENTIFIC ATLAN
SPRUCER
STARGATE 2000
SYLVANIA
TEXSCAN
TOCOM
UNIVERSAL
VIEWSTAR
WARNER AMEX
ZENITH
Code
015 023
042 043
042 043
022
036
016
016
032
033 034
019 021 023 028
046
017 029 035 037 045
SET-TOP BOX
Brand
ALPHASTAR
ANAM
CHANNEL MASTER
CROSSDIGITAL
CHAPARRAL
DIRECT TV
DAEWOO
DISH NETWORK SYSTEM
DISHPRO
DRAKE
DX ANTENNA
ECHOSTAR
EXPRESSVU
GOI
GE
GENERAL INSTRUMENT
HTS
HOME CABLE
HITACHI
HUGHES NETWORK
IQ
IQ PRISM
JANEIL
JERROID
JVC
Code
023
043
018 034
019
035
015 016 017 019 022 045 060 061 062 065 066 067
068
074
069 070
069
018 024 032
027
025 069 070 071
069
069
065
046 047 048 063 064
069
056
022
015 017
020
020
059
063
069 070
Brand
LG(Goldstar)
MAGNAVOX
MEMOREX
MOTOROLA
MACOM
MITSUBISHI
NEXT LEVEL
PHILIPS
PRIMESTAR
PANASONIC
PAYSAT
PROSCAN
RCA
RADIOSHACK
REALISTIC
STS
STAR TRAK
SKY
SKY LIFE
SHACK
STAR CHOICE
SONY
TOSHIBA
ULTIMATE TV
UNIDEN
ZENITH
Code
044 073
016 021 036 038 039 040 041 042
016
064
018
015
047 048 064
015 016 017 021 033 036 038 039 040 041 042 067
046 049 050 063
058 059 061 062
016
065 066
051 052 053 065 066
064
057
020 027
026
031
005 006 007
064
064
054 060
015 017 028 029 030 072
060 066
016 021 037 055 056 057
024 031 068
English-22
Continued...
Page 23

SAMSUNG DVD
Product
DVD
DVDR
BD Record
VCR COMBO
VCR Record
DHR COMBO
DVD
Brand
ANAM
AUDIOVOX
AUDIOLOGIC
ANABA
APEX DIGITAL
AIWA
BROKSONIC
BLAUPUNKT
B&K
CURTIS MATHES
CYBER HOME
CLARION
CIRRUS
CINEVISION
DAEWOO
DENON
FARENHEIT
FISHER
GPX
GO VIDEO
GE
GREENHILL
HITACHI
HITEKER
HOYO
HARMAN / KARDON
IRT
INTEGRA
JBL
JVC
JATON
KENWOOD
KISS
KONKA
KLH
LG(Goldstar)
LOEWE
LASONIC
MOBILE AUTHORITY
MEMOREX
MALATA
MAGNAVOX
MINTEK
MONYKA
Code
000 001 002
003 004
005 006
007 008 009 010 011
012
013
Code
030
075
085
072
070 071 074 086 083 084 088 111 112
114
062
074
122 123
027
065 077 078 079 082
080 125
081
095
066
146
067 068
090
060
061 089 133 135
069 074
074
064 113
071
073
091 110
089
092
091
022 033 115 116
073
051 108 109
073
059 100 106 107
074 075
025 031
057
058
054
055
056
076 093
074 094
073
Product
Home Theater VCR COMBO
HDD Record COMBO
TWIN TRAY COMBO
STB DVD COMBO
DVD Receiver
AV Receiver
Brand
NORCENT
NEXT BASE
NEC
NANTAUS
NESA
OPTOMEDIA ELECTRONICS
OPTIVIEW
ONKYO
PHILCO
PRINCETON
PROSCAN
PANASONIC
PHILIPS
ROTEL
RIO
RCA
RAITE
ROWA
SAMPO
SONY
SHERWOOD
SVA
SYLVANIA
SHARP
SANSUI
SANYO
SHINSONIC
SANYO
THOMSON
TOSHIBA
TECHNICS
TVIEW
TOKAI
TEAC
TECHWOOD
TREDEX
URBAN CONCEPTS
VENTURER
VOCOPRO
YAMAHA
YAMAKAWA
XWAVE
ZENITH
Code
014 015 016
017
018
019
020
021
Code
048 049 050
052
053
144
074
105
072
076 092 119
044 045
046 047
023
024 034 124 134 136 137 138
036 076
117 118
120
023 035 074 075 131 132
073
038
104
026 029 126 127 128 129 130 141
039 041
042
043 093
140
062
062
094
090
145
028 062 076
139
072
073
096
097
098 099 101
076
075
102
032 063
040 073
103
076 121
English-23
Page 24
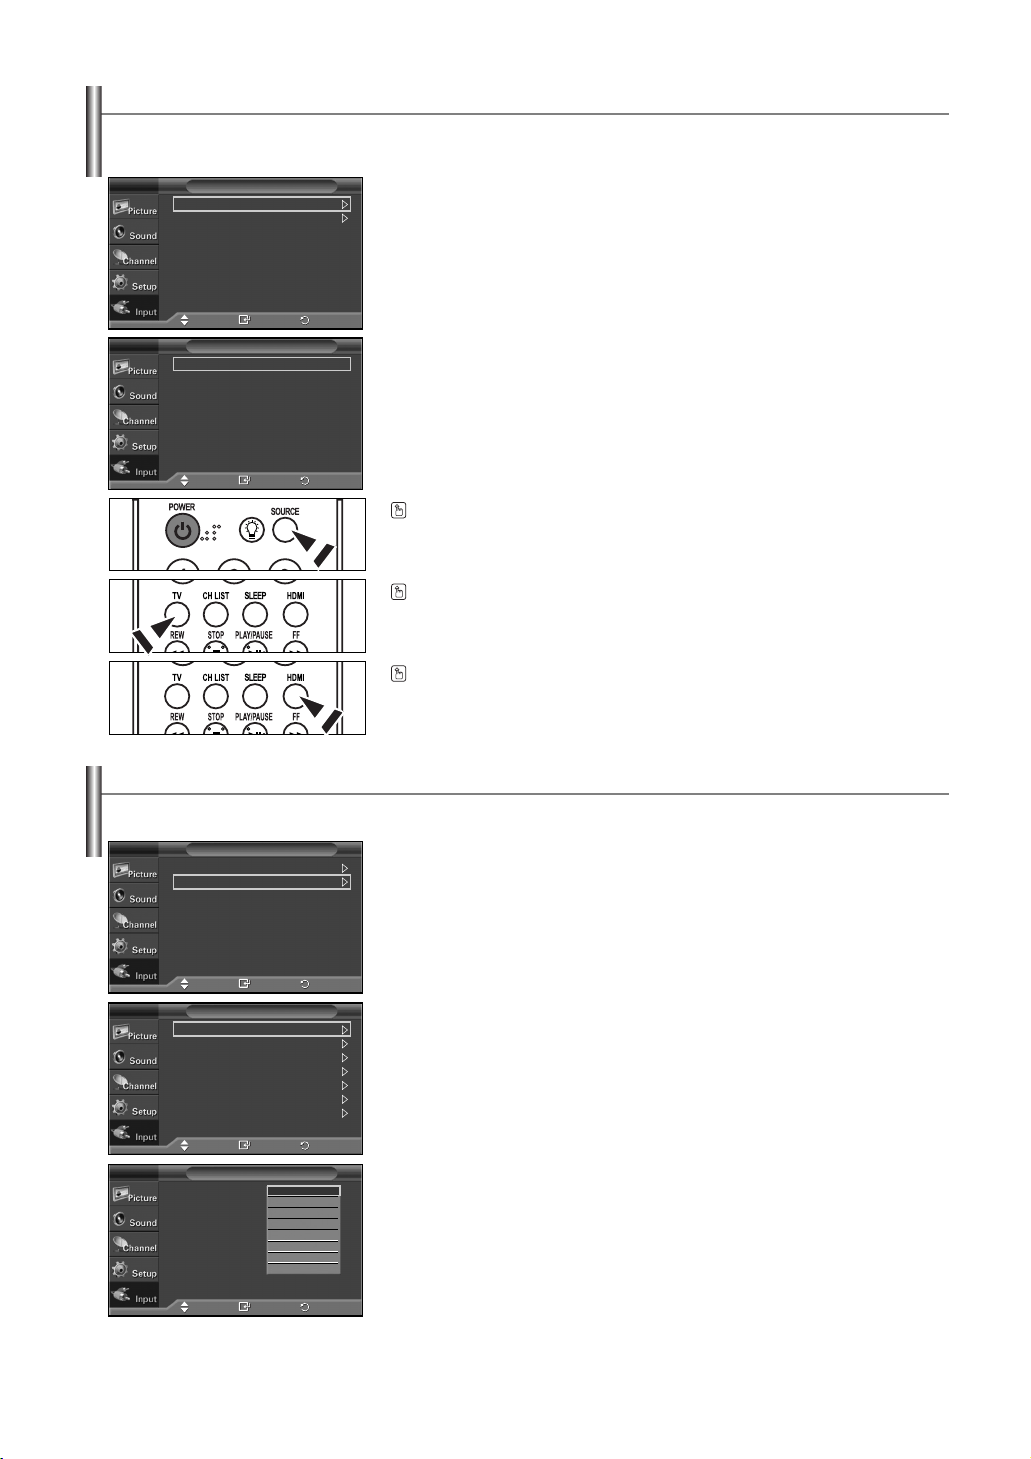
To Select the Source
Use to select TV or other external input sources connected to the TV.
Use to select the input source of your choice.
TV
TV
Source List : TV
Edit Name
TV
AV1 :
AV2 :
S-Video :
Component1 :
Component2 :
PC :
HDMI :
Input
Move Enter
Source List
Move Enter
-----
-----
-----
-----
-----
-----
-----
Return
Return
1. Press the MENU button to display the menu.
Press the ……or ††button to select “Input”, then press the ENTER button.
2. Press the ENTER button to select “Source List”.
Press the ……or ††button to select signal source, then press the ENTER button.
➢
You can choose between the following sets of jacks: AV1, Component1, Component2,
PC, HDMI on the TV’s rear panel and AV2 or S-Video on the TV’s side panel.
➢
HDMI input can only be selected when the external device is turned on and connected
via HDMI.
➢
In case of PL-42Q91HP/50Q91HP models, the Source List displays HDMI1 and HDMI2
instead of HDMI.
➢
You can choose only those external devices that are connected to the TV.
Press the SOURCE button on the remote control to view an external signal source.
You can enter TV mode directly by using the TV button on the remote control.
You can enter HDMI mode directly by using the HDMI button on the remote control.
(PL-42C91HP/50C91H/42C71HP models only)
To Edit the Input Source Name
Name the device connected to the input jacks to make your input source selection easier.
TV
TV
TV
Source List : TV
Edit Name
AV1 :
AV2 :
S-Video :
Component1 :
Component2 :
PC :
HDMI :
AV1 :
AV2 :
S-Video :
Component1 :
Component2 :
PC :
HDMI :
Input
Move Enter
Edit Name
Move Enter
Edit Name
Move Enter
-----
-----
-----
-----
-----
-----
-----
-----
-----
VCR
-----
DVD
-----
D-VHS
-----
Cable STB
HD STB
-----
Satellite STB
-----
†
-----
Return
Return
Return
1. Press the MENU button to display the menu.
Press the ……or ††button to select “Input”, then press the ENTER button.
Press the ……or ††button to select “Edit Name”, then press the ENTER button.
2. Press the ……or ††button to select “AV1”, “AV2”, “S-Video”, “Component1”,
“Component2”, “PC”, or “HDMI” input jack, then press the ENTER button.
➢
In case of PL-42Q91HP/50Q91HP models, the Source List displays HDMI1 and
HDMI2 instead of HDMI.
3. Press the ……or ††button to select “VCR”, “DVD”, “D-VHS”, “Cable STB”,
“HD STB”, “Satellite STB”, “AV Receiver”, “DVD Receiver”, “Game”,
“Camcorder”, “DVD Combo”, “DHR”, or “PC” input source, then press
the ENTER button.
Press the EXIT button to exit.
➢
When a PC with a resolution of 640 x 480@60Hz is connected to the HDMI IN 1 port,
you should set the HDMI1 mode to PC in the Source List of Input mode. If the HDMI1
mode is not PC, it may work depending on the TV setting.
English-24
Page 25
Picture Control
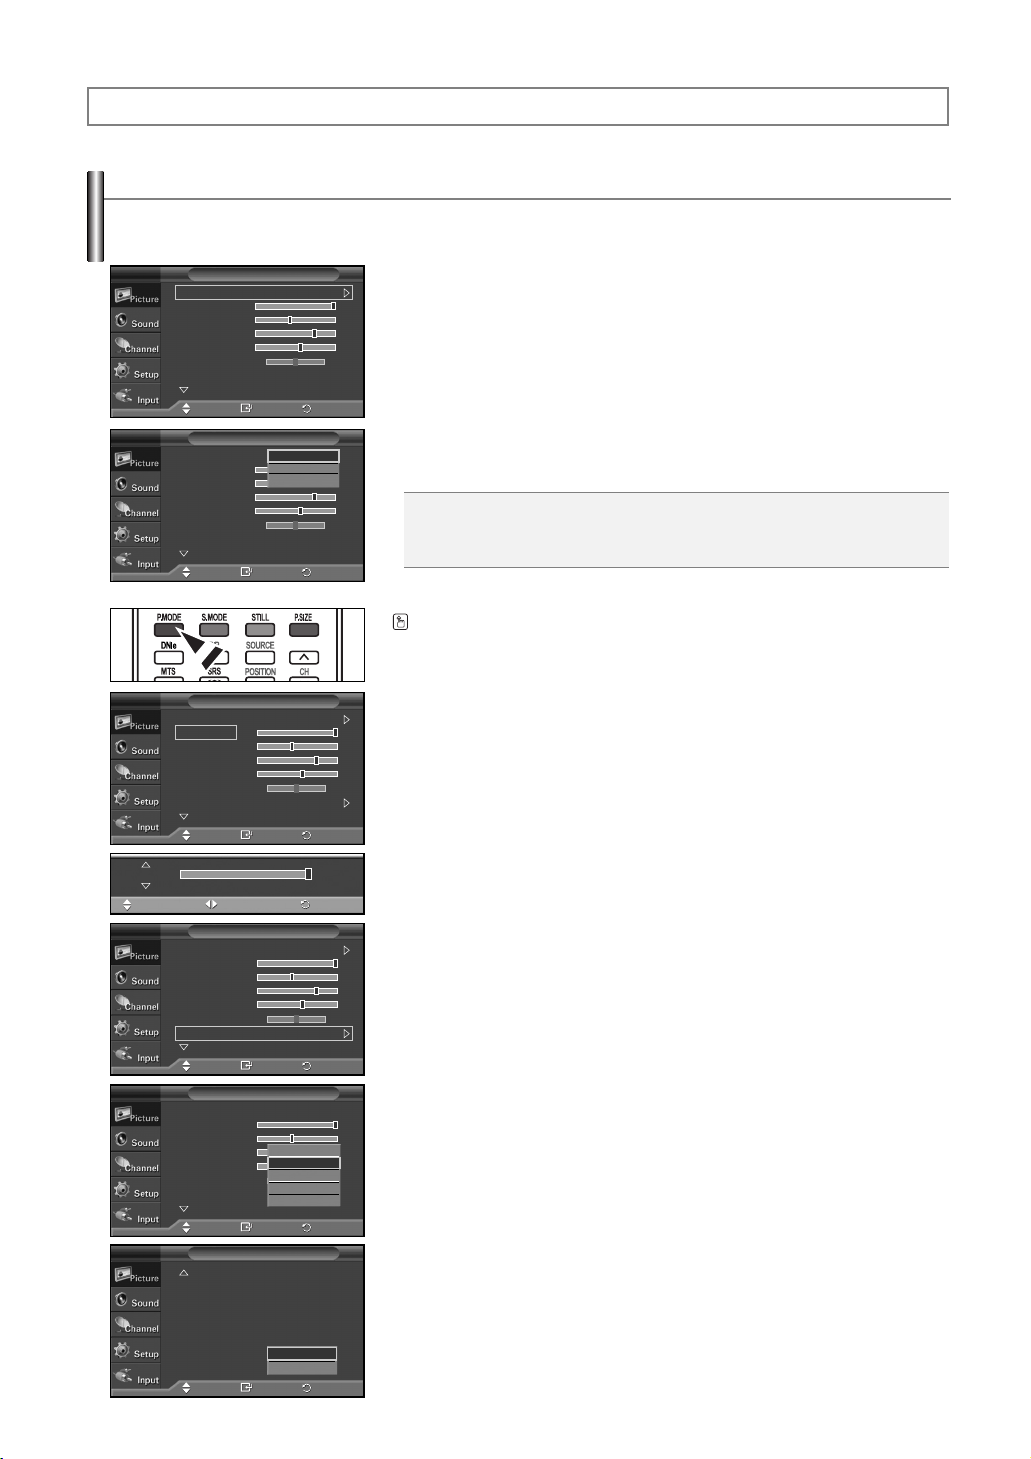
Using Automatic Picture Settings
Your TV has three automatic picture settings (“Dynamic”, “Standard”, and “Movie”) that are preset at the factory.
You can activate either Dynamic, Standard, or Movie by making a selection from the menu.
TV
Mode : Dynamic
Contrast 100
Brightness 45
Sharpness 75
Color 55
Tint G 50 R 50
Color Tone : Cool1
More
Move Enter
TV
Mode : Dynamic
Contrast 100
Brightness 45
Sharpness 75
Color 55
Tint G 50 R 50
Color Tone : Cool1
More
Move Enter
Picture
Picture
Dynamic
Standard
Movie
Return
Return
1. Press the MENU button to display the menu.
Press the ENTER button to select “Picture”.
2. Press the ENTER button again.
Press the ……or ††button to select the “Dynamic”, “Standard”, or “Movie”
picture setting, then press the ENTER button.
Choose Dynamic for viewing the TV during the day or when there is a bright light in
the room.
Choose Standard for general TV watching mode.
Choose Movie when viewing a movie.
➢
Picture mode needs to be adjusted separately for each input.
Press the P. MODE button on the remote control to select one of the standard picture
settings.
TV
Mode : Dynamic
Contrast 100
Brightness 45
Sharpness 75
Color 55
Tint G 50 R 50
Color Tone : Cool1
More
Move Enter
Contrast
Move
TV
TV
TV
Adjust
Mode : Dynamic
Contrast 100
Brightness 45
Sharpness 75
Color 55
Tint G 50 R 50
Color Tone : Cool1
More
Move Enter
Mode : Dynamic
Contrast 100
Brightness 45
Sharpness 75
Color 55
Tint G 50 R 50
Color Tone : Cool1
More
Move Enter
More
Detailed Settings
Size : 16:9
Digital NR : Auto
Active Color : On
DNIe : On
Reset : OK
Move Enter
Picture
Picture
Picture
Picture
Cool2
Cool1
Normal
Warm1
Warm2
OK
Cancel
Return
100
Return
Return
Return
Return
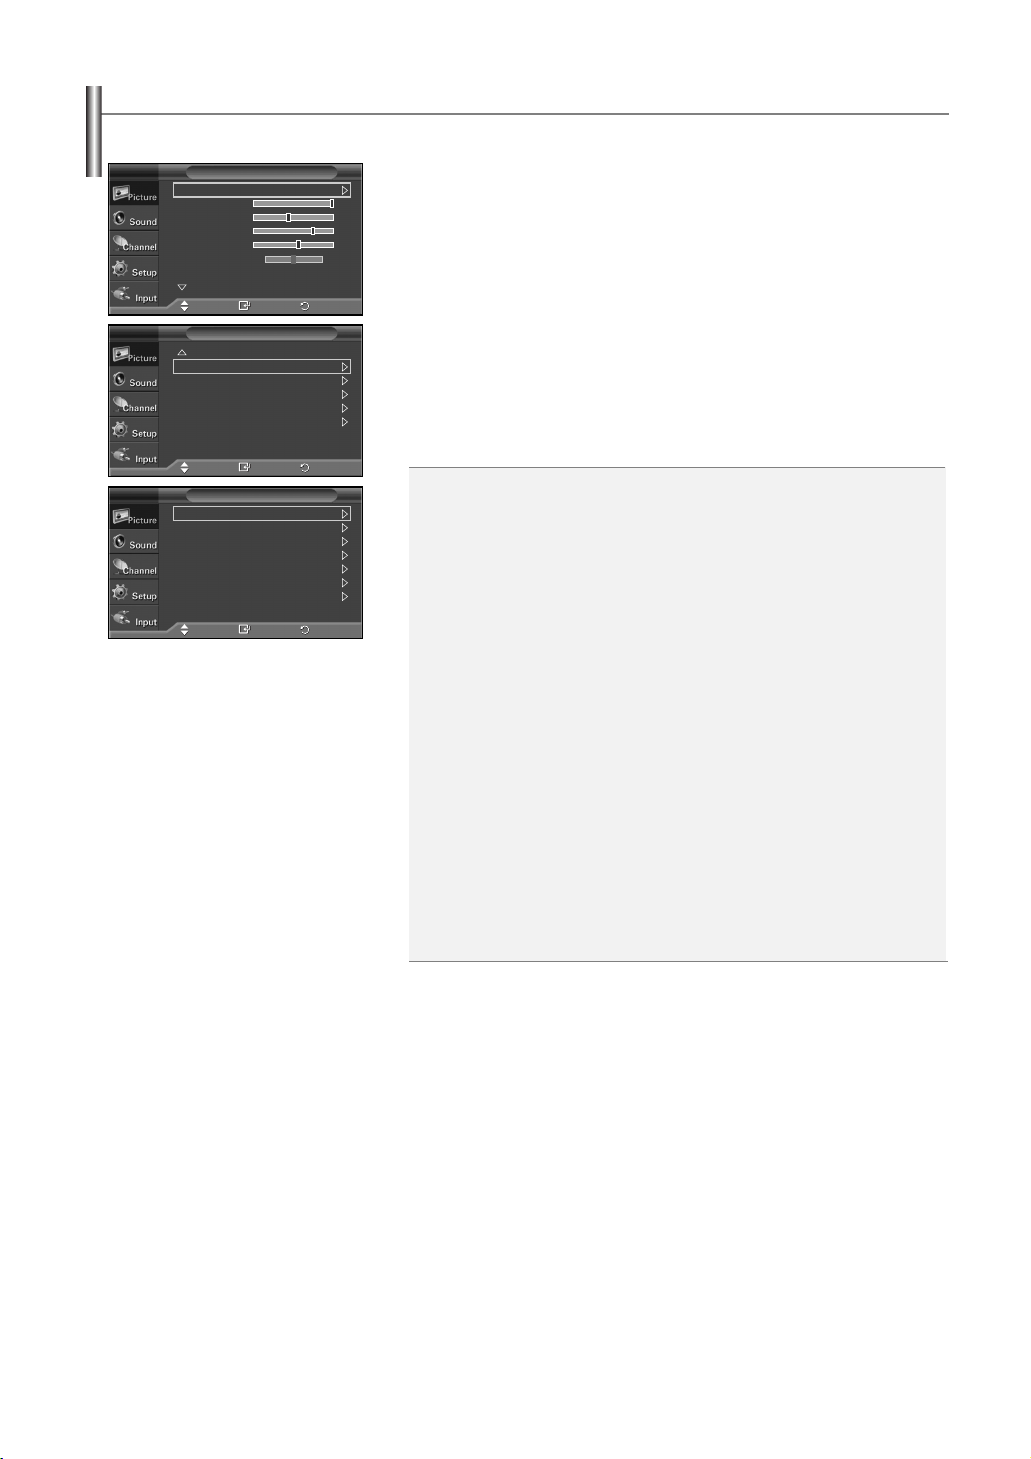
3. Press the ……or ††button to select “Contrast”, “Brightness”, “Sharpness”,
“Color”, or “Tint”, then press the ENTER button.
4. Press the œ or √ button to decrease or increase the value of a particular item.
➢
• In PC mode, only the Contrast and Brightness can be selected.
• Each adjusted setting will be stored separately according to its input mode.
5. Press the ENTER button to return to “Mode”.
6. Press the ……or ††button to select “Color Tone”, then press the ENTER button.
7. Press the ……or ††button to select “Cool2”, “Cool1”, “Normal”, “Warm1”,
or “Warm2”, then press the ENTER button.
➢
When the picture mode is set to Dynamic or Standard, Warm1 and Warm2 cannot be
selected. Movie mode is only available.
Resetting the Picture Settings to the Factory Defaults
8. Press the ……or ††button to select “Reset”, then press the ENTER button.
9. Press the ……or ††button to select “OK” or “Cancel”, then press the ENTER button.
Press the EXIT button to exit.
➢
Each picture mode can be reset.
English-25
Page 26
Configuring Detailed Settings on the Picture
You can set detailed picture settings.
TV
Mode : Dynamic
Contrast 100
Brightness 45
Sharpness 75
Color 55
Tint G 50 R 50
Color Tone : Cool1
TV
Detailed Settings
Size : 16:9
Digital NR : Auto
Active Color : On
DNIe : On
Reset
TV
Black Adjust : Off
Dynamic Contrast : Off
Gamma : 0
Color Space : Wide
White Balance
My Color Control
Edge Enhancement
Picture
More
Move Enter
Picture
More
Move Enter
Detailed Settings
Move Enter
: Off
Return
Return
Return
1. Press the MENU button to display the menu.
Press the ENTER button to select “Picture”.
2. Press the ……or ††button to select “Detailed Settings”, then press the ENTER
button.
3. Select the required option by pressing the ……or ††button, then press the ENTER
button.
Available options: Black Adjust, Dynamic Contrast, Gamma, Color Space,
White Balance, My Color Control, Edge Enhancement
4. When you are satisfied with your setting, press the ENTER button.
5. Press the EXIT button to exit.
➢
Picture Mode is available in Standard or Movie mode.
➢
If DNIe is Off, the Detailed Settings cannot be selected when the Picture mode is in
Standard mode.
• Black Adjust: Off/Low/Medium/High
You can directly select the black level on the screen to adjust the screen depth.
• Dynamic Contrast: Off/Low/Medium/High
You can adjust the screen contrast so that the optimal contrast is provided.
• Gamma: -3 ~ +3
You can adjust the middle brightness of pictures.
Press the œ or √ button until you reach the optimal setting.
• Color Space: Auto/Wide
You can set the color reproduction space for the input signal to Auto or Wide.
• White Balance: R-Offset/G-Offset/B-Offset/R-Gain/G-Gain/B-Gain/Reset
You can adjust the color temperature for more natural picture colors.
R-Offset/G-Offset/B-Offset/R-Gain/G-Gain/B-Gain: Changing the adjustment value
will refresh the adjusted screen.
Select the required option by pressing the ……or ††button, then press the ENTER
button. Press the œ or √ button until you reach the optimal setting.
Reset: The previously adjusted white balance will be reset to the factory defaults.
• My Color Control: Pink/Green/Blue/White/Reset
This setting can be adjusted to suit your personal preferences.
Pink/Green/Blue/White: Changing the adjustment value will refresh the adjusted
screen.
Select the required option by pressing the ……or ††button, then press the ENTER
button. Press the œ or √ button until you reach the optimal setting.
➢
When running the My Color Control feature, the current picture is captured as a
still image before being displayed on the screen.
Reset: The previously adjusted colors will be reset to the factory defaults.
• Edge Enhancement: Off/On
You can emphasize object boundaries.
English-26
Page 27
Changing the Screen Size
Screen size selection depends on the type of video input.
TV
Detailed Settings
Size : 16:9
Digital NR : Auto
Active Color : On
DNIe : On
Reset
TV
16:9
Zoom
4:3
Just Scan
Picture
More
Move Enter
Size
Move Enter
Return
Return
1. Press the MENU button to display the menu.
Press the ENTER button to select “Picture”.
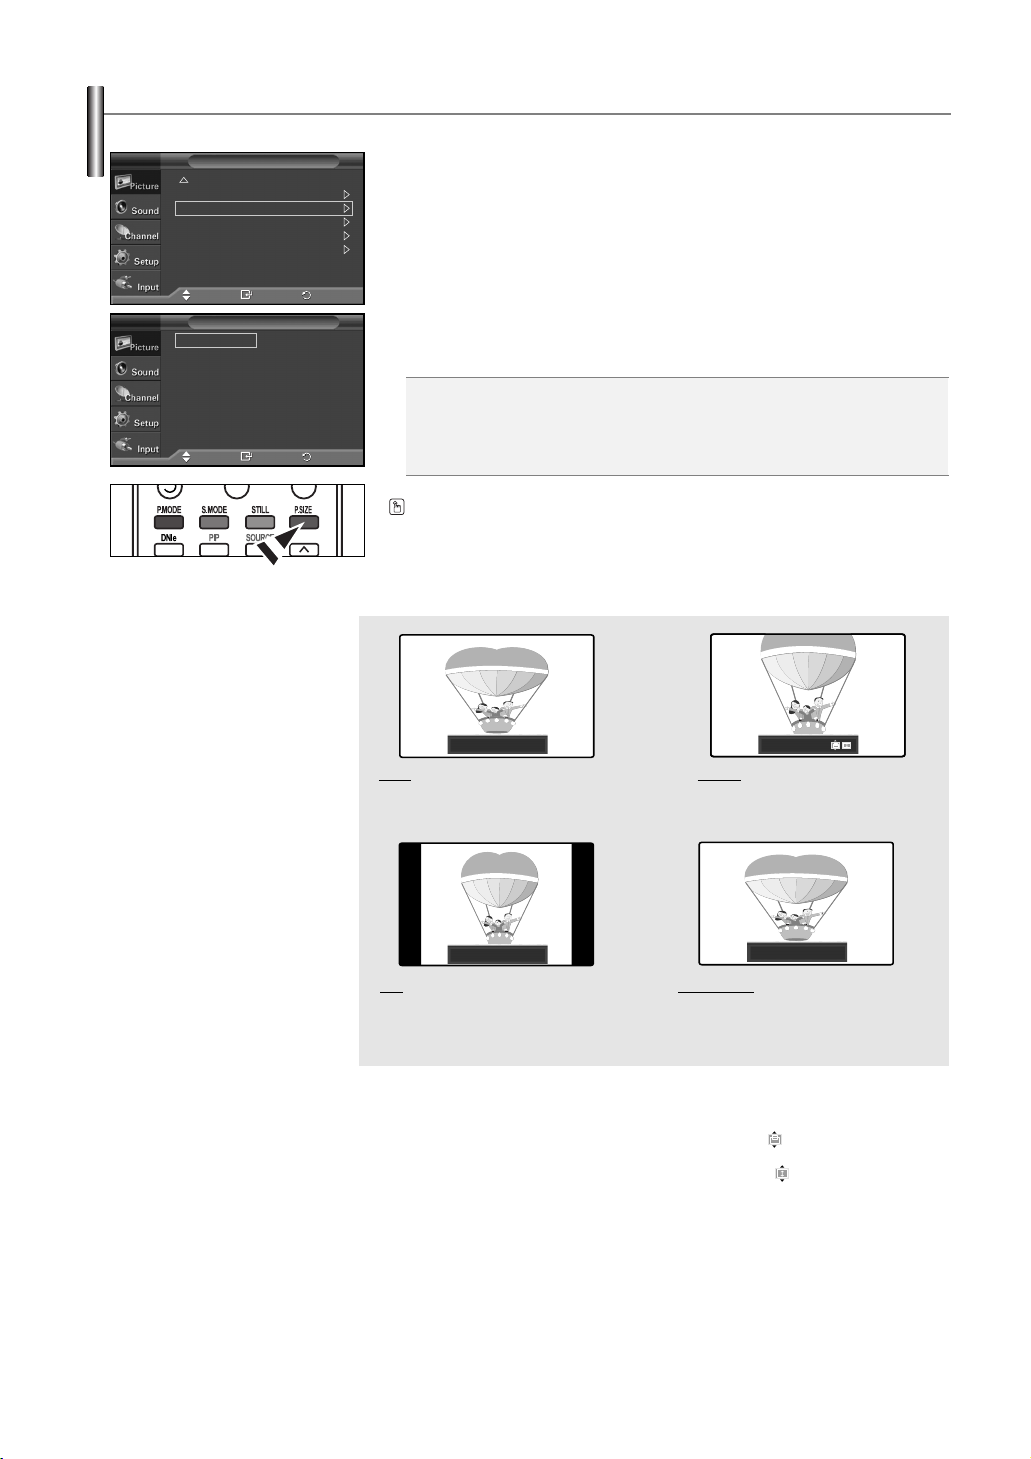
2. Press the ……or ††button to select “Size”, then press the ENTER button.
3. Press the ……or ††button to select the screen format you want.
Press the ENTER button.
Press the EXIT button to exit.
• 16:9 : Sets the picture to 16:9 wide mode.
• Zoom : Magnifies the size of the picture on the screen.
• 4:3 : Sets the picture to 4:3 normal mode.
• Just Scan : Use the function to see the full image without any truncation when DTV
Press the P.SIZE button on the remote control to change the picture size.
➢
If you watch a still image or the 4:3 (Normal) mode for a long time (over 2 hours), an image may
be burned onto the screen. View the TV in 16:9 (Wide) mode as much as possible.
or HDMI 720p/1080i signals are input.
16:9
16:9
Sets the picture to 16:9 wide mode.
Zoom
Magnifies the size of the picture on
Zoom
the screen.
4:3
4:3
Sets the picture to 4:3 normal mode.
Just Scan
Use the function to see the full image
Just Scan
without any truncation when DTV or
HDMI 720p/1080i signals are input.
Positioning and Sizing the screen using Zoom
• Resizing the screen using the Zoom enables the positioning and sizing of the screen to up/down
direction using the ……or ††button as well as the screen size.
• Move the screen up/down using the ……or ††button after selecting the by pressing the
œ or √
button.
• Resize the screen vertically using the ……or ††button after selecting the by pressing the
œ or √
button. (Pressing the ……button extends it upward and pressing the ††button extends it downward.)
• Screen enlargement operates only in TV/Video/S-Video/Component and HDMI input modes.
• PC mode prevent the screen enlargement function.
➢
• In TV, VIDEO, S-VIDEO, COMPONENT is available all the resolutions, and can be selected.
(
16:9 ➞Zoom ➞4:3
)
• In PC, only 16:9 & 4:3 modes can be selected.
• If you change the picture size when PIP is On, PIP will automatically be turned Off.
• In the HDMI mode with all the resolution, all screen modes can be selected.
(16:9 - Zoom - 4:3 - Just Scan).
English-27
Page 28
Digital Noise Reduction
If the broadcast signal received by your TV is weak, you can activate the Digital Noise Reduction feature to help reduce any static
and ghosting that may appear on the screen.
TV
TV
Detailed Settings
Size : 16:9
Digital NR : Auto
Active Color : On
DNIe : On
Reset
Detailed Settings
Size : 16:9
Digital NR : Auto
Active Color : On
DNIe : On
Reset
Picture
More
Move Enter
Picture
More
Move Enter
Off
Low
Medium
High
Auto
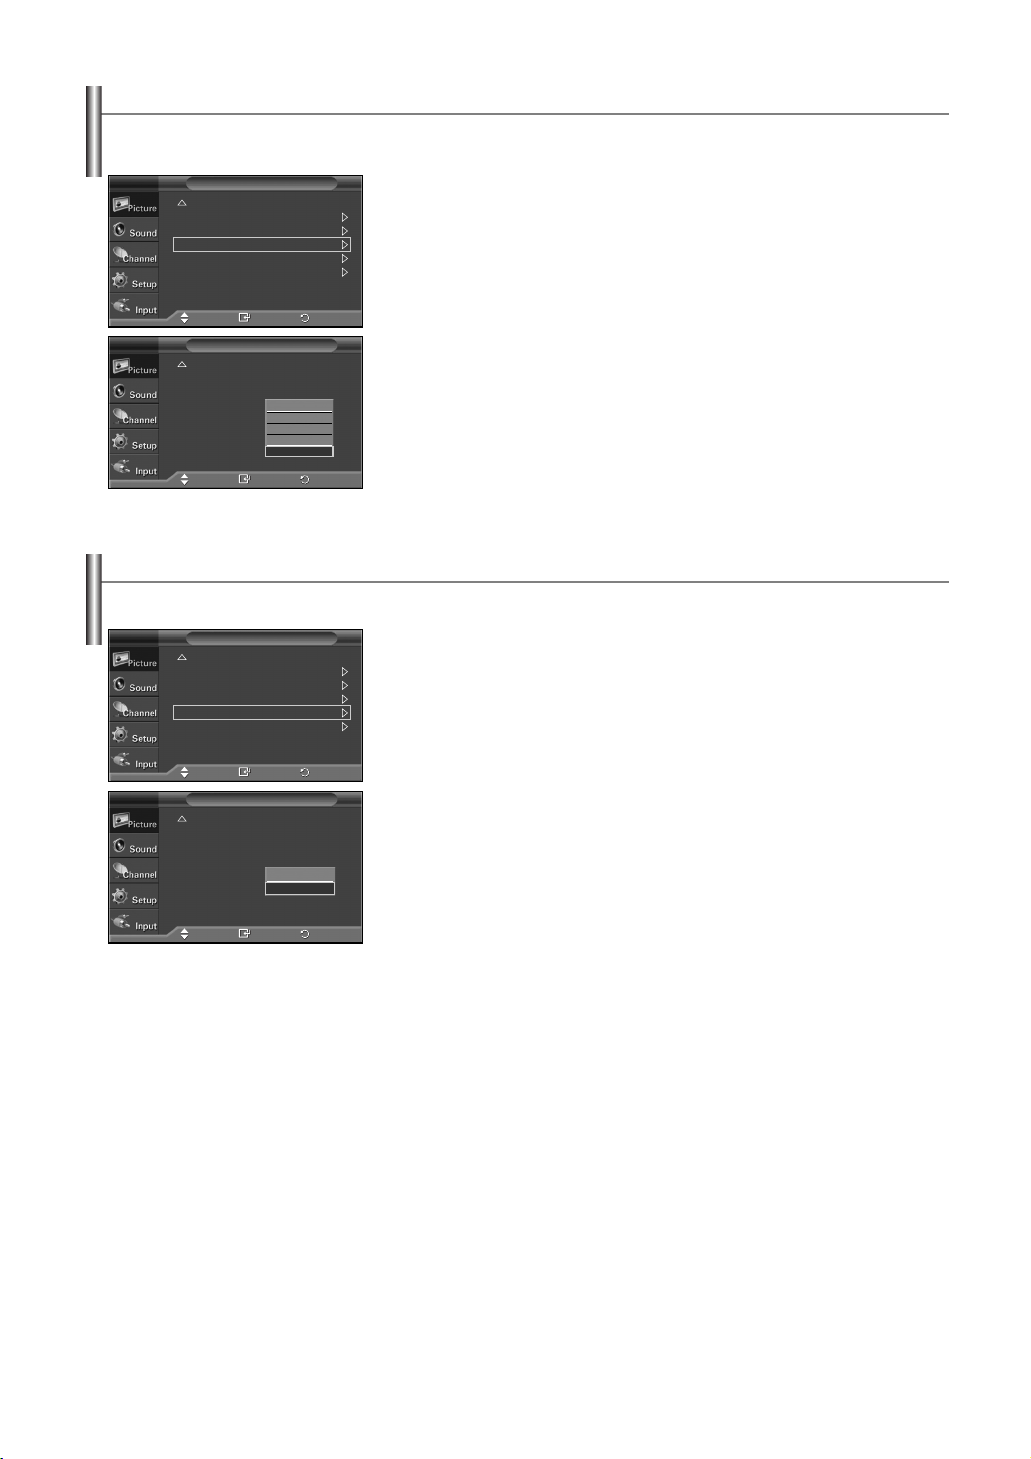
1. Press the MENU button to display the menu.
Press the ENTER button to select “Picture”.
2. Press the ……or ††button to select “Digital NR”, then press the ENTER button.
Return
3. Press the ……or ††button to select “Off”, “Low”, “Medium”, “High”, or “Auto”, then
press the ENTER button.
Press the EXIT button to exit.
Return
Active Color
If you turn on this option, the colors of the sky and grass will be stronger and clearer for a more vivid on-screen picture.
TV
TV
Detailed Settings
Size : 16:9
Digital NR : Auto
Active Color : On
DNIe : On
Reset
Detailed Settings
Size : 16:9
Digital NR : Auto
Active Color : On
DNIe : On
Reset
Picture
More
Move Enter
Picture
More
Move Enter
1. Press the MENU button to display the menu.
Press the ENTER button to select “Picture”.
2. Press the ……or ††button to select “Active Color”, then press the ENTER button.
Return
3. Press the ……or ††button to select “Off” or “On”, then press the ENTER button.
Press the EXIT button to exit.
➢
This function is not available in PC mode.
Off
On
Return
➢
This function is not available in Standard or Movie mode.
English-28
Page 29
DNIe (Digital Natural Image engine)
This TV includes the DNIe function so as to provide a high visual quality. If you set DNIe to on, you can view the screen with the DNIe
feature activated. If you set the DNIe to Demo, you can view the applied DNIe and normal pictures on the screen, for demonstration
purposes. Using this function, you can view the difference in the visual quality.
TV
Detailed Settings
Size : 16:9
Digital NR : Auto
Active Color : On
DNIe : On
Reset
TV
Detailed Settings
Size : 16:9
Digital NR : Auto
Active Color : On
DNIe : On
Reset
Picture
More
Move Enter
Picture
More
Move Enter
Off
Demo
On
Return
Return
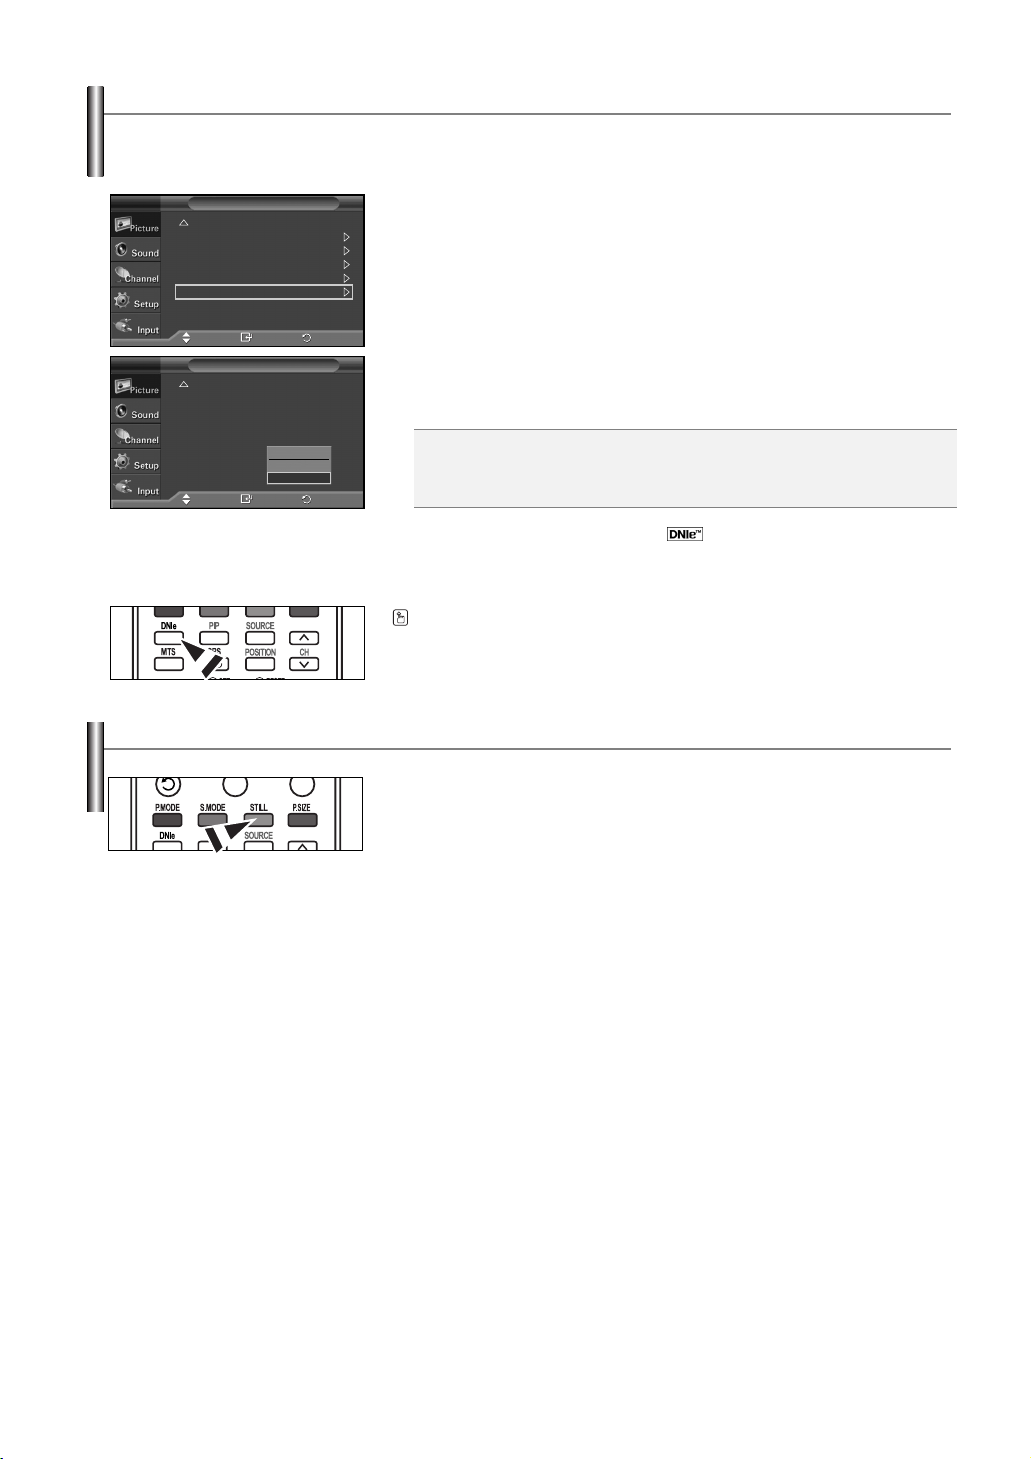
1. Press the MENU button to display the menu.
Press the ENTER button to select “Picture”.
2. Press the ……or ††button to select “DNIe”, then press the ENTER button.
➢
This function is not available in PC mode.
3. Press the ……or ††button to select “Off”, “Demo”, or “On”, then press the ENTER
button.
Press the EXIT button to exit.
• Off: Switches off the DNIe mode.
• Demo: The screen before applying DNIe appears on the left and the screen after
applying DNIe appears on the right.
• On: Switches on the DNIe mode.
➢
DNIeTM(Digital Natural Image engine)
This feature brings you more a detailed image with 3D noise reduction and detail,
contrast and white enhancement.
Press the DNIe button on the remote control repeatedly to select one of the settings.
Freezing the Current Picture
1. Press the STILL button to freeze a moving picture.
➢
Normal sound will still be heard. Press again to cancel.
➢
To prevent screen burn-in, this function will automatically cancel after 5 minutes.
English-29
Page 30
Sound Control
Using Automatic Sound Settings
Your TV has automatic sound settings (“Standard”, “Music”, “Movie”, “Speech”, and “Custom”) that are preset at the factory.
Or, you can select “Custom”, which automatically recalls your personalized sound settings.
TV
Mode : Custom
Equalizer
SRS TS XT : Off
MTS : Mono
Auto Volume : Off
Internal Mute : Off
Sound Select : Main
Reset
Sound
Move Enter
Standard
Music
Movie
Speech
Custom
Return
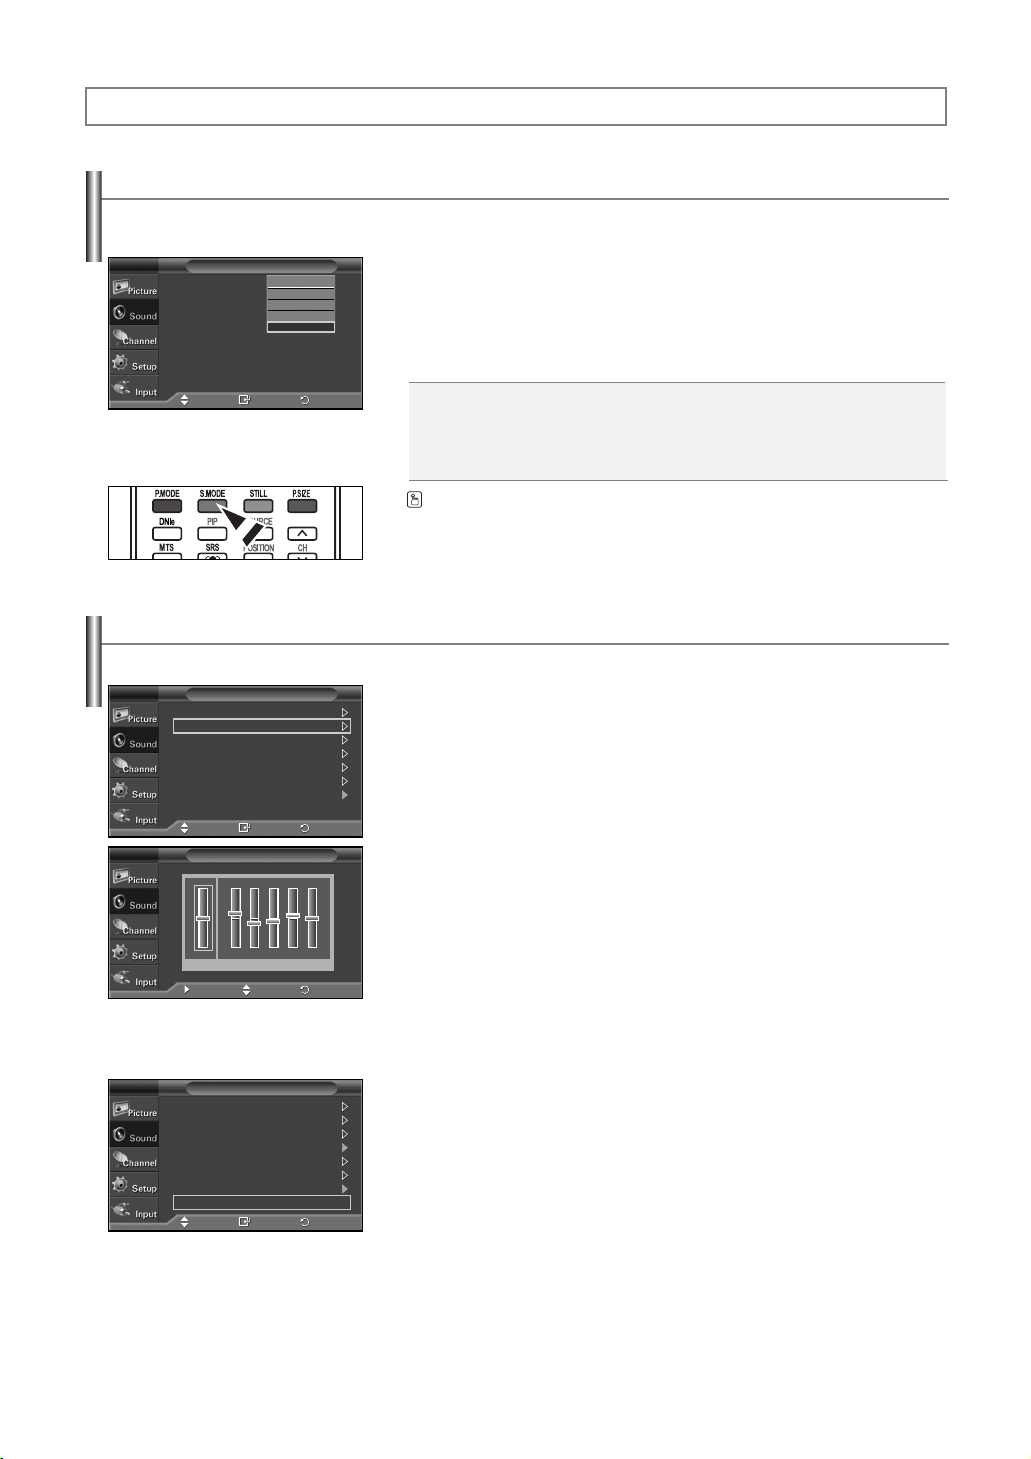
Customizing the Sound
The sound settings can be adjusted to suit your personal preference. (Alternatively, you can use one of the “automatic” settings.)
TV
Mode : Custom
Equalizer
SRS TS XT : Off
MTS : Mono
Auto Volume : Off
Internal Mute : Off
Sound Select : Main
Reset
TV
Sound
Move Enter
Equalizer
+
R
0
-
L
100Hz 300Hz 1KHz 3KHz 10KHz
Balance
Move Adjust
Return
Return
1. Press the MENU button to display the menu.
Press the ……or ††button to select “Sound”, then press the ENTER button.
2. Press the ENTER button to select “Mode”.
Press the ……or ††button to select “Standard”, “Music”, “Movie”, “Speech”,
or “Custom” sound setting, then press the ENTER button.
Press the EXIT button to exit.
• Choose Standard for the standard factory settings.
• Choose Music when watching music videos or concerts.
• Choose Movie when watching movies.
• Choose Speech when watching a show that is mostly dialog (i.e., news).
• Choose Custom to recall your personalized settings (see “Customizing the Sound”).
Press the S.MODE button on the remote control to select one of the standard sound
settings.
1. Press the MENU button to display the menu.
Press the ……or ††button to select “Sound”, then press the ENTER button.
2. Press the ……or ††button to select “Equalizer”, then press the ENTER button.
3. Press the œ or √ button to select a particular frequency to adjust.
+
0
-
Press the ……or ††button to increase or decrease the level of the particular frequency,
then press the ENTER button.
Press the EXIT button to exit.
➢
• L/R Sound Balance Adjustment: To adjust the sound balance of the L/R speakers.
• Bandwidth Adjustment (100Hz, 300Hz, 1KHz, 3KHz, 10KHz)
: To adjust the level of different bandwidth frequencies.
➢
If you make any changes to the equalizer settings, the sound mode is automatically
switched to the “Custom” mode.
TV
Mode : Custom
Equalizer
SRS TS XT : Off
MTS : Mono
Auto Volume : Off
Internal Mute : Off
Sound Select : Main
Reset
Sound
Move Enter
Return
Resetting the Equalizer Settings to the Factory Defaults
To operate the Reset function, the Game mode must be set to On. (Refer to page 42)
1. Press the MENU button to display the menu.
Press the ……or ††button to select “Sound”, then press the ENTER button.
2. Press the ……or ††button to select “Reset”, then press the ENTER button.
➢
The equalizer resets to the factory defaults.
Press the EXIT button to exit.
English-30
Page 31

Setting the TruSurround XT
TruSurround XT is a patented SRS technology that solves the problem of playing 5.1 multichannel content over two speakers.
TruSurround delivers a compelling, virtual surround sound experience through any two-speaker playback system, including internal
television speakers. It is fully compatible with all multichannel formats.
TV
Mode : Custom
Equalizer
SRS TS XT : Off
MTS : Mono
Auto Volume : Off
Internal Mute : Off
Sound Select : Main
Reset
Sound
Move Enter
1. Press the MENU button to display the menu.
Press the ……or ††button to select “Sound”, then press the ENTER button.
Off
On
2. Press the ……or ††button to select “SRS TS XT”, then press the ENTER button.
3. Press the ……or ††button to select “Off” or “On”, then press the ENTER button.
Press the EXIT button to exit.
Return
Press the SRS button on the remote control to select “On” or “Off”.
TRADEMARK & LABEL LICENSE NOTICE
TruSurround XT, SRS and Symbol are trademarks of
SRS Labs, Inc.
TruSurround XT technology is incorporated under license from
SRS Labs, Inc.
Choosing a Multi-Channel Sound (MTS) Track
Depending on the particular program being broadcast, you can listen to Mono, Stereo or SAP.
TV
Mode : Custom
Equalizer
SRS TS XT : Off
MTS : Mono
Auto Volume : Off
Internal Mute : Off
Sound Select : Main
Reset
TV
Mode : Custom
Equalizer
SRS TS XT : Off
MTS : Mono
Auto Volume : Off
Internal Mute : Off
Sound Select : Main
Reset
Sound
Move Enter
Sound
Move Enter
Mono
Stereo
SAP
Return
Return
1. Press the MENU button to display the menu.
Press the ……or ††button to select “Sound”, then press the ENTER button.
2. Press the ……or ††button to select “MTS”, then press the ENTER button.
3. Press the ……or ††button to select a setting you want, then press the ENTER button.
Press the EXIT button to exit.
• Choose Mono for channels that are broadcasting in mono, or if you are having difficulty
receiving a stereo signal.
• Choose Stereo for channels that are broadcasting in stereo.
• Choose SAP to listen to the Separate Audio Program, which is usually a foreign-language
translation.
Press the MTS buttons on the remote control to select “Mono”, “Stereo”, or “SAP”.
English-31
Page 32

Automatic Volume Control
Reduces the difference in volume level among broadcasters.
TV
Mode : Custom
Equalizer
SRS TS XT : Off
MTS : Mono
Auto Volume : Off
Internal Mute : Off
Sound Select : Main
Reset
TV
Mode : Custom
Equalizer
SRS TS XT : Off
MTS : Mono
Auto Volume : Off
Internal Mute : Off
Sound Select : Main
Reset
Sound
Move Enter
Sound
Move Enter
1. Press the MENU button to display the menu.
Press the ……or ††button to select “Sound”, then press the ENTER button.
2. Press the ……or ††button to select “Auto Volume”, then press the ENTER button.
Return
3. Press the ……or ††button to select “Off” or “On”, then press the ENTER button.
Press the EXIT button to exit.
Off
On
Return
Selecting the Internal Mute
Sound output from the TV speakers is muted. This is useful when you want to listen to audio through your sound system instead of the TV.
TV
Mode : Custom
Equalizer
SRS TS XT : Off
MTS : Mono
Auto Volume : Off
Internal Mute : Off
Sound Select : Main
Reset
TV
Mode : Custom
Equalizer
SRS TS XT : Off
MTS : Mono
Auto Volume : Off
Internal Mute : Off
Sound Select : Main
Reset
Internal Mute Off
Internal Mute On
Video No Signal
When “Internal Mute” is set to “On”, Sound menu except “MTS” cannot be adjusted.
Sound
Move Enter
Sound
Move Enter
Speaker Output
TV
Mute
Mute
1. Press the MENU button to display the menu.
Press the ……or ††button to select “Sound”, then press the ENTER button.
2. Press the ……or ††button to select “Internal Mute”, then press the ENTER button.
Return
3. Press the ……or ††button to select “Off” or “On”, then press the ENTER button.
Press the EXIT button to exit.
➢
• The VOL +, VOL - and MUTE buttons do not operate when the Internal Mute is set to On.
Off
On
Return
Internal Speakers
Speaker Output
• When Internal Mute is On, only MTS is selectable for the Sound.
AV, S-Video
Mute
Mute
Component, PC, HDMI
Speaker Output
Mute
Mute
TV
Sound Output
Sound Output
Mute
Audio Out (R/L Out)
AV, S-Video
Sound Output
Sound Output
Mute
Component, PC, HDMI
Sound Output
Sound Output
Mute
Listening to the Sound of the Sub (PIP) Picture
When the PIP feature is activated, you can listen to the sound of the sub (PIP) picture.
TV
Mode : Custom
Equalizer
SRS TS XT : Off
MTS : Mono
Auto Volume : Off
Internal Mute : Off
Sound Select : Main
Reset
TV
Mode : Custom
Equalizer
SRS TS XT : Off
MTS : Mono
Auto Volume : Off
Internal Mute : Off
Sound Select : Main
Reset
Sound
Move Enter
Sound
Move Enter
Main
Sub
Return
Return
1. Press the MENU button to display the menu.
Press the ……or ††button to select “Sound”, then press the ENTER button.
2. Press the ……or ††button to select “Sound Select”, then press the ENTER button.
3. Press the ……or ††button to select “Sub”, then press the ENTER button.
Press the EXIT button to exit.
Main: Used to listen to the sound of the main picture.
Sub: Used to listen to the sound of the sub picture.
You can select this option when “PIP” is set to “On”.
➢
English-32
Page 33

Channel Control
Adding / Locking Channels
Using the Channel Manager, you can conveniently lock or add channels.
TV
Air/Cable : Air
Auto Program
Channel Manager
Fine Tune
Color System : Auto
Move Enter
TV
Channel List
Child Lock : Off
Move Enter
Channel List
Air 3 1 / 7
Ch.
Air 2
Air 3
Air 4
Air 5
Air 6
Air 7
Air 8
Air 9
Air 10
Air 11
Add Lock
Move Enter
Page Return
Channel
Channel Manager
Return
Return
1. Press the MENU button to display the menu.
Press the ……or ††button to select “Channel”, then press the ENTER button.
2. Press the ……or ††button to select “Channel Manager”, then press the
ENTER button.
Adding channels
Using the Channel Manager, you can add channels.
3. Select the “Channel List” by pressing the ENTER button.
4. Move to the ( ) field by pressing the
…… / ††
/ œ / √ buttons,
select a channel to be added, and press the ENTER button to add the
channel.
➢
If you press the ENTER button again, the ( ) symbol next to the channel
disappears and the channel is not added.
5. Press the RETURN button to return on the “Channel Manager”.
Locking channels
This feature allows you to prevent unauthorized users, such as children, from watching
unsuitable programmes by muting out video and audio.
6. Press the ……or ††button to select “Child Lock”, then press the ENTER
button.
7. Select “On” by pressing the ……or ††buttons, then press the ENTER button.
8. Press the ……or ††buttons to select the “Channel Manager”, then press the
ENTER button.
9. Move to the ( ) field by pressing the
…… / ††
/ œ / √ buttons, select a
channel to be locked, and press the ENTER button.
Press the EXIT button to exit.
➢
If you press the ENTER button again, the ( ) symbol next to the channel
disappears and the channel lock is canceled.
➢
A blue screen is displayed when Child Lock is activated.
Press the CH LIST button on the remote control to display a list of channels.
English-33
Page 34

Fine Tuning Analog Channels
Use fine tuning to manually adjust a particular channel for optimal reception.
TV
Air/Cable : Air
Auto Program
Channel Manager
Fine Tune
Color System : Auto
Channel
1. Press the MENU button to display the menu.
Press the ……or ††button to select “Channel”, then press the ENTER button.
2. Press the ……or ††button to select “Fine Tune”, then press the ENTER button.
Move Enter
Fine Tune
Air 3
Reset
Adjust
Air 3 *
Adjust
Air 3
Move
Save
Fine Tune
Reset
Save
Fine Tune
Reset
Enter
Return
0
Return
+10
Return
0
Return
3. Press the œ or √ button to adjust the fine tuning.
4. To store the fine tuning setting in the TV’s memory, press the ENTER button.
To reset the fine tuning setting, press the ††button to select “Reset”,
then press the ENTER button.
Press the EXIT button to exit.
➢
Only analog TV channels can be fine tuned.
➢
“*” will appear next to the number of fine-tuned channels.
Setting the Color System
Normally the TV can receive image and sound with good quality in Auto mode. This mode detects the color signal sources automatically.
If the color implementation is unsatisfactory, select any of PAL-M, PAL-N or NTSC.
TV
Air/Cable : Air
Auto Program
Channel Manager
Fine Tune
Color System : Auto
Channel
1. Press the MENU button to display the menu.
Press the ……or ††button to select “Channel”, then press the ENTER button.
2. Press the ……or ††button to select “Color System”, then press the ENTER
button.
TV
Move Enter
Air/Cable : Air
Auto Program
Channel Manager
Fine Tune
Color System : Auto
Channel
Move Enter
Auto
PAL-M
PAL-N
NTSC
Return
3. Press the ……or ††button to select the desired color standard (Auto, PAL-M,
PAL-N, or NTSC), then press the ENTER button.
Press the EXIT button to exit.
Return
English-34
Page 35

PC Display
Using Your TV as a Computer (PC) Display
Setting Up Your PC Software (Based on Windows XP)
The Windows display-settings for a typical computer are shown below. The actual screens on your PC will probably be different,
depending upon your particular version of Windows and your particular video card. However, even if your actual screens look different,
the same basic set-up information will apply in almost all cases. (If not, contact your computer manufacturer or Samsung Dealer.)
1. First, click on “Control Panel” on the Windows start menu.
2. When the control panel window appears, click on “Appearance and Themes” and a
display dialog-box will appear.
3. When the control panel window appears, click on “Display” and a display dialog-box
will appear.
4. Navigate to the “Settings” tab on the display dialog-box.
The correct size setting (resolution)
Optimum: 1024 x 768 pixels
If a vertical-frequency option exists on your display settings dialog box,
the correct value is “60” or “60 Hz”. Otherwise, just click “OK” and exit the dialog box.
Display Modes
If the signal from the system equals the standard signal mode, the screen is adjusted automatically. If the signal from the system doesn’t equal the standard
signal mode, adjust the mode by referring to your video card user guide; otherwise there may be no video. For the display modes listed below, the screen
image has been optimized during manufacture.
P
N
N
N
N
P
P
P
N
N
P
P
PL-42C91HP/
PL-42Q91HP/
PL-42C71HP
✔
✔
✔
✔
✔
✔
✔
✔
✔
✔
✔
✔
✔
✔
PL-50C91H/
PL-50Q91HP
✔
✔
✔
✔
✔
✔
✔
✔
✔
✔
✔
✔
✔
✔
✔
Video Signal
IBM PC / AT
Compatible
• The interlace mode is not supported.
• The TV operates abnormally if a non-standard video format is selected.
• The table above conforms to IBM/VESA regulations and is based on using the Analog Input.
✔
” mark means that this mode can be supported.
•“
➢
• The PC text quality of PL-42C91HP/PL-42Q91HP/PL-42C71HP is optimum in XGA mode (1024 x 768@60Hz).
• The PC text quality of PL-50C91H/PL-50Q91HP is optimum in WXGA mode (1360 x 768@60Hz).
(Three pixels on left, right, top and bottom will be grayed out at the resolution setting of 1360x768@60Hz. This is not a mechanical problem but a result caused
by the pixel difference between the standard resolution and the PDP panel.)
• When this TV is used as a PC display, 32-bit color is supported.
• Depending on the manufacturer, your PC display screen might appear different. (and depending on your particular version of Windows.)
Check your PC instruction book for information about connecting your PC to a TV.
• If a vertical and horizontal frequency-select mode exists, select 60Hz (vertical) and 48.4kHz (horizontal).
• In some cases, abnormal signals (such as stripes) might appear on the TV screen when the PC power is turned off (or if the PC is disconnected). If so, press the
SOURCE button on the remote control or SOURCE button on the side panel to enter a VIDEO mode. Also, make sure that the PC is connected.
Resolution
(Dot X Line)
640 x 350
720 x 400
640 x 480
800 x 600
1024 x 768
1360 x 768
Vertical
Frequency (Hz)
70.086
70.087
59.940
70.000
72.809
75.000
60.317
70.000
72.188
75.000
60.004
70.069
72.000
75.029
60.015
Horizontal
Frequency (KHz)
31.469
31.469
31.469
35.000
37.861
37.500
37.879
43.750
48.077
46.875
48.363
56.476
57.672
60.023
47.712
Vertical
Polarity
N
P
N
N/P
N
N
P
N/P
P
P
N
N
N/P
P
P
Horizontal
Polarity
N/P
N/P
N/P
English-35
Page 36

Setting up the TV with your PC
How to
Auto Adjust
Use the Auto Adjust function to have the TV set automatically adjust the video signals it receives from the PC.
The function also automatically fine-tunes the settings and adjusts the frequency values and positions.
➢ This function does not work in DVI-Digital mode.
➢ Change to the PC mode first.
TV
PC
Home Theater PC : Off
Light Effect :
Energy Saving : Off
Screen Burn Protection
HDMI Black Level : Normal
TV
Image Lock
Position
Auto Adjustment
Image Reset
Setup
More
More
Move Enter
PC
1. Press the MENU button to display the menu.
Press the ……or ††button to select “Setup”, then press the ENTER button.
Press the ……or ††button to select “PC”, then press the ENTER button.
Standby Mode On
Return
2. Press the ……or ††button to select “Auto Adjustment”, then press the ENTER button.
The message “Auto Adjustment in progress. Please wait.” appears on the screen
and the picture adjustments are automatically activated.
Press the EXIT button to exit.
Move Enter
Auto Adjustment in progress.
Please wait.
Return
Adjusting the Screen Quality
The purpose of the picture quality adjustment is to remove or reduce picture noise. If the noise is not removed by fine tuning alone,
then do the frequency adjustments to the utmost and fine tune again. After the noise has been reduced, re-adjust the picture so that
it is aligned on the center of the screen.
➢ Change to the PC mode first.
TV
Image Lock
Position
Auto Adjustment
Image Reset
Move Enter
TV
Coarse 50
Fine 0
Move Enter
PC
Image Lock
Return
Return
1. Press the MENU button to display the menu.
Press the ……or ††button to select “Setup”, then press the ENTER button.
Press the ……or ††button to select “PC”, then press the ENTER button.
2. Press the ENTER button to select “Image Lock”.
3. Press the ……or ††button to select “Coarse” or “Fine”, then press the ENTER button.
Press the œ or √ button to adjust the screen quality, then press the ENTER button.
Press the EXIT button to exit.
➢
This feature may change the width of the image. If necessary, adjust the position to center.
Coarse
Move
Adjust
50
Return
Continued...
English-36
Page 37

Changing the Scr
een Position
After connecting the TV to your PC, adjust the position of the screen if it is not well-aligned.
➢ Change to the PC mode first.
TV
Image Lock
Position
Auto Adjustment
Image Reset
PC
1. Press the MENU button to display the menu.
Press the ……or ††button to select “Setup”, then press the ENTER button.
Press the ……or ††button to select “PC”, then press the ENTER button.
2. Press the ……or ††button to select “Position”, then press the ENTER button.
Move Enter
TV
Position
Move Enter
Initializing the Screen Position
➢ Change to the PC mode first.
TV
Image Lock
Position
Auto Adjustment
Image Reset
Move Enter
Image Reset is completed.
PC
Return
Return
Return
3. Press the ……or ††button to adjust the V-Position.
Press the œ or √ button to adjust the H-Position.
Press the ENTER button.
Press the EXIT button to exit.
1. Press the MENU button to display the menu.
Press the ……or ††button to select “Setup”, then press the ENTER button.
Press the ……or ††button to select “PC”, then press the ENTER button.
2. Press the ……or ††button to select “Image Reset”, then press the ENTER button.
The message “Image Reset is completed.” appears on the screen.
Press the EXIT button to exit.
➢
The previously adjusted settings will be reset to the factory defaults.
Setting the Home Theater PC
You can view higher quality pictures by configuring the screen settings in PC Mode. If you set the Home Theater PC function to On,
you can configure the Detailed Settings (when Picture Mode is set to Standard or Movie) as in PC Mode.
TV
PC
Home Theater PC : Off
Light Effect :
Energy Saving : Off
Screen Burn Protection
HDMI Black Level : Normal
TV
PC
Home Theater PC : Off
Light Effect :
Energy Saving : Off
Screen Burn Protection
HDMI Black Level : Normal
Setup
More
More
Move Enter
Setup
More
More
Move Enter
Standby Mode On
Return
Off
On
Standby Mode On
Return
1. Press the MENU button to display the menu.
Press the ……or ††button to select “Setup”, then press the ENTER button.
2. Press the ……or ††button to select “Home Theater PC”, then press the ENTER
button.
3. Press the ……or ††button to select “Off” or “On”, then press the ENTER button.
Press the EXIT button to exit.
➢
This function is available only in PC mode.
English-37
Page 38

Time Setting
Setting the Clock
Setting the clock is necessary in order to use the various timer features of the TV.
Also, you can check the time while watching the TV. (Just press the INFO button.)
TV
Plug & Play
Language : English
Time
Caption
Game Mode : Off
Blue Screen : Off
Melody : Off
More
Move Enter
TV
Clock Set : 12 : 00 am
Sleep Timer : Off
Timer 1 : Inactivated
Timer 2 : Inactivated
Timer 3 : Inactivated
Move Enter
TV
Month01Day01Year
Hour12Minute00am/pm
Move Adjust
Setup
Time
Clock Set
Return
Return
2007
am
Return
1. Press the MENU button to display the menu.
Press the ……or ††button to select “Setup”, then press the ENTER button.
Press the ……or ††button to select “Time”, then press the ENTER button.
2. Press the ENTER button to select “Clock Set”.
3. Press the œ or √ button to move to “Month”, “Day”, “Year”, “Hour”, “Minute”, or
“am/pm”. Set the date and time you want by pressing the ……or ††button, then
press the ENTER button.
Press the EXIT button to exit.
➢
The current time will appear every time you press the INFO button.
➢
You can set the Month, Day, Year, Hour, and Minute directly by pressing the number
buttons on the remote control.
English-38
Page 39

Setting the Sleep Timer
The sleep timer automatically shuts off the TV after a preset time (from 30 to 180 minutes).
TV
Plug & Play
Language : English
Time
Caption
Game Mode : Off
Blue Screen : Off
Melody : Off
More
Move Enter
TV
Clock Set : 12 : 00 am
Sleep Timer : Off
Timer 1 : Inactivated
Timer 2 : Inactivated
Timer 3 : Inactivated
Move Enter
TV
Clock Set : 12 : 00 am
Sleep Timer : Off
Timer 1 : Inactivated
Timer 2 : Inactivated
Timer 3 : Inactivated
Move Enter
Setup
Time
Time
Off
30
60
90
120
150
180
1. Press the MENU button to display the menu.
Press the ……or ††button to select “Setup”, then press the ENTER button.
Press the ……or ††button to select “Time”, then press the ENTER button.
Return
2. Press the ……or ††button to select “Sleep Timer”, then press the ENTER button.
Return
3. Press the ……or ††button to select the time interval for the TV to stay on,
then press the ENTER button.
The interval ranges from 30 to 180 minutes.
Press the EXIT button to exit.
Return
Press the SLEEP button on the remote control until the appropriate time interval appears
(any of the preset values from “30 min” to “180 min”).
English-39
Page 40

Setting the On/Off Timer
TV
Plug & Play
Language : English
Time
Caption
Game Mode : Off
Blue Screen : Off
Melody : Off
More
Move Enter
TV
Clock Set : 12 : 00 am
Sleep Timer : Off
Timer 1 : Inactivated
Timer 2 : Inactivated
Timer 3 : Inactivated
Move Enter
TV
On Time
12 : 00 am Inactivate
Off Time
12 : 00 am Inactivate
Repeat
Volume Channel
10 STD 3
Move Adjust
Once
Setup
Time
Timer 1
Return
Return
Return
1. Press the MENU button to display the menu.
Press the ……or ††button to select “Setup”, then press the ENTER button.
Press the ……or ††button to select “Time”, then press the ENTER button.
2. Press the ……or ††button to select “Timer 1”, “Timer 2”, or “Timer3”, then press
the ENTER button. The timer menu is displayed.
Press the ……or ††button to adjust hour, then press the √ button to move to
the next step. Set other items using the same method as above.
3. Press the œ or √ button to select the required item below.
Press the ……or ††button to adjust to the setting satisfied.
Press the EXIT button to exit.
• On Time: Select hour, minute, am/pm, and Inactivated/Activated.
• Off Time: Select hour, minute, am/pm, and Inactivated/Activated.
• Repeat: Select Once, Everyday, Mon~Fri, Mon~Sat, or Sat~Sun.
• Volume: Select the required volume level.
• Channel: Select the required channel.
➢
➢
(To activate timer with the setting satisfied, set to Activated.)
(To activate timer with the setting satisfied, set to Activated.)
You can set the Month, Day, Year, Hour, and Minute directly by pressing the number
buttons on the remote control.
Auto Power Off
When you set the timer “On”, the TV will eventually turn off, if no controls are
operated for 3 hours after the TV was turned on by timer. This function is only
available in timer “On” mode and prevents overheating, which may occur if a TV is
on for too long.
English-40
Page 41

Function Description
Selecting a Menu Language
TV
Plug & Play
Language : English
Time
Caption
Game Mode : Off
Blue Screen : Off
Melody : Off
TV
Plug & Play
Language : English
Time
Caption
Game Mode : Off
Blue Screen : Off
Melody : Off
Setup
More
Move Enter
Setup
More
Move Enter
English
Français
Español
Português
1. Press the MENU button to display the menu.
Press the ……or ††button to select “Setup”, then press the ENTER button.
Press the ……or ††button to select “Language”, then press the ENTER button.
Return
2. Press the ……or ††button to select the appropriate language: English”, “Français”,
“Español”, or “Português”, then press the ENTER button.
Press the EXIT button to exit.
Return
Viewing Closed Captions
Your TV decodes and displays the closed captions that are broadcast with certain TV shows. These captions are usually subtitles for the
hearing impaired or foreign language translations. All VCRs record the closed caption signal from television programs, so home-recorded
video tapes also provide closed captions. Most prerecorded commercial video tapes provide closed captions as well. Check for the closed
caption symbol in your television schedule and on the tape’s packaging: .
➢
The Caption feature does not work in Component, PC and HDMI modes.
TV
Plug & Play
Language : English
Time
Caption
Game Mode : Off
Blue Screen : Off
Melody : Off
TV
Caption : Off
Mode : Caption
Channel : 1
Field : 1
Setup
More
Move Enter
Caption
1. Press the MENU button to display the menu.
Press the ……or ††button to select “Setup”, then press the ENTER button.
Press the ……or ††button to select “Caption”, then press the ENTER button.
Return
2. Press the ENTER button to select “Caption”.
Off
On
Press the ……or ††button to select “On”, then press the ENTER button.
Move Enter
Return
Continued...
English-41
Page 42

TV
Caption : On
Mode : Caption
Channel : 1
Field : 1
Caption
Caption
Text
3. Press the ……or ††button to select “Mode”, then press the ENTER button.
Press the ……or ††button to select “Caption” or “Text”, then press the ENTER button.
Return
4. Depending on the particular broadcast, it might be necessary to make changes to
“Channel” and “Field”: Press the ……or ††button to make the changes.
1
2
(Follow the same procedure as in steps 3 above.)
Press the EXIT button to exit.
➢
Different channels and fields display different information: Field 2 carries additional
TV
Caption : On
Mode : Caption
Channel : 1
Field : 1
Move Enter
Caption
information that supplements the information in Field 1. (For example, Channel 1 may
Move Enter
Return
have subtitles in English, while Channel 2 has subtitles in Spanish.)
➢
The Caption feature doesn’t work in Component, PC, HDMI modes.
➢
The availability of captions depends on the program being broadcast.
Press the CAPTION button on the remote control to select “On” or “Off”.
Using the Game Mode
When connecting to a game console such as PlayStationTMor XboxTM, you can enjoy a more realistic gaming experience by selecting game
menu.
TV
TV
Plug & Play
Language : English
Time
Caption
Game Mode : Off
Blue Screen : Off
Melody : Off
Plug & Play
Language : English
Time
Caption
Game Mode : Off
Blue Screen : Off
Melody : Off
Setup
More
Move Enter
Setup
More
Move Enter
1. Press the MENU button to display the menu.
Press the ……or ††button to select “Setup”, then press the ENTER button.
2. Press the ……or ††button to select “Game Mode”, then press the ENTER button.
Return
3. Select “Off” or “On” by pressing the ……or ††button, then press the ENTER button.
Press the EXIT button to exit.
➢
Restrictions on Game mode (Caution)
Off
On
Return
• To disconnect the game console and connect
another external device, set Game to Off in the
AV1
setup menu.
• If you display the TV menu in Game mode,
Game Mode
the screen shakes slightly.
• The mark ( ) appears on the screen which
means that Game Mode is on with the selected source.
➢
If Game Mode is On
• Picture Mode is automatically changed to Standard and users cannot change the mode.
• Sound Mode in the Sound menu is deactivated. Adjust the sound using the equalizer.
• The Reset in the Sound menu is activated. Reset function initializes the Equalizer
settings to the factory default setting.
➢
Game Mode is not available in TV mode.
➢
If the picture is poor when external device is connected to TV, check if Game Mode is On.
Set Game Mode to Off and connect external devices.
English-42
Page 43

Setting the Blue Screen Mode
If no signal is being received or the signal is very weak, a blue screen automatically replaces the noisy picture background.
If you wish to continue viewing the poor picture, you must set the “Blue Screen” mode to “Off”.
TV
Plug & Play
Language : English
Time
Caption
Game Mode : Off
Blue Screen : Off
Melody : Off
TV
Plug & Play
Language : English
Time
Caption
Game Mode : Off
Blue Screen : Off
Melody : Off
Setup
More
Move Enter
Setup
More
Move Enter
1. Press the MENU button to display the menu.
Press the ……or ††button to select “Setup”, then press the ENTER button.
2. Press the ……or ††button to select “Blue Screen”, then press the ENTER button.
Return
3. Press the ……or ††button to select “Off” or “On”, then press the ENTER button.
Press the EXIT button to exit.
➢
Blue Screen is displayed when there is no signal from an external device, regardless of the
Off
On
Return
Blue Screen Setting.
Setting the On/Off Melody
A melody sound can be set to come on when the TV is powered On or Off.
TV
Plug & Play
Language : English
Time
Caption
Game Mode : Off
Blue Screen : Off
Melody : Off
TV
Plug & Play
Language : English
Time
Caption
Game Mode : Off
Blue Screen : Off
Melody : Off
Setup
More
Move Enter
Setup
More
Move Enter
Off
Low
Medium
High
1. Press the MENU button to display the menu.
Press the ……or ††button to select “Setup”, then press the ENTER button.
2. Press the ……or ††button to select “Melody”, then press the ENTER button.
Return
3. Press the ……or ††button to select “Off”, “Low”, “Medium”, or “High”, then press
the ENTER button.
Press the EXIT button to exit.
Return
Setting the Light Effect
You can turn on/off the blue LED on the front of TV according to the situation. Use it for saving power or when the LED dazzles your
eyes.
TV
PC
Home Theater PC : Off
Light Effect :
Energy Saving : Off
Screen Burn Protection
HDMI Black Level : Normal
TV
PC
Home Theater PC : Off
Light Effect :
Energy Saving : Off
Screen Burn Protection
HDMI Black Level : Normal
Setup
More
More
Move Enter
Setup
More
More
Move Enter
Standby Mode On
Return
Off
Standby Mode On
Standby Mode On
Watching Mode On
On
Return
1. Press the MENU button to display the menu.
Press the ……or ††button to select “Setup”, then press the ENTER button.
2. Press the ……or ††button to select “Light Effect”, then press the ENTER button.
Press the ……or ††button to select submenu (Off, Standby Mode On, Watching
Mode ON, or On) you want, then press the ENTER button.
Press the EXIT button to exit.
Off: The blue LED is always off.
Standby Mode On: The blue LED lights while in Standby mode and it
turns off when your TV is turned on.
Watching Mode On: The blue LED lights when watching TV and it turns
off when your TV is turned off.
On: The blue LED always lights.
➢
Set the Light Effect to Off to reduce the power consumption.
English-43
Page 44

Using the Energy Saving Feature
This feature adjusts the screen brightness automatically depending on the surrounding lighting conditions.
TV
PC
Home Theater PC : Off
Light Effect :
Energy Saving : Off
Screen Burn Protection
HDMI Black Level : Normal
TV
PC
Home Theater PC : Off
Light Effect :
Energy Saving : Off
Screen Burn Protection
HDMI Black Level : Normal
Setup
More
More
Move Enter
Setup
More
More
Move Enter
Standby Mode On
Return
Standby Mode On
Off
Low
Medium
High
Return
1. Press the MENU button to display the menu.
Press the ……or ††button to select “Setup”, then press the ENTER button.
2. Press the ……or ††button to select “Energy Saving”, then press the ENTER button.
Press the ……or ††button to select submenu (Off, Low, Medium, or High)
you want, then press the ENTER button.
Press the EXIT button to exit.
Off: Inactivates the Energy Saving feature.
Low: Adjusts the brightness of the TV screen to the maximum level
regardless of the surrounding illumination.
The energy saving efficiency is low.
Medium: Adjusts the brightness of the TV screen to the mid level
regardless of the surrounding illumination.
The energy saving efficiency is the average.
High: Adjusts the brightness of the TV screen to darker regardless of the
surrounding illumination.
The energy is saved most effectively.
Preventing Screen Burn-in
To reduce the possibility of screen burn, this unit is equipped with screen burn prevention technology. This technology enables you to set
picture movement up/down (Vertical Line) and side to side (Horizontal Dot). The Time setting allows you to program the time between
movement of the picture in minutes.
TV
PC
Home Theater PC : Off
Light Effect :
Energy Saving : Off
Screen Burn Protection
HDMI Black Level : Normal
TV
Pixel Shift
All White
Signal Pattern
Side gray : Dark
Setup
More
More
Move Enter
Screen Burn Protection
1. Press the MENU button to display the menu.
Press the ……or ††button to select “Setup”, then press the ENTER button.
Standby Mode On
Return
2. Press the ……or ††button to select “Screen Burn Protection”, then press the
ENTER button.
TV
TV
Move Enter
Pixel Shift
Pixel Shift : On
Horizontal Dot : 4
Vertical Line : 4
Time : 4
Move Enter
Pixel Shift
Pixel Shift : On
Horizontal Dot : 4
Vertical Line : 4
Time : 4
Move Enter
Return
3. Press the ENTER button to select “Pixel Shift”, then press the ENTER button.
Off
On
Pressing the……or ††button
You will also see the items “Horizontal Dot”, “Vertical Line” and “Time”.
Pixel Shift: Using this function, you can minutely move pixels on the PDP in
horizontal or vertical direction to prevent after-images on the screen.
Return
will alternate between “On” and “Off”.
4. Press the ……or ††button to select the item you wish to change, then press the
0
1
2
3
4
Return
ENTER button.
Press the ……or ††button to change the value of the item, then press the ENTER
button.
Optimum condition for pixel shift;
Horizontal Dot
Vertical Line
Time(min)
The Pixel Shift value may differ depending on the monitor size (inches) and mode.
2
2
2
Press the EXIT button to exit.
English-44
Page 45

Reducing the Effects of Screen Burn
If screen burn has occurred, you can select a white screen or signal pattern (rolling screen) to help remove screen burn artifacts.
TV
TV
TV
TV
Screen Burn Protection
Pixel Shift
All White
Signal Pattern
Side gray : Dark
Move Enter
Screen Burn Protection
Pixel Shift
All White
Signal Pattern
Side gray : Dark
Move Enter
Screen Burn Protection
Pixel Shift
All White
Signal Pattern
Side gray : Dark
Move Enter
Screen Burn Protection
Pixel Shift
All White
Signal Pattern
Side gray : Dark
Return
Return
Return
1. Press the MENU button to display the menu.
Press the ……or ††button to select “Setup”, then press the ENTER button.
2. Press the ……or ††button to select “Screen Burn Protection”, then press the
ENTER button.
3. Press the ……or ††button to select “All White”, “Signal Pattern”, or “Side gray”, then
press the ENTER button.
Press the EXIT button to exit.
All White: This function removes after-images on the screen by changing the
Signal Pattern: This function removes after-images on the screen by moving all
Side gray: When you watch TV with the screen ratio of 4:3, the screen is prevented
➢
➢
➢
color of pixels to white. Use this function when there are remaining
after-images or symbols on the screen especially when you displayed
a still image on the screen for a long time.
the pixels on the PDP according to a pattern. Use this function
when there are remaining after-images or symbols on the screen
especially when you displayed a still image on the screen for a
long time.
from any damage by adjusting the white balance on both extreme left
and right sides.
Dark: When you set the screen ratio to 4:3, it darkens the left and right
sides.
Light: When you set the screen ratio to 4:3, it brightens the left and right
sides.
To remove after-images on the screen, use either the “All White” or “Signal Pattern”
function. Although both functions remove after-images on the screen, “Signal Pattern”
is more effective.
The after-image removal function has to be executed for a long time (approximately
1 hour) to effectively remove after-images on the screen. If the after-image is not
removed after performing the function, repeat the function again.
Press any key on the remote control to cancel this feature.
Move Enter
Return
Setting the HDMI Black Level
Using this function, you can adjust the image quality when the screen burn (appearance of black level, low
contrast, low color, etc.) is encountered by the HDMI input for RGB limited range (16 to 235).
TV
PC
Home Theater PC : Off
Light Effect :
Energy Saving : Off
Screen Burn Protection
HDMI Black Level : Normal
TV
PC
Home Theater PC : Off
Light Effect :
Energy Saving : Off
Screen Burn Protection
HDMI Black Level : Normal
Setup
More
More
Move Enter
Picture
More
More
Move Enter
Standby Mode On
Return
Standby Mode On
Normal
Low
Return
1. Press the MENU button to display the menu.
Press the ……or ††button to select “Setup”, then press the ENTER button.
2. Press the ……or ††button to select “HDMI Black Level”, then press the ENTER button.
3. Press the ……or ††button to select “Normal” or “Low”, then press the ENTER
button.
Press the EXIT button to exit.
➢
This function is active only when the externel input connects to HDMI(RGB signals).
English-45
Page 46

Setting the AV Color System
You can set the color encoding standards for external signal inputs.
Normally the TV can receive image and sound with good quality in Auto mode. This mode detects the color signal sources automatically.
If the color implementation is unsatisfactory, select any of PAL-M, PAL-N or NTSC.
TV
AV Color System : Auto
PIP
More
Setup
1. Press the MENU button to display the menu.
Press the ……or ††button to select “Setup”, then press the ENTER button.
2. Press the ……or ††button to select “AV Color System”, then press the ENTER
button.
Auto
PAL-M
PAL-N
NTSC
Return
3. Press the ……or ††button to select the desired color standard (Auto, PAL-M,
PAL-N, or NTSC), then press the ENTER button.
Press the EXIT button to exit.
Return
TV
Move Enter
Setup
More
AV Color System : Auto
PIP
Move Enter
Wall-Mount Adjustment (Sold separately)
Once the wall mount is installed, the position of your TV can be easily adjustable.
TV
Position1
TV Rear Panel
Serial Cable(1P to 1P)(Not supplied)
Setup
More
AV Color System : Auto
Wall-Mount Adjustment
PIP
Move Enter
Wall-Mount Adjustment
Return
Entering the menu
1. Press the MENU button to display the menu.
Press the ……or ††button to select “Setup”, then press the ENTER button.
2. Press the ……or ††button to select “Wall-Mount Adjustment”, then press the ENTER
button.
3. Adjust to the desired position using the ……, ††, œ, √ buttons.
Press the EXIT button to exit.
➢
If you press an arrow button when no OSD is displayed on the TV screen, the Adjustment
screen appears.
➢
When you turn the power off, your TV moves to the initial installation position.
When you turn the power on, your TV moves to the last remembered position you
adjusted.
Auto Wall-Mount
Position 1 2 3
Adjust
INFO
Center
Exit
Continued...
English-46
Page 47

Using the Remote Control Buttons
Button Operations
Wall-mount angle
adjustment
Reset
Remembering the
position and moving
to the remembered
position
➢
For installation, refer to the Installation Manual provided.
➢
For product installation and the installation and moving of the wall mount, make sure to consult a specialized installation company.
➢
This installation manual is to be used when attaching the wall mount to a wall.
Tilt Up, Tilt Down, Move right, Move left
Moves to the initial installation position
Remembers 3 positions with the Red, Green and
Yellow buttons.
Moves to the remembered position using these 3
color buttons.
When attaching to other building materials, please contact your nearest dealer
Viewing Picture-in-Picture
This product has one built-in tuner, which does not allow PIP to function in the same mode. For example, you cannot watch one TV
channel in the main screen, and a different one in the PIP screen. Please see ‘PIP Settings’ below for details.
Activating Picture-in-Picture
TV
AV Color System : Auto
PIP
More
Setup
1. Press the MENU button to display the menu.
Press the ……or ††button to select “Setup”, then press the ENTER button.
Press the ……or ††button to select “PIP”, then press the ENTER button.
TV
Move Enter
PIP : Off
Source : TV
Size :
Position :
Channel : 3
Move Enter
PIP
Return
2. Press the ENTER button again.
Off
On
Return
Press the ……or ††button to select “On”, then press the ENTER button.
➢
If you turn the TV off while watching in PIP mode and turn it on again, the PIP window
will disappear.
Press the PIP button on the remote control to activate or deactivate the PIP.
PIP Settings
PIP screen
Main screen
TV
AV1
AV2
S-Video
Component1
Component2
PC
HDMI
➢
This TV has only one tuner and does not allow you to watch one TV channel in the main screen and another
channel in the PIP screen.
TV AV1 AV2
X
X
X
X
X
X
X
X
O
O
O
O
O
O
O
O
S-Video
Component1 Component2 PC HDMI
X
X
X
X
X
X
X
X
X
O
X
O
X
O
X
O
X
X
X
X
X
X
X
X
O : PIP operate
X : PIP doesn’t operate
X
X
X
X
X
X
X
X
X
X
X
X
X
X
X
X
X
X
X
X
X
X
X
X
Continued...
English-47
Page 48

Selecting a Signal Sour
TV
PIP : On
Source : TV
Size :
Position :
Channel : 3
ce (External A/V) for PIP
PIP
TV
AV1
AV2
3. Press the ……or ††button to select “Source”, then press the ENTER button.
.
Select the source of the sub picture (PIP) by pressing the ……or ††button,
then press the ENTER button.
➢
The sub picture can serve different source selections based on what the main picture is
set to.
Move Enter
Return
Changing the Size of the PIP Window
TV
PIP : On
Source : TV
Size :
Position :
Channel : 3
Move Enter
PIP
Return
Changing the Position of the PIP Window
TV
PIP : On
Source : TV
Size :
Position :
Channel : 3
Move Enter
PIP
Return
Press the SOURCE button on the remote control to select a signal from an external source
in PIP.
4. Press the ……or ††button to select “Size”, then press the ENTER button.
Press the ……or ††button to select the desired size of the PIP window, then press
the ENTER button.
➢
If main picture is in PC mode, Size is not available.
➢
You may notice that the picture in the PIP window becomes slightly unnatural when
you use the main picture to view a game or karaoke.
➢
Only in the HDMI mode is available the option Size.
5. Press the ……or ††button to select “Position”, then press the ENTER button.
Press the ……or ††button to select the desired PIP window position, then press the
ENTER button.
Press the POSITION button on the remote control to change the position of the PIP
screen.
Changing the PIP Channel
TV
PIP : On
Source : TV
Size :
Position :
Channel : Air 3
Move Enter
PIP
▲
3
▲
Return
6. Press the ……or ††button to select “Channel”, then press the ENTER button.
Press the ……or ††button at the bottom of the remote to select the desired channel
in the PIP window, then press the ENTER button.
➢
The channel can be active when the sub picture is set to TV.
Press the PIP CH and buttons on the remote control to change the PIP channel.
English-48
Page 49

About Anynet+
What is Anynet+? (PL-42Q91HP/50Q91HP)
Anynet+ is an AV network system that enables you to control all connected Samsung AV devices with your Samsung TV’s remote.
Connecting Anynet+ Devices
The Anynet+ system can be used only with Samsung AV devices that have the Anynet+ feature. To be sure your Samsung AV
device has this feature, check if there is an Anynet+ mark on it.
To dir
ectly connect to TV
TV
Anynet+ Device 1 Anynet+ Device 2
Connect the [HDMI 1] or
[HDMI 2] jack on the TV and
the HDMI OUT jack of the
corresponding Anynet+
device using the HDMI
cable.
HDMI Cable
HDMI Cable
To connect to Home Theater
1. Connect the [HDMI 1] or
TV
Anynet+ Device 1
2. Connect the HDMI IN
HDMI Cable
Home Theater
HDMI Cable
➢
Connect only one Home Theater.
➢
You can connect an Anynet+ device using the HDMI Cable. Some HDMI cables may not support Anynet+ functions.
➢
Anynet+ works when the AV device supporting Anynet+ is in the Standby or On status.
➢
Anynet+ supports up to 12 AV devices in total.
HDMI Cable
Anynet+ Device 2
[HDMI 2] jack on the TV
and the HDMI OUT jack
of the corresponding
Anynet+ device using
the HDMI cable.
jack of the home theater
and the HDMI OUT jack
of the corresponding
Anynet+ device using
the HDMI cable.
English-49
Page 50

Setting Up Anynet+
The following settings are to use Anynet+ functions.
To use the
TV Air 28
Anynet+ (HDMI-CEC) :
Auto Turn Off :
Searching Connections
Anynet+ Function, Anynet+ (HDMI-CEC) must be set to On
1. Press the Anynet+ button.
Recevier: On
Connect Recorder
Setup
Move
Enter
Exit
Anynet+ Setup
Off
On
Press the ……or ††button to select Setup, then press the ENTER button.
2. Press the ENTER button to select Anynet+ (HDMI-CEC), then press the
ENTER button.
3. Press the ……or ††button to select On, then press the ENTER button.
➢
➢
➢
Move Enter
Return
The Anynet+ (HDMI-CEC) function is enabled.
If you select Off, Anynet+ (HDMI-CEC) is disabled.
When the Anynet+ (HDMI-CEC) function is disabled, all the Anynet+ related
operations are deactivated.
Setting an Anynet+ Device to turn Of
Anynet+ Setup
Anynet+ (HDMI-CEC) : On
Auto Turn Off :
Searching Connections
Move Enter
Off
On
f Automatically when the TV is Turned Off
2. Press the ……or ††button to select Auto Turn Off, then press the ENTER
button.
3. Press the ……or ††button to select On, then press the ENTER button.
➢
The Auto turn off function is enabled.
➢
Return
If you select Off, the Auto turn off function is canceled.
Press the EXIT button to exit.
➢
The Select Device setting of the TV remote control is to be set to TV to use the Anynet+
function.
➢
If you set Auto Turn Off to On, connected external devices are also turned off when the
TV is turned off. However, if the device is recording, it may not be turned off.
Scanning and Switching between Anynet+ Devices
TV Air 28
Recevier: On
Connect Recorder
Setup
Move Enter
Anynet+ (HDMI-CEC) : On
Auto Turn Off : On
Searching Connections
Move Enter
Exit
Anynet+ Setup
Return
1. Press the Anynet+ button.
➢
Anynet+ devices connected with the TV are listed.
2. Press the ……or ††button to select to a particular device and press the ENTER
button. It is switched to the selected device.
3. If you cannot find a device you want, press the ……or ††button to select
Searching Connections, then press the ENTER button.
The meassage Configuring Anynet+ connection... is displayed. When
searching devices completes, the connected devices are listed in the
Anynet+ menu.
➢
Switching to the selected devices may take up to 2 minutes. You cannot cancel the
operation during the switching operation.
➢
The time required to scan for devices is determined by the number of connected
devices.
➢
When the device scan is complete, the number of found devices is not displayed.
➢
Although the TV automatically scans devices when it is turned on using the POWER
button, devices connected when the TV is already on are not displayed in the device list.
In this case, select the Searching Connections menu to search devices.
➢
If you have selected external AV device by pressing the SOURCE button, you cannot use
the Anynet+ function. Make sure to switch to an Anynet+ device by using the Anynet+
button.
English-50
Continued...
Page 51

Anynet+ Menu
The Anynet+ menu changes depending on the type and status of the Anynet+ devices connected to the TV.
Anynet+ Menu
View TV
Record
(Device_Name) Menu
(Device_Name) Operation
Connect (Device_Name)
Receiver
Setup
Switches from Anynet+ to TV broadcast mode.
Starts a recording. (This menu works only for a device supporting recording.)
Shows the menu of the connected device.
Example. When a DVD Recorder is connected, the DVD Recorder’s title menu appears.
Shows the play control menu of the connected device.
Example. When a DVD Recorder is connected, the play control menu of the DVD Recorder
appears.
Your TV connects to the corresponding device.
Sound is output through the receiver (home theater). A audio stream in HDMI is one way
only from Device to TV. But there’s SPDIF output in TV. So TV sound can be sent to HT.
You can set the Anynet+ (HDMI-CEC), auto turn off, and searching connections for using
Anynet+.
TV Remote Control Buttons Available in Anynet+ Mode
Device Type
Anynet+ Device
Device with built-in Tuner
After switching to the device, when the menu of the
corresponding device is displayed on the screen.
After switching to the device, while playing a file
After switching to the device, when you are watching
a TV program
Operating Status Available Buttons
Description
Numeric buttons
…/†/œ/√/ENTER buttons
Color buttons
EXIT button
œœ(Backward search)
√√(Forward search)
■(Stop)
√»(Play/Pause)
CH …/† button
Audio Device
➢
The Anynet+ function only works when the remote control is set to TV.
➢
The REC button works only while in the recordable state.
➢
You cannot control Anynet+ devices using the buttons on the side of the TV. You can control Anynet+ devices only using the TV remote
control.
➢
The TV remote control may not work under certain conditions. In this case, re-select the Anynet+ device.
➢
The Anynet+ functions don’t operate for the products from other manufacturers.
➢
The Anynet+ functions do not work withother manufacturers’ products.
➢
The œœ, √√operations may differ depending on the device.
When Receiver is activated
VOL +/- button
MUTE button
Recording
You can make a recording of a TV program using a recorder.
Press the REC button.
Recording begins. (Only when the Anynet+ enabled recording device is connected.)
➢
You can also record the source streams by selecting Record after pressing the Anynet+ button.
➢
The current TV program is recorded in the Watching TV status. If you are watching video from another device, the video from the
device is recorded.
➢
Before recording, check whether the antenna jack is properly connected to the recording device.
For the antenna connection to the recording device, refer to its user manual.
English-51
Page 52

Listening through a Receiver (Home theater)
You can listen to sound through a receiver instead of the TV speaker.
TV Air 28
Recevier: On
Connect Recorder
Setup
1. Press the Anynet+ button.
Press the ……or ††button to select Receiver, then press the ENTER button.
2. Press the œ or √ button to select to On, then press the ENTER button.
Now you can listen to sound through the receiver.
3. Press the EXIT button to exit.
➢
When the receiver is set to On, you can listen to the TV sound through the 2-channel(Stereo)
Move
Enter
Exit
Sound. This is not always true. When TV is displaying DTV(air) TV can send out 5.1 channel
sound through SPDIF. But when the source is DVD(for example), TV can receive only 2 channel
sound using HDMI. In that case, 2 channel sound is only transmitted to the Receiver through
SPDIF.
➢
If the receiver is exclusively for a home theater only (supporting audio only), it may not
appear in the device list.
➢
In case of a content with copyright problem, listening through the receiver may not
properly operate.
➢
When listening through the receiver, there are restrictions for using the PIP and audio-related
menu.
Check Points before Requesting Service
Symptom
Anynet+ does not work.
I want to start Anynet+.
I want to exit Anynet+.
The Connecting to Anynet+
device... message appears on the
screen.
The Anynet+ device does not play.
The connected device is not
displayed.
The TV program cannot be
recorded.
Solutiona
■
Check if the device is an Anynet+ device. The Anynet+ system supports Anynet+ devices
only.
■
Connect only one receiver (home theater).
■
Check if the Anynet+ device power cord is properly connected.
■
Check the Anynet+ device’s Video/Audio/HDMI Cable connections.
■
Check whether Anynet+ (HDMI-CEC) is set to On in the Anynet+ setup menu.
■
Check whether the TV remote control is in TV mode.
■
Check whether it is Anynet+ exclusive remote control.
■
Anynet+ doesn’t work at a certain condition. (Searching channels)
■
When connecting or removing the HDMI Cable, please make sure to search devices
again or restart your TV.
■
Check if the Anynet+ Function of Anynet+ device is set on.
■
Check if the Anynet+ device is properly connected to the TV and check if the Anynet+
(HDMI-CEC) is set to On in the Anynet+ Setup menu.
■
Press the TV button on the TV remote control to switch to TV. Then press the Anynet+
button to show the Anynet+ menu and select a menu you want.
■
Select View TV in Anynet+ menu.
■
Press the SOURCE button on the TV remote control and select a device other than
Anynet+ devices.
■
Press any of CH, CH LIST, PRE-CH, and such to change to the TV mode.
(Note that the channel button operates only when an Anynet+ device with a built-in tuner
is not connected.)
■
You cannot use the remote control when you are configuring Anynet+ or switching to a
view mode.
■
Use the remote control when the Anynet+ setting or switching to view mode is complete.
■
You cannot use the play function when Plug & Play is in progress.
■
Check whether or not the device supports Anynet+ functions.
■
Check whether or not the HDMI Cable is properly connected.
■
Check whether Anynet+ (HDMI-CEC) is set to On in the Anynet+ setup menu.
■
Search Anynet+ devices again.
■
You can connect an Anynet+ device using the HDMI Cable only. Some HDMI cables
may not support Anynet+ functions.
■
Check whether the antenna jack on the recording device is properly connected.
English-52
Page 53

Appendix
Identifying Problems
If the TV seems to have a problem, first try this list of possible problems and solutions.
If none of these troubleshooting tips apply, call your nearest Samsung service center.
Problem
Poor picture quality.
Poor sound quality.
No picture or sound.
No sound or sound is too low at
maximum volume.
Picture rolls vertically.
The TV operates erratically.
The TV won’t turn on.
Remote control malfunctions
The image is too light or too dark.
The image is too large or too small.
Screen is black and power indicator
light blinks steadily.
The visual qualities of digital
channels vary.
The damaged picture appears in
the corner of the screen.
Possible Solution
Try another channel.
Adjust the antenna.
Check all wire connections.
Try another channel.
Adjust the antenna.
Try another channel.
Press the SOURCE button.
Make sure the TV is plugged in.
Check the antenna connections.
Make sure the MUTE button is off.
First, check the volume of units connected to your TV (digital broadcasting receiver, DVD, cable
broadcasting receiver, VCR, etc.). Then, adjust the TV volume accordingly.
Check all connections.
Unplug the TV for 30 seconds, then try operating it again.
Make sure the wall outlet is working.
Replace the remote control batteries.
Clean the upper edge of the remote control (transmission window).
Check the battery terminals.
Press the TV button to put your remote in the “TV” mode.
Make sure the remote has batteries.
Check that the “+” and “-” ends of the batteries are inserted correctly.
Adjust the Brightness and Contrast.
Adjust the Fine tuning.
Adjust the Size settings.
On your computer check; Power and Signal Cable.
The TV is using its power management system.
Move the computer’s mouse or press any key on the keyboard.
On your equipment check (STB, DVD, etc) ; Power and Signal Cable.
The TV is using its power management system.
Press the Source button on the panel or remote control.
Turn the TV off and on.
The visual qualities of digital channels may vary depending on the original production method (analog or
digital).
• If the original production method is digital: High visual quality program.
• If the original production method is analog: The digital program displayed on the screen is originally an
analog program which has been converted to digital. The visual quality is an SD(Standard Definition)
grade.
If Just Scan is selected in some external devices, the damaged picture may appear in the corner of the
screen. This symptom is caused by external devices, not TV.
English-53
Page 54

Wall Mount Kit Specifications (VESA)
Install your wall mount on a solid wall perpendicular to the floor.
When attaching to other building materials, please contact your nearest dealer.
If installed on a ceiling or slanted wall, it may fall and result in severe personal injury.
Product Family
LCD-TV
PDP-TV
➢
We provided the standard dimensions for wall mount kits as shown in the table above.
➢
When purchasing our wall mount kit, a detailed installation manual and all parts necessary for assembly are provided.
➢
Do not use screws longer than the standard dimension, as they may cause damage to the inside of the TV set.
➢
For wall mounts that do not comply with the VESA standard screw specifications, the length of the screws may differ depending on their
specifications.
➢
Do not use screws that do not comply with the VESA standard screw specifications.
Do not use fasten the screws too strongly, this may damage the product or cause the product to fall, leading to personal injury.
Samsung is not liable for these kinds of accidents.
➢
Samsung is not liable for product damage or personal injury when a non-VESA or non-specified wall mount is used or the consumer fails
to follow the product installation instructions.
➢
Our 57” and 63” models do not comply with VESA Specifications. Therefore, you should use our dedicated wall mount kit for this model.
➢
Do not exceed 15 degrees tilt when mounting this TV.
Do not install your Wall Mount Kit while your TV is turned on.
It may result in personal injury due to electric shock.
inch VESA Spec. (A*B) QuantityStandard Screw
23 ~ 26
32 ~ 40
46 ~ 52
57
57 ~ 70
80 ~
42 ~ 50
55 ~ 70
63
80 ~
200 * 100
200 * 200
600 * 400
700 * 400
(No VESA)
800 * 400
1400 * 800
600 * 400
800 * 400
No VESA
1400 * 800
M4
M6
M8
M8
4
4
6
4
English-54
Page 55

How to assemble the Stand-Base (depending on the model)
Using the 6 screws for securing the stand base and the monitor, firmly
attach the monitor to the stand base.
(The exterior of the set may be different than the picture.)
Warning
Firmly secure the stand to the TV before
moving it, as the stand may fall and could
cause serious injury.
➢
Two or more people should carry the TV.
Never lay the TV on the floor because of
possible damage to the screen. Always
store the TV upright.
Specifications
Model Name
Screen Size (Diagonal)
PC Resolution
Sound (Output)
Dimension (WxHxD)
Body
With stand
Weight
Body
With stand
Environmental Considerations
Operating Temperature
Operating Humidity
Storage Temperature
Storage Humidity
PL-42C91HP/PL-42Q91HP
42 inch
1024 x 768 @ 60 Hz
AUDIO (L/R)
45.5 X 35.0 X 17.3 inches
(1155 X 888 X 440 mm)
41.5 X 30.5 X 13.4 inches
(1055 X 775 X 341 mm)
103.6 lbs (47 kg)
89.1 lbs (40.4 kg)
41.5 X 28.1 X 4.0 inches
(1055 X 713 X 102.5 mm)
41.5 X 29.9 X 13.4 inches
(1055 X 758.5 X 340 mm)
50 °F to 104 °F (10 °C to 40 °C)
10% to 80%, non-condensing
-4 °F to 113 °F (-20 °C to 45 °C)
5% to 95%, non-condensing
In case of installing your TV on the wall,
close the cover (Œ) on the stand-base
connection part using two screws for hiding.
PL-42C71HP
42 inch
1024 x 768 @ 60 Hz
AUDIO (L/R)
74.5 lbs (33.8 kg)
87.1 lbs (39.5 kg)
PL-50C91H/PL-50Q91HP
1360 x 768 @ 60 Hz
AUDIO (L/R)
53.3 X 39.3 X 18.1 inches
(1355 X 998 X 460 mm)
48.3 X 33.9 X 13.4 inches
(1227.1 X 861.3 X 341 mm)
129.0 lbs (58.5 kg)
109.6 lbs (49.7 kg)
50 inch
➢
This device is a Class B digital apparatus.
➢
Design and specifications are subject to change without prior notice.
➢
For the power supply and Power Consumption, refer to the label attached to the product.
English-55
Page 56

Page 57

PL-42C91HP
PL-42Q91HP
PL-50C91H
PL-50Q91HP
PL-42C71HP
DISPLAY DE PLASMA
Manual do
Usuário
Registe o seu produto e participe das nossas promoções no site:
www.samsung.com/global/register
Registre aqui o modelo e o número de série para consulta futura.
■
Modelo ________________ ■No de série ________________
Page 58

Informações importantes sobre a garantia com relação à visualização no formato da TV
Os monitores PDP formato wide screen (16:9, relação de largura x altura da tela) são projetados essencialmente para exibir
vídeo full motion (de movimento total) no formato wide screen.
As imagens exibidas na tela devem estar no formato wide screen 16:9, ou no formato expandido para preenchê-la, se o
modelo oferecer esse recurso e se as imagens estiverem em movimento constante.
A exibição de gráficos e imagens paradas na tela, como as barras pretas laterais nas programações e vídeos da TV em
formato padrão não expandido deve limitar-se a não mais que 5% do total de visualizações na TV por semana.
Além disso, a visualização de outras imagens e textos parados, como relatórios da bolsa de valores, displays de vídeo game,
logotipos de estação, web sites ou gráficos e padrões de computadores deve ser limitada em todos os aparelhos de TV,
conforme a descrição mencionada acima. A exibição de imagens paradas que ultrapasse as orientações acima pode
causar um desgaste irregular dos monitores de plasma e, conseqüentemente, problemas de imagens fantasmas
permanentes na tela.
Para evitar que isso ocorra, varie a programação e as imagens, exibindo filmes em tela cheia, e não imagens paradas
ou barras escuras.
Nos modelos de monitores que oferecem recursos de enquadramento de imagem, utilize esses controles para visualizar
formatos diferentes como uma imagem em tela cheia.
Esteja atento à seleção e duração de formatos de TV utilizados para visualização.
O desgaste irregular do monitor PDP como resultado da seleção e do uso de formatos, bem como as imagens fantasmas
permanentes, não são cobertos pela garantia limitada Samsung.
Português-2
Page 59

Instruções ao usuário
Retenção da imagem na tela
Não exiba uma imagem congelada (como em um vídeo game) no painel do display de plasma por mais de alguns
minutos, pois isso pode causar retenção da imagem na tela. Essa retenção de imagem também é conhecida como
"queima da tela". Para evitar essa retenção, consulte a página 25 deste manual para reduzir o nível de brilho e
contraste na tela, ao exibir uma imagem congelada.
Altitude
O monitor não funcionará normalmente em altitudes acima de 1981 m.
Calor sobre a TV PDP
O lado superior do produto pode ficar quente após longos períodos de uso, pois o calor se dissipa do painel através
do orifício de ventilação na parte superior do produto.
Isto é normal e não indica defeito ou falha no funcionamento do produto.
No entanto, as crianças devem ser instruídas a não tocar a parte superior do produto.
O produto emite "estalos".
Um "estalos" pode ocorrer quando o produto contrai ou expande devido a uma mudança no ambiente circunjacente,
como na temperatura ou umidade. Isso é normal e não representa defeito do aparelho.
Defeitos na célula
O monitor utiliza um painel que consiste em 1.230.000 (nível SD) a 3.150.000 (nível HD) pixels, que requer uma
tecnologia sofisticada em sua produção. No entanto, pode haver alguns pixels mais claros ou escuros na tela.
Esses pixels não causam impacto na performance do produto.
Evite operar a TV em temperaturas abaixo de 5°C
Uma imagem congelada, quando exibida por muito tempo, pode causar danos permanentes no Painel PDP.
Assistir à TV PDP no formato 4:3 por muito tempo pode deixar indícios nas margens
exibidas à esquerda, direita ou centro da tela; isso é causado pela diferença de emissão
de luz na tela.
A reprodução de um DVD ou o uso de um console de jogo pode causar um efeito
semelhante na tela. Os danos causados pelo efeito acima mencionado não são cobertos
pela Garantia.
Imagem persistente na tela.
A exibição de imagens congeladas de vídeo games e PCs por um certo período pode produzir imagens persistentes
parciais.
Para impedir esse efeito, reduza o "brilho" e o "contraste" ao exibir imagens congeladas por um longo período.
Garantia
A garantia não cobre defeitos causados por retenção de imagens.
A queima de tela não está coberta pela garantia.
Português-3
Page 60

Conteúdo
INFORMAÇÕES GERAIS
Lista de recursos ................................................................ 5
Acessórios .......................................................................... 5
Visualizando o Painel de Controle ..................................... 6
Visualizando o Painel de Conexão..................................... 7
Controle remoto.................................................................. 8
Colocando pilhas no controle remoto................................. 9
CONEXÕES
Conectando antenas VHF e UHF....................................... 9
Conectando uma TV a cabo............................................... 10
Conectando um VCR.......................................................... 11
Conectando um VCR S-VHS.............................................. 11
Conectando uma filmadora ................................................ 12
Conectando um DVD player/decodificador Set-Top........... 12
Conectando um DVD player/decodificador Set-Top via DVI
............................................................................................ 12
Conectando um DVD player/decodificador Set-Top via HDMI
............................................................................................ 13
Conectando um amplificador/DVD Home Theater ............. 13
Conectando um PC ............................................................ 14
OPERAÇÃO
Ligando e desligando a TV ................................................ 15
Recurso Plug & Play........................................................... 15
Mudando os canais ............................................................ 16
Ajustando o volume ............................................................ 17
Visualizando o display ........................................................ 17
Visualizando os menus....................................................... 17
Memorizando os canais...................................................... 18
Configurando o Controle remoto ........................................ 19
Para selecionar a fonte....................................................... 24
Para editar o nome da fonte de entrada ............................ 24
CONTROLE DE CANAL
Adicionando/bloqueando canais .................................... 33
Sintonia fina dos canais analógicos............................... 34
Ajustando o sistema de cores........................................ 34
DISPLAY DO COMPUTADOR
Utilizando sua TV como display do computador (PC)... 35
Modos de visualização................................................... 35
Configurando a TV com o seu PC................................. 36
Definição do PC+home theater...................................... 37
AJUSTE DA HORA
Ajustando o relógio ........................................................ 38
Ajustando o Sleep Timer................................................ 39
Ajustando o timer para On/Off....................................... 40
DESCRIÇÃO DAS FUNÇÕES
Selecionando um idioma do menu ................................ 41
Visualizando Closed Captions ....................................... 41
Utilizando o modo Jogo ................................................. 42
Definindo o modo de tela azul ....................................... 43
Ajustando a função Ligar/desligar melodia.................... 43
Configurando o Light Effect (efeito luminoso)................ 43
Usando o recurso Economia de energia ....................... 44
Evitando queima de tela ................................................ 44
Reduzindo os efeitos de queima de tela ....................... 45
Ajustando o Nível de Preto HDMI.................................. 45
Configuração do sistema de cores AV........................... 46
Ajuste de parede (vendido separadamente).................. 46
Visualizando o PIP (Picture-in-Picture).......................... 47
CONTROLE DE IMAGEM
Utilizando as definições automáticas de imagem.......... 25
Definição de configurações detalhadas da imagem...... 26
Alterando o tamanho da tela.......................................... 27
Redução do ruído digital................................................ 28
Cor ativa (Active Color).................................................. 28
DNIe (Digital Natural Image engine).............................. 29
Congelando a imagem atual.......................................... 29
CONTROLE DE SOM
Utilizando as definições automáticas de som................ 30
Personalizando o som ................................................... 30
Ajustando o modo TruSurround XT............................... 31
Selecionando uma trilha de som multicanal (MTS)....... 31
Controle automático de volume ..................................... 32
Selecionando o recurso Mudo Interno........................... 32
Como ouvir o som da sub-tela (PIP) ............................. 32
símbolo pressione importante nota tecla de 1
➢
toque
SOBRE O ANYNET+ (PL-42Q91HP/50Q91HP)
APÊNDICE
Português-4
O que é Anynet+?.......................................................... 49
Conectar dispositivos Anynet+....................................... 49
Configurar o Anynet+..................................................... 50
Procurar e mudar entre dispositivos Anynet+................ 50
A gravação ..................................................................... 51
Ouvindo por meio de um receiver (Home theater) ........ 52
Antes de solicitar auxílio técnico, verifique os
seguintes itens ............................................................... 52
Identificando problemas................................................. 53
Especificações do kit de montagem na parede (VESA)
Como montar a base (dependendo de cada modelo)
Especificações ............................................................... 55
.. 54
....... 55
Page 61

Informações gerais
Lista de recursos
Definições de imagem reguláveis que podem ser armazenadas na memória da TV.
Timer automático para ligar e desligar a TV.
Sleep Timer especial.
Controle remoto
O controle remoto fornecido pode ser usado para operar a TV e também a maioria dos DVD players, decodificadores Set-top,
decodificadores de cabo e VCRs.
Qualidade de imagem excelente
-
Imagens nítidas e reais são proporcionadas pela tecnologia DNIe.
SRS TruSurround XT
-
A tecnologia SRS TruSurround XT oferece um sistema virtual Dolby surround.
Anynet+ (somente nos modelos PL-42Q91HP/50Q91HP)
-
O sistema de rede de AV (Anynet) permite controlar facilmente os dispositivos de áudio-vídeo (AV) desta TV.
Acessórios
Ve rifique se os itens a seguir foram incluídos com a TV.
Se algum item estiver faltando, entre em contato com o representante.
Controle remoto/
pilhas AAA
Tecido de Limpeza Núcleo de ferrite para
As peças a seguir são vendidas separadamente e estão disponíveis na maioria das lojas de eletrônicos.
Cabo S-Video Cabo HDMI Cabo HDMI/DVI Cabo de vídeo
➢
Núcleo de ferrite (cabo de alimentação, cabo de áudio/vídeo, cabo de S-Video,
fone de ouvido)
Os núcleos de ferrite são usados para proteger os cabos de interferência
Ao conectar um cabo, abra o núcleo de ferrite e prenda-o ao redor do cabo próximo
ao plugue.
Tampa-fundo / parafusos (2ea)
(PL-42C91HP/42Q91HP/
50C91H/50Q91HP,
Consulte a pág. 55)
Cabo de força
Núcleo de ferrite para cabo
de alimentação
(3301-001110)
Cabo para PC
Manual do Usuário Certificado de garantia/
Núcleo de ferrite para
lado AV / S-Video
(3301-001305)
Cabo de áudio de computador
Certificado de registro/
Guia de segurança
(Não está disponível em todos os locais)
fone de ouvido
(3301-001456)
Cabo de antenaCabos de componentesCabos de áudio
Português-5
Page 62

Visualizando o Painel de Controle
Botões na parte inferior
Os botões do painel inferior direito controlam os recursos básicos da TV, inclusive o menu na tela.
Para utilizar os recursos mais avançados, utilize o controle remoto. A cor e o formato do produto podem variar, dependendo do modelo.
PL-42C91HP/42Q91HP/
50C91H/50Q91HP
PL-42C71HP
direita do painel
Œ
SOURCE
Alterna entre todas as fontes de vídeo disponíveis (TV,
AV1, AV2, S-Video, Component1, Component2, PC,
HDMI).
➢
Nos modelos PL-42Q91HP/50Q91HP, a Lista de Entrada
exibe HDMI1 e HDMI2 em vez de HDMI.
´
MENU
Pressione para ver o menu na tela de recursos da sua
TV.
ˇ + VOL –
Pressione para aumentar ou diminuir o volume.
No menu na tela, use os botões
forma que os botões œœe √√no controle remoto.
¨ CH
Pressione para mudar os canais.
No menu na tela, use os botões
forma que os botões ……e††no controle remoto.
+ VOL –
CH
da mesma
da mesma
ˆ
Ø
∏
Português-6
(ENTER)
Pressione para confirmar uma seleção.
POWER
Pressione para ligar e desligar a TV.
Indicador de energia
Pisca e apaga com a energia ligada e acende em
modo standby.
Sensor do controle remoto
Aponte o controle remoto para este ponto na TV.
Alto-falantes
Page 63

Visualizando o Painel de Conexão
Tomadas do painel traseiro
Utilize as tomadas do painel traseiro para conectar os componentes A/V que serão conectados continuamente, como VCR ou DVD players. Para obter mais
informações sobre a conexão dos equipamentos, consulte as páginas 9-14. A cor e o formato do produto podem variar dependendo do modelo.
Œ
PL-42C91HP/50C91H/42C71HP
PL-42Q91HP/50Q91HP
POWER IN
Conecte o cabo de força fornecido.
´
AUDIO-R/L (AV IN 1)
Entradas de áudio para dispositivos externos,
como uma camcorder ou um VCR.
ˇ
VIDEO (AV IN 1)
Entrada de vídeo para dispositivos externos,
como uma camcorder ou um VCR.
¨
AUDIO OUT (AUDIO-R/L)
Saídas de áudio para dispositivos externos.
ˆ
DVI IN (AUDIO-R/L)
Conecte à tomada de saída de áudio DVI
de um dispositivo externo.
➢
Nos modelos PL-42Q91HP/50Q91HP,
somente o conector de entrada HDMI IN 2 é
compatível com DVI.
Ø
HDMI/DVI IN
Conecte à tomada HDMI de um dispositivo
com saída HDMI. Essa entrada também pode
ser usada como uma conexão DVI com
entradas de áudio analógicas separadas. (Nos
modelos PL-42Q91HP/50Q91HP, somente o
conector de entrada HDMI IN 2 é compatível
com DVI.) Será necessário um cabo HDMI/DVI
opcional para fazer essa conexão. Ao usar o
adaptador HDMI/DVI opcional, as entradas de
áudio analógicas DVI da TV permitem receber
o audio esquerdo e direito do dispositivo DVI.
(Não compatível com PC)
∏
ANT IN
Conector coaxial de 75Ω para Rede de
cabos/antenas.
”
COMPONENT IN 1, 2
Entradas de componente de vídeo
(Y/PB/PR) e áudio (R-AUDIO-L).
’
SERVICE
Essas tomadas destinam-se apenas às
finalidades de serviço.
˝
PC AUDIO IN
Conecte à tomada de saída de áudio do PC.
Ô
PC IN
Conecte à tomada de saída de vídeo do PC.
T
omadas do painel lateral
Utilize as tomadas do painel direito para conectar um componente utilizado apenas ocasionalmente, como uma camcorder ou um
videogame (consulte a página 12). A cor e o formato do produto podem variar, dependendo do modelo.
Œ
S-VIDEO IN
Entrada de S-Video para dispositivos externos com uma saída S-Video.
´
AV IN 2
Entradas de vídeo e áudio para dispositivos externos.
ˇ
FONE DE OUVIDO
Você pode conectar fones de ouvido se desejar assistir a um programa de televisão sem
perturbar outras pessoas na sala.
Português-7
Page 64

Controle remoto
Utilize o controle remoto até aproximadamente 7 metros de distância da TV. Ao utilizar o controle remoto, aponte-o sempre na direção
da TV. Você também pode utilizar o controle remoto para operar o VCR, o decodificador, o DVD player ou o decodificador Set-Top.
ΠPOWER
Liga e desliga a TV.
´ BOTÕES NUMÉRICOS
Pressione para selecionar um canal
diretamente.
ˇ
-
/
--
Use para selecionar um canal acima de
100. Por exemplo, para o canal 122,
pressione “-”, depois “2”, e a seguir “2”.
¨ CH LIST
Usado para exibir as Listas de canais
na tela.
ˆ TV
Seleciona diretamente o modo TV.
Ø Funções VCR/DVD
- Retrocesso
- Parar
- Reprodução/Pausa
- Avanço rápido
VOL +, VOL –
∏
Pressione para aumentar ou diminuir o
volume.
” MUTE
Pressione para interromper
temporariamente o som.
’ MENU
Exibe o menu principal na tela.
˝ S.MODE
Pressione para selecionar o modo de som.
Ô RETURN
Volta ao menu anterior.
P. MODE
Pressione para selecionar o modo de
imagem.
Ò PIP
Ativação/desativação do Picture-inPicture (PIP).
Ú DNIe (Digital Natural Image engine)
Ativa o modo DNIe Demo.
Æ MTS
Pressione para selecionar estéreo,
mono ou programa de áudio separado
(transmissão SAP).
ı SRS
Seleciona o modo SRS TruSurround XT.
˜ SET
Ajusta o controle remoto do seu
aparelho de TV, VCR, Cabo, DVD ou
decodificador Set-Top.
¯ TV / DVD / STB / CABLE / VCR
Pressione para operar o seu aparelho de TV,
DVD, STB, CABO (decodificador) ou VCR.
˘
Pressione para ativar a Luz de fundo
de VOL, CH e do botão de origem ativo
(TV, DVD,CABO, STB, VCR) no
controle remoto.
¿ SOURCE
Pressione para exibir todas as fontes
de vídeo disponíveis.
¸ PRE-CH
Sintoniza o canal anterior.
˛ SLEEP
Pressione para selecionar um intervalo
de tempo predefinido para
desligamento automático.
◊
HDMI
(somente modelos PL-42C91HP/
50C91H/42C71HP)
Seleciona o modo HDMI diretamente.
REC
(somente modelos PL-42Q91HP/
50Q91HP)
Use para fazer uma gravação.
± CH
Pressione para mudar os canais.
≠ EXIT
Pressione para sair do menu.
– ACIMA / ABAIXO / A ESQUERDA /
A DIREITA / ENTER
Use para selecionar itens de menu na
tela e alterar valores no menu.
— INFO
Pressione para exibir informações na
tela da TV.
÷ CAPTION
50C91H/42C71HP)
Controla o decodificador caption.
Anynet+
50Q91HP)
Executa funções de visualização Anynet+
e configura dispositivos Anynet+.
® STILL
Pressione para interromper a ação
durante uma cena particular.
Pressione novamente para retomar o
vídeo normal.
∑ P.SIZE
Pressione para alterar o tamanho da tela.
µ SOURCE
Pressione para selecionar um sinal de
uma fonte externa em PIP.
¥ CH , CH
Exibe os canais disponíveis em
seqüência. (Estes botões mudam os
canais somente na janela PIP).
≥ POSITION
Altera a posição da janela PIP.
≤ RESET
Quando o seu remoto não funciona, troque
as pilhas e pressione o botão RESET
durante 2 ou 3 segundos antes do uso.
(somente modelos PL-42C91HP/
(somente modelos PL-42Q91HP/
➢ Este é um controle remoto especial para deficientes visuais e possui pontos em braile nos
botões POWER, Channel, Volume, STOP e PLAY/PAUSE.
➢ O funcionamento do controle remoto pode ser alterado por luz clara.
➢
A ilustração do controle remoto mostrado neste manual foi criada com base no modelo PL-42C91HP.
Português-8
Page 65

Colocando pilhas no controle remoto
1. Levante a tampa localizada na parte traseira do controle remoto, conforme mostrado na figura.
2. Coloque duas pilhas de tamanho AAA.
➢
Combine os pólos “+” e “–” das pilhas de acordo com o diagrama mostrado no interior do compartimento.
➢
Não misture os tipos de bateria, ou seja, alcalinas e de manganês.
3. Recoloque a tampa do compartimento das pilhas.
➢
Remova as pilhas e guarde-as em um local fresco e seco, se não for utilizar o controle remoto por um longo
período.
O controle remoto pode ser utilizado até aproximadamente 7 metros de distância da TV.
(Considerando a utilização normal da TV, as pilhas durarão cerca de um ano.)
➢
Se o controle remoto não funcionar, verifique o seguinte:
1. A TV está ligada?
2. Os pólos mais e menos das pilhas estão invertidos?
3. As pilhas estão esgotadas?
4. Há falta de energia ou o cabo de energia está fora da tomada?
5. As pilhas estão perto de alguma lâmpada fluorescente ou de um sinal de neônio especial?
Conexões
Conectando antenas VHF e UHF
Se a antena tiver um conjunto de cabos condutores similar a este, consulte “Antenas com cabo
condutor duplo horizontal de 300 Ω”, a seguir.
Se a antena tiver um cabo condutor semelhante a este, consulte “Antenas com cabo condutor
redondo de 75 Ω”.
Se você tiver duas antenas, consulte “Antenas VHF e UHF separadas”.
Antenas com cabo condutor duplo horizontal de 300 Ω
Se você estiver utilizando uma antena externa (por exemplo, uma antena de telhado ou uma “antena em V”) que tenha um cabo
condutor duplo horizontal de 300 Ω, siga as instruções a seguir.
1. Coloque os fios do cabo condutor duplo sob os parafusos em um adaptador de
300-75 Ω (não fornecido).
Utilize uma chave de fenda para apertar os parafusos.
2. Conecte o adaptador ao terminal ANT IN na parte traseira da TV.
Antenas com cabo condutor redondo de 75 Ω
1. Conecte o cabo da antena ao terminal ANT IN na parte traseira da TV.
Antenas
VHF e UHF separadas
Se você tiver duas antenas separadas para sua TV (uma VHF e outra UHF), combine os dois sinais de antena antes de conectar as
antenas à TV. Este procedimento exige um adaptador/combinador opcional (disponível na maioria das lojas de produtos eletrônicos).
1. Conecte os dois cabos da antena ao combinador.
UHF
VHF
2. Conecte o combinador ao terminal ANT IN na parte inferior da parte traseira.
UHF
VHF
Português-9
Page 66

Conectando uma TV a cabo
Para conectar o sistema de TV a cabo, siga as instruções a seguir.
Cabo sem decodificador
1. Conecte o cabo de entrada ao terminal ANT IN na parte traseira da TV.
Não é necessário um decodificador para visualizar os canais a cabo decodificados.
➢
Conectando um decodificador que decodifica todos os canais
1. Localize o cabo conectado ao terminal ANT OUT no decodificador.
Esse terminal pode ser identificado como “ANT OUT”, “VHF OUT” ou, simplesmente, “OUT”.
ANT IN
ANT OUT
➢
2. Conecte a outra extremidade do cabo ao terminal da ANT IN na parte traseira da TV.
Conectando um decodificador
para decodificar alguns canais
Se o decodificador decodificar somente alguns canais (como os canais premium), siga as instruções a seguir. Você precisará de um divisor
de duas vias, de um interruptor RF (A/B) e quatro comprimentos de cabo de antena. (Esses itens podem ser adquiridos na maioria das lojas
de eletrônicos.)
1. Localize e desconecte o cabo conectado ao
ANT IN
terminal ANT IN no decodificador.
Esse terminal pode ser identificado como
➢
“ANT IN”, “VHF IN” ou, simplesmente, “IN”.
2. Conecte o cabo ao divisor de duas vias.
Cabo de
entrada
Divisor
3. Conecte um cabo de antena entre o
terminal OUTPUT no divisor e o terminal
Cabo de
entrada
Divisor
Decodificador
IN no decodificador.
4. Conecte um cabo de antena entre o
terminal ANT OUT no decodificador e o
Cabo de
entrada
Divisor
Decodificador
RF (A/B)
Interruptor
terminal B–IN no interruptor RF (A/B).
5. Conecte outro cabo entre o terminal OUT
no divisor e o terminal A–IN no interruptor
Cabo de entrada
Cabo de
entrada
Divisor
Divisor
Decodificador
Decodificador
RF (A/B)
Switch
RF (A/B)
Interruptor
Parte traseira
da TV
Após essa conexão, ajuste o interruptor A/B na posição “A” para a visualização normal. Coloque o interruptor A/B na posição “B” para visualizar os
canais codificados. (Ao ajustar o interruptor A/B em “B”, você precisará sintonizar a TV com o canal de saída do decodificador, que normalmente é o
canal 3 ou 4.)
RF (A/B).
6. Conecte o último cabo de antena entre o
terminal OUT no interruptor RF (A/B) e o
terminal ANT IN na parte traseira da TV.
Português-10
Page 67

Conectando um VCR
Estas instruções presumem que você já tenha conectado a TV a uma antena ou a um sistema de TV a cabo (conforme as instruções nas
páginas 9-10). Ignore a etapa 1 se você ainda não tiver feito a conexão à antena ou ao sistema a cabo.
1. Desconecte o cabo ou a
antena da parte traseira da
TV.
2. Conecte o cabo ou a antena
ao terminal ANT IN na parte
traseira do VCR.
Painel traseiro da TV
VCR
5
2
➢
Cada VCR possui uma configuração diferente do painel posterior.
➢
Ao conectar um VCR, use um terminal de conexão com a mesma cor do cabo.
➢
A ilustração de como ligar os conectores na parte posterior, mostrada neste manual, foi criada com
base no modelo PL-42C91HP. Mesmo que a configuração do conector seja diferente da do seu
modelo, o método de conexão é o mesmo do apresentado na ilustração.
Cabo de áudio (não fornecido)
4
Cabo de vídeo (não fornecido)
3
Cabo de antena (não fornecido)
3. Conecte um cabo de antena
entre o terminal ANT OUT no
VCR e o terminal ANT IN na
TV.
4. Conecte um cabo de vídeo
entre a tomada VIDEO OUT
no VCR e a tomada AV IN 1
[VIDEO] na TV.
5. Conecte os cabos de áudio
entre as tomadas AUDIO
OUT no VCR e as tomadas
AV IN 1 [R-AUDIO-L] na TV.
➢
Se você tiver um VCR
"mono" (não estéreo), use
um conector Y (não
fornecido) para conectá-lo
às tomadas de entrada de
áudio direita e esquerda da
TV. Se seu VCR for estéreo,
conecte dois cabos.
Conectando um VCR S-VHS
A sua TV Samsung pode ser conectada ao sinal S-Video a partir de um VCR S-VHS.
(Esse tipo de conexão proporciona uma imagem melhor se comparada ao VCR VHS padrão.)
Painel traseiro da TVPainel lateral da TV
VCR
3
Cabo de áudio (não fornecido)
Cabo S-Video (não fornecido)
2
1
Cabo de antena (não fornecido)
O cabo S-Video normalmente é incluído com o VCR S-VHS. (Se ele não estiver incluído, tente
adquirí-lo em alguma loja local de eletrônicos.)
➢
Cada VCR S-VHS possui uma configuração diferente do painel posterior.
➢
Ao conectar um VCR S-VHS, use um terminal de conexão com a mesma cor do cabo.
➢
Alguns jogos podem ser exibidos com uma imagem cortada quando a TV está conectada ao aparelho
de game.
➢
A ilustração de como ligar os conectores na parte posterior, mostrada neste manual, foi criada com
base no modelo PL-42C91HP. Mesmo que a configuração do conector seja diferente da do seu
modelo, o método de conexão é o mesmo do apresentado na ilustração.
1. Para iniciar, siga as etapas
1–3 na seção anterior para
conectar a antena ou o
cabo ao VCR e à TV.
2. Conecte um cabo S-Video
entre a tomada S-VIDEO
OUT no VCR e a tomada
AV IN 2 [S-VIDEO] na TV.
3. Conecte os cabos de áudio
entre as tomadas AUDIO
OUT no VCR e as tomadas
AV IN 2 [R-AUDIO-L] na TV.
Português-11
Page 68

Conectando uma filmadora
As tomadas do painel lateral na TV facilitam a conexão de uma camcorder com a sua TV.
Elas permitem que você visualize as fitas da camcorder sem utilizar um VCR.
Painel lateral da TV
1
Cabo S-Video (não fornecido)
ou
Cabo de vídeo (não fornecido)
filmadora
➢
Cada vídeo câmera possui uma configuração diferente do painel posterior.
➢
Ao conectar uma videocâmera, use um terminal de conexão com a mesma cor do cabo.
1
2
Cabo de áudio (não fornecido)
1. Conecte um cabo de vídeo
2. Conecte os cabos de áudio
Conectando um DVD player/decodificador Set-Top
As tomadas do painel traseiro na TV facilitam a conexão do DVD player/decodificador Set-Top com a sua TV.
DVD player/decodificador
Set-Top
2
Cabo de áudio (não fornecido)
Cabo de componente (não fornecido)
1
➢
O Component Video separa o vídeo em Y (luminância (brilho)), PB(azul) e PR(vermelho) para
obter uma qualidade de vídeo superior.
Verifique se as conexões de Component Video e áudio são iguais.
Por exemplo, se conectar o cabo de vídeo em COMPONENT IN, conecte o cabo de áudio também
em COMPONENT IN.
➢
Cada DVD player/decodificador Set-Top possui uma configuração diferente do painel posterior.
➢
Ao conectar um DVD player/decodificador Set-Top, use um terminal de conexão com a mesma cor do cabo.
➢
A ilustração de como ligar os conectores na parte posterior, mostrada neste manual, foi criada com
base no modelo PL-42C91HP. Mesmo que a configuração do conector seja diferente da do seu modelo,
o método de conexão é o mesmo do apresentado na ilustração.
Painel traseiro da TV
1. Conecte um Cabo
2. Conecte os cabos de áudio
(ou cabo S-Video) entre a
tomada AV IN 2 [VIDEO]
(ou S-VIDEO) na TV e a
tomada VIDEO OUT na
camcorder.
entre as tomadas AV IN 2
[R-AUDIO-L] na TV e as
tomadas AUDIO OUT na
camcorder.
componente entre os
conectores de entrada
COMPONENT IN 1 [Y, P
B,
PR] (ou COMPONENT IN 2
[Y, PB, PR]) na TV e os
conectores de saída
COMPONENT OUT [Y, PB,
PR] no tocador de
DVD/decodificador Set-Top.
entre as tomadas
COMPONENT IN 1
[R-AUDIO-L] (ou
COMPONENT IN 2
[R-AUDIO-L]) na TV e as
tomadas AUDIO OUT no
DVD player/decodificador
Set-Top.
Conectando um DVD player/decodificador Set-Top via DVI
Esta conexão pode ser efetuada apenas se houver uma tomada de Saída de DVI no dispositivo externo.
Painel traseiro da TV (PL-42Q91HP/50Q91HP)
DVD player/decodificador Set-Top
Cabo DVI para HDMI (não fornecido)
1
2
Cabo de áudio (não fornecido)
➢
Cada DVD player/decodificador Set-Top possui uma configuração diferente do painel posterior.
➢
Ao conectar um DVD player/decodificador Set-Top, use um terminal de conexão com a mesma cor do cabo.
➢
Nos modelos PL-42Q91HP/50Q91HP, somente o conector de entrada HDMI IN 2 é compatível com DVI.
Painel traseiro da TV (PL-42C91HP/50C91H/42C71HP)
2
Cabo de áudio (não fornecido)
Cabo DVI para HDMI (não fornecido)
1
Português-12
1. Conecte um cabo DVI a
2. Conecte os cabos de áudio
HDMI ou adaptador DVIHDMI entre o conector de
entrada HDMI/DVI IN (ou
HDMI IN 2) na TV e o
conector de saída DVI OUT
no tocador de
DVD/decodificador Set-Top.
entre a tomada DVI IN
[R-AUDIO-L] na TV e as
tomadas AUDIO OUT no
DVD player/decodificador
Set Top.
Page 69

Conectando um DVD player/decodificador Set-Top via HDMI
Esta conexão pode ser efetuada apenas se houver uma tomada de Saída de HDMI no dispositivo externo.
Painel traseiro da TV (PL-42Q91HP/50Q91HP)
DVD player/decodificador Set-Top
Painel traseiro da TV (PL-42C91HP/50C91H/42C71HP)
1.
Conecte um cabo HDMI entre
o conector de entrada
HDMI/DVI IN (ou HDMI IN 1,
2) na TV e o de saída HDMI
OUT no tocador de
DVD/decodificador Set-Top.
1
Cabo HDMI (não fornecido)
1
Cabo HDMI (não fornecido)
O que é HDMI?
• HDMI ou interface multimídia de alta definição é uma interface de próxima geração que
habilita a transmissão digital de sinais de vídeo e de áudio com apenas um cabo sem
compressão.
• "Interface multimídia" é um nome mais preciso para HDMI, principalmente porque
permite contato com vários canais de áudio digitais (canais 5.1).
A diferença entre HDMI e DVI é que o dispositivo HDMI é menor, tem o recurso de
codificação HDCP (High Bandwidth Digital Copy Protection - Proteção de Conteúdo
Digital de Alta Largura de Banda) instalado e é compatível com áudio digital multicanal.
➢
Cada DVD player/decodificador Set-Top possui uma configuração diferente do painel posterior.
➢
Ao conectar um DVD player/decodificador Set-Top, use um terminal de conexão com a mesma cor do
cabo.
➢
Ao conectar via HDMI, não é necessário conectar os cabos de áudio. Os cabos de áudio devem ser
conectados apenas na conexão via HDMI/DVI.
➢
Se não houver sinal de vídeo, desligue seu DVD player/decodificador Set-Top e ligue-o novamente.
Conectando um amplificador/DVD Home Theater
Amplificador/DVD
Home Theater
1
Cabo de áudio (não fornecido)
Painel traseiro da TV
1. Conecte os cabos de áudio
entre AUDIO OUT
[R-AUDIO-L] na TV e
AUDIO IN no
amplificador/DVD Home
Theater.
Quando um amplificador de
áudio estiver conectado aos
terminais “AUDIO OUT
[R-AUDIO-L]": Diminua o
ganho (volume) da TV e
ajuste o nível do volume
com o controle de volume
do amplificador.
➢
Cada amplificador/DVD Home Theater possui uma configuração diferente do painel posterior.
➢
Ao conectar um amplificador/DVD Home Theater, use um terminal de conexão com a mesma cor do cabo.
➢
A ilustração de como ligar os conectores na parte posterior, mostrada neste manual, foi criada com
base no modelo PL-42C91HP. Mesmo que a configuração do conector seja diferente da configuração
do seu modelo, o método de conexão é o mesmo do apresentado na ilustração.
Português-13
Page 70

Conectando um PC
Painel traseiro da TV
PC
2
Cabo de áudio de PC (não fornecido)
1
Cabo D-Sub (não fornecido)
➢
Cada PC possui uma configuração diferente do painel posterior.
➢
Ao conectar um PC, use um terminal de conexão com a mesma cor do cabo.
➢
As tomadas HDMI/DVI não são compatíveis com a conexão ao PC.
➢
A ilustração de como ligar os conectores na parte posterior, mostrada neste manual, foi criada
com base no modelo PL-42C91HP. Mesmo que a configuração do conector seja diferente da
configuração do seu modelo, o método de conexão é o mesmo do apresentado na ilustração.
1. Conecte um cabo D-Sub
entre a tomada PC IN [PC]
na TV e a tomada de saída
PC no seu computador.
2. Conecte um cabo de áudio
PC entre a tomada PC-IN
[AUDIO] na TV e a Audio
Out da placa de som no seu
computador.
Português-14
Page 71

Operação
Ligando e desligando a TV
Pressione o botão POWER no controle remoto.
Você também pode utilizar o botão POWER na TV.
➢
A inicialização de sua TV pode demorar um pouco.
Recurso Plug & Play
Quando a TV é ligada, quatro definições básicas são automaticamente realizadas e na seguinte seqüência:
Plug & Play
Start Plug & Play
OK
Entrar
Plug & Play
Idioma
Selecione Modo
Home ao instalar esta TV em casa.
Loja
Mover
Verif. entrada de antena
Ar/Cabo
Mover
Prog. Auto
Ajuste Relógio
Mês Data Ano Hora Minuto am/pm
01 01 2007 12 : 00 am
English
Français
Español
Português
Entrar IgnorarMover
Plug & Play
Entrar Ignorar
Plug & Play
OK
Entrar Ignorar
Plug & Play
Entrar Ignorar
Plug & Play
Iniciar
Entrar
Plug & Play
Exit
Casa
Ar
STD
HRC
IRC
Ar 3
Ignorar
1. Pressione o botão POWER no controle remoto.
A mensagem “Start Plug & Play” é exibida.
Pressione o botão ENTER para selecionar “OK”. É exibido o menu de Idioma.
➢
O menu Idioma aparecerá automaticamente após alguns segundos, mesmo quando o
botão ENTER não for pressionado.
2. Selecione o idioma desejado, pressionando o botão ……ou ††.
Pressione o botão ENTER para confirmar sua escolha e então o menu "Selecione
Modo Home ao instalar esta TV em casa" (Select Home Mode when installing this
TV at home) é exibido automaticamente.
3. Pressione o botão œ ou √ para selecionar “Loja” (Shop) ou “Casa” (Home) e, em
seguida, pressione o botão ENTER.
O menu “Select the language of the OSD” (Selecione o idioma do OSD) é exibido
automaticamente.
É exibida a mensagem “Verificar entrada da antena” (Check antenna input).
➢
O padrão é “Casa” (Home).
➢
Recomendamos configurar a TV no modo Casa para obter a melhor imagem no seu
ambiente domiciliar.
➢
O modo Loja deve ser usado apenas em ambientes comerciais.
➢
Se a unidade tiver sido ajustada em modo Loja acidentalmente, e você deseja voltar para
o modo Dinâmico (Home), pressione o botão de volume e, depois, segure pressionado o
botão MENU no painel da TV por cinco segundos.
➢
A mensagem Verificar entrada da antena aparecerá automaticamente após alguns
segundos, mesmo quando o botão ENTER não for pressionado.
4. Pressione o botão ENTER para selecionar OK.
É exibido o menu para seleção da fonte do sinal.
5. Selecione a fonte correta do sinal (Ar, STD, HRC, e IRC) pressionando o botão
††
ou
e, depois, pressione o botão ENTER.
6. Para iniciar a pesquisa do canal, pressione o botão ENTER.
➢
A pesquisa terminará automaticamente. Os canais são classificados e armazenados em
uma ordem que reflete sua posição na faixa de freqüência (com o primeiro mais baixo e o
último mais alto).
Quando tiver terminado, será exibido o menu Definição de relógio.
➢
Para parar a pesquisa antes de terminar ou retornar ao modo de visualização normal,
pressione o botão MENU.
7. Pressione o botão ENTER.
Pressione o botão œ ou √ para mover entre Mês, Data, Ano, Hora, Minuto ou
am/pm. Defina a data e a hora desejadas pressionando o botão … ou † e, depois,
pressione o botão ENTER.
➢
É possível ajustar diretamente Mês, Data, Ano, Hora e Minuto, pressionando as teclas
numéricas do controle remoto.
8. Quando tiver terminado, será exibida a mensagem “Bom filme” e os canais que
foram armazenados poderão ser visualizados.
……
Ajuste
Mover
Bom filme
OK
Entrar
Continuação...
Português-15
Page 72

Se você quiser
TV
redefinir esse recurso...
Configuração
Plug & Play
Idioma : Português
Hora
Modo Jogo : Desligado
Closed Caption
Tela Azul : Desligado
Melodia : Desligado
Mais
Mover Entrar Retornar
Plug & Play
Iniciar Plug & Play
OK
Entrar Retornar
1. Pressione o botão MENU para exibir o menu.
Pressione o botão ……ou ††para selecionar “Configuração” e, em seguida,
pressione o botão ENTER.
2. Pressione o botão ENTER para selecionar “Plug & Play”.
Para obter mais detalhes sobre as opções de configuração, consulte a página 15.
➢
O recurso Plug & Play só pode ser acessado no modo TV.
Mudando os canais
Utilizando os botões de canais
1. Pressione o botão CH ou CH para mudar os canais.
➢
Quando você pressiona o botão
seqüência.
Você visualizará todos os canais memorizados pela TV. (A TV deve memorizar, no
mínimo, três canais.) Você não visualizará os canais apagados ou não memorizados.
Consulte a página 18 para obter informações sobre como memorizar canais.
Utilizando os botões numéricos
Utilize os botões numéricos para sintonizar rapidamente qualquer canal.
1. Pressione os botões numéricos para ir diretamente para um canal.
Por exemplo, para selecionar o canal 27, pressione “2” e “7”.
A TV mudará os canais quando você pressionar o segundo número.
CH ou CH , os canais da TV mudam em
Utilizando o botão “-/--”
1. Para selecionar um canal acima de 100, para o canal 122, pressione “-/--”,
seguido de “2” e “2”.
Utilizando o botão PRE-CH para selecionar o canal anterior
1. Pressione o botão PRE-CH.
A TV alternará para o último canal visualizado.
➢
Para alternar rapidamente entre dois canais distantes, sintonize um canal e utilize o
botão de número para selecionar o segundo canal. Em seguida, selecione o botão PRE-
CH para alternar rapidamente entre eles.
Português-16
Page 73

Ajustando o volume
1. Pressione o botão
VOL +
ou
VOL –
Utilizando o botão Silencioso
Você pode interromper o som a qualquer momento utilizando o botão MUTE.
1. Pressione MUTE para interromper o som.
A palavra “Mute” será exibida no canto inferior esquerdo da tela.
2. Para desativar mute, pressione o botão MUTE novamente ou simplesmente
VOL +
ou
pressione o botão
VOL –
Visualizando o display
O display identifica o canal atual e o status de determinadas definições de áudio-vídeo.
Ar 3
Mono
Imagem : Dinâmico
Som : Personalizado
MTS : Estéreo
SRS TS XT : Desligado
12 : 00 am
1. Pressione o botão INFO no controle remoto.
A TV exibirá o canal, o tipo de som e o status de determinadas definições de
imagem e som.
para aumentar ou diminuir o volume.
.
Visualizando os menus
TV
Lista de Entradas : TV
Editar Nome
Entrada
Mover Entrar Retornar
Pressione o botão INFO novamente ou aguarde aproximadamente 10 segundos e a imagem
desaparecerá automaticamente.
1. Com o botão Power ligado, pressione o botão MENU.
O menu principal aparece na tela. A lateral esquerda exibe cinco ícones:
Picture, Sound, Channel, Setup, Input.
2. Pressione o botão ……ou ††para selecionar um dos cinco ícones.
Em seguida, pressione o botão ENTER para acessar o submenu do ícone.
3. Pressione o botão EXIT para sair.
O menu na tela demora aproximadamente 1 minuto para desaparecer.
➢
Português-17
Page 74

Memorizando os canais
Sua TV pode memorizar e armazenar todos os canais disponíveis para os canais “off-air” (ar) e a cabo.
Após a memorização dos canais, utilize o botão CH ou CH para fazer uma varredura dos canais.
Com isso, você não precisará mudar os canais, inserindo seus dígitos. Três etapas são necessárias para a memorização de canais:
Seleção de uma fonte de transmissão, memorização dos canais (automática) e adição e exclusão de canais (manual).
Selecionando a fonte do sinal de vídeo
Antes da TV iniciar a memorização dos canais disponíveis, você deve especificar o tipo de fonte de sinal conectada à TV (isto é, um
sistema aéreo ou a cabo).
TV
TV
Ar/Cabo : Ar
Prog. Auto
Gestor canais
Sintonia fina
Sistema de cor : Auto
Ar/Cabo : Air
Prog. Auto
Gestor canais
Sintonia fina
Sistema de cor : Auto
Canal
Mover Entrar Retornar
Canal
Ar
STD
HRC
IRC
Mover Entrar
Retornar
1. Pressione o botão MENU para exibir o menu.
Pressione o botão ……ou ††para selecionar “Canal” e, em seguida, pressione o
botão ENTER.
2. Pressione o botão ENTER para selecionar “Ar/Cabo”.
Pressione o botão ……ou ††para selecionar “Ar”, “STD”, “HRC” ou “IRC” e,
depois, pressione o botão ENTER.
➢
Se estiver conectado a uma antena Ar, deixe “Ar” em exibição. Se estiver conectado a
uma antena cabo, pressione o botão ……ou ††para exibir o tipo de sistema a cabo:
“STD”, “HRC” ou “IRC”. (Se não tiver certeza do tipo de sistema a cabo que possui,
entre em contato com a empresa de TV a cabo).
Pressione o botão EXIT para sair.
➢
STD, HRC e IRC identificam vários tipos de sistema de TV a cabo. Entre em contato
com a empresa local de TV a cabo para identificar o tipo de sistema a cabo existente
em sua área específica. Neste ponto, a fonte do sinal foi selecionada.
Storing Channels in Memory (Automatic Method)
TV
Ar/Cabo : Ar
Prog. Auto
Gestor canais
Sintonia fina
Sistema de cor : Auto
Canal
Mover Entrar
Prog. Auto
Iniciar
Retornar
Ar 3
1. Pressione o botão MENU para exibir o menu.
Pressione o botão ……ou ††para selecionar “Canal” e, em seguida, pressione o botão
ENTER.
2. Pressione o botão ……ou ††para selecionar “Prog. Auto ” e, depois, pressione o botão
ENTER.
3. Pressione o botão ENTER.
A TV começará a memorizar todos os canais disponíveis.
Após a memorização dos canais disponíveis, o menu Programação automática
reaparece. Pressione o botão ENTER para parar.
Pressione o botão EXIT para sair.
Entrar
Retornar
➢
• Todos os canais analógicos disponíveis são automaticamente armazenados na memória.
• São necessários de 3 a 10 minutos para memorizar canais.
Português-18
Page 75

Configurando o Controle remoto
Após um ajuste correto, seu controle remoto pode operar em cinco modos diferentes: TV, VCR, Cabo, DVD ou decodificador Set-Top.
Se você pressionar o botão correspondente no controle remoto, poderá escolher entre esses modos e controlar quaisquer equipamentos de
sua escolha.
O controle remoto pode não ser compatível com todos os DVD players, VCRs, decodificadores de cabo e decodificadores Set-Top.
➢
Configuração do controle remoto para a operação do VCR
1.
Desligue o VCR.
2.
Pressione o botão VCR no controle remoto de sua TV.
3.
Pressione o botão SET no controle remoto de sua TV.
4.
Usando os botões numéricos no seu controle remoto, insira os três dígitos do código de VCR
listado na página 21 deste manual, correspondente à marca do seu VCR. Certifique-se de inserir
os 3 dígitos do código, mesmo que o primeiro dígito seja “0”. (Caso haja mais de um código
listado, tente o primeiro).
5.
Pressione o botão POWER no controle remoto. O VCR será ligado, se o controle remoto
estiver configurado corretamente.
Se o VCR não ligar após a configuração, repita os passos 2, 3 e 4 tentando um dos outros
códigos listados para a marca do seu VCR. Se nenhum outro código estiver listado, experimente
todos os códigos de VCR, de 000 a 080.
Nota sobre a utilização dos modos do controle remoto: VCR
Quando o controle remoto está no modo “VCR”, os botões do volume ainda controlam o volume da
TV.
Configuração do controle remoto para a operação do Decodificador de cabo
1.
Desligue o Decodificador de cabo.
2.
Pressione o botão CABLE no controle remoto de sua TV.
3.
Pressione o botão SET no controle remoto de sua TV.
4.
Usando os botões numéricos no seu controle remoto, insira os três dígitos do código de
decodificador de cabo listado na página 22 deste manual, correspondente à marca do seu
decodificador de cabo. Certifique-se de inserir os 3 dígitos do código, mesmo que o primeiro
dígito seja “0”. (Caso haja mais de um código listado, tente o primeiro).
5.
Pressione o botão POWER no controle remoto.
O decodificador de cabo será ligado, se o controle remoto estiver configurado corretamente.
Se o decodificador não ligar após a configuração, repita os passos 2, 3 e 4 tentando um dos
outros códigos listados para a marca do seu decodificador. Se nenhum outro código estiver
listado, experimente todos os códigos de decodificador de cabo, de 000 a 046.
Nota sobre a utilização dos modos do controle remoto: Decodificador
Quando o controle remoto está no modo “CABO”, os botões do volume ainda controlam o volume
da TV
Português-19
Continuação...
Page 76

Configuração do controle remoto para a operação do DVD
1.
Desligue o DVD.
2.
Pressione o botão DVD no controle remoto de sua TV.
3.
Pressione o botão SET no controle remoto de sua TV.
4.
Usando os botões numéricos no seu controle remoto, insira os três dígitos do código de DVD
listado na página 23 deste manual, correspondente à marca do seu DVD. Certifique-se de inserir
os 3 dígitos do código, mesmo que o primeiro dígito seja “0”. (Caso haja mais de um código
listado, tente o primeiro)
5.
Pressione o botão POWER no controle remoto.
O DVD será ligado, se o controle remoto estiver configurado corretamente.
Se o DVD não ligar após a configuração, repita os passos 2, 3 e 4 tentando um dos outros códigos
listados para a marca do seu DVD. Se nenhum outro código estiver listado, experimente todos os
códigos do decodificador de cabo, de 000 a 141.
Nota sobre a utilização dos modos do controle remoto: DVD
Quando o controle remoto está no modo “DVD”, os botões do volume ainda controlam o volume da
TV.
Configuração do controle remoto para a operação do decodificador Set Top
1.
Desligue o STB.
2.
Pressione o botão STB no controle remoto de sua TV.
3.
Pressione o botão SET no controle remoto de sua TV.
4.
Usando os botões numéricos no seu controle remoto, insira os três dígitos do código de STB
listado na página 22 deste manual, correspondente à marca do seu STB. Certifique-se de inserir os
3 dígitos do código, mesmo que o primeiro dígito seja “0”. (Caso haja mais de um código listado,
tente o primeiro)
5.
Pressione o botão POWER no controle remoto.
O STB será ligado, se o controle remoto estiver configurado corretamente.
Se o STB não ligar após a configuração, repita os passos 2, 3 e 4 tentando um dos outros códigos
listados para a marca do seu STB. Se nenhum outro código estiver listado, experimente todos os
códigos de decodificador de cabo, de 000 a 074.
Nota sobre a utilização dos modos do controle remoto: STB
Quando o controle remoto está no modo “STB”, os botões do volume ainda controlam o volume da
TV.
Continued...
Português-20
Page 77

Códigos do contr
VCR
Marca
SAMSUNG
ADMIRAL
AIWA
AKAI
AUDIO DYNAMICS
BELL&HOWELL
BROKSONIC
CANDLE
CANON
CITIZEN
COLORTYME
CRAIG
CURTIS MATHES
DAEWOO
DB
DIMENSIA
DYNATECH
ELECTROHOME
EMERSON
FISHER
FUNAI
GENERAL ELECTRIC
GO VIDEO
LG(Goldstar)
HARMAN KARDON
HITACHI
INSTANT REPLAY
JC PENNEY
JCL
KENWOOD
KLH
LIOYD
LOGIK
LXI
JVC
MAGNAVOX
MARANTZ
MARTA
KONIA
ORION
MEI
MEMOREX
MGA
MIDLAND
MINOLTA
ole remoto
Código
000 001 002 003 004 005 077 078 079
020
025
004 027 032
007 026
018
022
002 003 006 008 015 055
021 056
002 003 006 008 015 055
007
002 024
002 007 008 017 021 025 056 064 066
003 010 011 012 013 014 015 016
007 026
017
025
034
001 003 006 021 022 025 030 032 034 040 047 050
052 060 063 065 066 067 069 073
018 024 028 029 048 051 061
025
002 005 017 021 056
002
006 007 008 009 010
007
019 025 041 042 074
021
002 007 018 019 021 026 037 041 054 056
007 008 018 021 026 037
007 008 018 026 037
070
025
038
025
081 082 083
021 056 059
007 008 018 021 026 037 062
006
036
073 074 075 076
021
006 021 024 025
034
005
019 041 075
Marca
MITSUBISHI
MONTGOMERY WARD
MTC
MULTITECH
NEC
OPTIMUS
PANASONIC
PENTAX
PENTEX RESEARCH+
PHILCO
PHILIPS
PIONEER
PORTLAND
PROSCAN
QUARTZ
QUASAR
RADIO SHACK/REALISTIC
RCA
SANSUI
SANYO
SCOTT
SEARS
SHARP
SHIMTOM
SIGNATURE
SONY
SYLVANIA
SYMPHONIC
TANDY
TAS H IKA
TATUNG
TEAC
TECHNICS
TEKNIKA
TMK
TOSHIBA
TOTEVISION
UNITECH
VECTOR RESEARCH
VICTOR
VIDEO CONCEPTS
VIDEOSONIC
WARDS
YAMAHA
ZENITH
Código
019 034 041 046
020
002 025
002 005 025 038
007 008 018 026 037 062 064
020
021 056 071 072
019 041 075
008
021 056 059
021 080
019 026 039 053
015 049 055
017
018
021 056
006 018 020 021 024 025 029 034 048 056
002 017 019 021 035 041 043 057 068 076
026
018 024
003 047 052 067
006 018 019 024 028 029 041 048 051
020 034 045 015
027 033 038 058
025
027 033 044
021 025 056 059
025
018 025
006
037
025 037 068
021
006 021 025 031
066
003 019 029 051 052
002 006
002
007 026
026
007 026
002
002 003 006 019 020 021 024 025 034 038 041
007 008 018 026 037
023 027 033
Português-21
Continuação...
Page 78

DECODIFICADOR
Marca
SAMSUNG
GI
HAMLIN
HITACHI
JERROLD
MACOM
MAGNAVOX
OAK
PANASONIC
PHILIPS
PIONEER
RCA
REGAL
Código
000 001 002 003 004 005 006 007
041
003 024 031
025 030
038 039
025 030
019 023 028
026
003 022 027 037 044
019 021 023 028
004 018 020 044
014 022 040
003
DECODIFICADOR SET-TOP SAMSUNG
Marca
Ground wave STB
CABLE STB
Satellite STB
Código
000 001 002 008 013
000 004 008 013
000 003 008 013
Marca
REGENCY
SA
SCIENTIFIC ATLAN
SPRUCER
STARGATE 2000
SYLVANIA
TEXSCAN
TOCOM
UNIVERSAL
VIEWSTAR
WARNER AMEX
ZENITH
Código
015 023
042 043
042 043
022
036
016
016
032
033 034
019 021 023 028
046
017 029 035 037 045
DECODIFICADOR SET-TOP
Marca
ALPHASTAR
ANAM
CHANNEL MASTER
CROSSDIGITAL
CHAPARRAL
DIRECT TV
DAEWOO
DISH NETWORK SYSTEM
DISHPRO
DRAKE
DX ANTENNA
ECHOSTAR
EXPRESSVU
GOI
GE
GENERAL INSTRUMENT
HTS
HOME CABLE
HITACHI
HUGHES NETWORK
IQ
IQ PRISM
JANEIL
JERROID
JVC
Código
023
043
018 034
019
035
015 016 017 019 022 045 060 061 062 065 066 067
068
074
069 070
069
018 024 032
027
025 069 070 071
069
069
065
046 047 048 063 064
069
056
022
015 017
020
020
059
063
069 070
Marca
LG(Goldstar)
MAGNAVOX
MEMOREX
MOTOROLA
MACOM
MITSUBISHI
NEXT LEVEL
PHILIPS
PRIMESTAR
PANASONIC
PAYSAT
PROSCAN
RCA
RADIOSHACK
REALISTIC
STS
STAR TRAK
SKY
SKY LIFE
SHACK
STAR CHOICE
SONY
TOSHIBA
ULTIMATE TV
UNIDEN
ZENITH
Código
044 073
016 021 036 038 039 040 041 042
016
064
018
015
047 048 064
015 016 017 021 033 036 038 039 040 041 042 067
046 049 050 063
058 059 061 062
016
065 066
051 052 053 065 066
064
057
020 027
026
031
005 006 007
064
064
054 060
015 017 028 029 030 072
060 066
016 021 037 055 056 057
024 031 068
Português-22
Continuação...
Page 79

SAMSUNG DVD
Produto
DVD
DVDR
BD Record
VCR COMBO
VCR Record
DHR COMBO
DVD
Marca
ANAM
AUDIOVOX
AUDIOLOGIC
ANABA
APEX DIGITAL
AIWA
BROKSONIC
BLAUPUNKT
B&K
CURTIS MATHES
CYBER HOME
CLARION
CIRRUS
CINEVISION
DAEWOO
DENON
FARENHEIT
FISHER
GPX
GO VIDEO
GE
GREENHILL
HITACHI
HITEKER
HOYO
HARMAN / KARDON
IRT
INTEGRA
JBL
JVC
JATON
KENWOOD
KISS
KONKA
KLH
LG(Goldstar)
LOEWE
LASONIC
MOBILE AUTHORITY
MEMOREX
MALATA
MAGNAVOX
MINTEK
MONYKA
Código
000 001 002
003 004
005 006
007 008 009 010 011
012
013
Código
030
075
085
072
070 071 074 086 083 084 088 111 112
114
062
074
122 123
027
065 077 078 079 082
080 125
081
095
066
146
067 068
090
060
061 089 133 135
069 074
074
064 113
071
073
091 110
089
092
091
022 033 115 116
073
051 108 109
073
059 100 106 107
074 075
025 031
057
058
054
055
056
076 093
074 094
073
Produto
Home Theater VCR COMBO
HDD Record COMBO
TWIN TRAY COMBO
STB DVD COMBO
DVD Receiver
AV Receiver
Marca
NORCENT
NEXT BASE
NEC
NANTAUS
NESA
OPTOMEDIA ELECTRONICS
OPTIVIEW
ONKYO
PHILCO
PRINCETON
PROSCAN
PANASONIC
PHILIPS
ROTEL
RIO
RCA
RAITE
ROWA
SAMPO
SONY
SHERWOOD
SVA
SYLVANIA
SHARP
SANSUI
SANYO
SHINSONIC
SANYO
THOMSON
TOSHIBA
TECHNICS
TVIEW
TOKAI
TEAC
TECHWOOD
TREDEX
URBAN CONCEPTS
VENTURER
VOCOPRO
YAMAHA
YAMAKAWA
XWAVE
ZENITH
Código
014 015 016
017
018
019
020
021
Código
048 049 050
052
053
144
074
105
072
076 092 119
044 045
046 047
023
024 034 124 134 136 137 138
036 076
117 118
120
023 035 074 075 131 132
073
038
104
026 029 126 127 128 129 130 141
039 041
042
043 093
140
062
062
094
090
145
028 062 076
139
072
073
096
097
098 099 101
076
075
102
032 063
040 073
103
076 121
Português-23
Page 80

Para selecionar a fonte
Use para selecionar TV ou outras fontes de entrada externas conectadas à TV.
Use para selecionar a fonte de entrada escolhida.
TV
TV
Lista de Entradas : TV
Editar Nome
TV
AV1 :
AV2 :
S-Video :
Componente1 :
Componente2 :
PC :
HDMI :
Entrada
Mover Entrar
Lista de Entradas
-----
-----
-----
-----
-----
-----
-----
Mover Entrar
Retornar
Retornar
1. Pressione o botão MENU para exibir o menu.
Pressione o botão ENTER para selecionar “Entrada”.
2. Pressione o botão ENTER para selecionar “Lista de Entradas”.
Pressione o botão ……ou ††para selecionar a fonte de sinal e, em seguida,
pressione o botão ENTER.
➢
É possível escolher entre as seguintes combinações de conectores: AV1, Component1,
Component2, PC, HDMI no painel traseiro da TV e AV2 ou S-Video no painel lateral da TV.
➢
A entrada HDMI só pode ser selecionada quando o dispositivo externo estiver ligado e
conectado via HDMI.
➢
Nos modelos PL-42Q91HP/50Q91HP, a Lista de Entrada exibe HDMI1 e HDMI2 em vez
de HDMI.
➢
Só é possível escolher entre os dispositivos externos que estão conectados à TV.
Pressione o botão SOURCE no controle remoto para visualizar uma fonte de sinal externa.
Você pode entrar diretamente no modo TV, usando o botão TV no controle remoto.
Você pode entrar diretamente no modo HDMI, usando o botão HDMI no controle remoto.
(somente nos modelos PL-42C91HP/50C91H/42C71HP)
Para editar o nome da fonte de entrada
Nomeie o dispositivo conectado às tomadas de entrada para facilitar a seleção de sua fonte de entrada.
TV
TV
TV
Lista de Entradas : TV
Editar Nome
AV1 :
AV2 :
S-Video :
Componente1 :
Componente2 :
PC :
HDMI :
AV1 :
AV2 :
S-Video :
Componente1 :
Componente2 :
PC :
HDMI :
Entrada
Mover Entrar
Editar Nome
-----
-----
-----
-----
-----
-----
-----
Mover Entrar
Editar Nome
-----
-----
-----
-----
-----
-----
-----
Mover Entrar
Retornar
Retornar
-----
VCR
DVD
D-VHS
Sinal Cabo
Sinal HD
Sinal Satélite
†
Retornar
1. Pressione o botão MENU para exibir o menu.
Pressione o botão ……ou ††para selecionar “Entrada” e, depois, pressione o
botão ENTER.
Pressione o botão ……ou ††para selecionar “Editar Nome” e, depois, pressione
o botão ENTER.
2. Pressione o botão ……ou ††para selecionar um conector de entrada “AV1”,
“AV2”, “S-Video”, “Component1”, “Component2”, “PC” ou “HDMI” e, depois,
pressione o botão ENTER.
➢
Nos modelos PL-42Q91HP/50Q91HP, a Lista de Entrada exibe HDMI1 e HDMI2 em vez
de HDMI.
3. Pressione o botão ……ou ††para selecionar a fonte de entrada “VCR”, “DVD”,
“D-VHS”, “Sinal Cabo”, “Sinal HD”, “Sinal Satélite”, “Receiver AV”, “Receiver
DVD”, “Jogo”, “Filmadora”, “DVD Combo”, “Grav. DVD HDD”, ou “PC” e, em
seguida, pressione o botão ENTER.
Pressione o botão EXIT para sair.
➢
Quando um PC com resolução de 640 x 480 a 60Hz é conectado à porta HDMI IN 1,
você deve ajustar o modo HDMI1 para PC na Lista de Entradas do modo Entrada.
Se o modo HDMI1 não for PC, ele pode funcionar dependendo dos ajustes da TV.
Português-24
Page 81

Controle de imagem
Utilizando as definições automáticas de imagem
A sua TV possui três ajustes de imagem (“Dinâmico” [Dynamic], “Padrão” [Standard] e “Filme” [Movie]) com pré-ajustes de fábrica.
Ative Dinâmico, Padrão ou Filme selecionando no menu.
TV
Modo : Dinâmico
Contraste 100
Brilho 45
Nitidez 75
Cor 55
Matiz G 50 R 50
Tonalidade de cor : Frio1
Mais
Mover Entrar
TV
Modo : Dynamic
Contraste 100
Brilho 45
Nitidez 75
Cor 55
Matiz G 50 R 50
Tonalidade de cor : Frio1
Mais
Mover Entrar
Imagem
Imagem
Dinâmico
Padrão
Filme
Retornar
Retornar
1. Pressione o botão MENU para exibir o menu.
Pressione o botão ENTER para selecionar “Imagem” (Picture).
2. Pressione o botão ENTER novamente.
Pressione o botão ……ou ††para selecionar a definição de imagem “Dinâmico”
(Dynamic), “Padrão” (Standard) e “Filme” (Movie) e, em seguida, pressione o
botão ENTER.
Selecione Dinâmico (Dynamic) para assistir TV durante o dia ou quando há luz clara
no ambiente.
Selecione Padrão (Standard) para o modo comum de assistir à TV.
Selecione Filme (Movie) ao assistir a um filme.
➢
O modo Imagem precisa ser ajustado separadamente para cada entrada.
Pressione o botão P. MODE no controle remoto para selecionar uma das definições de
imagem padrão.
TV
Modo : Dinâmico
Contraste 100
Brilho 45
Nitidez 75
Cor 55
Matiz G 50 R 50
Tonalidade de cor : Frio1
Mais
Mover Entrar
Contraste
Mover
TV
TV
TV
Ajuste
Modo : Dinâmico
Contraste 100
Brilho 45
Nitidez 75
Cor 55
Matiz G 50 R 50
Tonalidade de cor : Frio1
Mais
Mover Entrar
Modo : Dinâmico
Contraste 100
Brilho 45
Nitidez 75
Cor 55
Matiz G 50 R 50
Tonalidade de cor : Cool1
Mais
Mover Entrar
Mais
Configurações detalhadas
Tamanho : 16:9
Digital NR : Auto
Cor ativa : Ligado
DNIe : Ligado
Restaurar Padrões :
Mover Entrar
Imagem
Imagem
Imagem
Imagem
Frio2
Frio1
Normal
Quente1
Quente2
OK
Cancelar
Retornar
100
Retornar
Retornar
Retornar
Retornar
3. Pressione o botão ……ou ††para selecionar um item específico, “Contraste”,
“Brilho”, “Nitidez”, “Cor”, ou “Matiz ” e, em seguida, pressione o botão ENTER.
4. Pressione o botão œ ou √ para aumentar ou diminuir o valor de um item
específico. Pressione o botão ENTER.
➢
• No modo PC, é possível selecionar somente Contraste e Brilho.
• Cada definição ajustada será armazenada separadamente, de acordo com o seu
modo de entrada.
5. Pressione o botão ENTER para retornar a “Modo”.
6. Pressione o botão ……ou ††para selecionar “Tonalidade de cor” e, em seguida,
pressione o botão ENTER.
7. Pressione o botão ……ou ††para selecionar “Frio2”, “Frio1”, “Normal”,
“Quente1”, ou “Quente2” e, em seguida, pressione o botão ENTER.
➢
Quando o modo de imagem estiver definido como Dinâmico ou Padrão, as opções
Quente1 e Quente2 não poderão ser selecionadas. Somente o modo Filme estará
disponível.
Redefinindo os ajustes de imagem para os padrões de fábrica
8. Pressione o botão ……ou † para selecionar “Restaurar Padrões” e, depois,
pressione o botão ENTER.
9. Pressione o botão ……ou † para selecionar “OK”ou “Cancelar” e, depois,
pressione o botão ENTER.
Pressione o botão EXIT para sair.
➢
Todo modo de imagem pode ser redefinido.
Português-25
Page 82

Definição de configurações detalhadas da imagem
Você pode definir as configurações detalhadas.
TV
Modo : Dinâmico
Contraste 100
Brilho 45
Nitidez 75
Cor 55
Matiz G 50 R 50
Tonalidade de cor : Frio1
TV
Configurações detalhadas
Tamanho : 16:9
Digital NR : Auto
Cor ativa : Ligado
DNIe : Ligado
Restaurar Padrões
TV
Ajuste de preto : Desligado
Contraste dinâmico: Desligado
Gamma : 0
Espaço de cores : Wide
Estabilidade de branco
Meu controle de cor
Aprimoramento da margem: Desligado
Imagem
Mais
Mover Entrar
Imagem
Mais
Mover Entrar
Configurações detalhadas
Mover Entrar
Retornar
Retornar
Retornar
1. Pressione o botão MENU para exibir o menu.
Pressione o botão ENTER para selecionar “Imagem” (Picture).
2. Pressione o botão ……ou ††para selecionar “Configurações detalhadas" (Detailed
Settings) e, em seguida, pressione o botão ENTER.
3. Selecione a opção desejada, pressionando o botão ……ou ††e, em seguida,
pressione o botão ENTER.
Opções disponíveis: Ajuste de preto (Black Adjust), Contraste dinâmico
(Dynamic Contrast), Gamma, Espaço de cores (Color Space), Estabilidade de
branco (White Balance), Meu controle de cor (My Color Control),
Aprimoramento da margem (Edge Enhance)
4. Quando terminar de fazer o ajuste, pressione o botão ENTER.
5. Pressione o botão EXIT para sair.
➢
O modo Imagem está disponível nos modos Padrão e Filme.
➢
Quando o modo Imagem estiver no modo Padrão, se o DNIe estiver definido como
"Desligado", as Configurações detalhadas não poderão ser selecionadas.
• Ajuste de preto (Black Adjust): Desligado/Baixa/Médio/Alto (Off/Low/Medium/High)
Você pode selecionar o nível de preto diretamente na tela para ajustar a
profundidade da tela.
• Contraste dinâmico (Dynamic Contrast): Desligado/Baixa/Médio/Alto
(Off/Low/Medium/High)
Você pode ajustar o contraste da tela para obter um excelente contraste.
• Gamma: -3 ~ +3
Você pode ajustar o brilho médio de imagens.
Pressione o botão œ ou √ até obter o ajuste ideal.
• Espaço de cores (Color Space): Auto/Efeito wide (Auto/Wide)
Você pode ajustar o espaço de reprodução das cores para o sinal de entrada como
Auto ou Efeito wide.
• Estabilidade de branco (White Balance): Vrm.-Offset/Verde-Offset/
Azul-Offset/Verm.-Gain/Verde-Gain/Azul-Gain/Restaurar Padrões (R Offset/G
Offset/B Offset/R Gain/G Gain/B Gain/Reset)
Você pode ajustar a temperatura da cor para obter imagens com cores mais naturais.
Vrm.-Offset/Verde-Offset/Azul-Offset/Verm.-Gain/Verde-Gain/Azul-Gain
(R Offset/G Offset/B Offset/R Gain/G Gain/B Gain): Alterar o ajuste atualizará a tela
ajustada.
Selecione a opção desejada, pressionando o botão ……ou ††e, em seguida, pressione
o botão ENTER. Pressione o botão œ ou √ até obter o ajuste ideal.
Restaurar Padrões (Reset): A estabilidade de branco estabelecida anteriormente
retornará aos padrões de fábrica.
• Meu Controle de Cor (My Color Control): Rosa/Verde/Azul/Branco/Restaurar
padrões (Pink/Green/Blue/White/Reset)
Essa configuração pode ser ajustada de acordo com suas preferências pessoais.
Rosa/Verde/Azul/Branco (Pink/Green/Blue/White): Alterar o ajuste atualizará a tela
ajustada.
Selecione a opção desejada, pressionando o botão ……ou ††e, em seguida, pressione
o botão ENTER. Pressione o botão œ ou √ até obter o ajuste ideal.
➢
Quando executar o recurso Meu controle de cor, a imagem atual é capturada
como uma imagem estática antes de ser exibida na tela.
Restaurar Padrões (Reset): As cores estabelecidas anteriormente retornarão aos
padrões de fábrica.
• Aprimoramento da margem (Edge Enhancement): Desligado/Ligado
Você pode enfatizar as bordas dos objetos.
Português-26
Page 83

Alterando o tamanho da tela
A seleção do tamanho da tela depende do tipo da entrada de vídeo.
TV
Configurações detalhadas
Tamanho : 16:9
Digital NR : Auto
Cor ativa : Ligado
DNIe : Ligado
Restaurar Padrões
TV
16:9
Zoom
4:3
Apenas varrer
Imagem
Mais
Mover Entrar
Tamanho
Mover Entrar
Retornar
Retornar
1. Pressione o botão MENU para exibir o menu.
Pressione o botão ENTER para selecionar “Imagem” (Picture).
2. Pressione o botão ……ou ††para selecionar “Tamanho” e, em seguida, pressione o
botão ENTER.
3. Pressione o botão ……ou ††para selecionar o formato de tela desejado.
Pressione o botão ENTER.
Pressione o botão EXIT para sair.
• 16:9 : Ajusta a imagem para o modo amplo 16:9.
• Zoom : Magnifies the size of the picture on the screen.
• 4:3 : Amplia o tamanho da imagem na tela.
• Apenas varrer: Use a função para ver a imagem cheia, sem estar truncada, quando
os sinais DTV ou HDMI 720p/1080i estiverem entrando.
Pressione o botão P.SIZE no controle remoto para alterar o tamanho da imagem.
➢
Se você assistir uma imagem estática ou o modo 4:3 (Normal) por um longo tempo (mais de 2 horas),
uma imagem poderá ser queimada na tela. Assista TV no modo 16:9 (Amplo) sempre que possível.
16:9
16:9
Ajusta a imagem para o modo amplo
Zoom
Amplia o tamanho da imagem na tela.
Zoom
16:9.
4:3
4:3
Ajusta a imagem no modo normal 4:3.
Apenas varrer:
Use a função para ver a imagem cheia, sem
Apenas varrer
estar truncada, quando os sinais DTV ou
HDMI 720p/1080i estiverem entrando.
Como posicionar e dimensionar a tela usando Zoom
•O redimensionamento da tela com a opção Zoom permite o posicionamento e o dimensionamento da
tela na direção para cima/para baixo, usando o botão ……ou ††e o tamanho da tela.
• Mova a tela para cima/para baixo, usando o botão ……ou ††após selecionar e pressionar o botão
œ ou √.
• Redimensione a tela verticalmente, usando o botão ……ou ††após selecionar o e pressionar o
œ ou √. (Pressione o botão
botão
para baixo)
•O aumento da tela funciona somente nos modos de entrada TV/Video/S-Video/Component/HDMI.
•O modo PC impede a função de aumento da tela.
➢
• Em TV, VIDEO, S-VIDEO, COMPONENTE, todas as resoluções estão disponíveis e podem ser
selecionadas. (
16:9 ➞Zoom ➞4:3
• Em PC, só é possível selecionar os modos 16:9 e 4:3.
•
Se o tamanho da imagem for alterado quando PIP está ligada, ela será desligada automaticamente.
• No modo HDMI com toda a resolução, é possível selecionar todos os modos de tela.
(16:9 - Zoom - 4:3 - Somente scan).
……
para ampliar para cima e pressione o botão ††para ampliar
)
Português-27
Page 84

Redução do ruído digital
Se o sinal de transmissão recebido pela TV estiver fraco, você poderá ativar o recurso de redução de ruído digital para ajudar a reduzir
qualquer imagem fantasma e estática na tela.
TV
Configurações detalhadas
Tamanho : 16:9
Digital NR : Auto
Cor ativa : Ligado
DNIe : Ligado
Restaurar Padrões
TV
Configurações detalhadas
Tamanho : 16:9
Digital NR : Auto
Cor ativa : On
DNIe : On
Restaurar Padrões
Imagem
Mais
Mover Entrar
Imagem
Mais
Mover Entrar
Desligado
Baixa
Médio
Alto
Auto
1. Pressione o botão MENU para exibir o menu.
Pressione o botão ENTER para selecionar “Imagem” (Picture).
2. Pressione o botão ……ou ††para selecionar “Digital NR” e, em seguida, pressione
o botão ENTER.
Retornar
3. Pressione o botão ……ou ††para selecionar “Desligado”, “Baixa”, “Médio”, “Alto” ou
“Auto” e, em seguida, pressione o botão ENTER.
Pressione o botão EXIT para sair.
Retornar
Cor ativa (Active Color)
Se você ativar essa opção, as cores do céu e da grama serão mais fortes e claras para proporcionar uma imagem mais viva na tela.
TV
Configurações detalhadas
Tamanho : 16:9
Digital NR : Auto
Cor ativa : Ligado
DNIe : Ligado
Restaurar Padrões
TV
Configurações detalhadas
Tamanho : 16:9
Digital NR : Auto
Cor ativa : On
DNIe : On
Restaurar Padrões
Imagem
Mais
Mover Entrar
Imagem
Mais
Mover Entrar
Desligado
Ligado
Retornar
Retornar
1. Pressione o botão MENU para exibir o menu.
Pressione o botão ENTER para selecionar “Imagem” (Picture).
2. Pressione o botão ……ou ††para selecionar “Cor ativa” e, em seguida, pressione o
botão ENTER.
3. Pressione o botão ……ou ††para selecionar “Desligado” ou “Ligado” e, em seguida,
pressione o botão ENTER.
Pressione o botão EXIT para sair.
➢
Essa função não está disponível no modo PC.
➢
Essa função não está disponível no modo Padrão ou no modo Filme.
Português-28
Page 85

DNIe (Digital Natural Image engine)
Esta TV inclui a função DNIe para fornecer uma alta qualidade visual. Se você configurar DNIe como ligado, pode ver a tela com o
recurso DNIe ativado. Se você configurar a opção DNIe como Demo, poderá visualizar o DNIe aplicado e as imagens normais na tela para
fins de demonstração. Ao utilizar essa função, você poderá ver a diferença na qualidade visual.
TV
Configurações detalhadas
Tamanho : 16:9
Digital NR : Auto
Cor ativa : Ligado
DNIe : Ligado
Restaurar Padrões
TV
Configurações detalhadas
Tamanho : 16:9
Digital NR : Auto
Cor ativa : Ligado
DNIe : On
Restaurar Padrões
Imagem
Mais
Mover Entrar
Imagem
Mais
Mover Entrar
Desligado
Demo
Ligado
Retornar
Retornar
1. Pressione o botão MENU para exibir o menu.
Pressione o botão ……ou ††para selecionar “DNIe” e, em seguida, pressione o botão
ENTER.
2. Pressione o botão ……ou ††para selecionar “DNIe” e, em seguida, pressione o botão
ENTER.
➢
Essa função não está disponível no modo PC.
3. Pressione o botão ……ou ††para selecionar “Desligado”, “Demo” ou “Ligado” e, em
seguida, pressione o botão ENTER.
Pressione o botão EXIT para sair.
• Desligado (Off): Desativa o modo DNIe.
• Demo: A tela anterior à aplicação do DNIe é exibida à esquerda e a tela posterior, à
direita.
Ligado (On): Ativa o modo DNIe.
➢
DNIeTM(Digital Natural Image engine)
Este recurso proporciona uma imagem mais detalhada, com redução de ruídos 3D e
melhoria dos detalhes, do contraste e das áreas brancas.
Pressione o botão DNIe várias vezes no controle remoto para selecionar um dos
ajustes.
Congelando a imagem atual
1. Pressione o botão STILL para congelar uma imagem em movimento.
➢
Você continuará escutando som normal. Pressione novamente para cancelar.
➢
Para impedir a queima da tela, esta função é cancelada automaticamente depois de
5 minutos.
Português-29
Page 86

Controle de som
Utilizando as definições automáticas de som
A sua TV possui definições automáticas de som (“Padrão”, “Música”, “Filme”, “Diálogo”,e “Personalizado”) que são predefinidas na
fábrica. Selecione “Personalizado” para reativar automaticamente as definições personalizadas de som.
TV
Modo : Personalizado
Equalizador
SRS TS XT : Desligado
MTS : Mono
Volume Automático
Mudo interno : Desligado
Seleção do Som : Principal
Restaurar Padrões
Som
: Desligado
Mover Entrar
Padrão
Música
Filme
Diálogo
Personalizado
Retornar
Personalizando o som
Vo cê pode ajustar as definições de som de acordo com as suas preferências pessoais. (Opcionalmente, utilize um dos ajustes
“automáticos”).
TV
Modo : Personalizado
Equalizador
SRS TS XT : Desligado
MTS : Mono
Volume Automático
Mudo interno : Desligado
Seleção do Som : Principal
Restaurar Padrões
TV
R
L
Balance
TV
Modo : Personalizado
Equalizador
SRS TSXT : Desligado
MTS : Mono
Volume Automático
Mudo interno : Desligado
Seleção do Som : Principal
Restaurar Padrões
Som
: Desligado
Mover Entrar
Equalizador
+
0
-
100Hz 300Hz 1KHz 3KHz 10KHz
Mover
Mover Entrar
Ajuste
Som
: Desligado
Retornar
Retornar
Retornar
1. Pressione o botão MENU para exibir o menu.
Pressione o botão ……ou ††para selecionar “Som” e, em seguida, pressione o
botão ENTER.
2. Pressione o botão ENTER para selecionar “Modo”.
Pressione o botão ……ou ††para selecionar “Padrão”, “Música”, “Filme”,
“Diálogo”, ou “Personalizado” e, em seguida, pressione o botão ENTER.
Pressione o botão EXIT para sair.
• Selecione Padrão para as definições de fábrica padrão.
• Selecione Música ao assistir a vídeos musicais ou concertos.
• Selecione Filme quando estiver assistindo a filmes.
• Selecione Diálogo ao assistir a um programa com diálogo em sua maior parte
(por exemplo, um noticiário).
• Selecione Personalizado para reativar suas definições personalizadas (consulte
"Personalizando o som").
Pressione o botão S.MODE no controle remoto para selecionar uma das definições de
som padrão.
1. Pressione o botão MENU para exibir o menu.
Pressione o botão ……ou ††para selecionar “Som” e, em seguida, pressione o
botão ENTER.
2. Pressione o botão ……ou ††para selecionar “Equalizador” e, em seguida,
pressione o botão ENTER.
3. Pressione o botão œ ou √ para selecionar uma determinada freqüência para
+
0
-
ajuste.
Pressione o botão ……ou ††para aumentar ou diminuir o nível de determinada
freqüência; em seguida, pressione o botão ENTER.
Pressione o botão EXIT para sair.
➢
• Ajuste da estabilidade do som E/D: Para ajustar a estabilidade do som dos
alto-falantes E/D.
• Ajuste da largura de banda (100Hz, 300Hz, 1KHz, 3KHz, 10KHz)
: Para ajustar o nível de diferentes freqüências de largura de banda.
➢
Se os ajustes do equalizador forem alterados, o modo de som passará
automaticamente para o modo Personalizado.
Redefinindo os ajustes de Equalizador para os padrões de fábrica
Para operar a função Padrão, o modo Jogo deve estar ajustado como Ligado.
(Consulte a página 42)
1. Pressione o botão MENU para exibir o menu.
Pressione o botão ……ou ††para selecionar “Som” e, em seguida, pressione o
botão ENTER.
2. Pressione o botão ……ou ††para selecionar “Padrão” e, em seguida, pressione
o botão ENTER.
➢
O equalizador é redefinido para os padrões de fábrica.
Pressione o botão EXIT para sair.
Português-30
Page 87

Ajustando o modo TruSurround XT
TruSurround XT é uma tecnologia patenteada SRS que resolve o problema de reprodução de conteúdo em múltiplos canais 5.1 em dois
alto-falantes. A tecnologia TruSurround possibilita uma fascinante experiência de som ambiental virtual em qualquer sistema de reprodução
com dois alto-falantes, incluindo os alto-falantes internos da televisão. É totalmente compatível com todos os formatos multicanais.
TV
Modo : Personalizado
Equalizador
SRS TSXT : Desligado
MTS : Mono
Volume Automático
Mudo interno : Desligado
Seleção do Som : Principal
Restaurar Padrões
Som
: Desligado
Mover Entrar
Desligado
Ligado
Retornar
1. Pressione o botão MENU para exibir o menu.
Pressione o botão ……ou ††para selecionar “Som” e, em seguida, pressione o
botão ENTER.
2. Pressione o botão ……ou ††para selecionar “SRS TSXT” e, em seguida, pressione
o botão ENTER.
3. Pressione o botão ……ou ††para selecionar “Desligado” ou “Ligado” e, em seguida,
pressione o botão ENTER.
Pressione o botão EXIT para sair.
Pressione o botão SRS no controle remoto para selecionar “Ligado” ou “Desligado”.
NOTAS DE MARCA REGISTRADA E DE LICENCIAMENTO DO RÓTULO
TruSurround XT, SRS e Symbol são marcas registradas da
SRS Labs, Inc.
A tecnologia TruSurround XT é incorporada sob licença da SRS
Labs, Inc.
Selecionando uma trilha de som multicanal (MTS)
Dependendo do programa específico transmitido, é possível ouvi-lo em Mono, Estéreo ou SAP.
TV
Modo : Personalizado
Equalizador
SRS TSXT : Desligado
MTS : Mono
Volume Automático
Mudo interno : Desligado
Seleção do Som : Principal
Restaurar Padrões
Mover Entrar
TV
Modo : Personalizado
Equalizador
SRS TSXT : Desligado
MTS : Mono
Volume Automático
Mudo interno : Desligado
Seleção do Som : Principal
Restaurar Padrões
Mover Entrar
Som
: Desligado
Som
Estéreo
: Desligado
Mono
SAP
Retornar
Retornar
1. Pressione o botão MENU para exibir o menu.
Pressione o botão ……ou ††para selecionar “Som” e, em seguida, pressione o
botão ENTER.
2. Pressione o botão ……ou ††para selecionar “MTS” e, em seguida, pressione o
botão ENTER.
3. Pressione o botão ……ou ††para selecionar uma definição desejada e, em
seguida, pressione o botão ENTER.
Pressione o botão EXIT para sair.
• Escolha Mono para canais que estão transmitindo em mono ou se você está tendo
dificuldade para receber um sinal estéreo.
• Selecione Estéreo para canais transmitidos em estéreo.
• Selecione SAP para ouvir o Programa de áudio separado; geralmente, trata-se da
tradução de um idioma estrangeiro.
Pressione os botões MTS no controle remoto para selecionar “Mono”, “Estéreo” ou “SAP”.
Português-31
Page 88

Controle automático de volume
Reduz a diferença de nível de volume entre emissoras.
TV
Modo : Personalizado
Equalizador
SRS TS XT : Desligado
MTS : Mono
Volume Automático
Mudo interno : Desligado
Seleção do Som : Principal
Restaurar Padrões
TV
Modo : Personalizado
Equalizador
SRS TS XT : Desligado
MTS : Mono
Volume Automático
Mudo interno : Desligado
Seleção do Som : Principal
Restaurar Padrões
Som
: Desligado
Mover Entrar
Som
: Desligado
Mover Entrar
Desligado
Ligado
1. Pressione o botão MENU para exibir o menu.
Pressione o botão ……ou ††para selecionar “Som” e, em seguida, pressione o botão
ENTER.
2. Pressione o botão ……ou ††para selecionar “Volume Automático” e, em seguida,
pressione o botão ENTER.
Retornar
3. Pressione o botão ……ou ††para selecionar “Desligado” ou “Ligado” e, em seguida,
pressione o botão ENTER.
Pressione o botão EXIT para sair.
Retornar
Selecionando o recurso Mudo Interno
A saída de som dos alto-falantes da TV é desativada. Esse recurso é útil quando você deseja ouvir o áudio em seu aparelho de som e
não na TV.
TV
Modo : Personalizado
Equalizador
SRS TS XT : Desligado
MTS : Mono
Volume Automático
Mudo interno : Desligado
Seleção do Som : Principal
Restaurar Padrões
TV
Modo : Personalizado
Equalizador
SRS TS XT : Desligado
MTS : Mono
Volume Automático
Mudo interno : Desligado
Seleção do Som : Principal
Restaurar Padrões
Internal Mute Desligado
Internal Mute Ligado
Video sem Sinal
Quando "Mudo Interno" é ajustado como "Ligado", os menus de som com exceção de "MTS" não podem ser ajustados.
Som
: Desligado
Mover Entrar
Som
: Desligado
Mover Entrar
Saída do alto-falante
Desligado
Ligado
TV
Mute
Mute
1. Pressione o botão MENU para exibir o menu.
2. Pressione o botão ……ou ††para selecionar “Mudo interno” e, em seguida, pressione o
Retornar
3. Pressione o botão ……ou ††para selecionar “Desligado” ou “Ligado” e, em seguida,
Retornar
Alto-falantes internos
AV, S-Video
Saída do alto-falante
Pressione o botão ……ou ††para selecionar “Som” e, em seguida, pressione o botão
ENTER.
botão ENTER.
pressione o botão ENTER.
Pressione o botão EXIT para sair.
➢
• Os botões VOL +, VOL - e MUTE não funcionam quando a opção Mudo Interno estiver
Ligada.
• Quando o Mudo Interno estiver Ligado, somente a opção MTS poderá ser selecionada
para o Som.
Saída de áudio (L/R Out)
AV, S-Video
Saída de som
Saída de som
Mute
Componente, PC, HDMI
Saída de som
Saída de som
Mute
Mute
Mute
Componente, PC, HDMI
Saída do alto-falante
Mute
Mute
TV
Saída de som
Saída de som
Mute
Como ouvir o som da sub-tela (PIP)
Quando o recurso PIP está ativado, você pode ouvir o som da sub-tela (PIP).
TV
Modo : Personalizado
Equalizador
SRS TS XT : Desligado
MTS : Mono
Volume Automático
Mudo interno : Desligado
Seleção do Som : Principal
Restaurar Padrões
TV
Modo : Personalizado
Equalizador
SRS TS XT : Desligado
MTS : Mono
Volume Automático
Mudo interno : Desligado
Seleção do Som : Principal
Restaurar Padrões
Som
: Desligado
Mover Entrar
Som
: Desligado
Mover Entrar
Principal
Sub Tela
Retornar
Retornar
1. Pressione o botão MENU para exibir o menu.
Pressione o botão ……ou ††para selecionar “Som” e, em seguida, pressione o
botão ENTER.
2. Pressione o botão ……ou ††para selecionar “Seleção do Som” e, em seguida,
pressione o botão ENTER.
3. Pressione o botão ……ou ††para selecionar “Sub tela” (Sub) e, em seguida,
pressione o botão ENTER.
Pressione o botão EXIT para sair.
Principal (Main): Usado para ouvir o som da imagem principal.
Sub tela (Sub): Usado para ouvir o som da sub-imagem.
É possível selecionar esta opção quando “PIP”está configurado como "Ligado" (On).
➢
Português-32
Page 89

Controle de canal
Adicionando/bloqueando canais
Com o Gestor de Canais, você pode bloquear ou adicionar os canais convenientemente.
TV
Ar/Cabo : Ar
Prog. Auto
Gestor canais
Sintonia fina
Sistema de cor : Auto
Mover Entrar
TV
Lista de canais
Bloqueio de Canais : Desligado
Mover Entrar
Lista de canais
Ar 3 1 / 7
Ch.
Ar 2
Ar 3
Ar 4
Ar 5
Ar 6
Ar 7
Ar 8
Ar 9
Ar 10
Ar 11
Adicionar Bloquear
Mover Entrar
Página Retornar
Canal
Gestor canais
Retornar
Retornar
1. Pressione o botão MENU para exibir o menu.
Pressione o botão ……ou ††para selecionar “Canal” e, em seguida, pressione
o botão ENTER.
2. Pressione o botão ……ou ††para selecionar “Gestor canais” e, em seguida,
pressione o botão ENTER.
Adicionando canais
Com o Gestor de Canais, você pode adicionar os canais.
3. Selecione “Gestor canais” pressionando o botão ENTER.
4. Vá até o campo ( ) pressionando os botões
…… / ††
/ œ / √, selecione o
canal a ser adicionado e pressione o botão ENTER para adicioná-lo.
➢
Se você pressionar o botão ENTER novamente, o símbolo ( ) ao lado do canal
desaparece e o canal não é adicionado.
5. Pressione o botão RETURN para retornar ao “Gestor canais”.
Bloqueando canais
Este recurso permite que você impeça usuários não autorizados, como crianças, de
assistirem a programas inadequados ao ativar o mute do vídeo e do áudio.
6. Pressione o botão ……ou ††para selecionar “Bloqueio de CH.”, e pressione o
botão ENTER.
7. Pressione “Ligado” pressionando os botões ……ou ††e a seguir o botão
ENTER.
8. Pressione o botão ……ou ††para selecionar “Gestor canais” e, em seguida,
pressione o botão ENTER.
9. Vá até o campo ( ) pressionando os botões
…… / ††
/ œ / √, selecione o
canal a ser bloqueado e pressione o botão ENTER.
Pressione o botão EXIT para sair.
➢
Se você pressionar o botão ENTER novamente, o símbolo ( ) ao lado do canal
desaparece e o bloqueio do canal é cancelado.
➢
Uma tela azul é exibida quando o Bloqueio para Criança está ativado.
Pressione o botão CH LIST no controle remoto para exibir uma lista de canais.
Português-33
Page 90

Sintonia fina dos canais analógicos
Utilize a sintonia fina para ajustar manualmente um canal particular para ótima recepção.
TV
Ar/Cabo : Ar
Prog. Auto
Gestor canais
Sintonia fina
Sistema de cor : Auto
Canal
1. Pressione o botão MENU para exibir o menu.
Pressione o botão ……ou ††para selecionar “Canal” e, em seguida, pressione o
botão ENTER.
2. Pressione o botão ……ou ††para selecionar “Sintonia fina” e, em seguida,
pressione o botão ENTER.
Mover Entrar
Sintonia fina
Ar 3
Restaurar Padrões
Ajuste
Ar 3 *
Ajuste
Ar 3
Mover
Salvar
Sintonia fina
Restaurar Padrões
Salvar
Sintonia fina
Restaurar Padrões
Entrar
Retornar
0
Retornar
+10
Retornar
0
Retornar
3. Pressione o botão œ ou √ para ajustar a sintonia fina.
4. Para armazenar a definição da sintonia fina na memória da TV, pressione o
botão ENTER.
Para retornar a sintonia fina, pressione o botão ††para selecionar “Padrão” e,
depois, pressione o botão ENTER.
Pressione o botão EXIT para sair.
➢
Somente canais de TV analógicos podem ser submetidos a ajuste de sintonização fina.
➢
“*” aparecerá junto ao número dos canais com sintonia fina.
Ajustando o sistema de cores
Normalmente, a TV pode receber imagem e som de boa qualidade no modo Auto. Este modo detecta automaticamente as fontes de sinais
da cor.
Se a implementação da cor for insatisfatória, selecione PAL-M, PAL-N ou NTSC.
TV
Ar/Cabo : Ar
Prog. Auto
Gestor canais
Sintonia fina
Sistema de cor : Auto
Canal
1. Pressione o botão MENU para exibir o menu.
Pressione o botão ……ou ††para selecionar “Canal” e, em seguida, pressione o
botão ENTER.
2. Pressione o botão ……ou ††para selecionar “Sistema de cor” e, em seguida,
pressione o botão ENTER.
TV
Mover Entrar
Ar/Cabo : Ar
Prog. Auto
Gestor canais
Sintonia fina
Sistema de cor : Auto
Canal
Mover Entrar
Auto
PAL-M
PAL-N
NTSC
Retornar
3. Pressione o botão ……ou ††para selecionar o padrão desejado da cor (AUTO,
PAL-M, PAL-N, NTSC) e pressione o botão ENTER .
Pressione o botão EXIT para sair.
Retornar
Português-34
Page 91

Display do computador
Utilizando sua TV como display do computador (PC)
Como configurar o software do PC (baseado no Windows XP)
Os ajustes de exibição do Windows para um computador padrão são exibidos a seguir. As telas do PC provavelmente serão diferentes,
dependendo da versão particular do Windows e da placa de vídeo. Porém, as mesmas informações de configuração básica serão aplicadas
na maioria dos casos, ainda que as telas sejam diferentes. (Do contrário, entre em contato com o fabricante do computador ou com o
representante da Samsung.)
1. Primeiro, clique em “Control Panel” (Painel de Controle) no menu Inicial do Windows.
2. Quando a janela do painel de controle for exibida, clique em “Aparência e temas”
(Appearance and Themes) e irá aparecer uma caixa de diálogo.
3. Quando a janela do painel de controlo for exibida, clique em “Display” (Exibir) e irá
aparecer uma caixa de diálogo.
4. Navigate to the “Settings” (Configurações) tab on the display dialog-box.
A definição do tamanho correto (resolução)
Otimizado: 1024 x 768 pixels
Se existir uma opção de freqüência vertical na caixa de diálogo de ajustes do display, o
valor correto é “60” ou “60 Hz.” Do contrário, basta clicar “OK” e sair da caixa de diálogo.
Modos de visualização
Se o sinal do sistema for igual ao modo de sinal padrão, a tela se ajusta automaticamente. Se o sinal do sistema não for igual ao modo de sinal padrão, ajuste o
modo consultando o guia do usuário da placa de vídeo; do contrário, poderá não haver vídeo. Para os modos de visualização abaixo, a imagem da tela foi
otimizada durante a fabricação.
P
N
N
N
N
P
P
P
N
N
P
P
PL-42C91HP/
PL-42Q91HP/
PL-42C71HP
✔
✔
✔
✔
✔
✔
✔
✔
✔
✔
✔
✔
✔
✔
PL-50C91H/
PL-50Q91HP
✔
✔
✔
✔
✔
✔
✔
✔
✔
✔
✔
✔
✔
✔
✔
Sinal de vídeo
IBM PC / AT
Compatível
•O modo entrelaçado não é compatível.
•ATV opera de forma anormal se for selecionado um formato de vídeo fora do padrão.
•Atabela acima segue os regulamentos IBM/VESA e não está baseada no uso da entrada analógica.
• Uma marca “
➢
• A qualidade do texto no PC fica melhor no modo XGA (1024 x 768@60Hz). (PL-42C91HP/PL-42Q91HP/PL-42C71HP).
• A qualidade do texto no PC fica melhor no modo WXGA (1360 x 768@60Hz). (PL-50C91H/PL-50Q91HP)
(Três pixels à esquerda, direita, acima e abaixo serão sombreados na configuração de resolução 1360x768 a 60Hz. Isto não é um problema mecânico, mas sim um
resultado causado pela diferença de pixel entre a resolução padrão e o painel do monitor).
• Quando esta TV é usada como monitor de computador, são aceitas cores de 32 bits.
• Dependendo do fabricante, a tela do seu PC pode ter uma aparência diferente. (e também dependendo da sua versão específica do Windows).
Verifique no manual do seu PC as informações sobre como conectar o PC a uma TV.
• Se existir um modo de Freqüência vertical e Freqüência horizontal, selecione 60Hz (vertical) e 48,4KHz (horizontal).
• Em alguns casos, sinais anormais (como faixas) podem aparecer na tela da TV quando o PC é desligado (ou desconectado).
Nesse caso, pressione o botão SOURCE no controle remoto ou no painel lateral para entrar no modo “VÍDEO”. Além disso, verifique se o PC está conectado.
Resolução
(Ponto x Linha)
640 x 350
720 x 400
640 x 480
800 x 600
1024 x 768
1360 x 768
✔
” significa que esse modo pode ser compatível.
Freqüência
Vertical (Hz)
70.086
70.087
59.940
70.000
72.809
75.000
60.317
70.000
72.188
75.000
60.004
70.069
72.000
75.029
60.015
Freqüência
horizontal (KHz)
31.469
31.469
31.469
35.000
37.861
37.500
37.879
43.750
48.077
46.875
48.363
56.476
57.672
60.023
47.712
Polaridade
vertical
N
P
N
N/P
N
N
P
N/P
P
P
N
N
N/P
P
P
Polaridade
horizontal
N/P
N/P
N/P
Português-35
Page 92

Configurando a TV com o seu PC
Como efetuar
o ajuste automático
Utilize a função Ajuste Automático para que a TV ajuste automaticamente os sinais de vídeo recebidos do PC.
Esta função também sintoniza automaticamente as definições e ajusta os valores e posições da freqüência.
➢ Este recurso não funciona no modo DVI-Digital.
➢ Primeiro, mude para o modo PC.
TV
TV
Auto ajuste em andamento
Ajustando a qualidade da tela
O propósito de ajustar a qualidade da imagem é o de remover ou reduzir interferências da imagem.Se a interferência não for
removida somente com sintonização fina, então ajuste a freqüência ao máximo e efetue novamente a sintonização fina. Após ter
reduzido a interferência, ajuste novamente a imagem, de modo que ela fique centralizada na tela.
Configuração
Mais
PC
PC+home theater : Desligado
Light Effect :
Economia energia
Proteção de tela
Nível de preto HDMI
Mais
Mover Entrar
Bloq. Imagem
Posição
Auto Ajuste
Reset Imagem
Mover Entrar
Aguarde por favor
Modo Standby ativo
: Desligado
: Normal
PC
1. Pressione o botão MENU para exibir o menu.
Pressione o botão ……ou ††para selecionar “Configuração” e, depois, pressione o
botão ENTER.
Pressione o botão ……ou ††para selecionar “PC” e, depois, pressione o botão
ENTER.
Retornar
2. Pressione o botão ……ou ††para selecionar “Auto Ajuste” e, depois, pressione o botão
ENTER.
A mensagem “Auto ajuste em andamento Aguarde por favor” aparece na tela e os
ajustes da imagem são ativados automaticamente.
Pressione o botão EXIT para sair.
Retornar
➢ Primeiro, mude para o modo PC.
TV
Bloq. Imagem
Posição
Auto Ajuste
Reset Imagem
PC
1. Pressione o botão MENU para exibir o menu.
Pressione o botão ……ou ††para selecionar “Configuração” e, em seguida, pressione
o botão ENTER.
Pressione o botão ……ou ††para selecionar “PC” e, em seguida, pressione o botão
ENTER.
2. Pressione o botão ENTER para selecionar “Bloq. Imagem”.
Mover Entrar
TV
Grosso 50
Ajuste fino 0
Mover Entrar
Grosso
Mover
Ajuste
Bloq. Imagem
Retornar
Retornar
50
Retornar
3. Pressione o botão ……ou ††para selecionar “Grosso” ou “Ajuste fino” e, em seguida,
pressione o botão ENTER.
Pressione o botão œ ou √ para selecionar a qualidade da tela e, em seguida,
pressione o botão ENTER.
Pressione o botão EXIT para sair.
➢
Essa função pode alterar a largura da imagem. Se necessário, ajuste a posição para o
centro.
Continuação...
Português-36
Page 93

Alterando a posição da tela
Após conectar a TV ao PC, ajuste a posição da tela se não estiver bem alinhada.
➢ Primeiro, mude para o modo PC.
TV
TV
Bloq. Imagem
Posição
Auto Ajuste
Reset Imagem
Mover Entrar
PC
Posição
Retornar
1. Pressione o botão MENU para exibir o menu.
Pressione o botão ……ou ††para selecionar “Configuração” e, em seguida,
pressione o botão ENTER.
Pressione o botão ……ou ††para selecionar “PC” e, em seguida, pressione o botão
ENTER.
2. Pressione o botão ……ou ††para selecionar “Posição” e, em seguida, pressione o
botão ENTER.
3. Pressione o botão ……ou ††para ajustar a posição vertical.
Pressione o botão œ ou √ para ajustar a posição horizontal.
Pressione o botão ENTER.
Pressione o botão EXIT para sair.
Mover Entrar
Retornar
Inicializando a posição da tela
➢ Primeiro, mude para o modo PC.
TV
Bloq. Imagem
Posição
Auto Ajuste
Reset Imagem
Mover Entrar
Reset de imagem concluído
PC
1. Pressione o botão MENU para exibir o menu.
Pressione o botão ……ou ††para selecionar “Configuração” e, em seguida, pressione o
botão ENTER.
Pressione o botão ……ou ††para selecionar “PC” e, em seguida, pressione o botão
ENTER.
2. Pressione o botão ……ou ††para selecionar “Reset Imagem” e pressione o botão
Retornar
ENTER.
A mensagem “Reset de imagem concluído" aparece na tela.
Pressione o botão EXIT para sair.
➢
As definições estabelecidas anteriormente retornarão aos padrões de fábrica.
Definição do PC+home theater
Você pode ver imagens de alta definição ajustando as configurações da tela no Modo PC. Colocando a função PC Home Theater em
Ligado, é possível ajustar as Configurações Detalhadas (quando o Modo Imagem estiver em Padrão ou Filme) como no Modo PC.
TV
TV
Configuração
Mais
PC
PC+home theater : Desligado
Light Effect :
Economia energia
Proteção de tela
Nível de preto HDMI
Mais
Mover Entrar
Mais
PC
PC+home theater : Desligado
Light Effect :
Economia energia
Proteção de tela
Nível de preto HDMI
Mais
Mover Entrar
Modo Standby ativo
: Desligado
: Normal
Configuração
Desligado
Modo Standby ativo
: Desligado
: Normal
Ligado
Retornar
Retornar
1. Pressione o botão MENU para exibir o menu.
Pressione o botão ……ou ††para selecionar “Configuração” e, em seguida,
pressione o botão ENTER.
2. Pressione o botão ……ou ††para selecionar “PC+home theater” e pressione o botão
ENTER.
3. Pressione o botão ……ou ††para selecionar “Desligado” ou “Ligado” e, em seguida,
pressione o botão ENTER.
Pressione o botão EXIT para sair.
➢
Essa função está disponível somente no modo PC.
Português-37
Page 94

Ajuste da hora
Ajustando o relógio
O ajuste do relógio é necessário para usar os diversos recursos de timer da TV.
Você também poderá ver a hora quando estiver assistindo a TV. (Basta pressionar o botão INFO.)
TV
Plug & Play
Idioma : Português
Hora
Closed Caption
Modo Jogo : Desligado
Tela Azul : Desligado
Melodia : Desligado
Mais
Mover Entrar
TV
Ajuste Relógio : 12 : 00 am
Sleep Timer : Desligado
Timer1 : desativado
Timer2 : desativado
Timer3 : desativado
Mover Entrar
TV
Mês01Data01Ano
Hora12Minuto00am/pm
Mover Ajuste
Configuração
Hora
Ajuste Relógio
Retornar
Retornar
2007
am
Retornar
1. Pressione o botão MENU para exibir o menu.
Pressione o botão ……ou ††para selecionar “Configuração” e, depois, pressione o
botão ENTER.
Pressione o botão ……ou ††para selecionar “Hora” e, depois, pressione o botão
ENTER.
2. Pressione o botão ENTER para selecionar “Ajuste Relógio”.
3. Pressione o botão œ ou √ para mover para “Mês”, "Data”, “Ano”, “Hora”, “Minuto”
ou “am/pm”. Defina a data e a hora desejadas pressionando o botão … ou † e,
depois, pressione o botão ENTER.
Pressione o botão EXIT para sair.
➢
A hora atual será exibida sempre que você pressionar o botão INFO.
➢
É possível ajustar diretamente Mês, Data, Ano, Hora e Minuto, pressionando as teclas
numéricas do controle remoto.
Português-38
Page 95

Ajustando o Sleep Timer
O Sleep Timer desliga automaticamente a TV depois de um tempo predefinido (de 30 a 180 minutos).
TV
Plug & Play
Idioma : Português
Hora
Closed Caption
Modo Jogo : Desligado
Tela Azul : Desligado
Melodia : Desligado
Mais
Mover Entrar
TV
Ajuste Relógio : 12 : 00 am
Sleep Timer : Desligado
Timer1 : desativado
Timer2 : desativado
Timer3 : desativado
Mover Entrar
TV
Ajuste Relógio : 12 : 00 am
Sleep Timer : Desligado
Timer1 : desativado
Timer2 : desativado
Timer3 : desativado
Mover Entrar
Configuração
Hora
Hora
Desligado
30
60
90
120
150
180
1. Pressione o botão MENU para exibir o menu.
Pressione o botão ……ou ††para selecionar “Configuração” e, em seguida, pressione
o botão ENTER.
Pressione o botão ……ou ††para selecionar “Hora” e, depois, pressione o botão
ENTER.
Retornar
2. Pressione o botão ……ou ††para selecionar “Sleep Timer” e, depois, pressione o
botão ENTER.
Retornar
3. Pressione o botão ……ou ††para selecionar o intervalo de tempo em que a TV
permanecerá ligada e depois pressione o botão ENTER.
Esse intervalo varia de 30 a 180 minutos.
Pressione o botão EXIT para sair.
Retornar
Pressione o botão SLEEP no controle remoto até que o intervalo de tempo apropriado
apareça (qualquer um dos valores predefinidos de “30 min” a “180 min”).
Português-39
Page 96

Ajustando o timer para On/Off
TV
Plug & Play
Idioma : Português
Hora
Closed Caption
Modo Jogo : Desligado
Tela Azul : Desligado
Melodia : Desligado
Mais
Mover Entrar
TV
Ajuste Relógio : 12 : 00 am
Sleep Timer : Desligado
Timer1 : desativado
Timer2 : desativado
Timer3 : desativado
Mover Entrar
TV
Tempo ligado
12 :00 am inativar
Tempo desligado
12 : 00 am inativar
Repetir
Volume Canal
10 STD 3
Mover Ajuste
Configuração
Hora de Ligar
Uma vez
Hora
Retornar
Retornar
Retornar
1. Pressione o botão MENU para exibir o menu.
Pressione o botão ……ou ††para selecionar “Configuração” e, em seguida, pressione
o botão ENTER.
Pressione o botão ……ou ††para selecionar “Hora” e, depois, pressione o botão
ENTER.
2. Pressione o botão ……ou ††para selecionar “Timer1”, “Timer2” ou “Timer3” e,
depois, pressione o botão ENTER. É exibido o menu do temporizador (timer).
Pressione o botão ……ou ††para ajustar a hora e, depois, pressione o botão √ para
ir para a próxima etapa. Ajuste os outros itens como explicado acima.
3. Pressione o botão œ ou √ para selecionar o item necessário abaixo.
Pressione o botão ……ou ††para ajustar a configuração correspondente.
Pressione o botão EXIT para sair.
• Tempo ligado: Selecione Hora, Minuto, am/pm e inativar/Ativar.
(Para ativar o temporizador com a configuração correspondente,
coloque em Ativar.)
• Tempo desligado: Selecione Hora, Minuto, am/pm e inativar/Ativar.
(Para ativar o temporizador com a configuração correspondente,
coloque em Ativar.)
• Repetir: Selecione Uma vez, Todos os dias, Seg-Sex, Seg~Sab ou
Sábado ~ Domingo
• Volume: Selecione o nível de volume necessário.
• Canal: Selecione o canal necessário.
➢
É possível ajustar diretamente Mês, Data, Ano, Hora e Minuto, pressionando as teclas
numéricas do controle remoto.
➢
Desligamento automático
Ao ajustar o timer para “Ligado”, sua TV será desligada se você não operar o controle
durante as próximas 3 horas após o timer tê-la ligado. Esta função está disponível
somente no modo timer “Ligado” e impede o superaquecimento, que pode ocorrer se a TV
for deixada ligada por muito tempo.
Português-40
Page 97

Descrição das funções
Selecionando um idioma do menu
TV
TV
Configuração
Plug & Play
Idioma : Português
Hora
Closed Caption
Modo Jogo : Desligado
Tela Azul : Desligado
Melodia : Desligado
Mais
Mover Entrar
Configuração
Plug & Play
Idioma : Português
Hora
Closed Caption
Modo Jogo : Desligado
Tela Azul : Desligado
Melodia : Desligado
Mais
Mover Entrar
English
Français
Español
Português
1. Pressione o botão MENU para exibir o menu.
Pressione o botão ……ou ††para selecionar “Configuração” e, em seguida, pressione
o botão ENTER.
Pressione o botão ……ou ††para selecionar “Idioma” e, depois, pressione o botão
ENTER.
Retornar
2. Pressione o botão ……ou ††para selecionar o idioma apropriado: “English”,
“Français”, “Español”, ou “Português”, e pressione o botão ENTER.
Pressione o botão EXIT para sair.
Retornar
Visualizando Closed Captions
Sua TV decodifica e exibe o recurso closed captions transmitido em determinadas apresentações de TV. Essas closed captions normalmente
são legendas para deficientes auditivos ou traduções em idiomas estrangeiros. Todos os VCRs gravam o sinal closed caption de programas
de TV; assim, as fitas de vídeo gravadas também fornecem closed captions. A maioria das fitas de vídeo comerciais também fornece closed
captions. Verifique o símbolo closed caption na lista de sua TV e na embalagem da fita: .
➢
O recurso Caption não funciona Component, PC o HDMI modo.
TV
TV
Configuração
Plug & Play
Idioma : Português
Hora
Closed Caption
Modo Jogo : Desligado
Tela Azul : Desligado
Melodia : Desligado
Mais
Mover Entrar
Closed Caption
Closed Caption : Desligado
Modo : Closed
Canal : 1
Campo : 1
Desligado
Closed Caption
Ligado
1. Pressione o botão MENU para exibir o menu.
Pressione o botão ……ou ††para selecionar “Configuração” e, em seguida, pressione
o botão ENTER.
Pressione o botão ……ou ††para selecionar “Closed Caption” e, em seguida,
pressione o botão ENTER.
Retornar
2. Pressione o botão ENTER para selecionar “Closed Caption”.
Pressione o botão ……ou ††para selecionar “Ligado” e, em seguida, pressione o
botão ENTER.
Mover Entrar
Retornar
Continuação...
Português-41
Page 98

TV
Closed Caption : Ligado
Modo : Caption
Canal : 1
Campo : 1
Closed Caption
Closed Caption
Texto
3. Pressione o botão ……ou ††para selecionar “Modo” e, em seguida, pressione o
botão ENTER.
Pressione o botão ……ou ††para selecionar “Closed Caption” ou “Text” e, em
seguida, pressione o botão ENTER.
1
2
Retornar
4. Dependendo do tipo de transmissão específica, talvez seja necessário fazer
alterações em “Canal” e “Field”: Pressione o botão
…… /†† /œœ/√√
para fazer as
alterações. (Siga o mesmo procedimento mencionado nas etapas 3 acima).
Pressione o botão EXIT para sair.
➢
Os diferentes canais e campos exibem informações distintas. O Campo 2 oferece
Mover Entrar
TV
Closed Caption : Ligado
Modo : Closed Caption
Canal : 1
Campo : 1
Closed Caption
informações que suplementam as do Campo 1. (Por exemplo: O canal 1 pode ter
Mover Entrar
Retornar
legendas em inglês, ao passo que o canal 2 tem legendas em espanhol)
➢
O recurso Caption não funciona nos modos Component, PC, HDMI.
➢
A disponibilidade das legendas depende do programa que está sendo transmitido.
Pressione o botão CAPTION no controle remoto para selecionar “Ligado” ou “Desligado”.
Utilizando o modo Jogo
Na conexão a um console de jogos como PlayStationTMou XboxTM, você pode desfrutar de uma experiência mais realista com a seleção do
modo Jogo.
TV
TV
Configuração
Plug & Play
Idioma : Português
Hora
Closed Caption
Modo Jogo : Desligado
Tela Azul : Desligado
Melodia : Desligado
Mais
Mover Entrar
Configuração
Plug & Play
Idioma : Português
Hora
Closed Caption
Modo Jogo : Desligado
Tela Azul : Desligado
Melodia : Desligado
Mais
Mover Entrar
Desligado
Ligado
Retornar
Retornar
1. Pressione o botão MENU para exibir o menu.
Pressione o botão ……ou ††para selecionar “Configuração” e, em seguida, pressione
o botão ENTER.
2. Pressione o botão ……ou ††para selecionar “Modo Jogo” e, em seguida, pressione o
botão ENTER.
3. Selecione “Ligado” ou “Desligado” pressionando o botão ……ou ††e, depois, pressione o
botão ENTER.
4. Pressione o botão EXIT para sair.
➢
Restrições do modo Jogo (cuidado)
• Para conectar o console de jogos e conectar outro
dispositivo externo, desative o modo Jogo no menu
da configuração.
• Se você exibir o menu da TV no modo Jogo, a tela
oscila levemente.
• A marca ( ) aparece na tela, o que significa que o
modo jogo está ativado com a fonte selecionada.
➢
Se o modo Jogo estiver ativado
• O modo Imagem é alterado automaticamente para Padrão e os usuários não podem
alterá-lo.
• O modo Som no menu Som é desativado. Ajuste o som utilizando o equalizador.
• A opção Padrão no menu Som é desativada. A função Padrão inicializa as definições do
Equalizador para os ajustes padrão de fábrica.
➢
O modo Jogo está desligado no modo TV.
➢
Se a imagem estiver inadequada quando o dispositivo externo estiver conectado à TV,
verifique se o modo Jogo está Ligado. Defina o modo Jogo como Desligado e conecte os
dispositivos externos.
AV1
Modo Jogo
Português-42
Page 99

Definindo o modo de tela azul
Se nenhum sinal for recebido ou se o sinal estiver muito fraco, uma tela azul substituirá automaticamente o fundo da imagem com ruído.
Se você deseja continuar visualizando uma imagem de qualidade inferior, deve ajustar o modo “Tela Azul” para “Desligado”.
TV
TV
Configuração
Plug & Play
Idioma : Português
Hora
Closed Caption
Modo Jogo : Desligado
Tela Azul : Desligado
Melodia : Desligado
Mais
Mover Entrar
Configuração
Plug & Play
Idioma : Português
Hora
Closed Caption
Modo Jogo : Desligado
Tela Azul : Desligado
Melodia : Desligado
Mais
Mover Entrar
Desligado
Ligado
Retornar
Retornar
1. Pressione o botão MENU para exibir o menu.
Pressione o botão ……ou ††para selecionar “Configuração” e, em seguida,
pressione o botão ENTER.
2. Pressione o botão ……ou ††para selecionar “Tela Azul” e, em seguida, pressione
o botão ENTER.
3. Pressione o botão ……ou ††para selecionar “Desligado” ou “Ligado” e, em seguida,
pressione o botão ENTER.
Pressione o botão EXIT para sair.
➢
A tela azul é exibida quando não há sinal de um dispositivo externo,
independentemente do ajuste da Tela azul.
Ajustando a função Ligar/desligar melodia
É possível fazer com que uma melodia seja tocada quando a TV for ligada ou desligada.
TV
TV
Configuração
Plug & Play
Idioma : Português
Hora
Closed Caption
Modo Jogo : Desligado
Tela Azul : Desligado
Melodia : Desligado
Mais
Mover Entrar
Configuração
Plug & Play
Idioma : Português
Hora
Closed Caption
Modo Jogo : Desligado
Tela Azul : Desligado
Melodia : Desligado
Mais
Mover Entrar
Desligado
Baixa
Médio
Alto
1. Pressione o botão MENU para exibir o menu.
Pressione o botão ……ou ††para selecionar “Configuracao” e, em seguida,
pressione o botão ENTER.
2. Pressione o botão ……ou ††para selecionar “Melodia” e, em seguida, pressione o
botão ENTER.
Retornar
3. Pressione o botão ……ou ††para selecionar “Desligado” ou “Ligado” e, em seguida,
pressione o botão ENTER.
Pressione o botão EXIT para sair.
Retornar
Configurando o Light Effect (efeito luminoso)
Você pode ligar/desligar o LED azul na parte frontal da TV de acordo com a situação. Utilize esse recurso para economizar energia ou
quando o LED ofuscar a vista.
TV
TV
Configuração
Mais
PC
PC+home theater : Desligado
Light Effect :
Economia energia
Proteção de tela
Nível de preto HDMI
Mais
Mover Entrar
Mais
PC
PC+home theater : Desligado
Light Effect :
Economia energia
Proteção de tela
Nível de preto HDMI
Mais
Mover Entrar
Modo Standby ativo
: Desligado
: Normal
Configuração
Desligado
Modo Standby ativo
Modo standby ativo
: Desligado
Modo de visualização ativo
Ligado
: Normal
Retornar
Retornar
1. Pressione o botão MENU para exibir o menu.
Pressione o botão ……ou ††para selecionar “Configuração” e, em seguida,
pressione o botão ENTER.
2. Pressione o botão ……ou ††para selecionar “Light Effect” e, depois, pressione o botão
ENTER.
Pressione o botão ……ou ††para selecionar o submenu (Desligado, Modo Standby
ativo, Modo de visualização ativo ou Ligado) desejado e então pressione o botão
ENTER.
Pressione o botão EXIT para sair.
Desligado (Off): O LED azul fica sempre desligado.
Modo standby ativo (Standby Mode ON):
O LED azul acende no modo Standby e desliga quando a TV é ligada.
Modo de visualização ativo (Watching Mode ON):
O LED azul liga enquanto você assiste à TV e desliga quando a TV é
desligada.
Ligado (On): O LED azul fica sempre aceso.
➢
Ajuste o Light Effect em Desligado para reduzir o consumo de energia.
Português-43
Page 100

Usando o recurso Economia de energia
Este recurso ajusta o brilho da tela automaticamente, dependendo das condições de iluminação do ambiente.
TV
TV
Configuração
Mais
PC
PC+home theater : Desligado
Light Effect :
Economia energia
Proteção de tela
Nível de preto HDMI
Mais
Mover Entrar
Mais
PC
PC+home theater : Desligado
Light Effect :
Economia energia
Proteção de tela
Nível de preto HDMI
Mais
Mover Entrar
Modo Standby ativo
: Desligado
: Normal
Configuração
Modo Standby ativo
: Desligado
Desligado
: Normal
Baixa
Médio
Alto
Retornar
Retornar
1. Pressione o botão MENU para exibir o menu.
Pressione o botão ……ou ††para selecionar “Configuração” e, em seguida,
pressione o botão ENTER.
2. Pressione o botão ……ou ††para selecionar “Economia energ.” e pressione o botão
ENTER.
Pressione o botão ……ou ††para selecionar o submenu desejado (Desligado, Baixa,
Médio ou Alto) e então pressione o botão ENTER.
Pressione o botão EXIT para sair.
Desligado: Desativa o recurso Economia de energia.
Baixa: Ajusta o brilho da tela da TV para um nível máximo, independente
da iluminação ambiente. A eficiência da economia de energia é
baixa.
Médio: Ajusta o brilho da tela da TV para um nível médio, independente
Alto: Ajusta o brilho da tela da TV para o mais escuro, independente da
da iluminação ambiente. A eficiência da economia de energia é a
média.
iluminação ambiente. A energia é economizada com mais eficiência.
Evitando queima de tela
Para reduzir a possibilidade de queima de tela, esta unidade é equipada com tecnologia de prevenção contra queima de tela. Essa
tecnologia permite ajustar o movimento da imagem para cima/para baixo (Linha vertical) e de um lado a outro (Ponto horizontal).
A opção Hora permite programar a hora entre o movimento da imagem em minutos.
TV
TV
Configuração
Mais
PC
PC+home theater : Desligado
Light Effect :
Economia energia
Proteção de tela
Nível de preto HDMI
Mais
Mover Entrar
Deslocamento de Pixel
Tela Branca
Sinal Padrão
Cinza lateral : Escuro
Modo Standby ativo
: Desligado
: Normal
Proteção de tela
1. Pressione o botão MENU para exibir o menu.
Pressione o botão ……ou ††para selecionar “Configuração” e, em seguida,
pressione o botão ENTER.
Retornar
2. Pressione o botão ……ou ††para selecionar “Proteção de tela” e depois pressione o
botão ENTER.
TV
TV
Mover Entrar
Deslocamento de Pixel
Deslocamento de Pixel
Ponto Horizontal : 4
Linha Vertical : 4
Hora : 4
Mover Entrar
Deslocamento de Pixel
Ponto Horizontal : 4
Linha Vertical : 4
Hora : 4
Mover Entrar
: On
Deslocamento de Pixel
:Ligado
Retornar
Desligado
Ligado
Retornar
0
1
2
3
4
Retornar
3. Pressione o botão ENTER para selecionar “Desloc. de Pixel” e pressione o botão
ENTER.
Quando você pressionar o botão
as opções
“Ligado” e “Desligado”. Também aparecerão os itens “Ponto
……
ou ††esse procedimento alternará
Horizontal”, “Linha Vertical” e “Hora”.
Desloc. de Pixel: Ao utilizar esta função, você pode mover pixels no monitor PDP
de minuto em minuto, na direção horizontal ou vertical, para evitar pós-imagens na
tela.
4. Pressione o botão ……ou ††para selecionar o item a ser alterado e, depois, pressione
o botão ENTER.
Pressione o botão ……ou ††para alterar o valor do item e pressione o botão ENTER.
Condição ideal para deslocamento de pixels;
Ponto Horizontal
Linha Vertical
Hora (min)
2
2
2
O valor Deslocamento de Pixel pode variar de acordo com o tamanho do monitor
(em polegadas) e o modo.
Pressione o botão EXIT para sair.
Português-44
 Loading...