

Samsung OMNIA W, GT-I8350, OMNIA W GT-I8350 User Manual

GT-I8350
user manual

Using this manual
2
Using this manual
Thank you for purchasing this Samsung mobile device.
This device will provide you with high quality mobile
communication and entertainment based on Samsung’s
exceptional technology and high standards.
This user manual has been specially designed to guide you
through the functions and features of your device.
Read me rst
●
Please read all safety precautions and this manual carefully
before using your device to ensure safe and proper use.
●
The descriptions in this manual are based on the default
settings of your device.
●
Images and screenshots used in this user manual may dier
in appearance from the actual product.
●
Content in this user manual may dier from the product,
or from software provided by service providers or carriers,
and is subject to change without prior notice. Refer to
www.samsung.com for the latest version of the user
manual.
●
Available features and additional services may vary by
device, software, or service provider.
●
Formatting and delivery of this user manual is based on
Windows operating systems and may vary depending on
the user’s operating system.
●
Applications on this device may perform dierently from
comparable PC applications and may not include all
functions available in the PC version.
●
Applications and their functions may vary by country,
region, or hardware specications. Samsung is not liable for
performance issues caused by third-party applications.

Using this manual
3
●
Samsung is not liable for performance issues or
incompatibilities caused by edited registry settings or
modied operating system software. Attempting to
customise the operating system may cause your device or
applications to work improperly.
●
You may upgrade your mobile device’s software by
accessing www.samsung.com.
●
Software, sound sources, wallpapers, images, and other
contents provided in this device are licenced for limited use
between Samsung and their respective owners. Extracting
and using these materials for commercial or other purposes
is an infringement of copyright laws. Samsung is not liable
for such copyright infringement by the user.
●
This product includes certain free/open source
software. The exact terms of the licences, disclaimers,
acknowledgements and notices are available on the
Samsung’s website opensource.samsung.com.
●
Please keep this manual for future reference.
Instructional icons
Before you start, familiarise yourself with the icons you will
see in this manual:
Warning—situations that could cause injury to
yourself or others
Caution—situations that could cause damage to
your device or other equipment
Note—notes, usage tips, or additional information

Using this manual
4
►
Refer to—pages with related information; for
example:
► p. 12 (represents “see page 12”)
→
Followed by—the order of options or menus you
must select to perform a step; for example: In Menu
→
mode, select Settings
region+language →
Display language (represents Settings, followed by
region+language, followed by Display language)
[ ]
Square brackets—device keys; for example: [
]
(represents the Home key)
Copyright
Copyright © 2011 Samsung Electronics
This user manual is protected under international copyright
laws.
No part of this user manual may be reproduced, distributed,
translated, or transmitted in any form or by any means,
electronic or mechanical, including photocopying, recording,
or storing in any information storage and retrieval system,
without the prior written permission of Samsung Electronics.
Using this manual
5
Trademarks
●
SAMSUNG and the SAMSUNG logo are registered
trademarks of Samsung Electronics.
●
This product includes software
licensed from MS, an aliate
of the Microsoft Corporation.
Microsoft and software bearing
the Microsoft name are
registered trademarks of the Microsoft Corporation.
●
Bluetooth
Inc. worldwide.
●
Oracle and Java are registered trademarks of Oracle and/
or its aliates. Other names may be trademarks of their
respective owners.
●
Wi-Fi
®
registered trademarks of the Wi-Fi Alliance.
●
All other trademarks and copyrights are the property of
their respective owners.
is a registered trademark of the Bluetooth SIG,
®
, the Wi-Fi CERTIFIED logo, and the Wi-Fi logo are

Contents
Assembling ................................................................ 9
Unpack ...................................................................................... 9
Install the SIM or USIM card and battery .......................... 9
Charge the battery ............................................................... 11
Getting started ....................................................... 15
Turn your device on and o ............................................... 15
Get to know your device ..................................................... 16
Use the touch screen ........................................................... 19
Lock or unlock the touch screen and keys ..................... 21
Get to know the Start screen ............................................. 21
Access applications .............................................................. 22
Customise your device ........................................................ 22
Enter text ................................................................................ 25
Communication ..................................................... 27
Calling ..................................................................................... 27
Messaging .............................................................................. 31
Email ........................................................................................ 33
Entertainment ........................................................ 36
Camera .................................................................................... 36
Pictures ................................................................................... 41
Music+Videos ........................................................................ 43
Games ..................................................................................... 48
Personal information ............................................ 49
People ..................................................................................... 49
Calendar ................................................................................. 52
Contents
6

Web .......................................................................... 54
Internet Explorer .................................................................. 54
Maps ........................................................................................ 57
Marketplace ........................................................................... 59
Now .......................................................................................... 59
Deezer ..................................................................................... 63
Ligue 1 ..................................................................................... 63
Orange et Moi ........................................................................ 63
Orange Maps ......................................................................... 64
TV d’Orange ........................................................................... 64
wi d’Orange ......................................................................... 64
Connectivity ........................................................... 65
Bluetooth ................................................................................ 65
Wi-Fi ......................................................................................... 66
GPS ........................................................................................... 67
Tools ......................................................................... 69
Alarms ..................................................................................... 69
Calculator ............................................................................... 69
Help+How-to ......................................................................... 70
Oce ....................................................................................... 70
Search ...................................................................................... 73
Voice command .................................................................... 74
Settings .................................................................... 75
Access the Settings menu .................................................. 75
system ..................................................................................... 75
applications ........................................................................... 82
Contents
7

Troubleshooting .................................................... 88
Safety precautions ................................................. 93
Index ...................................................................... 104
Contents
8

Assembling
Unpack
Check your product box for the following items:
●
Mobile device
●
Battery
●
Travel adapter (charger)
●
Headset
●
Quick start guide
Use only Samsung-approved software. Pirated or illegal
software may cause damage or malfunctions that are
not covered by your manufacturer's warranty.
●
The items supplied with your device and available
accessories may vary depending on your region or
service provider.
●
You can purchase additional accessories from your
local Samsung dealer.
●
The supplied accessories perform best for your device.
●
Accessories other than the supplied ones may not be
compatible with your device.
Install the SIM or USIM card and battery
When you subscribe to a cellular service, you will receive
a Subscriber Identity Module (SIM) card, with subscription
details, such as your personal identication number (PIN) and
optional services. To use UMTS or HSDPA services, you can
purchase a Universal Subscriber Identity Module (USIM) card.
Assembling
9
Assembling
10
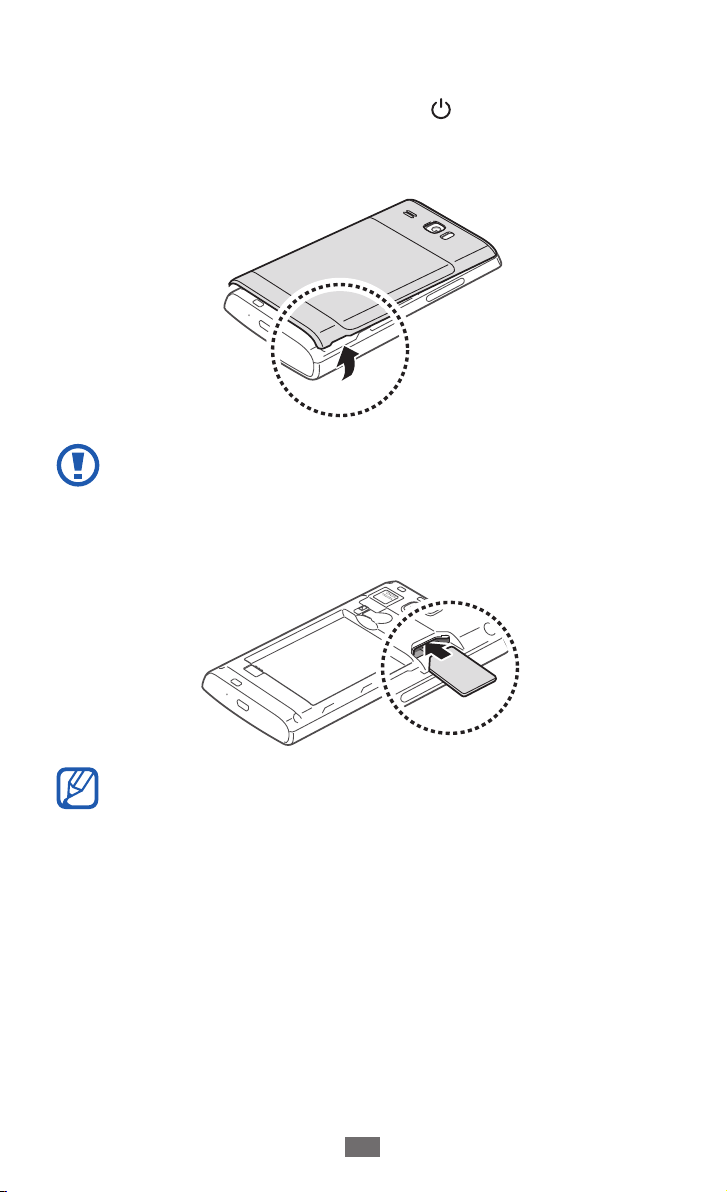
To install the SIM or USIM card and battery,
If the device is on, press and hold [
1
screen down with your nger.
Remove the back cover.
2
Be careful not to damage your ngernails when you
remove the back cover.
Insert the SIM or USIM card with the gold-coloured
3
contacts facing down.
] and drag the lock
If you do not insert a SIM or USIM card, you can only use
your device’s non-network services and some menus.
Assembling
11
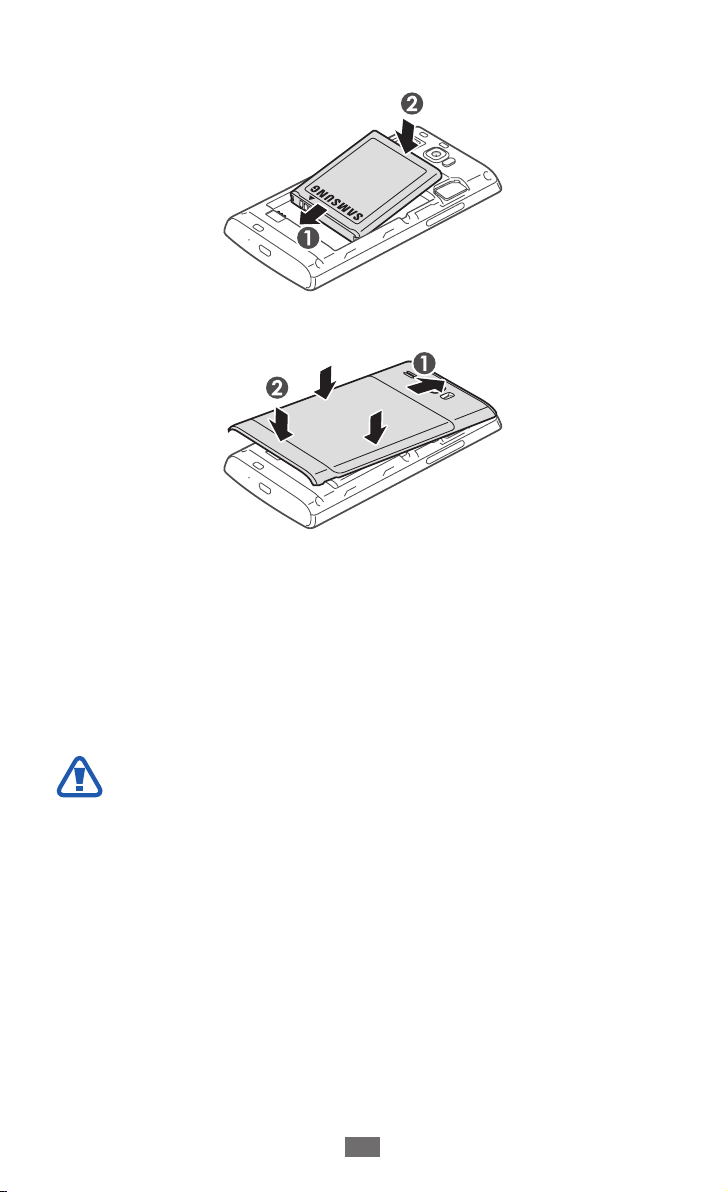
Insert the battery.
4
Replace the back cover.
5
Charge the battery
Before using the device for the rst time, you must charge the
battery.
You can charge the device with a travel adapter or by
connecting the device to a PC with a USB cable.
Use only Samsung-approved chargers and cables.
Unauthorised chargers or cables can cause batteries to
explode or damage your device.

Assembling
12
●
When your battery is low, the device will emit a
warning tone and display a low battery message. The
battery icon
becomes too low, the device will automatically power
o. Recharge your battery to continue using your
device.
●
If the battery is completely discharged, you cannot
turn on the device, even with the travel adapter
connected. Allow a depleted battery to charge for a
few minutes before you try to turn on the device.
Charge with a travel adapter
›
Plug the small end of the travel adapter into the
1
multifunction jack.
will also be empty. If the battery level
Connecting the travel adapter improperly may cause
serious damage to the device. Any damage caused by
misuse is not covered by the warranty.

Assembling
13
Plug the large end of the travel adapter into a power
2
outlet.
●
You can use the device while it is charging, but it may
take longer to fully charge the battery.
●
While the device is charging, the touch screen may
not function due to an unstable power supply. If this
happens, unplug the travel adapter from the device.
●
While charging, the device may heat up. This is
normal and should not aect your device’s lifespan or
performance.
●
If your device is not charging properly, bring your
device and the charger to a Samsung Service Centre.
When the battery is fully charged, rst unplug the travel
3
adapter from the device and then from the power outlet.
Do not remove the battery before removing the travel
adapter. Doing this may cause damage to the device.
To save energy, unplug the travel adapter when not in
use. The travel adapter does not have a power switch,
so you must unplug the travel adapter from the outlet
when not in use to avoid wasting power. The travel
adapter should remain close to the socket when in use.

Charge with a USB cable
›
Before charging, ensure that your PC is turned on.
Plug one end (micro-USB) of the USB cable into the
1
multifunction jack.
Plug the other end of the USB cable into a USB port on a
2
PC.
Depending on the type of USB cable you are using, it
may take some time before charging begins.
When the battery is fully charged, rst unplug the USB
3
cable from the device and then from the PC.
Assembling
14
Getting started
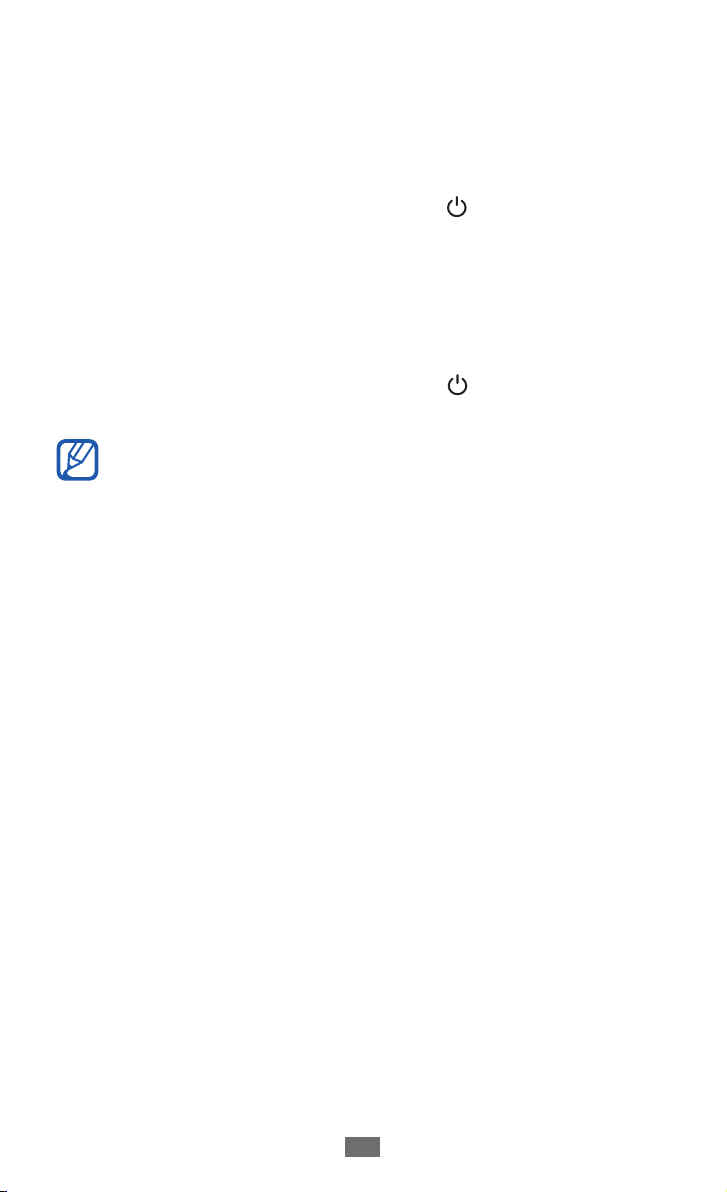
Turn your device on and o
To turn on your device, press and hold [ ]. If you turn on your
device for the rst time, follow the on-screen instructions to
set up your device.
You can log in to Windows Live or create a Windows Live
account to use applications that interact with the Windows
Live server.
To turn o your device, press and hold [
screen down with your nger.
●
Follow all posted warnings and directions from
authorised personnel in areas where the use of
wireless devices is restricted, such as aeroplanes and
hospitals.
●
To use your device's non-network services only,
switch to Flight mode. In Menu mode, select Settings
→
ight mode.
] and drag the lock
Getting started
15

Getting started
16
Get to know your device
Device layout
›
Earpiece
Volume key
Home key
Back key
Multifunction jack
Proximity sensor
Front camera lens
Touch screen
Search key
Mouthpiece

Getting started
17
Rear camera lens
Headset jack
Speaker
Power/Reset/Lock
key
Camera key
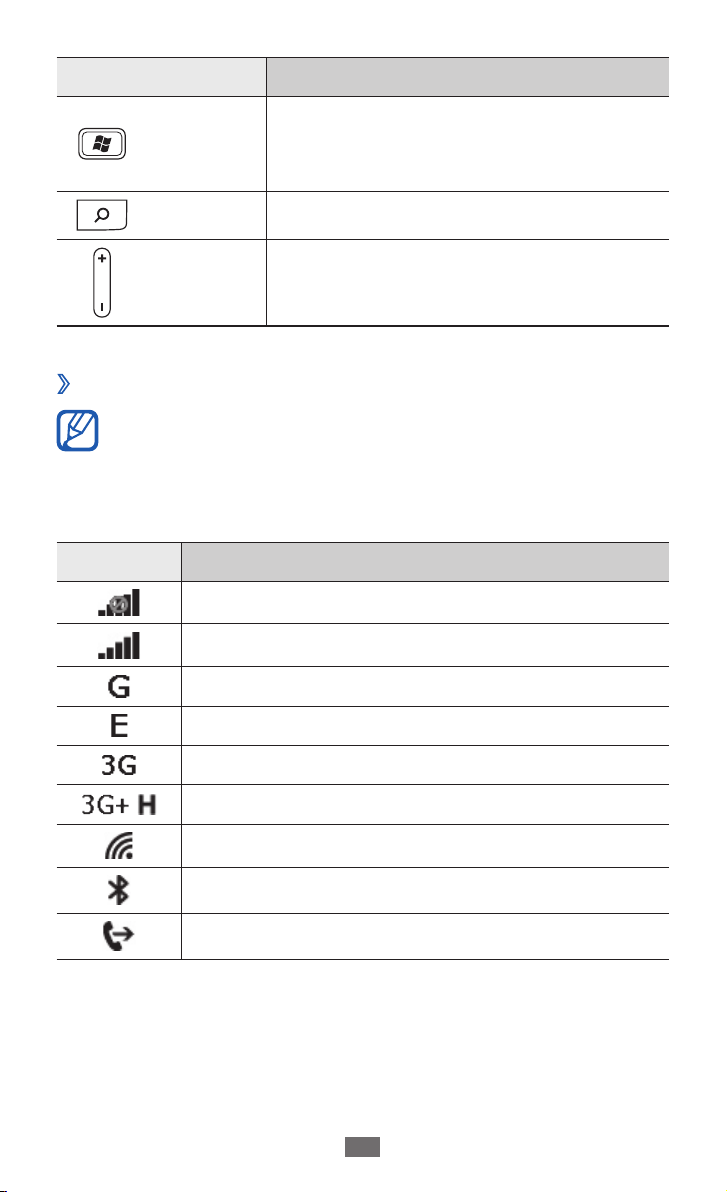
Keys
›
Key Function
Turn on the device (press and hold);
Power/
1
Reset
Lock
Reset the device (press and hold for
/
13-15 seconds until the SAMSUNG
logo appears); Lock the touch screen
and switch to Sleep mode.
Flashbulb
Back cover
Internal antenna
Camera
Turn on the camera; In Camera mode
take a photo or record a video.
Return to the previous screen;
Back
View open windows of all active
applications (press and hold).
1. If your device has fatal errors or hang-ups, or freezes, you may
need to reset the device to regain functionality.
Getting started
18
Key Function
Return to the Start screen; Launch the
Home
voice command feature (press and
hold).
Search Open the quick search bar.
Volume Adjust the device’s volume.
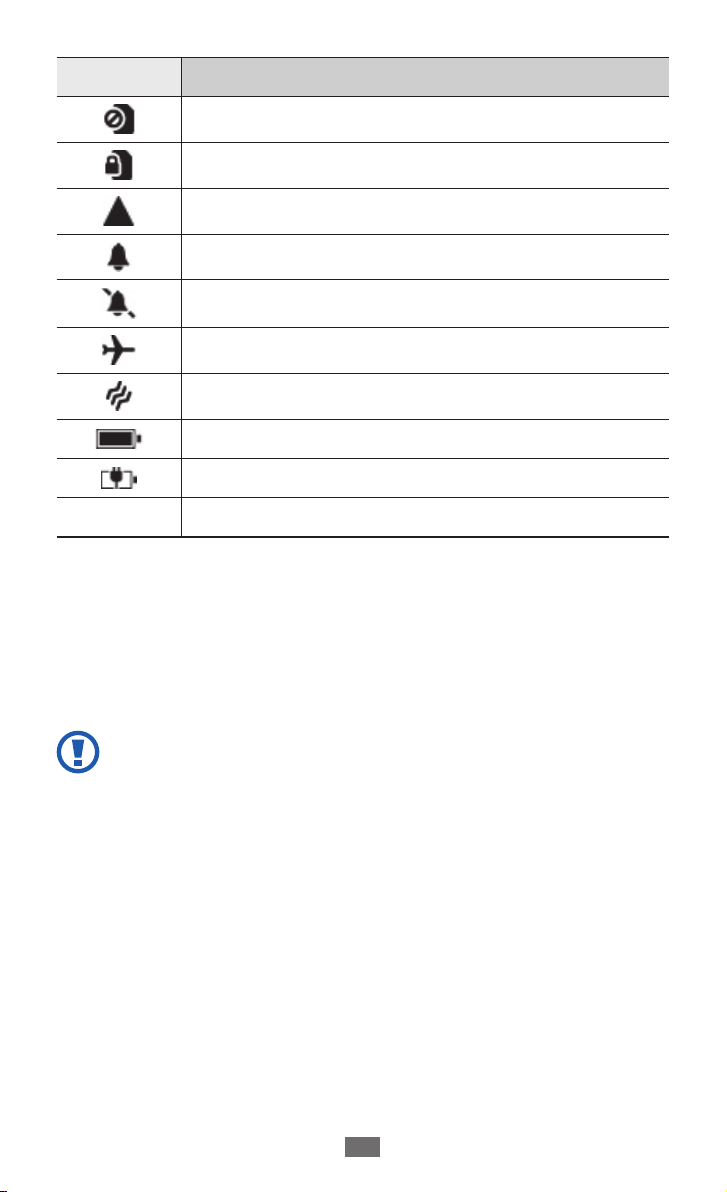
Indicator icons
›
●
Icons shown on the display may vary depending on
your region or service provider.
●
Some indicator icons may be hidden. To display
hidden icons, tap the indicator icon area.
Icon Denition
No signal
Signal strength
GPRS network connected
EDGE network connected
UMTS network connected
/
HSDPA/HSUPA network connected
WLAN activated
Bluetooth device connected
Call diverting activated
Getting started
19
Icon Denition
No SIM or USIM card
SIM or USIM card locked
Roaming (outside of normal service area)
Ringer on
Silent mode activated
Flight mode activated
Vibration mode activated
Battery power level
Charging battery
10:00
Current time
Use the touch screen
Your device’s touch screen lets you easily select items or
perform functions. Learn basic actions to use the touch
screen.
●
To avoid scratching the touch screen, do not use
sharp tools.
●
Do not allow the touch screen to come into contact
with other electrical devices. Electrostatic discharges
can cause the touch screen to malfunction.
●
Do not allow the touch screen to come into contact
with water. The touch screen may malfunction in
humid conditions or when exposed to water.
Getting started
20
●
For optimal use of the touch screen, remove the
screen protection lm before using your device.
●
Your touch screen has a layer that detects small
electrical charges emitted by the human body. For
best performance, tap the touch screen with your
ngertip. The touch screen will not react to touches of
sharp tools, such as a stylus or pen.
Control your touch screen with the following actions:
●
Tap: Touch once with your nger to select or launch a
menu, option, or application.
●
Tap and hold: Tap an item and hold it for more than
2 seconds to open a pop-up option list.
●
Drag: Tap and drag your nger up, down, left, or right to
move to items on lists.
●
Drag and drop: Tap and hold your nger on an item, and
then drag your nger to move the item.
●
Double-tap: Tap twice quickly with your nger to zoom in
or out while viewing photos or web pages.
●
Pinch: Place two ngers far apart, and then pinch them
together.
●
Your device turns o the touch screen when you do
not use the device for a specied period. To turn on
the screen, press [
●
You can set the length of time the device waits before
] or [ ].
turning o the screen. In Menu mode, select Settings
→
lock+wallpaper → Screen times out after.
Getting started
21
Lock or unlock the touch screen and keys
You can lock the touch screen and keys to prevent any
unwanted device operations. Press [
screen and keys. To unlock, turn on the screen by pressing [
], and drag the lock screen up with your nger.
or [
You can activate the screen lock feature to prevent
others from using or accessing your personal data and
information saved in your device.
] to lock the touch
► p. 24
Get to know the Start screen
When the device is in Idle mode, you will see the Start screen.
From the Start screen, you can view indicator icons, shortcuts
to applications, and other items.
Add items to the Start screen
›
You can customise the Start screen by adding shortcuts to
applications or items in applications. To add items to the Start
screen, tap and hold on the item and select pin to start.
]
Move items on the Start screen
›
Tap and hold an item to move.
1
Drag the item to the location you want when the item is
2
magnied.
3
Press [
].
Getting started
22
Remove items from the Start screen
›
Tap and hold an item to remove.
1
Select 2 .
Access applications
From the Start screen, select 1 to access Menu mode.
Select an application.
2
Press [3 ] to return to the previous screen; Press [ ] to
return to the Start screen.
Switch applications
›
Press and hold [ ] to view open windows of all active
applications. You can switch between applications, select one
from the windows of active applications.
Uninstall applications
›
You can uninstall add-on applications.
In Menu mode, tap and hold an application.
1
Select 2 uninstall.
Follow the on-screen instructions.
3
Customise your device
Get more from your device by customising it to match your
preferences.
Getting started
23
Change the language of the display
›
In Menu mode, select 1 Settings → region+language
Display language.
Select a language you want.
2
Set the current time and date
›
In Menu mode, select 1 Settings → date+time.
Drag the slider next to
2
this feature.
Select your time zone, and set the time and date.
3
Adjust the device volume
›
Press [+/-] to adjust the volume of sounds.
Switch to Silent mode
›
To mute or unmute your device, press [+/-] and select
ring+vibrate.
You can set the device to alert you to various events
in Silent mode. In Menu mode, select Settings
ringtones+sounds and drag the slider next to Vibrate.
When you switch to Silent mode,
.
of
Set automatically to deactivate
will appear in place
→
→
Change your ringtone
›
In Menu mode, select 1 Settings → ringtones+sounds →
Ringtone.
Select a ringtone from the list.
2
To play the ringtone before setting it, select .
Getting started
24
Change the display theme
›
In Menu mode, select 1 Settings → theme.
Select colours for the background and the highlight.
2
Adjust the brightness of the display
›
In Menu mode, select 1 Settings → brightness.
Drag the slider next to
2
Select
3
Select a wallpaper for the lock screen
›
In Menu mode, select 1 Settings → lock+wallpaper.
Select
2
Select
3
Lock your device
›
You can lock your device by activating the device password.
In Menu mode, select
1
Drag the slider next to
2
Enter a 4-digit password, enter the new password again,
3
and then select done.
Level → a brightness level.
The brightness level of the display will aect how
quickly the device consumes battery power.
change wallpaper → an image folder → an image.
.
The rst time you access a menu that requires a
password, you will be prompted to create and conrm a
password.
Automatically adjust.
Settings → lock+wallpaper.
Password.
Select
4
time the device waits before locking itself.
Require a password after and select the length of
Getting started
25
Once the device lock is enabled, you must enter the password
each time you turn on the device or unlock the touch screen.
●
If you forget your password, bring your device to a
Samsung Service Centre to unlock it.
●
Samsung is not responsible for any loss of passwords
or private information or other damages caused by
illegal software.
Lock your SIM or USIM card
›
You can lock your device by activating the PIN supplied with
your SIM or USIM card.
In Menu mode, select
1
Drag the slider next to
2
Enter your PIN and select
3
Once the PIN lock is enabled, you must enter the PIN each
time you turn on the device.
●
If you enter an incorrect PIN too many times, your SIM
or USIM card will be blocked. You must enter a PIN
unlock key (PUK) to unblock the SIM or USIM card.
●
If you block your SIM or USIM card by entering an
incorrect PUK, bring the card to your service provider
to unblock it.
Settings → applications → phone.
SIM security.
enter.
Enter text
You can enter text by selecting characters on the virtual
keypad.
You cannot enter text in some languages. To enter text,
you should change the writing language to one of the
supported languages.
► p. 79
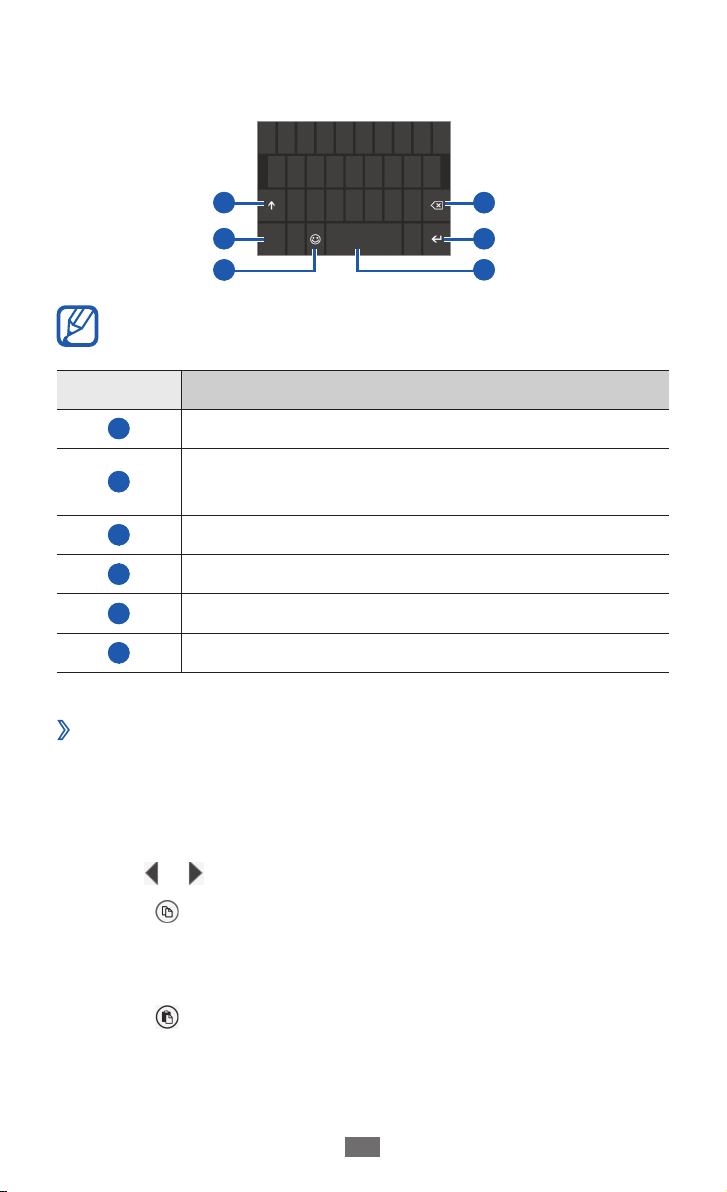
Enter text by selecting alphanumeric keys on the screen. You
can also use the following keys:
1
2
3
This screen may dier depending on applications.
Number Function
1
2
3
4
5
6
Copy and paste text
›
While you are entering text, you can use the copy and paste
feature to use text in other applications.
Change case.
Switch between Number/Symbol mode and
ABC mode.
Switch to Emoticon mode.
Clear your input.
Start a new line.
Insert a space.
4
5
6
Tap a word you want to copy.
1
Drag 2 or to select the text you want.
Select
3
In another application, place the cursor where you want to
4
paste the text.
Select
5
eld.
to copy onto the clipboard.
to insert the text from the clipboard into the text
Getting started
26
Communication
Calling
Learn to use calling functions, such as making and answering
calls, using options available during a call or customising and
using call-related features.
Make or answer a call
›
You can use the buttons or the touch screen when you make,
accept, end, or reject calls.
●
When you hold the device near your face, your device
automatically turns o and locks the touch screen to
prevent accidental inputs.
●
Static electricity discharged from your body or
clothing may interfere with the proximity sensor
during a call.
Make a call
In Menu mode, select 1 Phone → , and enter an area
code and a phone number.
Select
2
To end the call, select
3
call to make a call.
end call.
Communication
27
Communication
28
Answer a call
When a call comes in, select 1 answer.
When the device is ringing, press [+/-] to mute the
ringtone.
To end the call, select
2
end call.
Reject a call
When a call comes in, select ignore. The caller will hear a busy
tone.
Call an international number
In Menu mode, select 1 Phone → , and tap and hold
to insert the + character.
Enter the complete number you want to dial (country
2
code, area code and phone number), and then select call
to dial the number.
Use a headset
›
By plugging a headset into the device, you can control calls
hands-free;
●
To answer a call, press the headset button.
●
To reject a call, press and hold the headset button.
●
To place a call on hold or retrieve a held call during call,
press and hold the headset button.
●
To end a call, press the headset button.
Communication
29
Use options during a call
›
You can use the following options while a call is in progress:
●
To adjust the voice volume, press [
●
To place a call on hold, select
select
●
To dial a second call, select
again.
add call and then dial a new
+/-].
. To retrieve a held call,
number.
●
To answer a second call, select
answer when a call waiting
tone sounds. The rst call is automatically placed on hold.
You must subscribe to the call waiting service to use this
feature.
●
To open the dialling screen, select
●
To deactivate the speakerphone feature, select
.
speaker.
In noisy environments, you may have diculty hearing
some calls while using the speakerphone feature. For
better audio performance, use the normal phone mode.
●
To turn o the microphone so that the other party cannot
hear you, select mute.
●
To make a multiparty call (conference call), make or answer
a second call and select merge calls when connected to
the second party. Repeat to add more parties. You must
subscribe to the multiparty call service to use this feature.
●
To open the phonebook, select
●
To switch between the two calls, select
.
PRESS TO SWAP.
View and dial missed calls
›
Your device will display calls you have missed. To dial the
number of a missed call, select the missed call notication.

Communication
30
Use additional features
›
You can use various other call-related features, such as auto
rejection or call diverting.
Set auto rejection
Use auto rejection to reject calls from certain numbers
automatically. To activate auto rejection and create auto
reject lists,
In Menu mode, select
1
Drag the slider next to
2
Select
3
To add a phone number by selecting one from the
phonebook, select add from contacts.
Enter a number and name, and then select
4
option.
Select
5
To add more numbers, repeat steps 3-5.
6
Set call forwarding
Call diverting is a network feature to send incoming calls to
another number that you specify. You can set this feature
separately for several conditions when you are not able to
answer calls, such as when you are already on the phone or
when you are outside of the service area.
In Menu mode, select
1
Scroll to
2
forwarding.
add by keypad.
Save → ok.
applications and select phone → Call
Settings → call blocking.
Block unknown calls.
Criteria → an
Settings.
 Loading...