

NQ50C7935ES
Combi Steam Built-in
Oven
user manual
Please be advised that the Samsung warranty does NOT cover service
calls to explain product operation, correct improper installation, or
perform normal cleaning or maintenance.
This manual is made with 100 % recycled paper.
imagine the possibilities
Thank you for purchasing this Samsung product.
NQ50C7935ES_EU_DG68-00471E-01_EN.indb 1 2014-10-23 12:01:56

contents
OVEN FEATURES
14
BEFORE YOU BEGIN
17
OVEN USE
22
14 Oven
15 Oven controls
16 Accessories
17 Setting the clock
18 Setting the energy save mode
18 Switching off the beeper
19 Child safety lock
20 Filling the water tank
21 Setting the water hardness
22 Types of heating
25 Using the steam mode
29 Using the combi steam mode
31 Using the reheat mode
32 Using oven mode
43 Using multi-level cook mode
45 Using the keep warm mode
46 Setting cook time
47 Setting end time
48 Setting delay start
49 Using the auto menu mode
50 Guide to auto menu setting
53 Using the auto defrost mode
55 Test dishes
DESCALING AND CLEANING
56
TROUBLESHOOTING AND
INFORMATION CODE
56 Descale mode
58 Using the steam clean feature
59 Cleaning
60 Changing the lamp
61 Troubleshooting
63 information codes
61
TECHNICAL DATA
64 Technical data
65 Product data sheet
64
English - 2
NQ50C7935ES_EU_DG68-00471E-01_EN.indb 2 2014-10-23 12:01:56
safety information
USING THIS INSTRUCTION BOOKLET
You have just purchased a SAMSUNG oven. Your Owner’s Instructions contain valuable information
on cooking with your oven:
• Safety precautions
• Suitable accessories and cookware
• Useful cooking tips
• Cooking tips
LEGEND FOR SYMBOLS AND ICONS
01 SAFETY INFORMATION
WARNING
CAUTION
Hazards or unsafe practices that may result in severe personal injury or death.
Hazards or unsafe practices that may result in minor personal injury or property
damage.
Warning; Fire hazard Warning; Hot surface
Warning; Electricity Warning; Explosive material
Do NOT attempt. Do NOT touch.
Do NOT disassemble. Follow directions explicitly.
Unplug the power plug from the wall
socket.
Call the service center for help. Note
Important
Make sure the machine is grounded to
prevent electric shock.
IMPORTANT SAFETY INSTRUCTIONS
READ CAREFULLY AND KEEP FOR FUTURE
REFERENCE.
Make sure that these safety precautions are obeyed at all times.
Before using the oven, confirm that the following
instructions are followed.
WARNING
This appliance is not intended for use by persons
(including children) with reduced physical, sensory
or mental capabilities, or lack of experience and
knowledge, unless they have been given supervision
or instruction concerning use of the appliance by a
person responsible for their safety.
English - 3
NQ50C7935ES_EU_DG68-00471E-01_EN.indb 3 2014-10-23 12:01:57
Children should be supervised to ensure that they do
not play with the appliance.
If the supply cord is damaged, it must be replaced by
the manufacturer, its service agent or similarly qualified
persons in order to avoid a hazard.
Appliance should allow to disconnection of the
appliance from the supply after installation.
The disconnection may be achieved by having the plug
accessible or by incorporating a switch in the fixed
wiring in accordance with the wiring rules.
During use the appliance becomes hot. Care should
be taken to avoid touching heating elements inside the
oven.
WARNING: Accessible parts may become hot during
use. Young children should be kept away.
A steam cleaner is not to be used.
WARNING: Ensure that the appliance is switched o
before replacing the lamp to avoid the possibility of
electric shock.
WARNING: The appliance and its accessible parts
become hot during use.
Care should be taken to avoid touching heating
elements.
Children less than 8 years of age shall be kept away
unless continuously supervised.
This appliance can be used by children aged from
8years and above and persons with reduced physical,
sensory or mental capabilities or lack of experience
and knowledge if they have been given supervision or
instruction concerning use of the appliance in a safe
way and understand the hazards involved. Children
shall not play with the appliance. Cleaning and user
maintenance shall not be made by children without
supervision.
English - 4
NQ50C7935ES_EU_DG68-00471E-01_EN.indb 4 2014-10-23 12:01:57
Do not use harsh abrasive cleaners or sharp metal
scrapers to clean the oven door glass since they can
scratch the surface, which may result in shattering of
the glass.
The temperature of accessible surfaces may be high
when the appliance is operating.
The door or the outer surface may get hot when the
appliance is operating.
Keep the appliance and its cord out of reach of
children less than 8 years.
Appliances are not intended to be operated by means
of an external timer or separate remote-control system.
Please put the bent up frame side to the
back, in order to support the restposition
when cooking big loads.
Do not use oven rack for microwave oven mode.
INSTALLATION INSTRUCTIONS
General
Technical Information
Electrical Supply: 230 V ~ 50 Hz
Dimensions (w×h×d)
Set size : W 595 x H 454.2 x D 570
Built in size : W 555 x H 445 x D 548.8
This appliance complies with EU regulations.
Disposal of Packaging and Appliance
Packaging is recyclable.
Packaging may consist of the following materials:
- cardboard;
- polyethylene film (PE);
- CFC-free polystyrene(PS rigid foam).
01 SAFETY INFORMATION
English - 5
NQ50C7935ES_EU_DG68-00471E-01_EN.indb 5 2014-10-23 12:01:57

Please dispose of these materials in a responsible manner
in accordance with government regulations.
The authorities can provide information on how to dispose
of domestic appliances in a responsible manner.
Safety
This appliance should only be connected by a qualified
technician. The Oven is NOT designed for use in a
commercial cooking setting. It should be used exclusively
for cooking food in a home setting. The appliance is hot
during and after use.
Exercise caution when young children are present.
Electrical Connection
The house mains to which the appliance is connected
should comply with national and local regulations.
Appliance should allow to disconnection of the appliance
from the supply after installation. The disconnection
may be achieved by having the plug accessible or by
incorporating a switch in the fixed wiring in accordance
with the wiring rules.
Install in the Cabinet
Kitchen Cabinets in contact with the oven must be heatresistant up to 100 °C.
Samsung will take no responsibility for damage of cabinets
from the heat.
English - 6
NQ50C7935ES_EU_DG68-00471E-01_EN.indb 6 2014-10-23 12:01:58
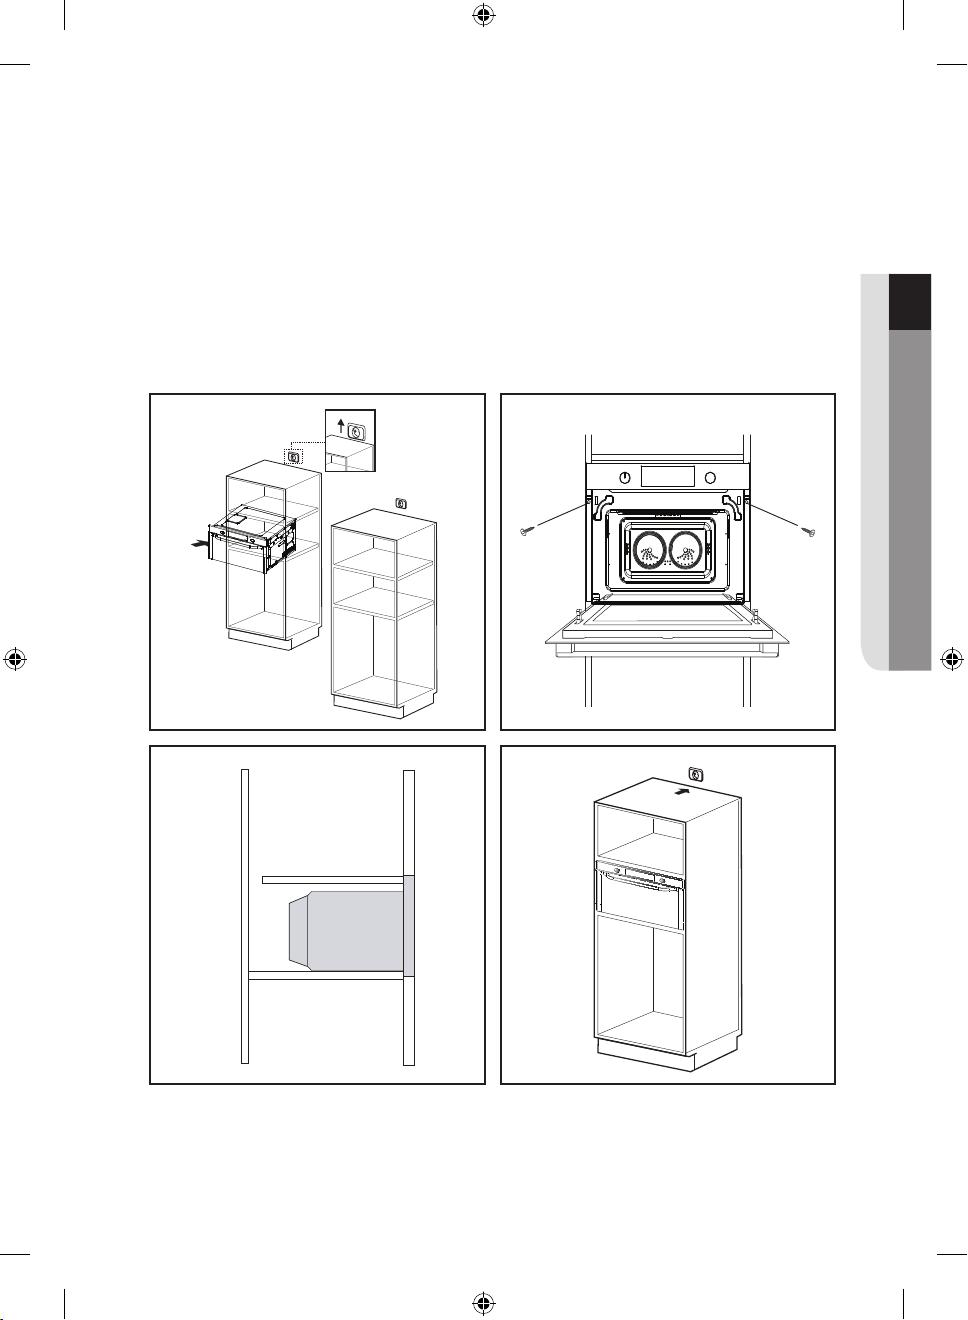
Fig1. Slide the oven partly into the recess. Lead the
connection cable to the power source.
Fig2. Slide the oven completely into the recess.
Fig3. Fasten the oven using the two screws (4 X 25 mm)
provoded.
Fig4. Make the electrical connection.
Check that the appliance works.
01 SAFETY INFORMATION
Fig1
Fig2
Fig3
Fig4
English - 7
NQ50C7935ES_EU_DG68-00471E-01_EN.indb 7 2014-10-23 12:02:17
Building-in dimensions
454.2
358
85
595
Min. 550
555
341
600
Min. 564
Max. 568
445
549
21
200 cm²
200 cm²
Min. 50
Min. 446
Max. 450
Space for
power outlet
(30 ¢ Hole)
Be sure to hold the appliance with
2side handles and door handle
Built-under Dimensions
when unpacking the product.
Min.
Side
handle
Door handle
NQ50C7935ES_EU_DG68-00471E-01_EN.indb 8 2014-10-23 12:02:18
Side
handle
English - 8
Min.
446
Max. 450
Min. 550
50
200 cm²
564
Max. 568
INSTALLATION & WIRING INSTRUCTIONS
IMPORTANT NOTE :
The mains lead on this equipment is supplied with a
moulded plug incorporating a fuse.
The value of the fuse is indicated on the pin face of the
plug and, if it requires replacing, a fuse approved to
BS1363 of the same rating must be used.
Never use the plug with the fuse cover omitted if the cover
is detachable. If a replacement fuse cover is required, it
must be of the same colour as the pin face of the plug.
Replacement covers are available from your Dealer. If the
fitted plug is not suitable for the power points in your house
or the cable is not long enough to reach a power point, you
should obtain a suitable safety approved extension lead
or consult your Dealer for assistance. However, if there is
no alternative to cutting o the plug, remove the fuse and
then safely dispose of the plug. Do not connect the plug to
a mains socket, as there is a risk of shock hazard from the
bared flexible cord.
01 SAFETY INFORMATION
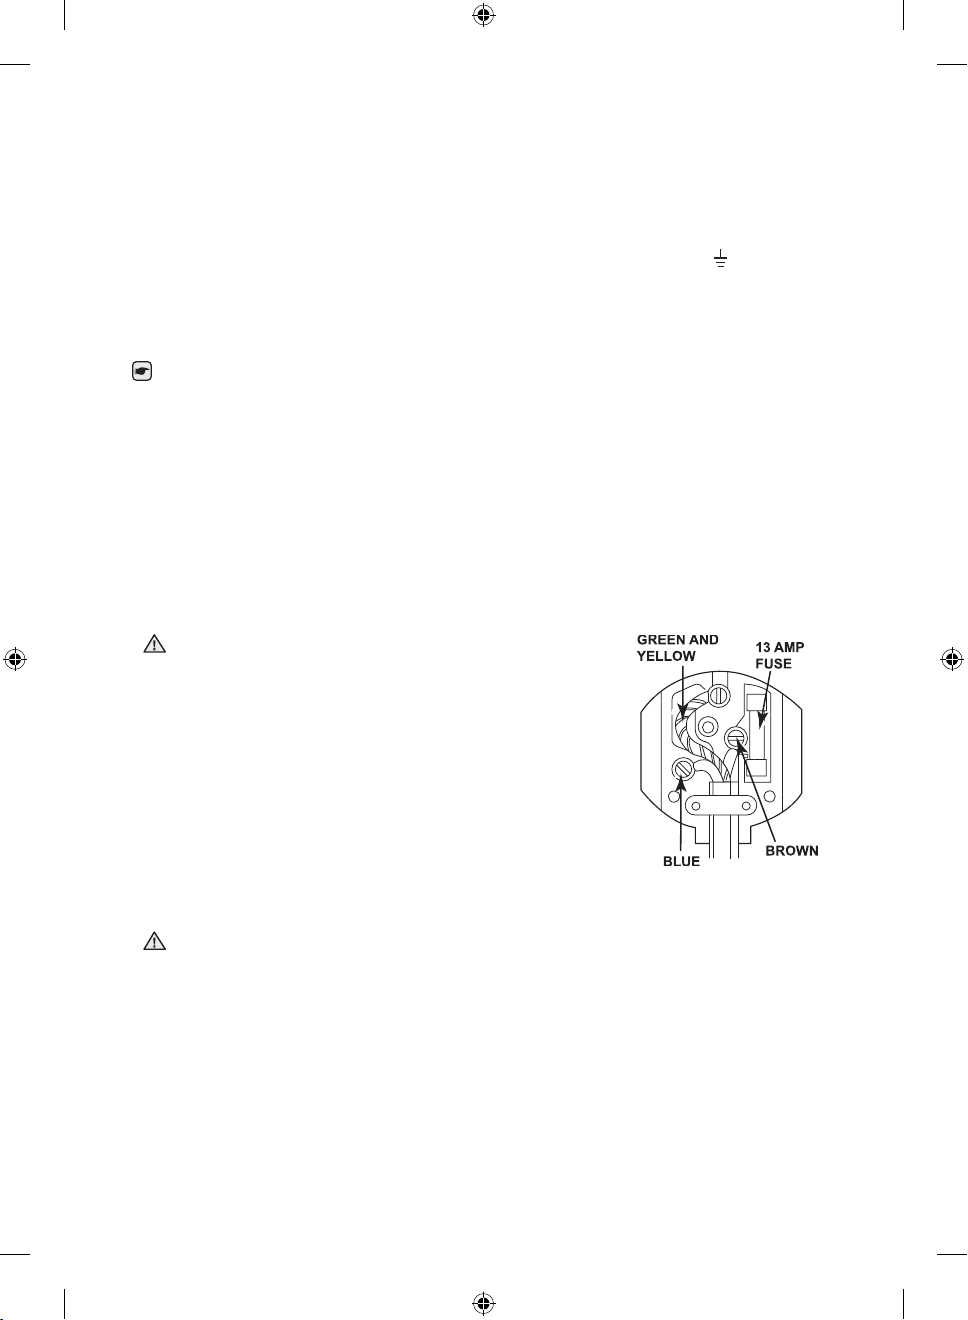
WIRING INSTRUCTIONS
WARNING THIS APPLIANCE MUST BE EARTHED.
This appliance must be earthed. In the event of an
electrical short circuit, earthing reduces the risk of electric
shock providing an escape wire for the electric current. The
appliance is equipped with a mains lead which includes
an earth wire for connecting to the earth terminal of your
mains plug. The plug must be plugged into a socket that is
properly installed and earthed.
The wires in this mains lead are coloured in accordance
with the following code:
• Green and yellow : Earth
• Blue : Neutral
• Brown : Live
English - 9
NQ50C7935ES_EU_DG68-00471E-01_EN.indb 9 2014-10-23 12:02:18
As the colours of the wires in the mains lead of this
appliance may not correspond with the coloured markings
indentifying the terminals in your plug, proceed as follows.
Connect the green and yellow wire to the terminal in the
plug marked with the letter E or the earth symbol (
) or
coloured green or green-and-yellow.
Connect the blue wire to the terminal marked with the letter
N or coloured black.
Consult a qualified electrician or service technician if in
doubt about any of these instructions. The manufacturer
of this oven will not accept any liability for damage
to persons or material for non observance of these
requirements. There are no user-serviceable parts
inside the oven and if the mains lead of this appliance is
damaged, it must only be replaced by qualified service
personnel approved by the manufacturer because
special tools are required.
WARNING : Ensure that the plug and
WARNING
power cord are not damaged before
use. If you have any reason to remove
the moulded plug from this appliance,
immediately remove the fuse and
dispose of the plug.
Do not connect the plug to a mains
socket under any circumstances as
there is a danger of electric shock.
CIRCUITS : Your microwave oven should be operated
WARNING
on a separate circuit from other appliances. Failure to
do this may cause the circuit breaker to trip, the fuse
to blow, or the food to cook more slowly.
English - 10
NQ50C7935ES_EU_DG68-00471E-01_EN.indb 10 2014-10-23 12:02:18
CLEANING YOUR OVEN
Cleaning inside the cavity.
1.
• Lift up both left and right shelves at
the front (1). Move them towards the
middle (2) and pull them out. Wipe any
leftovers from the ceiling or walls using
a neutral cloth dipped in detergent.
• When completed, install both shelves
back into the correct positions.
• Even solid, dicult stains or dry leftovers
can be removed by using the steam clean process.
2.
Cleaning the oven surface, control panel and window.
• The surface of the oven can be wiped with a wet dish
towel, followed by a dry cloth to remove the water
completely.
• Do not use force when cleaning the control panel as it
can be damaged while cleaning.
• Clean the transparent window with a neutral
detergent-dipped dish towel and then with a dry cloth
until no water remains.
3.
Cleaning the water tank and the tray.
• Wipe them with a sponge dipped in a neutral
detergent and then rinse them with water.
4.
Cleaning the accessories.
• Wipe them with a neutral detergent and dry them
before inserting them back into the cooking cavity.
• Do not use force on the accessories when wiping
them with a scrubber, as this may damage the coated
surface.
01 SAFETY INFORMATION
2
1
English - 11
NQ50C7935ES_EU_DG68-00471E-01_EN.indb 11 2014-10-23 12:02:18
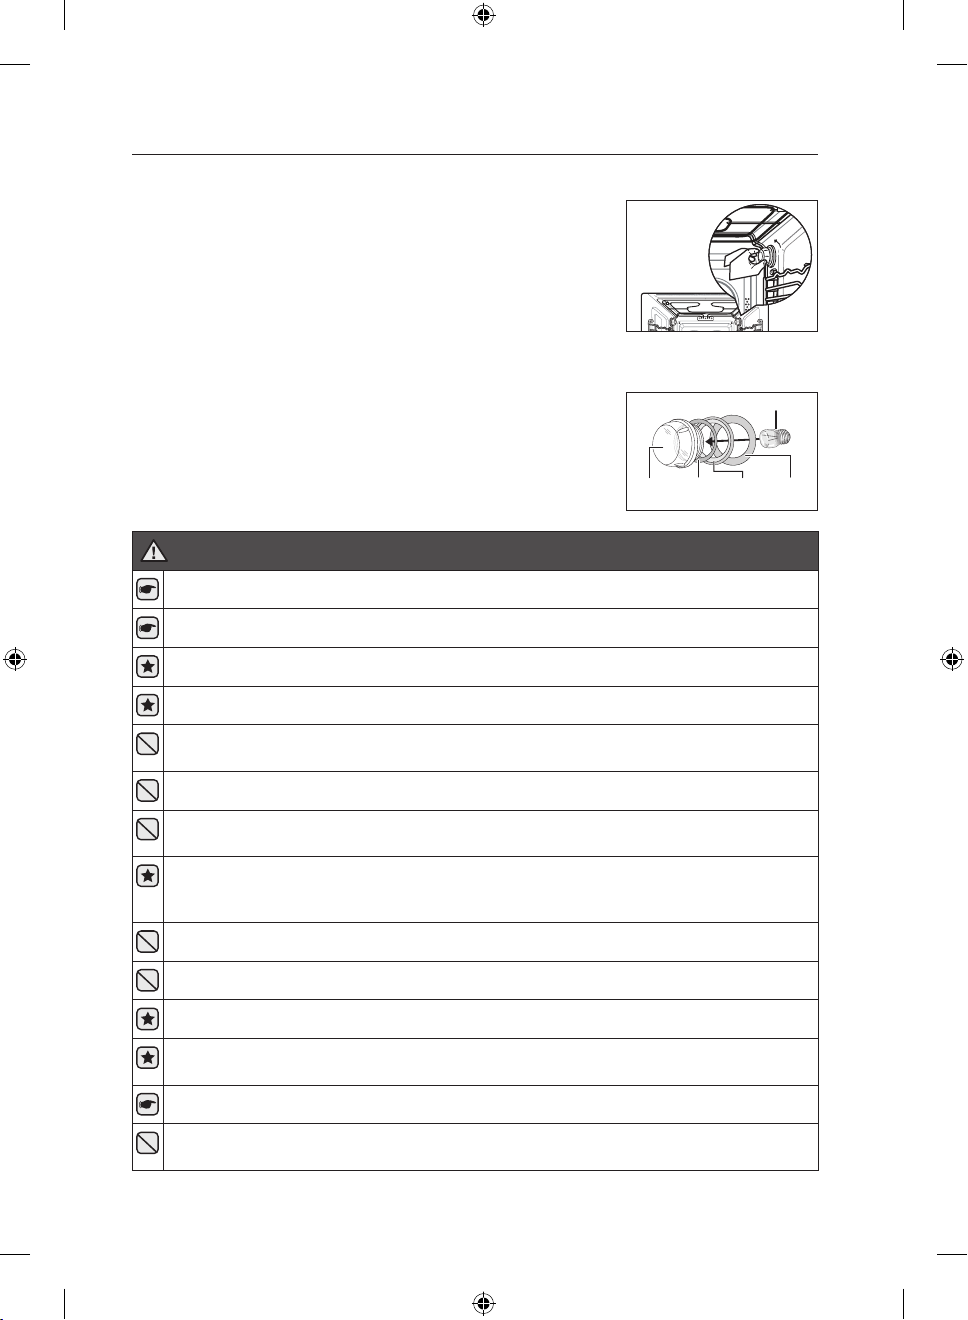
CHANGING THE LAMP
Replacing the rear oven lamp and cleaning the glass cap
1. Take o the cap by turning
counterclockwise.
2. Remove the metal ring and the sheet
ring and clean the glass cap.
3. If necessary, replace the bulb with a
25watt, 230 V, 300 °C heat - resistant oven light bulb.
4. Fit the metal and the sheet ring to the
Bulb
glass cap.
5. Replace the glass cap.
WARNING
This appliance is intended only for domestic use.
This appliance must only be used for food preparation.
Open the cooking compartment door carefully. Hot steam will escape.
Never store combustible items in the cooking compartment.
Never trap cables of electrical appliances in the hot cooking compartment door. The cable
insulation could melt.
Never take accessories out of the appliance without using oven gloves.
Do not clean the appliance immediately after switching it o. The water in the evaporator dish
is still hot. Wait until the appliance has cooled down.
Incorrect repairs are dangerous. Repairs may only be carried out by one of our experienced
after-sales engineers. If the appliance is faulty, switch it o using the fuse in the fuse box or
disconnect the appliance at the mains. Contact the after-sales service.
Do not use the cooking compartment door as a shelf.
Do not store any food in the appliance. This can lead to corrosion.
Use only the accessories provided. They are specially designed for your appliance.
When steaming in the perforated steam dish, you can insert the baking tray underneath.
Dripping liquid is caught. (Steam function model only)
Ovenware must be heat and steam resistant.
Do not use ovenware that shows signs of rust. Even the smallest spots of rust can lead to
corrosion in the cooking compartment.
Glass
cap
Sheet
ring
Metal
ring
Sheet
ring
English - 12
NQ50C7935ES_EU_DG68-00471E-01_EN.indb 12 2014-10-23 12:02:19
The cooking compartment in your appliance is made of enamel. Improper care can lead to
corrosion in the cooking compartment. Refer to the care and cleaning instructions in the
instruction manual.
Salts are very abrasive. If salt is deposited in the cooking compartment, rust could develop in
places.
Acidic sauces, such as ketchup and mustard, or salted foods, e.g. cured roasts, contain
chloride and acids. These aect the stainless steel surface. Clean the cooking compartment
after each use.
Keep children away from the door when opening or closing it as they may bump themselves
on the door or catch their fingers in the door.
If the seal on the outside of the cooking compartment is very dirty, the cooking compartment
door will no longer close properly during operation. The fronts of adjacent units could be
damaged. Keep the seal clean.
Do not stand or sit on the cooking compartment door.
Do not hold or carry the appliance by the door handle.
The door handle cannot hold the weight of the appliance and may break o.
If this appliance has steam cooking function, do not operate this appliance when the water
supply cartridge is damaged. (Steam function model only)
When the cartridge is cracked or broken, do not use it and contact your nearest service
center. (Steam function model only)
• Use this appliance only for its intended purpose as described in this instruction manual.
Warnings and Important Safety Instructions in this manual do not cover all possible
conditions and situations that may occur. It is your responsibility to use common sense,
caution, and care when installing, maintaining, and operating your appliance.
• Because these following operating instructions cover various models, the characteristics
of your microwave oven may dier slightly from those described in this manual and not
all warning signs may be applicable. If you have any questions or concerns, contact your
nearest service centre or find help and information online at www.samsung.com.
• This microwave oven is supposed for heating food. It is intended for domestic home-use
only. Do not heat any type of textiles or cushions filled with grains, which could cause burns
and fire. The manufacturer cannot be held liable for damage caused by improper or incorrect
use of the appliance.
• Failure to maintain the oven in a clean condition could lead to deterioration of the surface that
could adversely aect the life of the appliance and possible result in a hazardous situation.
01 SAFETY INFORMATION
CORRECT DISPOSAL OF THIS PRODUCT
(WASTE ELECTRICAL & ELECTRONIC EQUIPMENT)
(Applicable in countries with separate collection systems)
This marking on the product, accessories or literature indicates that the product and its electronic accessories
(e.g. charger, headset, USB cable) should not be disposed of with other household waste at the end of their
working life. To prevent possible harm to the environment or human health from uncontrolled waste disposal,
please separate these items from other types of waste and recycle them responsibly to promote the sustainable
reuse of material resources.
Household users should contact either the retailer where they purchased this product, or their local government
oce, for details of where and how they can take these items for environmentally safe recycling.
Business users should contact their supplier and check the terms and conditions of the purchase contract. This
product and its electronic accessories should not be mixed with other commercial wastes for disposal.
English - 13
NQ50C7935ES_EU_DG68-00471E-01_EN.indb 13 2014-10-23 12:02:19
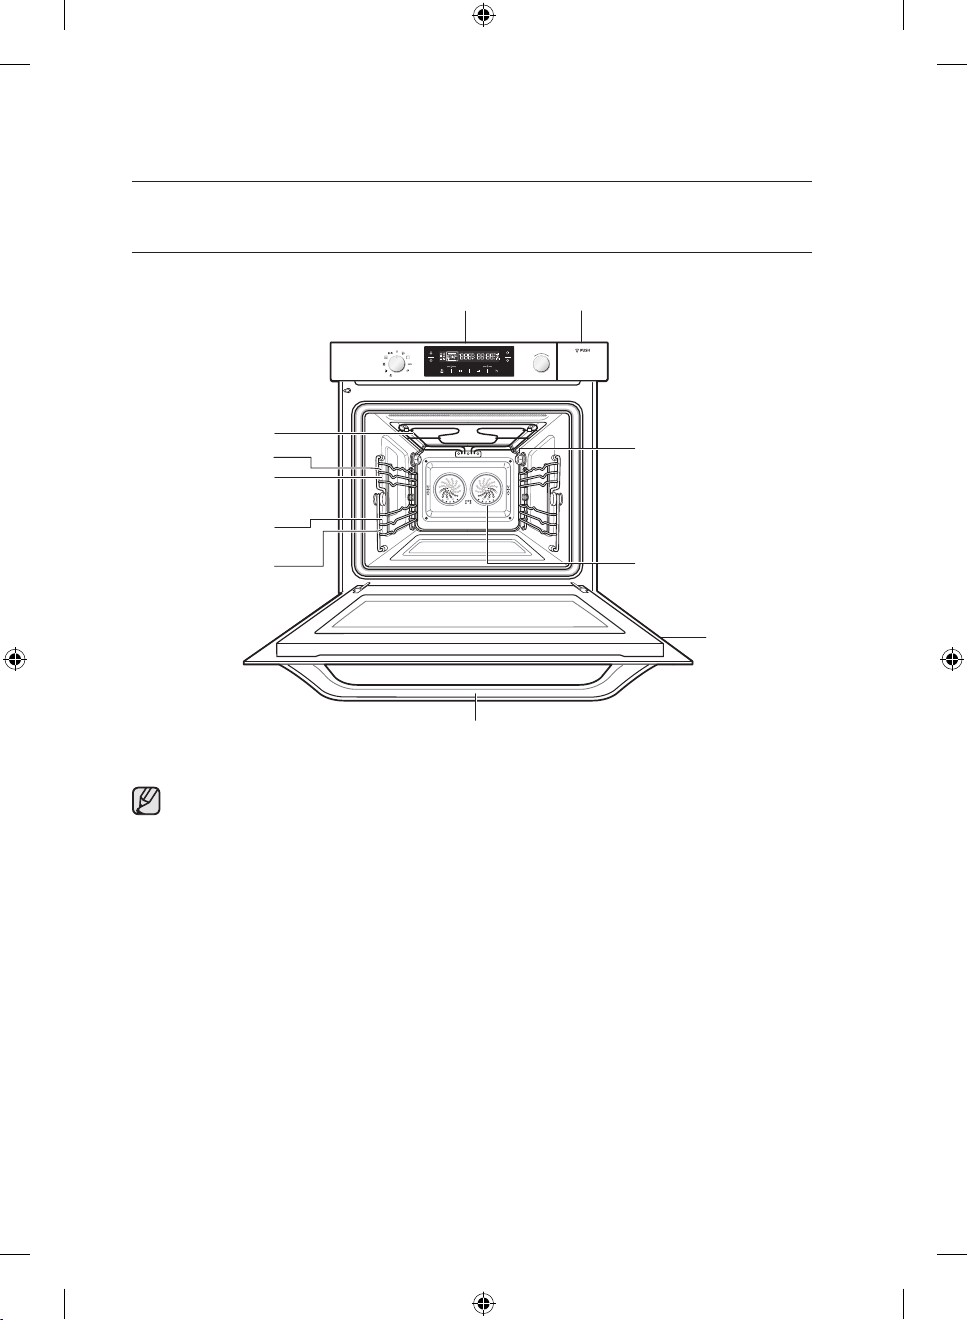
oven features
OVEN
Control box Water tank
Grill heater
Level 4
Level 3
Level 2
Level 1
Door handle
• Shelf levels are numbered from the bottom up.
• The levels 3 and 4 are mainly used for the grill function.
• The levels 1 and 2 are mainly used for baking and roasting.
• The level 2 is mainly used for steam function.
• Please refer to the Cooking Guides provided throughout this booklet to
determine the appropriate shelf level for your dishes.
Oven light
Fan
Door
English - 14
NQ50C7935ES_EU_DG68-00471E-01_EN.indb 14 2014-10-23 12:02:19
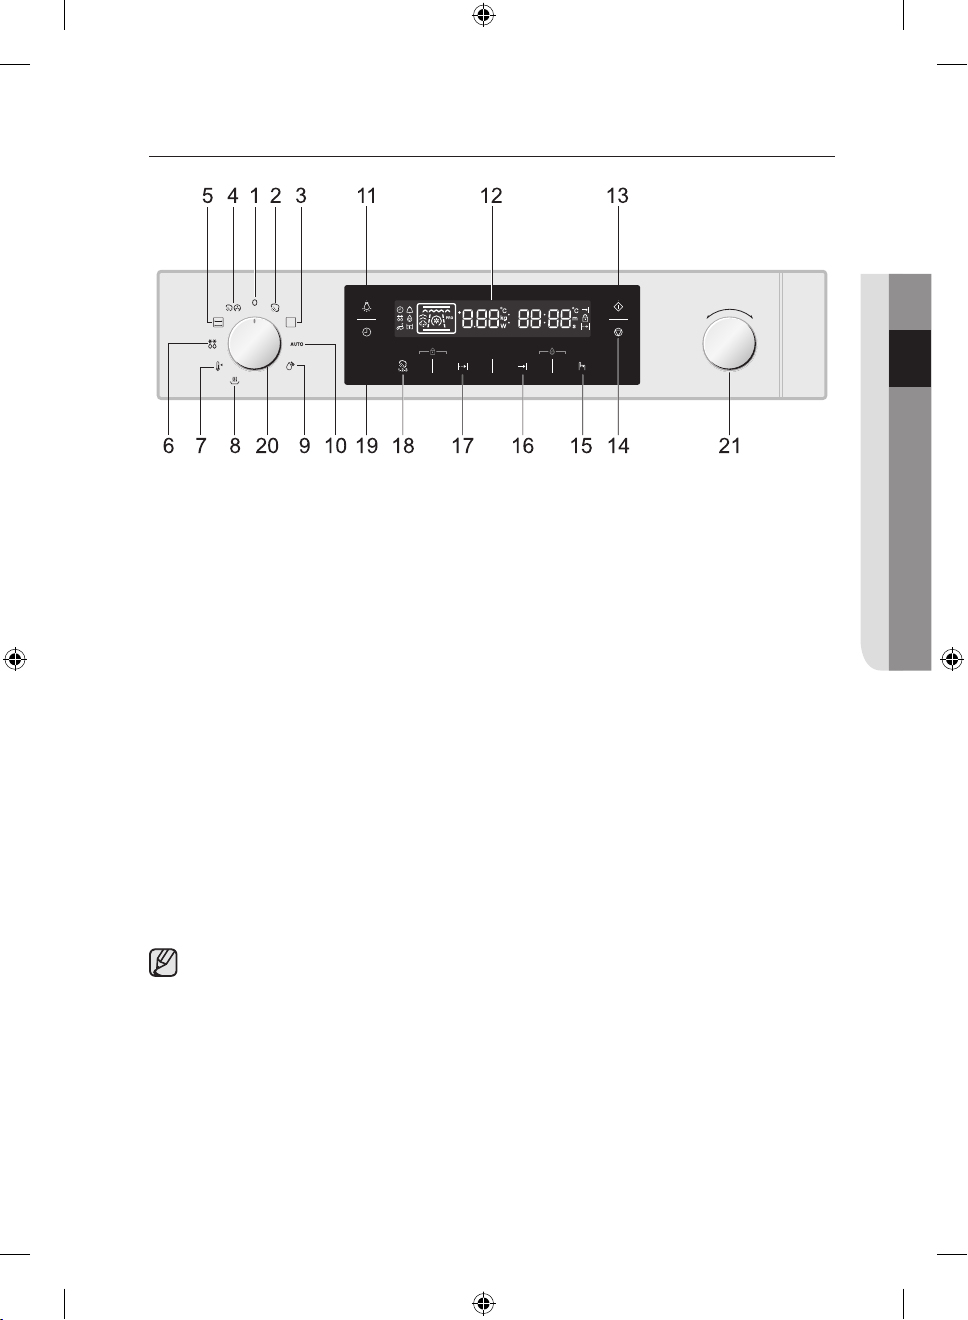
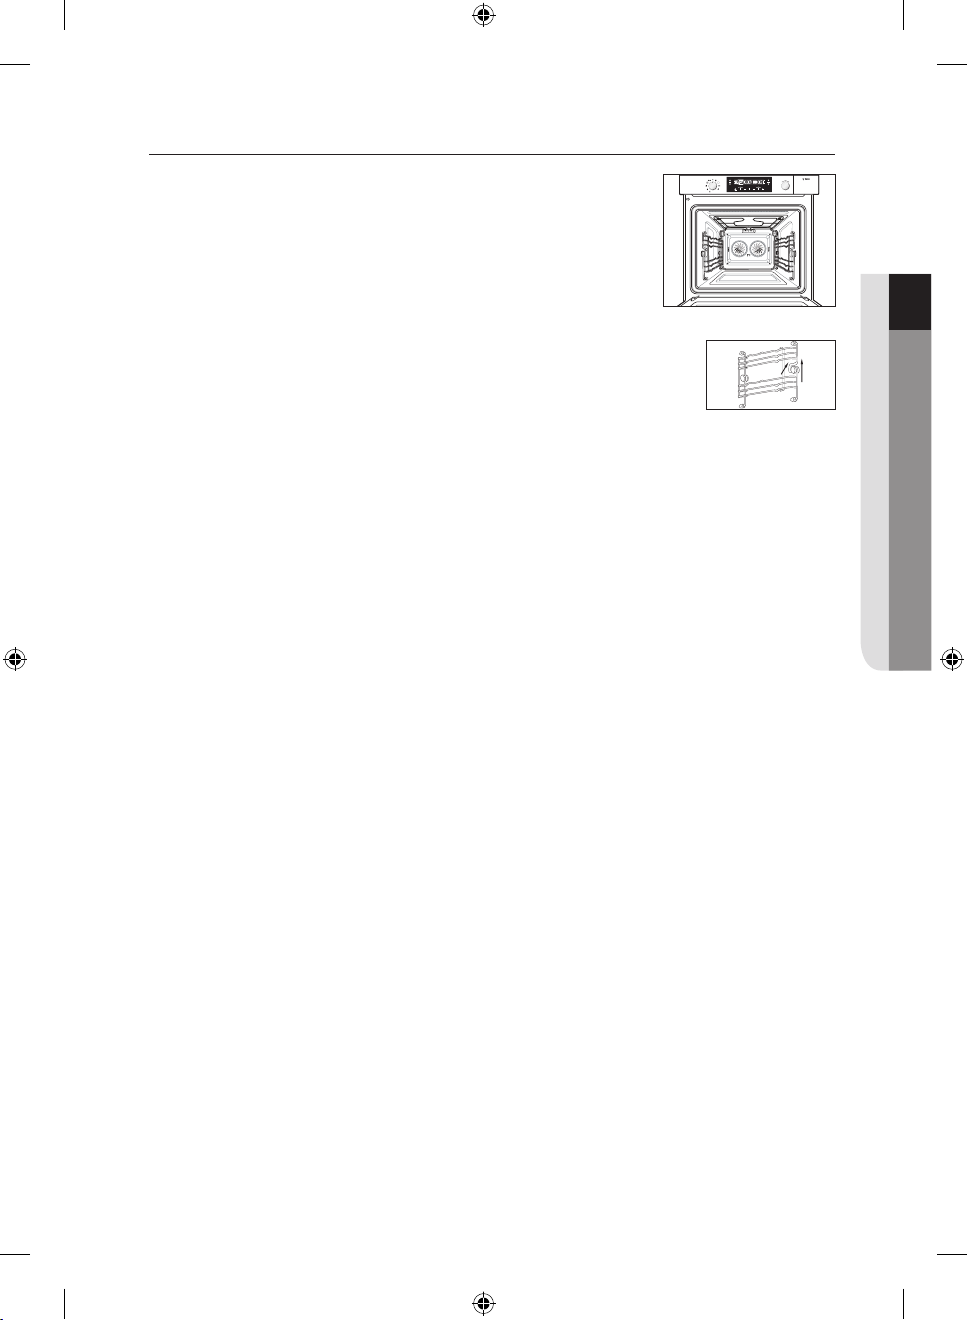
OVEN CONTROLS
02 OVEN FEATURES
1. OFF
2. STEAM MODE
3. OVEN MODE
4. COMBI STEAM MODE
5. MULTI-LEVEL COOK MODE
6. AUTO DEFROST MODE
7. KEEP WARM MODE
8. REHEAT MODE
9. STEAM CLEAN MODE
10. AUTO MENU MODE
11. LAMP
Using pop up dials
The MODE SELECTOR (20) and MULTI-FUNCTION SELECTOR (21) are pop up
dials. Simply press and turn to desired setting.
12. DISPLAY
13. START
14. STOP/CANCEL
15. SELECT
16. END TIME
17. COOK TIME
18. STEAM LEVEL
19. CLOCK
20. MODE SELECTOR
21. MULTI-FUNCTION SELECTOR
15 + 16. DESCALE
17 + 18. CHILD LOCK
English - 15
NQ50C7935ES_EU_DG68-00471E-01_EN.indb 15 2014-10-23 12:02:20
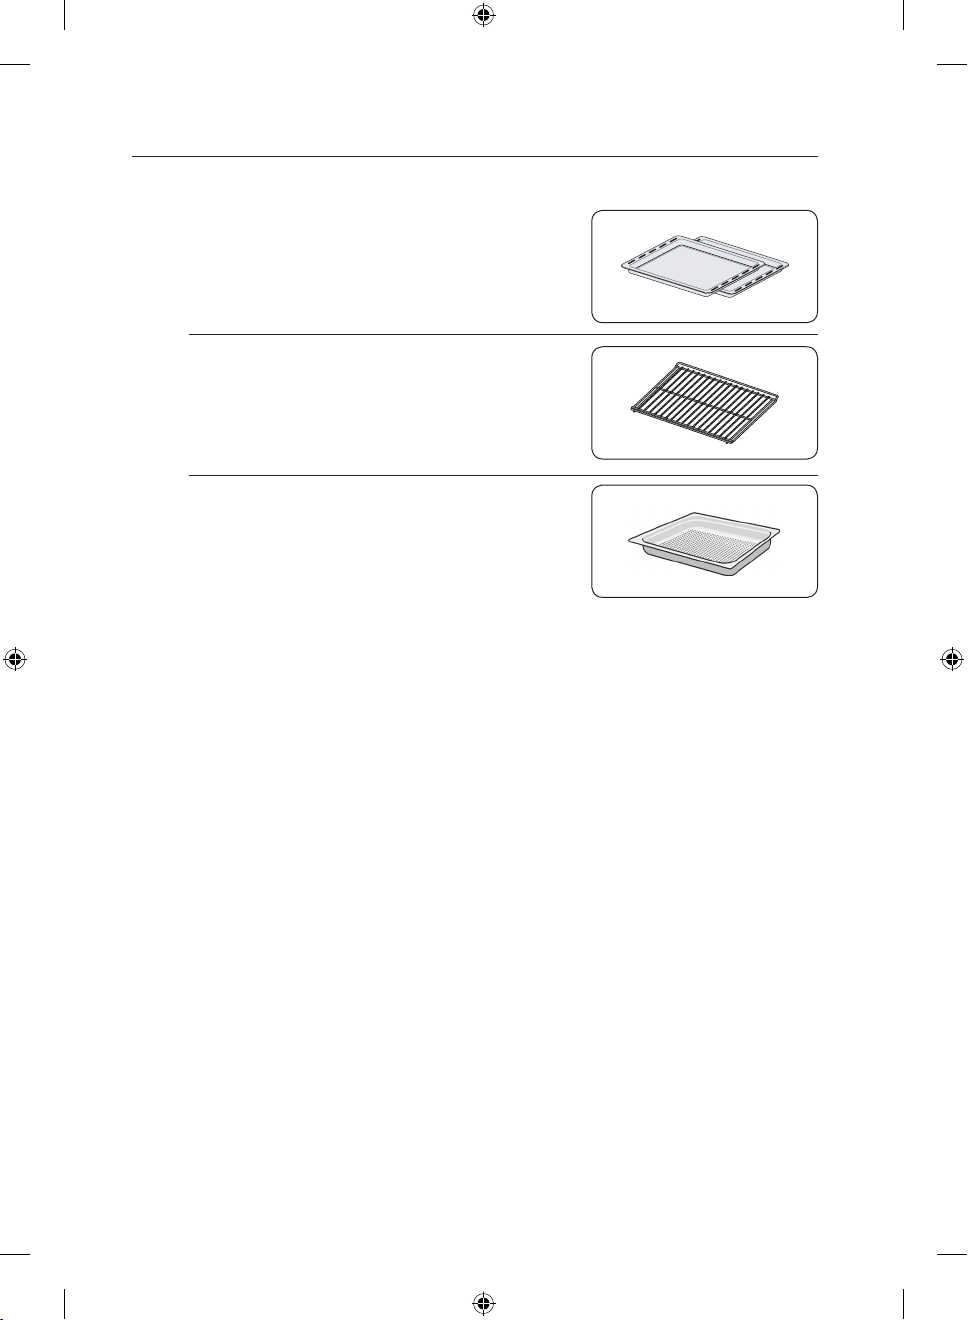
ACCESSORIES
The following accessories are provided with your Steam Oven:
1. Baking Tray.
2. Oven Rack. (for all levels)
3. Steam dish, perforated, 40 mm deep, (useful
for steam mode)
For steaming, you can place only the perforated steam dish or perforated
steam dish in level 2 with the baking tray underneath.
English - 16
NQ50C7935ES_EU_DG68-00471E-01_EN.indb 16 2014-10-23 12:02:20
before you begin
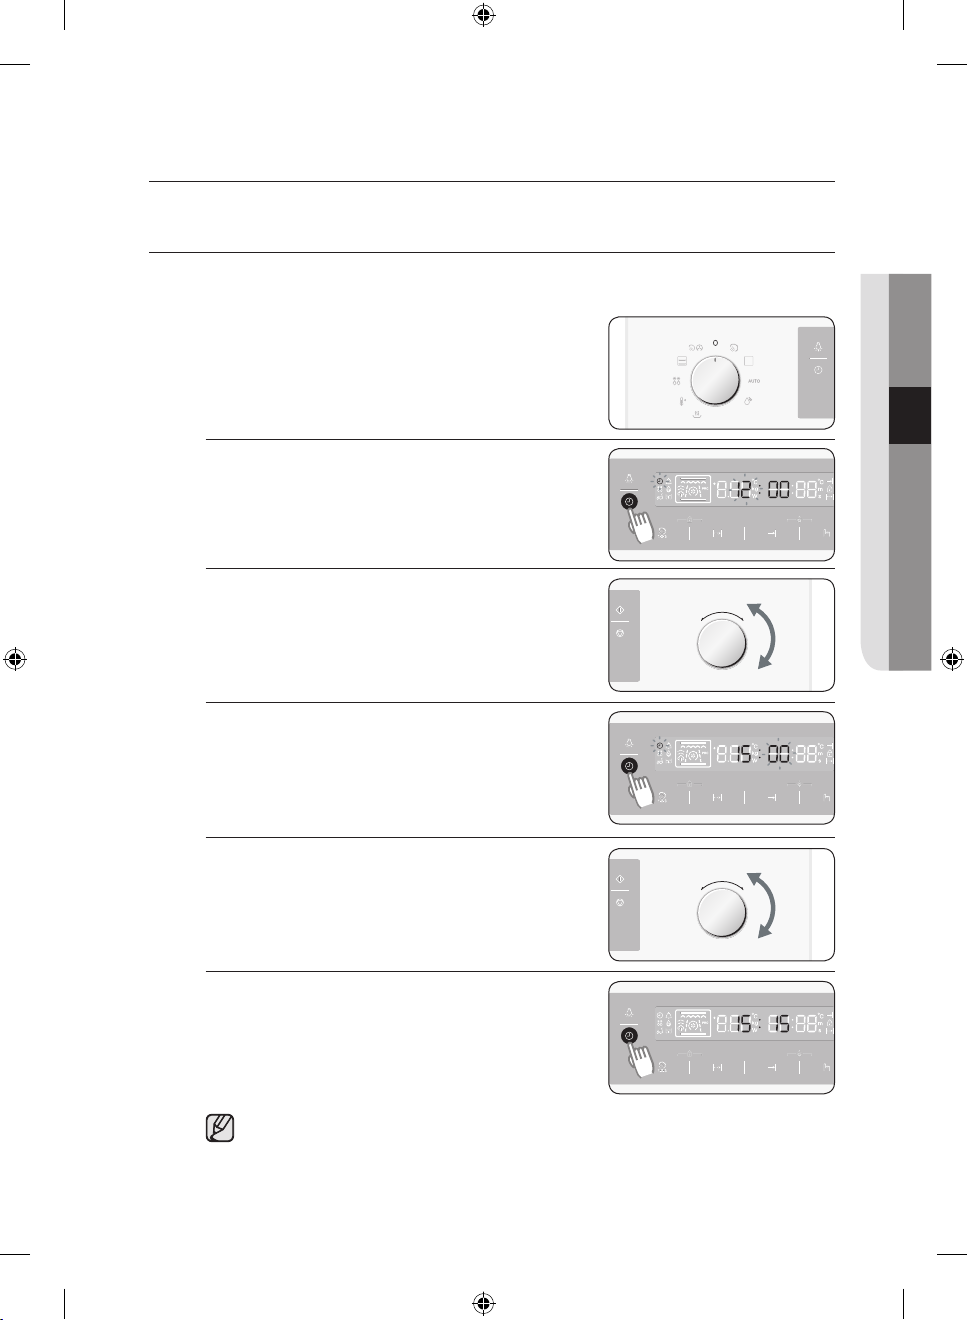
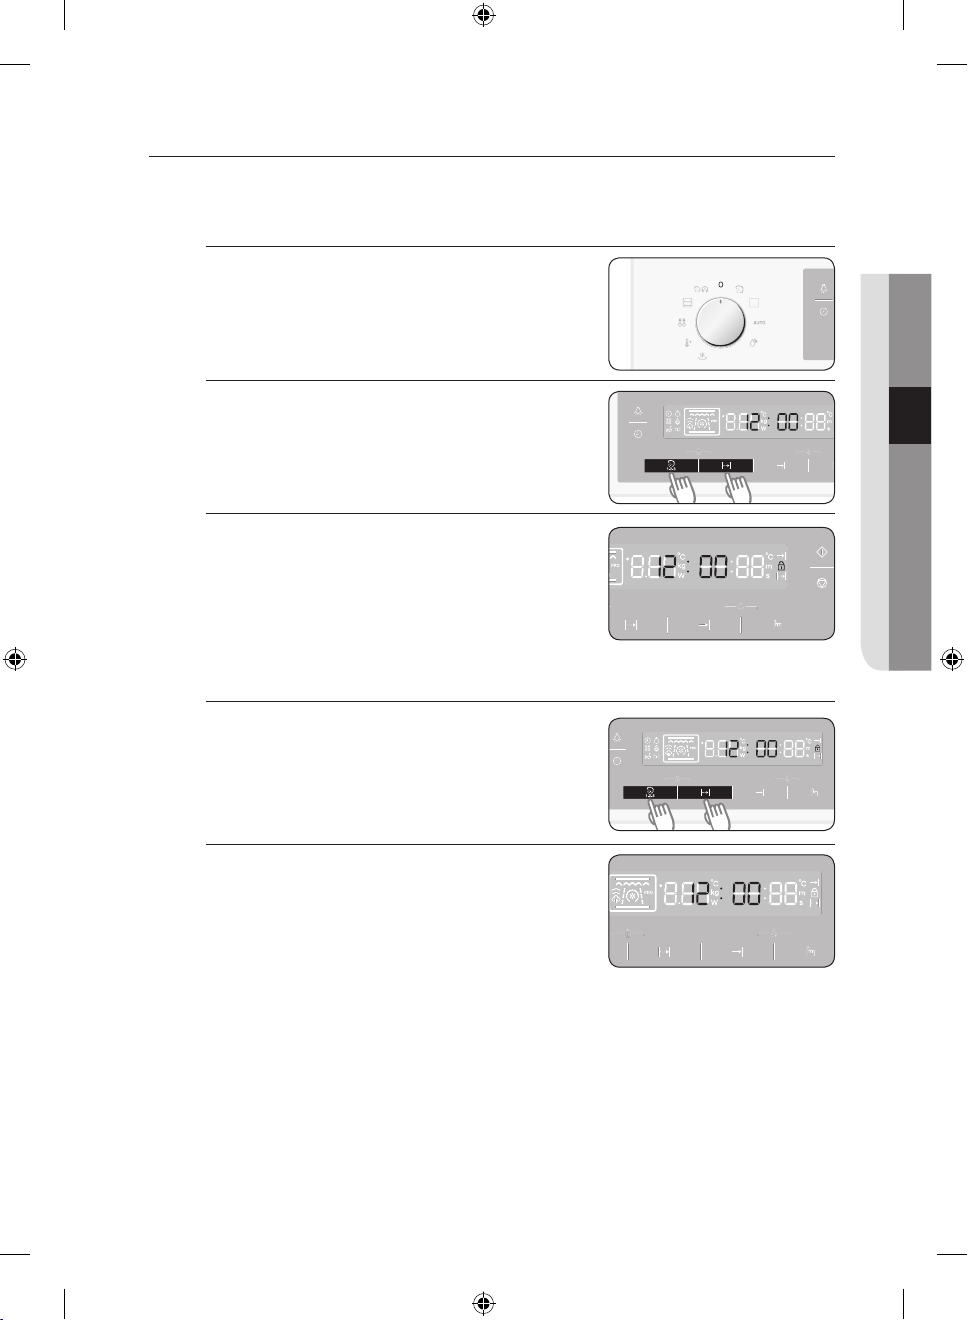
SETTING THE CLOCK
When the appliance is first plugged in, the display lights up. (example 15:15)
When connecting the power for the first time, please use the product after setting the time.
1. Turn the MODE SELECTOR to the “OFF”
position.
2. Press CLOCK. The “12” starts blinking.
3. Turn the MULTI-FUNCTION SELECTOR to set
the hour.
4. Press CLOCK again. The “00” starts blinking.
03 BEFORE YOU BEGIN
5. Turn the MULTI-FUNCTION SELECTOR to set
the minutes.
6. Press CLOCK again.
If you want to change a setting after you have pressed a button, the setting
starts blinking. You can only change this setting during blinking. If it has
stopped blinking, you have to press the button so it will start blinking again.
English - 17
NQ50C7935ES_EU_DG68-00471E-01_EN.indb 17 2014-10-23 12:02:21
SETTING THE ENERGY SAVE MODE
The oven has an energy save mode. This facility saves electricity when the oven is not in
use.
Standby mode
The oven will default to Standby mode after 10 minutes if not operated.
ECO mode
1. Turn the MODE SELECTOR to “OFF” position.
2. Press END TIME for 3 seconds.
While in ECO mode, the display is turn o and
the oven cannot used.
3. To remove ECO mode, open the door or press any button. And then the
display is switched on again. The oven is ready for use.
SWITCHING OFF THE BEEPER
1. Turn the MODE SELECTOR to “OFF” position.
2. To switch the beeper o, press COOK TIME
and END TIME at the same time and hold for
3seconds.
3. To switch the beeper back on, press COOK
TIME and END TIME again at the same time
and hold for 3 seconds.
English - 18
NQ50C7935ES_EU_DG68-00471E-01_EN.indb 18 2014-10-23 12:02:21
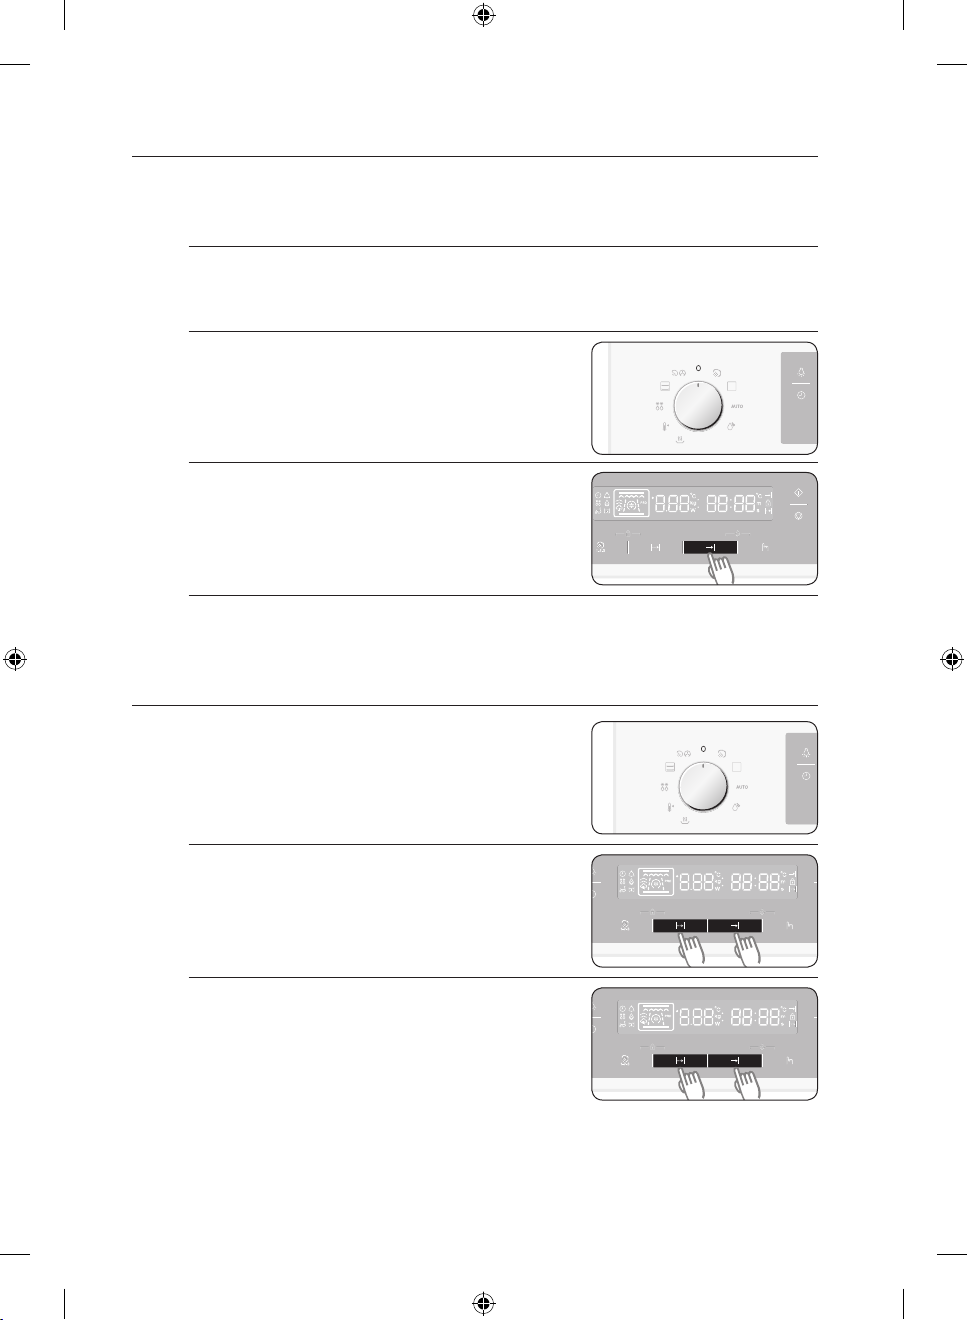
CHILD SAFETY LOCK
The oven’s Child Safety Lock allows you to lock the control panel to protect the oven
against unintended use.
To Lock the Oven
1. Turn the MODE SELECTOR to “OFF” position.
2. Press STEAM LEVEL and COOK TIME at the
same time and hold for 3 seconds.
3. A lock symbol appears in the display, indicating
that all functions are locked.
To Unlock the Oven
1. Turn the MODE SELECTOR to “OFF” position.
Press STEAM LEVEL and COOK TIME at the
same time and hold for 3 seconds.
03 BEFORE YOU BEGIN
2. The Lock symbol disappears in the display,
indicating that all functions are unlocked.
English - 19
NQ50C7935ES_EU_DG68-00471E-01_EN.indb 19 2014-10-23 12:02:22
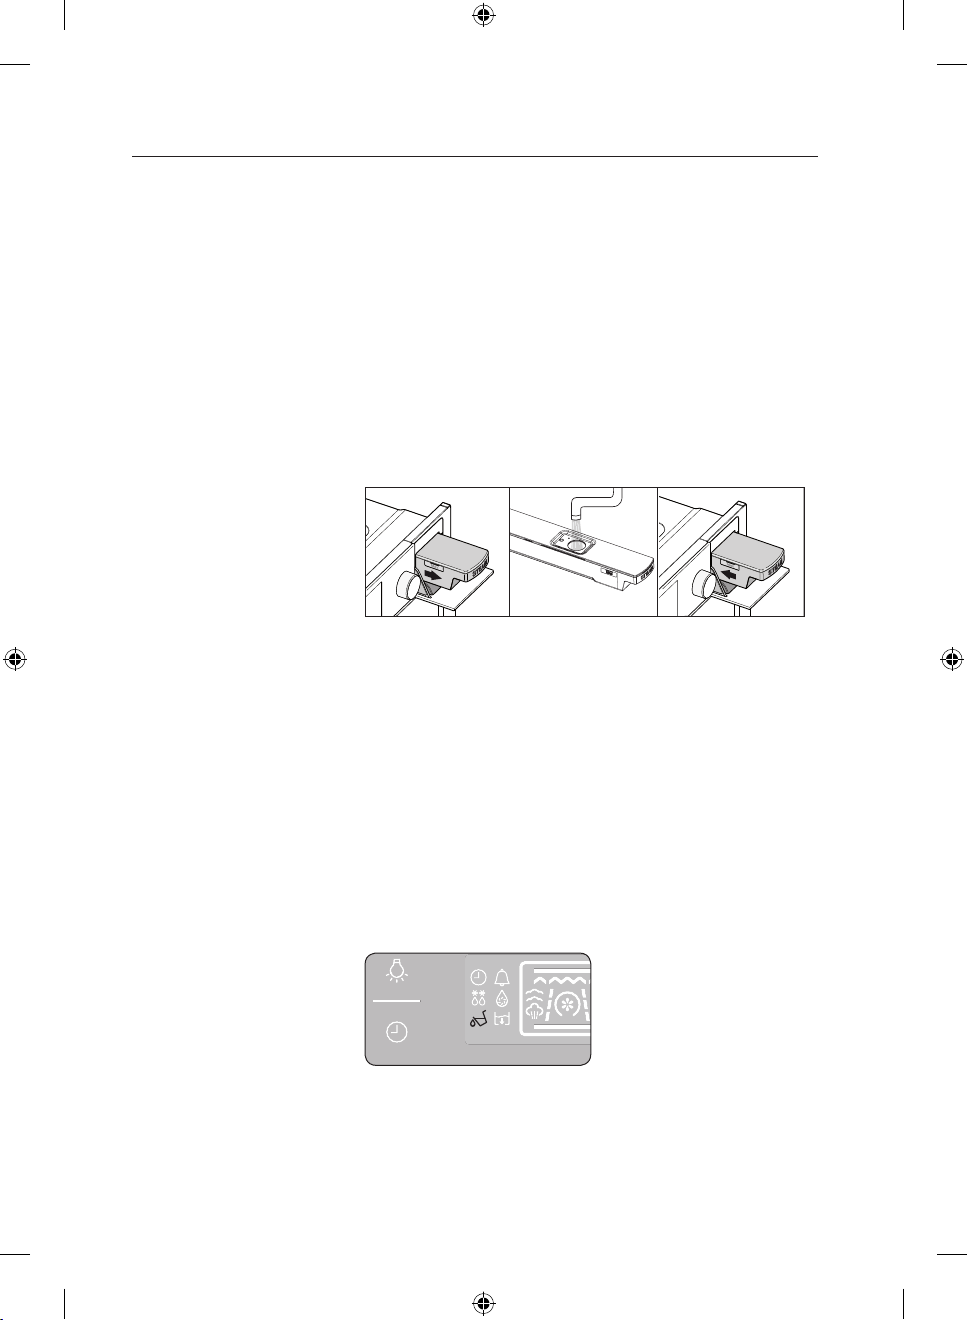
FILLING THE WATER TANK
You will see the water tank on the right-hand side. Only fill the tank with fresh tap
water or with still bottled water. If your water is very hard, we recommend that you use
softened water (see also “Water hardness”).
Caution Do not fill the water tank with distilled water or any other
liquids.
Fill the water tank before
each use
Empty the water tank after
each use
“Fill water tank” display If the water tank is empty, a signal sounds.
Push the steam door to open it. Lift the water tank over
the interlock and pull the tank out of the appliance. Open
the lid and fill the water tank with cold water up to the
“Max” mark. If you use the measuring jug to fill the water
tank, you don’t have to pull the water tank completely out
of the appliance. Close the lid until you feel it engage.
Slide the water tank back until it engages.
Pull the water tank out of the appliance slowly. Pulling it
out quickly may cause water to spill. Hold the water tank
horizontally, so that no remaining water can drip out of
the valve seat.
Empty out the water.
Thoroughly dry the water tank in the appliance and the
seal in the lid.
A symbol appears in the display (see the below picture).
The operation is interrupted.
1. Take out the water tank, fill to the “Max” mark and
reinsert.
2. Press START.
English - 20
NQ50C7935ES_EU_DG68-00471E-01_EN.indb 20 2014-10-23 12:02:22
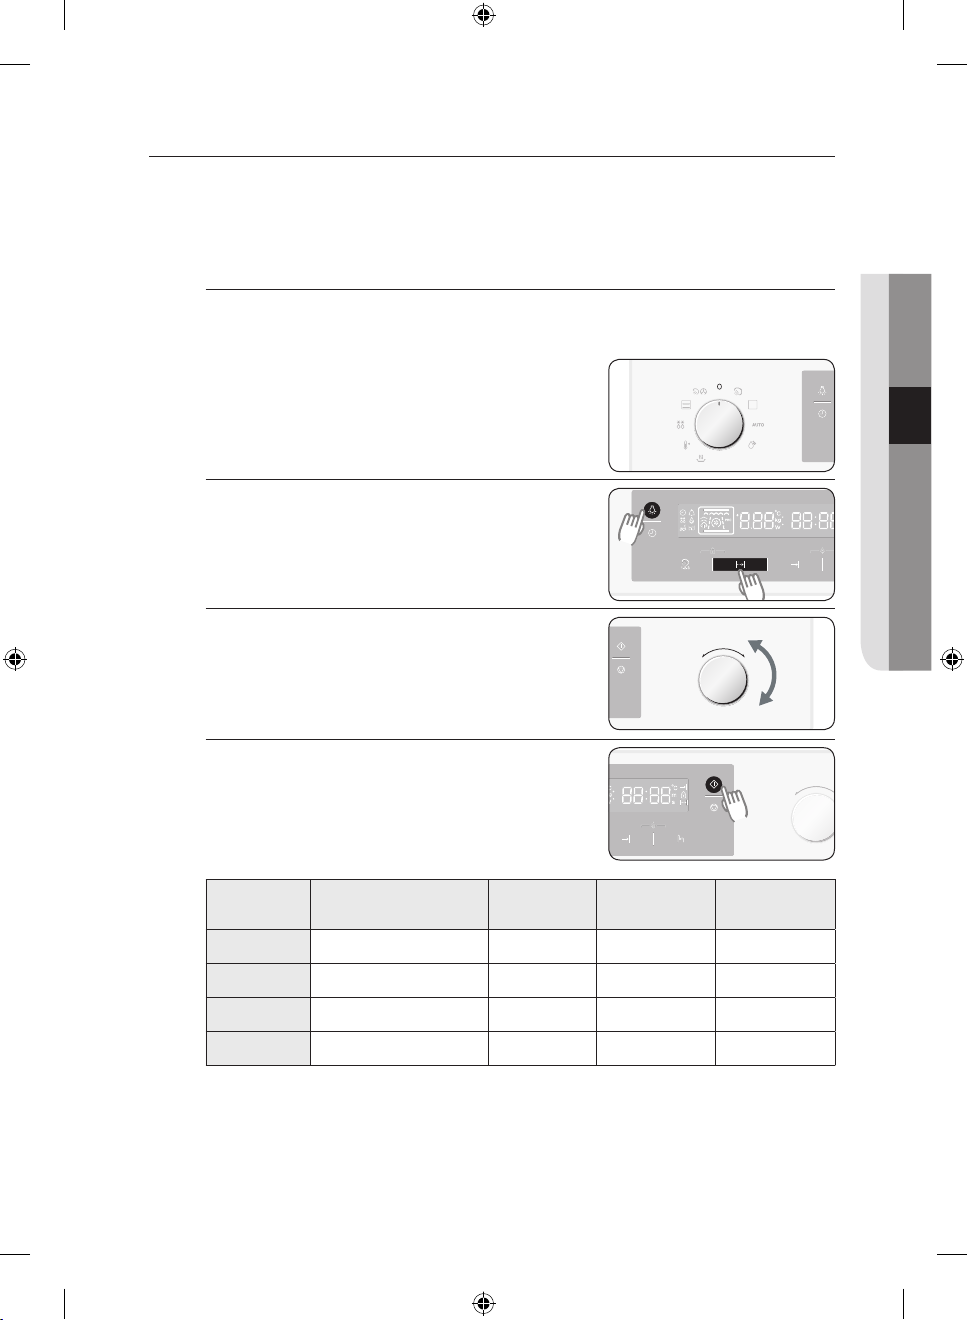
SETTING THE WATER HARDNESS
It is necessary to descale your appliance at regular intervals. This is the only way to
prevent damage.
Your appliance has a system that automatically displays when it needs descaling. It is
preset to a water hardness 3. Change the value of water type in your home.
Checking the Water Hardness
Information on the hardness of the water in your area can be obtained from the
local water board.
1. Turn the MODE SELECTOR to “OFF” position.
2. Press LAMP and COOK TIME at the same
time.
3. Turn the MULTI-FUNCTION SELECTOR to the
desired water hardness.
4. Press START.
• The appliance is now programmed to
provide the descaling warning when
necessary, based on the actual hardness of
the water.
03 BEFORE YOU BEGIN
Display Type PPM
H1 Soft Water 0 - 105 0 - 11 0 - 6
H2 Medium Soft water 125 - 230 12 - 23 7 - 13
H3 (Default) Medium Hard Water 250 - 350 24 - 36 14 - 20
H4 Hard Water > 375 > 37 > 21
French deg.
(°df)
German deg.
(°dH)
English - 21
NQ50C7935ES_EU_DG68-00471E-01_EN.indb 21 2014-10-23 12:02:23
 Loading...