

Page 1
Chapter 1.
Getting Started
Product Features 2
Before You Start 4
Contents 7
Safety Precautions 8
Proper Posture During Computer Use 18
Important Safety Information 20
Replacement Parts and Accessories 22
Regulatory Compliance Statements 24
WEEE SYMBOL INFORMATION 33
Overview 34
Turning the Computer On and Off 42
Page 2
Product Features
Small but Strong UMPC (Ultra Mobile PC)
● Intel ULV CPU (Optional)
● 512MB~Up To 1GB DDR2 Memory
7” WSVGA TFT LCD
● Basic Resolution of 1024x600 Pixels, Maximum Resolution of
● A Touch Screen and Touch Sensor buttons (optional) have
2048x1536 Pixels (when an external display is connected)
been adopted allowing convenient input with your fingers.
● A Keypad has been adopted to easily enter characters
● A convenient mouse function (Mouse/Joystick, Mouse Button
applied)
Powerful Multimedia Functions
● Various Multimedia Programs Such as Play AVStation etc.
● Dual camera for photographing and video recording (Optional)
2
Page 3
Multiple Network Support
● Wired LAN, Wireless LAN, Bluetooth (Optional)
● Resolves Space Restrictions through the Wireless
Communication Function
Compact, Light-Weight Design for Portability /
Polished Design
● A mere 690g (1.52lb) (Without optional items)
● High-Gloss Front Panel
Optional Accessories for Additional Convenience
● USB Data Cable Enabling Data Exchange with another PC.
● USB External ODD(Optical Disk Drive), Ultra-Slim USB
External Keyboard
● Power Bank to Extend Usage Time
3
Page 4
Before You Start
Before reading the User Guide, first check the following information.
User Guide Information
This product is supplied with an Getting
Started Guide, and a User Guide.
You can even more easily and
conveniently use the computer by using
any of the guides depending on your
needs.
Getting Started Guide
This guide is provided so that you can
conveniently refer to this guide when
using the computer for the first time after
purchasing it.
User Guide
The document you are currently reading
is the User Guide. You can read it by
double-tapping the icon on the Desktop.
This document includes the computer
functions, how to use the functions, and
how to use the program.
Utilizating the User Guide
Be sure to read the Safety Precautions
before using the computer.
For basic usage of the computer refer to
the additionally supplied Getting Started
Guide.
Refer to the User Guide for the
procedures to use the computer.
Using the Index of the User Guide, you
can easily find any information you are
looking for.
Using the Glossary of the User Guide,
you can easily find meanings for technical
terms.
If a problem occurs, refer to the Q & A
included in the User Guide.
■ Some devices and software
referred in the User Guide may
not be provided and/or changed
by upgrade.
Note that the computer
environment referred in the User
Guide may not be the same as
your own environment.
■ The image used for the cover and
text of the User Guide may not be
the same as actual ones.
4
Page 5
■ This guide decribes procedures
for both the mouse and the stylus
pen together.
A ‘
Click’ in this manual refers to
a ‘Single-tap’ for the Stylus Pen.
■ The figures in this guide are
provided assuming that your
operating system is Windows
Vista. The figures are subject to
change.
■ The User guide supplied
with computer may be varied
depending on model.
Text Notations
Icon Notation Description
Before
You
Start
Caution
Note
Content included in
this section includes
information required
before using a function.
Content included in
this section includes
information required
about the function.
Content included in this
section includes helpful
information to use the
function.
Safety Precaution Notations
Icon Notation Description
Failing to follow
instructions marked with
Warning
Caution
this symbol, may cause
personal injury and or
fatality.
Failing to follow
instructions marked with
this symbol, may cause
slight injury to yourself or
damage your property.
Start >
All Programs
> Samsung >
User Guide >
User Guide
5
Page XX
This notation represents
the page number you can
refer to for information
about related functions or
as a reference.
This represents a menu
path to run a program.
Click the Start button and
then select All Programs
> Samsung > User
Guide > User Guide in
this order from the menu.
Page 6

Copyright
© 2007 Samsung Electronics Co., Ltd.
Example) When trying to install Windows
Vista Home Premium when Windows
Vista Home Basic is already installed.
Samsung Electronics Co., Ltd. owns the
copyright of this manual.
No part of this manual may be
reproduced or transmitted in any form or
by any means, electronic or mechanical,
without the consent of Samsung
Electronics Co., Ltd.
The information in this document is
subject to change without notice due
to improving the performance of the
product.
Samsung Electronics shall not be liable
for any data loss. Please take care to
avoid losing any important data and
backup your data to prevent any such
data loss.
Precautions for
Operating System Support
The operating system (OS) installed
on this product is the latest version of
Windows Vista. You cannot install an
operating system other than Windows
Vista as well as any unauthorized copy of
Windows Vista.
Other operating systems (Windows 98,
Windows ME, Windows 2000, Windows
2003 server, UNIXand LINUX, other
Windows Vista versions, etc.) other than
the operating system already installed on
this computer are not supported.
If a problem occurs because of the
installation of another operating system,
the company will not provide technical
support, a replacement or refund, and if
our service engineer visits you due to this
problem, a service charge will be applied.
In addition, installing a program that does
not support Windows Vista, may cause
the program to not work properly.
In this case, ask the corresponding
software manufacturer about the
problem. If you request our services
to resolve a problem caused by
incompatible software, a service charge
will be applied.
6
Page 7
Contents
Chapter 1. Getting Started
Product Features 2
Before You Start 4
Contents 7
Safety Precautions 8
Proper Posture During Computer Use 18
Important Safety Information 20
Replacement Parts and Accessories 22
Regulatory Compliance Statements 24
WEEE SYMBOL INFORMATION 33
Overview 34
Turning the Computer On and Off 42
Chapter 2. Using the Computer
Stylus Pen 45
Entering Text 48
Using the Buttons 54
Multi Card Slot 61
Connecting a Monitor 64
Adjusting the Volume 68
Chapter 3. Using Microsoft Windows Vista
Chapter 5. Using Applications
Introducing Programs 113
Origami Experience 116
CyberLink PowerDVD 118
Samsung Update Plus 120
Play AVStation 122
AVStation Now 136
Play Camera 138
OmniPass (Fingerprint Identification
software) 141
Chapter 6. Settings
BIOS Setup 148
Setting a Boot Password 153
Changing the Boot Priority 156
Battery 157
Chapter 7. Windows Media Center
About Package Contents
and the Program Guide 164
Connecting and Setting Up Media Center 165
Using Media Center 169
About Microsoft Windows Vista 71
Windows Vista Screen Layout 74
Control Panel 83
Chapter 4. Using the Network
Wired Network 96
Wireless Network 99
Using the Easy Network Manager 102
Bluetooth 106
Chapter 8. Appendix
Using Samsung Magic Doctor 182
Using McAfee SecurityCenter 183
Reinstalling Software 184
Reinstalling Windows Vista 186
Samsung Recovery Solution II 190
Q & A 200
Intel Media Sharing Software Information 217
Product Specifications 218
Glossary 222
Index 225
Contact SAMSUNG WORLD WIDE 226
7
Page 8
Safety Precautions
For your security and to prevent damage, please read the following safety instructions carefully.
Since this is commonly applied to Samsung Computers, some figures may differ from actual ones.
Warning
Failing to follow instructions marked with this symbol may cause personal injury and even
fatality.
Installation Related Power Related
The power plug and
wall outlet figures may
differ depending on the
country specifications
and the product model.
Do not install the product
in places exposed to
humidity such as a
bathrooms.
There is a danger of
electric shock. Use the
product within the operating
conditions specified in the
Manufacturers User Guide.
Keep the plastic bags out
of the reach of children.
There is a danger of
suffocation.
Keep a distance of 15cm
or more between the
computer and the wall
and do not place any
objects between them.
This may increase the
internal temperature of the
computer and may cause an
injury.
Do not install the
computer on a slant or a
place prone to vibrations,
or avoid using the
computer in that location
for a long time.
This increases the risk that a
malfunction or damage to the
product will occur.
Do not touch the mains
plug or power cord with
wet hands.
There is a danger of
electric shock.
Do not exceed the
standard capacity
(voltage/current) of a
multi-plug or power
outlet extension when
using it for the product.
There is a danger of
electric shock or fire
hazard.
8
Page 9
If the power cord or
power outlet makes a
noise, disconnect the
power cord from the
wall outlet and contact a
service center.
There is a danger of
electric shock or fire
hazard.
Do not use a damaged
or loose mains plug or
power cord or power
outlet.
There is a danger of
electric shock or fire
hazard.
Plug the power cord
firmly into the power
outlet and AC adapter.
Failing to do so may cause
fire hazard.
Do not unplug the power
cord out by pulling the
cable only.
If the cord is damaged, it
may cause electric shock.
Do not bend the power
cord excessively or do
not place a heavy object
over the power cord. It is
especially important to
keep the power cord out
of reach of infants and
pets.
If the cord is damaged, it
may cause electric shock
or fire.
Use a wall outlet or multiplug with a grounding
part.
Failing to do so may cause
electric shock hazard.
9
Page 10
10
Battery Usage Related
Usage Related
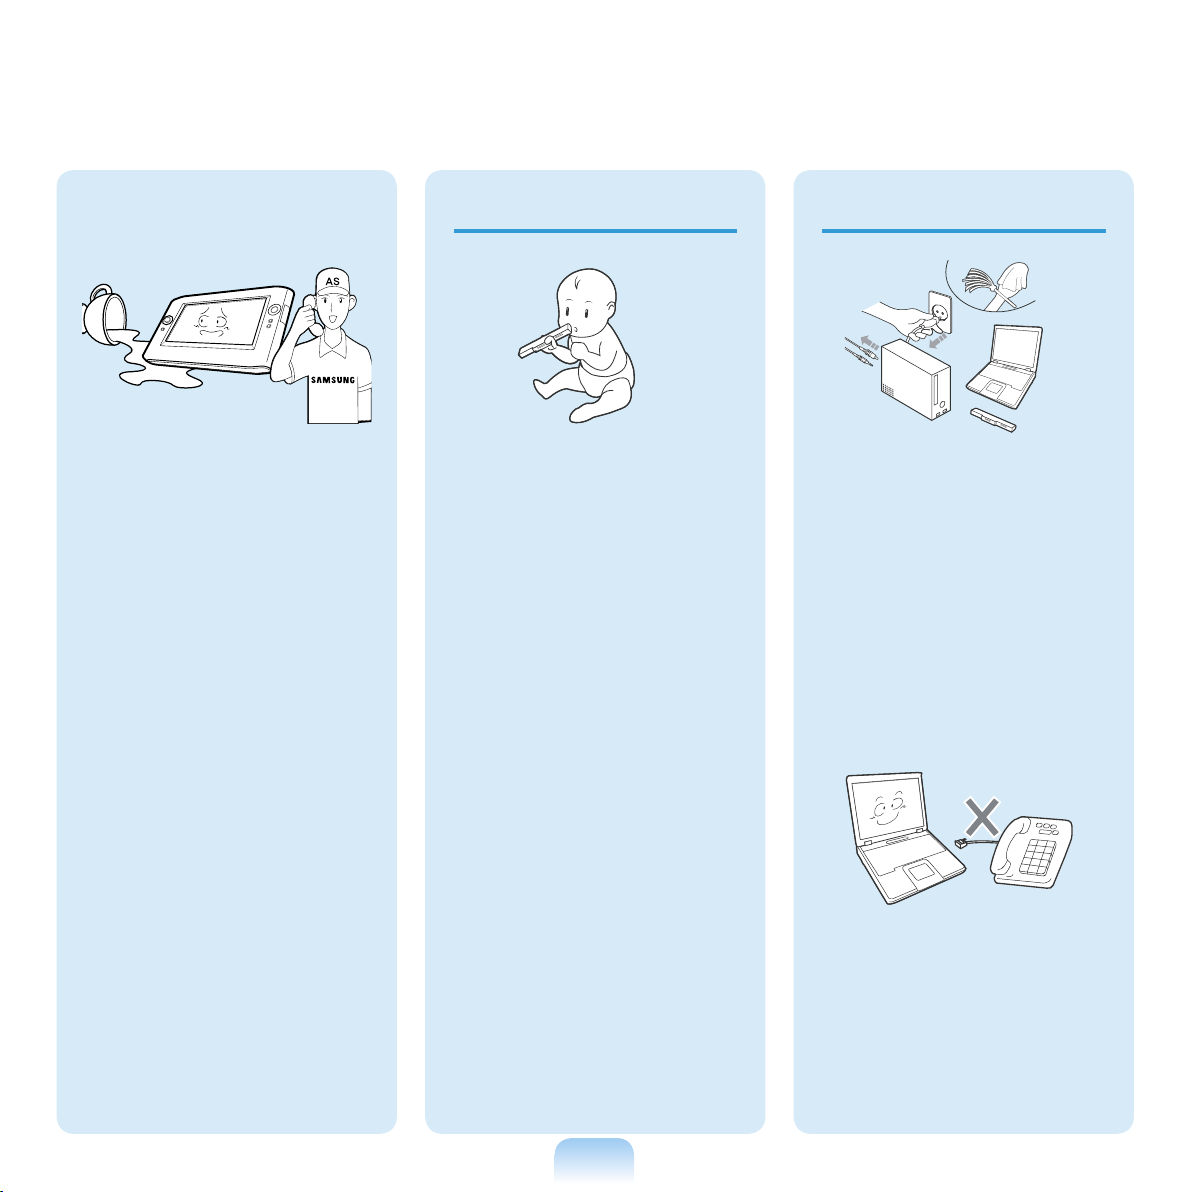
If water or another
substance enters
the power input jack,
AC adapter or the
computer, disconnect
the power cord and
contact the service
center.
Damage to the device
within the computer may
cause electric shock or
fire hazard.
Keep the battery out of
the reach of infants and
pets, as they could put
the battery into their
mouths.
There is a danger of
electric shock or choking.
Disconnect all cables
connected to the
computer before
cleaning it. If you are
using a notebook
computer, remove the
battery.
There is a danger of
electric shock or damage
to the product.
Do not connect a phone
line connected to a
digital phone to the
modem.
There is a danger of a
electric shock, fire or
damage to the product.
Page 11
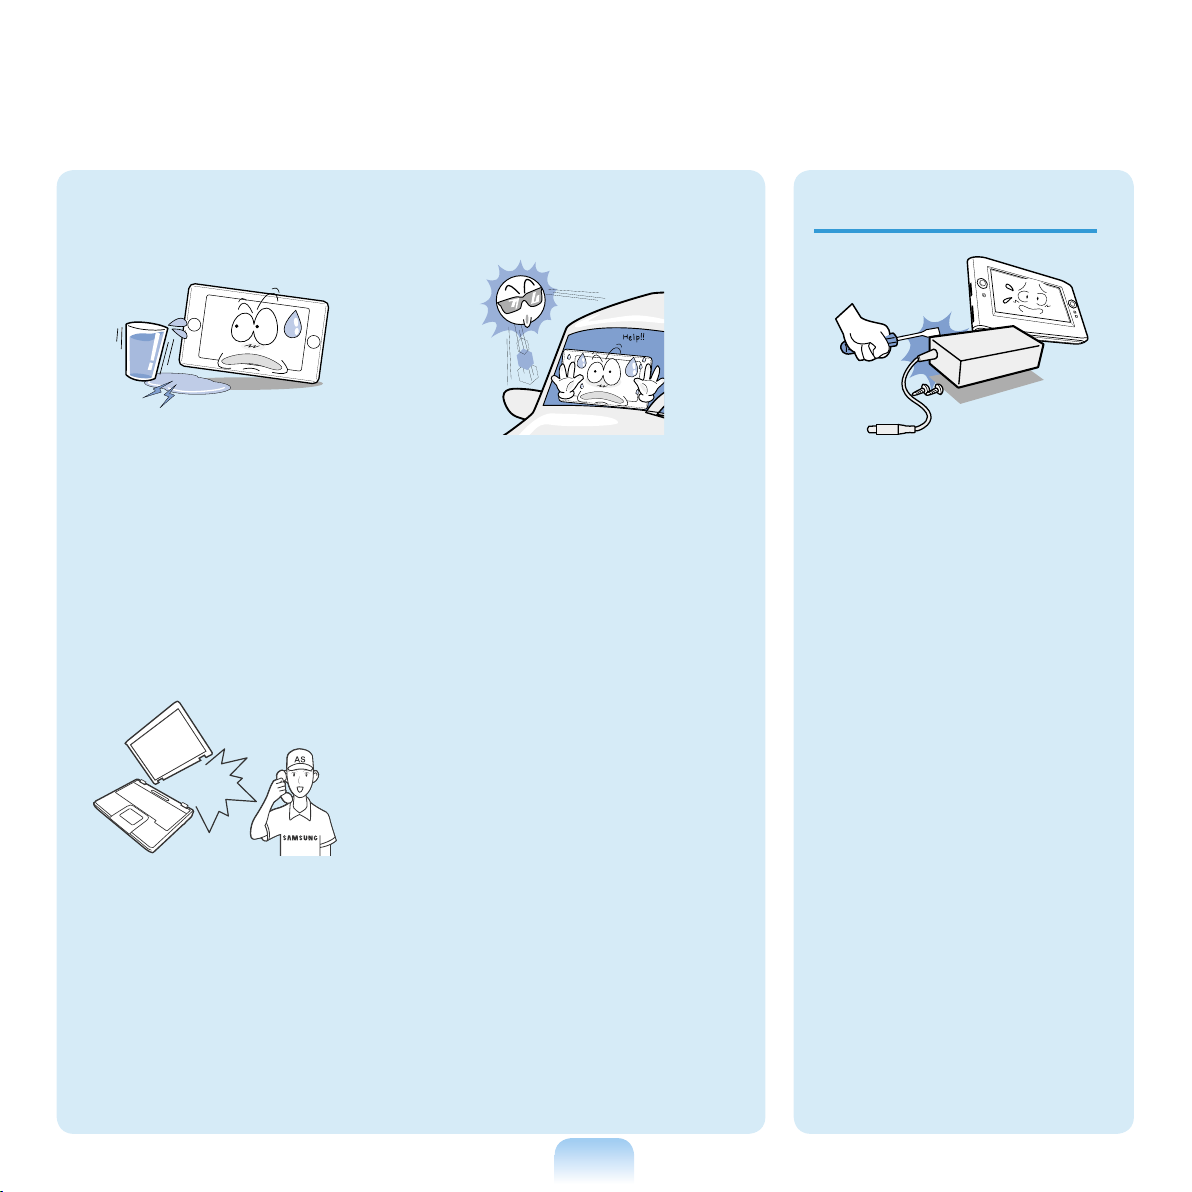
Upgrade Related
Do not place any
container filled with
water or chemicals over
or near the computer.
If water or chemicals enter
the computer, this may
cause fire or electric shock.
If the computer is broken
or dropped, disconnect
the power cord and
contact a service center
for a safety check.
Using a broken computer
may cause electric shock
or fire hazard.
Avoid direct sunlight
when the computer is in
an air-tight location such
as inside a vehicle.
There is a danger of a fire
hazard. The computer may
overheat and also present
opportunity to thieves.
Never disassemble the
power supply or AC
adapter.
There is a danger of
electric shock.
When removing the
RTC (Real Time Clock)
battery, keep it out of
the reach of children as
they could touch and/or
swallow it.
There is a danger of
choking. If a child has
swallowed it, contact a
doctor immediately.
11
Page 12
12
Use only authorized
parts (multi-plug,
battery and memory)
and never disassemble
parts.
There is a danger of
damaging the product,
electric shock or fire
hazard.
Shut down the
computer and
disconnect all cables
before disassembling
the computer. If there is
a modem, disconnect
the phone line. If you
are using a notebook
computer, make sure to
remove the battery.
Failing to do so, may
cause electric shock.
Custody and
Movement Related
Follow the instructions
for the relevant location
(e.g. airplane, hospital,
etc.) when using a
wireless communication
device (wireless LAN,
Bluetooth, etc.).
Page 13
Caution
Failing to follow instructions marked with this symbol may cause slight injury or damage to the
product.
Installation Related Battery Usage Related
Do not block the ports
(holes), vents, etc. of the
product and do not insert
objects.
Damage to a component
within the computer may
cause electric shock or fire.
When using the
computer with it lying on
its side, place it so that
the vents face upwards.
Failing to do so, may cause
the internal temperature
of the computer to rise
and the computer to
malfunction or halt.
Do not place a heavy
object over the product.
This may cause a problem
with the computer. In
addition, the object may
fall and cause injury, or
damage the computer.
Dispose of worn-out
batteries properly.
■ There is a danger of fire
or explosion.
■ The battery disposal
method may differ
depending on your
country and region.
Dispose of the used
battery in an appropriate
way.
Do not throw or
disassemble the battery
and do not put it into
water.
This may cause an injury,
fire or explosion.
Use only a battery
authorized by Samsung
Electronics.
Failing to do so may cause
an explosion.
Avoid contact with metal
objects such as car keys
or clips when keeping or
carrying a battery.
Contact with a metal may
cause excessive current
and a high temperature
and may damage the
battery or cause a fire.
Charge the battery
according to the
instructions in the
manual.
Failing to do so, may
cause and explosion or
fire from damage to the
product.
Do not heat the battery
or expose it to heat (e.g.
inside a vehicle during
the summer).
There is a danger of
explosion or fire.
13
Page 14

14
Usage Related
Do not place a candle,
lighted cigar, etc. over or
on the product.
There is a danger of fire.
Make sure to have the
product tested by a safety
service engineer after
repairing the product.
Authorised Samsung
Repair Centers will carry
out safety checks after a
repair. Using a repaired
product without testing it for
safety might cause electric
shock or fire.
In case of lightning,
immediately turn the
system off, disconnect
the power cord from the
wall outlet and line do not
use a modem or phone.
There is a danger of electric
shock or fire.
Connect only permitted
devices to the connectors
or ports of the computer.
Failing to do so, may cause
electric shock and fire.
Close the LCD panel
only after checking if the
notebook computer is
turned off.
The temperature may
rise and it may cause
overheating and
deformation of the product.
Do not press the Eject
Button while the Floppy
Disk/CD-ROM drive is in
operation.
You might lose data and
the disk might be suddenly
ejected and could cause an
injury.
Take care not to drop the
product while using it.
This may cause personal
injury or loss of data.
Do not contact the
antenna with electricity
facility such as the power
outlet.
There is a danger of electric
shock.
When handling
computer parts, follow
the instructions on the
manual supplied with the
parts.
Failing to do so, may cause
damage to the product.
If the computer emits
smoke, or there is a
burning smell, disconnect
the power plug from the
wall outlet and contact
a service center. If your
computer is a note-book
computer, make sure to
remove the battery.
There is a danger of fire.
Page 15

Upgrade Related
Do not use a damaged or
modified CD/Floppy Disk.
There is a danger of
damaging the product or
personal injury.
Do not insert your fingers
into the PC Card Slot.
There is a danger of injury
or electric shock.
Use recommended
computer cleansing
solution when cleaning
the product and only use
the computer when it is
completed dried.
Failing to do so may cause
electric shock or fire.
Emergency disk eject
method using paperclip
should not be used while
the disk is in mothion.
Make sure to use the
emergency disk eject
method only when the
Optical Disk Drive is
stopped.
There is a danger of injury.
Do not place your face
close to the Optical Disk
Drive tray when it is
operating.
There is a danger of injury
due to an abrupt ejection.
Check CDs for cracks
and damage prior to use.
It may damage the disc
and cause disorder of
device and injury of user.
Take care when
touching the product or
parts.
The device may be
damaged or you may be
injured.
Take care not to throw
or drop a computer part
or device.
This may cause injury or
damage to the product.
Make sure to close the
computer cover before
connecting the power
after a reassembly.
There is a danger of
electric shock if your
body touches an internal
part.
15
Page 16

16
Custody and Movement Related
Use parts authorized
by Samsung
Electronics only.
Failing to do so, may
cause fire or damage
the product.
Never disassemble or
repair the product by
yourself.
There is a danger of
electric shock or file.
To connect a
device that is not
manufactured
or authorized by
Samsung Electronics,
enquire at your
service center before
connecting the device.
There is a danger of
damaging the product.
When moving the
product, turn the power
off and separate all
connected cables first.
The product might be
damaged or users may trip
over the cables.
For long periods of not
using the notebook
computer, discharge the
battery and preserve as
it is detached.
The battery will be
preserved at its best
condition.
Keep the Stylus Pen out
of reach of children.
hildren may injure
themselves by swallowing
it or damaging their eyes.
Use a computer
cleansing solution when
cleaning the product.
Using a cleansing solution
or chemical that is not
developed for a computer
may damage the product.
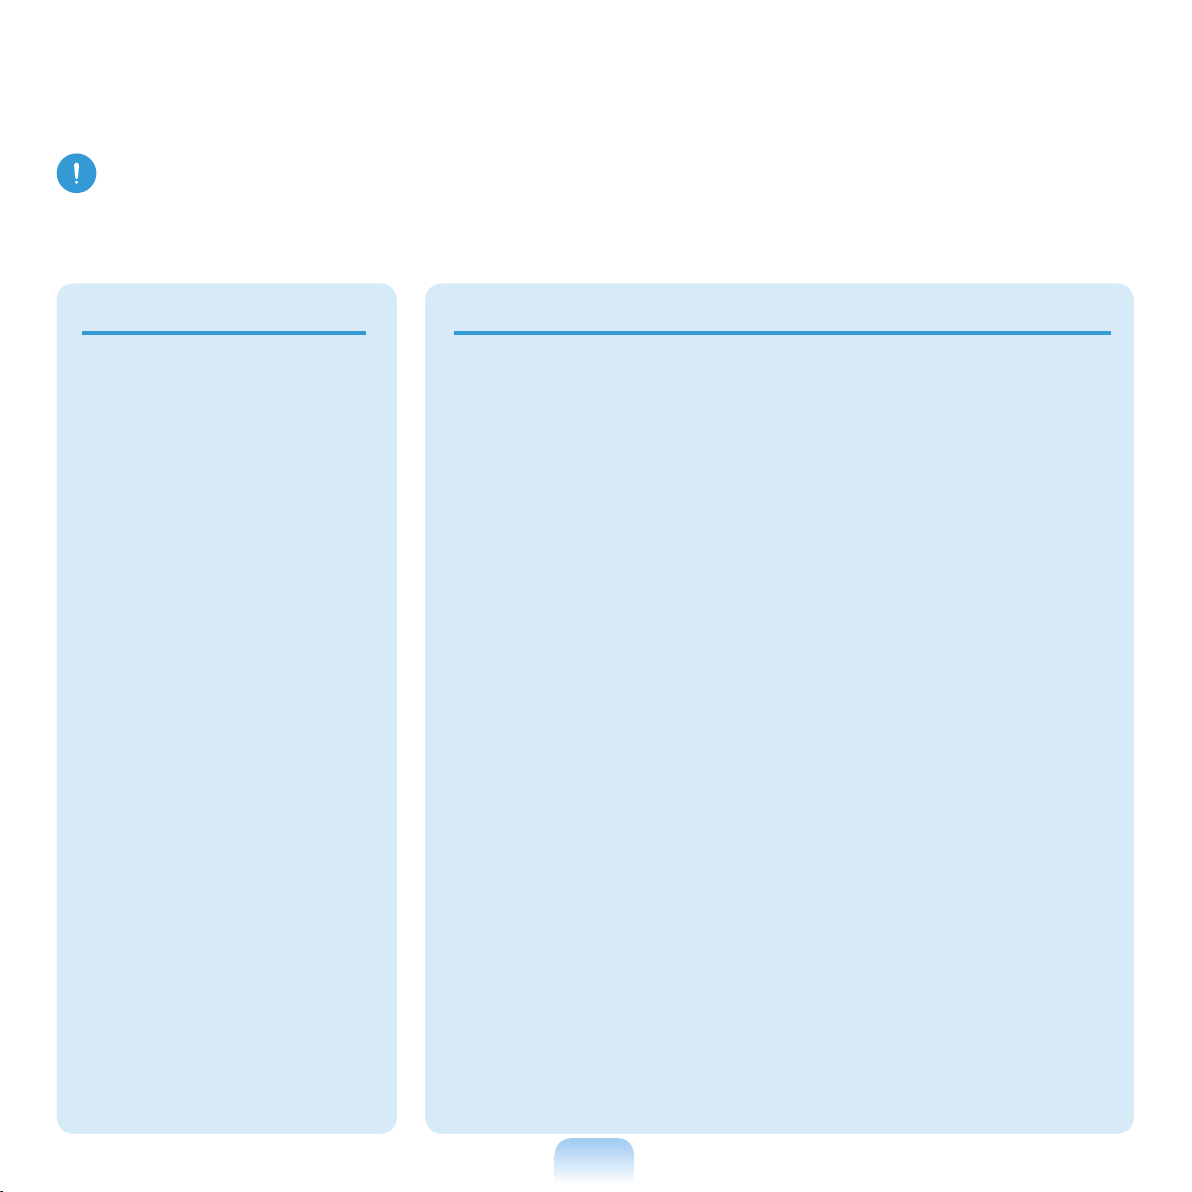
Do not use or watch the
computer while driving a
vehicle.
This may cause a traffic
accident. Concentrate on
driving.
Page 17

LCD Related
Cautions on Preventing Data Loss (Hard Disk Management)
LCD Bad Pixels
The limits of LCD
manufacturing
technology permit a
maximum of 4 abnormal
or bad pixels, which
does not affect the
system performance.
This system may have
the same level of
abnormal or bad pixels
as any other company’s
products.
Cleaning the LCD
When cleaning the
LCD panel, use only
computer specific
cleaners with a soft
cloth, and lightly wipe in
one direction.
Pressing down hard may
damage the LCD.
To prevent data loss due to damage to the hard disk
drive, please backup your data frequently.
Take care not to damage
the data on a hard disk
drive.
■ A hard disk drive is so
sensitive to external
impact that an external
impact may cause loss of
data on the surface of the
disk.
■ Take extra care, because
moving the computer
or an impact on the
computer when it is
turned on may damage
the data of the hard disk
drive.
■ The company is not
liable for the loss of
any data caused by
customer such as the
carelessness usage
or bad environmental
condition.
Causes that may damage
the data of a hard disk
drive and the hard disk
drive itself.
■ The data may be lost
when an external impact
is applied to the disk
while disassembling
or assembling the
computer.
■ The data may be lost
when the computer is
turned off or reset by
a power failure while
the hard disk drive is
operating.
■ The data may be lost and
irrecoverable due to a
computer virus infection.
■ The data may be lost if
the power is turned off
while running a program.
■ Moving or causing an
impact to the computer
while the hard disk drive
is operating, may cause
files to be corrupted or
bad sectors on the hard
disk.
17
Page 18
Proper Posture During Computer Use
Maintaining a proper posture during computer use is very important to prevent physical harm.
The following instructions are about maintaining a proper posture during computer use
developed through human engineering. Please read and follow them carefully when using the
computer.
Otherwise, the probability of (RSI: Repetitive Strain Injury) from repeated operations may
increase and serious physical harm may be caused.
The instructions in this manual have been prepared so that they can be applied
within the coverage of general users. If the user is not included in the coverage, the
recommendation is to be applied according to the user’s needs.
Since this is commonly applied to Samsung Computers, some figures may differ
from actual ones.
Proper Posture
■ Do not use the computer on your lap or
close to your skin for a long time.
There is a danger of burns due to the high
temperature of the computer.
■ To use the computer while talking over
the telephone, use the ear-microphone
phone.
When using the computer while holding a
phone over your shoulder and talking on
the phone, your posture becomes bad.
■ Keep frequently used work items within an
easy working range (where you can reach
them with your hands easily).
Eye Position
Keep a distance of at least 50cm between
the LCD and your eyes.
■ Adjust the height of the LCD screen so
that its top height is equal to or lower than
your eyes.
■ Avoid setting the LCD excessively bright.
■ Keep the LCD screen clean.
■ When wearing glasses, clean them before
using the computer.
18
Page 19
Hand Position
Use Time (Break Time)
■ It is recommended to connect and use an
external keyboard and mouse when using
the computer for a long time.
■ Do not hold the Stylus Pen with excessive
force.
■ Do not press the touch screen with
excessive force.
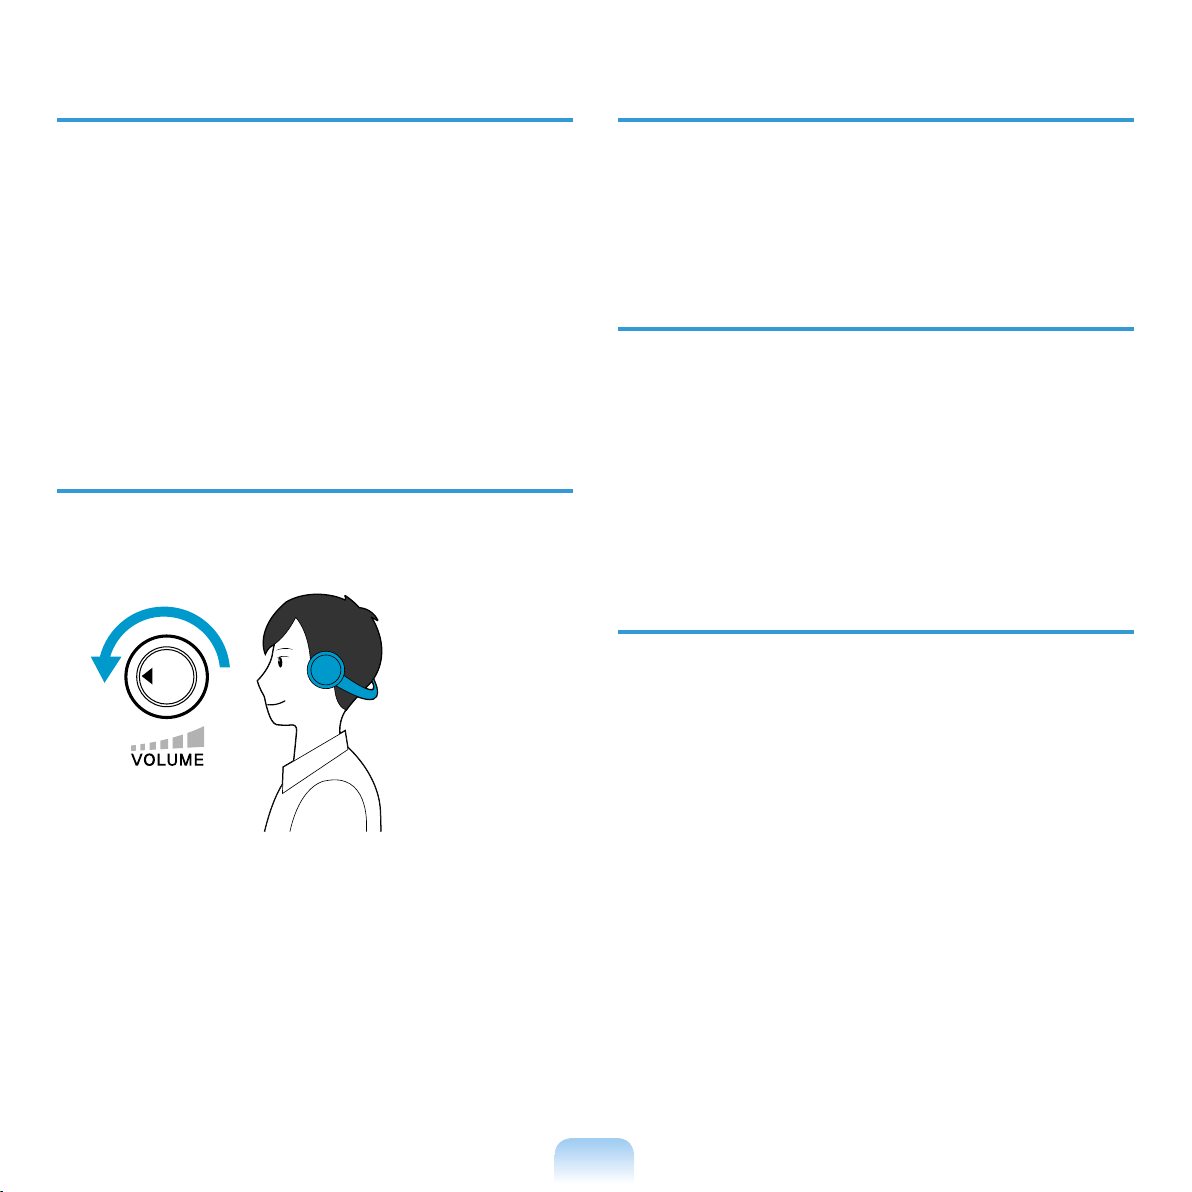
Volume Control
(Headphones and Speakers)
Check your volume first to listen to
music.
Check your
volume!!
■ Take a break for 10 minutes or more after
a 50-minute period when working for more
than one hour.
Illumination
■ Do not use the computer in dark locations.
The illumination level for computer use
must be as bright so for reading a book.
■ Indirect illumination is recommended. Use
a curtain to prevent reflection on the LCD
screen.
Operation Condition
■ Do not use the computer in hot and humid
locations.
■ Use the computer within the allowed
temperature and humidity range specified
in the User Guide.
■ Check if the volume is too loud before
using headphones.
■ Do not turn the volume to the maximum
level right from the start. Instead, start
the volume at a low level and increase it
slowly while listening to the sound.
■ It is not recommended using headphones
for long periods of time.
19
Page 20
Important Safety Information
Safety instructions
Your system is designed and tested
to meet the latest standards for safety
of information technology equipment.
However, to ensure safe use of this
product, it is important that the safety
instructions marked on the product and in
the documentation are followed.
Always follow these instructions to
help guard against personal injury
and damage to your system.
Setting Up your System
■ Read and follow all instructions marked
on the product and in the documentation
before you operate your system. Retain
all safety and operating instructions for
future use.
■ Do not use this product near water or a
heat source such as a radiator.
■ Ensure that the electrical outlet you are
using to power your equipment is easily
accessible in case of a fire or short circuit.
■ If your computer has a voltage selector
switch, make sure that the switch is in the
proper position for your area.
■ Openings in the computer case are
provided for ventilation. Do not block or
cover these openings. Make sure you
provide adequate space, at least 6 inches
(15 cm), around the system for ventilation
when you set up your work area.
Never insert objects of any kind into the
computer ventilation openings.
■ Ensure that the fan vents on the bottom
of the casing are clear at all times. Do
not place the computer on a soft surface,
doing so will block the bottom vents.
■ If you use an extension cord with this
system, make sure that the total power
rating on the products plugged into the
extension cord does not exceed the
extension cord power rating.
■ Set up the system on a stable work
surface.
■ The product should be operated only with
the type of power source indicated on the
rating label.
20
Page 21

Care During Use
■ Do not walk on the power cord or allow
anything to rest on it.
The Instruction On
Safety Operation of NotePC
■ Do not spill anything on the system. The
best way to avoid spills is to not eat or
drink near your system.
■ Some products have a replaceable CMOS
battery on the system board. There is a
danger of explosion if the CMOS battery
is replaced incorrectly. Replace the
battery with the same or equivalent type
recommended by the manufacturer.
Dispose of batteries according to the
manufacturers instructions. If the CMOS
battery requires replacement insure that a
qualified technician performs the task.
■ When the computer is turned off, a small
amount of electrical current still flows
through the computer. To avoid electrical
shock, always unplug all power cables,
remove the battery and modem cables
from the wall outlets before cleaning the
system.
When installing and operating devices
1
please refer to safety requirements in
the user guide.
Devices can be used only with the
2
equipment specified in the technical
specifications of the devices.
If any smell of burning or smoke
3
from the computer the unit should be
switched off and battery removed.
The unit should be checked by a
qualified technician before reuse.
Service and repair of devices should
4
be carried out by authorized service
centers.
■ Unplug the system from the wall outlet
and refer servicing to qualified personnel
if:
– The power cord or plug is damaged.
– Liquid has been spilled into the system.
– The system does not operate properly
when the operating instructions are
followed.
– The system was dropped or the casing
is damaged.
– The system performance changes.
21
Page 22
Replacement Parts and Accessories
Use only replacement parts and accessories recommended by SAMSUNG.
Do not use this product in areas
classified as hazardous. Such
areas include patient care areas of
medical and dental facilities, oxygen
rich environments, or industrial
areas.
Battery Disposal
Do not put rechargeable batteries
or products powered by nonremovable rechargeable batteries in
the garbage.
Contact the Samsung Helpline for
information on how to dispose of
batteries that you cannot use or recharge
any longer.
Follow all local regulations when
disposing of old batteries.
THERE IS A RISK OF EXPLOSION
IF BATTERY IS REPLACED BY AN
INCORRECT TYPE. DISPOSE OF
USED BATTERIES ACCORDING TO
THE INSTRUCTIONS.
Connect and Disconnect
the AC adapter
The socket-outlet shall be installed
near the equipment and shall be easily
accessible.
Do not unplug the power cord out by
pulling the cable only.
Power Cord Requirements
The power cord set (wall plug, cable and
AC adapter plug) you received with your
computer meets the requirements for use
in the country where you purchased your
equipment.
Power cord sets for use in other
countries must meet the requirements of
the country where you use the computer.
For more information on power cord set
requirements, contact your authorized
dealer, reseller, or service provider.
22
Page 23

General Requirements
The requirements listed below are
applicable to all countries:
■ The length of the power cord set must be
at least 6.00 feet (1.8m) and a maximum
of 9.75 feet (3.0m).
■ All power cord sets must be approved
by an acceptable accredited agency
responsible for evaluation in the country
where the power cord set will be used.
■ The power cord set must have a minimum
current capacity of 7 A and a nominal
voltage rating of 125 or 250 volts AC, as
required by each country’s power system.
■ The appliance coupler must meet the
mechanical configuration of an EN
60 320/IEC 320 Standard Sheet C7
connector, for matching with appliance
inlet on the computer.
23
Page 24

Regulatory Compliance Statements
Wireless Guidance
Low power, Radio LAN type devices (radio frequency (RF) wireless communication devices),
operating in the 2.4 GHz Band, may be present (embedded) in your notebook system. The
following section is a general overview of considerations while operating a wireless device.
Additional limitations, cautions, and concerns for specific countries are listed in the specific
country sections (or country group sections). The wireless devices in your system are only
qualified for use in the countries identified by the Radio Approval Marks on the system rating
label. If the country you will be using the wireless device in, is not listed, please contact your
local Radio Approval agency for requirements. Wireless devices are closely regulated and
use may not be allowed.
The RF field strength of the wireless device or devices that may be embedded in your
notebook are well below all international RF exposure limits as known at this time. Because
the wireless devices (which may be embedded into your notebook) emit less energy than is
allowed in radio frequency safety standards and recommendations, manufacturer believes
these devices are safe for use. Regardless of the power levels, care should be taken to
minimize human contact during normal operation.
This transmitter must not be collocated or operate in conjunction with any other antenna or
transmitter except the installed Bluetooth transmitter.
Some circumstances require restrictions on wireless devices. Examples of common
restrictions are listed below:
24
Page 25
■ Radio frequency wireless communication can interfere with equipment on
commercial aircraft. Current aviation regulations require wireless devices to be
turned off while traveling in an airplane.
802.11B (also known as wireless Ethernet or Wifi) and Bluetooth communication
devices are examples of devices that provide wireless communication.
■ In environments where the risk of interference to other devices or services is
harmful or perceived as harmful, the option to use a wireless device may be
restricted or eliminated. Airports, Hospitals, and Oxygen or flammable gas
laden atmospheres are limited examples where use of wireless devices may be
restricted or eliminated. When in environments where you are uncertain of the
sanction to use wireless devices, ask the applicable authority for authorization
prior to use or turning on the wireless device.
■ Every country has different restrictions on the use of wireless devices. Since your
system is equipped with a wireless device, when traveling between countries with
your system, check with the local Radio Approval authorities prior to any move or
trip for any restrictions on the use of a wireless device in the destination country.
■ If your system came equipped with an internal embedded wireless device, do not
operate the wireless device unless all covers and shields are in place and the
system is fully assembled.
■ Wireless devices are not user serviceable. Do not modify them in any way.
Modification to a wireless device will void the authorization to use it. Please
contact manufacturer for service.
■ Only use drivers approved for the country in which the device will be used. See
the manufacturer System Restoration Kit, or contact manufacturer Technical
Support for additional information.
25
Page 26
26
United States of America
USA and Canada Safety
Requirements and Notices
Do not touch or move the antenna while the unit
is transmitting or receiving.
Do not hold any component containing the radio
such that the antenna is very close or touching
any exposed parts of the body, especially the
face or eyes, while transmitting.
Do not operate the radio or attempt to transmit
data unless the antenna is connected; if not, the
radio may be damaged.
Use in specific environments:
The use of wireless devices in hazardous
locations is limited by the constraints posed by
the safety directors of such environments.
Use On Aircraft Caution
Regulations of the FCC and FAA
prohibit airborne operation of radiofrequency wireless devices because
their signals could interfere with critical
aircraft instruments.
Other Wireless Devices
Safety Notices for Other Devices in the
Wireless Network: Refer to the documentation
supplied with wireless Ethernet adapters or
other devices in the wireless network.
The Part 15 radio device operates on
a non-interference basis with other
devices operating at this frequency.
Any changes or modification to this
product not expressly approved by
Intel could void the user’s authority to
operate this device.
The use of wireless devices on airplanes is
governed by the Federal Aviation Administration
(FAA).
The use of wireless devices in hospitals is
restricted to the limits set forth by each hospital.
Explosive Device Proximity Warning
Do not operate a portable transmitter
(such as a wireless network device)
near unshielded blasting caps or in
an explosive environment unless
the device has been modified to be
qualified for such use.
Unintentional Emitter
per FCC Part 15
This device complies with Part 15 of the FCC
Rules. Operation is subject to the following two
conditions:(1) this device may not cause harmful
interference, and (2) this device must accept
any interference received, including interference
that may cause undesired operation.
Page 27
This equipment has been tested and
found to comply with the limits for a
Class B digital device pursuant to Part
15 of the FCC Rules. These limits
are designed to provide reasonable
protection against harmful interference
in a residential installation. This
equipment generate uses and can
radiate radio frequency energy and if
not installed and used in accordance
with the instructions may cause
harmful interference will not occur in a
particular installation. If this equipment
does cause harmful interference to
radio or television reception, which
can be determined by turning the
equipment off and on, the user is
encouraged to try to correct the
interference by one or more of the
following measures:
■ Reorient or relocate the receiving
antenna.
■ Increase the separation between the
equipment and receiver.
■ Connect the equipment into an outlet
on a circuit different from that to
which the receiver is connected.
■ Consult the dealer or an
experienced radio/TV technician for
help.
If necessary, the user should consult the dealer
or an experienced radio/television technician
for additional suggestions. The user may find
the following booklet helpful: “Something About
Interference.”
This is available at FCC local regional offices.
Our company is not responsible for any
radio or television interference caused by
unauthorized modifications of this equipment
or the substitution or attachment of connecting
cables and equipment other than those specified
by our company. The correction will be the
responsibility of the user. Use only shielded data
cables with this system.
Intentional emitter per FCC Part 15
Low power, Radio LAN type devices (radio
frequency (RF) wireless communication
devices), operating in the 2.4 GHz Band, may
be present (embedded) in your notebook
system. This section is only applicable if these
devices are present. Refer to the system label to
verify the presence of wireless devices.
Wireless devices that may be in your system
are only qualified for use in the United States of
America if an FCC ID number is on the system
label.
This transmitter must not be collocated or
operate in conjunction with any other antenna
or transmitter except the installed Bluetooth
transmitter.
Operation of this device is subject to the
following two conditions: (1) This device may not
cause harmful interference, and (2) this device
must accept any interference received, including
interference that may cause undesired operation
of the device.
27
Page 28
28
Wireless devices are not user
serviceable. Do not modify them in any
way. Modification to a wireless device
will void the authorization to use it.
Contact manufacturer for service.
FCC Part 68
(If fitted with a modem device.)
to determine the maximum REN for the calling
area.
If the terminal equipment causes harm to the
telephone network, the Telephone Company
will notify you in advance that temporary
discontinuance of service may be required. But
if advance notice is not practical, the telephone
company will notify the customer as soon as
possible. Also, you will be advised of your right
to file a complaint with the FCC if you believe it
is necessary.
This equipment compiles with part of the FCC
rules. On the back of this equipment is a label
that contains, among other information, the
FCC registration number and ringer equivalence
number (REN) for this equipment. If requested,
this information must be provided to the
telephone company.
This equipment uses the following USOC jacks :
RJ11C.
An FCC compliant telephone cord and modular
plug is provided with this equipment. This
equipment is designed to be connected to the
telephone network or promises wiring using
a compatible modular jack which is Part 68
compliant. See Installation Instructions for
details.
The REN is used to determine the quantity of
devices which may be connected to telephone
line. Excessive RENs on the telephone line may
result in the devices not ringing in response to
an incoming call. In most, but not all areas, the
sum of RENs should not exceed five (5.0). To
be certain of the number of devices that may
be connected to a line, as determined by total
RENs, contact the local telephone company
The telephone company may make changes
in its facilities, equipment, operations, or
procedures that could affect the operation of
the equipment. If this happens, the telephone
company will provide advanced notice in order
for you to make necessary modifications to
maintain uninterrupted service.
If trouble is experienced with this equipment
(Modem) for repair or warranty information,
please contact your local distributor. If the
equipment is causing harm to the telephone
network, the telephone company may request
that you disconnect the equipment until the
problem is resolved.
The user must use the accessories and cables
supplied by the manufacturer to get optimum
performance from the product.
No repairs may be done by the customer.
This equipment cannot be used on public
coin phone service provided by the telephone
company. Connection to party line service is
subject to state tariffs.
Page 29
The Telephone Consumer Protection Act of
1991 makes it unlawful for any person to use a
computer or other electronic device, including
fax machines, to send any message unless such
message clearly contains in a margin at the top
or bottom of each transmitted page or on the
first page of the transmission, the date and time
it is sent and an identification of the business
or other entity, or other individual sending the
message and the telephone number of the
sending machine or such business, other entity,
or individual. (The telephone number provided
may not be any number for which charges
exceed local or long-distance transmission
charges.)
In order to program this information into your fax
machine, refer to your communications software
user manual.
European Union
European Union CE Marking
and Compliance Notices
Products intended for sale within the
European Union are marked with the
Conformité Européene (CE) Marking, which
indicates compliance with the applicable
Directives and European standards
and amendments identified below. This
equipment also carries the Class 2 identifier.
The following information is only applicable
to systems labeled with the CE mark .
European Directives
This Information Technology Equipment has
been tested and found to comply with the
following European directives:
■ EMC Directive 89/336/EEC with amending
directives 92/31/EEC & 93/68/EEC as per
– EN 55022 Class B
– EN 61000-3-2
– EN 61000-3-3
– EN 55024
■ Low Voltage Directive (Safety) 73/23/EEC as
per EN 60950-1:2001+A11
■ Radio and Telecom Terminal Equipment
Directive 199/5/EC as per
– CTR21 (if fitted with a modem device)
29
Page 30
30
– ETS 300 328 (if fitted with a 2.4 GHz band
embedded wireless device)
– ETS 301 489-1 (if fitted with a 2.4 GHz band
embedded wireless device)
– ETS 301 489-17 (if fitted with a 2.4 GHz
band embedded wireless device)
European Radio Approval
Information (for products fitted with
EU-approved radio devices)
This Product is a Notebook computer; low
power, Radio LAN type devices (radio frequency
(RF) wireless communication devices),
operating in the 2.4 GHz band, may be present
(embedded) in your notebook system which is
intended for home or office use. This section
is only applicable if these devices are present.
Refer to the system label to verify the presence
of wireless devices.
Wireless devices that may be in your system are
only qualified for use in the European Union or
associated areas if a CE mark with a Notified
Body Registration Number and the Alert Symbol
is on the system label.
The power output of the wireless device or
devices that may be embedded in you notebook
is well below the RF exposure limits as set by
the European Commission through the R&TTE
directive.
Translated Statements of Compliance
[English]
This product follows the provisions of the
European Directive 1999/5/EC.
[Danish]
Dette produkt er i overensstemmelse med det
europæiske direktiv 1999/5/EC
[Dutch]
Dit product is in navolging van de bepalingen
van Europees Directief 1999/5/EC.
[Finnish]
Tämä tuote noudattaa EU-direktiivin 1999/5/EC
määräyksiä.
[French]
Ce produit est conforme aux exigences de la
Directive Européenne 1999/5/EC.
[German]
Dieses Produkt entspricht den Bestimmungen
der Europäischen Richtlinie 1999/5/EC
[Greek]
Το προϊόν αυτό πληροί τις προβλέψεις της
Ευρωπαϊκής Οδηγίας 1999/5/ΕC.
[Icelandic]
Þessi vara stenst reglugerð Evrópska Efnahags
Bandalagsins númer 1999/5/EC
See 802.11b and 802.11g restrictions
for specific countries or regions within
countries under the heading “European
Economic Area Restrictions” below.
[Italian]
Questo prodotto è conforme alla Direttiva
Europea 1999/5/EC.
Page 31

[Norwegian]
Dette produktet er i henhold til bestemmelsene i
det europeiske direktivet 1999/5/EC.
[Portuguese]
Este produto cumpre com as normas da Diretiva
Européia 1999/5/EC.
[Spanish]
Este producto cumple con las normas del
Directivo Europeo 1999/5/EC.
[Swedish]
Denna produkt har tillverkats i enlighet med EGdirektiv 1999/5/EC.
European Economic Area Restrictions
Local Restriction of 802.11b/802.11g Radio
Usage
Due to the fact that the frequencies
used by 802.11b/802.11g wireless LAN
devices may not yet be harmonized
in all countries, 802.11b/802.11g
products are designed for use only
in specific countries or regions, and
are not allowed to be operated in
countries or regions other than those
of designated use.
As a user of these products, you
are responsible for ensuring that the
products are used only in the countries
or regions for which they were
intended and for verifying that they are
configured with the correct selection of
frequency and channel for the country
or region of use. Any deviation from
permissible settings and restrictions in
the country or region of use could be
an infringement of local law and may
be punished as such.
[Note to integrator: The following statements on
local restrictions must be published in all enduser documentation provided with the system
or product incorporating the Wireless Network
product.
The European variant is intended for use
throughout the European Economic Area.
However, authorization for use is further
restricted in particular countries or regions within
countries, as follows:
General
European standards dictate maximum radiated
transmit power of 100 mW effective isotropic
radiated power (EIRP) and the frequency range
2400 – 2483.5 MHz.
Belgium
The product may be used outdoors, but for
outdoor transmissions over a distance of 300m
or more, a license from the BIPT is required.
31
Page 32

This restriction should be indicated in the
manual as follows:
marking is indicative that this equipment meets
or exceeds the following technical standards:
Dans le cas d’une utilisation privée, à l’extérieur
d’un bâtiment, au-dessus d’un espace public,
aucun enregistrement n’est nécessaire pour une
distance de moins de 300m. Pour une distance
supérieure à 300m un enregistrement auprès de
l’IBPT est requise. Pour une utilisation publique
à l’extérieur de bâtiments, une licence de
l’IBPT est requise. Pour les enregistrements et
licences, veuillez contacter l’IBPT.
France
For Metropolitan departments:
2.400 - 2.4835 GHz for indoor use.
2.400 - 2.454 GHz (channels 1 to 7) for outdoor
use.
For Guadeloupe, Martinique, St Pierre et
Miquelon, Mayotte:
2.400 - 2.4835 GHz for indoor and outdoor use.
For Reunion, Guyane:
2.400 - 2.4835 GHz for indoor use.
2.420 - 2.4835 GHz for outdoor use (channels 5
to 13)
European Telecommunication
Information (for products fitted with
EU-approved modems)
CTR 21 – Attachment requirements for panEuropean approval for connection to the
analogue Public Switched Telephone Networks
(PSTNs) of TE (excluding TE supporting
voice telephony services) in which network
addressing, if provided, is by means of Dual
Tone Multi-Frequency (DTMF) signaling.
Although this equipment can use
either loop disconnect (pulse) or DTMF
(tone) signaling, only the performance
of the DTMF signaling is subject to
regulatory requirements for correct
operation.
It is therefore strongly recommended
that the equipment is set to use DTMF
signaling for access to public or private
emergency services. DTMF signaling
also provides faster call setup.
This equipment has been approved to Council
Decision 98/482/EEC-“CTR 21” for PanEuropean single terminal connection to the
Public Switched Telephone Network (PSTN).
However, due to differences between the
individual PSTNs provided in different countries,
the approval does not, of itself, give an
unconditional assurance of successful operation
on every PSTN termination point. In the event
of problems, you should contact manufacturer
Technical Support.
Marking by the symbol indicates compliance
of this equipment to the Radio and Telecom
Terminal Equipment Directive 1999/5/EC. Such
32
Page 33

WEEE SYMBOL INFORMATION
Correct Disposal of This Product
(Waste Electrical & Electronic Equipment)
(Applicable in the European Union and other European countries with separate
collection systems)
This marking shown on the product or its literature, indicates that it should not be disposed
with other household wastes at the end of its working life. To prevent possible harm to the
environment or human health from uncontrolled waste disposal, please separate this from
other types of wastes and recycle it responsibly to promote the sustainable reuse of material
resources.
Household users should contact either the retailer where they purchased this product,
or their local government office, for details of where and how they can take this item for
environmentally safe recycling.
Business users should contact their supplier and check the terms and conditions of the
purchase contract. This product should not be mixed with other commercial wastes for
disposal.
USA ONLY
This Perchlorate warning applies only to primary CR (Maganese Dioxide) Lithium coin cells in
the product sold or distributed ONLY in California USA.
“Perchlorate Material- special handling may apply, See www.dtsc.ca.gov/hazardouswaste/
perchlorate.”
LAMP(S) INSIDE THIS PRODUCT CONTAIN MERCURY AND MUST BE RECYCLED OR
DISPOSED OF ACCORDING TO LOCAL, STATE OR FEDERAL LAWS.
For details see lamprecycle.org, eise.org, or call 1-800-Samsung.
33
Page 34

Overview
■
The items marked with this symbol are optional items which may be changed or
*
may not be provided depending on the computer model.
■ The actual color and appearance of the computer may differ from the pictures used
in this guide.
■ The shapes and characters of buttons may differ from actual ones.
Front View
Keypad
Using the Keypad, users can
enter letters or numbers directly.
Avoid dropping water on the
keypad.
Speaker
Generates sound
from the computer.
Mouse/Joystick
You can use it as a
mouse, joystick and
a button to display
the Dialkeys. p.56
Status Indicators
Shows the computer
operating status. p.35
LCD
Displays the computer
screen.
Camera *
Using the front side camera,
you can take pictures or
record video. p.138
Touch Sensor Buttons *
You can configure functions
by lightly touching it with
your finger. p.36
Keypad
Speaker
User-Defined
Button
You can configure
this button to
launch a frequently
used program.
Enter Button
Press this button to
run a selection. It
performs the role of
the Enter key on the
keyboard.
Fingerprint sensor *
Using this sensor, you can use the
fingerprint identification function.
You can use it to identify whether
a fingerprint is registered by
placing a finger over it. p.141
Microphone *
The microphone is used to
make a sound recording.
A built-in microphone is
provided for some models.
- L Button: A single press performs the role of a click and
double pressing performs the role of a double-click.
- R Button: A single press performs the role of a right-click.
Mouse Button
This performs the role of the left
and right buttons of the mouse
when the Mouse/Joystick is
used as a mouse.
34
Page 35

Status Indicators
Press the MOUSE button
above Mouse/Joystick.
If the Joystick icon is lit, you
can use it as a joystick when
HDD
This is lit when the hard
disk drive is accessed.
Joystick
playing a game.
Power
This shows the computer’s operating status.
On: When the computer is turned on.
Blink: When the computer is in Sleep mode.
To wake the computer up from Sleep mode,
slide the Power Switch downwards.
Mouse
Press the MOUSE button above
Mouse/Joystick.
If the Mouse icon is lit, you can
use it as a mouse.
Wireless LAN
This is lit for models with
wireless LAN capability
when the Wireless LAN
function is in operation.
Charge
This shows the AC adapter and battery status.
Green: When the battery is completely charged
or is not installed.
Amber: When the battery is being charged.
Blink: When the HOLD switch is lifted up or a
button is pressed in the HOLD (Lock) status.
Off: When the computer is running on battery
power without an AC power supply.
35
Page 36

36
Touch Sensor Buttons
You can run a function by lightly touching a Touch Sensor Button with your finger.
The Touch Sensor Buttons are optional and may not be provided depending on your
computer model.
MENU
If you touch this button,
UDF
If you touch this button,
the Easy Button Manager
appears in which you can
configure the User-Defined
Button function.
the MENU program will be
launched.
The menu program provides
a menu with the computer’s
frequently used functions.
You can conveniently
configure the functions.
VOL-, VOL+
You can adjust the volume.
Page 37

Precautions for using the Touch Sensor Buttons
- The Touch Sensor Buttons only work when the computer is turned on.
- If you touch the Touch Sensor Buttons when the computer is locked, the lock icon will
appear and the buttons will not work.
- Please ensure your hands are clean and dry when using the Touch Sensor Buttons.
In a humid environment, remove any moisture from your hands and the Touch Sensor
Button surface before use.
- Since the Touch Sensor Buttons are sensitive, do not press them using excessive force.
Take care as excessive force may damage the sensor of the Touch Sensor Buttons.
- Do not press the buttons with a sharp object such as a Stylus Pen or ballpoint pen, as this
may damage them.
- When you need to press a Touch Sensor Button, press the relevant Touch Sensor Button
precisely using your finger taking care not to touch another Touch Sensor Button.
- The Touch Sensor Buttons may not work properly when you are wearing gloves or if the
buttons are covered by plastic packaging or a protection panel.
- A Touch Sensor Button may malfunction when the Touch Sensor Button surface is touched
by a conductive material such as a metal object.
37
Page 38

38
Top View
Multi-Card Slot *
You can connect SD or
MMC cards using this slot.
Shutter *
(Only for the camera model)
You can take pictures using the
camera shutter. p.138
Internet Button *
(Only for some models that camera
is not applied.)
Launch Internet.
MENU Button *
(For models without a Camera and
Touch Sensor buttons)
Launches the MENU program.
Headphone Jack
You can connect
headphones using this jack.
USB Port
You can connect USB devices
such as a USB keyboard/mouse,
USB ODD (Optical Disk Drive),
etc. using this port.
Vents
Emits heat generated
inside the computer.
Avoid blocking the vents
as this may overheat the
computer.
Page 39

Right View
Windows Security Button
Pressing this button is the same as pressing the
<Ctrl>+<Alt>+<Del> keys on the keyboard.
Press with the Stylus Pen.
Power IN Jack
The AC adapter which supplies power for the
computer is connected here.
LAN Port
You can connect a LAN cable using this port.
USB Port
You can connect USB devices such as a USB
keyboard/mouse, USB ODD, etc. using this port.
Open the cover.
Monitor Port
You can connect a monitor, TV or projector
supporting a 15pin D-SUB interface using this port.
p.64
Stylus Pen / Stylus Slot
Using this pen, you can enter information on the touch screen.
You can keep the Stylus Pen in the Stylus Slot.
39
Page 40

40
Left View
Hand Strap Hole
You can attach a hand strap using
this hole.
AV Button
Press this button to launch AVStation Now. p.136
Power Switch / HOLD Switch
z Power Switch Function
Slide the switch downwards to turn the computer on.
If you slide the switch downwards again, the computer enters
Sleep mode and the Power LED blinks.
x HOLD Switch (Lock) Function
If you slide the switch upwards to the end (HOLD position),
the Lock icon appears and the computer is Locked and you
will not be able to use any function.
Slide the switch to the mid position to release the lock.
Then you can use the computer normally.
If you slide the switch down to the end and hold it for 1 to
2 seconds when the computer is in the HOLD state, the
computer will enter Hibernation mode.
To cancel Sleep mode, slide the switch downward to the end.
Page 41

Back View
Vents
Emits heat generated inside the computer.
Avoid blocking the vents as this may
overheat the computer.
Hand Strap Hole
Connecting this hole and the hole of left
side with hand strap allow you to fix hand.
Camera *
Using the camera at the back, you can take
pictures or record video.
Stand
Using the stand, you can use the
screen at a comfortable angle.
Hand Strap Hole
Battery
A lithium-Ion rechargeable
battery that supplies power for
the computer. p.157
Battery Latch
The battery latch is used to
separate or fix the battery. p.157
z
x c
41
Page 42

Turning the Computer On and Off
Turning the computer on
Install the
1
(Refer to the
Adjust the
2
Slide the
3
The computer is turned on.
■
battery and connect the
Getting Started Guide
stand at the back of the computer to a comfortable angle.
Power Switch
If you slide the
enters Sleep mode.
In Sleep mode, the Power LED blinks. If you slide the power switch downwards
again, the computer wakes up from Sleep mode.
downwards.
Power Switch
AC adapter
.)
downwards when the computer is on, the computer
.
Shutdown
If you have changed the power options of the
Control Panel, sliding the power switch downwards will shutdown the computer.
8
8
p.
When running the computer on battery power, the LCD brightness is dimmed
■
automatically to save battery power.
For the models with Touch Sensor buttons, press the
press the ,
For models without Touch Sensor buttons, press the
while holding down the
buttons for the
DIAL KEY to adjust the LCD brightness.
Brightness
42
Power button
MENU
to adjust the LCD brightness.
User Defined buttons
to
button and then
in the
4
p.5
(▲/▼)
Page 43

Turning the computer off
Click the Start ( ) button on the taskbar.
1
Click the ( ) and click on Shut down. The computer will shut down.
2
1 2 3
If the computer does not shutdown due to a system error, slide the power switch
down and hold it for more than 4 seconds to forcefully turn it off.
When turning the computer on again after it was turned off by sliding the power
switch down and holding it, the system examination program may run.
Power Button
Before Using the Power Button
Since the Power Icon is set to power saving mode, selecting Start > Power Button
( ), will cause the computer to enter Sleep mode.
To shut down the computer by clicking this icon, refer to the descriptions for Setting
up Start menu power button of the Control Panel. p.88
43
Page 44

Chapter 2.
Using the computer
Stylus Pen 45
Entering Text 48
Using the Buttons 54
Multi Card Slot 61
Connecting a Monitor 64
Adjusting the Volume 68
Page 45

Stylus Pen
A Stylus Pen is used instead of a mouse and provides the same function.
It is recommended to connect and use a USB keyboard and mouse when using the
computer for a long time.
Taking the Stylus Pen Out
Take the Stylus Pen out to the right.
When finishing using the pen, return it to the
Stylus Slot.
Learning Tablet PC Operations
Click Start > All Programs > Tablet PC to learn how to operate a Tablet PC using a
Stylus Pen. p.73
Operate the touch screen LCD with a Stylus Pen or your finger. Sharp objects may
scratch or damage the LCD surface.
45
Page 46

46
Stylus Pen Functions
Mouse Using the Stylus Pen Function
Single-
click
Double-
click
Right-
click
Single-
tap
Double-
tap
Press and
Hold
Screen Mouse
Single-tap with the pen to select an item.
Double-tap with the pen to run an item.
● Method 1.
If you press and hold the pen over a
point of the screen, a circle is drawn
around the pointer.
If you remove the pen when the circle
is completely drawn, the pop-up menu
appears.
● Method 2.
In addition, if you press on the screen
with the Pen, the Screen Mouse
appears for a moment.
If you click the right button of the
Screen Mouse, it performs the role
of the right button of an external-type
mouse.
Drag Drag
Tap an item and drag it with the pen to
move the item.
Page 47

Calibrating the Screen
When using the computer for the first
time or you are experiencing some
difficulty in pointing the pointer on
the screen using your finger or pen,
calibrating the screen is recommended.
Tap Start > Control Panel >
1
Hardware and Sound > Tablet PC
Settings.
In the Calibration Area of the
2
General tab, select a screen direction
and click Calibrate....
Tap the Crosshair (+) displayed
3
on the screen with the Stylus Pen
whenever it appears on the screen.
To cancel a calibration, press the
stylus pen against the screen and
hold it for more than 3 seconds. A
pop-up menu will appear. Select
Cancel from the pop-up menu.
47
If you have pressed all the
4
Crosshairs, the Digitizer Calibration
Tools window appears. Tap the OK
button to apply the calibration result
for the pointing position correction.
Page 48

Entering Text
You can enter characters using the Keypad, Tablet PC Input Panel, or Dialkeys.
■ For long periods of use, use the keypad or a USB keyboard for your convenience.
■ For example, the procedures to enter text in the Notepad will be described below.
Using the Keypad
Using the keypad you can enter characters and numbers directly.
The Keypad image may differ from the actual Keypad.
Character/Numeric Key
You can directly enter
characters/numbers to
the screen by pressing
this key.
Shift
To switch between capital
and small letters, press
the key while holding the
Shift key down.
This key performs the
role of the Backspace
key on a keyboard.
If you press this key,
you can erase the
last characters on the
screen.
Space
This key performs the
role of the space key.
SYM
You can enter special key it
is below the Character key by
pressing this key.
Entering special keys
Press the SYM key once and
press the corresponding key.
The special key below the
corresponding key is entered.
To enter special keys
successively, repeat the
above operation.
Shift
Num Lock
If you press the Num Lock
key and then a first line key,
a digit is entered.
If you press the Num Lock
key again, the numeric key
mode is canceled and you
can enter characters.
48
Page 49

Using the Tablet PC Input Panel
The Tablet PC Input Panel is an on-screen letter input pad provided by Windows.
Using it, you can enter letters with the Stylus Pen.
You can enter letters using the Tablet PC Input Panel in 3 ways.
Tap Start > All Programs > Accessories > Notepad. Notepad is launched.
1
If you tap over the Notepad with the Stylus Pen, < > appears with the cursor.
2
If you tap < > with the Stylus Pen, the Tablet PC Input Panel appears.
3
This function may not be supported depending on the languages.
Alternatively, press the Tablet PC Input Panel hidden at the left end of the Desktop
to display the Tablet PC Input Panel.
On-Screen
Keyboard
Character
Pad
Writing Pad
Tools
Help
Provides information on how to
use the Tablet PC Input Panel.
Close
49
Page 50

50
Entering text using the Writing Pad
You can enter characters by writing
characters on the Stylus Pen Writing Pad
directly.
Entering text
using the Character Pad
You can write a letter in each cell of the
Character Pad with the Stylus Pen.
In the Tablet PC Input Panel, tap the
1
Writing Pad icon ( ).
Write text in the input area of the
2
Writing Pad with the Stylus Pen and
wait a moment. The written letters
are converted into the corresponding
computer characters.
Insert
Tap the Insert button to enter the
3
converted letters.
Modifying Text
To modify a wrong character, write
over the character or tap below
the character and select another
character.
In the Tablet PC Input Panel, tap the
1
Character Pad icon ( ).
Write a letter in the cell of the
2
Character Pad with the Stylus Pen
and wait a moment. The written letter
is converted into the corresponding
computer character.
Tap the Insert button to enter a
converted letter.
In the Writing Pad, you can replace a
word with another or modify a character
by clicking on it.
Insert
Page 51

Entering text using the On-Screen Keyboard
The On-Screen Keyboard displays a standard keyboard on the screen so that you can
enter a letter by pressing the corresponding key on the screen.
In the Tablet PC Input Panel, tap the On-Screen Keyboard icon ( ).
1
Tap a character key with the Stylus Pen to enter the character.
2
51
Page 52

52
Dialkeys
DialKeys is an on-screen keyboard designed to be used with compact touch screen
computers. You can enter letters using the DialKeys by pressing a key on the screen with
your thumbs while holding both of the lower corners of the computer with your hands.
Execution Method 1.
If you press the DIAL KEY part below the Mouse/Joystick,
the Dialkeys appear. If you press it again, the Dialkeys disappear.
Execution Method 2.
DIAL KEY
Select Start > All Programs > Microsoft Origami Experience Pack > DialKeys.
The Dialkeys appear at both ends of the lower screen. Enter characters using your
thumbs. If they disappear, press the Dialkeys icon ( ) from the Taskbar referring to
the following note.
* The Dialkeys appearance
and color may differ from
actual ones.
Dialkeys
Dialkeys icon
Hiding Dialkeys
Whenever you tap the Dialkeys icon ( ) in the Taskbar, the Dialkeys appear and
then disappear.
To hide, tap the Dialkeys icon ( ) on the Taskbar.
Alternatively, you can show or hide the Dialkeys by pressing the DIAL KEY part
below the Mouse/Joystick.
Page 53

Exiting Dialkeys
Press and hold the Dialkeys icon ( ) in the Taskbar,
press the Exit from the pop-up menu.
Corresponds to the Enter key on a keyboard.
Corresponds to the space bar on a keyboard.
The Dialkey key is minimized and moved into the notification area of the Taskbar.
To restore it to its original size, click the minimized Dialkey.
Corresponds to the Backspace on a keyboard.
Moves the current window up.
Entering a Number
If you tap the 123 ( ) key shown in the figure on the left pane of Dialkeys, the 123
( ) key turns blue and you can enter a number. After you enter a number, it returns
to text input mode.
If you tap the 123 ( ) twice, it turns red and you can enter multiple numbers
continuously. When you have finished entering numbers, tap the 123 ( ) once
again to cancel number input mode.
53
Page 54

Using the Buttons
The functions of the MENU button, User-Defined button, Mouse/Joystick, and mouse buttons
are described below.
The MENU Button
When the MENU button is pressed, the MENU program appears.
MENU button
(For models with the
Touch Sensor button only)
Touch Sensor button only)
MENU button
(For models without the
The MENU Program provides shortcuts to frequently used functions on the computer.
You can easily change the settings.
Press the MENU button again or press a point on the screen to hide the MENU
Program.
MENU Program
54
Page 55

MENU Items Function
You can select the display device when an external monitor is
connected. Whenever you press the button to the right of the
LCD/CRT button, the computer screen is output to LCD > CRT >
LCD+CRT Clone > LCD+CRT Dual View mode, in this sequence.
LCD / CRT
Displaying the computer screen on an external monitor only,
may not be supported with the MENU button. In this case, to
display the screen on an external monitor, try using the Intel
program. p.66
Brightness /
Backlit On / Off
Rotation
Sound On / Off Press this item to turn the volume on or off.
Etiquette Mode
On / Off
Wireless LAN
On / Off
Whenever this item is pressed, the LCD brightness is
increased(decreased) by one step.
If you press Off, the LCD screen is turned off. To turn it on again,
press down on the LCD screen once.
Whenever you press this button, the screen rotates clockwise or
counterclockwise by 90 degrees.
When rotating the screen, a part of the screen image may
not be displayed in some software programs.
Turns Etiquette mode on or off.
Use Etiquette mode when you need a quiet working environment.
Since Etiquette Mode makes the CPU run at its slowest, the
program operating speed may slow down and the computer
may overheat due to the slow fan speed.
Press this item to turn the Wireless LAN on or off.
Battery Shows the remaining battery charge.
55
Page 56

56
Mouse/Joystick
The Mouse/Joystick has the functions of a mouse, joystick and Dialkeys.
Mouse Function
Press the MOUSE part at the top of the Mouse/Joystick. If the Mouse ( ) icon is lit,
you can use the Mouse/Joystick as a mouse.
Mouse button
MOUSE
Mouse/Joystick
(L / R buttons)
Moving the Cursor
Place your left hand thumb on the Mouse/Joystick, and move it in the direction you
want to move the cursor.
Click / Double-Click
When the Mouse ( ) icon is lit, press the L button ( ) once for the click (select)
operation and press the button twice for the double-click operation.
Right-Click
When the Mouse ( ) icon is lit, press the R button ( ) once for the right-click
operation.
Page 57

Joystick Function
Press the MOUSE button above the Mouse/Joystick.
If the Joystick ( ) icon is lit, you can use the
Mouse/Joystick as a joystick.
Dialkeys Function
If you press the DIAL KEY button below the
Mouse/Joystick, the Dialkeys appear on the screen.
You can enter characters using your thumbs via the
Dialkeys.
If you press the DIAL KEY again, the Dialkeys disappear.
For more information on using the Dialkeys, refer to p.52
MOUSE
DIAL KEY
57
Dialkeys
Page 58

58
User-Defined Button
A User-Defined Button refers to a button which can be
configured so that pressing it launches a frequently used
program or plays the role of pressing a particular key
combination.
It is convenient to set your frequently-used programs or key
combinations as groups.
The button shapes and program screens may differ from actual ones.
User-Defined
Button
Default Group Setting
The Internet, Explorer and Presentation are provided as a basic group and the Internet
group is set by default when purchasing the computer. However, you cannot change
the settings for the basic group.
Internet Group Setting Status
Button Function Description
▲
MouseScrollUP Scrolls up in a window as a mouse scroll.
▶
▼
◀
Forward
MouseScrollDown Scrolls down in a window as with a mouse scroll.
Back
Moves forward in Internet or Windows Explorer to
display the next page.
Moves back in Internet or Windows Explorer to display
the previous page.
Page 59

Configuring Additional Groups
Below are procedures to add an additional group to the default group and for setting up
functions for the four buttons.
As an example, the procedures to add a new group named “Test”, configure the ▲
button to a particular key combination, and configure the ► button to a program are
described below.
Double-click the Easy Button Manager icon ( ) on the Desktop.
1
Alternatively, press the UDF ( ) Touch Sensor button if there are Touch Sensor
buttons.
In the Main screen, click Add.
2
Enter a name in the Group Name
3
field of the Tablet PC Input Panel.
For example, enter “Test”.
For information on how
to use the Tablet PC
Input Panel, refer to the
descriptions for Entering
Text.
After selecting the ▲ button, select the Key Combination Function.
4
Key Combination Function: You can set a User Button to a particular key
combination.
Mouse Function: You can set a User Button to a mouse operation.
Program Link Function: You can set a User Button to launch a frequently used
program.
p.49
59
Page 60

Press a required key combination.
5
For example, if you have pressed the Ctrl, Alt, Delete key in order, “Ctrl + Alt +
Delete” is displayed on the left side of the screen.
To continue with setting up the ► button, select the ► button and click the
6
Program Link Function.
Select the program you want and click the OK button.
If the program you want is not in the list, click the Search button and select a
program.
2
1
3
You can view the settings for each button in the Main screen.
7
Select a group from the Group Name and click the OK button. The user buttons
perform the roles set in the selected group.
■ To use the functions of the added group or another group
Launch Easy Button Manager, select a group from the
screen and click OK.
■ To delete or modify the group list
Launch Easy Button Manager, select a group from the
screen and click Delete or Modify.
60
Group Name of the main
Group Name of the main
Page 61

Multi Card Slot
You can use SD and MMC cards using the multi card slot.
You can use storage cards as removable disks and use them to conveniently exchange data
with digital devices such as digital cameras, digital camcorders, MP3 players, etc.
■ A multi card slot is optional and is provided for some models only.
■ Users have to purchase storage cards according to their needs.
■ While the multi card slot enables users to use memory cards as data storage, it
does not support a copyright protection function.
■ Remove and keep the cards in a separate location when carrying the computer as
they may become lost while moving.
Supported Card Types Using a Memory Card
Insert the memory card into the multi
1
card slot according to the direction
printed on the slot.
SD Card
MMC Card
Example)
SD Card
61
Page 62

62
The card drive appears. Click Open
2
folder to view files.
If the window does not appear, click
Start > Computer.
You cannot use an unformatted card.
If the card is not formatted, format the
card first, referring to the ‘Formattung
a Card’ section. p.63
To use a Mini SD or RS-MMC
card
These cards cannot be inserted
into the slot because they are too
small.
You can use the cards by inserting
the cards into the corresponding
card adapter and then inserting the
adapter into the multi card slot.
Removing a Card
If a window appears asking if you
want to scan and change, click the
Continue without scan option.
You can proceed to Step 2.
Double-click the corresponding drive
3
to save, move or delete data.
Push the end of the card slightly.
1
The card clicks and pops out.
2
Remove the card from the slot.
Page 63

Formatting a Card
You have to format a card before using it.
If you format a card, all the data
saved on the card will be removed.
Make sure to backup data before
formatting a card if data has been
saved to the card.
Select Start > Computer.
1
Right-click over the card drive and
2
select Format from the pop-up menu.
If you click Start, formatting will
3
begin.
To use a card to exchange
data with a digital device such
as a digital camera, formatting
the card in the digital device is
recommended.
Some digital devices may fail to
recognize a card formatted on a
computer. In this case, you have to
format the card in the digital device.
63
Page 64

Connecting a Monitor
Using an external monitor, you can watch a movie on wide screen or give a presentation.
The procedures to view pictures on an external monitor are described below.
When using an external monitor or playing a game, using the Mouse/Joystick or
an external mouse is convenient.
You have to purchase the monitor connection cable additionally.
The monitor port color may differ from the actual one.
Connecting a Monitor
Open the cover on the right side and connect a monitor to the Monitor Port.
64
Page 65

Method 1. Configuring with the MENU Button
Connect the monitor and touch the MENU button to launch the MENU program.
1
MENU button (For models with the
Touch Sensor button only)
Press the button to the right of the LCD/CRT button to switch to a different mode.
2
Whenever you press the button to the right of the LCD/CRT button, the computer
screen is output to LCD > CRT > LCD+CRT Clone > LCD+CRT Dual View mode,
in this sequence.
● LCD: You can view the computer screen through the LCD only.
● CRT: You can view the computer screen on an external monitor.
MENU button
(For models without the
Touch Sensor button only)
LCD/CRT Item
● LCD+CRT Clone: When selecting this mode, you can view the same screen on
both the LCD and the external monitor.
● LCD+CRT Dual View: When selecting this mode, you can view a screen
spanning over the LCD and the external monitor, and you can set different
resolutions for each display device.
Displaying the computer screen on an external monitor only, may not be supported
with the MENU button. In this case, to display the screen on an external monitor, try
using the Intel program. p.66
65
Page 66

66
Method 2. Configuring with the Intel Program
* The terms and the screen figures in the manual may differ from actual ones.
Connect the monitor and click the Intel(R) Graphics Media Accelerator Driver for
1
Mobile icon ( ) on the Taskbar. Or right-click on the desktop. The pop-up menu
appears.
Select Graphics Options and Output To from the
2
pop-up menu.
Select a display mode from among the available Display Modes 1~4 in the
3
Graphics Options menu.
2 To View through the
External Monitor Only
1 To View through a Notebook
Computer (LCD) Only
3 To View through the LCD +
External Monitor (Clone Mode)
4 To View through the LCD +
External Monitor (Extended Mode)
Page 67

Display Device Display Mode
When carrying it Select Notebook.
1
Select Monitor.
When playing a
2
3
game
When giving a
presentation
(Clone Mode)
When playing a game, using only the
external monitor is better.
Select the Intel(R) Dual Display
Clone.
When selecting this mode, you can
view the same screen on both the
LCD and the external monitor.
When giving a
presentation
4
(Extended Mode:
Dual View)
Select the Extended Desktop.
When selecting this mode, you can
view a screen spanning over the
LCD and the external monitor, and
you can set different resolutions for
each display device.
67
Page 68

Adjusting the Volume
You can control the volume with the Volume Control button or Volume Control program.
Using the Volume Control with the
Volume Control Button
● For models with the Touch Sensor
buttons only
Press the VOL-button ( ) with your
finger to turn the volume down. Press
the VOL+button ( ) to turn the
volume up.
● For models without the Touch Sensor
buttons only
Press the User Defined buttons (◀/▶)
while holding down the DIAL KEY to
adjust the volume.
Adjusting the Volume using the
Volume Adjustment Program
Alternatively, right-click over the Volume
icon ( ) and select Open Volume Mixer
to adjust the volume.
Using the Sound Recorder
The procedures to record sound using the
Windows Recorder are described below.
Click the Volume icon ( ) on the taskbar
and slide the volume control bar to adjust
the volume.
Mute
Right-click over the Volume icon ( )
1
on the taskbar and select Recording
Device.
Check if the microphone is set as the
2
default recording device.
If this is the case, it is already set as
the default device. If not, right-click
over the microphone and select Set
default.
68
Page 69

Click Start > All Programs >
3
Accessories > Sound Recorder
and click Start recording to start a
recording.
Using SRS
The SRS function enables you to
experience more stereophonic sound by
expanding the space-perception through
the stereo speaker.
This function is available for specific
models only.
x
z
Right-click over the Volume icon ( )
1
in the Taskbar and select Playback
Device(P).
Select Speaker in the Playback tab
2
and click Properties.
Select the SRS tab in the Speaker
3
Properties window. z Select a mode,
select the x Enable checkbox on the
left and click OK. Then you can listen
to sound through the selected SRS
effect.
● WOW HD(Music): Select to listen to
music.
● TruSurround XT(Movie/Video): Select
to watch a movie.
The SRS function supports the
computer’s built-in speaker and
headphones only.
69
Page 70

Chapter 3.
The screen shots used in this chapter may differ from
actual screens depending on the Windows Vista version
and model.
Using Microsoft
Windows Vista
About Microsoft Windows Vista 71
Windows Vista Screen Layout 74
Control Panel 83
Page 71

In the Welcome Center, you can view brief descriptions of Windows Vista functions and
run the functions directly.
1
Click Start > Welcome Center.
2
If you click on an item, information on the function is displayed in the description
window.
For example, if you click View computer details, your computer information is
displayed in the description window.
In addition, if you click on Show more Details, you can view more detailed
information.
1
Description Window
2
Windows Vista Demo
If you click Start > Welcome Center > Show all 7 items > Windows Vista Demo,
you can watch the Windows Vista introduction movie.
About Microsoft Windows Vista
Microsoft Windows Vista (hereafter Windows) is a computer operating system. Since you
have to learn how to use it in order to use the computer efficiently and effectively, use the
Welcome Center and Windows Help and Support to learn about Windows Vista.
Welcome Center
The screen layout may differ depending on the computer model and the operating
system.
71
Page 72

Help and Support
Windows Help and Support provides information on Windows basic functions and
usages.
Click Start > Help and Support.
You can find help for frequently used basic functions using Find an Answer and you
can search for help by entering a keyword in the Search box.
Help Search
Find an Answer
Windows Basics
Introduces the basic usage of the computer and the Windows
operation system.
You can learn tasks and tools necessary to use the computer.
Security and
Maintenance
You can view help on computer protection and security.
Windows Online
Help
If your computer is connected to the Internet, you can view the
necessary information online.
Table of Contents
The help pages are arranged by subject so that users can
easily find the relevant information.
Troubleshooting
You can view possible problems that may occur while using
Windows and solutions to the problems.
What’s new? You can view help for new Windows Vista features.
72
Page 73

This computer is a Tablet PC with a touch screen.
In the Tablet PC Settings of the Control Panel, you can set the screen correction,
screen pivot function and whether to use the left-handed or right-handed option.
Click Start > Control Panel > Hardware and Sound > Tablet PC Settings.
Tablet PC Setting Information
For the efficient use of a Tablet PC
You can use the computer more efficiently in a short time by learning how to use
your fingers and the Stylus Pen.
Click Start > All Programs > Tablet PC and then click Tablet PC Touching
Training or Tablet PC Pen Training.
73
Page 74

Windows Vista Screen Layout
Desktop
If you turn the computer on, the Desktop screen appears.
The desktop is the working area on the computer. It consists of a large workspace and
a taskbar at the bottom as shown in the figure below.
The screen layout may differ depending on the computer model and the operation
system version.
1 Recycle
Bin
2 Shortcut
Icons
3 Start
Menu
6 Gadget
7 Sidebar
4 Start
Button
5 Taskbar
8 System
Tray with
Clock
74
Page 75

1 Recycle Bin
You can drop useless files and folders here.
2 Shortcut Icons
You can launch programs by clicking the shortcut icons on the Desktop.
3 Start Menu
The menu from which you can launch programs.
4 Start Button
Press the start button. The Start menu appears.
5 Taskbar
Currently running programs are displayed here.
6 Gadget
This is a mini information program that appears on the Sidebar.
7 Sidebar
This is a vertical bar that appears at the side of the Desktop.
8 System Tray
with Clock
Shows some running program icons. Icons not being used are hidden.
If you click the arrow mark on the left, you can view hidden icons.
Some item may not be provided depending on the Windows Vista version.
75
Page 76

Start Menu
The menu from which you can launch programs.
Click Start ( ). The Start menu appears.
Fixed Programs
The program or
search result is
displayed.
All Programs
You can search for
files, folders, etc.
User name
Search
Computer
Control Panel
Help and Support
Power Menu Button
Lock Button
Power Button
76
Page 77

Search Enables users to search for files and folders.
Computer
Shows storage devices such as hard disk drives, CD/DVD
drives, network drives, etc.
In addition, you can manage files and folders here.
Control Panel
Enables users to configure the appearance and settings of
Windows such as the Desktop, window colors, hardware and
software settings, security, etc.
Help and
Support
Provides on-line help about function, usage of Windows,
and troubleshooting. You can find a solution to a problem by
entering a keyword.
Power Button
Click the Power button to enter Sleep mode.
However, what the power button does changes according to the
power button setting. p.88
Lock Button
To lock the computer, click this button. If you lock your
computer, no one can use the computer until you enter the
password.
Power Menu
Button
Click the Power Menu button to shut down, restart, and logoff
from the computer.
77
Page 78

Sidebar / Gadget
Sidebar is a vertical bar that appears at the side of the Desktop.
A mini program called Gadget runs over the Sidebar which shows information such as
stocks, schedule, weather, etc. and provides frequently used tools.
You can download various Gadgets from the Internet, other than the default Gadget.
Sidebar / Gadget Structure
To use the Sidebar/Gadget, click Start > All Programs > Accessories > Windows
Sidebar to launch it.
To always display the Sidebar, right-click over the Sidebar and select Properties
and then select the Sidebar is always on top of Screen option in the
Arrangement field.
Sidebar
Gadget
78
Page 79

Adding a Gadget
You can find a gadget in the Gadget Gallery and add it to the Sidebar.
1
If you click the + at the top of the Sidebar, the Gadget Gallery opens.
2
If you double-click on a gadget, the gadget is added to the Sidebar.
■ If you drag a gadget to a new location with the Stylus Pen it moves the gadget to
that location.
Not only can you move a gadget onto the Sidebar but also out of the Sidebar.
■ If you tap on the gadget with the Stylus Pen, the Close and Option buttons appear.
79
Page 80

Exiting the Sidebar
Right-click on the Sidebar icon ( ) in the System Tray with the clock on the taskbar
and select Exit to exit the Sidebar.
Closing the Sidebar
■ Even if you close the Sidebar, the Sidebar continues running in the System Tray in
the clock area, though it is not displayed on the Desktop.
■ To close the Sidebar, right-click over the Sidebar on the Desktop and select Close
Sidebar.
To open the Sidebar again, right-click on the Sidebar icon ( ) in the System Tray
with the clock on the taskbar and select Open.
80
Page 81

Window
A window is the basic frame for a computer operation. As an example, let’s see the
layout of a Pictures Window.
Click Start > Pictures.
The items and names may differ depending on your computer model and the
Windows Vista version.
Window Layout
1 Address Display Line
2 Move
Button
3 Menu Bar
4 Toolbar
5 Search
Window
6 Window
Buttons
7 Search Box
9 Folder / File
10 Preview
Window
11 Detailed
Information
Window
8 Sort Order
81
Page 82

82
1 Address Display Line
Shows the location of the currently selected folder or file.
2 Move Button
You can move to the previous or next page by clicking the Back or
Next buttons.
Opens the previously opened page.
Opens the next page, when you have returned to a previous
page.
3 Menu Bar
Provides menus to run functions for the selected folder or file, etc.
4 Toolbar
Provides icons to quickly run frequently used functions.
5 Search Window
You can view the drive structure and the currently opened window
location.
You can move directly to a folder by clicking the folder in the
Search window.
6 Window Buttons
Used to resize the window.
Minimizes the window.
Maximizes the window.
Closes the window.
7 Search Box
You can search for files by specifying the text included in the
file name or within the file or file attributes.
8 Sort Order
Used to change the sort order of the files.
9 Folder / File
The drives, folders and files included on the computer are
displayed here.
10 Preview Window
You can preview a selected file before opening it.
A preview function is not provided for drives and folders.
11 Detailed Information
Window
Shows the general information of the selected file.
Page 83

Control Panel
Tools for configuring Windows are located in the Control Panel.
Opening the Control Panel
Click Start > Control Panel.
System and
Maintenance
Using this function, you can configure Windows performance
options.
Security
Using this function, you can check the current security status to
protect the computer and configure the security settings for the
firewall, spyware, etc.
Network and
Internet
Using this function, you can check the network status and
configure the settings.
You can change the Internet connection settings.
Hardware and
Sound
Using this function, you can add a printer and other hardware,
change the settings, and update the device drivers.
Programs
Using this function, you can remove a program, Windows
function, or download a new program from the internet.
83
Page 84

User Accounts
and Family Safety
You can change the user account settings, passwords and
configure the Parental Controls function.
Appearance and
Personalize
Using this function, you can configure the Desktop style, theme
or screen saver settings.
Clock, Language,
and Region
Using this function, you can configure the date, time, language
and regional settings.
Ease of Access
Using this function, you can select options for hearing and sight
impaired persons as well as for challenged persons. You can
configure the audio recognition settings.
Additional
Options
Using this function, you can configure other Control Panel item
settings.
Mobile PC
You can set up the mobility, power option and personal settings
for your mobile PC. You can also synchronize your mobile PC
with another portable device or network folder.
84
Page 85

User Accounts
Using Windows Vista User Accounts, more than one user can easily share the same
PC.
The procedures to add and delete a user account and to switch users, are described
below.
Adding User Accounts
1
Click Start > Control Panel> User
Accounts and Family Safety.
2
Click User Accounts > Manage
another account.
3
Click Create a new account.
4
Enter a new username and select
either Standard User or Administrator.
5
Click Create Account to add a new
account.
85
Page 86

Removing User Accounts
1
Click Start > Control Panel > User
Accounts and Family Safety > User
Accounts.
2
Click Manage Another Account.
3
Click on the user account to be
deleted.
4
Click Delete the Account in the
Make changes to user’s account
menu.
5
A window appears asking whether
you want to save the desktop,
documents, favorites, music files,
pictures and video folders as new
folders on the Desktop before
deleting the account.
If you click Delete files, the account
and all files belonging to the account
are deleted.
If you click Keep files, only the
account is deleted and the files
belonging to the user are saved on
the Desktop.
Switching User Accounts
1
Click Start ( ) on the taskbar and
select Switch User.
2
If you click on another username in
the start screen, you can login with
that user account.
■ If there is only one
administrator account for the
computer, you cannot delete the
administrator account.
■ You can only delete another
account when you are logged in
as an administrator.
86
Page 87

The resolution refers to the number of pixels displayed on the screen. When increasing
the resolution, the items on the Desktop become smaller and more items can be
displayed on the screen. The higher the color quality, the more colors are displayed on
the screen.
1
Click Start > Control Panel > Appearance and Personalization >
Personalization > Display Settings.
Alternatively, right-click on the Desktop and select Personalization > Display
Settings from the pop-up menu.
2
The Display Settings screen appears.
Change the resolution and color settings and click the OK button.
The following resolutions and color qualities are recommended according to the
computer LCD panel type.
LCD Type Resolution Color Quality
7” WSVGA 1024 x 600 Very High (32bit)
Changing the screen resolution and the color
To change the color
quality, click this button
and select a particular
quality.
To change the
resolution, slide the
resolution sliding
bar to a particular
resolution.
You can check the
graphics chipset.
87
Page 88

The Power button on the Start menu
( ) performs various operations
depending on the settings.
1
Click Start > Control Panel >
Hardware and Sound > Power
Options and then Change battery
settings.
2
Click on Change Plan Settings in
the currently selected power setting.
3
Click on Change Advanced Power
Settings and open Start Menu
Power Button in the Power Buttons
and Lid item.
1
2
Configuring the Start Menu Power Button
88
Page 89

4
Select a power plan and click the OK button.
Type Description
Power Button
Image after
Setting
Change
Sleep
Sets the computer to enter Sleep mode.
The screen and hard disk will be turned off to reduce the
power consumption of the overall system.
If you slide the power switch of the computer downwards,
the computer wakes from Sleep Mode and you can resume
working.
Hibernate
Sets the computer to hibernate.
All work is automatically saved, the screen is turned off and
the computer makes no noise.
If you slide the power switch of the computer downwards, the
computer wakes from Hibernation Mode and you can resume
working.
Shut
down
Shut down the computer.
You have to shut down the computer after closing all programs
and opened folders.
■ The Power button is set to Sleep mode by default.
■ If the computer is set to download Windows updates automatically, the update
mark ( ) is displayed on the Power button when an update is ready.
If you click this button, the update is installed and the computer is shut down when
the update installation is complete.
89
Page 90

Phishing Filter Settings
1
Launch Internet Explorer.
2
Select Tools from the menu and click Phishing Filter > Phishing Filter Settings.
Phishing Filter
Phishing is a method used by hackers to illegally collect personal information such
as credit card numbers, passwords, other account numbers, etc. through emails or
websites.
The Phishing Filter protects users from these phishing attempts.
If the current page is judged to be a suspicious website, the Phishing Filter displays a
warning message with an alarm when the Phishing Filter is enabled. In addition, if a
page that the user is currently trying to open is registered as a known Phishing website
list, it displays a warning page instead.
90
Page 91

91
3
The Internet Options window opens.
Locate the Phishing Filter item in the Settings field. Select Turn on automatic
website checking and click the OK button to use the Phishing Filter.
4
To not use the Phishing Filter, select Turn off automatic website checking in the
Settings field in Step 3 above.
Page 92

User control function
Using this function, you can control the content your children can access.
You can determine for how long they can use the computer and the content they can
access. When you have finished the settings, click OK to finish.
Configuring Parental Controls
1
Click Start > Control Panel > User Accounts and Family Safety > Parental
Controls.
2
Select a user to configure the Parental Controls for.
The User Controls window for that user opens.
3
Click Parental Controls > Use and configure the necessary settings in the
Windows Settings at the bottom. If you click OK, the Parental Controls setting is
completed.
92
Page 93

Using Activity Report
You can view and evaluate your
children’s internet access through the
Activity Report.
1
Open the User Controls window
referring to the descriptions of
Parental Controls.
2
Set Activity Reporting to On.
3
To view the Activity Report, click on
View Activity Report on the right of
the User Controls window.
4
If you click the View Activity
Report, the following window opens
displaying a computer operating
summary.
93
Page 94

Using the Windows Mobility Center, you can easily configure computer settings such
as the volume, wireless network connection settings, display settings, etc. all at the
same time.
Some functions may not be supported depending on the Windows Vista version.
1
Click Start > All Programs > Accessories > Windows Mobility Center.
Alternatively, click Start > Control Panel > Mobile PC > Windows Mobility Center.
2
Configure the volume, battery status, external display, Sync center, etc. according to
your requirements.
■ Configurable items may differ depending on the installed Windows Vista version or
programs.
■ If the Easy Network Manager program is installed, you can see Easy Network
Manager window.
p.102
■ If you turn off Wireless Networking in the Mobility Center, it will not affect the
Wireless LAN LED and the MENU program. If you turn off the Wireless LAN in
the MENU program, the Wireless LAN LED will be turned off and the Wireless
Network button of the Mobility Center will also be disabled.
Volume Control
Easy Network
Manager Window
Display Connection
Settings
Battery Status
Settings
Rotating the
Screen
94
Windows Mobility Center
Page 95

Using the Network
Wired Network 96
Wireless Network 99
Using the Easy Network Manager 102
Bluetooth 106
Chapter 4.
Page 96

96
1
Connect a LAN cable to the
computer’s LAN port.
2
Click Start > Control Panel >
Network and Internet > Network
and Sharing Center
.
3
Click Manage Network Connections
from the left pane.
4
Right-click over the Local Area
Connection and select Properties.
Wired Network
A wired network is a network environment used for a company network or broadband internet
connection at home.
You can also configure the network settings using the Easy Network Manager.
p.10
2
Page 97

97
5
Select Internet Protocol Version 4
(TCP/IPv4) from the Networking tab
and click Properties.
6
Configure the IP settings.
When using DHCP, select Obtain an
IP address automatically. To use
a static IP address, select Use the
following IP address, and set the IP
address manually.
7
When you have completed the
settings, click the OK button.
The network settings have been
completed.
■ The LAN device driver may differ
depending on your LAN device
model.
■ To add a network component,
click Install in the screen shown
in the figure above. You can add
clients, services, and protocols.
When not using DHCP, ask your
network administrator for the IP
address.
Page 98

98
Using both DHCP
and a fixed IP simultaneously
Using the Alternate Configuration
providing by Windows Vista, you can set
both automatic and fixed IP addresses
and then you can select to use either of
them to connect to the Internet.
1
Click Start > Control Panel >
Network and Internet > Network
and Sharing Center and click
Manage Network Connections in
the left pane.
2
Right-click over the Local Area
Connection and select Properties.
3
Select Internet Protocol Version 4
(TCP/IPv4) from the Networking tab
and select Properties.
4
Select the Alternate Configuration
tab, select User configured and fill in
the corresponding fields.
5
When you have completed the
settings, click the OK button.
Page 99

99
Wireless Network
A wireless network (Wireless LAN) environment is a network environment that enables
communicating between multiple computers at home or a small-size office through wireless
LAN devices.
■ The descriptions below are for computer models with a Wireless LAN card or
device. You can also configure the wireless network settings using the Easy
Network Manager.
p.102
A Wireless LAN device is optional. To view the installed wireless LAN card, click
Start > Control Panel > Hardware and Sound > Device Manager > Network
Adapter and click the + symbol.
The figures in this manual may differ from the actual ones depending on your
wireless LAN device model.
■ To use the wireless LAN, you have to turn the wireless LAN on first. To turn it on,
click the MENU button and set the Wireless LAN item to On. If the wireless LAN is
turned on, the Wireless LAN LED is lit.
Wireless LAN Connections
Wireless network connections can
be classified into 3 categories and
this manual describes the connection
procedures for connecting through an
Access Point (AP).
■ Access Point (AP)
You can connect to the Internet or another
computer on the network through an AP.
What is an Access Point (AP)?
An AP is a network device that
bridges wired and wireless LANs,
and corresponds to a wireless
hub in a wired network. You can
connect multiple wireless LAN
installed computers to an AP.
■ Computer-to-computer (ad hoc) network
This is also called a peer-to-peer network.
In computer-to-computer wireless
networks, you can connect 2 or more
computers with wireless LAN modules.
For details, see the descriptions that
appear when clicking Start > Help
and Support > Table of Contents >
Networking-connecting computers and
devices > Setting up a network > Setting
up a computer-to-computer (ad hoc)
network.
When you use Ad-Hoc, you have to
change the McAfee Firewall settings.
Page 100

100
Connecting to a Wireless LAN
If there is an AP, you can connect to the
Internet via the AP using the Wireless
LAN connection method provided by
Windows Vista.
1
Right-click over the Network
Connections ( ) icon on the
taskbar and click Connect to the
Network.
2
Select an AP to connect to and click
Connect. If there is a configured
network key for the AP to connect
to, the Enter Network Key window
appears. Enter the network key in the
window and then click the Connect
button.
Ask your network administrator for
the network key, if necessary.
3
When Connected to the AP is
displayed, click the Close button.
You can access the network.
 Loading...