


- This Document can not be used without Samsung's authorization -
Troubleshooting
4.
Normal direction
1)
(1) Tools used for repairing the product
System Diagnostics Disk
MS-DOS Booting Disk
System Diagnostics Card
Screwdrivers (┼,━)
Tweezers
Multi-meter
Oscilloscope
(2) Replaceable Units
DDR2 RAM Module
1.8” PATA HDD
Wireless LAN Module
System FAN
Bluetooth Module
Hall Mouse
Touch Pad
LCD Panel
Main Board
Harness Cable – MIC Cable, HDD FPC, T-Con FPC, Camera FPC, Wireless LAN Antenna
(FRU: Field Replaceable Unit)
Right/Left FFC, Finger Print FFC, Right/Left Touch button FPC,
Touch Sensor FPC, LED FPC
4- 1
- This Document can not be used without Samsung's authorization -
Troubleshooting
4.
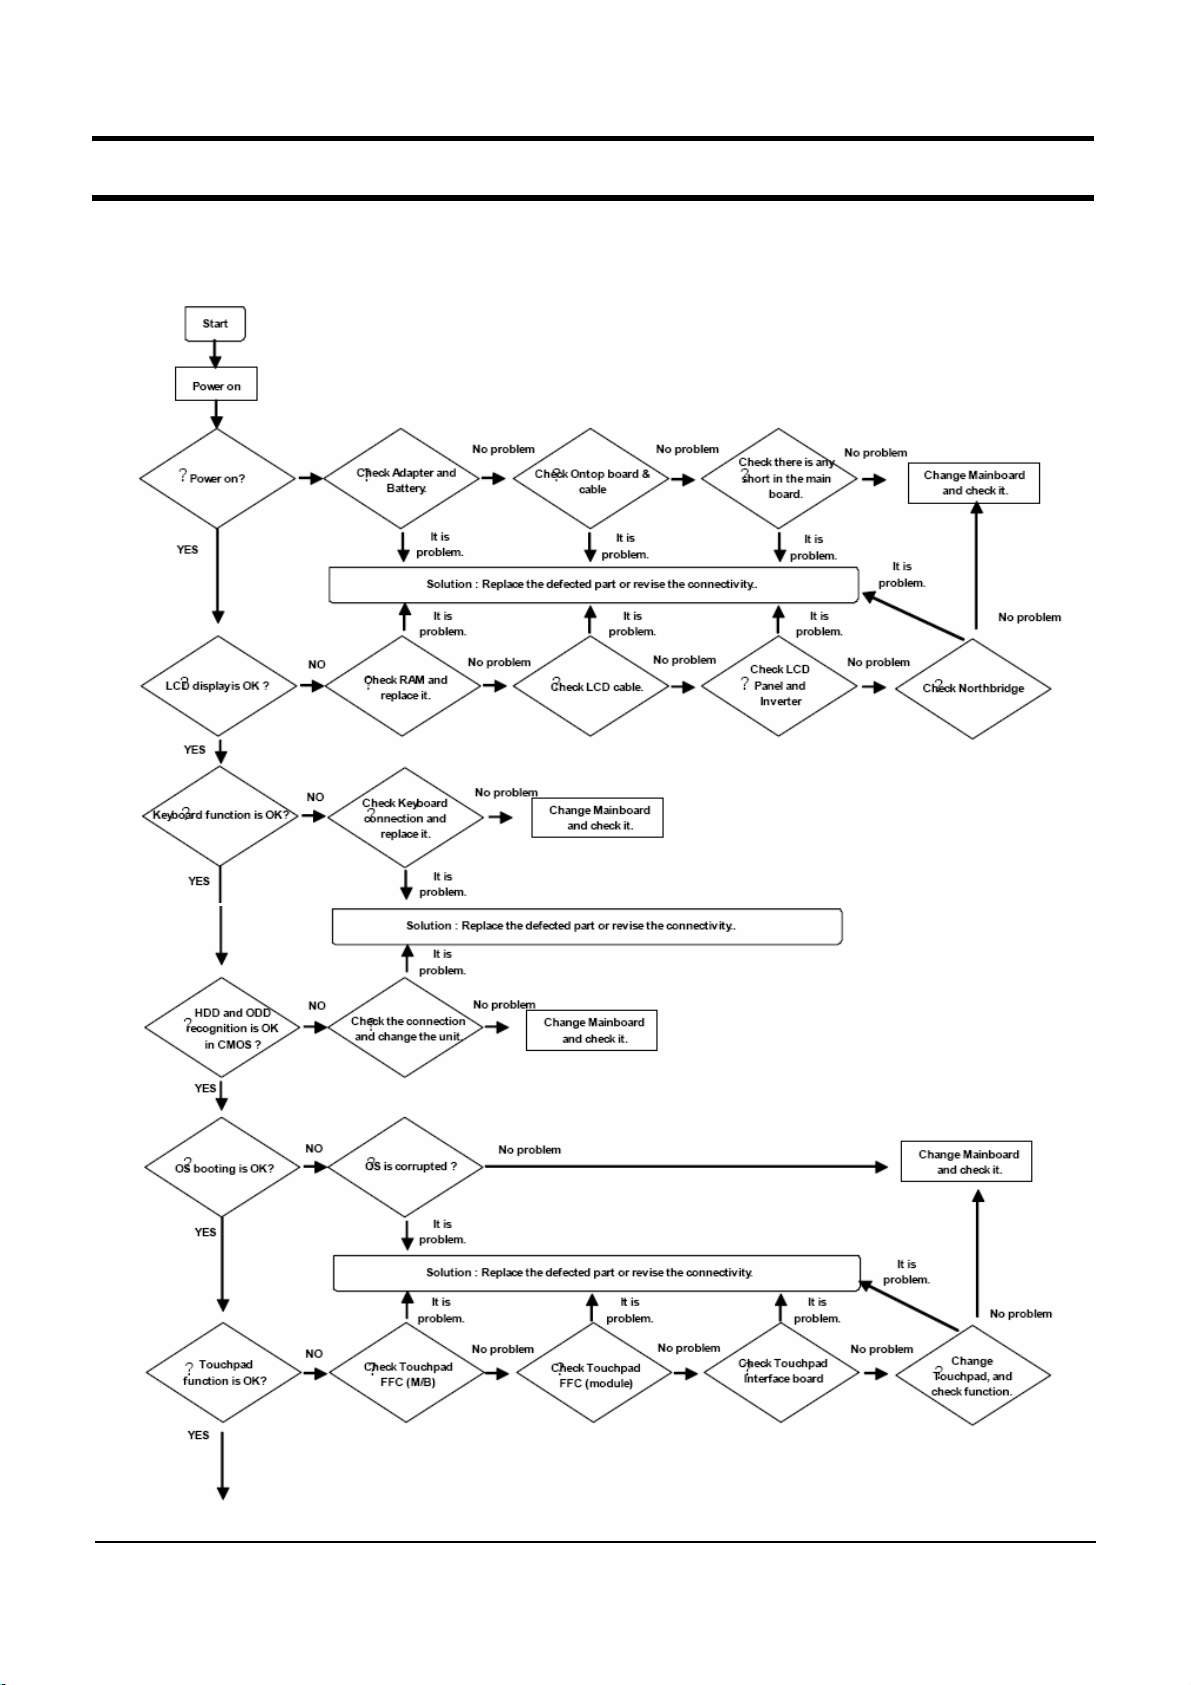
2) Debugging Flow Chart
4- 2

- This Document can not be used without Samsung's authorization -
Troubleshooting
4.
4- 3

- This Document can not be used without Samsung's authorization -
Troubleshooting
4.
test tool
3)
1)
System Diagnostics Card
The Diagnostics Card shows the system operations during the POST (Power On Self Test) in a
2 digit hexadecimal number by connecting the cable to the 10 pin connector below the PCMCIA slot
after separating the Top part. The card is used to evaluate the reason for the malfunction without
disassembling the system when the system malfunctions and to test if the system operates normally
after replacing a defective FRU.
2) Debugging Code
In general, if a defect of the circuit or part is detected during the system test, the system stops at
a particular code. The error codes for each part of the system are listed in the following table.
Code Beeps POST Routine Description (POST
02h Verify Real Mode (CPU
03h Disable Non-Maskable Interrupt (NMI:
04h Get CPU type (CPU
06h Initialize system hardware (
08h Initialize chipset with initial POST values(
09h Set IN POST flag ( POST
0Ah Initialize CPU registers (CPU
0Bh Enable CPU cache (CPU
0Ch Initialize caches to initial POST values (POST
0Eh Initialize I/O component (
0Fh Initialize the local bus IDE (IDE
10h Initialize Power Management (
11h Load alternate registers with initial POST values (
12h Restore CPU control word during warm boot(
13h Initialize PCI Bus Mastering devices (PCI
14h Initialize keyboard controller (
16h 1-2-2-3
17h Initialize cache before memory auto size (
18h 8254 timer initialization (8254
1Ah 8237 DMA controller initialization (8237 DMA
1Ch Reset Programmable Interrupt Controller (PIC
20h 1-3-1-1 Test DRAM refresh (DRAM
22h 1-3-1-3 Test 8742 Keyboard Controller (8742
24h Set ES segment register to 4 GB (ES
26h Enable A20 line (A20 line
28h
29h Initialize POST Memory Manager (POST
2Ah Clear 512 KB base RAM ( 512 KB
2Ch 1-3-4-1 RAM failure on address line xxxx* (xxxx
2Eh 1-3-4-3
2Fh Enable cache before system BIOS shadow (cache
30h 1-4-1-1
BIOS ROM checksum (
상확인
Auto size DRAM (DRAM
확인
RAM failure on data bits xxxx* of low byte of memory bus (
서 메모리 에러
RAM failure on data bits xxxx* of high byte of memory bus (
서 메모리 에러
)
모드 변경 점검
타입 읽어오기)→지원가능
시스템 하드웨어 초기화
용플레그설정
레지스터 초기화
케시 사용설정
입출력장치초기화
전원 관리 초기화
키보드 컨트롤러 초기화
바이오스 롬 체크섬 검사)→
타이머 초기화
리프레쉬 테스트
을연다
크기 자동 인식 설정)→ 메모리 모듈 장착 상태 점검/메모리교체후증상
)
)
거스를수없는인터럽트
버스 초기화
키보드 컨트롤러 테스트
세그먼트 레지스터를
)
기본 메모리 지움
CPU
)
칩셋 레지스터 초기화
)
)
)
값으로케시초기화
)
)
)
대체 레지스터를 부름
웜부팅 동안
버스마스터링 장치 초기화
)
BIOS ROM
메모리 크기 자동설정을 위한 케시 초기화
)
컨트롤러 초기화
컨트롤러 리셋
)
메모리 관리장치 초기화
)
어드레스 라인에서 메모리 에러
를활성화
절차 설명
)
인지 확인
CPU
,CPU
)
)
제어명령 저장
)
의상태점검
)
)
)
로설정
4GB
)
메모리 버스의하위
)
메모리 버스의상위
)
혹은 메인보드 교체
)
)
업데이트 후 증
/BIOS
)
)
)
xxxx
xxxx
데이터 비트에
데이터 비트에
4- 4

- This Document can not be used without Samsung's authorization -
Troubleshooting
4.
32h Test CPU bus-clock frequency (CPU
33h Initialize Phoenix Dispatch Manager (
36h Warm start shut down (
38h Shadow system BIOS ROM (BIOS를RAM
3Ah Auto size cache (
3Ch
3Dh Load alternate registers with CMOS values
42h Initialize interrupt vectors (
45h POST device initialization (POST
46h 2-1-2-3 Check ROM copyright notice (ROM copyright
48h Check video configuration against CMOS(
49h Initialize PCI bus and devices(PCI
4Ah Initialize all video adapters i n system(
4Bh Quiet Boot start (optional)(Quite boot시작)
4Ch Shadow video BIOS ROM(Video BIOS를RAM
4Eh Display BIOS copyright notice(BIOS copyright
50h Display CPU type and speed(CPU
51h Initialize EISA board(EISA
52h Test keyboard(
54h Set key click if enabled(
58h 2-2-3-1 Test for unexpected interrupts(
59h Initialize POST display service(POST display s ervice
5Ah Display prompt "Press F2 to enter SETUP"(F2
5Bh Disable CPU cache(CPU
5Ch Test RAM between 512 and 640 KB(512~649KB의RAM
60h Test extended memory(extended
62h Test extended memory address lines(extended
64h Jump to UserPatch1(Uerpatch1
66h Configure advanced c ache registers(
67h Initialize Multi Processor APIC(
68h Enable external and CPU caches(External및CPU cache
69h Setup System Management Mode (SMM) area(SMM
6Ah Display external L2 cache size(L2 cache
6Bh Load custom defaults (optional)(
6Ch Display shadow-area message(sha dow-area
6Eh Display possible high address for UMB recovery(UMB
70h Display error messages(
72h Check for configuration errors(
76h Check for keyboard errors(
7Ch Set up hardware interrupt vectors(
7Eh Initialize coprocessor if present(co-processor
80h Disable onboard Super I/O ports and IRQs(
81h Late POST device initialization(POST
82h Detect and install external RS232 ports(RS232 port
83h Configure non-MCD IDE controllers(non-MCD IDE
84h Detect and install external parallel ports(
85h Initialize PC-compatible PnP ISA devices(PnP ISA
Advanced configuration of chipset registers (
초기화 점검
CMOS
키보드 테스트)→키보드교체후증상확인.개선안될시마이컴칩교체후확인
웜 스타트 셧다운
케시 크기 자동 설정
인터럽트벡터초기화
초기화
키클릭 설정
캐쉬 미사용 설정
에러 메시지 표시
키보드에러확인
클럭 주파수 테스트
피닉스 Dispatch 관리장치 초기화
)
에복사
)
)
칩셋 레지스터 고급 설정)→
)
장치 초기화
버스와 장치를 초기화)→
타입과속도보여줌
)
)
돌발 인터럽터에 대한 테스트
메모리 테스트)→메모리교체후증상확인
으로 분기
캐쉬 관련 레지스터 고급설정)→
멀티 프로세서 초기화
기본값 로드
설정 에러 확인
하드웨어 인터럽트 설정
)
확인
)
비디오
cmos
비디오 어뎁터 초기화)→그래픽칩주변회로점검
에복사
)
보여줌
)
)
초기화
셋업 진입 메시지 표시
)
메모리라인테스트
)
)
영역 설정
사이즈 표시
)
메시지 표시
)
)
)
초기화
시스템상의
후반기 디바이스 초기화
병렬포트 확인 및 설정
)
복원을위한상위주소표시
)
확인및설정
콘트롤러 설정
디바이스 초기화
)
)
배터리를 제거하여
RTC
설정값 확인
테스트)→메모리교체후증상확인
설정
)
)
I/O,IRQ
PCI Dev ice
)
)
)
)
사용안함 설정
)
)
)
)
)
제거후증상확인
)
→메모리교체후증상확인
)
RTC Reset
)
후증상확인
)
)
4- 5

- This Document can not be used without Samsung's authorization -
Troubleshooting
4.
86h Re-initialize onboard I/O ports.(
87h Configure Mothe board Configurable Devices (optional)(MCD
88h Initialize BIOS Data Area(
89h Enable Non-Maskable Interrupts (NMIs)(NMI설정)
8Ah Initialize Extended BIOS Data Area(BIOS
8Bh Test and initialize PS/2 mouse(PS/2
8Ch Initialize floppy controller(
8Fh Determine number of ATA drives (optional)(ATA
90h Initialize hard-disk controllers(
91h Initialize local-bus hard-disk controllers(
92h Jump to UserPatch2(UserPatch2
93h Build MPTABLE for multi-processor boards(
95h Install CD ROM for boot(
96h Clear huge ES segment register(ES
97h Fixup Multi Processor table(
98h 1-2 Search for option ROMs. One long, two short beeps on(
che checksum failure(
99h Check for SMART Drive (optional)(SMART
9Ah Shadow option ROMs(
9Ch Set up Power Management(
9Dh Initialize security engine (optional)(
9Eh Enable hardware interrupts(
9Fh Determine number of ATA and SCSI drives(ATA/SCSI
A0h Set time of day(날짜/
A2h Check key lock(key lock
A4h Initialize Typematic rate(
A8h Erase F2 prompt(F2
AAh Scan for F2 key stroke(F2
ACh Enter SETUP(
AEh Clear Boot flag(
B0h Check for errors(
B2h POST done - prepare to boot operating system(POST끝.
B4h 1 One short beep before boot(
B5h Terminate QuietBoot (optional)(quiteboot종료)
B6h Check password (optional)(
B9h Prepare Boot(
BAh Initialize DMI parameters(DMI
BBh Initialize PnP Option ROMs(PnP
BCh Clear parity checkers(
BDh Display Multi Boot menu(
BEh Clear screen (optional)(
BFh Check virus and backup reminders(
C0h Try to boot with INT 19(INT 19
C1h Initialize POST Error Manager (PEM)(PEM
C2h Initialize error logging(
C3h Initialize error display function(
C4h Initialize system error handler(
C5h PnPnd dual CMOS (optional)(PnP
첵썸 실패
옵션롬을 메모리에 복사
시간 설정
메시지 지움
셋업으로 들어감
부트 플래그 초기화
에러 확인
부팅 준비
패러티체크초기화
에러 로깅 초기화
시스템
바이오스 데이터 영역 초기화
플로피 콘트롤러 초기화
하드디스크 콘트롤러 초기화
로분기
부팅을 위한
멀티 프로세서 테이블 고정
)
파워 메니지먼트 설정
하드웨어 인터럽트 설정
)
확인
)
키입력 속도 초기화
)
입력여부 확인
)
)
부팅전1회짧은비프
비밀번호 확인)→
)
값초기화
옵션롬 초기화
멀티부트 메뉴 표시
화면 초기화
부팅시도)→ 바이오스 셋업에서 부팅순서 변경확인
에러 표시함수 초기화
시스템 에러 핸들러 초기화
포트재초기화
I/O
확장데이터영역초기화
마우스 테스트/초기화
)
드라이브개수결정
로컬버스 하드 디스크 콘트롤러 초기화
)
다중 프로세서 보드를 위한
CD-ROM설치)
세그먼트 레지스터 초기화
드라이브 확인
)
)
보안엔진 초기화
)
)
)
RTC Reset
)
)
)
)
)
바이러스 체크 및 잔여부분 백업
초기화
)
듀얼
CMOS)
)
)
)
)
)
옵션롬 검색
)
)
)
드라이브 갯수 결정
)
후증상확인
)
)
)
디바이스 설정
)
)
)
)
부팅준비
)
)
)
)
MPTABLE구성)
)
/OS
재설치
4- 6
 Loading...