

Page 1
71
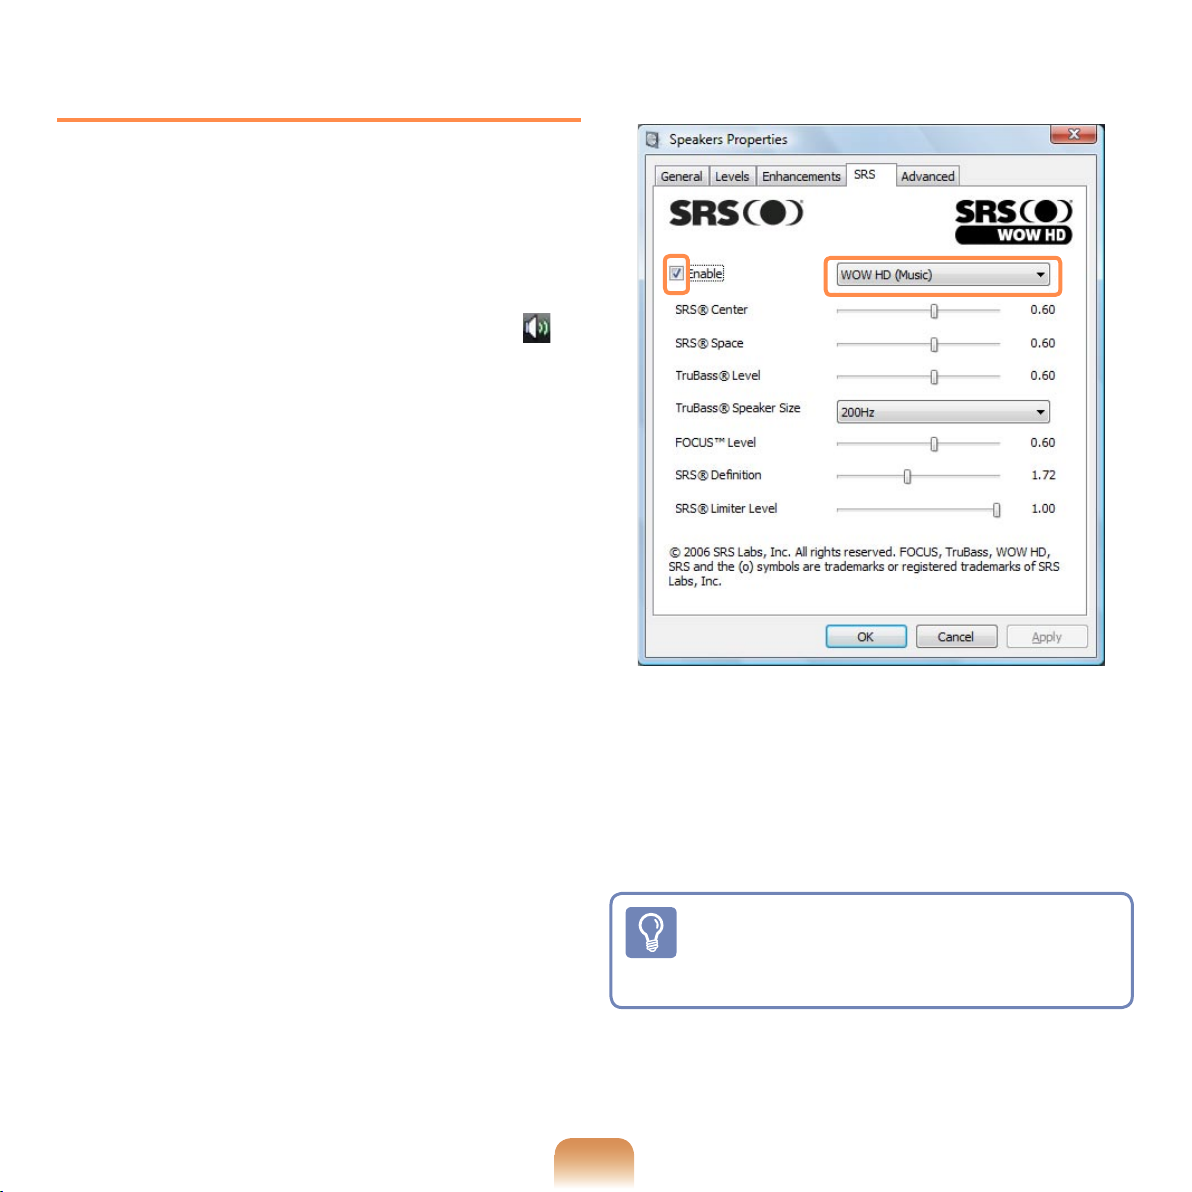
Using SRS
The SRS function enables you to experience more stereophonic sound by expanding the space-perception through the
stereo speaker.
1
Right-click over the Volume icon ( )
in the Taskbar and select Playback
Device(P).
2
Select Speaker in the Playback tab
and click Properties.
3
Select the SRS tab in the Speaker
Properties window. z Select a mode,
select the x Enable checkbox on the
left and click OK. Then you can listen
to sound through the selected SRS
effect.
z
x
● WOW HD(Music): Select to listen to
music.
● TruSurround XT(Movie/Video): Select
to watch a movie.
The SRS function supports the
computer’s built-in speaker and
headphones only.
Page 2

Chapter 3.
The screen shots used in this chapter may differ from
actual screens depending on the Windows Vista version
and model.
Using Microsoft
Windows Vista
About Microsoft Windows Vista 73
Windows Vista Screen Layout 76
Control Panel 85
Page 3
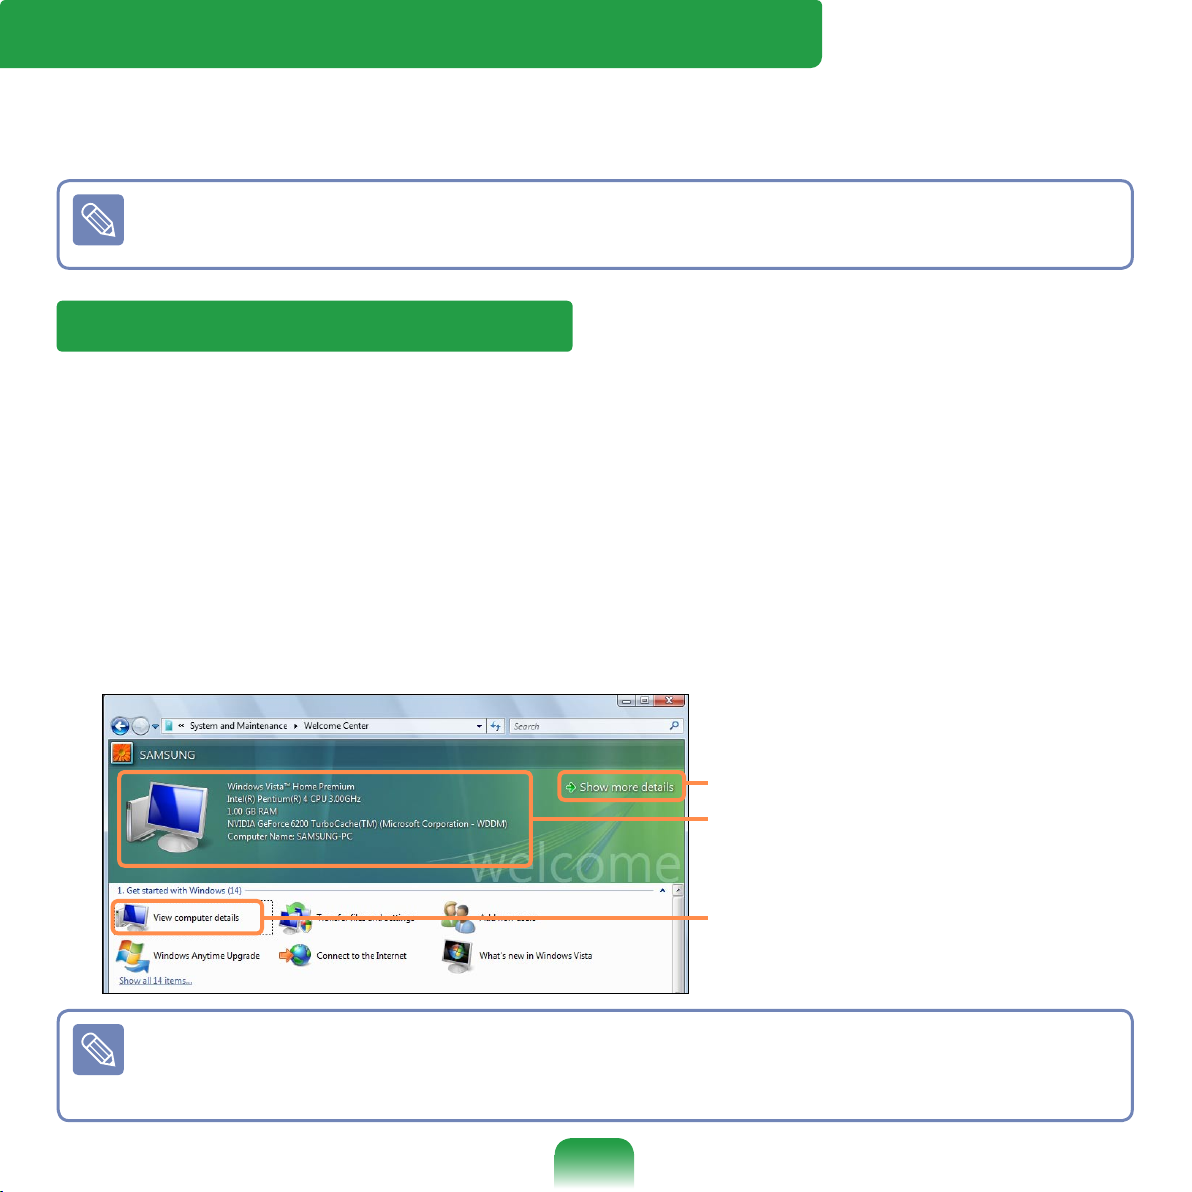
In the Welcome Center, you can view brief descriptions of Windows Vista functions and
run the functions directly.
1
Click Start > Welcome Center.
2
If you click on an item, information on the function is displayed in the description
window.
For example, if you click View computer details, your computer information is displayed in the description window.
In addition, if you click on Show more Details, you can view more detailed information.
1
Description Window
2
Windows Vista Demo
If you click Start > Welcome Center > Show all 7 items > Windows Vista Demo,
you can watch the Windows Vista introduction movie.
About Microsoft Windows Vista
Microsoft Windows Vista (hereafter Windows) is a computer operating system. Since you
have to learn how to use it in order to use the computer efficiently and effectively, use the
Welcome Center and Windows Help and Support to learn about Windows Vista.
Welcome Center
The screen layout may differ depending on the computer model and the operating
system.
73
Page 4
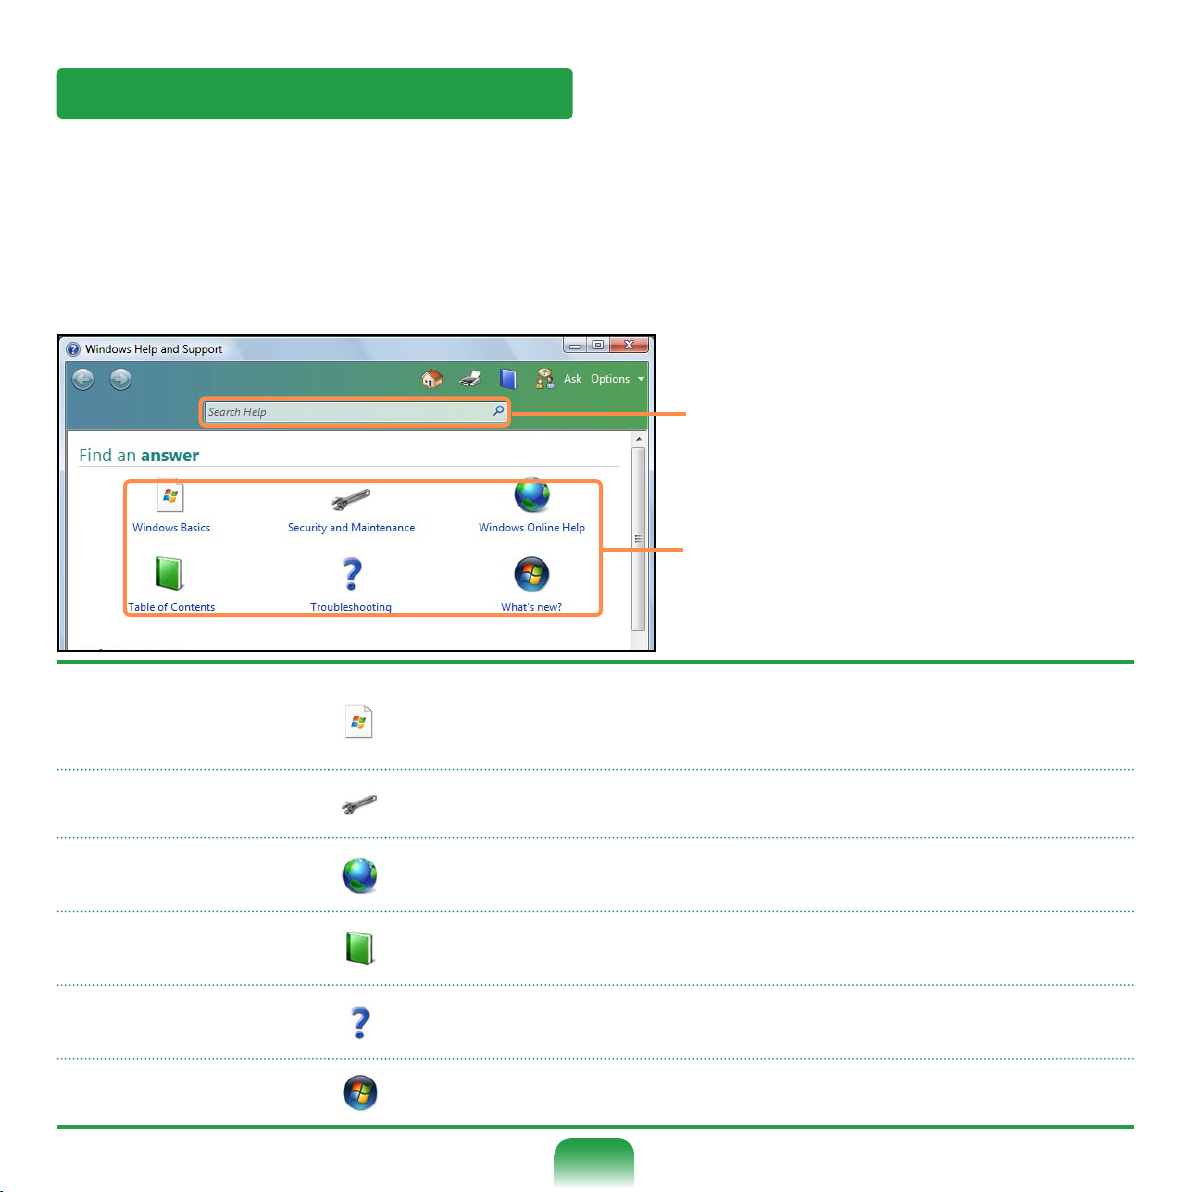
Help and Support
Windows Help and Support provides information on Windows basic functions and usages.
Click Start > Help and Support.
You can find help for frequently used basic functions using Find an Answer and you
can search for help by entering a keyword in the Search box.
Help Search
Find an Answer
Windows Basics
Introduces the basic usage of the computer and the Windows
operation system.
You can learn tasks and tools necessary to use the computer.
Security and Maintenance
You can view help on computer protection and security.
Windows Online
Help
If your computer is connected to the Internet, you can view the
necessary information online.
Table of Contents
The help pages are arranged by subject so that users can easily find the relevant information.
Troubleshooting
You can view possible problems that may occur while using
Windows and solutions to the problems.
What’s new? You can view help for new Windows Vista features.
74
Page 5
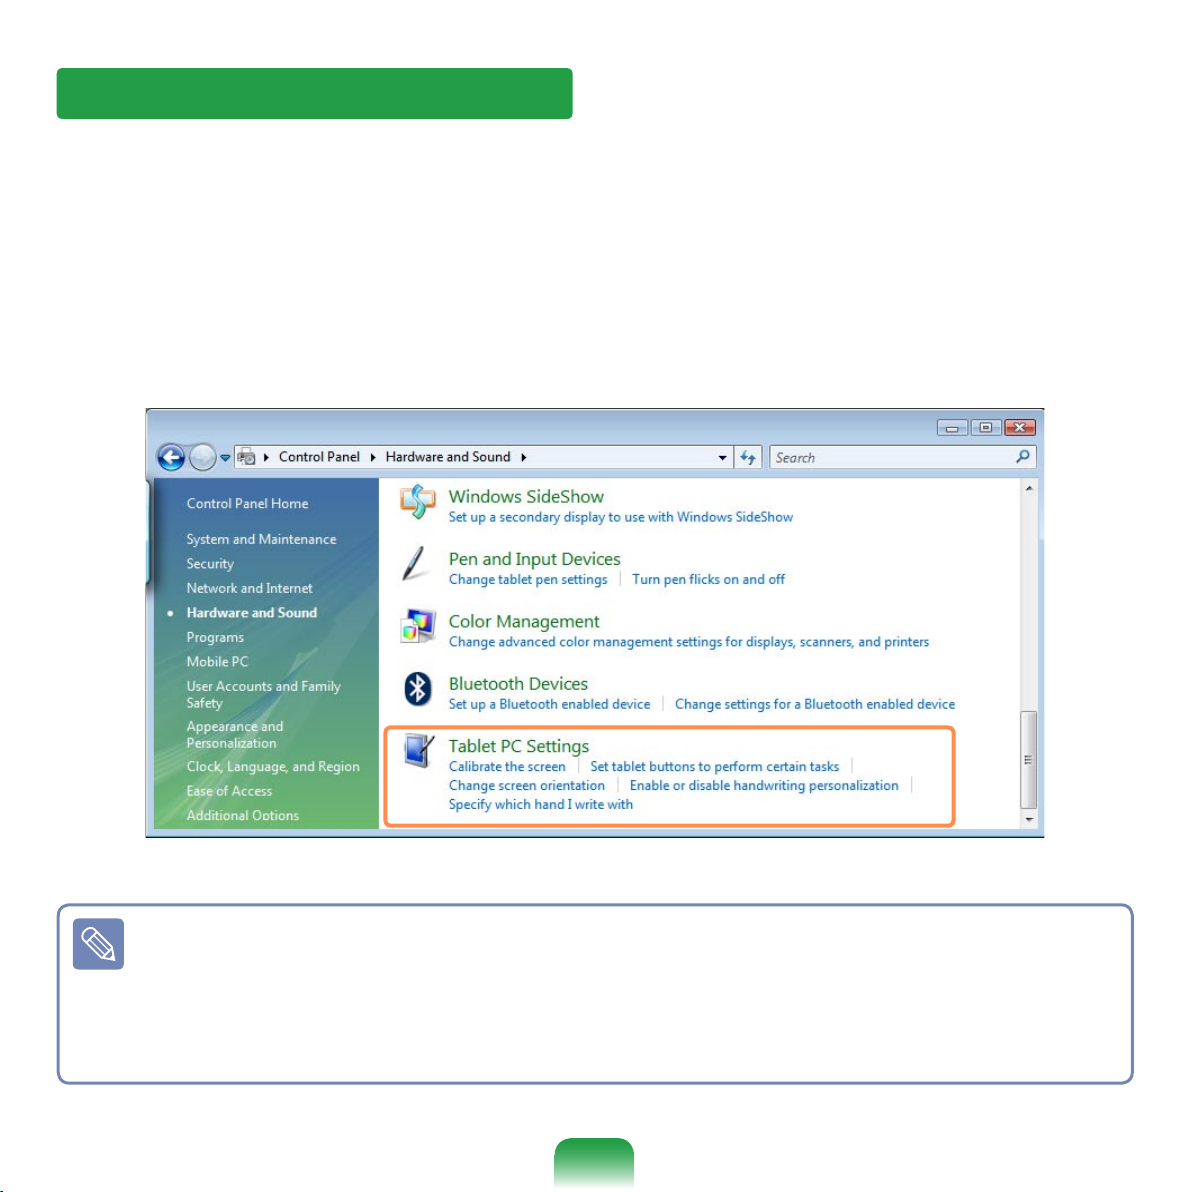
This computer is a Tablet PC with a touch screen.
In the Tablet PC Settings of the Control Panel, you can set the screen correction,
screen pivot function and whether to use the left-handed or right-handed option.
Click Start > Control Panel > Hardware and Sound > Tablet PC Settings.
Tablet PC Setting Information
For the efficient use of a Tablet PC
You can use the computer more efficiently in a short time by learning how to use
your fingers and the Stylus Pen.
Click Start > All Programs > Tablet PC and then click Tablet PC Touching Train-
ing or Tablet PC Pen Training.
75
Page 6

Windows Vista Screen Layout
Desktop
If you turn the computer on, the Desktop screen appears.
The desktop is the working area on the computer. It consists of a large workspace and
a taskbar at the bottom as shown in the figure below.
The screen layout may differ depending on the computer model and the operation
system version.
1 Recycle
Bin
2 Shortcut
Icons
3 Start
Menu
6 Gadget
7 Sidebar
4 Start
Button
5 Taskbar
8 System
Tray with
Clock
76
Page 7
1 Recycle Bin
You can drop useless files and folders here.
2 Shortcut Icons
You can launch programs by clicking the shortcut icons on the Desktop.
3 Start Menu
The menu from which you can launch programs.
4 Start Button
Press the start button. The Start menu appears.
5 Taskbar
Currently running programs are displayed here.
6 Gadget
This is a mini information program that appears on the Sidebar.
7 Sidebar
This is a vertical bar that appears at the side of the Desktop.
8 System Tray
with Clock
Shows some running program icons. Icons not being used are hidden.
If you click the arrow mark on the left, you can view hidden icons.
Some item may not be provided depending on the Windows Vista version.
77
Page 8
Start Menu
The menu from which you can launch programs.
Click Start ( ). The Start menu appears.
Fixed Programs
The program or
search result is
displayed.
All Programs
You can search for
files, folders, etc.
Username
Search
Computer
Control Panel
Help and Support
Power Menu Button
Lock Button
Power Button
78
Page 9
Search Enables users to search for files and folders.
Computer
Shows storage devices such as hard disk drives, CD/DVD
drives, network drives, etc.
In addition, you can manage files and folders here.
Control Panel
Enables users to configure the appearance and settings of
Windows such as the Desktop, window colors, hardware and
software settings, security, etc.
Help and Sup-
port
Provides on-line help about functions and usage of Windows
and troubleshooting. You can find a solution to a problem by
entering a keyword.
Power Button
Click the Power button to enter Sleep mode.
However, what the power button does changes according to the
power button setting. p.90
Lock Button
To lock the computer, click this button. If you lock your computer, no one can use the computer until you enter the password.
Power Menu
Button
Click the Power Menu button to shut down, restart, and logoff
from the computer.
79
Page 10
Sidebar / Gadget
Sidebar is a vertical bar that appears at the side of the Desktop.
A mini program called Gadget runs over the Sidebar which shows information such as
stocks, schedule, weather, etc. and provides frequently used tools.
You can download various Gadgets from the Internet other than the default Gadget.
Sidebar / Gadget Structure
If you launch Windows, the Sidebar is automatically launched and the Sidebar and
Gadget appear at the side of the Desktop.
■ If the Sidebar is not launched automatically when Windows starts, click Start > All
Programs > Accessories > Windows Sidebar to launch it manually.
■ To always display the Sidebar, right-click over the Sidebar and select Properties
and then select the Sidebar is always on top of Screen option in the Arrange-
ment field.
Sidebar
Gadget
80
Page 11
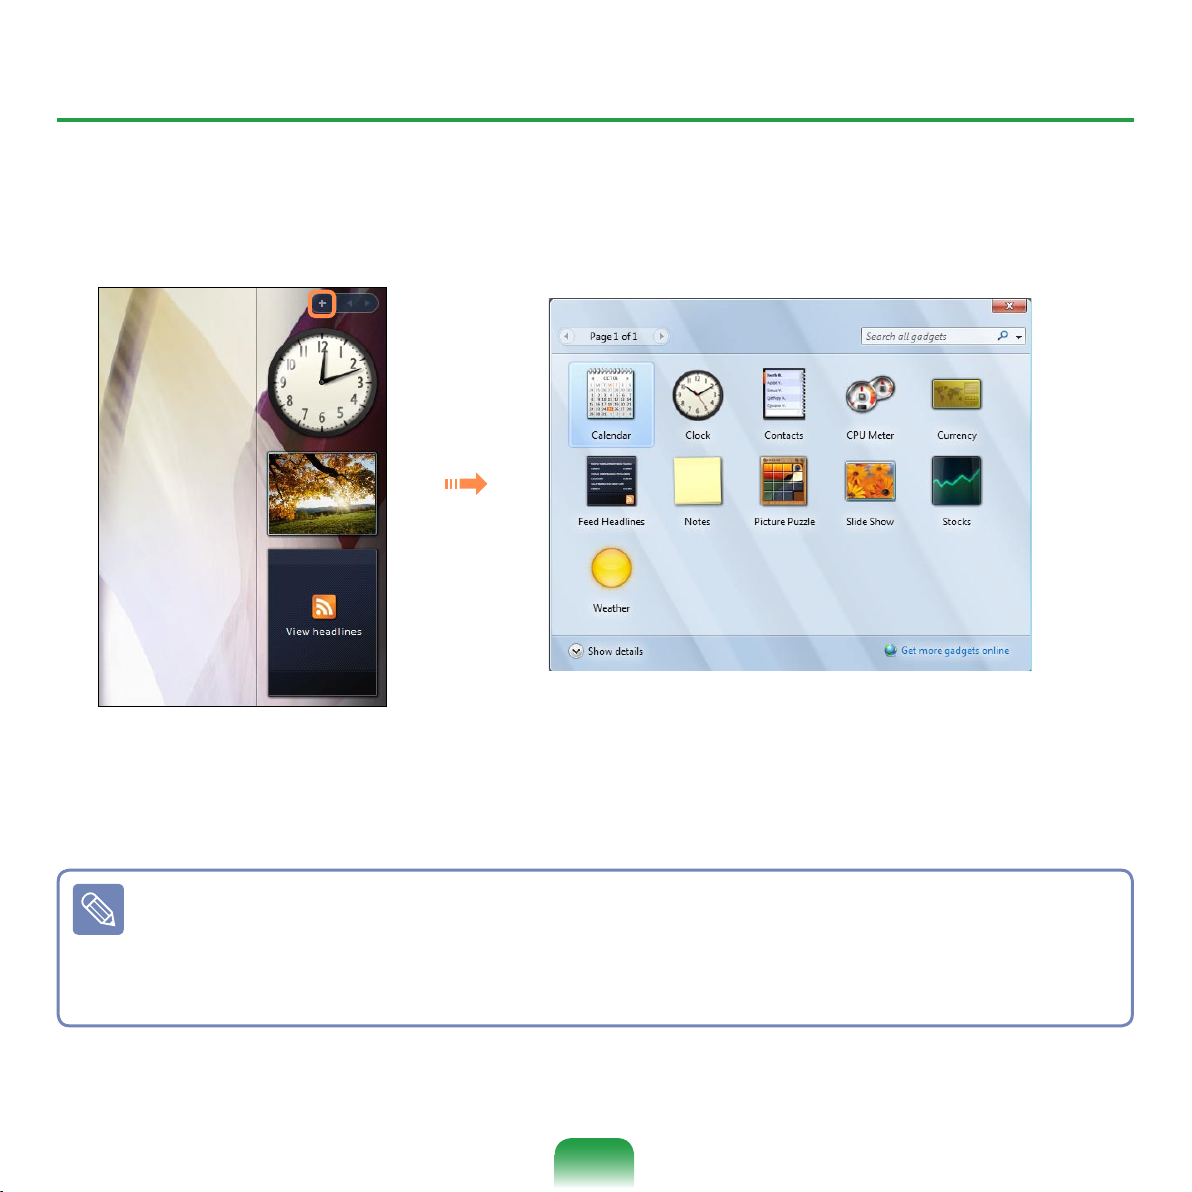
Adding a Gadget
You can find a gadget in the Gadget Gallery and add it to the Sidebar.
1
If you click the + at the top of the Sidebar, the Gadget Gallery opens.
2
If you double-click on a gadget, the gadget is added to the Sidebar.
■ If you drag a gadget to a new location with the Stylus Pen it moves the gadget to
that location.
Not only can you move a gadget onto the Sidebar but also out of the Sidebar.
■ If you tap on the gadget with the Stylus Pen, the Close and Option buttons appear.
81
Page 12
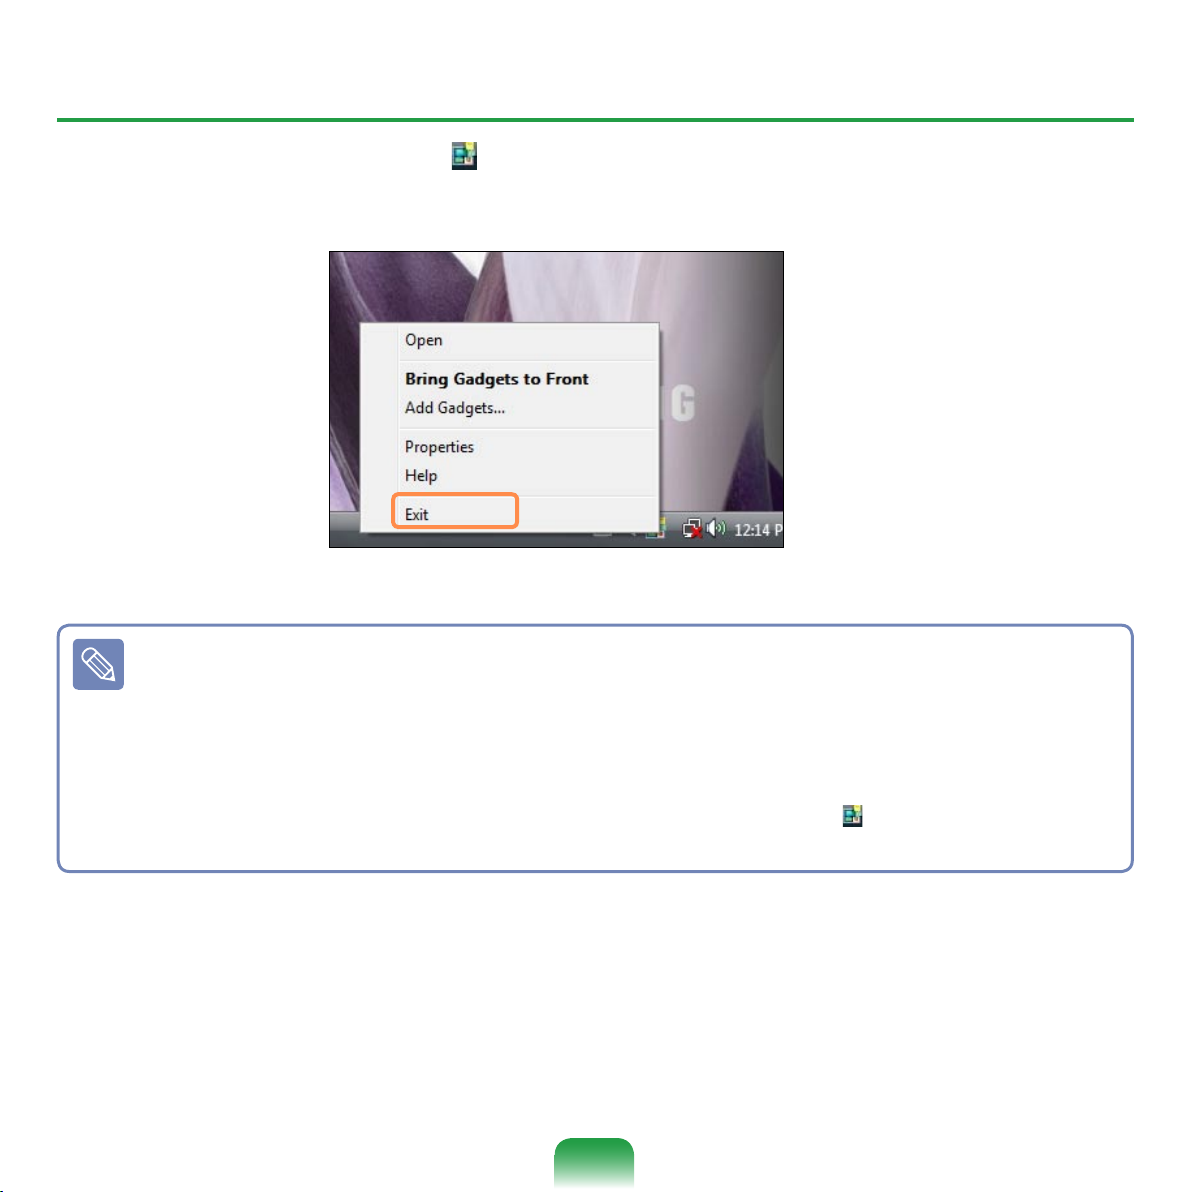
Exiting the Sidebar
Right-click on the Sidebar icon ( ) in the System Tray with the clock on the taskbar
and select Exit to exit the Sidebar.
Closing the Sidebar
■ Even if you close the Sidebar, the Sidebar continues running in the System Tray in
the clock area, though it is not displayed on the Desktop.
■ To close the Sidebar, right-click over the Sidebar on the Desktop and select Close
Sidebar.
To open the Sidebar again, right-click on the Sidebar icon ( ) in the System Tray
with the clock on the taskbar and select Open.
82
Page 13
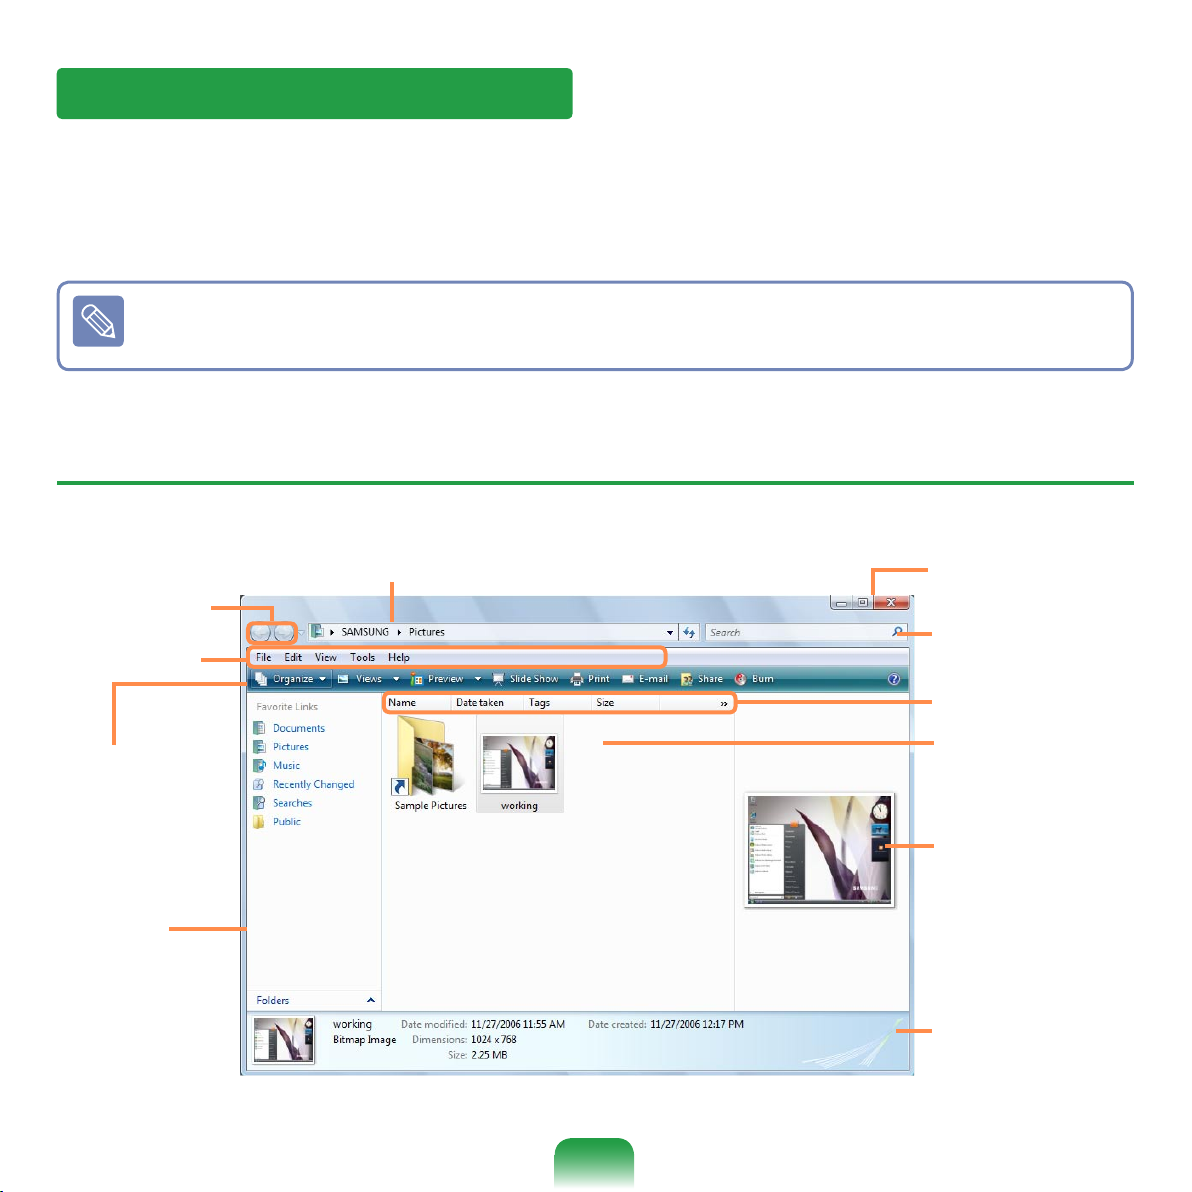
Window
A window is the basic frame for a computer operation. As an example, let’s see the
layout of a Pictures Window.
Click Start > Pictures.
The items and names may differ depending on your computer model and the Windows Vista version.
Window Layout
1 Address Display Line
2 Move
Button
3 Menu Bar
4 Toolbar
5 Search
Window
6 Window
Button
7 Search Box
9 Folder / File
10 Preview
Window
11 Detailed
Information
Window
8 Sort Order
83
Page 14
84
1 Address Display Line
Shows the location of the currently selected folder or file.
2 Move Button
You can move to the previous or next page by clicking the Back or
Next buttons.
Opens the previously opened page.
Opens the next page, when you have returned to a previous
page.
3 Menu Bar
Provides menus to run functions for the selected folder or file, etc.
4 Toolbar
Provides icons to quickly run frequently used functions.
5 Search Window
You can view the drive structure and the currently opened window
location.
You can move directly to a folder by clicking the folder in the
Search window.
6 Window Button
Used to resize the window.
Minimizes the window.
Maximizes the window.
Closes the window.
7 Search Box
You can search for files by specifying the text included in the filename or within the file or file attributes.
8 Sort Order
Used to change the sort order of the files.
9 Folder / File
The drives, folders and files included on the computer are displayed here.
10 Preview Window
You can preview a selected file before opening it.
A preview function is not provided for drives and folders.
11 Detailed Information
Window
Shows the general information of the selected file.
Page 15
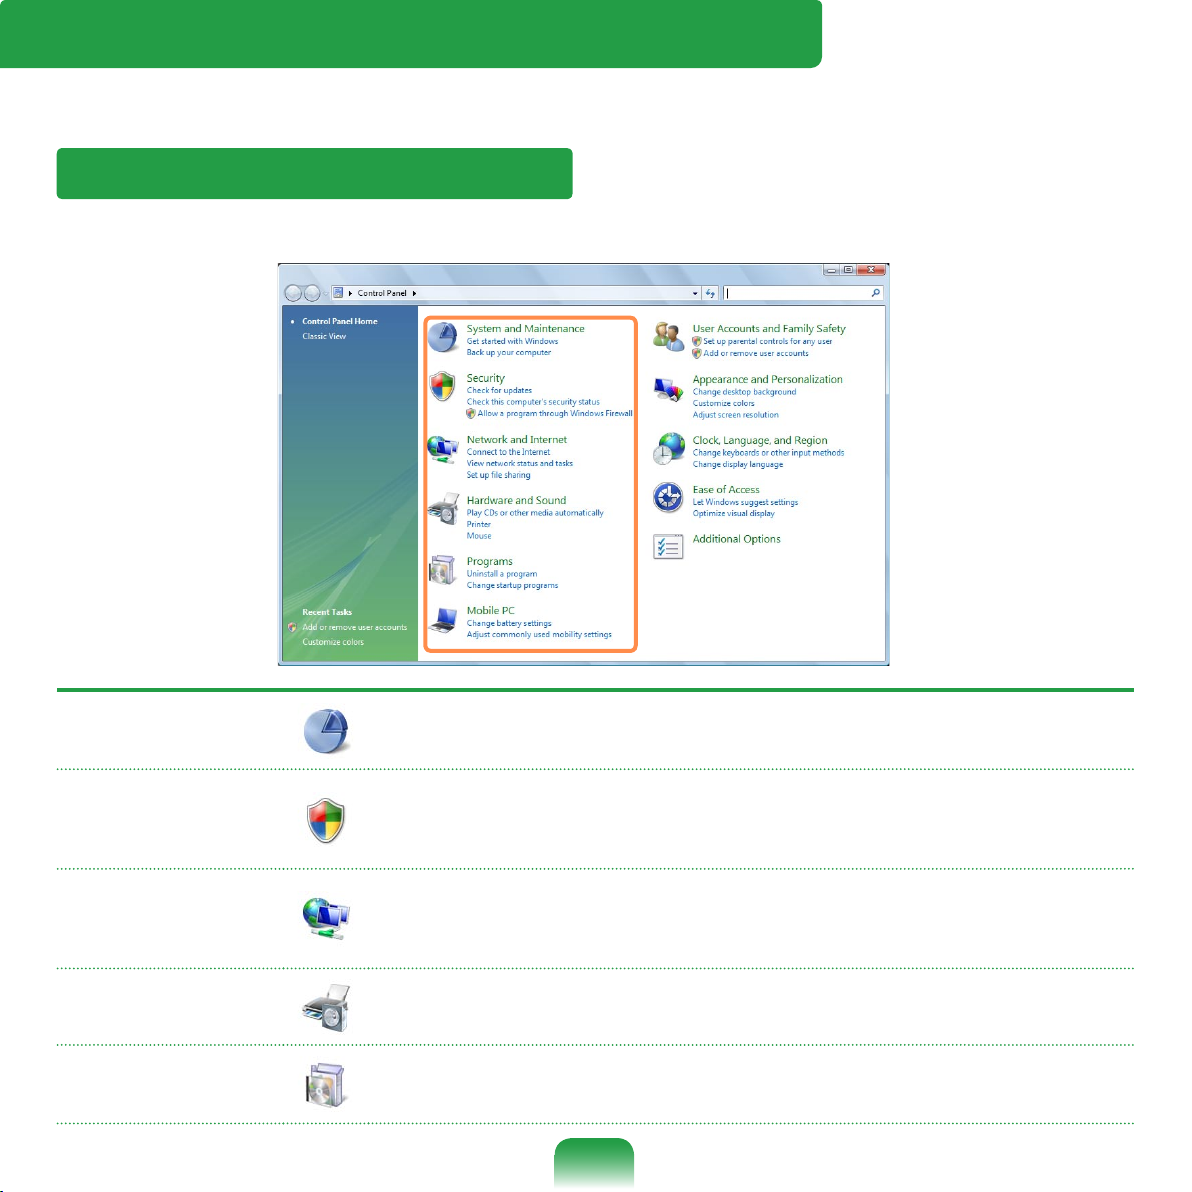
Control Panel
Tools for configuring Windows are located in the Control Panel.
Opening the Control Panel
Click Start > Control Panel.
System and
Maintenance
Using this function, you can configure Windows performance options.
Security
Using this function, you can check the current security status to
protect the computer and configure the security settings for the
firewall, spyware, etc.
Network and
Internet
Using this function, you can check the network status and configure the settings.
You can change the Internet connection settings.
Hardware and
Sound
Using this function, you can add a printer and other hardware,
change the settings, and update the device drivers.
Programs
Using this function, you can remove a program or Windows function and download a new program from the internet.
85
Page 16
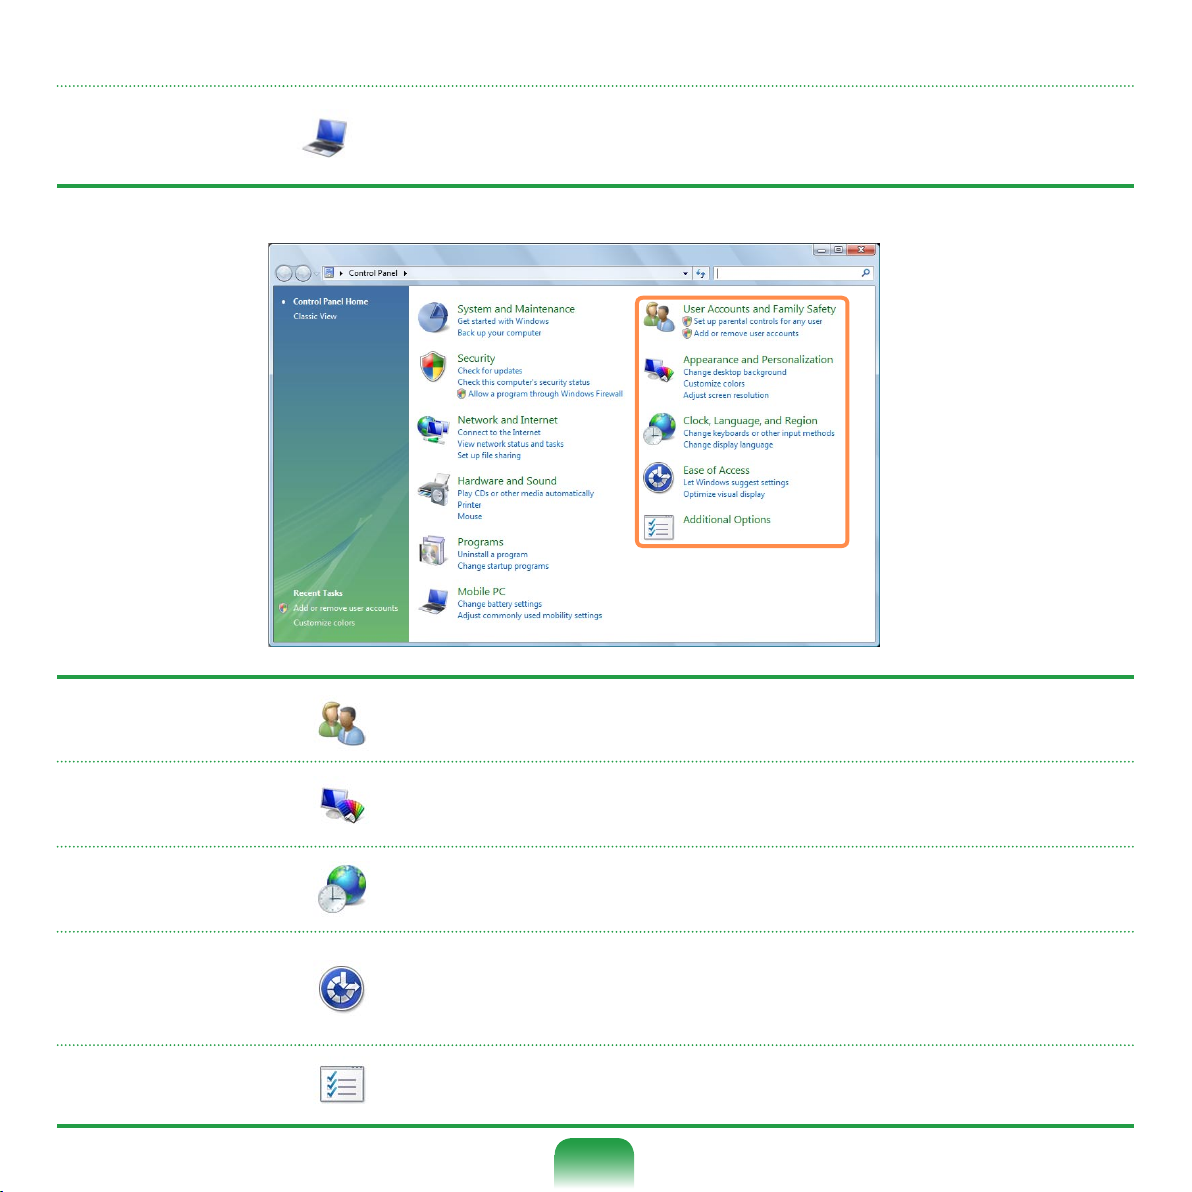
User Accounts
and Family Safety
You can change the user account settings, passwords and configure the Parental Controls function.
Appearance and
Personalize
Using this function, you can configure the Desktop style, theme
or screen saver settings.
Clock, Language,
and Region
Using this function, you can configure the date, time, language
and regional settings.
Ease of Access
Using this function, you can select options for hearing and sight
impaired persons as well as for challenged persons. You can
configure the audio recognition settings.
Additional
Options
Using this function, you can configure other Control Panel item
settings.
Mobile PC
You can set up the mobility, power option and personal settings
for your mobile PC and synchronize with another portable device
or network folder.
86
Page 17
User Accounts
Using Windows Vista User Accounts, more than one user can easily share the same
PC.
The procedures to add and delete a user account and to switch users are described
below.
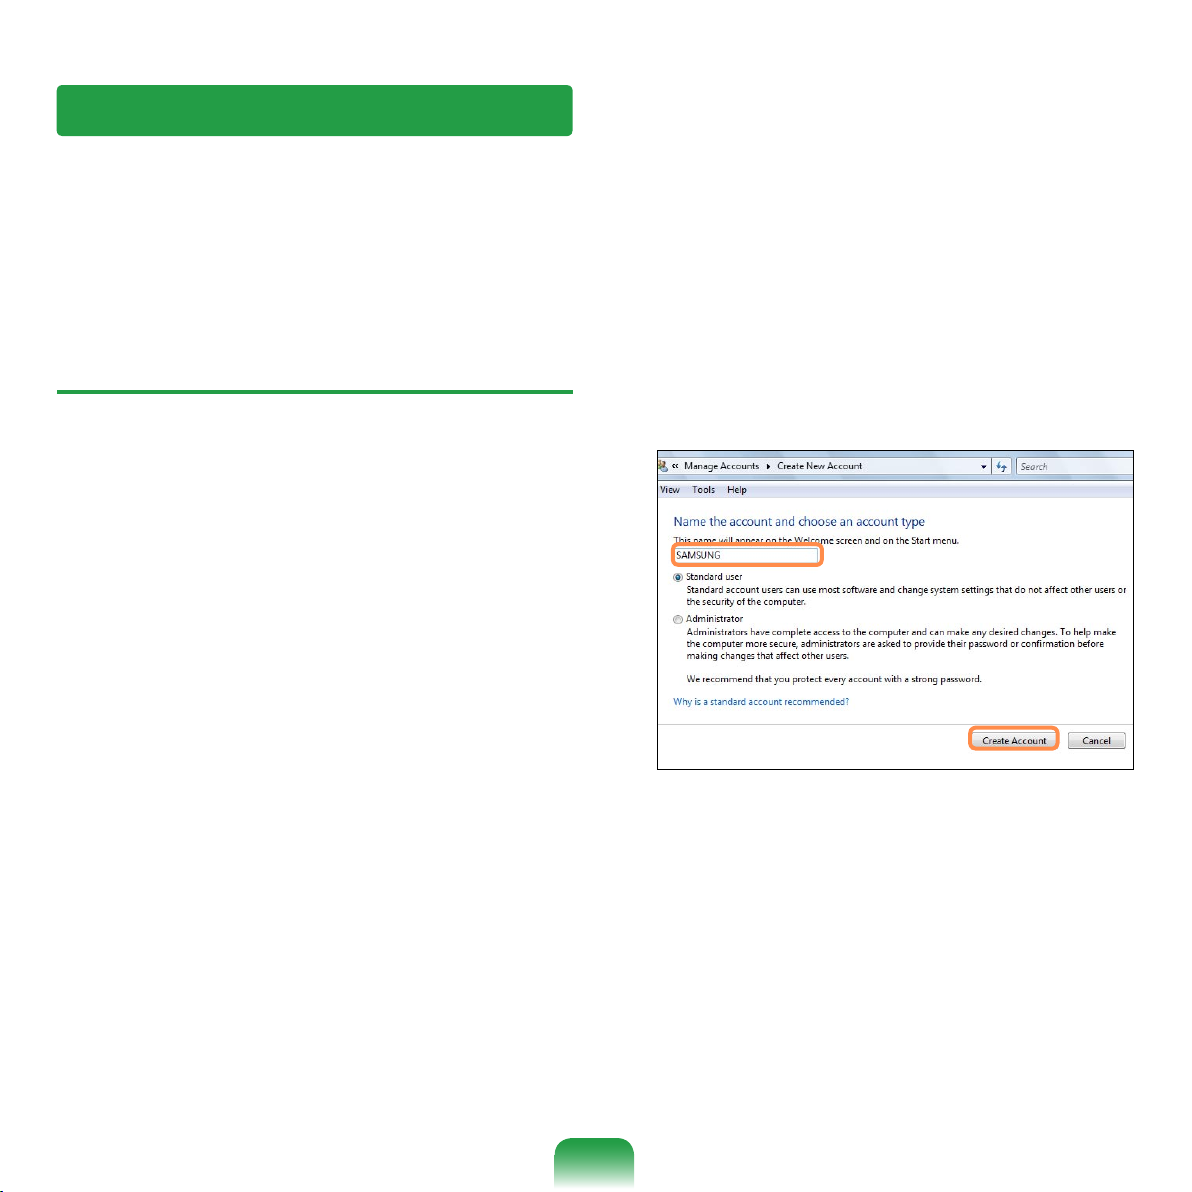
Adding User Accounts
1
Click Start > Control Panel> User
Accounts and Family Safety.
2
Click User Accounts > Manage
another account.
3
Click Create a new account.
4
Enter a new username and select
either Standard User or Administrator.
5
Click Create Account to add a new
account.
87
Page 18
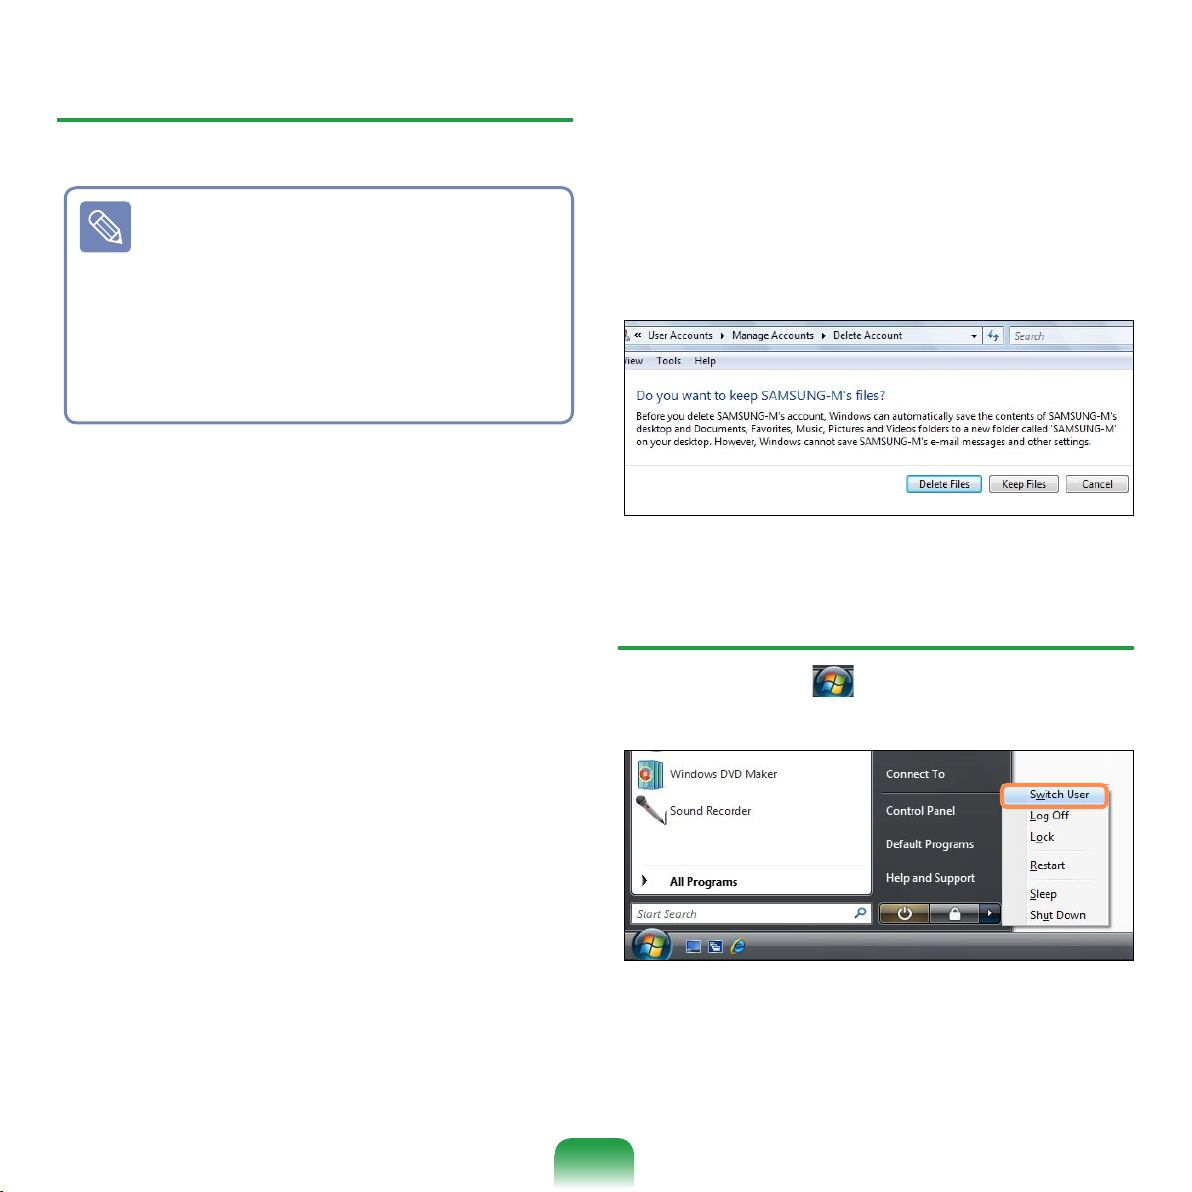
Removing User Accounts
1
Click Start > Control Panel > User
Accounts and Family Safety > User
Accounts.
2
Click Manage Another Account.
3
Click on the user account to be
deleted.
4
Click Delete the Account in the
Make changes to user’s account
menu.
5
A window appears asking whether
you want to save the desktop, documents, favorites, music files, pictures
and video folders as new folders
on the Desktop before deleting the
account.
If you click Delete files, the account
and all files belonging to the account
are deleted.
If you click Keep files, only the account is deleted and the files belonging to the user are saved on the
Desktop.
Switching User Accounts
1
Click Start ( ) on the taskbar and
select Switch User.
2
If you click on another username in
the start screen, you can login with
that user account.
■ If there is only one administra-
tor account for the computer,
you cannot delete the adminis-
trator account.
■ You can only delete another account when you are logged in as
an administrator.
88
Page 19
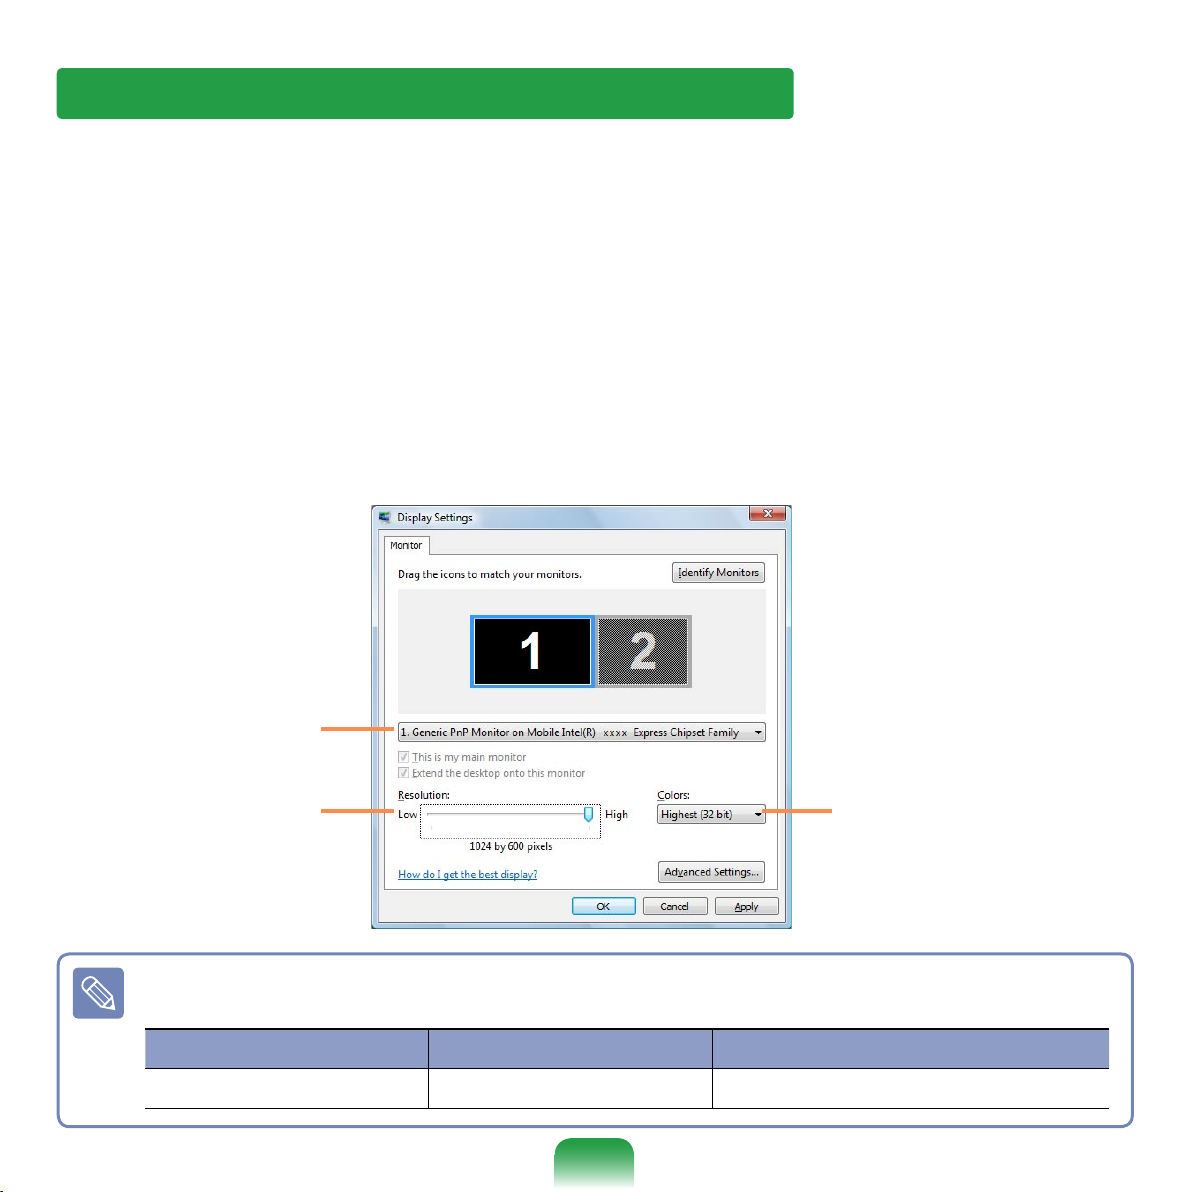
The resolution refers to the number of pixels displayed on the screen. When increasing the resolution, the items on the Desktop become smaller and more items can be
displayed on the screen. The higher the color quality, the more colors are displayed on
the screen.
1
Click Start > Control Panel > Appearance and Personalization > Personaliza-
tion > Display Settings.
Alternatively, right-click on the Desktop and select Personalization > Display Set-
tings from the pop-up menu.
2
The Display Settings screen appears.
Change the resolution and color settings and click the OK button.
The following resolutions and color qualities are recommended according to the
computer LCD panel type.
LCD Type Resolution Color Quality
7” WSVGA 1024 x 600 Very High (32bit)
Changing the screen resolution and the color
To change the color
quality, click this button
and select a particular
quality.
To change the resolu-
tion, slide the resolu-
tion sliding bar to a
particular resolution.
You can check the
graphics chipset.
89
Page 20
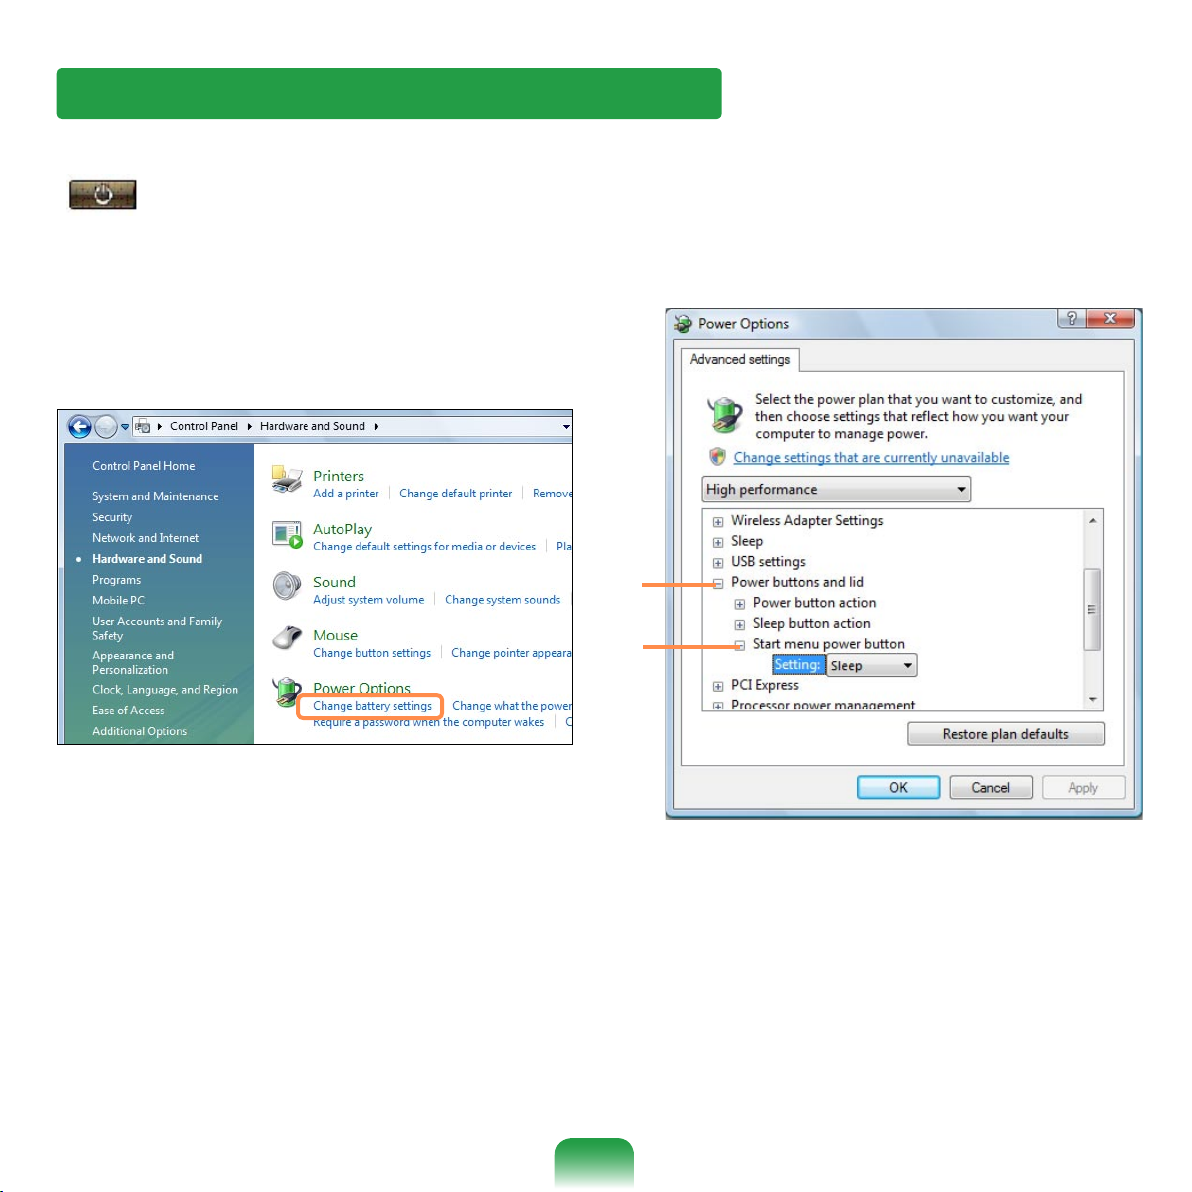
The Power button on the Start menu
( ) performs various operations depending on the settings.
1
Click Start > Control Panel > Hard-
ware and Sound > Power Options
and then Change battery settings.
2
Click on Change Plan Settings in
the currently selected power setting.
3
Click on Change Advanced Power
Settings and open Start Menu
Power Button in the Power Buttons
and Lid item.
1
2
Configuring the Start Menu Power Button
90
Page 21
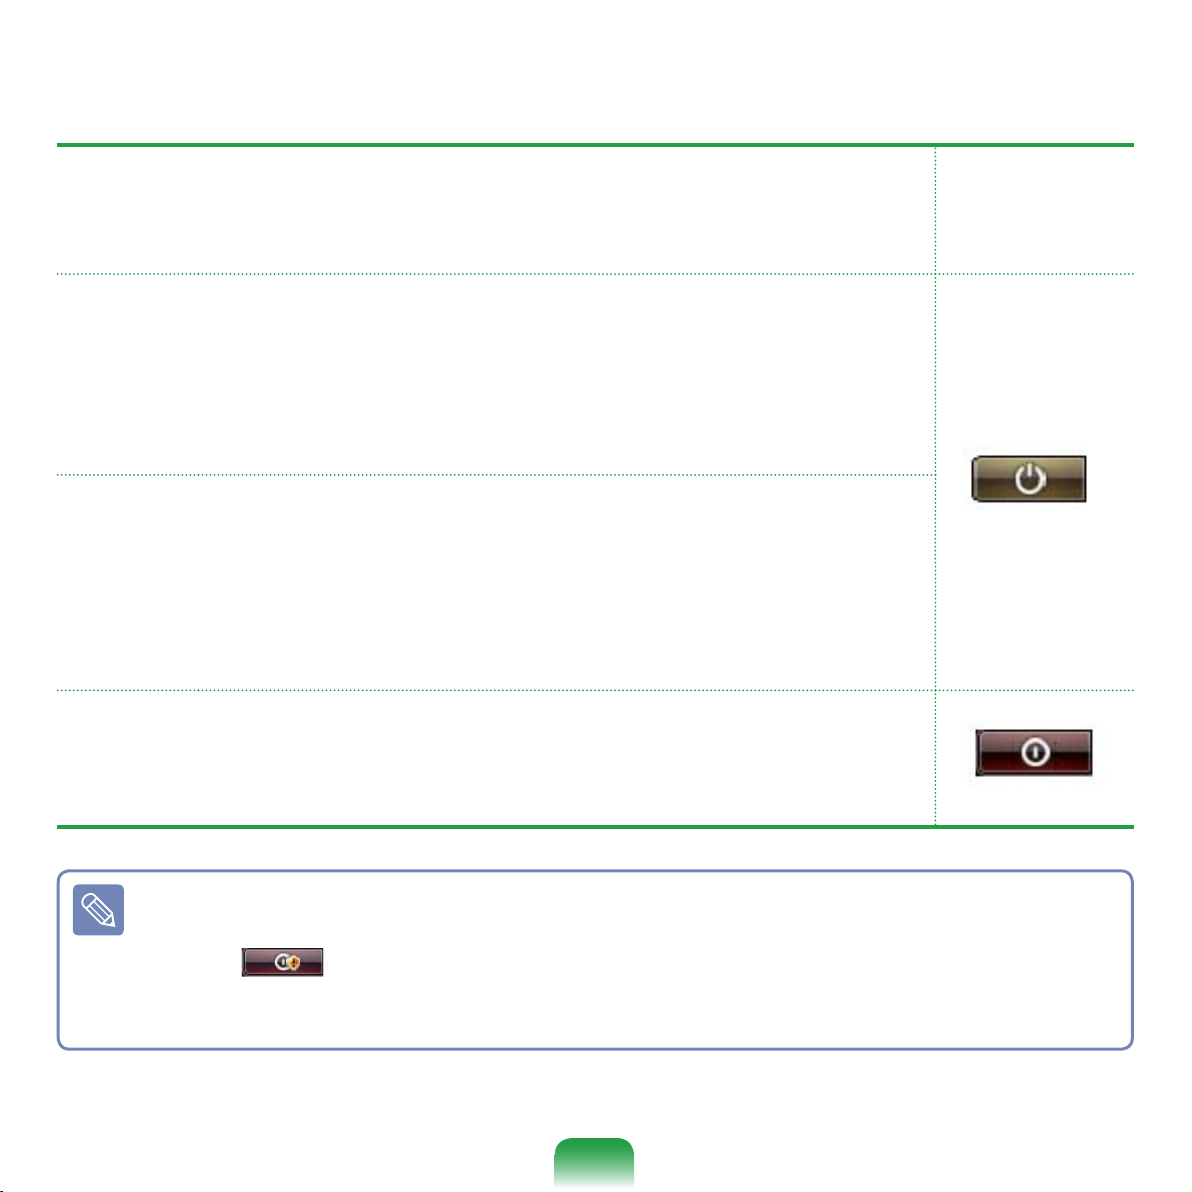
4
Select a power plan and click the OK button.
Type Description
Power But-
ton Image
after Setting
Change
Sleep
Sets the computer to enter Sleep mode.
The screen and hard disk will be turned off to reduce the
power consumption of the overall system.
If you slide the power switch of the computer to downwards,
the computer wakes from Sleep Mode and you can resume
working.
Hibernate
Sets the computer to hibernate.
All work is automatically saved, the screen is turned off and
the computer makes no noise.
If you slide the power switch of the computer to downwards,
the computer wakes from Hibernation Mode and you can resume working.
Shut
down
Shut down the computer.
You have to shut down the computer after closing all programs
and opened folders.
■ The Power button is set to Sleep mode by default.
■ If the computer is set to download Windows updates automatically, the update
mark ( ) is displayed on the Power button when an update is ready.
If you click this button, the update is installed and the computer is shut down when
the update installation is complete.
91
Page 22

Phishing Filter Settings
1
Launch Internet Explorer.
2
Select Tools from the menu and click Phishing Filter > Phishing Filter Settings.
Phishing Filter
Phishing is a method used by hackers to illegally collect personal information such as
credit card numbers, passwords, other account numbers, etc. through emails or websites.
The Phishing Filter protects users from these phishing attempts.
If the current page is judged to be a suspicious website, the Phishing Filter displays a
warning message with an alarm when the Phishing Filter is enabled. In addition, if a
page that the user is currently trying to open is registered as a known Phishing website
list, it displays a warning page instead.
92
Page 23
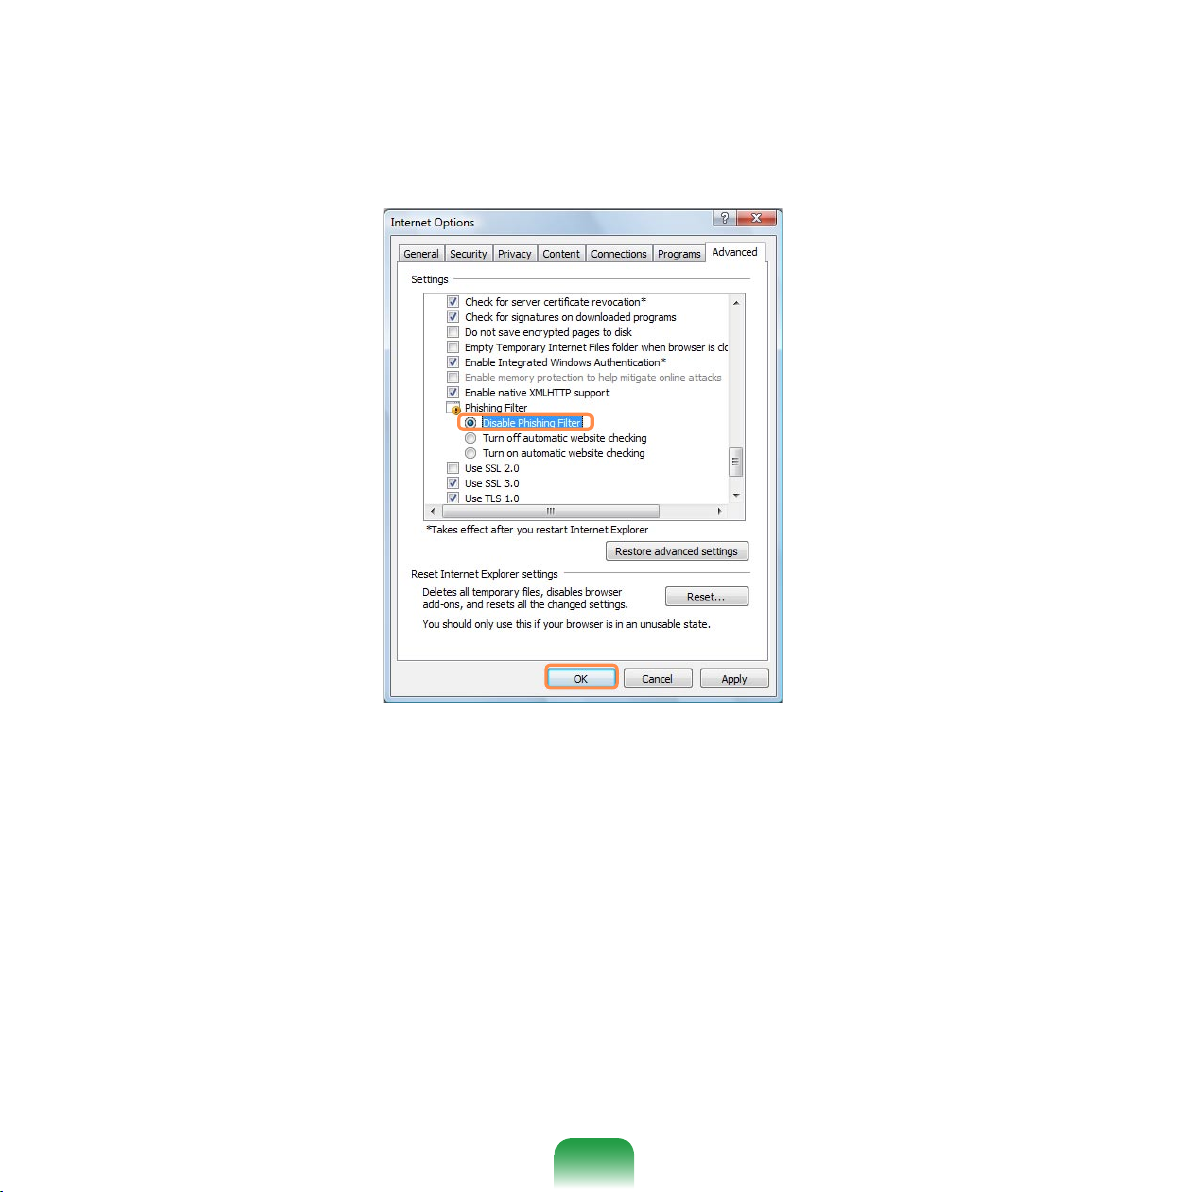
93
3
The Internet Options window opens.
Locate the Phishing Filter item in the Settings field. Select Turn on automatic
website checking and click the OK button to use the Phishing Filter.
4
To not use the Phishing Filter, select Turn off automatic website checking in the
Settings field in Step 3 above.
Page 24

User control function
Using this function, you can control the content your children can access. You can
determine for how long they can use the computer and the content they can access.
When you have finished the settings, click OK to finish.
Configuring Parental Controls
1
Click Start > Control Panel > User Accounts and Family Safety > Parental
Controls.
2
Select a user to configure the Parental Controls for.
The User Controls window for that user opens.
3
Click Parental Controls > Use and configure the necessary settings in the
Windows Settings at the bottom. If you click OK, the Parental Controls setting is
completed.
94
Page 25

Using Activity Report
You can view and evaluate your children’s internet access through the Activity
Report.
1
Open the User Controls window re-
ferring to the descriptions of Parental
Controls.
2
Set Activity Reporting to On.
3
To view the Activity Report, click on
View Activity Report on the right of
the User Controls window.
4
If you click the View Activity Report,
the following window opens displaying a computer operating summary.
95
Page 26

Using Windows Mobility Center, you can easily configure computer settings such as
the volume, the wireless network connection settings, the display settings, etc. all at
the same time.
Some functions may not be supported depending on the Windows Vista version.
1
Click Start > All Programs > Accessories > Windows Mobility Center.
Alternatively, click Start > Control Panel > Mobile PC > Windows Mobility Center.
2
Configure the volume, the battery status, the external display, the Sync center, etc.
according to your requirements.
■ Configurable items may differ depending on the installed Windows Vista version or
programs.
■ If Easy Network Manager program is installed, you can see Easy Network Manager window.
■ Turning off WLAN in the Mobility Center is not applied to the Status indicator and
the MENU window. If you turn off the WLAN with touch sensor, the status indica
tor of WLAN will be turned off and the WLAN button in the Mobility Center will be
inactivated.
Volume Control
Easy Network
Manager Window
Display Connection
Settings
Battery Status
Settings
Rotating the
Screen
96
Windows Mobility Center
Page 27

Using the Network
Wired Network 98
Wireless Network 101
Using the Easy Network Manager 104
Bluetooth 108
Chapter 4.
Page 28

98
1
Connect a LAN cable to the comput-
er’s LAN port.
2
Click Start > Control Panel >
Network and Internet > Network
and Sharing Center
.
3
Click Manage Network Connections
from the left pane.
4
Right-click over the Local Area Con
-
nection
and select Properties
.
Wired Network
A wired network is a network environment used for a company network or broadband internet
connection at home.
You can also configure the network settings using the Easy Network Manager.
p.10
4
Page 29

99
5
Select Internet Protocol Version 4
(TCP/IPv4) from the Networking tab
and click Properties.
6
Configure the IP settings.
When using DHCP, select Obtain an
IP address automatically. To use
a static IP address, select Use the
following IP address, and set the IP
address manually.
7
When you have completed the set-
tings, click the OK button.
The network settings have been completed.
■ The LAN device driver may differ
depending on your LAN device
model.
■ To add a network component,
click Install in the screen shown
in the figure above. You can add
clients, services, and protocols.
When not using DHCP, ask your
network administrator for the IP
address.
Page 30

100
Using both DHCP
and a fixed IP simultaneously
Using the Alternate Configuration providing by Windows Vista, you can set both
automatic and fixed IP addresses and
then you can select to use either of them
to connect to the Internet.
1
Click Start > Control Panel >
Network and Internet > Network
and Sharing Center and click
Manage Network Connections in
the left pane.
2
Right-click over the Local Area Con-
nection and select Properties.
3
Select Internet Protocol Version 4
(TCP/IPv4) from the Networking tab
and select Properties.
4
Select the Alternate Configuration
tab, select User configured and fill in
the corresponding fields.
5
When you have completed the set-
tings, click the OK button.
Page 31

101
Wireless Network
A wireless network (Wireless LAN) environment is a network environment that enables communicating between multiple computers at home or a small-size office through wireless LAN
devices.
■ The descriptions below are for computer models with a Wireless LAN card or device.
You can also configure the wireless network settings using the Easy Network Man
-
ager.
p.104
A Wireless LAN device is optional. To view the installed wireless LAN card, click
Start
> Control Panel > Hardware and Sound > Device Manager > Network Adapter
and click the + symbol.
The figures in this manual may differ from the actual ones depending on your wire
-
less LAN device model.
■ To use the wireless LAN, you have to turn the wireless LAN on first. To turn it on, click
the MENU button and set the Wireless LAN item to On. If the wireless LAN is turned
on, the Wireless LAN LED ( ) is lit.
Wireless LAN Connections
Wireless network connections can be classified into 3 categories and this manual describes the connection procedures for connecting through an AP.
■ Access Point (AP)
You can connect to the Internet or another
computer on the network through an AP.
What is an Access Point (AP)?
An AP is a network device that
bridges wired and wireless LANs,
and corresponds to a wireless hub
in a wired network. You can connect multiple wireless LAN installed
computers to an AP.
■ Computer-to-computer (ad hoc) network
This is also called a peer-to-peer network.
In computer-to-computer wireless networks, you can connect 2 or more computers with wireless LAN modules.
For details, see the descriptions that appear when clicking Start > Help and Sup-
port > Table of Contents > Networking-connecting computers and devices
> Setting up a network > Setting up a
computer-to-computer (ad hoc) network.
Page 32

102
Connecting to a Wireless LAN
If there is an AP, you can connect to the
Internet via the AP using the Wireless LAN
connection method provided by Windows
Vista.
1
Right-click over the Network Con-
nections ( ) icon on the taskbar
and click Connect to the Network.
2
Select an AP to connect to and click
Connect. If there is a configured
network key for the AP to connect
to, the Enter Network Key window
appears. Enter the network key in the
window and then click the Connect
button.
Ask your network administrator for
the network key, if necessary.
3
When Connected to the AP is dis-
played, click the Close button.
You can access the network.
Page 33

103
Checking
the network connection status
If you move the pointer over the Network
Connections icon ( ) of the Taskbar, you
can view the connection status.
Page 34

104
Using the Easy Network Manager
Easy Network Manager is a program that helps configure the network settings.
Easy Network Manager provides the following features.
You can easily configure the network and printer settings.
You can immediately use the network without having to define new network settings
again after moving to another location.
By configuring the network settings (IP address, printer settings, etc.) for each location, you
can immediately access the network without following the network setting procedures each
time regardless of your location.
You can diagnose the network status.
Network Settings
This section describes the procedures to
connect to the Internet by setting up a network. The setting up procedures include
procedures to add a printer to the network.
1
To use a wired LAN, connect the LAN
cable to the LAN port. To use the
wireless LAN, you have to turn the
wireless LAN on first.
To turn it on, press the MENU button
and set the Wireless LAN item to
On. If the wireless LAN is turned on,
the Wireless LAN LED ( ) is lit.
2
Click Start > All Programs >
Samsung > Easy Network Manager
> Easy Network Manager.
3
Click the Add button.
4
Select a network location icon and
enter the name of the location (e.g.
Home). Click the Next button.
Page 35

105
5
Select Internet Direct Connection
and click the Next button.
6
Select the LAN device, setup the IP
address and click the Next button.
Select Device
Select a device to be connect
ed to the Internet. Select either
Wired LAN or Wireless LAN.
IP Settings
To use a static IP address, fill in the
fields. For the IP address information,
ask your network administrator.
Obtain an IP address automatically
Select DHCP to use this option (automatic IP
setting).
7
Click Add Printer and set up a printer
according to the wizard. When the
printer has been added, click the
Refresh button, select the newly
added printer and then click the
Finish button.
To not add a printer, click the Fin-
ish button.
8
When the network settings are com-
plete, the ’Do you want to move to
the newly added location now?’
message appears. Click the No
button.
An icon for the added location is
created. The network settings have
been completed.
If you select ’Yes’, the network set-
tings for the added location are
applied.
To add a new location, repeat the
procedures from Step 3 above.
Page 36

106
Using in Another Location
By configuring the network settings (IP address, printer setting, etc.) for each location, you can immediately access the network in one click, without performing the
network setting procedures regardless of
your location.
1
Click Start > All Programs >
Samsung > Easy Network Manager
> Easy Network Manager when con-
nected to the Internet.
2
Select an icon that represents the
corresponding location from the
Saved Locations window and then
click Move.
3
If the Internet connection is a wired
LAN, you can immediately load the
settings for the new location and the
corresponding network connection
information is displayed in the Current
Location Information window.
If the Internet connection is a wireless
LAN, you have to select an AP as follows.
Right-click over the Network con-
nection ( ) icon on the Taskbar
using the mouse and select
Connect to the Network.
Select an available AP and click
the Connect button. If a network
key is required, ask your network
administrator for the key information.
Page 37

107
Diagnosing the Network Status
You can diagnose the network state and
find solutions for why you cannot connect
to the network.
1
Launch Easy Network Manager.
2
Select Management and Diagnose
Status from the menu.
3
The Network Connections window
appears.
Click Start to start the network diagnosis.
4
When the diagnosis is complete, a
device with a problem is marked by
an exclamation mark icon with a description of the problem at the bottom
of the window.
Page 38

108
File Transmission
You can exchange files between two Bluetooth devices.
You can exchange files with another Bluetooth device such
as another computer, cell phone, PDA, etc.
Network Access
You can connect to another Bluetooth-installed computer
in the same way as an Ad-Hoc mode in wireless LAN and
connect to the network via an AP or an Internet connection
sharing server.
Network Access
through a Phone
Connection
You can connect to the network via a Bluetooth cell phone.
Data Sync
(Synchronization)
You can synchronize PIMS data (Outlook E-mail address
data) with Bluetooth devices such as a cell phone, PDA, another notebook computer, etc.
Bluetooth Function
Bluetooth
Bluetooth is wireless communications technology that allows access to nearby devices such as
another computer, a cell phone, printer, keyboard, mouse, etc. without a cable connection. Using Bluetooth, you can exchange files, connect to the Internet, and construct a private network
as well as communicate with a keyboard, mouse, printer, etc. without a cable connection.
■ The Bluetooth supporting function is only available between devices (a computer,
cell phone, PDA, printer, etc.) and the connection may be restricted according to
the profile of the corresponding device.
■ The Bluetooth function is optional and may not be supported depending on your
model.
■ Compatibility to devices without the authentication or logo of Bluetooth is not guaranteed.
Page 39

109
Using Bluetooth
The procedures to exchange files between
computers supporting Bluetooth and to
use other Bluetooth devices are described
below.
Using Bluetooth Devices
(Connecting Headset supporting
Bluetooth)
As an example, the procedures to connect
to a headset supporting Bluetooth will be
described below. Searching for Bluetooth
devices corresponds to Steps 1 to 4 and
may be slightly different depending on the
device.
1
To connect to another device via
Bluetooth, double-click the Bluetooth
icon( ) on the Taskbar.
For more information about using the Bluetooth function, refer to the online help of
the Bluetooth Device.
Electronic Business Card (Vcard)
Exchange
You can exchange business cards with Bluetooth devices
such as a cell phone, PDA, another notebook computer, etc.
Sound Output
You can output computer sound to another Bluetooth device
or vice versa.
HID Connections
You can connect and use Bluetooth peripherals such as a
keyboard, mouse, joystick, etc.
Page 40

110
2
If the Bluetooth Device window
appears, click Add.
3
If the Add Bluetooth Device Wizard
screen appears, select the My device
is set up and ready to be found and
click the Next button.
4
When the search is complete, all
available Bluetooth devices are listed.
Select the Headset from the list and
click the Next button.
Page 41

111
■ A Bluetooth device is represented by the device type and name
(Dedicated Bluetooth ID).
■ To use the Bluetooth headset, Blue-
tooth Pairing Mode is required.
For the procedures to set up
Pair-
ing Mode, refer to the
Headset
Manual.
5
Enter the PIN in the device PIN field
and click the Next button.
For pairing, a PIN is required.
Since a PIN is provided by the
headset manufacturer, refer to the
corresponding manual.
6
If the Completing the Add Bluetooth
Device Wizard window appears, click
Finish.
7
The stereo headset is connected
and you can now use the Bluetooth
headset normally.
Page 42

112
Exchanging Files between
Bluetooth Computers
The procedures to exchange files between
computers with Bluetooth capability are
described below.
1
On the computer which is sending a
file (hereafter Computer A), right-click
the Bluetooth icon( ) on the taskbar
and select File Transfer.
2
Click Browse, select a Bluetooth
device to send the file to and click the
Next button in the Select Bluetooth
Device window.
3
Select a Bluetooth device to send the
file from and click the OK button.
4
Enter a PIN in the Bluetooth PIN
Code field and click the Next button.
The Bluetooth PIN Code is a
password used for connecting two
Bluetooth devices. The user just
enters the same PIN Code (E.g.
same numbers) on both Bluetooth
devices to make the connection.
5
Click Browse, specify a file to be sent
and click Next button in the Select
File to be Sent screen.
Page 43

113
6
After a short while, the Bluetooth PIN
Code required dialog box appears on
Computer B. Enter the code entered
in Step 4 above.
7
If the FTP File Access Privilege
Request window appears on Computer B, click on the window. If the
Select Access Permission window
appears, click the OK button.
Usage Instructions
Bluetooth devices to be connected must
be within a 3m (10 ft.) distance.
For a better communications environ-
ment, there should be no walls or obstacles between the Bluetooth devices.
You can connect to only one Bluetooth
device at a time for a phone connection,
data syncing, electronic business card
exchange, FAX transmission/reception,
sound related functions, and serial port
functions.
Using the network connection or file
transmission function, multiple Bluetooth devices can be connected. However, since connecting to multiple devices may slow down the data rate or make
the connection unstable, connecting to
one device at a time is recommended.
The Bluetooth function of a Bluetooth
PDA, mobile phone, mouse or keyboard
may be turned off. To use them in connection with a Samsung computer supporting Bluetooth, you must check if the
Bluetooth function of the device to connect to is turned on.
For the procedures on turning on the
Bluetooth function of a device, refer to
the relevant device manual.
The services provided by Bluetooth de-
vices may vary depending on their capabilities. For the services provided by
the Bluetooth device, refer to the device
manual.
Page 44

Chapter 5.
Using Applications
Introducing Programs 115
Using Origami Experience 118
CyberLink PowerDVD 120
Samsung Update Plus 122
Play AVStation 124
AVStation Now 138
Play Camera 140
Using OmniPass Program 143
Page 45

115
Introducing Programs
Using the software supplied with the Samsung computer, you can easily use functions and
troubleshoot problems.
Try to use the software after learning about the basic use of the software. For detailed information, refer to the help section of the corresponding software.
Every software program may not be provided or the version may differ depending on
your computer model.
In addition, the screen capture images may differ from actual ones depending on the
computer model and software version.
Page 46

116
Multi Media Functions
CyberLink PowerDVD ( , Optional)
Using this program, you can play a
DVD title.
The CyberLink PowerDVD program
is only supplied when you have purchased an external ODD, and you
have to install the program additionally.
p.120
Play AVStation ( , Optional)
Play AVStation is an integrated multimedia program that enables users
to enjoy better quality music, photographs, videos, movies, etc. all with a
single program.
p.124
Origami Experience ( , Optional)
Origami Experence is a program that
categorizes programs installed on the
computer for easier and more convenient use. p.118
It is optional and is not supplied with
some models.
Play Camera ( , Optional)
This software enables taking pictures
and video recording by using the cameras on the front and back of the computer. p.140
Management Functions
Samsung Update Plus ( ,
Optional)
Samsung Update Plus is a software
function that examines and updates
the Samsung software and drivers
installed on your Samsung computer to
the most recent versions. p.122
Easy Network Manager ( ,
Optional)
Easy Network Manager is a program
that enables you to easily configure the
network settings.
You can configure the network settings
for each location and you can also diagnose the network status. p.104
Easy Battery Manager ( ,
Optional)
Easy Battery Manager is a power management program that provides easyto-use power management and power
saving settings so that the battery usage time can be extended. p.162
Page 47

117
OmniPass ( , Fingerprint
Identification software, Optional)
OmniPass is fingerprint identification
software. You can register your fingerprint and use it by placing your finger
on the fingerprint identification sensor
instead of using a password.
You can turn the computer on, login to
Windows and encrypt a file, all using
your fingerprint. p.143
Troubleshooting Functions
SAMSUNG Magic Doctor ( ,
Optional)
SAMSUNG Magic Doctor is troubleshooting software provided by
Samsung Computer for system diagnosis, and restoring the system.
The system diagnosis function enables
users to diagnose system problems
without assistance from others.
Samsung Recovery Solution II ( ,
Optional)
Using this program, you can restore
your computer to its initial status before a problem occured while using the
computer.
Page 48

118
Using Origami Experience
Origami Experience is a program that categorizes programs installed on the computer for
easier and more convenient use.
To launch Origami Experience, click Start > All Programs > Microsoft Origami Expe-
rience Pack > Origami Experience.
Category
Home
Switch Windows
Minimize Window
Close Window
Battery Charge Status
Wireless LAN
Status
Play Control Button
Volume
Clock
It is optional and is not supplied with some models.
The terms and the screen figures in the manual may differ from actual ones.
Page 49

119
For example, the procedures to launch the Calculator are described below.
Launch Origami Experience.
Click Programs > More Programs > Calculator.
z
x
c
Page 50

120
1
Insert a DVD title into the DVD drive.
2
Select PowerDVD and click the OK
button.
After a moment, the DVD title will
play.
3
If the DVD title is not automatically
played, click Start > All Programs >
CyberLink DVD Suite > Power DVD
> CyberLink PowerDVD.
4
Then click the Play icon in the control
panel of CyberLink PowerDVD to play
the DVD title.
Play Undock Player
Panel
The CyberLink PowerDVD program is only supplied when you have purchased an
external ODD, and you have to install the program additionally.
It is optional and is not supplied with some models.
CyberLink PowerDVD
CyberLink PowerDVD is a DVD player program.
Page 51

121
■ Detailed Usage
For more detailed usage, click Start > All Programs > Cyberlink DVD Suite >
Power DVD > PowerDVD Help.
■ DVD Region Code
A DVD title has a region code according to the international specifications so that it
can be played only in that specific region.
DVD titles with a region code will only play on DVD drives and program for playing
with the same region code.
A DVD drive is sold with an empty region code and the region code is set when
the user inserts a DVD title into the drive for the first time. Whenever a DVD title is
inserted with a region code different from that of the DVD drive, the region code of
the DVD drive is automatically changed to the region code of the DVD title.
However, changing the region code of a DVD drive is limited to 5 changes. After
that, the region code is permanently fixed to the last region code. If you need to
change the region code after changing the code 5 times, contact a service center.
Although a service center can help you in this case, you will be charged a service
fee.
If you click the Undock Player Panel button, the program control panel transforms
as follows.
Page 52

122
■ To search for updates and update your computer using Samsung Update Plus,
your computer must be connected to the Internet.
■ The update search result may differ depending on your computer model.
Samsung Update Plus does not provide updates for applications installed after purchasing the computer.
Samsung Update Plus
Samsung Update Plus is software that examines and updates the Samsung software and
drivers installed on your Samsung computer to the latest version.
To update the software and drivers
1
Click Start > All Programs >
Samsung > Samsung Update Plus
> Samsung Update Plus.
If this is the first time you are
running the program, a window will
appear asking you if you agree to
the agreement in the window. Click
Agree to use this software.
2
If you click on Search for new
updates, new updates are searched
for.
Page 53

123
3
If there are available software or
driver updates for your computer, the
available updates will be listed.
Select the required updates from the
list and click on Install Updates to
start the update.
Updates that must be installed
separately.
If you select Install for an update
item that must be installed separately, a message appears inform
ing you of this. Follow the instruction message to correctly install it.
Automatic update items display
By default, your computer is configured to automatically search for
updates. If there is a new update
available, this is displayed in the
notification area. Click the balloon
help icon in the notification area.
Here you will be able to find the lat
-
est available updates.
Page 54

124
To launch the program, click Start > All Programs > Samsung > Play AVStation.
Alternatively, double-click the Play AVStation icon( )on the Desktop.
Play AVStation
Play AVStation is an integrated multimedia program that enables users to enjoy music, photographs, video, movies, etc. using a single program.
This section describes the basic usage of Play AVStation.
Launching and Screen Layouts
■ The screens used in this manual may differ from actual screens according to the
program version.
■ For detailed usage, refer to the program help.
■ TV Station is only available for systems supporting the TV function. This computer
is not supported.
■ To play an audio CD or DVD, you have to connect an external ODD. Use the de-
scription below provided that an external ODD is connected.
Menu
Library
Station Bar
Resize Window
And Exit Buttons
Page 55

125
Movie Station
Movie
You can play a video (movie) file or a DVD/VCD title.
Music
You can play a music file or an audio CD.
Photo
You can view or edit a photograph (image), and also view the photographs in a SlideShow.
Launch Play AVStation and click on Movie on the Station Bar.
Mini Mode View
Movie List and
Thumbnail Window
Play Control
Buttons
Volume Control
Play Highlight
Button
Capture Button
EDS Button
(Enhanced Digital
Sound Setting)
Create Highlight/Chapter Button
EDI Button
(Enhanced Digital
Image Setting)
Movie Library
Page 56

126
■ What is EDI (Enhanced Digital Image)?
EDI (Enhanced Digital Image) is visual quality enhancement technology developed by Samsung Electronics. You can view clearer and sharper images by enabling the EDI function when watching TV or playing a movie on Play AVStation.
To enable the EDI function, click the EDI ( ) button at the bottom of the TV or
Movie Station.
Some TV tuner and graphics cards are not supported by EDI.
■ What is EDS (Enhanced Digital Sound)?
EDS (Enhanced Digital Sound) is sound quality enhancement technology developed by Samsung Electronics. You can listen to clearer sound if you enable the
EDS function when playing music or movie on Play AVStation.
To enable the EDS function, click the EDS ( ) button at the bottom of Music or
Movie Station.
■ The EDI and EDS functions are not provided for some models.
Page 57

127
Playing a Movie File
The procedures to play a movie file registered to the MOVIE Library are described below.
For the procedures to register files to the Library, refer to p.128.
1
Move to Movie Station and double-click All Video in the left menu pane.
2
Double-click a movie file.
The file is played.
■ Playing a Video File not Registered to the Library
Click Menu > File > Open File, select a movie file to be played and click Open.
The selected file is automatically registered to the Library and played.
■ Playing a Video File in Full Screen
1. Double-click on the current playback screen.
2. The movie is played in full screen.
In full screen, to view the movie at the default size, double-click on the current
playback screen again.
■ Capturing the Video Screen
Click on Capture Current Screen ( ) below the You can view captured images
in the Photo Station > Captured Images folder. Captured images are saved in
the C:\Samsung\Play AVStation\Data\Capture. You can change the captured im-
age folder by selecting Menu > Tools > Options > Capture.
Page 58

128
Adding Videos to the Library
The Movie Library is a library with movie
files to be used by Movie Station. The
procedures to add movie files saved on
the computer to the Library are described
below.
You can add files or folders. As an example, the procedures to add folders are
described below.
1
Select Menu > File > Add to Library
> Folder.
2
Select a target folder and select
Video Files option in the Target File
Type field.
3
The movie files found in the selected
folder are added to the Library.
The movie files used in Play AVStation are automatically added to the
Library.
Page 59

129
Highlight / Chapter Function
Using the Highlight function, you can
watch a highlighted part of a movie such
as a sports or news item, etc. Using the
Chapter function, you can create chapters for a movie and play the movie from
any of the chapters.
1
Select a movie and click Make Highlight/Chapter at the bottom of the
window.
2
Select the movie type (Sports, News,
Other).
A Highlight / Chapter is created.
3
To watch a highlight, double-click
a file made and click the Highlight
icon at the bottom right of the current
movie file.
Highlight
Make Chapters
4
The highlight is played. If you click on
a Chapter thumbnail, the corresponding Chapter is played.
Page 60

130
Launch Play AVStation and click Music on the Station Bar.
Music Station
Playlist
Window
Music
Search
Volume
Control
Music Library
Music Type
Repeat Setting
Random Play
Setting
EQ
EDS
Play Control Buttons
Page 61

131
Playing an Audio CD
The procedures to play an audio CD are
described below.
To use it, you need to connect an
external-type ODD.
1
Insert an audio CD into the CD drive.
2
If the AutoPlay window appears,
select Play audio CD using
Samsung PLAY AVStation.
3
The CD is played.
If a CD is already inserted in the
CD/DVD drive, select CD in the
Audio CD folder of the Library and
double-click the title. The CD is
played.
Page 62

132
Play a Track not registered to the Library
Click Menu > File > Open File, select a music file to be played and click Open. The
selected track is registered to the Library and played.
Playing a Music File
If a music file is registered to the Music Library, you can easily play the music file. For
the procedures to register tracks to the Library, refer to p.133.
1
Move to Music Station and double-click on All Music.
2
Double-click a music file.
The file is added to the playlist and played.
Page 63

133
Adding Music Files to the Library
The Music Library is a library with music
files used by Music Station. The procedures to add music files saved on the
computer to the Library are described
below.
You can add files, folders.
As an example, the procedures to add a
folder are described below.
1
Select Menu > File > Add to Library
> Folder.
2
Select a target folder and select the
Audio File option in the Target File
Type.
3
The music files found in the selected
folder are added to the Library. The
music files are registered.
The tracks played in Play AVStation are automatically added to the
Library.
Page 64

134
Launch Play AVStation and click on Photo on the Station Bar.
Photo Station
Photo Library
Photo List and
Thumbnail
Window
Batch Edit Button
SlideShow Button
View and Edit
Button
Page 65

135
Viewing an Image
The procedures to view images registered to the Photo Library individually and
via a SlideShow are described below.
For the procedures to register image files
to the Library, refer to p.137.
1
Move to Photo Station and doubleclick on All Images.
2
Double-click on an image. The selected image is displayed in the Preview
screen. Press the left and right arrow
keys to navigate through the images.
Left and Right
Arrows
Zoom
Control
Edit Image
Slide Show
3
Click on To The list Screen to return
to the list.
■ Viewing an image not registered to the Library
Click Menu > File > Open File,
select an image file to view, and
click Open.
The selected image file is regis
tered to the Library and displayed
in the Preview window.
■ Viewing images using the
SlideShow function
Click the SlideShow button at
the bottom of the Photo Station.
Page 66

136
Editing an Image
You can change the shape of an image,
edit an image or apply special effects to
an image. The image editing functions
are described below.
1
Move to Photo Station and doubleclick on All Images.
2
Click on a folder which includes
images, and the images in the folder
are displayed.
3
Double-click on an image or click the
View and Edit button at the bottom
right to switch to the Preview screen.
4
If the Preview screen appears, click
the Edit button at the bottom left. If
the image editor screen appears, edit
the image using the Edit tools at the
bottom of the window.
Click to switch
to the Preview
screen
Click to save
the edited
image
Edit ToolsImage Editor Window
Click on Original View to edit the
image comparing it to the original.
5
You can save an edited image by
clicking the Save or Save As button.
6
Click the Exit Editor button to return
to the Preview screen.
Page 67

137
The image files used in AVStation are automatically added to the Library.
Adding Images to the Library
The Photo Library is a library with image files to be used by Photo Station. The procedures to add image files saved on the computer to the Library are described below.
You can add files, add folders.
As an example, the procedures to add folders are described below.
1
Select Menu > File > Add to Library > Folder.
2
Select a target folder and select the Image File option in the Target File Type field.
The image files found in the selected folder are added to the Library.
Page 68

138
If the HOLD switch on the left side
of the computer is slid upwards all
buttons of the computer are locked
and do not work. If AVStation Now
is not launched, check the position
of the HOLD switch.
AVStation Now
Using AVStation Now, you can easily and quickly play music, photographs, movies and DVDs
when the computer is on/off.
Start
When the computer is on or off, press the
AV button ( ).
The AVStation Now program is launched.
Screen Layout
Each menu of AVStation Now is linked
to a multimedia program so that you can
use the corresponding function.
Click on a menu to run the corresponding
program.
For more detailed usage of each program, refer to the online help of each
program.
■ AVStation Now menus may differ depending on your computer
model and some functions are
optional and may not be supported by your computer. In addition,
if a required program is removed
or not installed, the corresponding menu will not appear.
■ TV Station is only available for
systems supporting the TV function.
■ The screens used in this manual
may differ from actual screens
according to the program version.
Exit
Move the mouse pointer to the top of the
screen and click the Exit ( ) button to
exit AVStation Now.
Page 69

139
Music: Play AVStation is launched and you can play a music file or audio CD.
Movie: Play AVStation is launched and you can play a movie or DVD title.
Photo: Play AVStation is launched and you can view photographs or image files indi-
vidually or in a SlideShow.
Page 70

140
Play Camera
This computer provides an optional dual camera on the front and back so that users can take
pictures or record video.
If your computer model is equipped with the dual camera, you can take pictures or record
video using the Play Camera software.
■ This function is applied to some models only.
■ The program version number in this manual is subject to change and the screen
figures and terminologies may differ from the actual ones.
■ For more detailed usage procedures, refer to the program Help.
Precautions when Taking a Picture
■ Do not take a picture or record video of a person without that person’s consent.
■ Do not take a picture or record video where photographing is prohibited.
■ Do not take a picture or record video where you may violate another person’s
privacy.
Photographing Procedures 1.
1
Select Start > All Programs > Samsung > Play Camera > Play Camera.
Page 71

141
2
Press the Front Camera ( ) or Rear Camera ( ) button, focus on an object and
press Capture Screen ( ) button. To record video, press the Record ( ) button.
Close the Window
Preview Window
Open Folder: Opens the folder
which includes photos or videos.
Preview Window: Shows or
hides the Preview window.
Front Camera: Select to use the front camera.
Rear Camera: Select to use the rear camera.
Capture Screen (Still Picture): Takes a picture.
Record: Records video.
To stop a video recording, press the Stop ( ) button. Recording will stop.
3
Press the Open Folder ( ) button to view pictures or recorded videos.
- You can view a photo by double-clicking it.
- Since you cannot view recorded video files using the Play Camera, please use
another video player (e.g. Windows Media Player, Cyberlink PowerDVD, etc.) to
view video files.
Page 72

142
Photographing Procedures 2.
1
When the computer is on, press the SHUTTER button at the top.
2
When the Play Camera program is launched, press the Shutter button again. A
picture will be taken.
To switch the active camera to the rear or front camera, press the Front Camera
( ) or Rear Camera ( ) in the Play Camera screen and press the Shutter button.
To record video, click the Record ( ) button of the Play Camera program.
3
Press the Open Folder ( ) button to view pictures and recorded videos.
■ In the Preview window, right-click to configure the camera settings, the resolution
and device settings, the save folder, etc.
■ The Play Camera supports up to 1280 x 1024 pixels. Photographs are taken with
the resolution selected but the photographs displayed on screen are only 640 x 480
pixels due to restrictions of screen size.
■ Video files recorded by the Play Camera are saved with a 320 x 240 pixels resolution.
■ Since you cannot view recorded video files using the Play Camera, please use another
video player (e.g. Windows Media Player, Cyberlink PowerDVD, etc.) to view video files.
■ Switch front/rear camera by Play Camera program while you are video chatting through
any other program. You can not use the function of preview, taking pictures, recording
video with Play Camera when you are using other program.
You can not taking pictures while you are video chatting.
Page 73

143
Using OmniPass Program
(Fingerprint Identification, Integrated Password Authentication)
Using the OmniPass program, you can use the following functions.
Fingerprint Identification Function
You can register your fingerprint and use it instead of a password.
Integrated Password Authentication Function
You can use your Windows user account information using the Integrated Password
Authentication Function.
If you register your Windows user account(s) information with the OmniPass program,
you can login to Windows or onto websites using a single password.
■ This function is applied to some models only.
■ The program version described in this manual is subject to change and some functions may not be provided due to restrictions in the program.
■ This model does not support the function which turns the computer on via a fingerprint.
For more detailed information on the usage procedures, refer to the Help section in
the OmniPass program(Fingerprint Identification, Integrated Password Authentication).
Signing Up
You have to register your fingerprint and Windows user account information as follows
to use the fingerprint identification and integrated password authentication functions.
When using the fingerprint identification sensor
Keep your finger clean and dry when touching the sensor.
Place your finger over the fingerprint sensor and push gently down.
1
Select Start ( ) > All Programs > Softex > OmniPass Control Center.
Turn the computer on and click the Start button in the Omnipass window.
Page 74

144
2
Click Run Enrollment Wizard to start
the registration.
3
For the integrated password authentication step, complete the following.
Enter the Windows user ID and logon
password and click the Next button.
If you do not enter a logon password,
the integrated password authentication function will be permitted to
anyone; it is therefore recommended
entering a logon password.
Creating a user logon password.
z Select Start > Control Panel
> User Accounts > Create pass
-
word for user account.
x Enter a password in the New
Password field, and re-enter the
password in the Confirm New Pass
-
word field. Click
Create Password.
A password has been created.
4
To register a fingerprint, click on AuthenTec Fingerprint Device and
then click the Next button.
5
The fingerprint registration begins.
Select the finger to be registered and
click the Next button.
6
Register the fingerprint by placing
your finger over the fingerprint identification sensor and placing it down
slowly. Repeat this at least 3 times
until the next screen appears automatically.
7
Place the registered finger over the
fingerprint identification sensor again
and click the Next button.
8
A window appears asking if you
want to register an additional fingerprint. Click No to proceed to the next
window.
If you click Yes, Steps 4~7 are re-
peated.
9
The authentication device registration complete window appears. Select
‘Security authentication device
registered. Execute OmniPass registration’ and click the Next button.
Page 75

145
10
Proceed with the settings and click
the Next button.
11
When the user profile backup instruction window appears, read
the contents and click on Current
Backup.
Specify a path to save the user
profile to and save the name. When
the backup file password window
appears, enter a password and click
the OK button.
What is a user profile backup?
This is a function for backing up the
OmniPass information (fingerprint
and user account information) registered on a computer so that the
information can be used on another
computer. For information on how
to use a backed up user profile on
another computer, refer to the Help
section.
12
Click Finish. Registering informa-
tion for using the fingerprint identification and integrated password
authentication functions has been
completed.
1
If you turn the computer on after completing the user information registration step, the Logon Authentication
window appears.
(To use the fingerprint identification function)
In the Logon Authentication window, select AuthenTec Fingerprint
Driver, place your finger over the
fingerprint identification sensor and
place it down slowly.
If your fingerprint is not recognized,
the fingerprint is displayed in red
in the fingerprint display window.
In this case, place your finger over
the fingerprint identification sensor
again and push it down slowly until
the fingerprint is displayed in green.
Logging onto Windows
 Loading...