

Page 1
21
Chapter 1
Getting Started
Proper Posture During Computer Use
Maintaining a proper posture during computer use is very
important to prevent physical harm.
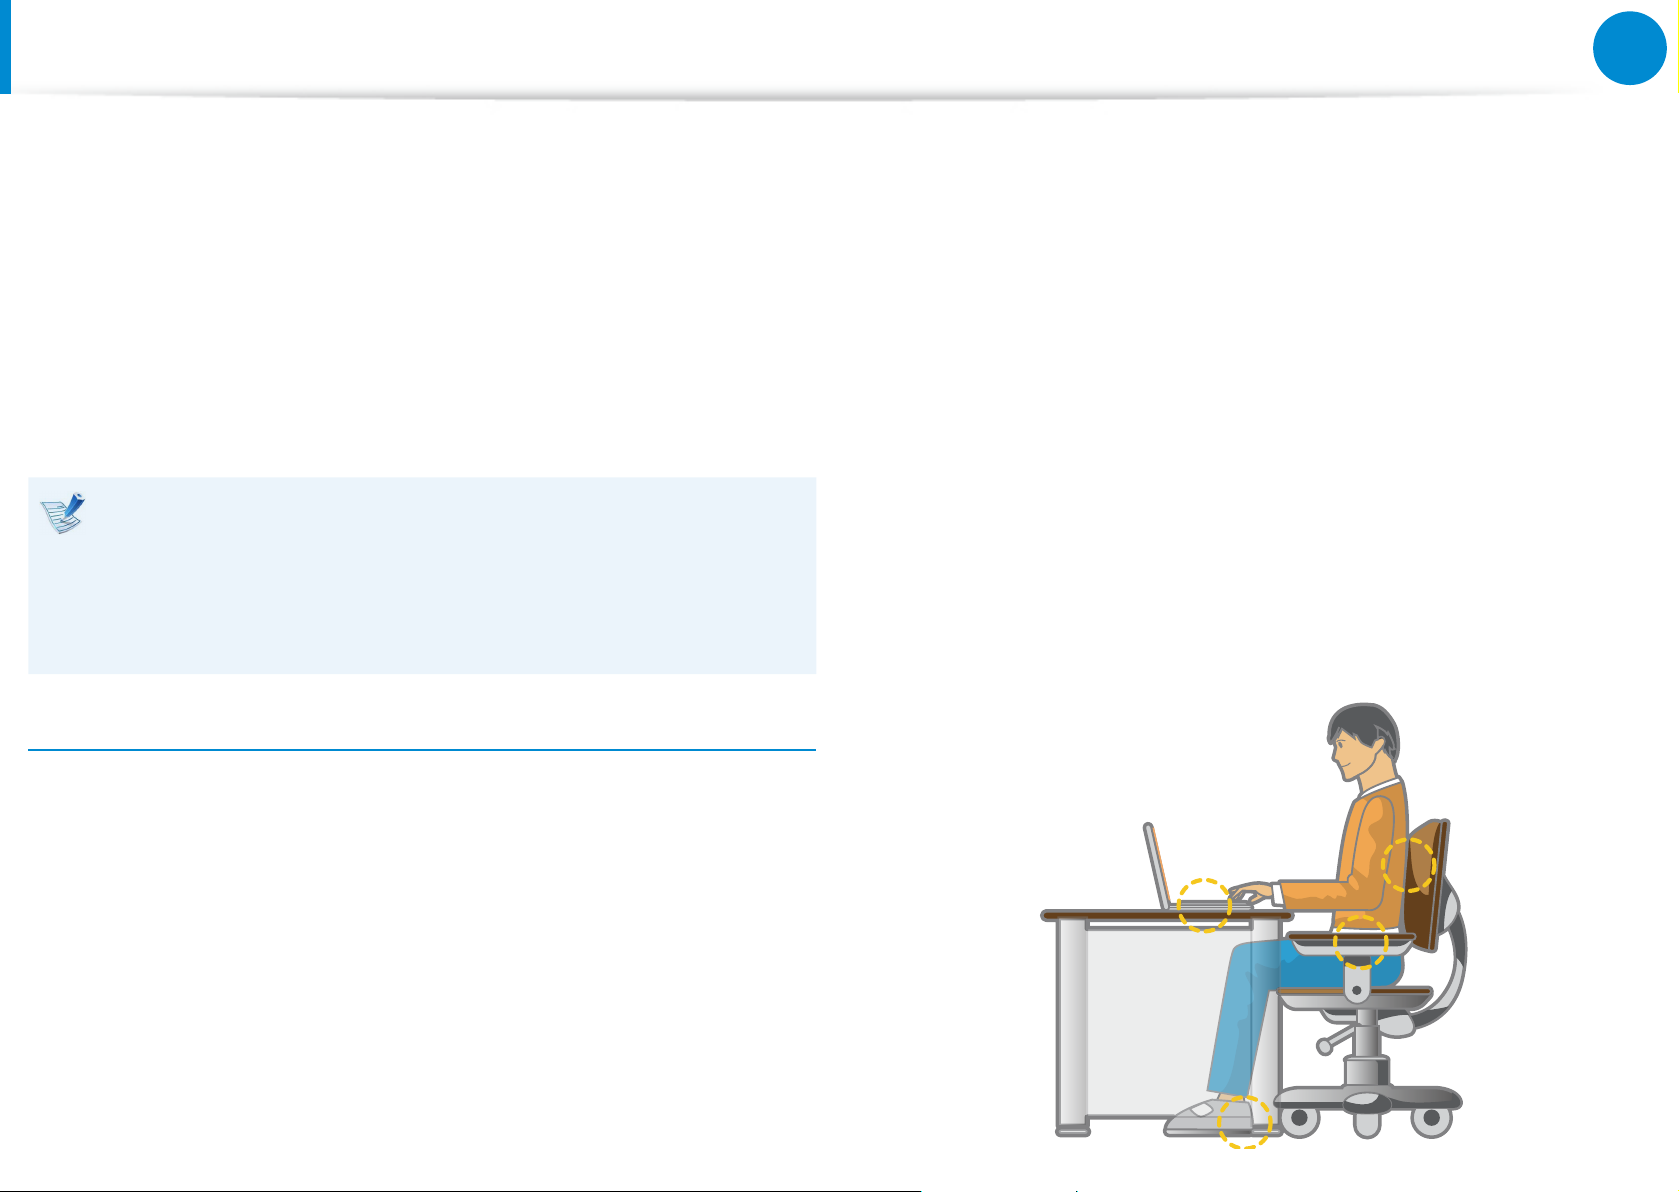
The following instructions are about maintaining a proper posture
during computer use developed through human engineering.
Please read and follow them carefully when using the computer.
Otherwise, the probability of repetitive strain injury (RSI) from
repeated operations may increase and serious physical harm may
be caused.
The instructions in this manual have been prepared so that •
they can be applied within the coverage of general users.
If the user is not included in the coverage, the •
recommendation is to be applied according to the user’s
needs.
Proper Posture
Do not use the computer while you are lying down, but only •
while you are sitting down.
Do not use the computer on your lap. If the computer •
temperature increases, there is a danger of burning yourself.
Work while keeping your waist straight.•
Use a chair with a comfortable back.•
Keep the center of your leg weight not on the chair but on •
your feet when you are sitting on a chair.
To use the computer while talking over the telephone, use a •
headset. Using the computer with the phone on your shoulder
is bad for posture.
Keep frequently used items within a comfortable work range •
(where you can reach them with your hands).
Adjust the heights of desks and chairs appropriate to your
height.
The heights are to be adjusted so that your arm forms a right
angle when you place your hand over the keyboard while sitting
down on a chair.
Adjust the height of the chair so that your heels are comfortably
placed on the oor.
Page 2
22
Chapter 1
Getting Started
Proper Posture During Computer Use
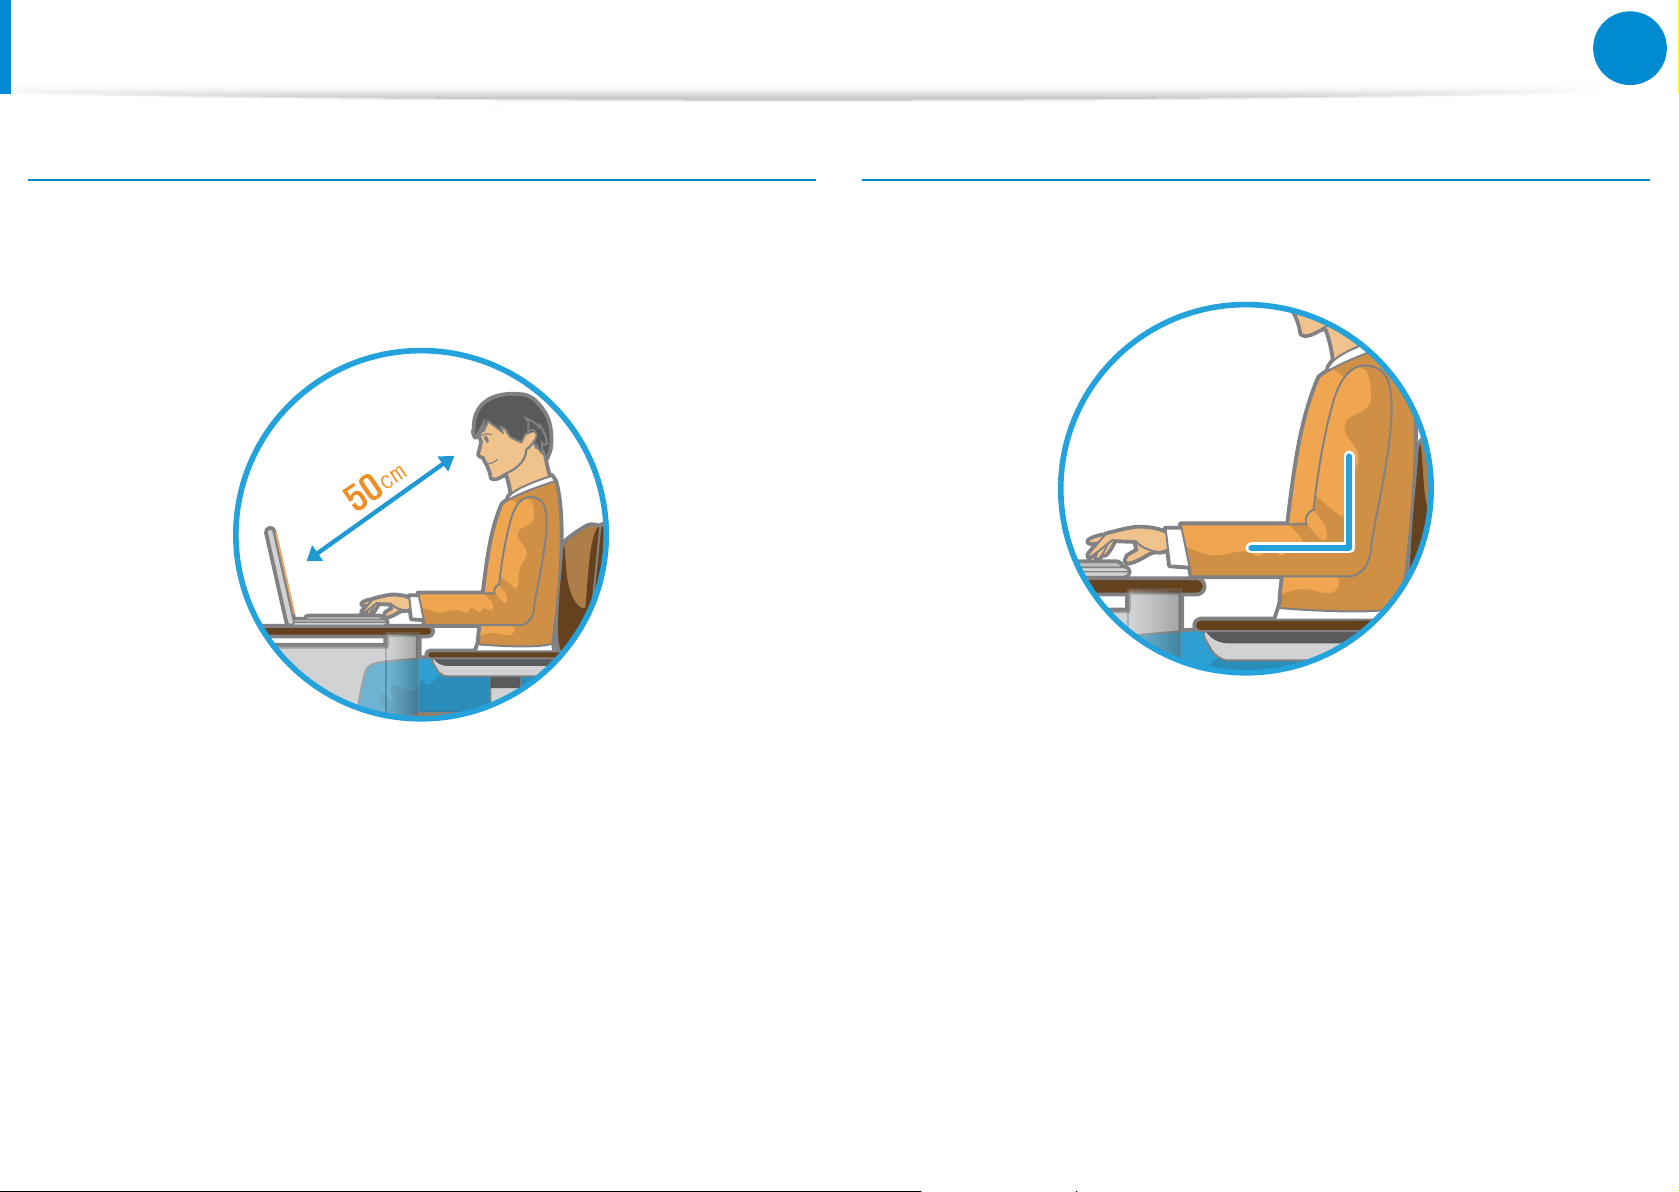
Eye Position
Keep the monitor or LCD away from your eyes by at least
50cm.
Hand Position
Keep your arm at a right angle as shown by the gure.
Adjust the height of the monitor and the LCD screen so that its •
top height is equal to or lower than your eyes.
Avoid setting the monitor and LCD excessively bright.•
Keep the monitor and LCD screen clean.•
If you wear glasses, clean them before using the computer.•
When entering contents printed on a paper into the computer, •
use a static paper holder so that the height of the paper is
almost equal to that of the monitor.
Keep the line from your elbow to your hand straight.•
Do not place your palm over the keyboard while typing.•
Do not hold the mouse with excessive force.•
Do not press the keyboard, touchpad or mouse with excessive •
force.
It is recommended to connect an external keyboard and •
mouse when using the computer for long periods of time.
Page 3
23
Chapter 1
Getting Started
Proper Posture During Computer Use
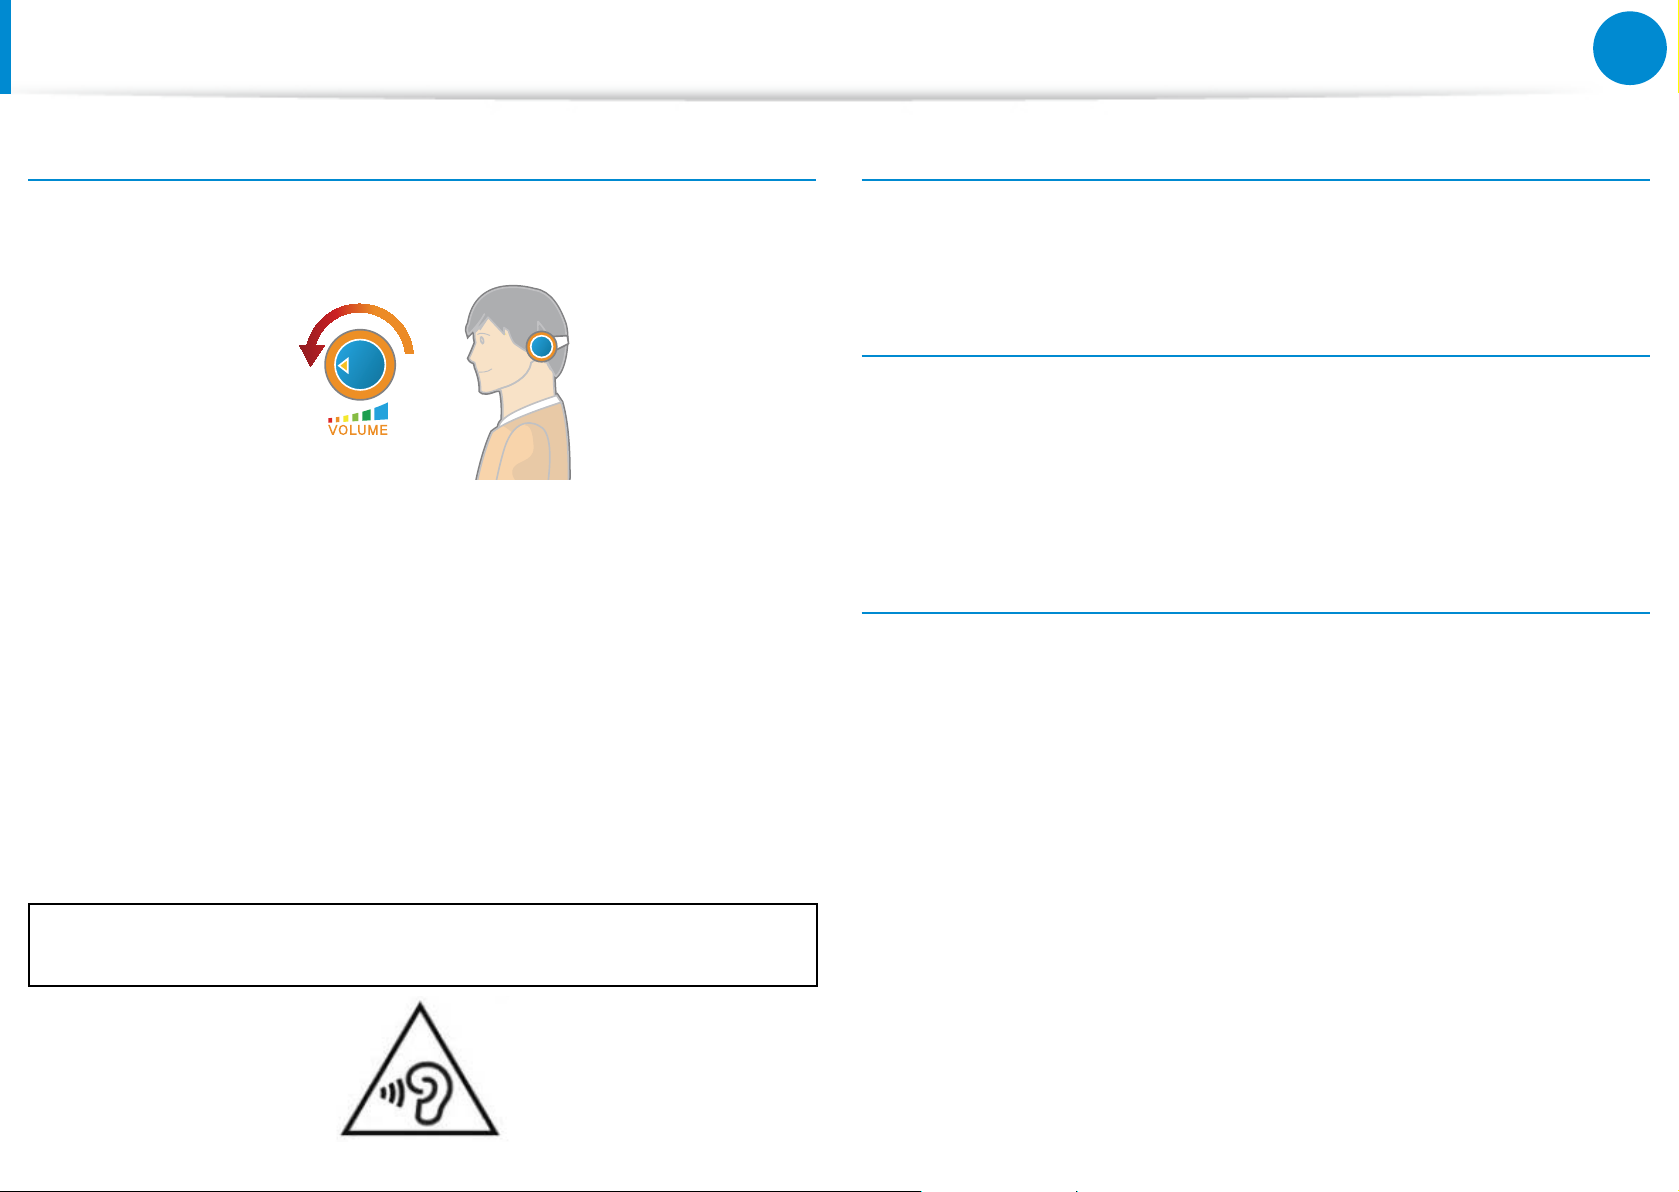
Volume Control (Headphones and Speakers)
Check your volume rst to listen to music.
Check your
volume!
Check if the volume is too loud before using headphones.•
It is not recommended using headphones for long periods of •
time.
Any deviation from the equalizer default setting could cause •
hearing impairment.
The default setting can be changed through software and •
Use Time (Break Time)
Take a break for 10 minutes or more after a 50-minute period •
when working for more than one hour.
Illumination
Do not use the computer in dark locations. The illumination •
level for computer use must be as bright as for reading a book.
Indirect illumination is recommended. Use a curtain to prevent •
reection on the LCD screen.
Operation Condition
Do not use the computer in hot and humid locations.•
Use the computer within the allowed temperature and •
humidity range specied in the User Guide.
driver updates without your intervention. Please check the
equalizer default setting before rst usage.
To prevent possible hearing damage, do not listen at high volume
levels for long periods.
Page 4
24
Chapter 1
Getting Started
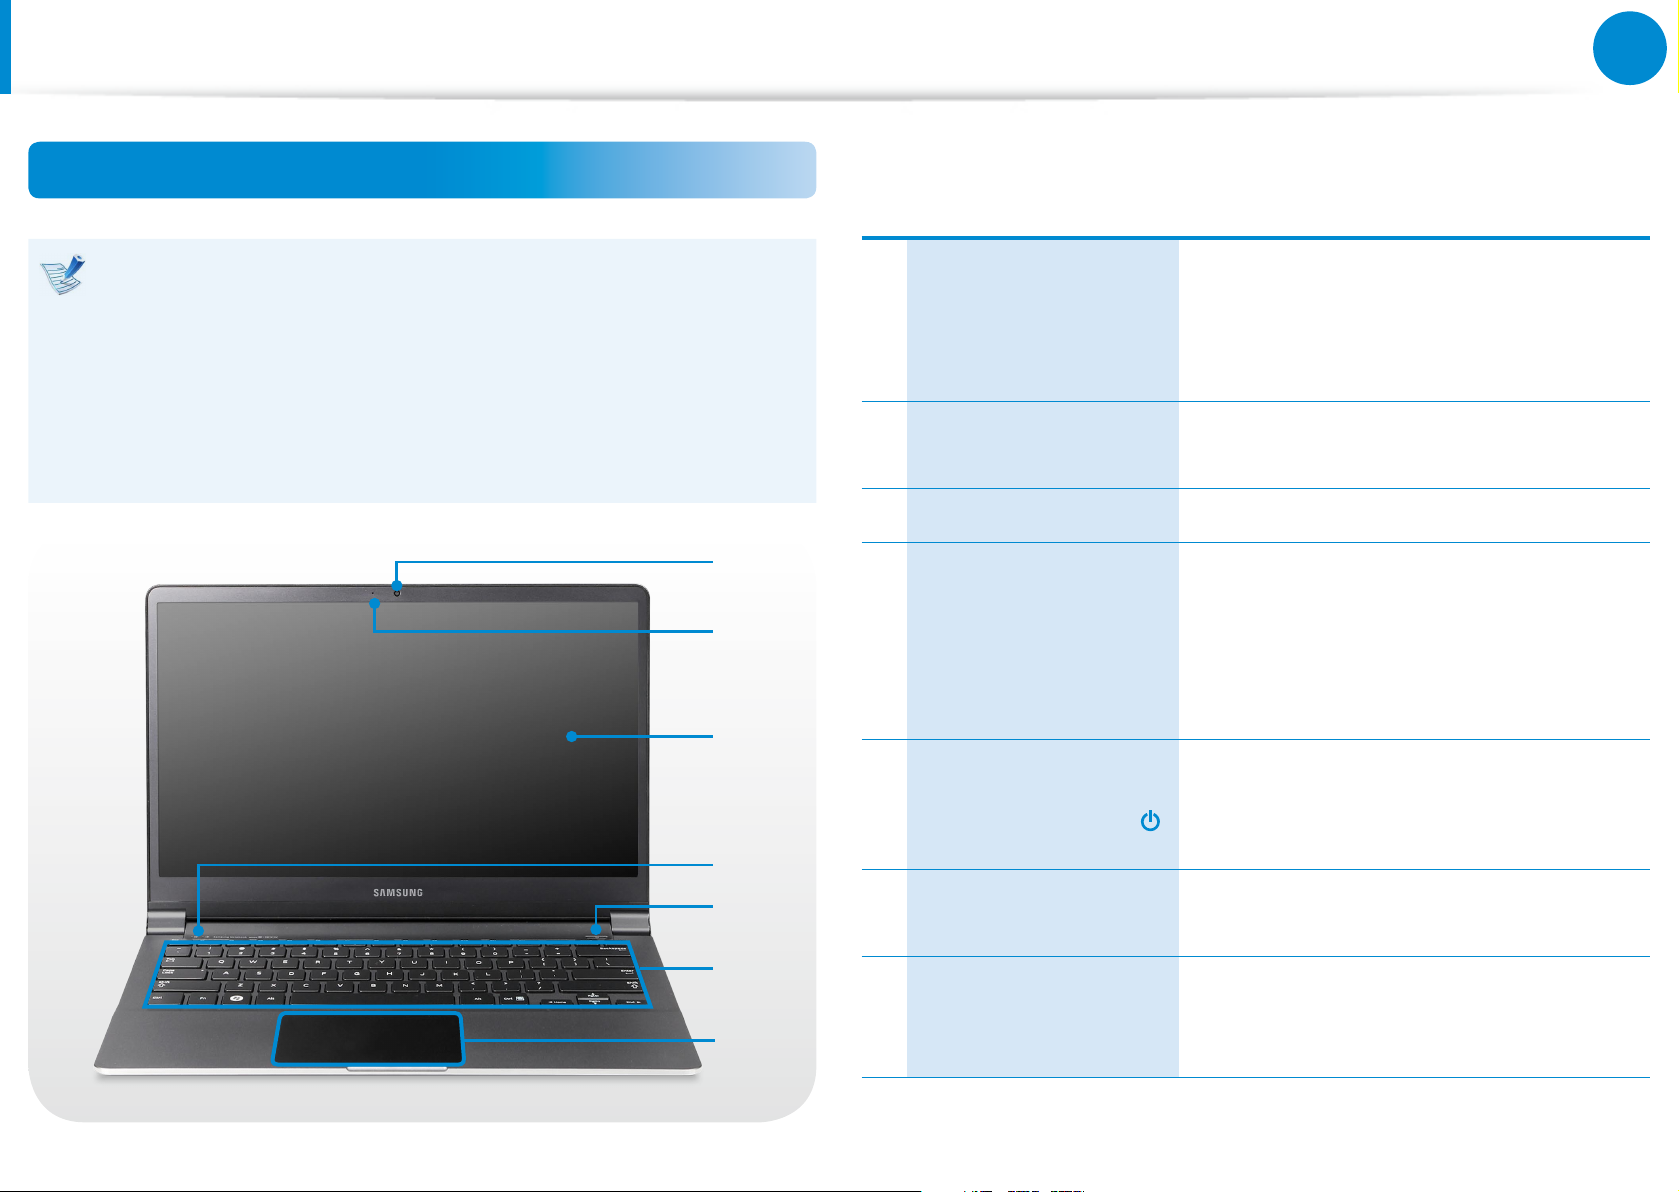
Overview
Front View
The pictures used for the cover and the main body in the •
User Manual are those of the representative model of each
series. Therefore the colors and appearance of the pictures
may dier from the actual appearance of the product
depending on the model.
The actual color and appearance of the computer may •
dier from the pictures used in this guide.
1
2
3
4
5
Using this camera, you can take still
pictures and record video.
1 Camera (Optional)
You can take a picture or make a movie
using the Charms > Start > Camera.
Camera operating
2
indicator
3 LCD The screen images are displayed here.
Status indicators and
4
sensors (Optional)
Power Button /
5
Power Button LED
6 Keyboard
This indicates the camera operating
status.
Shows the operating status of the
computer.
The corresponding operating LED is
lit when the corresponding function
operates.
Turns the computer on and o.
When the computer is on, the power
button LED is lit.
A device to enter data by pressing the
keys.
6
Touc hp ad /
7
7
Touchpad Buttons
The touchpad and touchpad buttons
provide functions similar to the mouse
ball and buttons.
Page 5
25
Chapter 1
Getting Started
Overview
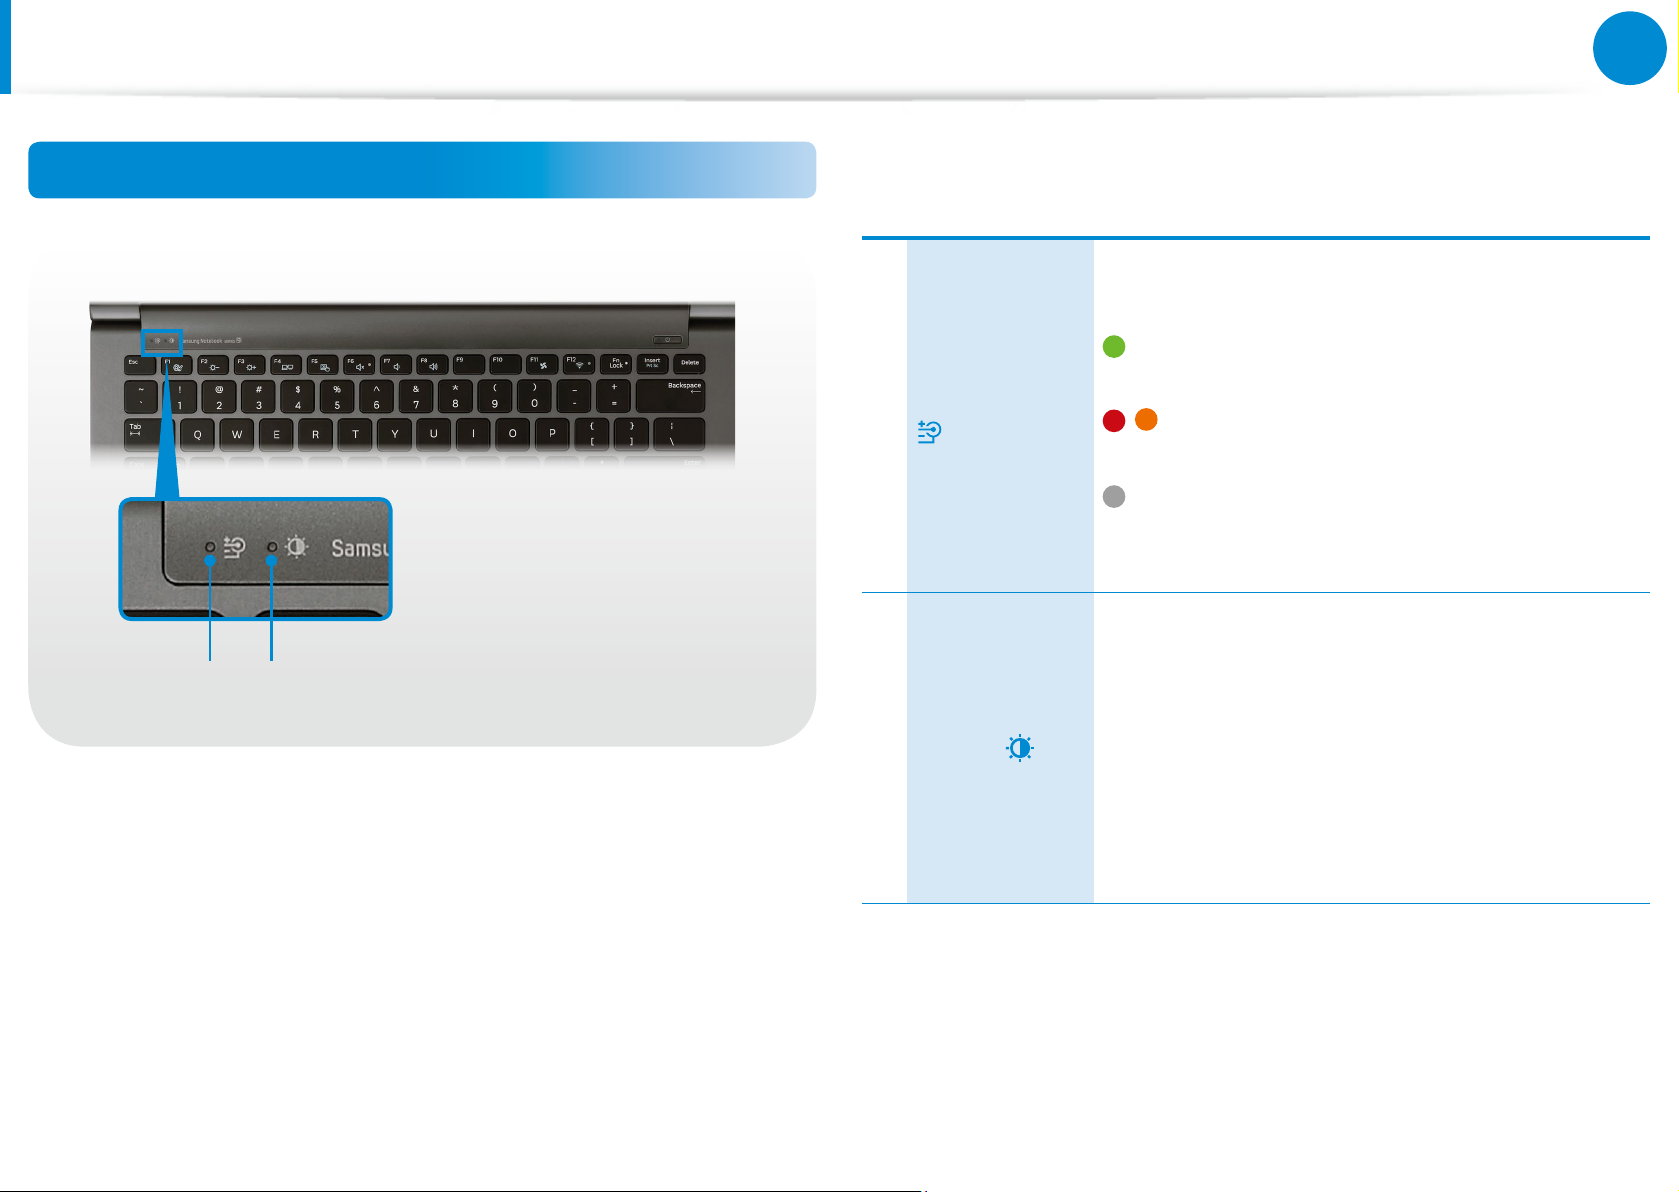
Status indicators and sensors (Optional)
Charge Status
1
This shows the power source and the battery
charge status.
Green: When the battery is fully charged or
the battery is not installed.
/ Red or orange: When the battery is being
charged.
O: When the computer is running on
battery power without being connected to
AC adapter.
1 2
Illumination
2
Sensor
(Optional)
This sensor detects the ambient illumination of
the PC.
If the ambient illumination becomes dark,
the LCD becomes dimmer and the keyboard
backlight is lit.
On the contrary, if the ambient illumination
becomes brighter, the LCD becomes brighter
and the keyboard backlight is turned o.
Page 6
26
Chapter 1
Getting Started
Overview
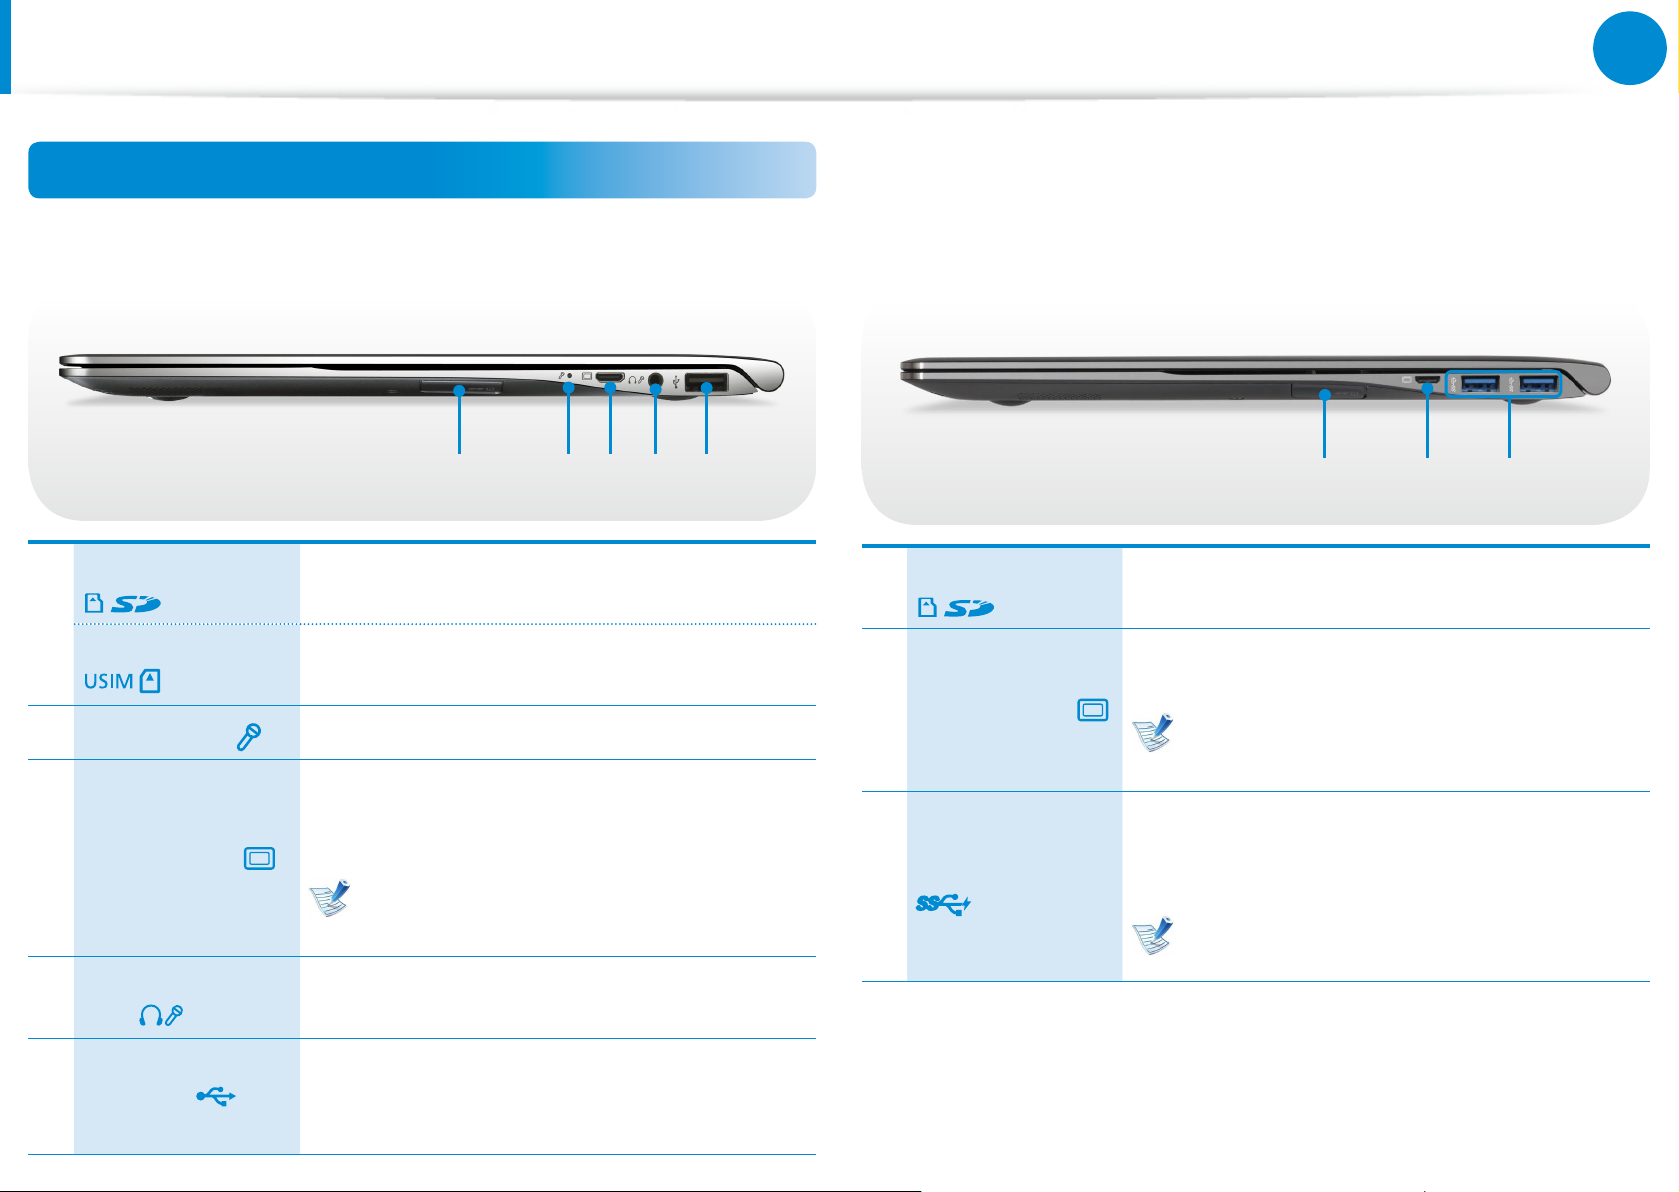
Right View
For 13.3 inch models
►
For 15 inch models
►
Multi Card Slot
(Optional)
1
USIM Card Slot
(Optional)
Microphone You can use the built-in microphone.
2
Monitor Port
3
Ear-set / headset
4
Jack
A card slot supports multi cards.
This slot is for USIM cards.
A port used to connect a monitor, TV
or projector supporting a 15pin D-SUB
interface.
You can connect a VGA adapter
(optional).
This is the jack for connecting an ear-set or
headset.
51 32 4
Multi Card Slot
1
Monitor Port
2
USB 3.0 Port
3
A card slot supports multi cards.
A port used to connect a monitor, TV or
projector supporting a 15pin D-SUB interface.
You can connect a VGA adapter
(optional).
You can connect USB devices to the USB port
such as a keyboard/mouse, digital camera,
etc.
For Windows XP, the USB 3.0 feature
may be restricted.
1 32
USB Port
5
You can connect USB devices to the USB
port such as a keyboard/mouse, digital
camera, etc.
Page 7
27
Chapter 1
Getting Started
Overview
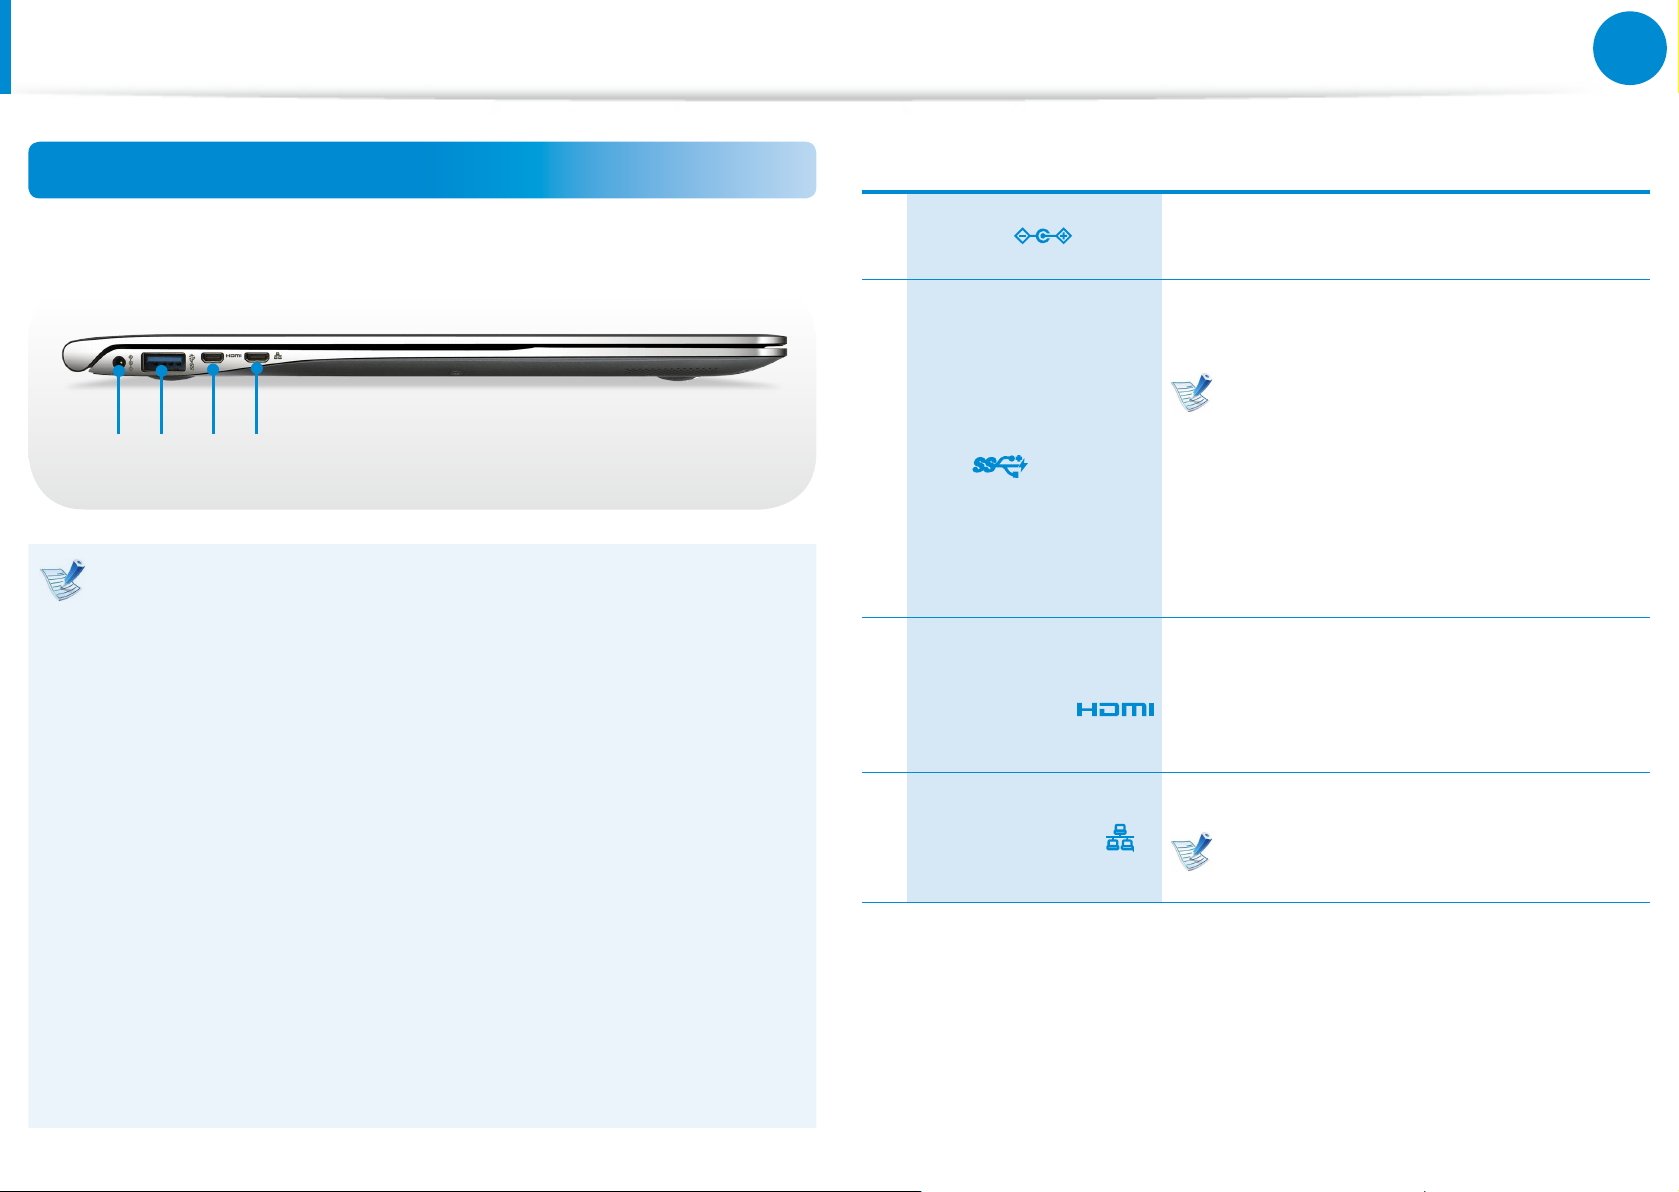
Left View
For 13.3 inch models
►
41 2 3
What is a chargeable USB port?
USB device accessing and charging functions are •
supported.
The USB charging function is supported regardless of •
whether the power is turned on or o.
Charging a device through a chargeable USB port may take •
longer than general charging.
1 DC Jack
Chargeable USB 3.0
2
Port
Micro Digital
Video / Audio Port
3
(Micro HDMI)
(Optional)
A jack to connect the AC adapter that
supplies power to the computer.
This is a chargeable USB port that can be
used to connect and charge a USB device.
When the AC adapter is connected, it
may be inconvenient to use the USB
port. In this case, purchase and use
a USB 3.0 extension cable or use the
USB ports on the right side.
For Windows XP, the USB 3.0 feature
may be restricted.
This is the port for a micro HDMI.
You can enjoy digital video and audio by
connecting the computer to a TV.
Connect the Ethernet cable to this port.
Using the Chargeable USB function when the computer is •
running on battery power reduces the battery usage time.
The user cannot evaluate the charging status of the USB •
device from the computer.
This may not be supported for some USB devices.•
You can turn the Chargeable USB function • ON/OFF by
selecting the Settings > Power Management > USB
Charging option. (Optional)
4
Wired LAN Port
You can use wired LAN by using the
LAN adapter (Optional).
Page 8
28
Chapter 1
Getting Started
Overview
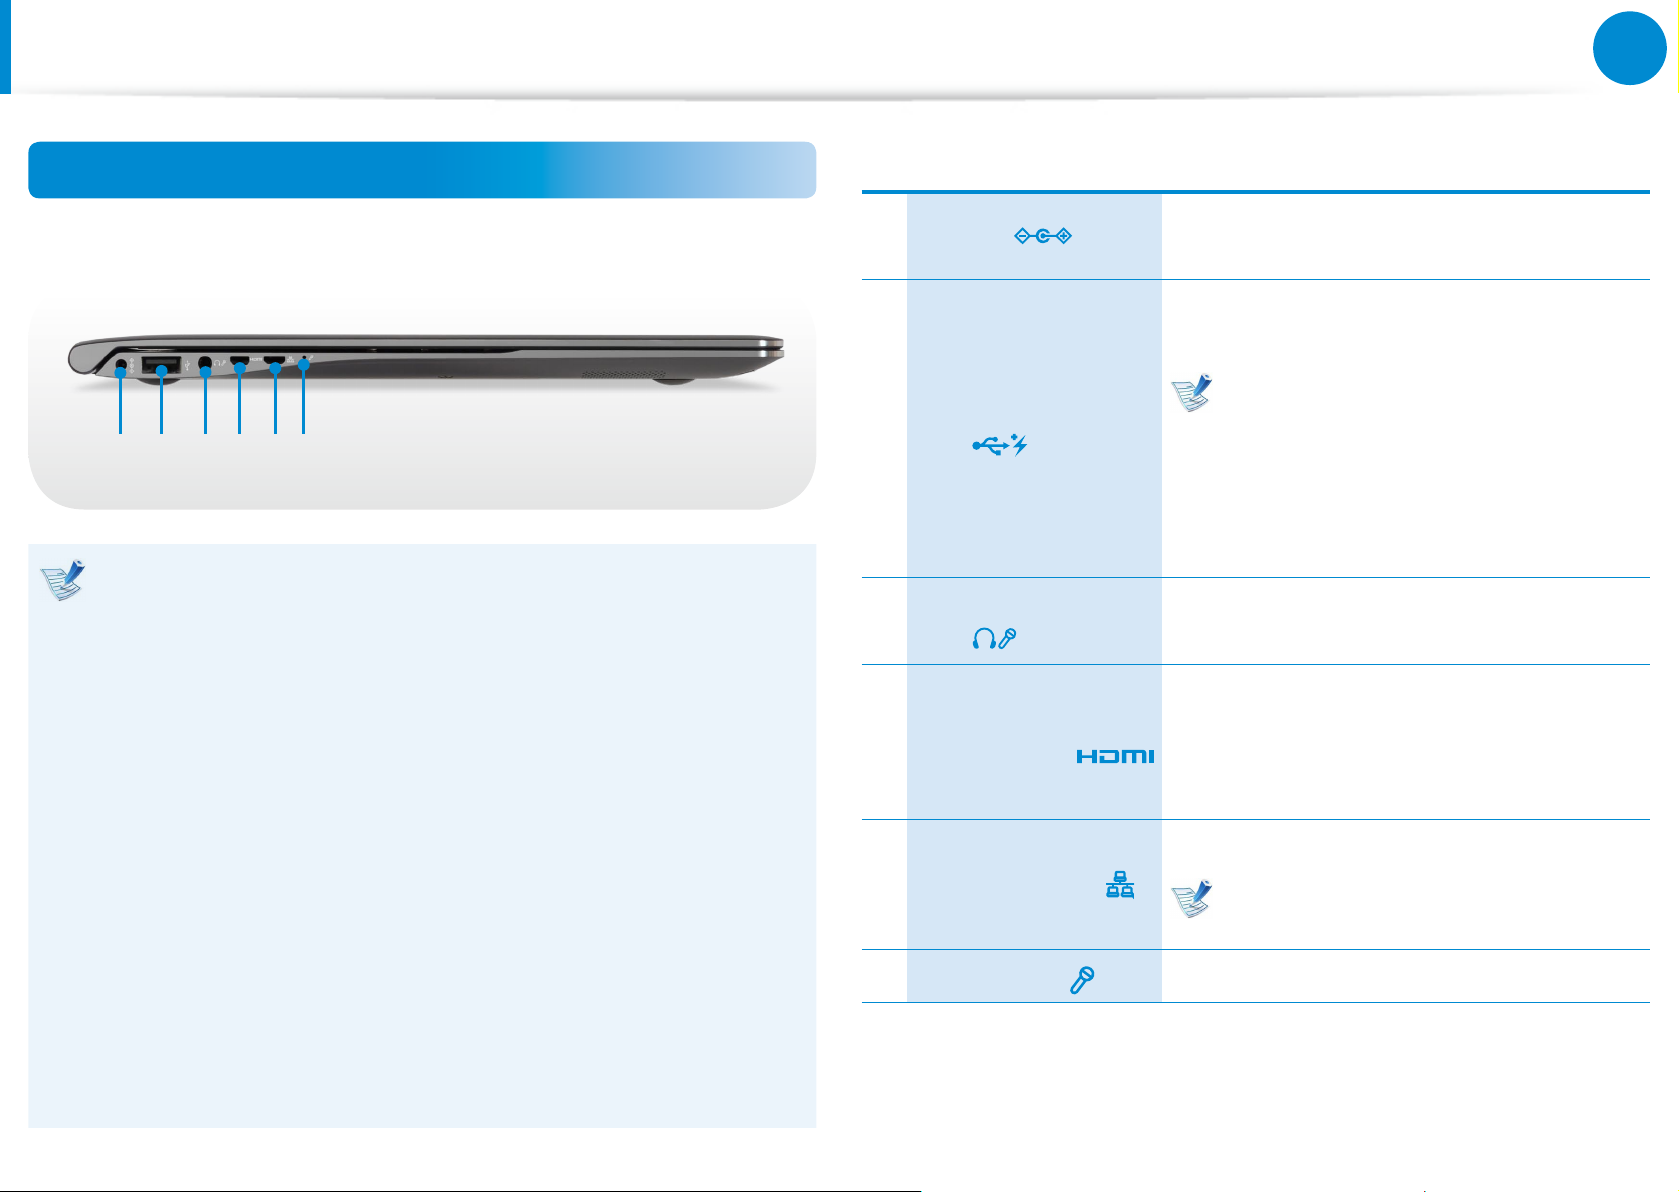
Left View
For 15 inch models
►
4 5 61 2 3
What is a chargeable USB port?
USB device accessing and charging functions are •
supported.
The USB charging function is supported regardless of •
whether the power is turned on or o.
Charging a device through a chargeable USB port may take •
longer than general charging.
1 DC Jack
Chargeable USB 2.0
2
Port
Ear-set / headset
3
Jack
Micro Digital
Video / Audio Port
4
(Micro HDMI)
(Optional)
A jack to connect the AC adapter that
supplies power to the computer.
This is a chargeable USB port that can be
used to connect and charge a USB device.
When the AC adapter is connected, it
may be inconvenient to use the USB
port.
In this case, purchase and use a USB
extension cable or use the USB ports
on the right side.
This is the jack for connecting an ear-set
or headset.
This is the port for a micro HDMI.
You can enjoy digital video and audio by
connecting the computer to a TV.
Using the Chargeable USB function when the computer is •
running on battery power reduces the battery usage time.
The user cannot evaluate the charging status of the USB •
device from the computer.
This may not be supported for some USB devices.•
You can turn the Chargeable USB function • ON/OFF by
selecting the Settings > Power Management > USB
Charging option. (Optional)
Connect the Ethernet cable to this port.
5
Wired LAN Port
6 Microphone You can use the built-in microphone.
You can use wired LAN by using the
LAN adapter (Optional).
Page 9
29
Chapter 1
Getting Started
Overview
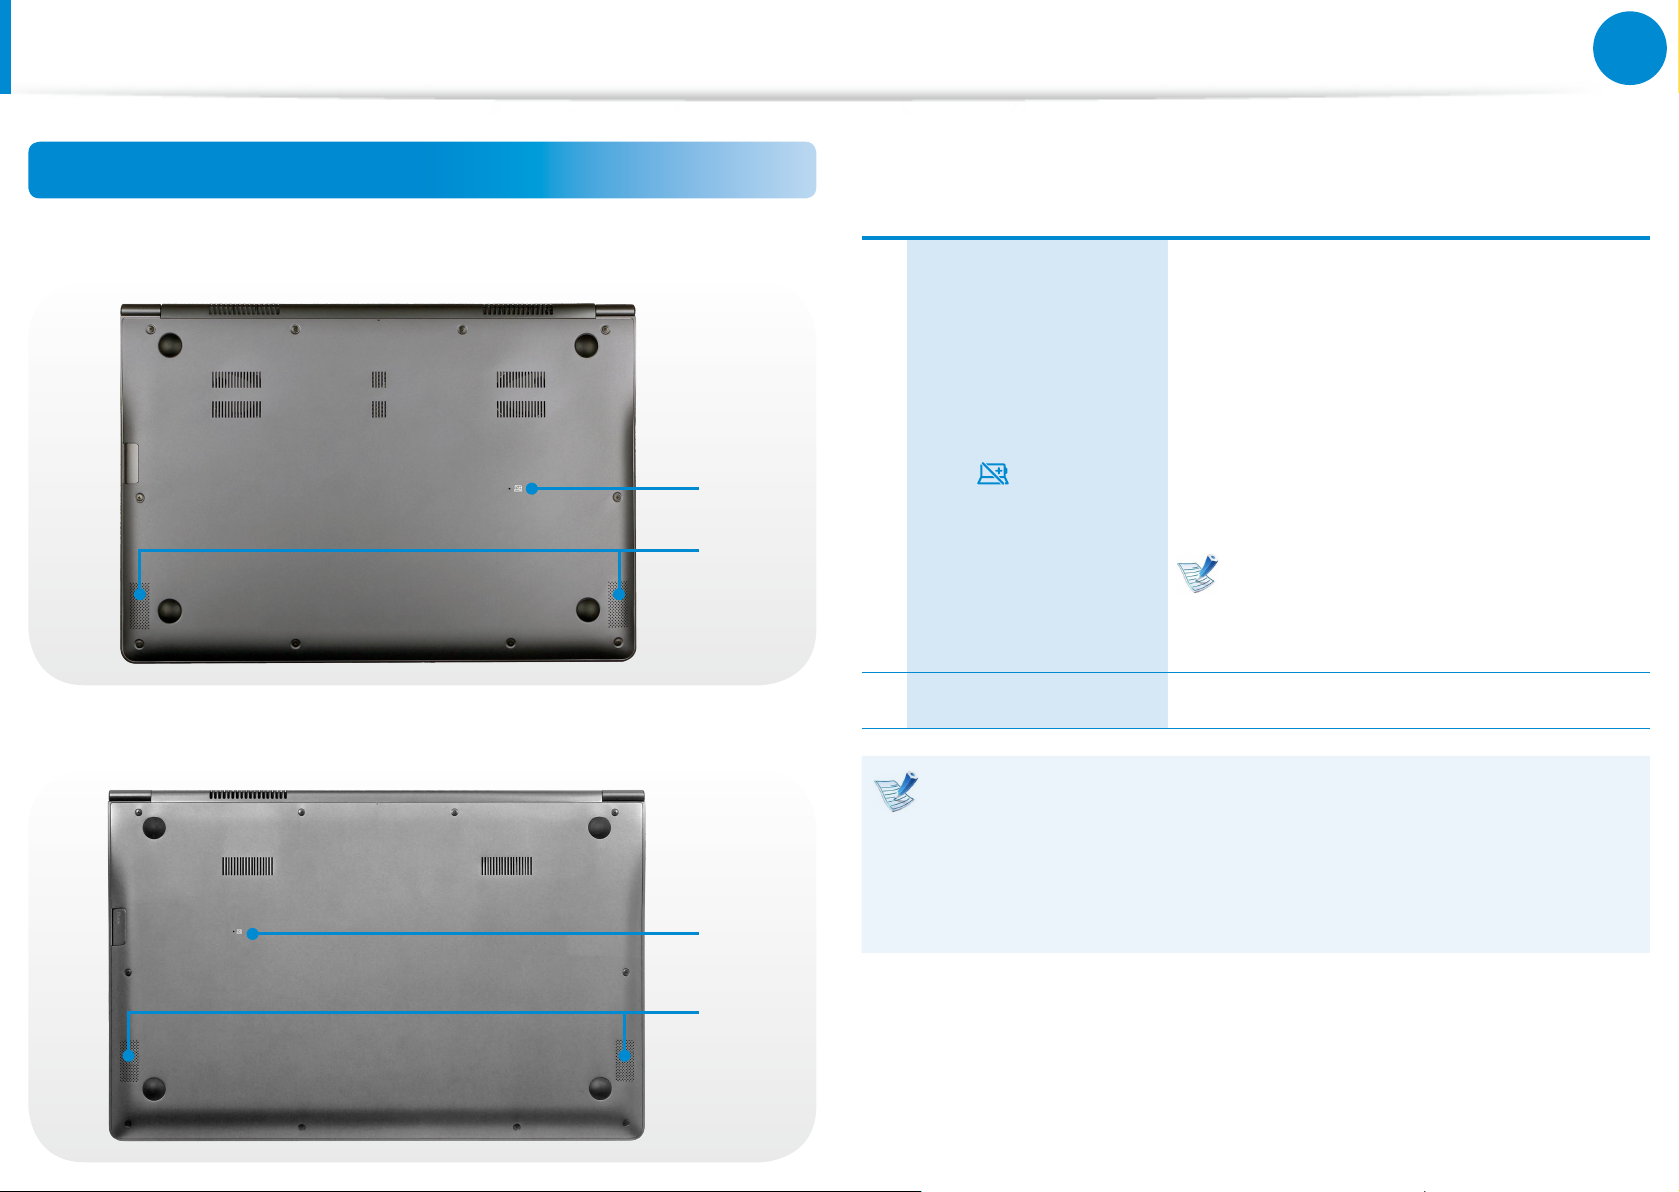
Bottom View
For 13.3 inch models
►
This hole is to cut the power supply to
the battery. Insert and press one end of
an unfolded paper clip into the hole it to
cut the power to the battery.
For more information, refer to About
Battery Emergency
1
1
2
Hole
the function to cut the power supply
to the internal battery in the Safety
Precautions.
The location of the Emergency
Battery Hole may dier depending
on the model.
For 15 inch models
►
2
Speaker A device used to generate sound.
If you replace the bottom of the product, the model name,
serial number and some logos etched into the bottom of the
product will no longer be there.
For more information, please ask for assistance from the
1
2
service center.
Page 10
30
Chapter 1
Getting Started
Turning the Computer On and O
áᔪ
Ŗᮁ
᯲
ᰆ⊹
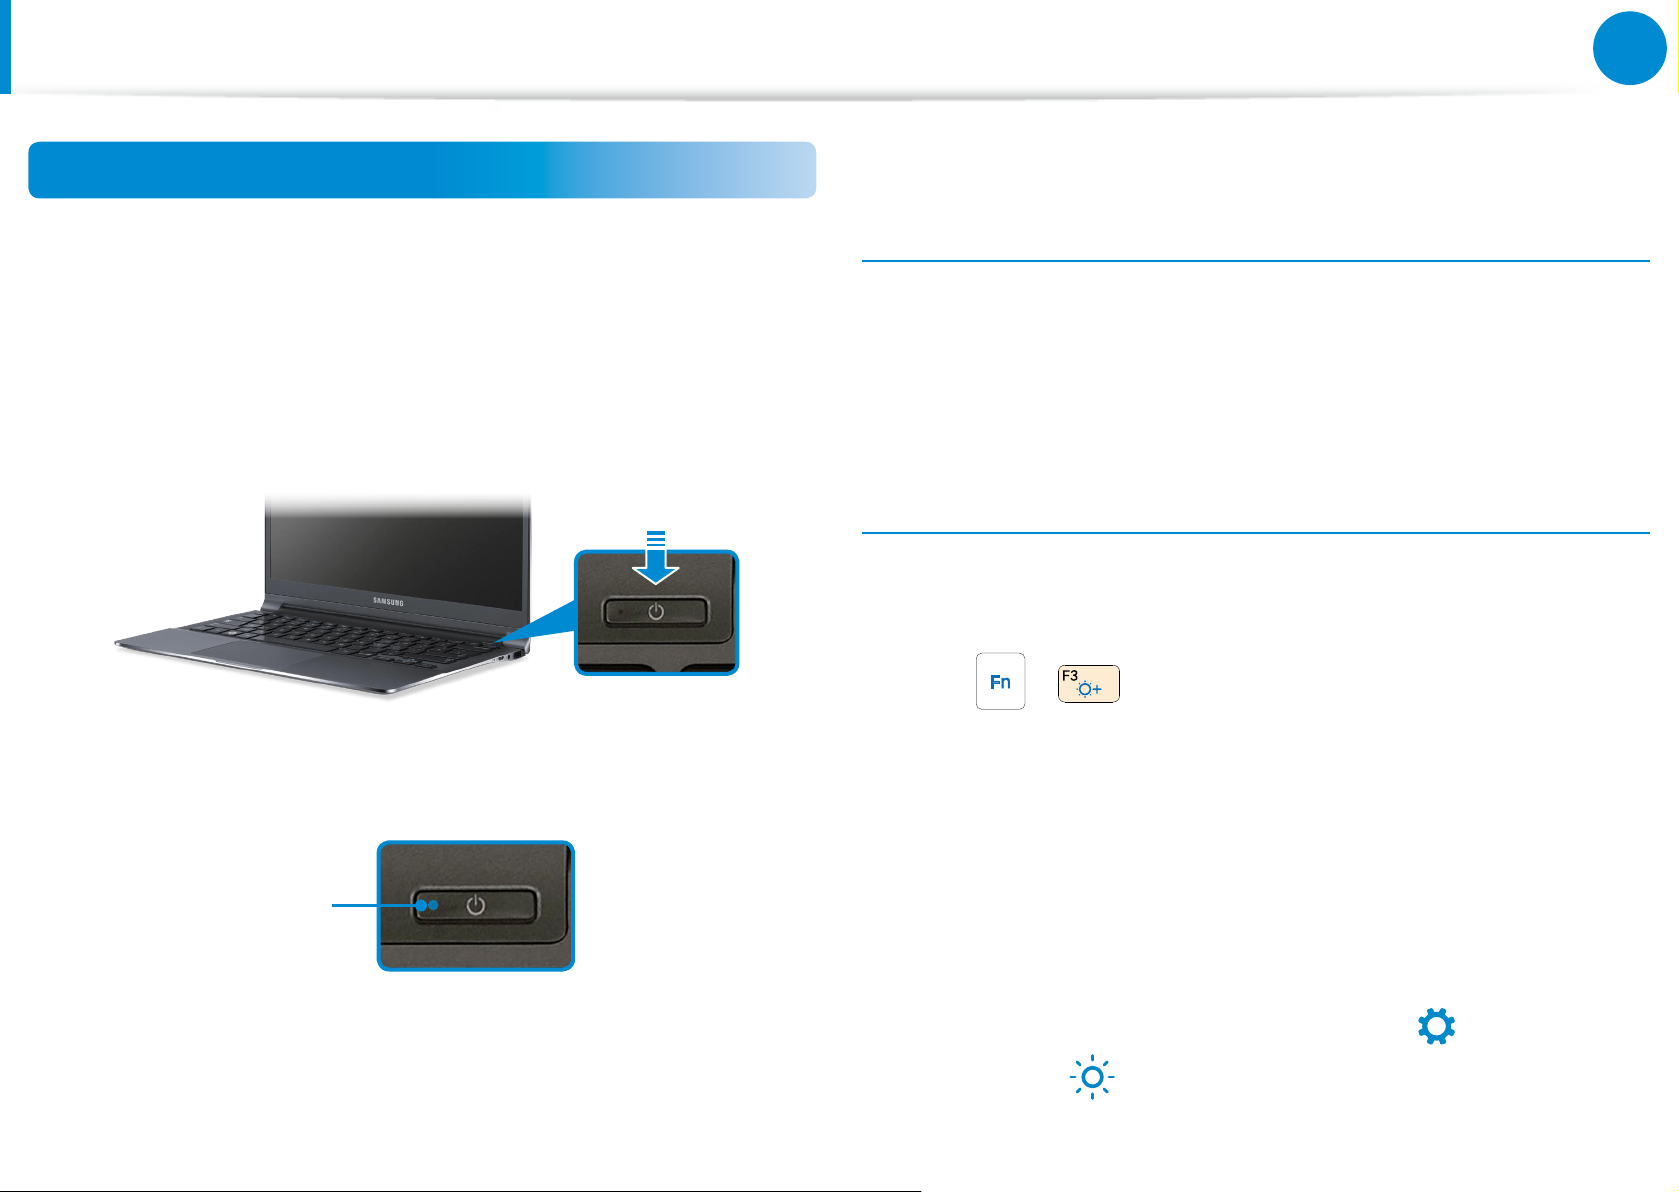
Turning the computer on
Connect the AC adapter.
1
Lift the LCD panel up.
2
Press the Power button to turn the computer on.
3
Power button LED is lit while the computer is turned on.
4
About Windows Activation
When you turn the computer on for the rst time, the Windows
activation screen appears.
Follow the activation procedures according to the instructions on
the screen to use the computer.
Adjusting the screen brightness
When the computer runs on battery power, the LCD brightness is
automatically set to low.
Press the + key combination to increase the screen
brightness.
The Charms menu appears when you place your mouse
1
pointer at the edge of the top or bottom right of the screen.
LED
Alternatively, if you place your nger on the right edge of the
touchpad and drag your nger toward the center, the Charms
menu appears.
Increase the bar by pressing the Settings
>
2
Brightness
.
Page 11
31
Chapter 1
Getting Started
áᔪ
Ŗᮁ
᯲
ᰆ⊹
Turning the Computer On and O
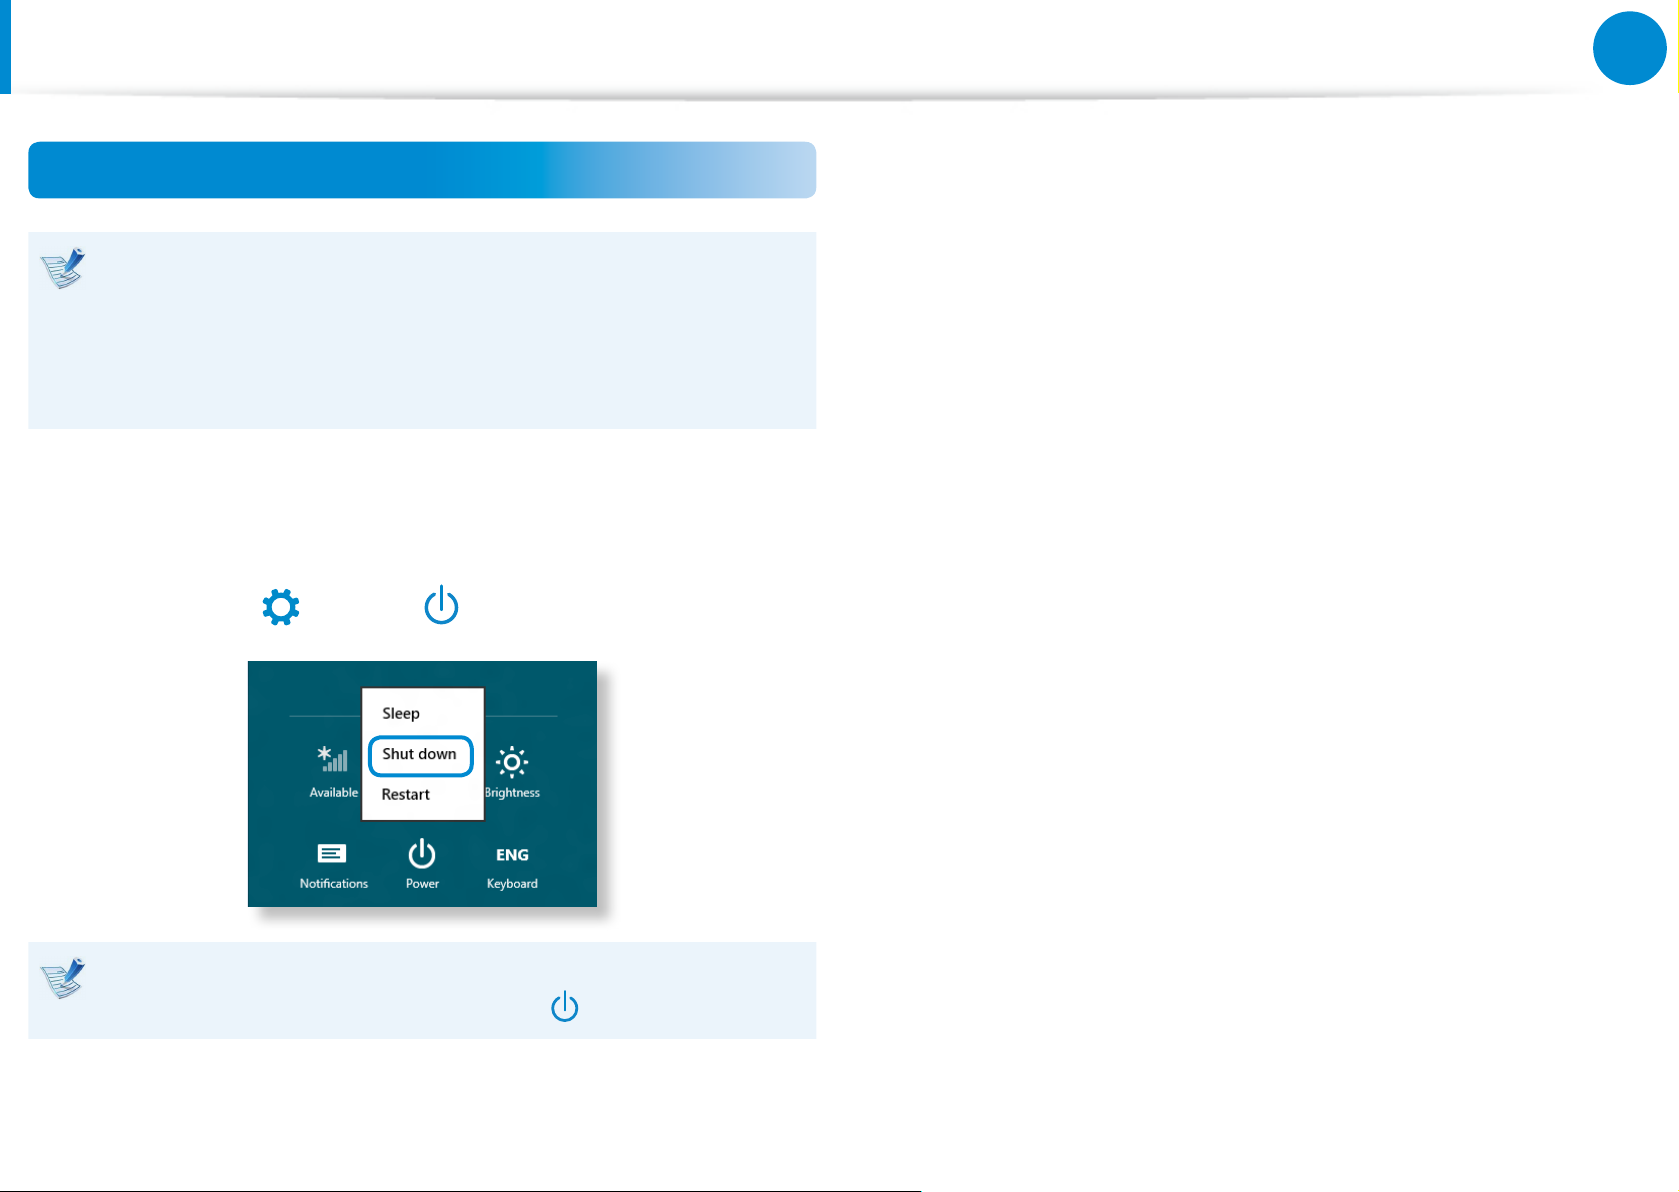
Turning the computer o
Since the procedures to turn the computer o may dier •
depending on the installed operating system, please turn
the computer o according to the procedures for the
purchased operating system.
Save all your data before clicking on • Shut down.
The Charms menu appears when you place your mouse
1
pointer at the edge of the top or bottom right of the screen.
Click Settings
2
If you want to power o your computer when you are logged
out, unlock the screen and click Power
> Power
> Shut down.
> Shut down.
Page 12
Chapter 2.
Using Windows 8
What is Microsoft Windows 8? 33
Screen At a Glance 34
Using the Charms 36
Using Apps 38
Windows Hot Key Function 41
Page 13
What is Microsoft Windows 8?
Microsoft Windows 8 (hereafter referred to as Windows) is an
operating system that is required for operating a computer.
To use your computer optimally, you need to know how to use it
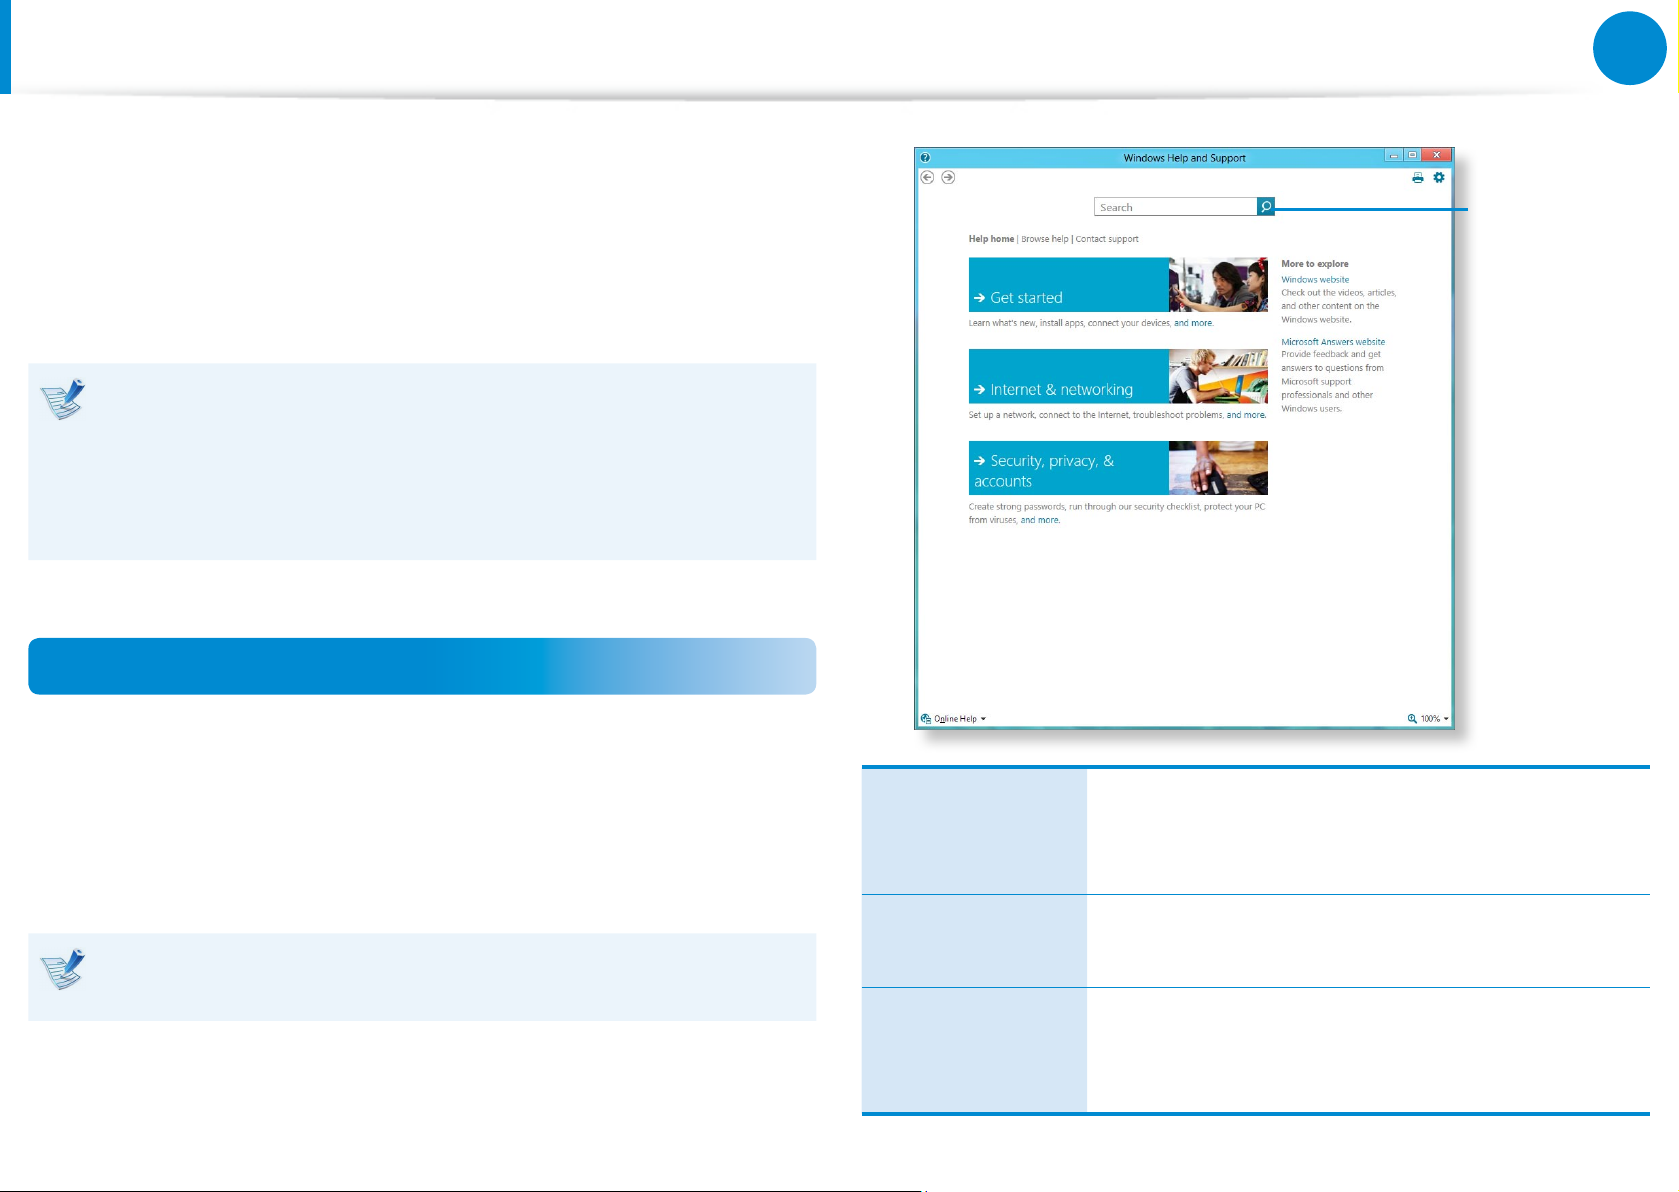
properly. Therefore, It is better to learn how to use Windows by
utilizing Windows Help and Support.
The screen may appear somewhat dierent depending on •
the model and the operating system.
Since this guide has been prepared based on Windows •
8, some of the instructions may dier depending on the
version. It may also be modied without prior notice.
Chapter 2
Using Windows 8
Searching
for Help
33
Displaying Help
Press the F1 Key on the keyboard to display the Help.
Alternatively, place your mouse cursor over the end of the top or
bottom right area on the screen to display the Charms menu.
Click Charms menu > Settings > Help.
If you are connected to the internet, you can access the most
recent online Help.
Get Started
Internet &
networking
Security, privacy,
& accounts
You can view basic instructions on how to use
your computer including new function(s) for the
Windows OS.
After connecting to the network, you can check
the Help section required to use the internet.
You can check the Help information required
to protect your computer and personal
information.
Page 14
34
Chapter 2
Using Windows 8
Screen At a Glance
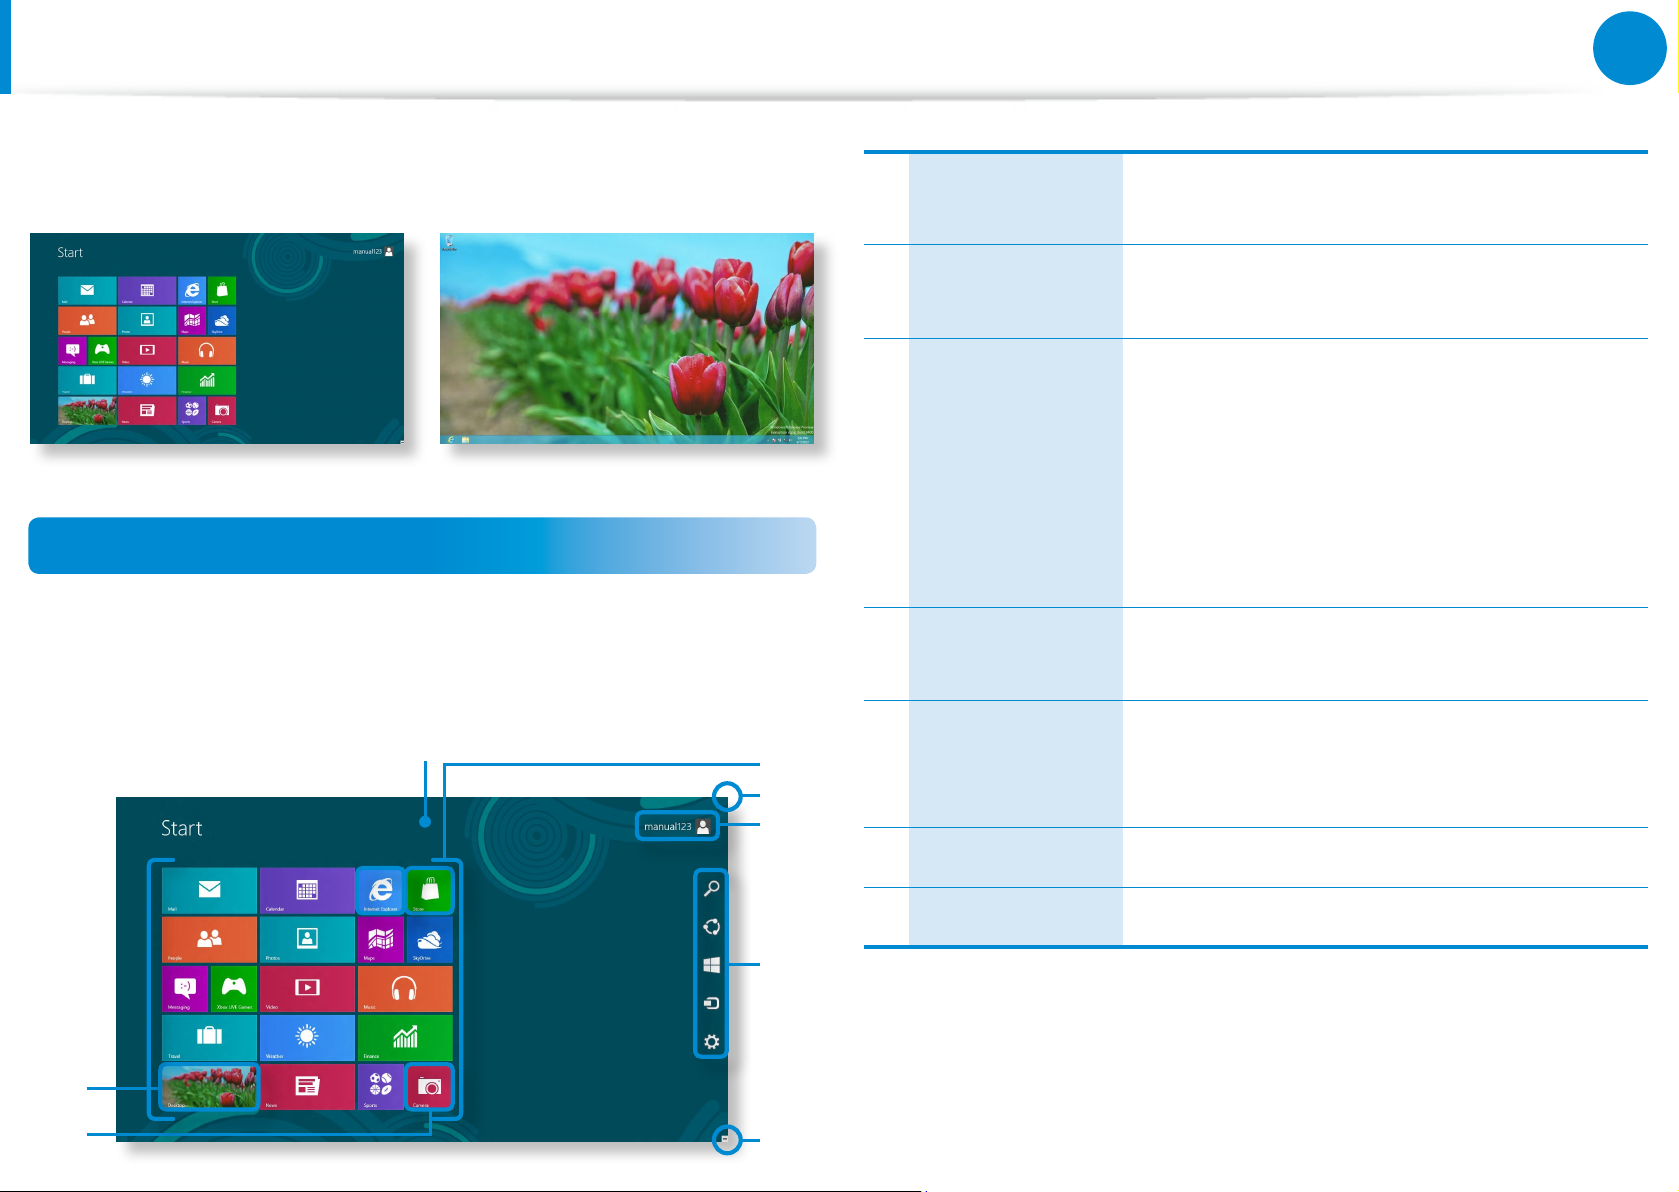
Windows 8 provides both the new Start screen mode and the
Desktop mode of the existing OS.
1 Start Screen
Refers to the default Start screen of
Windows 8.
Start Screen Desktop
Start Screen
When you turn on the computer, the Start screen is displayed,
which allows you to use the applications (Application, App,
hereafter referred to as an App) at the same location.
1
2 App
Displaying the
3
Charms
4 User Account
2
3
4
5 Charms
Refers to the apps that are currently
installed.
The Charms is hidden at the right of the
screen. Place your mouse pointer at the
edge of the top or bottom right of the
screen to display the Charms.
Or you place your nger on the right edge of
the touch pad and drag your nger toward
the center, the Charms menu appears.
This refers to the currently used user
account.
This refers to the menu that allows you to
use functions such as Search, Share, Start,
Device and Settings.
6 Desktop Switches to Desktop mode.
7 Camera Allows you to take pictures or make a movie.
5
6
7
3
Page 15
35
Chapter 2
Using Windows 8
Screen At a Glance
Desktop
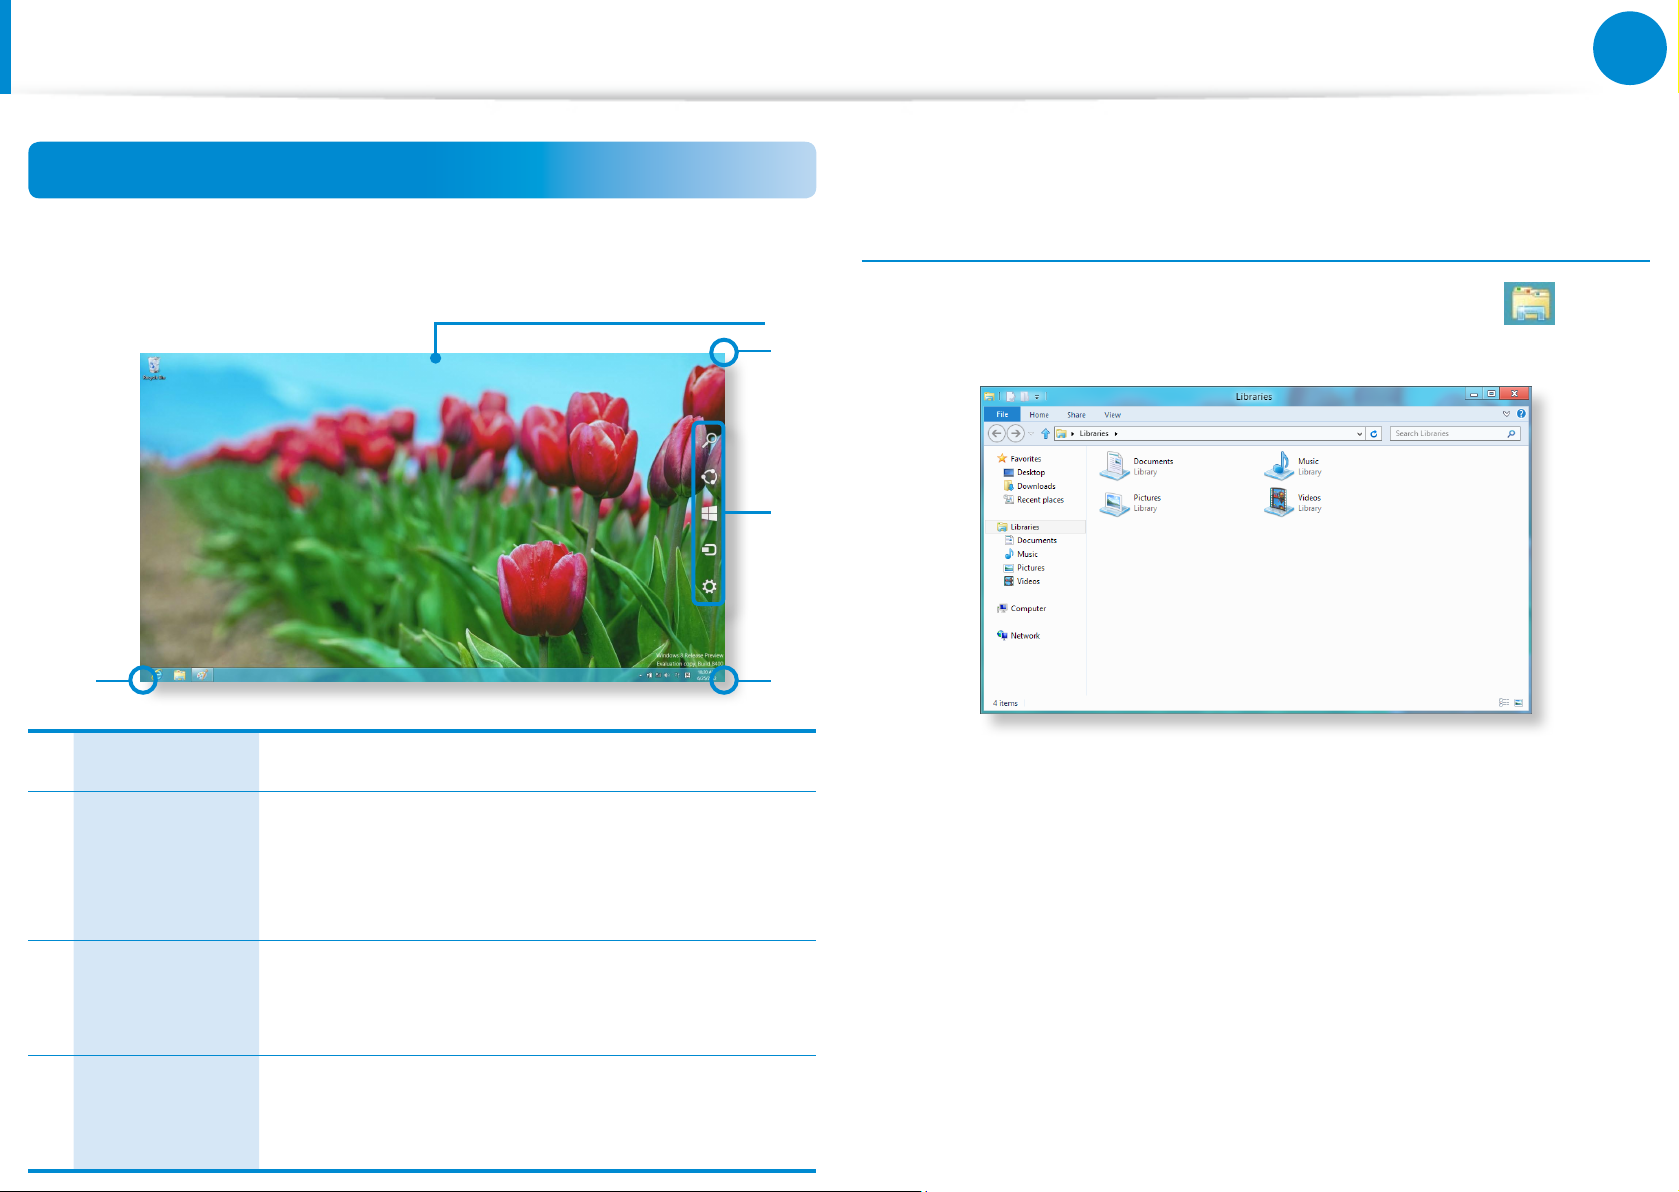
This provides similar functions to those provided by the Desktop
in prior Windows versions.
1
2
3
4
1 Desktop Refers to the Desktop.
The Charms is hidden at the right of the screen.
Displaying the
2
Charms
Place your mouse pointer at the edge of the
top or bottom right of the screen to display the
Charms.
2
Displaying Documents and Files
Click Windows Explorer in the taskbar on the Desktop to
search for documents and les.
3 Charms
Switching
4
to the Start
Screen
This refers to the menu that allows you to use
functions such as Search, Share, Start, Device
and Settings.
Click the corner of the bottom left of the screen
to switch to the Start screen.
Page 16
36
Chapter 2
Using Windows 8
Search
Search
Share
Search
Share
Start
Search
Share
Start
Device
Search
Share
Start
Device
Settings
Using the Charms
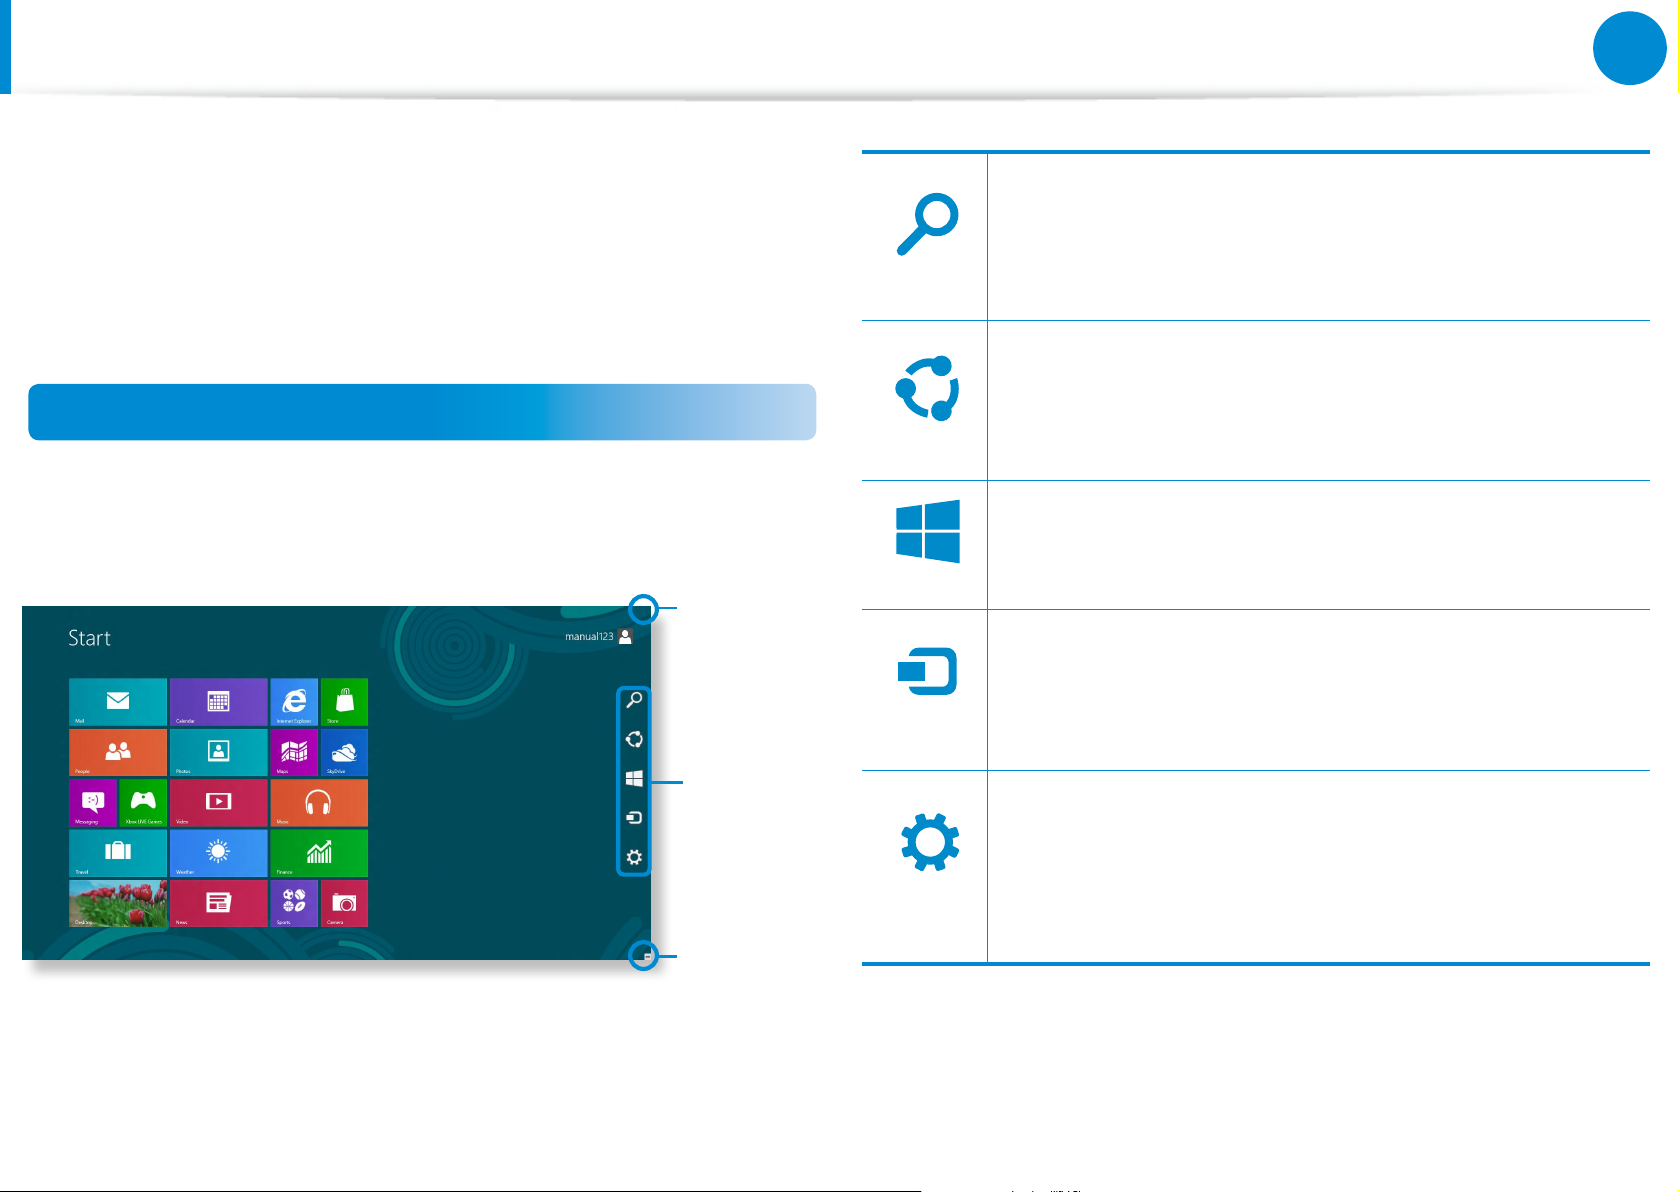
The Charms is a new type of menu that combines the Start menu
with the Control Panel of existing Windows.
The Charms allows you to quickly congure the device(s)
connected to your computer, search for App(s)/le(s), and use the
sharing function, etc.
Activating the Charms
If you move your mouse pointer to the top or bottom right corner
If you want to search for a program or le in the App(s)/
Settings/File(s), simply enter a keyword in the Search
charm and start Search.
You can also search within an App or on the Web.
You can use this menu to transfer a picture or le to
another user. You can easily share pictures or les with
other users simply by associating multiple Apps with the
Share charm.
of the screen, the Charms appears.
Displaying
the Charms
Menu
Charms
Displaying
the Charms
Menu
You can move to the Start screen.
As this allows you to move directly to a desired device,
you can handle tasks such as importing pictures from
a digital camera, streaming a video to your TV or
transferring les to a device on the current screen.
The Settings charm allows you to perform basic tasks
such as adjusting the volume, turning o the PC, etc.
If you select the Settings charm while a specic App is
running, the settings for the currently running App are
displayed.
Page 17
37
Chapter 2
Using Windows 8
Using the Charms
ENG
Changing the Settings
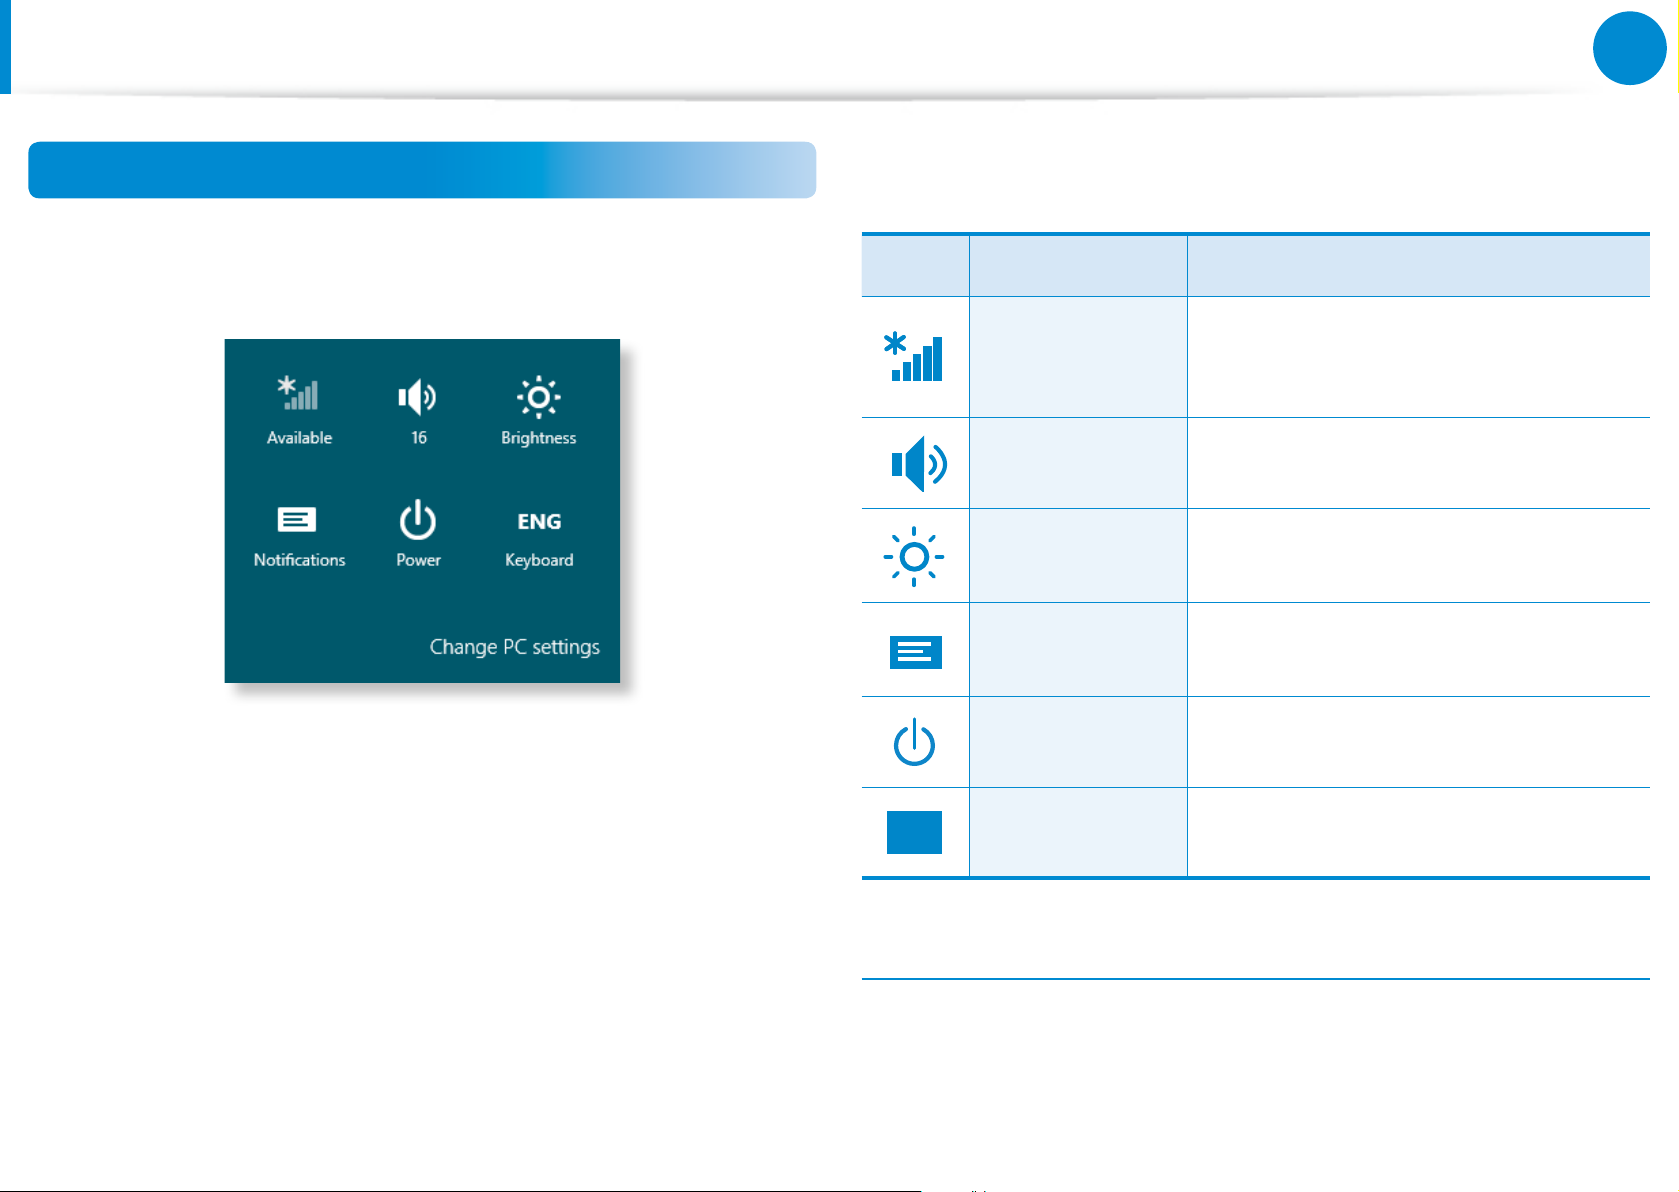
Frequently used Windows menus are collected.
Click the Charms > Settings.
Icon Name Function Description
Wireless
Network
Adjusting the
Volume
Screen
Brightness
Notice
Power
Language You can set the Language.
You can connect to a wireless network.
Select a wireless network to connect
to.
You can adjust the volume or mute the
sound.
You can adjust the screen brightness.
You can set the interval at which an
App sends notices.
You can turn o your computer or
select the Power Options.
Change PC settings
You can change more settings.
Page 18

38
Chapter 2
Using Windows 8
Using Apps
An App refers to an application program (hereafter referred to as
an App). In a larger sense, it refers to all the software programs
installed on the operating system.
Windows 8 provides basic Apps for frequently performed tasks.
Starting/Exiting an App
Click on an App in the Start screen to activate it.
To exit the App
Move your mouse pointer to the top of the screen.
1
Your mouse pointer changes to a hand shape.
Click and hold your mouse button and then drag it to the
2
bottom of the screen. The App moves downward and
disappears and exits.
Using Apps
Displaying Currently Running App(s)
Move your mouse pointer to the top left corner of the screen
1
to display the last run App.
Then, move your mouse pointer down to display a list of the
2
currently running Apps in order.
Click on an App in that list or drag it to the center of the
3
screen. Now, you can check the selected App which is
currently running.
Right-click over the App in the list and click Close to exit the
App.
1
2
1
2
Page 19
39
Chapter 2
Using Windows 8
Using Apps
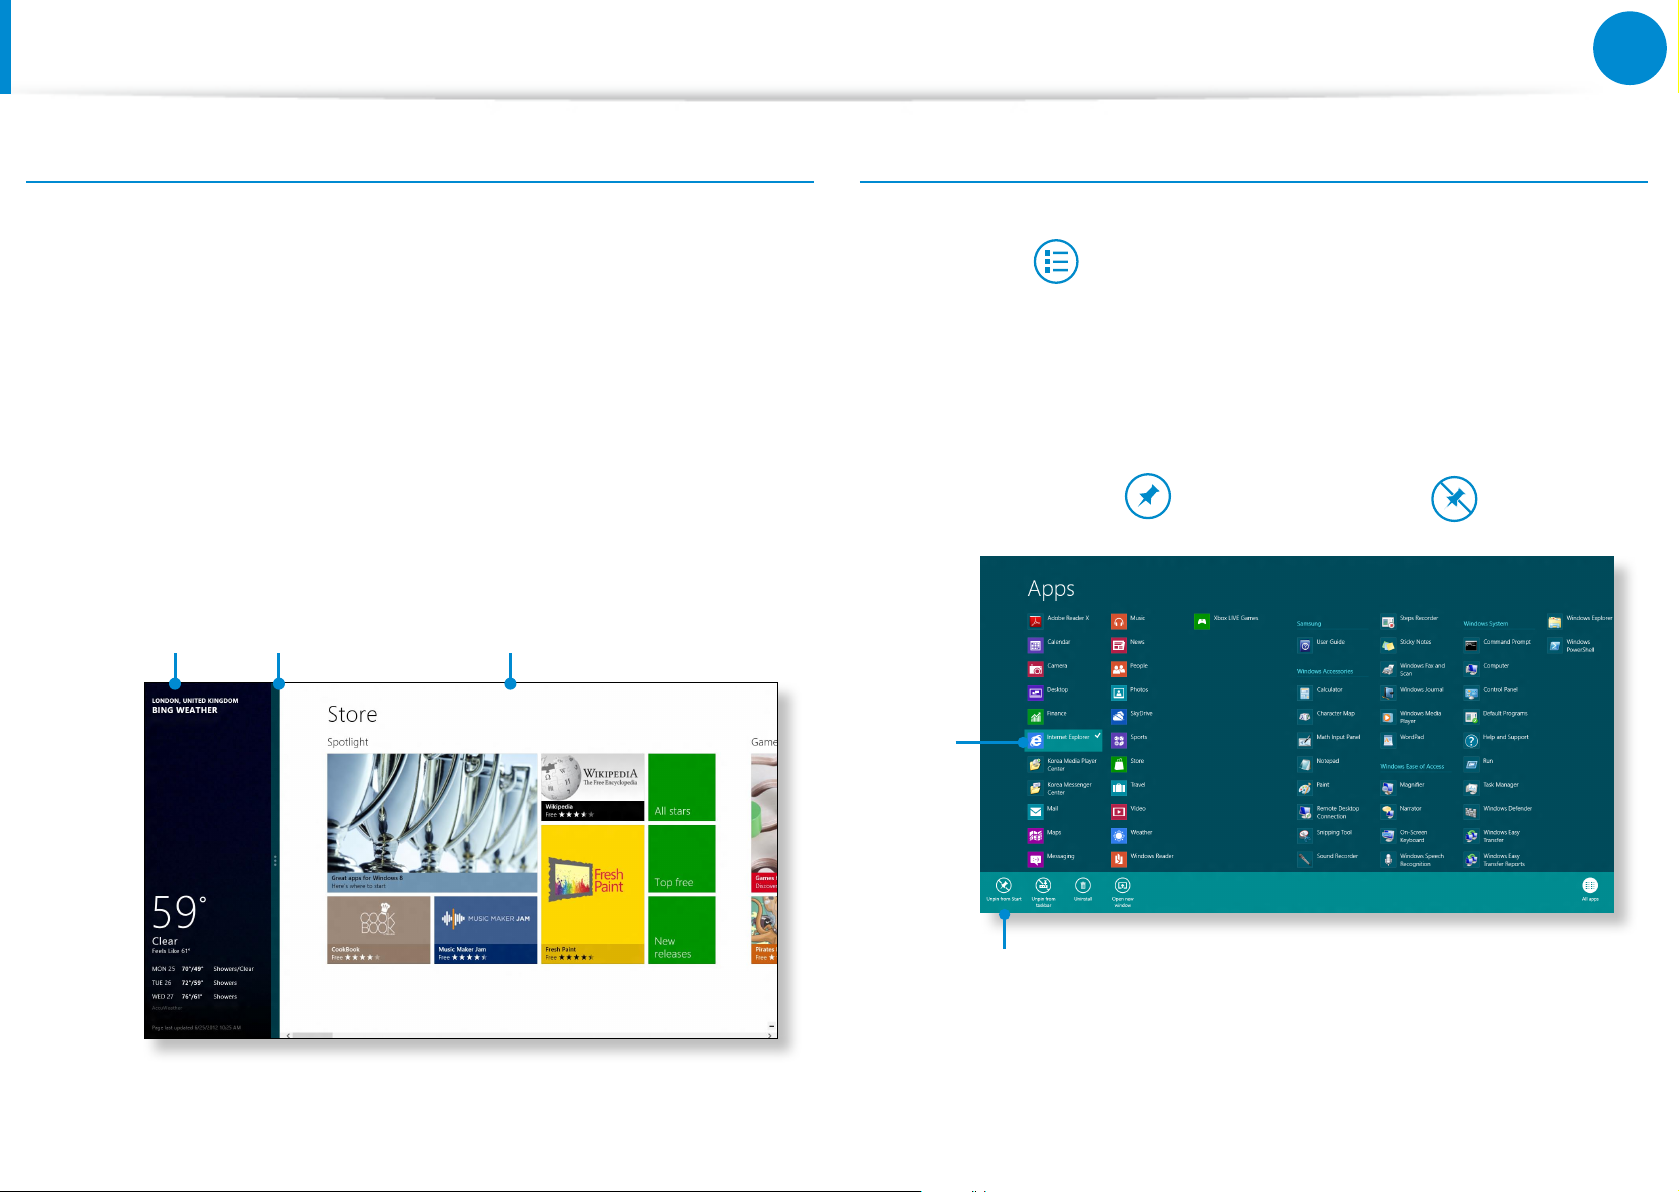
Running Two Apps at the Same Time
Select the Apps in the Start screen.
1
Move your mouse pointer to the top of the screen. Your
2
mouse pointer changes to a hand shape.
If you click and hold your mouse button and move left or
3
right, you can split the screen to display multiple Apps.
Move the Screen Split Bar to change the screen split ratio.
4
Supported screen split ratios are 3:7 or 7:3.
Weather
App
Screen
Split Bar
Store App
Adding/Removing an App to/from the Start Screen
Click Start screen > right-click your mouse button.
Click All Apps at the bottom of the screen to display all the
Apps that are currently installed.
If you right-click over the App to be added, the relevant menu
1
is activated at the bottom of your screen.
Click Pin to start or Unpin from Start .
2
1
2
Ex) When removing an App in the Start screen
Ex) If you run the Weather App and Store App at the
same time
Page 20
40
Chapter 2
Using Windows 8
Using Apps
Using the Windows Store
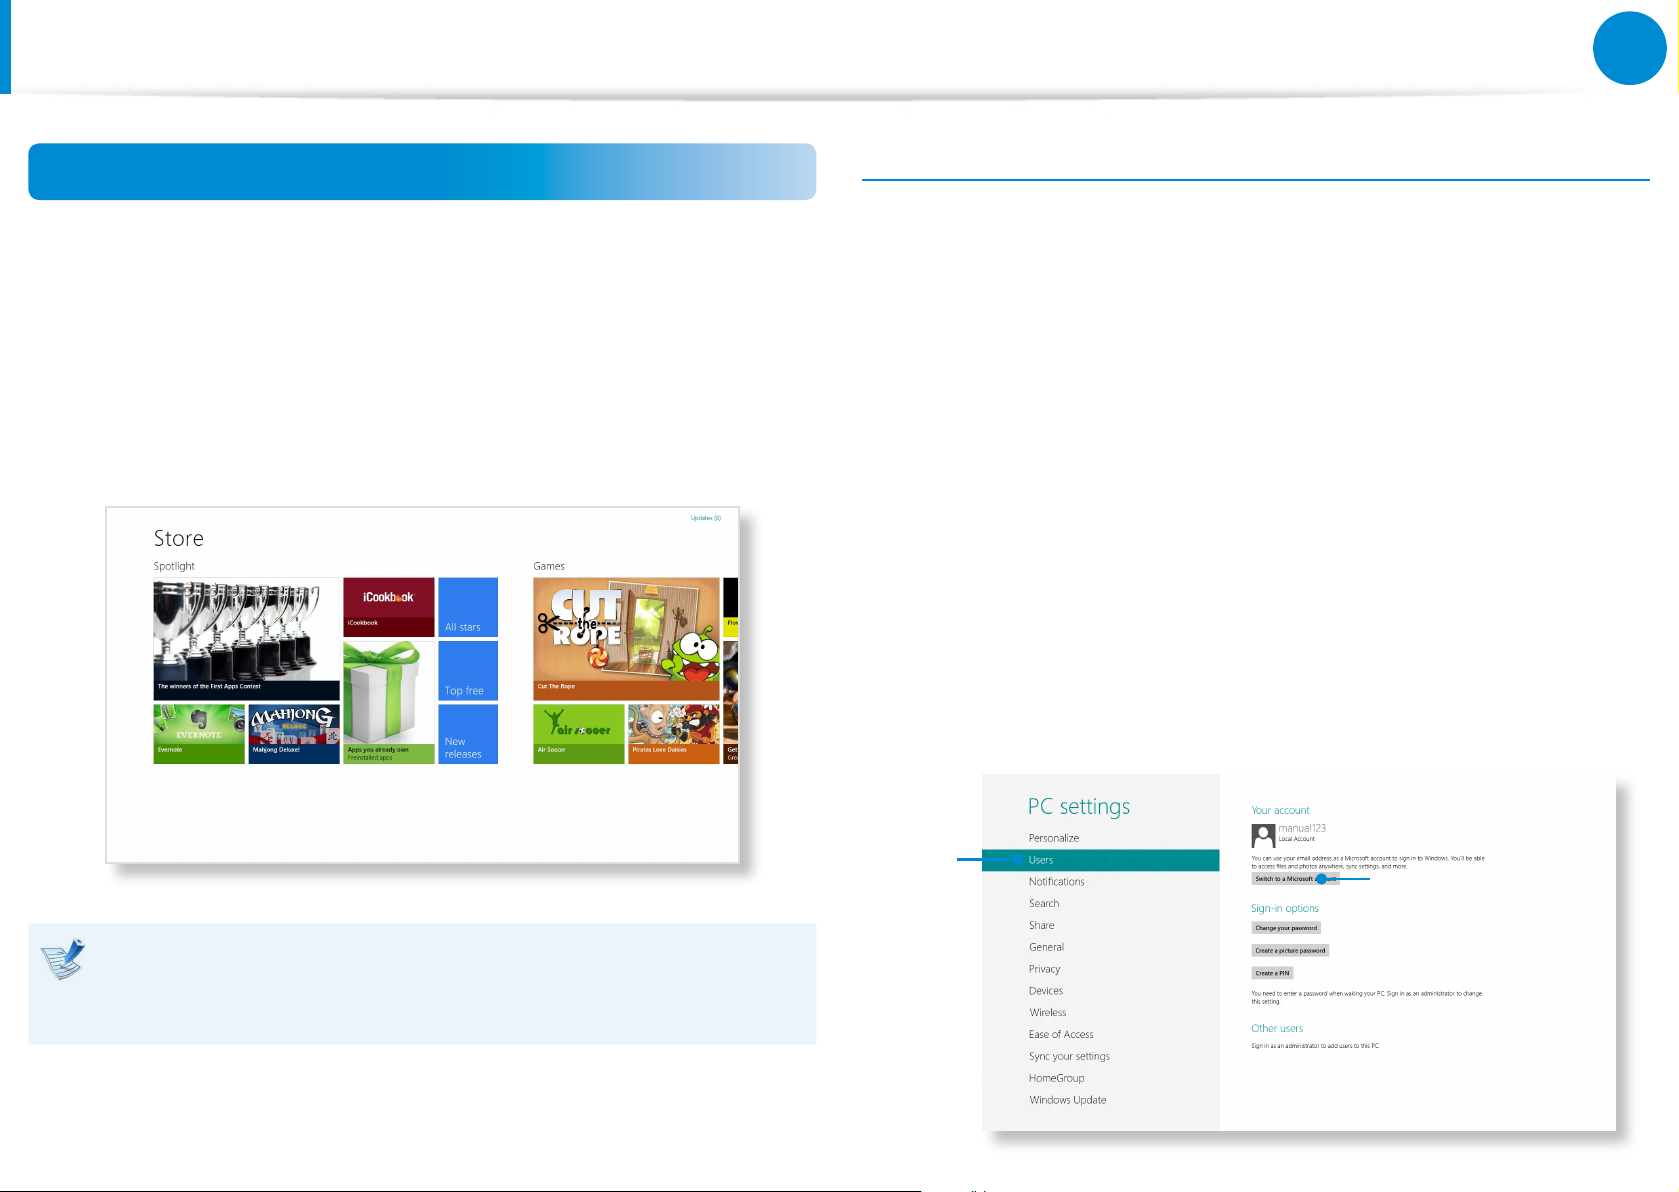
If you run the App Store in the Start screen, the Apps in the
Windows Store are displayed.
However, a Microsoft account is required to purchase App(s) in the
Windows Store.
Continue after registering your Microsoft Account in the
Charms.
Conguring your Microsoft Account
A Microsoft Account allows you to synchronize your settings with
other device(s) running Windows 8 online allowing you to share
le(s) or settings.
You should register a Microsoft Account to download or purchase
App(s) from the Store.
Run the Charms and click Settings > Change PC Settings.
1
Click Users > Your account > Switch to a Microsoft
2
account.
Register your account through the following relevant
3
procedures.
Samsung cannot solve errors occuring with other apps
installed from the Windows Store. Contact customer support
for the app directly.
1
2
 Loading...