

Page 1
Page 2

1
This guide is provided for information purposes only. All information included herein is subject to change without notice. Samsung
Electronics is not responsible for any damages, direct or indirect, arising from or related to use of this manual.
© 2005 Samsung Electronics Co., Ltd. All rights reserved.
• Samsung logo and SyncThru
TM
are trademarks of Samsung Electronics Co., Ltd.
• Microsoft, Windows, Windows 98, Windows NT, Windows Me, Windows 2000, Windows XP, and Windows 2003 are registered trademarks
of Microsoft Corporation.
• Macintosh, AppleTalk, and EtherTalk are registered trademarks of Apple Computer, Inc.
• Novell and Novell NetWare are registered trademark of Novell, Inc.
• All other brand or product names are trademarks of their respective companies or organizations.
Page 3

2
CONTENTS
1. Getting started
Introduction .......................................................................................................................... 1.1
Supported network environments ............................................................................................. 1.1
Samsung Network Printer Card ................................................. ............................................... 1.1
Package contents .. ............................................................................................ ............... 1.1
System requirements ........................................................................................................ 1.2
Installing your Network Printer Card ......................... ........................................................... 1.2
2. Programs supplied on the Network Utilities CD
System requirements ........................................................................................................ 2.1
Installing software ............................................................................................................ 2.1
Uninstalling software ......................................................................................................... 2.1
Viewing the SyncThru Web Admin Service User’s Gu ide ......................................................... 2.1
IP address setup ......................... ..................................................................................... ...... 2.2
3. TCP/IP environment
Management protocols ..................................................... ....................................................... 3.1
DHCP/BOOTP ................................................................................................................... 3.1
HTTP .............................................................................................................................. 3.1
SNMP .............................................................................................................................. 3.1
SLP ................................................................................................................................. 3.2
Dynamic DNS (DDNS) ....................................................................................................... 3.2
WINS .............................................................................................................................. 3.2
Bonjour ........................................................................................................................ ... 3.3
UPnP ............................................................................................................................... 3.3
Printing protocols ................................................................ ................................................... 3.4
Standard TCP/IP port ......................................................................................... ............... 3.4
LPR port .......................................................................................................................... 3.4
Samsung Printer Port ........................................................................................................ 3.5
IPP port ........................................................................................................................... 3.5
Additional functions ................................................. ............................................................... 3.6
4. NetWare environment
NetWare printing .................................................................................................... ............... 4.1
Configuring NetWare .............................................................................................................. 4.1
Printing in NetWare ................................................................................................................ 4.2
Adding a queue ................................................................................................................ 4.2
Adding a printer ................................................................................ ............................... 4.2
5. EtherTalk environment
EtherTalk printing .................................................................................................................. 5.1
Configuring EtherTalk ............................................................. ........................................... 5.1
Configuring the printer ...................................................................................................... 5.1
TCP/IP printing ...................................................................................................................... 5.2
Bonjour printer ...................................................................................................................... 5.2
6. Wireless network environment
Overview .............................................................................................................................. 6.1
Basic concept and terms .................................................................. ....................................... 6.1
Before configuring the print server ........................................................................................... 6.3
Wireless settings .................................................................................................................... 6.3
Wireless basic settings ...................................................................................................... 6.4
Wireless security settings .................................................................................................. 6.4
Page 4

3
7. Appendix
Specifications ................................................................................................................. ....... 7.1
Wireless specifications ..................................................... ....................................................... 7.1
OpenSSL Statements ....................................................... ....................................................... 7.2
OpenSSL License .............................................................................................................. 7.2
INDEX
Page 5

4
United States of America
Federal Communications Commission (FCC)
Intentional emitter per FCC Part 15
Low power, Radio LAN type devices (radio frequency (RF)
wireless communication devices), operating in the 2.4 GHz/5
GHz Band, may be present (embedded) in your printer system.
This section is only applicable if these devices are pres ent.
Refer to the system label to verify the presence of w ireless
devices.
Wireless devices that may be in your system are only qualified
for use in the United States of America if an FCC ID number is
on the system label.
The FCC has set a general guideline of 20 cm (8 inches)
separation between the device and the body, for use of a
wireless device near the body (this does not include
extremities). This device should be used more than 20 cm (8
inches) from the body when wireless devices are on. The power
output of the wireless device (or devices), which may be
embedded in your printer, is well below the RF exposure limits
as set by the FCC.
This transmitter must not be collocated or operation in
conjunction with any other antenna or transmitter.
Operation of this device is subject to the following two
conditions:(1) This device may not cause harmful interference,
and(2) this device must accept any interference received,
including interference that may cause undesired operation of
the device.
Wireless devices are not user serviceable. Do not
modify them in any way. Modification to a
wireless device will void the authorization to use
it. Contact manufacturer for service.
FCC Statement for Wireless LAN use:
“While installing and operating this transmitter
and antenna combination the radio frequency
exposure limit of 1mW/cm2 may be exceeded at
distances close to the antenna installed.
Therefore, the user must maintain a minimum
distance of 20cm from the antenna at all times.
This device can not be collocated with another
transmitter and transmitting antenna.”
European Radio Approval
Information
(for products fitted with EU-approved radio devices)
This Product is a printer; low power, Radio LAN type devices
(radio frequency (RF) wireless communication devices),
operating in the 2.4 GHz/5 GHz band, may be present
(embedded) in your printer system which is intended for home
or office use. This section is only applicable if these devices are
present. Refer to the system label to verify the presence of
wireless devices.
Wireless devices that may be in your system are only qualified
for use in the European Union or associated areas if a CE mark
with a Notified Body Registration Number and the Alert
Symbol is on the system label.
The power output of the wireless device or devices that may be
embedded in you printer is well below the RF exposure limits as
set by the European Commission through the R&TTE directive.
European States qualified under wireless approvals:
EU
Austria, Belgium, Denmark, Finland, Fran ce
(with frequency restrictions), Germany,
Greece, Ireland, Italy, Luxembourg, The
Netherlands, Portugal, Spain, Sweden and the
United
Accept EU
Iceland, Liechtenstein, Norway and Switzerland
European States with restrictions on use:
EU
In France, the frequency range is restricted to
2446.5-2483.5 MHz for devices above 10 mW
transmitting power such as wireless
Accept EU
No limitations at this time.
Regulatory Compliance Statements
Wireless Guidance
Low power, Radio LAN type devices (radio frequency (RF)
wireless communication devices), operating in the 2.4 GHz/5
GHz Band, may be present (embedded) in y our printer system.
The following section is a general overview of considerations
while operating a wireless device.
Additional limitations, cautions, and concerns for specific
countries are listed in the specific country sections (or country
group sections). The wireless devices in your system are only
qualified for use in the countries identified by the Radio
Approval Marks on the system rating label. If the country you
will be using the wireless device in, is not listed, please contact
your local Radio Approval agency for requirements. Wireless
devices are closely regulated and use may not be allowed.
The power output of the wireless device or devices that may be
embedded in your printer is well below the RF exposure limits
as known at this time. Because the wireless devices (which may
be embedded into your printer) emit less energy than is allowed
in radio frequency safety standards and recommendations,
manufacturer believes these devices are safe for use.
Regardless of the power levels, care should be ta ken to
minimize human contact during normal operation.
As a general guideline, a separation of 20 cm (8 inches)
between the wireless device and the body , for use of a wireless
device near the body (this does not include extremities) is
typical. This device should be used more than 20 cm (8 inches)
from the body when wireless devices are on and transmitting.
This transmitter must not be collocated or operation in
conjunction with any other antenna or transmitter.
Page 6

5
Some circumstances require restrictions n wireless devices.
Examples of common restrictions are listed below:
Radio frequency wireless communication can
interfere with equipment on commercial aircraft.
Current aviation regulations require wireless
devices to be turned off while traveling in an
airplane. IEEE 802.11 (also known as wireless
Ethernet) and Bluetooth communication devices
are examples of devices that provide wireless
communication.
In environments where the risk of interference to
other devices or services is harmful or perceived
as harmful, the option to use a wireless device
may be restricted or eliminated. Airports,
Hospitals, and Oxygen or flammable gas laden
atmospheres are limited examples where use of
wireless devices may be restricted or eliminated.
When in environments where you are uncertain
of the sanction to use wireless devices, ask the
applicable authority for authorization prior to use
or turning on the wireless device.
Every country has different restrictions on the
use of wireless devices. Since your system is
equipped with a wireless device, when traveling
between countries with your system, check with
the local Radio Approval authorities prio r to any
move or trip for any restrictions on the use of a
wireless device in the destination country.
If your system came equipped with an internal
embedded wireless device, do not operate the
wireless device unless all covers and shields are
in place and the system is fully assembled.
Wireless devices are not user serviceable. Do not
modify them in any way. Modification to a
wireless device will void the authorization to use
it. Please contact manufacturer for service.
Only use drivers approved for the country in
which the device will be used. See the
manufacturer System Restoration Kit, or contact
manufacturer Technical Support for additional
information.
Page 7

Getting started
1.
1
1 Getting started
Introduction
The Samsung Network Printer Card allows you to connect your
printer directly to a network physically or wirelessly to share
the printer among multiple users. Once the card has been
installed, the printer is ready to function as a network print
server supporting various network environments, such as
Windows 98/Me/NT/2000/XP/2003, Novell NetWare, UNIX,
Linux, and Macintosh 8.6 or higher.
This guide explains how to install the Samsung Network Printer
Card and set up your printer as a print sever over the network.
This guide assumes that you have:
• A good working knowledge of your network utilities
• A supported network operating system
• A fully operational computer system
• Access to the supervisor account as a network administrator,
or access to an account that has supervisor and print server
operator privileges
Supported network
environments
Administrators and users can configure, and use printers on the
following supported network operating systems:
Operating
system
Network
environment
Printing
protocol
Action
Windows 98, NT, ME,
2000, XP, 2003
TCP/IP, LPD
(LPR), IPP,
IPX/SPX,
Bonjour
See Chapter 3,
“TCP/IP
environment.”
Linux Red Hat 8.0 ~
9.0, Fedora Core
1 ~ 3, Mandrake
9.0 ~ 10.2,
SuSE 8.2 ~ 9.2
TCP/IP, LPD
(LPR)
See Chapter 3,
“TCP/IP
environment.”
NOTE
: Your printer may not support all of the listed computing
environments (operating systems). Therefore, check the
network environment your printer supports in the user's guide
that came with the printer.
Samsung Network Printer Card
Your printer may or ma y not have built- in network capabilities,
depending on the model. If not, a networking package must be
purchased and installed to enable network printing. The printer
card shape and content may vary, depending on the package
purchased.
Package contents
When unpacking your network printer card, you should find the
following items. Depending on your particular card type (wir ed
or wired/wireless), some items may be different.
• Wired Network Printer Card
• Wired / Wireless Network Printer Card
Unix AT&T system V
(Rel 4.2),
BSD4.3, HP-UX
(Rel 9.x & Rel
10.x), SCO 5.x,
SUNOS 5.5,
Sparc or Solaris
2.5.
TCP/IP, LPD
(LPR)
See Chapter 3,
“TCP/IP
environment.”
Novell
NetWare
NetWare
versions 3.x,
4.x, 5.x, 6.x
IPX/SPX See Chapter 4,
“NetWare
environment.”
Macintosh Macintosh 8.6 ~
9.2, 10.1 ~
10.3, or higher
TCP/IP,
EtherTalk,
Bonjour
See Chapter 5,
“EtherTalk
environment.”
Operating
system
Network
environment
Printing
protocol
Action
Page 8
Getting started
1.
2
System requirements
The following hardware is required to configure a Samsung
printer for network applications.
Installing your Network Printer Card
Before installing the Samsung Network Printer Card, you must
have administrator or root privileges on the local system.
1
Install the network printer card in the printer. For details,
refer to your printer user’s guide.
2
Use a twisted pair cable with an RJ-45 connector to
connect the printer to your network.
Once a connection is established between the network
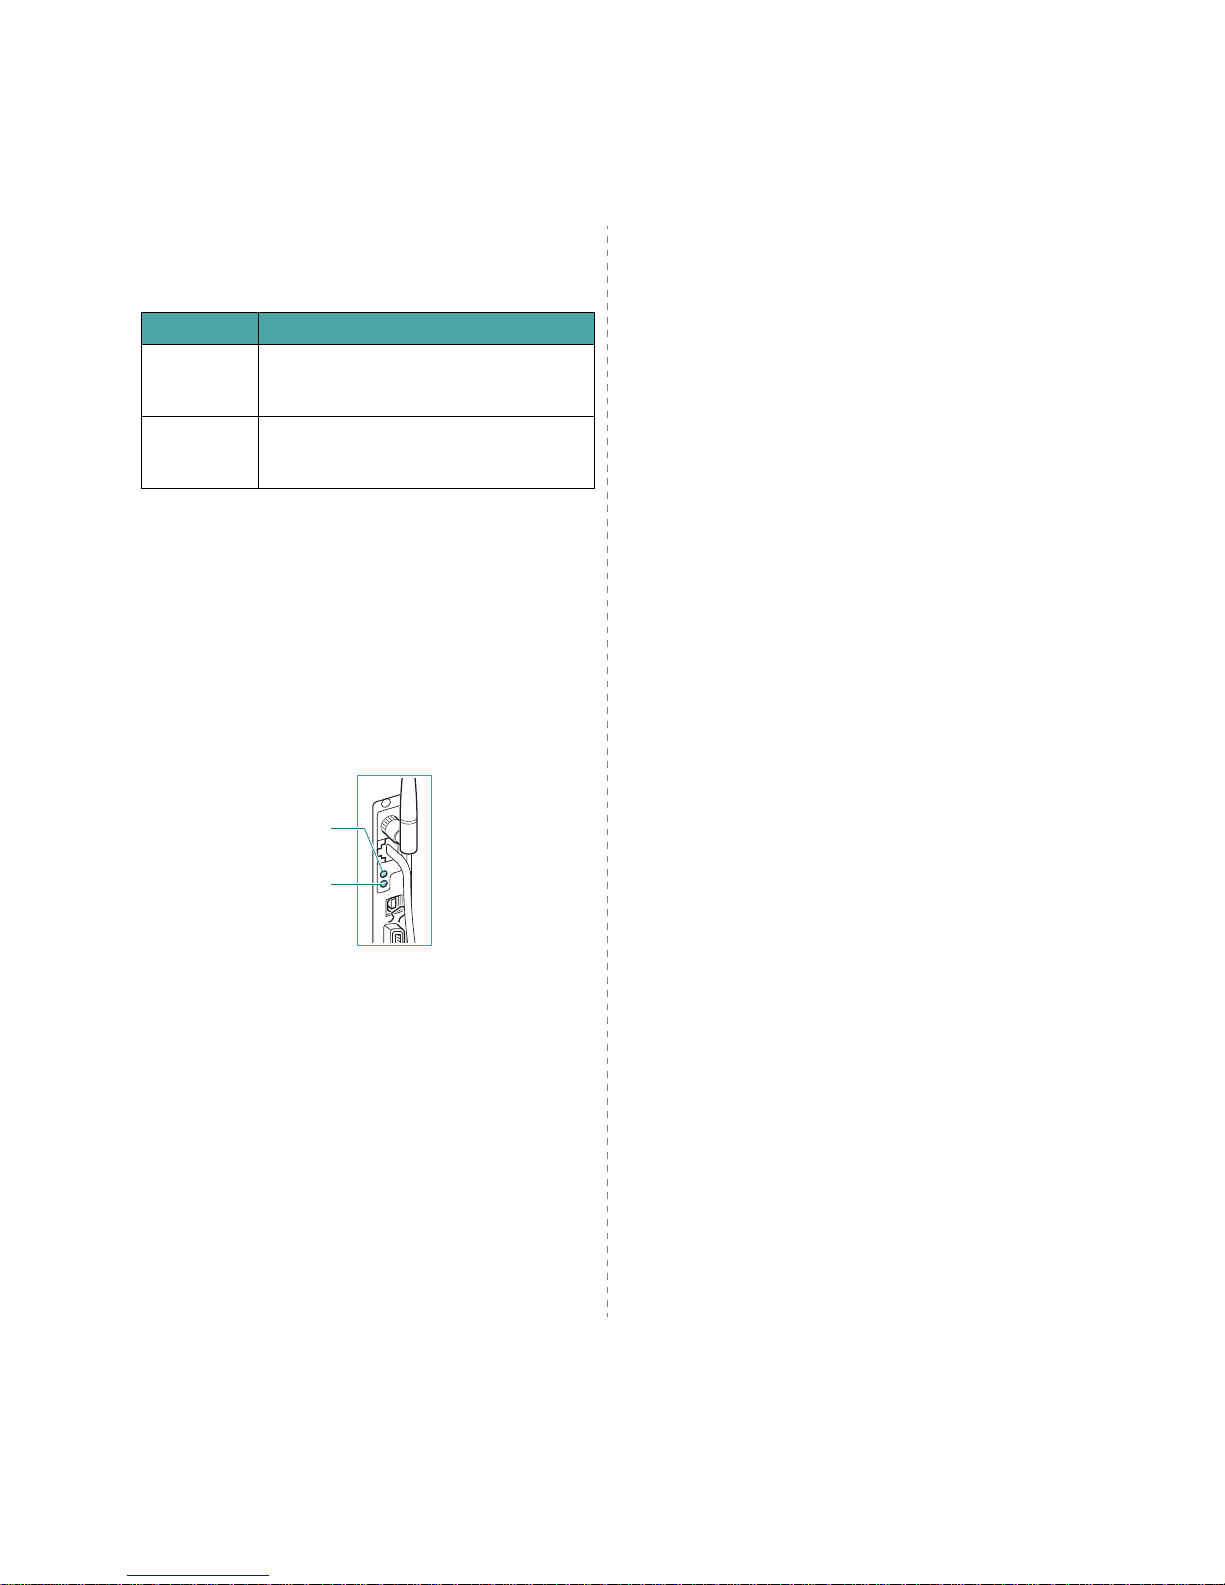
printer card and your network, the LEDs on the card light
green.
3
Set up your printer's IP address. See “IP address setup” on
page 2.2.
Computer Requirements
IBM compatible PC
• 80486 CPU or higher
• Minimum of 16 MB of RAM
• 2 MB of free disk space
Macintosh • PowerPC 68020 or higher
• Minimum of 8 MB of RAM
• 2 MB of free disk space
Lights when the
printer card is
connected to the
network.
Blinks when data
packets are being
transferred.
Page 9

Programs supplied on the Network Utilities CD
2.
1
2 Programs supplied on
the Network Utilities CD
The CD-ROM supplied with your printer card provides yo u with:
•
SyncThru Web Admin Service
: A web-based printer
management solution for network administrators. It
provides you with an efficient way of managing network
printers and lets you remotely monitor and troubleshoot
network printers from any site with corporate intranet
access.
•
SetIP
: A utility program allowing you to select a netwo rk
printer card and manually configure the addresses for use
with the TCP/IP protocol.
System requirements
T o install SyncThru W eb Admin Service and SetIP, the following
are required:
• Operating system: Windows 2000/XP/2003
• Computer/Processor: 133 MHz or faster Pentium-compatible
processor
• Memory: 256 MB (recommended)
• Hard Disk space: 2 GB hard disk with 1.5 GB available harddisk space
• Internet Explorer 5.5 or later, or Mozilla 1.0
Installing software
1
Insert the supplied CD-ROM into your CD-ROM drive.
The CD-ROM will automatically run. If it does not, click
Start
Æ
Run
, enter
x:/cdsetup.exe (x
represents your
CD-ROM drive), and click
OK
.
2
Select the language you want.
3
Click
Install SyncThru Web Admin Service
or
Install
SetIP
.
4
Follow the onscreen instructions to complete installation.
5
Click
Finish
when installation is done.
Uninstalling software
You should remo ve the Network utilities if you are upgrading
the software or if the installation fails.
NOTE
: Close all programs before uninstalling software.
1
Click
Start
Æ
Programs
Æ
Samsung Network Utilities
Æ
SetIP
or
SyncThru Web Admin Service
Æ
Uninstall
SetIP
or
Uninstall SyncThru Web Admin Service
.
2
Click OK to confirm uninstallation.
3
Click
Finish
when uninstallation is done.
Viewing the SyncThru Web Admin
Service User’s Guide
The user’s guide for SyncThru Web Admin Service in HTML
format is installed on the Windows Start menu automatically
with the program. It provides you with quick and easy access
to the topic you want. Refer to the user’s guide any time you
need help while using the program.
To open the SyncThru Web Admin Service User’s Guide, click
Start
Æ
Programs
Æ
Samsung Network Printer Utilities
Æ
SyncThru Web Admin Service
Æ
User’s Guide
.
Page 10
Programs supplied on the Network Utilities CD
2.
2
IP address setup
Before using your network print server in your network, you
must set TCP/IP addresses for the print server. You will need
your printer card’s MAC address, IP address, subnet mask, and
gateway address. First, check with your network administrator
for the TCP/IP addresses.
NOTE
: The MAC address is the hardware serial number of the
network printer card. You can check the address by printing
the Network Printer Configuration Page. For printing the page,
refer to your printer user’s guide.
You can set your print serve r’s IP address via the following
methods:
• Printer control panel: If your printer has a control panel and
the network configuration menu, you can set the IP address
directly from the printer. Refer to your printer user’s guide.
• SetIP program: Go to the
Using SetIP
.
• SyncThru Web Admin Service: Go to the
Using SyncThru
Web Admin Service
.
• SyncThru Web Service: Once you have set an IP address for
your network print server, you can use the embedded web
server in the network printer card to change the address. Go
to page 2.3.
• DHCP: You can use Dynamic Host Configuration Protocol
(DHCP) to get an IP address automatically assigned by your
network administrator, if your network system supports this
protocol.
• BOOTP: A network-based server using the BootStrap
protocol (BOOTP) can notify the network printer card of its
assigned IP address each time the printer turns on, if your
network system supports this protocol.
NOTE
: To get an IP address from the DHCP or BOOTP server,
the IP assignment method must be set to DHCP or BOOTP.
Using SetIP
1
From the Windows Start menu, select
Programs
Æ
Samsung Network Printer Utilities
Æ
SetIP
Æ
SetIP
.
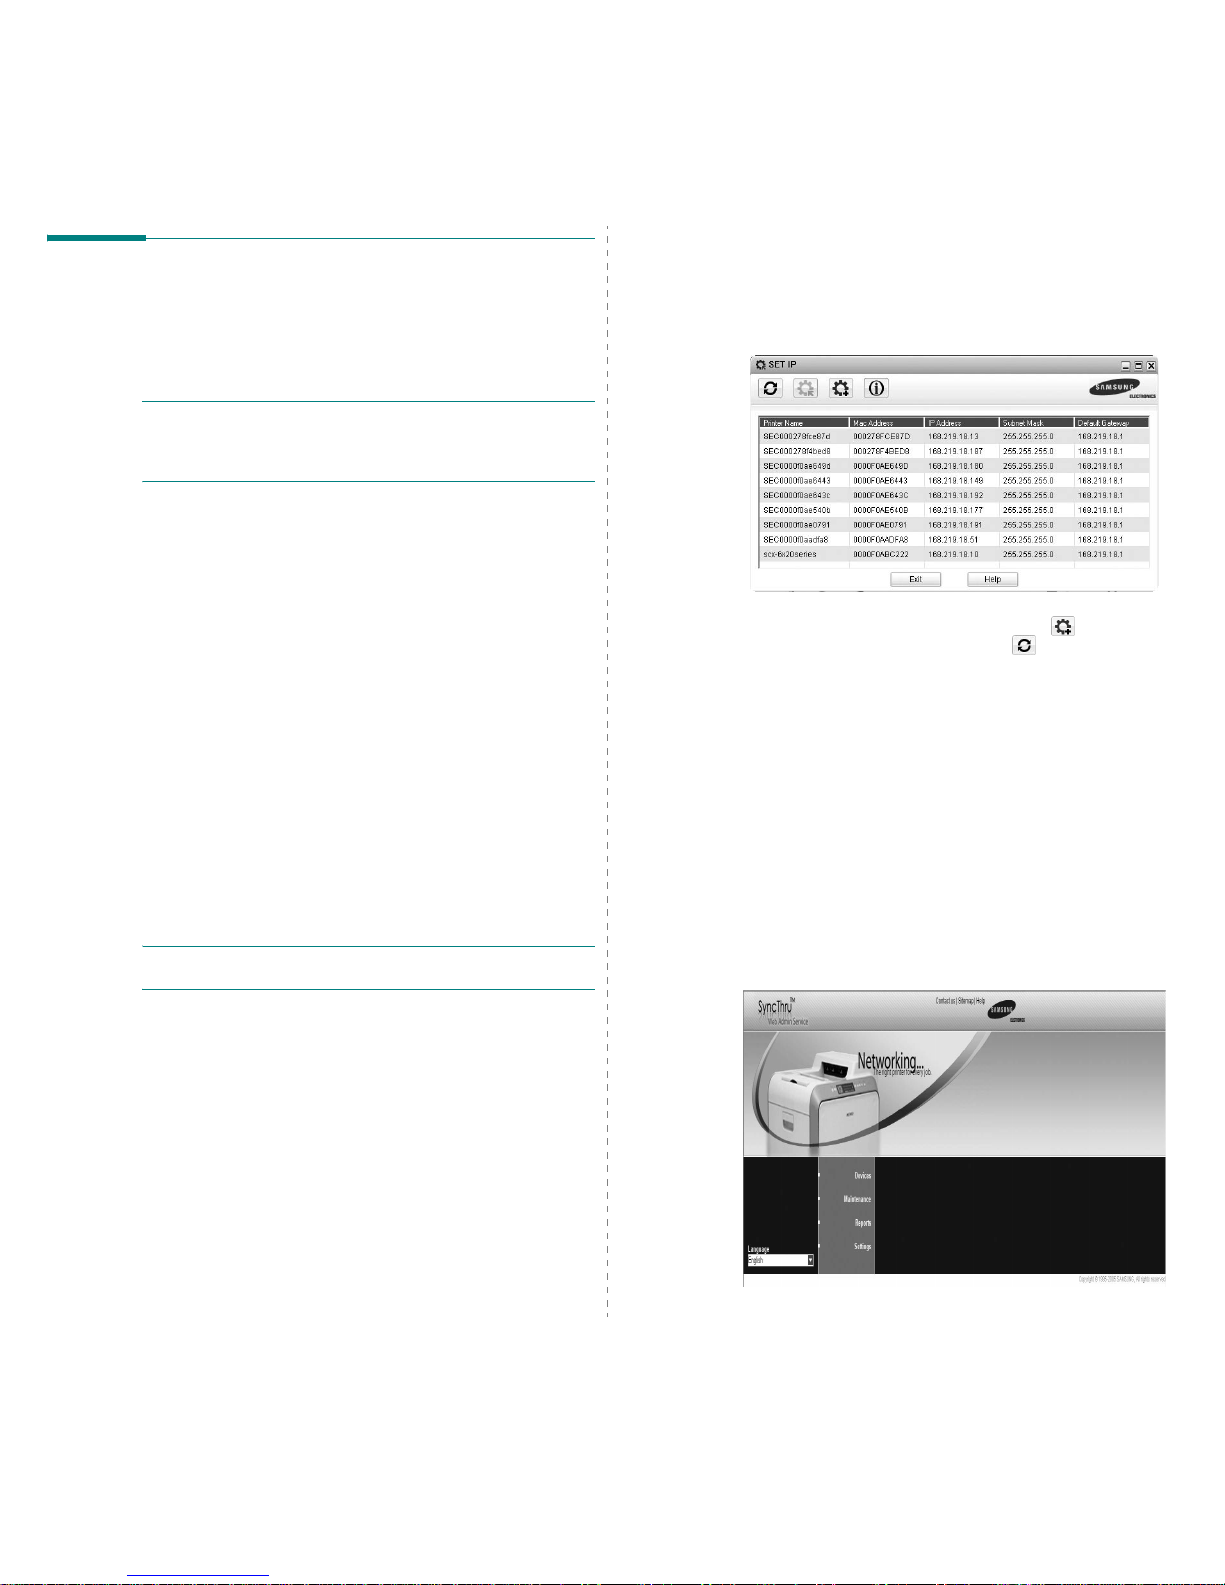
The program automatically detects and displays new and
configured print servers on your network.
2
Select the name of your printer and click . If you
cannot find your printer name, click to refresh the list.
Even with this step, if you cannot find your printer name ,
then contact Network Administrator.
3
Enter your network printer card’s MAC address (hardware
address), IP address, subnet mask, default gateway, and
then click
Apply
.
4
Click OK to confirm the settings.
5
Click
Exit
to close the SetIP program.
Using SyncThru Web Admin Service
1
From the Windows Start menu, select
Programs
Æ
Samsung Network Printer Utilities
Æ
SyncThru Web
Admin Service
Æ
SyncThru Web Admin Service
.
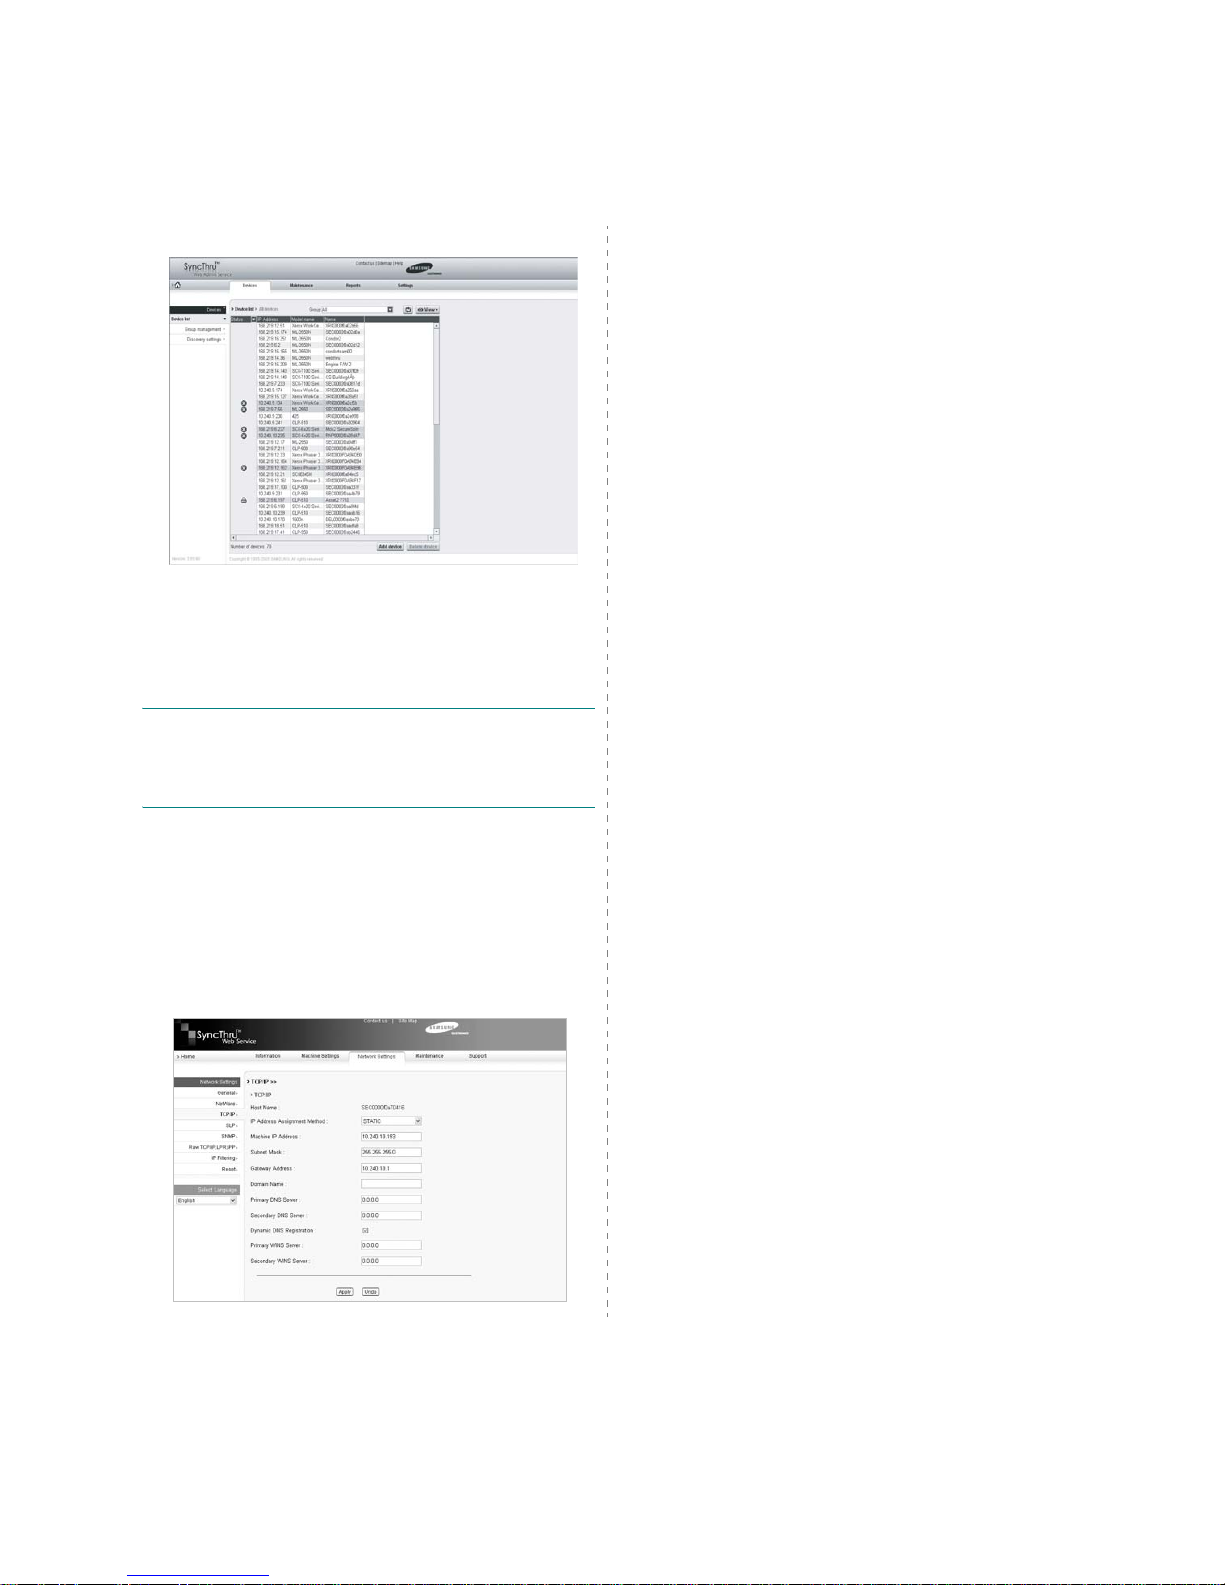
The homepage of SyncThru Web Admin Service opens in
your default web browser.
2
If necessary, change the display language.
Page 11
Programs supplied on the Network Utilities CD
2.
3
3
Click
Devices
Æ
Add device
.
If you click Devices, SWAS would search out the printer
connected to network. Thus you need to wait for a while.
4
Enter the IP address or DNS name of the network printer
card and click
OK
.
Your network print server is added to the device list.
NOTE
: You can set SyncThru Web Admin Service to
automatically detect print servers on the network. From the
Devices page, click
Discover settings
and set the discovery
method and schedule. For details, see the SyncThru Web
Admin Service User’s Guide.
Using SyncThru Web Service
1
Run your web browser.
2
Enter your print server’s IP address in the URL field and
click
Go
.
3
Click
Network Settings
Æ
TCP/IP
.
4
Select
Static
from
IP Address Assignment Method
.
5
Enter your print server’s TCP/IP addresses and click
Apply
.
Page 12

TCP/IP environment
3.
1
3 TCP/IP environment
A TCP/IP network provides you with various protocols for using
printing devices and managing various types of networked
devices.
In this chapter , you will learn which management protocols are
available in TCP/IP network environments, and how to print via
your network print server using TCP/IP protocol.
Management protocols
Before beginning to print documents via your network printer,
you need to check or configure some parameters using
management protocols.
DHCP/BOOTP
Dynamic Host Configuration Protocol (DHCP) is a
communication protocol enabling network administrators to
centrally manage and to automate the assignment of IP
addresses in a network. In an IP network, each device needs a
unique IP address. DHCP lets a network administrator
supervise and distribute IP addresses from a central point and
automatically sends a new IP address when a device is plugged
into a different place in the network.
Bootstrap Protocol (BOOTP) is UDP/IP-based protocol which
allows a booting host to configure itself dynamically and
without user supervision. BOOTP provides means to notify a
host of its assigned IP address, the IP address of a boot server
host, and other configuration information, such as the local
subnet mask, the local time offset, and the addresses of default
routers. Addresses of various Internet servers can also be
transferred to a host using BOOTP.
DHCP is active by factory default on your network print server.
After boot up, the network print server will get an IP address
automatically from the DHCP server, if one exists. To set an IP
address manually, see page 2.2.
Configuring DHCP/BOOTP
To enable or disable DHCP/BOOTP, use one of the following
methods:
•
Printer’s control panel
: Refer to Network Menu settings in
your printer user’s guide.
•
SyncThru Web Service
: Select
Network Settings
Æ
TCP/IP
and select
DHCP
or
BOOTP
from the IP Address
Assignment Method list.
HTTP
Hypertext Transfer Protocol (HTTP) is an application layer
protocol for distributed, collaborative, hypermedia information
systems. It is a generic, stateless protocol which can be used
for many tasks beyond its use for hypertext, such as with name
servers and distributed object management systems. You are
using HTTP when you connect your network printer via a web
browser.
The Samsung Network Printer Card has a built-in web server,
SyncThru Web Service. You can configure and manage your
network print server through SyncThru W eb Service using HT TP
over TCP/IP.
SNMP
Simple Network Management Protocol (SNMP), which is part of
the TCP/IP protocol suite, is an application layer protocol that
facilitates the exchange of management information between
network devices. It enables network administrators to remotely
monitor and configure network devices, find and solve network
problems, and plan for network growth.
Network devices are monitored and controlled using four basic
SNMP commands:
•
read
: is used by a Network Management server to monitor
network devices. The server examines different variables
that are maintained by the devices.
•
write
: is used by a Network Management server to control
managed devices. The server changes the values of
variables stored within the devices.
•
trap
: is used by network devices to asynchronously report
events to a Network Management server. When certain types
of events occur, a device sends a trap to the specified server.
•
Traversal operations
: are used by a Network Management
server to determine which variables a netw o rk device
supports and to sequentially gather information in variable
tables, such as a routing table.
Configuring SNMP
To access your network print server using SNMP, Community
Name/Access Permission pair must be properly specified. There
are two access permission: read and write.
Assign the IP addresses of trap hosts and community names (IP
addresses) of network devices in SyncThru W eb Service; select
Network Settings
Æ
SNMP
.
Using SNMP
SyncThru Web Service accesses, configures, and manages
network devices using SNMP. You can use other MIB
(Management Information Base) browser software, which
allows you to access management information gathered from
network devices.
Page 13

TCP/IP environment
3.
2
SLP
Service Location Protocol (SLP) is an Internet standard network
protocol that provides a framework to allow networking
applications to discover the existence, location, and
configuration of networked services in enterprise networks,
such as printers, Web servers, fax machines, video camer as,
file systems, backup devices (tape drives), databases,
directories, mail servers, and calendars.
In order to locate services on the network, users of network
applications are required to supply the host name or network
address of the device that supplies a desired service. However,
SLP eliminates the need for a user to know the name of a
network host supporting a service. Rather, the user only needs
to supply the desired type of service and set of attributes or
keywords, which describe the service.
Based on that description, SLP also resolves the network
address of the service of the user. Administrators do not need
to help clients find new services or to remove services when
they are no longer available. SLP uses multicasting and can
work over subnet boundaries.
Configuring SLP
You can configure SLP protocol settings through Sync Thru W eb
Service. Select
Network Settings
Æ
SLP
.
•
SLP Protocol
: You can enable or disable SLP.
•
Port Number
: The port number is fixed to 427.
•
Scope 1 ~ 3
: A scope is a set of services and a string used
to group resources by location, network, or administrative
category. Each scope should not be more than 32
characters.
•
Message Type
: You can select the outgoing SLP message
type sent to network devices. The default value is
Multicast
.
•
Multi Cast Radius
: You can specify the maximum number
of subnets that SLP multicasts can travel across. This value
is also called the “hop count” or “time-to-live” (TTL). The
default value is 255.
•
Registration Lifetime
: You can define the time in seconds
before the Server Agents registration expires.
•
Multicast Address
: The Multicast Address value is fixed to
239.255.255.253, 224.0.1.127.
Using SLP
Once
SLP enabled
is checked, the network print server works
as a Service Agent and the User Agent, for example, SyncThru
Admin Service, searches for the network print server by SLP
Protocol.
Dynamic DNS (DDNS)
DNS (Domain Name System) is used for registration of domain
names and provides Host names to an IP address resolution
service. For printer devices, DNS may be utilised for printer
domain name registration, so that print server clients may refer
to the printer by its host name rather than by its IP address.
Even though a printer’s IP address is changed, all clients can
operate this printer without reconfiguration. Addressing to a
printer device by IP address is not convenient and may often go
stale if an IP address to a device is assigned dyna mically via a
DHCP server. If the DHCP server can provide information about
a printer’s changing IP address to the DNS server
automatically, user convenience is increased. The printer’s
name will be used as its DNS name.
Configuring DDNS
1
Let the DHCP server provide updated information to the
DNS server.
2
Configure the same DDNS domain through SyncThru Web
Service as entered in the DNS server.
If you connect your network printer via a web browser, you
can enable this by selecting
Network Setting
Æ
TCP/IP
Æ
Dynamic DNS Registration
.
3
Set the IP assignment method of your network print server
to
DHCP
and reboot the printer.
The DNS server will update its database and users can use
the printer’s name instead of its IP address.
WINS
Before Dynamic DNS was defined, DNS could only be updated
manually when DHCP servers automatically provided (or
removed) IP addresses. As a result, DNS servers often
contained obsolete listings. In response, Microsoft developed
Windows Internet Name Service (WINS) to solve this problem
for NetBIOS names.
Microsoft now recommends moving to Dynamic DNS and away
from WINS. However, many customers including Microsoft
maintain WINS systems and need devices to interoperate with
WINS. So devices must, at least for now, support WINS
interoperability to allow for dynamic NetBIOS name to IP
address registration and resolution.
WINS provides a distributed database for regi stering and
querying dynamic NetBIOS names to IP address mapping in a
routed network environment. This is the best choice for
NetBIOS name resolution in such a routed network because it
is designed to solve the problems that occur with name
resolution in complex Internet networks.
Page 14

TCP/IP environment
3.
3
Configuring WINS
Access SyncThru W eb Service and select
Network Settings
Æ
TCP/IP
. You will configure two WINS serv er addresses, the
Primary WINS Server or the Secondary WINS Server. The
default value is 0.0.0.0.
In a DHCP server
A DHCP server can support the NBNS (NetBIOS Name Server)
option. An administrator has to set the WINS server IP address
in the NBNS option.
1
Set the IP assignment method of your network print server
to
DHCP
.
2
Reboot the print server.
The WINS server will update the printer's NetBIOS name
in its database. Users can use the printer name instead of
its IP address.
In the network print server
1
Configure the WINS server address through SyncThru W eb
Service or SyncThru Web Admin Service.
2
Reboot the print server.
The WINS server will update the printer's NetBIOS name
in its database. Users can use the printer name instead of
its IP address.
Bonjour
Bonjour allows for a network system to be easily discovered
and its capabilities to be revealed by any Bonjour-complian t
client software, such as Print Center Utility built in to Mac OS X.
For details, see page 5.2.
UPnP
UPnP is an architecture for pervasive peer-to-peer network
connectivity of intelligent appliances, wireless devices, and PCs
of all form factors. It is designed to br ing easy-to- use, flexible,
standards-based connectivity to ad-hoc or unmanaged
networks whether in the home, in a small business, public
spaces, or attached to the Internet.
UPnP is a distributed, open networking architecture that
leverages TCP/IP and Web technologies to enable seamless
proximity networking in addition to control and data transfer
among networked devices in the home, office, and public
spaces.
UPnP is more than just a simple extension of the plug and play
peripheral model. It is designed to support zero-configuration,
“invisible” networking, and automatic discovery for a wide
breadth of device categories from a wide range of vendors. This
means a device can dynamically join a network, obtain an IP
address, convey its capabilities, and learn about the presence
and capabilities of other devices. DHCP and DNS servers are
optional and are used only if available on the network, while a
device can leave a network smoothly and automatically without
leaving any unwanted state issues behind.
UPnP supports 6 protocol stacks for addressing, discovery,
description, control, eventing, and presentation, but the
Samsung Network Printer Card supports only Simple Service
Discovery Protocol (SSDP) which allows addressing,
description, and discovery.
Configuring UPnP
• Control panel: Refer to the Network Menu setting in your
printer user’s guide.
• SyncThru Web Service: Select
Network Settings
Æ
UPnP
.
-
Auto IP Enabled
: You can enable or disable Auto IP. When
this option is selected, the network print server cannot find
the control point and receive an IP address from the
control point. The network print server will create an IP
address of “169.254.XXX.XXX.”
-
Multicast DNS Enabled
: SSDP can use Multicast DNS.
-
SSDP Enabled
: You can enable or disable SSDP.
-
SSDP TTL
: You can specify the maximum number of
subnets that SSPD multicasts can travel across.
Using UPnP
If SSDP (Simple Service Discovery Protocol) is enabled, your
network print server is checked by a control point. This control
point is an application which supports finding UPnP devices.
Information on searching and control functions or your network
print server’s device information is displayed in a n XML pa ge
(http://xxx.xxx.xxx.xxx:5200/printer.xml).
Page 15

TCP/IP environment
3.
4
Printing protocols
Before setting the network printing ports, you must install the
printer driver with the local port (LPT) on the system. Refer to
your printer user’s guide.
Standard TCP/IP port
You can print your documents to your Samsung network printer
by creating a Standard TCP/IP port.
Configuring Standard TCP/IP in Windows
2000/XP/2003
You can enable or disable the Standard T C P/IP Printing port
through SyncThru Web Service. Select
Network Settings
Æ
Raw TCP/IP, LPR, IPP
.
You can also change the port number of the Standard T CP /IP
port. The default port number is 9100.
Creating a Standard TCP/IP port
1
In Windows XP, click
Start
Æ
Printers and Faxes
. In
Windows 2000/2003, click
Start
Æ
Settings
Æ
Printers
.
2
Click
Add a printer
or double-click
Add Printer
, and then
Next
.
3
Click
Local printer attached to this computer
and then
Next
.
Make sure that
Automatically detect and install my
Plug and Play printer
is not selected.
4
Click
Create a new port
, select
Standard TCP/IP port
from the Type of port list, and click
Next
.
5
Click
Next
.
6
Enter the IP address or DNS name of your network printer
and click
Next
.
For the port name, a default name will be entered by
Windows. You can change it to a mo re user-friendly name.
7
Follow the instructions on the screen to complete
installation.
Now, you can select your printer from the Print Setup
dialogue box.
LPR port
LPD, Line Printer Daemon, is the protocol associated with lineprinter spooling services. Users can use the printing service
from LPD running on a Samsung network print server through
the LPR port. Most operating systems, such as Microsoft
Windows NT/2000/XP/2003, Linux, and Unix, support LPR port
printing.
Configuring an LPR port
You can enable or disable the LPR Printing port through
SyncThru Web Service. Select
Network Settings
Æ
RawTCP/IP, LPR, IPP
. You can also change the port number
of LPR/LPD. The default port number is 515.
In Windows NT
Before adding an LPR printing port, make sure that Microsoft
TCP/IP printing service is installed on your Windows NT
computer, or install the software, if necessary.
Installing the TCP/IP printing service
1
Make sure your computer supports Microsoft TCP/IP
printing service.
1) From the Windows Start menu, select
Settings
Æ
Control Panel
.
2) Double-click
Network
.
3) Make sure that
TCP/IP protocol
is listed in the
Protocols tab and Microsoft TCP/IP printing is listed in
the
Services
tab. If not, go to step 2.
2
Install TCP/IP printing service:
Click
Add
and select
TCP/IP Protocol
Æ
Microsoft
TCP/IP Printing
. Follow the onscreen instructions to
complete installation.
NOTES
:
• During the installation process, you may need the Windows
Installation CD-ROM.
• You can only install Microsoft TCP/IP Printing if you have
administrator privileges.
After installing the service, restart your computer.
Adding an LPR port
1
From the Windows Start menu, select
Settings
Æ
Printers
.
2
Click
Add Printer
.
3
Click
My Computer
and then
Next
.
4
Click
Add Port
and select
LPR Port
from the port type
list.
Page 16

TCP/IP environment
3.
5
5
Click
New Port
.
6
Enter the IP address or DNS name of the printer and the
name of a user-defined print queue.
7
Click OK.
8
Follow the onscreen instructions to complete installation.
In Windows 2000/XP/2003
To add an LPR port to Windows 2000/XP/2003, users must
install a Standard TCP/IP port by default, then change the
printing protocol in the printer properties. For installing the
Standard TCP/IP port, see page 3.4.
1
From the Windows Start menu, select
Settings
Æ
Printers
, or
Printers and Faxes
.
2
Right-click the printer you want and select
Properties
.
3
Click
Ports
.
4
Make sure that the appropriate Standard TCP/IP por t is
selected and click
Configure Port
.
5
Select
LPR
from the Protocol section.
6
Enter the print queue name and click OK.
7
Click OK to close the properties window.
In Unix
Depending on your particular Unix system, LPD configuration
may vary. See your system documentation for the correct
syntax for the system.
Samsung Printer Port
A Samsung Network Printer port is used to send print jobs from
network computers running Windows OS that do not support
the Standard TCP/IP port or LPR port. Adding a Samsung
Network Printer port
1
From the Windows Start menu, select
Settings
Æ
Printers
.
2
Right-click the printer you want and select
Properties
.
3
Open the
Details
tab and click
Add Port
.
4
Select
Samsung Network Printer Port
from the Other
list and click OK.
5
Select the print server you want to use and click OK.
If you cannot find the print server, click
Add New Print
Server to list
, specify information for the print server,
such as print server name, IP address, IPX address, or
MAC address, and click
OK
.
6
When the port name displays in the Print to the following
port list, click
OK
or
Close
.
IPP port
Internet Printing Protocol (IPP) allows printing across the
Internet, meaning that you can send a print job to your printer
from a remote place if you are an Internet user, no matter what
operating system you use or where you are.
Configuring IPP in the print server
The network administrator must specify information required
for IPP, such as the URI (Uniform Resource Identifier).
1
Run your web browser and access SyncThru Web Service.
2
Click
Network Settings
Æ
Raw TCP/IP, LPR, IPP
.
3
Configure the IPP parameters:
•
Printer Name
: Enter the network printer's name to be
used with IPP printing.
•
Printer URI
: Enter the URL of the printer using the
following format: ipp://the IP address of the printer or
http://the IP address of the printer:631 (Ex:ipp://
168.10.17.82 or http://168.10.17.82:631) 631 is the
IPP port number.
•
Printer Information
: Enter additional information
about the printer.
•
More Printer Information
: Enter more additional
information about the printer.
•
Printer Location
: Enter the name of the location
where the printer is physically located.
•
Multiple Operation Timeout
: Enter the time to elapse
before the printer ends a print job. When there is no
incoming data after the specified number of seconds,
the printer ends reception.
•
Time to Keep Jobs in History
: Set the length of time
the IPP printer keeps job information.
•
Operator Message
: Enter printer information for
printer users.
•
Job Count
: shows the number of print jobs.
•
Driver Installer
: shows the URL where you can get the
driver installer.
•
Manufacturer
: shows the URL where you can get
manufacturer information.
4
Click
Apply
.
Page 17

TCP/IP environment
3.
6
Configuring a Windows client
After the network administrator has configured the network
print server , each printer user must install the printer driver and
set the print port to Samsung IPP 1.1 Port Monitor.
NOTE
: Before following the steps below, each printer user
should install the printer driver. If the printer driver is not
already installed on the computer , install the printer driver that
came with the printer. Select the local port (LPT) when you
install the driver.
1
From the Windows Start menu, select
Settings
Æ
Printers
, or select
Printers and Faxes
.
2
Right-click the printer you want and select
Properties
.
3
In Windows 95/98/Me, click
Details
.
In Windows NT4.0/2000/XP/2003, click
Ports
.
4
Click
Add Port
.
5
Select
Samsung IPP Port
from the Other list and click
OK
.
6
Enter the printer URL and port name and click OK.
7
When the port name displays on the print port list, click
OK
.
Now you can select the network print server from the Print
Setup dialogue box to send a job.
Setting IPP security
SyncThru Web Service allows administrators to choose an
authentication method and to create or modify user accounts.
1
Run your web browser and access SyncThru Web Service.
2
Click
Network Settings
Æ
Raw TCP/IP, LPR, IPP
.
•
Authentication
: You can set a user name and
password encryption method (refer to http digest
authentication in RFC).
•
User DB
: You can set a user name and password for
IPP printing. You can set up the user database for up to
10 items.
3
Click
Apply
.
NOTE
: A user name should be unique for all slots and should
not include symbols. The length of the user name and the
password should each be less than 7 characters.
Additional functions
The following are additional functions you can use through
SyncThru Web Service or SyncThru Web Admin Service.
Printer properties settings
You can check and modify printer and document properties for
an installed printer . For prop erties that are not supported by the
printer driver, an error message indicating that the property is
not supported is displayed. These settings are used only for
printing from this system to the printer . However , these setting s
do not affect the printer properties of the network printer.
Firmware upgrade (HTTP)
You can upgrade y o ur printer’s firmware using the HTTP
protocol. First, you need to download firmware from the
Samsung website (http://www .samsungprinter.com).
NOTE
: Before upgrading the firmware, mak e sure that TCP/IP
parameters are entered in the print server.
1
Run your web browser and access SyncThru Web Service.
2
Click
Maintenance
Æ
Firmware Upgrade
.
3
Select a firmware type,
Printer Firmware
or
Network
Firmware
.
4
Click
Browse
, and then select the downloaded new
firmware.
5
Click
Upgrade
.
NOTE
: It takes a few minutes to upgrading the firmware.
After completely upgrade, the printer will be reset.
Default setting (HTTP/SNMP)
You can reset all of your network p arameter settings to their
default status.
NOTE
: All default parameters will be applied after the print
server restarts.
IP filtering
This security feature (IP Filtering) provides the ability to
prevent unauthorised network access to the network print
server based on IP addresses set by a network administrator
using SyncThru Web Service.
1
Run your web browser and access SyncThru Web Service.
2
Select
Network Settings
Æ
IP filtering
.
Page 18

TCP/IP environment
3.
7
3
Configure an IP filter.
•
IP Filtering
: You can enable or disable IP filtering.
•
IP Address1
~
Address10
: You can enter filtered IP
addresses. Users having the IP addresses set here are
able to access the network print server.
4
Click
Apply
.
Only system administrators or authorised users can set, via
SyncThru Web Service, IP addresses that can access the
device. Up to 10 addresses or ranges of address choices can be
made and set. Authorised users are able to change the action
(Apply/ Undo) and to print to the network print server.
NOTE
: Ranges of addresses shouldn't contain “null” or
“0.0.0.0” values.
Reset
1
Run your web browser and access SyncThru Web Service.
2
Click
Network Settings Æ
Reset
.
You can reboot the network print server, if your network
settings are not applied correctly or the network card is
disconnected from your network.
Ethernet speed
You can set the communication spe ed for Ethernet connections.
1
Run your web browser and access SyncThru Web Service.
2
Click
Network Settings
Æ
General
.
•
Speed Rate
: Automatic, 10 Mbps(Harf Duplex),
10 Mbps(Full Duplex), 100 Mbps(Harf Duplex ) ,
100 Mbps(Full Duplex). select a Ethernet speed from
the drop-down list.
3
Click
Apply
.
Page 19

NetWare environment
4.
1
4 NetWare environment
Samsung network printer card is compatible with Novell
NetWare networks in versions 3.x, 4.x, 5.x, and 6.x. You can
print to the network printer from any NetWare client that is
attached to the network. This section describes how to continue
printing with your network printer card in a NetWare
environment.
NetWare printing
The NetWare architecture for printing is comprised of the
following:
Printers
These are the physical printers, which may be attached either
to NetWare file servers, NetWare machines dedicated as print
servers, NetWare work stations, or directly to the network. The
Samsung network printer falls into the last category.
Print queues
These queues are found on NetWare file se rvers where print
jobs are stored before printing.
Print servers
These are programs that transfer print jobs from the print
queues to the printers. Print servers may operate from various
points in the NetWare network:
• They may be present on the NetWare file server (RPRINTER
mode). This puts an additional load on the file server.
• They may be present on the printers themselves (PSERVER
mode). This relieves the file server of a printing load a n d
does not require any dedication of NetWare machines as
print servers. Printing performance will be improved as the
printer will have optimised software and hardware to
accommodate network printing. Also, the print server and
physical printer are in close proximity and print data need
not travel over the network fr om print server to printer.
Additionally, printers connected to NetWare workstations may
be shared with the rest of the network. This is done by running
RPRINTER on the workstation and configuring the printers as
Remote Printers. Print servers on the network may then
interact with the RPRINTER program on the workstation for
printing. Configuration for NetWare printing in volves creation of
printers, print queues, and print servers, and the associations
between them on the NetWare file server.
The file server configuration for printers, print queues, and
print servers may be achieved using NetW are supplied utilities,
such as PCONSOLE and NWADMIN.
Configuring NetWare
NetWare Setup allows you to enter the names of the NetWare
objects that are concerned with network print jobs. The
NetWare print queues must be assigned to the NetWare print
servers you have set up for printing to the network printer card.
When you enable NetWare Setup, you can set up NDS (Novell
Directory Services), Bindery Services, or both. NDS is used with
NetWare 4.x/5.x/6 .x; Bindery Services are used with N etWare
3.x or with NetWare 4.x/5.x/ 6. x in bindery emulation mode.
You can set up IPX/SPX in SyncThru Web Service. Select
Network Settings
Æ
NetWare
.
•
Enable/Disable Bindery
: Select this option if you have a
NetWare network connected with the network print serv er.
•
Select Frames Types
: EtherNet_802.2/EtherNet_802.3/
EtherNet_II/EtherNet_SNAP. You must select at least one
frame type.
•
IPX/SPX mode configuration
: Configure IPX/SPX mode
for your NetWare system.
Bindery configuration
: You can set up the bindery server.
-
Bindery Setup
: Use this option if you have already
configured one or more bindery servers (file servers
running NetWare 3.x, or 4.x, 5.x, or 6.x in bindery
emulation) with a print server and a print queue for
network printing. Before entering bindery settings, The
network print server connected to the network and the
NetWare file server must be running. If access to the file
server or print server is restricted, you need to log in to a
NetWare Client system.
-
Bindery Print Server
: Enter the name of the print server
that you have configured in the NetWare utility PCONSO LE.
This is the print server that will route print jobs to the
network print server from NetWare Client on IPX ne tworks.
-
File Server
: Enter the name of the NetWare server on
which you have configured a print server and a print queue
to handle network printing.
NDS configuration
: You can set up the NDS server.
-
Enable/Disable NDS
: If NetWare servers you will use to
print to the network print server are running NetWare 4.x/
5.x/6.x in native mode.
-
NDS Tree
: Enter the name of the NDS tree that contains
the printer, print server, and print queue objects you have
previously defined on the NetWare server for the network
print server. Your new NDS tree selection automatically
overwrites any previous tree selection. If you change the
NDS tree selection and there are also current Bindery
settings, you are alerted that they will be deleted. If you
continue with NDS Setup, you can replace Bindery settings
afterwards.
-
NDS Print Server
: Enter the name of the print server
object as “name.context.”
Page 20

NetWare environment
4.
2
NOTE
: Use NDS Setup if your network uses NetWare 4.x/5.x/
6.x in native mode. Use Bindery Setup if your network uses
NetWare 3.X or uses NetW are 4.x/5.x/6.x in bindery emulation
mode.
Printing in NetWare
T o print to your network printer on a NetW are workstation, you
need to add a print queue.
NOTE
: T o use bindery emulation, y ou must log on to a Bindery
server as an administrator. In the NDS mode, log on to target
text of the NDS tree where you have administrator privileges.
Adding a queue
1
Open the NWADMIN dialogue box by double clicking on the
NetWare Client.
2
Right-click
CONTEXT
, then choose the
create
menu.
3
You will need to create all of the following items:
• Printer Server: represents a network print server.
• Printer: represents a network printing device.
• Printer Queue: represents a network print queue.
NOTE
: The New Object dialogue box lets you choose the class
of object to create.
4
Double-click each tree print object and select
Assignments menu
.
5
Click
Add
.
The print server object which was created in Step 3 has a
link assigned to the printer object and the printer object a
link to the print queue object.
Adding a printer
1
Select
Add Printer
from the
Printer and fax
menu in the
control panel.
2
Select
Network Printer
and click
Next
.
3
Select
Novell Directory Service
, and then click the
context tree and an existing printer object name.
4
Click
Next
.
5
If the server does not provide the printer driver or there is
no one available on the network, a dialogue box appears
to allow users to select a printer driver. Select the driver
and click
Next
.
6
Install the printer driver by following the onscreen
instructions.
Page 21

EtherTalk environment
5.
1
5 EtherTalk environment
EtherTalk is AppleTalk used in an Ethernet network. This
protocol is widely used in Macintosh network environments.
Microsoft Windows system also supports this protocol. Like
TCP/IP, EtherTalk also provides packet transmission and routing
functionality .
The Samsung network printer card works on EtherTalk
networks, if the host printer supports PostScript. The
description in this chapter applies to network printing from a
Macintosh computer.
EtherTalk printing
Printing in an EtherTalk network is possible with several
different hardware and software configurations. When y ou
issue a command to print a document, the application begins a
series of EtherT alk calls attempting to establish a connection to
the printer. The calls first initiate the NBP (Name Binding
Protocol) name-lookup process to find the currently selected
printer and its EtherTalk address. Then the Printer Access
Protocol (PAP) is used to open a connection with the printer.
Once the connection has been established, the workstation and
printer interact over a PAP connection. PAP uses lower-level
protocols, such as ATP and DDP, to provide a data-stream
service for sending print data to the printer.
Configuring EtherTalk
You can configure EtherTalk using the following methods:
Control Panel
Refer to the Network Menu setting in your printer user's guide.
SyncThru Web Service
1
Run your web browser.
2
Enter the printer's IP address in the URL field and click Go.
3
Select
Network Settings
Æ
EtherTalk
.
•
EtherTalk Protocol
: allows you to enable or disable
the EtherTalk protocol.
•
Printer Name
: allows you to set the printer name for
EtherTalk protocol. The default name is SEC+MAC
address. This name is automatically displayed on
Chooser.
•
Printer Type
: shows the printer type.
•
Last Error Occurred
: shows the last error.
•
RTMP
: allows you to set the time in seconds after which
the routing table entry maintained by the RTMP protocol
times out.
•
ZIP (current zone)
: shows the AppleTalk Zone name.
If there is no configured zone, *(asterisk) should be
displayed.
•
PAP (wait time before transmitting a tickle
packet)
: enables you to define the time interval in
seconds after which the PAP protocol should resend a
tickle packet to verify the status of the PAP connection
between the printer and your Macintosh.
4
Click
Apply
.
Configuring the printer
Note
: The following instructions are for Mac OS 10.3, but
similar for other versions.
The following steps must be taken to configure the network
printer for use on a Macintosh system. If the network printer
you want to use is not listed in the printer pop-up menu when
you try to print a document, you should add it to your list of
available printers.
1
Open
System Preferences
and click
Print & Fax
.
2
Click
Printing
Æ
Set Up Printers
.
3
If the printer already appears in the printer list, select the
In Menu
check box to add it to your list of available
printers. You will see the printer in the Printer pop -up
menu the next time you print.
4
Choose
Printers
Æ
Add Printer
.
5
Choose
AppleTalk
from the pop-up menu list on the top.
6
If necessary, choose an AppleTalk zone from the pop-up
menu that appears directly below it. Any Apple Talk printers
in the zone you have chosen appear in the Printer List.
7
Select the printer in the Printer List.
8
To use printer-specific features, choose the item
appropriate for your printer from the Printer Model pop-up
menu, then select your printer in the Model Name list.
9
Click
Add
.
The printer appears in the Printer List as the default
printer (in boldface). It also appears in the Printer pop-up
menu when you print a document.
Page 22

EtherTalk environment
5.
2
TCP/IP printing
Apple added TCP/IP printing to all versions including and after
OS 8.6.
NOTE
: Ensure that the Macintosh has version 8.6 or later.
Earlier versions do not support TCP/IP printing as standard.
An IP printer is a network printer that uses TCP/IP protocols
(such as LPD/LPR, IPP, or Socket or Jet Direct) to make itself
accessible to your computer. If the IP printer you want to use is
not listed when you want to print, you can add it to your list of
available printers. To add an IP printer, you need to know its IP
address or DNS name.
1
Open
System Preferences and click
Print & Fax
.
2
Click
Printing
Æ
Set Up Printers
.
3
If the printer already appears on the Printer List, select the
In Menu
check box to add it to your list of available
printers. You will see the printer in the Printer pop-up
menu the next time you print.
4
Choose
Printers
Æ
Add Printer
.
5
Choose
IP Printing
from the pop-up menu.
6
Select the appropriate printing protocol from the Printer
Type pop-up menu.
7
Enter the IP address or DNS name for the printer in the
Printer Address field.
8
If your printer requires it, type the queue name for your
printer in the Queue Name field.
9
To use printer-specific features, choose the item
appropriate for your printer from the Printer Mod el pop-up
menu, then select your printer in the Model Name list.
10
Click
Add
.
The printer appears on the Printer List as the default
printer (in boldface). It also appears in the Printer pop-up
menu when you print a document.
Bonjour printer
Usually used in Macintosh networks to search for network
devices, Bonjour consists of IPv4 Link-Local Addressing,
Multicast DNS, and DNS Service Discovery. Known as zero
configuration networking, Bonjour uses industry standard IP
protocols to allow devices to automatically find each other
without the need to enter IP addresses or configure DNS
servers.
In order to provide a true zero configuration experience,
meaning that you do not need to configure network
parameters, the printer MUST have Bonjour enabled by default.
It is NOT possible to disable any part of Bonjour.
After boot up, check the Bonjour printer name of this printer
network card in Mac OS X.
1
Open
System Preferences
and select
Print & Fax
.
2
Click
Printing
Æ
Set Up Printers
.
3
If the printer already appears on the Printer List, select the
In Menu
check box to add it to your list of available
printers. You will see the printer in the Printer pop -up
menu the next time you print.
4
Choose
Printers
Æ
Add Printer
.
5
Choose
Bonjour
from the pop-up menu. Any Bonjourenabled printers on your local network or subnetwork
appear on the Printer List.
6
Select your printer from the Printer List.
7
To use printer-specific features, choose the item
appropriate for your printer from the Printer Model pop-up
menu, then select your printer in the Model Name list.
8
Click
Add
.
The printer appears on the Printer List as the default
printer (in boldface). It also appears in the Printer pop-up
menu when you print a document.
Page 23
Wireless network environment
6.
1
6 Wireless network
environment
Overview
The Samsung Wireless Network Printer Card supports the
IEEE 802.11a/b/g standard for wireless LAN (W LAN)
communications. Properly configuring your network's wireless
settings on the print server will allow you to send print jobs to
the print server over the WLAN. When a computer sends a file
to the print server , a r adio signal is transmitted. When the print
server receives the incoming signal, either directly from the
computer (Ad Hoc/Computer-to-Computer mode) or from an
access point (Infrastructure/AirPort Network mode), it prints
the file.
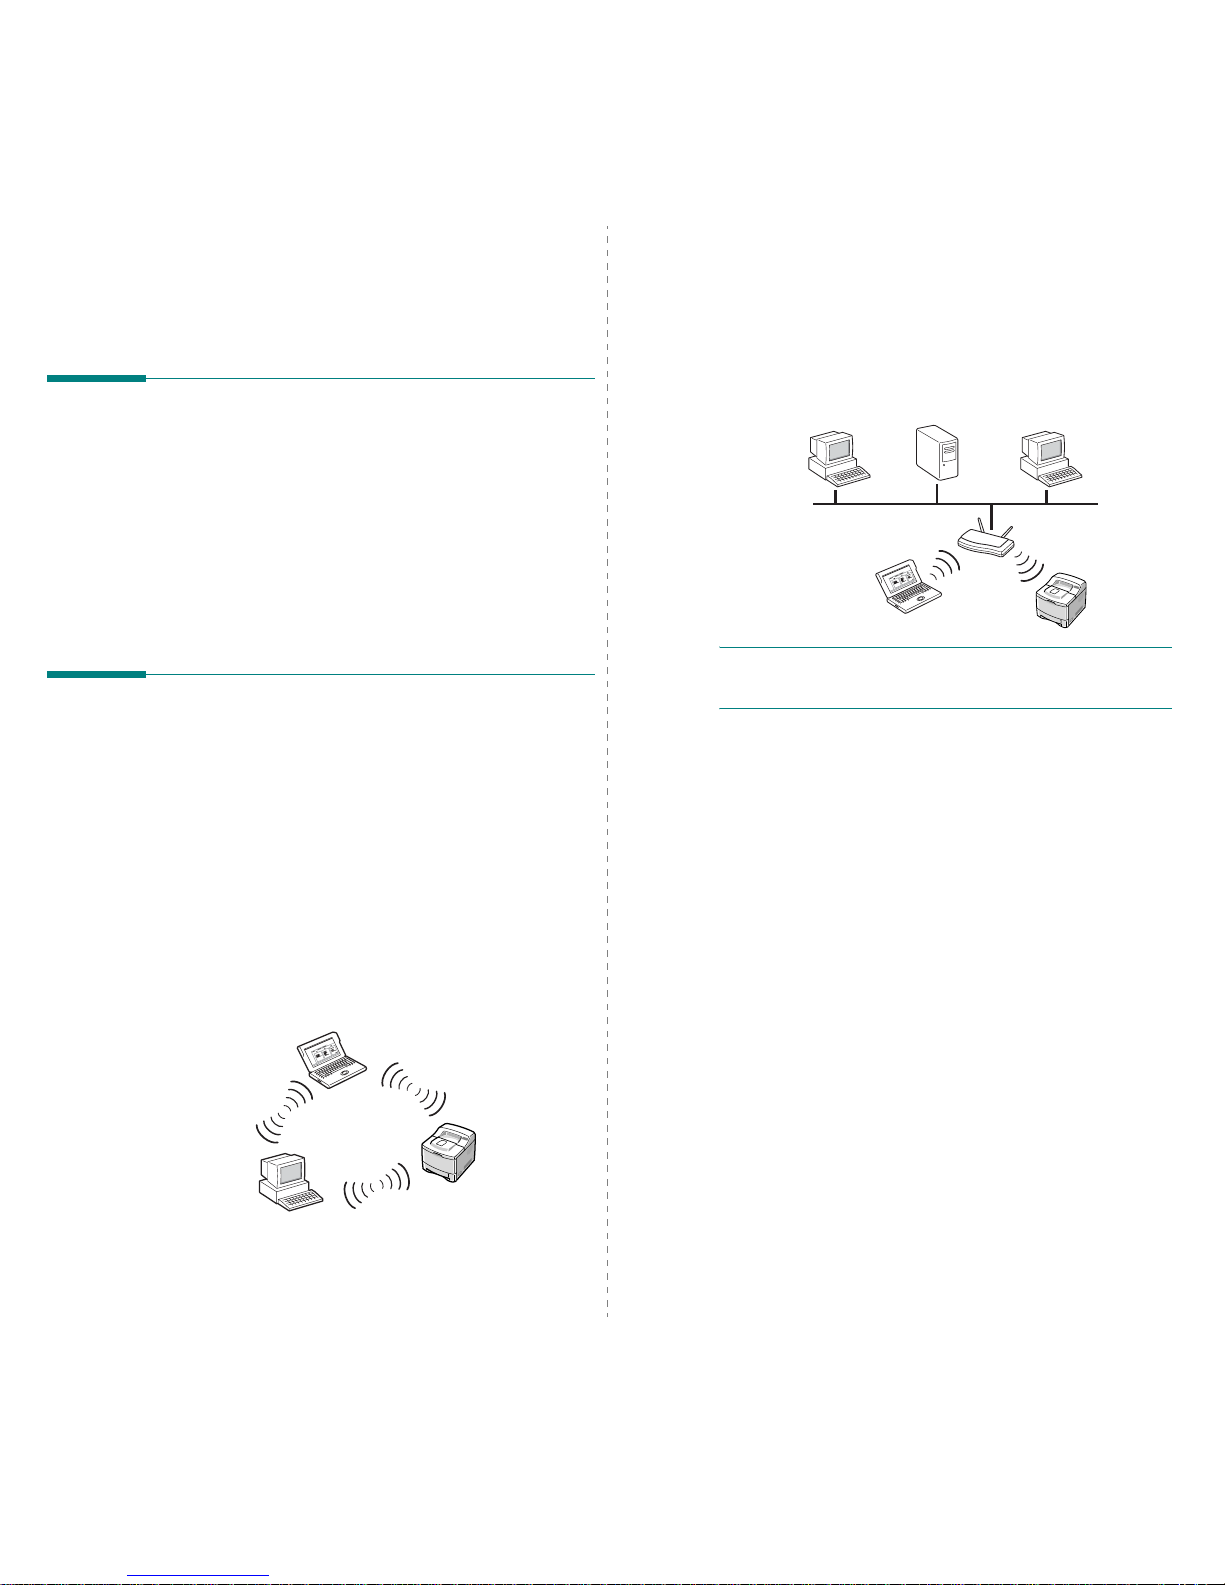
Basic concept and terms
This section provides you with information on the basic
concepts and terms used for wireless networking.
Operation mode
The Samsung Wireless Network Printer Card supports two
standard wireless operation modes, Ad hoc and Infrastructure.
•
Ad hoc (peer-to-peer) mode
: Ad hoc mode is also
referred to as Peer-to-peer mode. In Ad hoc mode, wi reless
devices or workstations communicate directly with each
other, without using an access point (AP). They can share
files and printers, but may not be able to access the
Internet. A print server receives print jobs from wireless
computers directly. On Apple networks, Ad hoc mode is
called “computer-to-computer” mode.
•
Infrastructure mode
: In Infrastructure mode, wireless
devices or workstations communicate with each other
through an access point (AP). The access point acts like a
hub, providing connectivity for wireless computers. In
Infrastructure mode, wireless devices can communicate with
each other or can communicate with a wired network. On
Apple networks, Infrastructure mode is called Airport
Network mode. In this mode, the Samsung print server
receives print jobs from wireless and wired network
computers through an access point.
NOTE
: If you connect a network cable to the Samsung
Network Printer Card, the print server will not use the wireless
interface. All packets will be transferred via the wired LAN.
Access point
An access point is a device that acts as a wireless
communication hub so that users of a wireless device can
connect to a wired network. An access point must be able to
receive and forward network traffic between wireless and
cabled network devices. Multiple access points can act as
repeaters to extend the range of a wireless network. To use
Infrastructure mode, you need to use an access point.
Service Set Identifier (SSID)
The Service Set ldentifier is the ID used to form a wireless
network. You can set up to 32 characters in the SSID field. An
identifier attached to packets sent over the wireless LAN
functions as a password for joining a particular wireless
network (BSS). All wireless devices and access points within
the same BSS must use the same SSID. The SSID is also
referred to as the network name because it is an identifying
label for a wireless network.
Channels
There are several channels specified in the 802.11a/b/g
standard for wireless communications. The number of available
channels authorised for use may be restricted based on your
location (generally regulatory domain). See Appendix for
available channels at your location. When shipped from the
factory, the Samsung Wireless Network Printer Card is
configured for Ad-hoc mode using the automatic channel
selection. In most cases, manual configuration of the channel
is not required. If the print server discovers a wireless network
that has the same SSID and operation mode when powered up ,
it will automatically adjust the channel to match that network.
Page 24

Wireless network environment
6.
2
IEEE 802.11 authentication
IEEE 802.11 authentication is a process of identifying an
individual who is attempting to access a wireless LAN or an
access point. The IEEE 802.11 standard defines two types of
authentication services:
•
Open System
: Authentication is not used, and encryption
may or may not be used, depending on the need for data
security.
•
Shared Key
: Authentication is used. A device that has a
proper WEP key can access the network.
The Samsung Network Printer Card supports both
authentication methods.
WEP encryption
WEP (Wired Equivalent Privacy) is a security protocol
preventing unauthorised access to your wireless network.
Wireless LANs, which communicate over radio waves, do not
have a physical structure that can be protected from
unauthorised access and therefore are vulnerable to tampering.
WEP is designed to provide a wireless LAN with a security level
equal to that found on a wired network. WEP encrypts the data
portion of each packet exchanged on a wireless network using
a 64-bit or 128-bit WEP encryption key. Sometimes, 64-bit WEP
is called 40-bit and 128-bit is called 104-bit. 40-b it an d 64 -bit
encryption are really the same thing, as are 104-bit and 128bit encryption, because an additional 24 initialisation vector
(IV) bits are automatically added to make a total of 64 bits and
128 bits. To encrypt data, the Samsung Wireless Network
Printer Card uses four encryption keys. You must sele ct a k ey
and enter the key value. The key value must be the same as
the other wireless devices or that of the access point of your
wireless network. In 64-bit mode, each key value is 10
hexadecimal digits (0-9 and A-F) or 5 alphanumeric char acters.
In 128-bit mode, each key value is 26 hexadecimal digits or 13
alphanumeric characters. Contact your network administrator
for this configuration.
IEEE 802.1x
IEEE 802.1x uses EAP (Extensible Authentication Protocol) and
an authentication server, such as RADIUS (Remote
Authentication Dial In User Server, RFC2138) for client and
network server authentication. In this authentication process,
the authentication server verifies the identity of the party
attempting to connect to the network. The Samsung Wireless
Network Printer Card supports popular authentication methods
based on EAP, including:
•
EAP-MD5
(EAP using Message Digest Algorithm 5): EAPMD5 uses a password protected by the MD5 encryption
algorithm, which is the same challenge handshake protocol
as PPP-based CHAP. This authentication method provides
one-way authentication based on a user name and
password. This implementation is useful only in a small
private network because it does not support automatic key
distribution.
•
EAP-MSCHAPv2
: EAP-MSCHAPv2 uses the MS-CHAPv2
authentication protocol to create a strong encryption key
initially for MMPE (Microsoft Point-to-Point Encryption) and
to use a different encryption key during communication.
•
EAP-TLS
(EAP using Transport Layer Security): EAP-TLS
uses X.509-compliant digital certificates for both client and
server authentication.
•
EAP-TTLS
: EAP-T TLS is known as a Tunneled TLS (T ransport
Layer Security) protocol. It is designed to provide
authentication that is every bit as strong as EAP-TLS, but it
does not require that each user be issued a certificate.
Instead, only the RADIUS authentication servers are issued
certificates. User authentication is performed by a password.
The password credentials are transported in a securely
encrypted tunnel that is established using the server
certificate. As a result, the credentials are not vulnerable to
dictionary attacks. Using TTLS forwarding, any inner
authentication requests that are found inside the TTLS
tunnel, such as EAP, PAP, CHAP, or MS-CHAP-V2, can be
processed by downstream RADIUS servers. In this manner,
you can perform authentication against any RADIUS
infrastructure that is already deployed in your organisation.
•
PEAP
(Protected Extensible Authentication Protocol): PEAP
uses digital certificates for network server authentication
and a password for client authentication.
WPA (Wi-Fi Protected Access)
WPA, announced by Wi-Fi Alliance, authorises and identifies
users based on a secret key that changes automatically at
regular intervals. WPA use s 80 2.1x or WPA-PSK (WPA mode
Pre-Shared Key) for authentication. WPA -PSK verifies users via
a pre-shared key on both a client station and an access point.
In WPA-PSK authentication, a client may only gain access to the
network if the client's password matches the access point's
password. WPA also uses TKIP (Temporal Key Integrity
Protocol) and AES (Advanced Encryption Standard) for data
encryption.
Certificates
Certificates are used to validate the identity of clients and
network servers and allow encrypted data communications for
EAP/802.1x authentication. Certificates may be issued and
signed by a trusted third party, called Certificate Authority
(CA). In EAP/802.1x authentications, such as EAP-TLS, EAPTTLS, and PEAP, the Samsung network print server may require
one or both of the following certificates:
•
Root Certificate
: A certificate from a trusted Certificate
Authority (CA) is used to validate the identity of a network
authentication server while EAP authentication methods,
such as EAP-TLS, EAP-TTLS, and PEAP, are performed. The
network authentication server's identity will be validated
when the root certificate information installed on the
Samsung network print server is identical to the information
on a certificate received from the network authentication
server, such as RADIUS. To be installed on the Samsung
Page 25
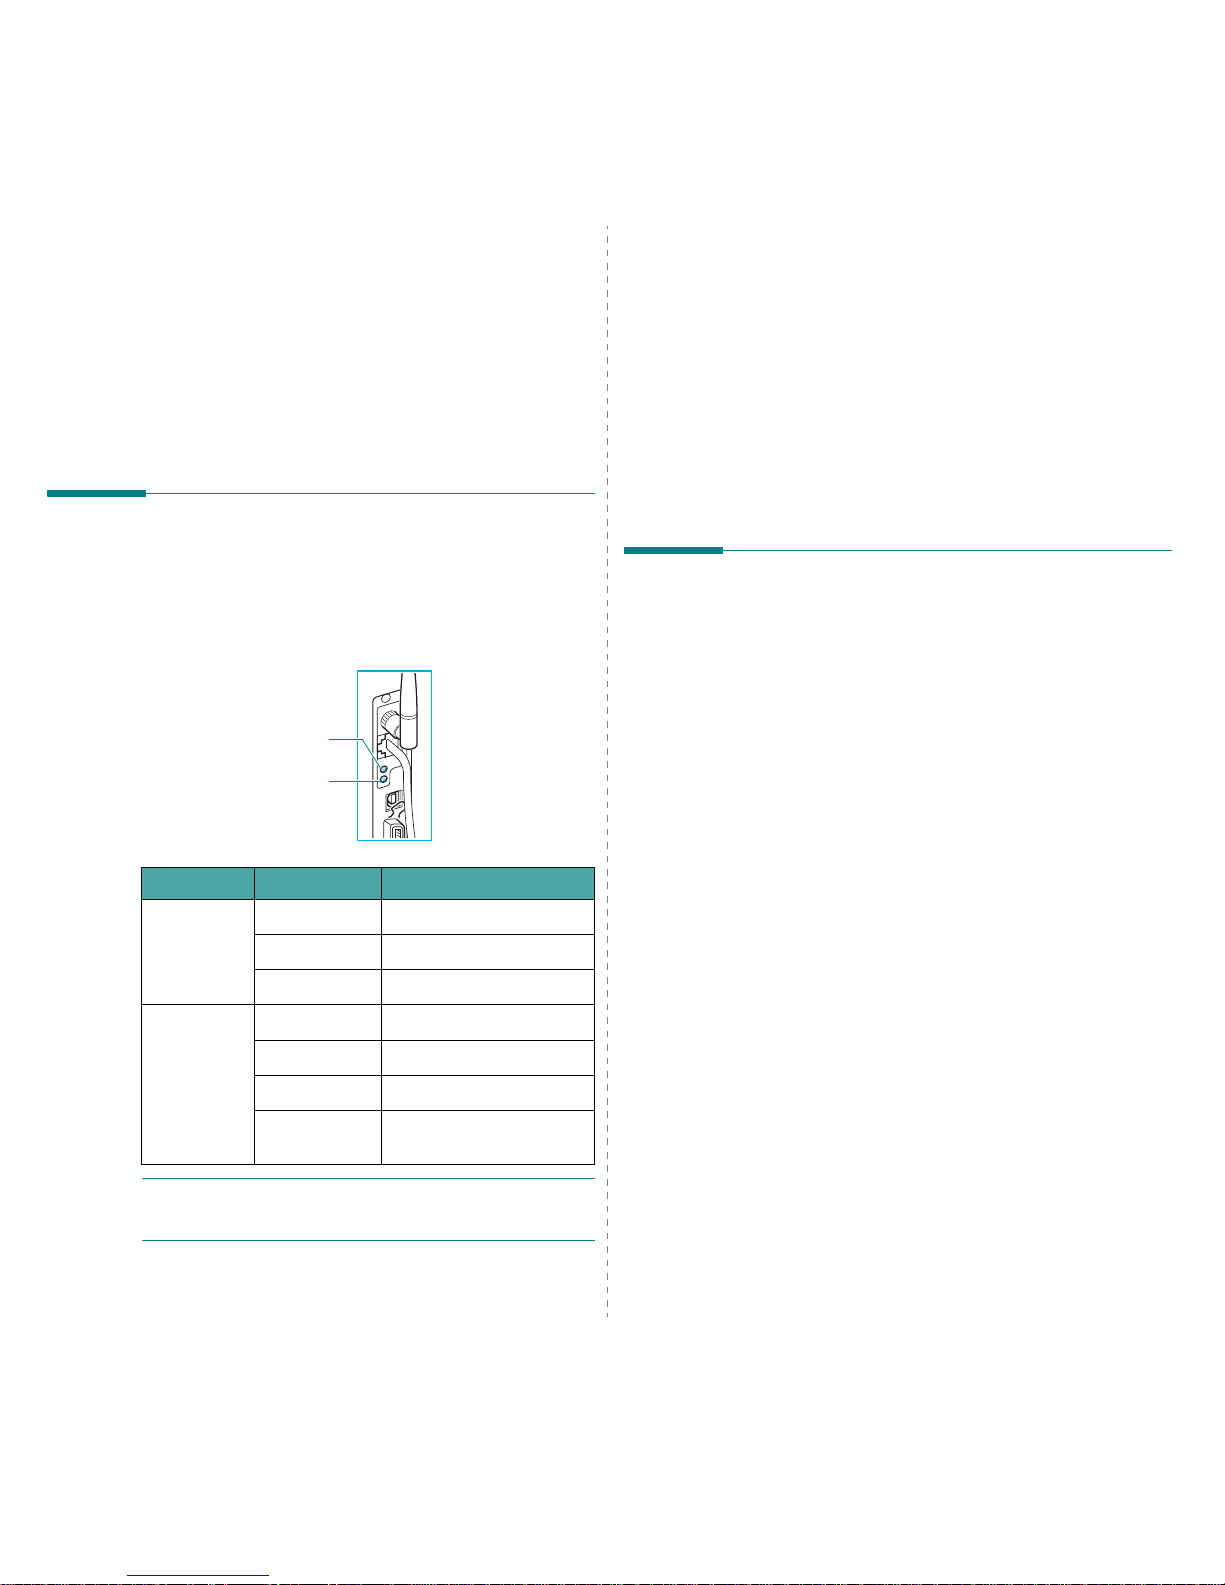
Wireless network environment
6.
3
Network Printer Card, a root certificate must be in the form
of Base64 Encoded X.509 with a .cer extension and be less
than 3,072 bytes.
•
Client Certificate
: A client certificate is used to validate the
identity of the Samsung Network Printer Card from a
network authentication server, such as RADIUS, while the
EAP-TL S authentication method is performed. To be installed
on the Samsung Network Printer Card, a client certificate
must be in the form of PKCS #12 / Personal Information
Exchange with a .pfx extension and be less than 3,072
bytes.
Before configuring the print
server
The Samsung Wireless Network Printer Card has two LEDs to
show the network connection status. When you configure the
wireless settings on your print server, please refer to these
LEDs to make sure that a network connection is functioning.
NOTE
: If the operation mode is set to Ad hoc and the Link LED
lights red, it means that the print server is or can be another
Ad hoc station.
LED Status Description
Activity LED Off Power off or system error
On System error
Blinking Normal
Link LED Off Not linked to a network
Green on Linked to a wired LAN
Red on Linked to a wireless LAN.
Orange on Linked to both wired and
wireless LANs.
Link LED
Activity LED
You can check the current network settings with the Netw ork
Configuration page. For details, please refer to the printer
user's guide.
• Check for the currently selected operation mode: Ad hoc or
Infrastructure
• Check for the SSID. Make sure that the print server SSID
matches the SSID of the network. The SSID is casesensitive.
•Check for the
Line Quality
item on the Network Printer Card
Test page. If the quality is low or very low, improve the
quality of network connections by removing obstacles,
moving the wireless device closer to the printer, or adjusting
the antenna direction.
Wireless settings
The Samsung network print server provides two solutions to
configure wireless network settings:
• SyncThru Web Service: This method is suitable for users who
can use a wired network. In order to use this method, you
must connect the Samsung print server to a local network
using an Ethernet cable.
• Printer control panel: This method is suitable for users who
can use the printer control panel menus. T o use this method,
refer to the printer user's guide.
Configuration explained in this sections is based on SyncThru
Web Service. Before configuring wireless netw ork param eters,
make sure of the following, depending on your situation:
• The Wireless Printer Network Card and antenna are installed
in the print server. If they are not, the
Wireless
menu will
not be displayed on SyncThru Web Service.
• Connect the Samsung print server to your wired network
using an Ethernet cable.
• The print server's IP address is configured as an IP address
available on your network.
To access SyncThru Web Service:
1
Run your web browser.
2
Enter the print server's IP address in the URL field and
click
Go
.
3
Select
Network Settings
Æ
Wireless
.
Page 26

Wireless network environment
6.
4
Wireless basic settings
These are the basic parameters required to make wireless
connections found on the
Wireless
page of SyncThru Web
Service. Click
Apply
after changing parameters.
•
SSID
: SSID (Service Set Identifier) is a name that identifies
a wireless network. Access points and wireless devices
attempting to connect to a specific wireless network must
use the same SSID. The SSID is case-sensitive.
•
Operation Mode
: Operation Mode refers to the type of
wireless connections. Choose one of the following options:
-
Ad hoc
: allows wireless devices to communicate directly
with each other in a peer-to-peer environment.
-
Infrastructure
: allows wireless devices to communicate
with each other through an access point.
•
Frequency Mode
: Choose a frequency mode. The Samsung
print server supports 802.11a, 802.11b, and 802.11g
frequency modes.
-
802.11a (5GHz) mode
: Data is sent using IEEE802.11a
standard communications in the 5 GHz band.
-
802.11b/g (2.4GHz) mode
: Data is sent using
IEEE802.11g standard communications in the 2.4 GHz
band. This mode is compatible with IEEE802.11b standard.
-
802.11a, b/g (5GHz, 2.4GHz) mode
: Data is sent using
the frequency range defined in both IEEE802.11a and
IEEE802.11g standards.
•
Ad hoc Channel
: Change the channel selection setting. If
you select
Auto Setting
, the Samsung print server will
automatically adjust channels. To manually set a channel,
select
Channel Selection
. In most cases, manually setting
up channels is not required.
•
Connection Status
: This section displays information on the
current wireless connection.
-
Link Status
: indicates whether or not the WLAN interface
is connected to other wireless devices.
-
Associated Frequency
: indicates the associated frequency
mode, for example, 802.11a.
-
BSSID
: displays the associated BSSID, for example,
00:02:78:E3:43:89.
-
Link Quality
: represents quality of the wireless link
between the print server and an access point or other
devices by percentage, for example, 100%
-
Current Tx Rate
: is automatically determined by radio
transmission speed, for example, 54 Mbps.
-
Current Channel
: represents the associated channel, for
example, [149] 5745 MHz.
NOTE
: Your wireless basic setting changes w ill be applied after
the print server restarts. In order to restart the print server,
from SyncThru Web Service, select
Network Settings
Æ
Reset and click
Restart
, or turn the print server off and then
back on.
Wireless security settings
This section describes how to configure wireless security for
your wireless network. The Samsung Network Printer Card
supports several security features, such as static WEP, IEEE
802.1x, and WPA, to protect y o ur network from unauthorised
access, and provides three security modes:
•
None
: This is used when the validation of a wireless device's
identity and data encryption are not required for your
network. Open system is used for IEEE 802.11
authentication.
•
Static WEP
: This uses the WEP (Wired Equivalent Privacy)
algorithm suggested by IEEE 802.11 standard for security.
Static WEP security mode requires a proper WEP key for
data encryption, decryption, and IEEE 802.11
authentication.
•
Enhanced Security
: This provides more advanced security
and better key management than Static WEP by using IEEE
802.1x EAP authentication, WPA-PSK, and dynamic
encryption, such as dynamic WEP, TKIP, and AES. In
Enhanced Security mode, there are four authentications,
depending on WPA authentication and 802.1x
authentication:
-
WPA-PSK authentication
: You can select WP A-PSK to
authenticate the print server based on WPA Pre-Shared
Key. This uses a shared secret key (generally called PreShared Key passphrase) that is manually configured on the
access point and each of its clients. This is suitable for
users who want to use WPA but do not have a RADIUS
server installed on their network.
-
EAP-TLS authentication
: EAP-TLS uses X.5 09 -compliant
digital certificates for both client and network server
authentications. Root certificates and client certificates
must be installed on the print server.
-
EAP-TTLS authentication
: EAP-TTLS uses an X.509compliant digital certificate for network server
authentication. This also requires a 802.1x user name,
user password, and a TTLS identity used by inner
authentication protocols for client authentication over a
secure connection.
-
PEAP authentication
: PEAP is similar to EAP-TTLS. This
also uses an X.509-compliant digital ce rtificate for network
server authentication and requires an 802.1x user name
and user password used by inner authentication protocols
for client authentication over a secure connection.
Additionally, you may configure the related parameters to use
a special security mode. The following table summarises the
security modes and authentication options available on the
Samsung network print server and describes the features of
each option:
Security
mode
Authentication
method
employed
Encryption method
employed
None Open System No encryption
Page 27

Wireless network environment
6.
5
NOTE
: The Samsung network print server provides “None”
and Static WEP without 802.1x authentication in Ad hoc mode
while “None,” Static WEP with 802.1x authentication, and
Enhanced security are provided in Infrastructure mode.
You may first choose one of the security m odes and configure
additional parameters for each security mode.
“None” security mode settings
This uses Open System for IEEE 802.11 authentication and
doesn't require additional parameter settings.
Static WEP security mode settings
To use Static WEP , you need to configure the following
parameters:
•
IEEE 802.11 Authentication
: Choose one of the following
IEEE 802.11 authentications:
-
Open System
: This is used if your wireless network does
not require authentication for network access. However,
your network may still use encryption keys for data
security.
-
Shared Key
: Use Shared Key authentication if your
network requires that each device be configured with the
same secret WEP key for network access.
Static
WEP
Open System,
Shared key, or
optionally 802.1x
authentication
(EAP-MD5 or EAPMSCHAPv2) if
needed.
Static WEP encryption
Enhanced
Security
WPA-PSK Using dynamic key
management
TKIP, and AES
EAP-TLS Using dyn amic key
management
TKIP, AES, 64-bit WEP, and
128-bit WEP
EAP-TTLS Using dynamic key
management
TKIP, AES, 64-bit WEP, and
128-bit WEP
PEAP Using dynamic key
management
TKIP, AES, 64-bit WEP, and
128-bit WEP
Security
mode
Authentication
method
employed
Encryption method
employed
•
WEP Encryption
: Choose either 64-bit WEP or 128-bit WEP.
If your network uses WEP encryption keys, you must
configure the encryption keys.
•
Key 1/2/3/4
: You need to specify a static WEP encryption
key if your network uses WEP encryption keys. You can
configure up to four keys. The active key (called using key)
must match the value and active key position (for ex ample,
Key 1) configured on other wireless devices. The appropriate
key size must be configured according to the WEP key entry
format and the WEP encryption key type. The following table
shows how to configure encryption keys using HEX or ASCII
values.
•
802.1x Authentication
: Choose one of the IEEE 802.1x
authentications: None, EAP-MD5, or EAP-MSCHAPv2.
•
User Name
: 802.1x EAP authentication methods, such as
EAP-MD5, EAP-MSCAHPv2, EAP-TTLS, and PEAP, require an
EAP user name as an account name. A user name consisting
of up to 31 characters is necessary, if 802.1x authentication
is enabled. This is not saved as the default value.
•
User Password
: 802.1x EAP authentication methods, such
as EAP-MD5, EAP-MSCAHPv2, EAP-TTLS, and PEAP, require
an EAP user password as an account password. A password
consisting of up to 15 characters is necessary, if 802.1x
authentication is enabled. This is not saved as the default
value.
Enhanced Security mode settings
•
WPA authentication
: WPA supports WPA-PSK and IEEE
802.1x for authentication. Choose either authentication
method.
•
Encryption
: Choose one of the encryption key types: TKIP,
AES, 64-bit WEP, or 128-bit WEP. WPA supports TKIP and
AES for data encryption.
•
WPA Shared Key
: If you are using WPA-PSK, the print
server WPA shared key must be the same as that of an
access point. The WPA shared key is used to authenticate
and to create a master session key.
•
802.1x Authentication
: You must select an authentication
method which is supported by a RADIUS server. The
authentication method is determined by negotiation between
clients and the server. Therefore, it is not necessary for the
selected authentication to be higher priority on a RADIUS
server. Available authentications are NONE, EAP-MD5, EAP
MSCHAPv2 in 802.1x Authentication on Static WEB security.
Key Hexadecimal format ASCII format
64-bit
WEP
10 digits (0~9, A~F) 5 alphanumeric
characters
128-bit
WEP
26 digits (0~9, A~F) 13 alphanumeric
characters
Page 28

Wireless network environment
6.
6
•
Inner Authentication Protocol
: EAP-TTLS and PEAP allow
for standard RADIUS protocols within their inner tunnel.
User authentication is performed by a password. The
password credentials are transported in a securely encrypted
tunnel that is established using the server certificate. EAPTTLS supports EAP-MD5, CHAP, MS-CHAP, and MS-CHAPv2.
PEAP supports EAP-MD5 and MSCHAPv2 as inner
authentications.
•
Identity Name
: EAP-TTLS has a unique feature, TTLS
Identity , that other EAP authentication protocols do not offer.
It passes your user name through an encrypted tunnel
(generally called tunneled TLS) as your credentials. It uses
TTLS Identity as your credentials before the encrypted
tunnel is created.
•
User Name
: 802.1x EAP authentication methods, such as
EAP-MD5, EAP-MSCAHPv2, EAP-TTLS, and PEAP, require an
EAP user name as an account name. A user name is
necessary, if 802.1x authentication is enabled. This is not
saved as the default value.
•
User Password
: 802.1x EAP authentication methods, such
as EAP-MD5, EAP-MSCAHPv2, EAP- TTLS, and PEAP, require
an EAP user password as an account password. A user
password is necessary, if 802.1x authentication is enabled.
This is not saved as the default value.
•
Root certificate
: You can install a root certifica te. To be
installed on the Samsung Wireless Network Printer Card, a
root certificate must be in the form of Base64 Encoded
X.509 with a .cer extension and be less than 3,072 bytes.
EAP-TLS, EAP-TTLS, and PEAP authentications need root
certificates.
1. Click
Configure
.
If the root certificate has been configured, detailed
information on the root certificate displays.
2. Select the root certificate file.
3. Upload the file and click
back
to return to the front page.
•
Client certificate
: You can install a client certificate. To be
installed on the Samsung Wireless Network Printer Card, a
client certificate must be in the form of PKCS #12 / Personal
Information Exchange with a .pfx extension and be less than
3,072 bytes. EAP-TLS authentication needs a client
certificate.
1. Click
Configure
.
If the client certificate has been configured, detailed
information on the client certificate displays.
2. Select the client certificate file.
3. Upload the file and click
back
to return to the front page.
NOTE
: You can make a certificate into a file using Windows
Console:
1. From the Windows Start menu, select
Run
.
2. Enter
mmc
in the Run dialogue box.
3. Select
File
Æ
Add/Remove Snap-in
.
4. Click
Add
, select
Certificate
, and then click
Add
.
5. In the Certificate Snap-in dialogue box, select
Computer
Account
and click
Next
Æ
Finish
Æ
Close
Æ OK.
6. Select the certificate you want to change to a file.
• When making a root certificate, select one of the
certificates in the trusted root certificate authority folder.
• When making a client certificate, select one of the
certificates in the personal folder.
7. Right-click the certificate and select
All task
Æ
Export
.
8. In the Certificate Export wizard, click
Next
.
9. Select
DER encoded X.509 Binary (.cer)
for a root
certificate, or
PKCS #12 (.PFX)
for a client certificate, and
click
Next
.
10. Enter a file name and click
Next
.
11. Click
Finish
to close the wizard.
•
Enable Server certificate Validation
: This option
determines whether or not the client authenticates the
server. If Server Certificate Valida tion is disabled, EAP-TTLS
and PEAP authentication do not require a root certificate.
In Enhanced Security mode, four authentications are provided
according to WPA authentication and 802.1x authentication. T o
use each authentication in Enhanced Security mode, perform
the following steps:
Using WPA-PSK
1
Set Security Mode to
Enhanced Security
.
2
Set WPA Authentication to
WPA-PSK
.
3
Choose
TKIP
or
AES
for encryption. The same encryption
algorithm must be configured on the access point.
4
Enter the WPA Shared Key as the secret key. The same
WPA Shared Key must be configured on the access point.
Using EAP-TLS
1
Set Security Mode to
Enhanced Security
.
2
Set WPA Authentication to
IEEE802.1x
.
3
Set 802.1x Authentication to
EAP-TLS
.
4
Choose
TKIP, AES, 64-bit WEP
, or
128-bit WEP
for
encryption. The same encryption algorithm must be
configured on the access point.
Page 29

Wireless network environment
6.
7
5
Install a root certificate. A root certificate must be issued
by the Certificate Authority (CA) who signed the
authentication server’s certificate and be in the form of
Base64 Encoded X.509 with a .cer extension. It must also
be less than 3,072 bytes.
6
Install a client certificate. A client certificate must be
issued by the trusted Certificate Authority (CA) and is used
for the RADIUS server to validate print server's identity. It
must be in the form of PKCS #12 / Personal Information
Exchange with a .pfx extension and be less than 3,072
bytes. You also need to enter the same private key
password used when a client certificate is issued by CA.
Using EAP-TTLS
1
Set Security Mode to
Enhanced Security
.
2
Set WPA Authentication to
IEEE802.1x
.
3
Set 802.1x Authentication to
EAP-TLS
.
4
Choose
TKIP, AES, 64-bit WEP
, or
128-bit WEP
for
encryption. The same encryption algorithm must be
configured on the access point.
5
Choose
EAP-MD5, CHAP, MS-CHAP
, or
MS-CHAPv2
for
inner authentication protocol. The selected inner
authentication protocol must be supported by the RADIUS
server.
6
Set an Identity name of up to 31 characters as another
identity name.
7
Set a user name of up to 31 characters. This account name
must also be set up on the RADIUS server.
8
Set a user password of up to 15 characters. This account
password must also be set up on the RADIUS server.
9
Select or deselect
Enable Server Certificate Validation
.
If this option is deselected, the print server always rega rds
the RADIUS server as a valid authentication server without
a root certificate.
10
Install a root certificate. A root certificate must be issued
by the Certificate Authority (CA) who signed the
authentication server’s certificate and be in the form of
Base64 Encoded X.509 with a .cer extension. It must also
be less than 3,072 bytes. If you deselect
Enable Server
Certificate Validation
, you don't need to install a root
certificate.
Using PEAP
1
Set Security Mode to
Enhanced Security
.
2
Set WPA Authentication to
IEEE802.1x
.
3
Set 802.1x Authentication to
EAP-TLS
.
4
Choose
TKIP, AES, 64-bit WEP
, or
128-bit WEP
for
encryption. The same encryption algorithm must be
configured on the access point.
5
Choose
EAP-MD5
or
MS-CHAPv2
for inner authentication
protocol. The selected inner authentication protocol must
be supported by the RADIUS server.
6
Set a user name of up to 31 characters. This account name
must also be set up on the RADIUS server.
7
Set a user password of up to 15 characters. This account
password must also be set up on the RADIUS server.
8
Select or deselect
Enable Server Certificate Validation
.
If this option is deselected, the print server alwa ys regards
the RADIUS server as a valid authentication server without
a root certificate.
9
Install a root certificate. A root certificate must be issued
by the Certificate Authority (CA) who signed the
authentication server’s certificate and be in the form of
Base64 Encoded X.509 with a .cer extension. It must also
be less than 3,072 bytes. If you deselect
Enable Server
Certificate Validation
, you don't need to install a root
certificate.
NOTE
: Your wireless basic setting changes will be applied after
the print server restarts. In order to restart the print server,
from SyncThru Web Service, select
Network Settings
Æ
Reset and click
Restart
, or turn the print server off and then
back on.
Page 30

Appendix
7.
1
7 Appendix
Specifications
Items Specifications
Supported
networks
• Windows: 98, NT, ME, 2000, XP, 2003
• Linux: Red Hat 8.0 ~ 9.0, Fedora Core 1 ~
3, Mandrake 9.0 ~ 10.2, SuSE 8.2 ~ 9.2
• Unix: AT&T system V (Rel 4.2), BSD4.3 , HPUX (Rel 9.x & Rel 10.x), SCO 5.x, SUNOS
5.5, Sparc or Solaris 2.5.
• Novel NetWare: NetWare versions 3.x, 4.x,
5.x, 6.x
• Macintosh: Macintosh 8.6 ~ 9.2, 10.1 ~
10.3, or higher
Protocol TCP/IP, LPD (LPR), IPP, IPX/SPX, EtherTalk,
Bonjour.
Configuration
utilities
SetIP, SyncThru Web Service, SyncThru Web
Admin Service
Hardware
requirements
•PC:
- 80486 CPU or higher
- Minimum of 16 MB of RAM
- 2 MB of free disk space
•Macintosh:
- PowerPC 68020 or higher
- Minimum of 8 MB of RAM
- 2 MB of free disk space
Wireless
interface
IEEE 802.11a/b/g standard
Wireless specifications
* Subject to local regulatory
** 802.11a mode is supported only when connecting with
IEEE 802.11a adapter
***802.11g mode is supported only when connecting with
IEEE 802.11g adapter
Items Specifications
Frequency
band*
Americas 2.412 ~2.462GHz
5.180 ~ 5.320GHz
5.745 ~ 5.825GHz
Europe 2.412 ~2.472GHz
5.180 ~ 5.320GHz
Asia-Pacific 2.412 ~2.472GHz
5.745 ~ 5.805GHz
Spread
spectrum
method
802.11a
mode
OFDM
802.11b
mode
DSSS
802.11g
mode
OFDM
Data transfer
rate
802.11a
mode**
54, 48, 36, 24, 18, 12, 9,
6Mbps
802.11b
mode
11, 5.5, 2, 1Mbps
802.11g
mode***
54, 48, 36, 24, 18, 12, 9,
6Mbps
Page 31

Appendix
7.
2
OpenSSL Statements
OpenSSL License
Copyright © 1998-2000 The OpenSSL Project. All rights
reserved.
Redistribution and use in source and binary forms, with or
without modification, are permitted provided that the following
conditions are met:
1
Redistributions of source code must retain the above
copyright notice, this list of conditions and the following
disclaimer.
2
Redistributions in binary form must reproduce the above
copyright notice, this list of conditions and the following
disclaimer in the documentation and/or other materials
provided with the distribution.
3
All advertising materials mentioning features or use of this
software must display the following acknowledgment:
4
“This product includes software developed by the OpenSSL
Project for use in the OpenSSL Toolkit. (http://
www.openssl.org/)”
5
The names “OpenSSL Toolkit” and “OpenSSL Project” must
not be used to endorse or promote products derived from
this software without prior written permission.
6
For written permission, please contact openssl[email protected].
7
Products derived from this software may not be called
“OpenSSL” nor may “OpenSSL” appear in their names
without prior written permission of the OpenSSL Project.
8
Redistributions of any form whatsoever must retain the
following acknowledgment:
“This product includes software developed by the OpenSSL
Project for use in the OpenSSL Toolkit (http://
www.openssl.org/)”
THIS SOFTWARE IS PROVIDED BY THE OpenSS L PROJECT “ AS
IS” AND ANY EXPRESSED OR IMPLIED WARRANTIES,
INCLUDING, BUT NOT LIM ITED TO, THE IMPLIED WARRANTIES
OF MERCHANTABILITY AND FITNESS FOR A PARTICULAR
PURPOSE ARE DISCLAIMED. IN NO EVENT SHALL THE OpenSSL
PROJECT OR ITS CONTRIBUTORS BE LIABLE FOR ANY DIRECT,
INDIRECT, INCIDENTAL, SPECIAL, EXEMPLARY, OR
CONSEQUENTIAL DAMAGES (INCLUDING, BUT NOT LIMITED
TO, PROCUREMENT OF SUBSTITUTE GOODS OR SERVICES;
LOSS OF USE, DATA, OR PROFITS; OR BUSINESS
INTERRUPTION) HOWEVER CAUSED AND ON ANY THEORY OF
LIABILITY, WHETHER IN CONTRACT, STRICT LIABILITY, OR
TORT (INCLUDING N EGLIGENCE OR O THE RWISE) ARISING IN
ANY WAY OUT OF THE USE OF THIS SOFTWARE, EVEN IF
ADVISED OF THE POSSIBILITY OF SUCH DAMAGE.
This product includes cryptographic software written by Eric
Young ([email protected]).
This product includes software written by Tim Hudson
([email protected]).
Page 32

1
INDEX
A
Ad hoc (peer-to-peer) mode 6.1
B
Bonjour 5.2
BOOTP 3.1
C
Certificates
client certificate 6.3, 6.6
making files 6.6
root certificate 6.2, 6.6
Channels 6.1, 6.4
Client certificate 6.3
installing 6.6
D
DDNS 3.2
DHCP 3.1
E
EAP-MD5 6.2
EAP-MSCHAPv2 6.2
EAP-TLS 6.2, 6.4, 6.6
EAP-TTLS 6.2, 6.4, 6.7
EtherTalk
Bonjour 5.2
configuring EtherTalk 5.1
configuring the printer 5.1
TCP/IP printing 5.2
F
Firmware upgrade 3.6
H
HTTP 3.1
I
Infrastructure mode 6.1
Installing Samsung Network Printer Card 1.1
Installing software 2.1
IP address setup
BOOTP 2.2
DHCP 2.2
Printer control panel 2.2
SetIP 2.2
SyncThru Web Admin Service 2.2
SyncThru Web Service 2.3
IP filtering 3.6
IPP port 3.5
L
LEDs 1.2, 6.3
LPR port 3.4
N
NetWare
adding a printer 4.2
adding a queue 4.2
Bindery configuration 4.1
configuring Netware 4.1
NDS configuration 4.1
printing architecture 4.1
Network administration software, install 2.1
Network environments, supported 1.1
P
PEAP 6.2, 6.4, 6.7
R
Resetting 6.4, 6.7
Root certificate 6.2
installing 6.6
S
Samsung Network Printer Card, install 1.1
Samsung Printer Port 3.5
SetIP 2.1
SLP 3.2
SNMP 3.1
Specifications 7.1
Standard TCP/IP port 3.4
SyncThru Web Admin Service 2.1
SyncThru Web Admin Service User’s Guide 2.1
T
TCP/IP
in Macintosh 5.2
management protocol
BOOTP 3.1
DDNS 3.2
DHCP 3.1
HTTP 3.1
SLP 3.2
SNMP 3.1
UPnP 3.3
WINS 3.2
printing protocol
IPP port 3.5
LPR port 3.4
Samsung Printer Port 3.5
Standard TCP/IP port 3.4
U
Uninstalling software 2.1
UPnP 3.3
W
WINS 3.2
Wireless network
access point 6.1
basic settings 6.4
certificates 6.2
Page 33

2
channels 6.1, 6.4, 7.1
Enhanced Security 6.4, 6.5
frequency 6.4
IEEE 802.11 authentication 6.2
IEEE 802.1x 6.2
operation mode 6.1, 6.4
security settings 6.4
SSID 6.1, 6.4
Static WEP 6.4
WEP encryption 6.2
WPA (Wi-Fi Protected Access) 6.2
Wireless specifications 7.1
WPA-PSK 6.4, 6.6
Page 34

Rev.1.00
 Loading...