


Using Your Documentation
Congratul ations on your purchase of a No tebook co m put er. Whether y ou are new
to using a portable computer or are an experienced user, this user’s manual can
help you get the most from yo ur c omputer.
Special Features of the User’s Manual
Three types of messages with icons appear in the manual:
A note informs y ou of special circumstances.
A caution warns you of possible damage to equipment.
A warning indicates the possibility of personal injury.
Keys that you need to press to perform certain functions are shown in the manual
enclosed in angle brackets. For example,
<Ctrl>
indicate s the c on t r ol k e y (Ctrl o n th e co mp ute r ’s keyboard).
If you need to press two keys at the same time, the key names are shown joined by
a plus sign. For example,
<Fn+F11>
means that you should press the Fn key and hold it and then pr ess the F11 key.
If you ar e new to using computer s, see “Glossa ry ” . The “Glossary” explains
general co mputing term s tha t ar e used in t his m an ua l and te ll s you abo ut some of
the differences betwee n notebook comput e rs an d desktop computers.
Using Your Documentation 1

Using the Software User Documentation
Your computer shi ppe d f rom t he facto ry with several s oftware programs in stal led.
The s oftware may include its own online or printed documenta tio n . Re f e r to the
document at i on o r the Help o pt i ons in the softwa r e for more info rm a tion.
2 Using Your Documentation
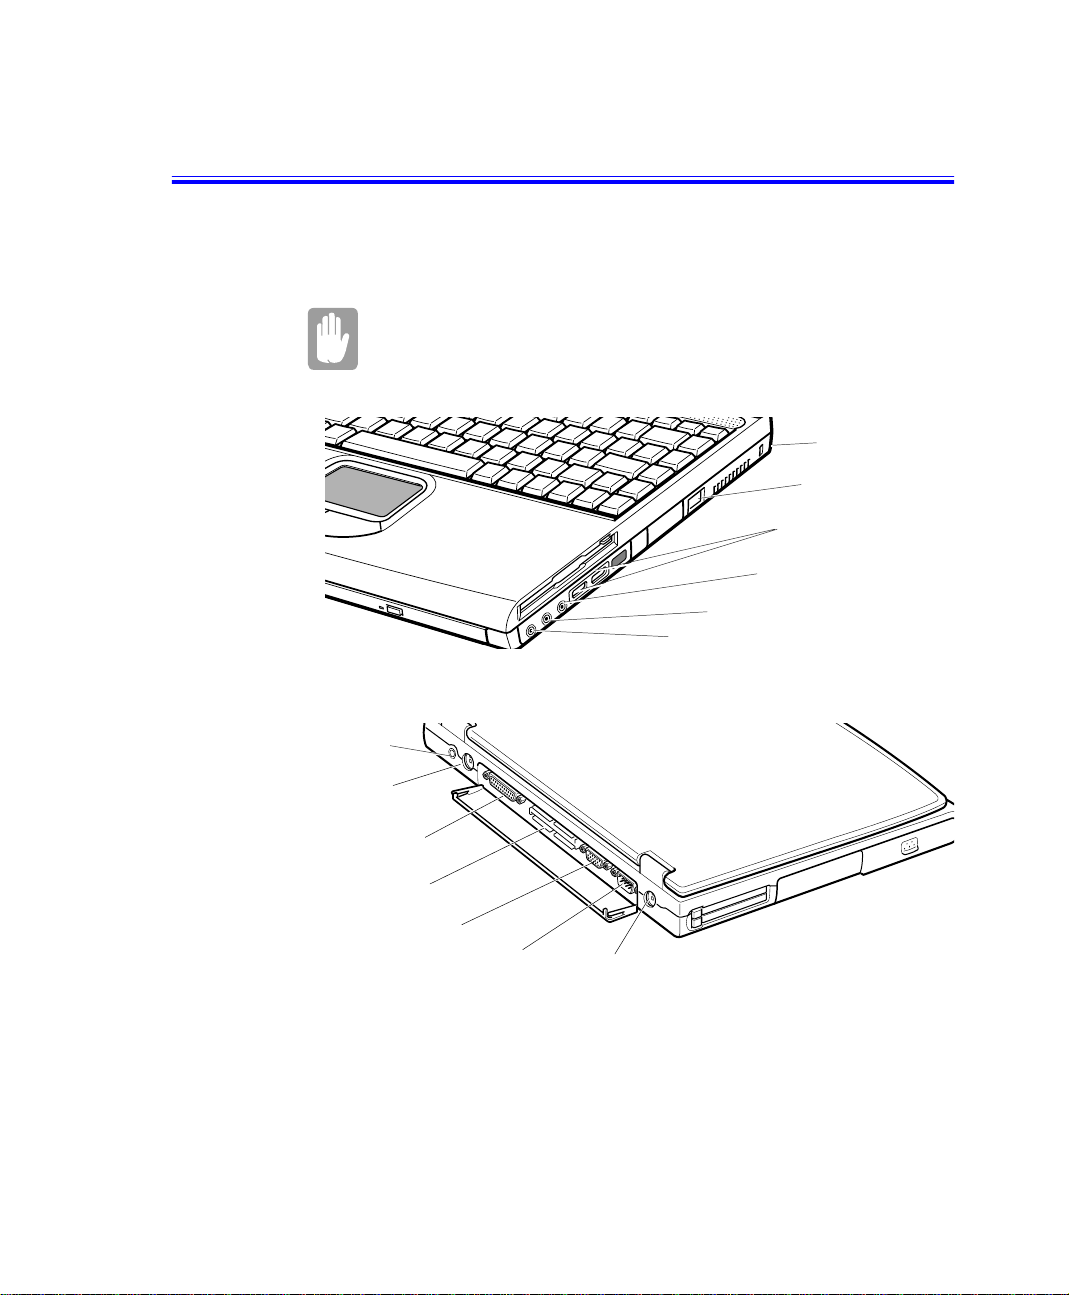
Introducing Your Computer
Your computer is a lightweight portable computer that includes features to meet
your com p u ti n g needs at ho m e o r on th e road.
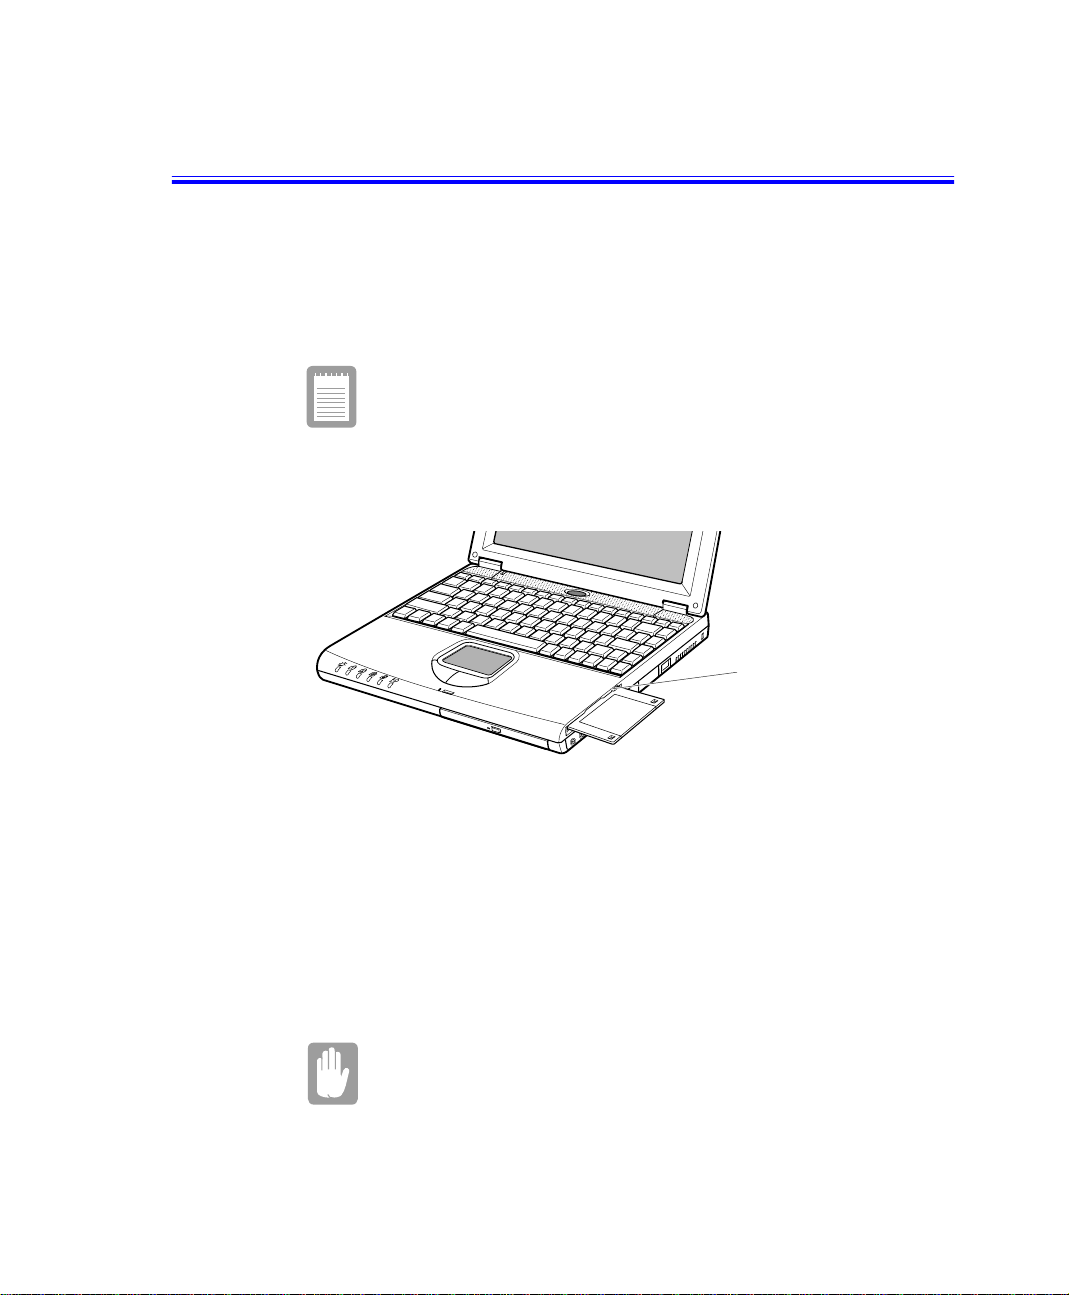
Your computer has a CD-ROM drive and a floppy disk drive within the computer.
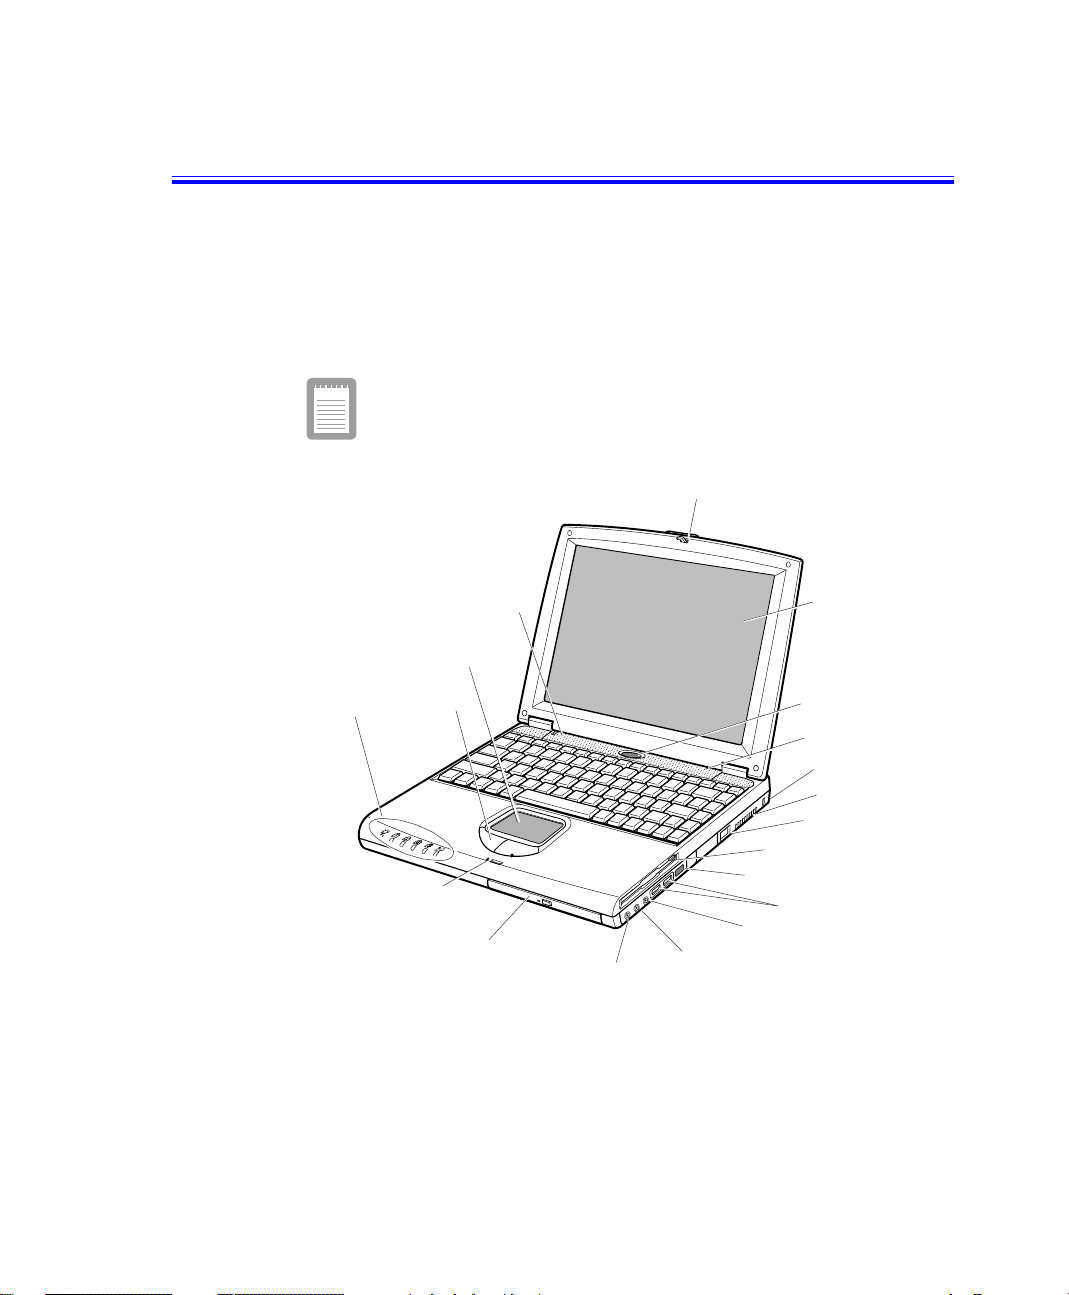
Figure 1 through 3 show you the features of your computer.
Docking Station port, Modem port, TV-out port, IrDA is
optional, so that your computer may not have those optional
ports or functions.
Cover latch
Speaker
Touchpad
Status
lights
Mouse
Buttons
Microphone
CD-ROM drive
Figure 1. Front View of Computer
Line-in
LCD
Power button
Speaker
Kensington lock
Fan vent
Modem jack
Floppy drive
Infrared port
USB ports
External-mic jack
Headphone
jack
Introducing Your Computer 3
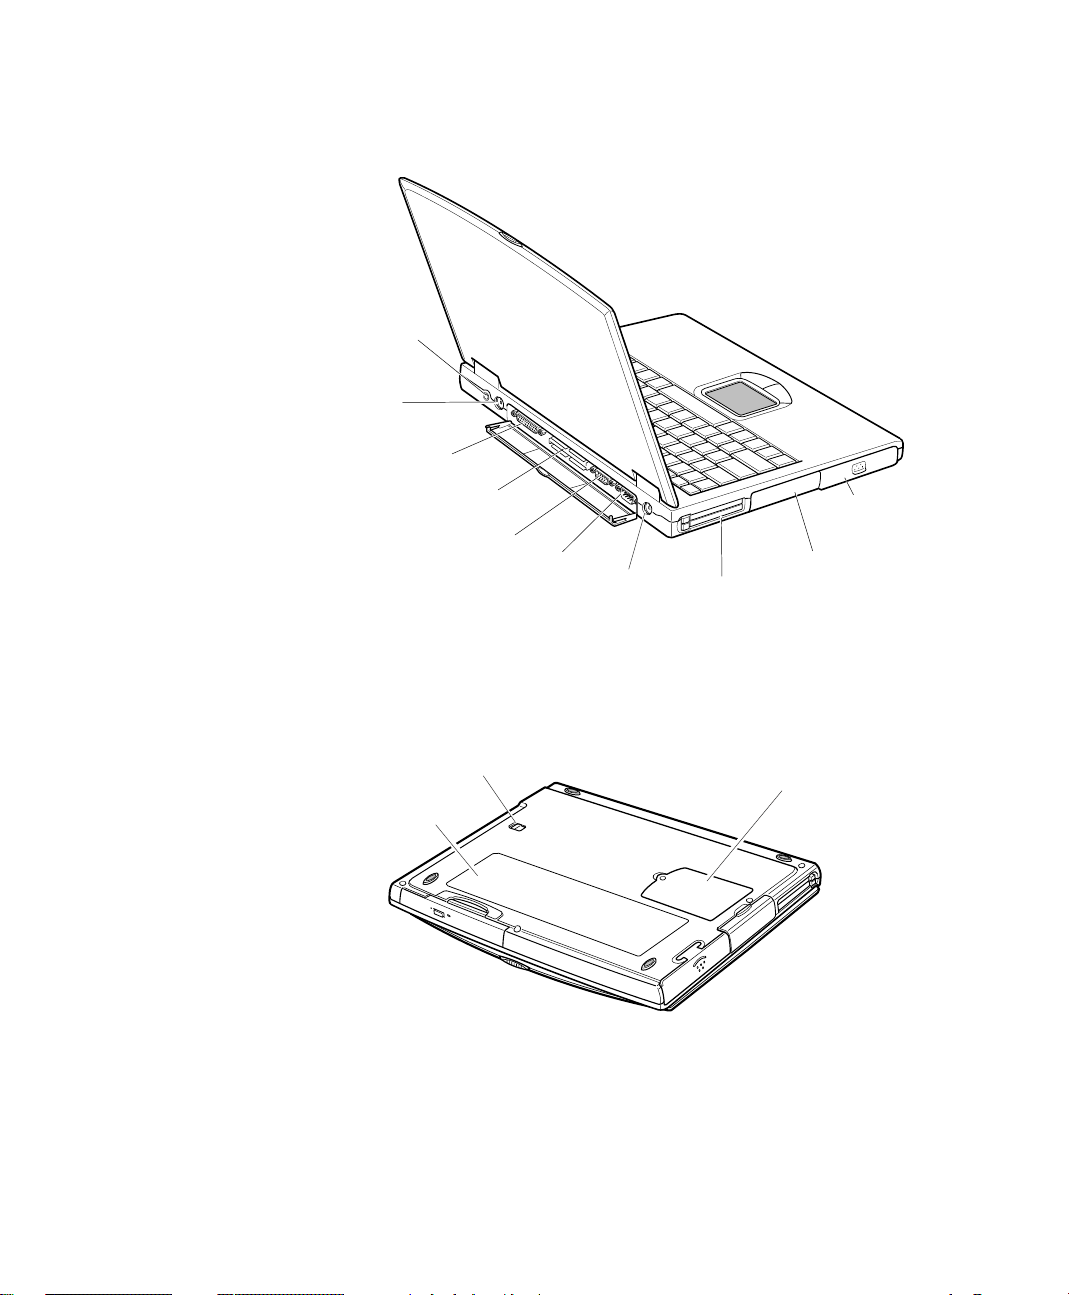
Power Connecto
PS/2™
mouse and
keyboard
port
Parallel port
Docking
connector
Video port
Figure 2. Back View of Computer
Serial
port
TV out
PC Card
compartment
Battery
compartment
Hard drive
compartment
System label &
Business card holder
Figure 3. Bottom View of Computer
4 Introducing Your Computer
Flex-Bay latch
Memory module
compartment
Using Your Computer for the First Time
This section g iv e s you de t a i l ed information o n using your compu ter for the first
time.
Attaching the AC Adapter
Your computer runs on power from the battery in the computer or from an
electrical outlet. The first time that you use your computer, fully charge the battery
by atta c hi n g the p o wer cord t o t he computer and to an electrical outlet.
All batteries lose their charge if they sit unused for an
extended time period. When not used, battery can discharge
fully in 2 to 3 months. The battery may have discharged in the
time it took for the computer to go from the factory to you.
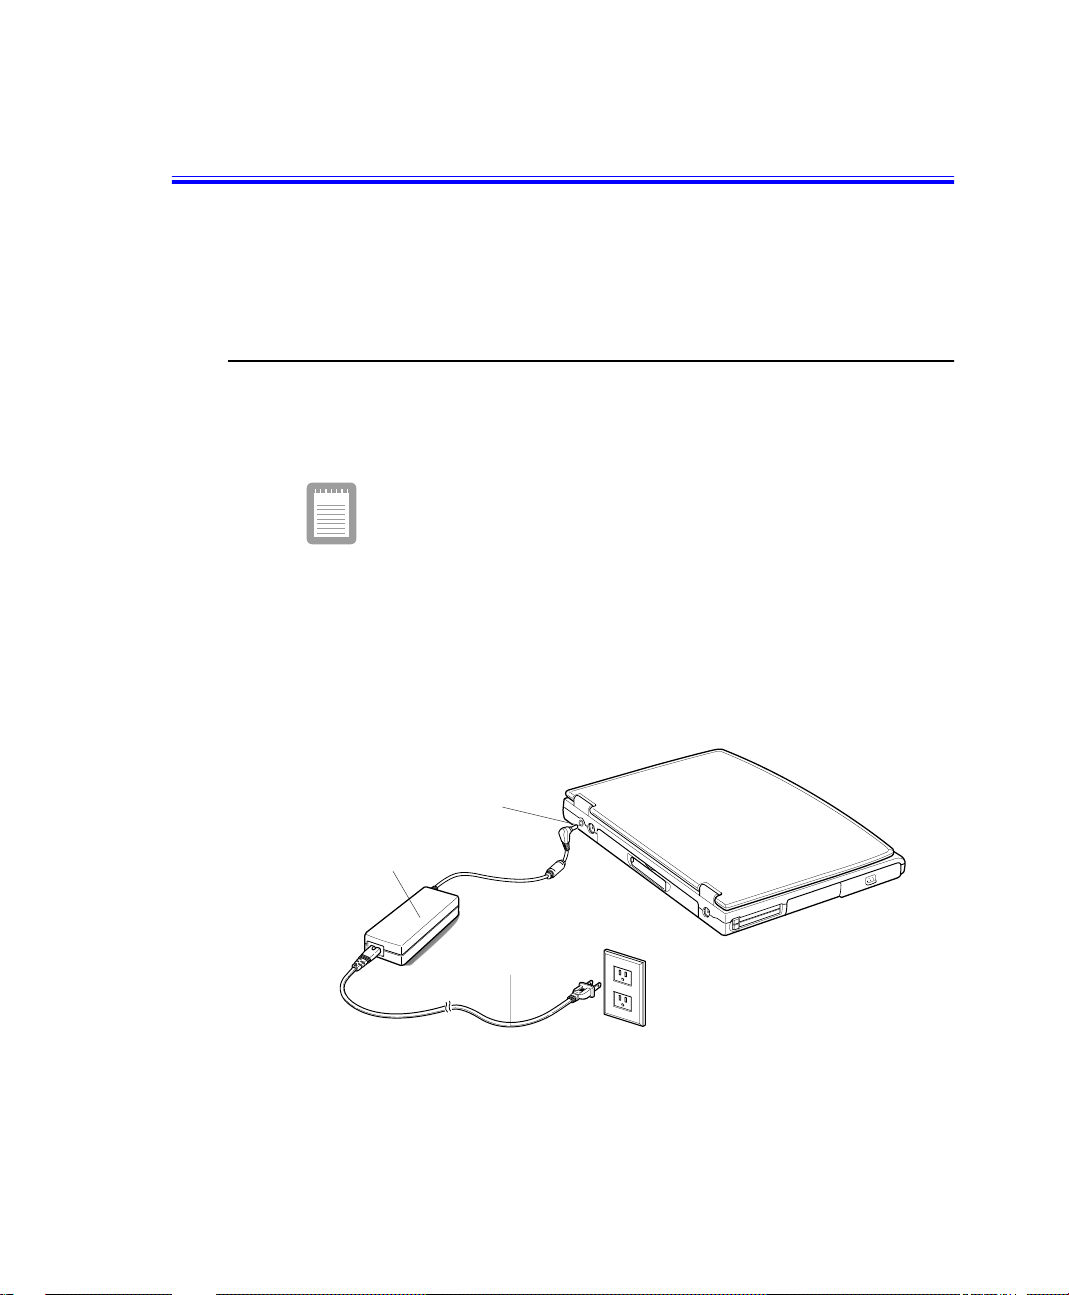
To attach the power cord:
1. Plug the AC adapter into th e p ower connect or on the b ack side of the compute r
(Figure 4).
2. Connect the power cord to the AC adapter and then to an electrical outlet.
Power connector
AC Adapter
Power cord
Figure 4. Connecting the AC Adapter
Using Your Computer for the First Time 5
The battery sta r ts charging as soon as you plug the power cord into an electrical
outlet. The ba tt e ry charges faster i f th e c o mp u ter i s tu r n e d off dur i n g ch arging.
If the battery is f ul l y de pleted and t h e co m p ut er is turned off, the battery charges
in about 3 hours. If the computer is turned on, the battery charges in about 5 hours.
When the battery is charging, the battery charge light is amber. When the battery
is fully charged, the light turns green.
See ”Using t he Battery” on page 32 for more information on using your
computer’s battery.
Turning On the Computer
To turn on the co mp ut er’s power f o r the first time:
1. Push to the right and hold the cover latches o n th e fro n t of the cover.
2. Lift up the cover.
3. Press and th en release th e power butt on (Figure 5).
The power light is on when the computer’s power is on.
Cover latch
Power light Power button
Figure 5. Turning On the Computer’s Power
6 Using Your Computer for the First Time

Understanding POST
When you t u rn on your compu t er , a routine called P OST (Power-On Self-Test)
automati ca ll y r u ns t o test the co m put er component s. System logo appears on the
screen durin g P OST.
Screen messages are built into th e co mputer t o rep o r t both normal and abnormal
system conditions. If an error message appears, take any action suggested in the
message . I f the m ess age identifies th e e r ror condition b u t does not suggest any
corrective act ion, write down the message and contact manufacturer or an
authorise d ser vice cen te r for assi sta nce. (See ”Troubleshooting” on page 95 .)
Adjusting the LC D Display
You may w is h to a djus t th e LCD (Liquid-Cr ys t al Display) when you begin using
your computer. A TFT (Thin- Film Tra ns i s t or) LCD does not require ad ju stment
for contrast because the contrast is set to remain at m aximum.
To ad j u st the LCD:
Press <Fn+Right Arrow> to increase the display brightness.
•
Press <Fn+Left Arrow> to decrease the display brightness.
•
Turning Off Your Computer
If your computer has a Windows operating system, turn off
your computer by performing the shutdown procedure
described in this section. Otherwise, you may lose data.
APM(Advanced Power Management) mode
To turn off th e co mp uter:
1. Click Start on the taskbar.
2. Click Shut Down.
3. Select the shut down option.
4. Click OK or Yes.
Using Your Computer for the First Time 7

If the operating system is Windows 98/ Me, the computer turns off.
•
If the opera ting s yst em is Windows NT, you receive a shutdow n message
•
and you mus t p r ess t he power b utton t o t ur n o f f the computer.
ACPI(Advanced Configuration and Power Interface) mode
If your ope rat ing s ystem supports AC PI a n d you want to shut d ow n the computer
just by pressin g the p ow er b utton, then follow next steps to set th e men u in Power
Management Properties. Also see “Using Power Management Options” on page
63 and the docum ent at io n acc o mpan yi ng your opera ting system.
To set the menu;
1. Select Power Management Properties in Control Pannel.
2. Select the operations of power button.
Standby mode: o pe r ates as Power On Susp en d mode. (See ”Rest Mode” on
•
page 64 for more information.)
Hib ernate mode : ope r a tes as S a ve T o Di sk mod e. S e t Hiber nate submenu to
•
enabled to use Hibernate mode. (See ”Rest Mode” on p a ge 64 for more
information.)
Restarting Your Computer
You may need to restart (reboot) your computer when installing hardware or
software o r if t he co mputer does not respo nd to y o ur input. A warm (or soft) boot
prompts you to save your files, turns off the computer, and then restarts the
computer . A c o ld bo o t t urns off the co mp uter without saving your files.
To perform a warm (or soft) boot:
1. Click Start on the taskbar.
2. Click Shut Down.
3. Select the restart option.
4. Click OK or Yes.
5. Save your files if prompted . You r com puter reboots.
8 Using Your Computer for the First Time

Do not perform a cold boot unl es s your keyboard and
touchpad have no effect and you cannot perform a warm
boot.
When you perfor m a cold bo ot , you lose da ta unless it was
saved to a storage medium.
You can also perform a soft boot by saving your files and pressing
<Ctrl+Alt+Del>. I n A C PI , you can perf orm a col d ( o r ha rd) boot by pressing the
power but ton t o tur n t he c om pu t e r off , waiting five second, a n d the n pres sing the
power button to turn the computer on.
Tips for Using Your Computer
The following information helps you avoid potential problems as you use your
computer:
Do not try to disassemble your computer. Opening the
system chassis voids your warranty. Only an authorised
manufacturer service center can replace or add any parts
inside the chassis.
Follow all the in str uctions and cau t i ons in y our computer us e r documen tation.
•
The LCD has a polarized surface and can be damaged easily. To prevent
•
damage, avoid touching the screen.
Use only approved AC adapters, auto adapters, memory modules and other
•
options.
Because a notebook computer is small and has restricted air flow around
•
components, it is more likely to ov erh e a t th an a d es kto p computer. A fan
inside your computer runs when needed to help eliminate some heat. Make
sure the fan v en t o n th e right side o f your computer is not bloc ked when you
use the computer. (See Figure 1 on page 3 and Figure 2 on page 4 for the
location of the vent.) Occasionally check the vents and remove any
accumulat ed du s t o n the outsi de.
Avoid using or storing the computer in extremely hot or cold areas, such as a
•
car on a hot day. Keep the computer away from heaters and out of direct
sunlight. Exposure to excessive heat may damage computer components.
Using Your Computer for the First Time 9

If you have left your comp ut e r in a hot place, let it cool down slo w l y t o r oom
temperature (with the LCD panel open) before using it.
Do not remove the memory-module compartment door, or try to install a
•
memory module when t he c omput er i s on. (See ” B o tto m View of Co m put er”
on page 4 for the location of the door.)
(For information on installing m e mory modules , see “Installin g a Mem ory
Module” o n pag e 86.)
Set up your c om put e r work are a to avoid phys ical strain. Sit with your back
•
straight and supported b y you r ch ai r . Adjust your c hair or work table so that
your arms and wrists can remain in a relaxe d position, paral l el with the floor.
Avoid bending or twisting your wrists as you work. Your hand s should “float”
slightly above the keyboard. Refer to a book on office ergonomics for more
informatio n on setting u p your work area.
Take frequent bre ak s fr o m wo r king at the co mputer to rest your eyes and
•
stretch your muscles.
Remember to save your data files frequently and to make backup copies of
•
your f iles.
Traveling with Your Computer
If you are traveling by airplane, follow these tips:
Take the computer with you as carry-on luggage. Do not check the computer
•
with your baggage.
Allow the computer and disks to go through the X-ray security devices. Do
•
not hand-car r y disks through the w alk -through metal detec to rs, which can
cause loss of data.
Make sure that the battery is charged or the power cord is easily accessible.
•
You may be required to turn o n the c om p u ter for airport securi ty personnel.
Be prepared to t u rn off the computer during take off and landing.
•
Contact your air li n e f o r information about using an optional airline a d apter to
•
power your computer while traveling by airplane.
10 Using Your Computer for the First Time

Handl in g Sp il ls
Do not spill anything on yo u r com p ut e r. The be st way to av oi d s pills is to avoid
eating and drinking around your computer. If you do spill something on your
computer, turn off your computer, unplug it immediately, and do the following:
If you spill liqui d on the keyboard, drain a s much of the liquid fr om the
•
keyboar d as possible. Be ca r e fu l no t to le t th e li q uid d ri p o n to t he LCD panel.
Allow the system to dry for several days before trying to use it.
If you spill liquid on an external keyboard or keypad, unplug it and drain as
•
much of t he liquid as possible. Allow the keyb o ar d to si t a t ro om temperature
for a full day before t rying to use it .
Sweet liquids leave a sticky residue that may jam the
keyboard despite your efforts to dry it.
If you spill li q u id on t he LCD panel, clean it immedi ately with a soft cloth and
•
denature d a lc o h ol. Do not use wat er, wind ow cleane r, ac et o ne , arom atic
solvent, or dry, rough towels to clean it.
Some liquids damage the polarized LCD screen. If your
screen is damaged, contact your authorized manufacturer’s
service center for a replacement.
Storing the Comp uter for Long Period s
If possible , leave the power cord conne cted to the com puter an d an ele ctrical outlet
when the computer is not in use. This extends the life of the battery and keeps the
battery fully charged.
If you will not be using the compu te r f or a long period o f tim e (a mon th or more),
you should charg e t he ba t t er y unti l it is com p l et e l y fu l l. After you have done so,
remove the battery from the unit.
Using Your Computer for the First Time 11
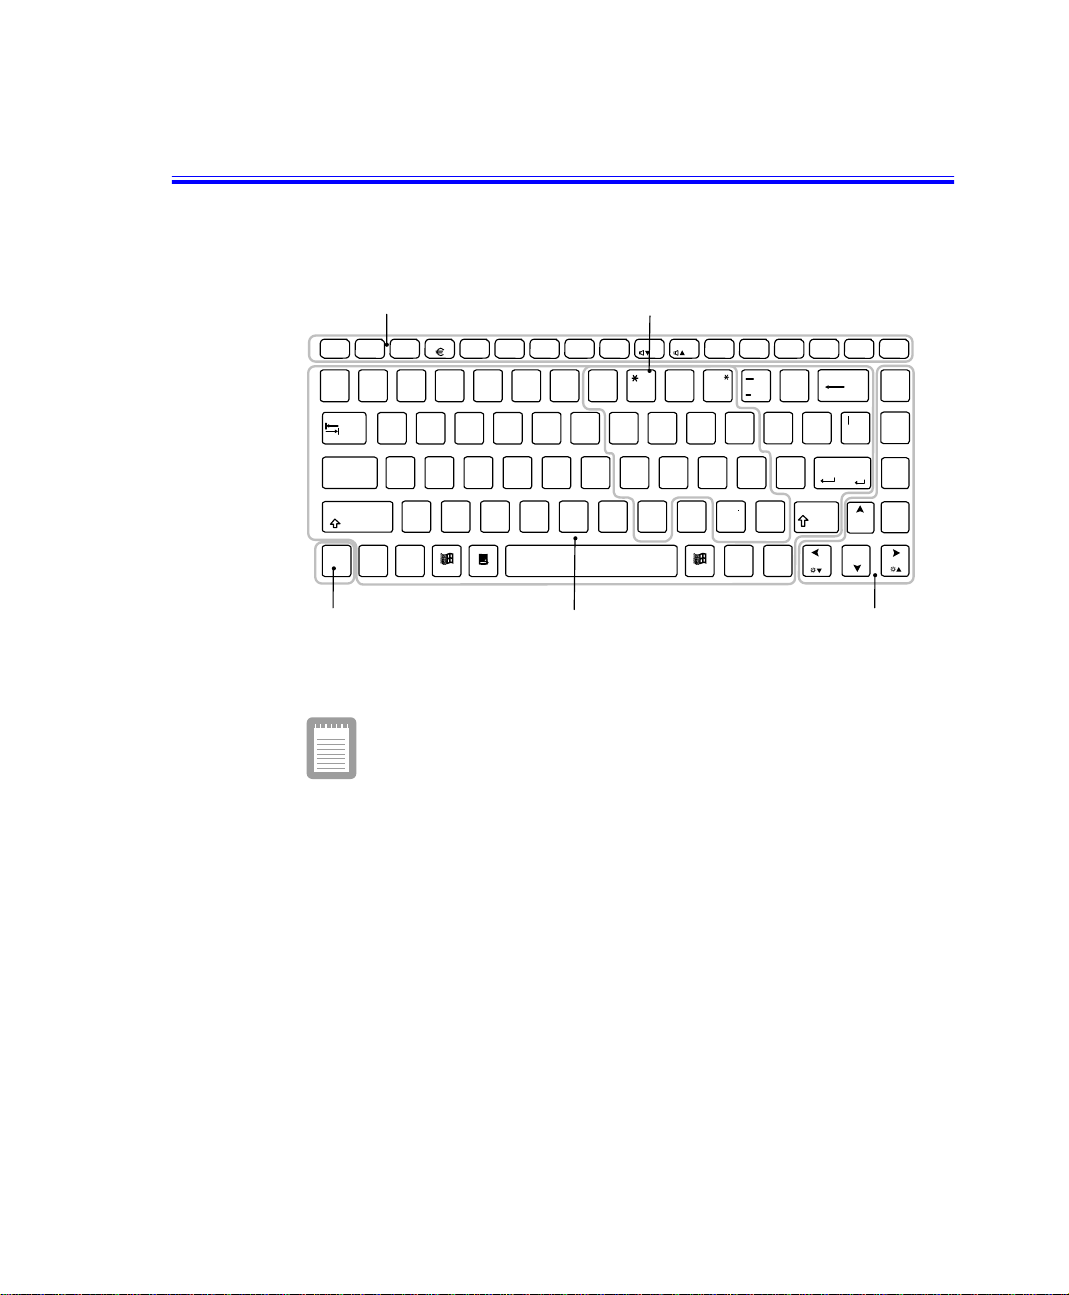
Using the Keyboard
Your computer has an 87/88-key keyboard (Figure 6). By pressing designated key
combinations, you can have access to all the key functions of a full-sized keyboard.
Function and Special Purpose Hot Keys
F1
F2
F3
Esc
Prt Sc
~
`
Tap
Caps Lock
Shift
Fn
Function Key
Sys Rq
@
!
1
23
QWER T
A
Alt
Ctrl
F4
Backlit
#
SD FGH
XCVBNM<>
Z
F5
F6 F7
Gauge
CRT/LCD
$
4
KeyLock
%
^
567
YU
Alphanumeric Keys Cursor and Screen Control Keys
Embeded Numeric Keypad
F8
F9
Mute
7
8
&
()
890
54
IOP
1
JK
0/
F10 F11
Rest
9
6
23
L:
,
.
F12 Num
Scroll
_
;
Alt
{
[
+
?
/
Ctrl
Lock
+
=
}
]\
"
'
Shift
Pause
Break
Enter
Insert
Backspace
Figure 6. Keyboard
Although the layout of the keys on your computer’s keyboard
is different from th a t on a desktop co mpute r’s keyboard, the
keyboard feels like a full-sized keyboard when you use it. The
distance between the keys (the pitch) is the same as on a fullsize keyboard (19 mm). The travel, or space the key goes
down when pressed, is also the same (3 mm).
The keys on the keyboard can be grouped into the following categories:
Full-sized Alphanum e ri c typewriter k ey s are arra nged like a st andard
•
typewrite r ke yb o ard and are used for text entry. The Wi n dows key s on either
side o f t he spac e bar ope n Wind ows men u s and p e rform oth e r spec ial
functions.
Function keys, when pressed together with the <Fn> key, enable special
•
functions.
Cursor a n d Screen contro l k e ys move the curso r . The y may pe r f orm o ther
•
functions, depending on your software.
Delete
Home
PgUp
PgDn
End
12 Using the Keyboard
To clean the computer keyboard, use slightly damp cotton swabs. Scrub the key
and the surface around the keys.
Do not allow liquid to drip into the keyboard or you may
damage the keyboard.
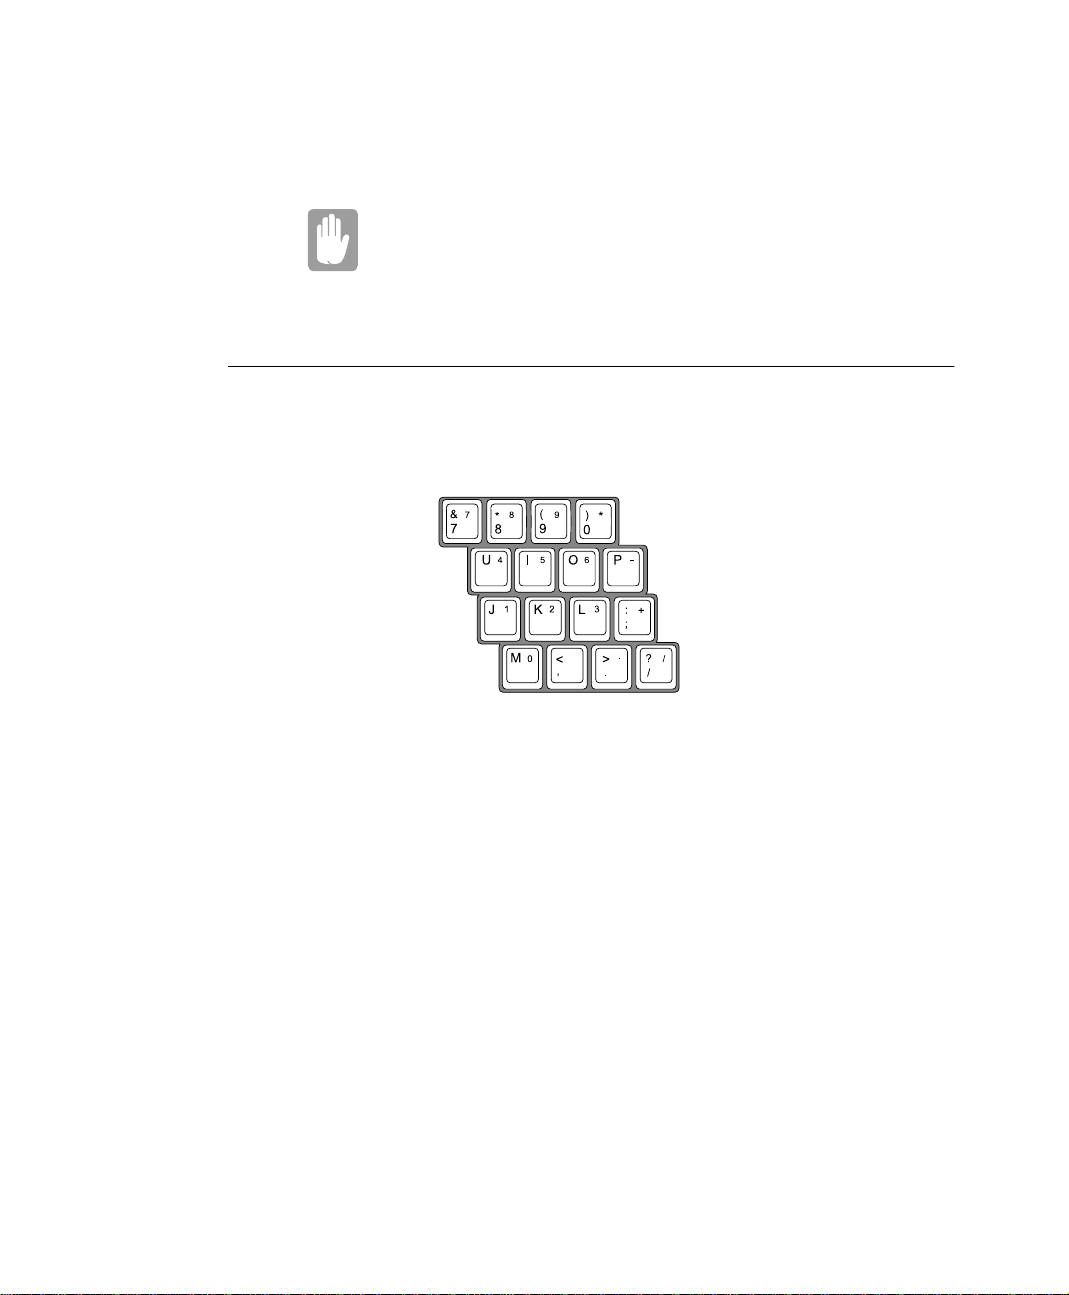
Using the Embeded Numeric Ke ypad
Your keyb o a r d in cl ude s a n u me r ic ke ypad, wh ich is a grou p of ke ys that you can
set to type numbers and mathematical symbols, such as the plus sign (Figure 7). A
number or sym bol on the right c or n e r of each keypad key shows it s numeric
function.
Figure 7. Numeric Keypad
Press <Num Lock > t o turn on the embe dded numeric keypad. The n umeric
functions of the keypad are enabled and the Num Lock light turns on. (See ”System
Status Lights” on page 18 for the location of the Num Lock light.)
While the numeric functions are enabled, you can temporarily return a key to its
normal function by pressing <Fn> and t h e key . For examp le to t yp e th e letter m,
press <Fn+m>.
To turn the numeric keypad o ff, p ress <Num L oc k> again . The Num Lock light
turns off.
Using the Keyboard 13

Using Spe cial Fun ction Keys
The <Fn > key activates spe ci al fu nc ti ons w he n it i s pres sed in combination with
another key. Table 1 shows the special key combinations.
Table 1. Description of Special Function Keys
<Fn> Key
Combination
<Fn+F1>
<Fn+F2>
<Fn+F3> This key combination can generate Euro Mark as other Eurokey.
<Fn+F4>
<Fn+F5>
<Fn+F6>
<Fn+F7>
<Fn+F8>
<Fn+F9>
<Fn+F10>
<Fn+F11>
<Fn+F12>
Function
Print screen:
paste into the Paint program.
System request:
Backlight
<Fn> key) to turn the LCD backlit back on.
CRT/LCD:
monitor, and simultaneous display on both the LCD and the
external monitor.
Gauge:
your screen.
The gauge closes in a few seconds, or you can press <Esc> to
close the gauge. (See ”Monitoring the Battery Charge” on page
35 for more information on the battery gauge.)
KeyLock:
Type your password and press <Enter> to unlock the keyboard.
The <Fn+F7> key combination has no effect unless a password is
enabled in System Setup. The Num Lock, Caps Lock, and Scroll
Lock lights blink when the keyboard is locked.
Mute:
Volume down:
Volume up:
Rest:
operation from rest, press the power button. (See ”Using Power
Management Options” on page 63 for more information about the
rest mode.)
Scroll:
the page up or down while the cursor position does not change.
Pressing <Fn+F12> again turns off the scrolling function.
Takes a picture of the open screen, which you can
Reserved for use in software programs.
: Turns the LCD backlit off. Press any key (except the
Switches the display between the LCD, the external
Displays the battery gauge in the upper-right corner of
Locks the keyboard and activates password protection.
Turns the audio output on and off.
Decreases the audio volume.
Increases the audio volume.
Puts the computer into rest mode. To resume normal
In some applications, sets the cursor-control keys to scroll
14 Using the Keyboard

<Fn+Right
Arrow>
<Fn+Left
Arrow>
When you press a function key combination, the system
sound may be temporar ily muted.
If you reinstall Windows, install the Magic Keyboard for
volume control function keys on keyboard, <Fn + F8/F9/F10>.
Or use the windows volume control on your screen.
Brightness up:
Brightness down:
Increases the LCD brightness.
Decreases the LCD brightness.
Using the Keyboard 15

Using the Touchpad
Your computer is equipped with a touchpad, which is an integrated-pointing
device that is used to perform standard mouse functions (Figure 8). The touchpad
is an advanced and reliable pointing device that works with a touch of your finger.
Figure 8. Touchpad
Table 2 explains how to use the touchpad.
Press on the touchpad gently. The touchpad responds to light
pressure
Touchpad
Mouse buttons
Mouse Action How To
Move cursor Place your finger on the touchpad and slide your finger
Click Tap the touchpad once with your finger.
Double-click Tap the touchpad twice with one finger.
Scroll up/down Place your finger on the right hand side of the touchpad
Scroll left/right Place your finger on the bottom of the touchpad and
16 Using t he Touchpad
Table 2. Using the Touchpad
in the direction you want the cursor to move. The faster
you move your finger, the faster the cursor moves
across the screen.
and slide it up or down to scroll the current window.
slide it left or right to scroll the current window.

You ca n use the buttons bel o w the touchp ad in th e s ame way you would use
standard mouse buttons. For more information on these features and other features
supported by your mouse driv er , see t h e Mouse propert i es in t he Co n tr ol Panel.
For information on at taching and us ing another po i nting devic e or keyboard with
your computer, see “Connecting Peripheral Devices” on page 20.
Using the Touchpad 17
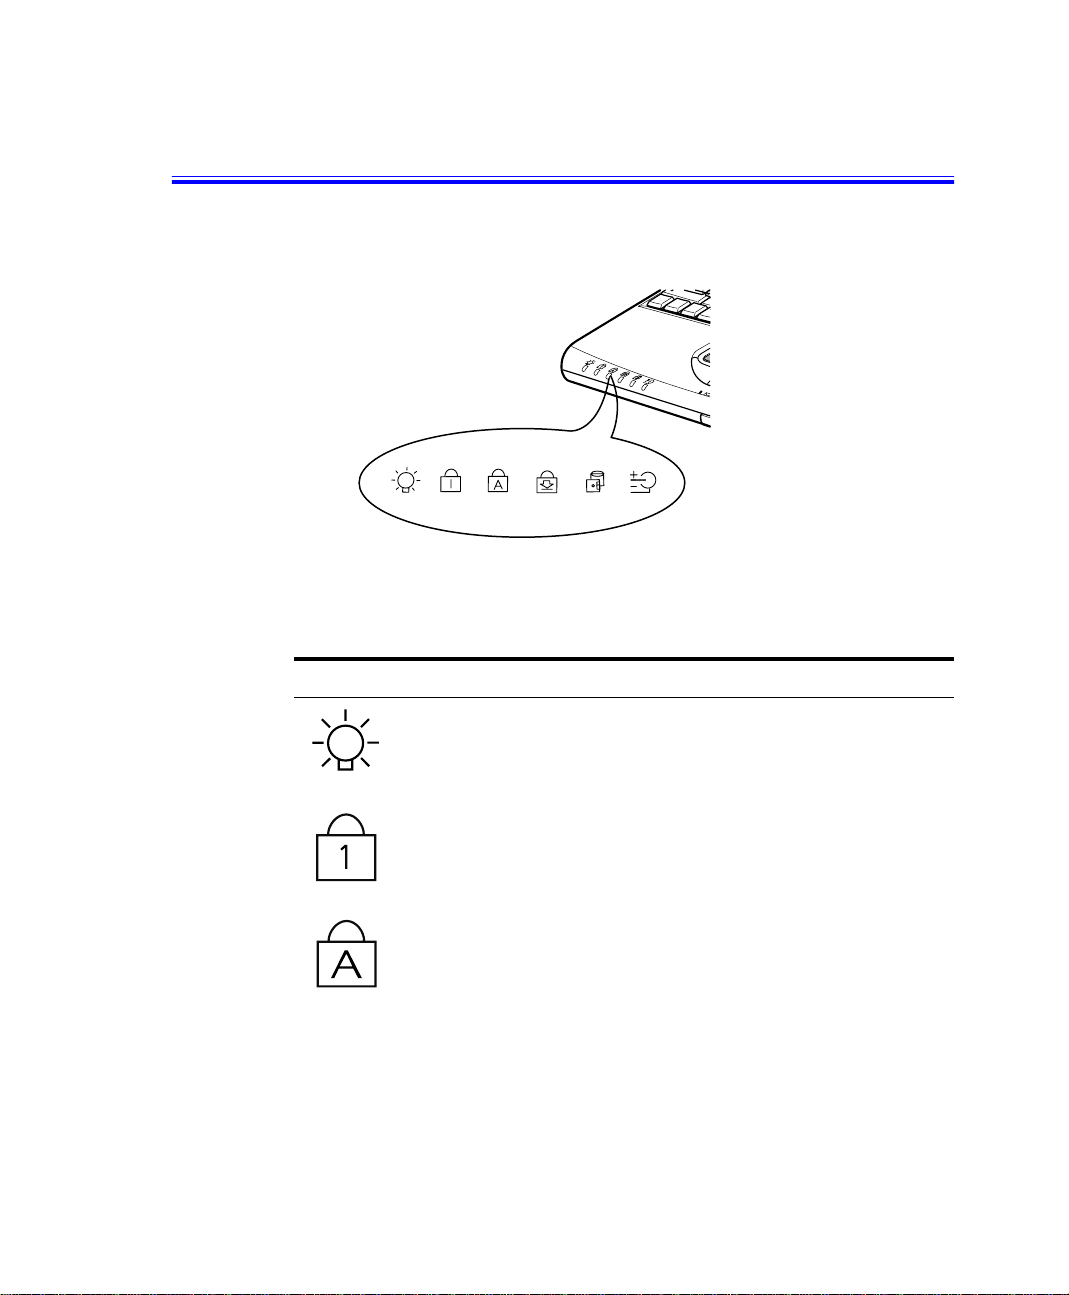
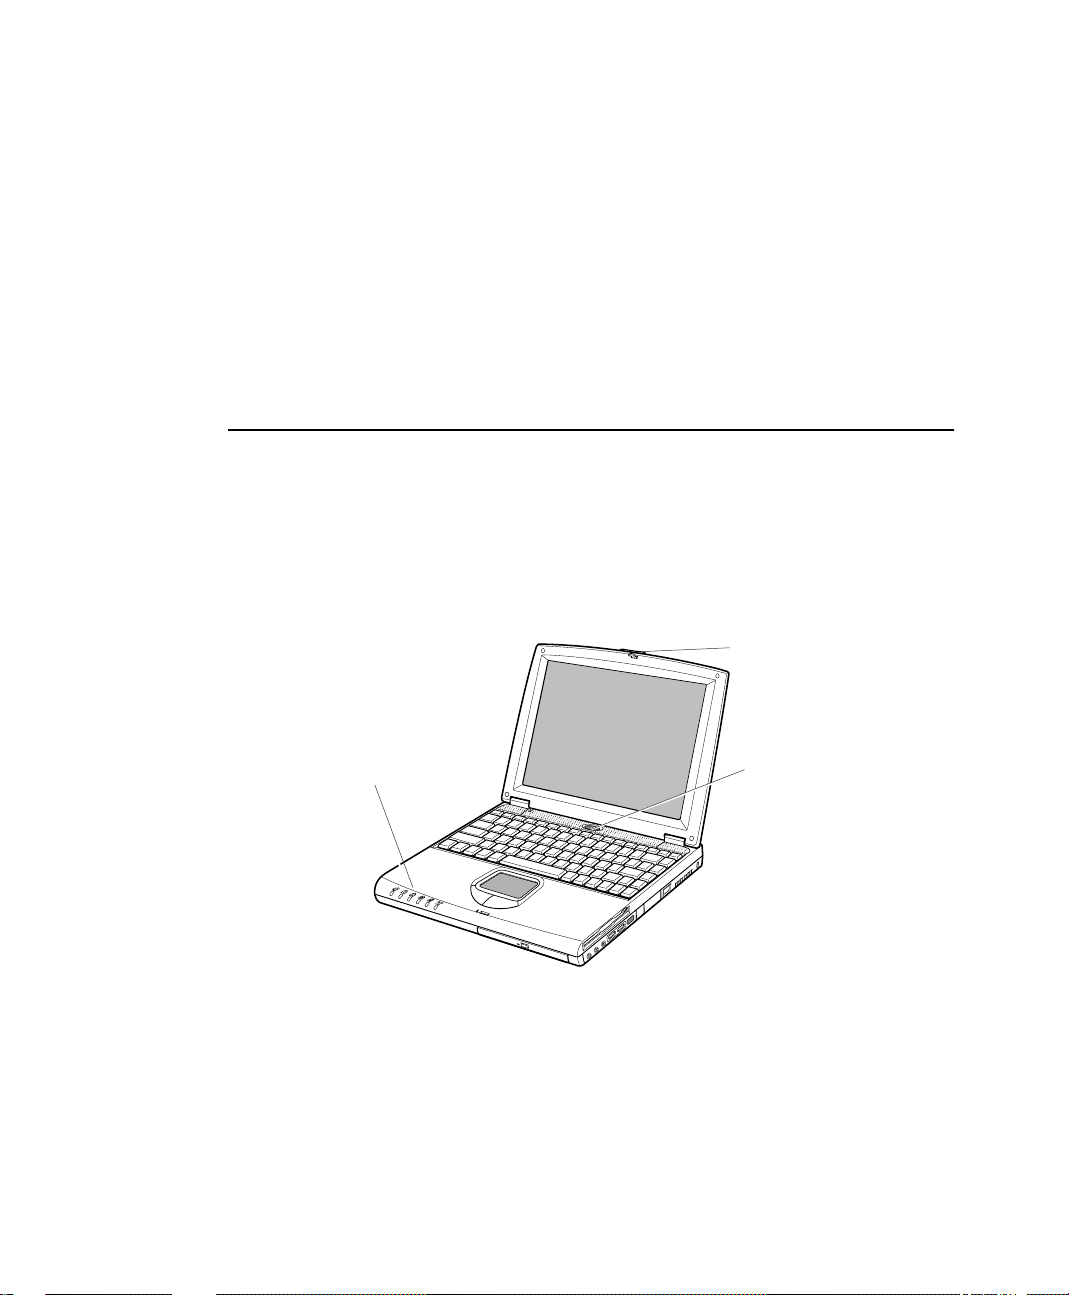
Reading the System Status Lights
System Status lights show the status of computer functions. The lights appear on
the left edge of the computer (Figure 9).
Figure 9. System Status Lights
Table 3 describes the meaning of the lights.
Table 3. System Status Lights
Icon Function of Light
Power light:
blinks when the computer is in Power On Suspend mode. (See ”Rest
Mode” on page 64 for more information on Power On Suspend
mode.)
Num Lock light:
activated. See ”Using the Embeded Numeric Keypad” on page 13 for
a description of the keypad.
Caps Lock light:
When the function is activated, all alphabetic characters you type will
be in upper case.
18 Readin g the Syst em Statu s Lights
Light is green when the computer’s power is on. Light
Light is on when the embedded numeric keypad is
Light is on when the caps lock function is activated.
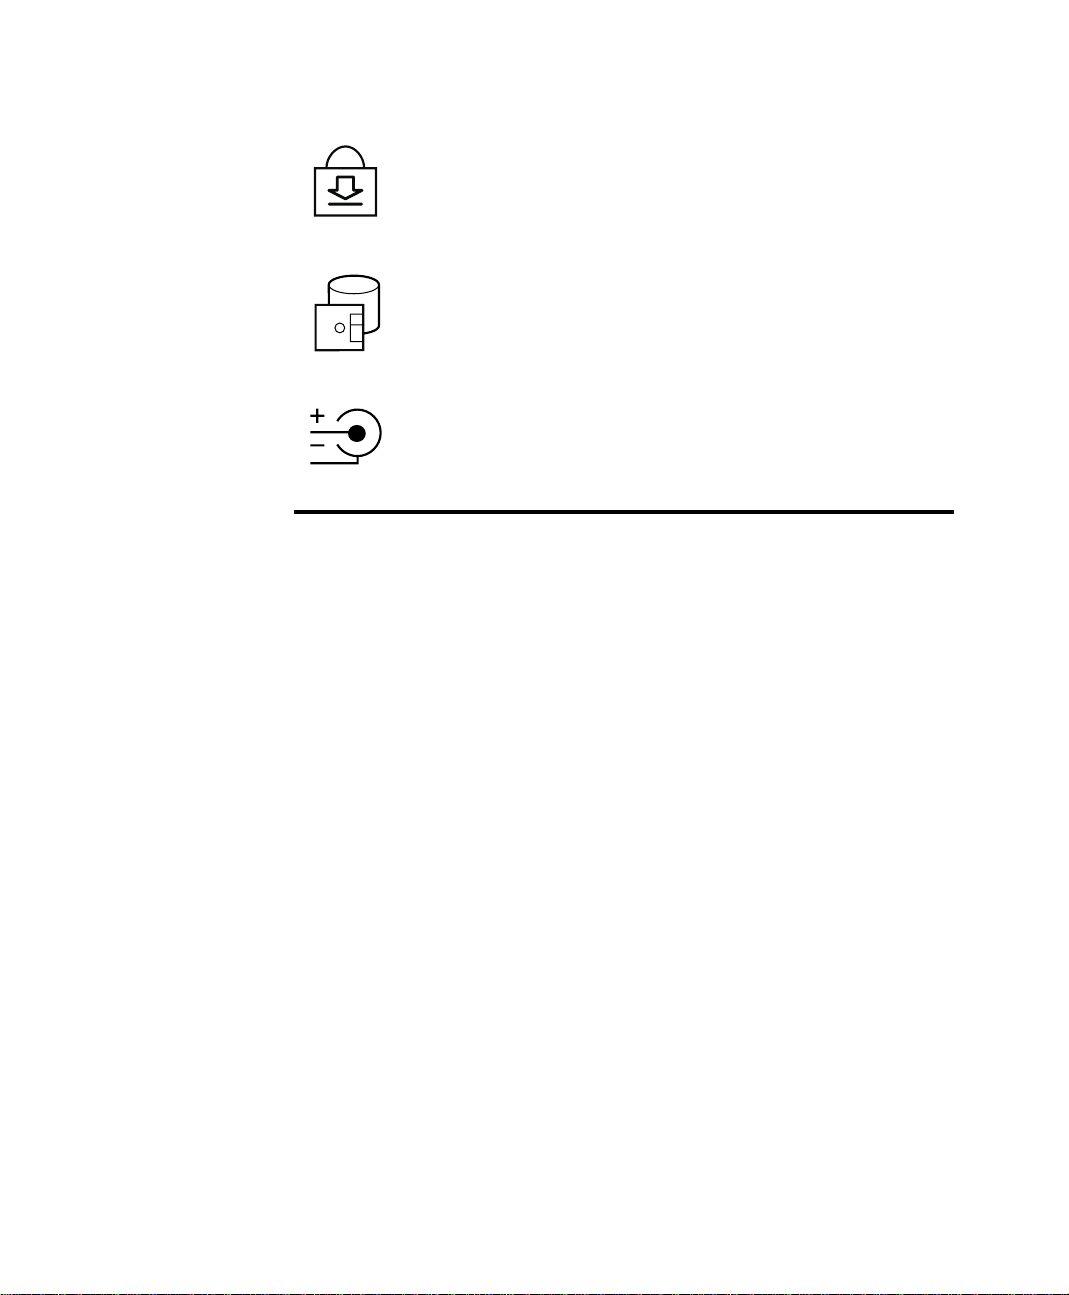
Scroll Lo ck ligh t:
Light is on when the scroll lock function is activated.
The scroll lock function affects cursor movement and text scrolling in
some applications. This is a software specific function. Refer to the
appropriate software manuals for a description of the <Scroll> key.
Drive light:
Light is on when the hard drive or floppy drive is being
accessed. Do not turn your computer off when this light is on. When
the light is amber, the floppy drive is being accessed. When the light
is green, the hard drive is being accessed. For a CD-ROM or DVDROM drive, check the light on the drive itself to see if the drive is
being accessed.
Battery char ge light:
When the power cord is connected, light gives
information about the battery charge. Light is amber when the
battery is charging normally. Light is green when the battery is fully
charged. (See ”Charging the Battery” on page 32 for more
information about charging the battery.)
Reading the Sy s tem Status Lights 19
Connecting Peripheral Devices
The conne ct ors on you r co mp u te r e n able you to at ta ch periphera l devices to the
computer (Figur e 10).
Turn off your computer before you connect a peripheral
device. Connecting a peripheral device with your computer
turned on may serious l y damage the device or your
computer.
Headphone jack
Line-in jack
Power
connector
Kensington
Lock
* Modem jack
USB ports
Mic-in jack
PS/2 mouse and
keyboard port
Parallel port
* Docking connector
Video port
Figure 10. Peripheral Connectors
* Optional
Table 4 shows the icons loca t ed n ear each connect o r and te ll s you the devices that
you can attach to the connectors.
20 Conn ecting P e r ipheral De vi ces
Serial port
* TV-out port (S-VHS)
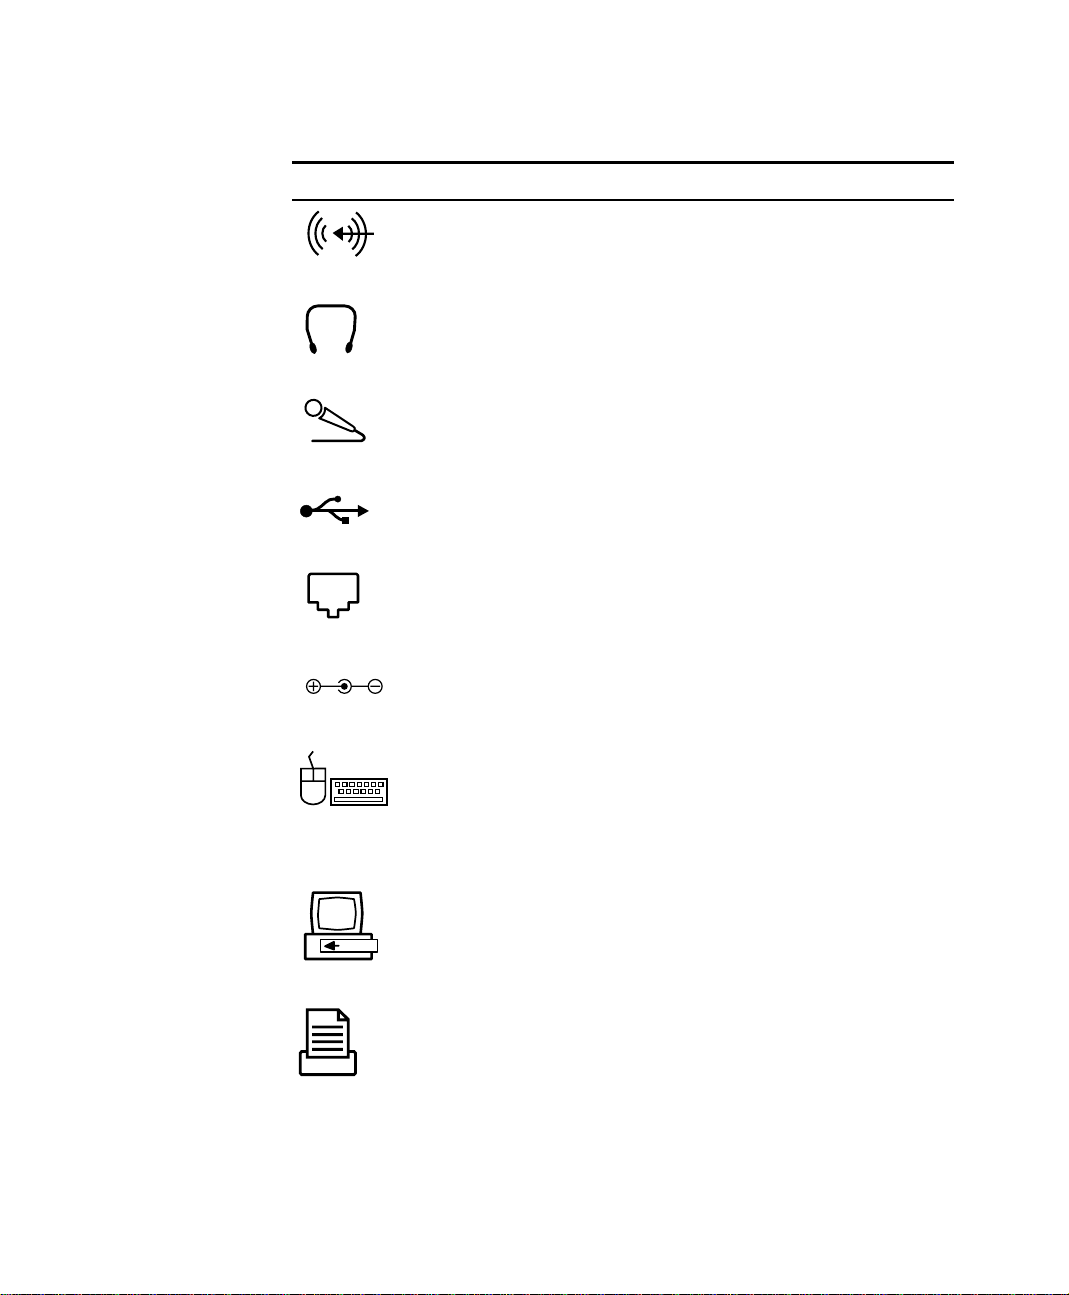
Table 4. Co nnecting Peripheral Devices
Icon Connector
Line-in jack:
Headphone jack :
An input for external audio.
Connect stereo headphones or speakers to this
jack. Speakers connected to this jack override the internal
speakers.
Microphone jack :
Connect an external microphone to this jack.A
microphone connected to this jack overrides the internal
microphone.
USB (universal s er i al b us) port:
Connect USB devices to this port.
USB input/output devices include keyboards, pointing devices, and
monitors.
Modem jack:
Connect a telephone line to connect to internet or
send/receive faxes, see the modem user’s manual for more
information
Power connector: Plug in the AC adapter to run the computer and
charge the battery, see “Attaching the AC Adapter” on page 5.
PS/2 (Personal System/2) mouse and keyboard port:
Connect a
PS/2-compatible mouse or external keyboard or keypad to this
port. Make sure your computer is turned off when you attach
peripherals to the port.
You can use the computer’s touchpad and a PS/2 keyboard at the
same time, see “Advanced Menu” on page 54 for more information
Docking conne ctor:
Connect a docking option to this connector.
Parall e l port:
Plug a parallel device, such as a parallel printer or
network adapter, into this 25-pin port.
Connecting Peripheral Devices 21
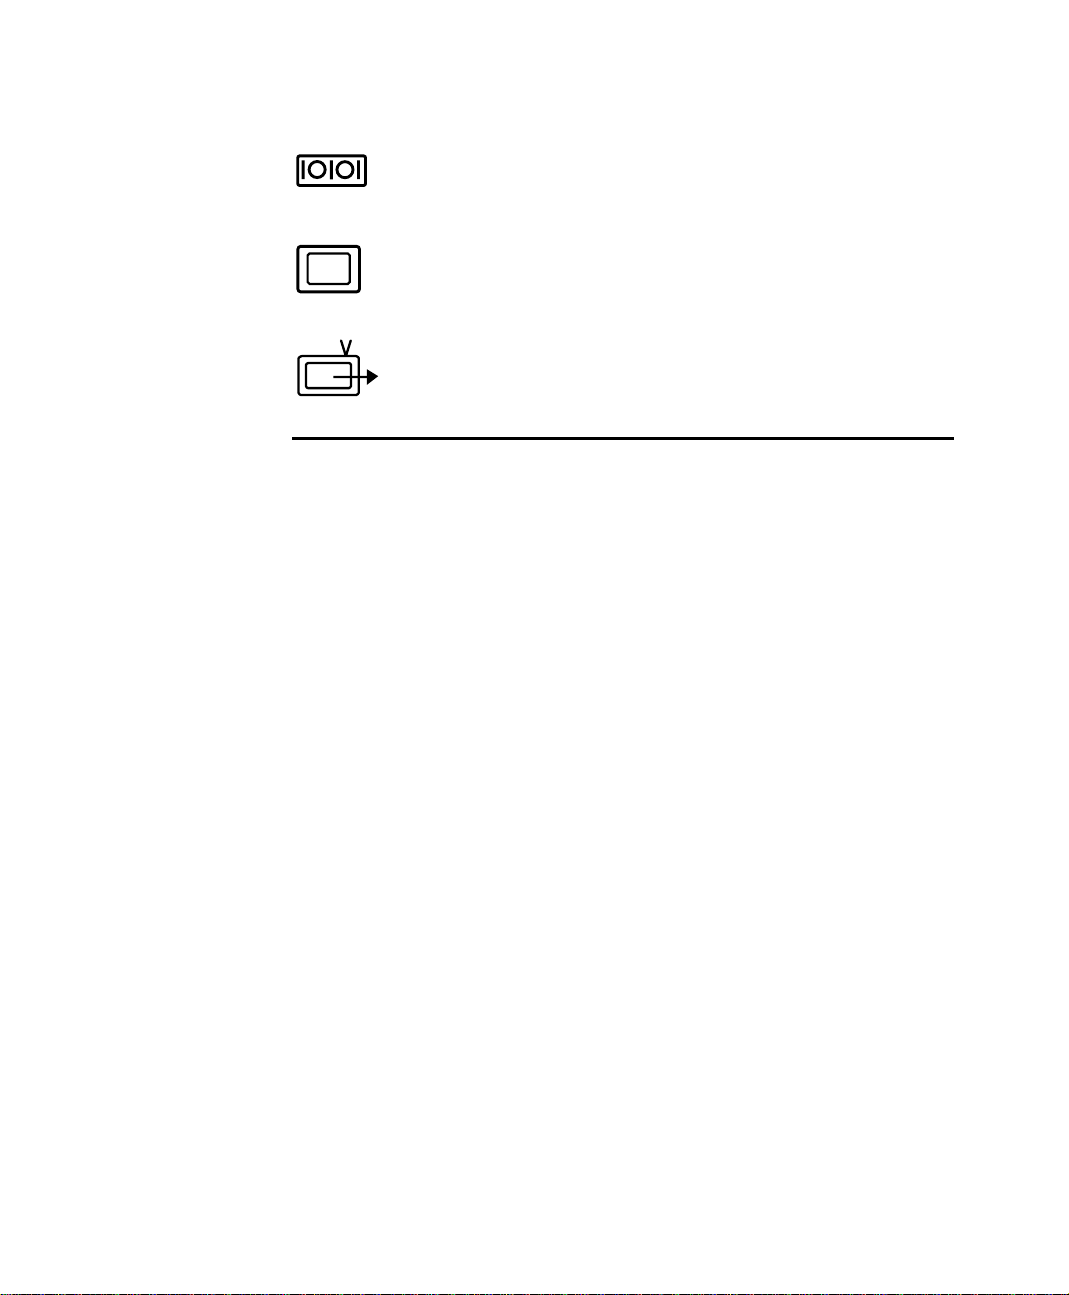
Serial port :
pin port. If the device has a 25-pin connector, you need a 25-to-9pin serial adapter.
Plug a serial device, such as a serial mouse, into this 9-
Video port:
15-pin connector and then plug the monitor power cord into a
grounded outlet.
TV-out port:
the jack into an external TV. No audio is transmitted via this port.
Plug the interface cable of an external monitor into this
plug a S-VHS jack into this port and the other side of
If your c omputer’s opera ting system is Windo ws 98/ Me, you c an use t he USB
port. Th e Windows NT 4.0 ope ra ting system does not support USB.
22 Conn ecting P e r ipheral De vi ces

Using the Flex-Bay
Your computer includes the Flex-Bay, a peripheral bay that can hold one of the
following devices:
CD-ROM drive: shippped with your computer.
•
DVD-ROM: shippped with your computer or also available as an option.
•
Optional seco ndar y ha rd drive: available as an opti on for yo ur computer.
•
Zip drive / Superdisk LS-120: availa ble as a n o p t ion for your computer.
•
There is only one IDE bu s in your sy stem, HDD is connected
as a master type of IDE devices and CD-RO M drive is
connected as a slave type of IDE devices. If you want to install
another IDE device to Flex-Bay, you must set the switch of
device to slave type.
See ”Using Opt ion s” on page 84 for detailed information and
the location of the switch on each devices. Refer to the below
table to s e t the switch on devices.
Table 5. Setting the IDE type
Drive Switch 1 Switch 2
CD-RO ON ON
DVD-ROM ON ON
ZIP ON OFF
LS-120 ON OFF
2nd HDD ON ON
To remove a device from the Flex-Bay
1. Turn the computer’s power off.
2. Close the LCD panel, and turn the co mputer over so that the bottom of the unit
faces up.
3. Pull up on the Flex-Bay latch and pull the device from the bay.(Figure 11)
Using the Flex-Bay 23
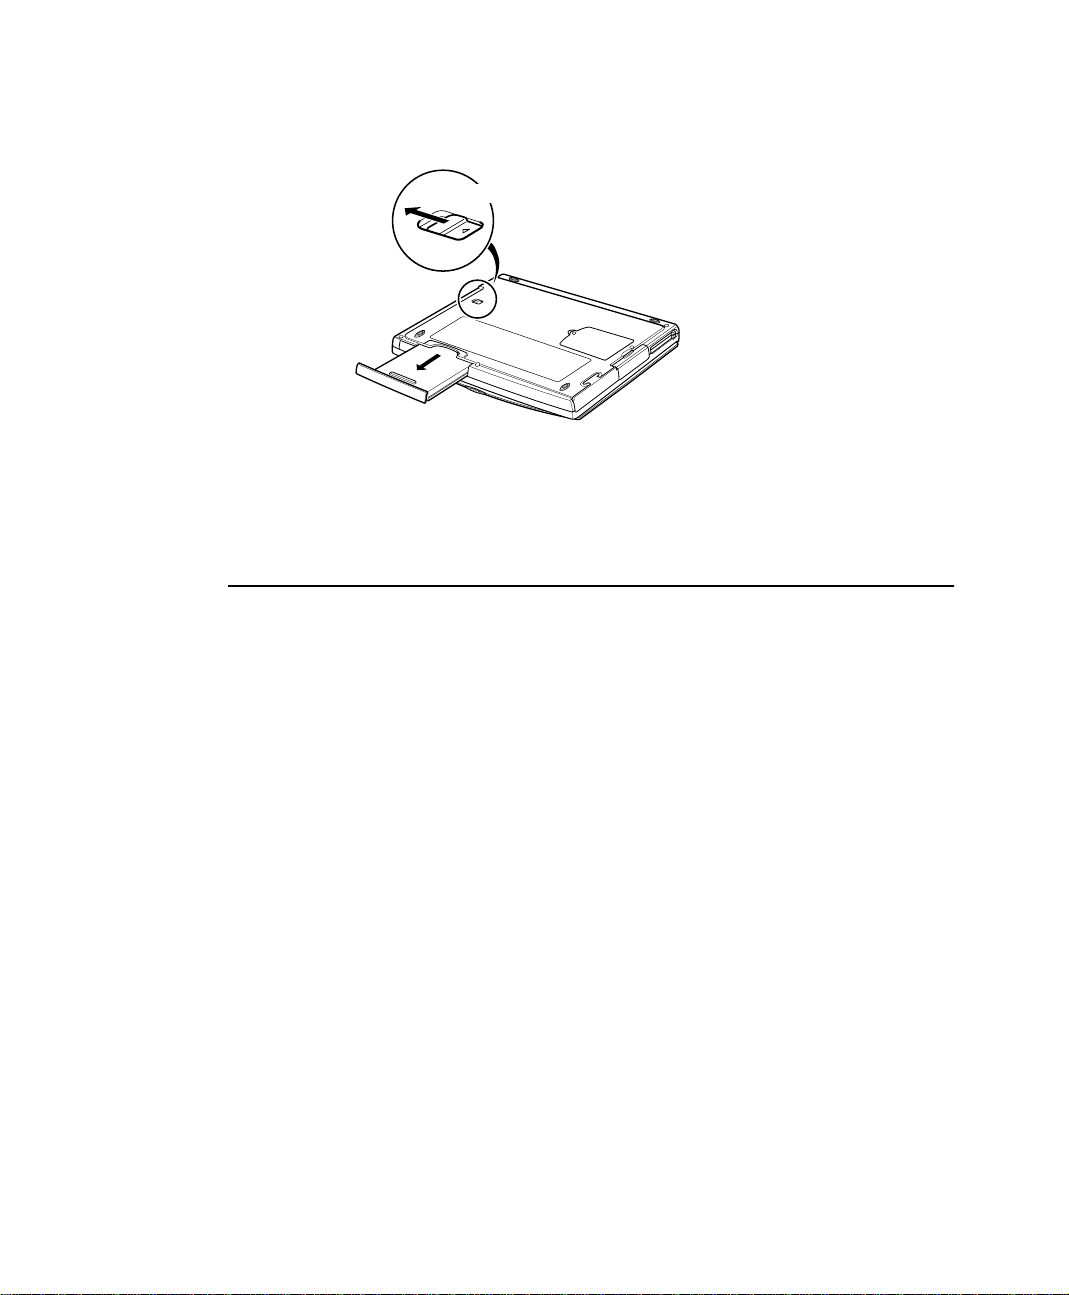
Flex-Bay latch
Figure 11. Removing a Device from the Flex-Bay
4. Remove the device out of the bay.
To install a device in the Flex-Bay:
1. Turn the computer’s power off.
2. Place the devi ce into the bay.
3. Push t he d evice in until it is f l ush w it h the chassis.
4. Push d own on th e Fle x- Bay l a tch unt il th e l atch s naps into place.
Your co m puter’s operating system auto matically recogn izes the devic e in the
Flex-B ay an d co n fi g u res your computer accord in g ly.
24 Using the Flex-Bay
Using the Floppy Drive
Your comput er co me s with a 1.44 MB, 3.5-inch, high-densit y flopp y drive, which
can read, write to, and format the following disk s:
A high-density, 3.5-inch disk, which stores 1.44 MB (megabytes) of data.
•
A double-density, 3.5-inch disk, which stores 720 KB (kilobytes) of data.
•
The floppy drive in your notebook comput er is smaller, but
more po we r -eff icient than a floppy drive in a desktop
computer. To get the best performance from your floppy drive
use high-quali ty flop p y disks.
To use a floppy disk in computer, insert it into the floppy drive (Figure 12).
Floppy eject
button
Figure 12. Inserting a Floppy Disk
To remove a floppy di sk , press the eject button on the flo pp y drive.
The floppy drive light on the comp u te r is on when the computer writes to or re ads
from a floppy disk. Do not remove a disk when this light is on.
To protect the data o n your floppy d is ks, follow t he se g uidelines:
Keep disks away from e xc es s iv e he at, direct sun ligh t, a nd liquids.
•
Keep magnets and any devi ce t h at c ontain s a magnet (like t he t elep hone)
•
away from your disks.
Magnetic fields can destroy the information on a disk.
Using the Floppy Drive 25

Do not write directly on a label on your disk; instead, write on a disk label first
•
and attach the label to the disk.
Make copies of all your important disks.
•
26 Using the Floppy Drive
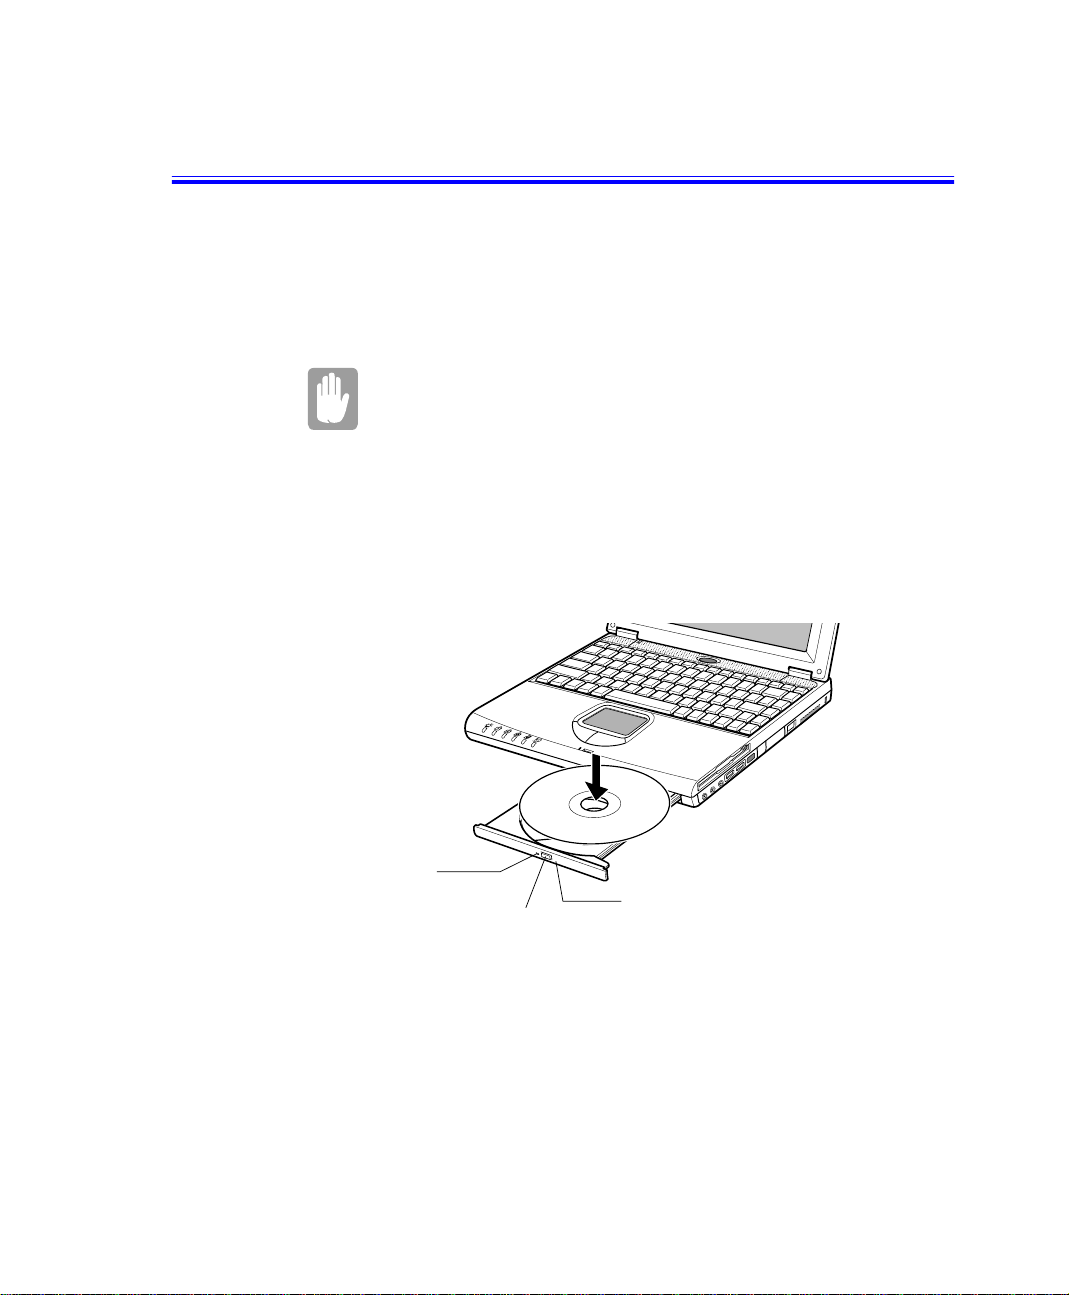
Using the CD-ROM Drive
Compact d iscs are designed so that you can easily i n ser t o ne into th e co mp uter
when you need it, and then remove it:
1. Press the button on the CD-ROM drive, and the tray slides out. (Do not lean on
the tray; it does not support much weight.)
If the tray fails to slide out it may be stuck, in which case
straighten out a paper clip, insert it into the small hole in the
front of the CD-ROM and push it until the tray ejects.
2. Insert a CD (compact disc), label side up (or remove a disc, if you have finished
using it).
3. Pus h the tr ay in gently to close the drive tray (Fi gure 1 3).
A light on the drive tray is on when the compu t e r is reading from a CD. Do not
remove a disc when this light is on.
CD-ROM
Light
Eject Button
Figure 13. Using the CD-ROM Drive
Emergency eject
button
The nam e of the C D -R OM d riv e is th e lett er f ollow i n g the letter ass ig n e d to your
last hard drive. For instance, if you have one hard drive with two hard drive
partitions, the hard drive is drives C and D and the CD-ROM drive is drive E.
Using the CD-ROM Drive 27

If neces s a ry , you c an use the em er g en cy eject button to open the C D-ROM drive.
To use the emergenc y ejec t but ton, t urn t he com put e r’s power off a nd insert a
small object, li ke a n unbent pape r clip , into th e h ole t o pr e s s the button.
Do not place reflective objects in the di sc sl ot because of
possible hazardo us laser emi ss ions.
The laser beam used in this CD-ROM drive is harmful to the
eyes . D o n o t attempt to di sassemble th e CD-RO M d r i v e. Refe
servicing to your authorised service center.
The on-board audio hardware and software of your computer enable the computer
to play audio com pa c t discs. If you wish to do so, you can attach ext e rnal speakers
to the Headphone jack.
To play an audio c o m pact di sc:
1. Insert a compact disc into your CD-ROM drive:
a. Press the but ton on the CD-ROM drive, and its tray slides out.
b. Insert a CD, label si de up.
c. Push the tray in to close the drive tray. The Windows Media Player
button appears on the taskbar.
The disc begins to play .
A light on the driv e tray i s on when t h e computer p lays a CD. Do not remove
a disc when this light is on.
2. To a d just t he sound, press th e fol lowing key comb inations:
<Fn+F9> decreases volume.
•
<Fn+F10> increases volume.
•
To rem ove th e CD:
1. Click t h e W in dows Media Play e r but to n on the Windows taskbar to open the
Windows Media Player window.
2. Click the Stop button in the Win d ow s Media Player Window.
3. Click the Eject button on the Windows Media Player window or press the
button on your CD- R OM dr ive. The dri ve tr ay ope ns and yo u can remove the
disc from the CD-ROM drive.
4. For more information on playing compact discs, see the Help menu in the
Windows Media Player window.
28 Using the CD-ROM Drive

Using the DVD-ROM Drive
See ”Using the Flex-Bay” on page 23 for information on installing the DVD-ROM
drive into the Flex-Bay type computer.
The DVD-R OM drive is operated the sa me a s t h e CD-ROM
drive.
While you play DVD-ROM Player, the <Fn+F6>, <Fn+F7> keys
maight fail to work. So Do not use tho se keys while playing
DVD-Player.
Your DVD-ROM drive will play DVD-ROM and CD-ROM discs.
Installing the Power DVD Player MPEG-2 Software
A DVD Software CD containing the Pow e r DVD P layer MPEG- 2 software i
optionanl with DVD-ROM drives.
1. Start Windows and insert the CD Labelled DVD Player into the DVD ROM
Drive.
2. The Installation application will start automatically, so follow the on-screen
instructions to complete the installation.
3. Reboot the system.
4. Make sure that DMA access is enabled for the DVD Drive:
a. From "Control Panel" open the "System" icon.
b. Select the "Device Manager" tab.
c. Click th e "Plus sign" be si d e the C D - ROM entry and select the DVD-
ROM dr ive.
d. Click the "Properties" button and se lect the "Settings" tab.
e. Check the "DMA" check box.
f. Click "O K" an d restar t th e sys tem.
For more information on playing DVD movies and discs, see the Help menu in the
DVD Playe r window.
Using the DVD-ROM Drive 29

Using the Hard Drive
Your co mputer inclu des a remov ab l e IDE (Inte gr ated Drive Elec tr onics) hard
drive. The IDE hard drive can store the data and programs your computer uses. The
drive plugs into a connector on the system board.
Although the storage capacity of hard drives varies according to model, any hard
drive hol ds much more than a floppy disk doe s. Al s o, th e co m pu ter reads and
works with a hard drive more rapidly than with a floppy disk.
Once information is s av e d on a h ard dr ive, it remains t he re un til it is overwritten.
Hard drive heads park automat ic al ly when yo u turn off your co mputer.
The hard drive that comes with your computer has already
been formatt ed. Do no t for ma t th e hard drive. Doing so
destroys all data contained on the drive. If you need to format
a new drive, or want to erase all data on your existing hard
drive, refer to the manua l for your operating system.
Windows 98/ Me can work with FAT-16 or FAT-32 (a 32-bit file allocation table),
your compu t er has been supplied wit h FA T-32. Older softwa r e that y ou may have
(16-bit soft ware) m ay r equi r e FAT-16 to run. Simila r ly Wi nd ows NT 4.0 can use
FAT-16 or NTFS (the W i n d o ws NT fi l e sys tem). There are utilities included with
Windows 98/ M e and Windows NT 4.0 to convert from FAT-16 to FAT-32 or
NTFS, see the documentation included with your operating system for more
information.
It is not possible to convert from FAT-32 or NTFS to FAT-16
without reformatting your hard drive.
Removing the Hard Drive
To prevent lo ss o f data and damage to the disk, do not
remove the hard drive while the computer’s power is on and
do not drop or jar the hard drive.
To remove the hard drive from the computer:
30 Using the Hard Drive

1. If you are installing a new hard dri ve, backup the ap pl ic a ti on and data files on
the old hard drive before removing it from the computer.
2. Turn the computer’s power off.
3. Close the LCD panel, and turn the co mputer over so that the bottom of the unit
faces up.
4. Remove the screw that holds the hard drive in place (Figure 14).
Bottom of
computer
Figure 14. Removing the Hard Drive
5. Pull the hard drive out of the computer.
Installing a Hard Drive
Hard-drive
To install a hard drive:
1. Remove the old h a r d dri v e fr om th e co m p uter as described in the previous
section.
2. Slide the ne w drive into the hard drive compartment. Make sure the drive is
pushed back as far as it will go.
3. Install the screw that holds the hard drive in place.
4. Format your drive and rein st a ll your file s. See the Opera ting System and
Original Driver and Application Restore Instructions that accompanied your
system for more information on this.
Using the Hard Drive 31

Using the Battery
Your computer uses a smart rechargeable battery pack for power when the AC
adapter is not attach ed to an electri cal ou tl et. The smart ba tt e ry gives a accurate
measurement of the current battery capacity which helps extend operating time by
enabling effective power management in operating systems that take advantage of
the accurate information supplied by the battery.
Charging the Battery
Your computer’ s battery st a r t s ch a rg i n g au tomatically when y ou connect the
power to the computer and to an electrical outlet. If the computer is off, the battery
charges faster than if the computer’s power is on.
Approximate charging times for Li-Ion (Ni-MH) battery are
3 (2) hours with the computer off.
•
5 (4) hours with the computer on.
•
While the ba ttery is charging normally, the ba tte r y charge light on the com puter is
amber (See ”System Status Lights” o n pag e 18 fo r the lo cati o n of the battery
charge light). When the battery is fully charged, the light changes to green.
When you us e a new b a tt er y pack for the first time or use a battery after a long
period of storage, the initial battery life is shorter than normal. Normal battery life
resumes after a few discharge-recharge cycles.
Follow the se rules for charging your battery:
•
•
•
32 Using the Battery
A battery n ormally dischar g e s power when not used for long periods of time.
Be sure t o recharg e the batter y ev e ry two mon ths wh en i t is not in use.
Make it a pr actice to d isc harge yo ur ba t t e r y fu ll y b e f ore rechar g ing the
battery. This can help extend the life of the battery.
Do not attempt to charge the battery in temperatures of under
o
over 95
F (35oC
All batteries eventually wear out and lose the ability to hold a
charge. You may need to replace your battery pack after a
year of averag e usage.
.)
41o F (5o C) or

Safely Using the Battery
Follow the se guid e li nes to s a f e ly use the ba tt er y:
Turn off your computer and unplug it if you accidentally:
•
– Expose the equipment to liquid.
– Drop, ja r, or damage the co mp uter.
Use only approved battery chargers
•
Do not disassem b le t h e battery, h ea t it a bove 2 12° F (100 ° C), or b ur n it. The
•
battery used in th is computer ma y cause a f i re or chemical bu rn if mistr ea t ed.
Your computer's rechargeable battery may be considered hazardous waste. If
•
you replace y ou r batt ery with a n e w one:
– Keep t he old battery out of the reach of children.
– Dispose o f the old batter y pr o mp tly.
– Make sure that you follow all local requirements when you dispose of
the old battery.
Removing the Battery
Your computer comes with the battery pack inserted in the computer. To remove
the battery from the computer:
1. Turn the computer’s power off.
2. Close the LCD panel, and turn the co mputer over so that the bottom of the unit
faces up.
3. Slide the batter y co mpartment c over straight up a n d o f f the com p ut er ( Figure
15).
Using the Battery 33

Figure 15. Removing the Battery Pack
4. Grasp t he tab on the ba tt e ry and pul l the b at t e r y out of t he compartment.
See ”Installing the Battery” for information on i nstal ling the battery.
Installing the Battery
To install the batt er y pac k:
1. With t h e com pu t er ’ s power off, cl o se the LC D pane l a nd turn t he computer
over so the bottom of the unit faces up.
2. Slide the batter y co mpartment cover str a ig h t up a n d o f f the com p ut er ( Figure
16).
Insert the battery into the battery compartment, ensuring the
correct orientation so that the battery fits in its slot properly.
3. Slide the battery pack into the compartment. Make sure the battery is fully
inserted into the compartment.
4. Align the tabs on the battery compartment cover with the slots on the bat tery
compartment.
5. Push t he c over st r aig ht do wn until it snaps into place.
34 Using the Battery

Figure 16. Installing the Battery
Monitoring the Battery Charge
Battery life is affected by factors such as the power-management settings in
System Setup , th e app lications you use, and the brightness set t in g s of th e LCD.
Under normal usage, the battery charge lasts approximately 3(2.5hrs for Ni-MH)
hours.
Battery life estimates are subject to variation. The actual life
of your battery may be less than the estimates given in the
manual.
You can monitor the charge of the battery pack installed in your computer through
the battery gauge.
Using the Battery Gauge
Press <Fn+F6> to display th e batt ery gauge on the LCD (Figure 17). You can
display the ba ttery g aug e wh i le y ou a r e i n any program.
Li-ion
Figure 17. Battery Gauge
Ni-MH
Using the Battery 35

The gauge has two sections:
The top se ctio n of the ga uge shows an i con of a battery to indicate that the
•
computer is being powered by the battery or an icon of a power cord plug to
indicate that the computer is being powered by the AC adapter.
The bottom section of the gauge shows you the approximate amount of battery
•
charge r emaining. (Th i s section of the guage i s only displ a y e d if the computer
is being powered by the battery.)
While the battery gauge is displayed, all keys except <Esc> are disabled. The
battery gauge closes in a few seconds, or you can press <Esc> to close it.
Using PowerProfiler to Monitor the Battery
PowerProfiler enables you to set power-management options for computer
shipped with Windows NT installed. To use PowerProfiler to monitor the battery
charge, p la ce t h e curs or o n th e ba tte r y ic on in the right c o rner of t h e taskbar.
PowerProfiler shows you the amount of battery charge remaining.
The col o r o f t he battery icon also indicates approxim at e ba tt er y charge:
Green: Charge i s ade quate to power computer.
•
Yellow: Charge is low.
•
Red: Charge is very low.
•
You can determine at what battery charge level PowerProfiler shows the low and
very lo w colors. The defa ult setti n g fo r the very low l evel is 20 pe rc ent battery
charge remaining.
To set battery monitoring options in PowerProfiler:
1. Double-click the PowerProfiler battery icon to open the software.
2. Click th e Battery tab.
3. Set options under Battery Status and Alarm Settings.
For more information on PowerProfiler, see the Help option in the PowerProfiler
software.
36 Using the Battery

Batte r y W a rni ngs
Your computer gives you the following low-battery warnings (Table 6).
Table 6. Battery Warnings
Warnings Condition Action to Take
The computer beeps 5
times (low-pitched
beeps).
The computer beeps 5
times (high-pitched
beeps), with a short time
between beeps. After a
short time, the computer
automatically goes into
rest mode.
Battery low: The battery
charge is about 10
percent. Approximately
5–10 minutes of battery
charge is left.
Battery very low: The
battery charge is about 3
percent.
Save your work. Use the
power cord to power the
computer or turn off the
computer and install a fully
charged battery.
Use the power cord to
power the computer and
charge the battery.
The above f e at ure s ar e valid w ith W indow s 98/ Me. You c a n adjus t th e battery
alarm features by us i ng the opera ting systems power managemen t program
(Control Panel > Power management in Windows 98/ Me).
Windows 98/ M e can o p erat e i n APM or ACPI mode , in the APM mode you
should select t he Rest mode of the lo w b a t tery situations (Power O n Suspend/
Save-to-Disk) in BIOS s et up, S ee “Power Menu” on pag e 56. Also see “U si ng
Power Management Options ” on page 63
If you cannot r un your computer from the batt ery and the battery wil l not charge
when you attach the powe r cord, the problem may be that :
The battery temperature is below 41° F (5° C) or over 9 5° F ( 35° C). If you
•
think the battery te mperature is too hot or too cold, t urn off the computer,
remove the batt e ry, a nd l et the bat te ry reach room tempe ra ture. Then try
charging the battery again.
The battery is defect ive. Replace the batter y with a new battery.
•
Using the Battery 37

Using the Modem
Dependin g on t he m o d e l of th e Not eb ook computer th at you have purchased you
may or ma y not have a modem installe d i n you r computer. If you are unsure as to
whether o r n o t you have a modem installe d l o ok for the Mode m Port at the side of
your c omp uter. Hav i ng this port means that you have a modem installe d in your
computer. Modems are factory installed and are not user installable.
SENS Modem Naming Convention
SENS Modem N ame is determ ine d b y the follo wi ng rule.
SENS MM
1 2 3 4 5
1. MM: Chipset Vendor
LT - Lucent Technologies
RW - Rockwell (Now Conexant)
PT - PCtel
CX - Conexant (Old Rockwell)
2. NN: Maximum Speed
56 - 56K
336 - 33.6K
3. P: Interface
P- PCI Interface
M - Mini PCI Interface
A - AMR/ MDC Interface
I - ISA behind Intel 82559
None - ISA Interface
4. X: Supported Functions
V - DATA/FAX/TAM/Speakerphone
D - DATA/FAX
T - DATA/FAX/TAM
5. W: Worldwide Suppo rt
NN P X W Modem
38 Using the Modem

W - Worldwide DAA
None - Domesti c DAA
In the case of Worldwide DAA, modem should pass the
individual country’s PTT in order to support that country.
Check which countries can be supported by the SENS
modem with your local distributor before you use it.
Precautions before use
If you connect the mod em to th e digita l key-p hone lin e, the
modem will be da maged.
Dos S up port
Windows 98 : The SENS Modem with a PCI/Mini PCI interface or AMR/MDC
interface d oes not support DOS mode. You can use DO S box in Windows 98
inste ad of pur e DO S mode .
Windows ME : Windows ME doesn't support pure DOS mode. and modem
doesn't support also DOS box of Windows . So you can't use a communication
applicati on using in D O S .
If you use the modem on a PBX system (Analog Key-phone
system)
If you use a simple terminal program
you should t yp e "ATX3&W" or "ATX3" command as an initiali zat io n command.
If you use a W indows Comm un i cation Program
Follo w th e ins truct io ns belo w.
1. Click th e Start button and then point to Settings.
2. Click Control Panel.
3. Double-click Modems icon and the click Properties button at the General tab.
4. Check o f f " Wa i t for di al t one before di al i n g" ch ec k box at the Connection tab.
5. Click OK button to close the dialog box.
Using the Modem 39

6. Click OK button to close "Modem Properties" dialog box.
Description of 56K
There are di f fe r ent st an d ar ds regardin g 56K technology.
K56Flex.
•
Technology developed by R ockwell Semi con du c t or Systems an d Lucent
Technologies
X2.
•
Technology developed by USR (US Robotics, now 3Com)
K56Flex and X2 are not interoperable.
V.90 Standard.
•
In February 1 998, The ITU-T (ITU Telecom mu nication Standardization
Sector) agreed on the techn ical specifi ca tions for 56K mode ms (V.90) and has
approved i n mid-September, 1 99 8 .
But, the modem driver ca n b e upd ate d to res olv e fine points of o peration
between differ e nt vendor's modems and un us ual telephone line conditions.
1. Due to FCC limitations, speeds of 53kbps are the maximum
permissible transmit power levels during download
transmissions.Actual data speeds will vary depending on line
conditions.
2. In order to use the 56K feature, be sure to check if the
standards supported by the on-line service provider and the
modem are id entical.
If you use a PBX ph on e s y stem, you can no t co nnect using
the 56K mode due to line loss.
Specification
•
40 Using the Modem
Data communications.
V.90, K56 Fl ex, V .34+, V.34, V.32t erbo , V.32b is, V22bis , V.23, V.21,
BELL 212 A , BEL L 1 0 3J

Data throughput speed
•
56,000 bps ~ 28,000 bps (V.90, downstream only, step: about 1333 bps)
56,000 bps ~ 32,000 bps (K56Flex, downstream only, step: 2000 bps)
33,600 bps ~ 2,400 bps (step: 2400 bps)
1,200 bps
300 bps
Fax mode support.
•
V.17, V.29, V.27ter , V.21ch2
Fax throughput speed.
•
14400, 12000, 9600, 7200, 4800, 2400, 300
Data compression feature.
•
V.42bis, MNP CLASS 5
Data correction feature.
•
V.42 LAPM, MNP CLASS 2~4
Fax capacity.
•
CLASS 1
PCI 2.1, PPMI 1.0 support
•
Insta lli ng th e Mod em Drive r in Windo ws Me
Install th e Modem Dr ive r
Before yo u i nstal l the mo d em dri ve r, check if the PCI Card un der Oth er device s of
Device Manager tab of C ont r ol Panel o n Windows exists. If it exi s ts, remove it
first.
After that, install the modem driver according to the instruction below.
1. When the Windows ME automatically detects PCI Card, Choose "Specify the
location o f the driver (Advanced )" and then click Next button.
2. Insert the CD or floppy diskette that has a modem driver in it.
3. Check "Speci f y a loc ation" of Search for the best driver for your
device.(Recommended)." and enter the directory location, then click Next
button.
4. Click N ext button when t he d i al o g appea r s s ay i ng that windows is now ready
to install the best driver for SENS PCI Modem Enumerator.
Using the Modem 41

5. Click Finish butto n when the dia l og app e ar s saying that windows has finished
installing.
6. Restart the syst e m.
Selecting a Country
You have to check if the country is selected correctly before you use the modem.
If the country is not selected correctly, the modem may not
work properly. S o, you must check if the country you're
calling from is selected appropriately and the n use the
modem. If your modem only suppo rts " Domestic", yo u must
select the count ry where you bough t you r notebook
computer. And, if you use the modem in other countries, you
modem m ay not wo rk pr oper ly. If you r mode m su pp orts
"Worldwi de ", pleas e check with your local distr ibuto r which
countries can be supported by the SENS modem.
1. Click the Start button, point to Settings and click control panel.
2. Double-click "HSF Modem Region Select" icon.
3. Select your cur rent located country in the Select a region.
4. Click OK button.
Confirming Installation of the Modem Driver
After the modem driver is i nst alle d , ch ec k if t he mod e m drive r is ins talled
properly.
1. Click the Start button, point to Settings and then click Control Panel.
2. Double-Click Modems icon.
3. Select SENS CX56ADW Modem in the Diagnostics tab and then click the
4. The mode m is pr operly installe d i f th e content s of Command a nd Response
Deleting the Modem Driver
1. Click the Start button, point to Settings and then click Control Panel.
42 Using the Modem
More Info ... button.
appear in th e More Info. .. win dow.

2. Double-Click Add/Remove Programs icon.
3. Choose SENS CX56A DW Modem in the Install/Uninstall t a b and then click
Add/Remove.. . bu t ton.
4. Click Yes button in the C onfir m Fil e Deletion dialog.
5. Click OK button in the warning dialog.
6. Restar t th e syst e m by clicking Yes button in the Syst em Settings C hange
dialog.
Installing the Modem Driver in Windows 95/98
You can i ns ta ll t h e modem driver as sh o wn in the foll o w ing.
The figures illustrated i n this manual may not be identical to
those on your system.
Install th e Modem Dr ive r
Before you insta ll the mod em driv ers, ch eck i f the PCI Card under Other devices
of Device Manager tab of Control Panel on Windows exists. If it exists, remove it
first.
After that, install the modem driver according to the instructions below.
1. If the W in dows 98 aut om at ic all y de te ct s the mo de m and s ho ws the dialog
saying This wizard searches for new drivers for PCI Card, click Next button.
2. Choose Search for the best driver for your device (Recommended) and then
click Next button.
3. Check Specify a location check box in the dialog for specifying the se arc h
location. Insert t h e C D o r fl opp y d is kette that has a modem driver in i t , enter
the directory location, then follow the instruction of the wizard.
4. Click Finish button when a dialog appears saying that installation is completed.
Selecting a Country
You have to check if the country is selected correctly before you use the modem.
Using the Modem 43

If the country is not selected correctly, the modem may not
work properly. S o, you must check if the country you're
calling from is selected appropriately and the n use the
modem. If your modem only suppo rts " Domestic", yo u must
select the count ry where you bough t you r notebook
computer. And, if you use the modem in other countries, you
modem m ay not wo rk pr oper ly. If you r mode m su pp orts
"Worldwi de ", pleas e check with your local distr ibuto r which
countries can be supported by the SENS modem.
1. Click th e Start button, point to Settings, and then click Control Panel.
2. Double-click the System icon.
3. Go to the Device Manager tab and double-click SENS CX56ADW Modem
under M od em .
4. Go to the Country Select tab.
5. Check if Country is selected correctly.
Confirming Installation of the Modem Driver
After the modem driver is installed, you can check if the modem driver is installed
properly.
1. Click th e Start button, point to Settings, and then click Control Panel.
2. Double-click Modem icon.
3. Go to Diagnostic tab when the Modem Properties dialog appears.
4. Select the p ort th at the mo dem is installed in an d then click the More In fo
5. The modem is properly installed if you can see the modem information.
44 Using the Modem
button.
If the modem is not properly installed, install the driver again.

Modem Commands
The SENS Modem includes the basic commands used by the Smart Modem of the
Hayes Corporation . All the more, some additional commands are added to it to
improve its capacity.
What ar e AT comma n ds?
AT commands are the control commands of Fax modems developed by the Hayes
Corporation. AT commands are the industry standard and necessary for any fax
modem. It is used with S-regist e r to se t the modem status.
Generally , AT co mmands are use d by d irec tly entering the command into any
communications program, like Hyper terminal.
You can do the below jobs more easily by using AT commands.
Calling up or hanging up the phone in order to communicate by Computer
•
modem
Choosing a modem in or der to make the most efficient co m munication status.
•
But, as the communication programs are becoming more efficient and more
intelligent nowadays, users do not have to know all the AT commands. Only a few
basic comm ands are e nough fo r compu ter communications.
Before Us in g AT Command s
AT commands can be used by entering them into terminal-based communication
programs directly. (Hyper terminal, CrossTalk, Procomm, etc.)
CompuServe, America On-line applications are not the communication programs
for term inal, but they are the co mmunication pr ograms base d on Graphic
environment . This kind of progr ams can initiat e the modem setti ng by enterin g AT
comman d in a menu hav ing a mod em initialization command.
What you have to k now b ef ore using A T c om mands is that there a re two kinds of
modes whe n y ou us e it.
Comman d mode:
If you turn on your compute r and start communicat i on b y a com munication
program, you can see a prompt on the terminal screen. Under such conditions, you
can use AT commands like calling, etc.
DATA Mode
Using the Modem 45

In command mode, you can call by using AT commands and communicate with
others by connecting to other modems. You can call this status Data mode or Online mode. In data mode, You can't use any AT commands except the +++
command, which has +++ at the head.
If you s to p com mu nica t ion and di s c onnect the phone, t h e Fax m odem will run in
command mode again.
Using Command Mode during Communications
Sometim es, y ou h ave to use AT command while yo u' re communicating with
others via mode m. In t his case, you can use +++ co mm a nd fo r AT co mmand
without hanging u p your telephone. Pressing '+' three times makes fax mode
change to com m and mo de. Of co u r se, th e teleph one is not discon n ec ted. (Don't
enter Enter key after input +++)
Connection m ay be lo st depe nd in g on the server.
If you want return to Data mode from command mode, you only have to input ATO
and press the Enter key to start the com mu ni cations again.
The mode can not be transfored fro m the command mode to
data mode de pending o n the server.
Using AT commands
AT c ommands can b e used in the following w ay. There's no difference betw een
capital letters and small letters, and al l comm ands should inclu d e 'AT' as a prefix
except ones, which includes 'A/' instead.
Also, Carriage Return save d i n t he S3 reg i s ter sh ould be entered in orde r to sign
the end o f the command.
Example: ATDT 123-4567 Press Enter and the model dials to 123-4567
Display the result value
After entering AT commands, the result value is displayed on the screen.
46 Using the Modem
AT command Press Enter key

The result value can be displayed during communication. Generally, the result will
be OK. According to the ATV comman d, the result can be displayed as Words or
numeral let t ers. (A T V 0 : Display as nu meral letters, A T V1 : Di splay as English
words)
Basic AT Commands
A/ Repeats the previous command in the buffer
ATA Responds manually to incoming RING signals
+++ Switches from on-line mode to command mode
ATO Switc hes fr om command m ode to on-l ine mode
ATEn Echo control
E0 Disables echoing of the commands to the screen
E1 Enables echoing of the commands to the screen
ATDT phone number Touch tone dial
ATDP phone number Pulse dial
ATHn Hook control
H0 On-Hook (same as hang-up)
H1 Off-Hook (same as hold-on)
ATLn Modem speaker loudness control
L0~1 Low volume
L2 Medium volume
L3 High volume
ATMn Modem speaker control
M0 Disables modem speaker
M1 Enables only when in connection procedure
M2 Enables always
M3 Enables until carrier has been detected after connection
ATS0 =n Sets S0 re g i s t er value (n ran g e : 0~2 55) . Sets the nu m ber o f incom ing
ring signals before answering. Modem responds after ringing as many
Using the Modem 47

times as specified in n value. If the value of n is '0', ATA command
should be entere d for a u to answer
ATS0? Displays S0 register value on the terminal
ATX3 Dials after waiting for s pecified time
ATX4 Dials after dial tone is detected
ATZ Initializes modem
AT&F Load s the fac tor y d e faul t conf i gurat i on (profile)
AT&V Sh ows c u rre nt confi guration
AT&W Saves user profile
AT&Zn=xStores the dial string in modem memory (n=0~3, x=phone number)
e.g.) AT &Z0=1235678
Automatically calls the st o r ed phone number b y us i n g the following
command.
ATDTS0 Recalls the stored phone number as AT&Z0 by tone
dial
ATDPS0 Recalls the stored phone number as AT&Z0 by pulse
dial
AT+MS=X Sets protocol for modem connection
48 Using the Modem
(X=V90, V34)
AT+MS=V90 (defau lt setting)
Try to connect with V90 (max 56 Kbps)
AT+MS=V34
Try to connect with V.34 (max 33.6 Kbps)

Using System Setup
The System Setup program enables you to configure your computer hardware and
set securi ty and power-savings o pti ons. The settings you choose are stored in
battery-maintained CMOS memory that sa ves the information even when the
computer’s power is turned off. Whe n you r co m p ut e r is t ur ned back on, it is
configured with the values found in this memory.
Run System Setup if you get a message prompting you to run the program. You
may als o want to r un System Setup, partic ularly the first ti me y ou use your
computer, to set the time and date, use security or power-management features, or
alter th e settin gs of othe r feat ures .
Your computer’s version of System Setup may not include all
the fields listed here or may include additional fields. Field
names and order of appearance can vary according to the
version of the BIOS (b as ic input/ou tput system) on your
computer.
You can use the conf ig urat ion listing a t t h e back of this manua l to record
information specific to your computer. (See ”Recording the Computer Hardware
Configur ation ” on page 109. ) Fi ll it out as you complete yo ur Syste m Setup
configuration. This list helps you describe your computer if you must contact your
authorise d reseller fo r service o r product infor mation.
Starting System Setup
To start System Setup, turn on your computer and then press <F2> when
prompted. The System Setup screen appears.
The top of the System Setup screen has a menu bar with the selections listed in
Table 7.
Table 7. System Setup Menus
Menu Function
Main Changes the basic system configuration.
Advanced Configures advanced features on your
computer.
Using System Setup 49

Security Enables security features, including
passwords and backup and virus-check
reminders.
Power Configures power-management features.
Boot Specifies the order of boot devices and
configures boot features.
Exit Specifies how to exit System Setup.
To open a menu, use the left or right arrow keys to select the menu name and then
press <Enter>.
Table 8 lists the keys you can use to navigate through System Setup.
Table 8. Syst em Setup Nav i gation Keys
Navigation
Key
<F1> <Alt+H> Displays the General Help window.
<Esc> Exits the current menu.
<Left Arrow>
and <Right
Arrow> keys
<Up Arrow>
and <Down
Arrow> keys
<Tab> Moves the cursor forward through the cells for a
<Tab+Shift> Moves the cursor backward through the cells for
<Home> <PgUp> Moves the cursor to the field at the top of the
<End> <PgDn> Moves the cursor to the field at the bottom of the
<F5> <-> Scrolls backwards through the options for the
Alternate
Key
Keypad
arrow keys
Keypad
arrow keys
Function
Select a different menu. Pressing <ESC> at the
Main menu brings you to the Exit menu.
Move the cursor up and down between fields.
highlighted field. If the field has only one cell, the
<Tab> key moves the cursor down to the next
field.
a highlighted field. If the field has only one cell,
the <Tab+Shift> key combination moves the
cursor up to the previous field.
window.
window.
highlighted field.
50 Using System Setup

<F6> <+> or
<Space>
<F9> Sets the parameters for the current menu to
<F10> Sets the parameters for the current menu to
<Enter> Executes commands or opens a submenu.
Scrolls forward through the options for the
highlighted field.
their default values.
their previous values.
A pointer s y m b o l appear i n g to the left of a field in di cates that yo u can open a
submenu fr o m this fiel d. A s ubm enu contains additional options for a field. To
open a submenu, highl igh t the field and press <Enter>. Use the same keys to e n ter
values and m ove from field t o fiel d withi n subm e nus as you use within menus.
When you highlight a field, information about the field appears on the right side of
the screen . System Setup also provides a General H e lp screen th at c an be opened
from any menu by pressing <F1> or <Alt+H>. The General Help screen lists the
navigat ion k e ys wi th their corre sp onding alternates and functions.
When a scroll bar appears to the right of a help window, more information is
availab le t han c an b e disp la ye d in t he win d ow. U se the <Pg Up> and <PgDn> keys
or the <Up A r row> and <Down Ar row> keys to scroll through the entire help
document. Press <Home> to display the first page, or press <End> to go to the last
page. To exit the help window, press <Enter> or <Esc>.
If your computer will not boot after you have changed settings in System Setup and
exited the program, r eboot and pre ss <F2 > to re en t er System Setup. Once in
System Setup, you can try to change the values that caused your computer boot to
fail. If the problem persists, press <F9> to load the default values.
Main Menu
When yo u open Syst e m Se t u p , the M ain menu appe a rs. You c an m ake changes to
your co mpu ter ’s bas ic system configurati o n fr om this menu. The fields displayed
in this menu are described below.
System Time: Sets your computer to the time that you specify, usually the current
time. Ent er th e hour, m in ute, and sec o n d in the format hh:mm:ss. Use a 24-hour
clock. Use t h e tab ke y t o move between the hour, minute, an d second cells. Use
the hyphe n key <- > or <Space> bar to decrease or increa se th e num bers.
Using System Setup 51

System Date: Sets your computer to the da te that you specify, usually the current
date. Enter the month, day, and year in the form at mm:dd:yyyy. Use the tab key to
move between the month, day, and year cells. Use the hyphen key <-> or <Space>
bar to decrease or increase the numbers. This field supports year dates of 2000 and
beyond.
Floppy Disk A: Specifies a drive type for floppy drive A. 1.44 MB, 3 1/2”( default)
floppy disk can be used.
Primary Master and Primary Slave: Your computer has one IDE bus. Primary
master defines the hard drive installed in the computer, and Primary Slave defines
the CD-RO M, DVD-ROM o r other removabl e drives in the Flex bay.
To configure a replacement or u pgrade hard drive, m ove the c ursor to select the
Primary Master field in t h e Syste m Setup Main me nu , and then press the <Ent er >
key. The submenu appears.
Normally, you can use the Auto option of the Type field in the submenu to
automati cally set th e values for the other fie l d s i n the submenu . Man ual ly set the
other fields in this submenu only i f th e dr ive yo u hav e installed in your computer
is not rec ognize d by System Setup.
Set the Auto option of the Type field in the Secondary Master
submenu to enable the system to boot from Bootable CDROMs, you will also ne ed to check the boot device priority,
field and Bootable C D check field.
After you make your selections from this submenu, press the <Esc> key to exit
back to the Main menu.
The P rimary Maste r an d Primary Slave fields calls up a submenu. The following
fields are fo u nd in the submenu:
Type: Configures the hard drive type. Normally, select Auto at this field to
have your compute r attempt to automatical l y det e ct t h e drive type and set the
values for th e rema ini n g fiel ds in t his submenu m an ually , specify User.
Manually enter the number of cylinders, heads, sectors per track, and write
precompe n sation for your drive. Refe r to your drive’s user do cu m en tation or
look on the drive to obtain this information.
52 Using System Setup
Before attempting to configure a hard drive, make sure you
have the confi guration info rmation supplied by the
manufacturer of the hard drive. Incorrect drive settings can
cause your computer to malfunction.

If no drive is installed or if you are removing a d ri v e and no t re p lacing it,
select None.
Multi-Sector Transfers: Sets th e num ber of secto rs per block to the highest
number supported by the drive. Configuration options are Disabled, 2 Sectors,
4 Sectors, 8 Sectors, and 16 Sect ors.
LBA Mode Control: En ab l es or disables 28 -bi t addr ess i n g o f the h ard d rive,
without regard for cylinders, heads, and sectors. Note that enabling this field
may decr ease the acce ss speed of the har d drive.
32 Bit I/O: Enable s or disabl es 32- Bit I /O (input/output). When Enabled, your
hard drive c a n w ork wit h a pplic at ion s wi th 3 2 - bit inp ut a nd output. If the field
is Disabled (de fau lt ) , your c omputer wo r k s wi th 16-bi t input and output and
has lower performance.
Transfer Mode: Selects the method for transferring data between the hard
drive and system memory. Refer to your drive’s user documentation to
specify t h e correct option for this field. O pt ions are Stand ard, Fast PIO 1,
Fast PIO 2, Fast PIO 3, Fast PIO 4, FPIO3/DMA1, and FPIO4/DMA2.
Ultra DMA Mode: Enables the hard drive to use ultra DMA (direct memory
access) transfer mode to transfer data between the drive and system memory.
Options are Disabled, Mode 0, Mode 1, and Mode 2.
CPU Type: Displays the CPU type detected during start up.
CPU Speed: Displays the CPU speed detected during start up.
System Memory: Displays the amount of conventional memory detected by your
computer dur i n g sta rt up. This field is for r ef e re nc e only.
Extended Memory : Displays the amount of extended memory detected by your
computer dur i n g sta rt up. This field is for r ef e re nc e only.
BIOS Version: Displa y s t h e BIOS versio n of your system.
KBC Version: Displays the Firmwave version of you r system.
Using System Setup 53

Advanced Menu
Selecting Advanced from the menu bar displays the Advanced menu.
Installed O/S: Select the oper ating sys tem installed on you r s yste m which you
will use most commonly. An incorrect setting can cause the unexpected system
behavior.
Mouse Configuration: Disabled prevents both the touchpad and external PS/2
port from functioning. Single m ouse enables the external PS/2 port or the
touchpad, and external PS/2 port has proirity. Dual Mouse allows the use of both
the touchpad and PS/2 port.
Scr een Expansi o n: Enables or disables the Screen Expansion mode. If you set this
field to Enabled, the system expands VGA mode (DOS mode or 640x480 Graphic
mode) to use th e full size of th e LCD . If this field i s Disabl e d VGA mo de a pp ears
as a 640x480 box in the LCD.
TV Out Mode: Select TV standard such as NTSC(default) and PAL.
Display Configuration: Enable you to set t he d e fau lt d ispl ay . Optio ns are LCD,
CRT and Both. C h o ose LCD to use the bu il t-i n d is pl ay only , CR T to use an
external monitor only or BOTH to have both built-in and external displays used as
the dafault. If you select CRT and no external monitor is attached you will see no
display until you attach the external monitor. The default is LCD.
I/O Device Configuration: Opens the I/O Device Configuration submenu if you
press <Enter> when this field is highlighted. If you attempt to set two ports to the
same s e ttings, the fie lds will be ma rk e d with ast e risks.
The submenu contains these fields:
Serial port: Configures serial port. The options for this field are Enabled
(default), and Disabled. If you set this field to Enabled, you can set the Base I /
O Address field to 3F8 IRQ4 (default), 2F8 IRQ3, 3E8 IRQ4, or 2E8 IRQ3 .
When th e fie ld is set to Enabled, the computer’s operating system uses the
default configuration or t he c on figu r ation you c hoose. If you select Disabled,
you free up an IRQ for use by another device.
Infra red por t : Co nfi gu res the i nfrared port. The options for this field are
Enabled, a nd Disabled (default). If you set this field to Enabled, you can set
the Base I/O Address field and the Mode field and the Mode field. Settings for
the Base I / O Addres s are 3F8 IRQ4, 2F8 IRQ3 (default), 3E8 IRQ4, or 2E8
IRQ3. Mode FIR (fast infrare d ) enable s y ou to s et the DMA channel to 0, 1, 3.
54 Using System Setup

When the Infr ar ed po r t field is set to Enabled, the computer’s operating
system uses the defau lt c onfig u r ati on o r t he c onfigurat ion yo u choose. If you
select Disabled, you free up an IRQ for use by another device.
Parallel port : Configures the parallel p ort. The options for this field are
Enabled (default), or Disabled. If you set this field to Enabled, you can set the
Mode field and the Base I/O Address field. Settings for the Base I/O Address
are 378 IRQ7(default), 378 IRQ5, 278 IRQ7, 278 IRO5, 3BC IRQ7, and 3BC
IRQ5. Setti ngs for the Mode are Output only, Bi-directional, EPP (enhanced
parallel port), and ECP (ext ended capabi litie s port). Sel e c t ing the ECP s e t t i ng
enables you to set the DMA Channel to 1, 2, or 3.
When the Parallel port field is set to Enabled, the computer’s operating
system uses the defau lt c onfig u r ati on o r t he c onfigurat ion yo u choose. If you
select Disabled, you free up an IRQ for use by another device.
Floppy di s k co n t r o ller: Configures the floppy disk controller. The options for
this field are Enabled (default), or Disabled. When the Floppy di sk co n tr oller
field is set to Enabled, the computer’s oper at ing sy st e m us es the de f ault
configuration for the c ontroller.
Local Bus IDE adapter: Enables the integrated IDE local bus adapters. Options
are Enabled (default) and Disabled.
Large Disk Access Mode: Enables your computer’s operating system to work
with drives larger than 540 MB. Choose DOS (default) for Microsoft operating
systems. Choose Other for any other operat i ng systems.
Security Menu
Selecting Security from the menu bar displays the Security menu. Your computer’s
advanced secur i ty s ys tem a l lo w s yo u t o set t w o di ff e re nt passwor d s to p revent
unauthorized access to sys te m resou rce s, da ta , a nd System Setup. Fr o m the
Security menu, you ca n enable a boot passwor d, d i sk access, a s ys te m b a ckup
reminder, and a virus check reminder.
Set User Password: Enables you to set a user password to control access to the
system at boot. See ” Creating a Password” on page 60 for instructions on setting a
password.The user password al lows restr icted access t o the System Setup Sec urity
menu; th e u ser has access only to changing his own password an d to ena bling or
disabling Password on boot. A s upervisor password must be set before a user
password can be set
Using System Setup 55

Set Superv isor Password: Enables you to set the su p ervisor pass word to control
access to the System Setup utility. See ”Creating a Password” on page 60 for
instructions on setting a password.
Password on boot: Determines wheth er the com pu t e r prompts for a password
when starting up. The options are Enabled and Disabled. A supervisor password
mus t be set b e f o re you ca n enab le this o p ti on.
Fixed disk boot sector: Enables you to write-protect the hard drive boot sector to
protect against viruses and alterations. Only a user with the supervisor password
can access this field. The o pti on s f o r this fiel d are Normal (default) and Write
Protect.
Power Menu
The Power menu of System Setup allows you to enable and adjust your computer’s
sophisticated power-saving features. Enabling these features extends the life of the
battery.
If your computer shipped with Windows 98/ Me instal led, the
Power Management works with the settings in the Power
Managem e nt option of Con trol Panel. But if your computer
has DOS, Wi nd ows 95 or Wind ows N T 4.0, th e Power
Managem ent works with the settings in System Setup.
Power Savings: Enables and disables Maximum Performance mode. The options
are Maximum Performance, Maximum Power Saving(default), Customized and
Disabled. If you set this field to Maximum Performance, the microprocessor and
hard drive run at full speed, unless affected by other power-savings settings. If you
set this field to Maximum Power Savi ng, t he micro proces sor and the har d drive run
at slow spee d , when there is no user i nput or de v ice activity. Choose Customized
to alte r t he s e settings and Disabled to turn off the Power management function.
Idle Mode: Turns on or off the idle mode power savings. On slows down the CPU
when the system is not busy.
Standby Timeout: Sets the period of comp ute r in act ivit y (n o user input or device
activity) that must pass before your computer automatically goes into standby
mode. In standby mode some devices are turned off (includin g the LCD screen)
and the microproce ssor slows down. Yo u c an dis a bl e t his option by selecting Off,
56 Using System Setup

or you can specify a Standby Timeout delay time of from 1 to 16 mi nutes. The
default is 1 Minute.
Rest Time out: Sets the period of computer inactivity from standby that must pass
before y our co mp ute r a utomatically goes into rest mo d e. When t he rest timeout
expired, yo u r c om p u ter goes to the r est mode accordi ng to Rest Mode.
Rest Mode: Specifies the ty pe of rest mod e your computer enters:
Power On Suspend: Saves power by turning off the microprocessor and DMA
•
clocks, video, and all controllable peripheral devices. Some power is still used
when your system is in thi s mode.
Save To D i s k (default): Provides the greatest power-saving capabilities by
•
essentially turning off your computer. In the save to disk mode, all syste
logic (except for your computer wakeup circuitry and battery charger) is
turned off. D u ring save to disk mode, the sy stem and v ideo memor y a r e saved
to the hard drive and are restored when your compu ter resumes fro m rest.
When th e computer enters save to disk mode, it will not res ume normal
operation at a specifi ed time no matter how the Resume On Time field is set.
Hard Disk Timeout: Sets the amount of time the hard disk needs to be inactive
before it is turned off.
Resume On Mode m Ring: Enables the computer to resume operation from rest
mode in the event of modem communication. The computer will resume only if the
Rest Mode field is set to Power On Suspend, not Save To Disk. The default sett ing
is Off. Windows 98 do not use this item.
Resume On Time: Enables the computer to resume operation from rest mode at a
schedule d time. The compute r will resume o n l y if the Rest Mo de field is set to
Power On Suspend, not Save To Disk. If you set this field to On, you must set the
Resu m e T ime field as well. The default setting is Off. Windows 98 do not use this
feature.
Resume Ti me: Specifies the time for your computer to automatically resume from
rest mode. Enter two-digit numbers to indicate the hour, minutes, and seconds in
the format hh:mm:ss. Use a 24-hou r clo ck. Use the tab key to move between the
hour, minute, and second cells. Use the hyphen key <-> or <Space> bar to decrease
or increase the numbers.
You must set this option if you enable Resume On Time.
Using System Setup 57

Boot Menu
The Boot menu enables you to select a boot device and set boot options.
Logo Screen Display: Enables (d ef ault) or Disables the d isplay of the boot time
logo. If y ou select Disabled, the diagnostic POST screen is displayed during boot
QuickBoot Mode: Allows the system to skip certain tests while booting for
decreasing the boot time.
Bootable CD Check: Enables a check of the CD-ROM drive during the tests
performe d by the computer at startup. When this fie ld is set to Enabled, booting
the system by CD-ROM drive is possible.
Summary screen: Displays the system configuration when the computer starts.
The option s are Enabled and Disabled(default).
Boot Device Priority: Enables you to select th e o r der in whic h t he co m puter
attempts to boot from different devices. The field has three options: Diskette Drive,
Remova ble Devi ces, Hard Drive, and DVD-CD R OM.
To choose a devi ce as the first, second, or thir d boot device:
1. Press <Enter> at the Boot Device Priority field
2. Highlight the option with the <Up Arrow> or <Down Arrow> key.
3. Press the <Space> bar until th e option moves up or down in the list of options
and the number 1, 2, or 3 appe a rs beside the option.
4. Press <Esc > t o r etu rn to the B oot menu.
Exit Menu
Select Exit or press <Exc> from the menu bar to display the Exit menu.
58 Using System Setup
If you want to s tar t the system using a bootable CD, change
the ATAPI CD-ROM Drive to be the first priority and make sure
the Auto is set in the Type field of the Secondary Maste
Submenu at M ain page, and al so make sure that Enabled is
set in the Bootable CD check field at Boot page.

Pressing <Esc> does not exit this menu. You must select one
of the options from this menu or a menu bar item to exit this
menu.
Exit Saving Changes Enables you to exit System Setup and sa ves your changes.
When you select this item and press <Enter>, a message appears asking you if you
want to save your changes and exit System Setup. Choose Yes and press <Enter>
to save y o ur changes and e xi t. Choose No and press <Ent er> to r emain in System
Setup.
Exit Discarding Changes: Enables you to exi t Sys tem Set up witho ut savi ng your
changes. Wh en you se le ct this item and press < E nt e r> a m essa ge app ea rs asking
you if you want to save changes before exiting. Choose No and press <Enter> to
exit without saving changes. Choose Yes and press <Enter> to save changes and
exit.
Load Setu p Defaults: Loads the default values for all System Setup parameters.
When you sele ct this option and pre ss <En t er >, a mess age ap pea r s asking if you
want to l oad the defau lt conf i gu ration. Choose Yes and press <Enter> to load
default settings and remain in System Setup. C hoos No and press <Enter> to
retain your chang es an d remai n in Sys tem Setup.
Smart Battery Calibration: Enables you to discharge the system battery
completely for a more accurate battery level detection. This option only works
with the smart batte r y i f the A C A d apter is not pl ug g ed in.
Using System Setup 59

Using System Securi ty
This section describes the security options provided with your computer.
System Passwords
The com pu t e r p ro v ides two levels of p as sword sec urity: adm i nistrative-level
(supervi sor) and user-le vel ( u ser). Either password prevents unauthorized acces
to the computer. The supervisor password enables full access to all System Setup
fields. The user password enables full access to only the Set User Password and
Passw ord on boo t security fields and read access to all other System Setup fields.
(See ”Securit y M e nu” o n p age 55 f o r a co m pl ete l is t of S ystem Setup security
fields.)
If mul ti p le use rs ha ve access to the computer (such a s in a netwo rk e n v ir onment),
a supervisor password can prevent unauthorized access to certain security options.
Choose t he type o f passwor d securi ty th at is appropr iate for y o ur wor k. If yo u want
to set a user password, you must set a supervisor password first.
Creating a Password
To create a password :
1. At startup , press <F2 > t o open S y stem Setup.
2. Use the <Right A r row> key to select the Security menu.
3. Use the <Down Arrow> key to select Set Supervisor Password or Set User
Password.
4. Press <E nter>. The Set Password dialog box appears.
5. Type a p as s w o r d o f up to seven characters. You can e nt er l etters or numbers,
but you cannot use the function keys, such as <Shift>. Your computer does not
distinguish between capitalized and lowercase letters in your password. As you
type the password, the cur sor mo ves but your password does not appear on the
screen.
60 Using System Security

6. Press <Enter> after you have typed your password. The computer prompts you
to reent er y o ur password for ve ri fication.
7. Type your password again and press <Ent e r>. A messa ge appe ars telling you
that the changes have been saved. Press <Enter> again to return to the Security
menu.
8. Press <Esc > t o g o to t h e Ex it menu.
9. Select Exit Saving Changes, p res s <En ter >, an d press <En ter > again to re start
the compute r .
Deleting a Password
To delete t h e passwor d:
1. At startup , press <F2 > t o open S y stem Setup.
2. Type your p a s s w o r d wh en prompt ed and press <Enter>.
3. Use the <Right A r row> key to select the Security menu.
4. Use the <Down Arrow> key to select Set S upe rv is or Passw ord or Set User
Password.
5. Press <Enter>. The computer prompts you to enter the current password.
6. Press <Enter>. The computer prompts you to enter a password. Do not type
anything.
7. Press <Enter>. The computer prompts you to re-enter the password. Do not
type anything.
8. Press <Ent e r>. A message appears telli ng yo u th at the changes have been
saved. Press <Enter> again to return to the Security menu.
9. Press <Esc > t o g o to t h e Ex it menu.
10. Select Exit Saving Changes, p res s <En ter >, an d press <En ter > again to re start
the compute r .
Using System Security 61

Requiring a Boot Password
After you crea te a super vi s or or user passw o rd, yo u ca n ena ble t he com p uter to
prompt for a password each time it starts.
To enable the pr o mp t, sel ec t the option Enabled in the Password on boot field in
System Setup. For more information about the Password on boot field, see
“Securi ty Menu” on page 55.
Locking th e Hard Drive Boot Sector
If you h av e an s up ervisor password, yo u can lock t h e har d dr iv e boo t s ector to
protect against viruses or alterations
To lock the ha rd drive boot sector, sele ct the op tion Write protect in the Fixed disk
boot sector field in System Setup. For more information about the Fixed disk boot
sector field, see “Security Menu” on page 55.
Locking th e Keyboard
The keyboard lock enables you to protect your system when you walk away from
it for a time. To use the keyboard lock, you must first enable a password through
System Setup. (See ”Creating a Password” on page 6 0 f or instructions.To lock
your keyboard, press <Fn+F7>. To unlock your keyboard, type your password and
press <Enter>.
62 Using System Security

Using Power Ma nagement Options
Your computer inclu d e s power- managemen t op ti ons that can help the battery
charge last longer a nd exten d the life of t h e battery , LC D pane l , and other
components. Po w er-managem ent options slow down or shut of f system
components when the components are not being used.
Power ma n agement may slow down system performance. Your computer runs
fastest with the power cord attac hed, when power management is disabled.
Windows 98/ Me has two Power Man a gem e nt s tr ate gies:
APM (Adva nced Power Manageme n t) mode : Under APM mode , Windows
•
98/ Me Power management works with the settings in the Power Management
option on the Con t ro l Panel e xcept for re st mode.
ACPI (Advanced Configuration and Power Management Interface) mode:
•
Under the ACPI mode, All the settin gs in System Setup have no effect on
Windows 98/ Me. Battery low a nd ba ttery very low warning s are configured
using the Powe r Manageme nt option.
If you want t o use Hiber nation function in ACP I mode (Wi n do ws 98/
Me), then click Start > Settings > Con trol Panel and double click
Power Management icon. Select Hibernate on the When I pres s the
sleep button on my computer field in Advanced tap. Then you ca n use
the power button for activating the hibernation function.
If you want to shut d ow n your compute r by p ressing the power button,
see “ACPI(Advanced Configuration and Power Interface) mode” on
page 8.
If your c omp uter uses DOS or Windows 95, Pow e r Man agement works with the
settings in System Setu p
If your c om p uter shipped fro m the factory wi th Windows NT inst alled,
PowerProfiler software was included to support power management.
Maximum P ow er Saving Mode
For maximum power saving mode, the microprocessor may run at slow speed to
conserv e power. To enable th is mo de , set the Idle Mode field in S y s t em Setup to
enabled.
Using Power Management Options 63

Standby Mode
The Standby Timeout field in Sy st em Setup enables you to specif y the time period
that the co mp uter can remain idle (no us e r i n p ut or disk activit y ) before the
computer enters standby mode. You can disable this option by selecting Off, or you
can specify a Standby Timeout delay t im e of from 1 to 16 minutes.
In standby mode, the system and video memory and the video controller slo
down. The LCD backli g ht , hard drive, flop py drive, PC Card controller, and some
other dev i ces turn of f to save e n er g y . DPMS (display p ower-mana ge ment
signaling), a form of monitor power management, to an external monitor i
invoked.
To resume from standby, press t he Po we r B u tto n o r to u ch the tou c h pad. Do not
press any keys on your keyboard. Windows 98/ Me has no standby mode.
In Win dows 98/ Me, the standby mode works same as rest
mode in system setup. It means that Windows 98/ Me has
different standby mode to standby mode in syste m setup.
If you enable both standby and rest modes, your computer enters standby when the
delay time you chose for standby ha s elapse d, and then enters rest mode w h en the
delay time you chose for rest mode has elapsed.
Rest Mode
The Rest Timeout field in Syst em S etup enables you to specify the time period t h e
computer can remain idle (no user input or device activity) before the computer
enters rest mode. You can disable this option by selecting Off, or you can specify
a Rest Timeout delay time of from 5 to 60 minutes.
The Rest Mode field in System Set up defines wh a t type of rest m ode y our
computer enters:
Power On Suspend: This mode save s power by tur n i ng off the mi c rop rocessor
•
and DMA clocks, video, and all controlla b le peripheral devices. The computer
still uses some power w hile in this mode. If you leave you r computer in power
on suspend for several days without the power cord attached, the computer’s
batter y wi ll disch a rge.
Save To D i s k: This mode provides the greatest power-saving capabilities by
•
essentially turn i n g off your computer. In this mode, all system logic (except
64 Using Power Management Options

for your computer wakeup circuitry and battery charger) is turned off. During
save to disk mode, the DRAM and video memory are saved to the hard drive
and are re sto r ed whe n yo ur c o mpu t er re sum es op er ation.
You can press <Fn+F11> to manually place your computer into Rest mode.
When you use the <Fn+F11> key combination, your computer
may postpone entering Rest mode during a critical operation,
such as reading fr om or wr iting to the hard dri ve.
To resume to full-power mode, press the power button.
Once all devices return to full-power mode, all active software applications and
system states are restore d to exactly how they were before your comp u te r entered
rest mode.
When your computer en t er s or resumes from save to dis k mo de, screens appear
indicating system status. These status screens do not appear when the computer
enters or resumes from power on suspend.
Rest Mode Precautions
Observe the following precautions when using rest mode:
Save all open fi le s before you press <Fn+F11> to manually place your
•
computer into Rest mode.
If you purchased a new ha rd dri ve , m ake s ure that you creat e a save to d is k
•
partition equa l to the amount of syst em m e mory plus the amo un t of video
memory plus 2 MB before you enab le sav e to disk mode. See ”Creating a
Save to Disk Pa rtiti on” on page 67 for more infor mation.
Do not try to res ume to full-power m ode using bat t ery power if th e battery
•
charge is low. If the batte r y ch a rg e is too l ow , the sy stem may not b e able to
resume fully. Plug in the power cord if your computer cannot resume normal
operation because of a low battery charge.
When your computer is in power on suspend or save to disk
mode, do not connect or remove any devices (including PC
Cards or memory modules) because you may damage the
computer or resume to full power may fail. If a floppy disk is
in the floppy drive, do not remove it or switch it with another
disk. However, you can plug in the AC adapter if the resume
to full power fails because of a low battery charge. When the
Using Power Management Options 65

computer is in save to disk mode, y ou can remove and
replace the battery.
Using Po w er P rofi l er
PowerProfiler enables you to set power-management options for computer
shipped w i t h W i nd ow s NT install ed. To open the PowerPr of i l e r win dow, doubleclick th e ba tt er y icon on the ri ght corn e r of the W ind o ws tas kb ar. If you click the
icon with th e rig h t mouse b u tt on, a me n u appe a rs with a n opti o n to put the
computer in Rest mode.
Click the Standard tab in PowerProfiler to set timeouts for the LCD and the hard
drive. You can also set power management to be en abled Always, Battery Only, or
Never. The Advanced screen in PowerProfiler enables resume from rest options,
and the Battery scr e en enables optio ns t o con se rv e batt e r y life.
Keep th e following in m i n d whe n u s i n g P ow e rPro filer:
If you disable p o wer management in Power Pr ofil e r, t he sett ing o ver ri d es any
•
power-ma na g em en t settin gs i n Sys tem Setup.
If you enabl e LCD a n d hard d ri ve t im eo u ts in PowerProfil er an d th e standby
•
timeout in System Setup, the LCD an d hard d rive t u r n o ff when t he shortest
timeout period in either program passes.
If you di sa bl e the Resume on Time field in System Setup, the same field in
•
PowerProf iler is also automatically di sa bl ed. An easy way to wor k with these
two fields is to set the resume t ime to 0 in Sys tem S et up and set the actual
resume tim e that you desire in PowerProfiler.
PowerProfiler maintains the accuracy of the system clock
when the computer resumes from rest mode. If PowerProfiler
is closed or removed from your hard drive, your system clock
may not be acc ura te when your computer resumes from rest
mode.
For more information on PowerProfiler, see the Help option in the PowerProfiler
software.
66 Using Power Management Options

Creating a Save to Disk Partition
Save To Disk Partition enables you to store da ta from the
system and video memory to hard drive during Save To Disk
mode for computer shipped with Windows 95, 98 installed.
Windows Me does no t need this partition.
If you want t o us e a new h ard dri ve to you r sys t e m, you need to create a Save to
Disk Partition area on the new h a r d drive.
See the below notes and cautions before partitioning your HDD;
• Back up data files of your old hard drive.
If you do not intend to use Save to Disk mode, you do not need to create a
•
Save to Disk Partition.
For system boot with CD-ROM, u nd e r th e Boot menu in Sy stem setup, set
•
Bootable C D Check to Ena bl e d an d set Boot Dev ic e Pr i ority order ed starting
from [DVD/CD-ROM]. Use DVD Software CD in this process.
Before you set pa rtiti o n and fo r mat HDD, s et Fi xe d D isk Boot Sector to
•
Normal in Security menu of Syst em setup.
To create FDISK
1. Set the system boot with CD-ROM, press <F8> key to boot with “Safe mode
command prompt only”.
2. Operate Fdisk.exe, type “A:\>fdisk” and press Enter.
3. When 'Do you wish to enable l ar g e dis k support (Y/N)...?' shows, select Y and
press Enter.
4. Select '1. Cre at e DOS partition or Lo gical DOS Dr i v e' f ield in [FDISK
Options].
5. Select 'Create Primary DOS Partition' field in [Create DOS Partition or Logical
DOS Drive] a nd press Enter to start cre at ing 'Primar y DOS Partit ion'.
6. ’Do you wish to use the maximum available si ze f o r a Primary DOS Partition
and make the pa r ti ti on active ( Y / N) ...?' shows, then select N to div ide HDD
into several drives or using Save to Disk mode. If you select Y, it means you
are not using Sav e to D i sk Partition and use HDD sector as active DOS only.
Creating a Save to Disk Partition 67

7. Type the part iti o n si ze in the b la nk of 'Ent er parti tio n siz e in Mbytes or percent
of disk spa ce ( %) to creat e a Prima r y DOS Partition...: [ ]' and press Enter.
(HDD size ) - (Save-To- D i s k Partiti o n + 5MB)
Eg.) Partition size for 6.4 GB HDD = 6250 - (140 + 5) = 6105
8. Finish the Fdisk by <Esc> key and press the power button to reboot the system.
To create PHDISK
1. Set the system boot with CD-ROM, press <F8> key to boot with “Command
prompt only”.
2. Operate Phdisk.exe as follows.
3. Type ‘E:\sys u ti l> phdisk /c 14336 0 /p’ and press Enter.
143360 is calculated as bel o w for mu la , a nd it could b e diffe ren t acc ord ing to
system memory.
1433 60={system memory(6 4 MB) + video memory(8MB) + extended
memory(64MB) + buffer space(1MB)}x1024
4. Press any key to restart the system.
To format the HD
1. Boot system by CD-ROM.
2. Operate Format.exe, type ‘A:/format c: /s’ and press Enter.
3. Warni ng message sa y ing all the dat a will be re move d sh ows, type Y for
'Proceed with Format (Y/N)?' a nd press E nter.
4. Type the drive label and press Enter.
To install W i ndows and each devic e drivers
Use System Recovery CD to insta ll Win dows a n d System Software CD to install
devices’ drivers.
68 Creating a Save to Disk Partition

Restoring your Operating System and Original Applications and Drivers
Notebook comp ut ers th at ship from the factory include System Reco ver CD-ROM
and System Software CD-ROM, which contains a copy of the applications and
drivers needed for computer’s operating system.
In the unlikely event that pr ograms o n the co mp u te r h a rd drive become corrupted
or are erased, you can use the System Recovery CD-ROM to reinstall your
operating s yste m and then System Software CD-ROM to reinstall your original
applicati ons and d river s .
Under the Boot menu in System Setup, set
the first boot device and
“Using System Setup” on page 49 for info rm atio n on setting
options.)
See the documentation that a cc ompanied your operat ing
system for detailed information on installation and setup.
CD-ROM Drive
as the second. (see
To (re)install your operating system
1. Turn your machine on.
2. Durin g the Boot Sequence , press F2 to en ter Sy stem Setup.
3. Insert the System Recovery CD-ROM.
4. Ente r the Boot Menu and e n sure t hat Bootable CD Check is Enabled.
5. Select th e Bo o t Device Priori t y menu option, p res s Enter. Ensure that ATAPI
CD-ROM Device is first on the list.
6. Press F10 to sav e and exit Syst em Se t up and confirm yes by pressing ENTER.
7. When the Recovery Menu appears, select number as you ins ist.
1. Restore Manufacture’s originally preinstalled.
2. Exit to DOS Prompt.
Diskette Drive
as
Restoring your Operating System and Original Applications and Drivers 69

Please note this will delete everything from your C: drive.
To (re)install your original applications and drivers:
Use the System Software CD-ROM included in the packing. And follow the
instruction in the CD cover.
70 Res tor i ng your Operatin g System and O r iginal Applicati ons and Driv ers

Video Features and Configuration
Your computer includes a TFT LCD or active-matrix display. The capabilities of
the screen plus the video drivers installed on the computer determine the quality of
the image your LCD can display.
The following se ctions describe the display capabilities of your computer.
Resolution and Color Depth
The re so lu t ion of t he LCD is the sharpness of the ima ge i t can di splay. Res o lution
is measu r ed by the numbe r o f pixels ( i ndiv id u al dot s) d i sp layed on th e entire
screen. In general, the more pix els the LC D ca n di sp lay, the better the image.
Your LCD s cr een is XG A( S V G A), with a maximum di splay of
1024x768(800x600), about 800,000(480,000) pixels.
The number of colors the LCD can display is measured by how many bits the LCD
uses to represent each pixel:
8-bit color can support 256 different colors.
•
16-bit color can s upport 64 K (65,5 36) colors.
•
24-bit color can s upp ort 16 M (16.8 m il lio n) colors.
•
32-bit color can s upp ort 16 M (16.8 m il lio n) colors.
•
24-bit color uses the RGB color model.
32-bit col o r us es the CMYK c o lor mo d e l wh ic h gives bett e r prin te d color
matching.
Table 9 lists the basic video mode capabilities and maximum colors supported by
your computer.
Video Features and Configuration 71

Table 9. Video Driver Capabilities
Software
Drivers
Windows 98 640x480, 720x480, 800x600, 848x480, 1024x768,
Windows NT®
4.0
Resolution Supported with 4MB(8MB) SGRAM
1152x864, 1280x1024, 1400x1050, 1600x1200
640x480, 720x480, 800x600, 848x480, 1024x768,
1152x864, 1280x1024, 1400x1050, 1600x1200
640x480, 720x480, 800x600, 848x480, 1024x768,
1152x864, 1280x1024, (1400x1050, 1600x1200)
640x480, 720x480, 800x600, 848x480, 1024x768,
1152x864, (1280x1024, 1400x1050)
640x480, 800x600, 1024x768, 1152x864,
1280x1024, 1600x1200
640x480, 800x600, 1024x768, 1152x864,
1280x1024, 1600x1200
640x480, 800x600, 1024x768, 1152x864,
1280x1024, (1600x1200)
640x480, 800x600, 1024x768, 1152x864,
(1280x1024, 1400x1050)
Number of
Colors
256
65,536
16.8 million
(24 bit)
16.8 million
(32 bit)
256
65,536
16.8 million
(24 bit)
16.8 million
(32 bit)
All these vid eo modes c an be di sp layed on an e x te rnal monitor. How e ve r , if you
disconnect a n ex t e rnal monit o r that was attac he d to your comp u t e r a nd then start
the computer, the LCD may revert to a differe nt r es ol u ti on than the one you chose
for the external monitor.
Configuring Display Features
The fol low i ng sections de scr i b e how to c onf igu r e the display settings on your
computer.
Selecting a Monitor Type
When you attach an external monitor to your computer, Windows 98/Me automatically
selects display settings for it (this feature is not av aila ble in Window s NT). If you
wish, you can adjust the display settings by selecting a monitor type:
1. Click the Start button on the Windows taskbar.
72 Video Features and Configuration

2. Select Settings.
3. Click Control Panel. The Control Panel window appears.
4. Double-click the Display icon. The Display Properties window appears .
5. Click th e Settings tab. The Settings screen appears.
6. Click th e Advanced button. The Advanced Properties screen appears.
7. Click th e Monitor tab.
8. Click th e Change button. The Update Device Driver Wizard screen appears.
9. Click th e Next button.
10. Select the Display a list of all the drivers in a sp ec if i c lo ca t io n, so you can
select the driver you want radio button and click the Next button.
11. Select the Show all hardware radio button.
12. Select a manufacturer and model setting that matches your external monitor.
Your computer has an intelligent video chip set that automatically matches
your LCD panel resolution and frequenc y whe n an exte rnal moni to r is not
present.
13. Click th e Next button.
14. The Upda t e Device Drive r Wizard screen appears showing the driver location
of the dev i ce y ou h av e sel ect ed. Click the Ne xt b utton.
15. Fo llow any p romp t s that appe ar on the scr een.
Changing Color Depth and Resolution
To change the colour depth and resolution of your LCD or external monitor:
1. Click th e Start button on the Windows taskbar.
2. Select Settings.
3. Click Control Panel. The Control Panel window appears.
4. Double-click the Display icon. The Display Properties window appears .
5. Click th e Settings tab. The Settings screen appears.
6. To change the colour depth, click the arrow next to Col or pal ette and select the
colour dep t h you want.
Video Features and Configuration 73

7. To chan ge the resolution, click an d drag the knob under the Screen area until
you select the resolution yo u want.
8. Click the OK button.
9. Follow the prompts that appear on the screen.
Changing the Video Driver
It is possible that you may want to update your video driver or that your installed
video d river has become corrupt so that th e display is unusable.
1. Insert the System Software CD into the CD-ROM drive.
2. Click o n the Start Button. and the Start Menu appe ars.
3. Select Run to open Run window.
4. Insert directory in Open field.
– Windows Me: ’D:\WinME\Driv ers\Video\S etup.exe’
– Windo ws 98: ’D:\Win98\Drivers\Video\Setup. ex e ’
– Windows 2000: ’D:\Win2000\Drivers\Video\Setup.exe’
– Windows NT: ’D:\NT4\Drivers\Video\Setup.exe’
5. Select the OK button.
6. Follow any directions on the scre en to finish the insta ll ation.
7. Res t ar t th e syst e m t o c omplete the instal lation.
Using the TV-Out Port
This feature is only av ai la b le with Windows 9 8 / Me. Using the S-VHS TV-out
port, a compatible TV or other compatible display dev ice can be connected and an
image displayed. No Audio is transmitted through the TV-Out port. To check if
and how your TV displays the TV-out signal see the documentation included with
your TV.
Concurrent enabling LCD and TV doesn't support. So, either
TV or LCD is recommended. While TV is ON, pressing
74 Video Features and Configuration

Fn+CRT/L CD cause
TV-Out
disable. Then, you should follow
from step4. (DO S mode -you sh ou l d restart.)
To enable TV-out:
1. Connect the TV to the TV-Out port usin g an approp ria te S-VHS cable
2. Enter System Setup and under the Advanced menu, set TV Standard to the
appropriate standard for your TV. (see “Using System Setu p” for information
on setting options.)
3. Reboot your computer.
4. You can see TV display.
5. Click the Start button on the Windows taskbar.
6. Select Settings.
7. Click Control Panel. The Control Panel window appears.
8. Double-click the Display icon. The Display Properties window appears .
9. Click th e Settings tab. The Settings screen appears.
10. Click th e A dva nc e d P r oper t ie s button. Th e Advanc e d P r op e rt i es screen
appears.
11. Click the Displays tab. The system will now try to detect a TV connected to the
TV-out port.
12. Put a tick in th e box under t he TV symbol
If the TV sym bol is greyed out then th e system has not
detected a TV, check that the TV standard in the System Setup
is set correctly and that the TV is turned on and connected
properly.
13. Click OK and follow the prompts that appear on the screen.
Video Features and Configuration 75

Using Dual View mode
Single V iew mode is used to be the basic display method until now which displays
same vi ew on all the dis pl ay devices connect e d to a sys tem. While Dual View
mode is the ’Extended screen mode’ supported in Windows 98/Me, which displays
separate views on each display devices connected to a system.
The defaul t setting on your s ystem is Single View mode.
Setting Dual View mode
To set Dual View mode on your system;
1. Connect peripheral display device such as monitor, TV to your system and start
the system.
2. Select Start > Settings > Control panel > Display and start Display properties.
3. Click Settings tab.
4. Click the second monitor among two monitor pictures.
5. When ~ Do you want to enable this monitor?message appears, then se lect Yes.
6. Click Apply or OK.
To confirm whether the system is set properly with Dual View mode;
1. Open Display properties and click Settings tab
2. Place t he mous e pointer on the first monito r picture a nd click ov er a second,
then digit number 1
the mouse pointer on the second monitor picture and click over a second, then
digit number 2
3. The monitor displays digit number 1 is the primary monitor and number 2 is
the secondary monitor.
When you start Window s ex plorer, th e n t he program displ a y s on the primary
monitor, if you can drag it to seconda ry m oni t or, then Dua l View mode is now
working properly.
76 Using Dual View mode
will be shown on the first actual monitor screen. And place
will be sho w n on the s econd actual monito r screen.

The s ec ondar y monitor has a disp la y of 256 col ors ( col o r depth) and 640x480
pixels (resolution) at first. The color depth and resolution of primary/secondary
monitors are separately changeable.
To reset the syst em to Sin gle View mode;
a. Start Display properties.
b. Click Settings tab.
c. Click the second monitor among two monitor pictures.
d. Uncheck Extend my Windows desktop onto this monito .
e. Click Apply or OK.
Limits and cau tio ns of us i ng D ual View mode
The supporting cap ab il ities of the prima r y monitor and the
secondary monitor are differ.
Primary CRT Controller Capabilities
•
– VGA Mode
– Acceler ator Mode
– Hardwar e O v er l ay
– Hardware Cursor or Hardware Icon
– Ratiometric Expa ns i on (from up to 10 2 4 x768 source)
Secondary CRT Controller Capabilities
•
– No VGA Mode
– Acceler ator Mode
– No Hardware Overlay
– No Hardware Cursor or Hardware Icon
– No Ratiometric Expansion
LCD, CRT an d TV d isplay de vi ces are su pported in your
system.
Next table shows the limits and possible usage when you use two or three display
devices.
Using Dual View mode 77

Table 10. Using several display devices
Two Displays
Three Displays
C = Coprocessor mode only
E = No Expansion
I = No Hardware Icon
O = No Overlay
R = Same Refresh rate
Primary
CRTC
LCD CRT C, I, O
LCD TV C, I, O
CRT LCD C, E, I, O
CRT TV C, I, O
TV LCD C, E, I, O
TV CRT C, I, O
LCD + CRT R
CRT + TV R
LCD CRT + TV C, I, O, R
TV LCD + CRT C, E, I, O, R
LCD + CRT R TV C, I, O
CRT + TV R LCD C, E, I, O
Limits
Secondary
CRTC
Limits
78 Using Dual View mode
Software cursor is used while two controller and hardware
ico ns are acti vated.
The same CRT controller can not be used for both LCD and
TV.
Basically, the program shoul d b e started in the primary
monitor, then you can drag the program to the secondary
monitor to use. But, some programs are not able to drag from
the primary monitor to secondary monitor.
The order of Icons on the Windows desktop could be changed
after using Dual View mode.

Limits on Video Driver while using Dual View mode
1. Certain combinations of display modes, color depth and refresh rate, when
Dual View mo de is act i ve, are not supported because of video memory
bandwidth limitation.
2. When us i n g Du a l View in simultan eous display mode , f rame rates in Direct
Draw applications are slightly lower because of the need to synchronize buffer
flip.
3. If the primary/secondary monitor on Dual View mode is set to high resolution
and high refresh rate display mode, the full frame rate setting on DVD-ROM
may not played properly. Playing DVD-ROM on Single View mode is highly
recommended.
4. It is not possible to use 16 bit colors in Windows 98. If so, secondary monitor
on Dual View mode can not support the VGA mode.
5. The video memory uses one memory pool for two screen and Direct Draw
application on Dual View mode in Windows 98. So activating the Direct Draw
applicatio n which does not support th at mode could ca u se fail in changing
mode.
6. The program which does not have Dual View compatibility can not be used in
the secondary monitor on Dual View mode.
7. The ATI video drive r su ppo rts VPE (Microsoft video port specifi c ation) for
multimedia function. So the program uses VPM (Cirrus logic video port
specification) may not be supported.
8. Changing Dual View mode to Single View mode while you maximize the
window of a p r ogram (su ch as Windows Explorer) could be failed. Set the
resolution o f the se co n d a r y mon itor lower tha n the p r imary monitor , or adjust
the window size to sma ller (n ot ful l screen).
9. When you use CRT and TV together a s the same primar y mon it or or se condary
monitor, the display size of the CRT is smaller than TV. The reason is that the
frequency bandwidth is differ ent from TV to CRT.
Using Dual View mode 79

Working with PC Cards
By inst alling PC Car ds , you can add functions to your notebo ok c omputer similar
to those found on add-in boards for desktop computers. Available PC Cards
include:
Input/output , such as modem, network, pager, v ideo capture, and SCSI ca rds.
•
Storage, such as hard drive and flash (SRAM) cards.
•
Combo cards, such as a combination modem and network card.
•
Your co mpu ter inc lu d es the fol l owin g PC C a r d support:
Two P C-Car d slo ts: You can in stall Type I, II, or III ca rds in the s lots. Type
•
III cards are thicker than Types I an d II. If you inst all a Ty pe I I I card in the
botto m slot, you cannot inst all a card in the top slot.
CardBus hardware and software: CardBus ena bles the computer to use 32-bit
•
PC Cards. Windows 98/ Me supports 32-bit and 16-bit PC Cards. The
SystemSoft
systems that ship from the factory with Windows NT installed, also supports
both 16-bit and 32-bit cards.
Zoomed video : B ot h PC Card slot s and the vid e o ch i p on your computer
•
support zoomed vi d eo . Wh e n you in s t al l a zo om vi d e o PC Ca r d in the upper
or lower slot, data can be transf e rr ed directl y f rom the PC Card to video and
audio systems without goin g thro ugh the microprocess or. Video conferencing
and rea l-t ime multime dia devices , su ch as vide o c am eras, are supported by
zoomed vi deo.
®
CardWizard™ for Windows NT program, provided with
To use the Card Bus and zo om ed vi de o tec hnol og y with
Windows NT, install the CardBus and zoomed video driver
provided wit h your PC Card. If no drivers we re supplied with
your card, conta ct the PC Card manufacturer. ATA (AT
attachment ) and mo dem PC Car ds do no t require extra
drivers.
Maint a in in g P C Cards
To maintain your P C Cards, follow these guidelines:
Keep cards away f rom excessive h ea t , direct sunlig ht, and liquids.
•
80 Working with PC Cards

Do not drop, bend, flex, or crush cards when handling.
•
Keep dust, magnets, and static electricity away from PC Cards.
•
When a ca r d is not i n u se , carry it in i t s pr ot ec tiv e ca rr ying case.
•
Some PC Cards include ca bl es that extend fr o m the back of th e cards. Be
•
careful not to ben d or put excessive str a in o n thes e cables.
Using PC Cards
You can install PC Cards while the computer is on.
To insert a PC Card into a slot:
1. Push the slot door in with the PC Card.
2. Align t he card with a slot and inser t t he card into the slot unti l i t lo c ks in place
(Figure 18).
The eject button for the card slot operates in two steps.
To remove a PC Card:
1. push the eject button once to pop it outward.
2. Push t he ej ec t b utton again , th e n the c ard w i ll be ejected.
Eject button
PC Card
Figure 18. Inserting a PC Card
Windows 98/ Me
Windows 98/ M e autom at ica lly ass ig n s co mp ut er resources (such as
communication ports and memory ad dresses) to a PC Card installed in your
Working with PC Cards 81

computer. F or f u rthe r information on configuring a PC Card in Windows 98/ Me,
see the index entry PC card in the Windows Help. Windows 98/ Me also handles
power m ana ge me nt for PC Cards.
To remove a PC Card from your computer if your operating system is Windows
98/ Me:
Use the following procedure s to remove PC Cards, or you
may lose data that is being sto r ed to a card.
1. Click t h e P C Card icon on the taskbar.
2. Select the name of the card you want to remove, and then click the Stop button.
3. Push the card eject button on the side of the PC Card slot when prompted to do
so.
4. Pull the ca r d o u t of the PC Car d slot.
Windows NT
Systemsoft Card Wizard is shipped with this notebook computer that use Windows
NT as the operatin g system. When you inst al l a PC Card, CardWizard attempts to
configure it a utom at ic ally . I f C ard Wi z ard su ccessfully ass i gn s system res ources
to your ca rd, the comput e r bee p s twice.
If Card W iz ard cannot au t om at ic a ll y con fi gure your PC Ca rd , the com put e r beeps
once and a message appears telling you that the card has not been configured. Click
the Wizard button on the CardWizard window. CardWizard then analyzes why the
card was not configured and fixes the problem or gives you information to help fix
the problem.
CardWizard works with the P ower Profil er progra m to ma nage PC Cards when the
computer enters or resumes from rest mode. CardWizard gives you instructions to
prevent loss of data before the computer enters rest mode or may stop the computer
from entering re st mode. ATA and modem cards can enter rest mode.
Follow th ese guide lines w h e n using PC Cards with Car d Wizard :
Some of LAN (local-area network) cards can be inserted while the computer
•
is on but shou ld be remo v ed onl y when the syst e m is tu rned off.
SCSI cards should be inserted at startup to enable Windows NT to find the
•
device attached to the SCS I car d. SCS I car ds ca n be rem ov ed w he n the
computer is turned off. If you resta r t your compu t er withou t the SC SI c ard
82 Working with PC Cards

installed, a message may appear telling you that a service did not start. You
can ignore this message.
Modem and ATA cards can be inserted and removed while the computer is
•
on.
Before you remove a modem or ATA card from your
computer, stop the card through the CardWizard program or
you may lose data.
To stop and remove a PC Car d f r om yo ur computer:
1. In the SystemSoft CardWizard screen, click with the right mouse button on the
name of th e card you want to re m ove.
2. Click Stop in the Actions menu. A red stop sign appears on the main scre e n
when th e car d is stopped.
3. Click OK.
4. Push t he ca r d eject button on the side of the PC C a rd slot.
5. Pull th e car d o ut of the slot comp ar t ment.
For mo r e information on using the CardWiza rd program, see the CardWizard
Help.
Working with PC Cards 83

Using Options
You can order the following options for your Notebook computer from your
authorised re seller:
An extra AC adapter.
•
An auto adap t er that enables you t o charge the c om p ut er’s battery and operate
•
the computer while in an automobile.
An extra battery pack.
•
32, 64 and 128 MB PC100 compliant SDRAM memory modules that enable
•
you to upgrade your computer’ s memor y to a ma ximum o f 256MB.
An upgraded h ard driv e. Optiona l hard drives are avai la ble to fit in the hard
•
drive compartment or the Flex-Bay.
A CD-ROM drive module.
•
A DVD-ROM drive module.
•
A ZIP d rive modu l e .
•
A Superdis k LS-120 drive.
•
Docking opti o ns t h at enable you to use your computer like a desktop
•
computer.
The op tion s tha t are avail able may chan g e peri odicall y . Contac t your res eller for
updated in formation on cur ren t a n d new options.
AC Adapter
Battery Pack
84 Using Options
The optional AC adapter operates in the same way as the adapter that came with
your c omp uter does. See ”Attaching the AC A d ap ter” on pa ge 5 for inf ormation
about the AC adapter.
You can order another smart lithium-ion battery pack or dumb Ni-MH battery pack
for your c omp uter. See ”Using the Battery” on page 32 fo r information on the
battery.

Auto Adapter
The auto a dap te r e nab les you to po w e r your co m put e r and cha r ge th e computer
battery
In an automobile, through the +12 volt cigarette lighter socket.
•
To use the adapter:
1. Plug t he ad a pt er cable int o the AC adapter connect o r on th e computer.
2. Connect the adap ter t o the ciga r et te l ig hter socket.
The light on the adapter is green when the adapter is working properly. The light
may be re d fo r a few seconds whe n you first plug in the a d a p ter or while you use
the adapter. Thi s is normal. If the light remains red, check to make sure the adapter
is connected correctly.
If the ada pter i s plugg ed in and the ad apter light does not turn on:
Check th e ada pter conne c tions.
•
If you are in an autom obile, turn on the automobile ’s igni t io n to sup ply power
•
to the adapter. In some vehicles, pow er to the cigarette lighter socket is alway
on and you do not need to turn on the ignition.
If the previous proced u r es do not activate th e adapter, you may need to change
•
the fuse in the adapter. To remove the fuse from the adapter, unscrew the
adapter cap with a pair of pliers and remove the cap. Replace the fuse with an
8 amp fu se. In an automobil e, you m ay ne e d to repla ce the fuse in the c igarette
lighter socket.
When yo u con nect the a d a pt er to the cigarette lighter, the batte r y st arts charging
immediately.
To prevent loss of data and possible damage to the computer,
unplug the auto adapter when starting and stopping the
automobile engi ne.
Memory Modules
You can i nc rease system mem ory by installin g op tional m e mor y modules. You
can inst all a 32, 64 or 128 MB modules.
Using Options 85

Never use 66 MHz memory module. Use only PC100
compliant SDRAM modules.
To avoid possible system problems, use only approved
memory modules in your computer.
Before You Insta l l Memory
To prevent personal injury and damage to the equipment,
follow the precautions listed here b efore installing a memory
module.
Take the following pre cautions when installing a memory module:
Before you remove the memory module compartment door, turn off the
•
computer, unplug the power cord, and remove the battery. Also, disconnect
any peripheral devices.
Before handling a memory module, discharge any static electricity by
•
touching a grounded surfac e o r using a gro u nding wrist strap.
Do not inser t objec t s with conductive material, such as metal screwdrivers or
•
graphite pencils, into the memory- module compartment.
Be careful in handling the metal plate of the memory door.
•
Installi ng a Memory Module
86 Using Options
Handle a me mory mo dule carefully. Hold them only by th
edges.
If you are using just one socket, use socket 1.
Never us e PC100 SDRA M and 66 MHz S DRAM memory
module together.
To install a memory module:
1. Turn the compu ter over so that the bot to m faces up.

2. Using a screwdriver, re move the sc rew that holds the memory-module
compartment door in place (Figure 19).
Socket 2
Socket 1
Figure 19. Removing the Memory Module Compartment Door
3. Grasp t h e edg e of the door and pull the door off the chassis.
4. Remove installed modules if necessary:
When removing modules, pull on the plastic portion of the
connector slots tabs only. Do not pull on the metal part of the
tabs, or you may damage the tabs.
a. Pull the ta bs o n the conne ctor slo t o utw ard slightly, until the edge of
the memory module pops up (Figure 20).
Tab
Tab
Figure 20. Removing a Memory Module
b. Hold the memory module by the edges and pull it forward out of the
compartment.
5. Align the connector on the me mory module with the connector of the slot.
Using Options 87

6. Push the memory mo du l e into the slot at a slight angle until the c onnectors are
fully enga ged (Figur e 21).
7. Push down on t he e d ge o f the memory module u n til the mod ule snaps into
place.
Figure 21. Installing a Memory Module
8. Align the memory module compartment door with the compartment and push
the door down until it snaps in to place.
9. Reinstall the screw you removed in step 2.
10. Turn on the computer and perform a complete POST to check the memory
integrity.
Hard Drives
88 Using Options
You can order optional hard drives for your system. A hard drive can be installed
in the hard-dri ve comp artmen t to replace you r existing hard drive see “Installing a
Hard Drive” on page 31 for information on installing a new drive in the hard-drive
compart me nt . Or you can orde r a ha rd d rive tha t fits in the Flex- B ay, in th is case,
you should purchase t h e dr i v e pa c k t o fit in the F le x -Bay.
To install and use the 2nd HDD in the Flex-Bay, you must set the switch on a
device to set it as slave type of IDE bus. Set switch 1 to ON and switch 2 to ON.
See ”Using the Flex-Bay” on pag e 23 for information on installing a device in the
Flex-Bay.

Figure 22. Setting the switch on 2nd HDD
CD-ROM Drive
If your system did not ship with a CD-ROM drive included, you can order a drive.
See ”Using the CD-ROM Drive” on page 27 for directions on installing the CDROM drive.
To install and use the CD-ROM drive in the Flex-Bay, you must set the switch on
a device to set i t as slav e type o f ID E bus. Set switch 1 to ON and switch 2 to ON.
See ”Using the Flex-Bay” on pag e 23 for information on installing a device in the
Flex-Bay.
12
ON
12
ON
Figure 23. Setting the switch on CD-ROM drive
Using Options 89

DVD-ROM Drive Module
If your sys tem did not ship with a DV D - R OM drive includ ed, you can order a
drive. The DVD-ROM drive module can be inserted into your computer exactly as
you would insert a CD - ROM. See ”Using the CD-R OM Drive” on page 27 for
directions on ins talling and using the CD-ROM drive. There is MPEG-2 software
included with the drive that will enable you to play DVD movies from the DVDROM drive.
To install and use the DV D- R O M d rive in the Fl ex- Bay, you mu st s et t he switch
on a device to set it as slave type of IDE bus. Set switch 1 to ON and switch 2 to
ON. See ”Using the Flex-Bay” o n pa ge 23 for informa t i on on installing a device
in the Flex-Bay.
ZIP Drive
The ZIP drive enables you to store 100 MB of data on a ZIP-100 diskette. The ZIP
drive fits in the Flex-Bay, see “Using the Flex-Bay” on page 23. The re is IOmega
ZIP
To install and use the ZIP drive in the Flex-Bay, you must set the switch on a
device to set it as slave type of IDE bus. Set switch 1 to ON and switch 2 to OFF.
See ”Using the Flex-Bay” on pag e 23 for information on installing a device in the
Flex-Bay.
Superdisk L S-120 Drive
The LS-120 drive enables you to store 120 MB of data on a single, 3.5-inch LS120 dis ke tte . It is backwa rd c om p at i b le wit h standar d HD 1.44MB 3.5-inch
diskettes and it can read and write to them up to three times faster.
To install and use the LS-120 drive in the Flex-Bay, you must set the switch on a
device to set it as slave type of IDE bus. Set switch 1 to ON and switch 2 to OFF.
See ”Using the Flex-Bay” on pag e 23 for information on installing a device in the
Flex-Bay.
90 Using Options

Figure 24. Inserting a 120MB LS-120 diskette into the LS-120 drive
If you want to boot from LS-120, you have to disable "Flopp
Disk A:" field in BIOS setup.
Docking Options
Contact your r e se lle r for a list of docking options a va il a ble f or your N otebook
computer. User’s manuals are included with the docking options.
Using Options 91

About Drivers an d System Resources
This section gives you basic inform ation about drivers and system IRQs.
Drivers
A driver is a program th at enables the operating system to work with a hardware
device. Yo ur computer includes driver s for t he audio, video, infrared, touchpad,
keyboard, CD-ROM drive, hard drive, floppy drive, and PC Card controller. When
you add a device to your computer, such as a printer, you install a driver for that
device. Different drivers a re used by different operating systems.
IRQs
Most of the devices in your computer or connected to your computer need their
own IR Q ( interrupt reques t line). The IRQ is a hardware line that a device can use
to send signals to the microprocessor. When the device needs the microprocessor’s
service, t he d e vice sends an in ter rupt re quest si g nal to the micro processor.
The num ber of IR Q s available for any computer is limi t e d by ind u st ry st a ndards.
Because it ships with numerous features, this computer uses most of the available
IRQs. I f yo u add anoth e r device t o y our c ompu ter, y ou may need to disable an
existing device to free up an IRQ for the new device. IRQ resources are of
particul a r concer n w h en the c o m pu t er is attache d to a dockin g device.
The de fau lt IRQ settin gs t ha t ar e us e d by your co mp uter ar e lis t ed in Table 11.
IRQ Win dows 98/ Me Windows NT 4.0
0 System timer System timer
1 Keyboard Keyboard
2 Internal Controller Internal Controller
3 Reserved Reserved
4 COM 1 COM 1
5 Audio/Modem Audio/Modem
92 About Dri ve r s and System Res o u rc es
Table 11. IRQs

IRQ Win dows 98/ Me Windows NT 4.0
6 Floppy controller Floppy controller
7 LPT1 (parallel port) LPT1 (parallel port)
8 CMOS/Clock CMOS/Clock
9 Reserved Reserved
10 USB USB
11 CardBus CardBus
12 Touchpad, PS/2 mouse Touchpad, PS/2 mouse
13 Numeric data processor Numeric data processor
14 IDE 1 (hard drive) IDE 1 (hard drive)
15 Reserved Reserved
In Windows 98/ Me, you can configure a device so that the device is disabled when
you connect your co m p u ter to a docking station bu t enable d whe n the computer is
not connec ted t o the dockin g station . Wi th this configurati on, an I R Q is available
for a peripheral de vice that you connect to the doc king station. See your Wi ndow
manual fo r more information.
Service Pack 4 fo r Windo ws NT 4.0
Microsoft® Service Pac k 4 (SP4 ) is includ e d with computers shipped from the
factory with Wi ndows NT installed. An y time you ch an ge or a d d co mponents to
your Wind o w s NT syste m, y o u ne e d to r einstall SP4.
The version of SP3 on your computer’s hard drive includes the correct video driver
for your system. If possible, always install this version on your computer.
To in stall SP3:
1. Run t he ex e cu t abl e fi le. On your computer’s hard drive this file is lo c a ted at
C:\SP4\i386\update.
2. Follow the instructions o n the screen with these exceptions:
a. When you are prompted to over write the uninstal l dir e c tor y, c l ick the
Yes button.
About Drivers and System Resources 93

b. When a prompt identifies your pcmcia.sys file as an OEM-installed file
and asks y ou to o v er write the ver sion of the file on your system with
the service pack version, click t he No button.
If you install any future service packs on your computer,
make s ure that , whe n yo u are pr ompt ed, you do no t overwrite
the pcmcia.sys file, or you may be unable to use your
computer.
After installation of Windows NT 4.0, install the latest service
pack to support proper video, PC card driver.
If you install SP4 from any source other than your computer’s hard drive, the video
driver t h at w as ins ta ll ed on your computer at th e fa ct ory is over writ ten. After you
install the service pack, you must reinstall the video driver the first time you restart
your computer, see “Changing the Video Driver” on page 74 for more infomation.
94 About Dri ve r s and System Res o u rc es

Troubleshooting
If you ever have difficulty running you r com p uter , follow these steps:
1. Consu lt th e fol l ow i ng sections for advi c e on how to hand le s y st em problems.
2. If steps 1 do not help you to resolve the problem, contact your reseller.
Operating Problem
This secti o n tells you wh a t to do if you have problems runni ng y our computer. If
any problem persists after you take c or re c tive action, c ontact your reseller for
assistance.
The computer does nothing wh en you turn it on.
Has the battery run down? Connect the power cord to get power and recharge the
battery. Tr y turning o n the computer again.
The computer is not behaving as expected.
Operating your computer at high speed with the cache enabled may cause syste
instability and incompatibility with some applications. If your computer is not
behaving as expect ed and no error messages appear, disable the External Cache
setting in the Memory Cache field of System Setup.
Nothing ap p ears on the LCD panel when you turn on t he computer.
Adjust the b r igh t n ess on a TFT LCD. Are you using an external monitor? If so,
press <Fn+F5> to return to the LCD panel.
Nothing appears on the external monitor when yo u switch th e disp lay to it.
Is the mo nit or pro pe r l y con n ec te d t o t he c om pu t er ? Is the monitor ’s pow e r cord
connec ted to an AC wall outlet? Check th e brig htness and con trast cont rols on the
monitor. Does the progra m appear on the LCD p an e l inst ead o f the ext ernal
monitor? If so, press <Fn+F5> to switch to the monitor. Try turning the monitor
off and on again.
The external monitor displays flashes or waves.
Check th e cab l es between the monitor and the c om put er. A re the y p roperly
installed?
Troubleshooting 95

Some of the letter keys type numbers instead of the indicated letters.
Is the Num Lock light on? If so, the numeric keypad on the keyboard is active. To
return the keypad keys to typing letters, press <Num Lock>.
Batter y power seems to run out faster than expected.
If you are running the computer from the battery rather than the power cord, make
sure that you set the Idle Mode field in System Setup to On. This setting enables
the microprocessor and t he h a rd drive to slow down wh en the computer is not
busy.
You can also enabl e other power-saving options through System Setup. Set the
timeou t ti me s in th e S tan dby T imeo ut and Rest Timeout fields to the shor test ti mes
to ensure maximum power savings.
Certain software programs “hang” during operations when there is no
interaction with the keyboard or peripheral devices.
Your computer may be in standby or rest mode. Tap the touchpad to resume from
standby or press the powe r bu t t on to re sume from rest.
A serial or parallel device attached to a serial or parallel port on the rear
panel of the system unit does not work properly.
Check the attached device. Is it turned on? Is the cable properly installed between
the device and the port? If you are using an op er at ing syste m that is not plug and
play comp l iant, make sure the Plug & Pl a y O/S field in System Setup is set to No.
Check to make sure that the port is enabled in System Setup.
A PC Card does not wo rk co rrectly.
Make sure that the PC Card is inserted left side up in the PC Card slot. Check that
the card is inserted fully into the slot. If you are using a PC Card modem, check
the modem cable c onnections. For t he W ind ows 98/ M e o p erat i ng sy st em, try
setting the Plug & Play OS f ield in System Setup to Yes to enable Windows 98/
Me to autosense an olde r P C Car d . For the Windows NT operating system, make
sure Plug & Play O/S in System Setup is set to No.
The System Setup settings are not retained when you turn off the computer.
The CMOS bat ter y inside th e co mp u ter may n e ed to b e r eplac ed. The CMOS
battery provides power to save the sy st em B IOS inf ormation when th e co mp uter
is turned off. Norm al ly, t he CMOS battery las t s for se ve r al years. Do not attempt
to open the chassis and replace this battery yourself or your warranty is void. Have
an autho ri ze d the manufact urer’s se rvice center replace the CMOS b attery.
96 Troubleshooting

Infrared Problems
If your computer’s operating system is Wind ows 98/ Me , yo u can enable and use
the infrared port. The Windows NT 4.0 operating system does not support infrared.
If you ar e unable t o transfer files with the i nf rared port, c h e ck t h e following:
Make sure the setting of Serial port B is same to resource of
•
Windows\System\Properties\Network\IrDA driver.
The sending and re ce i ving devices need to b e on the s ame level vertic ally and
•
place the infra r ed p or ts on the sen d ing an d rec eivi ng devic es fac e each other,
with no mor e th a n a 30 d e gr ee ang l e be t w een th e t wo infrar ed ports.
To use Infr ared por t, you hav e to set Serial P or t B in BIOS setup to Enabled,
•
and Use Infrared port field in Control Panel, Infrared to Enabled.
Even if all the setting is done, In fr a re d driver ma y not support 4Mbps or the
file does not tans ferred in ACPI Win d ow s 98. Th is is the Windows 98’s
known problem. Use the D irec t C a b le Connection or hyper t er m ina l for faster
speed in transfering the file, see Windows help to get information on its
setting method .You may hear t h e aud i o noise while us i ng the ifrared port, set
Use Infrar ed por t field in Control Pane l, Infrared to Disabled to prevent
noise.
Modem Probl e ms
My modem doesn't connect to services or disconnects during communication
If your mod em has difficulty in co nnecting to on-l i n e services and sustaining
communicat io n s, first ly check t he q u al it y of t he pho ne line. I nterference from
certain d ev ic es or poor line power c onditions may d e gr a d e the qua lity of your
connection. Under these conditions gradually reduce the communication speed of
your modem u ntil a reliable connect ion is achieved .
Check your on-line service provider. Service line or service may be halted.
When using a PBX phone system I can't dial on my modem.
If you use a PBX phone system you may need to press a number i.e. '9' to connect
to an exter n al line, you should e nt e r th e f ol l o w ing command bef o re trying the
connection and check mod e m initialization.
ATX3&W
And add "9," as the ext ern al l ine pr efix (in our ex am ple) of the p hon e number
when using the dial command "ATD T9, 123- 4567 " .
Troubleshooting 97

Screen displays random or garbage characters during communications.
After your modem has connected to the on-line service, your screen may display
garbage characters or after-images in screen transitions. This problem is caused
by a mismatch of the terminal modes between communications service and
communications programs. You need to match the terminal modes to each other.
Refer the user's guide of the c ommunicat ion s program you're using.
Reports error message that insufficient Hard Disk space is available.
Delete the unnecess a ry mes sages or data you rec eived by Modem or Fax every
one to three months as required.
If you're using WWW of the internet, many picture and data files can get
downloaded to your H ARD DISK ev e ry tim e you vis i t a home pag e , which will
consume a lot of y o u r HARD DI SK sp a ce. Delete the unn e c essary messages or
data you received by Modem or Fax every one to three months as required. For
more detailed information about the method of deleting, refer to the help of the
Web browser you've b een using or your user's guide.
Depending on the telephon e lin e status or types of FAX
machines/programs that send/r ec eive the FAX, FAX
transmissio n/reception may not work correctly. In that case,
please try oth er F AX p rogr ams( e. g. Microsoft FAX).
98 Troubleshooting

Specifications
Table 12 g ives t h e s pe c if ic at ions for computers.
Table 12. Hardware Specifications
LCD viewing area (12.1 TFT) 9.7 x 7.2 in (246 x 184.5 mm)
LCD viewing area (14.1 TFT) 11.2 x 8.4 in (285.7 x 214.3 mm)
Width 12.2 in (31.0 cm)
Height 12.1" 1.50 in (3.8 cm)
Height 14.1" 1.58 in (4.02 cm)
Depth 9.92 in (25.2 cm)
Weight 12.1" in (with CD-ROM drive,
without battery)
Weight 14.1" in (with CD-ROM drive,
without battery)
Dimension
LCD viewing area
4.85 lb (2200 g)
6.6 lb (3000 g)
Environment
Ambient temperature, operating 50o–90o F (10o–32oC)
Ambient temperature, storage 23o–104o F (-5o–40o C)
Relative humidity (noncondensing),
operating
Relative humidity (noncondensing),
storage
Altitude, operating 0 to 8,000 ft (0 to 2,348 m)
Altitude, storage 0 to 40,000 ft (0 to 12,192 m)
Shock, operating 10 G for 11 ms half sine
Shock, nonoperating 60 G for 11 ms half sine
20–80%
5–90%
Specifications 99

Lithiu m-Ion Smart Bat tery
Normal Weight 0.99lb (450g)
Nominal open circuit voltage 11.1 VDC
Capacity, typical 5100 mAhr, 56.6whr
Charging time, approximate, with
3.0 hr
computer turned off , typical
Charging time, approximate, with
5.0 hr
computer turned on , typical
Average battery life, with no power
3.0 hr
management enabled
Ni-MH Dumb Battery
Normal Weight 1.36 lb (620 g)
Nominal open circuit voltage 12.0 VDC
Capacity, typical 4000 mAhr, 48whr
Charging time, approximate, with
2.0 hr
computer turned off , typical
Charging time, approximate, with
4.0 hr
computer turned on, typical
Average battery life, with no power
2.5 hr
management enabled
100 Specifications
External AC Adapter
Operating voltage 100-240 VA
Line frequency 50/60 Hz
Input current 1.5 -0.8 A
Output current 3.15 A
Output voltage 19.0 VDC
 Loading...