

Page 1

User guide
You’re just minutes from enjoying
the movies you want whenever you want them.
Page 2

ii iii
Page 3

© 2003 Buena Vista DataCasting, Inc. All rights reserved.
MovieBeam, (others TBD) are trademarks and registered trademarks of Buena
Vista DataCasting, Inc. and Samsung.
All other product or brand names as they appear are trademarks or registered
trademarks of their respective holders.
This document may not be copied, reproduced, transmitted, distributed,
transcribed, stored in a retrieval system, modified or translated into any other
language or computer language, or sublicensed, in any form or by any means
- electronic, mechanical, magnetic, optical, chemical, manual or otherwise without the prior written consent of Buena Vista DataCasting, Inc. (BVD)
Unauthorized or improper use of any of the material contained in this
document will result in liability for damages.
Buena Vista DataCasting makes every effort to assure that the material
contained in this manual is correct and up to date. However, products
continually evolve and software is periodically updated. The company shall
not be liable for any errors contained herein or for any damages arising out of,
or related to, this document or the information contained therein, even if the
company has been advised of the possibility of such damages.
This manual is intended for informational purposes only. We reserve the right
to change it without prior notification. Updated manuals are available on the
website.
Revision history:
draft 2 - June 6, 2003
Page 4

Declaration of Conformity
NOTE: any changes or modifications to the MovieBeam receiver not expressly
approved by BVD will void your warranty.
Important Safety Information
To get the most from your movie watching experience, read and follow the
instructions in this guide.
The MovieBeam receiver has no user-serviceable parts. Do not disassemble
the unit, attempt to repair or service it yourself or modify the receiver,
antenna, or remote in any way. Contact with parts inside the receiver may
cause injury or death from electric shock. It can also damage it. If the
MovieBeam receiver, antenna, or remote need service, see Chapter 4.
Avoid damaging the power cord. When disconnecting the power cord, pull
on the plug, not the cord. Keep all cords and cables away from children and
pets. If the power cord is damaged, return it for a replacement.
Keep the MovieBeam receiver dry. Don’t expose it to liquids or moisture or
use it near water.
Attach the MovieBeam receiver and antenna to other entertainment
system components ONLY as shown in this guide or on the website,
www.MovieBeam.com.
iv v
Page 5

Contents
1 Setup
Welcome to the MovieBeam experience! 1-2
Things you can do with the MovieBeam receiver 1-2
Sources of information and support 1-2
Feature updates 1-2
How to use this guide 1-2
What’s in the box 1-3
Positioning the MovieBeam receiver 1-5
Connecting the phone cord 1-6
Connecting to your entertainment system 1-7
Using the S-video cable 1-8
1.TV with only one input. Input is used 1-9
2.TV with several inputs. 1-10
3.Television with several inputs. 1-11
4.TV with coax input. 1-12
5.TV with several inputs.
MovieBeam and other device send
audio through surround sound system. 1-13
6. TV with several inputs. Audio from
other devices is passed through to
surround sound system. 1-14
7. TV with several inputs. Digital audio
cable (S/PDIF) is used to connect to
surround sound system. 1-16
8. Home Theater/AV controller with
multiple inputs. 1-18
2 Setup Details
Connecting the antenna 2-2
Positioning the antenna 2-2
Connecting power 2-3
Electrical precautions 2-3
3 Finishing Setup, Renting
and Watching Movies
Inserting batteries into the remote control 3-2
Remote control - navigation star 3-3
Remote control - buttons 3-4
Remote control - video control buttons 3-5
Getting to know your MovieBeam receiver 3-6
Navigation star 3-7
Turning on the MovieBeam receiver and TV 3-8
Getting around the screens 3-9
Phone setup 3-10
Antenna setup 3-11
Can’t wait to watch a movie? 3-14
Main menu 3-14
New releases 3-15
Movie page 3-16
Find movies 3-17
My current rentals 3-18
Watching movies 3-19
Closed captioning 3-19
Settings 3-19
Parental controls 3-20
Set/Change passcode 3-21
Rating lock 3-24
Spending limits 3-25
Sound effects volume 3-26
Wide screen/full screen 3-27
Phone setup 3-28
Pulse or tone 3-28
Dialing prefix 3-29
Phone service center 3-30
Help and account info 3-31
Account information 3-31
Rental history 3-32
Alert 3-33
4 Maintenance, Troubleshooting
and Endnotes
Maintaining your MovieBeam receiver 4-2
Troubleshooting 4-2
Account info 4-8
How to get more
www.MovieBeam.com 4-9
information
4-9
Page 6

vi
Page 7

Setup 1
This chapter describes what’s in
the shipping box and shows you
how to connect the MovieBeam
receiver to the antenna, phone
line, and your entertainment
system.
Basic Setup 1-1
Welcome to the MovieBeam experience! 1-2
Things you can do with the
MovieBeam receiver 1-2
Sources of information and support 1-2
Feature updates 1-2
How to use this guide 1-2
What’s in the box 1-3
Cables 1-4
Positioning the MovieBeam receiver 1-5
Connecting the phone cord 1-6
Connecting to your entertainment system 1-7
Using the S-video cable 1-8
1. TV with only one input. Input is used 1-9
2. TV with several inputs. 1-10
3. Television with several inputs. 1-11
4. TV with coax input. 1-12
5. TV with several inputs.
MovieBeam and other device send
audio through surround sound system. 1-13
6. TV with several inputs. Audio from
other devices is passed through to
surround sound system. 1-14
7. TV with several inputs. Digital audio
cable (S/PDIF) is used to connect to
surround sound system. 1-16
8. Home Theater/AV controller with
multiple inputs. In input is available. 1-18
Setup 1-1
Page 8

Welcome to the MovieBeam experience!
You are about to experience a new way to watch movies. With the MovieBeam receiver, you can
watch what you want, when you want. Because movies are beamed right to your home, you’ll have
no more trips to the video rental store and no more late fees.
Basic Setup 1-2
Things you can do with the MovieBeam receiver
The MovieBeam receiver comes with up to 100 movies already loaded onto it - new Hollywood
blockbusters and classic video favorites. Every week, you’ll receive ten to twelve new movies at
about the same time they arrive in video stores. Movies are available whenever you’re ready to
watch them. You can watch full-length studio trailers for all 100 movies, then search by title, actor,
director, and genre. As you watch a film, you can pause, fast forward, and rewind in the same way
you would a DVD or VCR. You can watch a movie as often as you want during the 24-hour rental
period. You can also set parental controls such as spending limits and viewing limits.
Sources of information and support
If you have any questions we haven’t covered in this manual, please visit us at
www.MovieBeam.com.
Feature updates
Occasionally, new features are added. We broadcast software updates in the same way we
broadcast movies, over the air. When this happens, your MovieBeam receiver will automatically
reboot so that the changes can take effect. If the update occurs while you’re watching a movie,
you can delay the update until you’re done.
How to use this guide
Use this guide as you install and learn to use your MovieBeam receiver. It contains detailed
instructions that go beyond the quick setup card and provides more information about features
than what may be available onscreen.
Setup 1-2
Page 9
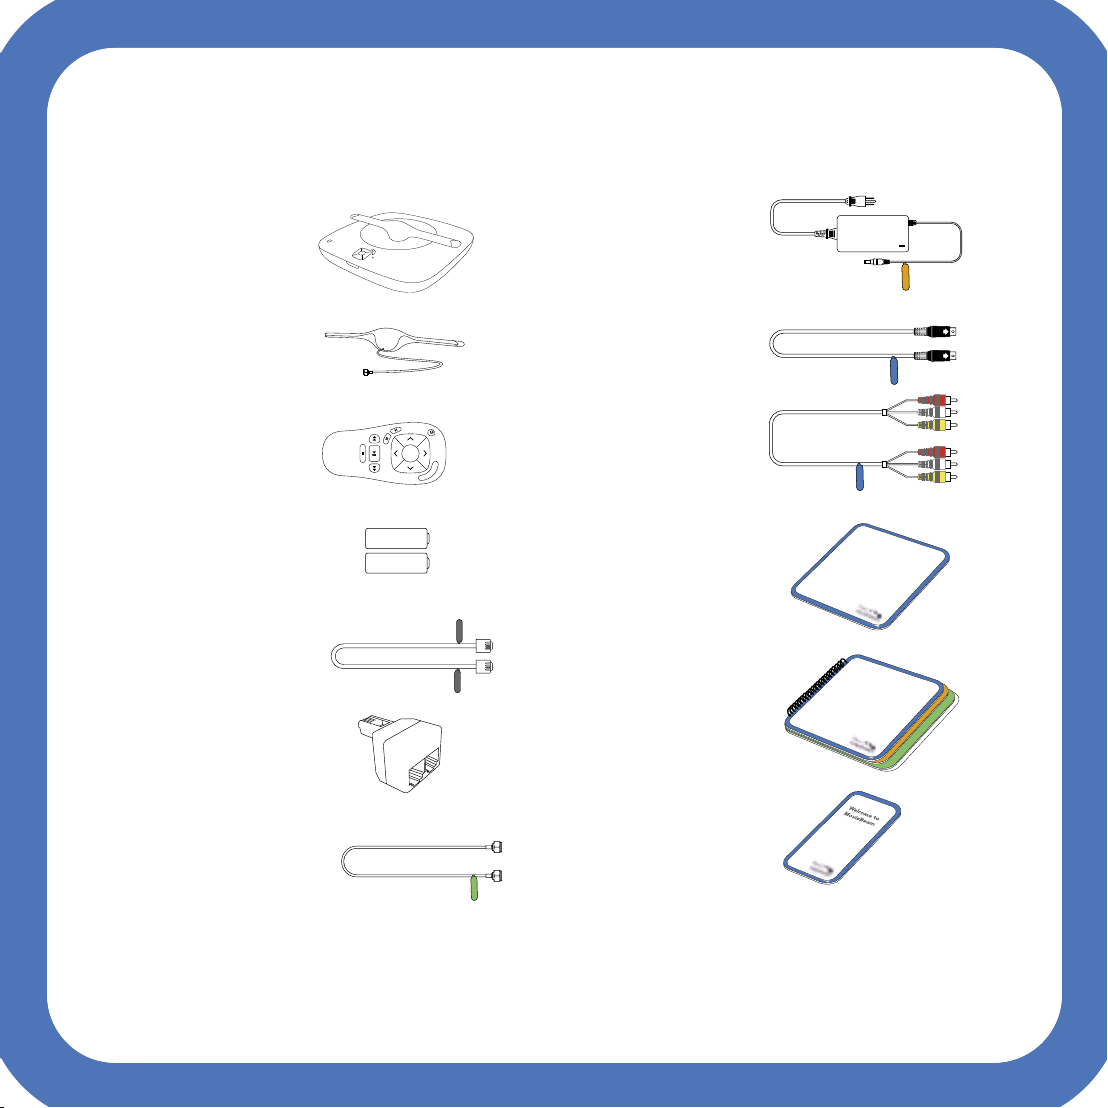
What’s in the box
select
m
e
n
u
Q
ui
ck
s
t
a
r
t
Y
o
u
a
r
e
s
te
p
s
f
r
o
m
w
a
t
c
h
i
n
g
y
o
u
r
f
irst
m
o
vie
.
Y
o
u
'
r
e
j
u
s
t
m
i
n
u
t
e
s
f
r
o
m
en
j
o
y
i
n
g
th
e
m
o
v
i
e
s
yo
u
w
a
n
t
w
h
e
n
e
v
e
r
y
o
u
w
ant
th
e
m
.
Use
r
g
u
id
e
Basic Setup 1-3
MovieBeam
Antenna
Remote
Two AA Batteries
Phone Cord
Phone Line Splitter
Power Cord
S-Video Cable
A/V Cable
Quick Start Guide
User Guide
Welcome Pamphlet
Antenna Extension Cord
If any of these items are missing or damaged, contact Customer Care at 1-866-865-1500.
Be sure to save the box and packing material in case you need to ship the receiver.
Setup will take just a few minutes and no tools are needed.
Setup 1-3
Page 10
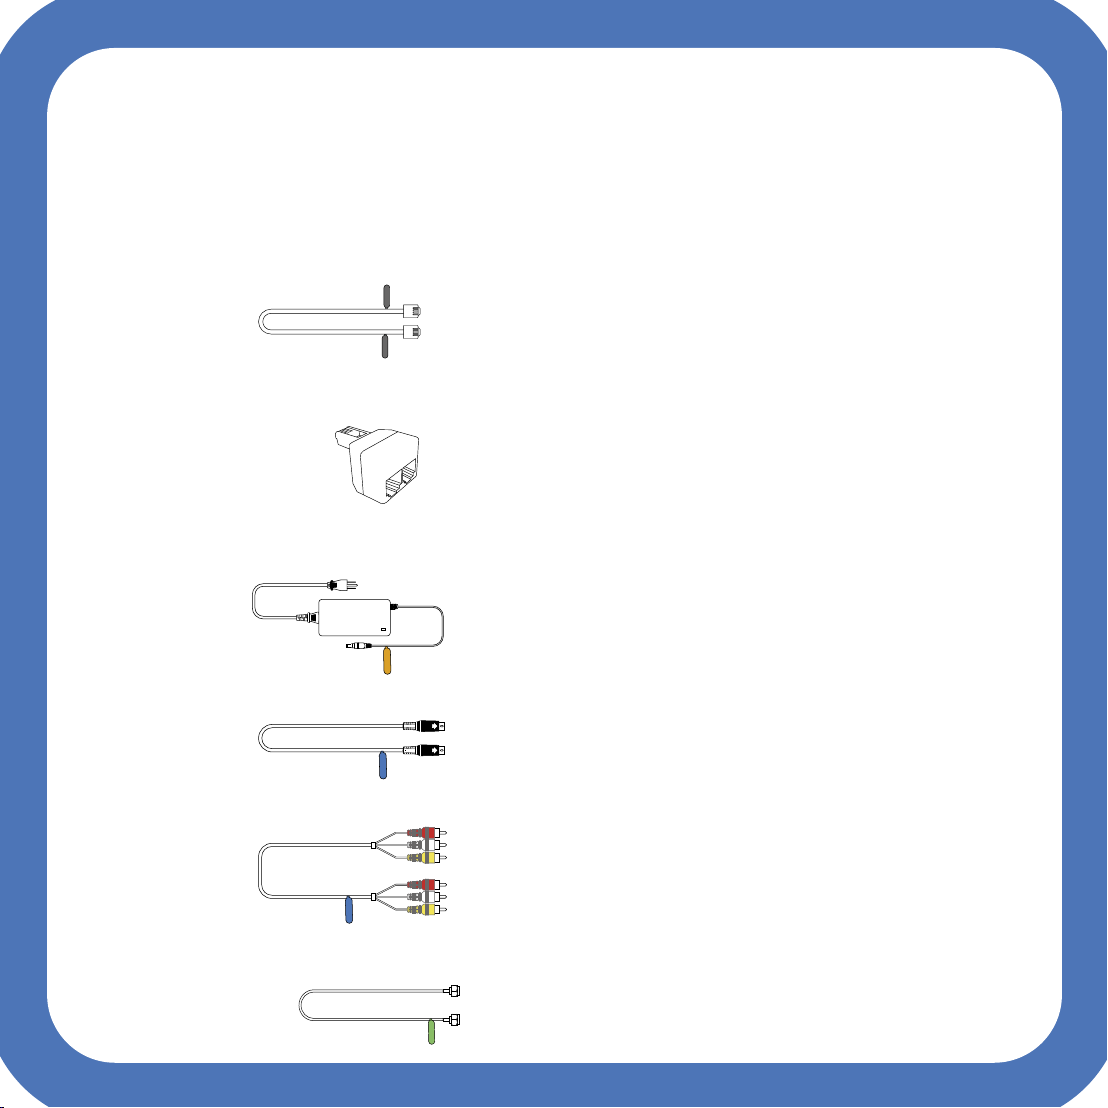
Cables
Basic Setup 1-4
Cords and cables included in the package are described below. Each cable is color-coded to
match connectors on the back of the MovieBeam receiver. All you have to do is match the colors
of the cables and connectors. The tags on the cables also tell you where to plug them in.
Phone Cord
the receiver.
Phone Line Splitter Lets the MovieBeam receiver share a phone line with your
telephone.
Power Cord Connects power to the MovieBeam receiver.
S-Video Cable
plug in the yellow connectors on the A/V cable.
A/V Cable
for audio.
Connects a phone wall jack to the phone jack on
Provides the video signal. When you use this cable, don’t
Provides three connectors: yellow for video, white and red
Optional Antenna
Extension Cord from the MovieBeam receiver for better reception.
Use this only if you need to place the antenna farther
Setup 1-4
Page 11

Positioning the MovieBeam receiver
Place the MovieBeam receiver with the other components in your entertainment system. Don’t put
anything on top of your receiver other than the antenna!
Important! To reduce the risk of fire or electric shock, do not expose the MovieBeam receiver to
moisture.
Basic Setup 1-5
Alternate positions
Setup 1-5
Page 12
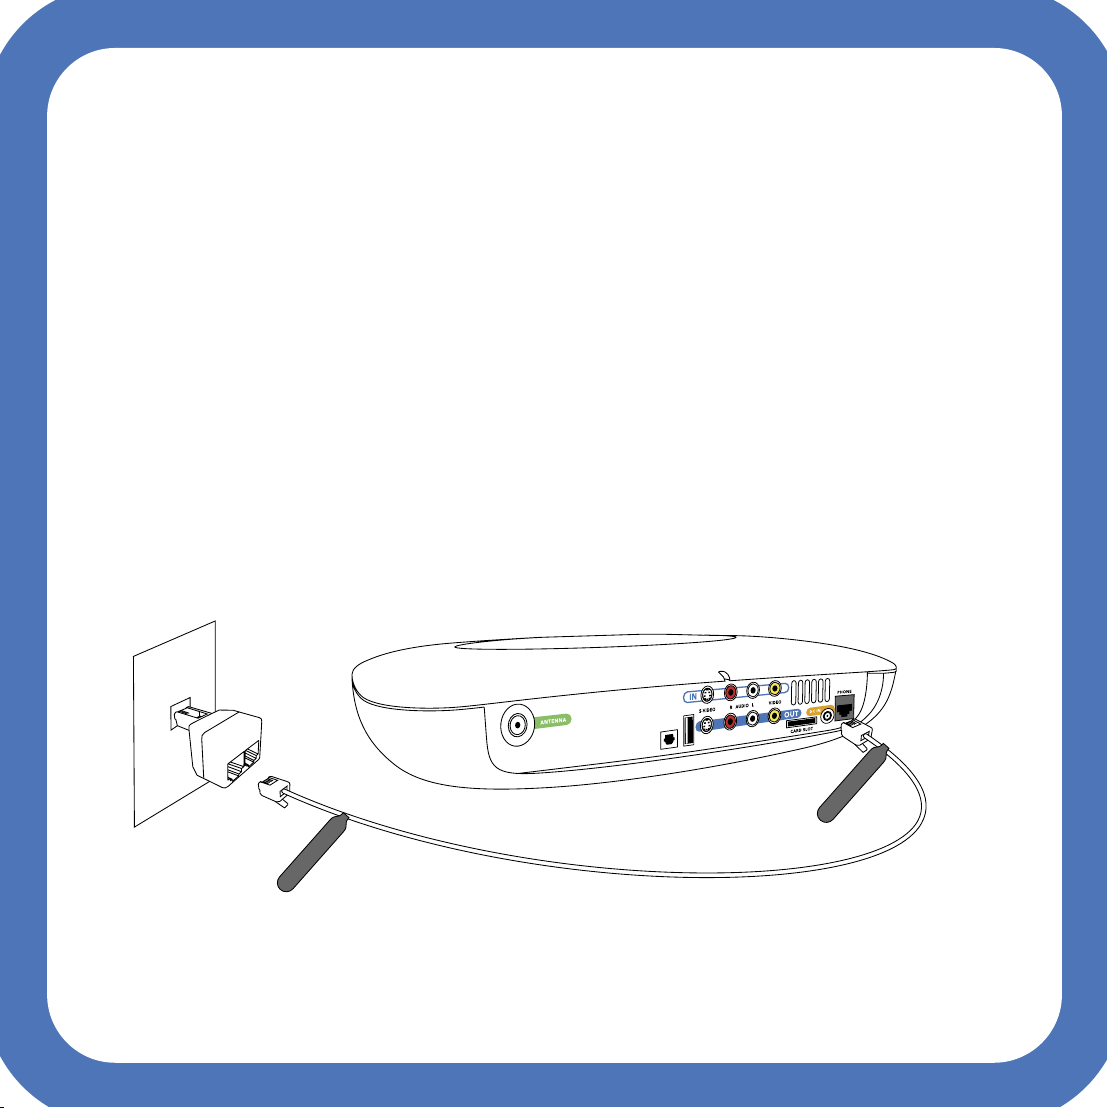
Connecting the phone cord
Basic Setup 1-6
You need to connect a phone line to the MovieBeam receiver so that it can communicate with
MovieBeam services, about once every two weeks or as needed. For better service, it’s best to
keep the phone line plugged in at all times. If there is no phone jack near your TV set, you can
connect the phone line once every two weeks, or you might consider using a wireless phone jack,
which converts an electrical outlet into a phone jack. We don’t provide you with this device but
you can get it at the same retailers that carry the MovieBeam receiver.
Connect one end of the phone cord to the phone jack on the back of the MovieBeam receiver.
Connect the other end to a phone wall jack. If the wall jack is being used, plug the phone line
splitter into the wall jack, then connect both phone lines into it. The phone line splitter will not
interfere with your phone. Your phone line will not be tied up because movies are not sent via the
phone line.
B
S
U
F
I
D
P
/
S
O
PH
NE�CORD-
ovieBeam
M
Setup 1-6
ONE�CORD-
PH
ovieBeam
M
Page 13

Connecting to your entertainment system
Connect the MovieBeam receiver directly to your television. Check the back of the television to
determine the types of connectors (inputs) available.
The pages which follow show various ways to connect the MovieBeam receiver to your television,
depending on the type of connectors on your television and other devices which may be attached.
Simple Systems
1. Television with one input; input is used.
2. Television with several inputs; an input is available.
Advanced Systems
3. Television with several inputs; all inputs are used.
4. Television with no A/V input. RF modulator needed.
5. Television with several inputs; input is available; the MovieBeam receiver and other
device send audio through surround sound.
6. Television with several inputs; all inputs are used. Other device passed
through the MovieBeam receiver to surround sound.
Basic Setup 1-7
7. Television with several inputs; input is available. Digital audio (S/PDIF)
used.
8. Home theater/AV controller with multiple inputs; input is available.
For some of the advanced systems, you may need to purchase one or more of the following types
of cables: digital audio cable (S/PDIF), extra AV composite cable, extra S-video cable. Although
these are not included with the MovieBeam receiver , they are available at most electronics
retailers.
Setup 1-7
Page 14
Using the S-video cable
When your entertainment system has an S-Video input, you can substitute the S-video cable for
the yellow connector of the A/V cable to achieve better quality images. However, you still need to
connect the Audio Left and Audio Right connectors of the A/V cable in order to transmit sound.
On the pages which follow, only the A/V video cable is shown.
Basic Setup 1-8
Using the A/V cable
Using the S-video and A/V cables
Setup 1-8
Page 15

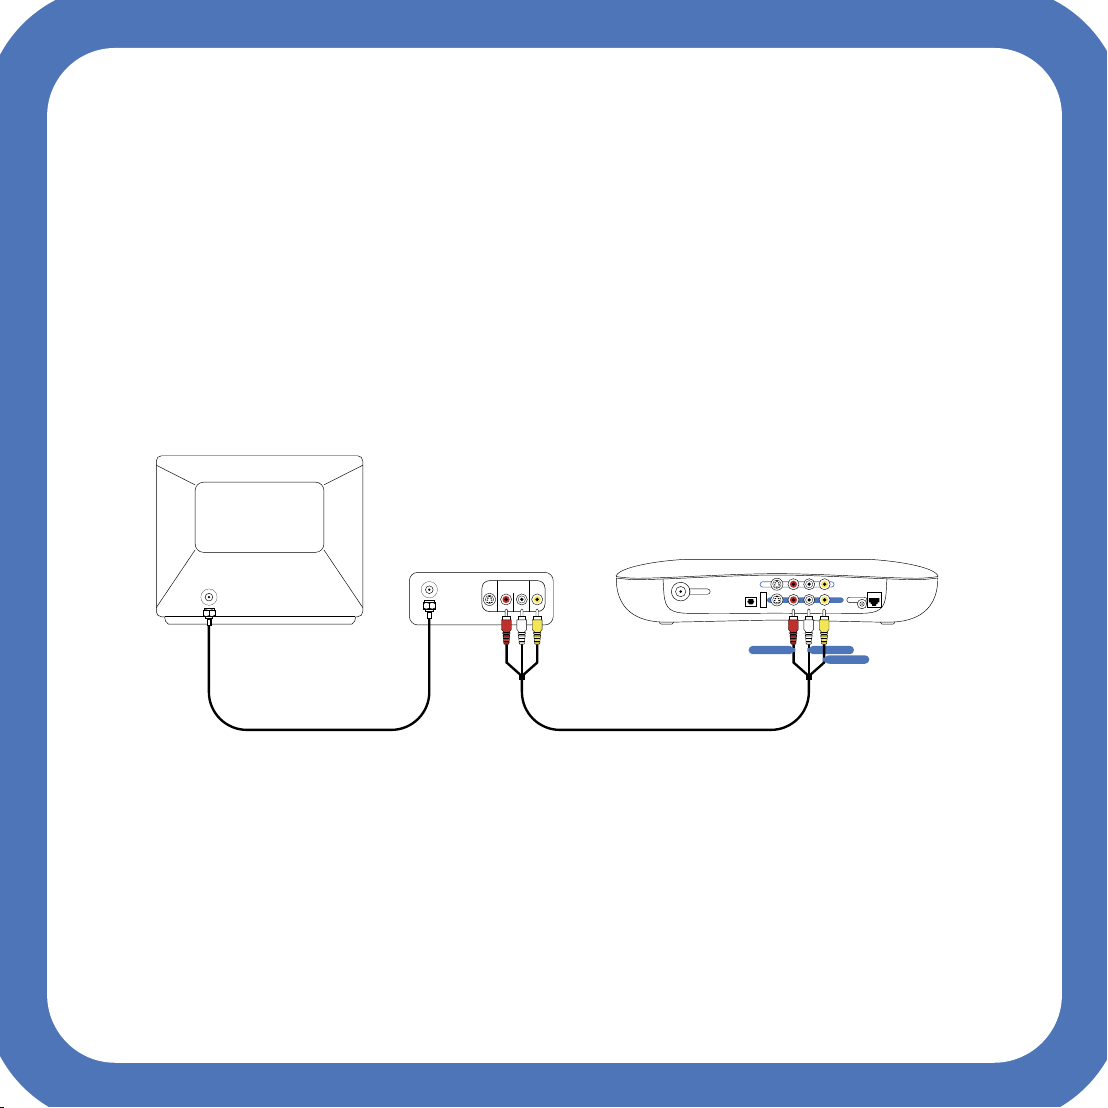
1. TV with only one input. Input is used.
OUT
IN
TV
MovieBeam
receiver
R AUDIO LS-VIDEO
Input #1
VIDEO
DVD/VCR
or other device
If a device, such as a DVD player or VCR is connected to your TV:
Basic Setup 1-9
1 Unplug the device from the TV and plug it into the appropriate connectors marked IN on your
MovieBeam receiver.
2. Connect the A/V (and S-video) cables from the MovieBeam receiver’s “OUT” connectors to the
TV’s “IN” connectors as shown below. (Using the S-video cable is recommended.)
Setup 1-9
Page 16
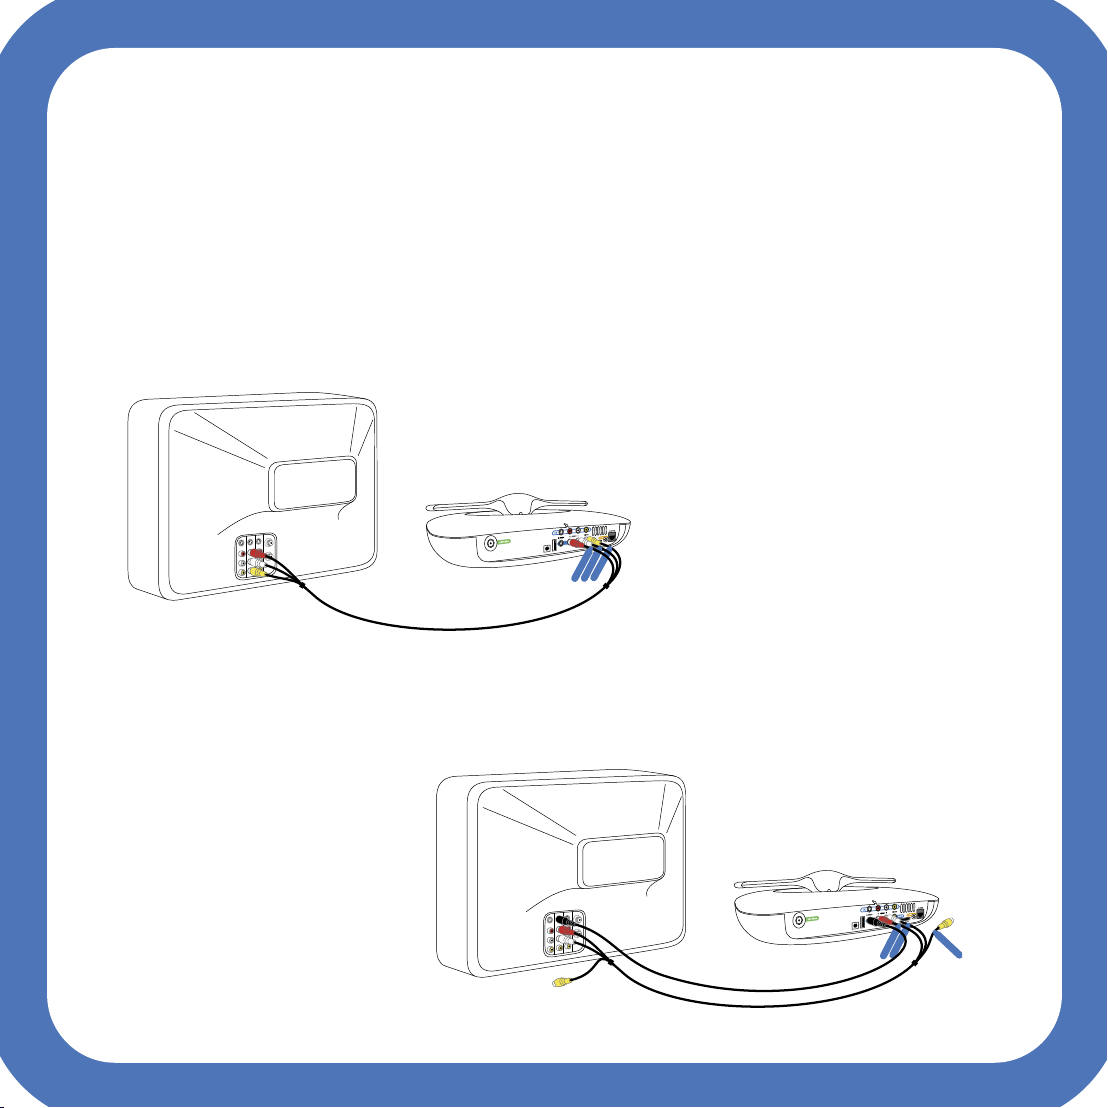
2. TV with several inputs. An input is available.
OUT
IN
TV
R AUDIO LS-VIDEO
Input #2
Input #1
VIDEO
DVD/VCR
or other device
MovieBeam receiver
Basic Setup 1-10
If your TV has more than one set of inputs and a device, such as a DVD player or VCR is connected
to your TV and another set of inputs is available:
1 Plug the A/V (and S-video) cables into the MovieBeam receiver and TV as shown below. (Using
the S-video cable is recommended.) You don’t need to change any other connections.
The remaining connection scenarios are for more complex home entertainment systems; you
probably don’t need to refer to them.
Setup 1-10
Page 17

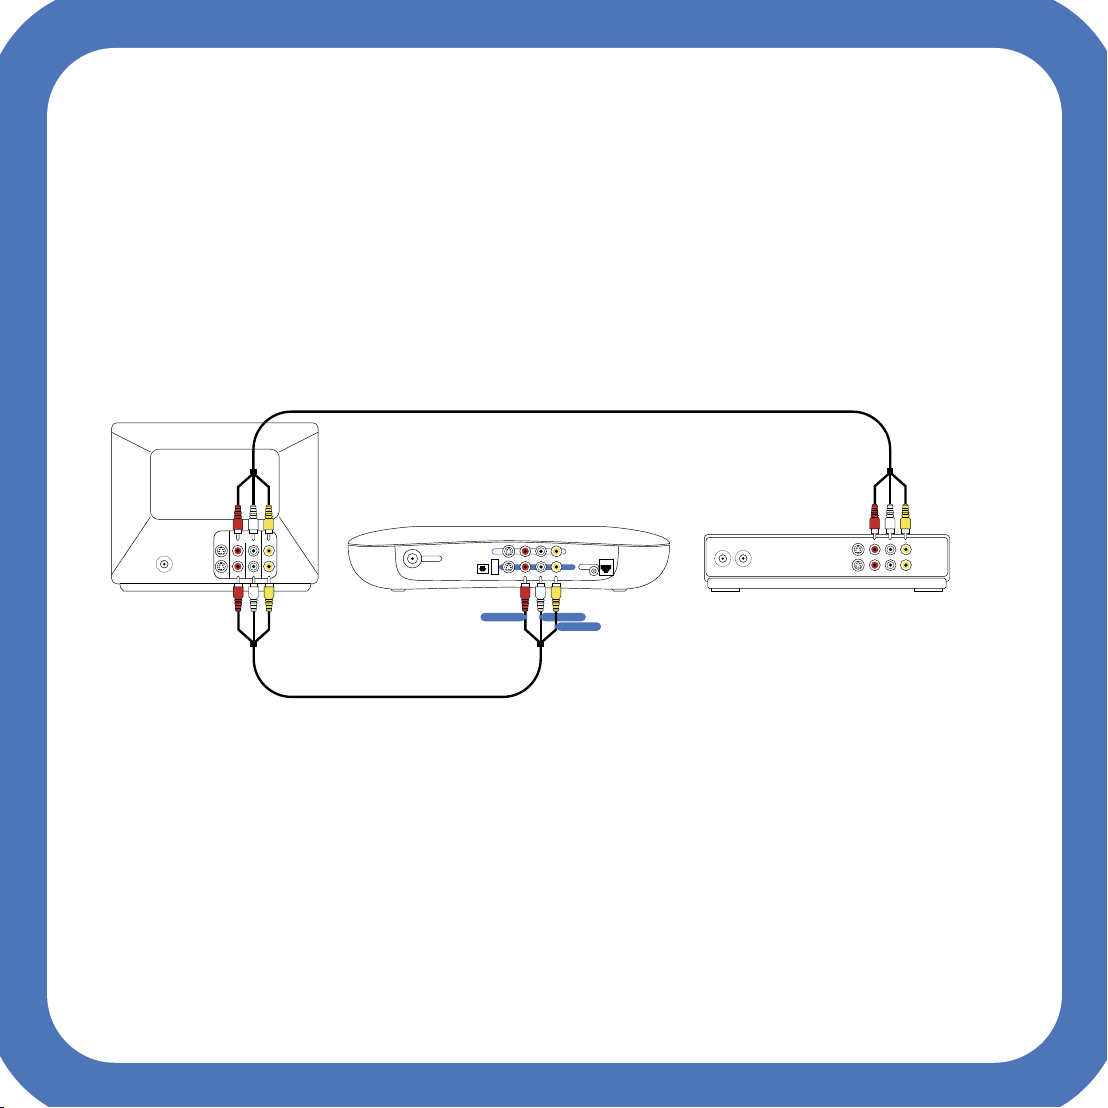
3. Television with several inputs. All inputs are used.
DVD
or other device
OUT
IN
TV
R AUDIO LS-VIDEO
Input #2
Input #1
VIDEO
VCR
or other device
MovieBeam
receiver
Basic Setup 1-11
If your TV has more than one set of inputs and they are all used:
1. Unplug one device from the TV and plug it into the appropriate connectors marked IN on your
MovieBeam receiver. The other end should be plugged into the connectors marked OUT on
the device.
2. Connect the A/V (and S-video cables) from the MovieBeam receiver’s “OUT” connectors to the
TV’s “IN” connectors as shown below. (Using the S-video cable is recommended.)
Setup 1-11
Page 18
4. TV with coax input.
OUT
IN
TV
RF Modulator
R AUDIO LS-VIDEO
COAX
COAX
VIDEO
MovieBeam
receiver
If you have an older TV which has only a coax connector, you will need to purchase an RF
Basic Setup 1-12
modulator and coax cable to supply the S-vIdeo and A/V connections. RF modulators are available
at most electronics retailers. Connect it as shown below.
1. Connect the coax cable between the TV and the RF modulator.
2. Plug the A/V (and S-video) cables into the MovieBeam receiver and RF modulator as shown
below. (Using the S-video cable is recommended.)
Setup 1-12
Page 19
5. TV with several inputs. An input is available. MovieBeam
S/PDIF
S/PDIF
DVD or other
S/PDIF device
OUT
IN
TV
Surround
sound
R AUDIO LS-VIDEO
Input #2
Input #1
VIDEO
MovieBeam
receiver
and other device send audio through surround sound system.
Basic Setup 1-13
When you are using a surround sound system, audio outputs are connected to the surround sound
system instead of to the TV. You will need to purchase an additional composite video cable or use
the S-video cable.
1. Unplug one device from the TV and plug it into the appropriate connectors marked IN on your
MovieBeam receiver. The other end should be plugged into the connectors marked OUT on
the device.
2. Connect the A/V (and S-video cables) from the MovieBeam receiver’s “OUT” connectors to the
TV’s “IN” connectors as shown below. (Using the S-video cable is recommended.)
Setup 1-13
Page 20

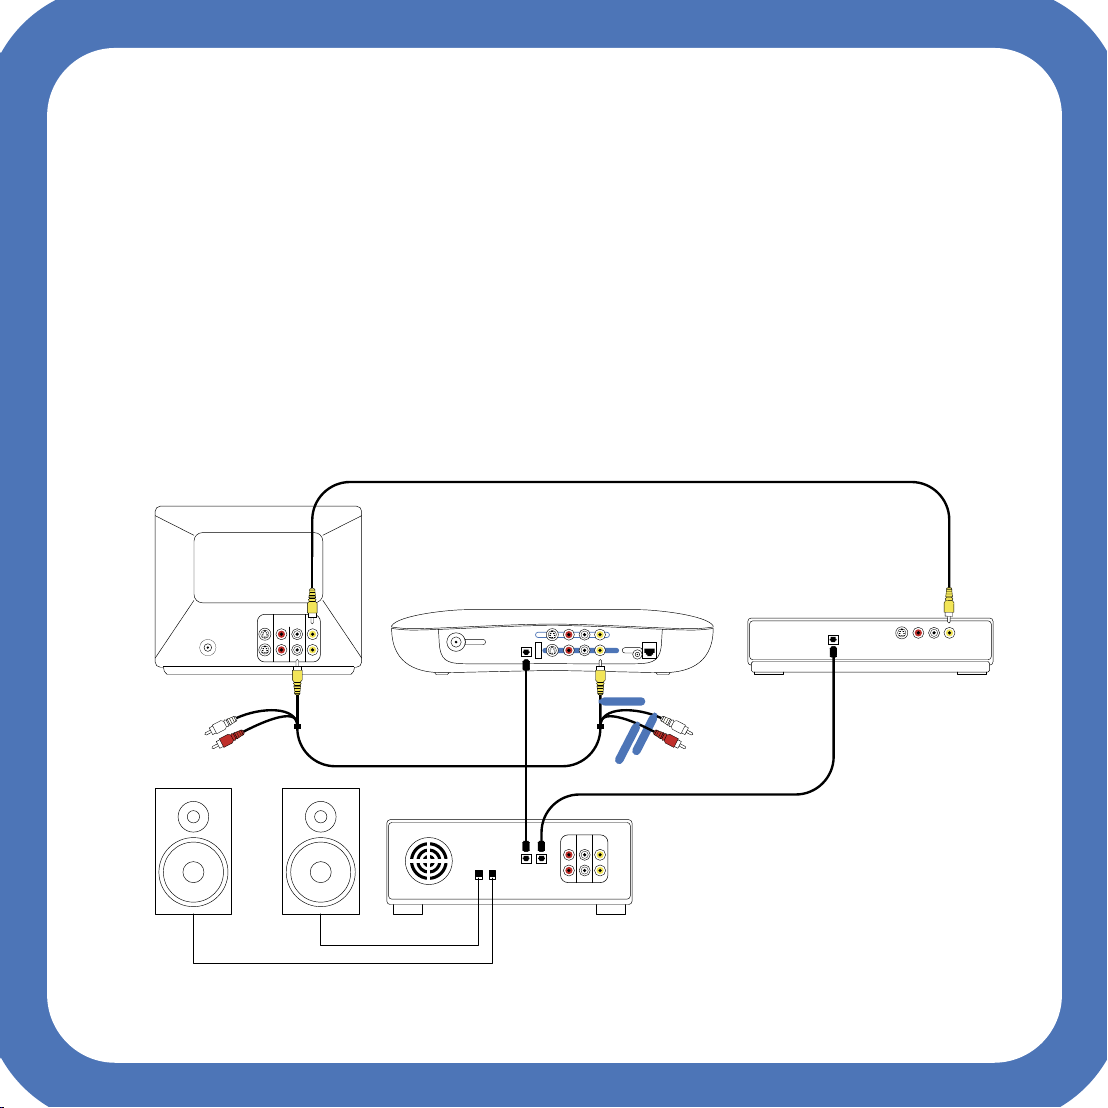
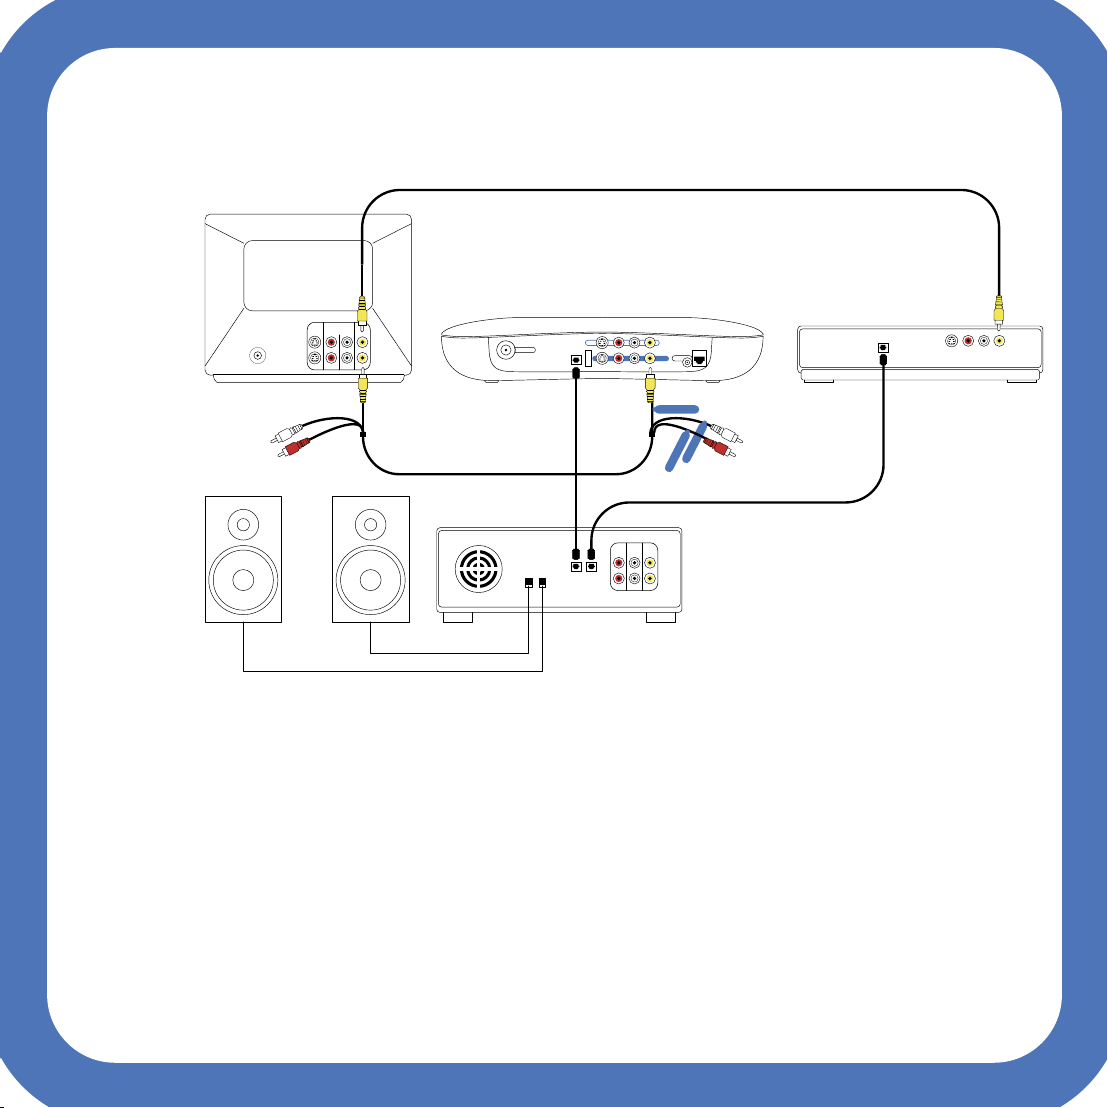
6. TV with several inputs. All inputs are used. Audio from the
Basic Setup 1-14
other devices such as DVDs or VCRs is passed through the MovieBeam receiver to surround sound system.
When the surround sound has only two audio inputs, you can pass the audio signal through the
MovieBeam receiver as shown below. You will need the following cables:
- A/V cable (provided with the receiver)
- Two video cables (one yellow connector on each end)*
- Two audio cables (red and white connector on each end)*
*cables not included with the MovieBeam receiver.
1. Connect one end of the A/V cable to the MovieBeam receiver IN connectors. Plug the other
end into the OUT connectors on the VCR or other device.
2. Connect the red and white A/V connectors to the MovieBeam receiver audio OUT connectors.
Plug the other end into the surround sound audio IN connectors.*
3. Connect the red and white A/V connectors to the surround sound audio IN connectors. Plug
the other end into the DVD (or other device) audio OUT connectors.*
4. Connect the yellow connector* to the MovieBeam receiver video OUT connector and the
other yellow connector to the video IN connector on the TV.
5. Connect the yellow connector* to the TV video IN connector and the other yellow connector
to the video OUT connector on the DVD or other device.
Setup 1-14
Page 21
DVD
or other device
OUT
IN
TV
R AUDIO LS-VIDEO
Input #2
Input #1
VIDEO
VCR
or other device
Input #1
Input #2
Surround
Sound
DVD
or other device
OUT
IN
TV
R AUDIO LS-VIDEO
Input #2
Input #1
VIDEO
VCR
or other device
Input #1
Input #2
Surround
sound
MovieBeam
receiver
Basic Setup 1-15
Setup 1-15
Page 22

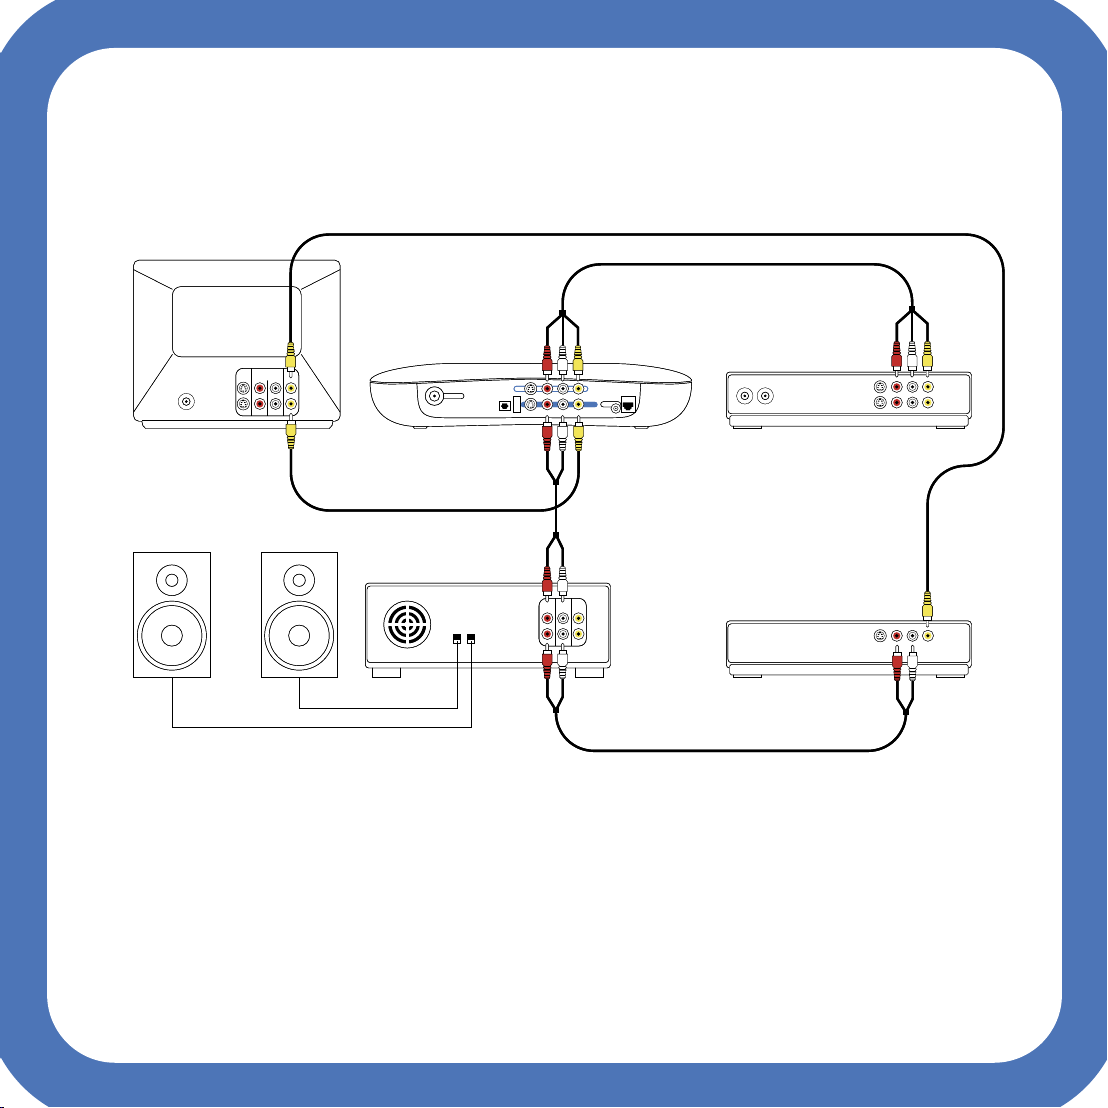
7. TV with several inputs. An input is available. Digital audio
cable (S/PDIF) is used to connect to surround sound system.
When the surround sound has S/PDIF connectors, you can pass the audio signal through the
MovieBeam receiver as shown below. You will need the following cables:
- A/V cable (provided with the receiver)
- Two S/PDIF cables*
*cables not included with the MovieBeam receiver.
1. Connect the yellow connector of the A/V cable to the MovieBeam receiver video OUT
connector. Plug the other end into the video IN connector on the TV. Do not use the red and
white connectors.
2. Connect one end of the S/PDIF to the one of the S/PDIF connectors on the surround sound
system. Plug the other end into the S/PDIF connector on the DVD (or other device).*
Basic Setup 1-16
Setup 1-16
Page 23
S/PDIF
S/PDIF
DVD or other
S/PDIF device
OUT
IN
TV
Surround
sound
R AUDIO LS-VIDEO
Input #2
Input #1
VIDEO
MovieBeam
receiver
Basic Setup 1-17
Setup 1-17
Page 24

8. Home theater/AV controller with multiple inputs.
Basic Setup 1-18
An input is available.
When a home theater/AV controller has multiple inputs, you can directly connect the MovieBeam
receiver to any of the available inputs (regardless of whether they are labeled DVD, VCR, and son
on) the home theater/AV controller as shown below. Do not connect to the component video
connectors (labelled R, G, B).
Remember, you can substitute the S-video cable for the yellow connector on the A/V cable for
better picture quality. Details are on page 8.
You will need the following additional cables:
- Three A/V cables
*cables not included with the MovieBeam receiver.
1. Connect the A/V cable to the MovieBeam receiver OUT connectors. Plug the other end into
the IN connectors on the home theater A/V controller.
2. Connect the second A/V cable to the home theater A/V controller OUT connectors. Plug the
other end into the IN connectors on the TV.*
3. Connect the third A/V cable to the home theater A/V controller IN connectors. Plug the other
end into the OUT connectors on the VCR or other device.*
4. Connect the fourth A/V cable to the home theater A/V controller IN connectors. Plug the other
end into the OUT connectors on the DVD or other device.*
Setup 1-18
Page 25

Home Theater
A/V Controller
OUT
IN
MovieBeam
receiver
DVD
or other device
TV
R AUDIO LS-VIDEO
Input #2
Input #1
VIDEO
Input #3
Input #2
Input #1
Output
VCR
or other device
Basic Setup 1-19
Setup 1-19
Page 26

Basic Setup 1-20
Setup 1-20
Page 27

Setup Details 2
This chapter shows you how to connect
and position the antenna and connect
power to the MovieBeam receiver.
Connecting the antenna 2-2
Positioning the antenna 2-2
Connecting power 2-3
Electrical precautions 2-3
Setup Details 2-1
Page 28

Connecting the antenna
Connect one end of the antenna cable to the antenna. Connect the other end into the
antenna connector on the back of the MovieBeam receiver labeled “Antenna”. This
connector pushes on; twist it until it is snug.
Positioning the antenna
Place the antenna on top of the MovieBeam receiver. You may need to reposition it later.
Setup Details 2-2
Page 29

Connecting power
Plug the power cord into a wall outlet and the other end into the MovieBeam receiver’s power
connector. You should always keep the receiver plugged in so it can receive movies. If the
MovieBeam receiver is connected to a power outlet controlled by a wall switch, be sure the
switch remains in the “on” position. If power is connected via a power strip, do not turn the
power strip off.
Electrical precautions
Place the power cord where it will not be walked on and where it is not accessible to children
or pets. When disconnecting the power cord, pull on the pug, not the cord.
Setup Details 2-3
Page 30

Setup Details 2-4
Page 31

Finishing Setup, Renting 3
and Watching Movies
This chapter shows you how to complete
setup and tells you about the lights and
buttons on your MovieBeam receiver and
the remote control. It includes the steps
to rent a movie, watch trailers, and search
for movies. It also tells you how to set a
parental control passcode, and set rating
and spending limits.
Inserting batteries into the remote control 3-2
Remote control - navigation star 3-3
Remote control - buttons 3-4
Remote control - video control buttons 3-5
Getting to know your MovieBeam receiver 3-6
Navigation star 3-7
Turning on the MovieBeam receiver and TV 3-8
Getting around the screens 3-9
Phone setup 3-10
Antenna setup 3-11
Can’t wait to watch a movie? 3-14
Main menu 3-14
New releases 3-15
Movie page 3-16
Find movies 3-17
My current rentals 3-18
Watching movies 3-19
Closed captioning 3-19
Settings 3-19
Parental controls 3-20
Set/Change passcode 3-21
Rating lock 3-24
Spending limits 3-25
Sound effects volume 3-26
Wide screen/full screen 3-27
Phone setup 3-28
Pulse or tone 3-28
Dialing prefix 3-29
Phone service center 3-30
Help and account info 3-31
Account information 3-31
Rental history 3-32
Alert 3-33
Finishing Setup, Renting and Watching Movies 3-1
Page 32

Inserting batteries into the remote control
Remove the battery cover from the back of the remote.
Two AA batteries are in the box. Match the + and – marks on the batteries to the + and – marks in
the battery case, then insert the batteries into the remote. Close the case.
1
2
3
Finishing Setup, Renting and Watching Movies 3-2
Page 33

select
m
e
nu
Remote control - navigation star
1. Left
Press to move the highlight left one increment.
When you are watching full screen video, this
also acts as a skip back.
2. Select
Press to select whatever is highlighted. When
you are watching full screen video, pressing this
button pauses the movie and returns to the last
control screen. Pressing this button when a
screen saver is displayed returns you to the last
thing you were viewing; either a menu or movie.
3. Up
Press to move the highlight up one increment
or to go to the next screen. Press and hold for
fast scrolling up through lists.
4. Right
Press to move the highlight right one increment or
to go to the next screen. When you are
watching full screen video, this also acts as a
skip forward.
5. Down
Press to move the highlight down one increment.
Press and hold for fast scrolling down through
lists.
2
1
3
4
5
Finishing Setup, Renting and Watching Movies 3-3
Page 34

Remote control - buttons
select
m
e
n
u
1. Power button
This is the power button.
2. Page Up
In a list, pressing this button moves the
highlight up an entire screen of information.
On a movie page, pressing this button takes
you to the previous movie page in the
currently selected category. In full screen
playback mode, it acts like a next chapter
button. In full screen pause mode, it acts
like a frame advance button.
1
4
3. Page Down
In a list, moves highlight down an entire screen
of information. On a movie page, goes to
the next movie page in the currently selected
category. In full screen playback mode, acts like
a previous chapter button. In full screen pause
mode, acts like a frame back button.
4. Main Menu
Pressing this button displays the main menu.
2
3
Finishing Setup, Renting and Watching Movies 3-4
Page 35

select
m
e
n
u
Remote control video control buttons
1. Stop (back)
Stops playback of a full screen movie or full
screen trailer and returns to last menu. If movie
or trailer is playing, pressing Stop pauses
playback. In a menu, pressing Stop displays the
previous screen. In Passcode screens, pressing
stop cancels the screen.
2. Fast Reverse
You can fast reverse at two speeds: press once to
reverse; press twice to reverse at a faster speed.
In the passcode entry screens, press this button
to clear and return to the previous passcode
digit.
3. Pause/Play (toggle)
Press once to pause playback of a movie.
Press twice to resume play of a movie
or video. Pressing Pause and FFW at the
same time creates a slow motion effect.
Pressing Pause followed by Page Up or
Page Down moves one screen forward or
backward.
2
1
3
4
4. Fast Forward
You can fast forward at two speeds: press
once for fast speed; press twice for faster
Pressing Pause and FFW at the same time
creates a forward slow motion effect.
Pressing again creates the next slow motion
rate.
Finishing Setup, Renting and Watching Movies 3-5
Page 36

Getting to know your MovieBeam receiver
Generally, you’ll operate the MovieBeam receiver using your remote control. However, buttons on
the receiver let you rent and watch movies just as you would with a remote control. Here’s where
they are and what they do:
1
2
3
4
1. Standby LED
Blinks when the remote control or front panel button is pressed. This is also the power button.
It is green when the receiver is sending video to your TV and orange when it is in
standby mode. It blinks when a button is pressed.
2. Main menu button
Pressing it will always bring you to the main menu. In standby mode, pressing this button turns
on the box.
3. Navigation star (see next page)
4. Antenna LED
The antenna LED is normally off. It turns red when the antenna needs adjustment.
Finishing Setup, Renting and Watching Movies 3-6
Page 37

Navigation star
select
m
e
n
u
3
2
4
1
5
6
1. Left
Press to move the highlight left one increment. When you are watching full screen video, this
also acts as a skip back.
2. Select
Press to select whatever is highlighted. When you are watching full screen video, pressing this
button pauses the movie and returns to the last control screen. Pressing this button when
a screen saver is displayed returns you to the last thing you were viewing; either a menu or
movie.
3. Up
Press to move the highlight up one increment or to go to the next screen. Press and hold for
fast scrolling up through lists.
4. Main Menu
Pressing this button displays the main menu.
5. Right
Press to move the highlight right one increment or to go to the next screen. When you are
watching full screen video, this also acts as a skip forward.
6. Down
Press to move the highlight down one increment. Press and hold for fast scrolling down
through lists.
Finishing Setup, Renting and Watching Movies 3-7
Page 38

Turning on the MovieBeam receiver and your TV
The first time you plug in your MovieBeam receiver, you may hear the disk drive make some
sounds as it boots up. A welcome screen will display with further instructions. The welcome screen
may display for as long as 5 minutes.
Your MovieBeam receiver is always powered “on.” When it is in standby mode and not sending
video to your TV, the LED will be orange. You will know that the receiver is sending video to your
TV if the green LED is on.
If you are not getting images on your TV, find either the “Input” or “TV/VCR” button your
TV’s remote control. Keep pressing it until it you select the right input and the welcome page
shows on your TV screen.
An animated sequence will guide you through the rest of the setup. Follow the prompts to set up
dialing, adjust the antenna, learn about the MovieBeam receiver’s features and rent a movie.
Finishing Setup, Renting and Watching Movies 3-8
Page 39

Getting around the screens
select
m
e
n
u
For the guided setup and to use all of the MovieBeam receiver’s features, use the buttons on
the navigation star on your remote control or on MovieBeam receiver’s front panel. Press the
up, down, left or right buttons to move the highlight on the screen. When the item you want is
highlighted, press the Select button in the center of the navigation star.
Finishing Setup, Renting and Watching Movies 3-9
Page 40

Phone setup
Part of the setup process involves the receiver checking the phone line and calling in to activate.
If the call is successful, it will begin playing the MovieBeam receiver’s features movie while the
phone call is in progress. This can take up to 5 minutes.
When the call is complete, continue to the antenna adjustment step.
If the call is unsuccessful, you will be prompted to enter dialing parameters. Use the navigation
star buttons on the remote or on the MovieBeam receiver to respond to the prompts. If the phone
call is unsuccessful, call MovieBeam Customer Service (1-866-865-1500) for further instructions.
When the MovieBeam receiver has successfully called in, you will be instructed on how to position
the antenna.
Finishing Setup, Renting and Watching Movies 3-10
Page 41

Antenna setup
The MovieBeam receiver checks the antenna signal. If the signal is good, you can go on to the
next step. If the signal needs improvement, the MovieBeam receiver will prompt you to move the
antenna until the bar on the screen extends past “good”.
If the bar is showing green on the ends, you are getting adequate signal. If not, try orienting the
antenna in several directions and positions. The length of the bar will indicate signal strength.
Reposition the antenna until the bar is at maximum length and the ends show green.
Finishing Setup, Renting and Watching Movies 3-11
Page 42

Hints:
The higher up you place your antenna, the more likely you are to improve your reception.
If necessary, attach the antenna extension cable to give yourself more placement options.
Position the antenna closer to a window.
Finishing Setup, Renting and Watching Movies 3-12
Page 43

As you move the antenna, audio beeps increase in frequency as the signal gets better and
decrease as the signal gets worse. To improve reception, you may need to extend the ends of the
antenna by sliding them out.
Once the antenna signal is set, the beeping changes to a different steady beeping sound.
If you are experiencing difficulty, highlight More Information on the Antenna Setup screen or refer
to Troubleshooting in Chapter 4.
When the antenna signal is adequate, you can choose to watch a short video that tells you about
the MovieBeam receiver’s features or you can go to the main menu.
When setup is complete, the MovieBeam receiver continuously receives new movies through
the antenna. All you need to do is to make sure the unit is plugged in and that the phone line is
connected. If the antenna is moved or becomes incapable of receiving the signal, the antenna
LED on the MovieBeam receiver will light and an “Antenna Warning” will be displayed. Select the
“Antenna Warning” to display an adjustment screen similar to the antenna setup described above.
Finishing Setup, Renting and Watching Movies 3-13
Page 44

Can’t wait to watch a movie?
Watching a movie is as easy as highlighting one of the featured movies on the main menu and
pressing Select. Once you rent a movie, you can watch it for 24 hours. You can watch it as often as
you want until the 24 hours are up! Movies come and go all the time. To help you prioritize what
to watch first, some of the movies indicate guaranteed availability for a certain period. To continue
with setup, including setting passcodes, rating and spending limits, continue to the section on
Settings on p. 3-19.
Main menu
The main menu shows new releases, lets you find movies to rent, tells you how many movies are
currently rented, and provides access to Settings, Help and Account Info. Any error or warning
messages will also display on the main menu.
Finishing Setup, Renting and Watching Movies 3-14
Page 45

New releases
Seven to 12 movies arrive every week.
To review the new releases:
1. Use the right and left arrow buttons to scroll through the mini-posters of the new releases.
As each poster is highlighted, details about the movie are displayed.
2. Pick a movie by highlighting it and pressing Select. You will be taken to the movie page for
that movie, where you can watch the trailer, get more information about the movie, and rent
it.
Finishing Setup, Renting and Watching Movies 3-15
Page 46

Movie page
The movie page shows complete information about the movie and lets you watch the studio
trailer. For some movies, it also displays the date until which a movie will be available. Not all
movies have “guaranteed until” dates – so if you see a movie without a guaranteed date next to
it, it could be replaced with a new movie at any time.
When you come to a movie page, the movie preview will immediately start playing (if you have
already rented the movie and are still in the 24 hour window, the preview won’t play). Highlight
the trailer window and press Select to watch the trailer full screen. Press the Stop button to stop
the trailer and return to the movie page.
To rent the movie, click on Rent This Movie. If you have set parental controls, you will be
prompted to enter your passcode.
Finishing Setup, Renting and Watching Movies 3-16
Page 47

Find movies
Because so many movies are available, it’s nice to have several ways to decide what to watch. You
can search for movies by the newest ones to arrive, title, genre, rating, actor, and director.
To search for movies:
1. On the main menu, choose Find Movies.
2. In the Find Movies menu, choose the search criteria: title, newly arrived, genre, rating, actor, or
director.
3. Press Select. A results list displays. Use the up and down arrow buttons on the remote to
highlight a title, then press Select. The movie’s home page displays so that you can watch a
trailer and rent the movie.
Finishing Setup, Renting and Watching Movies 3-17
Page 48

My current rentals
You can rent any number of movies at one time; however, you have to watch each one within 24
hours of renting it. My Current Rentals on the main menu tells you how many movies are currently
rented. You can choose to go back to viewing any movie from this list.
To see a list of what is currently rented:
1. On the main menu, highlight My Current Rentals and press Select.
2. The My Current Rentals screen displays and lists the titles and how much rental time remains.
The movies are sorted by the amount of rental time remaining.
1. Highlight the title in the list and press Play.
If a passcode is required, you will be prompted to enter it. If there is not enough time left in
the rental period to watch the entire movie, we will let you know. You can still watch as much
of the movie as you can within the 24 hour rental period.
2. If you highlight a title in the list and press Select, you will be taken to the movie page for that
movie.
Finishing Setup, Renting and Watching Movies 3-18
Page 49

Watching movies
While a movie is playing, you can use the buttons on the remote control to pause it, stop it, fast
forward and fast rewind. When you use any of these functions, a timeline displays to show where
you are in the movie, for example, 20 minutes from the end, and so on. The timeline disappears
from the screen when you press Play.
When a movie has been stopped or paused and there is insufficient rental time to complete
viewing it when you press Play, a screen will let you know that you don’t have enough time to
finish…but you can still watch for as much time as you have left.
Closed captioning
MovieBeam supports the display of closed captions. Be sure to turn the feature on at your TV.
Settings
The Settings option on the main menu gives you access to screens in which you can set
preferences for the following: Parental controls, Sound effects volume, Television type, and
Phone Setup and Phone Service Center. After the first-time setup is complete, the Settings screen
displays the settings that are in effect.
Finishing Setup, Renting and Watching Movies 3-19
Page 50

Parental controls
Parental controls let you set and change a passcode to limit the ratings of movies than can be
watched, and to set a spending limit. You can also clear the passcode from this screen.
To turn on parental controls, highlight Parental Controls in the Settings screen and press Select.
You don’t need a passcode to view the Parental Controls screen.
Finishing Setup, Renting and Watching Movies 3-20
Page 51

Set/Change passcode
You can use a passcode to limit the ratings of movies that can be viewed, to set a spending limit,
or to require a passcode to watch all movies. Only one passcode can be set, and if you don’t want
to set any viewing or spending limits, there’s no need to set a passcode.
To set a passcode:
1. Highlight Settings on the main menu.
2. In the Settings screen, highlight Parental Controls.
3. In the Parental Controls screen, highlight Set/Change Passcode.
4. In the Set/Change Passcode screen, set the passcode by pressing the remote control buttons
in any order.
5. Enter a four-digit sequence. If you enter an incorrect number, press the rewind button on the
remote to clear it and then re-enter the number. Enter the 4-digit sequence again to confirm.
Finishing Setup, Renting and Watching Movies 3-21
Page 52

To change a passcode:
1. Choose Settings on the main menu.
2. Choose Parental Controls from the Settings menu. Highlight Set/Change Passcode and press
Select.
3. Enter your current passcode. Enter the new passcode. Enter it again to confirm.
Passcode for all movies
Selecting this option means that a passcode must be entered to watch any movie. If you already
have a passcode set, simply highlight yes or no on the menu. If you haven’t set a passcode yet,
enter it on the passcode screen which will be displayed before the “Passcode For All Movies”
screen displays.
Finishing Setup, Renting and Watching Movies 3-22
Page 53

If you forget your passcode
If you forgot your passcode, try entering it again. If the “incorrect passcode” message
displays again, you can either clear it by accessing the “My Account” section online at
www.MovieBeam.com or by contacting Customer Service at 1-866-865-1500.
The customer care representative will remove the forgotten passcode. Because the passcode
is cleared through the phone line, the customer service representative will ask you to select the
“Account Dial In” option on the Forgot Passcode screen after you finish your call or after you clear
the passcode online.
Clearing a passcode
Choosing Clear Passcode on the Parental Controls screen removes all parental controls if you
decide not to use them anymore.
Finishing Setup, Renting and Watching Movies 3-23
Page 54

Rating lock
You can prevent movies above a certain rating from being watched unless a passcode is entered.
To set a rating lock:
1. Choose Settings on the main menu.
2. Choose Parental Controls on the Settings menu.
3. Choose Rating Lock on the Parental Controls screen and press Select.
4. Enter your passcode. If you haven’t set a passcode, you will be prompted to do so. Choose
the ratings that you want to lock with a passcode.
Finishing Setup, Renting and Watching Movies 3-24
Page 55

Spending limits
You can set a weekly spending limit for movies. Once the limit has been met, additional movies
can be rented by entering the passcode. The default spending limit is none.
To set a spending limit:
1. On the main menu, choose Settings.
2. On the Settings screen, choose Parental Controls, then Spending Limit.
3. In the Weekly Spending Limit screen, use the up and down keys on the remote to set a limit
between 1 and 99 dollars. Press Select.
4. Enter your passcode to confirm the limit.
Finishing Setup, Renting and Watching Movies 3-25
Page 56

Sound effects volume
Sound effects volume refers to the sounds that the MovieBeam receiver makes when you press
buttons or change screens. It has nothing to do with your television volume.
To adjust the sound effects volume:
1. Choose Settings on the main menu.
2. Choose Sound Effects Volume on the Settings menu. Press Select.
3. In the popup window, choose low, high, or off, then press Select.
Finishing Setup, Renting and Watching Movies 3-26
Page 57

Wide screen/full screen
Sometimes films are received in widescreen format (16:9). If your TV is widescreen and you would
like to view movies which arrive in this format automatically, highlight and select Widescreen. If
you have a regular television (4:3), highlight and select Full Screen.
Finishing Setup, Renting and Watching Movies 3-27
Page 58

Phone setup
This option on the main menu lets you change the options that your MovieBeam receiver uses to
dial in.
Pulse or tone
On this screen, select which kind of phone you have and press Enter. The dialing prefix screen will
display.
Finishing Setup, Renting and Watching Movies 3-28
Page 59

Dialing prefix
If your phone requires a dialing prefix to call out, for example, if you have to dial “9” before
the phone number, highlight YES on this screen and press Enter. You will be asked to enter the
proper dialing prefix. Once you have provided it, press Enter and the phone will dial out. The
MovieBeam receiver will let you know when the call out has been successfully completed.
When done, the receiver will try the new settings by dialing out.
Finishing Setup, Renting and Watching Movies 3-29
Page 60

Phone service center
If you don’t always have the phone line connected to the MovieBeam receiver, you should
periodically connect it and allow it to “phone home”. This is necessary to keep your account up to
date.
A message on the screen will indicate the call’s progress and prompt you when it is completed.
Finishing Setup, Renting and Watching Movies 3-30
Page 61

Help and account info
Choosing the Help and Account Info option on the main menu gives you access to these features:
Contact Customer Care provides the contact
number and web address for customer service.
Rental History - lists the last 45 movies you rented.
FAQs - provides answers to frequently asked
questions. Check these before contacting customer
service. Updates are available at
www.MovieBeam.com.
Troubleshooting - provides solutions to typical concerns. Also check the troubleshooting section
in Chapter 4. Updates are available at www.MovieBeam.com.
View Welcome Video - plays a short video that tells you about the MovieBeam receiver’s
features.
Diagnostic Screen - provides information about your MovieBeam receiver that you need if you
call customer service.
Account information
You can view the details of your account, including your complete rental history in the secure user
account area of http://www.MovieBeam.com/MyAccount.
Finishing Setup, Renting and Watching Movies 3-31
Page 62

Rental history
Your MovieBeam receiver maintains a history of your last 45 rentals. Twelve months of rental
history can be obtained in the secure user account section at http://www.MovieBeam.com/
MyAccount. The rental history on the website may lag behind the history on your receiver by as
much as two weeks.
To view your rental history:
1. On the main menu, choose Help and Account Info.
2. Choose Rental History.
The history screen shows the date a movie was rented, along with its title, rating, and price. If
there are more movies than will fit on the screen, use the page up and page down buttons to
scroll through the list.
To clear the rental history:
Highlight Clear Movie History and press Select. If a passcode has been set, you will be prompted
to enter it to clear the movie history. Clearing the movie history does not change the information
that the receiver transmits when it calls home and it doesn’t change the information contained in
your secure account accessible at http://www.MovieBeam.com/MyAccount.
Finishing Setup, Renting and Watching Movies 3-32
Page 63

Alert
An Alert (warning) indicator may display on the main menu when a problem exists. The indicator
may change its name depending on the problem. For example, the screen may show “Antenna
alert” if the signal is inadequate. If more than one alert situation exists, you can select Alert to
view a screen that provides more details. If you see an alert on the main menu, refer to the Alerts
section in Chapter 4 for details about the cause and how to correct it.
Finishing Setup, Renting and Watching Movies 3-33
Page 64

Finishing Setup, Renting and Watching Movies 3-34
Page 65

Maintenance, 4
Troubleshooting and
Endnotes
In this chapter you’ll find information on
how to maintain your MovieBeam receiver,
guide to solving problems, and other
information.
Maintaining your MovieBeam receiver 4-2
Troubleshooting 4-2
Can’t connect the MovieBeam receiver
to my TV 4-2
No power 4-2
Remote control doesn’t work 4-3
Antenna warning 4-4
No picture 4-4
No audio 4-5
No closed captions 4-5
The receiver is making sounds 4-5
The MovieBeam receiver reboots itself 4-5
Phone 4-6
I forgot my passcode 4-6
Can’t find a movie 4-7
Can’t view a movie 4-7
Movie list isn’t updating 4-7
Account info 4-8
How to get more information 4-9
www.MovieBeam.com 4-9
Maintenance, Troubleshooting and Endnotes 4-1
Page 66

Maintaining your MovieBeam receiver
The MovieBeam receiver requires minimal maintenance. Just dust it periodically with a clean,
damp cloth. Do not use abrasive cleansers. Do not immerse it in water.
Troubleshooting
If you are experiencing problems with your MovieBeam receiver, this section offers helpful tips.
Can’t connect the MovieBeam receiver to my TV
What’s wrong
My television doesn’t have the right
kind of connectors.
No power
What’s wrong
The MovieBeam receiver does not
come on.
The MovieBeam receiver will not
turn off.
How to fix it
If you have an older television with RF connectors,
you will need to purchase an RF modulator which will
provide the correct connectors. Check the diagram on
p. 1-12.
How to fix it
Be sure that the power cord is plugged into an outlet
and into the MovieBeam receiver. Be sure that the
power button is pressed. Be sure your TV is turned
on.
The receiver is in standby mode. The light on the
receiver just means it’s ready to go... it should always
be lit, even if it is in standby. You should always keep
power on to the MovieBeam receiver so that it can
receive new movies.
(Continued on next page.)
Maintenance, Troubleshooting and Endnotes 4-2
Page 67

No power
(Continued from previous page.)
What’s wrong
The MovieBeam receiver is plugged
into a switched outlet which is
switched off.
The MovieBeam receiver is plugged
into a power strip that is switched
off.
How to fix it
Some wall outlets get power only when you
turn a light switch on. If you have a light switch
that you never really knew what it did...this
might be it. Turn the switch on and leave it on.
Turn the power strip on. Power on is often
indicated by a little red light.
Remote control doesn’t work
Any time the remote doesn’t work, you can still watch movies and control the
MovieBeam receiver using the buttons on the receiver’s front panel.
What’s wrong
Batteries are missing, dead, or
incorrectly installed.
Remote is being used too far from
the MovieBeam receiver.
How to fix it
Install two AA batteries as shown on p. 3-2.
Move the remote closer to the receiver. Be sure
the MovieBeam receiver is in the direct path of
the remote.
The dog ate my remote. If your remote is lost or damaged, contact
customer service at 1-866-865-1500.
Maintenance, Troubleshooting and Endnotes 4-3
Page 68

Antenna warning
Because the MovieBeam receiver is sent to you with movies preloaded, you may not
experience a problem until new movies begin to arrive. The warning may also display if you
have repositioned your antenna.
What’s wrong
The antenna warning is displayed
because you are not getting
sufficient signal.
No picture
What’s wrong
I’m not getting any video on the TV.
How to fix it
Try positioning your antenna higher and extending its
ends.
If the MovieBeam receiver is in a basement, try moving
the antenna and/or the receiver upstairs or closer to a
window.
Repeat the antenna adjustment procedure described
on p. 3-11.
How to fix it
Check your TV remote to see if it has a TV/VCR button
on an Input button. Press the button several times to
see if the MovieBeam homepage displays.
Check that the A/V cables are connected as described
beginning on p. 1-9.
Check that the MovieBeam receiver is plugged into a
power outlet and turned on.
Maintenance, Troubleshooting and Endnotes 4-4
Page 69

No audio
What’s wrong
I’m not getting any audio.
How to fix it
Check that the A/V cables are connected as
described beginning on p. 1-9.
Remove the A/V cables and switch them around,
so that the side that plugged into your MovieBeam
receiver now plugs into your TV.
No closed captions
What’s wrong
Closed captions are not displayed.
How to fix it
The MovieBeam receiver can display closed captions
if this feature is available on your TV. Check your TV
manual.
The receiver is making sounds
What’s wrong
This is normal.
How to fix it
When movies are being received, you may hear the
hard disk operating.
The MovieBeam receiver reboots itself
What’s wrong
This is normal.
How to fix it
MovieBeam’s software is continuously being
improved and new features are added, at no cost
to you. Software is broadcast in the same way as
movies. The reboot is necessary to enable the new
features in the software. You don’t need to do
anything; your box will continue to function once this
is complete. When new features have been added,
check the website www.MovieBeam.com for details
on how to use them.
Maintenance, Troubleshooting and Endnotes 4-5
Page 70

Phone
What’s wrong
The MovieBeam receiver can’t call
out.
I forgot my passcode
What’s wrong
I set a passcode and can’t
remember it.
How to fix it
Be sure the receiver is connected to a phone line as
described on p. 1-6.
If you have DSL and the receiver is plugged into
a phone line without a filter, connect the splitter
provided with your MovieBeam receiver to the
phone outlet with a DSL filter on it. Plug one
phone cable into your phone and the other into the
receiver. Refer to p. 1-6.
A dialing prefix may be needed. Refer to the
instructions on p. 3-30 to force a dial in.
How to fix it
Once a passcode has been set, you will not be able
to watch movies above a certain rating or exceed a
spending limit without entering it.
If you have forgotten your passcode, go to the “My
Account” section on the MovieBeam website to clear
it. You can also call
1-866-865-1500 and our customer service agents will
be happy to assist you. Remember that once you
clear your passcode on the web or over the phone,
you must go to the Settings screen to force a dial in.
Maintenance, Troubleshooting and Endnotes 4-6
Page 71

Can’t find a movie
What’s wrong
The movie I want to watch is not
available.
Can’t view a movie
What’s wrong
The movie I want to watch is not
available.
Movie list isn’t updating
How to fix it
Movies come and go. For most movies, guaranteed
availability dates are shown on the movie page. Be
sure to check the availability.
How to fix it
Movies come and go. For most movies, guaranteed
availability dates are shown on the movie page. Be
sure to check the availability.
A passcode may have been set which prevents the
viewing of movies of a specified rating. Enter the
passcode as described on p. 3-21.
If you have forgotten your passcode, go to the “My
Account” section on the MovieBeam website to
clear it. You can also call 1-866-865-1500 and our
customer service agents will be happy to assist you.
Remember that once you clear your passcode on the
web or over the phone, you must go to the Settings
screen to force a dial in.
What’s wrong
The movie list is not updating.
Maintenance, Troubleshooting and Endnotes 4-7
How to fix it
Movies come and go. If the list of available movies
doesn’t change within 7 to 10 days, check your
antenna signal as described on p. 3-11.
(Continued on next page.)
Page 72

Movie list isn’t updating
(Continued from previous page.)
What’s wrong
The movie list is not updating.
Account info
What’s wrong
I rented something but it doesn’t
appear in my rental history.
How to fix it
Force MovieBeam to “phone home” as described
on p. 3-30.
It’s a good idea to always keep the MovieBeam
receiver connected to both power and the phone
line. If the receiver hasn’t dialed in for more than 2
weeks, force a dial in as described on p. 3-30.
If you have watched five movies and MovieBeam
hasn’t dialed in, force a dial in as described on p. 3-
30.
How to fix it
The rental history is available from the Help and
Account Info screen. It lists up to 45 rentals and
includes the title, rating, price, and the date and time
a movie was rented, and your time zone.
If you recently cleared your rental history you may
not see a listing of a previous rental. However,
you can also check your account online at
www.MovieBeam.com/MyAccount. The account
information on the website may lag the history in the
MovieBeam receiver by as much as two weeks. If you
cleared the history before the receiver has phoned
home, the account information on the website will
be complete only after the receiver dials in.
(Continued on next page.)
Maintenance, Troubleshooting and Endnotes 4-8
Page 73

Account info
(Continued from previous page.)
What’s wrong
My phone number (credit card,
address, etc.) changed.
How to fix it
On the main menu, choose Settings and Info/ Phone
Dialing Settings and follow the prompts to enter new
phone information. You can also edit your account
information on the website, www.MovieBeam.com, or
contact customer service at 1-866-865-1500.
How to get more information
More information about the MovieBeam receiver is available on the website and via customer
service.
www.MovieBeam.com
On the MovieBeam website, you can download new versions of this user guide, check your
account status, make changes to your account information, find answers to frequently asked
questions and troubleshooting tips.
Customer service
Customer service can be reached tollfree at 1-866-865-1500.
Maintenance, Troubleshooting and Endnotes 4-9
Page 74

Account info
(Continued from previous page.)
What’s wrong
My phone number (credit card,
address, etc.) changed.
How to fix it
On the main menu, choose Settings and Info/ Phone
Dialing Settings and follow the prompts to enter new
phone information. You can also edit your account
information on the website, www.MovieBeam.com, or
contact customer service at 1-866-865-1500.
How to get more information
More information about the MovieBeam receiver is available on the website and via customer
service.
www.MovieBeam.com
On the MovieBeam website, you can download new versions of this user guide, check your
account status, make changes to your account information, find answers to frequently asked
questions and troubleshooting tips.
Customer service
Customer service can be reached tollfree at 1-866-865-1500.
Maintenance, Troubleshooting and Endnotes 4-9
Page 75

Account info
(Continued from previous page.)
What’s wrong
My phone number (credit card,
address, etc.) changed.
How to fix it
On the main menu, choose Settings and Info/ Phone
Dialing Settings and follow the prompts to enter new
phone information. You can also edit your account
information on the website, www.MovieBeam.com, or
contact customer service at 1-866-865-1500.
How to get more information
More information about the MovieBeam receiver is available on the website and via customer
service.
www.MovieBeam.com
On the MovieBeam website, you can download new versions of this user guide, check your
account status, make changes to your account information, find answers to frequently asked
questions and troubleshooting tips.
Customer service
Customer service can be reached tollfree at 1-866-865-1500.
Maintenance, Troubleshooting and Endnotes 4-9
Page 76

Account info
(Continued from previous page.)
What’s wrong
My phone number (credit card,
address, etc.) changed.
How to fix it
On the main menu, choose Settings and Info/ Phone
Dialing Settings and follow the prompts to enter new
phone information. You can also edit your account
information on the website, www.MovieBeam.com, or
contact customer service at 1-866-865-1500.
How to get more information
More information about the MovieBeam receiver is available on the website and via customer
service.
www.MovieBeam.com
On the MovieBeam website, you can download new versions of this user guide, check your
account status, make changes to your account information, find answers to frequently asked
questions and troubleshooting tips.
Customer service
Customer service can be reached tollfree at 1-866-865-1500.
Maintenance, Troubleshooting and Endnotes 4-9
 Loading...