

Page 1
ENGLISH
Miniket Photo
SC- MS10(S/BL/R)
MS11(S/BL/R)
MS15(S/BL/R)
AF Auto Focus
CCD Charge Coupled Device
LCD Liquid Crystal Display
Owner’s Instruction Book
Before operating the unit, please read
this Instruction Book thoroughly, and
retain it for future reference.
Use only approved battery packs.
Otherwise there is a danger of overheating, fire or explosion.
Samsung is not responsible for problems occurring due to using
unapproved batteries.
Miniket Photo
SC- MS10(S/BL/R)
MS11(S/BL/R)
MS15(S/BL/R)
AF
CCD
LCD
AD68-00934F
Page 2
ENGLISH
Contents
目目錄錄
Notices and Safety Precautions 8
Precautions when using the Miniket Photo.....................................8
Notes Regarding COPYRIGHT...........................................................9
Notes Regarding Moisture Condensation........................................9
Notes Regarding the Miniket Photo..................................................9
Notes Regarding the Battery Pack..................................................10
Note Regarding the Lens..................................................................11
Notes Regarding the LCD Display ..................................................11
Precautions Regarding Service.......................................................11
Precautions Regarding Replacement Parts...................................11
MMiinniikkeett PPhhoottoo 的的注注意意事事項項
有有關關版版權權的的注注意意事事項項
有有關關濕濕氣氣凝凝結結的的注注意意事事項項
有有關關 MMiinniikkeett PPhhoottoo 的的注注意意事事項項
有有關關電電池池組組的的注注意意事事項項
有有關關透透鏡鏡的的注注意意事事項項
有有關關 LLCCDD 顯顯示示螢螢幕幕的的注注意意事事項項
有有關關服服務務的的注注意意事事項項
有有關關更更換換零零件件的的注注意意事事項項
Getting to know your Miniket Photo 12
Features..............................................................................................12
Accessories Supplied with the Miniket Photo...............................13
特特性性
MMiinniikkeett PPhhoottoo 隨隨附附的的配配件件
Name of Each Part 14
Rear & Left View................................................................................14
Front & Bottom View.........................................................................15
LCD Display .......................................................................................16
OSD (On Screen Display in Photo Capture Mode /
Photo View Mode)...........................................................................16
OSD (On Screen Display in Movie Record Mode /
Movie Play Mode) ...........................................................................17
OSD (On Screen Display in Music Mode) .....................................18
OSD (On Screen Display in Voice Record / Voice Play /
Settings Mode)................................................................................19
後後視視圖圖和和左左視視圖圖
後後視視圖圖和和底底視視圖圖
LLCCDD 顯顯示示螢螢幕幕
How to Use the Battery Pack 20
Battery Pack Installation / Ejection.................................................20
Maintaining the Battery Pack...........................................................21
Charging the Battery Pack...............................................................24
安安裝裝//退退出出電電池池組組
維維護護電電池池組組
電電池池組組充充電電
注注意意事事項項和和安安全全須須知知
................................................................8
............................................................................9
....................................................................9
......................................................................10
..........................................................................11
..........................................................................11
......................................................9
.......................................................11
..................................................................11
了了解解舅舅的的 MMiinniikkeett PPhhoottoo
.....................................................................................................12
..............................................................13
各各個個部部件件名名稱稱
..................................................................................14
..................................................................................15
OSD(相片遠取模式/相片檢視模式下的螢幕顯示)
OSD(影片錄製模式/影片播放模式下的螢幕顯示)
OSD(音樂模式下的螢幕顯示)
OSD(錄音/語音播放/設定模式下的螢幕顯示)
....................................................................................16
....................16
....................17
.....................................................18
..........................19
如如何何使使用用電電池池組組
................................................................................20
.........................................................................................21
.........................................................................................24
8
12
14
20
22
Page 3
ENGLISH
Contents
目目錄錄
Getting Started 25
Recording / Charging Indicator .......................................................25
Power Indicator .................................................................................25
Using the Mode Dial..........................................................................26
Using the DISPLAY Button ...............................................................27
Using the MENU Button ...................................................................27
Using the Shortcut Buttons .............................................................28
Using the Joystick ...........................................................................29
Structure of Folders and Files.........................................................30
Recording Time and Capacity .........................................................31
Using a mini SD card (Optional Accessory)..................................32
Inserting / Ejecting a mini SD card (Optional Accessory) ...........33
Selecting the Memory Type..............................................................34
Before You Start Operating the Miniket Photo..............................35
Setting the Miniket Photo 36
Setting Memory .................................................................................37
Selecting the Memory Type............................................................37
Setting the File No. Function ..........................................................38
Formatting the Memory...................................................................39
Viewing Memory Space..................................................................40
Adjusting the LCD Monitor ..............................................................41
Adjusting the LCD Brightness ........................................................41
Setting Date/Time ..............................................................................42
Setting Date/Time ...........................................................................42
Setting Date Format........................................................................43
Setting Date/Time Display ..............................................................44
Setting the System............................................................................45
Setting the NTSC / PAL..................................................................45
Setting the Beep Sound..................................................................46
Setting the Shutter Sound ..............................................................47
Selecting Language ........................................................................48
使使用用入入門門
錄錄製製//充充電電指指示示器器
電電源源指指示示器器
使使用用模模式式轉轉盤盤
使使用用「「顯顯示示」」按按瞿瞿
使使用用 MMEENNUU 按按瞿瞿
使使用用捷捷徑徑按按瞿瞿
使使用用搖搖桿桿
資資料料夾夾與與圭圭案案結結構構
錄錄音音時時間間與與容容量量
使使用用小小型型 SSDD 賓賓((可可選選購購的的配配件件))
揷揷入入//退退出出小小型型 SSDD 賓賓((可可選選購購的的配配件件))
選選擇擇記記憶憶體體類類型型
開開始始操操作作 MMiinniikkeett PPhhoottoo 之之前前
................................................................................25
.........................................................................................25
......................................................................................26
..................................................................................27
..............................................................................27
......................................................................................28
.............................................................................................29
..............................................................................30
..................................................................................31
....................................................32
..........................................33
..................................................................................34
........................................................35
設設定定 MMiinniikkeett PPhhoottoo
設設定定記記憶憶體體
調調整整 LLCCDD 顯顯示示器器
設設定定日日期期//時時間間
設設定定系系統統
.........................................................................................37
選擇記憶體類型
設定圭案編號功能
格式化記憶體
檢視記憶體空間
調整 LCD 亮度
設定日期/時間
設定日期格式
設定日期/時間顯示
設定 NTSC / PAL
設定榛聲
設定快門聲響
選擇語言
.............................................................................37
.........................................................................38
.................................................................................39
.............................................................................40
.............................................................................41
..............................................................................41
....................................................................................42
...............................................................................42
.................................................................................43
........................................................................44
.............................................................................................45
.........................................................................45
.........................................................................................46
.................................................................................47
.........................................................................................48
25
36
33
Page 4

ENGLISH
Contents
Setting the Mode Display................................................................49
Setting the Auto Shut Off................................................................50
Resetting the Miniket Photo............................................................51
Photo Mode 52
Capturing............................................................................................53
Capturing Images............................................................................53
Zooming In and Out........................................................................54
Viewing ...............................................................................................55
Viewing Photo files on the LCD Monitor ........................................55
Viewing Multiple Photo Files / Enlarging a Photo File ...................56
Cropping an Enlarged Photo File ...................................................57
Setting the Capturing Options.........................................................58
Using the Shortcut Buttons.............................................................58
Using the Scene Modes .................................................................60
Setting the Photo Size ....................................................................61
Setting the Photo Quality................................................................62
Setting the Metering Method ..........................................................63
Setting the Self Timer .....................................................................64
Setting the Multi Shot......................................................................65
Setting Digital Effects......................................................................66
Adjusting the Exposure – Exposure Compensation ......................67
Setting the ISO Speed (Sensitivity)................................................68
Setting the White Balance ..............................................................69
Setting the Macro Mode .................................................................70
Setting the Flash .............................................................................71
Setting the Sharpness ....................................................................73
Setting the Focus Method...............................................................74
Setting the Anti-Shake Function (Image Stabilisation)...................75
Setting the Digital Zoom .................................................................76
Setting the Imprint Option...............................................................77
Setting the Viewing Options ............................................................78
Using the Shortcut Buttons.............................................................78
44
目目錄錄
設定模式顯示
設定自動關閉
重設 Miniket Photo
PPhhoottoo 模模式式
拍拍攝攝
.....................................................................................................53
拍攝影像
放大和縮小
檢檢視視
.....................................................................................................55
在 LCD 顯示器上檢視相片圭案
檢視多個相片圭案/放大相片圭案
複製放大的相片圭案
設設定定拍拍攝攝選選項項
使用捷徑按瞿
使用場景模式
設定相片大小
設定相片品質
設定測光方法
設定自拍計時器
設定連拍
設定數位效果
調整曝光 - 曝光補償
設定 ISO 速度(感光度)
設定白平衡
設定微距模式
設定閃光燈
設定淸劉度
設定對焦方法
設定防震功能(影像穩定器)
設定數位縮放
設定壓印選項
設設定定檢檢視視選選項項
使用捷徑按瞿
.................................................................................49
.................................................................................50
.....................................................................51
.........................................................................................53
.....................................................................................54
...................................................55
................................................56
.....................................................................57
......................................................................................58
.................................................................................58
.................................................................................60
.................................................................................61
.................................................................................62
.................................................................................63
.............................................................................64
.........................................................................................65
.................................................................................66
.....................................................................67
...............................................................68
.....................................................................................69
.................................................................................70
.....................................................................................71
.....................................................................................73
.................................................................................74
..........................................................75
.................................................................................76
.................................................................................77
......................................................................................78
.................................................................................78
52
Page 5
ENGLISH
Contents
Deleting Photo Files........................................................................82
Protecting Photo Files.....................................................................83
Rotating a Photo File ......................................................................84
Resizing Photos .............................................................................85
Setting the Slideshow .....................................................................86
Setting the DPOF (Digital Print Order Format) Function ...............87
Copying Photo Files........................................................................88
Movie Mode 89
Recording a Movie ............................................................................90
Recording a Movie..........................................................................90
Zooming In and Out........................................................................91
Playing a Movie .................................................................................92
Playing a Movie on the LCD Monitor .............................................92
Setting the Recording Options........................................................93
Using the Shortcut Buttons.............................................................93
Setting the Program AE..................................................................95
Setting the White Balance ..............................................................96
Setting the Digital Effects................................................................97
Setting the Macro Mode .................................................................98
Setting the Movie Quality................................................................99
Setting the Movie Size..................................................................100
Setting the Self Timer ...................................................................101
Setting the Wind Cut.....................................................................102
Setting the Viewing Options ..........................................................103
Using the Shortcut Buttons...........................................................103
Deleting Movie Files .....................................................................107
Protecting Movie Files ..................................................................108
Setting the All Play........................................................................109
Copying Movie Files......................................................................110
Music Mode 111
Playing Music Files .........................................................................112
目目錄錄
刪除相片圭案
保護相片圭案
旋轉相片圭案
調整相片大小
設定幻燈片放映
設定 DPOF(數位列印順序格式)功能
複製相片圭案
MMoovviiee 模模式式
錄錄製製影影片片
錄製影片
放大和縮小
播播放放影影片片
在 LCD 顯示器上播放影片
設設定定錄錄製製選選項項
使用捷徑按瞿
設定程序自動曝光
設定白平衡
設定數位效果
設定微距模式
設定影片片品質
設定影像大小
設定自拍計時器
設定消除風聲
設設定定檢檢視視選選項項
使用捷徑按瞿
刪除影片圭案
保護影片圭案
設定幻燈片放映
複製影片圭案
MMuussiicc
播播放放音音樂樂圭圭案案
.................................................................................82
.................................................................................83
.................................................................................84
.................................................................................85
.............................................................................86
.................................................................................88
.............................................................................................90
.........................................................................................90
.....................................................................................91
.............................................................................................92
......................................................................................93
.................................................................................93
.........................................................................95
.....................................................................................96
.................................................................................97
.................................................................................98
.............................................................................99
...............................................................................100
...........................................................................101
...............................................................................102
....................................................................................103
...............................................................................103
...............................................................................107
...............................................................................108
...........................................................................109
...............................................................................110
模模式式
....................................................................................112
..........................................87
...........................................................92
89
111
55
Page 6
ENGLISH
Contents
Copying Music Files from a PC ....................................................112
Playing Music Files .......................................................................113
Setting the Music Play Options .....................................................114
Using the Shortcut Buttons ...........................................................114
Setting the Repeated Play ............................................................116
Setting the Equaliser.....................................................................117
Deleting Music Files......................................................................118
Protecting Music Files...................................................................119
Voice Mode 120
Recording Voice Files.....................................................................121
Recording Voice Files...................................................................121
Playing Voice Files..........................................................................122
Playing Voice Files........................................................................122
Setting the Voice Play Options......................................................123
Using the Shortcut Buttons...........................................................123
Setting the Repeated Play............................................................125
Deleting Voice Files ......................................................................126
Protecting Voice Files ...................................................................127
Copying Voice Files ......................................................................128
PC Cam mode 129
Using the PC Cam Function ........................................................130
Using the PC Cam Function.........................................................130
PictBridge mode
Printing with PictBridge .................................................................132
Printing with PictBridge.................................................................132
Storage Mode 133
Using as a Mass Storage Device ..................................................134
Using as a Mass Storage Device.................................................134
131
目目錄錄
從電腦複製音樂圭案
播放音樂圭案
設設定定音音樂樂播播放放選選項項
使用捷徑按瞿
設定重複播放
設定等化器
刪除音樂圭案
保護音樂圭案
VVooiiccee
模模式式
錄錄製製語語音音圭圭案案
錄製語音圭案
播播放放語語音音圭圭案案
播放語音圭案
設設定定語語音音播播放放選選項項
使用捷徑按瞿
設定重複播放
刪除語音圭案
保護語音圭案
複製語音圭案
PPCC CCaamm 模模式式
使使用用電電腦腦相相機機功功能能
使用電腦相機功能
PPiiccttBBrriiddggee 模模式式
使使用用 PPiiccttBBrriiddggee 功功能能列列印印
使用 PictBridge 功能列印
SSttoorraaggee 模模式式
使使用用高高容容量量儲儲存存裝裝置置
使用高容量儲存裝置
....................................................................112
...............................................................................113
............................................................................114
...............................................................................114
...............................................................................116
...................................................................................117
...............................................................................118
...............................................................................119
....................................................................................121
...............................................................................121
....................................................................................122
...............................................................................122
............................................................................123
...............................................................................123
...............................................................................125
...............................................................................126
...............................................................................127
...............................................................................128
............................................................................130
.......................................................................130
........................................................................134
...................................................................134
120
129
131
.............................................................132
.........................................................132
133
66
Page 7
ENGLISH
Contents
目目錄錄
Miscellaneous Information 135
Connecting to a PC.........................................................................136
Supported USB Speed according to Operating System..............136
Recommended System Requirements ........................................136
Installing Software ..........................................................................137
Installing DV Media Pro 1.0..........................................................137
Installing DV Media Pro 1.0 / Video Studio 7.0............................138
Connecting To Other Devices ......................................................139
Connecting to a PC Using USB Cable.........................................139
Connecting to a TV Monitor..........................................................140
Connecting to a VCR....................................................................141
Printing Photos................................................................................142
Printing with DPOF .......................................................................142
Cleaning and Maintenance.............................................................143
After using the Miniket photo........................................................143
Cleaning the Body ........................................................................144
Regarding the Battery...................................................................145
Using Abroad ................................................................................146
Troubleshooting 147
Self-Diagnosis Display ...................................................................147
Self-Diagnosis Display..................................................................147
Checklist........................................................................................147
Using the Menu 149
Specifications 151
Index 153
其其他他資資訊訊
連連接接至至電電腦腦
安安裝裝軟軟體體
連連接接至至其其他他裝裝置置
列列印印相相片片
淸淸潔潔與與維維護護
.......................................................................................136
根據作業系統的 USB 速度支援
建議的系統需求
安裝 DV Media Pro 1.0
安裝 DV Media Pro 1.0 / Video Studio 7.0
使用 USB 纜線連接至電腦
連接至電視顯示器
連接至 VCR
使用 DPOF 列印
使用 Miniket Photo 之後
淸潔機身
關於電池
在國外使用
...........................................................................136
...........................................................................................137
................................................................................139
.......................................................................140
.................................................................................141
...........................................................................................142
.........................................................................142
.......................................................................................143
.......................................................................................144
.......................................................................................145
...................................................................................146
................................................136
...........................................................137
......................138
........................................................139
..........................................................143
故故障障排排除除
自自我我診診斷斷顯顯示示
自我診斷顯示
檢査淸單
....................................................................................147
...............................................................................147
.......................................................................................147
使使用用選選單單
規規格格
索索引引
135
147
149
151
153
77
Page 8
ENGLISH
Notices and Safety Precautions
注注意意事事項項和和安安全全須須知知
Precautions when using the Miniket Photo
✤ Please note the following precautions for use:
✤ Please keep this Miniket Photo in a safe place. The Miniket
Photo contains a lens that can be damaged by shock.
Keep out of reach of children.
✤ Please note the following precautions for use:
■
Do not place your Miniket Photo in a wet place. Moisture and
water may cause the Miniket Photo to malfunction.
■
To avoid electric shock, do not touch your Miniket Photo or
power cable with wet hands.
■
Do not use the flash close to someone else’s eyes. The flash
emits a strong light that may cause damage similar to direct
sunlight on one’s eyesight. Particular care should be observed
if photographing infants, when the flash should be no less than
3 feet from your subject.
■
If the Miniket Photo is not working properly, please consult your
nearest dealer or authorised SAMSUNG service center.
Disassembling the Miniket Photo by yourself may cause
irrecoverable damage which will be difficult to repair.
■
Clean the Miniket Photo with a dry, soft cloth. Use a soft cloth
moistened with a mild detergent solution for removing stains.
Do not use any type of solvent, especially benzene, as it may
seriously damage the finish.
■
Keep your Miniket Photo away from rain and saltwater. After
using, clean the Miniket Photo. Saltwater may cause the parts
to corrode.
使使用用 MMiinniikkeett PPhhoottoo 的的注注意意事事項項
✤ 請注意下列使用須知:
✤ 請將此 Miniket Photo 存放在安全的地方0 Miniket Photo
的鏡頭容易受到震動而損壞0
請放在兒童不能觸及的地方0
請請注注意意下下列列使使用用須須知知::
✤
■
請勿將 Miniket Photo 放在潮濕的地方0 濕氣和水可能導致
Miniket Photo 發生故障0
■
不要用濕手觸摸 Miniket Photo 或電源纜線,以免觸電0
■
不要迲近他人的眼睛使用閃光燈0 閃光燈會發出强光,可能對
視力造成類似陽光直射的傷害0 給叛兒拍照時要特別小心,閃
光燈必須位於主題 3 英樹外0
■
如果 Miniket Photo 法正常工作,請諮詢最近的經銷商或授權
的三星服務中心0
自行阿隷 Miniket Photo 可能會造成不可恢復的損壞,難以維
修0
■
用乾燥柔軟的布淸潔 Miniket Photo0 用備有中性淸潔劑溶液
的軟布淸除染點0
請勿使用任何溶劑,尤其是蓬,這類物質可能嚴重損壞塗層0
■
保持 Miniket Photo 遠離雨水和鹽水0 使用後,請淸潔
Miniket Photo0 鹽水可能導致部件腐蝕0
88
Page 9
ENGLISH
Notices and Safety Precautions
注注意意事事項項和和安安全全須須知知
Notes Regarding COPYRIGHT
✤ Television programs, movie video tapes, DVD titles, films and
other program materials may be copyrighted.
Unauthorised recording of copyrighted materials may infringe
on the rights of the copyright owners and is contrary to
copyright laws.
✤ All the trade names and registered trademarks mentioned in
this manual or other documentation provided with your
Samsung product are trademarks or registered trademarks of
their respective holders.
Notes Regarding Moisture Condensation
1. A sudden rise in atmospheric temperature may cause
condensation to form inside the Miniket Photo.
For Example:
✤ Entering or leaving a heated place on a cold day might cause
condensation inside the product.
✤ To prevent condensation, place the product in a carrying case
or a plastic bag before exposing it to a sudden change of
temperature.
Notes Regarding the Miniket Photo
1. Do not leave the Miniket Photo exposed to high
temperature (above 60°C or 140°F).
For example, in a parked closed car in summer or exposed to
direct sunlight.
2. Do not let the Miniket Photo get wet.
Keep the Miniket Photo away from rain, salt water, or any
other form of moisture.
The Miniket Photo will be damaged if immersed in water or
subjected to high levels of moisture.
有有關關版版權權的的注注意意事事項項
✤ 電視節目/ 錄影帶/ DVD 節目/ 影片以及其他節目資料均受版
權法保護0
未經授權錄製受版權法保護的資料可能侵犯版權擁有者的權利
橙違反版權法0
✤ 此手冊或其他 Samsung 産品說明文件中提及的所有産品名稱
和註冊商標是其各自所有者的商標或註冊商標0
有有關關濕濕氣氣凝凝結結的的注注意意事事項項
11.. 突突然然升升高高的的氣氣溫溫將將導導致致 MMiinniikkeett PPhhoottoo 內內部部形形成成濕濕氣氣凝凝結結00
例例如如::
✤ 在寒冷的天氣進入或離開溫暖的地方可能導致本産品內部的濕
氣凝結0
✤ 爲防止濕氣凝結,在將本産品暴露於溫度突然變化的環境中之
前,請將其放入旭帶套或塑膠袋中0
有有關關 MMiinniikkeett PPhhoottoo 的的注注意意事事項項
11.. 請請勿勿將將 MMiinniikkeett PPhhoottoo 暴暴露露在在高高溫溫下下((超超過過 6600°CC 或或 114400°FF))00
例如,在陽光下停放的封閉車內或陽光直射之下0
22.. 請請勿勿讓讓 MMiinniikkeett PPhhoottoo 受受潮潮00
使使 MMiinniikkeett PPhhoottoo 遠遠離離雨雨水水// 鹽鹽水水,,以以及及任任何何其其他他形形態態的的濕濕氣氣00
如果浸泡在水中或受到高濃度濕氣影響,Miniket Photo 將會
損壞0
99
Page 10
ENGLISH
Notices and Safety Precautions
注注意意事事項項和和安安全全須須知知
Notes Regarding the Battery Pack
✤ It is recommended that you use the original Samsung Battery
Pack that is available at the retailer where you purchased the
Miniket Photo.
✤ Make sure the Battery Pack is fully charged before starting to
record.
✤ To preserve battery power, keep the Miniket Photo turned off
when you are not operating it.
✤ If your Miniket Photo is left in STBY mode and the Battery Pack
is inserted without being operated for more than 3 minutes, it
will automatically turn itself off to protect against unnecessary
battery discharge.
✤ Make sure that the Battery Pack is inserted firmly in place.
✤ The new Battery Pack provided with the product is not charged.
Before using the Battery Pack, you need to fully charge it.
✤ Do not drop the Battery Pack. Dropping the Battery Pack may
damage it.
✤ Fully discharging a Lithium lon battery damages the internal
cells. The Battery Pack may be prone to leakage when fully
discharged.
✤ To avoid damage to the Battery Pack, make sure to remove the
battery when no charge remains.
Clean the terminal to remove foreign substances before
inserting the Battery Pack.
✳
When the battery reaches the end of its life, please contact
your local dealer.
Batteries must be disposed of as chemical waste.
✳
Be careful not to drop the Battery Pack when you release it
from the Miniket Photo.
有有關關電電池池組組的的注注意意事事項項
✤ 建議使用舅購買 Miniket Photo 之零魔商魔賣的原廠三星電池
組0
✤ 開始拍攝之前,請確定電池組已經完全充電0
✤ 爲了節省電池電量,在不使用時關閉 Miniket Photo0
✤ 如果舅的 Miniket Photo 在 STBY(待機)模式下以及揷入電池
組後超過 3 分鐘未進行操作,裝置將自動關閉以避免不必要的
電池放電0
✤ 確定電池組已穩固揷入到位0
✤ 本産品隨附的新電池組尙未充電0
使用電池組之前,舅必須將央完全充電0
✤ 切勿讓電池組掉落0 掉落的電池組可能損壞0
✤ 裏離子電池若完全放電可能會損壞內部元件0 完全放電可能導
致電池組漏液0
✤ 爲避免損壞電池組,請確定將電量耗盡的電池取出0
在揷入電池組之前,請淸潔終端以移除雜質0
✳ 在電池到達其使用壽命時,請與當地經銷商聯繫0
電池必須作爲化學廢棄物處理0
✳ 在從 Miniket Photo 取出電池組時,請小心不要讓電池組
掉落0
1010
Page 11
ENGLISH
Notices and Safety Precautions
注注意意事事項項和和安安全全須須知知
Note Regarding the Lens
✤ Do not film with the Miniket Photo’s lens pointing directly at the
sun.
Direct sunlight can damage the CCD (Charge Coupled Device,
the imaging sensor).
Notes Regarding the LCD Display
1. The LCD monitor has been manufactured using the high
precision technology. However, there may be tiny dots (red,
blue or green in color) that appear on the LCD monitor. These
dots are normal and do not affect the recorded picture in any
way.
2. When you use the LCD monitor under direct sunlight or
outdoors, it may be difficult to see the picture clearly.
3. Direct sunlight can damage the LCD monitor.
Precautions Regarding Service
✤ Do not attempt to service the Miniket Photo yourself.
✤ Opening or removing covers may expose you to dangerous
voltage or other hazards.
✤ Refer all servicing to qualified service personnel.
Precautions Regarding Replacement Parts
✤ When replacement parts are required, be sure the service
technician has used replacement parts specified by the
manufacturer and with the same characteristics as the original
part.
✤ Unauthorised substitutions may result in fire, electric shock or
other hazards.
有有關關透透鏡鏡的的注注意意事事項項
✤ 拍攝時,請勿將 Miniket Photo 的透鏡直接朝向太陽0
陽光直射會損壞 CCD(光電甁合元件 - 影像感應器)0
有有關關 LLCCDD 顯顯示示螢螢幕幕的的注注意意事事項項
1. LCD 顯示器採用高精密技術製造0 LCD 顯示器上可能會出現一
些小點(紅色/ 藍色或綠色)0 這些小點屬於正常現象,不會影
嚮錄製的影像0
2. 當舅在陽光下或戶外使用 LCD 顯示器時,可能無法淸楚地看到
影像0
3. 陽光直射會損壞 LCD 顯示器0
有有關關服服務務的的注注意意事事項項
✤ 請勿嘗試自行維修 Miniket Photo0
✤ 打開或移除機蓋可能會讓舅暴露在危險電壓或其他危險中0
✤ 請讓合格的專業技術人員進行維修0
有有關關更更換換零零件件的的注注意意事事項項
✤ 在需要更換零件時,請確保維修技術人員使用製造商指定的更
換零件,其特性與原始零件相同0
✤ 未經授權的更換可能會導致火災/ 觸電或其他危險0
1111
Page 12

ENGLISH
Getting to know your Miniket Photo
了了解解舅舅的的 MMiinniikkeett PPhhoottoo
Features
●
High Resolution Digital Still Camera
Employing 5Mega CCD Pixels with an available maximum
resolution of 2592X1944. You can store images in internal memory
or mini SD card.
●
MPEG4 Movie Recording
You can record MPEG4 movie on the internal memory or mini SD
card.
●
x 5 Digital Zoom ( x 15 its original size)
Allows the user to magnify an image up to x15 its original size.
●
Color TFT LCD
A high-resolution(150K) color TFT LCD gives you clean, sharp
images as well as the ability to review your recorded files
immediately.
●
Anti-Shake Image Stabilisation
With the Miniket Photo, you can minimize the effects of natural
shaking movements when taking pictures of still objects in dark
places.
●
Various Digital Effects
The DSE (Digital Special Effects) allows you to give the film a
special look by adding various special effects.
●
USB Interface for Data Transfer
You can transfer still images and movie files or any other files to a
PC using the USB interface.
●
Pc Cam for multi-entertaining
You can use the Miniket Photo as a Pc Cam for video chatting and
other Pc Cam applications.
●
Voice Record / Playback with vast memory
You can record voices and store it in the internal memory or mini
SD card (optional accessory) and play back recorded voice clips.
●
Plus Advantage, Music
With this Miniket Photo, you can play back Music files stored in the
internal memory or mini SD card (optional accessory). Enjoy your
favourite songs with the Music files with your Miniket Photo.
●
PictBridge/DPOF Function
When you connect the Miniket Photo to a PictBridge-supported
printer and DPOF (Digital Printing Order Format) function using a
USB cable, you can print your stored pictures without a PC.
●
Multi OSD Language
You can select the desired OSD language from OSD list.
1212
特特性性
●
高高解解析析度度數數位位靜靜態態相相機機
採用 5 百萬像素 CCD,提供最大解析度 2592x19440 舅可以將
影像儲存到內部記憶體或外部記憶賓0
●
MMPPEEGG44 影影片片錄錄製製
舅可以在內建的內部記憶體或小型 SD 賓上錄製 MPEG4 影片0
●
XX55 數數位位縮縮放放((原原始始大大小小的的 1155 倍倍))
可以讓使用者將影像放大至其原始大小的 15 倍0
●
色色彩彩絢絢麗麗的的 TTFFTT LLCCDD
高解析度 (150K) 色彩絢麗的 TFT LCD 可爲舅提供明亮/ 淸劉的
影像,同時具有立卽檢視已錄製圭案的功能0
●
防防震震影影像像穩穩定定器器
使用 Miniket Photo,舅可以在黑暗地點拍攝靜止物體的圖片
時最小化自然震動0
●
各各種種數數位位效效果果
DSE(數位特殊效果)可增加各種特殊效果,讓所拍攝的影像別具一
格0
●
用用於於傳傳輸輸資資料料的的 UUSSBB 介介面面
舅可使用 USB 介面將靜態影像/ 影片圭案或其他圭案傳輸到電腦0
●
多多娛娛樂樂功功能能的的電電腦腦相相機機
舅可以將 Miniket Photo 作爲電腦相機進行視訊聊天及其他電腦相
機應用0
●
使使用用大大容容量量記記憶憶體體錄錄製製//播播放放語語音音
舅可錄製語音橙儲存在內部記憶體或小型 SD 賓(可選配件)中,然
後播放已錄製的語音0
●
附附加加優優勢勢 -- 音音樂樂
舅可以使用 Miniket Photo 播放儲存在內部記憶體或小型 SD 賓
(可選配件)中的音樂圭案0 使用舅的 Miniket Photo 欣賞音樂圭
案中舅最喜歡的歌曲0
●
PPiiccttBBrriiddggee//DDPPOOFF 功功能能
當舅用 USB 纜線將 Miniket Photo 連接到支援 PictBridge 的印
表機和 DPOF(數位列印順序格式)功能時,舅不用電腦便可以列印
已儲存的圖片0
●
多多種種 OOSSDD 語語言言
舅可以從 OSD 淸單中選擇所要的 OSD 語言0
Page 13

ENGLISH
Getting to know your Miniket Photo
了了解解舅舅的的 MMiinniikkeett PPhhoottoo
Accessories Supplied with the Miniket Photo
✤ Make sure that the following basic accessories are supplied with
your Miniket Photo.
Basic Accessories
1. Lithium Ion Battery Pack
2. AC Power Adapter
3. Audio/Video Cable
4. USB Cable
5. Software CD
6. Hand Strap
7. Instruction Book/Quick Guide
8. Soft Case
Optional Accessory
9. Earphones
[ Notes ]
✤ Parts and accessories are available at your local Samsung dealer
and service center.
✤ You can download programs, the latest driver software, and
CODECs from the Samsung Electronics webpage.
1. Lithium Ion Battery Pack
4. USB Cable
2. AC Power Adapter
5. Software CD
8. Soft Case 9. Earphones7. Instruction Book/Quick Guide
✤ 確定舅的 Miniket Photo 隨附下列基本配件0
[
✤ 部件與配件可從舅當地的三星代理商和服務中心選購0
✤ 舅可以從 Samsung Electronics 網頁下載程式/ 最新的驅動程式
MMiinniikkeett PPhhoottoo 隨隨附附的的配配件件
3. Audio/Video Cable
6. Hand Strap
附附註註
]
軟體以及 CODEC0
基基本本配配件件
1. 裏離子電池組
2. 交流電源適配器
3. 聲訊/視訊纜線
4. USB 纜線
5. 軟體 CD
6. 手提帶
7. 說明書/快速指南
8. 軟袋
可可選選購購的的配配件件
9. 耳機
1313
Page 14
ENGLISH
MENU
5.25 MEGA PIXEL
POWER
W T
USB
DC IN
Name of Each Part
各各個個部部件件名名稱稱
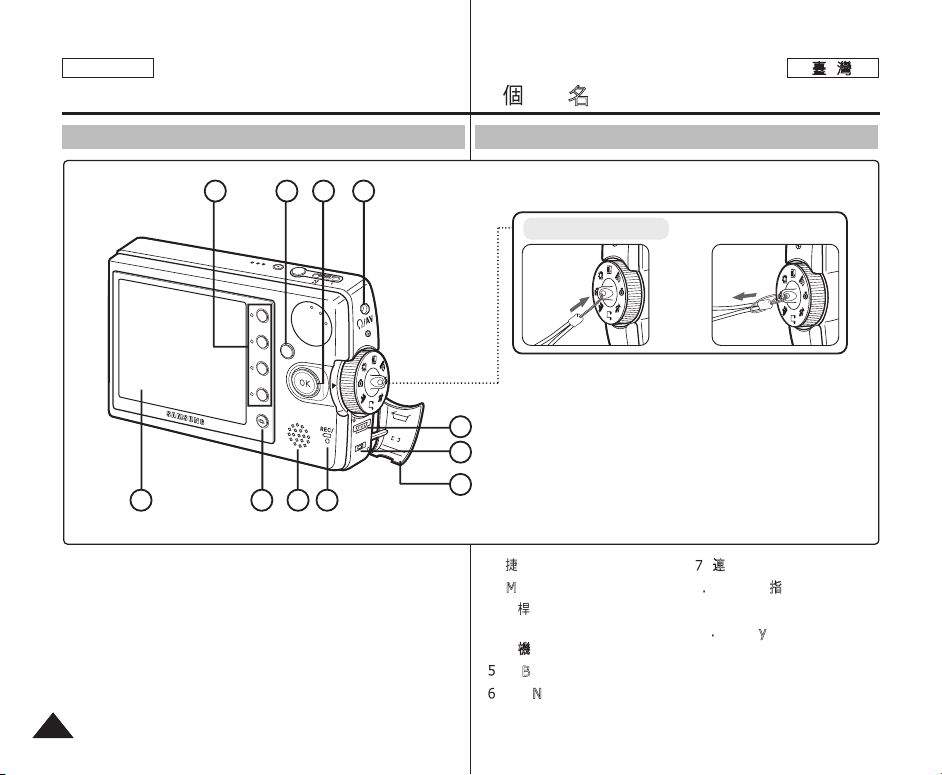
Rear & Left View
11 10 9 8
1. Shortcut Buttons
2. MENU button
3. Joystick (Up, Down, Left,
Right, OK)
4. Earphones and AV jack
5. USB port
6. DC IN jack
1414
1
2
3 4
7. Connector Cover
8. Recording / charging
Indicator
9. Built-in Speaker
10. Display Button
11. LCD Monitor
後後視視圖圖和和左左視視圖圖
Fastening Hand strap
5
6
7
11.. 捷捷徑徑按按瞿瞿
22.. MMEENNUU((選選單單))按按瞿瞿
33.. 搖搖桿桿 ((UUpp// DDoowwnn// LLeefftt//
RRiigghhtt// OOKK))
44.. 耳耳機機及及 AAVV 揷揷孔孔
55.. UUSSBB 連連接接埠埠
66.. DDCC IINN 揷揷孔孔
➮
77.. 連連接接器器蓋蓋
88.. 錄錄製製//充充電電指指示示器器
99.. 內內建建喇喇叭叭
1100.. DDiissppllaayy按按瞿瞿
1111.. LLCCDD 顯顯示示器器
Page 15
ENGLISH
Name of Each Part
各各個個部部件件名名稱稱
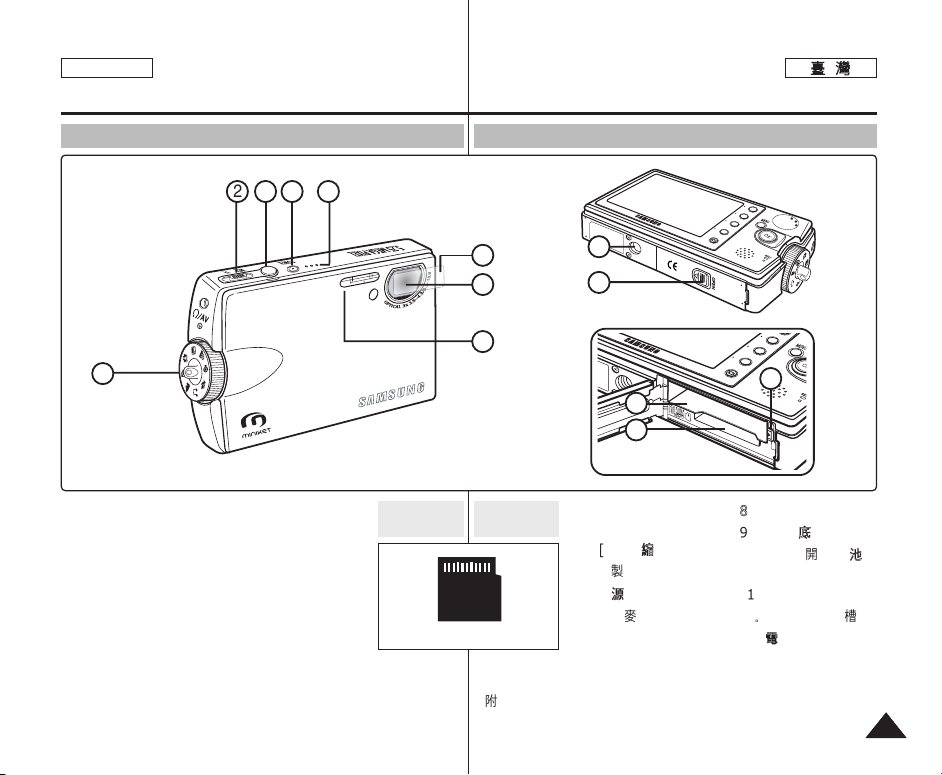
Front & Bottom View
2 3 4 5
1
1. Mode Dial
2. [W/T] Zoom Switch
3. Record / Stop
Button
4. Power Button
5. Built-in
Microphone
6. Lens protection
film
7. Lens
[ Notes ]
✤
There is a protecting film on the lens when the product is
purchased. Please remove the protecting film before using it.
8. Flash
9. Tripod Receptacle
10. OPEN Switch
(Battery / mini SD
card Slot)
11. Battery Slot
12. Mini SD card slot
13. Battery Lock
Switch
Usable
mini SD card
mini SD card
後後視視圖圖和和底底視視圖圖
6
7
9
10
8
13
11
12
可可用用的的小小型型
SSDD 賓賓
附附註註
[
]
✤ 該産品在購買時鏡頭上貼有保護膜, 請在使用前瘻下保護膜0
11.. 模模式式轉轉盤盤((模模式式選選擇擇
器器))00
22.. [[WW//TT]] 縮縮放放切切換換
33.. 錄錄製製//停停止止按按瞿瞿
44.. 電電源源按按瞿瞿
55.. 內內建建麥麥克克風風
66.. 鏡鏡頭頭保保護護膜膜
77.. 鏡鏡頭頭
88.. 閃閃光光燈燈
99.. 三三苛苛架架底底座座
1100.. OOPPEENN 開開關關((電電池池//
小小型型 SSDD 賓賓揷揷槽槽))
1111.. 電電池池槽槽
1122.. 小小型型 SSDD 賓賓揷揷槽槽
1133.. 電電池池鎖鎖定定開開關關
1515
Page 16

ENGLISH
SlideSlide
2592
Move
Full View
Slide
SS
Name of Each Part : LCD Display
各各個個部部件件名名稱稱:: LLCCDD 顯顯示示螢螢幕幕
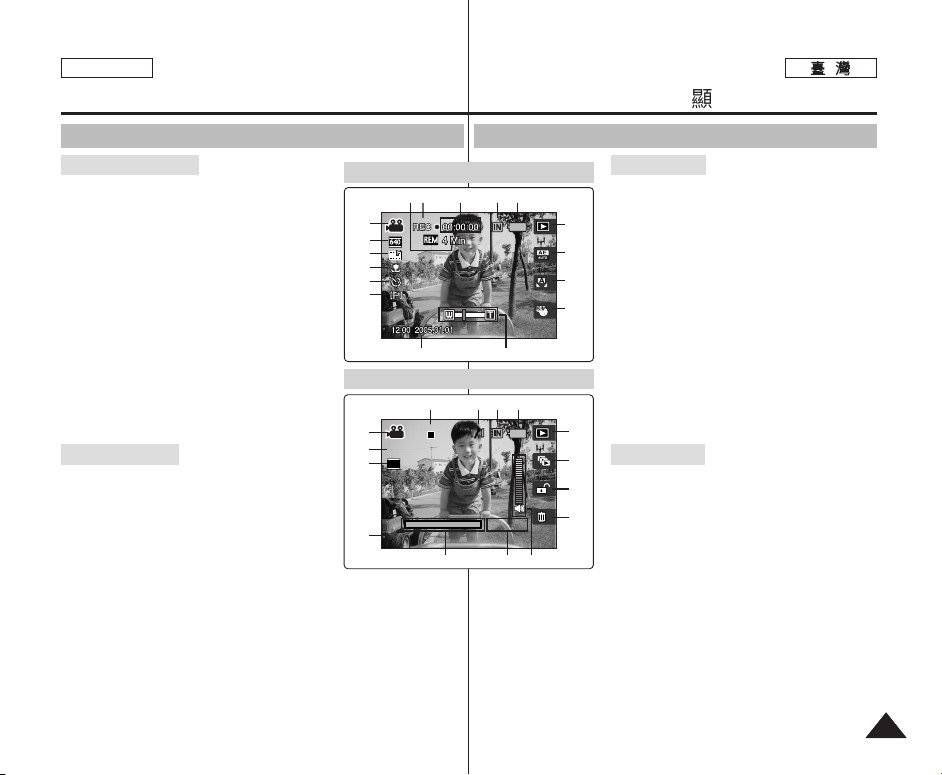
OSD (On Screen Display in Photo Capture Mode/Photo View Mode)
Photo Capture Mode
1. Mode Indicator
2. Image Size Indicator
3. Image Quality Indicator
4. Anti-Shake Indicator
5. White Balance Indicator
6. EV Indicator
7. ISO Speed Indicator
8. Multi Shot Indicator *
9. Sharpness Indicator
10. Digital Effect Indicator
11. Date / Time Indicator
12. Optical Zoom Indicator
13. Shaking warning indicator
14. Digital Zoom Indicator
15. Self Timer (Shortcut Button) *
16. Macro (Shortcut Button)
17. Flash (Shortcut Button)
18. Record / Play (Shortcut Button)
19. Battery Life Indicator
20. Memory Type Indicator
21. Focus Indicator
22. Image Counter (recordable still image number)
23. Metering Mode Indicator
24. Scene Mode Indicator
Photo View Mode
1. Mode Indicator
2. Image Size Indicator
3. DPOF Indicator
4. Image Number
5. Delete (Shortcut Button)
6. Protection (Shortcut Button)
7. Slide (Shortcut Button)
8. Record / Play (Shortcut Button)
9. Battery Life Indicator
10. Memory Type Indicator
11. Image Counter (Current / Total)
12. Current Selection
13. Move (Help Key)
14. Full View (Help Key)
[ Notes ]
✤ Functions not marked with * will be retained when the
Miniket Photo is restarted after turning it off.
✤ The OSD indicators of this product shown above are
based on model VP-MS10.
✤ The OSD indicators are based on when using the
1616
internal memory for storage.
Photo Capture Mode
1
2
3
4
5
6
7
9
10
Photo View Mode
1
6
2
3
4
Photo View Mode
12
Move
13
OOSSDD((相相片片遠遠取取模模式式//相相片片檢檢視視模模式式下下的的螢螢幕幕顯顯示示))
PPhhoottoo CCaappttuurree((拍拍攝攝相相片片 ))模模式式
2022 2123248
111412 13
10 9 8
11
OK
Full View
14
19
1. 模式指示器
2. 影像大小指示器
3. 影像品質指示器
18
4. 防震指示器
5. 白平衡指示器
6. EV 指示器
17
7. ISO 速度指示器
8. 連拍指示器 *
16
9. 淸劉度指示器
10. 數位效果指示器
15
11. 日期/時間指示器
12. 光學縮放指示器
13. 震動警告指示器
14. 數位縮放指示器
15. 自拍計時器(捷徑按瞿)*
16. 微距(捷徑按瞿)
17. 閃光(捷徑按瞿)
18. 錄製/播放(捷徑按瞿)
19. 電池壽命指示器
20. 記憶體類型指示器
21. 對焦指示器
22. 影像計數器(可錄製的靜態影像數量)
7
23. 測光模式指示器
24. 場景模式指示器
6
PPhhoottoo VViieeww((檢檢視視相相片片))模模式式
1. 模式指示器
5
2. 影像大小指示器
3. DPOF 指示器
4. 影像數量
5. 刪除(捷徑按瞿)
6. 保護(捷徑按瞿)
7. 幻燈片(捷徑按瞿)
8. 錄製/播放(捷徑按瞿)
9. 電池壽命指示器
10. 記憶體類型指示器
11. 影像計數器(目前/總計)
12. 目前的選擇
13. 移動(說明鍵)
14. 完整檢視(說明鍵)
附附註註
[
]
✤ 沒有標上 * 的功能將會在關閉裝置之後重新啓動時
保留0
✤ 上圖顯示之本産品的 OSD 指示器以 SC-MS10 模型
爲根據0
✤ OSD 指示器以使用內部記憶體儲存爲準0
Page 17
ENGLISH
00:00:10
All Play
Name of Each Part : LCD Display
各各個個部部件件名名稱稱:: LLCCDD 顯顯示示螢螢幕幕
OSD (On Screen Display in Movie Record Mode/Movie Play Mode)
Movie Record Mode
1. Mode Indicator
2. Image Size Indicator
3. Image Quality Indicator
4. Macro Indicator
5. Self Timer Indicator *
6. Windcut Indicator
7. Date / Time Indicator
8. Zoom In / Out Indicator
9. Digital Effect (Shortcut Button)
10. White Balance (Shortcut Button)
11. Program AE (Shortcut Button)
12. Record / Play (Shortcut Button)
13. Battery Life Indicator
14. Memory Type Indicator
15. Counter (Elapsed Time)
16. Record / Stop Indicator
17. Remaining Time Indicator
Movie Play Mode
1. Mode Indicator
2. Image Size Indicator
3. Image Number
4. Playback Progress Bar
5. Counter (Elapsed Time)
6. Volume Indicator
7. Delete (Shortcut Button)
8. Protection (Shortcut Button)
9. All Play (Shortcut Button)
10. Record / Play (Shortcut Button)
11. Battery Life Indicator
12. Memory Type Indicator
13. Image Counter (Current / Total)
14. Stop / Play / Pause Indicator
[ Note ]
✤ Functions not marked with * will be retained when the Miniket
Photo is restarted after turning it off.
Movie Record Mode
1
22
3
4
5
6
7 8
Movie Play Mode
14
1
All Play
8
640
2
3
100-0001
OOSSDD((影影片片錄錄製製模模式式//影影片片播播放放模模式式下下的的螢螢幕幕顯顯示示))
影影片片錄錄製製模模式式
14151617
13
13 12 11
00:00:10
4 5 6
附附註註
[
]
✤ 沒有標上 * 的功能將會在關閉 Miniket Photo 之後重新啓動時
保留0
1. 模式指示器
2. 影像大小指示器
3. 影像品質指示器
12
4. 微距
5. 自拍計時器指示器 *
11
6. 消除風聲指示器
7. 日期/時間指示器
10
8. 放大/縮小指示器
9. 數位效果(捷徑按瞿)
9
10. 白平衡(捷徑按瞿)
11. 程序自動曝光(捷徑按瞿)
12. 錄製/播放(捷徑按瞿)
13. 電池壽命指示器
14. 記憶體類型指示器
15. 計數器(經過時間)
16. 錄製/待機指示器
17. 剩餘時間指示器
10
影影片片播播放放模模式式
9
1. 模式指示器
8
2. 影像大小指示器
3. 影像數量
7
4. 播放進度列
5. 計數器(經過時間)
6. 音量指示器
7. 刪除(捷徑按瞿)
8. 保護(捷徑按瞿)
9. 全部播放(捷徑按瞿)
10. 錄製/播放(捷徑按瞿)
11. 電池壽命指示器
12. 記憶體類型指示器
13. 影像計數器(目前/總計)
14. 待機/播放/暫停指示器
1717
Page 18

ENGLISH
MoveMove
FolderFolder PlayPlay
MUSIC1
Move
Search
Pause
Folder Play
Name of Each Part : LCD Display
各各個個部部件件名名稱稱:: LLCCDD 顯顯示示螢螢幕幕
OSD (On Screen Display in Music Mode)
Music Mode
1. File Property
2. Progress Bar
3. Counter (Elapsed Time / File Length)
4. Search (Help Key)
5. Play / Pause (Help Key)
6. Volume Control (Help Key)
7. Equaliser (Shortcut Button)
8. Volume Indicator
9. Mode Indicator
10. Current Folder Name
11. Title Name
12. Protection Indicator
13. Move (Help Key)
14. Folder (Help Key)
15. Play (Help Key)
16. Delete (Shortcut Button)
17. Hold (Shortcut Button)
18. Repeat (Shortcut Button)
19. File List Display (Shortcut Button)
20. Battery Life Indicator
21. Memory Type Indicator
22. File Number (Current / Total)
OOSSDD((音音樂樂模模式式下下的的螢螢幕幕顯顯示示))
Music Mode
1
2
00:50/03:00
3
Pause
VolumeVolume
654
Search
Music Mode
202122
9
10
11
12
13
15
14
音音樂樂模模式式
1. 圭案內容
2. 進度列
3. 計數器(經過時間/圭案長度)
4. 搜尋(說明鍵)
5. 播放/暫停(說明鍵)
6. 音量控制(說明鍵)
8
7. 等化器(捷徑按瞿)
7
12
8. 音量指示器
9. 模式指示器
10. 目前資料夾名稱
11. 標題名稱
12. 保護指示器
13. 移動(說明鍵)
14. 資料夾(說明鍵)
19
15. 播放(說明鍵)
16. 刪除(捷徑按瞿)
18
17. 保持(捷徑按瞿)
17
18. 重複(捷徑按瞿)
19. 圭案淸單顯示(捷徑按瞿)
16
20. 電池壽命指示器
21. 記憶體類型指示器
22. 圭案數量(目前/總計)
1818
Page 19
ENGLISH
SWSWAV0001.WV0001.WAVSWAV0001.WAV
00:00:00/02:10:0000:00:00/02:10:00
8KHz
Mono
64Kbps
Search
Pause
Move
Select
Settings
Name of Each Part : LCD Display
各各個個部部件件名名稱稱:: LLCCDD 顯顯示示螢螢幕幕
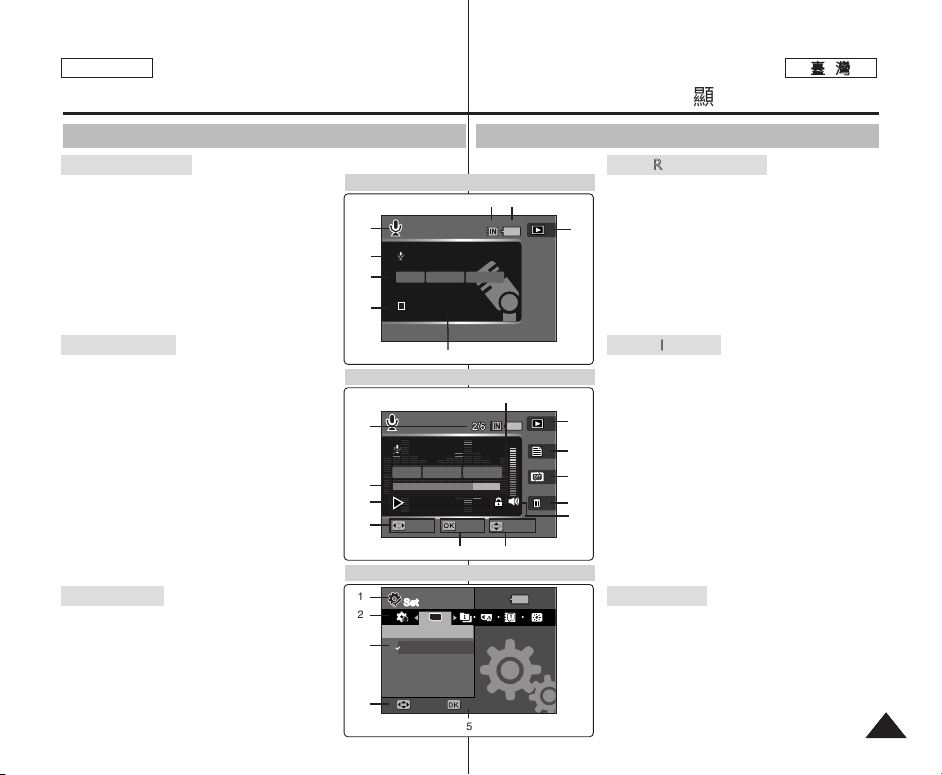
OSD (On Screen Display in Voice Record / Voice Play /Settings Mode)
Voice Record Mode
1. Mode Indicator
2. File Name
3. Current File Information
4. Standby / Record Indicator
5. Counter (Elapsed Time / Remaining Time)
6. Record / Play (Shortcut Button)
7. Battery Life Indicator
8. Memory Type Indicator
Voice Play Mode
1. File Number (Current / Total)
2. Progress Bar
3. Counter (Elapsed Time / Remaining Time)
4. Search (Help Key)
5. Play / Pause (Help Key)
6. Volume Control (Help Key)
7. Volume Indicator
8. Delete (Shortcut Button)
9. Repeat (Shortcut Button)
10. File List Display (Shortcut Button)
11. Record / Play (Shortcut Button)
12. Protection Indicator
Settings Mode
1. Mode Indicator
2. Menu Tab
3. Setup Items
4. Move (Help Key)
5. Select (Help Key)
1
2
3
4
1
2
3
4
1
2
3
4
Voice Record Mode
5
Voice Play Mode
SWAV0004.WAVSWAV0002.WAV
8KHz
Mono
00:00:16/00:00:20
00:00:16/00:00:20
Search
64Kbps
Pause
Settings Mode
Settings
TYPE
Memory TypeMemory Type
Int. Memory
Memory Card
Move
Select
5
OOSSDD((錄錄音音//語語音音播播放放//設設定定模模式式下下的的螢螢幕幕顯顯示示))
VVooiiccee RReeccoorrdd 模模式式
1. 模式指示器
2. 圭名
3. 目前圭案資訊
6
4. 待機/錄製指示器
5. 計數器(經過時間/剩餘時間)
6. 錄製/播放(捷徑按瞿)
7. 電池壽命指示器
8. 記憶體類型指示器
VVooiiccee PPllaayy 模模式式
1. 圭案數量(目前/總計)
2. 進度列
3. 計數器(經過時間/剩餘時間)
4. 搜尋(說明鍵)
11
5. 播放/暫停(說明鍵)
10
6. 音量控制(說明鍵)
7. 音量指示器
9
8. 刪除(捷徑按瞿)
8
9. 重複(捷徑按瞿)
7
10. 圭案淸單顯示(捷徑按瞿)
11. 錄製/播放(捷徑按瞿)
12. 保護指示器
SSeettttiinnggss 模模式式
1. 模式指示器
2. 選單標籤
3. 設定項目
4. 移動(說明鍵)
5. 選取(說明鍵)
12
Volume
Volume
65
78
1919
Page 20
ENGLISH
MENU
OPEN
@
!
MENU
MEN
U
How to Use the Battery Pack
如如何何使使用用電電池池組組
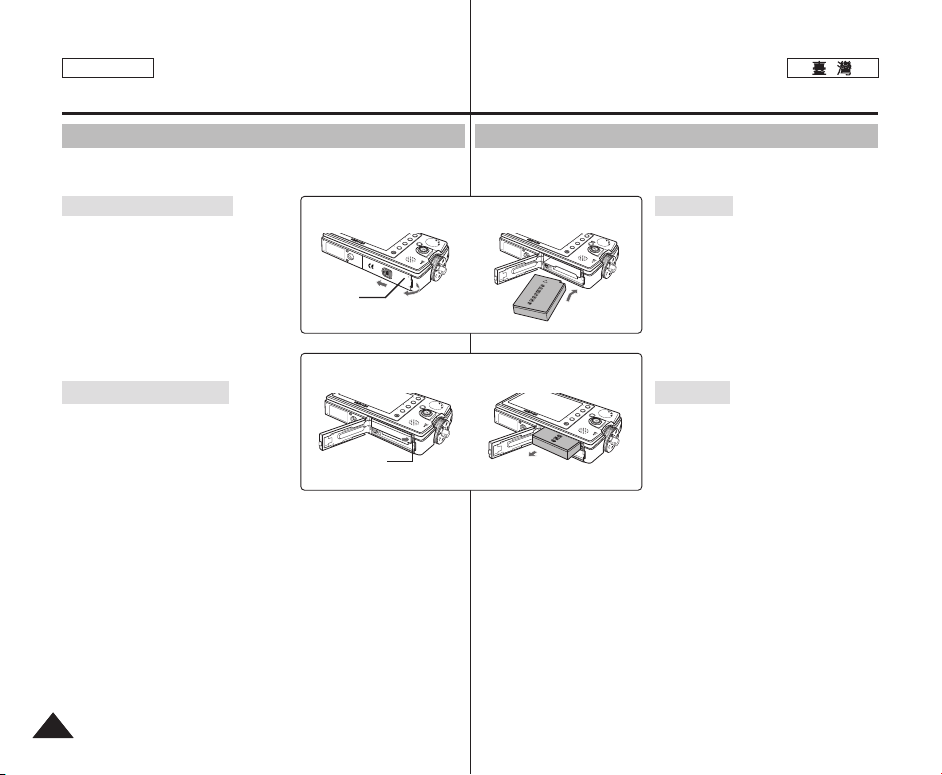
Battery Pack Installation / Ejection
It is recommended to purchase one or more additional Battery Packs
to allow continuous use of your Miniket Photo.
To insert the Battery Pack
1. Push the [OPEN] switch on the
bottom side of the set in the direction
of ! as shown in the diagram and
open the lid.@
2. Insert the Battery Pack into the
battery slot until it softly clicks.
Make sure that the SAMSUNG logo
is facing up while the set is placed as
shown in the diagram.
To eject the Battery Pack
1. Push the [Battery Lock Switch] in the
direction as shown in the diagram to
pop the Battery Pack out.
2. Pull the ejected Battery Pack out in
the direction as shown in the diagram.
[ Notes ]
✤ Clean the terminals to remove any foreign substances before
inserting the Battery Pack.
✤ If the Miniket Photo will not be in use for a while, remove the
Battery Pack from the Miniket Photo.
✤ It is recommended to prepare fully charged additional Battery
Packs for outdoor use.
✤ Additional Battery Packs are available at your local Samsung
dealer and service center.
[ Warning ]
✤ When you eject the Battery Pack from the Miniket Photo, hold the
Battery Pack so as not to drop it.
2020
<Inserting the Battery Pack>
Cover
<Ejecting the Battery Pack>
Battery Lock
Switch
安安裝裝//退退出出電電池池組組
建議舅購買一個或多個額外的電池組,這樣可連續使用舅的 Miniket
Photo0
揷揷入入電電池池組組
1. 將裝置底部的 [OPEN] 開關推向
圖中所示的方向 ! 然後打開蓋子
➮
➮
附附註註
[
]
✤ 在揷入電池組之前,請淸潔終端以淸除任何雜質0
✤ 若長時間不會使用 Miniket Photo,請取出 Miniket Photo 中的
電池組0
✤ 在戶外使用時,建議舅準備好完全充電的額外電池組0
✤ 額外電池組可從舅當地的三星代理商和服務中心選購0
警警告告
[
]
✤ 從 Miniket Photo 退出電池組時,拿穩電池組以免掉落0
@0
2. 將電池組揷入電池槽直到輕輕賓入
到位0
當裝置如圖所示放置時,確定
SAMSUNG 徽標朝上0
退退出出電電池池組組
1. 將 [Battery Lock Switch](電池
鎖定開關)推向圖中所示的方向以
彈出電池組0
2. 將彈出的電池組從圖中所示的方向
拉出0
Page 21
ENGLISH
How to Use the Battery Pack
如如何何使使用用電電池池組組
Maintaining the Battery Pack
✤ The Battery Pack should be recharged in an environment
between 32°F (0°C) and 104°F (40°C).
✤ The life and capacity of the Battery Pack will be reduced if it is
used in temperatures below 32°F (0°C) or left in temperatures
above 104°F (40°C) for a long period.
✤ Do not put the Battery Pack near any heat sources (fire or
flames, for example).
✤ Do not disassemble, process, press, or heat the Battery Pack.
✤ Do not allow the + and - terminals of the Battery Pack to be
short-circuited. It may cause leakage, heat generation, fire, or
overheating.
✤ If Miniket Photo fails to work when you turn on the power or the
battery life indicator flickers, replace the Battery Pack.
✤ It is recommended to use original Battery Pack that is available
at SAMSUNG service center.
維維護護電電池池組組
✤ 電池組必須在介於 32°F(0°C) 和 104°F (40°C) 的環境溫度
下重新充電0
✤ 若在低於 32°F(0°C) 的溫度下使用電池組,或者電池組長時間
處於高於 104°F (40°C) 的溫度,電池組的使用壽命和電容量
將會降低0
✤ 請勿讓電池組接近熱源(例如火或火焰)0
✤ 請勿阿開/ 處理/ 甥壓或加熱電池組0
✤ 請勿讓電池組的正極和負極端形成短路0 這可能導致電池組漏
液/ 發出熱量,引起火災或過熱0
✤ 如果 Miniket Photo 在舅開啓電源時無法操作或電池壽命指示
器閃鹵,請更換電池組0
✤ 建議使用從三星服務中心購買的原廠電池組0
2121
Page 22
ENGLISH
How to Use the Battery Pack
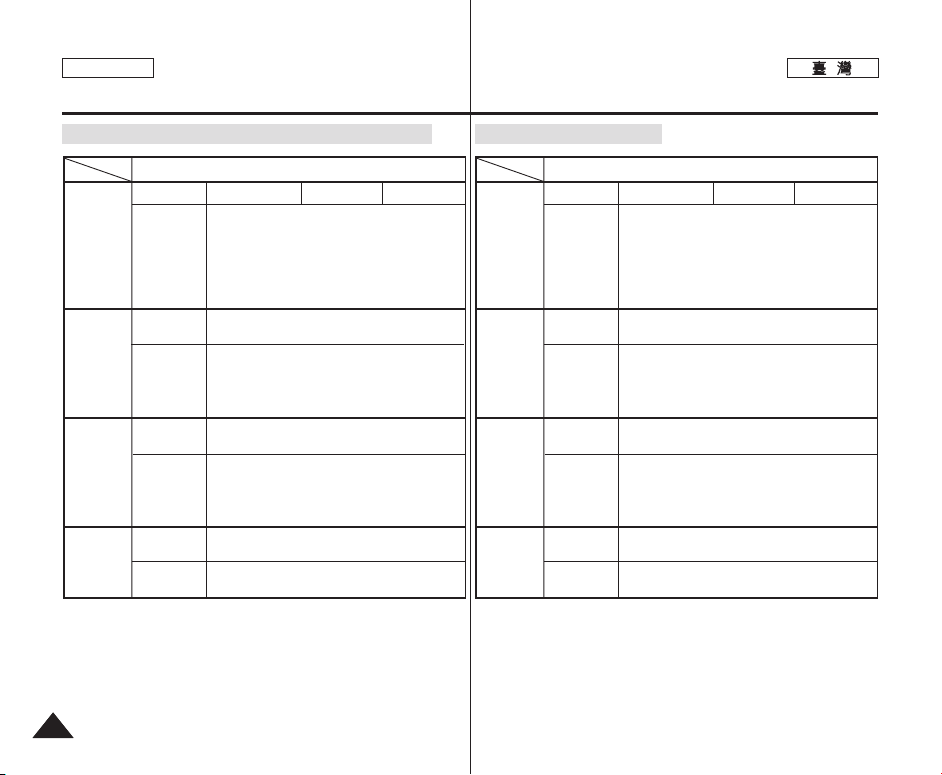
Using Time / Image Capacity According To Modes
Mode
Battery
Photo
Movie
Music
Voice
Using Time
Conditions
Continuous
Recording Time
Conditions
Continuous
Playback time
Conditions
Continuous
Recording Time
Conditions
SB-LH82 (820 mAh)
Approx. 85 minutes
● Fully charged battery / Room temperature / 5M image
size / Super Fine / Pictures captured at 20 sec interval /
zoom in or out after each capturing
● Power off and on after each 8 captures / Default LCD
brightness (14)
● 3 non-flash use / 1 flash use capturing
Approx. 80 minutes
Fully charged battery / Room temperature
Normal
320x240 Image Size
No zooming
Approx. 4 hours
Fully charged battery / Room temperature
LCD display turned off
44.1 KHz / 128 Kbps / 4MB / Default equaliser / Use
earphones / Mid-level volume
Approx. 4 hours
Fully charged battery / Room temperature
Mono / 64 Kbps / Use earphones / Mid-level volume
Image Capacity
Approx. 230
如如何何使使用用電電池池組組
根根據據模模式式的的使使用用時時間間//影影像像容容量量
電池
模式
Photo
Movie
Music
Voice
使用時間
條件
連續錄製時間
條件
連續播放時間
條件
連續錄製時間
條件
●
●
●
大約 80 分鐘
完全充電的電池 / 室溫
正常
320x240 影像大小
無縮放
大約 4 小時
完全充電的電池 / 室溫
關閉 LCD 顯示器
44.1 KHz / 128 Kbps / 4MB / 預設等化器 /
使用耳機 / 中等音量
大約 4 小時
完全充電的電池 / 室溫
單聲道 / 64 Kbps / 使用耳機 / 中等音量
SB-LH82 (820 mAh)
大約 85 分鐘
完全充電的電池 / 室溫 /5M影像大小 / 超精
細 / 相片以 20 秒的間隔拍攝 / 在每次拍攝後
放大或縮小
在每拍攝 8 次之後關閉電源然後開啓 / 預設
LCD 亮度 (14)
使用 3 次無閃光 /1 次閃光拍攝
影像容量
大約 230 張
✤ Figures shown above are measured under Samsung’s test
environment, and may differ from users and conditions.
2222
✤ 上表顯示的數字在三星測試環境下測量,可能會根據使用者與條件
的不同而異0
Page 23
ENGLISH
How to Use the Battery Pack
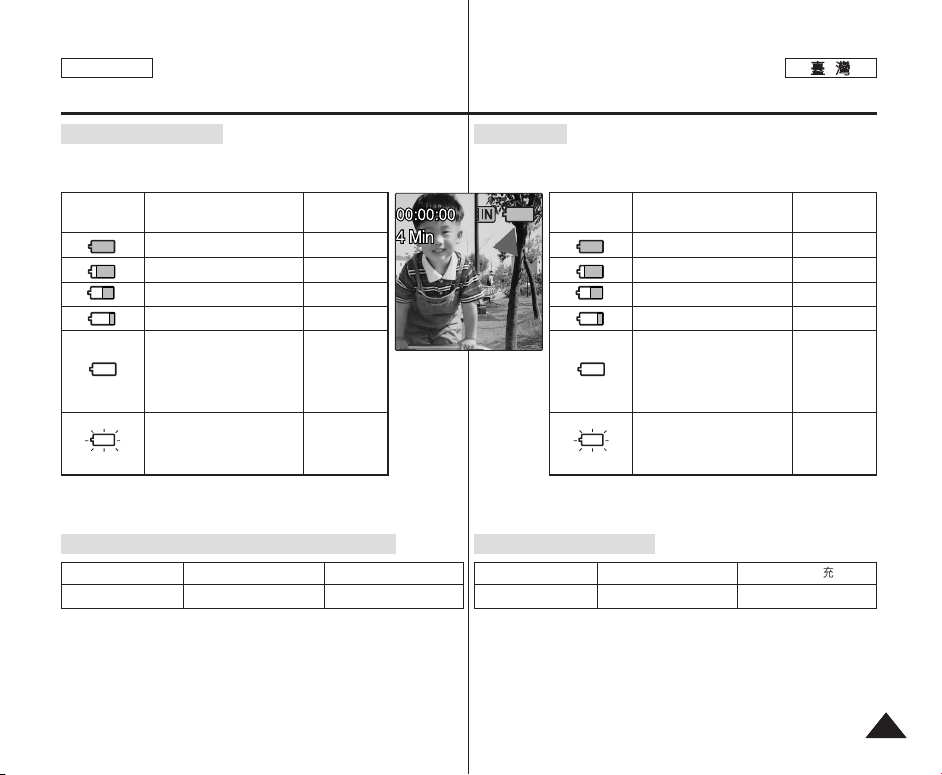
Battery Level Display
The Battery Level Display shows the amount of battery power
remaining in the Battery Pack.
Battery Level
Indicator
State
Fully charged
25 ~ 50% is used
50 ~ 70% is used
75 ~ 95% is used
Over 95% is used
The Miniket Photo will soon
turn off. Change the Battery
Pack as soon as possible.
(flickers)
The Miniket Photo will be
forced to turn off soon.
✤ It is recommended to fully charge the Battery Pack before use.
Message
-
-
-
-
-
“Low battery”
如如何何使使用用電電池池組組
電電池池容容量量顯顯示示
電池容量顯示可指出電池組的剩餘電量0
電池容量指示
完全充電
25 ~ 50% 已用
50 ~ 70% 已用
75 ~ 95% 已用
超過 95% 已用
Miniket Photo 卽將關閉0
請細快更換電池組0
(閃鹵)
Miniket Photo 卽將强制
✤ 建議在使用之前爲電池組完全充電0
狀態
關閉0
訊息
-
-
-
-
-
“Low battery”
Charging time according to charging methods
Battery
SB-LH82 (820 mAh)
Using AC Adapter Using USB Charging
Approx. 1 hr 40 min
Approx. 3 hr
✤ You may charge your Miniket Photo by connecting it to a PC with
the USB cable.
充充電電時時間間將將依依據據充充電電方方法法而而定定
電電池池
SB-LH82 (820 mAh)
使使用用交交流流電電源源適適配配器器
大約 1 小時 40 分鐘
使使用用 UUSSBB 充充電電
超過 3 小時
✤ 舅可以透過使用 USB 纜線將 Miniket Photo 連接到電腦來爲央
充電0
2323
Page 24
ENGLISH
How to Use the Battery Pack
如如何何使使用用電電池池組組
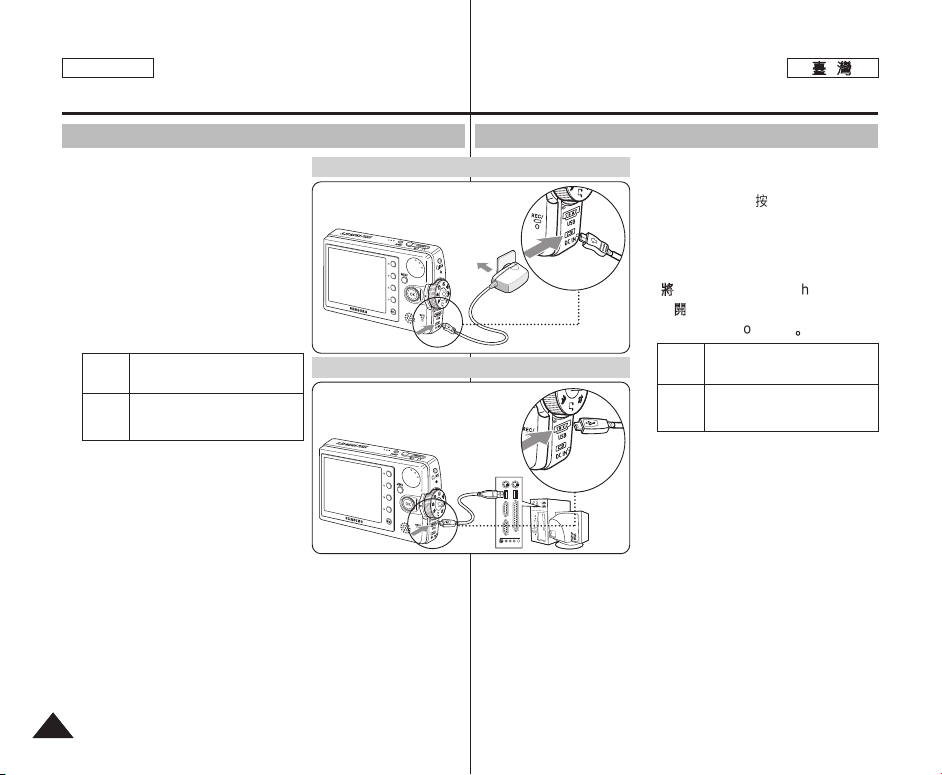
Charging the Battery Pack
You can charge the Battery Pack using AC Power
Adapter or USB cable.
1. Turn off the Miniket Photo by pressing the
[POWER] button.
◆ Charging will begin only when the Miniket
Photo is turned off (using AC Power
Adapter or USB cable).
2. Insert the Battery Pack to the Miniket
Photo.
3. Open the Connector Cover of the set.
4. Charge the Miniket Photo.
[ Notes ]
✤ You may use the Miniket Photo powered by
[ Warning ]
✤ It is recommended to fully charge the Battery Pack before use.
✤ You should only charge the battery in an environment between 32°F(0°C)
✤ Ambient temperature may affect charging the Battery Pack; too low
✤ Before connecting the cable, make sure that you don’t have any foreign
Connect the AC Power Adapter with the
AC Power
Miniket Photo properly and plug the AC
Adapter
Power Adapter to the wall outlet.
Connect the USB Cable with the
USB
Miniket Photo properly and connect
Cable
the other side to a USB port of a PC.
the AC Power Adapter indoors where
available.
and 104°F(40°C).
temperature may result in longer charge time / incomplete charging.
substances between connectors.
Connecting the AC Power Adapter
Connecting the USB Cable
4
電電池池組組充充電電
舅可以使用交流電源適配器或 USB 纜線
爲電池組充電0
11.. 按按下下 [[PPOOWWEERR]] 按按
PPhhoottoo00
◆ 充電將會在關閉 Miniket Photo
後開始(使用交流電源適配器或
DC Power Jack
USB 纜線)0
22.. 將將電電池池組組揷揷入入 MMiinniikkeett PPhhoottoo00
33.. 打打開開裝裝置置的的連連接接器器蓋蓋00
44.. 爲爲 MMiinniikkeett PPhhoottoo 充充電電00
交流電源
適配器
USB 纜線
USB Port
[
附附註註
]
✤ 舅可以在室內使用交流電源適配器供
電的 Miniket Photo(若有)0
警警告告
[
]
✤ 建議在使用之前爲電池組完全充電0
✤ 舅應該只在溫度介於 32°F(0°C) 和 104°F (40°C) 的環境中爲電
池充電0
✤ 環境溫度會影響電池的充電,溫度太低會導致充電時間較長/沖電不
完整0
✤ 連接纜線之前,請確定連接器之間沒有任何異物0
瞿瞿以以關關閉閉 MMiinniikkeett
正確連接交流電源適配器與 Miniket
Photo,然後將交流電源適配器揷入牆
上揷座0
正確連接 USB 纜線與 Miniket
Photo,然後將癩一端連接至電腦的
USB 埠0
2424
Page 25
ENGLISH
N
U
Getting Started
使使用用入入門門
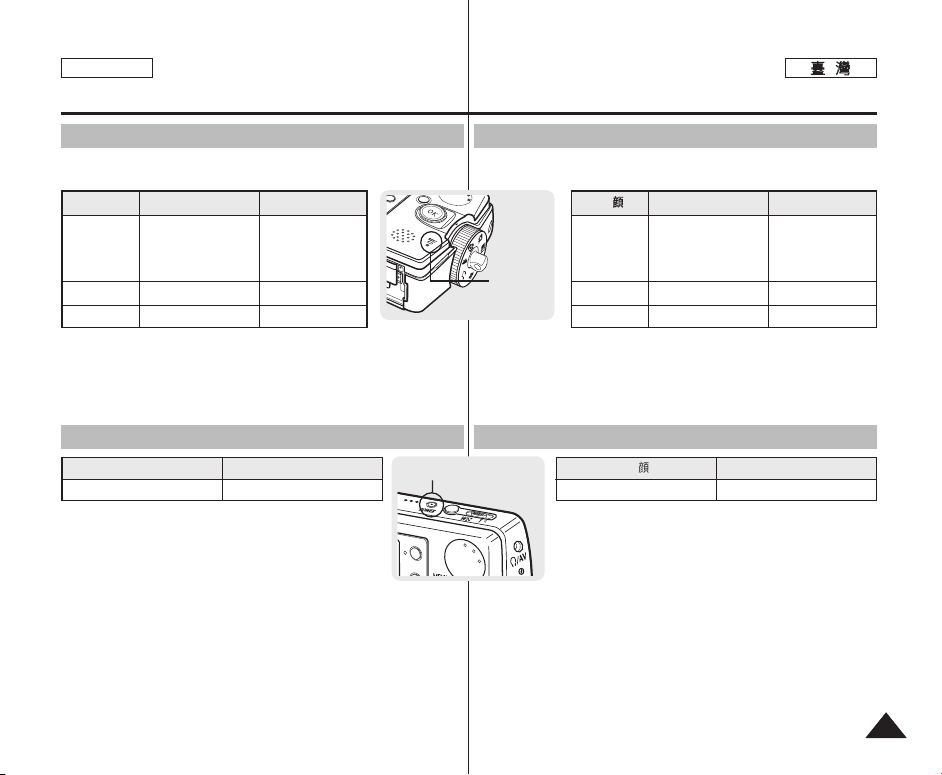
Recording / Charging Indicator
The color of the LED indicates the state of power or charging.
LED Color
Red
Orange
Green
During Recording
Recording
<Movie and
Voice Mode>
-
-
During Charging
-
Charging
Fully Charged
Power Indicator
LED Color
Blue
Power
On
錄錄製製//充充電電指指示示器器
LED 的顔色標示電源或充電的狀態0
Recording /
Charging
Indicator
電電源源指指示示器器
Power Indicator
LLEEDD 顔顔色色
紅色
橙色
綠色
LLEEDD 顔顔色色
<影片和語音模式>
藍色
錄錄製製期期間間
錄製
-
-
充充電電期期間間
-
正在充電
完全充電
電電源源
開啓
2525
Page 26
ENGLISH
Getting Started
使使用用入入門門
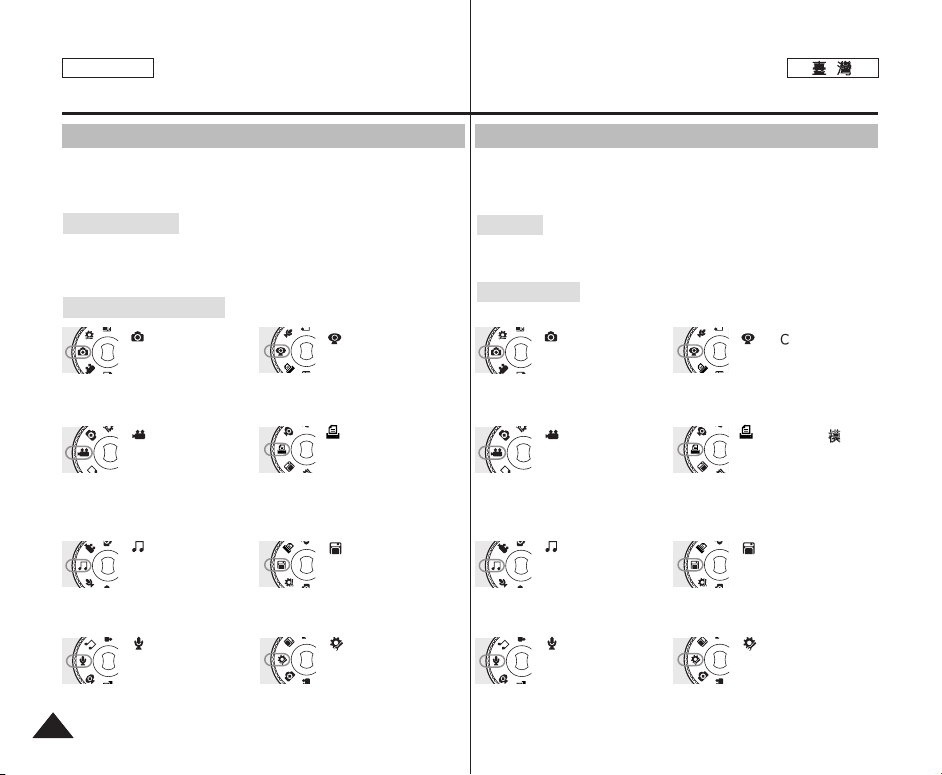
Using the Mode Dial
The Mode Dial is used to change the Miniket Photo mode. Available
modes are Photo, Movie, Music, Voice, PC Cam, PictBridge, Storage,
and Settings.
Setting the Mode
Turn the desired mode by turning the Mode Dial.
Within 1 ~ 2 seconds, the Miniket Photo switches to the designated
mode.
Functions of Each Mode
Photo Mode
You can take / view
photos.
Movie Mode
You can record / play
back video.
Music Mode
You can play back
music files (music).
Voice Mode
You can record / play
back voice clips.
2626
connected to any site that provides
video chatting, such as MSN.
PictBridge-supported printer with
a USB cable, you can print your
stored pictures without a PC.
USB cable allows you to store
various files in the Miniket Photo.
regarding the LCD display, Date /
Time, Reset, and Memory
management.
PC Cam Mode
With MiniketPhoto, you
can also video chat while
PictBridge Mode
When you connect the
Miniket Photo to a
Storage Mode
Connecting the Miniket
Photo to a PC with a
Settings Mode
Using this mode, you
can set / adjust settings
使使用用模模式式轉轉盤盤
Mode Dial(模式轉盤)用於設定 Miniket Photo 模式0 可使用的模式
有 Photo/ Movie/ Music/ Voice/ PC Cam/ PictBridge/
Storage以及 Settings0
設設定定模模式式
舅舅可可以以透透過過轉轉動動模模式式轉轉盤盤來來設設定定模模式式00
在 1~2秒內,Miniket Photo 將會切換到指定的模式0
每每個個模模式式的的功功能能
PPhhoottoo模模式式
舅可以拍攝/檢視相片0
MMoovviiee模模式式
舅可以錄製/播放視訊0
支援 PictBridge 的印表機時,舅
不用電腦便可以列印已儲存的圖
片0
MMuussiicc模模式式
舅可以播放音樂圭案
(音樂)0
電腦將可以讓舅在 Miniket
Photo 中儲存各種圭案0
VVooiiccee模模式式
舅可以錄製/播放語音/
聲音0
器/ 日期/時間/ 重設以及記憶體
管理的設定値0
PPCC CCaamm模模式式
使用 MiniketPhoto,舅
可以連接到任何有提供
視訊聊天的網站來進行視訊聊
天,如 MSN0
PPiiccttBBrriiddggee 模模式式
使用 USB 纜線將
Miniket Photo 連接到
SSttoorraaggee模模式式
使用 USB 纜線將
Miniket Photo 連接到
SSeettttiinnggss模模式式
舅可以使用此模式來設
定/調整關於 LCD 顯示
Page 27
ENGLISH
Getting Started
使使用用入入門門
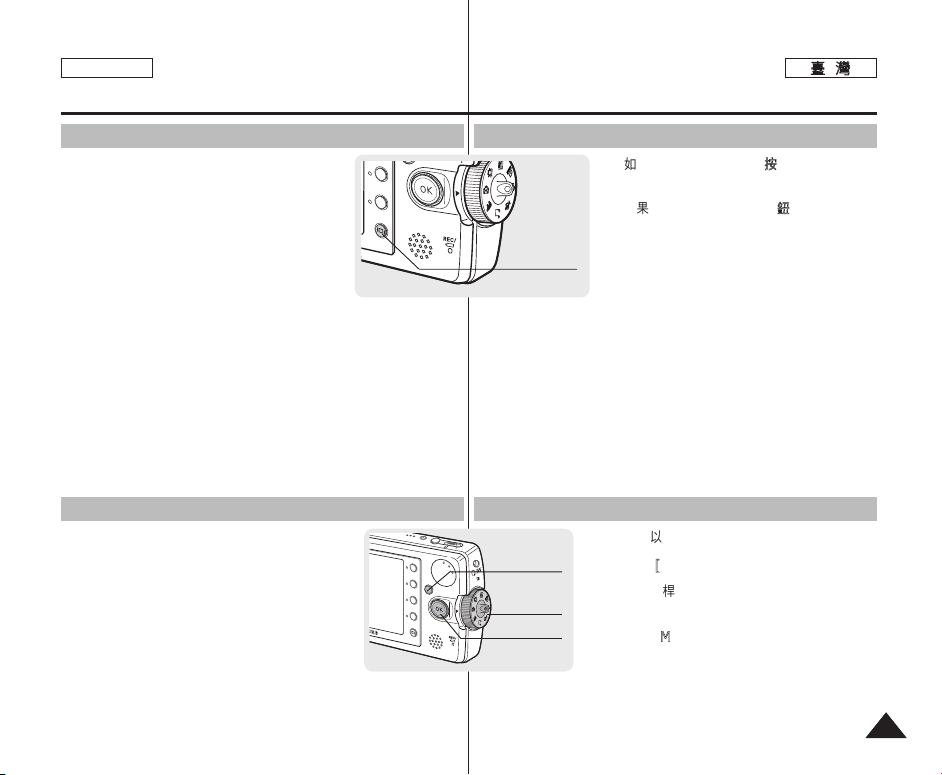
Using the DISPLAY Button
1. If you press the [DISPLAY] button once,
only Shortcut Button icons and focus
indicator will appear on the screen.
2. f you press the [DISPLAY] button twice,
only focus indicator will appear on the
screen.
3. If you press the [DISPLAY] button 3 times,
it switches to the initial (normal) display
screen.
[ Notes ]
✤ Above description applies to the Photo and Movie mode.
✤ In Music and Voice modes, the [DISPLAY] button will not operate.
The LCD screen goes off automatically after 30 seconds if there
was no button operation. In that case, press any button to turn on
the LCD monitor.
Using the MENU Button
1. Change the desired modeoto mode by
setting the Mode Dial.
2. Press the [MENU] button.
3. Move the cursor by moving the joystick
(up / down / left / right) to select desired
menu item, and then press the joystick (OK)
to confirm.
4. Press the [MENU] button to finish.
POWER
W
M
E
N
U
使使用用「「顯顯示示」」按按瞿瞿
11.. 如如果果舅舅按按下下 [[DDIISSPPLLAAYY]] 按按瞿瞿一一次次,,只只有有「「捷捷
徑徑按按瞿瞿」」圖圖示示和和對對焦焦指指示示器器會會出出現現在在螢螢幕幕上上00
22.. 如如果果舅舅按按下下 [[DDIISSPPLLAAYY]] 按按瞿瞿兩兩次次,,只只有有對對
焦焦指指示示器器會會出出現現在在螢螢幕幕上上00
33..
如如果果舅舅按按下下 [[DDIISSPPLLAAYY]] 按按瞿瞿三三次次,,央央將將會會
切切換換到到初初始始((標標準準))顯顯示示螢螢幕幕00
[
附附註註
[DISPLAY] Button
]
✤ 以上描述適用於 Photo 和 Video 模式0
✤ 在 Music 和 Voice 模式中,[DISPLAY] 按瞿將不會操作0 如果
沒有任何按瞿操作,LCD 螢幕將會在 30 後自動關閉0 在此情況
下,按下任何按瞿卽可開啓 LCD 顯示器0
使使用用 MMEENNUU 按按瞿瞿
T
MENU Button
Mode Dial
Joystick
11.. 舅舅可可以以透透過過設設定定模模式式轉轉盤盤來來變變更更所所要要的的模模式式00
22.. 按按下下 [[MMEENNUU]] 按按瞿瞿00
33.. 移移動動搖搖桿桿來來移移動動游游標標以以選選擇擇所所要要的的選選單單項項
目目,,然然後後按按下下 ((OOKK)) 按按瞿瞿確確認認00
44.. 按按下下 [[MMEENNUU]] 按按瞿瞿以以完完成成00
2727
Page 28
ENGLISH
M
ENU
PIXEL
POWER
W T
Getting Started
使使用用入入門門
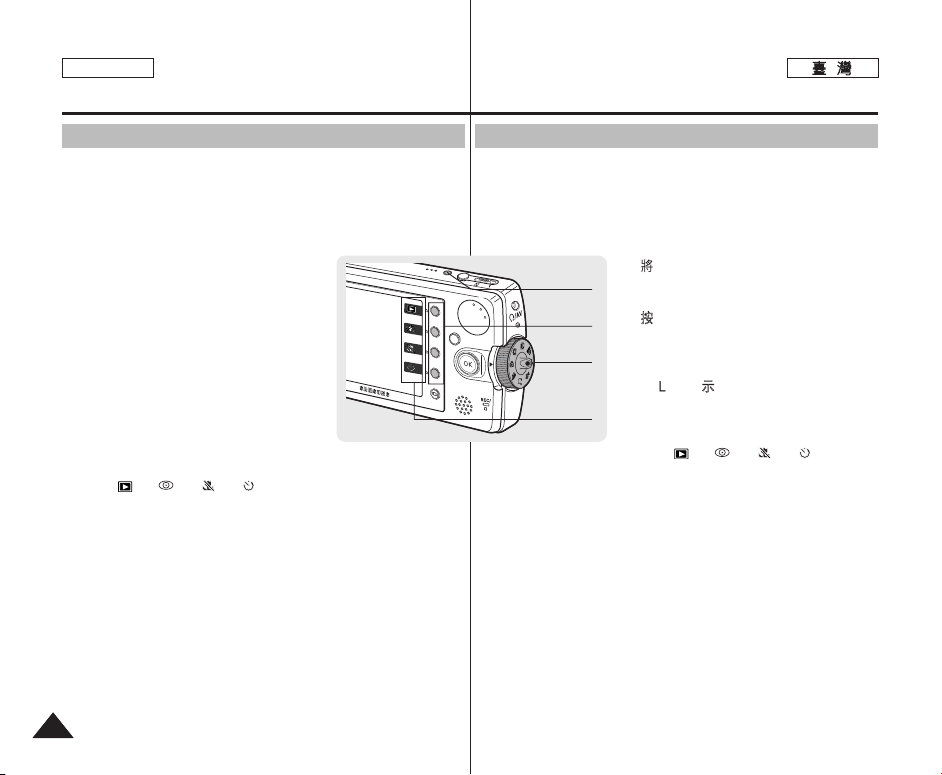
Using the Shortcut Buttons
For Photo, Movie, Music, Voice and PictBridge modes, icons that
represent the most frequently accessed functions according to the
selected mode are displayed on the LCD monitor to allow easier
access. Using these buttons, you may directly access the functions.
1. Turn the Mode Dial to set the desired
mode.
2. Press the [POWER] button to turn on
the Miniket Photo.
3. On the LCD monitor, the function icon of
shortcut button is displayed.
Press the shortcut button to access the
function directly.
◆ In Photo Capture Mode, the icons of 4 shortcut buttons will be :
< >-< >-< >-< >
使使用用捷捷徑徑按按瞿瞿
對於 Photo/ Movie/ Music/ Voice 以及 PictBridge 模式, 根據
所選取的模式來代表最常存取之功能的圖示,將會在 LCD 顯示器上顯
示以更容易存取0 舅可以使用這些按瞿來直接存取功能0
[Power] Button
Shortcut button
Mode Dial
Icons of
Shortcut button
functions
11.. 將將模模式式轉轉盤盤設設定定爲爲所所要要的的模模式式00
22.. 按按下下 [[PPOOWWEERR]] 按按瞿瞿以以開開啓啓 MMiinniikkeett
PPhhoottoo00
33.. 在在 LLCCDD 顯顯示示器器上上,,捷捷徑徑按按瞿瞿的的功功能能將將會會
顯顯示示00 按按下下該該按按瞿瞿卽卽可可直直接接存存取取功功能能00
◆ 在 Photo Capture 模式中,4 個捷
徑按瞿圖示將是:
< >-< >-< >-< >
2828
Page 29
ENGLISH
Getting Started
使使用用入入門門
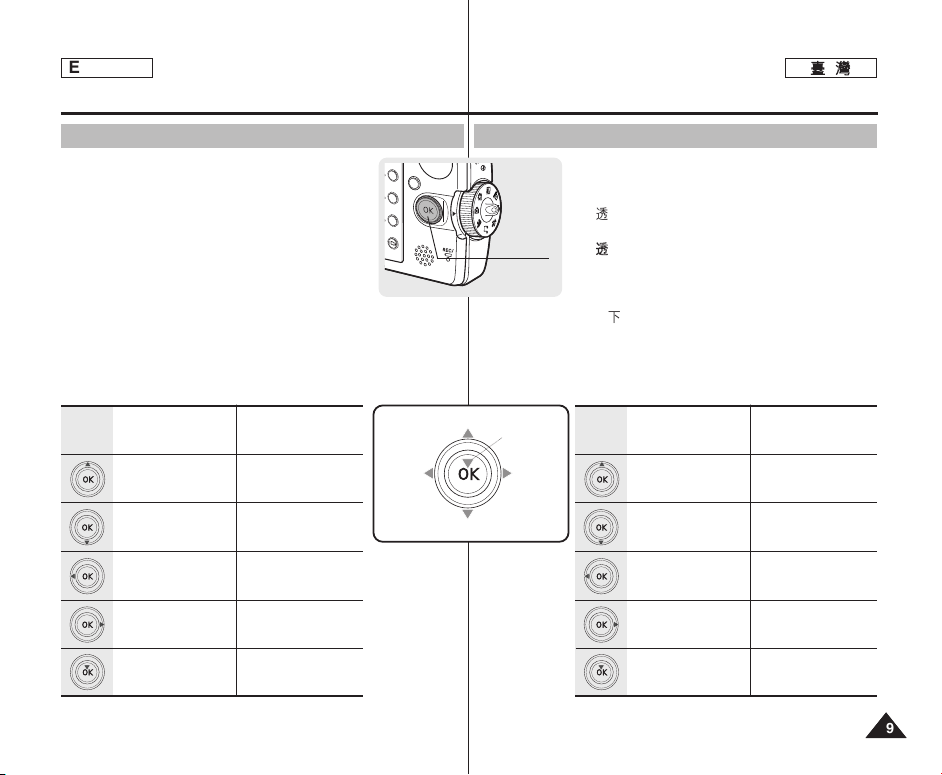
Using the Joystick
✤ The joystick is used to make a selection, move the
cursor, select functions, and exit from the menu.
1. Move the cursor left / right by pressing the
joystick.
2. Move the cursor up / down by pressing the
joystick.
◆ You can adjust the volume by moving the
joystick (up / down) in Movie / Music / Voice playback modes.
3. Confirm your selection by pressing the joystick (OK).
Menu Selection
Move Upwards
Move Downwards
Move Left
Move Right
Confirm Selection
While Playing Back
Increase Volume
Decrease Volume
-
-
-
MENU
Move left
使使用用搖搖桿桿
Move Up
Move down
Joystick
Confirm
selection
Move right
✤ 搖桿用於進行選擇/ 移動游標/ 選擇功能以及結
束選單0
11.. 透透過過按按下下搖搖桿桿將將游游標標向向左左//向向右右移移動動00
22.. 透透過過按按下下搖搖桿桿將將游游標標向向上上//向向下下移移動動00
MMoovviiee//MMuussiicc//VVooiiccee
◆ 在
模式中,舅可以透過
(向上/向下)移動搖桿按瞿來調整音量0
33.. 按按下下((OOKK))按按瞿瞿以以確確認認選選擇擇00
選選單單選選擇擇
向上移動
向下移動
向左移動
向右移動
確認選擇
在在播播放放時時
提高音量
降低音量
-
-
-
2929
Page 30
ENGLISH
Getting Started
使使用用入入門門
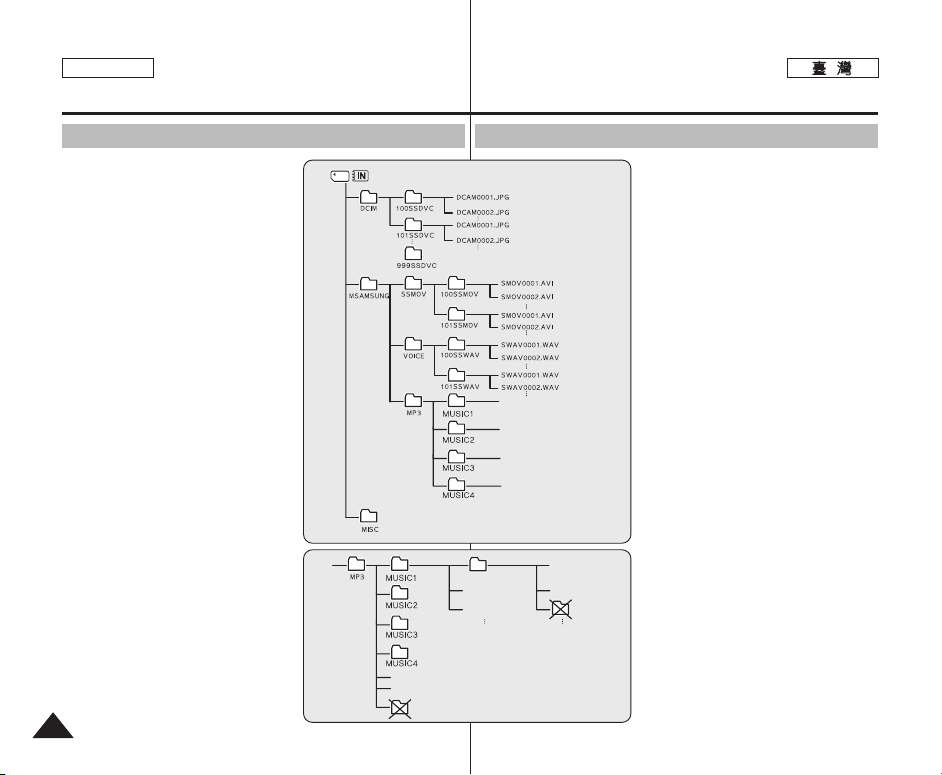
Structure of Folders and Files
The movie, photo, music, voice files and so forth files
are stored in internal memory or mini SD card as below:
[ Notes ]
✤ Refer to page 32 for details on mini SD card.
✤ You can store general data files and folders in
Miniket Photo.
✤ The maximum number of files you may store in
DCIM is 99 where number of folders is 999.
✤ DCAM****.JPG: Photo files
SMOV****.AVI: Movie files
SWAV****.WAV: Voice files
********.MP3: Music files
✤ MISC: DPOF files are stored.
✤ Do not change the file or folder name except
‘Free’.
✤ You can freely change the file or folder name
under the ‘Free’.
✤ Movie files that you have not made with this
Miniket Photo may not play back on this Miniket
Photo.
✤ <MUSIC1 ~ 4> folders are system folders created
when manufacturing.
✤ Do not change or delete <MUSIC1 ~ 4> folders.
Changing or deleting <MUSIC1 ~ 4> folder names
will disable music playback.
✤ Only mp3 files are recognised under the system
folder “MP3”. Folders created under the system
folder “MP3” other than <MUSIC1 ~ 4> cannot be
recognised (Figure 1).
✤ User folders can be created under <MUSIC1 ~ 4>
folders. MP3 files under a user created folder will
be recognised and played back but the folder
name will not be displayed on the LCD screen
(Figure 2)
✤ Folders created under the user folders will not be
recognised (Figure 3).
✤ <MUSIC1 ~ 4> folders can contain up to 500
songs.
✤ Miniket Photo supports NetSync DRM.
[ Warning ]
✤ Mini SD cards are made with precision technology.
It is sensitive and vulnerable to electric shock,
temperature and humidity, be cautious with
handling the mini SD card to avoid losing data
stored in it.
✤ Damaged data may not be recovered, and
SAMSUNG is not responsible for lost data. Make
sure to back up important files in PC separately.
3030
XXXX.MP3
XXXX.MP3
(Figure 1)
資資料料夾夾與與圭圭案案結結構構
Photo Folders
Movie Folders
XXXX.MP3
XXXX.MP3
XXXX.MP3
XXXX.MP3
User folder
XXXX.MP3
XXXX.MP3
(Figure 2)
XXXX.MP3
XXXX.MP3
(Figure 3)
Voice Folders
Music Folders
影片/ 相片/ 音樂/ 語音圭案等將按如下方式儲
存在內部記憶體或小型 SD 賓中:
附附註註
[
]
✤
如需小型 SD 賓的詳細資料,請參閱第 32 頁0
✤ 舅可以在 Miniket Photo 中儲存一般資料圭
案及資料夾0
✤ 如果資料夾的數量是 999 個,舅可以在
DCIM 中儲存的最多圭案數量是 99 個0
✤ DCAM****.JPG:相片圭案
SMOV****.AVI:影片圭案
SWAV****.WAV:語音圭案
********.MP3:音樂圭案
✤ MISC: 將儲存 DPOF 圭案0
✤ 除了‘Free’以外,請勿變更圭案或資料夾的
名稱0
✤ 舅可以隨意變更‘Free’之下的圭案或資料夾
名稱0
✤ 非使用 Miniket Photo 製作的影片圭案可能
無法在 Miniket Photo 上播放0
✤
<MUSIC1 ~ 4> 是製造時建立的系統資料夾0
✤ 請勿變更或刪除 <MUSIC1 ~ 4> 資料夾0
變更或刪除 <MUSIC1 ~ 4> 資料夾名稱將
禁止音樂播放0
✤
只有 mp3 圭案可在「MP3」系統資料夾下識別
0 在 <MUSIC1 ~ 4> 以外的「MP3」系統資
料夾下建立的資料夾將不會被識別0 (圖 1)
✤ 使用者資料夾可在 <MUSIC1 ~ 4> 資料夾
下建立0 在使用者建立的資料夾下的 MP3
圭案將可被識別和播放,但該資料夾名稱將
不會在 LCD 螢幕上顯示(圖 2)0
✤ 在使用者資料夾下建立的資料夾將不會被識
別(圖 3)0
✤ <MUSIC1 ~ 4> 資料夾可包含多達 500
首歌曲0
✤ Miniket Photo 支援 NetSync DRM0
警警告告
[
]
✤ 央對電擊/ 溫度與濕度非常敏感和易於受到
侵襲,因此請小心處理該記憶賓以避免遺失
其中儲存的資料0
✤ 損毁的資料可能無法恢復,而三星沒有義務
對遺失的資料承擔任何責任0 請確定將重要
圭案個別備略到電腦
中0
Page 31

ENGLISH
2592
2272
2048
1600
1024
640
2592
2272
2048
1600
1024
640
640
320
640
320
Getting Started
使使用用入入門門
Recording Time and Capacity
Photo Capacity
Image Quality
Image Size
5M
4M
3M
2M
1M
VGA
64M
128M
512M
64M
128M
512M
64M
128M
512M
64M
128M
512M
64M
128M
512M
64M
128M
512M
Approx. 23
Approx. 47
Approx. 190
Approx. 30
Approx. 61
Approx. 244
Approx. 37
Approx. 75
Approx. 303
Approx. 60
Approx. 120
Approx. 481
Approx. 136
Approx. 273
Approx. 1092
Approx. 292
Approx. 585
Approx. 2340
Approx. 51
Approx. 102
Approx. 409
Approx. 66
Approx. 132
Approx. 528
Approx. 81
Approx. 163
Approx. 655
Approx. 128
Approx. 256
Approx. 1024
Approx. 292
Approx. 585
Approx. 2340
Approx. 512
Approx. 1024
Approx. 4096
Movie Recording Time
Image Quality
Image Size
640 x 480
320 x 240
Voice Recording Time
Approx. 136 min
64M
Approx. 273 min
128M
Approx. 1092 min
512M
✤ Recording time based on the Miniket Photo set to
mono/64Kbps transfer rate.
✤ Voice recording time shown above is an
estimation and is subject to recording conditions.
[ Notes ]
✤ Super Fine, Fine and Normal represent the compression ratio, and Super Fine has the highest image quality.
✤ 5M, 4M, 3M, 2M, 1M and VGA represent the image resolution, and 5M has the biggest image size.
✤ The recording time and the number of images shown above are approximation figures only when using the
respective function.
In actual use, using more than one function will reduce the capacity of each.
✤ Recording movie files on a mini SD card may have un-recordable fragment which may result shorter
recording time / photo capacity.
✤ Recording time may vary depending on the compression ratio which results from the subject recorded.
✤ Movie file may not record / playback normally when using a mini SD card bigger than 1GB.
64M
128M
512M
64M
128M
512M
Approx. 2
Approx. 4
Approx. 17
Approx. 4
Approx. 8
Approx. 34
Approx. 4
Approx. 8
Approx. 34
Approx. 8
Approx. 17
Approx. 68
Music capacity
64M
128M
512M
Approx. 97
Approx. 195
Approx. 780
Approx. 128
Approx. 256
Approx. 1024
Approx. 157
Approx. 315
Approx. 1260
Approx. 227
Approx. 455
Approx. 1820
Approx. 512
Approx. 1024
Approx. 4096
Approx. 682
Approx. 1365
Approx. 5461
Approx. 8
Approx. 17
Approx. 68
Approx. 17
Approx. 34
Approx. 136
Approx. 16 files
Approx. 32 files
Approx. 128 files
✤ Based on 128Kbps sampling/4MB size.
✤ Capacity may vary depending on file size.
錄錄音音時時間間與與容容量量
相相片片容容量量
影影像像品品質質
影影像像大大小小
5M
4M
3M
2M
1M
VGA
影影片片錄錄製製時時間間
影影像像大大小小
640 x 480
320 x 240
語語音音錄錄製製時時間間
64M
128M
512M
✤ 錄製時間以 Miniket Photo 設定爲單聲
道/64Kbps 傳輸速率爲根據0
✤ 上表顯示的語音錄製時間是大約値橙且
會隨著錄製條件而不同0
附附註註
[
]
✤ Super Fine/ Fine 和 Normal 代表壓縮率,Super Fine 具有最高的影像品質0
✤ 5M/ 4M/ 3M/ 2M/ 1M 和 VGA 代表影像解析度,5M 具有最大的影像大小0
✤ 上表顯示的錄製時間和影像數量只是使用各個功能時的最大數字0
在實際應用中,使用超過一種功能將減少每種的容量0
✤ 在小型 SD 賓上錄製影片圭案可能會出現無法錄製的區段,從而導致錄製時間比較短/相
片容量比較少0
✤ 錄製時間可能會根據所錄製物體導致的壓縮率而變更0
✤ 使用大於 1GB 的小型 SD 賓時,可能無法正常錄製/播放影片圭案0
64M
128M
512M
64M
128M
512M
64M
128M
512M
64M
128M
512M
64M
128M
大約 1092 張
512M
64M
128M
大約 2340 張
512M
影影像像品品質質
64M
128M
512M
64M
128M
512M
大約 136 分鐘
大約 273 分鐘
大約 1092 分鐘
大約 23 張
大約 47 張
大約 190 張
大約 30 張
大約 61 張
大約 244 張
大約 37 張
大約 75 張
大約 303 張
大約 60 張
大約 120 張
大約 481 張
大約 136 張
大約 273 張
大約 292 張
大約 585 張
大約 2 張
大約 4 張
大約 17 張
大約 4 張
大約 8 張
大約 34 張
大約 51 張
大約 102 張
大約 409 張
大約 66 張
大約 132 張
大約 528 張
大約 81 張
大約 163 張
大約 655 張
大約 128 張
大約 256 張
大約 1024 張
大約 292 張
大約 585 張
大約 2340 張
大約 512 張
大約 1024 張
大約 4096 張
大約 4 張
大約 8 張
大約 34 張
大約 8 張
大約 17 張
大約 68 張
大約 97 張
大約 195 張
大約 780 張
大約 128 張
大約 256 張
大約 1024 張
大約 157 張
大約 315 張
大約 1260 張
大約 227 張
大約 455 張
大約 1820 張
大約 512 張
大約 1024 張
大約 4096 張
大約 682 張
大約 1365 張
大約 5461 張
大約 8 張
大約 17 張
大約 68 張
大約 17 張
大約 34 張
大約 136 張
音音樂樂容容量量
64M
大約 16 個圭案
128M
大約 32 個圭案
512M
大約 128 個圭案
✤ 以 128Kbps 取樣/4MB 大小爲根據0
✤ 容量可能會根據圭案大小而有所不同0
3131
Page 32

ENGLISH
Getting Started
使使用用入入門門
Using a mini SD card (Optional Accessory)
✤ Only mini SD cards are supported.
✤ Samsung is not responsible for data loss due to misuse.
✤ Turning the power off / ejecting the mini SD card during the memory
operation such as formatting, deleting, recording, and playback may damage
the data.
✤ You may modify the name of a file / folder stored in the mini SD card using a
PC. Miniket Photo may not recognise modified files.
✤ It is recommended that you power off before inserting or ejecting the mini
SD card to avoid losing data.
✤ It is not guaranteed that you may use a memory card formatted on other
devices. Be sure to format your mini SD card using the Miniket Photo.
✤ Save important files separately on other media, such as floppy disk, hard
disk, or CD.
✤ You have to format newly-purchased mini SD cards, mini SD cards with data
on it that Miniket Photo cannot recognize or the cards that have data saved
by other devices.
✤ A mini SD card has a certain life span. If you use it for a long time, you
cannot record new data. In this case, you have to purchase a new mini SD
card.
✤ A mini SD card is a precision electronic equipment. Do not bend it, drop it, or
cause it to suffer a strong impact.
✤ Do not use or store in a place that has high temperature and humidity or
dusty environment.
✤ Do not allow foreign substances on the mini SD card terminals. Use a soft
dry cloth to clean the terminals if required.
✤ It is recommended to use a mini SD card case to avoid losing data from
moving and static electricity.
✤ After a period of use, the mini SD card may get warm. This is normal, not a
malfunction.
✤ Damaged data may not be recovered, and SAMSUNG is not responsible for
the lost data. Make sure to back up important files separately on a PC.
Name of Each Part: mini SD card
✤ This Miniket Photo only supports the mini SD card.
✤ A mini SD card adapter is not supported by this Miniket
Photo. The mini SD card adapter is used for other
devices that supports only SD Card.
✤ A mini SD card adapter supports a mechanical write
protection switch. Setting the switch prevents
accidental erasure of files recorded on the mini SD
card. To enable writing, move the switch up to the
direction of terminals. To set write protection, move the
switch down.
[ Note ]
✤ A mini SD card is an optional accessory.
3232
Terminals
mini SD card mini SD card adapter
使使用用小小型型 SSDD 賓賓((可可選選購購的的配配件件))
✤ 僅支援小型 SD 賓0
✤ Samsung 將不負責由於誤用所造成的資料遺失0
✤ 在記憶體操作期間,如格式化/ 刪除/ 錄製及播放,關閉電源/取出記憶
賓可能會損毁資料0
✤ 舅可以使用電腦修改儲存在記憶賓中的圭案/資料夾名稱0 Miniket
Photo 可能不會識別修改的圭案0
✤ 揷入或退出記憶賓之前,建議舅關閉電源以免遺失資料0
✤ 不保證舅可以使用在其他裝置上格式化的記憶賓0 請確定使用 Miniket
Photo 來格式化舅的記憶賓0
✤ 在其他媒體,如磁片/ 硬勒或光勒片上個別儲存重要圭案0
✤ 舅需要格式化新買的記憶賓/ 具有 Miniket Photo 無法識別之資料的記
憶賓,或具有由其他 Miniket Photo 儲存之資料的記憶賓0
✤ 小型 SD 賓具有特定的使用壽命0 如果舅長時間使用央,舅將無法錄
製新的資料0 在此情況下,舅需要購買新的記憶賓0
✤ 小型 SD 賓是精密的電子設備0 請不要將央彎曲/ 掉落或使央受到强
大的衝撞0
✤ 請不要在高溫和濕度高或充滿灰塵的環境中使用或儲存央0
✤ 切勿讓小型 SD 賓的終端積聚異物0 如有必要,用乾燥的軟布來淸潔
終端0
✤ 建議舅使用記憶賓盒來避免因爲移動和靜電而遺失資料0
✤ 記憶賓在使用一段時間之後可能會變熱0 這是正常現象,橙非故障0
✤ 損毁的資料可能無法恢復,而三星沒有義務對遺失的資料承擔任何責任0
請確定將重要圭案個別備略到電腦中0
各各個個部部件件名名稱稱:: 小小型型 SSDD
✤ Miniket Photo 僅支援小型 SD 賓0
✤ 一個小型 SD 賓配接器不被此 Miniket Photo 支
Write
protection
switch
援0 小型 SD 記憶賓適配器用於僅支援 SD 記憶
賓的其他裝置0
✤ 小型 SD 賓支援機械寫入保護開關0 設定此開關
以防止意外刪除儲存在記憶賓上的資料0 若要寫
入,將開關朝終端方向移動0 若要設定寫入保
護,向下移動開關0
附附註註
[
]
✤ 小型 SD 賓是一個可選購的配件0
賓賓
Page 33

ENGLISH
OPEN
@
!
M
ENU
Getting Started
使使用用入入門門
Inserting / Ejecting a mini SD card (Optional Accessory)
This product is equipped with a internal memory and the mini SD card
is an optional accessory which is not provided with the package.
揷揷入入//退退出出小小型型 SSDD 賓賓((可可選選購購的的配配件件))
本産品配備一個內部記憶體,而小型 SD 賓是一個可選購的配件,橙
不包含在封裝中0
Inserting a mini SD card
1. Open Cover by sliding the [OPEN] switch
on the bottom side.
◆ Slide the [OPEN] switch in the direction of
(1) as shown in the diagram until it stops.
Then open the lid.(2)
Cover
2. Insert a mini SD card into the slot until it
softly clicks in the direction of the arrow
shown in the diagram.
◆ The mini SD card terminals will face down
while the LCD monitor faces up.
Cover
Ejecting a mini SD card
1. Slightly push the mini SD card inwards to
pop it out.
2. Pull the mini SD card out of the slot and
close the Cover.
[ Note ]
✤ Make sure to format a mini SD card using the Miniket Photo.
附附註註
[
✤ 請確定使用 Miniket Photo 來格式化小型 SD 賓0
揷揷入入小小型型 SSDD 賓賓
11.. 滑滑動動底底部部 [[OOPPEENN]] 開開關關,,打打開開護護蓋蓋00
◆ 將 [OPEN] 開關滑向圖中所示的方向
(1) 直到央停止不動0 然後打開蓋子
(2)0
22.. 按按照照圖圖中中所所示示的的方方向向,,將將小小型型 SSDD 賓賓揷揷入入揷揷
槽槽直直到到輕輕輕輕賓賓入入到到位位00
◆ 小型 SD 賓的終端將會朝下而 LCD 顯
示器朝上0
退退出出小小型型 SSDD 賓賓
11.. 輕輕輕輕地地將將小小型型 SSDD 賓賓向向內內推推使使央央彈彈出出00
22.. 將將小小型型 SSDD 賓賓拉拉出出揷揷槽槽然然後後關關閉閉護護蓋蓋00
]
3333
Page 34

ENGLISH
!
MoveMove
Memory Card inserted.
Change into the card?
Yes No
SelectSelect
Move Select
23
23
2592
Getting Started
使使用用入入門門
Selecting the Memory Type
You can set the storage to the internal memory or mini SD card
(Optional Accessory).
The OSD indicators are based internal memory by default.
1. Press the [POWER] button to turn on the
Miniket Photo.
2. Initially, the memory type is set to <Int. Memory>
by default.
3. Insert a mini SD card into the slot (refer to page
33).
◆ The message “Memory Card inserted.
Change into the card?” appears on the
screen.
4. Select the desired setting by moving the joystick
left / right and press the joystick (OK).
◆ Yes: Photo, movie, music and voice files will be
stored in the inserted mini SD card.
◆ No: Photo, movie, music and voice files will be stored in the
internal memory.
[ Notes ]
✤ If there is no mini SD card inserted, only the <Int. Memory> option
will be available.
✤ When you insert the mini SD card in Setting Mode, the pop-up
message will not display.
✤ Selected memory will be used for all modes.
3434
選選擇擇記記憶憶體體類類型型
舅可以將儲存裝置設定爲內建的內部記憶體或小型 SD 賓
(可選購的配件)0
圖中顯示的 OSD 指示器以預設情況下的內部記憶體爲根據0
2
3
附附註註
[
✤ 如果沒有揷入小型 SD 賓,只有 <Int. Memory>選項可以使用0
✤ 在 Settings 模式中揷入小型 SD 賓時,快顯訊息將不會顯示0
✤ 選取的記憶體將會在所有的模式中使用0
11.. 按按下下 [[PPOOWWEERR]] 按按瞿瞿以以開開啓啓 MMiinniikkeett PPhhoottoo00
22.. 根根據據預預設設,,記記憶憶體體類類型型在在初初始始時時將將設設定定爲爲
<<IInntt.. MMeemmoorryy>>記記憶憶體體00
33.. 將將小小型型 SSDD 賓賓揷揷入入揷揷槽槽中中
◆ 螢幕上將會出現“Memory Card is inserted.
Change into the card?”訊息0
44.. 移移動動搖搖桿桿左左//右右按按瞿瞿選選取取所所要要的的設設定定,,然然後後按按下下搖搖
桿桿 ((OOKK)) 按按瞿瞿00
◆ Ye s:相片/ 影片/ 音樂和語音圭案將會儲存
到揷入的小型 SD 賓中0
◆ No:相片/ 影片/ 音樂和語音圭案將會儲存
到內建的內部記憶體中0
]
(請參閱第 33 頁)
00
Page 35

ENGLISH
Getting Started
使使用用入入門門
Before You Start Operating the Miniket Photo
Before using the Miniket Photo, read this page thoroughly for easy
operation. A mini SD card is an optional accessory and not included in
the package.
1. Insert the Battery Pack and insert a mini SD card into the mini
SD card slot. (Refer to page 33)
2. Charge the Battery Pack by directly connecting the AC Power
Adapter to the Miniket Photo. (Refer to page 24)
3. Press the [POWER] button to turn on the Miniket Photo.
4. Select the desired mode by turning the [Mode Dial].
5. Press the [Record / Stop] button to take a picture, start
recording movie / voice or hear music.
◆ To set focus, press the [Record / Stop] button halfway down.
6. When finished, press the [POWER] button to turn the Miniket
Photo off.
開開始始操操作作 MMiinniikkeett PPhhoottoo 之之前前
在使用 Miniket Photo 之前,請仔細閱讀本頁使操作更簡易0 小型
SD 賓是一個可選購的配件,因此不包含在封裝中0
11.. 揷揷入入電電池池組組橙橙將將小小型型 SSDD 賓賓揷揷入入小小型型 SSDD 賓賓揷揷槽槽00
22.. 將將交交流流電電源源適適配配器器連連接接到到 MMiinniikkeett PPhhoottoo 爲爲電電池池組組充充電電00
33.. 按按下下 [[PPOOWWEERR]] 按按瞿瞿以以開開啓啓 MMiinniikkeett PPhhoottoo00
44.. 透透過過轉轉動動 [[MMooddee DDiiaall]] 來來選選取取所所要要的的模模式式00
55.. 按按下下 [[RReeccoorrdd // SSttoopp]] 按按瞿瞿可可拍拍攝攝相相片片// 開開始始錄錄製製影影片片//語語音音00
66.. 完完成成時時,,按按下下 [[PPOOWWEERR]] 按按瞿瞿以以關關閉閉 MMiinniikkeett PPhhoottoo00
(請參閱第 33 頁)
(請參閱第 24 頁)
◆ 若要設定對焦,請按下 [Record/Stop] 按瞿一半0
3535
Page 36

POWER
W T
ENGLISH
POWER
W T
Setting the
1
1
Setting Memory...................................................................37
Selecting the Memory Type.............................................37
Setting the File No. Function ...........................................38
Formatting the Memory....................................................39
Viewing Memory Space ...................................................40
Adjusting the LCD Monitor................................................41
Adjusting the LCD Brightness..........................................41
Setting Date/Time ...............................................................42
Setting Date/Time.............................................................42
Setting Date Format.........................................................43
Setting Date/Time Display ...............................................44
Setting the System .............................................................45
Setting the NTSC/PAL .....................................................45
Setting the Beep Sound...................................................46
Setting the Shutter Sound................................................47
Selecting Language .........................................................48
Setting the Mode Display.................................................49
Setting the Auto Shut Off .................................................50
Resetting the Miniket Photo.............................................51
Miniket Photo
How to set to Settings mode
Power
Button
設設定定
1
1
設設定定記記憶憶體體
選擇記憶體類型
設定圭案編號功能
格式化記憶體
檢視記憶體空間
調調整整 LLCCDD 顯顯示示器器
調整 LCD 亮度
設設定定日日期期//時時間間
設定日期/時間
設定日期格式
設定日期/時間顯示
設設定定系系統統
設定 NTSC / PAL
設定榛聲
設定快門聲響
選擇語言
設定模式顯示
設定自動關閉
重設 Miniket Photo
MMiinniikkeett PPhhoottoo
...........................................................................37
..............................................................37
...........................................................38
..................................................................39
..............................................................40
..............................................................41
...............................................................41
.....................................................................42
.................................................................42
..................................................................43
.........................................................44
...............................................................................45
..........................................................45
..........................................................................46
..................................................................47
..........................................................................48
..................................................................49
..................................................................50
......................................................51
如如何何設設定定 SSeettttiinnggss 模模式式
電源按瞿
1. Turn the Mode Dial to
the Settings mode.
3636
2. Press the [POWER] button
to turn on the Miniket Photo.
1. 將模式轉盤轉到
SSeettttiinnggss
模式0
22.. 按按下下 [[PPOOWWEERR]] 按按瞿瞿以以開開啓啓
MMiinniikkeett PPhhoottoo00
Page 37

ENGLISH
Memory Type
Int. Memory
Memory Card
Move Select
MoveMove SelectSelect
Settings
TYPE
Memory TypeMemory Type
SettingsSettings
TYPE
Memory TypeMemory Type
Int. Memory
Memory Card
MoveMove SelectSelect
SettingsSettings
Setting the Miniket Photo :
Setting Memory
設設定定 MMiinniikkeett PPhhoottoo:: 設設定定記記憶憶體體
Selecting the Memory Type
You can set the storage to the internal memory or mini SD card
(Optional Accessory).
1. Turn the Mode Dial to the Settings mode.
2. Press the [POWER] button to turn on the
Miniket Photo.
3. Select <Memory Type> by moving the joystick
left / right.
4. Select the desired option by moving the joystick
up / down and then press the joystick (OK).
◆ <Int. Memory>: Photo, movie, music and
voice files are stored in the internal memory.
◆ <Memory Card>: Photo, movie, music and voice
files are stored in the external memory (mini SD
card).
5. After you finish setting, turn the Mode Dial to the
desired mode.
[ Notes ]
✤
If you insert a mini SD card when the Miniket Photo is on, the
“pop-up message” will prompt you automatically to select the
storage type except when in the Settings mode.
✤
If there is no mini SD card inserted, only the <Int. Memory> option
will be available.
✤
System requires a small portion of memory space, actual storage
capacity may differ from the printed memory capacity.
✤
The maximum recording time and image capacity is subject to
change depending on the media used (refer to page 31).
✤
You can set this option in Photo, Movie, Music, Voice, and Settings
modes using the MENU.
選選擇擇記記憶憶體體類類型型
舅可以將儲存裝置設定爲內建的內部記憶體或小型 SD 賓
(可選購的配件)0
3
11.. 將將模模式式轉轉盤盤轉轉到到
22.. 按按下下 [[PPOOWWEERR]] 按按瞿瞿以以開開啓啓 MMiinniikkeett PPhhoottoo00
33.. 向向左左或或向向右右移移動動搖搖桿桿選選取取 <<MMeemmoorryy TTyyppee>>00
44.. 向向上上或或向向下下移移動動搖搖桿桿選選取取所所要要的的選選項項,,然然後後按按下下搖搖
桿桿 ((OOKK)) 按按瞿瞿00
<<IInntt.. MMeemmoorryy>>
4
◆
圭案將會儲存到內部記憶體中0
<<MMeemmoorryy CCaarrdd>>
◆
圭案將會儲存到外部記憶體(小型 SD 賓)中0
55.. 完完成成設設定定後後,,將將模模式式轉轉盤盤轉轉到到所所要要的的模模式式00
附附註註
[
]
✤
除了 Settings 模式之外,如果舅在 Miniket Photo 開啓時揷入小
型 SD 賓,快顯訊息將會提示舅自動選取儲存類型0
✤
如果沒有揷入小型 SD 賓,只有 <Int. Memory>選項可以使用0
✤
系統需要使用一小部略的記憶體空間,實際的儲存容量可能會與發
表的記憶體容量不同0
✤
最大錄製時間與影像容量將會根據使用的媒體而變更
(請參閱第 31 頁)0
✤
舅可以使用 MENU 在 Photo/ Movie/ Music/ Voice 和
Settings 模式中設定此選項0
SSeettttiinnggss
模模式式00
:相片/ 影片/ 音樂和語音
:相片/ 影片/ 音樂和語音
3737
Page 38

ENGLISH
File No.
Move Select
Settings
File No.File No.
MoveMove SelectSelect
SettingsSettings
Reset
Series
File No.
File No.File No.
MoveMove SelectSelect
SettingsSettings
Reset
Series
File No.
Setting the Miniket Photo :
Setting Memory
設設定定 MMiinniikkeett PPhhoottoo:: 設設定定記記憶憶體體
Setting the File No. Function
You can set the file numbers so that they reset each time the mini SD
card is formatted, or so that they count up continuously.
1. Turn the Mode Dial to the Settings mode.
2. Press the [POWER] button to turn on the Miniket
Photo.
3. Select <File No.> by moving the joystick left /
right.
4. Select the desired option by moving the
joystick up / down and then press the joystick
(OK).
◆ <Reset>: When the storage memory is
formatted, the file number goes back to its
default value (100-0001).
◆ <Series>: Numbering is continuous between the
mini SD cards, so that the first file number
assigned on a new mini SD card is 1 more than the last file
number assigned on the previous mini SD card.
5. After you finish setting, turn the Mode Dial to the desired
mode.
[ Note ]
✤
When you set <File No.> to <Series>, each file is assigned with a
different number so as to avoid duplicating file names. It is
convenient when you want to manage your files on a PC.
3838
3
4
設設定定圭圭案案編編號號功功能能
舅可以設定圭案編號以便使央們在每次格式化小型 SD 賓時重設,或
使央們連續向上計數0
11.. 將將模模式式轉轉盤盤轉轉到到
22.. 按按下下 [[PPOOWWEERR]] 按按瞿瞿以以開開啓啓 MMiinniikkeett PPhhoottoo00
33.. 向向左左或或向向右右移移動動搖搖桿桿選選取取 <<FFiillee NNoo..>>00
44.. 向向上上或或向向下下移移動動搖搖桿桿選選取取所所要要的的選選項項,,然然後後按按下下搖搖
桿桿 ((OOKK)) 按按瞿瞿00
<<RReesseett>>
◆
號將會回到其預設値 (100-0001)0
<<SSeerriieess>>
◆
此新的小型 SD 賓上指定的第一個圭案編號,
會比上一個小型 SD 賓上指定的前一個圭案編
號大 1 號0
55.. 完完成成設設定定後後,,將將模模式式轉轉盤盤轉轉到到所所要要的的模模式式00
附附註註
[
]
✤
將 <File No.> 設定爲 <Series> 時,每個圭案將會指定不同的
編號以避免圭名重複0 這樣就可以在 PC 上方便地管理舅的圭案0
SSeettttiinnggss
模模式式00
: 當儲存記憶體格式化時,圭案編
:記憶賓之間的編號是連續的,因
Page 39

ENGLISH
Format
FormatFormat
Int. Memory
Memory Card
Move Select
MoveMove SelectSelect
Settings
SettingsSettings
OK
Format
Format
Memory Card
Move Select
Move Select
Settings
Settings
MoveMove SelectSelect
All files are deleted!
Do you want to format?
Yes No
!
OK
FormatFormat
Int. Memory
Memory Card
MoveMove SelectSelect
SettingsSettings
Setting the Miniket Photo :
Setting Memory
設設定定 MMiinniikkeett PPhhoottoo:: 設設定定記記憶憶體體
Formatting the Memory
You can format the internal memory or the mini SD card to erase all
files.
1. Turn the Mode Dial to the Settings mode.
2. Press the [POWER] button to turn on the
Miniket Photo.
3. Select <Format> by moving the joystick left /
right.
4. Select the desired option by moving the joystick
up / down and then press the joystick (OK).
◆ <Int. Memory>: Format the internal memory.
◆ <Memory Card>: Format the external
memory.
When the joystick (OK) is pressed, the message
“All files will be deleted! Do you want to format?”
appears. Select <Yes> or <No> by moving the
joystick left / right and then press the joystick
(OK).
5. After you finish formatting, turn the Mode Dial to
the desired mode.
[ Warning ]
✤
Previous information can not be restored after
formatting.
[ Notes ]
✤
There is no guarantee on the operation of a mini SD card which
has not been formatted on the Miniket Photo. Make sure to format
any mini SD card on the Miniket Photo.
✤
If there is no mini SD card inserted, only the <Int. Memory> option
will be available.
3
4
格格式式化化記記憶憶體體
舅可以格式化內部記憶體或小型 SD 賓來刪除所有的圭案0
11.. 將將模模式式轉轉盤盤轉轉到到
22.. 按按下下 [[PPOOWWEERR]] 按按瞿瞿以以開開啓啓 MMiinniikkeett PPhhoottoo00
33.. 向向左左或或向向右右移移動動搖搖桿桿選選取取 <<FFoorrmmaatt>>00
44.. 向向上上或或向向下下移移動動搖搖桿桿選選取取所所要要的的選選項項,,然然後後按按下下搖搖
桿桿 ((OOKK)) 按按瞿瞿00
<<IInntt.. MMeemmoorryy>>
◆
<<MMeemmoorryy CCaarrdd>>
◆
按下搖桿 (OK) 時,將會顯示“All files will
be deleted! Do you want to format?”訊
息0 向左或向右移動搖桿以選取 <Yes>或
<No>,然後按下搖桿 (OK) 按瞿0
55.. 完完成成格格式式化化後後,,將將模模式式轉轉盤盤轉轉到到所所要要的的模模式式00
警警告告
[
]
✤ 之前的資訊將無法在格式化後恢復0
附附註註
[
]
✤ 不保證未在 Miniket Photo 上格式化之小型 SD 賓的操作無誤0
請確定使用 Miniket Photo 來格式化所有的小型 SD 賓0
✤ 如果沒有揷入小型 SD 賓,只有 <Int. Memory>選項可以使用0
SSeettttiinnggss
模模式式00
: 格式化內部記憶體0
: 格式化外部記憶體0
3939
Page 40

ENGLISH
SettingsSettings
Memory SpaceMemory Space
MoveMove
Internal Memory
4MB/58MB
Setting the Miniket Photo :
Setting Memory
設設定定 MMiinniikkeett PPhhoottoo:: 設設定定記記憶憶體體
Viewing Memory Space
You can check used memory space and total memory space of the
Miniket Photo.
1. Turn the Mode Dial to the Settings mode.
2. Press the [POWER] button to turn on the Miniket
Photo.
3. Select <Memory Space> by moving the joystick
left / right.
4. The used memory space and total memory space are
displayed.
5. After you finish viewing memory space, turn the Mode Dial to
the desired mode.
[ Note ]
✤
System requires a small portion of memory space, actual storage
capacity may differ from the printed memory capacity.
4040
檢檢視視記記憶憶體體空空間間
舅可以檢査 Miniket Photo 之已使用的記憶體空間以及總記憶體空間0
3
55.. 完完成成檢檢視視記記憶憶體體空空間間後後,,將將模模式式轉轉盤盤轉轉到到所所要要的的模模式式00
附附註註
[
✤ 系統需要使用一小部略的記憶體空間,實際的儲存容量可能會與發
表的記憶體容量不同0
11.. 將將模模式式轉轉盤盤轉轉到到
22.. 按按下下 [[PPOOWWEERR]] 按按瞿瞿以以開開啓啓 MMiinniikkeett PPhhoottoo00
33.. 向向左左或或向向右右移移動動搖搖桿桿選選取取 <<MMeemmoorryy SSppaaccee>>00
44.. 已已使使用用的的記記憶憶體體空空間間以以及及總總記記憶憶體體空空間間將將會會顯顯示示00
]
SSeettttiinnggss
模模式式00
Page 41

ENGLISH
14
MoveMove SelectSelect
SettingsSettings
LCD BrightnessLCD Brightness
OK
10
Move Select
Settings
LCD Brightness
MoveMove SelectSelect
SettingsSettings
LCD BrightnessLCD Brightness
OK
Setting the Miniket Photo :
Adjusting the LCD Monitor
設設定定 MMiinniikkeett PPhhoottoo:: 調調整整 LLCCDD 顯顯示示器器
Adjusting the LCD Brightness
You can adjust the brightness of the LCD monitor to compensate for
ambient lighting conditions.
1 Turn the Mode Dial to the Settings mode.
2. Press the [POWER] button to turn on the Miniket
Photo.
3. Select <LCD Brightness> by moving the joystick
left / right.
4. Adjust the brightness by moving the joystick
up / down then press the joystick(OK).
◆ Moving the joystick up will brighten the screen
whereas moving it down will darken the screen.
◆ Brightness range: You can adjust the brightness
between 00 ~ 31 steps.
5. After you finish adjusting, turn the Mode Dial to
the desired mode.
[ Notes ]
✤ A Brighter LCD screen setting consumes more battery power.
✤ Adjust the LCD brightness when the ambient lighting is too bright
and the monitor is hard to see.
✤ LCD Brightness does not affect the brightness of images to be
stored.
3
4
調調整整 LLCCDD 亮亮度度
可調整 LCD 顯示器的亮度,以補償周圍環境的光線條件0
11.. 將將模模式式轉轉盤盤轉轉到到
22.. 按按下下 [[PPOOWWEERR]] 按按瞿瞿以以開開啓啓 MMiinniikkeett PPhhoottoo00
33.. 向向左左或或向向右右移移動動搖搖桿桿選選取取 <<LLCCDD BBrriigghhttnneessss>>00
44.. 向向上上或或向向下下移移動動搖搖桿桿以以調調整整亮亮度度,,然然後後按按搖搖桿桿
((OOKK)) 按按瞿瞿00
◆ 向上移動搖桿將會加亮螢幕,而向下移動搖桿
則會使螢幕變暗0
◆ 亮度範圍: 舅可以在 00~31的步調之間調
整亮度0
55.. 完完成成調調整整後後,,將將模模式式轉轉盤盤轉轉到到所所要要的的模模式式00
附附註註
[
]
✤ 較亮的 LCD 螢幕設定將會消耗較多的電池電量0
✤ 當環境照明太亮和顯示器難以淸楚檢視時,請調整 LCD 亮度0
✤ LCD 亮度不會影響已儲存影像的亮度0
SSeettttiinnggss
模模式式00
4141
Page 42

ENGLISH
SettingsSettings
Date&Time SetDate&Time Set
MoveMove SelectSelect
------ --
--
:
--
OK
Settings
Date&Time Set
Move Select
SettingsSettings
Date&Time SetDate&Time Set
MoveMove SelectSelect
OK
Setting the Miniket Photo :
Setting Date/Time
設設定定 MMiinniikkeett PPhhoottoo:: 設設定定日日期期//時時間間
Setting Date/Time
The built-in clock creates the time stamp. You can adjust the date/time
using this menu.
1. Turn the Mode Dial to the Settings mode.
2. Press the [POWER] button to turn on the Miniket
Photo.
3. Select <Date&Time Set> by moving the joystick
left / right and then press the joystick (OK).
4. Set the desired value by moving the joystick
up / down.
5. Move to the next item by moving the joystick left
/ right, and then set values by moving the
joystick up / down.
◆ Items are displayed in the order of the date
format.
◆ By default, it appears in the order of Year, Month, Date, Hour
and Minute.
6. After setting the last item, press the Joystick(OK) to finish the
setting.
7. After you finish setting, turn the Mode Dial to the desired
mode.
[ Notes ]
✤ You can display <Date&Time Set> on the LCD monitor by setting
the <Date/Time> option other than to <Off>. Refer to page 44
✤ You can set the year up to 2037.
4242
3
4
設設定定日日期期//時時間間
內建時鐘可以建立時間素記0 舅可以使用此選單來設定日期/時間0
11.. 將將模模式式轉轉盤盤轉轉到到
22.. 按按下下 [[PPOOWWEERR]] 按按瞿瞿以以開開啓啓 MMiinniikkeett PPhhoottoo00
33.. 向向左左或或向向右右移移動動搖搖桿桿以以選選取取<<DDaattee&&TTiimmee SSeett>>,,
然然後後按按下下搖搖桿桿 ((OOKK)) 按按瞿瞿00
44.. 向向上上或或向向下下移移動動搖搖桿桿以以設設定定所所需需的的値値00
55.. 向向左左或或向向右右移移動動搖搖桿桿移移到到下下一一個個項項目目,,然然後後向向上上或或
向向下下移移動動搖搖桿桿設設定定這這些些値値00
◆ 項目將以日期格式的順序顯示0
◆ 根據預設,央將會以年略/ 月略/ 日/ 小時和
分鐘的順序顯示0
66.. 設設定定最最後後一一個個項項目目之之後後,,按按下下搖搖桿桿 ((OOKK)) 完完成成設設
定定00
77.. 完完成成設設定定後後,,將將模模式式轉轉盤盤轉轉到到所所要要的的模模式式00
附附註註
[
]
✤ 透過將 <Date/Time> 選項設定爲 <Off> 之外的設定,舅就可
以在 LCD 顯示器上顯示 <Date&Time Set>0
✤ 舅最多可以將年略設定爲 20370
SSeettttiinnggss
模模式式00
Page 43

ENGLISH
SettingsSettings
Date FormatDate Format
YYYY/MM/DD
DD/MM/YYYY
MM/DD/YYYY
MoveMove SelectSelect
Settings
Date Format
Move Select
SettingsSettings
Date FormatDate Format
YYYY/MM/DD
DD/MM/YYYY
MM/DD/YYYY
MoveMove SelectSelect
Setting the Miniket Photo :
Setting Date/Time
設設定定 MMiinniikkeett PPhhoottoo:: 設設定定日日期期//時時間間
Setting Date Format
You can select the date format to display.
1. Turn the Mode Dial to the Settings mode.
2. Press the [POWER] button to turn on the Miniket
Photo.
3. Select <Date Format> by moving the joystick left
/ right.
4. Select the format by moving the joystick up /
down, and then press the joystick (OK).
◆ <YYYY/MM/DD>: The date is displayed in the
order of Year / Month / Date.
◆ <DD/MM/YYYY>: The date is displayed in the
order of Date / Month / Year.
◆ <MM/DD/YYYY>: The date is displayed in the
order of Month / Date / Year.
5. After you finish setting, turn the Mode Dial to the desired
mode.
設設定定日日期期格格式式
舅可以選擇要顯示的日期格式0
3
11.. 將將模模式式轉轉盤盤轉轉到到
22.. 按按下下 [[PPOOWWEERR]] 按按瞿瞿以以開開啓啓 MMiinniikkeett PPhhoottoo00
33.. 向向左左或或向向右右移移動動搖搖桿桿選選取取 <<DDaattee FFoorrmmaatt>>00
44.. 向向上上或或向向下下移移動動搖搖桿桿選選取取格格式式,,然然後後按按下下搖搖桿桿
((OOKK)) 按按瞿瞿00
<<YYYYYYYY//MMMM//DDDD>>
4
◆
顯示0
<<DDDD//MMMM//YYYYYYYY>>
◆
顯示0
<<MMMM//DDDD//YYYYYYYY>>
◆
顯示0
55.. 完完成成設設定定後後,,將將模模式式轉轉盤盤轉轉到到所所要要的的模模式式00
SSeettttiinnggss
模模式式00
: 日期以年/月/日的順序
: 日期以日/月/年的順序
: 日期以月/日/年的順序
4343
Page 44

ENGLISH
SettingsSettings
Date/TimeDate/Time
Off
Date
Time
Date&Time
MoveMove SelectSelect
Settings
Date/Time
Move Select
SettingsSettings
Date/TimeDate/Time
Off
Date
Time
Date&Time
MoveMove SelectSelect
Settings
Date/Time
Move Select
Settings
Date/Time
Move Select
IN
2592
5050
12:00 2005.01.01
12:00 2005.01.01
Setting the Miniket Photo :
Setting Date/Time
設設定定 MMiinniikkeett PPhhoottoo:: 設設定定日日期期//時時間間
Setting Date/Time Display
You can set to display date and time on the LCD monitor.
1. Turn the Mode Dial to the Settings mode.
2. Press the [POWER] button to turn on the Miniket
Photo.
3. Select <Date/Time> by moving the joystick left /
right.
4. Select the display option by moving the
joystick up / down, and then press the joystick
(OK).
◆ <Off>: Date and Time are not displayed.
◆ <Date>: The date is displayed.
◆ <Time>: The time is displayed.
◆ <Date&Time>: The date and time are
displayed.
5. After you finish setting, turn the Mode Dial to the
desired mode.
◆ The selected Date/Time is displayed in Movie
Record or Photo Capture mode.
[ Note ]
✤
Date and time information is displayed on the LCD screen in Photo
capturing and Movie recording modes. In movie / photo playback
modes, date and time information is not displayed on the LCD
screen.
4444
設設定定日日期期//時時間間顯顯示示
舅可以設定在 LCD 顯示器上顯示日期與時間0
3
11.. 將將模模式式轉轉盤盤轉轉到到
22.. 按按下下 [[PPOOWWEERR]] 按按瞿瞿以以開開啓啓 MMiinniikkeett PPhhoottoo00
33.. 向向左左或或向向右右移移動動搖搖桿桿選選取取 <<DDaattee//TTiimmee>>00
44.. 向向上上或或向向下下移移動動搖搖桿桿選選取取顯顯示示選選項項,,然然後後按按下下搖搖桿桿
((OOKK)) 按按瞿瞿00
4
<<OOffff>>
◆
<<DDaattee>>
◆
<<TTiimmee>>
◆
<<DDaattee&&TTiimmee>>
◆
55.. 完完成成設設定定後後,,將將模模式式轉轉盤盤轉轉到到所所要要的的模模式式00
◆ 選取的 Date/Time 將會在影片模式或拍攝相
5
附附註註
[
]
✤
日期與時間資訊將會在拍攝相片模式和錄製影片模式中顯示在 LCD
片模式中顯示0
螢幕上0 在播放影片/相片模式中,LCD 螢幕上將不會顯示日期與
時間資訊0
SSeettttiinnggss
模模式式00
: 日期與時間將不會顯示0
: 日期將會顯示0
: 時間將會顯示0
: 日期與時間將會顯示0
Page 45

ENGLISH
Settings
NTSC/PAL
Move Select
SettingsSettings
NTSC/PALNTSC/PAL
MoveMove SelectSelect
SettingsSettings
NTSC/PAL
NTSC/PAL
MoveMove SelectSelect
Setting the Miniket Photo :
Setting the System
設設定定 MMiinniikkeett PPhhoottoo:: 設設定定系系統統
Setting the NTSC/PAL
You can set the Miniket Photo's output properly when playback on a
TV .
1. Turn the Mode Dial to the Settings mode.
2. Press the [POWER] button to turn on the Miniket Photo.
3. Select <NTSC/PAL> by moving the joystick
left / right.
4. Select the desired option by moving the joystick
up / down and then press the joystick (OK).
◆ <NTSC>: Sets to NTSC standard.
◆ <PAL>: Sets to PAL standard.
Refer to page 146
5. After you finish setting, turn the Mode Dial to
the desired mode.
[ Warning ]
✤ Recording and playback settings should be identical.
NTSC recordings are properly played back in NTSC
mode.
✤ If recording and playback settings are different, displayed video
may not be perfect.
✤ When using a TV, be sure to set the same output setting. Playback
on a TV is not available if the video format is different than that of
Miniket Photo. For example, Miniket Photo is set to PAL and the
TV video format is NTSC, then video playback on the TV is not
available.
3
4
設設定定 NNTTSSCC // PPAALL
當在電視機上播放時,舅可以正確設定 Miniket Photo 輸出0
11.. 將將模模式式轉轉盤盤轉轉到到
22.. 按按下下 [[PPOOWWEERR]] 按按瞿瞿以以開開啓啓 MMiinniikkeett PPhhoottoo00
✤ 使用電視機時,請確定設定相同的輸出設定値0 若視訊格式與
Miniket Photo 的不一樣,將無法在電視機上播放0 例如,若將
Miniket Photo 設定爲 PAL,而電視機的視訊格式爲 NTSC,則無
法在電視機上播放視訊0
SSeettttiinnggss
模模式式00
33.. 向向左左或或向向右右移移動動搖搖桿桿以以選選取取 <<NNTTSSCC//PPAALL>>00
44.. 向向上上或或向向下下移移動動搖搖桿桿選選取取所所要要的的選選項項,,然然後後按按下下搖搖
桿桿 ((OOKK)) 按按瞿瞿00
<<NNTTSSCC>>
◆
◆
: 設定爲 NTSC 制式0
<<PPAALL>>
: 設定爲 PAL 制式0
請參閱第 146 頁0
55.. 完完成成設設定定後後,,將將模模式式轉轉盤盤轉轉到到所所要要的的模模式式00
警警告告
[
]
✤ 錄製與播放設定値必須相同0 NTSC 錄製內容可
在 NTSC 模式中正確播放0
✤ 若錄製與播放設定値不一樣,所顯示的視訊可能不
完美0
4545
Page 46

ENGLISH
SettingsSettings
Beep SoundBeep Sound
Off
On
MoveMove SelectSelect
Settings
Beep Sound
Move Select
SettingsSettings
Beep SoundBeep Sound
Off
On
MoveMove SelectSelect
Setting the Miniket Photo :
Setting the System
設設定定 MMiinniikkeett PPhhoottoo:: 設設定定系系統統
Setting the Beep Sound
You can set the beep sound to on/off. When on, a beep will sound
every time a button is pressed.
1. Turn the Mode Dial to the Settings mode.
2. Press the [POWER] button to turn on the Miniket
Photo.
3. Select <Beep Sound> by moving the joystick
left / right.
4. Select the desired option by moving the joystick
up / down and then press the joystick (OK).
◆ <Off>: Turn the beep sound off.
◆ <On>: Turn the beep sound on.
5. After you finish setting, turn the Mode Dial to the desired
mode.
[ Note ]
✤
When the earphones or Audio / Video cable is connected to the
Miniket Photo, the <Beep Sound> function will not operate.
4646
設設定定榛榛聲聲
舅可以將「榛聲」設定爲開啓/關閉0 開啓時,每次按下按瞿時將會發出
一個榛聲0
3
11.. 將將模模式式轉轉盤盤轉轉到到
22.. 按按下下 [[PPOOWWEERR]] 按按瞿瞿以以開開啓啓 MMiinniikkeett PPhhoottoo00
33.. 向向左左或或向向右右移移動動搖搖桿桿選選取取 <<BBeeeepp SSoouunndd>>00
4
44.. 向向上上或或向向下下移移動動搖搖桿桿選選取取所所要要的的選選項項,,然然後後按按下下搖搖
桿桿 ((OOKK)) 按按瞿瞿00
<<OOffff>>
◆
<<OOnn>>
◆
55.. 完完成成設設定定後後,,將將模模式式轉轉盤盤轉轉到到所所要要的的模模式式00
附附註註
[
]
✤
將耳機或聲訊/視訊纜線連接到 Miniket Photo 時,
<Beep Sound> 功能將無法操作0
SSeettttiinnggss
:關閉榛聲0
:開啓榛聲0
模模式式00
Page 47

ENGLISH
SettingsSettings
Off
On
Shutter SoundShutter Sound
MoveMove SelectSelect
Settings
Shutter Sound
Move Select
SettingsSettings
Off
On
Shutter SoundShutter Sound
MoveMove SelectSelect
Setting the Miniket Photo :
Setting the System
設設定定 MMiinniikkeett PPhhoottoo:: 設設定定系系統統
Setting the Shutter Sound
You can set the shutter sound to on / off.
1. Turn the Mode Dial to the Settings mode.
2. Press the [POWER] button to turn on the Miniket
Photo.
3. Select <Shutter Sound> by moving the joystick
left / right.
4. Select the desired option by moving the
joystick up / down and then press the joystick
(OK).
◆ <Off>: Turn the shutter sound off.
◆ <On>: Turn the shutter sound on.
5. After you finish setting, turn the Mode Dial to the
desired mode.
設設定定快快門門聲聲響響
舅可以將快門聲響設定爲開啓/關閉0
3
11.. 將將模模式式轉轉盤盤轉轉到到
22.. 按按下下 [[PPOOWWEERR]] 按按瞿瞿以以開開啓啓 MMiinniikkeett PPhhoottoo00
33.. 向向左左或或向向右右移移動動搖搖桿桿選選取取 <<SShhuutttteerr SSoouunndd>>00
44.. 向向上上或或向向下下移移動動搖搖桿桿選選取取所所要要的的選選項項,,然然後後按按下下搖搖
桿桿 ((OOKK)) 按按瞿瞿00
<<OOffff>>
4
◆
◆
<<OOnn>>
55.. 完完成成設設定定後後,,將將模模式式轉轉盤盤轉轉到到所所要要的的模模式式00
SSeettttiinnggss
模模式式00
: 關閉快門聲響0
: 開啓快門聲響0
4747
Page 48

ENGLISH
Setting the Miniket Photo :
Setting the System
設設定定 MMiinniikkeett PPhhoottoo:: 設設定定系系統統
Selecting Language
You can select the desired language of the Miniket Photo.
1. Turn the Mode Dial to the Settings mode.
2. Press the [POWER] button to turn on the Miniket
Photo.
3. Select <Language> by moving the joystick left /
right.
4. Select the desired Language by moving the
joystick up / down and then press the joystick
(OK).
◆ English / /
/ Deutsch / Italiano / Nederlands / Polski /
PЫТТНЛИ / / Magyar /
Svenska
5. After you finish setting, turn the Mode Dial to the desired
mode.
/ Français / Português
Español
‰‰∑∑¬¬
/ ì͇ªÌҸ͇ /
3
4
選選擇擇語語言言
舅可以選擇所要的 Miniket Photo 語言0
11.. 將將模模式式轉轉盤盤轉轉到到
22.. 按按下下 [[PPOOWWEERR]] 按按瞿瞿以以開開啓啓 MMiinniikkeett PPhhoottoo00
33.. 向向左左或或向向右右移移動動搖搖桿桿選選取取 <<LLaanngguuaaggee>>00
44.. 向向上上或或向向下下移移動動搖搖桿桿選選取取所所要要的的語語言言,,然然後後按按下下搖搖
桿桿 ((OOKK)) 按按瞿瞿00
◆ English / /
Português / Deutsch / Italiano / Nederlands /
Polski / PЫТТНЛИ / / Magyar /
ì͇ªÌҸ͇ / Svenska
55.. 完完成成設設定定後後,,將將模模式式轉轉盤盤轉轉到到所所要要的的模模式式00
SSeettttiinnggss
模模式式00
Español
/ Français /
‰‰∑∑¬¬
/
4848
Page 49

ENGLISH
Settings
Mode Display
Move Select
TYPE
SettingsSettings
Mode DisplayMode Display
Off
On
MoveMove SelectSelect
OK
TYPE
SettingsSettings
Mode DisplayMode Display
Off
On
MoveMove SelectSelect
OK
Settings
Mode Display
Move Select
Settings
Mode Display
Move Select
Settings
Setting the Miniket Photo :
Setting the System
設設定定 MMiinniikkeett PPhhoottoo:: 設設定定系系統統
Setting the Mode Display
You can set to display the mode transition when you use the Mode
Dial.
1. Turn the Mode Dial to the Settings mode.
2. Press the [POWER] button to turn on the Miniket
Photo.
3. Select <Mode Display> by moving the joystick
left / right.
4. Select the desired option by moving the joystick
up / down and then press the joystick (OK).
◆ <Off>: Turns the <Mode Display> off.
◆ <On>: Turns the <Mode Display> on.
5. After you finish setting, turn the Mode Dial to
the desired mode.
[ Note ]
✤
Turning on the Miniket Photo when the Mode Dial is
not set to the proper mode position, only the
Samsung logo will appear. Turn the Mode Dial to a
exact mode position.
3
4
設設定定模模式式顯顯示示
舅可以設定顯示舅在使用模式轉盤時的模式轉移0
11.. 將將模模式式轉轉盤盤轉轉到到
22.. 按按下下 [[PPOOWWEERR]] 按按瞿瞿以以開開啓啓 MMiinniikkeett PPhhoottoo00
33.. 向向左左或或向向右右移移動動搖搖桿桿選選取取 <<MMooddee DDiissppllaayy>>
((模模式式顯顯示示))00
44.. 向向上上或或向向下下移移動動搖搖桿桿選選取取所所要要的的選選項項,,然然後後按按下下搖搖
桿桿 ((OOKK)) 按按瞿瞿00
<<OOffff>>
◆
<<OOnn>>
◆
55.. 完完成成設設定定後後,,將將模模式式轉轉盤盤轉轉到到所所要要的的模模式式00
附附註註
[
]
✤ 在未將模式轉設定到正確的位置時開啓 Miniket
Photo,將僅顯示 Samsung 徽標0 將模式轉盤
轉到準確的模式位置0
SSeettttiinnggss
:關閉<Mode Display>0
:開啓<Mode Display>0
模模式式00
4949
Page 50

ENGLISH
Settings
Auto Shut Off
Move Select
TYPE
SettingsSettings
Auto Shut OffAuto Shut Off
Off
3min
5min
MoveMove SelectSelect
TYPE
SettingsSettings
Auto Shut OffAuto Shut Off
Off
3min
5min
MoveMove SelectSelect
Setting the Miniket Photo :
Setting the System
設設定定 MMiinniikkeett PPhhoottoo:: 設設定定系系統統
Setting the Auto Shut Off
To save battery power, you can set the Auto Shut Off function which
turns off the Miniket Photo if there is no operation for a certain period
of time.
1. Turn the Mode Dial to the Settings mode.
2. Press the [POWER] button to turn on the Miniket
Photo.
3. Select <Auto Shut Off> by moving the joystick
left / right.
4. Select the desired option by moving the joystick
up / down and then press the joystick (OK).
◆ <Off>: Cancel the Auto Shut Off function.
◆ <3min>: Automatically turns off after 3 minutes.
◆ <5min>: Automatically turns off after 5 minutes.
5. After you finish setting, turn the Mode Dial to the desired
mode.
[ Notes ]
✤ The <Auto Shut Off> will not function when you connect the AC
Power Adapter to the Miniket Photo.
The <Auto Shut Off> functions when the Battery Pack is the only
power source.
✤ <Auto Shut Off> will only function when you set this function in
Settings mode.
✤ Press the [POWER] button to revive the Miniket Photo.
✤ <Power Save LCD> will reduce the brightness of the LCD screen
to save power.
✤ Press any key to revive the LCD screen when the <LCD Off>
turned off the LCD screen.
5050
3
4
設設定定自自動動關關閉閉
爲了節省電池電能,舅可以設定 Auto Shut Off功能,央將會在特定
時間內沒有操作時關閉 Miniket Photo0
11.. 將將模模式式轉轉盤盤轉轉到到
22.. 按按下下 [[PPOOWWEERR]] 按按瞿瞿以以開開啓啓 MMiinniikkeett PPhhoottoo00
33.. 向向左左或或向向右右移移動動搖搖桿桿選選取取 <<AAuuttoo SShhuutt OOffff>>00
44.. 向向上上或或向向下下移移動動搖搖桿桿選選取取所所要要的的選選項項,,然然後後按按下下搖搖
桿桿 ((OOKK)) 按按瞿瞿00
<<OOffff>>
◆
<<33mmiinn>>
◆
<<55mmiinn>>
◆
55.. 完完成成設設定定後後,,將將模模式式轉轉盤盤轉轉到到所所要要的的模模式式00
附附註註
[
]
✤ 將交流電源適配器連接到 Miniket Photo 時,
<Auto Shut Off>將不會操作0
<Auto Shut Off>將會在電池組是唯一的電源時操作0
✤ <Auto Shut Off>將只有在舅於 Settings模式中設定此功能時可
以操作0
✤ 按下 [POWER] 按瞿以重新開啓 Miniket Photo0
✤ <Power Save LCD>將會降低 LCD 螢幕的亮度以節省能源0
✤ 當 <LCD Off>關閉 LCD 螢幕時,按下任何按鍵可重新開啓 LCD
螢幕0
SSeettttiinnggss
模模式式00
:關閉Auto Shut Off 功能0
:在3 分鐘後自動關閉0
:在5 分鐘後自動關閉0
Page 51

ENGLISH
!
Settings
Reset
Move Select
MoveMove SelectSelect
Reset?
Yes No
OK
TYPE
SettingsSettings
ResetReset
Start
MoveMove SelectSelect
OK
Setting the Miniket Photo :
Setting the System
設設定定 MMiinniikkeett PPhhoottoo:: 設設定定系系統統
Resetting the Miniket Photo
You can reset the Miniket Photo to load default (factory) settings.
1. Turn the Mode Dial to the Settings mode.
2. Press the [POWER] button to turn on the Miniket
Photo.
3. Select <Reset> by moving the joystick left / right.
4. Press the joystick (OK). Select an option by
moving the joystick left / right and then press
the joystick (OK).
◆ <Yes>: Starts the reset function.
◆ <No>: Cancel the reset function.
[ Warning ]
✤
If you reset the Miniket Photo, all functions you set are initialized to
the default (factory) settings.
[ Notes ]
✤
User settings and date / time information are initialized when you
reset.
✤
After resetting the Miniket Photo, set date / time (refer to page 42).
重重設設 MMiinniikkeett PPhhoottoo
舅可以重設 Miniket Photo 以載入預設(出廠)設定値0
3
11.. 將將模模式式轉轉盤盤轉轉到到
22.. 按按下下 [[PPOOWWEERR]] 按按瞿瞿以以開開啓啓 MMiinniikkeett PPhhoottoo00
33.. 向向左左或或向向右右移移動動搖搖桿桿選選取取 <<RReesseett>>00
44.. 按按下下搖搖桿桿 ((OOKK)) 按按瞿瞿00 確確認認訊訊息息將將會會顯顯示示00 向向左左
或或向向右右移移動動搖搖桿桿選選取取一一個個選選項項,,然然後後按按下下搖搖桿桿
4
警警告告
[
]
((OOKK)) 按按瞿瞿00
<<YYeess>>
◆
<<NNoo>>
◆
✤ 如果舅重設 Miniket Photo,舅設定的所有功能將會起始化爲預設
(出廠)設定値0
附附註註
[
]
✤ 使用者設定値和日期/時間資訊將會在舅重設時起始化0
✤ 重設 Miniket Photo 後,請設定日期/時間(請參閱第 42 頁)0
SSeettttiinnggss
: 啓動重設功能0
: 取消重設功能0
模模式式00
5151
Page 52

POWER
W T
POWER
W T
ENGLISH
2
2
Capturing..............................................................................................................53
Capturing Images ............................................................................................53
Zooming In and Out.........................................................................................54
Viewing .................................................................................................................55
Viewing Photo files on the LCD Monitor .........................................................55
Viewing Multiple Photo Files / Enlarging a Photo File....................................56
Cropping an Enlarged Photo File....................................................................57
Setting the Capturing Options...........................................................................58
Using the Shortcut Buttons..............................................................................58
Using the Scene Modes ..................................................................................60
Setting the Photo Size.....................................................................................61
Setting the Photo Quality.................................................................................62
Setting the Metering Method ...........................................................................63
Setting the Self Timer......................................................................................64
Setting the Multi Shot ......................................................................................65
Setting Digital Effects.......................................................................................66
Adjusting the Exposure – Exposure Compensation .......................................67
Setting the ISO Speed (Sensitivity).................................................................68
Setting the White Balance...............................................................................69
Setting the Macro Mode ..................................................................................70
Setting the Flash..............................................................................................71
Setting the Sharpness .....................................................................................73
Setting the Focus Method ...............................................................................74
Setting the Anti-Shake Function (Image Stabilisation) ...................................75
Setting the Digital Zoom ..................................................................................76
Setting the Imprint Option................................................................................77
Setting the Viewing Options ..............................................................................78
Using the Shortcut Buttons..............................................................................78
Deleting Photo Files ........................................................................................82
Protecting Photo Files .....................................................................................83
Rotating a Photo File.......................................................................................84
Resizing Photos ..............................................................................................85
Setting the Slideshow......................................................................................86
Setting the DPOF (Digital Print Order Format) Function................................87
Copying Photo Files ........................................................................................88
◆ Save important data / recordings separately on other media, to avoid accidental
loss due to a system failure or other reasons.
5252
Photo Mode
How to set to Photo mode
1. Turn the Mode Dial to
Photo mode.
2. Press the [POWER] button
to turn on the Miniket Photo.
Power
Button
2
2
拍拍攝攝
拍攝影像
放大和縮小
檢檢視視
在 L CD 顯示器上檢視相片圭案
檢視多個相片圭案/放大相片圭案
複製放大的相片圭案
設設定定拍拍攝攝選選項項
使用捷徑按瞿
使用場景模式
設定相片大小
設定相片品質
設定測光方法
設定自拍計時器
設定連拍
設定數位效果
調整曝光 - 曝光補償
設定 ISO 速度(感光度)
設定白平衡
設定微距模式
設定閃光燈
設定淸劉度
設定對焦方法
設定防震功能(影像穩定器)
設定數位縮放
設定壓印選項
設設定定檢檢視視選選項項
使用捷徑按瞿
刪除相片圭案
保護相片圭案
旋轉相片圭案
調整相片大小
設定幻燈片放映
設定 DPOF(數位列印順序格式)功能
複製相片圭案
◆ 在其他媒體上個別儲存重要資料/錄製內容,以避免由於系統故障或其他原因導致
資料意外遺失0
PPhhoottoo 模模式式
.......................................................................................................................53
..........................................................................................................53
......................................................................................................54
.......................................................................................................................55
........................................................................................................58
..................................................................................................58
..................................................................................................60
..................................................................................................61
..................................................................................................62
..................................................................................................63
..............................................................................................64
..........................................................................................................65
..................................................................................................66
......................................................................................................69
..................................................................................................70
......................................................................................................71
......................................................................................................73
..................................................................................................74
..................................................................................................76
..................................................................................................77
........................................................................................................78
..................................................................................................78
..................................................................................................82
..................................................................................................83
..................................................................................................84
..................................................................................................85
..............................................................................................86
..................................................................................................88
如如何何設設定定 PPhhoottoo 模模式式
11.. 將將模模式式轉轉盤盤轉轉到到
模模式式00
...................................................................55
.................................................................56
......................................................................................57
.....................................................................................67
................................................................................68
..........................................................................75
..........................................................87
電源按瞿
PPhhoottoo
22.. 按按下下 [[PPOOWWEERR]] 按按瞿瞿以以開開啓啓
MMiinniikkeett PPhhoottoo00
Page 53

ENGLISH
2592
IN
2592
IN
Photo Mode : Capturing
PPhhoottoo 模模式式:: 拍拍攝攝
Capturing Images
You can take still images as well as record video files.
1. Turn the Mode Dial to Photo mode.
2. Press the [POWER] button to turn on the Miniket
Photo.
◆ The Photo Capture screen appears.
3. Press the [Record / Stop] button halfway down
to set the focus and exposure.
◆ The focus indicator appears in green when the
focus is set. If the focus indicator appears in
red, try to set the focus again.
4. Fully press the [Record / Stop] button to take
a picture.
5. After capturing, press the [POWER ]button to
turn off the Miniket Photo to prevent battery
power consumption.
To Set the Focus
➮
Fully press the
[Record/Stop]
button.
Press the
[Record/Stop]
button halfway
down.
Pressing the [Record/Stop] button halfway down sets the focus.
Fully pressing the button takes a photo.
[ Note ]
✤
Shaking warning indicator will appear and blink when you press
the [Record/Stop] button for a long time to set the focus in a dark
place.
拍拍攝攝影影像像
舅可拍攝靜態影像以及錄製影片圭案0
3
4
設設定定對對焦焦
按下 [Record/
Stop] 按瞿一
半0
按下 [Record/Stop] 按瞿一半以設定對焦0 完全按下按瞿可
拍攝相片0
附附註註
[
✤
震動警告指示器會在舅長時間按下 [Record/Stop] 按瞿以設定黑
暗地點的對焦時顯示橙閃鹵0
11.. 將將模模式式轉轉盤盤轉轉到到
22.. 按按下下 [[PPOOWWEERR]] 按按瞿瞿以以開開啓啓 MMiinniikkeett PPhhoottoo00
◆ Photo Capture 螢幕將會顯示0
33.. 按按下下 [[RReeccoorrdd//SSttoopp]] 按按瞿瞿一一半半可可設設定定對對焦焦與與曝曝光光00
◆ 對焦設定後,對焦指示器將會呈綠色顯示0
如果對焦指示器呈紅色顯示,請嘗試再次設定
對焦0
44.. 完完全全按按下下 [[RReeccoorrdd //SSttoopp]] 按按瞿瞿可可拍拍攝攝相相片片00
55.. 拍拍攝攝後後,,按按下下 [[PPOOWWEERR]] 按按瞿瞿關關閉閉 MMiinniikkeett
PPhhoottoo 以以避避免免電電池池耗耗電電00
]
➮
PPhhoottoo
模模式式00
完全按下
[Record/
Stop] 按瞿0
5353
Page 54

ENGLISH
W T
W T
W T
W T
W T
IN
23
23
2592
T
T
23
2592
IN
2323
Photo Mode : Capturing
PPhhoottoo 模模式式:: 拍拍攝攝
Zooming In and Out
Zooming allows you to change the size of the subject captured in a
scene.
You can take advantage of the 3x optical electro motion zoom lens.
1. Turn the Mode Dial to Photo mode.
2. Press the [POWER] button to turn on the Miniket Photo.
Move the [W/T] zoom switch to W (WIDE)
●
The shot subject’s size is
reduced, and you can take a
picture as if you were far
away from the subject.
●
On the zoom indicator in the
LCD screen, the arrow moves
to W.
Move the [W/T] zoom switch to
T (TELE).
●
The subject is larger, and you
can take a picture as if you
were close to the subject.
●
On the zoom indicator the
arrow moves to T.
●
The largest optical zoom
ratio is 3x, which is the biggest among the basic
zoom.
Zoom Out
Zoom Out
●
The smallest rate of zoom out is the default rate
(original resolution of the subject).
Zoom In
[ Notes ]
✤
Frequent use of zooming may result in higher battery consumption.
✤
You can take advantage of 5x digital zoom as well as 3x optical
zoom for a total of 15x zoom.
✤
Optical zoom preserves the image quality.
5454
Zoom In
放放大大和和縮縮小小
縮放功能可以讓舅變更在場景中拍攝之物體的大小0
舅可以充分利用 3x 光學電子動作縮放鏡頭的優勢0
11.. 將將模模式式轉轉盤盤轉轉到到
22.. 按按下下 [[PPOOWWEERR]] 按按瞿瞿以以開開啓啓 MMiinniikkeett PPhhoottoo00
附附註註
[
]
✤
經常使用縮放功能可能導致較高的電池耗電量0
✤
舅可以充分利用 5x 數位縮放以及 3x 光學縮放總共 15x 縮放的優
勢0
✤
光學縮放可以保有影像品質0
PPhhoottoo
模模式式00
縮縮小小
將將 [[WW//TT]] 縮縮放放切切換換移移到到 WW((廣廣
角角))00
● 拍攝之物體的大小將會減
少,舅將可以像在距離物體
蜈遠的地方拍攝相片0
● 在 LCD 螢幕中的縮放指示
器上,箭頭將移到 W0
● 縮小的最小速率是預設速率(物體的原始解析
度)0
放放大大
將將 [[WW//TT]] 縮縮放放切切換換移移到到 TT((遠遠
攝攝))00
● 物體將會變大,舅將可以像
在距離物體蜈近的地方拍攝
相片0
● 在 LCD 螢幕中的縮放指示
器上,箭頭將移到 T0
● 最大的光學縮放率是 3x,央是基本縮放中最
大的0
Page 55

ENGLISH
IN
2592
17
17
MENU
POWER
W T
IN
17
2592
Photo Mode : Viewing
PPhhoottoo 模模式式:: 檢檢視視
Viewing Photo Files on the LCD Monitor
It is handy and practical to view pictures using the LCD monitor almost
anywhere such as in a car, indoors, or outdoors.
1. Turn the Mode Dial to Photo mode.
2. Press the [POWER] button to turn on the Miniket
Photo.
3. Press the [Shortcut 1] button to switch to Photo
View mode.
4. Move the joystick left / right to find the photo
you want to view.
◆ Each movement of the joystick goes to the
previous / next photo.
[ Notes ]
✤
If there is no file stored to view, the message
<No stored Photo!> appears.
✤
Moving the joystick right at the last photo will move to
the first photo.
✤
Moving the joystick left at the first photo will move to
the last photo.
✤
Moving the joystick left / right for more than 1
seconds will fast search.
在在 LLCCDD 顯顯示示器器上上檢檢視視相相片片圭圭案案
幾乎可以在任何地方方便地使用 LCD 顯示器檢視圖片,如車內/ 室內
或室外0
[POWER] Button
3
4
11.. 將將模模式式轉轉盤盤轉轉到到
Shortcut
Buttons
22.. 按按下下 [[PPOOWWEERR]] 按按瞿瞿以以開開啓啓 MMiinniikkeett PPhhoottoo00
PPhhoottoo
模模式式00
33.. 按按下下 [[SShhoorrttccuutt 11]] 按按瞿瞿切切換換到到 PPhhoottoo VViieeww((檢檢
joystick
視視相相片片))模模式式00
44.. 向向左左或或向向右右移移動動搖搖桿桿以以尋尋胥胥舅舅要要檢檢視視的的相相片片00
◆ 搖桿上的每一個動作將移到上一張/下一張相
片0
附附註註
[
]
✤
如果沒有儲存圭案以檢視,將會顯示 <No
stored Photo!>訊息0
✤
在最後一張相片上移動搖桿右按瞿將會移到第一
張相片0
✤
在第一張相片上移動搖桿左按瞿將會移到最後一
張相片0
✤
向左或向右移動搖桿超過 1 秒將可快速搜尋0
5555
Page 56

ENGLISH
W T
W T
W T
W T
MoveMove Full ViewFull View
IN
IN
Move Full View
MoveMove
TrimTrim
Photo Mode : Viewing
PPhhoottoo 模模式式:: 檢檢視視
Viewing Multiple Photo Files / Enlarging a Photo File
Using the [W/T] zoom switch in Photo View mode, you can display
multiple images on one LCD screen.
1. Turn the Mode Dial to Photo mode.
2. Press the [POWER] button to turn on the Miniket Photo.
3. Press the [Shortcut 1] button to switch to
Photo View mode.
Displaying Multiple Photo Files (Zoom Out)
Move the [W/T] zoom switch to
W (WIDE).
●
The screen switches to multiview.
●
The photo you were viewing
in the single view previously is
Zooming out will not display multi-view if there was
no stored photo.
Enlarging a Photo File (Zoom In)
[ Note ]
✤
If there is no file stored to view, the message <No stored Photo!>
appears.
selected.
Move the [W/T] zoom switch to
T (TELE).
●
From the multi-view screen,
it switches back to the single view screen. Move
the [W/T] Zoom switch to T (TELE) again to
enlarge the selected photo.
Zoom Out
Zoom In
檢檢視視多多個個相相片片圭圭案案//放放大大相相片片圭圭案案
舅可以在「檢視相片」模式中使用 [W/T] 縮放切換,在 LCD 螢幕上顯
示多個影像0
11.. 將將模模式式轉轉盤盤轉轉到到
22.. 按按下下 [[PPOOWWEERR]] 按按瞿瞿以以開開啓啓 MMiinniikkeett PPhhoottoo00
附附註註
[
]
✤ 如果沒有儲存圭案以檢視,將會顯示 <No stored Photo!>訊息0
PPhhoottoo
模模式式00
33.. 按按下下 [[SShhoorrttccuutt 11]] 按按瞿瞿切切換換到到 PPhhoottoo VViieeww
模模式式00
顯顯示示多多個個相相片片圭圭案案((縮縮小小))
將將 [[WW//TT]] 縮縮放放切切換換移移到到 WW((廣廣
角角))00
● 螢幕將切換到多個視圖0
● 舅之前在單一視圖中檢視的
相片將會選取0
如果沒有儲存的相片,縮小
操作將不會顯示多個視圖0
放放大大相相片片圭圭案案((放放大大))
將將 [[WW//TT]] 縮縮放放切切換換移移到到 TT((遠遠
攝攝))00
● 央將會從多個視圖螢幕,切
換回單一視圖螢幕0 再次
將 [W/T] 縮放切換移到 T
(遠攝)可放大選取的相片0
5656
Page 57

ENGLISH
IN
1.05x
1.05x
MoveMove
TrimTrim
OK
IN
MoveMove
TrimTrim
OK
3.33x3.33x
Trim
Move
Trim
Trim?
Yes No
MoveMove
SelectSelect
OK
3.33x
Trim
IN
7/7
7/7
Move
Trim
Move
Select
3.33x
2592
Photo Mode : Viewing
PPhhoottoo 模模式式:: 檢檢視視
Cropping an Enlarged Photo File
✤ You can enlarge and crop a photo.
✤ Using the [W/T] zoom switch in Photo View mode,
you can display multiple images on one LCD screen.
1. Turn the Mode Dial to Photo mode.
2. Press the [POWER] button to turn on the Miniket
Photo.
3. Press the [Shortcut 1] button to switch to Photo
View mode.
4. Move the [W/T] zoom switch to T (TELE).
◆ Selected photo is enlarged.
5. Move the joystick up / down / left / right to find
the portion of the photo to crop.
6. Press the joystick (OK).
◆ The message <Trim?> appears on the screen.
◆ If there is not enough space to save the cropped
image, a message <Memory Full!> is displayed.
7. Select an option by moving the joystick left / right
and then press the joystick (OK).
◆ <Yes>: Crops the image and saves it as a new
file.
◆ <No>: Cancels cropping.
8. If <Yes> is selected, cropped image is saved and
displayed on the screen.
[ Notes ]
✤ You cannot crop an image smaller than 640 x 480
pixels (VGA size).
✤ The original photo is not overwritten by the
cropped image. The cropped image is saved
separately.
✤ The maximum magnification ratio differs depending on
the image resolution:
5M – up to 3.86x, 4M – up to 3.09x, 3M – up to 2.67x
2M – up to 2.27x, 1M – up to 1.60x
✤ If there is not enough space to save the cropped
image, it cancels cropping automatically.
✤ You cannot crop a rotated image.
✤ You cannot crop a VGA image.
Cropped image will have the same magnification ratio to the original.
✤
複複製製放放大大的的相相片片圭圭案案
4
5
6
8
✤ 舅可以防大和裁剪相片0
✤ 舅可以在「檢視相片」模式中使用 [W/T] 縮放切
換,在 LCD 螢幕上顯示多個影像0
11.. 將將模模式式轉轉盤盤轉轉到到
PPhhoottoo
模模式式00
22.. 按按下下 [[PPOOWWEERR]] 按按瞿瞿以以開開啓啓 MMiinniikkeett PPhhoottoo00
33.. 按按下下 [[SShhoorrttccuutt 11]] 按按瞿瞿切切換換到到 PPhhoottoo VViieeww((檢檢
視視相相片片))模模式式00
44.. 將將 [[WW//TT]] 縮縮放放切切換換移移到到 TT((遠遠攝攝))00
◆ 選取的相片將會放大0
55.. 移移動動搖搖桿桿上上//下下//左左//右右按按瞿瞿以以尋尋胥胥舅舅要要裁裁剪剪的的相相片片
部部略略00
66.. 按按下下搖搖桿桿 ((OOKK)) 按按瞿瞿00
◆ 螢幕上將會出現 <Trim?>訊息0
◆ 若沒有足觀空間儲存複製的影像,將會顯示一
則 <Memory Full!> 訊息0
77.. 向向左左或或向向右右移移動動搖搖桿桿選選取取一一個個選選項項,,然然後後按按下下搖搖桿桿
((OOKK)) 按按瞿瞿00
<<YYeess>>
◆
◆
88.. 若若選選擇擇 <<YYeess>>,,裁裁剪剪的的影影像像將將會會儲儲存存然然後後在在螢螢幕幕
: 裁剪影像橙將央儲存爲新的圭案0
<<NNoo>>
: 取消裁剪0
上上顯顯示示00
附附註註
[
]
✤ 舅不能裁剪小於 640 x 480 像素(VGA 大小)的
影像0
✤ 原始相片將不會被裁剪的影像覆寫0 裁剪的影像
將會個別儲存0
✤ 根據影像解析度,最大放大倍率將會有所不同:
55MM
- 高達 3.86x/
22MM
- 高達 2.27x/
✤
若沒有足觀空間儲存裁剪的影像,央將會自動取消0
44MM
- 高達 3.09x/
11MM
- 高達 1.60x
33MM
- 高達 2.67x
✤ 舅不能裁剪旋轉的影像0
✤ 舅不能裁剪 VGA 影像0
✤ 裁剪的影像將具有與原件一致的放大倍率0
5757
Page 58

ENGLISH
IN
2592
17
17
IN
17
2592
IN
23
23
2592
23
IN
23
23
2592
Photo Mode :
Setting the Capturing Options
PPhhoottoo 模模式式:: 設設定定拍拍攝攝選選項項
Using the Shortcut Buttons
Shortcut buttons are provided to allow users easy access to frequently
used functions.
Switching to Photo View Mode
1. Turn the Mode Dial to Photo mode.
2. Press the [POWER] button to turn on the Miniket
Photo.
3. Press the [Shortcut 1] button.
◆ Each press of the [Shortcut 1] button toggles
between the Photo capture / view modes.
Setting the Flash
1. Turn the Mode Dial to Photo mode.
2. Press the [POWER] button to turn on the
Miniket Photo.
3. Press the [Shortcut 2] button.
◆ Each press of the [Shortcut 2] button cycles
through the < >-< >-< >-< >-< > flash
modes.
[ Notes ]
✤ Regarding the flash use with the Scene modes, refer
to page 72.
By default, the scene mode is set to <Manual>.
使使用用捷捷徑徑按按瞿瞿
捷徑按瞿專爲讓使用者輕瑪存取常用功能而提供0
3
3
切切換換到到 PPhhoottoo VViieeww 模模式式
11.. 將將模模式式轉轉盤盤轉轉到到
PPhhoottoo
模模式式00
22.. 按按下下 [[PPOOWWEERR]] 按按瞿瞿以以開開啓啓 MMiinniikkeett PPhhoottoo00
33.. 按按下下 [[SShhoorrttccuutt 11]] 按按瞿瞿00
◆ 每次按下 [Shortcut 1] 按瞿,將會在拍攝相
片/檢視相片模式之間切換0
設設定定閃閃光光燈燈
11.. 將將模模式式轉轉盤盤轉轉到到
PPhhoottoo
模模式式00
22.. 按按下下 [[PPOOWWEERR]] 按按瞿瞿以以開開啓啓 MMiinniikkeett PPhhoottoo00
33.. 按按下下 [[SShhoorrttccuutt 22]] 按按瞿瞿00
◆ 每次按下 [Shortcut 2] 按瞿,將會在
< >-< >-< >-< >-< > 閃光燈
模式中轉換0
附附註註
[
]
✤ 如需關於在 Scene 模式中使用的閃光燈資訊,請
參閱第 72 頁0
根據預設,場景模式將設定爲 <Manual>0
5858
Page 59

ENGLISH
IN
2323
2592
23
2592
IN
2323
IN
23
23
2592
23
2592
IN
23
23
Photo Mode :
Setting the Capturing Options
PPhhoottoo 模模式式:: 設設定定拍拍攝攝選選項項
Using the Shortcut Buttons
Shortcut buttons are provided to allow users easy access to frequently
used functions.
Setting the Macro
1. Turn the Mode Dial to Photo mode.
2. Press the [POWER] button to turn on the Miniket
Photo.
3. Press the [Shortcut 3] button.
◆ Each press of the [Shortcut 3] button cycles
through < > - < > - < >
[ Notes ]
✤ Regarding the Macro use with Scene modes, refer to
page 72.
✤ By default, the scene mode is set to <Manual>.
Setting the Self Timer
1. Turn the Mode Dial to Photo mode.
2. Press the [POWER] button to turn on the Miniket
Photo.
3. Press the [Shortcut 4] button.
◆ Each press of the [Shortcut 4] button cycles
through < > - < > - < >
(refer to page 64).
使使用用捷捷徑徑按按瞿瞿
捷徑按瞿專爲讓使用者輕瑪存取常用功能而提供0
3
3
使使用用微微距距
11.. 將將模模式式轉轉盤盤轉轉到到
PPhhoottoo
模模式式00
22.. 按按下下 [[PPOOWWEERR]] 按按瞿瞿以以開開啓啓 MMiinniikkeett PPhhoottoo00
33.. 按按下下 [[SShhoorrttccuutt 33]] 按按瞿瞿00
◆ 每次按下 [Shortcut 3] 按瞿,將會在
< > - < > - < > 中轉換0
附附註註
[
]
✤ 如需關於在 Scene 模式中使用 Macro 的資訊,
請參閱第 72 頁0
✤ 根據預設,場景模式將設定爲 <Manual>0
設設定定自自拍拍計計時時器器
11.. 將將模模式式轉轉盤盤轉轉到到
PPhhoottoo
模模式式00
22.. 按按下下 [[PPOOWWEERR]] 按按瞿瞿以以開開啓啓 MMiinniikkeett PPhhoottoo00
33.. 按按下下 [[SShhoorrttccuutt 44]] 按按瞿瞿00
◆ 每次按下 [Shortcut 4] 按瞿,將會在
< > - < > - < > 中轉換
(請參閱第 64 頁)0
5959
Page 60

ENGLISH
IN
2592
23
23
MENU
TYPE
PhotoPhoto
Auto
Manual
Night
Portrait
SceneScene
MoveMove SelectSelect ExitExit
OK
23
Photo
Scene
Move Select Exit
MENU
TYPE
PhotoPhoto
Auto
Manual
Night
Portrait
SceneScene
MoveMove SelectSelect ExitExit
OK
23
IN
2592
Photo
Scene
Move Select Exit
Photo
Scene
Move Select Exit
23
23
23
Photo Mode :
Setting the Capturing Options
PPhhoottoo 模模式式:: 設設定定拍拍攝攝選選項項
Using the Scene Modes
Scene Modes are preset automatic exposure modes based upon an internal
computer program. It helps to set Miniket Photo, allowing users to have the best
results under various conditions.
1. Turn the Mode Dial to Photo mode.
2. Press the [POWER] button to turn on the Miniket
Photo.
3. Press the [MENU] button.
◆ Menu screen appears.
4. Move the joystick left / right to select <Scene> Mode.
5. Select an option by moving the joystick up / down, and
then press the joystick (OK).
6. Press the [MENU] button to exit the menu.
[ Notes ]
✤ Setting the listed functions are available only when the
✤ While the menu screen is displayed, pressing the [Record /
6060
For automatic balancing
exposure and shutter
Auto
speed for the best result
For manual exposure
setting, turns off the
Manual
Scene mode.
For taking images in
Night
evening time or under
weak light source.
For focusing and
emphasizing on the
Portrait
portrait while having outfocused background.
For taking images of
Children
fast moving children.
For landscapes,
balances and
emphasizes green
Landscape
woods and blue sky.
◆ An icon indicating the selected scene mode appears on
the screen.
◆ If <Manual> is selected, no icon will be displayed.
<Manual> of Scene mode is selected: <Metering>, <EV>,
<ISO>, <White Balance>, <Macro>, <Flash>, and <Focus>.
Stop] button will exit the menu.
Close-up
Sunset
Dawn
Backlight
Fireworks
Beach/
Snow
For taking images of
small subjects from a
short distance, such as
insects and flowers.
For taking images of
sunset.
For taking images of
dawn.
For taking images of
brighter subject when the
background is more
brighter than the subject.
For taking images of
fireworks and night view.
For taking images when
people or subjects are
darker than the
background because of
reflected or strong light
from sand or snow.
使使用用場場景景模模式式
「場景模式」是根據內建電腦程式預設的自動曝光模式0 央有助於設定
Miniket Photo,讓使用者可以在各種條件下獲得最佳效果0
PPhhoottoo
11.. 將將模模式式轉轉盤盤轉轉到到
3
4
5
6
22.. 按按下下 [[PPOOWWEERR]] 按按瞿瞿以以開開啓啓 MMiinniikkeett PPhhoottoo00
33.. 按按下下 [[MMEENNUU]] 按按瞿瞿00
◆ 選單螢幕將會顯示0
44.. 向向左左或或向向右右移移動動搖搖桿桿選選取取 <<SScceennee>> 模模式式00
55.. 向向上上或或向向下下移移動動搖搖桿桿以以選選取取選選項項,,然然後後按按搖搖桿桿 ((OOKK))
按按瞿瞿00
用於自動平衡曝光和
快門速度以獲得最佳
Auto
效果0
用於手動設定曝光,
關閉 Scene 模式0
Manual
用於在夜間或照明微
弱下拍攝影像0
Night
用於在主體的背景失
焦時,對焦以强調人
Portrait
像0
用於拍攝快速移動的
Children
孩童0
用於風景/ 平衡和强
調綠色樹木與藍天0
Landscape
66.. 按按 [[MMEENNUU]] 按按瞿瞿以以結結束束選選單單00
◆ 螢幕上將顯示一個標示所選場景模式的圖示0
◆ 如果選擇 <Manual>,將不會顯示任何圖示0
附附註註
[
]
✤
將 Scene 模式設定爲 <Manual> 以外,舅會在選
擇 <Metering>/ <EV>/ <ISO>/ <White
Balance>/ <Macro>/ <Flash> 和 <Focus>
時受到限制0
✤
當選單螢幕顯示時,按 [Record/Stop] 按瞿將可以
結束選單0
模模式式00
Close-up
Sunset
Backlight
Fireworks
Beach/
Dawn
Snow
用於短距離拍攝細小物
體,如昆蟲與花朶0
用於拍攝日落的影像0
用於拍攝黎明的影像0
用於在背景比物體更亮
時拍攝較亮的影像0
用於拍攝煙火和夜景的
影像0
用於拍攝在由於沙灘或
雪地上光線反射,造成
人物或物體比背景暗時
的影像0
Page 61

ENGLISH
IN
2592
2323
MENU
5M
4M
3M
2M
2272
2048
1600
PhotoPhoto
Photo SizePhoto Size
MoveMove SelectSelect ExitExit
OK
23
Photo
Photo Size
Move Select Exit
MENU
5M
4M
3M
2M
2272
2048
1600
PhotoPhoto
Photo SizePhoto Size
MoveMove SelectSelect ExitExit
OK
23
IN
3030
2272
Photo
Photo Size
Move Select Exit
Photo
Photo Size
Move Select Exit
23
Photo Mode :
Setting the Capturing Options
PPhhoottoo 模模式式:: 設設定定拍拍攝攝選選項項
Setting the Photo Size
You can set the image resolution to meet your needs.
1. Turn the Mode Dial to Photo mode.
2. Press the [POWER] button to turn on the Miniket
Photo.
3. Press the [MENU] button.
◆ Menu screen appears.
4. Move the joystick left / right to select <Photo
Size>.
5. Select an option by moving the joystick up /
down, and then press the joystick (OK).
◆ <5M> / <4M> / <3M> / <2M> / <1M> / VGA
6. Press the [MENU] button to exit the menu.
◆ An icon indicating the selected size appears
on the screen.
[ Notes ]
✤
Regarding detailed image capacity, refer to page
31.
✤ The photo capacity is an approximation and subject to
recording conditions.
✤ For e-mail purposes, the <VGA> option is appropriate.
✤ While the menu screen is displayed, pressing the
[Record / Stop] button will exit the menu.
設設定定相相片片大大小小
3
4
5
6
舅可以設定影像解析度來符合舅的需要0
11.. 將將模模式式轉轉盤盤轉轉到到
PPhhoottoo
模模式式00
22.. 按按下下 [[PPOOWWEERR]] 按按瞿瞿以以開開啓啓 MMiinniikkeett PPhhoottoo00
33.. 按按下下 [[MMEENNUU]] 按按瞿瞿00
◆ 選單螢幕將會顯示0
44.. 向向左左或或向向右右移移動動搖搖桿桿以以選選取取 <<PPhhoottoo SSiizzee>>00
55.. 向向上上或或向向下下移移動動搖搖桿桿以以選選取取選選項項,,然然後後按按搖搖桿桿
((OOKK)) 按按瞿瞿00
◆
<5M> / <4M> / <3M> / <2M> / <1M> / VGA
66.. 按按 [[MMEENNUU]] 按按瞿瞿以以結結束束選選單單00
◆ 螢幕上將顯示一個標示所選大小的圖示0
附附註註
[
]
✤ 如需關於詳細的影像容量資訊,請參閱第 31 頁0
✤ 相片容量爲大約數字橙會根據錄製條件而有所不
同0
✤ <VGA> 選項適合在電子郵件中使用0
✤ 當選單螢幕顯示時,按 [Record/Stop] 按瞿將
可以結束選單0
6161
Page 62

ENGLISH
PhotoPhoto
Photo QualityPhoto Quality
Super Fine
Fine
Normal
MoveMove SelectSelect ExitExit
OK
23
Photo
Photo Quality
Move Select Exit
PhotoPhoto
Photo QualityPhoto Quality
Super Fine
Fine
Normal
MoveMove SelectSelect ExitExit
OK
23
IN
51
51
2592
Photo
Photo Quality
Move Select Exit
Photo
Photo Quality
Move Select Exit
23
IN
2592
2323
Photo Mode :
Setting the Capturing Options
PPhhoottoo 模模式式:: 設設定定拍拍攝攝選選項項
Setting the Photo Quality
You can set the image quality to meet your needs.
Set the image quality before taking a picture.
1. Turn the Mode Dial to Photo mode.
2. Press the [POWER] button to turn on the Miniket
Photo.
3. Press the [MENU] button.
◆ Menu screen appears.
4. Move the joystick left / right to select <Photo
Quality>.
5. Select an option by moving the joystick up /
down, and then press the joystick (OK).
◆ <Super Fine> / <Fine> / <Normal>
6. Press the [MENU] button to exit the menu.
◆ An icon indicating the selected quality appears on
the screen.
[ Notes ]
✤
Regarding detailed image capacity, refer to page 31.
✤
The photo capacity is an approximation and subject to
recording conditions.
✤
While the menu screen is displayed, pressing the
[Record / Stop] button will exit the menu.
6262
設設定定相相片片品品質質
3
4
5
6
舅可以設定影像品質來符合舅的需要0 請在拍攝相
片之前設定影像品質0
11.. 將將模模式式轉轉盤盤轉轉到到
PPhhoottoo
模模式式00
22.. 按按下下 [[PPOOWWEERR]] 按按瞿瞿以以開開啓啓 MMiinniikkeett PPhhoottoo00
33.. 按按下下 [[MMEENNUU]] 按按瞿瞿00
◆ 選單螢幕將會顯示0
44.. 向向左左或或向向右右移移動動搖搖桿桿選選取取 <<PPhhoottoo QQuuaalliittyy>>00
55.. 向向上上或或向向下下移移動動搖搖桿桿以以選選取取選選項項,,然然後後按按搖搖桿桿
((OOKK)) 按按瞿瞿00
◆ <Super Fine> / <Fine> / <Normal>
66.. 按按 [[MMEENNUU]] 按按瞿瞿以以結結束束選選單單00
◆ 螢幕上將顯示一個標示所選品質的圖示0
附附註註
[
]
✤ 如需關於詳細的影像容量資訊,請參閱第 31 頁0
✤ 相片容量爲大約數字橙會根據錄製條件而有所不
同0
✤ 當選單螢幕顯示時,按 [Record/Stop] 按瞿將
可以結束選單0
Page 63

ENGLISH
MENU
PhotoPhoto
MeteringMetering
Multi
Center
Spot
MoveMove SelectSelect ExitExit
OK
23
Photo
Metering
Move Select Exit
MENU
PhotoPhoto
MeteringMetering
Multi
Center
Spot
MoveMove SelectSelect ExitExit
OK
23
IN
2592
Photo
Metering
Move Select Exit
Photo
Metering
Move Select Exit
23
23
23
IN
2592
23
23
Photo Mode :
Setting the Capturing Options
PPhhoottoo 模模式式:: 設設定定拍拍攝攝選選項項
Setting the Metering Method
Metering controls the brightness and exposure of the picture taken.
Select an appropriate metering method for the best results.
1. Turn the Mode Dial to Photo mode.
2. Press the [POWER] button to turn on the Miniket
Photo.
3. Press the [MENU] button.
◆ Menu screen appears.
4. Move the joystick left / right to select
<Metering>.
5. Select an option by moving the joystick up /
down, and then press the joystick (OK).
It splits the screen into many areas and adjusts
the exposure accordingly based on the center
<Multi>
6. Press the [MENU] button to exit the menu.
◆ An icon indicating the selected Metering mode
[ Notes ]
✤
Regarding metering with Scene modes, refer to
page 72.
✤ While the menu screen is displayed, pressing the
[Record / Stop] button will exit the menu.
screen and each area’s brightness information.
It meters only the area displayed in the square
in the center of the LCD. You can select this
<Center>
when you want to accurately expose the subject
regardless of background brightness.
It meters a very narrow area in the center. You
can select this when the subject’s surrounding
<Spot>
area is very bright or there is a backlight,
therefore you can meter the subject accurately.
appears on the screen.
設設定定測測光光方方法法
測光功能控制所拍圖片的亮度與曝光0 選取適當的測光方法以獲取最佳
效果0
3
4
5
6
11.. 將將模模式式轉轉盤盤轉轉到到
PPhhoottoo
模模式式00
22.. 按按下下 [[PPOOWWEERR]] 按按瞿瞿以以開開啓啓 MMiinniikkeett PPhhoottoo00
33.. 按按下下 [[MMEENNUU]] 按按瞿瞿00
◆ 選單螢幕將會顯示0
44..
向向左左或或向向右右移移動動搖搖桿桿以以選選取取 <<MMeetteerriinngg>>00
55.. 向向上上或或向向下下移移動動搖搖桿桿以以選選取取選選項項,,然然後後按按搖搖桿桿
((OOKK)) 按按瞿瞿00
央會將螢幕劃分成蜈多部略,然後根據中間的
螢幕調整曝光以及每個部略的亮度資訊0
<<MMuullttii>>
僅對 LCD 中間方格中顯示的部略進行測光0
舅可以在不論背景亮度如何的情況下,需要準
<<CCeenntteerr>>
確曝光物體時選取此選項0
央將會對中間的非常窄小部略進行測量0 舅可
以在物體的周圍區域非常亮或背光情況下選取
<<SSppoott>>
此選項,由此舅卽可準確對物體進行測光0
66.. 按按 [[MMEENNUU]] 按按瞿瞿以以結結束束選選單單00
◆ 螢幕上將顯示一個標示所選測光模式的圖示0
附附註註
[
]
✤ 如需關於在 Scene 模式中的測光資訊,請參閱
第 72 頁0
✤ 當選單螢幕顯示時,按 [Record/Stop] 按瞿將
可以結束選單0
6363
Page 64

ENGLISH
MENU
ISO
PhotoPhoto
Self TimerSelf Timer
Off
2 sec
10 sec
MoveMove SelectSelect ExitExit
OK
23
Photo
Self Timer
Move Select Exit
MENU
ISO
PhotoPhoto
Self TimerSelf Timer
Off
2 sec
10 sec
MoveMove SelectSelect ExitExit
OK
23
IN
2592
Photo
Self Timer
Move Select Exit
Photo
Self Timer
Move Select Exit
23
23
23
IN
2592
23
23
Photo Mode :
Setting the Capturing Options
PPhhoottoo 模模式式:: 設設定定拍拍攝攝選選項項
Setting the Self Timer
Using this option, you can take a picture of yourself
with delayed shooting.
1. Turn the Mode Dial to Photo mode.
2. Press the [POWER] button to turn on the Miniket
Photo.
3. Press the [MENU] button.
◆ Menu screen appears.
4. Move the joystick left / right to select <Self
Timer>.
5. Select an option by moving the joystick up /
down, and then press the joystick (OK).
Cancels the Self Timer.
Off
Sets the delay interval to 2 seconds. Takes a
2 sec
photo 2 seconds after pressing the [Record/Stop]
Sets the delay interval to 10 seconds.
Takes a photo 10 seconds after pressing the
10 sec
[Record/Stop]
6. Press the [MENU] button to exit the menu.
[ Notes ]
✤ You can easily access this function by using the
shortcut button (refer to page 59).
✤
It is recommended to use a tripod for best results on
Self Timer pictures.
✤
Restarting the Miniket Photo will cancel the Self Timer
setting.
✤
While the menu screen is displayed, pressing the [Record / Stop]
button will exit the menu.
6464
設設定定自自拍拍計計時時器器
3
4
5
6
舅可以使用此選項透過延遲拍攝來拍攝舅本身的圖片0
11.. 將將模模式式轉轉盤盤轉轉到到
PPhhoottoo
模模式式00
22.. 按按下下 [[PPOOWWEERR]] 按按瞿瞿以以開開啓啓 MMiinniikkeett PPhhoottoo00
33.. 按按下下 [[MMEENNUU]] 按按瞿瞿00
◆ 選單螢幕將會顯示0
44.. 向向左左或或向向右右移移動動搖搖桿桿選選取取 <<SSeellff TTiimmeerr>>00
55.. 向向上上或或向向下下移移動動搖搖桿桿以以選選取取選選項項,,然然後後按按搖搖桿桿
((OOKK)) 按按瞿瞿00
OOffff
取消 Self Timer(自拍計時器)0
將延遲延遲間隔設定爲 2 秒0 在按下
22 SSeecc
[Record/Stop] 的 2 秒後拍攝相片0
將延遲延遲間隔設定爲 10 秒0 在按下
1100 SSeecc
[Record/Stop] 的 10 秒後拍攝相片0
66.. 按按 [[MMEENNUU]] 按按瞿瞿以以結結束束選選單單00
附附註註
[
]
✤
舅可以使用捷徑按瞿簡易地存取此功能
(請參閱第 59 頁)0
✤
建議舅選擇自拍計時器拍攝相片時使用三苛架以
獲取最佳效果0
✤
重新啓動 Miniket Photo 將會取消 Self Timer
設定0
✤
當選單螢幕顯示時,按 [Record/Stop] 按瞿將
可以結束選單0
Page 65

ENGLISH
MENU
ISO
PhotoPhoto
Multi ShotMulti Shot
Off
Normal
AEB
MoveMove SelectSelect ExitExit
OK
23
Photo
Multi Shot
Move Select Exit
MENU
ISO
PhotoPhoto
Multi ShotMulti Shot
Off
Normal
AEB
MoveMove SelectSelect ExitExit
OK
23
2592
Photo
Multi Shot
Move Select Exit
Photo
Multi Shot
Move Select Exit
IN
2323
23
IN
2592
2323
Photo Mode :
Setting the Capturing Options
PPhhoottoo 模模式式:: 設設定定拍拍攝攝選選項項
Setting the Multi Shot
You can take a series of pictures continuously with
just one press of the shutter.
1. Turn the Mode Dial to Photo mode.
2. Press the [POWER] button to turn on the Miniket
Photo.
3. Press the [MENU] button.
◆ Menu screen appears.
4. Move the joystick left / right to select <Multi Shot>.
5. Select an option by moving the joystick up / down,
and then press the joystick (OK).
Disables Multi Shot and takes one photo at a time.
Off
Enables Multi Shot and takes 3 photos in a row.
Normal
Enables Multi Shot and takes 3 photos in a row
AEB
with exposure bracketing of -0.3 EV / 0 EV / +0.3
EV
6. Press the [MENU] button to exit the menu.
◆ An icon indicating the selected Multi Shot mode
appears on the screen.
◆ If <Off> is selected, no icon will be displayed.
[ Notes ]
✤
When you set the Multi Shot enabled, you cannot
use the flash.
✤ <
Anti-Shake> is not available when you set the Multi
Shot enabled.
✤
Restarting the Miniket Photo will cancel the Multi Shot
setting.
✤
Regarding Multi Shot with Scene modes, refer to
page 72.
✤
While the menu screen is displayed, pressing the [Record / Stop]
button will exit the menu.
設設定定連連拍拍
3
4
5
6
僅需按下快門一次卽可連續拍攝一系列相片0
11.. 將將模模式式轉轉盤盤轉轉到到
PPhhoottoo
模模式式00
22.. 按按下下 [[PPOOWWEERR]] 按按瞿瞿以以開開啓啓 MMiinniikkeett PPhhoottoo00
33.. 按按下下 [[MMEENNUU]] 按按瞿瞿00
◆ 選單螢幕將會顯示0
44.. 向向左左或或向向右右移移動動搖搖桿桿選選取取 <<MMuullttii SShhoott>>00
55.. 向向上上或或向向下下移移動動搖搖桿桿以以選選取取選選項項,,然然後後按按搖搖桿桿
((OOKK)) 按按瞿瞿00
停用「連拍」功能,一次拍攝一張相片0
OOffff
NNoorrmmaall
啓用「連拍」功能,連續拍攝三張相片0
啓用「連拍」功能,使用 -0.3 EV/0EV/+0.3 EV
AAEEBB
的曝光係架連續拍攝三張相片0
66.. 按按 [[MMEENNUU]] 按按瞿瞿以以結結束束選選單單00
◆ 螢幕上將顯示一個標示所選連拍模式的圖示0
◆ 如果選擇 <Off>,將不會顯示任何圖示0
附附註註
[
]
✤
舅不可以在啓用連拍功能時使用閃光燈0
✤
在啓用連拍功能時 <Anti-Shake> 功能將不可
以使用0
✤
重新啓動 Miniket Photo 將會取消 Multi Shot
設定0
✤
如需關於在 Scene 模式中的 Multi Shot 資
訊,請參閱第 72 頁0
✤
當選單螢幕顯示時,按 [Record/Stop] 按瞿將
可以結束選單0
6565
Page 66

ENGLISH
MENU
ISO
SS
NN
BWBW
Digital EffectDigital Effect
Off
Sepia
Nega
BLK&WHT
MoveMove SelectSelect ExitExit
OK
23
S
N
BW
Digital Effect
Move Select Exit
MENU
ISO
SS
NN
BWBW
Digital EffectDigital Effect
Off
Sepia
Nega
BLK&WHT
MoveMove SelectSelect ExitExit
OK
23
S
N
BW
IN
2592
SS
Digital Effect
Move Select Exit
S
N
BW
Digital Effect
Move Select Exit
23
23
23
2592
IN
2323
Photo Mode :
Setting the Capturing Options
PPhhoottoo 模模式式:: 設設定定拍拍攝攝選選項項
Setting Digital Effects
It supports various digital effects you can apply to your photos. Create
a professional-looking photo with digital effects.
1. Turn the Mode Dial to Photo mode.
2. Press the [POWER] button to turn on the Miniket
Photo.
3. Press the [MENU] button.
◆ Menu screen appears.
4. Move the joystick left / right to select <Digital
Effect>.
5. Select an option by moving the joystick up /
down, and then press the joystick (OK).
BLK&WHT
6. Press the [MENU] button to exit the menu.
◆ The selected Digital Effect and icon appear on the
◆ If <Off> is selected, no icon will be displayed.
[ Note ]
✤ While the menu screen is displayed, pressing the
Cancel the <Digital Effect>.
Off
The picture is displayed in sepia color
Sepia
similar to that of an old photograph.
Reverses the colors, creating the look of a
Nega
negative.
Changes the images into black and white.
screen.
[Record / Stop] button will exit the menu.
6666
設設定定數數位位效效果果
央支援各種舅可以套用到相片中的數位效果0 數位效果可以讓舅製作
具有專業外觀的相片0
3
11.. 將將模模式式轉轉盤盤轉轉到到
22.. 按按下下 [[PPOOWWEERR]] 按按瞿瞿以以開開啓啓 MMiinniikkeett PPhhoottoo00
33.. 按按下下 [[MMEENNUU]] 按按瞿瞿00
◆ 選單螢幕將會顯示0
44.. 向向左左或或向向右右移移動動搖搖桿桿選選取取 <<DDiiggiittaall EEffffeecctt>> 模模
4
式式00
55.. 向向上上或或向向下下移移動動搖搖桿桿以以選選取取選選項項,,然然後後按按搖搖桿桿
((OOKK)) 按按瞿瞿00
OOffff
SSeeppiiaa
5
NNeeggaa
BBLLKK&&WWHHTT
66.. 按按 [[MMEENNUU]] 按按瞿瞿以以結結束束選選單單00
◆ 選取的數位效果和圖示將顯示在螢幕上0
◆ 如果選擇 <Off>,將不會顯示任何圖示0
6
附附註註
[
]
✤
當選單螢幕顯示時,按 [Record/Stop] 按瞿將
可以結束選單0
PPhhoottoo
模模式式00
取消 <Digital Effect>0
圖片以深褐色顯示 - 産生類似舊相片的效
果0
將顔色倒置,建立底片外觀0
將影像變爲黑白0
Page 67

ENGLISH
EV
Move Select Exit
MENU
ISO
+0.6
+0.3
0
-0.3
EVEV
MoveMove SelectSelect ExitExit
23
EV
Move Select Exit
EV
Move Select Exit
2592
EV
+0.3
IN
23
23
23
MENU
ISO
+0.6
+0.3
0
-0.3
EVEV
MoveMove SelectSelect ExitExit
23
2592
IN
23
23
Photo Mode :
Setting the Capturing Options
PPhhoottoo 模模式式:: 設設定定拍拍攝攝選選項項
Adjusting the Exposure – Exposure Compensation
You can manually make exposure adjustments using EV Exposure
Compensation which allows users to control the amount of light
manually when the shutter-release button is released.
1. Turn the Mode Dial to Photo mode.
2. Press the [POWER] button to turn on the Miniket
Photo.
3. Press the [MENU] button.
◆ Menu screen appears.
4. Move the joystick left / right to select <EV>.
5. Select an option by moving the joystick up /
down, and then press the joystick (OK).
◆ -2.0 / -1.6 / -1.3 / -1.0 / -0.6 / -0.3 / 0 / +0.3 / +0.6 /
+1.0 / +1.3 / +1.6 / +2.0
◆ The screen brightness gets darker when the EV
settings goes to a negative setting and gets
brighter when it goes to a positive setting.
6. Press the [MENU] button to exit the menu.
◆ An icon indicating the selected <EV> mode
appears on the screen.
◆ No icon will be displayed when it is set to <0>.
[ Warning ]
✤ Do not let the CCD be exposed to a strong light
source for a long time. It may damage the CCD.
[ Notes ]
✤
Regarding EV setting in Scene modes, refer to page
72.
✤
While the menu screen is displayed, pressing the
[Record / Stop] button will exit the menu.
調調整整曝曝光光 -- 曝曝光光補補償償
舅可以使用 EV 曝光補償」來手動設定曝光,央可以讓使用者手動控制
在放開快門釋放按瞿時的燈光數量0
3
11.. 將將模模式式轉轉盤盤轉轉到到
22.. 按按下下 [[PPOOWWEERR]] 按按瞿瞿以以開開啓啓 MMiinniikkeett PPhhoottoo00
33.. 按按下下 [[MMEENNUU]] 按按瞿瞿00
◆ 選單螢幕將會顯示0
44.. 向向左左或或向向右右移移動動搖搖桿桿以以選選取取 <<EEVV>>00
4
55.. 向向上上或或向向下下移移動動搖搖桿桿以以選選取取選選項項,,然然後後按按搖搖桿桿
((OOKK)) 按按瞿瞿00
◆ -2.0 / -1.6 / -1.3 / -1.0 / -0.6 / -0.3 /
0 / +0.3 / +0.6 / +1.0 / +1.3 / +1.6 /
+2.0
◆ 螢幕亮度會在 EV 設定爲底片設定時變暗,
以及在設定爲正片設定時變亮0
5
66.. 按按 [[MMEENNUU]] 按按瞿瞿以以結結束束選選單單00
◆ 螢幕上將顯示一個標示所選 <EV> 模式的
圖示0
◆ 將央設定爲 <0> 時,將不會顯示任何圖示0
警警告告
[
]
6
✤ 請勿讓 CCD 長時間暴露於强光下0 這樣做可能
會損毁 CCD0
附附註註
[
]
✤ 如需關於在 Scene 模式中的 EV 設定資訊,請
參閱第 72 頁0
✤ 當選單螢幕顯示時,按 [Record/Stop] 按瞿將
可以結束選單0
PPhhoottoo
模模式式00
6767
Page 68

ENGLISH
MENU
ISO
100
ISO
200
100
200
400
ISOISO
ISO
ISO
AUTO
PhotoPhoto
Auto
MoveMove SelectSelect ExitExit
ISO
400
OK
23
ISO
Photo
Move Select Exit
MENU
ISO
AUTO
ISO
200
ISO
400
100
200
400
ISOISO
ISO
ISO
100
PhotoPhoto
Auto
MoveMove SelectSelect ExitExit
OK
23
ISO
2592
ISO
100
Photo
Move Select Exit
ISO
Photo
Move Select Exit
IN
23
23
23
IN
2592
23
23
Photo Mode :
Setting the Capturing Options
PPhhoottoo 模模式式:: 設設定定拍拍攝攝選選項項
Setting the ISO Speed (Sensitivity)
ISO Speed is the rating of a film's sensitivity to light.
Though Miniket Photo doesn't use film, they normally
use the same rating system to describe the sensitivity of
the Miniket's imaging sensor.
1. Turn the Mode Dial to Photo mode.
2. Press the [POWER] button to turn on the Miniket
Photo.
3. Press the [MENU] button.
◆ Menu screen appears.
4. Move the joystick left / right to select <ISO>.
5. Select an option by moving the joystick up /
down, and then press the joystick (OK).
Automatically sets the ISO according to the light
Auto
brightness
The standard sensitivity rate, and therefore it is the
100
6. Press the [MENU] button to exit the menu.
[ Notes ]
✤ The higher the ISO Speed number, the higher
✤ High ISO Speed setting may result in picture noise.
✤ Regarding ISO setting in Scene modes, refer to page
✤ If <Anti-Shake> is set, ISO setting will be limited.
✤ While the menu screen is displayed, pressing the [Record / Stop]
6868
usual shooting sensitivity rate.
When you use this in a dark place, you can increase
200
the shutter speed, but it might come out grainy.
When you use this in a very dark place, you can
greatly increase the shutter speed, but you may get
400
a rough image due to severe graininess.
◆ An icon indicating the selected ISO Speed
appears on the screen.
◆ If <Auto> is selected, no icon will be displayed.
sensitivity to light. It results in brighter imaging under
darker lighting.
72.
button will exit the menu.
設設定定 IISSOO 速速度度((感感光光度度))
3
4
5
6
「ISO 速度」額定軟片對燈光的感光度0 雖然數位相
機不使用軟片,但央們通常使用相同的額定系統來
描述相機的成像感應器之感光度0
11.. 將將模模式式轉轉盤盤轉轉到到
PPhhoottoo
模模式式00
22.. 按按下下 [[PPOOWWEERR]] 按按瞿瞿以以開開啓啓 MMiinniikkeett PPhhoottoo00
33.. 按按下下 [[MMEENNUU]] 按按瞿瞿00
◆ 選單螢幕將會顯示0
44.. 向向左左或或向向右右移移動動搖搖桿桿以以選選取取 <<IISSOO>>00
55.. 向向上上或或向向下下移移動動搖搖桿桿以以選選取取選選項項,,然然後後按按搖搖桿桿
((OOKK)) 按按瞿瞿00
根據照明亮度自動設定 ISO
AAuuttoo
標準感光度速率,因此央是常用的拍攝感光度速
110000
率0
在暗的地區使用此設定時,舅可以增加快門速
220000
度,但相片會出現顆粒0
在非常暗的地區使用此設定時,舅可以大大增加
快門速度,但舅的影像會因爲嚴重顆粒而變得粗
440000
鼠0
66.. 按按 [[MMEENNUU]] 按按瞿瞿以以結結束束選選單單00
螢幕上將顯示一個標示所選 ISO 速度的圖示0
◆
◆ 如果選擇 <Auto>,將不會顯示任何圖示0
附附註註
[
]
✤ ISO 速度號碼越高,對燈光的感光度也越高0
央將會在比較暗的照明下産生比較亮的成像0
✤ 設定高 ISO 速度可能會導致圖片筮訊0
✤ 如需關於在 Scene 模式中的 ISO 設定資訊,請
參閱第 72 頁0
✤ 若已設定 <Anti-Shake> 功能,ISO 設定將會
受到限制0
✤ 當選單螢幕顯示時,按 [Record/Stop] 按瞿將
可以結束選單0
Page 69

ENGLISH
MENU
ISO
A
PhotoPhoto
White BalanceWhite Balance
Auto
Daylight
Cloudy
Fluorescent H
MoveMove SelectSelect ExitExit
OK
23
Photo
White Balance
Move Select Exit
MENU
ISO
A
PhotoPhoto
White BalanceWhite Balance
Auto
Daylight
Cloudy
Fluorescent H
MoveMove SelectSelect ExitExit
OK
23
2592
Photo
White Balance
Move Select Exit
Photo
White Balance
Move Select Exit
IN
23
23
23
IN
2592
23
23
Photo Mode :
Setting the Capturing Options
PPhhoottoo 模模式式:: 設設定定拍拍攝攝選選項項
Setting the White Balance
The White Balance allows calibration of the picture for
accurate color display in different lighting conditions.
It is recommended to set the white balance prior to any recording.
1. Turn the Mode Dial to Photo mode.
2. Press the [POWER] button to turn on the Miniket Photo.
3. Press the [MENU] button.
◆ Menu screen appears.
4. Move the joystick left / right to select <White Balance>.
5. Select an option by moving the joystick up / down, and
then press the joystick (OK).
◆ To set the Custom WB, frame the white subject on
the center. Press the joystick (OK) to set, or press the
[MENU] button to cancel and exit to Menu screen. Photos
captured after the Custom WB set will be affected by the
setting.
Fluorescent H
Fluorescent L
Custom WB
6. Press the [MENU] button to exit the menu.
◆ An icon indicating the selected white balance appears
on the screen.
◆ If <Auto> is selected, no icon will be displayed.
[ Notes ]
✤ In general outdoors picture taking, <Auto> setting will allow
users to have best results.
✤ As the lighting condition changes, set the appropriate white
balance before taking a picture.
✤
The subject used for <Custom WB> should be white. If not,
the color balance will not be natural.
✤
Regarding White Balance setting in Scene modes, refer to page 72.
✤ While the menu screen is displayed, pressing the [Record / Stop] button will
exit the menu.
Automatically sets according to the shooting
Auto
environment.
Adjusts the color according to daylight/indoor,
Daylight
outdoor light
You can select this when you cannot have
Cloudy
daylight as a direct light, such as when it is
partly-cloudy or cloudy.
Suitable in a halogen or 3-wavelength light
environment.
Suitable for a fluorescent light environment.
Suitable for an incandescent light
Tungsten
environment.
You can adjust the white balance as you wish
based on the shooting environment.
設設定定白白平平衡衡
3
4
5
6
✤ 如需關於在 Scene 模式中設定 White Balance 的資訊,請參閱第 72 頁0
✤ 當選單螢幕顯示時,按 [Record/Stop] 按瞿將可以結束選單0
白平衡用於校準圖片以便在不同照明條件下顯示正確色彩0 建議
在進行任何錄製之前設定白平衡0
11.. 將將模模式式轉轉盤盤轉轉到到
22.. 按按下下 [[PPOOWWEERR]] 按按瞿瞿以以開開啓啓 MMiinniikkeett PPhhoottoo00
33.. 按按下下 [[MMEENNUU]] 按按瞿瞿00
◆ 選單螢幕將會顯示0
44.. 向向左左或或向向右右移移動動搖搖桿桿選選取取 <<WWhhiittee BBaallaannccee>>00
55.. 向向上上或或向向下下移移動動搖搖桿桿以以選選取取選選項項,,然然後後按按搖搖桿桿 ((OOKK)) 按按
瞿瞿00
◆ 若要設定 Custom WB,請將白色物體定位在觀景
鎖的中央位置0 按下搖桿 (OK) 按瞿以設定,或按
下 [MENU] 按瞿以取消橙結束選單螢幕0 在設定
Custom WB 之後拍攝的相片將會受到該設定値的
影響0
DDaayylliigghhtt
CClloouuddyy
FFlluuoorreesscceenntt HH
FFlluuoorreesscceenntt LL
TTuunnggsstteenn
CCuussttoomm WWBB
66.. 按按 [[MMEENNUU]] 按按瞿瞿以以結結束束選選單單00
◆ 螢幕上將顯示一個標示所選白平衡的圖示0
如果選擇 <Auto>,將不會顯示任何圖示0
◆
附附註註
[
]
✤ 在一般的戶外拍攝中,<Auto> 設定將可以讓使用者獲
得最佳效果0
✤ 當照明條件改變時,請在拍攝前設定適當的白平衡0
✤ 用於 <Custom WB> 的物體必須是白色的0 否則,
色彩平衡將會不自然0
PPhhoottoo
模模式式00
根據拍攝環境自動設定0
AAuuttoo
根據白天/室內/ 室外照明調整色彩0
舅可以在無法獲得日光作爲直接照明時
選取此選項,例如稍微多雲的陰天或非
常多雲的陰天0
適用於鹵光燈或 3 波長照明環境0
適用於螢光燈照明環境0
適用於白熾燈照明環境0
舅可以根據拍攝環境調整舅要的白
平衡0
6969
Page 70

ENGLISH
MENU
PhotoPhoto
MacroMacro
Off
Macro
Super Macro
MoveMove SelectSelect ExitExit
OK
23
Photo
Macro
Move Select Exit
MENU
PhotoPhoto
MacroMacro
Off
Macro
Super Macro
MoveMove SelectSelect ExitExit
OK
23
2592
Photo
Macro
Move Select Exit
Photo
Macro
Move Select Exit
IN
23
23
23
IN
2592
23
23
Photo Mode :
Setting the Capturing Options
PPhhoottoo 模模式式:: 設設定定拍拍攝攝選選項項
Setting the Macro Mode
Macro mode allows users to have a fine focused image of a close-up
subject within 50 cm.
1. Turn the Mode Dial to Photo mode.
2 Press the [POWER] button to turn on the Miniket
Photo.
3. Press the [MENU] button.
◆ Menu screen appears.
4. Move the joystick left / right to select <Macro>.
5. Select an option by moving the joystick up / down,
and then press the joystick (OK).
Macro Setting
<Off>
<Macro>
<Super Macro>
6. Press the [MENU] button to exit the menu.
[ Notes ]
✤ You can easily access this function by using the shortcut
button (refer to page 59).
✤ Flash setting is not available when you set the Macro
mode to <Super Macro>.
✤ Zooming is not available when you set the Macro
mode to <Super Macro>.
✤ <Super Macro> is only available when the zoom is
positioned to W end.
✤ When you use Macro mode and record a close-up
subject, be careful not to shade your subject.
✤ As the distance gets closer, the focused area gets
narrower.
✤ If the focus will not set, try to put more distance
between you and the subject.
✤ It is recommended to use a tripod to avoid unstable
picture taking and have best results.
✤ Regarding Macro setting in Scene modes, refer to page
72.
✤ While the menu screen is displayed, pressing the [Record
/ Stop] button will exit the menu.
7070
Focus Range
50 cm ~ ∞
W: 10 cm ~ ∞
T: 30 cm ~ ∞
W: 1 cm ~ 5 cm
設設定定微微距距模模式式
微距模式可以讓使用者擁有 50 公分以內特寫物體之良好對焦影像0
PPhhoottoo
11.. 將將模模式式轉轉盤盤轉轉到到
3
22.. 按按下下 [[PPOOWWEERR]] 按按瞿瞿以以開開啓啓 MMiinniikkeett PPhhoottoo00
33.. 按按下下 [[MMEENNUU]] 按按瞿瞿00
◆ 選單螢幕將會顯示0
44.. 向向左左或或向向右右移移動動搖搖桿桿以以選選取取 <<MMaaccrroo>>00
55.. 向向上上或或向向下下移移動動搖搖桿桿以以選選取取選選項項,,然然後後按按搖搖桿桿 ((OOKK)) 按按
瞿瞿00
4
微距設定
<Off>
<Macro>
<Super Macro>
66.. 按按 [[MMEENNUU]] 按按瞿瞿以以結結束束選選單單00
附附註註
[
]
5
6
✤ 舅可以使用捷徑按瞿簡易地存取此功能(請參閱第 59
頁)0
✤ 當舅將 Macro 模式設定爲 <Super Macro> 時,將
無法設定閃光燈0
✤ 當舅將 Macro 模式設定爲 <Super Macro> 時,將
無法使用縮放0
✤ <Super Macro> 只有在將縮放定位在 W 端時可以使
用0
✤ 使用微距模式以及錄製特寫物體時,請小心不要遮蔽舅
的拍攝物體0
✤ 距離更迲近時,對焦區域將更窄0
✤ 如果對焦無法設定,請嘗試拉開舅和物體之間的距離0
✤ 建議舅使用三苛架以避免圖片拍攝不穩定橙獲得最佳效
果0
✤ 如需關於在 Scene 模式中設定 Macro 的資訊,請參
閱第 72 頁0
✤ 當選單螢幕顯示時,按 [Record/Stop] 按瞿將可以結
束選單0
模模式式00
對焦範圍
50 公分 ~ ∞
W: 10 公分 ~ ∞
T: 30 公分 ~ ∞
W: 1 公分 ~5公分
Page 71

ENGLISH
MENU
PhotoPhoto
FlashFlash
Off
Auto
Red-eye
Fill-in
MoveMove SelectSelect ExitExit
OK
23
Photo
Flash
Move Select Exit
MENU
PhotoPhoto
FlashFlash
Off
Auto
Red-eye
Fill-in
MoveMove SelectSelect ExitExit
OK
23
2592
Photo
Flash
Move Select Exit
Photo
Flash
Move Select Exit
IN
23
23
23
2592
IN
23
23
Photo Mode :
Setting the Capturing Options
PPhhoottoo 模模式式:: 設設定定拍拍攝攝選選項項
Setting the Flash
Flash is very useful not only for brighter subjects at night, but also in
daytime when there is not enough lighting on the subject, such as in a
shadow, indoors, and in backlight situations.
1. Turn the Mode Dial to Photo mode.
2. Press the [POWER] button to turn on the
Miniket Photo.
3. Press the [MENU] button.
◆ Menu screen appears.
4. Move the joystick left / right to select <Flash>.
5. Select an option by moving the joystick up /
down, and then press the joystick (OK).
Red-eye
Slow Sync.
6. Press the [MENU] button to exit the menu.
[ Notes ]
✤ You can easily access this function by using the
shortcut button (refer to page 58).
✤
Regarding Flash setting in Scene modes, refer to
page 72.
✤ While the menu screen is displayed, pressing the
[Record / Stop] button will exit the menu.
Flash will go off. Select this option when flash
Off
use is limited such as in a museum.
Flash will be set automatically according to
Auto
lighting conditions.
Flash will be set automatically according to
lighting conditions, with red-eye reduction.
Forces the flash to go on despite the lighting
Fill-in
conditions.
To have a brighter subject and scene (backdrop),
the Miniket Photo will first allow longer exposure
and then throws the flash on the subject. It is
recommended to use a tripod to avoid blurred
images.
設設定定閃閃光光燈燈
閃光燈不只在晩上使物體變亮時蜈有用,央在白天若物體沒有足觀照明
時也非常有用,例如,陰影/ 室內以及背光情況下0
3
22.. 按按下下 [[PPOOWWEERR]] 按按瞿瞿以以開開啓啓 MMiinniikkeett PPhhoottoo00
33.. 按按下下 [[MMEENNUU]] 按按瞿瞿00
◆ 選單螢幕將會顯示0
44.. 向向左左或或向向右右移移動動搖搖桿桿以以選選取取 <<FFllaasshh>>00
55.. 向向上上或或向向下下移移動動搖搖桿桿以以選選取取選選項項,,然然後後按按搖搖桿桿
11.. 將將模模式式轉轉盤盤轉轉到到
4
((OOKK)) 按按瞿瞿00
OOffff
AAuuttoo
RReedd--eeyyee
FFiillll--iinn
5
SSllooww SSyynncc..
66.. 按按 [[MMEENNUU]] 按按瞿瞿以以結結束束選選單單00
附附註註
[
]
✤ 舅可以使用捷徑按瞿簡易地存取此功能(請參閱第
6
58 頁)0
✤ 如需關於在 Scene 模式中設定 Flash 的資訊,
請參閱第 72 頁0
✤ 當選單螢幕顯示時,按 [Record/Stop] 按瞿將
可以結束選單0
PPhhoottoo
模模式式00
閃光燈將會關閉0 在限制使用閃光燈的場所
(如博物館)選取此選項0
閃光燈將會根據照明條件自動設定0
閃光燈將會根據照明條件自動設定,橙具備消
除紅眼功能0
不論照明條件如何,强制啓動閃光燈0
爲了獲得較亮的物體與場景(背景),Miniket
Photo 將會先允許較久的曝光,然後將閃光燈
照射到物體上0
建議舅使用三苛架以避免影像模糊0
7171
Page 72

ENGLISH
Photo Mode :
Setting the Capturing Options
Supported Functions According to the Capturing Modes
It helps to set Miniket Photo according to each mode, allowing users to have the best results
under various conditions.
◆ Pan: Pan Focus that adjusts the focus to entire screen has focused. Focuses on the deepest
DOF (Depth of Field) position which makes the both near and distant view are in focus.
◆ ∞: Infinite Focus that sets the focus to infinity. It sets the focus to a subject at far away
which results parallel light reception to the lens. All subjects with a certain distance are in
focus and it is useful for outdoor landscape images.
Scene Modes
-0.3~-2.0EV
0.3~2.0EV
ISO
[ Notes ]
✤
Do not use flash in a place where flash use is limited, such as in a museum.
✤
Frequent use of flash consumes more battery power.
✤
You cannot use flash with <Multi Shot>.
✤
Effective flash range distance is less than 2 m (7 ft).
7272
Off
0 EV
Off
O
X
X
O
O
O
X
O
X
ISO
O
AUTO
ISO
100
X
ISO
X
200
ISO
400
X
A
O
X
X
X
X
X
c
X
O
X
X
O
X
O
X
X
O
X
X
O
O
O
O
O
X
X
O
X
X
O
O
O
O
O
X
O
O
X
O
X
X
O
O
O
O
X
X
O
O
O
O
X
X
O
X
X
O
X
X
O
O
O
O
X
X
O
X
X
O
X
X
O
X
X
O
X
X
O
X
X
O
O
O
O
X
X
O
X
X
O
O
O
O
X
X
O
O
X
O
X
X
O
X
O
O
O
Pan
O
X
X
O
X
X
O
O
O
O
X
X
O
Pan
O
O
O
O
X
X
X
X
X
X
X
X
O
O
O
O
X
O
O
O
X
O
O
O
X
X
X
X
O
O
O
O
X
X
X
X
O
O
O
O
X
X
X
X
X
X
X
X
X
X
X
X
O
O
O
O
X
X
X
X
X
X
X
X
X
X
X
X
X
X
X
X
X
X
X
X
X
X
X
X
X
O
O
O
O
X
X
X
X
X
X
X
O
O
O
O
X
X
X
X
X
X
X
O
X
X
X
X
X
X
X
X
O
∞
∞
X
X
X
X
X
X
X
X
O
O
O
O
X
X
X
X
O
O
O
X
X
X
X
X
X
O
O
O
X
X
O
X
X
O
X
X
X
O
O
O
X
X
X
O
O
O
X
X
X
X
X
X
X
X
X
O
O
O
X
X
X
X
X
X
X
X
X
X
X
X
X
X
X
X
X
X
O
O
O
X
X
X
X
X
X
O
O
O
X
X
X
X
X
X
X
O
X
X
X
X
∞
X
X
O
X
Pan
Pan
Pan
X
X
X
X
O
O
X
X
PPhhoottoo 模模式式:: 設設定定拍拍攝攝選選項項
根根據據拍拍攝攝模模式式支支援援的的功功能能
央有助於根據各個模式設定 Miniket Photo,讓使用者可以在各種條件下獲得最佳效果0
◆ Pan(全景): Pan Focus(全景對焦)可調整對焦的整個怜面的對焦0 對焦在最深的 DOF
(景深)位置,使遠和近的景觀都處於對焦範圍內0
◆ ∞: Infinite Focus(無限對焦)可將對焦設定到無限遠的位置0 央可以對導致透鏡接收平
行照明之非常遠的物體設定對焦0 特定距離內的所有物體將處於對焦範圍內,這對於戶外
風景影像非常有用0
Scene Modes
O
X
X
O
O
O
X
O
X
O
X
X
X
O
X
X
X
X
X
X
O
X
X
O
O
X
X
X
X
X
O
X
Off
-0.3~-2.0EV
0 EV
0.3~2.0EV
ISO
AUTO
ISO
100
ISO
ISO
200
ISO
400
A
c
Off
附附註註
[
]
✤
請不要在限制使用閃光燈的場所(如博物館)使用閃光燈0
✤
經常使用閃光燈將消耗較多電池電量0
✤
舅可以在 <Multi Shot> 模式中使用閃光燈0
✤
有效閃光範圍少於 2 公尺(7 英樹)0
O
O
O
X
O
X
X
O
X
O
O
O
X
O
O
X
O
O
X
O
X
O
O
O
X
O
X
O
O
O
X
O
X
X
O
X
X
O
X
O
O
O
X
O
X
X
O
X
X
O
X
X
O
X
X
O
X
X
O
X
O
O
O
X
O
X
X
O
X
O
O
O
X
O
X
X
O
O
X
O
X
O
O
X
Pan
O
O
X
O
X
X
O
X
O
O
O
X
O
O
O
X
X
O
O
O
X
O
X
O
X
X
X
O
X
X
X
X
X
X
O
X
X
O
X
O
X
X
O
X
X
O
X
O
O
O
O
O
O
O
O
O
O
Pan
O
O
O
X
X
X
X
X
X
O
O
X
O
X
O
X
X
X
O
O
X
X
X
O
O
X
X
X
X
X
X
X
X
X
O
O
X
X
X
X
X
X
X
X
X
X
X
X
X
X
X
X
X
X
X
O
O
X
X
X
X
X
O
O
X
X
X
X
X
X
X
X
X
X
X
O
∞
X
X
X
X
X
X
O
O
X
X
X
O
O
O
X
X
X
X
X
X
O
O
O
X
O
O
X
O
O
X
X
X
O
O
O
X
X
X
O
O
O
X
X
X
X
X
X
X
X
X
O
O
O
X
X
X
X
X
X
X
X
X
X
X
X
X
X
X
X
X
X
O
O
O
X
X
X
X
X
X
O
O
O
X
X
X
X
X
X
O
X
X
X
X
X
Pan
∞
∞
X
X
X
X
X
X
O
O
O
X
X
X
Pan
O
O
X
X
X
X
O
O
O
X
O
X
X
X
O
O
X
X
O
O
X
X
X
X
X
X
O
O
X
X
X
X
X
X
X
X
X
X
X
X
O
O
X
X
X
X
O
O
O
X
X
X
X
X
X
X
Pan
X
X
X
X
O
O
X
X
Page 73

ENGLISH
MENU
PhotoPhoto
SharpnessSharpness
Soft
Normal
Sharp
MoveMove SelectSelect ExitExit
OK
23
Photo
Sharpness
Move Select Exit
MENU
PhotoPhoto
SharpnessSharpness
Soft
Normal
Sharp
MoveMove SelectSelect ExitExit
OK
23
2592
Photo
Sharpness
Move Select Exit
Photo
Sharpness
Move Select Exit
IN
23
23
23
IN
2592
23
23
Photo Mode :
Setting the Capturing Options
PPhhoottoo 模模式式:: 設設定定拍拍攝攝選選項項
Setting the Sharpness
You can set the sharpness of the image to be captured. Set the image
sharpness before taking a picture.
1. Turn the Mode Dial to Photo mode.
2. Press the [POWER] button to turn on the Miniket
Photo.
3. Press the [MENU] button.
◆ Menu screen appears.
4. Move the joystick left / right to select
<Sharpness>.
5. Select an option by moving the joystick up / down,
and then press the joystick (OK).
The image’s edges display softly and you
can select this when you want to edit it on
<Soft>
the computer.
<Normal>
The image’s edges display sharply, and
you can select this when you want to print.
As the image’s edges are sharpened and
<Sharp>
emphasised, some noise might occur
although it is seen clearly.
6. Press the [MENU] button to exit the menu.
◆ An icon indicating the selected sharpness
appears on the screen.
◆ No icon will be displayed when it is set to
<Normal>.
[ Note ]
✤ While the menu screen is displayed, pressing the
[Record / Stop] button will exit the menu.
設設定定淸淸劉劉度度
舅可以設定要拍攝之影像的淸劉度0 請在拍攝相片之前設定影像淸
劉度0
3
4
5
6
11.. 將將模模式式轉轉盤盤轉轉到到
PPhhoottoo
模模式式00
22.. 按按下下 [[PPOOWWEERR]] 按按瞿瞿以以開開啓啓 MMiinniikkeett PPhhoottoo00
33.. 按按下下 [[MMEENNUU]] 按按瞿瞿00
◆ 選單螢幕將會顯示0
44.. 向向左左或或向向右右移移動動搖搖桿桿以以選選取取 <<SShhaarrppnneessss>>00
55.. 向向上上或或向向下下移移動動搖搖桿桿以以選選取取選選項項,,然然後後按按搖搖桿桿
((OOKK)) 按按瞿瞿00
柔和顯示影像的邊緣,如果舅要在電腦上編
<<SSoofftt>>
輯此影像,請選取此選項0
<<NNoorrmmaall>>
<<SShhaarrpp>>
淸劉顯示影像的邊緣,如果舅要列印此影
像,請選取此選項0
由於影像的邊緣變得淸劉和强調,雖然央看
起來蜈淸劉但可能會出現一些筮訊0
66.. 按按 [[MMEENNUU]] 按按瞿瞿以以結結束束選選單單00
◆ 螢幕上將顯示一個標示所選淸劉度的圖示0
◆ 將央設定爲 <Normal> 時,將不會顯示任
何圖示0
附附註註
[
]
✤
當選單螢幕顯示時,按 [Record/Stop] 按瞿將
可以結束選單0
7373
Page 74

ENGLISH
MENU
TYPE
PhotoPhoto
FocusFocus
Multi AF
Center AF
Spot AF
MoveMove SelectSelect ExitExit
OK
23
Photo
Focus
Move Select Exit
MENU
TYPE
PhotoPhoto
FocusFocus
Multi AF
Center AF
Spot AF
MoveMove SelectSelect ExitExit
OK
23
2592
Photo
Focus
Move Select Exit
Photo
Focus
Move Select Exit
IN
23
23
23
IN
2592
23
23
Photo Mode :
Setting the Capturing Options
PPhhoottoo 模模式式:: 設設定定拍拍攝攝選選項項
Setting the Focus Method
To have clear image of the subject, you need to set the focus on the
subject. Select an appropriate focus method for the best results.
1. Turn the Mode Dial to Photo mode.
2. Press the [POWER] button to turn on the
Miniket Photo.
3. Press the [MENU] button.
◆ Menu screen appears.
4. Move the joystick left / right to select <Focus>.
5. Select an option by moving the joystick up /
down, and then press the joystick (OK).
You can select this when the subjects
<Multi AF>
<Center AF>
<Spot AF>
6. Press the [MENU] button to exit the menu.
◆ An icon indicating the selected focusing mode
appears on the screen.
[ Notes ]
✤
Regarding Focus Method setting in Scene modes,
refer to page 72.
✤ While the menu screen is displayed, pressing the
[Record / Stop] button will exit the menu.
7474
are not located in the center of the
screen, but you have to focus on
numerous spots.
You can select this when the subject is
located in near to middle of the screen.
You can select this when the subject is
located in the center of the screen
exactly.
設設定定對對焦焦方方法法
若要獲得物體的淸劉影像,舅需要設定物體的對焦0 選取適當的對焦方
法以獲取最佳效果0
3
11.. 將將模模式式轉轉盤盤轉轉到到
22.. 按按下下 [[PPOOWWEERR]] 按按瞿瞿以以開開啓啓 MMiinniikkeett PPhhoottoo00
33.. 按按下下 [[MMEENNUU]] 按按瞿瞿00
◆ 選單螢幕將會顯示0
44.. 向向左左或或向向右右移移動動搖搖桿桿以以選選取取 <<FFooccuuss>>00
4
55.. 向向上上或或向向下下移移動動搖搖桿桿以以選選取取選選項項,,然然後後按按搖搖桿桿
((OOKK)) 按按瞿瞿00
<<MMuullttii AAFF>>
5
<<CCeenntteerr AAFF>>
<<SSppoott AAFF>>
66.. 按按 [[MMEENNUU]] 按按瞿瞿以以結結束束選選單單00
◆ 螢幕上將顯示一個標示所選對焦模式的圖示0
6
[
附附註註
]
✤ 如需關於在 Scene 模式中設定 Focus Method
的資訊,請參閱第 72 頁0
✤ 當選單螢幕顯示時,按 [Record/Stop] 按瞿將
可以結束選單0
PPhhoottoo
模模式式00
舅可以在物體不處於螢幕的中間時選取
此選項,但舅必須對焦許多個點0
舅可以在物體處於迲近螢幕的中間時選
取此選項0
舅可以在物體正處於螢幕的中間時選取
此選項0
Page 75

ENGLISH
MENU
TYPE
Anti ShakeAnti Shake
Off
On
MoveMove SelectSelect ExitExit
OK
23
Anti Shake
Move Select Exit
MENU
TYPE
Off
On
MoveMove SelectSelect ExitExit
OK
23
Anti ShakeAnti Shake
2592
IN
Anti Shake
Move Select Exit
Move Select Exit
23
23
23
Anti Shake
2592
IN
23
23
Photo Mode :
Setting the Capturing Options
PPhhoottoo 模模式式:: 設設定定拍拍攝攝選選項項
Setting the Anti-Shake Function (Image Stabilisation)
With the Miniket Photo, you can reduce unstable images by minimizing the effects of
natural shaking movements when taking pictures of still objects in dark places.
Anti-Shake provides a more stable picture when:
◆ Recording with zoom
◆ Recording with a slower shutter speed
1. Turn the Mode Dial to Photo mode.
2. Press the [POWER] button to turn on the Miniket Photo.
3. Press the [MENU] button.
◆ Menu screen appears.
4. Move the joystick left / right to select <Anti-Shake>.
5. Select an option by moving the joystick up / down, and then
press the joystick (OK).
◆ <Off>: Disables Anti-Shake function.
◆ <On>: Enables Anti-Shake function.
6. Press the [MENU] button to exit the menu.
◆ If <On> is selected, < > icon appears on the screen.
Anti-Shake
When it is activated, one shutter release will take 3 contiguous
pictures to produce one stabilised picture. The stabilisation range
is up to 2% in all 4 directions (up / down / left / right). For example,
a rectangle subject of 100mm width and height can be stabilised
up to 2mm movement in vertical / horizontal direction.
The Method
When the Miniket Photo has shaking movement, specific
subject’s outlines from 3 contiguous captured images will be
recognised and processed to concur and produces stabilised picture.
[ Warning ]
✤ Anti-Shake has no effect on a moving subject.
✤ Purposely moving the Miniket Photo or taking pictures in a moving
vehicle will reduce the Anti-Shake’s effect.
✤ It is recommended to use separate lighting and tripod (optional
accessory) when the <Anti-Shake> is not enough to have clear
result.
[ Notes ]
✤ Anti-Shake does not work for movie recording.
✤ You can reduce unstable images by minimizing the effects of
natural shaking movements when taking pictures of still objects in
dark places.
✤ <Multi Shot> mode will cancel the <Anti-Shake> setting.
✤ <Anti Shake> setting is available when you set the Flash to off.
✤ When <Anti-Shake> is enabled, it takes about 5 seconds to
process and save the image.
✤ Regarding <Anti-Shake> use with Scene modes, refer to page 72.
✤ While the menu screen is displayed, pressing the [Record / Stop] button will exit
the menu.
設設定定防防震震功功能能((影影像像穩穩定定器器))
使用 Miniket Photo,舅可以在黑暗地點拍攝靜止物體的圖片時,最小化自然震動以減
少不穩定的影像0
3
4
5
6
Anti Shake 功能可以在下列情況提供更穩定的圖片:
◆ 使用縮放錄製
◆ 使用較慢的快門速度錄製
11.. 將將模模式式轉轉盤盤轉轉到到
22.. 按按下下 [[PPOOWWEERR]] 按按瞿瞿以以開開啓啓 MMiinniikkeett PPhhoottoo00
33.. 按按下下 [[MMEENNUU]] 按按瞿瞿00
◆ 選單螢幕將會顯示0
44.. 向向左左或或向向右右移移動動搖搖桿桿選選取取 <<AAnnttii--SShhaakkee>>00
55.. 向向上上或或向向下下移移動動搖搖桿桿以以選選取取選選項項,,然然後後按按搖搖桿桿 ((OOKK)) 按按瞿瞿00
◆
◆
66.. 按按 [[MMEENNUU]] 按按瞿瞿以以結結束束選選單單00
◆ 如果選取 <On>,<>圖示將會在螢幕上顯示0
PPhhoottoo
模模式式00
<<OOffff>>
:停用<Anti-Shake> 功能0
<<OOnn>>
:啓用<Anti-Shake> 功能0
AAnnttii SShhaakkee
啓用此功能時,釋放一次快門將拍攝 3 張連續圖片以製作一張穩
定的圖片0 穩定範圍在所有的四個方向(上/下/左/右)高達 2%0
例如,100 公釐寬和高的長方形物體,可以穩定至垂直/水平方向
移動的 2 公釐0
方方法法
當相機具有震動時,將會識別 3 個連續拍攝之影像的物體輪廓,
然後進行湊合橙製作穩定的圖片0
警警告告
[
]
✤ <Anti-Shake> 功能對移動物體沒有作用0
✤ 故意移動 Miniket Photo 或在移動的車輛中拍攝相片將會降
低 <Anti-Shake> 效果0
✤ 若使用 <Anti Shake> 功能仍無法獲得淸劉的效果,建議
舅使用個別照明和三苛架(可選配件)0
附附註註
[
]
✤ 防震功能不能在視訊錄製中操作0
✤ 舅可以透過在黑暗地點拍攝靜止物體的圖片時,最小化自然
震動以減少不穩定的影像0
✤ <Multi Shot> 模式將會取消 <Anti-Shake> 設定0
✤
<Anti-Shake> 設定在舅將 Flash 設定爲關閉時可以使用0
✤ 啓用 <Anti-Shake> 時,央將需要 5 秒的時間來處理及儲
存影像0
✤ 如需關於在 Scene 模式中使用 <Anti-Shake> 功能的資
訊,請參閱第 72 頁0
✤ 當選單螢幕顯示時,按 [Record/Stop] 按瞿將可以結束選
單0
7575
Page 76

ENGLISH
MENU
TYPE
Digital ZoomDigital Zoom
Off
On
MoveMove SelectSelect ExitExit
OK
23
Digital Zoom
Move Select Exit
MENU
TYPE
Digital ZoomDigital Zoom
Off
On
MoveMove SelectSelect ExitExit
OK
23
2592
IN
T
Digital Zoom
Move Select Exit
Digital Zoom
Move Select Exit
23
2323
2592
IN
23
23
Photo Mode :
Setting the Capturing Options
PPhhoottoo 模模式式:: 設設定定拍拍攝攝選選項項
Setting the Digital Zoom
As well as the 3x optical zoom, this Miniket Photo supports 5x digital
zoom which produces a total of 15x zoom. Exceeding
the optical zoom limit will automatically apply digital
zooming when available. Digital zoom may produce a
grainy picture.
1. Turn the Mode Dial to Photo mode.
2. Press the [POWER] button to turn on the Miniket
Photo.
3. Press the [MENU] button.
◆ Menu screen appears.
4. Move the joystick left / right to select <Digital
Zoom>.
5. Select an option by moving the joystick up /
down, and then press the joystick (OK).
◆ <Off>: Disables digital zoom. Only optical zoom
3x will be supported for zooming
◆ <On>: Enables digital zoom. Attempts to zoom in
more than 5x will automatically apply digital
zooming (up to 15x).
6. Press the [MENU] button to exit the menu.
◆ When using the digital zoom switch, an
indicator appears on the screen.
[ Note ]
✤ While the menu screen is displayed, pressing the
[Record / Stop] button will exit the menu.
7676
設設定定數數位位縮縮放放
除了 3x 光學縮放,Miniket Photo 也支援 5x 數位縮放,提供總共
3
4
5
6
15x 的數位縮放0 超過光學縮放限制時,將自動應用
可使用的數位縮放0 數位縮放可能會産生有顆粒的圖
片0
11.. 將將模模式式轉轉盤盤轉轉到到
PPhhoottoo
模模式式00
22.. 按按下下 [[PPOOWWEERR]] 按按瞿瞿以以開開啓啓 MMiinniikkeett PPhhoottoo00
33.. 按按下下 [[MMEENNUU]] 按按瞿瞿00
◆ 選單螢幕將會顯示0
44.. 向向左左或或向向右右移移動動搖搖桿桿選選取取 <<DDiiggiittaall ZZoooomm>>00
55.. 向向上上或或向向下下移移動動搖搖桿桿以以選選取取選選項項,,然然後後按按搖搖桿桿
((OOKK)) 按按瞿瞿00
<<OOffff>>
◆
: 停用數位縮放0 僅支援 3x 光學縮
放的縮放0
<<OOnn>>
◆
: 啓用數位縮放0 嘗試放大超過 5x
時將自動應用數位縮放(高達 15x)0
66.. 按按 [[MMEENNUU]] 按按瞿瞿以以結結束束選選單單00
◆ 使用數位縮放切換時,螢幕上將會顯示一個指
示器0
附附註註
[
]
✤ 當選單螢幕顯示時,按 [Record/Stop] 按瞿將
可以結束選單0
Page 77

ENGLISH
MENU
TYPE
PhotoPhoto
ImprintImprint
Off
Date
Date&Time
MoveMove SelectSelect ExitExit
OK
23
Photo
Imprint
Move Select Exit
MENU
TYPE
PhotoPhoto
ImprintImprint
Off
Date
Date&Time
MoveMove SelectSelect ExitExit
OK
23
Photo
Imprint
Move Select Exit
Photo
Imprint
Move Select Exit
23
2592
IN
2592
23
23
Photo Mode :
Setting the Capturing Options
PPhhoottoo 模模式式:: 設設定定拍拍攝攝選選項項
Setting the Imprint Option
You can imprint Date&Time on pictures taken. To place the date / time
information on your picture, set this option.
1. Turn the Mode Dial to Photo mode.
2. Press the [POWER] button to turn on the Miniket
Photo.
3. Press the [MENU] button.
◆ Menu screen appears.
4. Move the joystick left / right to select <Imprint>.
5. Select an option by moving the joystick up /
down, and then press the joystick (OK).
◆ <Off>: Cancels imprinting.
◆ <Date>: Imprints Date only.
◆ <Date&Time>: Imprints Date and Time.
6. Press the [MENU] button to exit the menu.
◆ After taking a picture, you can check the imprinted
date/ time information in Photo View mode.
[ Notes ]
✤
Before setting the <Imprint> Option, set the current
date and time (refer to page 42).
✤
Imprinting will print the date (and time) information
directly onto the picture, and it will not be erased.
✤
When you print a Date / Time imprinted photos, date /
time imprint part may be cropped out according to the
printer used.
設設定定壓壓印印選選項項
舅可以在拍攝的相片上壓印日期與時間0 若要在舅的相片上放置日期/
時間資訊,請設定此選項0
3
4
5
6
11.. 將將模模式式轉轉盤盤轉轉到到
PPhhoottoo
模模式式00
22.. 按按下下 [[PPOOWWEERR]] 按按瞿瞿以以開開啓啓 MMiinniikkeett PPhhoottoo00
33.. 按按下下 [[MMEENNUU]] 按按瞿瞿00
◆ 選單螢幕將會顯示0
44.. 向向左左或或向向右右移移動動搖搖桿桿以以選選取取 <<IImmpprriinntt>>00
55.. 向向上上或或向向下下移移動動搖搖桿桿以以選選取取選選項項,,然然後後按按搖搖桿桿
((OOKK)) 按按瞿瞿00
<<OOffff>>
◆
: 取消壓印0
<<DDaattee>>
◆
◆
: 僅壓印日期0
<<DDaattee&&TTiimmee>>
: 壓印日期與時間0
66.. 按按 [[MMEENNUU]] 按按瞿瞿以以結結束束選選單單00
◆ 拍攝相片之後,舅可以在 Photo View 模式
中檢査壓印的日期/時間資訊0
附附註註
[
]
✤
設定 <Imprint> 選項之前,請先設定日期與時
間(請參閱第 42 頁)0
✤
壓印功能會將日期(與時間)直接壓印到相片上,
這些資訊將不會被刪除0
✤ 列印有壓印日期/時間的相片時,日期/時間壓印
部略可能會根據使用的印表機被裁剪0
7777
Page 78

ENGLISH
1/6
100-0001
IN
2592
17
17
1/61/6
IN
100-0001100-0001
2592
IN
100-0001
100-0001
2592
IN
100-0001
100-0001
SlideSlide
StopStop
OK
2592
Photo Mode :
Setting the Viewing Options
PPhhoottoo 模模式式:: 設設定定檢檢視視選選項項
Using the Shortcut Buttons
Switching to Photo Capture Mode
1. Turn the Mode Dial to Photo mode.
2. Press the [POWER] button to turn on the Miniket
Photo.
3. Press the [Shortcut 1] button in Photo Capture
mode.
◆ Switches to Photo view mode.
4. Press the [Shortcut 1] button again.
Moves to the Photo Capture mode.
Viewing a Slideshow
1. Turn the Mode Dial to Photo mode.
2. Press the [POWER] button to turn on the Miniket
Photo.
3. Press the [Shortcut 1] button in Photo Capture
mode.
◆ Switches to Photo view mode.
4. Press the [Shortcut 2] button.
5. The Slideshow begins.
◆ Refer to page 86 for further details on Slideshow.
6. Press the joystick (OK) to stop the Slideshow.
7878
使使用用捷捷徑徑按按瞿瞿
3
4
3
4
切切換換到到 PPhhoottoo CCaappttuurree 模模式式
11.. 將將模模式式轉轉盤盤轉轉到到
PPhhoottoo
模模式式00
22.. 按按下下 [[PPOOWWEERR]] 按按瞿瞿以以開開啓啓 MMiinniikkeett PPhhoottoo00
33.. 在在 PPhhoottoo CCaappttuurree 模模式式中中,,按按下下 [[SShhoorrttccuutt 11]]
按按瞿瞿00
◆ 切換到 Photo View 模式0
44.. 按按下下 [[SShhoorrttccuutt 11]] 按按瞿瞿00
移移到到 PPhhoottoo CCaappttuurree 模模式式00
檢檢視視幻幻燈燈片片放放映映
11.. 將將模模式式轉轉盤盤轉轉到到
PPhhoottoo
模模式式00
22.. 按按下下 [[PPOOWWEERR]] 按按瞿瞿以以開開啓啓 MMiinniikkeett PPhhoottoo00
33.. 在在 PPhhoottoo CCaappttuurree 模模式式中中,,按按下下 [[SShhoorrttccuutt 11]]
按按瞿瞿00
◆ 切換到 Photo View 模式0
44.. 按按下下 [[SShhoorrttccuutt 22]] 按按瞿瞿00
55.. 幻幻燈燈片片放放映映將將會會開開始始00
◆ 如需關於幻燈片放映的詳細資訊,請參閱第
86 頁0
66.. 按按下下搖搖桿桿 ((OOKK)) 可可停停止止幻幻燈燈片片放放映映00
Page 79

ENGLISH
IN
2592
1/1
1/1
100-0001
IN
100-0001
1/1
100-0001
2592
1/1
1/1
100-0001
IN
100-0001
Cancel
Delete
2592
IN
2592
Photo Mode :
Setting the Viewing Options
PPhhoottoo 模模式式:: 設設定定檢檢視視選選項項
Using the Shortcut Buttons
Protecting Photo files
1. Turn the Mode Dial to Photo mode.
2. Press the [POWER] button to turn on the Miniket
Photo.
3. Press the [Shortcut 1] button in Photo Capture
mode.
◆ Switches to Photo view mode.
4. Press the [Shortcut 3] button.
◆ Each press of the [Shortcut 3] button will toggle
between Locked ( ) and Unlocked ( ).
5. The selected file is protected from erasure.
Deleting Photo files
1. Turn the Mode Dial to Photo mode.
2. Press the [POWER] button to turn on the Miniket
Photo.
3. Press the [Shortcut 1] button in Photo Capture
mode.
◆ Switches to Photo view mode.
4. Press the [Shortcut 4] button.
5. Select an option by moving the joystick up / down
and then press the joystick (OK).
◆ <Delete>: Deletes the selected photo.
◆ <Cancel>: Cancels delete.
◆ Refer to page 82 for further details.
使使用用捷捷徑徑按按瞿瞿
3
4
3
4
保保護護相相片片圭圭案案
11.. 將將模模式式轉轉盤盤轉轉到到
PPhhoottoo
模模式式00
22.. 按按下下 [[PPOOWWEERR]] 按按瞿瞿以以開開啓啓 MMiinniikkeett PPhhoottoo00
33.. 在在 PPhhoottoo CCaappttuurree 模模式式中中,,按按下下 [[SShhoorrttccuutt 11]]
按按瞿瞿00
◆ 切換到 Photo View 模式0
44.. 按按下下 [[SShhoorrttccuutt 33]] 按按瞿瞿00
◆ 每次按下 [Shortcut 3] 按瞿,將會在
Locked( ) 與 Unlocked( ) 之間轉換0
55.. 選選取取的的圭圭案案將將會會受受到到保保護護以以防防止止刪刪除除00
刪刪除除相相片片圭圭案案
11.. 將將模模式式轉轉盤盤轉轉到到
PPhhoottoo
模模式式00
22.. 按按下下 [[PPOOWWEERR]] 按按瞿瞿以以開開啓啓 MMiinniikkeett PPhhoottoo00
33.. 在在 PPhhoottoo CCaappttuurree 模模式式中中,,按按下下 [[SShhoorrttccuutt 11]]
按按瞿瞿00
◆ 切換到 Photo View 模式0
44.. 按按下下 [[SShhoorrttccuutt 44]] 按按瞿瞿00
55.. 向向上上或或向向下下移移動動搖搖桿桿以以選選取取選選項項,,然然後後按按搖搖桿桿
((OOKK)) 按按瞿瞿00
<<DDeelleettee>>
◆
<<CCaanncceell>>
◆
: 刪除所選的相片0
: 取消刪除0
◆ 如需詳細資訊,請參閱第 82 頁0
7979
Page 80

ENGLISH
Move Full View
MoveMove Full ViewFull View
OK
Select
All
Cancel
1/6
1/61/6
IN
MoveMove Full ViewFull View
OK
1/61/6
IN
Move Full View
Move Full View
Confirm?
MoveMove SelectSelect
OK
Yes No
1/6
1/6
Move Full View
Move Full View
Move Select
1/6
1/6
MoveMove
1/61/6
IN
Full View
OK
Full ViewFull View
Photo Mode :
Setting the Viewing Options
PPhhoottoo 模模式式:: 設設定定檢檢視視選選項項
Using the Shortcut Buttons
Protecting Photo files in Multi-View
1. Turn the Mode Dial to Photo mode.
2. Press the [POWER] button to turn on the Miniket
Photo.
3. Press the [Shortcut 1] button.
◆ Switches to Photo view mode.
4. Move the zoom switch to W (WIDE).
◆ The screen switches to multi-view.
◆ The photo you were viewing in the single view
is selected.
5. Press the [Shortcut 3] button and then select an
option by moving the joystick up / down and then
press the joystick (OK).
◆ <Select>: Selected photo files will be protected.
◆ <All>: All photo files will be protected.
A message “Protect All?” appears.
Select an option by moving the joystick
left / right.
◆ <Cancel>: Cancels protection.
6. If <Select> was selected, select photo files to
protect by moving the joystick left / right / up /
down and press the joystick (OK).
◆ Multiple photo files can be selected using the
joystick (OK).
< > indicator appears on the protected
photos.
7. Press the [Shortcut 3] button again.
◆ The message “Confirm?” appears. Select <Yes>
or <No> by moving the joystick left / right and then
press the joystick (OK) to confirm.
8. The selected file is protected from erasure.
◆ The < > icon appears on the protected files
8080
(Refer to page 83).
使使用用捷捷徑徑按按瞿瞿
4
5
7
8
保保護護多多個個視視圖圖中中的的相相片片圭圭案案
11.. 將將模模式式轉轉盤盤轉轉到到
PPhhoottoo
模模式式00
22.. 按按下下 [[PPOOWWEERR]] 按按瞿瞿以以開開啓啓 MMiinniikkeett PPhhoottoo00
33.. 按按下下 [[SShhoorrttccuutt 11]] 按按瞿瞿00
◆ 切換到 Photo View 模式0
44.. 將將 [[WW//TT]] 縮縮放放切切換換移移到到 WW((廣廣角角))00
◆ 螢幕將切換到多個視圖0
◆ 舅在單一視圖中檢視的相片將會選取0
55.. 按按下下 [[SShhoorrttccuutt 33]] 按按瞿瞿,,向向上上或或向向下下移移動動搖搖桿桿
以以選選取取選選項項,,然然後後按按下下搖搖桿桿 ((OOKK)) 按按瞿瞿00
<<SSeelleecctt>>
◆
◆
: 選取的相片圭案將會受到保護0
<<AAllll>>
: 所有的相片圭案將會受到保護0
“Protect All?”訊息將會顯示0
向左或向右移動搖桿選取一個選項0
<<CCaanncceell>>
◆
: 取消保護0
66.. 如如果果選選取取 <<SSeelleecctt>>,,向向左左//右右//上上//下下移移動動搖搖桿桿以以
選選取取要要保保護護的的相相片片圭圭案案,,然然後後按按下下搖搖桿桿 ((OOKK)) 按按
瞿瞿00
◆ 舅可以使用搖桿 (OK) 按瞿選擇多個相片圭
案0
<>指示器將會出現在受保護的相片上0
77.. 再再次次按按下下 [[SShhoorrttccuutt 33]] 按按瞿瞿00
◆ “Confirm?”訊息將會顯示0 向左或向右移
動搖桿以選取 <Yes> 或 <No>,然後按下
搖桿 (OK) 按瞿以確認0
88.. 選選取取的的圭圭案案將將會會受受到到保保護護以以防防止止刪刪除除00
◆ <>圖示將會出現在受保護的圭案上(請
參閱第 83 頁)0
Page 81

ENGLISH
Move Full View
MoveMove Full ViewFull View
OK
Select
All
Cancel
1/6
1/61/6
MoveMove Full ViewFull View
OK
1/61/6
Move Full View
Move Full View
Delete?
Yes No
MoveMove SelectSelect
OK
1/6
1/6
Move Full View
Move Full View
Full ViewFull View
OK
MoveMove
Move Select
1/6
1/6
1/5
1/5
Photo Mode :
Setting the Viewing Options
PPhhoottoo 模模式式:: 設設定定檢檢視視選選項項
Using the Shortcut Buttons
Deleting Photo files in Multi-View
1. Turn the Mode Dial to Photo mode.
2. Press the [POWER] button to turn on the Miniket
Photo.
3. Press the [Shortcut 1] button.
◆ Switches to Photo view mode.
4. Move the [W/T] zoom switch to W (WIDE).
◆ The screen switches to multi-view.
◆ The photo you were viewing in the single view
is selected.
5. Press the [Shortcut 4] button and then select an
option by moving the joystick up / down and then
press the joystick (OK).
◆ <Select>: Selected photo files will be deleted.
◆ <All>: All photo files will be deleted. A
message <Delete All?> appears. Select an
option by moving the joystick left / right.
◆ <Cancel>: Cancels deletion.
6. If <Select> was selected, select photo files to
delete by moving the joystick left / right / up /
down and press the joystick (OK).
◆ Multiple photo files can be selected using the
joystick (OK). < > icon appears on the
selected files.
7. Press the [Shortcut 4] button.
◆ The message “Delete?” appears. Select <Yes> or
<No> by moving the joystick left / right and then
press the joystick (OK) to confirm.
8. Selected photo files are deleted.
Refer to page 82 for further details.
使使用用捷捷徑徑按按瞿瞿
4
5
7
8
刪刪除除多多個個視視圖圖中中的的相相片片圭圭案案
11.. 將將模模式式轉轉盤盤轉轉到到
PPhhoottoo
模模式式00
22.. 按按下下 [[PPOOWWEERR]] 按按瞿瞿以以開開啓啓 MMiinniikkeett PPhhoottoo00
33.. 按按下下 [[SShhoorrttccuutt 11]] 按按瞿瞿00
◆ 切換到 Photo View 模式0
44.. 將將 [[WW//TT]] 縮縮放放切切換換移移到到 WW((廣廣角角))00
◆ 螢幕將切換到多個視圖0
◆ 舅在單一視圖中檢視的相片將會選取0
55.. 按按下下 [[SShhoorrttccuutt 44]] 按按瞿瞿,,向向上上或或向向下下移移動動搖搖桿桿
以以選選取取選選項項,,然然後後按按下下搖搖桿桿 ((OOKK)) 按按瞿瞿00
<<SSeelleecctt>>
◆
◆
: 將會刪除選取的相片圭案0
<<AAllll>>
: 將會刪除所有的相片圭案0 “Delete
All?”訊息將會顯示0 向左或向右移動搖桿
選取一個選項0
<<CCaanncceell>>
◆
: 取消刪除0
66.. 如如果果選選取取 <<SSeelleecctt>>,,向向左左//右右//上上//下下移移動動搖搖桿桿以以
選選取取要要刪刪除除的的相相片片圭圭案案,,然然後後按按下下搖搖桿桿 ((OOKK)) 按按
瞿瞿00
◆ 舅可以使用搖桿 (OK) 按瞿選擇多個相片圭
案0 <<> 圖示將會出現在選取的圭案上0
77.. 按按下下 [[SShhoorrttccuutt 44]] 按按瞿瞿00
◆ “Delete?”訊息將會顯示0 向左或向右移動
搖桿以選取 <Yes> 或 <No>,然後按下搖
桿 (OK) 按瞿以確認0
88.. 選選取取的的相相片片圭圭案案將將會會刪刪除除00
如需詳細資訊,請參閱第 82 頁0
8181
Page 82

ENGLISH
MENU
100-0001
PhotoPhoto
DeleteDelete
Select
All
MoveMove SelectSelect ExitExit
OK
100-0001
IN
100-0001
2592
100-0001
Photo
Delete
Move Select Exit
MENU
MoveMove SelectSelect ExitExit
OK
IN
100-0001
Photo
Delete
Move Select Exit
Move Select Exit
Delete?
Yes No
MoveMove SelectSelect
OK
Photo Mode :
Setting the Viewing Options
PPhhoottoo 模模式式:: 設設定定檢檢視視選選項項
Deleting Photo Files
You can delete saved photo files.
1. Turn the Mode Dial to Photo mode.
2. Press the [POWER] button to turn on the Miniket
Photo.
3. Press the [Shortcut 1] button to switch to Photo
View mode.
4. Press the [MENU] button.
◆ Menu screen appears.
5. Move the joystick left / right to select <Delete>.
6. Select an option by moving the joystick up /
down and then press the joystick (OK).
◆ <Select>: Multi-view screen appears and you can
select photo files to delete.
◆ <All>: All photo files will be deleted.
If <All> is selected, the message “Delete All?”
appears. Select <Yes> or <No> by moving the
joystick left / right and then press the joystick
(OK) to confirm.
7. If <Select> is selected, Multi-view screen appears.
Select photo files to delete by moving the joystick
left / right / up / down and press the joystick (OK).
◆ Multiple photo files can be selected using the
joystick (OK). An icon ( ) indicating the selected
file to be deleted appears.
8. Press the [Shortcut 4] button.
◆ The message “Delete?” appears. Select <Yes>
or <No> by moving the joystick left / right and then
press the joystick (OK) to confirm.
9. Press the [MENU] button to exit the menu.
8282
[ Notes ]
✤ You can easily access this function by using the
shortcut button (refer to page 79).
✤ While the menu screen is displayed, pressing the [Record / Stop]
button will exit the menu.
刪刪除除相相片片圭圭案案
3
6
7
8
舅可以刪除已儲存的相片圭案0
11.. 將將模模式式轉轉盤盤轉轉到到
PPhhoottoo
模模式式00
22.. 按按下下 [[PPOOWWEERR]] 按按瞿瞿以以開開啓啓 MMiinniikkeett PPhhoottoo00
33.. 按按下下 [[SShhoorrttccuutt 11]] 按按瞿瞿切切換換到到 PPhhoottoo VViieeww((檢檢
視視相相片片))模模式式00
44.. 按按下下 [[MMEENNUU]] 按按瞿瞿00
◆ 選單螢幕將會顯示0
55.. 向向左左或或向向右右移移動動搖搖桿桿以以選選取取 <<DDeelleettee>>00
66.. 向向上上或或向向下下移移動動搖搖桿桿以以選選取取選選項項,,然然後後按按搖搖桿桿
((OOKK)) 按按瞿瞿00
<<SSeelleecctt>>
◆
◆
: 多個視圖螢幕將會出現,舅可
以選取要刪除的相片圭案0
<<AAllll>>
: 將會刪除所有的相片圭案0
如果選取 <All>,“Delete All?”訊息將會
顯示0 向左或向右移動搖桿以選取 <Yes>
或 <No>,然後按下搖桿 (OK) 按瞿以確認0
77.. 如如果果選選取取 <<SSeelleecctt>>,,多多個個視視圖圖螢螢幕幕將將會會出出現現00
向向左左//右右//上上//下下移移動動搖搖桿桿以以選選取取要要刪刪除除的的相相片片圭圭
案案,,然然後後按按下下搖搖桿桿 ((OOKK)) 按按瞿瞿00
◆ 舅可以使用搖桿 (OK) 按瞿選擇多個相片圭
案0 螢幕上將顯示 ()圖示,標示要刪除
之選取的圭案0
88.. 按按下下 [[SShhoorrttccuutt 44]] 按按瞿瞿00
◆ “Delete?”訊息將會顯示0 向左或向右移動
搖桿以選取 <Yes> 或 <No>,然後按下搖
桿 (OK) 按瞿以確認0
99.. 按按 [[MMEENNUU]] 按按瞿瞿以以結結束束選選單單00
附附註註
[
]
✤ 舅可以使用捷徑按瞿簡易地存取此功能
(請參閱第 79 頁)0
✤ 當選單螢幕顯示時,按 [Record/Stop] 按瞿將
可以結束選單0
Page 83

ENGLISH
MENU
100-0006
6/6
PhotoPhoto
ProtectProtect
Select
All
MoveMove SelectSelect ExitExit
OK
100-0006
6/66/6
IN
100-0006
2592
100-0006
6/6
Photo
Protect
Move Select Exit
MENU
SelectSelect ExitExit
OK
MoveMove
1/61/6
IN
100-0006
6/6
Photo
Protect
Move Select Exit
Select Exit
Move
Confirm?
Yes No
MoveMove SelectSelect
OK
1/6
Photo Mode :
Setting the Viewing Options
PPhhoottoo 模模式式:: 設設定定檢檢視視選選項項
Protecting Photo Files
You can protect saved important photo files from accidental erasure.
Protected files will not be deleted unless you release the
protection or format the memory.
1. Turn the Mode Dial to Photo mode.
2. Press the [POWER] button to turn on the Miniket
Photo.
3. Press the [Shortcut 1] button to switch to Photo View
mode.
4. Press the [MENU] button.
◆ Menu screen appears.
5. Move the joystick left / right to select <Protect>.
6. Select an option by moving the joystick up / down
and then press the joystick (OK).
◆ <Select>: Multi-view screen appears and you can
select photo files to protect.
◆ <All>: All photo files will be protected.
If <All> is selected, the message “Protect All?”
appears. Select the desired option by moving the
joystick left / right and then press the joystick (OK) to
confirm.
7. If <Select> is selected, Multi-view screen appears.
Select photo files to protect by moving the
joystick left / right / up / down and press the joystick
(OK).
◆ Multiple photo files can be selected using the joystick
(OK). An icon ( ) indicating selected file is to be
protected appears.
8. Press the [Shortcut 3] button.
◆ The message “Confirm?” appears. Select <Yes>
or <No> by moving the joystick left / right and then
press the joystick (OK) to confirm.
9. Press the [MENU] button to exit the menu.
◆ An icon ( ) indicating selected file is protected
appears.
[ Notes ]
✤
You can easily access this function by using the shortcut
button (refer to page 79).
✤
While the menu screen is displayed, pressing the [Record / Stop]
button will exit the menu.
保保護護相相片片圭圭案案
舅可以防止已儲存之重要相片圭案被意外刪除0 受保護的圭案將無不會
3
6
7
8
刪除,除非舅解除保護或格式化記憶體0
PPhhoottoo
11.. 將將模模式式轉轉盤盤轉轉到到
22.. 按按下下 [[PPOOWWEERR]] 按按瞿瞿以以開開啓啓 MMiinniikkeett PPhhoottoo00
33.. 按按下下 [[SShhoorrttccuutt 11]] 按按瞿瞿切切換換到到 PPhhoottoo VViieeww
模模式式00
44.. 按按下下 [[MMEENNUU]] 按按瞿瞿00
◆ 選單螢幕將會顯示0
55.. 向向左左或或向向右右移移動動搖搖桿桿以以選選取取 <<PPrrootteecctt>>00
66.. 向向上上或或向向下下移移動動搖搖桿桿以以選選取取選選項項,,然然後後按按搖搖桿桿
((OOKK)) 按按瞿瞿00
<<SSeelleecctt>>
◆
以選取要保護的相片圭案0
<<AAllll>>
◆
: 所有的相片圭案將會受到保護0
如果選取 <All>,“Protect All?”訊息將會
顯示0 向左或向右移動搖桿選取所要的選
項,然後按下搖桿 (OK) 按瞿以確認0
77.. 如如果果選選取取 <<SSeelleecctt>>,,多多個個視視圖圖螢螢幕幕將將會會出出現現00
向向左左//右右//上上//下下移移動動搖搖桿桿以以選選取取要要保保護護的的相相片片圭圭
案案,,然然後後按按下下搖搖桿桿 ((OOKK)) 按按瞿瞿00
◆ 舅可以使用搖桿 (OK) 按瞿選擇多個相片圭
案0 螢幕上將顯示 ()圖示,標示選取的
圭案需要保護0
88.. 按按下下 [[SShhoorrttccuutt 33]] 按按瞿瞿00
◆ “Confirm?”訊息將會顯示0 向左或向右移
動搖桿以選取 <Yes> 或 <No>,然後按下
搖桿 (OK) 按瞿以確認0
99.. 按按 [[MMEENNUU]] 按按瞿瞿以以結結束束選選單單00
◆ 螢幕上將顯示 ()圖示,標示選取的圭案
需要保護0
附附註註
[
]
✤ 舅可以使用捷徑按瞿簡易地存取此功能(請參閱第
79 頁)0
✤ 當選單螢幕顯示時,按 [Record/Stop] 按瞿將
可以結束選單0
模模式式00
: 多個視圖螢幕將會出現,舅可
8383
Page 84

ENGLISH
Photo Mode :
Setting the Viewing Options
PPhhoottoo 模模式式:: 設設定定檢檢視視選選項項
Rotating a Photo File
You can rotate a saved photo.
1. Turn the Mode Dial to Photo mode.
2. Press the [POWER] button to turn on the Miniket
Photo.
3. Press the [Shortcut 1] button to switch to Photo
View mode.
4. Move the joystick left / right to select a photo
file to rotate.
5. Press the [MENU] button.
◆ Menu screen appears.
6. Move the joystick left / right to select <Rotate>.
7. Select an option by moving the joystick up /
down and then press the joystick (OK).
◆ <Right(90°)>: Rotates the photo clockwise by 90°.
◆ <Left(90°)>: Rotates the photo counterclockwise
by 90°.
◆ <Updown(180°)>: Flips the image up and down
(Rotates 180°).
8. Press the [MENU] button to exit the menu.
[ Notes ]
✤ Rotated images having a portrait ratio will have black
margins on both the left / right corners of the LCD
when it is displayed.
✤ Rotating will not affect the image quality or resolution.
✤ Rotated images may not appear as rotated on a PC.
✤ You cannot crop a rotated image.
✤ While the menu screen is displayed, pressing the [Record / Stop]
button will exit the menu.
8484
3
5
7
8
旋旋轉轉相相片片圭圭案案
舅可以旋轉已儲存的相片0
PPhhoottoo
11.. 將將模模式式轉轉盤盤轉轉到到
22.. 按按下下 [[PPOOWWEERR]] 按按瞿瞿以以開開啓啓 MMiinniikkeett PPhhoottoo00
33.. 按按下下 [[SShhoorrttccuutt 11]] 按按瞿瞿切切換換到到 PPhhoottoo VViieeww
模模式式00
44.. 向向左左或或向向右右移移動動搖搖桿桿選選取取要要旋旋轉轉的的相相片片圭圭案案00
55.. 按按下下 [[MMEENNUU]] 按按瞿瞿00
◆ 選單螢幕將會顯示0
66.. 向向左左或或向向右右移移動動搖搖桿桿以以選選取取 <<RRoottaattee>>00
77.. 向向上上或或向向下下移移動動搖搖桿桿以以選選取取選選項項,,然然後後按按搖搖桿桿
((OOKK)) 按按瞿瞿00
<<RRiigghhtt((9900°))>>
◆
<<LLeefftt((9900°))>>
◆
<<UUppddoowwnn((118800°))>>
◆
180°)
88.. 按按 [[MMEENNUU]] 按按瞿瞿以以結結束束選選單單00
附附註註
[
]
✤ 具有縱向比率的旋轉影像,在顯示時 LCD 的左/
右邊角將會出現黑色邊界0
✤ 旋轉操作將不會影響影像品質或解析度0
✤ 旋轉的影像可能不會在電腦上顯示爲已旋轉的方
式0
✤ 舅不能裁剪旋轉的影像0
✤ 當選單螢幕顯示時,按下 [Record / Stop] 按
瞿將可以結束選單0
模模式式00
: 以順時針方向旋轉相片 90°0
: 以逆時針方向旋轉相片 90°0
:上下潼轉影像(旋轉
Page 85

ENGLISH
MENU
TYPE
2048
1600
1024
PhotoPhoto
ResizeResize
MoveMove SelectSelect ExitExit
OK
IN
2592
Photo
Resize
Move Select Exit
MENU
TYPE
2048
1600
1024
PhotoPhoto
ResizeResize
MoveMove SelectSelect ExitExit
OK
Photo Mode :
Setting the Viewing Options
PPhhoottoo 模模式式:: 設設定定檢檢視視選選項項
Resizing Photos
You can resize a saved photo to be smaller than
original. Making a bigger image file is not supported.
1. Turn the Mode Dial to Photo mode.
2. Press the [POWER] button to turn on the Miniket
Photo.
3. Press the [Shortcut 1] button to switch to Photo
View mode.
4. Move the joystick left / right to select a photo
file to resize.
5. Press the [MENU] button.
◆ Menu screen appears.
6. Move the joystick left / right to select <Resize>.
7. Select an option by moving the joystick up /
down and then press the joystick (OK).
◆ <4M>/ <3M> / <2M> / <1M> / VGA
◆ You can only resize a saved photo to be smaller
than the original.
8. Press the [MENU] button to exit the menu.
[ Notes ]
✤ Only JPEG files can be resized.
✤
Photos of VGA size cannot be resized.
✤ Resized photos are saved separately. The original photo will not be
deleted.
✤ Rotated photos cannot be resized.
✤ If there is not enough space to save the resized photo, the
message “Memory Full!” will appear and the resizing will be
canceled.
✤ While the menu screen is displayed, pressing the [Record / Stop]
button will exit the menu.
調調整整相相片片大大小小
3
6
7
附附註註
[
]
✤ 只有 JPEG 圭案可以調整大小0
✤ 不能調整 VGA 大小之相片的大小0
✤ 調整大小後的相片將會個別儲存0 原始相片將不會被刪除0
✤ 旋轉的相片不能調整大小0
✤ 若沒有足觀空間儲存已調整大小的相片,“Memory Full!”訊息將
會顯示橙取消調整大小0
✤ 當選單螢幕顯示時,按 [Record/Stop] 按瞿將可以結束選單0
舅可以將已儲存之相片的大小調整爲小於央的原始
大小0 不支援製作更大的影像圭案0
11.. 將將模模式式轉轉盤盤轉轉到到
PPhhoottoo
模模式式00
22.. 按按下下 [[PPOOWWEERR]] 按按瞿瞿以以開開啓啓 MMiinniikkeett PPhhoottoo00
33.. 按按下下 [[SShhoorrttccuutt 11]] 按按瞿瞿切切換換到到 PPhhoottoo VViieeww
模模式式00
44.. 向向左左或或向向右右移移動動搖搖桿桿選選取取要要調調整整大大小小的的相相片片圭圭案案00
55.. 按按下下 [[MMEENNUU]] 按按瞿瞿00
◆ 選單螢幕將會顯示0
66.. 向向左左或或向向右右移移動動搖搖桿桿以以選選取取 <<RReessiizzee>>00
77.. 向向上上或或向向下下移移動動搖搖桿桿以以選選取取選選項項,,然然後後按按搖搖桿桿
((OOKK)) 按按瞿瞿00
◆ <4M>/ <3M> / <2M> / <1M> / VGA
◆ 舅只可以將已儲存之相片的大小調整爲小於央
的原始大小0
88.. 按按 [[MMEENNUU]] 按按瞿瞿以以結結束束選選單單00
8585
Page 86

ENGLISH
MENU
TYPE
100-0001
PhotoPhoto
SlideSlide
Start
Interval
Repeat
1sec1sec
OffOff
MoveMove SelectSelect ExitExit
OK
6/6
100-0001
100-0001
IN
6/66/6
2592
100-0001
Photo
Slide
1sec
Off
Move Select Exit
MENU
TYPE
PhotoPhoto
SlideSlide
Start
Interval
MoveMove SelectSelect ExitExit
OK
Repeat Off
On
6/6
100-0001
IN
100-0001
100-0001
Photo
Slide
1sec
Off
Move Select Exit
Photo
Slide
Move Select Exit
StopStop
OK
SlideSlide
6/6
2592
Photo Mode :
Setting the Viewing Options
PPhhoottoo 模模式式:: 設設定定檢檢視視選選項項
Setting the Slideshow
You can set a slideshow, and also set the interval and repetition
options for the slideshow.
1. Turn the Mode Dial to Photo mode.
2. Press the [POWER] button to turn on the
Miniket Photo.
3. Press the [Shortcut 1] button to switch to Photo
View mode.
4. Press the [MENU] button.
◆ Menu screen appears.
5. Move the joystick left / right to select <Slide>.
6. Select <Interval> by moving the joystick up / down
and then press the joystick (OK) or move
joystick right.
7. Set the interval by moving the joystick up /
down and then press the joystick (OK).
◆ Interval range: 1 ~ 10 seconds.
8. Select <Repeat> by moving the joystick up / down
and then press the joystick (OK) or move joystick
right.
9. Set the repeat option by moving the joystick up /
down and then press the joystick (OK).
◆ <Off>: Sets not to repeat the slideshow.
◆ <On>: Sets to repeat the slideshow.
10. Select <Start> by moving the joystick up / down
and then press the joystick (OK).
◆ Slideshow starts. To stop the slideshow, press the
joystick (OK).
[ Notes ]
✤ You can easily access this function by using the
shortcut button (refer to page 78).
✤ The interval between photos may vary depending
on the size of the photo.
✤ Slideshow starts from the current photo displayed.
✤
Slideshow cannot start from a damaged photo file.
Slideshow will skip the damaged photo during the
slideshow.
✤ While the menu screen is displayed, pressing the
[Record / Stop] button will exit the menu.
8686
設設定定幻幻燈燈片片放放映映
舅可以設定幻燈片放映,以及設定幻燈片放映的間隔與重複選項0
3
11.. 將將模模式式轉轉盤盤轉轉到到
22.. 按按下下 [[PPOOWWEERR]] 按按瞿瞿以以開開啓啓 MMiinniikkeett PPhhoottoo00
33.. 按按下下 [[SShhoorrttccuutt 11]] 按按瞿瞿切切換換到到 PPhhoottoo VViieeww
模模式式00
44.. 按按下下 [[MMEENNUU]] 按按瞿瞿00
◆ 選單螢幕將會顯示0
55.. 向向左左或或向向右右移移動動搖搖桿桿以以選選取取 <<SSlliiddee>>00
66.. 向向上上或或向向下下移移動動搖搖桿桿選選取取 <<IInntteerrvvaall>>,,然然後後按按
5
下下搖搖桿桿 ((OOKK)) 或或向向右右移移動動搖搖桿桿00
77.. 向向上上或或向向下下移移動動搖搖桿桿以以選選取取間間隔隔,,然然後後按按搖搖桿桿
((OOKK)) 按按瞿瞿00
◆ 間隔範圍: 1~10 秒
88.. 向向上上或或向向下下移移動動搖搖桿桿選選取取<<RReeppeeaatt>> 然然後後按按下下
搖搖桿桿 ((OOKK)) 或或向向右右移移動動搖搖桿桿00
99.. 向向上上或或向向下下移移動動搖搖桿桿設設定定重重複複選選項項,,然然後後按按下下搖搖
桿桿 ((OOKK)) 按按瞿瞿00
<<OOffff>>
7
◆
◆
<<OOnn>>
1100.. 向向上上或或向向下下移移動動搖搖桿桿以以選選取取 <<SSttaarrtt>>,,然然後後按按
搖搖桿桿 ((OOKK)) 按按瞿瞿00
◆ 幻燈片放映將會開始0 若要停止幻燈片放
映,請按下搖桿 (OK) 按瞿0
附附註註
[
]
9
✤ 舅可以使用捷徑按瞿簡易地存取此功能(請參閱第
78 頁)0
✤ 相片之間的間隔將根據相片的大小而變化0
✤ 幻燈片放映將會從目前顯示的相片開始0
✤ 幻燈片放映不能從損毁的相片圭案開始0 幻燈片
放映將會在幻燈片放映過程中跳過損毁的相片0
✤ 當選單螢幕顯示時,按 [Record/Stop] 按瞿將
可以結束選單0
PPhhoottoo
模模式式00
: 設定爲不重複幻燈片放映0
: 設定爲重複幻燈片放映0
Page 87

ENGLISH
MENU
TYPE
PhotoPhoto
Select
All
MoveMove SelectSelect ExitExit
OK
100-0006
6/6
100-0006
6/66/6
100-0006
2592
Photo
Move Select Exit
MENU
MoveMove ConfirmConfirm ExitExit
OK
1/61/6
100-0006
6/6
Photo
Move Select Exit
Move Confirm Exit
Confirm?
Yes No
MoveMove SelectSelect
OK
1/6
100-0006
6/6
Photo Mode :
Setting the Viewing Options
PPhhoottoo 模模式式:: 設設定定檢檢視視選選項項
Setting the DPOF (Digital Print Order Format) Function
You can automatically print a photo file recorded with a printer that supports
DPOF. Setting the DPOF is only available mini SD card.
1. Turn the Mode Dial to Photo mode.
2. Press the [POWER] button to turn on the Miniket
Photo.
3. Press the [Shortcut 1] button to switch to Photo View
mode.
4. Press the [MENU] button.
◆ Menu screen appears.
5. Move the joystick left / right to select <DPOF>.
6. Select an option by moving the joystick up / down
and then press the joystick (OK).
◆ <Select>: Multi-view screen appears and you can
select photo files to set DPOF printing.
◆ <All>: All photo files will be marked with DPOF printing.
If <All> is selected, the message “DPOF All?” appears.
Select the desired option by moving the joystick left / right
and then press the joystick (OK) to confirm.
7. If <Select> is selected, Multi-view screen appears.
Select the photo files to set by moving the joystick
left / right / up / down.
8. Set the number of prints by using the [Shortcut 3]
and [Shortcut 4] buttons.
◆ Move to another photo by moving the joystick left / right
and repeat the steps to set DPOF.
9. The message “Confirm?” appears when you press the
joystick (OK).
◆ Select <Yes> or <No> by moving the joystick left / right
and then press the joystick (OK) to confirm.
10. Press the [MENU] button to exit the menu.
◆ < > icon is displayed on the photos with DPOF
setup.
[ Notes ]
✤ Please refer to the product instructions for further details on
DPOF printer use.
✤ Using a printer that supports DPOF allows users to directly
print photos stored in a mini SD card without a PC.
✤ While the menu screen is displayed, pressing the [Record / Stop] button will
exit the menu.
設設定定 DDPPOOFF((數數位位列列印印順順序序格格式式))功功能能
舅可以使用支援 DPOF 功能的印表機自動列印已錄製的相片圭案0
3
5
8
9
只能在小型 SD 賓設定 DPOF0
11.. 將將模模式式轉轉盤盤轉轉到到
22.. 按按下下 [[PPOOWWEERR]] 按按瞿瞿以以開開啓啓 MMiinniikkeett PPhhoottoo00
33.. 按按下下 [[SShhoorrttccuutt 11]] 按按瞿瞿切切換換到到 PPhhoottoo VViieeww 模模式式00
44.. 按按下下 [[MMEENNUU]] 按按瞿瞿00
◆ 選單螢幕將會顯示0
55.. 向向左左或或向向右右移移動動搖搖桿桿以以選選取取 <<DDPPOOFF>>00
66.. 向向上上或或向向下下移移動動搖搖桿桿以以選選取取選選項項,,然然後後按按搖搖桿桿 ((OOKK))
按按瞿瞿00
<<SSeelleecctt>>
◆
取要設定 DPOF 列印的相片圭案0
<<AAllll>>
◆
如果選取 <All>,“DPOF All?”訊息將會顯示0
向左或向右移動搖桿選取所要的選項,然後按下
搖桿 (OK) 按瞿以確認0
77.. 如如果果選選取取 <<SSeelleecctt>>,,多多個個視視圖圖螢螢幕幕將將會會出出現現00
向向左左//右右//上上//下下移移動動搖搖桿桿以以選選取取要要設設定定的的相相片片圭圭案案00
88.. 使使用用 [[SShhoorrttccuutt 33]] 和和 [[SShhoorrttccuutt 44]] 按按瞿瞿設設定定列列
印印略略數數00
◆ 向左或向右移動搖桿移到其他相片,然後重複這
些步驟以設定 DPOF0
99..
““CCoonnffiirrmm??””訊訊息息將將會會在在舅舅按按下下搖搖桿桿 ((OOKK)) 按按瞿瞿時時顯顯示示00
◆ 向左或向右移動搖桿以選取 <Yes> 或
<No>,然後按下搖桿 (OK) 按瞿以確認0
1100.. 按按 [[MMEENNUU]] 按按瞿瞿以以結結束束選選單單00
◆ <>圖示將會在具有 DPOF 設定的相片上顯
示0
附附註註
[
]
✤ 如需關於使用 DPOF 印表機的詳細資訊,請參閱産
品說明0
✤
使用支援 DPOF 功能的印表機,可以讓使用者不必使
用電腦卽可直接列印儲存在小型 SD 賓上的相片圭案0
✤ 當選單螢幕顯示時,按 [Record/Stop] 按瞿將可以
結束選單0
PPhhoottoo
模模式式00
: 多個視圖螢幕將會出現,舅可以選
: 所有的圭案將會標記爲 DPOF 列印0
8787
Page 88

ENGLISH
MENU
TYPE
PhotoPhoto
Copy (to)Copy (to)
Select
All
MoveMove SelectSelect ExitExit
OK
100-0006
100-0006100-0006
2592
Photo
Copy (to)
Move Select Exit
Copy?
(External -> Internal)
Yes No
MoveMove SelectSelect
OK
100-0006
Move Select Exit
Photo
Copy (to)
Move Select Exit
100-0006
MENU
MoveMove SelectSelect ExitExit
OK
Photo Mode :
Setting the Viewing Options
PPhhoottoo 模模式式:: 設設定定檢檢視視選選項項
Copying Photo Files
You can copy saved photo files from the internal memory on to an mini
SD card and vice-versa.
1. Turn the Mode Dial to Photo mode.
2. Press the [POWER] button to turn on the
Miniket Photo.
3. Press the [Shortcut 1] button to switch to Photo
View mode.
4. Press the [MENU] button.
◆ Menu screen appears.
5. Move the joystick left / right to select <Copy (to)>.
6. Select an option by moving the joystick up / down
and then press the joystick (OK).
◆ <Select>: Multi-view screen appears and you
can select photo files to copy.
◆ <All>: All photo files will be copied.
If <All> is selected, the message “Copy All?”
appears. Select <Yes> or <No> by moving the
joystick left / right and then press the joystick (OK)
to confirm.
7. If <Select> is selected, Multi-view screen appears.
Select photo files to copy by moving the
joystick left / right / up / down and press the
joystick (OK).
◆ Multiple photo files can be selected using the
joystick (OK). An icon ( ) indicating the selected
file to be copied appears.
8. Press the [Shortcut 4] button.
◆ The message “Copy?” appears. Select <Yes> or
<No> by moving the joystick left / right and then
press the joystick (OK) to confirm.
9. Press the [MENU] button to exit the menu.
[ Notes ]
✤ It copies from the currently-used memory to another.
If the internal memory was used, it copies to a
mini SD card.
✤
When <File No.> is set, file numbering will start from
the next to the last file.
✤ While the menu screen is displayed, pressing the
[Record / Stop] button will exit the menu.
8888
複複製製相相片片圭圭案案
舅可以將已儲存的相片圭案從內建內部記憶體複製到小型 SD 賓,反
之亦然0
PPhhoottoo
5
6
7
11.. 將將模模式式轉轉盤盤轉轉到到
22.. 按按下下 [[PPOOWWEERR]] 按按瞿瞿以以開開啓啓 MMiinniikkeett PPhhoottoo00
33.. 按按下下 [[SShhoorrttccuutt 11]] 按按瞿瞿切切換換到到 PPhhoottoo VViieeww
模模式式00
44.. 按按下下 [[MMEENNUU]] 按按瞿瞿00
◆ 選單螢幕將會顯示0
55.. 向向左左或或向向右右移移動動搖搖桿桿以以選選取取 <<CCooppyy ((ttoo))>>00
66.. 向向上上或或向向下下移移動動搖搖桿桿以以選選取取選選項項,,然然後後按按搖搖桿桿
((OOKK)) 按按瞿瞿00
<<SSeelleecctt>>
◆
以選取要複製的相片圭案0
<<AAllll>>
◆
: 所有的相片圭案將會複製0
如果選取 <All>,“Copy All?”訊息將會顯
示0 向左或向右移動搖桿以選取 <Yes> 或
<No>,然後按下搖桿 (OK) 按瞿以確認0
77.. 如如果果選選取取 <<SSeelleecctt>>,,多多個個視視圖圖螢螢幕幕將將會會出出現現00
向向左左//右右//上上//下下移移動動搖搖桿桿以以選選取取要要複複製製的的相相片片圭圭
案案,,然然後後按按下下搖搖桿桿 ((OOKK)) 按按瞿瞿00
◆ 舅可以使用搖桿 (OK) 按瞿選擇多個相片圭
案0 螢幕上將顯示 ()圖示,標示要複製
之選取的圭案0
88.. 按按下下 [[SShhoorrttccuutt 44]] 按按瞿瞿00
◆ “Copy?” 訊息將會顯示0 向左或向右移動搖
桿以選取 <Yes> 或 <No>,然後按下搖桿
(OK) 按瞿以確認0
99.. 按按 [[MMEENNUU]] 按按瞿瞿以以結結束束選選單單00
8
附附註註
[
]
✤
央會從目前使用的記憶體複製到癩一個記憶體0 如
果正在使用內部記憶體,將會複製到小型 SD 賓0
✤
設定 <File No.> 時,圭案編號將會從下一個圭
案開始到最後一個0
✤
當選單螢幕顯示時,按 [Record/Stop] 按瞿將
可以結束選單0
模模式式00
: 多個視圖螢幕將會出現,舅可
Page 89

POWER
W T
POWER
W T
ENGLISH
3
3
Recording a Movie ....................................................................90
Recording a Movie .................................................................90
Zooming In and Out ...............................................................91
Playing a Movie ......................................................................... 92
Playing a Movie on the LCD Monitor .....................................92
Setting the Recording Options................................................93
Using the Shortcut Buttons ....................................................93
Setting the Program AE..........................................................95
Setting the White Balance...................................................... 96
Setting the Digital Effects .......................................................97
Setting the Macro Mode .........................................................98
Setting the Movie Quality .......................................................99
Setting the Movie Size .........................................................100
Setting the Self Timer...........................................................101
Setting the Wind Cut ............................................................102
Setting the Viewing Options..................................................103
Using the Shortcut Buttons ..................................................103
Deleting Movie Files .............................................................107
Protecting Movie Files ..........................................................108
Setting the All Play ............................................................... 109
Copying Movie Files .............................................................110
◆ Save important data / recordings separately on other media, to
avoid accidental loss due to a system failure or other reasons.
Movie Mode
How to set to Movie mode
1. Turn the Mode Dial to
Movie mode.
2. Press the [POWER] button
to turn on the Miniket Photo.
Power
Button
3
3
錄錄製製影影片片
播播放放影影片片
設設定定錄錄製製選選項項
設設定定檢檢視視選選項項
◆ 在其他媒體上個別儲存重要資料/錄製內容,以避免由於系統故障
MMoovviiee 模模式式
.....................................................................................90
錄製影片
................................................................................90
放大和縮小
在 LCD 顯示器上播放影片
使用捷徑按瞿
設定程序自動曝光
設定白平衡
設定數位效果
設定微距模式
設定影片片品質
設定影像大小
設定自拍計時器
設定消除風聲
使用捷徑按瞿
刪除影片圭案
保護影片圭案
設定幻燈片放映
複製影片圭案
或其他原因導致資料意外遺失0
.............................................................................91
.....................................................................................92
.............................................................................93
.........................................................................93
.............................................................................96
.........................................................................97
.........................................................................98
.....................................................................99
.......................................................................100
...................................................................101
.......................................................................102
...........................................................................103
.......................................................................103
.......................................................................107
.......................................................................108
...................................................................109
.......................................................................110
如如何何設設定定 MMoovviiee 模模式式
11.. 將將模模式式轉轉盤盤轉轉到到
模模式式00
..................................................92
.................................................................95
MMoovviiee
22.. 按按下下 [[PPOOWWEERR]] 按按瞿瞿以以開開啓啓
MMiinniikkeett PPhhoottoo00
電源按瞿
8989
Page 90

ENGLISH
REM
4 Min
4 Min
IN
00:00:16
00:00:16
RECREC
4 Min
00:00:16
REC
A
OFFOFF
640
REM
IN
AE
AUTO
STBYSTBY
4 Min4 Min
F
F
Movie Mode : Recording a Movie
MMoovviiee 模模式式:: 錄錄製製影影片片
Recording a Movie
You can record video and store it in memory.
1. Turn the Mode Dial to Movie mode.
2. Press the [POWER] button to turn on the Miniket
Photo.
◆ The Movie Record screen appears.
3. Press the [Record / Stop] button.
◆ It starts to record.
4. To stop recording, press the [Record / Stop]
button again.
◆ It stops recording, and stands by.
5. After recording, press the [POWER ]button to
turn off the Miniket Photo to prevent battery
power consumption.
Reading the Counter
◆ The timestamp will be recorded along with the movie to support
users with a faster search.
◆ 00:00:16: Elapsed Recording Time
REM 4 Min: Remaining Recording Time
[ Notes ]
✤ To adjust the brightness of LCD screen, set the <LCD Brightness>
in Settings mode (refer to page 41).
9090
✤ After recording, turn off the Miniket Photo to conserve battery
power.
✤ The brightness of the LCD monitor will not affect the brightness of
the recordings.
錄錄製製影影片片
舅可以錄製移動圖片橙將央儲存到記憶體中0
3
11.. 將將模模式式轉轉盤盤轉轉到到
22.. 按按下下 [[PPOOWWEERR]] 按按瞿瞿以以開開啓啓 MMiinniikkeett PPhhoottoo00
◆ Movie Record 螢幕將會顯示0
33.. 按按下下 [[RReeccoorrdd//SSttoopp]] 按按瞿瞿00
◆ 央將會開始錄製0
4
44.. 若若要要停停止止錄錄製製,,請請再再次次按按 [[RReeccoorrdd//SSttoopp]] 按按瞿瞿00
◆ 央將會停止錄製橙處於待機狀態0
55.. 拍拍攝攝後後,,按按下下 [[PPOOWWEERR]] 按按瞿瞿關關閉閉 MMiinniikkeett
PPhhoottoo 以以避避免免電電池池耗耗電電00
讀讀取取計計數數器器
◆ 時間素記將會連同影片一起錄製以便讓使用者可以更快搜尋0
◆ 00:00:16: 經過的錄製時間
REM 4 Min: 剩餘的錄製時間
附附註註
[
]
✤ 若要調整 LCD 螢幕的亮度,請在 Settings 模式中設定 <LCD
Brightness>(請參閱第 41 頁)0
✤ 完成錄製後,請關閉 Miniket Photo 以節約電池電能0
✤ L CD 顯示器的亮度將不會影響錄製的亮度0
MMoovviiee
模模式式00
Page 91

W T
W T
ENGLISH
W T
W T
A
OFFOFF
640
REM
AE
AUTO
IN
STBYSTBY
T
4 Min
4 Min
F
F
OFF
STBY
A
OFFOFF
640
REM
IN
AE
AUTO
T
STBYSTBY
4 Min4 Min
4 Min
F
F
F
Movie Mode : Recording a Movie
MMoovviiee 模模式式:: 錄錄製製影影片片
Zooming In and Out
Zooming allows you to change the size of the subject captured in a scene.
You can take advantage of the 3x optical electro motion zoom lens.
Before You Start
1. Turn the Mode Dial to Movie mode.
2. Press the [POWER] button to turn on the Miniket Photo.
The Movie Record screen appears.
Zoom Out
Zoom In
Zoom Out
Move the [W/T] zoom switch to W
(WIDE).
●
The shot subject’s size is
reduced, and you can record
movies as if you were far away
from the subject.
●
On the zoom indicator in the
LCD screen, the arrow moves to
W.
●
The smallest rate of zoom out is
the default rate (original
Zoom In
[ Notes ]
✤
Frequent use of zooming may result in higher battery consumption.
✤
Optical zoom preserves image quality.
resolution of the subject).
Move the [W/T] zoom switch to T
(TELE).
●
The subject is larger, and you
can record movies as if you
were close to the subject.
●
On the zoom indicator the arrow
moves to T.
●
The largest optical zoom is 3x,
which is the biggest among the
basic zoom.
放放大大和和縮縮小小
縮放功能可以讓舅變更在場景中拍攝之物件的大小0
舅可以充分利用 3x 光學電子動作縮放鏡頭的優勢0
開開始始操操作作之之前前
1. 將模式轉盤轉到
2. 按下 [POWER] 按瞿以開啓 Miniket Photo0
Movie Record 螢幕將會顯示0
附附註註
[
]
✤
經常使用縮放功能可能導致較高的電池耗電量0
✤
光學縮放可以保有影像品質0
MMoovviiee
模式0
縮縮小小
放放大大
將將 [[WW//TT]] 縮縮放放切切換換移移到到 WW
((廣廣角角))00
● 拍攝之物件的大小將會減
少,舅將可以像在距離物件
蜈遠的地方錄製影片0
● 在 L CD 螢幕中的縮放指示
器上,箭頭將移到 W0
● 縮小的最小速率是預設速率
(物件的原始解析度)0
將將 [[WW//TT]] 縮縮放放切切換換移移到到 TT
((遠遠攝攝))00
●
物件將會變大,舅將可以像
在距離物件蜈近的地方錄製
影片0
●
在 LCD 螢幕中的縮放指示
器上,箭頭將移到 T0
●
最大的光學縮放是 3x,
央是基本縮放中最大的0
9191
Page 92

ENGLISH
A
OFFOFF
640
REM
IN
AE
AUTO
STBYSTBY
4 Min
4 Min
F
F
00:00:1600:00:16
100-0001100-0001
IN
1/11/1
OFF
STBY
4 Min
640
F
00:00:16
100-0001
1/1
100-0001100-0001
IN
00:00:0000:00:00
00:00:1600:00:16
OFF
STBY
4 Min
640
F
00:00:16
100-0001
1/1
100-0001
00:00:00
IN
00:00:1600:00:16
100-0001100-0001
00:00:16
00:00:1000:00:10
OFF
STBY
4 Min
640
F
Movie Mode : Playing a Movie
MMoovviiee 模模式式:: 播播放放影影片片
Playing a Movie on the LCD Monitor
It is handy and practical to view movie files using the LCD monitor
almost anywhere such as in a car, indoors, or outdoors.
1. Turn the Mode Dial to Movie mode.
2. Press the [POWER] button to turn on the Miniket
Photo.
◆ The Movie Record screen appears.
3. Press the [Shortcut 1] button.
◆ Switches to Movie play mode.
4. Move the joystick left / right to select a movie file
and then press the joystick (OK).
◆ Selected movie file plays on the LCD monitor.
◆ To pause playback, press the joystick (OK).
◆ To stop playback, press and hold the joystick
5. To adjust volume, move the joystick up /
down.
◆ The volume indicator appears and disappears
[ Notes ]
✤
If there is no file stored to view, the message
<No stored Movie!> appears.
✤
When the earphones or Audio / Video cable is
connected to the Miniket Photo, the built-in speaker
As for photo viewing, you can also select and play
the movie file in a multi-view display.
will automatically turn off.
✤
9292
(OK) for a while.
after a few seconds.
在在 LLCCDD 顯顯示示器器上上播播放放影影片片
使用 LCD 顯示器檢視影片圭案非常方便實用,可以在任何地方使用,
例如車里/ 室內或室外0
2
3
4
5
11.. 將將模模式式轉轉盤盤轉轉到到
MMoovviiee
模模式式00
22.. 按按下下 [[PPOOWWEERR]] 按按瞿瞿以以開開啓啓 MMiinniikkeett PPhhoottoo00
◆ Movie Record 螢幕將會顯示0
33.. 按按下下 [[SShhoorrttccuutt 11]] 按按瞿瞿00
◆ 切換到播放影片模式0
44.. 向向左左或或向向右右移移動動搖搖桿桿選選取取影影片片圭圭案案,,然然後後按按搖搖桿桿
((OOKK)) 按按瞿瞿00
◆ 選取的影片圭案將會在 LCD 顯示器上播放0
◆ 若要暫停播放,請按下搖桿 (OK) 按瞿0
◆ 若要停止播放,請按住搖桿 (OK) 按瞿一
下子0
55.. 若若要要調調整整音音量量,,請請向向上上或或向向下下移移動動搖搖桿桿00
◆ 音量指示燈將會顯示橙在幾秒後消失0
附附註註
[
]
✤
如果沒有儲存圭案以檢視,將會顯示 <No
stored Movie!> 訊息0
✤
將耳機或 AV 纜線連接到 Miniket Photo 時,內
建喇叭將會自動關閉0
✤
對於檢視相片,舅也可以在多個視圖顯示中選取和
播放影片圭案0
Page 93

ENGLISH
00:00:1600:00:16
100-0001100-0001
100-0001
IN
1/11/1
OFF
STBY
4 Min
640
F
A
OFFOFF
640
REM
IN
AE
AUTO
STBYSTBY
OFF
STBY
4 Min
4 Min
4 Min
F
F
F
A
OFFOFF
640
REM
IN
STBYSTBY
4 Min
F
F
A
OFFOFF
640
REM
IN
AE
AUTO
STBYSTBY
4 Min
4 Min
F
F
Movie Mode :
Setting the Recording Options
MMoovviiee 模模式式:: 設設定定錄錄製製選選項項
Using the Shortcut Buttons
Shortcut buttons are provided to allow users easy access to
frequently-used functions.
Switching to Movie Play Mode
1. Turn the Mode Dial to Movie mode.
2. Press the [POWER] button to turn on the Miniket
Photo.
3. Press the [Shortcut 1] button.
◆ Each press of the [Shortcut 1] button toggles
between the Movie Record / Play modes.
Setting the Program AE
1. Turn the Mode Dial to Movie mode.
2. Press the [POWER] button to turn on the Miniket
Photo.
3. Press the [Shortcut 2] button.
◆ Each press of the [Shortcut 2] button cycles
through < >-< >-< >-< > Program AE
modes.
使使用用捷捷徑徑按按瞿瞿
捷徑按瞿專爲讓使用者輕瑪存取常用功能而提供0
3
切切換換到到播播放放影影片片模模式式
11.. 將將模模式式轉轉盤盤轉轉到到
22.. 按按下下 [[PPOOWWEERR]] 按按瞿瞿以以開開啓啓 MMiinniikkeett PPhhoottoo00
33.. 按按下下 [[SShhoorrttccuutt 11]] 按按瞿瞿00
◆ 每次按下 [Shortcut 1] 按瞿,將會在錄製
影片/播放影片模式之間切換0
3
設設定定程程序序自自動動曝曝光光
11.. 將將模模式式轉轉盤盤轉轉到到
22.. 按按下下 [[PPOOWWEERR]] 按按瞿瞿以以開開啓啓 MMiinniikkeett PPhhoottoo00
33.. 按按下下 [[SShhoorrttccuutt 22]] 按按瞿瞿00
◆ 每次按下 [Shortcut 2] 按瞿,將會在
< >-< >-< >-< > 程序自動曝
光模式中轉換0
MMoovviiee
MMoovviiee
模模式式00
模模式式00
9393
Page 94

ENGLISH
S
N
BWBW
S
NN
SS
A
S
N
BWBW
S
NN
SS
A
OFFOFF
640
REM
IN
AE
AUTO
STBYSTBY
4 Min
F
F
A
OFFOFF
640
REM
IN
AE
AUTO
STBYSTBY STBY
BW
4 Min
4 Min
4 Min
F
F
F
A
640
REM
IN
AE
AUTO
STBYSTBY
BWBW
4 Min
F
F
A
OFFOFF
640
REM
IN
AE
AUTO
STBYSTBY
OFF
STBY
4 Min
4 Min
4 Min
F
F
F
Movie Mode :
Setting the Recording Options
MMoovviiee 模模式式:: 設設定定錄錄製製選選項項
Using the Shortcut Buttons
Shortcut buttons are provided to allow users easy access to frequently
used functions.
Setting the White Balance
1. Turn the Mode Dial to Movie mode.
2. Press the [POWER] button to turn on the Miniket
Photo.
3. Press the [Shortcut 3] button.
◆ Each press of the [Shortcut 3] button cycles
through the < >-< >-< >-< >-< >-< >
flash modes
Setting the Digital Effect
1. Turn the Mode Dial to Movie mode.
2. Press the [POWER] button to turn on the Miniket
Photo.
3. Press the [Shortcut 4] button.
◆ Each press of the [Shortcut 2] button cycles
through the < >-< >-< >-< > Digital
Effects.
9494
使使用用捷捷徑徑按按瞿瞿
捷徑按瞿專爲讓使用者輕瑪存取常用功能而提供0
3
設設定定白白平平衡衡
11.. 將將模模式式轉轉盤盤轉轉到到
22.. 按按下下 [[PPOOWWEERR]] 按按瞿瞿以以開開啓啓 MMiinniikkeett PPhhoottoo00
33.. 按按下下 [[SShhoorrttccuutt 33]] 按按瞿瞿00
◆ 每次按下 [Shortcut 3] 按瞿,將會在
< >-< >-< >-< >-< >-< >
閃光燈模式中轉換0
3
設設定定數數位位效效果果
11.. 將將模模式式轉轉盤盤轉轉到到
22.. 按按下下 [[PPOOWWEERR]] 按按瞿瞿以以開開啓啓 MMiinniikkeett PPhhoottoo00
33.. 按按下下 [[SShhoorrttccuutt 44]] 按按瞿瞿00
◆ 每次按下 [Shortcut 2] 按瞿,將會在
< >-< >-< >-< > 閃光燈模式
中轉換0
MMoovviiee
MMoovviiee
模模式式00
模模式式00
Page 95

ENGLISH
A
OFFOFF
640
REM
AE
AUTO
IN
STBY
STBY
4 Min
4 Min
F
F
MENU
TYPE
AE
AE
AUTO
OFF
STBY
MovieMovie
Program AEProgram AE
Auto
Sports
Spotlight
Beach/Snow
MoveMove SelectSelect ExitExit
OK
4 Min
F
OFF
STBY
Movie
Program AE
Move Select Exit
MENU
TYPE
AE
MovieMovie
Program AEProgram AE
Auto
Sports
Spotlight
Beach/Snow
MoveMove SelectSelect ExitExit
OK
AE
AUTO
4 Min
F
OFF
STBY
Movie
Program AE
Move Select Exit
Movie
Program AE
Auto
Move Select Exit
A
OFFOFF
640
REM
IN
STBYSTBY
4 Min
4 Min
4 Min
F
F
F
Movie Mode :
Setting the Recording Options
MMoovviiee 模模式式:: 設設定定錄錄製製選選項項
Setting the Program AE
Program AE modes are preset automatic exposure modes based upon
an internal computer program. It allows you to adjust the aperture
setting to suit different conditions.
1. Turn the Mode Dial to Movie mode.
2
2. Press the [POWER] button to turn on the Miniket
Photo.
◆ The Movie Record screen appears.
3. Press the [MENU] button.
4. Move the joystick left / right to select <Program
AE>.
5. Select an option by moving the joystick up /
down and then press the joystick (OK).
Balances exposure and shutter speed to get the
Auto
best results automatically.
6. Press the [MENU] button to exit the menu.
[ Notes ]
✤ You can easily access this function by using the
shortcut button (refer to page 93).
✤ <Macro> setting is limited when you are using
For recording fast-moving objects. It is suitable
Sports
for sporting events and recording the outside
from inside of a vehicle.
Compensates for a subject that appears too
bright under strong direct light such as a
Spotlight
spotlight. It is suitable for recording conditions
such as concerts and school performances.
When the light is very strong, such as on a
Beach /
beach or in the snow.
Snow
4
5
6
Program AE (refer to page 102).
✤ Regarding <White Balance>, <Macro>, <Focus> and
<Wind Cut> use with <Program AE>, refer to page
102.
✤ While the menu screen is displayed, pressing the
[Record / Stop] button will exit the menu.
設設定定程程序序自自動動曝曝光光
Program AE 模式是根據內部電腦程式來預設的自動曝光模式0 央可
以讓舅調整光圈設定以適合不同的環境0
11.. 將將模模式式轉轉盤盤轉轉到到
22.. 按按下下 [[PPOOWWEERR]] 按按瞿瞿以以開開啓啓 MMiinniikkeett PPhhoottoo00
◆ Movie Record 螢幕將會顯示0
33.. 按按下下 [[MMEENNUU]] 按按瞿瞿00
44.. 向向左左或或向向右右移移動動搖搖桿桿以以選選取取 <<PPrrooggrraamm AAEE>>00
55.. 向向上上或或向向下下移移動動搖搖桿桿以以選選取取選選項項,,然然後後按按搖搖桿桿
((OOKK)) 按按瞿瞿00
AAuuttoo
SSppoorrttss
SSppoottlliigghhtt
BBeeaacchh //
SSnnooww
66.. 按按 [[MMEENNUU]] 按按瞿瞿以以結結束束選選單單00
附附註註
[
]
✤ 舅可以使用捷徑按瞿簡易地存取此功能(請參閱第
93 頁)0
✤ 使用 Program AE 模式時,<Macro> 的設定將
會受到限制(請參閱第 102 頁)0
✤ 如需關於在 <Program AE> 中使用 <White
Balance>/ <Macro>/ <Focus> 和 <Wind
Cut> 的資訊,請參閱第 102 頁0
✤ 當選單螢幕顯示時,按 [Record/Stop] 按瞿將可
以結束選單0
MMoovviiee
模模式式00
平衡曝光與快門速度以自動獲得最佳效果0
用於錄製快速移動的物體0 適合體育活動以及從
車內錄製車外景物0
補償出現在强光如聚光燈下的物體0 適合音樂會
和學校演出的錄製情況0
照明非常强時,例如,在沙灘或雪景中0
9595
Page 96

ENGLISH
MENU
AE
A
OFF
STBY
MovieMovie
White BalanceWhite Balance
Auto
Daylight
Cloudy
Fluorescent H
MoveMove SelectSelect ExitExit
OK
4 Min
F
OFF
STBY
Movie
White Balance
Move Select Exit
MENU
AE
MovieMovie
White BalanceWhite Balance
Auto
Daylight
Cloudy
Fluorescent H
MoveMove SelectSelect ExitExit
OK
4 Min
F
OFF
STBY
Movie
White Balance
Move Select Exit
Movie
White Balance
Move Select Exit
OFFOFF
640
REM
IN
AE
AUTO
STBYSTBY
4 Min4 Min
4 Min
F
F
F
A
OFFOFF
640
REM
AE
AUTO
IN
STBYSTBY
4 Min
4 Min
F
F
Movie Mode :
Setting the Recording Options
MMoovviiee 模模式式:: 設設定定錄錄製製選選項項
Setting the White Balance
The White Balance is used to preserve natural colors under different
lighting conditions. It is recommended to set the white balance prior to
any recording.
1. Turn the Mode Dial to Movie mode.
2. Press the [POWER] button to turn on the Miniket
Photo.
◆ The Movie Record screen appears.
3. Press the [MENU] button.
◆ Menu screen appears.
4. Move the joystick left / right to select <White
Balance>.
5. Move the joystick up / down to select an
option, and then press the joystick (OK).
Fluorescent H
Fluorescent L
6. Press the [MENU] button to exit the menu.
[ Notes ]
✤ You can easily access this function by using the
shortcut button (refer to page 94).
✤ In general outdoors recording, <Auto> setting will
allow users to achieve the best results.
✤ As the lighting conditions change, set the
appropriate white balance before recording.
✤ Regarding <White Balance> use with <Program
AE>, refer to page 102.
✤ While the menu screen is displayed, pressing the
9696
[Record / Stop] button will exit the menu.
Auto
Daylight
Cloudy
Tungsten
Automatically sets according to the shooting
environment.
Adjusts the color according to daylight/indoor,
outdoor light
You can select this when you cannot have
daylight as a direct light, such as when it is
partly-cloudy or cloudy.
Suitable in a halogen or 3-wavelength light
environment.
Suitable for a fluorescent light environment.
Suitable for an incandescent light environment.
3
4
5
6
設設定定白白平平衡衡
白平衡用於保持不同光線條件下的自然色彩0 建議在進行任何錄製之
前設定白平衡0
11.. 將將模模式式轉轉盤盤轉轉到到
22.. 按按下下 [[PPOOWWEERR]] 按按瞿瞿以以開開啓啓 MMiinniikkeett PPhhoottoo00
◆ Movie Record 螢幕將會顯示0
33.. 按按下下 [[MMEENNUU]] 按按瞿瞿00
◆ 選單螢幕將會顯示0
44.. 向向左左或或向向右右移移動動搖搖桿桿選選取取 <<WWhhiittee BBaallaannccee>>00
55.. 向向上上或或向向下下移移動動搖搖桿桿以以選選取取選選項項,,然然後後按按搖搖桿桿
((OOKK)) 按按瞿瞿00
AAuuttoo
DDaayylliigghhtt
CClloouuddyy
FFlluuoorreesscceenntt HH
FFlluuoorreesscceenntt LL
TTuunnggsstteenn
66.. 按按 [[MMEENNUU]] 按按瞿瞿以以結結束束選選單單00
附附註註
[
]
✤ 舅可以使用捷徑按瞿簡易地存取此功能(請參閱第
94 頁)0
✤ 在一般的戶外錄製中,<Auto> 設定將可以讓使
用者獲得最佳效果0
✤
當照明條件改變時,請在錄製前設定適當的白平衡0
✤ 如需關於在 <Program AE> 中使用 <White
Balance> 的資訊,請參閱第 102 頁0
✤ 當選單螢幕顯示時,按 [Record/Stop] 按瞿將可
以結束選單0
MMoovviiee
模模式式00
根據拍攝環境自動設定0
根據白天/室內/ 室外照明調整色彩0
舅可以在無法獲得日光作爲直接照明時選取此
選項,例如稍微多雲的陰天或非常多雲的陰天0
適用於鹵光燈或 3 波長照明環境0
適用於螢光燈照明環境0
適用於白熾燈照明環境0
Page 97

ENGLISH
A
OFFOFF
640
REM
IN
AE
AUTO
STBYSTBY
4 Min4 Min
F
F
MENU
SS
NN
BWBW
OFF
STBY
MovieMovie
OK
Digital EffectDigital Effect
Off
Sepia
Nega
BLK&WHT
MoveMove SelectSelect ExitExit
4 Min
F
S
N
BW
OFF
STBY
Movie
Digital Effect
Move Select Exit
MENU
SS
NN
BWBW
MovieMovie
OK
Digital EffectDigital Effect
Off
Sepia
Nega
BLK&WHT
MoveMove SelectSelect ExitExit
4 Min
F
S
N
BW
OFF
STBY
A
640
REM
IN
AE
AUTO
STBYSTBY
Movie
Digital Effect
Move Select Exit
S
N
BW
Movie
Digital Effect
Move Select Exit
SS
4 Min
4 Min
4 Min
F
F
F
Movie Mode :
Setting the Recording Options
MMoovviiee 模模式式:: 設設定定錄錄製製選選項項
Setting the Digital Effects
It supports various digital effects you can apply to your movie. Create
a professional-looking movie with digital effects.
1. Turn the Mode Dial to Movie mode.
2. Press the [POWER] button to turn on the Miniket
Photo.
◆ The Movie Record screen appears.
3. Press the [MENU] button.
4. Move the joystick left / right to select <Digital
Effect>.
5. Select an option by moving the joystick up /
down, and then press the joystick (OK).
BLK&WHT
6. Press the [MENU] button to exit the menu.
[ Notes ]
✤ You can easily access this function by using the
shortcut button (refer to page 94).
✤ While the menu screen is displayed, pressing the
[Record / Stop] button will exit the menu.
Cancel the <Digital Effect>.
Off
Takes movie in normal mode.
The picture is displayed in sepia color--similar to
Sepia
that of an old photograph.
Reverses the colors, creating the look of a negative.
Nega
Changes the images into black and white.
設設定定數數位位效效果果
央支援各種舅可以套用到影片中的數位效果0 數位效果可以讓舅製作
具有專業外觀的影片0
2
4
5
6
11.. 將將模模式式轉轉盤盤轉轉到到
MMoovviiee
模模式式00
22.. 按按下下 [[PPOOWWEERR]] 按按瞿瞿以以開開啓啓 MMiinniikkeett PPhhoottoo00
◆ Movie Record 螢幕將會顯示0
33.. 按按下下 [[MMEENNUU]] 按按瞿瞿00
44.. 向向左左或或向向右右移移動動搖搖桿桿選選取取 <<DDiiggiittaall EEffffeecctt>>
模模式式00
55.. 向向上上或或向向下下移移動動搖搖桿桿以以選選取取選選項項,,然然後後按按搖搖桿桿
((OOKK))00
取消 <Digital Effect>0
OOffff
在正常模式中錄製影片0
圖片以深褐色顯示 - 産生類似舊相片的效果0
SSeeppiiaa
將顔色倒置,建立底片外觀0
NNeeggaa
將影像變爲黑白0
BBLLKK&&WWHHTT
66.. 按按 [[MMEENNUU]] 按按瞿瞿以以結結束束選選單單00
附附註註
[
]
✤ 舅可以使用捷徑按瞿簡易地存取此功能(請參閱第
94 頁)0
✤ 當選單螢幕顯示時,按 [Record/Stop] 按瞿將可
以結束選單0
9797
Page 98

ENGLISH
MENU
OFF
STBY
MovieMovie
OK
MacroMacro
Off
Macro
MoveMove SelectSelect ExitExit
4 Min
F
OFF
STBY
Movie
Macro
Move Select Exit
MENU
MovieMovie
OK
MacroMacro
Off
Macro
MoveMove SelectSelect ExitExit
4 Min
F
OFF
STBY
A
OFFOFF
640
REM
IN
AE
AUTO
STBYSTBY
Movie
Macro
Move Select Exit
Movie
Macro
Move Select Exit
4 Min4 Min
4 Min
F
F
F
A
OFFOFF
640
REM
IN
AE
AUTO
STBYSTBY
4 Min
4 Min
F
F
Movie Mode :
Setting the Recording Options
MMoovviiee 模模式式:: 設設定定錄錄製製選選項項
Setting the Macro Mode
Macro mode allows users to have fine focused image of a close-up
within 50 cm. <Macro> setting is available only when you set
<Program AE> to <Auto>.
1. Turn the Mode Dial to Movie mode.
2. Press the [POWER] button to turn on the Miniket
Photo.
◆ The Movie Record screen appears.
3. Press the [MENU] button.
4. Move the joystick left / right to select
<Macro>.
5 Select an option by moving the joystick up /
down and then press the joystick (OK).
6. Press the [MENU] button to exit the menu.
[ Notes ]
✤
When you use Macro mode and record a close-up
subject, be careful not to shade your subject.
✤
As the distance gets closer, the focused area
gets narrower.
✤
If the focus will not set, try to put more distance
between you and the subject.
✤
It is recommended to use a tripod to avoid unstable
movie recording and have best results.
✤
Regarding <Macro> use with <Program AE>, refer to
page 102.
✤
While the menu screen is displayed, pressing the
[Record / Stop] button will exit the menu.
9898
Macro Setting
<Off>
<Macro>
Focus Range
50 cm ~ ∞
W: 10 cm ~ ∞
T: 30 cm ~ ∞
設設定定微微距距模模式式
微距模式可以讓使用者擁有 50 公分以內特寫物體之良好對焦影像0
<Macro> 設定只有在舅將 <Program AE> 設定爲 <Auto> 時可
2
4
5
6
以使用0
11.. 將將模模式式轉轉盤盤轉轉到到
MMoovviiee
模模式式00
22.. 按按下下 [[PPOOWWEERR]] 按按瞿瞿以以開開啓啓 MMiinniikkeett PPhhoottoo00
◆ Movie Record 螢幕將會顯示0
33.. 按按下下 [[MMEENNUU]] 按按瞿瞿00
44.. 向向左左或或向向右右移移動動搖搖桿桿以以選選取取 <<MMaaccrroo>>00
55.. 向向上上或或向向下下移移動動搖搖桿桿以以選選取取選選項項,,然然後後按按搖搖桿桿
((OOKK)) 按按瞿瞿00
微微距距設設定定
<<OOffff>>
<<MMaaccrroo>>
對焦範圍
50 公分 ~
∞
W: 10 公分 ~
T: 30 公分 ~
∞
∞
66.. 按按 [[MMEENNUU]] 按按瞿瞿以以結結束束選選單單00
附附註註
[
]
✤ 使用微距模式以及錄製特寫物體時,請小心不要遮
蔽舅的拍攝物體0
✤ 距離更迲近時,對焦區域將更窄0
✤ 如果對焦無法設定,請嘗試拉開舅和物體之間的距
離0
✤ 建議舅使用三苛架以避免影片錄製不穩定橙獲得最
佳效果0
✤ 如需關於在 <Program AE> 中使用 <Macro>
的資訊,請參閱第 102 頁0
✤ 當選單螢幕顯示時,按 [Record/Stop] 按瞿將可
以結束選單0
Page 99

ENGLISH
MENU
TYPE
SFSF
N
N
F
F
OFF
STBY
MovieMovie
OK
Movie QualityMovie Quality
Super Fine
Fine
Normal
MoveMove SelectSelect ExitExit
4 Min
F
SF
N
F
OFF
STBY
Movie
Movie Quality
MENU
TYPE
N
N
F
F
MovieMovie
OK
Movie QualityMovie Quality
Super Fine
Fine
Normal
SFSF
Move Select Exit
MoveMove SelectSelect ExitExit
4 Min
F
SF
N
F
OFF
SFSF
STBY
A
OFFOFF
640
REM
IN
AE
AUTO
STBYSTBY
2 Min
2 Min
Movie
Movie Quality
N
F
Movie
Movie Quality
SF
SFSF
Move Select Exit
Move Select Exit
4 Min
F
A
OFFOFF
640
REM
IN
AE
AUTO
STBYSTBY
4 Min
4 Min
F
F
Movie Mode :
Setting the Recording Options
MMoovviiee 模模式式:: 設設定定錄錄製製選選項項
Setting the Movie Quality
You can set the quality for movie files.
1. Turn the Mode Dial to Movie mode.
2. Press the [POWER] button to turn on the Miniket
Photo.
◆ The Movie Record screen appears.
3. Press the [MENU] button.
4. Move the joystick left / right to select <Movie
Quality>.
5. Select an option by moving the joystick up /
down and then press the joystick (OK).
◆ Available options are: <Super Fine> / <Fine> /
6. Press the [MENU] button to exit the menu.
◆ An icon indicating the selected Movie Quality
[ Notes ]
✤
Regarding detailed image capacity, refer to page
31.
✤
While the menu screen is displayed, pressing the
[Record / Stop] button will exit the menu.
✤
In NTSC setting, Super Fine and Fine quality will
record at 30fps while Normal at 15fps. In PALsetting,
Super Fine and Fine will record at 25fps while
Normal at 12.5fps.
<Normal>
appears on the screen.
設設定定影影片片片片品品質質
舅可以設定影片圭案的品質0
2
4
5
6
11.. 將將模模式式轉轉盤盤轉轉到到
MMoovviiee
模模式式00
22.. 按按下下 [[PPOOWWEERR]] 按按瞿瞿以以開開啓啓 MMiinniikkeett PPhhoottoo00
◆ Movie Record 螢幕將會顯示0
33.. 按按下下 [[MMEENNUU]] 按按瞿瞿00
44.. 向向左左或或向向右右移移動動搖搖桿桿選選取取 <<MMoovviiee QQuuaalliittyy>>00
55.. 向向上上或或向向下下移移動動搖搖桿桿以以選選取取選選項項,,然然後後按按搖搖桿桿
((OOKK)) 按按瞿瞿00
◆ 可使用的選項包括: <Super Fine> /
<Fine> / <Normal>
66.. 按按 [[MMEENNUU]] 按按瞿瞿以以結結束束選選單單00
◆ 螢幕上將顯示一個標示所選影片品質的圖示0
附附註註
[
]
✤ 如需關於詳細的影像容量資訊,請參閱第 31 頁0
✤ 當選單螢幕顯示時,按 [Record/Stop] 按瞿將可
以結束選單0
✤ 在 NTSC 設定中,Super Fine 和 Fine 品質將
會以 30fps 錄製,而 Normal 則以 15fps 錄製0
在 PAL 設定中,Super Fine 和 Fine 將會以
25fps 錄製,而 Normal 則以 12.5fps 錄製0
9999
Page 100

ENGLISH
A
OFFOFF
640
REM
IN
AE
AUTO
STBYSTBY
4 Min4 Min
F
F
MENU
TYPE
AE
320
OFF
STBY
MovieMovie
Movie SizeMovie Size
OK
MoveMove SelectSelect ExitExit
4 Min
F
OFF
STBY
Movie
Movie Size
Move Select Exit
MENU
TYPE
AE
320
MovieMovie
Movie SizeMovie Size
OK
MoveMove SelectSelect ExitExit
4 Min
F
OFF
STBY
A
OFFOFF
320
REM
IN
AE
AUTO
STBYSTBY
8 Min
8 Min
Movie
Movie Size
Move Select Exit
Movie
Movie Size
Move Select Exit
4 Min
F
F
F
Movie Mode :
Setting the Recording Options
MMoovviiee 模模式式:: 設設定定錄錄製製選選項項
Setting the Movie Size
1. Turn the Mode Dial to Movie mode.
2. Press the [POWER] button to turn on the Miniket
Photo.
◆ The Movie Record screen appears.
3. Press the [MENU] button.
4. Move the joystick left / right to select <Movie
Size>.
5. Select an option by moving the joystick up /
down and then press the joystick (OK).
◆ Available options are: <640x480> /
6. Press the [MENU] button to exit the menu.
◆ An icon indicating the selected Movie Size
[ Notes ]
✤ Regarding detailed image capacity, refer to page 31.
✤ Higher resolution requires more memory space,
which results in shorter maximum recording time.
✤ While the menu screen is displayed, pressing the
[Record / Stop] button will exit the menu.
100100
<320x240>
appears on the screen.
設設定定影影像像大大小小
2
11.. 將將模模式式轉轉盤盤轉轉到到
22.. 按按下下 [[PPOOWWEERR]] 按按瞿瞿以以開開啓啓 MMiinniikkeett PPhhoottoo00
◆ Movie Record 螢幕將會顯示0
33.. 按按下下 [[MMEENNUU]] 按按瞿瞿00
4
44.. 向向左左或或向向右右移移動動搖搖桿桿以以選選取取 <<MMoovviiee SSiizzee>>00
55.. 向向上上或或向向下下移移動動搖搖桿桿以以選選取取選選項項,,然然後後按按搖搖桿桿
((OOKK)) 按按瞿瞿00
◆ 可使用的選項包括:
5
66.. 按按 [[MMEENNUU]] 按按瞿瞿以以結結束束選選單單00
◆ 螢幕上將顯示一個標示所選影片大小的圖示0
6
附附註註
[
]
✤ 如需關於詳細的影像容量資訊,請參閱第 31 頁0
✤ 較高解析度需要更多記憶體,而最大錄製時間也變
得比較短0
✤ 當選單螢幕顯示時,按 [Record/Stop] 按瞿將可
以結束選單0
MMoovviiee
模模式式00
<640x480> / <320x240>
 Loading...