

Samsung MP-43 User Manual
CD/DAB/FM Digital Sound System with dock for iPod
ROBERTS
Sound for Generations
Please read this manual before use

iPod is a trademark of Apple Inc., registered in the U.S. and other countries.
"Made for iPod" means that an electrical accessory has been designed to connect specifically to
iPod and has been certified by the developer to meet Apple performance standards.
Apple is not responsible for the operation of the device or its
compliance with safety and regulatory standards.

Contents
About this instruction manual .....................................................2
Introduction ...................................................................................3
MP-43 Sound System features ..................................................3
Controls and connections ........................................................4-5
Remote control ........................................................................6-7
Using the touch panel .................................................................8
Remote control functions ............................................................8
Display icons ..............................................................................8
Using the sound system for the first time ...................................
DAB radio ....................................................................................10
Operating your sound system - DAB ........................................10
Selecting a station - DAB ......................................................... 11
Secondary services - DAB ....................................................... 11
Display modes - DAB ..........................................................12-13
Finding new stations - DAB ......................................................13
Manual tuning - DAB ................................................................14
Station order setup - DAB ...................................................15-16
Software version - DAB ............................................................17
Dynamic range control - DAB ...................................................18
FM radio .......................................................................................19
Operating your radio - search tuning FM ..................................19
Manual tuning - FM ..................................................................20
FM stereo / mono .....................................................................20
Display modes - FM..................................................................21
Presetting stations ....................................................................22
CD / MP3 / WMA ..........................................................................23
Compact discs ..........................................................................23
Playing a CD .......................................................................24-25
CD search and repeat ..............................................................26
If you need any further advice, please call our Technical Helpline on :-
020 8758 0338 (Mon-Fri)
CD track programming .............................................................27
MP3 / WMA CD mode ..............................................................
MP3 / WMA file and folder selection ....................................
iPod Docking ...............................................................................31
Navigating your iPod ................................................................32
Playing a file on your iPod ...................................................
Clock and Alarms .......................................................................
Alarms .................................................................................
Cancelling alarms .....................................................................36
9
Snooze .....................................................................................36
Sleep function ...........................................................................36
Setting the clock manually ...................................................37-38
Standby brightness control .......................................................39
Audio and Setup .........................................................................40
Equaliser function .....................................................................40
Bass and treble settings ......................................................40-41
Mute function ............................................................................41
Auxiliary input socket ................................................................
Line output socket ....................................................................42
Headphone socket ...................................................................43
Aerial removal ...........................................................................
Touch panel sensitivity control ..................................................
System reset ............................................................................45
Information ..................................................................................46
Cautions ...................................................................................46
Specifications ...........................................................................
Mains supply ............................................................................47
Guarantee ................................................................................49
28
29-30
32-33
34
34-35
42
43
44
46
1

About this instruction manual
This instruction manual is split into sections for each of the different operating
modes of your Roberts MP-43 Digital Sound System. The introduction
describes the features and controls of the product.
There are six sections covering the main features in detail - DAB radio,
FM radio, CD / MP3 / WMA playback, iPod docking, Clock and Alarm, and
Audio and Setup. Each section is clearly identified by the shaded heading
in the top right hand corner of each pair of pages.
The two sections for DAB Radio and FM Radio describe how to use the
sound system to listen to radio broadcasts.
The section for CD / MP3 / WMA player describes how to play digital
audio CDs or MP3 / WMA files which have previously been recorded to
CD-R or CD-RW.
The section for iPod docking describes how to use your MP-43 to play
audio files or video soundtracks directly from your iPod.
The section titled Clock and Alarms describes setting the clock, as well
as explaining the use of the alarms, snooze and sleep timer features.
The Audio and Setup section describes how to use the audio equaliser
and tone controls, how to connect other audio equipment, how to adjust
the sensitivity of the touch panel and how to reset the sound system.
Introduction
DAB Radio
FM Radio
CD / MP3 / WMA
iPod Docking
Clock and Alarms
Audio and Setup
(page 3)
(page 10)
(page 19)
(page 23)
(page 31)
(page 34)
(page 40)
Lastly, the Information section includes safety, specifications and warranty
information.
2
Information
(page 46)

MP-43 Sound System features
The Roberts MP-43 Digital Sound System provides the following range
of features in an attractive compact unit:-
Introduction .
● Radio for DAB and FM (with RDS) broadcasts.
● Audio CD player with track search and programming facility (can also
play CD-R, CD-RW discs).
● Playback of MP3 and WMA files which have been recorded to CD-R
or CD-RW.
● 20 radio station presets (10 for DAB and 10 for FM).
● iPod docking connector to play your music collection or video
soundtracks from your iPod.
● Easy to use, wipe clean, touch sensitive control panel.
● Clock display with time and date when in standby.
● Two alarm timers with snooze feature to wake you to either buzzer,
radio, CD or iPod (with humane wake system on buzzer alarm).
● Adjustable sleep timer which can be set to turn the sound system off
after between 15 and 120 minutes.
● Easy-to-read 2 line text display with large clock display.
● A 3.5mm stereo Auxiliary Input socket for playing audio from MP3
players, iPod devices which cannot use the dock connector, or other
audio equipment.
● A standard 3.5mm Line Output socket for connecting the audio signal
to an external amplifier or recorder.
● A standard 3.5mm headphone socket for private listening.
● High quality, full range, stereo speakers (2 x 7W).
● An acoustically tuned, hand finished cabinet that includes bass ports
and internal bracing for optimal sound reproduction.
● Low power consumption when in standby mode.
If you need any further advice, please call our Technical Helpline on :-
020 8758 0338 (Mon-Fri)
3
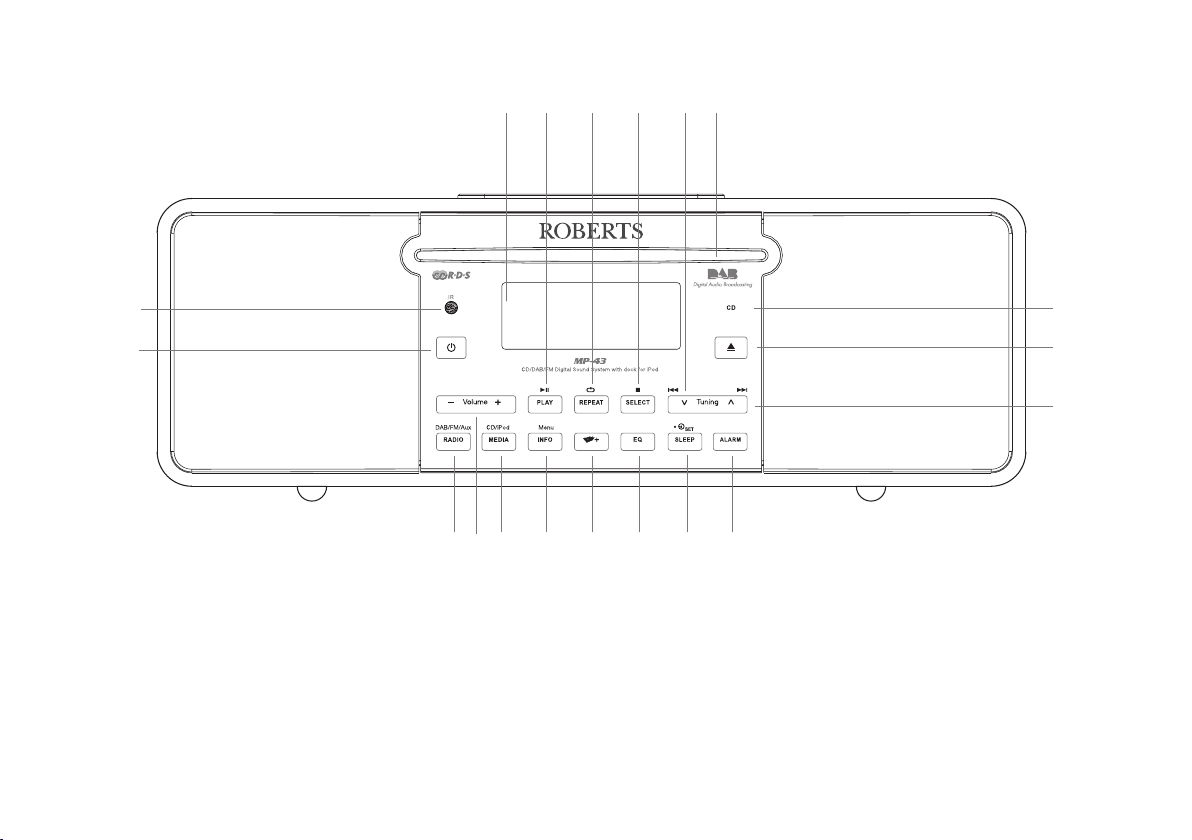
Controls and connections
(Front)
14
1516171819
1
2
1. Infra-red sensor
2. On / Standby button
3. Radio button
4. Volume Up and Down buttons
5. Media button
6. Info / Menu button
7. Folder button
8. Equaliser button
9. Sleep / Clock set button
10. Alarm button
11. Tuning Up / Fast-forward button
12. CD eject button
13. CD in indicator
14. CD slot
10
987653 4
15. Tuning down / Rewind button
16. Select / Stop button
17. Repeat button
18. Play / Pause button
19. LCD display
13
12
11
4
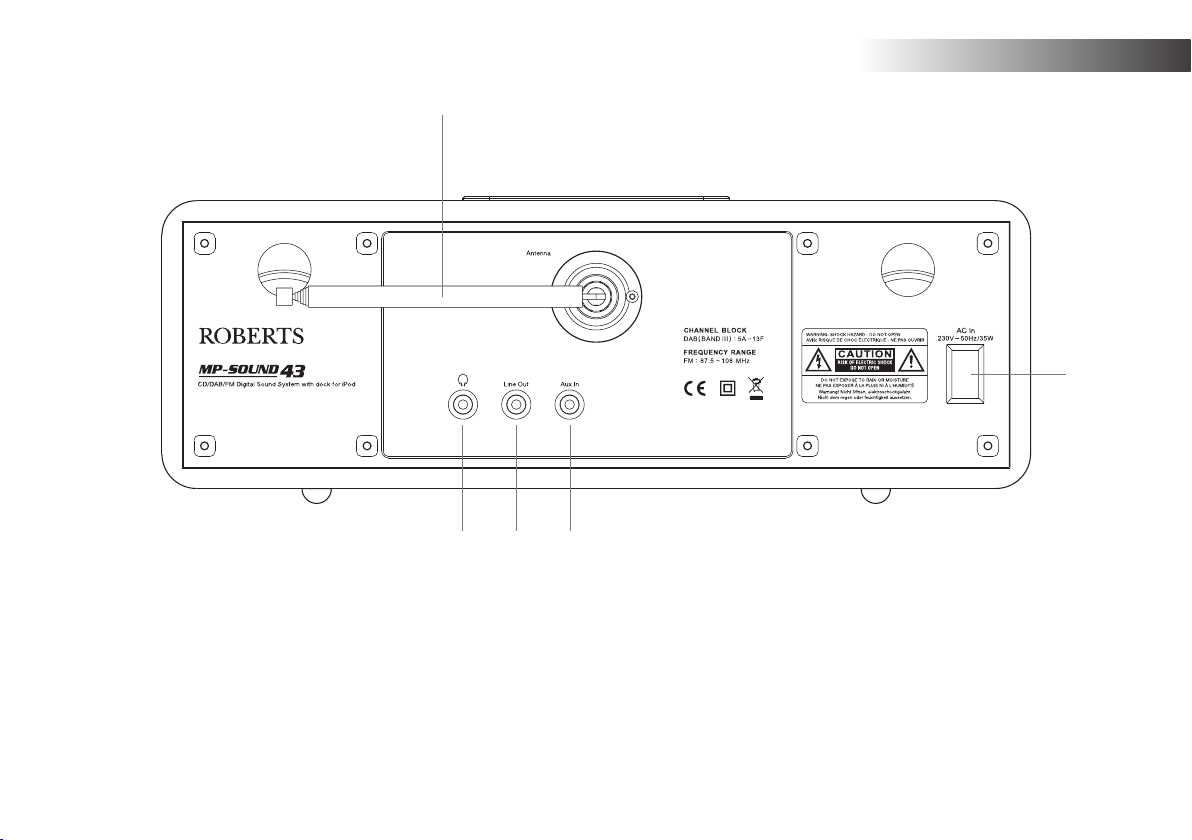
Controls and connections
(Rear)
20
21
Introduction .
24
22 23
20. Telescopic aerial
21. Headphone socket
22. Line output socket
If you need any further advice, please call our Technical Helpline on :-
020 8758 0338 (Mon-Fri)
23. Auxiliary input socket
24. Mains input socket
5
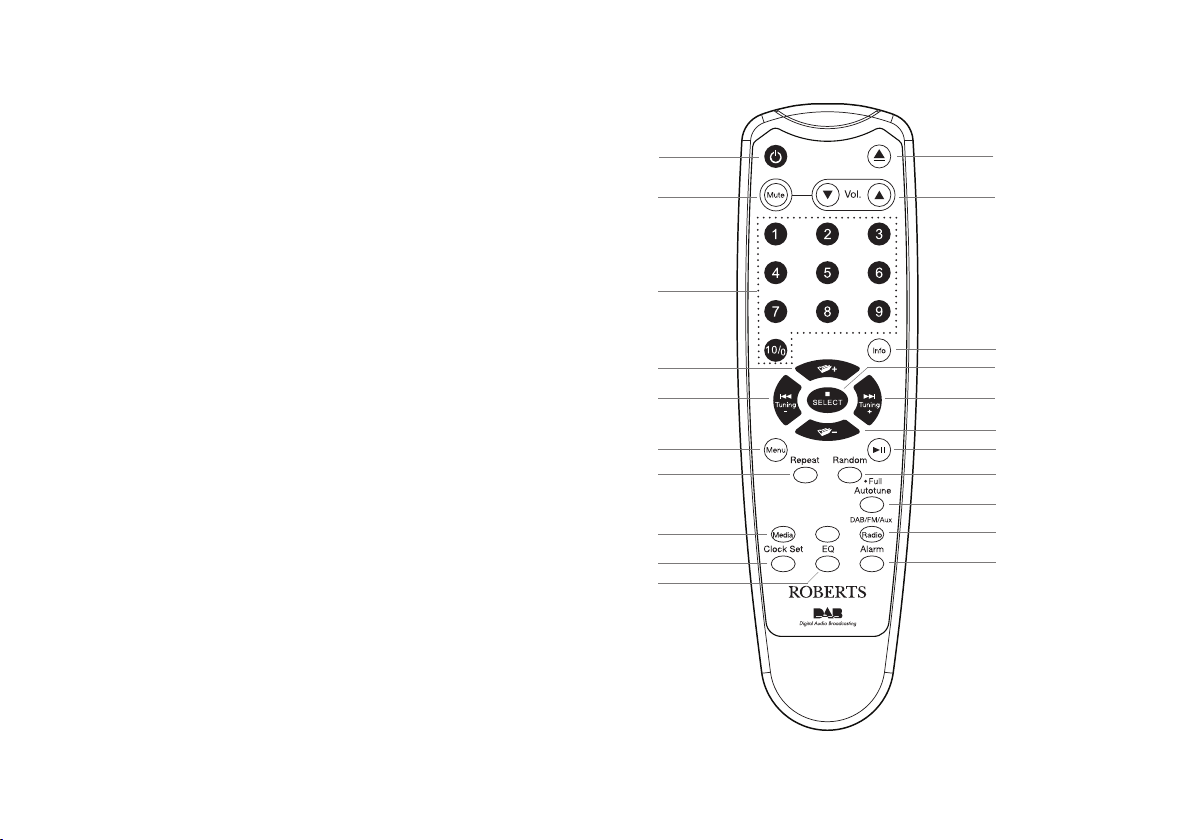
Remote control
1. On / Standby button
2. Mute button
3. Key pad buttons 1-10/0
4. Folder Up button
5. Tuning Down / Rewind button
6. Menu button
7. Repeat button
8. Media button
9. Sleep / Clock set button
10. Equaliser button
11. Alarm button
12. Radio button
13. Auto-tune button
14. Random button
15. Play / Pause button
16. Folder down button
17. Tuning / Fast-forward button
18. Select / Stop button
19. Info button
20. Volume Up / Down buttons
21. CD eject button
10
1
2
21
20
3
19
4
5
18
17
16
6
7
CD/iPod/
Record
8
SD/USB
9
15
14
13
12
11
Note:
The button marked Record is not used with the MP-43. It is intended for
use with another Roberts product.
Button 8, marked CD/iPod/SD/USB, only provides access to CD and iPod
functionality. The SD/USB markings are for another Roberts product.
6
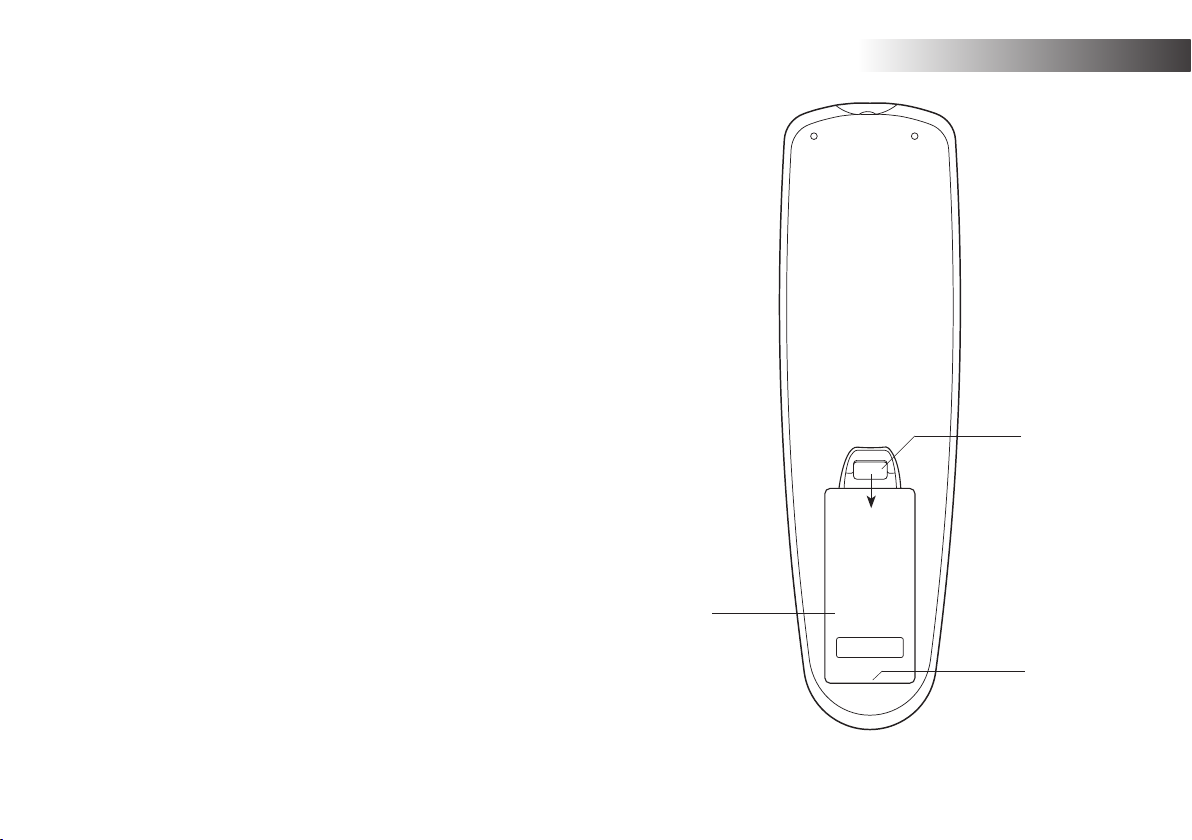
Remote control battery replacement
1. Remove the battery cover on the rear of your remote control by
applying pressure to the catch in the direction shown by the arrow in
the diagram, and then lifting the cover.
2. Insert 2 x AAA size batteries into the compartment. Make sure the (+)
and the (-) ends of the batteries are positioned as shown inside the
compartment.
3. Close the battery cover by inserting the retaining lugs first, then
apply pressure to the free end such that the catch latches the cover
securely.
4. If the remote is not to be used for an extended period of time it is
recommended that the batteries are removed.
Introduction .
IMPORTANT: The batteries should not be exposed to excessive heat
such as sunshine, fire or the like. After use, disposable batteries should
if possible be taken to a suitable recycling centre. On no account
should batteries be disposed of by incineration.
1. Battery compartment
2. Latch
3. Retaining lugs (inside)
If you need any further advice, please call our Technical Helpline on :-
020 8758 0338 (Mon-Fri)
2
1
3
7
Using the touch panel
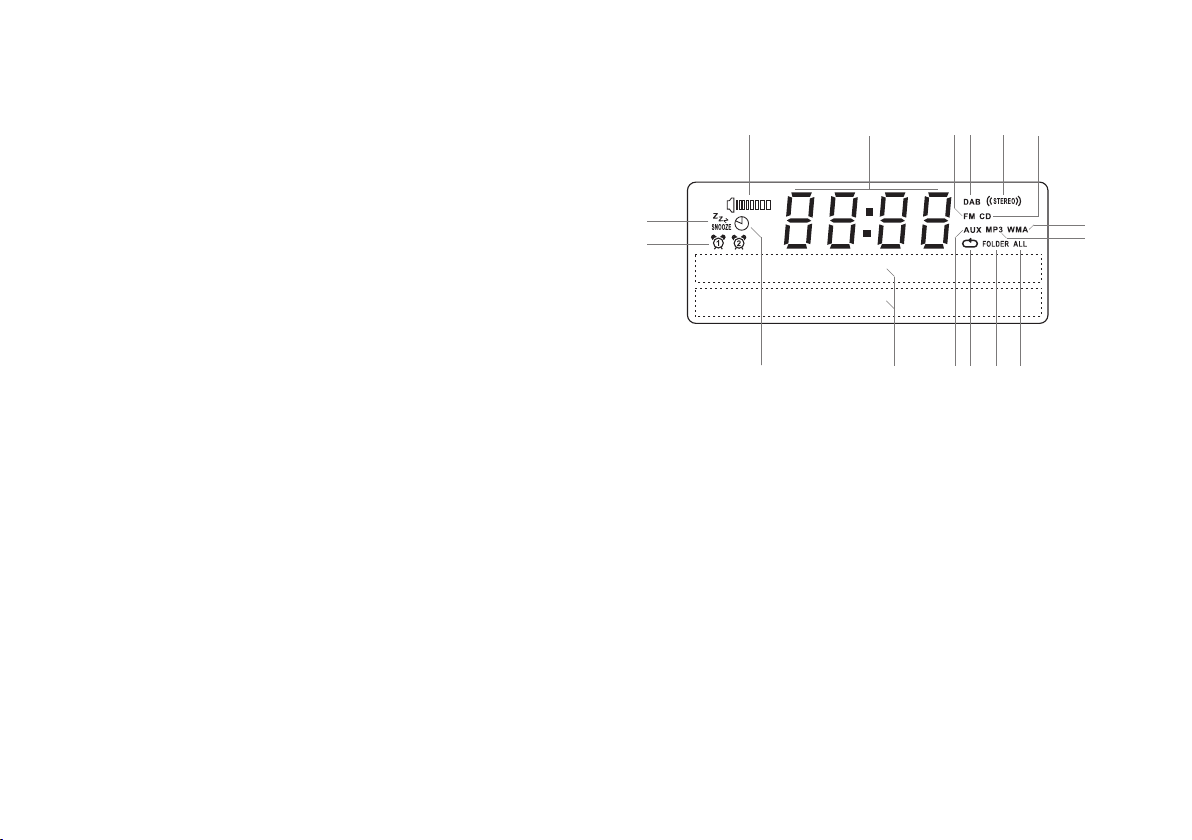
Display icons
The MP-43 sound system has a stylish touch panel instead of conventional
buttons.
To operate the buttons simply touch the button area with the tip of a finger
for about half a second. The clock set and system menu functions marked
with a dot () are accessed by means of a long touch (2-3 seconds) on
the appropriate button until the display on the sound system shows that
the command has been accepted.
You may find that at first, the sound system does not always detect that you
have touched a button. If so, try touching with a little more pressure, or for
slightly longer. You will soon find the optimum touch needed to control your
sound system. (See also Touch Panel Sensitivity Control on page 44.)
The panel may be cleaned using a dry cloth. Do not use abrasives,
cleaning fluids or solvents.
Remote control functions
Most of the functions of the MP-43 sound system can be controlled using
either the touch panel or the remote control. However, there are a few
functions which are only accessible using the remote control. These
are:
DAB / FM radio station presets DAB / FM auto-tune
DAB menu function CD track access by numbers
CD / iPod random track control Audio mute
D E F G H I
C
B
A
A. Sleep indicator
B. Alarm 1 and 2 indicators
C. Snooze indicator
D. Speaker indicator
E. Clock digits
F. FM indicator
G. DAB indicator
H. Stereo indicator
P
I. CD indicator
J. WMA indicator
K. MP3 indicator
L. Repeat all files indicator
M. Repeat folder indicator
N. Repeat single file indicator
O. Aux input indicator
P. Two line text display
LMNO
J
K
As with the front panel, some operations require a longer operation of the
button (explained in the relevant sections). In this case simply keep your
finger held on the remote control button for 2-3 seconds until the display
on the sound system shows that the command has been accepted.
8
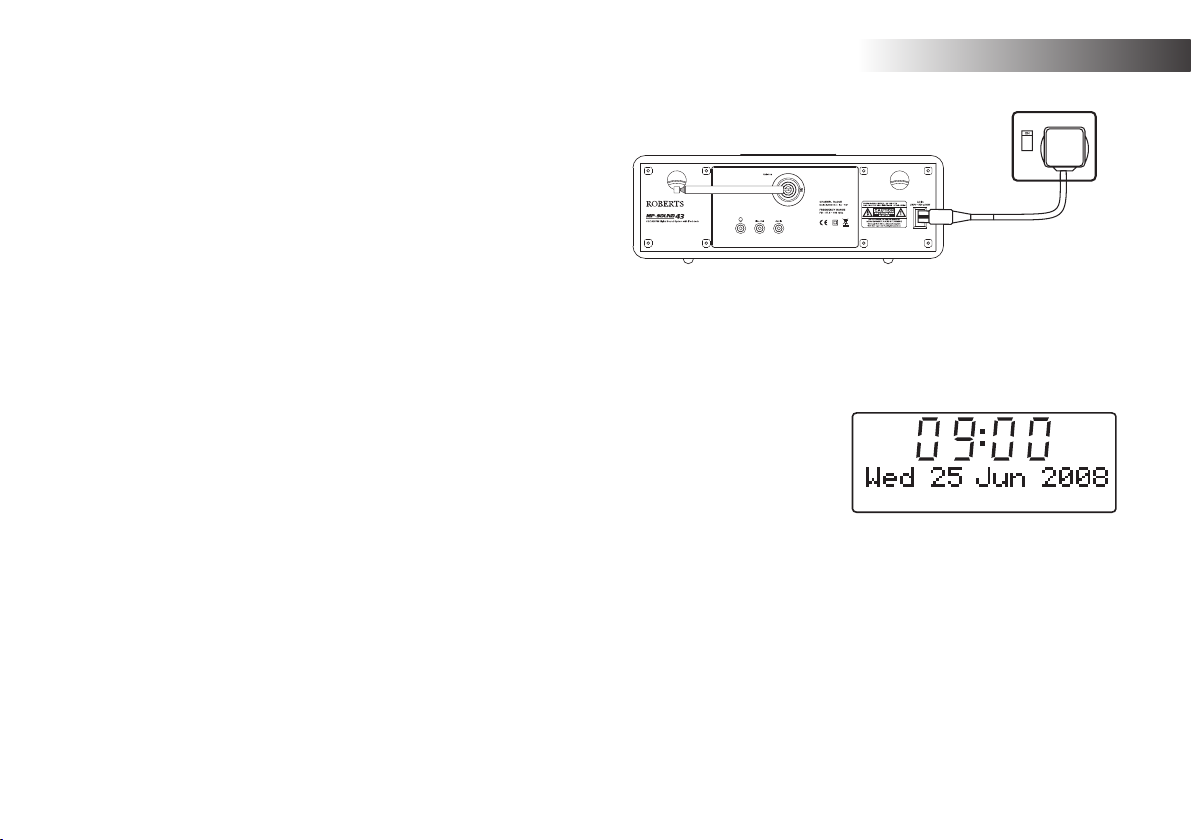
Using the sound system for the first time
1. Place your sound system on a flat surface.
2. Fully extend the telescopic aerial. The aerial should be fully extended
and positioned vertically for optimum reception.
3. Plug the mains lead into the mains socket located on the back of your
sound system ensuring that the plug is pushed fully into the socket.
4. Plug the other end of the mains lead into the wall socket and switch
on the wall socket.
IMPORTANT: The mains plug is used as the means of connecting
the sound system to the mains supply. The mains socket used for the
sound system must remain accessible during normal use. In order to
disconnect the sound system from the mains completely, the mains
plug should be removed from the mains socket outlet completely.
5. When your sound system is first switched on the clock display will
show 12:00 and the unit will enter standby mode. It will then scan for
DAB radio stations and when stations have been found the clock and
date should be set automatically. Note that the display will not show
any scanning message for this first scan.
6. If no stations have been found then the clock will not set. You may need
to relocate your sound system to a position giving better reception.
You should then carry out an auto-tune to find DAB stations. See DAB
Operation on page 10 and also Finding New Stations on page 13. The
clock will then be set from a DAB broadcast.
Introduction .
If you need any further advice, please call our Technical Helpline on :-
020 8758 0338 (Mon-Fri)
9
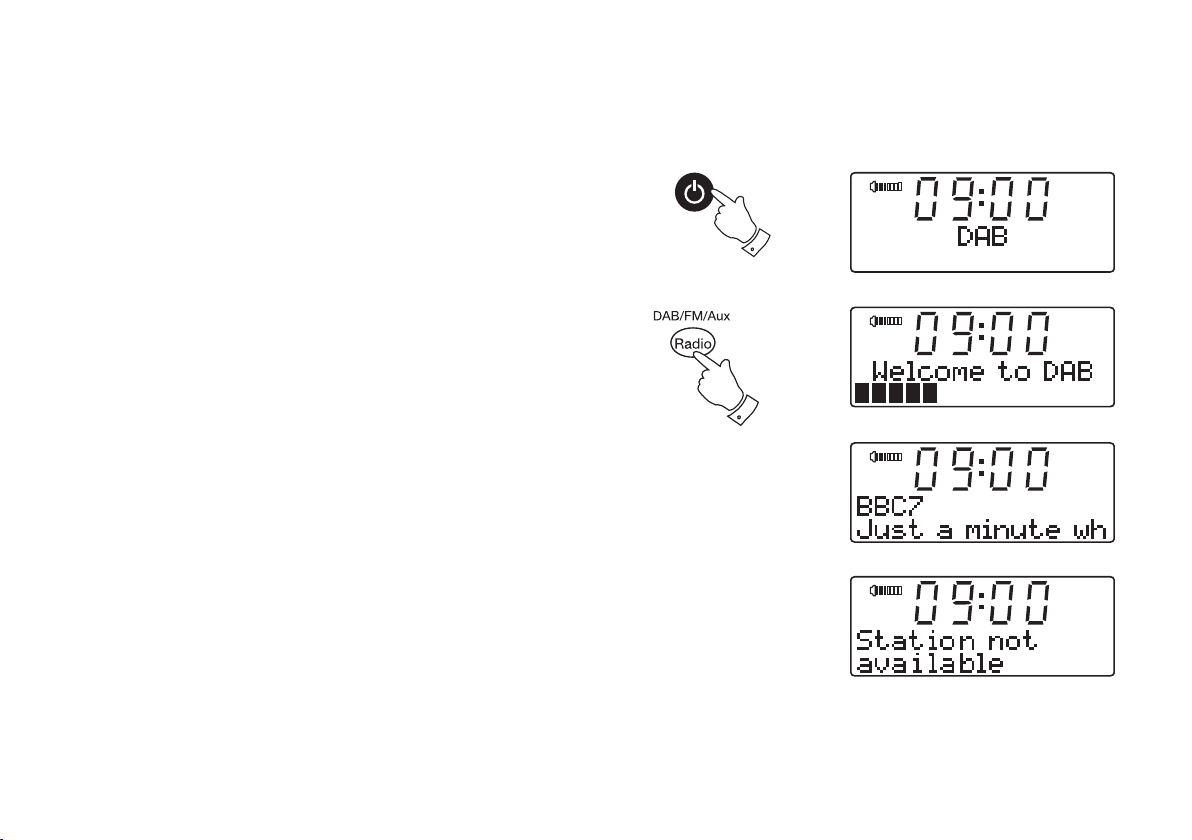
Operating your sound system - DAB
DAB
DAB
DAB
DAB
1. Fully extend the telescopic aerial.
2. If your sound system is in standby mode, press the On / Standby
button to switch it on.
3. Press and release the Radio button to select DAB mode. The display
will show "DAB" for a few seconds.
4. If this is the first time the sound system is used a quick scan of UK
Band III DAB channels may be carried out (depending on whether
scanning was already completed in standby mode). If the radio has
been used before, the last used station will be selected.
5. When first switched on, the first station in the list of stations found will
be played. The display will show the station name on the upper line
of the text display and broadcast information on the lower line.
6. If the station list is still empty after the scan operation or if the
selected station cannot be received your radio will display "Station
not available".
7. If no signals are found it may be necessary to relocate your sound
system to a position giving better reception, and then repeat the scan
using the Auto-tune facility (see Finding New Stations on page 13).
2
3
Note that radio station name and frequency displays shown in this user
guide may differ from those that you see on your radio. Broadcasters may
change radio station names that are transmitted, and the frequencies
used for DAB and FM radio stations may not be the same in all parts of
the country.
10
Selecting a station - DAB
DAB
DAB
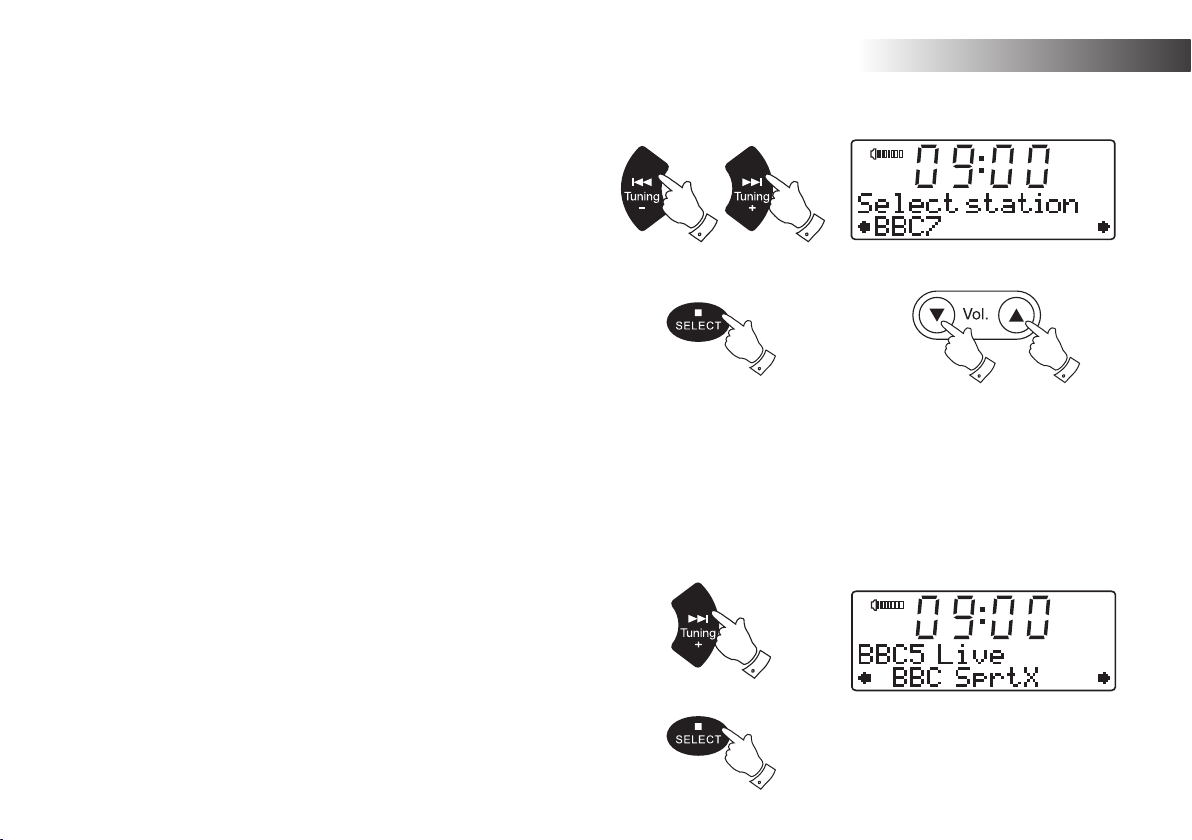
1. When the unit is in DAB mode the upper line of the text display normally
shows the name of the station currently tuned.
DAB Radio .
2. Repeatedly press the Tuning Up
the list of available stations on the lower line of the text display. Stop
pressing the Tuning buttons when you find the station that you wish
to hear. If you keep pressing one of the tuning buttons then the unit
will rapidly scroll through the list of available stations.
3. Press and release the Select button to cause the radio to tune to the
chosen station. The display may show "Now tuning" while your radio
finds the new station.
The use of memory presets is described on page 22.
4. Adjust the Volume
If after selecting a station the display shows "Station not available" it may
be necessary to relocate your radio to a position giving better reception.
to the required setting.
or Down buttons to scroll through
Secondary services - DAB
1. Certain radio stations have one or more secondary services associated
with them. If a station has a secondary service associated with it the
display will show ">>" next to the station name on the station list. The
secondary service will then appear immediately after the primary
service as you press the Tuning Up button.
2. Press and release the
Select button to select the station.
2
2
3
4
4
1
2
If you need any further advice, please call our Technical Helpline on :-
020 8758 0338 (Mon-Fri)
11

Display modes - DAB
DAB
DAB
DAB
DAB
DAB
When in DAB mode your radio has seven display options.
1. Press the
Info button to cycle through the various modes.
a. Scrolling text Displays scrolling text messages such
as artist/track name, phone in number,
etc.
b. Programme type Displays the type of station being
listened to e.g. Pop, Classic, News, etc.
c. Multiplex Name Displays the name of the multiplex to
which the current station belongs.
d. Time and date Displays the current time and date.
e. Channel & frequency Displays the channel number and
frequency for the current DAB radio
station.
1
12
Display modes - DAB cont.
DAB
DAB
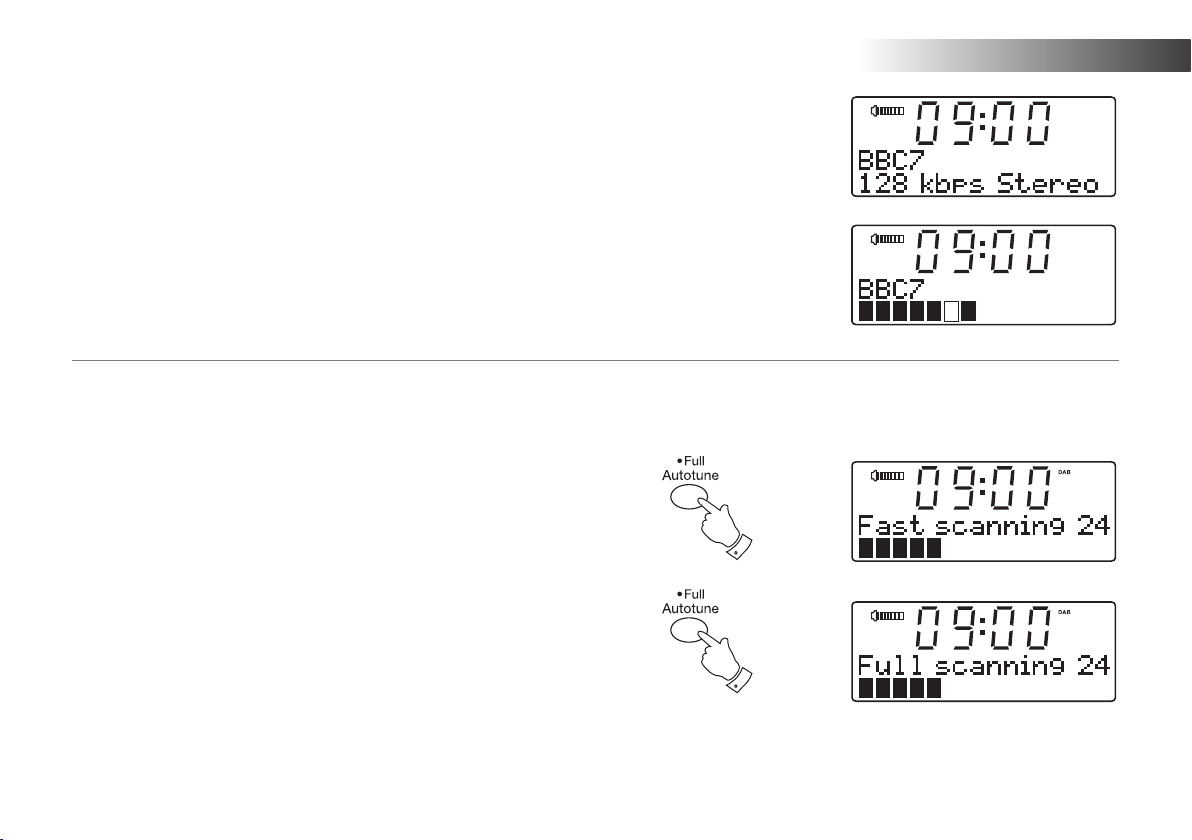
f. Bit rate/audio type Displays the digital bit rate and audio
type for the current DAB radio station.
g. Signal strength Displays signal strength for the station
being listened to. The clear rectangle
shows the minimum required signal
strength for clear DAB reception.
Finding new stations - DAB
As time passes new stations may become available. To find new stations
proceed as follows:-
DAB Radio .
1. With the unit in DAB mode (see page 10) press and release the
Auto-tune button. The display will then show "Fast scanning". The
radio will perform a scan of the UK DAB frequencies. As new stations
are found the station counter on the right-hand side of the display will
increase and stations will be added to the list.
2. To carry out a full scan of the entire DAB Band III frequencies press
and hold the Auto-tune button for more than 2 seconds and then
release. The display will show "Full scanning". As new stations are
found the station counter on the right-hand side of the display will
increase and stations will be added to the list.
If you need any further advice, please call our Technical Helpline on :-
020 8758 0338 (Mon-Fri)
1
2
13
Manual Tuning - DAB
DAB
DAB
DAB
DAB
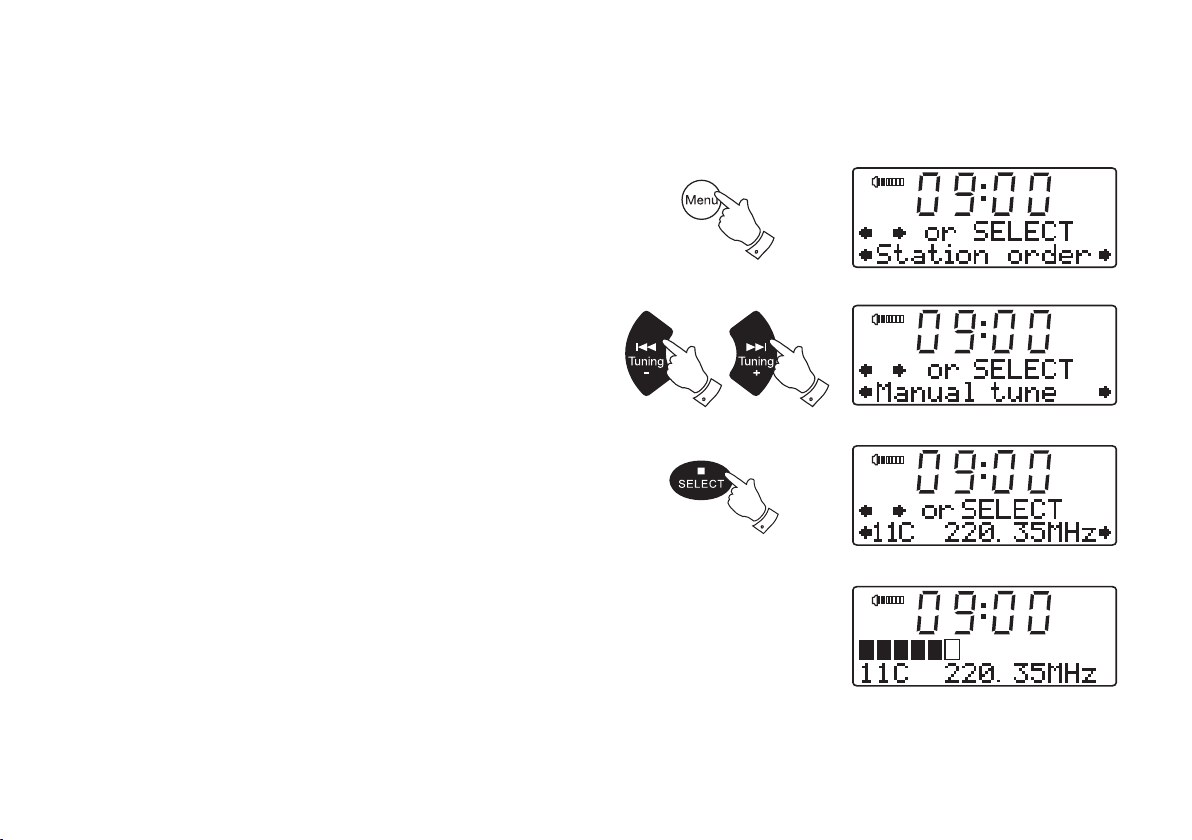
Manual tuning allows you to tune directly to the various DAB Band III
channels. UK DAB stations are located in the range 11B to 12D.
1. Press and release the Menu button so that the display shows "Station
order".
1
2. Press the Tuning Up
on the display. Press and release the
3. Press the Tuning Up
or Down buttons until "Manual tune" appears
Select button.
or Down buttons to select the required DAB
channel.
4. Press and release the Select button to select the channel. A signal
strength display will appear. The clear rectangle shows the minimum
required signal strength for clear DAB reception.
5. Any new stations that are found are automatically added to the stored
list of stations.
6. Press and release the Select button to return to normal tuning
mode.
14
2,3
2,3
2,4,6
 Loading...