

Page 1
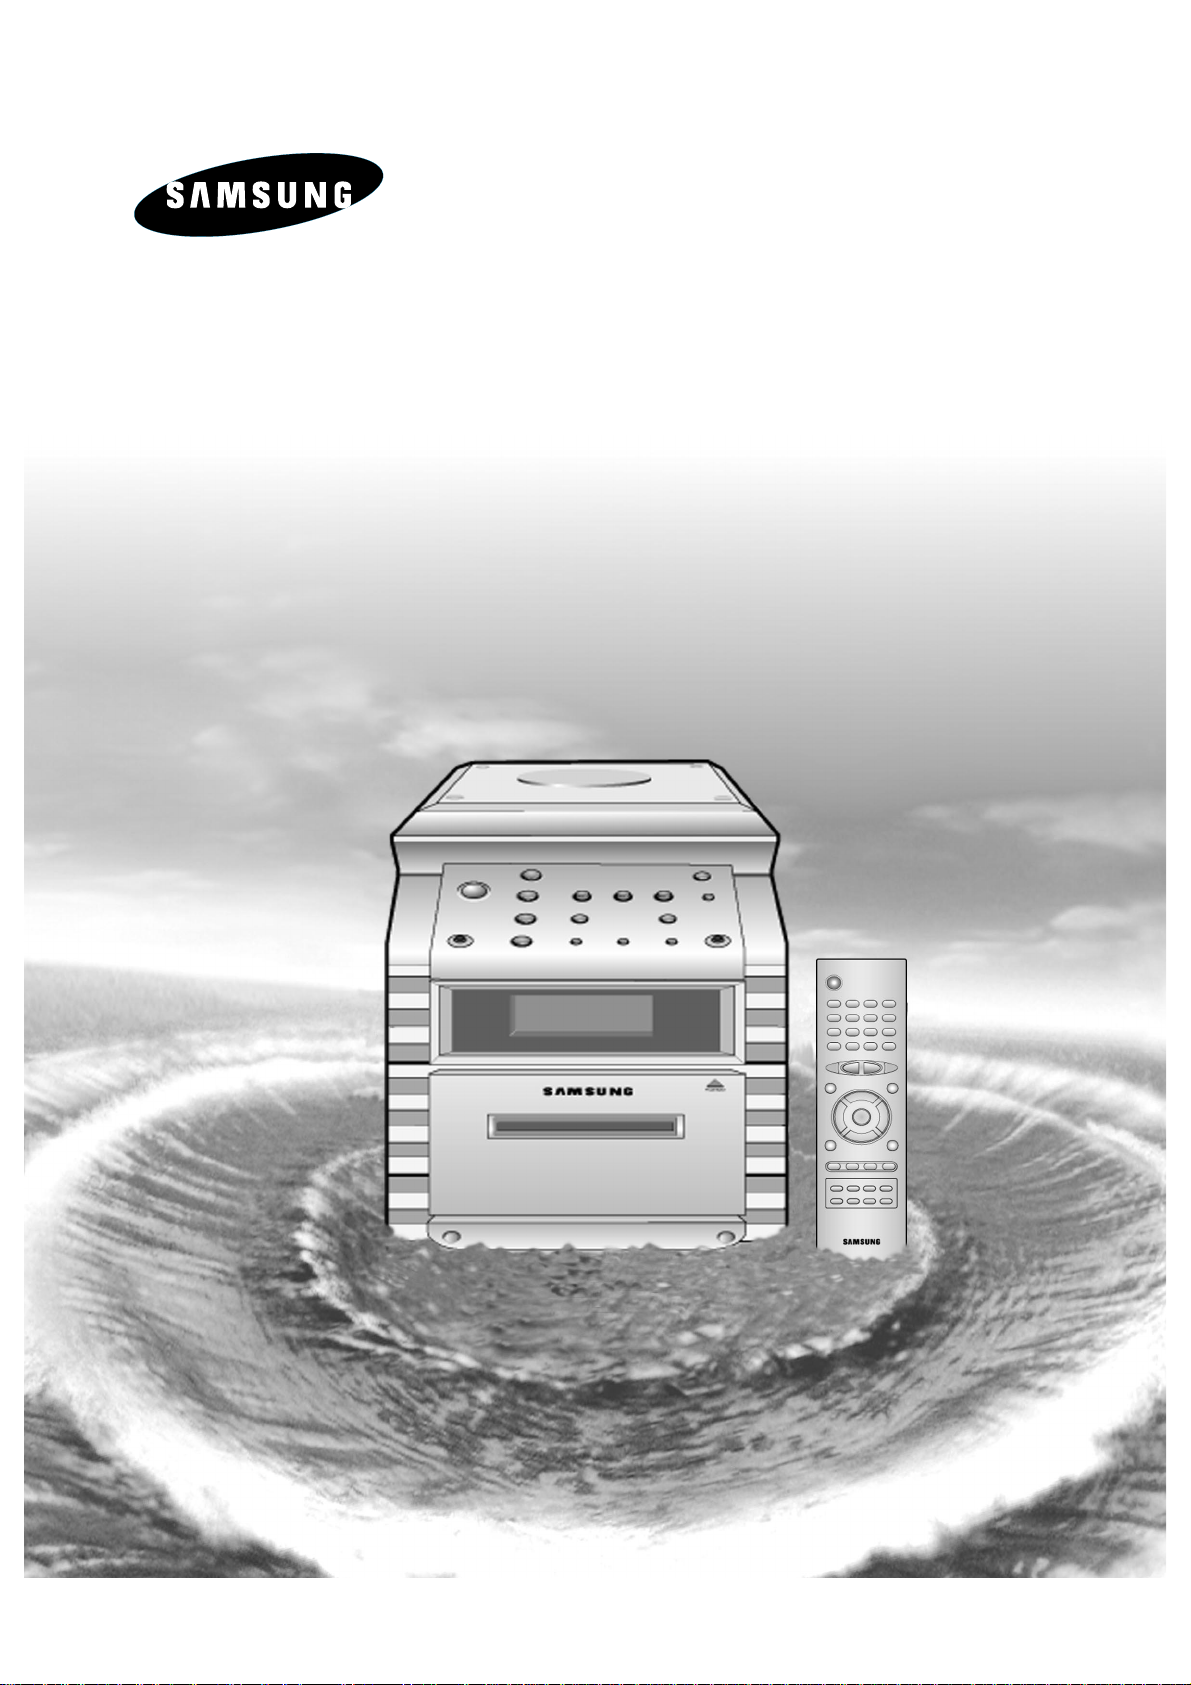
Instruction Manual
VIDEO-CD
MICRO COMPONENT
AUDIO SYSTEM
VCD/MP3-CD/CD-R/RW PLAYBACK
MM-VB7
Page 2
GB
2
Safety Warnings
CLASS 1 LASER PRODUCT
This Compact Disc player is classified as a CLASS 1
LASER product.
Use of controls adjustments or performance of procedures
other than those specified herein may result in hazardous
radiation exposure.
CAUTION-INVISIBLE LASER RADIATION WHEN OPEN
AND INTER LOCKS DEFEATED, AVOID EXPOSURE TO
BEAM.
CAUTION:
TO REDUCE THE RISK OF ELECTRIC SHOCK,
DO NOT REMOVE REAR COVER, NO USER
SERVICEABLE PARTS INSIDE, REFER SERVICING TO QUALIFIED SERVICE
PERSONNEL.
RISK OF ELECTRIC SHOCK.
DO NOT OPEN
CAUTION
CLASS 1 LASER PRODUCT
KLASSE 1 LASER PRODUKT
LUOKAN 1 LASER LAITE
KLASS 1 LASER APPARAT
PRODUCTO LASER CLASE 1
This symbol indicates that dangerous voltage constituting of a risk of electric shock is present within
this unit.
This symbol indicates that there are important operating and maintenance instructions in the owners
manual accompanying this unit.
WARNING: TO REDUCE THE RISK OF FIRE OR ELECTRIC SHOCK, DO NOT EXPOSE THIS APPLIANCE
TO RAIN OR MOISTURE.
CAUTION: TO PREVENT ELECTRIC SHOCK, MATCH WIDE BLADE OF PLUG TO WIDE SLOT, FULLY
INSERT.
Page 3
GB
Press Push Important Note
Symbols
3
Contents
S
AFETY
W
ARNINGS
.................................................................................................................................................................................. 2
I
NSTALLINGYOURMICROCOMPONENTSYSTEM
Front Panel View .................................................................................................................................................................................... 4
Remote Control ...................................................................................................................................................................................... 5
Rear Panel View ...................................................................................................................................................................................... 6
Where to Install Your Micro Component System................................................................................................................................7
Connecting your System to the Power Supply.................................................................................................................................... 7
Inserting Remote Control Batteries ...................................................................................................................................................... 7
Connecting to an External Source ........................................................................................................................................................ 8
Speaker Connection................................................................................................................................................................................ 8
Connecting the AM (MW)/LW Aerial .................................................................................................................................................... 9
Connecting the FM Aerial ...................................................................................................................................................................... 9
Connecting the SW Aerial(option) ........................................................................................................................................................ 9
Connecting to the Equipment
................................................................................................................................................................ 9
Viewing the Various Functions on Your System ................................................................................................................................10
Setting the Clock ....................................................................................................................................................................................10
VCD/CD-P
LAYER
To replay the CD/MP3-CD
....................................................................................................................................................................11
Regarding the playback of CD-R/RW
....................................................................................................................................................11
MP3-CD P
layback
....................................................................................................................................................................................11
Selecting a Track
....................................................................................................................................................................................12
Searching for a Specific Music Passage on a CD
................................................................................................................................12
Function to skip through 10 tracks at a time
......................................................................................................................................13
Repeating One or All Tracks on the Compact Discs
..........................................................................................................................13
Shuffle Play Function
..........................................................................................................................................................................13
Programming the Order of Playback
....................................................................................................................................................14
Checking or Changing Programmed Tracks
............................................................................................................................................14
Video CD Player Playback
......................................................................................................................................................................15
Search Functions
..................................................................................................................................................................................15
Time Search Function
............................................................................................................................................................................15
When adjusting play speed
..................................................................................................................................................................16
NTSC/PAL Selection Method
................................................................................................................................................................16
Sound Select Function
..........................................................................................................................................................................16
Key Control Function
............................................................................................................................................................................16
VCD View function
................................................................................................................................................................................17
ZOOM Function
......................................................................................................................................................................................17
Last Memory Function
..........................................................................................................................................................................17
T
UNER
Searching for and Storing the Radio Stations
........................................................................................................................................18
Selecting a Stored Station
....................................................................................................................................................................18
Improving Radio Reception
..................................................................................................................................................................18
Tape Deck
Listening to a Cassette
..........................................................................................................................................................................19
Selecting the Cassette Playback Mode
................................................................................................................................................19
Recording a Compact Disc
....................................................................................................................................................................20
Recording a Radio Program..................................................................................................................................................................20
O
THERFUNCTIONS
Timer Function........................................................................................................................................................................................21
Canceling the Timer ..............................................................................................................................................................................22
Mute Function ........................................................................................................................................................................................22
Selecting an Equalizer Preset................................................................................................................................................................22
Setting the System to Switch off Automatically ................................................................................................................................23
Connecting Headphones........................................................................................................................................................................23
Microphone Function
..............................................................................................................................................................................23
Recording with the Microphone
..............................................................................................................................................................23
R
ECOMMENDATIONS FORUSE
Safety Precautions..................................................................................................................................................................................24
Cleaning Your Micro Component System ..........................................................................................................................................24
Precautions When Using Compact Discs ............................................................................................................................................25
Precautions When Using Audio Cassettes ..........................................................................................................................................25
Before Contacting the After-Sales Service ..........................................................................................................................................25
Thank you for buying this
SAMSUNG micro component system.
Please take time to read these instructions.
They will allow you to operate your
system with ease and take full advantage
of its features.
Page 4
GB
Standby/On
Phones
Mic
Open/Close
Band
VCD/CD
TAPE
AUX
TUNER
Volume
Tuning
Mode
Previous
Down
Next
Up
Demo
REC/Pause REV.Mode
Sound
Mode
Push EjectPush Eject
1
2
3
4
5
6
7
8
9
10
11
12
13
4
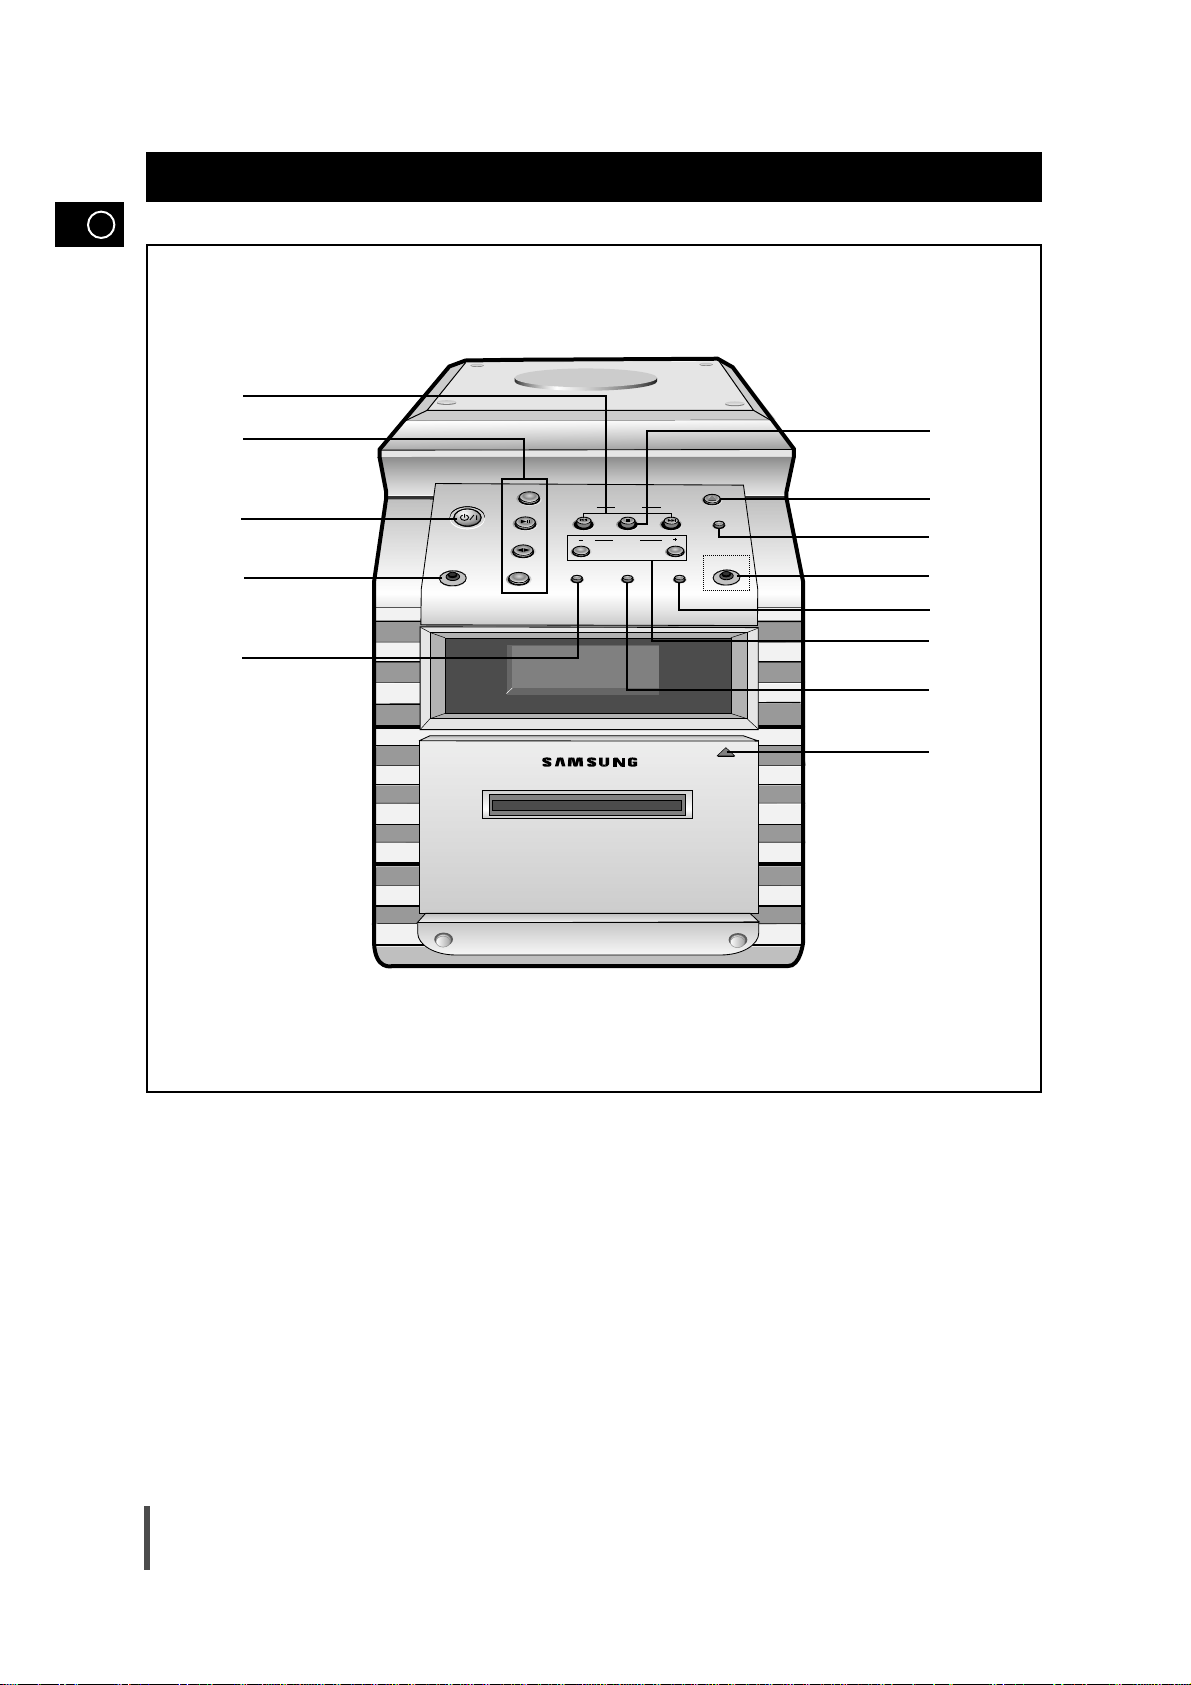
Front Panel View
1. Skip or Search
2. Function (TUNER,VCD/CD,TAPE,AUX)
3. Standby/On
4. Headphone Jack Connector
5. REC/Pause
6. Stop
7. CD Door open/close
8. Demo
9. Mic jack
10.
Sound Mode
11.
Volume
12. REV.Mode
13. Push Eject (Cassette Door Open/Close)
Page 5
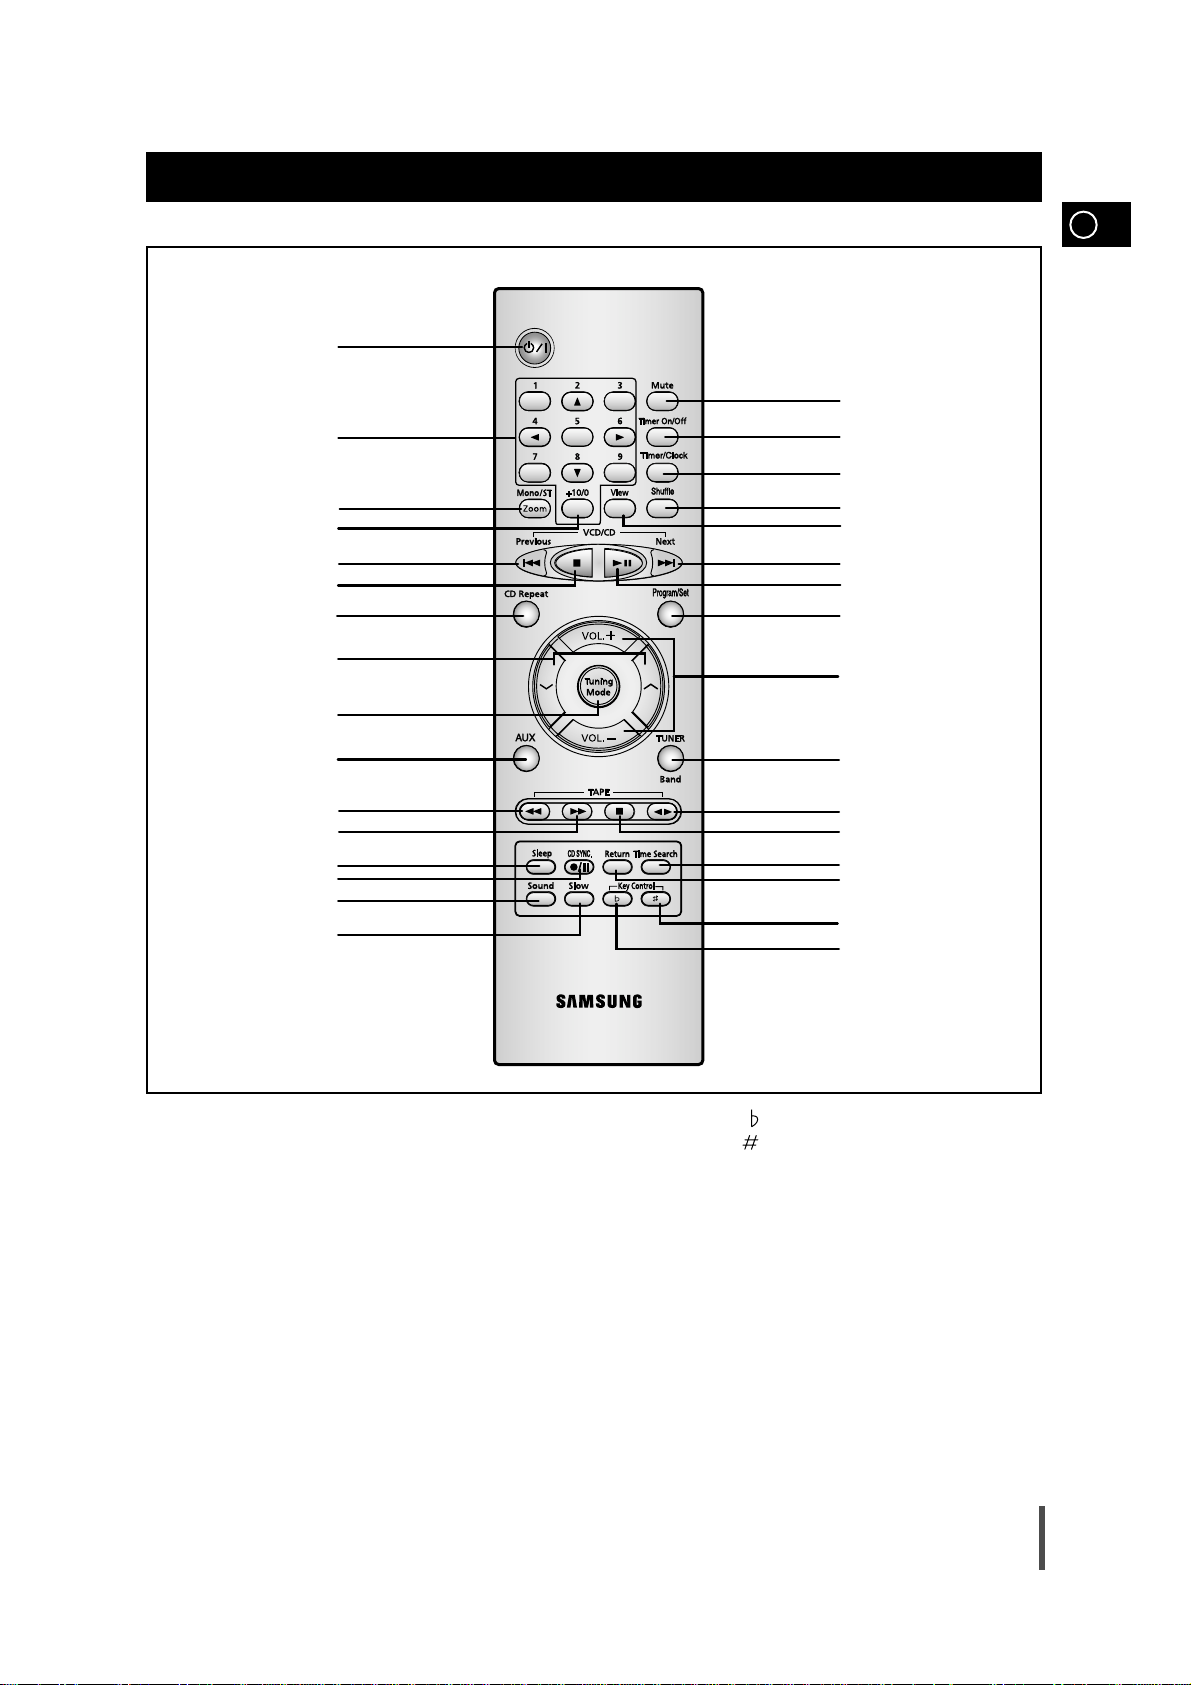
1. Standby/On
2. Digit Buttons/Direction Buttons
3. FM Mono/Stereo,VCD Zoom
4. +10/0
5. Track Previous
6. VCD/CD Stop
7. CD Repeat
8. Radio Station Search
9. Tuning Mode
10. AUX
11. TAPE Rewind
12. TAPE Fast-Forward
13. Sleep
14. CD Synchro
15. VCD Sound
16. VCD Slow Play
17. Key Control
18. Key Control
19. Return
20. Time Search (Last Memory)
21. TAPE Stop
22. TAPE Play
23. Tuner/Band
24. Volume Up/Down
25. Program/Set
26. Disc Play/Pause
27. Track Next
28. View
29. VCD/CD/MP3-CD Shuffle Play
30. Timer/Clock
31. Timer On/Off
32. Mute
GB
5
Remote Control
1
17
18
19
20
21
22
23
24
25
26
27
28
29
30
31
32
2
3
4
5
6
7
8
9
10
11
12
13
14
15
16
Page 6
GB
6
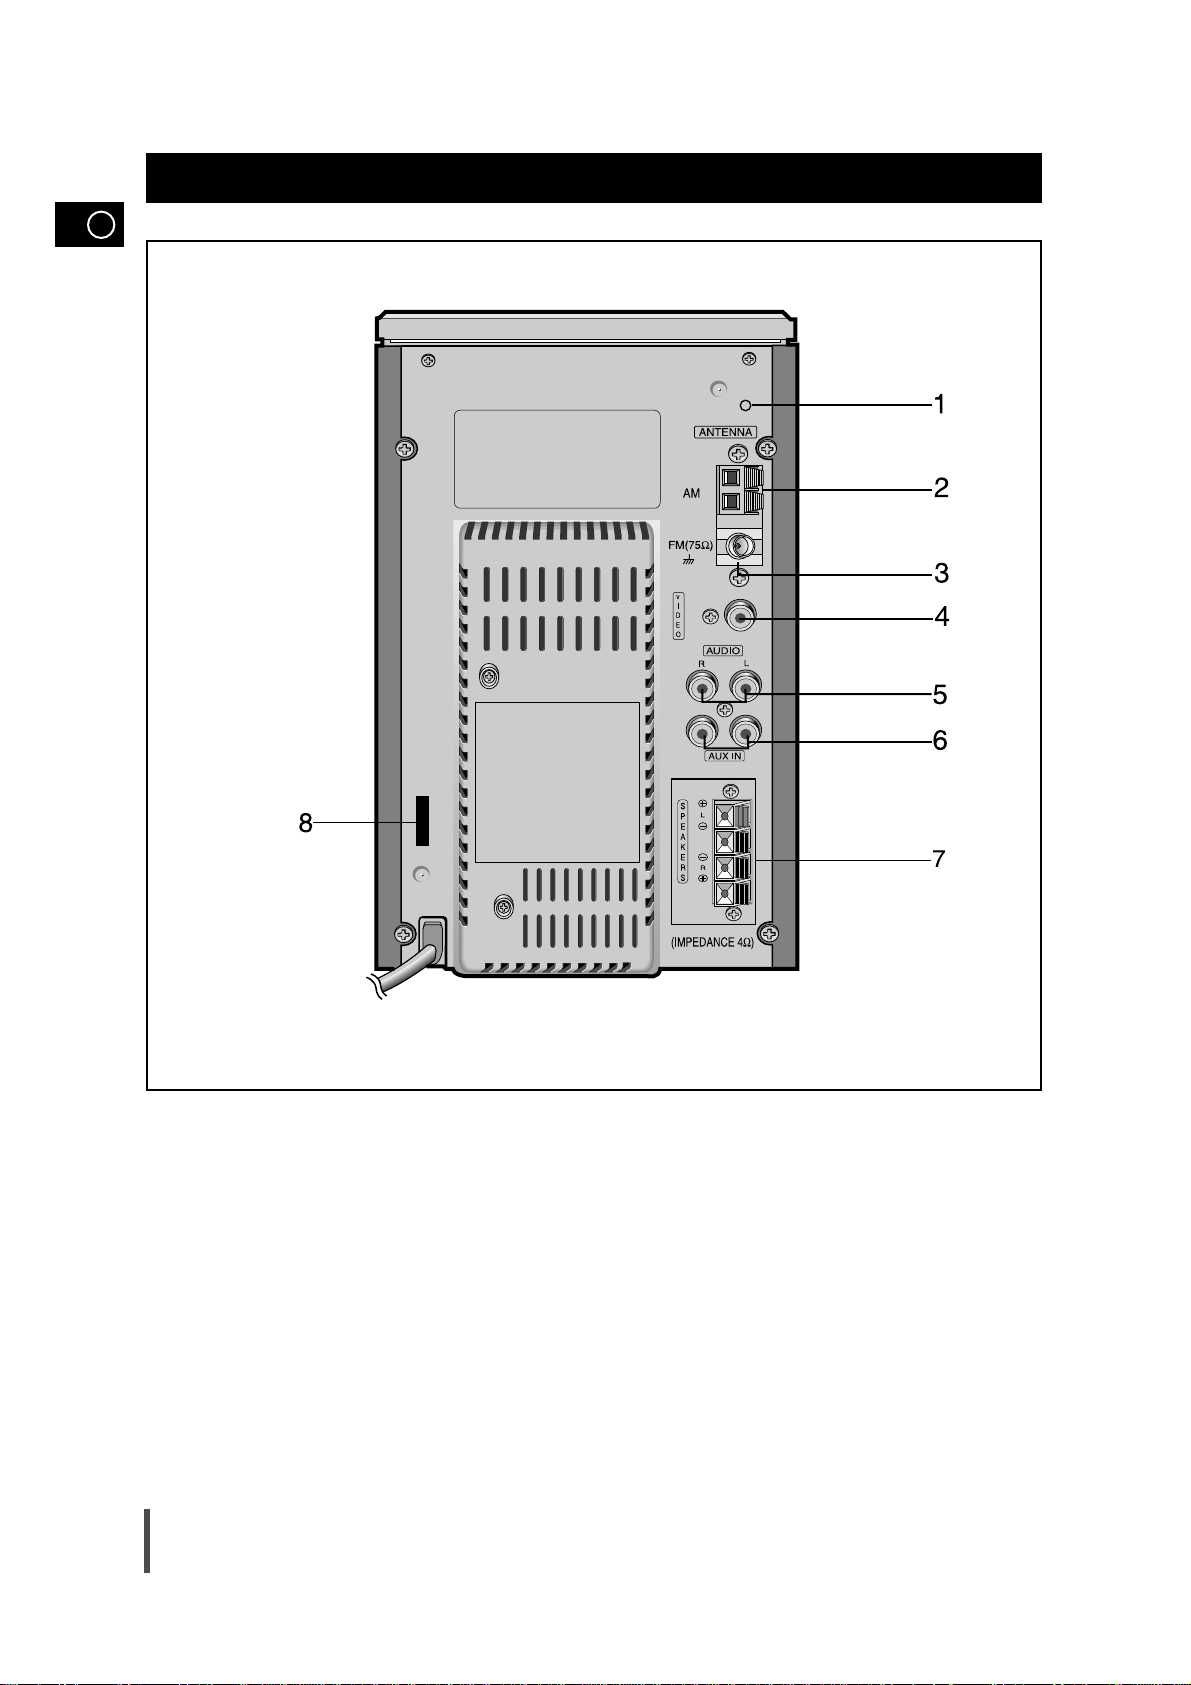
Rear Panel View
1. SW Aerial (option)
2. AM Aerial Connector Terminal
3. FM Aerial Connector Terminal
4. Video Output
5. Audio Output
6. AUX-Input
7. Loudspeakers Connector Terminals
8. Voltage Selector(option)
Page 7
7
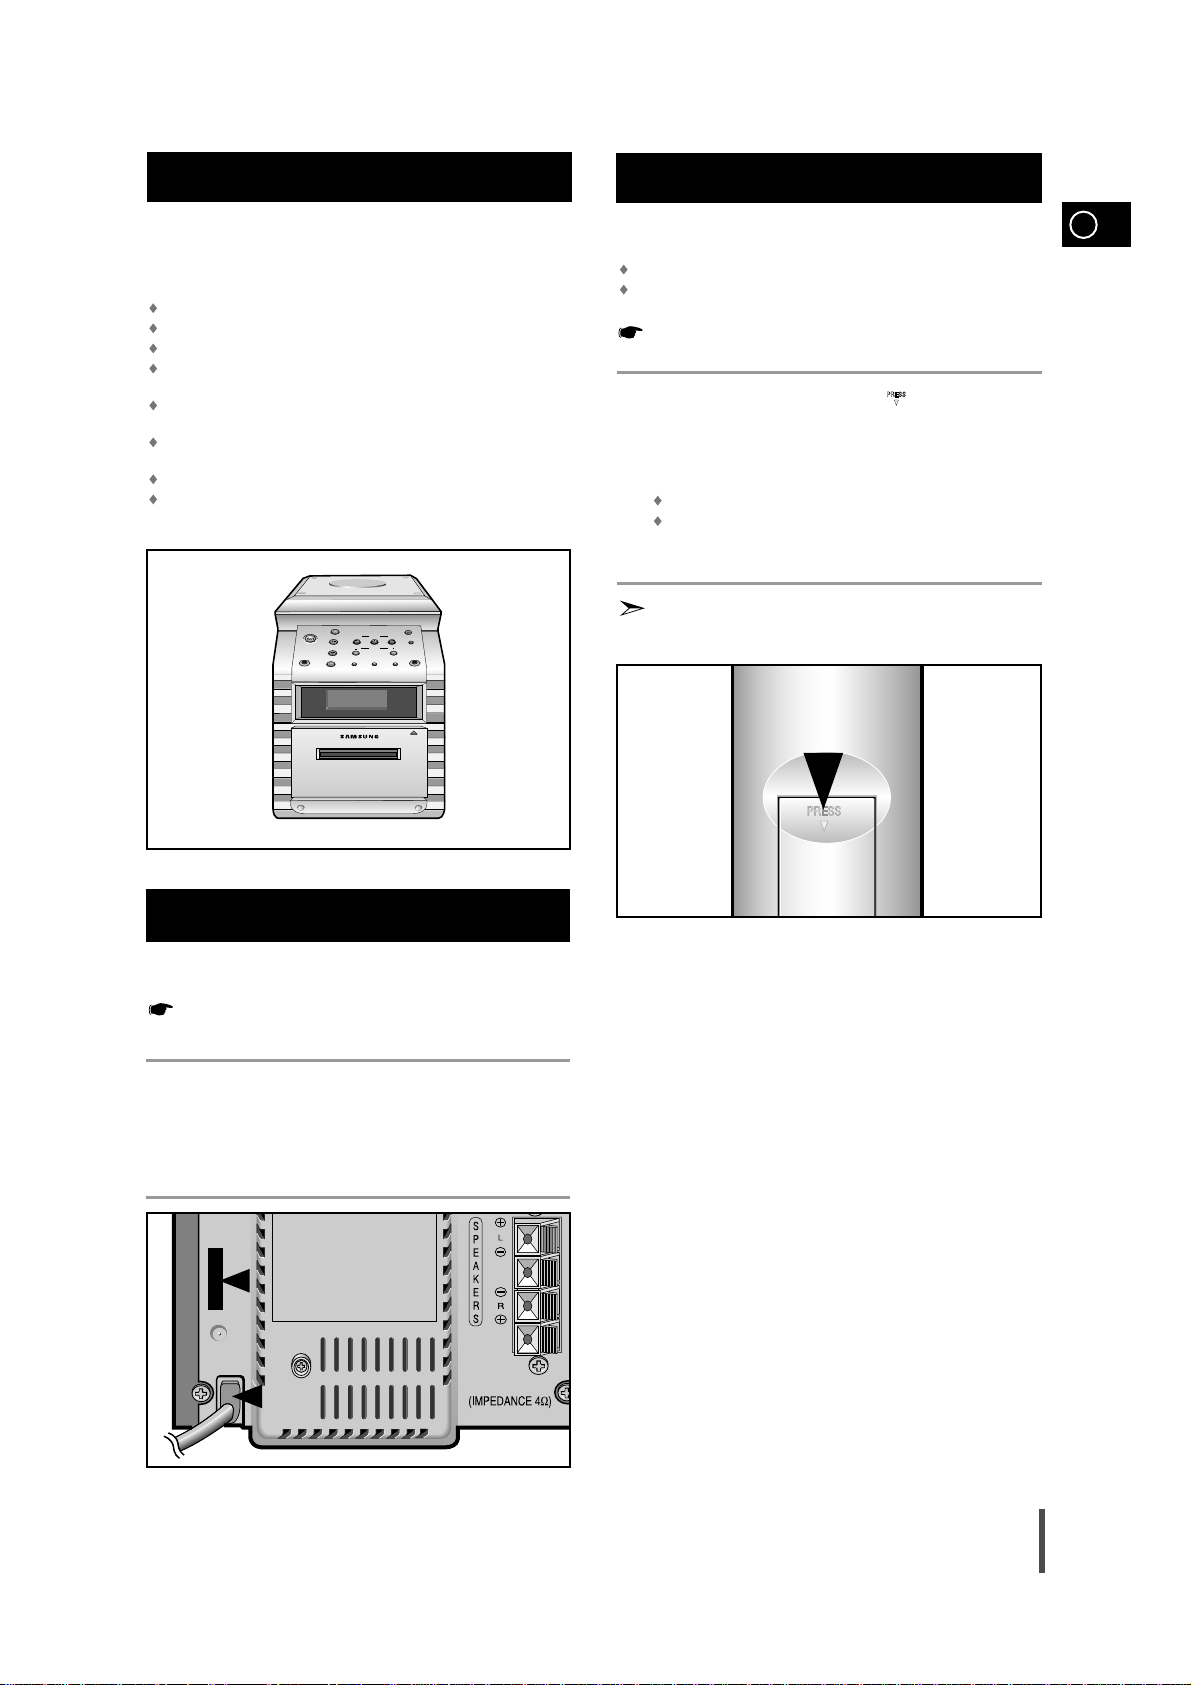
The main lead must be plugged into an appropriate socket.
Before plugging your system into a main socket, you must check
the voltage.
Check the position of the voltage selector on the rear panel
(OPTIONAL).
Plug the main lead (marked AC Cord on the rear of the system) into
an appropriate socket.
Press the Standby/On button to switch your mini-compact system on.
To take full advantage of your new micro component system,
follow these installation instructions before connecting the unit.
Install the system on a flat, stable surface.
Never place this unit on carpeting.
Never place this unit in an outdoor area.
Maintain an open space of approximately 6 inches (15 cm) on the
sides and rear of the system, for ventilation purposes.
Make sure that you have enough room to open the compact disc
compartment easily.
Place the loudspeakers at a reasonable distance on either side of
the system to ensure good stereo sound.
Direct the loudspeakers towards the listening area.
For optimum performance, make sure that both speakers are placed
at an equal distance above the floor.
Where to Install Your Micro Component System
Connecting your System to the Power Supply
2
Insert or replace remote control batteries when you:
Purchase the micro component system
Find that the remote control is no longer operating correctly
When replacing the batteries, use a new set of batteries and
never mix alkaline and manganese batteries.
Place your thumb on the position marked on the battery
compartment cover (rear of the remote control) and push the cover in
the direction of the arrow.
Insert two AA, R6 or equivalent batteries, taking care to respect the
polarities:
+ on the battery against + in the battery compartment
– on the battery against – in the battery compartment
Replace the cover by sliding it back until it clicks into position.
If you will not be using the remote control for a long time,
remove the batteries to prevent corrosion.
Inserting Remote Control Batteries
1
2
3
1
GB
3
Standby/On
Phones
Full Auto Remote Control Operation
TUNER
Band
VCD/CD
TAPE
AUX
Previous
Down
REC/Pause REV.Mode
Open/Close
Tuning
Next
Mode
Up
Demo
Volume
Mic
Sound
Mode
Push EjectPush Eject
Page 8
GB
8
The auxiliary input can be used to take advantage of the
sound quality of your micro component system when listening
to other sources.
Examples
: A television
A video disc player
A Hi-Fi stereo video cassette recorder
To connect the external source, the source must have an audio
output. In addition, you need an RCA connection cable.
Set the system to standby mode and disconnect it and the external
source from the main.
Connect the audio cable to the rear of the micro component system.
Connect the... To the connector marked...
Red jack R (right)
White jack L (left)
For optimum sound quality, do not invert the right and left
channels.
Plug the system back into the main socket and press Standby/On
( ) to switch it on.
Select the AUX source by pressing AUX.
Result: AUX is displayed.
Switch the external source on.
Adjust the volume and balance as required:
Volume Sound Mode
Example: You can watch a film and take advantage of stereo sound
provided that the original sound track is in stereo (as if you
were in a cinema).
Connecting to an External Source
1
2
3
4
5
6
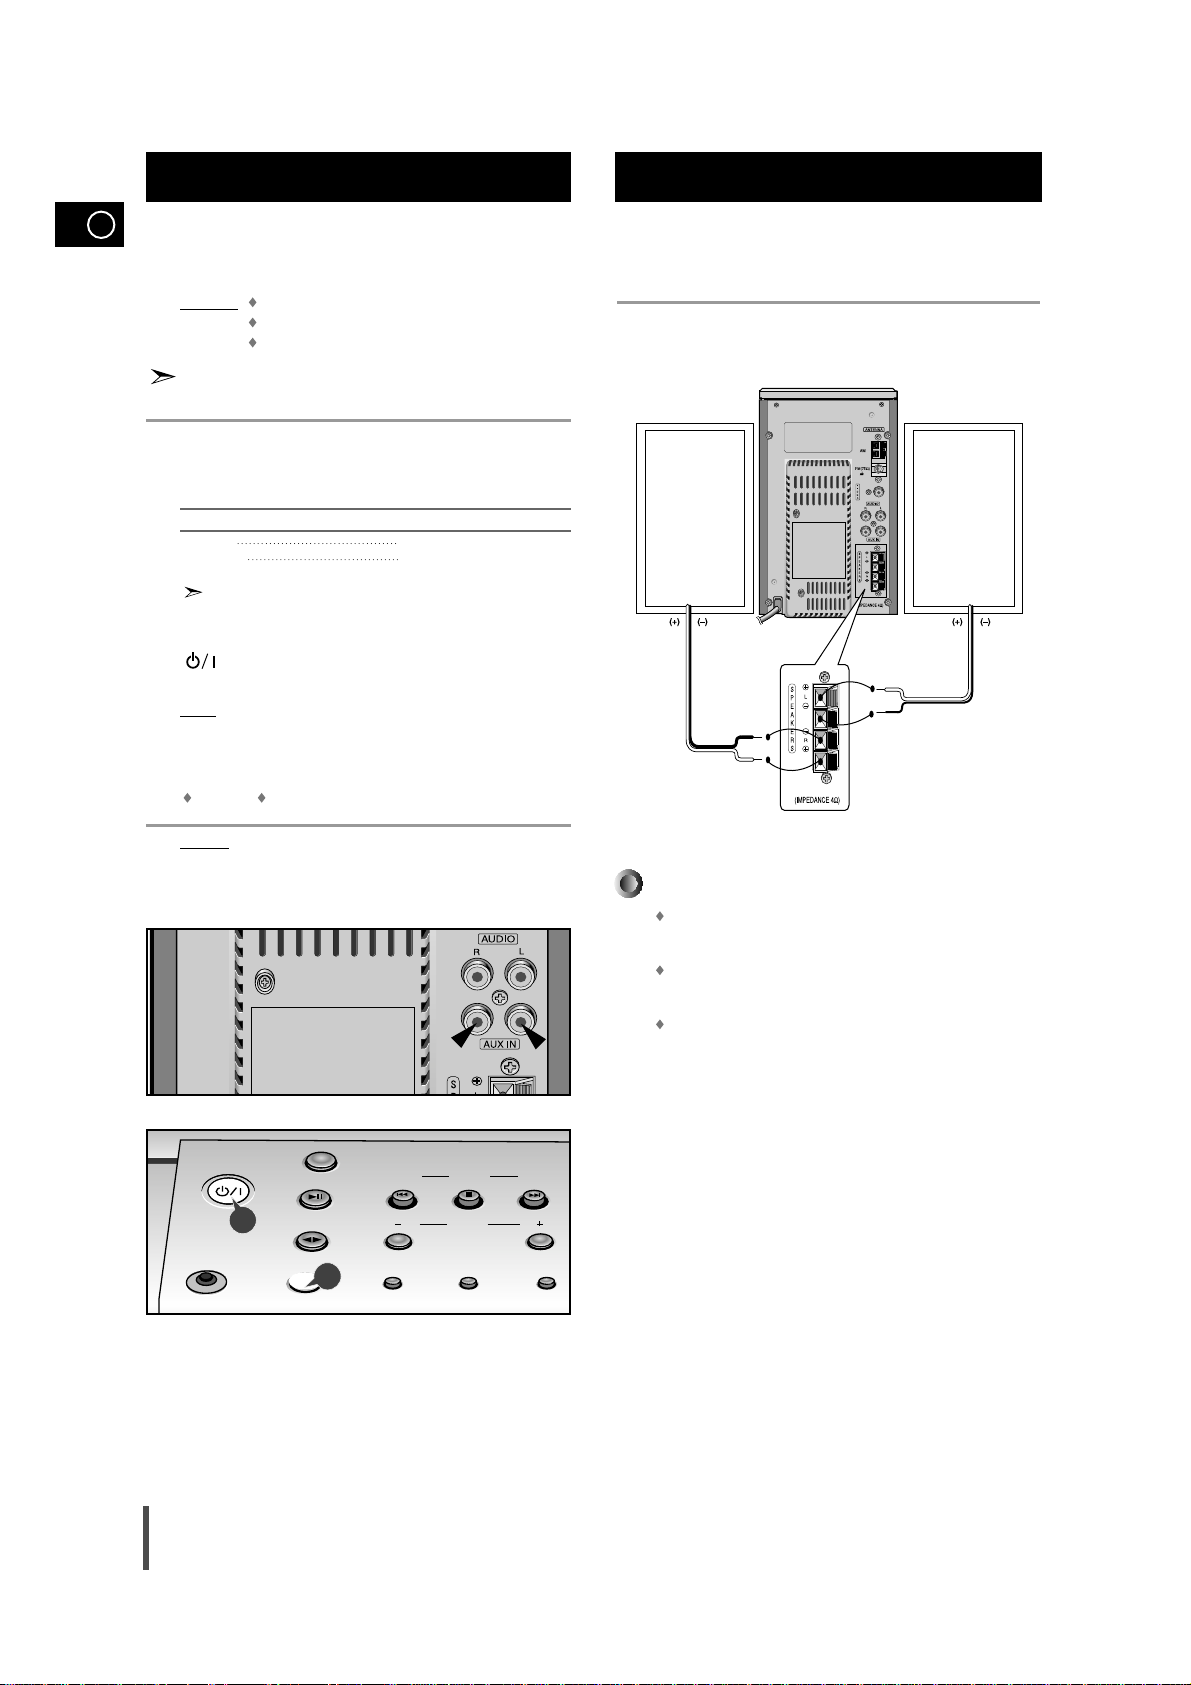
Speaker Connection
Directions in Installing Speaker
Installation in a place near heating apparatus, under direct lay of
light or with high humidity may cause performance degradation of
the speaker.
Do not install on the wall or on a high place of pole or other
unstable place to prevent any safety accident caused by falling
of the speaker.
Do not take the speaker apart from TV or computer monitor.
The speaker near the TV or computer monitor may influence the
quality of the screen display.
(Right Speaker) (Left Speaker)
Main Speaker Connection: Connect the Speaker cords
(red/black) to the Main Speaker jacks of System
3
4
TUNER
Standby/On
Phones
VCD/CD
TAPE
AUX
Band
Pervious
Down
REC/Pause REV.Mode
Tuning
Mode
Volume
Next
Up
Sound
Mode
Page 9
GB
9
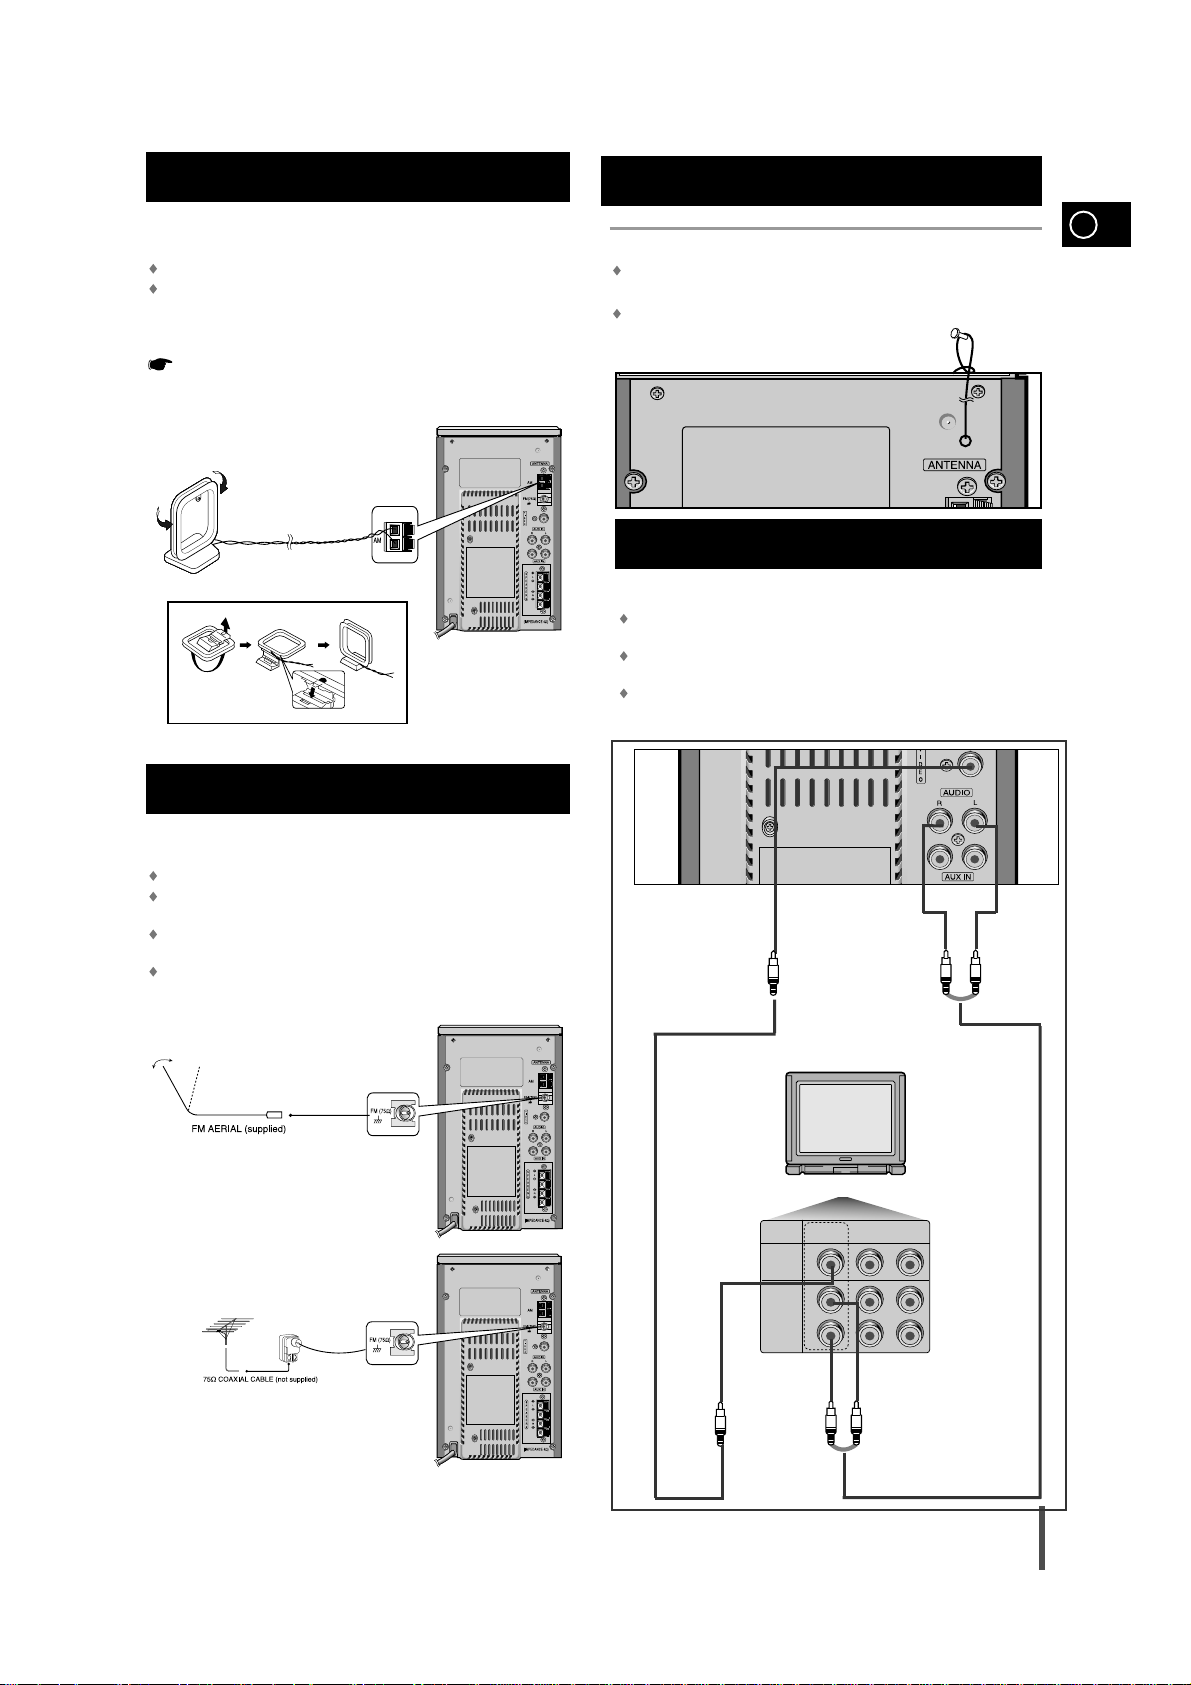
The AM aerial (for long and medium waves) can be:
Placed on a stable surface
Fixed to the wall (you must first remove the base)
The AM aerial connector terminals are located on the rear of the
system and are marked AM .
To avoid noise interference, check that the loudspeaker wires do
not run close to the aerial wires.
Always keep them at least 2 inches (5 cm) away.
Connecting the AM (MW)/LW Aerial
How to connect a COAXIAL TYPE aerial.
Connect a 75Ω antenna to the FM antenna terminal.
Plug the connector on the FM aerial supplied into the coaxial socket
(75Ω) marked FM on the rear of the system.
Follow the instructions given on Page 18 to tune into a radio
station, and determine the best position for the aerial.
If reception is poor, you may need to install an outdoor aerial.
To do so, connect an outdoor FM aerial to the FM socket on the
rear of the system using a 75Ω coaxial cable (not supplied).
Connecting the FM Aerial
Using the Audio Cord, Connect the Audio Output Terminals (Left, Right)
of the rear panel with the Audio Input Terminals (Left, Right) of TV.
Using the Video Cord, Connect the Video Output Terminal of the rear
panel with the Video Input Terminal of TV.
Turn on the TV and Select the Video mode by pressing the TV/VIDEO
SELECT button to the VIDEO Position.
Connecting to the Equipment
AUDIO
INPUT
VIDEO
INPUT
R
L
TV
VIDEO
INPUT
AUDIO
INPUT
123
L
R
()
TV Rear Panel
Connecting the SW Aerial (option)
How to connect a WIRE TYPE aerial.
Spread the SW aerial out and attach the ends to a wall, in the position
providing the best reception.
If reception is poor (e.g. distance from transmitter too great, walls blocking
the radio waves, etc.), install an outdoor aerial.
Page 10
GB
10
Your system is equipped with a clock which allows you to
turn your system on and off automatically.
You should set the clock:
When you first purchase the micro component system
After a power failure
After unplugging the unit
For each step, you have a few seconds to set the required
options. If you exceed this time, you must start again.
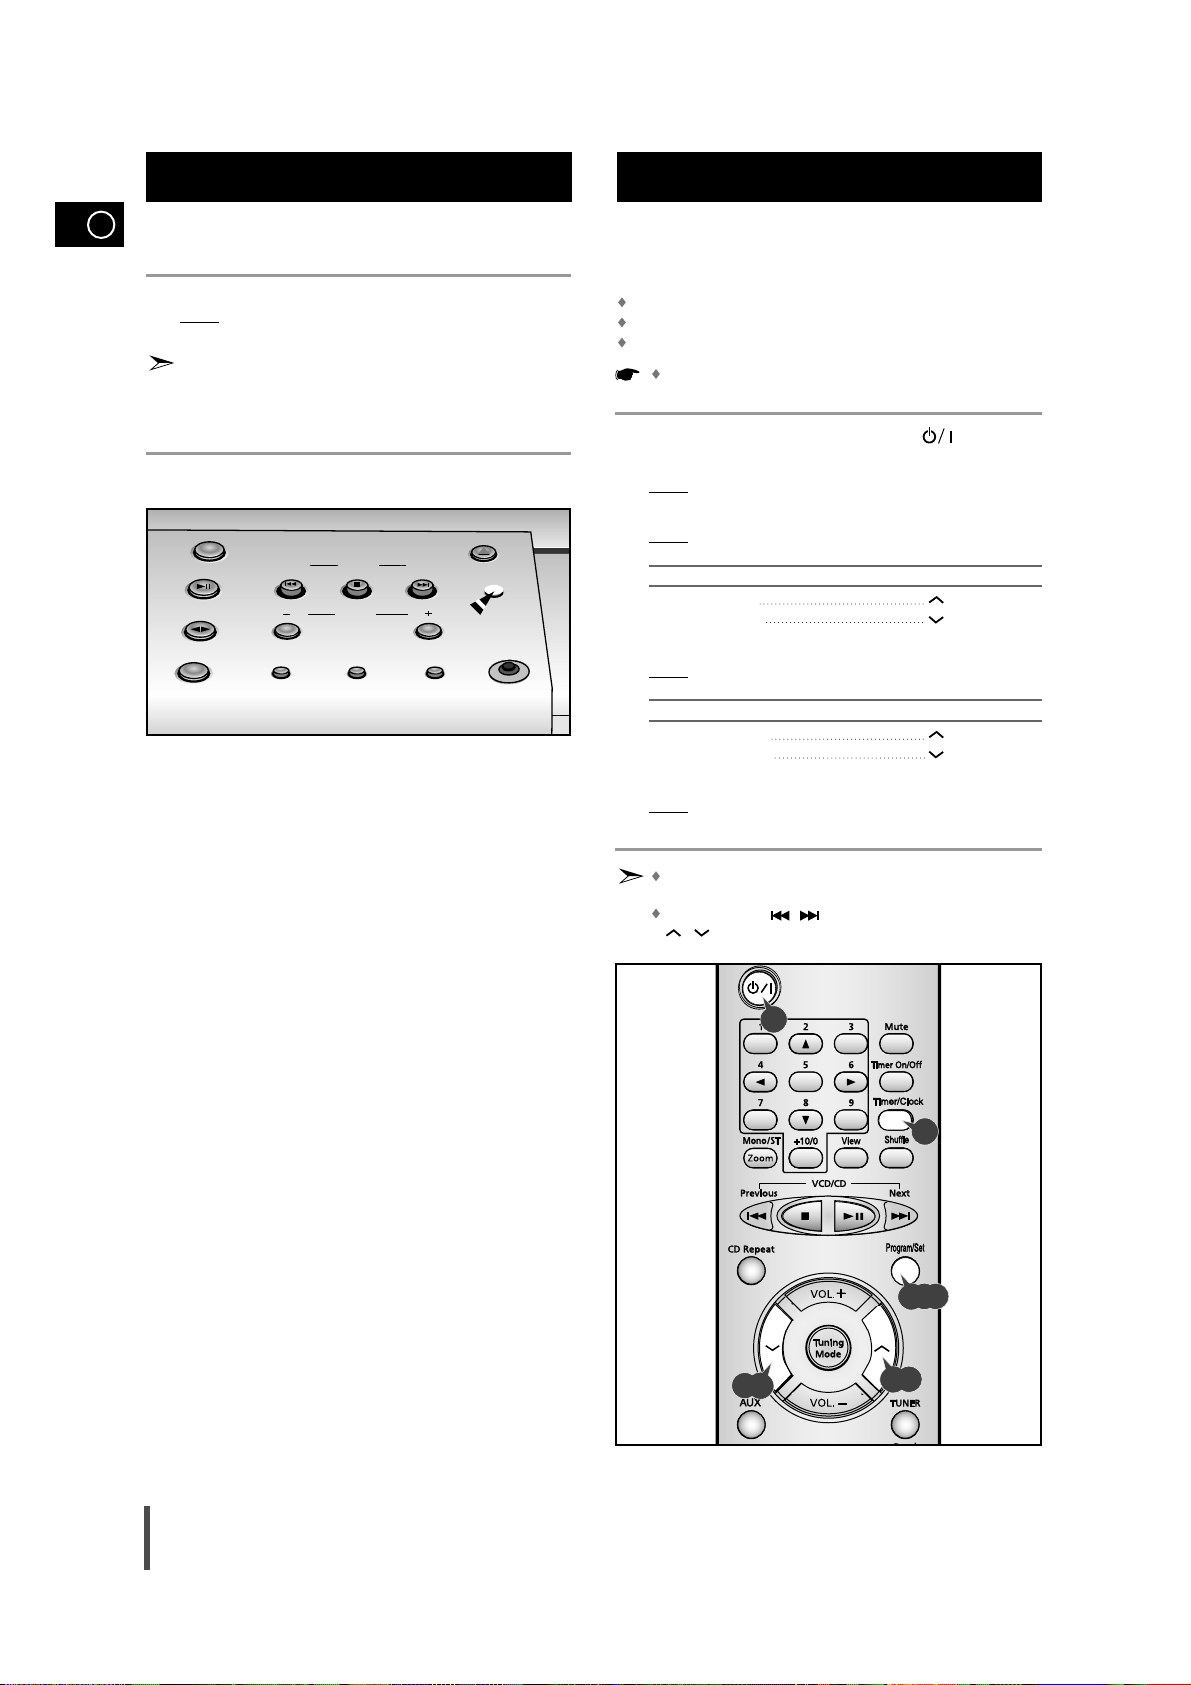
Switch the system on by pressing Standby/On ( ) .
Press Timer/Clock twice.
Result:
CLOCK is displayed.
Press Program/Set.
Result:
The hour flashes.
To... Press...
Increase the hours
Decrease the hours
When the correct hour is displayed, press Program/Set.
Result:
The minutes flash.
To... Press...
Increase the minutes
Decrease the minutes
When the correct time is displayed, press Program/Set.
Result:
The clock starts and is displayed, even when the system is in
standby mode.
You can display the time, even when you are using another
function, by pressing Timer/Clock once.
You can use the
/ button on the main unit to instead
/ button on the remote control in step 4,6.
Setting the Clock
1
2
3
4
5
6
7
You can view the various functions available on your system.
Press the Demo button in standby mode.
Result: The various functions available are listed in turn on the
display.
All these functions are described in detail in this booklet.
For instructions on how to use them, refer to the appropriate
sections.
To cancel this function, press Demo again.
2
1
Viewing the Various Functions on Your System
3,5,7
2
Open/Close
Band
CD
TAPE
AUX
TUNER
Volume
Tuning
Mode
Down
Up
Demo/Display
Rec/Pause REV.Mode
Sound
Mode
Open/Close
Band
VCD/CD
TAPE
AUX
TUNER
Volume
Tuning
Mode
Demo
REC/Pause REV.Mode
Sound
Mode
Mic
Pervious
Down
Next
Up
1
4,6
4,6
Page 11
This unit has been designed to playback the CDs: Audio CD,
CD Text, CD-R, CD-RW, MP3-CD and VCD.
Continued use of irregular shape CDs (heart-shape, octagonal,
etc.) can damage the unit.
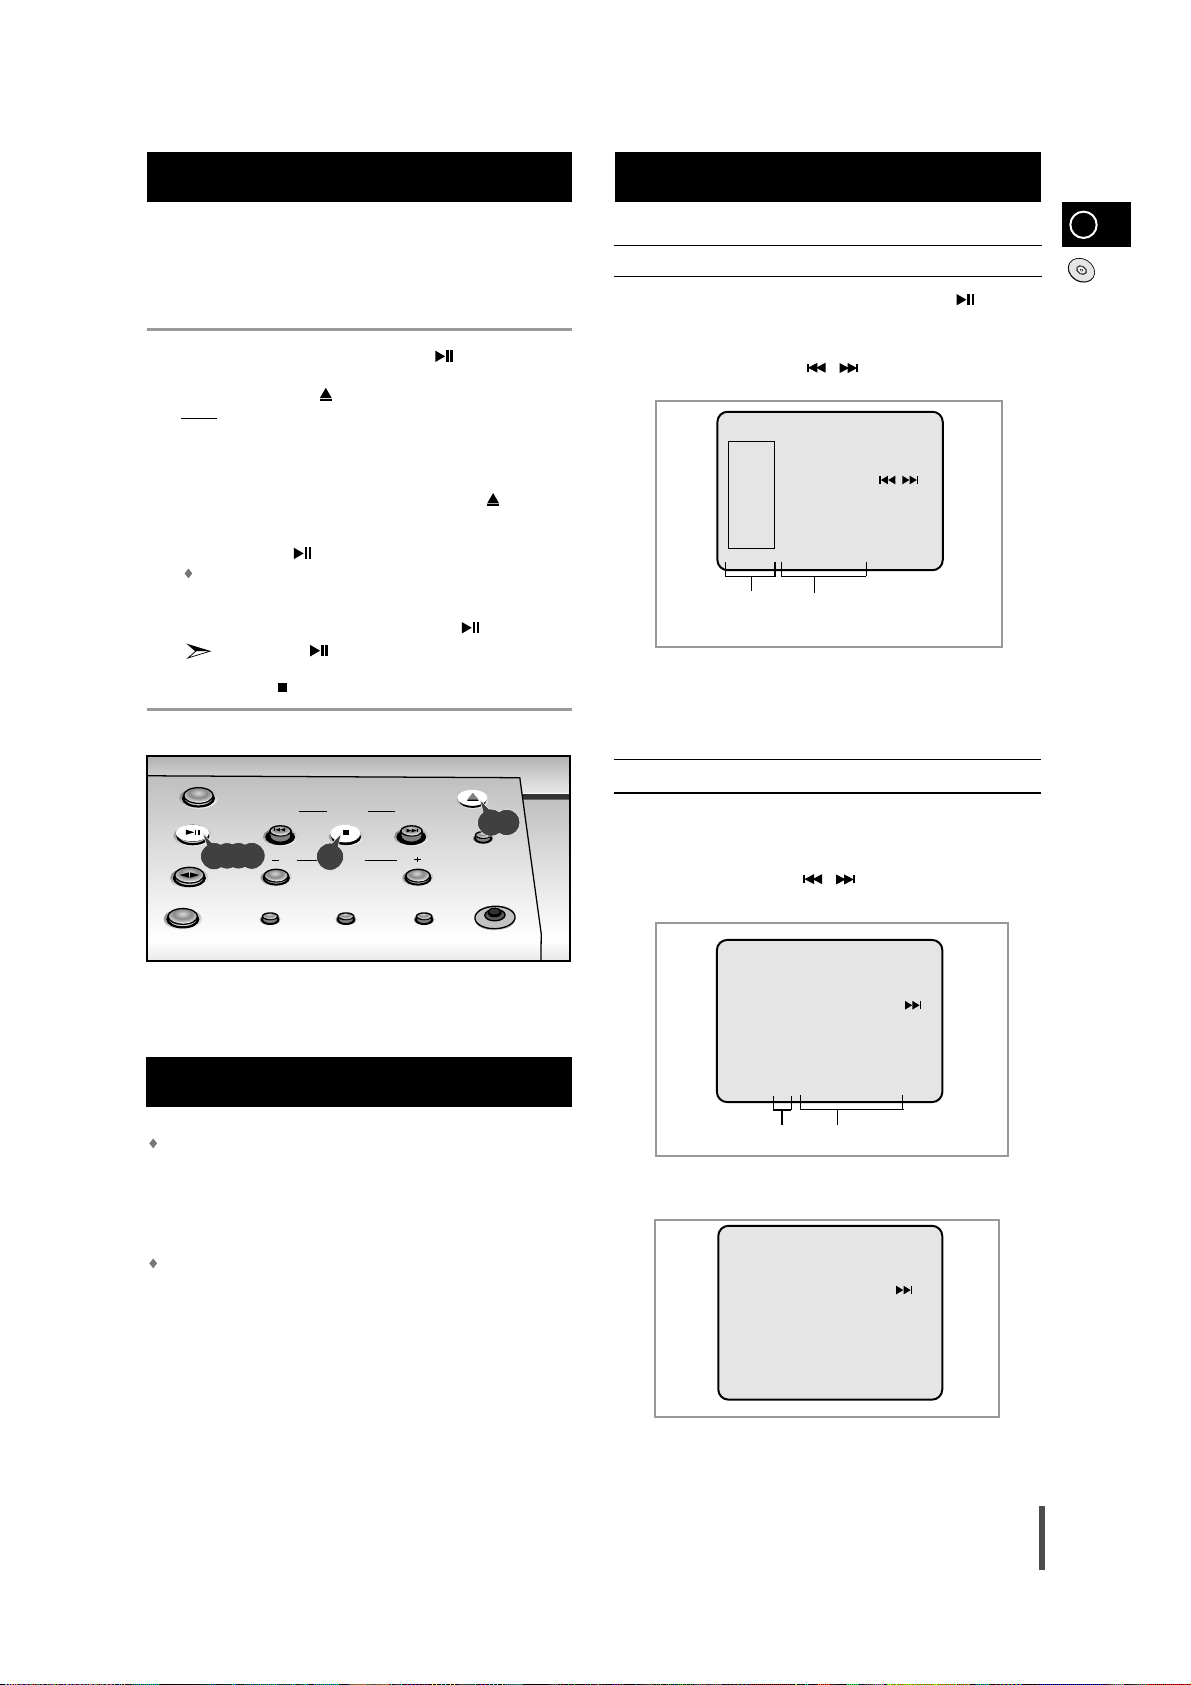
Select the CD function by pressing VCD/CD( ) button.
Press the Open/Close ( ) button.
Result
: The compartment opens.
Place your disc in the compartment, with the label on the disc facing
upwards.
Close the compartment by pressing the Open/Close ( ) button
again.
Press the VCD/CD( ) button.
Your CD Player will take a few moments to scan through all the
tracks recorded on a particular MP3-CD.
To stop playback temporarily, press the VCD/CD( ) button.
Press VCD/CD( ) again to continue playing the disc.
Press the Stop ( ) button when you have finished.
MP3 TOTAL: 120
PAGE 001/003
TR : 000 0 : 00 : 00
1 01 - BON
2 02 - NEW
3 03 - OLD
4 04 - SEE
5 05 - THE
GB
11
How to play back MP3-CD directly
•
7 tracks on the PAL TV screen.
•
5 tracks on the NTSC TV screen.
•
Select the number of song on the remote control Digit buttons
and you can enjoy the music.
After inserting MP3-CD in the Set, Press the
VCD/CD()
button or
Digit buttons after Reading.
1
You can see the information of Disc on the TV.
•
Press the Previous/Next
( , ) buttons to move on to the next
or previous track.
2
How to play back MP3-CD on menu mode
After inserting MP3-CD in the Set, Press the View button at the stop mode.
1
Select the Number of Directory.
You can see the following Display.
Select the number of song on the remote control Digit buttons and
you can enjoy the music.
You can see the following information of Disc on the TV.
•
Press the Previous/Next (, ) buttons to move on the next or
previous directory.
2
Directory No
Directory Name
MP3 TOTAL: 120
PAGE 001 / 002
TR : 000 0 : 00 : 00
01 - BON
1 RED
2 BLUE
3 GREEN
4 BLACK
5 WHITE
MP3-CD P
layback
Regarding the playback of CD-R/RW
In the case of an original CD-R(Recordable) recorded in audio CD
format, CD-RW(Rewritable) and editing by the user, playback is
processed on the respective completed status.
(The player may not be played back according to the characteristics
of the CD or recorded status.)
The CD-RW is comparably less reflexive than CD which causes more
time delay to read.
Mic
Open/Close
Band
VCD/CD
TAPE
AUX
TUNER
Volume
Tuning
Mode
Demo
REC/Pause REV.Mode
Sound
Mode
Previous
Down
Next
Up
7
1, 5, 6
2,4
1
2
3
4
5
7
6
To replay the CD/MP3-CD
MP3 TOTAL: 120
PAGE 002/024
TR : 017 0 : 02 : 39
006 BABY
007 KEEP THE
008 CAPTAIN
:: :
Track No
: MP3 File display
3
4
Page 12
GB
12
You can select the track you wish to listen to, either when the
compact disc player is stopped or when a disc is playing.
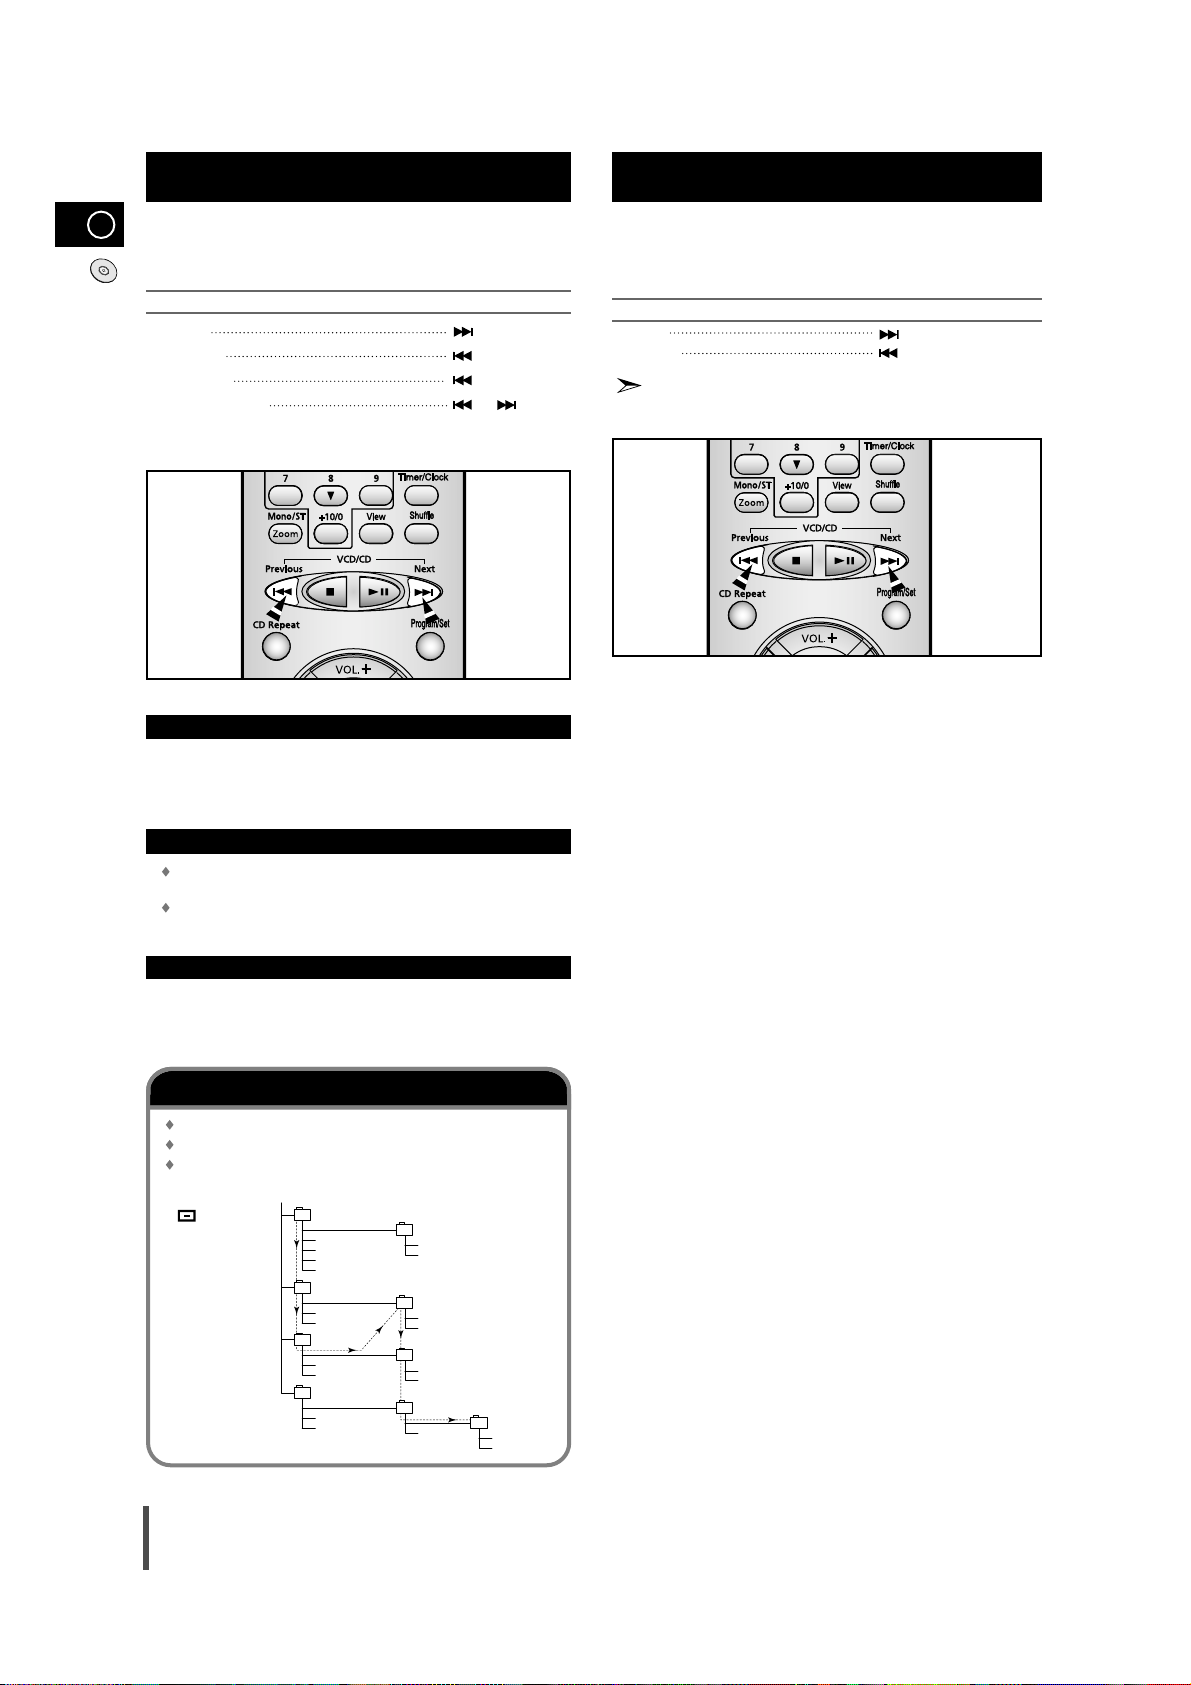
To start playback at the beginning of the...
Press...
Next track once
Current track once
Previous track twice
Track of your choice or the
appropriate number
of times.
Selecting a Track
When listening to a compact disc, you can quickly search for a
specific music passage on a track.
To search through the tracks... Press and hold down...
Forwards for at least one second
Backwards for at least one second
It is recommended that you turn the volume down before using
this function.
Searching for a Specific Music Passage on a CD
What is MP3?
Playback sequence of albums and tracks
In case of Window Explorer display.
The arrows indicates playback sequence of albums and tracks.
Tracks with jpg, wav or doc only are not audio files and therefore
will be skipped.
MP3 means MPEG1 Layer 3, the global standard for audio
signal compression technology. It uses digital compression
technology to compress original sound data by up to 12 times
without sound quality degradation.
File Compatibility
The unit will playback files created in MP3 format
(Mpeg1.Layer3) with *.mp3 as their extension.
Files created in MP2 format (Mpeg1.Layer2) with
*
.mp2 as their extension can also be played back.
How many MP3 files can a CD-R or CD-RW disc record?
The maximum capacity of one CD-R or CD-RW disc is 650MB.
Normally, one MP3 file has a capacity of 4MB, therefore
approximately 170 files can be recorded on a single disc.
Kevin01.mp3
Album 01
(E) CD-ROM drive
Kevin02.mp3
Kevin03.mp3
Kevin04.mp3
Kevin.jpg
Life.doc
Skipped
Album 02
Summer05.mp3
Summer06.mp3
Garden.mp3
Garden.mp3
Album 04
Album 03
Michael07.mp3
Michael08.mp3
Water.mp3
Water.mp3
Album 05
Skipped
Kenny01.wav
Kenny02.wav
Butterfly.mp3
Album 06
Piano14.mp3
John15.mp3
Album 07
Page 13
GB
13
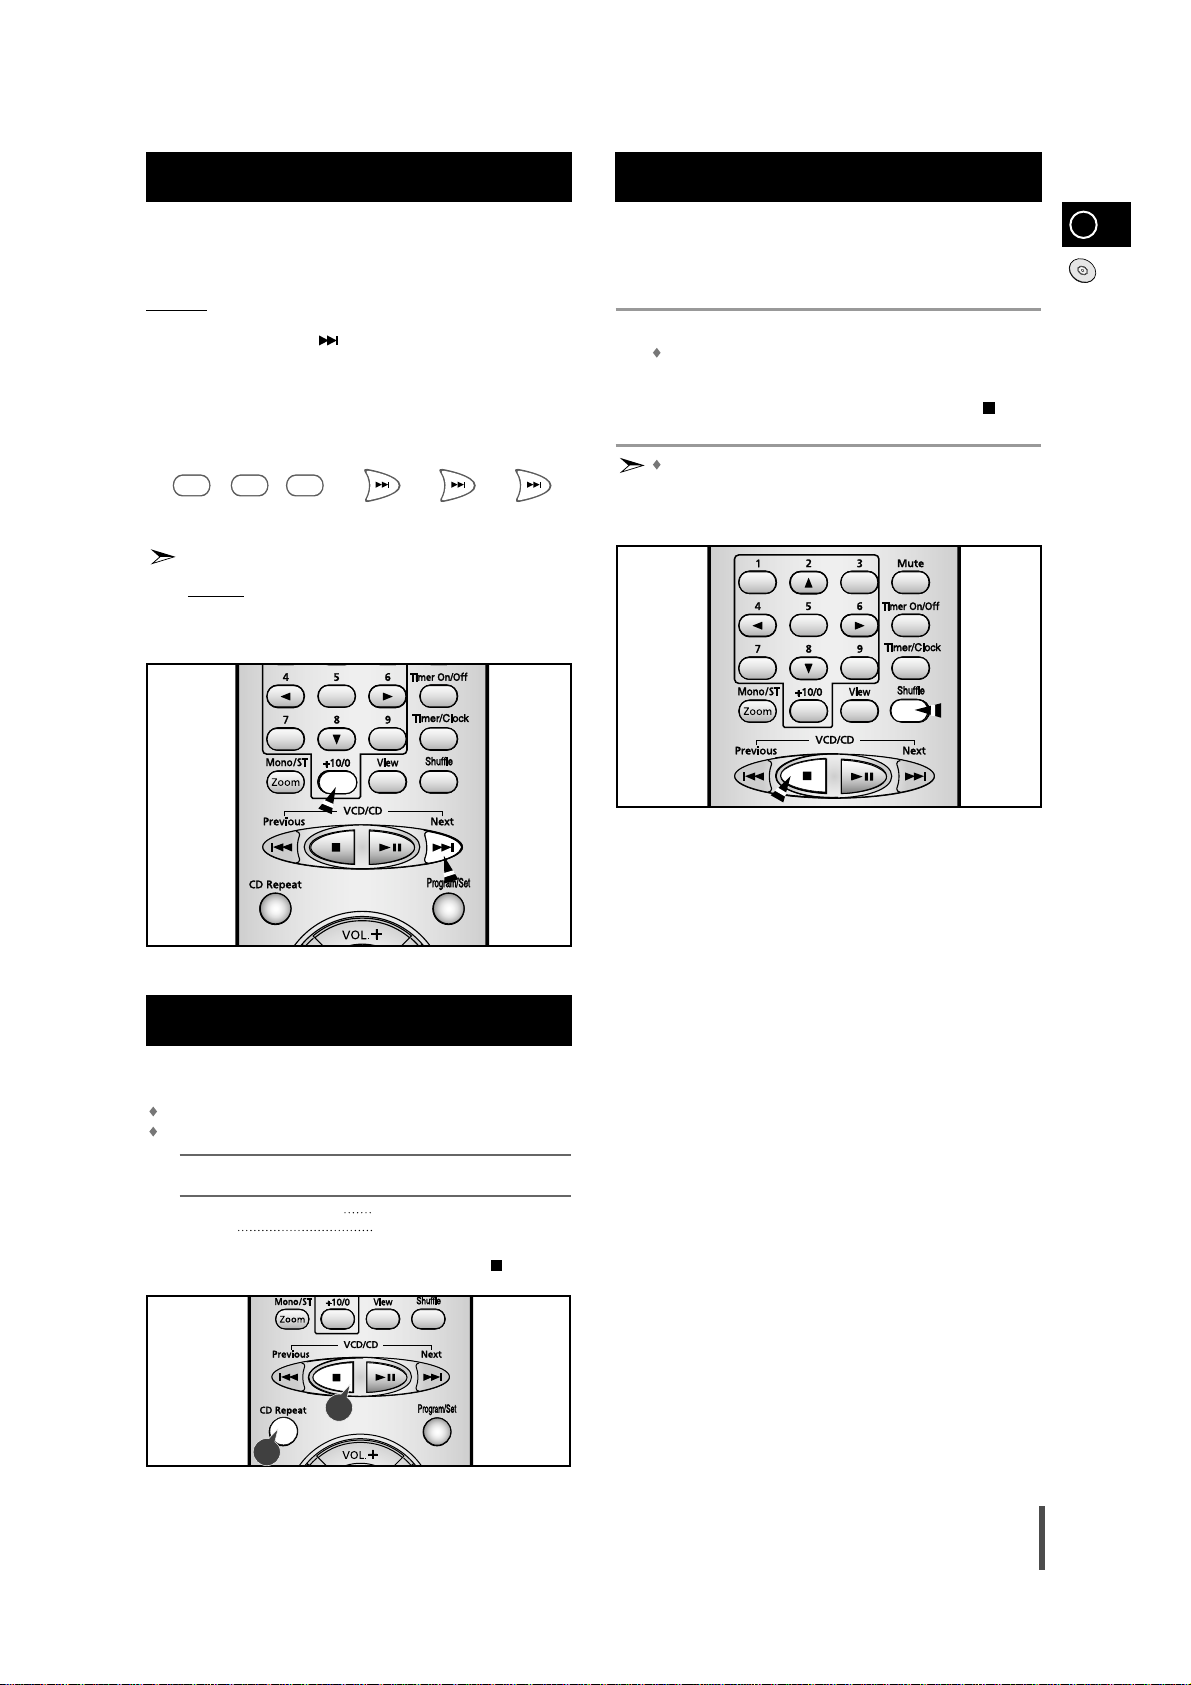
Function to skip through 10 tracks at a time
Press the +10/0 button briefly while playing back a
CD or VCD. The track 10 tracks after the current one
will then be played back.
Example:
If you want to select track 43 during playback of track
15, press the +10/0 button three times, and then
press the Next(
) button three times or Digit 3 button
once.
15 ➝20 ➝30 ➝40 ➝41 ➝42 ➝43
+10/0 +10/0 +10/0
You can repeat indefinitely:
A specific track on a compact disc.
All tracks on the compact disc selected.
To repeat... Press CD Repeat one or more
times until...
The current track indefinitely REPEAT 1 is displayed
All songs REPEAT ALL is displayed
When you wish to stop the Repeat function, press Stop ( ) button.
Repeating One or All Tracks on the Compact Discs
1
2
2
In selecting a track on MP3-CD, digit “0” will be entered if the button
of +10/0 is pressed.
Example:
If you want to select a track 40 during the
playback of a certain track, press both buttons
of 4 and +10/0.
You can listen to the tracks on a compact disc in a different
order each time, as the various tracks will be selected
automatically in a random sequence.
Press the Shuffle button.
If this button is pressed when the CD is being played back or stopped,
any track recorded in the CD may be selected to playback again.
When you have finished the random playback, press Stop() or
press the Shuffle button again.
The Repeat and CD Synchro function is not supported from the
Shuffle playback mode.
1
2
Shuffle Play Function
1
Page 14
GB
14
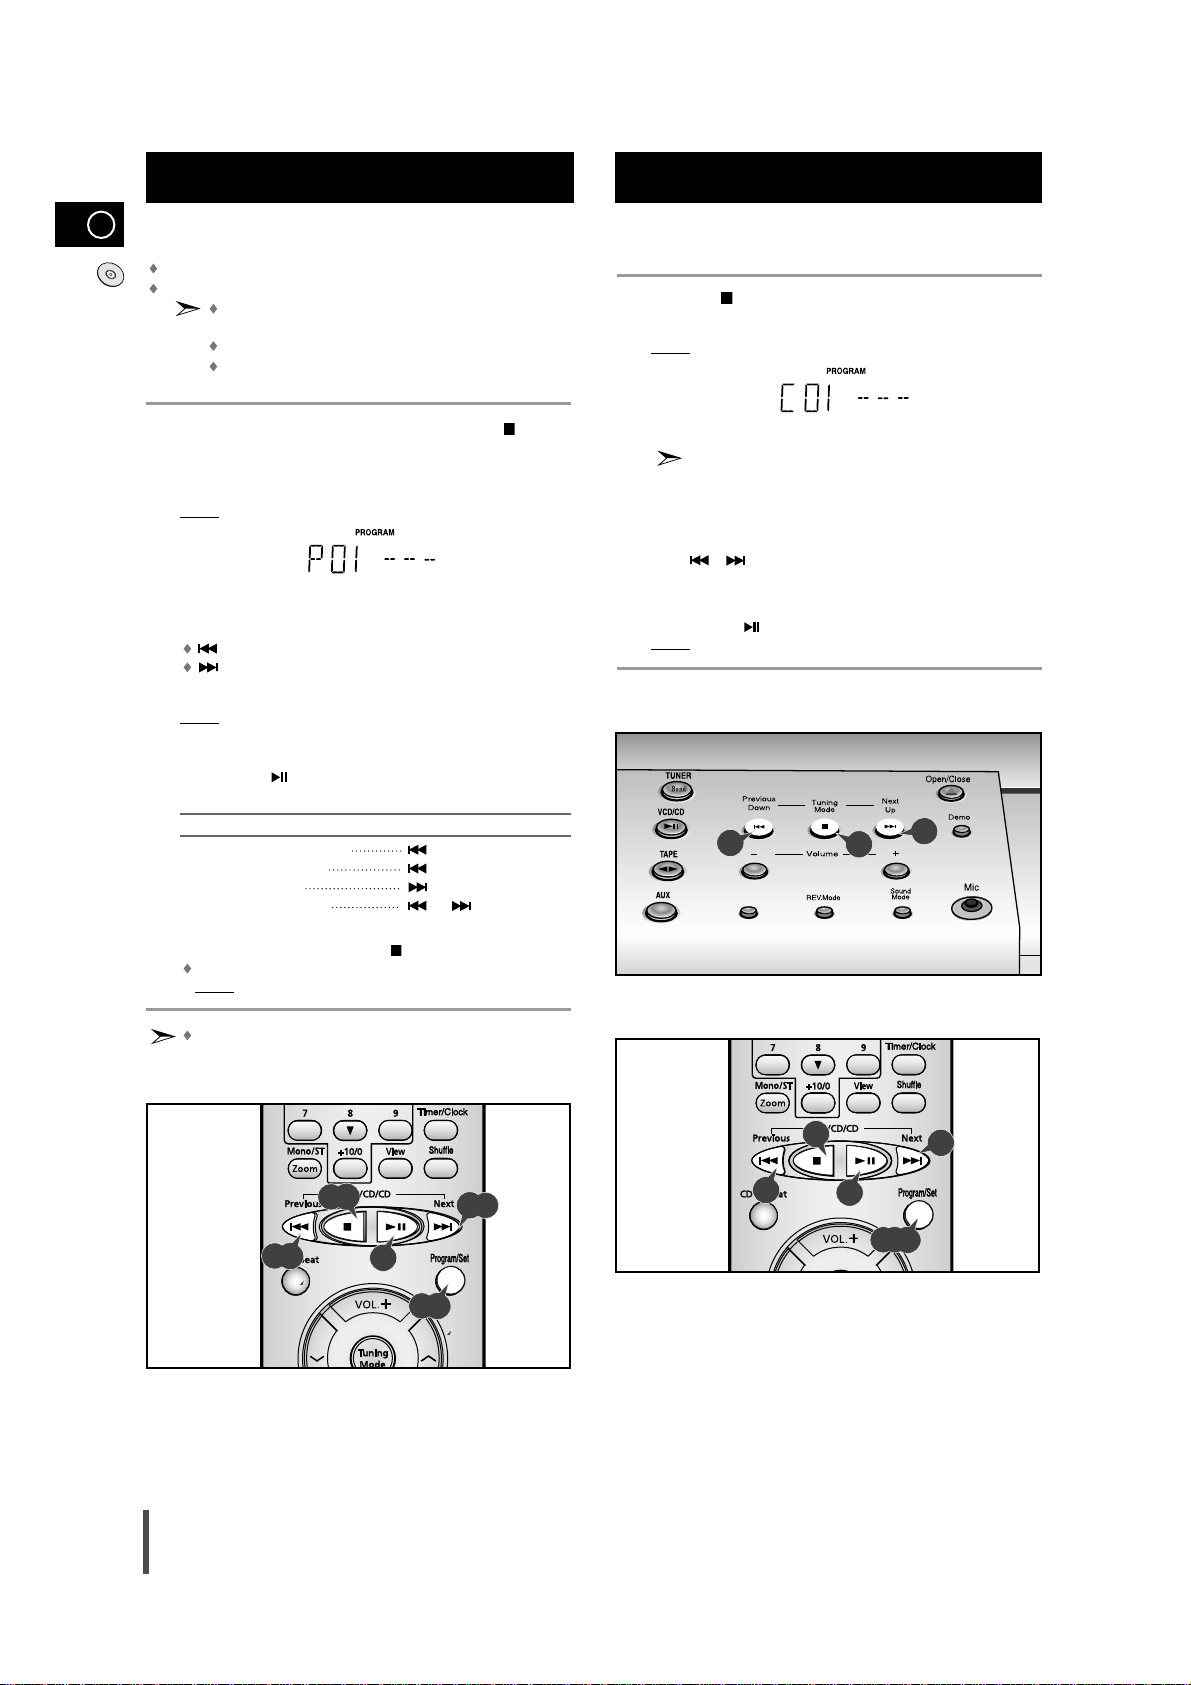
You can check or change your selection of tracks at any time.
Press Stop( ) once if you have started listening to the selection.
Press Program/Set button twice.
Result: The following indications are displayed:
(01 = Program no., – – = Track no. on the disc)
If you have already programmed 30 tracks, Check is displayed
instead of P when you press Program/Set.
Press Program/Set one or more times until the track to be changed
is displayed.
Press or to select a different track.
Press Program/Set to confirm your change.
Press
VCD/CD ()
to start listening to the selection.
Result: The first track selected is played.
1
2
3
4
5
6
You can decide:
The order of the track desired to listen
The track not desired to listen
A maximum of up to 30 order of tracks desired to listen
may be programmed.
Before selecting the track, the CD player should be stopped.
This function may be used simultaneously with the CD
Repeat function.
If the CD function is selected, stop the player by pressing Stop ( ) button.
Load the selected CDs.
Press Program/Set.
Result: The following indications are displayed:
(01 = Program no., -- -- = Track no. on the disc)
Select the required track by pressing:
to move back through the tracks
to move forward through the tracks
Press Program/Set to confirm your selection.
Result: The selection is stored and is displayed.
To select other tracks, repeat Steps 4 to 5.
Press VCD/CD ( ) to listen to the track selection in the order
programmed.
To... Press...
Listen to the current track again
once
Listen to the previous track
twice
Listen to the next track
once
Skip forwards or backwards
or the appropriate
one or more tracks number of times
To cancel the selection, press Stop ( ) button.
Once if the compact disc player is stopped.
Result:
PROGRAM is no longer displayed.
If you open the compartment, the selection is cancelled.
8
9
7
Programming the Order of Playback
1
2
3
4
5
6
1,9
7
4,8
Checking or Changing Programmed Tracks
6
2,3,5
1
4
REC/Pause
1
4
4
4
4,8
3,5
Page 15
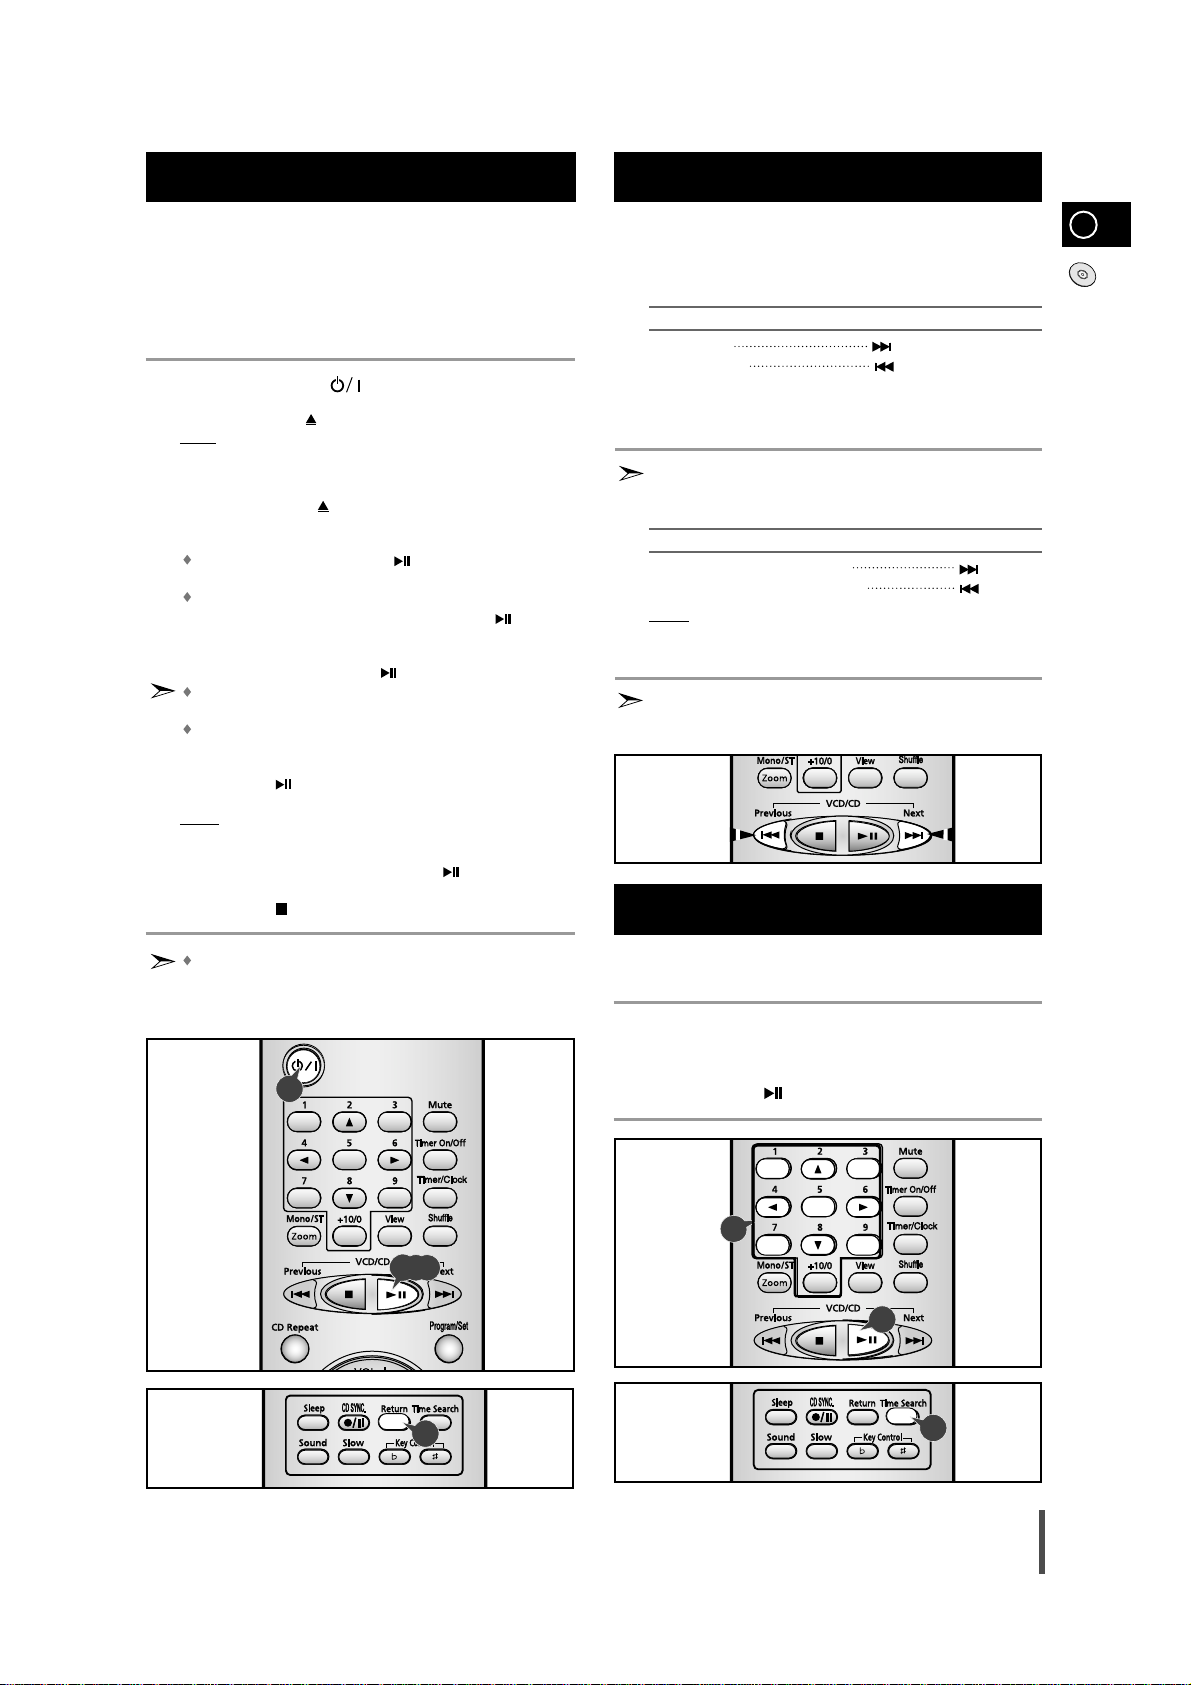
In order to play back video CD, make sure that your unit is connected
to your TV set.
This unit is designed for playback of video CD, version 1.1 and 2.0. Only
with version 2.0, it is possible to call up the on screen menu function. This
unit will not play back any other video CD other than 1.1 and 2.0 versions.
Turn on the Standby/On ( ) switch and set the VCD mode.
Press the Open/Close ( ) button on the unit to open the CD compartment.
Result: “OPEN” is displayed and the
CD compartment opens.
Load a video-CD with the label facing upwards in the
compartment
.
Press the Open/Close ( ) button again to close the CD
compartment
.
To playback:
In version 1.1, press the VCD/CD
()
button for direct access to
the film, as there is no menu-on-screen.
In version 2.0, load a video CD, “Video CD 2.0”, and “MENU ON”
are displayed on the TV screen. Press the VCD/CD
()
button
and the menu is displayed on the TV screen.
Select a number from the menu using Digit buttons on the remote
control and press the VCD/CD
()
button.
To return to the previous menu in the version 2.0, press the Return
button on the remote control.
When playing a video-CD version 2.0, reading time on the
display may take longer, depending on the disc’s contents.
Press VCD/CD
()
button on the remote control to receive a still
picture.
Result: Pause is displayed, a still picture appears and the sound is
muted.
To return to normal playback, press VCD/CD
()
button.
Press the Stop ( ) button to stop playback.
Please make sure that the Video-CD to be played is not flawed
optically, as this may cause a distorted sound or the unit to
malfunction.
GB
15
Video CD Player Playback
1
2
3
4
5
6
7
8
You can find a certain passage faster during playback.
This function is possible in CD or VCD Ver 1.1 or Ver 2.0 menu off
mode.
To... Press and hold down...
Scan forwards
Scan backwards
Release the Skip/Search buttons when the desired passage has
been found.
In the video CD version 1.1, where the disc’s contents are over 15
minutes long, you can scan up or down by intervals of five minutes.
To... Press...
Scan forwards by 5 minute intervals
Scan backwards by 5 minute intervals
Result:
The picture is still, and the disc’s contents are forwarded or
reversed by 5 minute intervals. Playback then resumes from
this new position.
In the Skip/Search or Scan mode, the sound can only be partially
heard and the picture scenes will change sporadically, until the
required passage has been found.
Search Functions
1
2
3
Please use this function for reproducing a desired track in a certain
time of playback.
Press the Time Search button.
Set a desired time by pressing the Digit buttons.
Press the VCD/CD ( ) button.
Time Search Function
(This function is available only during the playback of a CD/VCD)
1
2
3
3
1
1
5,6,7
2
5
Page 16
GB
16
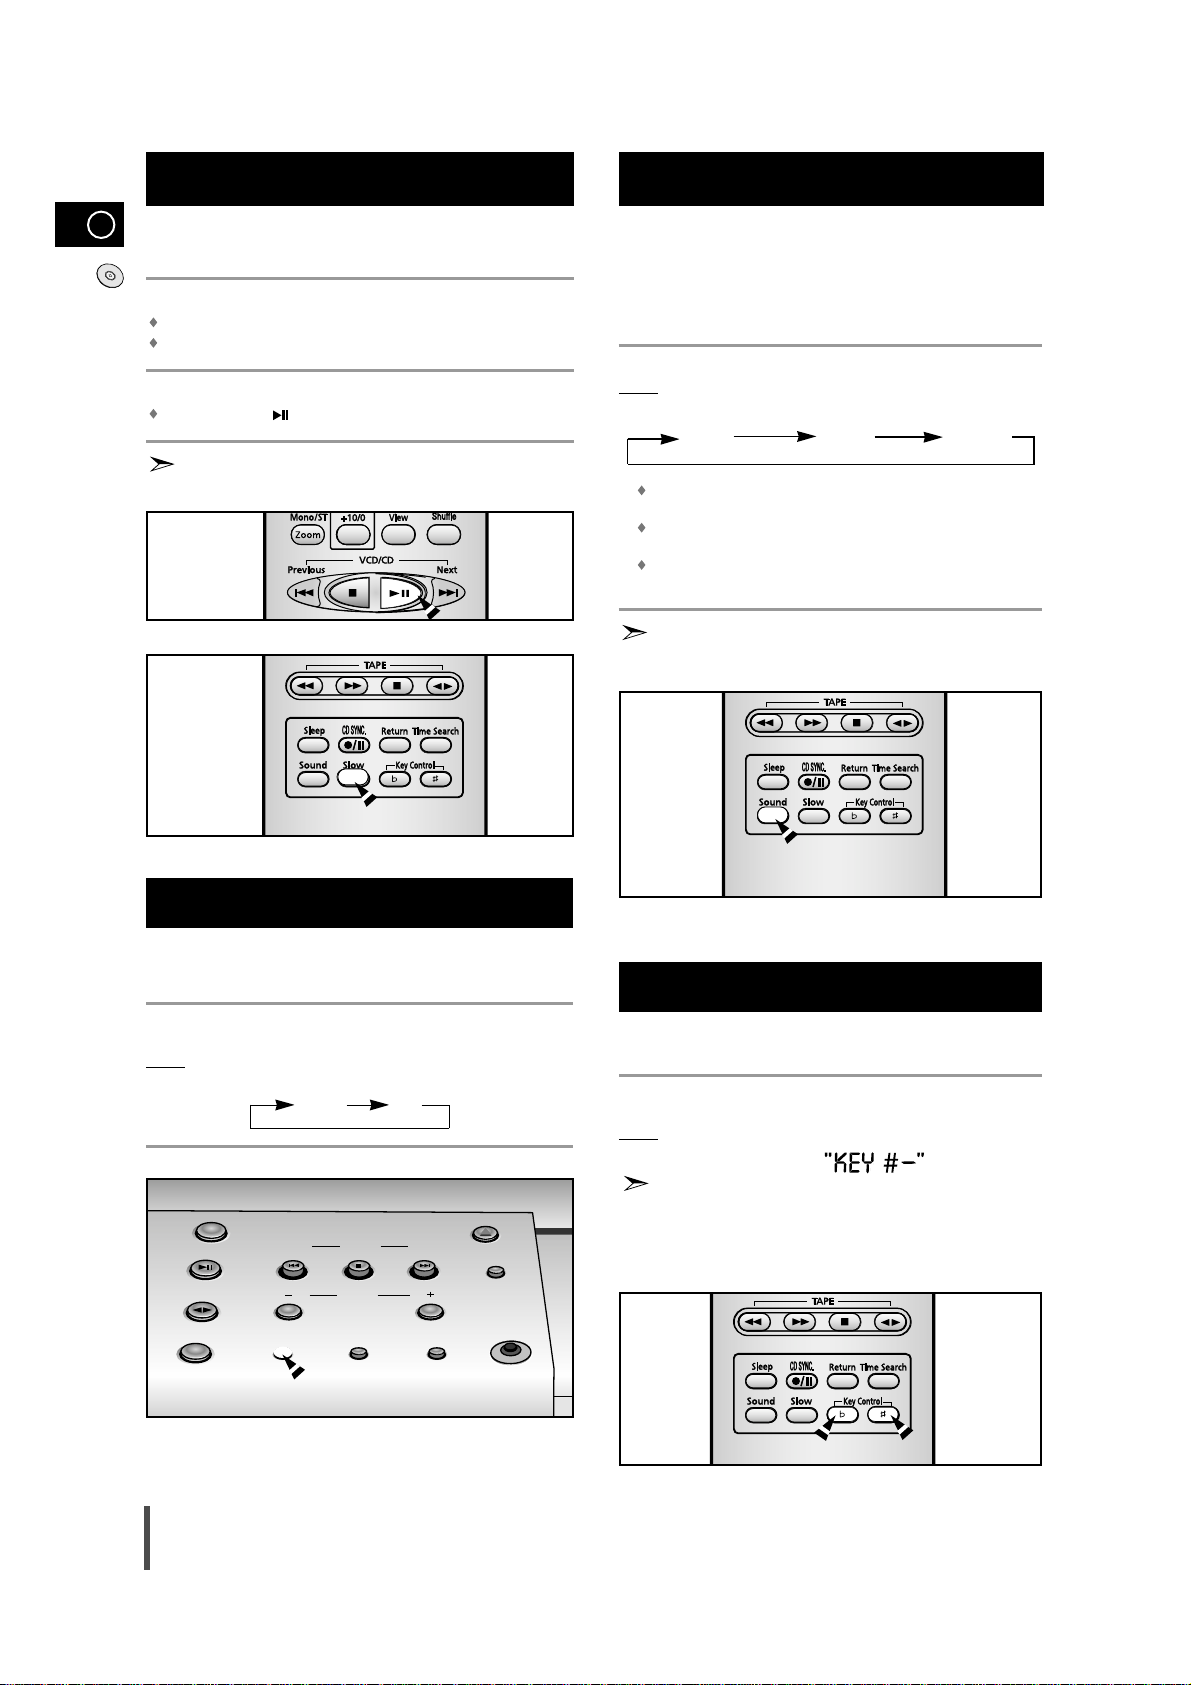
Turn on the TV and set video mode.
Press the Slow button on the remote control when the play function is on.
Voices do not come out when the Slow button is pressed.
Slow playing is 1/2, 1/4, 1/8 of the normal playing speed.
To return to normal operation.
Press the
VCD/CD ()
button.
When the slow mode is selected a disc will only forward operation.
When adjusting play speed
With this function, you can play back video CD that provide
2-channel tone(bilingual) in the original language. Similarly,
with karaoke video CD, you can select between the channel
for music without vocals for sing-along purpose, or the channel complete with music and vocals.
During playback, press the Sound button on the remote control.
Result: Each time the Sound button is pressed, the following appears in
the display and on the TV screen:
Lch MONO : Only the left channel (instrumental parts) is played back
through both the right and left speakers.
Rch MONO : Only the right channel (vocal parts) is played back
through both the right and left speakers.
STEREO : Cancels the Multiplex Sound (normal stereo playback
resumes).
You can select between listening to the tone from the left channel,
the right channel or both channels.
Sound Select Function
L-CH R-CH STEREO
(Lch MONO) (Rch MONO)
This function can work only at VCD mode.
Press the Key Control button to adjust the key to your voice. (the 15 step
key control you can select )
Result: Each time the Key Control #, b button is pressed, the following
appears on the TV screen:
b : Low-Pitched Key
# : High-Pitched Key
Key control function and VCD slow playing function do not work at
the same time .
Key Control Function
NTSC/PAL Selection Method
According to a DISC or TV, Press the REC/Pause button on the front
panel.
Set the system to standby(power off) mode, press the REC/Pause button
on the front panel.
Result: Each time the REC/Pause button is pressed, the following appears
in the display:
NTSC PAL
TUNER
Band
VCD/CD
TAPE
AUX
Pervious
Down
REC/Pause REV.Mode
Tuning
Mode
Volume
Open/Close
Next
Up
Sound
Mode
Demo
Mic
Page 17
17
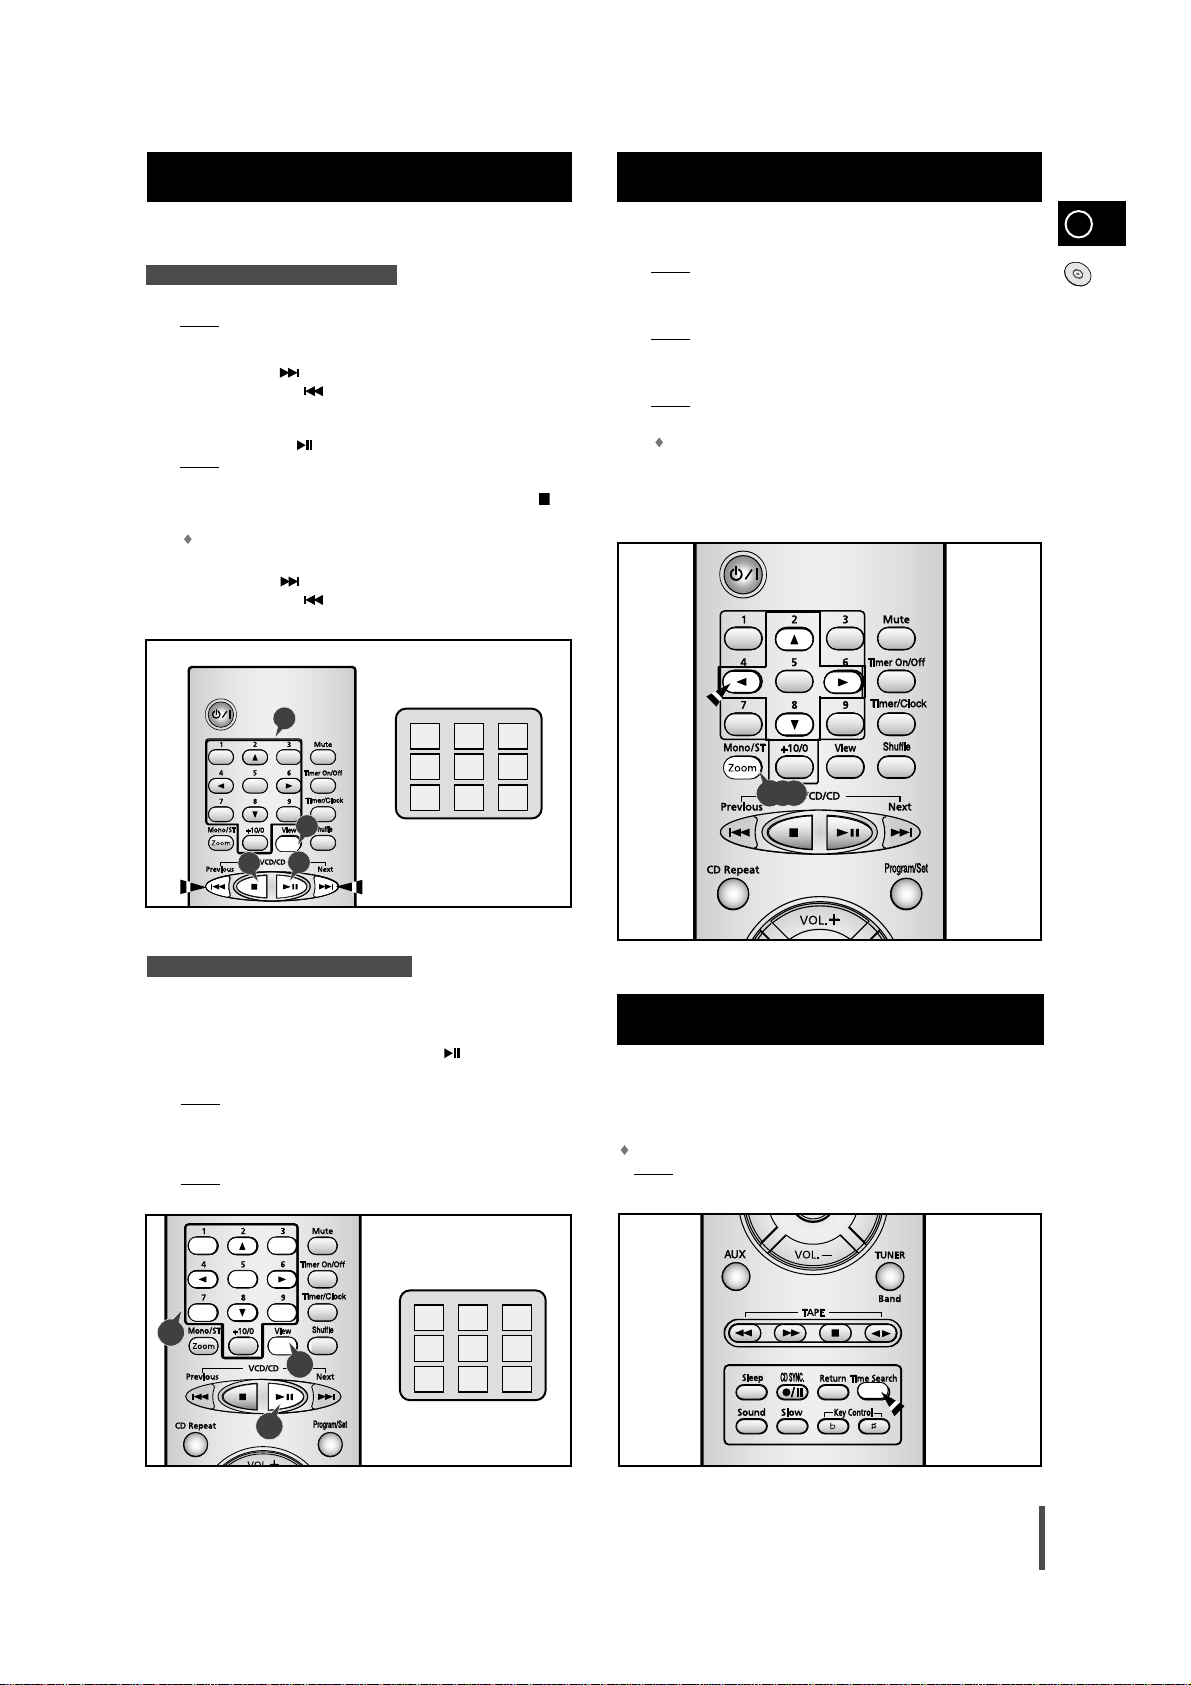
This function can be used conveniently to search a desired track in a VCD.
This function is possible in VCD Ver 1.1 and Ver 2.0 menu off mode.
Press the View button in the stop state.
Result:
"TRACK VIEW" menu is displayed on the screen.
The screen is split into 9 with each screen picture being
reproduced for 4 seconds.
– Press Next ( ) button to see the rest tracks.
– Press Previous ( ) button to see the previous tracks.
Select a track by pressing the Digit buttons.
Press the VCD/CD
()
button.
Result: The picture that you selected is displayed in full screen.
When you wish to stop the Disc View function, press the Stop ()
button.
When using more than 10 tracks :
Press the Digit and +10/0 buttons, select the desired track number.
– Press Next ( ) button to see the next track.
– Press Previous ( ) button to see the previous track.
VCD View function
Press Zoom button during VCD playback.
Result: The picture being reproduced will be enlarged twice as large
as the previous one.
Press Zoom button once more in the state of double sized zoom.
Result: The picture being reproduced is enlarged four times as large
as the initial one.
Press Zoom button in the state of four times sized zoom.
Result: The picture will return to the initial size.
During operating the zoom function, if you want to move the
picture upward/downward/leftward/rightward, please press the
respective Digit buttons (2,4,6,8).
ZOOM Function
When you want to select a track
1
1
2
3
2
3
4
This function is convenient to search a desired scene as it
displays a track reproduced by time.
Reproduce the pictures by pressing VCD/CD
()
button.
Press the View button.
Result:
"INDEX VIEW" menu is displayed on the screen.
The screen is split into 9 with each screen picture being
reproduced for 4 seconds.
Reproduce the pictures by pressing a desired Digit buttons.
Result:
The one of nine picture is displayed in full screen.
When you want to select an INDEX
1
2
3
When CD playback is selected again after your CD player has
been stopped or turned off, this function allows playback from the
start of the track that you last listened to.
Press Time Search button in standby mode.
Result:
The track that you last listened to will play back.
Last Memory Function
2
3
2
1
1,2,3
GB
4
1
3
TRACK VIEW
1
23
456
789
INDEX VIEW
1
23
456
789
Page 18
GB
18
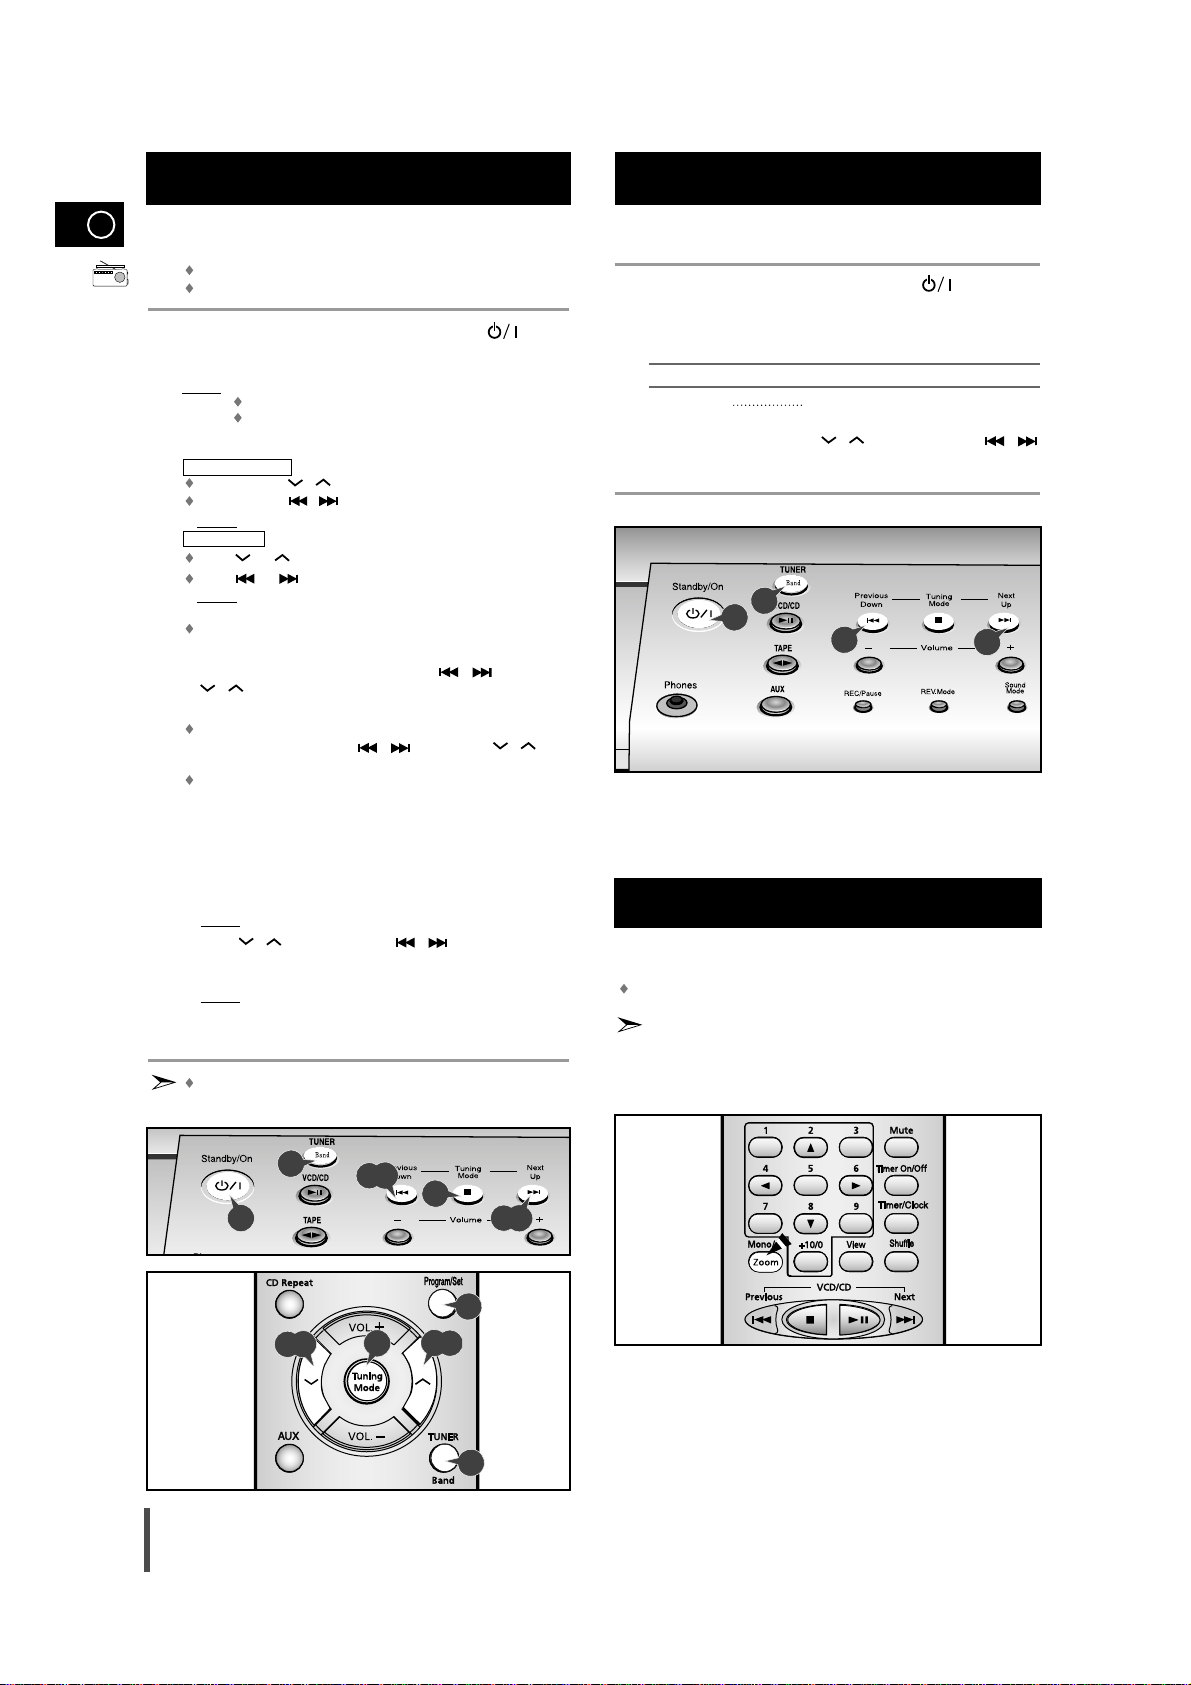
You can store up to:
15 FM stations
15 AM(MW) stations
Switch the system on by pressing Standby/On ( ) .
Select the required frequency band by pressing TUNER (Band)
again on the front panel.
Result: The appropriate indication is displayed:
FM Frequency Modulation
AM(MW) Medium Wave
Press Tuning Mode one or more times until MANUAL is displayed.
Automatic tuning
Press and hold , on the remote control.
Press and hold , on the main unit.
Result:
Automatically scans and tunes to the next available station.
Manual tuning
Press or on the remote control.
Press or on the main unit.
Result
: Press the button repeatedly to tune in the desired station
manually.
PRESET function is explained in detail in the section “Selecting a
Stored Station” on.
Select the station to be stored by pressing ,
(main unit)
or , (remote control) buttons to increase or decrease the
frequency respectively.
To scroll through the frequencies faster when searching
manually, hold down the ,
(main unit)
or ,
(remote control) buttons.
The automatic search procedure may stop on a frequency
that does not correspond to a radio station.
If this happens, use the manual search mode.
If you do not want to store the radio station found, revert to Step 4
and search for another station.
Otherwise:
a Press Program/Set.
Result:
The PROGRAM is displayed for a few seconds.
b Press , (remote control) or ,
(main unit)
to assign
a program number between 1 and 15.
c Press Program/Set to store the radio station.
Result:
PROGRAM is no longer displayed and the station is
stored.
To store any other radio frequencies required, repeat Steps 3 to 5.
The PROGRAM function can be used to assign a new station
to an existing program number.
You can improve the quality of radio reception by:
Rotating the FM or AM(MW) aerial
If reception from a specific FM radio station is poor, press Mono/ST.
to switch from stereo mode to mono. The quality of the sound will be
improved.
You can listen to a stored radio station as follows:
Switch the system on by pressing Standby/On ( ) .
Select the required frequency band by pressing TUNER(Band) .
Select the radio station as follows.
To listen to ... Press ...
Stored station 1.
the Tuning Mode button until “PRESET”
is displayed.
2. ,
(remote control) or
,
(main unit)
to select the required
program.
Selecting a Stored Station
1
2
3
Improving Radio Reception
1
2
3
1
2
3
4
5
6
Searching for and Storing the Radio Stations
5
4
3
5
4
2
1
5
4
5
4
2
3
5
3
Page 19
19
Always treat your cassettes with care; refer, if necessary, to
the section entitled “Precautions When Using Audio Cassettes”
on page 25.
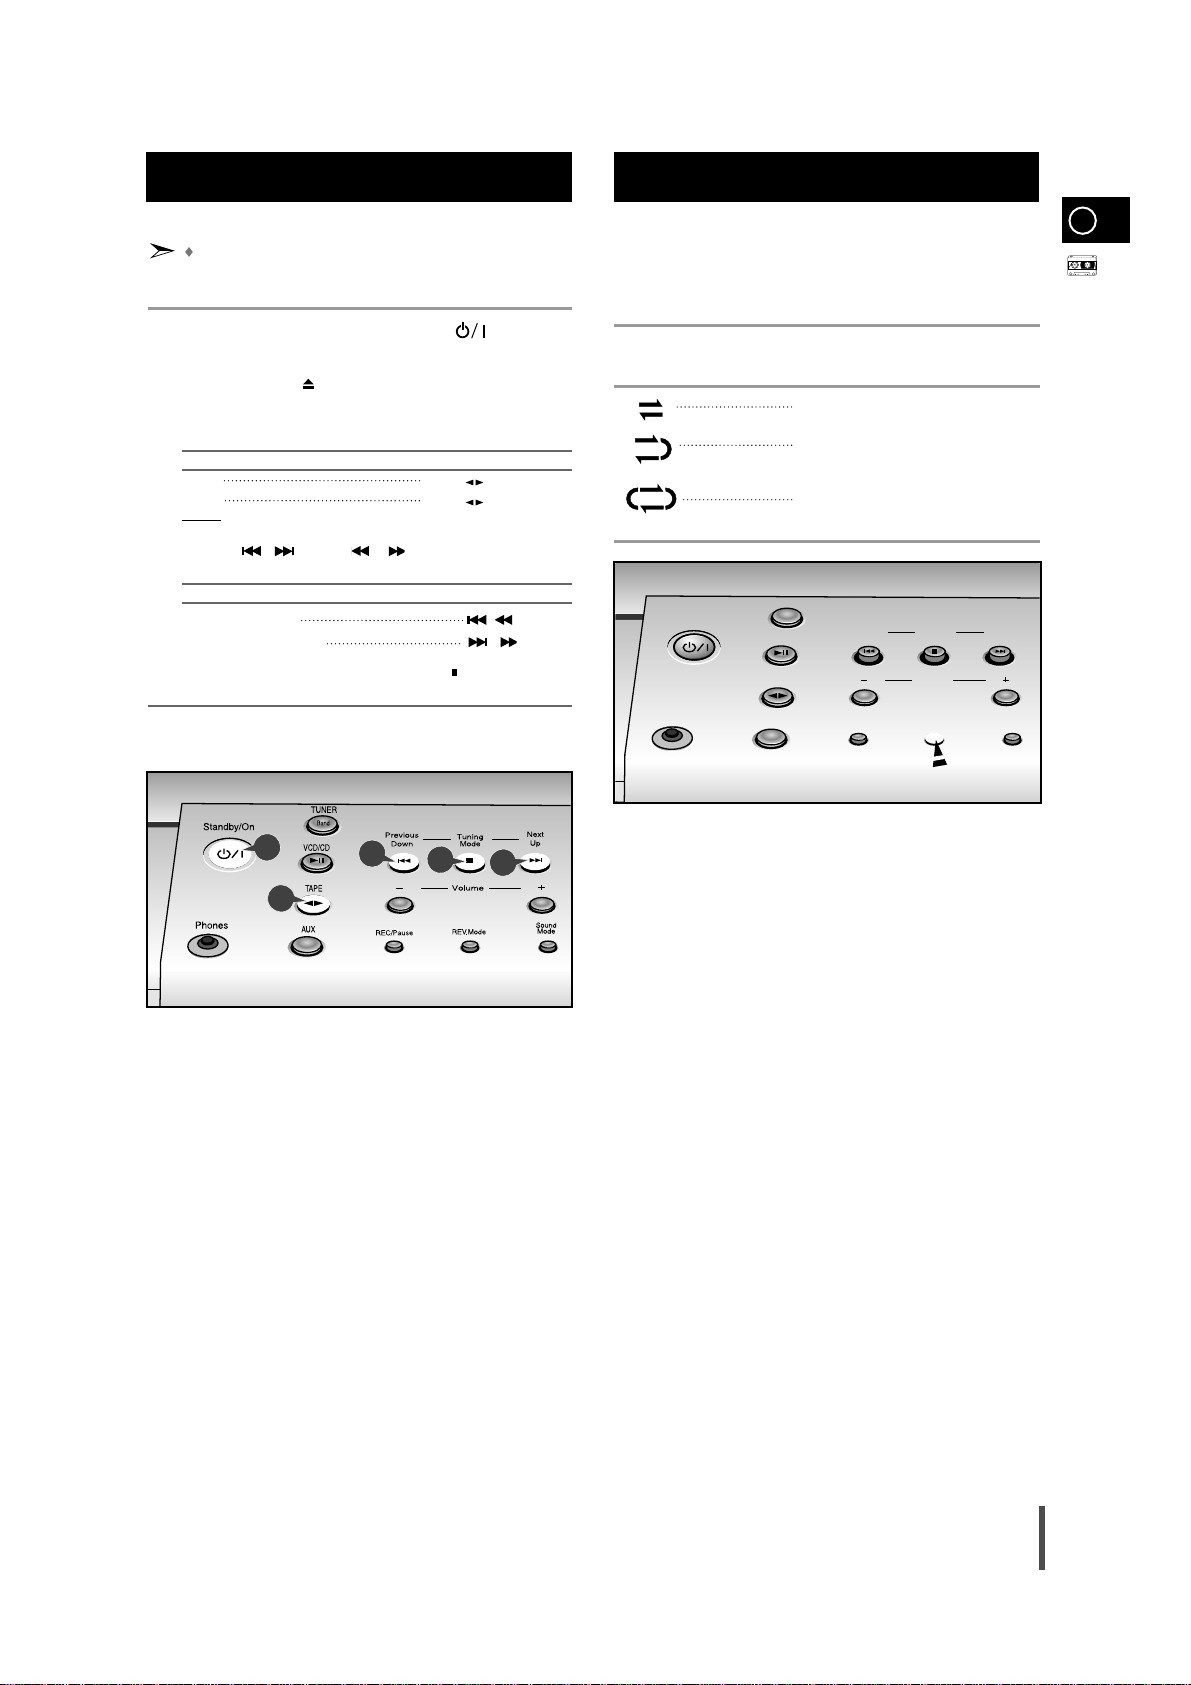
Switch the system on by pressing Standby/On ( ).
Open the cassette deck by pushing on the corner of the cover
marked Push Eject ( ) until you hear a click and then releasing it.
Close the deck by pushing on it until it clicks into place.
To listen to... Press ...
Side A Tape ( ) button once.
Side B Tape ( ) button twice.
Result:
The cassette starts playing.
Press the
, button or , on the remote control if nec-
essary.
To... Press ...
Rewind the cassette
()
button.
Fast-forward the cassette
()
button.
When you have finished playback, press Stop ()
button.
5
6
1
5
4
Your micro component system has three cassette playback
modes which enable you to listen to both sides of a cassette
automatically.
Press REV.Mode until the appropriate symbol is displayed.
When the display indicates... The micro component system plays
back...
One side of the selected cassette and
then stops.
One side of the cassette.
The other side of the cassette and then
stops.
Both sides of the cassette indefinitely until
you press stop.
Selecting the Cassette Playback Mode
Listening to a Cassette
1
2
3
4
5
6
GB
Standby/On
Phones
O
VCD/CD
TAPE
AUX
TUNER
Volume
Tuning
Mode
Pervious
Down
Next
Up
REC/Pause REV.Mode
Sound
Mode
Band
Page 20
You can record a radio program of your choice.
You do not need to adjust the volume, as it has no effect on
the recording.
Switch the system on by pressing Standby/On ( ) .
Insert a blank cassette in Deck.
Select the TUNER function by pressing TUNER(Band).
Select the radio station that you wish to record by pressing
or button .
Press REC/Pause.
Result:
REC is displayed in red and recording starts.
To stop recording, press Stop( ) button.
Standby/On
Phones
Op
VCD/CD
TAPE
AUX
TUNER
Volume
Tuning
Mode
D
REC/Pause REV.Mode
Sound
Mode
Band
Previous
Down
Next
Up
GB
20
1
2
3
4
5
6
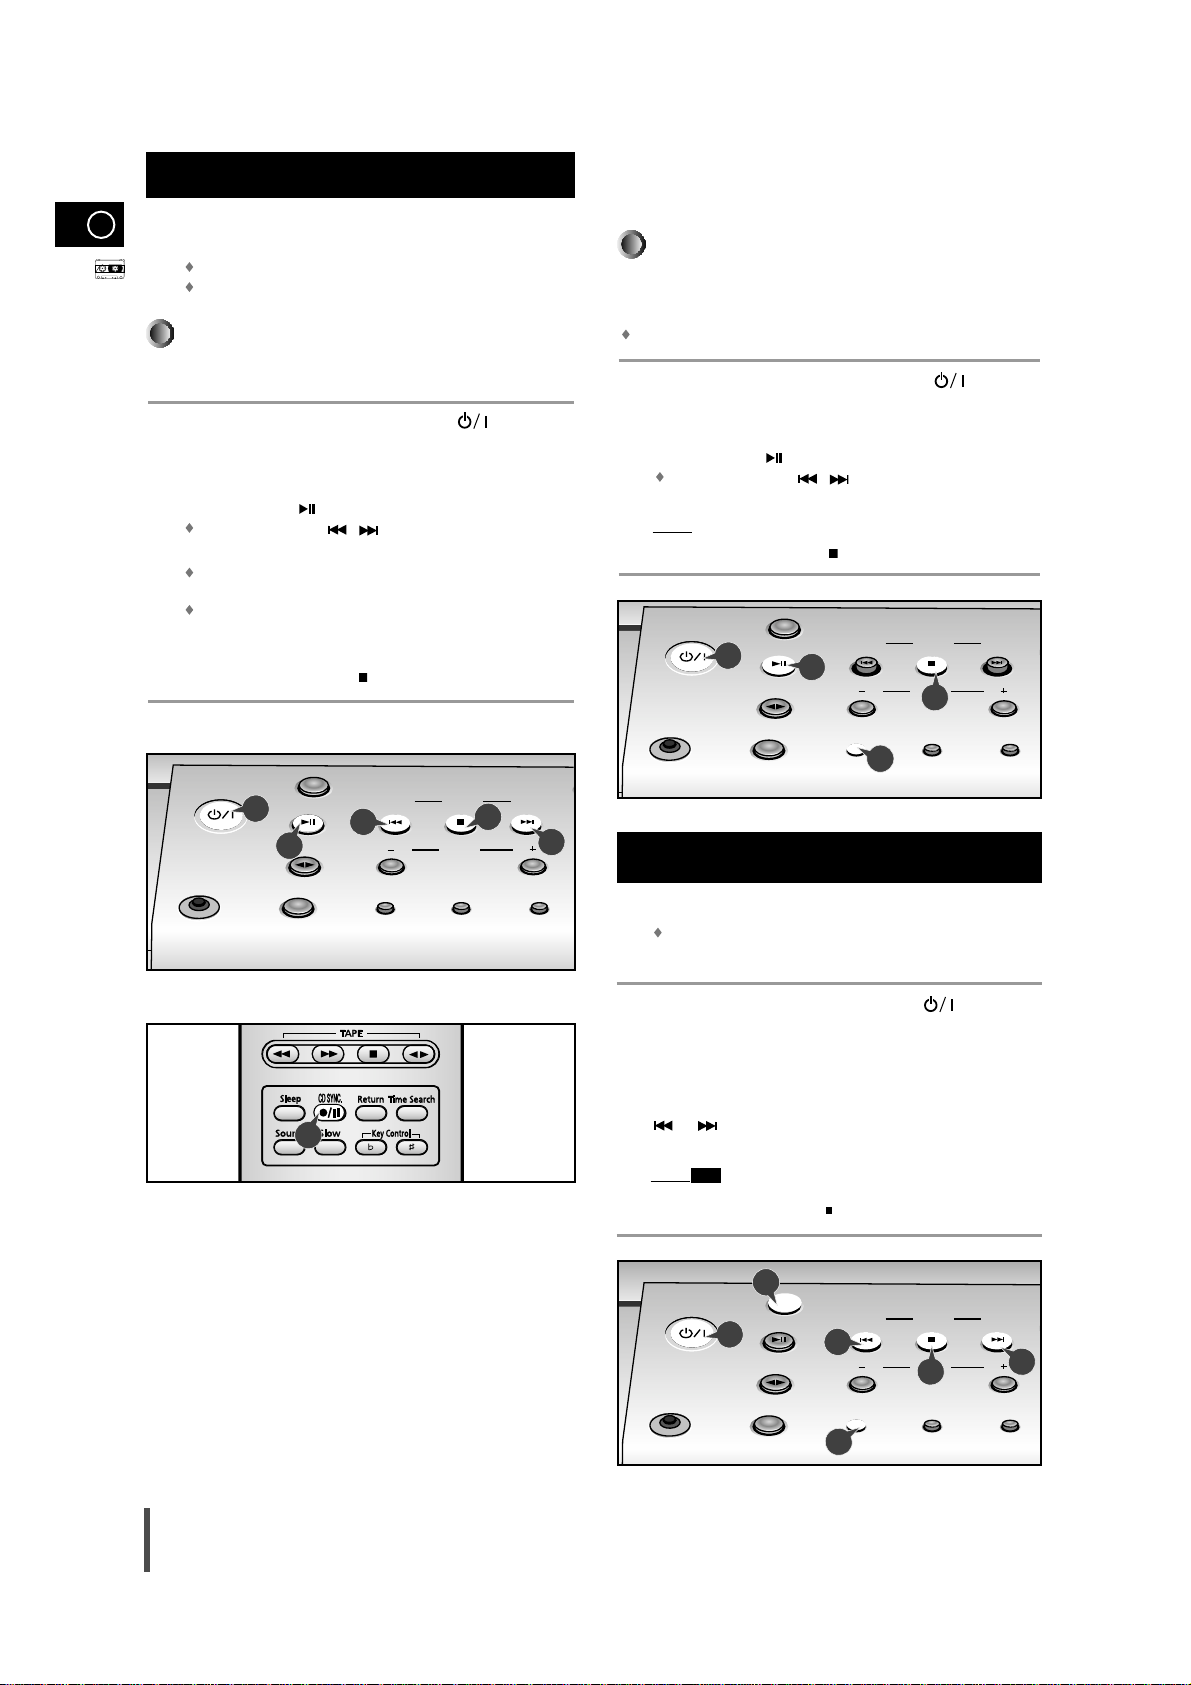
The direct recording mode enables you to start recording
with any track on the compact disc.
You do not need to adjust the volume, as it has no effect on the recording.
Switch your system on by pressing Standby/On ( ) .
Insert a blank cassette in Deck.
Load a compact disc.
Press the VCD/CD
()
button.
Use the CD selection ( , ) buttons to select the desired song.
Press the REC/Pause button.
Result: Recording will begin.
To stop recording, press Stop( )button.
Standby/On
Phones
Op
VCD/CD
TAPE
AUX
TUNER
Volume
Tuning
Mode
D
REC/Pause REV.Mode
Sound
Mode
Band
Previous
Down
Next
Up
Recording a Radio Program
4
1
4
5
6
3
You can record a compact disc on a cassette in two different ways:
Synchronised recording
Direct recording
This feature enables you to synchronize the start of the
recording with the start of the disc or track of your choice.
Switch the system on by pressing Standby/On ( ) .
Insert a blank cassette in Deck.
Load a compact disc.
Press the VCD/CD
()
button.
Use the CD selection ( , ) buttons to select the desired song.
Press the CD Synchro
button on the remote control.
When stopped, press the button to start the recording from the
first piece of music.
Press CD Synchro button
on the remote control
during the
playback of CD to start the recording from the first part of the
music being played.
To stop recording, press Stop( ) button.
Synchronised recording
1
2
3
4
5
6
1
2
3
4
5
6
Direct recording
Recording a Compact Disc
1
5
6
Standby/On
Phones
Op
VCD/CD
TAPE
AUX
TUNER
Volume
Tuning
Mode
Previous
Down
Next
Up
D
REC/Pause REV.Mode
Sound
Mode
Band
1
4
4
6
4
4
5
Page 21
GB
21
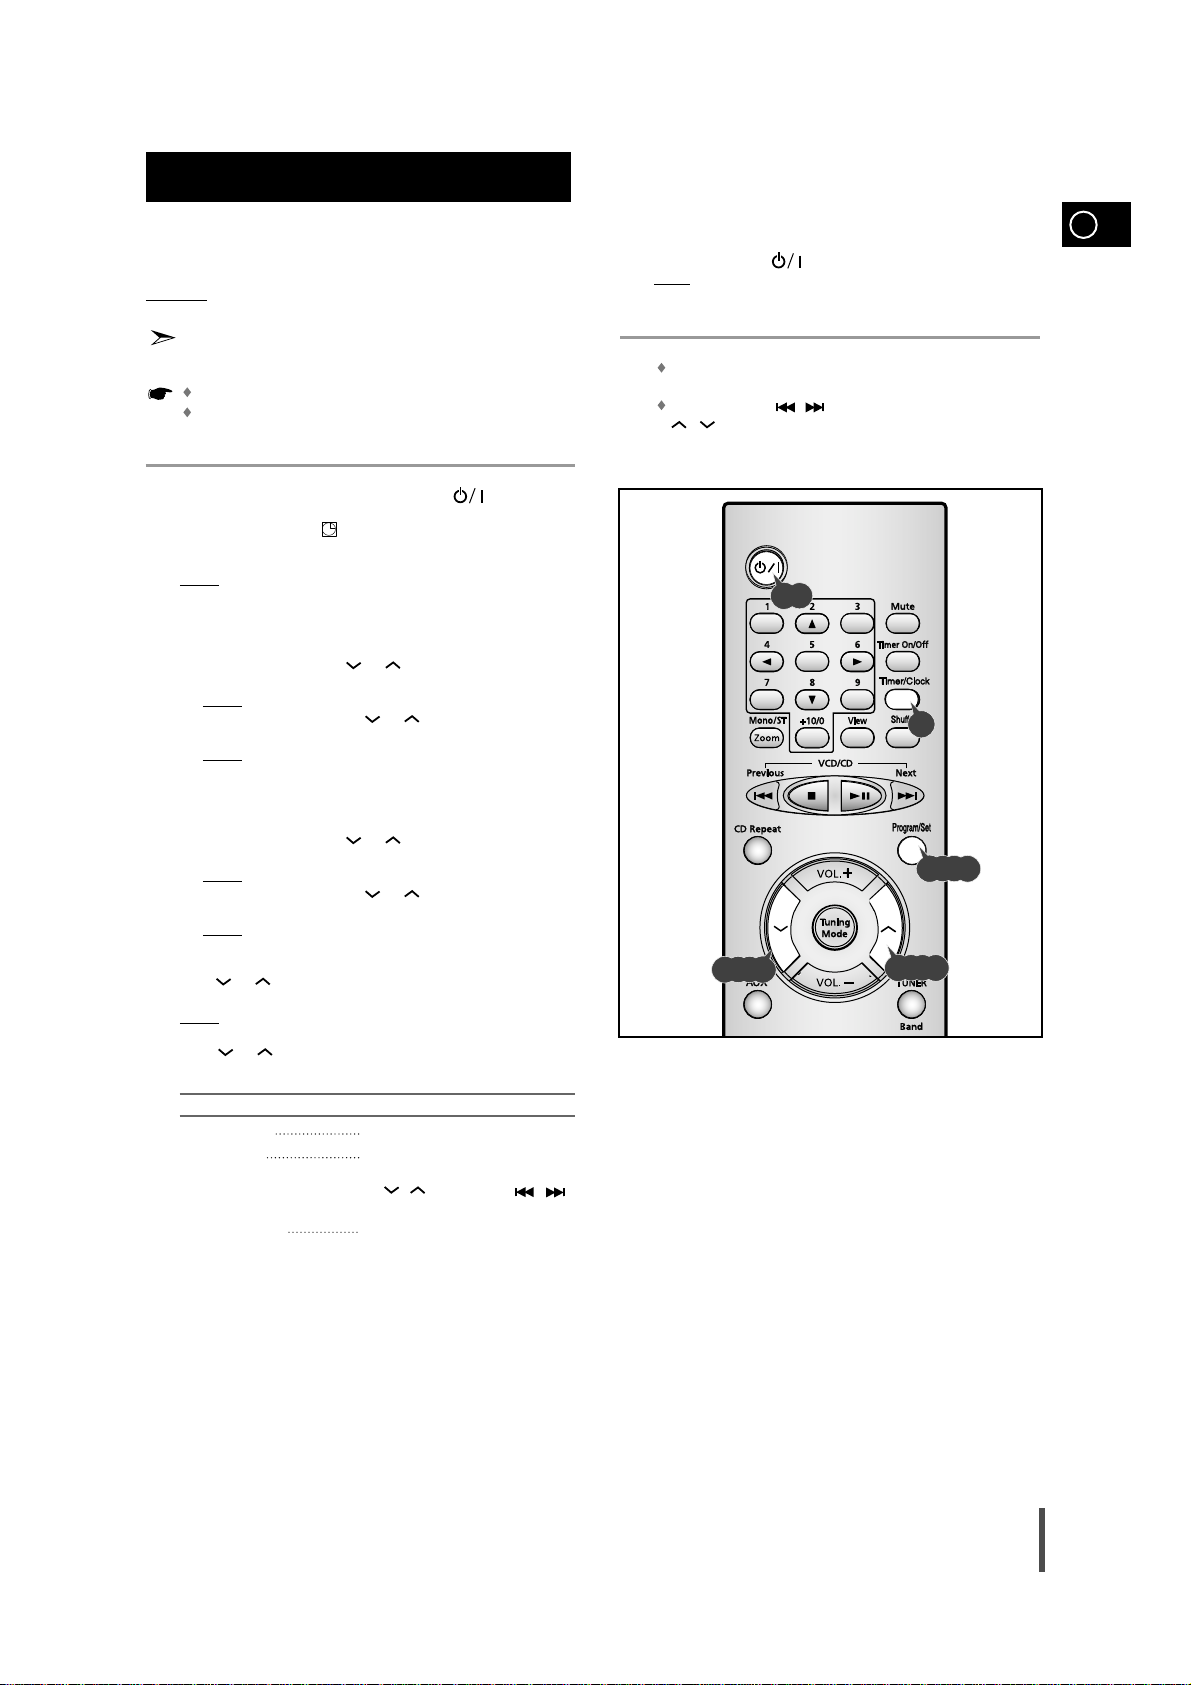
The timer enables you to switch the system on or off at
specific times.
Example: You wish to wake up to music every morning.
If you no longer want the system to be switched on or off
automatically, you must cancel the timer.
Before setting the timer, check that the current time is correct.
For each step, you have a few seconds to set the required
options. If you exceed this time, you must start again.
Switch the system on by pressing Standby/On ( ) .
Press Timer/Clock until TIMER is displayed.
Press Program/Set.
Result:
ON TIME is displayed (instead of the equalizer symbols) for a
few seconds, followed by any switch-on time already set; you
can set the timer switch-on time.
Set the timer switch-on time.
a Set the hour by pressing or button.
b Press Program/Set.
Result:
The minutes flash.
c Set the minutes by pressing or button.
d Press Program/Set.
Result:
OFF TIME is displayed (instead of the equalizer symbols)
for a few seconds, followed by any switch-off time already
set; you can now set the timer switch-off time.
Set the timer switch-off time.
a Set the hour by pressing or button.
b Press Program/Set.
Result:
The minutes flash.
c Set the minutes by pressing or button.
d Press Program/Set.
Result:
VOL 10 is displayed, where 10 corresponds to the
volume already set.
Press or button to adjust the volume level and press
Program/Set.
Result:
The source to be selected is displayed.
Press or button to select the source to be played when the
system switches on.
If you select... You must also...
TAPE (cassette) Insert a cassette tape.
TUNER (radio) a Press Program/Set.
b
Select a preset station by pressing
, (remote control) or ,
(main unit)
.
CD (compact disc) Load a compact disc.
Press Program/Set to confirm the timer.
Timer Function
7
5
6
1
2
3
4
1,9
Press Standby/On ( ) to set the system to standby mode.
Result
: is displayed to the upside left of the time, indicating that
the timer has been set. The system will switch on and off
automatically at the required times.
If the timer switch on and off times are identical, the word
ERROR is displayed.
You can use the
/ button on the main unit to instead
/ button in step 4,5,6,7.
8
9
2
4,5,6,7
3,4,5,6,7,8
4,5,6,7
Page 22
GB
Your micro component system is equipped with a preset equalizer
that allows you to choose the most appropriate
balance between treble and bass frequencies, according to the
type of music you are listening to.
The function of Power Sound amplifies bass and improves high
key or bass twice as much for you to appreciate powerful real
sound.
Press Sound Mode on the front panel until the required option is selected.
Press the button repeatedly to select “
POP ➞ ROCK ➞ CLAS-
SIC
➞
P.SOUND(Power Sound)➞PASS
”
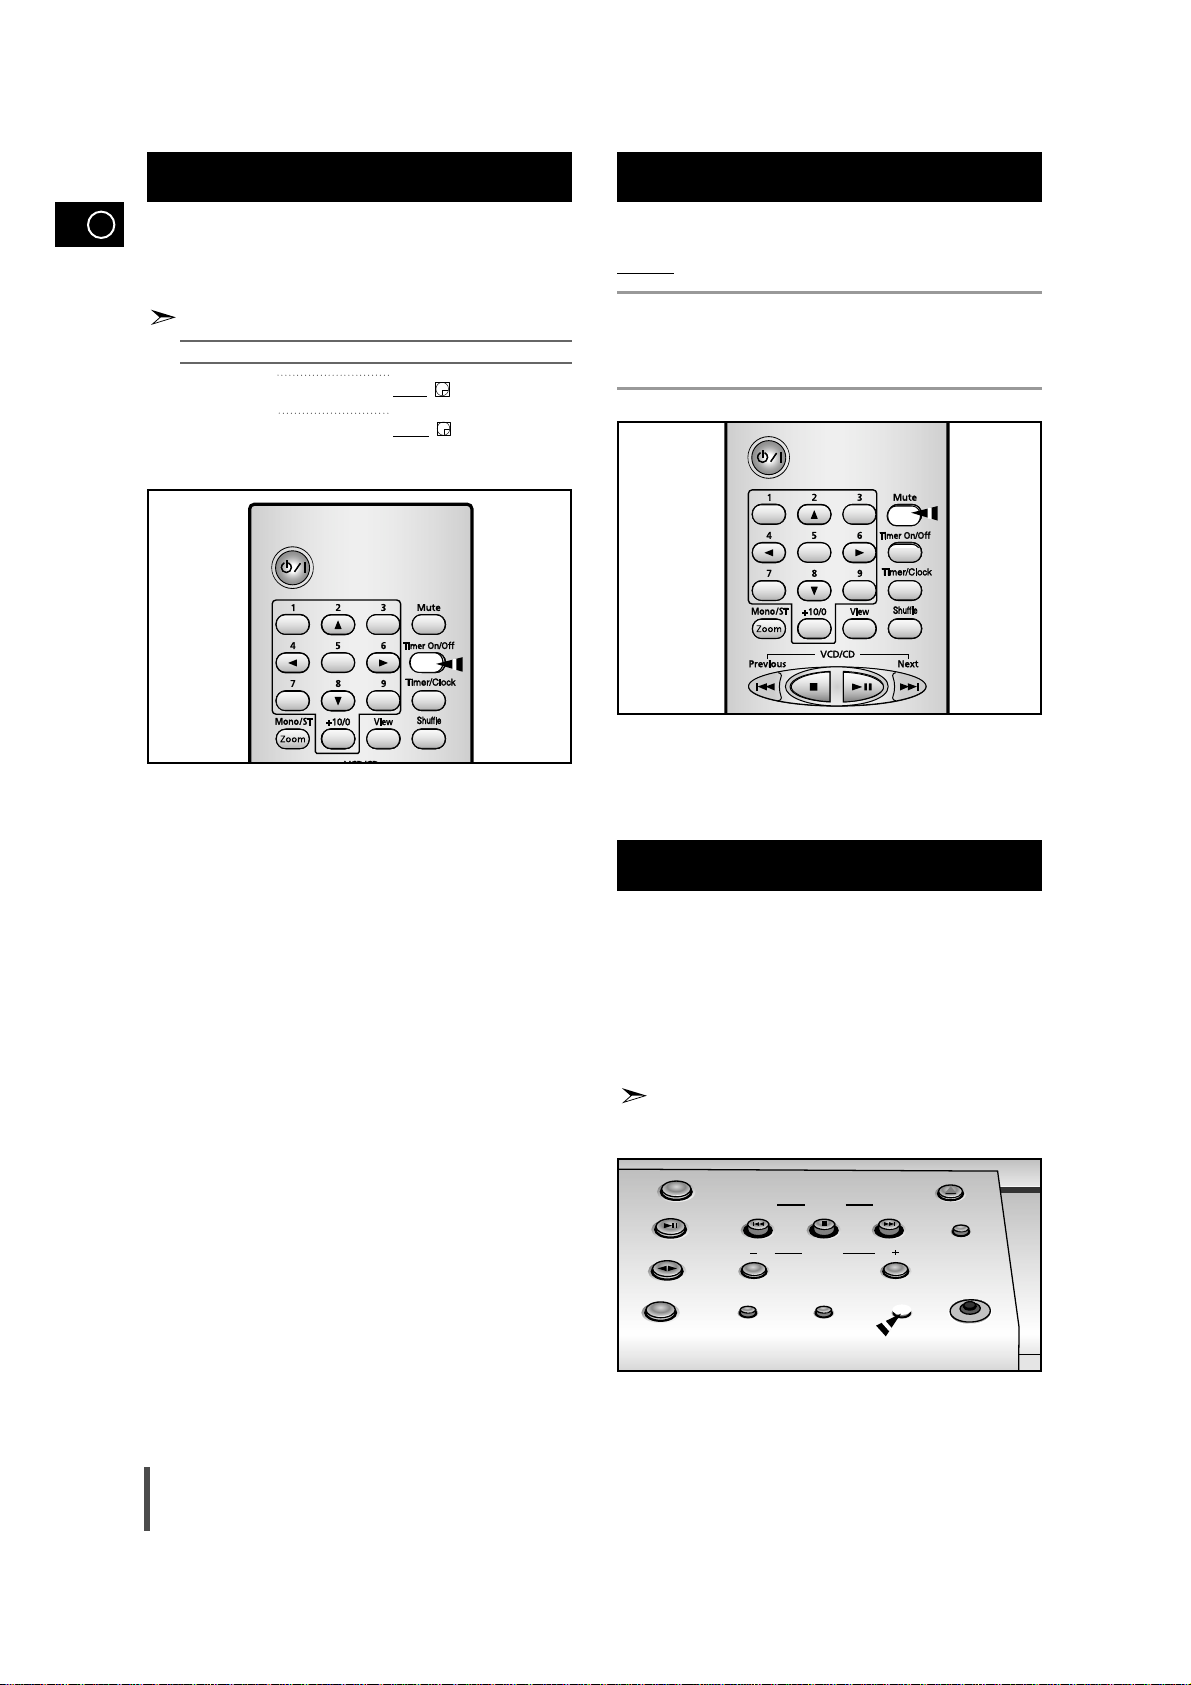
You can turn the sound off temporarily on your system.
Example
: You wish to answer a telephone call.
Press Mute.
To switch the sound back on (at the same volume as before), press
Mute again or the Volume buttons.
Mute Function
Selecting an Equalizer Preset
2
1
After having set the timer, it will start automatically as shown
by the TIMER indication on the display. If you no longer wish
to use the timer, you must cancel it.
You can stop the timer at any time (system on or in standby mode).
To... Press Timer On/Off...
Cancel the timer Once.
Result: is no longer displayed
.
Restart the timer Twice.
Result
: is displayed again.
Canceling the Timer
22
TUNER
Band
VCD/CD
TAPE
AUX
Pervious
Down
REC/Pause REV.Mode
Tuning
Mode
Volume
Next
Up
Sound
Mode
Open/Close
Demo
Mic
Page 23
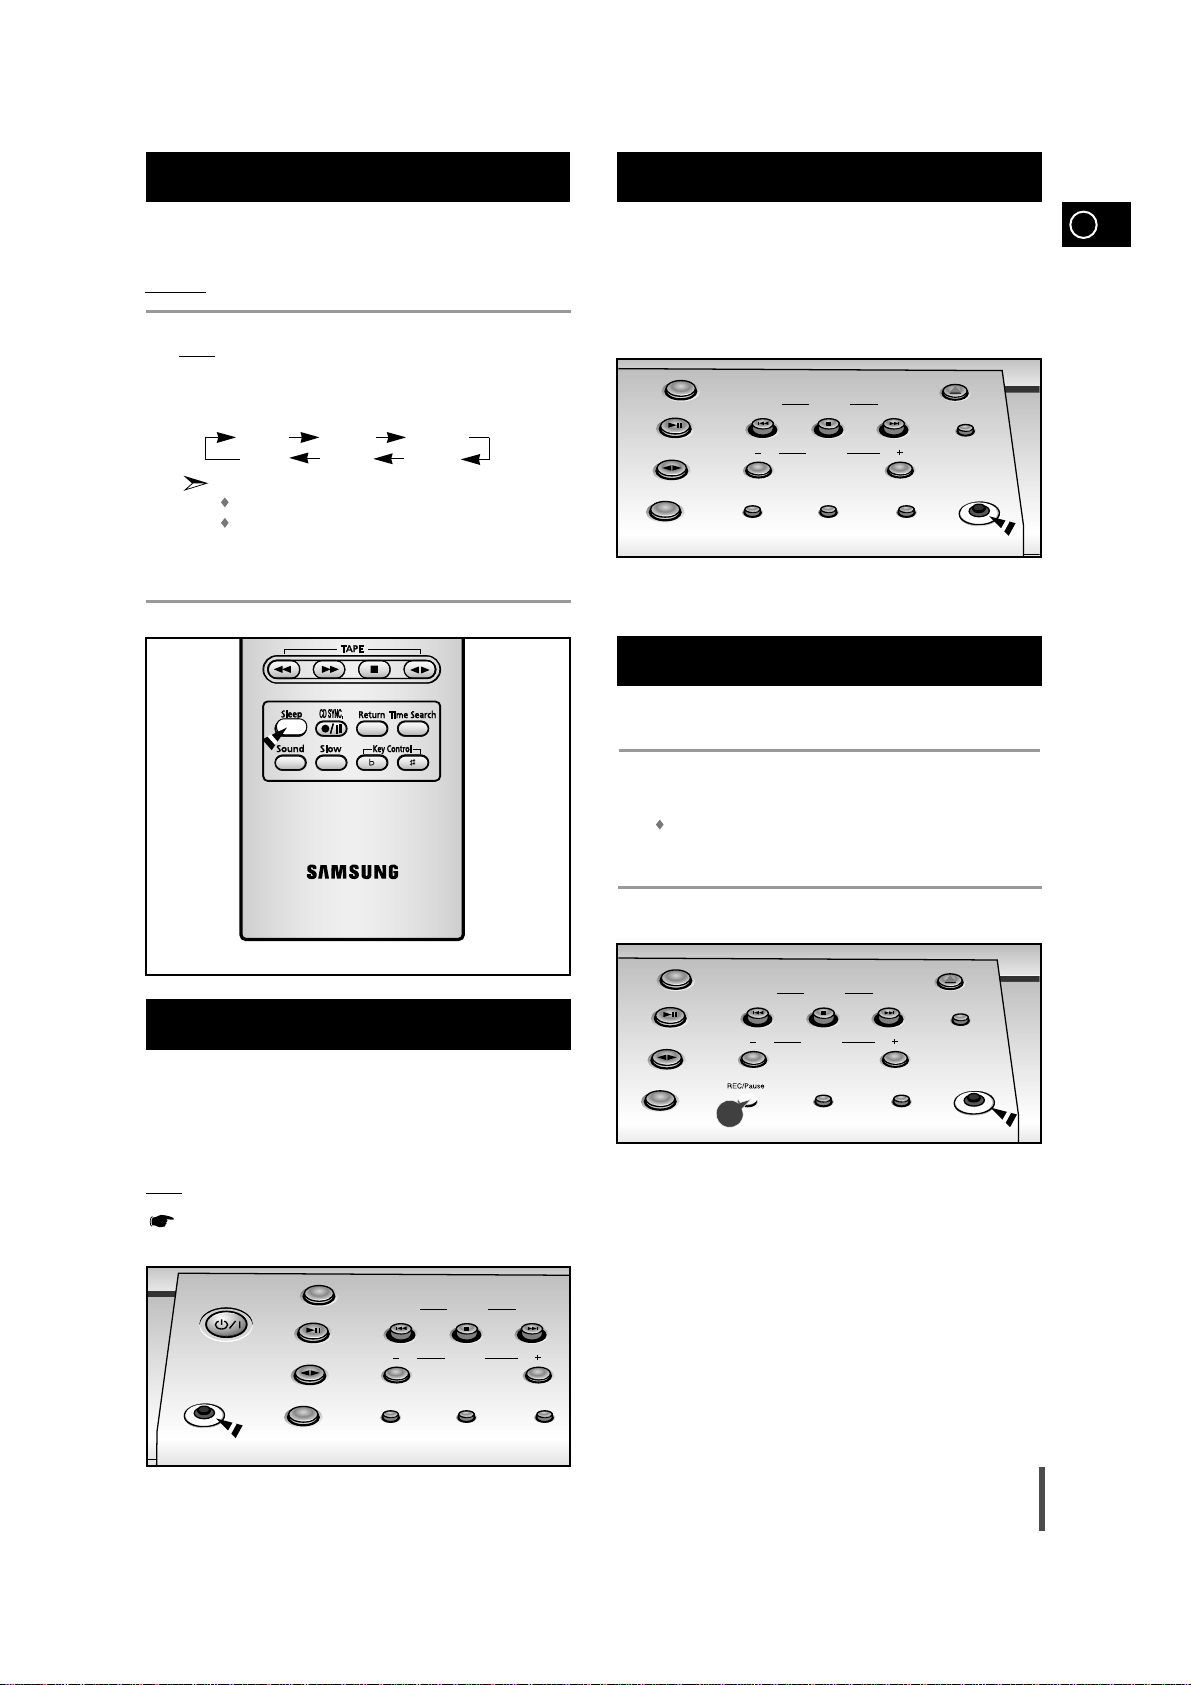
Connect the microphone to the microphone jack.
Insert the tape for recording in the deck.
Press REC/Pause button.
Recording starts.
Input the voice through the microphone.
GB
You can connect a set of headphones to your micro component
system so that you can listen to music or radio programmers
without disturbing other people in the room.
The earphones must have a 3.5
ø
jack or an appropriate adapter.
Connect the headphones to the Phones jack on the front panel.
Result
: The loudspeakers are no longer used to output the sound.
Prolonged use of headphones at a high volume may damage
your hearing.
While listening to a compact disc or a cassette, you can
set the system to switch off automatically
Example: You wish to go to sleep to music.
Press Sleep on the remote control.
Result: The following indications are displayed:
Press Sleep one or more times to indicate how long the
system should continue playing before it switches off:
At any time, you can:
Check the remaining time by pressing Sleep
Change the remaining time by repeating Steps 1 and 2
To cancel SLEEP function, press Sleep one or more times until
OFF is display.
Setting the System to Switch off Automatically
Connecting Headphones
1
2
3
90 MIN
90 MIN 60 MIN 45 MIN
OFF 15 MIN 30 MIN
Microphone (not supplied) Function
The microphone enables the user to mix in his or her vocals
to sing-along with the music.
Preparation
Plug the microphone with a 3.5mm mic jack into microphone terminal.
Recording with the Microphone
Open/Close
VCD/CD
TAPE
AUX
TUNER
Volume
Tuning
Mode
Pervious
Down
Next
Up
Demo
Mic
REC/Pause REV.Mode
Sound
Mode
Band
1
2
3
2
23
Standby/On
TUNER
Band
VCD/CD
TAPE
Pervious
Down
Tuning
Mode
Volume
O
Next
Up
TUNER
Band
VCD/CD
TAPE
AUX
Pervious
Down
Tuning
Mode
Volume
REV.Mode
Open/Close
Next
Up
Demo
Sound
Mode
Mic
Phones
AUX
REC/Pause REV.Mode
Sound
Mode
Page 24
GB
24
To obtain the best possible results from your micro component system, you must clean the following elements regularly:
The outer casing
The compact disc player
The cassette players (heads, rollers and drive capstans)
Always unplug the system from the wall outlet:
Before cleaning it
If you are not going to be using it for a long time
Outer Casing
Clean the outer casing regularly using a soft cloth and a light detergent. Do
not use abrasive powders, liquids or aerosol cleaners. Never let any liquids
get into the system.
Compact Disc Player
Before playing a compact disc, clean it with a special CD cleaning
agent. Do not use the same cleaning agents as for vinyl LP records.
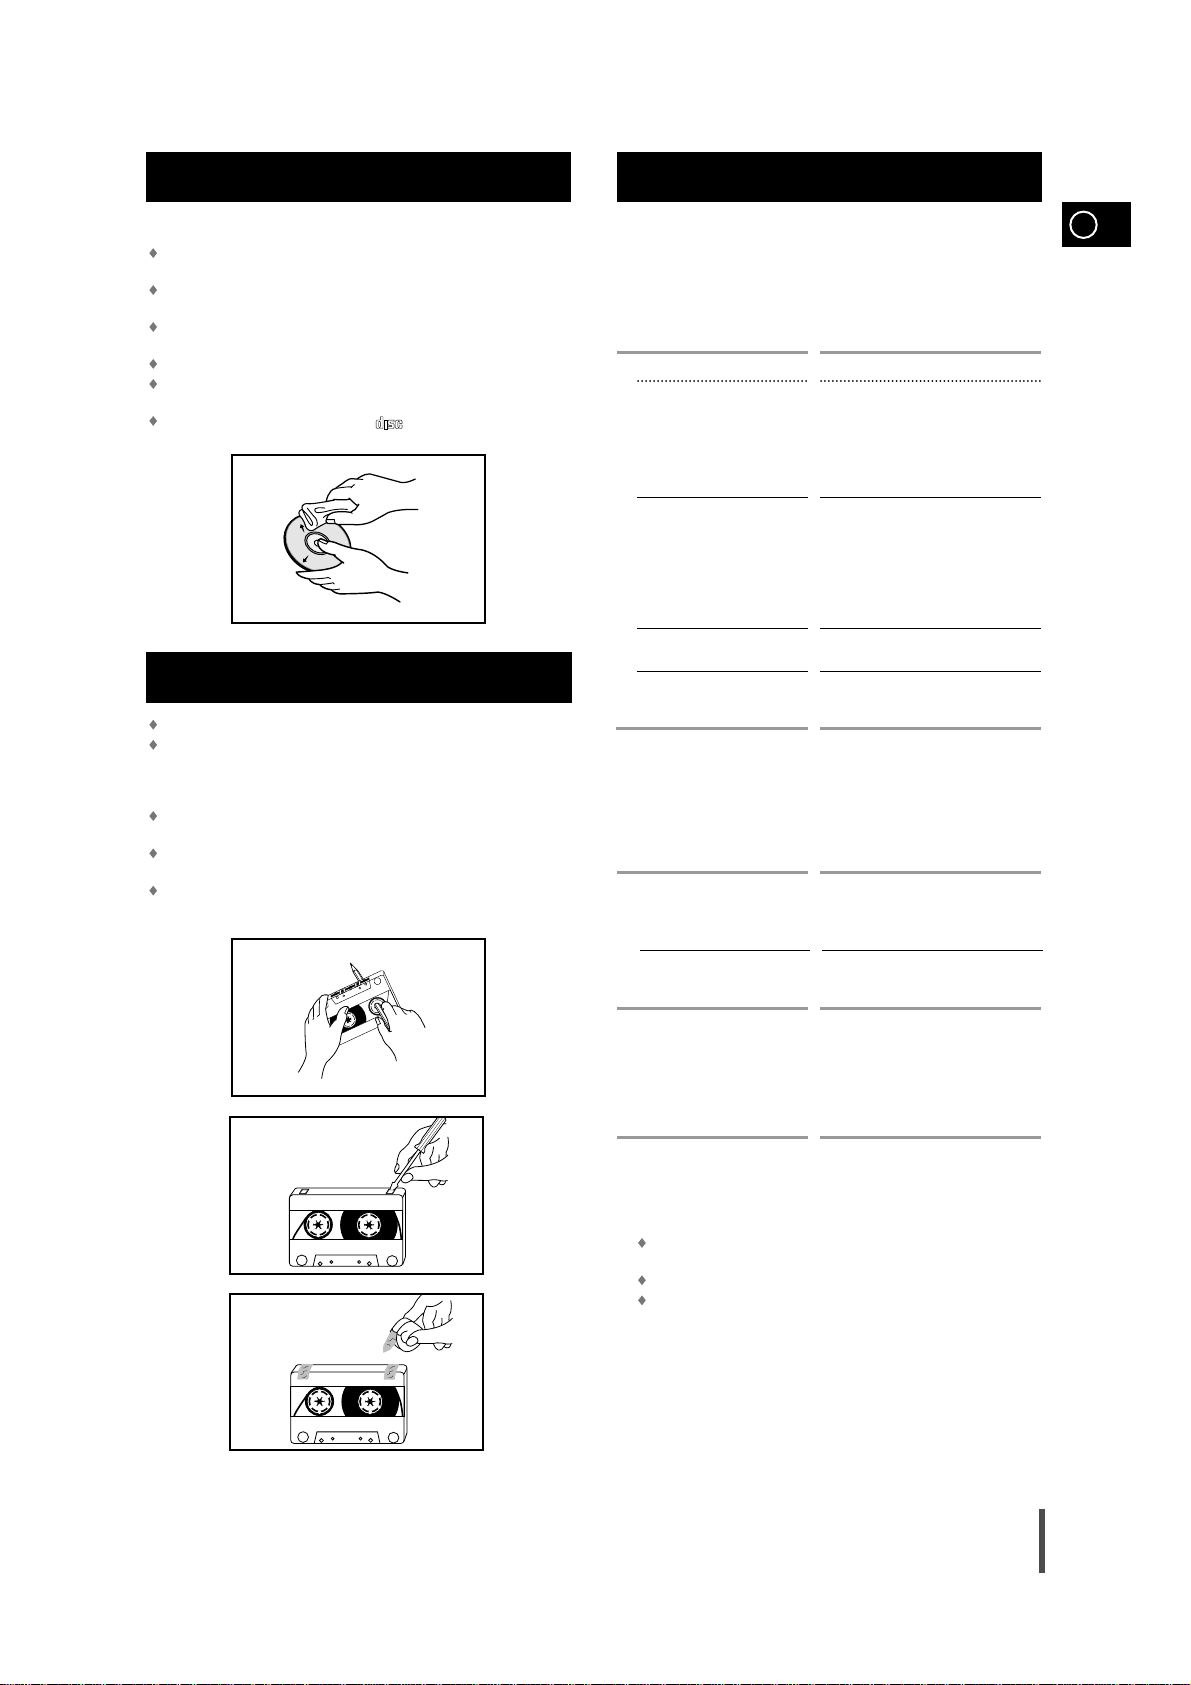
Carefully wipe the disc from the centre outward.
Regularly clean the player with a special cleaning disc (available from
your local dealer).
Tape Decks
Press Push Eject( ) to open the cassette deck.
Use a cotton bud and a special cassette cleaning agent to clean the:
Head (1)
Rollers (2)
Drive capstans (3)
If you will not be using the remote control for a long time,
remove the batteries to prevent corrosion.
Although your system is very hard-wearing, it should not be
used in an excessively dusty environment or subjected to
shocks or extreme heat (close to heating appliances or in
direct sunlight, etc.).
If the unit emits an unpleasant odor when in use, unplug it
from the main supply and contact the after-sales service.
Cleaning Your Micro Component System
1
1
2
2
3
21
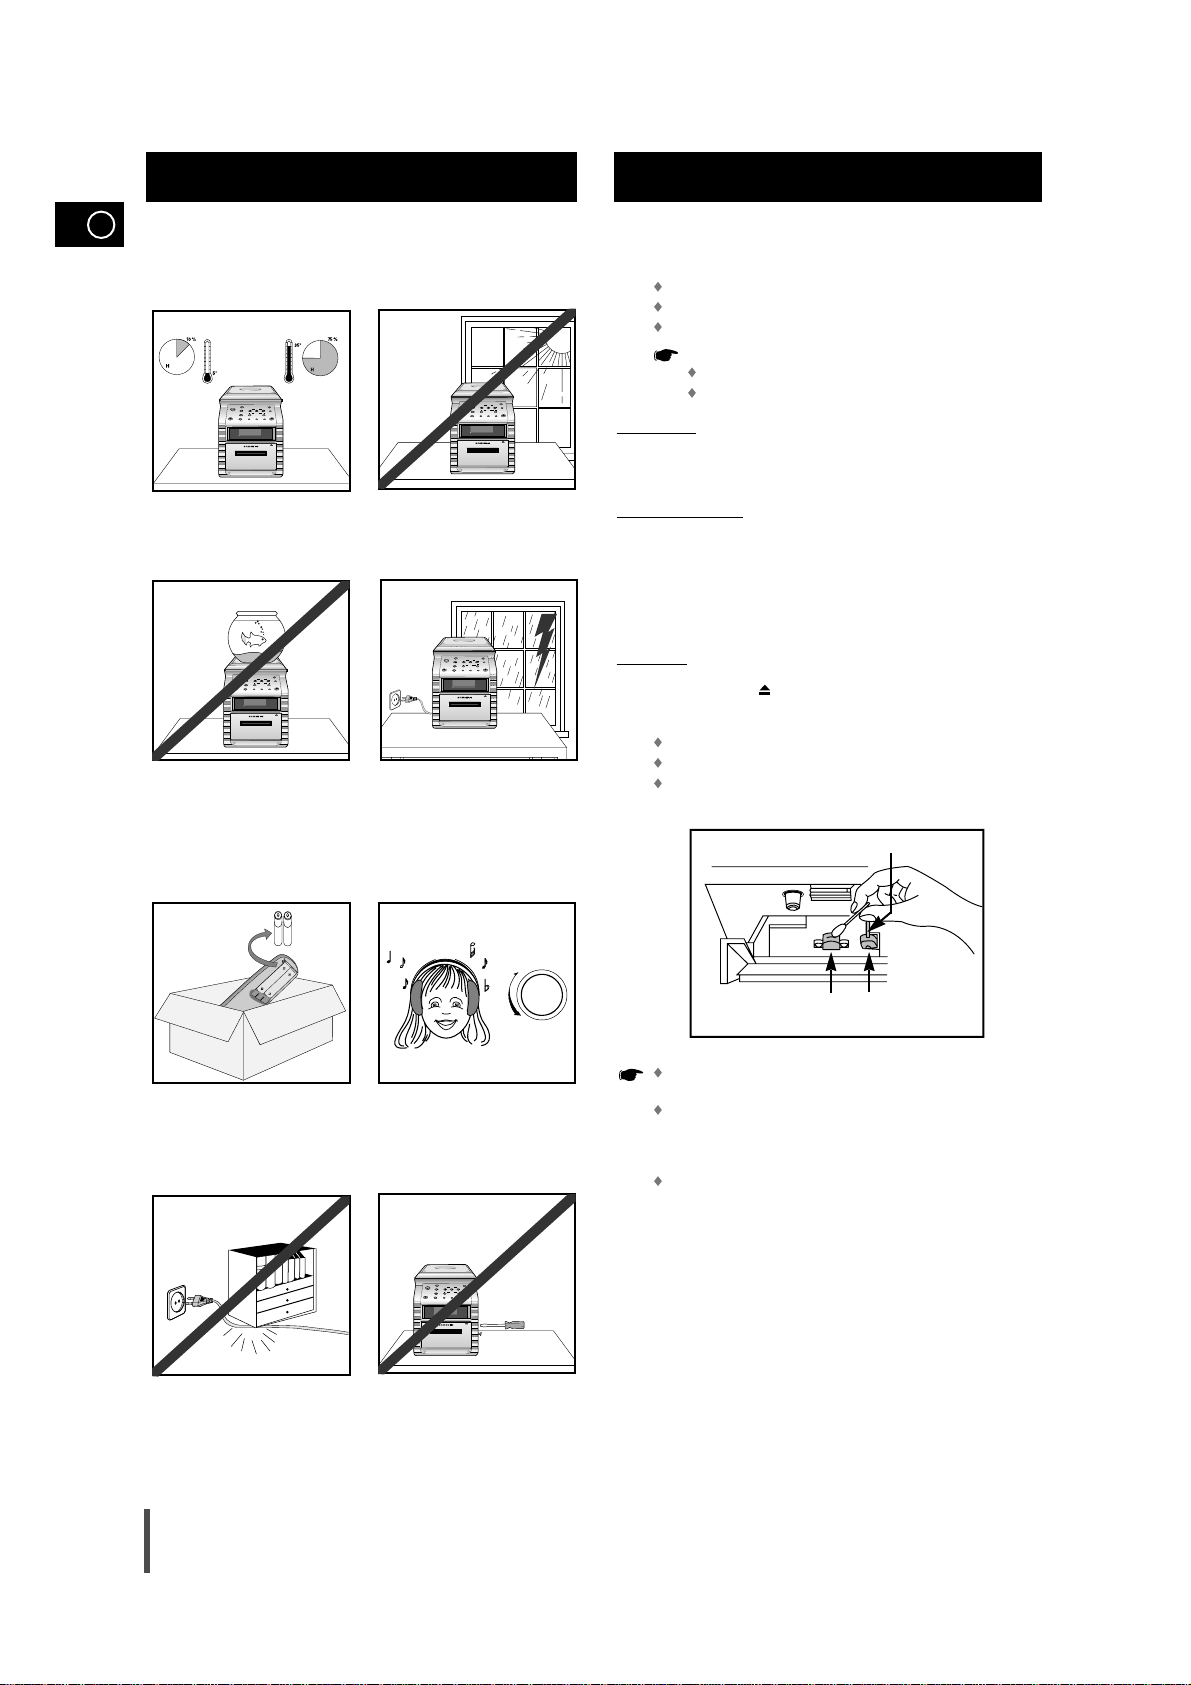
The following diagrams illustrate the precautions to be taken
when using or moving your micro component system.
Safety Precautions
Ambient operating conditions:
Ambient temperature 5°C-35°C
Humidity 10-75%
Do not expose the unit to direct sun
radiation or other heat sources.
This could lead to overheating and
malfunction of the unit.
Do not place potted plants or vases
on top of the unit. Moisture entering
the unit could lead to dangerous
electric shock and can cause
equipment damage. In such events
immediately disconnect the main
plug from the socket.
Remove the batteries from the
remote control, if not used for any
extended period.
Leaking batteries can cause serious
damage to the remote control.
When using headphones, take care
not to listen at excessive volumes.
Extended use of headphones at
high volumes will lead to hearing
damage.
Do not place heavy items on the
main lead. Main cable damage can
lead to damage of the equipment
(fire hazard) and can cause electric
shock.
Do not remove any equipment panels.
The inside of the unit contains live
components, which cause electric
shock.
During thunderstorms,
disconnect the main plug from the
socket.
Main voltage peaks due to lightning
could damage the unit.
TUNER
Open/Close
Band
Standby/On
Tuning
Next
Previous
Mode
Up
Down
VCD/CD
Demo
Volume
TAPE
Phones
Mic
Sound
AUX
Mode
REC/Pause REV.Mode
Push EjectPush Eject
Full Auto Remote Control Operation
TUNER
Open/Close
Band
Standby/On
Tuning
Next
Previous
Mode
Up
Down
VCD/CD
Demo
Volume
TAPE
Phones
Mic
Sound
AUX
Mode
REC/Pause REV.Mode
Push EjectPush Eject
Full Auto Remote Control Operation
TUNER
Band
Standby/On
VCD/CD
TAPE
Phones
AUX
Full Auto Remote Control Operation
TUNER
Open/Close
Band
Standby/On
Tuning
Next
Previous
Mode
Up
Down
VCD/CD
Demo
Volume
TAPE
Phones
Mic
Sound
AUX
Mode
REC/Pause REV.Mode
Push EjectPush Eject
Full Auto Remote Control Operation
Open/Close
Tuning
Next
Previous
Mode
Up
Down
Demo
Volume
Mic
Sound
Mode
REC/Pause REV.Mode
Push EjectPush Eject
VOLUME
UP
DOWN
TUNER
Open/Close
Band
Standby/On
Tuning
Next
Previous
Mode
Up
Down
VCD/CD
Demo
Volume
TAPE
Phones
Mic
Sound
AUX
Mode
REC/Pause REV.Mode
Push EjectPush Eject
Full Auto Remote Control Operation
Page 25
GB
25
It always takes a little time to become familiar with a new appliance.
If you have any of the problems listed below, try the solutions given.
They may save you the time and inconvenience of an unnecessary
service call.
If the above guidelines do not allow you to solve the problem, take a
note of:
The model and serial numbers, normally printed on the rear of
the system
Your warranty details
A clear description of the problem
Then contact your local dealer or SAMSUNG after-sales service.
Check that the tape in the cassette is sufficiently taut.
To prevent erasing a cassette that you wish to keep, remove the
safety tab on the upper edge of the cassette. To record a cassette,
where the tab has been broken, simply cover the opening with
adhesive tape.
When you have finished playing a cassette, always put it back in its
case.
Store your cassettes in a clean place, out of direct sunlight, where
they will not be exposed to high temperatures.
Avoid using 120-minute cassettes as they place unnecessary strain
on the tape mechanism.
Handle your compact discs with care. Always hold them by the
edges to avoid leaving fingerprints on the shiny surface.
When you have finished playing a compact disc, always put it back
in its case.
Do not fix paper or adhesive tape to the discs and do not write on
the label.
Clean them with a special-purpose cloth.
Store your compact discs in a clean place, out of direct sunlight,
where they will not be exposed to high temperatures.
Always use compact discs marked .
Precautions When Using Compact Discs
Before Contacting the After-Sales Service
Precautions When Using Audio Cassettes
Problem
The system does not work
There is no sound
The Timer does not work
In case it does not work, even the
action is taken as above.
The compact disc player does not
start playing
The tape does not start playing
The volume falls off
The cassette is not erased correctly
There is excessive wow and flutter
Reception is poor or no radio
stations are received at all
G
E
N
E
R
A
L
C
D
R
A
D
I
O
C
A
S
S
E
T
T
E
S
Checks/Explanation
• The main lead is not correctly plugged into
a wall socket or the wall socket is not
switched on.
• The remote control batteries need replacing
or the polarity has not been respected.
• The Standby/On button has not been
pressed.
• The volume has been completely turned
down.
• The correct function (TUNER, CD, TAPE,
AUX) has not been selected.
• You have connected a set of earphones.
• The loudspeaker wires have been
disconnected.
• The Mute button has been pressed.
• The timer has been stopped by pressing
Timer On/Off.
• Press the Sound Mode button for 5
seconds in power ‘OFF’(standby), then it is
returned the original position (RESET)
• The CD function has not been selected.
• The disc has been inserted face down or is
either dirty or scratched.
• The laser sensor is dirty or dusty.
• The system has not been installed on a flat,
horizontal surface.
• Condensation has formed in the player;
leave the system in a warm, airy room for at
least one hour.
• The TAPE function has not been selected.
•
The cassette has not been inserted correctly.
• The cassette player has not been closed.
• The tape is either slack or broken.
• The audio heads are dirty.
• The rollers or drive capstans are dirty.
• The tape is worn.
• The TUNER function has not been selected.
• The radio frequency has not been correctly
selected.
• The aerial has been disconnected or is not
facing the right way. Turn it until you find
the best orientation.
• You are in a building that blocks radio
waves; you must use an outside aerial.
DIGITAL AUDIO
COMPACT
Page 26
GB
26
SAMSUNG strives to improve its products at all times. Both the design specifications and these user
instructions are thus subject to change without notice.
Technical Specifications
RADIO
LW(option)
Usable sensitivity 60 dB
SW(option)
Usable sensitivity 40 dB
AM (MW)
Signal/noise ratio 40 dB
Usable sensitivity 54 dB
Total harmonic distortion 2 %
FM
Signal/noise ratio 62 dB
Usable sensitivity 3 dB
Total harmonic distortion 0.5 %
COMPACT DISC PLAYER
Frequency range 20 Hz - 20 KHz (±1 dB)
Signal/noise ratio 90 dB (at 1 KHz) with filter
Distortion 0.05 % (at 1 KHz)
Channel separation 75 dB
Disc sizes Diameter: 120 or 80 mm. Thickness: 1.2 mm
TAPE DECK
Frequency range 125 Hz ~ 10 KHz
Signal/noise ratio 40 dB
Channel separation 35 dB
Erasing effect 60 dB
AMPLIFIER
Output power (4Ω) 2 X 20 Watts RMS (total harmonic distortion : 10%)
Channel separation 50 dB
Signal/noise ratio 70 dB
GENERAL
Dimensions 150(W) x 233 (H) x 287(D) mm
Page 27
ELECTRONICS
THIS APPLIANCE IS MANUFACTURED BY:
AH68-01157B
 Loading...