

Page 1

ML-330x Series
ML-331x Series
ML-371x Series
User’s Guide
Basic
imagine the possibilities
This guide provides information concerning installation, basic operation and troubleshooting on
windows.
Page 2

2
Contents
1. Introduction
5 Key benefits
7 Features by models
8 Useful to know
9 About this user’s guide
10 Safety information
16 Machine overview
19 Control panel overview
22 Turning on the machine
23 Installing the driver locally
24 Reinstalling the driver
2. Menu overview and basic setup
28 Menu overview
30 Printing a demo page
31 Changing the display language
32 Media and tray
43 Basic printing
3. Maintenance
50 Ordering supplies and accessories
51 Available supplies
52 Available accessories
53 Available maintenance parts
54 Redistributing toner
56 Replacing the toner cartridge
58 Upgrading a memory module
60 Monitoring the supplies life
61 Setting the toner low alert
62 Cleaning the machine
4. Troubleshooting
67 Tips for avoiding paper jams
68 Clearing paper jams
74 Understanding the status LED
77 Understanding display messages
5. Appendix
83 Specifications
Page 3

3
93 Regulatory information
104 Copyright
Page 4

1. Introduction
This chapter provides information you need to know before using the
machine.
•Key benefits 5
•Features by models 7
•Useful to know 8
• About this user’s guide 9
• Safety information 10
• Machine overview 16
• Control panel overview 19
• Turning on the machine 22
• Installing the driver locally 23
• Reinstalling the driver 24
Page 5
Key benefits
Environmentally friendly
• To save toner and paper, this machine supports Eco feature.
• To save paper, you can print multiple pages on one single sheet of
paper (see Advanced Guide).
• To save paper, you can print on both sides of the paper (doublesided printing) (see Advanced Guide).
• To save electricity, this machine automatically conserves electricity
by substantially reducing power consumption when not in use.
Print with excellent quality and speed
• You can print with a resolution of up to 1,200 x 1,200 dpi effective
output.
• Fast, on-demand printing.
ML-330x:
- For single-side printing, 31 ppm (A4) or 33 ppm (Letter).
ML-331xD/ ML-331xND:
- For single-side printing, 31 ppm (A4) or 33 ppm (Letter).
- For duplex printing, 15 ppm (A4) or 16 ppm (Letter).
ML-371xD/ ML-371xND/ ML-371xDW:
- For single-side printing, 35 ppm (A4) or 37 ppm (Letter).
- For duplex printing, 17 ppm (A4) or 18 ppm (Letter).
Convenience
• Samsung Easy Printer Manager and Samsung Printer Status (or Smart
Panel) are a program that monitors and informs you of the machine’s
status and allows you to customize the machine’s settings (see
Advanced Guide).
• AnyWeb Print helps you screen-capture, preview, scrap, and print
the screen of Windows Internet Explorer more easily, than when you
use the ordinary program (see Advanced Guide).
Page 6

Key benefits
Wide range of functionality and application support
• Supports various paper sizes (see "Print media specifications" on page 85).
• Print watermark: You can customize your documents with words, such as “Confidential” (see Advanced Guide).
• Print posters: The text and pictures of each page of your document are magnified and printed across the multiple sheets of paper and can then
be taped together to form a poster (see Advanced Guide).
• You can print in various operating systems (see "System requirements" on page 88).
• Your machine is equipped with a USB interface and/or a network interface.
Expand your machine’s capacity
• This machine has an extra memory slot for adding more memory (see "Available accessories" on page 52).
• ML-371xD/ ML-371xND/ ML-371xDW: Emulation compatible with PostScript 3 (PS3) enables PS printing.
Page 7
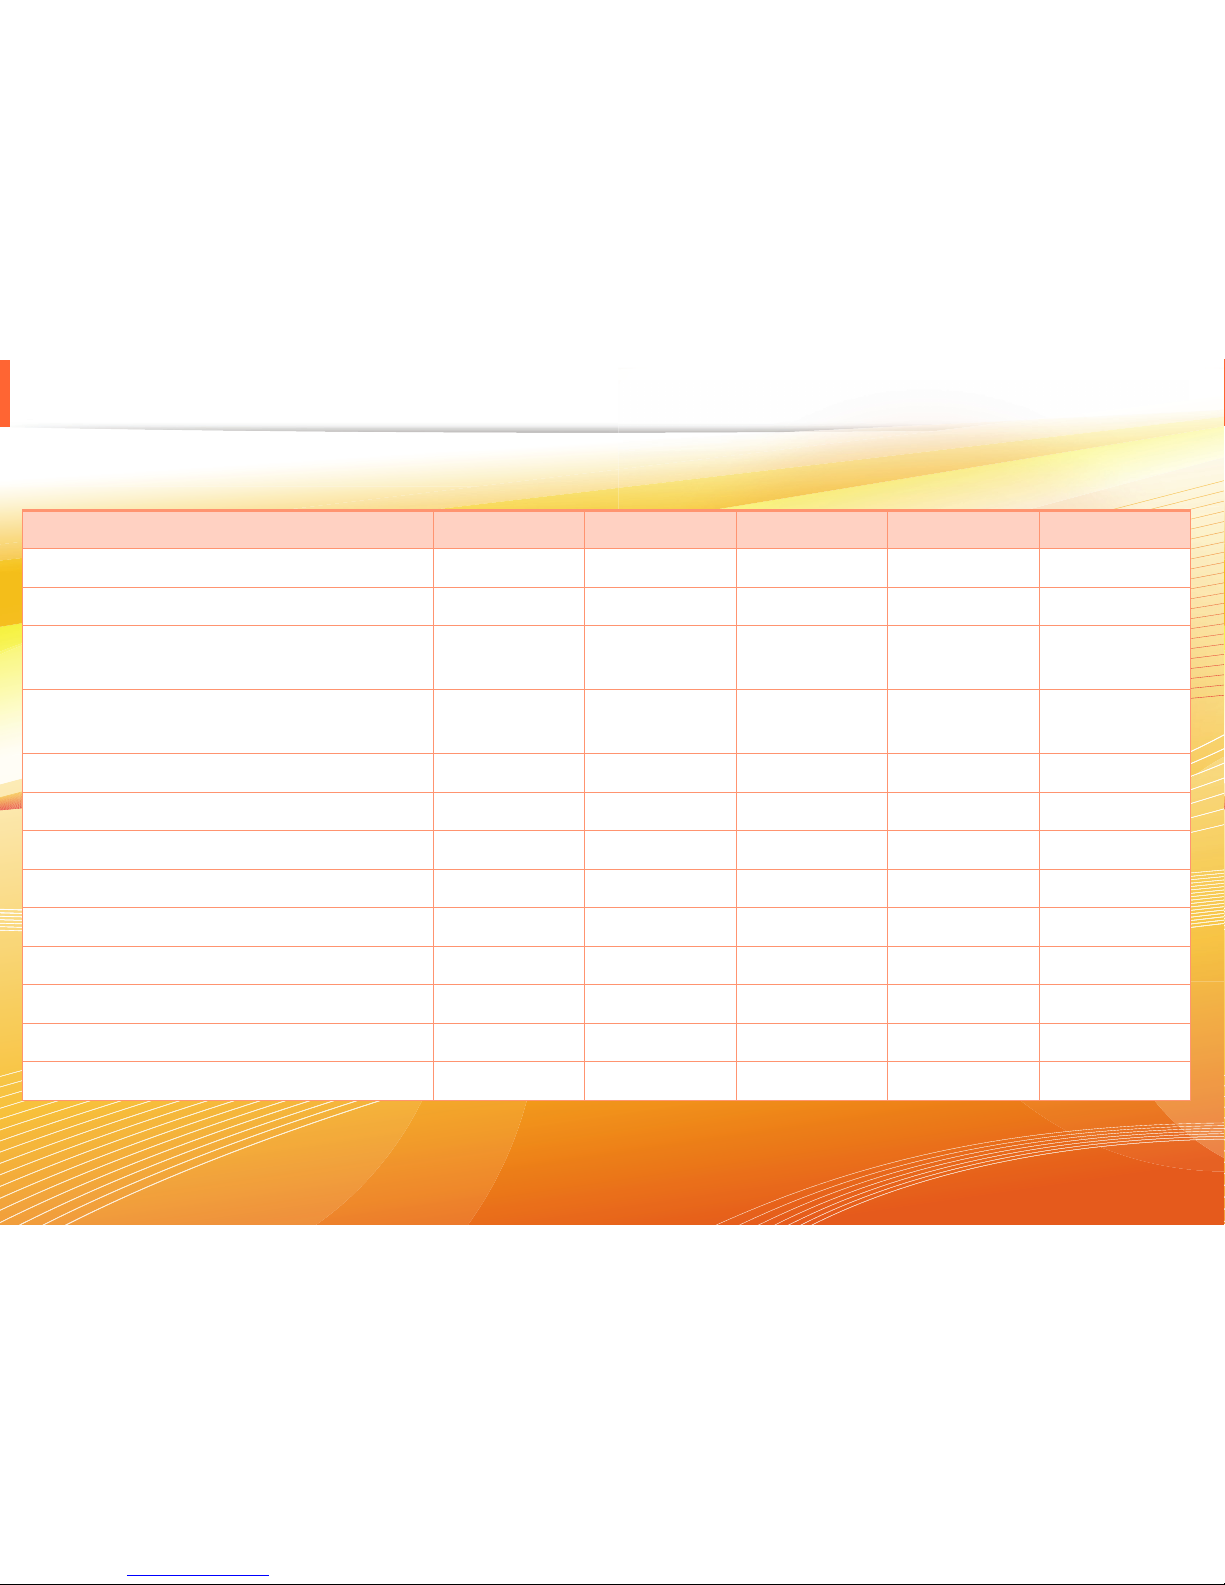
Features by models
Some features and optional goods may not be available depending on model or country.
( ●: Included, ○: Optional, Blank: Not available)
Features ML-331xD ML-331xND ML-371xD ML-371xND ML-371xDW
Hi-Speed USB 2.0 ● ● ● ● ●
IEEE 1284 parallel connector ○ ○ ○ ○ ○
Network Interface Ethernet 10/100 Base TX
wired LAN
●
Network Interface Ethernet 10/100/1000 Base
TX wired LAN
● ●
Network Interface 802.11b/g/n wireless LAN ●
IPv6 ● ● ●
Eco printing ● ● ● ● ●
Wi-Fi Protected Setup™ (WPS) ●
Duplex (2-sided) printing ● ● ● ● ●
Samsung Easy Printer Manager ● ● ● ● ●
Memory ○ ○ ○
Tray 2 (520 sheets) ○ ○ ○ ○
SyncThru™ Web Service ● ● ●
Page 8

Useful to know
The machine does not print.
• Open the print queue list and remove the document from
the list (see "Canceling a print job" on page 44).
• Remove the driver and install it again (see "Installing the
driver locally" on page 23).
• Select your machine as your default machine in your
Windows.
Where can I purchase accessories or supplies?
• Inquire at a Samsung distributor or your retailer.
• Visit www.samsung.com/supplies. Select your country/
region to view product service information.
The status LED flashes or remains constantly on.
• Turn the product off and on again.
• Check the meanings of LED indications in this manual
and troubleshoot accordingly (see "Understanding the
status LED" on page 74).
A paper jam has occurred.
• Open and close the front door.
• Check the instructions on removing jammed paper in this
manual and troubleshoot accordingly (see "Clearing
paper jams" on page 68).
Printouts are blurry.
• The toner level might be low or uneven. Shake the toner
cartridge.
• Try a different print resolution setting.
• Replace the toner cartridge.
Where can I download the machine’s driver?
• Visit www.samsung.com/printer to download the latest
machine’s driver, and install it on your system.
Page 9

9
1. Introduction
About this user’s guide
This user's guide provides information for your basic understanding
of the machine as well as detailed steps to explain machine usage.
• Read the safety information before using the machine.
• If you have a problem using the machine, refer to the
troubleshooting chapter.
• Terms used in this user’s guide are explained in the glossary
chapter.
• All illustrations in this user’s guide may differ from your machine
depending on its options or model you purchased.
• The screenshots in this user's guide may differ from your machine
depending on the machine’s firmware/driver version.
• The procedures in this user’s guide are mainly based on Windows
7.
1
Conventions
Some terms in this guide are used interchangeably, as below:
• Document is synonymous with original.
• Paper is synonymous with media, or print media.
• Machine refers to printer or MFP.
2
General icons
Icon Text Description
Caution
Gives users information to protect the
machine from possible mechanical damage
or malfunction.
Note
Provides additional information or detailed
specification of the machine function and
feature.
Page 10
10
1. Introduction
Safety information
These warnings and precautions are included to prevent injury to
you and others, and to prevent any potential damage to your
machine. Be sure to read and understand all of these instructions
before using the machine. After reading this section, keep it in a safe
place for future reference.
3
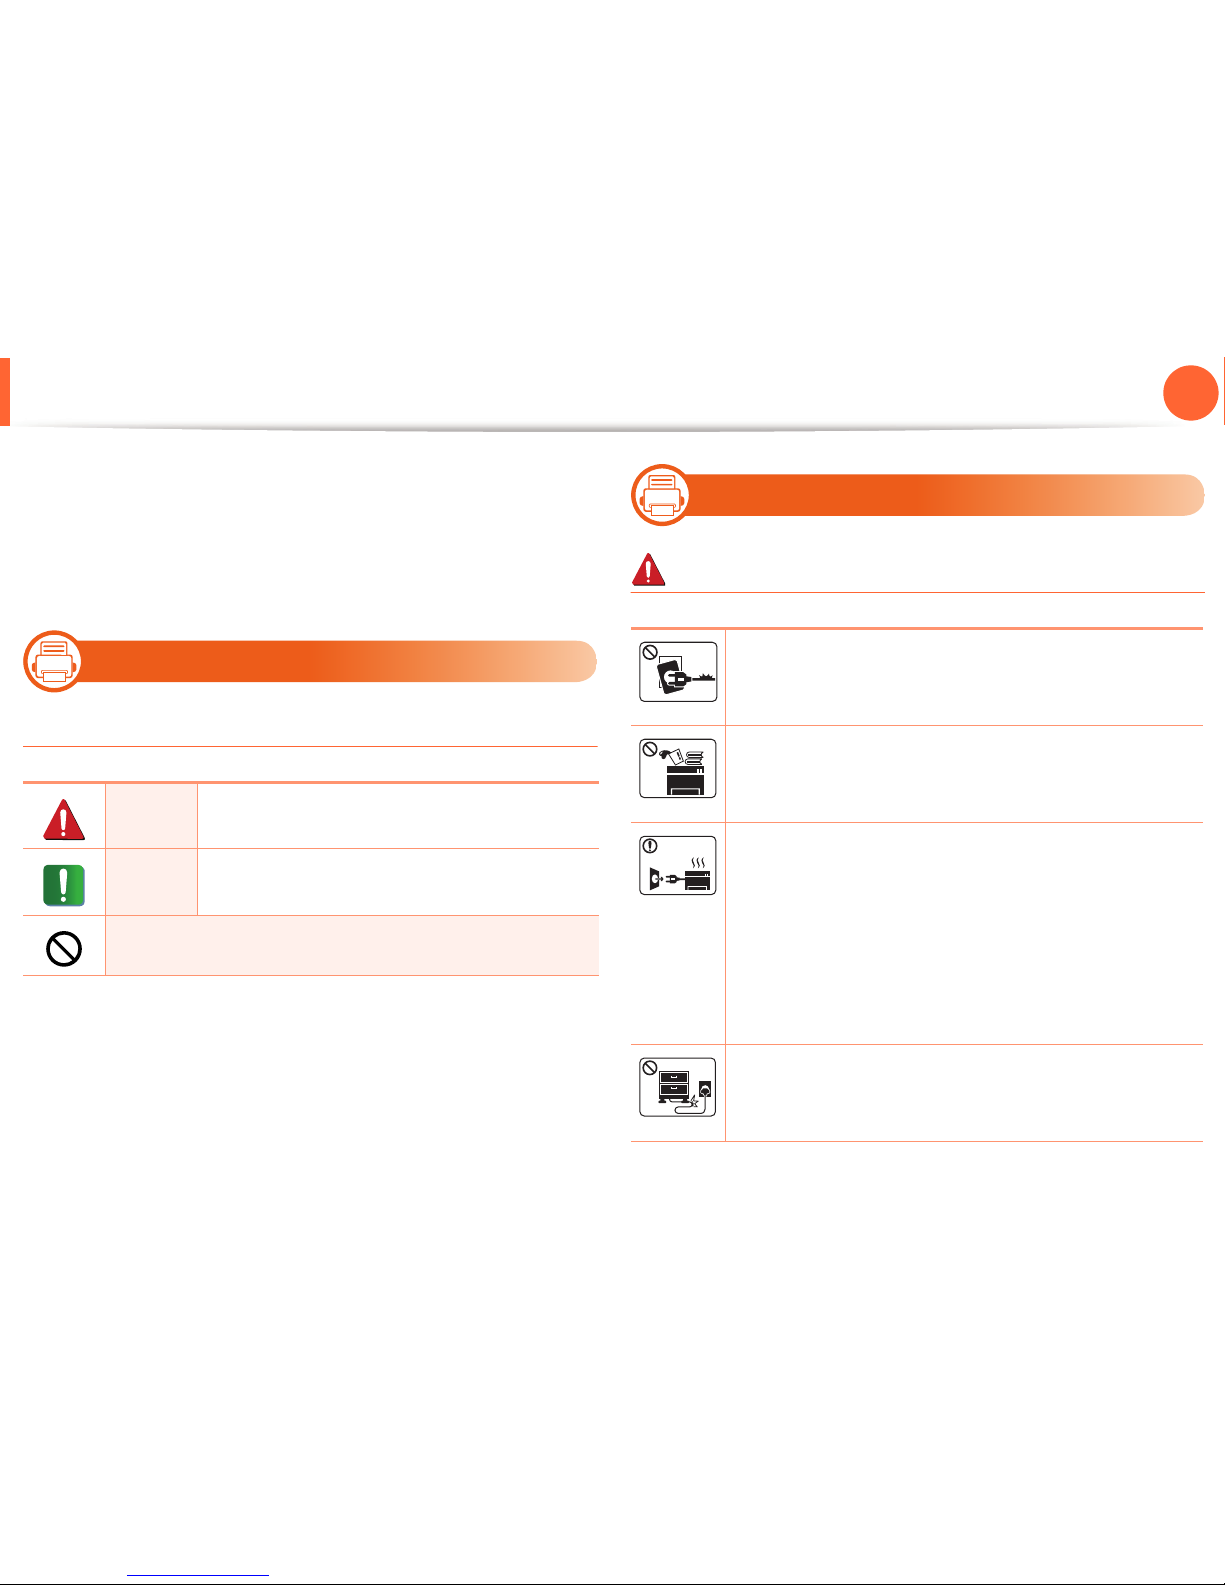
Important safety symbols
Explanation of all icons and signs used in this chapter
4
Operating environment
Warning
Warning
Hazards or unsafe practices that may result in
severe personal injury or death.
Caution
Hazards or unsafe practices that may result in
minor personal injury or property damage.
Do not attempt.
Do not use if the power cord is damaged or if the
electrical outlet is not grounded.
This could result in electric shock or fire.
Do not place anything on top of the machine (water,
small metal or heavy objects, candles, lit cigarettes, etc.).
This could result in electric shock or fire.
• If the machine gets overheated, it releases smoke,
makes strange noises, or generates an odd odor,
immediately turn off the power switch and unplug the
machine.
• The user should be able to access the power outlet in
case of emergencies that might require the user to pull
the plug out.
This could result in electric shock or fire.
Do not bend, or place heavy objects on the power cord.
Stepping on or allowing the power cord to be crushed by
a heavy object could result in electric shock or fire.
Page 11
Safety information
11
1. Introduction
Caution
5
Operating method
Caution
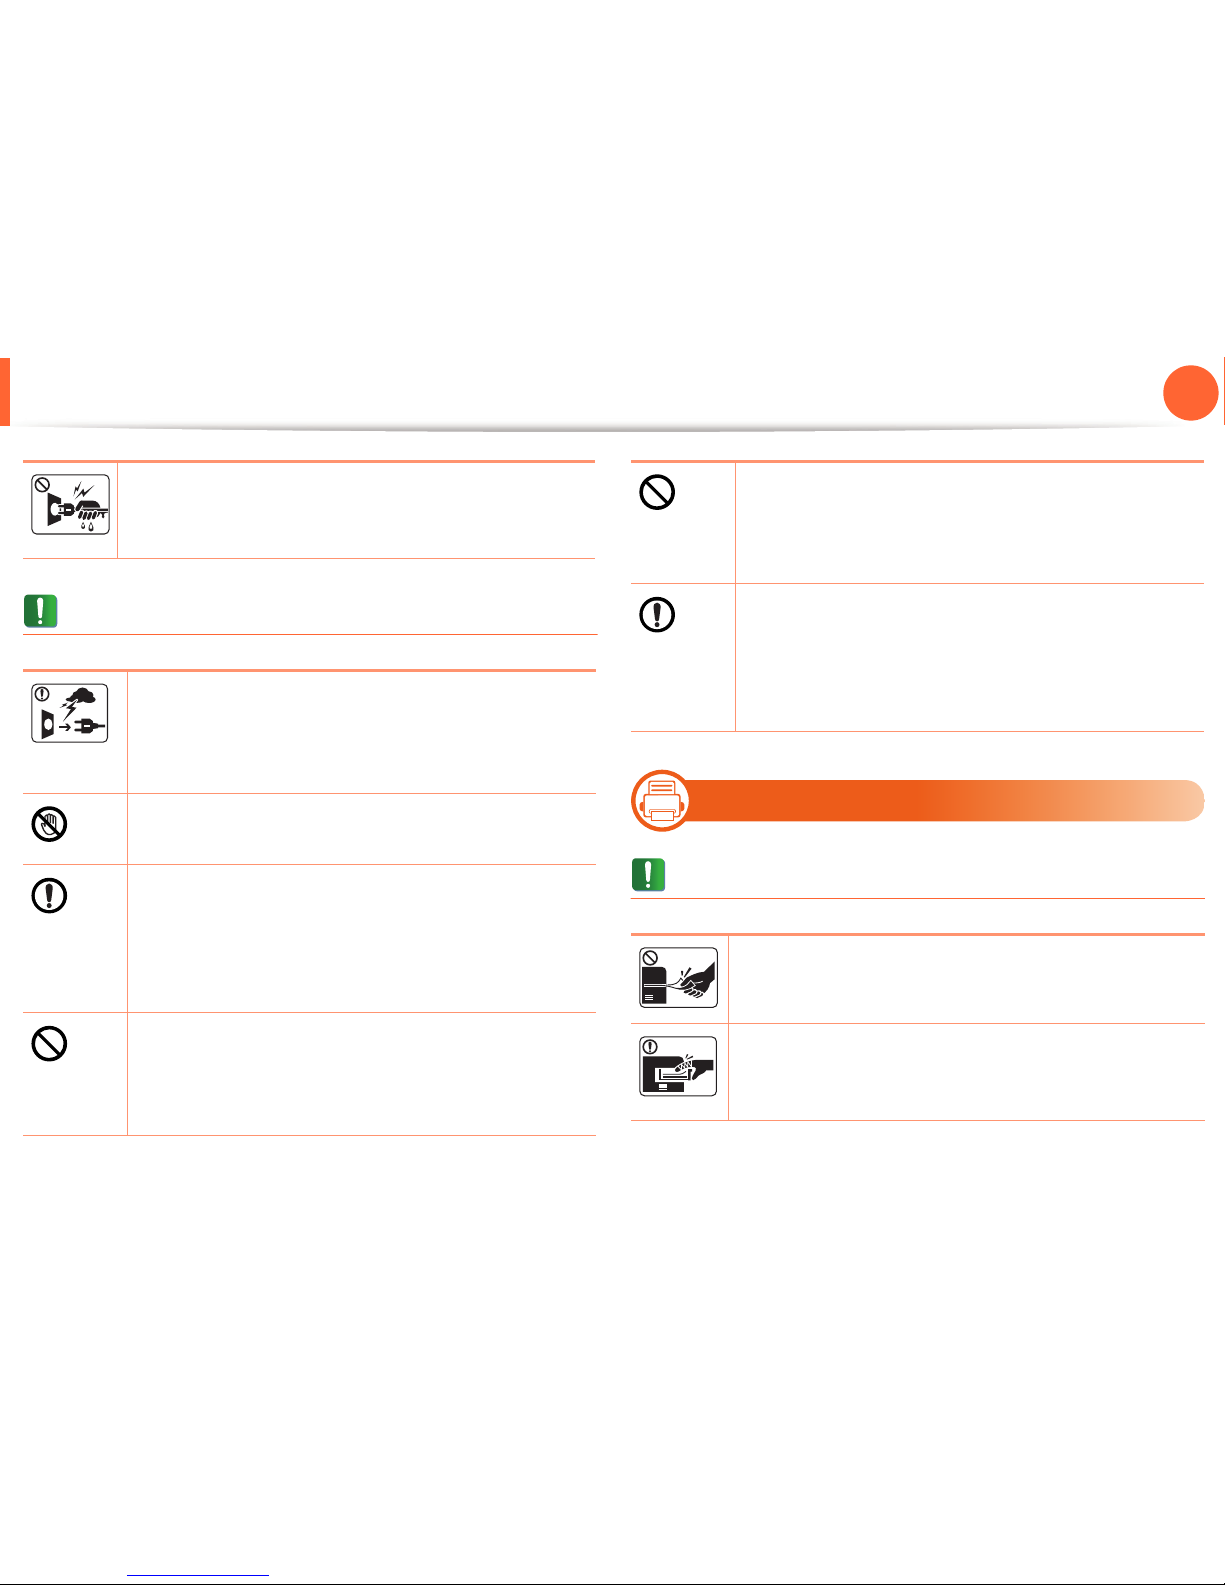
Do not remove the plug by pulling on the cord; do not
handle the plug with wet hands.
This could result in electric shock or fire.
During an electrical storm or for a period of nonoperation, remove the power plug from the electrical
outlet.
This could result in electric shock or fire.
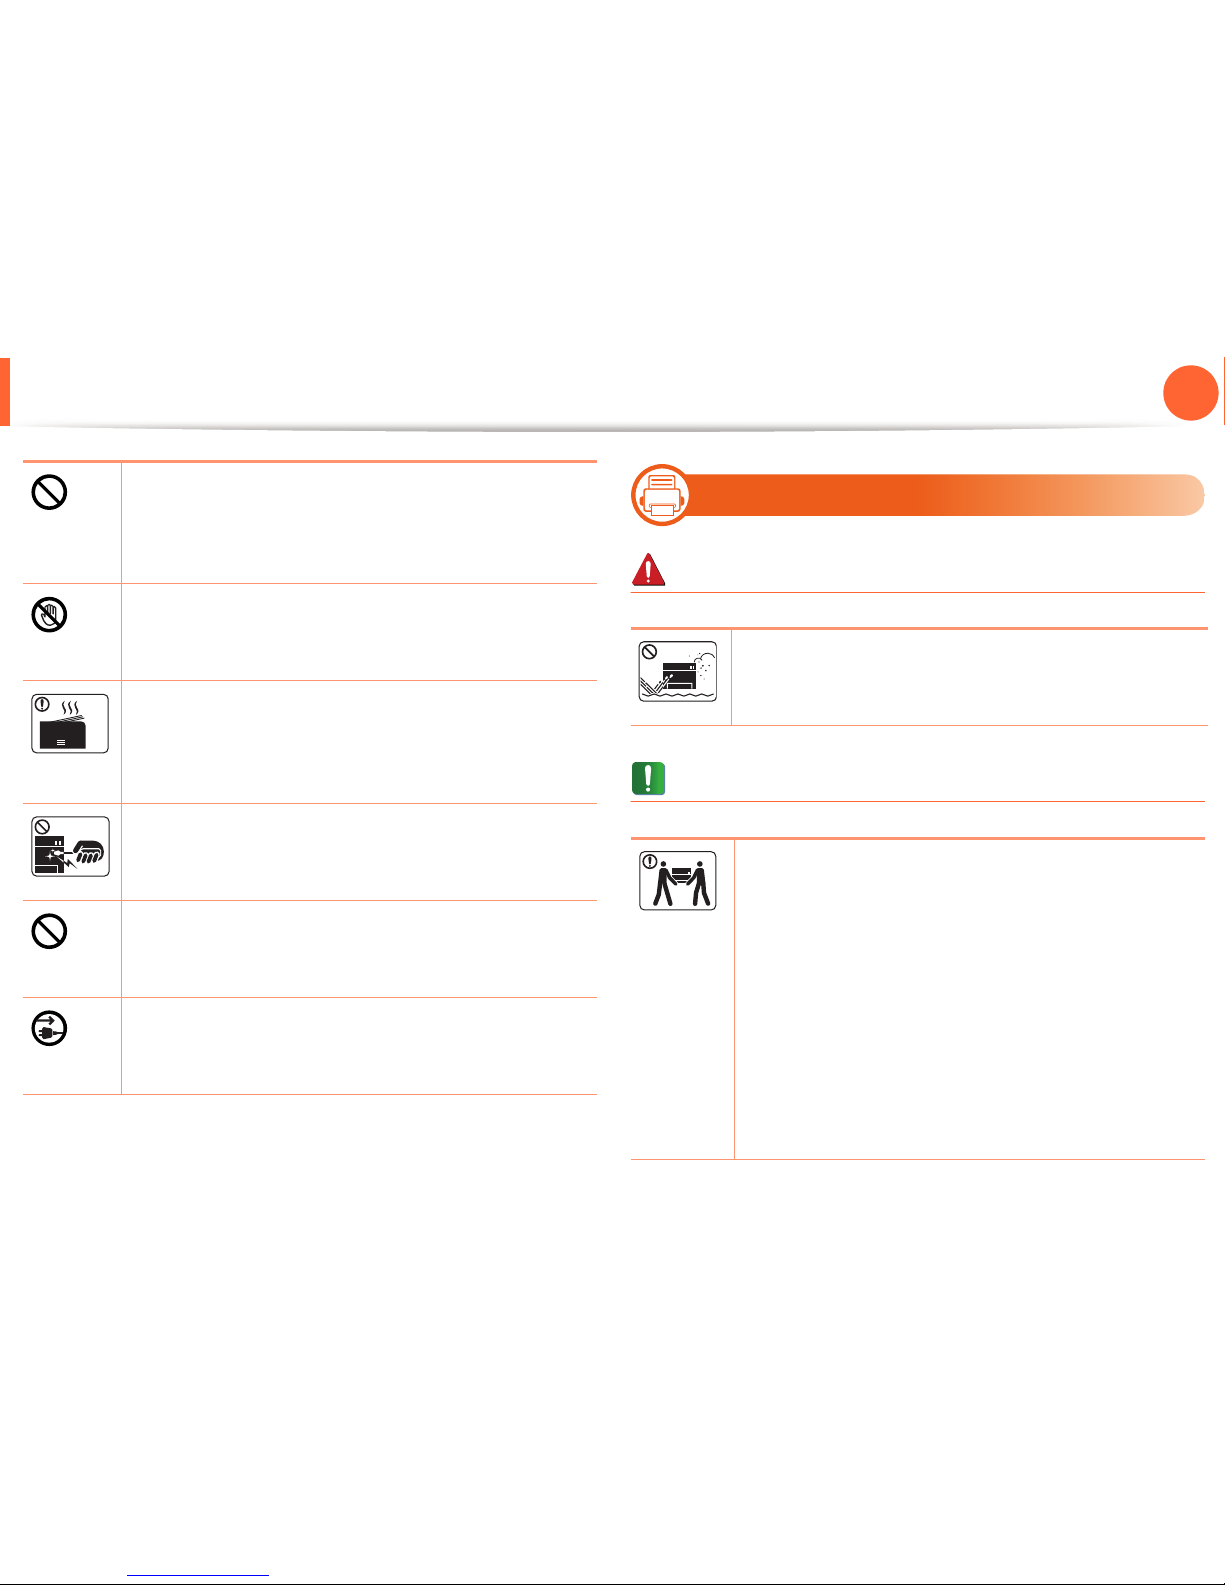
Be careful, the paper output area is hot.
Burns could occur.
If the machine has been dropped, or if the cabinet
appears damaged, unplug the machine from all
interface connections and request assistance from
qualified service personnel.
Otherwise, this could result in electric shock or fire.
If the plug does not easily enter the electrical outlet, do
not attempt to force it in.
Call an electrician to change the electrical outlet, or this
could result in electric shock.
Do not allow pets to chew on the AC power, telephone
or PC interface cords.
This could result in electric shock or fire and/or injury to
your pet.
If the machine does not operate properly after these
instructions have been followed, unplug the machine
from all interface connections and request assistance
from qualified service personnel.
Otherwise, this could result in electric shock or fire.
Do not forcefully pull the paper out during printing.
It can cause damage to the machine.
Be careful not to put your hand between the machine
and paper tray.
You may get injured.
Page 12
Safety information
12
1. Introduction
6
Installation / Moving
Warning
Caution
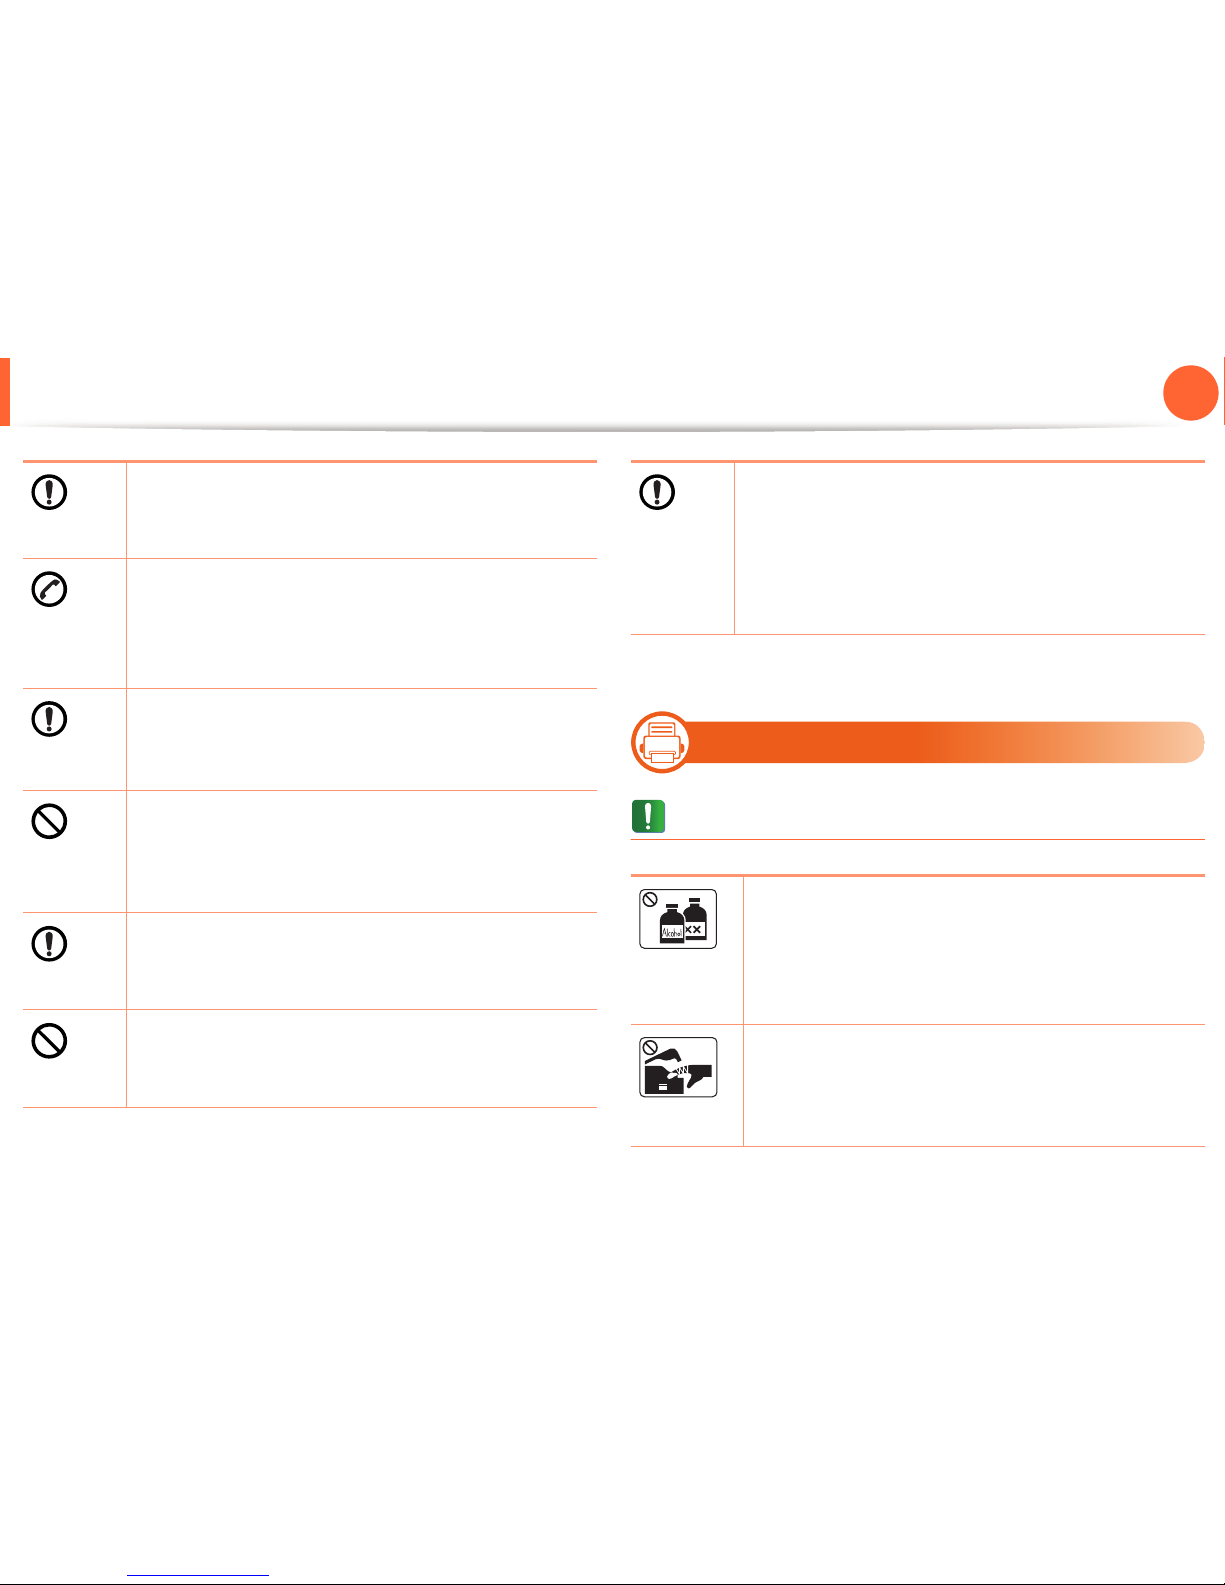
Do not block or push objects into the ventilation
opening.
This could result in elevated component temperatures
which can cause damage or fire.
Be care when replacing paper or removing jammed
paper.
New paper has sharp edges and can cause painful cuts.
When printing large quantities, the bottom part of the
paper output area may get hot. Do not allow children to
touch.
Burns can occur.
When removing jammed paper, do not use tweezers or
sharp metal objects.
It can damage the machine.
Do not allow too many papers to stack up in the paper
output tray.
It can damage the machine.
This machine's power reception device is the power cord.
To switch off the power supply, remove the power cord
from the electrical outlet.
Do not place the machine in an area with dust, humidity,
or water leaks.
This could result in electric shock or fire.
Before moving the machine, turn the power off and
disconnect all cords.
Then lift the machine:
• If the machine weighs under 20 kg (44.09 lbs), lift with
1 person.
• If the machine weighs 20 kg (44.09 lbs) - 40kg (88.18
lbs), lift with 2 people.
• If the machine weighs more than 40 kg (88.18 lbs), lift
with 4 or more people.
The machine could fall, causing injury or machine
damage.
Page 13
Safety information
13
1. Introduction
7
Maintenance / Checking
Caution
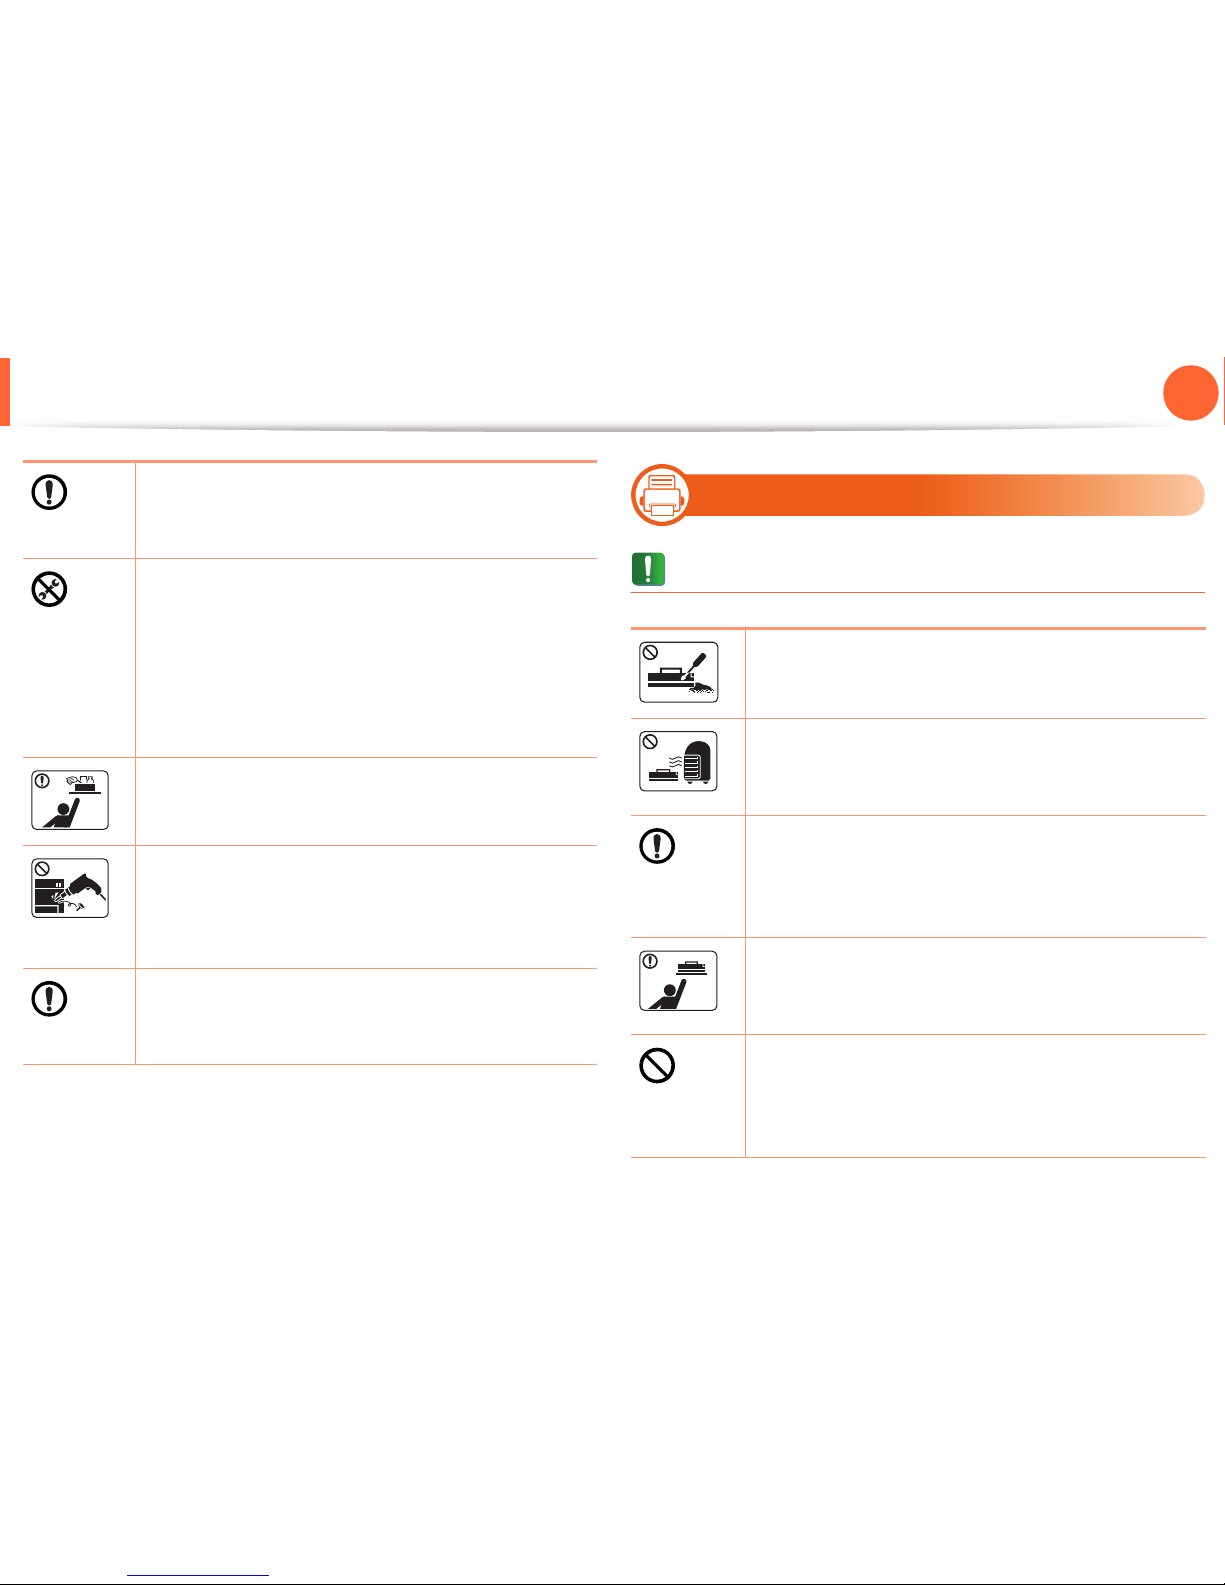
Do not place the machine on an unstable surface.
The machine could fall, causing injury or machine
damage.
The machine should be connected to
the power level which is specified on the label.
If you are unsure and want to check the power level you
are using, contact the electrical utility company.
Use only No.26 AWG
a
or larger, telephone line cord, if
necessary.
Otherwise, it can cause damage to the machine.
Do not put a cover over the machine or place it in an
airtight location, such as a closet.
If the machine is not well-ventilated, this could result in
fire.
Make sure you plug the power cord into a grounded
electrical outlet.
Otherwise, this could result in electric shock or fire.
Do not overload wall outlets and extension cords.
This can diminish performance, and could result in
electric shock or fire.
Use the power cord supplied with your machine for safe
operation. If you are using a cord which is longer than 2
meters (6 feet) with a 110 V machine, then the gauge
should be 16 AWG or larger.
Otherwise, it can cause damage to the machine, and
could result in electric shock or fire.
a. AWG: American Wire Gauge
Unplug this product from the wall outlet before
cleaning the inside of the machine. Do not clean the
machine with benzene, paint thinner or alcohol; do not
spray water directly into the machine.
This could result in electric shock or fire.
When you are working inside the machine replacing
supplies or cleaning the inside, do not operate the
machine.
You could get injured.
Page 14
Safety information
14
1. Introduction
8
Supply usage
Caution
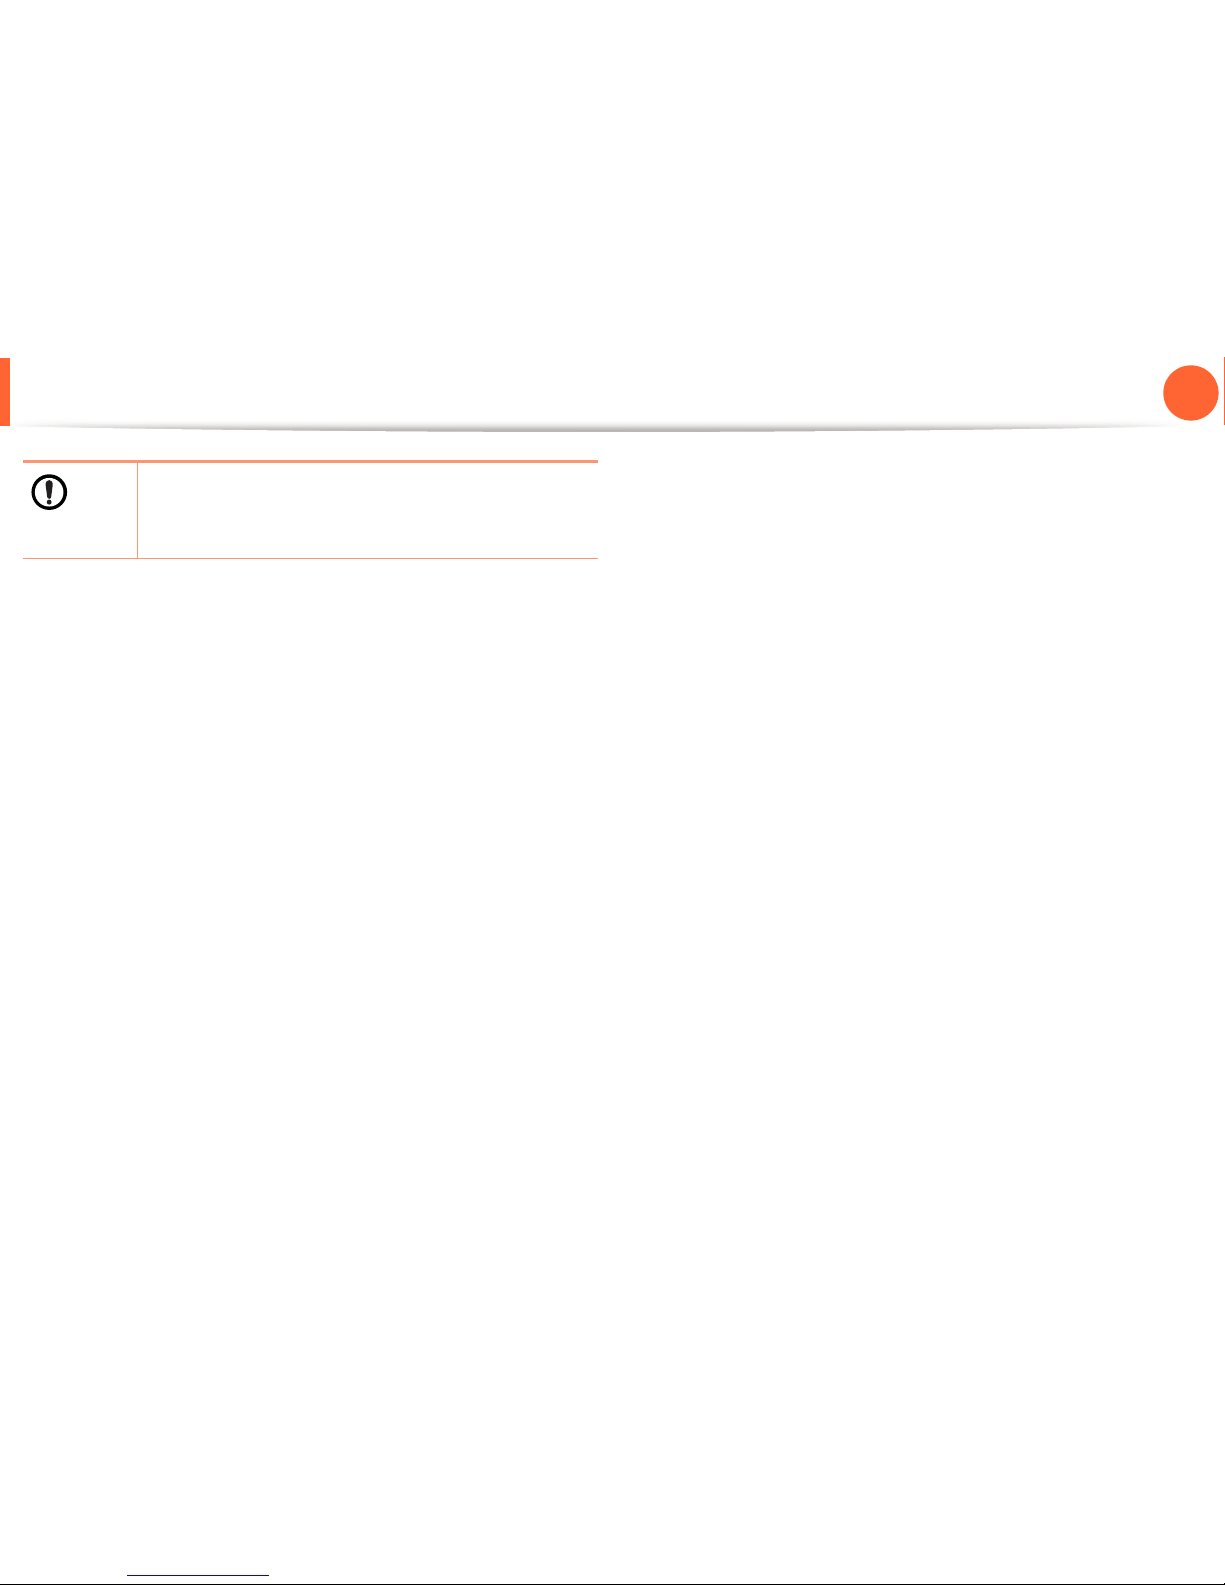
Keep the power cable and the contact surface of the
plug clean from dust or water.
Otherwise, this could result in electric shock or fire.
• Do not remove any covers or guards that are
fastened with screws.
• Fuser units should only be repaired by a certified
service technician. Repair by non-certified
technicians could result in fire or electric shock.
The machine should only be repaired by a Samsung
service technician.
Keep cleaning supplies away from children.
Children could get hurt.
Do not disassemble, repair or rebuild the machine by
yourself.
It can damage the machine. Call a certified technician
when the machine needs repairing.
To clean and operate the machine, strictly follow the
user's guide provided with the machine.
Otherwise, you could damage the machine.
Do not disassemble the toner cartridge.
Toner dust can be dangerous if inhaled or ingested.
Do not burn any of the supplies such as toner cartridge
or fuser unit.
This could cause an explosion or uncontrollable fire.
When changing the toner cartridge or removing
jammed paper, be careful not to let toner dust touch
your body or clothes.
Toner dust can be dangerous if inhaled or ingested.
When storing supplies such as toner cartridges, keep
them away from children.
Toner dust can be dangerous if inhaled or ingested.
Using recycled supplies, such as toner, can cause
damage to the machine.
In case of damage due to the use of recycled supplies, a
service fee will be charged.
Page 15
Safety information
15
1. Introduction
When toner gets on your clothing, do not use hot water
to wash it.
Hot water sets toner into fabric. Use cold water.
Page 16
16
1. Introduction
Machine overview
9
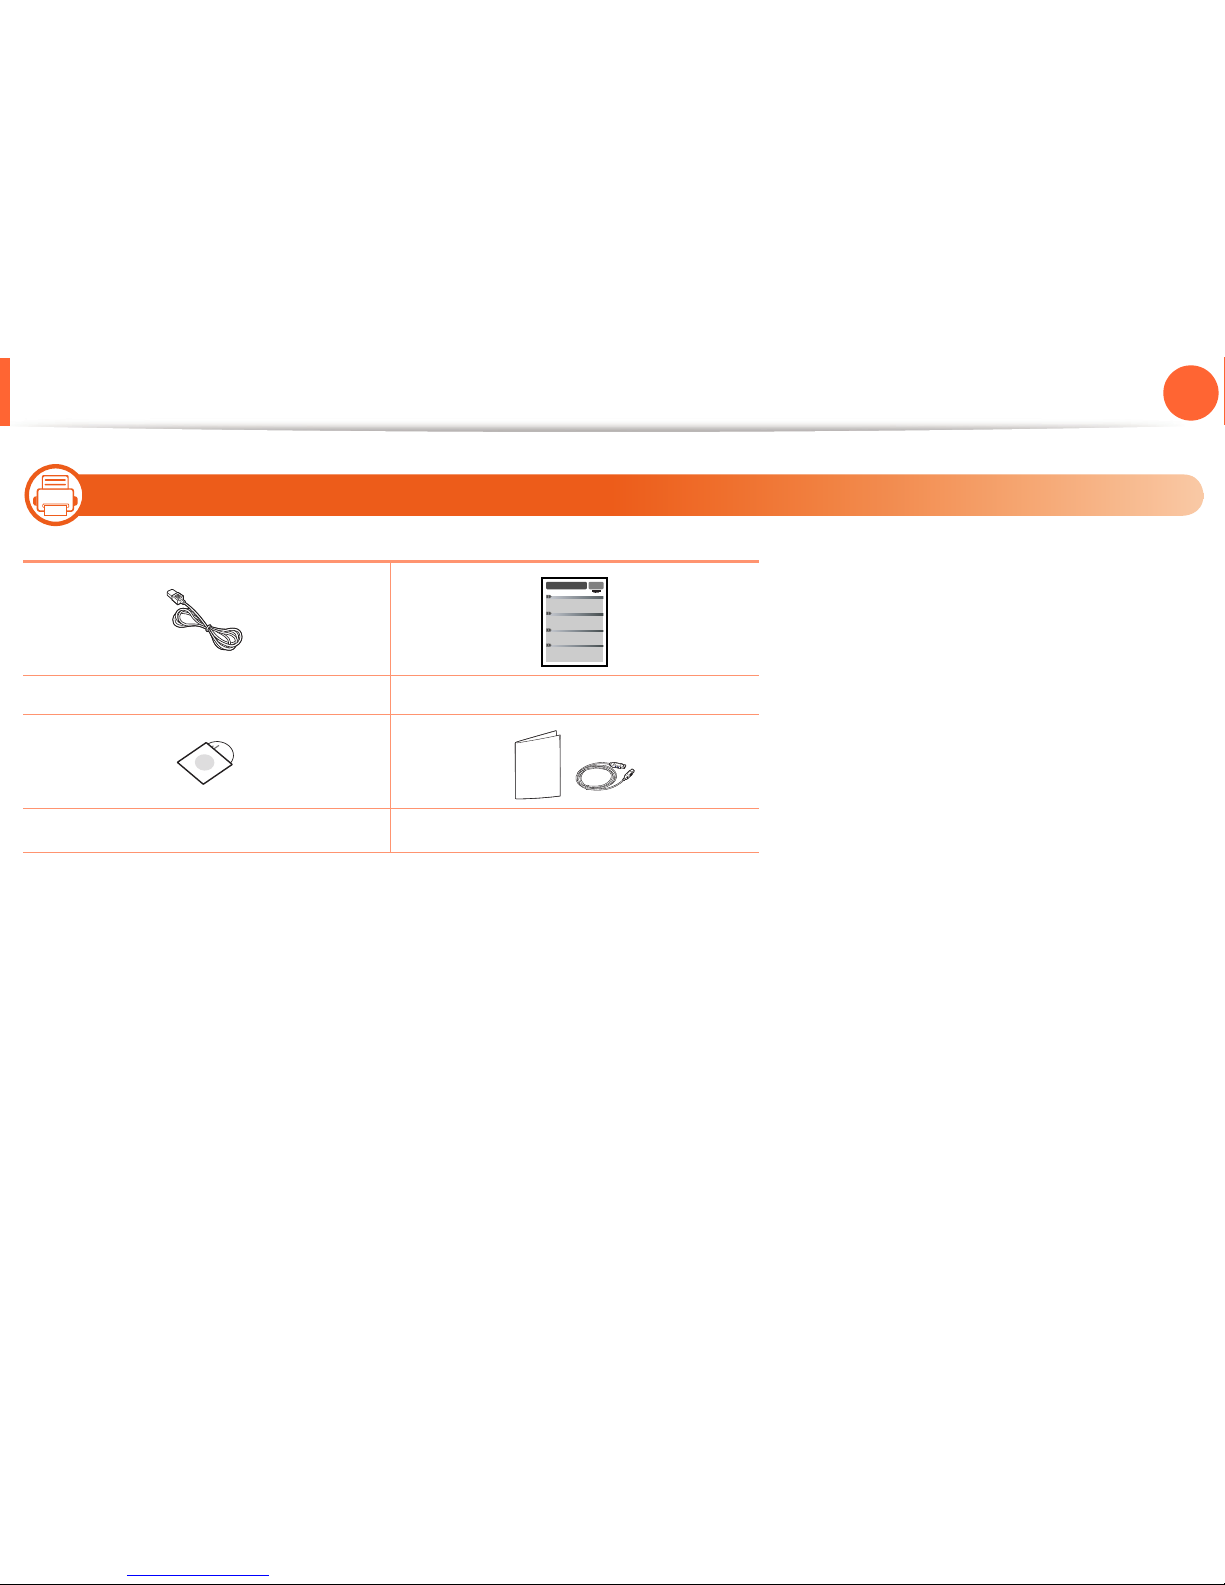
Accessories
Power cord Quick installation guide
Software CD
a
a. The software CD contains the printer driver and applications.
Misc. accessories
b
b. Miscellaneous accessories included with your machine may vary by country of purchase and specific
model.
Page 17
Machine overview
17
1. Introduction
10
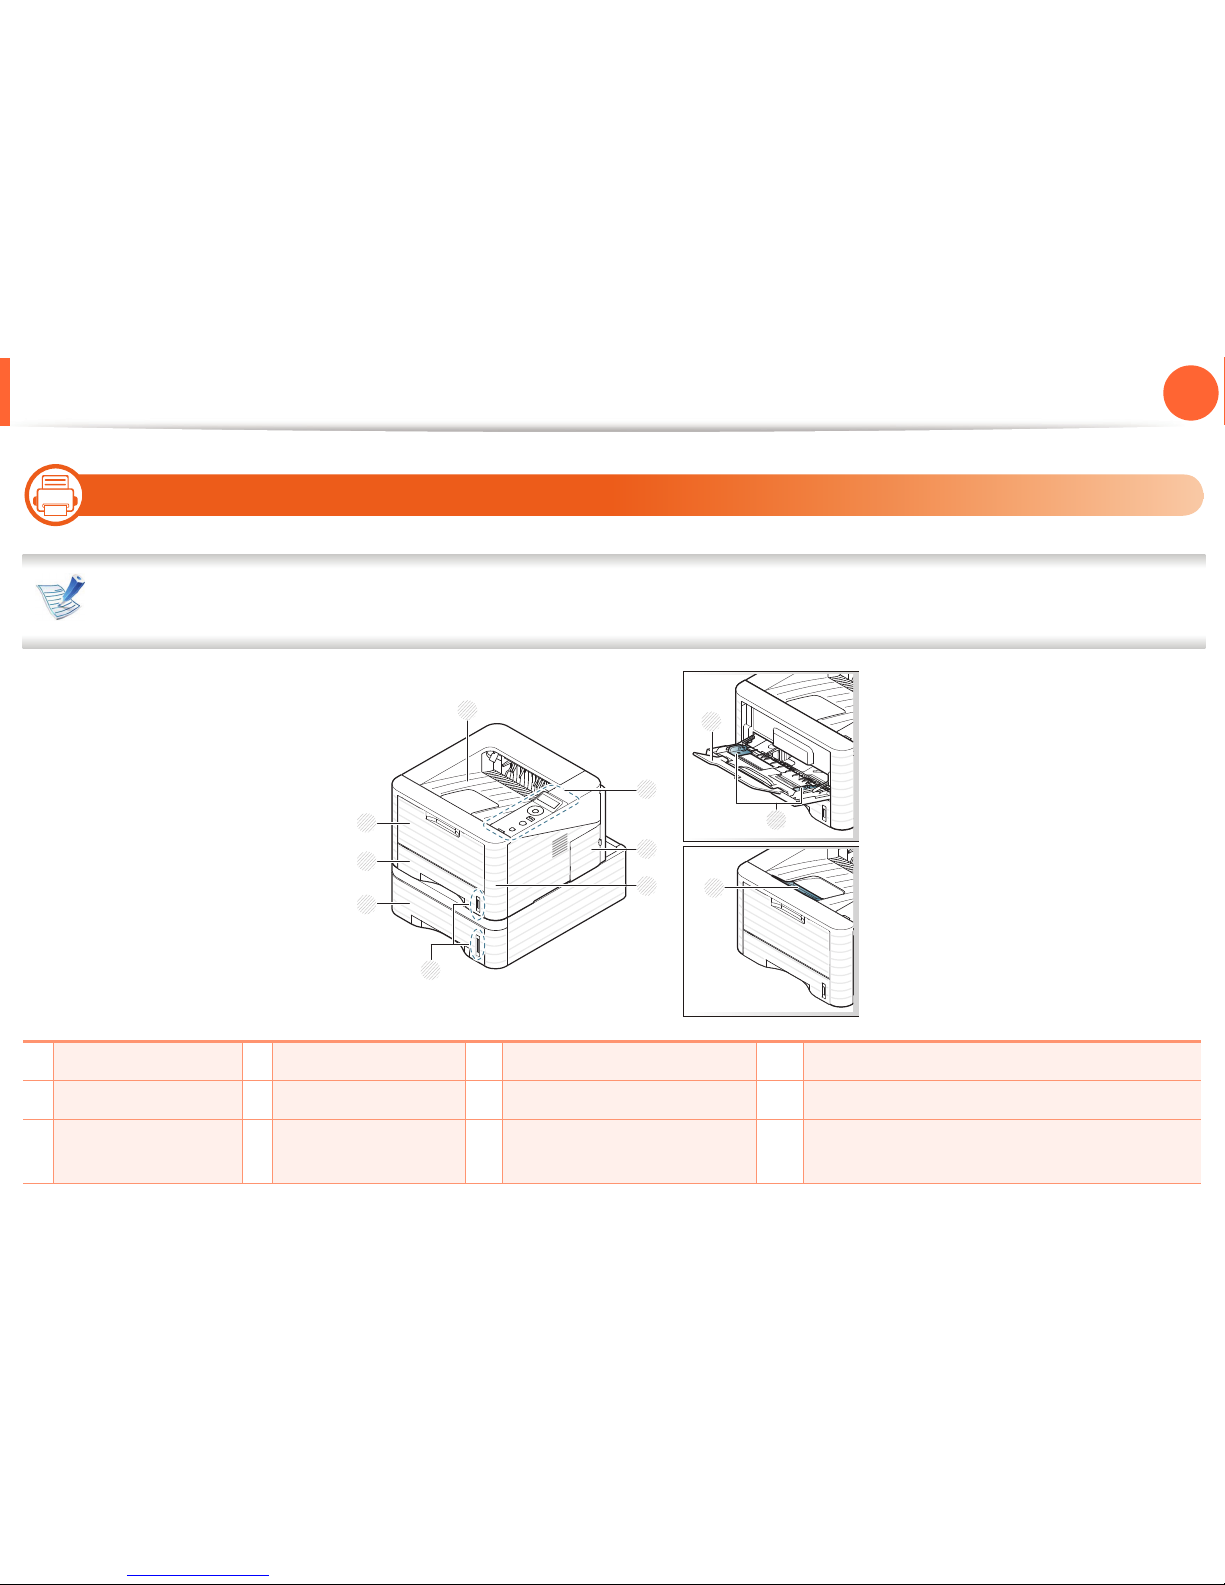
Front view
• This illustration may differ from your machine depending on its model.
• Some features and optional goods may not be available depending on model or country.
1 Output tray 4 Front cover 7 Tray 1 10 Paper width guides on a multi-purpose tray
2 Control panel 5 Paper level indicator 8 Multi-purpose tray 11 Output support
3
Control board cover
6
Tray 2
9
Multi-purpose tray paper
extension
1
8
7
6
3
4
5
2
9
10
11
Page 18
Machine overview
18
1. Introduction
11
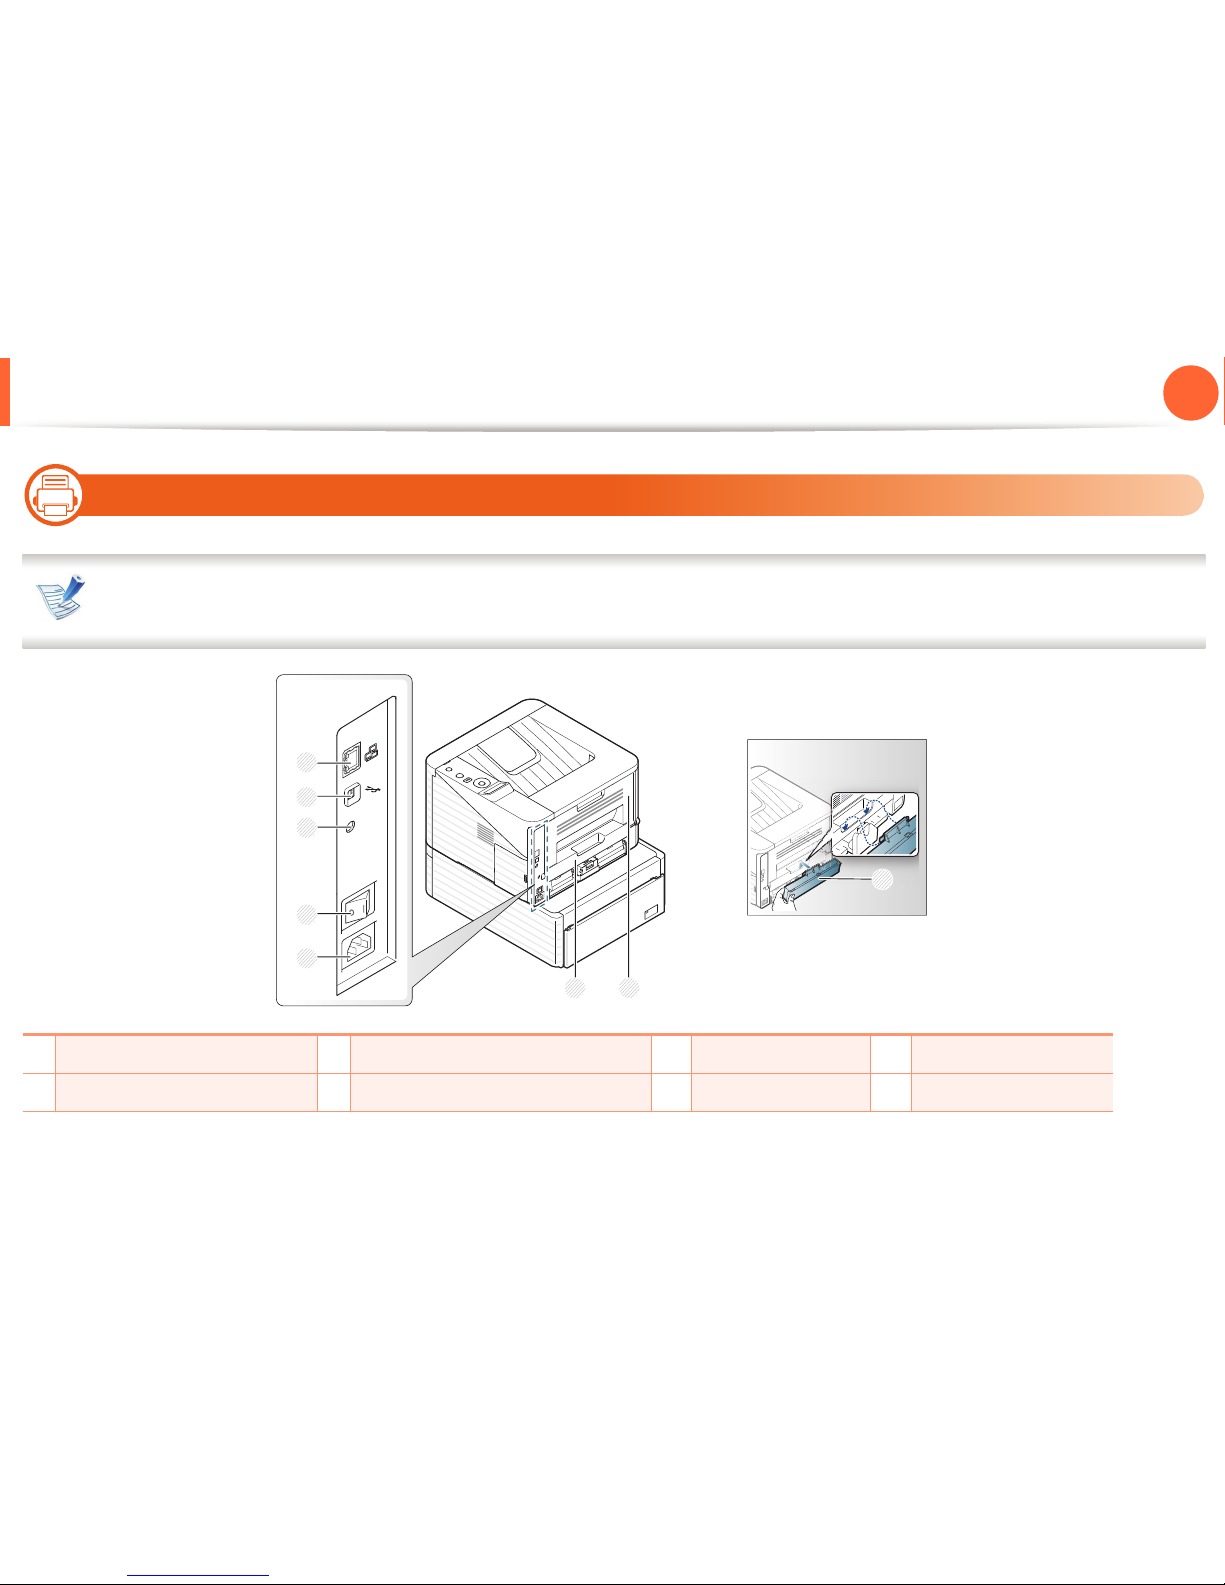
Rear view
• This illustration may differ from your machine depending on its model.
• Some features and optional goods may not be available depending on model or country.
1 Network port 3 IEEE 1284 parallel connector 5 Power receptacle 7 Rear cover
2 USB port 4 Power-switch 6 Duplex unit 8 Tray back cover
1
7
6
3
4
5
2
8
Page 19
19
1. Introduction
Control panel overview
This control panel may differ from your machine depending
on its model. There are various types of control panels.
12
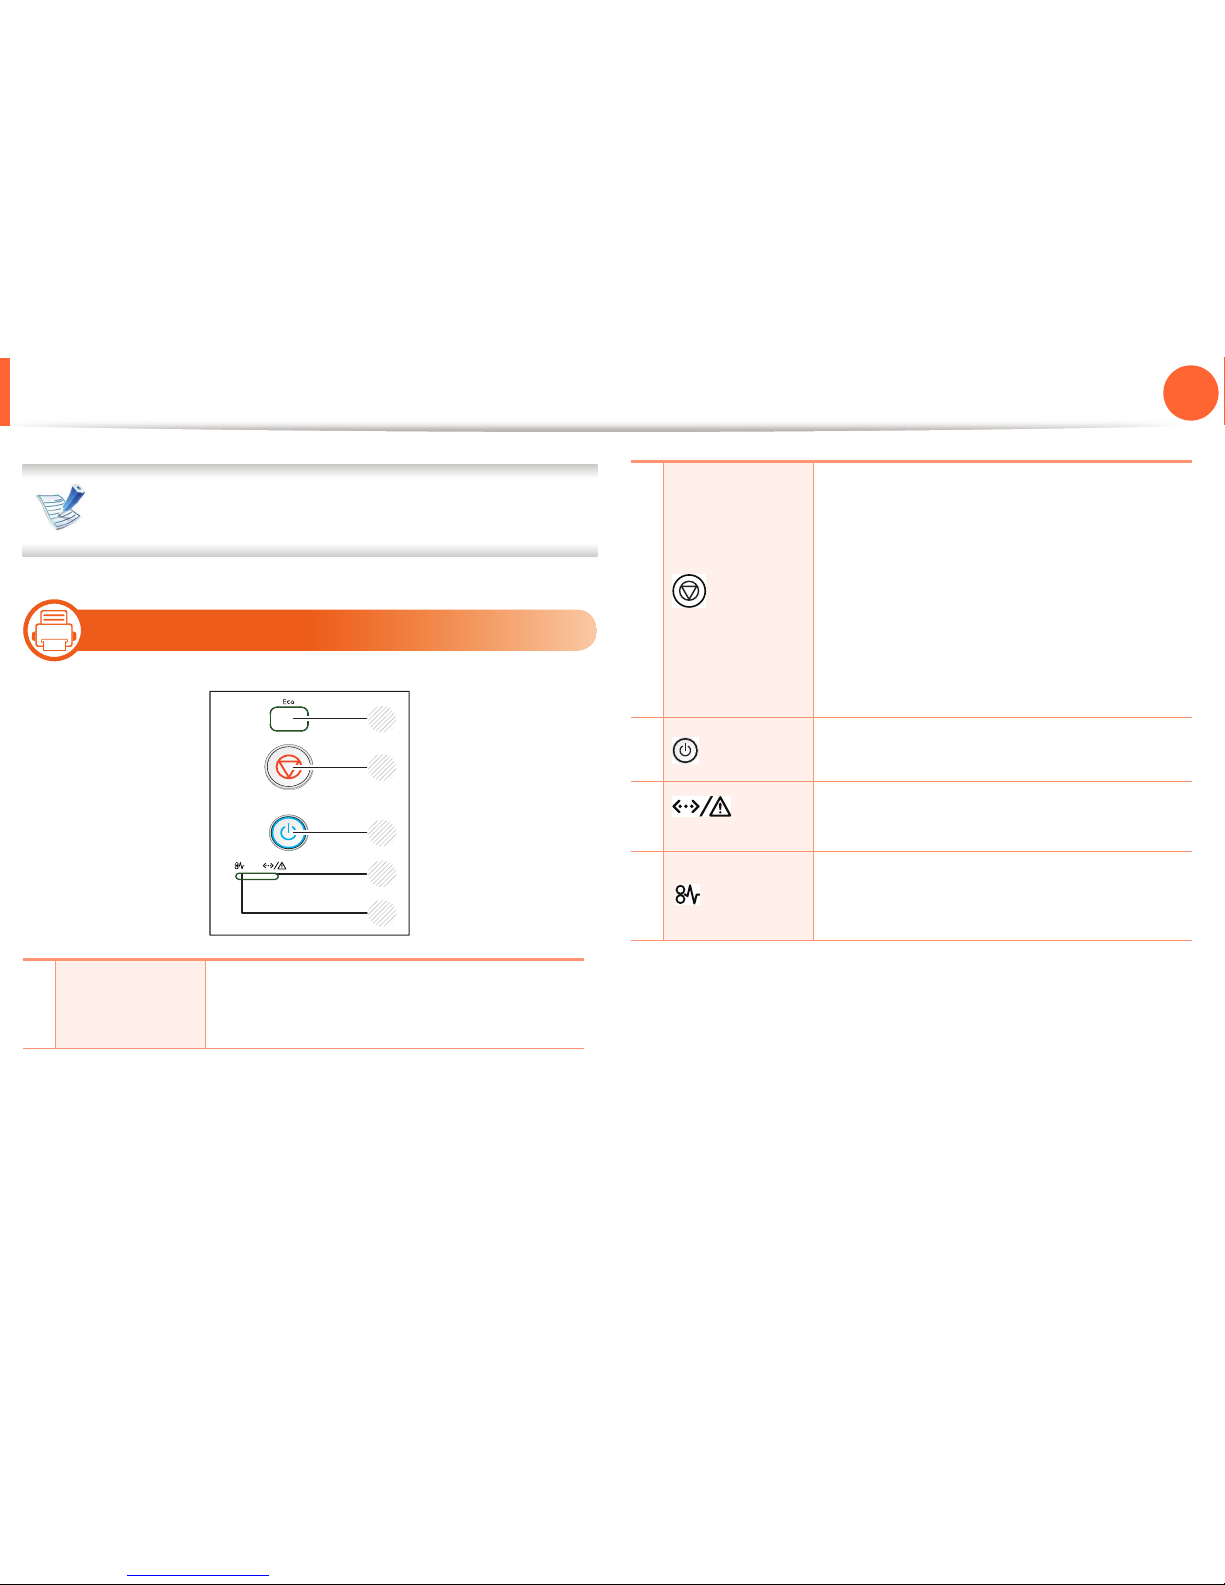
Type A
1
Eco
Enters eco mode to reduce toner
consumption and paper usage (see "Eco
options" on page 47).
1
2
3
4
5
2
(Cancel)
Stops an operation at any time and there are
more functions.
• Cancels the current job.
• Prints demo page: Press and hold this
button for about 5 seconds until the status
LED blinks, and release.
• Prints configuration reports: Press and
hold this button for about 3 seconds until
the status LED blinks, and release.
3
(Power)
You can turn the power on and off with this
button.
4
(Status
LED)
Shows the status of your machine (see
"Status LED" on page 75).
5
(Jam LED)
Shows the jam occurrance status of your
machine (see "Clearing paper jams" on page
68).
Page 20
Control panel overview
20
1. Introduction
13
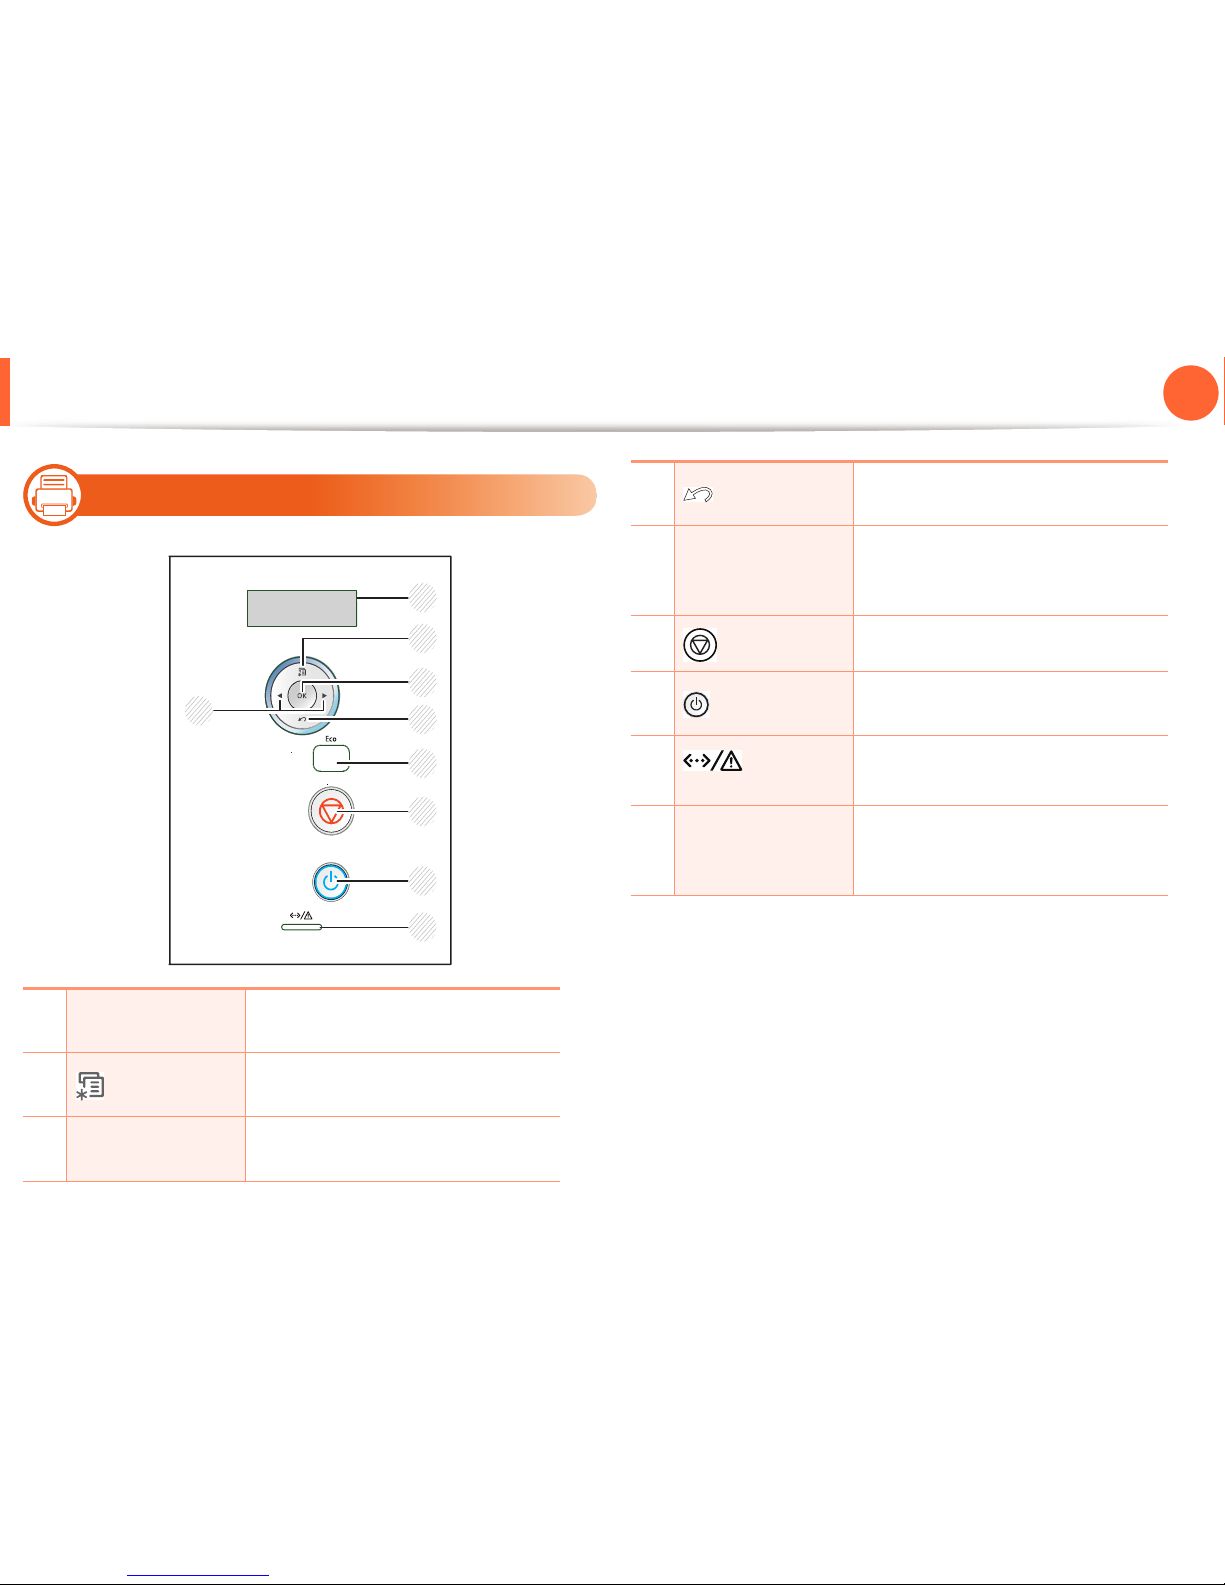
Type B
1
Display
Shows the current status and
prompts during an operation.
2
(Menu)
Enters menu mode and scrolls
through the available menus.
3
OK
Confirms the selection on the
display.
1
2
3
4
5
8
7
6
9
4
(Back)
Sends you back to the upper menu
level.
5
Eco
Enters eco mode to reduce toner
consumption and paper usage (see
"Eco options" on page 47).
6
(Cancel)
Stops an operation at any time.
7
(Power)
You can turn the power on and off
with this button.
8
(Status
LED)
Shows the status of your machine
(see "Status LED" on page 75).
9
Arrows
Navigates available values by
moving to the next or previous
options.
Page 21
Control panel overview
21
1. Introduction
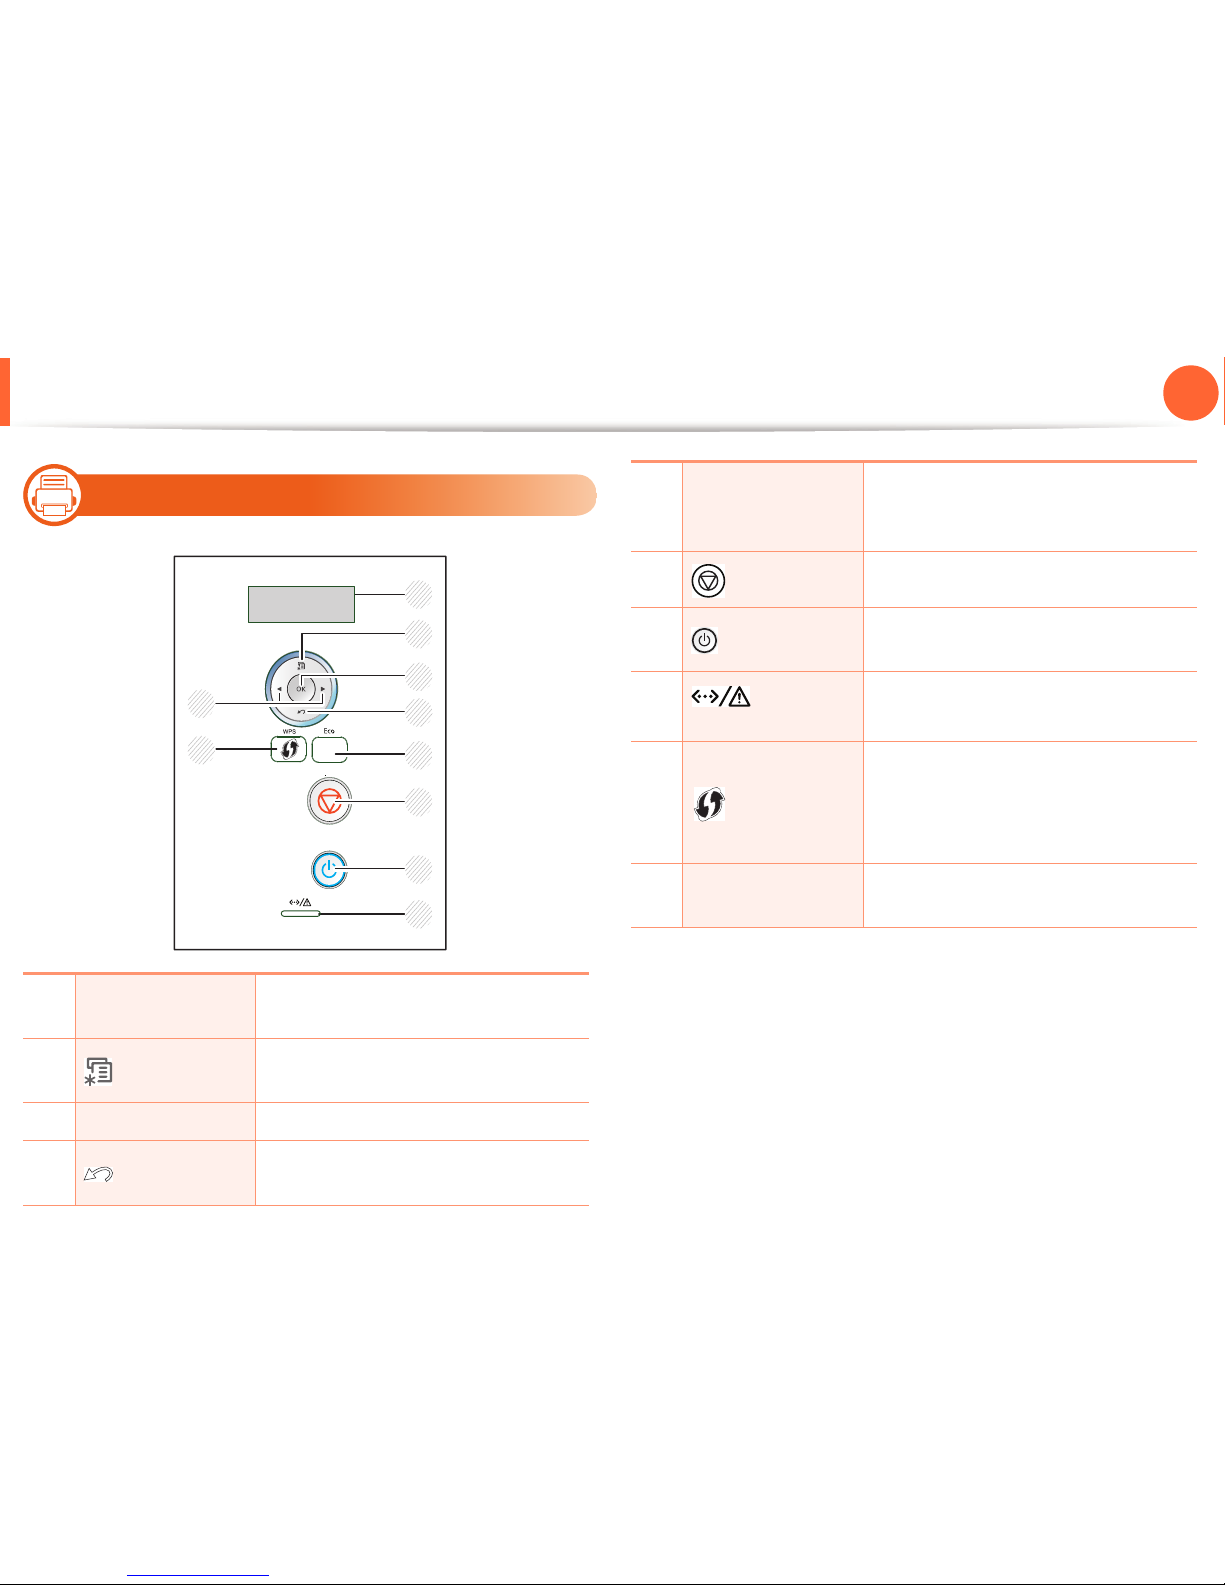
14
Type C
1
Display
Shows the current status and prompts
during an operation.
2
(Menu)
Enters menu mode and scrolls through
the available menus.
3
OK Confirms the selection on the display.
4
(Back)
Sends you back to the upper menu
level.
1
2
3
4
5
8
7
6
9
10
5
Eco
Enters eco mode to reduce toner
consumption and paper usage (see
"Eco options" on page 47).
6
(Cancel)
Stops an operation at any time.
7
(Power)
You can turn the power on and off with
this button.
8
(Status
LED)
Shows the status of your machine (see
"Status LED" on page 75).
9
(WPS)
If your wireless access point supports
Wi-Fi Protected Setup™(WPS), you can
configure the machine easily without a
computer (see Advanced Guide).
10
Arrows
Navigates available values by moving
to the next or previous options.
Page 22
22
1. Introduction
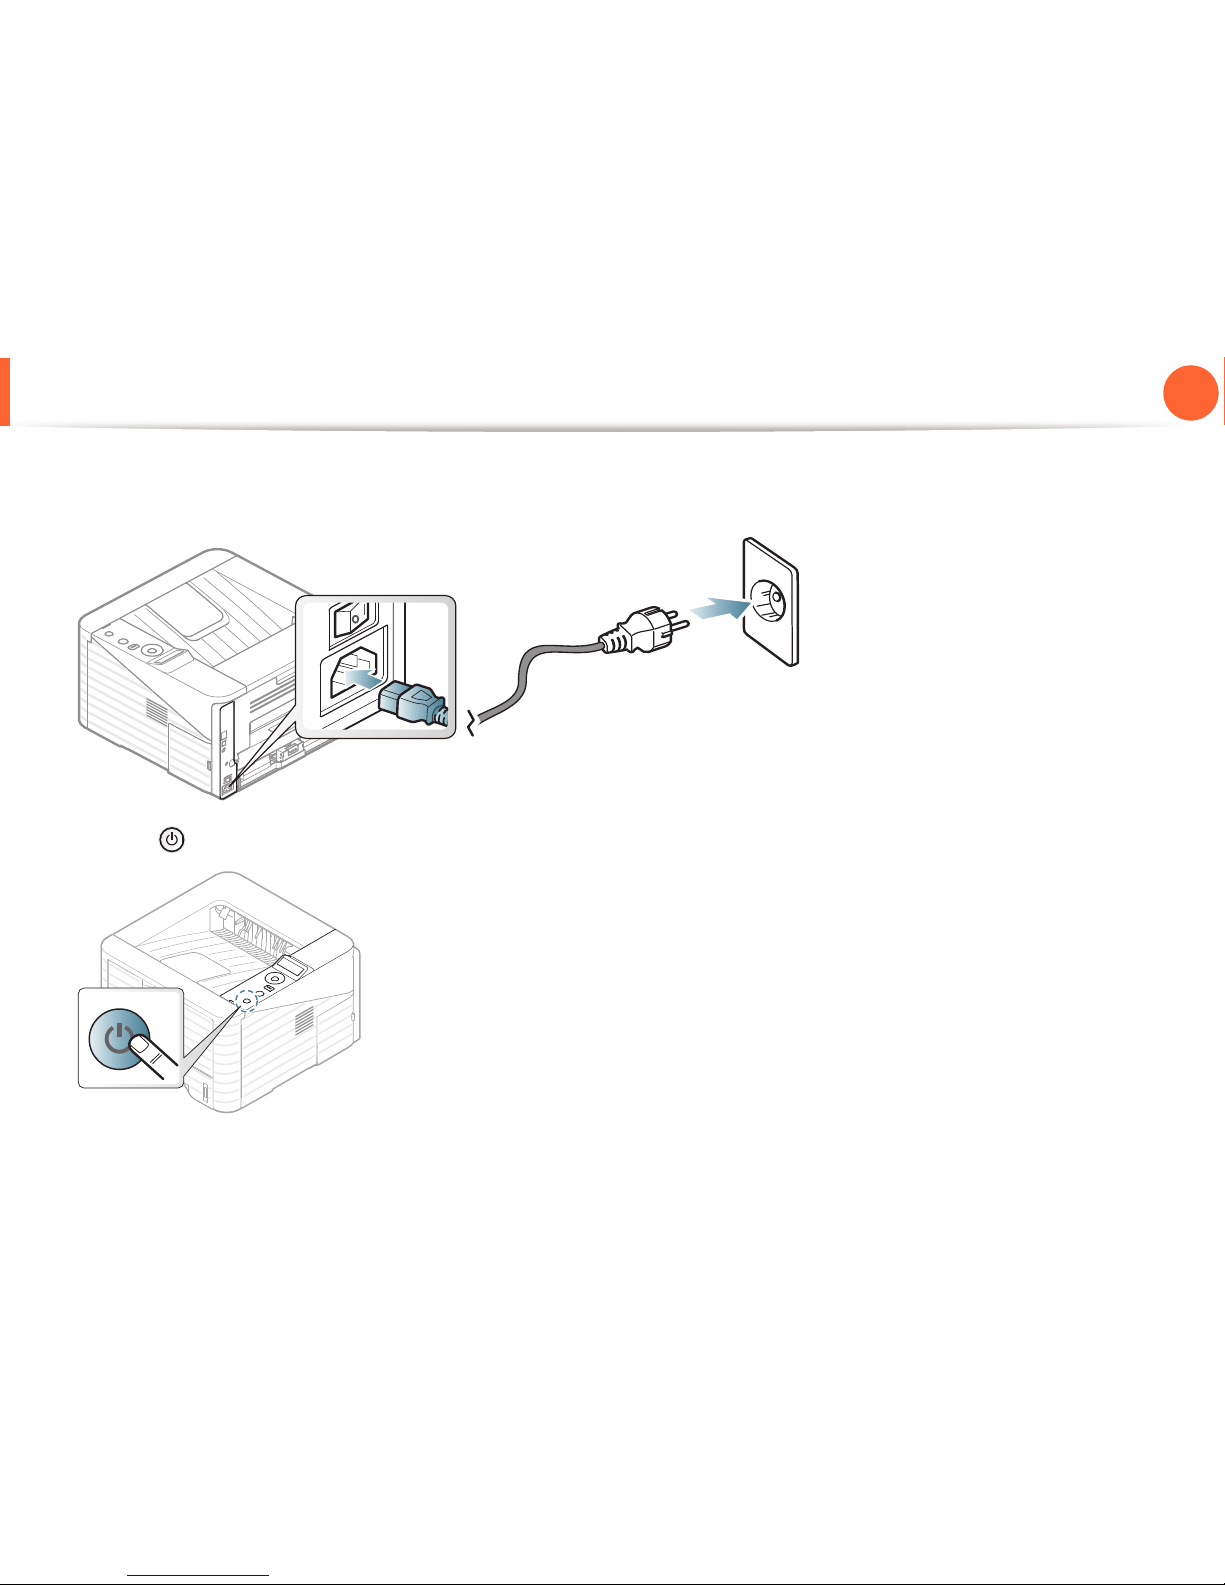
Turning on the machine
1
Connect the machine to the electricity supply first.
Turn the switch on if the machine has a power switch.
2
Press the (Power) button, then release.
Page 23
23
1. Introduction
Installing the driver locally
A locally connected machine is a machine directly attached to your
computer using the cable. If your machine is attached to a network,
skip the following steps below and go on to installing a network
connected machine’s driver (see Advanced Guide).
• If you are a Macintosh, Linux, or Unix OS user, refer to the
Advanced guide.
• The installation window in this User’s Guide may differ
depending on the machine and interface in use.
•Selecting Advanced Installation > Custom Installation
allows you to choose which programs to install.
• Only use a USB cable no longer than 3 meters (118 inches ).
15
Windows
1
Make sure that the machine is connected to your computer
and powered on.
If the “Found New Hardware Wizard” appears during the
installation procedure, click Cancel to close the window.
2
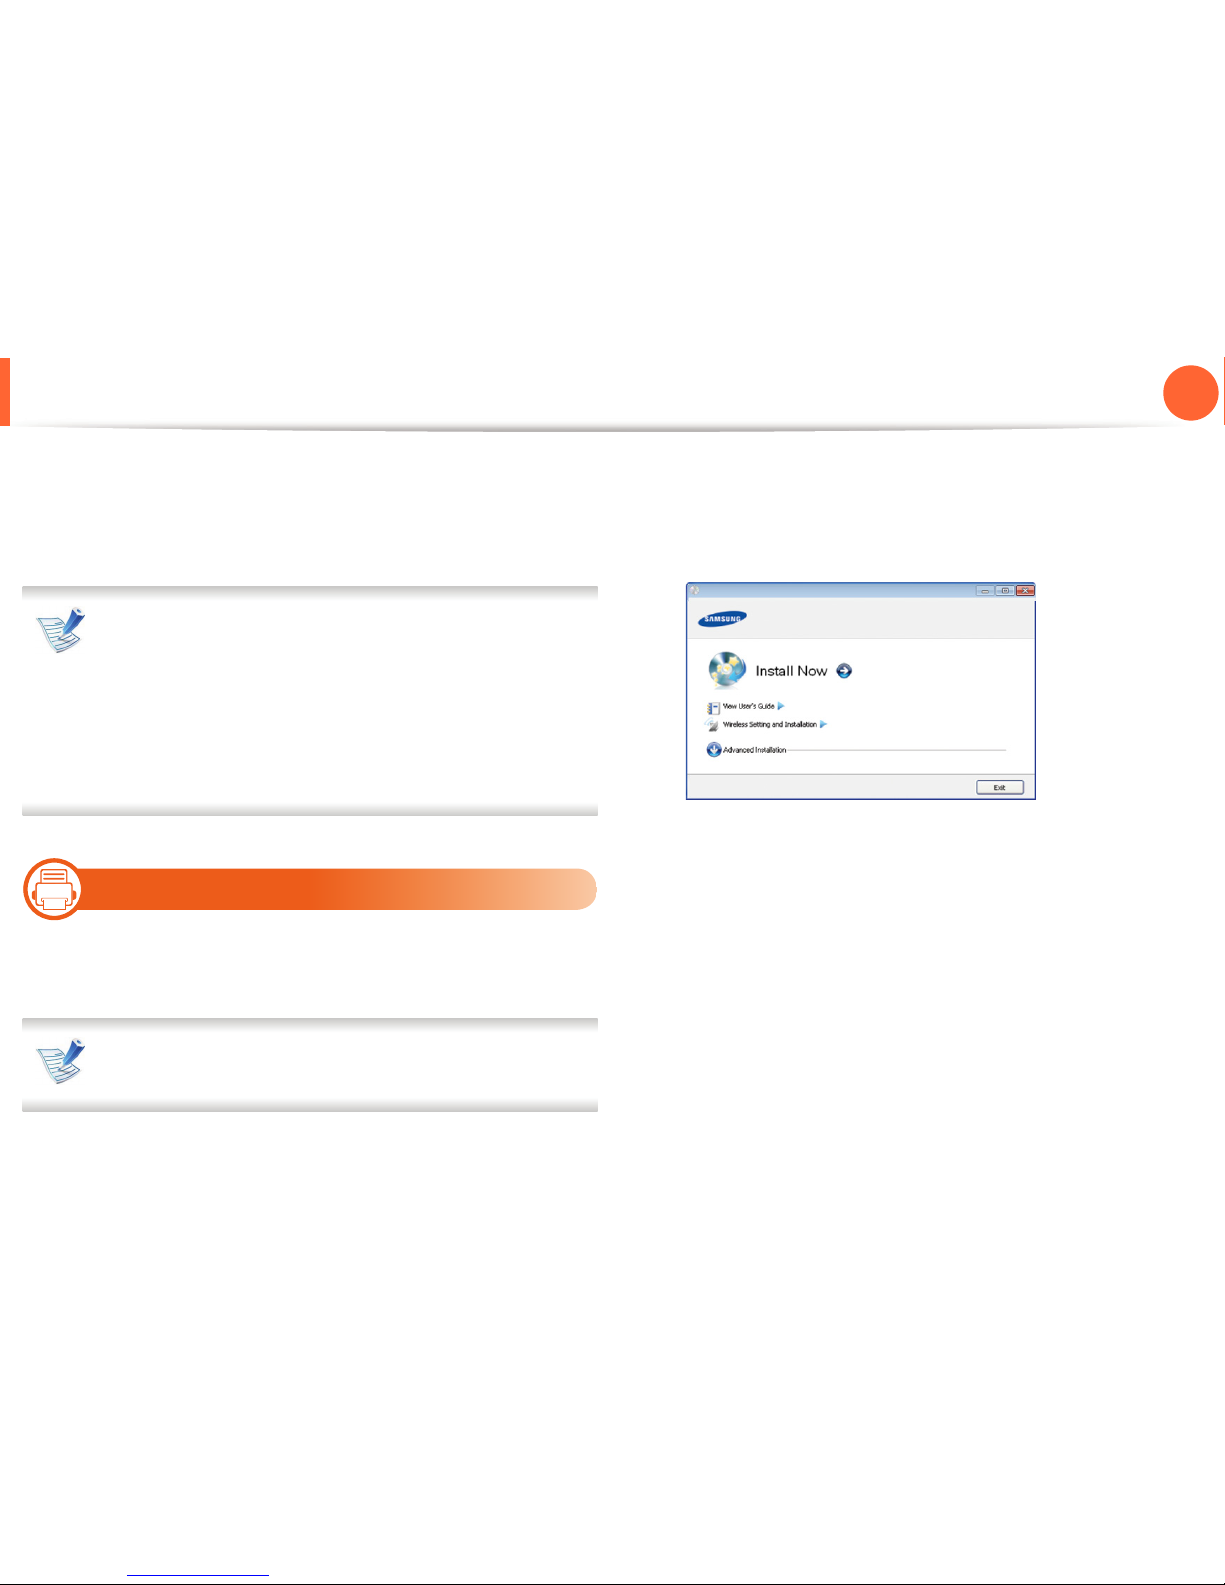
Insert the supplied software CD into your CD-ROM drive.
The software CD should automatically run and an installation
window will appear.
3
Select Install Now.
4
Read License Agreement, and select I accept the terms of
the License Agreement. Then, click Next.
5
Follow the instructions in the installation window.
Page 24

24
1. Introduction
Reinstalling the driver
If the printer driver does not work properly, follow the steps below to
reinstall the driver.
16
Windows
1
Make sure that the machine is connected to your computer
and powered on.
2
From the Start menu, select Programs or All Programs >
Samsung Printers > your printer driver name > Uninstall.
3
Follow the instructions in the installation window.
4
Insert the software CD into your CD-ROM drive and install the
driver again (see "Installing the driver locally" on page 23).
Page 25

2. Menu overview and basic
setup
After installation is complete, you may want to set the machine’s default
settings. Refer to the next section if you would like to set or change values.
This chapter provides information about the overall menu structure and
the basic setup options.
• Menu overview 2
•Printing a demo page 4
• Changing the display language 5
• Media and tray 6
• Basic printing 17
Page 26

28
2. Menu overview and basic setup
Menu overview
The control panel provides access to various menus to set up the
machine or use the machine’s functions.
• These menus can be accessed by pressing (Menu)
button. Press the arrows until the needed menu item
appears and press OK.
• An asterisk (*) appears next to the currently selected
menu.
• Some menus may not appear on the display depending on
options or models. If so, it is not applicable to your
machine.
• For models that do not have the display screen on the
control panel, this feature is not applicable.
• Some menu names may differ from your machine
depending on its options or the models.
Items Options
Information
Menu Map
Configuration
Supplies Info.
Demo Page
PCL Font
PS Font
EPSON Font
Usage Counter
Account Report
Layout
Orientation
Common Margin
MP Tray
Tray X
Emulation Mar.
Duplex Margin
Paper
Copies
MP Tray/ [Tray <x>]
Paper Source
Tray Chaining
Page 27

Menu overview
29
2. Menu overview and basic setup
Graphic
Resolution
Darken Text
System Setup
Language
Power Save
Wakeup Event
Altitude Adj.
Auto CR
Job Timeout
Maintenance
Toner Save
Eco Setup
Clear Setting
Emulation
Emulation Type
Setup
Items Options
Network
TCP/IP (IPv4)
TCP/IP (IPv6)
Ethernet Speed
802.1x
Wireless
Clear Setting
Network Conf.
Net. Activate
Http Activate
Custom
a
Job
Management
Active Job
Stored Job
File Policy
a. You can start applications. You need to register the application from the
SyncThru™ Web Service before you start the application.
Items Options
Page 28
30
2. Menu overview and basic setup
Printing a demo page
Print a demo page to make sure that the machine is operating
correctly.
1
Press (Menu) button on the control panel.
2
Press Information > OK > Demo Page > OK.
3
Press Print? > Yes > OK.
A demo page prints out.
If your machine does not have a display screen, press and
hold (Cancel) button for about 5 seconds until the status
LED blinks, and release.
Page 29
31
2. Menu overview and basic setup
Changing the display language
To change the language that is displayed on the control panel,
follow these steps:
For models that do not have the display screen on the
control panel, this feature is not applicable.
1
Press (Menu) button on the control panel.
2
Press System Setup > OK > Language > OK.
3
Press OK to select the language you want.
Page 30
32
2. Menu overview and basic setup
Media and tray
This chapter provides information on how to load print media into
your machine.
•Using print media that does not meet these specifications
may cause problems or require repairs. Such repairs are
not covered by Samsung’s warranty or service
agreements.
• Make sure not to use the inkjet photo paper with this
machine. It could cause damage to the machine.
• Using inflammable print media can cause a fire.
• Use designated print media (see "Print media
specifications" on page 4).
The use of inflammable media or foreign materials left in the
printer may lead to overheating of the unit and, in rare cases
may cause a fire.
1
Tray overview
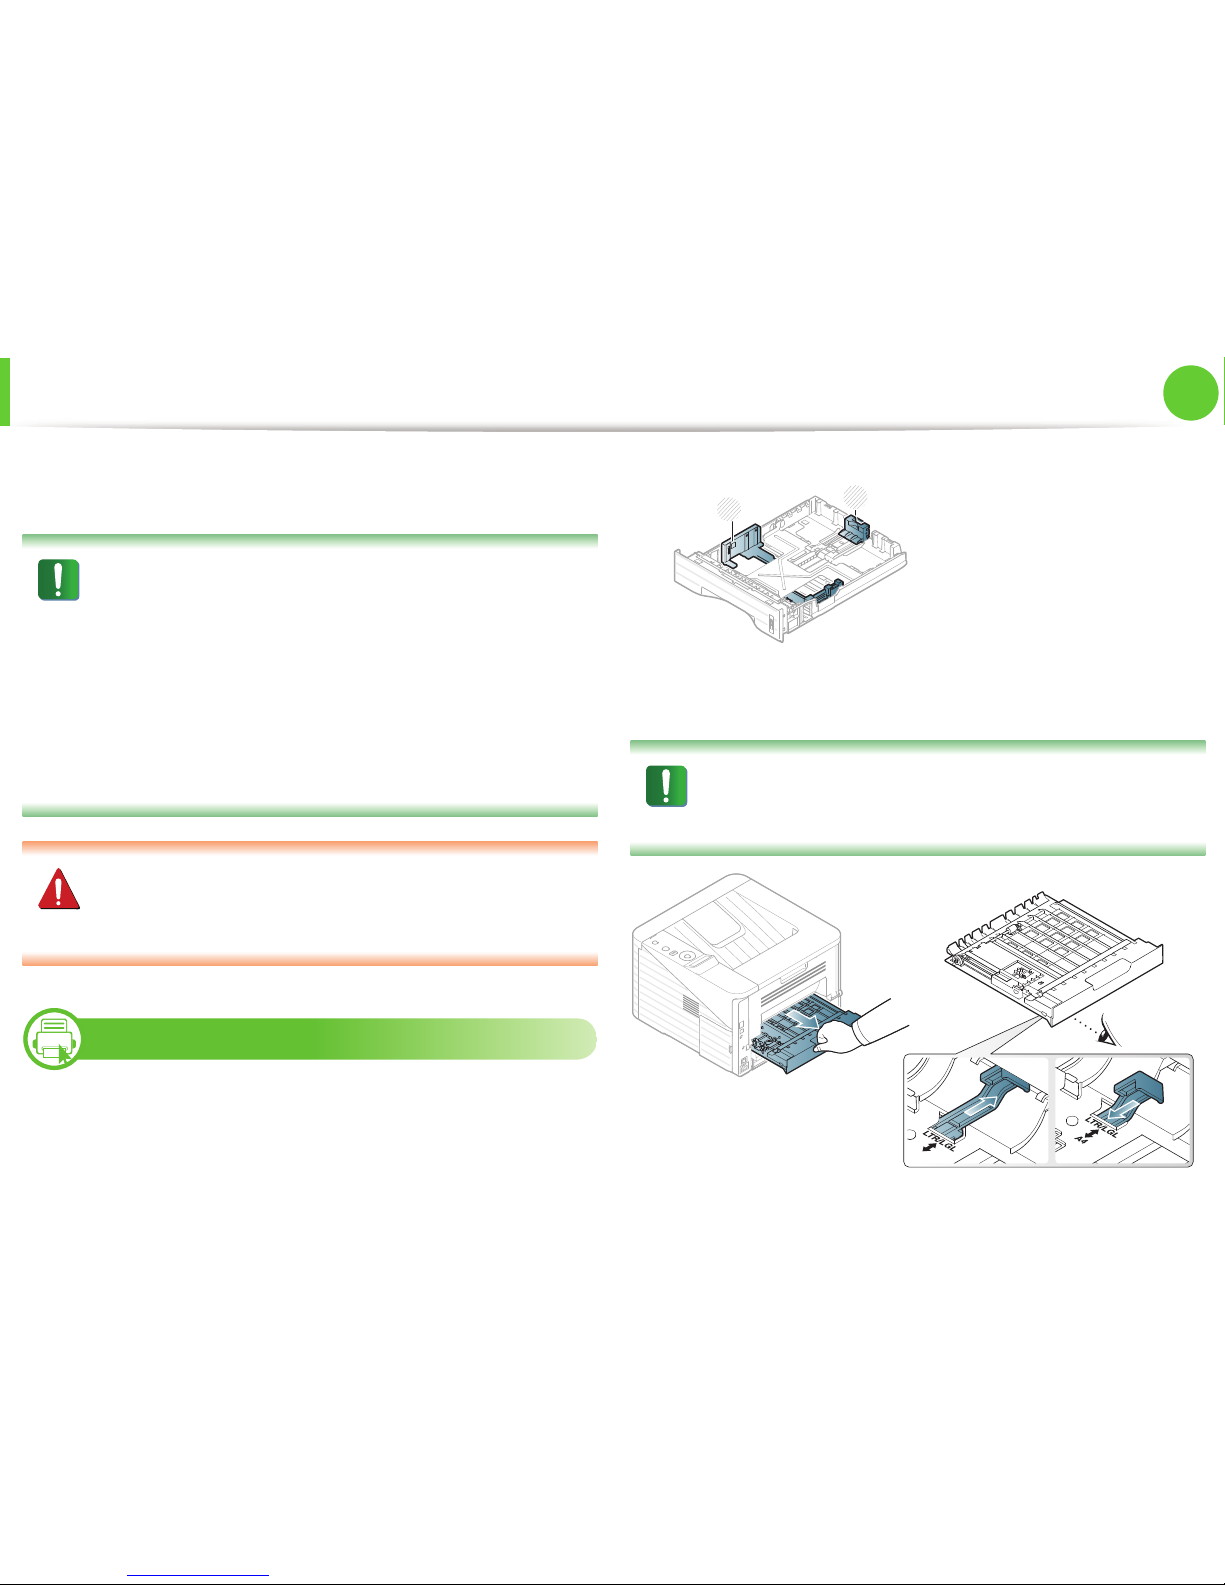
To change the size, you need to adjust the paper guides.
The duplex unit is preset to Letter/LGL or A4 size, depending on your
country. To change the paper size, adjust the guide as shown below.
If you do not adjust the guide, it may cause paper
registration, image skew, or jamming of the paper.
1 Paper length guide
2 Paper width guide
1
2
A4
Page 31
Media and tray
33
2. Menu overview and basic setup
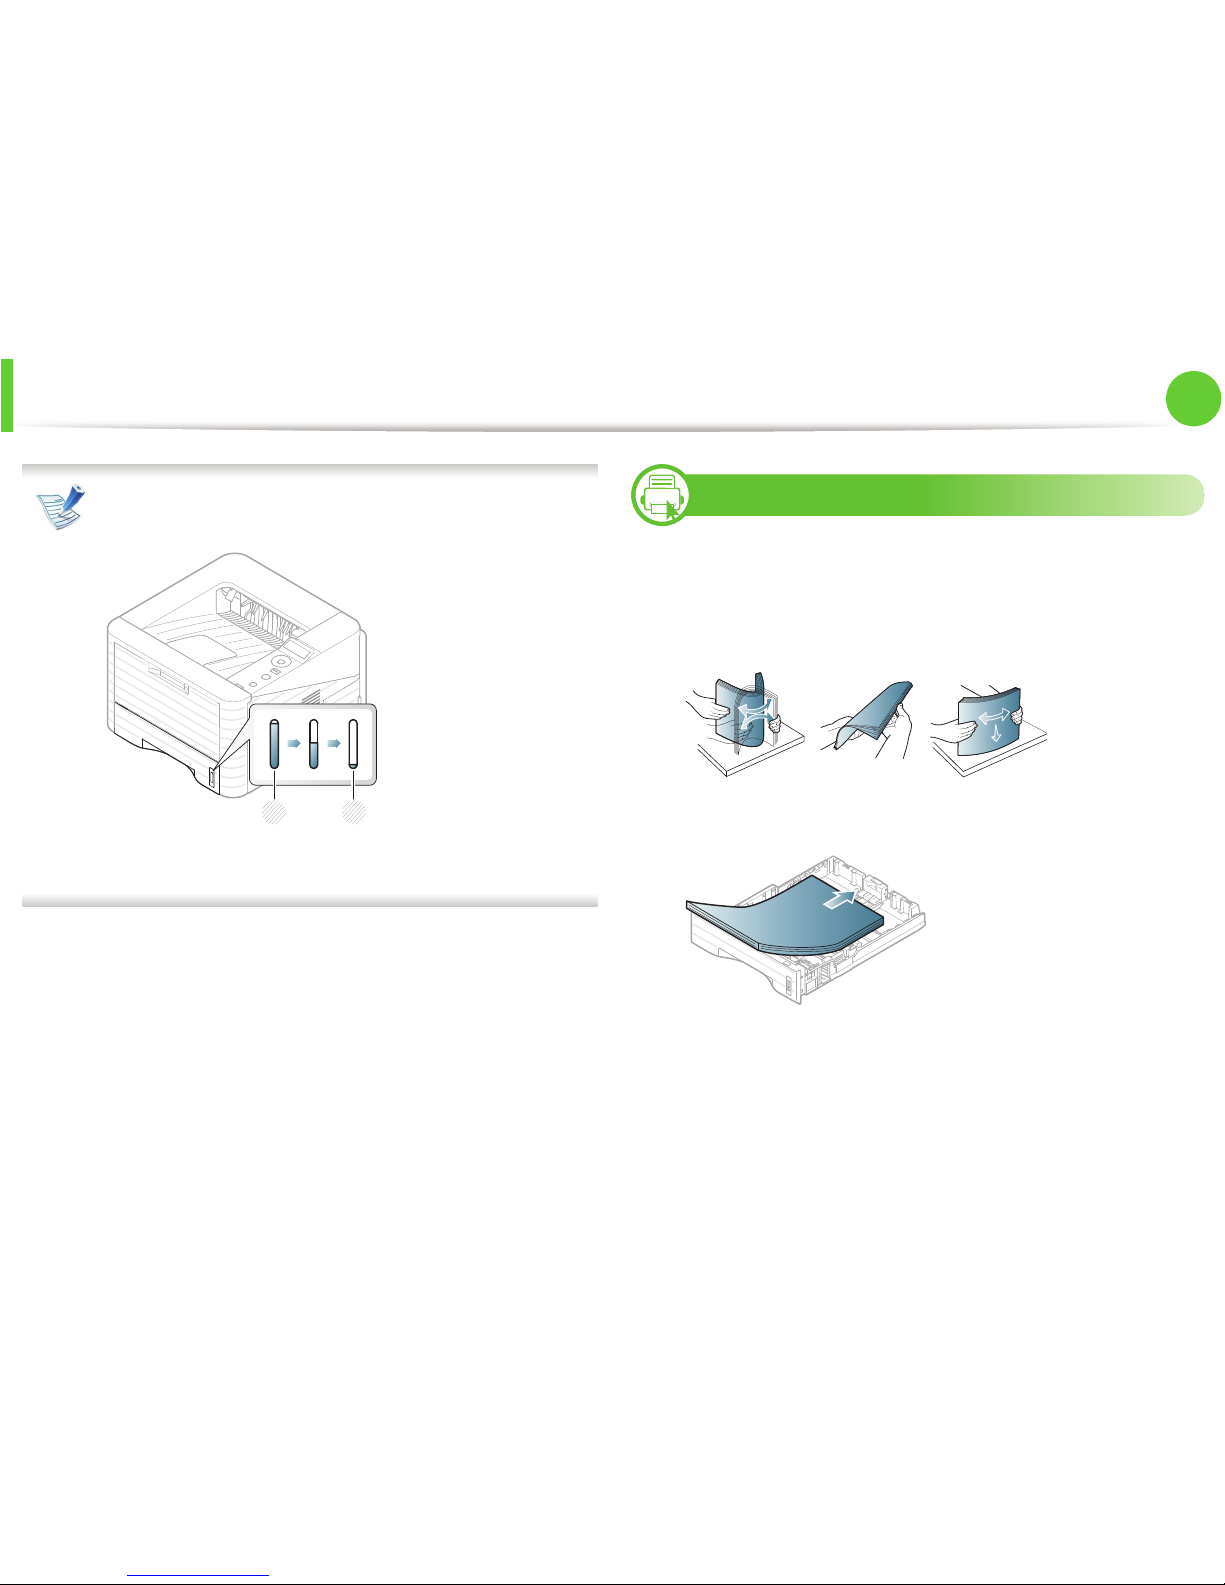
Paper quantity indicator shows the amount of paper in the
tray.
1 Full
2 Empty
2
Loading paper in the tray/ optional tray
1
Pull out the paper tray.
2
Flex or fan the edge of the paper stack to separate the pages
before loading papers.
3
Place paper with the side you want to print on facing down.
1
2
Page 32
Media and tray
34
2. Menu overview and basic setup
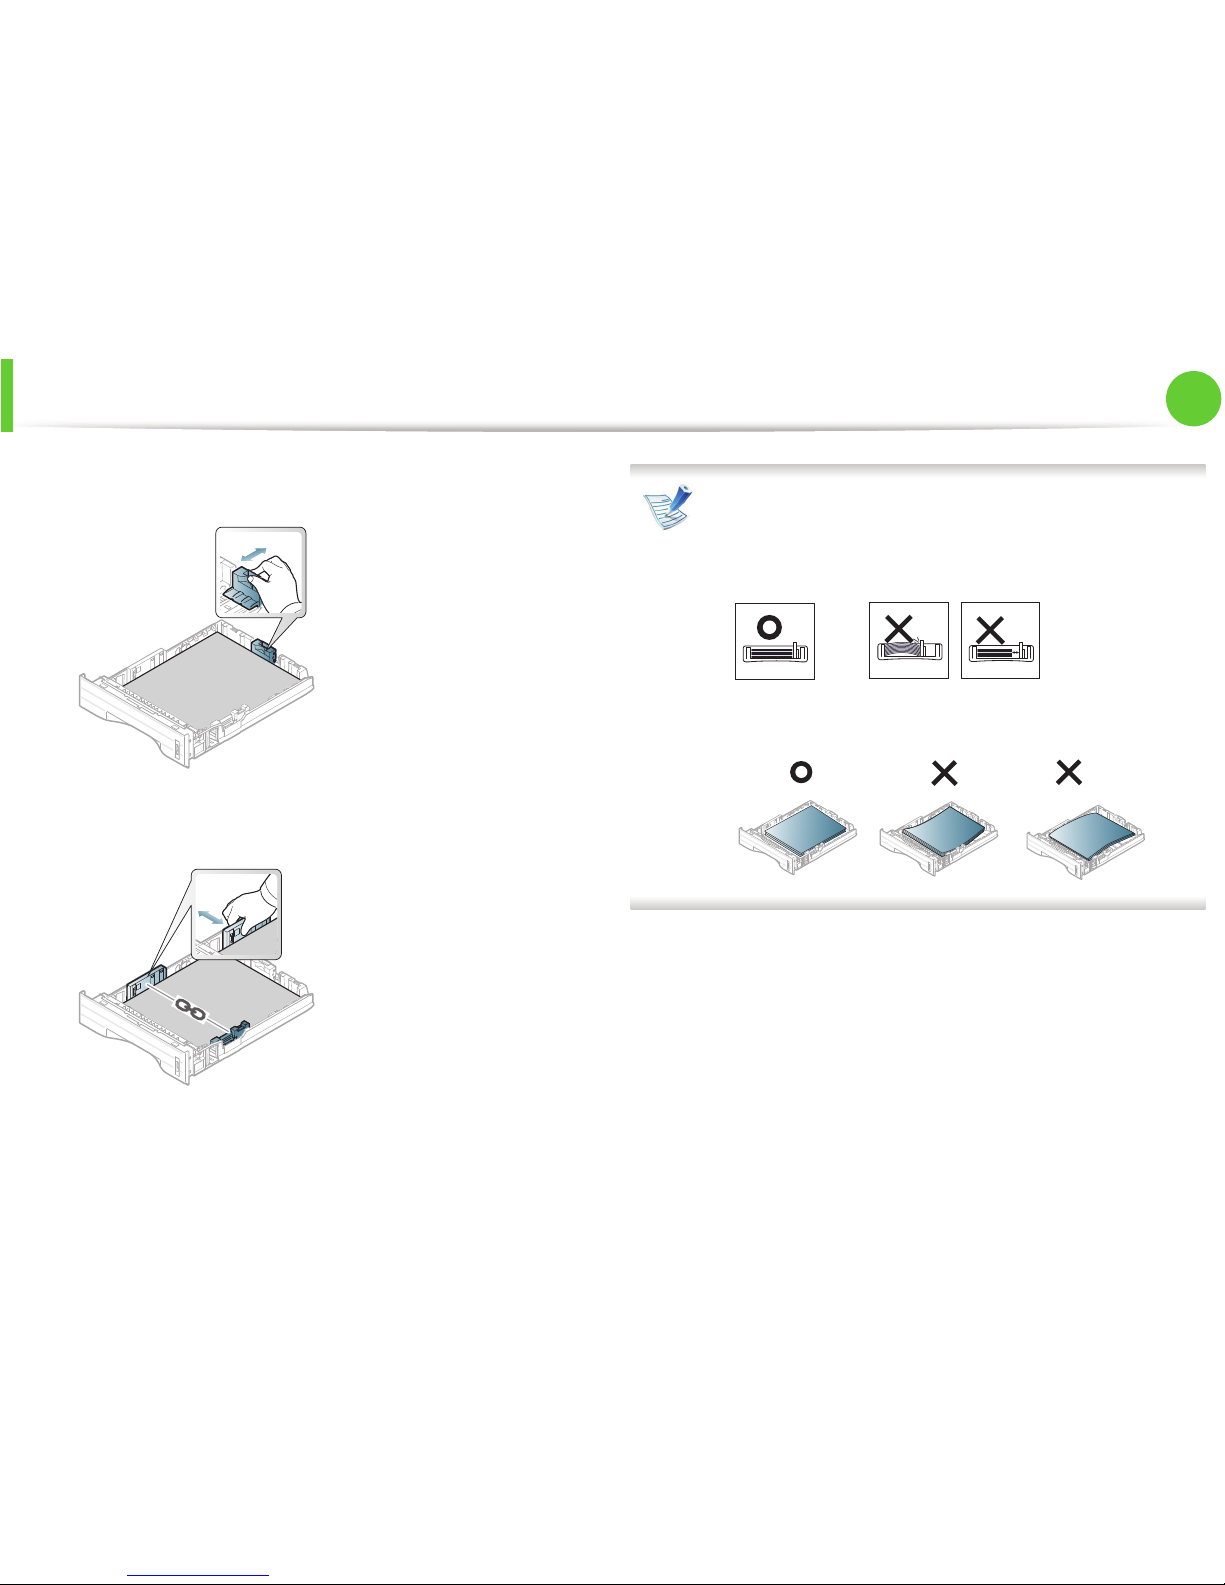
4
Slide the paper length guide until it lightly touches the end of
the paper stack.
5
Squeeze the paper width guide and slide it to the edge of the
paper stack without causing it to bend.
• Do not push the paper width guide too far causing the
media to warp.
• If you do not adjust the paper width guide, it may cause
paper jams.
• Do not use a paper with a leading-edge curl, it may cause
a paper jam or the paper can be wrinkled.
6
Insert the tray back into the machine.
7
Set the paper type and size for tray 1 (see "Setting the paper
size and type" on page 16).
Page 33
Media and tray
35
2. Menu overview and basic setup
The settings set from the machine driver override the
settings on the control panel.
a To print from an application, open an application and start
the print menu.
b Open Printing Preferences (see "Opening printing
preferences" on page 19).
c Press the Paper tab in Printing Preferences, and select an
appropriate paper type.
3
Loading in multi-purpose tray
The multi-purpose tray can hold special sizes and types of print
material, such as postcards, note cards, and envelopes.
• The machine does not have a display screen: 1 sheet of 80 g/
m
2
(20 lbs bond)
• The machine has the display screen: 50 sheets of 80 g/m
2
(20
lbs bond)
Tips on using the multi-purpose tray
• To prevent paper jams, do not add paper while printing
when there is still paper in the multi-purpose tray.
• Print media should be loaded face up with the top edge
going into the multi-purpose tray first and be placed in the
center of the tray.
• To ensure printing quality and to prevent paper jams, only
load the available paper (see "Print media specifications"
on page 4).
• Flatten any curl on postcards, envelopes, and labels before
loading them into the multi-purpose tray.
• When printing on special media, you must follow the
loading guidelines (see "Printing on special media" on
page 11).
• When papers overlap when printing using the multipurpose tray, open tray 1 and remove the overlapping
papers then try printing again.
• When paper does not feed well while printing, push the
paper in manually until it starts feeding automatically.
Page 34
Media and tray
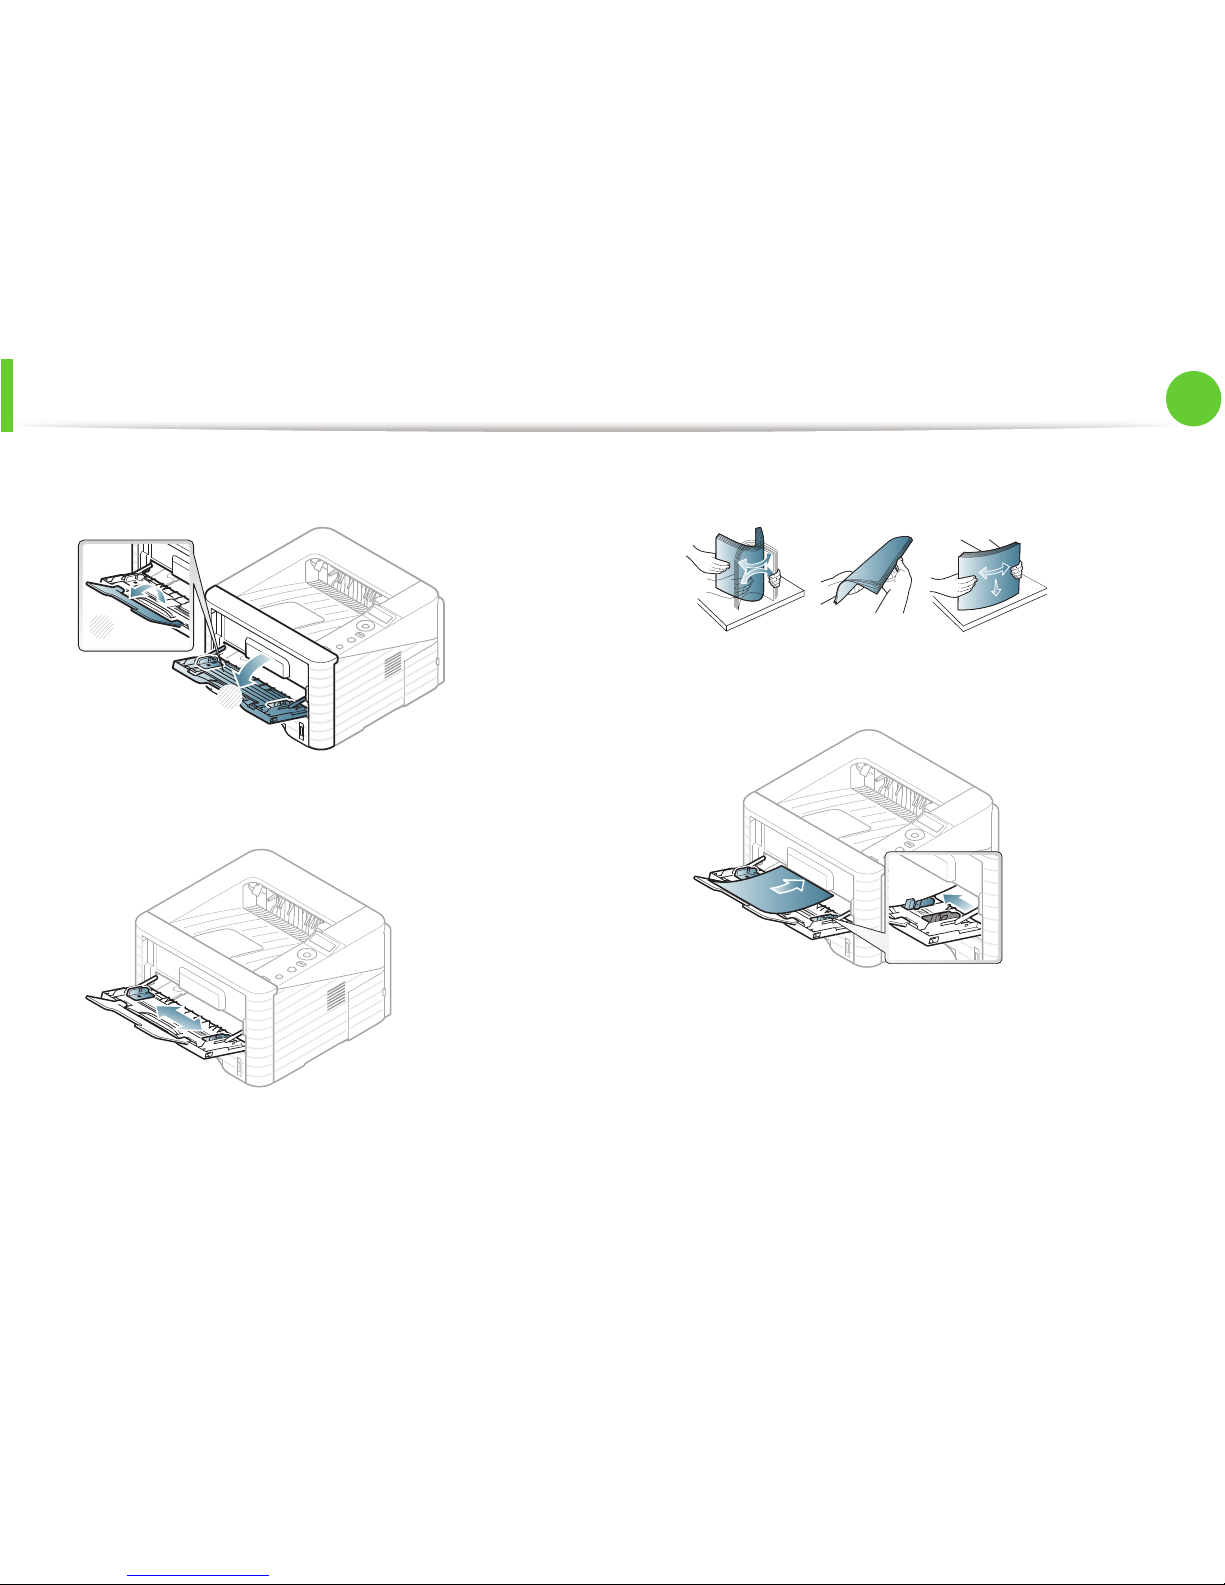
36
2. Menu overview and basic setup
1
Open the multi-purpose tray and unfold the multi-purpose
tray extension, as shown.
2
Adjust the multi-purpose tray paper width guides to the width
of the paper.
3
Flex or fan the edge of the paper stack to separate the pages
before loading paper.
4
Load the paper. Squeeze the multi-purpose tray paper width
guides and adjust them to the width of the paper.
5
Set the paper type and size from the control panel (see
"Setting the paper size and type" on page 16).
1
2
Page 35
Media and tray
37
2. Menu overview and basic setup
The settings set from the machine’s driver override the
settings on the control panel.
a To print from an application, open an application and start
the print menu.
b Open Printing Preferences (see "Opening printing
preferences" on page 19).
c Press the Paper tab in Printing Preferences and select an
appropriate paper type.
For example, if you want to use a label, set the paper type
to Label.
d Select MP Tray in paper source, then press OK.
e Start printing in application.
4
Printing on special media
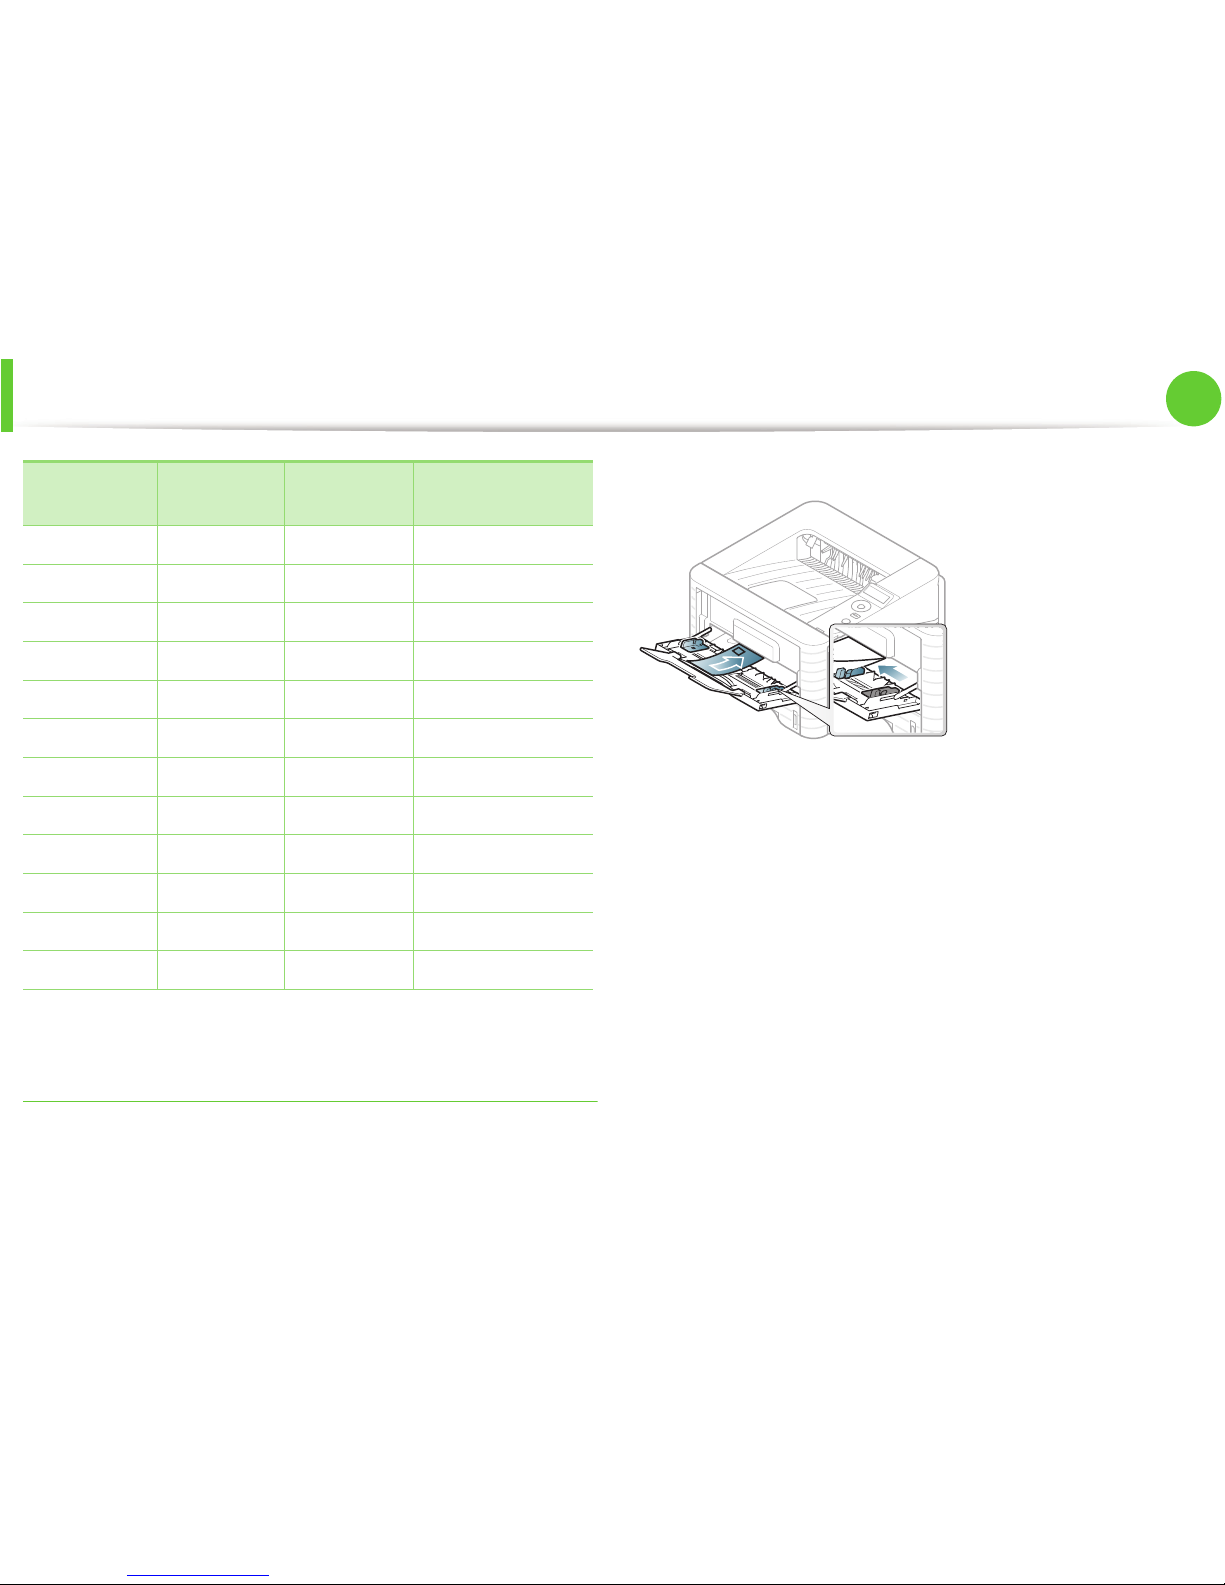
The table below shows the special media usable in each tray.
The media types are shown in the Printing Preferences. Select the
proper media type to get the highest printing quality.
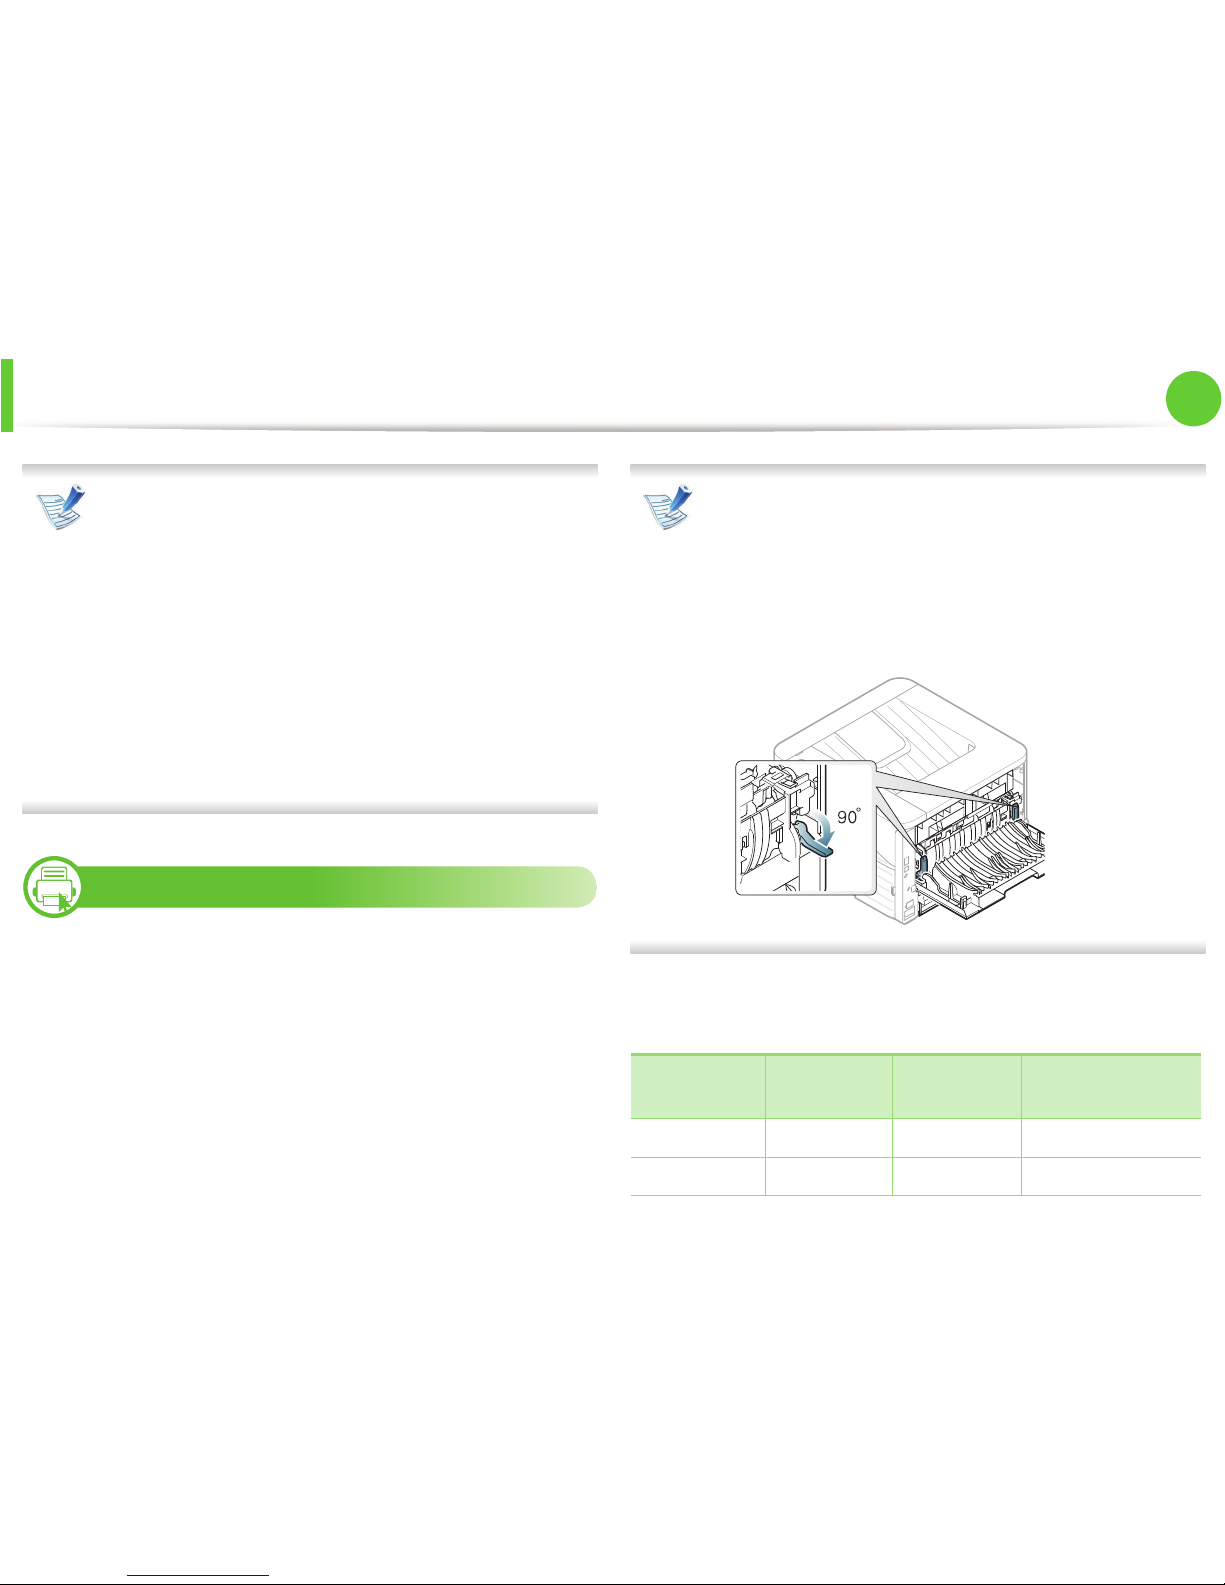
• When using special media, we recommend you feed one
sheet at a time (see "Print media specifications" on page 4).
• Printing the special media (Face up)
If special media are printed out with curl, wrinkles, crease,
or black bold lines, open the rear cover and pull down the
pressure lever as shown below and try printing again.
Keep the rear cover opened during printing.
To see for paper weights for each sheet, refer to "Print media
specifications" on page 4.
Types Tray 1
Optional
tray
Multi-purpose tray
Plain ?? ?
Thick ?? ?
Page 36
Media and tray
38
2. Menu overview and basic setup
( ?: Included, Blank: Not available)
Envelope
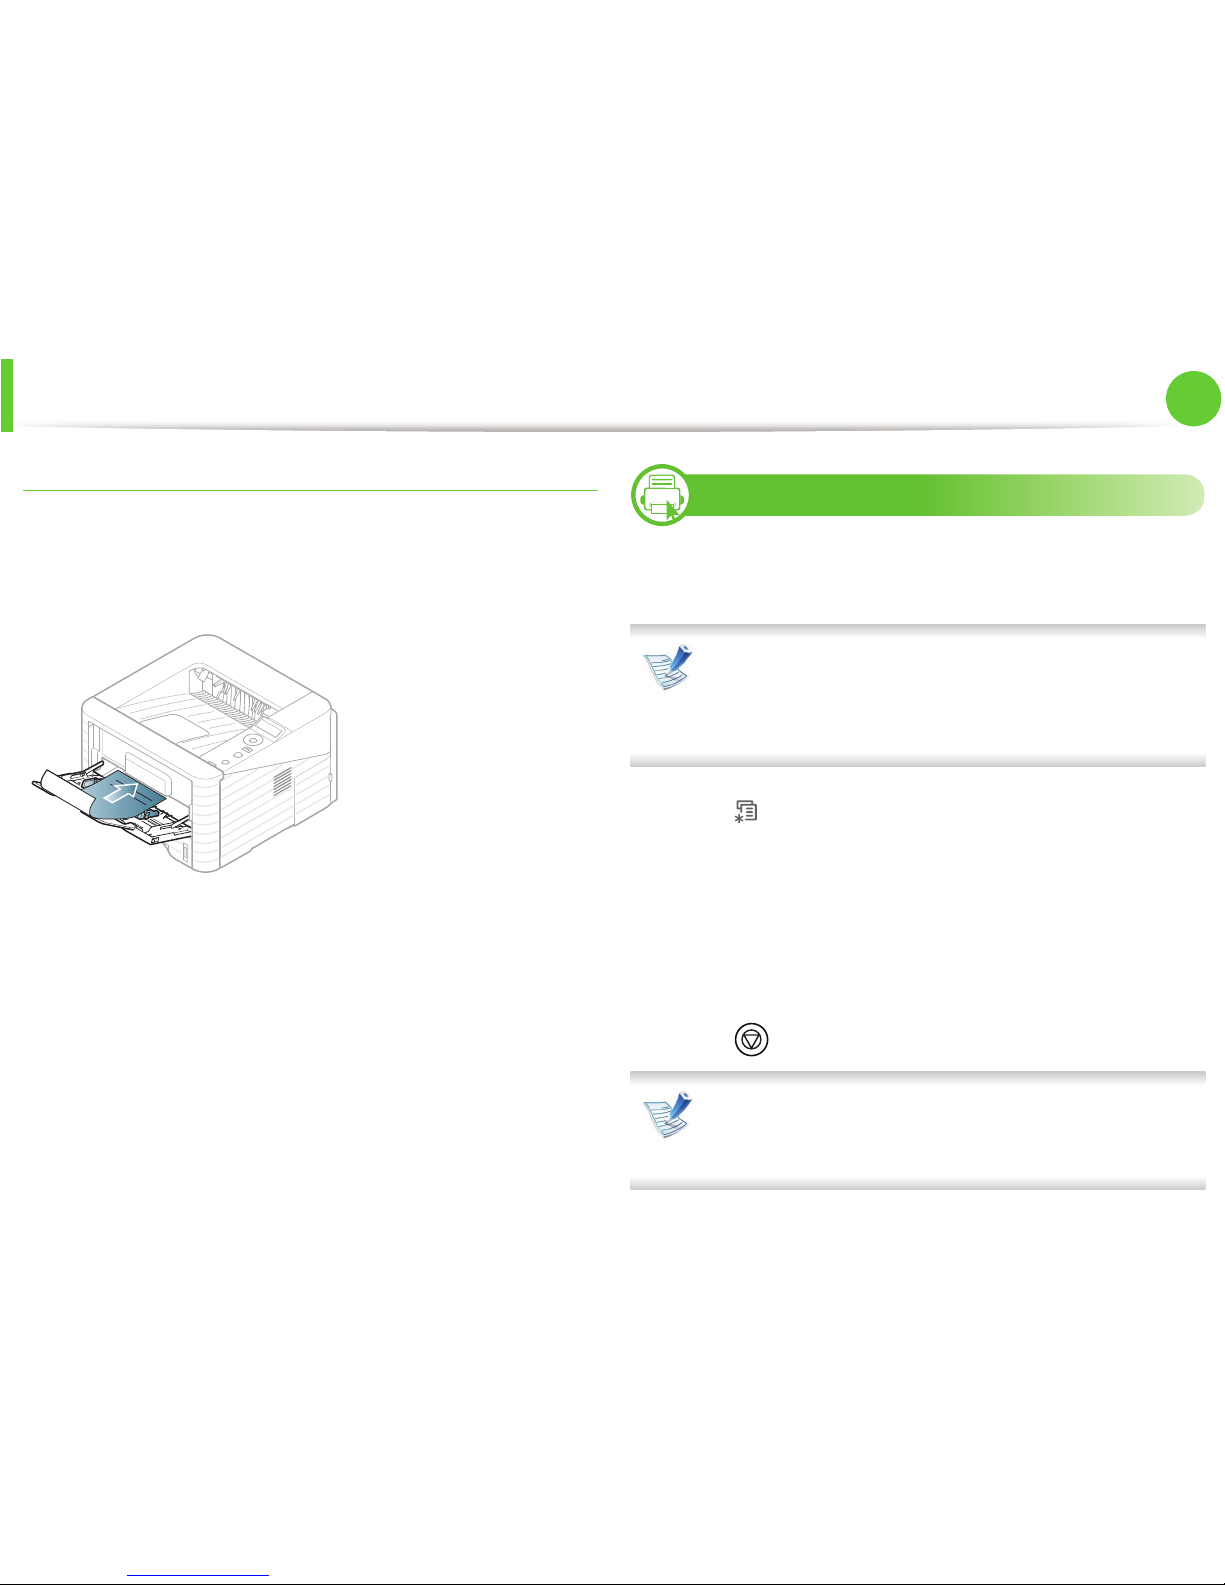
Printing successfully on envelopes depends upon the quality of the
envelopes.
To print an envelope, place it as shown in the following figure.
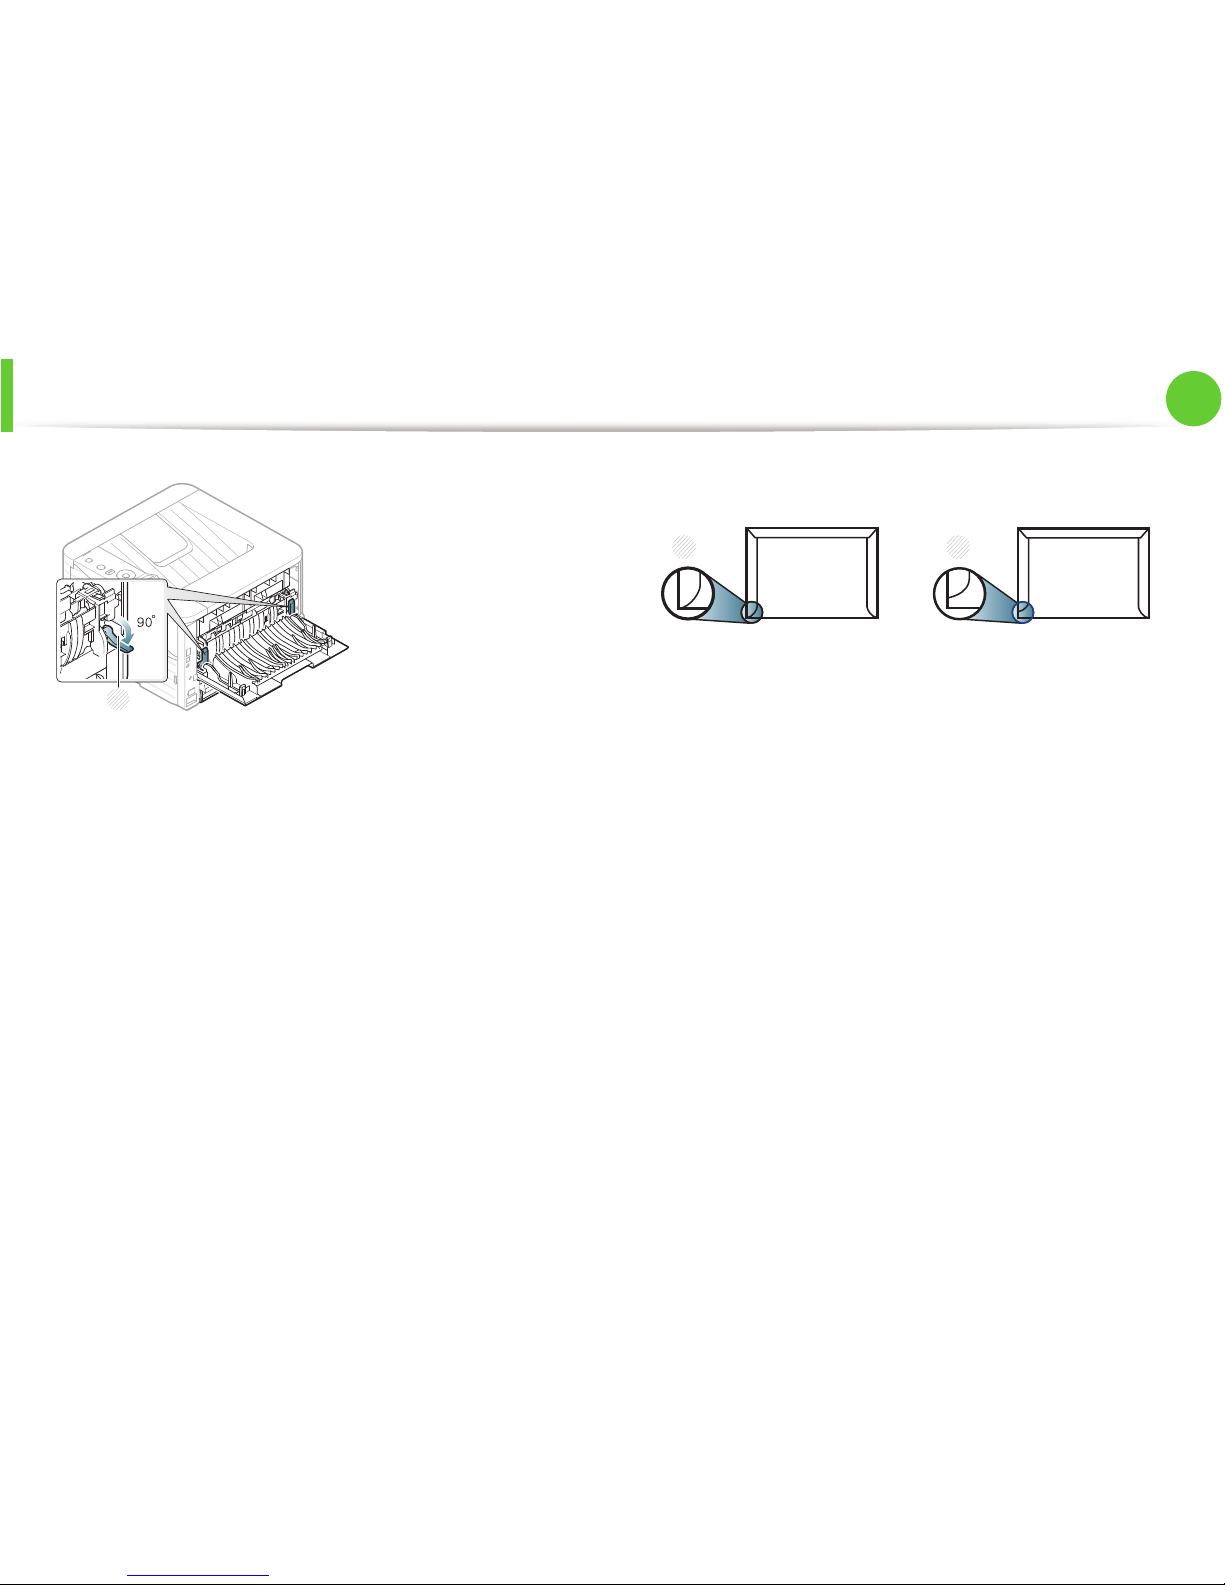
If envelopes are printed out with wrinkles, crease, or black bold lines,
open the rear cover and pull down the pressure lever on the right
side about 90 degrees and try printing again. Keep the rear cover
opened during printing.
Thicker ?
Thin ?? ?
Bond ?? ?
Color ?
CardStock ?? ?
Labels ?
Transparency ?
Envelope ?
Preprinted ?
Cotton ?
Recycled ?? ?
Archive ?? ?
Types Tray 1
Optional
tray
Multi-purpose tray
Page 37
Media and tray
39
2. Menu overview and basic setup
• When selecting envelopes, consider the following factors:
- Weight: should not exceed 90 g/m
2
otherwise; jams may
occur.
- Construction: should lie flat with less than 6 mm curl and
should not contain air.
- Condition: should not be wrinkled, nicked, nor damaged.
- Temperature: should resist the heat and pressure of the
machine during operation.
• Use only well-constructed envelopes with sharp and wellcreased folds.
• Do not use stamped envelopes.
• Do not use envelopes with clasps, snaps, windows, coated lining,
self-adhesive seals, or other synthetic materials.
• Do not use damaged or poorly made envelopes.
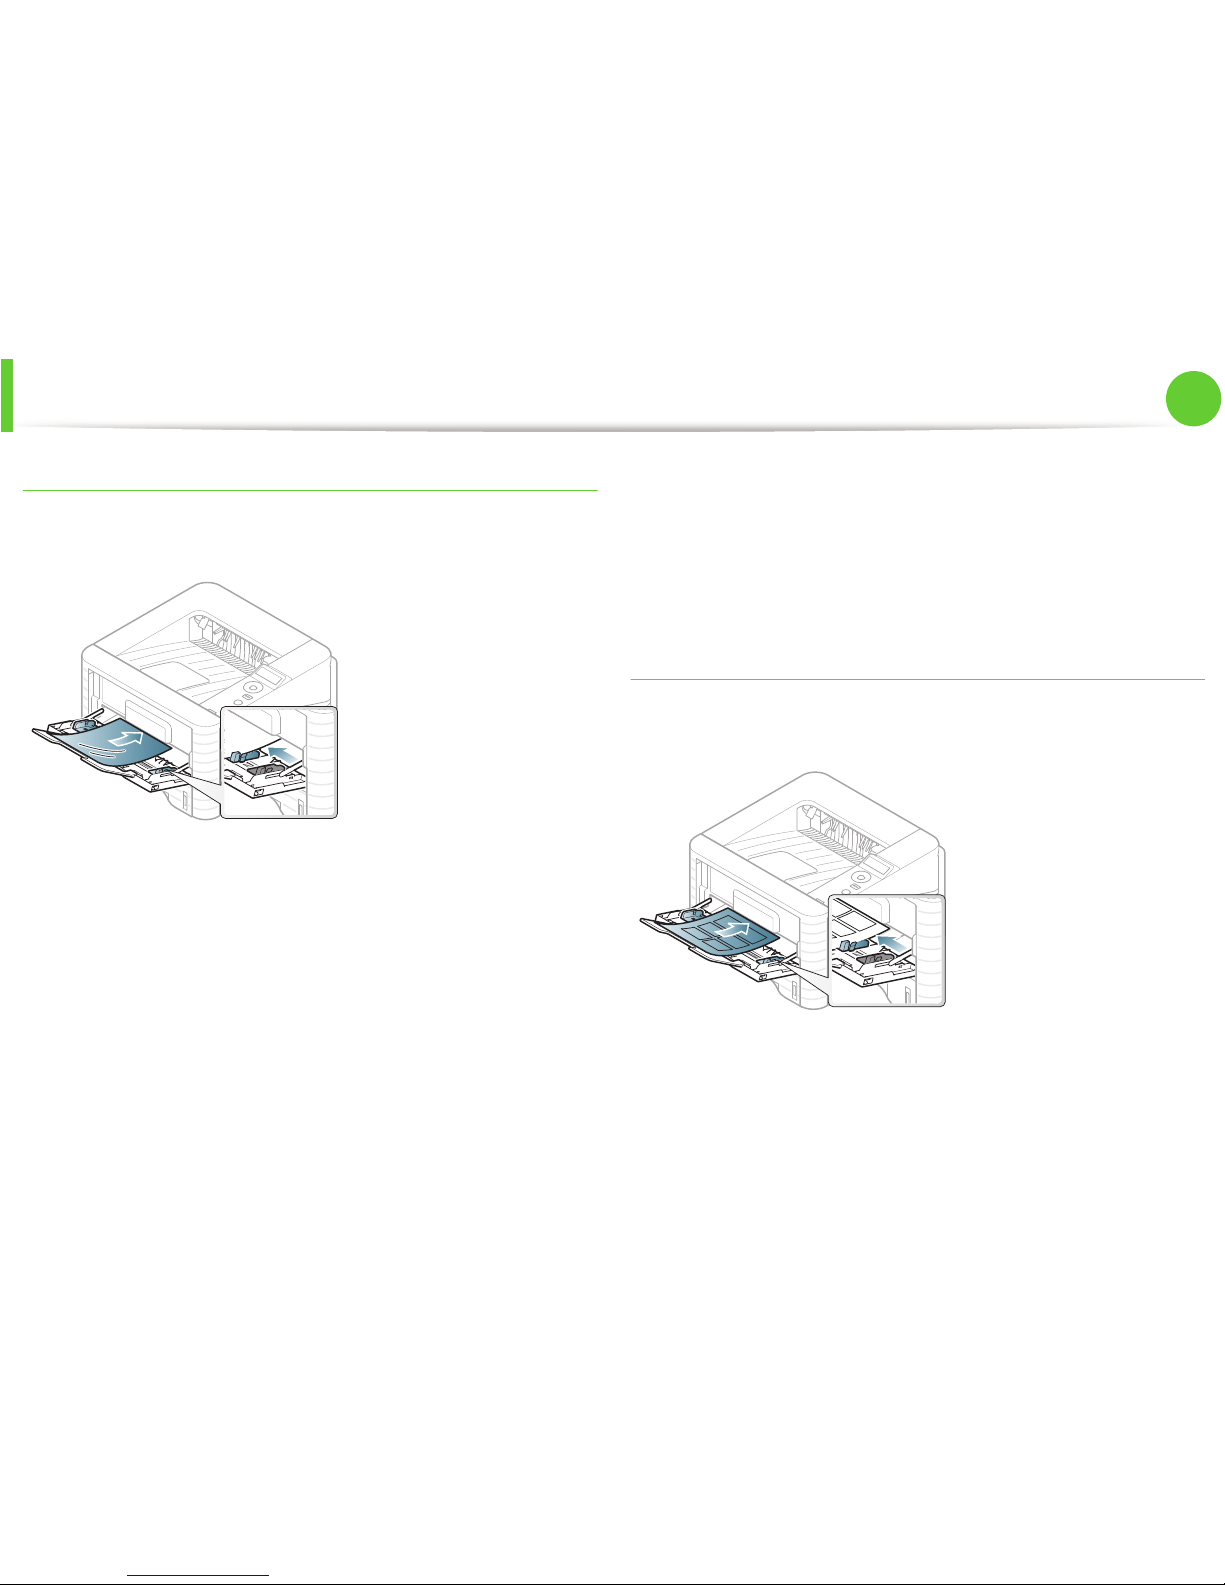
• Be sure the seam at both ends of the envelope extends all the
way to the corner of the envelope.
1 Acceptable
2 Unacceptable
• Envelopes with a peel-off adhesive strip or with more than one
flap that folds over to seal must use adhesives compatible with
the machine’s fusing temperature for 0.1 second (about 170°C
(338 °F)). The extra flaps and strips might cause wrinkling,
creasing, or jams, and may even damage the fuser.
• For the best print quality, position margins no closer than 15 mm
from the edges of the envelope.
• Avoid printing over the area where the envelope’s seams meet.
1 Pressure lever
1
1
2
Page 38
Media and tray
40
2. Menu overview and basic setup
Transparency
To avoid damaging the machine, use only transparencies designed
for use in laser printers.
• Must withstand the machine’s fusing temperature.
• Place them on a flat surface after removing them from the
machine.
• Do not leave unused transparencies in the paper tray for long.
Dust and dirt may accumulate on them, resulting in spotty
printing.
• To avoid smudging caused by fingerprints, handle them
carefully.
• To avoid fading, do not expose printed transparencies to
prolonged sunlight.
• Ensure that transparencies are not wrinkled, curled, or have any
torn edges.
• Do not use transparencies that separate from the backing sheet.
• To prevent transparencies from sticking to each other, do not let
the printed sheets stack up as they are being printed out.
• Recommended media: Transparency for a color laser printer by
Xerox, such as 3R 91331(A4), 3R 2780 (Letter)
Labels
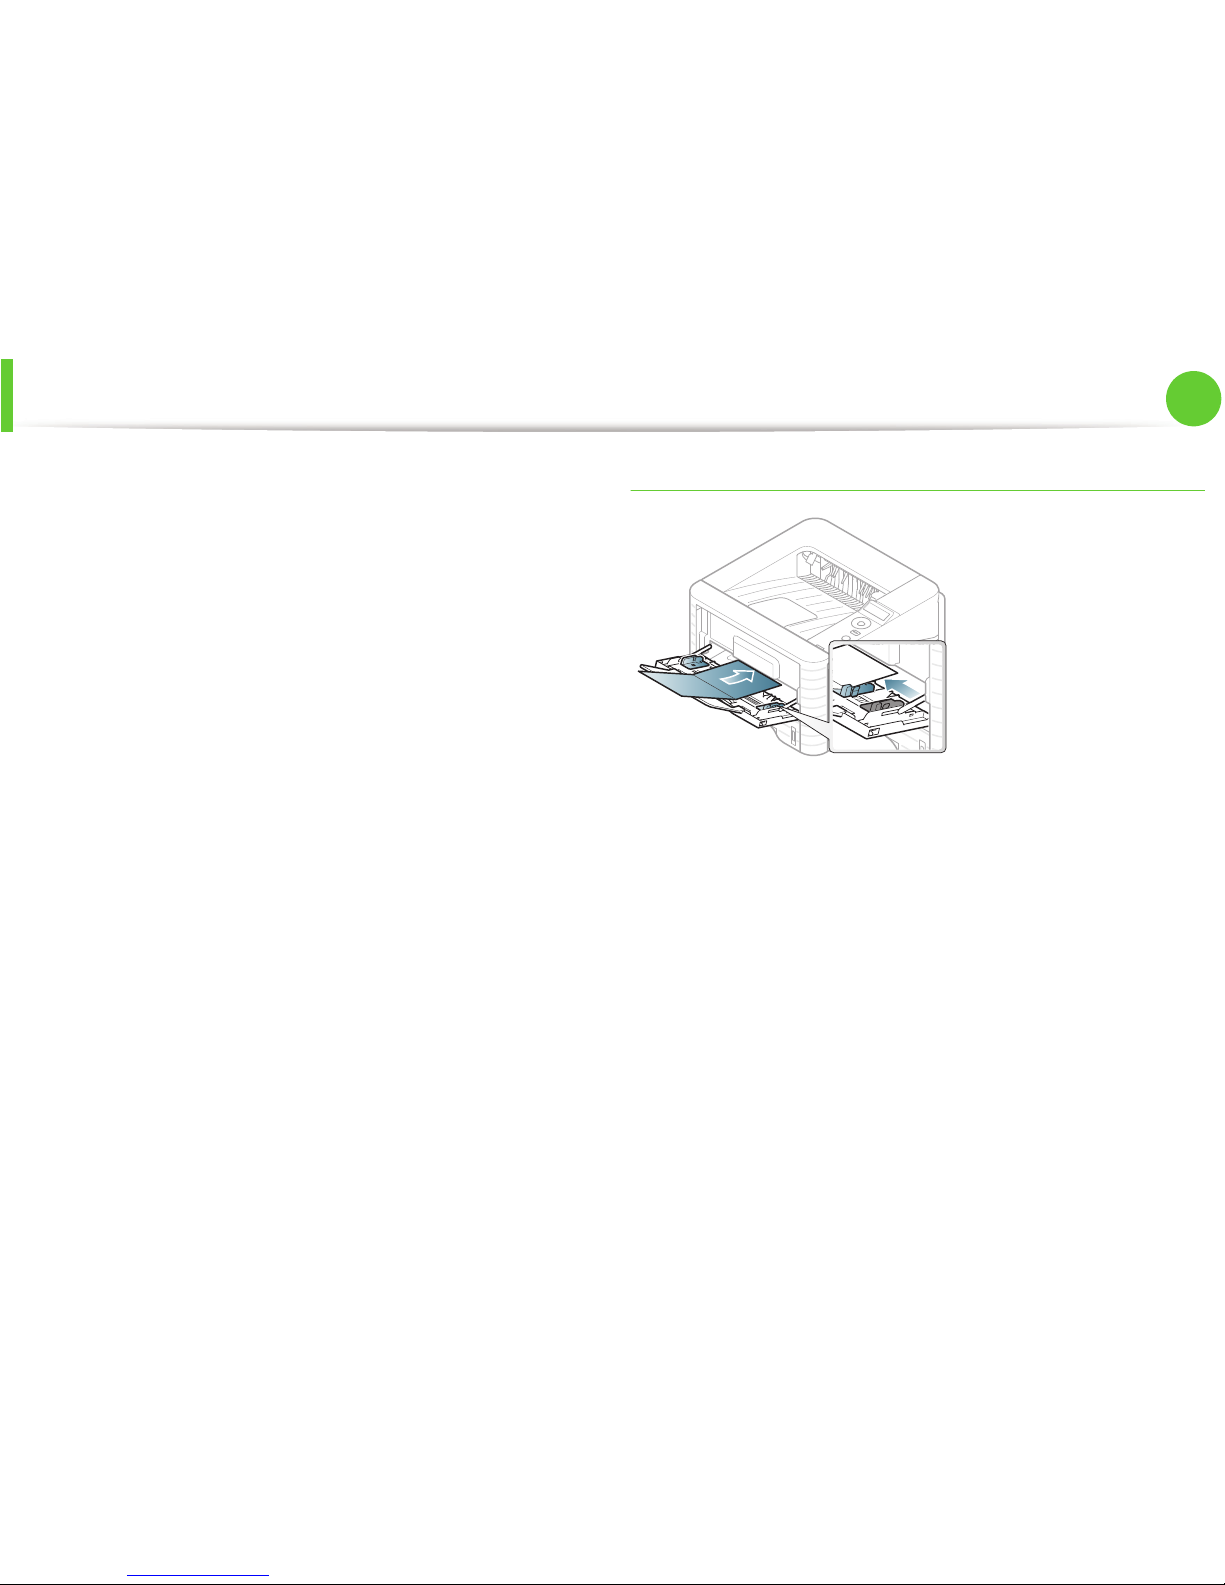
To avoid damaging the machine, use only labels designed for use in
laser printers.
• When selecting labels, consider the following factors:
- Adhesives: Should be stable at your machine’s fusing
temperature. Check your machine’s specifications to view the
fusing temperature (about 170°C (338°F)).
Page 39
Media and tray
41
2. Menu overview and basic setup
- Arrangement: Only use labels with no exposed backing
between them. Labels can peel off sheets that have spaces
between the labels, causing serious jams.
- Curl: Must lie flat with no more than 13 mm of curl in any
direction.
- Condition: Do not use labels with wrinkles, bubbles, or other
indications of separation.
• Make sure that there is no exposed adhesive material between
labels. Exposed areas can cause labels to peel off during printing,
which can cause paper jams. Exposed adhesive can also cause
damage to machine components.
• Do not run a sheet of labels through the machine more than
once. The adhesive backing is designed for only a single pass
through the machine.
• Do not use labels that are separating from the backing sheet or
are wrinkled, bubbled, or otherwise damaged.
Card stock/ Custom-sized paper
• In the software application, set margins at least 6.4 mm (0.25
inches) away from the edges of the material.
Page 40
Media and tray
42
2. Menu overview and basic setup
Preprinted paper
When loading preprinted paper, the printed side should be facing up
with an uncurled edge at the front. If you experience problems with
paper feeding, turn the paper around. Note that print quality is not
guaranteed.
• Must be printed with heat-resistant ink that will not melt,
vaporize, or release hazardous emissions when subjected to the
machine’s fusing temperature for 0.1 second (about 170°C
(338°F)).
• Must be non-flammable and should not adversely affect machine
rollers.
• Before you load preprinted paper, verify that the ink on the paper
is dry. During the fusing process, wet ink can come off preprinted
paper, reducing print quality.
5
Setting the paper size and type
After loading paper in the paper tray, set the paper size and type
using the control panel buttons.
• The settings set from the machine’s driver override the
settings on the control panel.
• For models that do not have the display screen on the
control panel, this feature is not applicable.
1
Press (Menu) button on the control panel.
2
Press Paper > OK > Select the tray you want > OK.
3
Press Paper Size > OK > Select the option you want > OK.
4
Press Paper Type > OK > Select the option you want > OK
5
Press (Cancel) to return to ready mode.
If you want to use special-sized paper such as billing paper,
select Custom in the Paper tab in the Printing Preferences
(see "Opening printing preferences" on page 19).
Page 41
43
2. Menu overview and basic setup
Basic printing
6
Printing
If you are a Macintosh, Linux, or Unix OS user, refer to the
Advanced Guide.
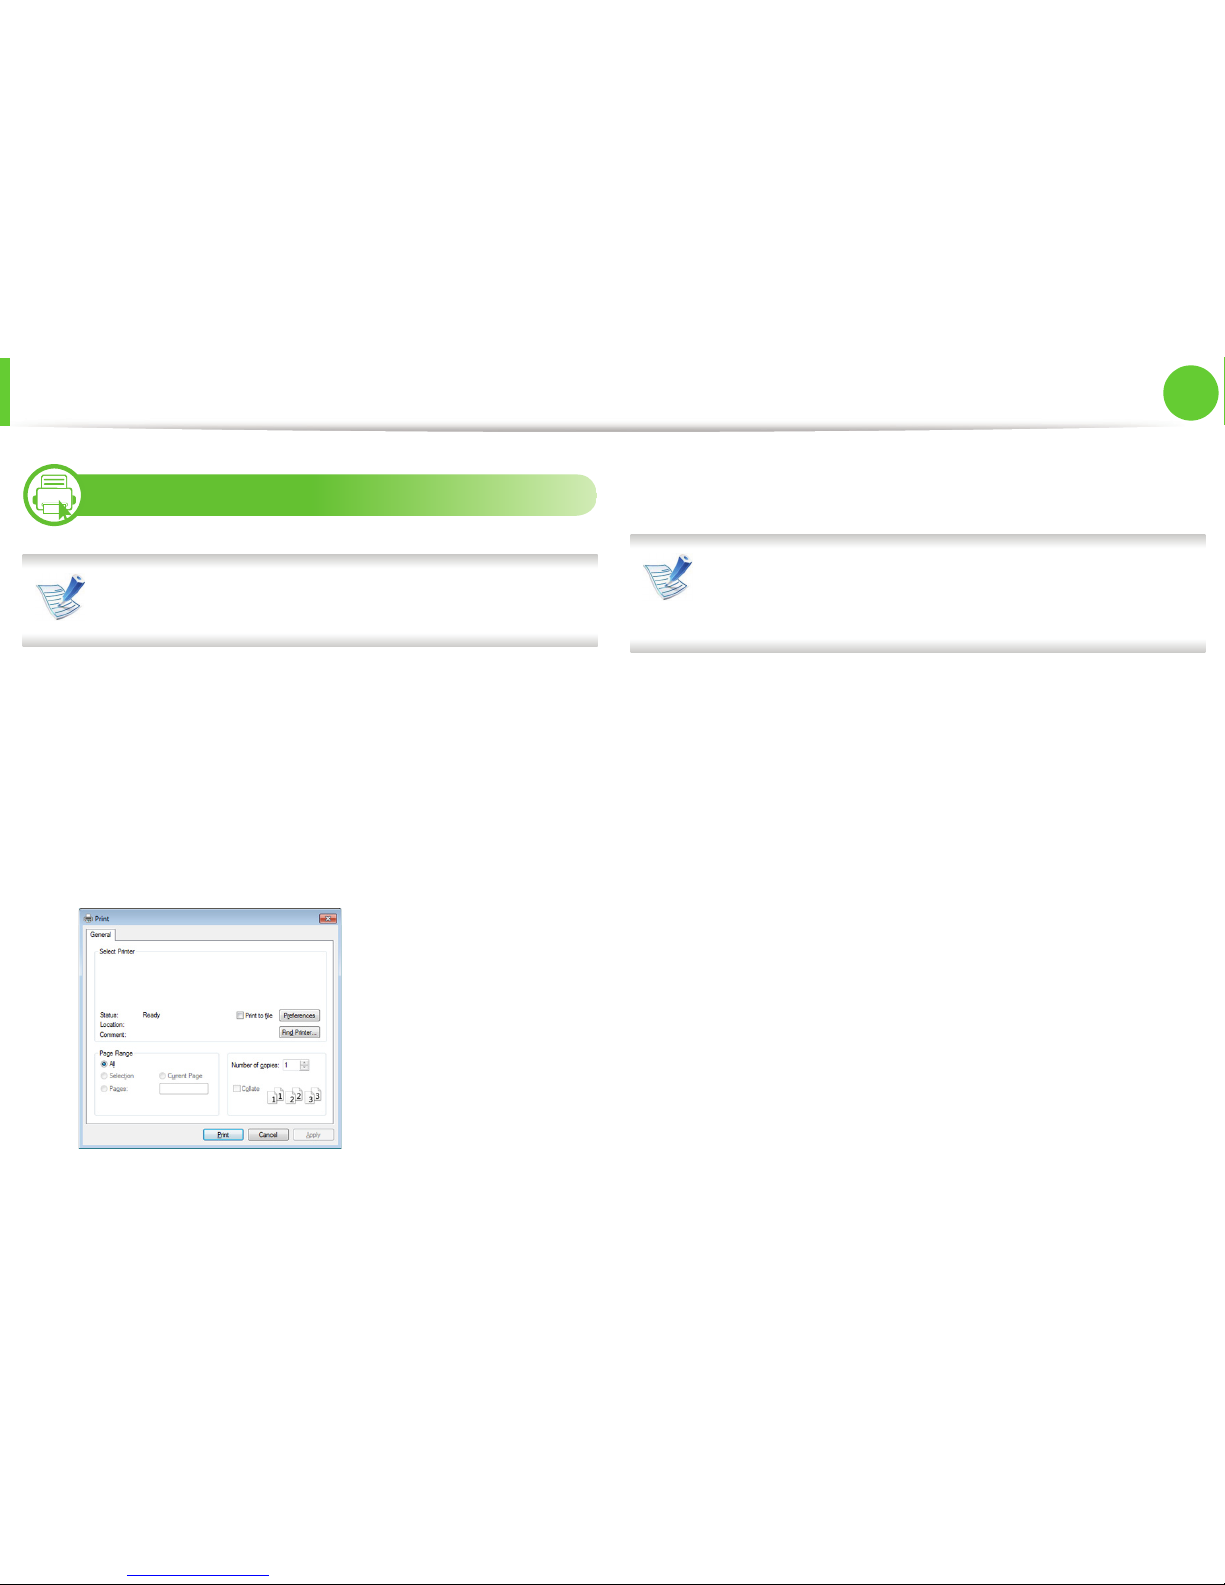
The following Printing Preferences window is for Notepad in
Windows 7.
1
Open the document you want to print.
2
Select Print from the File menu.
3
Select your machine from the Select Printer list.
4
The basic print settings including the number of copies and
print range are selected within the Print window.
To take advantage of the advanced printing features, click
Properties or Preferences from the Print window (see
"Opening printing preferences" on page 19).
5
To start the print job, click OK or Print in the Print window.
Page 42

Basic printing
44
2. Menu overview and basic setup
7
Canceling a print job
If the print job is waiting in the print queue or print spooler, cancel
the job as follows:
• You can access this window by simply double-clicking the
machine icon ( ) in the Windows task bar.
• You can also cancel the current job by pressing (Cancel) on
the control panel.
Page 43
Basic printing
45
2. Menu overview and basic setup
8
Opening printing preferences
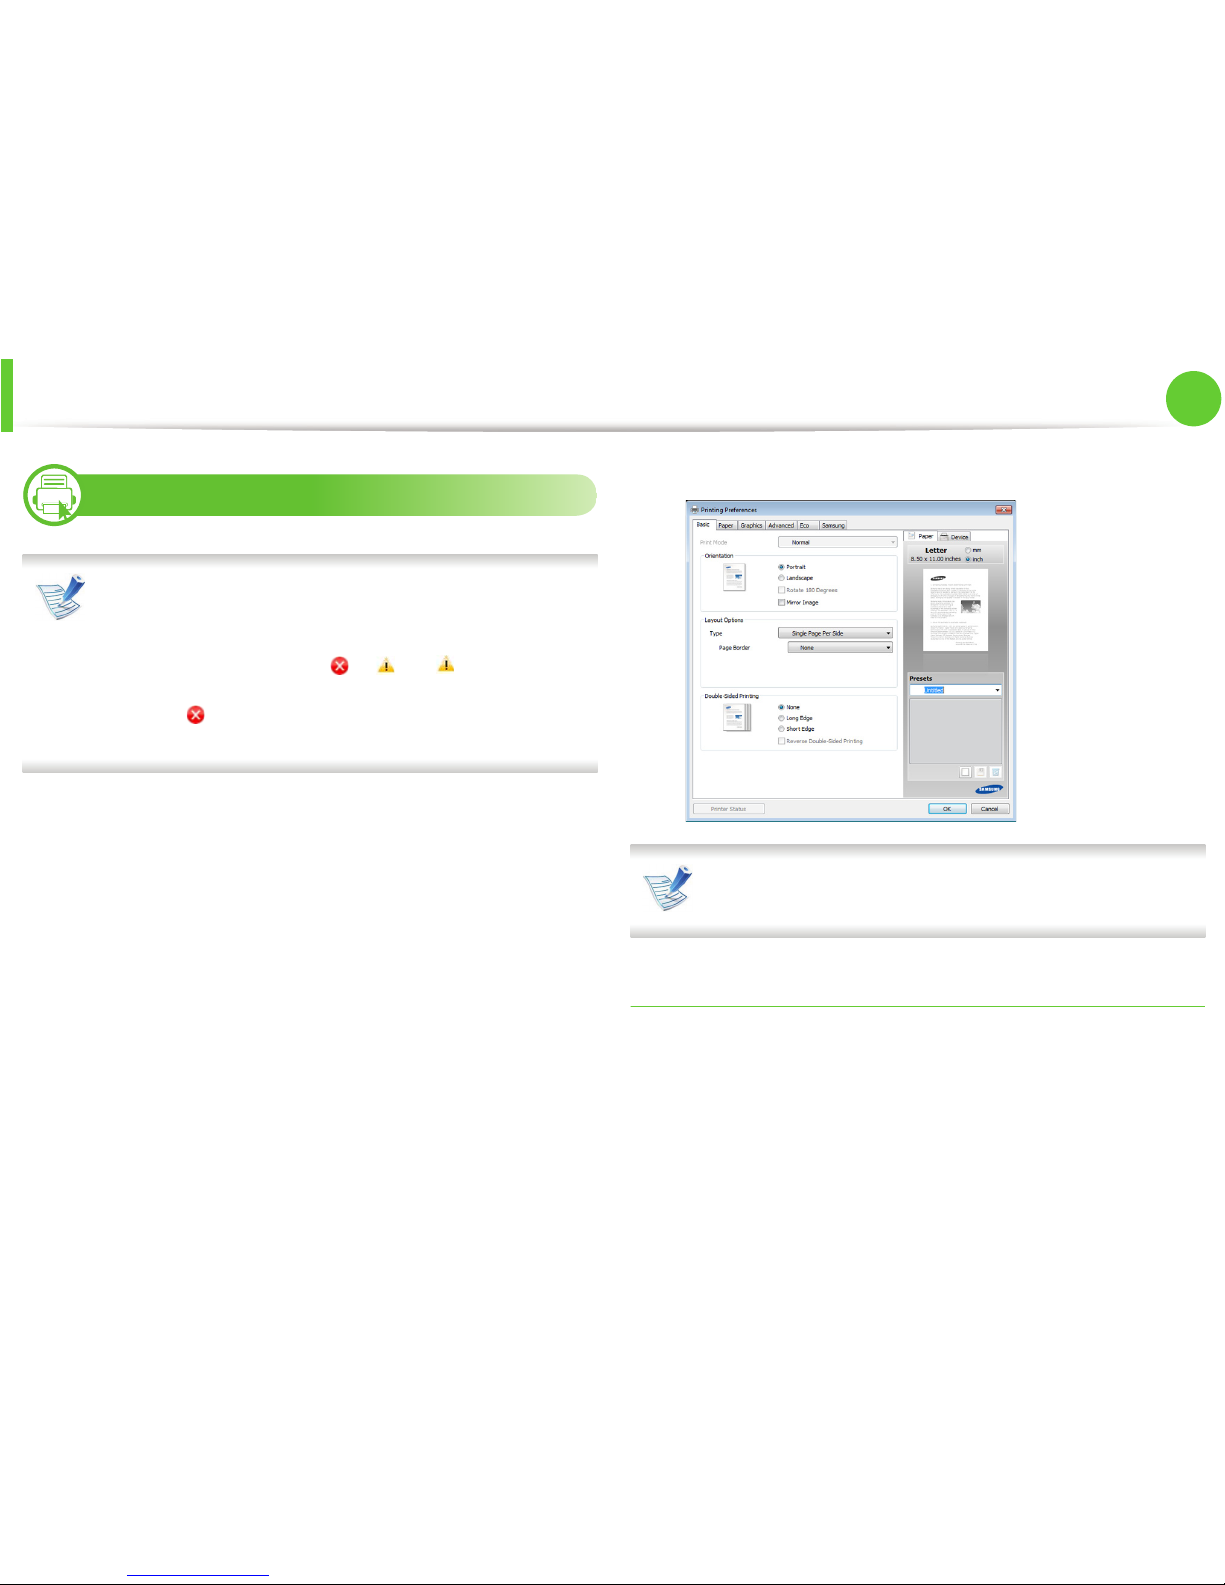
•The Printing Preferences window that appears in this
user’s guide may differ depending on the machine in use.
• When you select an option in Printing Preferences, you
may see a warning mark or . An mark means you
can select that certain option but it is not recommended,
and an mark means you cannot select that option due
to the machine’s setting or environment.
1
Open the document you want to print.
2
Select Print from the file menu.
3
Select your machine from the Select Printer.
4
Click Properties or Preferences.
You can check the machine's current status using the Printer
Status button (see Advanced Guide).
Using a favorite setting
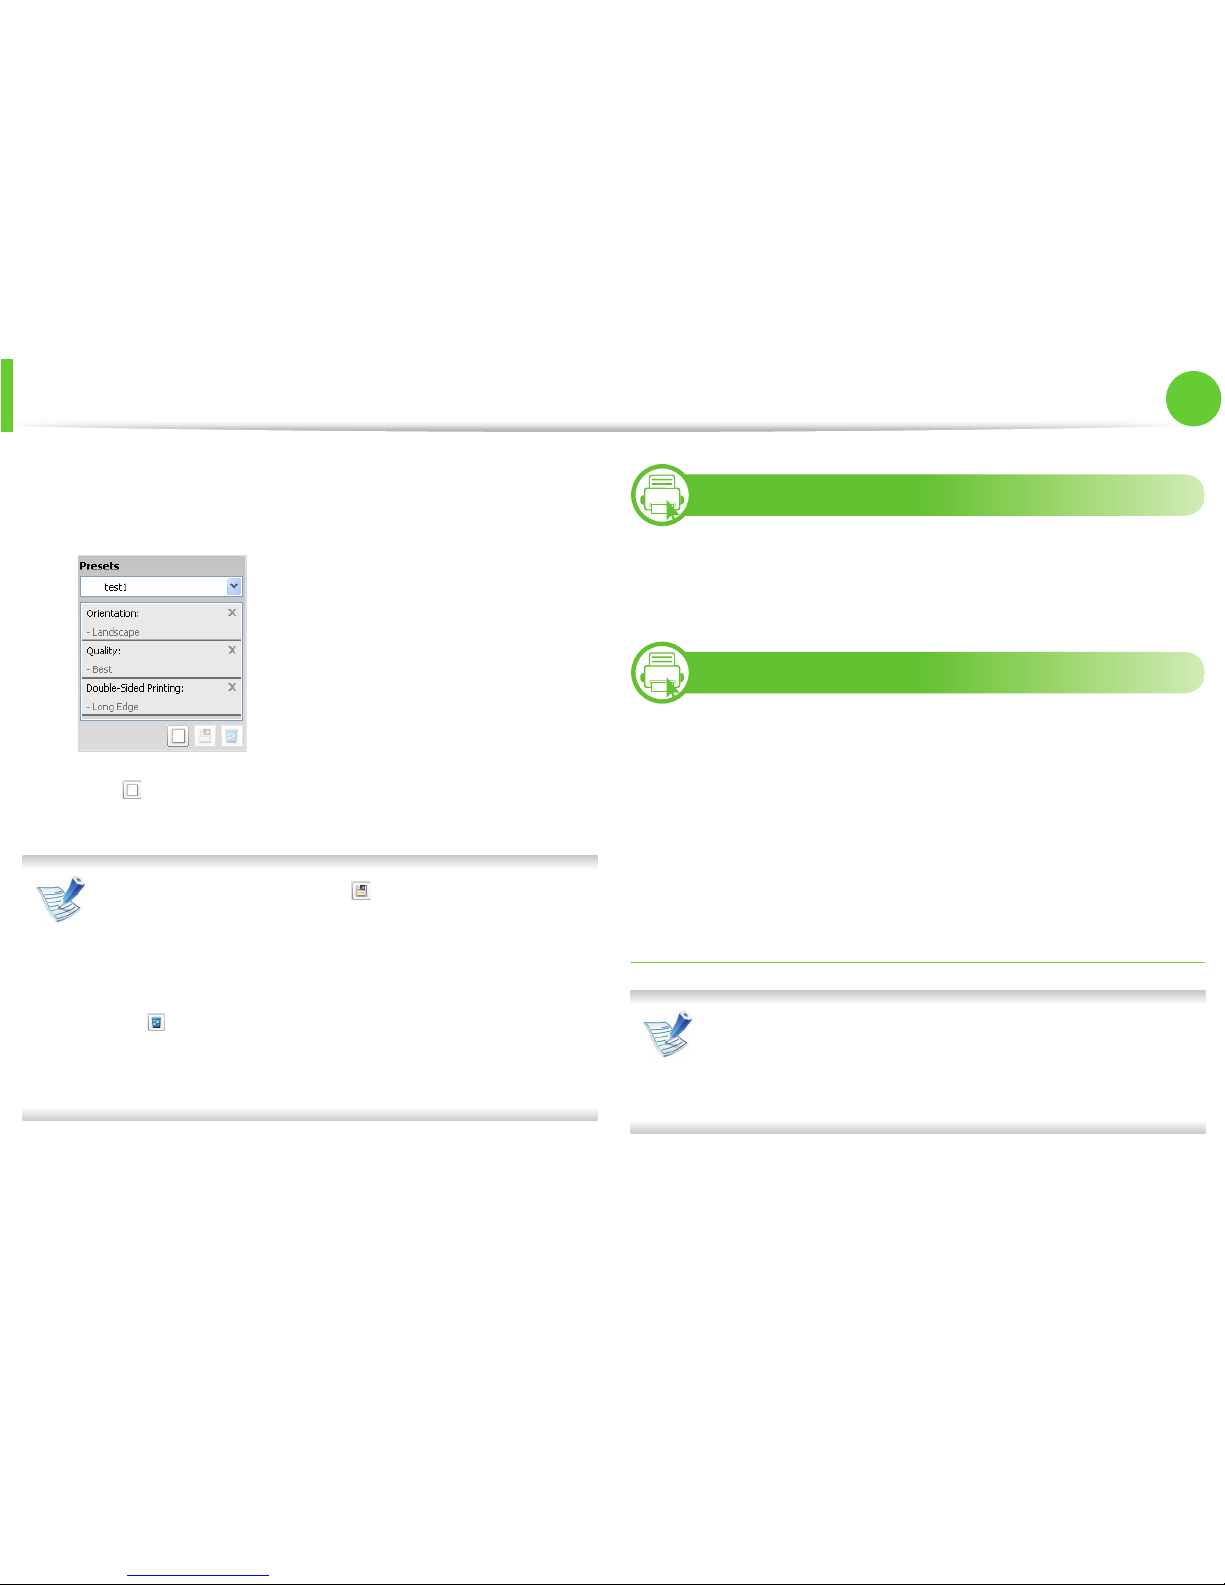
The Presets option, which is visible on each preferences tab except
for the Samsung tab, allows you to save the current preferences for
future use.
To save a Presets item, follow these steps:
Page 44
Basic printing
46
2. Menu overview and basic setup
1
Change the settings as needed on each tab.
2
Enter a name for the item in the Presets input box.
3
Click (Add). When you save Presets, all current driver
settings are saved.
Select more options and click (Update), settings will be
added to the Presets you made. To use a saved setting, select
it from the Presets drop-down list. The machine is now set to
print according to the settings you have selected. To delete
saved settings, select it from the Presets drop-down list and
click (Delete).
You can also restore the printer driver’s default settings by
selecting Default Preset from the Presets drop-down list.
9
Using help
Click the option you want to know on the Printing Preferences
window and press F1 on your keyboard.
10
Eco printing
The Eco function cuts toner consumption and paper usage. The Eco
function allows you to save print resources and lead you to ecofriendly printing.
If you press the Eco button from the control panel, eco mode is
enabled. The default setting of eco mode is duplex (long edge), 2-up,
skip blank pages, and toner save.
Setting eco mode on the control panel
• The settings set from the machine’s driver override the
settings on the control panel.
• For models that do not have the display screen on the
control panel, this feature is not applicable.
Page 45
Basic printing
47
2. Menu overview and basic setup
1
Press (Menu) button on the control panel.
2
Press System Setup > OK > Eco Setup > OK.
3
Press OK select the mode you want.
• Default Mode: Select this to turn on or off the eco mode.
(Duplex (long edge)/Toner save/2-up/Skip blank pages)
- Off: Set the eco mode off.
- On: Set the eco mode on.
If you set the eco mode on with a password from the
SyncThru™ Web Service ( Settings tab > Machine Settings >
System > Eco > Settings), the Onforce message appears.
You have to enter the password to change the eco mode
status.
• Change Temp.: Select the eco template.
- Default Eco: The default setting of eco mode is duplex,
2-up, skip blank pages, and toner save.
- Custom Eco: Follow the settings from Syncthru™ Web
Service. Before you select this item, you must set the
eco function in SyncThru™ Web Service> Settings tab
> Machine Settings > System > Eco > Settings.
Setting eco mode on the driver
Open the Eco tab to set eco mode. When you see the eco image
( ), that means the eco mode is currently enabled.
► Eco options
• Printer Default: Follows the settings from the machine's control
panel.
• None: Disables eco mode.
• Eco Printing: Enables eco mode. Activate the various eco items
you want to use.
• Password: If the administrator fixed to enable the eco mode, you
have to enter the password to change the status.
Page 46

Basic printing
48
2. Menu overview and basic setup
► Result simulator
Result Simulator shows the results of reduced emission of carbon
dioxide, used electricity, and the amount of saved paper in
accordance with the settings you selected.
• The results are calculated on the basis that the total number of
printed paper is one hundred without a blank page when the eco
mode is disabled.
• Refer to the calculation coefficient about CO2, energy, and paper
from IEA, the index of Ministry of Internal Affairs and
Communication of Japan and www.remanufacturing.org.uk.
Each model has a different index.
• The power consumption in printing mode refers to the average
printing power consumption of this machine.
• The actual saved or reduced amount may differ depending on
the operating system used, computing performance, application
software, connection method, media type, media size, job
complexity, etc.
Page 47

3. Maintenance
This chapter provides information about purchasing supplies, accessories
and maintenance parts available for your machine.
• Ordering supplies and accessories 50
• Available supplies 51
• Available accessories 52
• Available maintenance parts 53
• Redistributing toner 54
• Replacing the toner cartridge 56
• Upgrading a memory module 58
• Monitoring the supplies life 60
• Setting the toner low alert 61
• Cleaning the machine 62
Page 48
50
3. Maintenance
Ordering supplies and accessories
Available accessories may differ from country to country. Contact your sales representatives to obtain the list of available supplies, and
maintenance parts.
To order Samsung-authorized supplies, accessories, and maintenance parts, contact your local Samsung dealer or the retailer where you
purchased your machine. You can also visit www.samsung.com/supplies, and then select your country/region to obtain the contact
information for service.
Page 49
51
3. Maintenance
Available supplies
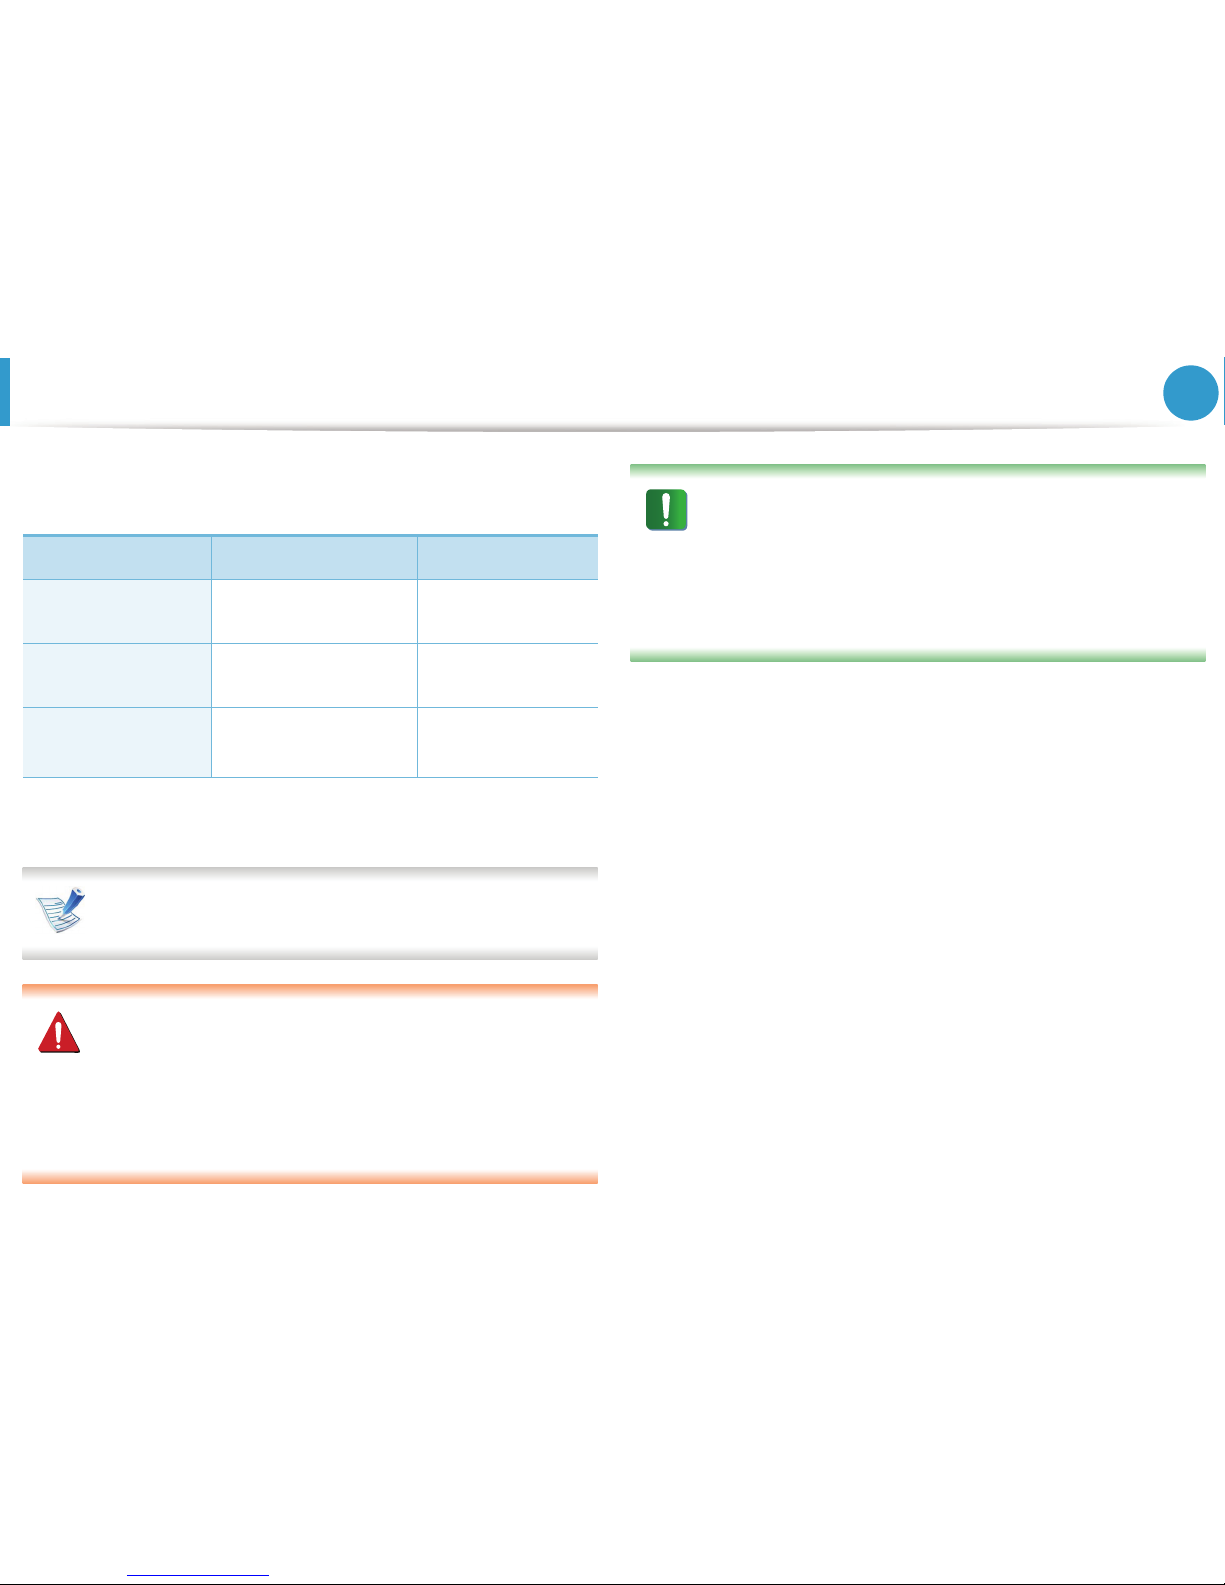
When supplies reach the end of their life spans, you can order the
following types of supplies for your machine:
Depending on the options and job mode used, the toner
cartridge’s lifespan may differ.
When purchasing new toner cartridges or other supplies,
these must be purchased in the same country as the machine
you are using. Otherwise, new toner cartridges or other
supplies will be incompatible with your machine due to
different configurations of toner cartridges and other
supplies according to the specific country conditions.
Samsung does not recommend using non-genuine Samsung
toner cartridge such as refilled or remanufactured toner.
Samsung cannot guarantee non-genuine Samsung toner
cartridge's quality. Service or repair required as a result of
using non-genuine Samsung toner cartridges will not be
covered under the machine’s warranty.
Type
Average yield
a
a. Declared yield value in accordance with ISO/IEC 19752.
Part name
Standard yield
toner cartridge
Approx. 2,000 pages MLT-D205S
High yield toner
cartridge
Approx. 5,000 pages MLT-D205L
Extra high yield
toner cartridge
b
b. The toner cartridge is available only for ML-371x Series and ML-3310ND/SIT.
Approx. 10,000 pages MLT-D205E
Page 50
52
3. Maintenance
Available accessories
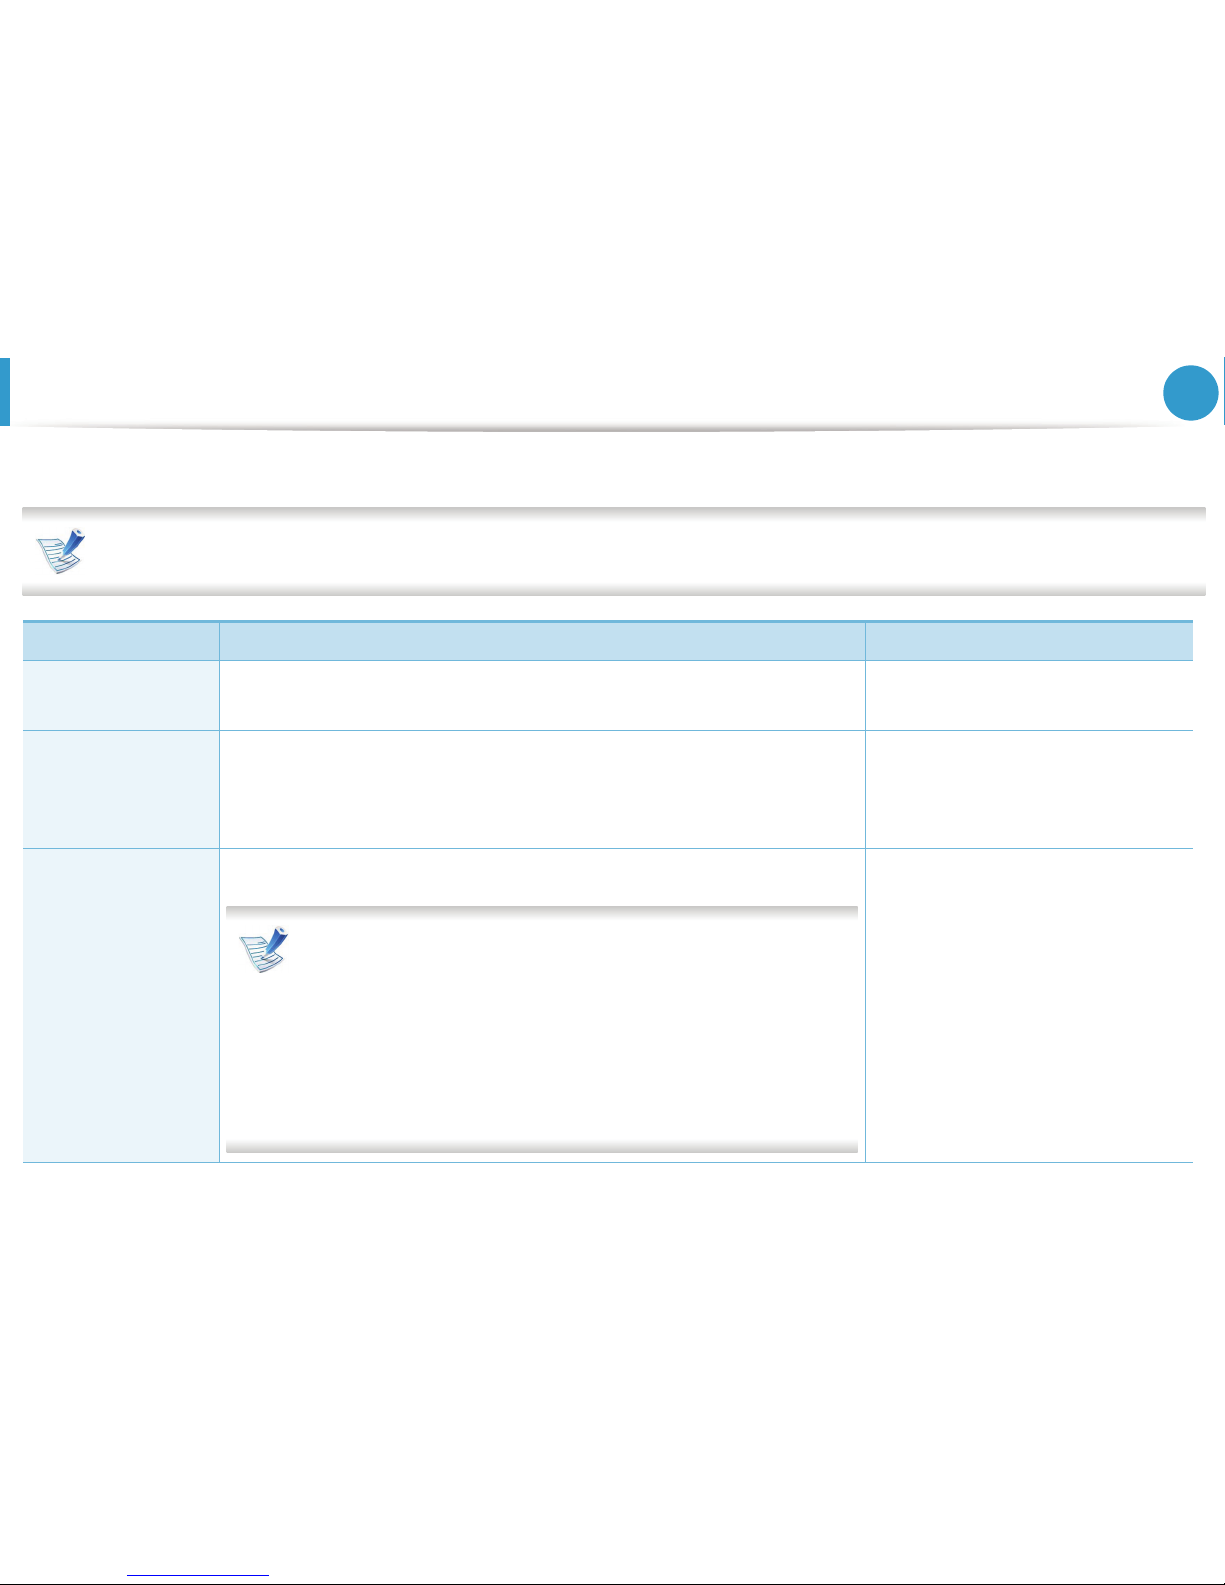
You can purchase and install accessories to enhance your machine’s performance and capacity.
Some features and optional goods may not be available depending on models or countries (see "Features by models" on page 7).
Accessory Function Part name
Memory module
Extends your machine’s memory capacity. • CLP-MEM201: 128 MB
• CLP-MEM202: 256 MB
Tray 2
If you are experiencing frequent paper supply problems, you can attach an
additional tray.
• ML-3310ND/ML-3710 Series: MLS3710A
• ML-3312ND/ML-3712 Series: MLS3712A
IEEE 1284 parallel
connector
Allows you to use various interface.
• When installing the printer driver with an IEEE1284 parallel
connector, the machine might not be found and after installing
the printer driver, only basic printing features are available.
• If you want to check the machine's status or set the settings,
connect the machine to a computer with a USB cable or a
network.
• If you use the IEEE 1284 parallel connector, you can not use the
USB cable.
ML-PAR100
Page 51

53
3. Maintenance
Available maintenance parts
To purchase maintenance parts, contact the source where you bought the machine. Replacing maintenance parts can be performed only by
an authorized service provider, dealer, or the retailer where you bought the machine. The warranty does not cover the replacement of any
maintenance parts once it has reached its “Average yield”.
Maintenance parts are replaced at specific intervals to avoid print quality and paper feed problems resulting from worn parts, see table below.
The purpose of which is to maintain your machine in top working condition. The maintenance parts below should be replaced when the life
span of each item has been met.
Parts
Average yield
a
a. It will be affected by the operating system used, computing performance, application software, connecting method, media
type, media size and job complexity.
Transfer roller Approx. 100,000 pages
Fuser unit Approx. 90,000 pages
Pickup roller Approx. 90,000 pages
Retard roller Approx. 60,000 pages
Page 52
54
3. Maintenance
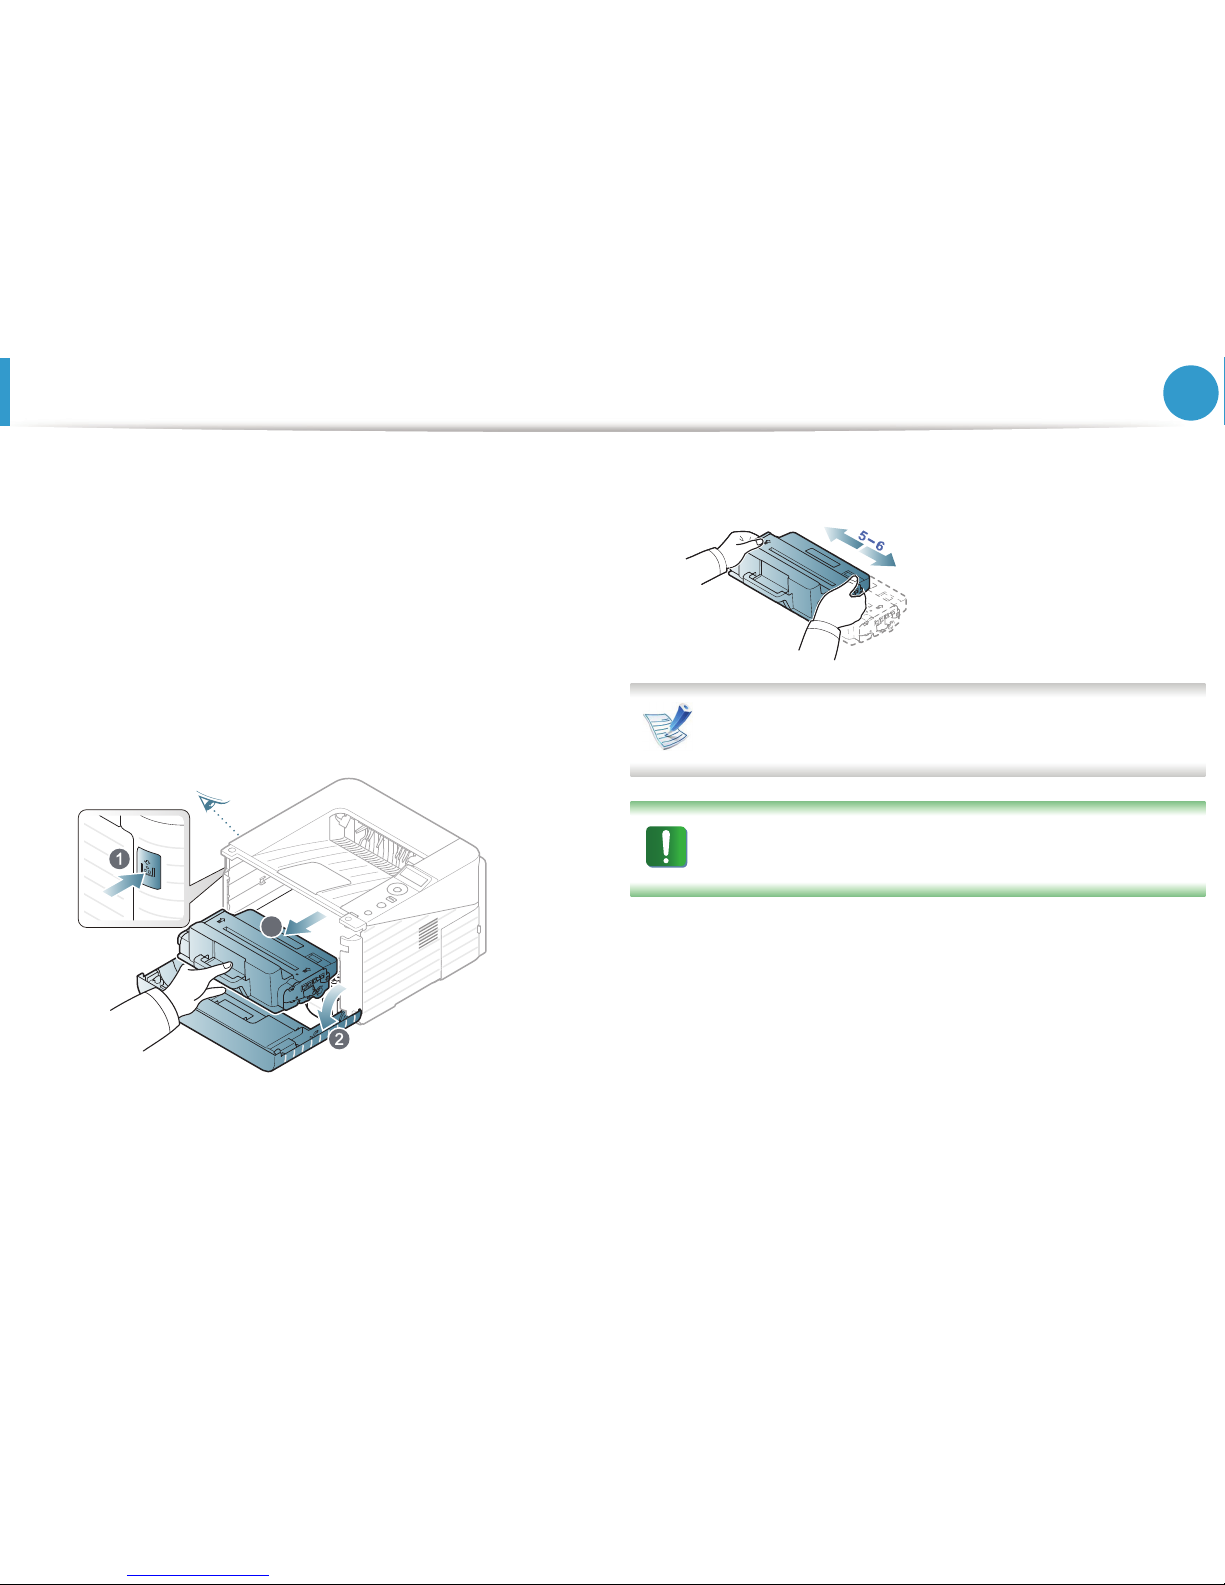
Redistributing toner
When the toner cartridge is near the end of its life:
• White streaks or light printing occurs and/or density variation
side to side.
•The Status LED blinks red.
If this happens, you can temporarily improve print quality by
redistributing the remaining toner in the cartridge. In some cases,
white streaks or light printing will still occur even after you have
redistributed the toner.
1
Open the front cover and pull the toner cartridge out.
2
Thoroughly roll the cartridge five or six times to distribute the
toner evenly inside the cartridge.
If toner gets on your clothing, wipe it off with a dry cloth and
wash clothing in cold water: hot water sets toner into fabric.
Do not touch the green underside of the toner cartridge. Use
the handle on the cartridge to avoid touching this area.
3
Page 53
Redistributing toner
55
3. Maintenance
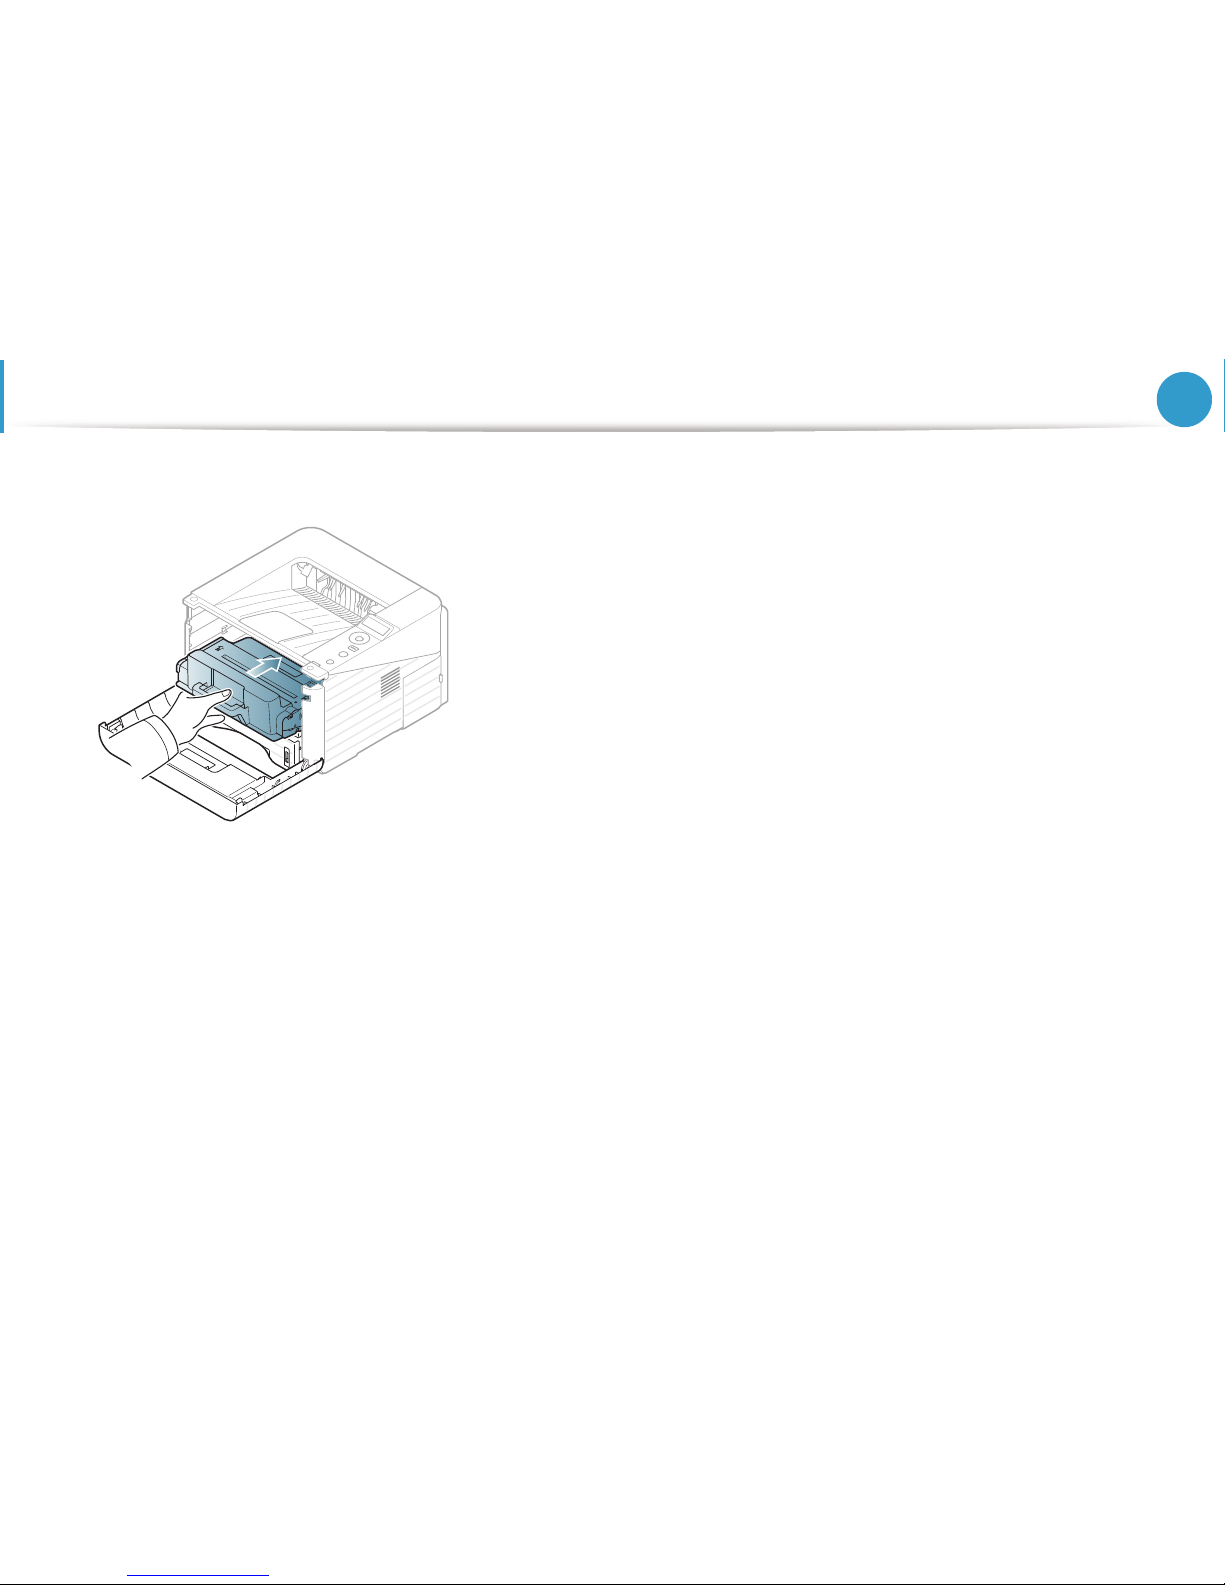
3
Hold the toner cartridge by the handle and slowly insert the
cartridge into the opening in the machine.
4
Close the front cover. Ensure that the cover is securely closed.
Page 54
56
3. Maintenance
Replacing the toner cartridge
Click this link to open an animation about replacing a toner
cartridge.
When a toner cartridge has reached the end of life, the machine will
stop printing.
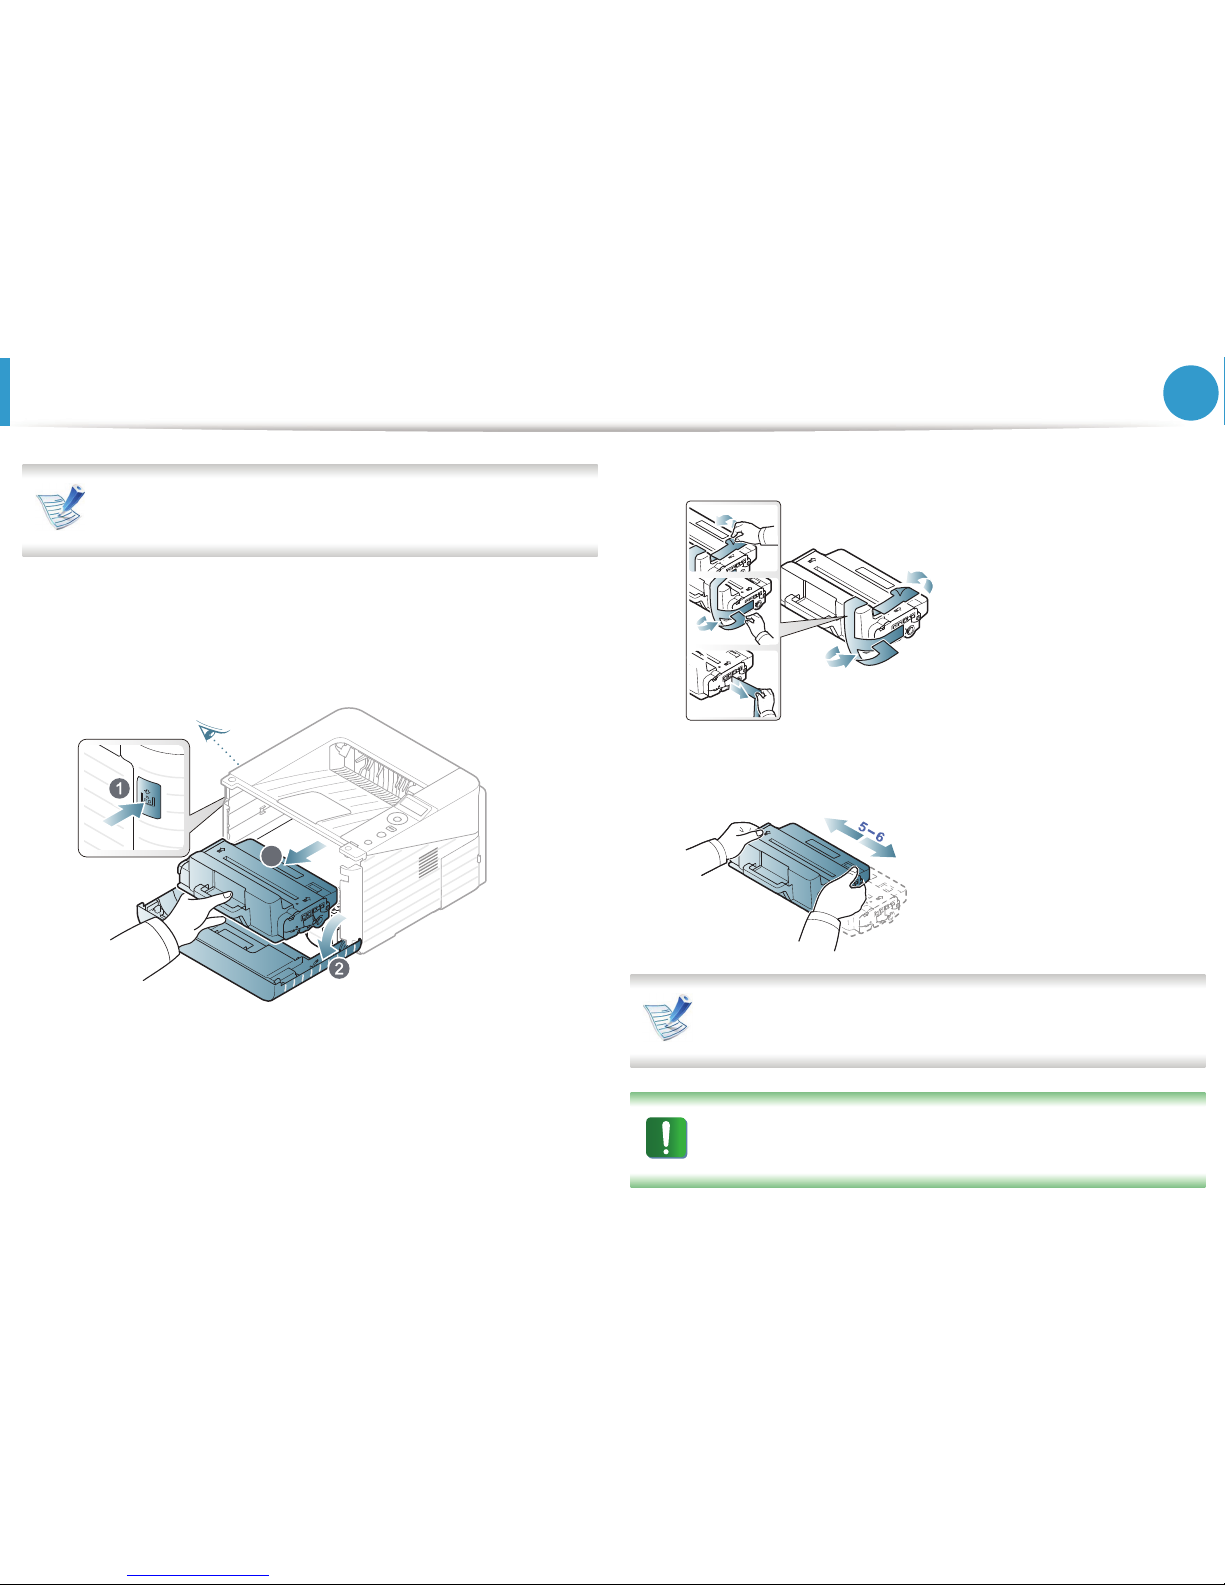
1
Open the front cover and pull the toner cartridge out.
2
Remove the new toner cartridge from its bag.
3
Remove the label from the toner cartridge as shown below.
4
Thoroughly shake side to side the cartridge five or six times to
distribute the toner evenly inside the cartridge.
If toner gets on your clothing, wipe it off with a dry cloth and
wash clothing in cold water: hot water sets toner into fabric.
Do not touch the green underside of the toner cartridge. Use
the handle on the cartridge to avoid touching this area.
3
Page 55
Replacing the toner cartridge
57
3. Maintenance
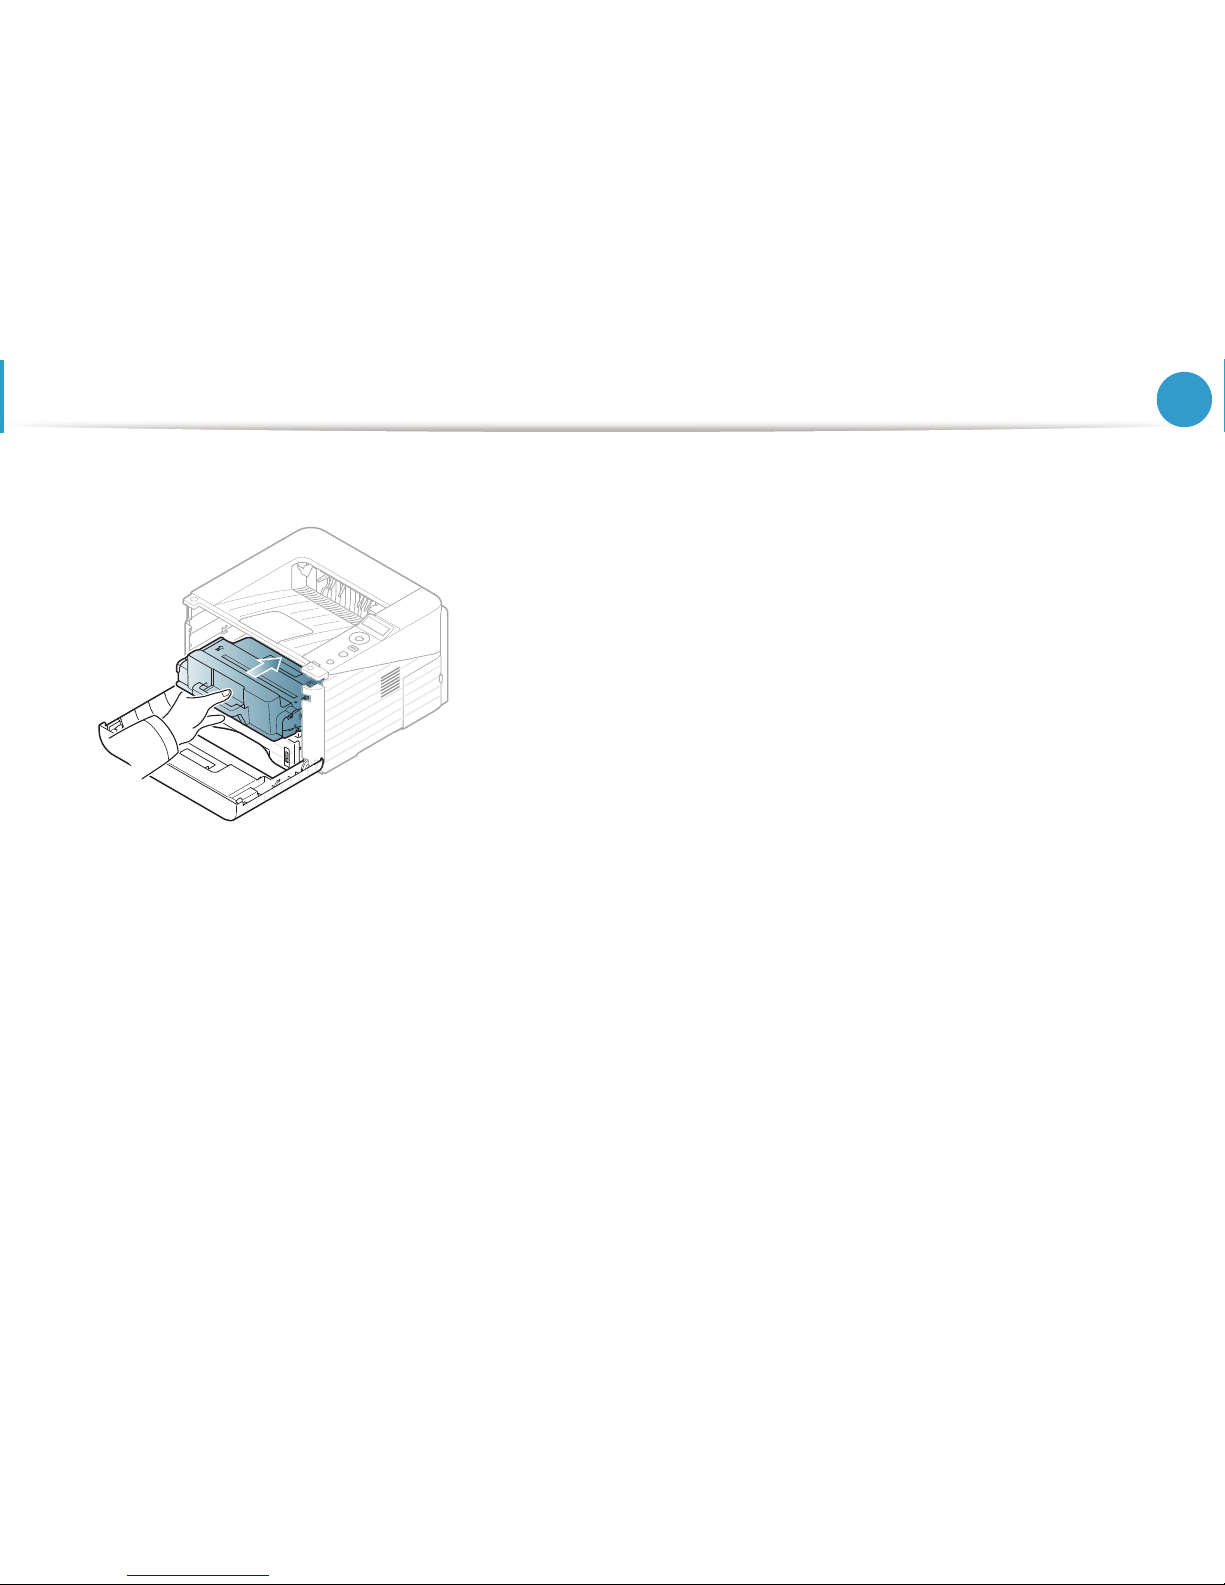
5
Hold the toner cartridge by the handle and slowly insert the
cartridge into the opening in the machine.
6
Close the front cover. Make sure that the cover is securely
closed.
Page 56
58
3. Maintenance
Upgrading a memory module
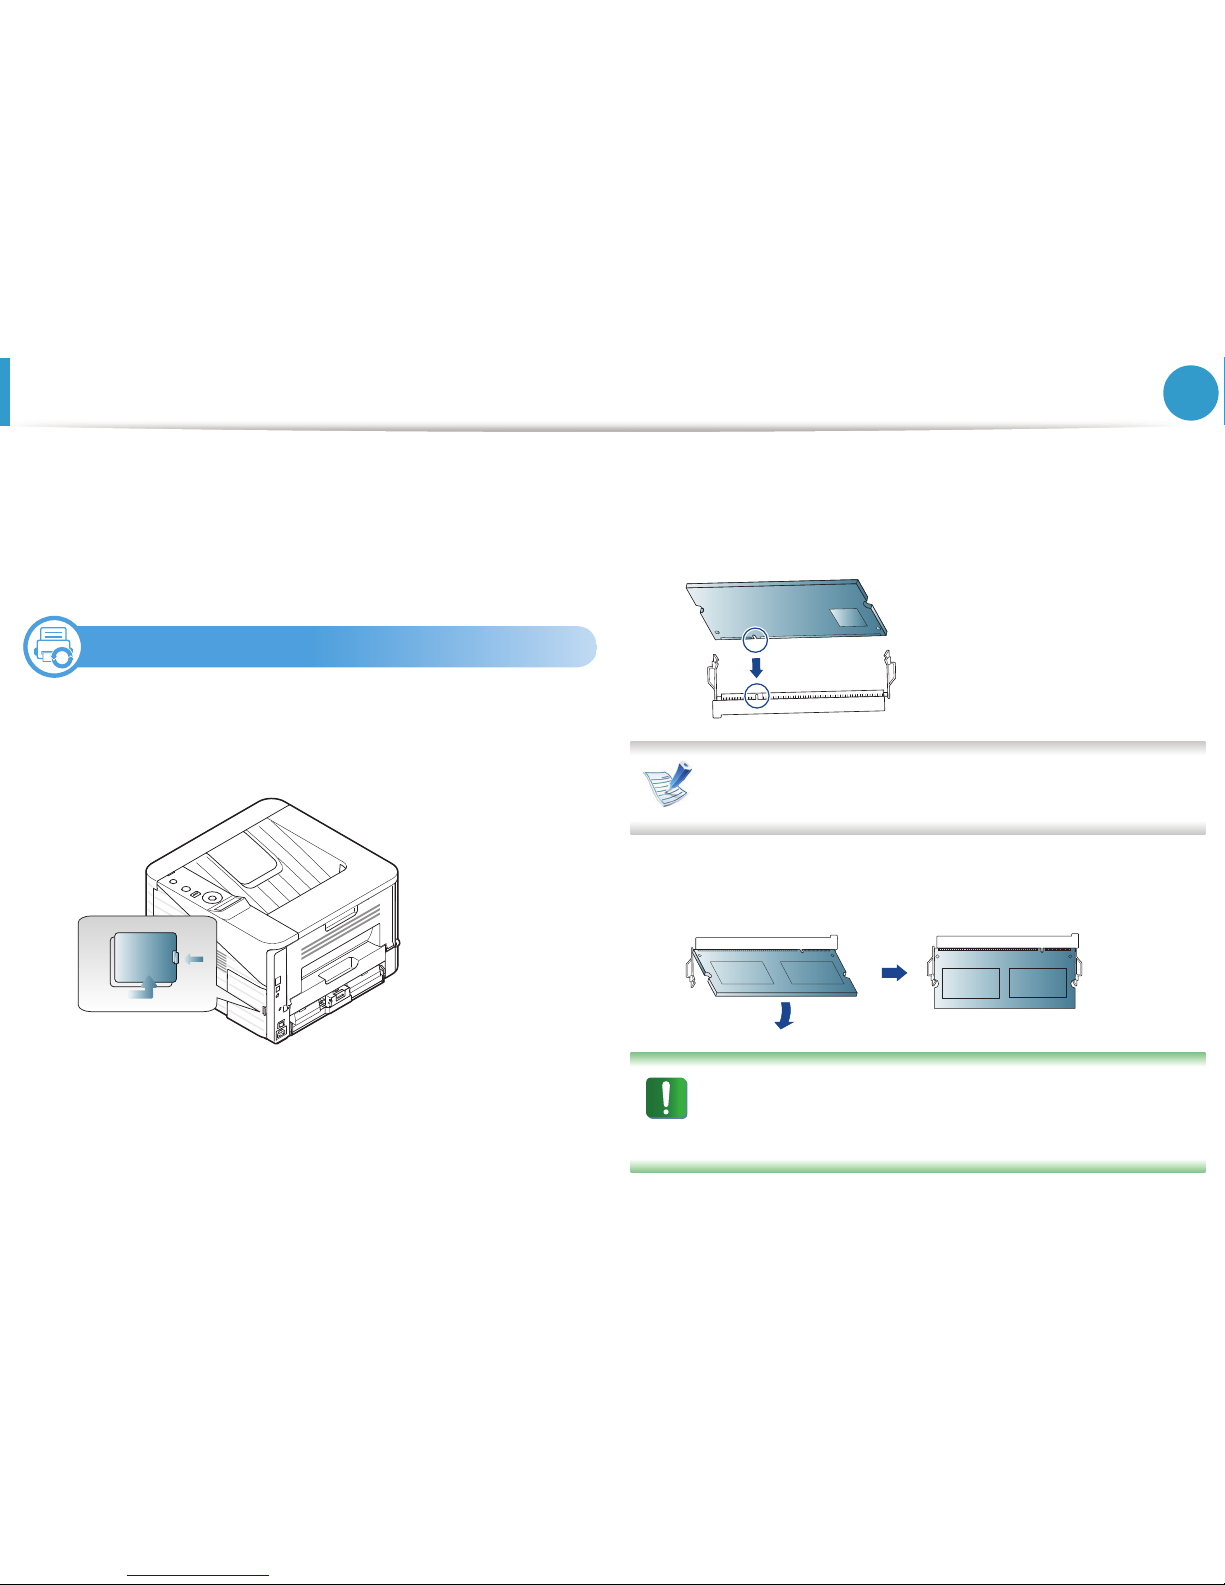
Your machine has a dual in-line memory module (DIMM). Use this
memory module slot to install additional memory.
Order information is provided for additional memory module. (See
"Available accessories" on page 52.)
1
Installing a memory module
1
Turn the machine off and unplug all cables from the machine.
2
Grasp the control board cover and remove it.
3
Remove the new memory module from its bag.
4
Holding the memory module by the edges, align the memory
module on the slot at about a 30-degree tilt. Make sure that
the notches of the module and the grooves on the slot fit each
other.
The notches and grooves illustrated above may not match
those on an actual memory module and its slot.
5
Press the memory module into the slot with care until you
hear a ‘click’.
Do not press the memory module strongly or the module
may be damaged. If the module does not seem to fit into the
slot properly, carefully try the previous procedure again.
Page 57

Upgrading a memory module
59
3. Maintenance
6
Replace the control board cover.
7
Reconnect the power cord and machine cable and turn the
machine on.
Page 58
60
3. Maintenance
Monitoring the supplies life
To view the supply life indicators, follow the steps below:
1
Press (Menu) on the control panel.
2
Press System Setup > OK > Maintenance > OK.
3
Press Supplies Info > OK.
4
Press OK to select the option you want.
For models that do not support the display screen on the control panel, this feature is not applicable.
Page 59
61
3. Maintenance
Setting the toner low alert
If the amount of toner in the cartridge is low, a message or LED informing the user to change the toner cartridge appears. You can set the
option for whether or not this message or LED appears.
1
Press (Menu) on the control panel.
2
Press System Setup > OK > Maintenance > OK.
3
Press Toner Low Alert > OK.
4
Select the option you want, then press OK.
For models that do not support the display screen on the control panel, this feature is not applicable.
Page 60
62
3. Maintenance
Cleaning the machine
If printing quality problems occur or if you use your machine in a
dusty enviroment, you need to clean your machine regularly to keep
it in the best printing condition and use your machine longer.
• Cleaning the cabinet of the machine with cleaning
materials containing large amounts of alcohol, solvents, or
other strong substances can discolor or distort the
cabinet.
• If your machine or the surrounding area is contaminated
with toner, we recommend you use a cloth or tissue
dampened with water to clean it. If you use a vacuum
cleaner, toner blows in the air and might be harmful to
you.
2
Cleaning the outside
Clean the machine cabinet with a soft, lint-free cloth. Dampen the
cloth slightly with water, but be careful not to let any water drip onto
or into the machine.
3
Cleaning the inside
During the printing process, paper, toner, and dust particles can
accumulate inside the machine. This buildup can cause print quality
problems, such as toner specks or smearing. Cleaning the inside of
the machine clears and reduces these problems.
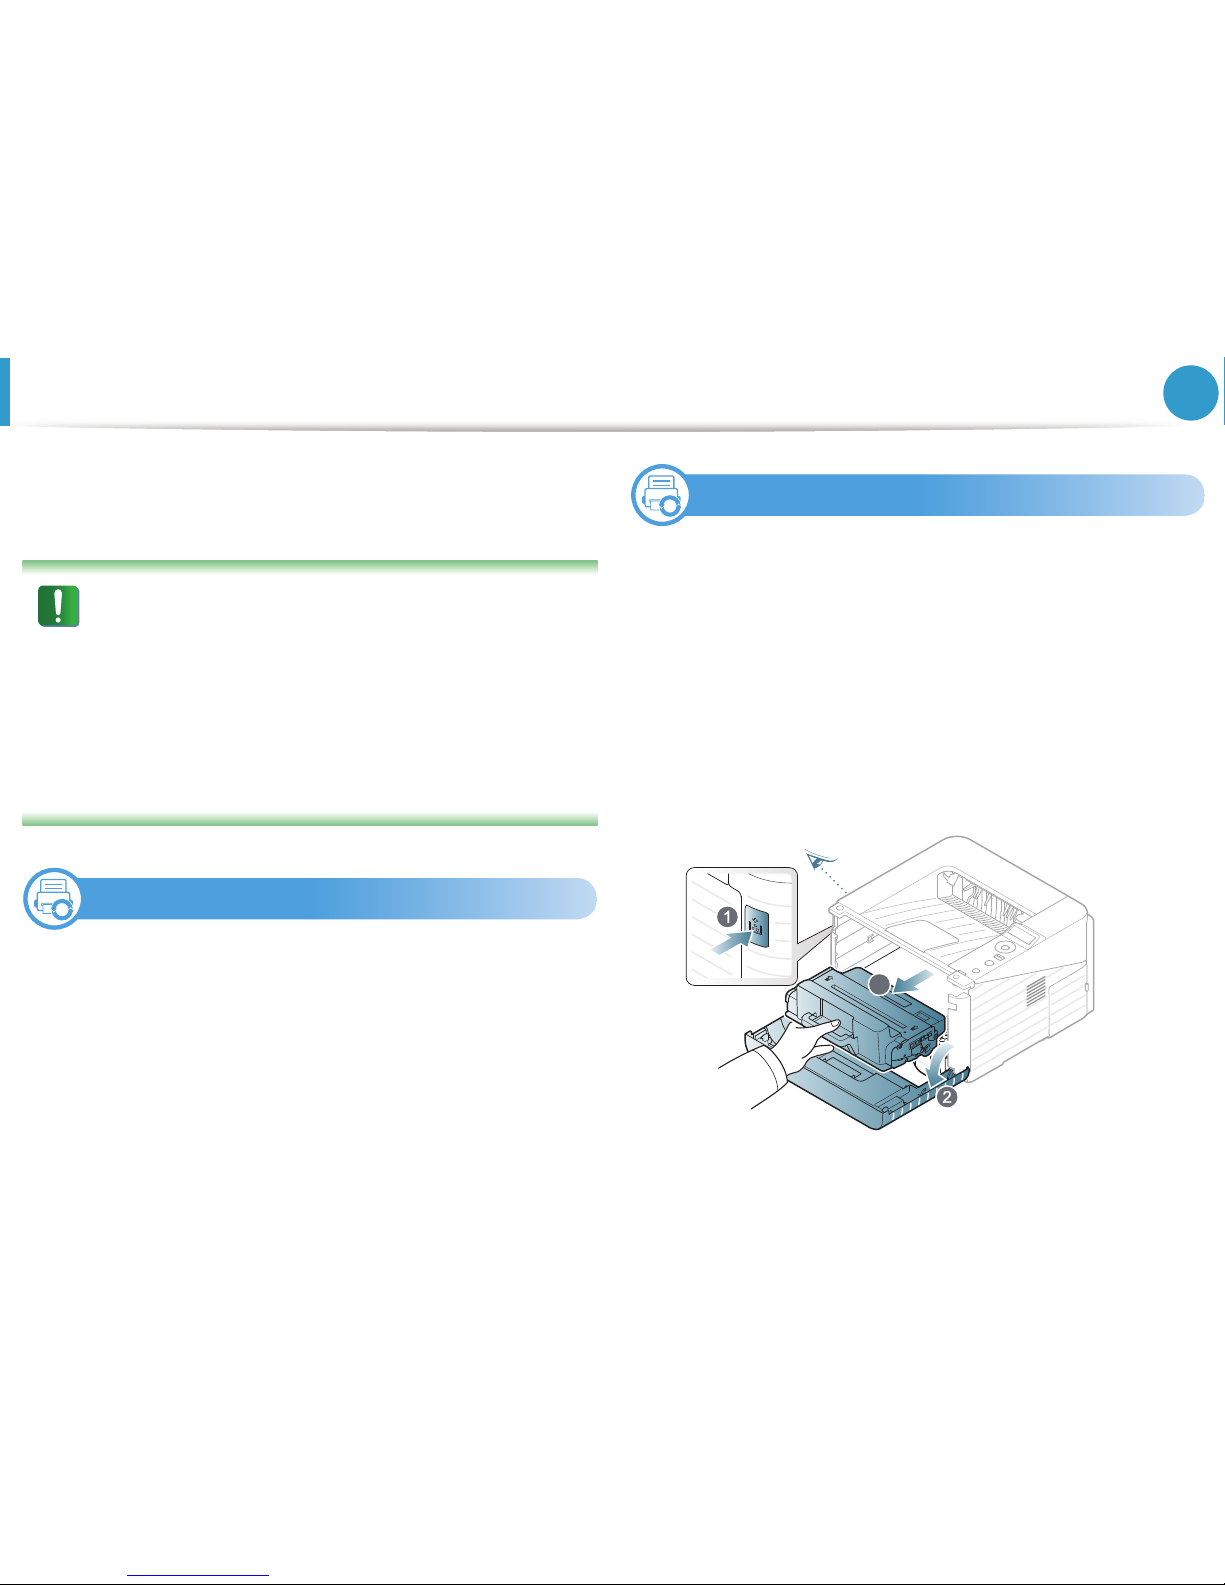
1
Turn the machine off and unplug the power cord. Wait for the
machine to cool down.
2
Open the front cover and pull the toner cartridge out. Set it on
a clean flat surface.
3
Page 61
Cleaning the machine
63
3. Maintenance
• To prevent damage to the toner cartridge, do not expose
it to light for more than a few minutes. Cover it with a piece
of paper, if necessary.
• Do not touch the green surface underside of the toner
cartridge. Use the handle on the cartridge to avoid
touching this area.
3
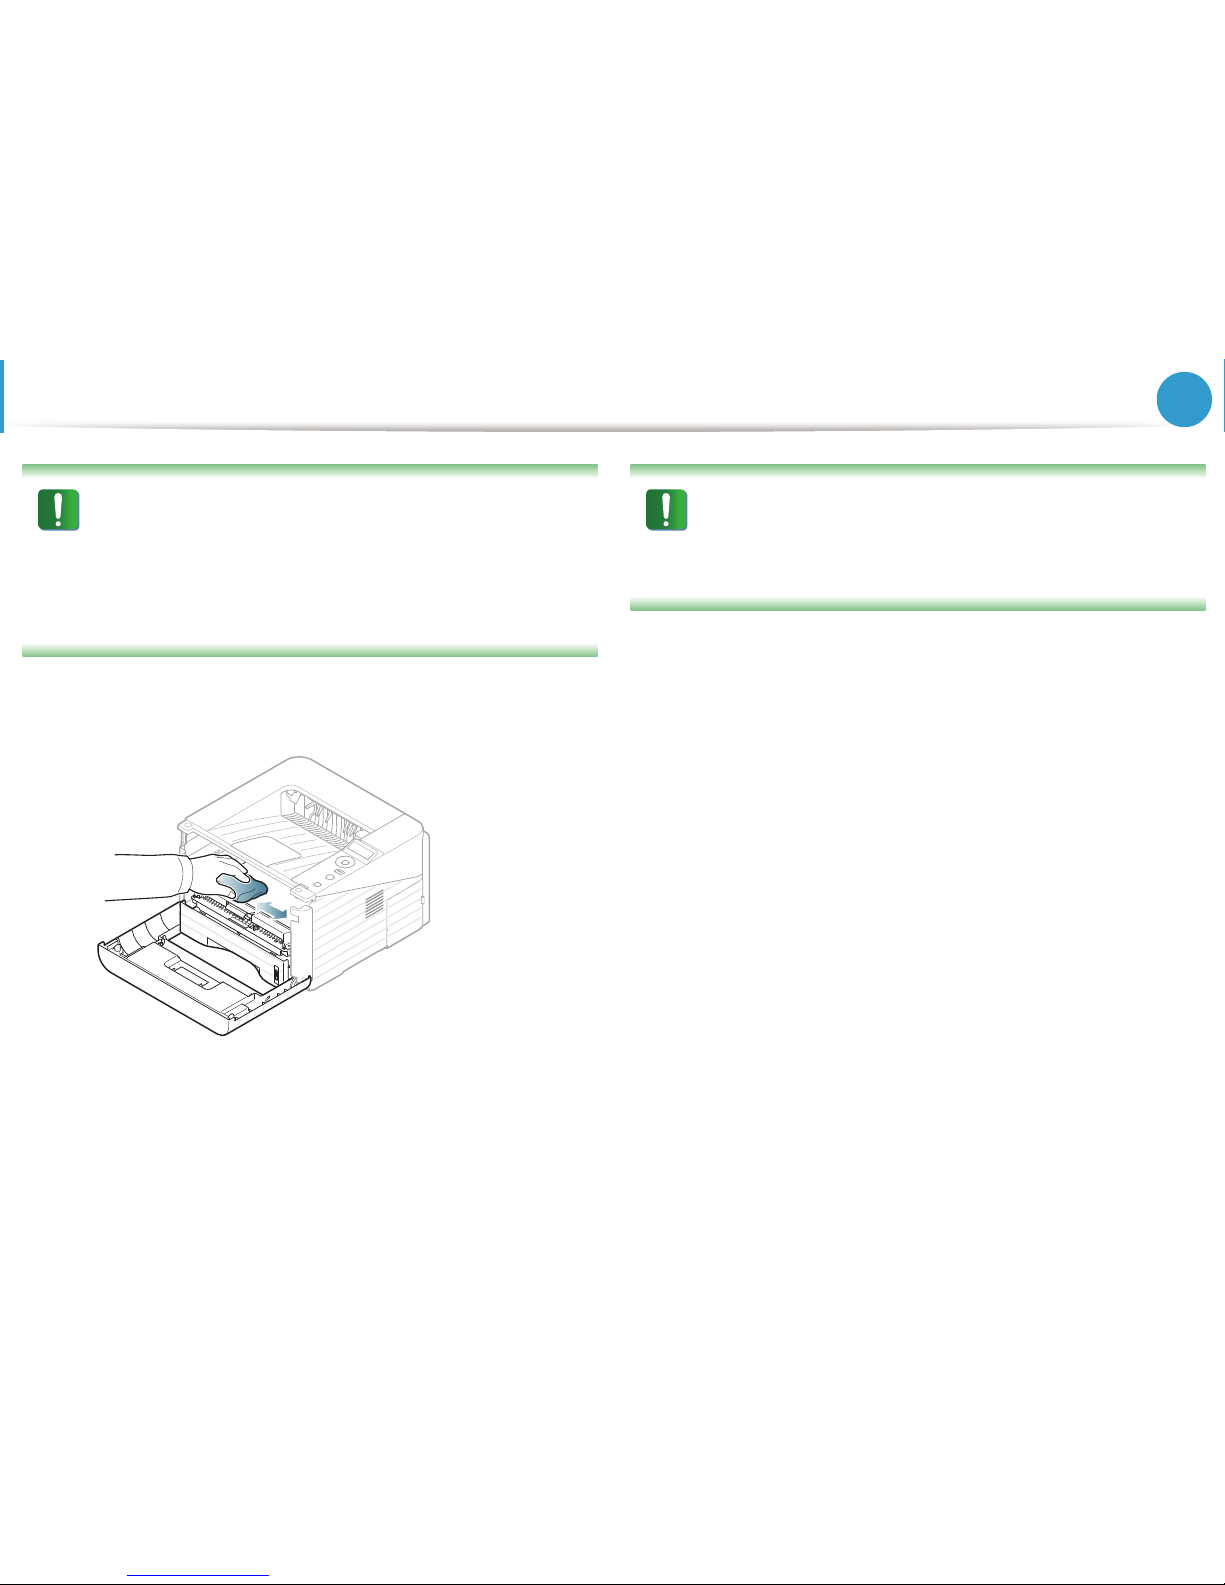
With a dry, lint-free cloth, wipe away any dust and spilled
toner from the toner cartridge area.
While cleaning the inside of the machine, be careful not to
damage the transfer roller or any other inside parts. Do not
use solvents such as benzene or thinner. Printing quality
problems can occur and cause damage to the machine.
4
Reinsert the toner cartridge and close the front cover.
Page 62
Cleaning the machine
64
3. Maintenance
4
Cleaning the pickup roller
1
Turn the machine off and unplug the power cord. Wait for the
machine to cool down.
2
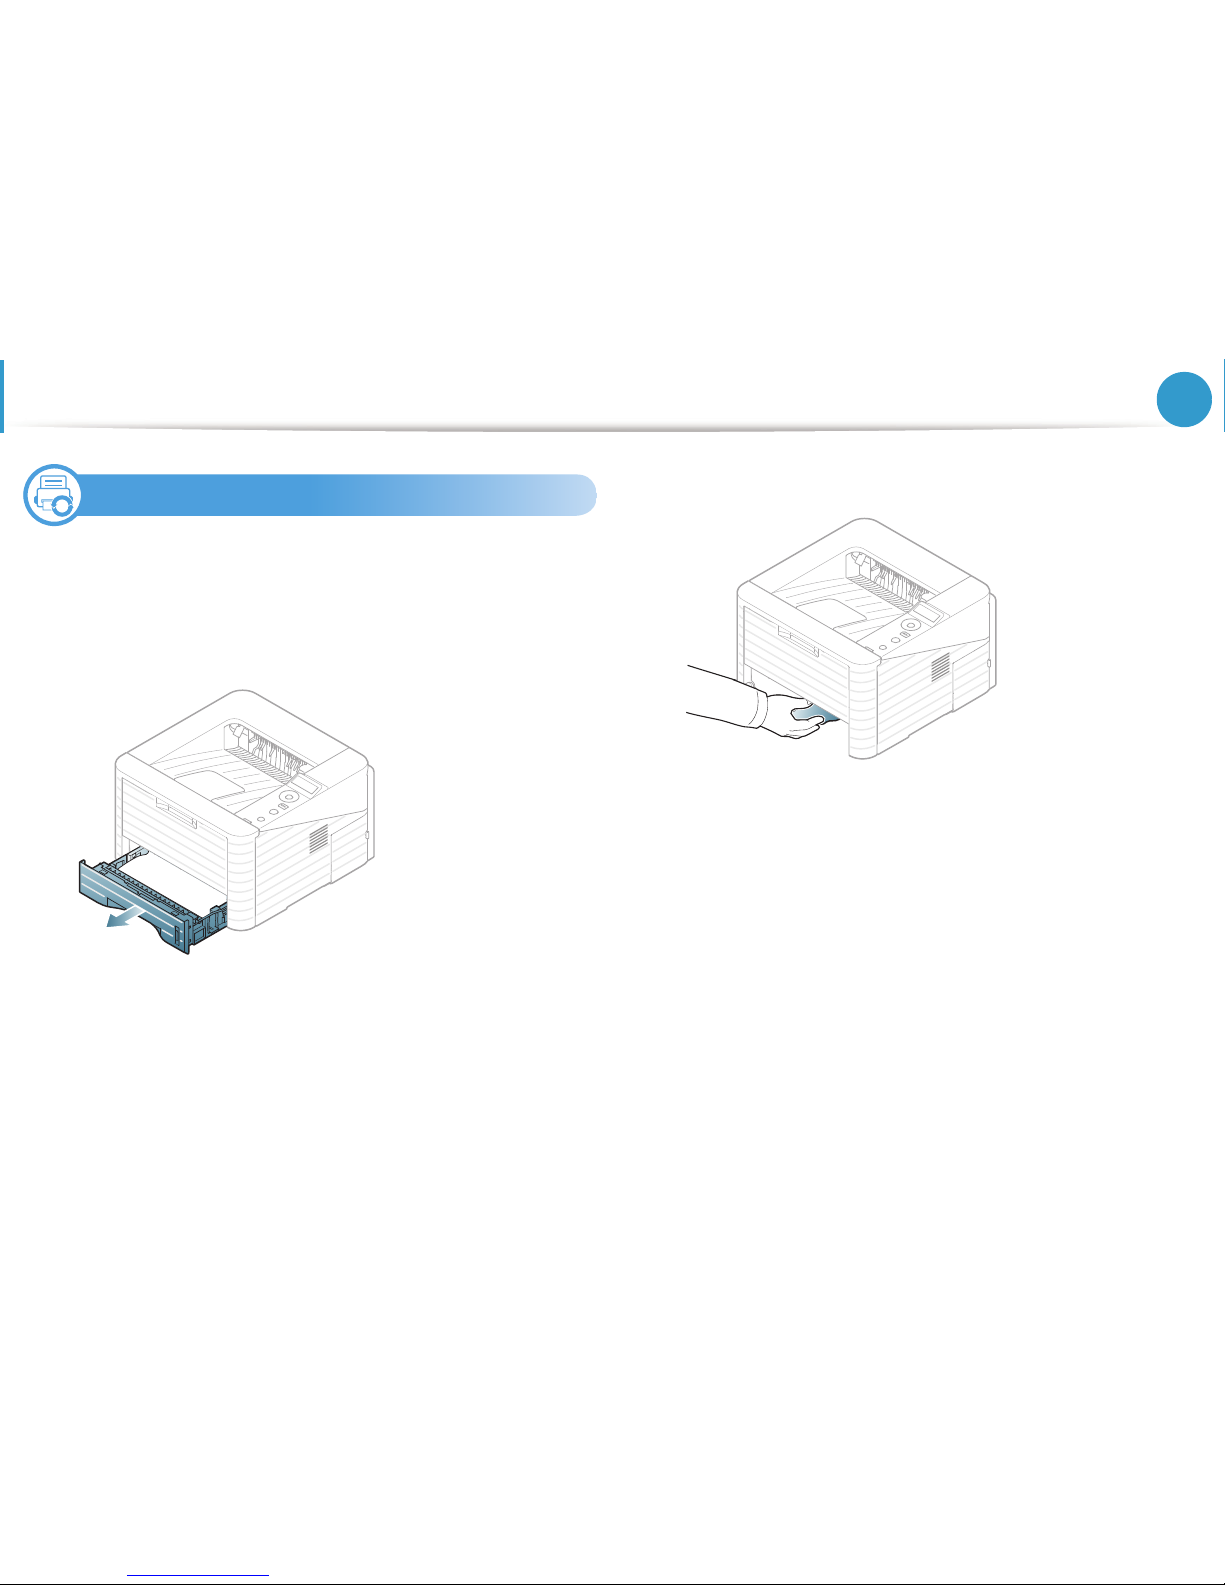
Pull out tray 1.
3
Clean the pickup roller with a soft, lint-free cloth.
4
Insert the tray back into the machine.
Page 63

4. Troubleshooting
This chapter gives helpful information for what to do if you encounter an
error.
• Tips for avoiding paper jams 67
• Clearing paper jams 68
• Understanding the status LED 74
• Understanding display messages 77
This chapter gives helpful information for what to do if you
encounter an error.
If your machine has a display screen, check the message on the
display screen first to solve the error. If you cannot find a solution
to your problem in this chapter, refer to the Troubleshooting
chapter in the Advanced User's Guide.
If you cannot find a solution in the User's Guide or the problem
persists, call for service.
Page 64

67
4. Troubleshooting
Tips for avoiding paper jams
By selecting the correct media types, most paper jams can be avoided. To avoid paper jams, refer to the following guidelines:
• Ensure that the adjustable guides are positioned correctly (see "Tray overview" on page 32).
• Do not overload the tray. Ensure that the paper level is below the paper capacity mark on the inside of the tray.
• Do not remove paper from the tray while your machine is printing.
• Flex, fan, and straighten paper before loading.
• Do not use creased, damp, or highly curled paper.
• Do not mix paper types in a tray.
• Use only recommended print media (see "Print media specifications" on page 85).
Page 65
68
4. Troubleshooting
Clearing paper jams
To avoid tearing the paper, pull the jammed paper out slowly
and gently.
1
In tray 1
Click this link to open an animation about clearing a jam.
1
Open and close the front cover. The jammed paper is
automatically ejected from the machine.
If the paper does not exit, go to the next step.
2
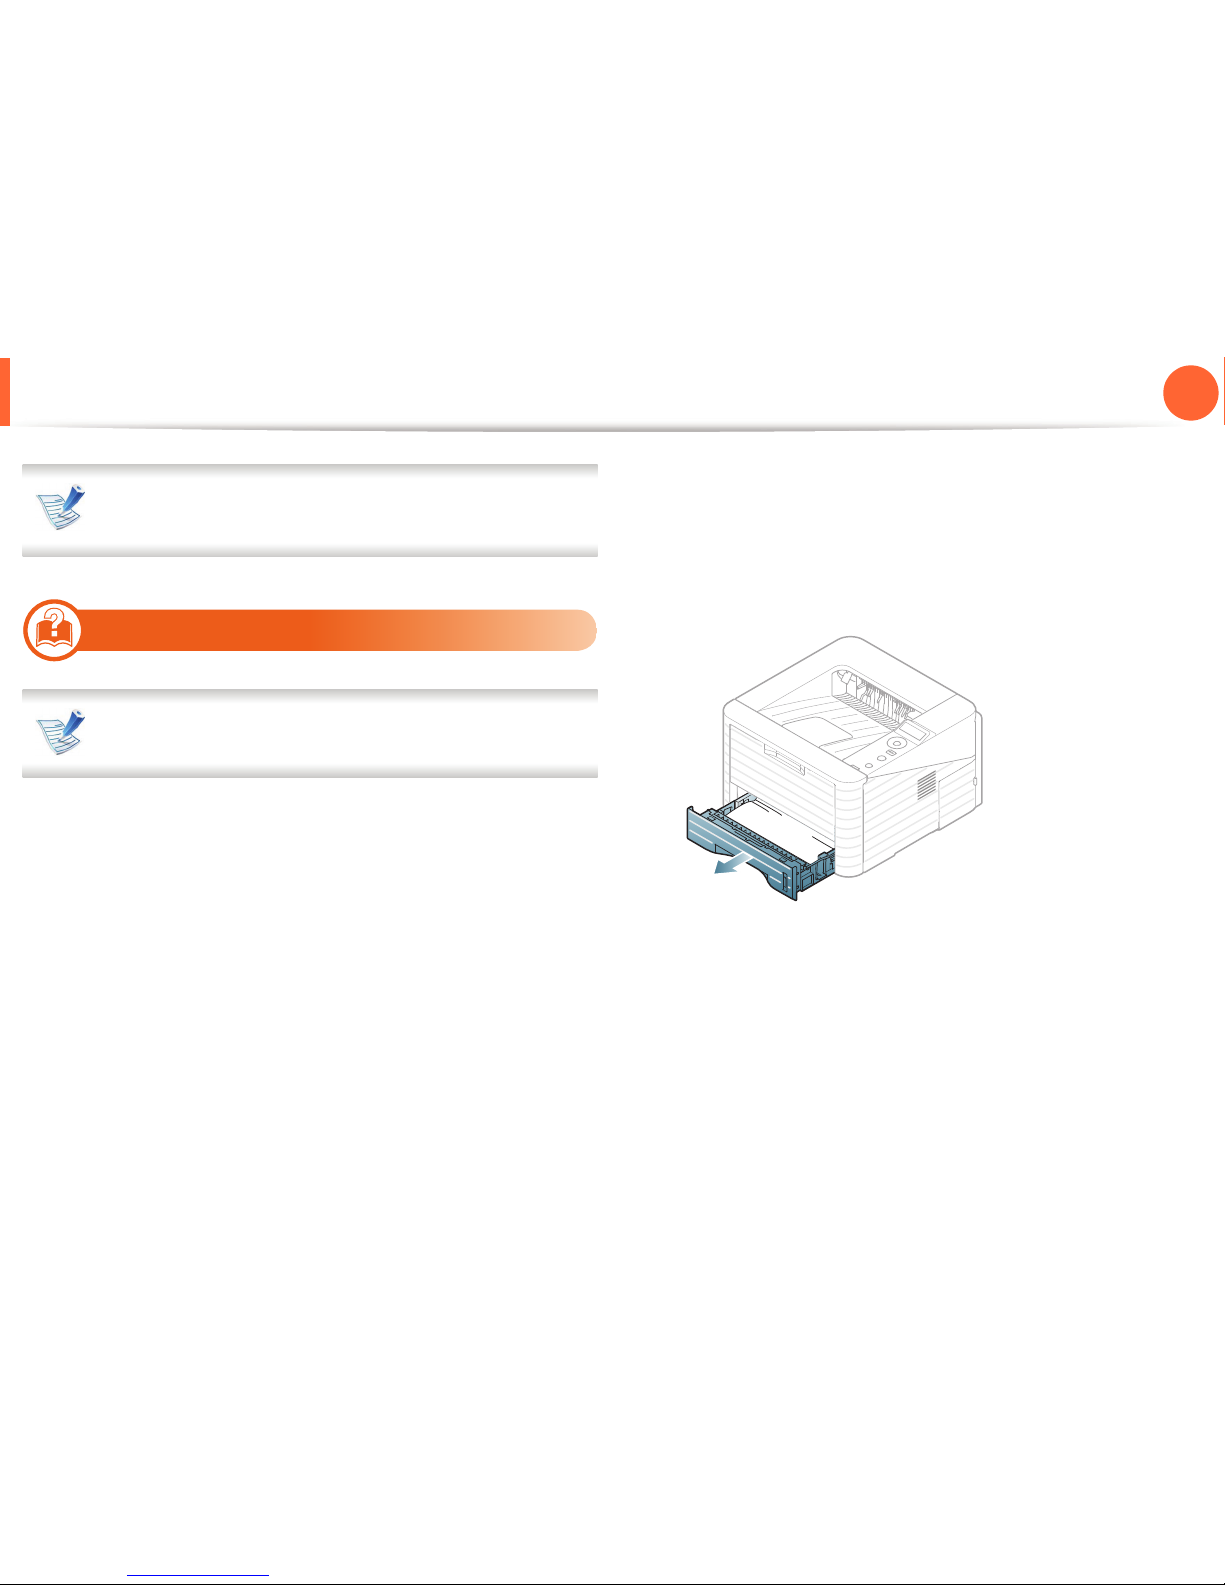
Pull out tray 1 .
Page 66
Clearing paper jams
69
4. Troubleshooting
3
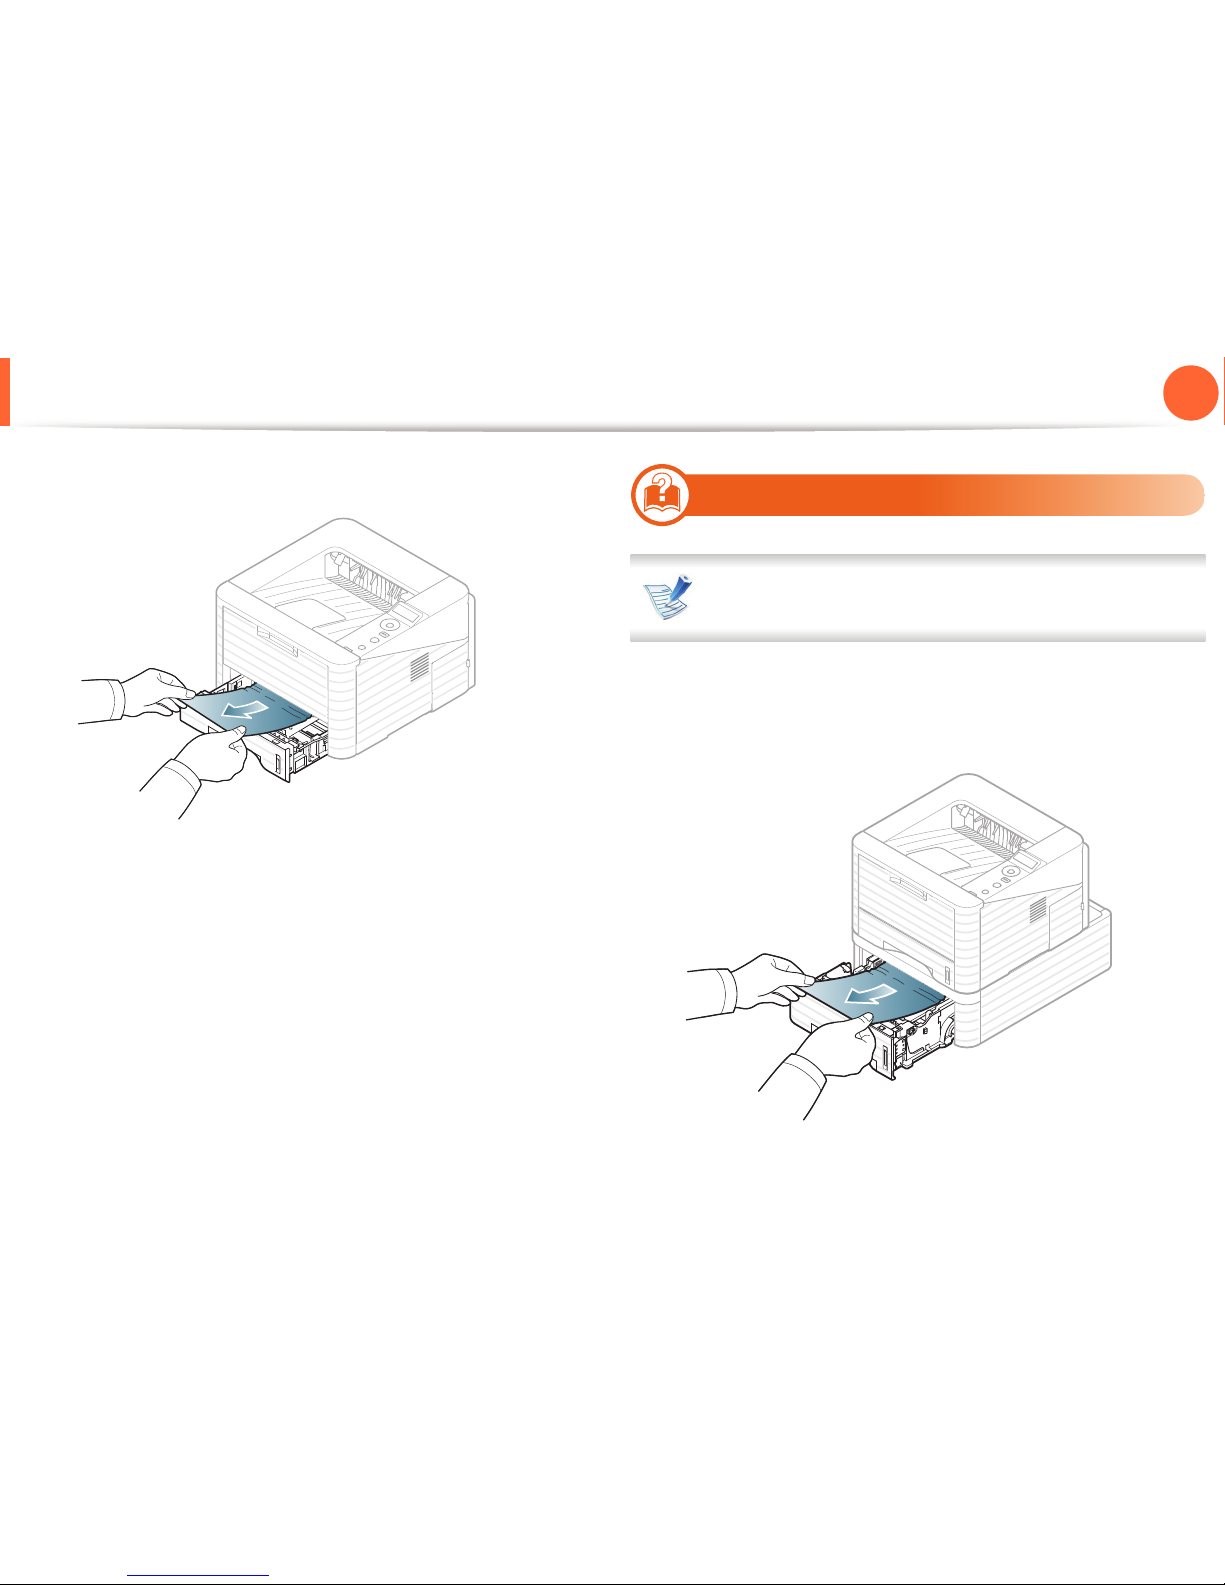
Remove the jammed paper by gently pulling it straight out.
If the paper does not move when you pull, or if you do not see
the paper in this area, check the fuser area around the toner
cartridge (see "Inside the machine" on page 70).
4
Insert tray 1 back into the machine until it snaps into place.
Printing automatically resumes.
2
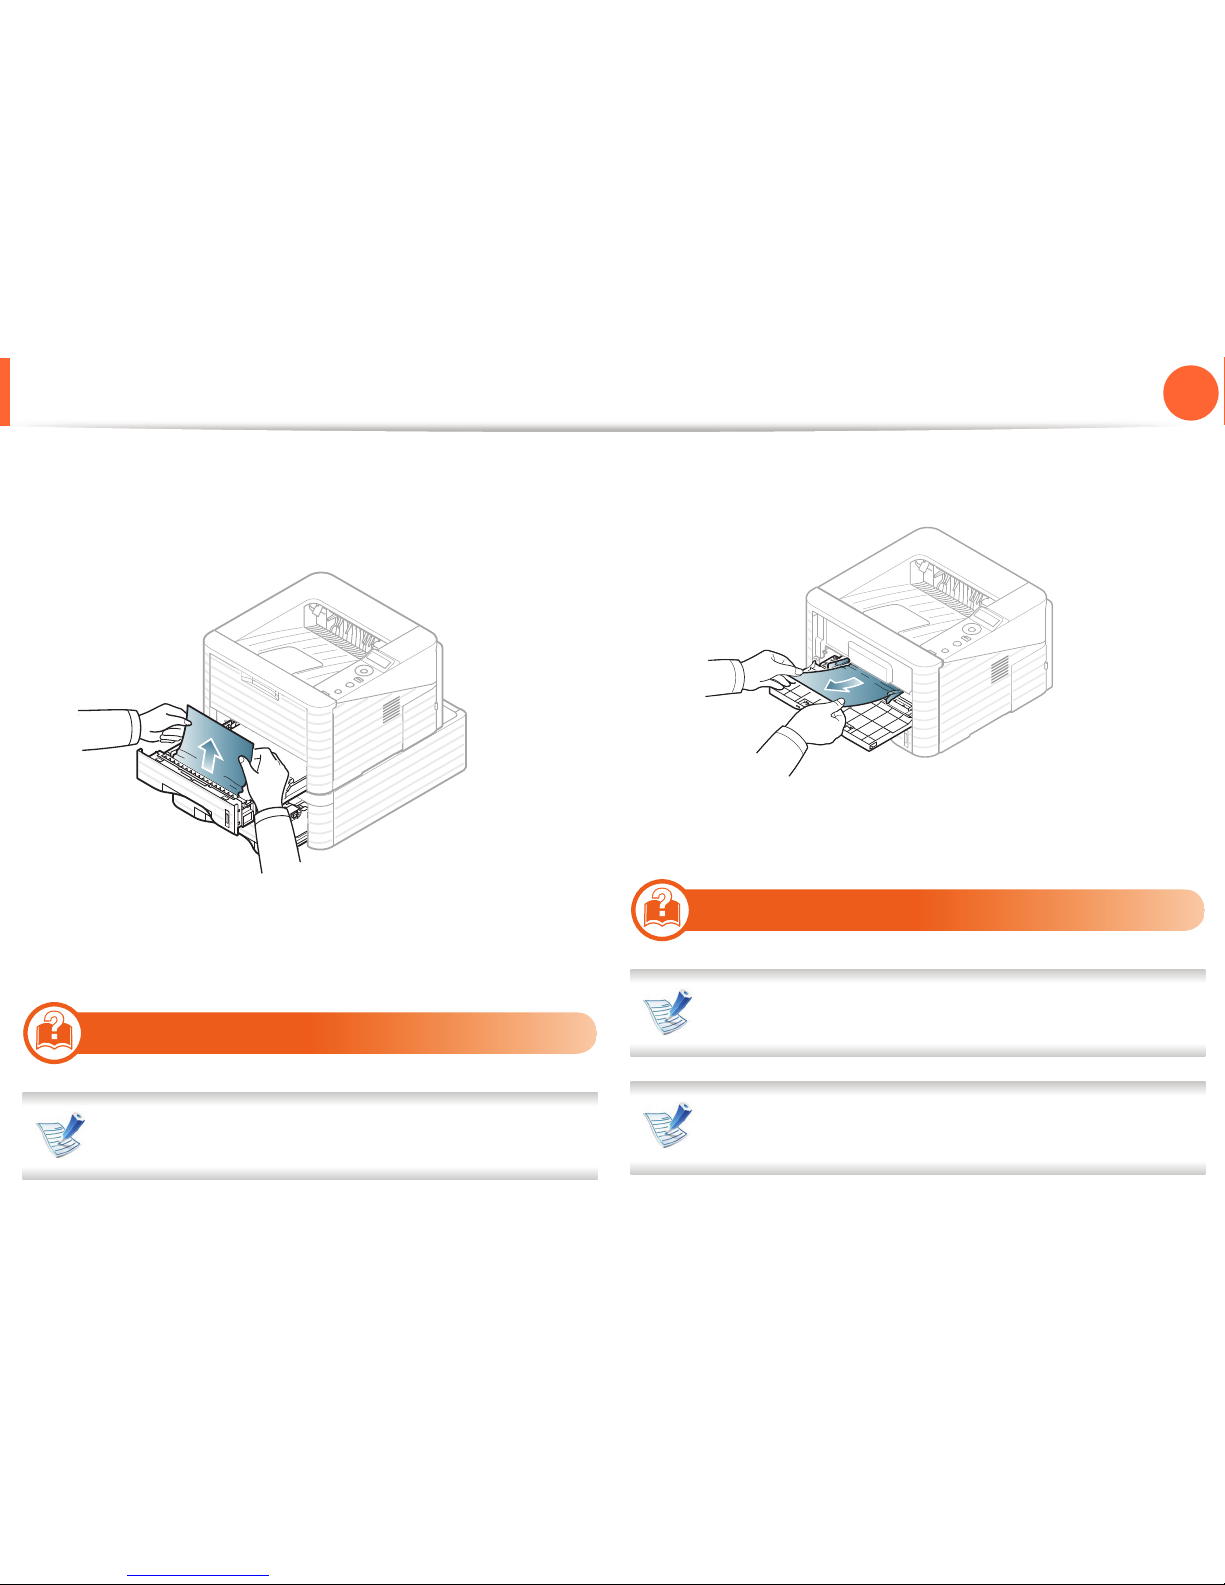
In optional tray2
Click this link to open an animation about clearing a jam.
1
Pull out optional tray 2.
2
Remove the jammed paper from the machine.
If the paper does not move when you pull or if you do not see
the paper in this area, stop and go to the next step.
Page 67
Clearing paper jams
70
4. Troubleshooting
3
Pull tray 1 half-way out.
4
Pull the paper straight up and out.
5
Insert the trays back into the machine. Printing automatically
resumes.
3
In the multi-purpose tray
Click this link to open an animation about clearing a jam.
1
If the paper is not feeding properly, pull the paper out of the
machine.
2
Open and close the front cover to resume printing.
4
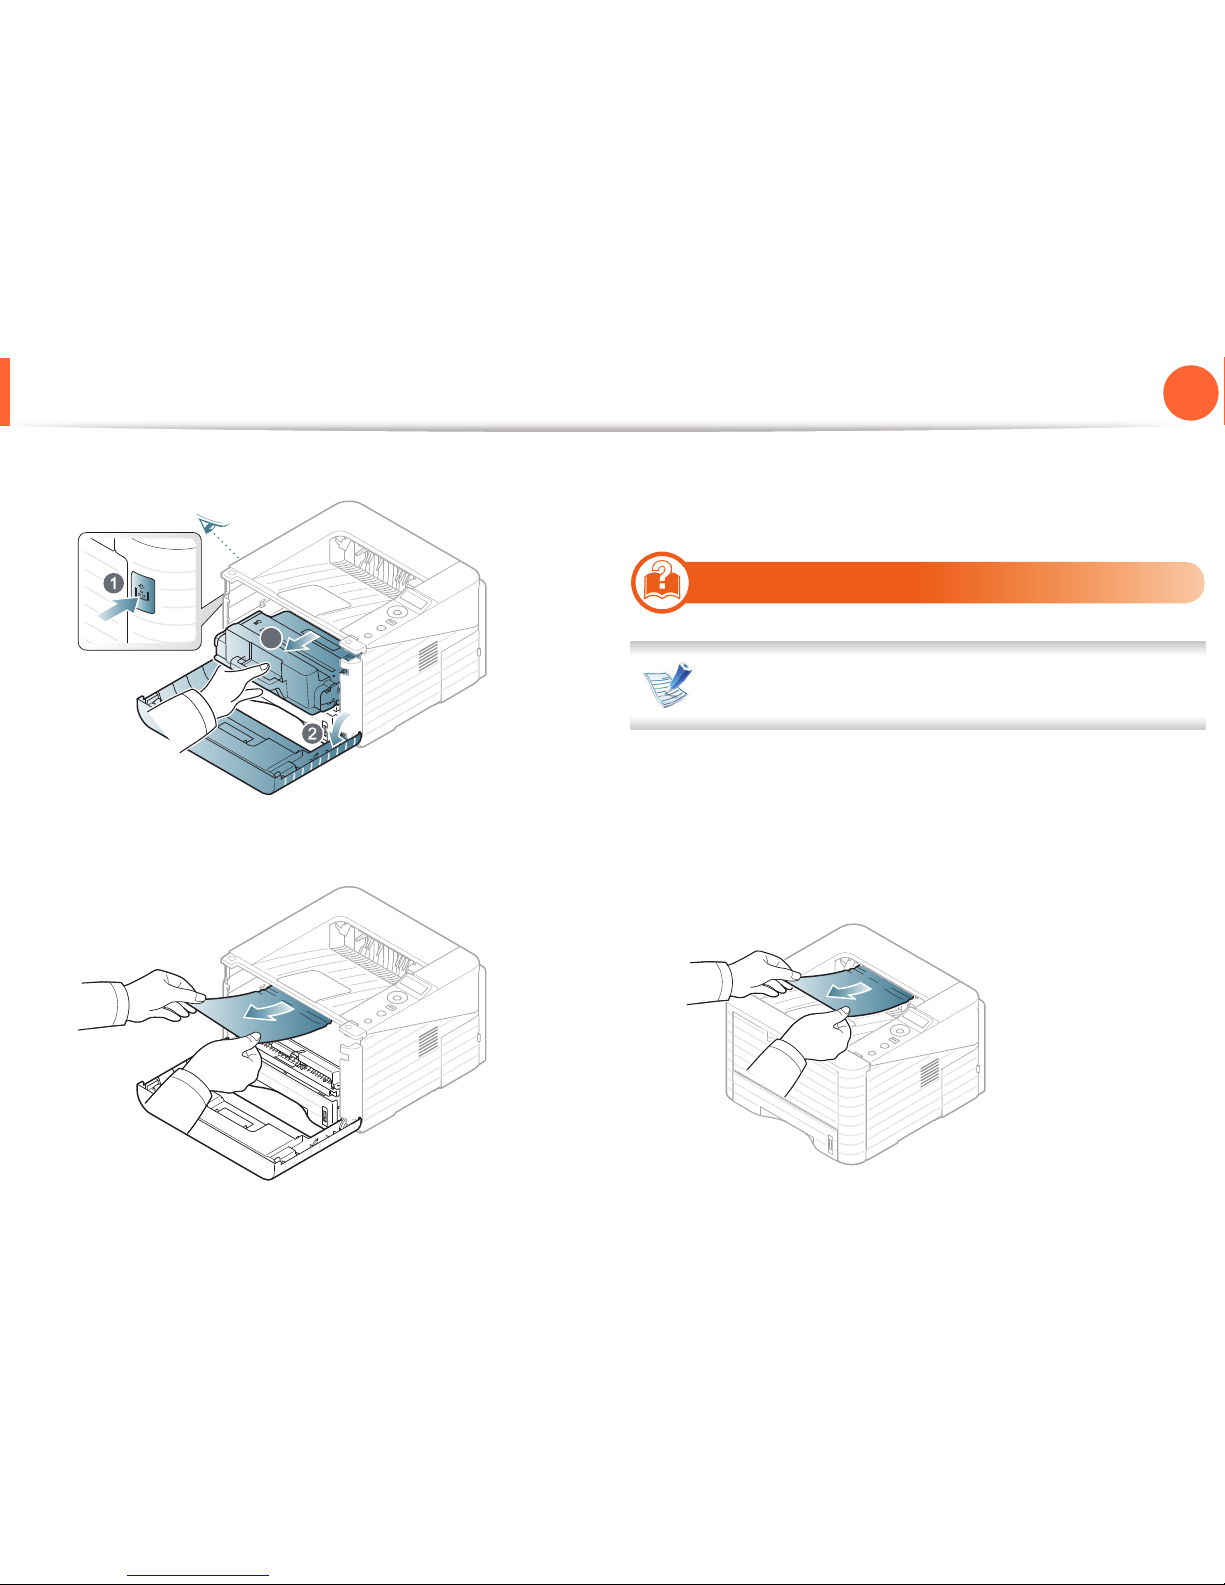
Inside the machine
Click this link to open an animation about clearing a jam.
The fuser area is hot. Take care when removing paper from
the machine.
Page 68
Clearing paper jams
71
4. Troubleshooting
1
Open the front cover and pull the toner cartridge out.
2
Remove the jammed paper by gently pulling it straight out.
3
Replace the toner cartridge and close the front cover. Printing
automatically resumes.
5
In the exit area
Click this link to open an animation about clearing a jam.
1
Open and close the front cover. The jammed paper is
automatically ejected from the machine.
If you do not see the jammed paper, go to the next step.
2
Gently pull the paper out of the output tray.
3
Page 69
Clearing paper jams
72
4. Troubleshooting
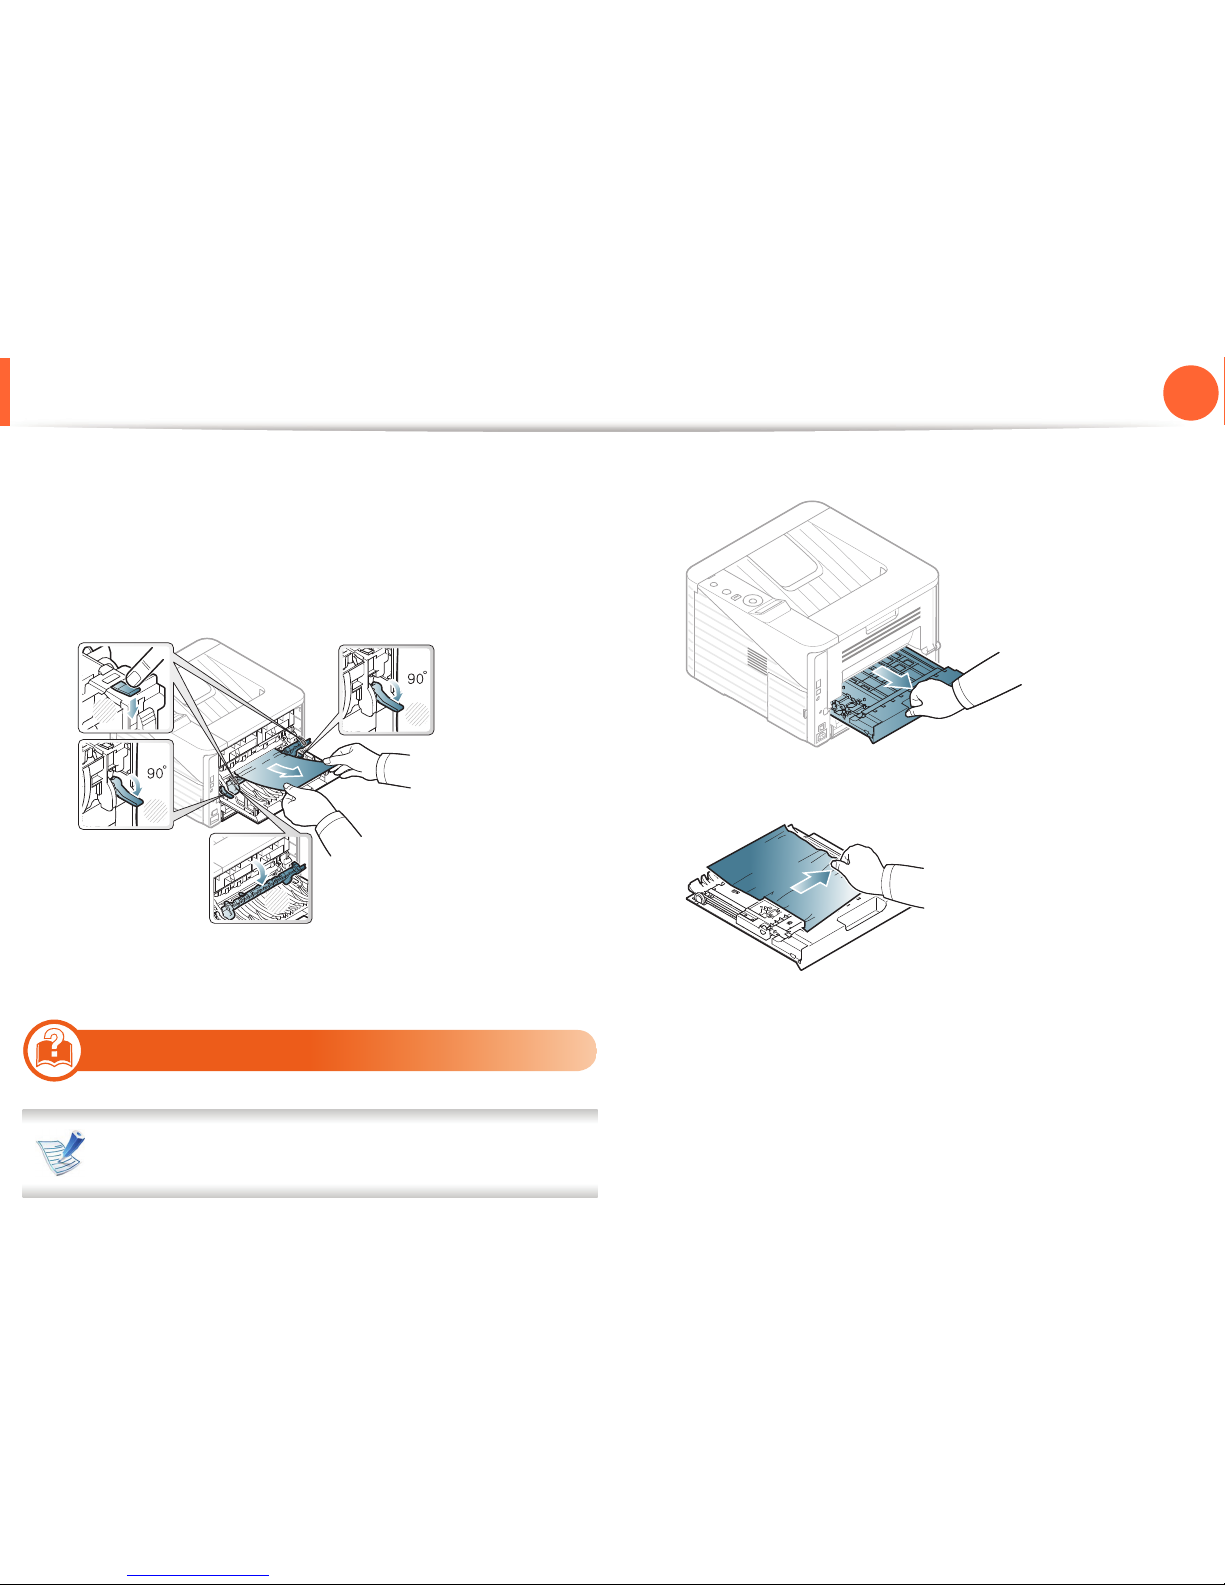
If you do not see the jammed paper or if there is any resistance
when you pull, stop and go to the next step.
3
Open the rear cover.
4
Remove the jammed paper as shown in the following figure.
5
Close the rear cover. Printing automatically resumes.
6
In the duplex unit area
Click this link to open an animation about clearing a jam.
1
Pull the duplex unit out of the machine.
2
Remove the jammed paper from the duplex unit.
3
1
1
3
2
Page 70
Clearing paper jams
73
4. Troubleshooting
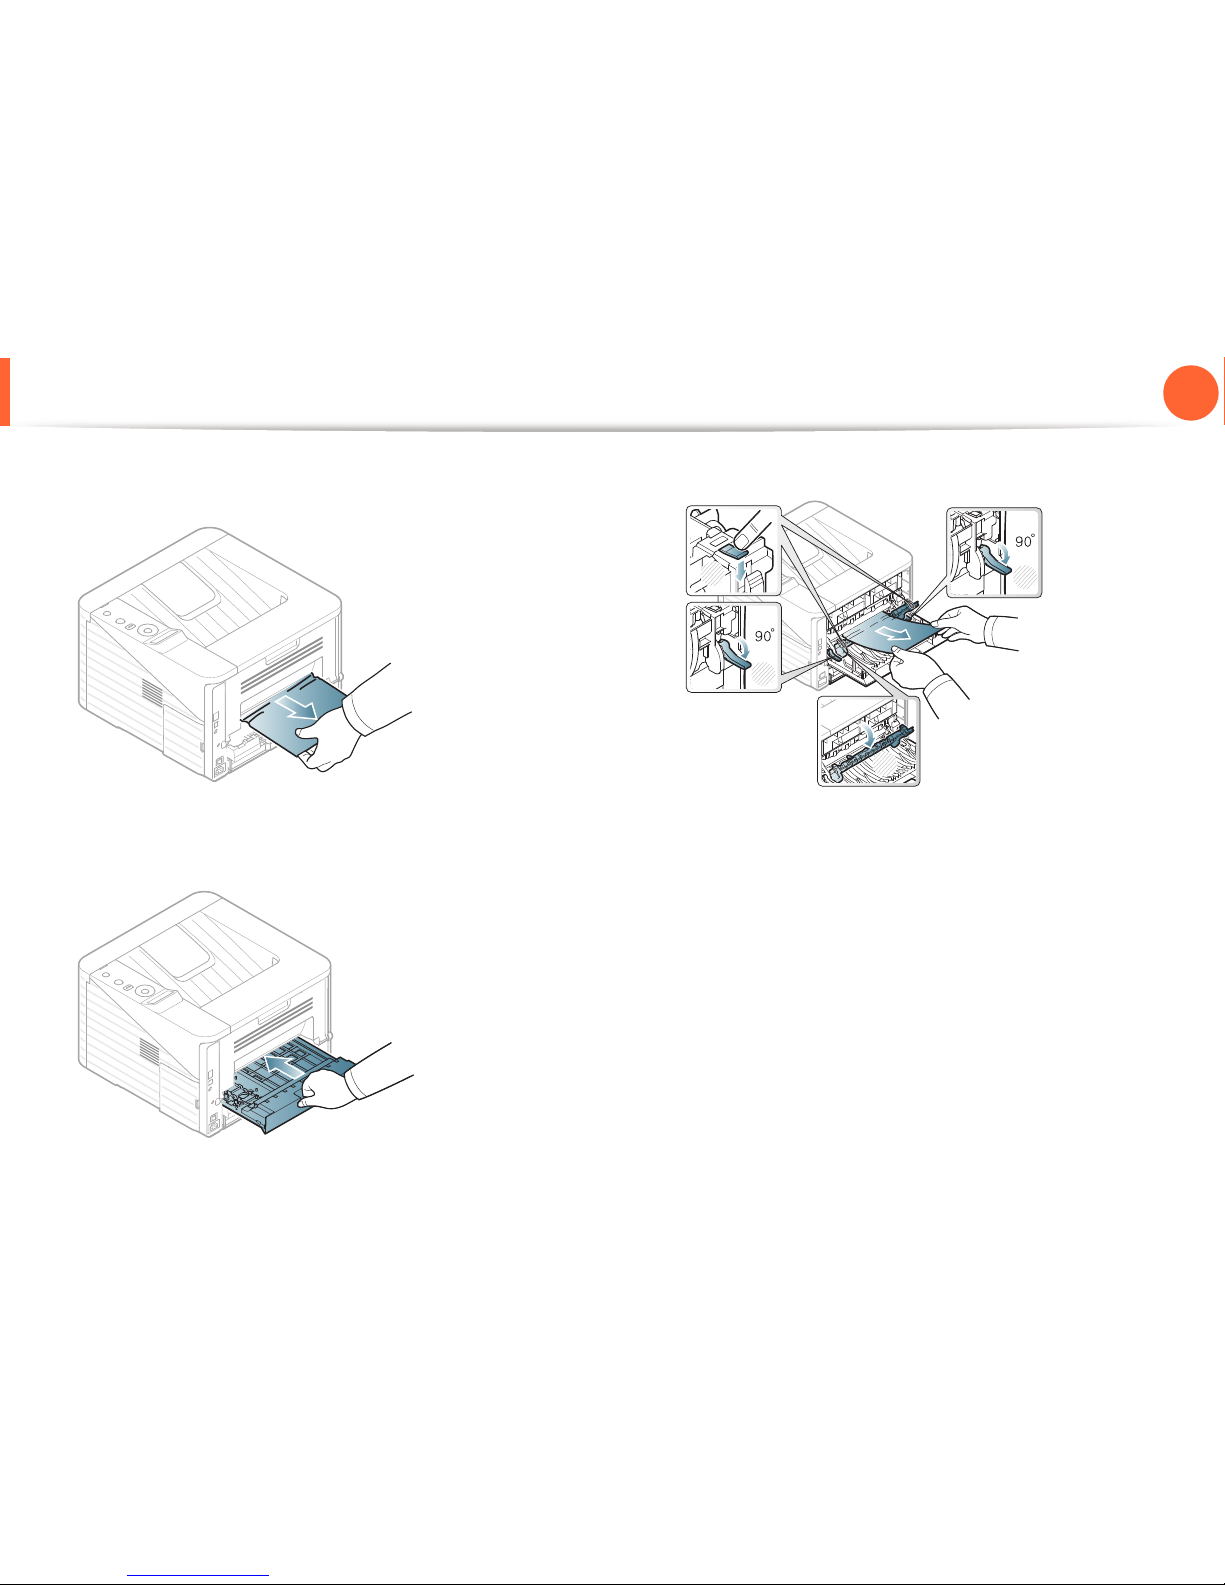
If the paper does not come out with the duplex unit, remove
the paper from the bottom of the machine.
If you still do not see the paper, go to the next step.
3
Insert the duplex unit into the machine.
4
Open the rear cover.
5
Remove the jammed paper as shown in the following figure.
6
Close the rear cover. Printing automatically resumes.
3
1
1
3
2
Page 71
74
4. Troubleshooting
Understanding the status LED
The color of the LED indicates the machine's current status.
• Some LEDs may not be available depending on model or country.
• To resolve the error, look at the error message and its instructions from the troubleshooting part.
• You also can resolve the error with the guideline from the computers’s Samsung Printer Status or Smart Panel program window.
• If the problem persists, call a service representative.
Page 72
Understanding the status LED
75
4. Troubleshooting
7
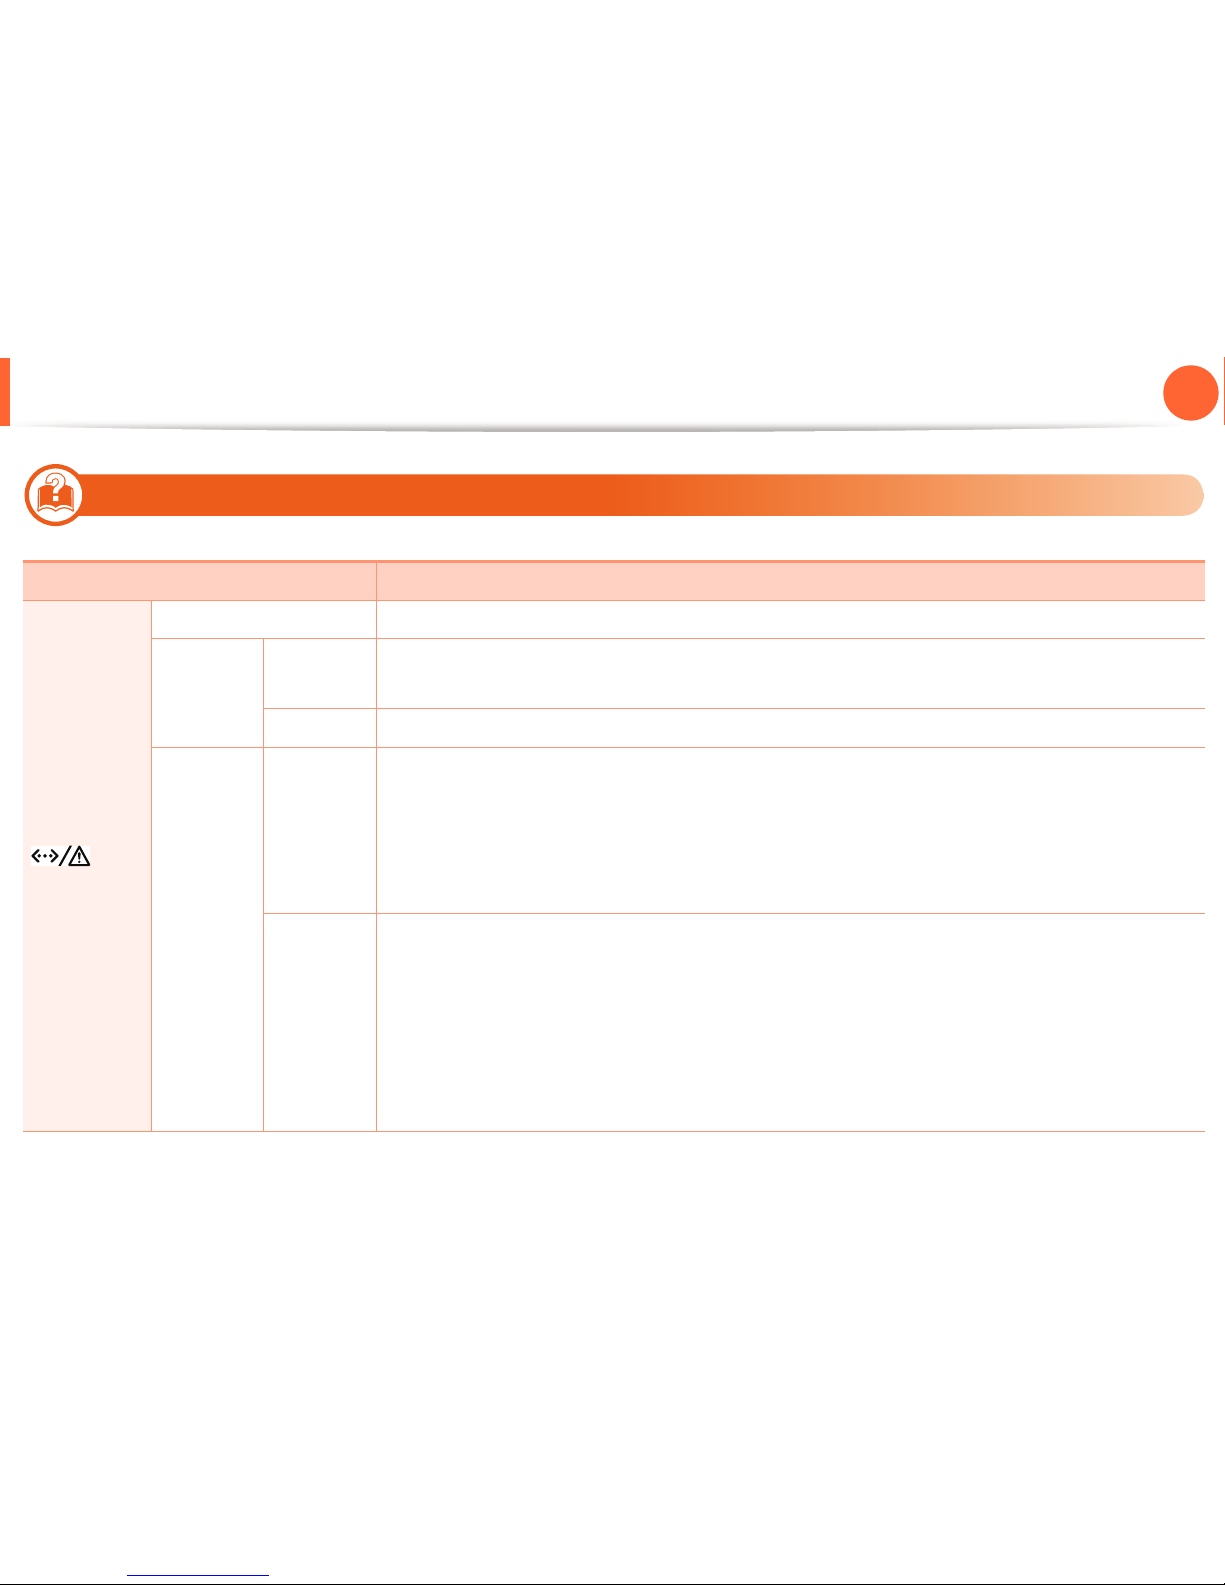
Status LED
Status Description
(Status LED)
Off The machine is off-line.
Green
Blinking
• When the backlight slowly blinks, the machine is receiving data from the computer.
• When the backlight blinks rapidly, the machine is printing data.
On • The machine is on-line and can be used.
Red
Blinking
• A minor error has occurred and the machine is waiting for the error to be cleared. Check the display
message. When the problem is cleared, the machine resumes. For some models that does not
support the display screen on the control panel, this feature is not applicable.
• Small amount of toner is left in the cartridge. The estimated cartridge life of toner is close. Prepare
a new cartridge for replacement. You may temporarily increase the printing quality by
redistributing the toner (see "Redistributing toner" on page 54).
On
• A toner cartridge has almost reached its estimated cartridge life
a
. It is recommended to replace the
toner cartridge (see "Replacing the toner cartridge" on page 56).
• The cover is opened. Close the cover.
• There is no paper in the tray. Load paper in the tray.
• The machine has stopped due to a major error. Check the display message (see "Understanding
display messages" on page 77).
• A paper jam has occurred (see "Clearing paper jams" on page 68).
Page 73
Understanding the status LED
76
4. Troubleshooting
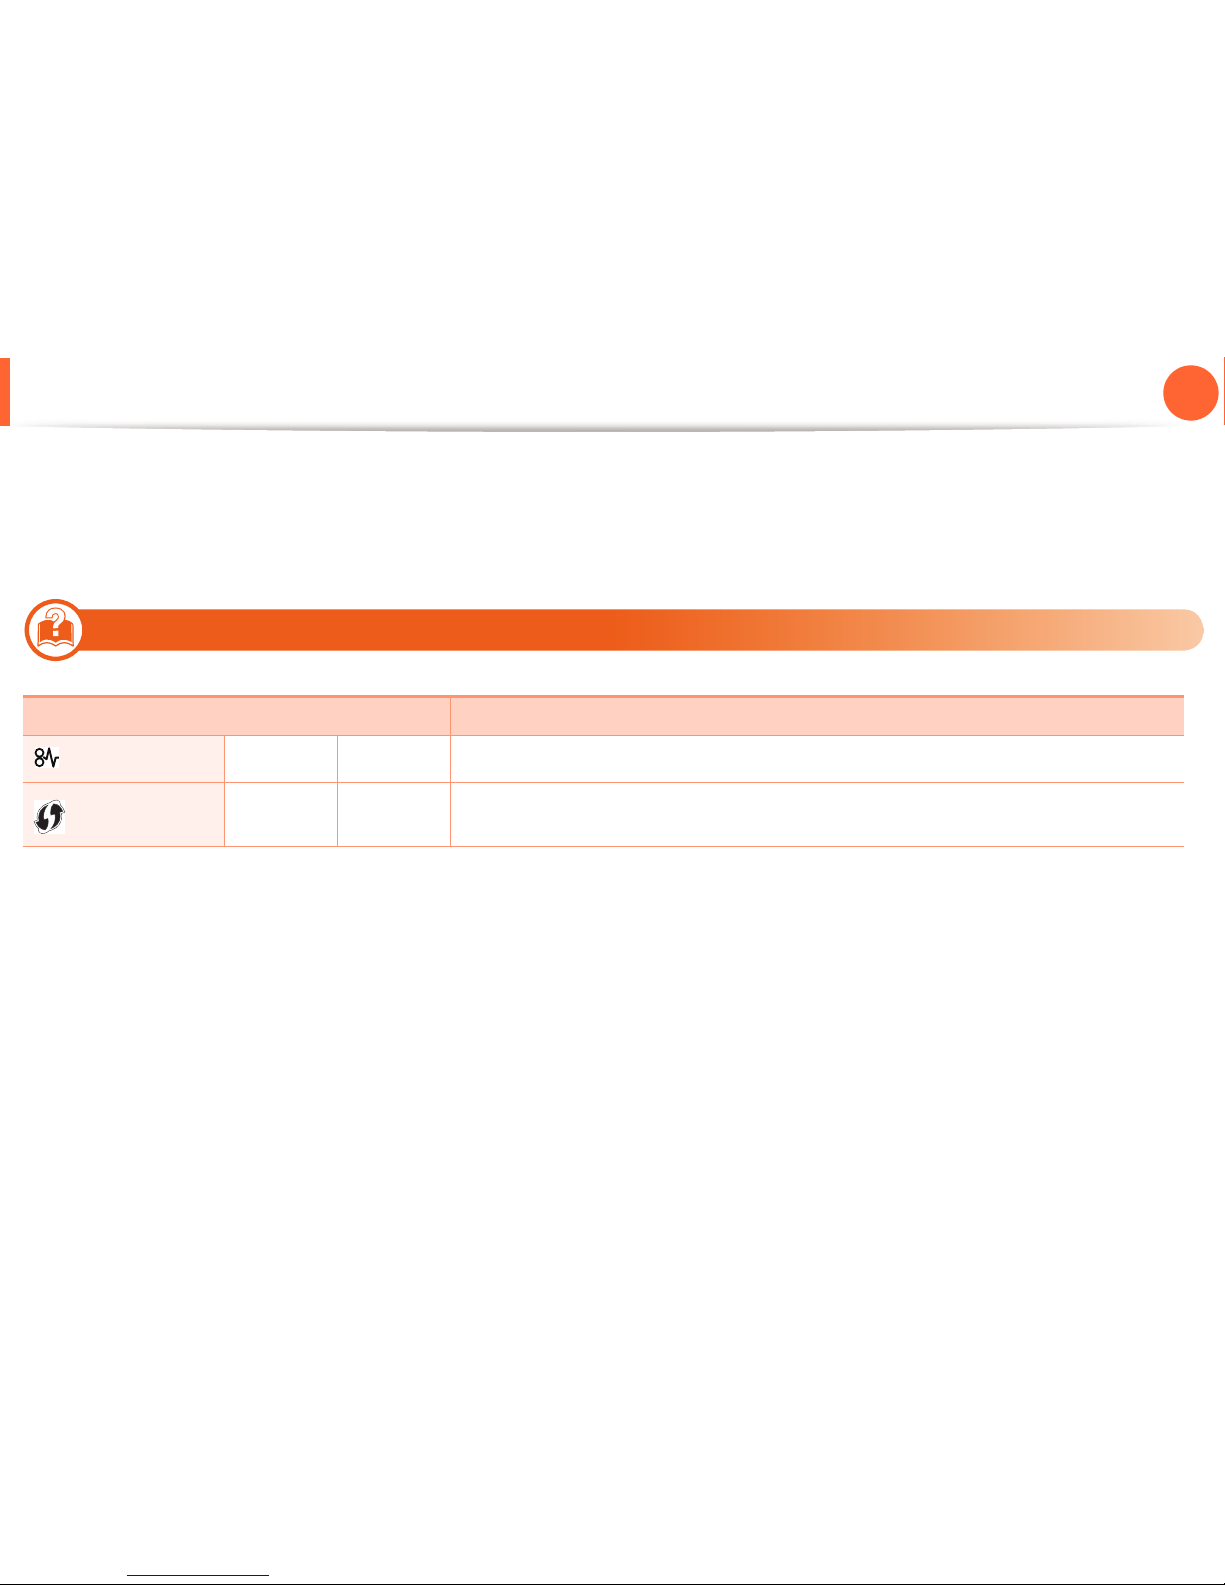
8
Jam LED/ WPS LED
a. Estimated cartridge life means the expected or estimated toner cartridge life, which indicates the average capacity of print-outs and is designed pursuant to ISO/
IEC 19752. The number of pages may be affected by operating environment, printing interval, graphics, media type and media size. Some amount of toner may
remain in the cartridge even when red LED is on and the printer stops printing.
Status Description
(Jam LED)
Orange On
A paper jam has occurred (see "Clearing paper jams" on page 68).
(WPS LED)
Blue On
When the machine is connected to a wireless network, WPS LED lights on blue (see
Advanced Guide).
Page 74
77
4. Troubleshooting
Understanding display messages
Messages appear on the control panel display to indicate the
machine’s status or errors. Refer to the tables below to understand
the messages’ and their meaning, and correct the problem, if
necessary.
9
Checking display messages
• If a message is not in the table, reboot the power and try
the printing job again. If the problem persists, call a service
representative.
• When you call for service, provide the service
representative with the contents of display message.
• Some messages may not appear on the display depending
on the options or models.
• [error number] indicates the error number.
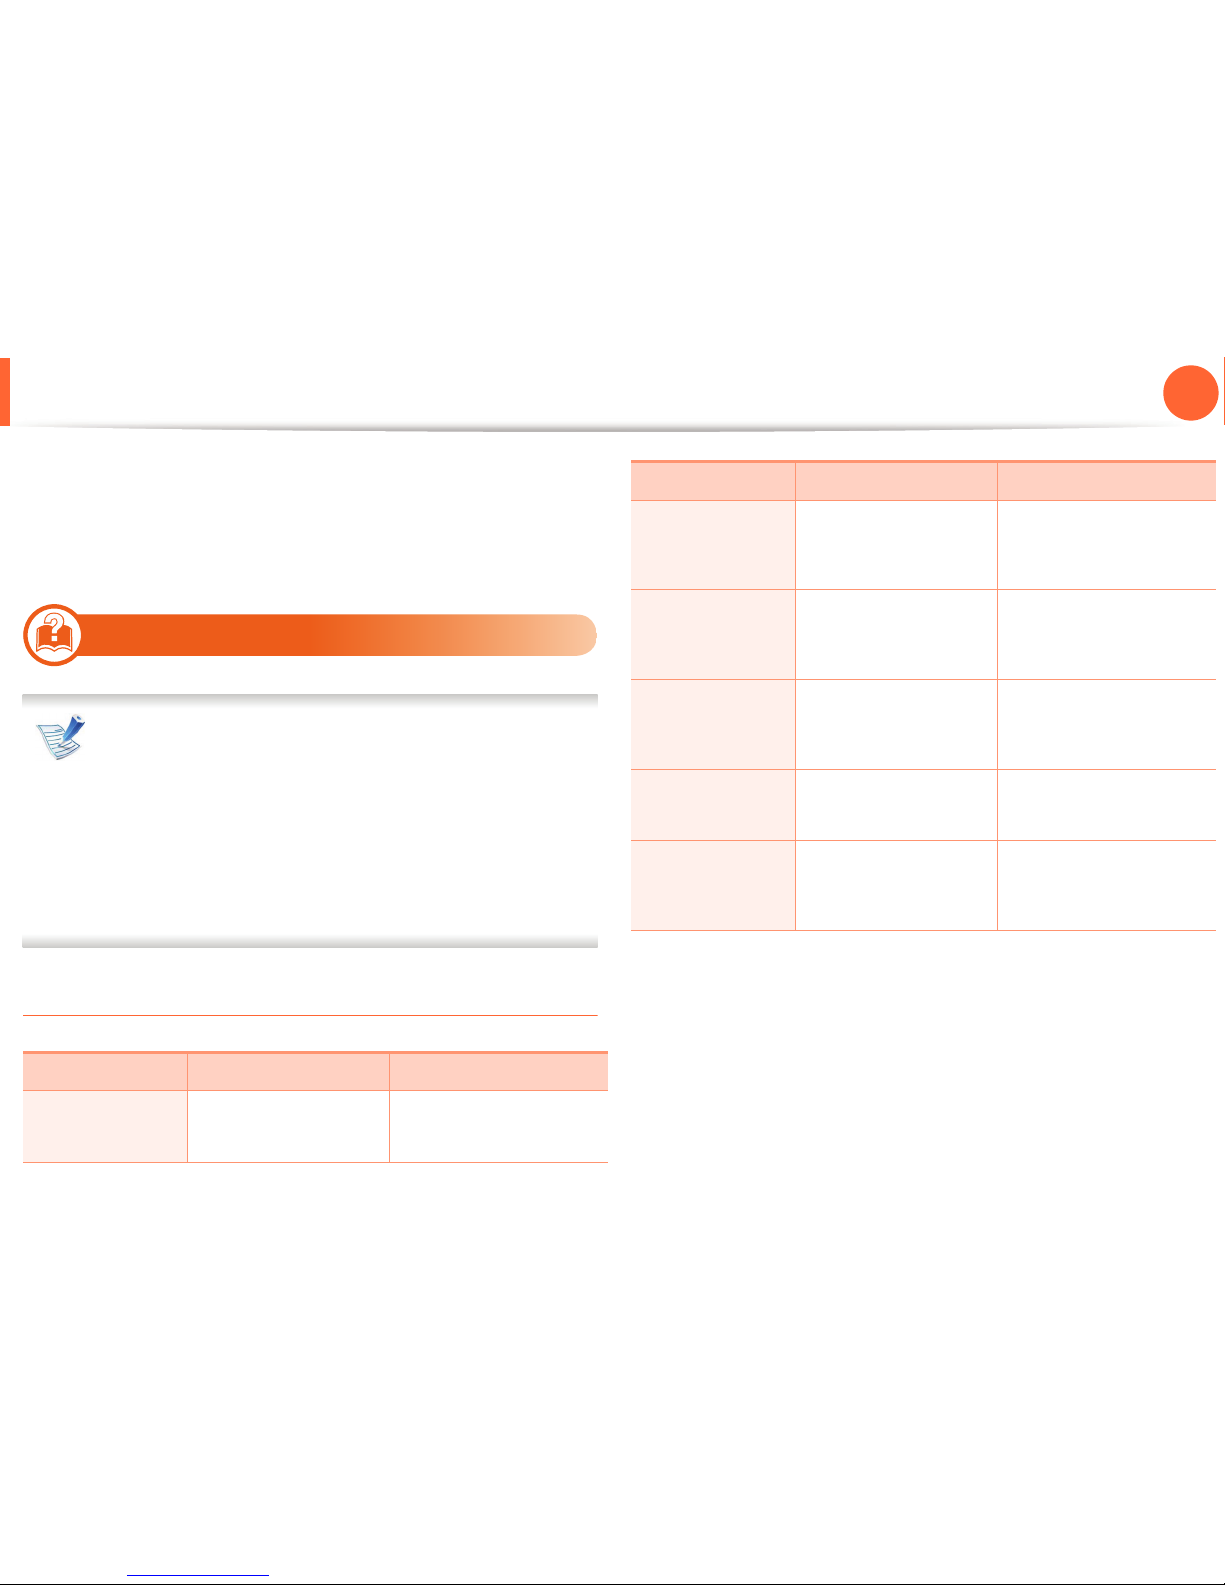
Paper Jam-related messages
Message Meaning Suggested solutions
Paper Jam
in Tray 1
Paper has jammed in
the paper feed area.
Clear the jam (see "In tray
1" on page 68).
Paper Jam
in Tray 2
Paper has jammed in
the optional tray.
Clear the jam (see "In
optional tray2" on page
69).
Paper Jam
in MP tray
Paper has jammed in
the multi-purpose tray.
Clear the jam (see "In the
multi-purpose tray" on
page 70).
Paper Jam
inside machine
Paper has jammed in
the inside machine.
Clear the jam (see "Inside
the machine" on page
70).
Paper Jam
in exit area
Paper has jammed in
the paper exit area.
Clear the jam (see "In the
exit area" on page 71).
Paper Jam
inside of duplex
Paper has jammed in
the duplex area.
Clear the jam (see "In the
duplex unit area" on
page 72).
Message Meaning Suggested solutions
Page 75

Understanding display messages
78
4. Troubleshooting
Toner-related messages
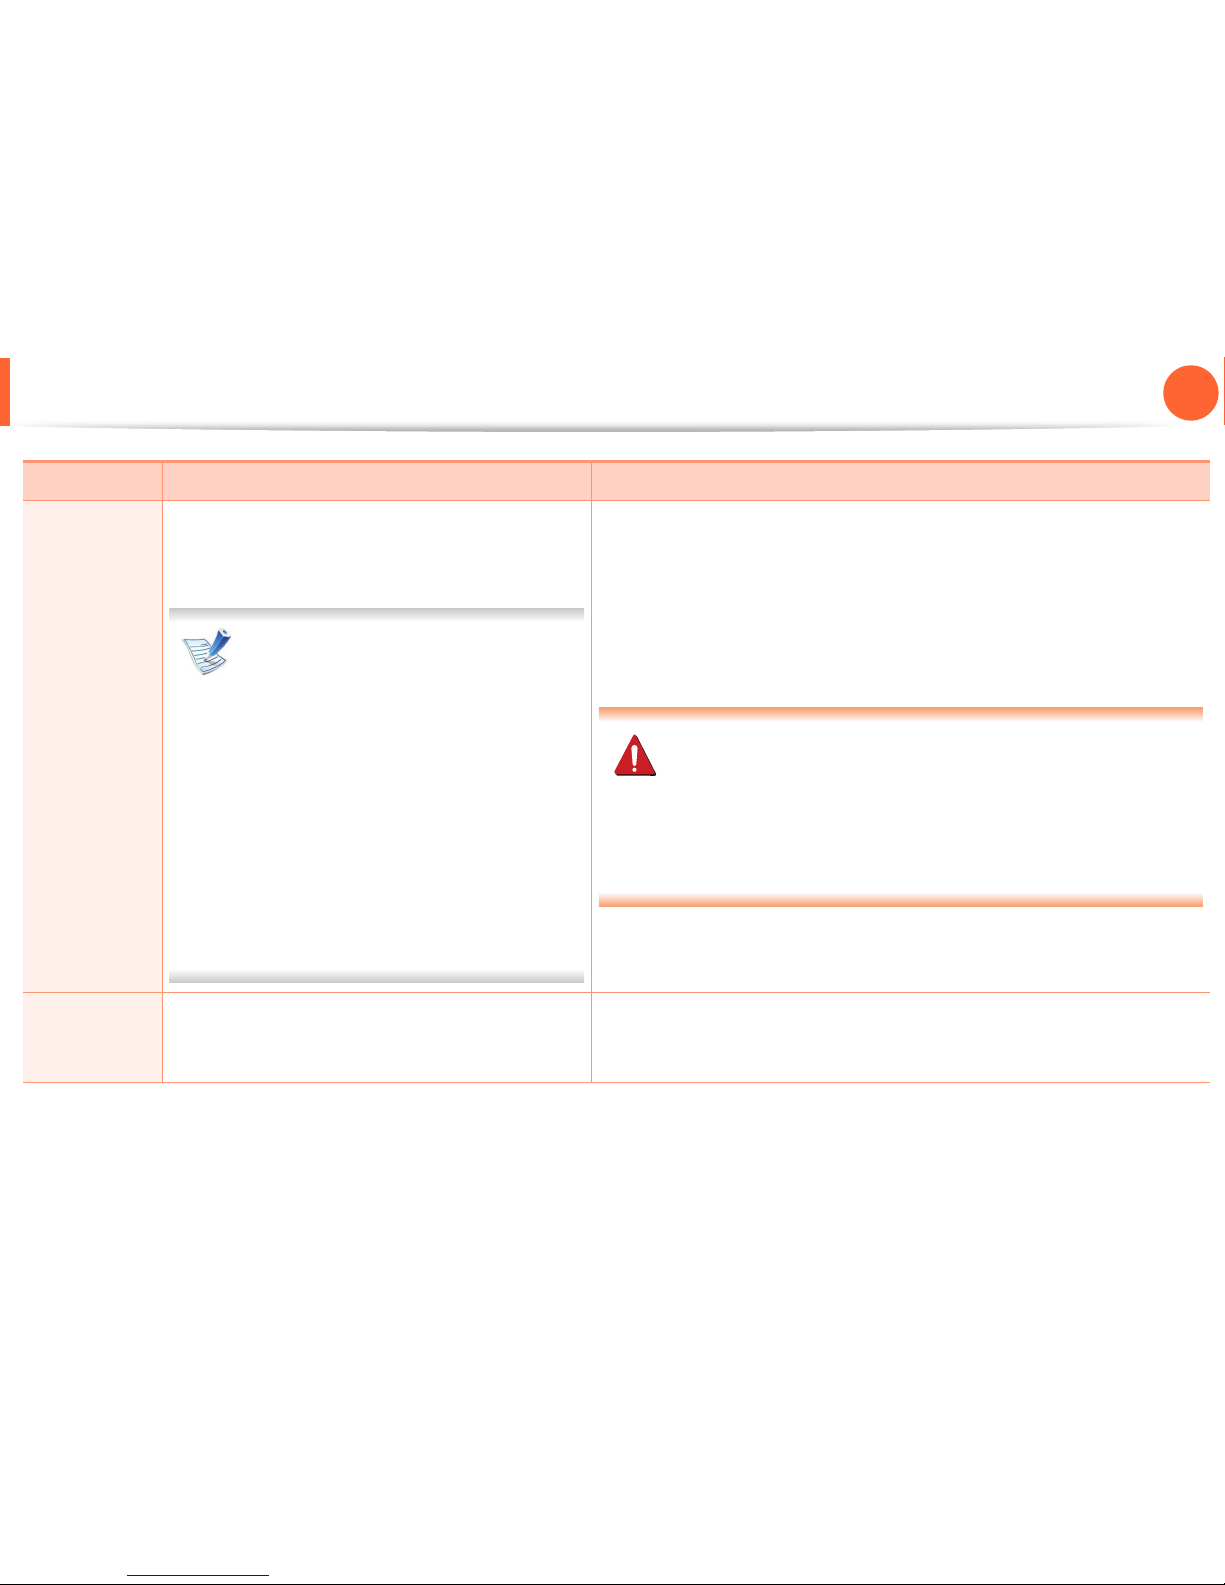
Message Meaning Suggested solutions
Install Toner A toner cartridge is not installed. Install a toner cartridge.
Not
Compatible
Toner
cartridge
The toner cartridge you have installed is not for
your machine.
Install a Samsung-genuine toner cartridge, designed for your machine.
Page 76
Understanding display messages
79
4. Troubleshooting
Replace new
cartridge
The indicated toner cartridge has almost reached
its estimated cartridge life. The machine might stop
printing.
Estimated cartridge life means the
expected or estimated toner cartridge
life, which indicates the average capacity
of print-outs and is designed pursuant to
ISO/IEC 19752 (see "Available supplies"
on page 51). The number of pages may
be affected by operating environment,
printing interval, media type, percentage
of image area, and media size. Some
amount of toner may remain in the
cartridge even when replace new
cartridge appears and the machine stops
printing.
•You can choose Stop or Continue as shown on the control panel. If you
select Stop, the printer stops printing and you cannot print any more
without changing the cartridge. If you select Continue, the printer
keeps printing but the printing quality cannot be guaranteed.
• Replace the toner cartridge for the best print quality when this message
appears. Using a cartridge beyond this stage can resultin printing
quality issues (see "Replacing the toner cartridge" on page 56).
Samsung does not recommend using non-genuine Samsung
toner cartridge such as refilled or remanufactured. Samsung
cannot guarantee non-genuine Samsung toner cartridge's
quality. Service or repair required as a result of using nongenuine Samsung toner cartridges will not be covered under the
machine warranty.
• If the machine stops printing, replace the toner cartridge (See
"Replacing the toner cartridge" on page 56).
Prepare new
cartridge
Small amount of toner is left in the indicated
cartridge. The estimated cartridge life of toner is
close.
Prepare a new cartridge for a replacement. You may temporarily increase
the printing quality by redistributing the toner (see "Redistributing toner"
on page 54).
Message Meaning Suggested solutions
Page 77

Understanding display messages
80
4. Troubleshooting
Tray-related messages
Message Meaning Suggested solutions
Paper Empty
in Tray 1
There is no paper in
tray 1.
Load paper in tray 1 (see
"Loading paper in the
tray/ optional tray" on
page 33).
Paper Empty
in Tray 2
There is no paper in
tray 2.
Load paper in tray 2 (see
"Loading paper in the
tray/ optional tray" on
page 33).
Paper Empty
in MP tray
There is no paper in
the multi-purpose
tray.
Load paper in the multipurpose tray (see
"Loading in multipurpose tray" on page
35).
Output bin full
Remove paper
The output tray is full. Remove papers from
the output tray, the
printer resumes
printing.
Page 78

Understanding display messages
81
4. Troubleshooting
Network-related messages
Misc. messages
Message Meaning Suggested solutions
Network
Problem
IP Conflict
The network IP
address you have set is
being used by
someone else.
Check the IP address and
reset it if necessary (see
Advanced Guide).
802.1x
Network Error
Fail to authenticate. Check the network
authentication protocol.
If the problem persists,
contact your network
administrator.
Message Meaning Suggested solutions
Door Open
Close it
The front cover or rear
cover is not securely
latched.
Close the cover until it
locks into place.
Error [error
number]
Call for service
A system error has
occurred
Reboot the power and
try the printing job
again. If the problem
persists, please call for
service.
Error [error
number]
Turn off then on
The machine unit
cannot be controlled.
Reboot the power and
try the printing job
again. If the problem
persists, please call for
service.
Message Meaning Suggested solutions
Page 79

5. Appendix
This chapter provides product specifications and information concerning
applicable regulations.
•Specifications 83
• Regulatory information 93
• Copyright 104
Page 80
83
5. Appendix
Specifications
1
General specifications
The specification values listed below are subject to change without notice. See www.samsung.com/printer for possible changes in
information.
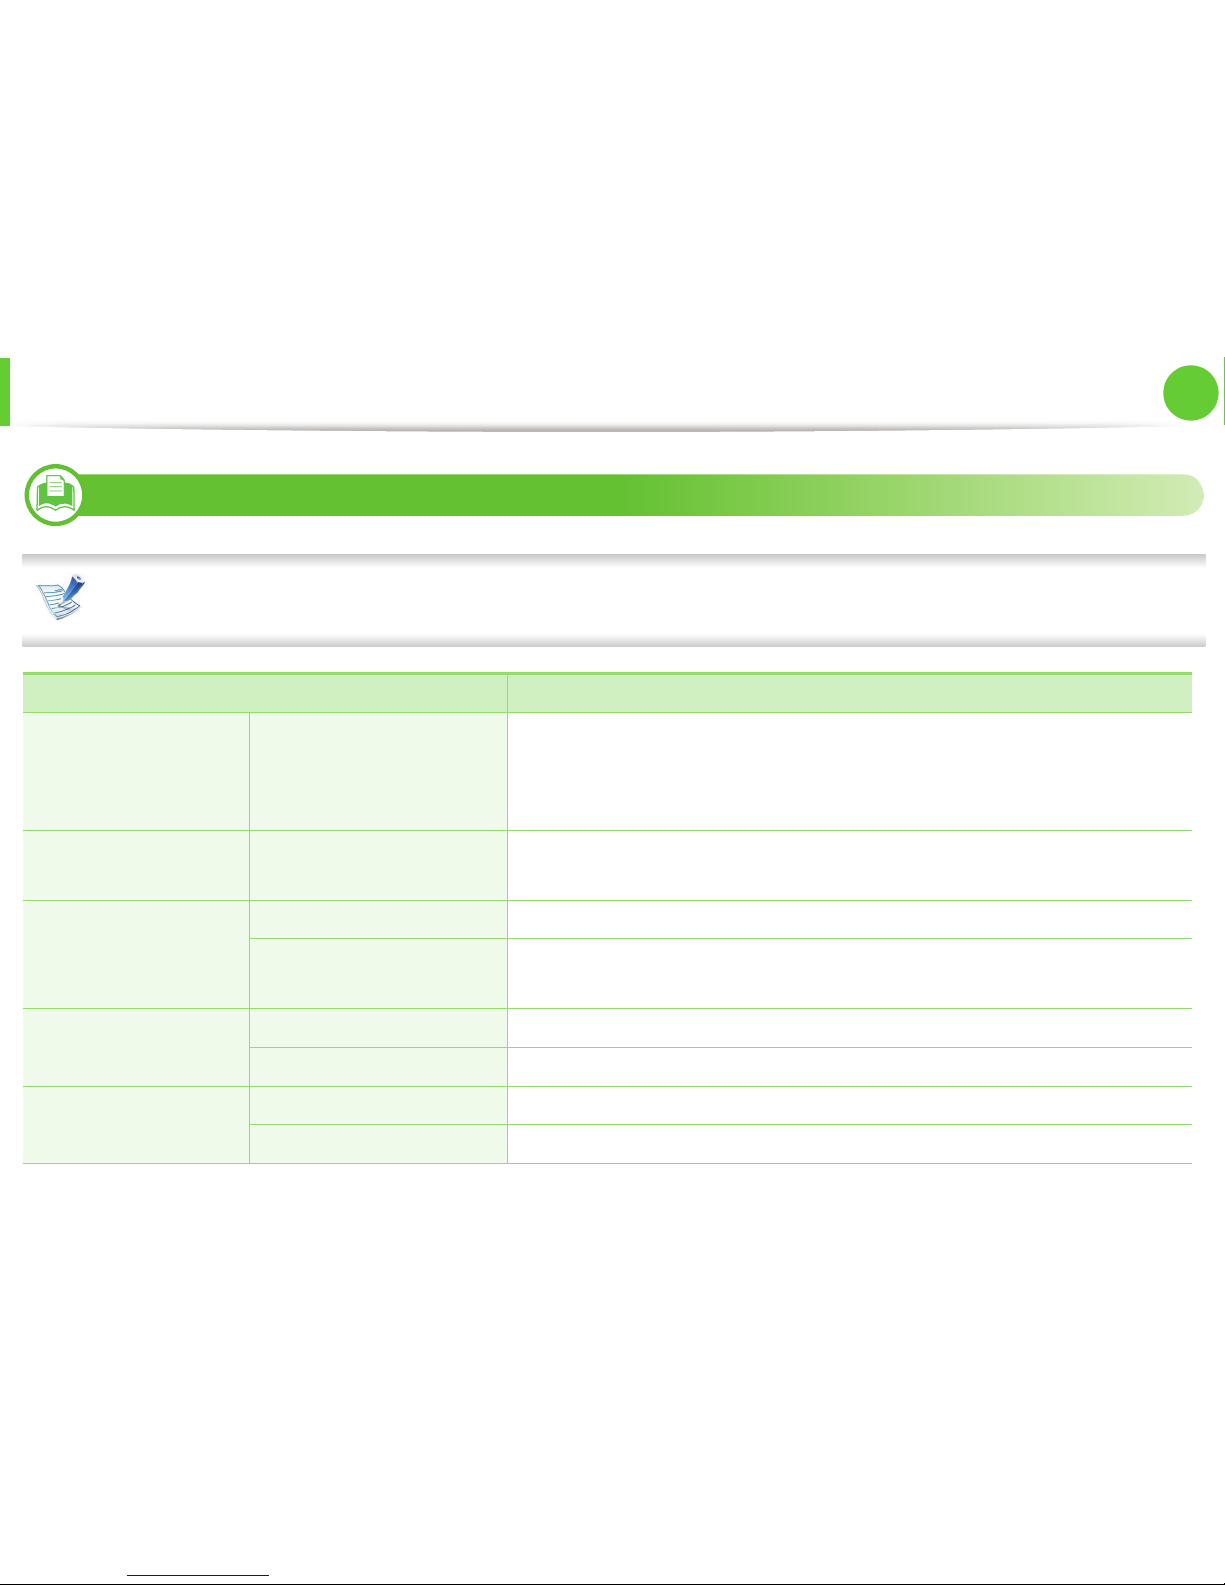
Items Description
Dimension Width x Length x Height
• ML-330x/ ML-331xD: 366 x 368 x 240.6 mm (14.40 x 14.48 x 9.47 inches) without
optional tray
• ML-331xND/ ML-371xD/ ML-371xND/ ML-371xDW: 366 x 368 x 252.9 mm
(14.40 x 14.48 x 9.96 inches) without optional tray
Weight Machine with consumables
• ML-330x/ ML-331x Series: 9.74 kg (21.47 lbs)
• ML-371x Series: 9.95 kg (21.94 lbs)
Noise Level
a
Ready mode 26 dB (A)
Print mode
• ML-330x/ ML-331x Series: 51 dB (A)
• ML-371x Series: 52 dB (A)
Temperature
Operation 10 to 32°C (50 to 90°F)
Storage (packed) -20 to 40°C (-4 to 104°F)
Humidity
Operation 20 to 80% RH
Storage (packed) 10 to 90% RH
Page 81

Specifications
84
5. Appendix
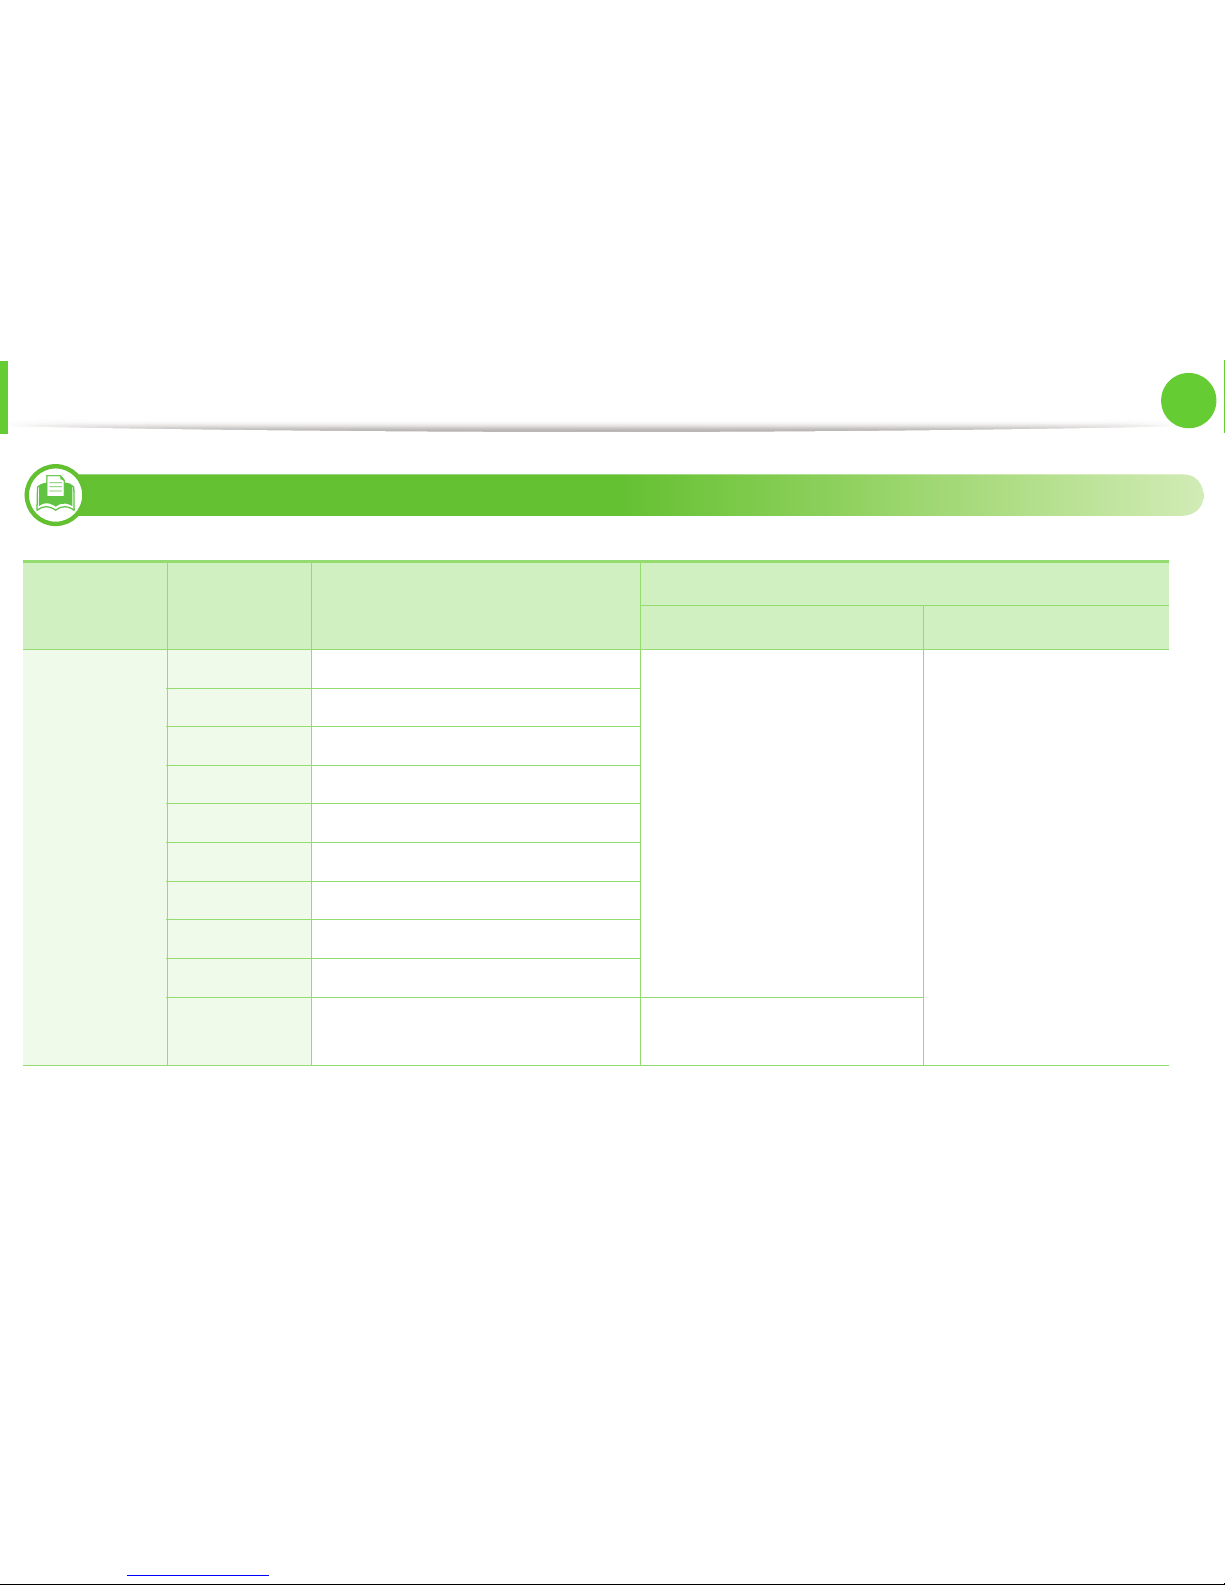
Power rating
b
110 volt models AC 110 - 127 V
220 volt models AC 220 - 240 V
Power consumption
Average operating mode Less than 550 W
Ready mode Less than 60 W
Power save mode Less than 3.5 W
Power off mode
Less than 0.4 W (0.1 W
c
)
Wireless
d
Module
U98Z058
a. Sound Pressure Level, ISO 7779. Configuration tested: basic machine installation, A4 paper, simplex printing.
b. See the rating label on the machine for the correct voltage (V), frequency (hertz) and type of current (A) for your machine.
c. For the machine that has a power switch.
d. Wireless model only (see "Features by models" on page 7).
Items Description
Page 82
Specifications
85
5. Appendix
2
Print media specifications
Type Size Dimensions
Print media weight/Capacity
a
Tray1 / Optional tray
Multi-purpose tray
b
Plain paper
Letter 216 x 279 mm (8.5 x 11 inches)
70 to 90 g/m
2
(19 to 24 lbs bond)
• 250 sheets of 80 g/m
2
(20 lbs
bond) for tray1.
• 520 sheets of 80 g/m2 (20 lbs
bond) for optional tray.
70 to 90 g/m
2
(19 to 24 lbs
bond)
• The machine does not
have a display screen: 1
sheet of 80 g/m
2
(20 lbs
bond)
• The machine has a display
screen: 50 sheets of 80 g/
m
2
(20 lb bond)
Legal 216 x 356 mm (8.5 x 14 inches)
US Folio 216 x 330 mm (8.5 x 13 inches)
A4 210 x 297 mm (8.27 x 11.69 inches)
Oficio 216 x 343 mm (8.5 x 13.5 inches)
JIS B5 182 x 257 mm (7.17 x 10.12 inches)
ISO B5 176 x 250 mm (6.93 x 9.84 inches)
Executive 184 x 267 mm (7.25 x 10.5 inches)
A5 148 x 210 mm (5.83 x 8.27 inches)
A6
105 x 148 mm (4.13 x 5.83 inches)
• 150 sheets of 75 g/m2 (20 lbs
bond)
Page 83

Specifications
86
5. Appendix
Envelope
Envelope
Monarch
98 x 191 mm (3.87 x 7.5 inches) Not available in tray1/optional
tray.
75 to 90 g/m
2
(20 to 24 lbs
bond)
Envelope No. 10105 x 241 mm (4.12 x 9.5 inches)
Envelope DL 110 x 220 mm (4.33 x 8.66 inches)
Envelope C5 162 x 229 mm (6.38 x 9.02 inches)
Envelope C6 114 x 162 mm (4.49 x 6.38 inches)
Thick paper
Refer to the
Plain paper
section
Refer to the Plain paper section
91 to 105 g/m
2
(24 to 28 lbs
bond)
91 to 105 g/m2 (24 to 28 lbs
bond)
Thicker paper
Refer to the
Plain paper
section
Refer to the Plain paper section Not available in tray1/optional
tray.
164 to 220 g/m
2
(44 to 58 lbs
bond)
Thin paper
Refer to the
Plain paper
section
Refer to the Plain paper section
60 to 70 g/m
2
(16 to 19 lbs bond) 60 to 70 g/m2 (16 to 19 lbs
bond)
Transparency Letter, A4
Refer to the Plain paper section Not available in tray1/optional
tray.
138 to 146 g/m
2
(36.81 to
38.91 lbs bond)
Type Size Dimensions
Print media weight/Capacity
a
Tray1 / Optional tray
Multi-purpose tray
b
Page 84

Specifications
87
5. Appendix
Labels
c
Letter, Legal,
US Folio, A4,
JIS B5, ISO B5,
Executive, A5
Refer to the Plain paper section Not available in tray1/optional
tray.
120 to 150 g/m
2
(32 to 40 lbs
bond)
Card stock
Letter, Legal,
US Folio, A4,
JIS B5, ISO B5,
Executive, A5
Refer to the Plain paper section
121 to 163 g/m
2
( 32 to 43 lbs
bond)
121 to 163 g/m2 (32 to 43 lbs
bond)
Bond paper
Refer to the
Plain paper
section
Refer to the Plain paper section
106 to 120 g/m
2
(28 to 32 lbs
bond)
106 to 120 g/m2 (28 to 32 lbs
bond)
Minimum size (custom)
• Multi-purpose tray: 76 x 127 mm (3
x 5 inches)
• Tray 1: 105 x 148.5 mm (4.13 x 5.85
inches)
60 to 163 g/m
2
(16 to 43 lbs bond) d,
e
Not available in optional tray.
Maximum size (custom) 216 x 356 mm (8.5 x 14 inches)
a. Maximum capacity may differ depending on media weight, thickness, and environmental conditions.
b. The machine does not have a display screen: 1 sheet for multi-purpose tray.
c. The smoothness of the labels used in this machine is 100 to 250 (sheffield). This means the numeric level of smoothness.
d. The paper types available in multi-purpose tray: Plan, Thick, Thicker, Thin, Cotton, Colored, Pre-printed, Recycled, Envelope, Transparency, Labels, Cardstock,
Bond, Archive
e. The paper types available in tray 1: Plan, Thick, Thin, Recycled, Cardstock, Bond, Archive
Type Size Dimensions
Print media weight/Capacity
a
Tray1 / Optional tray
Multi-purpose tray
b
Page 85
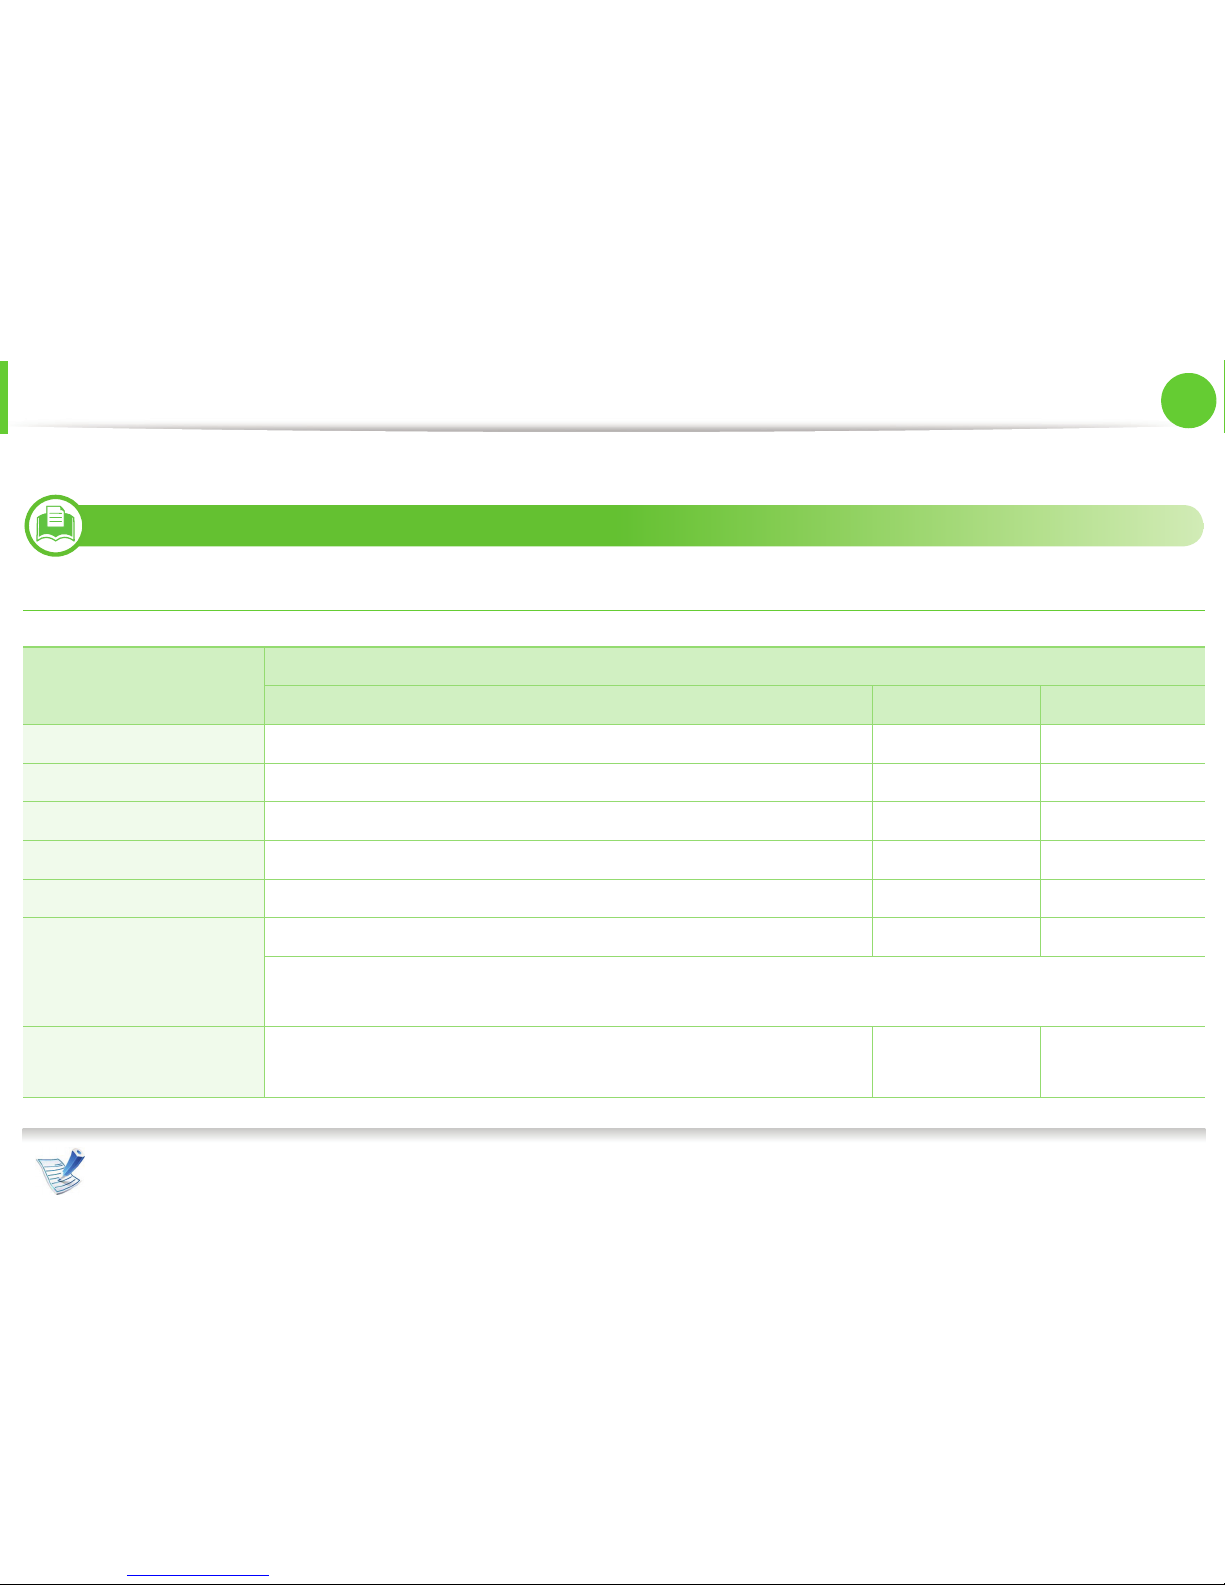
Specifications
88
5. Appendix
3
System requirements
Microsoft® Windows®
• Internet Explorer 6.0 or higher is the minimum requirement for all Windows operating systems.
• Users who have administrator rights can install the software.
Operating system
Requirement (recommended)
CPU RAM free HDD space
Windows® 2000 Intel® Pentium® II 400 MHz (Pentium III 933 MHz) 64 MB (128 MB) 600 MB
Windows® XP Intel® Pentium® III 933 MHz (Pentium IV 1 GHz) 128 MB (256 MB) 1.5 GB
Windows Server® 2003 Intel® Pentium® III 933 MHz (Pentium IV 1 GHz) 128 MB (512 MB) 1.25 GB to 2 GB
Windows Server® 2008 Intel® Pentium® IV 1 GHz (Pentium IV 2 GHz) 512 MB (2 GB) 10 GB
Windows Vista® Intel® Pentium® IV 3 GHz 512 MB (1 GB) 15 GB
Windows® 7
Intel® Pentium® IV 1 GHz 32-bit or 64-bit processor or higher 1 GB (2 GB) 16 GB
• Support for DirectX® 9 graphics with 128 MB memory (to enable the Aero theme).
•DVD-R/W Drive
Windows Server® 2008 R2 Intel® Pentium® IV 1 GHz (x86) or 1.4 GHz (x64) processors (2 GHz or faster) 512 MB (2 GB) 10 GB
Page 86

Specifications
89
5. Appendix
• Windows Terminal Services is compatible with your machine.
• For Windows 2000, Services Pack 4 or higher is required.
Macintosh
Operating system
Requirements (Recommended)
CPU RAM Free HDD space
Mac OS X 10.3 ~ 10.4
• Intel® processors
• PowerPC G4/ G5
• 128 MB for a powerPC based
Mac (512 MB)
• 512 MB for an Intel-based Mac
(1 GB)
1 GB
Mac OS X 10.5
• Intel® processors
• 867 MHz or faster Power
PC G4/ G5
512 MB (1 GB) 1 GB
Mac OS X 10.6 • Intel® processors 1 GB (2 GB) 1 GB
Page 87

Specifications
90
5. Appendix
Linux
Unix
Items Requirements
Operating system
Fedora 4 ~ 12 (32/ 64 bit)
OpenSuSE® 10.2, 10.3, 11.0, 11.1, 11.2 (32/64 bit)
SuSE 10.0, 10.1 (32 bit)
Ubuntu 5.04, 5.10, 6.04, 6.10, 7.04, 7.10, 8.04, 8.10, 9.04, 9.10 (32/64 bit)
Mandriva 2005, 2006, 2007, 2008, 2009, 2009.1 (32/64 bit)
Debian 4.0, 5.0 (32/64 bit)
Redhat® Enterprise Linux WS 4, 5 (32/64 bit)
SuSE Linux Enterprise Desktop 10, 11 (32/64 bit)
CPU Pentium IV 2.4GHz (Intel Core™2)
RAM 512 MB (1 GB)
Free HDD space 1 GB (2 GB)
Items Requirements
Operating system
Sun Solaris 9, 10 (x86, SPARC)
HP-UX 11.0, 11i v1, 11i v2, 11i v3 (PA-RISC, Itanium)
IBM AIX 5.1, 5.2, 5.3, 5.4
Page 88

Specifications
91
5. Appendix
4
Network environment
Network and wireless models only (see "Features by models" on page 7)
You need to set up the network protocols on the machine to use it as your network machine. The following table shows the network
environments supported by the machine.
Free HDD space Up to 100 MB
Items Specifications
Network interface
• Ethernet 10/100/1000 Base-TX
• 802.11b/g/n Wireless LAN
Network operating system
• Windows 2000/Server 2003 /Server 2008/XP/Vista/7/Server 2008 R2
•Various Linux OS
• Mac OS X 10.3 ~ 10.6
•Unix
Items Requirements
Page 89

Specifications
92
5. Appendix
Network protocols
•TCP/IPv4
• DHCP, BOOTP
• DNS, WINS, Bonjour, SLP, UPnP
• Standard TCP/IP Printing (RAW), LPR, IPP, WSD
• SNMPv 1/2/3, HTTP (S), IPSec
• TCP/IPv6 (DHCP, DNS, RAW, LPR, SNMPv 1/2/3, HTTP (S), IPSec)
Wireless security
• Authentication: Open System, Shared Key, WPA Personal, WPA2 Personal (PSK), WPA
Enterprise, WPA2 Enterprise
•Encryption: WEP64, WEP128, TKIP, AES
Items Specifications
Page 90
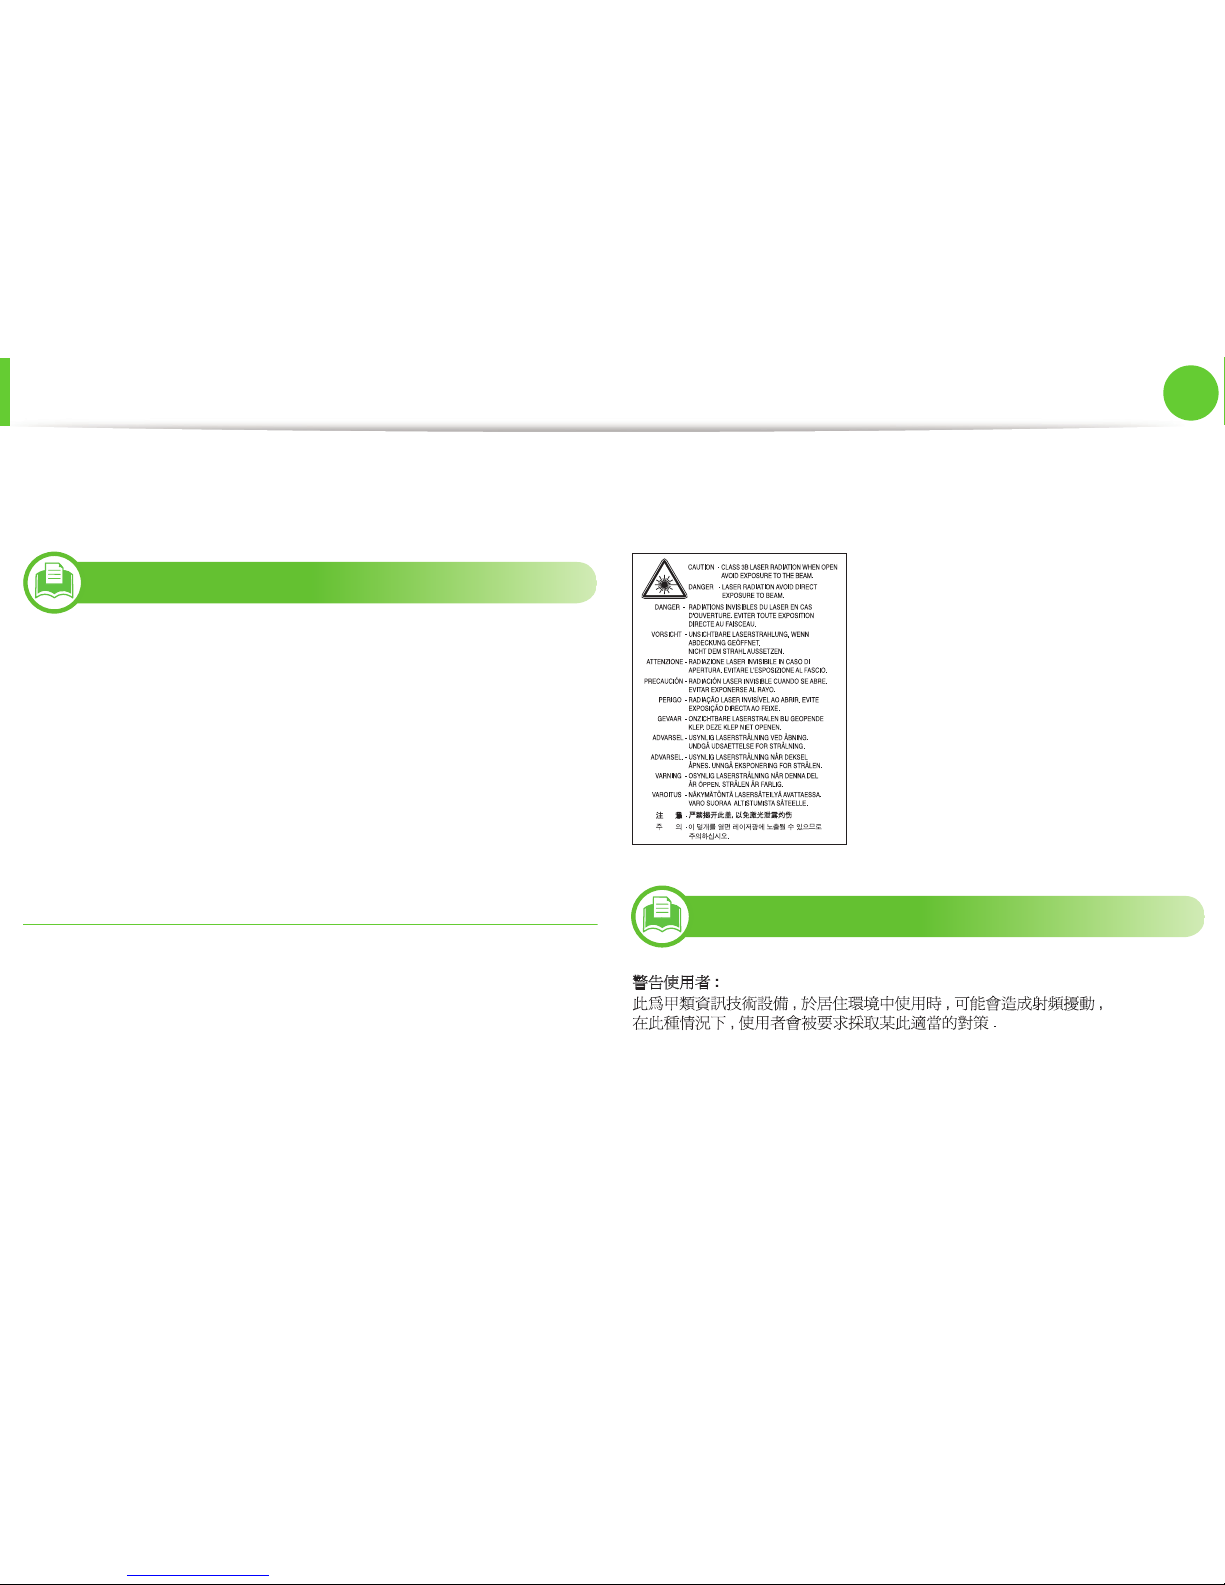
93
5. Appendix
Regulatory information
This machine is designed for a normal work environment and
certified with several regulatory statements.
5
Laser safety statement
The printer is certified in the U.S. to conform to the requirements of
DHHS 21 CFR, chapter 1 Subchapter J for Class I(1) laser products,
and elsewhere is certified as a Class I laser product conforming to the
requirements of IEC 60825-1 : 2007.
Class I laser products are not considered to be hazardous. The laser
system and printer are designed so there is never any human access
to laser radiation above a Class I level during normal operation, user
maintenance or prescribed service condition.
Warning
Never operate or service the printer with the protective cover
removed from laser/scanner assembly. The reflected beam,
although invisible, can damage your eyes.
When using this product, these basic safety precautions should
always be followed to reduce risk of fire, electric shock, and injury to
persons:
6
Taiwan only
Page 91
Regulatory information
94
5. Appendix
7
Ozone safety
8
Power saver
9
Recycling
10
China only
This product's ozone emission rate is under 0.1 ppm.
Because ozone is heavier than air, keep the product in
a place with good ventilation.
This printer contains advanced energy conservation
technology that reduces power consumption when it is
not in active use.
When the printer does not receive data for an extended
period of time, power consumption is automatically
lowered.
ENERGY STAR and the ENERGY STAR mark are
registered U.S. marks.
For more information on the ENERGY STAR program
see http://www.energystar.gov
Recycle or dispose of the packaging material for this
product in an environmentally responsible manner.
Page 92
Regulatory information
95
5. Appendix
11
Correct disposal of this product (Waste
electrical & electronic equipment)
(Applicable in the european union and other
european countries with separate collection
systems)
The United States of America only
Dispose unwanted electronics through an approved recycler. To find
the nearest recycling location, go to our
website:www.samsung.com/recyclingdirect Or call, (877) 278 - 0799
12
Radio frequency emissions
FCC information to the user
This device complies with Part 15 of the FCC Rules. Operation is
subject to the following two conditions:
• This device may not cause harmful interference, and
• This device must accept any interference received, including
interference that may cause undesired operation.
This marking on the product, accessories or literature
indicates that the product and its electronic accessories (e.g.
charger, headset, USB cable) should not be disposed of with
other household waste at the end of their working life. To
prevent possible harm to the environment or human health
from uncontrolled waste disposal, please separate these
items from other types of waste and recycle them responsibly
to promote the sustainable reuse of material resources.
Household users should contact either the retailer where they
purchased this product, or their local government office, for
details of where and how they can take these items for
environmentally safe recycling.
Business users should contact their supplier and check the
terms and conditions of the purchase contract. This product
and its electronic accessories should not be mixed with other
commercial wastes for disposal.
Page 93
Regulatory information
96
5. Appendix
This equipment has been tested and found to comply with the limits
for a Class B digital device, pursuant to Part 15 of the FCC Rules.
These limits are designed to provide reasonable protection against
harmful interference in a residential installation. This equipment
generates, uses and can radiate radio frequency energy and, if not
installed and used in accordance with the instructions, may cause
harmful interference to radio communications. However, there is no
guarantee that interference will not occur in a particular installation.
If this equipment does cause harmful interference to radio or
television reception, which can be determined by turning the
equipment off and on, the user is encouraged to try to correct the
interference by one or more of the following measures:
• Reorient or relocate the receiving antenna.
• Increase the separation between the equipment and receiver.
• Connect the equipment into an outlet on a circuit different from
that to which the receiver is connected.
• Consult the dealer or experienced radio TV technician for help.
Change or modifications not expressly approved by the
manufacturer responsible for compliance could void the
user's authority to operate the equipment.
Canadian radio interference regulations
This digital apparatus does not exceed the Class B limits for radio
noise emissions from digital apparatus as set out in the interferencecausing equipment standard entitled “Digital Apparatus”, ICES-003
of the Industry and Science Canada.
Cet appareil numérique respecte les limites de bruits
radioélectriques applicables aux appareils numériques de Classe B
prescrites dans la norme sur le matériel brouilleur: “Appareils
Numériques”, ICES-003 édictée par l’Industrie et Sciences Canada.
13
United states of america
Federal communications commission (FCC)
► Intentional emitter per FCC Part 15
Low power, Radio LAN type devices (radio frequency (RF) wireless
communication devices), operating in the 2.4 GHz/5 GHz Band, may
be present (embedded) in your printer system. This section is only
applicable if these devices are present. Refer to the system label to
verify the presence of wireless devices.
Wireless devices that may be in your system are only qualified for use
in the United States of America if an FCC ID number is on the system
label.
Page 94
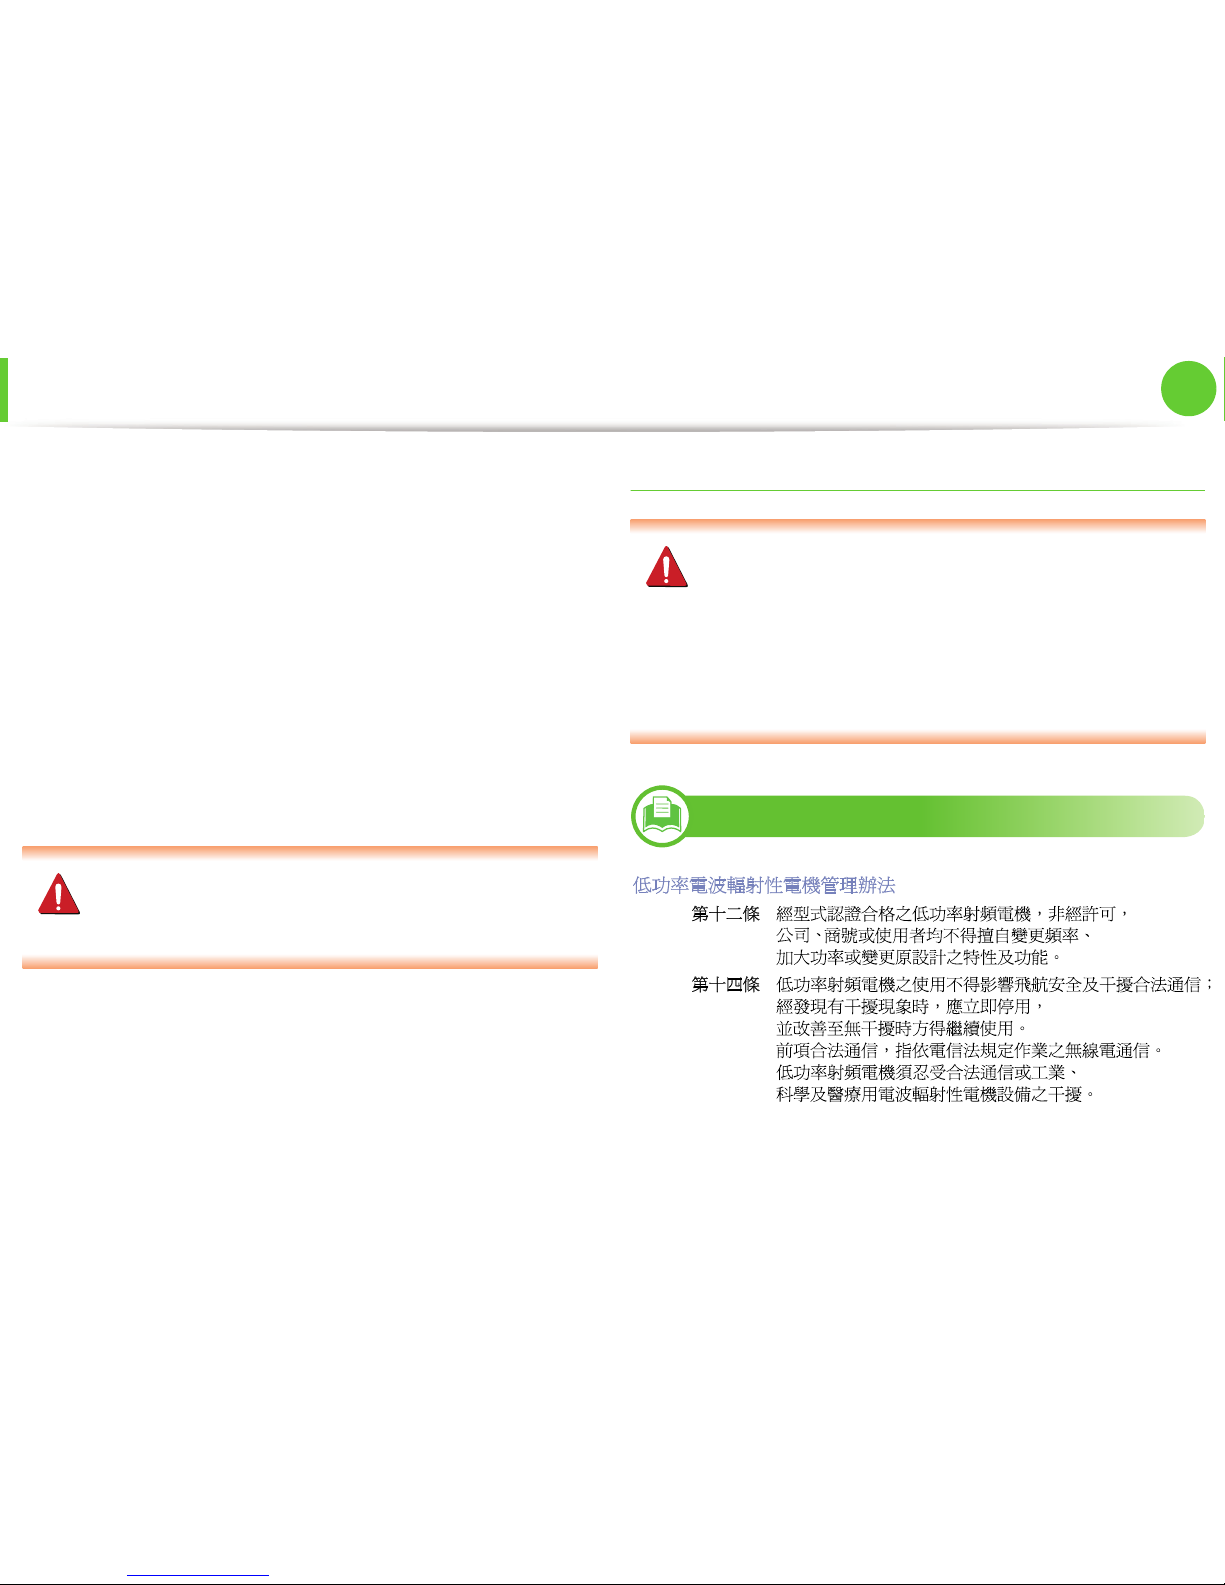
Regulatory information
97
5. Appendix
The FCC has set a general guideline of 20 cm (8 inches) separation
between the device and the body, for use of a wireless device near
the body (this does not include extremities). This device should be
used more than 20 cm (8 inches) from the body when wireless
devices are on. The power output of the wireless device (or devices),
which may be embedded in your printer, is well below the RF
exposure limits as set by the FCC.
This transmitter must not be collocated or operation in conjunction
with any other antenna or transmitter.
Operation of this device is subject to the following two conditions:
(1) This device may not cause harmful interference, and (2) this
device must accept any interference received, including interference
that may cause undesired operation of the device.
Wireless devices are not user serviceable. Do not modify
them in any way. Modification to a wireless device will void
the authorization to use it. Contact manufacturer for service.
FCC statement for wireless LAN use:
While installing and operating this transmitter and antenna
combination the radio frequency exposure limit of 1m W/
cm2 may be exceeded at distances close to the antenna
installed. Therefore, the user must maintain a minimum
distance of 20cm from the antenna at all times. This device
cannot be colocated with another transmitter and
transmitting antenna.
14
Taiwan only
Page 95
Regulatory information
98
5. Appendix
15
Russia only
16
Germany only
17
Turkey only
18
Replacing the fitted plug (for UK only)
Important
The mains lead for this machine is fitted with a standard (BS 1363) 13
amp plug and has a 13 amp fuse. When you change or examine the
fuse, you must re-fit the correct 13 amp fuse. You then need to
replace the fuse cover. If you have lost the fuse cover, do not use the
plug until you have another fuse cover.
Contact the people from you purchased the machine.
The 13 amp plug is the most widely used type in the UK and should
be suitable. However, some buildings (mainly old ones) do not have
normal 13 amp plug sockets. You need to buy a suitable plug
adaptor. Do not remove the moulded plug.
If you cut off the moulded plug, get rid of it straight away.
You cannot rewire the plug and you may receive an electric
shock if you plug it into a socket.
Page 96
Regulatory information
99
5. Appendix
Important warning:
If the wires in the mains lead do not match the colors marked in your
plug, do the following:
You must connect the green and yellow wire to the pin marked by
the letter “E” or by the safety ‘Earth symbol’ or colored green and
yellow or green.
You must connect the blue wire to the pin which is marked with the
letter “N” or colored black.
You must connect the brown wire to the pin which is marked with
the letter “L” or colored red.
You must have a 13 amp fuse in the plug, adaptor, or at the
distribution board.
19
Declaration of conformity (European
countries)
Approvals and Certifications
January 1, 1995: Council Directive 2006/95/EC Approximation of
the laws of the member states related to low voltage equipment.
January 1, 1996: Council Directive 2004/108/EC, approximation of
the laws of the Member States related to electromagnetic
compatibility.
You must earth this machine.
The wires in the mains lead have the following color code:
• Green and Yellow: Earth
• Blue: Neutral
• Brown: Live
Hereby, Samsung Electronics, declares that this [ML371xDW] is in compliance with the essential requirements
and other relevant provisions of R&TTE Directive 1999/5/EC.
Hereby, Samsung Electronics, declares that this [ML-330x
Series, ML-331x Series, ML-371x Series] is in compliance with
the essential requirements and other relevant provisions of
Low Voltage Directive (2006/95/EC), EMC Directive (2004/
108/EC).
The declaration of conformity may be consulted at
www.samsung.com/printer, go to Support > Download
center and enter your printer (MFP) name to browse the
EuDoC.
Page 97
Regulatory information
100
5. Appendix
March 9, 1999: Council Directive 1999/5/EC on radio equipment
and telecommunications terminal equipment and the mutual
recognition of their conformity. A full declaration, defining the
relevant Directives and referenced standards can be obtained from
your Samsung Electronics Co., Ltd. representative.
EC Certification
Certification to 1999/5/EC Radio Equipment & Telecommunications
Terminal Equipment Directive (FAX)
This Samsung product has been self-certified by Samsung for panEuropean single terminal connection to the analogue public
switched telephone network (PSTN) in accordance with Directive
1999/5/EC. The product has been designed to work with the national
PSTNs and compatible PBXs of the European countries:
In the event of problems, you should contact the Euro QA Lab of
Samsung Electronics Co., Ltd. in the first instance.
The product has been tested against TBR21. To assist in the use and
application of terminal equipment which complies with this
standard, the European Telecommunication Standards Institute
(ETSI) has issued an advisory document (EG 201 121) which contains
notes and additional requirements to ensure network compatibility
of TBR21 terminals. The product has been designed against, and is
fully compliant with, all of the relevant advisory notes contained in
this document.
European radio approval information (for products
fitted with EU-approved radio devices)
Low power, Radio LAN type devices (radio frequency (RF) wireless
communication devices), operating in the 2.4 GHz/5 GHz band, may
be present (embedded) in your printer system which is intended for
home or office use. Th is section is only appl icable i f these devices a re
present. Refer to the system label to verify the presence of wireless
devices.
The power output of the wireless device or devices that may be
embedded in you printer is well below the RF exposure limits as set
by the European Commission through the R&TTE directive.
► European states qualified under wireless approvals:
EU countries
► European states with restrictions on use:
EU
In France, the frequency range is restricted to 2454-2483.5 MHz for
devices above 10 mW transmitting power such as wireless
Wireless devices that may be in your system are
only qualified for use in the European Union or
associated areas if a CE mark with a Notified
Body Registration Number and the Alert
Symbol is on the system label.
Page 98
Regulatory information
101
5. Appendix
EEA/EFTA countries
No limitations at this time
20
Regulatory compliance statements
Wireless guidance
Low power, Radio LAN type devices (radio frequency (RF) wireless
communication devices), operating in the 2.4 GHz/5 GHz Band, may
be present (embedded) in your printer system. The following section
is a general overview of considerations while operating a wireless
device.
Additional limitations, cautions, and concerns for specific countries
are listed in the specific country sections (or country group sections).
The wireless devices in your system are only qualified for use in the
countries identified by the Radio Approval Marks on the system
rating label. If the country you will be using the wireless device in, is
not listed, contact your local Radio Approval agency for
requirements. Wireless devices are closely regulated and use may
not be allowed.
The power output of the wireless device or devices that may be
embedded in your printer is well below the RF exposure limits as
known at this time. Because the wireless devices (which may be
embedded into your printer) emit less energy than is allowed in
radio frequency safety standards and recommendations,
manufacturer believes these devices are safe for use. Regardless of
the power levels, care should be taken to minimize human contact
during normal operation.
As a general guideline, a separation of 20 cm (8 inches) between the
wireless device and the body, for use of a wireless device near the
body (this does not include extremities) is typical. This device should
be used more than 20 cm (8 inches) from the body when wireless
devices are on and transmitting.
This transmitter must not be collocated or operation in conjunction
with any other antenna or transmitter.
Some circumstances require restrictions on wireless devices.
Examples of common restrictions are listed below:
Radio frequency wireless communication can interfere with
equipment on commercial aircraft. Current aviation
regulations require wireless devices to be turned off while
traveling in an airplane. IEEE 802.11 (also known as wireless
Ethernet) and Bluetooth communication devices are
examples of devices that provide wireless communication.
Page 99
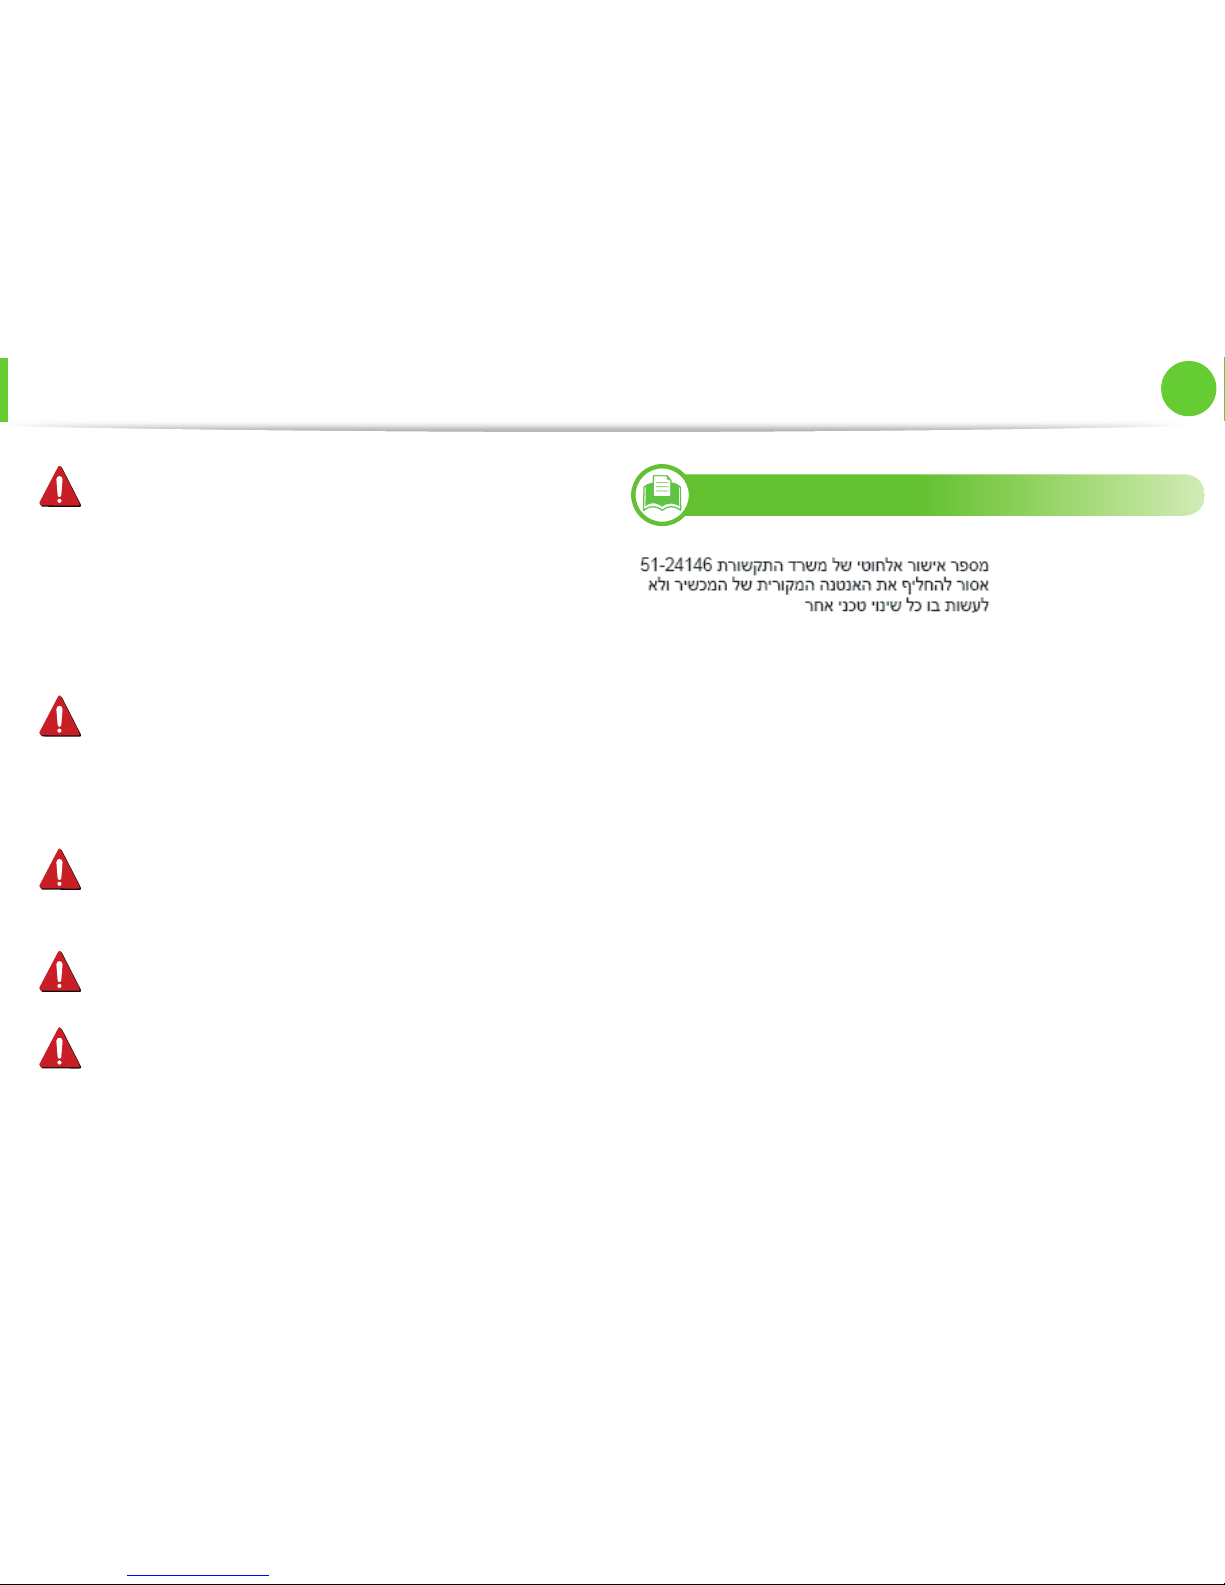
Regulatory information
102
5. Appendix
21
Israel only
In environments where the risk of interference to other
devices or services is harmful or perceived as harmful, the
option to use a wireless device may be restricted or
eliminated. Airports, Hospitals, and Oxygen or flammable gas
laden atmospheres are limited examples where use of
wireless devices may be restricted or eliminated. When in
environments where you are uncertain of the sanction to use
wireless devices, ask the applicable authority for
authorization prior to use or turning on the wireless device.
Every country has different restrictions on the use of wireless
devices. Since your system is equipped with a wireless device,
when traveling between countries with your system, check
with the local Radio Approval authorities prior to any move or
trip for any restrictions on the use of a wireless device in the
destination country.
If your system came equipped with an internal embedded
wireless device, do not operate the wireless device unless all
covers and shields are in place and the system is fully
assembled.
Wireless devices are not user serviceable. Do not modify them
in any way. Modification to a wireless device will void the
authorization to use it. Contact manufacturer for service.
Only use drivers approved for the country in which the device
will be used. See the manufacturer System Restoration Kit, or
contact manufacturer Technical Support for additional
information.
Page 100
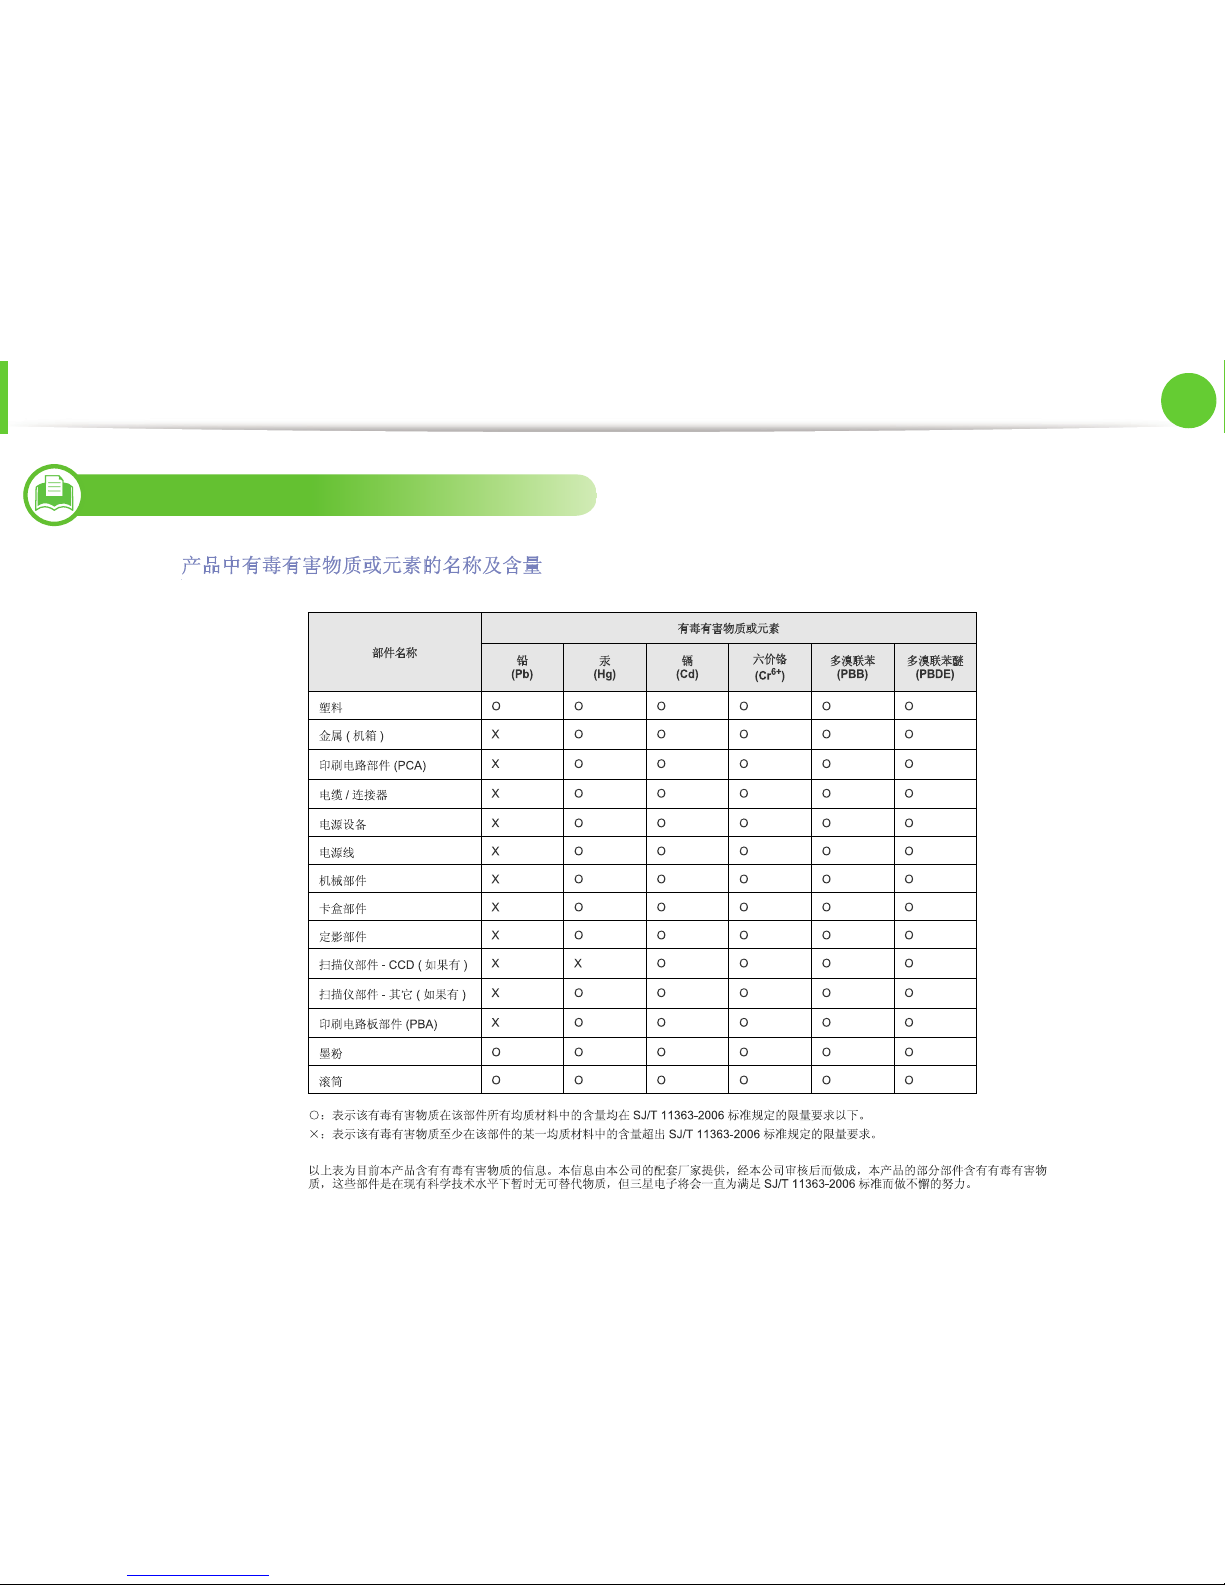
Regulatory information
103
5. Appendix
22
China only
 Loading...