

Page 1
User’s Guide
Monochrome
Laser
Printer
Page 2

© 2007 Samsung Electronics Co., Ltd. All rights reserved.
This user’s guide is provided for information purposes only. All information included herein is subject to change without notice. Samsung Electronics is not
responsible for any changes, direct or indirect damages, arising from or related to use of this user’s guide.
• ML-1630 is model names of Samsung Electronics Co., Ltd.
• Samsung and Samsung logo are trademarks of Samsung Electronics Co., Ltd.
• Microsoft, Windows, Windows XP and Windows Vista are either registered trademarks or trademarks of Microsoft Corporation.
• UFST® and MicroType™ are registered trademarks of Monotype Imaging Inc.
• TrueType, LaserWriter and Macintosh are trademarks of Apple Computer, Inc.
• All other brand or product names are trademarks of their respective companies or organizations.
Page 3
CONTACT SAMSUNG WORLD WIDE
If you have any comments or questions regarding Samsung products, contact the
Samsung customer care center.
Country Customer Care Center Web Site
ARGENTINE 0800-333-3733 www.samsung.com/ar
AUSTRALIA 1300 362 603 www.samsung.com/au
AUSTRIA
0800-SAMSUNG (726-7864)
www.samsung.com/at
BELGIUM 0032 (0)2 201 24 18 www.samsung.com/be
BRAZIL 0800-124-421
4004-0000
www.samsung.com/br
CANADA 1-800-SAMSUNG (7267864) www.samsung.com/ca
CHILE 800-726-7864 (SAMSUNG) www.samsung.com/cl
CHINA 800-810-5858
010- 6475 1880
www.samsung.com.cn
COLOMBIA 01-8000-112-112 www.samsung.com/co
COSTA RICA 0-800-507-7267 www.samsung.com/latin
CZECH
REPUBLIC
844 000 844 www.samsung.com/cz
Distributor pro Českou republiku : Samsung Zrt., česka
organizační složka Vyskočilova 4, 14000 Praha 4
DENMARK 70 70 19 70 www.samsung.com/dk
ECUADOR 1-800-10-7267 www.samsung.com/latin
EL SALVADOR 800-6225 www.samsung.com/latin
ESTONIA 800-7267 www.samsung.ee
KAZAHSTAN 8-10-800-500-55-500 www.samsung.kz
KYRGYZSTAN
00-800-500-55-500
FINLAND 030-6227 515 www.samsung.com/fi
FRANCE 3260 SAMSUNG or
08 25 08 65 65 (€ 0,15/min)
www.samsung.com/fr
GERMANY 01805 - 121213
(€ 0,14/min)
www.samsung.de
GUATEMALA 1-800-299-0013 www.samsung.com/latin
HONG KONG 3698 4698 www.samsung.com/hk
HUNGARY 06-80-SAMSUNG (7267864) www.samsung.com/hu
INDIA 3030 8282
1800 110011
www.samsung.com/in/
INDONESIA 0800-112-8888 www.samsung.com/id
ITALIA 800-SAMSUNG(7267864)
800-048989
www.samsung.com/it
JAMAICA 1-800-234-7267 www.samsung.com/latin
JAPAN 0120-327-527 www.samsung.com/jp
LATVIA 800-7267 www.samsung.com/lv/
index.htm
LITHUANIA 8-800-77777 www.samsung.com/lt
LUXEMBURG 0035 (0)2 261 03 710 www.samsung.com/be
MALAYSIA 1800-88-9999 www.samsung.com/my
MEXICO 01-800-SAMSUNG (7267864) www.samsung.com/mx
NETHERLANDS
0900 20 200 88 (€ 0,10/min) www.samsung.com/nl
NEW ZEALAND
0800SAMSUNG(726-7864) www.samsung.com/nz
NORWAY 815-56 480 www.samsung.com/no
PANAMA 800-7267 www.samsung.com/latin
PHILIPPINES 1800-10-SAMSUNG
(7267864)
www.samsung.com/ph
POLAND 0 801 801 881
022-607-93-33
www.samsung.com/pl
PORTUGAL 80 8 200 128 www.samsung.com/pt
PUERTO RICO 1-800-682-3180 www.samsung.com/latin
REP.
DOMINICA
1-800-751-2676 www.samsung.com/latin
REPUBLIC OF
IRELAND
0818 717 100 www.samsung.com/uk
RUSSIA 8-800-555-55-55 www.samsung.ru
SINGAPORE 1800-SAMSUNG (7267864) www.samsung.com/sg
SLOVAKIA 0800-SAMSUNG (726786) www.samsung.com/sk
SOUTH
AFRICA
0860 726 7864 (SAMSUNG) www.samsung.com/za
SPAIN 902 10 11 30 www.samsung.com/es
SWEDEN 0771-400 200 www.samsung.com/se
SWITZERLAND 0800-7267864 www.samsung.com/ch/
TAIWAN 0800-329-999 www.samsung.com/tw
THAILAND 1800-29-3232
02-689-3232
www.samsung.com/th
TRINIDAD &
TOBAGO
1-800-7267-864 www.samsung.com/latin
TURKEY 444 77 11 www.samsung.com.tr
U.A.E 800-SAMSUNG (7267864) www.samsung.com/mea
U.K 0870 SAMSUNG (7267864) www.samsung.com/uk
U.S.A. 1-800-SAMSUNG (7267864) www.samsung.com
UKRAINE 8-800-502-0000 www.samsung.ua
UZBEKISTAN 8-800-120-0400 www.samsung.com.uz
VENEZUELA 0-800-100-5303 www.samsung.com/latin
VIETNAM 1 800 588 889 www.samsung.com/vn
Country Customer Care Center Web Site
Page 4

CONTENTS
About this user’s guide .................................................................................................................................................i
Finding more information .............................................................................................................................................i
Safety and Regulatory Information ..............................................................................................................................ii
1. Introduction
Special features ...................................................................................................................................................... 1.1
Machine overview ................................................................................................................................................... 1.2
Front view ........................................................................................................................................................... 1.2
Rear view ............................................................................................................................................................ 1.3
Control panel overview ........................................................................................................................................... 1.4
2. Software overview
Supplied software .................................................................................................................................................... 2.1
Printer driver features .............................................................................................................................................. 2.2
System requirements .............................................................................................................................................. 2.2
3. Getting Started
Setting up the hardware .......................................................................................................................................... 3.1
Altitude adjustment .................................................................................................................................................. 3.2
4. Selecting and loading print media
Selecting print media ............................................................................................................................................... 4.1
Guidelines for selecting and storing print media ................................................................................................. 4.2
Specifications on print media .............................................................................................................................. 4.3
Guidelines for special print media ....................................................................................................................... 4.4
Loading paper in the tray ........................................................................................................................................ 4.5
Changing the paper size in the tray .................................................................................................................... 4.5
Setting the paper size and type ............................................................................................................................... 4.6
5. Basic printing
Printing a document ................................................................................................................................................ 5.1
Canceling a print job ............................................................................................................................................... 5.1
6. Maintenance
Printing a machine report ........................................................................................................................................ 6.1
Cleaning your machine ........................................................................................................................................... 6.1
Cleaning the outside ........................................................................................................................................... 6.1
Cleaning the inside ............................................................................................................................................. 6.1
Maintaining the cartridge ......................................................................................................................................... 6.3
Toner cartridge storage ...................................................................................................................................... 6.3
Expected cartridge life ........................................................................................................................................ 6.3
Redistributing toner ................................................................................................................................................. 6.3
Replacing the toner cartridge .................................................................................................................................. 6.5
Page 5

Maintenance Parts .................................................................................................................................................. 6.6
7. Troubleshooting
Tips for avoiding paper jams ................................................................................................................................... 7.1
Clearing paper jams ................................................................................................................................................ 7.1
In the paper feed area and rear the machine ..................................................................................................... 7.1
Rear and inside the machine .............................................................................................................................. 7.3
In the exit area .................................................................................................................................................... 7.5
Understanding display messages ........................................................................................................................... 7.7
Solving other problems ........................................................................................................................................... 7.8
Paper feeding problems ...................................................................................................................................... 7.8
Printing problems ................................................................................................................................................ 7.8
Printing quality problems .................................................................................................................................. 7.10
Common Windows problems ............................................................................................................................ 7.12
Common Linux problems .................................................................................................................................. 7.13
Common Macintosh problems .......................................................................................................................... 7.13
8. Ordering supplies and accessories
Supplies .................................................................................................................................................................. 8.1
How to purchase ..................................................................................................................................................... 8.1
9. Specifications
General specifications ............................................................................................................................................. 9.1
Printer specifications ............................................................................................................................................... 9.1
10. Glossary
Index
Page 6
i
About this user’s guide
This user’s guide provides information about basic understanding of the
machine as well as detailed explanation on each step during the actual
usage. Both novice users and professional users can refer to this guide for
installing and using the machine.
This explanation is mainly based on the Microsoft Windows operating
system.
Some terms in this guide are used interchangeably, as below.
• Document is synonymous with original.
• Paper is synonymous with media, or print media.
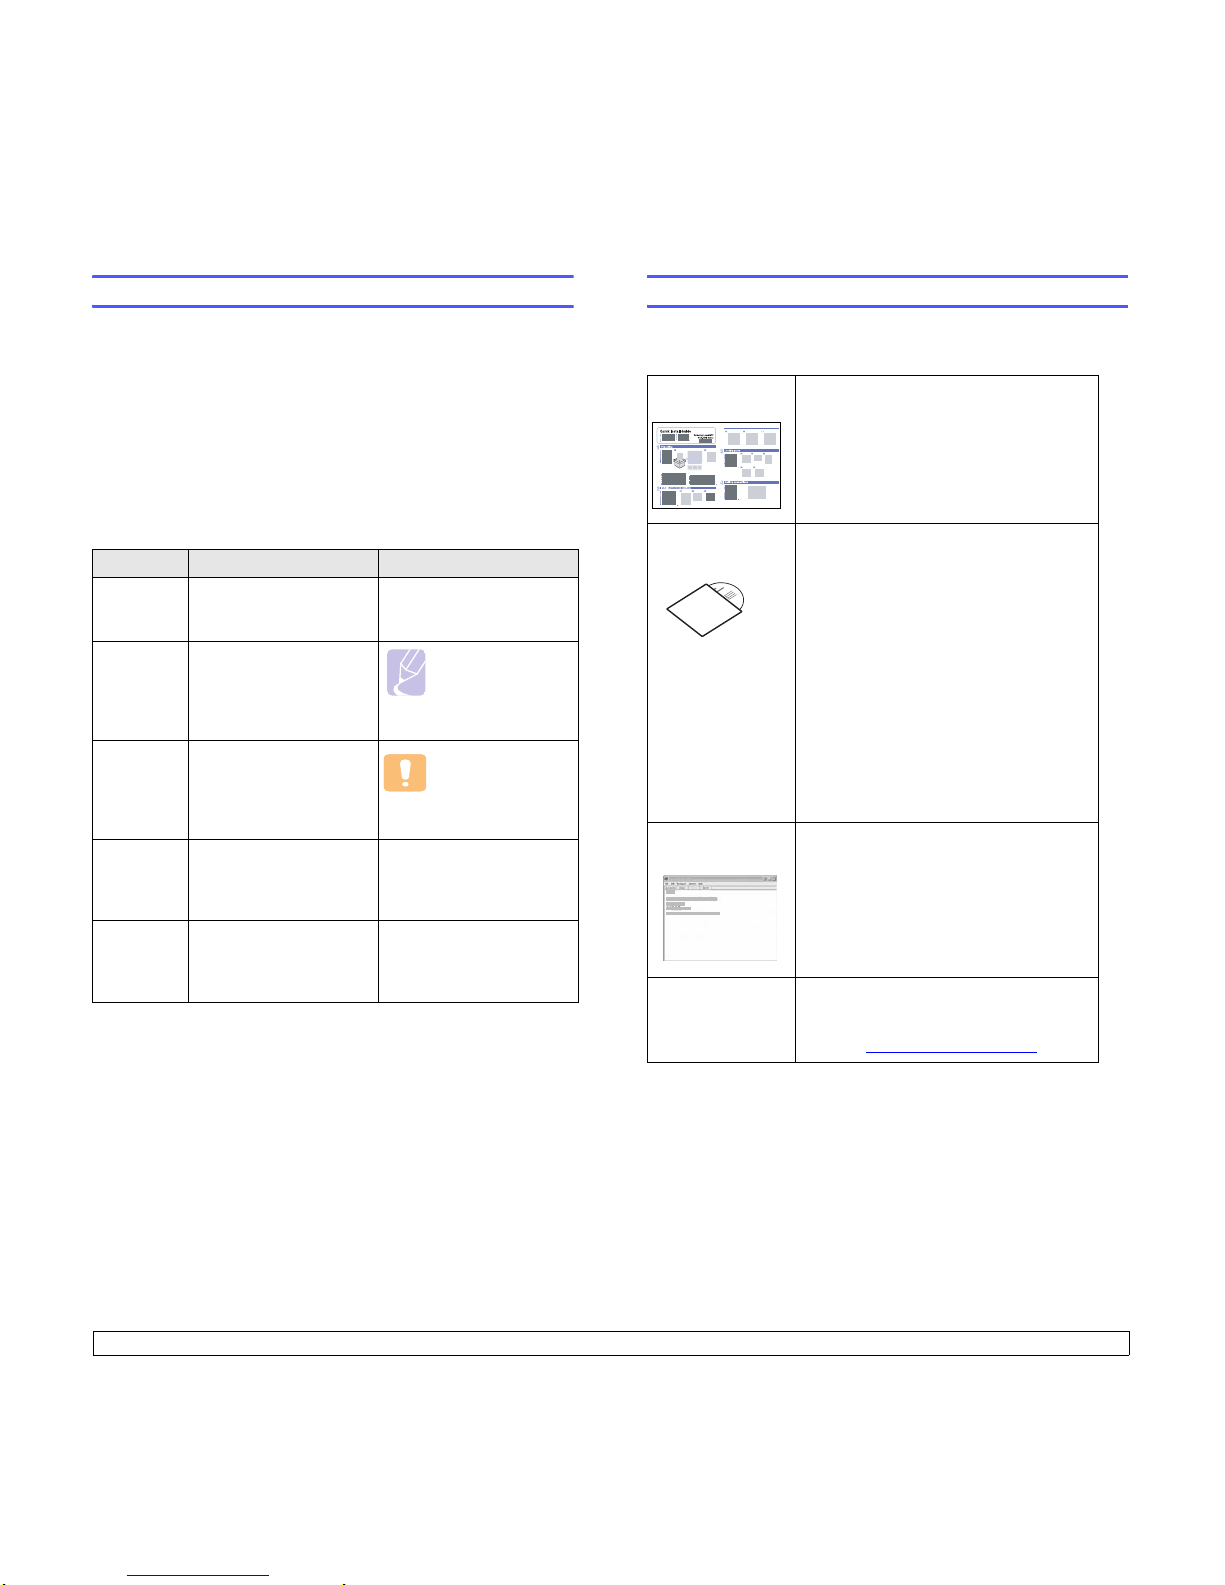
The following table offers the conventions of this guide.
Convention Description Example
Bold Used for texts on the
display or actual prints on
the machine.
Properties
Note Used to provide
additional information or
detailed specification of
the machine function and
feature.
Note
The date format
may differ from
country to country.
Caution Used to give users
information to protect the
machine from possible
mechanical damage or
malfunction.
Caution
Do not touch the
green underside of
the toner cartridge.
Footnote Used to provide more
detailed information on
certain words or a
phrase.
a. pages per minute
(See page
1.1 for
more
information)
Used to guide users to
the reference page for
the additional detailed
information.
(See page 1.1 for more
information)
Finding more information
You can find information for setting up and using your machine from the
following resources, either as a print-out or onscreen.
Quick Install
Guide
Provides information on setting up your
machine and this requires that you follow
the instructions in the guide to prepare the
machine.
Online User’s
Guide
Provides you with step-by-step
instructions for using your machine’s full
features, and contains information for
maintaining your machine,
troubleshooting, and installing
accessories.
This user’s guide also contains
Software
section
to provide you with information on
how to print documents with your machine
in various operating systems, and how to
use the included software utilities.
Note
You can access the user’s guide in other
languages from the Manual folder on the
printer software CD.
Printer Driver
Help
Provides you with help information on
printer driver properties and instructions
for setting up the properties for printing. To
access a printer driver help screen, click
Help
from the printer properties dialog
box.
Samsung website If you have Internet access, you can get
help, support, printer drivers, manuals,
and order information from the Samsung
website, www.samsungprinter.com
.
Page 7

ii
Safety and Regulatory Information
Important Precautions and Safety Information
When using this machine, these basic safety precautions should always be
followed to reduce risk of fire, electric shock, and injury to people:
1 Read and understand all instructions.
2 Use common sense whenever operating electrical appliances.
3 Follow all warnings and instructions marked on the machine and in the
literature accompanying the machine.
4 If an operating instruction appears to conflict with safety information,
heed the safety information. You may have misunderstood the
operating instruction. If you cannot resolve the conflict, contact your
sales or service representative for assistance.
5 Unplug the machine from the AC wall socket before cleaning. Do not
use liquid or aerosol cleaners. Use only a damp cloth for cleaning.
6 Do not place the machine on an unstable cart, stand or table. It may fall,
causing serious damage.
7 Your machine should never be placed on, near or over a radiator,
heater, air conditioner or ventilation duct.
8 Do not allow anything to rest on the power cable. Do not locate your
machine where the cords will be abused by persons walking on them.
9 Do not overload wall outlets and extension cords. This can diminish
performance, and may result in the risk of fire or electric shock.
10 Do not allow pets to chew on the AC power or PC interface cords.
11 Never push objects of any kind into the machine through case or
cabinet openings. They may touch dangerous voltage points, creating a
risk of fire or shock. Never spill liquid of any kind onto or into the
machine.
12 To reduce the risk of electric shock, do not disassemble the machine.
Take it to a qualified service technician when repair work is required.
Opening or removing covers may expose you to dangerous voltages or
other risks. Incorrect reassembly could cause electric shock when the
unit is subsequently used.
13 Unplug the machine from the PC and AC wall outlet, and refer servicing
to qualified service personnel under the following conditions:
• When any part of the power cord, plug, or connecting cable is
damaged or frayed.
• If liquid has been spilled into the machine.
• If the machine has been exposed to rain or water.
• If the machine does not operate properly after instructions have been
followed.
• If the machine has been dropped, or the cabinet appears damaged.
• If the machine exhibits a sudden and distinct change in performance.
14 Adjust only those controls covered by the operating instructions.
Improper adjustment of other controls may result in damage, and may
require extensive work by a qualified service technician to restore the
machine to normal operation.
15 Avoid using this machine during a lightning storm. There may be a
remote risk of electric shock from lightning. If possible, unplug the AC
power for the duration of the lightning storm.
16 If you continuously print multiple pages, the surface of the output tray
may become hot. Be careful not to touch the surface, and keep children
away from the surface.
17 The Power cord supplied with your machine should be used for safe
operation. If you are using a cord which is longer than 2 m with 110 V
machine, then it should be 16 AWG
*
or bigger.
18 SAVE THESE INSTRUCTIONS.
Environmental and Safety Consideration
Laser Safety Statement
The printer is certified in the U.S. to conform to the requirements of DHHS 21
CFR, chapter 1 Subchapter J for Class I(1) laser products, and elsewhere, is
certified as a Class I laser product conforming to the requirements of IEC 825.
Class I laser products are not considered to be hazardous. The laser system
and printer are designed so there is never any human access to laser
radiation above a Class I level during normal operation, user maintenance, or
prescribed service condition.
Warning
Never operate or service the printer with the protective cover removed from
Laser/Scanner assembly. The reflected beam, although invisible, can
damage your eyes.
When using this product, these basic safety precautions should always be
followed to reduce risk of fire, electric shock, and injury to persons:
* AWG: American Wire Gauge
Page 8

iii
Ozone Safety
During normal operation, this machine produces ozone.
The ozone produced does not present a hazard to the
operator. However, it is advisable that the machine be
operated in a well ventilated area.
If you need additional information about ozone, please
contact your nearest Samsung dealer.
California USA Only
This Perchlorate warning applies only to primary CR (Manganese Dioxide)
Lithium coin cells in the product sold or distributed ONLY in California USA.
Perchlorate Material - special handling may apply.
See www.dtsc.ca.gov/hazardouswaste/perchlorate.
Power Saver
This printer contains advanced energy conservation
technology that reduces power consumption when it is
not in active use.
When the printer does not receive data for an extended
period of time, power consumption is automatically
lowered.
ENERGY STAR and the ENERGY STAR mark are registered U.S. marks.
For more information on the ENERGY STAR program
see http://www.energystar.gov
Recycling
Please recycle or dispose of packaging materials for this
product in an environmentally responsible manner.
Correct Disposal of This Product (Waste Electrical
& Electronic Equipment)
(Applicable in the European Union and other European
countries with separate collection systems)
This marking shown on the product or its literature,
indicates that it should not be disposed with other
household wastes at the end of its working life. To prevent
possible harm to the environment or human health from
uncontrolled waste disposal, please separate this from
other types of wastes and recycle it responsibly to promote
the sustainable reuse of material resources.
Household users should contact either the retailer where they purchased this
product, or their local government office, for details of where and how they
can take this item for environmentally safe recycling.
Business users should contact their supplier and check the terms and
conditions of the purchase contract. This product should not be mixed with
other commercial wastes for disposal.
Radio Frequency Emissions
FCC Regulations
This device complies with Part 15 of the FCC Rules. Operation is subject to
the following two conditions:
• This device may not cause harmful interference, and
• This device must accept any interference received, including interference
that may cause undesired operation.
This device has been tested and found to comply with the limits for a Class B
digital device, pursuant to Part 15 of the FCC rules. These limits are designed
to provide reasonable protection against harmful interference in a residential
installation. This equipment generates, uses and can radiate radio frequency
energy and, if not installed and used in accordance with the instructions, may
cause harmful interference to radio communications. However, there is no
guarantee that interference will not occur in a particular installation. If this
equipment does cause harmful interference to radio or television reception,
which can be determined by turning the equipment off and on, the user is
encouraged to try to correct the interference by one or more of the following
measures:
• Reorient or relocate the receiving antenna.
• Increase the separation between the equipment and receiver.
• Connect the equipment into an outlet on a circuit different from that to
which the receiver is connected.
• Consult the dealer or an experienced radio/TV technician for help.
Caution:
Changes or modifications not expressly approved by the manufacturer
responsible for compliance could void the user’s authority to operate the
equipment.
Page 9

iv
Canadian Radio Interference Regulations
This digital apparatus does not exceed the Class B limits for radio noise
emissions from digital apparatus as set out in the interference-causing
equipment standard entitled “Digital Apparatus”, ICES-003 of the Industry
and Science Canada.
Cet appareil numérique respecte les limites de bruits radioélectriques
applicables aux appareils numériques de Classe B prescrites dans la norme
sur le matériel brouilleur: “Appareils Numériques”, ICES-003 édictée par
l’Industrie et Sciences Canada.
Declaration of Conformity (European Countries)
Approvals and Certifications
The CE marking applied to this product symbolises
Samsung Electronics Co., Ltd. Declaration of Conformity
with the following applicable 93/68/EEC Directives of the
European Union as of the dates indicated:
January 1, 1995: Council Directive 73/23/EEC Approximation of the laws of
the member states related to low voltage equipment.
January 1, 1996: Council Directive 89/336/EEC (92/31/EEC), approximation
of the laws of the Member States related to electromagnetic compatibility.
March 9, 1999: Council Directive 1999/5/EC on radio equipment and
telecommunications terminal equipment and the mutual recognition of their
conformity.
A full declaration, defining the relevant Directives and referenced standards
can be obtained from your Samsung Electronics Co., Ltd. representative.
Replacing the Fitted Plug (for UK Only)
Important
The mains lead for this machine is fitted with a standard (BS 1363) 13 amp
plug and has a 13 amp fuse. When you change or examine the fuse, you
must re-fit the correct 13 amp fuse. You then need to replace the fuse cover.
If you have lost the fuse cover, do not use the plug until you have another fuse
cover.
Please contact the people from you purchased the machine.
The 13 amp plug is the most widely used type in the UK and should be
suitable. However, some buildings (mainly old ones) do not have normal 13
amp plug sockets. You need to buy a suitable plug adaptor. Do not remove
the moulded plug.
Warning
If you cut off the moulded plug, get rid of it straight away.
You cannot rewire the plug and you may receive an electric shock if you
plug it into a socket.
Important warning:
You must earth this machine.
The wires in the mains lead have the following color code:
• Green and Yellow: Earth
• Blue: Neutral
• Brown: Live
If the wires in the mains lead do not match the colors marked in your plug, do
the following:
You must connect the green and yellow wire to the pin marked by the letter
“E” or by the safety ‘Earth symbol’ or colored green and yellow or green.
You must connect the blue wire to the pin which is marked with the letter “N”
or colored black.
You must connect the brown wire to the pin which is marked with the letter “L”
or colored red.
You must have a 13 amp fuse in the plug, adaptor, or at the distribution board.
Page 10
v
Page 11
1.1 <
Introduction>
1 Introduction
Thank you for purchasing this Samsung multifunctional product. Your
machine provides printing functions.
This chapter includes:
• Special features
• Machine overview
• Control panel overview
Caution
•
This product is high glossy. Please be careful of surface scratch
during installation.
Special features
Your new machine is equipped with special features.
Print with excellent quality and speed
• You can print with a resolution of up to 1200 dpi
class
Effective output
.
• Your machine prints A4-sized paper at up to 16 ppm
a
letter-sized paper at up to 17 ppm.
Handle different paper options with flexibility
The 100-sheet tray support plain paper in various
sizes.
Create professional documents
•Print Watermarks. You can customize your
documents with words, such as “Confidential”. See
Software section
.
•Print Posters. The text and pictures of each page of
your document are magnified and printed across the
sheet of paper and can then be taped together to
form a poster. See
Software section
.
Save time and money
Print in various environments
• To save paper, you can print multiple pages on one
single sheet of paper.
• This machine automatically conserves electricity by
substantially reducing power consumption when not in
use.
• You can print with Windows 2000 and Windows XP/
2003/Vista (32/64bit) as well as Linux and
Macintosh systems.
• Your machine is equipped with a USB interface.
a. pages per minute
Page 12
1.2 <
Introduction>
Machine overview
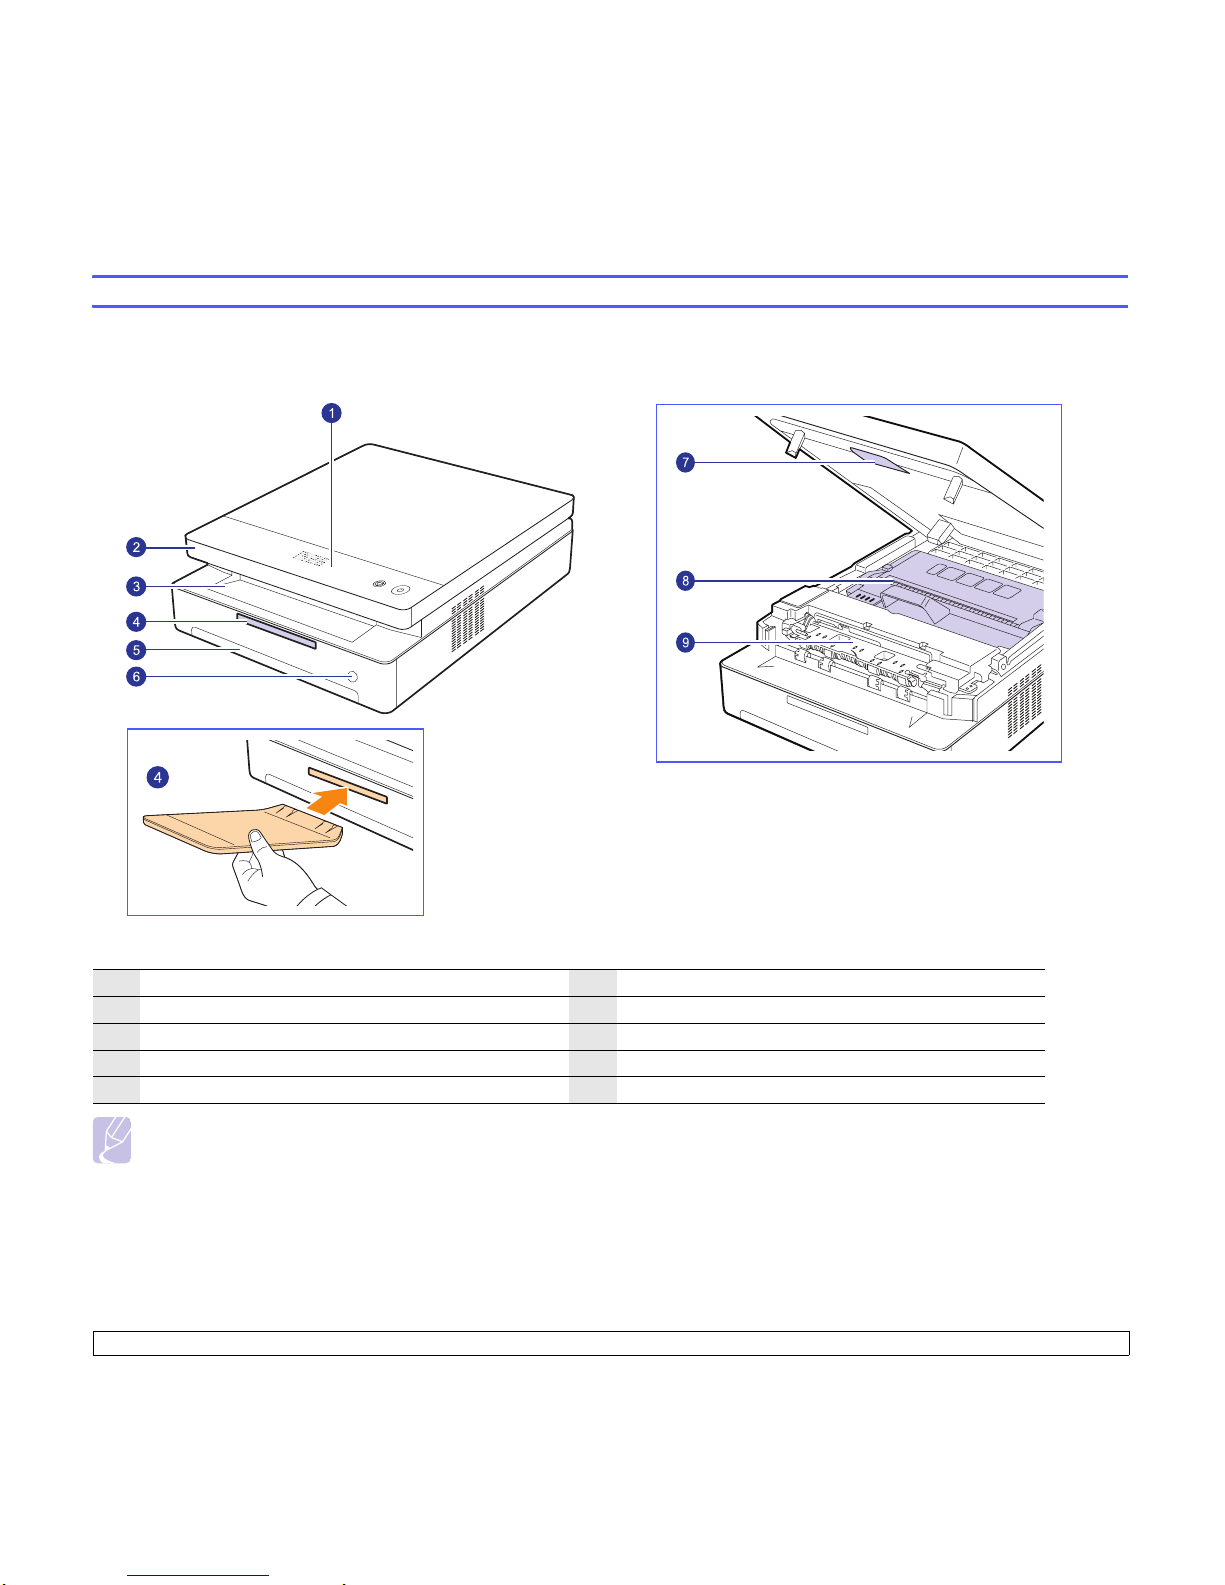
These are the main components of your machine.
Front view
Note
• All illustrations on this user’s guide may differ from your machine.
• The surface of the output tray may become hot if you print a large number of pages at once. Please make sure that you do not touch the surface,
and do not allow children near it.
1
control panel
6
tray open button
2
top cover
7
top cover lever
3
output tray
8
toner cartridge
4
output support
9
inner cover
5
tray
Page 13
1.3 <
Introduction>
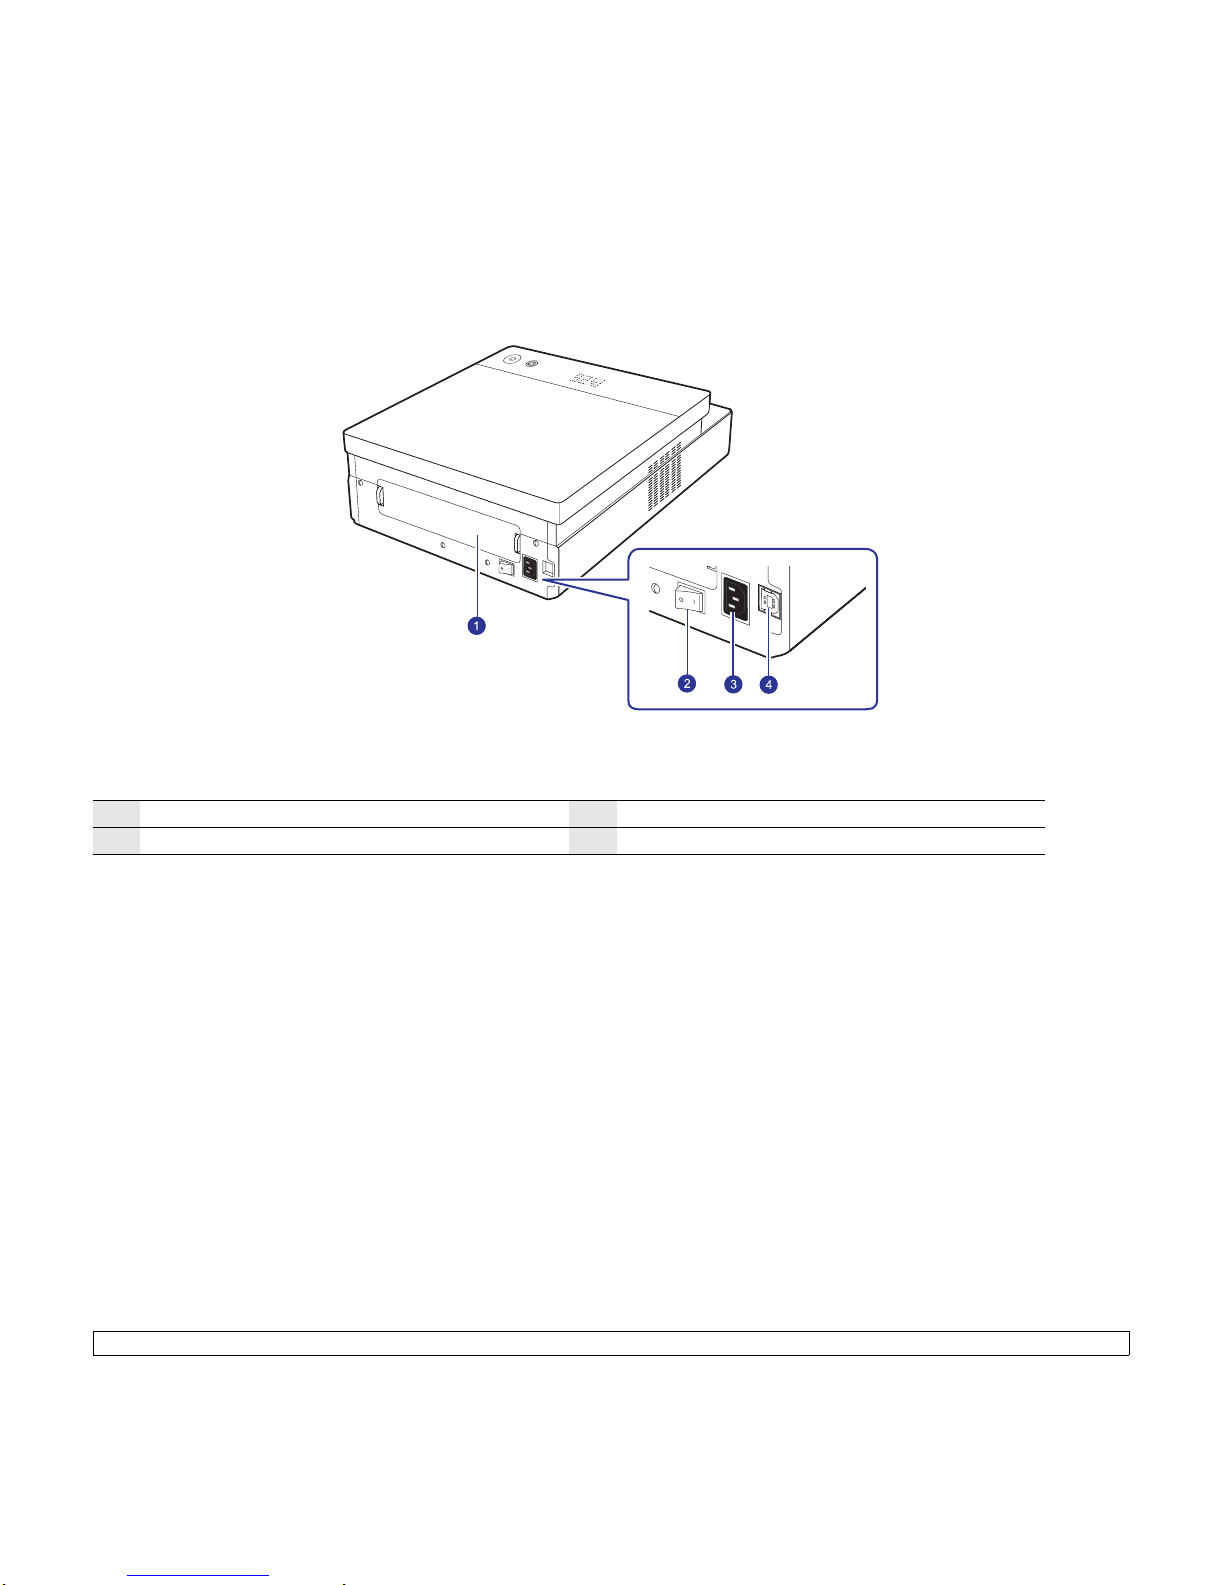
Rear view
1
rear cover
3
power receptacle
2
power switch
4
USB port
Page 14
1.4 <
Introduction>
Control panel overview
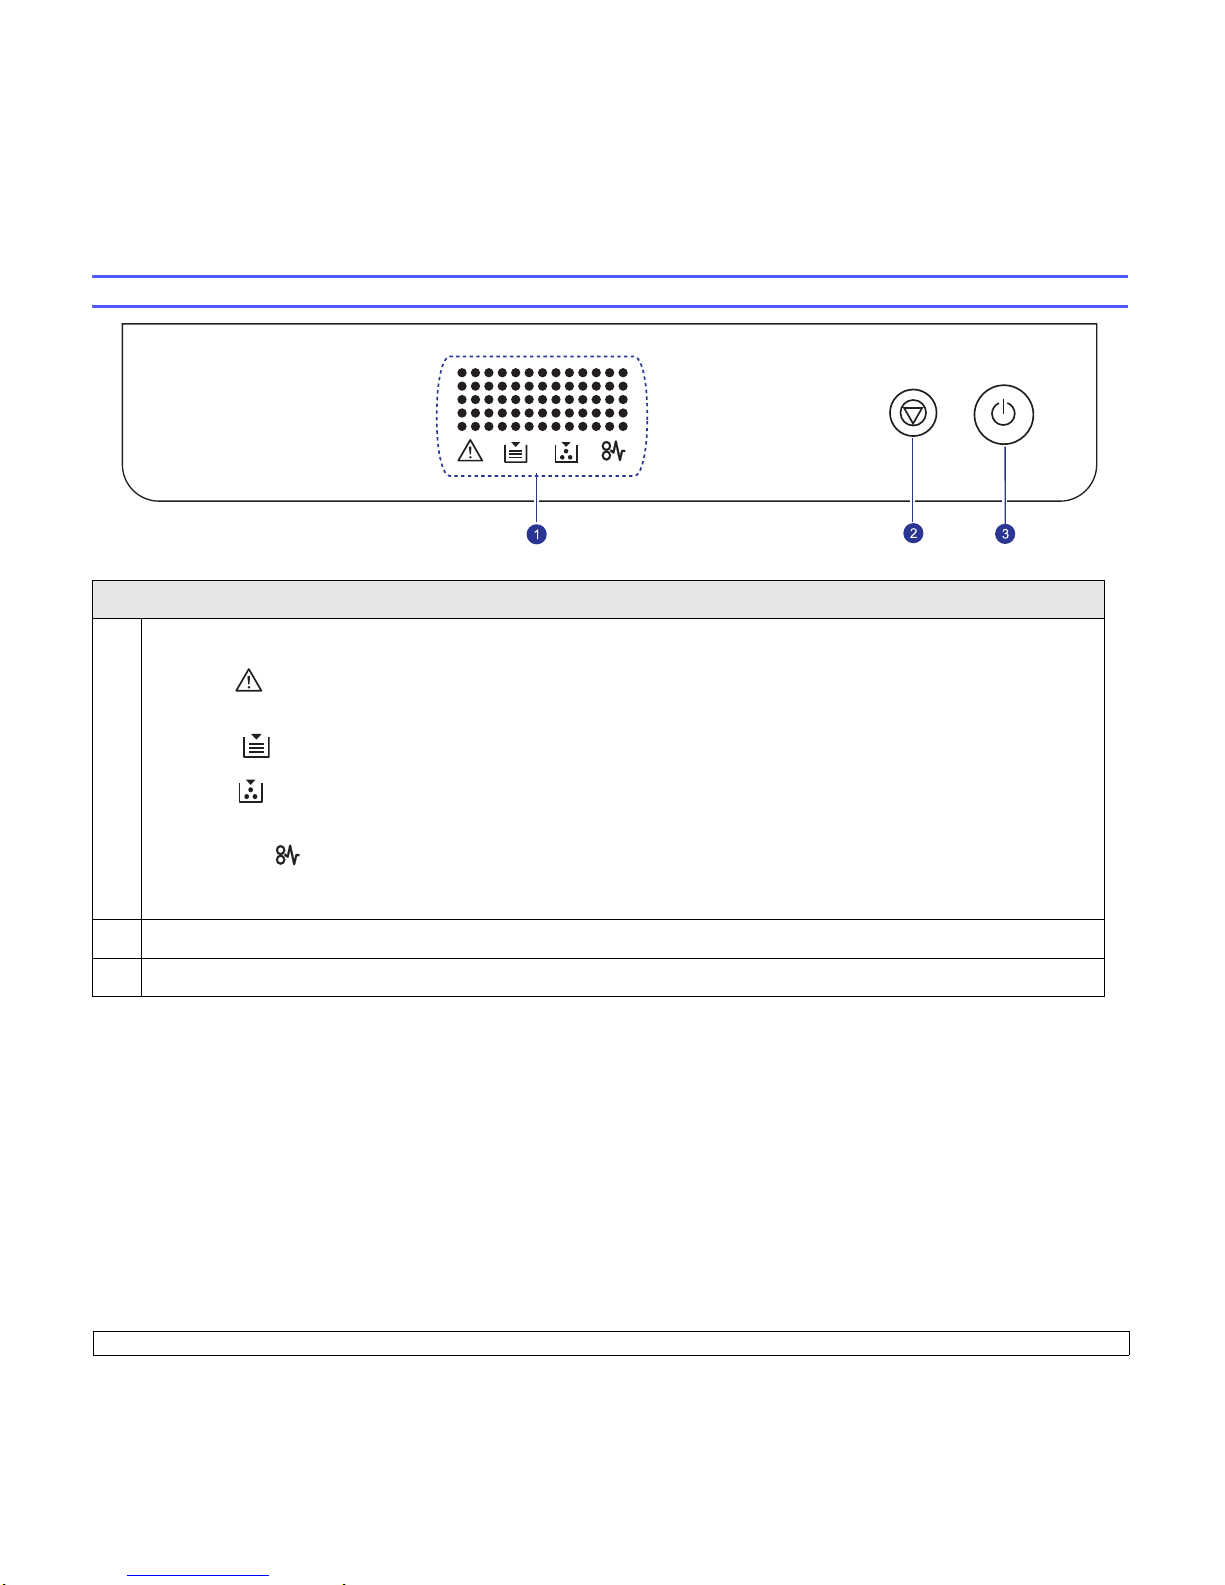
display
1
Shows the current status and prompts during an operation. The message shows with specific LEDs as below. LEDs are working with short
message on a display.
• error LED
Blinks when the error occurs on your machine. If it blinks rapidly, the machine has stopped for some reason. Check the display message to
solve the problem.
• paper LED
Blinks when the paper in the tray is empty.
• toner LED
Blinks when the toner cartridge is almost empty or is not Samsung-genuine cartridge. If it blinks rapidly, the toner cartridge is totally empty.
Check the display message and replace the toner cartridge.
• paper jam LED
Lights blink when there is a paper jam in the machine. Check the display message to release the jammed paper.
See page 7.7 about more information on the display messages.
2
Stops an operation at any time. Also, You can print a machine report by pressing this button for about 4 seconds.
3
You can power on or off the control panel by pressing and holding this button for a few seconds.
Page 15

2.1 <
Software overview>
2 Software overview
This chapter gives you an overview of the software that comes with your
machine. Further details on how to use the software are explained in the
Software section
.
This chapter includes:
• Supplied software
• Printer driver features
• System requirements
Supplied software
You must install the machine software using the supplied CDs after you
have set up your machine and connected it to your computer.
Each CD provides you with the following software:
CD Contents
Printer
software CD
Windows • Printer driver: Use this driver to
take full advantage of your
machine’s features.
• Smart Panel: This program allows
you to monitor the machine’s status
and alerts you when an error occurs
during printing.
• User’s Guide in PDF
Linux • Linux printer driver: Use this driver
to run your machine from a Linux
computer and print documents.
Macintosh • Macintosh printer driver: Use this
driver to run your machine from a
Macintosh computer and print
documents.
• Smart Panel: This program allows
you to monitor the machine’s status
and alerts you when an error occurs
during printing.
Page 16
2.2 <
Software overview>
Printer driver features
Your printer drivers support the following standard features:
• Paper size, orientation and media type
• Number of copies
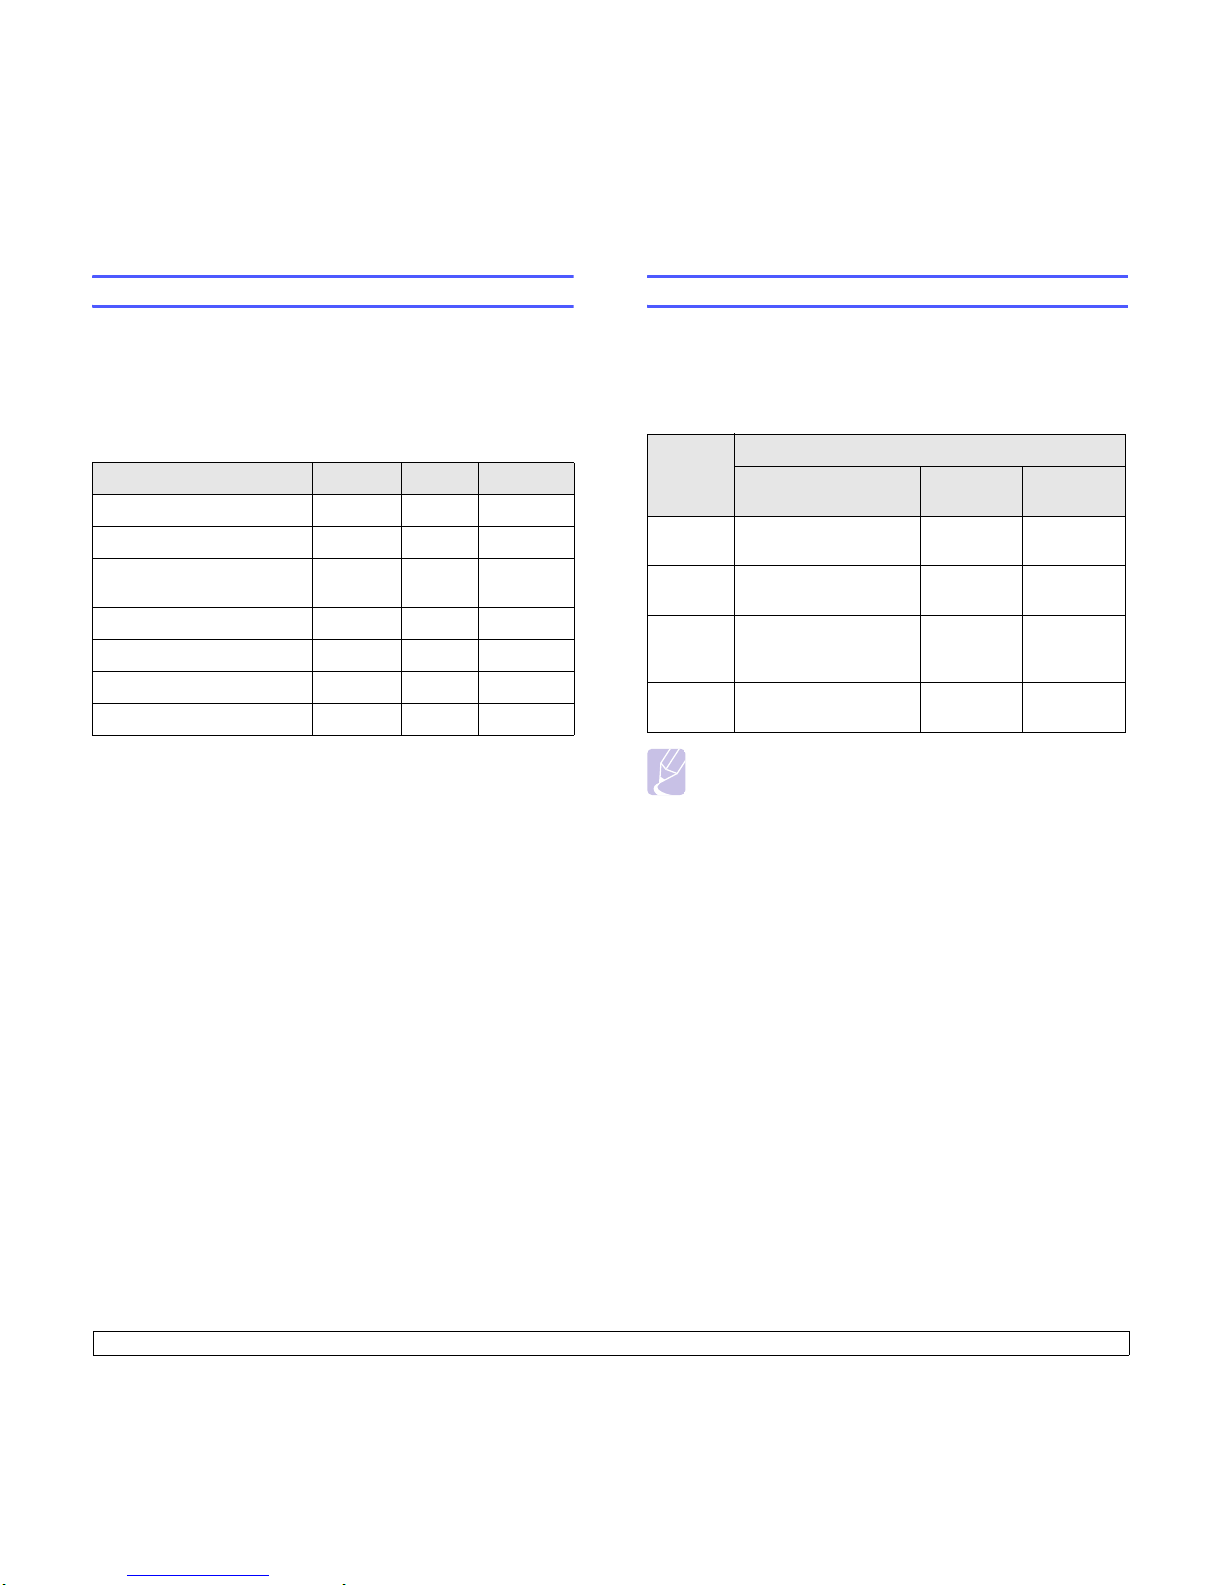
In addition, you can use various special printing features. The following
table shows a general overview of features supported by your printer
drivers:
Feature
Windows Linux Macintosh
Machine quality option O O O
Poster printing O X X
Multiple pages per sheet
(N-up)
O O (2, 4) O (2, 4, 6,
9, 16)
Fit to page printing O X X
Scale printing O X O
Watermark O X X
Overlay O X X
System requirements
Before you begin, ensure that your system meets the following
requirements:
Windows
Your machine supports the following Windows operating systems.
Note
• Internet Explorer 5.0 or higher is the minimum requirement for
all Windows operating systems.
• Users who have an administrator right can install the
software.
OS
Requirement (recommended)
CPU RAM
free HDD
space
Windows
2000
Pentium II 400 MHz
(Pentium III 933 MHz)
64 MB 650 MB
Windows XPPentium III 933 MHz
(Pentium IV 1 GHz)
128 MB
(256 MB)
1.5 GB
Windows
2003
Server
Pentium III 933 MHz
(Pentium IV 1 GHz)
128 MB
(512 MB)
1.25 GB to
2 GB
Windows
Vista
Pentium 4.3 GHz 512 MB
(1024 MB)
15 GB
Page 17
2.3 <
Software overview>
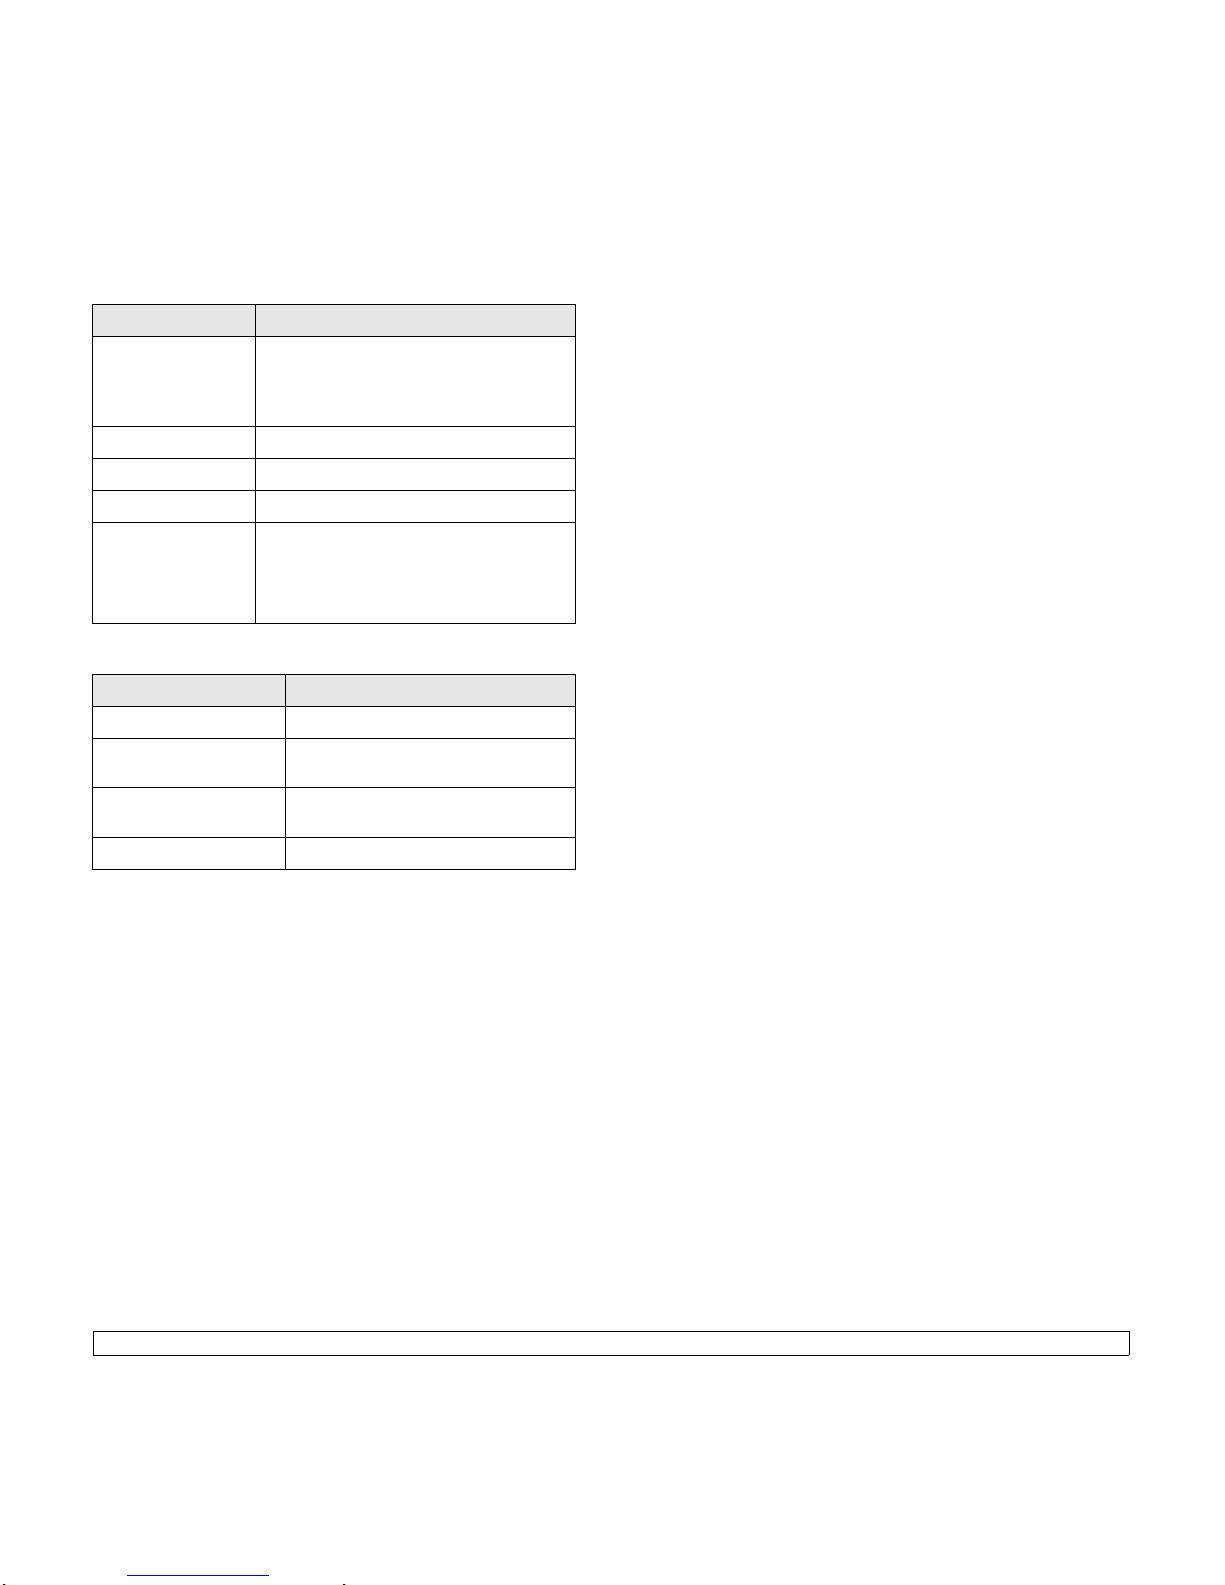
Linux
Macintosh
Item Requirements
Operating system • Red Hat 8 ~ 9
• Fedora Core 1 ~ 4
• Mandrake 9.2 ~ 10.1
• SuSE 8.2 ~ 9.2
CPU Pentium IV 1 GHz or higher
RAM 256 MB or higher
Free HDD space 1 GB or higher
Software • Linux Kernel 2.4 or higher
• Glibc 2.2 or higher
• CUPS
Item Requirements
Operating system Macintosh 10.3 ~ 10.5
CPU Intel processor
PowerPC G4 /G5
RAM 512 MB for an Intel-based Mac,
128 MB for a Power-PC based Mac
Free HDD space 1 GB
Page 18
3.1 <
Getting Started>
3 Getting Started
This chapter gives you step-by-step instructions for setting up the
machine.
This chapter includes:
• Setting up the hardware
• Altitude adjustment
Setting up the hardware
This section shows the steps to set up the hardware which is explained
in the Quick Install Guide. Make sure you read Quick Install Guide and
complete following steps.
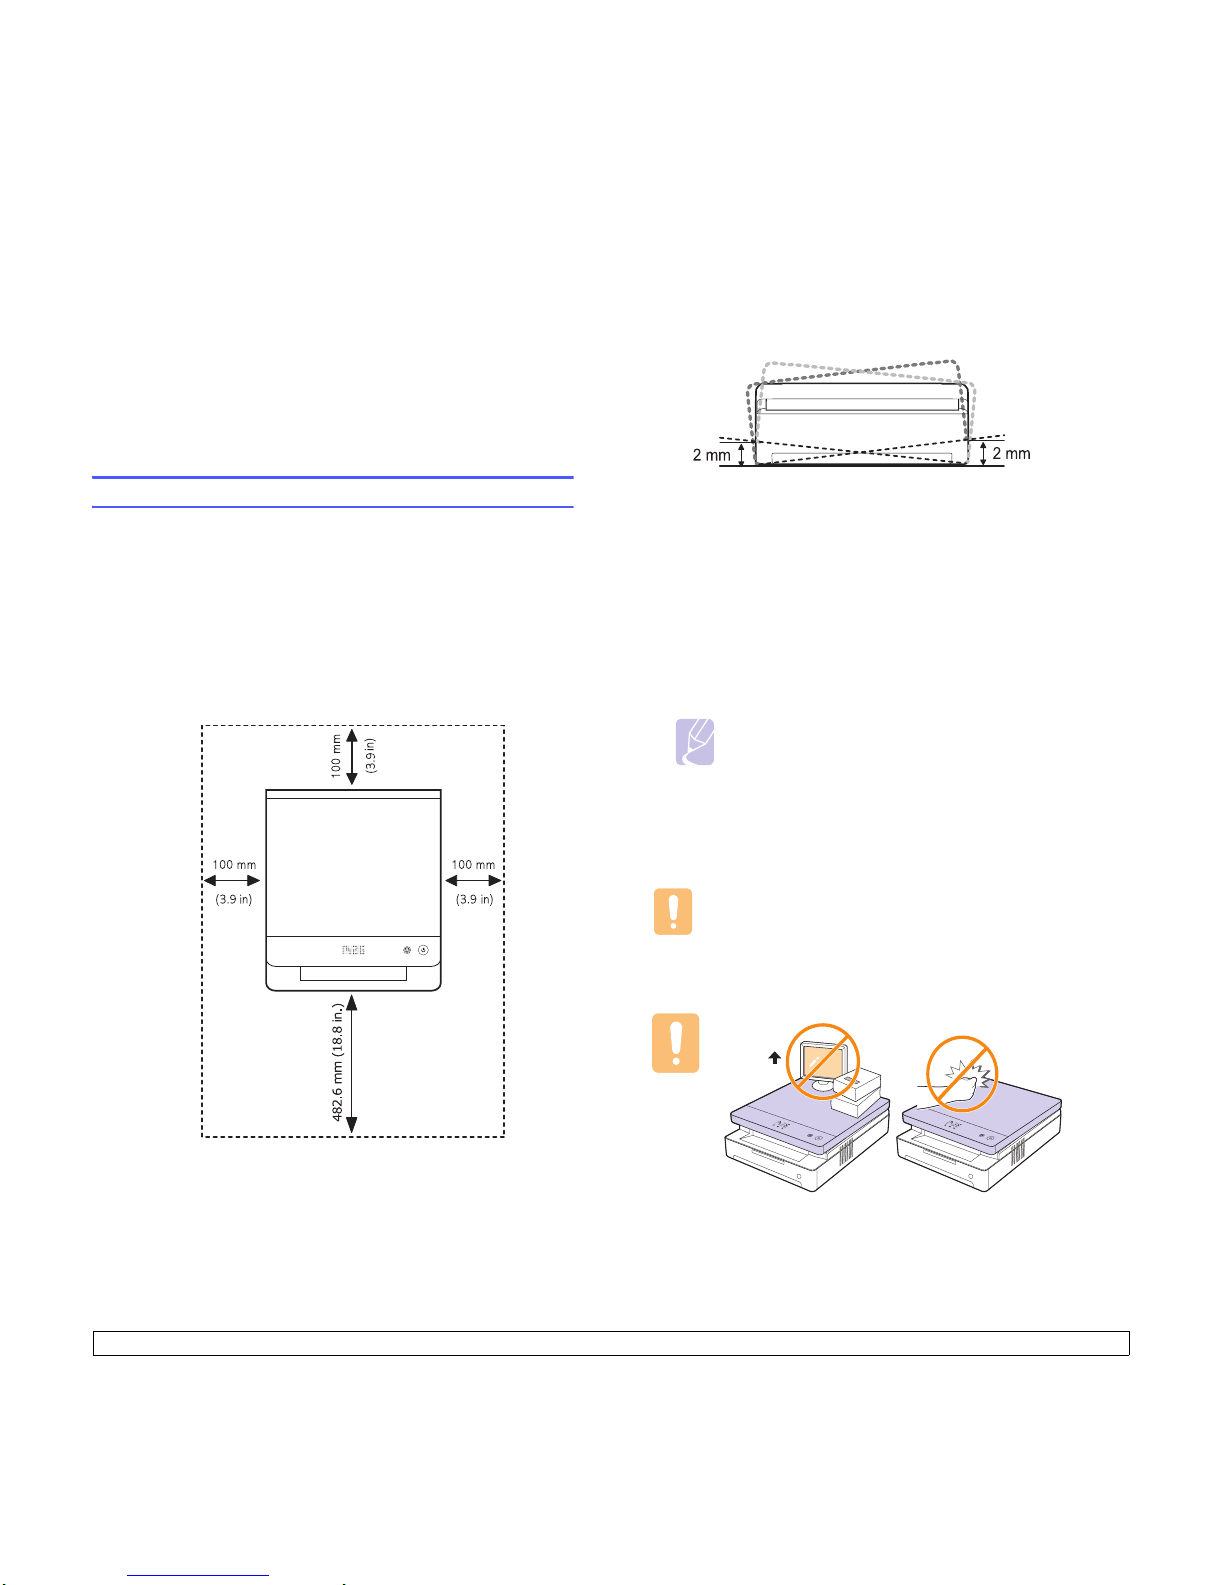
1 Select a stable location.
Select a level, stable place with adequate space for air circulation.
Allow extra space to open covers and trays.
The area should be well-ventilated and away from direct sunlight or
sources of heat, cold, and humidity. Do not set the machine close to
the edge of your desk or table.
Printing is suitable for altitudes under 1,000 m (3,281 ft). Refer to
the altitude setting to optimize your printing. See page 3.2 for more
information.
Place the machine on a flat and stable surface for not letting it lean
more than 2 mm (0.08 inches). Otherwise, it may affect the printing
quality.
2 Unpack the machine and check all the enclosed items.
3 Remove the tape holding the machine tightly.
4 Install both the toner cartridge.
5 Load paper. (See "Loading paper in the tray" on page 4.5.)
6 Make sure that all the cables are connected to the machine.
7 Turn the machine on.
8 Install the software. See Software section.
Note
When the printer driver is in installation process, the driver
installer detects the locale information of your operating
system, and sets the default paper size for your machine. If
you use the different Windows locale, you must change the
paper size of your machine for matching your commonly
used paper size. Go to the printer properties to change the
paper size after installation completes.
Caution
When you move the machine, do not tilt or turn it upside down.
Otherwise, the inside of the machine may be contaminated by
toner, which can cause damage to the machine or bad printing
quality.
5 Kg (11 lbs)
Page 19

3.2 <
Getting Started>
Altitude adjustment
The print quality is affected by atmospheric pressure, which is determined
by the height of the machine above sea level. The following information
will guide you on how to set your machine to the best print quality or best
quality of print.
The altitude above 1,000 m (3,281 ft), may affect the print quality such as
loose toner or light imaging.
Before you set the altitude setting, find the altitude where you are using
the machine.
To set the machine for high altitude, follow next step:
Note
The following procedure is for Windows XP. For other Windows
OS, refer to the corresponding Windows User's Guide or online
help.
1 Click the Windows Start menu.
2 Select Printers and Faxes.
3 Select Samsung ML-1630 Series icon.
4 Right-click on the printer driver icon and select Properties.
5 Click the Printer tab and select the High Altitude Correction.
6 Click OK.
Page 20

4.1 <
Selecting and loading print media>
4 Selecting and loading print
media
This chapter introduces you how to load originals and print media into
your machine.
This chapter includes:
• Selecting print media
• Loading paper in the tray
• Setting the paper size and type
Selecting print media
You can print on a variety of print media, such as plain paper, labels, and
transparencies. Always use print media that meet the guidelines for use
with your machine. Print media that does not meet the guidelines outlined
in this user’s guide may cause the following problems:
• Poor print quality
• Increased paper jams
• Premature wear on the machine.
Properties, such as weight, composition, grain, and moisture content, are
important factors that affect the machine’s performance and the output
quality. When you choose print materials, consider the following:
• The type, size and weight of the print media for your machine are
described later in this section.
• Desired outcome: The print media you choose should be appropriate
for your project.
• Brightness: Some print media are whiter than others and produce
sharper, more vibrant images.
• Surface smoothness: The smoothness of the print media affects how
crisp the printing looks on the paper.
Caution
Using print media that does not meet these specifications may
cause problems, requiring repairs. Such repairs are not covered
by Samsung’s warranty or service agreements.
Note
• Some print media may meet all of the guidelines in this section
and still not produce satisfactory results. This may be the result
of improper handling, unacceptable temperature and humidity
levels, or other variables over which Samsung has no control.
• Before purchasing large quantities of print media, ensure that it
meets the requirements specified in this user’s guide.
Page 21

4.2 <
Selecting and loading print media>
Guidelines for selecting and storing print media
When selecting or loading paper, or other print materials, keep these
guidelines in mind:
• Always use print media that conform with the specifications listed on
page 4.3.
• Attempting to print on damp, curled, wrinkled, or torn paper can cause
paper jams and poor print quality.
• For the best print quality, use only high quality copier grade paper
specifically recommended for use in laser machines.
• Avoid using the following media types:
- Paper with embossed lettering, perforations, or a texture that is too
smooth or too rough
- Erasable bond paper
- Multi-paged paper
- Synthetic paper and thermally reactive paper
- Carbonless paper and Tracing paper.
Use of these types of paper could result in paper jams, chemical
smells, and damage to your machine.
• Store print media in its ream wrapper until you are ready to use it.
Place cartons on pallets or shelves, not on the floor. Do not place
heavy objects on top of the paper, whether it is packaged or
unpackaged. Keep it away from moisture or other conditions that can
cause it to wrinkle or curl.
• Store unused print media at temperatures between 15 °C and 30 °C.
The relative humidity should be between 10% and 70%.
• Store unused print media in a moisture-proof wrap, such as a plastic
container or bag, to prevent dust and moisture from contaminating
your paper.
• Load special media types one sheet at a time through the tray to avoid
paper jams.
• To prevent print media, such as transparencies and label sheets, from
sticking together, remove them as they print out.
Page 22
4.3 <
Loading originals and print media>
Specifications on print media
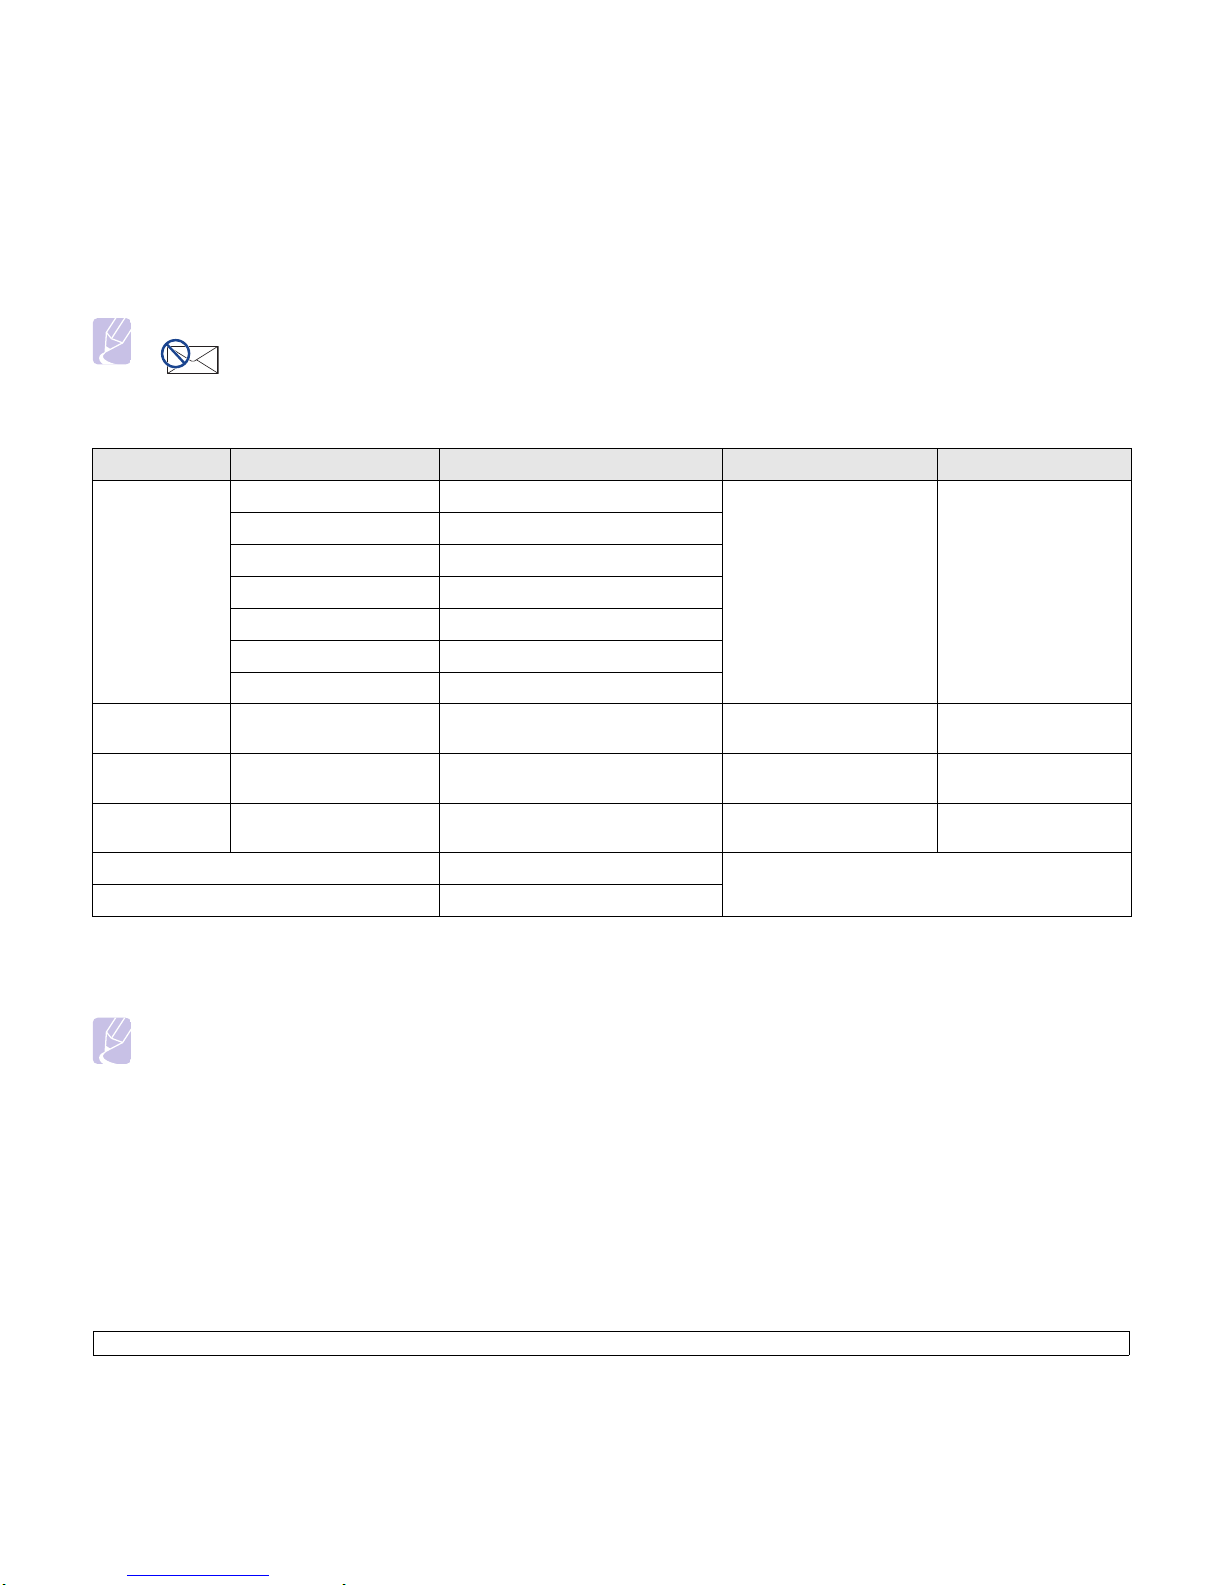
Note
• Due to the nature of the product, the envelope type of media cannot be used with your machine.
•Use the print media type mentioned below only.
Note
•When you use the thick paper (90 to 120 g/m2, 24 to 32 lb bond), select Thick Paper in the paper type. See 4.6 page.
• When you use the thin paper (under 70 g/m
2
, under 19 lb bond), select Thin Paper in the paper type. See 4.6 page.
• When you use the recycled paper, select Recycled Paper in the paper type. See 4.6 page.
Typ e Size Dimensions Weight
a
a. If media weight is over 105 g/m2 (28lb bond), load a paper into the tray one by one.
Capacity
b
b. Maximum capacity may differ depending on media weight, thickness, and environmental conditions.
Plain paper
Letter 216 x 279 mm (8.5 x 11 inches)
60 to 120 g/m
2
(16 to 32 lb
bond) for the tray
100 sheets of 75 g/m
2
(20 lb bond) paper for the
tray
A4 210 x 297 mm (8.26 x 11.69 inches)
JIS B5 182 x 257 mm (7.16 x 10.11 inches)
ISO B5 176 x 250 mm (6.93 x 9.84 inches)
A5 148 x 210 mm (5.82 x 8.26 inches)
A6 105 x 148 mm (4.13 x 5.82 inches)
Executive 184 x 267 mm (7.25 x 10.5 inches)
Transparency
c
c.
Recommended media: Transparency for a Laser Printers produced by HP, Xerox and 3M.
It is not recommended to use paperbacked transparencies such as Xerox 3R91334, which can cause a jam or be scratched.
Letter, A4 Refer to the Plain paper section
138 to 146 g/m
2
(37 to 39 lb
bond)
1 sheet for the tray
Labels Letter, A4 Refer to the Plain paper section
120 to 150 g/m
2
(32 to 40 lb
bond)
1 sheet for the tray
Card stock Letter, A4 Refer to the Plain paper section
60 to 120 g/m
2
(16 to 32 lb
bond)
1 sheet for the tray
Minimum size (custom) 105 x 148 mm (4.13 x 5.83 inches)
60 to 120 g/m
2
(16 to 32 lb bond) for the tray
Maximum size (custom) 216 x 297 mm (8.5 x 11.69 inches)
Page 23
4.4 <
Selecting and loading print media>
Guidelines for special print media
Media type Guidelines
Transparencies • To avoid damaging the machine, use only
transparencies designed for use in laser
machines.
• Transparencies used in the machine must be
able to withstand the machine’s fusing
temperature. Check your machine’s specification
to view the fusing temperature, see page 9.1.
• Place them on a flat surface after removing them
from the machine.
• Do not leave them in the paper tray for long
periods of time. Dust and dirt may accumulate
on them, resulting in spotty printing.
• To avoid smudging caused by fingerprints,
handle them carefully.
• To avoid fading, do not expose printed
transparencies to prolonged sunlight.
• Ensure that transparencies are not wrinkled,
curled, or have any torn edges.
Caution
Recommended media: Transparency for a
Color Laser Printers produced by HP,
Xerox and 3M. It is not recommended to
use paperbacked transparencies such as
Xerox 3R91334, which can cause a jam or
be scratched.
Note
If your machine does not feed the
transparency print media properly, put a
blank sheet of paper under the
transparency, and try again.
Labels • To avoid damaging the machine, use only labels
designed for use in laser machines.
• When selecting labels, consider the following
factors:
- Adhesives: The adhesive material should be
stable at your machine’s fusing temperature.
Check your machine’s specification to view the
fusing temperature, see page 9.1.
- Arrangement: Only use labels with no
exposed backing between them. Labels can
peel off sheets that have spaces between the
labels, causing serious jams.
- Curl: Prior to printing, labels must lie flat with
no more than 13 mm of curl in any direction.
- Condition: Do not use labels with wrinkles,
bubbles, or other indications of separation.
• Make sure that there is no exposed adhesive
material between labels. Exposed areas can
cause labels to peel off during printing, which
can cause paper jams. Exposed adhesive can
also cause damage to machine components.
• Do not run a sheet of labels through the machine
more than once. The adhesive backing is
designed for only a single pass through the
machine.
• Do not use labels that are separating from the
backing sheet or are wrinkled, bubbled, or
otherwise damaged.
Card stock or
custom-sized
materials
• Do not print on media smaller than 105 mm wide
or 148 mm long.
• In the software application, set margins at least
6.4 mm away from the edges of the material.
Note
If you experience jams with card stock
feeding, turn the paper around and try
again.
Preprinted
paper
• Letterhead must be printed with heat-resistant
ink that will not melt, vaporize, or release
hazardous emissions when subjected to the
printer’s fusing temperature for 0.1 second.
Check your machine’s specification to view the
fusing temperature, see page 9.1.
• Letterhead ink must be non-flammable and
should not adversely affect printer rollers.
• Forms and letterhead should be sealed in a
moisture-proof wrapping to prevent changes
during storage.
• Before you load preprinted paper, such as forms
and letterhead, verify that the ink on the paper is
dry. During the fusing process, wet ink can come
off preprinted paper, reducing print quality.
Media type Guidelines
Page 24
4.5 <
Loading originals and print media>
Loading paper in the tray
Load the print media you use for the majority of your print jobs in the tray.
The tray can hold a maximum of 100 sheets of 75 g/m
2
(20 lb bond) plain
paper.
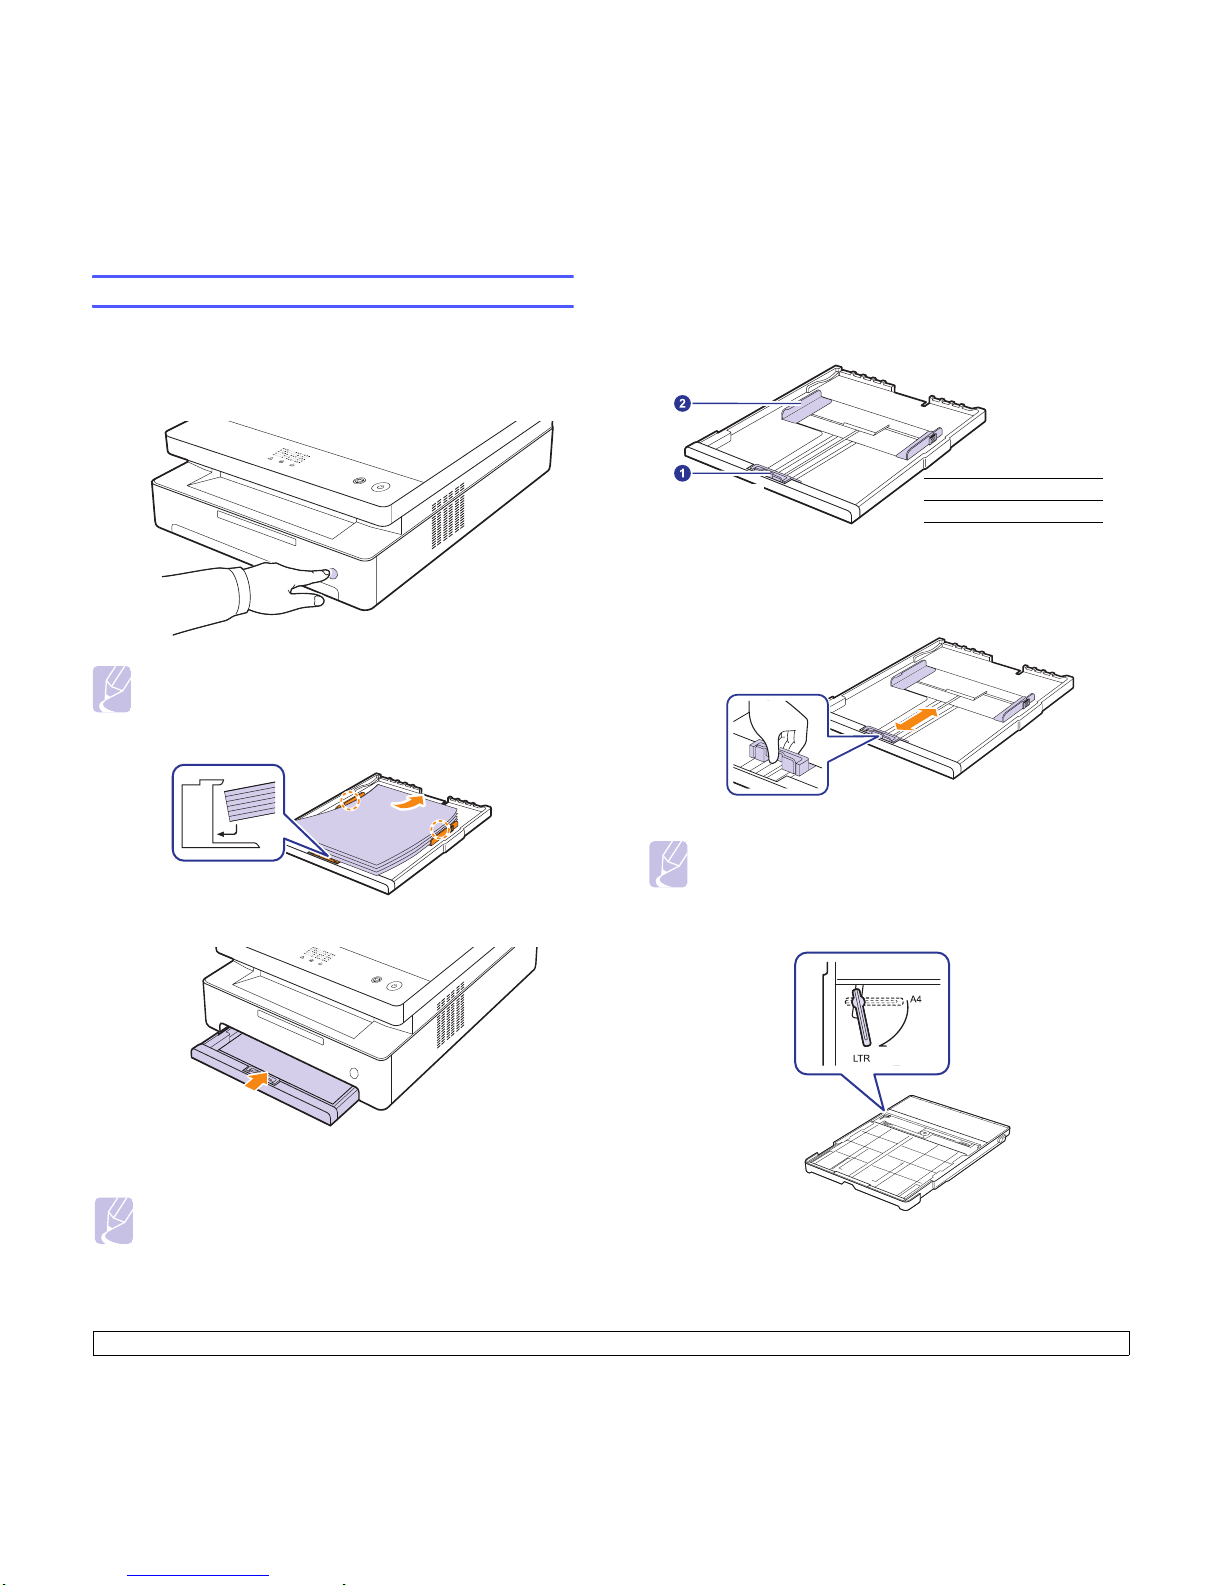
1 Press the tray open button, then the tray pops out. Pull the tray
completely out.
Note
When the tray does not close properly, pull the tray half way out
and try again.
2 Place paper with the side you want to print facing down.
3 Align the tray with the slot, and slide it into the machine.
4 After loading paper, set the paper type and size for the tray. See
Software section
for PC-printing.
Note
• You can load previously printed paper. The printed side should
be facing up with an uncurled edge at the rear. If you
experience problems with paper feed, turn the paper around.
Note that print quality is not guaranteed.
Changing the paper size in the tray
To load different sizes of paper, such as custom-sized paper, you need to
adjust the paper guides.
1 Adjust the paper length guide to the desired paper length. It is
preset to Letter or A4 size depending on the country. To load
another size, hold the lever and move the length guide to the
corresponding position.
Note
• The tray is preset to Letter or A4 size, depending on your
country.
• For example, if you want to change the size to Letter, hold the
lever at the back of the tray, and rotate the lever clockwise.
1
paper length guide
2
paper w idth guide
Page 25
4.6 <
Loading originals and print media>
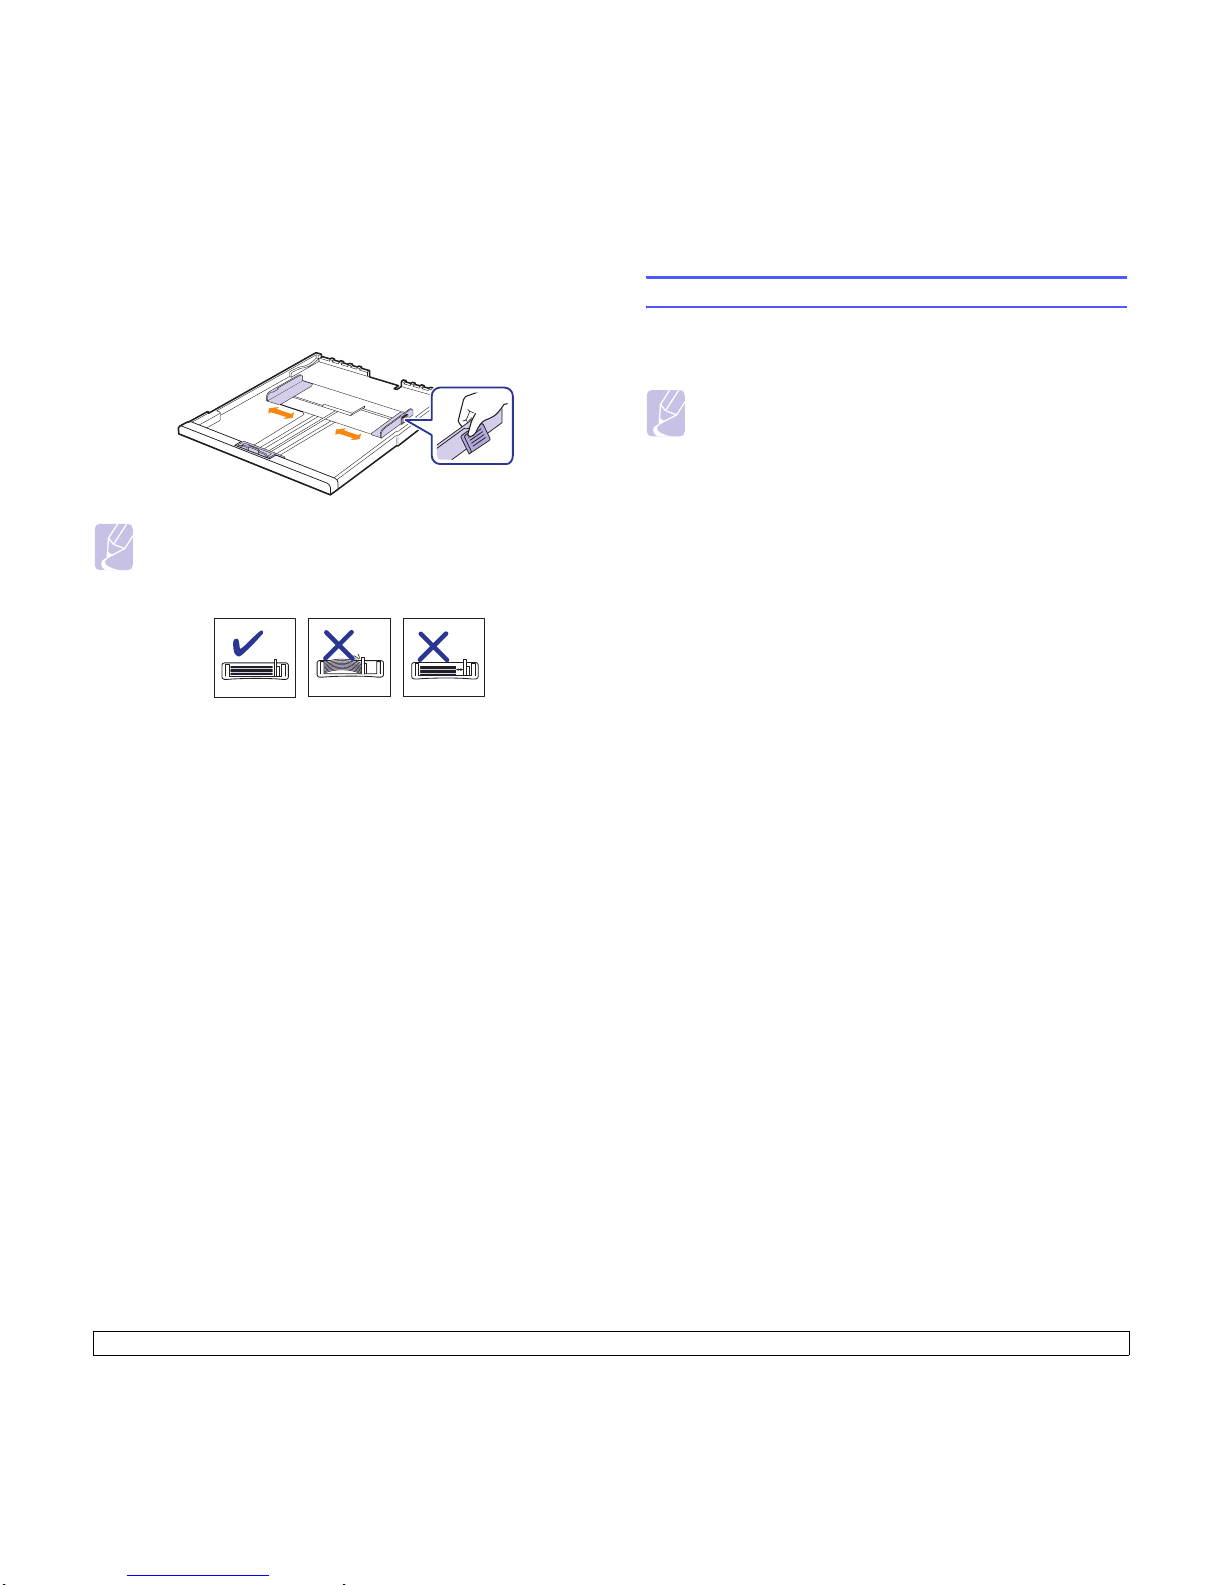
2 After inserting paper into the tray, while pinching the paper width
guide as shown, move it toward the stack of paper until it lightly
touches the side of the stack. Do not press the guide too tightly to
the edge of the paper; the guide may bend the paper.
Note
• Do not push the paper width guides far enough to cause the
materials to warp.
• If you do not adjust the paper width guides, it may cause paper
jams.
Setting the paper size and type
The settings you change remain in effect only while you are using the
current program. To make your changes permanent, make them in the
Printers folder.
Note
The following procedure is for Windows XP. For other Windows
OS, refer to the corresponding Windows User's Guide or online
help.
1 Click the Start button on the computer screen.
2 Select Printers and Faxes.
3 Right-click on the printer driver icon and select Printing
Preferences.
4 Click the Paper tab, and change the settings on Paper Options.
5 Click OK.
Page 26

5.1 <
Basic printing>
5 Basic printing
This chapter explains common printing tasks. Your machine allows you to
print from various Windows, Macintosh, or Linux applications.
Note
The following procedure is for Windows operating system.
For Linux and Macintosh, see Software section.
Printing a document
The exact steps for printing a document may vary depending on the
application you use.
1 Open the document you want to print.
2 Select Print from the File menu. The Print window is displayed. It
may look slightly different depending on your application.
3 Select your printer driver from the Selet Printer list.
4 To start the print job, click OK or Print in the Print window.
For details about printing, see
Software section
.
Canceling a print job
If the print job is waiting in a print queue or print spooler, such as the
printer group in Windows, delete the job as follows:
1 Click the Windows Start menu.
2 For Windows 2000, select Settings and then Printers.
For Windows XP/2003, select Printers and Faxes.
For Windows Vista, select Control Panel and than Printers.
3 Double-click the Samsung ML-1630 Series icon.
4 From the Document menu, select Cancel.
Note
You can also access this window by simply double-clicking the
printer icon at the bottom right corner of the Windows desktop.
You can also cancel the current job by pressing on the control
panel.
Page 27
6.1 <
Maintenance>
6 Maintenance
This chapter provides information for maintaining your machine and the
toner cartridge.
This chapter includes:
• Printing a machine report
• Cleaning your machine
• Maintaining the cartridge
• Redistributing toner
• Replacing the toner cartridge
• Maintenance Parts
Printing a machine report
Press and hold
Stop/Clear
button for about 4 seconds to print a
machine report.
Cleaning your machine
To maintain print quality, follow the cleaning procedures below each time
the toner cartridge is replaced or if print and scan quality problems occur.
Caution
• Cleaning the machine cabinet with cleaning materials that
contain large amounts of alcohol, solvent, or other strong
substances can discolor or damage the cabinet.
• If your machine or its surrounding is contaminated with toner,
we recommend you to use cloth or tissue dampened with
water to clean it. If you use a vacuum cleaner, toner blows in
the air and might be harmful for you.
• After cleaning, wipe the cabinet to remove any moisture.
Cleaning the outside
Make sure to brush off the dirt on the cloth provided before cleaning the
cabinet. Make sure to spray water 4 to 6 times onto the cloth provided, or
another cloth suitable for this purpose before cleaning the cabinet, wiping
in on direction.
Cleaning the inside
During the printing process, paper, toner and dust particles can
accumulate inside the machine. This buildup can cause print quality
problems, such as toner specks or smearing. Cleaning the inside of the
machine clears or reduces these problems. Contact a service
representative to clean the parts inside the machine.
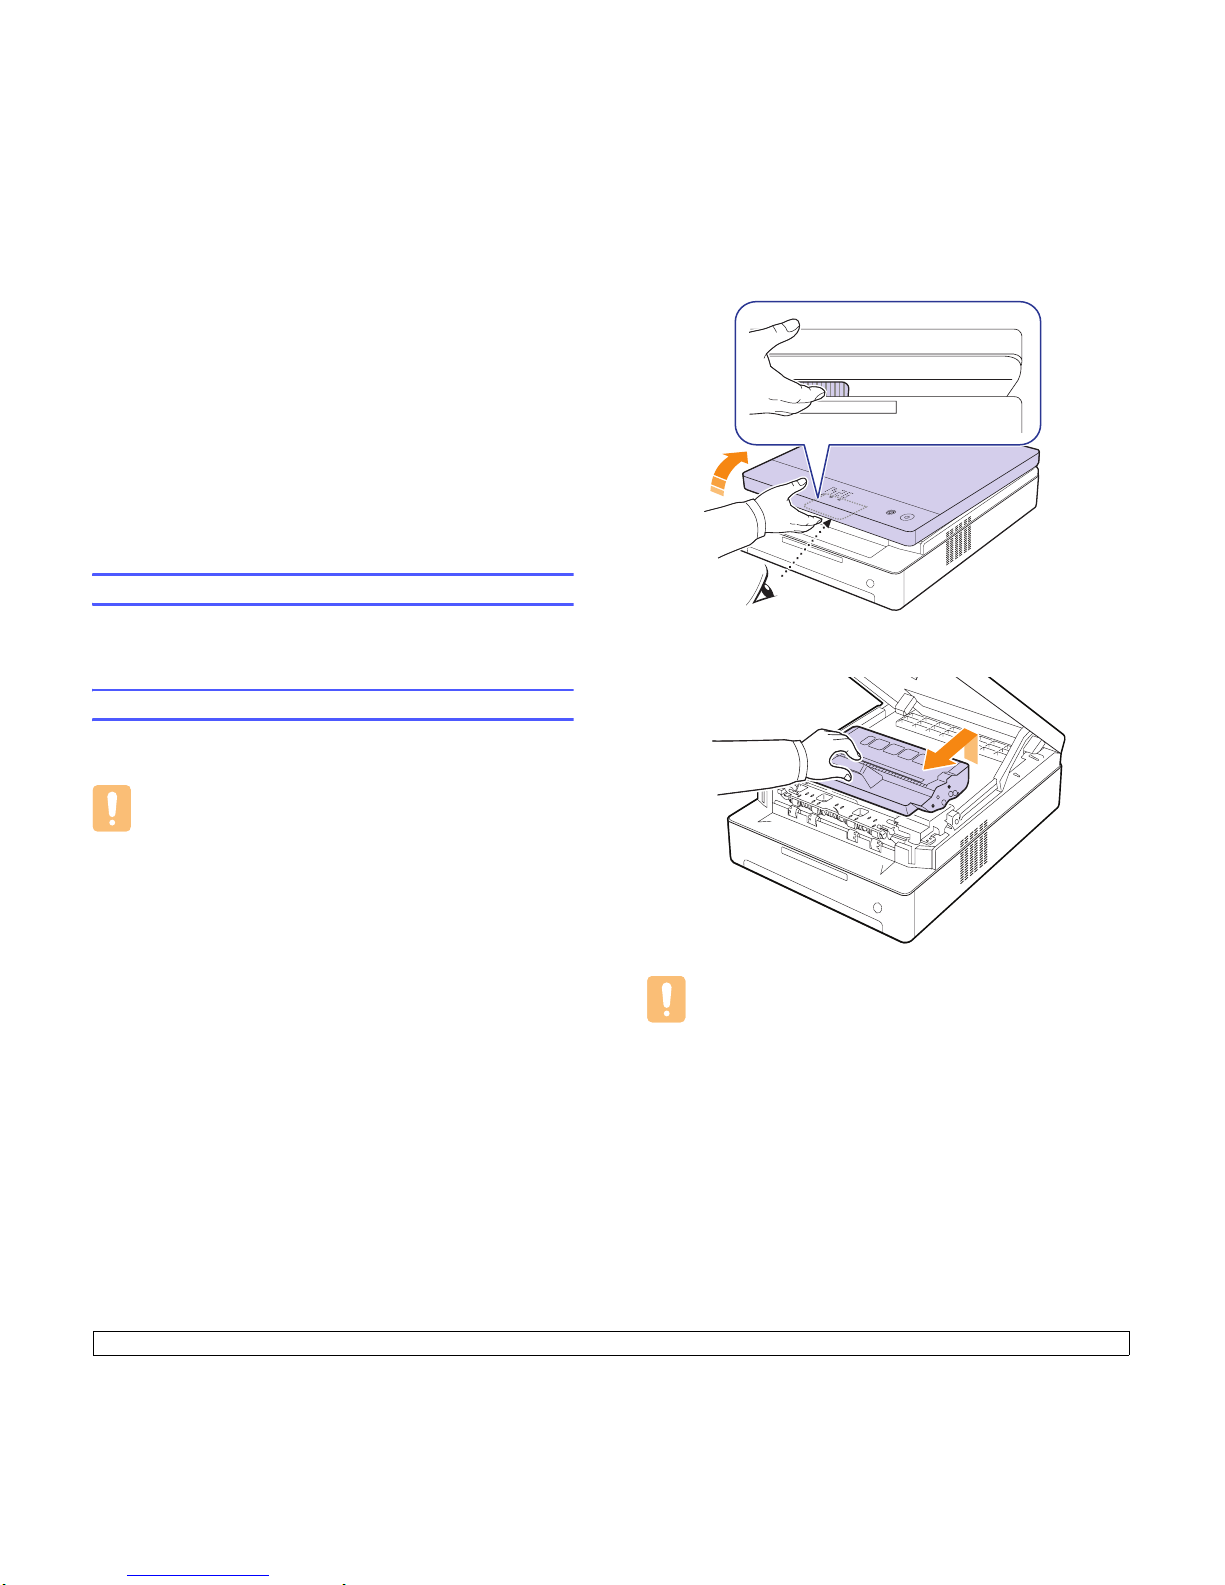
1 Press the top cover lever, completely open the top cover.
2 Grasp the handles on the toner cartridge and pull to remove the
cartridge from the machine.
Caution
• Do not touch the green surface, the OPC drum or the front of
the toner cartridge, with your hands or any other material.
Use the handle on each cartridge in order to avoid touching
this area.
• If you leave the top cover open for more than a few minutes,
the OPC drum can be exposed to light. This will cause
damage to the OPC drum. Close the top cover should the
installation need to be halted for any reason.
Page 28
6.2 <
Maintenance>
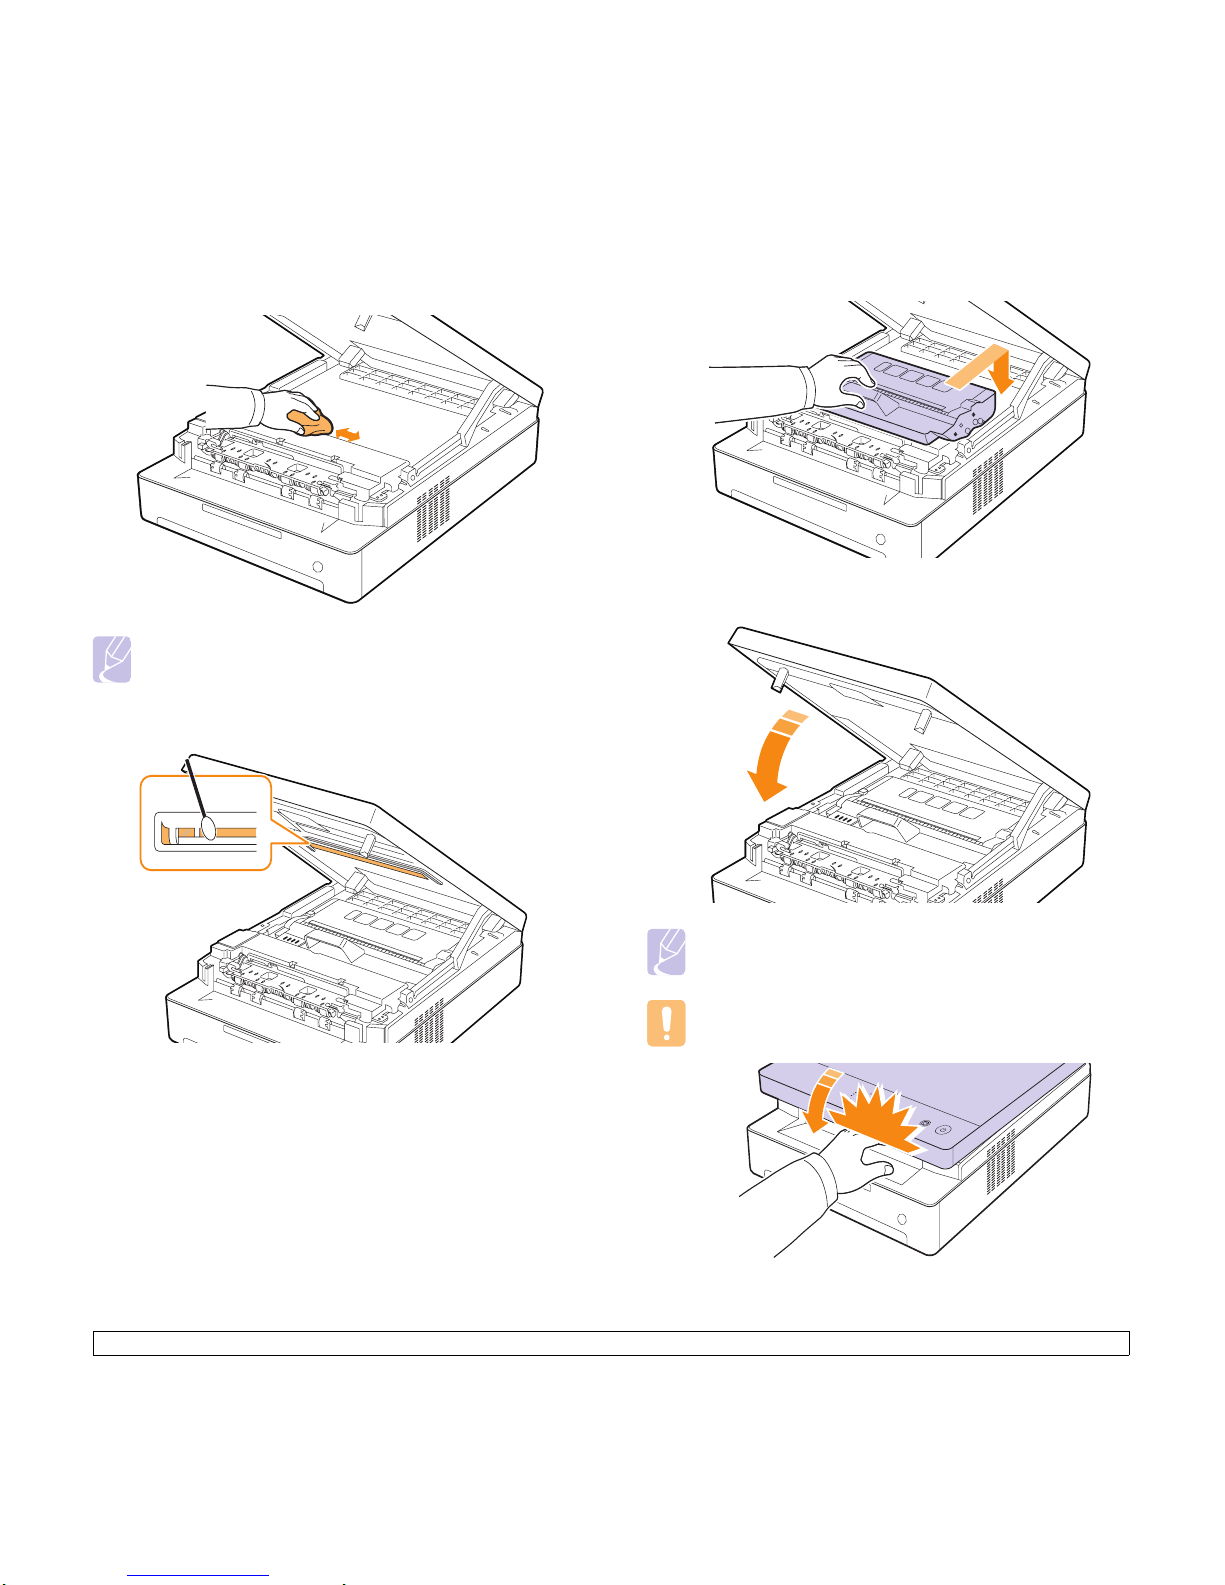
3 With a dry lint-free cloth, wipe away any dust and spilled toner from
the toner cartridges area and their cavities.
Note
If toner gets on your clothing, wipe it off with a dry cloth and
wash it in cold water. Hot water sets toner into fabric.
4 Locate the long strip of glass (LSU) inside the front door, and gently
swab the glass to see if dirt turns the white cotton black.
5 Slide the toner cartridge back into the machine.
6 Hold the top cover and close it slowly and carefully, until the cover is
the cover is securely latched.
Note
If the top cover is not completely closed, the machine will not
operate.
Caution
Be careful not to pinch your fingers
, since the top cover is very
heavy.
Page 29
6.3 <
Maintenance>
Maintaining the cartridge
Toner cartridge storage
To get the most from the toner cartridge, keep the following guidelines in
mind:
• Do not remove the toner cartridge from its package until ready for use.
• Do not refill the toner cartridge. The machine warranty does not cover
damage caused by using a refilled cartridge.
• Store toner cartridges in the same environment as your machine.
• To prevent damage to the toner cartridge, do not expose it to light for
more than a few minutes.
Expected cartridge life
The toner cartridge yield depends on the amount of toner that print jobs
require. Average yield for a new toner cartridge is 2,000 standard pages
in accordance with the ISO/IEC 19752 standard. (Average yield for the
original toner cartridge supplied with the machine is 1,000 standard
pages.) The actual number may also be different depending on the print
density of the pages you print on, and the number of pages may be
affected by operating environment, printing interval, media type, and
media size. If you print a lot of graphics, you may need to change the
cartridge more often.
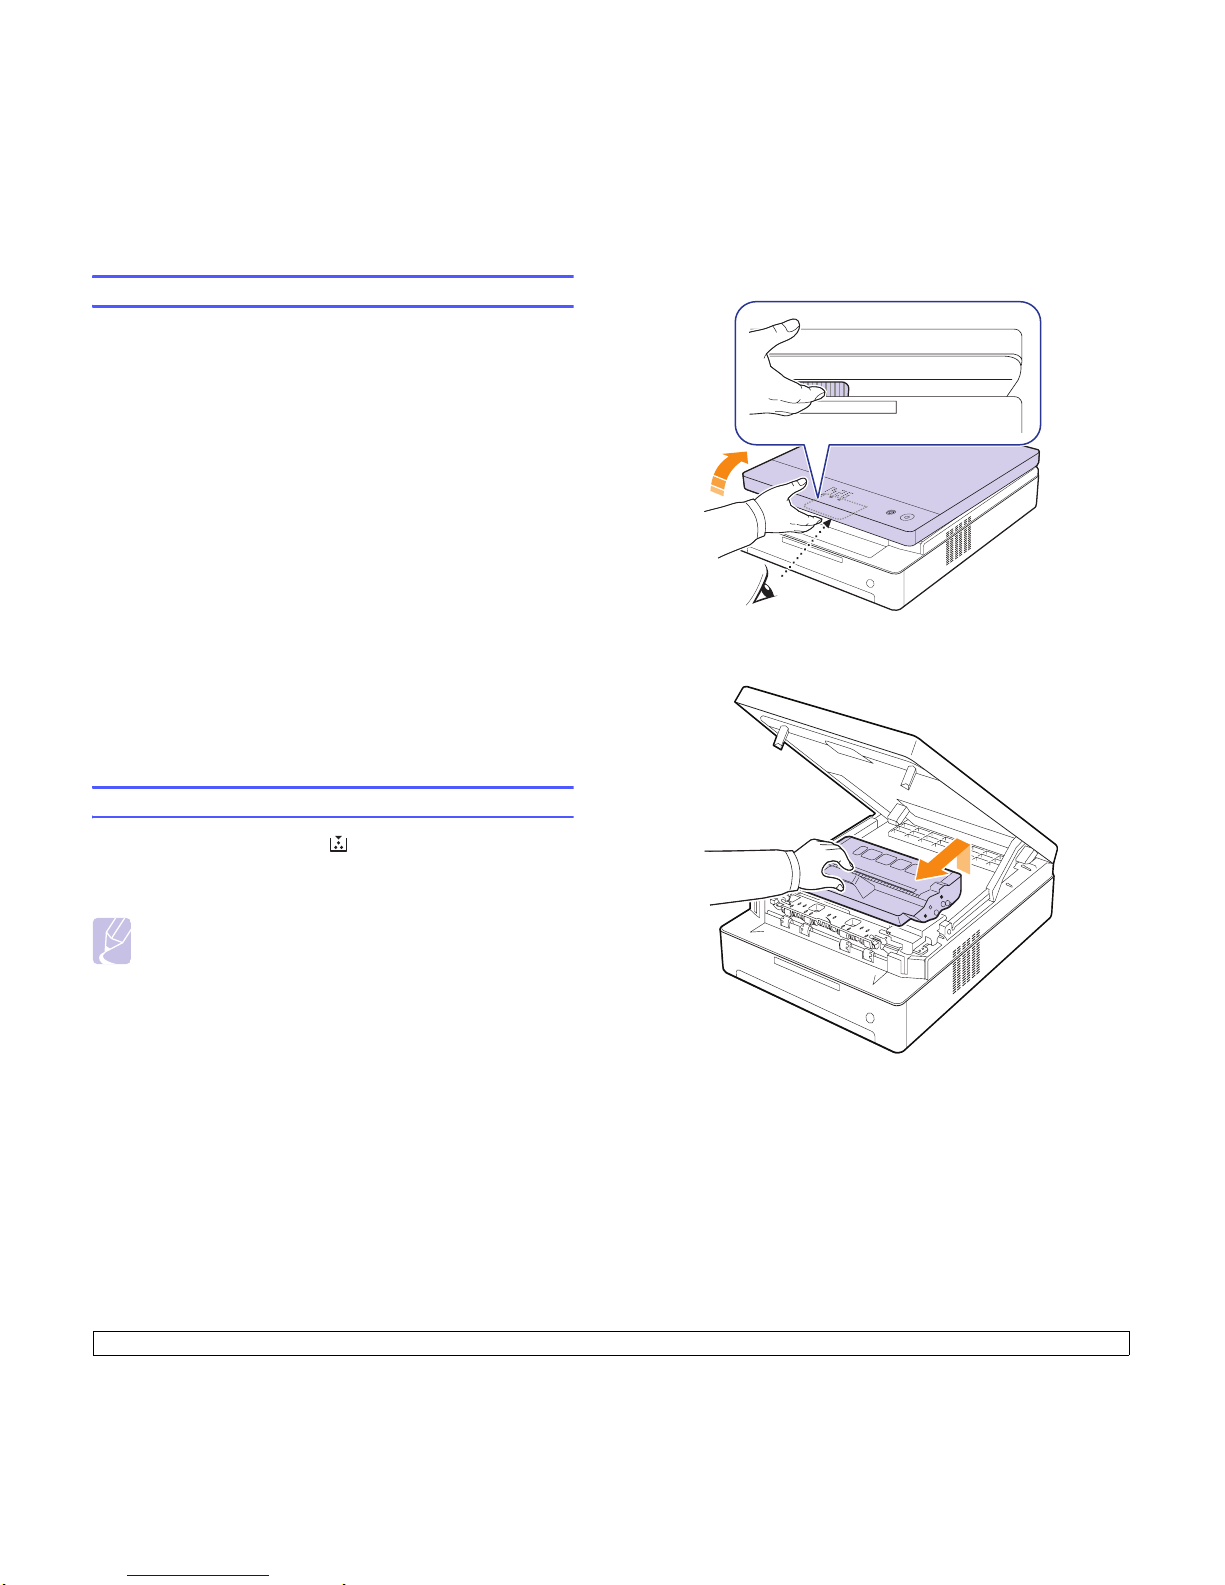
Redistributing toner
When a toner is low the toner LED( ) blinks slowly.
It may cause faded or light areas on a paper. You can temporarily improve
print quality by redistributing the toner.
For detailed information about error message, see page 7.7.
Note
In some cases, white streaks or light printing will still occur even
after you have redistributed the toner.
1 Press the top cover lever, completely open the top cover.
2 Grasp the handles on the toner cartridge and pull to remove the
cartridge from the machine.
Page 30
6.4 <
Maintenance>
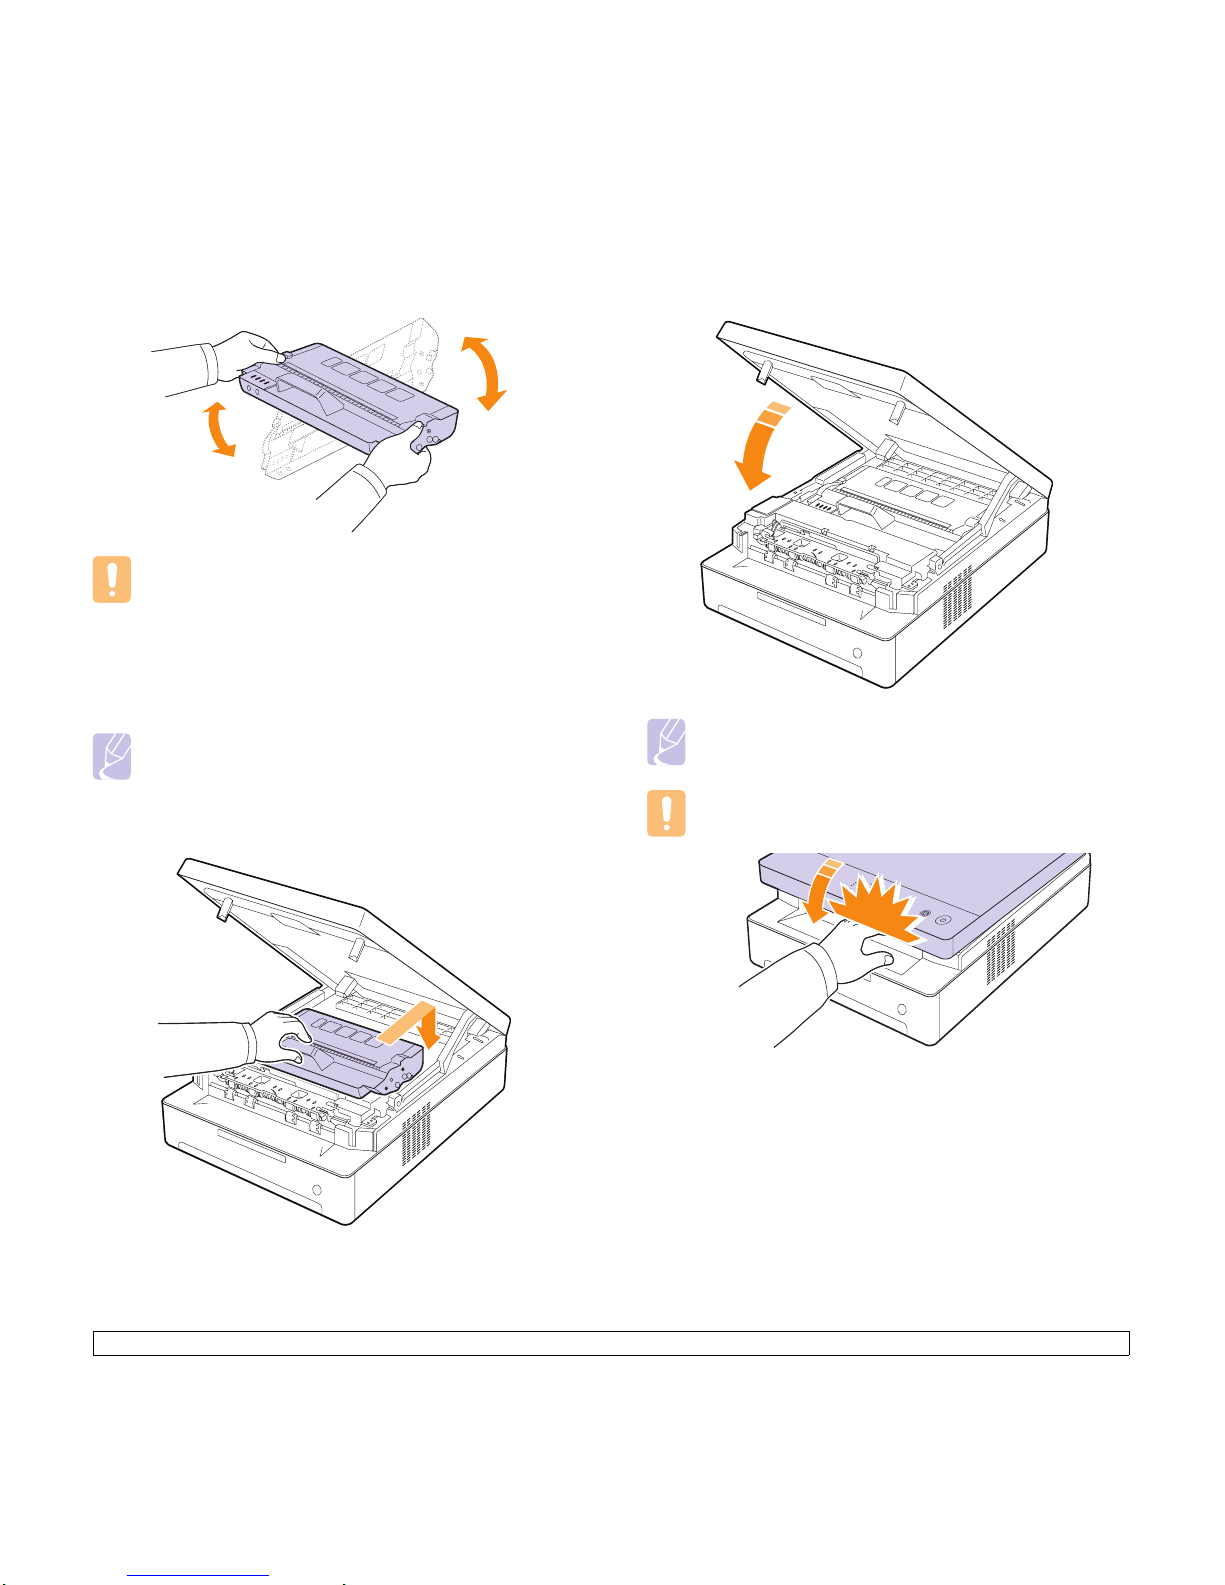
3 Holding side edges of the toner cartridge, thoroughly rock it from
side to side to redistribute the toner.
Caution
• Do not touch the green surface, the OPC drum or the front of
the toner cartridge, with your hands or any other material.
Use the handle on each cartridge in order to avoid touching
this area.
• If you leave the top cover open for more than a few minutes,
the OPC drum can be exposed to light. This will cause
damage to the OPC drum. Close the top cover should the
installation need to be halted for any reason.
Note
If toner gets on your clothing, wipe it off with a dry
cloth and wash it in cold water. Hot water sets toner into
fabric.
4 Slide the toner cartridge back into the machine.
5 Hold the top cover and close it slowly and carefully, until the cover is
the cover is securely latched.
Note
If the top cover is not completely closed, the machine will not
operate.
Caution
Be careful not to pinch your fingers
, since the top cover is very
heavy.
Page 31
6.5 <
Maintenance>
Replacing the toner cartridge
When the toner cartridge is completely empty.
• The toner LED( ) blinks rapidly and the toner-related messages on
the display indicate when toner cartridge should be replaced.
For detailed information about error message, see page 7.7.
• The machine stops printing.
At this stage, the toner cartridge needs to be replaced. Check the type of
toner cartridge for your machine. (See "Supplies" on page 8.1.)
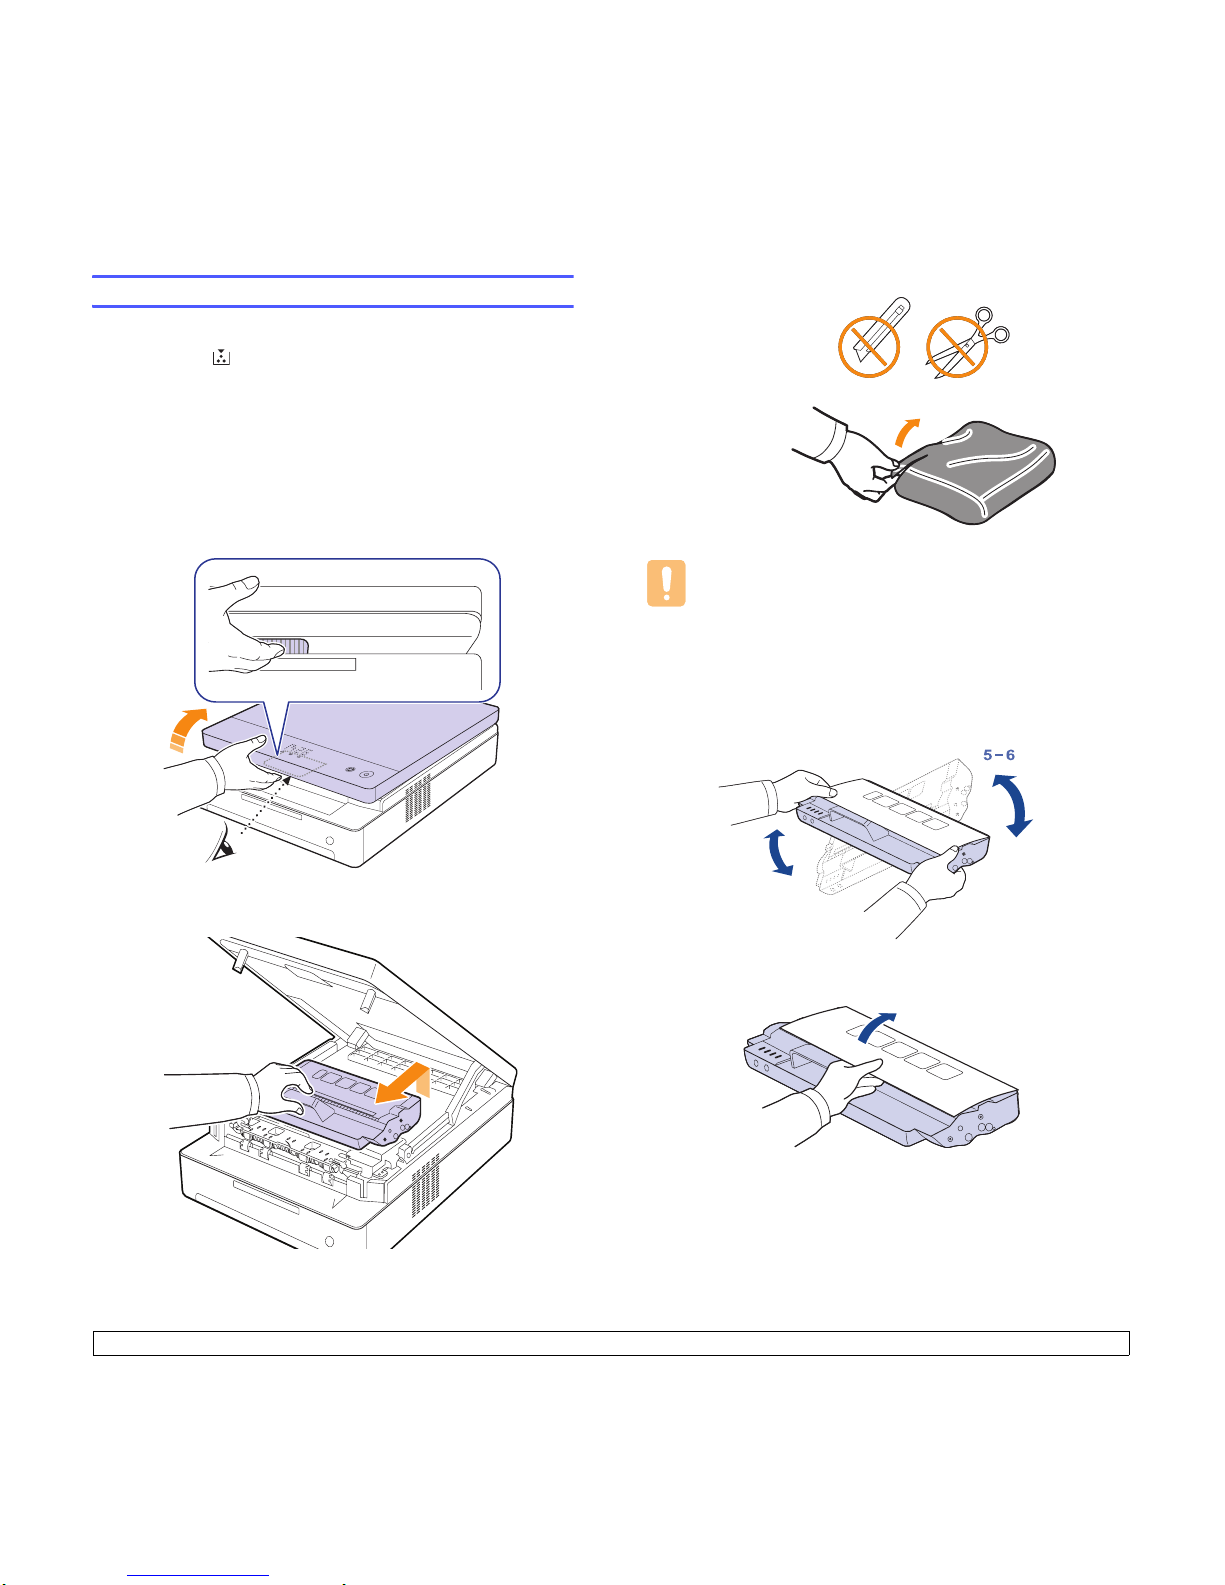
1 Turn the machine off, then wait a few minutes for the machine to
cool.
2 Press the top cover lever, completely open the top cover.
3 Grasp the handles on the empty toner cartridge and pull to remove
the cartridge from the machine.
4 Take a new toner cartridge out of its package.
Caution
• Don't use sharp objects, such as a knife or scissors, to open
the toner cartridge package. You could damage the surface of
the toner cartridge.
• To prevent damage, do not expose the toner cartridge to light
for more than a few minutes. Cover it with a piece of paper to
protect it if necessary.
5 Holding side edges of the toner cartridge, thoroughly rock it from
side to side to redistribute the toner.
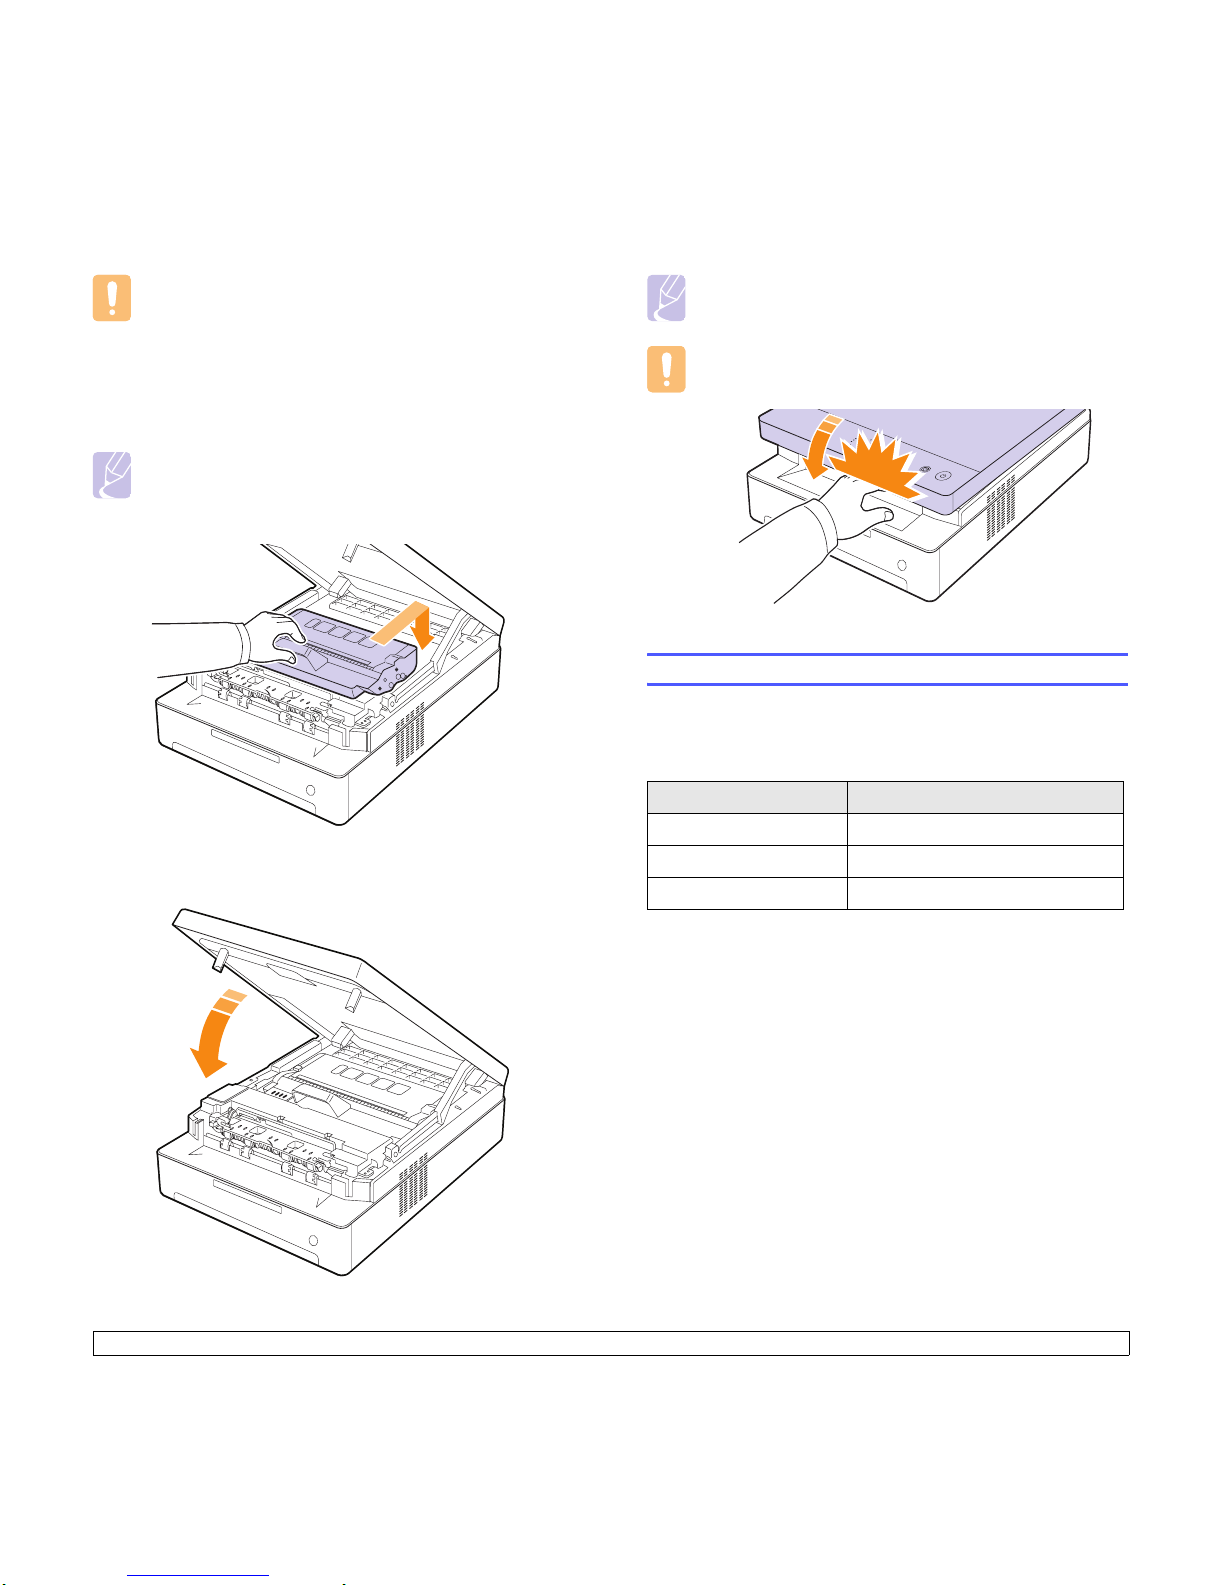
6 Place the toner cartridge on a flat surface, as shown, and remove
the paper covering the toner cartridge.
Page 32
6.6 <
Maintenance>
Caution
• Do not touch the green surface, the OPC drum or the front of
each toner cartridge, with your hands or any other material.
Use the handle on each cartridge in order to avoid touching
this area.
• If you leave the top cover open for more than a few minutes,
the OPC drum can be exposed to light. This will cause
damage to the OPC drum. Close the top cover should the
installation need to be halted for any reason.
Note
If toner gets on your clothing, wipe it off with a dry cloth and
wash it in cold water. Hot water sets toner into fabric.
7 Insert the cartridge into place.
8 Hold the top cover and close it slowly and carefully, until the cover is
the cover is securely latched.
Note
If the top cover is not completely closed, the machine will not
operate.
Caution
Be careful not to pinch your fingers
, since the top cover is very
heavy.
Maintenance Parts
To avoid print quality and paper feed problems resulting from worn parts,
and to maintain your machine in top working condition the following
condition, the following items will need to be replaced after the specified
number of pages, or when the life span of each item has expired.
We highly recommend that this maintenance be performed by an
authorized service provider, dealer or the retailer where you bought the
machine. The warranty does not cover the replacement of the
maintenance parts after their lifespan.
Items Yield (Average)
Transfer roller Approx. 50,000 pages
Fuser unit Approx. 50,000 pages
Paper feed roller Approx. 50,000 pages
Page 33
7.1 <
Troubleshooting>
7 Troubleshooting
This chapter gives helpful information on what to do if you encounter a
problem.
This chapter includes:
• Tips for avoiding paper jams
• Clearing paper jams
• Understanding display messages
• Solving other problems
Tips for avoiding paper jams
By selecting the correct media types, most paper jams can be avoided.
When a paper jam occurs, follow the steps outlined on page 7.1.
• Follow the procedures on page 4.5. Ensure that the adjustable guides
are positioned correctly.
• Do not overload the tray. Ensure that the paper level is below the
paper capacity mark on the inside of the tray.
• Do not remove paper from the tray while your machine is printing.
• Flex, fan, and straighten paper before loading.
• Do not use creased, damp, or highly curled paper.
• Do not mix paper types in a tray.
• Use only recommended print media. (see page
4.6
)
• Ensure that the recommended side of the print media is facing down in
the tray.
Clearing paper jams
Refer to the table below to locate and clear the paper jam.
Caution
To avoid tearing the paper, pull the jammed paper out gently
and slowly. Follow the instructions in the following sections to
clear the jam.
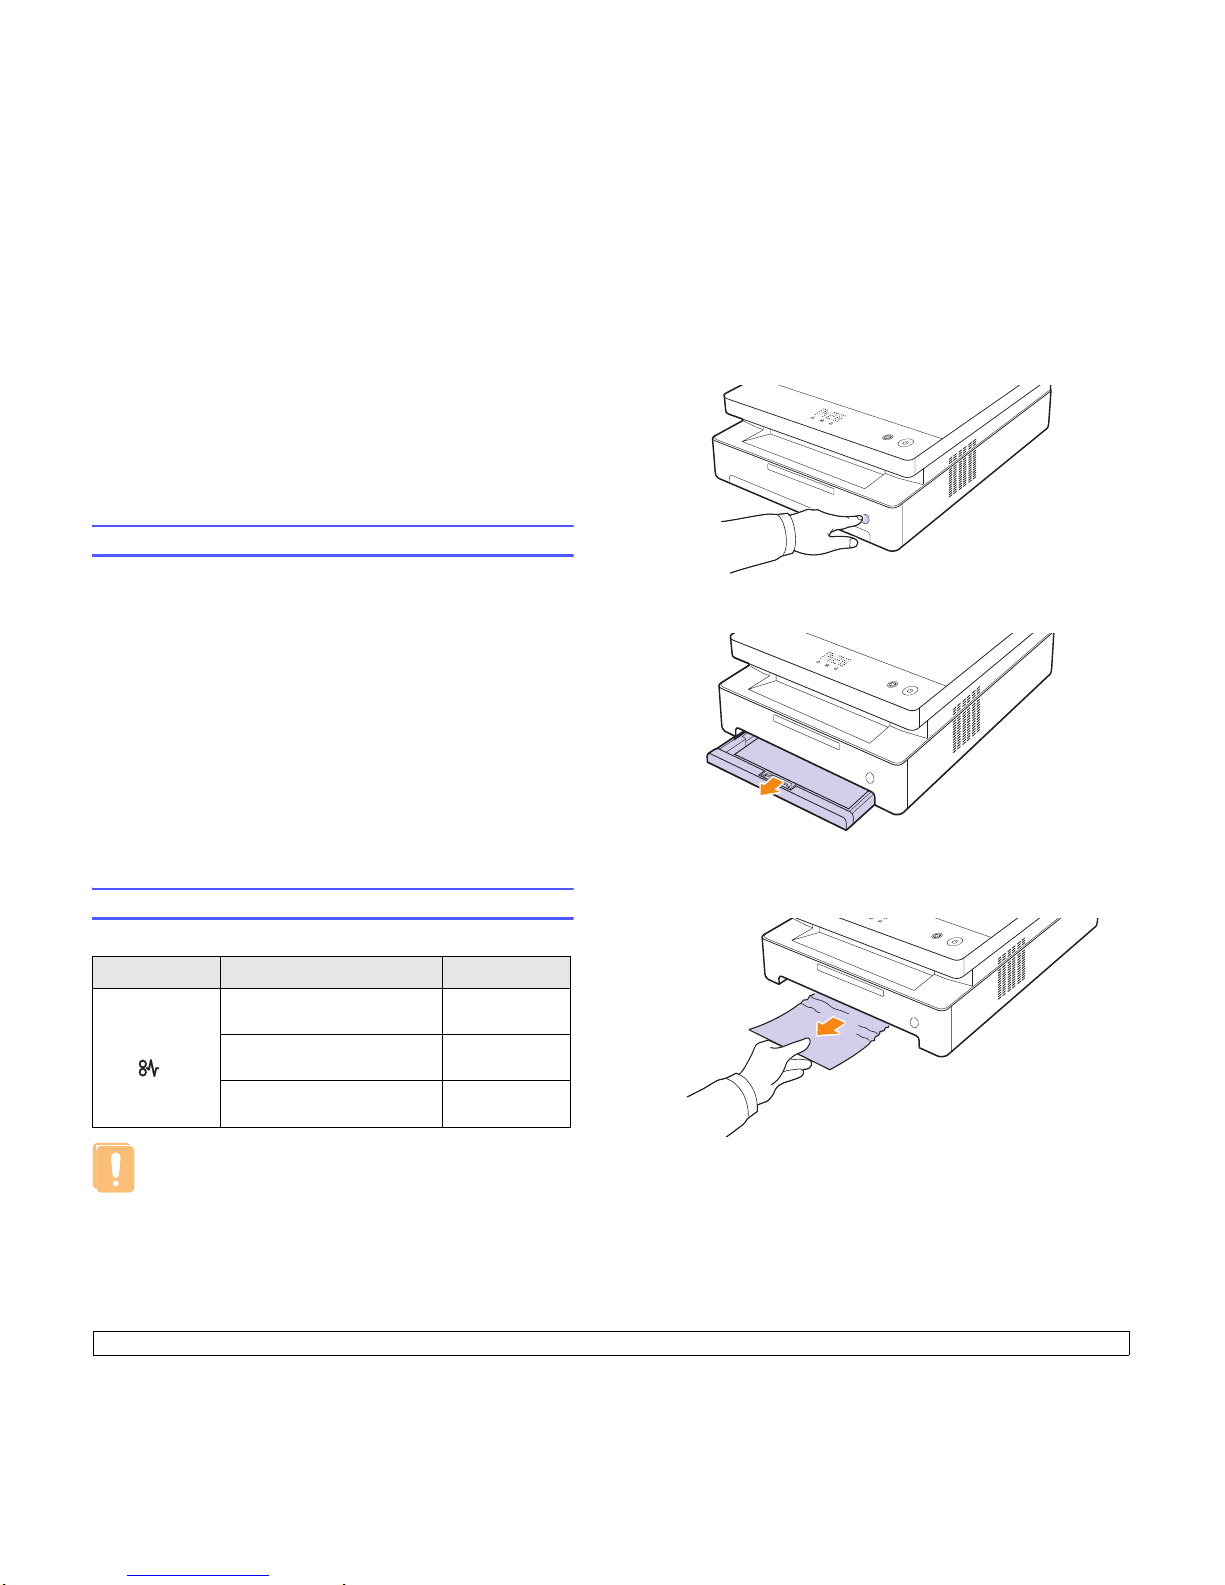
Status display Explanation Solution
Paper jam
LED( ) blinks
In the paper feed area and
rear the machine
Clear the jam.
(Page 7.1)
Rear and Inside the machine Clear the jam.
(Page 7.3)
In the exit area Clear the jam.
(Page 7.5)
In the paper feed area and rear the machine
If paper is jammed in the paper feed area and rear the machine, follow
the next steps to release the jammed paper.
1 Press the tray open button.
2 Pull the tray open.
3 Remove the jammed paper by gently pulling it straight out as shown
below.
Page 34
7.2 <
Troubleshooting>
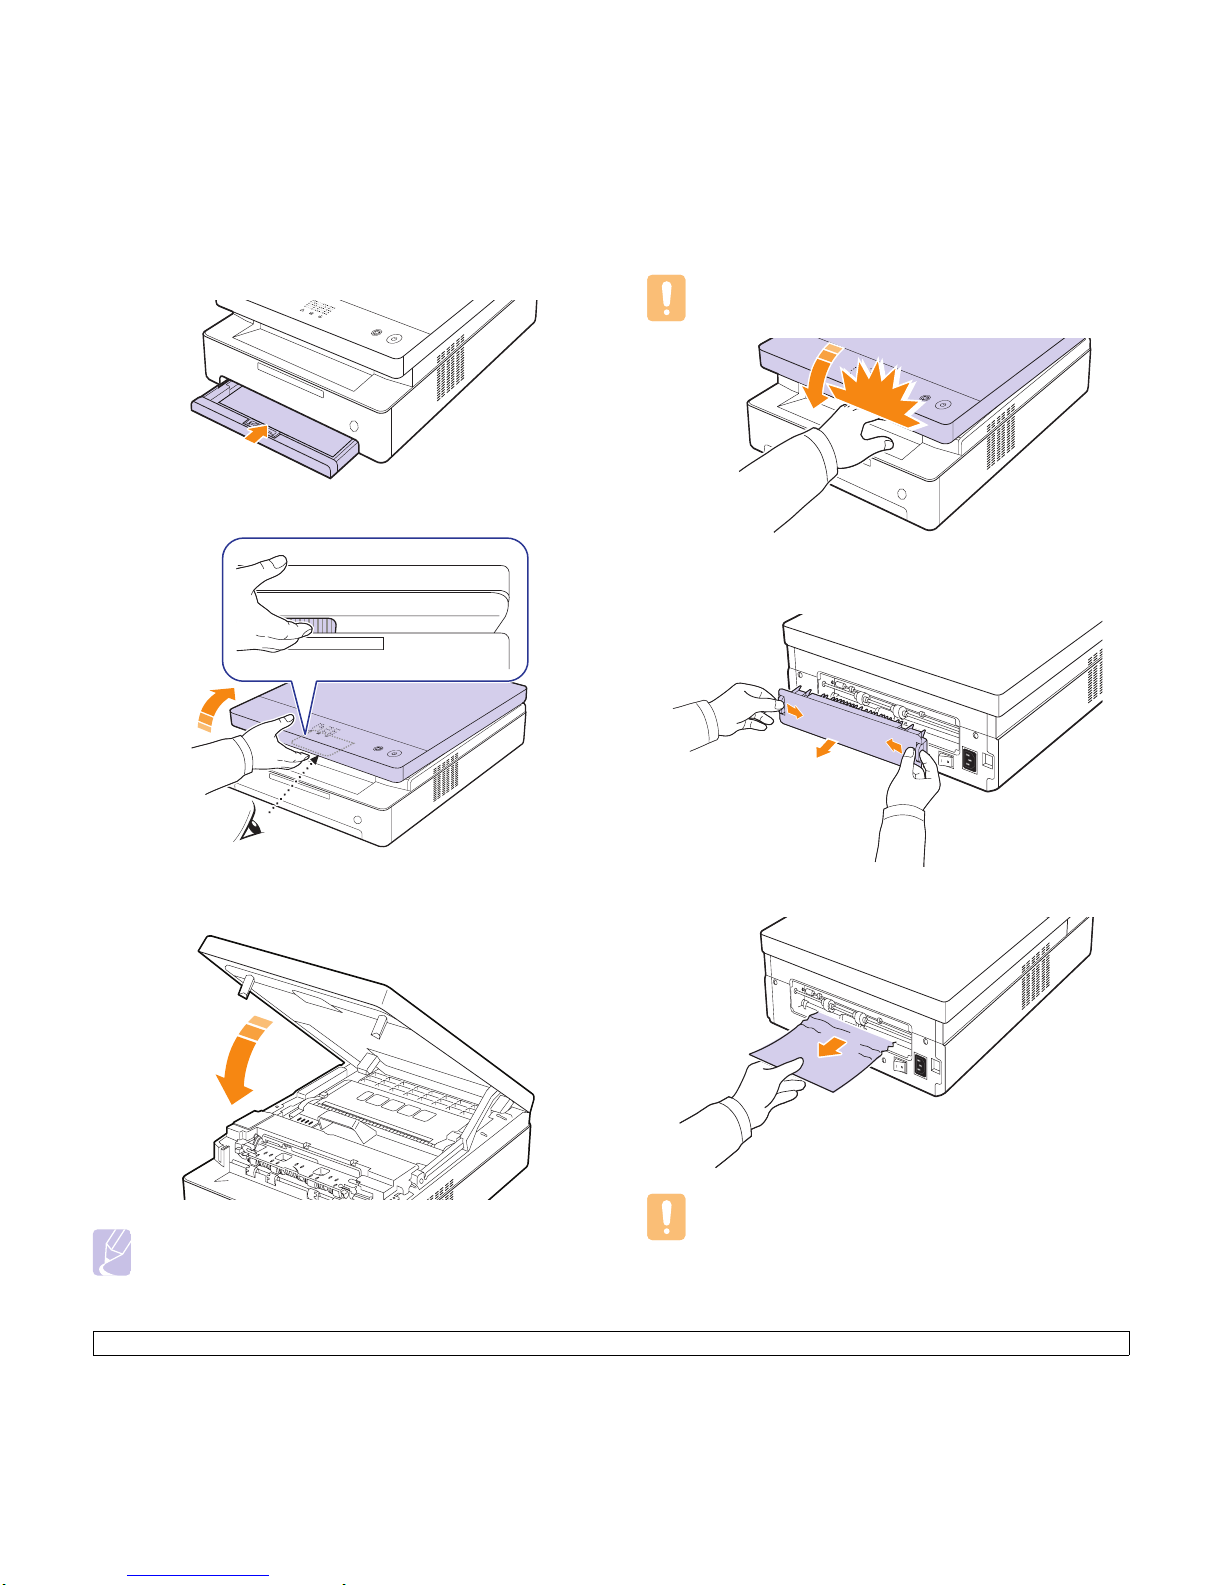
4 Align the tray with the slot, and slide it into the machine.
5 Press the top cover lever, completely open the top cover.
6 Hold the top cover and close it slowly and carefully, until the cover is
securely latched.
Note
If the top cover is not completely closed, the machine will not
operate.
Caution
Be careful not to pinch your fingers
, since the top cover is very
heavy.
7 If the paper jam LED blinks, go to next step.
8 Open the rear cover.
9 Carefully take the jammed paper out of the machine.
Caution
Do not touch the fuser inside the machine. It is hot and could
cause burns! The fuser's operating temperature is very hot.
Take care when removing paper from the machine.
Page 35
7.3 <
Troubleshooting>
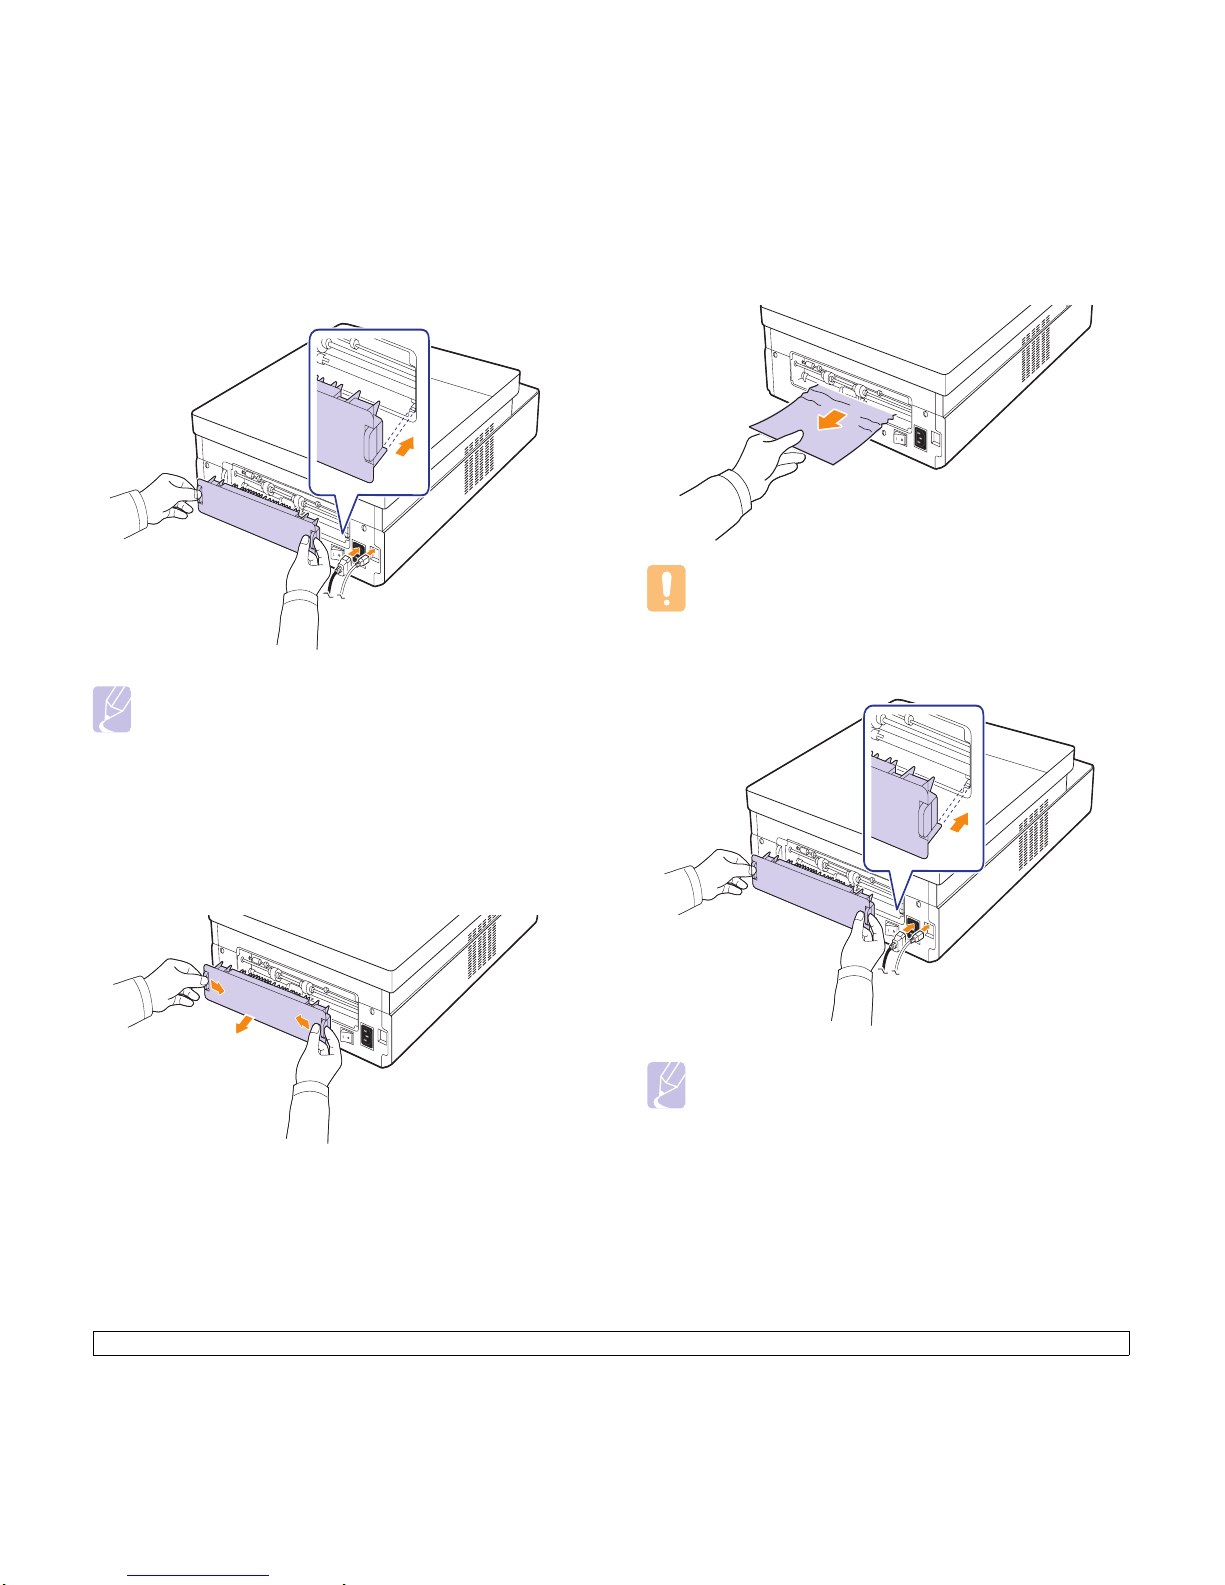
10 Hold both edges of the rear cover, and align it as shown in the
following figure. Press the rear cover firmly until it clicks.
Note
If the rear cover is not completely closed, the paper jam may
occur.
11 Open and close the top cover firmly. The machine will resume
printing.
Rear and inside the machine
If paper is jammed in the rear and inside the machine, follow the next
steps to release the jammed paper.
1 Open the rear cover.
2 Carefully take the jammed paper out of the machine.
Caution
Do not touch the fuser inside the machine. It is hot and could
cause burns! The fuser's operating temperature is very hot.
Take care when removing paper from the machine.
3 Hold both edges of the rear cover, and align it as shown in the
following figure. Press the rear cover firmly until it clicks.
Note
If the rear cover is not completely closed, the paper jam may
occur.
Page 36
7.4 <
Troubleshooting>
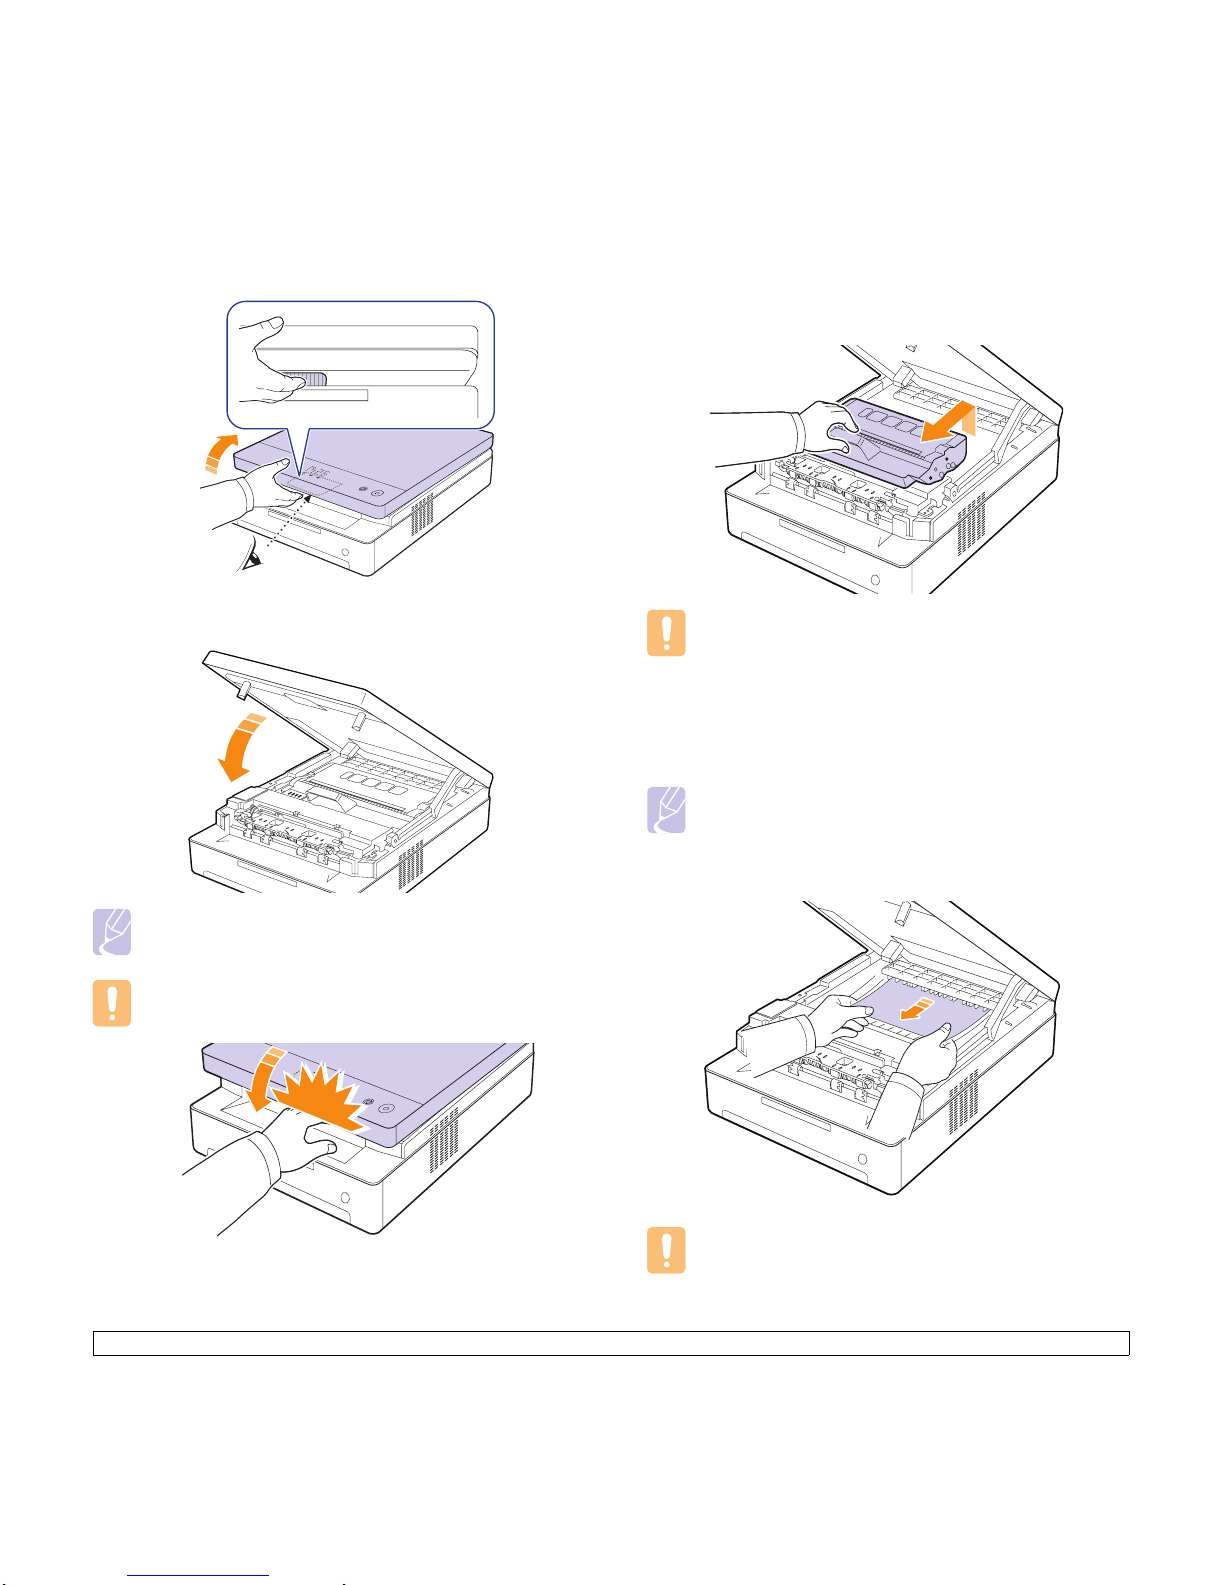
4 Press the top cover lever, completely open the top cover.
5 Hold the top cover and close it slowly and carefully, until the cover is
securely latched.
Note
If the top cover is not completely closed, the machine will not
operate.
Caution
Be careful not to pinch your fingers
, since the top cover is very
heavy.
6 If the paper jam LED blinks, go to next step.
7 Press the top cover lever, completely open the top cover.
8 Grasp the handles on the toner cartridge and pull to remove the
cartridge out of the machine.
Caution
• Do not touch the green surface, the OPC drum or the front of
the toner cartridge, with your hands or any other material.
Use the handle on each cartridge in order to avoid touching
this area.
• If you leave the top cover open for more than a few minutes,
the OPC drum can be exposed to light. This will cause
damage to the OPC drum. Close the top cover should the
installation need to be halted for any reason.
Note
If toner gets on your clothing, wipe it off with a dry
cloth and wash it in cold water. Hot water sets toner into
fabric.
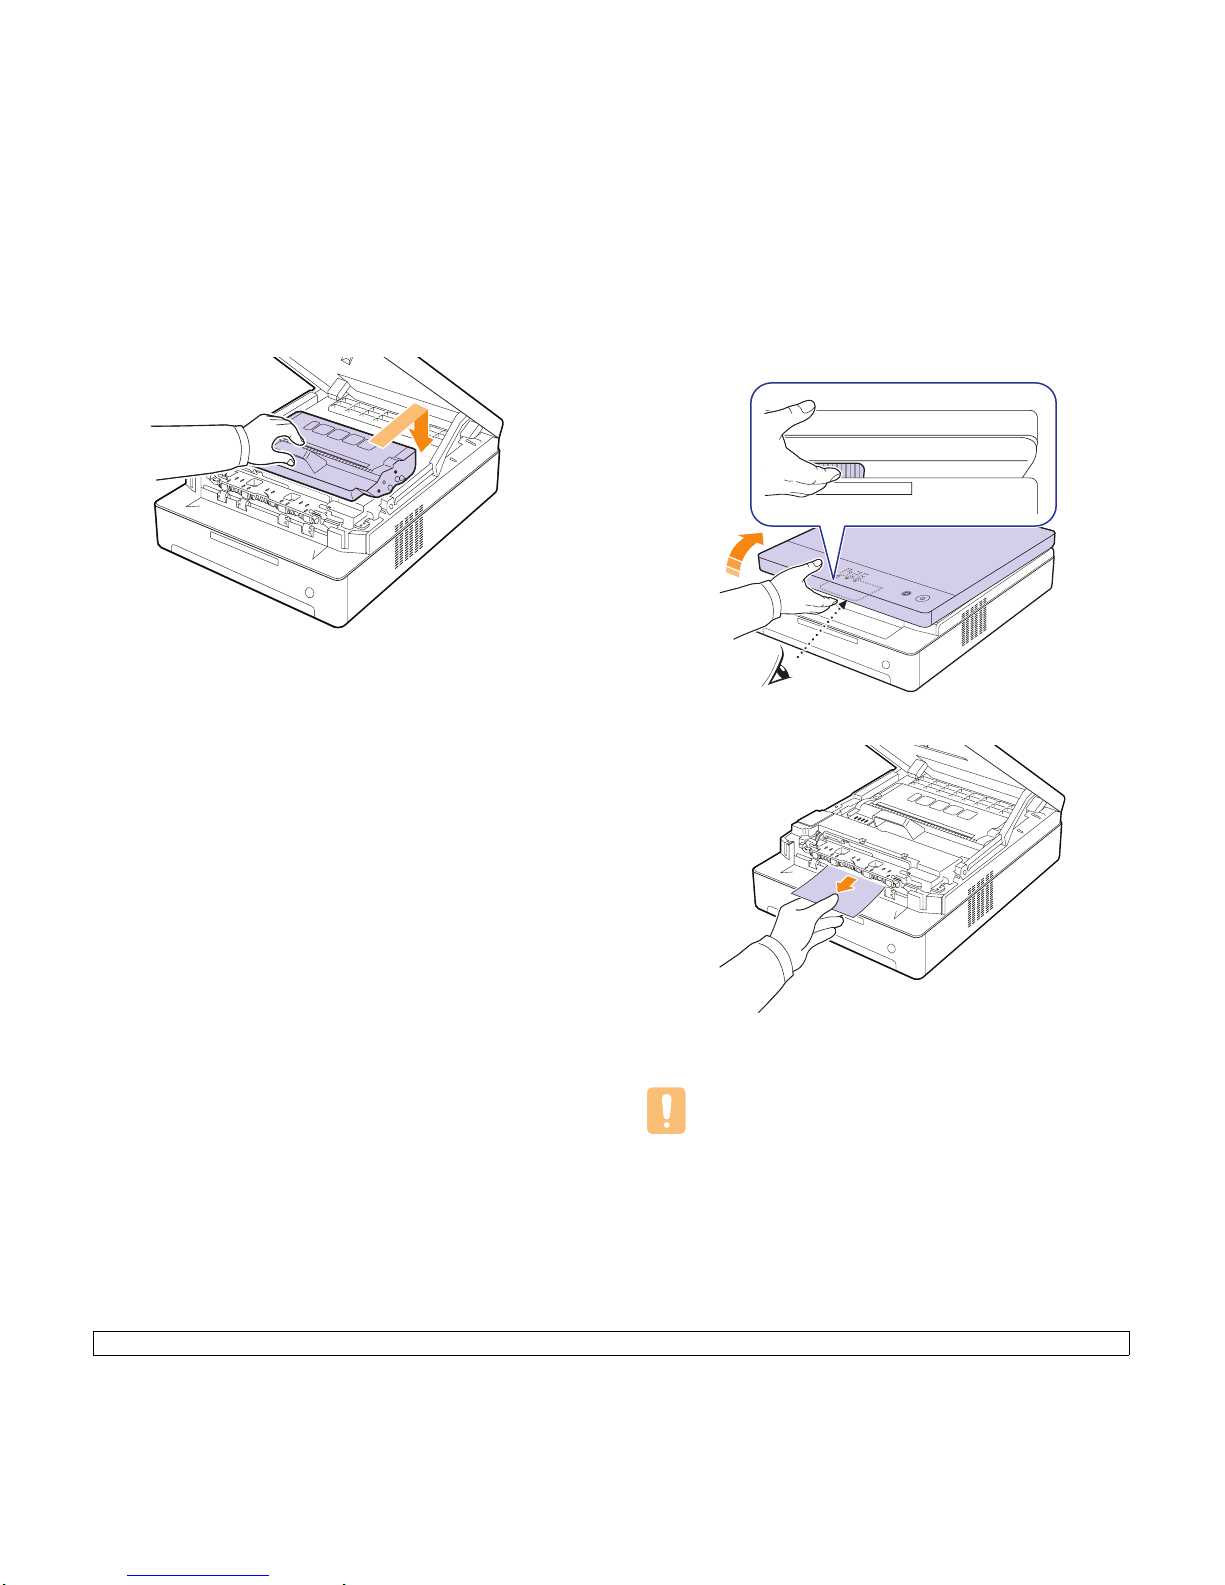
9 Carefully take the jammed paper out of the machine.
Caution
Do not touch the fuser inside the machine. It is hot and could
cause burns! The fuser's operating temperature is
very hot
.
Take care when removing paper from the machine.
Page 37
7.5 <
Troubleshooting>
10 After removing the jammed paper, check for paper which may be
jammed in other parts of the machine.
11 Slide the toner cartridge back into the machine.
12 Close the top cover firmly. The machine will resume printing.
In the exit area
If paper is jammed in the paper exit area, follow the next steps to release
the jammed paper.
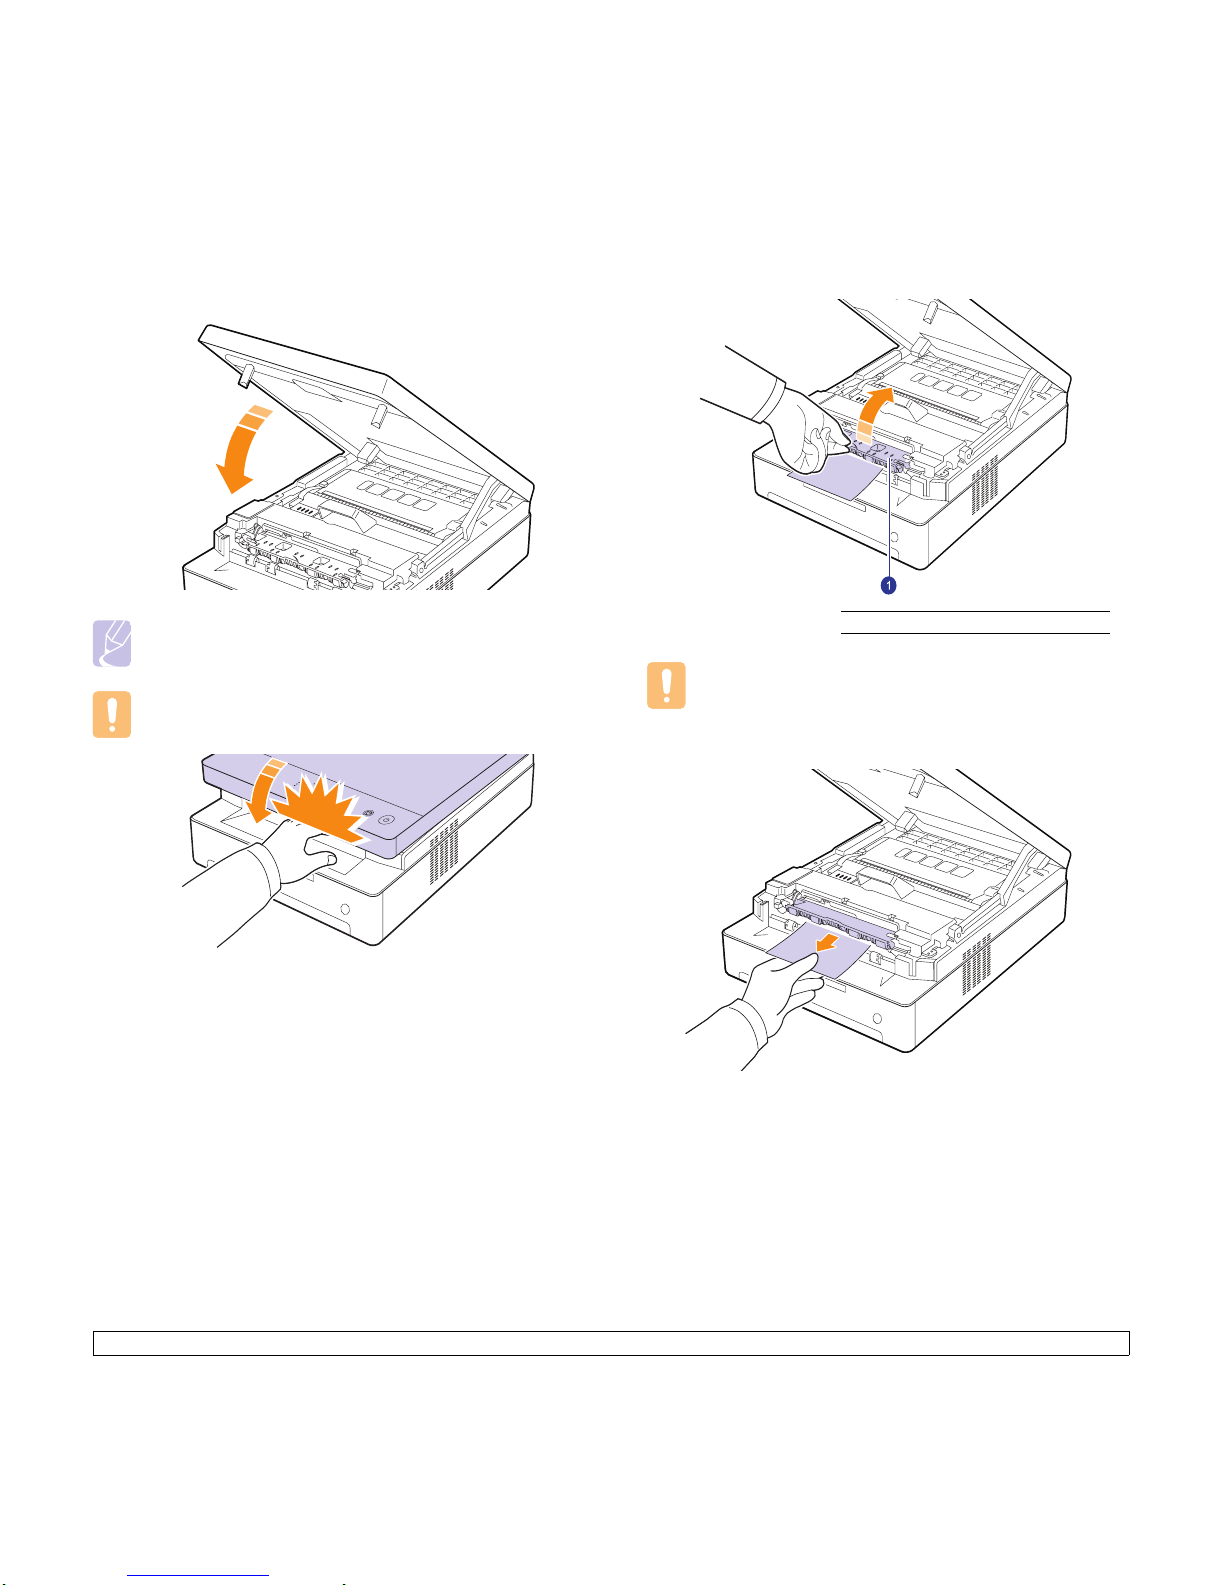
1 Press the top cover lever, completely open the top cover.
2 If a long portion of the paper is visible, pull it straight out.
If there is any resistance removing the paper, stop pulling and go to
step 4.
Caution
Do not touch the fuser inside the machine. It is hot and could
cause burns! The fuser's operating temperature is very hot.
Take care when removing paper from the machine.
Page 38
7.6 <
Troubleshooting>
3 Hold the top cover and close it slowly and carefully, until the cover is
securely latched.
Note
If the top cover is not completely closed, the machine will not
operate.
Caution
Be careful not to pinch your fingers
, since the top cover is very
heavy.
4 Open the inner cover.
Caution
Do not touch the fuser inside the machine. It is hot and could
cause burns! The fuser's operating temperature is very hot.
Take care when removing paper from the machine.
5 Carefully take the jammed paper out of the machine.
6 Close the inner cover.
7 After removing the jammed paper, check for paper which may be
jammed in other parts of the machine.
8 Close the top cover firmly. The machine will resume printing.
1
inner cover
Page 39
7.7 <
Troubleshooting>
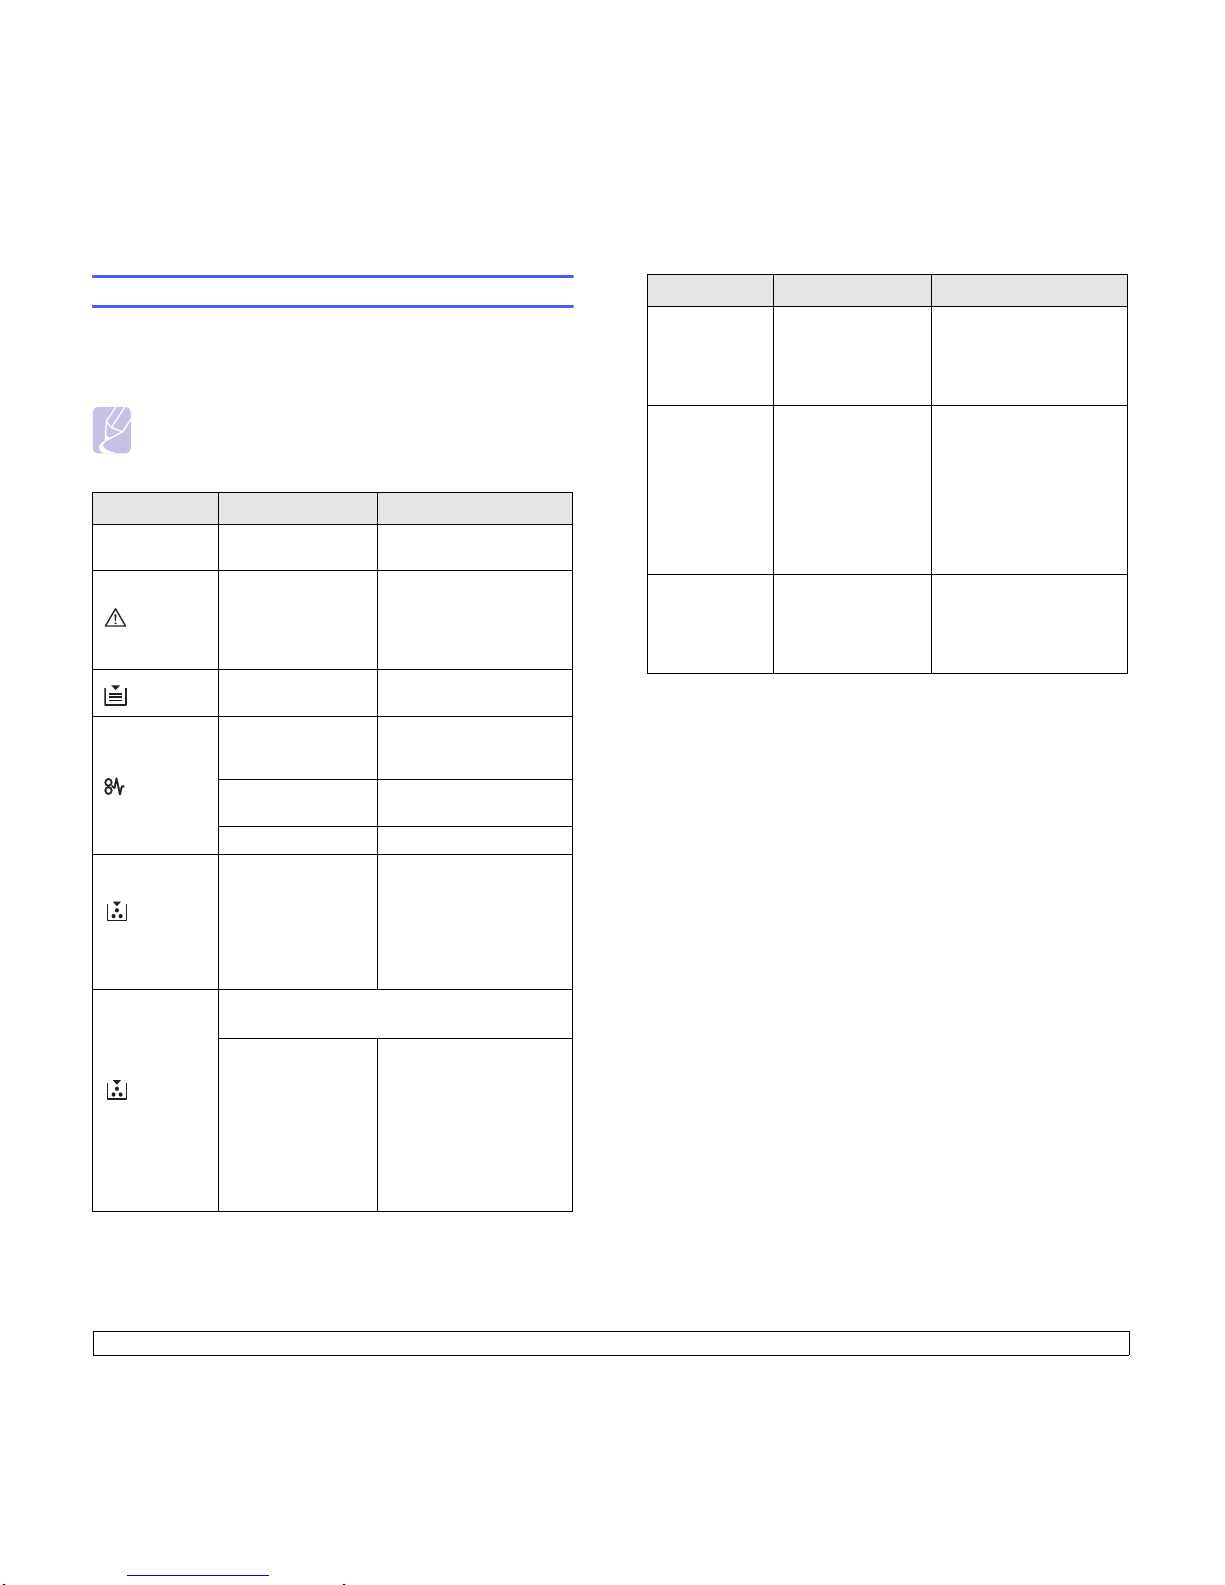
Understanding display messages
Messages appear on the Smart Panel program window or on the control
panel display to indicate machine status or errors. Refer to the tables
below to understand the messages meaning to correct the problem, if
necessary.
Note
When you call for service, it is very convenient to provide the
service representative with the contents of the display message.
Status display Explanation Solution
OPEN The covers is not
completely closed.
Press the covers until it
clicks.
LED blinks
There is a problem
in the machine.
Unplug the power cord
and plug it back in. If the
problem persists, contact
the service
representatives.
LED blinks
There is no paper in
the tray.
Load paper in the tray.
(Page 4.5)
LED blinks
In the paper feed
area and rear the
machine.
Clear the jam. (Page 7.1)
Rear and Inside the
machine.
Clear the jam. (Page 7.3)
In the exit area. Clear the jam. (Page 7.5)
LED blinks
slowly
The corresponding
toner cartridge is
almost empty.
Take out the
corresponding toner
cartridge and thoroughly
shake it. By doing this,
you can temporarily
reestablish printing
operations. (Page 6.3)
LED blinks
rapidly
Replace the toner cartridge with a new one. (Page
6.5)
The toner cartridge
is installed
improperly, or not
installed.
Reinstall the toner
cartridge two or three
times. If the problem
persists, the toner
cartridge is not being
detected. Please contact
the service
representatives. (Page
6.5)
T1 The toner cartridge
which the arrow
indicates is not
suitable for your
machine.
Install the a Samsunggenuine toner cartridge
designed for your
machine.
T2
The lifespan of the
toner cartridge
which the arrow
indicates is reached.
This message appears
when the toner is
completely empty, and
your machine stops
printing. Replace the
corresponding toner
cartridge with a Samsunggenuine cartridge.
(Page 6.5)
T3 The toner cartridge
which the arrow
indicates is not a
Samsung-genuine
cartridge.
Replace the
corresponding toner
cartridge with a Samsunggenuine cartridge.
(Page 6.5)
Status display Explanation Solution
Page 40
7.8 <
Troubleshooting>
Solving other problems
The following chart lists some conditions that may occur and the
recommended solutions. Follow the suggested solutions until the
problem is corrected. If the problem persists, please call for service.
Paper feeding problems
Condition Suggested solutions
Paper is jammed
during printing.
Clear the paper jam. (See "Clearing paper
jams" on page 7.1.)
Paper sticks
together.
• Ensure that there is not too much paper in the
tray. The tray can hold up to 100 sheets of
paper.
• Make sure that you are using the correct type
of paper. (See "Specifications on print
media" on page 4.3.)
• Remove paper from the tray and flex or fan
the paper.
• Humid conditions may cause some paper to
stick together.
Multiple sheets of
paper do not
feed.
• Different types of paper may be stacked in the
tray. Load paper of only one type, size, and
weight.
• If multiple sheets have caused a paper jam,
clear the paper jam. (See "Clearing paper
jams" on page 7.1.)
Paper does not
feed into the
machine.
• Paper has not been loaded correctly. Remove
paper from the tray and reload it correctly.
• There is too much paper in the tray. Remove
excess paper from the tray.
• The paper is too thick. Turn the paper around
or upside down, and try again. Use only paper
that meets the specifications required by the
machine. (See "Specifications on print
media" on page 4.3.)
• Remove any obstructions from inside the
machine.
The paper keeps
jamming.
• There is too much paper in the tray. Remove
excess paper from the tray.
• An incorrect type of paper is being used. Use
only paper that meets the specifications
required by the machine. (See "Specifications
on print media" on page 4.3.)
• There may be debris inside the machine.
Open the top cover and remove the debris.
Printing problems
Condition Possible cause Suggested solutions
The
machine
does not
print.
The machine is not
receiving power.
Check the power cord
connections. Check the
power switch and the power
source.
The machine is not
selected as the
default printer.
Select a machine name as
your default printer in your
Windows.
Check the machine for the following:
• The cover is not closed. Close the cover.
• Paper is jammed. Clear the paper jam. (See
"Clearing paper jams" on page 7.1.)
• No paper is loaded. Load paper. (See "Loading
paper in the tray" on page 4.5.)
• The toner cartridge is not installed. Install the toner
cartridge.
If a system error occurs, contact your service
representative.
The connection cable
between the
computer and the
machine is not
connected properly.
Disconnect the printer cable
and reconnect it.
The connection cable
between the
computer and the
machine is defective.
If possible, attach the cable
to another computer that is
working properly and print a
job. You can also try using a
different printer cable.
The port setting is
incorrect.
Check the Windows printer
setting to make sure that the
print job is sent to the correct
port. If the computer has
more than one port, make
sure that the machine is
attached to the correct one.
The machine may be
configured
incorrectly.
Check the printer properties
to ensure that all of the print
settings are correct.
The printer driver
may be incorrectly
installed.
Repair the printer software.
See
Software section
.
The machine is
malfunctioning.
Check the display message
on the control panel to see if
the machine is indicating a
system error. Contact a
service representative.
Page 41
7.9 <
Troubleshooting>
The
machine
selects print
materials
from the
wrong
paper
source.
The paper option that
was selected in the
machine properties
may be incorrect.
For many software
applications, the paper
source selection is found
under the Paper
tab within
the printer properties. Select
the correct paper source.
See the printer driver help
screen.
A print job
is extremely
slow.
The job may be very
complex.
Reduce the complexity of the
page or try adjusting the print
quality settings such as
adjusting the resolution.
Half the
page is
blank.
The page orientation
setting may be
incorrect.
Change the page orientation
in your application. See the
printer driver help screen.
The paper size and
the paper size
settings do not
match.
Ensure that the paper size in
the printer driver settings
matches the paper in the
tray.
Or, ensure that the paper
size in the printer driver
settings matches the paper
selection in the software
application settings you use.
The
machine
prints, but
the text is
wrong,
garbled, or
incomplete.
The printer cable is
loose or defective.
Disconnect the printer cable
and reconnect. Try a print job
that you have already printed
successfully. If possible,
attach the cable and the
machine to another computer
and try a print job that you
know works. Finally, try a
new printer cable.
The wrong printer
driver was selected.
Check the application’s
printer selection menu to
ensure that your machine is
selected.
The software
application is
malfunctioning.
Try printing a job from
another application.
The operating system
is malfunctioning.
Exit Windows and reboot the
computer. Turn the machine
off and then back on again.
Condition Possible cause Suggested solutions
Pages print,
but they are
blank.
The toner cartridge is
defective or out of
toner.
Redistribute the toner, if
necessary.
If necessary, replace the
toner cartridge.
The file may have
blank pages.
Check the file to ensure that
it does not contain blank
pages.
Some parts, such as
the controller or the
board, may be
defective.
Contact a service
representative.
PDF file
does not
print
correctlysome parts
are missing
in the
graphics,
text or
illustrations.
Incompatibility
between the PDF file
and the Acrobat
products.
Printing the PDF file as an
image may enable the file to
print. Turn on
Print As Image
from the Acrobat printing
options.
Note: It will take longer to
print when you print a PDF
file as an image.
The print
quality of
photos is
not good.
Images are
not clear.
The resolution of the
photo is very low.
Reduce the photo size. If you
increase the photo size in the
software application, the
resolution will be reduced.
Condition Possible cause Suggested solutions
Page 42
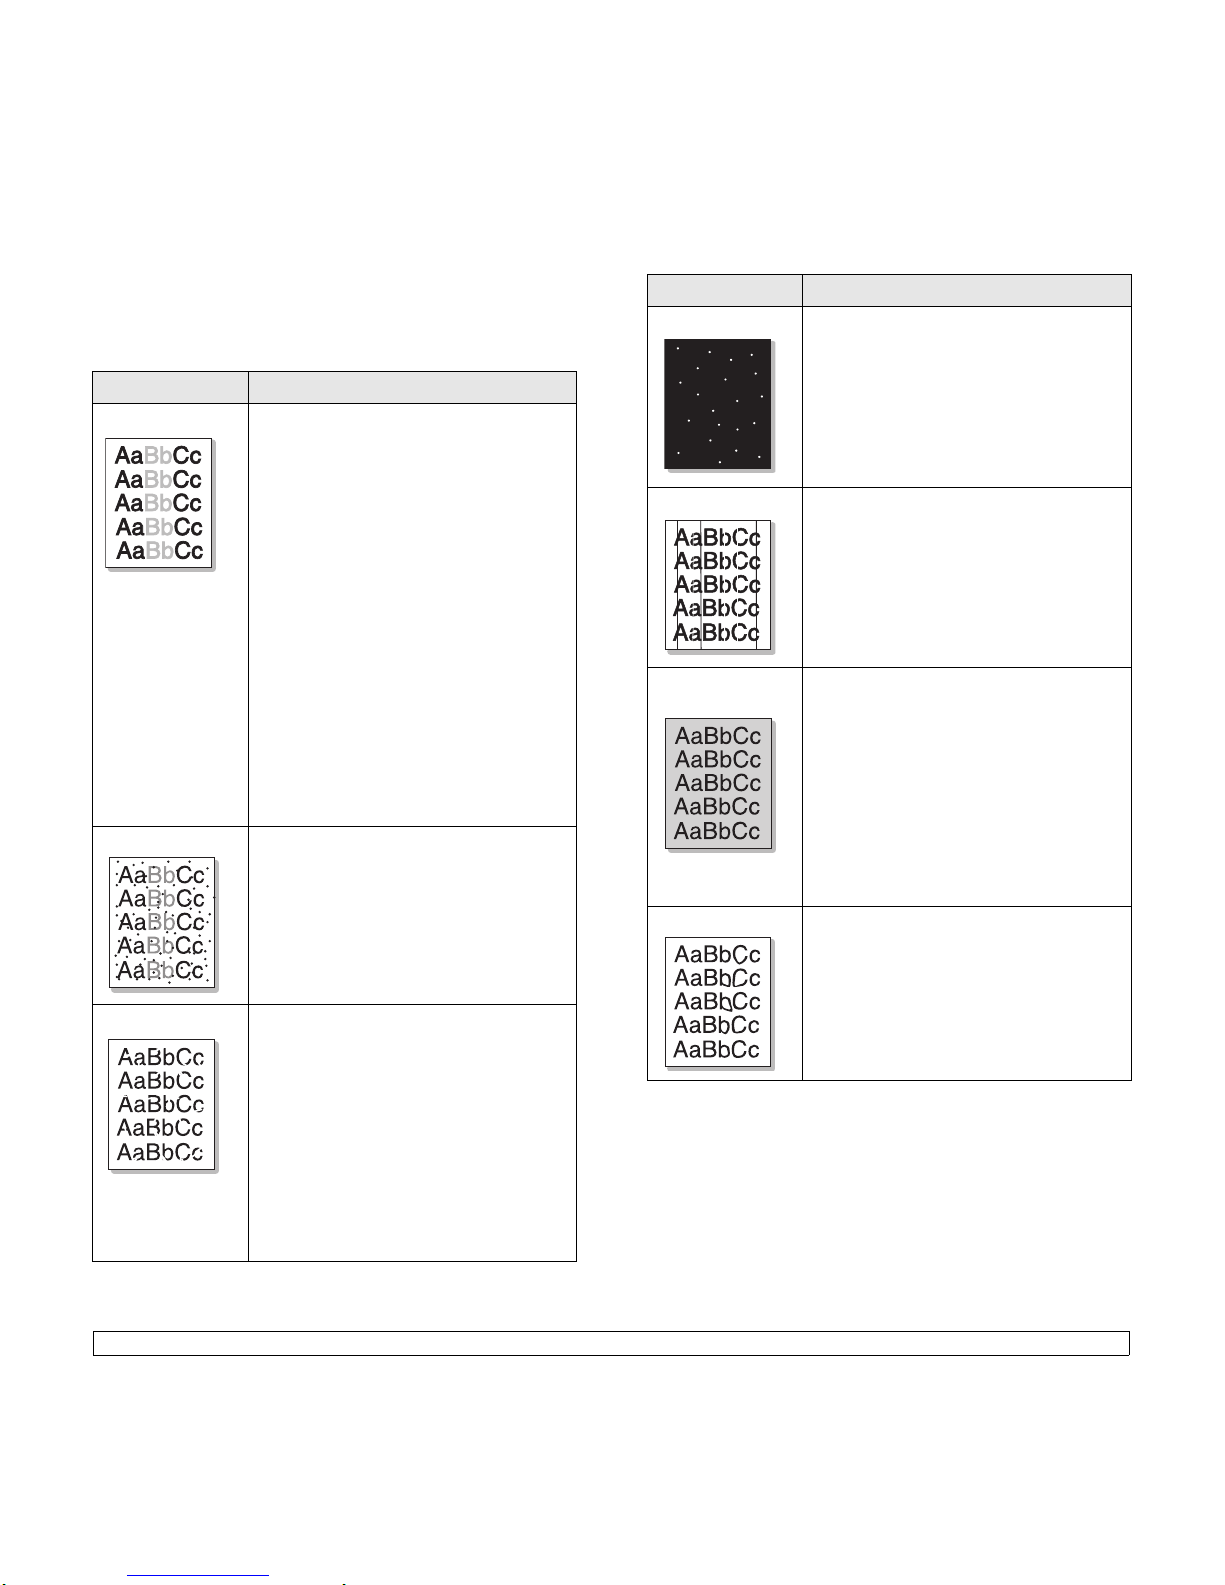
7.10 <
Troubleshooting>
Printing quality problems
If the inside of the machine is dirty or paper has been loaded improperly,
you may notice a reduction in print quality. See the table below to clear
the problem.
Condition Suggested solutions
Light or faded print
If a vertical white streak or faded area appears
on the page:
• The toner supply is low. You may be able to
temporarily extend the toner cartridge life. If
this does not improve the print quality, install
a new toner cartridge.
• The paper may not meet paper
specifications; for example, the paper may
be too moist or rough. (See "Specifications
on print media" on page 4.3.)
• If the entire page is light, the print resolution
setting is too low or the toner save mode is
on. Adjust the print resolution and turn the
toner save mode off. See the help screen of
the printer driver and refer to Software
section, respectively.
• A combination of faded or smeared defects
may indicate that the toner cartridge needs
cleaning. Contact a service representative.
• The surface of the LSU part inside the
machine may be dirty. Clean the LSU (see
page 6.2).
Toner specks
• The paper may not meet specifications; for
example, the paper may be too moist or
rough. (See "Specifications on print
media" on page 4.3.)
• The paper path may need cleaning. Contact
a service representative.
Dropouts
If faded areas, generally rounded, occur
randomly on the page:
• A single sheet of paper may be defective.
Try reprinting the job.
• The moisture content of the paper is uneven
or the paper has moist spots on its surface.
Try a different brand of paper. (See
"Specifications on print media" on page 4.3.)
• The paper lot is bad. The manufacturing
processes can cause some areas to reject
toner. Try a different kind or brand of paper.
• If these steps do not correct the problem,
contact a service representative.
White Spots White spots appear on the page:
• The paper path may need cleaning. Contact
a service representative.
Vertical lines
If black vertical streaks appear on the page:
• The toner cartridge has probably been
scratched. Remove the toner cartridge and
install a new one.
If white vertical streaks appear on the page:
• The surface of the LSU part inside the
machine may be dirty. Clean the LSU (see
page 6.2).
Color or Black
background
If the amount of background shading becomes
unacceptable:
• Change to a lighter weight paper. (See
"Specifications on print media" on page 4.3.)
• Check the environmental conditions: very
dry conditions (low humidity) or a high level
of humidity (higher than 80% RH) can
increase the amount of background
shading.
• Remove the old toner cartridge, and then
install a new one. (See "Replacing the toner
cartridge" on page 6.5.)
Toner smear
• Clean the inside of the machine. Contact a
service representative to clean the inside of
the machine.
• Check the paper type and quality. (See
"Specifications on print media" on page 4.3.)
Condition Suggested solutions
Page 43
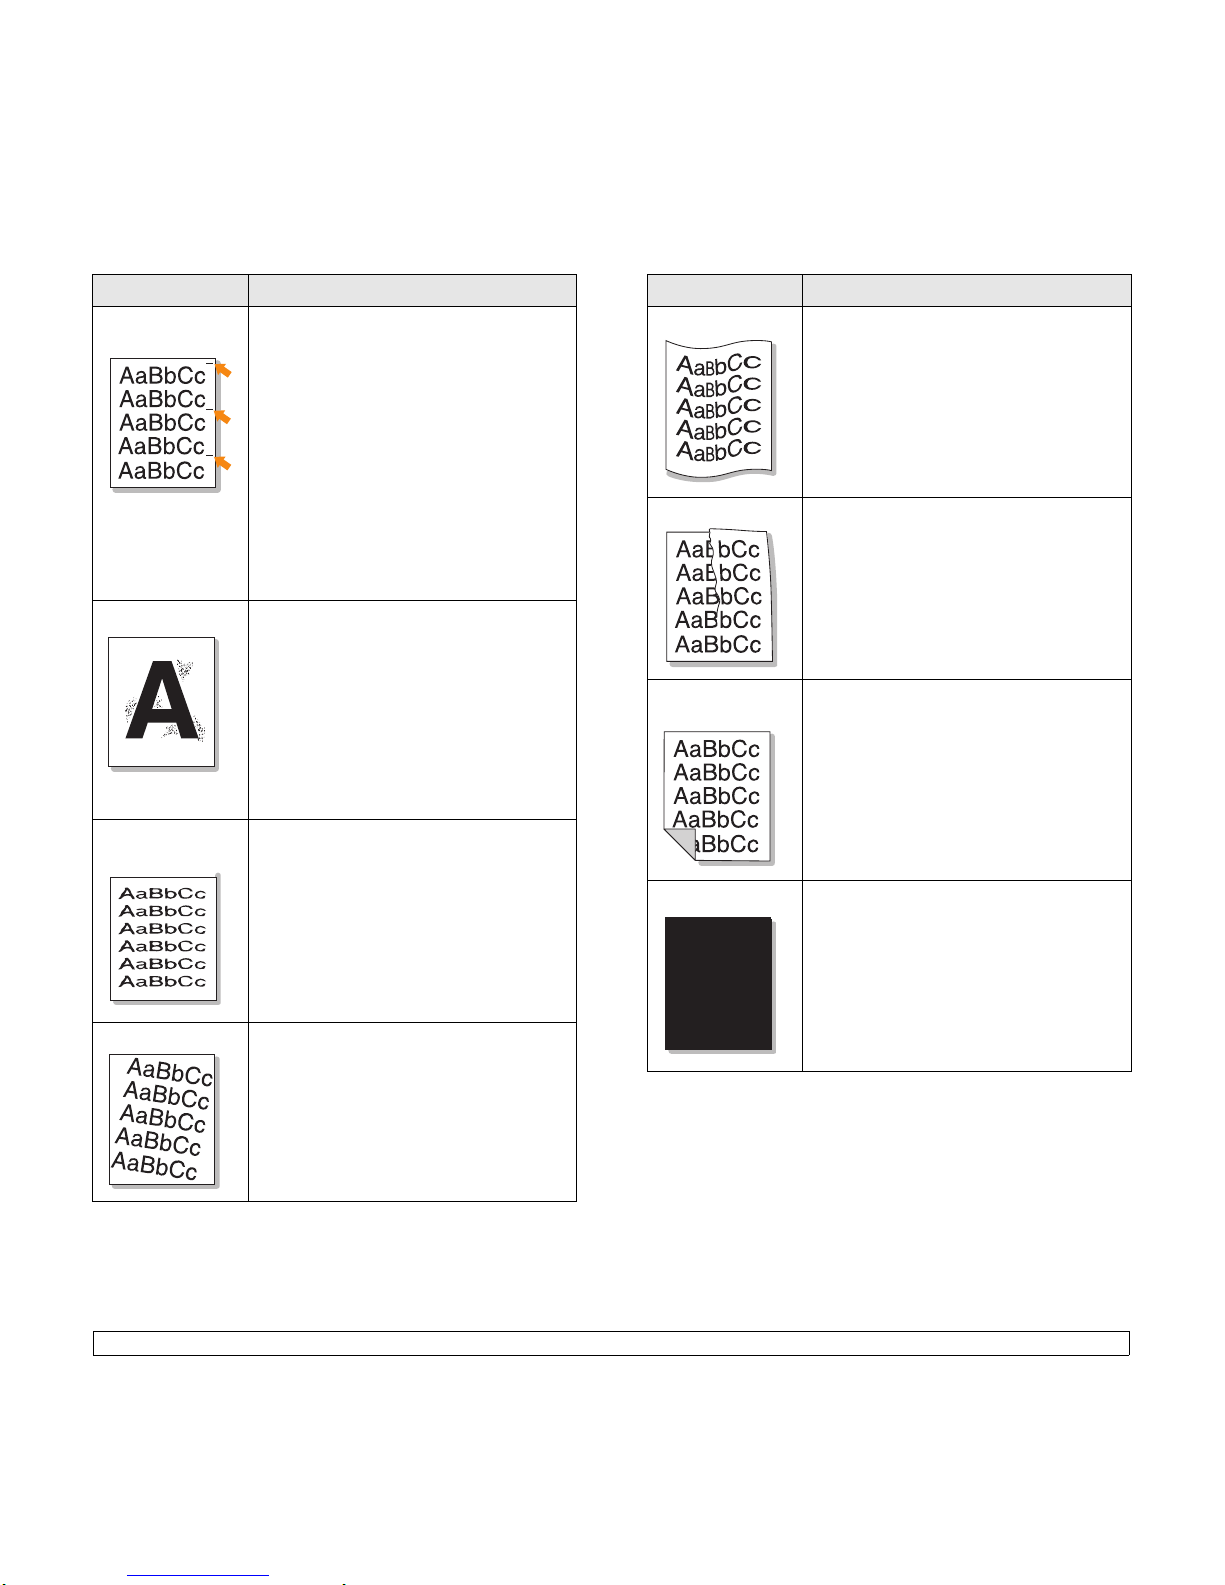
7.11 <
Troubleshooting>
Vertical repetitive
defects
If marks repeatedly appear on the printed side
of the page at even intervals:
• Clean the inside of the machine. Contact a
service representative to clean the inside of
the machine. After cleaning the inside of the
machine, if you still have the same
problems, install a new toner cartridge of the
problem color. See "Replacing the toner
cartridge" on page 6.5.
• Parts of the machine may have toner on
them. If the defects occur on the back of the
page, the problem will likely correct itself
after a few more pages.
• The fusing assembly may be damaged.
Contact a service representative.
Background scatter
Background scatter results from bits of toner
randomly distributed on the printed page.
• The paper may be too damp. Try printing
with a different batch of paper. Do not open
packages of paper until necessary so that
the paper does not absorb too much
moisture.
• If background scatter covers the entire
surface area of a printed page, adjust the
print resolution through your software
application or in printer properties.
Misformed
characters
• If characters are improperly formed and
producing hollow images, the paper stock
may be too slick. Try different paper. (See
"Specifications on print media" on page 4.3.)
• If characters are improperly formed and
producing a wavy effect, the scanner unit
may need service. Contact a service
representative.
Page skew
• Ensure that the paper is loaded properly.
• Check the paper type and quality. (See
"Specifications on print media" on page 4.3.)
• Ensure that the paper or other material is
loaded correctly and the guides are not too
tight or too loose against the paper stack.
Condition Suggested solutions
Curl or wave
• Ensure that the paper is loaded properly.
• Check the paper type and quality. Both high
temperature and humidity can cause paper
curl. (See "Specifications on print media" on
page 4.3.)
• Turn the stack of paper over in the tray. Also
try rotating the paper 180° in the tray.
Wrinkles or creases
• Ensure that the paper is loaded properly.
• Check the paper type and quality. (See
"Specifications on print media" on page 4.3.)
• Turn the stack of paper over in the tray. Also
try rotating the paper 180° in the tray.
Back of printouts
are dirty
Check for leaking toner. Clean the inside of
the machine. Contact a service
representative.
Black pages
• The toner cartridge may not be installed
properly. Remove the cartridge and reinsert
it.
• The toner cartridge may be defective and
need replacing. Remove the toner cartridge
and install a new one. (See "Replacing the
toner cartridge" on page 6.5.)
• The machine may require repair. Contact a
service representative.
Condition Suggested solutions
Page 44
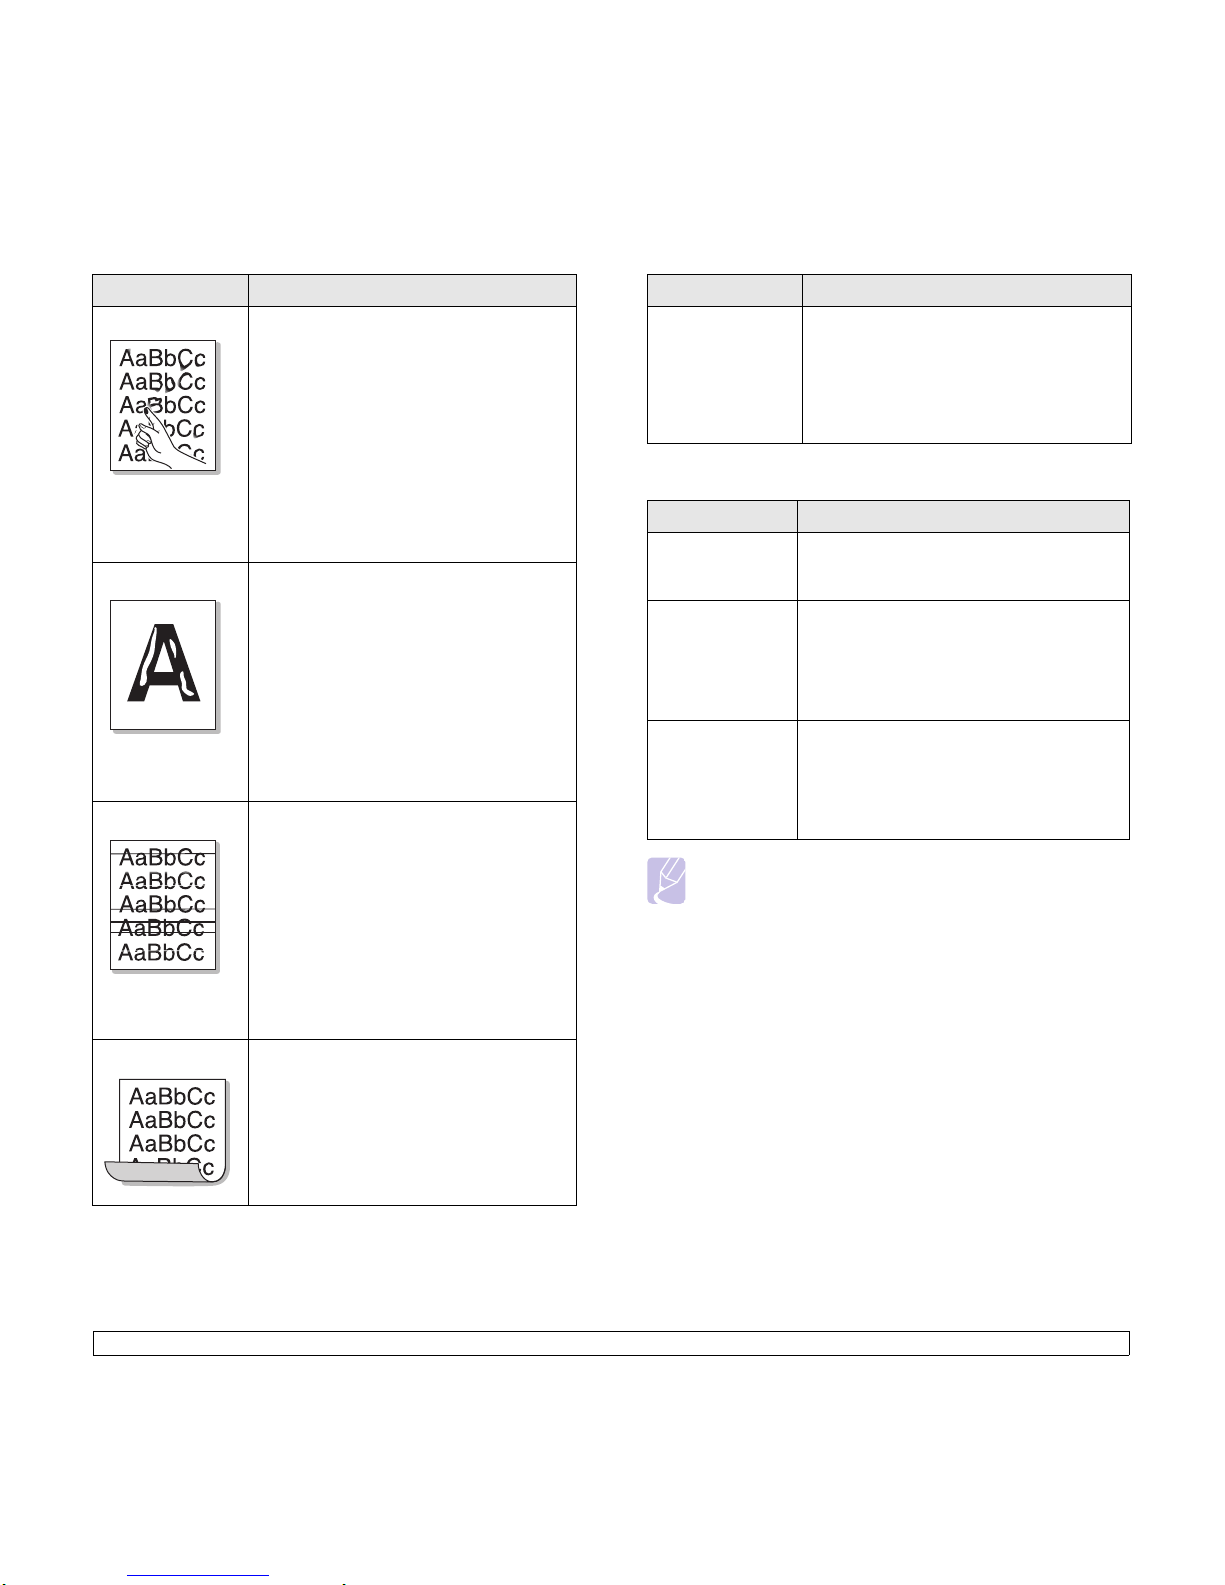
7.12 <
Troubleshooting>
Loose toner
• Clean the inside of the machine. Contact a
service representative to clean the inside of
the machine. After cleaning the inside of the
machine, if you still have the same
problems, contact a service representative.
• Check the paper type and quality. (See
"Specifications on print media" on page 4.3.)
• Remove the toner cartridge, and then install
a new one. (See "Replacing the toner
cartridge" on page 6.5.)
• If the problem persists, the machine may
require repair. Contact a service
representative.
Character Voids
Character voids are white areas within parts of
characters that should be solid black:
• If you are using transparencies, try another
type of transparency. Because of the
composition of transparencies, some
character voids are normal.
• You may be printing on the wrong surface of
the paper. Remove the paper and turn it
around.
• The paper may not meet paper
specifications. (See "Specifications on print
media" on page 4.3.)
Horizontal stripes
If horizontally aligned black streaks or smears
appear:
• The toner cartridge may be installed
improperly. Remove the cartridge and
reinsert it.
• The toner cartridge may be defective.
Remove the toner cartridge and install a
new one. (See "Replacing the toner
cartridge" on page 6.5.)
• If the problem persists, the machine may
require repair. Contact a service
representative.
Curl
If the printed paper is curled or paper does not
feed into the machine:
• Turn the stack of paper over in the tray. Also
try rotating the paper 180° in the tray.
Condition Suggested solutions
Common Windows problems
Note
Refer to Microsoft Windows 2000/XP/2003/Vista User’s Guide
that came with your PC for further information on Windows error
messages.
An unknown image
repetitively appears
on the next few
sheets or loose
toner, light print, or
contamination
occurs.
You machine is probably being used at an
altitude of 1,000 m (3,281 ft) or above. The
high altitude may affect the print quality from
loose toner or light imaging. You can set this
option through the Printer Tab in printer
driver’s properties. See page 3.2.
Condition Suggested solutions
“File in Use”
message appears
during installation.
Exit all software applications. Remove all
software from the StartUp Group, then restart
Windows. Reinstall the printer driver.
“General
Protection Fault”,
“Exception OE”,
“Spool32”, or
“Illegal Operation”
messages appear.
Close all other applications, reboot Windows
and try printing again.
“Fail To Print”, “A
machine timeout
error occurred.”
messages appear.
These messages may appear during printing.
Just keep waiting until the machine finishes
printing. If the message appears in standby
mode or after printing has been completed,
check the connection and/or whether an error
has occurred.
Condition Suggested solutions
Page 45

7.13 <
Troubleshooting>
Common Linux problems
Condition Suggested solutions
The printer doesn’t
print.
• Check if the printer driver is installed in your
system. Open Unified Driver Configurator
and switch to the Printers tab in Printers
configuration window to look at the list of
available printers. Make sure that your
machine is displayed on the list. If not,
please, invoke Add new printer wizard to set
up your device.
• Check if the printer is started. Open Printers
configuration and select your machine on
the printers list. Look at the description in
the Selected printer pane. If its status
contains “(stopped)” string, please, press
the Start button. After that normal operation
of the printer should be restored. The
"stopped" status might be activated when
some problems in printing occurred.
• Check if your application has special print
option such as “-oraw”. If “-oraw” is
specified in the command line parameter
then remove it to print properly. For Gimp
front-end, select “print” -> “Setup printer”
and edit command line parameter in the
command item.
I encounter error
“Unable to open
mfp port device
file!” when printing
a document.
Please avoid changing print job parameters
(via LPR GUI, for example) while a print job is
in progress. Known versions of CUPS server
break the print job whenever print options are
changed and then try to restart the job from
the beginning. Since Unified Linux Driver
locks mfp port while printing, the abrupt
termination of the driver keeps the port locked
and therefore unavailable for subsequent print
jobs. If this situation occurred, please, try to
release the mfp port.
When printing a
document over the
network in SuSE
9.2, the printer
does not print.
The CUPS (Common Unix Printing System)
version distributed with SuSE Linux 9.2
(cups-1.1.21) has a problem with ipp
(Internet Printing Protocol) printing. Use the
socket printing instead of ipp or install later
version of CUPS (cups-1.1.22 or higher).
Common Macintosh problems
Problem Suggested solutions
PDF file does not print
correctly-some parts are
missing in the graphics,
text or illustrations.
Incompatibility between the PDF file and
the Acrobat products.
Printing the PDF file as an image may
enable the file to print. Turn on
Print As
Image
from the Acrobat printing options.
Note: It will take longer to print when
you print a PDF file as an image.
The document has
printed, but the print job
has not disappeared from
the spooler in
Mac OS 10.3.2.
Update your Mac OS to OS 10.3.3. or
higher.
Some fonts are not
printed properly in the
Adobe Illustrator
program.
Those fonts may not supported by your
machine. Start the Adobe Illustrator
program, click File > Print > Illustrator
tab. Then, check Force Fonts to
Download, and try again.
Page 46

8.1 <
Ordering supplies and accessories>
8 Ordering supplies and
accessories
This chapter provides information on purchasing cartridges and
accessories available for your machine.
This chapter includes:
• Supplies
• How to purchase
Supplies
When the toner runs out, you can order the following type of toner
cartridge for your machine:
How to purchase
To order Samsung-authorized supplies or accessories, contact your local
Samsung dealer or the retailer where you purchased your machine, or
visit www.samsungprinter.com
and select your country/region to obtain
information on calling for technical support.
Typ e Average yield
a
a. Declared yield value in accordance with ISO/IEC 19752.
Caution
When you purchase a new toner cartridge or supplies, you must
purchase them in the same country you have purchased your
machine. Otherwise, the toner cartridge or supplies will be
incompatible with your machine since the configuration of the
toner cartridge or supplies vary depending on the countries.
Part number
Standard yield Approx. 2,000 pages ML-D1630A
Page 47
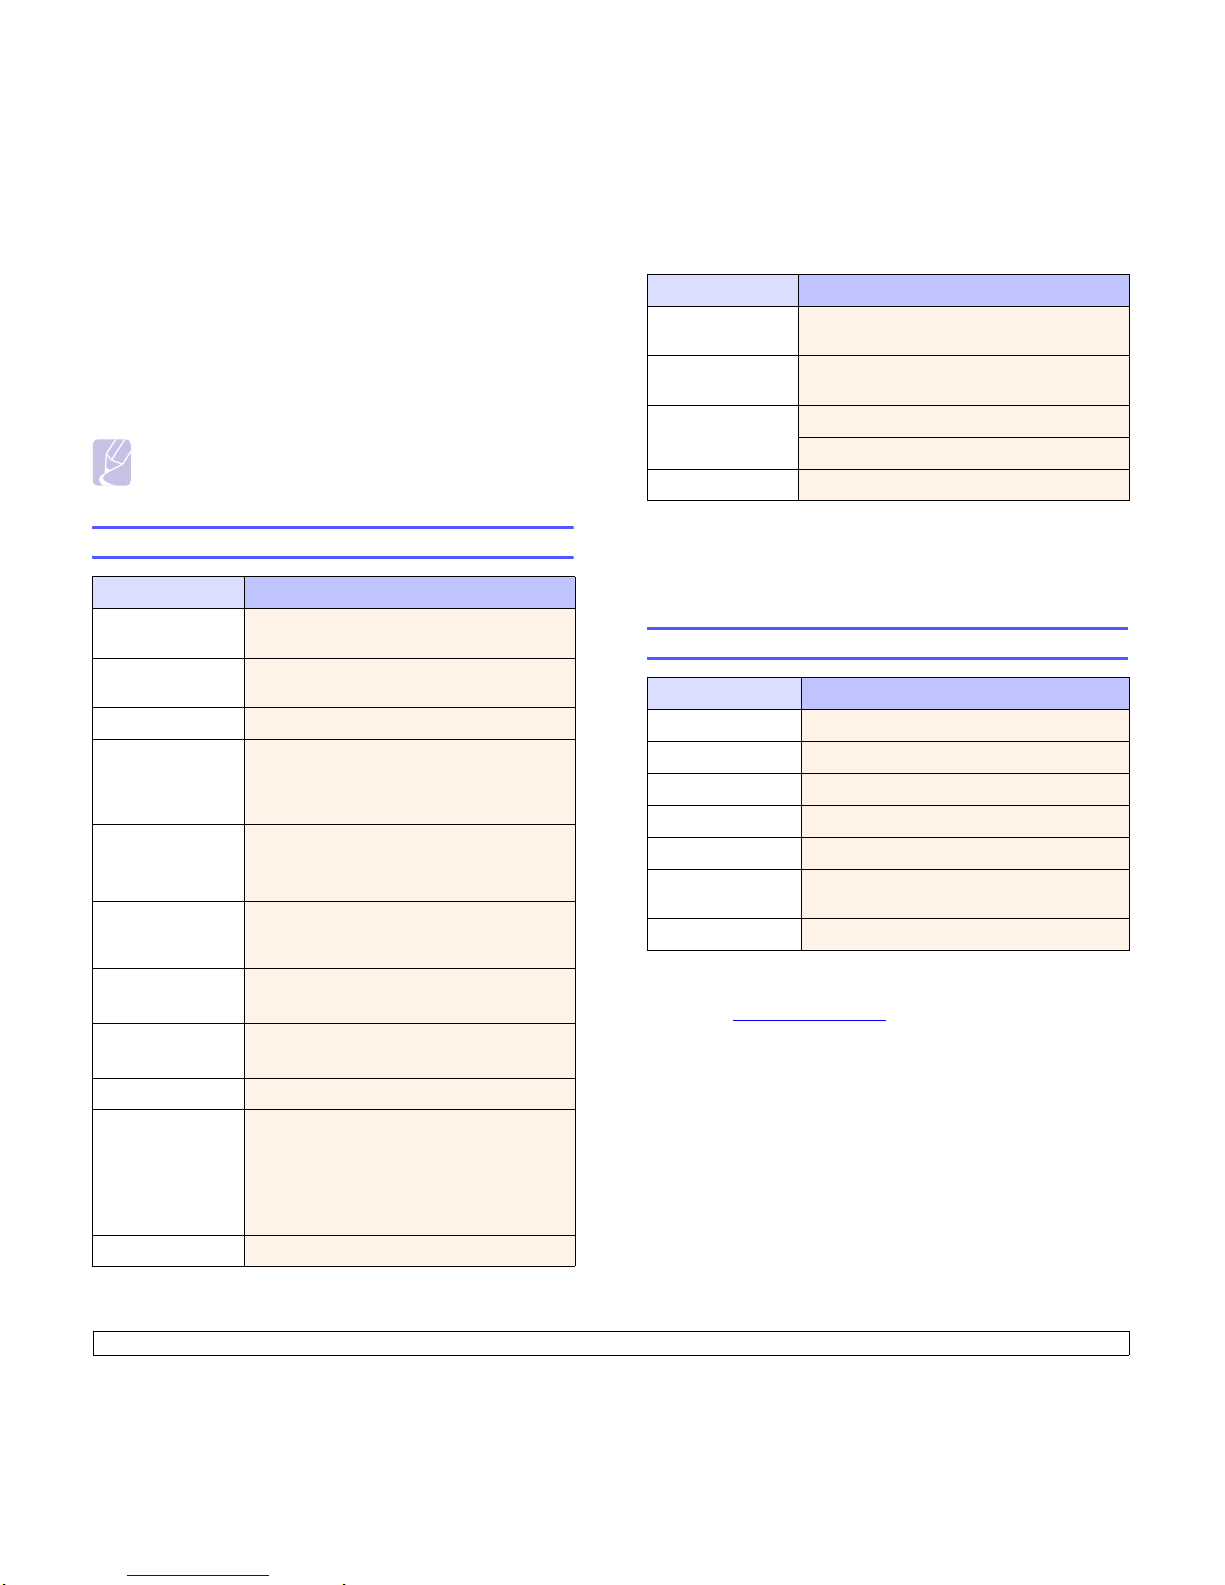
9.1 <
Specifications>
9 Specifications
This chapter includes:
• General specifications
• Printer specifications
Note
The numbers herein is subject to change according to its install
environment.
General specifications
Item Specifications and Description
Paper input
capacity
a
100 multi-pages for plain paper
(20 lb bond, 75 g/m
2
)
Paper output
capacity
30 sheets (face up)
Consumables 1-piece toner cartridge system
Power rating
AC 110 - 127 V or AC 220 - 240 V
See the Rating label on the machine for the
correct voltage, frequency (hertz) and type of
current for your machine.
Power
consumption
Average operation mode: Less than 350 W
Sleep mode: Less than 8.12 W
Power off mode: 0 W
Default time to
power save mode
from ready mode
0 minutes
Noise level
b
Standby mode: Less than 38 dBA
Operating
environment
Temperature: 10 °C to 32 °C (50°
F to 89.6° F
)
Humidity: 20% to 80% RH
Display Blue LED Module (65EA Dots)
toner cartridge
yield
c
Standard Yield: Average cartridge yield 2,000
standard pages.
(Ships with 1,000 pages Starter/Standard
Toner Cartridge)
** Declared yield value in accordance with
ISO/IEC 19752.
Memory 8 MB (Non-extendable)
Printer specifications
External dimension
(W x D x H)
332 x 375 x 121.5mm
(13.1 x 14.8 x 4.8 inches)
Weight
6.4 Kg (14.1 lbs)
(including consumables)
Package weight
Paper: 1.1 Kg (2.431 lbs)
Plastic: 0.271 Kg (0.60 lbs)
Duty cycle
Monthly print volume: Up to 5,000 pages
a.For details about paper input capacity, see page 4.3.
b. Sound Pressure Level, ISO 7779
c. Average cartridge yield declared in accordance with ISO/IEC 19752. The
number of pages may be affected by the operating environment, printing
interval, media type, and media size.
Item Description
Printing method
Laser Beam Printing
Printing speed
a
a. Print speed will be affected by operating system used, computing performance,
application software, connect on method, media type, media size, and job
complexity.
Up to 16 ppm in A4 (17 ppm in Letter)
First print out time
from coldboot: Less than 15 seconds
Print resolution Up to 1200 dpi class(Best) Effective output
Printer language
SPL (Samsung Printer Language)
OS compatibility &
driver
b
b. Please visit www.samsungprinter.com to download the latest software version.
Windows 2000/ 2003/ XP/ Vista, Various Linux
OS, Mac 10.3 ~ 10.5
Interface USB 2.0
Item Specifications and Description
Page 48

10.1 <
Glossary>
10 Glossary
Control Panel
A control panel is a flat area where control or monitoring instruments are
displayed. They are typically found in top or front of the machine.
Coverage
This is the printing term used for toner usage measurement on printing
and generally used as 5% coverage. 5% coverage means that an A4
sided paper has about 5% image or text on it. So, if the paper or original
has complicated images or lots of text on it, the coverage will be over 5%
and at the same time, toner usage will be as much as the coverage.
Default
The first set values.
DPI
This is the measurement of resolution which is used for printing or
scanning. Generally, more dots per inch result in a higher resolution,
more visible detail in the image, and a larger file size.
Duty Cycle
Duty cycle is the page quantity which does not affect printer performance
for a month. Generally the printer has the lifespan limitation such as
pages per year. The lifespan means the average capacity of print-outs,
usually within the warranty period. For example, if the duty cycle is 48,000
pages per month assuming 20 working days, a printer limits 2,400 pages
a day, which is not small amount.
Fuser Unit
This is the part of a laser printer that melts the toner onto the print media.
It consists of two hot rollers. After toner is transferred onto the paper, the
fuser unit applies heat and pressure to ensure that the toner stays on the
paper permanently, which is why paper is warm when it comes out of a
laser printer.
Grayscale
Shades of gray that represent light and dark portions of an image when
color images are converted to grayscale; colors are represented by
various shades of gray.
Halftone
This is an image type that simulates grayscale by varying the number of
dots. Highly colored areas consist of a large number of dots, while lighter
areas consist of a smaller number of dots.
ISO
The International Organization for Standardization (ISO) is an
international standard-setting body composed of representatives from
national standards bodies. It produces world-wide industrial and
commercial standards.
LED
A light-emitting diode (LED) is a semiconductor device that indicates the
status of a machine.
Print Media
Media such as papers, labels, and transparencies which can be used on
a printer, a scanner, a fax or, a copier.
OPC Drum
A mechanism that makes a virtual image for print using a laser beam
emitted from a laser printer, and it is usually green or gray-colored and
cylinder-shaped. An exposing unit of a drum is slowly worn away by its
usage of the printer, and it should be replaced appropriately since it
becomes scratched from grit in paper.
PDF
Portable Document Format (PDF) is a proprietary file format developed
by Adobe Systems for representing two-dimensional documents in a
device-independent and resolution-independent format.
PPM
Pages Per Minute. PPM shows the printer's speed, how many pages a
printer can actually print per minute.
PRN file
An interface for a device driver, this allows software to interact with the
device driver using standard input/output system calls, which simplifies
many tasks.
Resolution
The sharpness of an image, measured in dots per inch (dpi). The higher
the dpi, the greater the resolution.
Toner cartridge
It is a kind of bottle within a machine like a printer which contains toner.
Toner is a powder used in laser printers and photocopiers which forms the
text and images on the printed paper. Toner can be melted by the heat of
the fuser, causing it to bind to the fibers in the paper.
URL
Uniform Resource Locator (URL) is the global address of documents and
resources on the Internet. The first part of the address indicates what
protocol to use, the second part specifies the IP address or the domain
name where the resource is located.
USB
Universal serial bus (USB) is a standard that was developed by the USB
Implementers Forum, Inc., to connect computers and peripherals. Unlike
the parallel port, USB is designed to concurrently connect a single
computer USB port to multiple peripherals.
Page 49

1
C
cleaning
inside
6.1
outside
6.1
control panel
1.2, 1.4
D
driver
feature
2.2
E
error message 7.7
J
jam
clearing paper from the tray
7.1
tips for avoiding paper jams
7.1
L
Linux
requirements
2.3
Linux problems
7.13
M
Macintosh
problems
7.13
requirements
2.3
Maintenance
6.1
maintenance parts
6.6
toner cartridge
6.3
message on the display screen
7.7
O
ordering supplies 8.1
output support
1.2
output tray
1.2
P
paper
changing the size
4.5
clearing jam
7.1
paper feeding problems
7.8
setting the paper size of the tray
4.6
Power switch
1.3
print media
guidelines
4.2
selecting print media
4.1
specification
4.3
Printer software CD
2.1
printing
5.1
problem solving
7.8
printing report
6.1
problem, solve
Linux 7.13
problems
display message 7.7
Macintosh
7.13
paper feeder
7.8
printing
7.8
printing quality
7.10
Windows
7.12
Q
quality
solving the printing problem
7.10
R
replacing components
toner cartridge
6.5
S
specifications 9.1, 10.1
supplied software
2.1
supplies
expected toner cartridge life 6.3
ordering supplies
8.1
T
toner cartridge 1.2
top cover
1.2
top cover lever
1.2
tray
1.2
adjusting the width and length
4.5
tray open button
1.2
troubleshooting
7.1
U
USB
port
1.3
W
Windows
problems
7.12
requirements
2.2
INDEX
Page 50

Samsung Printer
Software section
Page 51

1
SOFTWARE SECTION
CONTENTS
Chapter 1:
INSTALLING PRINTER SOFTWARE IN WINDOWS
Installing Printer Software ................................. ........................................... ..... ....................... 4
Changing the Software Language .............................................................................................. 5
Reinstalling Printer Software ..................................................................................................... 6
Removing Printer Software ....................................................................................................... 6
Chapter 2:
BASIC PRINTING
Printing a Document ................................................................................................................ 7
Printing to a file (PRN) ............................................................................................................ 8
Printer Settings ....................................................................................................................... 8
Layout Tab ............ ........................................... ..... .......................................... ..... ......... 9
Paper Tab ...................................................................................................................... 9
Graphics Tab ............................................................................................................... 10
Extras Tab ................................................................................................................... 11
About Tab ................................................................................................................... 11
Printer Tab .................................................................................................................. 11
Using a Favorite Setting ................................................................................................ 12
Using Help ................................................................................................................... 12
Page 52

2
Chapter 3:
ADVANCED PRINTING
Printing Multiple Pages on One Sheet of Paper (N-Up Printing) ..................................................... 13
Printing Posters ..................................................................................................................... 14
Printing a Reduced or Enlarged Document ................................................................................ 14
Fitting Your Document to a Selected Paper Size ....................................................................... .. 14
Using Watermarks ................................................................................................................. 15
Using an Existing Watermark ......................................................................................... 15
Creating a Watermark ................................................................................................... 15
Editing a Watermark ..................................................................................................... 15
Deleting a Watermark ................................................................................................... 15
Using Overlays ...................................................................................................................... 16
What is an Overlay? ...................................................................................................... 16
Creating a New Page Overlay ......................................................................................... 16
Using a Page Overlay .................................................................................................... 16
Deleting a Page Overlay ................................................................................................ 16
Chapter 4:
SHARING THE PRINTER LOCALLY
Setting Up a Host Computer ............................................. .......................................... ..... ....... 17
Setting Up a Client Computer ...................................................................................... ..... ....... 17
Chapter 5:
USING SMART PANEL
Understanding Smart Panel .................................................................................................... 18
Opening the Troubleshooting Guide ......................................................................................... 19
Changing the Smart Panel Program Settings ............................................................................. 19
Chapter 6:
USING YOUR PRINTER IN LINUX
Getting Started ..................................................................................................................... 20
Installing the Unified Linux Driver ............................................................................................ 20
Installing the Unified Linux Driver ................................................................................... 20
Uninstalling the Unified Linux Driver ............................................................................... 21
Page 53

3
Using the Unified Driver Configurator ....................................................................................... 22
Opening the Unified Driver Configurator .......................................................................... 22
Printers Configuration ................................................................................................... 22
Ports Configuration ....................................................................................................... 23
Configuring Printer Properties ................................................................................................. 23
Printing a Document .............................................................................................................. 24
Printing from Applications .............................................................................................. 24
Printing Files ................................................................................................................ 24
Chapter 7:
USING YOUR PRINTER WITH A MACINTOSH
Installing Software ..................................................... ........................................................... 25
Setting Up the Printer ............................................ ..... ........................................................... 26
For a USB-connected .................................................................................................... 26
Printing ................................................................................................................................ 27
Printing a Document ..................................................................................................... 27
Changing Printer Settings .............................................................................................. 27
Printing Multiple Pages on One Sheet of Paper .................................................................. 28
Page 54
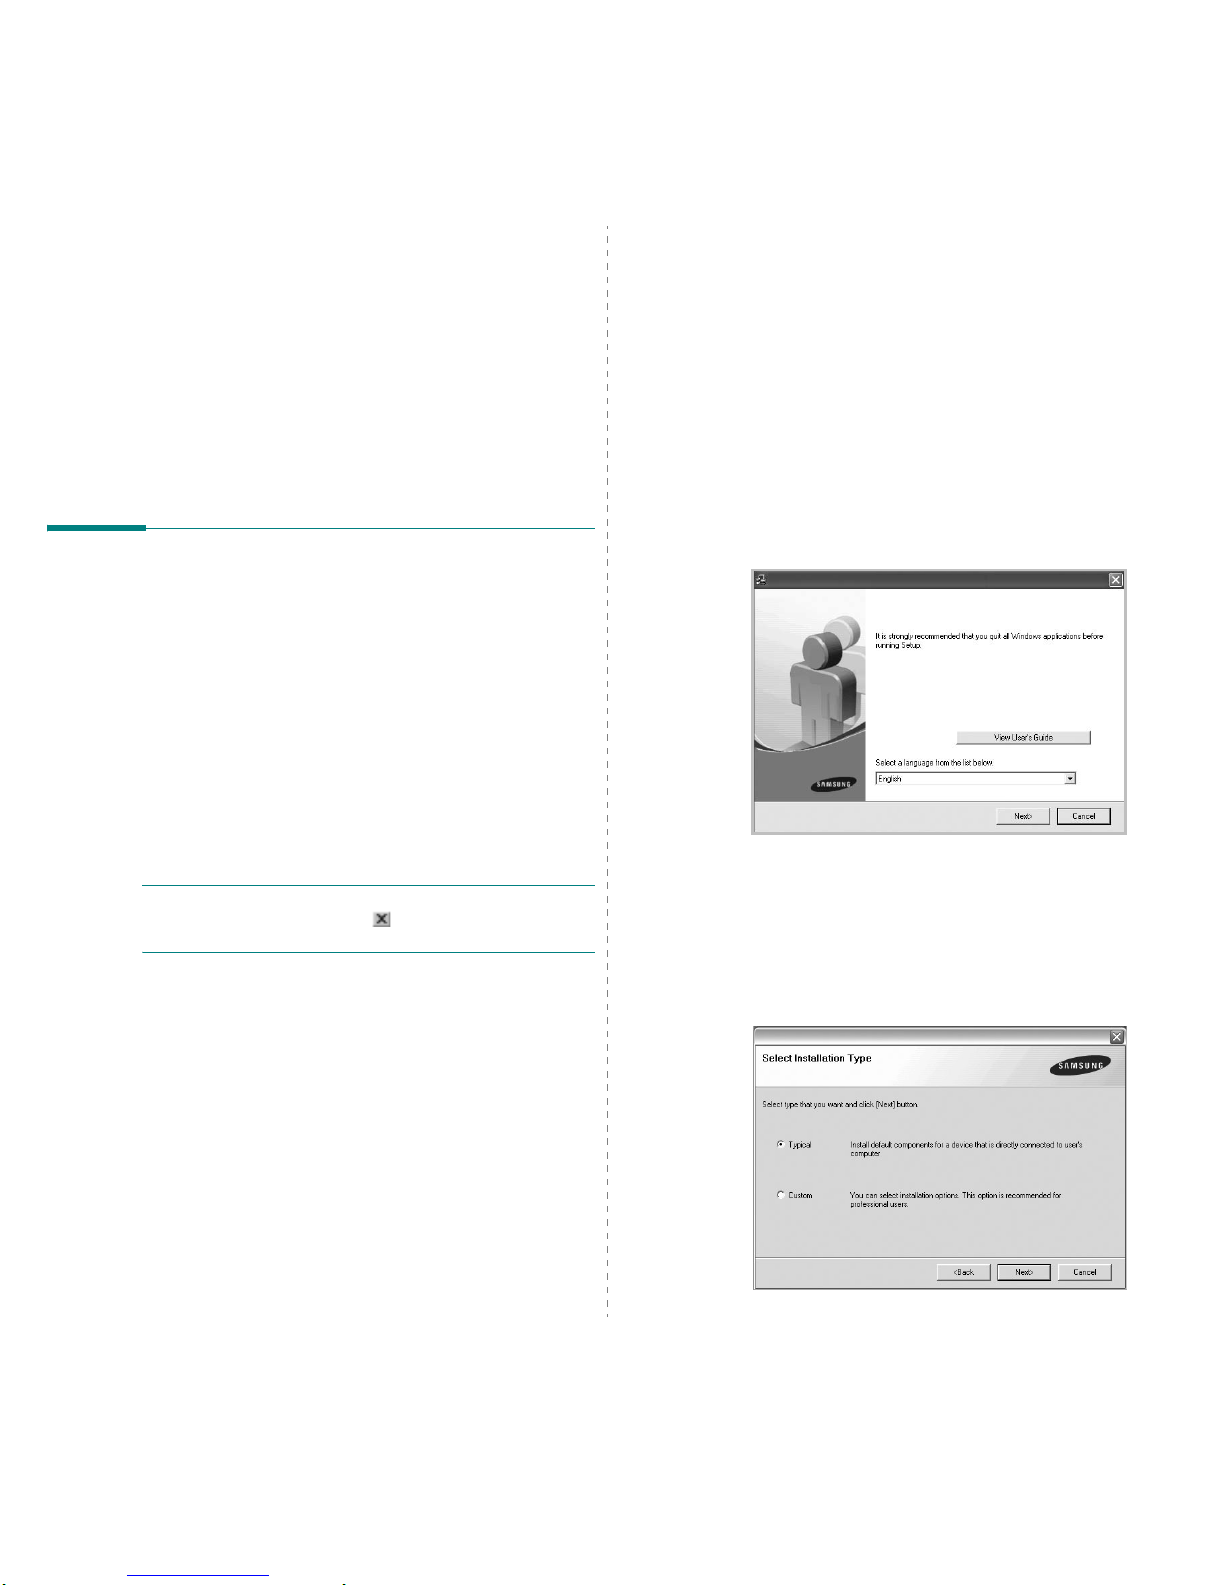
Installing Printer Software in Windows
4
1 Installing Printer
Software in Windows
This cha p t er includes :
• Installing Printer Software
• Changing the Software Languag e
• Reinstalling Printer Software
• Removing Printer Software
Installing Printer Software
You can install the printer software for local printing. To install
the printer software o n the com puter, perform the appropriate
installation procedure depending on the printer in use.
A printer driver is software that lets y ou r com p uter
communicate with your printer . The procedure to install drivers
may differ depending on the operating system you are using.
All applications should be closed on your PC before beginning
installation.
A local printer is a printer directly attached to your computer
using the printer cable supplied with your printer , such as a USB
or parallel cable.
You can install the printer software using the typical or custom
method.
NOTE
: If the “New Hardware Wizard” window appears during
the installation procedure, click in the upper right corner of
the box to close the window, or click
Cancel
.
This is recommended for most users. All components necessary
for printer operations will be installed.
1
Make sure that the printer is connected to your computer
and powere d on.
2
Insert the supplied CD-ROM into your CD-ROM drive.
The CD-ROM should automatically run, and an installation
window appears.
If the installation window does not appear, click
Start
and
then
Run
. Type
X:\Setup.exe
, replacing “X” with the
letter which represents your drive and click
OK
.
If you use Windows Vista, click
Start
→
All programs
→
Accessories
→
Run
, and type
X:\Setup.exe
.
If the
AutoPlay
window appears in Windows Vista, click
Run Setup.exe
in
Install or run program
field, and
click
Continue
in the
User Account Control
window.
3
Click
Next
.
• If necessary, select a languag e from the dr op-down list.
•
View User’s Guide
: Allows you to view the User’s
Guide. If your computer doesn’t have Adobe Acrobat,
click on this option and it will automatically install Adobe
Acrobat Reader for you.
4
Choose the type of installation. Click
Next
.
Page 55
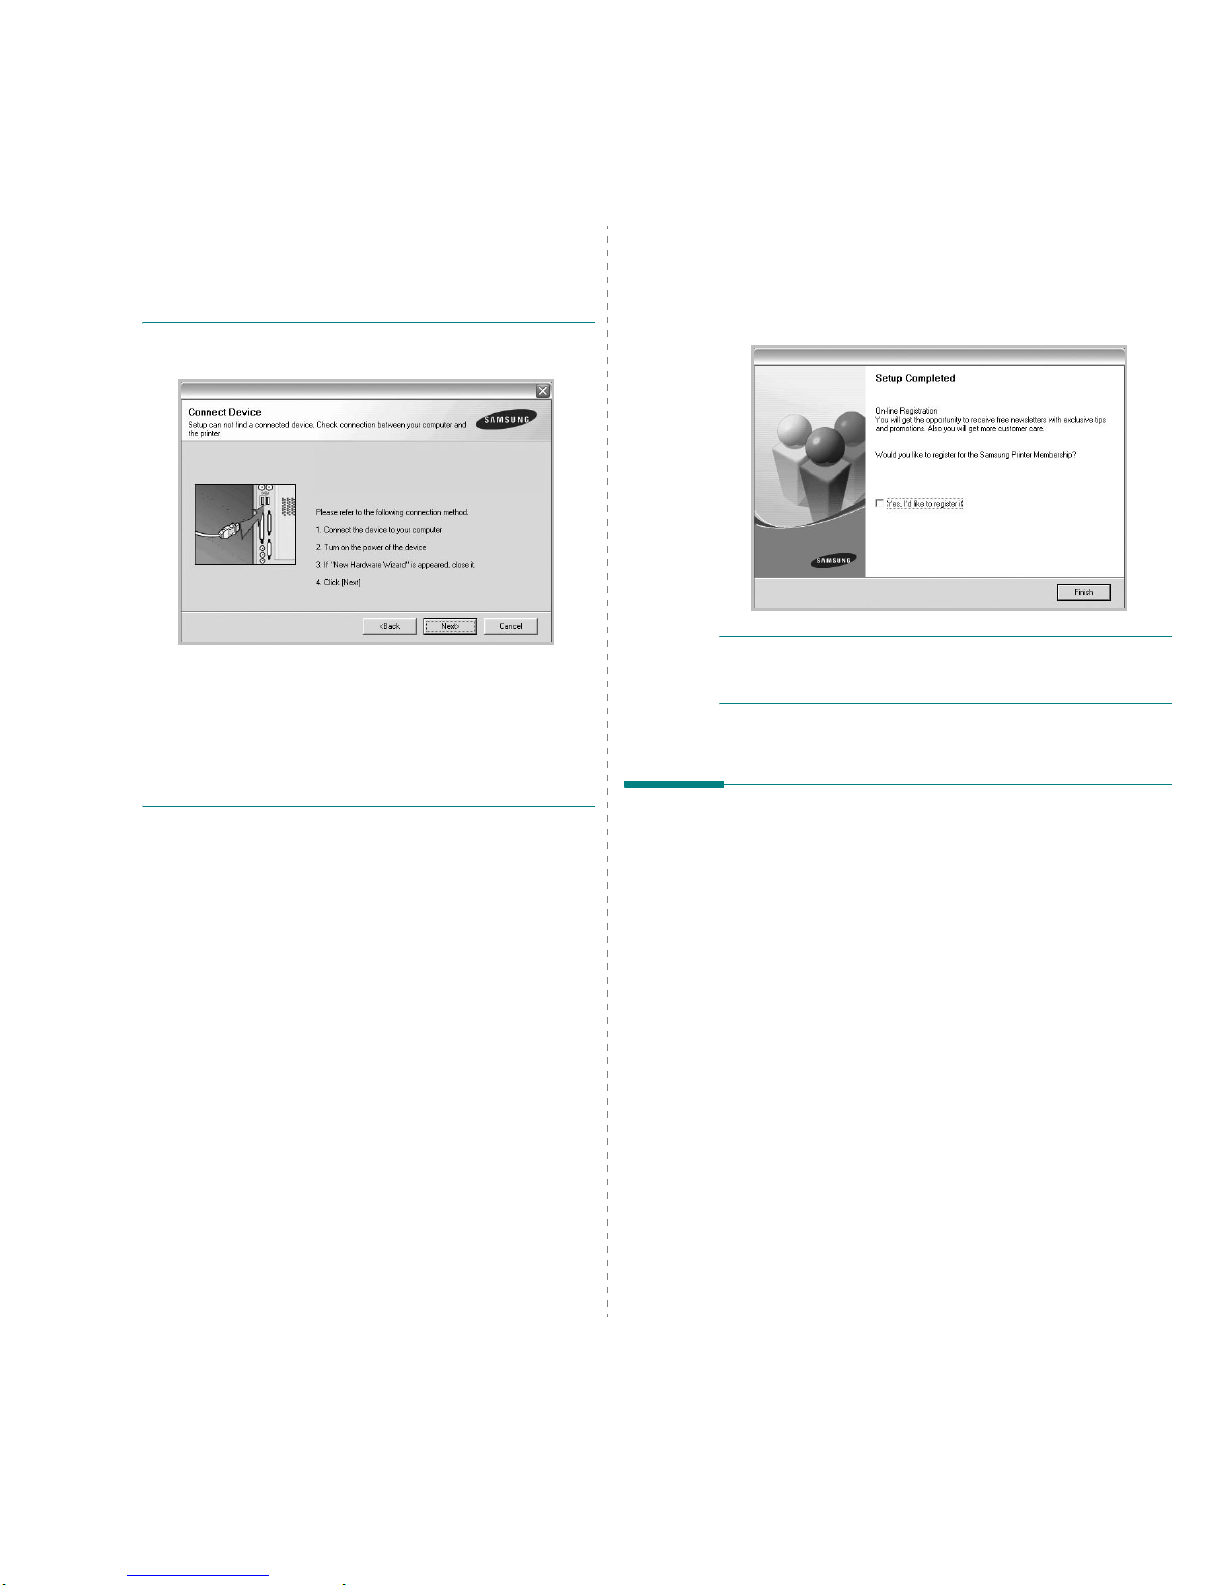
Installing Printer Software in Windows
5
•
Typical
: Installs the most common software for your
printer . This is recommended for most users.
•
Custom
: Allows you to choose the individu al
components you want to install.
NOTE
: If your printer is not already connected to the
computer , the following window will appear.
• After connecting the printer, click
Next
.
• If you don’t want to connect the printer at this time, click
Next
, and No on the following screen. Then the installation
will start and a test page will not be printed at the end of the
installation.
• The installation window that appears in this User’s
Guide may differ depending on the printer and
interface in use.
5
After the installation is finished, a window asking you to
print a test page appears. If you ch o ose to p rint a te st
page, select the checkbox and click
Next
.
Otherwise, just click
Next
and skip to step 7.
6
If the test page prints out correctly, click
Yes
.
If not, click
No
to reprint it.
7
T o register yourself as a user of Samsung Printers in order
to receive information from Samsung, select the checkbox
and click
Finish
. You are now sent to the Samsung web
site.
Otherwise, just click
Finish
.
NOTE
: After setup is complete, if your printer driver doesn’t
work properly, reinstall the printer driver . S ee “Reinstalling
Printer Software” on page 6.
Changing the Software
Language
After installation of the software, you can change the display
language.
1
Click the Windows
Start
menu.
2
Select
Programs
or
All Programs
and then
your printer
driver name
.
3
Select
Language Selection
.
4
Select the desired language from the language selection
window, and click
OK
.
Page 56
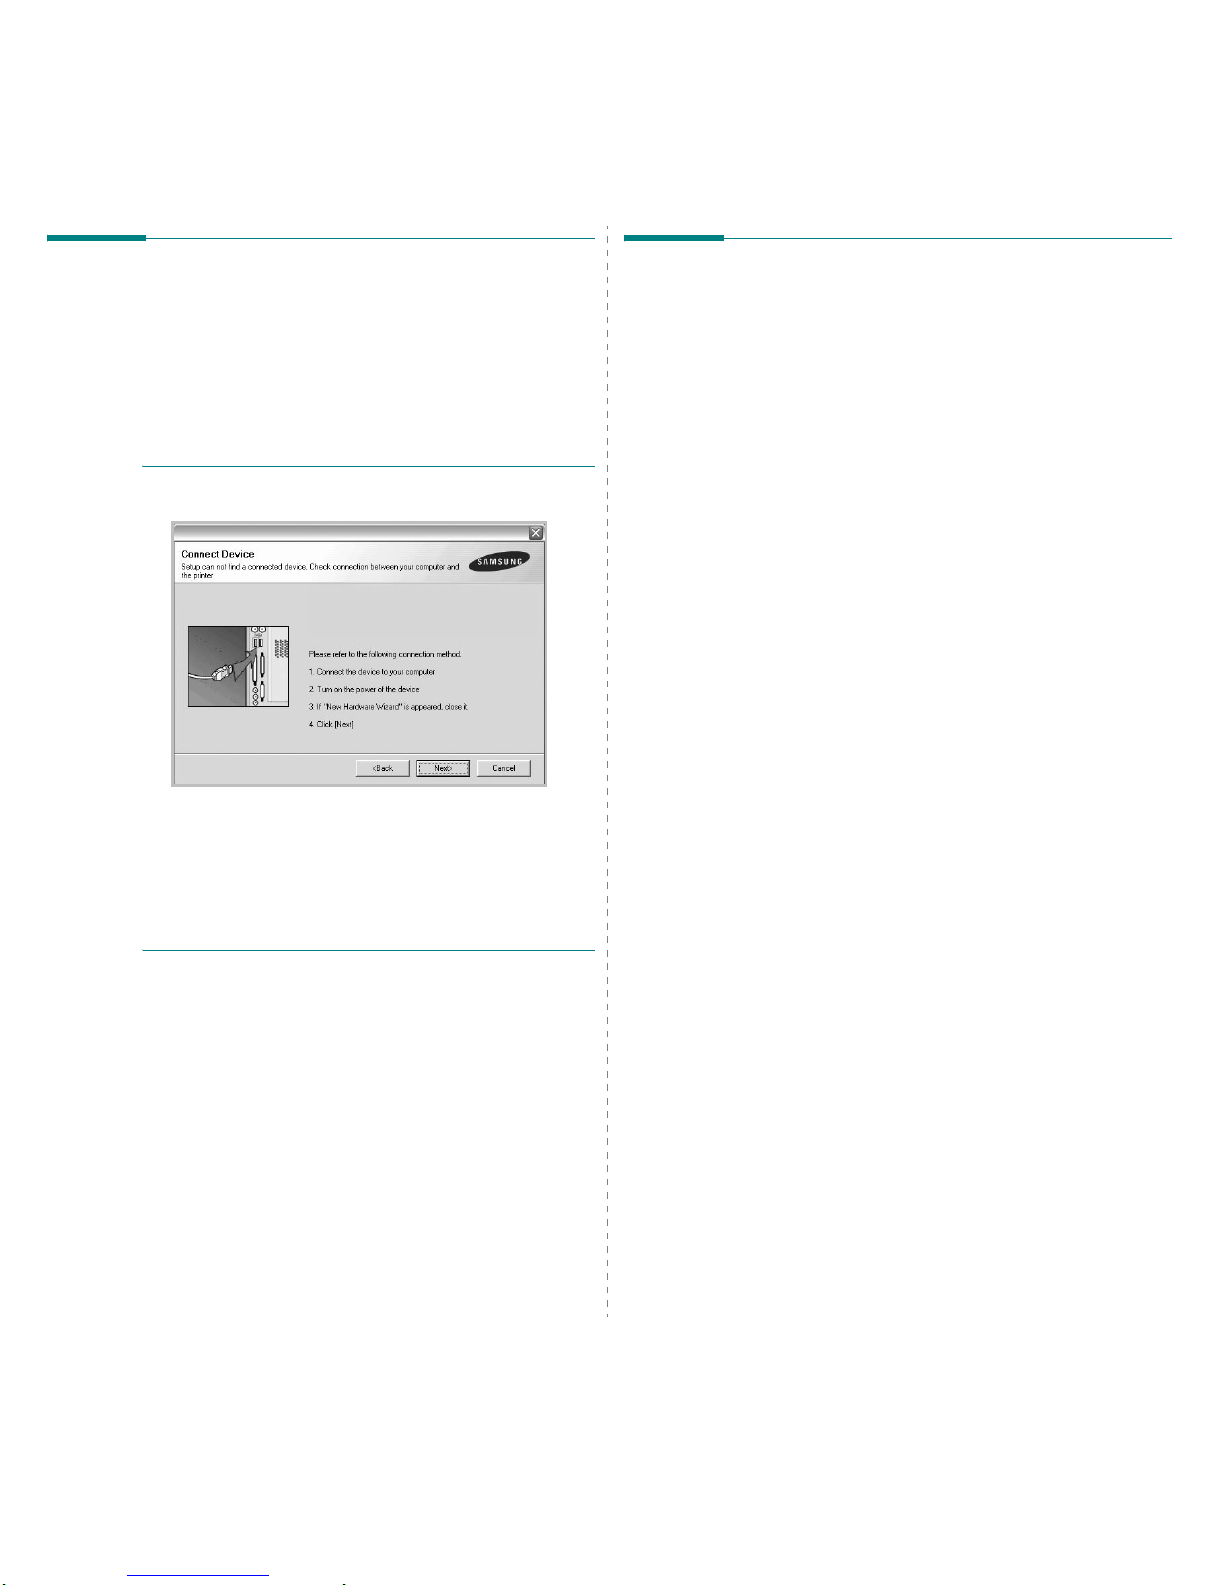
Installing Printer Software in Windows
6
Reinstalling Printer Software
You can reinstall the software if installation fails.
1
Start Windows.
2
From the
Start
menu select
Programs
or
All Programs
→
your printer driver name → Maintenance
.
3
Select
Repair
and click
Next
.
You will see a component list so that you can reinstall any
item individually.
NOTE
: If your printer is not already connected to the
computer , the following window will appear.
• After connecting the printer, click
Next
.
• If you don’t want to connect the printer at this time, click
Next
, and No on the following screen. Then the installation
will start and a test page will not be printed at the end of the
installation.
• The reinstallation window tha t appears in this User’s
Guide may differ depending on the printer and
interface in use.
4
Select the components you want to reinstall and click
Next
.
If you
you select
your printer driver name
and reinstall
the printer software for lo cal printing
, the window asking
you to print a test page appears. Do as follows:
a. To print a test page, select the check box and click
Next
.
b. If the test page prints out correctly, click
Yes
.
If it doesn’t, click No to reprint it.
5
When the reinstallation is done, click
Finish
.
Removing Printer Software
1
Start Windows.
2
From the
Start
menu select
Programs
or
All Programs
→
your printer driver name → Maintenance
.
3
Select
Remove
and click
Next
.
You will see a component list so that you can remove any
item individually.
4
Select the components you want to remove and th e n click
Next
.
5
When your computer asks you to confirm your selection,
click
Yes
.
The selected driver and all of its components are removed
from your computer.
6
After the software is remo ved, click
Finish
.
Page 57
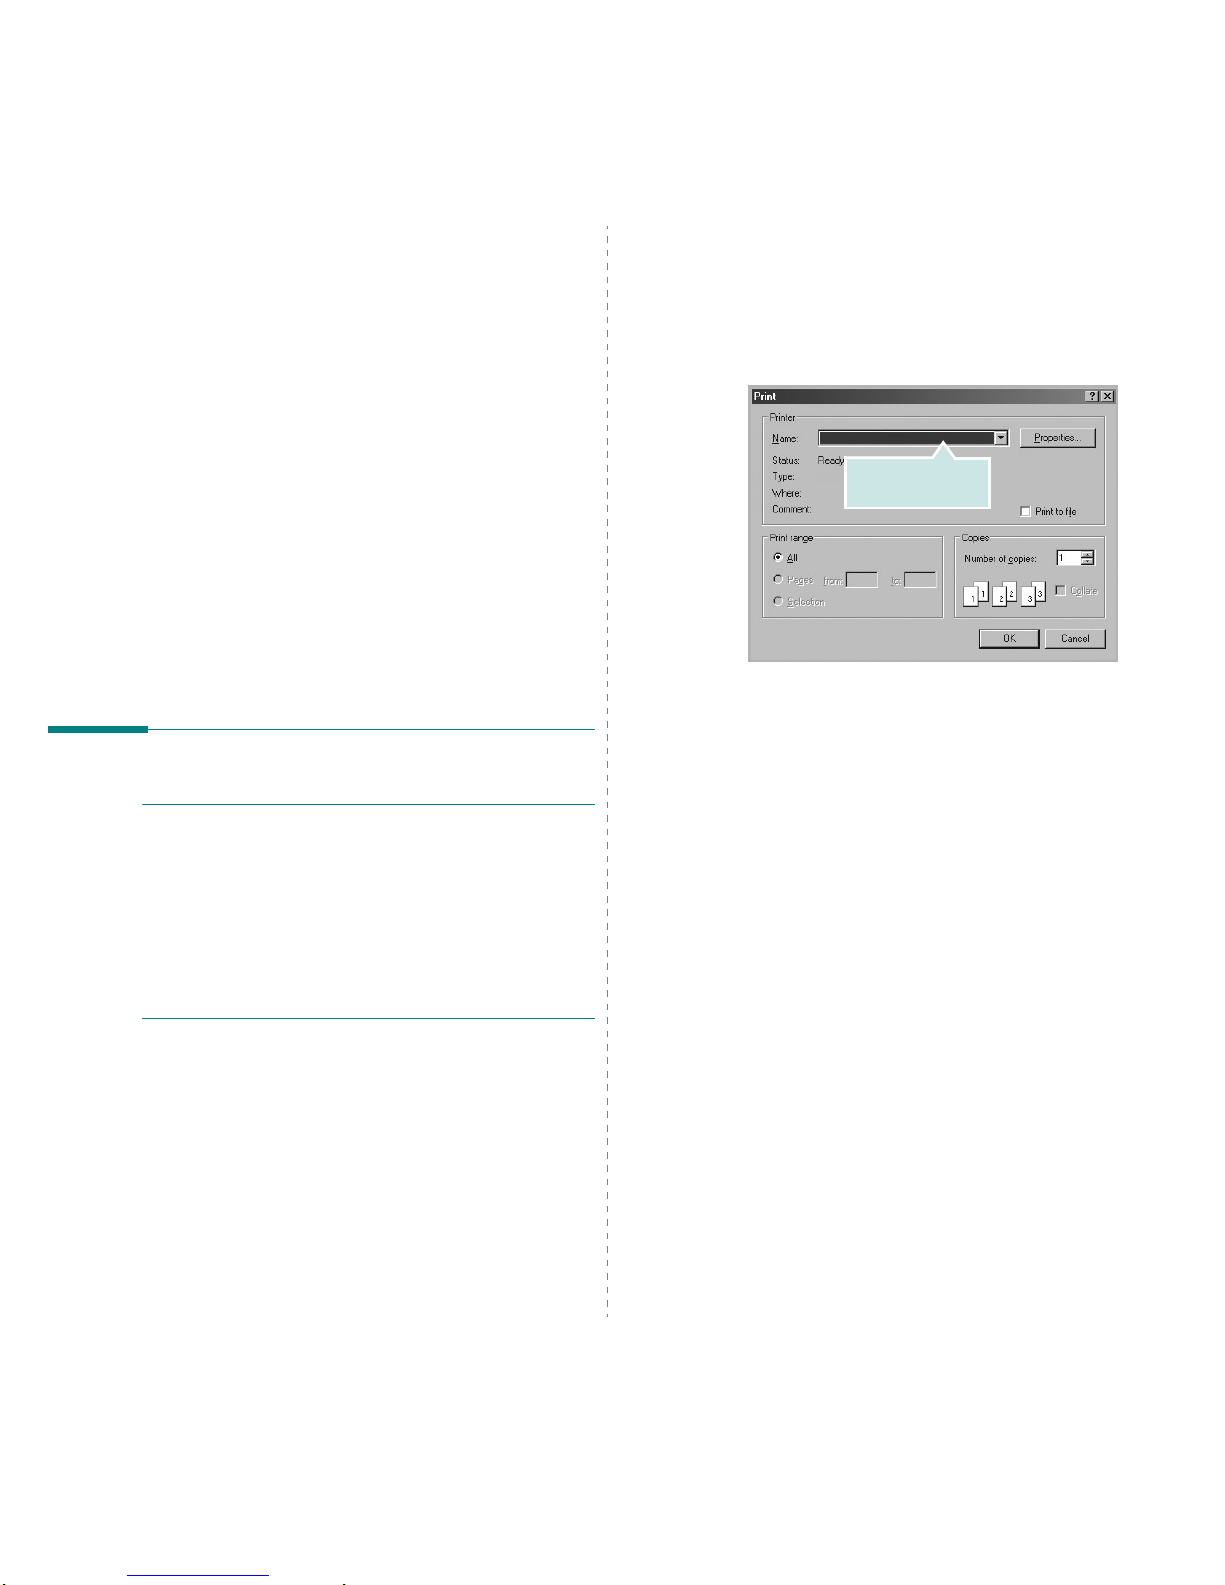
Basic Printing
7
2 Basic Printing
This chapter explains the printing options and comm on printing
tasks in Windows.
This cha p t er includes :
• Printing a Document
• Printing to a file (PRN)
• Printer Settings
- Layout T ab
- Paper Ta b
- Graphics Tab
- Extras Ta b
- About Tab
- Printer Tab
- Using a Favorite Setting
- Using H elp
Printing a Document
N
OTES
:
• Your printer driver
Properties
window that appears in this
User’s Guide may differ depending on the printer in use.
However the composition of th e printer prope rties window is
similar.
• Check the Operating System(s) that are compatible
with your printer. Please refer to the OS Compatibility
section of Printer Specifications in your Printer User’s
Guide.
• If you need to know the exact name of your printer, you can
check the supplied CD-ROM.
The following procedure describes the general steps required
for printing from various Windows applications. The exact steps
for printing a document may vary depending on the application
program you are using. Refer to the User’s Guide of your
software application for the exact printing procedure.
1
Open the document you want to print.
2
Select
Print
from the
File
menu. The Print window is
displayed. It may look slightly different depending on your
application.
The basic print settings are selected within the Print
window. These settings include the number of copies and
print range.
3
Select
your printer driver
from the
Name
drop-down
list.
T o take advantage of the printer features provided by your
printer driver, click
Properties
or
Preferences
in the
application’s Print window. For details, see “Printer
Settings” on page 8.
If you see
Setup, Printer
, or
Options
in your Print
window, click it instead. Then click
Properties
on the next
screen.
Click
OK
to close the printer properties wind ow.
4
To start the print job, click OK or
Print
in the Print
window.
Make sure that your
printer is selected.
Page 58
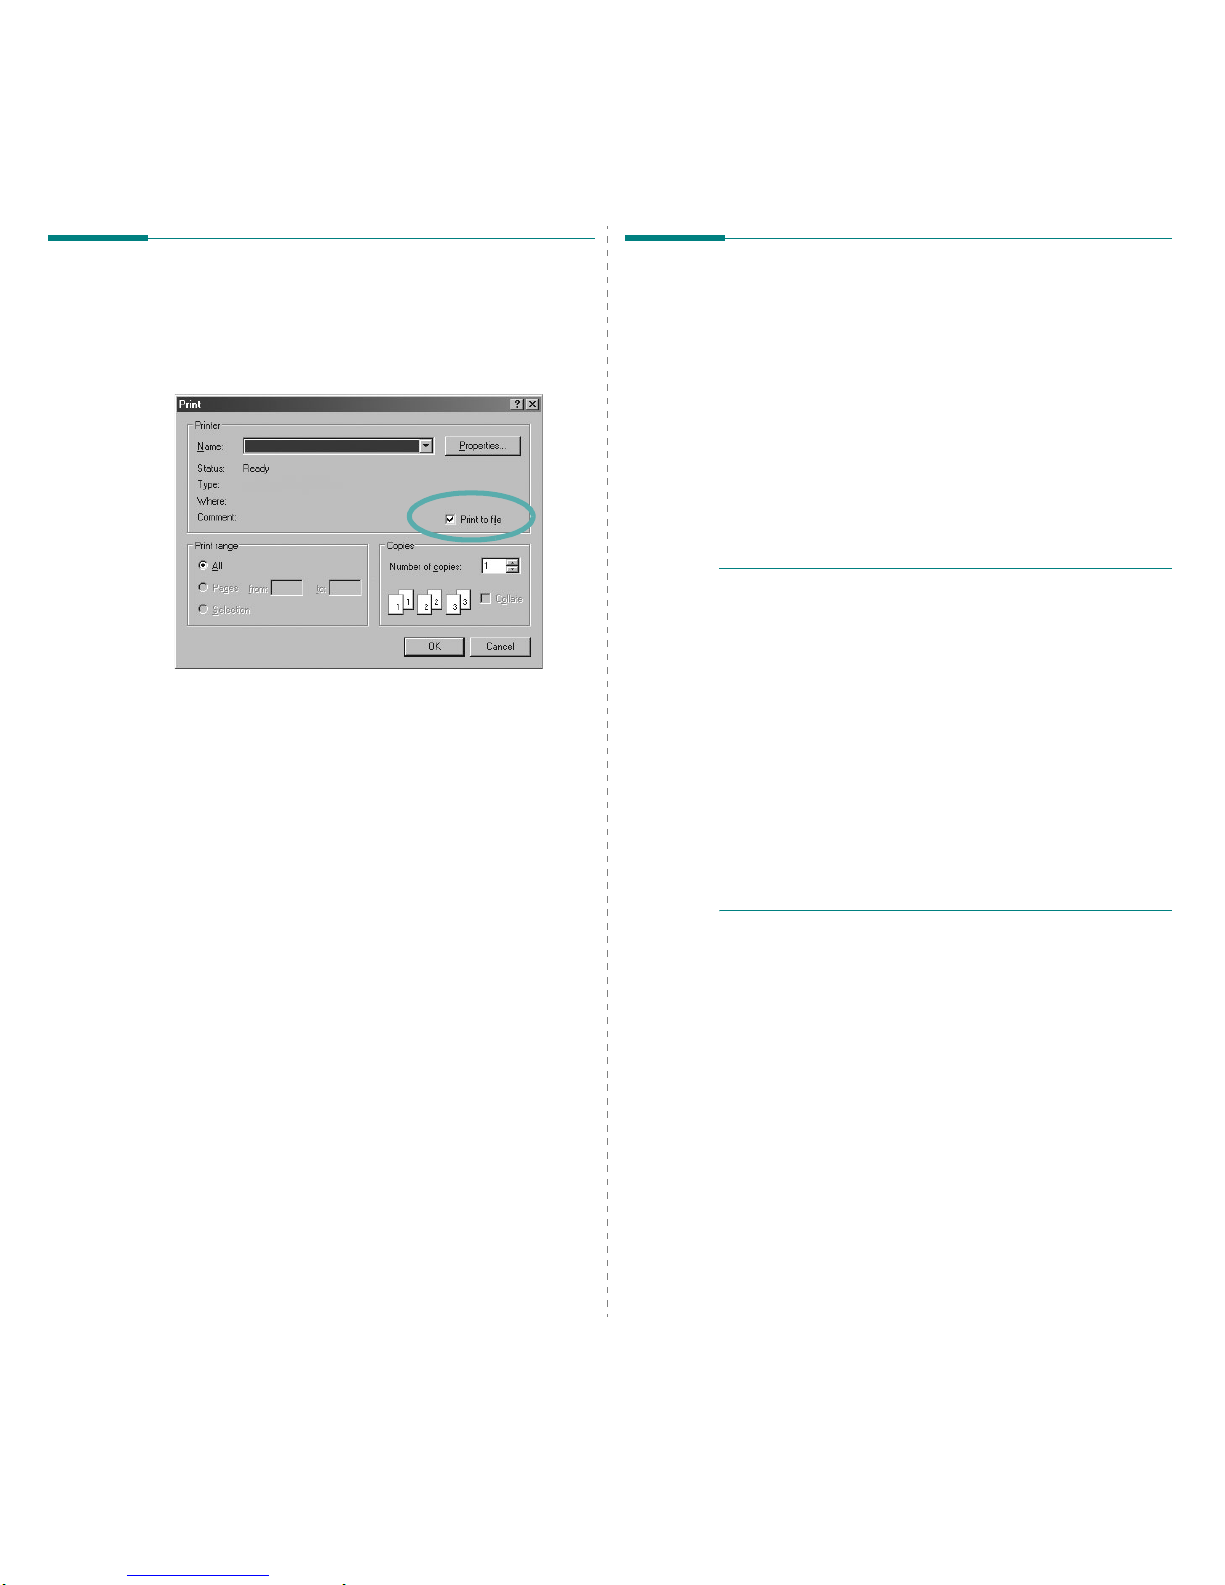
Basic Printing
8
Printing to a file (PRN)
You will som etimes need to save the print data as a file for your
purpose.
To create a file:
1
Check the
Print to file
box at the
Print
window.
2
Select the folder and assign a n ame of the file and then
click OK.
Printer Settings
You can use the printer properties window, which allows you to
access all of the printer options you need when using your
printer. When the printer p ro pe r ties ar e d isplayed, you can
review and change the settings needed for your print job.
Your printer properties window may differ, depending on your
operating system. This Software User’s Guide shows the
Properties window for Windows XP.
Your printer driver
Properties
window that appears in this
User’s Guide may differ depending on the printer in use.
If you access printer properties through the Printers folder, you
can view additional Windows-based tabs (refer to your
Windows User’s Guide) and the Printer tab (see “Printer Tab” on
page 11).
N
OTES
:
• Most Windows applications will override settings you specify
in the printer driver. Change all print settings available in the
software application first, and change any remaining settings
using the printer driver.
• The settings you change remain in effect only while y ou a re
using the current program.
To make your changes
permanent
, make them in the P rinter s fo lder.
• The following procedure is for Windows XP. For other
Windows OS, refer to the corresponding Windows User's
Guide or online help.
1. Click the Windows
Start
button.
2. Select
Printers and Faxes
.
3. Select your printer driver icon.
4. Right-click on the printer driver icon and select
Printing Preferences
.
5. Change the settings on each tab, click OK.
Page 59
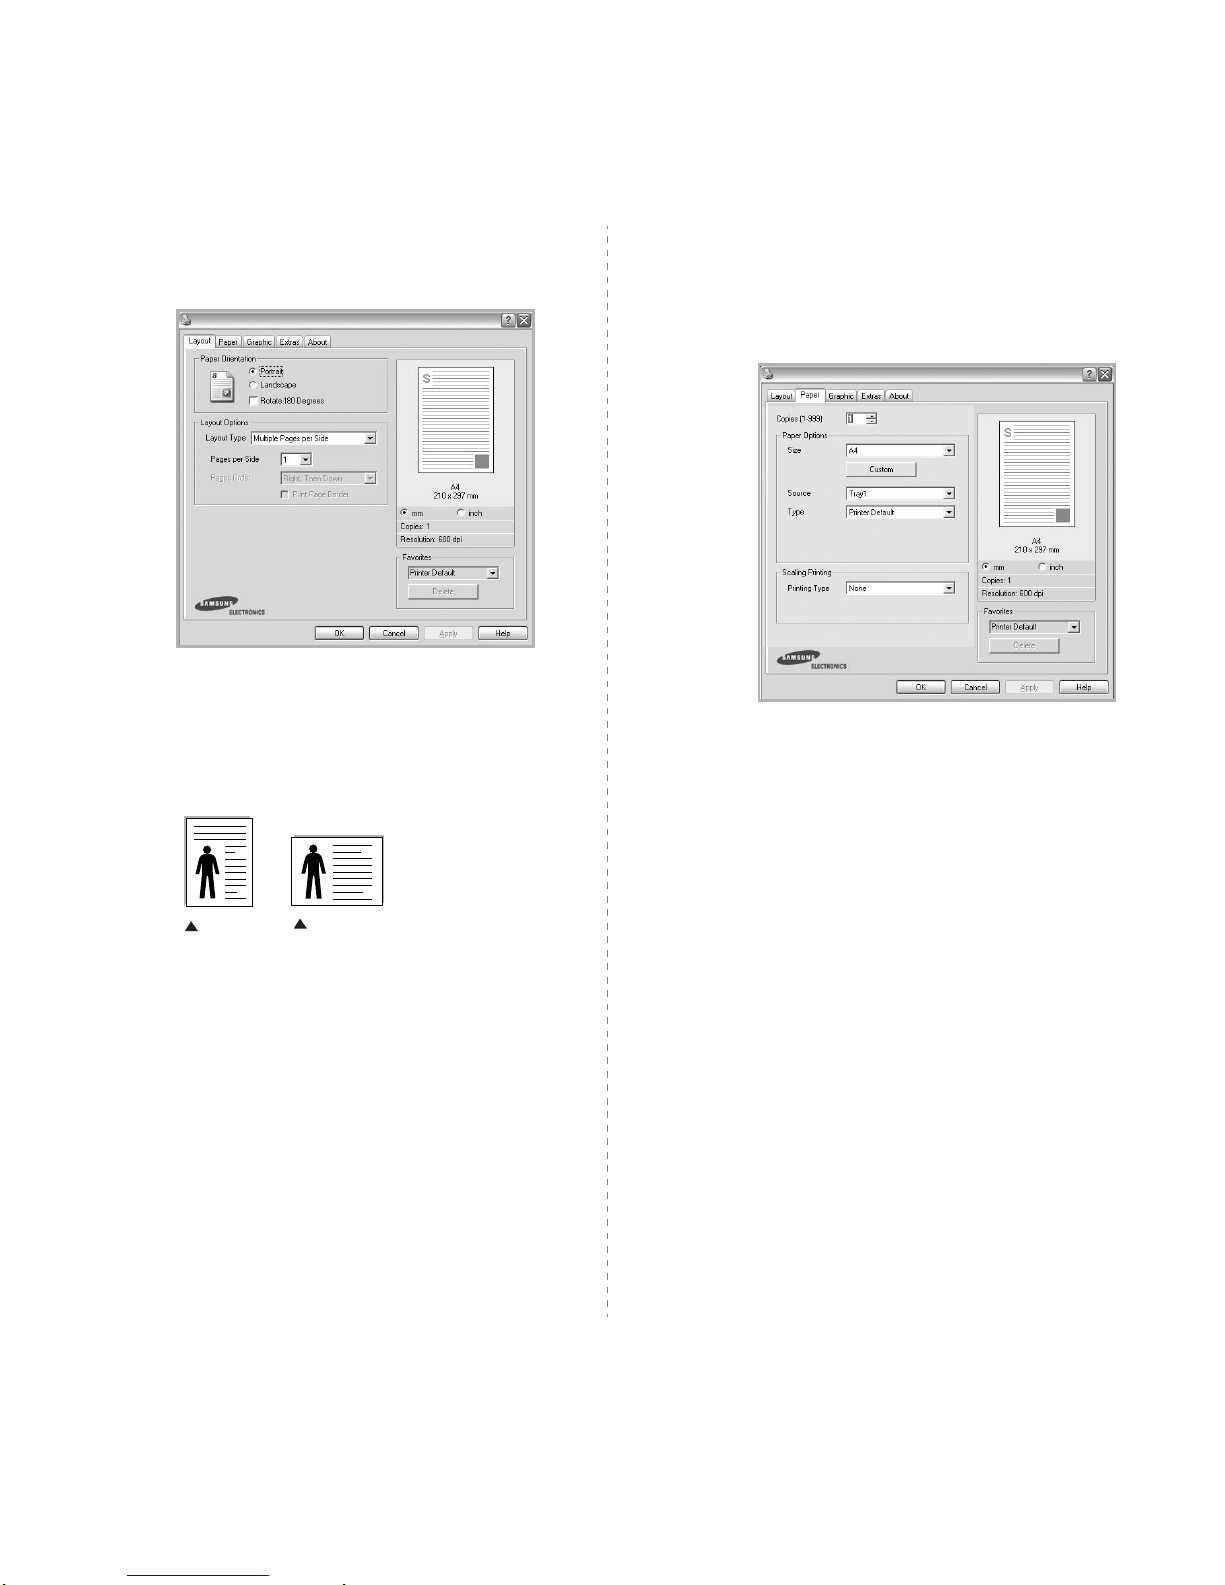
Basic Printing
9
Layout Tab
The
Layout
tab provides options to adjust how the document
appears on the printe d page.
Paper Orientation
Paper Orientation
allows you to select the direction in which
information is printed on a page.
•
Portrait
prints across the width of the page, letter style.
•
Landscape
prints across the length of the page, spreadsheet
style.
•
Rotate
allows you to rotate the page the selected degrees.
Layout Opti on s
Layout Opti on s
allows you to select advanced printing options.
You can choose
Multiple Pages per Side
and
Poster Printing
.
•
For details, see
“Printing Multiple Pages on One Sheet of Paper
(N-Up Printing)” on page 13.
•
For details, see
“Printing Posters” on page 14
Landscape
Portrait
Paper Tab
Use the following options to set the basic pape r ha n dling
specifications when you access the printer properties. See
“Printing a Document” on page 7 for more information on
accessing printer properties.
Click the
Paper
tab to access various paper properties.
Copies
Copies
allows you to choose the number of copies to be printed.
Yo u ca n se le ct 1 to 99 9 co p i es.
Paper Options
Size
Size
allows you to set the s ize of paper you loaded in the tray.
If the required size is not listed in the
Size
box, click
Custom
.
When the
Custom Paper S etting
window appears, set the paper
size and click
OK
. The setting appears in the list so that you can
select it.
Source
Make sure that
Source
is set to the corresponding paper tray.
Type
Set
Type
to correspond to the paper l oaded in the tray from
which you want to print. This will let you get the best quality
printout. If not, print quality may not be acheived as you want.
Scaling Printing
Scaling Printing
allows you to automatically or manually scale
your print job on a page. You can choose from
None, Reduce/
Enlarge
, and
Fit to Page
.
•
For details, see
“Printing a Reduced or Enlarged Document” on
page 14.
•
For details, see
“Fitting Your Do cument to a Selected Paper
Size” on page 14.
Page 60
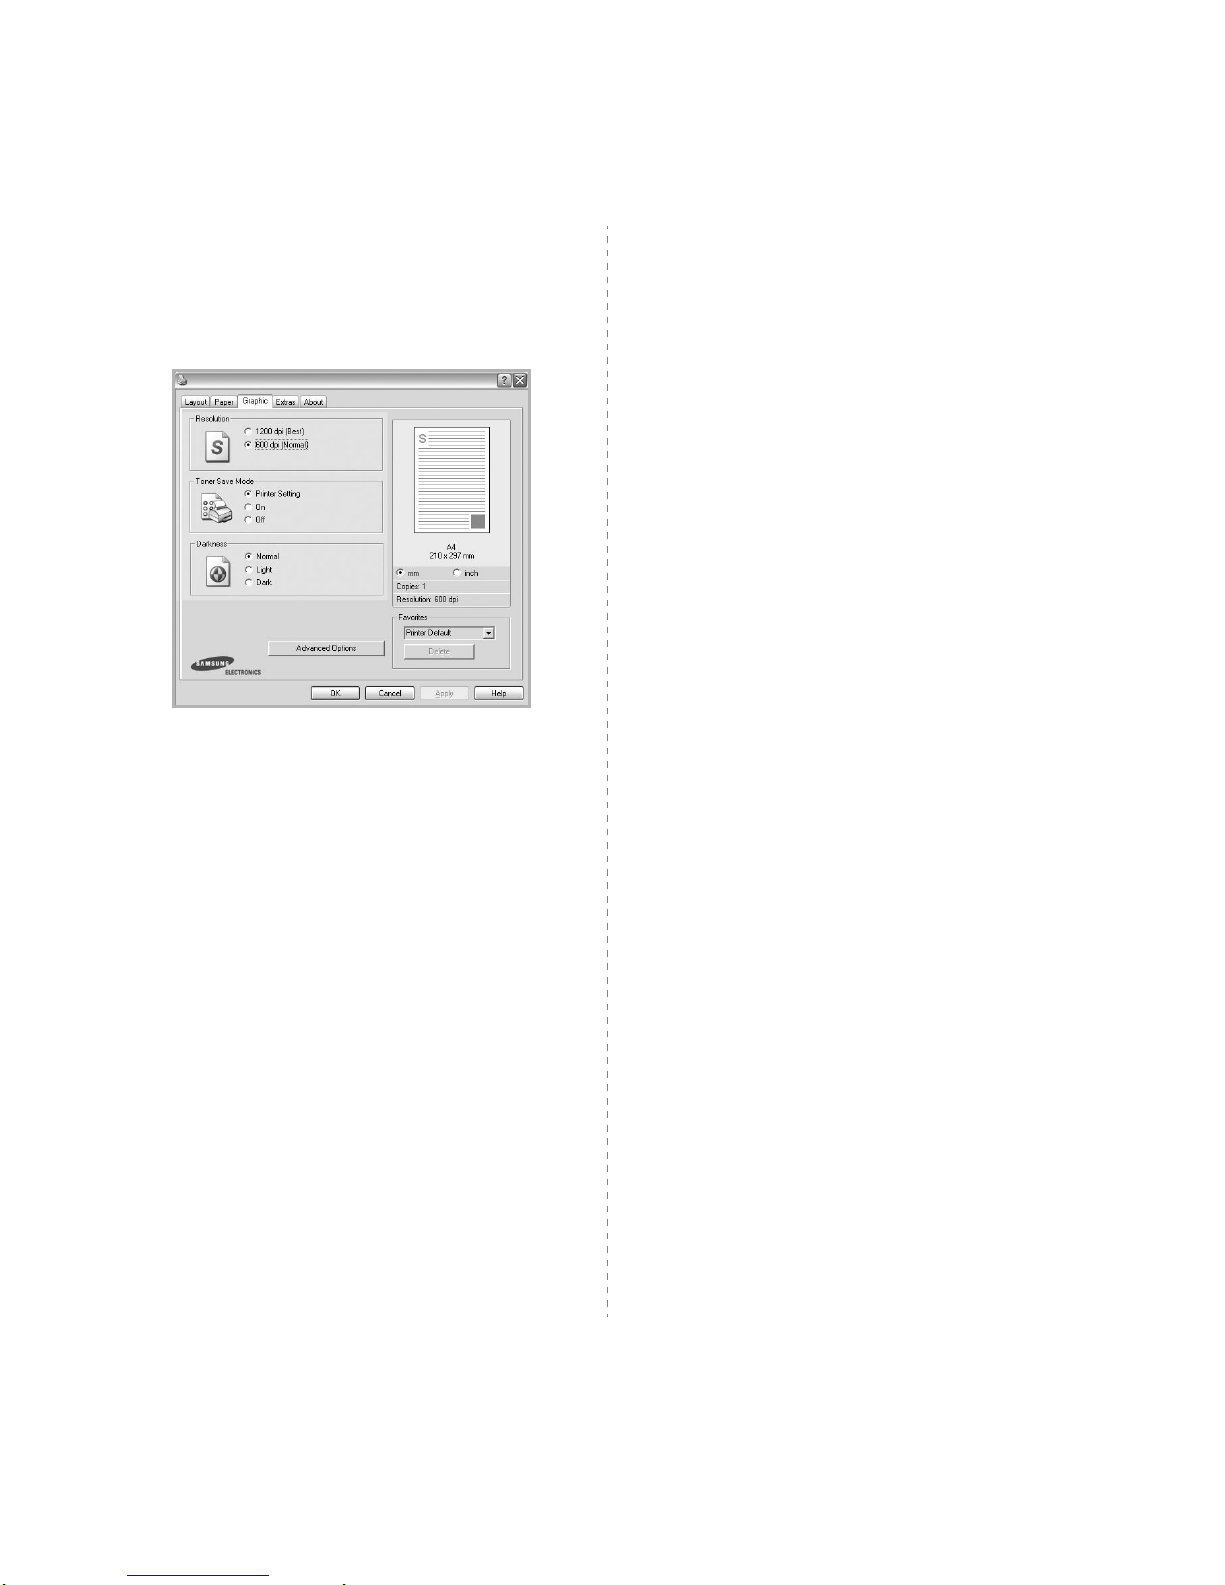
Basic Printing
10
Graphics Tab
Use the following Graphic options to adjust the print quality for
your specific printing needs. See “Printing a Document” on
page 7 for more information on accessing printer properties.
Click the
Graphic
tab to display the properties shown b e low.
Resolution
The Resolution options you can select may vary
depending on your printer model.
The higher the setting,
the sharper the clarity of printed characters and graphics. The
higher setting also may increase the time it takes to print a
document.
Toner Save Mode
Selecting this option extends the life of your toner cartridge and
reduces your cost per page without a significant reduction in print
quality.
Some printers do not support this feature.
•
Printer Setting
: If you select this option, this feature is
determined by the setting you’ve made on the control panel of
the printer.
•
On
: Select this option to allow the printer to use less toner on
each page.
•
Off
: If you don’t need to save toner when printing a document,
select this option.
Darkness
Use this option to lighten or darken your print job.
Some
printers do not support this feature.
•
Normal
: This setting is for normal documents.
•
Light
: This setting is for bolder line widths or darker gray-scale
images.
•
Dark
: This set ting is for finer line width, higher definition in
graphics, and lighter gray-scale images.
Advanced Options
You can set advanced settings by clicking the
Advanced
Options
button.
•
Grayscale Enhancement: Grayscale Enhancement
allows users to preserve the details of nature photos, and
improve contrast and readability among gray-scaled colors,
when printing color documents in grayscale.
•
Print All Text To Black
: When the
Print All Text To
Black
option is check ed, all text in your document print s solid
black, regardless of the color it appears on the screen.
•
Print All Text to Darken
: When the
Print All Text to
Darken
option is checked, all text in your document is allowed
to print darker than on a normal document.
Page 61
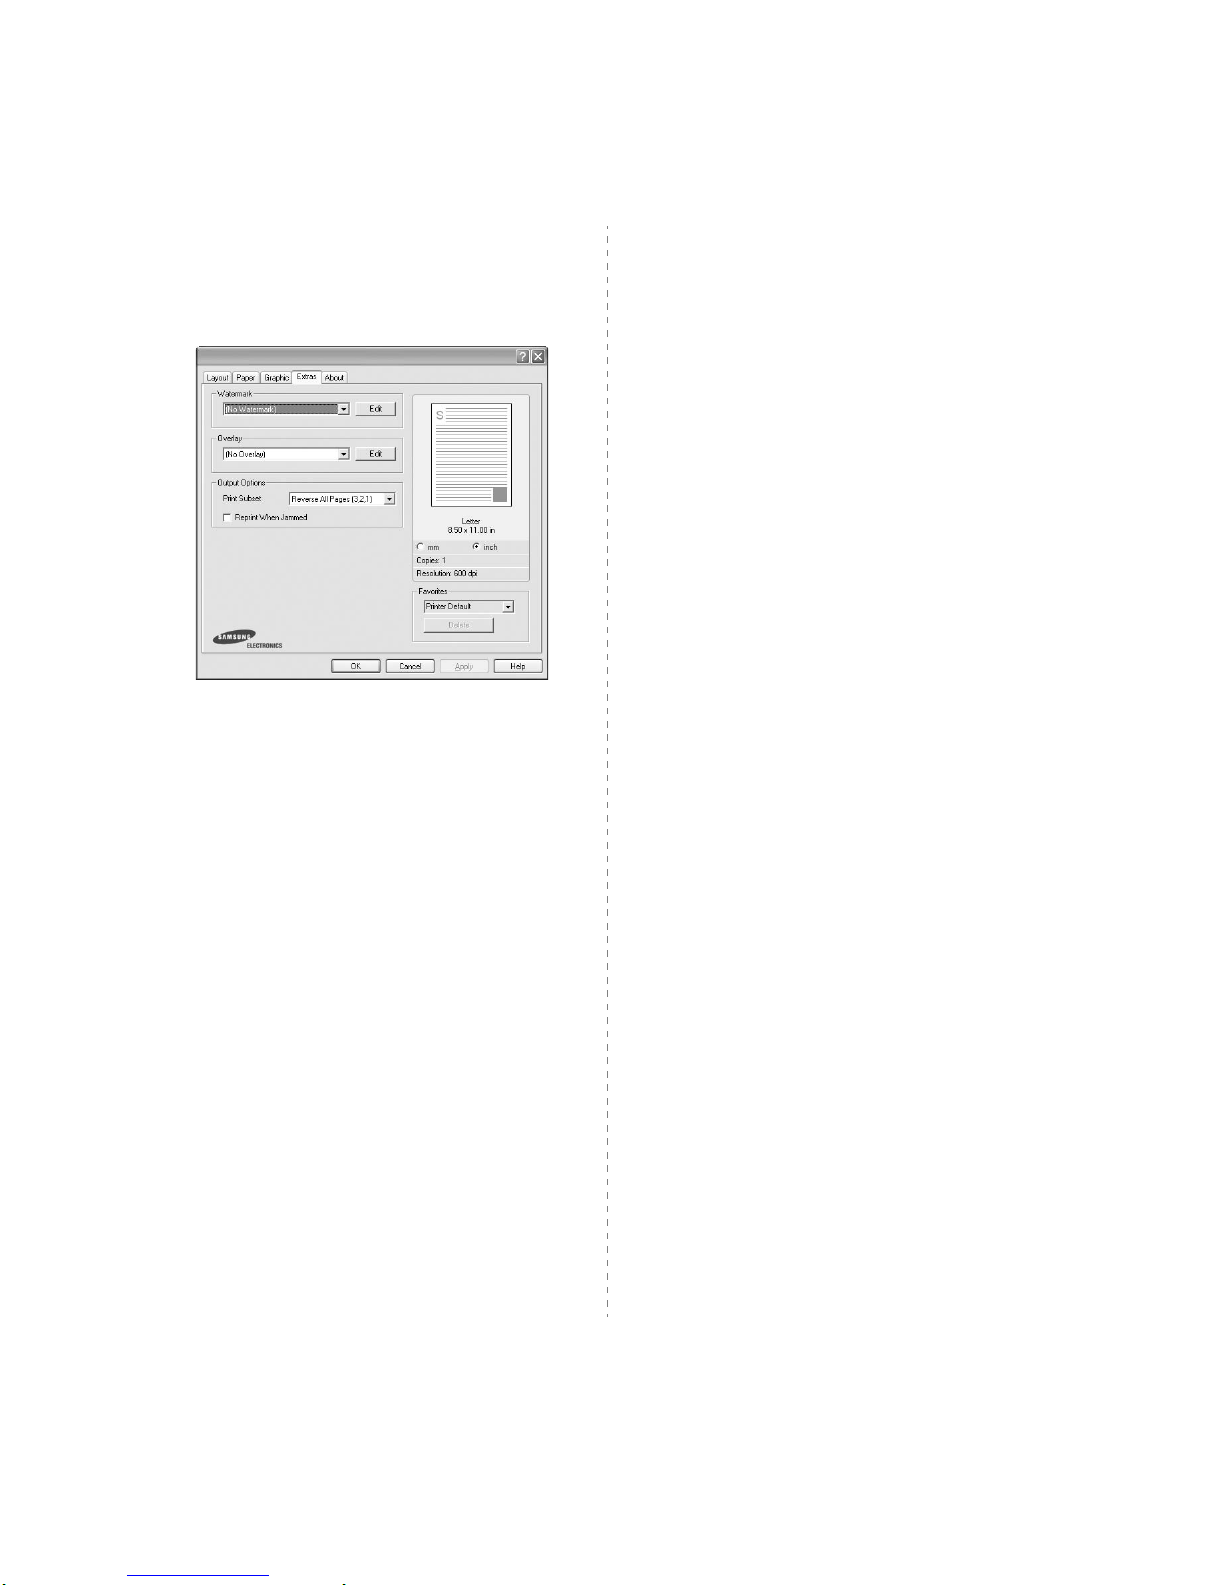
Basic Printing
11
Extras Tab
You can select output options for your document. See “Printing
a Document” on page 7 for more information about accessing
the printer properties.
Click the
Extras
tab to access the following feature:
Watermark
You can create a background text image to be printed on each
page of your document.
For details, see
“Using Watermarks” on
page 15.
Overlay
Overlays are often used to take the place of preprinted forms and
letterhead paper.
For details, see
“Using Overlays” on page 16.
Output Options
•
Print Subset
: You can set the sequence in which the pages
print. Select the print order from the drop-down list.
-
Normal (1,2,3)
: Your printer prints all pages from the first
page to the last page.
-
Reverse All Pages (3,2,1)
: Your printer prints all pages
from the last page to the first page.
-
Print Odd Pages
: Your printer prints only the odd numbered
pages of the document.
-
Print Even Pages
: Your printer prints only the even
numbered pages of the document.
•
Reprint When Jammed
: When this option is checked, the
printer retains the image of a printed page until the printer
signals that the page has successfully exited the printer. If a
paper jam occurs, the printer will reprint the last page sent from
the computer after you have cleared the jam.
Some printers
do not sup p o r t this feature.
About Tab
Use the
About
tab to display the copyright no tice a n d th e
version number of the driver. If you have an Internet browser,
you can connect to the Internet by clicking on the web site icon.
See “Printing a Document” on page 7 for more information
about accessing printer properties.
Printer Tab
If you access printer properties throug h th e
Printers
folder,
you can view the
Printer
tab. You can se t th e pr inter
configuration.
The following procedure is for Windows XP. For other Windows
OS, refer to the corresponding Windows User's Guide or online
help.
1
Click the Windows
Start
menu.
2
Select
Printers and Faxes
.
3
Select
your printer driver
icon.
4
Right-click on the printer driver icon and select
Properties
.
5
Click the
Printer
tab and set the options.
Page 62
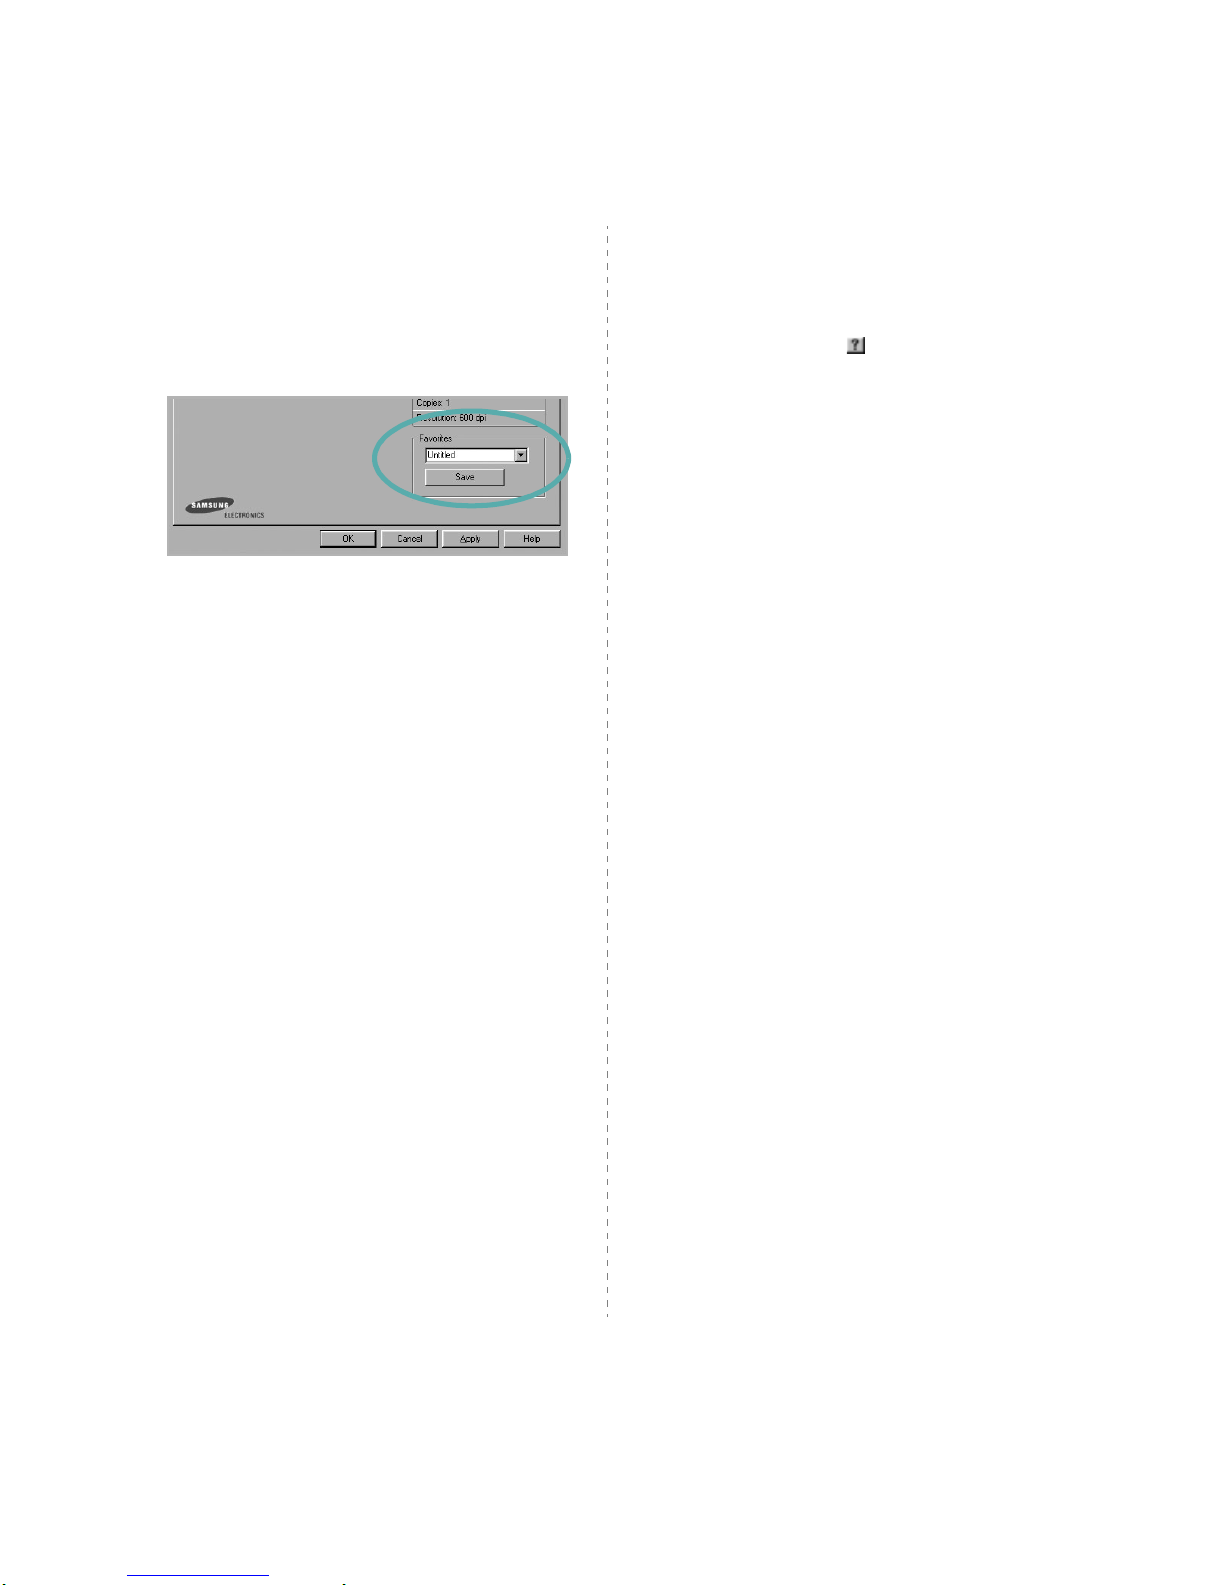
Basic Printing
12
Using a Favorite Setting
The
Favorites
option, which is visible on each properties tab,
allows you to save the current properties settings for future
use.
To save a
Favorites
item:
1
Change the settings as need ed o n each tab.
2
Enter a name for the item in the
Favorites
input box.
3
Click
Save
.
When you save
Favorites
, all current driver settings are
saved.
T o use a saved setting, select the item from the
Favorites
drop
down list. The printer is now set to print according to the
Favorites setting you selected.
To delete a Favorites item, select it from the list and click
Delete
.
You can also restore the printer driver’s default settings by
selecting
Printer Default
from the list.
Using Help
Your printer has a help screen that can be activated by clicking
the
Help
button in the printer properties window. These help
screens give detailed information abou t the p rinter featu res
provided by the printer driver.
You can also click from the upper right corner of the window,
and then click on any setting.
Page 63

Advanced Printing
13
3 Advanced Printing
This chapter explains printing options and advanced printing
tasks.
N
OTE
:
• Your printer driver
Properties
window that appears in this
User’s Guide may differ depending on the printer in use.
However the composition of th e printer prope rties window is
similar.
• If you need to know the exact name of your printer, you can
check the supplied CD-ROM.
This cha p t er includes :
• Printing Multiple Pages on One Sheet of Paper (N-Up
Printing)
•Printing Posters
• Printing a Reduced or Enlarged Docume nt
• Fitting Your Document to a Selected Paper Size
•Using Watermarks
•Using Overlays
Printing Multiple Pages on One
Sheet of Paper (N-Up Printing)
You can select the number of pages to print on a single sheet
of paper . To print more than one page per sheet, the pages will
be reduced in size and arranged in the order you specify. You
can print up to 16 pages on one sheet.
1
To change the print settings from your software
application, access printer properties. See “Printing a
Document” on page 7.
2
From the
Layout
tab, choose
Multiple Pages per Side
in
the
Layout Type
drop-down list.
3
Select the number of pages you want to print per sheet
(1, 2, 4, 6, 9, or 16) in the
Pages per Side
drop-dow n
list.
4
Select the page order from the
Page Order
drop-down
list, if necessary.
Check
Print Page Border
to print a border around each
page on the sheet.
5
Click the
Paper
tab, select the paper source, size, and
type.
6
Click OK and print the document.
1 2
3 4
Page 64
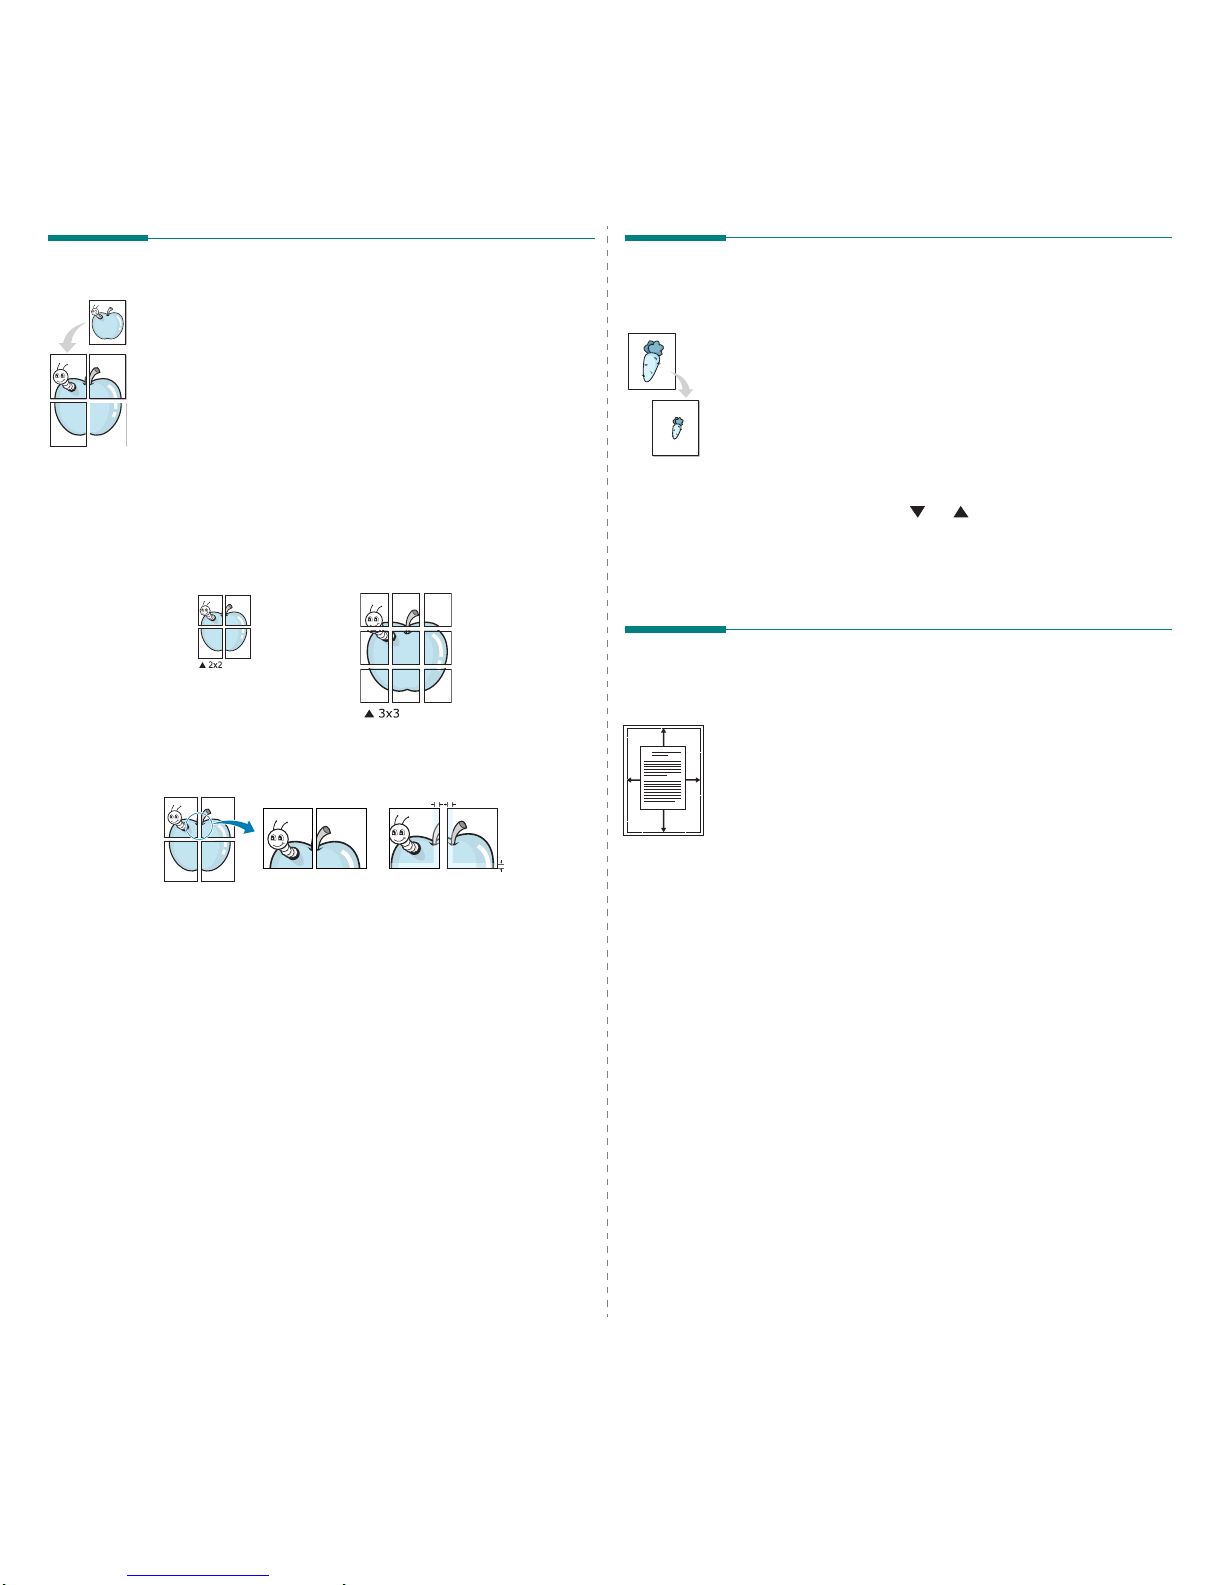
Advanced Printing
14
Printing Posters
This feature allows you to print a single-page document onto 4,
9, or 16 sheets of paper, for the purpose of pasting the sheets
together to form one poste r - size document.
1
To change the print settings from your softw are
application, access printer properties. See “Printing a
Document” on page 7.
2
Click the
Layout
tab, select
Poster Printing
in the
Layout Type
drop-down list.
3
Configure the poster option:
You can select the page layout from
Poster<2x2>
,
Poster<3x3>
or
Poster<4x4>
. If you select
Poster<2x2>
, the output will be automatically stretche d
to cover 4 physical pages.
Specify an overlap in millimeters or inches to make it
easier to pasting the sheets together.
4
Click the
Paper
tab, select the paper source, size, and
type.
5
Click OK and print the document. You can complete the
poster by pasting the sheets together.
0.15 inches
0.15 inches
Printing a Reduced or Enlarg ed
Document
You can cha nge the size of a p age’s content to appear larger or
smaller on the printed page.
1
To change the print settings from your software
application, access printer properties. See “Printing a
Document” on page 7.
2
From the
Paper
tab, select
Reduce/Enlarge
in the
Printing Type
drop-down list.
3
Enter the scaling rate in the
Percentage
input box.
You can also click the or button.
4
Select the paper source, size, and type in
Paper Options
.
5
Click OK and print the document.
Fitting Your Document to a
Selected Paper Size
This printer feature allows you to scale your print job to any
selected paper size regardless of the digital document size. This
can be useful when you want to check fine details on a small
document.
1
To change the print settings from your software
application, access printer properties. See “Printing a
Document” on page 7.
2
From the
Paper
tab, select
Fit to Page
in the
Printing
Type
drop-down list.
3
Select the correct size from the
Output size
drop-dow n
list.
4
Select the paper source, size, and type in
Paper Options
.
5
Click OK and print the docume n t.
A
Page 65

Advanced Printing
15
Using Watermarks
The Waterm ark option allows you to pr int text over an existing
document. For example, you may want to have large gray
letters reading “DRAFT” or “CONFIDENTIAL” printed diagonally
across the first page or all pages of a document.
There are several predefin ed watermarks that come with the
printer , and they can be modified, or you can add new ones to
the list.
Using an Existing Watermark
1
To change the print settings from your softw are
application, access printer properties. See “Printing a
Document” on page 7.
2
Click the
Extras
tab, and select the desired watermark
from the
Watermark
drop-down list. You will see the
selected watermark in the pre view image .
3
Click OK and start printing.
N
OTE
: The preview image shows how the page will look when
it is printed.
Creating a Wate rmark
1
To change the print settings from your softw are
application, access printer properties. See “Printing a
Document” on page 7.
2
Click the
Extras
tab, and click the
Edit
button in the
Watermark
section. The
Edit Watermark
window
appears.
3
Enter a text message in the
Watermark Message
box.
You can enter up to 40 characters. The me ssag e displays
in the preview window.
When the
First Page Only
box is checked, the watermark
prints on the first page only.
4
Select watermark options.
You can select the font name, style, size, or grayscale level
from the
Font Attributes
section and set the angle of the
watermark from the
Message Angle
section.
5
Click
Add
to add a new watermark to the list.
6
When you have finished editing, click OK and start
printing.
T o stop printing the wa termark, select
(No Watermark )
from
the
Watermark
drop-down list.
Editing a Watermark
1
To change the print settings from your software
application, access printer properties. See “Printing a
Document” on page 7.
2
Click the
Extras
tab and click the
Edit
button in the
Watermark
section. The
Edit Watermark
window
appears.
3
Select the watermark yo u want to edit from the
Current
Watermarks
list and change the watermark message a nd
options.
4
Click
Update
to save the changes.
5
Click OK until you exit the Print window.
Deleting a Watermark
1
To change the print settings from your software
application, access printer properties. See “Printing a
Document” on page 7.
2
From the
Extras
tab, click the
Edit
button in the
Watermark section. The
Edit Watermark
window
appears.
3
Select the waterm ark you w ant to delete from the
Current
Watermarks
list and click
Delete
.
4
Click OK until you exit the Print window.
Page 66

Advanced Printing
16
Using Overlays
What is an Overlay?
An overlay is text and/or images stored in the computer hard
disk driv e (H DD) a s a sp ecia l file form at tha t can be p rinted on
any document. Ov e r la y s ar e o ften used to take the place of
preprinted forms and letterhead paper. Rather than using
preprinted letterhead, you can create an overlay containing the
exact same information that is currently on your letterhead. T o
print a letter with your company’ s letterhead, yo u do not need
to load preprinted letterhead paper in the printer . You need only
tell the printer to print the letterhead ove rla y o n yo u r
document.
Creating a New Page Overlay
To use a page overlay, you must create a new page overlay
containing your logo or image.
1
Create or open a document containing text or an image for
use in a new page overlay. Position the items exactly as
you wish them to app ear when printed as an overlay.
2
To save the document as an overlay, access printer
properties. See “Printing a Document” on page 7.
3
Click the
Extras
tab, and click
Edit
button in the
Overlay
section.
4
In the Edit Overlay window, click
Create Overlay
.
5
In the Create Overlay window, type a name of up to eight
characters in the
File name
box. Select the destination
path, if necessary. (The default is C:\Formover).
6
Click
Save
. The name appears on the
Overlay List
box.
7
Click OK or
Yes
to finish creating.
The file is not printed. Instead it is store d on your
computer hard disk drive.
N
OTE
: The overlay document size must be the same as the
documents you print wi th the overla y . Do n ot create an o verlay
with a watermark.
WORLD BEST
Dear ABC
Regards
WORLD BEST
Using a Page Overlay
After an overlay has been created, it is ready to be printed with
your document. T o print an overlay with a document:
1
Create or open the docume n t you want to print.
2
To change the print settings from your software
application, access printer properties. See “Printing a
Document” on page 7.
3
Click the
Extras
tab.
4
Select the desired overlay from the
Overlay
drop-down
list box.
5
If the overlay file y ou want does not appear in the
Overlay
list, click
Edit
button and
Load Over lay
, and
select the overlay file.
If you have stored the overlay file you want to use in an
external source, you can also load the file when you access
the
Load Overlay
window.
After you select the file, click
Open
. The file appears in the
Overlay List
box and is available for printing. Select the
overlay from the
Overlay List
box.
6
If necessary, click
Confirm Page Overlay When
Printing
. If this box is checked, a message window
appears each time you submit a document for printing,
asking you to confirm your wish to print an overlay on your
document.
If this box is not checked and an overlay has been
selected, the overlay automatica lly prints with yo ur
document.
7
Click OK or
Yes
until printing begins.
The selected overlay downloads with your print job and
prints on your document.
N
OTE
: The resolution of the overlay document must be the
same as that of the documen t yo u w ill print w ith the overlay .
Deleting a Page Overlay
You can delete page overlays that you no longer use.
1
In the printer properties window, click the
Extras
tab.
2
Click the
Edit
button in the
Overlay
section.
3
Select the overlay you want to delete from the
Overlay
List
box.
4
Click
Delete Overlay
.
5
When a confirming message window appears, click
Yes
.
6
Click OK until you exit the Print window.
Page 67

Sharing the Printer Locally
17
4 Sharing the Printer
Locally
You can connect the printer directly to a selected computer,
which is called “host c o mputer,” on the network.
The following procedure is for Windows XP. For other Windows
OS, refer to the corresponding Windows User's Guide or online
help.
N
OTES
:
• Check the Operating System(s) that are compatible with
your printer. Please refer to the OS Compatibility section of
Printer Specifications in your Printer User’s Guide.
• If you need to know the exact name of your printer, you can
check the supplied CD-ROM.
Setting Up a Host Computer
1
Start Windows.
2
From the
Start
menu select
Printers and Faxes
.
3
Double-click
your printer driver icon
.
4
From the
Printer
menu, select
Sharing
.
5
Check the
Share this printer
box.
6
Fill in the
Shared Name
field, and then click OK.
Setting Up a Client Computer
1
Right-click the Windows
Start
button and select
Explore
.
2
Select
My Network Places
and then right-click
Search
for Computers
.
3
Fill in the IP address of host computer in
Computer name
field, and click
Search
. (In case host computer requires
User name
and
Password
, fill in User ID and passwo rd
of host computer account.)
4
Double-click
Printers and Faxes
.
5
Right-click printer driver icon, select
Connect
.
6
Click
Yes
, if the installation confirm message appears.
Page 68
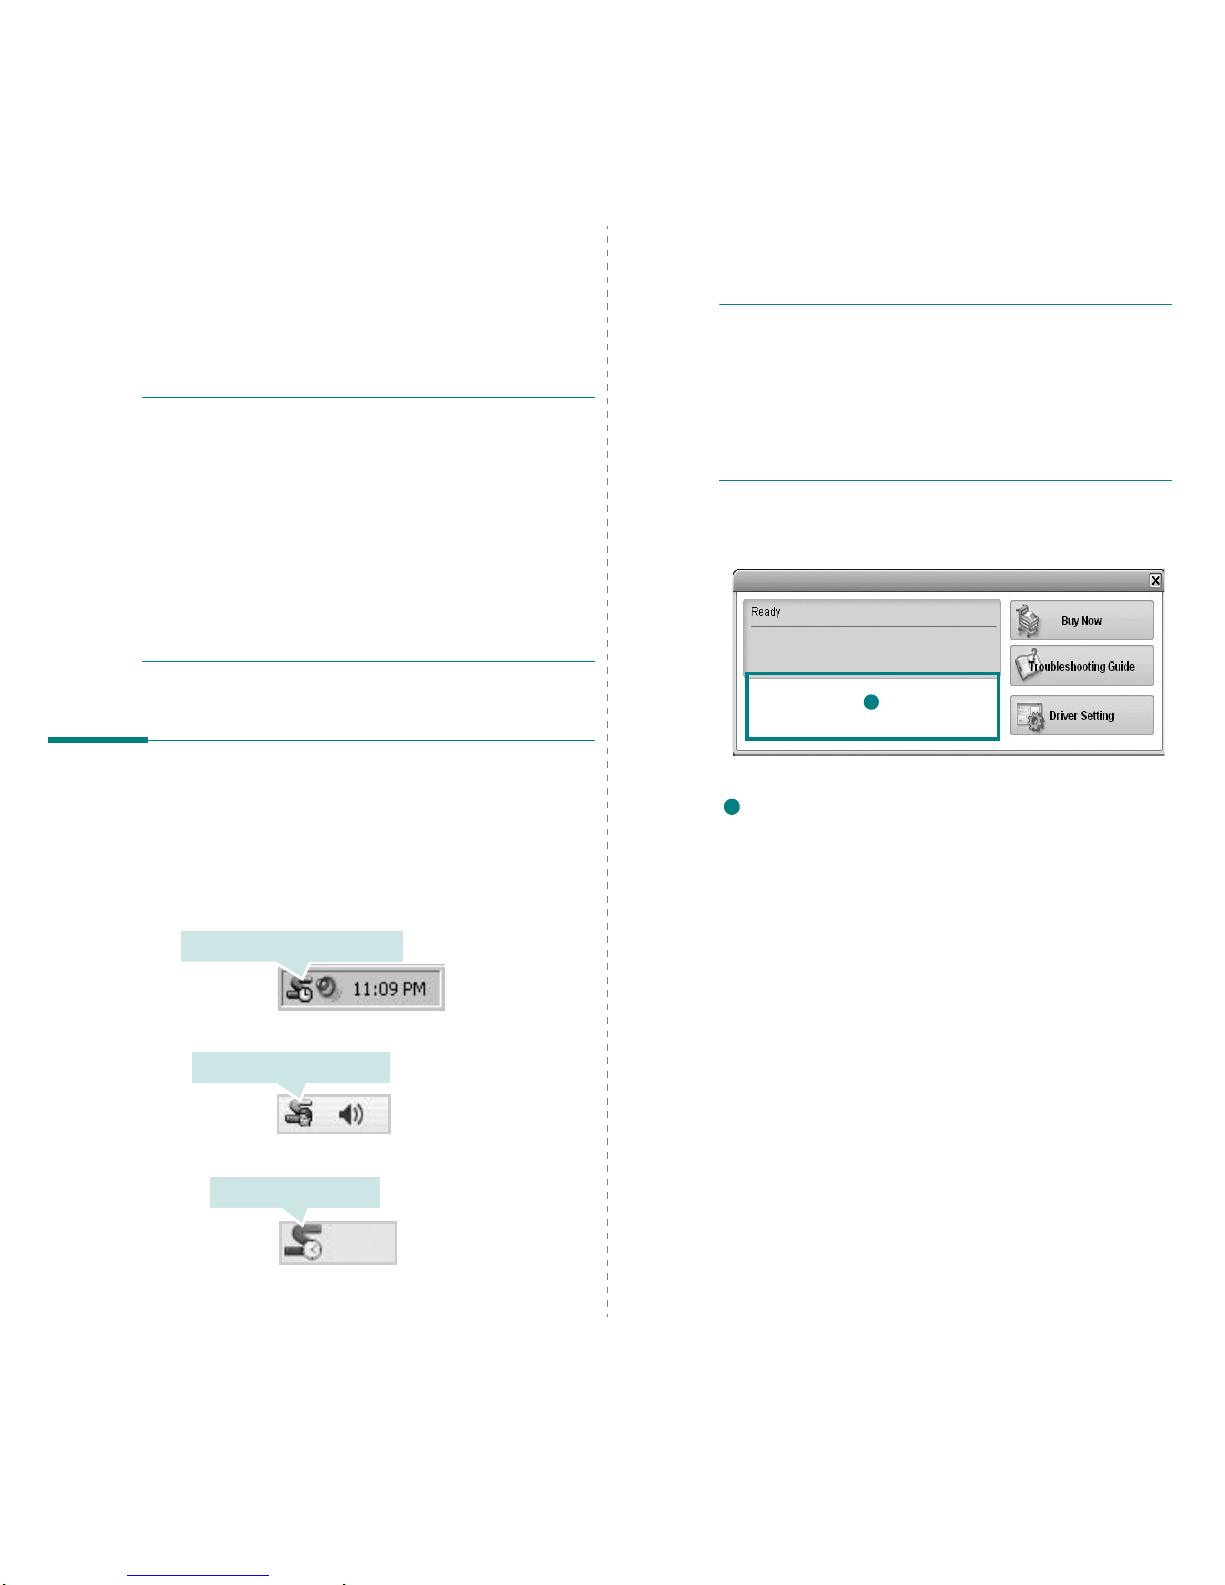
Using Smart Panel
18
5 Using Smart Panel
Smart Panel is a program that monitors and inform s you of the
status of the printer, and allows you to custom iz e the printer’ s
settings.
Smart Panel
is installed automatically when you
install the printer software.
N
OTES
:
• To use this program, you need:
- T o check for Operating System(s) that are compatible with
your printer, refer to Printer Specifications in your Printer
User’s Guide.
- Mac OS X 10.3 or higher
- Linux. To check for Linux systems that are compatible with
your printer, refer to Printer Specifications in your Printer
User’s Guide.
- Internet Explorer version 5.0 or higher for flash animation
in HTML Help.
• If you need to know the exact name of your printer, you can
check the supplied CD-ROM.
Understanding Smart Panel
If an error occurs while printing, Smart Panel appears
automatically, showing the error.
You can also launch Smart Panel manually. Double-click the
Smart Panel icon on the Windows task bar (in Windows), or
Notification Area (in Linux). You can also click it on the status
bar (in Mac O S X).
Double-click this icon in Windows.
Click this ic on in Mac OS X.
Click this icon in Linux.
If you are a Windows user, from the
Start
menu, select
Programs
or
All Programs
→
your printer driver name
→
Smart Panel
.
N
OTES
:
• If you have already installed more than one Samsung
printer, first select the printer model you want in order to
use the corresponding Smart Panel. Right-click (in Windows
or Linux) or click (in Mac OS X) the Smart Panel icon and
select
your printer name
.
• The Smart Panel window and its contents shown in this
Software User’s Guide may differ depending on the printer or
Operating System in use.
The Smart Panel program displays the current status of the
printer, the level of toner remaining in the toner cartridge(s)
and various other information. You can also change settings.
Toner Level
You can view the level of toner remaining in the toner
cartridge(s). The printer and the number of toner cartridge(s)
shown in the above window may differ depending on the printer in
use. Any printers do not have this feature.
Buy Now
You can order replacement t oner cartridge(s) online.
Troubleshooting Guide
You can view Help to solve problems.
Driver Setting (Only for Windows)
You can use the printer properties window, which allows you to
access all of the printer options you need for using your
printer.
For details,
See “Printer Settings” on page 8.
1
1
Page 69
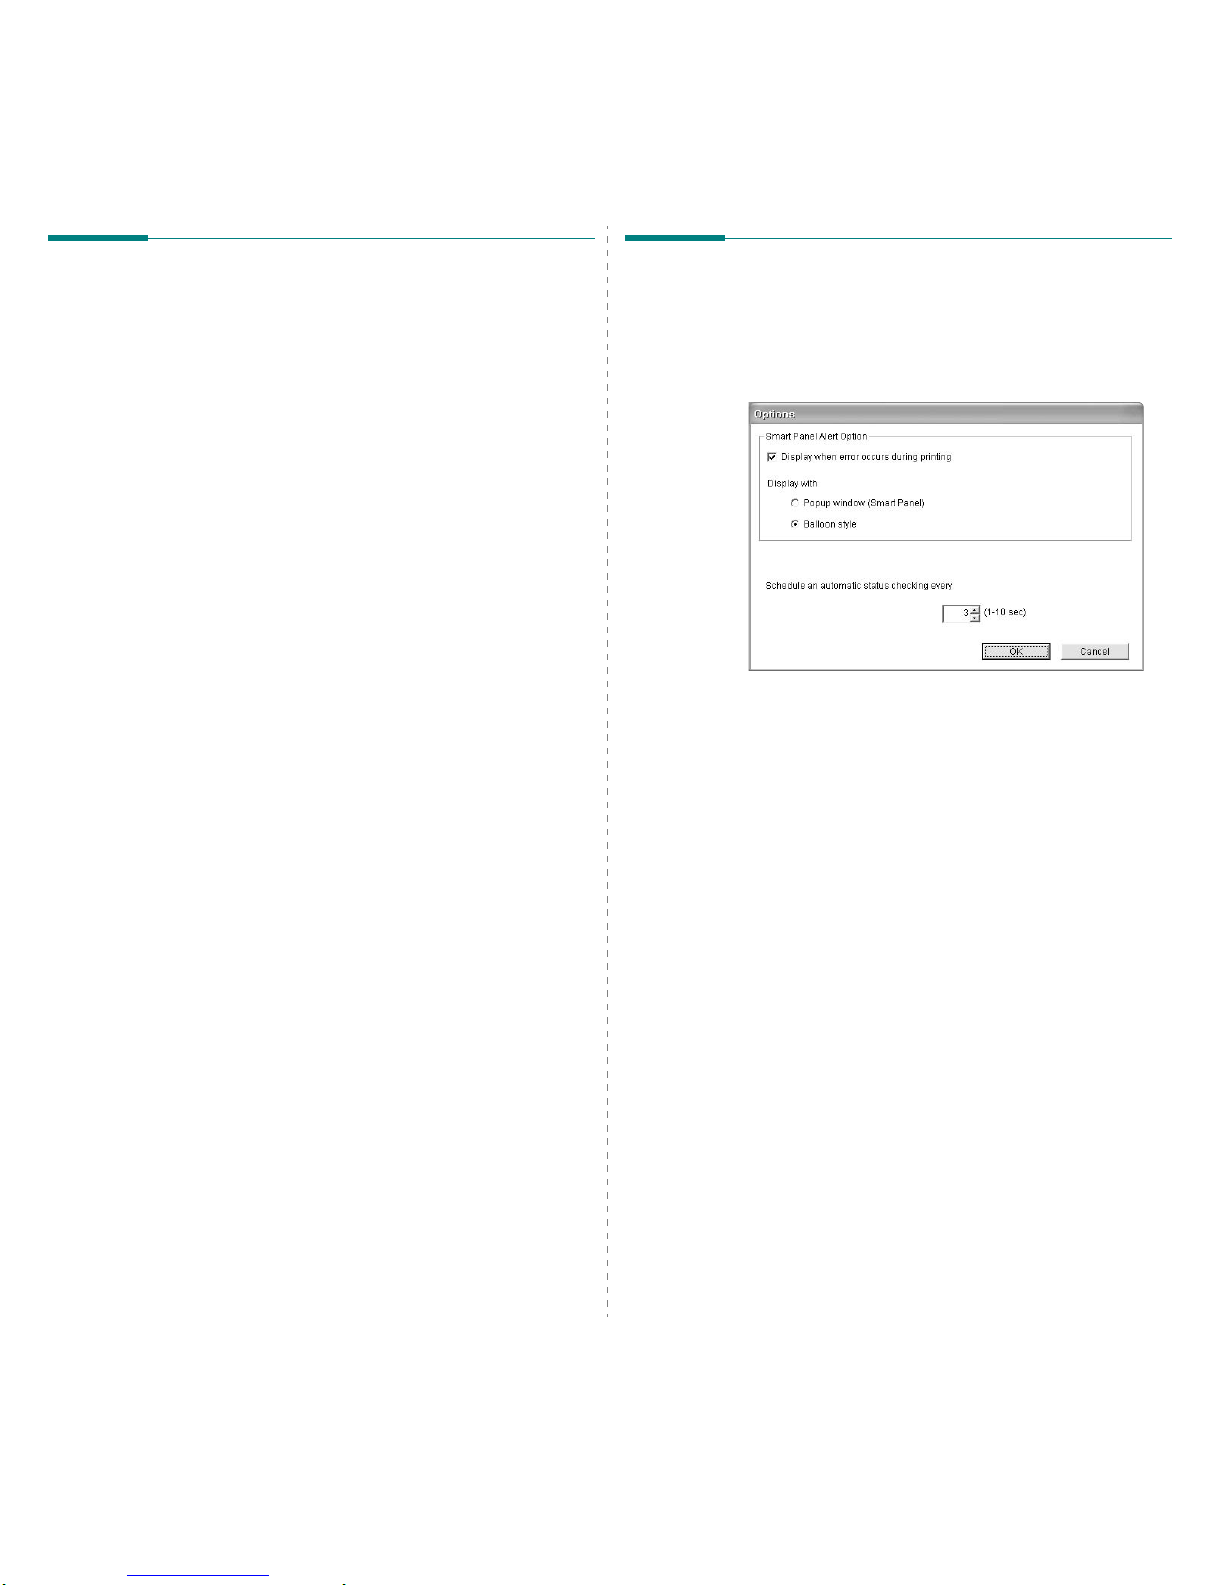
Using Smart Panel
19
Opening the Troubleshooting
Guide
Using the troubleshooting guide, you can view solutions for
error status problems.
Right-click (in Windows or Linux) or click (in Mac OS X) the
Smart Panel icon and select
Troubleshooting Guide
.
Changing the Smart Panel
Program Settings
Right-click (in Windows or Linux) or click (in Mac OS X) the
Smart Panel icon and select
Options
.
The following window opens.
•
Display w h en error occu r s d uring printi ng
: The
computer shows the Smart Panel popup window or
balloon when an error occurs during printing.
•
Display with
(Only for W indow s): You can select how the
computer shows you a message. If you select
Popup
window (smart panel)
, the message appears in the
Smart Panel popu p window.
•
Schedule an automatic status checking every
: The
computer updates the printer status regularly. Setting the
value close to 1 second causes the computer to check the
printer status more frequently, thereby allowing a faster
response to any printer error.
Page 70

Using Your Printer in Linux
20
6 Using Your Printer in
Linux
You can use your machine in a Linux environment.
This cha p t er includes :
• Getting Started
• Installing the Unified Linux Driver
• Using the Unified Driver Configurator
• Configuring Printer Properties
• Printing a Document
Getting Started
The supplied CD-ROM provides you with Samsung’s Unified
Linux Driver package for using your machine with a Linux
computer.
After the driver is installed on your Linux system, the driver
package allows you to monitor a number of machine devices via
fast ECP parallel ports and USB simultaneously.
The Unified Linux Driver package is supplied with a smart and
flexible installation program. You don't need to search for
additional components that might be ne cessary for the U nified
Linux Driver software: all required packages will be carried onto
your system and installed automatically; this is possible on a
wide set of the most popular Linux clones.
Installing the Unified Linux
Driver
Installing the Unified Linux Driver
1
Make sure that you connect your machine to your
computer. T urn both the computer and the machine on.
2
When the Administrator Login window appears, type in
root
in the Login field and enter the system password.
N
OTE
: You must log in as a super user (root) to install the
printer software. If you are not a super user, ask your system
administrator.
3
Insert the printer software CD-ROM. The CD-ROM w ill
automatically run.
If the CD-ROM does not au to m a tically run, click the
icon at the bottom of the desktop. When the Terminal
screen appears, type in:
If the CD-ROM is secondary master and the location to
mount is /mnt/cdrom,
[root@localhost root]#mount -t iso9660 /dev/hdc /mnt/
cdrom
[root@localhost root]#cd /mnt/cdrom/Linux
[root@localhost root]#./install.sh
N
OTE
: The installation program runs automatically if you
have an autorun software package installed and configured.
4
When the welcome screen appears, click
Next
.
Page 71
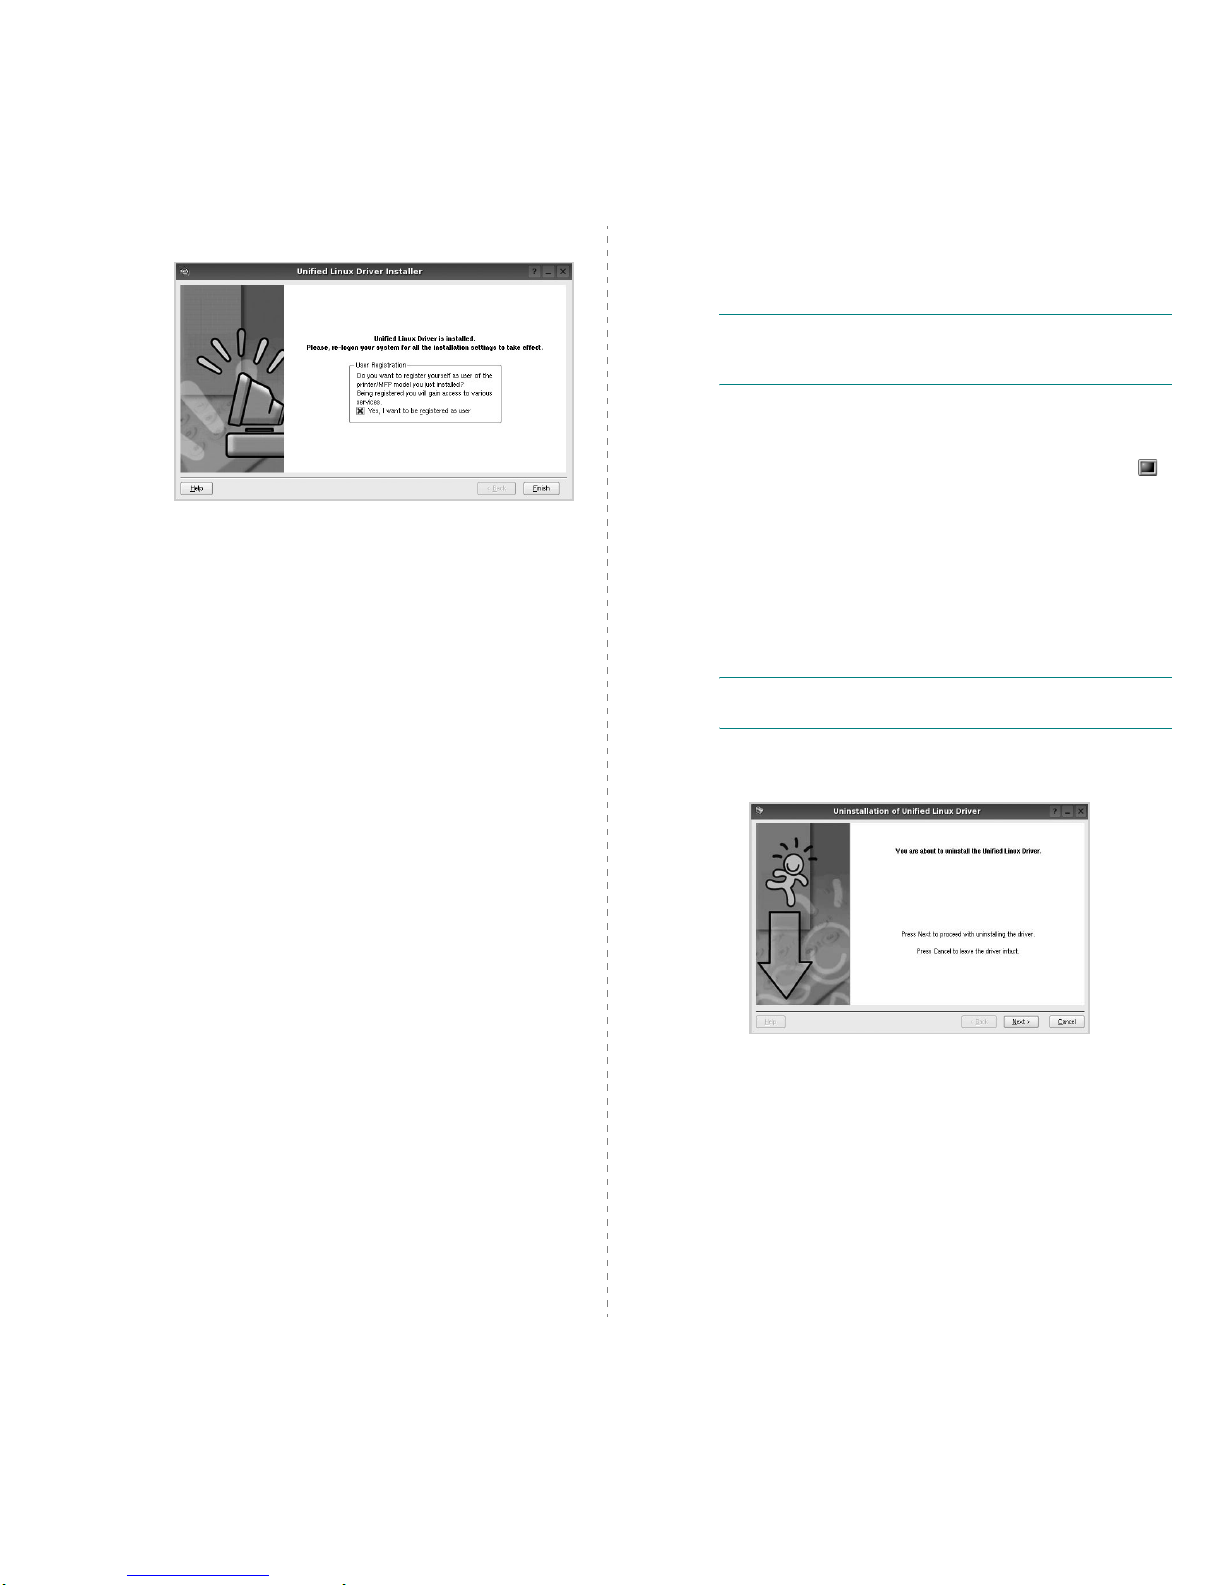
Using Your Printer in Linux
21
5
When the installation is complete, click
Finish
.
The installation program has added the Unified Driver
Configurator desktop icon and Samsung Unified Driver
group to the system menu for your convenience. If you
have any difficulties, consult the onscreen help that is
available through your system menu or can otherwise be
called from the driver package windows applications,
such as
Unified Driver Configurator
.
Uninstalling the Unified Linux Driver
1
When the Administrator Login window appears, type in
root
in the Login field and enter the system password.
N
OTE
: You must log in as a super user (root) to install the
printer software. If you are not a super user, ask your system
administrator.
2
Insert the printer software CD-ROM. The CD-ROM w ill
automatically run.
If the CD-ROM does not au to m a tically run, click the
icon at the bottom of the desktop. When the Terminal
screen appears, type in:
If the CD-ROM is secondary master and the location to
mount is /mnt/cdrom,
[root@localhost root]#mount -t iso9660 /dev/hdc /mnt/
cdrom
[root@localhost root]#cd /mnt/cdrom/Linux
[root@localhost root]#./uninstall.sh
N
OTE
: The installation program runs automatically if you
have an autorun software package installed and configured.
3
Click
Uninstall
.
4
Click
Next
.
5
Click
Finish
.
Page 72
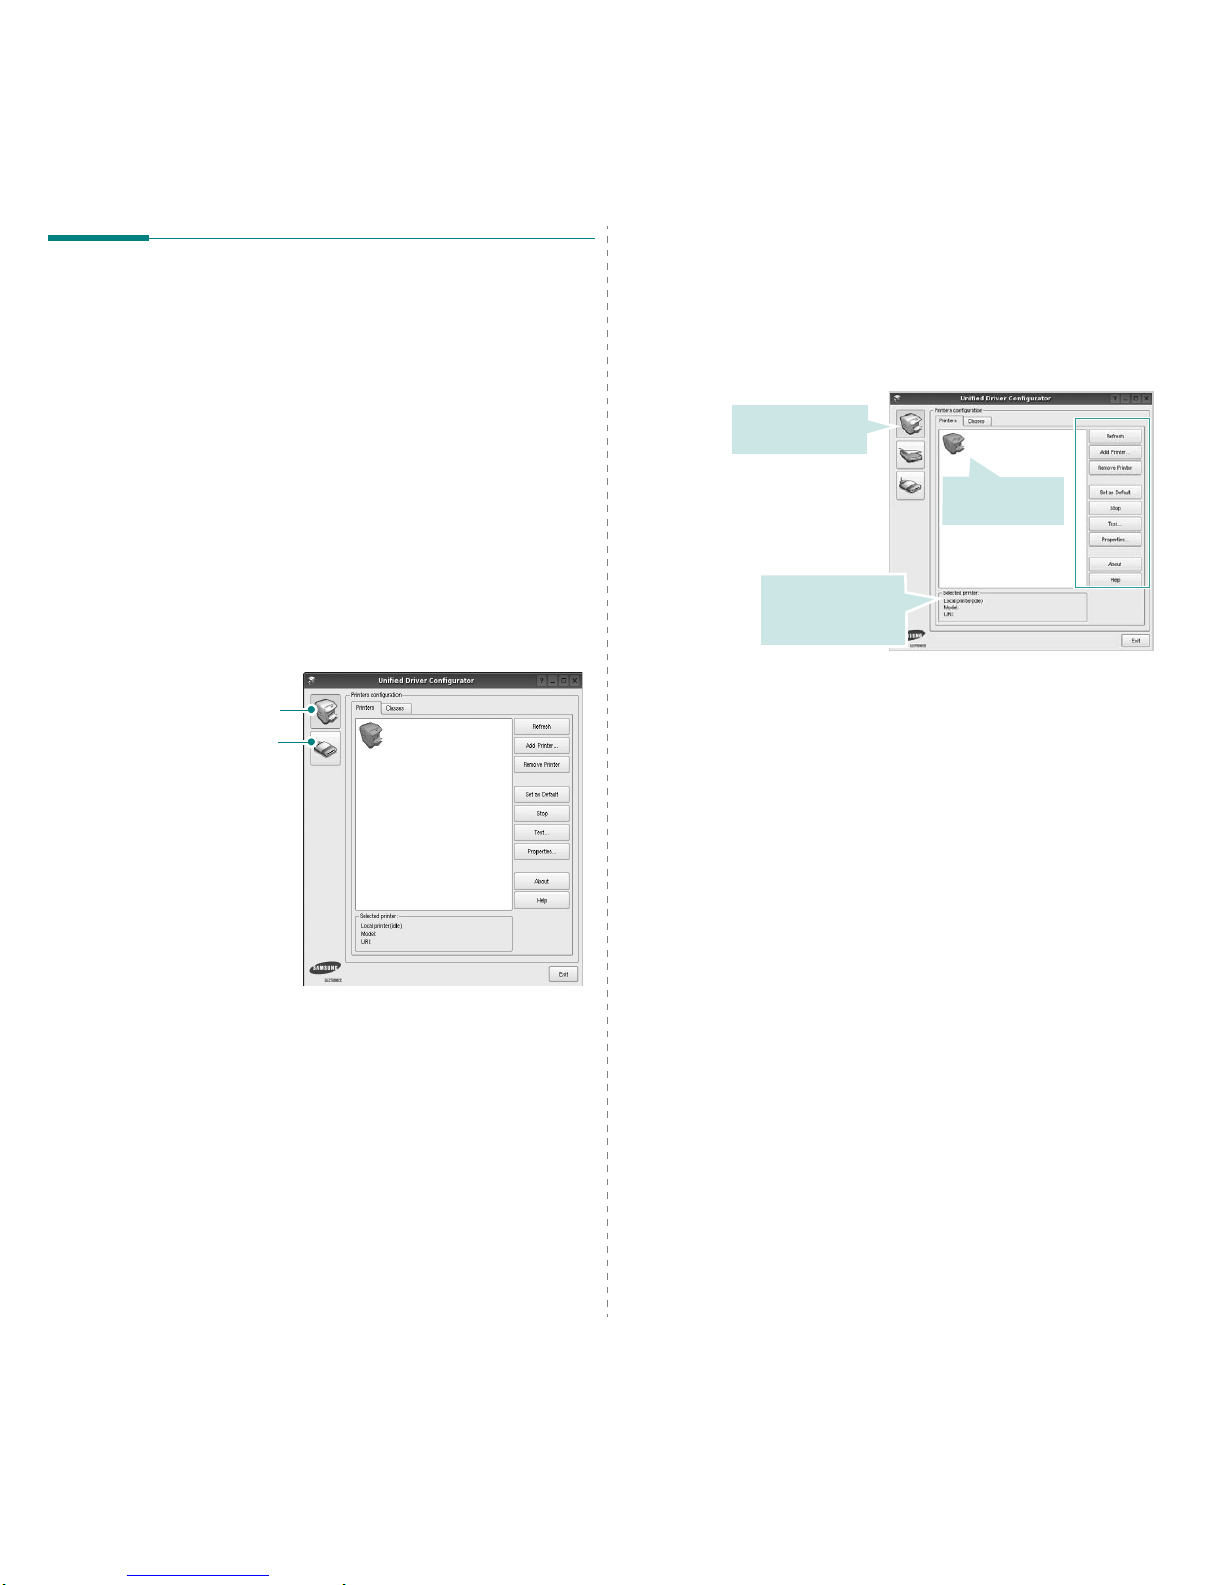
Using Your Printer in Linux
22
Using the Unified Driver
Configurator
Unified Linux Driver Configurator is a tool primarily intended for
configuring Printer.
After installing the Unified Linux driver , the Unified Linux Driver
Configurator icon will automatically be created on you r desktop.
Opening the Unified Driver
Configurator
1
Double-click
Unified Driver Configurator
on the
desktop.
You can also click the Startup Menu icon and select
Samsung Unified Driver
and then
Unified Driver
Configurator
.
2
Press each button on the Modules pane to switch to the
corresponding configuration window.
You can use the onscreen help by clicking
Help
.
3
After changing the configurations, click
Exit
to close the
Unified Driver Configurator.
Printers Configuration button
Ports Configuration button
Printers Configuration
Printers configuration has the two tabs:
Printers
and
Classes
.
Printers Tab
You can see the current system’s printer configuration by
clicking on the printer icon button on the left side of the Unified
Driver Configurator window.
You can use the following printer control buttons:
•
Refresh
: renews the available printers list.
•
Add Printer
: allows you to add a new printer.
•
Remove Printer
: removes the selected printer.
•
Set as Default
: sets the current printer as a default
printer.
•
Stop/Start
: stops/starts the printer.
•
Test
: allows you to prin t a test page to check if the
machine is working properly.
•
Properties
: allows you to view and change the printer
properties. For de ta i ls, see page 23.
Shows all of the
installed printer.
Switches to Printer
configuration.
Shows the status,
model name and
URI of your printer.
Page 73
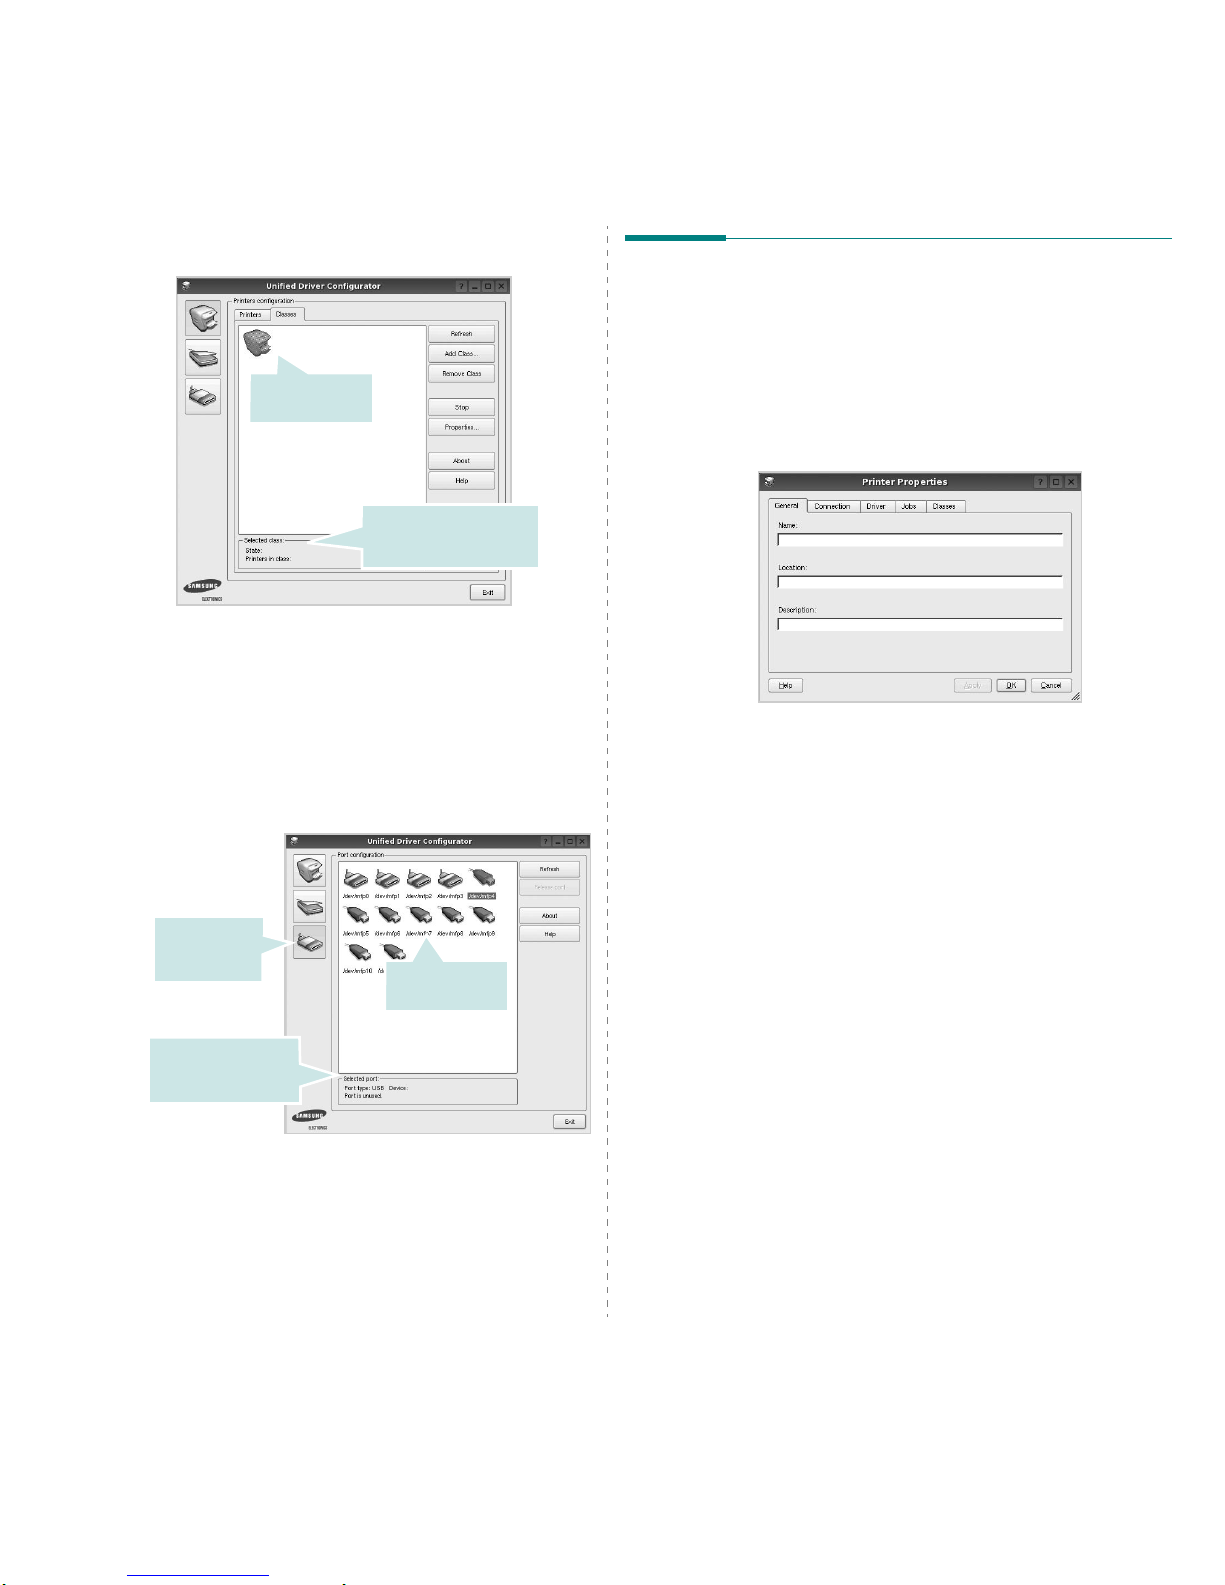
Using Your Printer in Linux
23
Classes Tab
The Classes tab shows a list of available printer classes.
•
Refresh
: Renews the classes list.
•
Add Class... :
Allows you to add a new printer class.
•
Remove Class :
Removes the selected printer class.
Ports Configuration
In this window, you can view the list of available ports, check
the status of each port and release a port that is stalled in busy
state when its owner is terminated for any reason.
•
Refresh
: Renews the available ports list.
•
Release port :
Releases the select ed port.
Shows the status of the
class and the number of
printers in the class.
Shows all of the
printer classes.
Switches to
ports
configuration.
Shows the port type,
device connected to
the port and status
Shows all of the
available ports.
Configuring Printer Properties
Using the properties w ind o w provided by the Printers
configuration, you can change the various properties for your
machine as a printer.
1
Open the Unified Driver Configurator.
If necessary, switch to Printers configuration.
2
Select y o u r m a ch in e on t he a vailable pr in te r s li st an d cli c k
Properties
.
3
The Printer Properties window opens.
The following five tabs display at the top of the window:
•
General
: allows you to change the printer location and
name. The name entered in this tab displays on the
printer list in Printers configuration.
•
Connection
: allows you to view or select another port. If
you change the pr in te r po r t fr om USB to parallel or vi c e
versa while in use, you must re-configure the printer port
in this tab.
•
Driver
: allows you to view or select another printer
driver. By clicking
Options
, you can set the default
device options.
•
Jobs
: shows the list of print jobs. Click
Cancel job
to
cancel the selected job and select the
Show completed
jobs
check box to see previous jobs on the job list.
•
Classes
: shows the class that your printer is in. Click
Add to Class
to add your printer to a specific class or
click
Remove from Class
to remove the printer from th e
selected class.
4
Click OK to apply the changes and close the Printe r
Properties Window.
Page 74
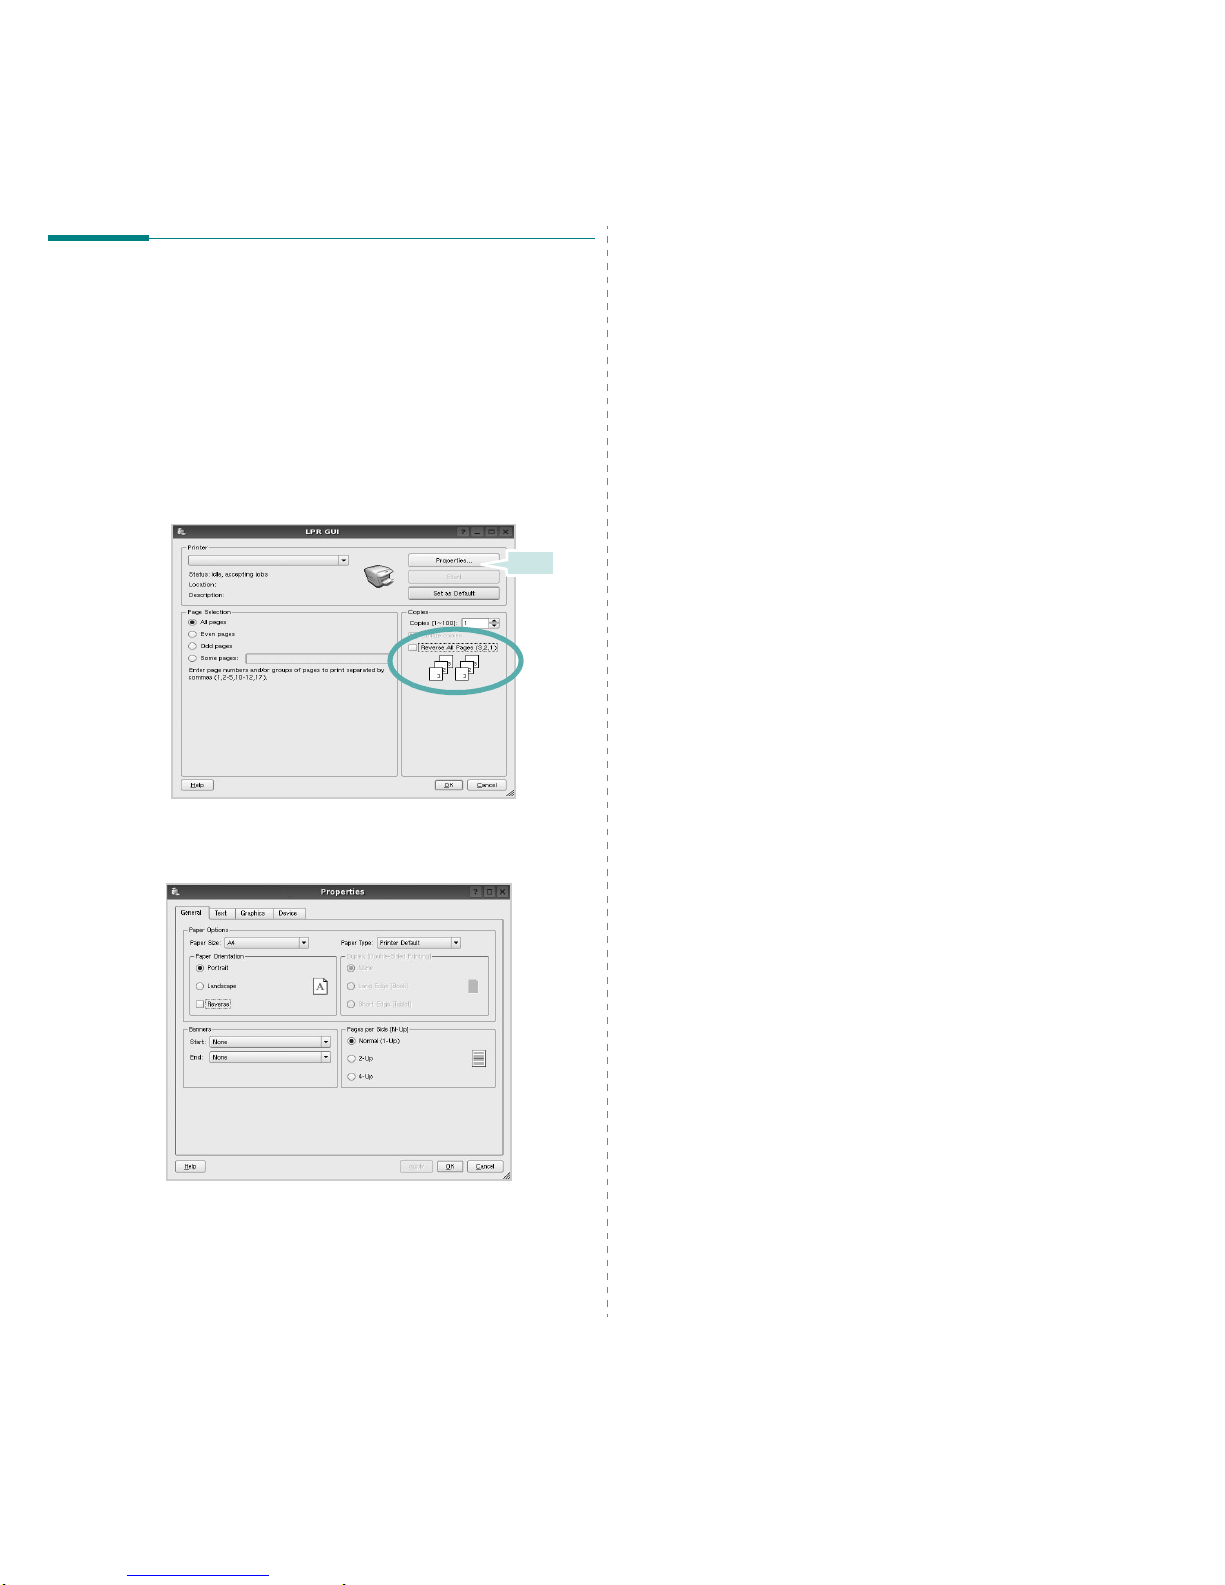
Using Your Printer in Linux
24
Printing a Document
Printing from Applications
There are a lot of Linux applications that you are allowed to
print from using Common UNIX Printing System (CUPS). You
can print on your machine from any such application.
1
From the application you are using, select
Print
from the
File
menu.
2
Select
Print
directly using
lpr
.
3
In the LPR GUI window, select the model name of your
machine from the Printer list and click
Properties
.
•
Reverse All Pages( 3, 2,1)
: When you use this feature,
you do not need to sort the pr int-out by stacks.
4
Change the printe r an d pr i n t jo b properties.
Click.
The following four tabs display at the top of the window.
•
General
- allows you to change the pape r size, the paper
type, and the orientation of the do cu me n ts, e nables the
duplex feature, adds start and end banners, and changes
the number of pages per sheet.
•
Text
- allows you to specify the page margins and set the
text options, such as spacing or columns.
•
Graphics
- allows you to set imag e options tha t are use d
when printing images/files, such as color options, image
size, or image position.
•
Device
: allows you to set the print resolution, paper
source, and destination.
5
Click
Apply
to apply the changes and close the Pro per ties
window.
6
Click OK in the LPR GUI window to start p rinting .
7
The Printing window appears, allowing you to monitor the
status of your print job.
To abort the current job, click
Cancel
.
Printing Files
You can print many different types of files on the Samsung
machine device using the standard CUPS way - directly from
the command line interface. The CUPS lpr utility allows you do
that. But the drivers package replaces the stand ard lpr tool by
a much more user-friendly LPR GUI program.
To print any document file:
1
Type
lpr <file_name>
from the Linux shell comm an d
line and press
Enter
. The LPR GUI window appears.
When you type only
lpr
and press
Enter
, the Select
file(s) to print window appears first. J ust sel ect a n y fi les
you want to print and click
Open
.
2
In the LPR GUI window, select your printer from the list,
and change the printer and print job properties.
For details about the pro pe r ties window, see page 24.
3
Click OK to start printing.
Page 75

Using Your Printer with a Macintosh
25
7 Using Your Printer with
a Macintosh
Your printer supports Macintosh systems with a built-in USB
interface or 10/100 Base-TX network interface card. When you
print a file from a Macintosh computer , you can u se the CUPS driver
by installing the PPD file.
N
OTE
:
Some printers do not support a network
interface. Make sure that your printer supports a
network interface by referring to Printer Specifications
in your Printer User’s Guide.
This cha p t er includes :
• Installing Software
• Setting Up the Printer
•Printing
Installing Software
The CD-ROM that cam e with your pr inter provides you with the
PPD file that allows you to use the CU PS driver or Apple
LaserWriter driver
(only available when you use a printer
which sup ports the PostScript drive r)
, for printing on a
Macintosh computer.
Printer driver
Installing the Printer driver
1
Make sure that you connect your printer to the computer.
T urn on your com puter and printer.
2
Insert the CD-ROM wh ich came with your printer into the
CD-ROM drive.
3
Double-click
CD-ROM icon
that appears on your
Macintosh desktop.
4
Double-click the
MAC_Installer
folder.
5
Double-click the
MAC_Printer
folder.
6
Double-click the
Samsung SPL2 Installer
icon.
7
Enter the password and click
OK
.
8
The Samsung SPL Installer window opens. Click
Continue
and then click
Continue
.
9
Select
Easy Install
and click
Install
.
10
After the installation is finished, click
Quit
.
Uninstalling the Printer driver
Uninsta ll is required if you are u pgrading the softwa re, or if
installation fails.
1
Insert the CD-ROM wh ich came with your printer into the
CD-ROM drive.
2
Double-click
CD-ROM icon
that appears on your
Macintosh desktop.
3
Double-click the
MAC_Installer
folder.
4
Double-click the
MAC_Printer
folder.
5
Double-click the
Samsung SPL2 Installer
icon.
6
Enter the password and click OK.
7
The Samsung SPL Installer window opens. Click
Continue
and then click
Continue
.
8
Select
Uninstall
and then click
Uninstall
.
9
When the uninstallation is done, click
Quit
.
Page 76

Using Your Printer with a Macintosh
26
Setting Up the Printer
Set up for your printer will be different depending on which
cable you use to connect the printer to your computer—the
network cable or the USB cable.
For a USB-connected
1
Follow the instructions on “Installing Software” on page 25
to install the PPD and Filter files on your com puter.
2
Open the
Applications
folder →
Utilities
, and
Print
Setup Utility
.
•For MAC OS 10.5, open
System Preferences
from the
Applications
folder, and click
Printer & Fax
.
3
Click
Add
on the
Printer List
.
•For MAC OS 10.5, press the “
+
” icon then a display
window will pop up.
4
For MAC OS 10 .3 , s e le ct the
USB
tab.
•For MAC OS 10.4, click
Default Browser
and find the
USB connection.
•For MAC OS 10.5, click
Default
and find the USB
connection.
5
Select
Samsung
in
Printer Model
and your printer in
Model Name
.
6
Click
Add
.
Your printer appears on the
Printer List
, and is set as the
default printer.
Page 77
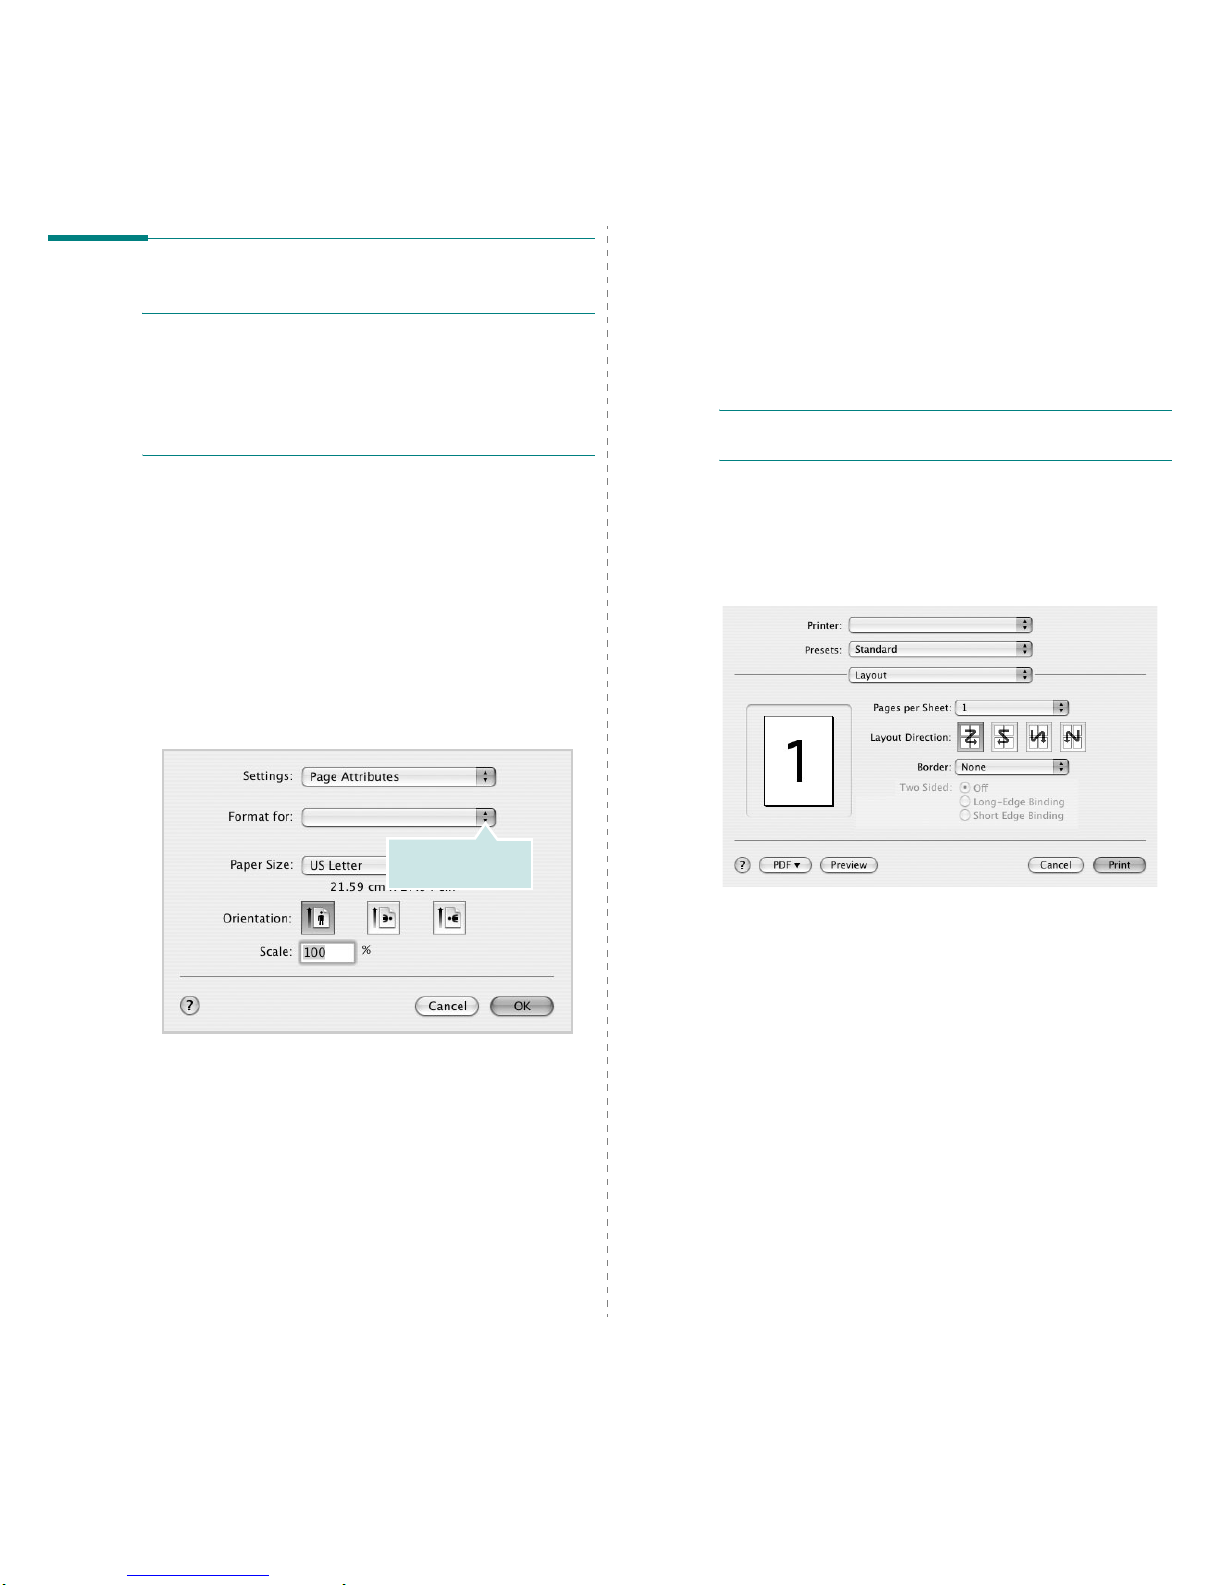
27
Printing
N
OTES
:
• The Macintosh printer’s properties window that appears in
this User’s Guide may differ depending on the printer in use.
However the composition of th e printer prope rties window is
similar.
• You can check your printer name in the supplied CD-
ROM.
Printing a Document
When you print with a Macintosh, you need to check the printer
software setting in each application you use. Follow these steps
to print from a Macintosh.
1
Open a Macintosh application and select the file you want
to print.
2
Open the
File
menu and click
Page Setup (Document
Setup
in some applications).
3
Choose your paper size, orientation, scaling, and other
options and click
OK
.
4
Open the
File
menu and click
Print
.
5
Choose the number of copies you want and indicate which
pages you want to print.
6
Click
Print
when you finish setting the options.
▲
Mac OS 10.3
Make sure that your
printer is selected.
Changing Printer Settings
You can use advanced printing features when using your
printer.
From your Macintosh application, select
Print
from the
File
menu. The printer name which appears in the printer properties
window may differ depending on the printer in use. Except for
the name, the composition of the p rinter properties window is
similar.
N
OTES
: The setting options may differ depending on printers
and Macintosh OS version.
Layout
The
Layout
tab provides options to adjust how the d ocument
appears on the printed page. You can print multiple pages on
one sheet of paper. Select
Layout
from the
Presets
drop-down
list to access the following features.
•
Pages per Sheet
: This feature determines how many
pages printed on one page. For details, see "Printing
Multiple Pages on One Sheet of Paper" on the next column.
•
Layout Direction
: You can select the printing direction on
a page as like the e x amples on UI.
▲
Mac OS 10.4
Page 78
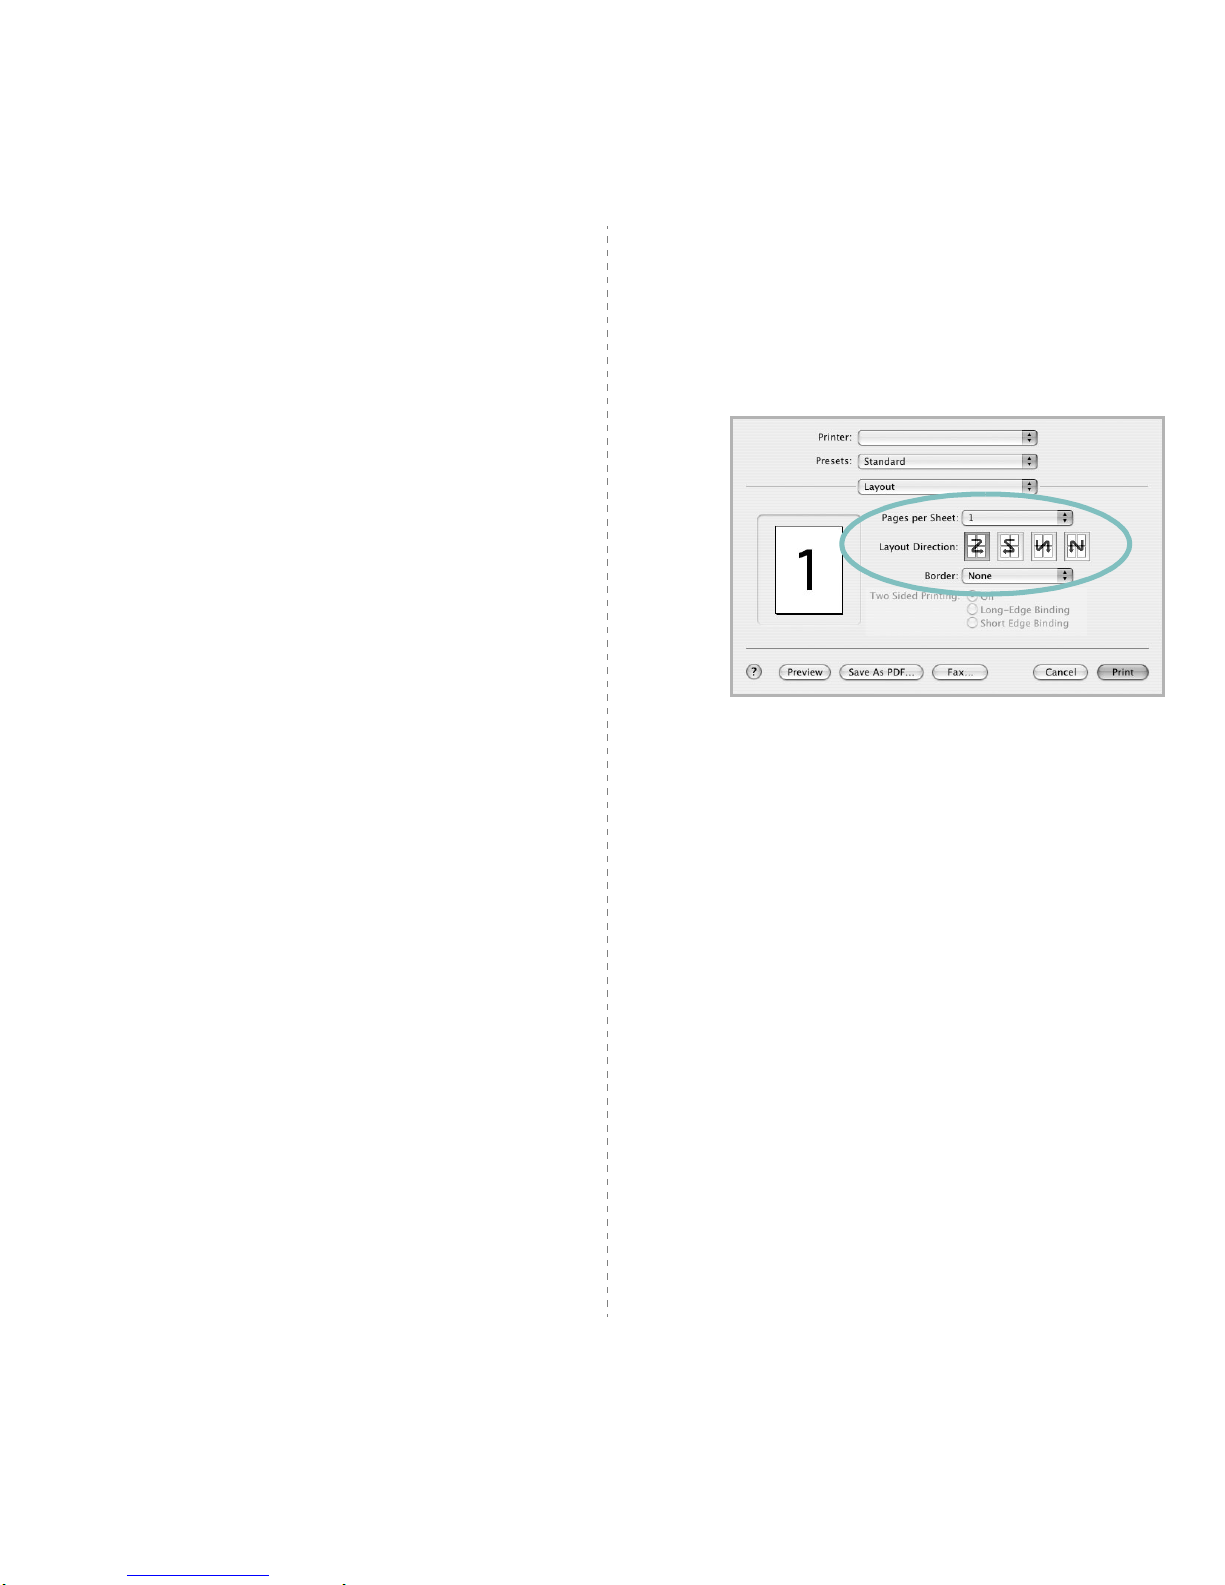
28
Graphics
The higher the setting, the sharper the clarity of printed characters
and graphics. The higher setting also may increase the time it
takes to print a document.
Paper
Set
Paper Type
to correspond to the paper loaded in the tr ay
from which you want to p rint. This will let you get the best
quality printout. If you load a different type of print material,
select the corresponding paper type.
Printing Multiple Pages on One Sheet
of Paper
You can print more than one page on a single sheet of paper.
This feature provides a cost-effective way to print draft pages.
1
From your Macintosh application, select
Print
from the
File
menu.
2
Select
Layout
.
3
Select the number of pages you want to print on one sheet
of paper on the
Pages per Sheet
drop-down list.
4
Select the page order from the
Layout Direction
option.
To print a border around each page on the sheet, select
the option you want from th e
Border
drop-down list.
5
Click
Print
, and the printer prints the selected nu m ber of
pages on one side of each page.
▲
Mac OS 10.3
Page 79

29
SOFTWARE SECTION
INDEX
A
advanced printing, use
13
D
document, print
Macintosh
27
Windows
7
E
Extras properties, set
11
F
favorites settings, use
12
G
Graphics properties, set
10
H
help, use
12
I
install
printer driver
Macintosh
25
Windows
4
installing
Linux software
20
L
language, ch ange
5
Layout properties, set
Windows
9
Linux
driver, install
20
printer properties
23
printing
24
M
Macintosh
driver
install
25
uninstall
25
printing
27
setting up the printer
26
MFP driver, install
Linux
20
N
n-up printing
Macintosh
28
Windows
13
O
orientation, print
24
Windows
9
overlay
create
16
delete
16
print
16
P
Paper properties, set
9
paper size, set
9
print
24
paper source, set
24
Windows
9
paper type, set
print
24
poster, print
14
print
document
7
fit to page
14
from Macintosh
27
from Windows
7
N-up
Macintosh
28
Windows
13
overlay
16
poster
15
PRN
8
scaling
14
watermark
15
print resolution
24
printer driver, install
Linux
20
printer properties
Linux
24
printer properties, set
Macintosh
27
Windows
8
printer resolution, set
Windows
10
printer software
install
Macintosh
25
Windows
4
uninstall
Macintosh
25
Windows
6
printing
from Linux
24
R
resolution
printing
24
S
setting
darkness
10
favorites
12
image mode
10
resolution
Windows
10
toner save
10
true-type option
10
software
install
Macintosh
25
Windows
4
reinstall
Windows
6
Page 80

30
system requirements
Macintosh
25
uninstall
Macintosh
25
Windows
6
status monitor, use
18
T
toner save, set
10
U
uninstall, software
Macintosh
25
Windows
6
uninstalling
MFP driver
Linux
21
W
watermark
create
15
delete
15
edit
15
print
15
Page 81

Rev.3.00
www.samsungprinter.com
 Loading...