

Page 1
Microwave Oven
User manual
MG11T5018C*
MG11T5018CC_AA_EN.indd 1 2/4/2020 10:44:18 AM
Page 2
Contents
Important safety instructions 3
Contents
Installation 11
Accessories 11
Turntable 11
Maintenance 12
Cleaning 12
Replacement (repair) 12
Care against an extended period of disuse 12
Cookware guide 31
Cooking guide 32
Troubleshooting and information code 40
Troubleshooting 40
Information code 44
Technical specications 44
Warranty 45
Microwave oven features 13
Microwave oven 13
Control panel 13
Microwave oven use 14
How a microwave oven works 14
Checking that your microwave oven is operating correctly 14
Cooking/Reheating 15
Setting the time 16
Power levels and time variations 16
Adjusting the cooking time 17
Stopping the cooking 17
Setting the energy save mode 18
Using Power Defrost 18
Using Auto Cook 20
Using Popcorn 27
Grilling 28
Combining microwaves and grill 28
Using the crusty plate 29
Using Child Lock 30
Switching the beeper off 30
2 English
MG11T5018CC_AA_EN.indd 2 2/4/2020 10:44:18 AM
Page 3
SAVE THESE INSTRUCTIONS
Important safety instructions
Congratulations on your new Samsung microwave oven. This manual contains
important information on the installation, use and care of your appliance. Please
take time to read this manual to take full advantage of your microwave oven’s
many benets and features.
WHAT YOU NEED TO KNOW
ABOUT SAFETY INSTRUCTIONS
Warnings and Important Safety Instructions in this manual do not cover all
possible conditions and situations that may occur. It is your responsibility to use
common sense, caution, and care when installing, maintaining, and operating your
microwave oven.
IMPORTANT SAFETY SYMBOLS
AND PRECAUTIONS
What the icons and signs in this user manual mean:
WARNING
Hazards or unsafe practices that may result in severe personal injury or death.
CAUTION
Hazards or unsafe practices that may result in minor personal injury or property
damage.
Important safety instructions
PRECAUTIONS TO AVOID
POSSIBLE EXPOSURE TO
EXCESSIVE MICROWAVE ENERGY
A. Do not attempt to operate this oven with the door open since open-door
operation can result in harmful exposure to microwave energy. It is important
not to defeat or tamper with the safety interlocks.
B. Do not place any object between the oven front face and the door or allow
soil or cleaner residue to accumulate on the sealing surface.
C. Do not operate the oven if it is damaged. It is particularly important that the
oven door close properly and that there is no damage to the:
1. Door (bent),
2. Hinges and latches, (broken or loosened),
3. Door seals and sealing surface.
D. The oven should not be adjusted or repaired by anyone except properly
qualied service personnel.
CAUTION
To reduce the risk of re, explosion, electric shock, or personal injury when using
your microwave oven, follow these basic safety precautions.
Do NOT attempt.
Do NOT disassemble.
Do NOT touch. Call the service center for help.
Follow directions explicitly. Note
These warning signs are here to prevent injury to you and others. Please follow
them explicitly. After reading this section, keep it in a safe place for future
reference.
Unplug the power plug from the
wall socket.
Make sure the machine is
grounded to prevent electric shock.
English 3
MG11T5018CC_AA_EN.indd 3 2/4/2020 10:44:20 AM
Page 4

SAVE THESE INSTRUCTIONS
Important safety instructions
Important safety instructions
CALIFORNIA PROPOSITION 65 WARNING
WARNING
Cancer and Reproductive Harm - www.P65Warnings.ca.gov
When using any electrical appliance, basic safety precautions should be followed,
including the following:
WARNING
To reduce risk of burns, electric shock, re, personal injury or exposure to
excessive microwave energy:
1. Read all safety instructions before using the appliance.
2. Read and follow the specic “Precautions to avoid possible exposure to
excessive microwave energy” on page 3.
3. This appliance must be grounded. Connect only to properly grounded outlets.
See Important “Grounding instructions” on page 5 of this manual.
4. Install or locate this appliance only in accordance with the provided
installation instructions.
5. Some products such as whole eggs and sealed containers (for example, closed
glass jars) can explode if heated rapidly. Never heat them in a microwave
oven.
6. Use this appliance only for its intended use as described in the manual. Do not
put corrosive chemicals or vapors in or on this appliance. This type of oven is
specically designed to heat, cook, or dry food. It is not designed for industrial
or laboratory use.
7. As with any appliance, close supervision is necessary when it is used by
children. Keep children away from the door when opening or closing it as they
may bump themselves on the door or catch their ngers in the door.
8. Do not operate this appliance if it has a damaged cord or plug, if it is not
working properly, or if it has been damaged or dropped.
9. This appliance should be repaired or serviced only by qualied service
personnel. Contact the nearest authorized service facility for examination,
repair, or adjustment.
10. Do not cover or block any openings on the appliance.
11. Do not tamper with or make any adjustments or repairs to the door.
12. Do not store this appliance outdoors. Do not use this product near water, for
example, near a kitchen sink, in a wet basement, near a swimming pool, or
similar locations.
13. Do not immerse the cord or plug in water.
14. Keep the cord away from heated surfaces. (including the back of the oven).
15. Do not let the cord hang over edge of table or counter.
16. When cleaning surfaces of the door and oven that come together when the
door closes, use only mild, nonabrasive soaps, or detergents applied with a
sponge or soft cloth. Unplug the plug before cleaning.
17. To reduce the risk of re in the oven cavity:
a. Do not overcook food. Carefully attend appliance when paper, plastic,
or other combustible materials are placed inside the oven to facilitate
cooking.
b. Remove wire twist-ties from paper or plastic bags before placing the bags
in the oven.
c. If materials inside the oven ignite, keep the oven door closed, turn the
oven off, and disconnect the power cord, or shut off the power at the fuse
or circuit breaker panel. If the door is opened, the re may spread.
d. Do not use the cavity for storage purposes. Do not leave paper products,
cooking utensils, or food in the cavity when not in use.
18. Liquids, such as water, milk, coffee, or tea can be overheated beyond the
boiling point without appearing to be boiling. Visible bubbling or boiling when
the container is removed from the microwave oven is not always present.
THIS COULD RESULT IN VERY HOT LIQUIDS SUDDENLY BOILING OVER WHEN
THE CONTAINER IS DISTURBED OR A SPOON OR OTHER UTENSIL IS INSERTED
INTO THE LIQUID. To reduce the risk of injury:
a. Do not overheat liquid.
b. Stir liquid both before and halfway through heating it.
c. Do not use straight-sided containers with narrow necks.
4 English
MG11T5018CC_AA_EN.indd 4 2/4/2020 10:44:20 AM
Page 5

SAVE THESE INSTRUCTIONS
d. After heating, allow the container to stand in the microwave oven for a
short time before removing the container.
e. Use extreme care when inserting a spoon or other utensil into the
container.
19. Oversized foods or oversized metal utensils should not inserted in microwave/
toaster oven as they may create a re of electric shock.
20. Do not clean with metal scouring pads. Piece can burn off the pad and touch
electrical parts involving a risk of electric shock.
21. Do not use paper products when appliance is operated in the toaster mode.
22. Do not store any materials, other than manufacturer’s recommended
accessories, in this oven when not in use.
23. Do not cover racks or any other part of the oven with metal foil. This will
cause overheating of the oven.
CAUTION
1. Over The Range model Only
• Clean Ventilating Hoods Frequently - Grease should not be allowed to
accumulate on the hood of the lter.
• When aming foods under the hood, turn the fan on.
• Use care when cleaning the vent-hood lter. Corrosive cleaning agents,
such as lye-based oven cleaner, may damage the lter.
2. Push Button type model Only
• Pre-caution for safe use to avoid possible exposure to excessive micro
oven energy : Do not attempt to pull any part of the door by hand to
open the door. Open the door only utilizing the push button located at
front-right-bottom side.
GROUNDING INSTRUCTIONS
This appliance must be grounded. In the event of an electrical short circuit,
grounding reduces the risk of electric shock by providing an escape wire for the
electrical current. This appliance is equipped with a cord that includes a grounding
wire and a grounding plug. The plug must be plugged into an outlet that is
properly installed and grounded.
WARNING
Improper use of the grounding plug can result in a risk of electric shock.
• Plug into a grounded 3 prong outlet. Do not remove the third (grounding)
prong. Do not use an adaptor or otherwise defeat the grounding plug.
• Consult a qualied electrician or service person if you do not understand
the grounding instructions or if you are not sure if the appliance is properly
grounded.
• We do not recommend using an extension cord with this appliance. If the
power-supply cord is too short, have a qualied electrician or serviceman
install an outlet near the appliance. However, if it is necessary to use an
extension cord, read and follow the “Use of extension cords” section below.
USE OF EXTENSION CORDS
A short power-supply cord is provided to reduce the risk of your becoming
entangled in or tripping over a longer cord. Longer cord sets or extension cords
are available and you can use them if you exercise care. If you use a long cord or
extension cord:
1. The marked electrical rating of the cord set or extension cord should be at
least as great as the electrical rating of the appliance.
2. The extension cord must be a grounding-type 3-wire cord and it must be
plugged into a 3-slot outlet.
3. The longer cord should be arranged so that it will not drape over the
counter top or tabletop where it can be pulled on by children or tripped over
accidentally. If you use an extension cord, the interior light may icker and the
speed of the blower may vary when the microwave oven is on. Cooking times
may be longer too.
Important safety instructions
MG11T5018CC_AA_EN.indd 5 2/4/2020 10:44:20 AM
English 5
Page 6

SAVE THESE INSTRUCTIONS
Important safety instructions
Important safety instructions
CRITICAL INSTALLATION
WARNINGS
The installation of this appliance must be performed by a qualied technician
or service company.
• Failing to have a qualied technician install the oven may result in
electric shock, re, an explosion, problems with the product, or injury.
Unpack the oven, remove all packaging material and examine the oven for
any damage such as dents on the interior or exterior of the oven, broken
door latches, cracks in the door, or a door that is not lined up correctly.
If there is any damage, do not operate the oven and notify your dealer
immediately.
Make sure to install your oven in a location with adequate space.
Remove all foreign substances such as dust or water from the power plug
terminals and contact points using a dry cloth on a regular basis.
• Unplug the power plug and clean it with a dry cloth.
• Failing to do so may result in electric shock or re.
Plug the power cord into a properly grounded 3 pronged outlet. Your oven
should be the only appliance connected to this circuit.
• Sharing a wall socket with other appliances, using a power strip, or
extending the power cord may result in electric shock or re.
• Do not use an electric transformer. It may result in electric shock or re.
• Ensure that the voltage, frequency and current provided match the
product’s specications. Failing to do so may result in electric shock or
re.
Keep all packaging materials out of the reach of children. Children may use
them for play.
This appliance must be properly grounded. Read and follow the specic
“Grounding instructions” found in the beginning of this Section. Do not
ground the appliance to a gas pipe, plastic water pipe, or telephone line.
• This may result in electric shock, re, an explosion, or problems with the
product.
• Never plug the power cord into a socket that is not grounded correctly
and make sure that it is grounded in accordance with local and national
codes.
Do not cut or remove the third (ground) prong from the power cord under
any circumstances.
The microwave requires a separate branch circuit single grounded outlet of
at least 15A and max of 20A.
Do not install this appliance in a humid, oily, or dusty location, or in a
location exposed to direct sunlight or water (rain drops).
• This may result in electric shock or re.
Plug the power plug into the wall socket rmly. Do not use a damaged
power plug, damaged power cord, or loose wall socket.
• This may result in electric shock or re.
Do not mount over a sink.
Do not pull or excessively bend the power cord.
Do not twist or tie the power cord.
Do not hook the power cord over a metal object, place a heavy object on the
power cord, insert the power cord between objects, or push the power cord
into the space behind the appliance.
• This may result in electric shock or re.
Do not pull the power cord when you unplug the oven.
• Unplug the oven by pulling the plug only.
• Faili ng to do so may result in electric shock or re.
When the power plug or power cord is damaged, contact your nearest
service center for a replacement or repair.
6 English
MG11T5018CC_AA_EN.indd 6 2/4/2020 10:44:20 AM
Page 7

SAVE THESE INSTRUCTIONS
INSTALLATION CAUTIONS
Position the oven so that the plug is easily accessible.
• Failing to do so may result in electric shock or re due to electric
leakage.
Unplug the oven when it is not being used for long periods of time or during
a thunder/lightning storm.
• Failing to do so may result in electric shock or re.
CRITICAL USAGE WARNINGS
If the microwave appliance is ooded, please contact your nearest service
center. Failing to do so may result in electric shock or re.
Read and follow the specic “Precautions to avoid possible exposure
to excessive microwave energy”, found in the beginning of this Safety
Information Section.
If the microwave generates a strange noise, a burning smell or smoke,
unplug it immediately and contact your nearest service center.
• Failing to do so may result in electric shock or re.
In the event of a gas leak (propane gas, LP gas, etc.), ventilate the room
immediately. Do not touch the microwave, power cord, or plug.
• Do not use a ventilating fan.
• A spark may result in an explosion or re.
Take care that the door or any of the other parts do not come into contact
with your body while cooking or just after cooking.
• Failing to do so may result in burns.
In the event of a grease re on the surface units below the oven, smother
the aming pan on the surface unit by covering the pan completely with a
lid, a cookie sheet, or a at tray.
Never leave surface units beneath your oven unattended at high heat
settings. Boil overs cause smoking and greasy spillovers that may ignite and
spread if the vent fan is operating. To minimize automatic fan operation,
use adequate sized cookware and use high heat on surface units only when
necessary.
If materials inside the oven should ignite, keep the oven door closed, turn
the oven off and disconnect the power cord, or shut off power at the fuse or
circuit breaker panel. If the door is opened, the re may spread.
• Always observe Safety Precautions when using your oven. Never try to
repair the oven on your own. There is dangerous voltage inside. If the
oven needs to be repaired, contact an authorized service center near
you.
Do not attempt to repair, disassemble, or modify the appliance yourself.
• Because a high voltage current enters the product chassis during
operation, opening the chassis can result in electric shock or re.
• You may be exposed to electromagnetic waves.
• When the oven requires repair, contact your nearest service center.
If any foreign substance such as water enters the microwave, unplug it and
contact your nearest service center.
• Failing to do so may result in electric shock or re.
Important safety instructions
MG11T5018CC_AA_EN.indd 7 2/4/2020 10:44:20 AM
English 7
Page 8

SAVE THESE INSTRUCTIONS
Important safety instructions
Important safety instructions
Do not touch the power plug with wet hands.
• This may result in electric shock.
Do not turn the appliance off by unplugging the power plug while the
appliance is in operation.
• Plugging the power plug into the wall socket again may cause a spark
and result in electric shock or re.
Keep all packaging materials well out of the reach of children. Packaging
materials can be dangerous to children.
• If a child places a bag over its head, the child can suffocate.
Do not let children or any person with reduced physical, sensory or mental
capabilities use this appliance unsupervised. Make sure that the appliance is
out of the reach of children.
• Failing to do so may result in electric shock, burns or injury.
Do not touch the inside of the appliance immediately after cooking. The
inside of the appliance will be hot.
• The heat on the inside of the oven can cause burns.
Do not put aluminum foil (except as specically directed in this manual),
metal objects (such as containers, forks, etc.) or containers with golden or
silver rims into the microwave.
• These objects can cause sparks or a re.
Do not use or place ammable sprays or objects near the oven.
• Heat from the microwave can cause ammable sprays to explode or
burn.
• Failing to do so may result in electric shock or injury.
Do not tamper with or make any adjustments or repairs to the door. Under
no circumstances should you remove the outer cabinet.
Do not store or use the oven outdoors.
USAGE CAUTIONS
If the surface of the microwave is cracked, turn it off.
• Failing to do so may result in electric shock.
Dishes and containers can become hot. Handle with care.
Hot foods and steam can cause burns. Carefully remove container coverings,
directing steam away from your hands and face.
Remove lids from baby food before heating. After heating baby food, stir
well to distribute the heat evenly. Always test the temperature by tasting
before feeding the baby. The glass jar or surface of the food may appear to
be cooler than the food in the interior, which can be so hot that it will burn
the infant’s mouth.
Make sure all cookware used in the oven is suitable for microwaving.
Use microwavable cookware in strict compliance with such manufacturer’s
recommendations.
Do not stand on top of the microwave or place objects (such as laundry, oven
covers, lighted candles, lighted cigarettes, dishes, chemicals, metal objects,
etc.) on the appliance.
• Items, such as a cloth, may get caught in the door.
• This may result in electric shock, re, problems with the product, or
injury.
Do not operate the appliance with wet hands.
• This may result in electric shock.
Do not spray volatile material such as insecticide onto the surface of the
appliance.
• As well as being harmful to humans, it may also result in electric shock,
re or problems with the product.
Do not place the appliance over a fragile object such as a sink or glass
object.
• This may result in damage to the sink or glass object.
8 English
MG11T5018CC_AA_EN.indd 8 2/4/2020 10:44:20 AM
Page 9

SAVE THESE INSTRUCTIONS
Do not put your face or body close to the appliance while cooking or when
opening the door just after cooking.
• Take care that children do not come too close to the appliance.
• Failing to do so may result in children burning themselves.
Do not place food or heavy objects over the door when opening the door.
• The food or object may fall and this may result in burns or injury.
Do not abruptly cool the door, the inside of the appliance, or the dish by
pouring water over it during or just after cooking.
• This may result in damage to the appliance. The steam or water spray
may result in burns or injury.
Do not cook without the glass tray in place on the oven oor. Food will not
cook properly without the tray.
Do not defrost frozen beverages in narrow-necked bottles. The containers
can break.
Do not scratch the glass of the oven door with a sharp object.
• This may result in the glass being damaged or broken.
Do not store anything directly on top of the appliance when it is in
operation.
Do not use sealed containers. Remove seals and lids before use. Sealed
containers can explode due to buildup of pressure even after the oven has
been turned off.
CRITICAL CLEANING
INSTRUCTIONS
Do not clean the appliance by spraying water directly onto it.
Do not use benzene, thinner, or alcohol to clean the appliance.
• This may result in discoloration, deformation, damage, electric shock, or re.
Before cleaning or performing maintenance, unplug the appliance from the wall
socket and remove food waste from the door and cooking compartment.
• Failing to do so may result in electric shock or re.
Take care not to hurt yourself when cleaning the appliance. (external/internal)
• You may hurt yourself on the sharp edges of the appliance.
Do not clean the appliance with a steam cleaner.
• This may result in corrosion.
Keep the inside of the oven clean. Food particles or spattered oils stuck to the
oven walls or oor can cause paint damage and reduce the efciency of the oven.
Important safety instructions
MG11T5018CC_AA_EN.indd 9 2/4/2020 10:44:20 AM
English 9
Page 10
SAVE THESE INSTRUCTIONS
Important safety instructions
Important safety instructions
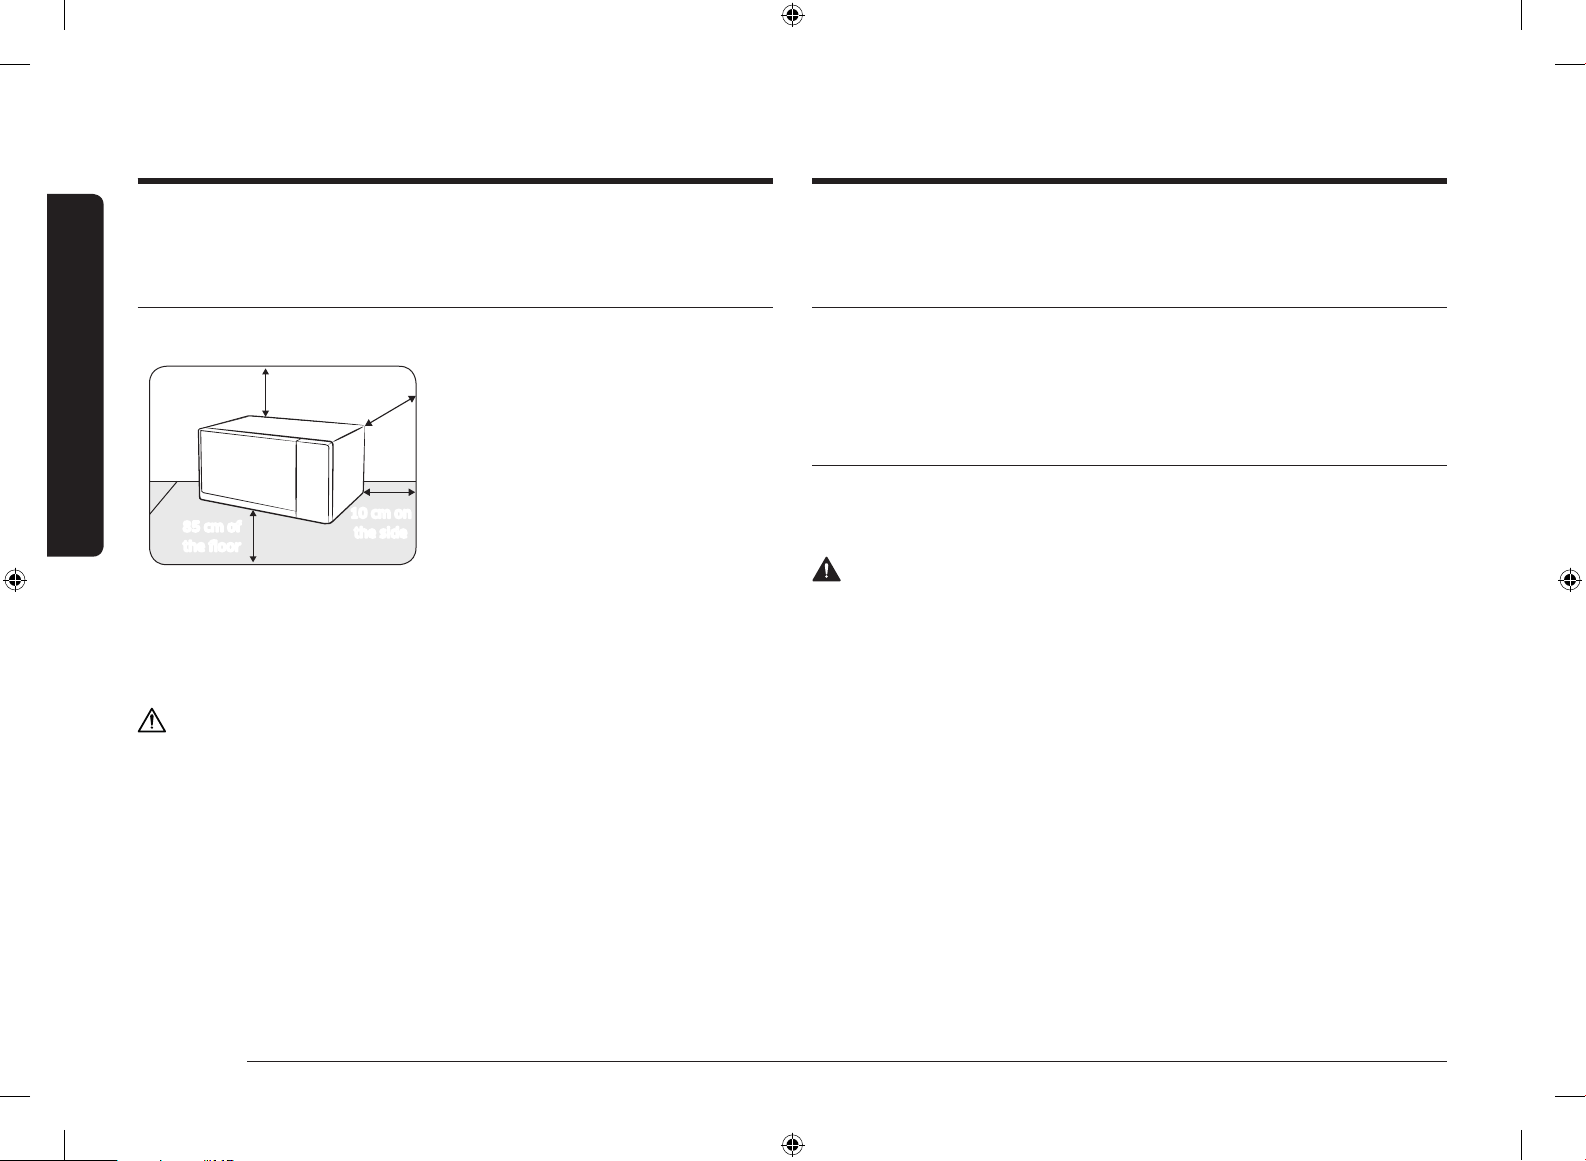
INSTALLING YOUR MICROWAVE
OVEN
Place the oven on a at level surface 85 cm above the oor. The surface should be
strong enough to safety bear the weight of the oven.
20 cm
above
85 cm of
the oor
10 cm
behind
10 cm on
the side
CAUTION
• If the supply cord is damaged, it must be replaced by the manufacturer, its
service agent or similarly qualied persons in order to avoid a hazard. For
your personal safety, plug the cable into a proper AC earthed socket.
• Do not install the microwave oven in hot or damp surroundings like next to a
traditional oven or radiator. The power supply specications of the oven must
be respected and any extension cable used must be of the same standard as
the power cable supplied with the oven. Wipe the interior and the door seal
with a damp cloth before using your microwave oven for the rst time.
NOT FOR BUILT-IN INSTALLATION
1. When you install your oven, make
sure there is adequate ventilation for
your oven by leaving at least 10 cm
(4 inches) of space behind and, on the
sides of the oven and 20 cm (8 inches)
of space above.
2. Remove all packing materials inside the
oven.
3. Install the roller ring and turntable.
Check that the turntable rotates freely.
(Turntable type model only)
4. This microwave oven has to be
positioned so that plug is accessible.
CLEANING THE TURNTABLE AND
ROLLER RINGS
Clean the roller rings periodically and wash the turntable as required. You can
wash the turntable safely in your dishwasher.
STORING AND REPAIRING YOUR
MICROWAVE OVEN
If you need to store your microwave oven for a short or extended period of time,
choose a dust-free, dry location. Dust and dampness may adversely affect the
microwave parts.
WARNING
• Do not repair, replace or service any part of your microwave oven yourself.
Allow only a qualied service technician to perform repairs. If the oven is
faulty and needs servicing, or you are in doubt about its condition, unplug the
oven from the power outlet and contact your nearest service center.
• Do not use the oven if it is damaged, in particular, if the door or door seals are
damaged. Door damage includes a broken hinge, a worn out seal, or distorted/
bent casing.
• Do not remove the oven from its casing.
• This microwave oven is for home use only and is not intended for commercial
use.
10 English
MG11T5018CC_AA_EN.indd 10 2/4/2020 10:44:21 AM
Page 11
Installation
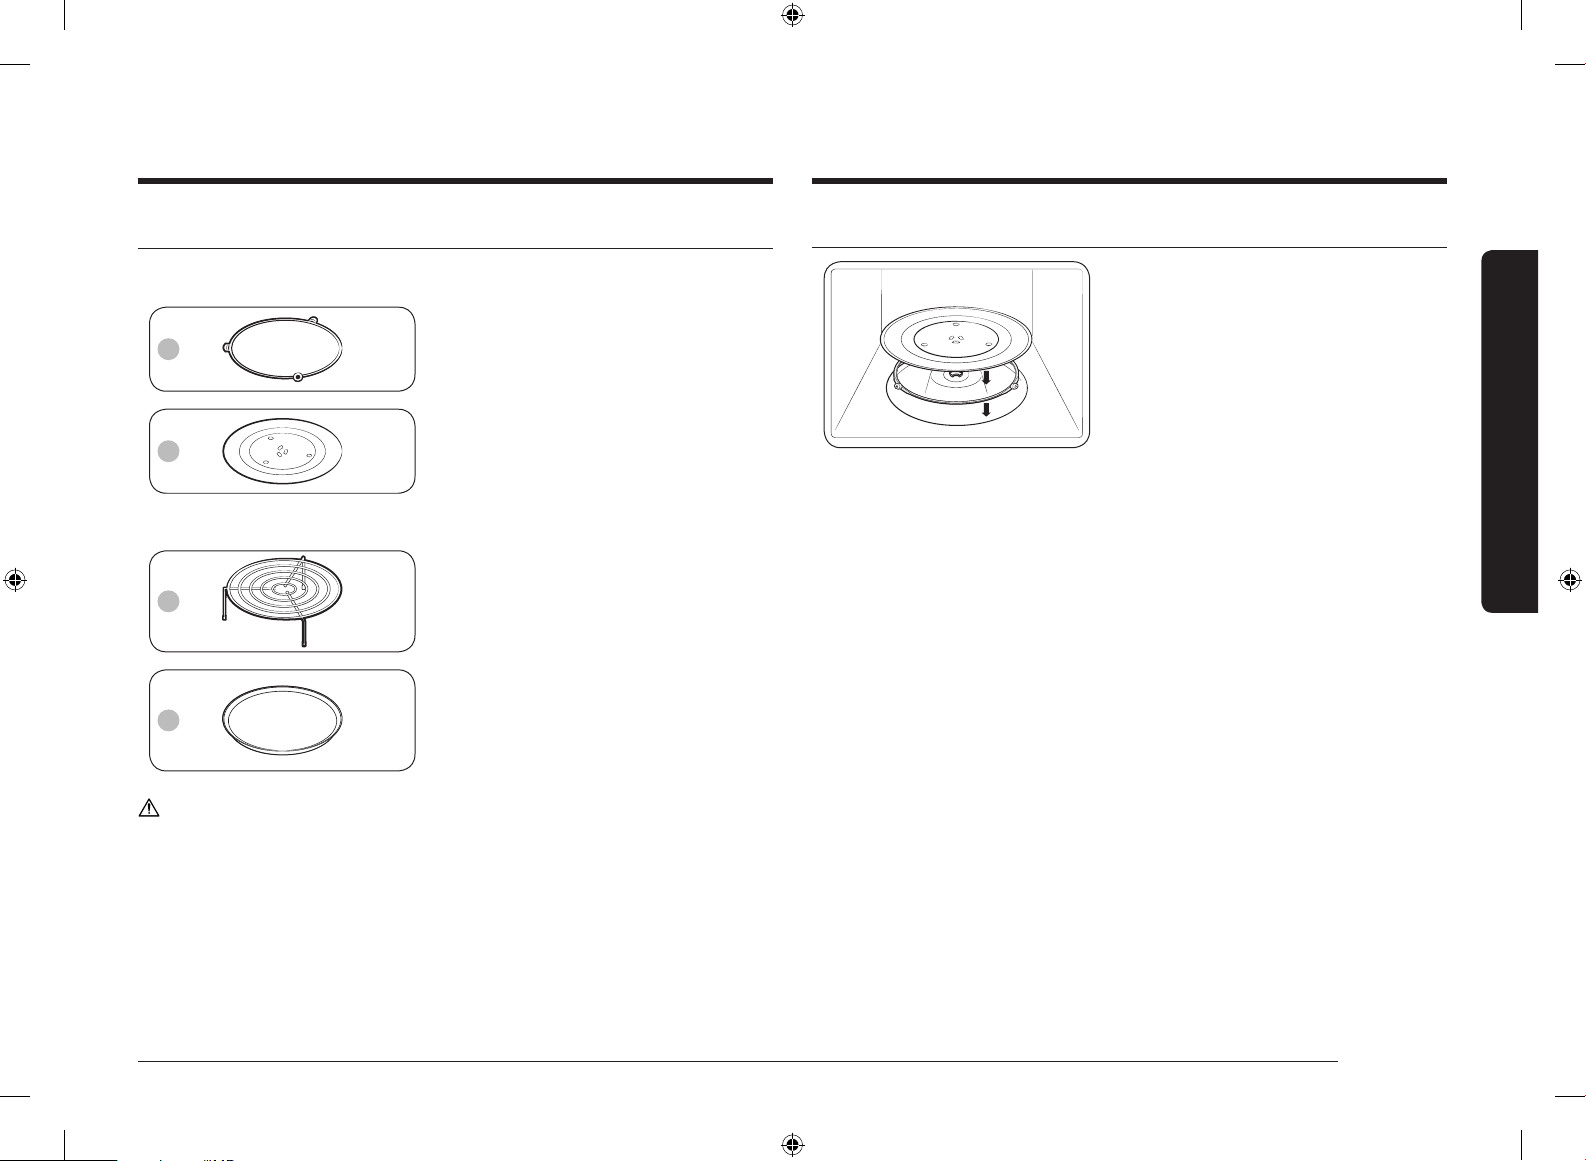
Accessories
Depending on the model that you have purchased, you are supplied with several
accessories that can be used in a variety of ways.
01 Roller ring, to be placed in the centre of
01
02
03
04
CAUTION
Do not operate the microwave oven without the roller ring and turntable.
the microwave oven.
The roller ring supports the turntable.
02 Turntable, to be placed on the roller
ring with the centre tting to the
coupler.
The turntable serves as the main
cooking surface; it can be easily
removed for cleaning.
03 Grill rack, to be placed on the turntable.
The metal rack can be used in grill and
combination cooking.
04 Crusty plate, see pages 29 to 30.
The crusty plate is used to brown
food better in the microwave or grill
combination cooking modes. It helps
keep pastry and pizza dough crisp.
Turntable
Remove all packing materials inside the
microwave oven. Install the roller ring and
turntable. Check that the turntable rotates
freely.
Installation
English 11
MG11T5018CC_AA_EN.indd 11 2/4/2020 10:44:22 AM
Page 12

Maintenance
Cleaning
Clean the microwave oven regularly to prevent impurities from building up on or
inside the microwave oven. Also pay special attention to the door, door sealing,
and turntable and roller ring (applicable models only).
If the door won’t open or close smoothly, rst check if the door seals have built up
impurities. Use a soft cloth in soapy water to clean both the inner and outer sides
of the microwave oven. Rinse and dry well.
Maintenance
To remove stubborn impurities with bad smells from inside the microwave oven
1. With an empty microwave oven, put a cup of diluted lemon juice on the centre
of the turntable.
2. Heat the microwave oven for 10 minutes at max power.
3. When the cycle is complete, wait until the microwave oven cools down. Then,
open the door and clean the cooking chamber.
CAUTION
• Keep the door and door sealing clean and ensure the door opens and closes
smoothly. Otherwise, the microwave oven’s lifecycle may be shortened.
• Take caution not to spill water into the microwave oven vents.
• Do not use any abrasive or chemical substances for cleaning.
• After each use of the microwave oven, use a mild detergent to clean the
cooking chamber after waiting for the microwave oven to cool down.
Replacement (repair)
WARNING
This microwave oven has no user-removable parts inside. Do not try to replace or
repair the microwave oven yourself.
• If you encounter a problem with hinges, sealing, and/or the door, contact a
qualied technician or a local Samsung service centre for technical assistance.
• If you want to replace the light bulb, contact a local Samsung service centre.
Do not replace it yourself.
• If you encounter a problem with the outer housing of the microwave oven,
rst unplug the power cord from the power source, and then contact a local
Samsung service centre.
Care against an extended period of disuse
If you don’t use the microwave oven for an extended period of time, unplug the
power cord and move the microwave oven to a dry, dust-free location. Dust and
moisture that builds up inside the microwave oven may affect the performance of
the microwave oven.
12 English
MG11T5018CC_AA_EN.indd 12 2/4/2020 10:44:22 AM
Page 13
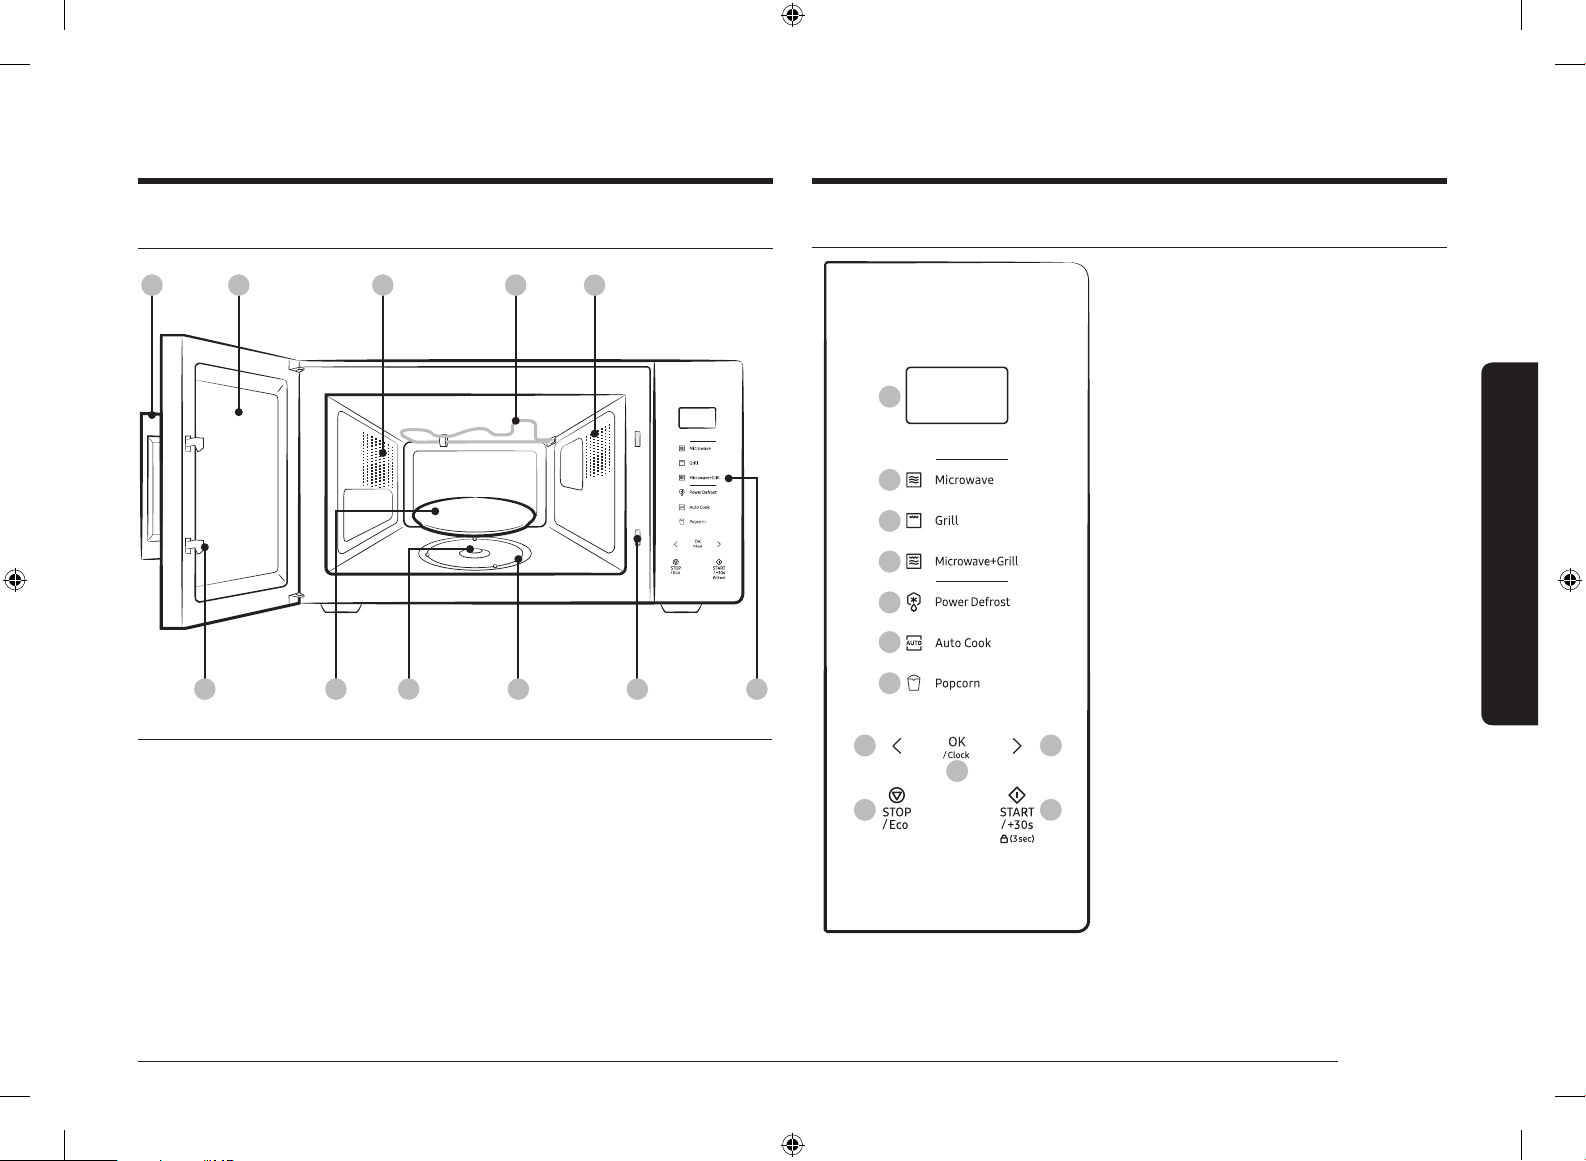
Microwave oven features
Microwave oven
01 02 03 04 05
06 09 1007 08 11
01 Door handle 02 Door 03 Ventilation holes
04 Heating element 05 Light 06 Door latches
07 Turntable 08 Coupler 09 Roller ring
Control panel
01
02
03
04
05
06
07
08
10
01 Display
02 Microwave
03 Grill
04 Microwave+Grill
05 Power Defrost
06 Auto Cook
07 Popcorn
08 Decrease/Increase
(Weight/Serving/Time)
Microwave oven features
09 OK (Clock)
10 STOP/Eco
11 START/+30s (Child Lock)
08
09
11
10 Safety interlock
11 Control panel
holes
English 13
MG11T5018CC_AA_EN.indd 13 2/4/2020 10:44:22 AM
Page 14
Microwave oven use
Microwave oven use
How a microwave oven works
Microwaves are high-frequency electromagnetic waves; the energy released
enables food to be cooked or reheated without changing either the form or the
colour.
You can use your microwave oven to:
• Defrost
• Reheat
• Cook
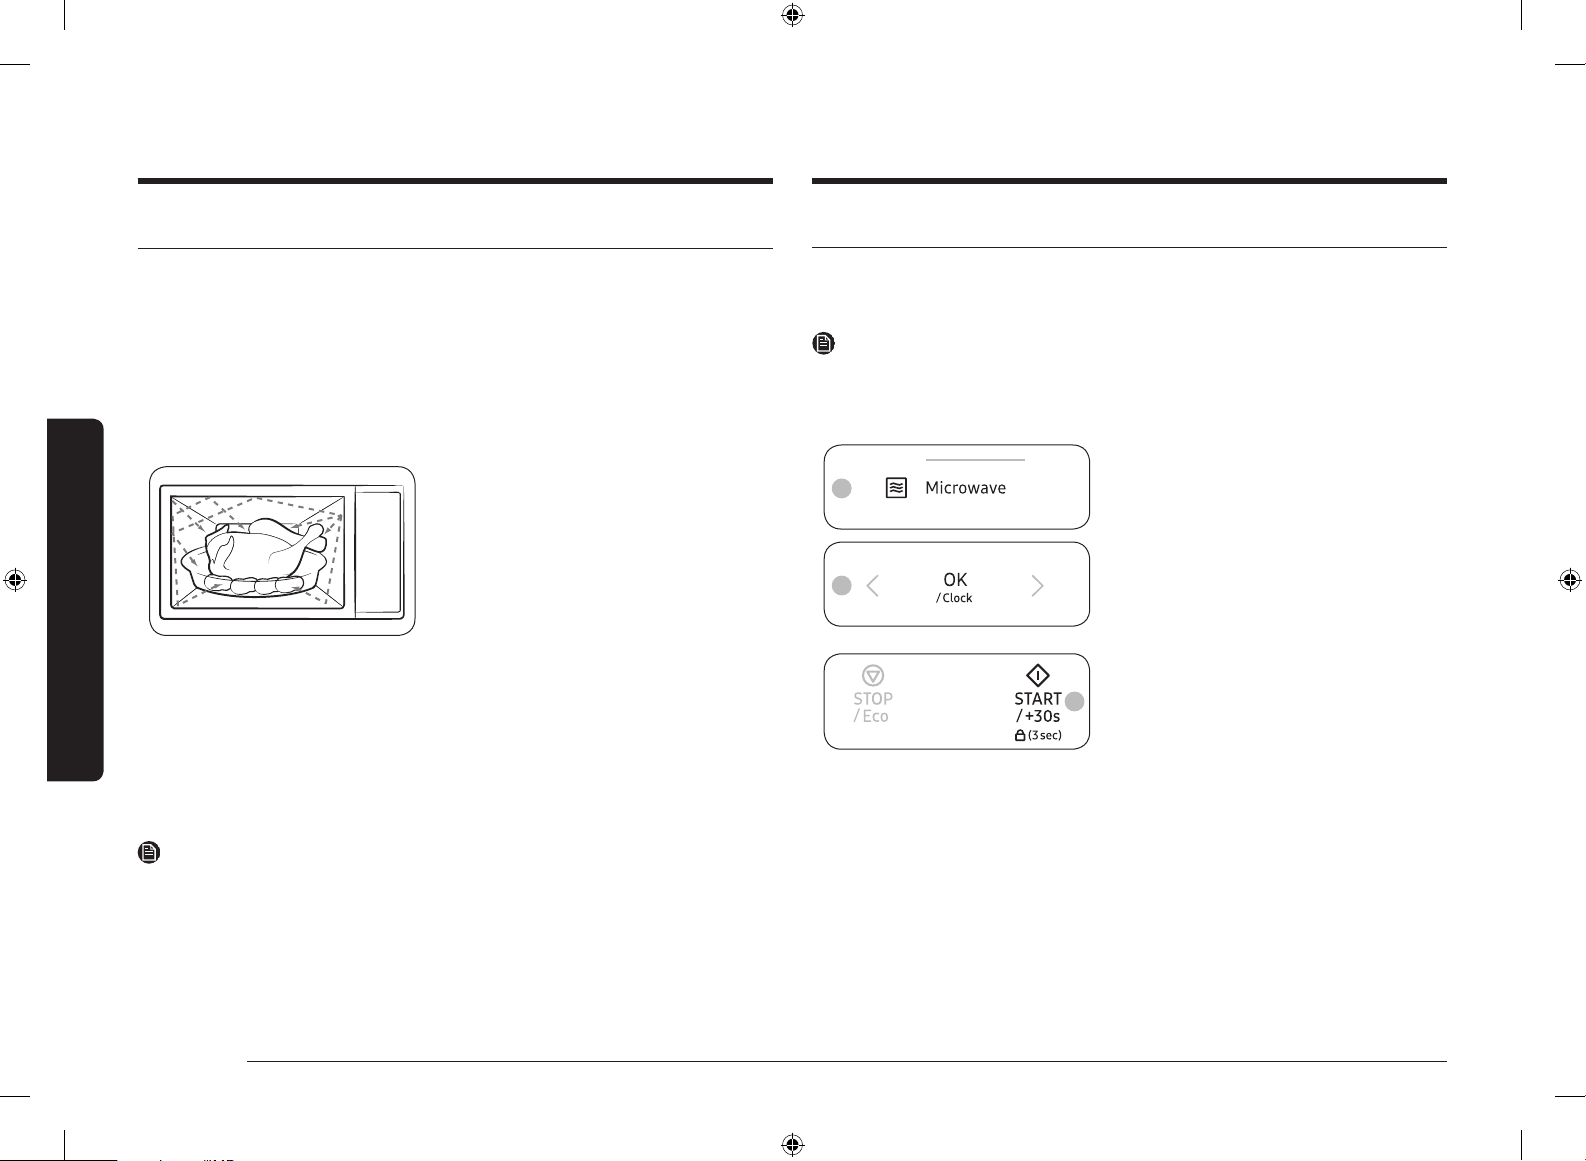
Cooking principle
1. The microwaves generated by the
magnetron reected at cavity and
are distributed uniformly as the food
rotates on the turntable. The food is
thus cooked evenly.
2. The microwaves are absorbed by the
food up to a depth of about 1 inch
(2.5 cm). Cooking then continues as the
heat is dissipated within the food.
3. Cooking times vary according to the
container used and the properties of
the food:
• Quantity and density
• Water content
• Initial temperature (refrigerated
or not)
Checking that your microwave oven is operating correctly
The following simple procedure enables you to check that your microwave oven is
working correctly at all times.
If you have any problems, see the “Troubleshooting” section on pages 40 to 44.
NOTE
The microwave oven must be plugged into an appropriate wall socket. The
turntable must be placed in the microwave oven. If a power level other than the
maximum (100 % - 1000 W) is used, the water takes longer to boil.
1. Pull the handle to open the microwave
3
4
5
oven door.
2. Place a glass of water on the turntable,
and then close the door.
3. Press Microwave.
4. The control panel display shows the
corresponding power level (100 1000 W). Press the OK button for
desired power level.
5. Press START/+30s repeatedly to set the
time to 4 or 5 minutes.
6. The microwave oven heats the water
for the set time. Check and make sure
the water is boiling.
NOTE
As the centre of the food is cooked by heat dissipation, cooking continues even
when you have taken the food out of the microwave oven. Standing times
specied in recipes and in this booklet must therefore be respected to ensure:
• Even cooking of the food right to the centre.
• The same temperature throughout the food.
14 English
MG11T5018CC_AA_EN.indd 14 2/4/2020 10:44:24 AM
Page 15
Cooking/Reheating
The following procedure explains how to cook or reheat food.
CAUTION
Always check your cooking settings before leaving the microwave oven
unattended.
1. Pull the handle to open the microwave
3
4
oven door.
2. Place the food on the centre of the
turntable, and then close the door.
CAUTION
Do not operate the microwave oven when it
is empty.
3. Press Microwave.
• The control panel display shows
the corresponding icon (
and the maximum power level
(1000 W).
4. Press < or > (Decrease/Increase) to
select the desired power level, and then
press OK.
• Refer to the “Power levels and time
variations” section on page 16 for
the appropriate power level.
5
the desired cooking time.
• The control panel display shows
the cooking time.
5. Press < or > (Decrease/Increase) to set
6
6. Press START/+30s to start cooking.
• The light turns on and the turntable
starts to rotate.
• When the cooking is complete, the
microwave oven beeps 4 times and
the control panel display shows
the current time. Then, the end
reminder signal beeps once every
minute for 3 times.
Microwave oven use
)
English 15
MG11T5018CC_AA_EN.indd 15 2/4/2020 10:44:24 AM
Page 16

Microwave oven use
Microwave oven use
Setting the time
When power is supplied, “88:88” and then “12:00” is automatically displayed on
the display. Please set the current time.
• When you rst install your microwave oven
• After a power failure
NOTE
You must manually change the time to apply daylight saving time.
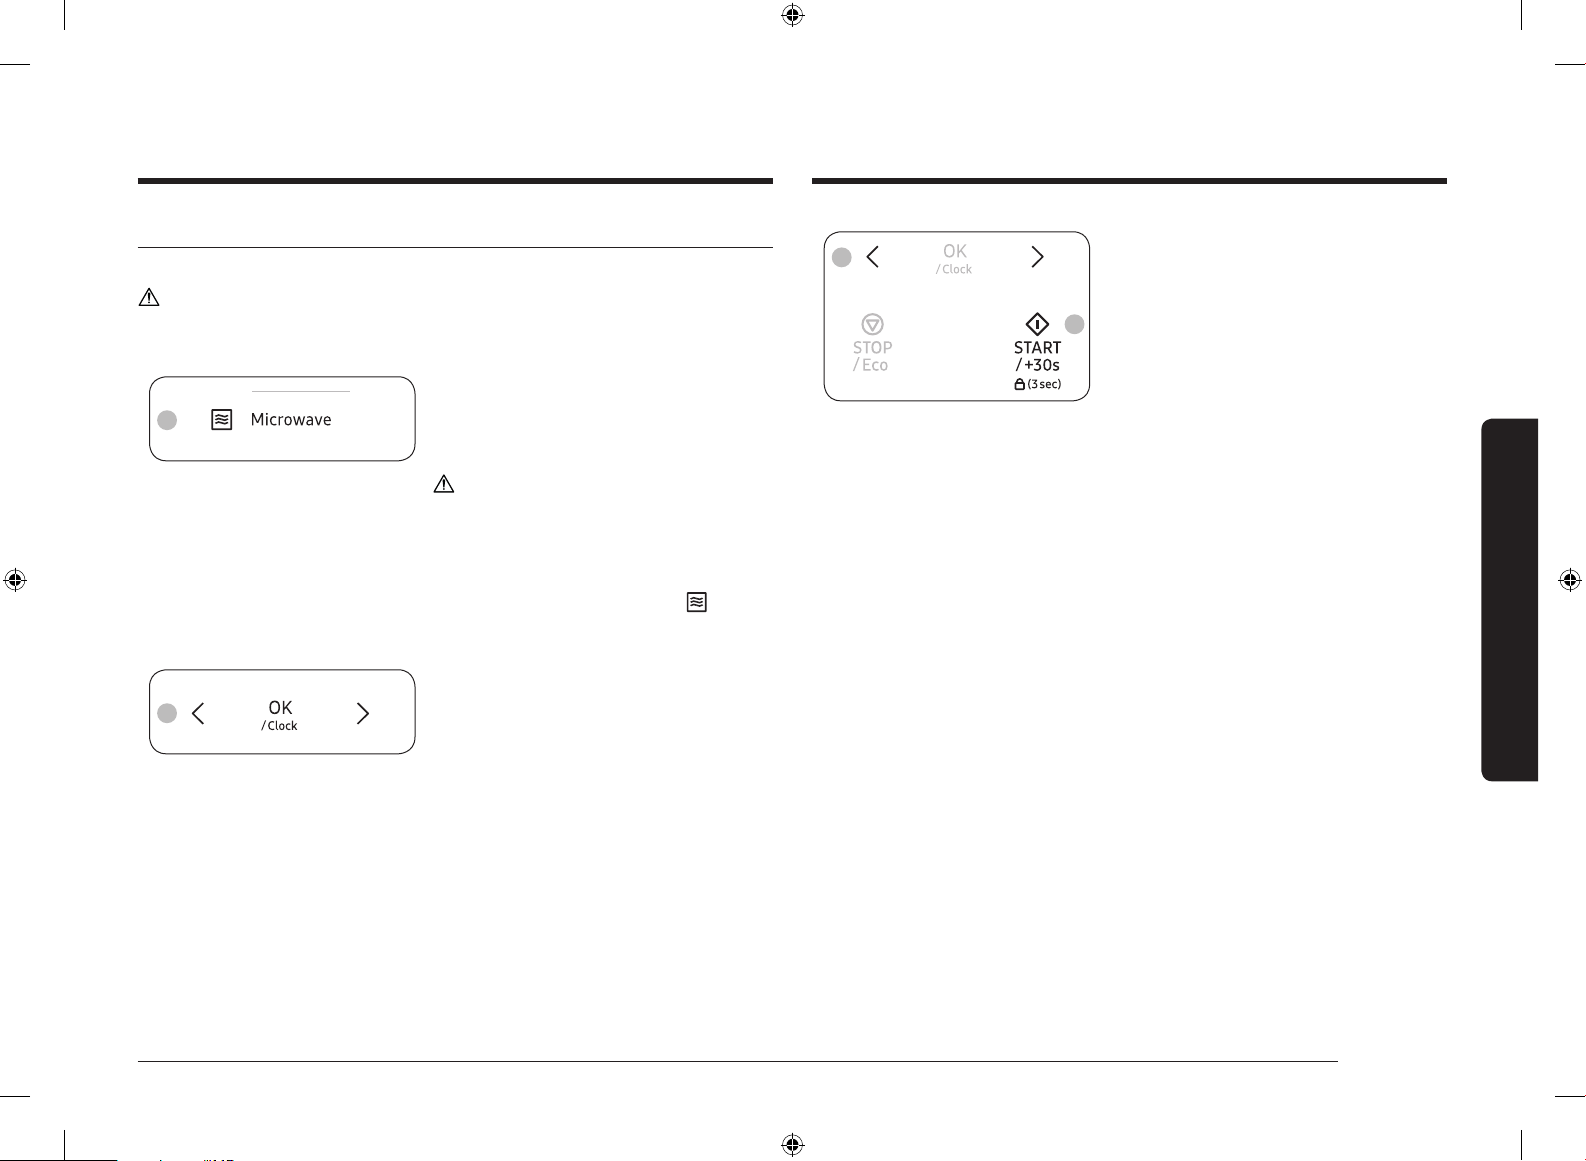
1. Press OK.
1
2. Press < or > (Decrease/Increase) to set
2
3
NOTE
The control panel display shows the time when the microwave is not in use.
the hour, and then press OK.
3. Press < or > (Decrease/Increase) to set
the minute, and then press OK.
Power levels and time variations
The power level function enables you to adapt the amount of energy dissipated
and thus the time required to cook or reheat your food, according to its type and
quantity. You can choose between 11 power levels.
0 = PL:0 (Deodorization) 60 = PL:60 (Simmer)
10 = PL:10 (Warm) 70 = PL:70 (Medium high)
20 = PL:20 (Defrost) 80 = PL:80 (Reheat)
30 = PL:30 (Low) 90 = PL:90 (Sauté)
40 = PL:40 (Medium low) 100 = PL:Hi (High)
50 = PL:50 (Medium)
The cooking times given in recipes and in this booklet correspond to the specic
power level indicated.
• The cooking time decreases If you select a higher power level.
• The cooking time increases If you select a lower power level.
16 English
MG11T5018CC_AA_EN.indd 16 2/4/2020 10:44:25 AM
Page 17

Adjusting the cooking time
You can increase or decrease the cooking time while the microwave oven is
cooking.
• Check how cooking is progressing at any time simply by opening the door,
and then increase or decrease the cooking time if necessary.
Stopping the cooking
You can stop cooking at any time so that you can:
• Check the food
• Turn the food over or stir it
• Leave it to stand
Method 1
Press START/+30s to increase the cooking
time by 30 seconds.
• Example: To add three minutes, press
START/+30s six times.
NOTE
You can only increase the cooking time.
Method 2
Press < or > (Decrease/Increase) to adjust
the cooking time.
To stop the cooking temporarily
1. Open the door or press STOP/Eco once.
• Cooking stops temporarily.
2. To resume cooking, close the door and press START/+30s.
To stop the cooking completely
1. Open the door or press STOP/Eco once.
• Cooking stops temporarily.
2. Press STOP/Eco button again.
Microwave oven use
English 17
MG11T5018CC_AA_EN.indd 17 2/4/2020 10:44:25 AM
Page 18
Microwave oven use
Microwave oven use
Setting the energy save mode
The microwave oven has an energy save mode.
• Press STOP/Eco. The control panel
display turns off.
• To cancel the energy save mode, open
the door or press STOP/Eco. The control
panel display shows the current time.
NOTE
Auto energy saving function
The product returns to standby status if there is no input for 25 minutes in the
middle of setting or while the operation has been paused. Also, if you leave the
door open, the interior lamp automatically turns off after 5 minutes.
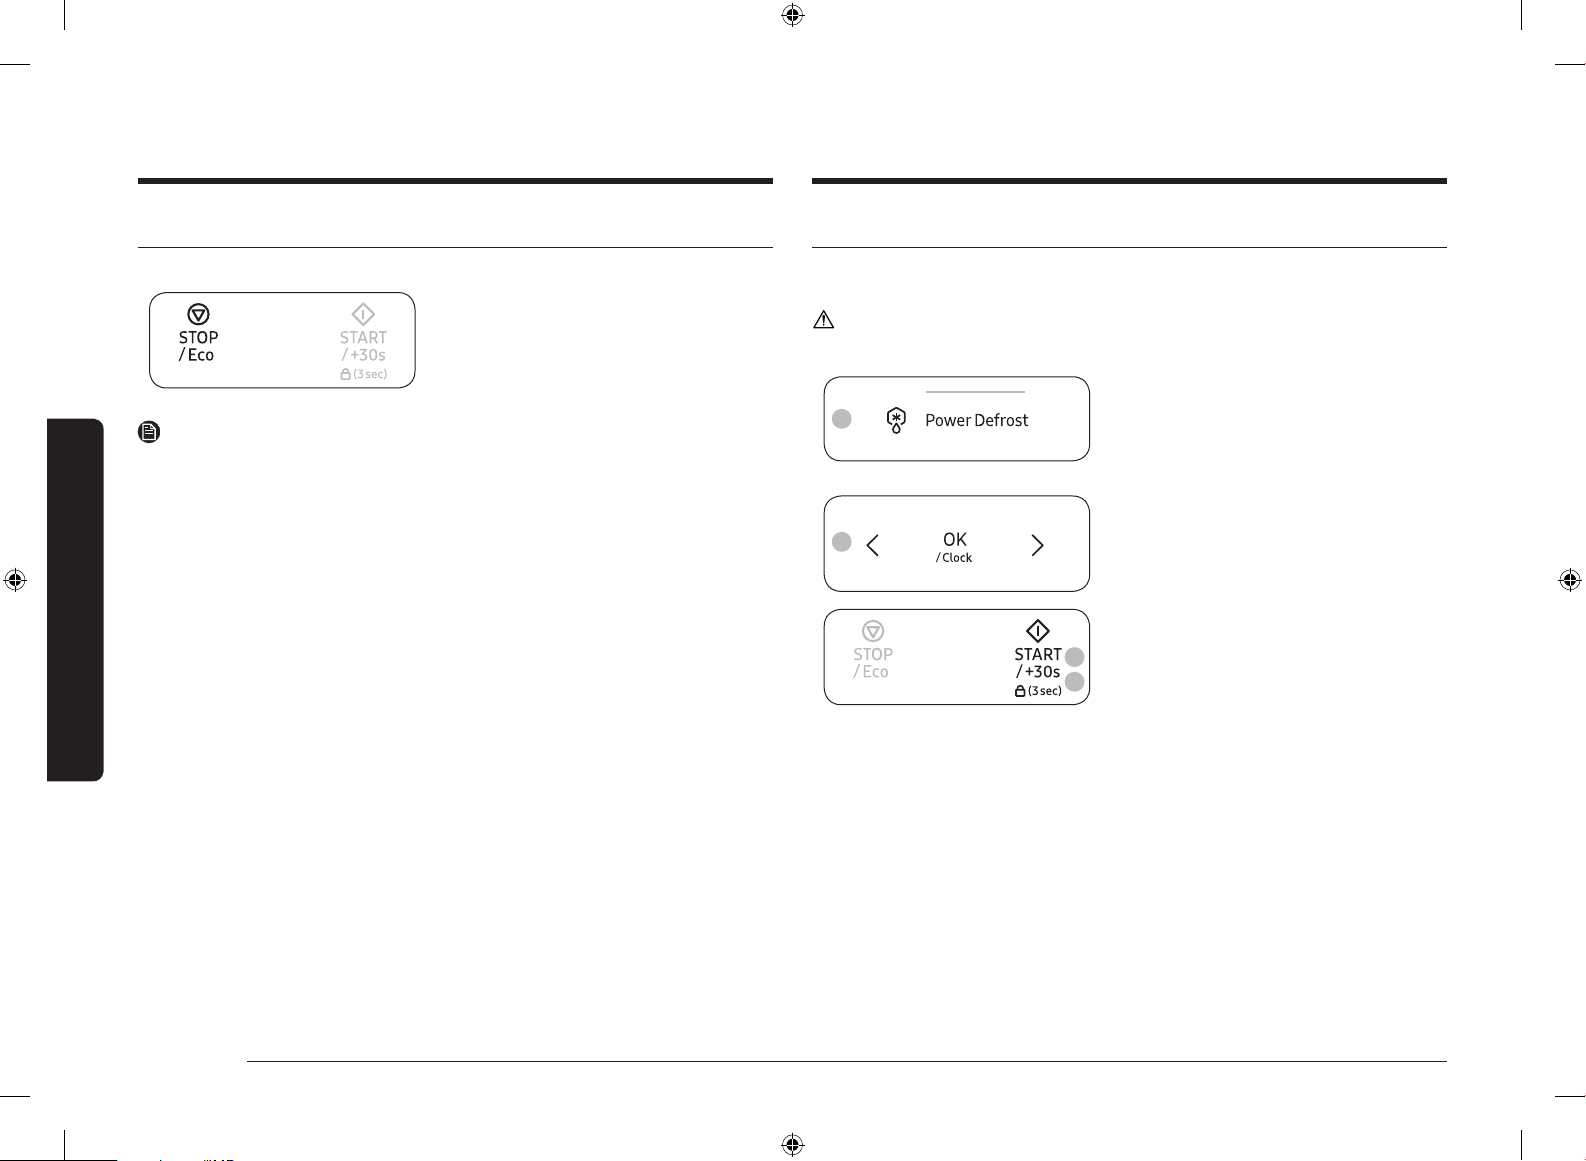
Using Power Defrost
The defrost time and power level are set automatically. You simply select the
programme and the weight.
CAUTION
Use only containers that are microwave-safe.
1. Pull the handle to open the microwave
3
4
5
6
oven door.
2. Place the food on the centre of the
turntable, and then close the door.
3. Press Power Defrost.
4. Press < or > (Decrease/Increase) to set
the serving size (0.1 lb.-3.5 lbs.), and
then press OK.
5. Press START/+30s to start defrosting.
• When the microwave oven beeps,
open the door and turn the food
over.
6. Close the door, and then press
START/+30s to resume defrosting.
• When the defrosting is complete,
the microwave oven beeps 4 times
and the control panel display
shows the current time. Then, the
end reminder signal beeps once
every minute for 3 times.
18 English
MG11T5018CC_AA_EN.indd 18 2/4/2020 10:44:25 AM
Page 19
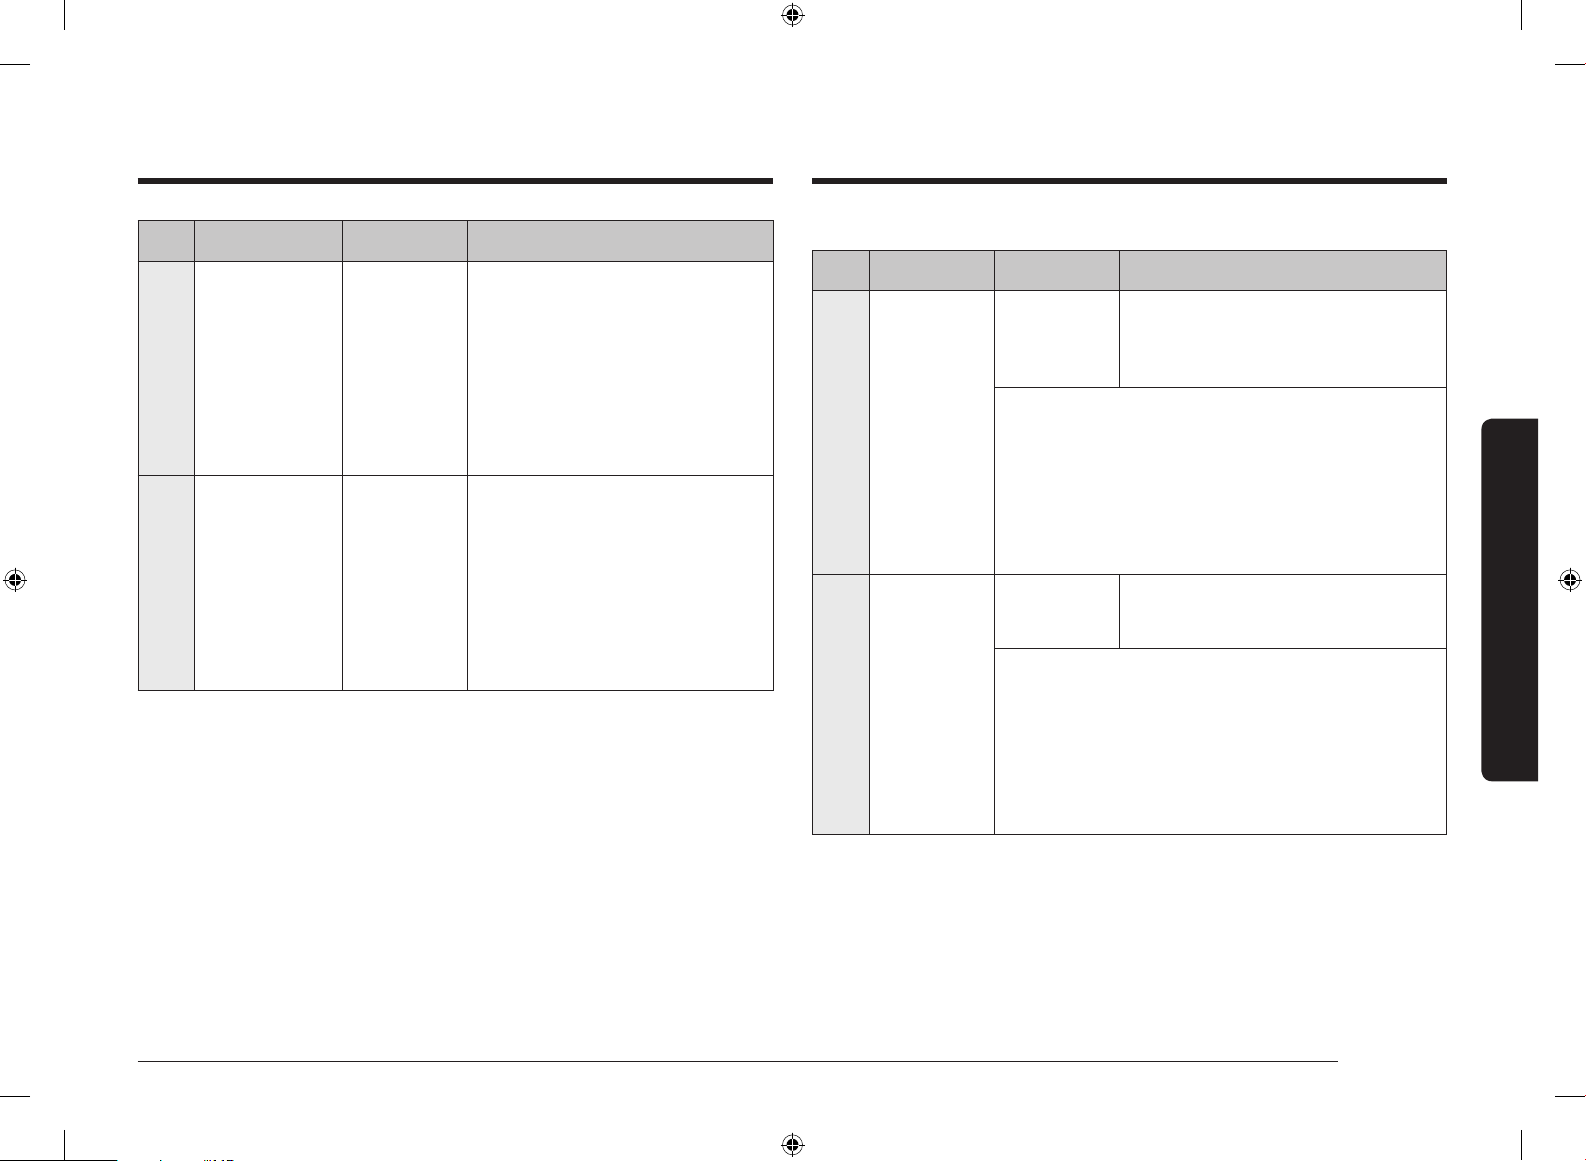
Power Defrost programme description
The following table details instructions. Remove all packaging materials before
defrosting.
Food Serving Size Instructions
Roast Beef,
Pork
2.5-3.5 lbs. Start with the food placed fat side down. After
each stage, turn the food over and shield any
warm portions with narrow strips of aluminum
foil. Let stand, covered for 10-20 minutes.
Steaks, Chops,
Fish
0.5-3.5 lbs. After each stage, rearrange the food. If
there are any warm or thawed portions of
food, shield them with narrow, at pieces of
aluminum foil. Remove any pieces of food that
are nearly defrosted. Let stand, covered for
5-10 minutes.
Ground Meat 0.5-3.5 lbs. After each stage, remove any pieces of food
that are nearly defrosted. Let stand, covered
with foil for 5-10 minutes.
Whole
Chicken
2.5-3.5 lbs. Remove giblets before frozen poultry. Start
defrosting with the breast side down. After the
rst stage, turn the chicken over and shield any
warm portions with narrow strips of aluminum
foil. After the second stage, again shield any
warm portions with narrow strips of aluminum
foil. Let stand, covered for 30-60 minutes in the
refrigerator.
Food Serving Size Instructions
Chicken
Pieces
0.5-3.5 lbs. After each stage, rearrange or remove any
pieces of food that are nearly defrosted. Let
stand for 10-20 minutes.
NOTE
Select the manual defrosting function with a power level of 20 % if you want to
defrost food manually. For further details on manual defrosting and defrosting
times, refer to the page 37.
Microwave oven use
English 19
MG11T5018CC_AA_EN.indd 19 2/4/2020 10:44:26 AM
Page 20
Microwave oven use
Microwave oven use
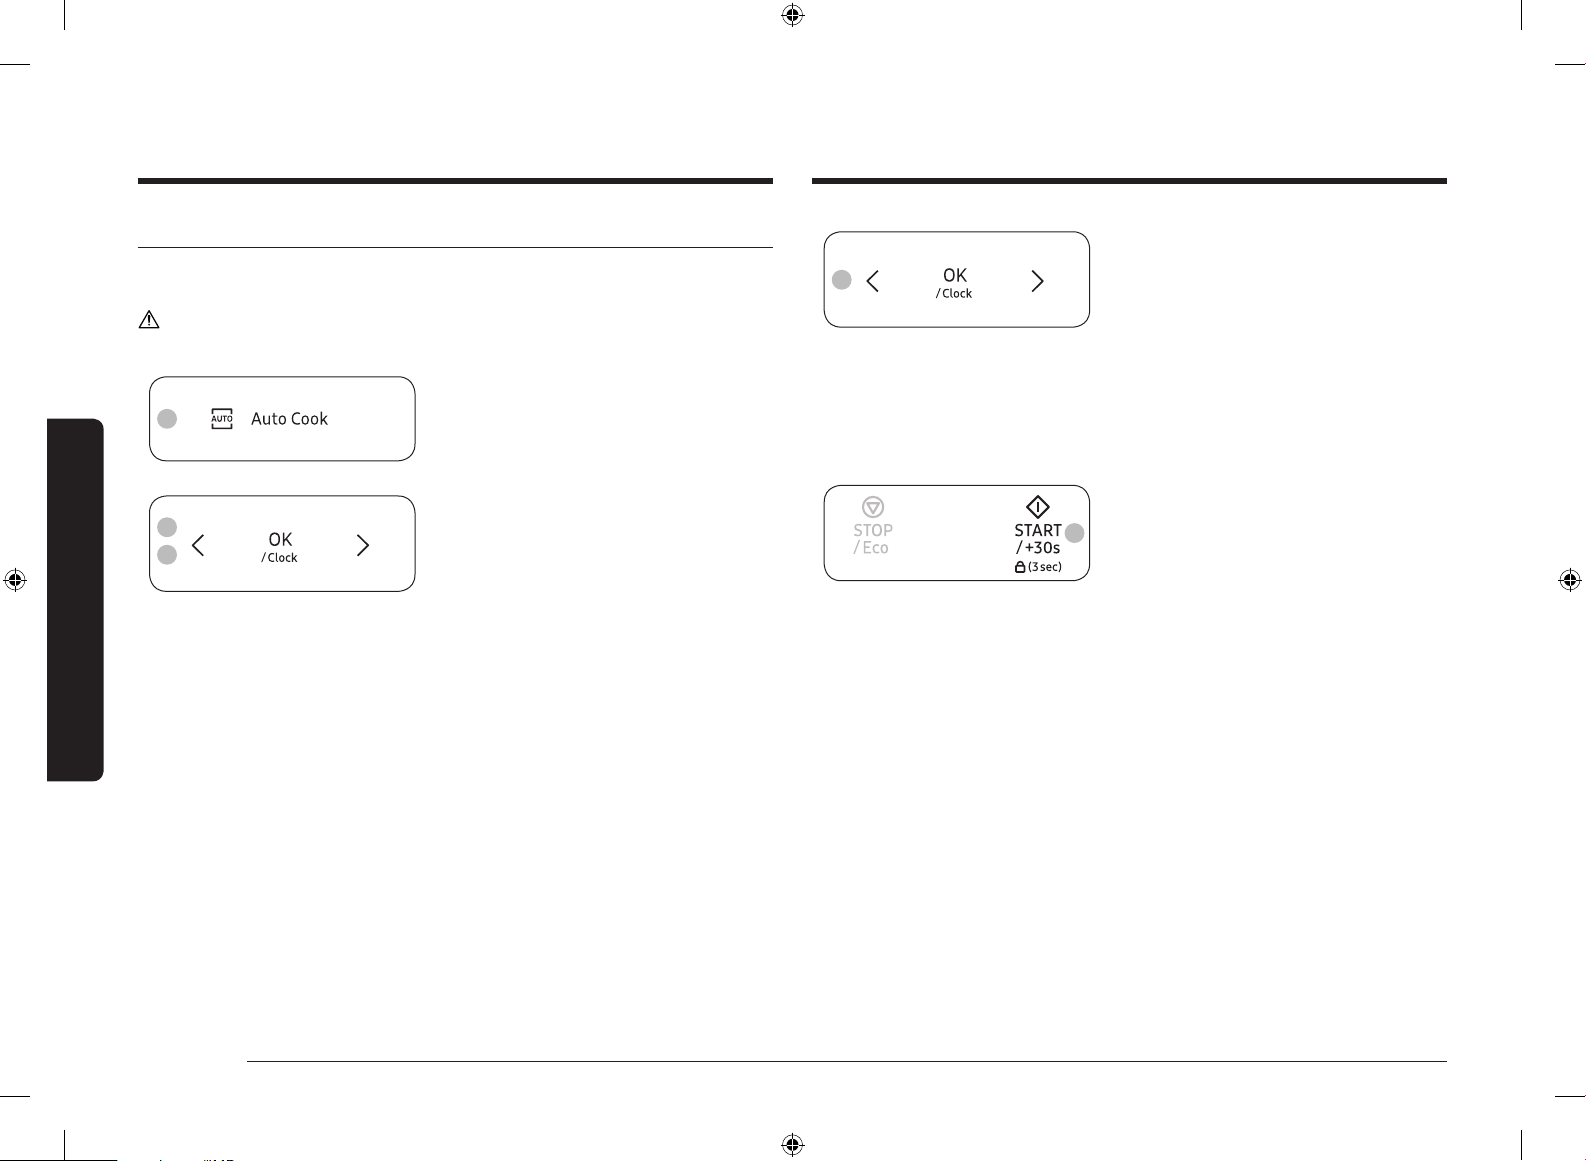
Using Auto Cook
Auto Cook has 37 pre-programmed cook settings. You do not need to set either the
cooking times or the power level.
CAUTION
Use only containers that are microwave-safe.
1. Pull the handle to open the microwave
3
4
5
oven door.
2. Place the food on the centre of the
turntable, and then close the door.
3. Press Auto Cook.
4. Press < or > (Decrease/Increase) to
select the desired category, and then
press OK.
• 1. Grill auto cook
• 2. Home Dessert
• 3. Auto Cook
• 4. Soften / melt
5. Press < or > (Decrease/Increase) to
select the type of food, and then press
OK.
• For more information, see the “Auto Cook
programme description” section on
pages 21 to 27.
6. Press < or > (Decrease/Increase) to
select the serving size, and then press
6
OK.
• For more information, see the "Auto Cook
programme description" section on
pages 21 to 27.
• Depending on the selected menu,
you may have only one weight
option available to select.
• You do not have to select a weight
for Home Dessert.
7. Press START/+30s to start Auto Cook.
• The microwave oven cooks the
7
food according to the selected preprogrammed setting.
• When the cooking is complete, the
microwave oven beeps 4 times and
the control panel display shows
the current time. Then, the end
reminder signal beeps once every
minute for 3 times.
20 English
MG11T5018CC_AA_EN.indd 20 2/4/2020 10:44:26 AM
Page 21
The following table presents quantities and appropriate instructions about
37 pre-programmed cooking options. The pre-programmes are categorized into
Grill auto cook, Home Dessert, Auto Cook and, Soften / melt.
CAUTION
Use oven gloves when taking out food.
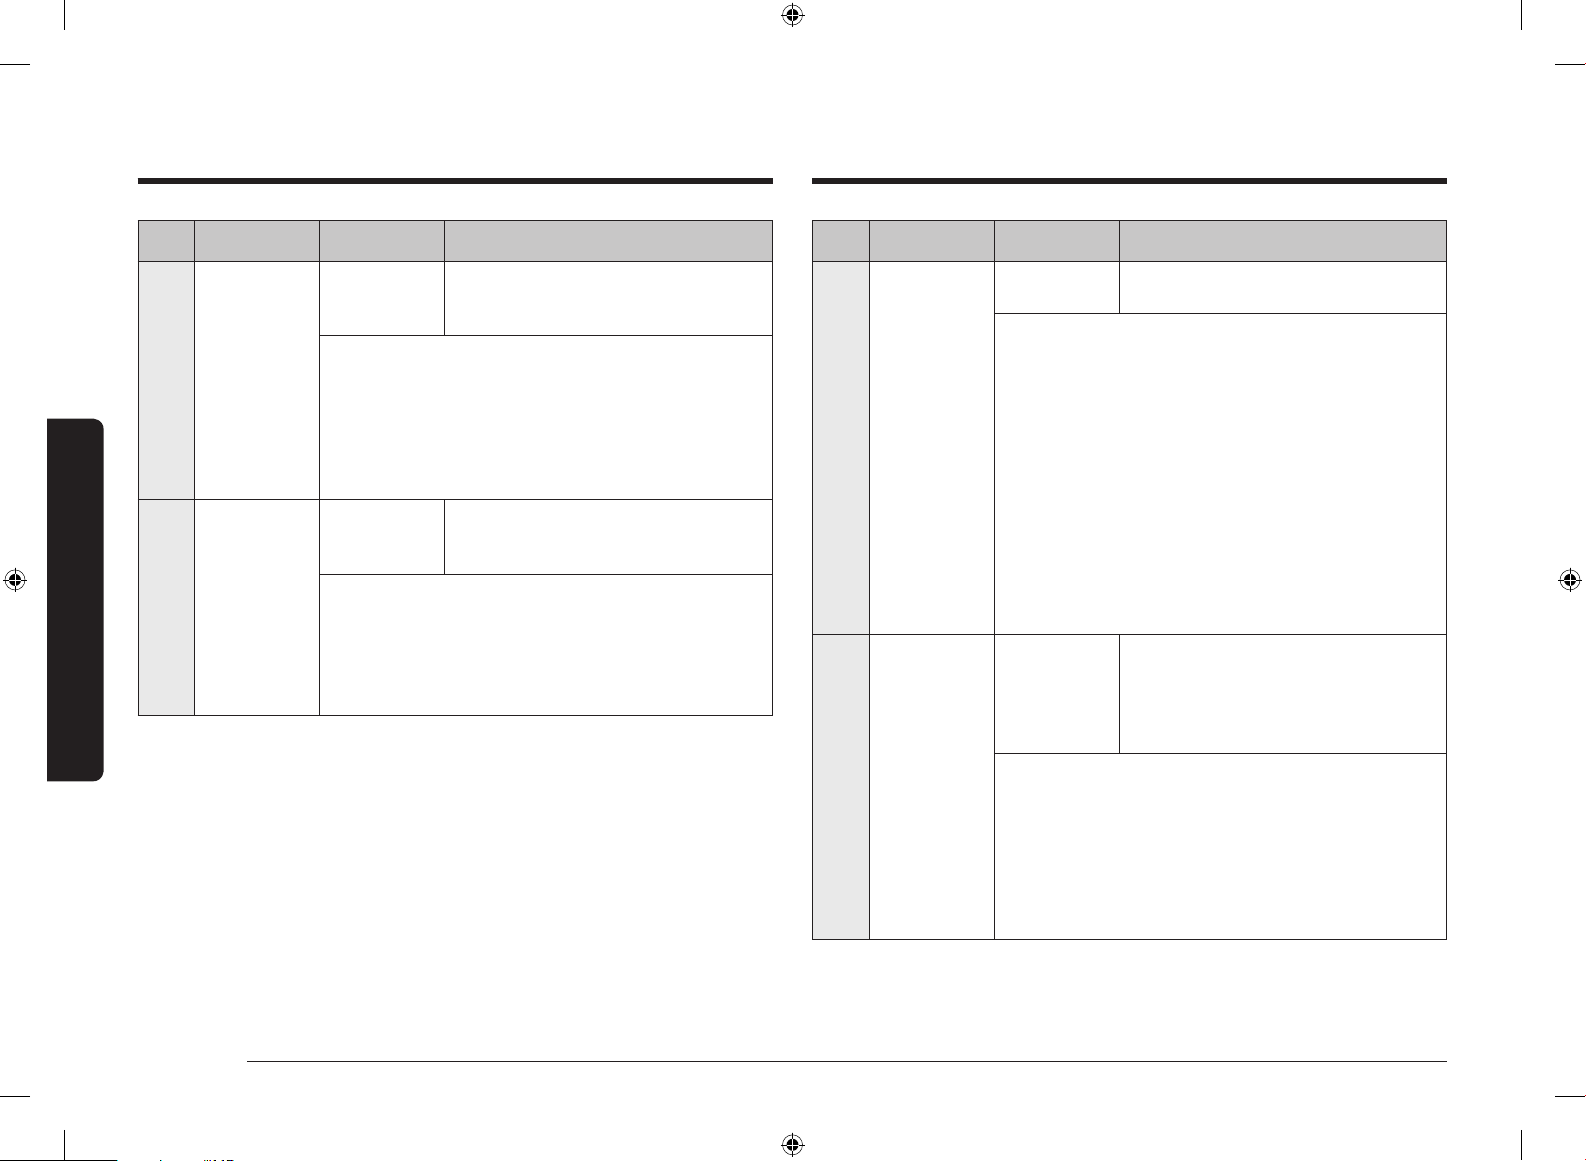
Auto Cook programme description
1. Grill auto cook
Code Food Serving Size Instructions
1-1 Frozen French
Fries
14 oz Place frozen French fries on the
crusty plate with the rack. Put them
in the microwave oven.
Select the auto cook program and
press the START/+30s button. After
cooking, stand for 2-3 minutes.
1-2 Frozen Pork
Cutlet
18 oz Place frozen pork cutlet on the
crusty plate with the rack. Put them
in the microwave oven. Select the
auto cook program and press the
START/+30s button.
When the beeps, turn the food
and then press the START/+30s to
continue. After cooking, stand for 2-3
minutes.
1-3 Frozen Chicken
Nuggets
12 oz Place frozen chicken nuggets on the
crusty plate with the rack. Put them
in the microwave oven.
Select the auto cook program and
press the START/+30s button. After
cooking, stand for 2-3 minutes.
Code Food Serving Size Instructions
1-4 Frozen Potato
Croquettes
12 oz Place frozen potato croquettes on the
crusty plate with the rack. Put them
in the microwave oven.
Select the auto cook program and
press the START/+30s button. After
cooking, stand for 2-3 minutes.
1-5 Frozen Corn
Dogs
18 oz Place frozen corn dogs on the crusty
plate with the rack. Put them in the
microwave oven.
Select the auto cook program and
press the START/+30s button. After
cooking, stand for 2-3 minutes.
1-6 Frozen Fish
Cutlets
11 oz Place frozen sh cutlets on the
crusty plate with the rack. Put them
in the microwave oven. Select the
auto cook program and press the
START/+30s button.
When the beeps, turn the food
and then press the START/+30s to
continue. After cooking, stand for 2-3
minutes.
1-7 Frozen Buffalo
Wings
18 oz Place frozen buffalo wings on the
crusty plate with the rack. Put them
in the microwave oven.
Select the auto cook program and
press the START/+30s button. After
cooking, stand for 2-3 minutes.
Microwave oven use
English 21
MG11T5018CC_AA_EN.indd 21 2/4/2020 10:44:26 AM
Page 22

Microwave oven use
Microwave oven use
Code Food Serving Size Instructions
1-8 Frozen Cheese
Cutlets
1-9 Frozen Cheese
Sticks
1-10 Frozen Spring
Rolls
14 oz Place frozen cheese cutlets on the
crusty plate with the rack. Put them
in the microwave oven.
Select the auto cook program and
press the START/+30s button. After
cooking, stand for 2-3 minutes.
11 oz Place frozen cheese sticks on the
crusty plate with the rack. Put them
in the microwave oven.
Select the auto cook program and
press the START/+30s button. After
cooking, stand for 2-3 minutes.
11 oz Slightly oil the frozen spring rolls on
the surface. Place frozen spring rolls
on the crusty plate with the rack. Put
them in the microwave oven. Select
the auto cook program and press the
START/+30s button.
When the beeps, turn the food
and then press the START/+30s to
continue. After cooking, stand for 2-3
minutes.
Code Food Serving Size Instructions
1-11 Frozen Breaded
Shrimps
1-12 Frozen Onion
Rings
1-13 Frozen Wedge
Potatoes
11 oz Slightly oil the frozen breaded
shrimps on the surface. Place frozen
breaded shrimps on the crusty
plate with the rack. Put them in
the microwave oven. Select the
auto cook program and press the
START/+30s button. When the
beeps, turn the food and then press
the START/+30s to continue. After
cooking, stand for 2-3 minutes.
11 oz Place frozen onion rings on the
crusty plate with the rack. Put them
in the microwave oven.
Select the auto cook program and
press the START/+30s button. After
cooking, stand for 2-3 minutes.
12 oz Place frozen wedge potatoes on the
crusty plate with the rack. Put them
in the microwave oven.
Select the auto cook program and
press the START/+30s button. After
cooking, stand for 2-3 minutes.
22 English
MG11T5018CC_AA_EN.indd 22 2/4/2020 10:44:26 AM
Page 23
Code Food Serving Size Instructions
1-14 Chicken
Drumsticks
18 oz Slightly oil the chicken drumsticks
on the surface. Add seasoning them
according to your preference. Place
chicken drumsticks on the crusty
plate with the rack. Put them in the
microwave oven.
Select the auto cook program and
press the START/+30s button. After
cooking, stand for 2-3 minutes.
1-15 Chicken Wings 18 oz Slightly oil the chicken wings on
the surface. Add seasoning them
according to your preference. Place
chicken wings on the crusty plate
with the rack. Put them in the
microwave oven.
Select the auto cook program and
press the START/+30s button. After
cooking, stand for 2-3 minutes.
2. Home Dessert
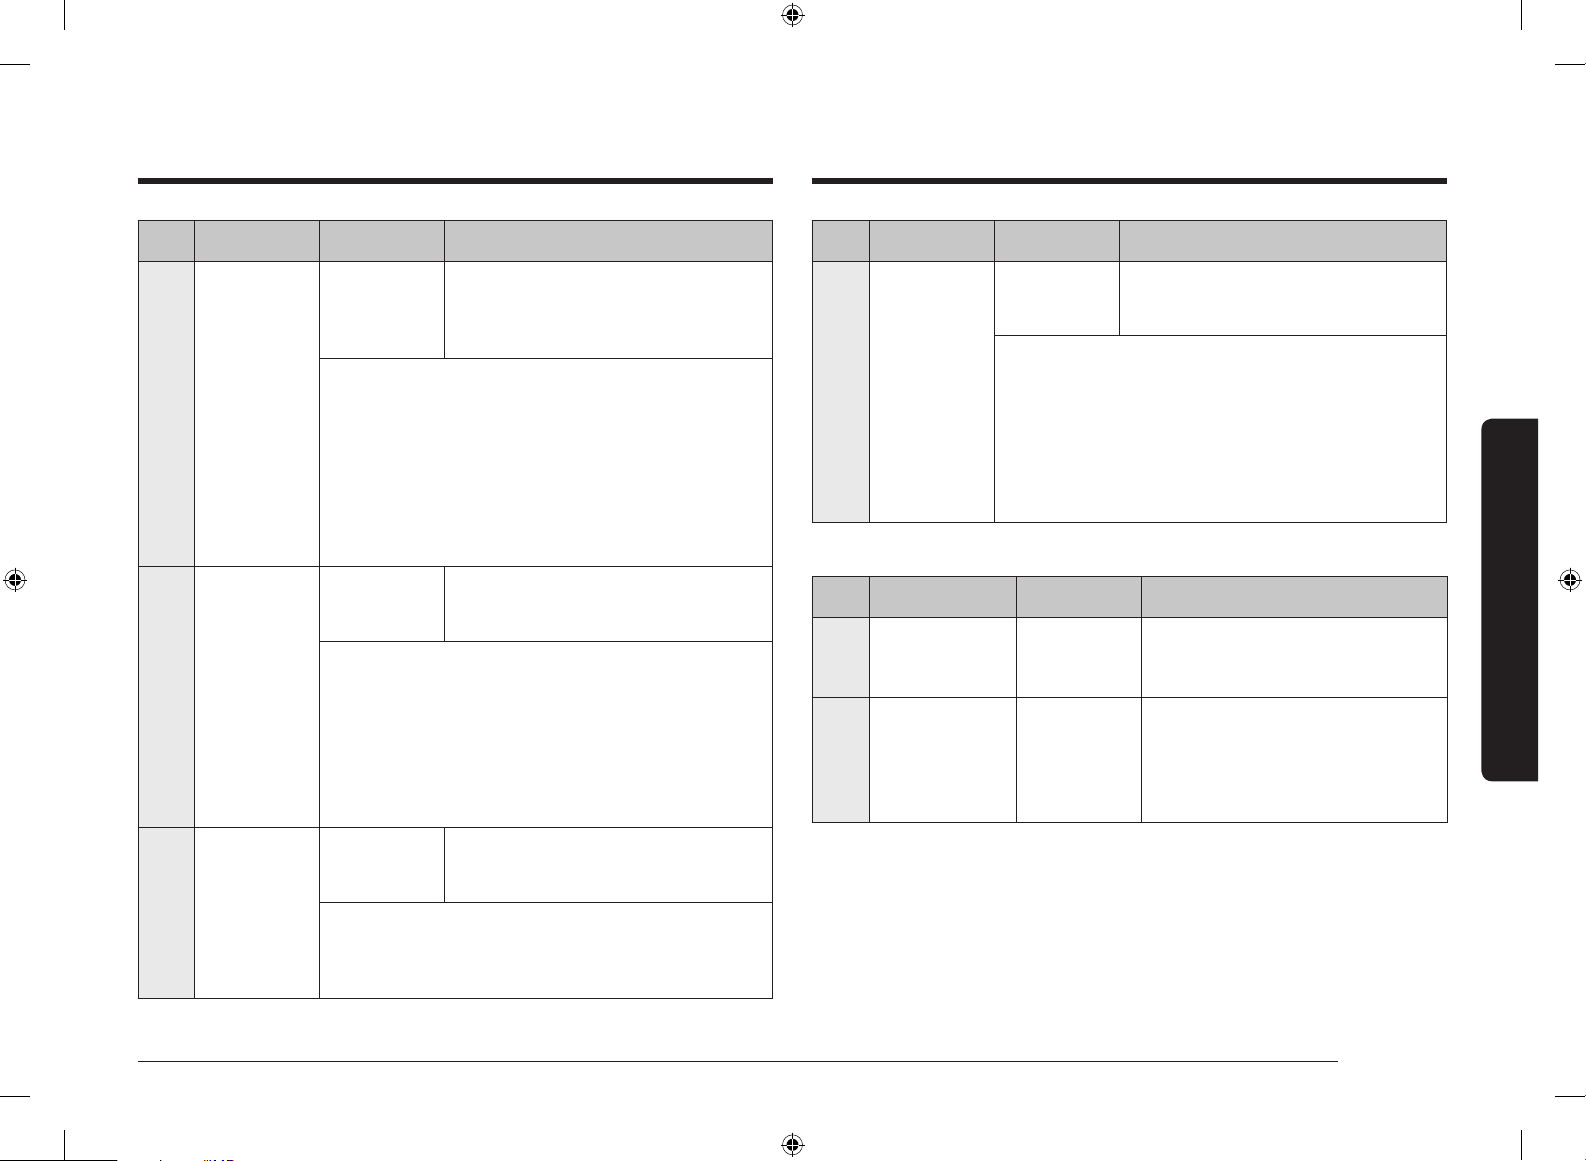
Code Food Serving Size Instructions
2-1
Walnut Pound
Cake
1 serving Ingredients
Flour 120 g, Butter 150 g, Black sugar
100 g, Egg 2 pcs., Walnut (Chopped)
50 g, Baking powder 4 g
1. Combine a butter and black sugar in bowl.
2. Add egg and mix well.
3. Add a our, baking powder and keep stirring.
4. Add a walnut and mix well.
5. Pour a mixture in greased glass or plastic bowl.
6. Put the bowl in the microwave oven and select the
auto cook program.
7. After cooking, stand for 2-3 minutes.
Banana Bread 1 serving
2-2
(6 pcs.)
Ingredients
Banana 3 pcs., Pancake mix 120 g, Milk
120 g, Egg 1 pc., Malt syrup 2 tbsp.
1. Chop the banana.
2. Combine a pancake mix, milk, egg, malt syrup in
bowl.
3. Add banana and mix well.
4. Pour a mixture in 6 paper cups.
5. Put paper cups in the microwave oven and select
the auto cook program.
6. After cooking, stand for 2-3 minutes.
Microwave oven use
English 23
MG11T5018CC_AA_EN.indd 23 2/4/2020 10:44:26 AM
Page 24
Microwave oven use
Microwave oven use
Code Food Serving Size Instructions
Sponge Cake 1 serving Ingredients
2-3
1. Combine a butter and sugar in bowl.
2. Add egg and mix well.
3. Add a our, baking powder and keep stirring.
4. Pour a mixture in greased glass or plastic bowl.
5. Put the bowl in the microwave oven and select the
auto cook program.
6. After cooking, stand for 2-3 minutes.
Brownie 1 serving Ingredients
2-4
1. Combine a butter, beaten eggs, sugar in bowl.
2. Add a our, cocoa powder and keep stirring.
3. Pour a mixture in greased glass or plastic bowl.
4. Put the bowl in the microwave oven and select the
auto cook program.
5. After cooking, stand for 20-30 minutes.
Flour 170 g, Butter 50 g, Sugar 150 g,
Egg 3 pcs., Baking powder 10 g
Flour 90 g, Butter (Melted) ½ cup, Sugar
230 g, Egg 2 pcs., Cocoa power 40 g
Code Food Serving Size Instructions
Egg Pudding 1 serving
2-5
Chocolate
2-6
Mug Cake
(3 pcs.)
1. Crack the two eggs into a bowl. Lightly beat the egg
with a balloon whisk. Don’t let the tip of the whisk
leave the bottom of the bowl to avoid creating too
much foam.
2. Combine milk, sugar in other bowl.
3. Add the milk to the beaten egg while whisking the
mixture.
4. Sieve the egg mixture with a ne mesh strainer.
Scrape off the bottom of the strainer with a spatula.
Remove any foam on the surface with a spoon.
5. Pour the mixture into custard cups.
6. Put the cups in the microwave oven and select the
auto cook program.
7. After cooking, refrigerate and serve.
1 serving Ingredients
1. Combine the butter, egg and cream together in a
mug until well combined.
2. Add the our, sugar and keep stirring.
3. Add the cocoa, vanilla and stir until just combined.
4. Stir in the chocolate chips.
5. Put the mug in the microwave oven and select the
auto cook program.
6. After cooking, stand for 2-3 minutes.
Ingredients
Milk 250 g, Sugar 40 g, Egg 2 pcs.
Butter 30 g, Sugar 60 g, Egg 1 pc.,
Heavy cream 40 g, Flour 25 g, Cocoa
powder 15 g, Vanilla 1.5 g, Semi-sweet
chocolate chips 50 g
24 English
MG11T5018CC_AA_EN.indd 24 2/4/2020 10:44:26 AM
Page 25
Code Food Serving Size Instructions
Code Food Serving Size Instructions
Mug Cake 1 serving Ingredients
2-7
1. Combine the butter, egg together in a mug until well
combined.
2. Add the our, sugar, baking powder and keep
stirring.
3. Add the almond powder, vanilla and stir until just
combined.
4. Put the mug in the microwave oven and select the
auto cook program.
5. After cooking, stand for 2-3 minutes.
Café Latte 1 serving Ingredients
2-8
1. Mix the coffee powder and water in mug.
2. Pour milk in other mug.
3. Put the coffee mixture in the microwave oven and
select the Dessert [8].
4. When the beeps, take mug out.
5. Put the milk in the microwave oven and press the
START/+30s button.
6. After cooking, mix all well and serve.
2-9
Green Tea
1 serving Ingredients
Latte
1. Mix all ingredients in mug.
2. Put the mug in the microwave oven and select the
auto cook program.
3. After cooking, mix well and serve.
Butter 30 g, Sugar 60 g, Egg 1 pc., Flour
50 g, Milk 30 g, Vanilla 6 g, Almond
powder 3 g, Baking powder 1.5 g
Instant coffee powder 2 g, Water 50 g,
Milk 125 g
Green tea powder 6 g, Sugar 15 g, Milk
250 g
Milk Tea 1 serving Ingredients
2-10
Black tea bag 2 pcs., Water 60 g, Milk
125 g
1. Mix the black tea bag and water in mug.
2. Pour milk in other mug.
3. Put the tea mixture in the microwave oven and
select the auto cook program.
4. When the beeps, take mug out.
5. Put the milk in the microwave oven and press the
START/+30s button.
6. After cooking, mix all well and serve.
3. Auto Cook
Code Food Serving Size Instructions
3-1 Beverage 0.5 cup
1 cup
2 cups
3-2 Pizza Slices 1 pc
2 pcs.
3 pcs.
4 pcs.
Use a measuring cup or mug and do
not cover. Place the beverage in the
oven. After heating, stir well.
Place 1-4 pizza slices on a microwave
safe plate with the wide ends of the
slices towards the outside edge of the
plate. Do not let the slices overlap. Do
not cover.
Microwave oven use
English 25
MG11T5018CC_AA_EN.indd 25 2/4/2020 10:44:26 AM
Page 26
Microwave oven use
Microwave oven use
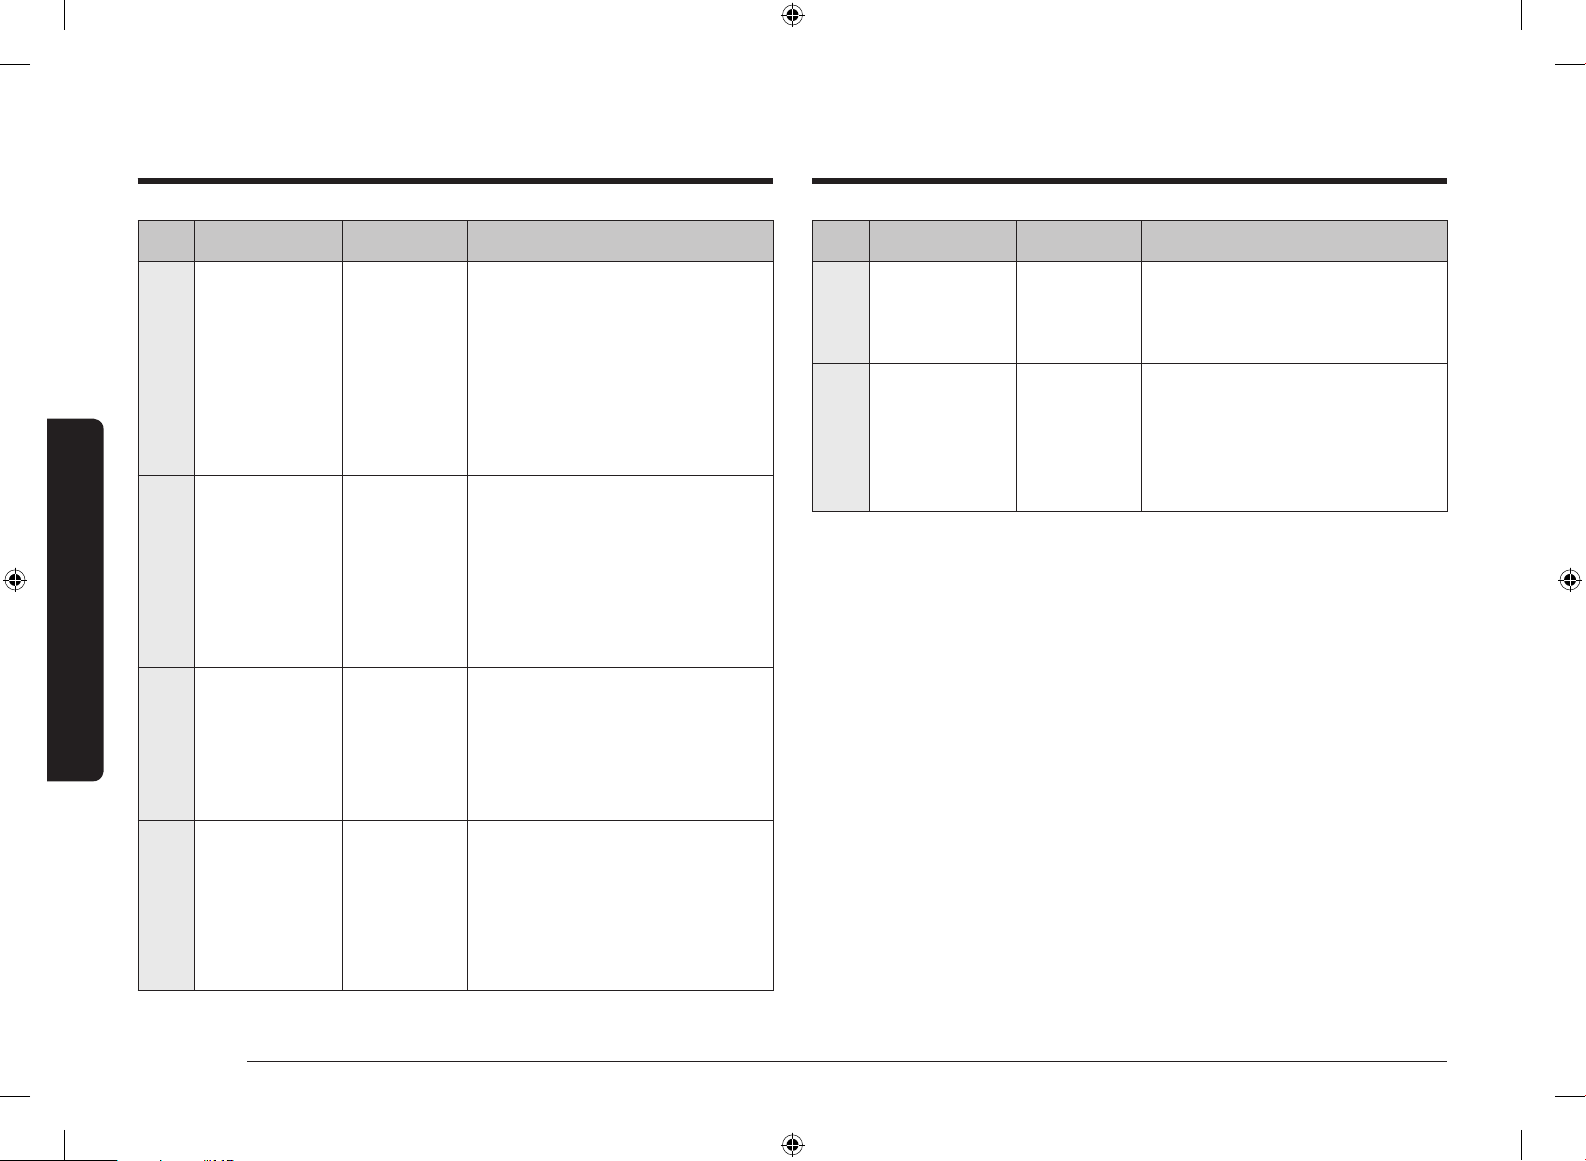
Code Food Serving Size Instructions
3-3 Fresh Vegetables 1 serving
(125 g)
2 servings
(250 g)
3 servings
(375 g)
4 servings
(500 g)
3-4 Frozen
Vegetables
3-5 Casserole 1 serving
1 serving
(125 g)
2 servings
(250 g)
3 servings
(375 g)
4 servings
(500 g)
2 servings
3 servings
4 servings
Place the fresh vegetables (broccoli
orets, cauliower orets, zucchini,
Eggplants etc.) in a microwavesafe ceramic, glass, or plastic dish
and add 2-4 tbs. water. Cover with
vented (1 inch vent) plastic wrap
while cooking and stir before letting
stand. Let the oven cool for at least
5 minutes before using it again.
Place the frozen vegetables in a
microwave-safe ceramic, glass, or
plastic dish and add 2-4 tbs. water.
Cover with vented (1 inch vent)
plastic wrap to cook. Stir before
letting stand for 3-5 minutes. Let
the oven cool for at least 5 minutes
before using it again.
Pour into a deep ceramic plate or
bowl. Cover the plate with vented
(1 inch vent) plastic wrap. Stir well
before serving.
Contents
Casseroles: refrigerated
Code Food Serving Size Instructions
3-7 Frozen Dinner 8-10 oz
11-14 oz
15-18 oz
3-8 Hot Dogs 2 pcs.
4 pcs.
Remove package from wrapping
and follow package instructions for
covering and standing. After cooking,
let stand 1-3 minutes.
Pierce the hot dogs 3 times with a
fork. Place the hot dogs on the plate.
Put them in the microwave. When
the microwave beeps, add the buns,
and then press the START/+30s to
continue.
3-6 Frozen Breakfast 4-6 oz
7-8 oz
26 English
MG11T5018CC_AA_EN.indd 26 2/4/2020 10:44:27 AM
Remove package from wrapping
and follow package instructions for
covering and standing. When the
microwave beeps, remove cover lm
and then press the START/+30s to
continue. After cooking, let stand
1-3 minutes.
Page 27
4. Soften / melt
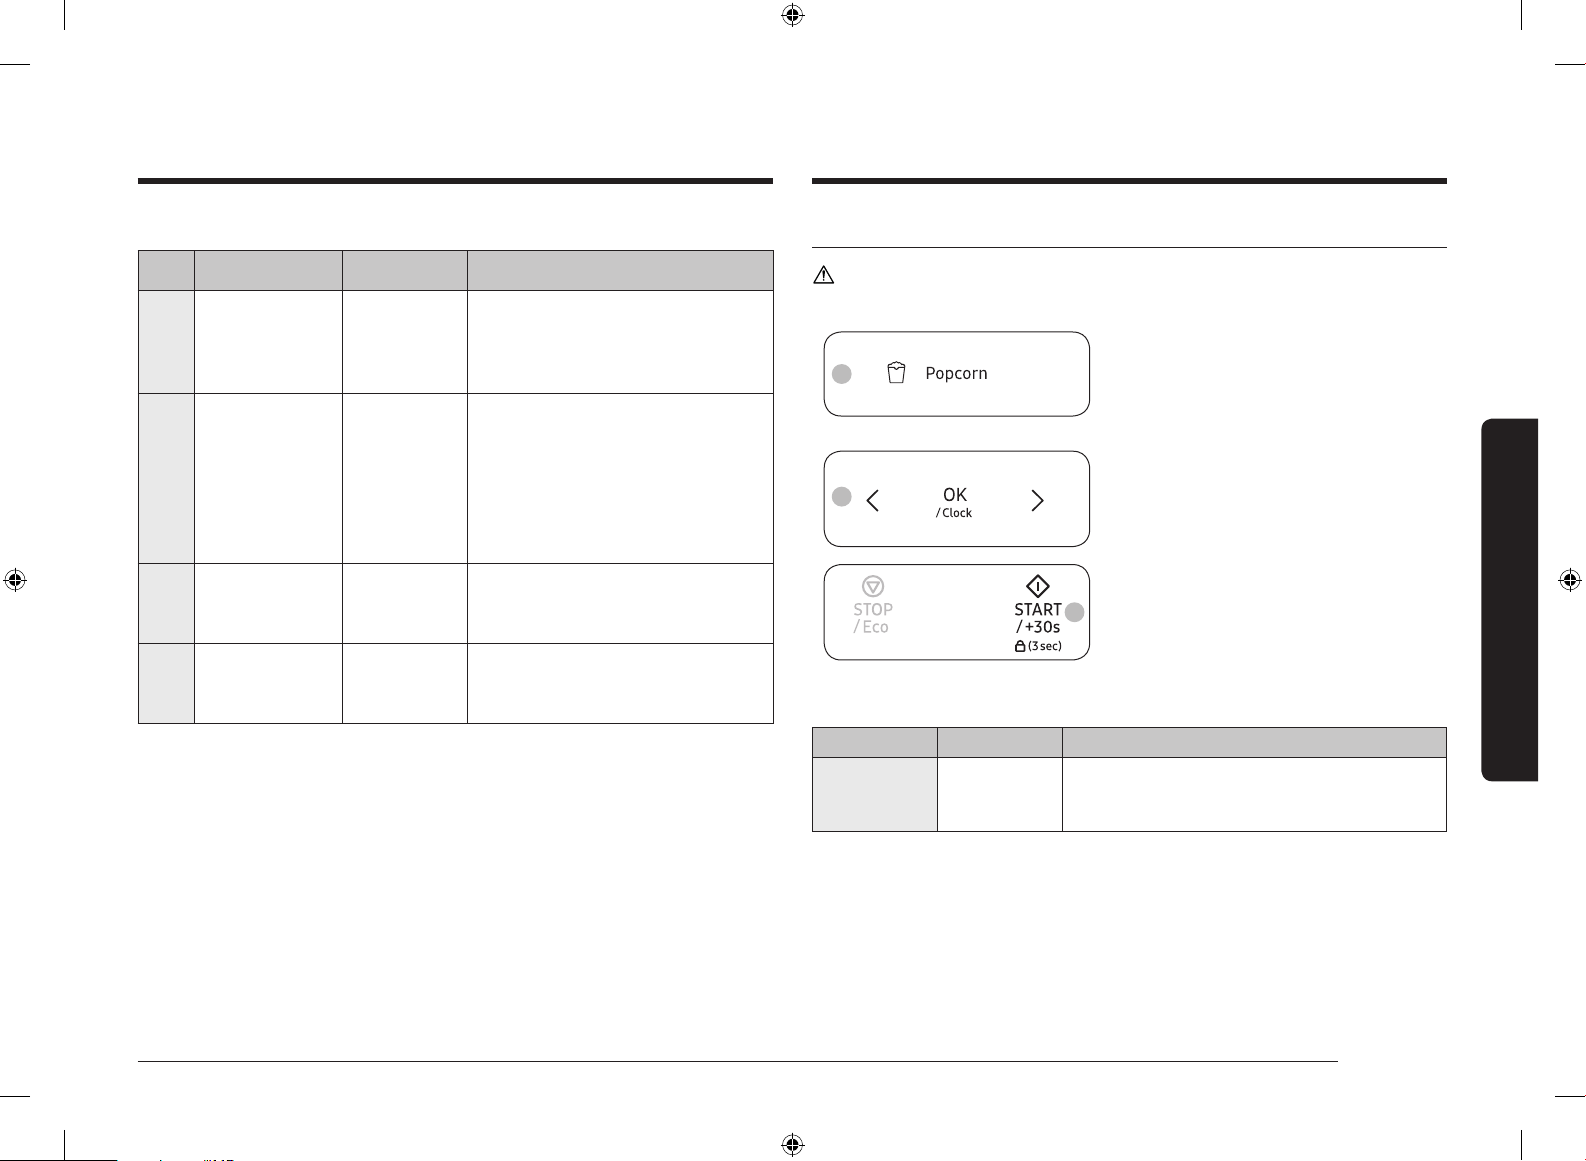
Using Popcorn
Code Food Serving Size Instructions
4-1 Melt Butter 4 oz (1 stick)
8 oz (2 sticks)
Unwrap the butter and cut the butter
into several pieces. Place the butter
on a microwave-safe dish and cover
with wax paper. Stir well afterwards.
4-2 Melt Chocolate 1 cup chips Place the chocolate chips in a
microwave-safe dish. When the
microwave beeps, stir well, and then
press the START/+30s to continue.
Unless stirred, the chocolate chips
will keep their shape even when the
heating time is over.
4-3 Soften Butter 4 oz (1 stick) Remove the butter from the
packaging and place on a microwavesafe dish.
4-4 Soften Cream
Cheese
1 pack
(1 pint)
Remove the lid of the carton. Place
the carton in the center of the
microwave.
CAUTION
Use only containers that are microwave-safe.
1. Pull the handle to open the microwave
3
oven door.
2. Place the food on the centre of the
turntable, and then close the door.
3. Press Popcorn.
4. Press < or > (Decrease/Increase) to
4
select the serving size, and then press
OK.
5. Press START/+30s to start Popcorn.
5
Popcorn programme description
Food Serving Size Instructions
Popcorn 3.0-3.5 oz.
1 package
Use only one microwave popcorn bag at a time.
Be careful when removing the heated bag from
the oven and opening it.
Microwave oven use
English 27
MG11T5018CC_AA_EN.indd 27 2/4/2020 10:44:27 AM
Page 28
Microwave oven use
Microwave oven use
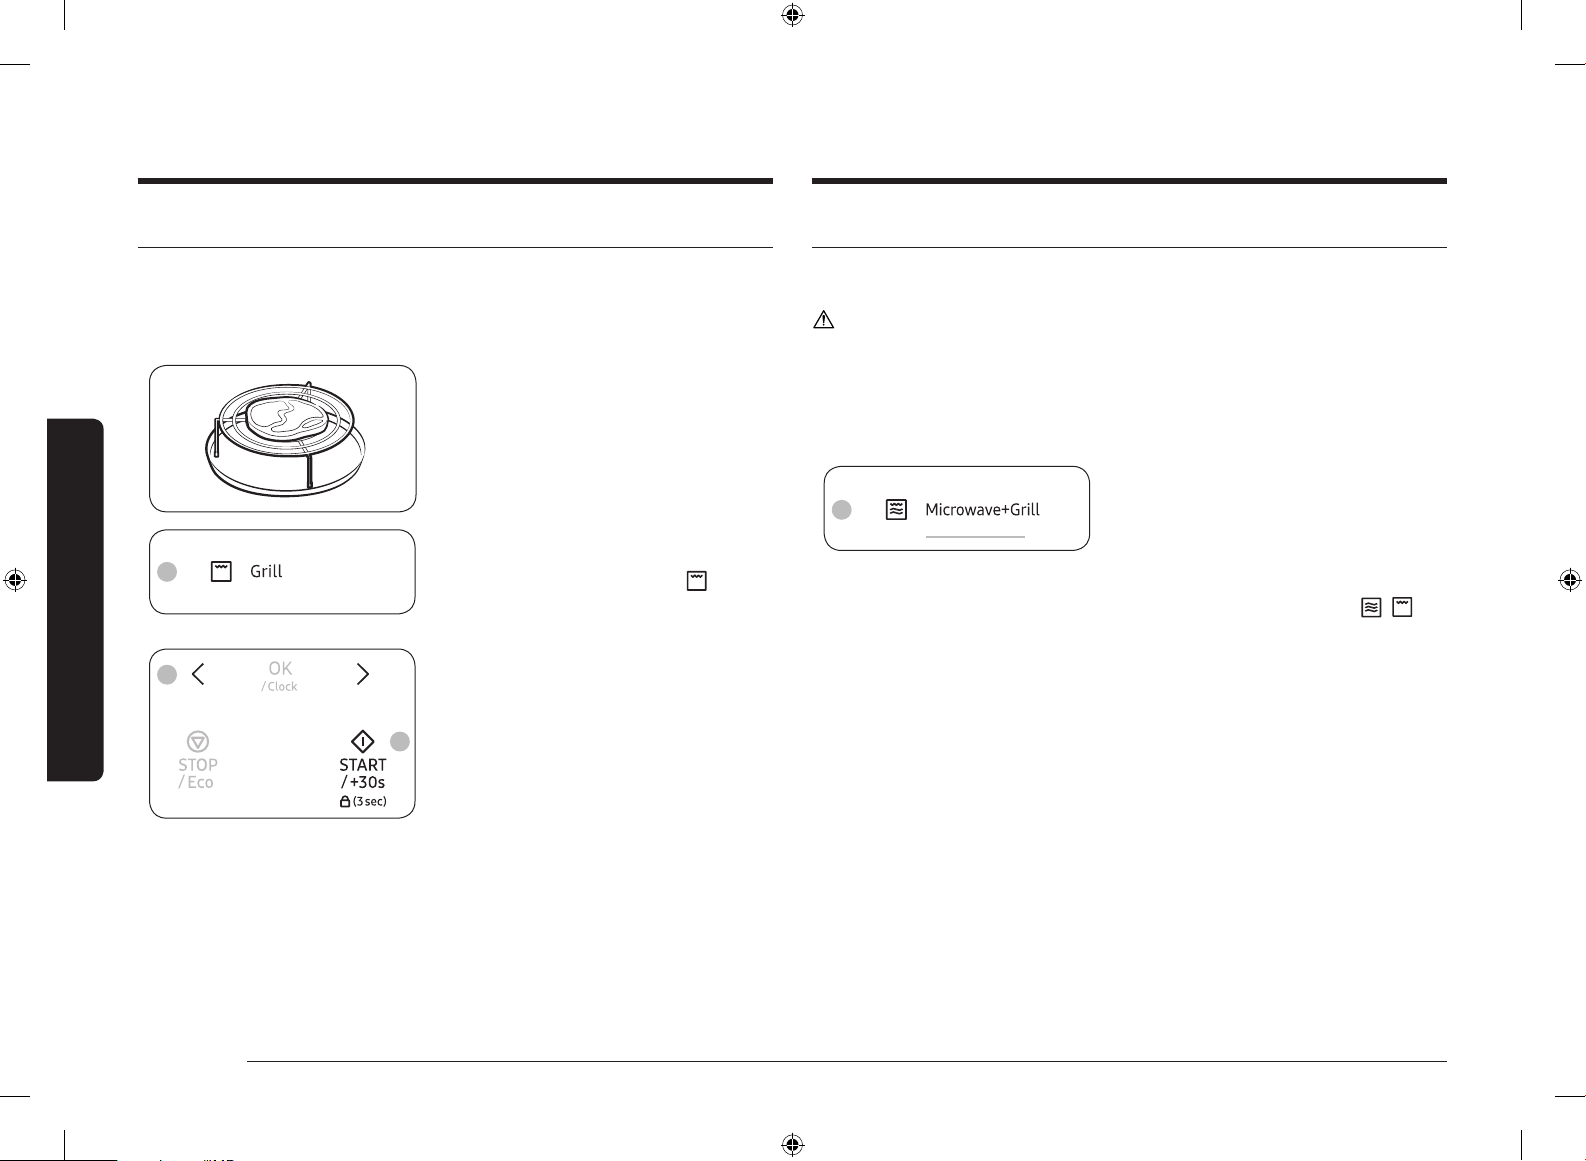
Grilling
The grill enables you to heat and brown food quickly, without using microwaves.
• Always use oven gloves when touching the cookware in the microwave oven,
as they will be very hot.
• You can get better cooking and grilling results, if you use the grill rack.
1. Pull the handle to open the microwave
oven door.
2. Place the food on the grill rack, and
then close the door.
3. Press Grill.
3
4
5
• The control panel display shows
the corresponding icon ( ).
• You cannot set the temperature of
the grill.
4. Press < or > (Decrease/Increase) to set
the desired grilling time.
• The maximum grilling time is
60 minutes.
5. Press START/+30s to start grilling.
• When the grilling is complete, the
microwave oven beeps 4 times and
the control panel display shows
the current time. Then, the end
reminder signal beeps once every
minute for 3 times.
Combining microwaves and grill
You can also combine microwave cooking with the grill, to cook quickly and brown
at the same time.
CAUTION
• Always use microwave-safe and oven-proof cookware. Glass or ceramic dishes
are ideal as they allow the microwaves to penetrate the food evenly.
• Always use oven gloves when touching the cookware in the microwave oven,
as they will be very hot.
• You can improve cooking and grilling, if you use the grill rack.
1. Pull the handle to open the microwave
3
oven door.
2. Place the food on the grill rack, and
then close the door.
3. Press Microwave+Grill.
• The control panel display shows
the corresponding icon ( , ).
28 English
MG11T5018CC_AA_EN.indd 28 2/4/2020 10:44:28 AM
Page 29
4
the desired cooking time.
• The maximum cooking time is
60 minutes.
4. Press < or > (Decrease/Increase) to set
5
5. Press START/+30s to start cooking.
• When the cooking is complete, the
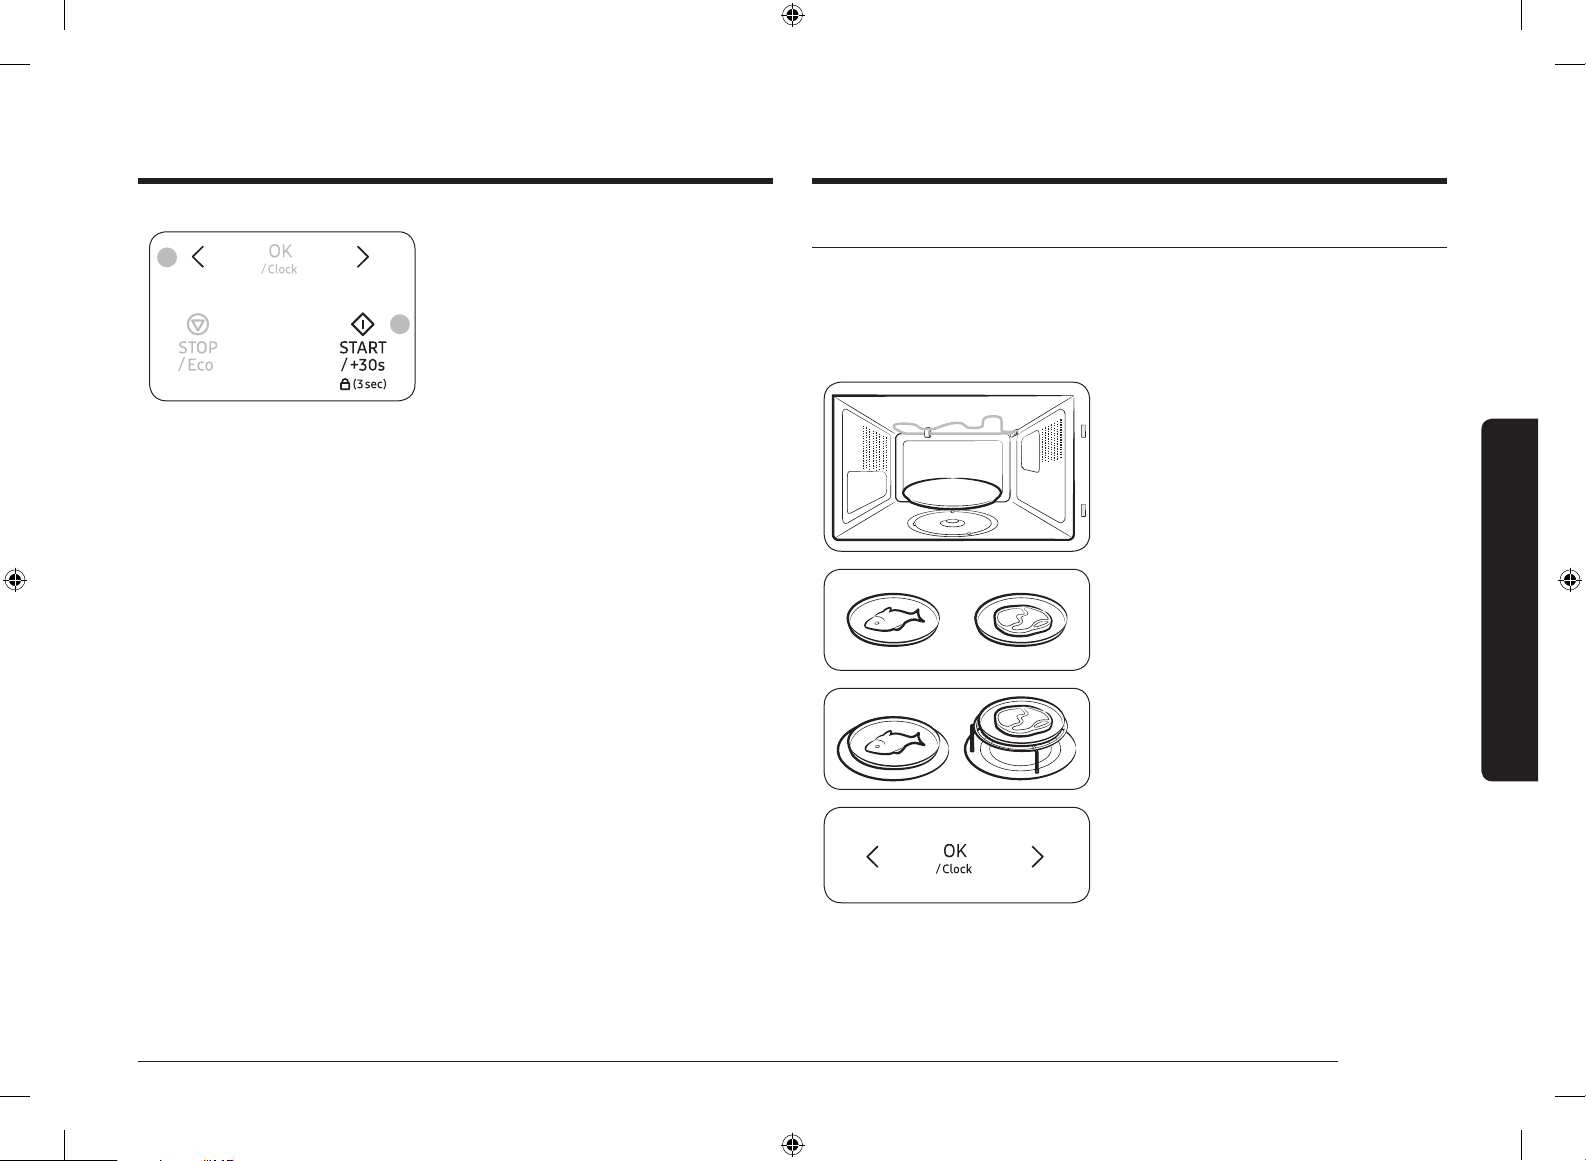
Using the crusty plate
This crusty plate allows you to brown food not only on the top with the grill, but
also the bottom of the food turns crispy and brown due to the high temperature
of the crusty plate. Several items which you can prepare on the crusty plate can
be found in the chart (see next page). The crusty plate can also be used for bacon,
eggs, sausages, etc.
microwave oven beeps 4 times and
the control panel display shows
the current time. Then, the end
reminder signal beeps once every
minute for 3 times.
1. Place the crusty plate directly on the
turntable and preheat it with highest
Microwave-Grill-Combination by
following the times and instructions in
the chart.
2. Brush the plate with oil if you are
cooking food, such as bacon and eggs,
Microwave oven use
in order to brown the food nicely.
3. Place the food on the crusty plate.
4. Place the crusty plate on the metal rack
(or turntable) in the microwave.
5. Select the appropriate cooking time and
power.
(Refer to the table on the side)
English 29
MG11T5018CC_AA_EN.indd 29 2/4/2020 10:44:28 AM
Page 30

Microwave oven use
Microwave oven use
CAUTION
• Always use oven gloves to take out the crusty plate, as will become very hot.
• Do not place any objects on the crusty plate that are not heat-resistant.
• Never place the crusty plate in the oven without turntable.
• Please note that the crust plate is not dish washer-safe.
NOTE
• Please note that the crusty plate has a teon layer which is not scratchresistant. Do not use any sharp objects like a knife to cut on the crusty plate.
• Clean the crusty plate with warm water and detergent and rinse off with clean
water.
• Do not use a scrubbing brush or a hard sponge otherwise the top layer will be
damaged.
Using Child Lock
Your microwave oven is tted with a special child lock programme, which enables
the microwave oven to be “locked” so that children or anyone unfamiliar with it
cannot operate it accidentally.
• To activate Child Lock, press and hold
START/+30s for 3 seconds.
• The control panel is locked, and the
control panel display shows “L”.
• To deactivate Child Lock, press and hold
START/+30s again for 3 seconds.
Switching the beeper off
You can switch the beeper off whenever you want.
• To turn the beeping sound off, press
< or > (Decrease/Increase) at the same
time.
• To turn the beeping sound back on,
press < or > (Decrease/Increase) at the
same time again.
30 English
MG11T5018CC_AA_EN.indd 30 2/4/2020 10:44:29 AM
Page 31

Cookware guide
To cook food in the microwave oven, the microwaves must be able to penetrate
the food, without being reected or absorbed by the dish used.
Care must therefore be taken when choosing the cookware. If the cookware is
marked microwave-safe, you do not need to worry.
The following table lists various types of cookware and indicates whether and how
they should be used in a microwave oven.
Cookware
Alunimium foil
Crust plate
China and
earthenware
Disposable polyester
cardboard dishes
Fast-food packaging
• Polystyrene cups
containers
• Paper bags or
newspaper
• Recycled paper
or metal trims
Glassware
• Oven-totableware
• Fine glassware
Microwave-
safe
✓✗
✓
✓
✓
✓
✗
✗
✓
✓
Comments
Can be used in small quantities to protect
areas against overcooking. Arcing
can occur if the foil is too close to the
microwave oven wall or if too much foil
is used.
Do not preheat for more than 8 minutes.
Porcelain, pottery, glazed earthenware
and bone china are usually suitable, unless
decorated with a metal trim.
Some frozen foods are packaged in these
dishes.
Can be used to warm food. Overheating
may cause the polystyrene to melt.
May catch re.
May cause arcing.
Can be used, unless decorated with a
metal trim.
Can be used to warm foods or liquids.
Delicate glass may break or crack if
heated suddenly.
Cookware
• Glass jars
Metal
• Dishes
• Freezer bag twist
ties
Paper
• Plates, cups,
napkins and
kitchen paper
• Recycled paper
Plastic
• Containers
• Cling lm
• Freezer bags
Wax or grease-proof
paper
✓
: Recommended
Microwave-
safe
✓
✗
✗
✓
✗
✓
✓
✓✗
✓
✓✗
: Use caution
Comments
Must remove the lid. Suitable for warming
only.
May cause arcing or re.
For short cooking times and warming. Also
to absorb excess moisture.
May cause arcing.
Particularly if heat-resistant thermoplastic.
Some other plastics may warp or discolour
at high temperatures.
Do not use Melamine plastic.
Can be used to retain moisture. Should not
touch the food. Take care when removing
the lm as hot steam will escape.
Only if boilable or oven-proof. Should not
be airtight. Prick with a fork, if necessary.
Can be used to retain moisture and
prevent spattering.
✗
: Unsafe
Cookware guide
English 31
MG11T5018CC_AA_EN.indd 31 2/4/2020 10:44:29 AM
Page 32

Cooking guide
Cooking guide
Microwave energy actually penetrates food and is attracted and absorbed by the
water, fat and sugar in the food. The microwaves cause the molecules in the food
to move rapidly. The rapid movement of these molecules creates friction and the
resulting heat cooks the food.
General microwave tips
Dense foods, such as potatoes, take longer to heat than lighter foods. Foods with
a delicate texture should be heated at a low power level to prevent them from
becoming tough.
Foods with a non-porous skin, such as potatoes or hot dogs, should be pierced to
prevent bursting.
Putting heating oil or fat in the microwave is not recommended. Fat and oil can
suddenly boil over and cause severe burns.
Some ingredients heat faster than others. For example, the jelly in a jelly doughnut
will be hotter than the dough. Keep this in mind to avoid burns.
The altitude and the type of cookware you are using can affect the cooking time.
When trying a new recipe, use the minimum cooking time and check the food
occasionally to prevent overcooking.
Home canning in the microwave oven is not recommended because not all harmful
bacteria may be destroyed by the microwave heating process.
Although microwaves do not heat the cookware, the heat from the food is often
transferred to the cookware. Always use pot holders when removing food from the
microwave and instruct children to do the same.
Making candy in the microwave is not recommended as candy can be heated to
very high temperatures. Keep this in mind to avoid injury.
Cooking techniques
NOTE
If the oven is set to cook for more than 20 minutes, it will automatically adjust to
70 percent power after 20 minutes to avoid overcooking.
Stirring
Open the microwave door and stir foods such as casseroles and vegetables
occasionally while cooking to distribute heat evenly. Food at the outside of the
dish absorbs more energy and heats more quickly, so stir from the outside towards
the center. The oven will turn off when you open the door to stir your food.
Arrangement
Arrange unevenly shaped foods, such as chicken pieces or chops, with the thicker,
meatier parts toward the outside of the turntable where they can receive more
microwave energy. To prevent overcooking, place thin or delicate parts towards
the center of the turntable.
Shielding
Shield food with narrow strips of aluminum foil to prevent overcooking. Areas that
need shielding include poultry wing-tips, the ends of poultry legs, and corners of
square baking dishes. Use only small amounts of aluminum foil. Larger amounts
can damage your oven.
Turning
Turn foods over midway through the cooking cycle to expose all parts to the
microwave energy. This is especially important with large items such as roasts.
Standing
Foods cooked in the microwave build up internal heat and continue to cook for
a few minutes after the oven stops. Let foods stand to complete the cooking
process, especially foods such as roasts and whole vegetables. Roasts need this
time to complete cooking in the center without overcooking the outer areas. All
liquids, such as soup or hot chocolate, should be shaken or stirred when cooking is
complete. Let liquids stand a moment before serving. When heating baby food, stir
well and test the temperature before serving.
Adding moisture
Microwave energy is attracted to water molecules. Food that is uneven in moisture
content should be covered or allowed to stand so that the heat disperses evenly.
Add a small amount of water to dry food to help it cook.
Venting
After covering a dish with plastic wrap, vent the plastic wrap by turning back one
corner to let excess steam escape.
32 English
MG11T5018CC_AA_EN.indd 32 2/4/2020 10:44:29 AM
Page 33

Cooking guide for frozen vegetables
Use a suitable glass pyrex bowl with lid. Cook covered for the minimum time – see
table. Continue cooking to get the result you prefer.
Stir twice during cooking and once after cooking. Add salt, herbs, or butter after
cooking. Cover during standing time.
Food Serving Size Power Time (min.)
Spinach 0.3 lbs. 60 % 5-6½
Instructions
Add 15 ml (1 tbsp.) cold water. Let stand for 2-3 minutes.
Broccoli 0.7 lbs. 60 % 8-9½
Instructions
Add 30 ml (2 tbsp.) cold water. Let stand for 2-3 minutes.
Peas 0.7 lbs. 60 % 7-8½
Instructions
Add 15 ml (1 tbsp.) cold water. Let stand for 2-3 minutes.
Green Beans 0.7 lbs. 60 % 7½-9
Instructions
Add 30 ml (2 tbsp.) cold water. Let stand for 2-3 minutes.
Mixed Vegetables
(Carrots/Peas/
Corn)
Mixed Vegetables
(Chinese Style)
0.7 lbs. 60 % 7-8½
Instructions
Add 15 ml (1 tbsp.) cold water. Let stand for 2-3 minutes.
0.7 lbs. 60 % 7½-9
Instructions
Add 15 ml (1 tbsp.) cold water. Let stand for 2-3 minutes.
Cooking guide for fresh vegetables
Use a suitable glass pyrex bowl with lid. Add 30-45 ml cold water (2-3 tbsp.) for
every 250 g unless another water quantity is recommended – see table. Cook
covered for the minimum time – see table. Continue cooking to get the result you
prefer. Stir once during and once after cooking. Add salt, herbs or butter after
cooking. Cover during a standing time of 3 minutes.
Hint: Cut the fresh vegetables into even sized pieces. The smaller they are cut,
the quicker they will cook.
Food Serving Size Power Time (min.)
Broccoli 0.6 lbs.
1.0 lbs.
90 % 4½-5½
7-8½
Instructions
Prepare even sized orets. Arrange the stems so they point
to the center. Let stand for 3 minutes.
Brussels Sprouts 0.6 lbs. 90 % 6-6½
Instructions
Add 60-75 ml (4-5 tbsp.) water. Let stand for 3 minutes.
Carrots 0.6 lbs. 90 % 4½-5½
Instructions
Cut carrots into even sized slices. Let stand for 3 minutes.
Cauliower 0.6 lbs.
1.0 lbs.
90 % 5-6
7½-9
Instructions
Prepare even sized orets. Cut big orets in half. Arrange
stems so they point to the center. Let stand for 3 minutes.
Courgettes 0.6 lbs. 90 % 4-5
Instructions
Cut courgettes into slices. Add 30 ml (2 tbsp.) water or
a knob of butter. Cook until just tender. Let stand for
3 minutes.
Cooking guide
English 33
MG11T5018CC_AA_EN.indd 33 2/4/2020 10:44:29 AM
Page 34

Cooking guide
Cooking guide
Food Serving Size Power Time (min.)
Egg Plants 0.6 lbs. 90 % 3½-4½
Instructions
Cut egg plants into small slices and sprinkle with 1 tbsp.
lemon juice. Let stand for 3 minutes.
Leeks 0.6 lbs. 90 % 4-5
Instructions
Cut leeks into thick slices. Let stand for 3 minutes.
Mushrooms 0.25 lbs.
0.6 lbs.
Instructions
Prepare small whole or sliced mushrooms. Do not add any
water. Sprinkle with lemon juice. Spice with salt and pepper.
Drain before serving. Let stand for 3 minutes.
Onions 0.6 lbs. 90 % 5-6
Instructions
Cut onions into slices or halves. Add only 15 ml (1 tbsp.)
water. Let stand for 3 minutes.
Pepper 0.6 lbs. 90 % 4½-5½
Instructions
Cut pepper into small slices. Let stand for 3 minutes.
Potatoes 0.6 lbs.
1.0 lbs.
Instructions
Weigh the peeled potatoes and cut them into similar sized
halves or quarters. Let stand for 3 minutes.
Turnip Cabbage 0.6 lbs. 90 % 5½-6½
Instructions
Cut turnip into small cubes. Let stand for 3 minutes.
90 % 1½-2½
2½-3½
90 % 4-5½
7-8½
Cooking guide for rice and pasta
Rice: Use a large glass pyrex bowl with lid – rice doubles in volume during
cooking. Cook covered. After the cooking time is over, stir before
standing time and salt or add herbs and butter. Remark: The rice may
not have absorbed all water after the cooking time is nished.
Pasta: Use a large glass pyrex bowl. Add boiling water, a pinch of salt and stir
well. Cook uncovered. Stir occasionally during and after cooking. Cover
during standing time and drain thoroughly afterwards.
Food Serving Size Power Time (min.)
White Rice
(Parboiled)
Brown Rice
(Parboiled)
Mixed Rice
(Rice + Wild Rice)
Mixed Corn
(Rice + Grain)
Pasta 0.6 lbs. 90 % 10-12
1 cup
1½ cups
Instructions
Add 2 cups of cold water for 1 cup of rice. Add 3 cups of
cold water for 1½ cups of rice. Let stand for 5 minutes.
0.6 lbs.
0.8 lbs.
Instructions
Add 2 cups of cold water for 1 cup of rice. Add 3 cups of
cold water for 1½ cups of rice. Let stand for 5 minutes.
0.6 lbs. 90 % 16-18
Instructions
Add 2 cups of cold water for 1 cup of rice/wild rice mix. Let
stand for 5 minutes.
0.6 lbs. 90 % 17-19
Instructions
Add 1¾ cups of cold water to 1 cup of mixed rice/grain. Let
stand for 5 minutes.
Instructions
Add 4¼ cups of water. Let stand for 5 minutes.
90 % 15-17
17½-19½
90 % 20-22
22-24
34 English
MG11T5018CC_AA_EN.indd 34 2/4/2020 10:44:29 AM
Page 35

Reheating
Your microwave oven will reheat food in a fraction of the time that conventional
ovens normally take.
Use the power levels and reheating times in the following chart as a guide. The
times in the chart consider liquids with a room temperature of about 64.5 to 68 °F
or a chilled food with a temperature of about 41 to 45 °F.
Arranging and covering
Avoid reheating large items such as joint of meat – they tend to overcook and dry
out before the center is piping hot. Reheating small pieces will be more successful.
Power levels and stirring
Some foods can be reheated using 90 % power while others should be reheated
using 60 %, 50 %, or even 30 % .
Check the tables for guidance. In general, it is better to reheat food using a lower
power level, if the food is delicate, in large quantities, or if it is likely to heat up
very quickly (mince pies, for example).
Stir well or turn food over during reheating for best results. When possible, stir
again before serving.
Take particular care when heating liquids and baby foods. To prevent eruptive
boiling of liquids and possible scalding, stir before, during, and after heating.
Keep them in the microwave oven during standing time. We recommend putting
a plastic spoon or glass stick into the liquids. Avoid overheating (and therefore
spoiling) the food.
It is preferable to underestimate cooking time and add extra heating time, if
necessary.
Heating and standing times
When reheating food for the rst time, it is helpful to make a note of the time
taken for future reference.
Always make sure that the reheated food is piping hot throughout.
Allow food to stand for a short time after reheating to let the temperature even
out.
The recommended standing time after reheating is 2-4 minutes, unless another
time is recommended in the chart.
Take particular care when heating liquids and baby food. See also the chapter with
the safety precautions.
Reheating liquids
Always allow a standing time of at least 20 seconds after the oven has been
switched off to allow the temperature to even out. Stir during heating, if necessary,
and ALWAYS stir after heating. To prevent eruptive boiling and possible scalding,
you should put a spoon or glass stick into the beverages and stir before, during,
and after heating.
Reheating baby food
Cooking guide
Baby food
Empty into a deep ceramic plate. Cover with plastic lid. Stir well after reheating!
Let stand for 2-3 minutes before serving. Stir again and check the temperature.
Recommended serving temperature: between 86 to 104 °F.
Baby milk
Pour milk into a sterilised glass bottle. Reheat uncovered. Never heat a baby’s
bottle with nipple on, as the bottle may explode if overheated. Shake well before
standing time and again before serving ! Always carefully check the temperature
of baby milk or food before giving it to the baby. Recommended serving
temperature: ca. 98.6 °F.
English 35
MG11T5018CC_AA_EN.indd 35 2/4/2020 10:44:29 AM
Page 36

Cooking guide
Cooking guide
Remark
Baby food in particular needs to be checked carefully before serving to prevent
burns. Use the power levels and times in the table below as guidelines for
reheating.
Reheating liquids and food
Use the power levels and times in this table as guidelines for reheating.
Food Serving Size Power Time (min.)
Drinks (Coffee, Tea
and Water)
Soup (Chilled) 0.6 lbs.
Stew (Chilled) 0.8 lbs. 60 % 4½-6
150 ml (1 cup)
300 ml (2 cups)
450 ml (3 cups)
600 ml (4 cups)
Instructions
Pour into cups and reheat uncovered:
1 cup in the center, 2 cups opposite of each other, 3 cups in
a circle. Keep in microwave oven during standing time and
stir well. Let stand for 1-2 minutes.
0.8 lbs.
1 lbs.
1.2 lbs.
Instructions
Pour into a deep ceramic plate or deep ceramic bowl.
Cover with a plastic lid. Stir well after reheating. Stir again
before serving. Let stand for 2-3 minutes.
Instructions
Put stew in a deep ceramic plate. Cover with a plastic lid.
Stir occasionally during reheating and again before
standing and serving. Let stand for 2-3 minutes.
90 % 1-1½
2-2½
3-4
3½-4½
90 % 2½-3
3-3½
3½-4½
4½-5½
Food Serving Size Power Time (min.)
Pasta with Sauce
(Chilled)
Filled Pasta with
Sauce (Chilled)
Plated Meal
(Chilled)
Cheese Fondue
Ready-To-Serve
(Chilled)
0.8 lbs. 60 % 3½-5½
Instructions
Put pasta (e.g. spaghetti or egg noodles) on a at ceramic
plate. Cover with microwave cling lm. Stir before serving.
Let stand for 3 minutes.
0.8 lbs. 60 % 4-6
Instructions
Put lled pasta (e.g. ravioli, tortellini) in a deep ceramic
plate. Cover with a plastic lid. Stir occasionally during
reheating and again before standing and serving. Let stand
for 3 minutes.
0.8 lbs.
1.0 lbs.
Instructions
Plate a meal of 2-3 chilled components on a ceramic dish.
Cover with microwave cling-lm. Let stand for 3 minutes.
0.9 lbs. 60 % 6-7½
Instructions
Put the ready-to-serve cheese fondue in a suitable sized
glass pyrex bowl with lid. Stir occasionally during and
after reheating. Stir well before serving. Let stand for
1-2 minutes.
60 % 4½-6
5½-7½
36 English
MG11T5018CC_AA_EN.indd 36 2/4/2020 10:44:29 AM
Page 37

Reheating baby food and milk
Use the power levels and times in this table as guide lines for reheating.
Food Serving Size Power Time
Baby Food
(Vegetables +
Meat)
Baby Porridge
(Grain + Milk +
Fruit)
Baby Milk 100 ml 30 % 30-40 sec.
0.4 lbs. 60 % 30 sec.
Instructions
Empty into ceramic deep plate. Cook covered. Stir after
cooking time. Before serving, stir well and check the
temperature carefully. Let stand for 2-3 minutes.
0.4 lbs. 60 % 20 sec.
Instructions
Empty into ceramic deep plate. Cook covered.
Stir after cooking time. Before serving, stir well and check
the temperature carefully. Let stand for 2-3 minutes.
200 ml 1 min. to
1 min. 10 sec.
Instructions
Stir or shake well and pour into a sterilised glass bottle.
Place intwo the center of turn-table. Cook uncovered.
Shake well and let stand for at least 3 minutes.
Before serving, shake well and check the temperature
carefully.
Manual defrosting
Microwaves are an excellent way of defrosting frozen food. Microwaves gently
defrost frozen food in a short period of time. This can be of great advantage, if
unexpected guests suddenly show up.
Frozen poultry must be thoroughly thawed before cooking. Remove any metal ties
and take it out of any wrapping to allow thawed liquid to drain away.
Put the frozen food on a dish without cover. Turn over half way, drain off any
liquid, and, if you are defrosting chicken, remove any giblets as soon as possible.
Check the food occasionally to make sure that it does not feel warm.
If smaller and thinner parts of the frozen food start to warm up, shield the parts by
wrapping small strips of aluminium foil around them during defrosting.
Should poultry start to warm up on the outer surface, stop thawing and allow
it to stand for 20 minutes before continuing. Let sh, meat, and poultry stand
to complete defrosting. The standing time for complete defrosting will vary
depending on the quantity defrosted. Please refer to the table below.
Hint: Flat food defrosts better than thick, and smaller quantities need less
time than larger quantities.
For defrosting of frozen food with a temperature of about -5 to -4 °F, use the
following table as a guide.
Food Serving Size Power Time (min.)
Meat
Minced Meat 0.6 lbs.
1.1 lbs.
Pork Steaks 0.6 lbs. 20 % 5-7½
Instructions
Place the meat on the turntable. Shield thinner edges with
aluminium foil. Turn over after half of defrosting time! Let
stand for 15-30 minutes.
20 % 6-7½
9-12½
Cooking guide
English 37
MG11T5018CC_AA_EN.indd 37 2/4/2020 10:44:29 AM
Page 38

Cooking guide
Cooking guide
Food Serving Size Power Time (min.)
Poultry
Chicken Pieces 2 pcs. (1.1 lbs.) 20 % 14-16
Whole Chicken 2.7 lbs. 20 % 32-35
Instructions
First, put chicken pieces rst skin-side down, whole chicken
rst breast-side-down on a at ceramic plate. Shield the
thinner parts like wings and ends with aluminium foil.
Turn over after half of defrosting time! Let stand for 1560 minutes.
Fish
Fish Fillets 0.4 lbs. 20 % 6-7½
Whole Fish 0.9 lbs. 20 % 11-14
Instructions
Put frozen sh in the middle of a at ceramic plate. Arrange
the thinner parts under the thicker parts. Shield narrow
ends of llets and tail of whole sh with aluminium foil.
Turn over after half of defrosting time! Let stand for 1025 minutes.
Fruit
Berries 0.7 lbs. 20 % 6-7½
Instructions
Spread fruit on a at, round glass dish (with a large
diameter). Let stand for 5-10 minutes.
Food Serving Size Power Time (min.)
Bread
Bread Rolls
(Each ca. 50 g)
Toast/Sandwich 0.6 lbs. 20 % 4-5
German Bread
(Wheat + Rye
Flour)
2 pcs.
4 pcs.
1.1 lbs. 20 % 7-9½
Instructions
Arrange rolls in a circle or bread horizontally on kitchen
paper in the middle of turntable. Turn over after half of
defrosting time! Let stand for 5-20 minutes.
20 % 1-1½
2½-3
Grill
The grill-heating element is located underneath the ceiling of the cavity. It
operates while the door is closed and the turntable is rotating. The turntable’s
rotation makes the food brown more evenly. Preheating the grill for 3-5 minutes
will make the food brown more quickly.
Cookware for grilling:
Should be ameproof and may include metal. Do not use any type of plastic
cookware, as it can melt.
Food suitable for grilling:
Chops, sausages, steaks, hamburgers, bacon and gammon rashers, thin sh
portions, sandwiches, and all kinds of toast with toppings.
Important remark:
Whenever you use the grill only mode, please remember that food must be placed
on the high rack, unless you are instructed otherwise.
38 English
MG11T5018CC_AA_EN.indd 38 2/4/2020 10:44:29 AM
Page 39

Microwave + grill
This cooking mode combines the radiant heat that is coming from the grill with
the speed of microwave cooking. It operates only while the door is closed and the
turntable is rotating. Due to the rotation of the turntable, the food browns evenly.
Cookware for cooking with microwaves + grill
Please use cookware that microwaves can pass through. Cookware should be
ameproof. Do not use metal cookware with combination mode. Do not use any
type of plastic cookware, as it can melt.
Food suitable for microwaves + grill cooking:
Food suitable for combination mode cooking include all kinds of cooked food
which need reheating and browning (e.g. baked pasta), as well as foods which
require a short cooking time to brown the top of the food. Also, this mode can
be used for thick food portions that benet from a browned and crispy top (e.g.
chicken pieces, turning them over half way through cooking). Please refer to the
grill table for further details.
Important remark:
Whenever you use the combination mode (microwave + grill), the food should be
placed on the high rack, unless you are instructed otherwise. Please refer to the
instructions in the following chart.
The food must be turned over, if it is to be browned on both sides.
Grill guide for fresh food
Preheat the grill with the grill-function for 2-3 minutes.
Use the power levels and times in this table as guidelines for grilling.
Use oven gloves when taking the food out of the microwave.
Fresh Food Serving Size Power 1 step (min.) 2 step (min.)
Toast slices 4 pcs.
(each 0.05 lbs.)
Instructions
Put toast slices side by side on the high rack.
Grilled
tomatoes
Tomato
Cheese
Toast
Toast
Hawaii
Baked
potatoes
Gratin
potatoes
0.9 lbs. (2 pcs.) MWO + Grill 8-10½ -
Instructions
Cut tomatoes into halves. Put some cheese on top. Arrange in a
circle in a at glass pyrex dish. Place it on the high rack. Let stand
for 2-3 minutes.
4 pcs. (0.7 lbs.) MWO + Grill 7-9½ -
Instructions
Toast the bread slices rst. Put the toast with topping on the high
rack. Let stand for 2-3 minutes.
4 pcs. (1.1 lbs.) MWO + Grill 8-10½ -
Instructions
Toast the bread slices rst. Put the toast with topping on the high
rack. Let stand for 2-3 minutes.
1.1 lbs. MWO + Grill 14-15½ -
Instructions
Cut potatoes into halves. Put them in a circle on the high rack with
the cut side to the grill.
1 lbs. MWO + Grill 14½-16 -
Instructions
Put the fresh gratin into a small glass pyrex dish. Put the dish on
the high rack. After cooking, let stand for 2-3 minutes.
Grill only 3-4 2-3
Cooking guide
English 39
MG11T5018CC_AA_EN.indd 39 2/4/2020 10:44:29 AM
Page 40

Cooking guide
Troubleshooting and information code
Troubleshooting and information code
Tips and tricks
Melting crystallized honey
Put ¾ oz (20 g) crystallized honey into a small deep glass dish.
Heat for 20-30 seconds using 30 %, until honey is melted.
Melting gelatine
Lay dry gelatine sheets ⅓ oz (10 g) for 5 minutes into cold water.
Put drained gelatine into a small glass pyrex bowl.
Heat for 1 minute using 30 %.
Stir after melting.
Cooking glaze/icing (for cake and gateaux)
Mix instant glaze (approximately 3 teaspoons) with 2⅔ tablespoons (40 g) sugar
and 1 cup (250 ml) cold water.
Cook uncovered in a glass pyrex bowl for 3½ to 4½ minutes using 90 %, until
glaze/icing is transparent. Stir twice during cooking.
Cooking jam
Put 21 oz of fruit (600 g or about 2½ cups) (for example mixed berries) in a
suitable sized glass pyrex bowl with a lid. Add 1½ cups (300 g) preserving sugar
and stir well.
Cook covered for 10-12 minutes using 90 %.
Stir several times during cooking. Empty directly into small jam glasses with twistoff lids. Stand on lid for 5 minutes.
Cooking pudding / custard
Mix the pudding mix with milk following the manufacturer’s instructions. Add
sugar if instructed. Stir well. Instructions and stir well. Use a suitable sized glass
pyrex bowl with lid. Cook covered for 6½ to 7½ minutes using 90 %.
Stir several times well during cooking.
Browning almond slices
Spread about 1 oz (30 g) of sliced almonds evenly on a medium sized ceramic
plate.
Stir several times during browning for 3½ to 4½ minutes using 60 %.
Let it stand for 2-3 minutes in the oven. Use oven gloves when taking out!
Troubleshooting
If you have any of the problems listed below try the solutions given.
Problem Cause Action
General
The buttons
cannot be
pressed properly.
The time is not
displayed.
The microwave
oven does not
work.
The microwave
oven stops while
in operation.
Foreign matter may be
caught between the buttons.
For touch models: Moisture
is on the exterior.
Child lock is activated. Deactivate Child lock.
The Eco (power-saving)
function is set.
Power is not supplied. Make sure power is supplied.
The door is open. Close the door and try again.
The door open safety
mechanisms are covered in
foreign matter.
The user has opened the
door to turn food over.
Remove the foreign matter
and try again.
Wipe the moisture from the
exterior.
Turn off the Eco function.
Remove the foreign matter
and try again.
After turning over the food,
press the
again to start operation.
START/+30s
button
40 English
MG11T5018CC_AA_EN.indd 40 2/4/2020 10:44:30 AM
Page 41

Problem Cause Action
The power
turns off during
operation.
The microwave oven
has been cooking for an
extended period of time.
The cooling fan is not
working.
Trying to operate the
microwave oven without
After cooking for an
extended period of time, let
the microwave oven cool.
Listen for the sound of the
cooling fan.
Put food in the microwave
oven.
food inside.
There is not sufcient
ventilation space for the
microwave oven.
There are intake/exhaust
outlets on the front and rear
of the microwave oven for
ventilation.
Keep the gaps specied
in the product installation
guide.
There is a
popping sound
during operation,
and the
Several power plugs are
being used in the same
socket.
Cooking sealed food or
using a container with a lid
may causes popping sounds.
Designate only one socket to
be used for the microwave
oven.
Do not use sealed containers
as they may burst during
cooking due to expansion of
the contents.
microwave oven
doesn't work.
Problem Cause Action
The microwave
oven exterior is
too hot during
operation.
There is not sufcient
ventilation space for the
microwave oven.
There are intake/exhaust
outlets on the front and rear
of the microwave oven for
ventilation. Keep the gaps
specied in the product
installation guide.
The door cannot
be opened
properly.
Heating including
the Warm
function does not
work properly.
Objects are on top of the
microwave oven.
Food residue is stuck
between the door and
microwave oven interior.
The microwave oven may
not work, too much food is
being cooked, or improper
cookware is being used.
Remove all objects on the top
of the microwave oven.
Clean the microwave oven
and then open the door.
Put one cup of water in a
microwave-safe container
and run the microwave
for 1-2 minutes to check
whether the water is heated.
Reduce the amount of food
and start the function again.
Use a cooking container with
a at bottom.
The thaw
function does not
Too much food is being
cooked.
Reduce the amount of food
and start the function again.
work.
The interior light
is dim or does
not turn on.
The door has been left open
for a long time.
The interior light may
automatically turn off when
the Eco function operates.
Close and reopen the door or
press the STOP/Eco button.
The interior light is covered
by foreign matter.
Clean the inside of the
microwave oven and check
again.
Troubleshooting and information code
English 41
MG11T5018CC_AA_EN.indd 41 2/4/2020 10:44:30 AM
Page 42

Troubleshooting and information code
Troubleshooting and information code
Problem Cause Action
A beeping sound
occurs during
cooking.
The microwave
oven is not level.
There are sparks
during cooking.
When power is
connected, the
microwave oven
immediately
starts to work.
There is
electricity
coming from the
microwave oven.
1. Water drips.
2. Steam emits
through a
door crack.
3. Water
remains
in the
microwave
oven.
If the Auto Cook function
is being used, this beeping
sound means it's time to
turn over the food during
thawing.
The microwave oven is
installed on an uneven
surface.
Metal containers are used
during the microwave oven/
thawing functions.
The door is not properly
closed.
The power or power socket
is not properly grounded.
There may be water or
steam in some cases
depending on the food. This
is not an microwave oven
malfunction.
After turning over the food,
press the
again to restart operation.
Make sure the microwave
oven is installed on at,
stable surface.
Do not use metal containers.
Close the door and check
again.
Make sure the power and
power socket are properly
grounded.
Let the microwave oven cool
and then wipe with a dry
dish towel.
START/+30s
button
Problem Cause Action
The brightness
inside the
microwave oven
varies.
Cooking is
nished, but the
cooling fan is still
running.
Turntable
While turning,
the turntable
comes out of
place or stops
turning.
The turntable
drags while
turning.
The turntable
rattles while
turning and is
noisy.
Brightness changes
depending on power output
changes according to
function.
To ventilate the microwave
oven, the cooling fan
continues to run for about
3 minutes after cooking is
complete.
There is no roller ring, or the
roller ring is not properly in
place.
The roller ring is not
properly in place, there
is too much food, or the
container is too large and
touches the inside of the
microwave.
Food residue is stuck to the
bottom of the microwave
oven.
Power output changes during
cooking are not malfunctions.
This is not an microwave
oven malfunction.
This is not an microwave
oven malfunction.
Install the roller ring and
then try again.
Adjust the amount of food
and do not use containers
that are too large.
Remove any food residue
stuck to the bottom of the
microwave oven.
42 English
MG11T5018CC_AA_EN.indd 42 2/4/2020 10:44:30 AM
Page 43

Problem Cause Action
Grill
Smoke comes out
during operation.
During initial operation,
smoke may come from the
heating elements when you
rst use the microwave
This is not a malfunction, and
if you run the microwave
oven 2-3 times, it should
stop.
oven.
Food is on the heating
elements.
Let the microwave oven cool
and then remove the food
from the heating elements.
Food is too close to the grill. Put the food a suitable
distance away while cooking.
Food is not properly
prepared and/or arranged.
Make sure food is properly
prepared and arranged.
Microwave oven
The microwave
The door is open. Close the door and try again.
oven does not
heat.
Smoke comes
out during
preheating.
During initial operation,
smoke may come from the
heating elements when you
rst use the microwave
This is not a malfunction, and
if you run the microwave
oven 2-3 times, it should
stop.
oven.
Food is on the heating
elements.
Let the microwave oven cool
and then remove the food
from the heating elements.
There is a
burning or plastic
Plastic or non heat-resistant
cookware is used.
Use glass cookware suitable
for high temperatures.
smell when using
the microwave
oven.
Problem Cause Action
There is a bad
smell coming
from inside the
microwave oven.
Food residue or plastic has
melted and stuck to the
interior.
Use the steam function and
then wipe with a dry cloth.
You can put a lemon slice
inside and run the microwave
oven to remove the odour
more quickly.
The microwave
oven does not
cook properly.
The microwave oven door
is frequently opened during
cooking.
If you open the door often,
the interior temperature will
be lowered and this may
affect the results of your
cooking.
The microwave oven
controls are not correctly
Correctly set the microwave
oven controls and try again.
set.
The grill or other accessories
are not correctly inserted.
The wrong type or size of
cookware is used.
Correctly insert the
accessories.
Use suitable cookware with
at bottoms.
Troubleshooting and information code
English 43
MG11T5018CC_AA_EN.indd 43 2/4/2020 10:44:30 AM
Page 44

Troubleshooting and information code
Technical specications
Technical specications
Information code
Information code Cause Action
Clean the keys and check if there is water
Control buttons
C-d0
NOTE
if the suggested solution does not solve the problem, contact your local SAMSUNG
Customer Care Centre.
are pressed
over 10
seconds.
on the surface around key. If it occurs
again, turn off the microwave oven over
30 seconds and try setting again. If it
appears again, call your local SAMSUNG
Customer Care Centre.
SAMSUNG strives to improve its products at all times. Both the design
specications and these user instructions are thus subject to change without
notice.
Model MG11T5018C*
Power source 120 V ~ 60 Hz
Power consumption
Maximum power
Microwave
Grill (heating element)
Output power 100 W / 1000 W (IEC-705)
Operating frequency 2450 MHz
Dimensions (W x H x D)
Outside (Include Handle)
Oven cavity
Volume 1.1 Cu.ft
Weight
Net 35.05 lb
1600 W
1600 W
1300 W
3
/8 x 113/4 x 163/4 mm
20
141/16 x 101/16 x 141/16 mm
44 English
MG11T5018CC_AA_EN.indd 44 2/4/2020 10:44:30 AM
Page 45

Warranty
Samsung microwave oven
LIMITED WARRANTY TO ORIGINAL PURCHASER WITH PROOF OF PURCHASE
This SAMSUNG brand product, as supplied and distributed by SAMSUNG
ELECTRONICS AMERICA, INC. (SAMSUNG) and delivered new, in the original
carton to the original consumer purchaser, is warranted by SAMSUNG against
manufacturing defects in materials or workmanship for the limited warranty
period, starting from the date of original purchase, of:
One (1) Year Parts and Labor
Ten (10) Years Magnetron Part (Part Only)
This limited warranty is valid only on products purchased and used in the United
States that have been installed, operated, and maintained according to the
instructions attached to or furnished with the product. To receive warranty service,
the purchaser must contact SAMSUNG at the address or phone number provided
below for problem determination and service procedures. Warranty service can
only be performed by a SAMSUNG authorized service center. The original dated
bill of sale must be presented upon request as proof of purchase to SAMSUNG or
SAMSUNG’s authorized service center to receive warranty service.
SAMSUNG will provide in-home service within the contiguous United States
during the warranty period at no charge, subject to availability of SAMSUNG
authorized servicers within the customer’s geographic area. If in-home service is
not available, SAMSUNG may elect, at its option, to provide transportation of the
product to and from an authorized service center. If the product is located in an
area where service by a SAMSUNG authorized servicer is not available, you may
be responsible for a trip charge or required to bring the product to a SAMSUNG
authorized service center for service.
To receive in-home service, product must be unobstructed and accessible to the
service agent.
During the applicable warranty period, a product will be repaired, replaced, or
the purchase price refunded, at the sole option of SAMSUNG. SAMSUNG may use
new or reconditioned parts in repairing a product, or replace the product with
a new or reconditioned product. Replacement parts and products are warranted
for the remaining portion of the original product’s warranty or ninety (90) days,
whichever is longer. All replaced parts and products are the property of SAMSUNG
and you must return them to SAMSUNG.
This limited warranty covers manufacturing defects in materials or workmanship
encountered in normal household, noncommercial use of this product and shall
not cover the following: damage that occurs in shipment, delivery, installation, and
uses for which this product was not intended; damage caused by unauthorized
modication or alteration of the product; product where the original factory serial
numbers have been removed, defaced, changed in any way, or cannot be readily
determined; cosmetic damage including scratches, dents, chips, and other damage
to the product’s nishes; damage caused by abuse, misuse, overheating due to
overcooking, glass tray or turntable, pest infestations, accident, re, oods, or
other acts of nature or God; damage caused by use of equipment, utilities, services,
parts, supplies, accessories, applications, installations, repairs, external wiring or
connectors not supplied or authorized by SAMSUNG; damage caused by incorrect
electrical line current, voltage, uctuations and surges; damage caused by failure
to operate and maintain the product according to instructions; in-home instruction
on how to use your product; service to correct installation not in accordance with
electrical or plumbing codes or correction of household electrical or plumbing (i.e.,
house wiring, fuses, or water inlet hoses); and reduced magnetron power output
related to normal aging.
The cost of repair or replacement under these excluded circumstances shall be the
customer’s responsibility.
Visits by an authorized servicer to explain product functions, maintenance or
installation are not covered by this limited warranty. Please contact SAMSUNG at
the number below for assistance with any of these issues.
Samsung will charge a repair fee for replacing an accessory or repairing cosmetic
damage if the damage to the unit and/or damage to or loss of the accessory was
caused by the customer. Items this covers include:
• Dented, scratched, or broken door, handle, out-panel, or control panel
• Broken or lost tray, guide roller, coupler, lter, or wire rack
Warranty
English 45
MG11T5018CC_AA_EN.indd 45 2/4/2020 10:44:30 AM
Page 46

Warranty
Warranty
Parts that SAMSUNG has determined can be replaced by the user may be sent to
the customer for installation. In SAMSUNG’s discretion, an authorized servicer can
be dispatched to perform such installation.
EXCLUSION OF IMPLIED WARRANTIES
IMPLIED WARRANTIES, INCLUDING THE IMPLIED WARRANTIES OF
MERCHANTABILITY OR FITNESS FOR A PARTICULAR PURPOSE, ARE LIMITED TO
ONE YEAR OR THE SHORTEST PERIOD ALLOWED BY LAW. Some states do not allow
limitations on how long an implied warranty lasts, so the above limitations or
exclusions may not apply to you. This warranty gives you specic rights, and you
may also have other rights, which vary from state to state.
LIMITATION OF REMEDIES
YOUR SOLE AND EXCLUSIVE REMEDY IS PRODUCT REPAIR, PRODUCT
REPLACEMENT, OR REFUND OF THE PURCHASE PRICE AT SAMSUNG’S OPTION,
AS PROVIDED IN THIS LIMITED WARRANTY. SAMSUNG SHALL NOT BE LIABLE
FOR SPECIAL, INCIDENTAL OR CONSEQUENTIAL DAMAGES, INCLUDING BUT NOT
LIMITED TO TIME WAY FROM WORK, HOTELS AND/OR RESTAURANT MEALS,
REMODELING EXPENSES, LOSS OF REVENUE OR PROFITS, FAILURE TO REALIZE
SAVINGS OR OTHER BENEFITS REGARDLESS OF THE LEGAL THEORY ON WHICH
THE CLAIM IS BASED, AND EVEN IF SAMSUNG HAS BEEN ADVISED OF THE
POSSIBILITY OF SUCH DAMAGES. Some states do not allow exclusion or limitation
of incidental or consequential damages, so the above limitations or exclusions may
not apply to you. This warranty gives you specic rights, and you may also have
other rights, which vary from state to state.
SAMSUNG does not warrant uninterrupted or error-free operation of the product.
No warranty or guarantee given by any other person, rm, or corporation with
respect to this product shall be binding on SAMSUNG.
To obtain warranty service, please contact SAMSUNG at:
Samsung Electronics America, Inc.
85 Challenger Road
Ridgeeld Park, NJ 07660
1-800-SAMSUNG (726-7864) and www.samsung.com/us/support
Memo
46 English
MG11T5018CC_AA_EN.indd 46 2/4/2020 10:44:30 AM
Page 47

Memo
MG11T5018CC_AA_EN.indd 47 2/4/2020 10:44:30 AM
Page 48

Scan the QR code* or visit
www.samsung.com/spsn
to view our helpful
How-to Videos and Live Shows
* Requires reader to be installed on your
smartphone
Please be advised that the Samsung warranty does NOT cover service calls to explain product operation, correct improper installation, or perform normal cleaning or
maintenance.
QUESTIONS OR COMMENTS ?
COUNTRY CALL OR VISIT US ONLINE AT
U.S.A
Consumer Electronics
CANADA 1-800-SAMSUNG(726-7864)
MG11T5018CC_AA_EN.indd 48 2/4/2020 10:44:30 AM
1-800-SAMSUNG (726-7864) www.samsung.com/us/support
www.samsung.com/ca/support (English)
www.samsung.com/ca_fr/support (French)
Page 49

Horno de microondas
Manual del usuario
MG11T5018C*
MG11T5018CC_AA_MES.indd 1 2/4/2020 10:43:45 AM
Page 50

Contenido
Contenido
Instrucciones de seguridad importantes 3
Instalación 11
Accesorios 11
Plato giratorio 11
Mantenimiento 12
Limpieza 12
Repuesto (reparación) 12
Cuidados para períodos prolongados sin uso 12
Características del horno de microondas 13
Horno de microondas 13
Panel de control 13
Uso del horno de microondas 14
Cómo funciona un horno de microondas 14
Cómo vericar el buen funcionamiento del horno de microondas 14
Cocinar/Recalentar 15
Conguración de la hora 16
Niveles de potencia y variaciones de tiempo 16
Ajuste del tiempo de cocción 17
Detención de la cocción 17
Conguración del modo de ahorro de energía 18
Uso de la función Descongelado Potente 18
Uso de la función Cocción automática 20
Uso de la función Palomitas 27
Parrilla 28
Combinación de microondas y dorador 28
Uso del plato para dorar 29
Uso de la función Seguro para niños 30
Desactivación de la alarma 30
Guía de utensilios de cocina 31
Guía de cocción 32
Resolución de problemas y código de información 40
Resolución de problemas 40
Código de información 44
Especicaciones técnicas 44
Garantia limitada 45
2 Español
MG11T5018CC_AA_MES.indd 2 2/4/2020 10:43:45 AM
Page 51

CONSERVE ESTAS INSTRUCCIONES
Instrucciones de seguridad importantes
Felicitaciones por haber adquirido su nuevo horno de microondas Samsung. Este manual contiene
información importante acerca de la instalación, el uso y el cuidado de su electrodoméstico. Lea
detenidamente el manual y podrá así aprovechar todas las ventajas y las funciones del horno de
microondas.
LO QUE NECESITA SABER SOBRE LAS
INSTRUCCIONES DE SEGURIDAD
Las advertencias y las instrucciones de seguridad importantes de este manual no cubren todos los
problemas y situaciones que podrían ocurrir. Es su responsabilidad usar el sentido común, ser precavido
y cuidadoso al instalar, mantener y manejar su horno de microondas.
SÍMBOLOS Y PRECAUCIONES DE
SEGURIDAD IMPORTANTES
Signicado de iconos y símbolos en este manual del usuario:
ADVERTENCIA
Prácticas peligrosas o inseguras que pueden provocar lesiones personales graves o la muerte.
PRECAUCIÓN
Prácticas peligrosas o inseguras que pueden provocar lesiones personales leves o daños a la propiedad.
Instrucciones de seguridad importantes
PRECAUCIONES PARA EVITAR LA
POSIBLE EXPOSICIÓN EXCESIVA A
ENERGÍA DE MICROONDAS
A. No intente hacer funcionar este horno con la puerta abierta dado que el funcionamiento con la
puerta abierta puede dar como resultado una exposición nociva a energía de microondas. Es
importante no alterar ni modicar las trabas de seguridad.
B. No coloque ningún objeto entre la parte delantera del horno y la puerta ni deje que se acumule
suciedad o residuos de limpiadores en la supercie de sellado.
C. No haga funcionar el horno si está dañado. Es de especial importancia que la puerta del horno
cierre correctamente y que no haya daños en:
1. La puerta (doblada),
2. Las bisagras y los pestillos (rotos o sueltos),
3. Las juntas de la puerta y la supercie de sellado.
D. Este horno no debe ser ajustado ni reparado por nadie excepto por personal del servicio técnico
adecuadamente calicado.
PRECAUCIÓN
Para reducir el riesgo de incendio, explosión, descarga eléctrica o lesiones personales cuando utilice el
horno de microondas, siga estas instrucciones básicas de seguridad.
NO intentar.
NO desensamblar.
NO tocar.
Siga las instrucciones elmente. Nota
Estas señales de advertencia se incluyen para evitar lesiones a usted y a otras personas. Sígalos
explícitamente. Una vez que haya leído esta sección, consérvela en un lugar seguro para consultas
futuras.
Desenchufe la alimentación eléctrica del
tomacorriente de la pared.
Asegúrese de que la máquina tenga buena
conexión a tierra para evitar descargas
eléctricas.
Comuníquese con el centro de servicio
técnico para obtener ayuda.
Español 3
MG11T5018CC_AA_MES.indd 3 2/4/2020 10:43:47 AM
Page 52

CONSERVE ESTAS INSTRUCCIONES
Instrucciones de seguridad importantes
Instrucciones de seguridad importantes
CALIFORNIA PROPOSICIÓN 65 ADVERTENCIA
ADVERTENCIA
Cáncer y Daño Reproductive – www.P65Warnings.ca.gov
Al utilizar cualquier electrodoméstico, se deben seguir precauciones de seguridad básicas, a saber:
ADVERTENCIA
Para reducir el riesgo de quemaduras, descargas eléctricas, incendios, lesiones o exposición a energía
de microondas excesiva:
1. Lea todas las instrucciones de seguridad antes de usar este electrodoméstico.
2. Lea y siga las “Precauciones para evitar la posible exposición excesiva a energía de microondas”
especicadas en la página 3.
3. Este electrodoméstico debe conectarse a tierra. Conéctelo solo a los tomacorrientes
adecuadamente conectados a tierra. Consulte las importantes “Instrucciones de conexión a tierra”
en la página 5 de este manual.
4. Instale o coloque este electrodoméstico solo de acuerdo con las instrucciones de instalación
proporcionadas.
5. Algunos productos tales como los huevos enteros y los recipientes sellados (por ejemplo, frascos
de vidrio cerrados) pueden explotar si se los calienta rápidamente. Nunca los caliente en un horno
de microondas.
6. Utilice este electrodoméstico únicamente para los nes descritos en el manual. No utilice vapores
ni productos químicos corrosivos en el interior o en el exterior de este electrodoméstico. Este tipo
de horno está especícamente diseñado para calentar, cocinar o secar alimentos. No está diseñado
para uso industrial o de laboratorio.
7. Al igual que con cualquier electrodoméstico, se requiere de supervisión cuando es utilizado
por niños. Mantenga a los niños alejados de la puerta cuando la abra o la cierre ya que podría
golpearlos o pillarles los dedos.
8. No haga funcionar este electrodoméstico si tiene un cable o enchufe dañado, si no funciona
correctamente o si fue dañado o se cayó.
9. Este electrodoméstico debe ser reparado solo por personal técnico calicado. Comuníquese con
la ocina del servicio técnico autorizado más cercana para que examinen, reparen o ajusten el
equipo.
10. No tape ni bloquee ninguna de las aberturas del electrodoméstico.
11. No altere ni haga ajustes ni reparaciones en la puerta.
12. No almacene este electrodoméstico al aire libre. No utilice este producto cerca del agua, por
ejemplo, cerca del fregadero de la cocina, en un sótano húmedo, cerca de una piscina o en lugares
similares.
13. No sumerja el cable ni el enchufe en agua.
14. Mantenga el cable alejado de supercies calientes. (incluso la parte posterior del horno).
15. No permita que el cable cuelgue del borde de una mesa o mesada.
16. Cuando limpie las supercies de la puerta y del horno que se ensamblan al cerrar la puerta,
utilice solo jabones o detergentes suaves, no abrasivos, aplicados con una esponja o paño suave.
Desenchúfelo antes de limpiarlo.
17. Para reducir el riesgo de incendio en el interior del horno:
a. No cocine los alimentos en exceso. Preste atención al electrodoméstico cuando coloque en su
interior papel, plástico u otros materiales combustibles para facilitar la cocción.
b. Retire las ataduras de alambre de las bolsas de papel o plástico antes de colocar las bolsas
en el horno.
c. Si los materiales en el interior del horno se prenden fuego, mantenga la puerta cerrada,
apague el horno y desconecte el cable de alimentación o corte la alimentación en el panel
del disyuntor o fusible. Si abre la puerta, el fuego puede expandirse.
d. No utilice el interior para almacenar alimentos u objetos. No deje productos de papel,
utensilios de cocina ni alimentos en el interior cuando no utiliza el horno.
18. Los líquidos tales como agua, leche, café o té pueden recalentarse más allá del punto de ebullición
sin que se note que están hirviendo. No siempre se verán las burbujas o el hervor cuando se retira
el recipiente del horno de microondas. ESTO PUEDE HACER QUE LOS LÍQUIDOS MUY CALIENTES
SE DERRAMEN REPENTINAMENTE CUANDO SE MUEVE EL RECIPIENTE O SE COLOCA UNA
CUCHARA U OTRO UTENSILIO EN EL LÍQUIDO. Para reducir el riesgo de lesiones:
a. No caliente demasiado los líquidos.
b. Revuelva el líquido antes y durante la etapa de calentamiento.
c. No utilice recipientes con lados rectos y cuellos estrechos.
d. Después de calentar, deje reposar el recipiente en el horno de microondas durante un tiempo
breve antes de sacarlo.
4 Español
MG11T5018CC_AA_MES.indd 4 2/4/2020 10:43:47 AM
Page 53

CONSERVE ESTAS INSTRUCCIONES
e. Tenga sumo cuidado cuando introduce una cuchara u otro utensilio en el recipiente.
19. Los alimentos o utensilios de metal de mayor tamaño al normal no deben colocarse en el
microondas/horno tostador dado que pueden provocar un incendio o una descarga eléctrica.
20. No limpie con paños para fregar de metal. Una pieza puede quemar el paño y tocar las partes
eléctricas, lo que presenta un riesgo de descarga eléctrica.
21. No utilice productos de papel cuando se hace funcionar el electrodoméstico en modo tostador.
22. No almacene ningún material, distinto de los accesorios recomendados por el fabricante, en este
horno cuando no se lo utiliza.
23. No cubra los estantes ni ninguna otra parte del horno con papel de aluminio. Esto provocará el
recalentamiento del horno de microondas.
PRECAUCIÓN
1. Solo modelo para instalar sobre la estufa
• Limpie las campanas de ventilación con frecuencia: no se debe acumular grasa en la
campana del ltro.
• Cuando ambee alimentos debajo de la campana, encienda el ventilador.
• Tenga cuidado al limpiar el ltro de la campana de ventilación. Los agentes de limpieza
corrosivos tales como los limpiadores de horno a base de lejía pueden dañar el ltro.
2. Solo modelo tipo Botón de apertura
• Precauciones para el correcto uso y para evitar la posible exposición a energía de
microondas excesiva: No intente jalar con la mano ninguna parte de la puerta para abrirla.
Abra la puerta solo utilizando el botón de apertura ubicado en el extremo inferior derecho
de la parte delantera.
INSTRUCCIONES DE CONEXIÓN A TIERRA
Este electrodoméstico debe conectarse a tierra. En caso de cortocircuito, la conexión a tierra reduce
el riesgo de descarga eléctrica ya que ofrece un cable de escape para la corriente eléctrica. Este
electrodoméstico está equipado con un cable que incluye un cable y un enchufe de conexión a tierra. El
enchufe debe conectarse a un tomacorriente que esté correctamente instalado y conectado a tierra.
ADVERTENCIA
El uso inadecuado del enchufe de conexión a tierra puede provocar un riesgo de descarga eléctrica.
• Enchúfelo a un tomacorriente de 3 clavijas conectado a tierra. No retire el tercer pin (a tierra). No
utilice un adaptador ni altere de otro modo el enchufe con conexión a tierra.
• Consulte a un electricista o técnico calicado si no entiende las instrucciones de conexión a tierra
o si no está seguro de si el electrodoméstico está bien conectado a tierra.
• No recomendamos utilizar un cable prolongador con este electrodoméstico. Si el cable de
alimentación es demasiado corto, llame a un electricista calicado o a un técnico autorizado para
que instale un tomacorriente cerca del electrodoméstico. No obstante, si es necesario utilizar un
cable prolongador, lea y siga las indicaciones de la sección “Uso de los cables prolongadores” a
continuación.
USO DE LOS CABLES PROLONGADORES
Se suministra un cable de alimentación corto para reducir el riesgo de enredarse o tropezar con un
cable más largo y caerse. Los juegos de cables más largos o cables prolongadores se encuentran
disponibles y puede utilizarlos con cuidado. Si utiliza un cable largo o un cable prolongador:
1. La especicación eléctrica marcada del juego de cables o cable prolongador debe ser como
mínimo igual a la especicación eléctrica del electrodoméstico.
2. El cable prolongador debe ser un cable de 3 hilos de conexión a tierra y se lo debe enchufar en un
tomacorriente de 3 ranuras.
3. El cable más largo debe disponerse de manera tal que no quede colgando de la mesada o mesa
en donde los niños pueden tirar de él o tropezarse con él accidentalmente. Si utiliza un cable
prolongador, la luz interior puede parpadear y la velocidad del ventilador puede variar cuando el
horno de microondas está encendido. Los tiempos de cocción también pueden ser más largos.
Instrucciones de seguridad importantes
MG11T5018CC_AA_MES.indd 5 2/4/2020 10:43:47 AM
Español 5
Page 54

CONSERVE ESTAS INSTRUCCIONES
Instrucciones de seguridad importantes
Instrucciones de seguridad importantes
ADVERTENCIAS FUNDAMENTALES
PARA LA INSTALACIÓN
La instalación de este aparato la debe realizar un técnico cualicado o una empresa de servicios.
• Si el horno no es instalado por un técnico calicado, pueden producirse descargas
eléctricas, incendios, explosiones, problemas con el producto o lesiones.
Desembale el horno, quite todo el material de embalaje y examine el horno para determinar si
hay daños tales como abolladuras en el interior o exterior del electrodoméstico, pestillos de la
puerta rotos, rajaduras en la puerta o una puerta que no esté correctamente alineada. Si hay
algún daño, no ponga el horno en funcionamiento y notique de inmediato al distribuidor.
Asegúrese de instalar su horno en un lugar con espacio suciente.
Retire todas las sustancias extrañas como polvo o agua de los terminales y puntos de contacto
del enchufe con un paño seco regularmente.
• Desenchufe la alimentación y limpie el enchufe con un paño seco.
• No hacerlo puede provocar una descarga eléctrica o un incendio.
Enchufe el cable de alimentación en un tomacorriente de 3 clavijas conectado a tierra
adecuadamente. Su horno debe ser el único electrodoméstico conectado en este circuito.
• Compartir un tomacorriente de pared con otros electrodomésticos utilizando un enchufe
múltiple o prolongar el cable de alimentación puede provocar descargas eléctricas o
incendios.
• No utilice un transformador eléctrico. Se puede producir una descarga eléctrica o un
incendio.
• Asegúrese de que el voltaje, la frecuencia y la corriente provistos coincidan con las
especicaciones del producto. No hacerlo puede provocar una descarga eléctrica o un
incendio.
Mantenga todos los materiales de embalaje fuera del alcance de los niños. Podrían utilizarlos
para jugar.
Este electrodoméstico debe conectarse a tierra correctamente. Lea y siga las "Instrucciones de
conexión a tierra" especicadas al comienzo de esta sección. No conecte el aparato a una tubería
de gas, una tubería plástica de agua o un cable de teléfono.
• Esto puede provocar descarga eléctrica, incendio, explosión o problemas con el producto.
• No enchufe el cable de alimentación en una toma que no tenga una conexión a tierra
adecuada y asegúrese de que cumpla las normas locales y nacionales.
No corte ni retire la tercera clavija (a tierra) del cable de alimentación bajo ninguna
circunstancia.
El horno de microondas requiere un tomacorriente separado con conexión a tierra único con
circuito derivado de mínimo 15 A y máximo 20 A.
No instale este electrodoméstico en un lugar húmedo, engrasado o cubierto de polvo, ni en un
lugar expuesto a la luz solar directa o al agua (gotas de lluvia).
• Se puede producir una descarga eléctrica o un incendio.
Enchufe la alimentación al tomacorriente de la pared con rmeza. No utilice un enchufe dañado,
un cable de alimentación dañado ni un tomacorriente de pared ojo.
• Se puede producir una descarga eléctrica o un incendio.
No lo coloque sobre un fregadero.
No jale ni doble excesivamente el cable de alimentación.
No retuerza ni ate el cable de alimentación.
No enganche el cable de alimentación de un objeto metálico, ni coloque un objeto pesado sobre
el cable de alimentación, ni introduzca el cable de alimentación entre objetos ni lo empuje
dentro del espacio que hay detrás del electrodoméstico.
• Se puede producir una descarga eléctrica o un incendio.
No tire del cable de alimentación al desenchufar el horno.
• Desenchufe el horno tirando únicamente del enchufe.
• No hacerlo puede provocar una descarga eléctrica o un incendio.
Cuando se dañe el enchufe o el cable de alimentación, comuníquese con el centro de servicio
técnico más cercano para solicitar un repuesto o una reparación.
6 Español
MG11T5018CC_AA_MES.indd 6 2/4/2020 10:43:48 AM
Page 55

CONSERVE ESTAS INSTRUCCIONES
PRECAUCIONES PARA LA
INSTALACIÓN
Coloque el horno de manera tal que se pueda acceder al enchufe fácilmente.
• No hacerlo puede provocar descarga eléctrica o incendio debido a fugas eléctricas.
Desenchufe el horno cuando no se utilice por períodos prolongados o durante una tormenta
eléctrica.
• No hacerlo puede provocar una descarga eléctrica o un incendio.
ADVERTENCIAS FUNDAMENTALES
PARA EL USO
Si el horno de microondas se inunda, comuníquese con el centro de servicio técnico más cercano.
No hacerlo puede provocar una descarga eléctrica o un incendio
Lea y siga las “Precauciones para evitar la posible exposición excesiva a energía de microondas”
especicadas al comienzo de esta sección de Información sobre seguridad.
Si el microondas genera un ruido extraño, olor a quemado o humo, desenchúfelo de inmediato y
comuníquese con el centro de servicio técnico más cercano.
• No hacerlo puede provocar una descarga eléctrica o un incendio.
En caso de producirse una fuga de gas (como gas propano, gas LP, etc.), ventile el ambiente de
inmediato. No toque el microondas, ni el cable de alimentación, ni el enchufe.
• No utilice un ventilador.
• Una chispa puede causar una explosión o un incendio.
Procure que ni la puerta ni ninguna otra pieza entre en contacto con el cuerpo mientras cocina o
cuando acaba de cocinar.
• No hacerlo puede provocar quemaduras.
En caso de un incendio provocado por grasa en las unidades de supercie debajo del horno,
extinga la charola en llamas sobre la supercie cubriéndola por completo con una tapa, una
bandeja para hornear o una bandeja plana.
Nunca descuide las unidades de supercie debajo de su horno en ambientes con altas
temperaturas. El sobrecalentamiento puede ocasionar humo y derrames de grasa que
pueden incendiarse y expandirse si el ventilador se encuentra encendido. Para minimizar el
funcionamiento automático del ventilador, utilice recipientes de tamaño adecuado y programe
altas temperaturas sobre las unidades de supercie solo cuando sea necesario.
Si los materiales en el interior del horno se encendieran, mantenga la puerta cerrada, apague el
horno y desconecte el cable de alimentación o corte la alimentación en el panel del disyuntor o
fusible. Si abre la puerta, el fuego puede expandirse.
• Siempre respete las Precauciones de seguridad cuando utilice su horno. Nunca intente
reparar el horno. Contiene voltaje peligroso en el interior. Si se debe reparar el horno,
comuníquese con un centro de servicio técnico autorizado cercano.
No intente reparar, desarmar ni modicar el electrodoméstico.
• Dado que una corriente de alta tensión ingresa en el chasis del producto durante su
funcionamiento, abrir el producto puede provocar descargas eléctricas o incendios.
• Podría estar expuesto a ondas electromagnéticas.
• Cuando sea necesario reparar el horno, comuníquese con el centro de servicio técnico más
cercano.
Si alguna sustancia extraña, por ejemplo, agua, ingresa en el horno, desenchúfelo y comuníquese
con el centro de servicio técnico más cercano.
• No hacerlo puede provocar una descarga eléctrica o un incendio
Instrucciones de seguridad importantes
MG11T5018CC_AA_MES.indd 7 2/4/2020 10:43:48 AM
Español 7
Page 56

CONSERVE ESTAS INSTRUCCIONES
Instrucciones de seguridad importantes
Instrucciones de seguridad importantes
No toque el enchufe de alimentación con las manos húmedas.
• Se puede producir una descarga eléctrica.
No desenchufe la alimentación para apagar el electrodoméstico cuando éste esté en
funcionamiento.
• Volver a enchufar la alimentación al tomacorriente de la pared puede provocar una chispa
y generar una descarga eléctrica o un incendio.
Mantenga todos los materiales de embalaje fuera del alcance de los niños. Los materiales de
embalaje pueden ser peligrosos para los niños.
• Si un niño se coloca una bolsa en la cabeza, puede asxiarse.
No deje que los niños ni ninguna persona con capacidades físicas, sensoriales o mentales
reducidas utilice el electrodoméstico sin supervisión. Asegúrese de que el electrodoméstico esté
fuera del alcance de los niños.
• No hacerlo puede provocar una descarga eléctrica, quemaduras o lesiones.
No toque el interior del electrodoméstico inmediatamente después de cocinar. El interior del
electrodoméstico estará caliente.
• El calor del interior del horno puede provocar quemaduras.
No utilice papel de aluminio (excepto en los casos particulares especicados en este manual),
objetos metálicos (tales como recipientes, tenedores, etc.) ni recipientes con bordes dorados o
plateados en el microondas.
• Estos objetos pueden provocar chispas o un incendio.
No utilice ni coloque objetos ni aerosoles inamables cerca del horno.
• El calor del microondas puede hacer que los aerosoles inamables exploten o ardan.
• No hacerlo puede provocar una descarga eléctrica o lesiones.
No altere ni haga ajustes ni reparaciones en la puerta. Bajo ninguna circunstancia debe quitar el
gabinete exterior.
No almacene ni utilice el horno al aire libre.
PRECAUCIONES PARA EL USO
Si la supercie del microondas está rajada, apague el electrodoméstico.
• No hacerlo puede provocar una descarga eléctrica.
La vajilla y los envases pueden calentarse. Manipúlelos con cuidado.
Los alimentos calientes y el vapor pueden provocar quemaduras. Retire cuidadosamente las
tapas de los envases, dirigiendo el vapor lejos de las manos y la cara.
Retire las tapas de los alimentos para bebé antes de calentarlos. Después de calentar los
alimentos para bebé, revuelva bien para distribuir el calor en forma pareja. Siempre pruebe los
alimentos para corroborar la temperatura antes de alimentar al bebé. El frasco de vidrio o la
supercie del alimento puede estar más frío que el interior del alimento, el cual puede estar tan
caliente como para quemar la boca del niño.
Asegúrese de que todos los utensilios de cocina que se utilicen en el microondas sean los
adecuados para este n.
Cuando utilice utensilios aptos para microondas, cumpla estrictamente las recomendaciones del
fabricante.
No se pare sobre el microondas ni coloque objetos (tales como ropa, velas o cigarrillos
encendidos, platos, químicos, objetos metálicos, etc.) sobre el electrodoméstico.
• Artículos tales como paños pueden quedar enganchados en la puerta.
• Se pueden producir descargas eléctricas, incendios, problemas con el producto o lesiones
personales.
No haga funcionar el aparato con las manos húmedas.
• Se puede producir una descarga eléctrica.
No rocíe materiales volátiles como insecticidas en la supercie del electrodoméstico.
• Además de ser perjudiciales para las personas, pueden producirse descargas eléctricas, un
incendio o problemas en el producto.
No coloque el electrodoméstico sobre un objeto frágil como un fregadero o un objeto de vidrio.
• Hacerlo puede provocar daños al fregadero o al objeto de vidrio.
8 Español
MG11T5018CC_AA_MES.indd 8 2/4/2020 10:43:48 AM
Page 57

CONSERVE ESTAS INSTRUCCIONES
No acerque el rostro ni el cuerpo al electrodoméstico mientras está cocinando o al abrir la
puerta inmediatamente después de la cocción.
• Asegúrese de que los niños no se acerquen demasiado al electrodoméstico.
• No hacerlo puede provocar quemaduras en los niños.
No coloque alimentos ni objetos pesados sobre la puerta del horno cuando la abra.
• Los alimentos o el objeto podrían caerse y provocar quemaduras o lesiones.
No enfríe abruptamente la puerta, el interior del electrodoméstico ni el plato vertiendo agua
sobre estas partes durante o después de la cocción.
• Esto puede provocar daños en el electrodoméstico. El vapor o el rocío de agua pueden
provocar quemaduras o lesiones.
No cocine sin la charola de vidrio en su lugar, sobre el piso del horno. Los alimentos no se
cocinarán correctamente sin la charola.
No descongele bebidas congeladas en botellas de cuello angosto. Los envases pueden romperse.
No raye el vidrio de la puerta del horno con un objeto puntiagudo.
• Esto puede provocar que el vidrio se dañe o se rompa.
No almacene nada directamente encima del electrodoméstico cuando está en funcionamiento.
No utilice recipientes sellados. Quíteles los sellos y las tapas antes de utilizarlos. Los recipientes
sellados pueden explotar debido a la acumulación de presión incluso después de que el horno se
ha apagado.
INSTRUCCIONES FUNDAMENTALES
PARA LA LIMPIEZA
No rocíe agua directamente sobre el electrodoméstico para limpiarlo.
No utilice benceno, diluyente ni alcohol para limpiar el electrodoméstico.
• Esto puede provocar decoloración, deformación, daños, descarga eléctrica o incendio.
Antes de limpiar o realizar el mantenimiento, desenchufe el electrodoméstico del tomacorriente de la
pared y quite los restos de comida de la puerta y del compartimiento de cocción.
• No hacerlo puede provocar una descarga eléctrica o incendio.
Tenga cuidado de no lastimarse cuando limpia el electrodoméstico. (externo/interno)
• Puede lastimarse con los bordes puntiagudos del electrodoméstico.
No limpie el electrodoméstico con un limpiador a vapor.
• Esto puede provocar corrosión.
Mantenga limpia la parte interna del horno. Las partículas de alimentos o los aceites salpicados que se
adhieren a las paredes o al piso pueden causar daños en la pintura y reducir la eciencia del horno.
Instrucciones de seguridad importantes
MG11T5018CC_AA_MES.indd 9 2/4/2020 10:43:48 AM
Español 9
Page 58

CONSERVE ESTAS INSTRUCCIONES
Instrucciones de seguridad importantes
Instrucciones de seguridad importantes
INSTALACIÓN DEL HORNO DE
MICROONDAS
Coloque el horno en una supercie plana 85 cm por encima del suelo. La supercie debe ser lo
sucientemente resistente como para soportar el peso del horno.
20 cm hacia
arriba
85 cm del piso
10 cm detrás
10 cm a los
costados
PRECAUCIÓN
• Si el cable de alimentación está dañado, debe ser reemplazado por el fabricante, su agente de
servicios o personas igualmente calicadas para evitar riesgos. Por seguridad personal, enchufe el
cable en un tomacorriente de CA conectado a tierra.
• No instale el horno de microondas en lugares calurosos ni húmedos como cerca de un horno
tradicional o un radiador. Deben respetarse las especicaciones eléctricas del horno y los cables
prolongadores que se utilicen deben ser iguales al cable de alimentación suministrado con el
horno. Limpie el interior y la traba de la puerta con un paño húmedo antes de usar el horno de
microondas por primera vez.
NO APTO PARA INSTALACIÓN EMPOTRADA
1. Cuando instale el horno, asegúrese de que la
ventilación sea la adecuada, deje un espacio de al
menos 10 cm (4 pulgadas) detrás y a los costados
del horno y 20 cm (8 pulgadas) hacia arriba.
2. Retire todo el material de empaque que está
dentro del horno.
3. Instale el anillo y el plato giratorio. Verique si
el plato giratorio gira libremente. (Modelos con
plato giratorio solamente)
4. Este horno de microondas debe colocarse de
manera tal que se pueda acceder al enchufe.
LIMPIEZA DEL ANILLO Y EL PLATO
GIRATORIO
Limpie los anillos giratorios periódicamente y lave el plato giratorio tanto como sea necesario. El plato
giratorio puede lavarse perfectamente en el lavavajillas.
ALMACENAMIENTO Y REPARACIÓN DE
SU HORNO DE MICROONDAS
Si debe guardar su horno de microondas durante un período corto o prolongado, escoja un lugar seco y
sin polvo. El polvo y la humedad pueden afectar las piezas del horno de microondas.
ADVERTENCIA
• No repare, reemplace ni realice el mantenimiento de ninguna pieza de su microondas sin
asistencia profesional. Llame únicamente a un técnico calicado para realizar reparaciones. Si
el horno presenta fallas y requiere servicio técnico, o si tiene dudas sobre su funcionamiento,
desenchufe el horno del tomacorriente y comuníquese con su centro de servicio técnico más
cercano.
• No utilice el horno si está dañado, en especial cuando la puerta o los burletes de la puerta se
encuentran dañados. Entre los daños de la puerta se incluyen: bisagras rotas, burletes desgastados
o cubiertas deformadas/dobladas.
• No retire el horno de su cubierta.
• Este horno de microondas es únicamente para uso doméstico y no ha sido diseñado para un uso
comercial.
10 Español
MG11T5018CC_AA_MES.indd 10 2/4/2020 10:43:48 AM
Page 59

Instalación
Accesorios
Dependiendo del modelo que haya adquirido, se suministran varios accesorios que se pueden utilizar
de diversas maneras.
01 Anillo giratorio, se coloca en el centro del horno
01
02
03
04
PRECAUCIÓN
No haga funcionar el horno de microondas sin el anillo y el plato giratorio.
de microondas.
El anillo giratorio es el soporte del plato giratorio.
02 Plato giratorio, se coloca sobre el anillo con
el accesorio central sobre el manguito de
acoplamiento.
El plato giratorio sirve como la principal
supercie de cocción; puede retirarse fácilmente
para la limpieza.
03 Estante para dorar, se coloca sobre el plato
giratorio.
El estante de metal puede usarse con el dorador y
la cocción combinada.
04 Plato para dorar, consulte las páginas 29 a 30.
El plato para dorar se utiliza para dorar mejor los
alimentos con los modos de cocción combinada
de microondas o dorador. Facilita que la masa de
pasteles y pizza quede crujiente.
Plato giratorio
Retire todo el material de empaque que está dentro
del horno de microondas. Instale el anillo y el plato
giratorio. Verique si el plato giratorio gira libremente.
Instalación
Español 11
MG11T5018CC_AA_MES.indd 11 2/4/2020 10:43:49 AM
Page 60

Mantenimiento
Limpieza
Limpie el horno de microondas con regularidad para evitar que se acumulen impurezas sobre el horno
de microondas o en su interior. Preste especial atención a la puerta, los burletes de la puerta, el plato
giratorio y el anillo giratorio (solo en modelos a los que sea aplicable).
Si la puerta no se abre o cierra con suavidad, revise si se acumularon impurezas en los burletes de la
puerta. Use un paño suave y agua jabonosa para limpiar las supercies interiores y exteriores del horno
de microondas. Enjuague y seque bien.
Mantenimiento
Para limpiar suciedad rebelde con olores desagradables en el interior del horno de microondas
1. Con el horno de microondas vacío, coloque una taza de jugo de limón diluido en el centro del
plato giratorio.
2. Caliente el horno de microondas durante 10 minutos a la máxima potencia.
3. Cuando nalice el ciclo, espere hasta que el horno de microondas se enfríe. Luego, abra la puerta
y limpie la cámara de cocción.
PRECAUCIÓN
• Mantenga limpios la puerta y los burletes y asegúrese de que la puerta se abra y se cierre con
suavidad. De lo contrario, puede reducirse la vida útil del horno de microondas.
• Tenga cuidado de no salpicar agua en los oricios de ventilación del horno de microondas.
• No use productos abrasivos ni sustancias químicas para la limpieza.
• Después de cada utilización del horno de microondas, espere hasta que este se enfríe y limpie la
cámara de cocción con un detergente suave.
Repuesto (reparación)
ADVERTENCIA
El interior de este horno de microondas no contiene piezas que pueda remover el usuario. No intente
reemplazar o reparar el horno de microondas usted mismo.
• Si se presenta algún problema con las bisagras, los burletes o la puerta, solicite asistencia a un
técnico cualicado o a un centro de servicio técnico local Samsung.
• Si desea reemplazar la bombilla de luz, comuníquese con un centro de servicio técnico Samsung.
No la reemplace usted mismo.
• Si se presenta algún problema con la carcasa externa del horno de microondas, desenchufe el
cable de alimentación del tomacorriente y comuníquese con un centro de servicio técnico local
Samsung.
Cuidados para períodos prolongados sin uso
Si no va a utilizar el horno de microondas durante un período prolongado, desenchufe el cable de
alimentación y coloque el horno de microondas en un lugar seco y sin polvo. El polvo y la humedad que
se acumulan en el interior del horno de microondas pueden afectar su desempeño.
12 Español
MG11T5018CC_AA_MES.indd 12 2/4/2020 10:43:49 AM
Page 61

Características del horno de microondas
Horno de microondas
01 02 03 04 05
06 09 1007 08 11
01 Manija de la puerta 02 Puerta 03 Oricios de ventilación
04 Elemento calentador 05 Luz 06 Trabas de la puerta
07 Plato giratorio 08 Manguito de
acoplamiento
09 Anillo giratorio
Panel de control
01
02
03
04
05
06
07
08
10
01 Pantalla
02 Microwave (Microondas)
03 Grill (Dorador)
04 Microwave+Grill (Microondas+Dorador)
05 Power Defrost (Descongelado Potente)
06 Auto Cook (Cocción automática)
07 Popcorn (Palomitas)
Características del horno de microondas
08 Reducir/Aumentar (peso/porción/tiempo)
09 OK (Aceptar)/Clock (Reloj)
10 STOP/Eco (CANCELAR/Eco)
11 START/+30s (INICIO/+30s) (Seguro para niños)
08
09
11
10 Oricios de las trabas de
11 Panel de control
seguridad
Español 13
MG11T5018CC_AA_MES.indd 13 2/4/2020 10:43:50 AM
Page 62

Uso del horno de microondas
Uso del horno de microondas
Cómo funciona un horno de microondas
El microondas consiste en ondas electromagnéticas de alta frecuencia; la energía liberada permite que
los alimentos se cocinen o se recalienten sin que pierdan la forma ni el color.
Puede usar el horno de microondas para:
• Descongelar
• Recalentar
• Cocinar
Principio de cocción
1. Las microondas generadas por el magnetrón se
reejan en la cavidad y se distribuyen de manera
uniforme a medida que los alimentos giran en el
plato. De esta manera, los alimentos se cocinan de
forma pareja.
2. Las microondas son absorbidas por los alimentos
hasta una profundidad de aproximadamente
1 pulgada (2.5 cm). La cocción continúa ya que el
calor se disipa dentro de los alimentos.
3. Los tiempos de cocción varían según el recipiente
utilizado y las propiedades de los alimentos:
• Cantidad y densidad
• Contenido de agua
• Temperatura inicial (refrigerados o no)
NOTA
Como el centro de los alimentos se cocina por disipación del calor, la cocción continúa aún después de
retirar los alimentos del horno de microondas. Por lo tanto, deben respetarse los tiempos de reposo
especicados en las recetas y en este folleto para garantizar:
• Una cocción pareja de los alimentos bien al centro.
• La misma temperatura en todo el alimento.
Cómo vericar el buen funcionamiento del horno de microondas
El siguiente procedimiento sencillo le permite vericar si el horno de microondas funciona
correctamente en todo momento.
Si tiene algún problema, consulte la sección “Resolución de problemas” en las páginas 40 a 44.
NOTA
El horno de microondas debe estar enchufado a un tomacorriente adecuado. El plato giratorio debe
estar colocado en el horno de microondas. Si se utiliza otro nivel de potencia diferente al máximo
(100 % - 1000 W), el agua demora más tiempo en hervir.
1. Jale de la manija para abrir la puerta del horno
3
4
5
de microondas.
2. Coloque un vaso de agua sobre el plato giratorio
y luego cierre la puerta.
3. Presione Microwave (Microondas).
4. La pantalla del panel de control muestra el nivel
de potencia correspondiente (100 - 1000 W).
Presione el botón OK (Aceptar) para el nivel de
potencia deseado.
5. Presione el botón START/+30s (INICIO/+30s)
reiteradamente para programar el tiempo en 4 o
5 minutos.
6. El horno de microondas calentará el agua durante
el tiempo programado. Verique el agua y
asegúrese de que esté hirviendo.
14 Español
MG11T5018CC_AA_MES.indd 14 2/4/2020 10:43:51 AM
Page 63

Cocinar/Recalentar
El siguiente procedimiento explica cómo cocinar o recalentar alimentos.
PRECAUCIÓN
Siempre verique sus ajustes de cocción antes de alejarse del horno de microondas.
1. Jale de la manija para abrir la puerta del horno
3
4
de microondas.
2. Coloque los alimentos en el centro del plato
giratorio y luego cierre la puerta.
PRECAUCIÓN
No haga funcionar el horno de microondas cuando está
vacío.
3. Presione Microwave (Microondas).
• La pantalla del panel de control muestra el
ícono correspondiente ( ) y el nivel de
potencia máximo (1000 W).
4. Presione < o > (Reducir/Aumentar) para
seleccionar el nivel de potencia deseado y luego
presione OK (Aceptar).
• Consulte la sección “Niveles de potencia y
variaciones de tiempo” de la página 16 para
ver el nivel de potencia adecuado.
5
congurar el tiempo de cocción.
• La pantalla del panel de control muestra el
tiempo de cocción.
5. Presione < o > (Reducir/Aumentar) para
6
6. Presione START/+30s (INICIO/+30s) para
comenzar a cocinar.
• Se enciende la luz y el plato giratorio
comienza a girar.
• Cuando haya transcurrido el tiempo de
cocción, el horno de microondas emitirá una
señal sonora 4 veces y la pantalla del panel
de control mostrará la hora actual. La señal
de recordatorio de nalización emitirá una
Uso del horno de microondas
señal sonora por minuto 3 veces.
Español 15
MG11T5018CC_AA_MES.indd 15 2/4/2020 10:43:52 AM
Page 64

Uso del horno de microondas
Uso del horno de microondas
Conguración de la hora
Cuando haya corriente eléctrica, aparecerá automáticamente “88:88” y, luego, “12:00” en el visor.
Congure la hora actual.
• Cuando instala su horno de microondas por primera vez
• Después de un corte de energía eléctrica
NOTA
Para aplicar la hora de verano, deberá congurar la hora manualmente.
1. Presione OK (Aceptar).
1
2. Presione < o > (Reducir/Aumentar) para
2
3
NOTA
Cuando el microondas no está en uso, la pantalla del panel de control muestra la hora actual.
congurar la hora y luego presione OK (Aceptar).
3. Presione < o > (Reducir/Aumentar) para
congurar los minutos y luego presione
OK (Aceptar).
Niveles de potencia y variaciones de tiempo
La función de nivel de potencia le permite adaptar la cantidad de energía disipada y, de este modo,
el tiempo necesario para cocinar o recalentar sus alimentos, de acuerdo con su tipo y cantidad. Puede
seleccionar entre 11 niveles de potencia.
0 = NP:0 (Desodorización) 60 = NP:60 (Fuego lento)
10 = NP:10 (Caliente) 70 = NP:70 (Mediano alto)
20 = NP:20 (Descongelar) 80 = NP:80 (Recalentar)
30 = NP:30 (Bajo) 90 = NP:90 (Saltear)
40 = NP:40 (Mediano bajo) 100 = NP:Hi (Alto)
50 = NP:50 (Mediano)
Los tiempos de cocción indicados en las recetas y en este manual corresponden al nivel de potencia
especíco indicado.
• Si selecciona un nivel de potencia más alto, el tiempo de cocción disminuye.
• Si selecciona un nivel de potencia más bajo, el tiempo de cocción aumenta.
16 Español
MG11T5018CC_AA_MES.indd 16 2/4/2020 10:43:52 AM
Page 65

Ajuste del tiempo de cocción
Puede aumentar o reducir el tiempo de cocción mientras el horno de microondas está en
funcionamiento.
• Vericar cómo progresa la cocción en cualquier momento simplemente abriendo la puerta y,
luego, aumentar o reducir el tiempo de cocción de ser necesario.
Detención de la cocción
Puede detener la cocción en cualquier momento para:
• Vericar los alimentos
• Dar la vuelta a los alimentos o revolverlos
• Dejarlos reposar
Método 1
Presione START/+30s (INICIO/+30s) para aumentar el
tiempo de cocción en 30 segundos.
• Ejemplo: Para agregar tres minutos, presione el
botón START/+30s (INICIO/+30s) seis veces.
NOTA
Solo puede aumentar el tiempo de cocción.
Método 2
Presione < o > (Reducir/Aumentar) para ajustar el
tiempo de cocción.
Para detener la cocción temporalmente
1. Abra la puerta o presione STOP/Eco (CANCELAR/Eco) una vez.
• La cocción se detiene temporalmente.
2. Para reanudar la cocción, cierre la puerta y presione el botón START/+30s (INICIO/+30s).
Para detener la cocción por completo
1. Abra la puerta o presione STOP/Eco (CANCELAR/Eco) una vez.
• La cocción se detiene temporalmente.
2. Presione el botón STOP/Eco (CANCELAR/Eco) nuevamente.
Uso del horno de microondas
Español 17
MG11T5018CC_AA_MES.indd 17 2/4/2020 10:43:52 AM
Page 66

Uso del horno de microondas
Uso del horno de microondas
Conguración del modo de ahorro de energía
El horno de microondas cuenta con un modo de ahorro de energía.
• Presione STOP/Eco (CANCELAR/Eco). La pantalla
del panel de control se apaga.
• Para cancelar el modo de ahorro de energía, abra
la puerta o presione STOP/Eco (CANCELAR/Eco).
La pantalla del panel de control muestra la hora
actual.
NOTA
Función de ahorro de energía automático
Si en medio de la conguración o la parada temporal del funcionamiento, no se produce ninguna
entrada durante 25 minutos, el producto vuelve al estado de espera. Asimismo, si deja la puerta abierta,
la lámpara del horno se apagará automáticamente después de 5 minutos.
Uso de la función Descongelado Potente
El tiempo de descongelamiento y el nivel de potencia se ajustan automáticamente. Simplemente
seleccione el programa y el peso.
PRECAUCIÓN
Use solo recipientes aptos para microondas.
1. Jale de la manija para abrir la puerta del horno
3
4
5
6
de microondas.
2. Coloque los alimentos en el centro del plato
giratorio y luego cierre la puerta.
3. Presione Power Defrost (Descongelado Potente).
4. Presione < o > (Reducir/Aumentar) para
establecer el tamaño de la porción (0.1 lb-3.5 lb)
y luego presione OK (Aceptar).
5. Presione START/+30s (INICIO/+30s) para empezar
a descongelar.
• Cuando el horno de microondas emita una
señal sonora, abra la puerta y dé vuelta los
alimentos.
6. Cierre la puerta del horno y luego presione
START/+30s (INICIO/+30s) para reanudar el
descongelamiento.
• Cuando haya nalizado el
descongelamiento, el horno de microondas
emitirá una señal sonora 4 veces y la
pantalla del panel de control mostrará la
hora actual. La señal de recordatorio de
nalización emitirá una señal sonora por
minuto 3 veces.
18 Español
MG11T5018CC_AA_MES.indd 18 2/4/2020 10:43:53 AM
Page 67

Descripción del programa Descongelado Potente
La siguiente tabla presenta las instrucciones. Retire todo el material de envasado antes de descongelar.
Alimentos Tamaño porción Instrucciones
Carne asada, cerdo 2.5-3.5 libras Comenzar con el alimento con el lado de la grasa
hacia abajo. Después de cada etapa, dar vuelta
los alimentos y proteger las partes que están
calientes con tiras nas de papel de aluminio.
Dejar reposar, con tapa, durante 10-20 minutos.
Bistecs, costillas, pescado 0.5-3.5 libras Después de cada etapa, reacomodar el alimento.
Si hay alguna parte caliente o descongelada,
cubrir con pedacitos nos de papel de aluminio.
Retirar cualquier parte del alimento que esté
casi descongelada. Dejar reposar, cubiertos, de
5 a 10 minutos.
Carne molida 0.5-3.5 libras Después de cada etapa, retirar cualquier parte
del alimento que esté casi descongelada. Dejar
reposar la carne, cubierta con papel de aluminio,
de 5 a 10 minutos.
Pollo entero 2.5-3.5 libras Retirar los menudos antes de congelar aves.
Comenzar a descongelar con el lado de la
pechuga hacia abajo. Después de la primera
etapa, dar vuelta el pollo y proteger las partes
que están calientes con tiras nas de papel de
aluminio. Después de la segunda etapa, volver
a cubrir cualquier parte caliente con tiras nas
de papel de aluminio. Dejar reposar, cubierto, de
30 a 60 minutos en el refrigerador.
Alimentos Tamaño porción Instrucciones
Presas de pollo 0.5-3.5 libras Después de cada etapa, reacomodar o
retirar cualquier parte del alimento que esté
casi descongelada. Dejar reposar durante
10-20 minutos.
NOTA
Seleccione la función de descongelamiento manual con un nivel de potencia del 20 % si desea
descongelar el alimento manualmente. Para obtener más información sobre el descongelamiento
manual y los tiempos de descongelamiento, consulte la página 37.
Uso del horno de microondas
Español 19
MG11T5018CC_AA_MES.indd 19 2/4/2020 10:43:53 AM
Page 68

Uso del horno de microondas
Uso del horno de microondas
Uso de la función Cocción automática
La función Cocción automática tiene 37 ajustes de cocción preprogramados. No es necesario ajustar el
tiempo de cocción ni el nivel de potencia.
PRECAUCIÓN
Use solo recipientes aptos para microondas.
1. Jale de la manija para abrir la puerta del horno
3
4
5
de microondas.
2. Coloque los alimentos en el centro del plato
giratorio y luego cierre la puerta.
3. Presione Auto Cook (Cocción automática).
4. Presione < o > (Reducir/Aumentar) para
seleccionar la categoría deseada y luego presione
OK (Aceptar).
• 1. Cocción automática en dorador
• 2. Postre casero
• 3. Cocción automática
• 4. Ablandar/derretir
5. Presione < o > (Reducir/Aumentar) para
seleccionar el tipo de alimento y luego presione
OK (Aceptar).
• Para obtener más información, consulte la
sección “Descripción del programa Cocción
automática” en las páginas 21 a 27.
6. Presione < o > (Reducir/Aumentar) para
seleccionar el tamaño de la porción y luego
6
presione OK (Aceptar).
• Para obtener más información, consulte la
sección “Descripción del programa Cocción
automática” en las páginas 21 a 27.
• Según el menú seleccionado, es posible que
solo tenga una opción de peso disponible
para elegir.
• No tiene que seleccionar un peso para
Postre casero.
7. Presione START/+30s (INICIO/+30s) para iniciar la
función Cocción automática.
7
• El horno de microondas cocina los alimentos
de acuerdo con el ajuste preprogramado
seleccionado
• Cuando haya transcurrido el tiempo de
cocción, el horno de microondas emitirá una
señal sonora 4 veces y la pantalla del panel
de control mostrará la hora actual. La señal
de recordatorio de nalización emitirá una
señal sonora por minuto 3 veces.
20 Español
MG11T5018CC_AA_MES.indd 20 2/4/2020 10:43:53 AM
Page 69

La siguiente tabla presenta las cantidades y las instrucciones correspondientes para 37 opciones de
cocción preprogramadas. Las opciones preprogramadas se clasican en Cocción automática en dorador,
Postre casero, Cocción automática y Ablandar/derretir.
PRECAUCIÓN
Utilice guantes para horno cuando retire los alimentos.
Descripción del programa Cocción automática
1. Cocción automática en dorador
Código Alimentos
1-1 Papas fritas
congeladas
Tamaño
porción
Instrucciones
14 oz Colocar las papas fritas congeladas en el plato para
dorar con el estante. Colocarlas en el horno de
microondas.
Seleccionar el programa Cocción automática y
presionar el botón START/+30s (INICIO/+30s). Después
de cocinar, dejar reposar durante 2-3 minutos.
1-2 Albóndigas de
cerdo congeladas
18 oz Colocar las albóndigas de cerdo congeladas en
el plato para dorar con el estante. Colocarlas
en el horno de microondas. Seleccionar el
programa Cocción automática y presionar el botón
START/+30s (INICIO/+30s).
Al oír la señal sonora, dar vuelta el alimento y
presionar el botón START/+30s (INICIO/+30s) para
continuar. Después de cocinar, dejar reposar durante
2-3 minutos.
Código Alimentos
1-3 Nuggets de pollo
congelados
1-4 Croquetas de
papa congeladas
1-5 Banderillas
congeladas
1-6 Albóndigas
de pescado
congeladas
Tamaño
porción
Instrucciones
12 oz Colocar los nuggets de pollo congelados en el plato
para dorar con el estante. Colocarlos en el horno de
microondas.
Seleccionar el programa Cocción automática y
presionar el botón START/+30s (INICIO/+30s). Después
de cocinar, dejar reposar durante 2-3 minutos.
12 oz Colocar las croquetas de papa congeladas en el plato
para dorar con el estante. Colocarlas en el horno de
microondas.
Seleccionar el programa Cocción automática y
presionar el botón START/+30s (INICIO/+30s). Después
de cocinar, dejar reposar durante 2-3 minutos.
18 oz Colocar las banderillas congeladas en el plato para
dorar con el estante. Colocarlas en el horno de
microondas.
Seleccionar el programa Cocción automática y
presionar el botón START/+30s (INICIO/+30s). Después
de cocinar, dejar reposar durante 2-3 minutos.
11 oz Colocar las albóndigas de pescado congeladas
en el plato para dorar con el estante. Colocarlas
en el horno de microondas. Seleccionar el
programa Cocción automática y presionar el botón
START/+30s (INICIO/+30s).
Al oír la señal sonora, dar vuelta el alimento y
presionar el botón START/+30s (INICIO/+30s) para
continuar. Después de cocinar, dejar reposar durante
2-3 minutos.
Uso del horno de microondas
Español 21
MG11T5018CC_AA_MES.indd 21 2/4/2020 10:43:53 AM
Page 70

Uso del horno de microondas
Uso del horno de microondas
Código Alimentos
1-7 Alitas de pollo
congeladas
1-8 Albóndigas de
queso congeladas
1-9 Palitos de queso
congelados
1-10 Rollos primavera
congelados
Tamaño
porción
18 oz Colocar las alitas de pollo congeladas en el plato
para dorar con el estante. Colocarlas en el horno de
microondas.
Seleccionar el programa Cocción automática y
presionar el botón START/+30s (INICIO/+30s). Después
de cocinar, dejar reposar durante 2-3 minutos.
14 oz Colocar las albóndigas de queso congeladas en el plato
para dorar con el estante. Colocarlas en el horno de
microondas.
Seleccionar el programa Cocción automática y
presionar el botón START/+30s (INICIO/+30s). Después
de cocinar, dejar reposar durante 2-3 minutos.
11 oz Colocar los palitos de queso congelados en el plato
para dorar con el estante. Colocarlos en el horno de
microondas.
Seleccionar el programa Cocción automática y
presionar el botón START/+30s (INICIO/+30s). Después
de cocinar, dejar reposar durante 2-3 minutos.
11 oz Aceitar la supercie de los rollos primavera
congelados ligeramente. Colocar los rollos primavera
congelados en el plato para dorar con el estante.
Colocarlos en el horno de microondas. Seleccionar el
programa Cocción automática y presionar el botón
START/+30s (INICIO/+30s).
Al oír la señal sonora, dar vuelta el alimento y
presionar el botón START/+30s (INICIO/+30s) para
continuar. Después de cocinar, dejar reposar durante
2-3 minutos.
Instrucciones
Código Alimentos
1-11 Camarones
empanizados
congelados
1-12 Aros de cebolla
congelados
1-13 Papas trozadas
congeladas
Tamaño
porción
11 oz Aceitar la supercie de los camarones empanizados
congelados ligeramente. Colocar los camarones
empanizados congelados en el plato para dorar con
el estante. Colocarlos en el horno de microondas.
Seleccionar el programa Cocción automática y
presionar el botón START/+30s (INICIO/+30s).
Al oír la señal sonora, dar vuelta el alimento y
presionar el botón START/+30s (INICIO/+30s) para
continuar. Después de cocinar, dejar reposar durante
2-3 minutos.
11 oz Colocar los aros de cebolla congelados en el plato
para dorar con el estante. Colocarlos en el horno de
microondas.
Seleccionar el programa Cocción automática y
presionar el botón START/+30s (INICIO/+30s). Después
de cocinar, dejar reposar durante 2-3 minutos.
12 oz Colocar las papas trozadas congeladas en el plato
para dorar con el estante. Colocarlas en el horno de
microondas.
Seleccionar el programa Cocción automática y
presionar el botón START/+30s (INICIO/+30s). Después
de cocinar, dejar reposar durante 2-3 minutos.
Instrucciones
22 Español
MG11T5018CC_AA_MES.indd 22 2/4/2020 10:43:53 AM
Page 71

Código Alimentos
Tamaño
porción
Instrucciones
1-14 Patas de pollo 18 oz Aceitar la supercie de las patas de pollo ligeramente.
Condimentar a gusto. Colocar las patas de pollo en el
plato para dorar con el estante. Colocarlas en el horno
de microondas.
Seleccionar el programa Cocción automática y
presionar el botón START/+30s (INICIO/+30s). Después
de cocinar, dejar reposar durante 2-3 minutos.
1-15 Alitas de pollo 18 oz Aceitar la supercie de las alitas de pollo ligeramente.
Condimentar a gusto. Colocar las alitas de pollo en el
plato para dorar con el estante. Colocarlas en el horno
de microondas.
Seleccionar el programa Cocción automática y
presionar el botón START/+30s (INICIO/+30s). Después
de cocinar, dejar reposar durante 2-3 minutos.
2. Postre casero
Código Alimentos
Pastel de
2-1
mantequilla con
nuez
Pan de banana 1 porción
2-2
Tamaño
porción
Instrucciones
1 porción Ingredientes
120 g de harina, 150 g de mantequilla, 100 g de
azúcar negra, 2 huevos, 50 g de nueces (picadas), 4 g
de polvo para hornear
1. Mezclar la mantequilla con el azúcar negra en un recipiente.
2. Agregar los huevos y mezclar bien.
3. Agregar la harina, el polvo para hornear y seguir revolviendo.
4. Agregar las nueces y mezclar bien.
5. Verter la mezcla en un recipiente de vidrio o plástico untado
con mantequilla.
6. Colocar el recipiente en el horno de microondas y seleccionar el
programa Cocción automática.
7. Después de cocinar, dejar reposar durante 2-3 minutos.
Ingredientes
(6 uds.)
3 bananas, 120 g de mezcla para panqueques, 120 g
de leche, 1 huevo, 2 cucharadas de extracto de malta.
1. Cortar las bananas.
2. En un recipiente, colocar la mezcla para panqueques, la leche, el
huevo y el extracto de malta.
3. Agregar las bananas y mezclar bien.
4. Verter la mezcla en 6 vasos de cartón.
5. Colocar los vasos de cartón en el horno de microondas y
seleccionar el programa Cocción automática.
6. Después de cocinar, dejar reposar durante 2-3 minutos.
Uso del horno de microondas
Español 23
MG11T5018CC_AA_MES.indd 23 2/4/2020 10:43:54 AM
Page 72

Uso del horno de microondas
Uso del horno de microondas
Código Alimentos
Bizcochuelo 1 porción Ingredientes
2-3
Brownie 1 porción Ingredientes
2-4
Tamaño
porción
170 g de harina, 50 g de mantequilla, 150 g de azúcar,
3 huevos, 10 g de polvo para hornear
1. Mezclar la mantequilla con el azúcar en un recipiente.
2. Agregar los huevos y mezclar bien.
3. Agregar la harina, el polvo para hornear y seguir revolviendo.
4. Verter la mezcla en un recipiente de vidrio o plástico untado
con mantequilla.
5. Colocar el recipiente en el horno de microondas y seleccionar el
programa Cocción automática.
6. Después de cocinar, dejar reposar durante 2-3 minutos.
90 g de harina, ½ taza de mantequilla (derretida),
230 g de azúcar, 2 huevos, 40 g de cacao en polvo
1. Mezclar la mantequilla con los huevos batidos y el azúcar en un
recipiente.
2. Agregar la harina, el cacao en polvo y seguir revolviendo.
3. Verter la mezcla en un recipiente de vidrio o plástico untado
con mantequilla.
4. Colocar el recipiente en el horno de microondas y seleccionar el
programa Cocción automática.
5. Después de cocinar, dejar reposar durante 20-30 minutos.
Instrucciones
Código Alimentos
Flan 1 porción
2-5
Bizcocho de
2-6
chocolate en taza
Tamaño
porción
Ingredientes
(3 uds.)
1. Romper los dos huevos en un recipiente. Batir ligeramente
2. Mezclar la leche y el azúcar en otro recipiente.
3. Incorporar la leche a los huevos batidos mientras se continúa
4. Colar la mezcla de huevo con un colador de malla na. Raspar
5. Verter la mezcla en aneras individuales.
6. Colocar las aneras en el horno de microondas y seleccionar el
7. Después de la cocción, colocar en el refrigerador y servir.
1 porción Ingredientes
1. Mezclar la mantequilla, el huevo y la crema en una taza hasta
2. Agregar la harina, el azúcar y seguir revolviendo.
3. Agregar el cacao y la vainilla y revolver hasta que apenas se
4. Incorporar las chispas de chocolate y revolver.
5. Colocar la taza en el horno de microondas y seleccionar el
6. Después de cocinar, dejar reposar durante 2-3 minutos.
250 g de leche, 40 g de azúcar, 2 huevos.
los huevos con un batidor de mano. No levantar la punta del
batidor del fondo del recipiente para evitar generar mucha
espuma.
batiendo.
el fondo del colador con una espátula. Quitar la espuma de la
supercie con una cuchara.
programa Cocción automática.
30 g de mantequilla, 60 g de azúcar, 1 huevo, 40 g
de crema doble, 25 g de harina, 15 g de cacao en
polvo, 1,5 g de vainilla, 50 g de chispas de chocolate
semiamargo.
unir bien.
unan.
programa Cocción automática.
Instrucciones
24 Español
MG11T5018CC_AA_MES.indd 24 2/4/2020 10:43:54 AM
Page 73

Código Alimentos
Tamaño
porción
Instrucciones
Código Alimentos
Tamaño
porción
Instrucciones
Bizcocho en taza 1 porción Ingredientes
2-7
1. Mezclar la mantequilla y el huevo en una taza hasta unir bien.
2. Agregar la harina, el azúcar y el polvo para hornear y seguir
revolviendo.
3. Agregar el polvo de almendras y la vainilla y revolver hasta
que apenas se unan.
4. Colocar la taza en el horno de microondas y seleccionar el
programa Cocción automática.
5. Después de cocinar, dejar reposar durante 2-3 minutos.
Café con leche 1 porción Ingredientes
2-8
1. Mezclar el café en polvo y el agua en una taza.
2. Verter la leche en otra taza.
3. Colocar la mezcla de café en el horno de microondas y
seleccionar la función Postre [8].
4. Al oír la señal sonora, retirar la taza.
5. Colocar la leche en el horno de microondas y presionar el botón
START/+30s (INICIO/+30s).
6. Después de la cocción, mezclar bien todo y servir.
30 g de mantequilla, 60 g de azúcar, 1 huevo, 50 g de
harina, 30 g de leche, 6 g de vainilla, 3 g de polvo de
almendras, 1,5 g de polvo para hornear.
2 g de café instantáneo en polvo, 50 g de agua, 125 g
de leche
2-9
Té verde con
1 porción Ingredientes
leche
1. Mezclar todos los ingredientes en una taza.
2. Colocar la taza en el horno de microondas y seleccionar el
programa Cocción automática.
3. Después de la cocción, mezclar bien y servir.
Té con leche 1 porción Ingredientes
2-10
1. Mezclar el saquito de té negro y el agua en una taza.
2. Verter la leche en otra taza.
3. Colocar la mezcla de té en el horno de microondas y seleccionar
el programa Cocción automática.
4. Al oír la señal sonora, retirar la taza.
5. Colocar la leche en el horno de microondas y presionar el botón
START/+30s (INICIO/+30s).
6. Después de la cocción, mezclar bien todo y servir.
6 g de té verde en polvo, 15 g azúcar, 250 g de leche
2 saquitos de té negro, 60 g de agua, 125 g de leche
Uso del horno de microondas
Español 25
MG11T5018CC_AA_MES.indd 25 2/4/2020 10:43:54 AM
Page 74

Uso del horno de microondas
Uso del horno de microondas
3. Cocción automática
Código Alimentos
3-1 Bebidas 0.5 taza
3-2 Porciones de
pizza
3-3 Vegetales frescos 1 porción
2 porciones
3 porciones
4 porciones
3-4 Vegetales
congelados
2 porciones
3 porciones
4 porciones
Tamaño
porción
1 taza
2 tazas
1 ud.
2 uds.
3 uds.
4 uds.
(125 g)
(250 g)
(375 g)
(500 g)
1 porción
(125 g)
(250 g)
(375 g)
(500 g)
Instrucciones
Utilizar una taza o un jarro para medir y no cubrir.
Colocar la bebida en el horno. Después de calentar,
revolver bien.
Colocar de 1 a 4 porciones de pizza en un plato apto
para microondas con los bordes gruesos de cada
porción hacia el borde del plato. No permitir que las
porciones se superpongan. No cubrir.
Colocar los vegetales frescos (ores de brócoli,
ores de colior, calabacines, berenjenas, etc.) en un
recipiente de cerámica, vidrio o plástico apto para
microondas y agregar 2-4 cucharadas de agua. Cubrir
con un envoltorio plástico ventilado (vent. 1 pulgada)
mientras se cocina y revolver antes de dejar reposar.
Dejar que el horno se enfríe por al menos 5 minutos
antes de volver a usarlo.
Colocar las verduras congeladas en un recipiente
de cerámica, vidrio o plástico apto para microondas
y agregar de 2 a 4 cucharadas de agua. Cubrir con
un envoltorio plástico ventilado (vent. 1 pulgada)
para cocinar. Revolver antes de dejar reposar por
3-5 minutos. Dejar que el horno se enfríe por al menos
5 minutos antes de volver a usarlo.
Código Alimentos
3-5 Guiso 1 porción
3-6 Desayunos
congelados
3-7 Comida
congelada
3-8 Salchichas 2 uds.
Tamaño
porción
2 porciones
3 porciones
4 porciones
4-6 oz
7-8 oz
8-10 oz
11-14 oz
15-18 oz
4 uds.
Instrucciones
Verter en un bol o plato de cerámica hondo. Cubrir
el plato con un envoltorio plástico ventilado (vent.
1 pulgada). Revolver bien antes de servir.
Contenido
Guisos: refrigerados
Retirar el paquete del envoltorio exterior y seguir
las instrucciones para cubrir y reposar. Al oír la
señal sonora, quitar el lm y presionar el botón
START/+30s (INICIO/+30s) para continuar. Después de
cocinar, dejar reposar 1-3 minutos.
Retirar el paquete del envoltorio exterior y seguir
las instrucciones para cubrir y reposar. Después de
cocinar, dejar reposar 1-3 minutos.
Pinchar cada salchicha 3 veces con un tenedor.
Colocar las salchichas en el plato. Luego,
colocarlas en el microondas. Al oír la señal sonora,
agregar los panecillos y presionar el botón
START/+30s (INICIO/+30s) para continuar.
26 Español
MG11T5018CC_AA_MES.indd 26 2/4/2020 10:43:54 AM
Page 75

4. Ablandar/derretir
Uso de la función Palomitas
Código Alimentos Tamaño porción Instrucciones
4-1 Derretir
mantequilla
4 oz (1 bastón)
8 oz (2 bastones)
Desenvolver la mantequilla y cortar la barra
en varios trozos. Colocar la mantequilla en un
recipiente apto para microondas y cubrir con
papel encerado. Revolver después.
4-2 Derretir
chocolate
1 taza de pepitas Colocar las pepitas de chocolate en un
recipiente apto para microondas. Al oír la
señal sonora, revolver bien y luego presionar
el botón START/+30s (INICIO/+30s) para
continuar. A menos que se revuelvan, las
pepitas de chocolate mantienen su forma
incluso cuando termina el tiempo de
calentamiento.
4-3 Ablandar
mantequilla
4-4 Ablandar queso
crema
4 oz (1 bastón) Separar la mantequilla del envoltorio y colocar
en un plato apto para microondas.
1 pote (1 pinta) Retirar la tapa del envase. Colocar el envase en
el centro del microondas.
PRECAUCIÓN
Use solo recipientes aptos para microondas.
1. Jale de la manija para abrir la puerta del horno
3
de microondas.
2. Coloque los alimentos en el centro del plato
giratorio y luego cierre la puerta.
3. Presione Popcorn (Palomitas).
4. Presione < o > (Reducir/Aumentar) para
4
seleccionar el tamaño de la porción y luego
presione OK (Aceptar).
5. Presione START/+30s (INICIO/+30s) para iniciar la
función Palomitas.
5
Descripción del programa Palomitas
Alimentos Tamaño porción Instrucciones
Palomitas 3,0-3,5 oz
1 paquete
Usar solo una bolsa de palomitas para microondas por vez.
Tener cuidado al retirar la bolsa del horno y al abrirla.
Uso del horno de microondas
Español 27
MG11T5018CC_AA_MES.indd 27 2/4/2020 10:43:54 AM
Page 76

Uso del horno de microondas
Uso del horno de microondas
Parrilla
El dorador le permite calentar y dorar los alimentos rápidamente, sin usar microondas.
• Utilice siempre guantes para horno cuando toque los recipientes que están dentro del horno de
microondas, ya que estarán muy calientes.
• Puede obtener mejores resultados de cocción y dorado si usa el estante para dorar.
1. Jale de la manija para abrir la puerta del horno
de microondas.
2. Coloque el alimento en el estante para dorar y
luego cierre la puerta.
3. Presione Grill (Dorador).
3
4
5
• La pantalla del panel de control muestra el
ícono correspondiente ( ).
• No se puede ajustar la temperatura del
dorador.
4. Presione < o > (Reducir/Aumentar) para
congurar el tiempo de dorado deseado.
• El tiempo máximo de dorado es de
60 minutos.
5. Presione START/+30s (INICIO/+30s) para iniciar
el dorado.
• Cuando naliza el dorado, el horno de
microondas suena 4 veces y la pantalla del
panel de control muestra la hora actual. La
señal de recordatorio de nalización emitirá
una señal sonora por minuto 3 veces.
Combinación de microondas y dorador
También puede combinar la cocción en microondas con el dorador, para cocinar rápidamente y dorar al
mismo tiempo.
PRECAUCIÓN
• Utilice siempre utensilios de cocina aptos para microondas. Los platos de vidrio o de cerámica son
ideales ya que permiten que las microondas penetren los alimentos en forma uniforme.
• Utilice siempre guantes para horno cuando toque los recipientes que están dentro del horno de
microondas, ya que estarán muy calientes.
• Puede mejorar la cocción y el dorado si usa el estante para dorar.
1. Jale de la manija para abrir la puerta del horno
3
de microondas.
2. Coloque el alimento en el estante para dorar y
luego cierre la puerta.
3. Presione Microwave+Grill (Microondas+Dorador).
• La pantalla del panel de control muestra el
ícono correspondiente ( , ).
28 Español
MG11T5018CC_AA_MES.indd 28 2/4/2020 10:43:55 AM
Page 77

4
congurar el tiempo de cocción.
• El tiempo máximo de cocción es de
60 minutos.
5
5. Presione START/+30s (INICIO/+30s) para
4. Presione < o > (Reducir/Aumentar) para
Uso del plato para dorar
Este plato para dorar permite dorar y dejar crocantes los alimentos no solo por la parte de arriba con
el dorador, sino también por debajo gracias a la alta temperatura que alcanza el plato para dorar. En la
tabla (ver página siguiente) se indican numerosos alimentos que puede preparar en el plato para dorar.
El plato para dorar también puede utilizarse para tocino, huevos, salchichas, etc.
comenzar a cocinar.
• Cuando haya transcurrido el tiempo de
cocción, el horno de microondas emitirá una
señal sonora 4 veces y la pantalla del panel
de control mostrará la hora actual. La señal
de recordatorio de nalización emitirá una
señal sonora por minuto 3 veces.
1. Coloque el plato para dorar directamente en el
plato giratorio y precaliéntelo con la combinación
más alta de Microondas-Dorador siguiendo los
tiempos e indicaciones de la tabla.
2. Pinte el plato con aceite si va a cocinar alimentos
como tocino y huevos para obtener un buen
dorado.
Uso del horno de microondas
3. Coloque los alimentos en el plato para dorar.
4. Coloque el plato para dorar sobre el estante de
metal (o plato giratorio) en el microondas.
5. Seleccione la potencia y el tiempo de cocción
adecuados.
(Consulte la tabla que se encuentra al costado.)
Español 29
MG11T5018CC_AA_MES.indd 29 2/4/2020 10:43:56 AM
Page 78

Uso del horno de microondas
Uso del horno de microondas
PRECAUCIÓN
• Utilice siempre guantes para horno para retirar el plato para dorar, ya que se calentará mucho.
• No coloque recipientes que no sean resistentes al calor sobre el plato para dorar.
• Nunca coloque el plato para dorar en el horno sin el plato giratorio.
• Tenga en cuenta que el plato para dorar no es apto para lavavajillas.
NOTA
• Advierta que el plato para dorar tiene una capa de teón que no es resistente a rayaduras. No
utilice objetos losos como cuchillos para cortar sobre el plato para dorar.
• Limpie el plato para dorar con agua tibia y detergente y enjuague con agua limpia.
• No utilice cepillos de fregar ni esponjas abrasivas o dañará el revestimiento.
Uso de la función Seguro para niños
Su horno de microondas está equipado con un programa especial de seguro para niños que permite
trabar el horno de microondas de modo tal que ni los niños ni ninguna persona que no esté
familiarizada con el horno pueda hacerlo funcionar accidentalmente.
• Para activar el Seguro para niños, mantenga
presionado START/+30s (INICIO/+30s) durante 3
segundos.
• El panel de control está bloqueado y en la
pantalla del panel de control se observa “L”.
• Para desactivar el Seguro para niños, mantenga
presionado START/+30s (INICIO/+30s) durante
3 segundos nuevamente.
Desactivación de la alarma
Puede desactivar la alarma cada vez que lo desee.
• Para desactivar la alarma, presione < o >
(Reducir / Aumentar) al mismo tiempo.
• Para volver a activar la alarma, presione <
o > (Reducir / Aumentar) al mismo tiempo
nuevamente.
30 Español
MG11T5018CC_AA_MES.indd 30 2/4/2020 10:43:56 AM
Page 79

Guía de utensilios de cocina
Para cocinar alimentos en el horno de microondas, las microondas deben poder penetrar los alimentos,
sin ser reejadas ni absorbidas por el recipiente utilizado.
Se debe tener cuidado al seleccionar el utensilio de cocina. Si el utensilio está rotulado como apto para
microondas, no debe preocuparse.
La siguiente tabla indica los diversos tipos de utensilios de cocina y detalla por qué y cómo deben
usarse en un horno de microondas.
Utensilios de cocina
Papel de aluminio
Plato para dorar
Porcelana y vajilla de barro
Platos de cartón y poliéster
desechables
Envases de comida rápida
• Vasos/recipientes de
poliestireno
• Bolsas de papel o
periódicos
• Papel reciclado o ribetes
de metal
Recipientes de vidrio
• Vajilla para horno
Apto para
microondas
✓✗
✓
✓
✓
✓
✗
✗
✓
Comentarios
Puede utilizarse en pequeñas cantidades para evitar
que algunas partes del plato se cocinen de más. Se
puede producir un arco eléctrico si el papel está
demasiado cerca de la pared del horno de microondas
o si usa demasiada cantidad.
No precalentar durante más de ocho minutos.
La porcelana, cerámica, vajilla de barro con vidrio
y la porcelana fría suelen ser aptas para hornos de
microondas, a menos que estén decoradas con un
ribete de metal.
Algunos alimentos congelados están envasados en
estos recipientes.
Pueden utilizarse para calentar alimentos. El
sobrecalentamiento puede provocar que el poliestireno
se derrita.
Pueden prenderse fuego.
Puede provocar un arco eléctrico.
Puede utilizarse, a menos que esté decorada con un
ribete de metal.
Utensilios de cocina
• Cristalería na
• Frascos de vidrio
Metal
• Recipientes
• Precintos de alambre de
bolsas para congelador
Papel
• Platos, vasos, servilletas de
papel y papel de cocina
• Papel reciclado
Plástico
• Recipientes
• Film transparente
• Bolsas para congelador
Papel encerado o paranado
✓
: Recomendado
Apto para
microondas
✓
✓
✗
✗
✓
✗
✓
✓
✓✗
✓
✓✗
: Tenga cuidado
Comentarios
Puede utilizarse para calentar alimentos o líquidos. La
cristalería delicada puede romperse o agrietarse si se
calienta repentinamente.
Se debe retirar la tapa. Adecuado solo para calentar.
Pueden provocar un arco eléctrico o un incendio.
Solo para una cocción corta o para calentar los
alimentos. También para absorber el exceso de
humedad.
Puede provocar un arco eléctrico.
Especialmente si es termoplástico resistente al
calor. Algunos otros plásticos pueden deformarse o
decolorarse a altas temperaturas.
No use plástico de melanina.
Puede utilizarse para retener la humedad. No debe
tocar los alimentos. Tenga cuidado al retirar el lm, ya
que puede liberar vapor caliente.
Solo si son aptas para horno o pueden hervirse. No
deben ser herméticas. Pinche con un tenedor, si es
necesario.
Puede utilizarse para retener la humedad y evitar las
salpicaduras.
✗
: Inseguro
Guía de utensilios de cocina
Español 31
MG11T5018CC_AA_MES.indd 31 2/4/2020 10:43:56 AM
Page 80

Guía de cocción
Guía de cocción
La energía de microondas penetra verdaderamente en los alimentos y es atraída y absorbida por el
agua, los contenidos de grasa y azúcar de los alimentos. Las microondas provocan que las moléculas de
los alimentos se muevan con rapidez. El movimiento veloz de estas moléculas crea fricción y el calor
resultante cocina los alimentos.
Sugerencias generales para cocinar en microondas
Los alimentos densos, como las papas, demoran más tiempo en calentarse que los alimentos más
livianos. Los alimentos con una textura delicada deben calentarse a un nivel de potencia bajo para
evitar que se endurezcan.
Los alimentos con una piel no porosa, tales como las papas o las salchichas, deben pincharse para evitar
que exploten.
No se recomienda freír con aceite caliente o grasa en el microondas. La grasa y el aceite pueden hervir
de repente y causar quemaduras graves.
Algunos ingredientes se calientan más rápido que otros. Por ejemplo, la jalea dentro de una donut se
calentará más que la donut. Tenga esto en cuenta para evitar quemaduras.
El alto y el tipo de recipiente de cocción que utiliza puede afectar el tiempo de cocción. Cuando pruebe
una receta nueva, use el tiempo de cocción mínimo y controle los alimentos de vez en cuando para
evitar el exceso de cocción.
No se recomienda el enlatado casero en el horno de microondas porque es posible que no todas las
bacterias nocivas se destruyan como consecuencia del proceso de calentamiento del microondas.
Si bien las microondas no calientan los recipientes de cocción, el calor de los alimentos suele
transferirse a dichos recipientes. Siempre use guantes protectores contra el calor cuando retire
alimentos del microondas e indique a los niños que hagan lo mismo.
No se recomienda hacer caramelo en el microondas, ya que puede calentarse hasta llegar a
temperaturas muy altas. Tenga esto en cuenta para evitar lesiones.
Técnicas de cocción
NOTA
Si el horno está programado para cocinar durante más de 20 minutos, después de ese tiempo se
ajustará automáticamente a una potencia del 70 por ciento para evitar que se pase la comida.
Revolver
Abra la puerta del microondas y revuelva los alimentos, tales como guisos y verduras, mientras
los cocina para distribuir el calor en forma pareja. Los alimentos en la parte exterior del recipiente
absorben más energía y se calientan con mayor rapidez, por lo tanto, revuélvalos desde el exterior
hacia el centro. El horno se apagará cuando usted abra la puerta para revolver los alimentos.
Disposición
Disponga los alimentos, tales como presas de pollo o chuletas, de forma irregular con las partes más
gruesas y carnosas hacia el exterior del plato giratorio, en donde pueden recibir más energía del
microondas. Para evitar el exceso de cocción, coloque las partes delgadas o delicadas hacia el centro del
plato giratorio.
Protección
Proteja los alimentos con tiras angostas de papel de aluminio para evitar el exceso de cocción. Las
áreas que requieren protección son las puntas de las alas, los extremos de las patas de las aves y las
esquinas de recipientes para hornear cuadrados. Use solo pequeñas cantidades de papel de aluminio.
Las cantidades más grandes pueden dañar su horno.
Dar vuelta
Dé vuelta los alimentos en la etapa intermedia del ciclo de cocción para exponer todas las partes a la
energía de microondas. Esto es de vital importancia para productos grandes, como por ejemplo, carnes
asadas.
Dejar reposar
Los alimentos cocidos en el microondas acumulan calor interno y continúan cocinándose durante
algunos minutos después de que el horno se detiene. Deje que los alimentos reposen para completar
el proceso de cocción, en especial aquellos alimentos, como por ejemplo, carnes asadas y vegetales
enteros. Las carnes asadas necesitan este tiempo para completar la cocción en el centro sin cocinar en
exceso las áreas exteriores. Todos los líquidos como, por ejemplo, la sopa o el chocolate caliente, deben
agitarse o revolverse cuando naliza la cocción. Deje que los líquidos reposen un momento antes de
servirlos. Cuando calienta alimentos para bebés, revuélvalos bien y controle la temperatura antes de
servirlos.
Agregar humedad
La energía de microondas es atraída hacia las moléculas de agua. Los alimentos con un contenido de
humedad irregular deben cubrirse o dejarse reposar de modo que el calor se disperse uniformemente.
Agregue una pequeña cantidad de agua a los alimentos secos para ayudarlos a cocinarse.
Ventilación
Después de cubrir un recipiente con un envoltorio plástico, ventílelo al destapar un extremo y permitir
que se libere el exceso de vapor.
32 Español
MG11T5018CC_AA_MES.indd 32 2/4/2020 10:43:56 AM
Page 81

Guía de cocción para verduras congeladas
Utilice un bol Pyrex de vidrio adecuado con tapa. Cubra el recipiente y cocine durante el tiempo
mínimo, consulte a la tabla. Continúe la cocción para obtener el resultado que usted preere.
Revuelva dos veces durante la cocción y una vez después de cocinar. Agregue sal, hierbas o mantequilla
después de la cocción. Cubra el recipiente durante el tiempo de reposo.
Alimentos Tamaño porción Potencia Tiempo (min)
Espinaca 0,3 lb 60 % 5-6½
Instrucciones
Agregar 15 ml (1 cucharada) de agua fría. Dejar reposar durante
2-3 minutos.
Brócoli 0,7 lb 60 % 8-9½
Instrucciones
Agregar 30 ml (2 cucharada) de agua fría. Dejar reposar durante
2-3 minutos.
Arvejas 0,7 lb 60 % 7-8½
Instrucciones
Agregar 15 ml (1 cucharada) de agua fría. Dejar reposar durante
2-3 minutos.
Ejotes 0,7 lb 60 % 7½-9
Instrucciones
Agregar 30 ml (2 cucharada) de agua fría. Dejar reposar durante
2-3 minutos.
Verduras varias
(Zanahorias/Arvejas/Maíz)
0,7 lb 60 % 7-8½
Instrucciones
Agregar 15 ml (1 cucharada) de agua fría. Dejar reposar durante
2-3 minutos.
Verduras varias
(Estilo chino)
0,7 lb 60 % 7½-9
Instrucciones
Agregar 15 ml (1 cucharada) de agua fría. Dejar reposar durante
2-3 minutos.
Guía de cocción para verduras frescas
Utilice un bol Pyrex de vidrio adecuado con tapa. Agregue 30-45 ml de agua fría (2-3 cucharadas
soperas) por cada 250 g, a menos que se recomiende otra cantidad de agua (consulte la tabla). Cubra
el recipiente y cocine durante el tiempo mínimo, consulte a la tabla. Continúe la cocción para obtener
el resultado que usted preere. Revuelva una vez durante la cocción y otra vez después de cocinar.
Agregue sal, hierbas o mantequilla después de la cocción. Cubra el recipiente durante un tiempo de
reposo de 3 minutos.
Sugerencia: corte las verduras frescas en trozos parejos. Mientras más pequeños los corte más rápido
se cocinarán.
Alimentos Tamaño porción Potencia Tiempo (min)
Brócoli 0,6 lb
1,0 lb
90 % 4½-5½
7-8½
Instrucciones
Preparar ores de tamaños parejos. Disponer los tallos de manera que apunten
hacia el centro. Dejar reposar durante 3 minutos.
Colecitas de
Bruselas
0,6 lb 90 % 6-6½
Instrucciones
Agregar 60-75 ml (4-5 cucharadas) de agua. Dejar reposar durante 3 minutos.
Zanahorias 0,6 lb 90 % 4½-5½
Instrucciones
Cortar las zanahorias en rebanadas parejas. Dejar reposar durante 3 minutos.
Colior 0,6 lb
1,0 lb
90 % 5-6
7½-9
Instrucciones
Preparar ores de tamaños parejos. Cortar las ores grandes por la mitad.
Disponer los tallos de manera que apunten hacia el centro. Dejar reposar durante
3 minutos.
Calabacines 0,6 lb 90 % 4-5
Instrucciones
Cortar los calabacines en rebanadas. Agregar 30 ml (2 cucharadas) de agua o
una nuez de mantequilla. Cocinar hasta que estén tiernos. Dejar reposar durante
3 minutos.
Guía de cocción
Español 33
MG11T5018CC_AA_MES.indd 33 2/4/2020 10:43:56 AM
Page 82

Guía de cocción
Guía de cocción
Alimentos Tamaño porción Potencia Tiempo (min)
Berenjenas 0,6 lb 90 % 3½-4½
Instrucciones
Cortar las berenjenas en rebanadas pequeñas y rociarlas con 1 cucharada de jugo
de limón. Dejar reposar durante 3 minutos.
Poros 0,6 lb 90 % 4-5
Instrucciones
Cortar los poros en rodajas gruesas. Dejar reposar durante 3 minutos.
Hongos 0,25 lb
0,6 lb
Instrucciones
Preparar hongos pequeños enteros o en rebanadas. No incorporar agua. Rociar
con jugo de limón. Condimentar con sal y pimienta. Escurrir antes de servir. Dejar
reposar durante 3 minutos.
Cebollas 0,6 lb 90 % 5-6
Instrucciones
Cortar las cebollas en rebanadas o por la mitad. Agregar solo 15 ml (1 cucharada)
de agua. Dejar reposar durante 3 minutos.
Pimientos 0,6 lb 90 % 4½-5½
Instrucciones
Cortar los pimientos en rebanadas pequeñas. Dejar reposar durante 3 minutos.
Papas 0,6 lb
1,0 lb
Instrucciones
Pesar las papas peladas y cortarlas en mitades o cuartos de tamaños similares.
Dejar reposar durante 3 minutos.
Nabo repollo 0,6 lb 90 % 5½-6½
Instrucciones
Cortar el nabo en cubos pequeños. Dejar reposar durante 3 minutos.
90 % 1½-2½
2½-3½
90 % 4-5½
7-8½
Guía de cocción para arroz y pasta
Arroz: Use un bol de vidrio Pyrex grande con tapa; el arroz duplica su volumen durante la
cocción. Cocinar con tapa. Cuando nalice el tiempo de cocción, revolver antes de dejar
reposar, salar o incorporar hierbas y mantequilla. Comentario: Es posible que el arroz no
haya absorbido toda el agua una vez nalizado el tiempo de cocción.
Pasta: Utilizar un bol de vidrio Pyrex grande. Agregue agua hirviendo, una pizca de sal y
revuelva bien. Cocinar destapado. Revuelva ocasionalmente durante y después de la
cocción. Cubra durante el tiempo de reposo y escurra bien después.
Alimentos Tamaño porción Potencia Tiempo (min)
Arroz blanco
(sancochado)
Arroz integral
(sancochado)
Mezcla de arroz
(Arroz + Arroz salvaje)
Mezcla de granos
(Arroz + Cereal)
Pasta 0,6 lb 90 % 10-12
1 taza
1½ tazas
Instrucciones
Agregar 2 tazas de agua fría por 1 taza de arroz. Agregar 3 tazas de agua
fría por 1½ tazas de arroz. Dejar reposar durante 5 minutos.
0,6 lb
0,8 lb
Instrucciones
Agregar 2 tazas de agua fría por 1 taza de arroz. Agregar 3 tazas de agua
fría por 1½ tazas de arroz. Dejar reposar durante 5 minutos.
0,6 lb 90 % 16-18
Instrucciones
Agregar 2 tazas de agua fría por 1 taza de arroz/mezcla de arroz salvaje.
Dejar reposar durante 5 minutos.
0,6 lb 90 % 17-19
Instrucciones
Agregar 1¾ tazas de agua fría por 1 taza de mezcla de arroz/cereal. Dejar
reposar durante 5 minutos.
Instrucciones
Agregar 4¼ tazas de agua. Dejar reposar durante 5 minutos.
90 % 15-17
17½-19½
90 % 20-22
22-24
34 Español
MG11T5018CC_AA_MES.indd 34 2/4/2020 10:43:57 AM
Page 83

Recalentar
Su horno de microondas recalentará los alimentos en bastante menos tiempo que los hornos
convencionales.
Utilice los niveles de potencia y los tiempos de recalentamiento de la siguiente tabla como guía. En la
tabla de tiempos, se contemplan líquidos a temperatura ambiente de 64,5 a 68 °F o alimentos fríos a
una temperatura aproximada de 41 a 45 °F.
Disponer y cubrir
Evite recalentar piezas grandes como asados de carne, ya que tienden a cocerse demasiado y a secarse
antes de que el centro esté bien caliente. Se obtienen mejores resultados si se recalientan trozos
pequeños.
Niveles de potencia y momentos en los cuales revolver
Algunos alimentos se pueden recalentar con una potencia del 90 %, mientras que otros necesitan 60 %,
50 % o incluso 30 %.
Consulte las tablas para obtener ayuda. En general, es mejor recalentar los alimentos con un nivel de
potencia bajo, si los alimentos son delicados, hay grandes cantidades o si tiende a recalentarse muy
rápido (los picadillos, por ejemplo).
Revuelva bien o dé vuelta los alimentos mientras los recalienta para obtener mejores resultados.
Cuando sea posible, revuelva otra vez antes de servir.
Preste especial atención cuando recaliente líquidos y alimentos para bebés. Para evitar ebulliciones
eruptivas de líquidos y posibles escaldaduras, revuelva los alimentos antes, durante y después de
calentarlos. Consérvelos en el horno de microondas durante el tiempo de reposo. Recomendamos poner
una cuchara plástica o una varilla de vidrio en los líquidos. Evite calentar de más los alimentos (y así
malograrlos).
Es preferible calcular menos tiempo de cocción del que corresponde y luego agregar más, de ser
necesario.
Calentar y calcular tiempos de reposo
Cuando recalienta alimentos por primera vez, es útil tomar nota del tiempo que emplea, para referencia
futura.
Siempre asegúrese de que todo el alimento recalentado esté bien caliente.
Deje que los alimentos reposen unos instantes después de recalentarlos, para permitir que la
temperatura se nivele.
El tiempo de reposo recomendado después de recalentar oscila entre 2 y 4 minutos, a menos que se
recomiende otro tiempo en la tabla.
Preste especial atención cuando recaliente líquidos y alimentos para bebés. Consulte además el capítulo
con precauciones de seguridad.
Recalentar líquidos
Siempre deje reposar los líquidos al menos 20 segundos una vez que el horno se haya apagado para
que la temperatura se nivele. Revuelva mientras calienta, si es necesario, y SIEMPRE revuelva después
de calentar. Para evitar que los líquidos hiervan y posibles escaldaduras, debe colocar una cuchara o
una varilla de vidrio en las bebidas y revolver antes, durante y después de calentarlas.
Recalentar alimentos para bebés
Alimento para bebés
Colocar el alimento en un plato hondo de cerámica. Cubra con una tapa de plástico. Revuelva bien
después de recalentar. Deje reposar 2-3 minutos antes de servir. Revuelva nuevamente y controle la
temperatura. Temperatura recomendada para servir: entre 86 y 104 °F.
Leche para bebés
Vierta la leche en un biberón esterilizado. Recaliente destapado. Nunca caliente un biberón con la tetina
puesta, ya que la botella puede explotar si se calienta en exceso. Agite bien antes de dejar reposar y
una vez más antes de servir. Siempre verique atentamente la temperatura de la leche o alimentos para
bebés antes de dárselos al niño. Temperatura recomendada para servir: aprox. 98,6 °F.
Guía de cocción
Español 35
MG11T5018CC_AA_MES.indd 35 2/4/2020 10:43:57 AM
Page 84

Guía de cocción
Guía de cocción
Comentario
Es importante vericar la temperatura de los alimentos para bebés, en particular, antes de servirlos
para evitar quemaduras. Utilice los niveles de potencia y los tiempos de la siguiente tabla como pautas
generales para recalentar líquidos y alimentos.
Recalentar líquidos y alimentos
Utilice los niveles de potencia y los tiempos de esta tabla como pautas generales para recalentar
líquidos y alimentos.
Alimentos Tamaño porción Potencia Tiempo (min)
Bebidas (Café, Té y
Agua)
Sopa (Fría) 0,6 lb
Estofado (Frío) 0,8 lb 60 % 4½-6
150 ml (1 taza)
300 ml (2 tazas)
450 ml (3 tazas)
600 ml (4 tazas)
Instrucciones
Verter en tazas y recalentar sin tapar:
1 taza en el centro, 2 tazas una frente a la otra, 3 tazas en un círculo.
Conservar en el horno de microondas durante el tiempo de reposo y
revolver bien. Dejar reposar durante 1-2 minutos.
0,8 lb
1 lb
1,2 lb
Instrucciones
Verter en un plato hondo de cerámica o en un bol profundo de cerámica.
Cubrir con una tapa de plástico. Revolver bien después de recalentar.
Revolver una vez más antes de servir. Dejar reposar durante 2-3 minutos.
Instrucciones
Poner el estofado en un plato hondo de cerámica. Cubrir con una tapa de
plástico.
Revolver ocasionalmente mientras recalienta y una vez más antes de
dejarlo reposar y servir. Dejar reposar durante 2-3 minutos.
90 % 1-1½
2-2½
3-4
3½-4½
90 % 2½-3
3-3½
3½-4½
4½-5½
Alimentos Tamaño porción Potencia Tiempo (min)
Pasta con salsa (Fría) 0,8 lb 60 % 3½-5½
Instrucciones
Colocar la pasta (por ejemplo, espaguetis o deos de huevo) en un plato
plano de cerámica. Cubrir con un lm transparente para microondas.
60 % 4½-6
5½-7½
Pasta rellena con salsa
(Fría)
Platos preparados
(Fríos)
Fondue de queso lista
para servir (Fría)
Revolver antes de servir.
Dejar reposar durante 3 minutos.
0,8 lb 60 % 4-6
Instrucciones
Colocar la pasta rellena (por ejemplo, ravioles, tortellinis) en un
plato hondo de cerámica. Cubrir con una tapa de plástico. Revolver
ocasionalmente mientras recalienta y una vez más antes de dejarlo reposar
y servir. Dejar reposar durante 3 minutos.
0,8 lb
1,0 lb
Instrucciones
Colocar una comida fría elaborada con 2 o 3 componentes en un plato de
cerámica. Cubrir con un lm transparente para microondas. Dejar reposar
durante 3 minutos.
0,9 lb 60 % 6-7½
Instrucciones
Colocar el fondue de queso en un bol de vidrio Pyrex del tamaño adecuado
con tapa. Revolver ocasionalmente durante y después del recalentamiento.
Revolver bien antes de servir. Dejar reposar durante 1-2 minutos.
36 Español
MG11T5018CC_AA_MES.indd 36 2/4/2020 10:43:57 AM
Page 85

Recalentar leche y alimentos para bebés
Utilice los niveles de potencia y los tiempos que se detallan en esta tabla como pautas generales para
recalentar líquidos y alimentos.
Alimentos Tamaño porción Potencia Tiempo
Alimento para bebés
(Verduras + Carne)
Papillas para bebés
(Cereal + Leche +
Fruta)
Leche para bebés 100 ml 30 % 30-40 s
0,4 lb 60 % 30 s
Instrucciones
Verter el alimento en un plato hondo de cerámica. Cocinar con tapa.
Revolver después del tiempo de cocción. Antes de servir, revolver bien y
vericar atentamente la temperatura. Dejar reposar durante 2-3 minutos.
0,4 lb 60 % 20 s
Instrucciones
Verter el alimento en un plato hondo de cerámica. Cocinar con tapa.
Revolver después del tiempo de cocción. Antes de servir, revolver bien y
vericar atentamente la temperatura. Dejar reposar durante 2-3 minutos.
200 ml 1 min a 1 min 10 s
Instrucciones
Revolver o agitar bien y verter en un biberón esterilizado.
Colocar en el centro del plato giratorio. Cocinar destapado.
Agitar bien y dejar reposar durante al menos 3 minutos.
Antes de servir, agitar bien y vericar atentamente la temperatura.
Descongelación manual
Los microondas son una excelente manera de descongelar alimentos congelados. Descongelan
suavemente los alimentos congelados en poco tiempo. Esto puede ser una gran ventaja, si de pronto
llegan invitados inesperados.
Las aves congeladas deben descongelarse bien antes de la cocción. Retire todos los precintos de metal y
quite todo el envoltorio para que el líquido descongelado se escurra.
Coloque los alimentos congelados en un plato sin tapa. Dé vuelta los alimentos en la mitad del proceso,
escurra el líquido y, si descongela pollo, quite los menudos lo antes posible. Cada tanto, verique los
alimentos para asegurarse de que no se calienten.
Si las partes más pequeñas y delgadas de los alimentos congelados comienzan a calentarse durante la
descongelación, protéjalas envolviéndolas con tiras pequeñas de papel de aluminio.
En caso de que la supercie exterior del ave comenzara a calentarse, detenga el proceso de
descongelamiento y deje reposar 20 minutos antes de continuar. Deje reposar pescados, carnes y aves
para que se descongelen por completo. El tiempo de reposo para que se descongelen por completo
variará según la cantidad que se descongele. Remítase a la siguiente tabla.
Sugerencia: los alimentos sin volumen se descongelan mejor que los gruesos y las cantidades más
pequeñas requieren menor tiempo que las más grandes.
Para descongelar alimentos congelados que tengan una temperatura aproximada de entre -5 y -4 °C,
utilice la siguiente tabla como guía.
Alimentos Tamaño porción Potencia Tiempo (min)
Carne
Carne molida 0,6 lb
1,1 lb
Bistec de cerdo 0,6 lb 20 % 5-7½
Instrucciones
Colocar la carne en el plato giratorio. Proteger los bordes más delgados
con papel de aluminio. Dar la vuelta en la mitad del tiempo de
descongelamiento. Dejar reposar durante 15-30 minutos.
20 % 6-7½
9-12½
Guía de cocción
Español 37
MG11T5018CC_AA_MES.indd 37 2/4/2020 10:43:57 AM
Page 86

Guía de cocción
Guía de cocción
Alimentos Tamaño porción Potencia Tiempo (min)
Ave
Presas de pollo 2 uds. (1,1 lb.) 20 % 14-16
Pollo entero 2,7 lb 20 % 32-35
Instrucciones
Primero, colocar las presas de pollo con la piel hacia abajo; si el pollo
está entero, primero colocar con el lado de la pechuga hacia abajo en un
plato de cerámica plano. Proteger las partes más delgadas como alas y
extremos con papel de aluminio. Dar la vuelta en la mitad del tiempo de
descongelamiento. Dejar reposar durante 15-60 minutos.
Pescado
Filetes de pescado 0,4 lb 20 % 6-7½
Pescado entero 0,9 lb 20 % 11-14
Instrucciones
Colocar el pescado congelado en el centro de un plato de cerámica plano.
Acomodar las partes más nas debajo de las partes más gruesas. Proteger
los extremos angostos de los letes y la cola del pescado entero con papel
de aluminio. Dar la vuelta en la mitad del tiempo de descongelamiento.
Dejar reposar durante 10-25 minutos.
Fruta
Frutos rojos 0,7 lb 20 % 6-7½
Instrucciones
Esparcir los frutos sobre un plato de vidrio redondo plano (de diámetro
grande). Dejar reposar durante 5-10 minutos.
Alimentos Tamaño porción Potencia Tiempo (min)
Pan
Panecillos
(Cada uno aprox. 50 g)
Tostada/Emparedado 0,6 lb 20 % 4-5
Pan alemán
(Harina de trigo +
Centeno)
2 uds.
4 uds.
1,1 lb 20 % 7-9½
Instrucciones
Acomodar los bollos en un círculo o el pan de manera horizontal sobre
papel de cocina en la mitad del plato giratorio. Dar la vuelta en la mitad
del tiempo de descongelamiento. Dejar reposar durante 5-20 minutos.
20 % 1-1½
2½-3
Dorador
El elemento calentador del dorador se ubica debajo del techo de la cavidad. Funciona cuando la puerta
está cerrada y el plato giratorio está rotando. La rotación del plato giratorio hace que los alimentos se
doren de una manera más uniforme. Precalentar el dorador durante 3-5 minutos hará que los alimentos
se doren con más rapidez.
Utensilios de cocina para dorar:
Deben ser resistentes al fuego y pueden tener metal. No utilice ningún tipo de utensilio de plástico ya
que puede derretirse.
Alimentos adecuados para dorar:
Chuletas, salchichas, bistecs, hamburguesas, tocino y lonjas de jamón, porciones delgadas de pescado,
emparedados y toda clase de tostadas con coberturas.
Comentario importante:
Siempre que utilice solo el modo dorador, recuerde que los alimentos deben colocarse en el estante alto,
a menos que se indique otra cosa.
38 Español
MG11T5018CC_AA_MES.indd 38 2/4/2020 10:43:57 AM
Page 87

Microondas+Dorador
Este modo de cocción combina el calor radiante proveniente del dorador con la velocidad de la cocción
en microondas. Funciona solo cuando la puerta está cerrada y el plato giratorio está rotando. Debido a
la rotación del plato giratorio, los alimentos se doran de manera uniforme.
Utensilios de cocina para cocinar con microondas + dorador
Use utensilios de cocina por los que puedan atravesar las microondas. Los utensilios deben ser
resistentes al fuego. No use utensilios de metal en el modo combinado. No utilice ningún tipo de
utensilio de plástico ya que puede derretirse.
Alimentos apropiados para la cocción en microondas + dorador:
Los alimentos apropiados para la cocción en modo combinado incluyen todo tipo de alimentos cocidos
que deban recalentarse y dorarse (por ejemplo, pasta al horno), así como alimentos que requieran un
tiempo de cocción breve para dorar la parte superior de los alimentos. Además, este modo puede usarse
para porciones grandes de comida a las que les viene bien una capa dorada y crocante (por ejemplo,
presas de pollo, deben darse vuelta cuando haya transcurrido la mitad del tiempo de cocción). Consulte
la tabla del dorador para obtener más detalles.
Comentario importante:
Siempre que utilice el modo combinado (microondas + dorador), recuerde que los alimentos deben
colocarse en el estante alto, a menos que se indique otra cosa. Consulte las instrucciones de la siguiente
tabla.
Los alimentos deben darse vuelta, si se pretende lograr un dorado de ambos lados.
Guía para asar alimentos frescos con el dorador
Precaliente el grill con la función de dorador durante 2 o 3 minutos.
Utilice los niveles de potencia y los tiempos de esta tabla como pautas generales para usar el dorador.
Utilice guantes para horno al retirar la comida del horno de microondas.
Alimentos
frescos
Rebanadas de
pan tostado
Tomates
grillados
Tostada con
tomate y
queso
Tosta Hawái 4 uds. (1,1 lb) Microondas+Dorador 8-10½ -
Papas al horno 1,1 lb Microondas+Dorador 14-15½ -
Gratín de
papas
Tamaño porción Potencia Paso 1 (min) Paso 2 (min)
4 uds.
(0,05 lb c/u)
Instrucciones
Colocar las rebanadas de pan tostado una al lado de la otra sobre el estante alto.
0,9 lb (2 uds.) Microondas+Dorador 8-10½ -
Instrucciones
Cortar los tomates por la mitad. Colocar un poco de queso encima. Disponer en
círculo en una fuente de vidrio Pyrex plana. Colocar en el estante alto. Dejar
reposar durante 2-3 minutos.
4 uds. (0,7 lb) Microondas+Dorador 7-9½ -
Instrucciones
Primero, tostar las rebanadas de pan. Colocar la tostada con los ingredientes en la
rejilla alta. Dejar reposar durante 2-3 minutos.
Instrucciones
Primero, tostar las rebanadas de pan. Colocar la tostada con los ingredientes en la
rejilla alta. Dejar reposar durante 2-3 minutos.
Instrucciones
Cortar las papas por la mitad. Colocarlas en círculo sobre el estante alto con el lado
cortado hacia el dorador.
1 lb Microondas+Dorador 14½-16 -
Instrucciones
Colocar el gratín fresco en una fuente de vidrio Pyrex pequeña. Colocar la fuente
en el estante alto. Después de cocinar, dejar reposar durante 2-3 minutos.
Solo dorador 3-4 2-3
Guía de cocción
Español 39
MG11T5018CC_AA_MES.indd 39 2/4/2020 10:43:57 AM
Page 88

Guía de cocción
Resolución de problemas y código de información
Resolución de problemas y código de información
Sugerencias y trucos
Derretir miel cristalizada
Coloque ¾ oz (20 g) de miel cristalizada en un plato hondo pequeño de vidrio.
Caliente durante 20-30 segundos al 30 %, hasta que la miel se derrita.
Derretir gelatina
Coloque ⅓ oz (10 g) láminas de gelatina seca durante 5 minutos en agua fría.
Coloque la gelatina escurrida en un bol de vidrio Pyrex pequeño.
Caliente durante 1 minuto al 30 %.
Revuelva después de derretir.
Cocinar glaseados/baños (para pasteles y tartas)
Mezcle glaseado instantáneo (aproximadamente 3 cucharaditas) con 2⅔ cucharadas de azúcar (40 g) y
1 taza (250 ml) de agua fría.
Cocine destapado en un bol de vidrio Pyrex durante 3½ a 4½ minutos al 90 %, hasta que el glaseado o
baño esté transparente. Revuelva dos veces durante la cocción.
Cocinar mermelada
Coloque 21 oz (600 g o unas 2½ tazas) de frutas (por ejemplo, frutos rojos varios) en un bol de vidrio
Pyrex de un tamaño adecuado con tapa. Agregue 1½ taza (300 g) de azúcar para conservas y revuelva
bien.
Cocine con tapa durante 10-12 minutos al 90 %.
Revuelva varias veces durante la cocción. Viértala directamente en frascos pequeños para mermelada
con tapas a rosca. Ponga el frasco tapado boca abajo durante 5 minutos.
Cocinar budines/anes
Mezcle el polvo para budín con leche siguiendo las instrucciones del fabricante. Agregue azúcar si así se
indica. Revuelva bien. Siga las instrucciones y revuelva bien. Utilice un bol de vidrio Pyrex del tamaño
adecuado con tapa. Cocine con tapa durante 6½ a 7½ minutos al 90 %.
Revuelva bien varias veces durante la cocción.
Dorar láminas de almendra
Esparza de manera uniforme 1 oz (30 g) de almendras en láminas sobre un plato de cerámica mediano.
Muévalas varias veces mientras las dora por 3½ a 4½ minutos al 60 %.
Déjelas reposar durante 2-3 minutos en el horno. ¡Utilice guantes para horno cuando retire los
alimentos!
Resolución de problemas
Si experimenta cualquiera de los problemas que se detallan a continuación, intente las soluciones que
se ofrecen.
Problema Causa Acción
General
Los botones no se
pueden presionar
fácilmente.
No se muestra la hora. La función Eco (ahorro de energía)
El horno de microondas
no funciona.
El horno de microondas
se detiene cuando está
en funcionamiento.
Puede haber alguna sustancia
extraña entre los botones.
Para modelos táctiles: Humedad en
el exterior.
El bloqueo para niños está
activado.
está activada.
No se recibe corriente. Asegúrese de que se reciba
La puerta está abierta. Cierre la puerta y vuelva a
Los mecanismos de seguridad de
puerta abierta están cubiertos de
alguna sustancia extraña.
El usuario abrió la puerta para dar
la vuelta al alimento.
Retire la sustancia extraña y
vuelva a intentarlo.
Seque la humedad del exterior.
Desactive el bloqueo para niños.
Desactive la función Eco.
corriente.
intentarlo.
Retire la sustancia extraña y
vuelva a intentarlo.
Luego de dar vuelta el alimento,
vuelva a presionar el botón
START/+30s (INICIO/+30s) para
iniciar el funcionamiento.
40 Español
MG11T5018CC_AA_MES.indd 40 2/4/2020 10:43:57 AM
Page 89

Problema Causa Acción
La alimentación eléctrica
se apaga durante el
funcionamiento.
El horno de microondas estuvo
funcionando durante demasiado
tiempo.
El ventilador de enfriamiento no
funciona.
El horno de microondas intenta
funcionar sin alimentos dentro.
El horno de microondas no tiene
suciente espacio de ventilación.
Si el horno de microondas funcionó
mucho tiempo, déjelo enfriar.
Escuche el sonido del ventilador
de enfriamiento.
Coloque alimentos en el horno de
microondas.
Hay aberturas de entrada/salida de
ventilación en la parte delantera y
trasera del horno de microondas.
Deje el espacio indicado en la guía
de instalación del producto.
Se produce un ruido
como de un ligero
estallido durante el
funcionamiento y el
Se enchufan varios cables en el
mismo tomacorriente.
Cocinar alimentos sellados o usar
un recipiente con tapa puede
producir sonidos como de ligeros
estallidos.
Asigne un tomacorriente exclusivo
para el horno de microondas.
No use recipientes sellados
durante la cocción ya que pueden
explotar debido a la expansión de
su contenido.
horno de microondas no
funciona.
El exterior del horno de
microondas se calienta
demasiado durante el
funcionamiento.
El horno de microondas no tiene
suciente espacio de ventilación.
Hay aberturas de entrada/salida de
ventilación en la parte delantera y
trasera del horno de microondas.
Deje el espacio indicado en la guía
de instalación del producto.
Hay objetos encima del horno de
microondas.
Retire todos los objetos de encima
del horno de microondas.
Problema Causa Acción
La puerta no se puede
abrir fácilmente.
Hay restos de comida adheridos
entre la puerta y el interior del
Limpie el horno de microondas y
abra la puerta.
horno de microondas.
El calentamiento,
incluida la función de
calentar, no funciona
correctamente.
El horno de microondas no
funciona, se están cocinando
demasiados alimentos o el
recipiente es inadecuado.
Coloque una taza de agua en un
recipiente apto para microondas
y haga funcionar el microondas
durante 1 o 2 minutos para
vericar si el agua se calienta.
Reduzca la cantidad de alimentos
y vuelva a iniciar la función. Utilice
un recipiente de cocción con la
base plana.
La función de
descongelar no funciona.
La luz interior es débil o
no se enciende.
Se están calentando demasiados
alimentos.
La puerta quedó abierta
demasiado tiempo.
Reduzca la cantidad de alimentos y
vuelva a iniciar la función.
La luz interior puede apagarse
automáticamente con la función
Resolución de problemas y código de información
Eco activada. Cierre y vuelva a
abrir la puerta o presione el botón
STOP/Eco (CANCELAR/Eco).
Se emite una señal
sonora durante la
cocción.
La luz interior está cubierta de
alguna sustancia extraña.
Si se está utilizado la función
de auto cocina, la señal sonora
indica que es hora de dar la
vuelta al alimento que está
Limpie el interior del horno de
microondas y vuelva a vericarlo.
Luego de dar vuelta el alimento,
vuelva a presionar el botón
START/+30s (INICIO/+30s) para
reiniciar el funcionamiento.
descongelándose.
Español 41
MG11T5018CC_AA_MES.indd 41 2/4/2020 10:43:57 AM
Page 90

Resolución de problemas y código de información
Resolución de problemas y código de información
Problema Causa Acción
El horno de microondas
no está nivelado.
Se producen chispas
durante la cocción.
Al enchufar el horno
de microondas,
comienza a funcionar
inmediatamente.
Sale electricidad del
horno de microondas.
1. Gotea agua.
2. Sale vapor a través
de una grieta de la
puerta.
3. Queda agua
en el horno de
microondas.
El brillo de la luz en el
interior del horno de
microondas varía.
Cuando termina la
cocción, el ventilador
de enfriamiento sigue
funcionando.
El horno de microondas está
instalado sobre una supercie
irregular.
Se utilizan recipientes de metal
durante las funciones de horno de
microondas/descongelamiento.
La puerta no está cerrada
completamente.
La alimentación o el tomacorriente
no tienen una conexión a tierra
adecuada.
En algunos casos puede haber
agua o vapor según el alimento.
No es un defecto del horno de
microondas.
El brillo cambia de acuerdo con la
salida de potencia de cada función.
Después de la cocción, el
ventilador de enfriamiento
continúa funcionando durante unos
3 minutos para ventilar el horno
de microondas.
Instale el horno de microondas en
una supercie plana y estable.
No utilice recipientes de metal.
Cierre la puerta y vuelva a
intentarlo.
Conecte adecuadamente a tierra la
alimentación y el tomacorriente.
Deje enfriar el horno de
microondas y elimine el agua con
una toalla seca.
La salida de potencia cambia
durante la cocción y no indica
un mal funcionamiento. No es un
defecto del horno de microondas.
No es un defecto del horno de
microondas.
Problema Causa Acción
Plato giratorio
El plato giratorio se
desplaza o deja de dar
vueltas.
El plato giratorio se
arrastra cuando da
vueltas.
El plato giratorio
traquetea y hace ruido
cuando da vueltas.
No se colocó el anillo giratorio, o
este no se encuentra en su lugar.
El anillo giratorio no está colocado
en su lugar, hay demasiados
alimentos o el recipiente es
demasiado grande y toca la pared
del horno de microondas.
Hay restos de comida en la parte
inferior del horno de microondas.
Instale el anillo giratorio y vuelva
a intentarlo.
Disminuya la cantidad de
alimentos y no utilice recipientes
demasiados grandes.
Retire los restos de comida
adheridos en la parte inferior del
horno de microondas.
42 Español
MG11T5018CC_AA_MES.indd 42 2/4/2020 10:43:57 AM
Page 91

Problema Causa Acción
Dorador
Sale humo durante el
funcionamiento.
Durante la operación inicial,
sale humo de los elementos
calentadores cuando se usa el
No es ningún defecto, y después
de utilizar el horno de microondas
2 o 3 veces, no saldrá más humo.
horno de microondas por primera
vez.
Hay restos de comida en los
elementos calentadores.
Deje enfriar el horno de
microondas y retire los restos
de comida de los elementos
calentadores.
Los alimentos se encuentran
demasiado cerca del dorador.
Durante la cocción, coloque
los alimentos a una distancia
adecuada.
Los alimentos no están preparados
o dispuestos correctamente.
Disponga los alimentos de manera
adecuada.
Horno de microondas
El horno de microondas
no calienta.
Sale humo durante el
precalentamiento.
La puerta está abierta. Cierre la puerta y vuelva a
intentarlo.
Durante la operación inicial,
sale humo de los elementos
calentadores cuando se usa el
No es ningún defecto, y después
de utilizar el horno de microondas
2 o 3 veces, no saldrá más humo.
horno de microondas por primera
vez.
Hay restos de comida en los
elementos calentadores.
Deje enfriar el horno de
microondas y retire los restos
de comida de los elementos
calentadores.
Hay olor a quemado o a
plástico cuando se utiliza
Se utiliza un recipiente de plástico
o que no es resistente al calor.
Utilice un recipiente apto para
altas temperaturas.
el horno de microondas.
Problema Causa Acción
Hay malos olores
procedentes del
interior del horno de
microondas.
Residuos de comida o plástico se
han derretido y adherido a las
paredes.
Utilice la función de vapor y limpie
con un paño seco. Puede colocar
una rebanada de limón y hacer
funcionar el horno de microondas
para eliminar más rápidamente los
malos olores.
El horno de
microondas no cocina
adecuadamente.
La puerta del horno de microondas
se abre con frecuencia durante la
cocción.
Si se abre la puerta con frecuencia,
la temperatura interna desciende y
esto puede afectar el resultado de
la cocción.
Los controles del horno de
microondas no están congurados
correctamente.
El dorador o bien otros accesorios
no están insertados correctamente.
Se utiliza un tipo o tamaño de
recipiente inadecuado.
Congure correctamente los
controles del horno de microondas
y vuelva a intentarlo.
Inserte correctamente los
accesorios.
Utilice recipientes con la base
plana.
Resolución de problemas y código de información
Español 43
MG11T5018CC_AA_MES.indd 43 2/4/2020 10:43:58 AM
Page 92

Resolución de problemas y código de información
Especicaciones técnicas
Especicaciones técnicas
Código de información
Código de
información
C-d0
NOTA
Si la solución sugerida no resuelve el problema, comuníquese con el centro local de atención al cliente
de SAMSUNG.
Causa Acción
Limpie las teclas y verique si hay agua en la
Los botones de
control permanecen
presionados más de
10 segundos.
supercie que rodea las teclas. Si vuelve a ocurrir,
apague el horno de microondas durante más de
30 segundos y vuelva a ajustarlo. Si vuelve a
aparecer, llame a su centro local de atención al
cliente de SAMSUNG.
SAMSUNG se esfuerza en todo momento por mejorar sus productos. Por esta razón, las especicaciones
de diseño y las instrucciones para el usuario están sujetas a cambios sin previo aviso.
Modelo MG11T5018C*
Fuente de alimentación 120 V ~ 60 Hz
Consumo de energía
Potencia máxima
Microondas
Dorador (elemento calentador)
Potencia de salida 100 W / 1000 W (IEC-705)
Frecuencia de funcionamiento 2450 MHz
Dimensiones (An. x Al. x Prof.)
Exterior (incluida manija)
Cavidad del horno
Volumen 1.1 pies cúbicos
Peso
Neto 35.05 lb
1600 W
1600 W
1300 W
3
/8 x 113/4 x 163/4 mm
20
141/16 x 101/16 x 141/16 mm
44 Español
MG11T5018CC_AA_MES.indd 44 2/4/2020 10:43:58 AM
Page 93

Garantia limitada
Horno de microondas Samsung
GARANTÍA LIMITADA AL COMPRADOR CONSUMIDOR ORIGINAL CON PRUEBA DE COMPRA
El presente producto de la marca SAMSUNG, tal como lo provee y distribuye SAMSUNG ELECTRONICS
AMERICA, INC. (SAMSUNG) y lo entrega como nuevo, en su caja de cartón original al comprador
consumidor original, está garantizado por SAMSUNG contra defectos de fabricación de los materiales o
la mano de obra durante el período limitado de la garantía, a partir de la fecha original de compra, de:
Un (1) año para piezas y mano de obra
Diez (10) años para el magnetrón (Solo la pieza)
La presente garantía limitada es válida únicamente para productos comprados y usados en Estados
Unidos que fueron instalados, operados y mantenidos de acuerdo con las instrucciones adjuntas o
provistas con el producto. Para recibir el servicio técnico en garantía, el comprador debe comunicarse
con SAMSUNG en la dirección o el teléfono que guran más abajo con el n de que se determine el
problema y los procedimientos del servicio. El servicio técnico de la garantía solo puede ser prestado
por un centro de servicio técnico autorizado de SAMSUNG. Para recibir el servicio técnico en garantía
debe presentarse la factura original de compra fechada cuando así lo solicite SAMSUNG o el Centro de
Servicio autorizado Samsung como prueba de compra.
Samsung brindará servicio técnico a domicilio dentro del territorio contiguo de Estados Unidos durante
el período de garantía sin cargo, sujeto a la disponibilidad de los centros de servicio autorizados por
SAMSUNG dentro de la zona geográca del cliente. Si el servicio técnico a domicilio no está disponible,
SAMSUNG puede, a su elección, optar por transportar el producto hasta y desde un centro de servicio
técnico autorizado. Si el producto está ubicado en una zona en la que no se encuentra disponible ningún
centro de servicio autorizado por SAMSUNG, usted podrá ser responsable del cargo por transporte o
se le podrá requerir que transporte el producto a un centro de servicio autorizado por SAMSUNG para
recibir asistencia técnica.
Para recibir el servicio técnico a domicilio, el producto no debe presentar obstrucciones y debe ser
accesible para el agente del servicio técnico.
Durante el periodo de garantía aplicable, el producto se reparará o se reemplazará, o se devolverá
el importe de compra, a la entera discreción de SAMSUNG. SAMSUNG podrá usar piezas nuevas o
reacondicionadas para la reparación del producto, o reemplazar el producto por un producto nuevo
o reacondicionado. La vigencia de la garantía de las piezas y los productos reemplazados será por el
período restante de la garantía original del producto o por un período de noventa (90) días, el que sea
el más largo. Todas las piezas y los productos reemplazados son propiedad de SAMSUNG y deben ser
devueltos a SAMSUNG.
La presente garantía limitada cubre defectos de fabricación de los materiales o la mano de obra
que ocurran durante el uso normal y doméstico de este producto y no cubrirá lo siguiente: daños
que ocurran durante el envío, entrega e instalación y usos para los cuales el presente producto no
fue destinado; daños causados por modicación o alteración no autorizada del producto; producto
cuyos números de serie originales de fábrica fueron eliminados, desgurados, alterados en algún
modo o que no se puedan determinar fácilmente; daños cosméticos incluyendo rayones, hendiduras,
abolladuras y otros daños al acabado del producto; daño causado por abuso o mal uso, plagas,
accidente, incendio, inundación u otros casos fortuitos o de fuerza mayor; daño causado por el uso de
equipo, utilidades, servicios, piezas, suministros, accesorios, aplicaciones, instalaciones, reparaciones,
cableado externo o conectores no provistos ni autorizados por SAMSUNG; daño causado por línea
eléctrica o voltaje incorrecto, uctuaciones y sobretensión; daño causado por no operar y mantener el
producto de acuerdo con las instrucciones; instrucción a domicilio acerca de cómo usar el producto; y
servicio técnico para corregir una instalación que no cumpla con los códigos eléctricos o de plomería
o corrección de cableado eléctrico o tuberías (es decir, cableado doméstico, fusibles o mangueras de
entrada de agua).
El costo de reparación o reemplazo bajo estas circunstancias excluidas será responsabilidad del cliente.
Las visitas de un proveedor de servicio técnico autorizado para explicar funciones, mantenimiento o
instalación del producto no se cubren bajo esta garantía limitada. Comuníquese con Samsung al número
que gura abajo para obtener ayuda con cualquiera de estos problemas.
Samsung le aplicará un cargo de reparación por reemplazar un accesorio o por reparar un daño
cosmético si el daño a la unidad o el daño/pérdida del accesorio es causado por el cliente. Esto incluye:
• Puerta, manija, panel exterior o panel de control abollados, rayados o rotos
• Bandeja, rodillo de guía, acoplador, ltro o rejilla rotos o faltantes
Garantia limitada
Español 45
MG11T5018CC_AA_MES.indd 45 2/4/2020 10:43:58 AM
Page 94

Garantia limitada
Garantia limitada
SAMSUNG podrá enviar al cliente las piezas que considera que el usuario puede instalar por sí mismo.
A su discreción, SAMSUNG puede enviar un prestador de servicio técnico autorizado para que realice
dicha instalación.
EXCLUSIÓN DE GARANTÍAS IMPLÍCITAS
LAS GARANTÍAS IMPLÍCITAS, INCLUYENDO GARANTÍAS IMPLÍCITAS DE COMERCIABILIDAD O
APTITUD PARA UN PROPÓSITO EN PARTICULAR, ESTÁN LIMITADAS A UN AÑO O AL PERIODO MÁS
CORTO PERMITIDO POR LA LEY. Algunos estados no permiten limitaciones en cuanto al periodo de
vigencia de una garantía implícita, de tal forma que las limitaciones o exclusiones mencionadas
tal vez no se apliquen a usted en particular. Esta garantía le otorga derechos especícos, e incluso
usted también puede tener otros derechos que varían de un estado a otro.
LIMITACIÓN DE RECURSOS
EL ÚNICO Y EXCLUSIVO RECURSO ES LA REPARACIÓN DEL PRODUCTO, EL REEMPLAZO DEL PRODUCTO
O LA DEVOLUCIÓN DEL IMPORTE DE COMPRA, A DISCRECIÓN DE SAMSUNG, CONFORME A ESTA
GARANTÍA LIMITADA. SAMSUNG NO SERÁ RESPONSABLE POR DAÑOS ESPECIALES, IMPREVISTOS O
DERIVADOS, INCLUYENDO ENTRE OTROS, TIEMPO FUERA DEL TRABAJO, HOTELES Y/O COMIDAS EN
RESTAURANTES, GASTOS DE REMODELACIÓN, PÉRDIDAS DE INGRESOS O GANANCIAS, INCAPACIDAD DE
GENERAR AHORROS U OTROS BENEFICIOS INDEPENDIENTEMENTE DE LA TEORÍA LEGAL EN LA QUE
SE BASE EL RECLAMO, E INCLUSO SI SAMSUNG HA SIDO ADVERTIDA DE LA POSIBILIDAD DE DICHOS
DAÑOS. Algunos estados no permiten la exclusión o la limitación de daños imprevistos o derivados,
por lo que las limitaciones o exclusiones mencionadas tal vez no se apliquen a usted en particular. Esta
garantía le otorga derechos especícos, e incluso usted también puede tener otros derechos que varían
de un estado a otro.
SAMSUNG no garantiza el funcionamiento ininterrumpido o sin errores del producto. Ningún aval
o garantía otorgados por otra persona, compañía o corporación con respecto al presente producto
revestirá carácter vinculante para SAMSUNG.
Notas
Para obtener el servicio de garantía, comuníquese con SAMSUNG en:
Samsung Electronics America, Inc.
85 Challenger Road
Ridgeeld Park, NJ 07660
1-800-SAMSUNG (726-7864)
www.samsung.com/us/support
46 Español
MG11T5018CC_AA_MES.indd 46 2/4/2020 10:43:58 AM
Page 95

Notas
MG11T5018CC_AA_MES.indd 47 2/4/2020 10:43:58 AM
Page 96

Escanee el código QR* o visite
www.samsung.com/spsn
para ver nuestros útiles
videos instructivos y programas en vivo
* Requiere un lector instalado en su teléfono inteligente
Tenga en cuenta que la garantía de Samsung NO cubre las llamadas de servicio para explicar el funcionamiento del producto, corregir una instalación inadecuada o realizar tareas de limpieza o mantenimiento.
¿TIENE PREGUNTAS O COMENTARIOS?
PAÍS LLAME AL O VISÍTENOS EN LÍNEA EN
U.S.A
Consumer Electronics
CANADA 1-800-SAMSUNG(726-7864)
MG11T5018CC_AA_MES.indd 48 2/4/2020 10:43:58 AM
1-800-SAMSUNG (726-7864) www.samsung.com/us/support
www.samsung.com/ca/support (English)
www.samsung.com/ca_fr/support (French)
 Loading...