

Page 1
MF68-00389A-00
Page 2
Safety & Care
!
WARNING
To reduce the risk of fire or
electric shock, do not expose this
product to rain or moisture. The
apparatus shall not be exposed
to dripping or splashing and that
no objects filled with liquids, such
as vases, shall be placed on the
apparatus
CAUTION
RISK OF ELECTRIC SHOCK
DO NOT OPEN
CAUTION: TO REDUCE TH E RISK
OF ELECTR IC SHOCK, D O NOT REMOVE
COVER (OR BACK).
NO USER-SERVICEABL E PARTS INSIDE.
REFER SERVI CING TO QUALIFI ED SERVICE
PERSONN EL.
TIP
We highly recommend plugging
the Samsung Fliptop powered
by DIRECTV® into a surge
protector to prevent damage from
fluctuations in your power supply.
Safety & Care
Your Samsung Fliptop powered by DIRECTV® has been designed and manufactured to stringent
quality and safety standards. You should, however, be aware of the following important precautions
for safe and optimal use of the equipment.
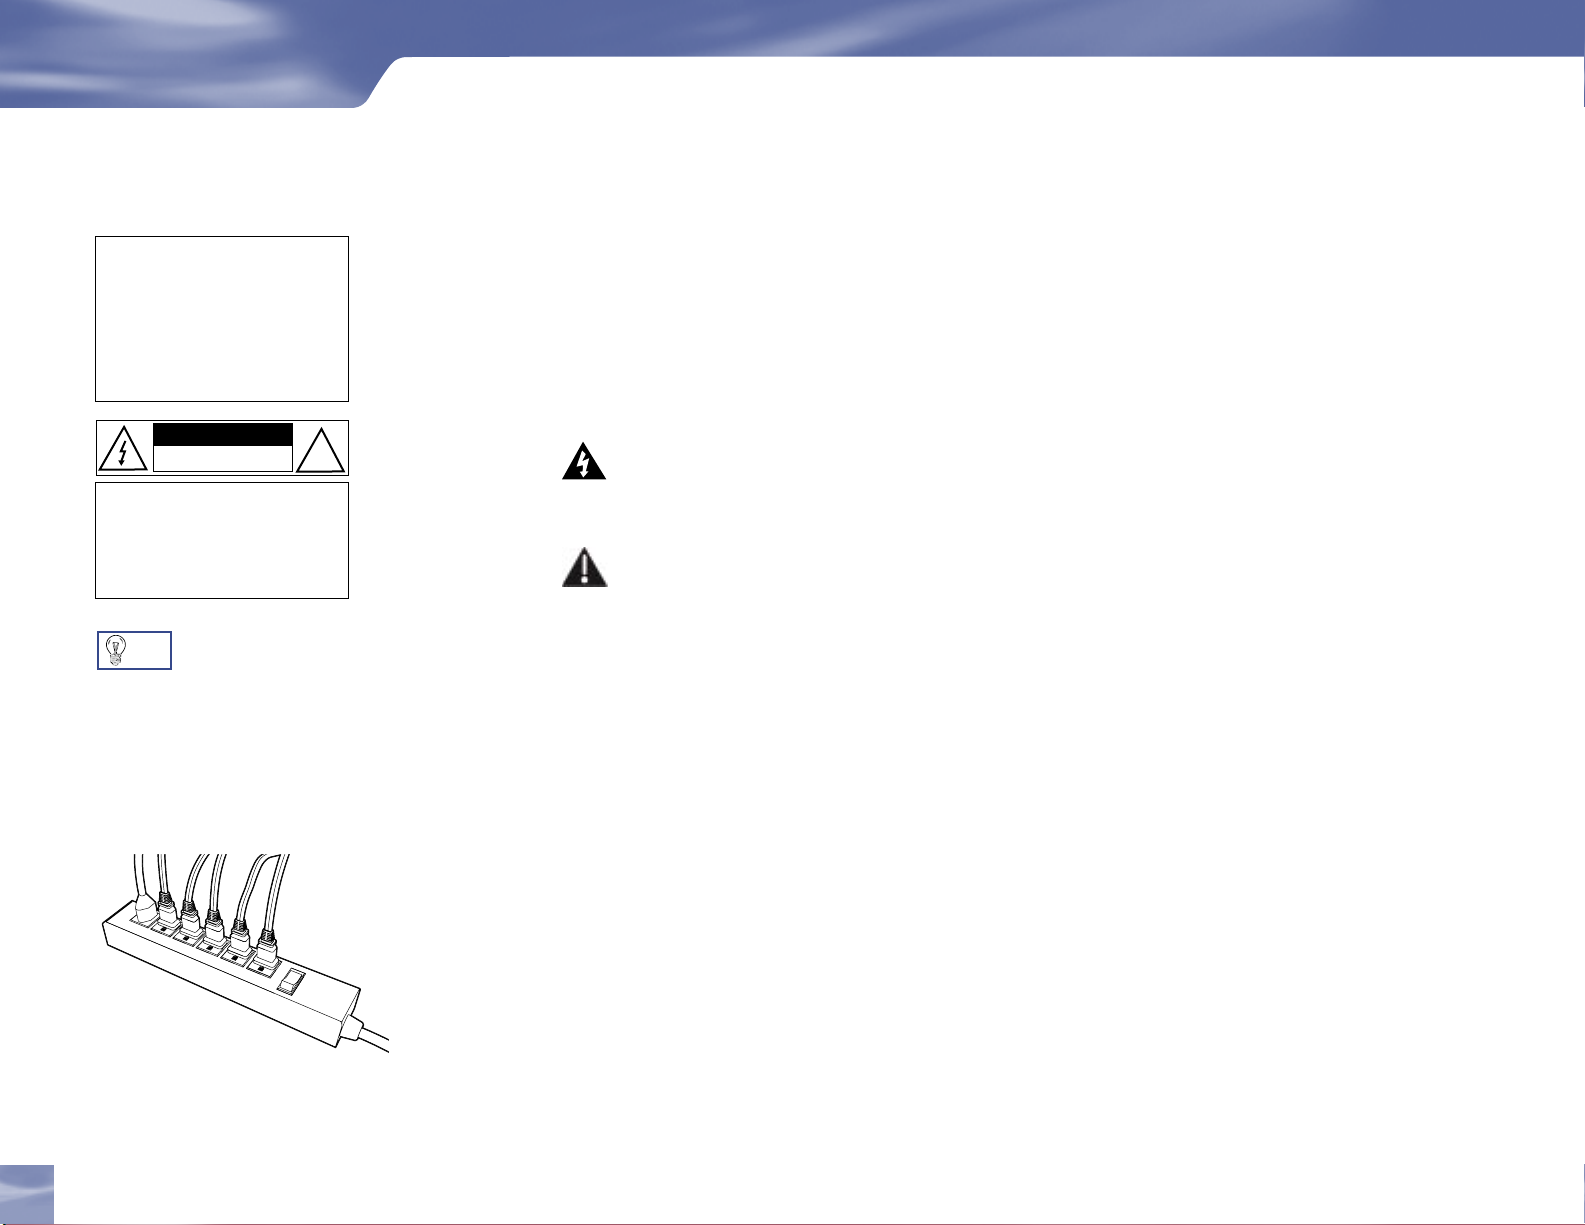
Meaning of symbols printed on the rear panel of the product:
• The “ bolt of lightning” indicates un-insulated material within your unit may cause an
electrical shock. For the safety of everyone in your household, please do not remove product
covering.
• The “exclamation point” calls attention to features for which you should read the enclosed
literature closely to prevent operating and maintenance problems.
Important Safety Instructions
1) When you use product, certainly read this instruction about safety.
2) When you use product, certainly keep this instruction about safety.
3) Heed all warnings.
4) Follow all instructions.
5) Do not use this apparatus near water.
6) Clean only with dry cloth.
7) Do not block any ventilation openings. Install in accordance with the manufacturer’s instructions.
8) Do not install near any heat sources such as radiators, heat registers, stoves, or other apparatus
(including amplifiers) that produce heat.
9) Do not defeat the safety purpose of the polarized or grounding-type plug. A polarized plug has
two blades with one wider than the other. A grounding type plug has two blades and a third
grounding prong. The wide blade or the third prong are provided for your safety. If the provided
plug does not fit into your outlet, consult an electrician for replacement of the obsolete outlet.
10) Protect the power cord from being walked on or pinched particularly at plugs, convenience
receptacles, and the point where they exit from the apparatus.
ii
Page 3
11) Only use attachments/accessories specified by the manufacturer.
12) Use only with the cart, stand, tripod, bracket, or table specified by the manufacturer, or sold with
the apparatus. When a cart is used, use caution when moving the cart/apparatus combination to
avoid injury from tip-over.
13) Unplug this apparatus during lightning storms or when unused for long periods of time.
14) Refer all servicing to qualified service personnel. Servicing is required when the apparatus has
been damaged in any way, such as power-supply cord or plug is damaged, liquid has been spilled
or objects have fallen into the apparatus, the apparatus has been exposed to rain or moisture, does
not operate normally, or has been dropped.
• If you operate it by wet hand, product may be broken down or you may be struck by electricity.
• Do not install near cooking instrument such as gas range and inflammable apparatus for cooking.
• CAUTION: Avoid moisture to reduce the risk of fire or electric shock. The Samsung Fliptop
powered by DIRECTV® should not be used near water (for example, bathtub, pool, damp
basement). Also, never spill liquid on the receiver, and do not place vases or other vessels
containing liquid on top of it.
• Ensure proper ventilation — the vent slots on the Samsung Fliptop powered by DIRECTV® must
be left uncovered to allow proper airflow to the unit. Blocking the airflow to the unit could impair
performance or damage your receiver and other components.
• Do not stack electronic components or other objects on top of the Samsung Fliptop powered by
DIRECTV®. Also, do not stack the receiver on top of a “hot component” such as an audio power
amplifier.
• Protect your components from power surges by connecting all the components before plugging any
power cords into the wall outlet. Use of a surge protector is also recommended.
• Don’t overload power outlets or extension cords, which can result in the risk of fire or shock.
It’s also important to use only the type of power source indicated on the marking label or in this
manual.
Safety & Care
The apparatus shall not be
exposed to dripping or splashing
and no objects filled with liquids,
such as vases, shall be placed on
the apparatus.
Note to Satellite Dish Installer
This reminder is provided to call your attention to articles 810 and 820 of the 2002 National Electrical Code. Refer
to article 810, in particular 810-1 and 810-15, for required grounding of the metal structure of the dish antenna.
Refer also to the 810-2 which, by reference to ar ticle 820, requires that the satellite dish coaxial cable shield be
connected to the grounding system of the building as close to the point of cable entry as practical.
iii
Page 4
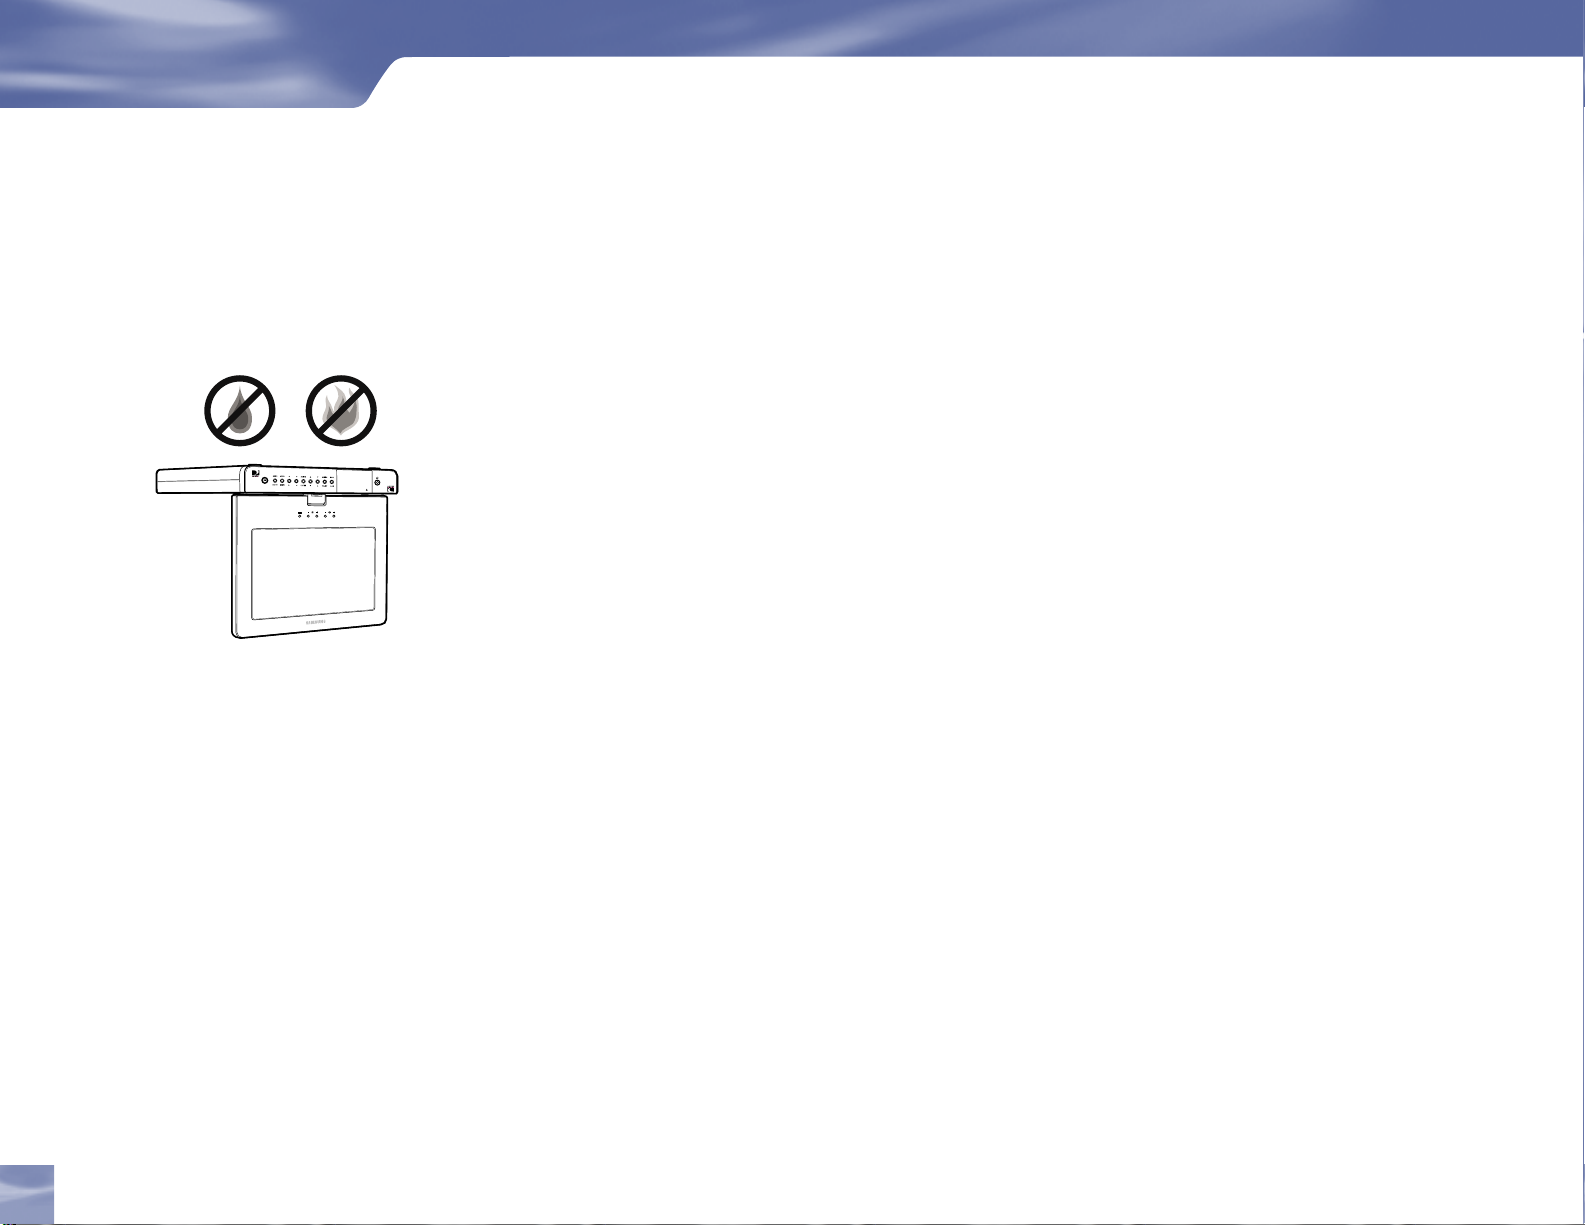
Safety & Care
IMPORTANT: Be sure not to place
your Samsung Fliptop powered
by DIRECTV® near anything WET
or HOT!
• To prevent electrical shock, this apparatus shall be connected to a mains socket outlet with a
protective earthing and fully inserted.
• Avoid audio hum or interference by inserting all cable plugs firmly into their jacks. Also, place
Audio/Video (A/V) cables to the sides of the LCD rather than down the middle once connected.
Try not to coil any twin-lead cables and keep them away from A/V cables as much as possible.
• Never insert objects of any kind into any openings in the Samsung Fliptop powered by
DIRECTV® (other than the DIRECTV® Access Card as detailed in this chapter).
• Place it on a flat, hard surface — do not operate the Samsung Fliptop powered by DIRECTV® on a
carpet or other padded surface.
• Always unplug your Samsung Fliptop powered by DIRECTV® before moving it.
• Leave the main power connector accessible the mains connector at the back of the unit in case of
emergency shutdown
• CAUTION: Electric Shock — never attempt to disassemble the Samsung Fliptop powered by
DIRECTV® yourself; always take it to a qualified service person when repair is required. Opening
or removing covers may expose dangerous voltage or other risks, and incorrect reassembly can
cause shock when receiver is subsequently used. Attempted self-repair may also void your warranty.
Changes or modifications not expressly approved by the party responsible for compliance (by the
warranty or by the manufacturer) could void the user’s authority to operate the equipment.
• Do not drop your Samsung Fliptop powered by DIRECTV® and always move it with care.
• Have your Samsung Fliptop powered by DIRECTV® professionally serviced (do not attempt to
service it yourself)
• Any changes or modifications in construction of this device which are not expressly approved by
the party responsible for compliance could void the user’s authority to operate the equipment.
• Do not use near water. accident may occur due to humidity such as short and electrical shock.
Also, it shall not be exposed to frying oil.
• If smoke occurs or fumes smell during stop operation. then, promptly stop power source and
remove plug. After this, contact service center.
• Pay attention to touch LCD with head during use.
For your information:
The identification sticker can be located underneath or on the back of your receiver.
The telecommunication network voltage used is the category number 3.
iv
Safety & Care
Page 5
Page 6
Using the Remote
R
MENU
1
2
3
4
5
6
7
8
9
0
VOL
MUTE PREV
DEFABC
JKL MNOGHI
TUV WXYZPQRS
DASH ENTER
CHAN
PA
G
E
INFO
BACK
ON
AV1 AV2 TV
OFF
TV
POWER
TV
INPUT
FORMAT
EXIT
LIST
GUIDE
ACTIVE
SELECT
PWR
Great TV viewing
is in your hands!
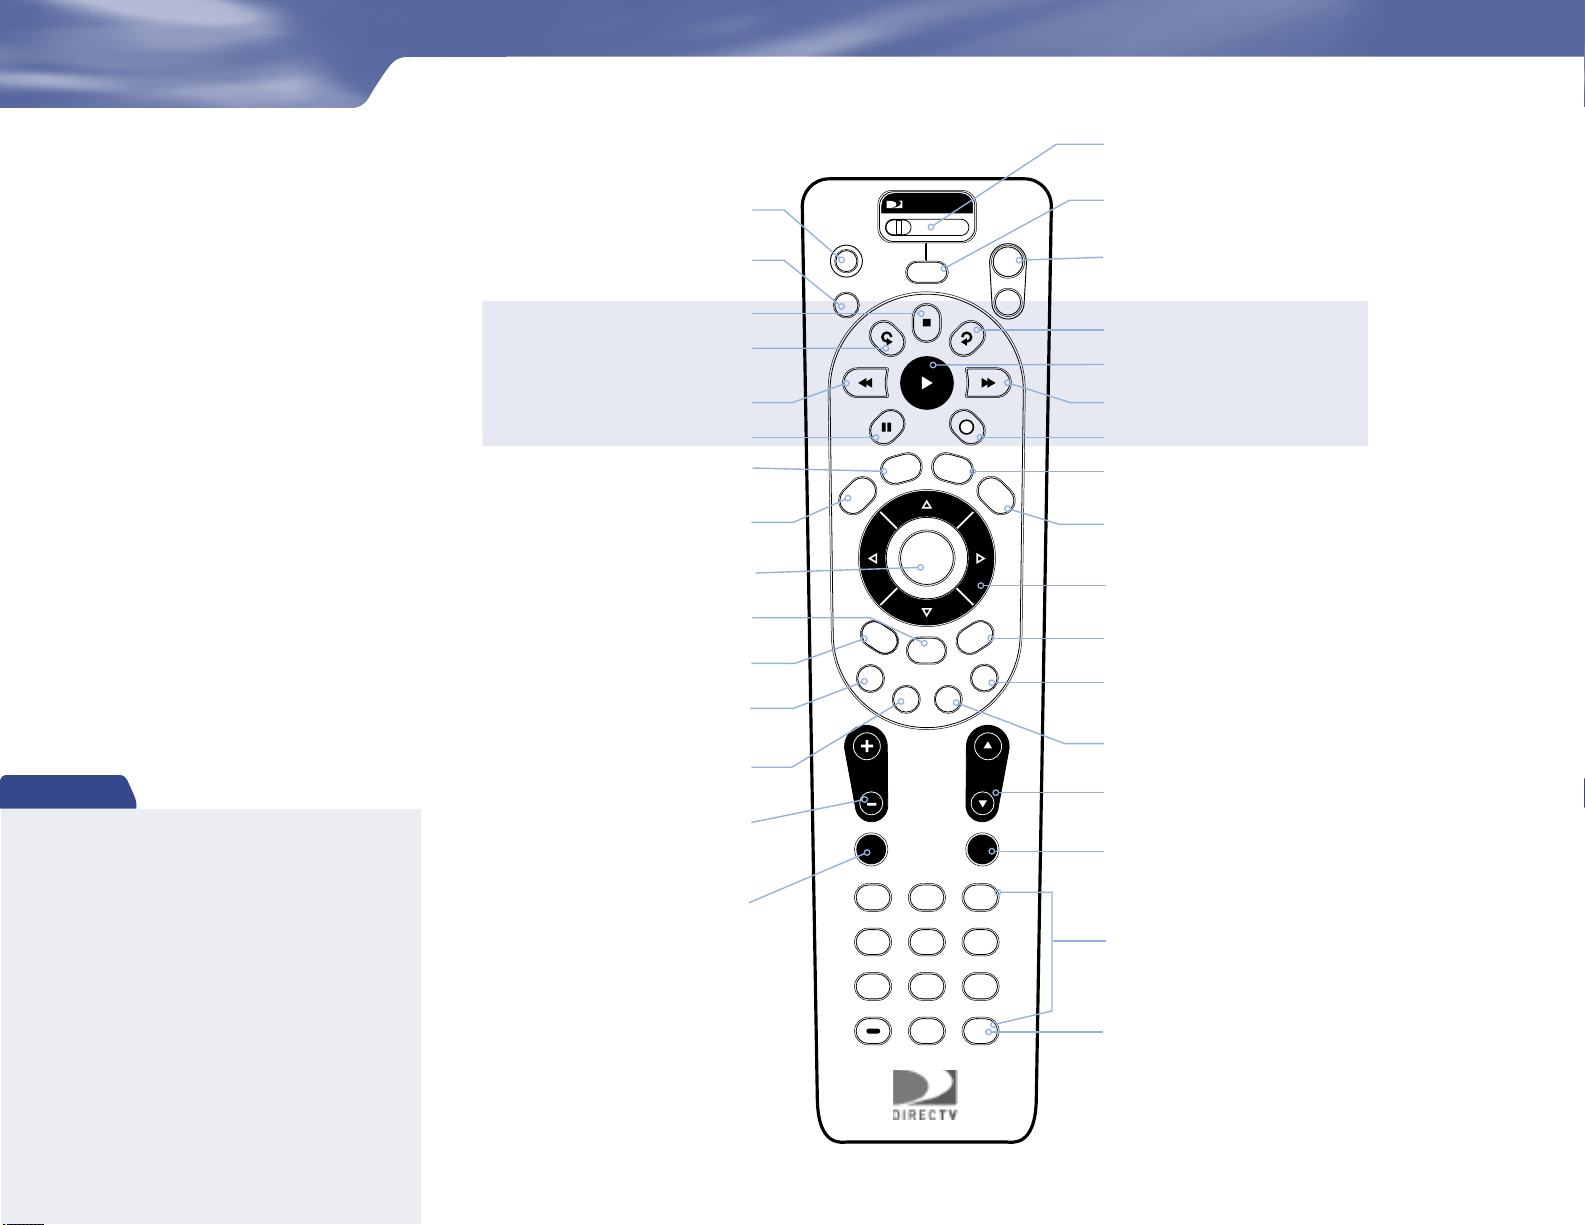
A good way to begin learning about your
Samsung Fliptop powered by DIRECTV®
is to familiarize yourself with the remote
control. You’ll fi nd further details
throughout the User Guide relating to
specifi c functions.
Navigating 101
You’ll fi nd you can get around nearly all
on-screen menus the same simple way.
Highlight… a menu or button by
using the ARROW keys (up, down,
left and right).
Choose it… by pressing SELECT while
the item is highlighted.
Note: Don’t worry about getting stuck in any
menu or on any item. You can always press
EXIT or BACK.
Quick Tip
To Place batteries in your remote control:
1. Remove cover from the battery
compartment by sliding it downward
2. Insert 2 AA batteries (supplied), matching
the positive (+) and negative (–) at each end
3. Slide the cover back on and you’re
good to go.
MODE SWITCH
Changes remote to control other equipment,
i.e., a VCR
TV INPUT
Not used in this model
Not used in this model
FORM AT
POWER
Turns your Receiver on and off when mode
switch is set to DIRECTV
TV POWER /ON /OFF
Turns your Receiver on and off when mode
switch is set to DIRECTV
STOP
ADVA NCE
Keys in this shaded area
can be programmed to
function with your VCR,
DVD player or stand-alone
DVR unit.
Access to special features services,
DIRECTV news and info.
Displays the on-screen programming guide
Chooses or activates any highlighted item
Brings up a helpful menu of settings and services
Takes you to the screen you visited previously
Function changes with context — for example, on
the left-most tab, press to jump to the right-most tab
Function changes with context — for example, on the
right-most tab, press to jump to the left-most tab
Raises or lowers volume (For the setup procedures
to use the Volume button, refer to page 12
“The Setup Procedures to Use the Volume Button on
Temporarily turns off sound volume
the Remote Control”.)
REPLAY
REWIND
PAUSE
ACTIVE
GUIDE
SELECT
MENU
BACK
RED
GREEN
VOLUME
MUTE
PLAY
FFWD
RECORD
LIST
Displays your To Do List of programs
EXIT
Exits any menu and returns
to last channel viewed
ARROWS
Move highlight to items in
whatever direction needed
INFO
Displays information on a chosen program or item
BLUE
Will provide future functionality
YEL LOW
Cycles through alternate audio tracks, when available
CHAN/PAGE
In live TV, changes channel up or down; in a menu,
such as the Guide, moves entire page up or down
PREV
Tunes to the last channel viewed
NUMBER KEYS & DASH
Tunes to a channel directly; also used to input numbers
and letters when needed in on-screen menus
ENT ER
Activates number entries more quickly; also,
sets a highlighted program for autotune
Page 7

Table of Contents
Chapter 1 – Introduction
Welcome ..............................................................................................................................2
About Your User Guide ....................................................................................................3
Chapter 2 – Getting Connected
Making the Right Connections .......................................................................................6
Helpful Hardware References .........................................................................................7
Getting Familiar ..............................................................................................................10
Mounting Instruction .....................................................................................................16
Choose the Setup That Suits You .................................................................................18
Guided Setup & Activation ...........................................................................................22
Chapter 3 – What’s On
Watching ...........................................................................................................................26
The Guide .........................................................................................................................29
Autotune ............................................................................................................................31
Pay Per View .....................................................................................................................33
Chapter 4 – The Quick Menu
What’s on the MENU? ...................................................................................................36
Settings ..............................................................................................................................37
Audio Options ................................................................................................................. 40
Category Sort ....................................................................................................................41
Pay Per View .....................................................................................................................42
Find By ..............................................................................................................................43
Date & Time .....................................................................................................................45
Favorites ............................................................................................................................46
Caller ID & Messages .....................................................................................................47
Parental Controls .............................................................................................................49
Chapter 5 – Other Information
Programming Your Remote Control ............................................................................54
Troubleshooting ...............................................................................................................56
Specification .....................................................................................................................64
Warranty ...........................................................................................................................66
vii
Page 8

Page 9

Chapter 1
2 Welcome
3 About Your User Guide
Page 10

Introduction
Welcome
Congratulations on choosing the best entertainment experience around!
With its astounding variety of channels and choices, crisp digital-quality picture and sound and
one-of-a-kind sports and events… DIRECTV® service offers everything you want in your television
experience. You can expect more than ever before, with access to over 250 channels, including over
30 premium movie channels, with something sure to please everyone in the family. DIRECTV® Pay
Per View offers a handy choice in recent hit movies, plus exciting live sports, concerts and specials.
There’s exclusive sports subscriptions for every taste and team. Even access to 36 commercial-free
channels and make 67 XM satellite radio music channels!
To deliver this unique programming and enhance your entertainment experience, the
Samsung Fliptop powered by DIRECTV® has been designed to be simple and user-friendly. You’ll
find that most features are self-explanatory, with on-screen directions to lead you through them.
2
Now that you’re part of the DIRECTV family, you’re sure to discover that using and watching TV is
easier and more enjoyable that ever.
Introduction
Page 11

About Your User Guide
About Your User Guide
Before you can start enjoying your new Samsung Fliptop powered by DIRECTV® and service, you’ll
need to know more about getting everything up and running, as well as learn all about how to use
our great features.
This User Guide will walk you through how to connect your equipment and other
Audio/Video (A/V) components, show how to customize your setup, and explain how to activate
your programming. You’ll fi nd full details on all of our easy-to-follow system features.
Plus, there’s important safety, troubleshooting and warranty information.
For some quick references for using and setting up your system, check out handy info on:
the remote control… inside front cover
helpful equipment defi nitions… page 7
glossary of icons… inside back cover
important phone numbers & resources… back cover
If you’re having your system professionally installed, be sure to thoroughly check out the
Safety & Care section, then you may want to go ahead and skip to Guided Setup & Activation on
page 22.
look here for
chapter title
Introd ucti on
Welcome
6
tainment experience around!
Welcome
hoices, crisp digital-quality picture and sound, and
Congratulations on choosing the best enter
®
service offers everything you’d want in y
With its astounding variety of channels and c
vie channels, with something sure to please
one-of-a-kind sports and events … DIRECTV
television experience. You can expect more than ev
®
Pay Per View offers a handy choice in recent hit mo
225 channels, including over 30 premium mo
. There’s exclusive sports subscriptions for ev
everyone in the family. DIRECTV
hannels!
exciting live sports, concerts and specials
team. Even 31 commercial-free music c
programming and enhance your enter
To deliver this unique
®
System has been designed to be simple and
DIRECTV
features are self-explanatory, with on-screen directions to lead y
So, welcome to the family. You’re sure to disco
and more enjoyable than ever
look here for
page # and
section title
er before, with access to over
tainment experience, the
user-friendly. You’ll fi nd that most system
ou through them.
ver that using and watching TV is easier
look here for
section title
DIR ECTV
g u p and ru nning , as well as lea rn a ll a
About Your User Guide
Before you can star t enjoyi ng your new
to know more about getting everythi n
how to connect your equipme nt and other aud io/video
navigating a round our TV world .
-tunes you’ll nee d to make, and ex plain how to a ctiva
This User’s Guide wil l walk you thr ough
and
components, show the per sonali zed fine
our
programming. You’l l fin d ful l deta ils on al
your
there’s importa nt safety, t roubleshoot ing
vies, plus
For some quick refe rences for u sing and setti
ery taste and
remote control…on the m anual in side fron
• the
• helpful equip ment defi nitions…on page 7
icons…on the inside back cover
• glossary of
• important phone numbers & resources…
If you’re havin g your system p rofessiona lly
Setup secti on on page 26 and go from t
Guided
the Safety and P recaution s portion of the
So, ready to get s tarted?
Just turn the pa ge!
look here for
page # and chapter
#
®hhh
Syst em and service, you’ ll ne ed
l of our ea sy-to-fol low syst em feat ures. Plus,
warranty information.
ng up your system , check out handy in fo on:
t cover
on the back cover
installed, you may want t o just j ump ahea d to ou
here. Be sure, t hough, to thorough ly check ou t
next section fi rst!
About Your User Gui de
bout
te
r
6
Chapter 1
Ready to get started? Just turn the page!
Chapter 1
3
Page 12

Page 13

Chapter 2
6 Making the Right Connections
7 Helpful Hardware References
10 Getting Familiar
16 Mounting Instruction
18 Choose the Setup That Suits You
22 Guided Setup & Activation
Page 14
Getting Connected
AUDIO
VIDEO IN
SATELLITE IN
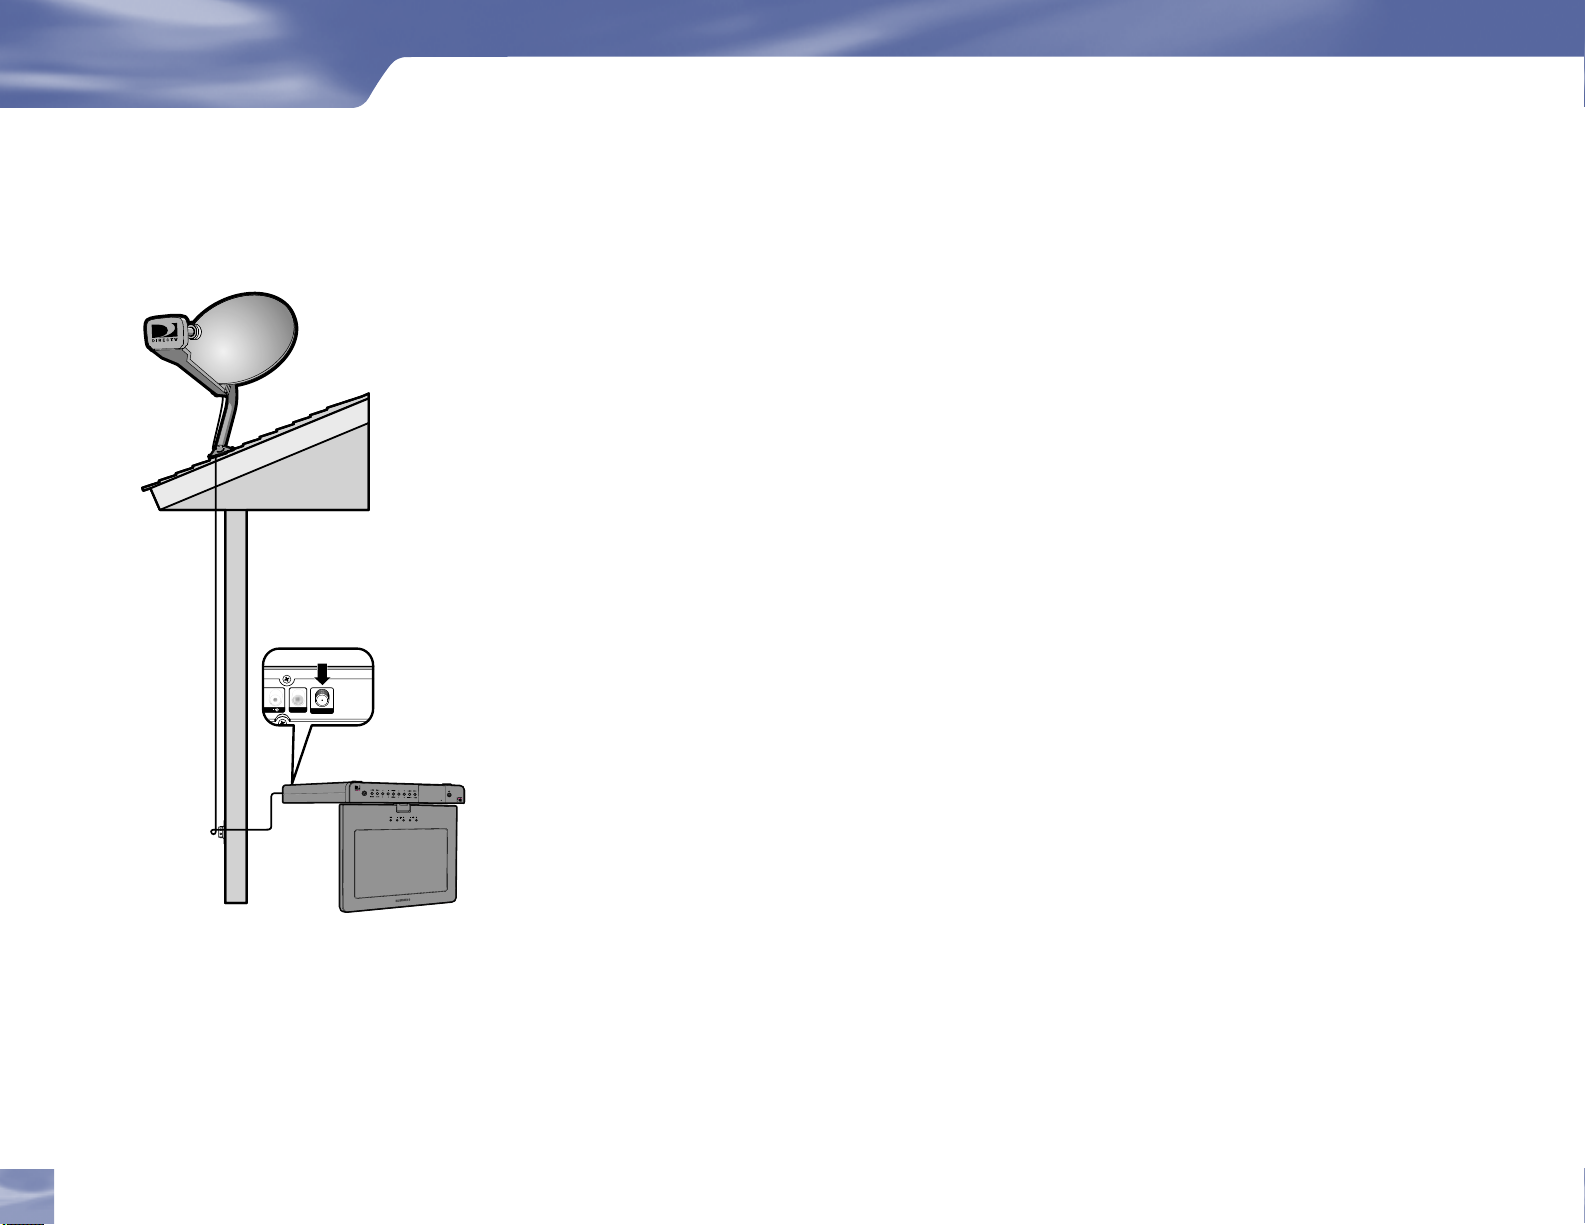
Making the Right Connections
Ready to connect your Samsung Fliptop powered by DIRECTV® and your other components?
Whether you’re having your system professionally installed or handling it
yourself, be sure to read over the following few pages to familiarize yourself
with some important tips for safety and care.
Before you begin
Your satellite dish antenna must be installed before you can begin following the procedures in this
User Guide. (Professional installation is highly recommended.) Your dish needs to be mounted in
a position where it has access to the satellite signals, and RG-6 coaxial cables must be run into the
room(s) where your receiver(s) will be located. If you choose to install the dish yourself, see the
separate instruction manual that came with your satellite dish antenna.
Package Contents
The following items are included with your Samsung Fliptop powered by DIRECTV® :
Access card User Guide Phone cord
Remote Control & batteries Power cord Adapter (DC 12V, 4A)
Spacer screws Spacer : male, females Power Adapter Bracket
Adapter Bracket screws Template Screen Cleaning Cloth
Making the Right Connections
6
Page 15
D I R E C T V
Helpful Hardware References
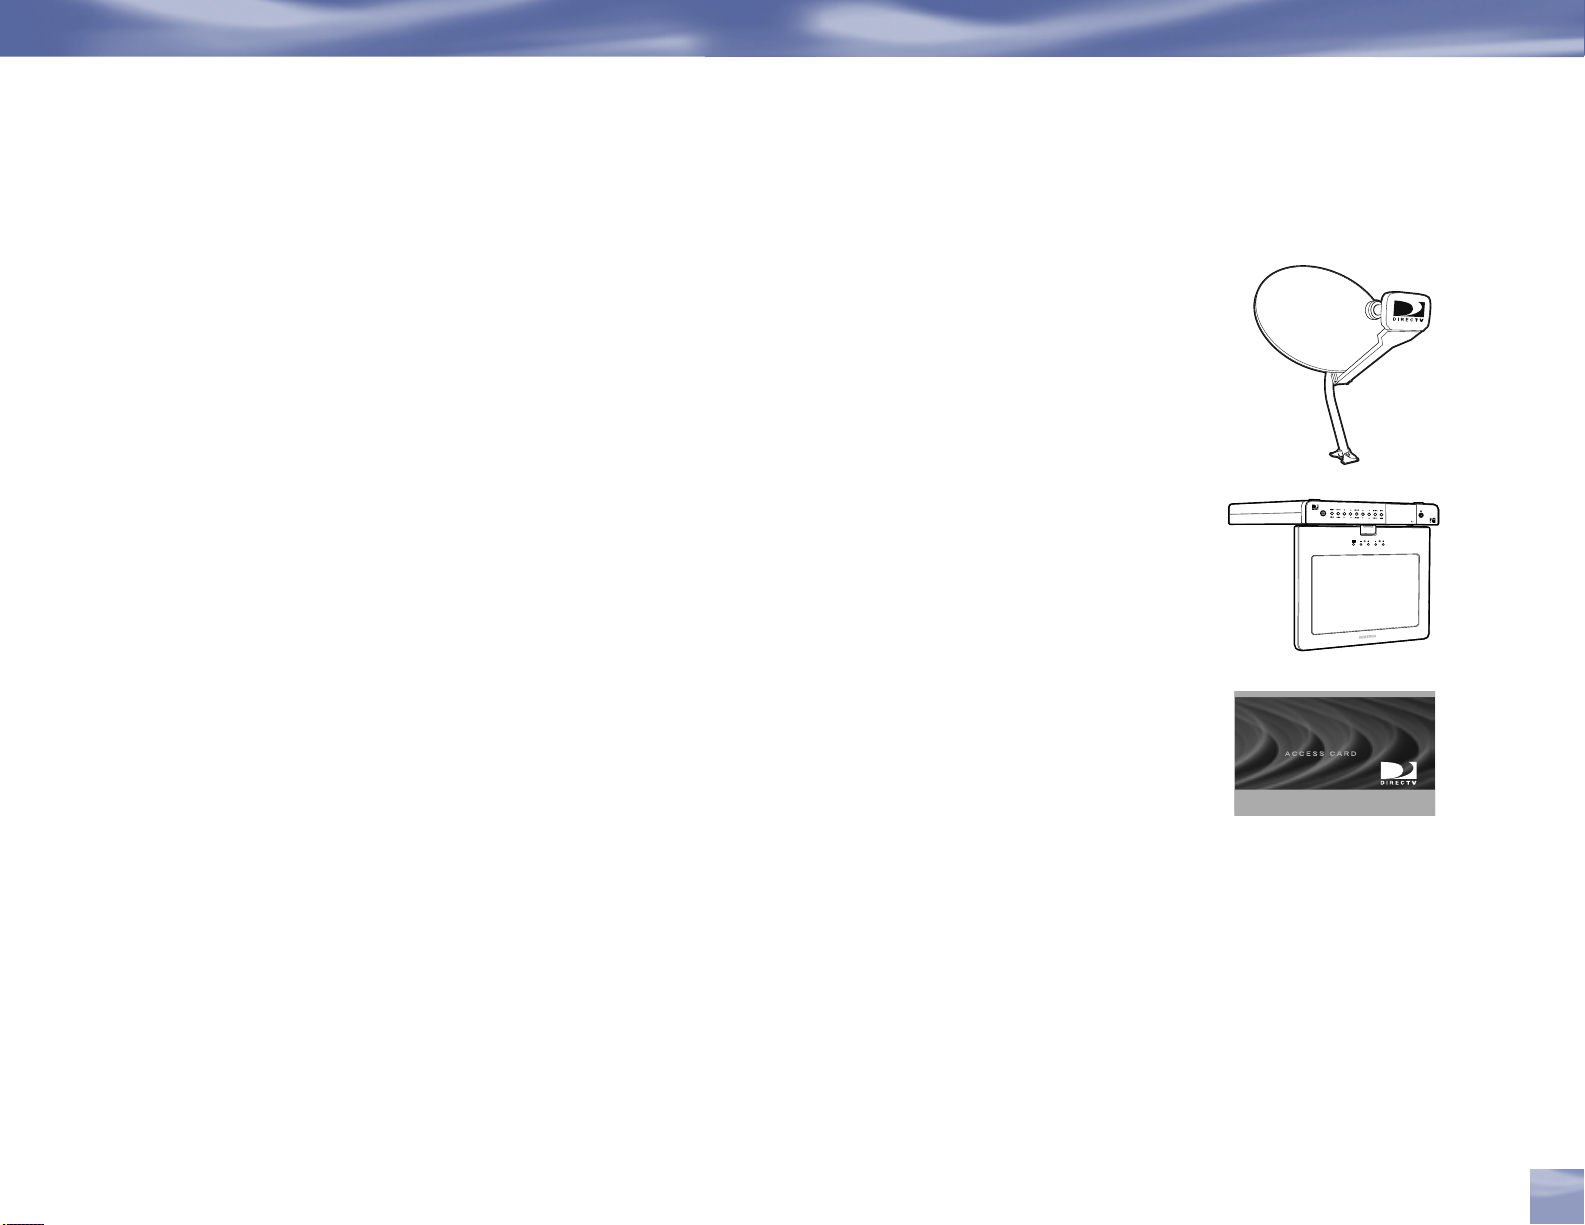
General
Satellite Dish Antenna
This is your “dish” and related hardware, affixed to your roof or other surface, which picks up
the broadcast signals from our satellites.
Helpful Hardware Reference
Samsung Fliptop powered by DIRECTV
®
Your Samsung Fliptop powered by DIRECTV® picks up the signal from your satellite dish
antenna and translates it into viewable TV programming.
DIRECTV System
Refers to the combination of the above components (plus the remote control).
Access Card
Contains information about your DIRECTV® service. It must be properly inserted for your
receiver to work and to activate your programming.
Chapter 2
7
Page 16
Getting Connected
L
V
R
Note you should use the Telephone
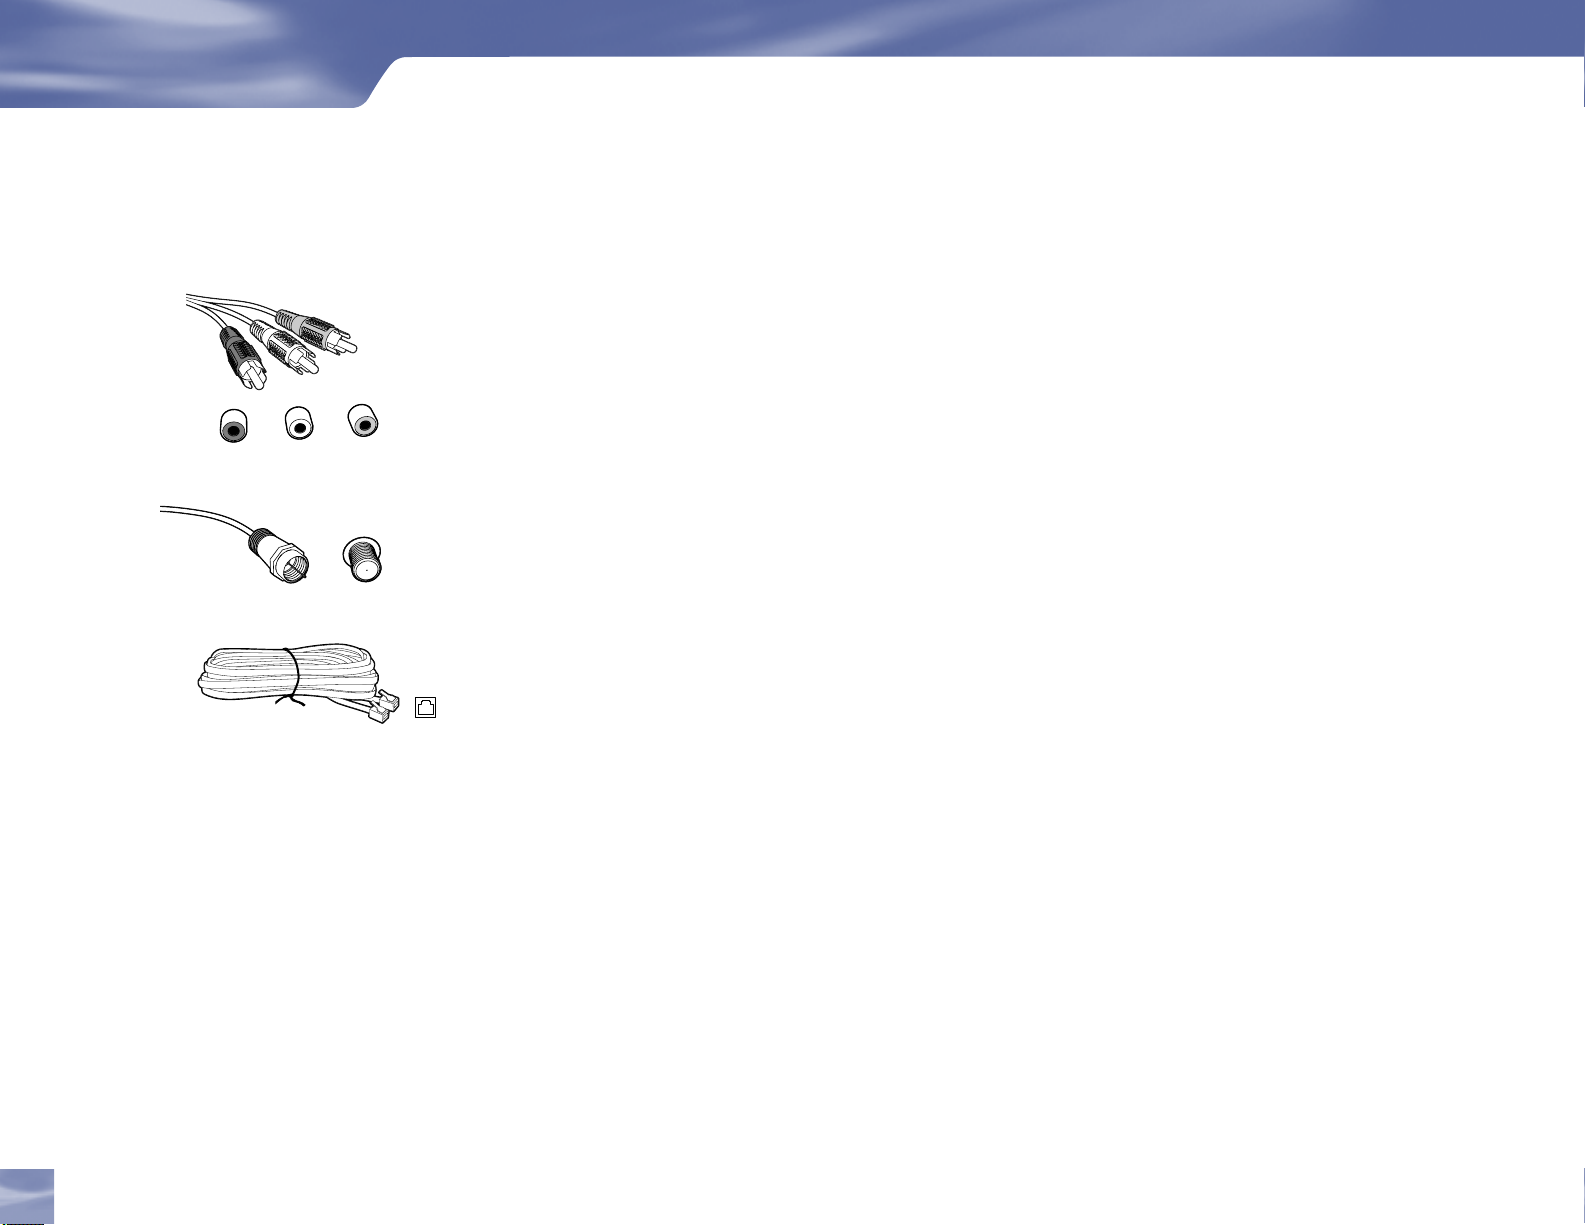
Cables & Connections
Audio/Video (A/V) Jack
VCR or other component equipped with external output connectors. (A/V cable is not supplied)
RF Jack and Coaxial Cable (F-type)
The RF jacks on the receiver are labeled SATELLITE IN. Note: Be sure to use RG-6 coaxial cable
when connecting from the satellite dish to the Samsung Fliptop powered by DIRECTV®.
(Cable is not supplied)
Telephone Jack and Cord
The telephone line cord is required to connect your Samsung Fliptop powered by DIRECTV® to a
land-based telephone line if you choose to subscribe to DIRECTV programming. The phone line
connection is used to periodically call DIRECTV. You will need an RJ11-type modulator jack (the
most common type of phone jack). This equipment uses the following USOC jack: RJ11c. Note:
Do not connect your receiver to a digital PBX phone system — doing so may permanently damage
your equipment and void your warranty.
line cord which is supplied with the
machine. If you are replacing it with
the other vendor’s part, it should be
minimum AWG #26 or larger gage.
Note that not all cables come with
your digital satellite receiver; you
may need to purchase additional
cables depending on your setup.
Helpful Hardware Reference
8
Page 17

Line Splitter
The line splitter lets you plug both a telephone and your Samsung Fliptop powered by
DIRECTV® into the same wall jack if necessary. (Not included with your Samsung Fliptop
powered by DIRECTV®.)
Optional Audio/Video and Electronics
Surge Protector
Devices that protect electronic equipment from power fluctuations. Highly recommended
to prevent damage to your DIRECTV System.
Helpful Hardware Reference
Chapter 2
9
Page 18
Getting Connected
1
4
3
2 5 6
7 8 9
10
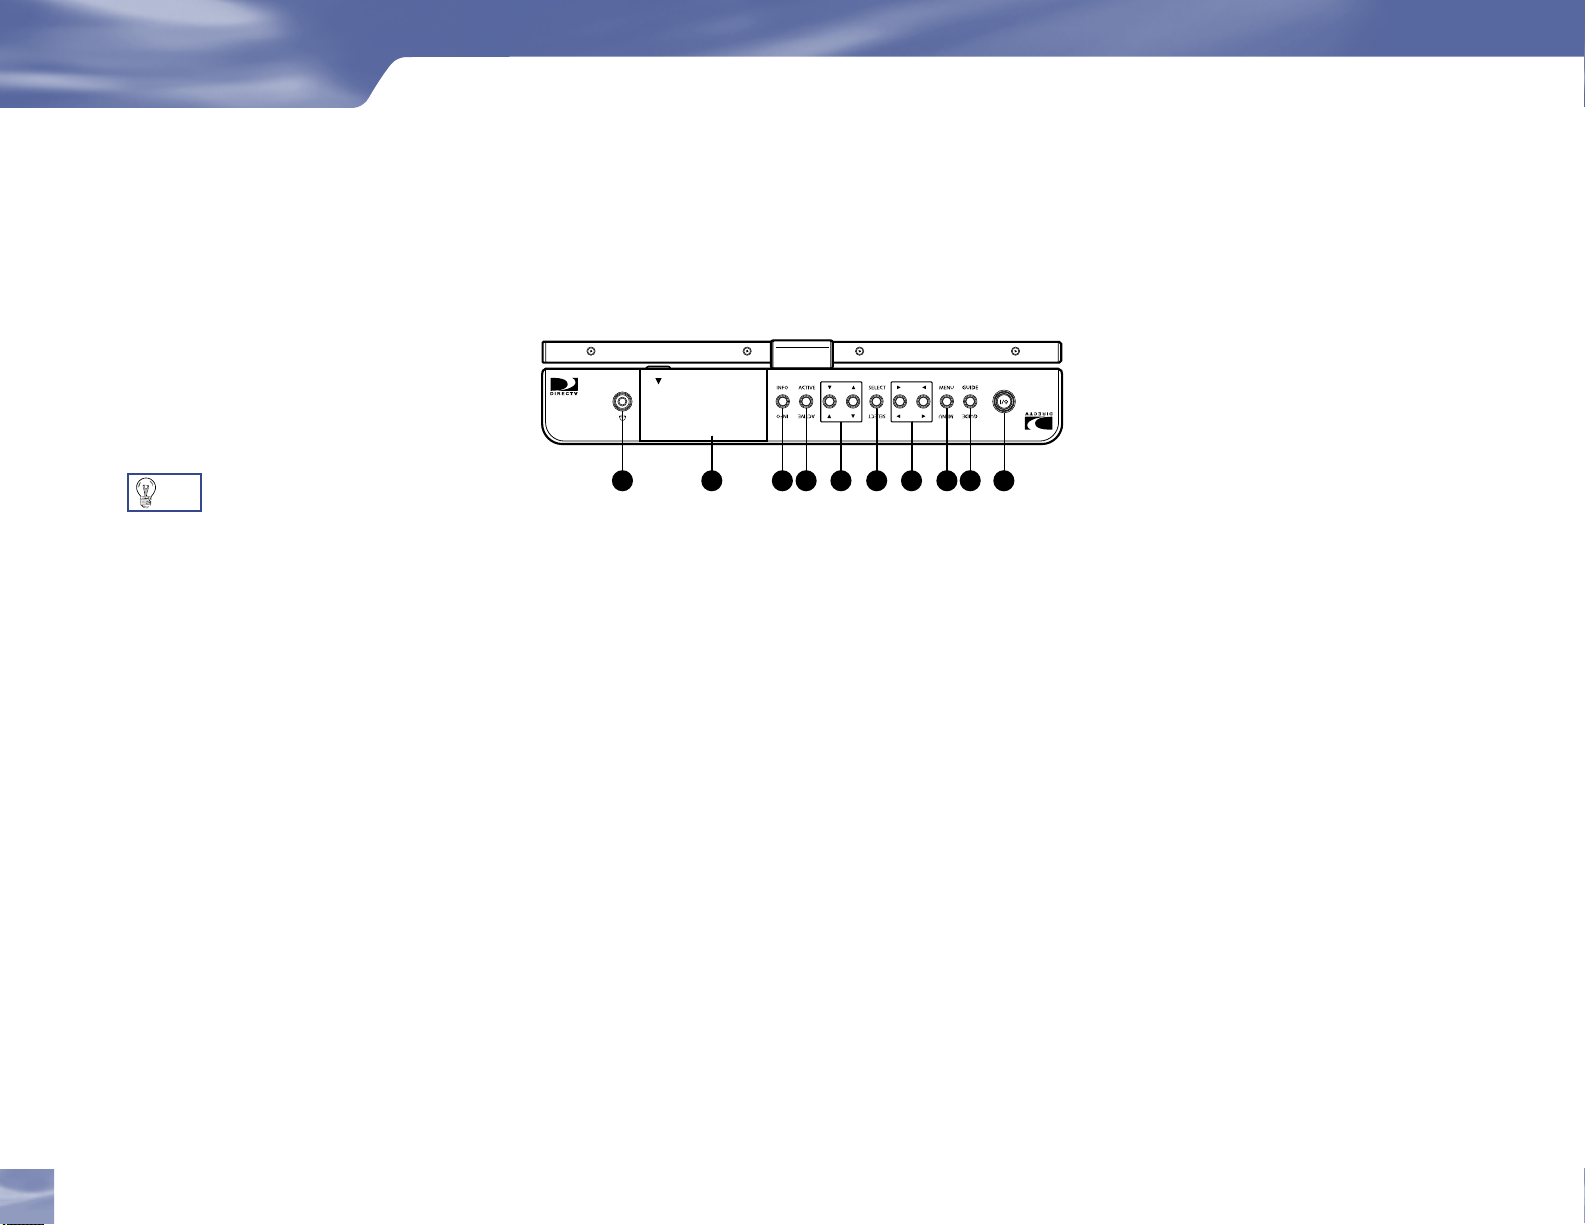
Getting Familiar
Receiver Front Panel
TIP
Prolonged use of headphones at
a high volume may damage your
hearing.
Turn the headphone volume down
to the minimum setting before
connecting.
Your equipment may not look exactly like the model illustrated.
1) Headphones jack – You can connect a set of headphones to your Samsung Fliptop powered by
DIRECTV® if you wish to watch a television program without disturbing the other people in
the room. (Cable is not supplied)
2) DOOR PANEL – The access card slot and reset button are located behind the door panel.
3) INFO – Displays channel banner or other relevant information to a highlighted item.
4) ACTIVE – Access to special features and content.
5) / ARROWS – Move the on-screen highlight up, down
6) SELECT – Chooses the item highlighted
7) /ARROWS – Move the on-screen highlight left or right
8) MENU – Brings up the helpful Quick Menu of settings and services
9) GUIDE – Displays the guide sort screen, so you can sort the Guide to display only channels of a
particular kind.
10) POWER – Turns your Samsung Fliptop powered by DIRECTV® on or off. Your Samsung
Fliptop powered by DIRECTV® still receives messages and other necessary information when
power is turned off or in standby.
10
Getting Familiar
Page 19

Insert your DIRECTV Access Card
Getting Familiar
Locate the access card that came
packed with your Samsung Fliptop
powered by DIRECTV® materials
and insert the card, facing upward,
fully into the slot.
Insert the smartcard with the gold
colored chip facing upwards.
Goldchip
upward
If the Samsung Fliptop
powered by DIRECTV®
is installed in the inverse
direction (e.g. when
installed in the kitchen),
insert the smart card so
that the gold colored chip
faces downwards.
Receiver Rear Panel
Your equipment may not look exactly like the model illustrated.
1) PHONE JACK – Connects the Samsung Fliptop powered by DIRECTV® to a telephone line.
The Samsung Fliptop powered by DIRECTV® requires a land-based telephone line connection to
communicate periodically with your program provider.
Goldchip
downward
2) DC IN 12V – Use to connect the power cord for your DIRECTV Receiver.
3) LOW SPEED DATA – You can connect your receiver to future services and accessories as they
become available. Additional hardware may be required.
4) AUDIO (R and L) – Connect a set of audio cables from another component, such as a VCR or stereo.
5) VIDEO – Connect the second RCA-type composite VIDEO jack from another device, such as a VCR.
You must also connect the AUDIO cables when using the VIDEO connection.
6) SATELLITE IN – Use to connect the Samsung Fliptop powered by DIRECTV® to the satellite dish
antenna.
Chapter 2
11
Page 20
Getting Connected
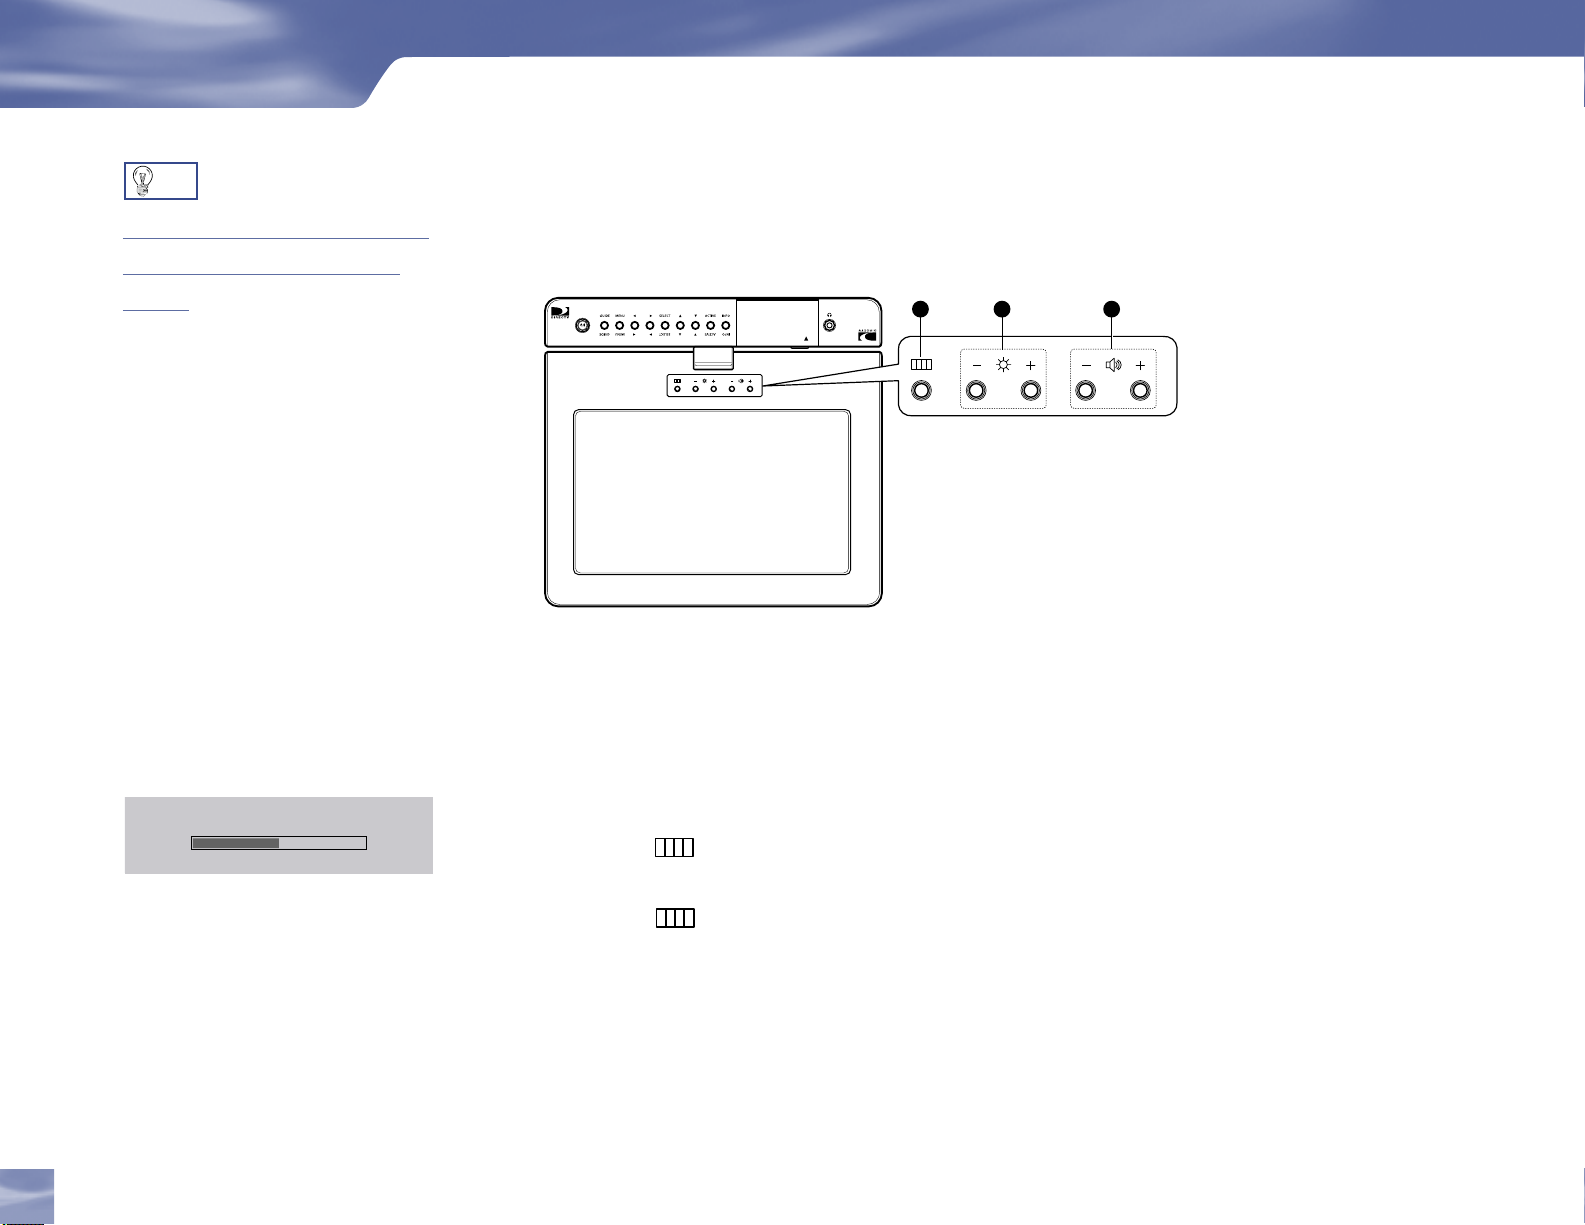
3311 22
VOLUME
VOLUME
TIP
The Setup Procedures to Use the
Volume Button on the Remote
Control
If the Volume button on the remote control
does not work or the remote control has
been reset, set up the Volume button
according to the following procedures.
1) Move the mode switch to TV.
2) Press and hold the MUTE and
SELECT keys until a light above the
mode switch on the remote flashes
twice.
3) Enter 1-0-7-6-6 in turn.
4) Move the switch back to DIRECTV
Receiver LCD Panel
Your equipment may not look exactly like the model illustrated.
1) MENU – The menu appears and the previous level menu exits.
2) –/+ Sign – Adjust an option value respectively.
12
12
Getting Familiar
3) VOLUME – Use to control the volume.
Operations on the LCD Panel
1) Press the on the LCD front panel.
2) Use the –/+ Sign to move to an item you wish to select.
3) Press the to select the item you wish to adjust.
4) Use the –/+ Sign to adjust according to your preferences.
The adjustment item is highlighted in red.
The new setting is applied.
5) When finishing the setting, select EXIT from the menu to exit.
Even when not selecting the EXIT menu, the menu automatically disappears after a few
seconds.
Page 21
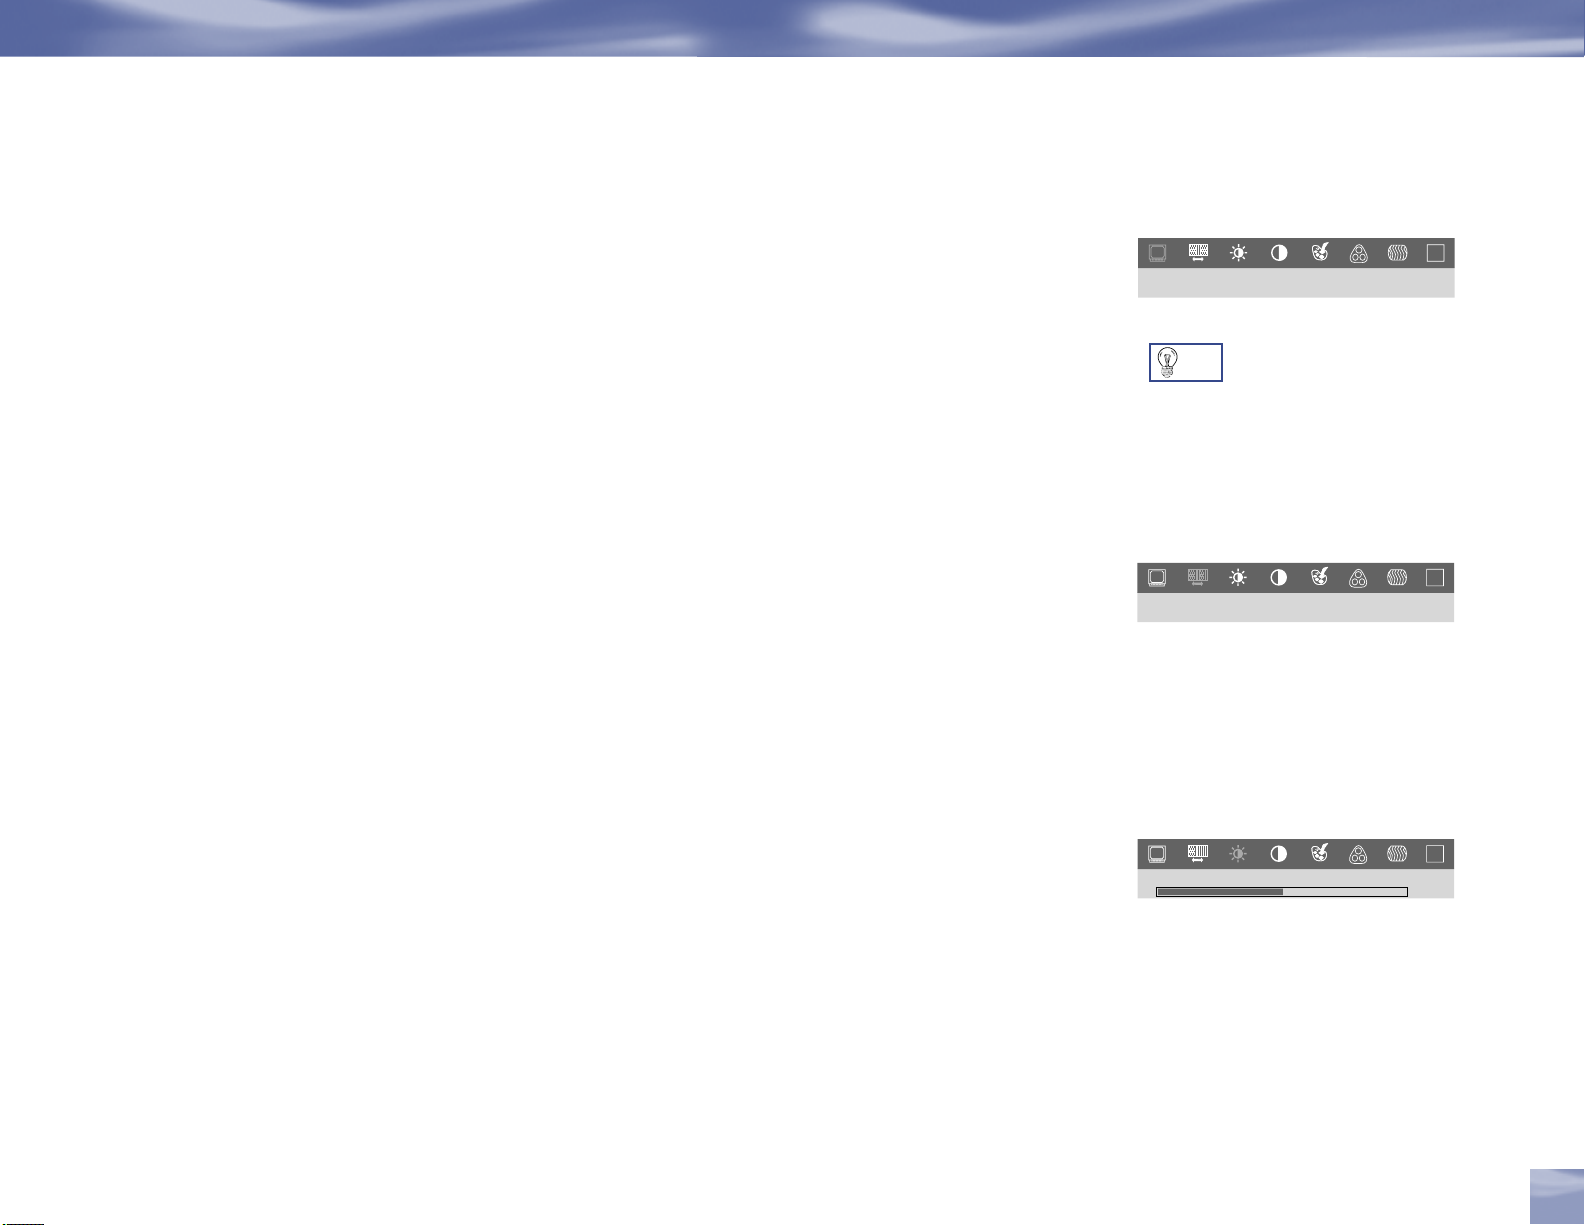
Video Source
DI RECT VEx tern al
So urc e
R
G B
EXIT
NO RMAL INVE RSE
WI DE
Scaling
R
G B
EXIT
Br ig ht ne ss
R
G B
EXIT
50
You can select an external device (DVD, VCR, etc) or satellite.
External: Select to use an external source.
DIRECTV: Select to watch DIRECTV Programs.
Scaling
Selects the picture size which best corresponds to your viewing requirements.
WIDE : Sets the picture to 16:9 wide mode.
NORMAL : Sets the picture to 4:3 normal mode.
INVERSE : The picture is displayed inversely. When installing the Samsung Fliptop powered
by DIRECTV® under the kitchen, the LCD panel is installed facing in the opposite direction.
Therefore invert the picture to see it in the correct position.
Getting Familiar
TIP
Make sure the external device is
connected to the port at the back
of the Samsung Fliptop powered by
DIRECTV®.
Brightness
Brightens or darkens the entire screen. The detailed data of the images in the dark areas can be
lost if the brightness is not adjusted to the proper level. Adjust the brightness for the best viewing
conditions.
Chapter 2
13
13
Page 22
Getting Connected
Ex it
R
G B
EXIT
Sa tu ra ti on
R
G B
EXIT
50
Hu e
R
G B
EXIT
50
Sh ar pn es s
R
G B
EXIT
8
Co nt ra st
R
G B
EXIT
50
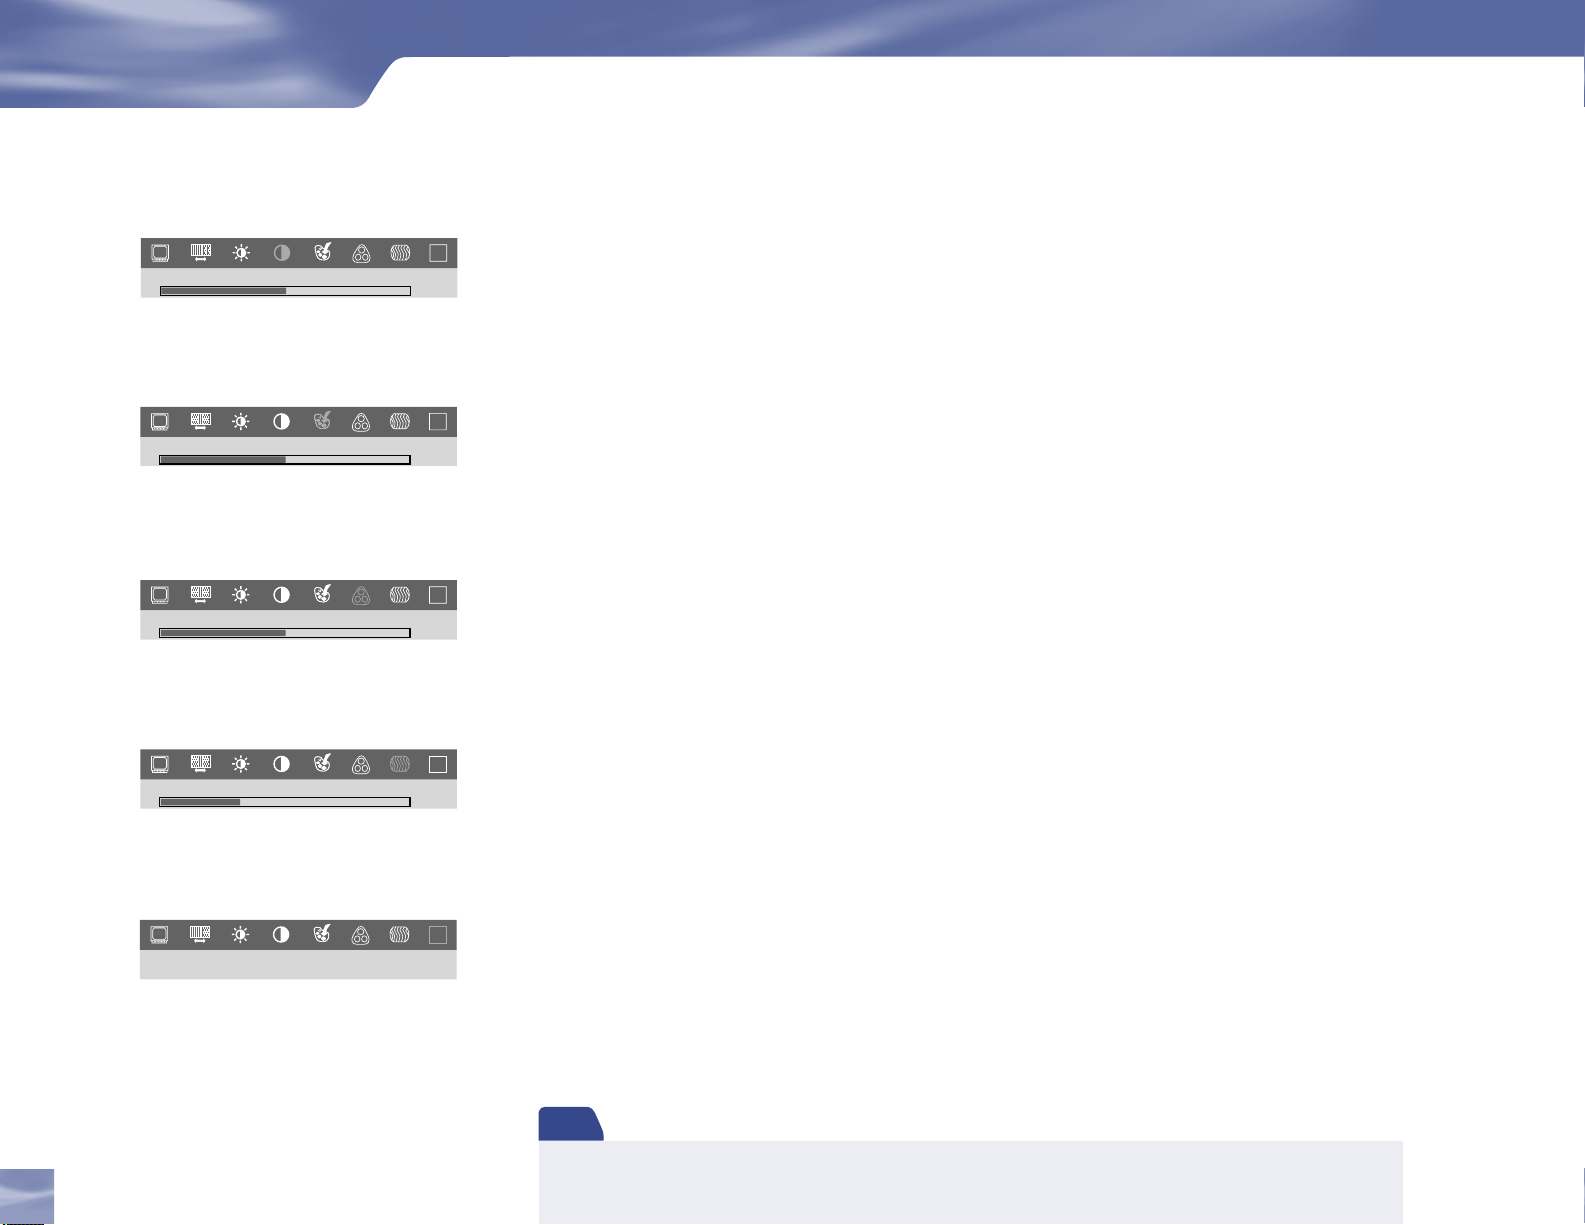
Contrast
Adjusts the difference in brightness between the bright and dark areas on the screen.
Determines the crispness of the images.
Saturation
Adjusts the color saturation.
Hue
Adjusts the color tint.
14
Getting Familiar
Sharpness
Adjusts the difference between the lightest and darkest areas of the display.
Exit
Use to exit from the LCD picture adjustment menu.
Note
To initialize the settings, press the + key on the LCD panel 3 times in succession, press the - key once,
press the -key (Volume Down) once and then press the Menu key once.
Page 23
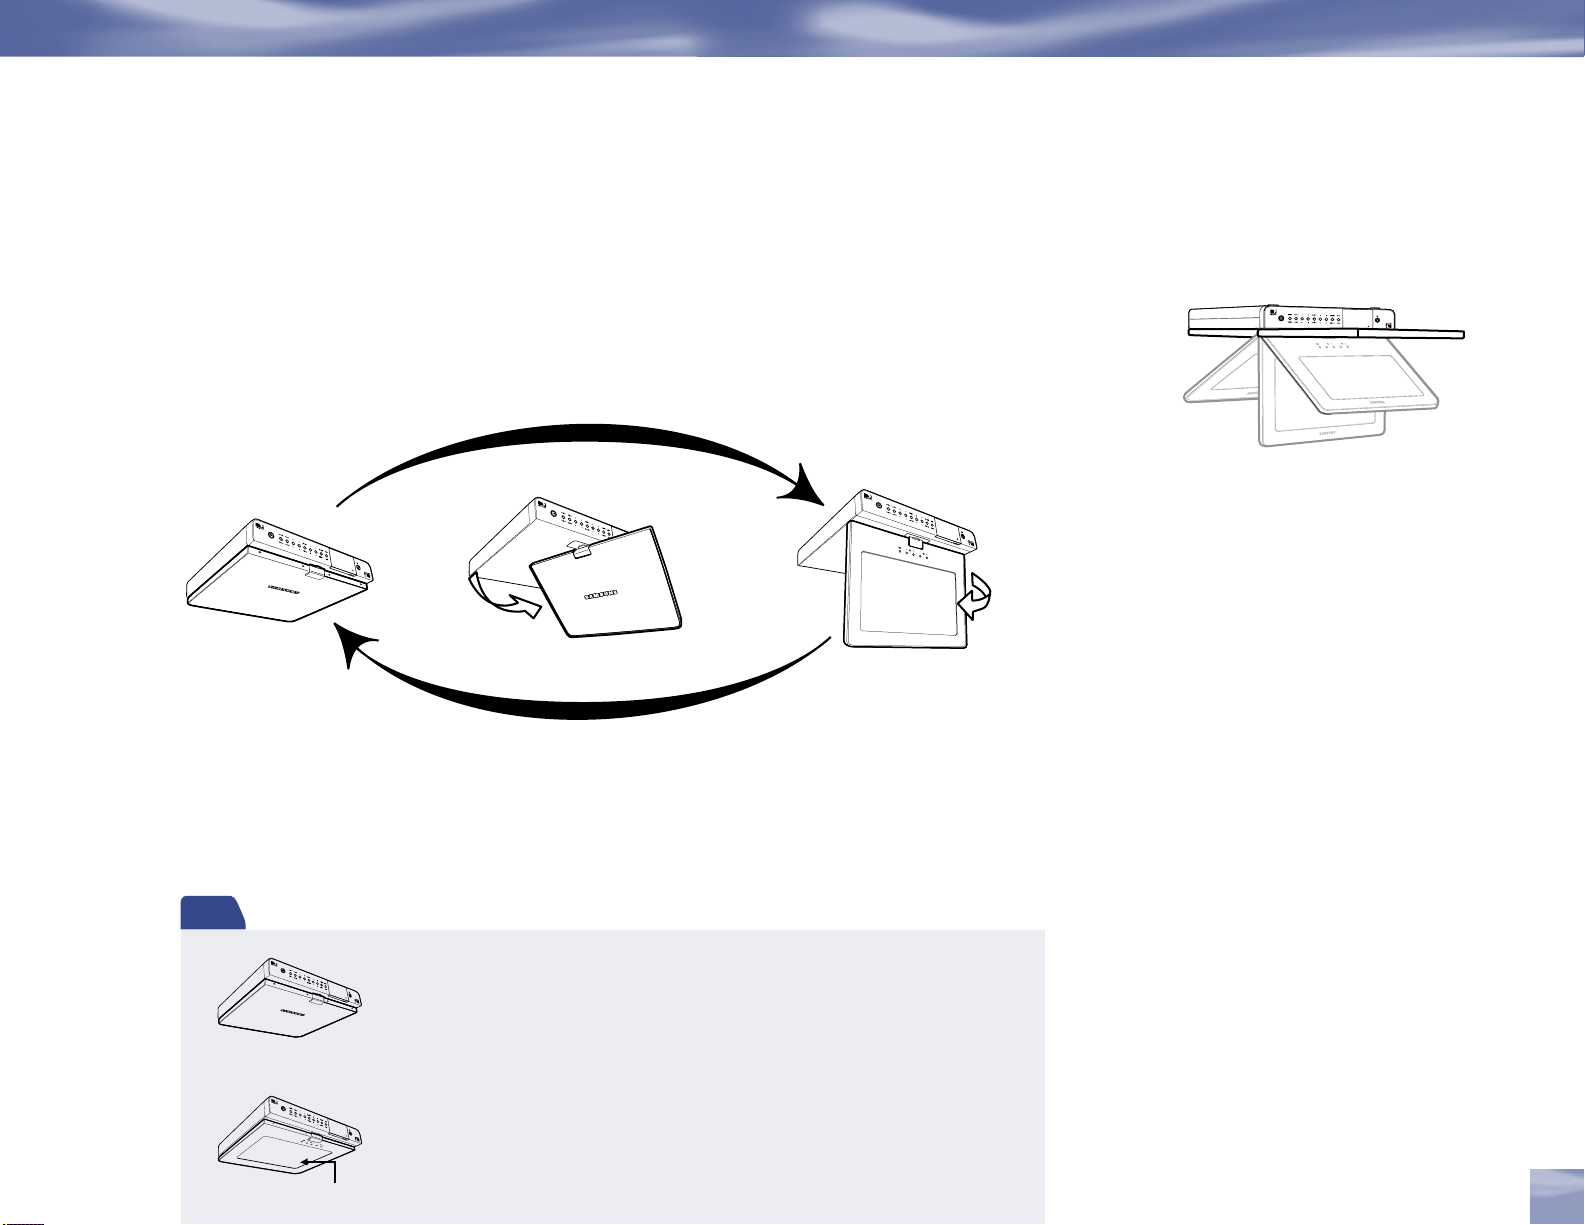
To use LCD display
It is very convenient to be able to rotate the LCD display at various angles and bend it down or
straighten it up.
Getting Familiar
You can bend it down or
straighten it up.
Rotating the LCD panel
excessively when it is folded
Note
LCD Displ ay panel
While the power is on, folding the LCD panel so that the Samsung logo faces
up and the screen is not viewable turns the LCD off. (If you unfold the LCD
panel, it turns on again)
Even if audio is output while the LCD is turned off, this is for the radio channel
and is not a problem. (When External mode is selected, Audio is not output.)
The LCD panel key LEDs except for the Power key LED are turned off.
If you fold the LCD panel so that the screen faces upwards, the screen does
not turn off.
forwards, might cause the
surface to be scratched.
Chapter 2
15
Page 24
Getting Connected
Mounting Instruction
Installation Notes
Samsung Electronics is not responsible for any damages to the product or harm to customers
when the installation is done by the customer.
The package contents and parts supplied for the mount are subject to change without prior notice.
Caution
Since the unit is heavy, be careful when installing the unit.
To reduce the risk of fire, do not place any heating or cooking appliance beneath this unit
Do not use this unit near water, for example, near a bathtub, wash bowl, laundry tub, in a wet
basement, a swimming pool or lake.
Kitchen Mounting
16
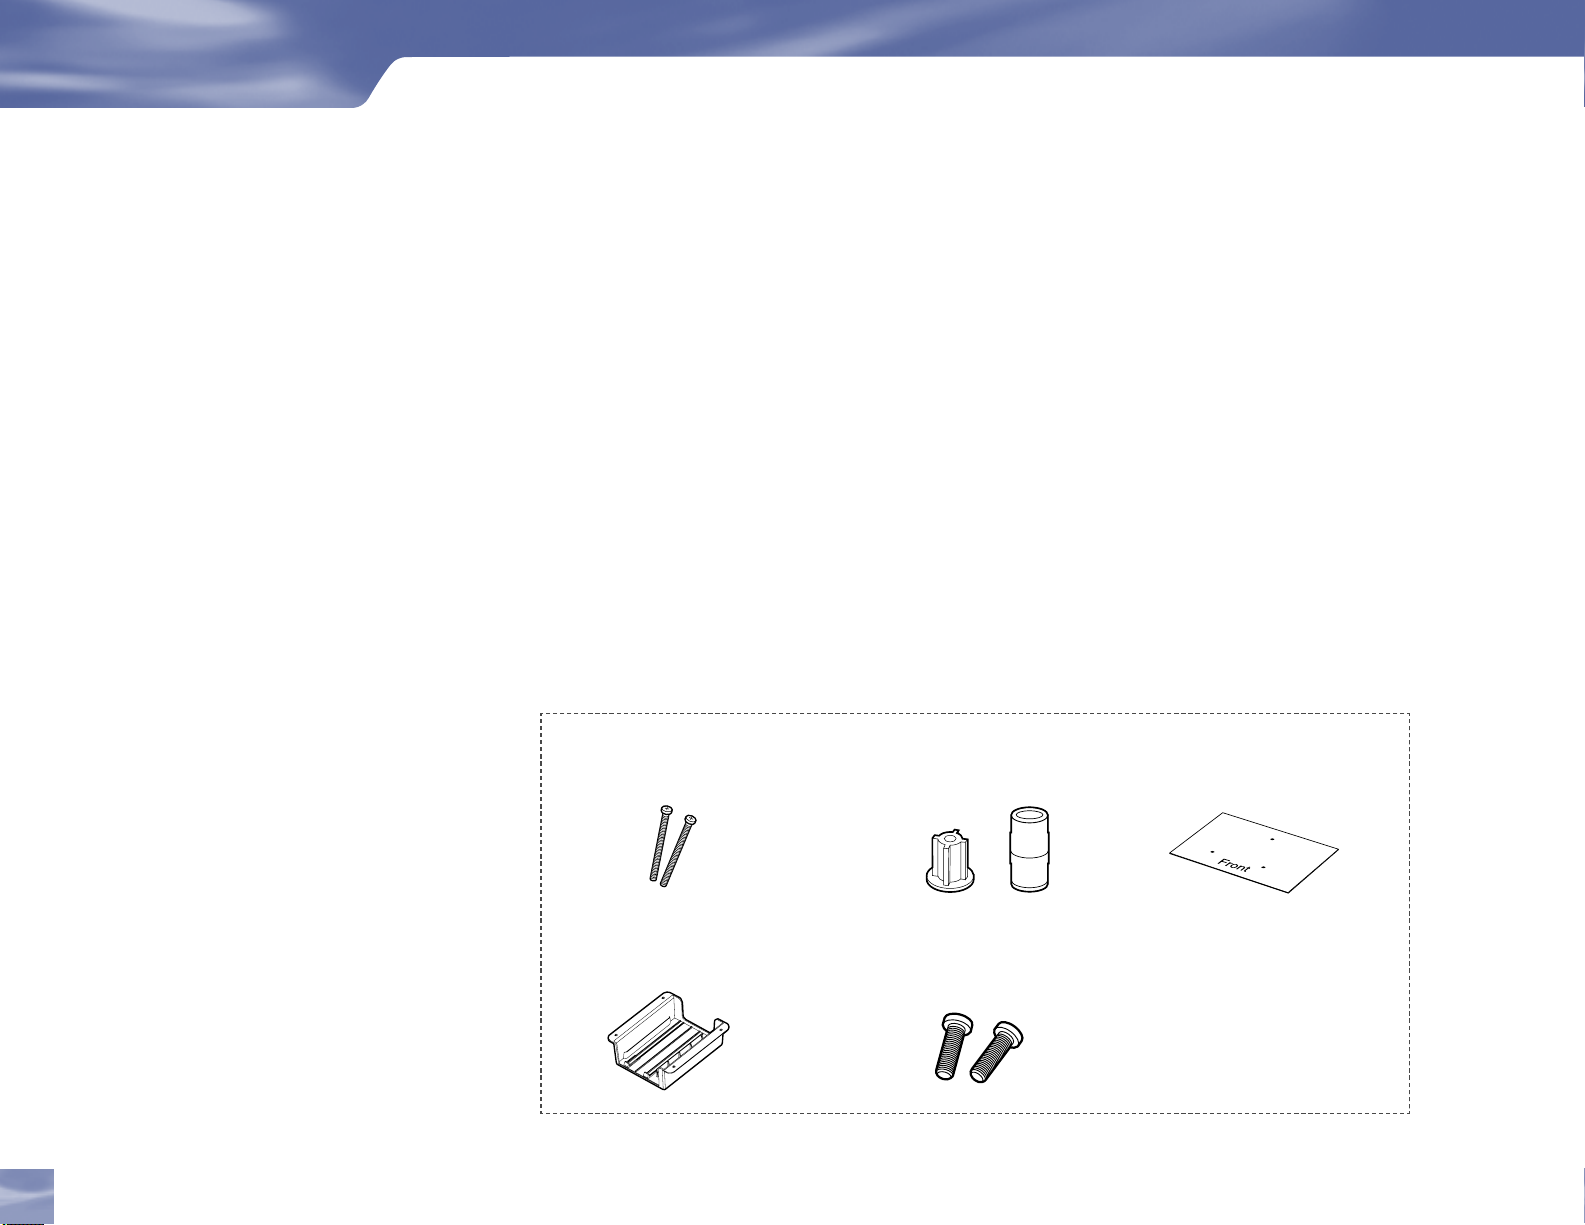
Parts
Spacer screws : 3 pieces
Power Adapter Bracket :
1 piece
Spacer : male(3 pieces),
females(3 pieces)
Adapter Bracket screws :
4 pieces
Template : Drilling
Position Guide Sheet
Page 25
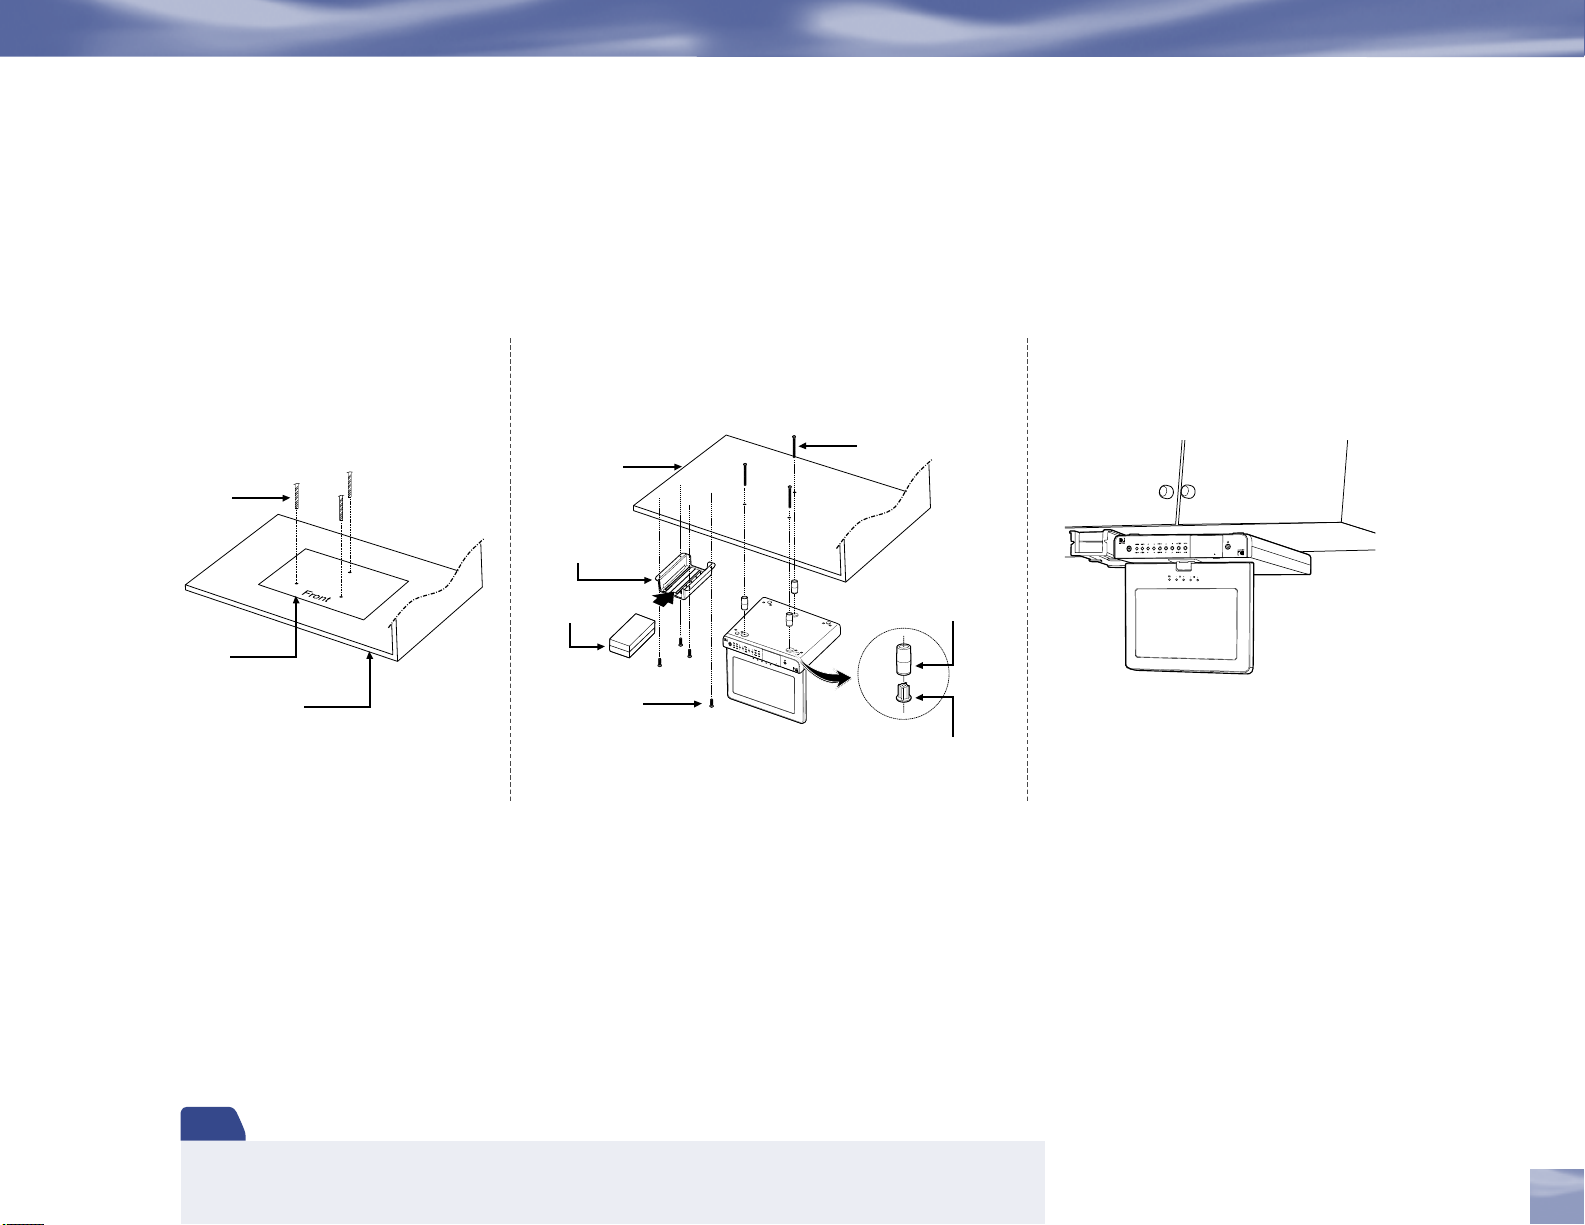
Kitchen Mounting
How to mount your Samsung Fliptop powered by DIRECTV
1 .
Drilling
Template
Kitchen Shelf
2 . 3 .
Kitchen
Shelf
Power Adapter
Bracket
Adapter
Screw
®
Screw
Spacer - female
Spacer - male
Note
- Since the unit is very heavy, be careful of when installing this unit.
- To reduce the risk of fire, do not place any heating or cooking appliance beneath this unit.
Chapter 2
17
Page 26

Getting Connected
TIP
When working with cables, be
sure to connect corresponding
inputs. Never connect an IN to
an IN or an OUT to an OUT.
IN
All A/V jacks and inputs are
color coded. Always match the
color of the plug to the same
color of the jack.
OUT
Choose the Setup That Suits You
There are several ways to connect your receiver to match your particular equipment setup and to
gain optimum signal quality. The following pages illustrate some of the most common setups.
Connecting Your Samsung Fliptop powered by DIRECTV®
with an Satellite In Input
1) Connect the RG-6 RF coaxial cable from your satellite dish to the jack labeled SATELLITE
IN on the Samsung Fliptop powered by DIRECTV®.
2) Plug one end of the telephone cord into a phone jack on your wall (or into a phone splitter that
is plugged into a phone jack) and the other end into the PHONE JACK on the back of the
Samsung Fliptop powered by DIRECTV®.
3) Plug all power cords into electrical sockets.
Now you can turn to page 22 to learn about Guided Setup and Activation.
Choose the Setup That Suits You
18
Page 27

Choose the Setup That Suits You
PHONE JACK
DC IN 12V
AUDIO IN
VIDEO IN
SATELLITE IN
LOW SPEED DATA
33
11
2
Samsung Fliptop powered
by DIRECTV
®
The back panels of your equipment may not look exactly like those illustrated.
Chapter 2
19
Page 28

Getting Connected
TIP
To switch between watching
your external device (DVD, VCR,
etc) and watching video from
your receiver, you will need to
set
Video Source
(See page 13 for more details)
to
External
.
Connecting Your Samsung Fliptop powered by DIRECTV® to an
External Device with A/V Inputs
1) Connect the RG-6 RF coaxial cable from your satellite dish to the jack labeled SATELLITE
IN on the Samsung Fliptop powered by DIRECTV®.
2) Using another A/V cable, connect the white, red and yellow plugs from one end of the
A/V cable to the AUDIO L (white) and R (red) and VIDEO (yellow) input jacks on the back of
the Samsung Fliptop powered by DIRECTV®. Connect the other end of the A/V cable to the
corresponding output jacks on your VCR or DVD.
3) Plug one end of the telephone cord into a phone jack on your wall (or into a phone splitter that
is plugged into a phone jack) and the other end into the PHONE JACK on the back of the
Samsung Fliptop powered by DIRECTV®.
4) Plug all power cords into electrical sockets.
Now you can turn to page 22 to learn about Guided Setup and Activation.
Choose the Setup That Suits You
20
Page 29

Choose the Setup That Suits You
PHONE JACK
DC IN 12V
AUDIO IN
VIDEO IN
SATELLITE IN
LOW SPEED DATA
VCR
DVD
2
4
33
11
Samsung Fliptop powered
by DIRECTV
®
or
The back panels of your equipment may not look exactly like those illustrated.
Chapter 2
21
Page 30

Getting Connected
TIP
Want to finish setting up some
of the functions later? Just
press MENU on your remote,
press SELECT on Settings then
select Setup.
Guided Setup & Activation
Now that your receiver and equipment are all hooked up and plugged in, you’re ready to
finish all the details to begin receiving your DIRECTV service.
1) Make sure the MODE SWITCH on the remote control is set to DIRECTV.
2) The Samsung Fliptop powered by DIRECTV® will turn on.
3) The first screen will allow you to select a language. Using the arrow keys on the remote control,
move to the language you prefer.
4) Press SELECT on the remote control.
5) You will see a Welcome screen.
Now, let us lead the way…
and simply follow the on-screen directions to complete your setup functions. If you’ve installed
your satellite dish and system yourself, you’ll be guided though various functions for optimizing
your signal and setup — including positioning your dish and a system test. If, like most people,
you had your system professionally installed, these functions already have been completed.
Guided Setup and Activation
22
After these setup procedures are complete, you’ll see the Satellite Data Acquisition screen, as the
receiver gathers information from the satellite for the on-screen program guide.
Next, you’ll be given the opportunity to set up your phone connection, as well as program your
remote to control other equipment such as your VCR and/or DVD player. Just follow the screen
suggestions and you’ll be ready to watch in no time!
Page 31

Don’t Wait, Activate!
Once all the setup processes are complete, all that’s left to do is activate your
DIRECTV service. Before you make the call, be sure to:
Tune to Channel 100 and be sure you’re picking up a satellite signal (DIRECTV channel).
Have on hand your service address, social security number and a valid major credit card.
Note your access card and receiver ID numbers (find these by pressing MENU, then go to
Settings and press SELECT. Then go to Setup and press SELECT.
All ready? Just call 1-800-SAMSUNG (1-800-726-7864) and pick the programming package that’s
right for you. Easy!
Guided Setup and Activation
Chapter 2
23
Page 32

Page 33

Chapter 3
26 Watching
29 The Guide
31 Autotune
33 Pay Per View
Page 34

What’s On
Watching
Now that everything’s set up, you’re ready to grab your remote and get clicking!
With the MODE SWITCH to the left (under the DIRECTV logo). To access the channel of your
choice, simply key in its numbers on your remote (the channel will appear in a few seconds, or
press ENTER after the numbers and it will appear right away). You can also navigate to different
channels through the Guide, covered in detail starting on page 29. Keep in mind, either way, you’ll
only be able to access those channels in your chosen DIRECTV® programming package.
TIP
Use your handy Channel Lineup
(included in your Welcome
package) to find the numbers
of all the channels.
Use the black keys on the left side of your remote control to adjust volume up or down (VOL)
or mute the sound (MUTE). The black keys on the right side can take you to the next channel
numerically up or down (CHAN), or jump to the previous channel you watched (PREV).
26
Watching TV
Page 35

The Channel Banner
The Channel Banner
Any time you tune to a channel, you’ll see the channel banner appear across the top of the screen.
This banner holds all sorts of useful information and options:
1) Current date & time
Displays the day, date and current time.
2) DIRECTV Channel
Number and call letter of the station you’re currently viewing.
3) Program
The title, start and stop times and rating of the current program.
4) Current Favorites
Identifies Favorite Channels List currently in use. (See Favorites on page 46 for complete
details.)
5) Audio options
Displays brightly if alternate audio options are available. (See Icons on the inside back page and
Audio Options on page 40 for more details.)
6) Messages
Displays brightly if there are new messages in Caller ID & Messages. (See Icons on the inside
back page and Caller ID & Messages on page 47 for details.)
2 31
The channel banner gives you
information on the channel and show
you are currently watching.
4
5
6
7
7) Parental Controls
Identifies if any “locks or limits” are placed on the current channel, show or time.
(See complete details on Parental Controls on page 49.)
Chapter 3
27
Page 36

What’s On
To see program details, at any time
press INFO on your remote (press
a second time to clear). Select
To remove the channel banner from the screen, you can always press EXIT. The banner will
disappear on its own — or time out — after a few seconds. You can also change display duration
of the channel banner. See Display on page 38 for more info.
You can also view the channel banner for a program you’re watching or that you’ve highlighted by
pressing INFO. For more detailed information, SELECT More Info button to check out additional
showings, purchase pay per view or set up an Autotune (Autotune described on page 31.)
28
More Info button to see additional
program information.
Channel Banner
Music Channels
You’ll find, as par t of your great DIRECTV programming, dozens of enjoyable, continuous,
commercial-free music channels with something for every taste. Tune to these just as you would to any
channel. You’ll see a special Channel Banner on these that initially displays its channel description (i.e.,
“Alternative,” “Today’s Country”). As information is received, current song information will appear in the
banner, including song title, artist and record company. Click on More Info for additional details.
Page 37

The Guide
The Guide
Overview of the DIRECTV Advanced Program Guide
®
The Guide is your helpful tool that displays listings of current and upcoming programs. Find out
what’s on (now or later), change the channel, find and purchase a pay per view movie or event,
even do a special search for a program you’re interested in. You’ll find program information for the
current time slot and forward for a total of 90 minutes displayed – and information for up to the
next 31/2 days.
The Guide displays most of the channel banner items, plus:
1) Picture In Graphic (PIG)
2) Time slots (with half-hour headings)
3) Channel number and call letters
4) Program listings
Also, some icons you may see next to program listings include:
– Alternate audio track available
– Broadcast in letterbox format
1
2
3
4
TIP
When you display the Guide – or when
performing other tasks – you’ll see
a small video picture, the Picture In
– All Day Ticket showings
Getting Around in the Guide
1) Press the GUIDE key on your remote.
2) You can choose how you want to sort the Guide. Select All Channels, or only those
in a specific category by using the up and down arrow keys on the remote to highlight your
choice.
Graphic (PIG), of the last channel you
were watching in the upper right-hand
corner of the screen. So, no matter what
you’re doing, you don’t miss a thing!
Chapter 3
29
Page 38

What’s On
R
MENU
VOL
CHAN
PA
G
E
INFO
BACK
ON
AV1 AV2 TV
OFF
TV
POWER
TV
INPUT
FORMAT
EXIT
LIST
GUIDE
ACTIVE
SELECT
PWR
Highlight an item by using the arrow
3) Press SELECT to view current listings.
4) Navigating through the Guide is simple:
The UP, DOWN, LEFT and RIGHT arrow keys move you through the listings and time slots.
Highlighting a program will show you its description.
Use the CHAN key up or down to move through channels, a full page up or down.
Press the RED or GREEN keys to move horizontally through the time slots a full screen
forward or back.
5) To tune to a program that is on now, highlight the program and press SELECT. Selecting a
future program displays program information.
30
keys to scroll LEFT, RIGHT, UP or
DOWN. Press SELECT to access the
information or channel.
Info Screen
The Guide
Like more information on a program? You can always press INFO when you’ve highlighted
a show in the Guide to view a more in-depth description – pressing SELECT on a future program
will get you there, too. This screen also gives you the choice to see what other showings of the
program there may be, even set your receiver to automatically tune in
(see Autotune on page 31).
Page 39

Autotune
A great way to catch all your favorites
Is there a favorite show you keep missing, or a movie you’ve been meaning to watch? Like to make
sure you don’t miss the big game? You’ll want to try the Autotune feature.
Set your Samsung Fliptop powered by DIRECTV® to autotune to any show on a channel you
receive within the Guide grid’s timeframe, and it will automatically turn on and tune in when the
time comes.
Autotune
Here’s how it works.
1) While in the Guide, highlight a program that interests you.
2) Find what you want, then press INFO. The full description of that show will be displayed, plus
you’ll see the Autotune option on the left side of the screen.
3) Highlight and select Autotune.
4) Select the Set Autotune button, then OK on the confirmation screen.
Chapter 3
31
Page 40

What’s On
TIP
Try one-touch convenience with
One-Touch Autotune. Just highlight a
program in the Guide and press ENTER
on your remote. Press ENTER a second
time to cancel the autotune. Keep in
mind – you won’t be able to customize
your autotuning the one-touch way.
Whenever you’ve set up a program to autotune, a related icon will appear on the listing.
Any time you’d like to view a list of the programs you’ve set to autotune, press LIST on your
remote to access the To Do List. Here, you can also view and alter your autotuned programs
through the Scheduler which you’ll find under Settings in the Quick Menu (see page 39 for more
info).
32
Note
If you turn your receiver off at any time, any scheduled autotunes will cause it to turn on for the
duration of the program being autotuned.
Autotune
Page 41

Pay Per View
You don’t have to go out for the best and biggest movies and special events! Recent hits
and events like sports, comedy and more are available 24 hours a day for a one-time purchase price
on DIRECTV® Pay Per View. You’ll find them listed in the Guide just like other
showings, starting at channel 100.
Scroll through your choices, and press SELECT or INFO to view the options. As long as
your receiver has been connected to a land-based phone line, you can place your order through
your remote (purchase charges will appear on your next bill). You’ll get a reminder on-screen that
your pay per view purchase is about to air shortly before air time. But, just to make sure you don’t
miss it, why not set up an autotune? Choose the Autotune option and follow the prompts.
Pay Per View
TIP
You can also order DIRECTV Pay Per
View movies or events over the phone
If you need to cancel your pay per view order for any reason, you may, as long as you haven’t yet
viewed any of the program. Highlight the show again and press INFO and you’ll be given the op-
portunity to cancel. You can also cancel, as well as see an overview of your pay per view purchases,
through the Scheduler, part of the Quick Menu (see page 39) you can access by pressing the MENU
key on your remote.
Keep in mind, too, if ever a pay per view program exceeds spending or rating limits you’ve set with
Parental Controls, your password will be required to purchase it.
or at DIRECTV.com. Keep in mind,
though, there is an ordering fee for
those purchases placed over the phone.
Also, you will be charged for the
program even if you don’t watch it.
Chapter 3
33
Page 42

Page 43

Chapter 4
36 What’s on the MENU?
37 Settings
40 Audio Options
41 Category Sort
42 Pay Per View
43 Find By
45 Date & Time
46 Favorites
47 Caller ID & Messages
49 Parental Controls
Page 44

The Quick Menu
What’s on the MENU?
All sorts of great things!
With the MENU key on your remote, accessing useful information and many handy
features is a snap with the Quick Menu. Some of the items you’ll see depend on which
screen is currently displayed. For instance, if you access the Quick Menu while viewing the Guide,
you’ll find an option to filter programs by category. Other options, such as
Settings, appear anytime you bring up the Quick Menu, regardless of your current screen. Whenever
you access the Quick Menu, the header across the top of the Quick Menu will read “Quick Menu.”
To remove the Quick Menu from the screen at any time, simply press EXIT to return to live TV,
or press the MENU key again to go back to where you were.
So, let’s start with some of the most commonly used features — ones you’ll use to enhance your
viewing experience.
36 37
36
What’s on the Menu?
Page 45
Settings
Want to have things just your way? From the Quick Menu SELECT Settings, here, you’ll find all
kinds of ways to customize, adjust and keep track of your DIRECTV viewing experience.
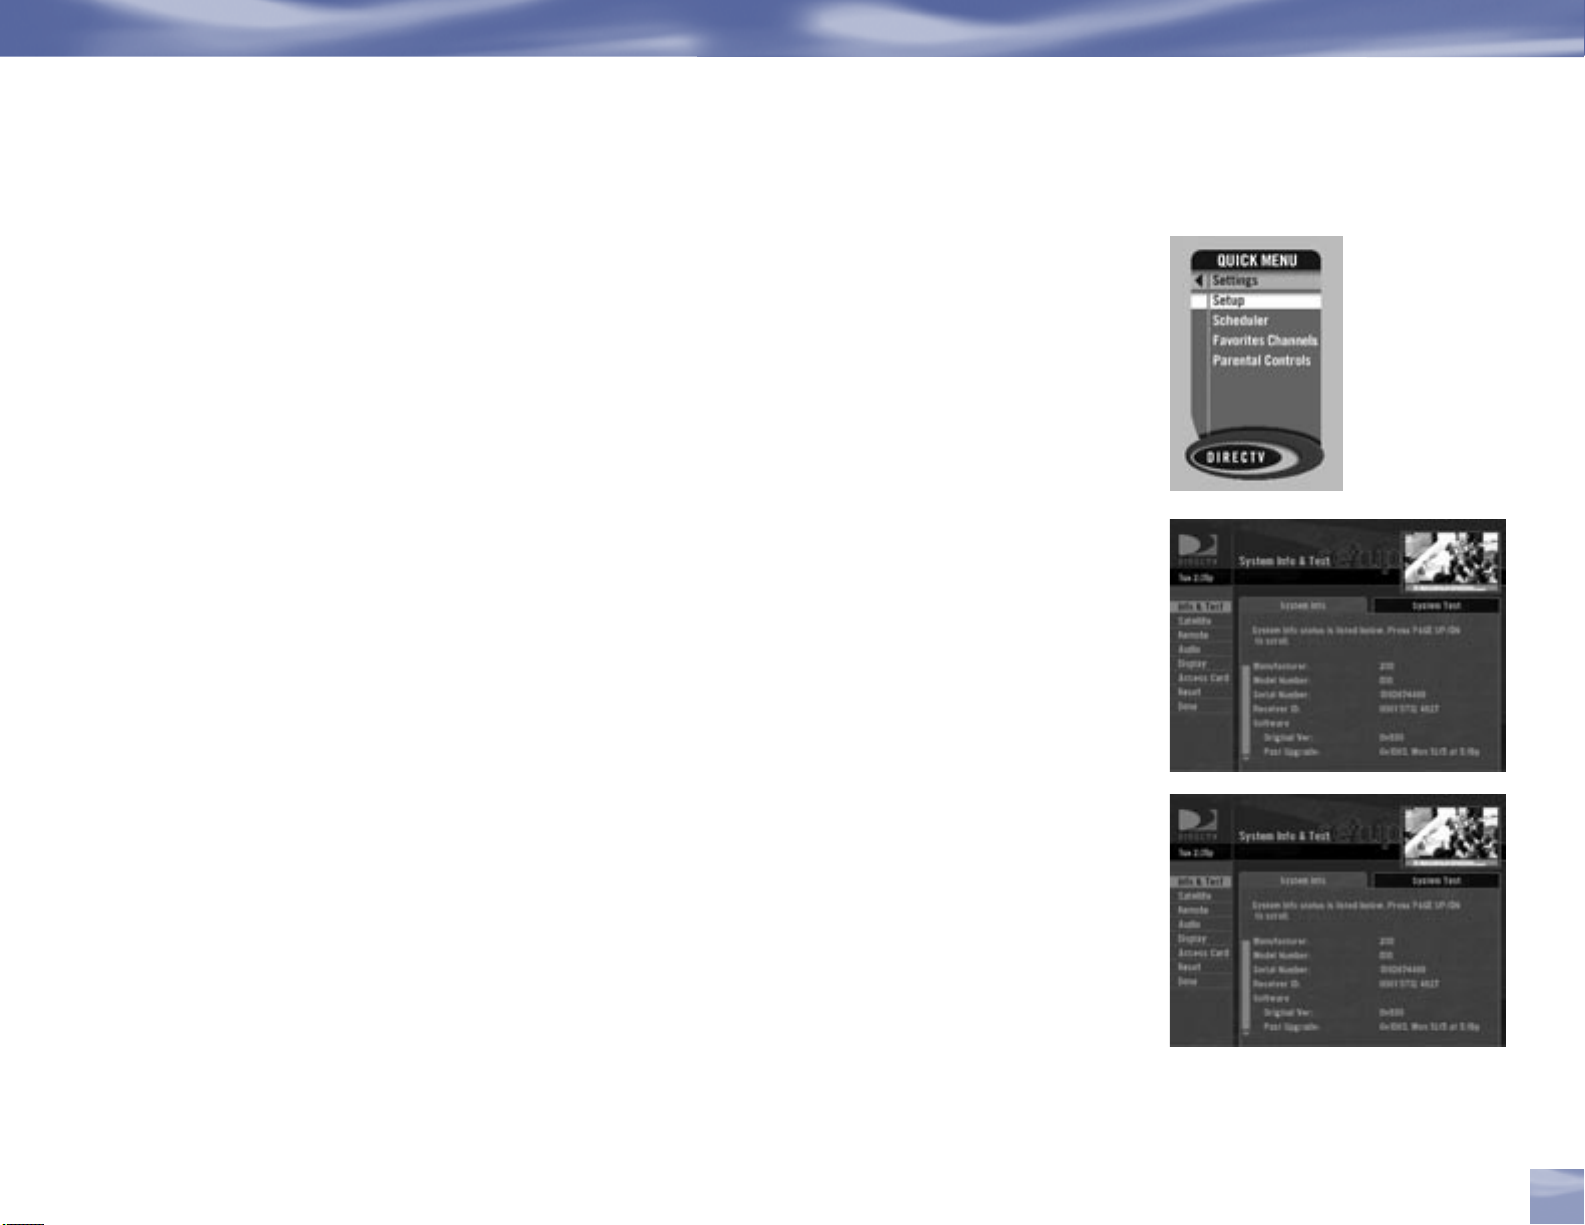
Setup
When you first enter Setup, your System Setup status screen will be displayed. To view all the
different settings that are currently in force, hit the RIGHT arrow and PAGE down through the
screen.
Info & Test
SELECT Info & Test will allow you to choose 2 options:
Use arrow keys to highlight System Info and press SELECT. This screen lets you view the
current system information.
Settings
Arrow and SELECT System Test to run tests of the tuner, access card, receiver ID and phone
lines.
Satellite
This option is useful if your box has lost signal strength, or you need to realign your satellite
dish. Here you can access the dish setup (including latitude and longitude screens, if you’re using
DIRECTV service from an RV or boat or other circumstance where you don’t have a ZIP code).
Remote
The option can be set up in such a way that you can control external devices such as a DVD player
or VCR using the remote control.
(TV mode does not require this option)
Chapter 4
37
Page 46

The Quick Menu
Audio
This screen allows you to make changes to your language audio setting. The default audio
language for your system is English. Press SELECT on the Audio Language options to find and
choose a new one. Audio language settings only affect programs with a Secondary Audio Program
(SAP) in the language you’ve selected The setting does not alter the language used on-screen.
Display
Display lets you customize certain viewing aspects. SELECT:
Banner You can adjust the length of time that the Channel Banner appears on screen.
TV Ratio You can select the aspect ratio of your TV screen to accommodate standard or
widescreen/HDTV screens.
Time Zone You can adjust the automatic Time Zone and Daylight Savings Time settings.
38
Access Card
Follow the on-screen directions here to replace your access card. You will need your old and new
access cards to complete this procedure. (Note: DIRECTV will provide new access card and
instructions when necessary.)
Reset
This screen offers directions for restarting the receiver, resetting all settings to factory defaults,
or resetting everything which clears all settings from the receiver. Certain safety measures are
included so changes can’t be made accidentally. You should only perform a reset if instructed by a
DIRECTV Customer Service Representative.
Settings
Page 47

Scheduler
This feature gives you an overview of and access to all the programs you’ve set to Autotune or
purchase. From the Quick Menu SELECT Scheduler, and you’ll see the current status screen. You can
choose other options from the menu item to the left.
To Do List
Selecting the To Do List will display all of the upcoming programs you have set to Autotune,
including all pay per view showings. If you did not set an Autotune for a PPV, then it will not appear
here. Highlight the program and press SELECT to access its Info screen and make changes. You
can also access the To Do List from your remote by pressing the LIST key.
Scheduler
Purchases
Here you’ll find a listing of past and future pay per view purchase items. Select an item to display
its Info screen.
Favorite Channels
Check the current status of your Favorites list(s) by clicking here, and make changes if you like. See
page 46 for more details.
Parental Controls
Check the current restrictions of your Parental Controls by clicking here, and make any
adjustments. See page 49 for more details.
Chapter 4
39
Page 48

The Quick Menu
Audio Options
Some programs have alternate audio available (such as other language tracks. You can set the
default so that whenever a program has alternate audio available, it automatically plays this audio,
or you can change the alternate audio temporarily for the program you are watching.
To change the default audio
1) While in Live TV press MENU.
2) From the Quick Menu, SELECT Settings
3) Scroll down to Setup and press SELECT,
4) Scroll down to Audio, and press SELECT
40
40
5) Pressing SELECT on the Default Audio option. Scroll down and SELECT the audio language
that you want as a default.
To temporarily change the audio
1) While in Live TV press MENU
2) From the Quick Menu, scroll down to Audio Options and press SELECT
3) Scroll to the audio track you prefer and press SELECT
This will temporarily change the audio. Once the program is over or you change the channel the
audio will change back to the default settings.
NOTE: You may also cycle through all available audio tracks for a tuned program by pressing the
yellow key on the remote.
Audio Options
Page 49

Category Sort
This handy tool lets you temporarily arrange the Guide to view only programs in a particular
category such as Movies, Sports or News.
1) While in the Guide, press MENU
2) Arrow to Category Sort and press SELECT
3) Select the genre you want, and you’ll be able to further narrow your choices by subcategories
(i.e., Movies, Comedy). The Guide fitting the description will appear.
4) Simply scroll through to find a program you like. SELECT on a presently playing show to
tune to it or SELECT a future program, and you’ll see its related Info screen and have the
opportunity to autotune it or see other showings.
Category Sort
TIP
For Category Sort results, move more
Just press GUIDE to return to the regular Guide, or EXIT to return to live TV.
quickly through the choices by using
the RED or GREEN keys on your remote
to advance or reverse 90 minutes.
Chapter 4
41
41
Page 50

The Quick Menu
TIP
Just highlight and select a pay per
view item from your list if you’d like to
schedule a viewing. See page 33 for
more details.
Pay Per View
This option enables you to check out DIRECTV Pay Per View listings by category.
1) While in the Guide, press MENU.
2) Arrow down to Pay Per View and press SELECT.
3) You will see three choices for sorting the listings. Choose All to display all current options.
Movies will give you listings of all current movies available. Pick Special Events to see available
events such as sports, comedy specials and more.
4) A list of PPV will appear. Select a current program to tune to it, or select a future program and
you will be presented with other options (Buy, set an Autotune or list other Showings).
42
Pay Per Viiew
Page 51

Find By
Would you like to locate a particular program, movie or sports event you want to see — even
shows starring a favorite actor, or games with your favorite team? Find by offers some easy ways to
spot just what you want while viewing the Guide.
1) Press MENU.
2) Scroll down to Find by and press SELECT. You’ll see options to direct your search.
3) You can find a program by Title, Person, Keyword or Channel.
Find By
Choose Title if you know the name of the program you’re looking for. Just scroll through and select
the letters of the alphabet that spell the name until you see it appear in the list.
Choose the Person search option if you’re looking for any programs that feature a particular
actor/actress or director. Select the letters of his or her last name until you see the name appear.
Select the name and you can narrow the search for programs by categories. If you would like to
select a category to narrow your search or select all.
If you don’t know the name of a program, but know one of the words of a title… or, if you’re
looking for a certain subject matter… try Keyword. Spell out the name of the word or words
you want, following the prompts (i.e., “Chicago Cubs” if you’re searching for ballgames).
Select Channel to view all upcoming programs on a particular channel by the call letters (i.e.,
HBO®) then select the channel to see the full programming listing.
TIP
Want to find your program quicker?
Narrow your search by selecting
subcategories – just follow the prompts.
TIP
Keep in mind, when you search with
Find by, only those programs slated to
air within the Guide’s number of days
of programming supported by your
receiver will appear on your list.
Chapter 4
43
Page 52

The Quick Menu
4) Once you’ve found a program you’re after, all you have to do is highlight and select the
title to display when the program is on.
5) If the program listed is currently on, then selecting it will tune to it. If the program is upcoming,
then selecting it will bring you to the Info screen. Here, you’ll have the opportunity to set an
autotune for the program.
Recent Finds
If you’d like to view all of the programs you’ve recently searched, you can always go back to repeat
a search for a found item for any new listings available — just select the item to try again. You can
also easily mark and delete any Finds you no longer want.
44
Find By
Page 53

Date & Time
Here’s a convenient way to look several days ahead in the Guide, without having to scroll through
pages of programs.
You can quickly see what’s on during a specific day or time.
1) While in the Guide press MENU.
2) Then scroll down to Date & Time and press SELECT.
3) You’ll find the current day and next 21/2 days listed. Choose the date you’re interested in.
4) Scroll through and select the hour you want. The Guide will now display programs for the date
and time you selected.
Date & Time
If you find something you like, press SELECT for a one-touch Autotune or INFO to view and set
Autotune options.
Chapter 4
45
Page 54

The Quick Menu
Favorites
Wouldn’t it be nice to have all the channels you like best, right-at-hand? Or a grouping of family
channels just for the kids?
Favorites allows you to set up special, customized Guide that shows only those channels you
choose.
TIP
The normal, or default, setting for the
channels you can view in the Guide is
All Channels, or all available channels
on DIRECTV service — whether or not
you receive them in your programming
package.
1) Press MENU to get to the Quick Menu.
2) Select Settings, then Favorites Channels.
3) SELECT a custom list on the left side of the screen.
Select the box next to the channel you want on a custom list (press SELECT again to delete it).
Use Add All or Remove All to save time when choosing a lot of channels.
Scroll through the channels, or key them in directly using the numbers on the remote to access
what you’re looking for. Once you’ve decided on the channels for your list, select the Name Tab.
4) To name your custom list, arrow over to Name List and press SELECT
Use the onscreen keypad to name your custom list — “Kids” or “Joe” or whatever you like.
When you are done, go to Update Name and press SELECT.
When you’re using a Favorites list, the Guide will only display those channels you’ve
chosen — and you’ll also only see those channels when you use CHAN UP/DOWN on
your remote.
Keep in mind, no matter what Favorites list you’re currently using, you can still always access any
channel you receive by keying in its channel number on your remote. You can also edit or delete a
list at any time.
46
46
Favorites
Page 55

Caller ID & Messages
Caller ID & Messages
Here you’ll be able to access communications from DIRECTV. If you have Caller ID service*, you
can also view phone calls you’ve received.
Caller ID
Here you can turn Caller ID on and off, set the number of calls and view the past calls
To turn Caller ID on and off:
1) Press MENU to get to the Quick Menu.
2) Go to Caller ID & Msgs and press SELECT.
3) Next SELECT Caller ID then Edit Settings.
4) SELECT the Turn on/off Notice to toggle it on and off.
To access other CALLER ID settings:
1) Press MENU to get to the Quick Menu.
TIP
Remember, you must already have
Caller ID service from your phone
company to use this feature!
2) Go to Caller ID & Msgs and press SELECT.
3) Next SELECT Caller ID then Edit Settings.
4) Now you can access the different settings available.
*You must subscribe to this service through your local telephone company and your Samsung
Fliptop powered by DIRECTV® must be connected to a phone line.
Chapter 4
47
47
Page 56

The Quick Menu
TIP
Choose the Service tab. Here you can choose to turn Caller ID on or off, set the number of calls to
keep in your log, and turn the notification and dialing audio features on or off.
Choose the Call Log tab to view your recent incoming calls. Highlight and select a name, and
you have the opportunity to call the number or delete that listing from your log. If you call the
number, you will have to pick up your phone to speak.
Unless you’ve turned off the Notification option, you’ll see a notice on your LCD screen whenever a
call comes in.
The messages icon will appear brightly
on your channel banner whenever
there’s any new or unread message in
your Inbox.
Messages
You’ll be able to view a listing of titles of any current messages waiting for you.
1) Press MENU to get to the Quick Menu
2) Go to Caller ID & Msgs and press SELECT
3) Next SELECT Messages to go to the Messages Inbox
4) Simply highlight and SELECT to read, then you’ll have the choice to save or delete them.
From time to time, a Must See Message may pop up on your screen while you’re watching LCD
screen or viewing the Guide. These are important messages that require your immediate attention
regarding issues that may affect your service. You’ll have the opportunity to respond to them on
the spot, or you can access them in your Inbox as well.
Caller ID & Messages
48
Page 57

Parental Controls
Would you like to set some limits on your children’s viewing habits? Parental Controls enables one or
more “keepers of the passcode” to place certain restrictions on just who’s watching what. Whether
it’s for mature content or spending amounts, you’re always able to keep limitations where you want
them for the whole family.
Parental Controls
From the Quick Menu, SELECT Parental Controls and you’ll see the current status showing any
restrictions. The system default is “unlocked” for all categories, and the “spending” control has a
default $10 limit. Here’s how you can set limits for:
Ratings
Here you can set rating limits for Movies and TV, allowing you to block programs with certain
ratings unless the proper passcode is entered
1) Press MENU to get to the Quick Menu
2) Go to Parental Controls then Edit Settings
3) SELECT Ratings
4) Scroll to the right to SELECT the Movies, TV or Other tab
Movies
Highlight and select the Movies tab, then select the overall rating limit you wish to impose Brief
descriptions of the ratings appear for your guidance. Choosing a rating allows all
ratings below that level; blocking one blocks any higher ratings also.
TV programs
Choose the TV tab, then highlight and select the TV rating you desire. You can also choose
ratings for particular content (i.e., Fantasy, Violence, Dialogue), each of which is described as you
scroll through.
TIP
For ratings limits and channel blocks,
as well as most other checkbox-type
items, pressing SELECT toggles the
item on and off when setting them up.
Chapter 4
49
Page 58

The Quick Menu
Other shows
To block programming that has no rating — such as news and sports and shows with a rating of
“None” — select the Other tab.
5) If you are done setting your Parental Controls, don’t forget to Lock Now.
Channel Blocks
You can limit viewing of a certain channel or channels from this menu.
1) Press MENU to get to the Quick Menu
2) Go to Parental Controls then Edit Settings
3) SELECT Chan Blocks
4) Scroll down the channel list to SELECT those you wish to block, or key in the channel
numbers for quicker access. Use Block All or Allow All to save time if you wish to affect a large
number of channels.
Parental Controls
50
Spending
From the menu on the left, choose Spending and then set your preferred spending limit
for any single pay per view purchase. Simply key in the amount from the numbers on your remote.
Page 59

Now, lock it
Once you’ve decided on the restrictions you want, choose Lock Now. You’ll be directed to create
a passcode (which you’ll want to make easy enough to remember, but hard enough that the little
ones won’t guess it!). This passcode will be your entry to unlocking and recreating limitations in
the future.
An on-screen message will appear whenever anyone tries to tune to a channel or program that has
been restricted, or attempts to spend or watch beyond limitations set. He or she will not be allowed
to proceed without the passcode. Using your passcode, you can easily override the limits.
Parental Controls
TIP
Parental Control in the Channel Banner
will tell you if the receiver is locked,
temporarily unlocked, or unlocked.
Unlocked Temporarily Locked
Unlocked
Chapter 4
51
Page 60

The Quick Menu
Let me in…!
Don’t worry — temporarily or permanently unlocking a restriction is easy. To temporarily unlock a
particular program:
1) When any controls are currently activated, Unlock Now will appear if you try to tune to a
restricted program.
2) SELECT Unlock Now and enter the password.
For more unlock options:
1) Go to the MENU.
2) Then SELECT Parental Controls.
3) Various options for removing restrictions temporarily or permanently will appear. SELECT
one and enter your password.
Parental Controls
52
52
Also note: If you have Parental Controls set and temporarily unlocked, turning the receiver power
off will relock the box. If anyone tries to unlock restrictions using an invalid passcode, there’s a
time delay that’s added with each additional attempt to discourage them.
You can change your passcode, at any time.
1) Go to the MENU.
2) Then SELECT Parental Controls.
3) Then SELECT Edit Settings.
4) Scroll down to Passcode and SELECT.
5) You will need to enter you old passcode before entering a new one.
Page 61

Chapter 5
54 Programming Your Remote Control
56 Troubleshooting
64 Specification
66 Warranty
Page 62

Other Information
Programming Your Remote Control
You can program the DIRECTV remote control to operate your additional equipment such as a
DVD, VCR, stereo.
1) Press the MENU key to display the Quick Menu.
2) Highlight Settings and press SELECT.
3) Highlight Setup and press SELECT.
4) SELECT the Remote item from the left menu.
5) Follow the on-screen instructions to program your remote for your Samsung Fliptop powered
by DIRECTV® or additional equipment (AV1 and AV2).
Programming Your Remote Control
54
If you would like to change the VOL and MUTE to work with another component, you can.
Simply set up your remote to work with the component, and then move the slide switch to the
position you would like to lock the VOL and MUTE keys to. Point the remote away from your
Samsung Fliptop powered by DIRECTV® and press and hold MUTE and SELECT until the
light near the slide switch blinks twice (about 5 seconds). Enter 9-3-3. The light will blink twice,
indicating the VOL and MUTE are now locked to the chosen component, no matter what position
the slide switch is in.
Page 63

Factory Default
To rest all the functions of the remote control to the factory defaults, follow these steps:
1) Point the remote away from your Samsung Fliptop powered by DIRECTV® and components.
Press and hold MUTE and SELECT until the light near t he slide switch on the remote flashes
twice (about 5 seconds).
2) Enter 9-8-1. The light on the remote will flash twice, indicating you have cleared the AV1, AV2
and TV modes.
Programming Your Control
Chapter 5
55
Page 64

Other Information
TIP
You can find additional troubleshooting
help at DIRECTV.com.
Troubleshooting
Many problems can be corrected by performing a simple reset of the DIRECTV® Receiver. If you
experience the following:
Image freezes
Audio freezes
Blank screen
Won’t respond to front panel button or remote control
Try one of these:
Press the red RESET button behind the access card panel door on the front of the
Samsung Fliptop powered by DIRECTV®, then wait for program guide information to be
acquired.
If the problems persist, try unplugging the power cord of the Samsung Fliptop powered by
DIRECTV® for 15 seconds to 2 minutes, then plug it in again.
Running the System Test (later in this section) can also help you diagnose and solve many
common problems.
Troubleshooting
56
Note
If you prefer, we can provide you with the name of an Authorized Service Representative who will visit
your home for a fee to set up your digital satellite receiver and instruct you on its operation. There
may be a fee charged for the service visit. For details about this service, call 1-800-SAMSUNG or visit
DIRECTV.com.
Page 65

System Upgrades
Your Samsung Fliptop powered by DIRECTV® is able to receive upgrades or modifications to some
of its features and functions. These modifications will occur automatically, usually at times when the
receiver would likely be turned off. If your receiver is on when an upgrade or modification is sent, you
may experience a disruption in reception for a minute or two. Your reception should return to normal
after the modification is complete. Your receiver must be plugged in to receive any upgrades.
Do not unplug your receiver while an upgrade is in progress. Please consult the Upgrade Menu to find
a schedule of upgrades or modifications planned by DIRECTV.
DIRECTV Receiver Problems
Troubleshooting
Progress bar freezes during Satellite Data Acquisition
This is normal. The progress bar times out after two minutes. If your screen is still blank for a few
minutes after the progress bar times out, follow these steps to restart your receiver:
1) Press the red RESET button behind the access panel door on the front of the
Samsung Fliptop powered by DIRECTV®.
2) Wait for program guide information to be acquired.
Wrong picture, blue screen, snow or black/blank picture
The Samsung Fliptop powered by DIRECTV® and VCR let you toggle between video sources.
If you don’t see the signal you think you should be seeing, try using these buttons to toggle between
the signals:
Press Menu on the LCD panel and toggle between video sources : External and DIRECTV
If problems persist, turn off all equipment that is connected to your Samsung Fliptop powered by
DIRECTV®, wait a few minutes, then turn the Samsung Fliptop powered by DIRECTV® on.
Chapter 5
57
Page 66

Other Information
Problems with Caller ID
You must subscribe to Caller ID service through your local phone company.
Also, check to be sure your Caller ID feature is turned on (see page 47).
If you are plugging your receiver to a wireless phone jack, note that it typically does not
transmit Caller ID information and you may need a special wireless phone jack to use with
Caller ID service. See the user’s manual that came with the wireless phone jack to see if it
transmits Caller ID information. If it doesn’t, either connect the phone line directly to a
standard wall-mount phone jack or install a wireless phone jack that transmits Caller ID
information.
Samsung Fliptop powered by DIRECTV® will not turn on
Check to make sure the power cord is plugged into the Samsung Fliptop powered by
DIRECTV® and the wall outlet.
Troubleshooting
58
Check the wall receptacle (or extension cord) to make sure it is “live” by plugging in
something else.
Make sure the remote control is on DIRECTV mode, and press TV POWER ON or PWR.
Press TV POWER ON, then press it a second time.
Check batteries in remote control.
Be sure remote control is pointed at remote sensor, and front of receiver is not blocked.
Unplug the receiver. Wait five minutes. Plug it in again.
Page 67

Turns off while playing
Electronic protection circuit may have been activated because of a power surge. Wait 30
seconds, then turn on again.
Unplug Samsung Fliptop powered by DIRECTV® for a few minutes, then plug back in. If this
happens frequently, the voltage in your house may be abnormally high or low.
Consider using a surge protector or line conditioner.
If your Samsung Fliptop powered by DIRECTV® turns off while playing, and other lights/
appliances in your house do too, you may have blown a circuit breaker or be experiencing a power
outage.
Consult an electrician if the problem is frequent or severe, especially if other household
appliances or electronics are affected.
Troubleshooting
Samsung Fliptop powered by DIRECTV® turns on or changes channels unexpectedly
An Autotune may have been activated. See page 31.
Blank screen
Check that all components connected to the input jacks are turned on.
Try another channel.
Press the INFO button on the front panel of the DIRECTV Receiver to see if the channel
banner appears. If it does not, check the Setup and Connections section for instructions about
connecting your satellite receiver.
Press the POWER( ) button on the front of the Samsung Fliptop powered by DIRECTV
Check that Video Source set to DIRECTV in the LCD panel menu.
®
Temporary loss of the satellite signal or Searching for Satellite Signal message
Your satellite system may be experiencing rain fade, a temporary loss of the satellite signal due
to unusually heavy rain clouds or rainfall. Rain fade is usually brief, lasting only as long as the
heavy rain cloud condition persists.
Your dish may be blocked. Check that something is not blocking the dish.
.
Chapter 5
59
Page 68

Other Information
Partial programming loss/channels missing from the Guide/channel is in the Guide but
can’t tune to
Your satellite dish antenna may be incorrectly configured. Check the dish type set in your
receiver’s preferences and change if necessary. Press the MENU key on the remote control,
then select Settings then Setup. In the next menu, select Satellite, then Repeat Satellite Dish Setup.
Follow the steps. From the Satellite Dish Type screen, make sure the proper dish type is selected
(round, oval with a dual LNB or oval with a triple LNB).
The channels might be excluded from the Favorites list currently in use. Press MENU on the
remote, select Favorites, then All Channels.
Remote Control Problems
Problems with the remote control
Check that nothing is between the remote control and the remote sensor.
Troubleshooting
60
Make sure the remote control is in DIRECTV mode. Slide the mode switch to the DIRECTV
position so the remote will control the Samsung Fliptop powered by DIRECTV®.
Check the batteries in the remote control. They may be weak, dead or installed incorrectly. Try
replacing batteries.
If you’re entering a channel number that is less than four digits long, the receiver might wait
two seconds before tuning to the channel. Press ENTER after entering a channel number to
tune immediately.
If you are trying to operate a device other than the Samsung Fliptop powered by DIRECTV
that you have programmed the remote to control, make sure you first slide the input switch to
the corresponding device (AV). The indicator light for the component you’re trying to control
should light up when you press a valid key for that component. If it doesn’t, make sure the
input switch is clicked into the correct position.
®
Page 69

A remote control indicator light starts flashing.
The batteries in the remote control are running low and should be replaced soon. (Note that when you
replace the batteries, you may have to reprogram your remote to control other devices.)
Running the System Test
The System Test allows you to run a basic diagnostics check on your Samsung Fliptop powered by
DIRECTV®. If you are experiencing any trouble with your receiver, run the system test. It will also
allow you to get your access card and receiver ID numbers or to initiate diagnostic procedures on
your digital satellite receiver.
First make sure that:
Troubleshooting
All connections — jacks, cables, etc. — are in place correctly (see Chapter Two,
Getting Connected, for more information)
There are batteries in the remote control, and they are working correctly
The access card is installed in the Samsung Fliptop powered by DIRECTV
®
.
Chapter 5
61
Page 70

Other Information
Follow these steps to run the diagnostics system test on your Samsung Fliptop powered by
DIRECTV®.
1) Turn on your Samsung Fliptop powered by DIRECTV®.
2) Set the Video Source to DIRECTV in the LCD panel menu. (See page 13 for more details)
3) Slide the mode switch to the DIRECTV position to put the remote control in satellite receiver-
controlling mode, then press MENU to bring up the Quick Menu.
4) Select Settings.
5) Select Setup, then Info & Test.
6) Use arrow keys to highlight the System Test tab, then press SELECT on Run Test.
7) If your system does not pass the system test, check any of these potential trouble areas: cabling,
pointing the satellite dish, phone connection and access card.
Troubleshooting
62
You should run a system test several times before concluding that there is a problem. Occasional
fluctuations in the phone line or satellite signal can give temporary false readings.
Fine-Tuning the Signal
If you self-installed your satellite dish antenna, you may have already used Guided Setup to find the
dish-pointing coordinates, acquire and fine-tune the signal and run a system test. If you need to
run Guided Setup again, select Settings from the Quick Menu, then select Guided Setup. Next, press
SELECT on Satellite, then select Repeat Satellite Setup.
Page 71

FCC Customer Information
This device complies with Part 15 of the FCC Rules. Operation is subject to the following two
conditions: (1) this device may not cause harmful interference, and (2) this device must accept any
interference received, including interference that may cause undesired operation.
Federal Communications Commission (FCC): This equipment complies with both Part 15 and
Part 68 of the FCC rules.
This equipment has been tested and found to comply with the limits of a Class B digital device,
pursuant to part 15 of the FCC Rules. These limits are designed to provide reasonable protection
against harmful interference in a residential installation.
This equipment generates, uses, and can radiate radio frequency energy and, if not installed
and used in accordance with the instructions, may cause harmful interference to radio
communications. However there is no guarantee that interference will not occur in a particular
installation. If this equipment does cause harmful interference to radio or television reception,
which can be determined by removing and applying power to the equipment, the user is
encouraged to try to correct the interference by one or more of the following measures:
Reorient or relocate the receiving satellite dish antenna.
Troubleshooting
Increase the separation between the equipment and the DIRECTV Receiver.
Connect the equipment into an outlet on a circuit different from that to which the DIRECTV
Receiver is connected.
Consult the dealer or an experienced radio/TV technician for help.
CAUTION: Changes or modifications not expressly approved by the manufacturer responsible
for compliance could void the user’s authority to operate the equipment.
Chapter 5
63
Page 72

Other Information
Specification
Produdt Specification
Type Adapter
Power Supply
Demodulator
RF Input
Video Decoder
Audio Decoder
Input voltage DC 12V
Power consumption Max. 27W (Adapter : 59W)
Type QPSK DEMODULATION
(DVB-S,DSS)
Code rate 1/2,2/3,3/4,5/6,6/7,7/8,8/9
Symbol rate 1 ~ 45 Mb/s
Input connector F Type ( Female )
Frequency range 950 ~ 2150 MHz
Input Signal level -65 ~ -25 dBm
Input impedance 75 Ω
Transport stream MPEG-2 ISO/IEC 13818
Video formats 4:3(Normal) & 16:9(Wide)
System decoding MPEG l Layer ll
Sampling frequency 48 kHz
64
Specification
Page 73

Physical Specification & Audio/Video Output
Specification
Physical Specification
Video
Audio
Size (W×D×H)
Weight(Net) 2.3 kg
Type LCD
Pixel arrangement RGB vertical stripe
Display color 262,144
Screen size(inch) 10.2”(Diagonal)
Number of pixel 800×480
Type Speaker & earphone
Speaker Dual speakers for stereo audio
Maximum input power 5 W
Electrical impedance 8 Ω
STB : 270 × 38 × 226 (mm)
LCD: 270 × 12.5 × 202.6 (mm)
Chapter 5
65
Page 74

Other Information
Warranty
LIMITED WARRANTY TO ORIGINAL PURCHASER
This SAMSUNG brand product, as supplied and distributed by SAMSUNG ELECTRONICS
AMERICA, INC. (SAMSUNG) and delivered new, in the original carton to the original
consumer purchaser, is warranted by SAMSUNG against manufacturing defects in materials and
workmanship for the following limited warranty period:
One (1) Year Parts / Ninety (90) Days Labor
This limited warranty begins on the original date of purchase, and is valid only on products
purchased and used in the United States, and does not include transportation, installation, removal
or reinstallation.
Warranty repairs must be performed by SAMSUNG’s authorized service center. To receive
warranty service, the original dated bill of sale must be presented upon request as proof of
purchase to SAMSUNG or SAMSUNG’s authorized service center. Transportation to and from
the service center is the responsibility of the purchaser.
66
SAMSUNG will repair or replace this product, at our option and at no charge with new or
reconditioned parts, if found to be defective during the limited warranty period specified above.
The product must be returned during the warranty period with transportation charges prepaid
to SAMSUNG’s designated service center. Prior to returning any product for warranty service,
the purchaser must contact SAMSUNG for problem determination and service procedures.
SAMSUNG does not warrant uninterrupted or error-free operation of the product.
Warranty
Page 75

All replaced parts and products become the property of SAMSUNG and must be returned to
SAMSUNG. Replacement parts and products assume the remaining original warranty, or ninety
(90) days, whichever is longer.
SAMSUNG’s obligations with respect to software products distributed by SAMSUNG under the
SAMSUNG brand name are set forth in the applicable end user license agreement.
Non-SAMSUNG hardware and software products are provided on an “AS IS” basis. However,
non-SAMSUNG manufacturers, suppliers, publishers, and service providers may provide their
own warranties.
This limited warranty covers manufacturing defects in materials and workmanship encountered in
normal, noncommercial use of this product and shall not apply to the following, including, but not
limited to:
damage which occurs in shipment; applications and uses for which this product was not intended;
failures or problems which are caused by products or equipment not supplied by SAMSUNG;
accidents, misuse, abuse, neglect, misapplication, fire, water, lightning or other acts of nature;
incorrect electrical line voltage, fluctuations or surges; damage caused by improper or faulty
installation; improper connection with any peripheral; product alteration or modification; improper
or unauthorized repair; cosmetic damage or exterior finish; product with altered serial numbers;
failure to follow operating instructions, customer adjustments, maintenance and environmental
instructions that are covered and prescribed in the instruction book; use of non-SAMSUNG or
unauthorized parts, supplies, accessories or equipment which damage this product or
result in service problems; failures or problems due to incompatibility with other equipment.
Warranty
Chapter 5
67
Page 76

Other Information
SAMSUNG ELECTRONICS
NORTH AMERICAN LIMITED WARRANTY STATEMENT
Subject to the requirements, conditions, exclusions and limitations of the original Limited
Warranty supplied with Samsung Electronics (SAMSUNG) products, and the requirements,
conditions, exclusions and limitations contained herein, SAMSUNG will additionally provide
Warranty Repair Service in the United States on SAMSUNG products purchased in the United
States, for the warranty period originally specified, and to the Original Purchaser only.
The above described warranty repairs must be performed by a SAMSUNG Authorized Service
Center. Along with this Statement, the Original Limited Warranty Statement and a dated Bill of
Sale as Proof of Purchase must be presented to the Service Center. Transportation to and from the
Service Center is the responsibility of the purchaser.
68
Conditions covered are limited only to manufacturing defects in material or workmanship, and
only those encountered in normal use of the product.
Excluded, but not limited to, are any originally specified provisions for, in-home or on-site
services, minimum or maximum repair times, exchanges or replacements, accessories, options,
upgrades, or consumables.
For the location of a SAMSUNG Authorized Service Center, please call toll-free:
In the United States : 1-800-SAMSUNG (1-800-726-7864)
Warranty
Page 77

Notes
Notes
69
Page 78

Notes
70
Notes
Page 79

Notes
Notes
71
Page 80

Notes
72
Notes
Page 81

Notes
Notes
73
Page 82

Notes
74
Notes
Page 83

Icon Reference
Directional arrows
Indicate that a show’s start or end time is earlier or later than is visible in the Guide
program cell.
LEFT and RIGHT arrows on the remote offer special functionality.
Objects are scrollable above or below the visible window.
UP and DOWN arrows on the receiver front panel offer special functionality.
Scheduler icons
Shows an Autotune has been set for a future program, or a present program
is Autotuned.
Indicates an Autotune has been set for all episodes of an ongoing program.
Indicates an Autotune set for a present or future program conflicts with
another scheduled program.
Shows an Autotune has been set for matching programs in a “Find by.”
Indicates a present or future pay per view program has been scheduled
for purchase.
And more...
Denotes one or more alternate audio tracks available for a program.
Denotes that no alternate audio tracks available.
Indicates one or more new messages are in the Inbox.
Indicates no new messages are in the Inbox.
Shows that Parental Control limits are currently “locked.”
Shows that limits are temporarily unlocked.
Shows that there are no current limits imposed.
Indicates a rating level or channel that is blocked via Parental Controls.
Indicates a pay per view program is available as an All Day Ticket replay.
Indicates program shown in letterbox format.
Denotes an error condition has occurred.
 Loading...