

Page 1
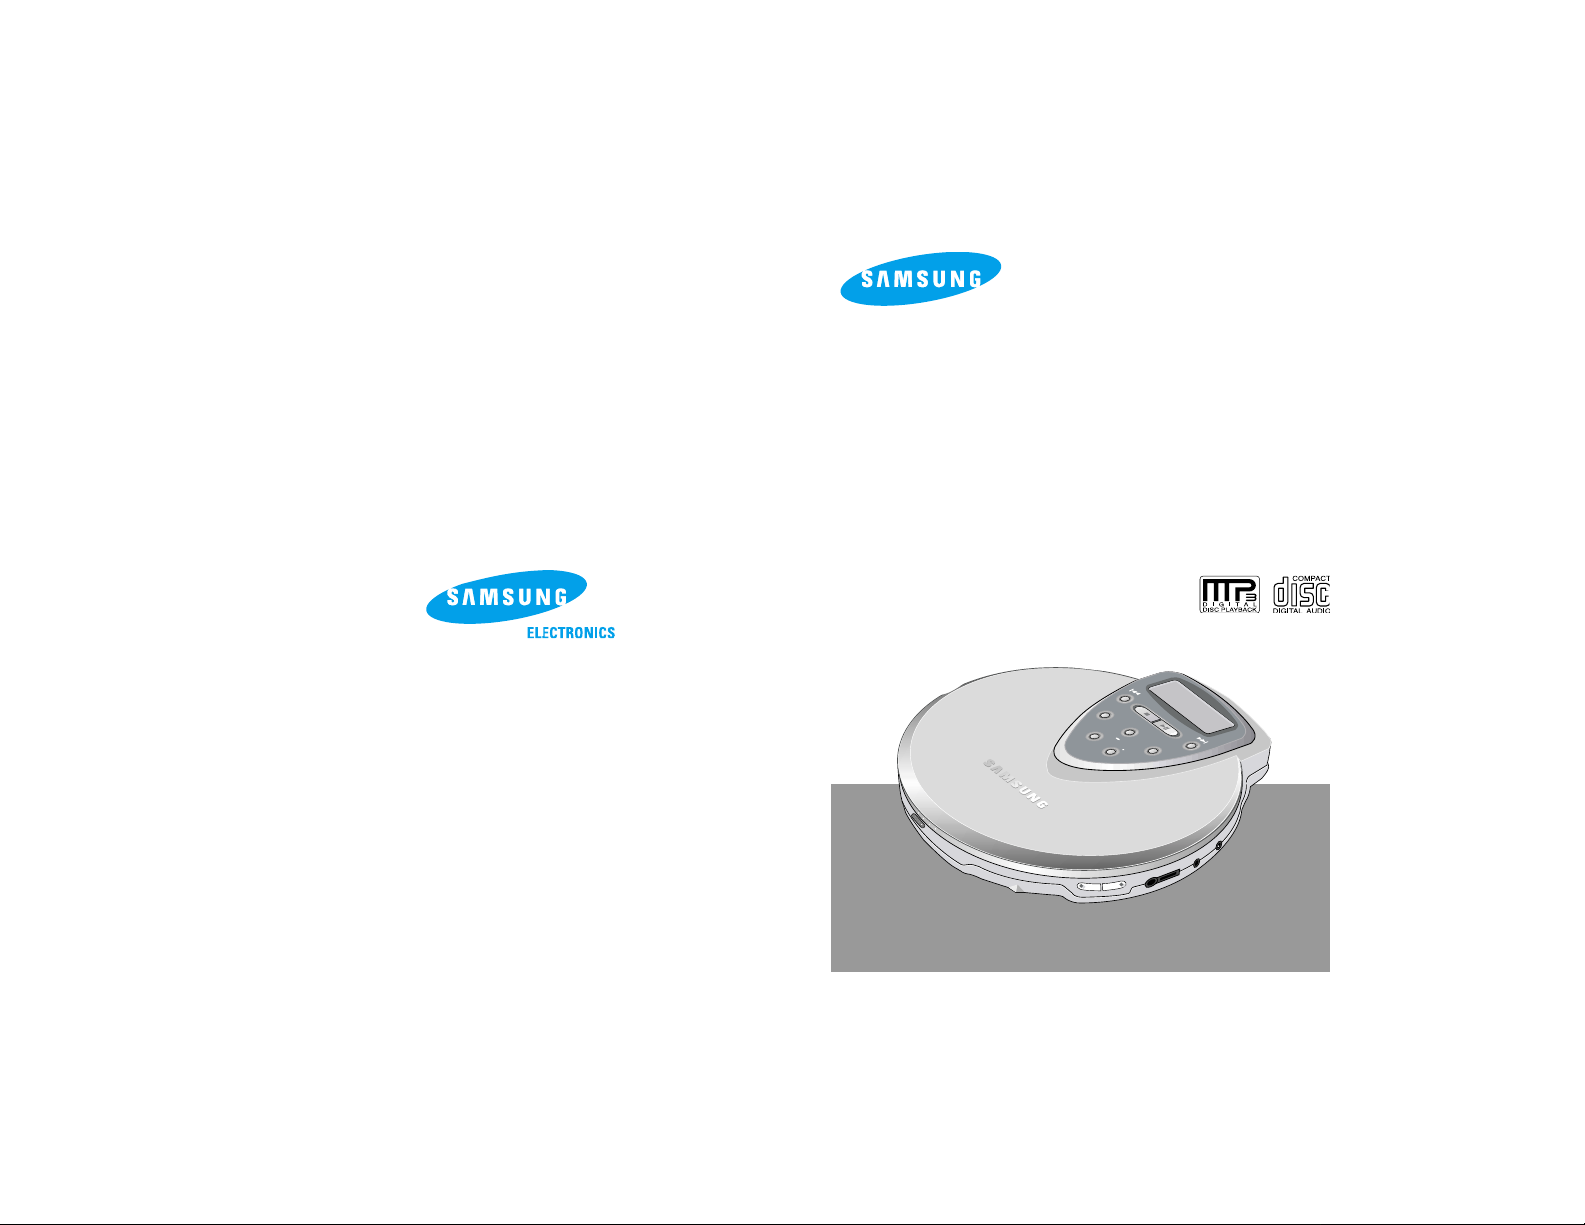
Portable MP3-CD Player
MCD-SF85
MP3-CD/CD-R/RW Playback
ESP/Album
Program
Stop
Play
Mode
+10
L.Memory
SBS
Instruction Manual
AH68-01096B
Page 2
21
What is MP3?
SBS function
The SBS function produces rich,
deep bass tones for a more powerful overall sound.
ESP function
The ESP function ensures high
resistance to shock or vibration so
that the sound signal remains undisturbed ( up to 120 seconds for MP3
and 45 seconds for a CD).
FM Radio Reception
You can listen to FM radio using
various functions such as the
automatic tuning, preset FM
stations, and etc.
Album function
(MP3-CD Only)
The Album function allows easy
browsing and searching of your
favorite tunes by album name, song
title and artist.
Last Memory function (MP3-CD Only)
The Last Memory function allows you
to listen to a song from the point you
left off - handy for when you have to
answer the phone or door.
MP3 means MPEG1 Layer 3, the global standard for audio signal compression technology. It uses digital compression technology to compress original sound data by up to 12
times without sound quality degradation.
File Compatibility
● The unit will play back files created in MP3 format (Mpeg1.Layer 3) with *.mp3 as their
extension.
● Files created in MP2 format (Mpeg1.Layer2) with *.mp2 as their extension can also be
played back.
How many MP3 files can a CD-R or CD-RW disc record?
● The maximum capacity of one CD-R or CD-RW disc is 680MB.
Normally, one MP3 file has a capacity of 4MB, therefore approximately 170 files can
be recorded on a single disc.
Safety Warning 3
Buttons and Controls 5
Preparation before using your unit 9
● How to Connect 9
● Using the rechargeable batteries 10
● Using standard batteries (not supplied) 11
CD Playback 12
MP3-CD Playback 13
Skip/Search function 14
Mode function 15
Last Memory/SBS function 16
ESP/Album function 17
+10 button 17
Program function 19
● To confirm the program 20
● To change the program 20
● To cancel the program mode 20
Listening to FM Radio 21
Presetting Stations 22
Features 24
Maintaining and looking after your unit 25
Troubleshooting Guide 26
Specifications 27
Main Features Contents
Page 3
43
Road safety
● Do not use the earphones while riding a bicycle, driving any kind of motor
vehicle or motorcycle.
This is very dangerous and is illegal in certain regions.
It is dangerous to wear earphones at high volume while crossing roads.
In order to protect your hearing
● Do not wear the earphones with the volume set too high.
Doctors state that listening to music at high volume for prolonged periods is
harmful to hearing.
● If you experience a ringing in your ears, reduce the volume or stop listening.
Warning : Please do not use earphones of other companies besides those of
this company.
Earphones
● Your unit consists of materials which can be recycled if disassembled by a
specialized company. Please observe local regulations regarding the
disposal of packing materials, exhausted batteries and old equipment.
Environmental information
● Ambient temperature : 5°C~35°C (41°F~95°F)
Humidity : 10~75%
Ambient operating conditions
Safety Warning
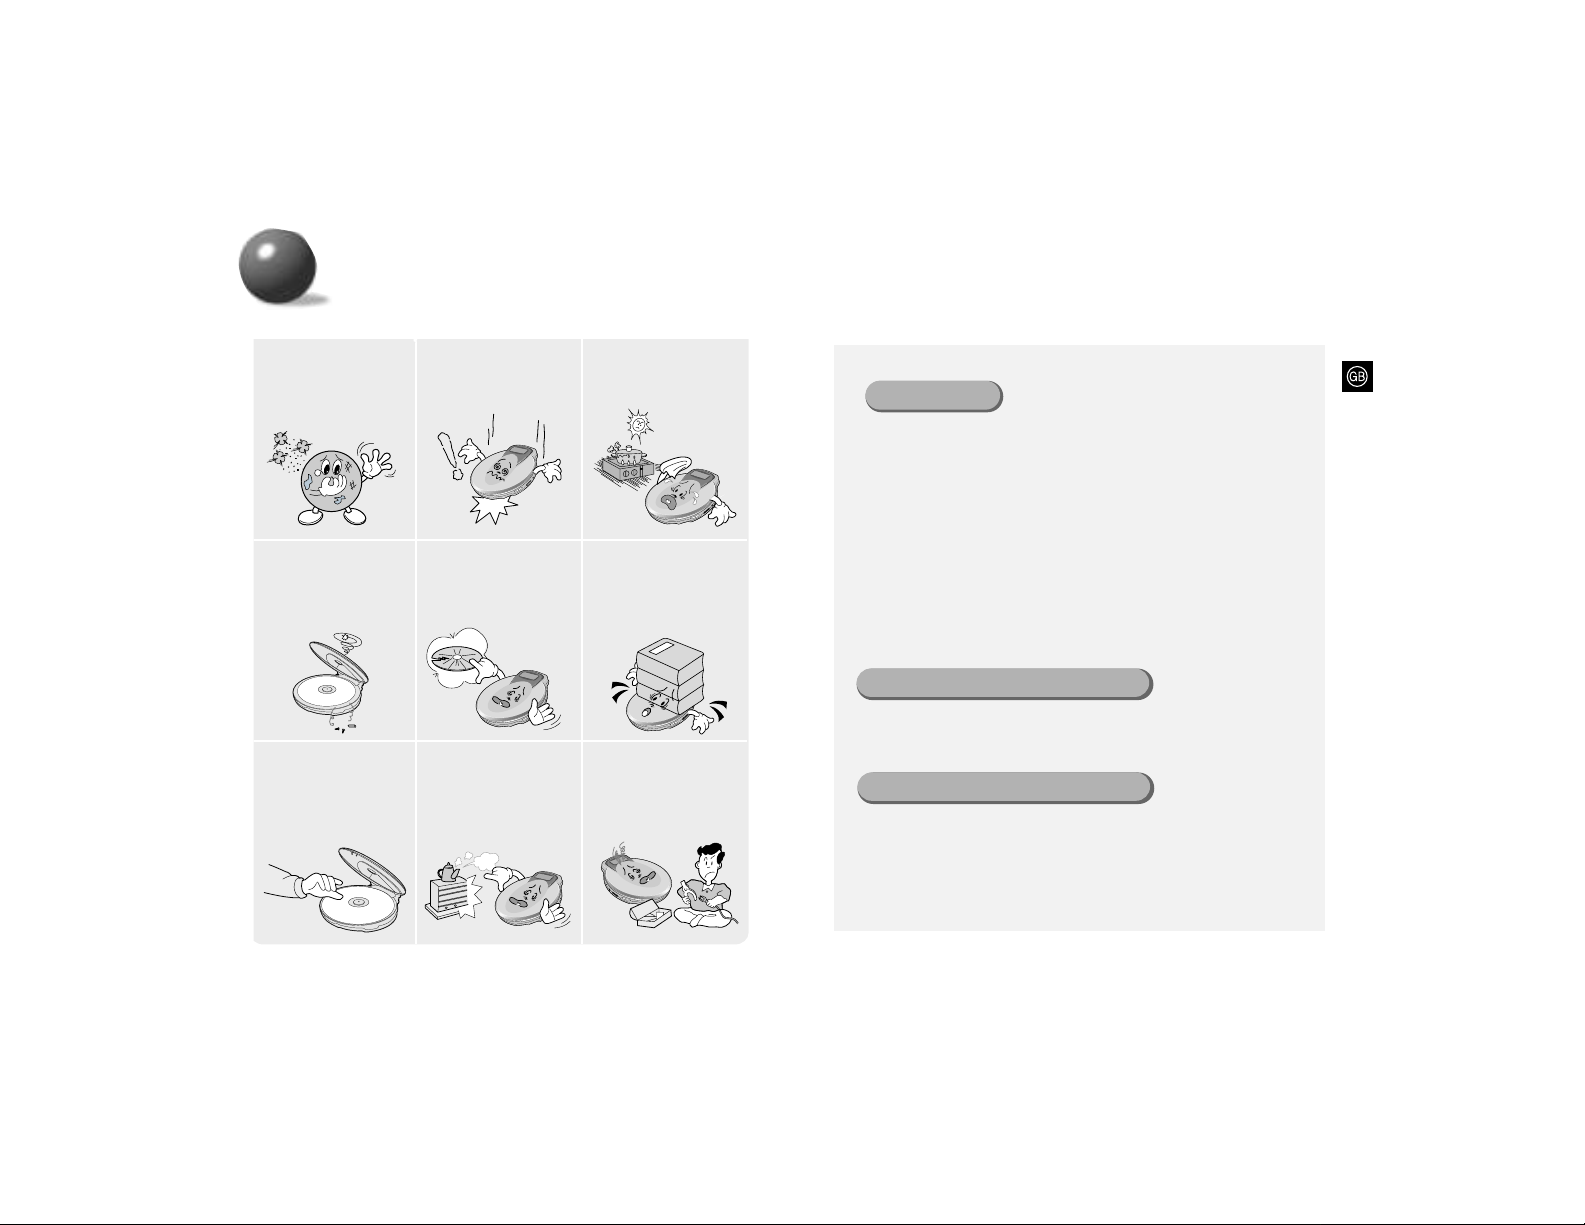
Take care not to allow
dust or other contaminants to come into contact with your player.
Do not apply heavy
pressure to the player.
Do not leave your player in direct sunlight or
near a heat source.
Do not put anything other
than a CD (CD-R or CD-RW)
inside your player.
● Such actions will dam-
age your player.
Do not use broken or
scratched MP3 CDs.
Do not use your player
on uneven or unstable
surfaces.
● Your player may not oper-
ate properly.
Do not touch the lens
with your finger or
scratch it.
● Your player may not
operate properly.
Do not place your
player in a dusty or
humid location.
Do not attempt to take
apart, repair or modify
your player.
● Such actions will damage
your player.
Page 4
65
Accessories
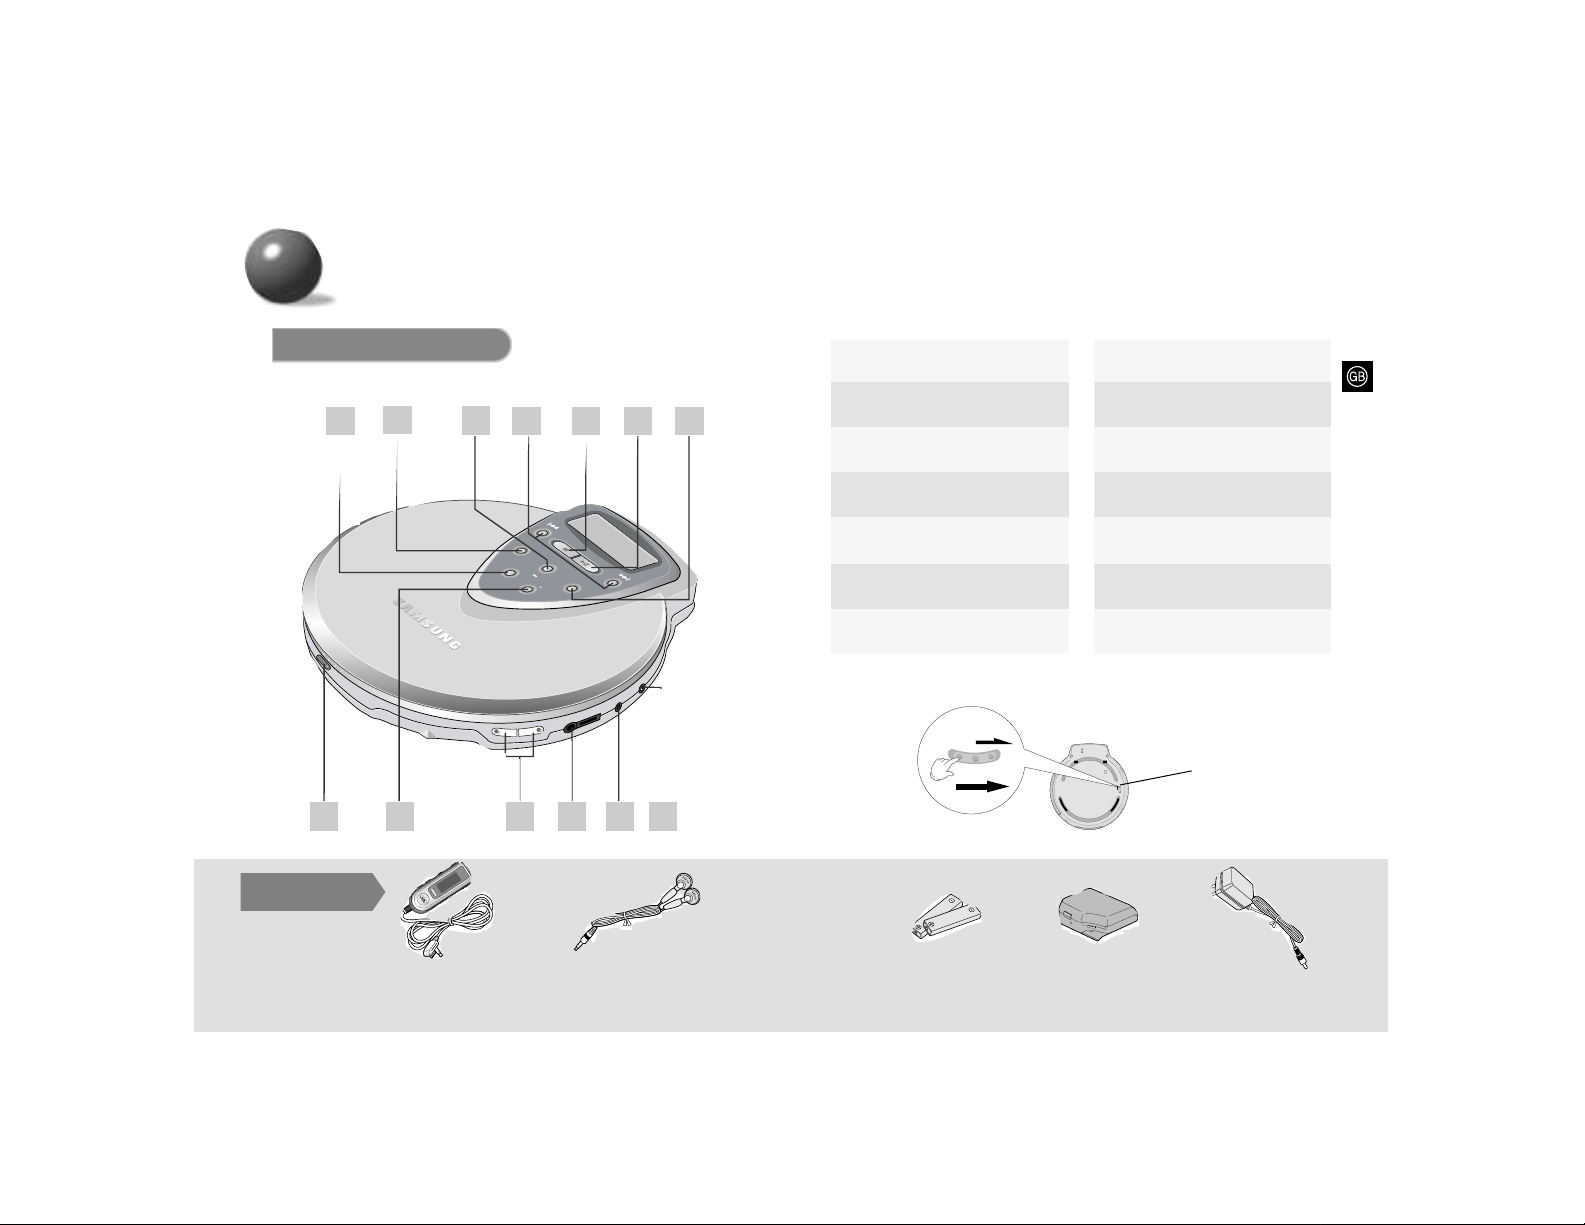
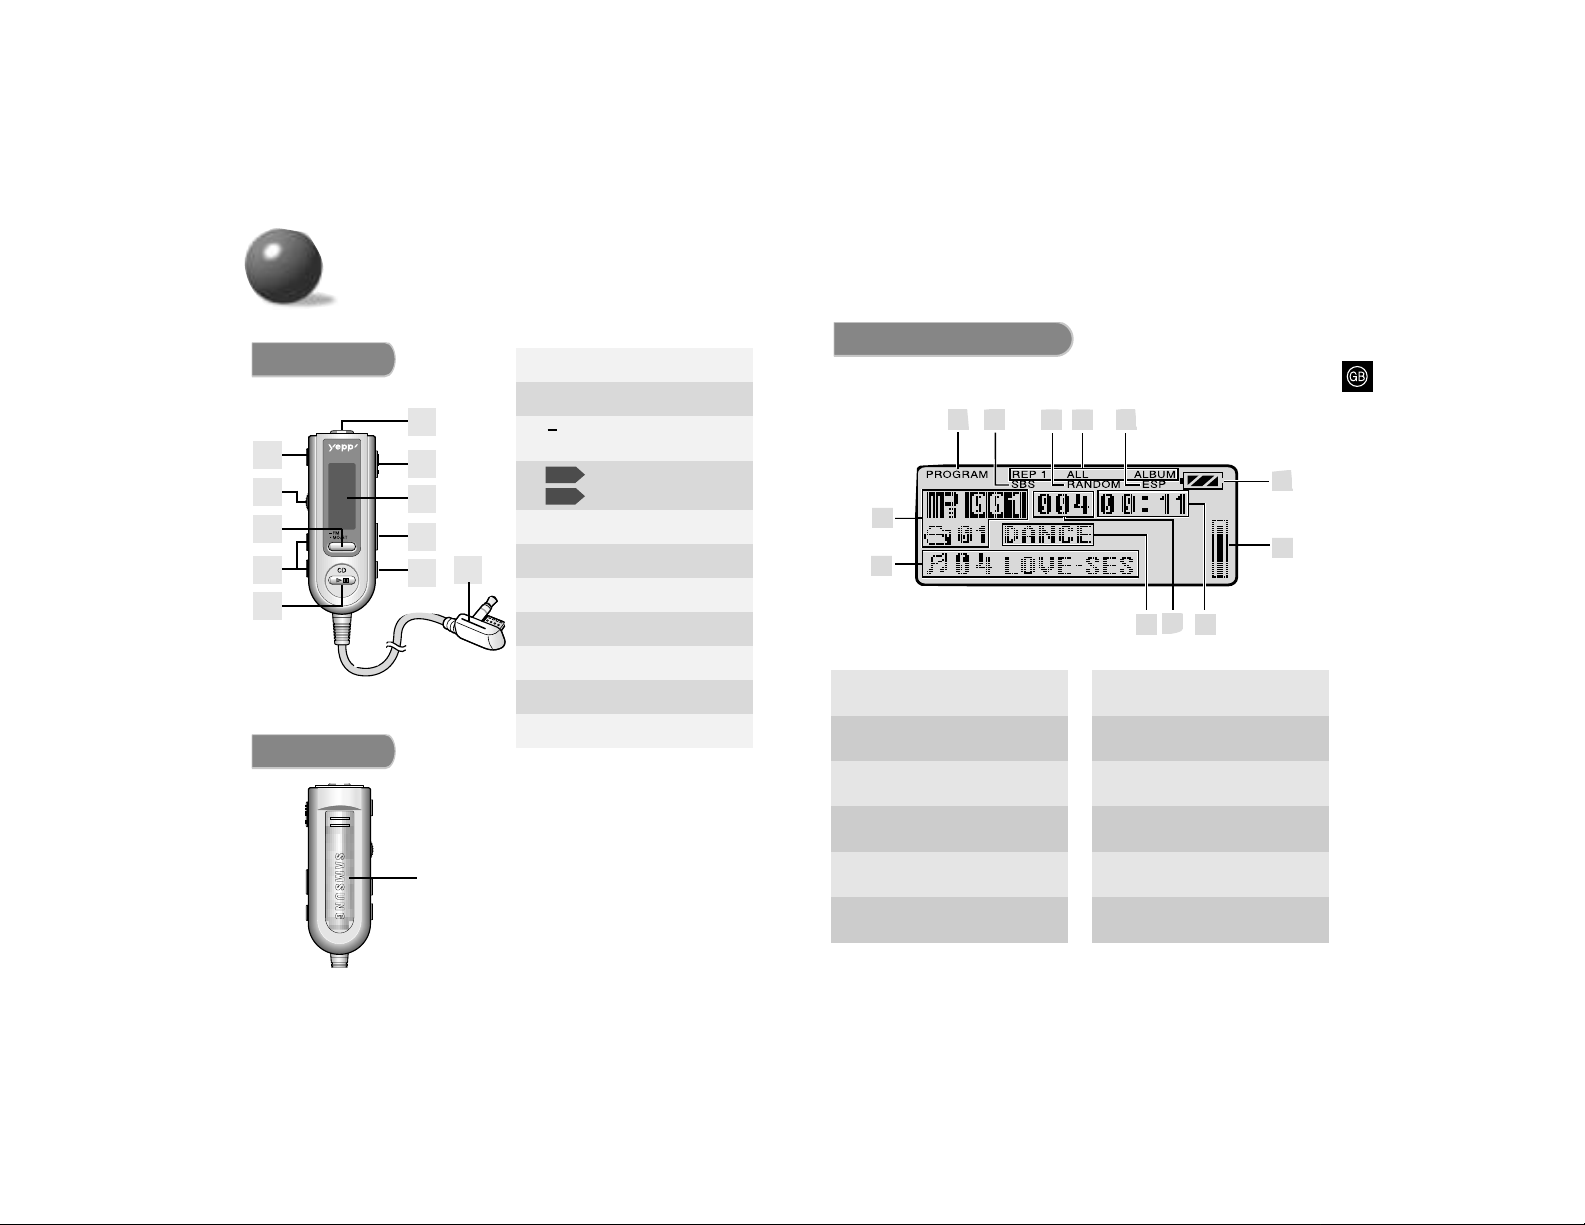
EarphoneRemote Control
Main Unit
Buttons and Controls
2
1
3
4 5 6 7
12 13108 9 11
ESP/Album
Program
Stop
Play
Mode
+10
L.Memory
SBS
1.
2.
3.
4.
5.
7.
6.
10.
11.
12.
13.
9.
8.
Program button
(Refer to pages 20, 21)
ESP/Album button
(Refer to pages 18, 19)
Skip/Search buttons
(Refer to page 14)
Stop button
+10 button
(Refer to page 18)
Play/Pause button
Mode button
(Refer to page 15)
Power Input Jack (Refer to page 10)
Last Memory/SBS button
(Refer to page 16)
Remote control Connection jack
(Refer to page 9)
Line Out output jack
(Refer to page 9)
Volume
Open switch
Hold switch
Bottom of the Main Unit
Rechargeable Batteries
(Ni-MH: 1350mAh 1.2V) x 2
External battery
pack
AC adaptor
Hold
Hold
Hold
Page 5
87
1 2
4
3
5
6
7
8
11
12
9
10
Display
1.
PROGRAM indicator
The picture of the display panel below is based on MP3-CD playback.
2.
SBS Indicator
3.
RANDOM indicator
4.
REPEATindicator
5.
ESP Indicator
6.
Remaining Battery Power indicator
7.
8.
9.
10.
11.
12.
Playtime indicator
Album Name indicator
(MP3-CD Only)
Title (track title & artist) indicator
(MP3-CD Only)
Anti-S.T. (Anti-shock Time)
Buffer Level meter
Track Number indicator
Album Number indicator
Belt clip
Front
6
7
8
9
10
11
1
2
3
4
5
Rear
Volume
FM button
• Mo/ST button
Stop/Power off button
2.
3.
4.
5.
6.
7.
8.
1.
Skip/Search button
Automatic Tuning button
CD
Radio
Hold switch (see page 14)
Display
AL/+10/MEM. button
CD Power On/Play/Pause button
Earphone jack
9.
10.
Mode/P.SET
button
11.
Main Unit connection jack
Buttons and Controls
Page 6
109
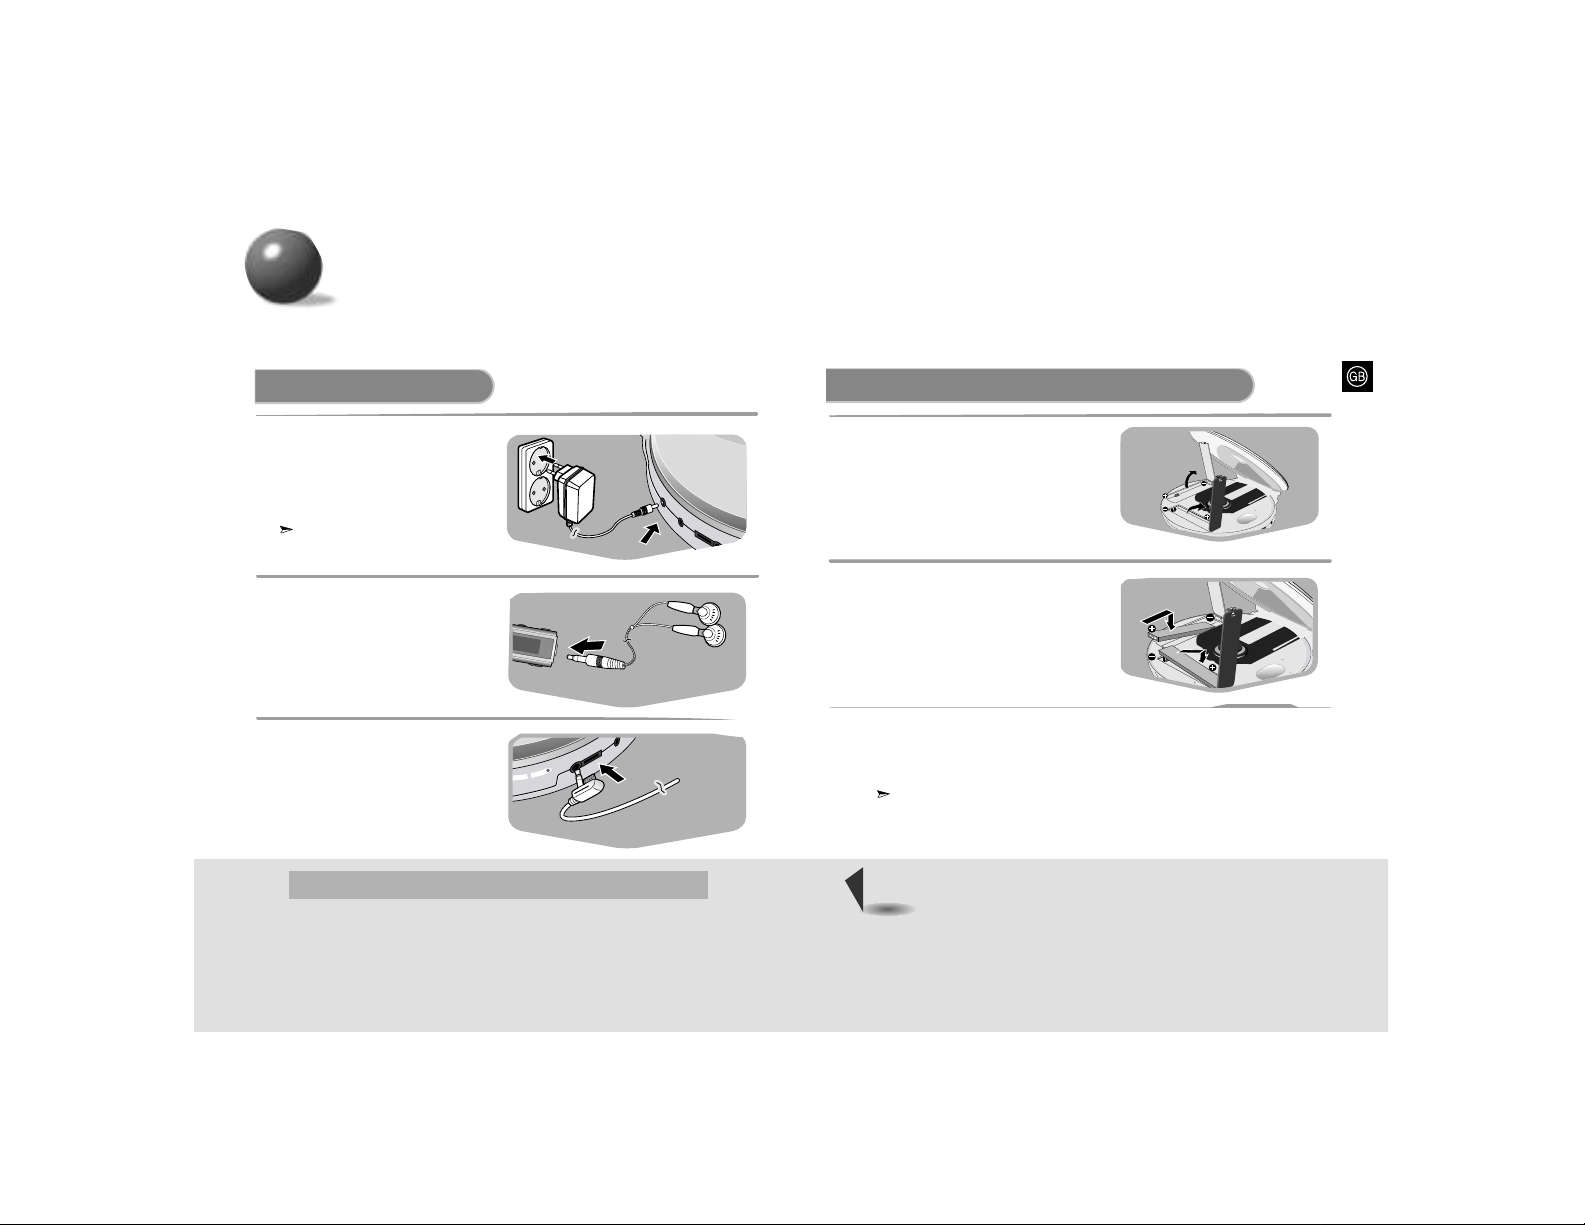
Connection to External Device (if necessary)
* Your CD Player may be connected to the AUX IN jack of an external device
1. Reduce the volume of the external device
2. Connect the Line Out jack to the Input jack of the device with
connection cable (not supplied).
How to Connect
1
2
Preparation before using your unit
Note
•
Time taken to fully charge the battery : 10 hours
•
Battery life of fully charged battery
MP3-CD : 9 hours max.
CD : 8 hours max(when ESP is off)
6 hours 30 minutes max(when ESP is on)
Using rechargeable batteries
Open the cover of the battery
compartment
1
Insert the rechargeable batteries
into the battery compartment.
•
Carefully check the correct orientation of
the positive and negative terminals of
the battery.
2
3
An AC adaptor must be connected to the AC outlet and
power input.
•
Charging of the rechargeable batteries will commence.
AC adaptor : DC4.5V, 500mA
Connect the AC adaptor to the power
input jack. Then, connect the AC plug
of the adaptor to the AC outlet.
• Only use the AC adaptor supplied
with your product.
When you are not using this product,
disconnect the AC adaptor from the AC outlet.
Connect the earphone to the
remote control.
Connect the earphone jack
plug to the main unit.
• Reduce the volume on the
remote control while increasing
the volume on the main unit.
3
Page 7
1211
Lock
Open
Lock
Open
Lock
Open
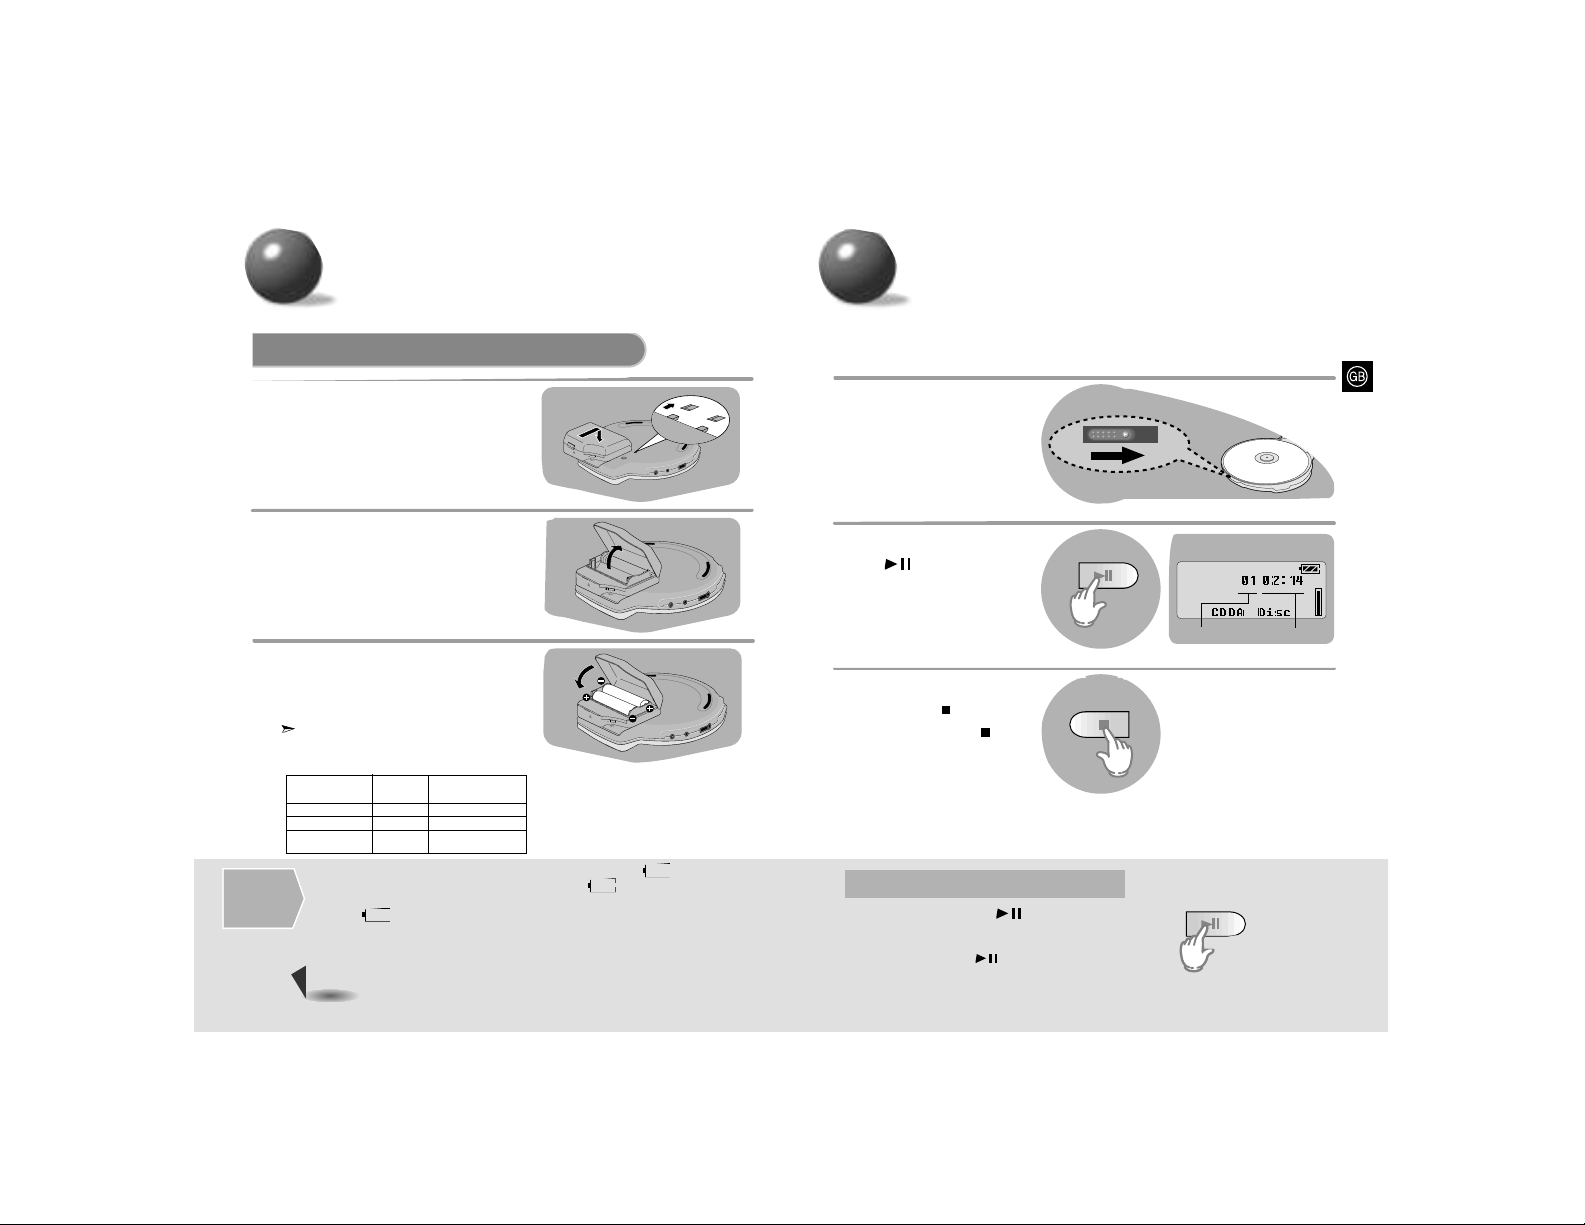
Open the cover of the battery compartment.
2
Attach the external battery pack as
shown in the picture.
•
Then, turn the lock control to secure
firmly in place.
1
Carefully check the correct orientation of the positive and negative terminals of the batteries.
•
Use two AA/R6 type 1.5 V batteries.
3
Use two AA/R6 alkaline batteries. Manganese
batteries have a shorter battery life.
•
Do not mix old and new batteries.
•
Remove the batteries if they will not be used for a long time.
•
Remove the standard batteries when you use an AC adaptor.
Warning
•
Replace the batteries if the remaining battery power indicator “ ” flashes.
•
Even though the remaining battery power indicator “ ” may be flashing, if the
batteries have already expired, the LCD remote control will not be lit.
•
Should “ ” flash, the player will automatically turn off the CD ESP ON mode to
conserve battery power consumption.
•
Standard batteries cannot be recharged.
•
The external battery pack cannot charge, as it does not have the capacity to charge.
Using standard batteries (not supplied)
Time for
Battery
Replacement
Rechargeable Rechargeable Batteries +
Batteries Battery Pack (type AA/R6)
MP3-CD 9 hours 20 hours
CD(when ESP is off) 8 hours 16 hours
CD(when ESP is on) 6 hours 14 hours
30 minutes
Battery Life (Using alkaline batteries)
Preparation before using your unit
Open
Slide the Open button to
open the door.
Insert a CD.
•
Push the door to close it.
1
Press the Play/Pause
( ) button.
•
Once the CD is
recognized, playback
commences.
2
To stop playback, press
the Stop ( ) button.
•
Press the Stop ( )
button again to switch
off the unit.
3
Press the Play/Pause ( ) button.
•
Playback will be temporarily suspended.
•
Press the Play/Pause ( ) button again to resume
playback.
To temporarily pause playback
Track Number Indicator
Playtime Indicator
CD Playback
Page 8
1413
Open
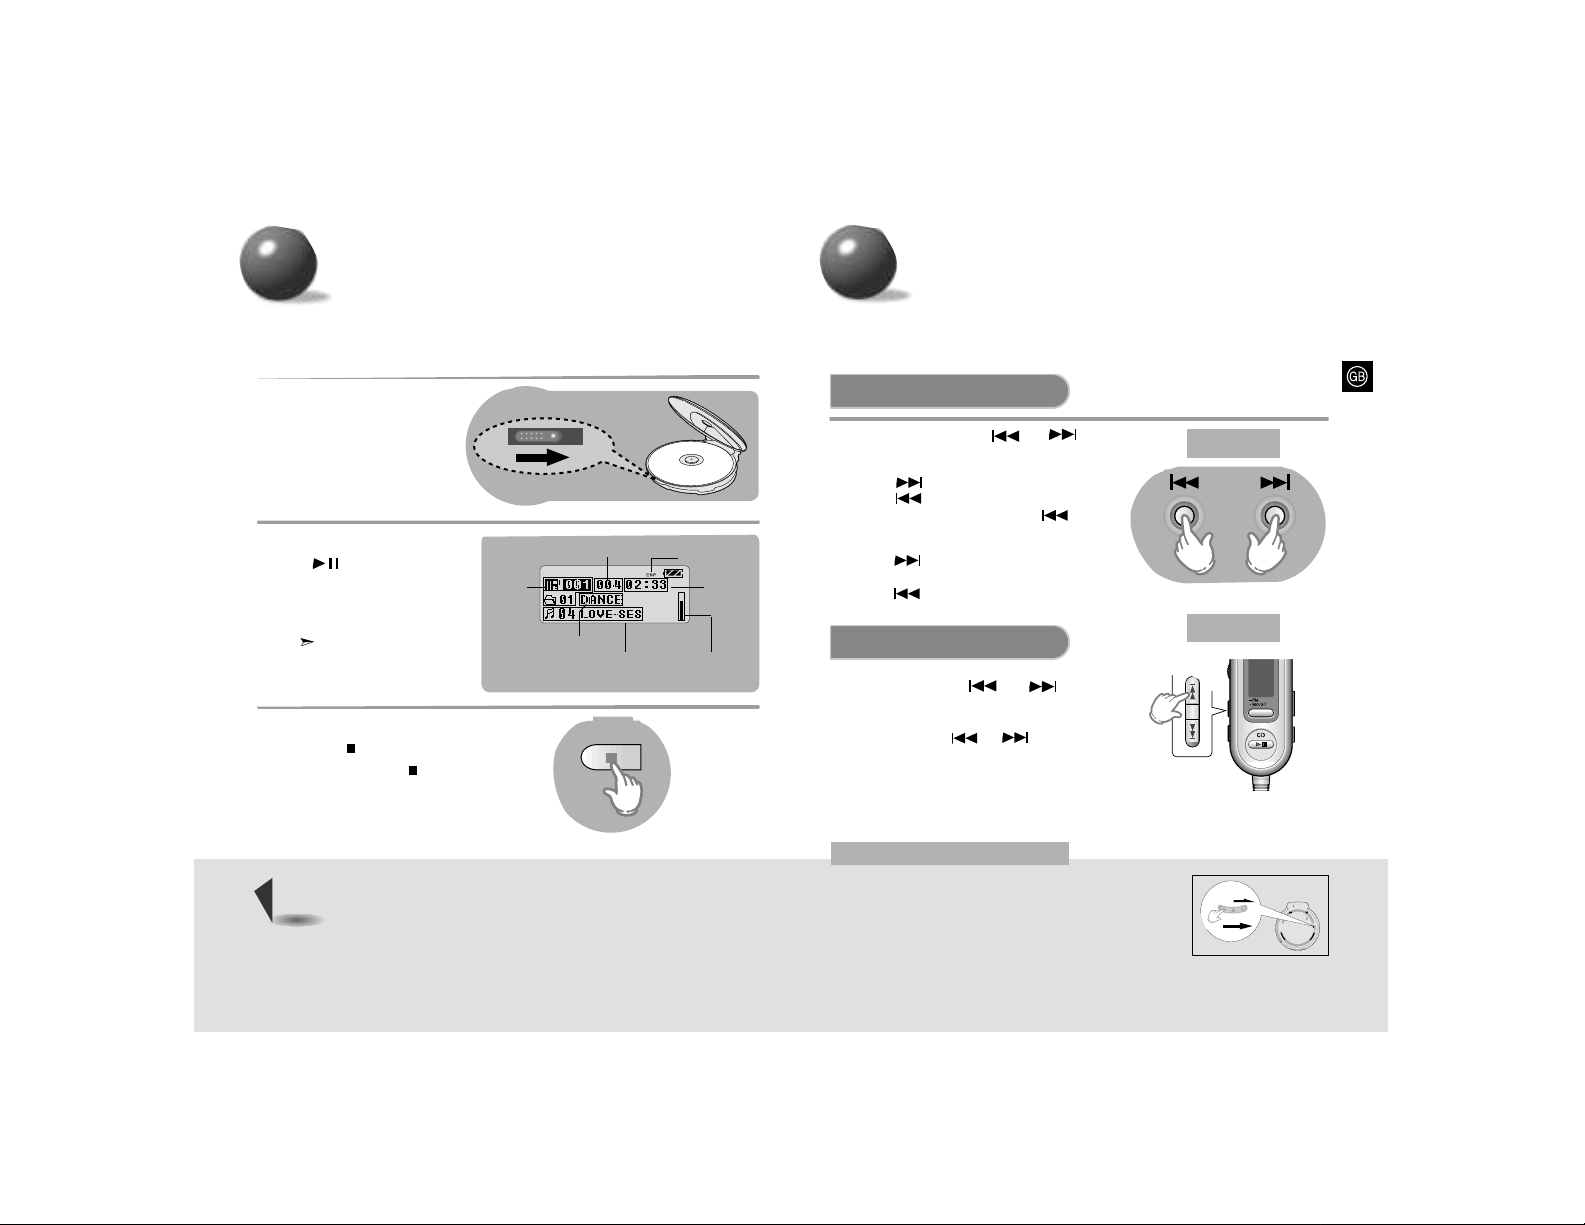
Slide the Open button to
open the door, and insert
an MP3-CD.
•
Push the door to close it.
1
Press the Play/Pause
( ) button.
•
The inserted MP3-CD will be
scanned for about 30~90
seconds. Playback will then
commence.
Your CD Player will take a
few moments to scan through
all the tracks recorded on a
MP3 CD.
2
To stop playback, press the
Stop ( ) button.
•
Press the Stop ( ) button
again to switch off the unit.
3
Album
Number
indicator
Track Number indicator
Album Name indicator
Title (track title and
artist) display
Anti-S.T (Anti-Shock
Time) Buffer Level indi-
cator
Playtime
indicator
•
When the Open switch is slid to open the door, playback will stop.
Note
MP3-CD Playback
Skip
Press and release the or button
during playback of a CD.
• Press the button to play the next track.
Press the button to go back to the beginning
of the current track. (Briefly press the button
twice to repeat the previous track).
• Press the button while the unit is in “Stop”
(no playback) mode. Track 2 will be played back.
Press the button to play back the previous song.
Search
Press and hold the or button
during playback of a CD.
•
Press and hold the or button.
The CD will playback in fast forward or fast reverse mode.
•
Release the button to return to normal playback mode.
• Buttons pressed during CD playback will not function.
(On the display, the “Hold” indicator will flash.)
• Use the HOLD function when carrying your CD Player around with you.
Use of this function will allow you to conserve battery life as it prevents
the CD Player from being turned on unintentionally if a button is pressed.
• The remote control will still operate while the HOLD function on the main unit
is active.
• The main unit will still operate while the HOLD function on the remote control
is active.
HOLD function
Main Unit
Remote Control
Hold
Hold
Hold
Skip/Search function
ESP
indicator
Page 9
1615
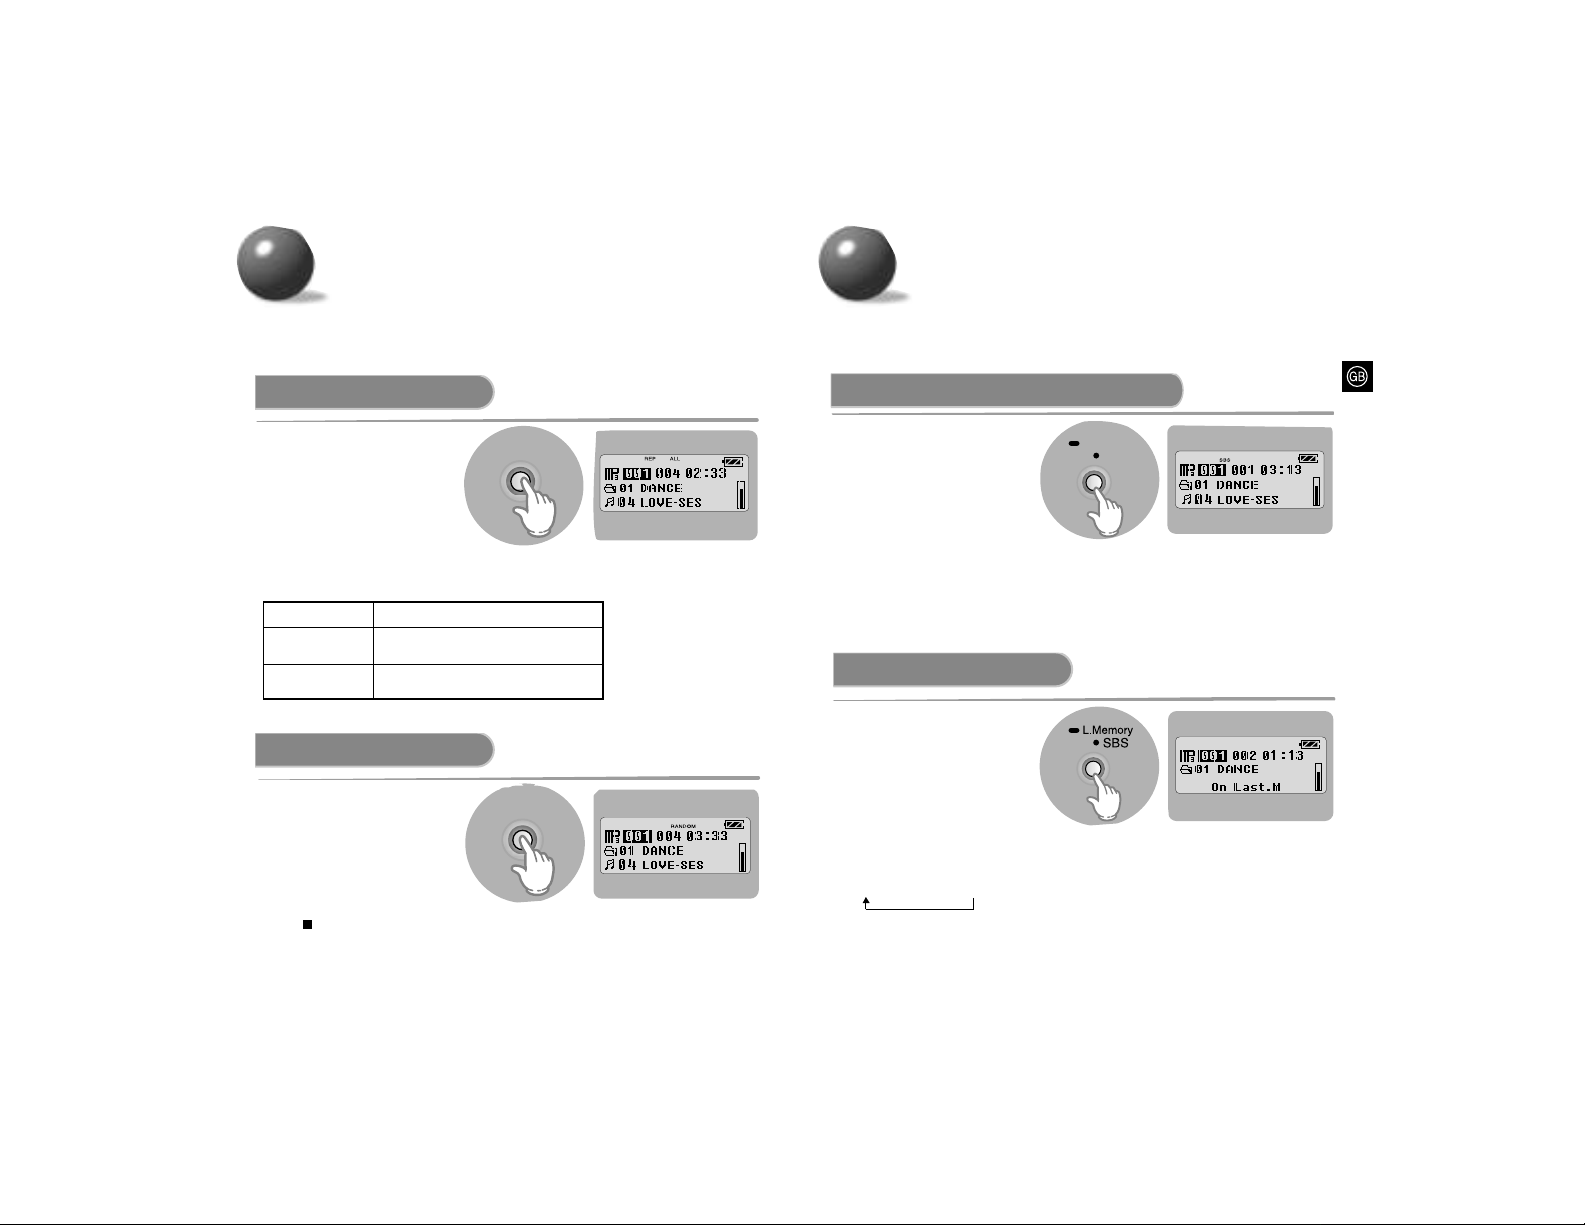
Repeat function
Mode
Press the Mode button.
(Press Mode/P.SET button on the
remote control)
•
Each time the button is pressed,
REP1, REP ALBUM and REP ALL
are selected.
(REPALBUM mode only works for
MP3-CD disks which contain
albums.)
Random function
Mode
Press and hold the Mode button.
(Press and the hold Mode/P.SET
button on the remote control)
•
All tracks will be played back in
random order.
•
To cancel this function, press and
hold the button again, or press the
Stop ( ) button.
Briefly press the Mode button to activate the Repeat function or hold it
down for longer to activate the Random function.
REP1 allows you to repeat the current track.
REP ALBUM
allows you to repeat all tracks in the current album.
(MP3-CD only)
REP ALL
allows you to replay the entire CD once it has
finished playing.
Mode function
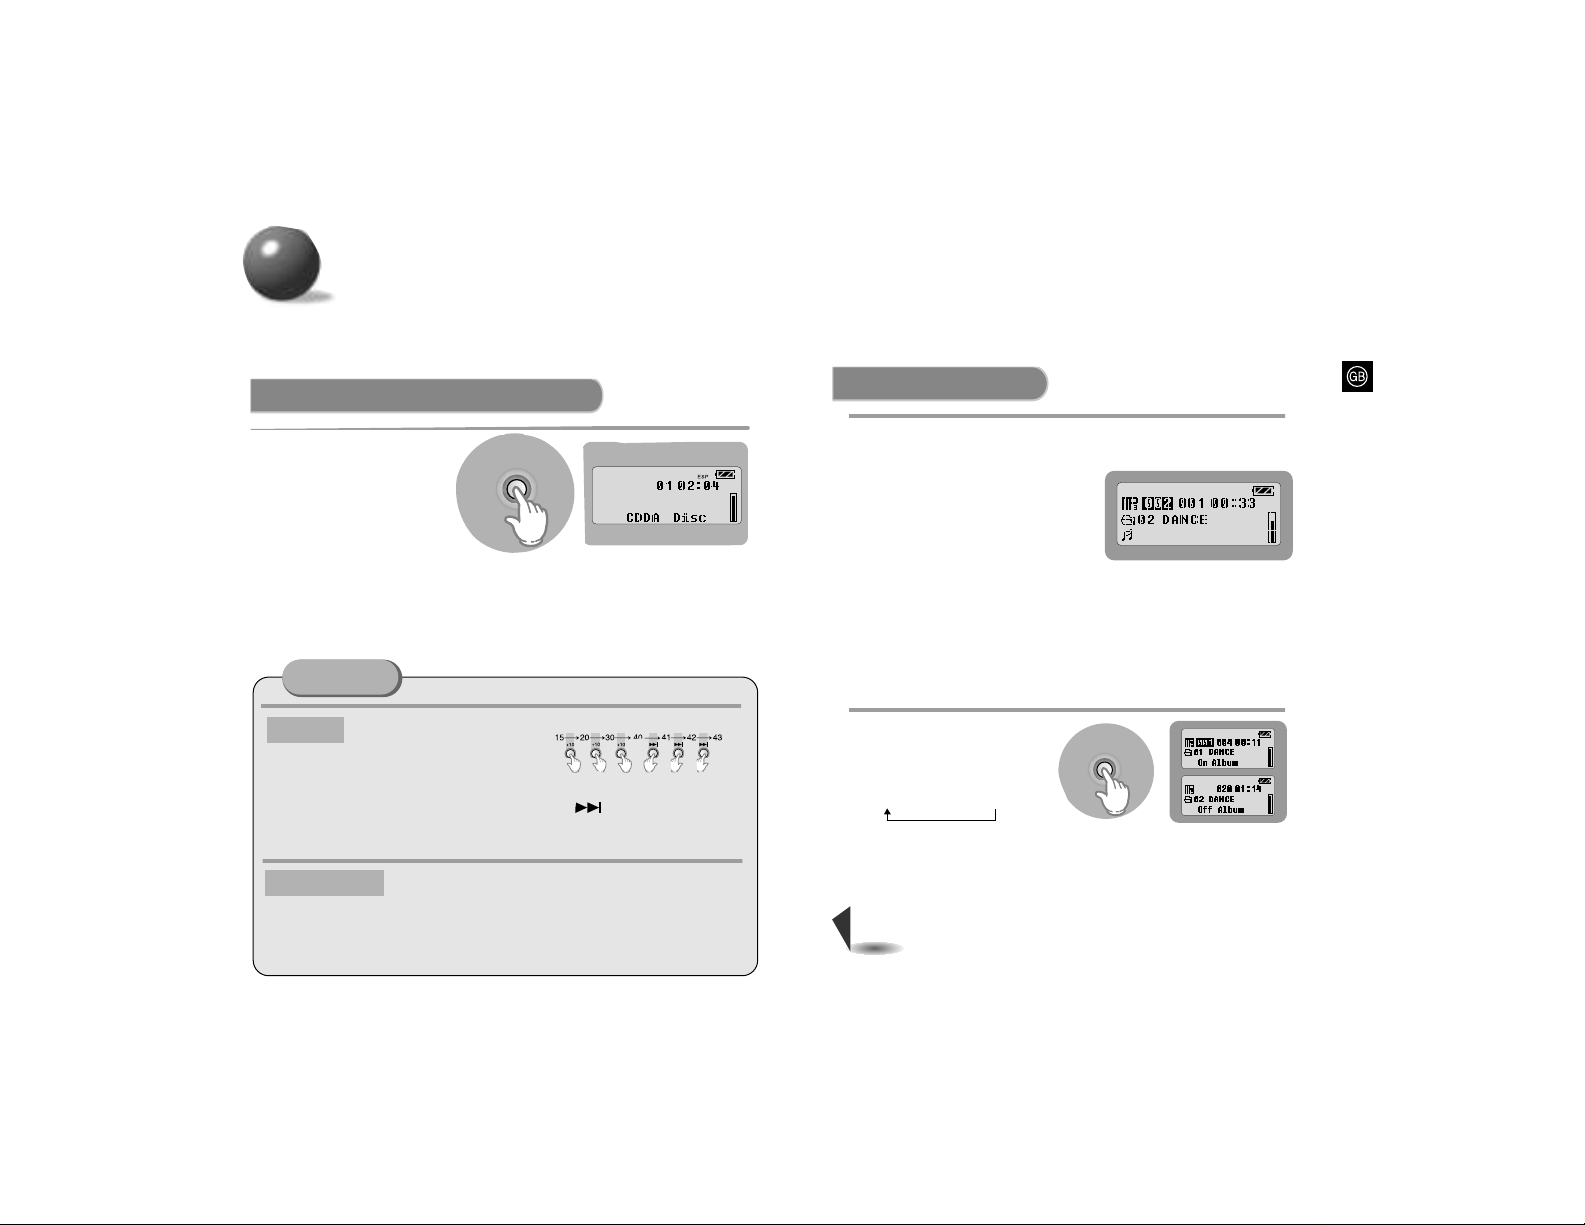
Briefly press the Last Memory/SBS button to activate the SBS function or hold it longer to activate the Last Memory function.
SBS
(Super Bass Sound)
function
SBS
L.Memory
Press the Last Memory/SBS button.
•
Each time the Last Memory/SBS
button is pressed, SBS will be turned
on and off alternately.
This function allows you to maximize
your listening enjoyment with dynamic
reproduction of low-pitched sounds.
When MP3-CD playback is
selected again after your
CD player has been stopped or
turned off, the unit plays back
from the start of the track that
you last listened to.
•
Press and hold the Last Memory/SBS button.
Each time the button is pressed and held, the
selection switches between
“On Last.M” and “Off Last.M”.
This function is only available during playback
of an MP3-CD.
Last Memory/SBS function
Last Memory function
Page 10
1817
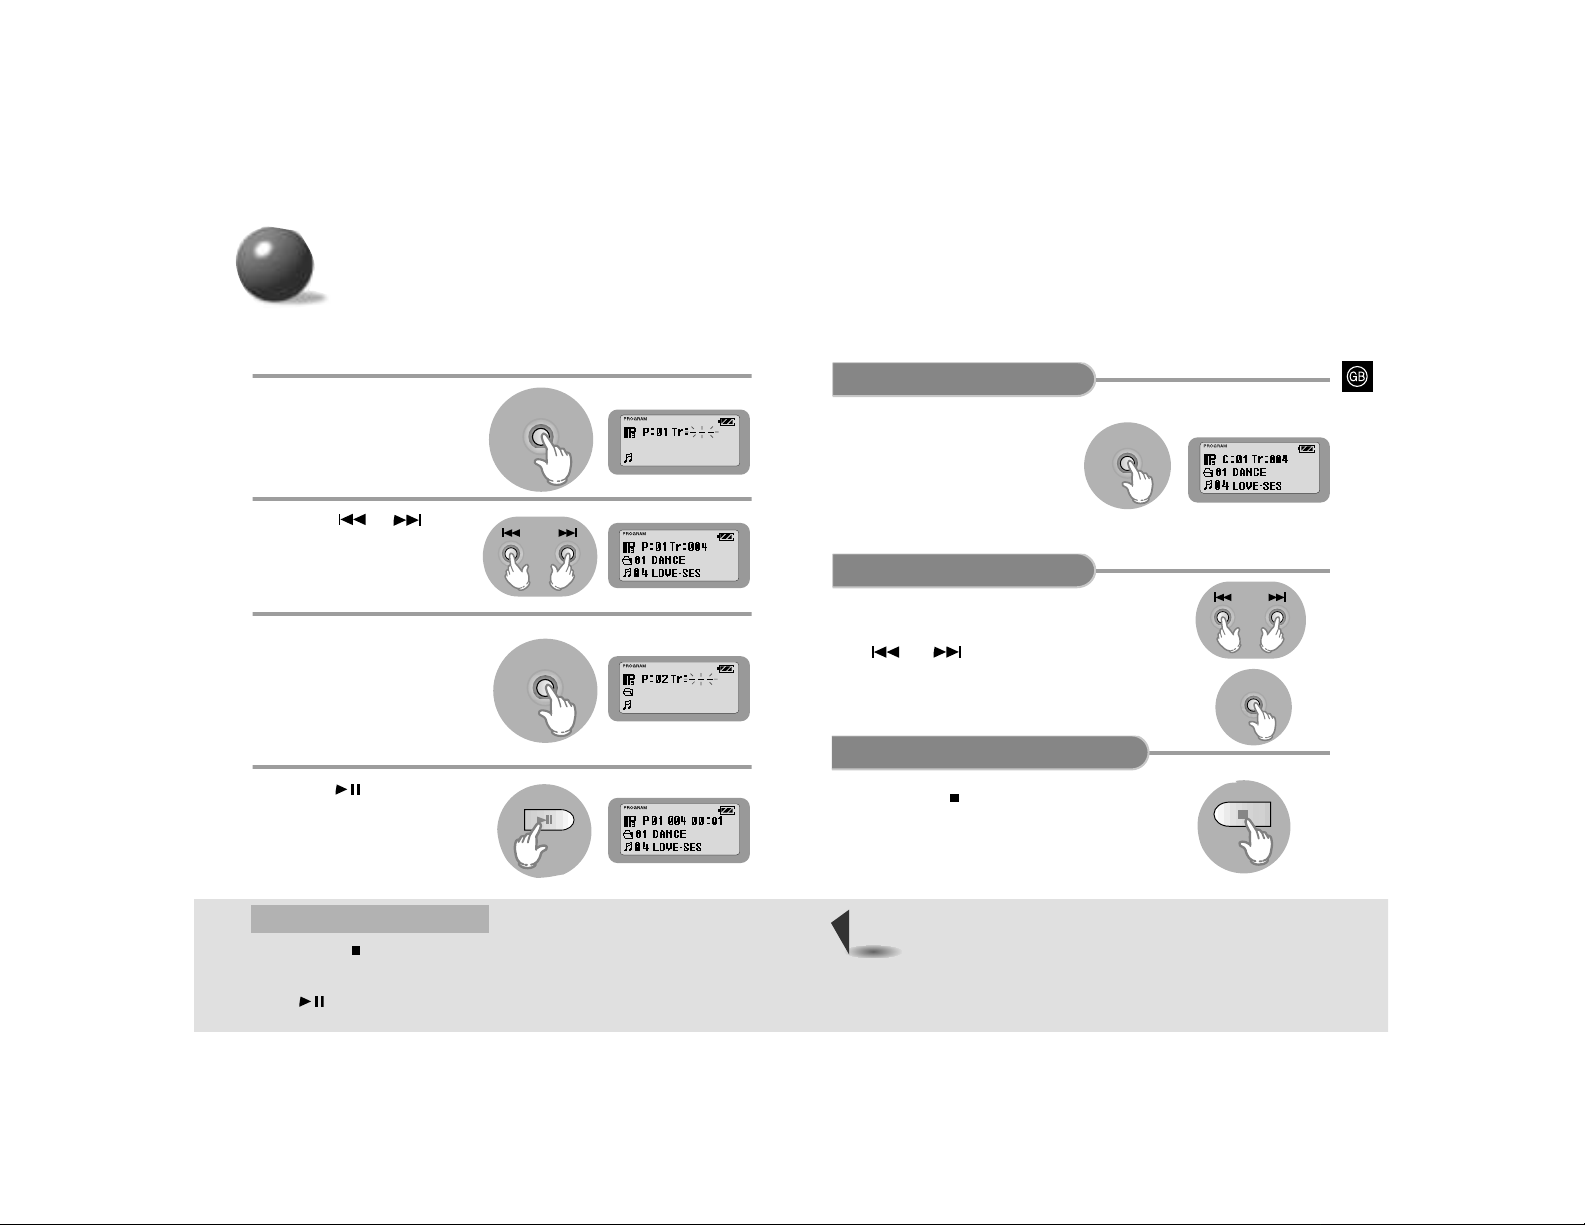
Press the +10 button.
• Press the +10 button briefly while playing
back a CD. Playback will skip 10 tracks.
Example : If you want to select track 43 during playback of track 15, press the
+10 button three times, then press the button three times.
• MP3-CD playback : Press and hold the ESP/Album button longer to select “Album
Off”. The button now functions as the +10 button.
ESP prevents the music
being interrupted by
vibration and shock.
ESP (Electronic Skip Protection) function
ESP/Album
Press the ESP/Album button.
• CD Playback: Press the
ESP/Album button to turn
this function on and off.
(During playback of an MP3-CD,
ESP will always be active whether
or not the ESP/Album button is pressed.)
• The player buffers up to 120 seconds of MP3 and 45 seconds of audio CD data; hence
even if the data flow is interrupted, data is read from memory so that the sound signal
remains undisturbed.
• While listening to music, the Anti-S.T(Anti-Shock Time) Buffer Level is automatically
saved.
+10 button
Main Unit
Press the AL/+10/MEM on the remote control.
• MP3-CD playback : By default, the button is enabled for Album function.
Press and hold the button longer to select “Album Off”.
The button functions as the +10 button.
• CD Playback : The button functions as the +10 button only.
Remote Control
ESP/Album function
Album Function
Press the ESP/Album button.
Press and hold the ESP/Album
button.
•
Each time the button is pressed,
the selection toggles between
“On Album” and “Off Album”.
•
If “Off Album” is selected, the album playlist
changes to the title playlist.
•
It moves to the next album.
(Press AL/+10/MEM button on the remote control)
•
This product is equipped with a graphic LCD display that supports English,
Japanese (without Chinese characters), and Korean characters.
•
Tag information is displayed for those files containing them.
Otherwise, the file name is displayed.
•
When writing your own MP3-CDs, we recommend using English for tag information as well as file names.
•
Languages other than English will be marked with an asterisk “*”.
Example) Pressing the ESP/Album
button during playback of
the first album will take you
to the start of the first track
of the second album.
•
This function is only available during playback of an MP3-CD.
Albums are sections of tracks representing one artist.
This function makes it easier to skip between them.
•
This function does not apply to MP3-CDs that have not been created with albums.
•
If a file is defective and cannot be recognized, the player skips to the next one.
Note
ESP/Album
Page 11
2019
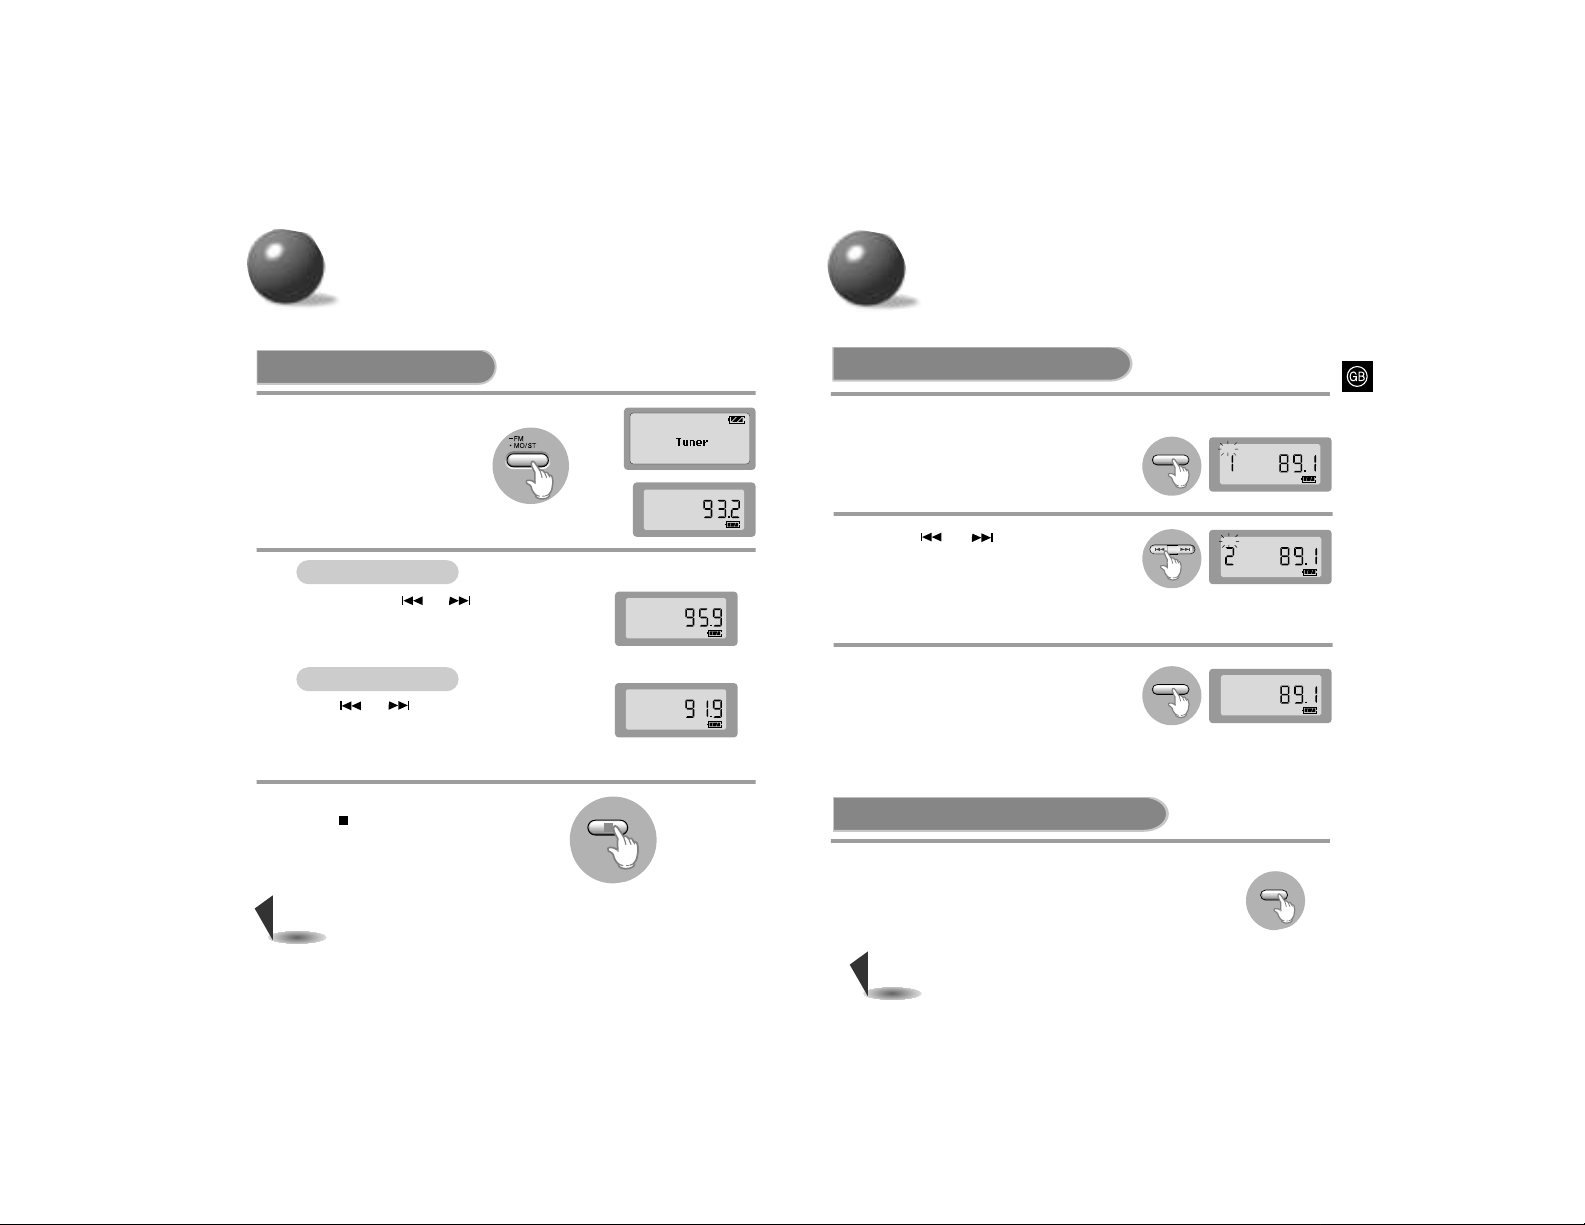
Example: When storing track number 4 to program number 1.
From Stop mode, press the
Program button on the
main unit.
1
Press the Program button.
•
Track number 4 is stored under
program number 1 and you will
be taken to program number 2.
•
Continue to program the desired
tracks.
3
Press (Play/Pause)
button when programming is
complete.
4
Using or or +10
button, select the desired
track.
2
• Press the Stop ( ) button.
• The total number of programmed tracks as well as the total number of tracks in a given
disk will be shown on the display.
• Press (Play/Pause) button to resume program playback.
To stop program playback
Program
Program
Program function
You can store up to 30 tracks of your favorite tunes.
• During programming, if no action is performed for about 15 sec-
onds, the player will automatically turn itself off to conserve battery power consumption.
Warning
• From Stop mode, press the Program
button.
• Each time the button is pressed,
track numbers will be shown on the
display according to their program
sequence.
To confirm the program
•
To change the programmed tracks during program
confirmation,
use or to select the track to change.
•
Press the Program button to add new tracks.
To change the program
• Press the Stop ( ) button twice.
The Program mode will also be canceled if the
lid opens during programming.
To cancel the program mode
Program
Program
Page 12
2221
T o tune in to a station
Automatic Tuning
Main
Unit
Remote
Control
Press and hold the -FM
button on the remote control.
•
The frequency of the received
station appears on the display of
the remote control.
•
Press the button to select either
mono or stereo (MO/ST).
1
To turn off the radio, press the
Stop ( ) button on the
remote control.
3
Press and hold or on the
remote control.
•
Automatically scans and tunes to the next
avaiable station.
Press or on the remote
control.
•
Press the button repeatedly to tune in
the desired station manually.
2
• The radio function is available only from the remote control.
• The backlight on the display of the remote control does not
work while using the radio function.
• This product can only tune in FM station.
Note
Manual Tuning
Listening to FM Radio
You can either manually or automatically preset and store FM stations.
AL/+10/MEM.
AL/+10/MEM.
PSET
PSET
Manually presetting stations
EXAMPLE: Storing an FM station at 89.1 MHz into preset number 2
Tune to a station of 89.1 MHz and then
press the AL/+10/MEM button on the
remote control.
•
"PSET" flashes.
1
Press or to select the preset
number 2.
•
Each time the button is pressed a higher or
lower preset number is selected..
•
As there is no stored station data in memory, begin with the preset number 1
if you have purchased this product for the first time.
2
Press the AL/+10/MEM button again to
store the selected station.
•
The preset number disappears, indicating
that the station has been stored.
•
Repeat steps 1 to 3 to change the station or
store other stations. You can preset up to 15
stations.
3
Presetting Stations
Automatically presetting stations
Press and hold the Mode/P.SET button on the remote control.
•
"PSET" flashes. Then, each frequency of the received station
is incrementally stored into the preset numbers from 1 to 15.
•
When a station is stored, the station is heard for about 3 seconds
before the automatic preset tuning resumes again.
• In a poor reception area, the total number of preset stations may
not reach 15.
Note
Mode/P.SET
Page 13
2423
Mode/P.SET
PSET
PSET
T uning in to a Preset Station
Press the Mode/P.SET button.
•
"PSET" and the station frequency stored
under that preset number appear on the
display.
1
Press or to select the desired
preset number.
•
"PSET" remains, and the frequencies of the
preset stations are displayed in turn.
2
Presetting Stations
(continued)
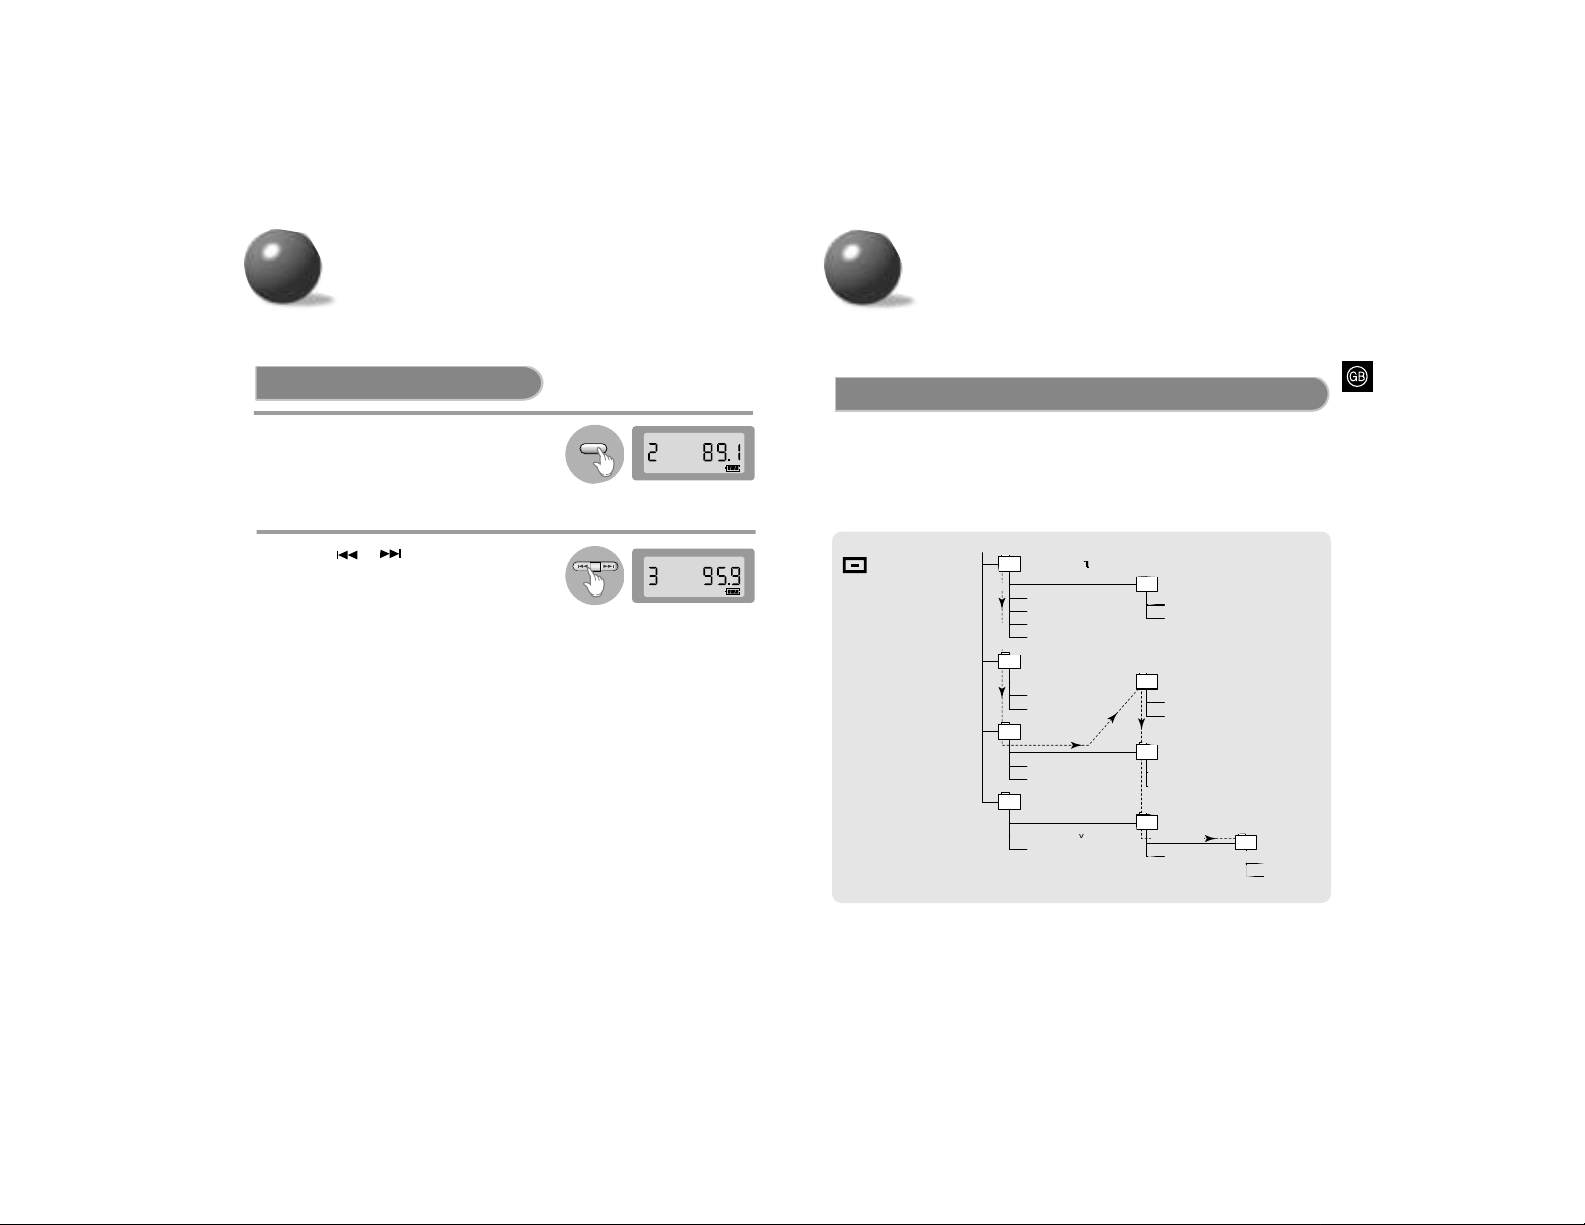
Playback sequence of albums and tracks
• When using Windows Explorer.
• The arrows indicate playback sequence of albums and tracks.
• Albums with .jpg, .wav or .doc are not audio files and therefore will be skipped.
Kevin01.mp3
ALBUM 01
(E) CD-ROM drive
Kevin02.mp3
Kevin03.mp3
Kevin04.mp3
Kevin.jpg
Life.doc
Skipped
ALBUM 02
Summer05.mp3
Summer06.mp3
Garden.mp3
Garden.mp3
ALBUM 04
ALBUM 03
Michael07.mp3
Michael08.mp3
Water.mp3
Water.mp3
ALBUM 05
Skipped
Kenny01.wav
Kenny02.wav
Butterfly.mp3
ALBUM 06
Piano14.mp3
John15.mp3
ALBUM 07
Features
Page 14
2625
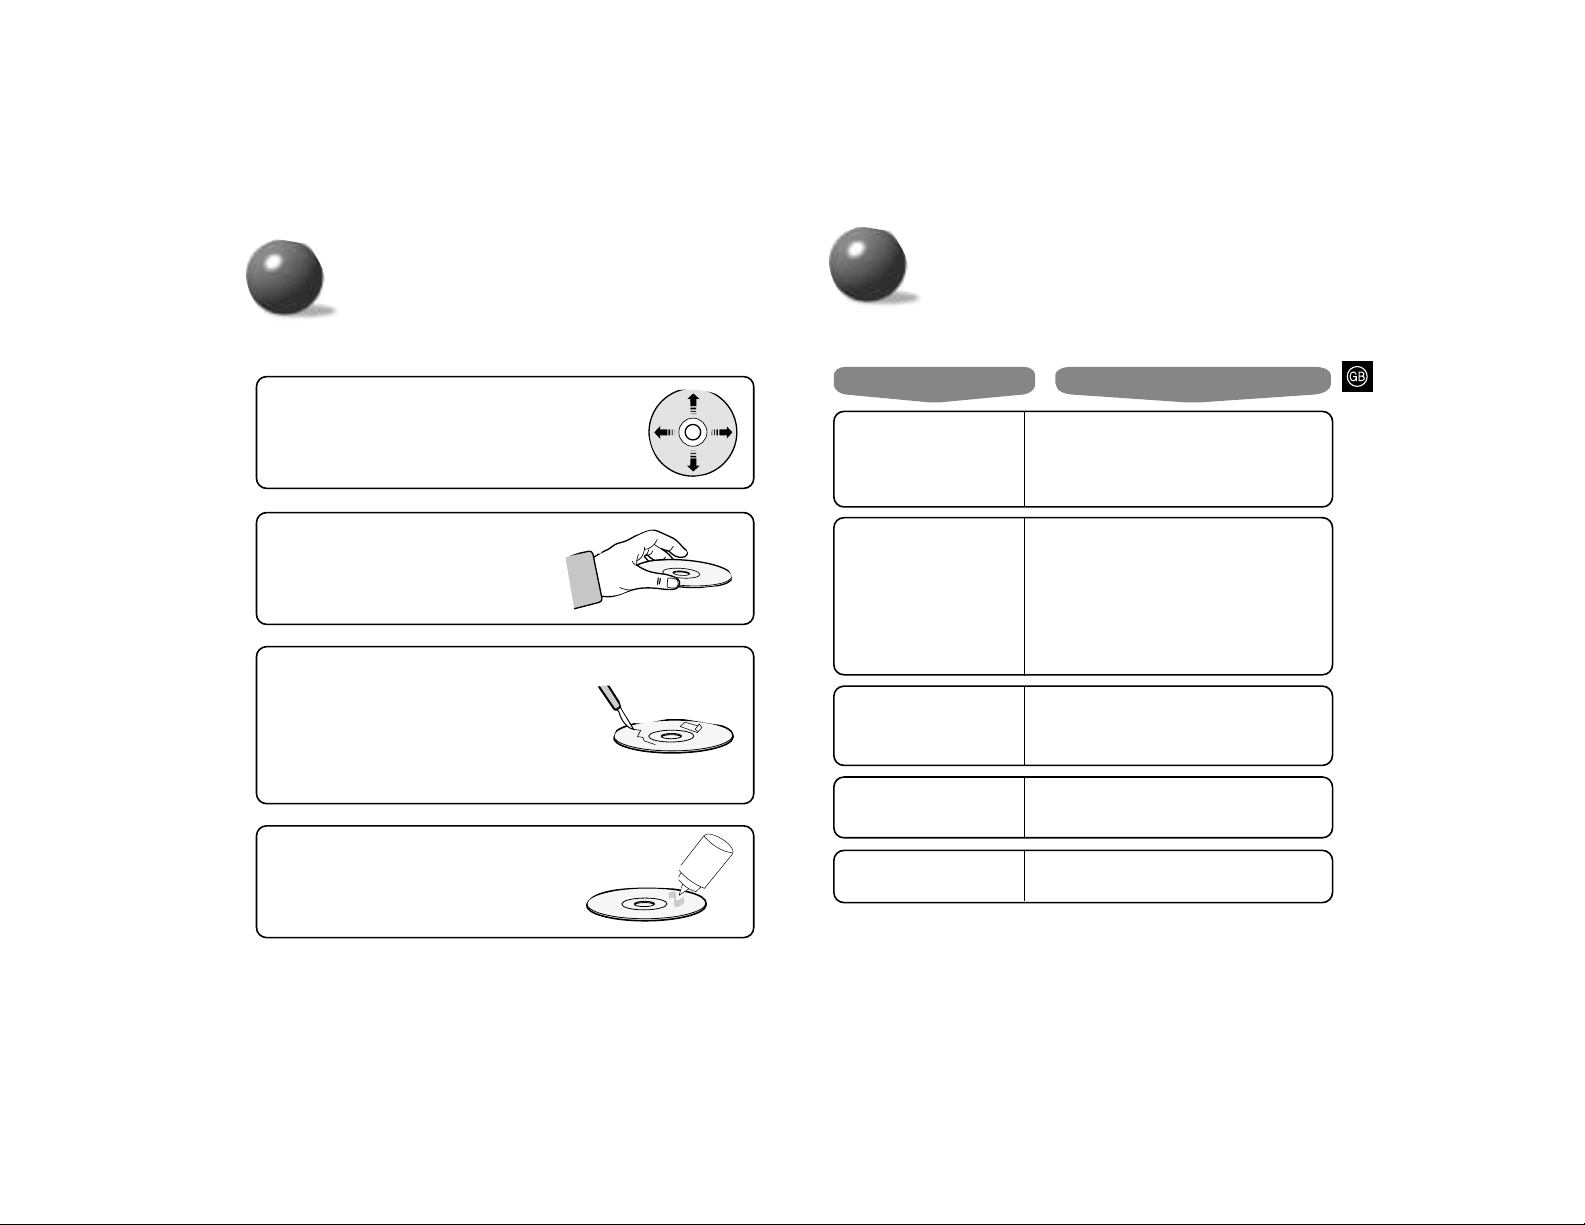
Looking after your CDs
Wash the disc with a neutral detergent diluted in water, and
then wipe gently with a soft dry cloth from the center of the
disc to the outside.
Handling your CDs
Carefully pick up the disc by its edge without
touching the disc’s surface.
Do not attach stickers to the
signal surface (the side with
shiny, rainbow colors).
Do not write on the labeled (printed) side with
a ballpoint pen or a pencil.
Do not clean this player with
record spray or anti-static.
Do not use volatile chemicals
such as benzene or thinners.
Maintaining and looking after your unit
Problem Check
Unit has no power.
● Did you insert the battery with the correct polari-
ty?
● Are the batteries drained?
● Is the AC adaptor connected correctly?
● Is the door open?
Earphones don’t work.
● Is the volume control on the unit at the minimum
setting?
A sound or track is
skipped.
● Was the unit jolted or knocked?
● Is there dust, fingerprints or scratches on the
disc?
Some of the MP3 files on a
CD are not recognised.
● Check if the unreadable files have .mp3 as their
extension on your PC.
Playback does not function.
● Is the disc inserted correctly?
● Is the disc damaged or deformed?
● Has the unit been locked with the Hold switch?
● Has the unit been moved from a cold place to a
hot place?
Abrupt change of temperature may cause condensation to form on the lens. Keep your CD
Player in a warm place until the condensation
on the lens has disappeared.
Troubleshooting Guide
Page 15
2827
•
The unit will play back files created in MP3 format (Mpeg1.Layer 3) with *.mp3 as
their extension.
•
Files created in MP2 format (Mpeg1.Layer2) with *.mp2 as their extension can also
be played back.
File Compatibility
•
The maximum capacity of one CD-R or CD-RW disc is 650MB.
Normally, one MP3 file has a capacity of 4 MB, therefore approximately 170 files can
be recorded on a single disc.
How many MP3 files can a CD-R or CD-RW disc record?
Frequency range 20Hz ~ 20KHz
Signal/noise ratio 74dB
Channel Separation
65dB, 1kHz, 0dB
Total harmonic distortion 0.1%
D/A conversion
1bit, 4 times Oversampling
Earphone
output
310mV(RMS), 6mW/CH
Line out output
290mV(RMS)
Scope of playback supported
Bit Rate : 64~322kbps
Sampling frequency : 44.1KHz
DISC Sizes Diameter
120mm,80mm
Dimensions 129.8(W) X 19(H) X 140.5(D) mm
Specifications
Memo
 Loading...