

Samsung FINO 170 SUPER, MAX-IMA ZOOM 170 GLM User Manual
ENGLISH

NOTE
• This camera will not function without a battery.
• Use one 3V lithium battery(CR-123A or DL-123A).
• The lens cap automatically opens when the Power button is turned on.
• Do not open the lens cap with your fingers.
The shutter does not operate in the following circumstances:
• When the camera has no battery or when the battery is almost drained.
• When the Power is turned off.(When the lens cap is closed.)
• When the zoom button is operating or when the film is winding or rewinding.
(Rewinding will stop when the shutter button is pressed during rewinding.)
• When the film remains in the camera after rewinding.
• When the flash is being charged.
This camera is controlled electronically by a built-in microcomputer. Although unlikely, it may fail
to operate under certain circumstances in which there is a strong electromagnetic field (near a
TV, microwave etc.). If this occurs, please remove the lithium battery and replace after 2~3
minutes.
2

CONTENTS
Thank you for purchasing the SAMSUNG camera. Please read this manual before using your camera.
TABLE OF CONTENTS
PREPARATION
TAKING PHOTOS
................................................................................
Part Names
...................................................................................
LCD panel
Viewfinder and Indicators
Loading the battery
Checking the battery
Loading the film
Attaching the strap
Using the camera
Holding the camera
Taking pictures
Adjusting the diopter
Buzzer operation
Rewinding the film
Date and Caption (Q.D. model only)
Using the Flash mode
Using the Shooting mode
Using the Self mode
Auto Red-eye Reduction
..................................................................................
Auto flash
...........................................................
.....................................................................
.................................................................
.........................................................................
....................................................................
.......................................................................
..................................................................
..........................................................................
.................................................................
.......................................................................
....................................................................
..............................................................
.........................................................
.................................................................
..........................................................
.......................................
4
7
8
9
10
11
12
13
14
15
16
17
18
19
21
22
23
24
25
.....................................................................................
Flash off
.................................................................................
Fill-in flash
Fill-in flash and Red-eye Reduction
Bulb shooting(B Shutter)
Flash off & Bulb shooting(B Shutter)
Snap shooting
Portrait zoom
Continuous shooting
Spot shooting
Landscape shooting
Using the focus lock
Self-timer
Double self-timer
2 second delayed shutter release
Macro photography
Panorama photography
IMPORTANT NOTES
Care and storage
Trouble shooting
...........................................................................
.............................................................................
.................................................................
............................................................................
.................................................................
..................................................................
...................................................................................
.......................................................................
...................................................................
......................................................................
.......................................................................
.........................................
..........................................................
.......................................
............................................
............................................................
SPECIFICATIONS
Checking the camera
...............................................................
26
26
27
28
29
30
31
32
33
34
35
36
37
38
39
40
41
42
45
3
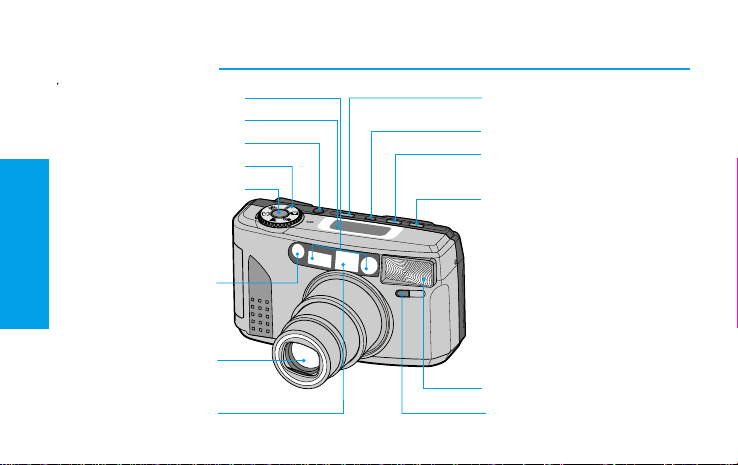
P ART NAMES
Front / Top
PREPARATION
4
Autofocus window
LCD panel
Power button
Shooting mode dial
Shutter button
Exposure sensor
Lens
Viewfinder
Flash button
(Flash mode selection button)
Buzzer ON/OFF button
Self mode button
DATE or TIME button
(Date and Caption selection button)
Flash
Self-timer lamp
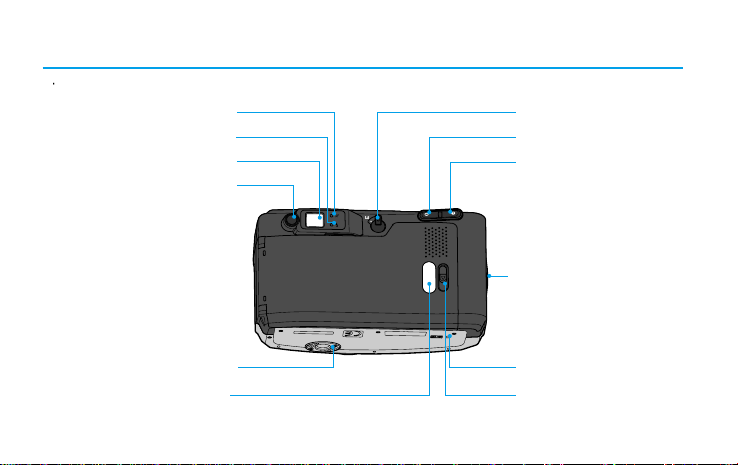
Rear / Bottom
Autofocus indicator(Green LED)
Flash indicator(Red LED)
Viewfinder
Diopter adjustment dial
Normal/Panorama switch
Zoom Button(WIDE)
Zoom Button(TELE)
Strap eyelet
Tripod socket
Film check window
Mid-roll rewind button
Back cover release button
5
6
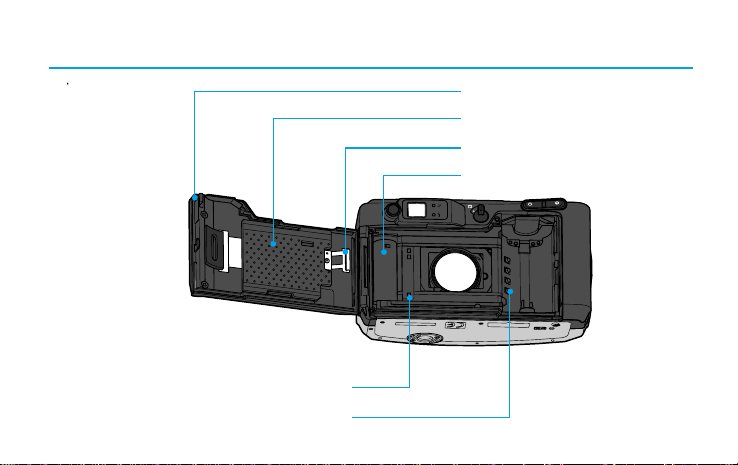
Interior
Back cover
Film pressure plate
Film pressure roller
Spool
Film sensor
DX contacts
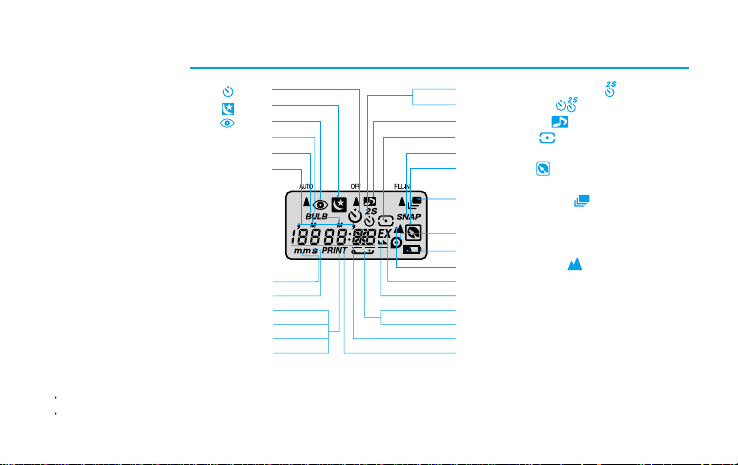
LCD P ANEL
Self-timer( /P.36)
Slow shutter sync( /P.26)
Red-eye reduction( /P.24)
Bulb shooting(B Shutter)(
Focal length unit(mm)
Date(Year, Month, Date, Time)
Exposure counter
Caption Letter indicator
Month
BULB /P.28)
Year
Seconds(s)
Focal length
2 sec. delayed shutter release
Double self-timer( /P.37)
Buzzer indicator( /P.17)
Spot shooting( /P.33)
Snap shooting(SNAP /P.30)
Portrait zoom( /P.31)
Continuous shooting( /P.32)
Film present indicator
Battery condition indicator
Landscape
shooting
Exposure unit(EX)
Film rewinding indicator
Back-cover open indicator
Film loading failure warning indicator(E)
Film loading indicator
Date or caption print mark
NOTE
For more information regarding the mark, refer to the pages in ( ).
When the back-light control function is selected, the flash will operate regardless of ambient lighting conditions.
( /P.38)
( /P 34)
7

VIEWFINDER AND INDICA T ORS
AF
Viewfinder
Close range picture area mark
- WIDE : Optimum picture area when shoot within 0.6m~1.2 m
- TELE : Optimum picture area when shoot within 0.9m ~ 3m
Picture area frame
- WIDE : Optimum picture area when shoot over 1.2 m
- TELE : Optimum picture area when shoot over 3m
Autofocus frame (Focus on the subject with this frame)
Green
Red
8
Indicators
1. Autofocus Indicator (Green LED)
When illuminated this confirms that conditions are suitable for picture taking.
When the subject is too close, (within 0.6m (1.97ft), the LED will blink rapidly and the
shutter will lock. (Refer to page 17 for information of buzzer operation)
The Auto Macro mode will be selected when the subject is within the range (0.6m ~
1.2m). At this point the LED will blink slowly.
2. Flash Indicator (Red LED)
Illuminates when the flash is fully charged. (In low light conditions)
Blinks rapidly when the flash is being charged. (Shutter will be locked)
It blinks quickly if you are out of the range.
Blinks slowly to indicate that the camera requires steady support (preferably a tripod) to
avoid camera shake.
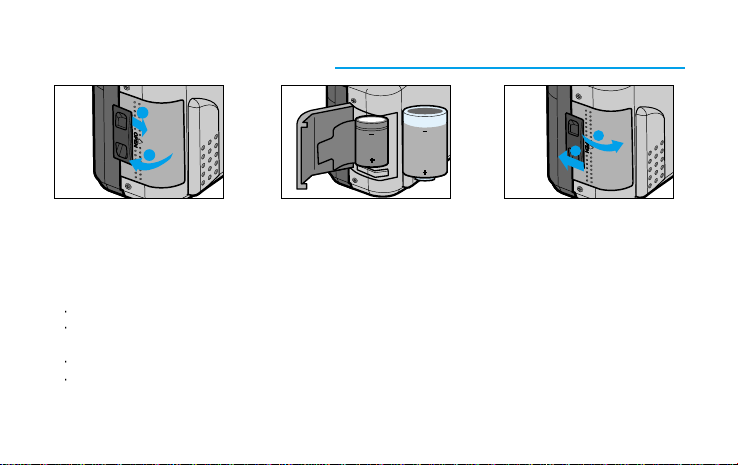
LOADING THE BA TTERY
2
1
2 1
1. Open the chamber cover by sliding the battery chamber cover.
2. Insert a new battery and ensure it is placed in the correct position.
3. Close the chamber cover.
3
1
2
NOTE
Use one CR-123A or DL-123A battery.
The camera will automatically turn the power off when not used after 3 minutes.
Remove the battery from the camera when the camera is not used for an extended period.
Be sure to check the date and shooting mode when you load a new battery.
If the date or time is incorrect, please refer to page 19 and adjust accordingly.
9
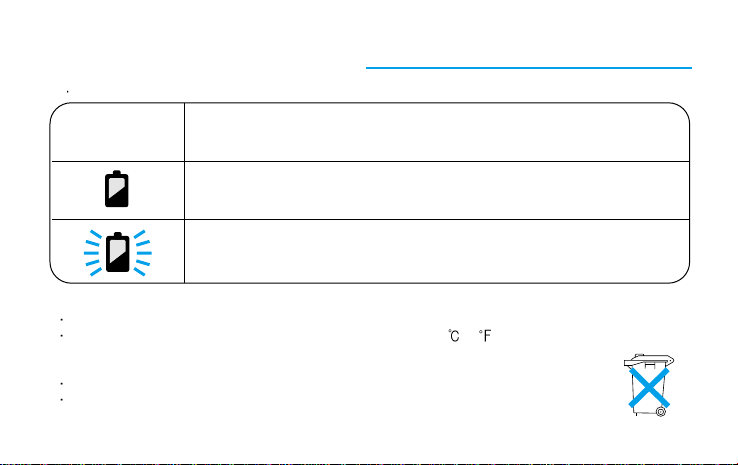
CHECKING THE BA TTERY
You can check the battery life on the LCD panel
1. Normal operation
- The battery condition indicator does not appear.
2. The indicator appears half way.
- The battery life is low and you should ensure that a replacement battery is available.
3. The indicator blinks.
- The battery is exhausted. Load a new battery.
NOTE
Do not remove the battery while the camera is operating, because it may cause the camera to malfunction.
Battery performance is reduced in low temperatures (under -10 (14 ));Try to keep the camera warm
between shots. (The battery will operate normally again when the temperature returns to
normal).
Please dispose of the exhausted battery with care.
Some local authorities may require batteries to be disposed of separately from other refuse.
10
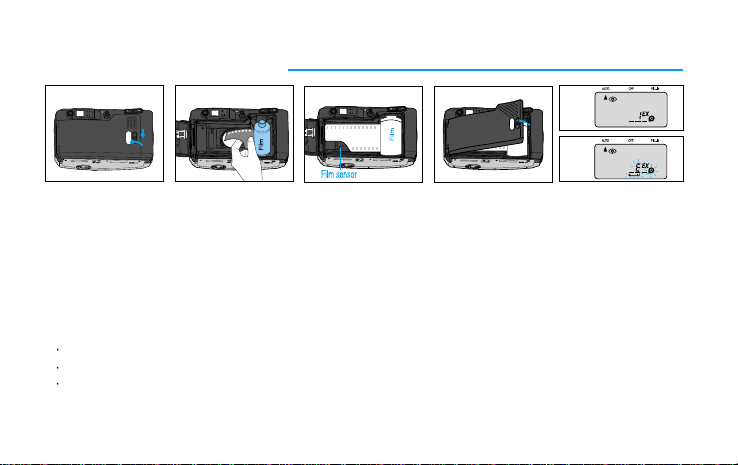
LOADING THE FILM
2 1
1. Open the back cover by sliding the release knob as shown above.
2. Insert a roll of film in the chamber. Do not force the film into position.
3. The film should lie flat.
4. Close the back cover. It will close with a “click”.
5. The film will automatically advance until the film counter reads “1”.
6. If a film is loaded incorrectly, the LCD panel will display an “E” warning signal. (Refer to page 17 for
information of buzzer operation) Reload the film following the steps shown above.
NOTE
The camera automatically adjusts for ISO 50-3200 DX film.
When you use non-DX film, the camera will set the film speed at ISO 100.
Load the film in subdued lighting.
3
4
5
6
11
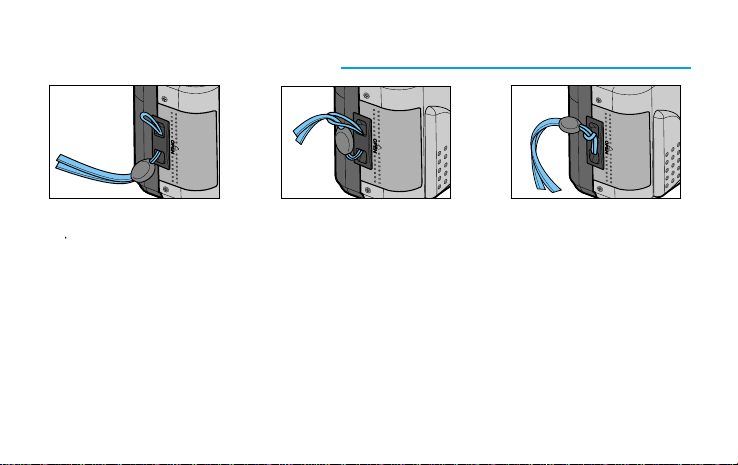
A TTACHING THE STRAP
1
Refer to the illustrations above.
12
2
3
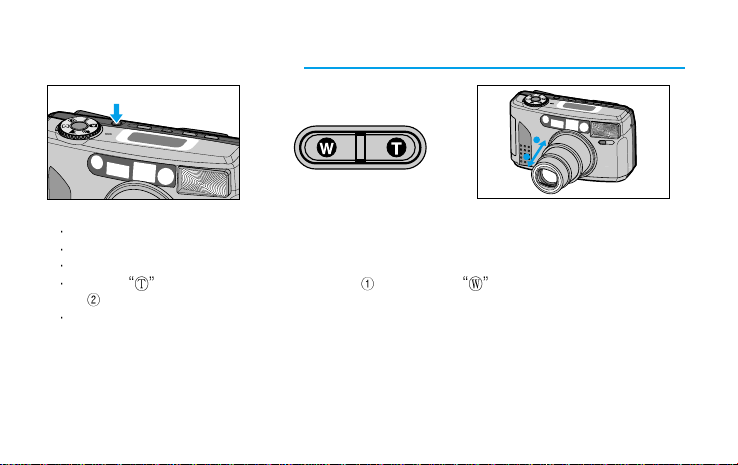
USING THE CAMERA
2
1
Press the Power button to turn the power on. The indicators will appear on the LCD panel.
If the camera is not used for 3 minutes, the power will be turned off automatically.
While looking through the viewfinder, aim the camera at the subject and operate the zoom buttons.
Press the (Tele) button to move the lens out and press the (Wide) button to move the lens
in .
During this operation, the LCD panel shows the focal lengths in the following sequence : 38, 45, 60,
70, 80, 90, 100, 110, 120, 130, 145, 155, 170 mm.
13
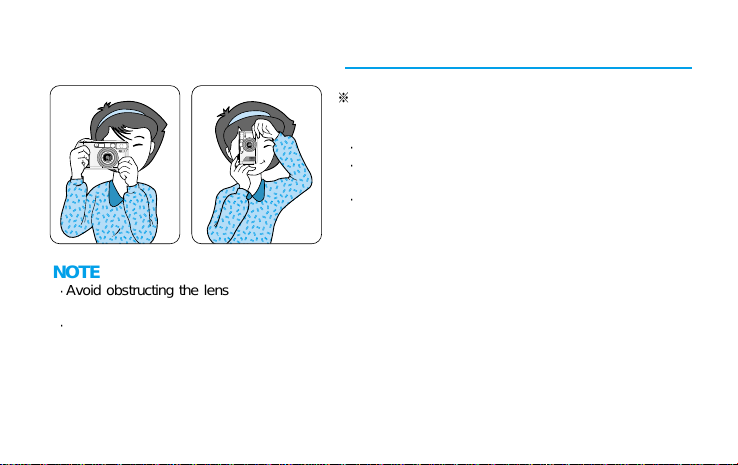
HOLDING THE CAMERA
;;;
;;;
NOTE
Avoid obstructing the lens when you take a picture. Pictures can be spoiled when a finger, hair or
camera strap falls in front of the Lens, Exposure Sensor or Auto-focus Windows.
When you take vertical pictures with flash, the flash should be above the lens.
14
In order to avoid camera shake, hold the camera
steady, especially when using longer focal lengths
(Tele).
Place the camera strap over your wrist.
Both elbows (horizontal picture) or one elbow (vertical
picture) should be held close to your body.
Keep your eye close to the viewfinder when using the
camera. This ensures correct framing. Ensure you can
see all four sides of the viewing frame when
composing your shot.
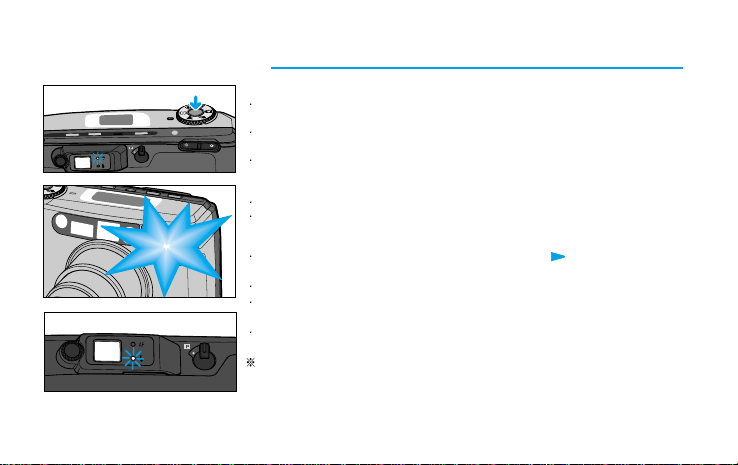
T AKING PICTURES
Aim the Autofocus frame at a subject.(Refer to page 8)
NOTE
Press the Shutter button half way down. The lens is focused when the green
lamp turns on.
If a subject is between 0.6m (1.97ft) and 1.2m (3.94ft), the green lamp blinks
slowly and Macro mode is set automatically.
If a subject is within 0.6m (1.97ft), the green lamp blinks quickly to indicate that
the subject is too close and the shutter is locked. Ensure that the camera/subject
distance is 0.6m or more.
Press the Shutter button all the way down to take a picture.
The film will automatically advance after shooting and the frame counter will advance.
When the flash is being charged, the flash indicator ( AUTO ) on the LCD
panel blinks and the shutter will not operate.
When the Red LED blinks slowly, use a tripod or support the camera to avoid camera shake.
In order to avoid camera shake, hold the camera steadily and press the Shutter
button gently, particularly when using longer focal lengths.(Tele)
After taking pictures, turn off the camera. This will protect the lens and prevent
unintended shots. (If not used for 3 minutes, the camera will turn off automatically).
In such a case, the power will be turn off with zoom lens move into the camera
automatically while the Shutter button is operate. If this occur, please turn the
power on and take a picture again.
15
 Loading...