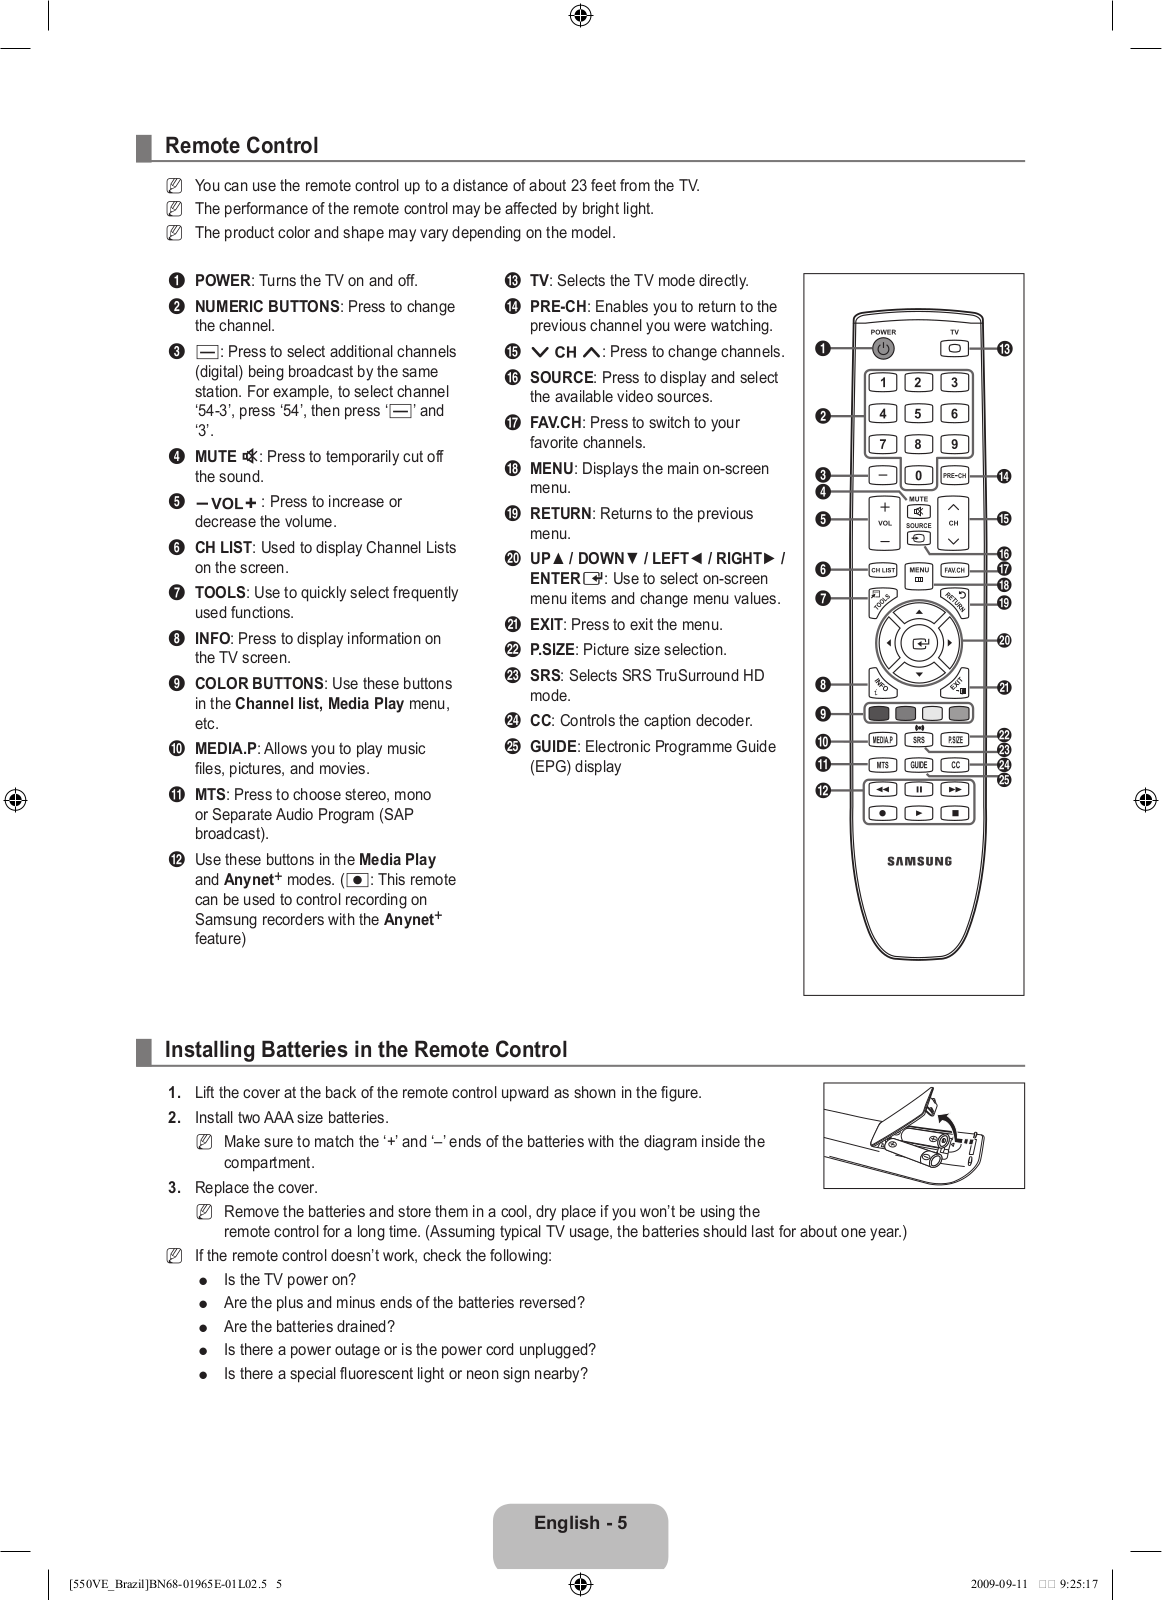
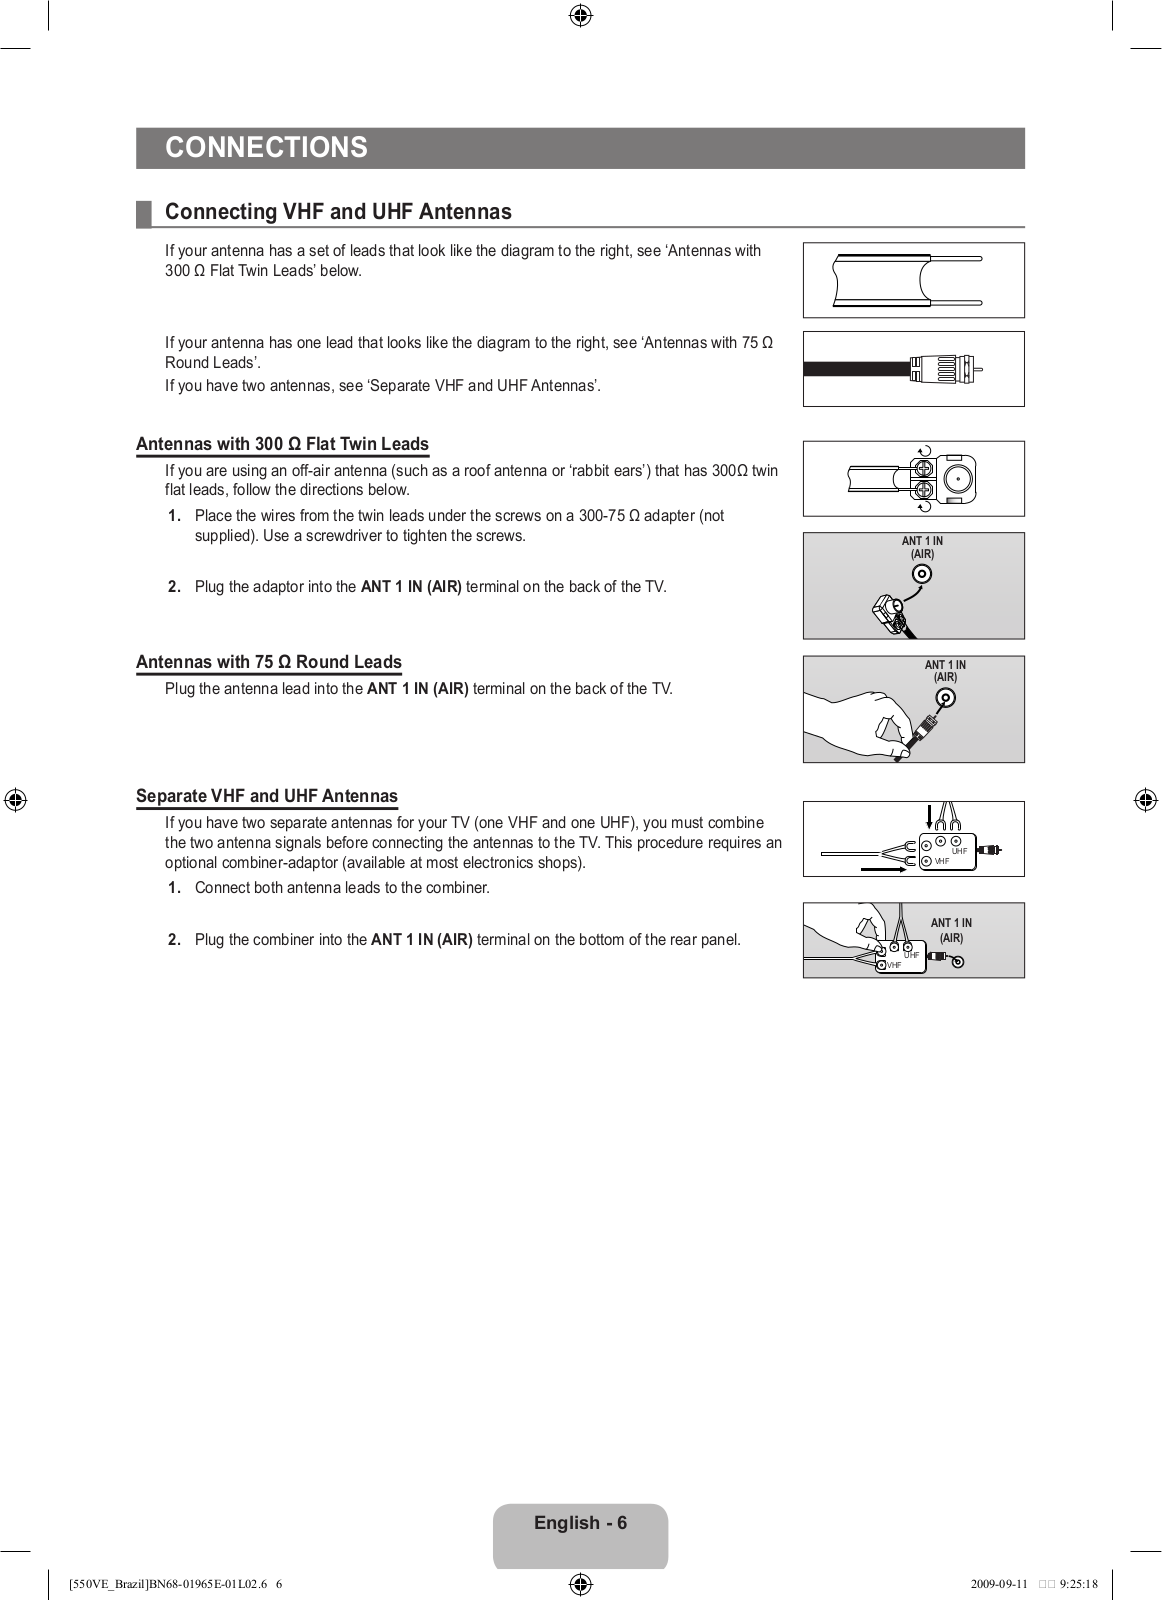
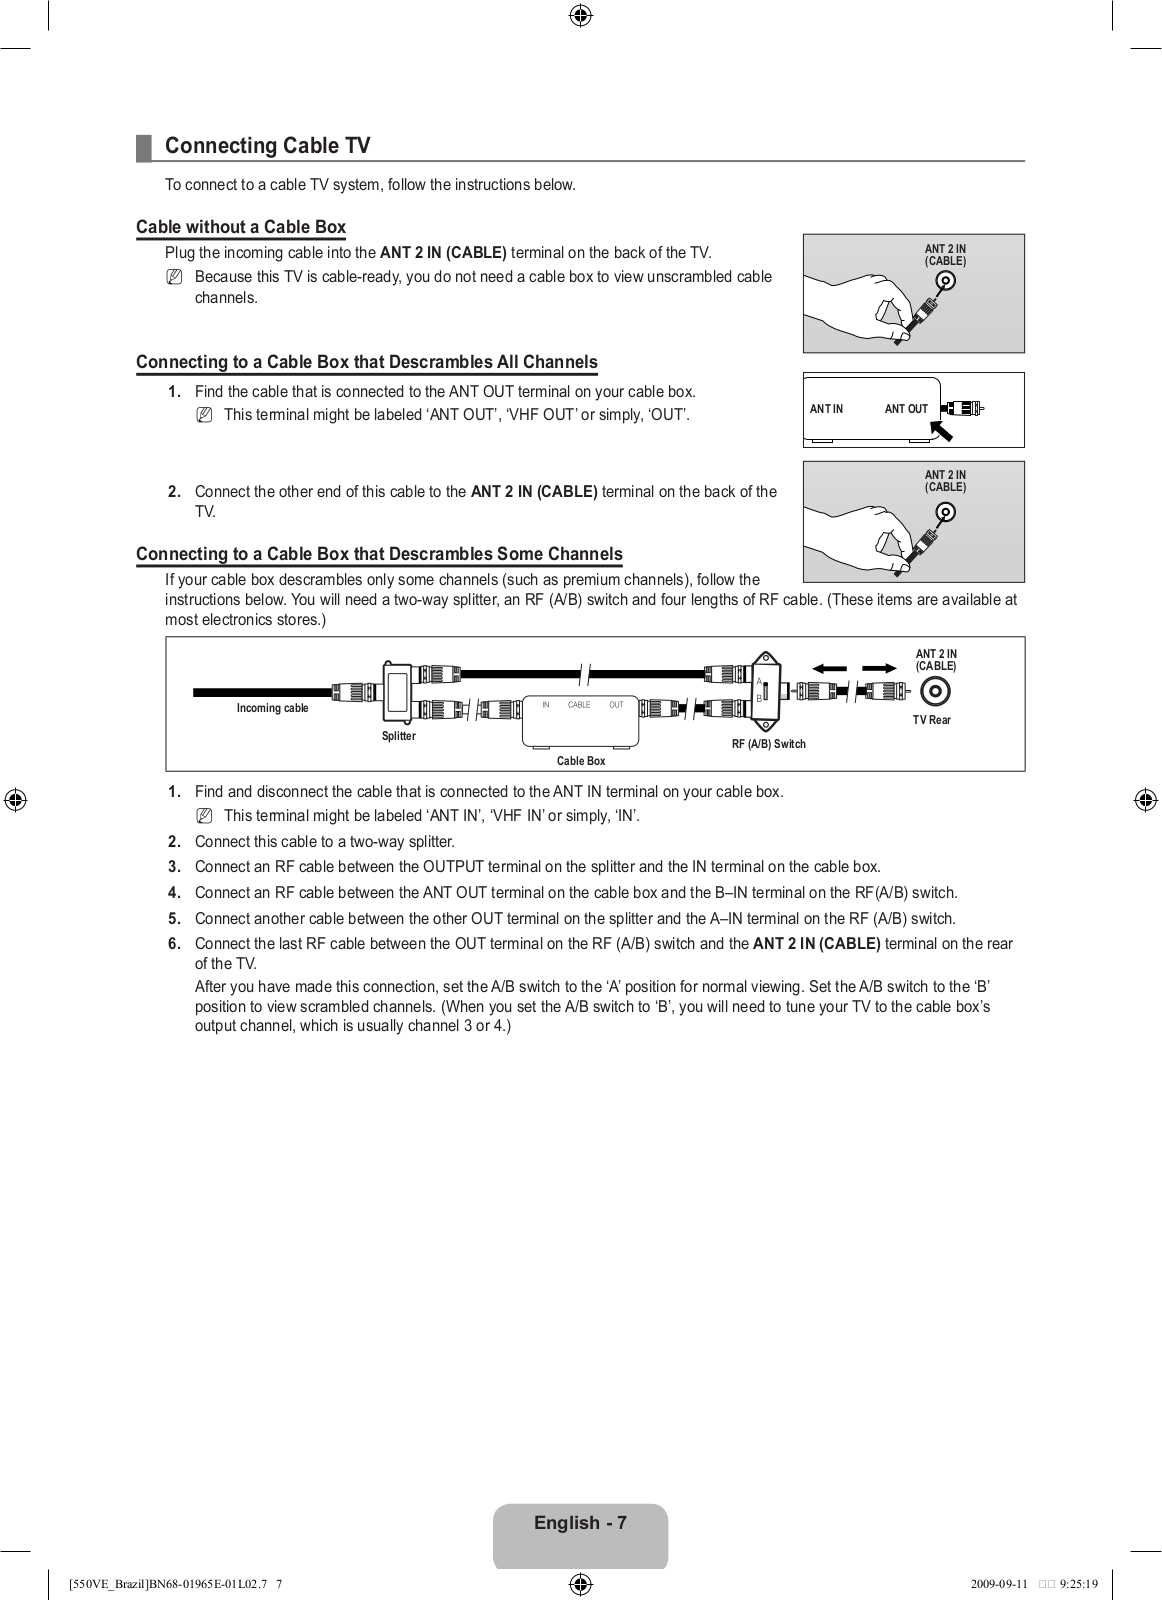
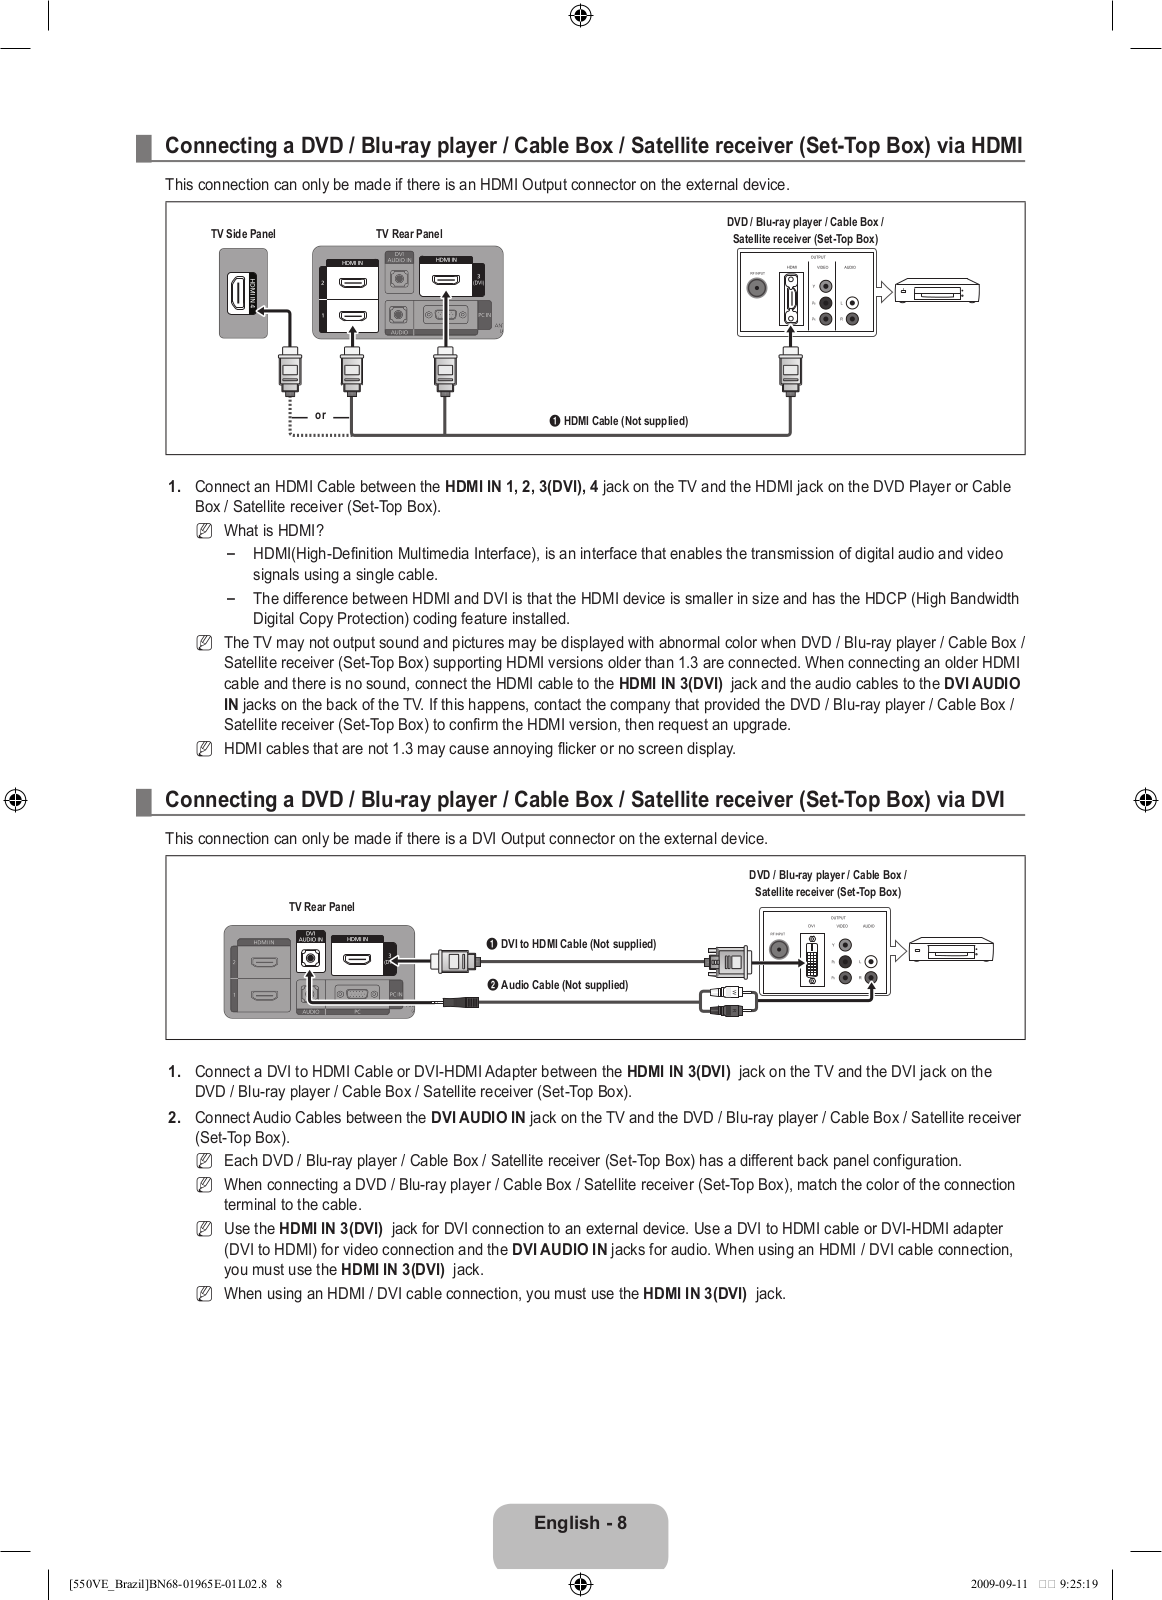
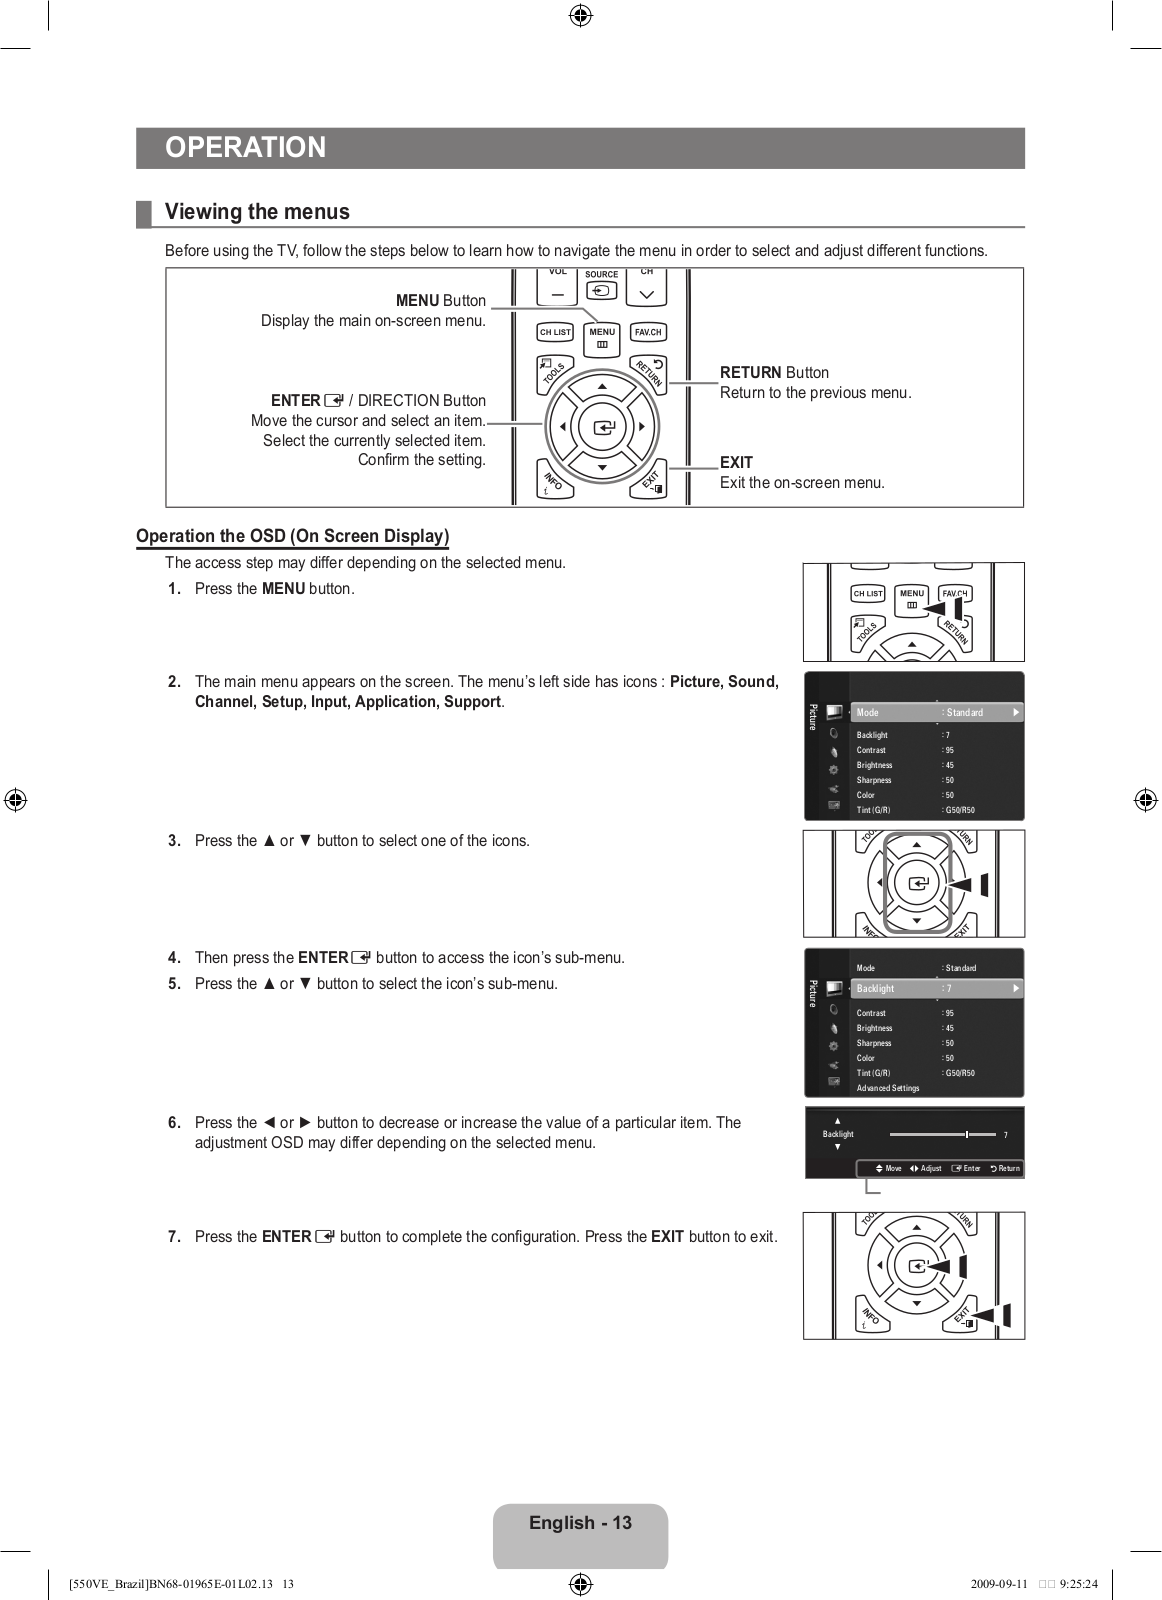
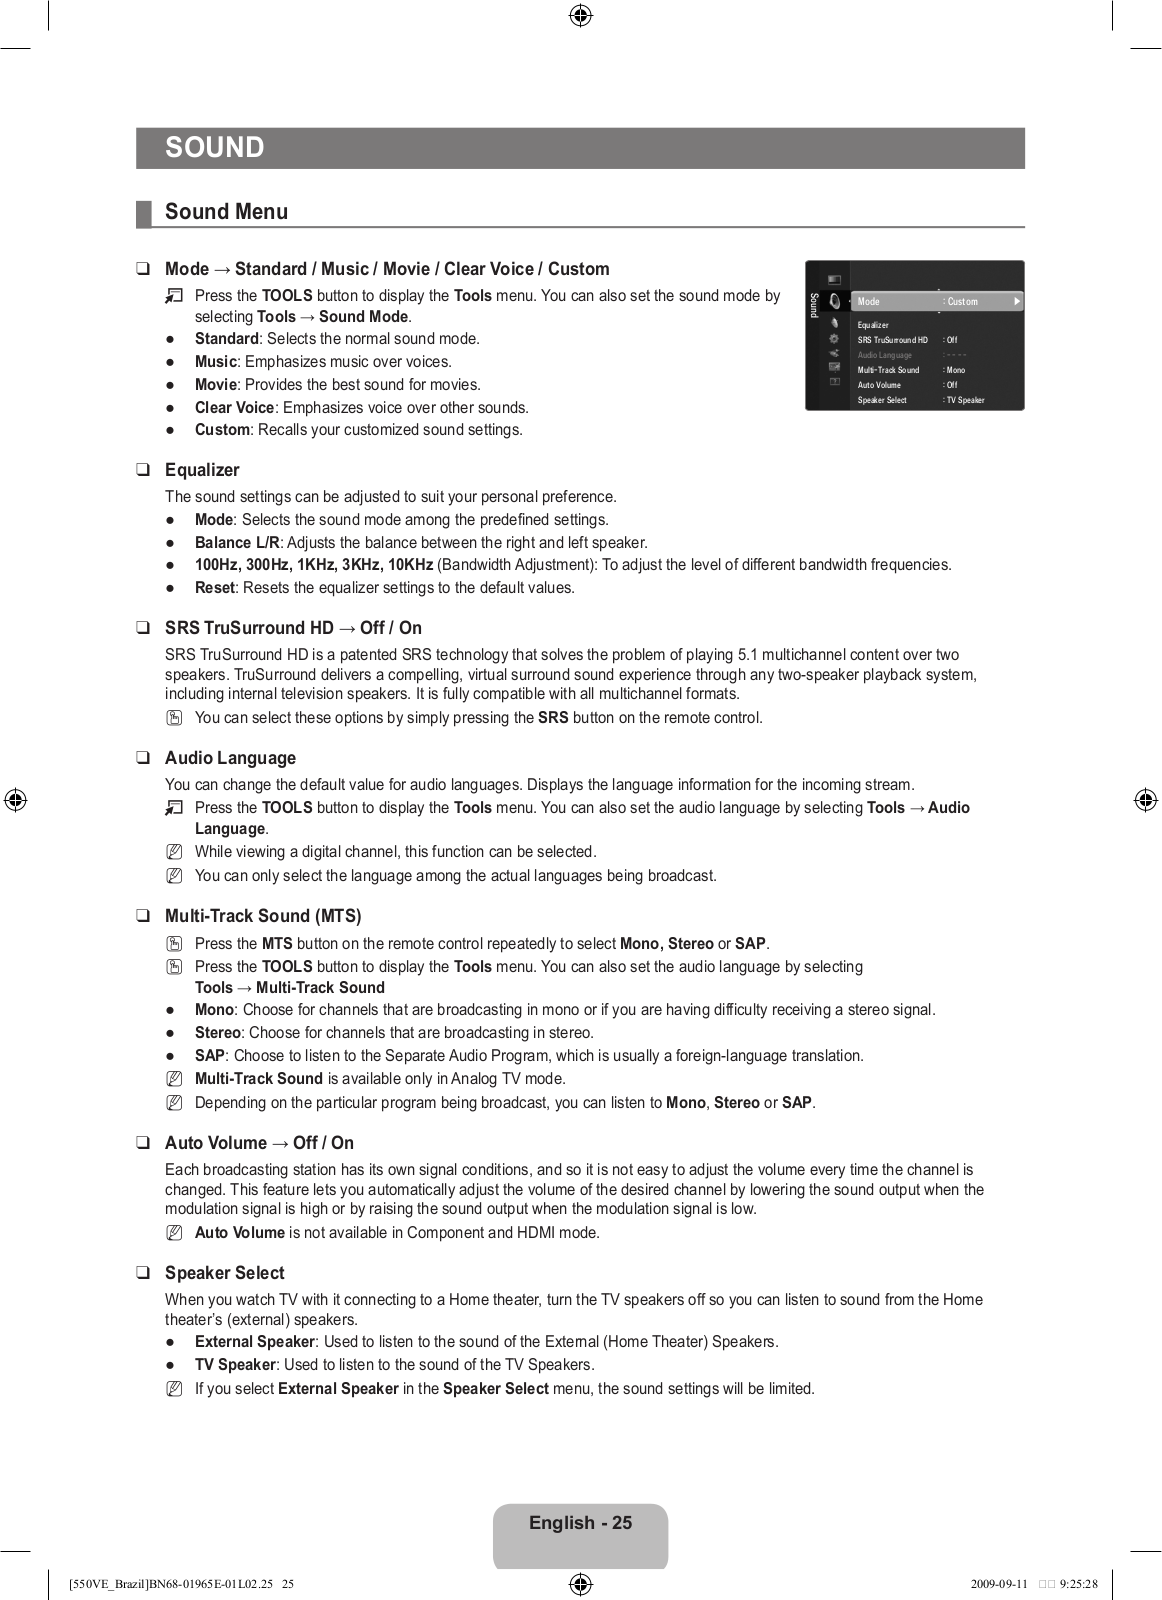
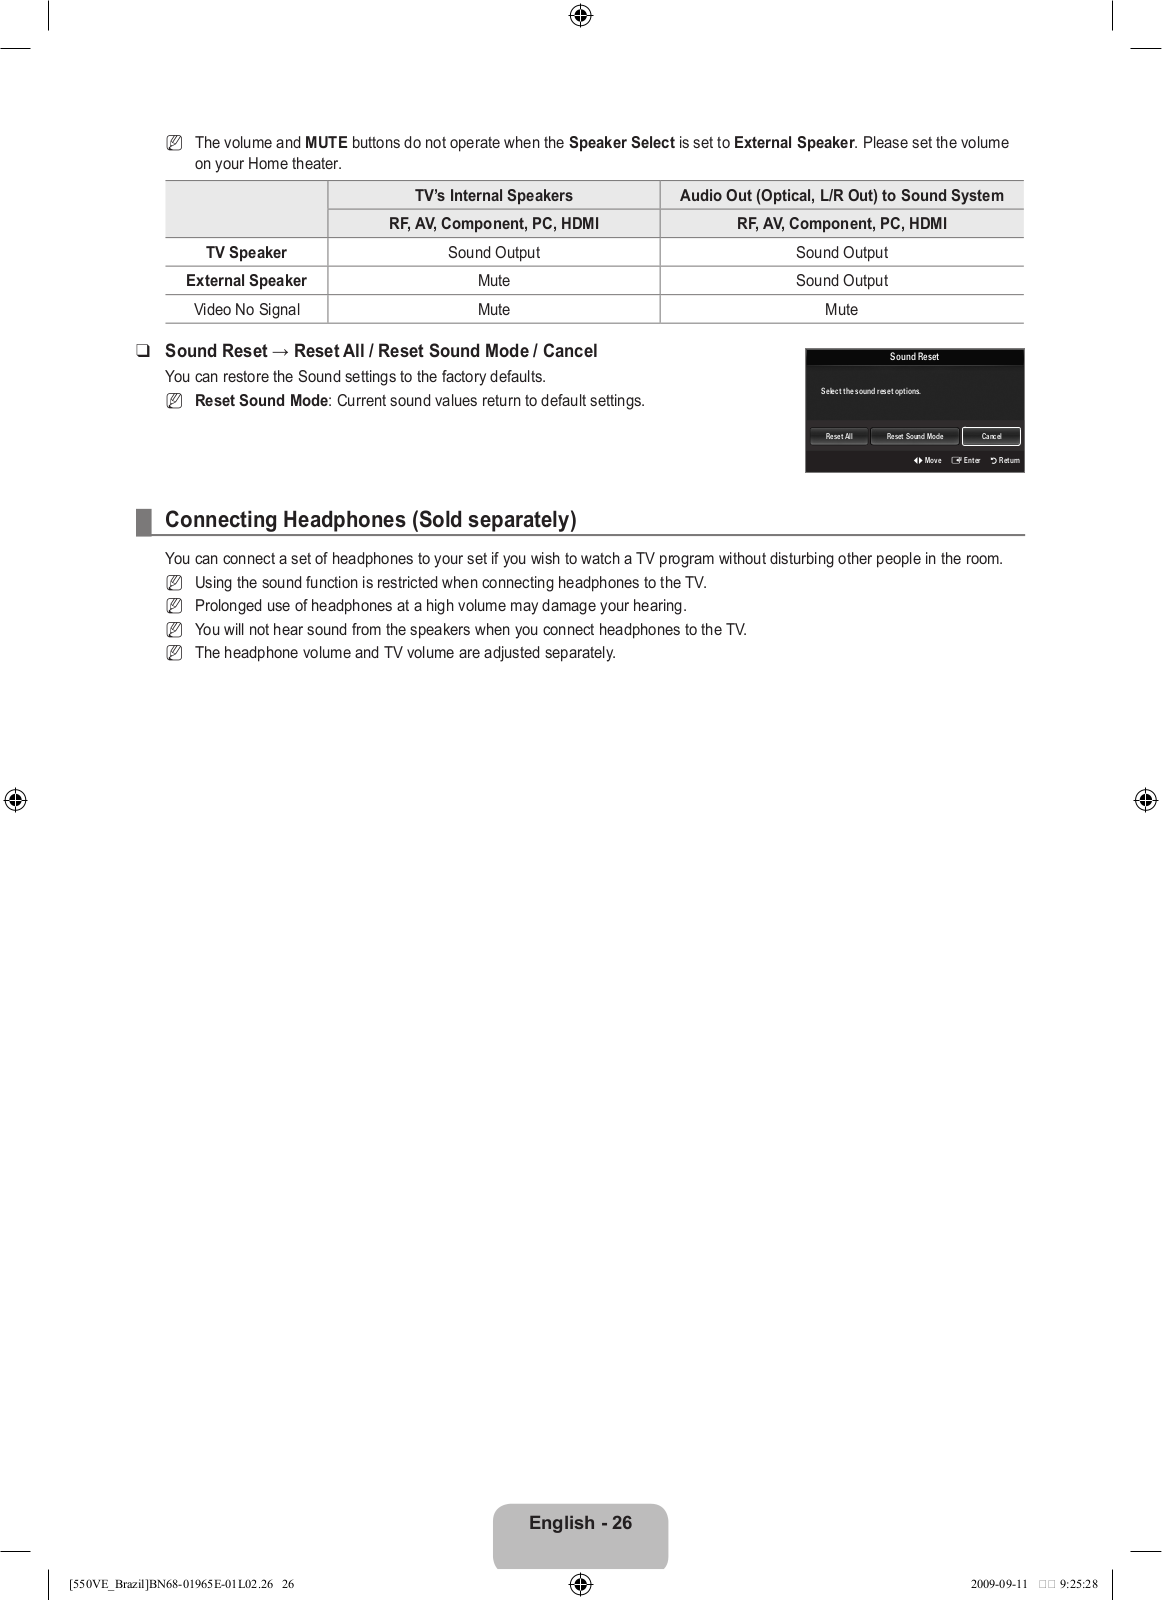
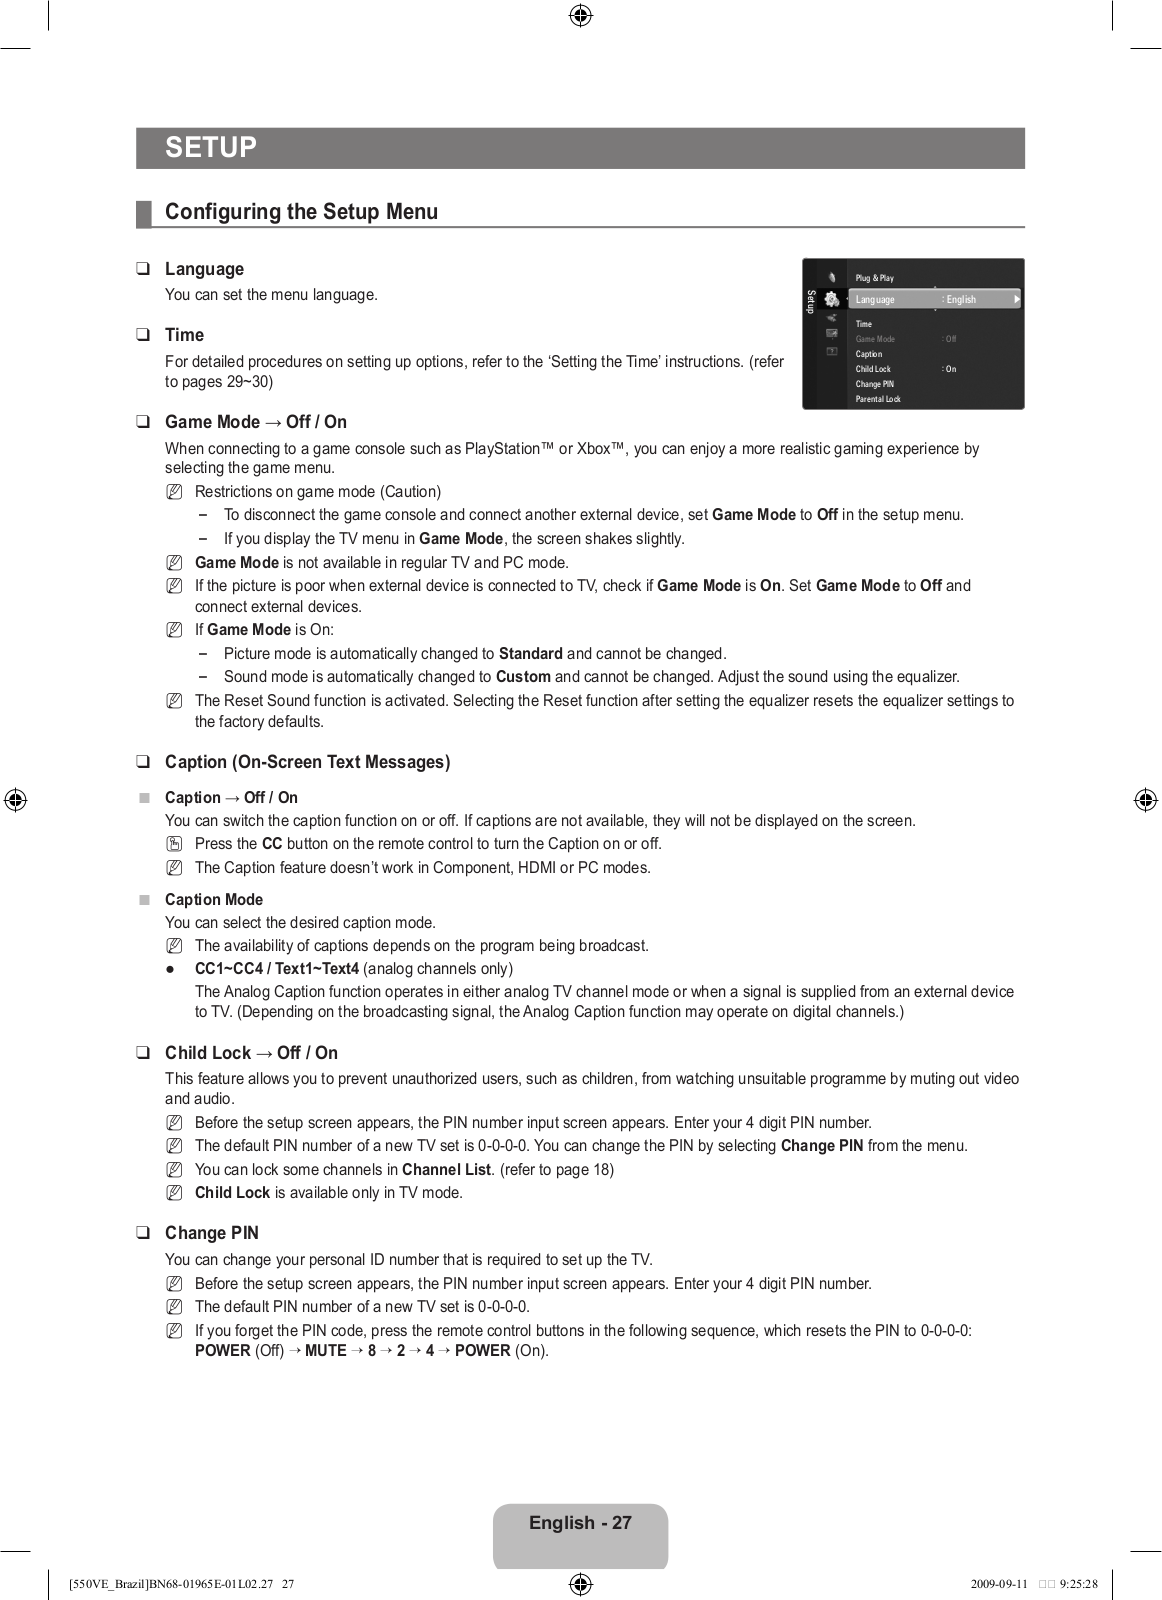
Contact SAMSUNG WORLDWIDE
If you have any questions or comments relating to Samsung products, please contact the SAMSUNG customer care center.
Contate a SAMSUNG EM TODO O MUNDO
Caso tenha dúvidas ou comentários sobre os produtos da Samsung, entre em contato com o centro de atendimento ao cliente da SAMSUNG.
Country |
Customer Care Center |
Web Site |
|
|
|
|
|
ARGENTINA |
0800-333-3733 |
www.samsung.com/ar |
|
|
|
|
|
BRAZIL |
0800-124-421 |
www.samsung.com/br |
|
4004-0000 |
|||
|
|
||
CHILE |
800-SAMSUNG(726-7864) |
www.samsung.com/cl |
|
|
|
|
|
COLOMBIA |
01-8000112112 |
www.samsung.com.co |
|
|
|
|
|
COSTA RICA |
0-800-507-7267 |
www.samsung.com/latin |
|
|
|
|
|
ECUADOR |
1-800-10-7267 |
www.samsung.com/latin |
|
|
|
|
|
EL SALVADOR |
800-6225 |
www.samsung.com/latin |
|
|
|
|
|
GUATEMALA |
1-800-299-0013 |
www.samsung.com/latin |
|
|
|
|
|
HONDURAS |
800-7919267 |
www.samsung.com/latin |
|
|
|
|
|
JAMAICA |
1-800-234-7267 |
www.samsung.com/latin |
|
|
|
|
|
PANAMA |
800-7267 |
www.samsung.com/latin |
|
|
|
|
|
PUERTO RICO |
1-800-682-3180 |
www.samsung.com/latin |
|
|
|
|
|
REP. DOMINICA |
1-800-751-2676 |
www.samsung.com/latin |
|
|
|
|
|
NICARAGUA |
00-1800-5077267 |
www.samsung.com/latin |
|
|
|
|
|
MEXICO |
01-800-SAMSUNG(726-7864) |
www.samsung.com/mx |
|
|
|
|
|
TRINIDAD & TOBAGO |
1-800-SAMSUNG(726-7864) |
www.samsung.com/latin |
|
|
|
|
|
VENEZUELA |
0-800-100-5303 |
www.samsung.com/latin |
|
|
|
|
LCD TV
user manual
imagine the possibilities
Thank you for purchasing this Samsung product. To receive more complete service, please register your product at
www.samsung.com/register
Model |
|
Serial No. |
BN68-01965E-01
Figures and illustrations in this User Manual are provided for reference only and may differ from actual product appearance. Product design and specifications may be changed without notice.
License
TruSurround HD, SRS and Symbol are trademarks of SRS Labs, Inc.
TruSurround HD technology is incorporated under license from SRS Labs, Inc.
Manufactured under license from Dolby Laboratories. Dolby and the double-D symbol are trademarks of Dolby Laboratories.
Precautions When Displaying a Still Image
A still image may cause permanent damage to the TV screen.
●Do not display a still image on the LCD panel for more than 2 hours as it can cause screen image retention. This image retention is also known as screen burn. To avoid such image retention, reduce the degree of brightness and contrast of the screen when displaying a still image.
●Watching the LCD TV in 4:3 format for a long period of time may leave traces of borders displayed on the left, right and center of the screen caused by the difference of light emission on the screen. Playing a DVD or a game console may cause a similar effect to the screen. Damages caused by the above effect are not covered by the Warranty.
●Displaying still images from Video games and PC for longer than a certain period of time may produce partial after-images. To prevent this effect, reduce the ‘brightness’ and ‘contrast’ when displaying still images.
© 2009 Samsung Electronics Co., Ltd. All rights reserved.
Contents |
|
Setting up Your TV |
|
■List of Features.................................................................................. |
2 |
■Accessories........................................................................................ |
2 |
■Viewing the Control Panel.................................................................. |
3 |
■Viewing the Connection Panel........................................................... |
4 |
■Remote Control.................................................................................. |
5 |
■Installing Batteries in the Remote Control.......................................... |
5 |
Connections |
|
■Connecting VHF and UHF Antennas................................................. |
6 |
■Connecting Cable TV......................................................................... |
7 |
■Connecting a DVD / Blu-ray player / Cable Box / Satellite receiver |
|
(Set-Top Box) via HDMI..................................................................... |
8 |
■Connecting a DVD / Blu-ray player / Cable Box / Satellite receiver |
|
(Set-Top Box) via DVI......................................................................... |
8 |
■Connecting a DVD / Blu-ray player / Cable Box / Satellite receiver |
|
(Set-Top Box) via Component cables........................................................ |
9 |
■Connecting a Camcorder................................................................... |
9 |
■Connecting a VCR........................................................................... |
10 |
■Connecting a Digital Audio System.................................................. |
10 |
■Connecting anAmplifier / DVD Home Theater.................................. |
11 |
■ Connecting a PC............................................................................. |
12 |
OPERATION |
|
■Viewing the menus........................................................................... |
13 |
■Placing Your Television in Standby Mode......................................... |
14 |
■Plug & Play Feature......................................................................... |
14 |
CHANNEL |
|
■Channel Menu.................................................................................. |
15 |
■Managing Channels......................................................................... |
17 |
Picture |
|
■Picture Menu.................................................................................... |
19 |
■PC Display....................................................................................... |
23 |
■Setting up the TV with your PC........................................................ |
24 |
Sound |
|
■Sound Menu..................................................................................... |
25 |
■Connecting Headphones (Sold separately)..................................... |
26 |
Setup |
|
■Setup Menu...................................................................................... |
27 |
■Setting the Time............................................................................... |
29 |
Input / Support |
|
■Input Menu....................................................................................... |
31 |
■Support Menu................................................................................... |
31 |
Media Play (USB) |
|
■Connecting a USB Device................................................................ |
33 |
■Using the Media Play Menu............................................................. |
34 |
■Using the PHOTO (JPEG) List......................................................... |
35 |
■Using the MP3 List........................................................................... |
38 |
■Using the Setup Menu...................................................................... |
39 |
Anynet+ |
|
■Connecting Anynet+ Devices........................................................... |
40 |
■Setting Up Anynet+.......................................................................... |
41 |
■Switching between Anynet+ Devices............................................... |
41 |
■Recording......................................................................................... |
42 |
■Listening through a Receiver (Home theater).................................. |
42 |
■Troubleshooting for Anynet+............................................................ |
43 |
RECOMMENDATIONS |
|
■Troubleshooting................................................................................ |
44 |
■Installing the Stand........................................................................... |
47 |
■Disconnecting the Stand.................................................................. |
47 |
■Wall Mount Kit Specifications (VESA).............................................. |
48 |
■Anti-Theft Kensington Lock.............................................................. |
49 |
■Securing the Installation Space........................................................ |
49 |
■Securing the TV to the Wall.............................................................. |
50 |
■Specifications................................................................................... |
51 |
■GNU GENERAL PUBLIC LICENSE |
|
■END OF TERMS AND CONDITIONS |
|
■GNU Lesser General Public License (LGPL) |
|
■END OF TERMS AND CONDITIONS |
|
■LICENSE ISSUES |
|
N O T
Symbol |
Note |
One-Touch Button |
TOOLS Button |
Press |
English
English -
Setting up Your TV
●Adjustable picture settings that can be stored in the TV’s memory.
●Automatic timer to turn the TV on and off.
●A special sleep timer.
●Excellent Digital Interface & Networking : With a built-in HD digital tuner, non-subscription HD broadcasts can be viewed with no Cable Box/Satellite receiver (Set-Top Box) needed.
●HDMI/DVI connection of your PC to this TV.
●Excellent Picture Quality
●SRS TruSurround HD provides a virtual surround system.
●Media Play: Allows you to play music files and pictures, saved on a USB.
N Please make sure the following items are included with your LCD TV. If any items are missing, contact your dealer.
N The items color and shape may vary depending on the model.
Remote Control & Batteries (AAA x 2) |
Power Cord |
Cover-Bottom |
(M4 X L16)
Cleaning Cloth |
Stand Screw |
Warranty Card / Safety Guide |
Owner’s Instructions /
Quick Setup Guide
English -
N The product color and shape may vary depending on the model.
N The front panel buttons can be activated by touching them with your finger.
8
7 6 5 4 3 2 1
1P(POWER): Press to turn the TV on and off.
2POWER INDICATOR: Blinks and turns off when the power is on and lights up in stand-by mode.
3z: Press to change channels. In the onscreen menu, use the zbuttons as you would use the ▼ and ▲ buttons on the remote control.
4y: Press to increase or decrease the volume. In the on-screen menu, use the ybuttons as you would use the
◄ and ► buttons on the remote control.
5MENU: Press to see an on-screen menu of your TV’s features.
6SOURCE E: Toggles between all the available input sources. In the on-screen menu, use this button as you use the ENTEREbutton on the remote control.
7REMOTE CONTROL SENSOR: Aim the remote control towards this spot on the TV.
8SPEAKERS
English -
[TV Side Panel] [TV Rear Panel] 1 |
2 3 |
1
!
0
4
|
|
|
|
|
|
|
|
|
|
Power Input |
0 |
|
|
|
|
|
|
|
|
||
9 |
87 6 |
5 |
NThe product color and shape may vary depending on the model.
1HDMI IN 1, 2, 3(DVI), 4 / DVI AUDIO IN
Connects to the HDMI jack of a device with an HDMI output.
N No sound connection is needed for an HDMI to HDMI connection.
2PC IN [AUDIO] / [PC]
Connects to the video and audio output jacks on your PC.
3ANT 1 IN (AIR) / ANT 2 IN (CABLE)
Connects to an antenna or cable TV system.
4KENSINGTON LOCK
The Kensington Lock (optional) is a device used to physically fix the system when used in a public place. If you want to use a locking device, contact the dealer where you purchased the TV.
N The location of the Kensington Lock may be different depending on its model.
5H(HEADPHONE)
Headphone may be connected to the headphone output on your set. While the head phone is connected, the sound from the built-in speakers will be disabled.
N Using the sound function is restricted when connecting headphones to the TV.
N Prolonged use of headphones at a high volume may damage your hearing.
N You will not hear sound from the speakers when you connect headphones to the TV.
N The headphone volume and TV volume are adjusted separately.
6DIGITAL AUDIO OUT (OPTICAL)
Connects to a Digital Audio component such as a Home theater receiver.
7SERVICE
Connector for service only.
8AUDIO OUT [R-AUDIO-L]
Connects to the audio input jacks on your Amplifier/Home theater.
9COMPONENT IN 1, 2
Connects Component video / audio.
0AV IN 1, 2 [VIDEO] / [R-AUDIO-L]
Video and audio inputs for external devices, such as a camcorder or VCR.
!USB
Connector for software upgrades and Media Play, etc.
English -
N You can use the remote control up to a distance of about 23 feet from the TV. N The performance of the remote control may be affected by bright light.
N The product color and shape may vary depending on the model.
1POWER: Turns the TV on and off.
2NUMERIC BUTTONS: Press to change the channel.
3_: Press to select additional channels (digital) being broadcast by the same station. For example, to select channel
‘54-3’, press ‘54’, then press ‘_’ and ‘3’.
4MUTE M: Press to temporarily cut off the sound.
5y: Press to increase or decrease the volume.
6CH LIST: Used to display Channel Lists on the screen.
7TOOLS: Use to quickly select frequently used functions.
8INFO: Press to display information on the TV screen.
9COLOR BUTTONS: Use these buttons in the Channel list, Media Play menu, etc.
0MEDIA.P: Allows you to play music files, pictures, and movies.
!MTS: Press to choose stereo, mono or Separate Audio Program (SAP broadcast).
@Use these buttons in the Media Play and Anynet+ modes. (∏: This remote
can be used to control recording on Samsung recorders with the Anynet+ feature)
# TV: Selects the TV mode directly.
$ PRE-CH: Enables you to return to the previous channel you were watching.
% z: Press to change channels.
^SOURCE: Press to display and select the available video sources.
&FAV.CH: Press to switch to your favorite channels.
*MENU: Displays the main on-screen menu.
( RETURN: Returns to the previous menu.
) UP▲ / DOWN▼ / LEFT◄ / RIGHT► /
ENTERE: Use to select on-screen menu items and change menu values.
aEXIT: Press to exit the menu.
bP.SIZE: Picture size selection.
cSRS: Selects SRS TruSurround HD mode.
dCC: Controls the caption decoder.
eGUIDE: Electronic Programme Guide (EPG) display
1.Lift the cover at the back of the remote control upward as shown in the figure.
2.Install two AAA size batteries.
N Make sure to match the ‘+’ and ‘–’ ends of the batteries with the diagram inside the compartment.
3.Replace the cover.
NRemove the batteries and store them in a cool, dry place if you won’t be using the
remote control for a long time. (Assuming typical TV usage, the batteries should last for about one year.)
NIf the remote control doesn’t work, check the following:
Is the TV power on?
Are the plus and minus ends of the batteries reversed?
Are the batteries drained?
Is there a power outage or is the power cord unplugged?
Is there a special fluorescent light or neon sign nearby?
English -
Connections
If your antenna has a set of leads that look like the diagram to the right, see ‘Antennas with
300 Ω Flat Twin Leads’ below.
If your antenna has one lead that looks like the diagram to the right, see ‘Antennas with 75 Ω
Round Leads’.
If you have two antennas, see ‘Separate VHF and UHF Antennas’.
Antennas with 300 Ω Flat Twin Leads
If you are using an off-air antenna (such as a roof antenna or ‘rabbit ears’) that has 300Ω twin flat leads, follow the directions below.
1.Place the wires from the twin leads under the screws on a 300-75 Ω adapter (not supplied). Use a screwdriver to tighten the screws.
2.Plug the adaptor into the ANT 1 IN (AIR) terminal on the back of the TV.
Antennas with 75 Ω Round Leads
Plug the antenna lead into the ANT 1 IN (AIR) terminal on the back of the TV.
Separate VHF and UHF Antennas
If you have two separate antennas for your TV (one VHF and one UHF), you must combine the two antenna signals before connecting the antennas to the TV. This procedure requires an optional combiner-adaptor (available at most electronics shops).
1.Connect both antenna leads to the combiner.
2.Plug the combiner into the ANT 1 IN (AIR) terminal on the bottom of the rear panel.
ANT 1 IN (AIR)
ANT 1 IN (AIR)
UHF
VHF
ANT 1 IN (AIR)
UHF
VHF
English -
To connect to a cable TV system, follow the instructions below.
Cable without a Cable Box
Plug the incoming cable into the ANT 2 IN (CABLE) terminal on the back of the TV.
NBecause this TV is cable-ready, you do not need a cable box to view unscrambled cable channels.
Connecting to a Cable Box that Descrambles All Channels
1.Find the cable that is connected to the ANT OUT terminal on your cable box. N This terminal might be labeled ‘ANT OUT’, ‘VHF OUT’ or simply, ‘OUT’.
ANT 2 IN (CABLE)
ANT IN |
ANT OUT |
ANT 2 IN
2. Connect the other end of this cable to the ANT 2 IN (CABLE) terminal on the back of the (CABLE) TV.
Connecting to a Cable Box that Descrambles Some Channels
If your cable box descrambles only some channels (such as premium channels), follow the
instructions below. You will need a two-way splitter, an RF (A/B) switch and four lengths of RF cable. (These items are available at most electronics stores.)
ANT 2 IN (CABLE)
Incoming cable TV Rear
Splitter |
RF (A/B) Switch |
|
|
|
Cable Box |
1.Find and disconnect the cable that is connected to the ANT IN terminal on your cable box. N This terminal might be labeled ‘ANT IN’, ‘VHF IN’ or simply, ‘IN’.
2.Connect this cable to a two-way splitter.
3.Connect an RF cable between the OUTPUT terminal on the splitter and the IN terminal on the cable box.
4.Connect an RF cable between the ANT OUT terminal on the cable box and the B–IN terminal on the RF(A/B) switch.
5.Connect another cable between the other OUT terminal on the splitter and the A–IN terminal on the RF (A/B) switch.
6.Connect the last RF cable between the OUT terminal on the RF (A/B) switch and the ANT 2 IN (CABLE) terminal on the rear of the TV.
After you have made this connection, set the A/B switch to the ‘A’ position for normal viewing. Set the A/B switch to the ‘B’ position to view scrambled channels. (When you set the A/B switch to ‘B’, you will need to tune your TV to the cable box’s output channel, which is usually channel 3 or 4.)
English -
This connection can only be made if there is an HDMI Output connector on the external device.
TV Side Panel |
|
|
|
TV Rear Panel |
DVD / Blu-ray player / Cable Box / |
||||||||||||||||
|
|
|
Satellite receiver (Set-Top Box) |
||||||||||||||||||
|
|
|
|
|
|
|
|
|
|
||||||||||||
|
|
|
|
|
|
|
|
|
|
|
|
|
|
|
|
|
|
|
|
|
|
|
|
|
|
|
|
|
|
|
|
|
|
|
|
|
|
|
|
|
|
|
|
|
|
|
|
|
|
|
|
|
|
|
|
|
|
|
|
|
|
|
|
|
|
|
|
|
|
|
|
|
|
|
|
|
|
|
|
|
|
|
|
|
|
|
|
|
|
|
|
|
|
|
|
|
|
|
|
|
|
|
|
|
|
|
|
|
|
|
|
|
|
|
|
|
|
|
|
|
|
|
|
|
|
|
|
|
|
|
|
|
|
|
|
|
|
|
|
|
|
|
|
|
|
|
|
|
|
|
|
|
|
or |
1HDMI Cable (Not supplied) |
|
1.Connect an HDMI Cable between the HDMI IN 1, 2, 3(DVI), 4 jack on the TV and the HDMI jack on the DVD Player or Cable
Box / Satellite receiver (Set-Top Box). N What is HDMI?
HDMI(High-Definition Multimedia Interface), is an interface that enables the transmission of digital audio and video signals using a single cable.
The difference between HDMI and DVI is that the HDMI device is smaller in size and has the HDCP (High Bandwidth Digital Copy Protection) coding feature installed.
NThe TV may not output sound and pictures may be displayed with abnormal color when DVD / Blu-ray player / Cable Box / Satellite receiver (Set-Top Box) supporting HDMI versions older than 1.3 are connected. When connecting an older HDMI cable and there is no sound, connect the HDMI cable to the HDMI IN 3(DVI) jack and the audio cables to the DVI AUDIO IN jacks on the back of the TV. If this happens, contact the company that provided the DVD / Blu-ray player / Cable Box / Satellite receiver (Set-Top Box) to confirm the HDMI version, then request an upgrade.
NHDMI cables that are not 1.3 may cause annoying flicker or no screen display.
¦Connecting a DVD / Blu-ray player / Cable Box / Satellite receiver (Set-Top Box) via DVI
This connection can only be made if there is a DVI Output connector on the external device.
DVD / Blu-ray player / Cable Box /
Satellite receiver (Set-Top Box)
TV Rear Panel
1DVI to HDMI Cable (Not supplied)
2Audio Cable (Not supplied)
1.Connect a DVI to HDMI Cable or DVI-HDMI Adapter between the HDMI IN 3(DVI) jack on the TV and the DVI jack on the DVD / Blu-ray player / Cable Box / Satellite receiver (Set-Top Box).
2.Connect Audio Cables between the DVI AUDIO IN jack on the TV and the DVD / Blu-ray player / Cable Box / Satellite receiver (Set-Top Box).
N Each DVD / Blu-ray player / Cable Box / Satellite receiver (Set-Top Box) has a different back panel configuration.
N When connecting a DVD / Blu-ray player / Cable Box / Satellite receiver (Set-Top Box), match the color of the connection terminal to the cable.
N Use the HDMI IN 3(DVI) jack for DVI connection to an external device. Use a DVI to HDMI cable or DVI-HDMI adapter (DVI to HDMI) for video connection and the DVI AUDIO IN jacks for audio. When using an HDMI / DVI cable connection, you must use the HDMI IN 3(DVI) jack.
N When using an HDMI / DVI cable connection, you must use the HDMI IN 3(DVI) jack.
English -
The rear panel jacks on your TV make it easy to connect a DVD / Blu-ray player / Cable Box / Satellite receiver (Set-Top Box) to your TV.
DVD / Blu-ray player / Cable Box / |
|
TV Rear Panel |
|||||||||||||||||
Satellite receiver (Set-Top Box) |
|
|
|
|
|
|
|||||||||||||
|
|
|
|
|
|
|
|
|
|
|
|
|
|
|
|
|
|
|
|
|
|
|
|
|
|
|
|
|
|
|
|
|
|
|
|
|
|
|
|
|
|
|
|
|
|
|
|
|
|
|
|
|
|
|
|
|
|
|
|
|
|
|
|
|
|
|
|
|
|
|
|
|
|
|
|
|
|
|
|
|
|
|
|
|
|
|
|
|
|
|
|
|
|
|
|
|
|
|
|
|
|
|
|
|
|
|
|
|
|
|
|
|
|
|
|
|
|
|
|
G B R W R
R W R B G
2Audio Cable (Not supplied)
1Component Cable (Not supplied)
1.Connect a Component Cable between the COMPONENT IN (1 or 2) [Y, PB, PR] jacks on the TV and the COMPONENT [Y, PB,
PR] jacks on the DVD / Blu-ray player / Cable Box / Satellite receiver (Set-Top Box).
2.Connect Audio Cables between the COMPONENT IN (1 or 2) [R-AUDIO-L] jacks on the TV and the AUDIO OUT jacks on the
DVD / Blu-ray player / Cable Box / Satellite receiver (Set-Top Box).
N Component video separates the video into Y (Luminance (brightness)), Pb (Blue) and Pr (Red) for enhanced video quality. Be sure to match the component video and audio connections. For example, if connecting a Component video cable to COMPONENT IN 1, connect the audio cable to COMPONENT IN 1 also.
N Each DVD / Blu-ray player / Cable Box / Satellite receiver (Set-Top Box) has a different back panel configuration.
N When connecting a DVD / Blu-ray player / Cable Box / Satellite receiver (Set-Top Box), match the color of the connection terminal to the cable.
The side panel jacks on your TV make it easy to connect a camcorder to your TV.
They allow you to view the camcorder tapes without using a VCR.
TV Side Panel
Y
W
R
1Video Cable (Not supplied)
2Audio Cable (Not supplied)
R W Y
Camcorder
1.Connect a Video Cable between the AV IN 2 [VIDEO] jack on the TV and the VIDEO OUT jack on the camcorder.
2.Connect Audio Cables between the AV IN 2 [R-AUDIO-L] jacks on the TV and the AUDIO OUT jacks on the camcorder.
N Each Camcorder has a different back panel configuration.
N When connecting a Camcorder, match the color of the connection terminal to the cable.
English -
TV Side Panel |
|
TV Rear Panel |
VCR Rear Panel |
|
|||||||||
|
|
|
|
|
|
|
|
|
|||||
|
|
|
|
|
|
|
|
|
|
|
|
|
|
|
|
|
|
|
|
|
|
|
|
|
|
|
|
|
|
|
|
|
|
|
|
|
|
|
|
|
|
|
|
|
|
|
|
|
|
|
|
|
|
|
|
|
|
|
|
|
|
|
|
|
|
|
|
|
|
|
|
|
|
|
|
|
|
|
|
|
|
|
|
Y |
W R |
R |
W |
Y |
Y |
W R |
1Video Cable (Not supplied)
2Audio Cable (Not supplied)
1.Connect a Video Cable between the AV IN (1 or 2) [VIDEO] jack on the TV and the VIDEO OUT jack on the VCR.
2.Connect Audio Cables between the AV IN (1 or 2) [R-AUDIO-L] jacks on the TV and the AUDIO OUT jacks on the VCR.
N If you have a ‘mono’ (non-stereo) VCR, use a Y-connector (not supplied) to connect to the right and left audio input jacks of the TV. Alternatively, connect the cable to the ‘R’ jack. If your VCR is stereo, you must connect two cables.
N Each VCR has a different back panel configuration.
N When connecting a VCR, match the color of the connection terminal to the cable.
The rear panel jacks on your TV make it easy to connect a Digital Audio System (Home theater/Receiver) to your TV.
Digital Audio System
TV Rear Panel
1Optical Cable (Not supplied)
1.Connect an Optical Cable between the DIGITAL AUDIO OUT (OPTICAL) jacks on the TV and the Digital Audio Input jacks on the Digital Audio System.
N When a Digital Audio System is connected to the DIGITAL AUDIO OUT (OPTICAL) jack: Decrease the volume of the TV and adjust the volume level with the system’s volume control.
N 5.1CH audio is possible when the TV is connected to an external device supporting 5.1CH.
N When the Home Theater receiver is set to On, you can hear sound output from the TV’s Optical jack. When the TV is displaying a DTV(air) signal, the TV will send out 5.1 channel sound to the Home theater receiver. When the source is a digital component such as a DVD / Blu-ray player / Cable Box / Satellite receiver (SetTop Box) and is connected to the TV via HDMI, only 2 channel sound will be heard from the Home Theater receiver. If you want to hear 5.1 channel audio, connect the digital audio out jack on DVD / Blu-ray player / Cable Box / Satellite receiver (SetTop Box) directly to an Amplifier or Home Theater, not the TV.
English - 10
Amplifier/DVD Home Theater |
TV Rear Panel |
|
W R R W
1Audio Cable (Not supplied)
1.Connect Audio Cables between the AUDIO OUT [R-AUDIO-L] jacks on the TV and Audio Input jacks on the Amplifier / DVD
Home Theater.
N When an audio amplifier is connected to the AUDIO OUT [R-AUDIO-L] jacks: Decrease the volume of the TV and adjust the volume level with the Amplifier’s volume control.
N Each Amplifier/DVD Home Theater has a different back panel configuration.
N When connecting an Amplifier/DVD Home Theater, match the color of the connection terminal to the cable.
English - 11
Using the D-Sub Cable
TV Rear Panel
PC
1D-Sub Cable (Not supplied)
2PC Audio Cable (Not supplied)
1.Connect a D-Sub Cable between PC IN [PC] connector on the TV and the PC output connector on your computer.
2.Connect a PC Audio Cable between the PC IN [AUDIO] jack on the TV and the Audio Out jack of the sound card on your computer.
N If your PC supports an HDMI connection, you can connect this to the HDMI IN 1, 2, 3(DVI) or 4 terminal. N If your PC supports a DVI connection, you can connect this to the HDMI IN 3(DVI) terminal.
Using the HDMI/DVI Cable
TV Rear Panel
PC
2HDMI/DVI Cable (Not supplied)
1 DVI Audio cable (Not supplied)
1.Connect an HDMI/DVI cable between the HDMI IN 3(DVI) jack on the TV and the PC output jack on your computer.
2.Connect a DVI Audio cable between the DVI AUDIO IN jack on the TV and the Audio Out jack of the sound card on your computer.
N When using an HDMI/DVI cable connection, you must use the HDMI IN 3(DVI) terminal.
Using the HDMI Cable
TV Side Panel |
|
|
|
TV Rear Panel |
|
|
|
|
|
PC |
||||
|
|
|
|
|
|
|
|
|
|
|
|
|
|
|
|
|
|
|
|
|
|
|
|
|
|
|
|
|
|
|
|
|
|
|
|
|
|
|
|
|
|
|
|
|
|
|
|
|
|
|
|
|
|
|
|
|
|
|
|
|
|
|
|
|
|
|
|
|
|
|
|
|
|
|
|
|
|
|
|
|
|
|
|
|
|
|
|
|
|
|
|
|
|
|
|
|
|
|
|
|
|
|
|
|
|
|
|
|
|
|
|
|
|
|
|
|
|
|
|
|
|
|
|
|
|
|
|
|
|
|
|
|
|
|
|
|
|
|
|
|
|
|
|
|
|
|
|
|
|
|
|
|
|
|
|
|
|
|
|
|
|
|
|
|
|
|
|
|
|
|
|
|
|
|
|
|
|
|
|
|
|
|
|
|
|
|
|
|
|
|
|
|
|
|
|
|
|
|
|
|
|
|
|
|
|
|
|
|
|
|
|
|
|
|
|
|
|
|
|
|
|
|
|
|
|
|
|
|
|
|
|
|
|
|
|
|
|
|
|
|
|
|
|
|
|
|
|
|
|
|
|
|
|
|
|
|
|
1HDMI Cable (Not supplied) |
or |
|
|
|
|
|
|
|
|
|
|
|
1.Connect an HDMI cable between the HDMI IN 1, 2, 3(DVI), 4 jack on the TV and the PC output jack on your computer.
N Each PC has a different back panel configuration.
English - 12
Before using the TV, follow the steps below to learn how to navigate the menu in order to select and adjust different functions.
MENU Button
Display the main on-screen menu.
ENTERE/ DIRECTION Button
Move the cursor and select an item.
Select the currently selected item.
Confirm the setting.
Operation the OSD (On Screen Display)
The access step may differ depending on the selected menu. 1. Press the MENU button.
RETURN Button
Return to the previous menu.
EXIT
Exit the on-screen menu.
2.The main menu appears on the screen. The menu’s left side has icons : Picture, Sound, Channel, Setup, Input, Application, Support.
3.Press the ▲ or ▼ button to select one of the icons.
Picture
Mode |
: Standard |
|
Backlight |
:7 |
|
Contrast |
:95 |
|
Brightness |
:45 |
|
Sharpness |
:50 |
|
Color |
:50 |
|
Tint (G/R) |
:G50/R50 |
|
4.Then press the ENTEREbutton to access the icon’s sub-menu.
5.Press the ▲ or ▼ button to select the icon’s sub-menu.
6.Press the ◄ or ► button to decrease or increase the value of a particular item. The adjustment OSD may differ depending on the selected menu.
Picture
Mode |
:Standard |
|
Backlight |
: 7 |
|
Contrast |
:95 |
|
Brightness |
:45 |
|
Sharpness |
:50 |
|
Color |
:50 |
|
Tint (G/R) |
:G50/R50 |
|
Advanced Settings |
|
|
▲
Backlight 7
▼
UMove LAdjust EEnter RReturn
7. Press the ENTEREbutton to complete the configuration. Press the EXIT button to exit.
English - 13
Your set can be placed in standby mode in order to reduce the power consumption. The standby mode can be useful when you wish to interrupt viewing temporarily (during a meal, for example).
1.Press the POWERPbutton on the remote control.
N The screen is turned off and a standby indicator appears on your set.
2.To switch your set back on, simply press the POWERPbutton again.
N Do not leave your set in standby mode for long periods of time (when you are away on holiday, for example). It is best to unplug the set from the mains and aerial.
When the TV is initially powered on, basic settings proceed automatically and subsequently.
1.Press the POWERPbutton on the remote control. N You can also use the POWERPbutton on the TV.
N The message Selecione o idioma do menu is displayed.
2.Press the ENTEREbutton. Press the ▲ or ▼ button to select the language, then press the ENTEREbutton. The message Select ‘Home Use’ when installing this TV in your home. is displayed.
3.Press the ◄ or ► button to select Store Demo or Home Use, then press the ENTERE button. The message Select the Antenna source to memorize. is displayed.
N We recommend setting the TV to Home Use mode for the best picture in your home environment.
N Store Demo mode is only intended for use in retail environments.
Plug& Play
Selecioneo idiomadomenu
Idioma |
:Português |
|
EEntrar
NIf the unit is accidentally set to Store Demo mode and you want to return to Home Use (Standard): Press the volume button on the TV. When the volume OSD is displayed, press and hold the MENU button on the TV for 5 seconds.
4.Press the ▲ or ▼ button to memorize the channels of the selected connection.
NAir: Air antenna signal. / Cable: Cable antenna signal. / Air + Cable: Air and Cable antenna signals.
NIf the antenna is connected to ANT 1 IN (AIR), select Air and if it is connected to ANT 2 IN (CABLE), select Cable.
NIf both ANT 1 IN (AIR) and ANT 2 IN (CABLE) are connected, select the Air + Cable.
5.Press the ENTEREbutton to select Start. The TV will begin memorizing all of the available channels.
NTo stop the search before it has finished, press the ENTEREbutton with Stop selected.
NAfter all the available channels are stored, it starts to remove scrambled channels. The Auto program menu then reappears. Press the ENTEREbutton when channel memorization is complete. The message Set the Clock Mode. is displayed.
6.Press the ENTEREbutton. Press the ▲ or ▼ button to select Auto, then Press the ENTEREbutton. If you select Manual, Set current date and time. is displayed.
7.Press the ▲ or ▼ button to highlight the time zone for your local area. Press the ENTEREbutton. If you have received a digital signal, the time will be set automatically. If not, refer to the ‘Setting the Time’ instructions to set the clock. (refer to pages 29~30)
8.The description for the connection method providing the best HD screen quality is displayed. Check the description and press the ENTEREbutton.
9.The message Enjoy your TV is displayed. When you have finished, press the ENTEREbutton.
If you want to reset this feature...
1.Press the MENU button to display the menu. Press the ▲ or ▼ button to select Setup, then press the ENTEREbutton.
2.Press the ENTEREbutton again to select Plug & Play.
N The Plug & Play feature is only available in the TV mode.
NIf a channel is locked using the Child Lock function, the PIN input window appears. (refer to page 27)
Setup
Plug & Play |
|
Language |
:English |
Time |
|
GameMode |
:Off |
Caption |
|
Child Lock |
:On |
Change PIN |
|
English - 14
¦ |
Channel Menu |
|
|
Antenna → Air / Cable |
|
|
Before your television can begin memorizing the available channels, you must specify the type |
|
|
of signal source that is connected to the TV (i.e. an Air or a Cable system). |
Channel |
|
T Press the TOOLS button to display the Tools menu. You can also set the Antenna by |
|
|
selecting Tools → Switch to Cable (or Switch to Air). |
|
NIf the antenna is connected to ANT 1 IN (AIR), select Air and if it is connected to
ANT 2 IN (CABLE), select Cable.
NIf both ANT 1 IN (AIR) and ANT 2 IN (CABLE) are connected, select the antenna input you want.
N If the antenna input is not selected properly, noise may appear on the screen.
Auto Program
Antenna |
:Air |
|
Auto Program |
|
|
Full Guide |
|
|
Mini Guide |
|
|
Default Guide |
: Full Guide |
|
Channel List |
|
|
FineTune |
|
|
■Air: Air antenna signal. / Cable: Cable antenna signal. / Air+Cable: Air and Cable antenna signals
N If the antenna is connected to ANT 1 IN (AIR), select Air and if it is connected to ANT 2 IN (CABLE), select Cable.
N If both ANT 1 IN (AIR) and ANT 2 IN (CABLE) are connected, select the Air+Cable.
N If you want to stop Auto Programming, press the ENTEREbutton. The Stop Auto Program? message will be displayed.
Select Yes by pressing the ◄ or ► button, then press the ENTEREbutton.
Full Guide / Mini Guide
The EPG (Electronic Programme Guide) information is provided by the broadcasters. Programme entries may appear blank or out of date as a result of the information broadcast on a given channel. The display will dynamically update as soon as new information becomes available.
O You can also display the guide menu simply by pressing the GUIDE button. (To configure the Default Guide, refer to the descriptions.)
■Full Guide
Displays the programme information as time ordered One hour segments. Two hours of programme information is displayed which may be scrolled forwards or backwards in time.
■Mini Guide
The information of each programme is displayed by each line on the current channel Mini Guide screen from the current programme onwards according to the programme starting time order.
Default Guide → Full Guide / Mini Guide
You can decide whether to display either the Full Guide or the Mini Guide when the GUIDE button on the remote control is pressed.
Channel List
For detailed procedures on using the Channel List, refer to the ‘Managing Channels’ instructions. (refer to pages 17~18) O You can select these options by simply pressing the CH LIST button on the remote control.
Fine Tune (analog channels only)
Use fine tuning to manually adjust a particular channel for optimal reception.
N If you do not store the fine-tuned channel in memory, adjustments are not saved. N ‘*’ will appear next to the name of fine-tuned channels.
N To reset the fine tuning setting, press the ▼ button to select Reset, then press the ENTEREbutton.
English - 15
LNA (Low Noise Amplifier) → On / Off
If the TV is operating in a weak-signal area, the LNA function can improve the reception (a low-noise preamplifier boosts the incoming signal).
N LNA functions only when antenna is set to Air or Cable.
N The LNA setting must be made separately for each channel.
N If the picture is noisy with the LNA set to On, select Off.
Color System → Auto / PAL-M / PAL-N / NTSC
Selects a color system suitable for the input video signals. N This function is available only in analog TV mode.
Using the Full / Mini Guide
FullGuide
|
|
|
|
DTV Air 04.1 SBT HD |
Wed, 7 May 3:14 pm |
||||
|
|
|
|
Freshmen On Campus |
|
|
|
||
|
|
|
|
9:00 am - 9:30 am |
|
|
|
||
|
|
|
|
Apresentado pelojornalista Carlos Nascimento |
|
||||
900 |
|
|
|
||||||
|
|
Today |
|
|
8:00am-9:00 am |
9:00am-10:00am |
|
||
02.1 |
CULTURA |
|
Freshmen O.. |
Street Hypn.. |
No Information |
|
|
||
04.1 |
SBTHD |
|
Mint Extra |
|
|
|
|
|
|
05.1 |
Globo HD |
|
Loaded |
|
|
No Information |
|
|
|
07.1 |
Record HD |
|
40 with Dynamite MC |
Kisstory |
|
|
|||
|
|
|
|
|
|
|
|
|
|
09.1 |
Read TV! HD |
|
The Distillery |
|
No Information |
|
|
||
|
|
|
|
|
|
|
|
|
|
|
▼ 11.1 |
Gazeta HD |
|
Smash Hits! Sunday |
|
|
|
||
|
EWatch INFO |
Information |
Page |
MiniGuide |
-2Hours |
+2Hours |
Exit |
MiniGuide |
DTVAir04.1SBTHD |
8:00am |
FreshmenOnCampus |
8:40am |
SBTBrasil |
▼ 9:45am |
RealtiShow |
EWatch INFO Information Page FullGuide Exit
To... |
Then... |
Watch a programme in the EPG list |
Select a programme by pressing the ▲, ▼, ◄, ► button. |
Exit the guide |
Press the blue button |
If the next programme is selected, it is scheduled with the clock icon displayed. If the ENTEREbutton is pressed again, press the ◄, ► button to select Cancel Schedules, the scheduling is cancelled with the clock icon gone.
View programme information |
Select a programme of your choice by pressing the ▲, ▼, ◄, ► button. |
|
Then press the INFO button when the programme of your choice is |
|
highlighted. |
|
The programme title is on the upper part of the screen center. |
Please click on INFO button for the detailed information. Channel Number, Running Time, Status Bar, Parental Level, Video Quality Information (HD / SD), Sound Modes, Subtitle or Teletext, languages of Subtitle or Teletext and brief summary of the highlighted programme are included on the detailed information. “...” will be appeared if the summary is long.
Toggle between the Full Guide and Mini Guide |
Press the Red button repeatedly. |
In Full Guide |
|
Scrolls backwards quickly (24 hours). |
Press the Green button repeatedly. |
Scrolls forwards quickly (24 hours). |
Press the Yellow button repeatedly. |
English - 16
Using this menu, you can add / delete or set favorite channels and use the program guide for digital broadcasts.
■All Channels
Shows all currently available channels.
■Added Channels
Shows all added channels.
■Favorite
Shows all favorite channels.
O To select the favorite channels you have set up, press the FAV.CH button on the remote control.
AddedChannels
04.1 SBT HD
05.1TVGolboHD
07.1RecordHD
Cable |
Zoom |
|
Select TTools |
■Programmed
Shows all current reserved programs.
N Select a channel in the All Channels, Added Channels or Favorite screen by pressing the ▲ / ▼ buttons, and pressing the
ENTEREbutton. Then you can watch the selected channel. N Using the Color buttons with the Channel List
Green (Zoom): Enlarges or shrinks a channel number.
Yellow (Select): Selects multiple channel lists. You can perform the add/delete or add to Favorite/delete from Favorite function for multiple channels at the same time. Select the required channels and press the Yellow button to set all the selected channels at the same time. The cmark appears to the left of the selected channels.
TOOLS (Tools): Displays the Add (or Delete), Add to Favorite (or Delete from Favorite), Lock (or Unlock), Timer Viewing, Channel Name Edit, Select All (or Deselect All), Auto Program menus (The Options menus may differ depending on the situation.)
NChannel Status Display Icons
c : A channel selected by pressing the Yellow button.
( : A program currently being broadcast.
* : A channel set as a Favorite.
) : A reserved program.
\ : A locked channel.
Channel List Option Menu (in All Channels / Added Channels / Favorite)
N Press the TOOLS button to use the option menu.
NOption menu items may differ depending on the channel status.
■Add / Delete
You can delete or add a channel to display the channels you want.
NAll deleted channels will be shown on All Channels menu.
NA gray-colored channel indicates the channel has been deleted.
NThe Add menu only appears for deleted channels.
NYou can also delete a channel from the Added Channels or Favorite menu in the same manner.
■Add to Favorite / Delete from Favorite
You can set channels you watch frequently as Favorite.
ChannelsAll |
04.1 |
SBT HD |
|
|
||||
|
05.1 |
GloboHD |
|
|
||||
|
7 |
|
Air |
|
|
|||
|
|
|
|
|||||
|
|
Delete |
|
|||||
|
09.1 |
ReadTV! HD |
Add toFavorite |
|
||||
|
Timer Viewing |
|
||||||
|
11.1 |
Gazeta HD |
Channel Name Edit |
|
||||
|
13 |
Air |
Lock |
|
||||
|
14 |
Air |
Select All |
|
||||
|
16.1 |
MIXTV HD |
▼ |
|||||
|
19 |
Air |
|
|
||||
|
21 |
Air |
|
|
||||
|
Air |
|
Zoom |
|
Select |
TTools |
|
|
|
|
|
|
|
TPress the TOOLS button to display the Tools menu. You can also set the add to (or delete from) Favorites by selecting Tools
→ Add to Favorite (or Delete from Favorite).
N The ‘*’ symbol will be displayed and the channel will be set as a favorite.
N All favorite channels will be shown on Favorite menu.
English - 17
■Timer Viewing
If you reserve a program you want to watch, the channel is automatically switched to the reserved channel in the Channel List; even when you are watching another channel. To reserve a program, set the current time first. (refer to page 29)
N Only memorized channels can be reserved.
N You can set the channel, day, month, year, hour and minute directly by pressing the number buttons on the remote control. N Reserving a program will be shown in the Programmed menu.
N Digital Program Guide and Viewing Reservation
When a digital channel is selected, and you press the ► button, the Program Guide for the channel appears. You can reserve a program according to the procedures described above.
■Channel Name Edit (analog channels only)
Channels can labeled so that their call letters appear whenever the channel is selected.
N The names of digital broadcasting channels are automatically assigned and cannot be labeled.
■Lock / Unlock
You can lock a channel so that the channel cannot be selected and viewed.
You can select the type of picture which best corresponds to your viewing requirements.
TPress the TOOLS button to display the Tools menu. You can also set the lock (unlock) current channels by selecting Tools →
Lock Current Channel (or Unlock Current Channel).
NThis function is available only when the Child Lock is set to On. (refer to page 27)
NThe PIN number input screen appears. Enter your 4 digit PIN number.
NThe default PIN number of a new TV set is 0-0-0-0. You can change the PIN, by
Nselecting Change PIN from the menu.
NThe ‘\’ symbol will be displayed and the channel will be locked.
■Select All / Deselect All
● Select All: You can select all the channels in the channel list. ● Deselect All: You can deselect all the selected channels.
NYou can only select Deselect All when there is a selected channel.
■Auto Program
NFor detailed procedures on using the Auto Program. (refer to page 15)
Channel List Option Menu (in Programmed)
You can view, modify or delete a reservation.
N Press the TOOLS button to use the option menu.
■Change Info
Select to change a viewing reservation.
■Cancel Schedules
Select to cancel a viewing reservation.
■Information
Select to view a viewing reservation.
(You can also change the reservation information.)
■Select All
Select all reserved program.
Programmed |
1 / 1/ 2009 |
|
Cancel Schedules |
||||||
|
|
|
|
|
|
||||
|
|
|
|
|
|
|
|||
|
|
|
3:48pm |
02.1CULTURA |
|
|
|||
|
|
|
Change Info |
|
|||||
|
|
|
3:52pm |
04.1 |
SBTHD |
|
|
||
|
|
|
Information |
||||||
|
|
|
3:59pm |
05.1 |
GloboHD |
SelectAll |
|
||
|
|
|
4:05pm |
07.1RecordHD |
)NoProgramName |
||||
|
|
|
4:16pm |
11.1GazetaHD )NoProgramName |
|||||
|
|
|
4:35pm |
16.1MIXTVHD )NoProgramName |
|||||
Air |
|
Zoom |
|
|
Select |
TTools EInformation |
|||
|
|
English - 18
Mode
You can select the type of picture which best corresponds to your viewing requirements.
TPress the TOOLS button to display the Tools menu. You can also set the picture mode by selecting Tools → Picture Mode.
■Dynamic
Selects the picture for increased definition in a bright room.
■Standard
Selects the picture for the optimum display in a normal environment.
■Natural
Selects the picture for an optimum and eye-comfortable display.
NThis function is not available in PC mode.
■Movie
Selects the picture for viewing movies in a dark room.
Backlight / Contrast / Brightness / Sharpness / Color / Tint (G/R)
Your television has several setting options that allow you to control the picture quality.
●Backlight: Adjusts the brightness of LCD back light.
●Contrast: Adjusts the contrast level of the picture.
●Brightness: Adjusts the brightness level of the picture
●Sharpness: Adjusts the edge definition of the picture.
●Color: Adjusts color saturation of the picture.
●Tint (G/R): Adjusts the color tint of the picture.
Picture |
Mode |
:Standard |
|
|
|||
|
Backlight |
: 7 |
|
|
Contrast |
: 95 |
|
|
Brightness |
: 45 |
|
|
Sharpness |
: 50 |
|
|
Color |
: 50 |
|
|
Tint (G/R) |
: G50/R50 |
|
▲
Backlight 7
▼
UMove LAdjust EEnter RReturn
NWhen you make changes to Backlight, Contrast, Brightness, Sharpness, Color or Tint (G/R) the OSD will be adjusted accordingly.
N In PC mode, you can only make changes to Backlight, Contrast and Brightness.
N Settings can be adjusted and stored for each external device you have connected to an input of the TV.
NThe energy consumed during use can be significantly reduced if the brightness level of the picture is lowered, which will reduce the overall running cost.
English - 19
Advanced Settings
Samsung’s new TVs allow you to make even more precise picture settings than previous models.
N Advanced Settings is available in Standard or Movie mode.
N In PC mode, you can only make changes to Gamma and White Balance from among the
Advanced Settings items.
■Black Tone → Off / Dark / Darker / Darkest
You can select the black level on the screen to adjust the screen depth.
AdvancedSettings
BlackTone |
:Off |
|
DynamicContrast |
:Medium |
|
Gamma |
:0 |
|
ColorSpace |
:Native |
|
WhiteBalance |
|
|
Flesh Tone |
:0 |
|
Edge Enhancement |
:On |
|
|
UMove EEnter |
RReturn |
■Dynamic Contrast → Off / Low / Medium / High
You can adjust the screen contrast so that the optimal contrast is provided.
■Gamma
You can adjust the primary color (red, green, blue) intensity.
■Color Space
Color space is a color matrix composed of red, green and blue colors. Select your favorite color space to experience the most natural color.
●Auto: Auto Color Space automatically adjusts to the most natural color tone based on program sources.
●Native: Native Color Space offers deep and rich color tone.
■White Balance
You can adjust the color temperature for more natural picture colors.
●R-Offset: Adjusts the red color darkness.
●G-Offset: Adjusts the green color darkness.
●B-Offset: Adjusts the blue color darkness.
●R-Gain: Adjusts the red color brightness.
●G-Gain: Adjusts the green color brightness.
●B-Gain: Adjusts the blue color brightness.
●Reset: The previously adjusted white balance will be reset to the factory defaults.
■Flesh Tone
You can emphasize the pink ‘flesh tone’ in the picture.
N Changing the adjustment value will refresh the adjusted screen.
■Edge Enhancement → Off / On
You can emphasize object boundaries in the picture.
■xvYCC → Off / On
Setting the xvYCC mode to on increases detail and color space when watching movies from an external device (ie. DVD player) connected to the HDMI or Component IN jacks.
N xvYCC is available when the picture mode is set to Movie, and the external input is set to HDMI or Component mode.
English - 20
Picture Options
N In PC mode, you can only make changes to the Color Tone and Size from among the items in Picture Options.
■Color Tone → Cool / Normal / Warm1 / Warm2 / Warm3
N Warm1, Warm2 or Warm3 is only activated when the picture mode is Movie.
N Settings can be adjusted and stored for each external device you have connected to an input of the TV.
■Size
PictureOptions
Color Tone |
: Normal |
|
Size |
: 16:9 |
|
Digital NR |
: Auto |
|
HDMI Black Level |
: Normal |
|
FilmMode |
: Off |
|
Blue Only Mode |
: Off |
|
|
UMove EEnter |
RReturn |
Occasionally, you may want to change the size of the image on your screen. Your TV comes
with several screen size options, each designed to work best with specific types of video input. Your cable box/satellite receiver may have its own set of screen sizes as well. In general, though, you should view the TV in 16:9 mode as much as possible.
O Alternately, you can press the P.SIZE button on the remote control repeatedly to change the picture size.
●16:9 : Sets the picture to 16:9 wide mode.
●Zoom1: Magnifies the size of the picture on the screen.
●Zoom2: Magnifies the size of the picture more than Zoom1.
●Wide Fit: Enlarges the aspect ratio of the picture to fit the entire screen.
●4:3 : Sets the picture to 4:3 normal mode.
●Screen Fit: Use the function to see the full image without any cut-off when HDMI (720p/1080i/1080p), Component (1080i/1080p) or DTV (1080i) signals are input.
|
|
|
|
|
|
|
|
|
|
|
|
16:9 |
|
Zoom1 UMove |
Zoom2 UMove |
||||||
|
|
|
|
|
|
|
|
|
|
|
16:9 |
|
|
|
Zoom1 |
|
Zoom2 |
||||
|
|
|
|
|
|
|
|
|
|
|
|
|
|
|
|
|
|
|
|
|
|
|
Wide Fit UMove |
|
4:3 |
Screen Fit |
||||||
|
|
|
|
|
|
|
|
|
|
|
Wide Fit |
4:3 |
Screen Fit |
N Temporary image retention may occur when viewing a static image on the set for more than two hours.
NAfter selecting Zoom1, Zoom2 or Wide Fit: Press the ► button to Select Position, then press the ENTEREbutton. Press the ▲ or ▼ button to move the picture up and down. Then press the ENTEREbutton. Press the ► button to Select Size, then press the ENTEREbutton. Press the ▲ or ▼ button to magnify or reduce the picture size in the vertical direction. Then press the ENTEREbutton.
NAfter selecting Screen Fit in HDMI (1080i/1080p) or Component (1080i/1080p) mode, you made need to center the picture:
Press the ◄ or ► button to select Position, then press the ENTEREbutton. Press the ▲, ▼, ◄ or ► button to move the picture.
Reset: Press the ◄ or ► button to select Reset, then press the ENTEREbutton. You can initialize the setting.
N HD (High Definition): 16:9 - 1080i/1080p (1920x1080), 720p (1280x720)
N Settings can be adjusted and stored for each external device you have connected to an input of the TV.
Input Source |
Picture Size |
|
ATV, AV, Component (480i, 480p) |
16:9, Zoom1, Zoom2, 4:3 |
|
DTV(1080i), Component (1080i, 1080p), |
16:9, 4:3, Wide Fit, Screen Fit |
|
HDMI (720p, 1080i, 1080p) |
||
|
||
PC |
16:9, 4:3 |
English - 21
■Digital NR → Off / Low / Medium / High / Auto
If the broadcast signal received by your TV is weak, you can activate the Digital Noise Reduction feature to help reduce any static and ghosting that may appear on the screen.
N When the signal is weak, select one of the other options until the best picture is displayed.
■HDMI Black Level → Normal / Low
You can select the black level on the screen to adjust the screen depth.
N This function is active only when an external device is connected to the TV via HDMI. The HDMI Black Level function may not be compatible with all external devices.
■Film Mode → Off / Auto1 / Auto2
The TV can be set to automatically sense and process film signals from all sources and adjust the picture for optimum quality.
N Film mode is supported in TV, Video, Component (480i / 1080i) and HDMI (480i / 1080i).
●Off: Turn the Film Mode function off.
●Auto1: Automatically adjusts the picture for the best quality when watching a film.
●Auto2: Automatically optimizes the video text on the screen (not including closed captions) when watching a film.
■Blue Only Mode → Off / On
This function is for AV device measurement experts. This function displays the blue signal only by removing the red and green signals from the video signal so as to provide a Blue Filter effect that is used to adjust the Color and Tint of video equipment such as DVD players, Home Theaters, etc. Using this function, you can adjust the Color and Tint to preferred values appropriate to the signal level of each video device using the Red/Green/Blue/Cyan/Magenta/Yellow Color Bar Patterns, without using an additional Blue Filter.
N Blue Only Mode is available when the picture mode is set to Movie or Standard.
Picture Reset → Reset Picture Mode / Cancel
Resets all picture settings to the default values.
N Reset Picture Mode: Current picture values return to default settings.
English - 22
Setting Up Your PC Software (Based on Windows XP)
The Windows display-settings for a typical computer are shown below. The actual screens on your PC will probably be different, depending upon your particular version of Windows and your particular video card. However, even if your actual screens look different, the same basic set-up information will apply in almost all cases. (If not, contact your computer manufacturer or Samsung Dealer.)
1.First, click on ‘Control Panel’ on the Windows start menu.
2.When the control panel window appears, click on ‘Appearance and Themes’ and a display dialog-box will appear.
3.When the control panel window appears, click on ‘Display’ and a display dialog-box will appear.
4.Navigate to the ‘Settings’ tab on the display dialog-box.
The correct size setting (resolution) - Optimum: 1920 X 1080 pixels
If a vertical frequency option exists on your display settings dialog box, the correct value is ‘60’ or ‘60 Hz’. Otherwise, just click ‘OK’ and exit the dialog box.
Display Modes
If the signal from the system equals the standard signal mode, the screen is adjusted automatically. If the signal from the system doesn’t equal the standard signal mode, adjust the mode by referring to your videocard user guide; otherwise there may be no video. For the display modes listed below, the screen image has been optimized during manufacturing.
■D-Sub and HDMI/DVI Input
N When using an HDMI/DVI cable connection, you must use the HDMI IN 3(DVI) jack.
Mode |
Resolution |
Horizontal Frequency |
Vertical Frequency |
Pixel Clock Frequency |
Sync Polarity |
|
(KHz) |
(Hz) |
(MHz) |
(H / V) |
|||
|
|
|||||
IBM |
640 x 350 |
31.469 |
70.086 |
25.175 |
+/- |
|
720 x 400 |
31.469 |
70.087 |
28.322 |
-/+ |
||
MAC |
640 x 480 |
35.000 |
66.667 |
30.240 |
-/- |
|
832 x 624 |
49.726 |
74.551 |
57.284 |
-/- |
||
|
1152 x 870 |
68.681 |
75.062 |
100.000 |
-/- |
|
|
720 x 576 |
35.910 |
59.950 |
32.750 |
-/+ |
|
VESA CVT |
1152 x 864 |
53.783 |
59.959 |
81.750 |
-/+ |
|
1280 x 720 |
44.772 |
59.855 |
74.500 |
-/+ |
||
|
1280 x 720 |
56.456 |
74.777 |
95.750 |
-/+ |
|
|
1280 x 960 |
75.231 |
74.857 |
130.000 |
-/+ |
|
|
640 x 480 |
31.469 |
59.940 |
25.175 |
-/- |
|
|
640 x 480 |
37.861 |
72.809 |
31.500 |
-/- |
|
|
640 x 480 |
37.500 |
75.000 |
31.500 |
-/- |
|
|
800 x 600 |
37.879 |
60.317 |
40.000 |
+/+ |
|
|
800 x 600 |
48.077 |
72.188 |
50.000 |
+/+ |
|
|
800 x 600 |
46.875 |
75.000 |
49.500 |
+/+ |
|
|
1024 x 768 |
48.363 |
60.004 |
65.000 |
-/- |
|
|
1024 x 768 |
56.476 |
70.069 |
75.000 |
-/- |
|
VESA DMT |
1024 x 768 |
60.023 |
75.029 |
78.750 |
+/+ |
|
1152 x 864 |
67.500 |
75.000 |
108.000 |
+/+ |
||
|
1280 x 1024 |
63.981 |
60.020 |
108.000 |
+/+ |
|
|
1280 x 1024 |
79.976 |
75.025 |
135.000 |
+/+ |
|
|
1280 x 800 |
49.702 |
59.810 |
83.500 |
-/+ |
|
|
1280 x 800 |
62.795 |
74.934 |
106.500 |
-/+ |
|
|
1280 x 960 |
60.000 |
60.000 |
108.000 |
+/+ |
|
|
1360 x 768 |
47.712 |
60.015 |
85.500 |
+/+ |
|
|
1440 x 900 |
55.935 |
59.887 |
106.500 |
-/+ |
|
|
1440 x 900 |
70.635 |
74.984 |
136.750 |
-/+ |
|
|
1680 x 1050 |
65.290 |
59.954 |
146.250 |
-/+ |
|
VESA GTF |
1280 x 720 |
52.500 |
70.000 |
89.040 |
-/+ |
|
1280 x 1024 |
74.620 |
70.000 |
128.943 |
-/- |
||
VESA DMT / |
1920 x 1080p |
67.500 |
60.000 |
148.500 |
+/+ |
|
DTV CEA |
||||||
|
|
|
|
|
English - 23
NPreset: Press the SOURCE button to select PC mode.
Auto Adjustment
Use the Auto Adjust function to have the TV automatically adjust the video signals it receives.
The function also automatically fine-tunes the settings and adjusts the frequency values and positions.
TPress the TOOLS button to display the Tools menu. You can also set the Auto Adjustment by selecting Tools → Auto Adjustment.
N This function does not work in DVI-Digital mode.
Screen
■Coarse / Fine
The purpose of picture quality adjustment is to remove or reduce picture noise. If the noise is not removed by Fine-tuning alone, then adjust the frequency as best as possible (Coarse) and Fine-tune again. After the noise has been reduced, readjust the picture so that it is aligned on the center of screen.
■PC Position
Adjust the PC’s screen positioning if it does not fit the TV screen. Press the ▲ or ▼ button to adjusting the Vertical-Position. Press the ◄ or ► button to adjust the Horizontal-Position.
■Image Reset
You can replace all image settings with the factory default values.
Picture
Coarse
Fine
PCPosition
ImageReset
Brightness |
: 45 |
Sharpness |
: 50 |
AutoAdjustment |
|
Screen
AdvancedSettings
Picture Options
Picture Reset
Screen
50
0
UMove EEnter RReturn
English - 24
Mode → Standard / Music / Movie / Clear Voice / Custom
TPress the TOOLS button to display the Tools menu. You can also set the sound mode by selecting Tools → Sound Mode.
●Standard: Selects the normal sound mode.
●Music: Emphasizes music over voices.
●Movie: Provides the best sound for movies.
●Clear Voice: Emphasizes voice over other sounds.
Sound
Mode |
: Custom |
|
Equalizer |
|
|
SRS TruSurroundHD |
: Off |
|
Audio Language |
: - - - - |
|
Multi-Track Sound |
: Mono |
|
Auto Volume |
: Off |
|
Speaker Select |
: TV Speaker |
|
●Custom: Recalls your customized sound settings.
Equalizer
The sound settings can be adjusted to suit your personal preference.
●Mode: Selects the sound mode among the predefined settings.
●Balance L/R: Adjusts the balance between the right and left speaker.
●100Hz, 300Hz, 1KHz, 3KHz, 10KHz (Bandwidth Adjustment): To adjust the level of different bandwidth frequencies.
●Reset: Resets the equalizer settings to the default values.
SRS TruSurround HD → Off / On
SRS TruSurround HD is a patented SRS technology that solves the problem of playing 5.1 multichannel content over two speakers. TruSurround delivers a compelling, virtual surround sound experience through any two-speaker playback system, including internal television speakers. It is fully compatible with all multichannel formats.
O You can select these options by simply pressing the SRS button on the remote control.
Audio Language
You can change the default value for audio languages. Displays the language information for the incoming stream.
TPress the TOOLS button to display the Tools menu. You can also set the audio language by selecting Tools → Audio
Language.
N While viewing a digital channel, this function can be selected.
N You can only select the language among the actual languages being broadcast.
Multi-Track Sound (MTS)
O Press the MTS button on the remote control repeatedly to select Mono, Stereo or SAP.
O Press the TOOLS button to display the Tools menu. You can also set the audio language by selecting
Tools → Multi-Track Sound
●Mono: Choose for channels that are broadcasting in mono or if you are having difficulty receiving a stereo signal.
●Stereo: Choose for channels that are broadcasting in stereo.
●SAP: Choose to listen to the Separate Audio Program, which is usually a foreign-language translation.
N Multi-Track Sound is available only in Analog TV mode.
NDepending on the particular program being broadcast, you can listen to Mono, Stereo or SAP.
Auto Volume → Off / On
Each broadcasting station has its own signal conditions, and so it is not easy to adjust the volume every time the channel is changed. This feature lets you automatically adjust the volume of the desired channel by lowering the sound output when the modulation signal is high or by raising the sound output when the modulation signal is low.
NAuto Volume is not available in Component and HDMI mode.
Speaker Select
When you watch TV with it connecting to a Home theater, turn the TV speakers off so you can listen to sound from the Home theater’s (external) speakers.
● External Speaker: Used to listen to the sound of the External (Home Theater) Speakers. ● TV Speaker: Used to listen to the sound of the TV Speakers.
NIf you select External Speaker in the Speaker Select menu, the sound settings will be limited.
English - 25
NThe volume and MUTE buttons do not operate when the Speaker Select is set to External Speaker. Please set the volume on your Home theater.
|
TV’s Internal Speakers |
Audio Out (Optical, L/R Out) to Sound System |
|
RF, AV, Component, PC, HDMI |
TV Speaker |
Sound Output |
Sound Output |
External Speaker |
Mute |
Sound Output |
Video No Signal |
Mute |
Mute |
Sound Reset → Reset All / Reset Sound Mode / Cancel
You can restore the Sound settings to the factory defaults.
N Reset Sound Mode: Current sound values return to default settings.
SoundReset
Selectthesound reset options.
Reset All |
Reset Sound Mode |
Cancel |
|
|
|
|
LMove |
EEnter RReturn |
|
|
|
You can connect a set of headphones to your set if you wish to watch a TV program without disturbing other people in the room. N Using the sound function is restricted when connecting headphones to the TV.
N Prolonged use of headphones at a high volume may damage your hearing.
N You will not hear sound from the speakers when you connect headphones to the TV. N The headphone volume and TV volume are adjusted separately.
English - 26
Language
You can set the menu language.
Time
For detailed procedures on setting up options, refer to the ‘Setting the Time’ instructions. (refer to pages 29~30)
Setup
Plug&Play |
|
|
Language |
:English |
|
Time |
|
|
GameMode |
:Off |
|
Caption |
|
|
ChildLock |
:On |
|
ChangePIN |
|
|
ParentalLock |
|
|
Game Mode → Off / On
When connecting to a game console such as PlayStation™ or Xbox™, you can enjoy a more realistic gaming experience by selecting the game menu.
N Restrictions on game mode (Caution)
To disconnect the game console and connect another external device, set Game Mode to Off in the setup menu.
If you display the TV menu in Game Mode, the screen shakes slightly.
N Game Mode is not available in regular TV and PC mode.
NIf the picture is poor when external device is connected to TV, check if Game Mode is On. Set Game Mode to Off and connect external devices.
NIf Game Mode is On:
Picture mode is automatically changed to Standard and cannot be changed.
Sound mode is automatically changed to Custom and cannot be changed. Adjust the sound using the equalizer.
NThe Reset Sound function is activated. Selecting the Reset function after setting the equalizer resets the equalizer settings to the factory defaults.
Caption (On-Screen Text Messages)
■Caption → Off / On
You can switch the caption function on or off. If captions are not available, they will not be displayed on the screen. O Press the CC button on the remote control to turn the Caption on or off.
N The Caption feature doesn’t work in Component, HDMI or PC modes.
■Caption Mode
You can select the desired caption mode.
N The availability of captions depends on the program being broadcast.
●CC1~CC4 / Text1~Text4 (analog channels only)
The Analog Caption function operates in either analog TV channel mode or when a signal is supplied from an external device to TV. (Depending on the broadcasting signal, the Analog Caption function may operate on digital channels.)
Child Lock → Off / On
This feature allows you to prevent unauthorized users, such as children, from watching unsuitable programme by muting out video and audio.
N Before the setup screen appears, the PIN number input screen appears. Enter your 4 digit PIN number.
N The default PIN number of a new TV set is 0-0-0-0. You can change the PIN by selecting Change PIN from the menu. N You can lock some channels in Channel List. (refer to page 18)
N Child Lock is available only in TV mode.
Change PIN
You can change your personal ID number that is required to set up the TV.
N Before the setup screen appears, the PIN number input screen appears. Enter your 4 digit PIN number. N The default PIN number of a new TV set is 0-0-0-0.
N If you forget the PIN code, press the remote control buttons in the following sequence, which resets the PIN to 0-0-0-0:
POWER (Off) → MUTE → 8 → 2 → 4 → POWER (On).
English - 27
Parental Lock
This feature allows you to prevent unauthorized users, such as children, from watching unsuitable programme by a 4-digit PIN
(Personal Identification Number) code that is defined by the user.
N Before the setup screen appears, the PIN number input screen appears. Enter your 4 digit PIN number.
N The default PIN number of a new TV set is 0-0-0-0. You can change the PIN by selecting Change PIN from the menu.
N When the parental ratings are set, the ‘\’ symbol is displayed. N Allow All: Press to unlock all TV ratings.
Block All: Press to lock all TV ratings.
Melody → Off / Low / Medium / High
A melody sound can be set to come on when the TV is powered On or Off. N The Melody does not play.
When no sound is output from the TV because the MUTE button has been pressed.
When no sound is output from the TV because the volume has been reduced to minimum with the VOL – button.
When the TV is turned off by Sleep Timer function.
Energy Saving → Off / Low / Medium / High / Auto
This feature adjusts the brightness of the TV in order to reduce power consumption. When watching TV at night, set the Energy Saving mode option to High to reduce eye fatigue as well as power consumption.
TPress the TOOLS button to display the Tools menu. You can also set the Energy Saving by selecting Tools → Energy
Saving.
AV Color System → Auto / PAL-M / PAL-N / NTSC
Normally the TV can receive image and sound with good quality when in the mode Auto. This mode detects the signal color system automatically. In case of some signal reception with color unsatisfactory, select the AV Color System Mode to PAL-M,
PAL-N or NTSC.
English - 28