

Samsung LN32A330J1DXZA, LN37A330J1DXZA, LN26A330J1DXZA, LN19A330J1DXZA Owner’s Manual

Contact SAMSUNG WORLDWIDE
If you have any questions or comments relating to Samsung products, ptease contact the SAMSUNG
customer care center.
Contacte con SAMSUNG WORLDWIDE
Si tiene alguna pregunta o comentario referente a nuestros productos, per favor contacte con nuestro Servicio de Atenci6n al
CIiente.
Samsung Electronics Canada Inc., Customer
Service 55 Standish Court Mississauga_
CANADA 1-800-SAMSUNG(726-7864) www.samsung.com/ca
U.S.A 1-800-SAMSUNG(726-7864) www.samsung.com 105 Challenger Road
Ontario L5R 4B2 Canada
Samsung Etectronique Canada Inc.,
Service a la Clientele 55 Standish Court
Mississauga, Ontario L5R 4B2 Canada
Samsung Electronics America, Inc.
Ridgefield Park, NJ 07660-0511
I
imagine the possibilities
Thank you for purchasing a Samsung product,
To receive a more comolete service olease
register your product at
www.samsung.com/globaliregister
Mode Serial No,
BN68-01514C-00
I important Warranty Regarding Viewing
Wide screen format LCD Displays (16:9, the aspect ratio of the screen width to height) are primarily designed to view wide screen format
full-motion video. The images displayed on them should primarily be in the wide screen 16:9 ratio format, or expanded to filt the screen
if your model offers this feature and the images are constantly moving. Displaying stationary graphics and images on screen, such as
the dark side-bars on nonexpanded standard format television video and programming, should be limited to no more than 5% of the total
television viewing per week.
Additionally, viewing other stationary images and text such as stock market reports, video game displays, station loges, web sites or
computer graphics and patterns, should be limited as described above for all televisions. Displaying stationary images that exceed the
above guidelines can cause uneven aging of LCD Displays that leave subtle, but permanent burned-in ghost images in the LCD picture. To
avoid this, vary the programming and images, and primarily display full screen moving images, not stationary patterns or dark bars.
On LCD models that offer picture sizing features, use these controls to view different formats as a fult screen picture
Be careful in the selection and duration of television formats used for viewing. Uneven LCD aging as a result of format selection and use,
as well as burned-in images, are not covered by your Samsung limited warranty.
U.S.A Only
The product und accompanying this user manual is licensed under certain intellectual property rights of certain third parties. In particular,
this product is licensed under the following US patents: 5,991,715, 5,740,317, 4,972,484, 5,214,678, 5,323,396, 5,539,829, 5,606,618,
5,530,655, 5,777,992, 6,289,308, 5,610,985, 5,481,643, 5,544,247, 5,960,037, 6,023,490, 5,878,080, and under US Published Patent
Application No. 2001-44713-A1.
This license is limited to private non-commercial use by end-user consumers for licensed contents. No rights are granted for commercial
use. The license does not cover any product unit other than this product unit and the license does not extend to any unlicensed product
unit or process conforming to ISO/IEC 11172-3 or ISO/IEC 13818-3 used or sold in combination with this product unit. The license only
covers the use of this product unit to encode and/or decode audio files conforming to the ISO/{EC 11172-3 or tSO/IEC 13818-3. No rights
are granted under this license for product features or functions that do not conform to the ISO/tEC 11172-3 or ISO/IEC 13818-3.
Other countries
The product unit accompanying this user manual is licensed under certain intellectual property rights of certain third parties. This license is
limited to private non-commercial use by end-user consumers for licensed contents. No rights are granted for commercial use. The license
does not cover any product unit other than this product unit and the license does not extend to any unlicensed product unit or process
conforming to ISO/IEC 1t172-3 or ISO/IEC 13818-3 used or sold in combination with this product unit. The license only covers the use of
this product unit to encode and/or decode audio files conforming to the ISO/IEC 11172-3 or ISO/IEC 13818-3. No rights are granted under
th s cense for product features or funct ons that do not conform to the SO EC 11172-3 or SO/EC 13818-3.
information Television Format
8AMSUNG ELECTRONICS NORTH AMERICAN LiMiTED WARRANTY STATEMENT
Subject _otne requirements, conditions, exclusions and I_nitations of tne onginai Limited Warranty supplied with Samsun§ Electromcs
(SAMSUNG) proauc_s, ana the requlremems, eonoi[lons exclusions and iimttanons containea harem SAMSUNG will additional., Drovlae
Narramy Repair Service in the United States on SAMSUNG proaucts purcnased in Canada and in Canada on SAMSUNG products uumnasea
the United States. for the warranty penod onglnally suecified, and to the Originat Purchaser _my.
The above descneea warranty repairs must be perforr-ed by a SAMSUNG Authorized Service CenteL &long with this Statement LheOriginal
Limited Warrant, Statemem ano a dated Bil of Sale as Proof of Purchase must De presemee to the Service Center Transportation to and from
me Service Center is the responstetHty of the uurchaser
_oi" ]luons covered are ltml[ea only "_ontanufacturing defects in ma[enal or worKmansnie, ano only Tnoseencoun[erea in normal use of the
croat. _'(
Excluded cut not ilml[ea [o. are any onginally specified provisions for. in-home or on-sire services minimum or maximum repair rimes
exenanges or reetacements, accessoues, options, upgraaes, or consumables
For the location of a SAMSUNG Authorized Service Center please call [o -free
In the United States : 1-800-SAMSUNG (1-800-726-7864) in Canada : "G800-SAMSUNG
See the warranty card for more information on warranty terms.
Precauti0nsWhen Displaying astill Image
Astittimagemay cause perraanentdamage to the TV screen
• Do notdisplaya still imageon the LCD panelfor morethan2 hoursas it can cause screen imageretention.]-his image retentionis atso
known as !'screenburn!'.Toavoidsuch imageretention,reducethe dagree of brightnessand contrastofthe screen'whendisPlayinga stil
image.
•Displaying still imagesfrom Video gamesand PC for tongerthan a certainperiod of time may producepartialafter-images.
Topreven!this effect,reduce !ha 'brightness'and '€ontrastl"whendisplaying stil! images.
© 2008SamsungElectronicsCo.,Ltd All rightsreserved.
Watchingthe LCD TV in 4:3formatfor a longperiod oftime may leave traces of borders displayeden the left, right and
center of the Screencaused by the differenceof tight emissionon the screen.
Playinga DVDor agameconso!e maycause asimila_effectto thescreen.
theab°ve effectare n°t c°vered bYtheWarranty

Contents
[] List ofFeatures...................................................................... 2 [] UsingYourTVas aComputer(PC)Displa_ .....34
[] Accessories................................................................... 2 [] DisptaI Modes .............................................. 34
[] v_ewlngtheControtPane ....3 [] SettinguptheTVwith.,ourPC ..................................................35
[] vlewlng[ne ConnectionPanel ................................. 4
e RemoteControl...........................................................
[] insratltncBatteriesin theRemoteControl....................................6 [] Settingthe Clock........................................................................37
[] ConnectingCabteTV ...............................................................7
[] Connectinga DVDPlayeror CableBox/Satellitereceiver
(Set-TopBox)viaHDMI........... 8
[] Connectinga DVDPlayerorCableBox/Sate!ierece,,,er
(Set-TopBox) a DVt ..................................................................8
[] Connectinga DVDPlayerorCableBox/Satellitereceiver
(Set-TopBox)viaComponentcaoJes...........................................9
[] Connectinga Camcorder..................................................... 9
[] Connectinga VCR. 10
[] Connecunga DigitalAudioSystem ............I1
[] ConnecnnganAmptlher/DVDHomeTheater ............11
[] Connectinoa PC........................................................................12
[] TurningtheTV Onand Off ........................................................13
[] Plug& Play :eature ...............................................................13
[] ChangingChannels.............. 14
[] AdjusungtheVolume........ 15
[] viewingtheDispla} ..............................................!5
[] ViewingtheMenus.....................................................................15
[] using the TOOLSButton.........................................................11_ [] Soecificafions.......................
[] MemorizingtheChannens..........
[] ToSelecttheSource .18
[] ToEdittheInputSourceName..................................................18
[] ChangingthePictureStandarc .............................................19
[] Customizingthe PictureSetnngs............................................19
[] ConfiguringPictureOpnons...................................................20
[] ResettingthePictureSettingstotheFactor, 3efautts...............23
......................................... [] Setectir] a MenuLanguage 40
[] UsingtheV-Chi_ ......41
[] ViewingClosedCaptions(On-ScreenTextMessages)
- Analog...............................................................................48
[] ViewingClesedCaptions(On-ScreenTextMessages
- Digitat.....................................................................................49
[] Aojus[Ing[neTVOn/OffMelodySouna......................................50
[] usingthe EnergySavingC_arure......................................... 50
[] dpgradingtheSoftware..............................................................51
[] Troubleshootinc .....................................................................52
[] HowtoAdusttheStand.............................................................54
[] HowtoAdjusttheAngleoftheTV..........................................54
[] ins[ailingtheWaltMountKit.................. 54
[] installingVESACompliantMountingDevices......................... 54
[] usingthe DecorationCovers .................................... 54
[] installingtheStand.......... 55
DisconnectingtheStand.................................................... 55
[] WaltMountKitSpecifications(VESAI ......... 56
usingthe AntFTheftKensingtonLOCK......................................57
58
[] ChangingrneSoundStandard....................... 24
[] Customizingthe Sound .........24
[] SettingtheTruSurroundXT.... 25
[] ChoosingaMulti-ChannelSound MTS)track- Digital.............25
[] ChoosingaMulti-ChannelSouna MTS)track- Analoc .......26
[] AutomaucvolumeControl..........................................................26
[] SemngtheTVSpeakersOn/Off.......................... 27
[] ConnectingHeadphones(Soldseparately)................................27
[] ClearingScrambledChannels- Digital.....................................28
[] AddingandErasingChannens......................................... 29
[] ToSet-UpYourFavoriteChannels.......................... 30
[] vie_,,qgtheChannelLists........................................... 31
[] LabeIingChannels................................................................ 32
[] FineTuningAnalogChannets........... 33
[] CheckingtheDigital-SignalStrengm .......33
A
m
Symbol Press
Note One-Touch
Butter

List of Features
Adjustable picture settings that can be stored in the TV% memory.
* Automatic timer to turn the TV on and off.
A special sleep timer.
Excellent Digital Interface & Networking :
With a built-in HD digital tuner, non-subscription HD broadcasts can be viewed with no Cable Box/Satellite receiver
(Set-Top Box) needed.
* HDMI/DVI connection of your PC to this TV.
* Excellent Picture Quality
SRS TruSurround XT
- SRS TruSurround XT provides a virtual surround system.
Accessories
Please make sure the following items are included with your LCD TV.
If any items are missing, contact your dealer.
RemoteControl &Batteries(AAA x 2) PowerCord Cleaning Cloth Owner's Instructions
(LN19A330J1D:BN59-00678A) (3903-000144) (BN63-01798A)
(LN19A331J1D:BN59-00678B)
WarrantyCard / RegistrationCard/ (BN96-04960A) (LN19A330J1D: Right: BN63-03217A
SafetyGuideManual Left: BN63-03216A)
(Not available inalllocations) (LN19A331J1D: Right: BN63-03217B)
>_The items color and shape may vary depending on the model.
WallMount kit DecorationCover

Viewing the Control Panel
Buttons on the Lower-Riqht Part of the Panel
The buttons on the lower-right panel control your TV's basic features, including the on-screen menu.
To use the more advanced features, you must use the remote control.
SOURCE
MENU
+
VOL
A
CH
v
Touch the right side of each
button to operate.
O SOURCE C,_
Toggles between atl the available input sources
(TV, AV, S-Video, ComponenL PC, HDMI).
In the on-screen menu, use this button as you would
use the ENTER button on the remote control.
0 MENU
Press to see an on-screen menu of your TV's features.
O - VOL +
Press to increase or decrease the volume.
In the on-screen menu, use the - VOL + buttons as you
would use the ,,I and _ buttons on the remote control.
O vCH ^
Press to change channels.
In the on-screen menu, use thevCH ^ buttons as you
would use the V and A buttons on the remote control.
O POWER iNDICATOR
Blinks and turns off when the power is on and
lights up in stand-by mode.
Q 0 (POWER)
Press to turn the TV on and off.
O REMOTE CONTROL SENSOR
Aim the remote control towards this spot on the TV.
SPEAKERS

Viewing the Connection Panel
Use the connection panel jacks to connect A/V components that will be connected continuously, such as DVD players or a VCR.
For more information on connecting equipmenL see pages 6~12.
........................................................................................................
J
...........
®®
_LO- AUO,O-
@
®®
>" The product color and shape may vary depending on the model.
O AUDIO OUT
Connects to the audio input jacks on your Amplifier/
Home theater.
O DIGITAL AUDIO OUT (OPTICAL}
Connects to a Digital Audio component.
O PC IN [PC] / [AUDIO]
Connects to the video and audio output jacks on your
PC.
O HDMI/DVI IN / DVI IN [R-AUDiO-L]
Connects to the HDMI jack of a device with an HDMI
output.
Use the HDMI/DVI IN jack for DVI connection to an
external device.
Use a DVt to HDMt cable or DVI-HDMI adapter (DVI to
HDMI) for video connection and the DVI IN [R-AUDIO-L]
jacks for audio.
- No sound connectionis needed for an HDMIto HDMI
connection.
- When using an HDMI/DVI cable connection,you must use
the HDMI/DVI INjack.
O SERVICE, EX-LINK
Connector for SERVICE only.
Q ANT IN
Connects to an antenna or cable TV system.
00®
ANT IN
=_Jii
SERVICE
®
an
KENSINGTON LOCK
O
The Kensington Lock (optional) is a device used to
physically fix the system when used in a public place.
If you want to use a locking device, contact the dealer
where you purchased the TV.
>-The location of the Kensington Lock may be different
depending on its model.
I_ (HEADPHONE}
O
Connects a set of external headphones for private
listening.
AM iN
Q
Video and audio inputs for external devices, such as a
camcorder or VCR.
S-VIDEO
Connects an S-Video signal from a camcorder or VCR.
COMPONENT iN
@
The COMPONENT IN jack is also used as the AV IN
jack.
@
POWER INPUT
Connects the supplied power cord.
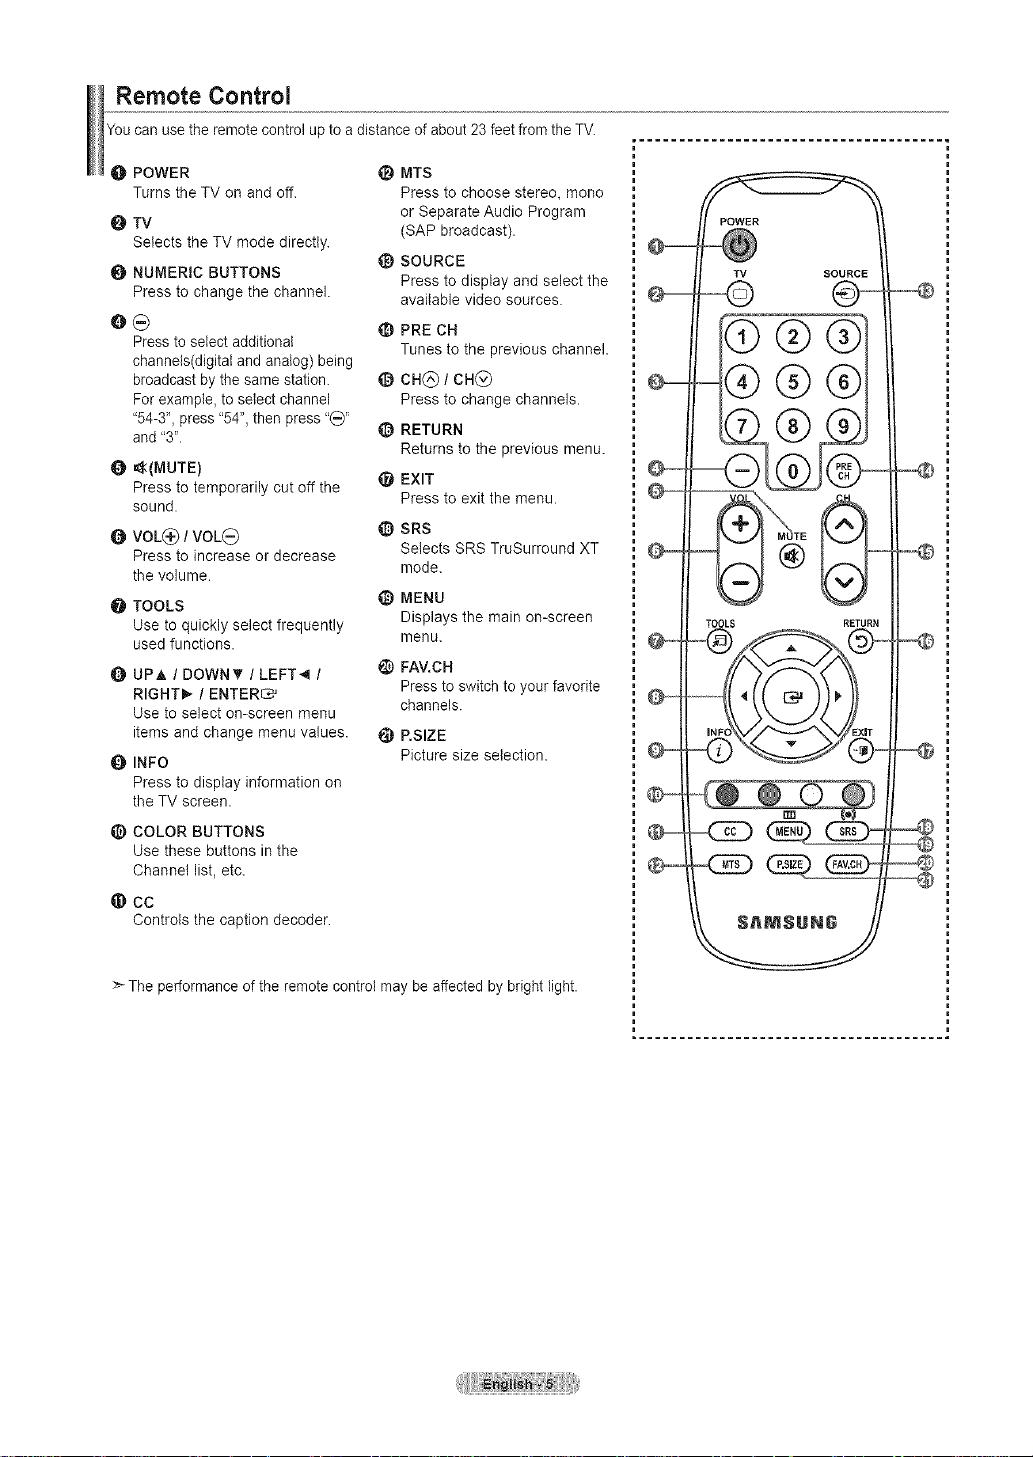
Remote Control
You can use the remote control up to a distance of about 23 feet from the TV.
O POWER
Turns the TV on and off.
O TV
Selects the TV mode directly.
O NUMERIC BUTTONS
Press to change the channel.
e_
Press to select additional
channels(digital and analog) being
broadcast by the same station.
For example, to select channel
"54-3", press "54", then press "_"
and "3".
0 _(MUTE)
Press to temporarily cut off the
sound.
O VOL_:) / VOL_)
Press to increase or decrease
the volume.
TOOLS
Use to quickly select frequently
used functions.
Q UPA / DOWNT / LEFT_I /
RIGHTI_ / ENTER_
Use to select on-screen menu
items and change menu values.
INFO
Press to display information on
the TV screen.
COLOR BUTTONS
Use these buttons in the
Channel list, etc.
@ CC
Controls the caption decoder.
_) MTS
Press to choose stereo, mono
or Separate Audio Program
(SAP broadcast).
_) SOURCE
Press to display and select the
available video sources.
PRE CH
Tunes to the previous channel.
@ca@ /CH@
Press to change channels.
_) RETURN
Returns to the previous menu.
_t EXIT
Press to exit the menu.
_) SRS
Selects SRS TruSurround XT
mode.
_) MENU
Displays the main on-screen
menu.
_) FAV.CH
Press to switch to your favorite
channels.
e RSIZE
Picture size selection.
POWER
TV SOURCE
=@@@
--
_D
-Q
>-The performance of the remote control may be affected by bright light.

Installing Batteries in the Remote Control
2, Install two AAA size batteries.
> Make sure to match the "+" and "-" ends of the batteries with the diagram inside the compartment.
3, Replacethe cover.
> Removethe batteriesandstorethem in a cool,dry placeif you won't beusingthe remote controlfor a [ _ ]
Iongtime. I / / /
The remote control can be used up to about 23 feet from the TV. I'_,_-_ /
(Assunling typical TV usage, tile batteries should last for about one year.)
1. Is the TV power on? L _'_---_ J
2. Are the plus and minus ends of the batteries reversed?
3. Are the batteries drained?
4. Is there a power outage or is the power cord unplugged?
5. Is there a special fluorescent light or neon sign nearby?
Connecting VHF and UHF Antennas
Ifyour antenna has a set of leads that look like the diagram tothe right, see "Antennas with
300 O Flat Twin Leads" below.
Ifyour antenna has one lead that looks like the diagram to the right, see "Antennas with 75
O Round Leads".
Ifyou have two antennas_see "Separate VHF and UHF Antennas".
Antennas with 300 Q Flat Twin Leads
Ifyou are using an off-air antenna (such as a roof antenna or "rabbit ears") that has 300 O twin flat leads, follow the directions
below.
t, Place the wires from the twin leads under the screws on a 300-75 O adapter
(not supplied).
Use a screwdriver to tighten the screws.
2, Plug the adaptor into the ANT IN terminal on the back of the TV.
Antennas with 75 Q Round Leads
t, Plug theantenna lead into the ANT INterminal on the back of the TV.
Separate VHF and UHF Antennas
Ifyou have two separate antennas for your TV (one VHF and one UHF), you must combine the two antenna signals before
connecting the antennas tothe TV. This procedure requires an optional combiner-adaptor (available at most electronics shops).
t, Connect both antenna leads to the combiner. 1_
2, Plug the combiner into the ANT IN terminal on the bottom of the rear panel.

Connecting Cable TV
Toconnect to a cable TV system, follow the instructionsbelow.
Cable without a Cable Box
1, Plug the incoming cable intothe ANT IN terminal on the back of the TV.
BecausethisTViscable-ready,youdonotneedacableboxtoviewunscrambledcablechannels.
Connectinq to a Cable Box that Descrambles All Channels
1, Find the cable that is connected to the ANT OUT terminat on your cabte box.
:_ Thisterminalmightbelabeled"ANTOUT","VHFOUT"or simply,"OUT".
2, Connect the other end of this cable to the ANT INterminal onthe backof the TV.
Connectinq to a Cable Box that Descrambles Some Channels
If your cable box descrambles only some channels (such as premium channels), follow the instructions below. Youwilt need a two-
way splitter, an RF (A/B) switch and four lengths of RF cable. (These items are available at most electronics stores.)
1, Find and disconnect the cable that is
connected to theANT INterminal on your
cable box.
:_ Thisterminalmightbelabeled"ANTIN",
"VHFIN"or simply,"IN".
NTIN ANTOUT_=
2, Connect this cable to a two-way splitter.
Incoming
cable
3, Connect an RF cable between the OUTPUT
terminal on the splitter and the IN terminal
on the cable box.
Incoming
cable
Splitter
,===_
Cable BOX
J
4, Connect an RF cable between the
ANT OUT terminal on the cable box and
the B-IN terminal on the RF(A/B) switch.
incoming
cable
Splitter
Cable BOX
5, Connect another cable between the other
OUT terminal on the splitter and the A-IN
terminal on the RF (A/B) switch.
OUT terminal on the RF (A/B) switch and _ _ A,T_,
°. onne tthe,ost ,,e,et ee t,e
the ANT IN terminal on the rear of the TV. _ _i_-7_. @
Incoming
cable
Cable Box Switch
Incoming .... ,11.... TV Rear
1'70_:'g s_ _ _ _ _ I
RF (A/B)
/ Cab,_Oo× Sw,_ch I
Afteryou have made this connection, set theA/B switch tothe "A" positionfor normal viewing.Set theA/B switchto the "B"positionto
viewscrambled channels.(When you set theA/B switchto "B",you will need to tune your TVto the cablebox'soutput channel,which is
usuallychannel 3 or 4.)

Connecting a DVD Player or Cable Box/Satellite receiver(Set-Top Box) via HDIVll
This connection can only be made if there is an HDMI Output connector on the external device.
1, Connect an HDMI Cable
between the HDMI/DVI IN jack (Set-Top Box) Rear Panel TV Rear Panel
on the TV and the HDMI jack
on the DVD Player or Cable
Box/Satellite receiver (Set-Top ___,,
DVD Player or Cable Bo×/aatellite receiver
ox,
HDMI Cable (Not supplied)
>What is HDMt?
• HDMt(High-Definition Multimedia Interface), is an interface that enables the
transmission of digital audio and video signals using a single cable.
The difference between HDMI and DVl is that the HDMI device is smaller in
size and has the HDCP (High Bandwidth Digital Copy Protection) coding feature
installed.
>Each DVD Player or Cable Box/Satellite receiver (Set-Top Box) has a different back
panel configuration.
Connecting a DVD Player or Cable Box,/Satellite receiver (Set-Top Box) via DVl
This connection can only be made if there is a DVl Output connector onthe external device.
1, Connect a DVIto HDMI Cable
or DVI-HDMI Adapter between
the HDMI/DVI IN jack on
the TV and the DVI jack on
the DVD Player or Cable DVD PlayerorCable Box/
Box/Satellite receiver (Set-Top Satellite receiver (Set-Top Box)
Box).
2, Connect Audio Cables
between the DVI IN
[R-AUDIO-L] jack on the TV
and the DVD Player or Cable
Box/Satellite receiver (Set-Top
Box).
> Each DVD Player or Cable Box/Satellite receiver (Set-Top Box) has a different back
panel configuration.
>When connecting a DVD Player or Cable Box/Satellite receiver (Set-Top Box), match
the color of the connection terminal to the cable.
>When using an HDMI/DVl cable connection, you must use the HDMI/DVl IN jack.
TV Rear Panel
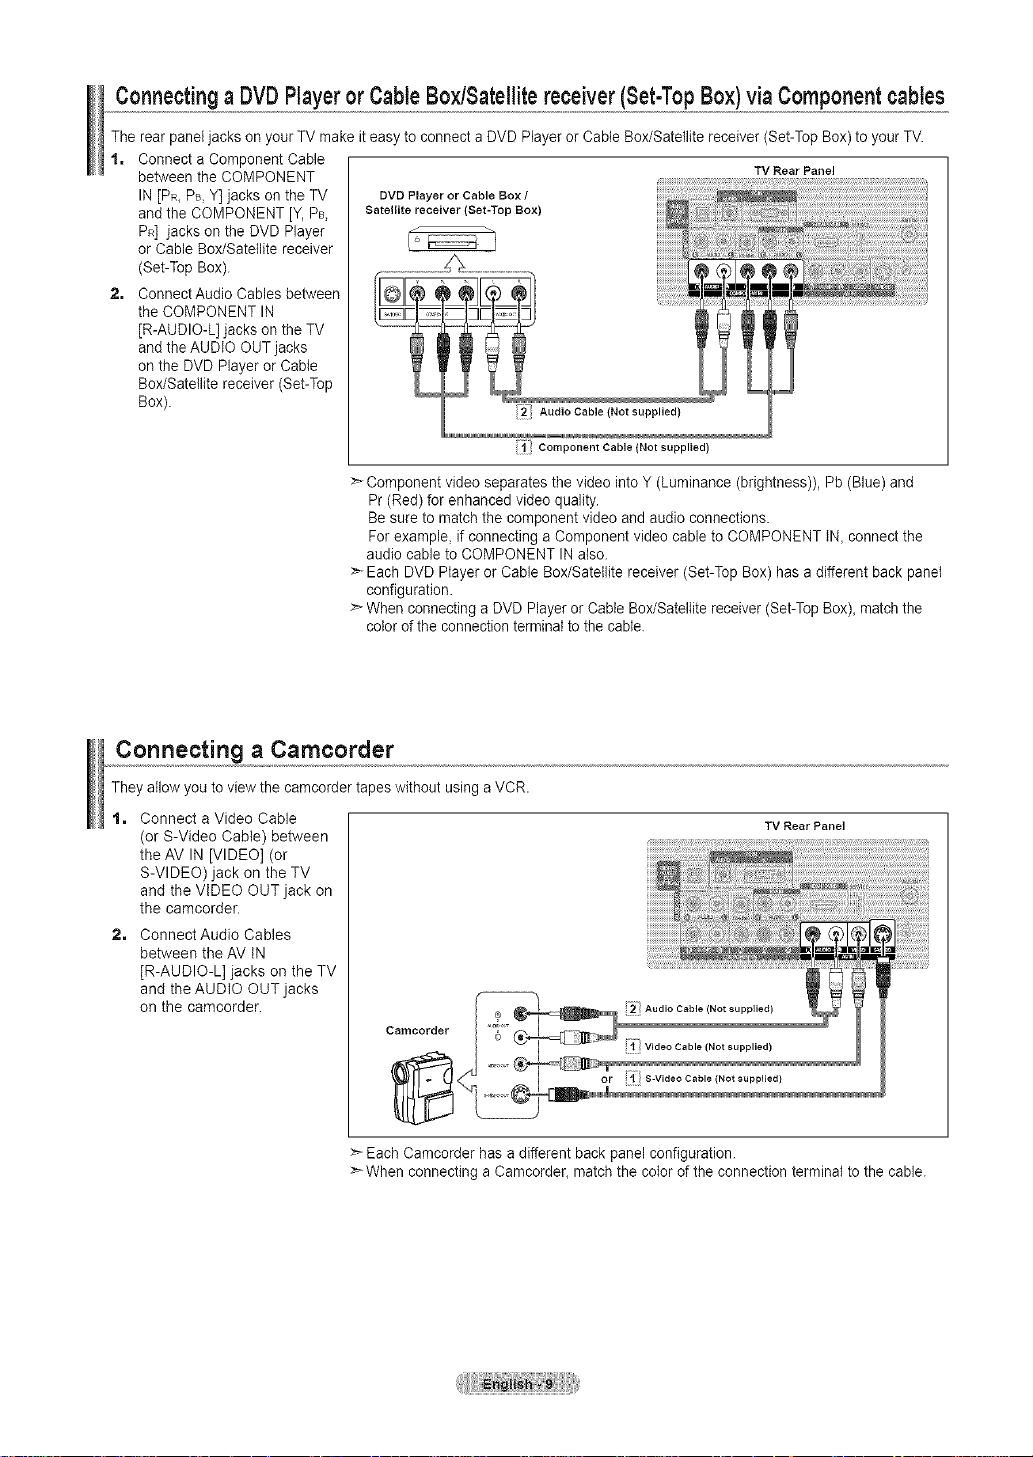
Connectinga DVDPlayerorCableBoyJSatellitereceiver(Set-TopBox)viaComponentcables
The rear panel jacks on your TV make it easy to connect a DVD Player or Cable Box/Satellite receiver (Set-Top Box) to your TV.
1. Connect a Component Cable
between the COMPONENT
IN [PR_PB,Y] jacks on the TV
and the COMPONENT [Y, PB,
PR] jacks on the DVD Player
or Cable Box/Satellite receiver
(Set-Top Box).
2. Connect Audio Cables between
the COMPONENT IN
[R-AUDIO-L] jacks on the TV
and the AUDIO OUT jacks
on the DVD Player or Cable
Box/Satellite receiver (Set-Top
Box).
DVD Player or Cable Box /
Satellite receiver (Set-Top Box)
Component Cable (Not supplied)
:>-Component video separates the video into Y (Luminance (brightness)), Pb (Blue) and
Pr (Red) for enhanced video quality.
Besure to match the component video and audio connections.
For example, if connecting a Component video cable to COMPONENT IN, connect the
audio cable to COMPONENT IN also.
>- Each DVD Player or Cable Box/Satellite receiver (Set-Top Box) has a different back panel
configuration.
>- When connecting a DVD Player or Cable Box/Satellite receiver (Set-TopBox), match the
color of the connection terminal to the cable.
TV Rear Panel
Connecting a Camcorder
They allow you to view the camcorder tapes without using a VCR.
1. Connect a Video Cable
(or S-Video Cable) between
the AV IN [VIDEO] (or
S-VIDEO) jack on the TV
and the VIDEO OUT jack on
the camcorder.
2. Connect Audio Cables
between the AV IN
[R-AUDIO-L] jacks on the TV
and the AUDIO OUT jacks
on the camcorder.
eamoorder
>_Each Camcorder has a different back panel configuration.
>- When connecting a Camcorder, match the color of the connection terminal to the cable.
TV Rear Panel

Connecting a VCR
Video Connection
These instructions assume that you have already connected your TV to an antenna or a cable TV system (according to the
instructions on pages 6~7). Skip step 1 if you have not yet connected to an antenna or a cable system.
1. Unplug the cable or antenna
from the back of the TV.
2, Connect the cable or antenna to
the ANT INterminat on the back
ofthe VCR.
Connectan RF Cable between
the ANTOUT terminalon the
VCRand the ANT INterminal
onthe TV.
4, Connect a Video Cable
between the VIDEO OUT jack
on the VCR andthe AV IN
[VIDEO] jack on the TV.
5, Connect Audio Cables
between the AUDIO OUT
jacks on the VCR and the
AV IN [R-AUDIO-L] jacks on
the TV.
>_If you have a "mono"
(non-stereo) VCR, use a
Y-connector (not supplied)
to hook up to the right and
left audio input jacks of the
TV. If your VCRis stereo,
you mustm connect two
cables.
VCR Rear Panel
i5_ Audio Cable (Not supplied)
!41} Video Cable (Not supplied)
i3: RF Cable (Not supplied)
Follow the instructionsin "Viewing a VCR or Camcorder Tape"to view your VCR tape.
:_ Each VCR has a different back panel configuration.
:_ When connecting a VCR, match the color of the connection terminal to the cable.
TV Rear Panel
S=Video Connection
Your Samsung TV can be connected to an S-Video jack on aVCR.
(This connection delivers a better picture when compared to the regular Video connection above.)
1. To begin, follow steps 1-3
in the previous section to
TV Rear Panel
connect the antenna or
cable to your VCR and your
TV.
VCR Rear Panel
2. Connect an S-Video Cable
between the S-VIDEO OUT
jack on the VCR and the
AV tN [S-VIDEO] jack on
the TV.
3. Connect Audio Cables
between the AUDIO OUT
jacks on the VCR and the
AV tN [R-AUDIO-L] jacks on
the TV.
i;I RF Cable (Not supplied)
An S-Videocable may beincludedwith a VCR. (If not,checkyour localelectronicsstore.)
>- Each VCR has a different back panel configuration.
:_ When connecting a VCR, match the color of the connection terminal to the cable.

Connecting a Digital Audio System
The rear panel jacks on yourTV make it easy to connect a Digital Audio System (Home theater/Receiver) to your TV.
t, Connect an Optical Cable
between the "DIGITAL AUDIO
OUT (OPTICAL)' jacks on the
TV and the Digital Audio Input
jacks on the DigitalAudio
System.
When a Digital Audio System
is connected to the "DIGITAL
AUDIO OUT (OPTICAL)" jack:
Decrease the volume of the
TV and adjust the volume
level with the system's volume
control.
> 5iCH audiois possible when the TV is connected to an externat device supporting 5.1CH.
> Each Digital Audio System has adifferent back panel configuration.
> When the receiver (hometheater) is set to On, you can hearsound output from theTV's
Digital Audio System
TV Rear Panel
DND
Opticaljack. When the TV is displaying a DTV(air) signal, the TV wiltsend out 5.1 chan-
nel sound to the Hometheater receiver. When the source is a digital component such as
a DVD and is connected to theTV via HDMI, only 2 channel sound will be heard from the
Home Theater receiver. If you want to hear 5.1channel audio, connectthe DIGITAL AUDIO
OUT (OPTICAL) jack on the DVD player or Cable/Satellite Box directly to an Amplifier or
Home Theater_notthe TV.
Connecting an Amplifier/DVD Home Theater
t, Connect Audio Cables
between the AUDIO OUT
[R-AUDIO-L]jacks on the TV
and AUDIO IN [R-AUDIO-L]
jacks on the Amplifier/DVD
Home Theater.
When an audio amplifier is
connected to the "AUDIO OUT
[R-AUDIO-L]" jacks: Decrease
the volume of the TV and
adjust the volume level with
the Amplifier's volume control.
AmpJifier/OVD Home Theater
Audio Cable (Not supplied)
> EachAmplifier/DVD Home Theater has a different back panel configuration.
> When connecting an Amplifier/DVD Home Theater_match the color of the connection
terminal to the cable.
TV Rear Panel

Connecting a PC
Using the D-Sub Cable
1, Connect a D-Sub Cable
between PC IN [PC]
connector on the TV and the
PCoutput connector on your
computer,
2, Connect a PCAudio Cable
between the PC IN [AUDIO]
jack on the TV and the Audio
Out jack of the sound card on
your computer.
Using the HDMI/DVI Cable
1, Connect a HDMI/DVI cable
between the HDMt/DVI IN
jack on the TV and the PC
output jack on your computer.
2, Connect a 3.5 mm Stereo
mini-plug/2RCA Cable
between the DVI IN
[R-AUDIO-L] jack on the TV
and the Audio Out jack of the
sound card on your computer.
TV Rear Panel
PC
2' PC Audio Cable (Not supplied)
i;/ D-Sub Cable (Not supplied)
TV Rear Panel
PC
3.5 rnm Stereo rnini-plug/2RCA Cable (Not supplied)
!;1! HDMI/DVl Cable (Not supplied)
Each PC has a different back panel configuration.
_--When connecting a PC, match the color of the connection terminat to the cable.
:_When using an HDMI/DVI cable connection, you must use the HDMI/DVI IN jack.
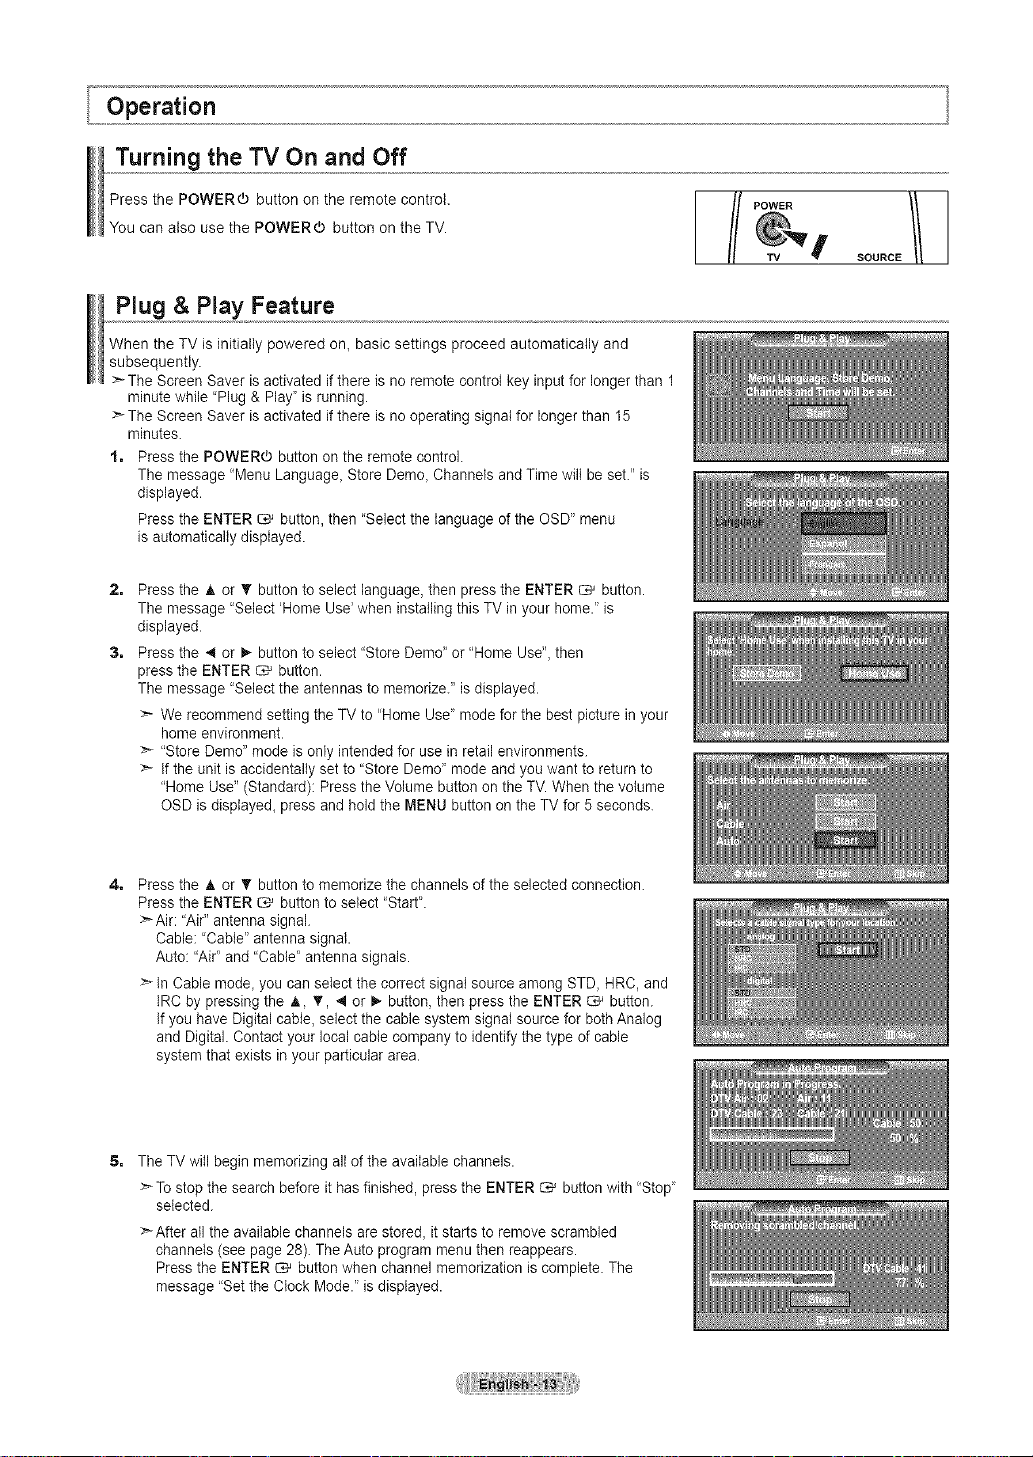
Turning the TV On and Off
Press the POWER(b button on the remote control.
You can also use the POWERd) button on the TV.
Plug & Play Feature
When the TV is initially powered on_basic settings proceed automatically and
subsequently.
>- The Screen Saver is activated if there is no remote control key input for longer than 1
minute while "Plug & Play' is running.
>The Screen Saver is activated ifthere is no operating signal for longer than 15
minutes.
1. Press the POWER(b button on the remote control.
The message "Menu Language_Store Demo_Channels and Time wilt be set." is
displayed.
Press the ENTER _ button, then "Select the language of the OSD" menu
is automatically displayed.
2=
Press the A or _' button to select language, then press the ENTER _ button.
The message "Select 'Home Use'when installing this TV inyour home." is
displayed.
3=
Press the 4 or 1_ button to select "Store Demo_ or "Home Use", then
press the ENTER _ button.
The message "Select the antennas to memorize." is displayed.
>_ We recommend setting the TV to "Home Use' mode for the best picture in your
home environment.
>* "Store Demo" mode is only intended for use in retail environments.
>* If the unit is accidentally set to "Store Demo' mode and you want to return to
"Home Use" (Standard): Press the Volume button on the TV. When the volume
OSD is displayed_press and hold the MENU button on the TV for 5 seconds.
/ POWER
SOURCE
4= Press the ,_ or ,lr button to memorize the channels of the selected connection.
Press the ENTER _ button to select "Start'.
:"--Air: "Air" antenna signal.
Cable: "Cable" antenna signal.
Auto: "Air' and "Cable' antenna signals.
>_In Cable mode_you can select the correct signal source among STD, HRC, and
IRC by pressing the A, _', 4 or _- button, then press the ENTER _ button.
If you have Digital cable, select the cable system signal source for both Analog
and Digital. Contact your local cable company to identify the type of cable
system that exists in your particular area.
5. The TV will begin memorizing alt of the available channels.
>To stop the search before it has finished, press the ENTER _ button with "Stop"
selected.
:_Afler all the available channels are stored, it starts to remove scrambled
channels (see page 28). The Auto program menu then reappears.
Press the ENTER _ button when channel memorization is complete. The
message "Set the Clock Mode." is displayed.
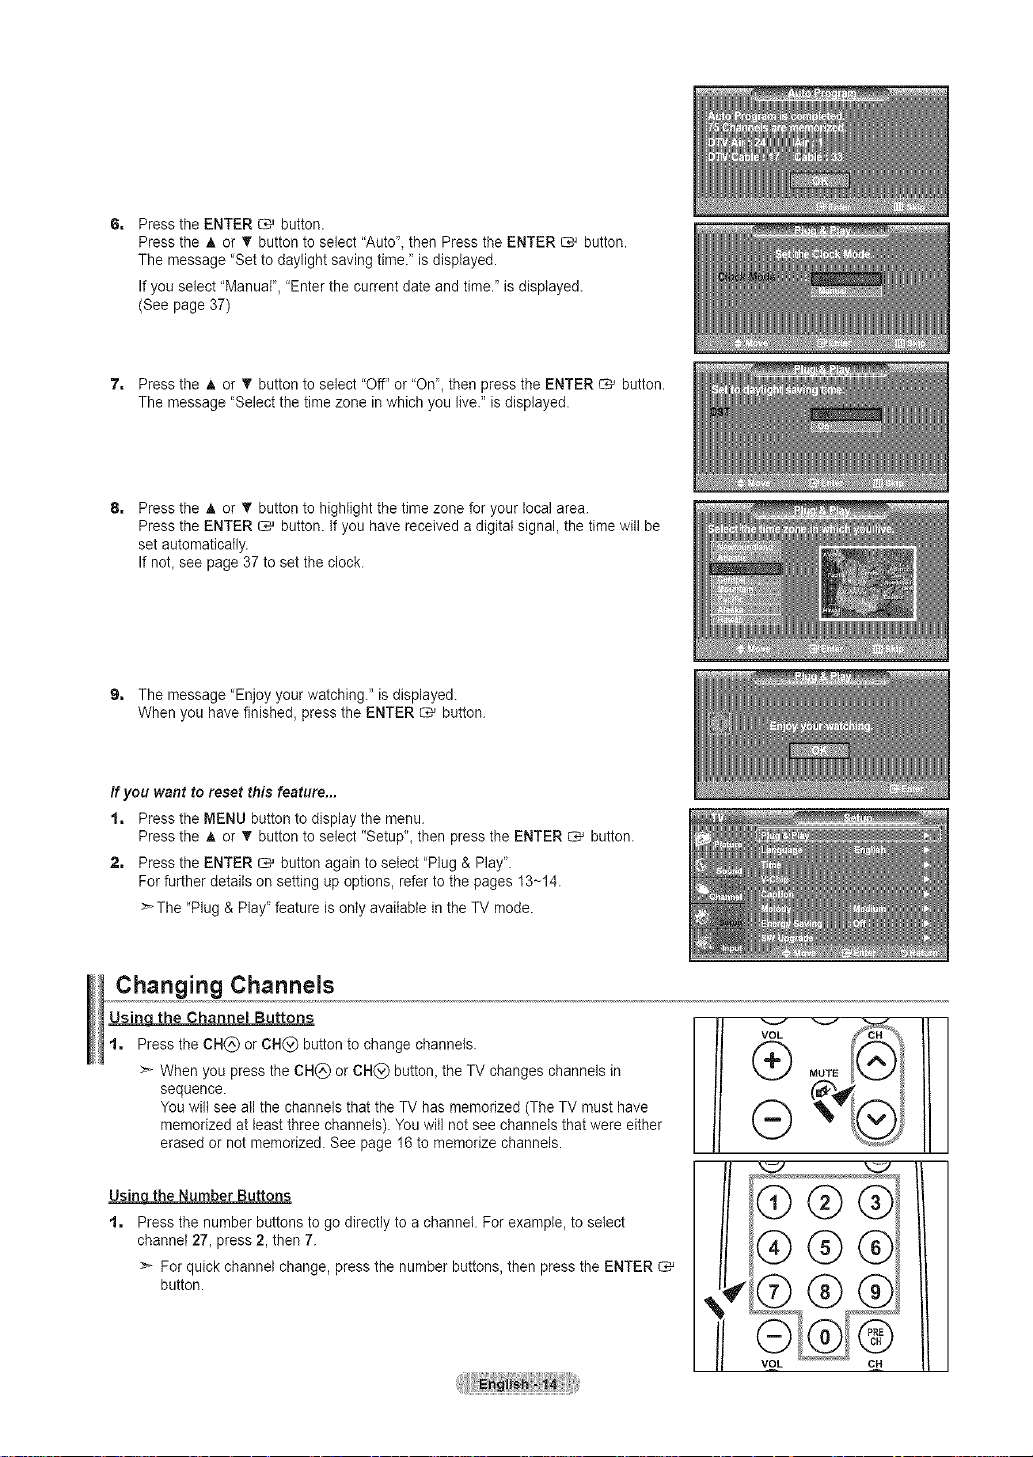
PresstheENTER_ button.
PresstheAorTbuttontoselect"Auto",thenPresstheENTER_ button.
Themessage"Settodaylightsavingtime."isdisplayed.
Ifyouselect"Manual","Enterthecurrentdateandtime."isdisplayed.
(Seepage37)
7, PresstheAorTbuttontoselect"Off"or"On",thenpresstheENTER_ button.
Themessage"Selectthetimezoneinwhichyoulive."isdisplayed.
Pressthe_, or _r button to highlight the time zone for your local area.
Press the ENTER _ button. Ifyou have received a digital signal, the time will be
set automatically.
If not_see page 37 to set the clock.
9, The message "Enjoy your watching." is displayed.
When you have finished, press the ENTER _ button.
If you want te reset this feature...
1, Press the MENU button to display the menu.
Press the A or T button to select "Setup"_then press the ENTER _ button.
2, Press the ENTER _ button again to select "Plug & Play'.
For further details on setting up options, refer to the pages 13~14.
>-The "Plug & Play" feature is only available in the TV mode.
Changing Channels
Usinq the Channel Buttons
t, Press the CH(_) or CN(_) button to change channels.
>- When you press the CH(_) or CH(_) button, the TV changes channels in
sequence.
You wilt see all the channels that the TV has memorized (The TV must have
memorized at least three channels). You will not see channels that were either
erased or not memorized. See page 16 to memorize channels.
the Number Buttons
t=
Press the number buttons to go directly to a channel. For example, to select
channel 27, press 2, then 7.
:_ For quick channel change, press the number buttons, then press the ENTER
button.
m

Usinq the _Button
The (_ button is used to select stations that broadcast a digital signal.
t. For example, for Channel 7-1, press 7, then _), then 1.
>` HD indicates the TV is receiving a DigitalHigh Definition signal. SD indicates
the TV is receiving a Standard Definition signal.
>` For quick channet change, press the number buttons, then press the ENTER
button.
Usinq the PRE CN Button to seJect the Previous Channel
t. Press the PRE CH button.
The TV will switch to the last channel viewed.
>-To quickly switch between two channels that are far apart, tune to one
channel, then use the number button to select the second channel. Then
use the PRE CH button to quickly alternate between them.
Adjusting the Volume
Using the Volume Buttons
t. Press the VOL(_ or VOL(_ button to increase or decrease the volume.
Usinqthe MUTE button
At any time, you can cut offthe sound using the MUTE button.
1. Press MUTE button and the sound cuts off.
"_' is displayed on the screen.
2. To turn mute off, press the MUTE button again or simply press the
VOL(_ or VOL(_ button.
Viewing the Display
The display identifies the current channel and the status of certain audio-video settings.
t. Press the INFO button on the remote controk
The TV wilt display the channel, the type of sound,
and the status of certain picture and sound settings.
Press the INFO button once more or wait approximately 10 seconds and the
display disappears automatically.
Viewing the Menus
t. With the power on, press the MENU button.
The main menu appears on the screen. The menu's left side has icons:
Picture, Sound, Channel, Setup, Input.
2. Press the A or T button to select one of the icons.
Then press the ENTER _ button to access the icon's sub-menu.
3. Press the EXIT button to exit.
>` The on-screen menus disappear from the screen after about one minute.
imt ®
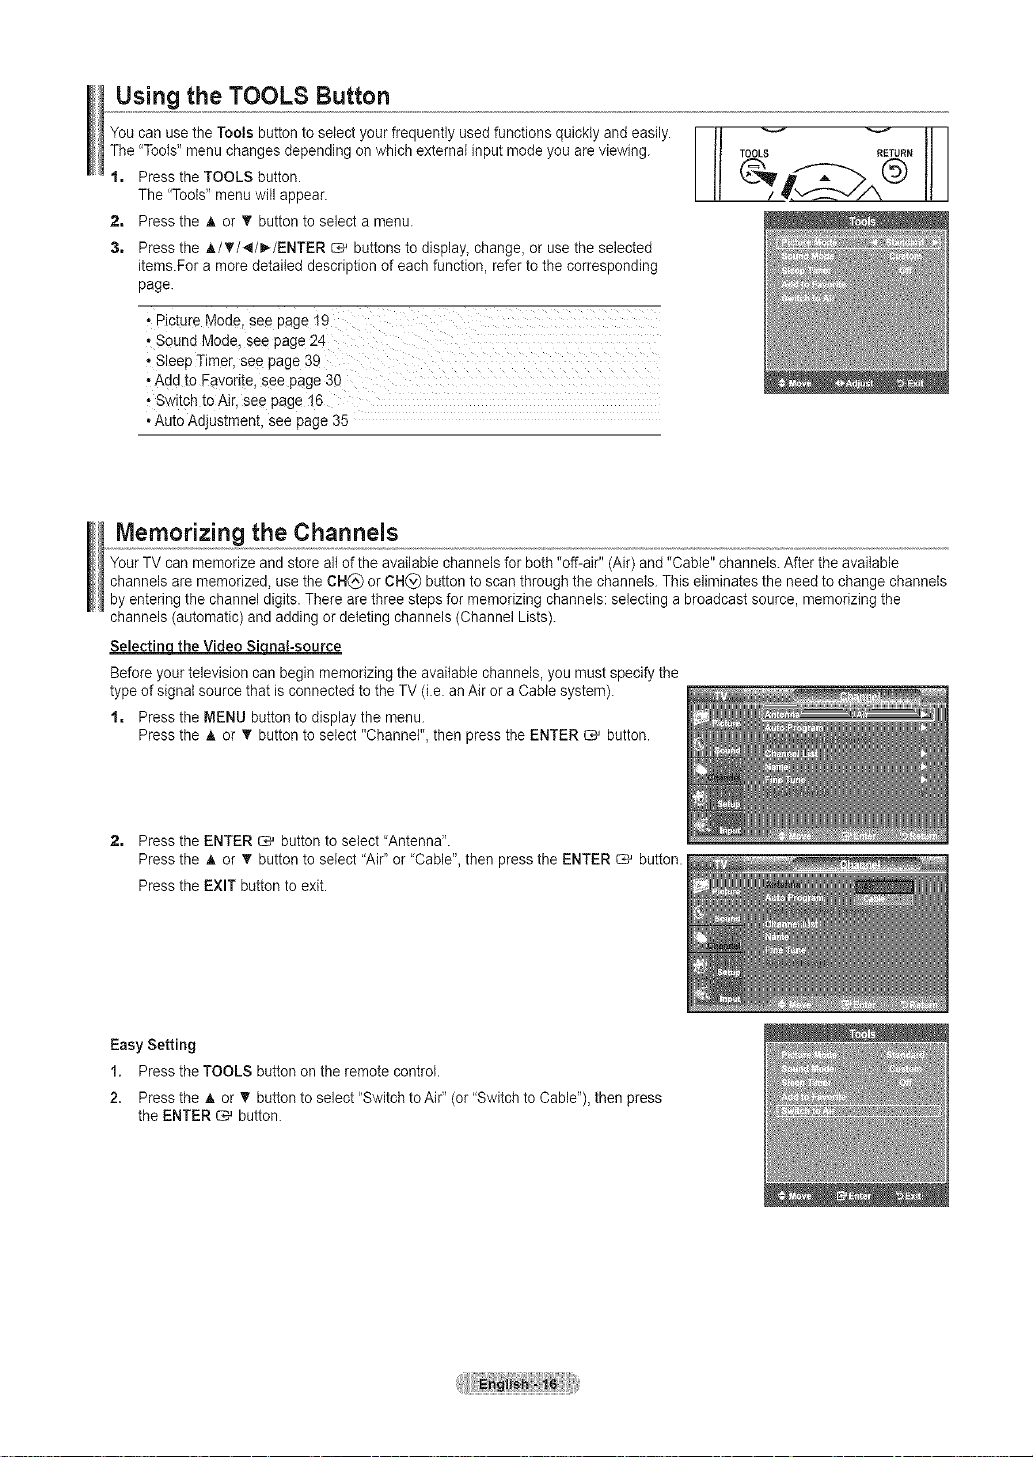
Using the TOOLS Button
You can use the Tools button to select your frequently used functions quickly andeasily.
The "Tools" menu changes depending on which external input mode you are viewing.
1, Press the TOOLS button.
The "Tools"menu will appear.
2, Press the _, or T button to select a menu.
3, Press the A/V'/_I/_/ENTER _ buttons to display, change, or use the selected
items.For a more detailed description of each function, refer to the corresponding
page.
• Picture Mode, see page 19
• Sound Mode, see page24
"Add to Favorite, see page 30
Switch toAir, see page 16
• Auto Adjustment, see page 35
TOOLS RETURN
Memorizing the Channels
YourTV can memorize and store alt of the available channels for both "off-air" (Air) and "Cable" channels. After the available
channels are memorized, use the CH(_) or CH(_) button to scan through the channels. This eliminates the need to change channels
by entering the channel digits. There are three steps for memorizing channels: selecting a broadcast source, memorizing the
channels (automatic) and adding or deleting channels (Channel Lists).
Selectinqthe Video Siqnal-source
Before your television can begin memorizing the available channels, you must specify the
type of signal source that is connected to the TV (i.e. an Air or a Cable system).
1, Press the MENU button to display the menu.
Press the A or T button to select "Channel", then press the ENTER _ button.
2, Press the ENTER _ button to select "Antenna".
Press the _, or T button to select "Air" or 'Cable", then press the ENTER _ button.
Press the EXIT button to exit.
Easy Setting
1. Press the TOOLS button on the remote control.
2. Press the A or _' button to select "Switch to Air" (or "Switch to Cable"), then press
the ENTER _ button.

Storinq Channels in Memory(Automatic Method}
1, Press the MENU button to display the menu.
Pressthe A or _' button to select 'Channel", then press the ENTER _ button,
2, Press the A or T button to select "Auto Program", then press the ENTER _ button,
31
Pressthe _, or • button to select the antenna connection, then press the
ENTER _ button.
:_Air: "Air" antenna signal.
Cable: "Cable" antenna signal.
Auto: "Air" and "Cable" antenna signals.
4, When selecting the Cable TV system:
Pressthe ENTER _ button to start the auto program.
Pressthe 4 or _,-button, then press the A or T to select the correct analog signal
cable system source among "STD", "HRC', and "IRC'. Press the ENTER _ button.
Ifyou have Digital cable TV,select the cable system signal source for both Analog
and Digital.
>-STD, HRC and IRC identify various types of cable TV systems. Contact your
local cable company to identify the type of cable system that exists in your
particular area.At this point the signal source has been selected.
5, The TV begins memorizing alt available stations.
After all the available channels are stored, it start to remove scrambled
channels(see page 28).
:- If you want to stop Auto Programming, press the ENTER _ button.The "Stop
Auto Program?" message wilt be displayed. Select "Yes" by pressing the _ or
button, then press the ENTER _ button.
Pressthe EXIT button to exit.

To Select the Source
Use to select TV or other external input sources such as DVD players or Cable Box/
Satellite receivers (Set-Top Box) connected to the TV. Use to select the input source
of your choice.
1, Press the MENU button to display the menu.
Press the_, or T button to select "Input", then press the ENTER _ button.
2, Press the ENTER _ button to select "Source List".
Pressthe A or T buttonto select signal source, then press the ENTER _ button.
>Available signal sources: TV,AV_S-Video_Component, PC, HDMI.
>'-You can choose only those external devices that are connected to the TV.
,,, e th SOU C utto o theremoteoo tro,
..-.. ..-.. ..--. t I
To Edit the input Source Name
Name the device connected to the input jacks to make your input source selection easier.
1, Press the MENU button to display the menu.
Press theA or T button to select "Input', then press the ENTER _ button.
Press the A or _' button to select "Edit Name"_then press the ENTER _ button.
2, Press the A or T button to select "AV', "S-Video", "Component", "PC", "HDMI"
input jack_then press the ENTER C,_ button.
Press the A or • button to select "VCR', "DVD"_"Cable STB', "Satellite STB",
'PVR STB'_ 'AV Receiver', "Game", "Camcorder"_' PC"_"TV', "IPTV', "Blu-Ray"_
"HD DVD", "Digital Media Adapter' input source, then press the ENTER _ button.
Press the EXIT button to exit.

Changing the Picture Standard
You can activate either Dynamic, Standard, Movie by making a selection from the menu.
1. Press the MENU button to display the menu.
Press the ENTER _ button, to select 'Picture".
2, Press the ENTER _ button to select "Mode".
Press the A or _' button to select the "Dynamic", "Standard" or "Movie'.
Dynamic:Selectsthepipturefor high-definitionina brightroom.
'*Standard:Setectsthepicturefor theoptimumdisplayina nQrntatenvironment.
,,Movie:Selectsthepictureforviewingmoviesina darkroom.
3. Press the EXIT button to exit.
Easy Setting
1. Press the TOOLS button on the remote control.
2. Press the & or • button to select "Picture Mode".
3. Press the _ or _,-button to select the required option.
4. Press the EXIT or TOOLS button to exit.
Customizing the Picture Settings
Yourtelevision has several setting options that allow you to control the picture quality.
1. Toselect the desired picture mode, follow the "Changing the Picture Standard'
instructions numbers 1 and 2.
2,
Press the A or T button to select "Backlight', "Contrast', "Brightness",
'Sharpness', "Color" or 'Tint", then press the ENTER _ button.
Press the 4 or I_ button to decrease or increase the value of a particular item.
Press the ENTER _ button.
Press the EXIT button to exit.
When you make changes to "Backlight', "Contrast"_ "Brightness", "Sharpness'_
"Color" or 'Tint'_ the OSD wilt be adjusted accordingly.
> In PC mode, you can only make changes to "Backlight", "Contrast" and
"Brightness'.
> Settings can be adjusted and stored for each external device you have
connected to an input of the TV.
' Back!ight: Adjusts the brightness of LCD back light.
• Contrast: Adjusts the contrast level of the picture.
•"Brightness: Adjust sthe brightness !eveI of the picture,
' Sharpness: Adjusts the edge definition of the picture.
• Color: Adjusts color saturation of the picture
. Tint: Adjusts the color tint of the picture.

Configuring Picture Options
Activatin Picture 0 tions
1, Press the MENU button to display the menu.
Press the ENTER C*_ button, to select "Picture".
2, Press the A or _r button to select "Picture Options", then press the ENTER
button,
Press the A or _' button to select a particular item. Press the ENTER _ button.
>_When you are satisfied with your setting, press the ENTER _ button.
>- In PC mode, you can only make changes to the "Color Tone" and "Size" from
among the items in 'Picture Options'.
Settin- the Color Tone
1, Follow the "Activating Picture Options" instructions numbers 1 and 2. (Refer to
page 20)
2, Press the _, or T button to select "Color Tone_,then press the ENTER _ button.
3, Press the A or T button to select "Cool2", "Cool1", 'Normal", "Warm1" or "Warm2".
Press the ENTER C,_ button.
:_ "Warm1" or "Warm2" is only activated when the picture mode is "Movie'.
:_ Settings can be adjusted and stored for each external device you have connected
to an input of the TM
Settin the Screen Size
Occasionally, you may want to change the size of the image on your screen. YourTV
comes with six screen size options, each designed to work best with specific types of
video input. Your cable box or satellite receiver may have its own set of screen sizes as
welt. In general, though, you should view the TV in 16:9mode as much as possible.
1, Follow the "Activating Picture Options' instructions numbers 1 and 2.
(Refer to page 20)
2, Press the A or _' button to select "Size", then press the ENTER _ button.
3, Press the A or T button to select the screen format you want.
Press the ENTER _ button.
Press the EXIT button to exit.
* Wide: Adjusts the p_c[uresize to Wide appropriate for DVDs or w_ae
Droaacasung
.1i}:9: Sets _ne picture to 16:9 wide moae.
, Zoom1: Magnifies the size of the olc_ureon the screen.
- Zoom2: Magnifies the size of the picture more than "Zoom1"
, Wide Fit: Enlarges the aspect ratio of the picture to fit the entire screen.
- 4:3: Sets the picture to 4:3 normal moae.
- ,Just Scan: Use the function to see the futl image w_thout any cutoff when
HDMI (720p/!080i), Component (1080i) or DTV (1080i) signals
are InDUL

Temporary image retention may occur when viewing a static image on the set
for more than two hours.
After selecting "Zooml", "Zoom2" or "Wide Fit":
Press the 4 or _,-button to select "Position', then press the ENTER
button. Press the A or V' button to move the picture up and down.
Reset: Press the ,,_or D,,button to select "Reset", then press the ENTER
button. You can initialize the setting.
After selecting "Just Scan" in HDMI (1080i) or Component (1080i) mode:
Press the A or T button to select "H-Position" or "V-Position", then press the
ENTER button.
Press the 4 or I_ button to adjust the screen Position. Press the
ENTER _ button.
Reset: Press the A or • button to select "Reset", then press the ENTER
button. You can initialize the setting.
HD (High Definition)
16:9- 1O8Oi(1920x1080), 720p (1280x720)
Settings can be adjusted and stored for each external device you have connected to an input of the TV.
l°putSoo,ce Pict,,,eSize
TV,Video, S-Video, Component (480i, 480p) Wide, 16:9, Zoom1, Zoom2, 4:3
DTV(1O80i), Component (1080i), HDMI (720p, 1080i) Wide, 16:9, 4:3, Wide Fit, Just Scan
_ Alternately, you can press the P.StZE button on the remote control repeatedlytOchangethe picture size. F// (_ @_________
}
Wide 16:9 Zoom1
Adjuststhep_c[ures_zetoWideappropriate Sets the picture to 16:9 wide mode. Magnifies the size of the oJc_ureon me
for DVDsor widebroadcasting screen
JVideFitZoom2 4:3
Magnifies the size of the _tcture more Enlarges the aspect ratio of the picture Sets the picture to 4:3 normal mode.
than "Zoom1 to fit the entire screen.
Just Sca
Use the function to see the full
mage w_thoutany cutoff when HDMI
720p/1080i), Component (1O8Oi)or
DTV 1080i) signals are input.
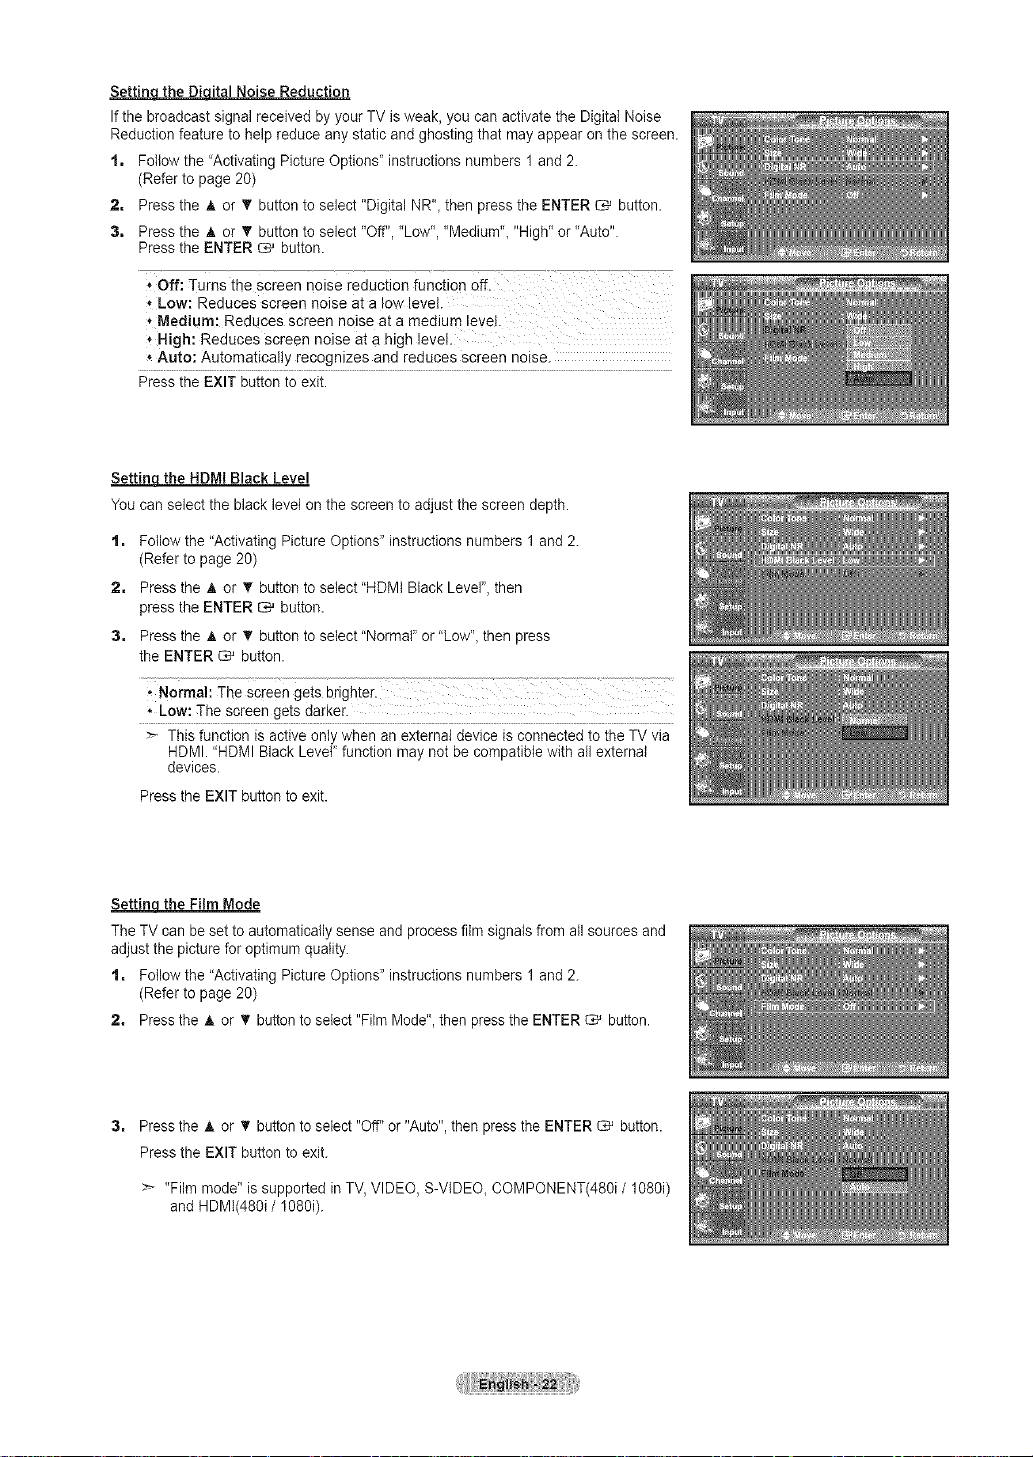
Settin_qital Noise Reduction
If the broadcast signal received by your TV is weak. you can activate the DigitaI Noise
Reduction feature to help reduce any static and ghosting that may appear on the screen.
1. Follow the "Activating Picture Options' instructions numbers 1 and 2.
(Refer to page 20)
2. Press the A or T button to select "Digital NR", then press the ENTER _ button.
3. Press the A or T button to select "Off". "Low". "Medium", "High" or "Auto".
Press the ENTER _ button.
, Off: Turns the screen noise reduction function off.
, Low: Reduces screen noise at a low levei.
*Medium: Reduces screen noise at a medium !evek
* High: Reduces screen noise at a high level
* Auto: Automatically recognizes and reduces screen noise.
Press the EXIT button to exit.
Settinq the HDMI Black Level
You can select the black level on the screen to adjust the screen depth.
t. Follow the "Activating Picture Options" instructions numbers 1and 2.
(Refer to page 20)
2. Press the A or T button to select"HDMt Black Level". then
press the ENTER _ button.
3, Press the A or T button to select "Normal" or "Low", then press
the ENTER _ button.
, Normal: The Screen gets brighter.
• Low: The screen gets darker.
This function is active only when an external device is connected to the TV via
HDMI. "HDMI Black LeveF function may not be compatible with all external
devices.
Press the EXIT button to exit.
Settin the Film Mode
The TV can beset to automatically sense and process film signals from atl sources and
adjust the picture for optimum quality.
t. Follow the "Activating Picture Options" instructions numbers 1and 2.
(Refer to page 20)
2. Press the A or _' button to select "Film Mode".then press the ENTER C_' button.
Press the A or _' button to select "Off" or "Auto". then press the ENTER _ button.
Press the EXIT button to exit.
:- "Film mode" is supported in TV. VIDEO. S-VIDEO, COMPONENT(480i / 1080i)
and HDMI(480i / 1080i).
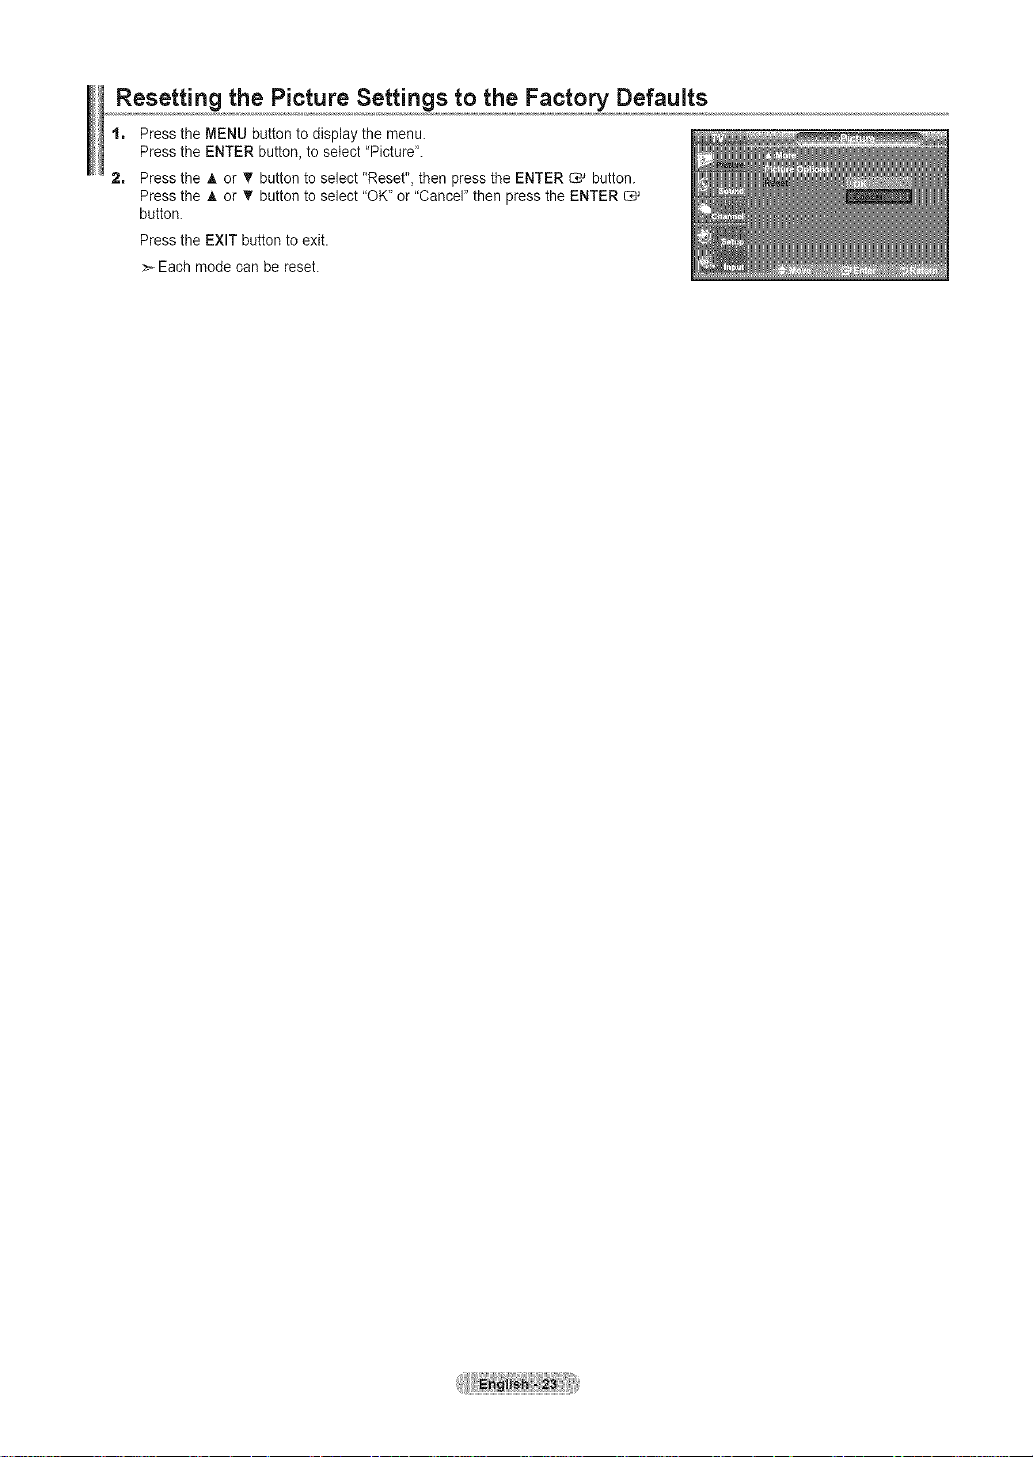
Resetting the Picture Settings to the Factory Defaults
1, Press the MENU button to display the menu.
Press the ENTER button, to select "Picture".
2, Press the A or _r button to select "Reset", then press the ENTER C# button.
Press the A or T button to select "OK" or "Cancel" then press the ENTER
button.
Press the EXIT button to exit.
Each mode can be reset.

Changing the Sound Standard
You can select the sound mode to best suit tile programming you're watching.
1. Press the MENU button to display the menu.
Press the A or _' button to select "Sound", then press the ENTER _ button.
2= Press the ENTER _ button to select "Mode".
Press the A or T button to select "Standard", "Music", "Movie"_ "Speech", or
"Custom" sound setting, then press the ENTER _ button.
Press the EXIT button to exit.
° standard: selects the normal sound mode.
• Music: emphasizes music Overvoices.
Movie Providesthe best sound for moyies
, Speech: emphasizes voice over other sounds.
° Custom: recallsyour customized sound settings.
Easy Setting
t. Press the TOOLS button on the remote control.
2. Press the A or T button to select"Sound Mode".
3. Press the _ or _,-buttonto select the required option.
4. Press the EXIT or TOOLS button to exit.
(see "Customizing the Sound")
Customizing the Sound
The sound settings can be adjusted to suit your personal preference.
t. Press the MENU button to display the menu.
Press the A or _' button to select "Sound", then press the ENTER _ button.
2. Press the A or _' button to select "Equalizer", then press the ENTER _ button.
Press the 4 or _,-button to select a particular frequency to adjust.
Pressthe A or T buttonto increaseor decreasethe levelof the particularfrequency.
Press the ENTER _ button.
Press the EXIT button to exit.
• L/R Sound Balance Adjustment: To ad ust the Sound balance of the L/R
speakers.
• Bandwidth Adjustment (100Hz, 300Hz, 1KHz, 3KHz, 10KHz): To adjust the
level of different bandwidth frequencies.
>- If you make any changes to the "Equalizer" settings, the sound mode is
automatically switched to the "Custom" mode.

Setting the TruSurround XT
TruSurround XT is a patented SRS technology that solves the problem of playing 5.1 multichannel content over two speakers.
TruSurround delivers a compelling, virtual surround sound experience through any two-speaker playback system, including internal
television speakers. It is fully compatible with all muttichannet formats.
1. Press the MENU button to display the menu.
Press the A or T button to select "Sound"_then press the ENTER C-_ button.
2. Press the A or V' button to select "SRS TruSurround XT"_then press the
ENTER _ button.
Press the A or _r button to select "Off" or "On", then press the ENTER _ button.
Press the EXIT button to exit.
$R$(_ SRS Labs, inc.
[_) Press the SRS button on the remote control to select "Off" or "On".
TruSurround XT, SRS and (o) Symbol are trademarks of
TruSurround XT technology is incorporated under license
from SRS Labs, Inc.
[1!®
Choosing a Multi-Channel Sound (MTS) track =Digital
The digitaI-TV transmission system is capable of simultaneous transmission of many audio tracks (for example, simultaneous
translations of the program into foreign languages). The availability of these additional "multitracks' depends upon the program.
>- "Multi-TrackOptions"is availableonly in TV mode.
Preferred Lan ucLuacJe
Press the MENU button to display the menu.
Press the A or • button to select "Sound", then press the ENTER C,_ button.
> Quick way to access the MTS menu: Just press the "MTS' button on the remote
control. You can listen in a language other than your chosen language by
pressing the MTS button.
2=
Press the _. or • button to select "Multi-Track Options", then press the ENTER
button.
3,
Pressthe ENTER _ button to select "PreferredLanguage".
Pressthe A or _' button to choose the language (English,Spanishor French) you
want,then pressthe ENTER_ button.
Pressthe EXIT button to exit.
> "Preferred Language' isavailableonly in Digital TV mode.
> You can onlyselect the language from among the actual languages being broadcast.
[5) You can listen in a language other than the Preferred language by pressing
the MTS button on the remote control.
CAD

Choosing a Multi=Channel Sound (MTS) track - Analog
Multi-Track Sound
t, Press the MENU button to display the menu.
Press the A or _' button to select "Sound", then press the ENTER _ button.
2, Press the A or T button to select "Multi-Track Options", then press the
ENTER _ button.
3=
Pressthe A or T button to select 'Multi-Track Sound'_then press the ENTER
button.
Pressthe A or T button to select a settingyou wahl then pressthe ENTER
button.
Pressthe EXIT buttonto exit.
• Mono: Choose for channels that are broadcasting in mono or if you are hawing
difficulty receiving a stereo signal.
• Stereo: Choose for channels that are broadcasting in stereo:
• SAR Choose to listen to the Separate Audio p[ogram, which is USUallya
foreign-language translation.
>_'Multi-TrackSound" isavailable only inAnalog TV mode.
>- Depending on the particular program beingbroadcast_you can listento "Mono"_
'Stered or "SAP".
Press the MTS buttons on the remote control repeatedly to select ' Mono"_
"Stereo" or 'SAP".
Automatic Volume Control
Reduces the differences in volume level among broadcasters.
t, Press the MENU button to display the menu.
Press the A or _' button to select "Sound", then press the ENTER _ button.
2, Press the A or _' button toselect "Auto Votume"_thenpress the ENTER_ button.
3, Press the A or T button to set Auto Volume "Off" or "On" then press the
ENTER _ button.
Press the EXIT button to exit.

Setting the TV Speakers On/Off
Sound output from the TV speakers is muted.
t. Press the MENU button to display the menu.
Press the A or _' button to select "Sound", then press the ENTER _ button.
2. Press the A or T button toselect "TV Speaker",then pressthe ENTER _ button.
3, Press the _, or V' button to select "Off", then press the ENTER _ button.
Press the EXIT button to exit.
>-When "TV Speaker' is set to ,,Off,,Sound menus except 'Multi-Track Options'
cannot be adjusted.
_.-The VOL(_), VOL_) and MUTE buttons do not operate when the "TV Speaker"
is set to "Off'.
TVSpeakerOn Speaker Output SpeakerOutput Speaker Output Sound Output _: Sound Output _: Sound Output
TVSpeakerOff Mute Mute Mute _: Sound Output Sound Output :: Sound Output
[_['_ _" Manufactured under license from Dolby Laboratories. Dolby and the double-D symbol are trademarks
D ! G II T A L of Dolby Laboratories.
Connecting Headphones (Sold separately)
You can connect a set of headphones to your set if you wish to watch a TV program without disturbing other people in the room.
When you insert the headphone's plug into the headphone jack, you cannot operate
"TV Speaker" in Sound menu.
:_ Prolonged use of headphones at a high volume may damage your hearing.
>_You will not hear sound from the speakers when you connect headphones to the TV.
TV Rear Panel
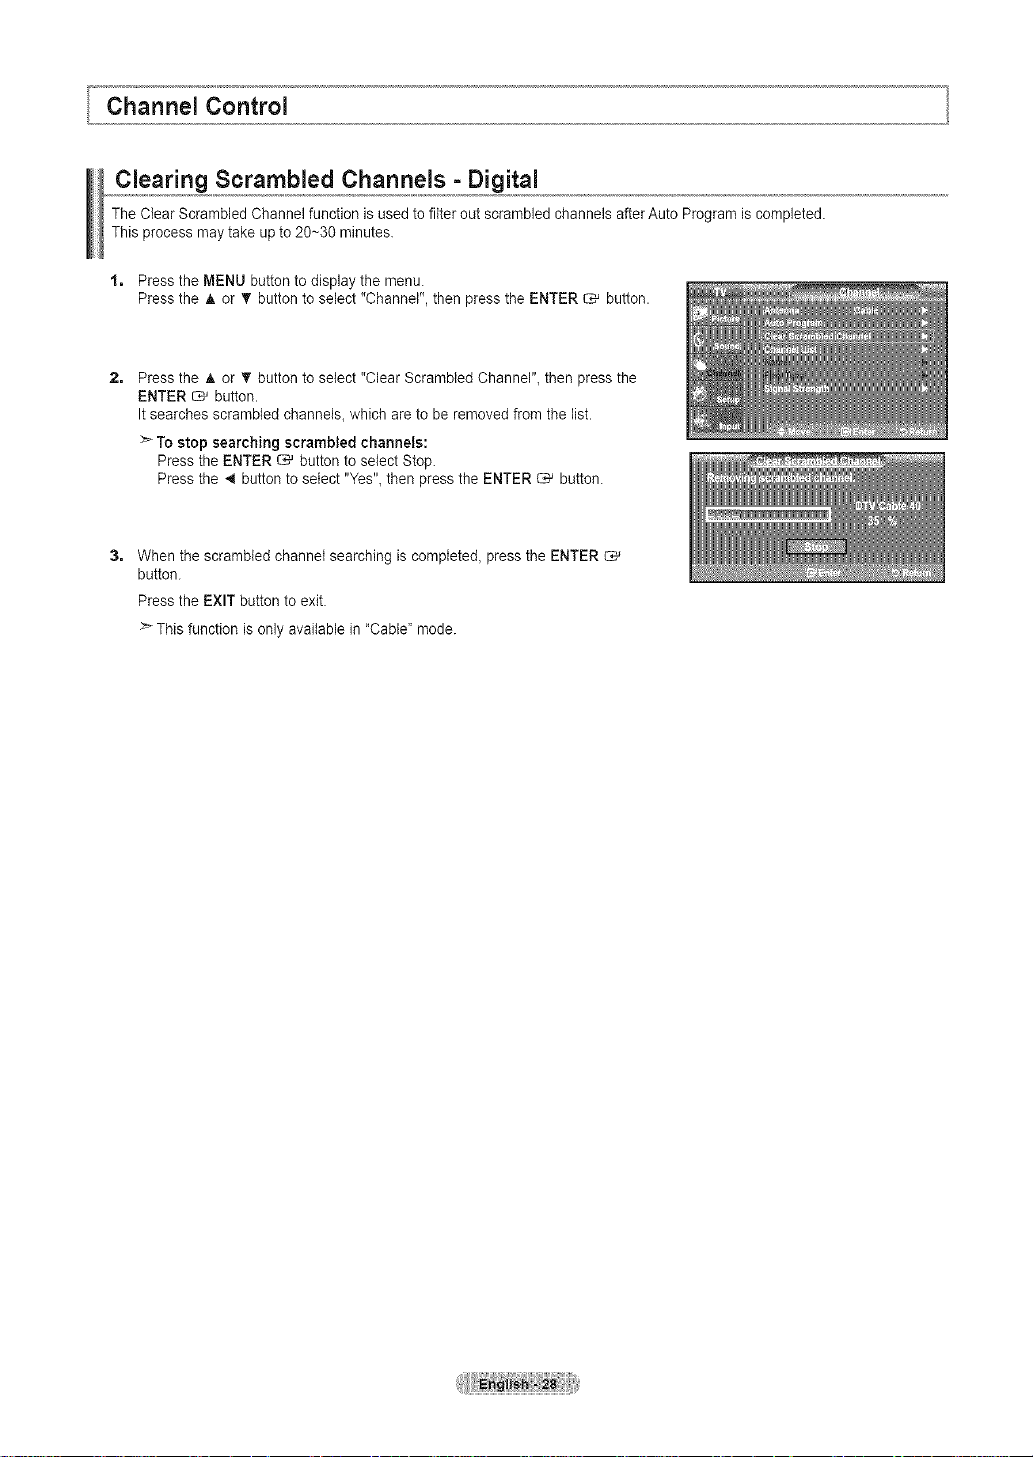
Clearing Scrambled Channels - Digital
The Clear Scrambled Channel function is used to fitter out scrambled channels after Auto Program is completed.
This process may take upto 20~30 minutes.
1, Press the MENU button to display the menu.
Press the A or T button to select "Channel", then press the ENTER _ button.
2=
Press the & or T button to select "Clear Scrambled Channel"_then press the
ENTER _ button.
It searches scrambled channels, which are to be removed from the list.
>_To stop searching scrambled channels:
Press the ENTER _ button to select Stop.
Press the 4 button to select "Yes", then press the ENTER _ button.
3, When the scrambled channel searching is completed_ press the ENTER C*_
button.
Press the EXIT buttonto exit.
>- This function is only available in "Cable" mode.
 Loading...