

SAMSUNG LN19R81B User Manual [en, es]
Contact SAMSUNG WORLD-WIDE
If you have any questions or comments relating to Samsung products, please contact the SAMSUNG
customer care center.
Contacte con SAMSUNG WORLD-WIDE
Si tiene alguna pregunta o comentario referente a nuestros productos, por favor contacte con nuestro Servicio de
Atención al Cliente.
LN-19R81BD
Country
ARGENTINE 0800-333-3733 www.samsung.com/ar
BRAZIL 4004-0000 www.samsung.com/br
CHILE 800-726-7864(SAMSUNG) www.samsung.com/cl
COLOMBIA 01 8000 112 112 www.samsung.com/co
COSTA RICA 0-800-507-7267 www.samsung.com/latin
ECUADOR 1-800-10-7267 www.samsung.com/latin
EL SALVADOR 800-6225 www.samsung.com/latin
GUATEMALA 1-800-299-0013 www.samsung.com/latin
JAMAICA 1-800-234-7267 www.samsung.com/latin
MEXICO 01-800-SAMSUNG (7267864) www.samsung.com/mx
PANAMA 800-7267 www.samsung.com/latin
PUERTO RICO 1-800-682-3180 www.samsung.com/latin
REP. DOMINICA 1-800-751-2676 www.samsung.com/latin
TRINIDAD & TOBAGO 1-800-7267-864 www.samsung.com/latin
VENEZUELA 1-800-100-5303 www.samsung.com/latin
Customer Care Center
Web Site
LN-19R81WD
TFT-LCD TELEVISION
IMPORTADO POR:SAMSUNG ELECTRONICS MÉXICO.S.A.de C.V.
Vía Lopez Portillo No.6,
Col.San Fco.Chilpan
Tultitlán,Estado de México,C.P.54940
TEL.01-55-5747-5100 / 01-800-726-7864
EXPORTADO POR:Samsung Electronics CO.,LTD.
416,Mae tan-3dong,Yeongtong -gu,
Suwon City,Gyeonggi-do Korea
Owner’s
Instructions
Register your product at www.samsung.com/global/register
Record your Model and Serial number here for future reference.
· Model __________ · Serial No. ____________
BN68-01184B-00

Precautions When Displaying a Still Image
A still image may cause permanent damage to the TV screen
• Do not display a still image on the LCD panel for more than 2 hours as it can cause screen image retention.
This image retention is also known as "screen burn".
To avoid such image retention, reduce the degree of brightness and contrast of the screen when displaying a still image.
• Watching the LCD TV in 4:3 format for a long period of time may leave traces of borders displayed on the
left, right and center of the screen caused by the difference of light emission on the screen.
Playing a DVD or a game console may cause a similar effect to the screen.
Damages caused by the above effect are not covered by the Warranty.
• Displaying still images from Video games and PC for longer than a certain period of time may produce partial after-images.
To prevent this effect, reduce the ‘brightness’ and ‘contrast’ when displaying still images.
Precauciones al mostrar en la pantalla una imagen fija
La imagen fija puede causar daños permanentes en la pantalla del televisor.
• No deje una imagen fija en la pantalla LCD durante más de dos horas ya que se podría producir una retención de la imagen en
la pantalla. Este fenómeno de retención de imágenes también se denomina “quemadura de pantalla”.
Para evitar que se produzca esa persistencia de la imagen, reduzca el nivel de luminosidad y de contraste de la pantalla
cuando muestre imágenes fijas.
• El uso del televisor LCD en formato 4:3 durante un tiempo prolongado puede dejar rastros de bordes en las
partes izquierda, derecha y central de la pantalla debido a las diferencias en la emisión lumínica de la pantalla.
La reproducción de un DVD o el uso de una consola de videojuegos pueden provocar un efecto similar en la
pantalla. Reproducir un DVD o una videoconsola puede causar un efecto similar en la pantalla. La garantía no
cubre estos daños.
• Ver imágenes fijas de videojuegos y PC durante más tiempo del indicado puede producir restos de imágenes parciales.
Para evitar este efecto, reduzca el ‘brillo’ y el ‘contraste’ cuando vea imágenes fijas.
© 2007 Samsung Electronics Co., Ltd. All rights reserved.

Contents
English
GENERAL INFORMATION
List of Features .................................................................2
■
Accessories ...................................................................... 2
■
Viewing the Control Panel ............................................... 3
■
Viewing the Connection Panel ......................................... 4
■
Remote Control ................................................................ 5
■
Installing Batteries in the Remote Control ........................ 6
■
CONNECTIONS
Connecting VHF and UHF Antennas ................................ 6
■
Connecting Cable TV ....................................................... 7
■
Connecting a VCR ............................................................8
■
Connecting a DVD Player/Set-Top Box ............................ 9
■
Connecting a DVD Player/Set-Top Box via HDMI ............9
■
Connecting a DVD Player/Set-Top Box via DVI ............. 10
■
Connecting a Digital Audio System ................................ 10
■
Connecting a PC .............................................................11
■
OPERATION
Turning the TV On and Off ............................................. 12
■
Plug & Play Feature ........................................................ 12
■
Changing Channels ........................................................ 13
■
Adjusting the Volume ...................................................... 14
■
Viewing the Display ........................................................ 14
■
Viewing the Menus ......................................................... 15
■
Memorizing the Channels ...............................................15
■
To Select the Source ...................................................... 17
■
To Edit the Input Source Name ....................................... 17
■
PICTURE CONTROL
Using Automatic Picture Settings ................................... 18
■
Adjusting the Color Tone ................................................ 19
■
Setting the Film Mode ..................................................... 19
■
Freezing the Picture (depending on the model) ............. 19
■
Changing the Screen Size ..............................................20
■
Viewing Picture-in-Picture .............................................. 21
■
HDMI Black Level ........................................................... 22
■
SOUND CONTROL
Customizing the Sound .................................................. 23
■
Using Automatic Sound Settings .................................... 23
■
Setting the TruSurround XT ............................................ 24
■
Choosing a Multi-Channel Sound (MTS) track - Digital .24
■
Choosing a Multi-Channel Sound (MTS) track - Analog 25
■
Automatic Volume Control ..............................................25
■
Selecting the Internal Mute .............................................26
■
Listening to the Sound of the Sub (PIP) Picture ............. 26
■
Resetting the Sound Settings to the Factory Defaults ....27
■
Connecting Headphones ................................................ 27
■
Setting the On/Off Melody .............................................. 27
■
CHANNEL CONTROL
Selecting the Antenna ..................................................... 28
■
Clearing Scrambled Channels - Digital ........................... 28
■
Setting the Channel Lists ................................................ 29
■
To set-up Your Favorite Channels .................................. 30
■
Using the Channel Lists .................................................. 31
■
Viewing the Channel Lists .............................................. 31
■
Labeling Channels ..........................................................32
■
LNA (Low Noise Amplier) .............................................. 32
■
Fine Tuning Analog Channels ......................................... 33
■
Checking the Digital-Signal Strength ..............................33
■
PC DISPLAY
Using Your TV as a Computer (PC) Display ................... 34
■
Display Modes ................................................................ 34
■
Setting up the TV with your PC ...................................... 35
■
TIME SETTING
Setting the Clock ............................................................ 37
■
FUNCTION DESCRIPTION
Selecting a Menu Language ...........................................40
■
Using the Game Mode .................................................... 40
■
Menu Transparency Level .............................................. 40
■
Viewing Closed Captions (On-Screen Text Messages)
■
- Analog ..........................................................................
Viewing Closed Captions (On-Screen Text Messages)
■
- Digital ...........................................................................
Setting the Function Help ............................................... 43
■
Setting the Light Effect ................................................... 43
■
Using the V-Chip ............................................................. 44
■
Digital Noise Reduction .................................................. 51
■
Upgrading the Software ..................................................51
■
APPENDIX
Appendix ......................................................................... 52
■
Troubleshooting ..............................................................52
■
Installing the Stand ......................................................... 54
■
Disconnecting the Stand ................................................. 54
■
How to Adjust the Stand ................................................. 55
■
Using the Decoration Covers .......................................... 55
■
Installing VESA compliant mounting devices .................. 55
■
Installing the Wall Mount Kit ........................................... 55
■
How to Adjust the Angle of the TV .................................. 55
■
Using the Anti-Theft Kensington Lock ............................ 56
■
Specications ................................................................. 56
■
41
42
English - 1
Symbol Press Important Note One-Touch
Button
General Information
List of Features
Adjustable picture settings that can be stored in the TV’s memory.
Automatic timer to turn the TV on and off.
A special sleep timer.
V-Chip function.
Excellent Digital Interface & Networking :
With a built-in HD digital tuner, non-subscription HD broadcasts can be viewed with no Set-Top Box needed.
Remote Control
The supplied remote can be used to operate the TV as well as most DVD players, Set-top boxes, Cable Boxes and
VCRs.
SRS TruSurround XT
- SRS TruSurround XT provides a virtual Dolby surround system.
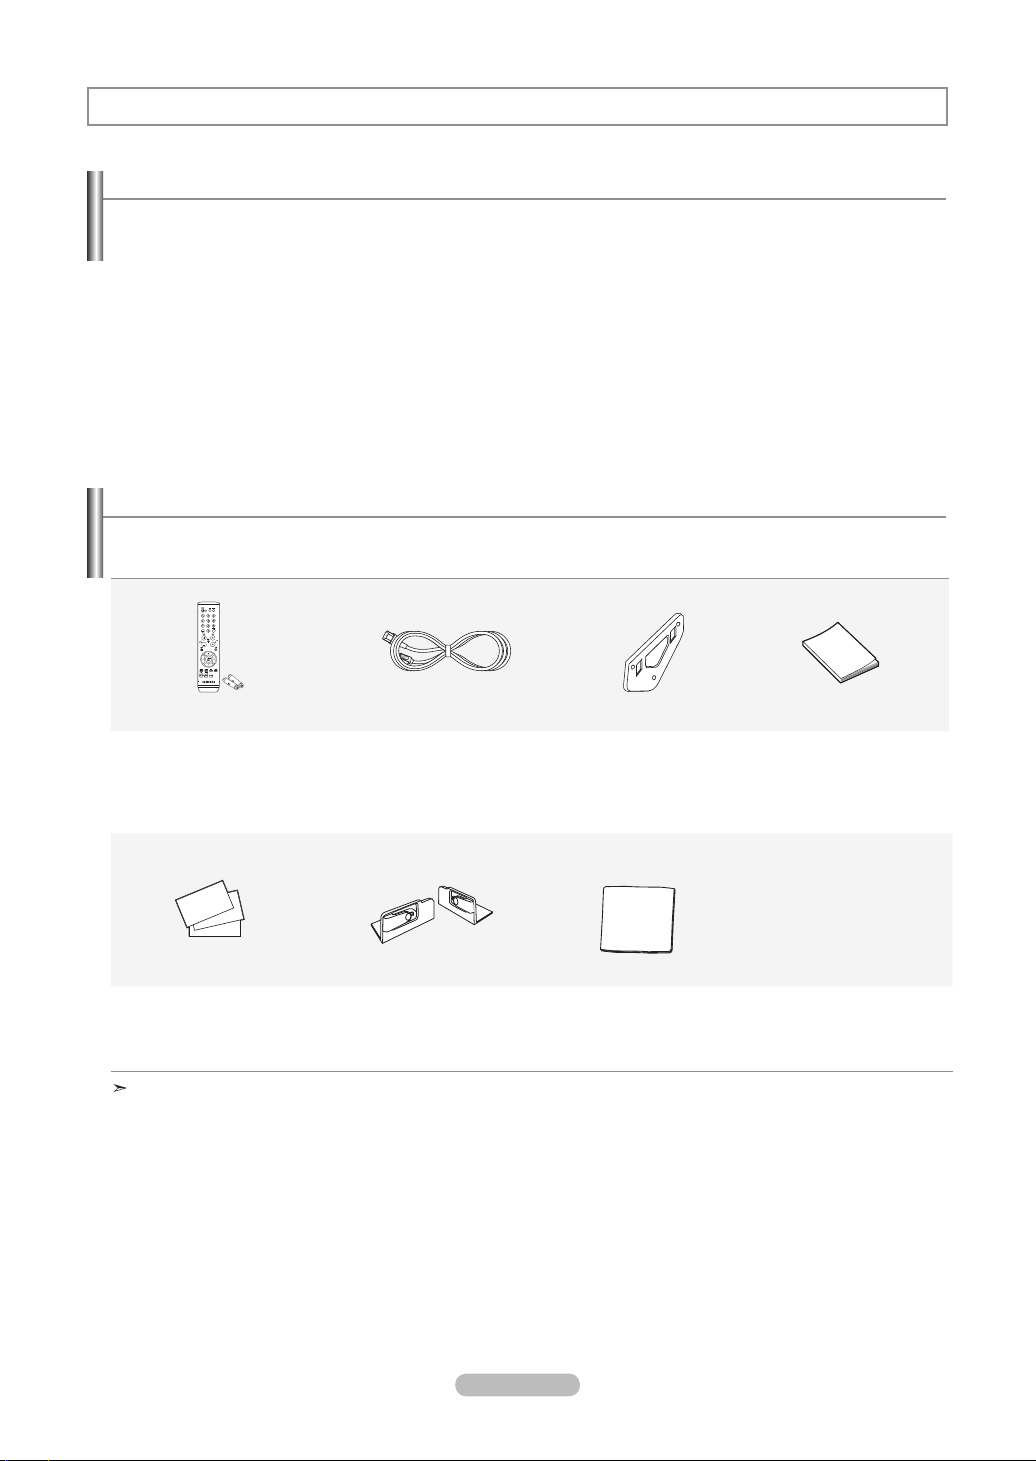
Accessories
Please make sure the following items are included with your LCD TV.
If any items are missing, contact your dealer.
Remote Control & Batteries
(AAA x 2)
Warranty Card / Registration
Card / Safety Guide Manual
(Not available in all locations)
The items color and shape may vary depending on the model.
Power Cord Wall Mount kit Owner’s Instructions
Decoration Cover Cleaning Cloth
English - 2
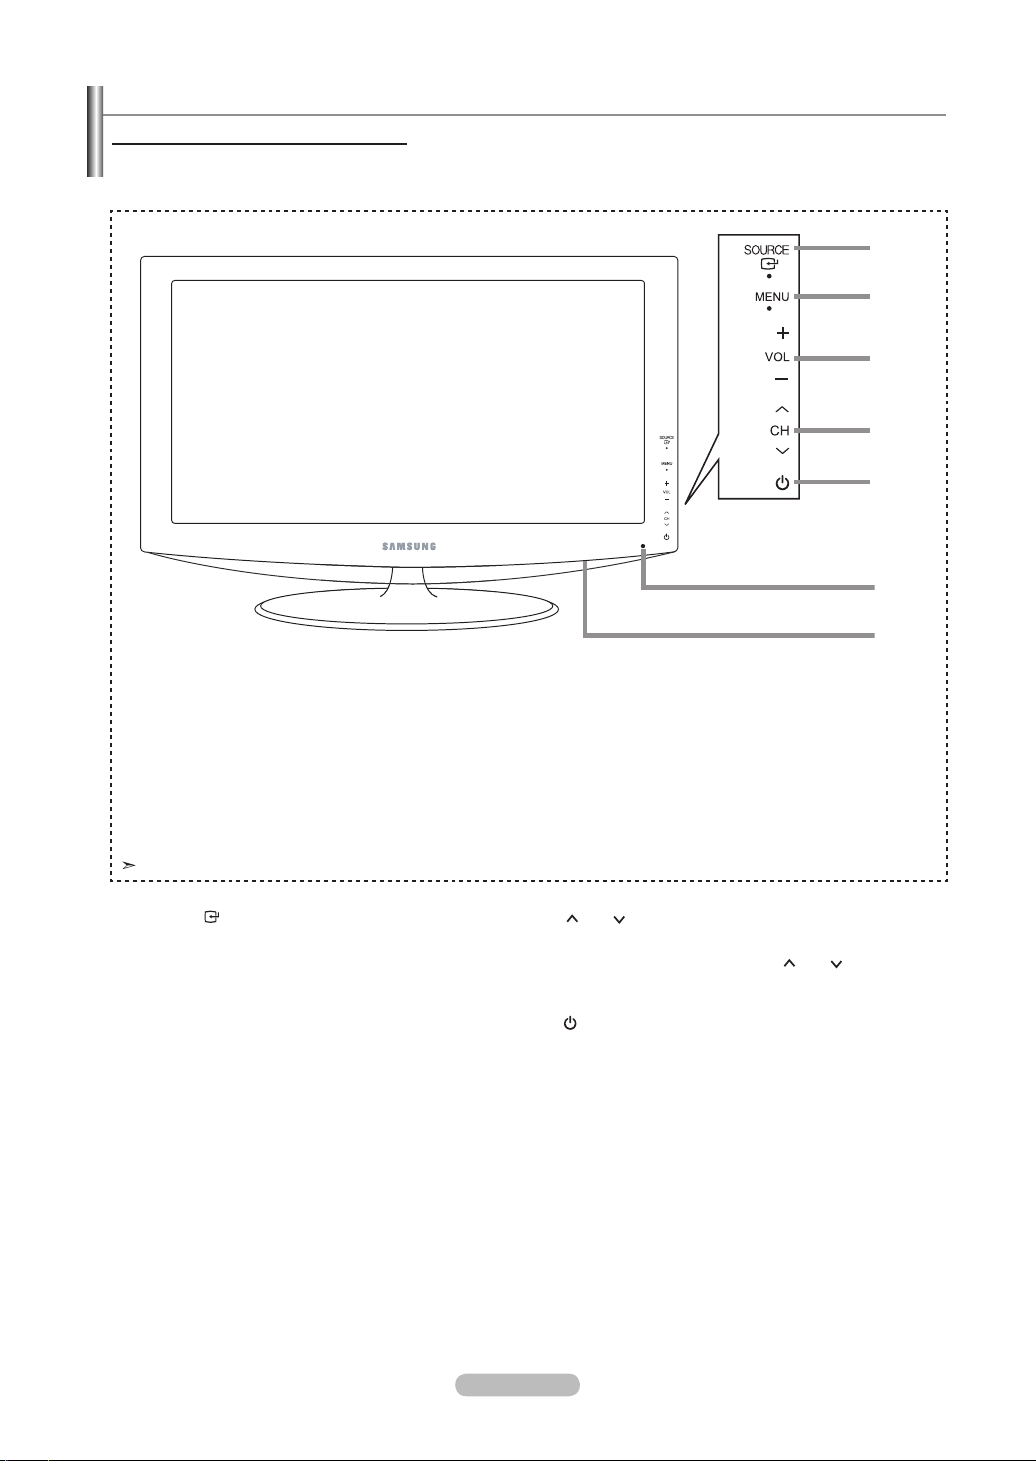
Viewing the Control Panel
Buttons on the Lower Part of the Panel
The buttons on the side panel control your TV’s basic features, including the on-screen menu.
To use the more advanced features, you must use the remote control.
1
2
3
4
5
6
7
The product color and shape may vary depending on the model.
1
SOURCE
Toggles between all the available input sources
(TV, AV, S-Video, Component, PC, HDMI).
In the on-screen menu, use this button as you would
use the ENTER button on the remote control.
2
MENU
Press to see an on-screen menu of your TV’s features.
3
+ VOL -
Press to increase or decrease the volume.
In the on-screen menu, use the + VOL - buttons as you
would use the ◄ and ► buttons on the remote control.
Front Panel buttons
Touch the right side of
each button to operate.
4 CH
Press to change channels.
In the on-screen menu, use the
you would use the ▲ and ▼ butons on the remote
control.
5
(POWER)
Press to turn the TV on and off.
POWER INDICATOR
Blinks and turns off when the power is on and lights up
in stand-by mode.
6
REMOTE CONTROL SENSOR
Aim the remote control towards this spot on the TV.
7
SPEAKERS
CH
buttons as
English - 3
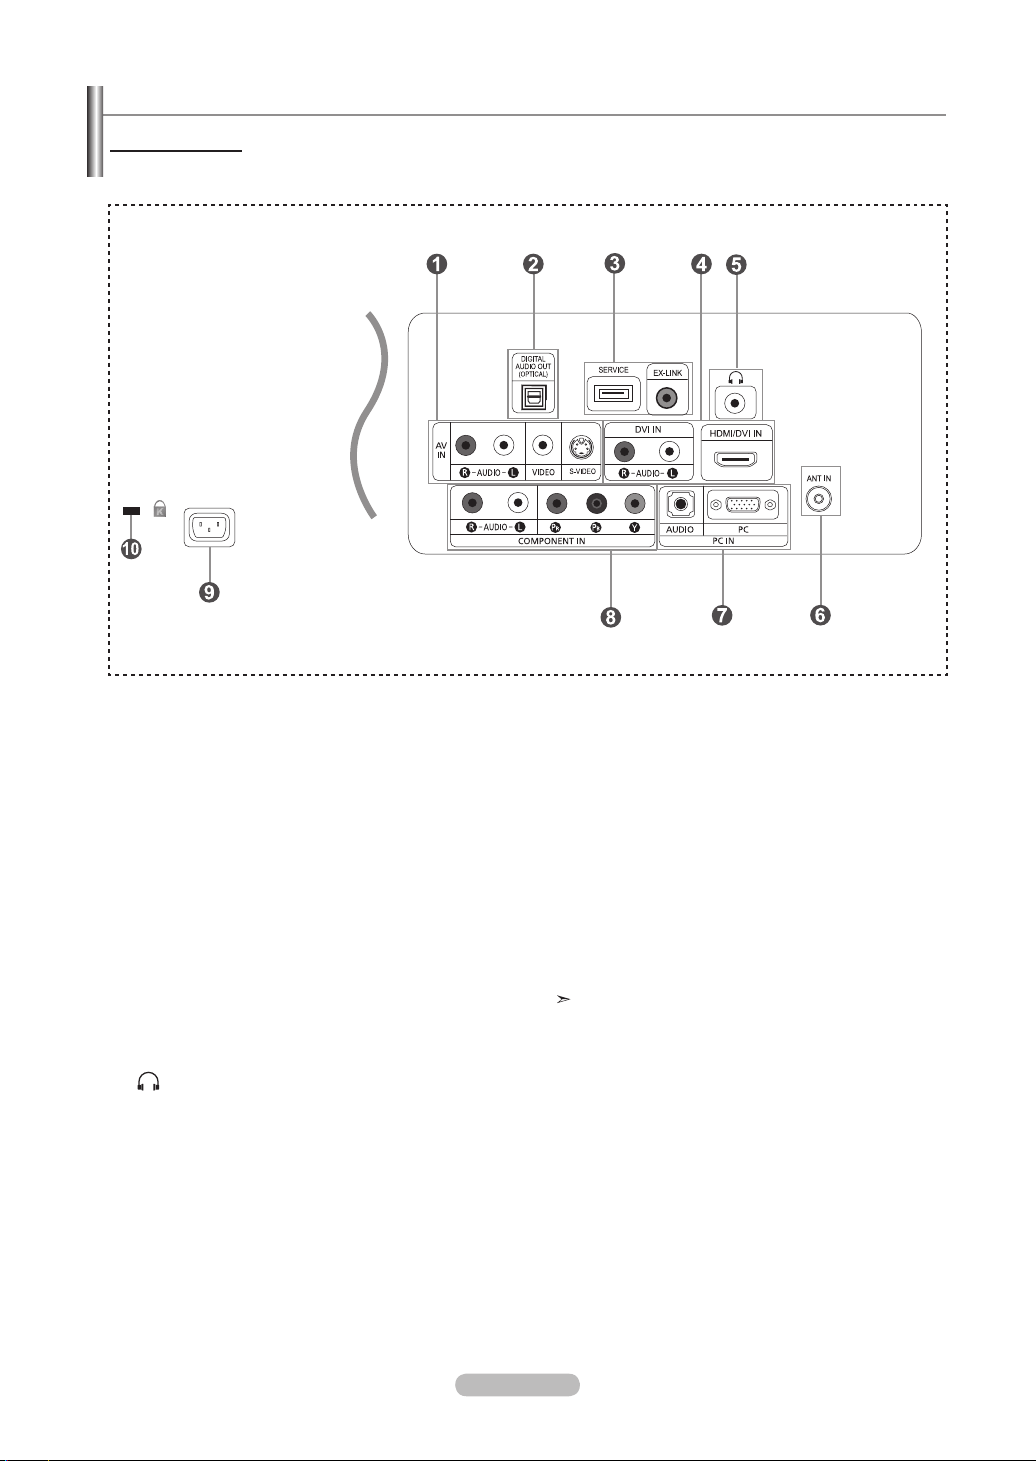
Viewing the Connection Panel
Rear Panel Jacks
Use the rear panel jacks to connect A/V components that will be connected continuously, such as VCR or DVD players.
For more information on connecting equipment, see pages 7-11.
1
AV IN
Video and audio inputs for external devices, such as a
camcorder or VCR.
S-VIDEO
Connect an S-Video signal from a camcorder or VCR.
2 DIGITAL AUDIO OUT (OPTICAL)
Connects to a Digital Audio component.
3 SERVICE / EX-LINK
Connector for service only.
4 HDMI/DVI IN / DVI IN (AUDIO R/L)
Connect to the HDMI jack of a device with an HDMI
output. Use the HDMI/DVI IN terminal for DVI connection
to an external device. You should use the DVI to HDMI
cable or DVI-HDMI adapter (DVI to HDMI) for video
connection, and the DVI IN ‘R-AUDIO-L’ terminal for
audio.
HDMI/DVI IN terminal does not support PC.
No sound connection is needed for an HDMI to HDMI
connection
5 HEADPHONE
Connects a set of external headphones for private
listening.
ANT IN
6
Connects to an antenna or cable TV system.
7
Connects to the video and audio output jacks on
your PC.
8
Connects Component video/audio.
9
Connects the supplied power cord.
0
The Kensington lock (not supplied) is a device used to
physically fix the system when used in a public place.
If you want to use a locking device, contact the dealer
where you purchased the TV.
The place of the Kensington Lock may be different
depending on its model.
PC IN
COMPONENT IN
POWER INPUT
KENSINGTON LOCK
English - 4
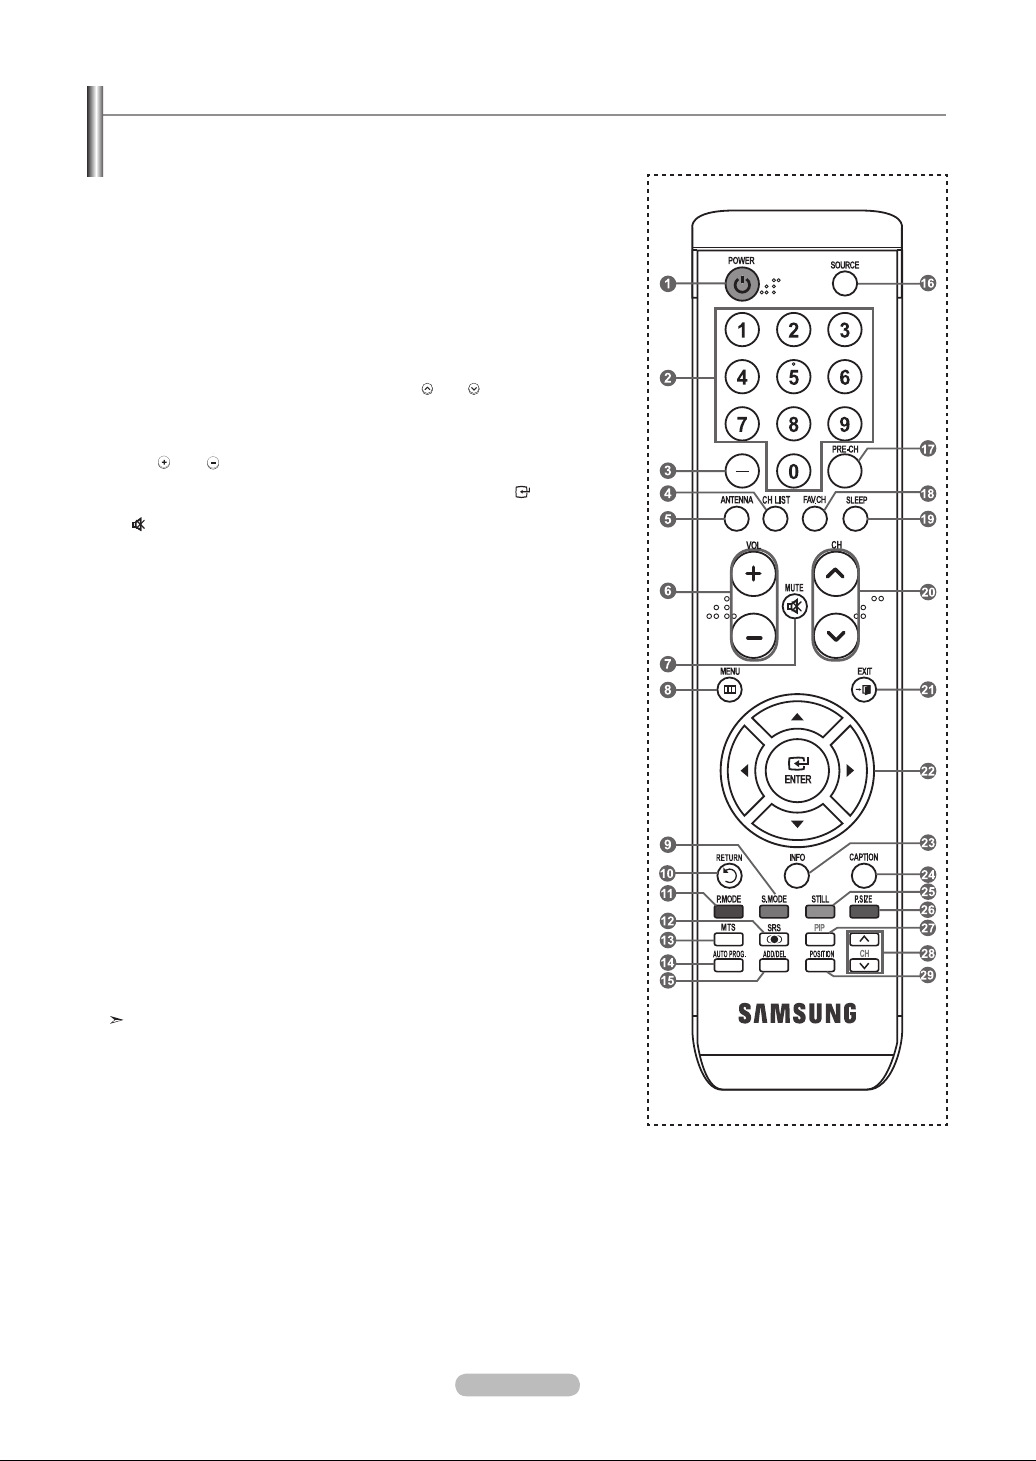
Remote Control
You can use the remote control up to a distance of about 23 feet from the TV. When using the remote, always point it directly at the
TV.
1
POWER
Turns the TV on and off.
2
NUMERIC BUTTONS
Press to change the channel.
3
–
Press to select additional channels(digital
and analog) being broadcast by the same
station. For example, to select channel
“54-3”, press “54”, then press “–” and “3”.
4
CH LIST
Used to display Channel Lists on the
screen.
5
ANTENNA
Press to select “AIR” or “CABLE”.
6
VOL / VOL
Press to increase or decrease the
volume.
7 (
MUTE)
Press to temporarily cut off the sound.
8
MENU
Displays the main on-screen menu.
9
S.MODE
Press to select the sound mode.
0
RETURN
Returns to the previous menu.
!
P.MODE
Press to select the picture mode.
@
SRS
Selects SRS TruSurround XT mode.
#
MTS
Press to choose stereo, mono or
Separate Audio Program
(SAP broadcast).
$
AUTO PROG.
Press to automatically store selected
TV/Cable channels.
%
ADD/DEL
Use to store and delete channels
to/from memory.
^
SOURCE
Press to display all of the available
video sources.
&
PRE-CH
Tunes to the previous channel.
*
FAV.CH
Press to switch to your favorite channels.
(
SLEEP
Press to select a preset time interval
for automatic ahut off.
)
CH / CH
Press to change channels.
a
EXIT
Press to exit the menu.
b
UP▲ / DOWN▼ / LEFT◄
RIGHT►
Use to select on-screen menu items
and change menu values.
c
Press to display information on the TV
screen.
d
CAPTION
e
Press to stop the action during a
particular scene.
Press again to resume normal video.
f
Picture size selection.
g
Picture-in Picture ON/OFF.
h
Displays the available channels in
sequence. (These buttons change
channels in the PIP window only.)
i
Change the position of the PIP screen.
/ ENTER
INFO
Controls the caption decoder.
STILL
P.SIZE
PIP
CH
POSITION
/
This is a special remote control for the visually impaired, and has Braille
points on the Power, Channel and Volume buttons.
English - 5

Installing Batteries in the Remote Control
1. Lift the cover at the back of the remote control upward as shown in the figure.
Install two AAA size batteries.
2.
Make sure to match the "+" and "–" ends of the batteries with the diagram inside the compartment.
3.
Replace the cover.
Remove the batteries and store them in a cool, dry place if you won’t be using the remote control for a
long time.
The remote control can be used up to about 23 feet from the TV.
(Assuming typical TV usage, the batteries should last for about one year.)
If the remote control doesn’t work, check the following:
1. Is the TV power on?
2. Are the plus and minus ends of the batteries reversed?
3. Are the batteries drained?
4. Is there a power outage, or is the power cord unplugged?
5. Is there a special fluorescent light or neon sign nearby?
Connections
Connecting VHF and UHF Antennas
If your antenna has a set of leads that look like the diagram to the right, see "Antennas with 300
Ω Flat Twin Leads" below.
If your antenna has one lead that looks like diagram to the right, see "Antennas with 75 Ω Round
Leads".
If you have two antennas, see "Separate VHF and UHF Antennas".
Antennas with 300 Ω Flat Twin Leads
If you are using an off-air antenna (such as a roof antenna or "rabbit ears") that has 300 Ω twin at leads, follow the directions
below.
1. Place the wires from the twin leads under the screws on a 300-75 Ω adapter
(not supplied).
Use a screwdriver to tighten the screws.
Plug the adaptor into the ANT IN terminal on the back of the TV.
2.
ANT IN
Antennas with 75 Ω Round Leads
1.
Plug the antenna lead into the ANT IN terminal on the back of the TV.
ANT IN
Separate VHF and UHF Antennas
If you have two separate antennas for your TV (one VHF and one UHF), you must combine the two antenna signals before connecting the antennas to the TV. This procedure requires an optional combiner-adaptor (available at most electronics shops).
1.
Connect both antenna leads to the combiner.
UHF
VHF
Plug the combiner into the ANT IN terminal on the bottom of the rear panel.
2.
English - 6
ANT IN
UHF
VHF

Connecting Cable TV
To connect to a cable TV system, follow the instructions below.
Cable without a Cable Box
1.
Plug the incoming cable into the ANT IN terminal on the back of the TV.
Because this TV is cable-ready, you do not need a cable box to view unscrambled cable channels.
Connecting to a Cable Box that Descrambles All Channels
1. Find the cable that is connected to the ANT OUT terminal on your cable box.
This terminal might be labeled "ANT OUT", "VHF OUT" or simply, "OUT".
ANT IN
ANT IN
ANT OUT
2. Connect the other end of this cable to the ANT IN terminal on the back of the TV.
ANT IN
Connecting to a Cable Box that Descrambles Some Channels
If your cable box descrambles only some channels (such as premium channels), follow the instructions below. You will need a twoway splitter, an RF (A/B) switch, and four lengths of RF cable. (These items are available at most electronics stores.)
1. Find and disconnect the cable that is
connected to the ANT IN terminal on your
cable box.
Connect this cable to a two-way splitter.
2.
This terminal might be labeled "ANT IN",
"VHF IN" or simply, "IN".
3. Connect an RF cable between the OUTPUT
terminal on the splitter and the IN terminal
on the cable box.
Incoming
cable
4. Connect an RF cable between the
ANT OUT terminal on the cable box and
the B–IN terminal on the RF(A/B) switch.
Incoming
cable
Splitter
5. Connect another cable between the other
OUT terminal on the splitter and the A–IN
terminal on the RF (A/B) switch.
Incoming
cable
Splitter
6. Connect the last RF cable between the
OUT terminal on the RF (A/B) switch and
the ANT IN terminal on the rear of the TV.
Incoming
cable
Splitter
After you have made this connection, set the A/B switch to the "A" position for normal viewing. Set the A/B switch to the "B" position to
view scrambled channels. (When you set the A/B switch to "B", you will need to tune your TV to the cable box’s output channel, which is
usually channel 3 or 4.)
Splitter
Cable Box
ANT IN
Incoming
cable
Cable Box
Cable Box
Splitter
RF (A/B)
Switch
Cable Box
RF (A/B)
Switch
RF (A/B)
Switch
ANT IN
TV Rear
English - 7
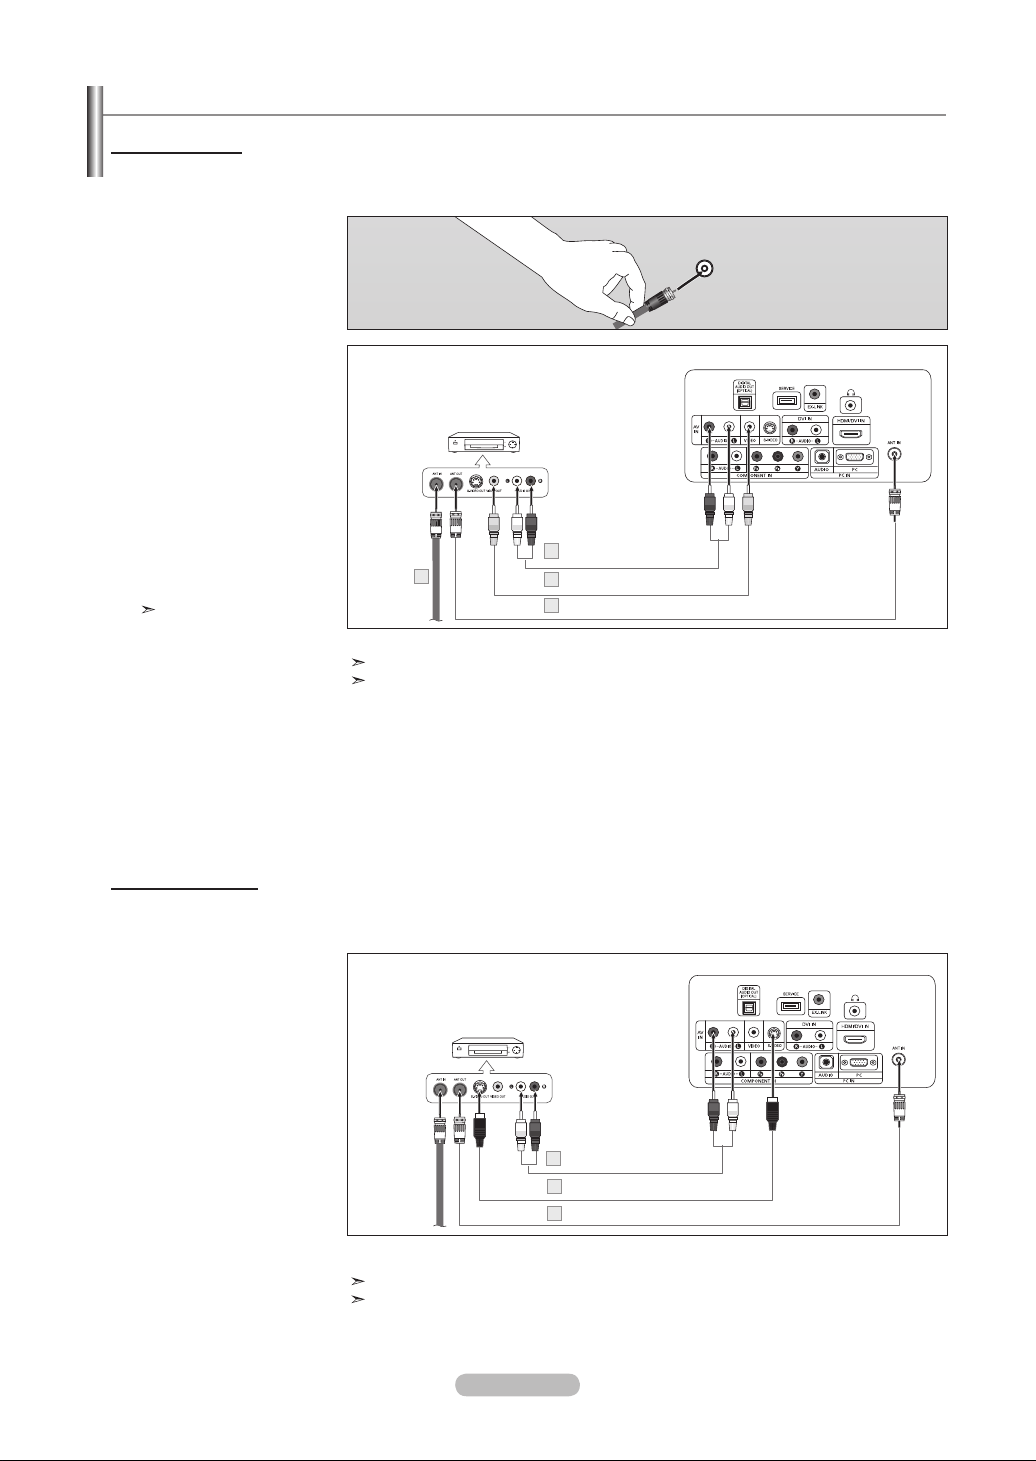
Connecting a VCR
Video Connecion
These instructions assume that you have already connected your TV to an antenna or a cable TV system (according to the
instructions on pages 6-7). Skip step 1 if you have not yet connected to an antenna or a cable system.
Unplug the cable or antenna
1.
from the back of the TV.
2.
Connect the cable or antenna
to the ANT IN terminal on the
back of the VCR.
3. Connect an RF Cable between
the ANT OUT terminal on the
VCR and the ANT IN or ANT IN
terminal on the TV.
4. Connect a Video Cable
between the VIDEO OUT jack
on the VCR and the AV IN 1
(or AV IN 2) [VIDEO] jack on
the TV.
5. Connect Audio Cables
between the AUDIO OUT
jacks on the VCR and the
AV IN 1 (or AV IN 2)
[R-AUDIO-L] jacks on the TV.
If you have a “mono”
(non-stereo) VCR, use a
Y-connector (not supplied)
to hook up to the right
and left audio input jacks
of the TV. If your VCR
is stereo, you must
connect two cables.
VCR Rear Panel
Audio Cable (Not supplied)
5
2
Video Cable (Not supplied)
4
3
RF Cable (Not supplied)
Follow the instructions in “Viewing a VCR or Camcorder Tape” to view your VCR tape.
Each VCR has a different back panel configuration.
When connecting a VCR, match the color of the connection terminal to the cable.
ANT IN
TV Rear Panel
S-Video Connecion
Your Samsung TV can be connected to an S-Video signal from an VCR.
(This connection delivers a better picture as compared to a standard VCR.)
1. To begin, follow steps 1–3
in the previous section to
connect the antenna or
cable to your VCR and
VCR Rear Panel
your TV.
Connect an S-Video Cable
2.
between the S-VIDEO OUT
jack on the VCR and the
AV IN1 [S-VIDEO] jack on
the TV.
Connect Audio Cables
3.
between the AUDIO OUT
jacks on the VCR and the
AV IN1 [R-AUDIO-L] jacks
on the TV.
An S-Video cable may be included with a VCR. (If not, check your local electronics store.)
Audio Cable (Not supplied)
3
S-Video Cable (Not supplied)
2
RF Cable (Not supplied)
1
Each VCR has a different back panel configuration.
When connecting a VCR, match the color of the connection terminal to the cable.
English - 8
TV Rear Panel
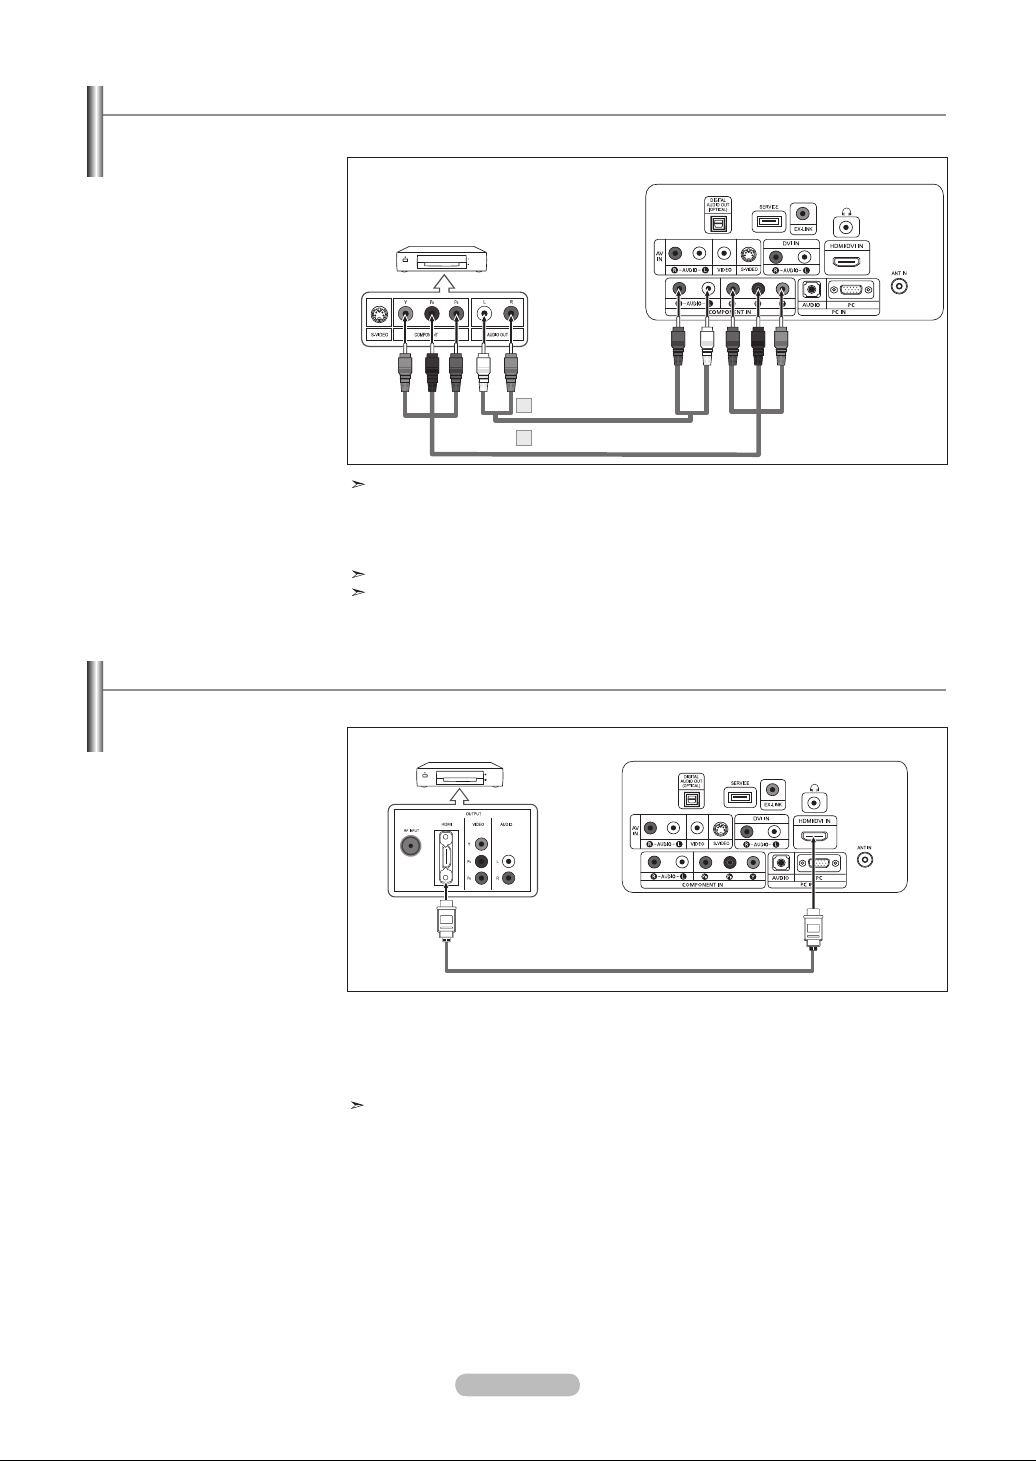
Connecting a DVD Player/Set-Top Box
The rear panel jacks on your TV make it easy to connect a DVD player to your TV.
Connect a Component
1.
Cable between the
COMPONENT IN(1 or 2)
[Y, PB, PR] jacks on the TV
and the COMPONENT
DVD Player/Set-Top Box
[Y, PB, PR] jacks on the
DVD/Set-top Box.
2.
Connect Audio Cables
between the COMPONENT
IN(1 or 2) [R-AUDIO-L]
jacks on the TV and the
AUDIO OUT jacks on the
DVD/Set-top Box
Audio Cable (Not supplied)
2
Component Cable (Not supplied)
1
Component video separates the video into Y (Luminance (brightness)), Pb (Blue) and
Pr (Red) for enhanced video quality.
Be sure to match the component video and audio connections.
For example, if connecting the video cable to COMPONENT IN, connect the audio cable
to COMPONENT IN also.
Each DVD Player/STB has a different back panel configuration.
When connecting a DVD player/STB, match the color of the connection terminal to the
cable.
Connecting a DVD Player/Set-Top Box via HDMI
TV Rear Panel
This connection can only be made if there is an HDMI Output connector on the external device.
Connect an HDMI Cable
1.
between the HDMI/DVI IN
DVD Player Rear Panel
connector on the TV and the
HDMI connector on the DVD
player/Set-Top Box
HDMI Cable (Not supplied)
What is HDMI?
• HDMI(High-Definition Multimedia Interface), is a next-generation an interface that
enables the transmission of digital audio and video signals using a single cable.
• The difference between HDMI and DVI is that the HDMI device is smaller in size,
has the HDCP (High Bandwidth Digital Copy Protection) coding feature installed.
Each DVD player/STB has a different back panel configuration.
TV Rear Panel
English - 9
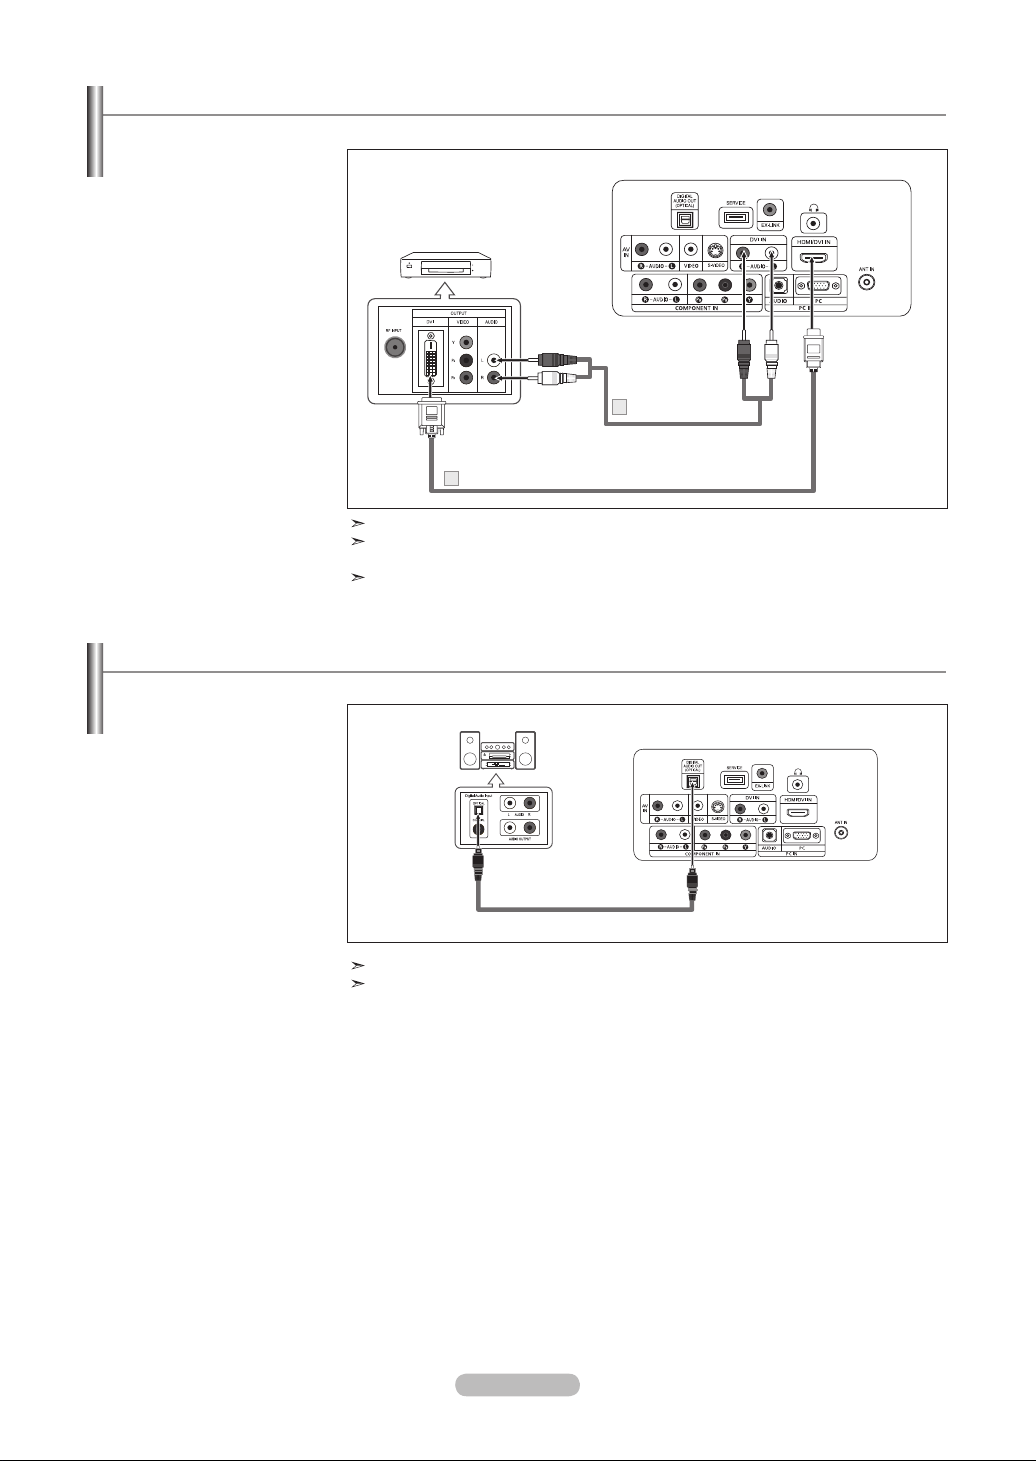
Connecting a DVD Player/Set-Top Box via DVI
This connection can only be made if there is a DVI Output connector on the external device.
1.
Connect a DVI to HDMI
Cable or DVI-HDMI Adapter
between the HDMI/DVI IN
connector on the TV and the
DVI connector on the
DVD Player / Set-Top Box
DVD player/Set-Top Box.
2.
Connect Audio Cables
between the DVI IN
[R-AUDIO-L] jack on the
TV and the AUDIO OUT jacks
on the DVD player/
Set-Top Box.
Audio Cable
2
(Not supplied)
DVI to HDMI Cable (Not supplied)
1
Each DVD player/STB has a different back panel configuration.
When connecting a DVD player/STB, match the color of the connection terminal to
the cable.
When using an HDMI/DVI cable connection, you must use the HDMI/DVI IN terminal.
Connecting a Digital Audio System
The rear panel jacks on your TV make it easy to connect a Digital Audio System to your TV.
1. Connect an Optical Cable
between the “DIGITAL
AUDIO OUT (OPTICAL)”
jacks on the TV and the
Digital Audio Input jacks on
the Digital Audio System.
When a Digital Audio
System is connected to the
“DIGITAL AUDIO OUT
(OPTICAL)” terminal:
Decrease the volume
of the TV, and adjust the
volume level with the
system’s volume control.
5.1CH audio is possible when the TV is connected to an external device supporting 5.1CH.
Each Digital Audio System has a different back panel configuration. .
Digital Audio System
Optical Cable (Not supplied)
TV Rear Panel
TV Rear Panel
English - 10
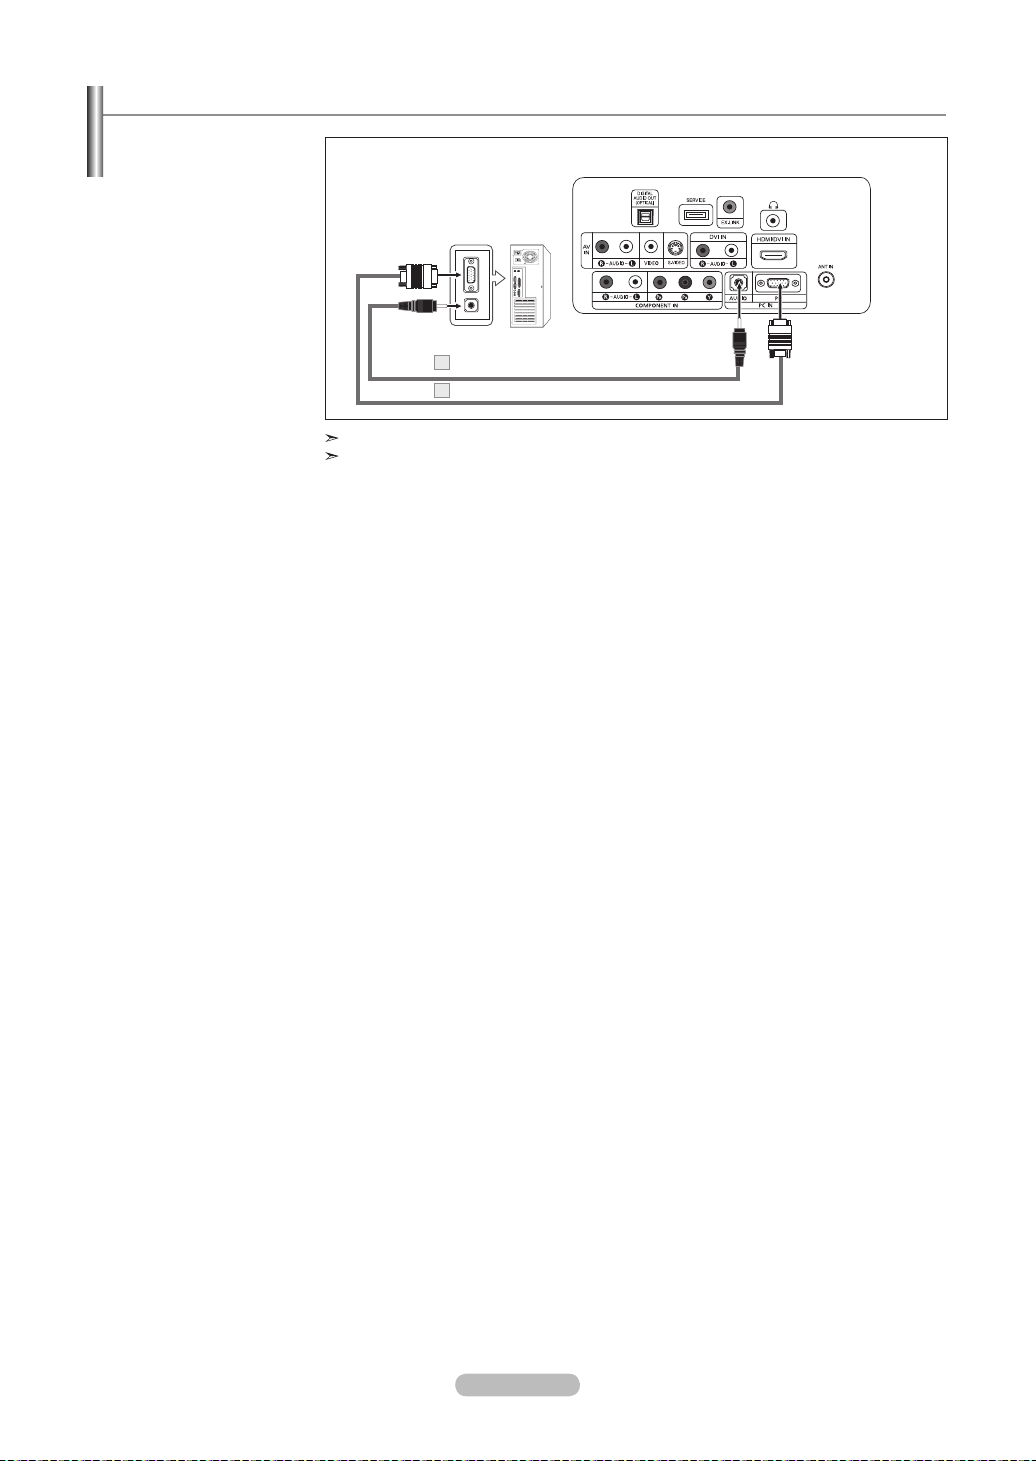
Connecting a PC
1. Connect a D-Sub
Cable between PC IN
[PC] connector on
the TV and the PC
output connector on
your computer.
2.
Connect a PC Audio
Cable between PC IN
[AUDIO] jack on the
TV and the Audio Out
jack of the sound card
on your computer.
TV Rear Panel
PC
PC Audio Cable (Not supplied)
2
1
D-Sub Cable (Not supplied)
Each PC has a different back panel configuration.
When connecting a PC, match the color of the connection terminal to the cable.
English - 11
Operation
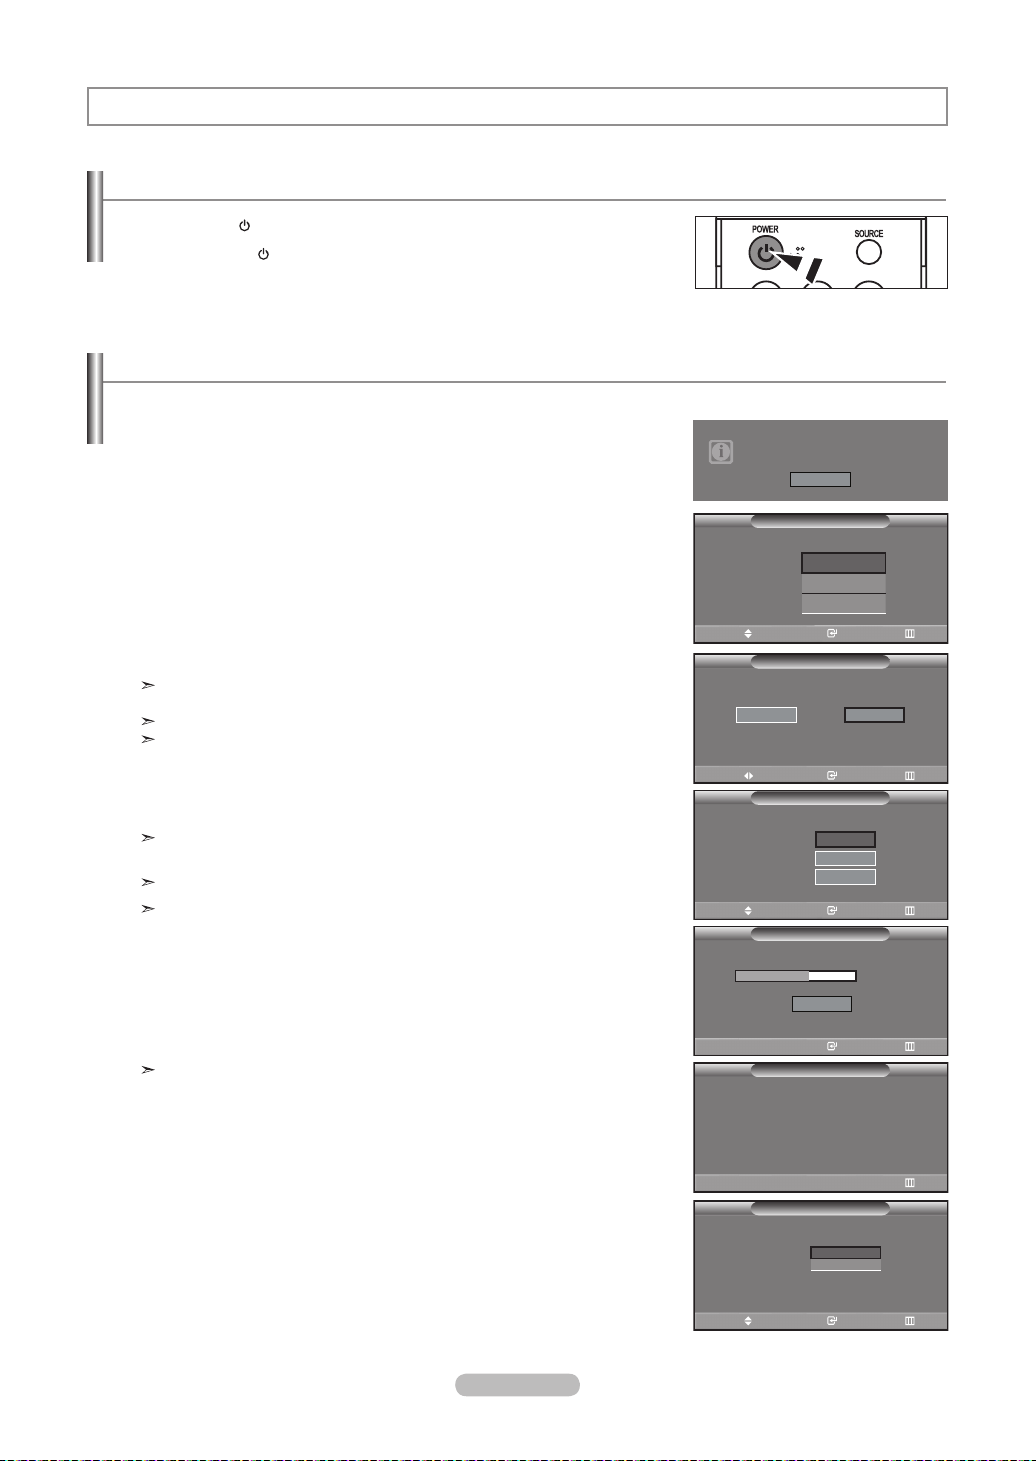
Turning the TV On and Off
Press the POWER button on the remote control.
You can also use the button on the side of the panel.
Plug & Play Feature
When the TV is initially powered on, basic settings proceed automatically and subsequently:
1. Press the POWER button on the remote control.
The message “Menu language, Shop Mode, Channels and Time will be set.” is
displayed.
Press the ENTER button, then “Select the language of the OSD” menu is
automatically displayed.
Press the ▲ or ▼ buttons to select language, then press the ENTER button.
2.
The message “Select Home Mode when installing this TV at home.” is displayed.
Press the ◄ or ► buttons to select “Shop” or “Home”, then press the
3.
ENTER button.
The message “Select the antennas to memorize.” is displayed.
We recommend setting the TV to Home mode for the best picture in your
home environment.
Shop mode is only intended for use in retail environments.
If the unit is accidentally set to Shop mode and you want to return to Dynamic
(Home) mode, press any Volume button and then hold down the MENU button
for five seconds on the side panel of the TV.
4.
Press the ▲ or ▼ buttons to memorize the channels of the selected connection.
Press the ENTER button to select “Start”.
If the antenna is connected to ANT, select “Air” and if it is connected to
ANT, select “Cable”.
If both ANT are connected, select the “Air + Cable”.
In Cable mode, you can select the correct signal source among STD, HRC,
and IRC by pressing the ▲ or ▼ button, then press the ENTER button.
Contact your local cable company to identify the type of cable system that
exists in your particular area.
The TV will begin memorizing all of the available channels.
5.
After all the available channels are stored, the Auto program menu reappears.
Press the ENTER button when channel memorization is complete.
The message “Select the clock mode.” is displayed.
To stop the search before it has finished, press the ENTER button with stop
selected.
Menu language, Shop Mode,
Channels and Time will be set.
Select the language of the OSD.
Language
Move Enter Skip
Select Home Mode when installing this TV at home.
Move Enter Skip
Select the antennas to memorize.
Air
Cable
Air+Cable
Move Enter Skip
Auto Program in progress.
Auto Program is completed.
16 Channels were memorized.
Air : 16, Cable : 0.
Shop
Start
Plug & Play
English
Español
Français
Plug & Play
Plug & Play
Start
Start
Start
Plug & Play
Stop
Plug & Play
Home
Air Channel 50
35%
Enter Skip
6. Press the ENTER button.
Press the ▲ or ▼ buttons to select “Manual” or “Auto”, then Press the
ENTER button.
The message “Set to daylight savings time.” is displayed.
English - 12
Skip
Clock Set
Select the clock mode.
Clock Mode :
Move Enter Skip
Plug & Play
Manual
Auto
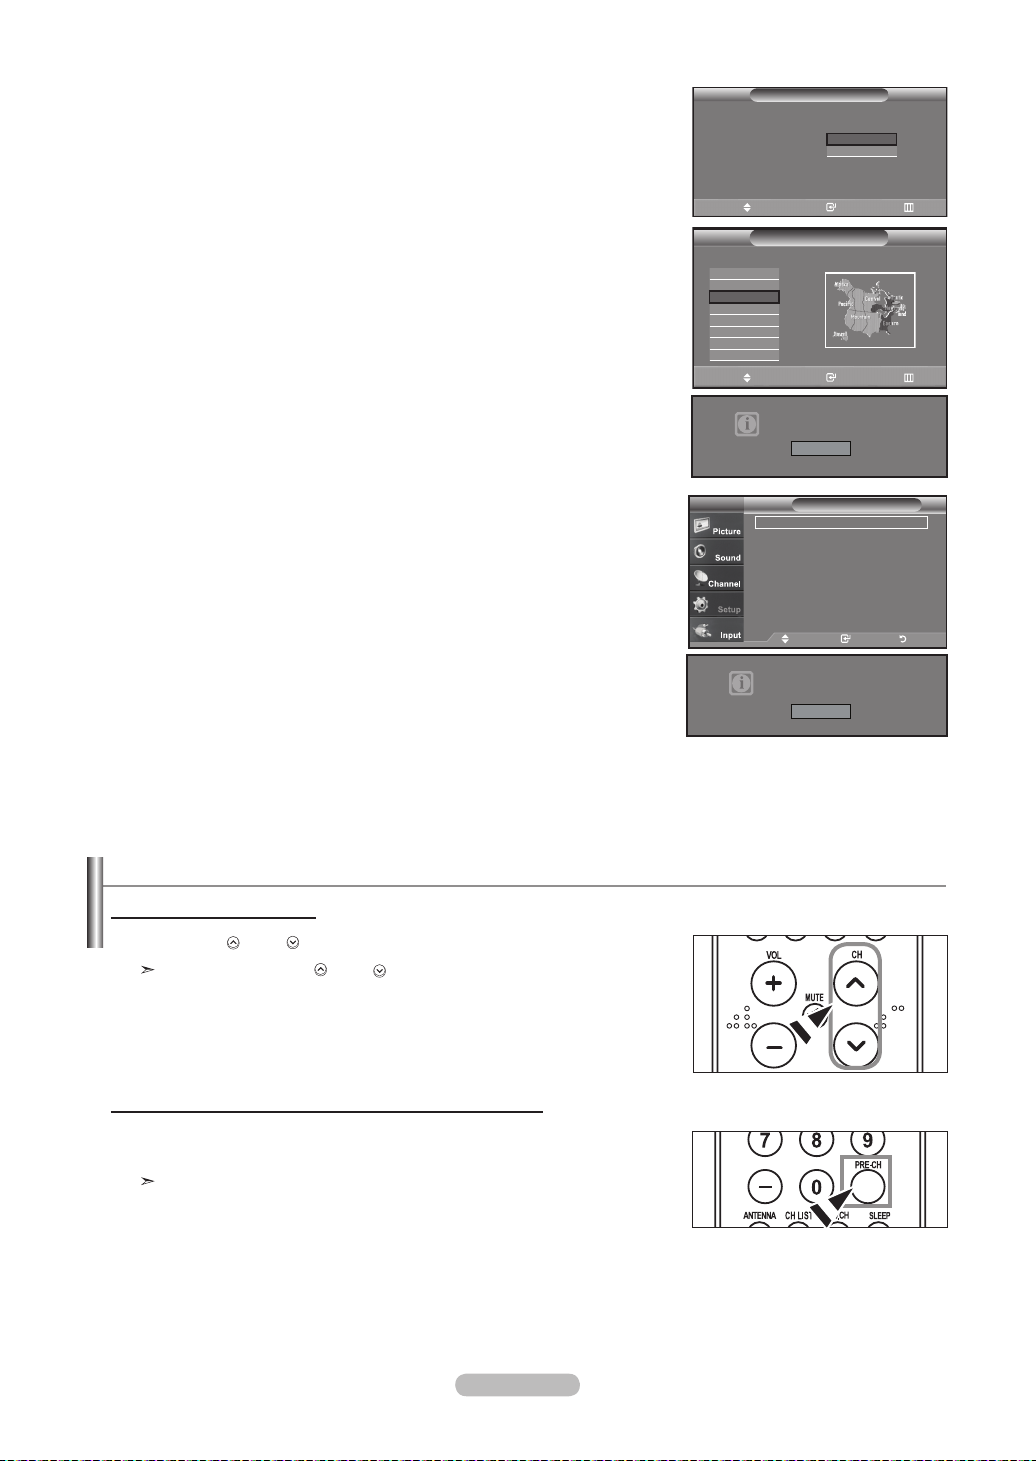
7. Press the ▲ or ▼ buttons to select “On” or “Off”, then Press the ENTER button.
The message “Select the time zone where you are located.” is displayed.
Set to daylight savings time.
Plug & Play
Daylight Savings Time :
On
Off
8. Press the ▲ or ▼ buttons to highlight the time zone for your local area.
Press the ENTER button. If you have received a digital signal, the time will be set
automatically.
If not, see page 38 to set the clock.
The message “Enjoy your watching.” is displayed.
9.
When you have finished, press the ENTER button.
If you want to reset this feature...
1. Press the MENU
button to display the menu.
Press the ▲ or ▼ buttons to select "Setup", then press the ENTER button.
2. Press the ENTER
3. The message "Menu language, Shop Mode, Channels and Time will be set."
button again, to select "Plug & Play".
is displayed.
Move Enter Skip
Select the time zone where you are located.
Newfoundland
Atlantic
Eastern
Central
Mountain
Pacific
Alaska
Hawaii
Move Enter Skip
TV
Plug & Play
Enjoy your watching.
OK
Plug & Play ►
Language : English ►
Time
Game Mode : Off ►
V-Chip ►
Caption ►
Menu Transparency : High
▼More
Move Enter Return
Menu language, Shop Mode,
Channels and Time will be set.
Setup
►
Start
►
Changing Channels
Using the Channel Buttons
1. Press the CH or
When you press the CH or
sequence.
You will see all the channels that the TV has memorized. (The TV must have
memorized at least three channels). You will not see channels that were either
erased or not memorized. See page 15 to memorize channels.
Using the PRE-CH Button to select the Previous Channel
1. Press the PRE-CH button.
The TV will switch to the last channel viewed.
To quickly switch between two channels that are far apart, tune to one
channel, then use the number button to select the second channel. Then
use the PRE-CH button to quickly alternate between them.
CH
button to change channels.
CH
button, the TV changes channels in
English - 13

Adjusting the Volume
1. Press the
VOL or VOL buttons to decrease or increase the volume.
Using Mute
At any time, you can cut off the sound using the MUTE button.
1.
Press MUTE button and the sound cuts off.
The word " " will appear in the lower-left corner of the screen.
2.
To turn mute off, press the MUTE button again, or simply press the
VOL or VOL buttons.
Viewing the Display
The display identies the current channel and the status of certain audio-video settings.
1. Press the INFO button on the remote control.
The TV will display the channel, the type of sound,
and the status of certain picture and sound settings.
Air 7
Mono
Picture Mode : Dynamic
Sound Mode : Custom
MTS : Stereo
Caption : On
V-Chip : On
05 : 54 pm
Press the INFO button once more or wait approximately 10 seconds and the
display disappears automatically.
English - 14
Viewing the Menus
1. With the power on, press the MENU button.
The main menu appears on the screen. The menu’ s left side has five icons:
Picture, Sound, Channel, Setup, Input.
2.
Use the ▲ or ▼ buttons to select one of the five icons.
Then press the ENTER button to access the icon’s sub-menu.
Press the EXIT button to exit.
3.
The on-screen menus disappear from the screen after about one minute.
Mode : Dynamic
Contrast 100
Brightness 45
Sharpness 75
Color 55
Tint G 50 R 50
Color Tone : Cool1
▼More
PictureTV
►
►
Move Enter Return
Memorizing the Channels
Your TV can memorize and store all of the available channels for both "off-air" (Air) and "Cable" channels. After the available
channels are memorized, use the CH or
channels by entering the channels digits. There are three steps for memorizing channels: selecting a broadcast source, memorizing the channels (automatic) and adding or deleting channels (Channel Lists).
Selecting the Video Signal-source
Before your television can begin memorizing the available channels, you must specify the type of signal source that is connected to
the TV (i.e. an Air or a Cable system).
1.
Press the MENU button to display the menu.
Press the ▲ or ▼ buttons to select "Channel", then press the
ENTER button.
2.
Press the ENTER button select “Antenna”.
Press the ▲ or ▼ buttons to select “Air” or “Cable”, then press the ENTER button.
Press the EXIT
button to exit.
CH
buttons to scan through the channels. This eliminates the need to change
TV
Antenna : Air ►
Auto Program ►
Clear Scrambled Channel ►
Channel List ►
Name ►
Fine Tune ►
Signal Strength ►
LNA : On ►
Move Enter Return
TV
Antenna : Air
Auto Program
Clear Scrambled Channel
Channel List
Name
Fine Tune
Signal Strength
LNA : On
Move Enter Return
Channel
Channel
Air
Cable
English - 15

Storing Channels in Memory (Automatic Method)
1.
Press the MENU button to display the menu.
Press the ▲ or ▼ buttons to select “Channel”, then press the ENTER button.
2.
Press the ▲ or ▼ buttons to select "Auto Program", then press the ENTER button.
3.
Press the ▲ or ▼ buttons to select the antenna connection, then press the
ENTER button.
Air: “Air” antenna signal. / Cable: “Cable” antenna signal. /
Air+Cable: “Air” and “Cable” antenna signals.
When selecting the Cable TV system: Press the ENTER button to start the auto
4.
program. By default, the cable TV system is set to “STD”. If you want to select
another type of cable system, press the ▲ or ▼ button to select “STD”, “HRC” or
“IRC”.
STD, HRC and IRC identify various types of cable TV systems. Contact your
local cable company to identify the type of cable system that exists in your
particular area. At this point the signal source has been selected.
Press the ENTER
button to start the auto program.
To stop the search before it has finished, press the ENTER button with stop
selected.
5.
After all the available channels are stored, the “Auto Program” menu reappears.
Press the EXIT button to exit.
TV
Antenna : Air ►
Auto Program
Clear Scrambled Channel
Channel List ►
Name
Fine Tune
Signal Strength
LNA : On
TV
Select the antennas to memorize.
Air
Cable
Air+Cable
TV
Selects a cable signal type for your location.
STD
HRC
IRC
STD
HRC
IRC
Auto Program in Progress.
Enter Return
Auto Program is completed.
25 Channels are memorized.
Air : 18, Cable : 7.
Channel
►
►
Start
Start
Start
Start
Cable 50
50%
►
►
►
►
Move Enter Return
Move Enter Return
Auto Program
Move Enter Return
Move Enter Return
Auto Program
Analog
Digital
Move Enter Return
Move Enter Return
Auto Program
Stop
Plug & Play
English - 16
Enter Return

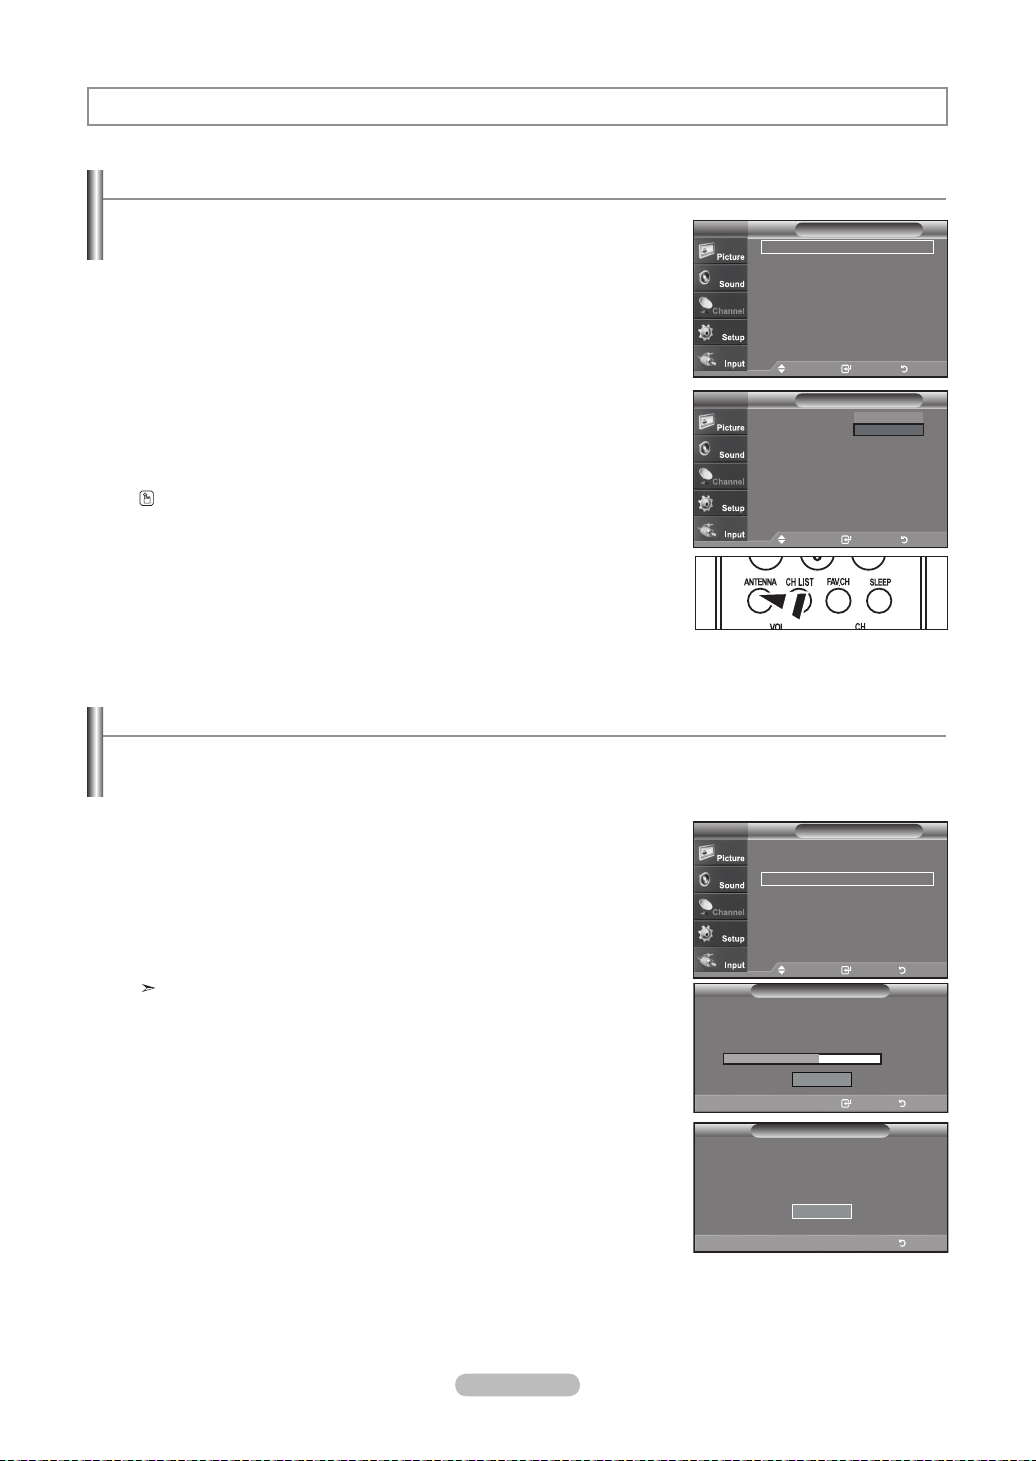
To Select the Source
Use to select TV or other external input sources connected to the TV.
Use to select the input source of your choice.
1.
Press the MENU button to display the menu.
Press the▲ or ▼ buttons to select “Input”, then press the ENTER button.
2.
Press the ENTER button to select "Source List".
Press the ▲ or ▼ buttons to select signal source, then press the ENTER button.
When you connect equipment to the LCD, you can choose between the
following sets of jacks: TV, AV, S-Video, Component, PC, HDMI on the TV’s rear
panel.
HDMI input can only be selected when the external device is turned on and
connected via HDMI.
You can choose only those external devices that are connected to the TV.
Press the SOURCE button on the remote control to view an external signal source.
To Edit the Input Source Name
Name the device connected to the input jacks to make your input source selection easier.
1. Press the MENU button to display the menu.
Press the▲ or ▼ buttons to select “Input”, then press the ENTER button.
Press the ▲ or ▼ buttons to select "Edit Name", then press the ENTER
button.
TV
Source List : TV ►
Edit Name
Move Enter Return
TV
AV : ---S-Video : ---Component : ---PC : ----
HDMI : ----
Move Enter Return
TV
Source List : TV ►
Edit Name
Input
►
Source ListTV
Input
►
Press the ▲ or ▼ buttons to select "AV", "S-Video", "Component", "PC", "HDMI"
2.
input jack, then press the ENTER button.
Press the ▲ or ▼ buttons to select "VCR", "DVD", "D-VHS", "Cable STB",
3.
"HD STB", "Satellite STB", "PVR STB", "AV Receiver", "DVD Receiver",
"Game", "Camcorder", "DVD Combo", "DVD HDD Recoder", "PC",
"Internet TV Recv.","Interactive TV Recv.","VOD STB", "TV" input source, then
press the ENTER button.
Press the EXIT button to exit.
English - 17
Move Enter Return
Edit NameTV
AV
S-Video
Component
PC
HDMI : ---- ►
Move Enter Return
AV
S-Video : ----
Component
PC
HDMI : ---- ►
Move Enter Return
: ---- ►
: ---- ►
: ---- ►
: ---- ►
Edit NameTV
: ---- ►
----
VCR
: ---- ►
DVD
D-VHS
: ---- ►
Cable STB
HD STB
Satellite STB
▼
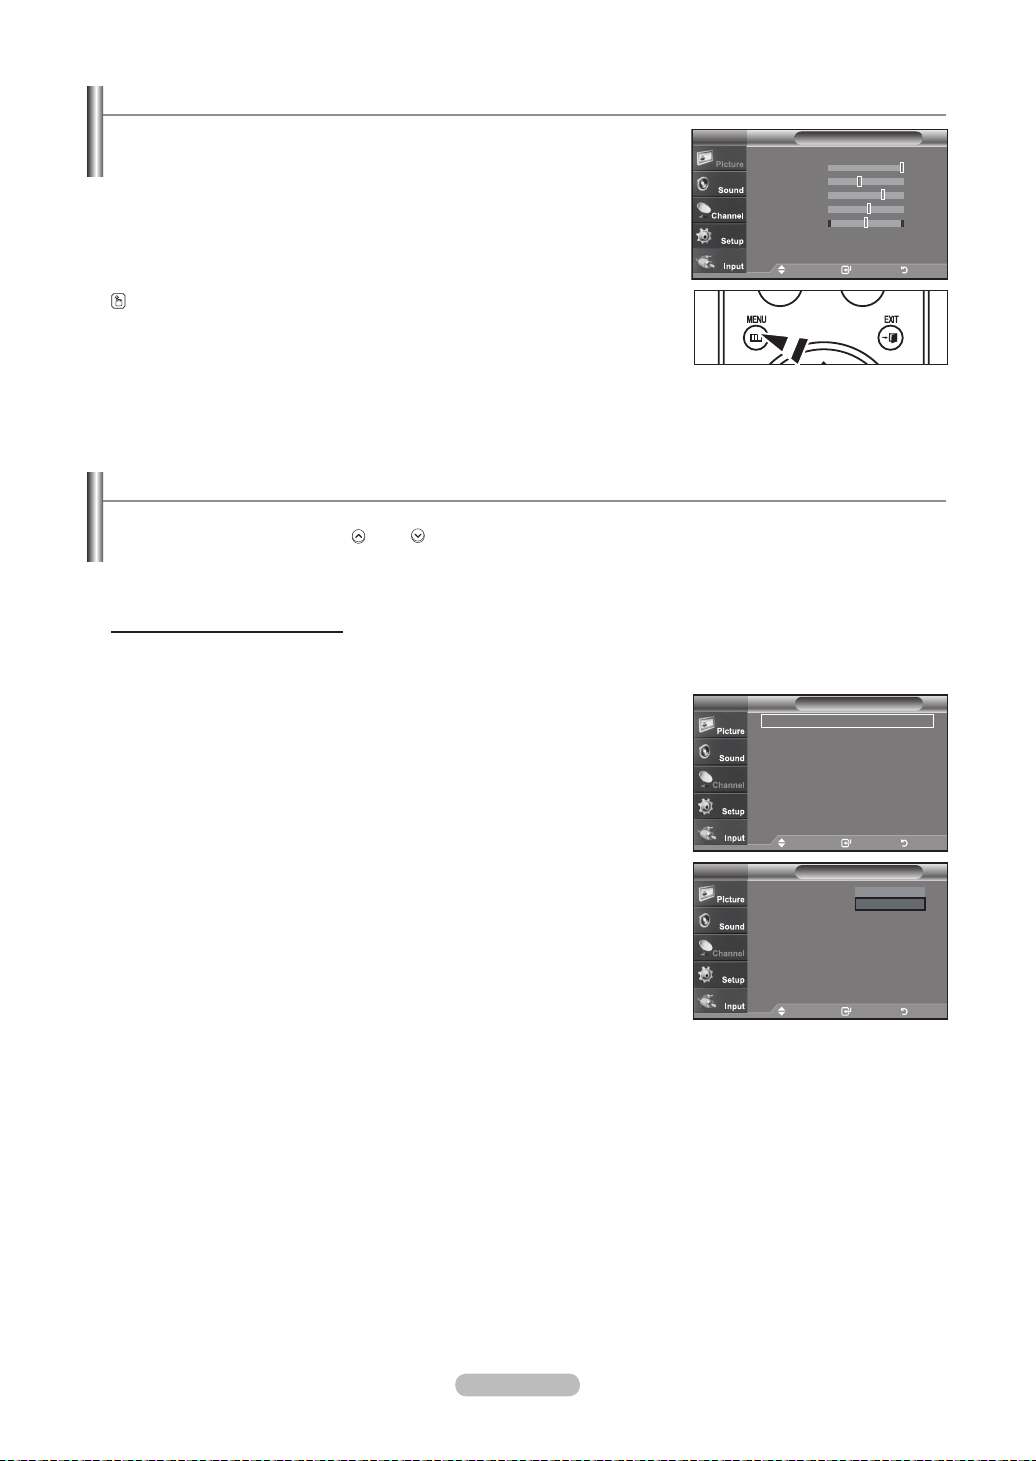
Picture Control
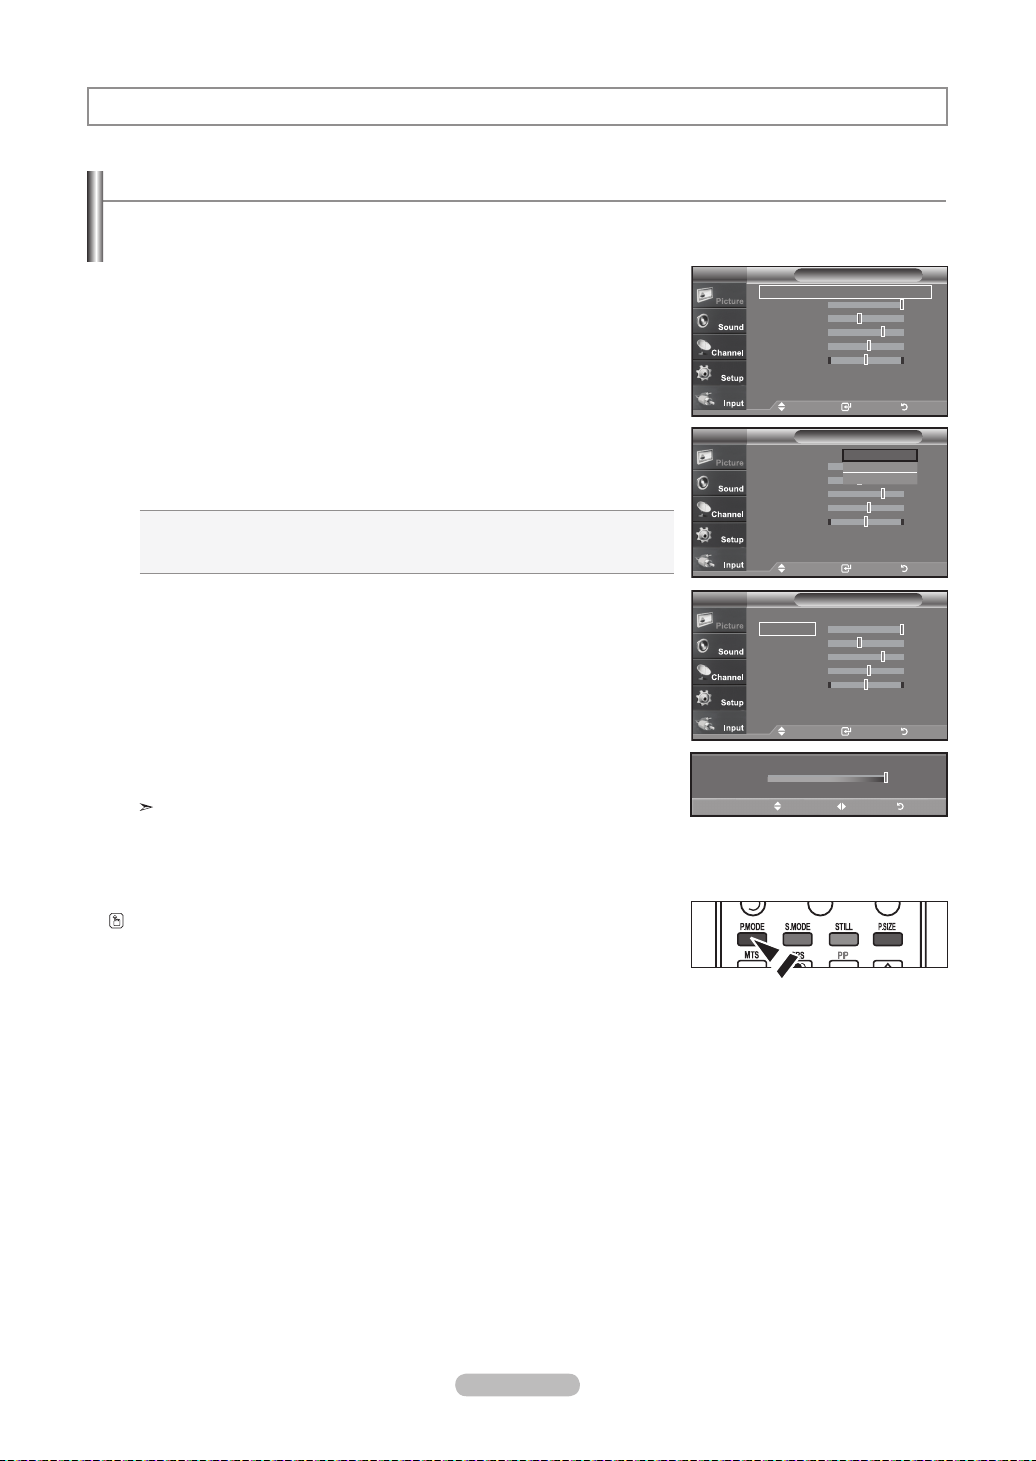
Using Automatic Picture Settings
Your TV has Three automatic picture settings ("Dynamic", "Standard", "Movie") that are preset at the factory.
You can activate either Dynamic, Standard, Movie by making a selection from the menu.
1.
Press the MENU button to display the menu.
Press the ENTER button, to select "Picture".
2.
Press the ENTER button to select "Mode".
Press the ▲ or ▼ buttons to select the "Dynamic", "Standard", "Movie" picture
setting. Press the ENTER button.
Choose Dynamic to increase the clarity and sharpness of the picture.
Choose Standard for the standard factory settings.
Choose Movie for a natural Image without picture enhancements.
3. Press the ▲ or ▼ buttons to select "Contrast", "Brightness", "Sharpness",
"Color", or "Tint(G/R)", then press the ENTER button.
Press the ◄ or ► buttons to decrease or increase the value of a particular item.
4.
For example, if you select "Contrast", pressing the ► button increases it.
Press the EXIT
button to exit.
• When you make changes to Contrast, Brightness, Sharpness, Color, Tint(G/R)
OSD will be also adjusted accordingly.
• When in PC mode, Tint, Sharpness, and Color are not available.
Mode : Dynamic
Contrast 100
Brightness 45
Sharpness 75
Color 55
Tint G 50 R 50
Color Tone : Cool1
▼More
Move Enter Return
Mode : Dynamic
Contrast 100
Brightness 45
Sharpness 75
Color 55
Tint G 50 R 50
Color Tone : Cool1
▼More
Move Enter Return
Mode : Dynamic
Contrast 100
Brightness 45
Sharpness 75
Color 55
Tint G 50 R 50
Color Tone : Cool1
▼More
Move Enter Return
▲
Contrast
▼
Move Adjust Return
PictureTV
PictureTV
Dynamic
Standard
Movie
PictureTV
►
►
100
Press the P.MODE button on the remote control
repeatedly to select the desired picture mode.
English - 18

Adjusting the Color Tone
You can change the color of the entire screen according to your preference.
1.
Press the MENU button to display the menu.
Press the ENTER button to select "Picture".
2. Press the ▲ or ▼ buttons to select "Color Tone", then press the ENTER button.
3. Press the ▲ or ▼ buttons to select "Cool2", "Cool1", "Normal", "Warm1",
or "Warm2".
Press the ENTER button.
When the picture mode is set to Dynamic or Standard, Warm1 and Warm2
cannot be selected. Movie mode is only available .
This function is available in PC mode.
Resetting the Picture Settings to the Factory Defaults
Press the ▲ or ▼ buttons to select "Reset", then press the ENTER button.
1.
Press the ▲ or▼ button to select “OK”, or “Cancel”, then press the ENTER button.
Press the EXIT
Each mode can be reset.
button to exit.
Mode : Dynamic
Contrast 100
Brightness 45
Sharpness 75
Color 55
Tint G 50 R 50
Color Tone : Cool1
▼More
Mode : Dynamic
Contrast 100
Brightness 45
Sharpness 75
Color 55
Tint G 50 R 50
Color Tone : Cool1
▼More
▲More
Size : 16 : 9
Digital NR : Off
Reset :
PictureTV
Move Enter Return
PictureTV
Move Enter Return
PictureTV
OK
Cancel
Move Enter Return
Cool2
Cool1
Normal
Warm1
Warm2
►
►
Freezing the Picture
1. Press the STILL button to freeze a moving picture.
Normal sound will still be heard. Press again to cancel.
While V-Chip is in operation, the Still function cannot be used.
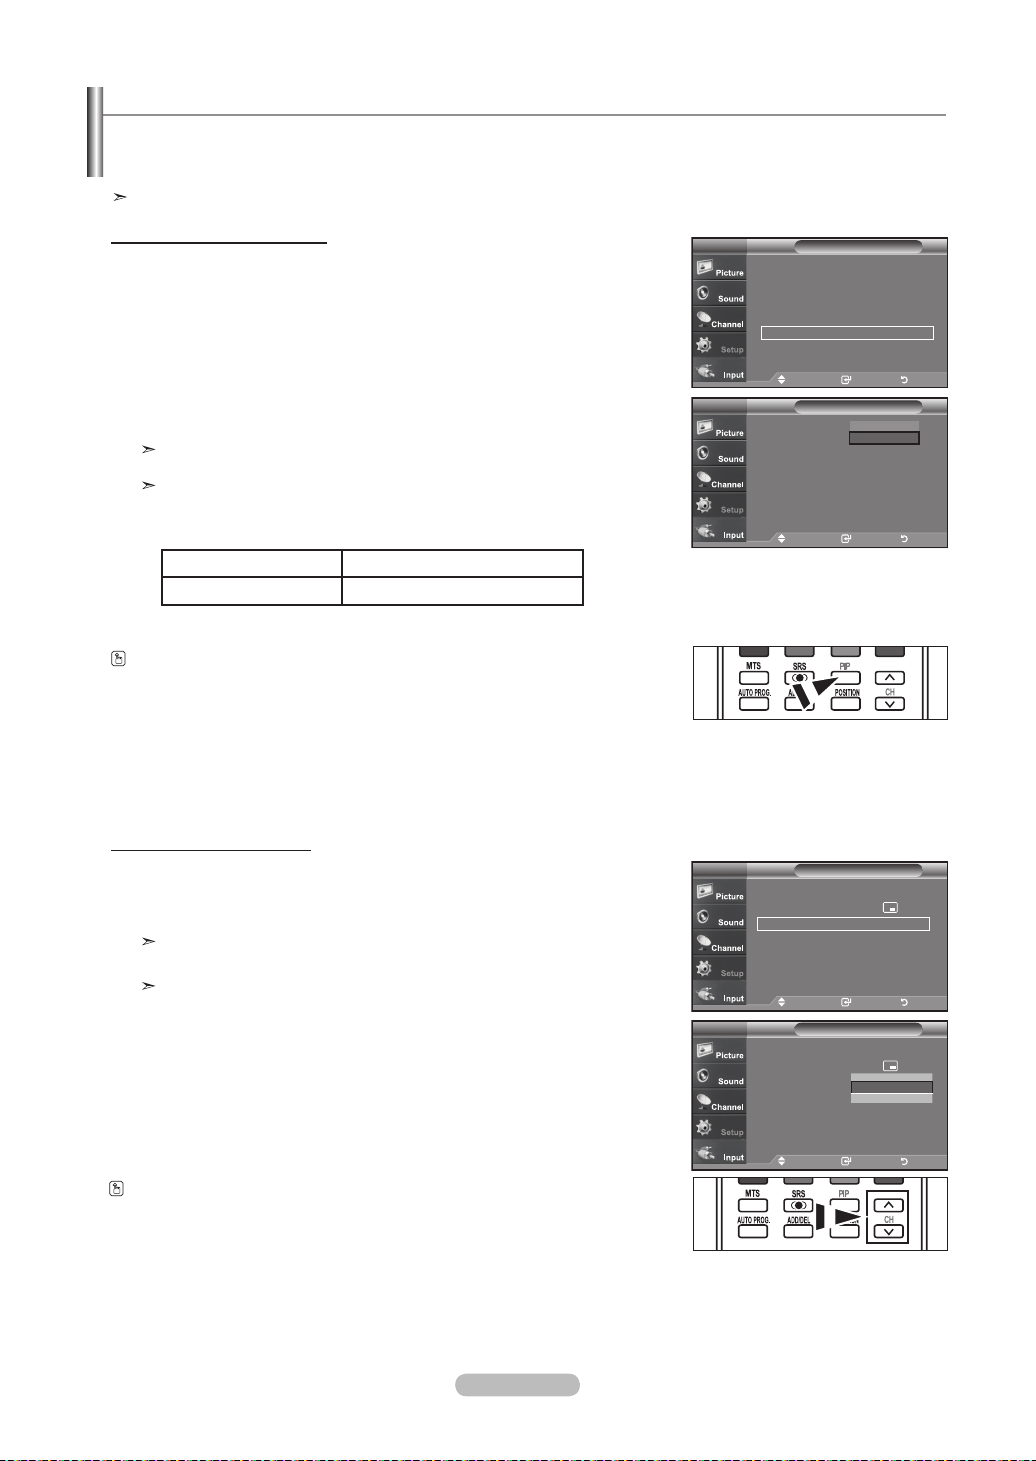
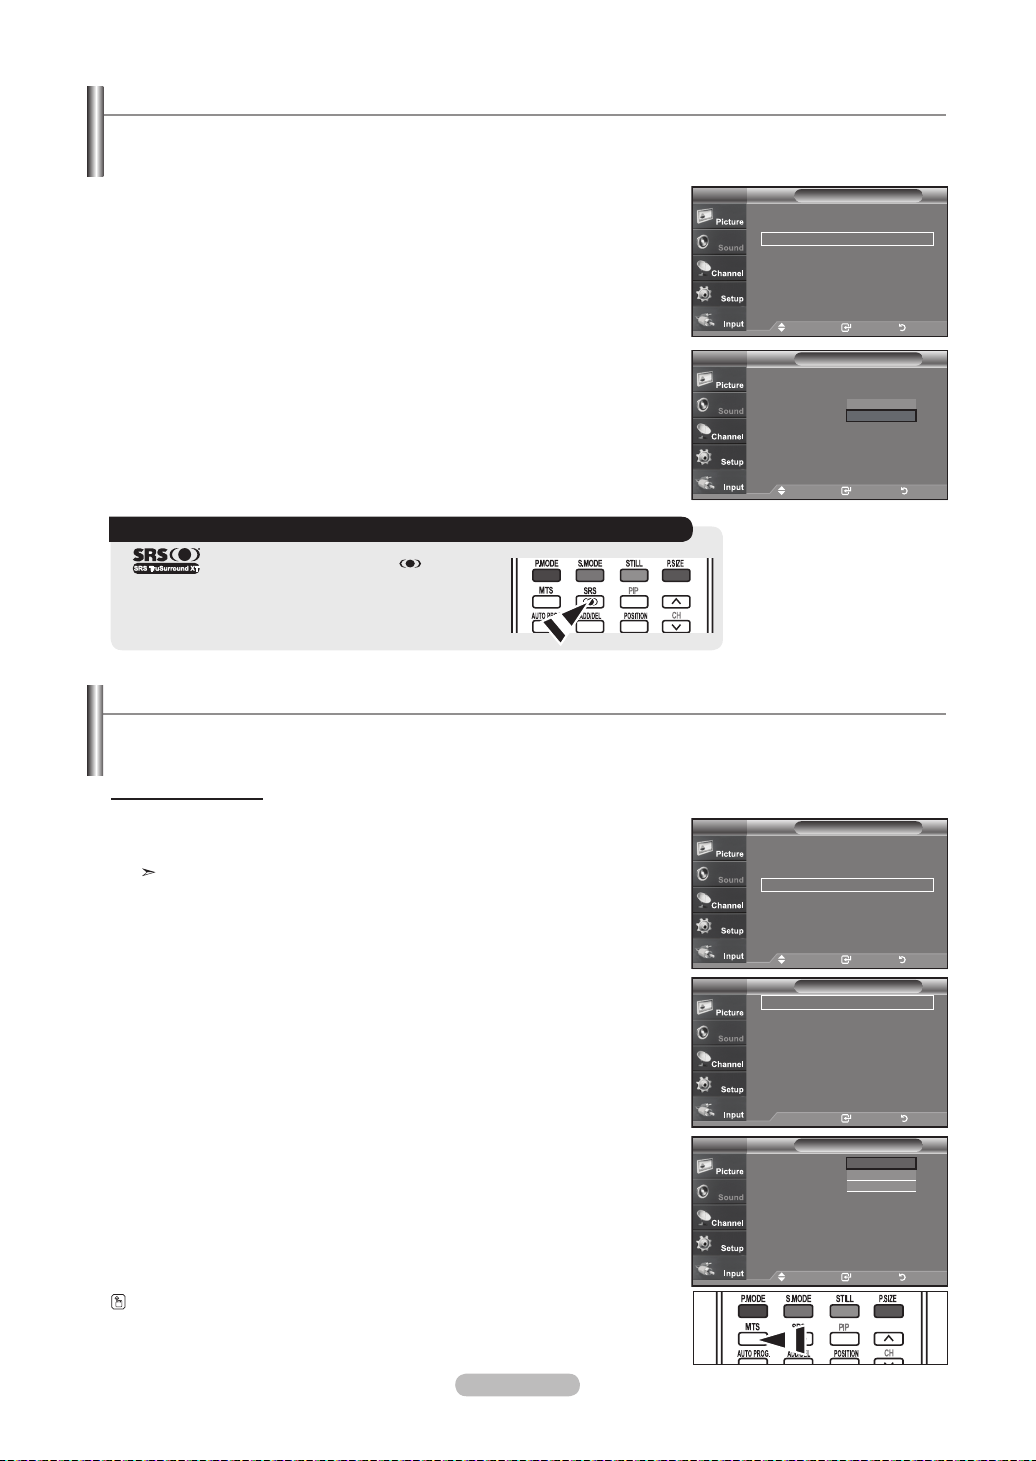
Setting the Film Mode
You can: automatically senses and processes lm signals from all sources and adjusts the picture for optimum quality.
1. Press the MENU button to display the menu.
Press the ▲ or ▼ buttons to select “Setup”, then press the ENTER button.
Press the ▲ or ▼ buttons to select "Flim Mode", then press the ENTER button.
2.
Press the ▲ or ▼ buttons to select "On" or "Off", then press the ENTER button.
3.
Press the EXIT button to exit.
Film mode is supported in TV, VIDEO, S-VIDEO, and COMPONENT480i.
▲More
Melody : Off
PC
HDMI Black Level
Film Mode : Off
►
PIP
Function Help : On
▼More
▲More
Melody : Off
PC
HDMI Black Level
Film Mode : Off
PIP
Function Help : On
▼More
PictureTV
: Normal ►
Move Enter Return
PictureTV
: Normal
Move Enter Return
►
►
►
►
Off
On
English - 19

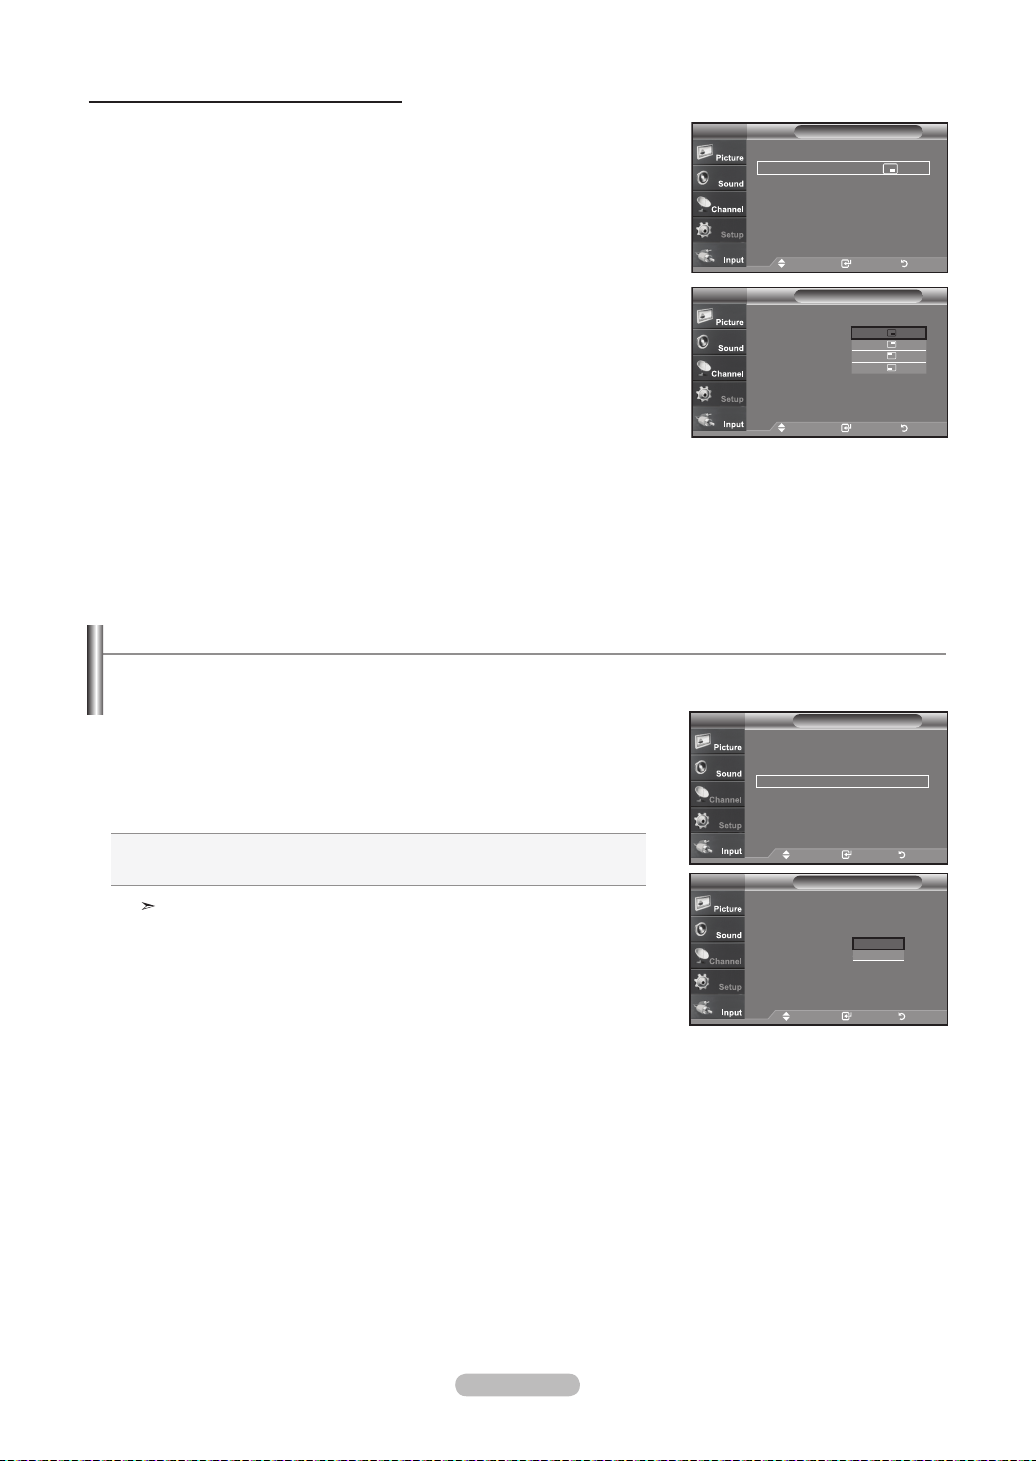
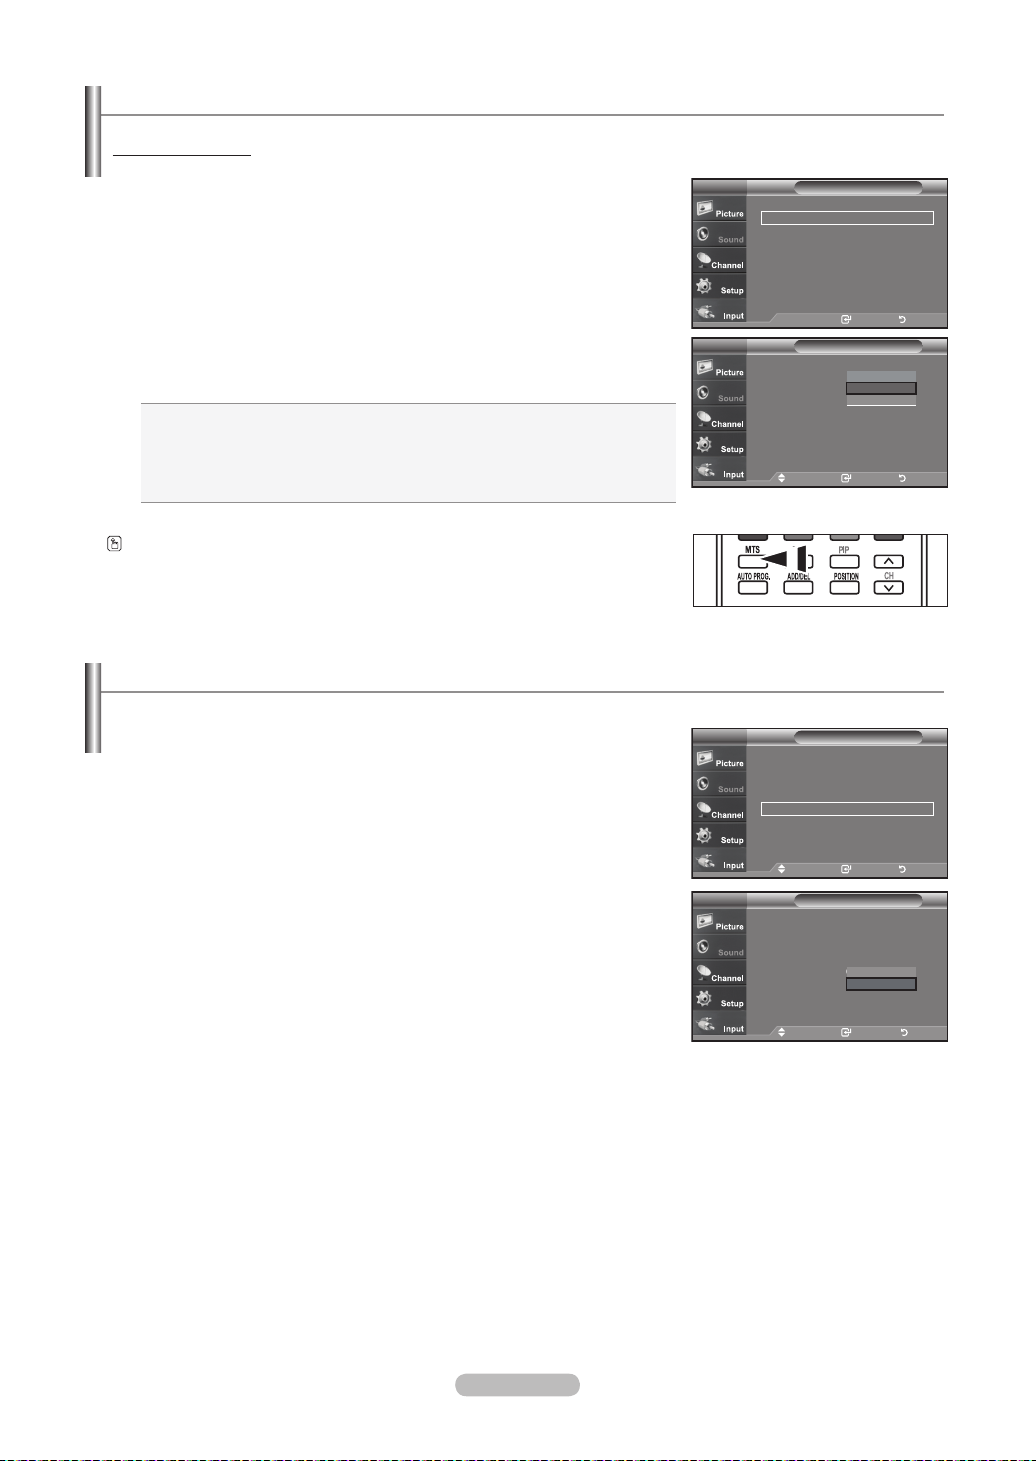
Changing the Screen Size
Screen size selection depends on the type of video input.
1. Press the MENU button to display the menu.
Press the ENTER button, to select "Picture".
2.
Press the ▲ or ▼ buttons to select "Size", then press the ENTER button.
3.
Press the ▲ or ▼ buttons to select the screen format you want.
Press the ENTER button.
Press the EXIT
• Wide : Adjusts the picture size to Wide appropriate for DVDs or wide
• 16:9 : Sets the picture to 16:9 wide mode.
• Zoom1 : Magnifies the size of the picture on the screen.
• Zoom2 : Magnifies the size of the picture more than “Zoom1”.
• 4:3 : Sets the picture to 4:3 normal mode.
• Just Scan : Use the function to see the full image without any cutoff
Alternately, you can press the P.SIZE button on the remote control repeatedly to
change the picture size.
If you watch a still image or the 4:3 mode for a long time (over 2 hours), an
image may be burned onto the screen. View the TV in 16:9 mode as much as possible.
HD (High Definition)
16:9 - 1080i (1920x1080), 720P (1280x720)
button to exit.
broadcasting.
when HDMI 720p/1080i signals are input.
▲More
Size : 16:9
Digital NR : Off
Reset : OK
Wide
16 : 9
Zoom1
Zoom2
4 : 3
Just Scan
PictureTV
Move Enter Return
SizeTV
▲
Position Reset
▼
Move Enter Return
►
►
►
Wide
Adjusts the picture size to
Wide appropriate for DVDs or
wide broadcasting.
Zoom2
The screen size when the
Zoom1 screen is vertically
enlarged.
16:9
Sets the picture to 16:9 wide mode.
4:3
Sets the picture to 4:3
Use the function to see the
normal mode.
Zoom1
The screen size when Wide
screen is vertically enlarged.
Just Scan
Just Scan
full image without any cutoff when HDMI 720p/1080i
signals are input.
• In TV, VIDEO, S-VIDEO,and all COMPONENT (480i, 480p), DTV (480i, 480p) modes, all screen modes can be selected.
(Wide • 16:9 • Zoom1 • Zoom2 • 4:3).
• You can select only the Wide, 16:9 and 4:3 screen sizes in the DTV Component (720p, 1080i) or HDMI
(720p, 1080i) mode.
• In PC mode, only Wide & 4:3 modes can be selected.
• You must select Zoom with P. Size button on the remote if you want to move the Zoom1 or 2 picture up or down.
• When watching a DTV’s HD signal, you can use. Horizontal zoom sets the optical picture format by
expanding it both horizontally and vertically. For example, you can reset the picture in 4:3 format to 16:9. Does not
support all external devices (DVD, VCR etc.).
English - 20
Viewing Picture-in-Picture
This product has one built-in tuner, which does not allow PIP to function in the same mode. For example, you cannot watch one TV
channel in the main screen, and a different one in the PIP screen. Please see ‘PIP Settings’below for details. You can use the PIP
feature to simultaneously watch two video sources. (See page 26 to select the PIP picture sound.)
While V-Chip (See page 44) in operation, the PIP function cannot be used.
Activating Picture-in-Picture
1. Press the MENU button to display the menu.
Press the ▲ or ▼ buttons to select “Setup”, then press the ENTER button.
Press the ▲ or ▼ buttons to select "PIP", then press the ENTER button.
Press the ENTER button again.
2.
Press the ▲ or ▼ buttons to select "On", then press the ENTER button.
If you turn the TV off while watching in PIP mode and turn it on again, the PIP
window will disappear.
You can view Analog TV broadcasts on the PIP screen (sub-picture) when the
main picture is from an external device connected to PC
Main picture Sub picture
PC Analog TV broadcasts only
Alternately, you can press the PIP button on the remote control repeatedly to activate or
deactivate the PIP.
▲More
Melody : Off
PC
HDMI Black Level
Film Mode : Off
PIP
Function Help : On
▼More
PIP
Position :
Channel : Air 65
SetupTV
: Normal ►
Move Enter Return
PIPTV
:
Move Enter Return
►
►
►
►
►
Off
On
Changing the PIP Channel
3. Press the ▲ or ▼ buttons to select “Channel”, then press the ENTER button.
Press the ▲ or ▼ buttons to select the desired channel in the PIP window.
Press the ENTER
buttons.
MAIN: PC
PIP: TV(Analog)
The channel can be active when the sub picture is set to TV.
Press the PIP Channel buttons on the remote control.
English - 21
PIP : On
Position :
Channel : Air 65
PIP : On
Position :
Channel :
PIPTV
Move Enter Return
PIPTV
Air 65
Move Enter Return
continued..
►
►
►
▲
▲
Changing the Position of the PIP Window
4. Press the ▲ or ▼ buttons to select “Position”, then press the ENTER button.
Press the ENTER
Press the EXIT
buttons.
button to exit.
HDMI Black Level
PIP : On
PIPTV
Position :
Channel : Air 65
Move Enter Return
PIPTV
PIP : On
Position :
Channel :
Move Enter Return
►
►
►
You can select the black level on the screen to adjust the screen depth.
1. Press the MENU button to display the menu.
Press the ▲ or ▼ buttons to select “Setup”, then press the ENTER button.
2.
Press the ▲ or ▼ buttons to select "HDMI Black Level", then
press the ENTER button.
3.
Press the ▲ or ▼ buttons to select “Normal” or “Low”, then press the ENTER button.
• Normal: The screen gets brighter.
• Low: The screen gets darker.
This function is active only when the an external device (DVD player, STB etc.)
is connected to the TV via HDMI.
Press the EXIT
button to exit.
TV
▲More
Melody : Off ►
PC ►
HDMI Black Level : Normal ►
Film Mode : Off ►
PIP
Function Help : Off
▼More
Move Enter Return
TV
▲More
Melody : Off
PC
HDMI Black Level : Normal
Film Mode : Off
PIP
Function Help : Off
▼More
Move Enter Return
Setup
Setup
Normal
Low
►
English - 22
Sound Control
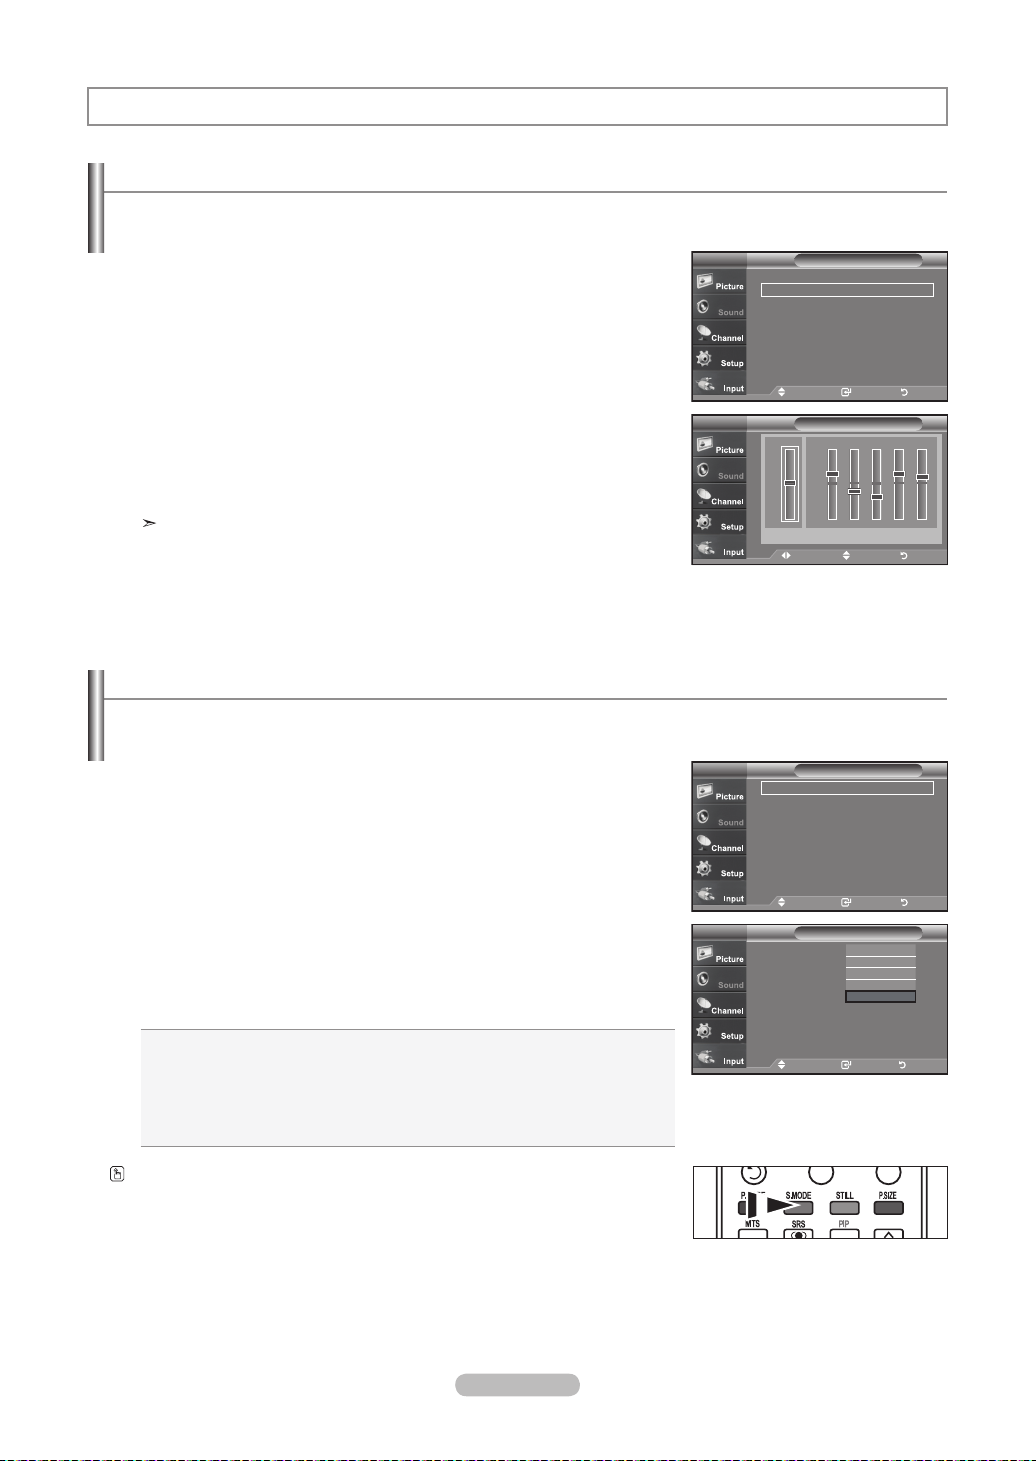
Customizing the Sound
The sound settings can be adjusted to suit your personal preference. (Alternatively, you can use one of the "automatic"
settings.)
1. Press the MENU button to display the menu.
Press the ▲ or ▼ buttons to select "Sound", then press the ENTER button.
2.
Press the ▲ or ▼ buttons to select "Equalizer", then press the ENTER button.
3.
Press the ◄ or ► buttons to select a particular frequency to adjust.
Press the ▲ or ▼ buttons to increase or decrease the level of the particular frequency.
Press the ENTER
Press the EXIT
button.
button to exit.
• L/R Sound Balance Adjustment :
To adjust the sound balance of the L/R speakers.
• Bandwidth Adjustment (100Hz, 300Hz, 1KHz, 3KHz, 10KHz) :
Mode : Custom ►
Equalizer
SRS TruSurround XT
Multi-Track Options ►
Auto Volume : Off
Internal Mute : Off
Sound Select : Main ►
Reset
R
L
Move Adjust Return
SoundTV
: Off ►
Move Enter Return
EqualizerTV
+
0
-
100Hz
300Hz 1KHz 3KHz 10KHzBalance
: To adjust the level of different bandwidth frequencies.
Using Automatic Sound Settings
►
►
►
Your TV has automatic sound settings ("Standard", "Music", "Movie", "Speech", and "Custom") that are preset at the factory.
Or, you can select "Custom", which automatically recalls your personalized sound settings.
1. Press the MENU button to display the menu.
Press the
Press the ENTER button to select "Mode".
2.
Press the
▲ or ▼
buttons to select "Sound", then press the ENTER button.
▲ or ▼
buttons to select "Standard", "Music", "Movie", "Speech",
or "Custom" sound setting, then press the ENTER button.
Press the EXIT
button to exit.
• Choose Standard for the standard factory settings.
• Choose Music when watching music videos or concerts.
Mode : Custom ►
Equalizer
SRS TruSurround XT
Multi-Track Options ►
Auto Volume : Off
Internal Mute : Off
Sound Select : Main ►
Reset
Mode : Custom
Equalizer
SRS TruSurround XT
Multi-Track Options
Auto Volume : Off
Internal Mute : Off
Sound Select : Main
Reset
SoundTV
: Off ►
Move Enter Return
SoundTV
Standard
Music
Movie
: Off
Speech
Custom
Move Enter Return
• Choose Movie when watching movies.
• Choose Speech when watching a show that is mostly dialog (i.e., news).
• Choose Custom to recall your personalized settings
(see “Customizing the Sound”).
Press the S.MODE button on the remote control repeatedly to select one of the sound
settings.
►
►
►
English - 23
Setting the TruSurround XT
TruSurround XT is a patented SRS technology that solves the problem of playing 5.1 multichannel content over two speakers.
TruSurround delivers a compelling, virtual surround sound experience through any two-speaker playback system, including internal
television speakers. It is fully compatible with all multichannel formats.
1. Press the MENU
button to display the menu.
Press the ▲ or ▼ buttons to select "Sound", then press the ENTER button.
2. Press the ▲ or ▼ buttons to select "SRS TruSurround XT", then press the
ENTER button.
3. Press the ▲ or ▼ buttons to select "On" or "Off", then press the
ENTER button.
Press the EXIT
button to exit.
TRADEMARK & LABEL LICENSE NOTICE
TruSurround XT, SRS and
Symbol are
trademarks of SRS Labs, Inc.
TruSurround XT technology is incorporated
under license from SRS Labs, Inc.
Mode : Custom ►
Equalizer
SRS TruSurround XT
Multi-Track Options ►
Auto Volume : Off
Internal Mute : Off
Sound Select : Main ►
Reset
Mode : Custom
Equalizer
SRS TruSurround XT
Multi-Track Options
Auto Volume : Off
Internal Mute : Off
Sound Select : Main
Reset
SoundTV
: Off ►
Move Enter Return
SoundTV
: Off
Move Enter Return
►
►
►
Off
On
Choosing a Multi-Channel Sound (MTS) track - Digital
The digital-TV transmission system is capable of simultaneous transmission of many audio tracks (for example, simultaneous
translations of the program into foreign languages). The availability of these additional “multitracks” depends upon the program.
Preferred Language
1. Press the MENU button to display the menu.
Press the ▲ or ▼ buttons to select "Sound", then press the ENTER button.
Quick way to access the MTS menu: Just press the “MTS” button on the
remote control. You can listen in a language other than your chosen language
by pressing the MTS button.
Press the ▲ or ▼ buttons to select "“Multi-Track Options", then press the ENTER
2.
button.
3.
Press the ENTER button to select “Preferred Language”.
Press the ▲ or ▼ buttons to choose the language (English, Spanish or French) you
want, then press the ENTER button.
Press the EXIT
You can listen in a language other than the favorite language by pressing the
button to exit.
MTS button on the remote control.
Mode : Custom ►
Equalizer
SRS TruSurround XT
Multi-Track Options ►
Auto Volume : Off
Internal Mute : Off
Sound Select : Main ►
Reset
Preferred Language
Multi-Track Sound : Stereo
Enter Return
Preferred Language
Multi-Track Sound : Stereo
SoundTV
►
English
Spanish
French
►
►
►
: Off ►
Move Enter Return
Multi-Track OptionsTV
: English ►
Multi-Track OptionsTV
: English
Move Enter Return
English - 24
Choosing a Multi-Channel Sound (MTS) track - Analog
Multi-Track Sound
1. Press the MENU button to display the menu.
Press the ▲ or ▼ buttons to select "Sound", then press the ENTER button.
Press the ▲ or ▼ buttons to select “Multi-Track Options", then press the ENTER
2.
button.
3.
Press the ▲ or ▼ buttons to select “Multi-Track Sound”, then press the ENTER button.
Press the ▲ or ▼ buttons to select a setting you want, then press the ENTER
Press the EXIT
button to exit.
• Choose Mono for channels that are broadcasting in mono, or if you are having
difficulty receiving a stereo signal.
• Choose Stereo for channels that are broadcasting in stereo.
• Choose SAP to listen to the Separate Audio Program, which is usually a
foreign-language translation.
Press the MTS buttons on the remote control repeatedly to select “Mono”,
“Stereo”, or “SAP”.
Automatic Volume Control
Reduces the differences in volume level among broadcasters.
1. Press the MENU button to display the menu.
Press the ▲ or ▼ buttons to select "Sound", then press the ENTER button.
2.
Press the ▲ or ▼ buttons to select "Auto Volume", then press the ENTER button.
Press the ▲ or ▼ buttons to set Auto Volume "On" or "Off" then press the
3.
ENTER button.
Press the EXIT
button to exit.
button.
Multi-Track OptionsTV
Preferred Language
Multi-Track Sound : Stereo
: English ►
►
Enter Return
Multi-Track OptionsTV
Preferred Language
Multi-Track Sound : Stereo
Mode : Custom ►
Equalizer
SRS TruSurround XT
Multi-Track Options ►
Auto Volume : Off
Internal Mute : Off
Sound Select : Main ►
Reset
Mode : Custom
Equalizer
SRS TruSurround XT
Multi-Track Options
Auto Volume : Off
Internal Mute : Off
Sound Select : Main
Reset
: English
Mono
Stereo
SAP
Move Enter Return
SoundTV
: Off ►
Move Enter Return
SoundTV
: Off
Off
On
Move Enter Return
►
►
►
English - 25
Selecting the Internal Mute
Sound output from the TV speakers is muted.
1. Press the MENU button to display the menu.
Press the ▲ or ▼ buttons to select "Sound", then press the ENTER button.
2.
Press the ▲ or ▼ buttons to select "Internal Mute", then press the ENTER button.
3.
Press the ▲ or ▼ buttons to select “On”, then press the ENTER button.
Press the EXIT
When Internal Mute is set to “On”, Sound menus except Multi-track Options
cannot be adjusted.
The VOL , VOL and MUTE buttons do not operate when the Internal Mute
is set to On.
button to exit.
TV's Internal Speakers Audio Out (Optical, L/R Out) to Sound System
Mode : Custom ►
Equalizer
SRS TruSurround XT
Multi-Track Options ►
Auto Volume : Off
Internal Mute : Off
Sound Select : Main ►
Reset
Mode : Custom
Equalizer
SRS TruSurround XT
Multi-Track Options
Auto Volume : Off
Internal Mute : Off
Sound Select : Main
Reset
SoundTV
: Off ►
Move Enter Return
SoundTV
: Off
Off
Move Enter Return
On
►
►
►
Internal Mute Off
Internal Mute On
Video No Signal
RF AV, S-Video
Speaker Output Speaker Output Speaker Output Sound Output Sound Output Sound Output
Mute Mute Mute Sound Output Sound Output Sound Output
Mute Mute Mute Mute Mute Mute
Component, PC, HDMI
RF AV, S-Video
When “Internal mute” is set to “On”, Sound menus except “Multi-Track Options” cannot be adjusted.
Listening to the Sound of the Sub (PIP) Picture
When the PIP feature is activated, you can listen to the sound of the sub (PIP) picture.
1. Press the MENU button to display the menu.
Press the ▲ or ▼ buttons to select "Sound", then press the ENTER button.
2.
Press the ▲ or ▼ buttons to select "Sound Select”, then press the ENTER button.
3.
Press the ▲ or ▼ buttons to select “Main” or “Sub”, then press the ENTER button.
Press the EXIT
• Main: Used to listen to the sound of the main picture.
• Sub: Used to listen to the sound of the sub picture.
You can select this option when “PIP” is set to “On”.
button to exit.
Component, PC
Mode : Custom ►
Equalizer
SRS TruSurround XT
Multi-Track Options ►
Auto Volume : Off
Internal Mute : Off
Sound Select : Main ►
Reset
Mode : Custom
Equalizer
SRS TruSurround XT
Multi-Track Options
Auto Volume : Off
Internal Mute : Off
Sound Select : Main
Reset
SoundTV
: Off ►
Move Enter Return
SoundTV
: Off
Main
Move Enter Return
Sub
►
►
►
English - 26
Resetting the Sound Settings to the Factory Defaults
If Game Mode is On, the Reset Sound function is activated. Selecting the Reset function resets the equalizer setting to the factory
defaults.
1. Press the MENU button to display the menu.
Press the ▲ or ▼ buttons to select "Sound", then press the ENTER button.
2.
Press the ▲ or ▼ buttons to select "Reset”, then press the ENTER button.
Press the EXIT
button to exit.
Mode : Custom ►
Equalizer
SRS TruSurround XT
Multi-Track Options ►
Auto Volume : Off
Internal Mute : Off
Sound Select : Main ►
Reset
SoundTV
: Off ►
Move Enter Return
►
►
►
Connecting Headphones
You can connect a set of headphones to your set if you wish to watch a TV program without disturbing the other people in the room.
When you insert the head set jack into the corresponding port, you can operate
only “Multi track option” in Sound menu.
Prolonged use of headphones at a high volume may damage your hearing.
You will not receive sound from the speakers when you connect headphones
to the system.
The headphone volume and TV volume are adjusted differently.
Press the VOL button on the remote control repeatedly to select one of the sound
settings.
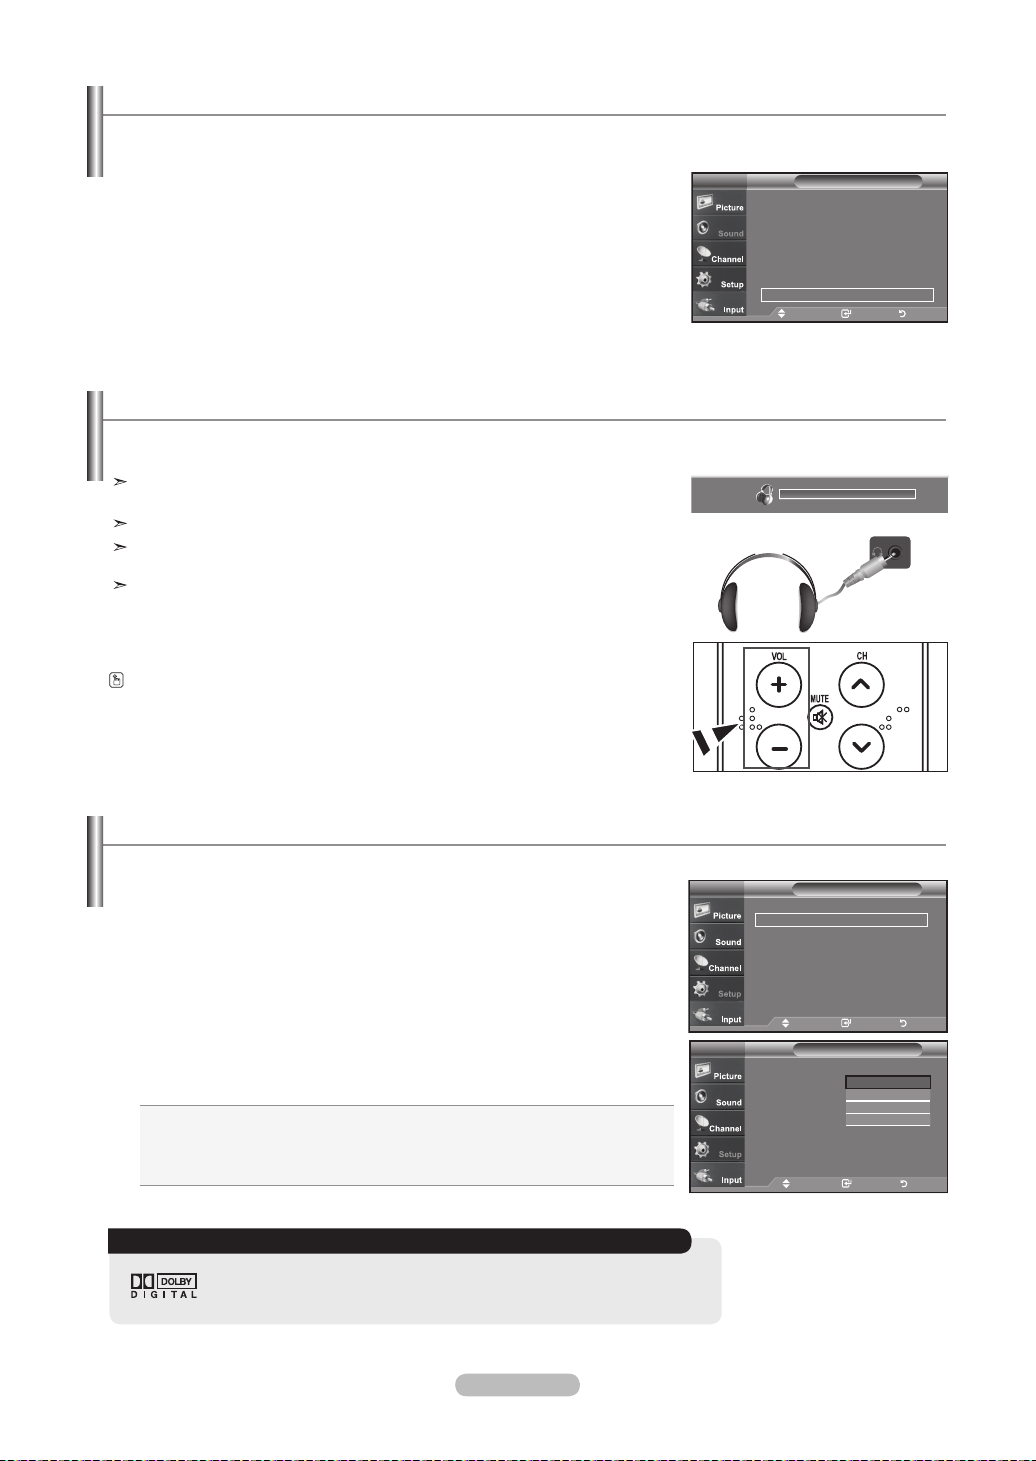
Setting the On/Off Melody
A melody sound can be set to come on when the TV is powered On or Off.
1.
Press the MENU button to display the menu.
Press the ▲ or ▼ buttons to select "Setup", then press the ENTER button.
2.
Press the ▲ or ▼ buttons to select "Melody", then press the ENTER button.
3. Press the ▲ or ▼ buttons to select "Off", "Low", "Medium", "High" then press the
ENTER button.
Off: Turns off the melody function.
Low: Sets the melody volume to low.
Medium: Sets the melody volume to medium.
High: Sets the melody volume to high.
Press the EXIT button to exit.
DOLBY DIGITAL
Manufactured under license from Dolby Laboratories.
“Dolby” and the double-D symbol are trademarks of Dolby Laboratories.
English - 27
TV
▲More
Melody : Off
PC
HDMI Black Level
Film Mode : Off
PIP
Function Help : On
▼More
Move Enter Return
TV
▲More
Melody : Off ►
PC
HDMI Black Level
Film Mode : Off
PIP
Function Help : On
▼More
Move Enter Return
Setup
: Normal ►
Setup
Off
Low
Medium
: Normal ►
High
►
►
►
►
►
►
►
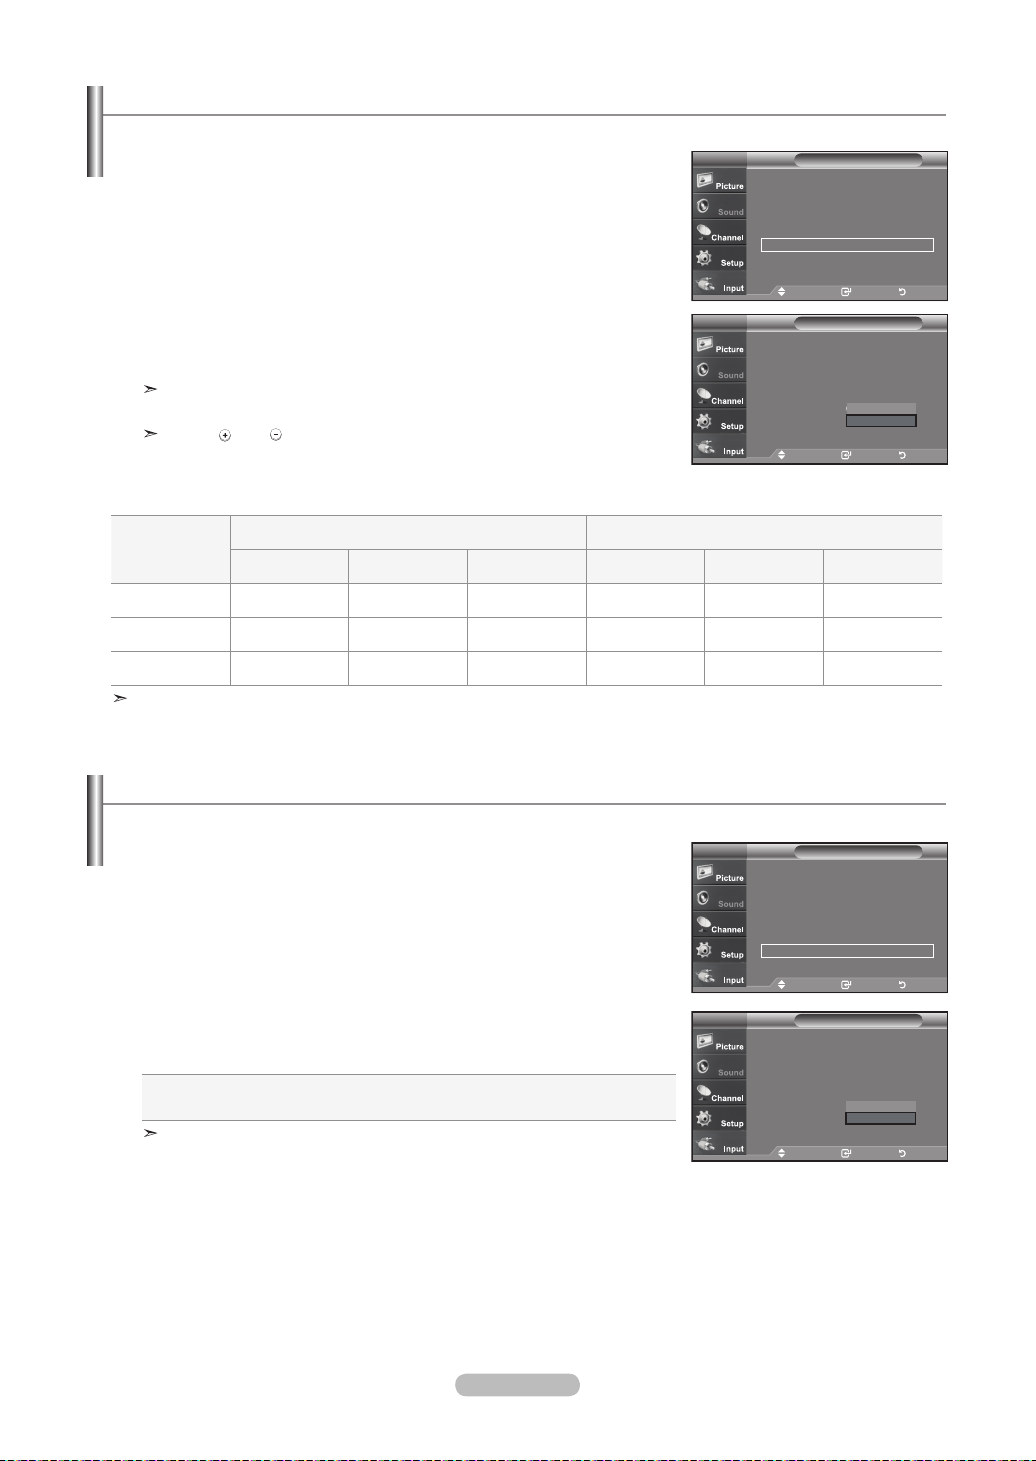
Channel Control
Selecting the Antenna
1. Press the MENU button to display the menu.
Press the ▲ or ▼ buttons to select "Channel", then press the ENTER button.
Press the ENTER button to select “Antenna”.
2.
Press the ▲ or ▼ buttons to select “Air” or “Cable”, then press the ENTER
button.
Press the EXIT
Press the ANTENNA button on the remote control.
button to exit.
TV
Antenna : Air ►
Auto Program ►
Clear Scrambled Channel ►
Channel List ►
Name ►
Fine Tune ►
Signal Strength ►
LNA : On ►
TV
Antenna : Air
Auto Program
Clear Scrambled Channel
Channel List
Name
Fine Tune
Signal Strength
LNA : On
Channel
Move Enter Return
Channel
Air
Cable
Move Enter Return
Clearing Scrambled Channels - Digital
The Clear Scrambled Channel function is used to lter out scrambled channels after Auto Program is completed.
It removes the scrambled channels from the list by tuning the digital cable channels. This process may take up to 20~30 minutes.
1. Press the MENU button to display the menu.
Press the ▲ or ▼ buttons to select "Channel", then press the ENTER button.
2. Press the ▲ or ▼ button to select "Clear Scrambled Channel", then press the
ENTER button. It searches scrambled channels, which are to be removed from
the list.
To stop searching scrambled channels;
Press the ENTER button to select Stop
Press the ◄ button to select Yes, then press the ENTER button.
3.
When the scrambled channel searching is completed, press the ENTER button.
Press the EXIT
button to exit.
English - 28
Antenna : Cable ►
Auto Program ►
Clear Scrambled Channel ►
Channel List ►
Name ►
Fine Tune ►
Signal Strength ►
LNA : On ►
Clear Scrambled Channel
Removing scrambled channel.
Enter Return
Clear Scrambled Channel
Scrambled Channel Searching is completed.
0 Channels are deleted.
Return
ChannelTV
Move Enter Return
DTV Cable 3-1
50%
Stop
DTV Cable 3-1
60%
OK
 Loading...