

Page 1

LCD TV
LE32S6
LE37S6
Contact SAMSUNG WORLDWIDE
If you have any questions or comments relating to Samsung products,
please contact the SAMSUNG customer care centre.
Kontakta SAMSUNG
Om du har några frågor eller synpunkter om Samsungs produkter,
är du välkommen att kontakta Samsung Support.
Kontakt SAMSUNG
Hvis du har spørgsmål eller kommentarer vedrørende Samsung produkter,
venligst kontakte Samsung Support.
Kontakt SAMSUNG
Om du har spørsmål eller synspunkter om Samsungs produkter,
er du velkommen å kontakte Samsung Support.
Ota yhteyttä Samsungiin
Jos sinulla on kysymyksiä tai kommentteja koskien Samsung tuotteita
voitte ottaa yhtyettä Samsung tukeen.
Country
BELGIUM 02 201 2418 www.samsung.com/be
CZECH REPUBLIC 844 000 844 www.samsung.com/cz
DENMARK 70 70 19 70 www.samsung.com/dk
FINLAND 030-6227 515 www.samsung.com/fi
FRANCE 3260 SAMSUNG(7267864) (€ 0,15/min) www.samsung.com/fr
GERMANY 01805-121213 (€ 0,14/Min) www.samsung.de
HUNGARY 06-80-SAMSUNG (7267864) www.samsung.com/hu
ITALIA 800 SAMSUNG(7267864) www.samsung.com/it
LUXEMBURG 0032 (0)2 201 24 18 www.samsung.lu
NETHERLANDS 0900 20 200 88 (€ 0,10/Min) www.samsung.com/nl
NORWAY 815-56 480 www.samsung.com/no
POLAND 0 801 801 881 www.samsung.com/pl
PORTUGAL 80 8 200 128 www.samsung.com/pt
REPUBLIC OF IRELAND 0818 717 100 www.samsung.com/uk
SLOVAKIA 0800-SAMSUNG (7267864) www.samsung.com/sk
SPAIN 902 10 11 30 www.samsung.com/es
SWEDEN 0771-400 200 www.samsung.com/se
SWITZERLAND 0800-7267864 www.samsung.com/ch
U.K 0870 SAMSUNG (7267864) www.samsung.com/uk
ESTONIA 800-7267 www.samsung.ee
LATVIA 800-7267 www.samsung.com/lv
LITHUANIA 8-800-77777 www.samsung.lt
KAZAKHSTAN 8 800 080 1188 www.samsung.kz
RUSSIA 8-800-200-0400 www.samsung.ru
UKRAINE 8-800-502-0000 www.samsung.com/ur
UZBEKISTAN 140-1234 www.samsung.uz
Customer Care Centre
“Distributor pro Českou republiku:
Samsung Zrt., česka organizační složka Vyskočilova 4, 14000 Praha 4”
Web Site
BN68-01147G-01
Owner’s Instructions
Before operating the unit,
please read this manual thoroughly,
and retain it for future reference.
ON-SCREEN MENUS
PC DISPLAY
PICTURE IN PICTURE (PIP)
TELETEXT
Register your product at www.samsung.com/global/register
Record your Model and Serial number here for future reference.
▪ Model _______________ ▪ Serial No. _______________
LE40S6
Page 2

Precautions When Displaying a Still Image
A still image may cause permanent damage to the TV screen.
• Do not display a still image on the LCD panel for more than 2 hours as it can cause screen image retention.
This image retention is also known as "screen burn".
To avoid such image retention, reduce the degree of brightness and contrast of the screen when displaying a still image.
• Watching the LCD TV in 4:3 format for a long period of time may leave traces of borders displayed on the left, right and center of
• Displaying still images from Video games and PC for longer than a certain period of time may produce partial after-images.
To prevent this effect, reduce the ‘brightness’ and ‘contrast’ when displaying still images.
the screen caused by the difference of light emission on the screen. Playing a DVD or a game console may cause a similar effect
to the screen. Damages caused by the above effect are not covered by the Warranty.
© 2007 Samsung Electronics Co., Ltd. All rights reserved.
Page 3

Contents
CONNECTING AND PREPARING YOUR TV
List of Parts ........................................................ 3
Installing the Stand ............................................. 3
Installing the Wall Mount Kit ............................... 3
Viewing the Control Panel .................................. 4
Viewing the Connection Panel ........................... 5
Viewing the Remote Control ............................... 7
Installing Batteries in the Remote Control .......... 8
Switching On and Off ......................................... 8
Placing Your Television in Standby Mode........... 8
Plug & Play ......................................................... 9
SETTING THE SOUND
Changing the Sound Standard ......................... 22
Adjusting the Sound Settings ........................... 23
Setting the TruSurround XT (SRS TS XT) ........ 23
Connecting Headphones .................................. 24
Selecting the Sound Mode ............................... 24
Adjusting the Volume Automatically ................. 24
Selecting the Internal Mute .............................. 25
Listening to the Sound of the Sub Picture ........ 25
Resetting the Sound Settings to the Factory
Defaults ............................................................ 26
English
SETTING THE CHANNELS
Storing Channels Automatically ....................... 10
Storing Channels Manually ...............................11
Setting the Channel Lists ................................. 12
Activating the Child Lock .................................. 12
Sorting the Stored Channels ............................ 13
Assigning Channels Names ............................. 13
Fine Tuning Channel Reception ....................... 14
SETTING THE PICTURE
Changing the Picture Standard ........................ 15
Adjusting the Custom Picture ........................... 15
Changing the Colour Tone................................ 16
Activating Backlight .......................................... 16
Conguring Detailed Settings on the Picture ... 17
Changing the Picture Size ................................ 18
Freezing the Current Picture ............................ 19
Selecting the Screen Mode .............................. 19
Resetting the Picture Settings to the
Factory Defaults ............................................... 19
Digital NR / Active Colour / DNIe ..................... 20
Viewing the Picture In Picture (PIP) ................. 21
HDMI Black Level ............................................. 22
SETTING THE TIME
Setting and Displaying the Current Time .......... 26
Setting the Sleep Timer .................................... 27
Switching the Television On and Off
Automatically .................................................... 27
FUNCTION DESCRIPTION
Choosing Your Language ................................. 28
Using Game Mode ........................................... 28
Setting the Blue Screen Mode / Selecting the
Melody ............................................................. 29
Setting the Home Theatre PC .......................... 29
Using the Energy Saving Feature .................... 30
Selecting the Source ........................................ 31
Editing the Input Source Names ...................... 31
English - 1
Page 4

USING THE DTV FEATURE
Previewing the DTV Menu System .................. 32
Updating the Channel List Automatically .......... 33
Updating the Channel List Manually ................ 33
Editing Your Favourite Channels ...................... 34
Selecting Channel List ..................................... 36
Displaying Programme Information .................. 36
Viewing the EPG
(Electronic Programme Guide) Information ...... 37
Using the Scheduled List ................................. 38
Setting the Default Guide ................................. 38
Viewing All Channels and
Favourite Channels .......................................... 39
Adjusting the Menu Translucency .................... 40
Setting up the Parental Lock ............................ 40
Setting the Subtitle ........................................... 41
Setting the Subtitle Mode ................................. 41
Selecting the Audio Format .............................. 41
Selecting the Digital Text (UK only) .................. 42
Selecting the Time Zone (Spain only) .............. 42
Viewing Product Information ............................ 42
Checking the Signal Information ...................... 43
Upgrading the Software ................................... 43
Viewing Common Interface ............................. 44
Selecting the CI (Common Interface) Menu ..... 44
Resetting .......................................................... 45
Selecting the Preferred Language
(Subtitle , Audio or Teletext) ............................. 45
Preference ........................................................ 46
USING THE TELETEXT FEATURE
Teletext Decoder .............................................. 46
Displaying the Teletext Information .................. 47
Selecting a Specic Teletext Page ................... 47
Using Fastext to Select a Teletext Page........... 48
Setting Up Your Remote Control ...................... 48
Remote Control Codes ..................................... 49
SETTING THE PC
Setting up Your PC Software
(Based on Windows XP) .................................. 52
Display Modes .................................................. 52
Setting the PC .................................................. 53
Wall-Mount Adjustment (LE40S6)
(Sold separately) .............................................. 54
RECOMMENDATIONS FOR USE
Using the Anti-Theft Kensington Lock .............. 55
Troubleshooting: Before Contacting Service
Personnel ......................................................... 55
Technical and Environmental Specications ... 56
Symbol Press Important Note One-Touch
English - 2
Button
Page 5

List of Parts
Please make sure the following items are included with your LCD TV.
If any items are missing, contact your dealer.
M4 X L16
Remote Control
& Batteries
(AAA x 2)
Owner’s Instructions
Warranty card / Safety Guide /
The stand and stand screw may not be included depending on the model.
Power Cord Cover-Bottom
Warranty card
Registration Cards (Not available in all locations)
Stand Screw
X 4
Safety Guide
Installing the Stand
Stand Cleaning Cloth
Registration Cards
< 2 >
1. Place the TV faced down on a soft cloth or cushion on a table.
2. Put the stand into the hole at the bottom of the TV.
3.
Insert screw into the hole indicated and tighten.
The stand is installed for models with the screen size of 37 inch and above.
Installing the Wall Mount Kit
Wall mount items (sold separately) allow you to mount
the TV on the wall.
For detailed information on installing the wall mount,
see the instructions provided with the Wall Mount items.
Contact a technician for assistance when installing the
wall mounted bracket.
Samsung Electronics is not responsible for any damage
to the product or injury to yourself or others
if you elect to install the TV on your own.
Do not install your Wall Mount Kit while your TV
is turned on. It may result in personal injury due
to electric shock
Remove the stand and cover the bottom hole with a
cap and fasten with two screws.
English - 3
< 3 >
Page 6

Viewing the Control Panel
The product colour and shape may vary depending on the model.
1 SOURCE
Toggles between all the available input
sources (TV, Ext.1, Ext.2, AV, S-Video,
Component, PC, HDMI1, HDMI2, DTV).
In the on-screen menu, use this button
as you use the ENTER/OK button on the
remote control.
2 MENU
Press to see an on-screen menu of your TV’s
features.
In case of DTV mode, the DTV menu
appears.
3
Press to decrease or increase the volume.
In the on-screen menu, use the
buttons as you use the and buttons on
the remote control.
4
Press to change channels.
In the on-screen menu, use the
buttons as you use the 5 and 6 buttons on
the remote control.
(Without the Remote Control, you can turn on
the TV by using the Channel buttons.)
5 Speakers
6 Remote Control Sensor
Aim the remote control towards this spot on
the TV.
7 (Power)
Press to turn the TV on and off.
8 Power Indicator
Blinks and turns off when the power is on and
lights up in stand-by mode.
English - 4
Page 7

Viewing the Connection Panel
1 2 3 4
[Side Panel]
5
6
Power Input
7890!@
The product colour and shape may vary depending on the model.
Whenever you connect an external device to your TV, make sure that power on the unit is turned off.
When connecting an external device, match the colour of the connection terminal to the cable.
1 Connecting Set-Top Box, VCR or DVD
Connector
EXT 1
EXT 2
Video
o
o
Input
Audio (L/R)
o
o
RGB
o
Output
Video + Audio (L/R)
Only TV or DTV output is available.
Output you can choose.
-Inputs or outputs for external devices, such as VCR, DVD, video game device or video disc players.
2 Connecting AUDIO
- Connect RCA audio cables to "R - AUDIO - L" on the rear of your set and the other ends to
corresponding audio in connectors on the Amplifier or DVD Home Theater.
3 HDMI IN 1,HDMI IN 2
- Supports connections between HDMI-connection-enabled AV devices (Set-Top Boxes, DVD
players)
- No additional Audio connection is needed for an HDMI to HDMI connection.
What is HDMI?
- “High Definition Multimedia interface” allows the transmission of high definition digital video data
and multiple channels of digital audio (5. 1 channels).
- The HDMI/DVI terminal supports DVI connection to an extended device with the appropriate cable
(not supplied). The difference between HDMI and DVI is that the HDMI device is smaller in size,
has the HDCP (High Bandwidth Digital Copy Protection) coding feature installed, and supports
multi - channel digital audio.
DVI IN (HDMI 2) (AUDIO R/L)
- When connecting this product via HDMI or DVI to a Set Top Box, DVD Player or Games Console
etc, make sure that it has been set to a compatible video output mode as shown in the table
below. Failure to observe this may result in picture distortion, image breakup or no picture.
- When using an HDMI/DVI cable connection, it is only possible from the HDMI 2 terminal.
English - 5
Page 8

You should use the DVI-to-HDMI cable or DVI-HDMI Adapter for the connection, and the
“R - AUDIO - L” terminal on DVI for sound output.
Supported modes for HDMI/DVI and Component
HDMI/DVI 50Hz
HDMI/DVI 60Hz
Component
480i
X
X
O
480p
X
O
O
576i
X
X
O
576p
O
X
O
720p
O
O
O
1080i
O
O
O
4 Connecting an Aerial or Cable Television Network
To view television channels correctly, a signal must be received by the set from one of the following
sources:
- An outdoor aerial / A cable television network / A satellite network
5 Connecting CI (Common Interface) CARD
- When not inserting "CI CARD" in some channels,"Scrambled Signal" is displayed on the screen.
- The pairing information containing a telephone number, CI CARD ID, Host ID and other information
will be displayed in about 2~3 minutes. If an error message is displayed, please contact your
service provider.
- When the channel information configuration has finished, the message "Updating Completed" is
displayed, indicating that the channel list is now updated.
You must obtain a CI CARD from a local cable service provider.
Remove the CI CARD by carefully pulling it out with your hands since dropping the CI CARD
may cause damage to it.
Insert the CI-Card in the direction marked on it.
7 Connecting External A/V Devices
- Connect RCA or S-VIDEO cable to an appropriate external A/V device such as VCR, DVD or
Camcorder.
- Connect RCA audio cables to "R - AUDIO - L" on the rear of your set and the other ends to
corresponding audio out connectors on the A/V device.
- Headphone may be connected to the headphone output (
6) on the side of your set. While the
head phone is connected, the sound from the built-in speakers will be disabled.
8 Connecting Computer
- Connect the D- Sub cable (optional) to "PC (PC IN)" on the rear of your set and the other end to
the Video Card of your computer.
- Connect the stereo audio cable (optional) to "AUDIO (PC IN)" on the rear of your set and the other
end to "Audio Out" of the sound card on your computer.
9 DIGITAL AUDIO OUT (OPTICAL)
- Connect to a Digital Audio Component.
0 SERVICE
- Service connection for qualified service engineer.
! Connecting Component Devices (DTV/DVD)
- Connect component video cables (optional) to component connector ("P
your set and the other ends to corresponding component video out connectors on the DTV or DVD.
", "PB", "Y") on the rear of
R
- If you wish to connect both the Set-Top Box and DTV (or DVD), you should connect the Set-Top Box
to the DTV (or DVD) and connect the DTV (or DVD) to component connector ("PR", "PB", "Y") on your
set.
- The P
, PB and Y connectors on your component devices (DTV or DVD) are sometimes labeled Y,
R
B-Y and R-Y or Y, Cb and Cr.
- Connect RCA audio cables (optional) to "R - AUDIO - L" on the rear of your set and the other ends
to corresponding audio out connectors on the DTV or DVD.
- This LCD TV displays its optimum picture resolution in 720p mode.
- This LCD TV displays its maximum picture resolution in 1080i mode.
@ Kensington Lock
- The Kensington lock (optional) is a device used to physically fix the system when used in a public
place.
- If you want to use a locking device, contact the dealer where you purchased the TV.
- The place of the Kensington Lock may be different depending on its model.
English - 6
Page 9

Viewing the Remote Control
1 Selects a target device to be
controlled by the Samsung
remote control (TV, DVD,
STB, CABLE, VCR)
(Refer to page 49~51)
2 Television Standby button
3 Number buttons for direct
channel access
4
One/Two-digit channel
selection
5 It display "Channel List"
on the screen.
6 Selects the TV and DTV
mode directly
7 VCR/DVD Functions
Rewind, Stop, Play/Pause,
Fast/Forward
8 Volume increase
Volume decrease
9 Temporary sound switch-off
0 Menu display and
change confirmation
! Returns to the previous
menu
@ SRS TS XT selection
# Electronic Program Guide
(EPG) display
$ Picture size selection
% Sound effect selection
^
Adjusts 5 separate devices
- TV, DVD, STB, CABLE, or
VCR
.
& When pressing this button, a
number of buttons on the
remote control (e.g. Selects
a target device, volume,
channel buttons) light up
for a few seconds and then
turn off to save power. This
function is to conveniently
use the remote control at
night or when dark.
* Available source selection
( Previous channel
) DTV menu display
a Selects the HDMI mode
directly.
b P : Next channel
P : Previous channel
c Exit the OSD
d Control the cursor in the
menu
e Use to see information on
the current broadcast
Colour buttons :
g
Press to add or delete
channels and to store
channels to the favorite
channel list in the “Channel
List” menu.
h Picture-In-Picture On / Off
i Digital subtitle display
j Picture effect selection
k Picture freeze
l When your remote does not
work, change the batteries
and press the "RESET"
button for 2-3 seconds before
use.
Teletext Functions
6 Exit from the teletext display
0 Teletext index
$ Teletext size selection
* Teletext mode selection
(LIST/FLOF)
( Teletext sub page
b P : Teletext next page
P : Teletext previous page
c Teletext cancel
e Teletext reveal
f Alternately select Teletext,
Double, or Mix.
g Fastext topic selection
h Teletext hold
j Teletext store
The performance of the remote control may be affected by bright light.
This is a special remote control for the visually impaired, and has Braille points on the Power,
Channel, STOP, PLAY/PAUSE and Volume buttons.
English - 7
Page 10
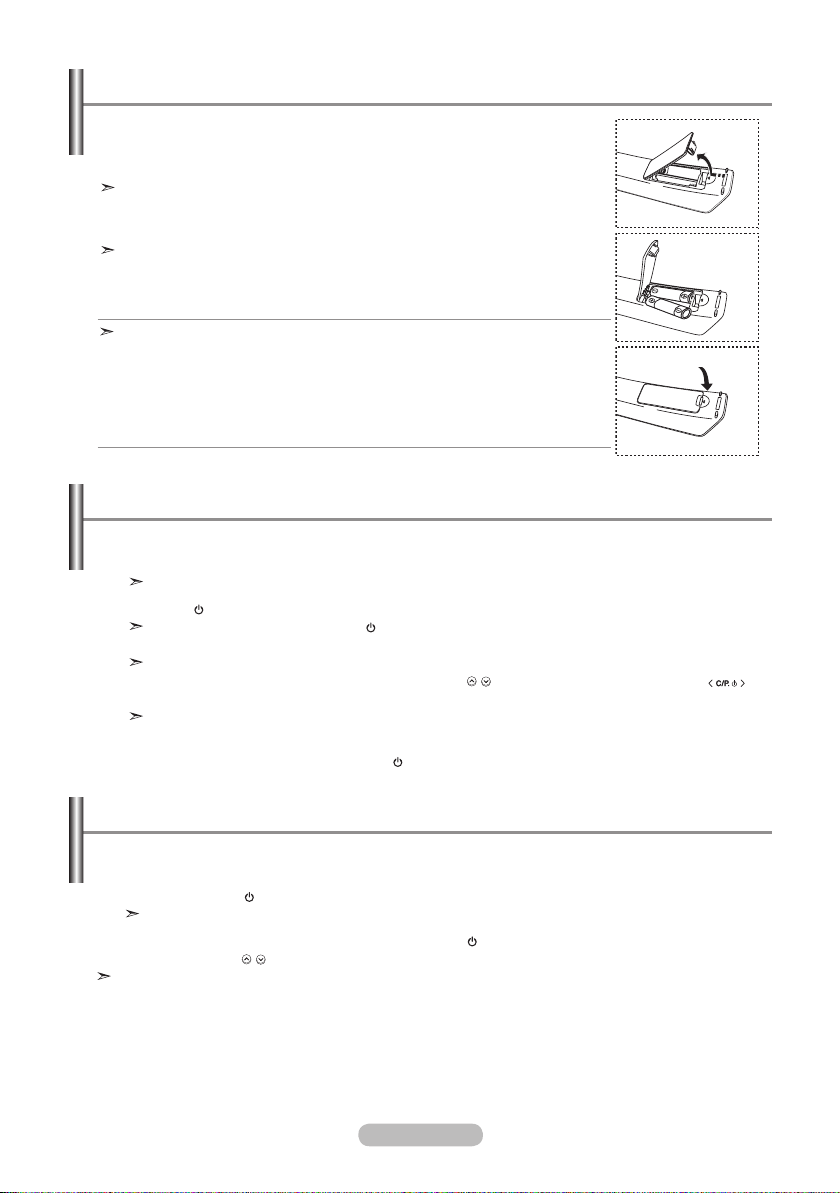
Installing Batteries in the Remote Control
1. Lift the cover at the back of the remote control upward as shown in the
figure.
2. Install two AAA size batteries.
Make sure to match the "+" and "–" ends of the batteries with the
diagram inside the compartment.
3. Replace the cover.
Remove the batteries and store them in a cool, dry place if you won’t be
using the remote control for a long time. The remote control can be used
up to about 23 feet from the TV.
(Assuming typical TV usage, the batteries last for about one year.)
If the remote control doesn’t work, check the following:
1. Is the TV power on?
2. Are the plus and minus ends of the batteries reversed?
3. Are the batteries drained?
4. Is there a power outage, or is the power cord unplugged?
5. Is there a special fluorescent light or neon sign nearby?
Switching On and Off
The mains lead is attached to the rear of your set.
1. Plug the mains lead into an appropriate socket.
The standby indicator lights up on the front of the set.
2. Press the button on the front of the set.
You also can press the POWER button or the TV/DTV button on the remote control to turn
the TV on.
The programme that you were watching last is reselected automatically.
3. Press the numeric button (0~9) or channel up/down ( / ) button on the remote control or
button on the right side of the set.
When you switch the set on for the very first time, you will be asked to choose language in
which the menus are to be displayed.
4. To switch your set off, press the POWER
button again.
Placing Your Television in Standby Mode
Your set can be placed in standby mode in order to reduce the power consumption. The standby
mode can be useful when you wish to interrupt viewing temporarily (during a meal, for example).
1. Press the POWER button on the remote control.
The screen is turned off and a red standby indicator appears on the front of your set.
2. To switch your set back on, simply press the POWER , numeric buttons (0~9), TV/DTV button or
channel up/down ( / ) button again.
Do not leave your set in standby mode for long periods of time (when you are away on holiday, for
example).
It is best to unplug the set from the mains and aerial.
English - 8
Page 11
Plug & Play
When the TV is initially powered on, several basic settings
proceed automatically and subsequently. The following
settings are available.
Any functions related to Digital TV (DVB) will only work in
countries or areas where DVB-T (MPEG2) digital terrestrial
signals are broadcasted. Please confirm with your local
dealer if you can receive DVB-T signals. Although this TV set
follows the DVB-T specification, maintaining compatibility with
the future coming DVB-T digital terrestrial broadcasts is not
guaranteed. Several functions may not be available in some
countries.
1. Press the POWER button on the remote control.
The message "Start Plug & Play" is displayed with "OK" selected.
2. Select the appropriate language by pressing the ▲ or ▼ buttons.
Press the ENTER/OK
button to confirm your choice.
3. Press the ◄ or ► buttons to select “Shop” or “Home”, then the ENTER/OK button.
We recommend setting the TV to Home mode for the best picture in your home environment.
Shop mode is only intended for use in retail environments.
If the unit is accidentally set to Shop mode and you want to return to Dynamic (Home) mode,
press the Volume button and then hold down the
MENU button for five seconds on the side
panel of the TV.
4. The message "Check antenna input." is displayed with "OK" selected.
Press the ENTER/OK
button.
Please check that the antenna cable is connected correctly.
▲
5. Select the appropriate country by pressing the
Press the ENTER/OK
button to confirm your choice.
or ▼ button.
6. The message “Some DTV functions may not be available. Digital Scan” is displayed.
Press the ◄ or ► button to select “Yes” or “No”, then press the ENTER/OK button.
Yes: First an ATV search is performed and then a DTV ch. auto search is performed.
No: Only an ATV search is performed.
This function is supported for all countries except for the following 8 countries: the United
Kingdom, Austria, France, Germany, Italy, Spain, Sweden and Finland.
7.
The "Auto Store" menu is displayed with the "Start" selected. Press the
ENTER/OK
The channel search will start and end automatically.
The DTV channel scan menu appears and the DTV channel is automatically updated.
If the DTV channel is updated, the Source in the source list of the Input menu is automatically
changed to DTV.
After all the available channels are stored, the "Clock Set" menu appears.
Press the ENTER/OK button at any time to interrupt the memorization process.
For detailed descriptions about DTV channel update, refer to page 33 of this manual.
After all the available digital channels are stored, the screen to select a time zone is displayed
depending on the country.
8. Press the ENTER/OK button.
Select the "Month", "Day", "Year", "Hour", or "Minute" by pressing the
Set the "Month", "Day", "Year", "Hour", or "Minute" by pressing the
▲
You can also set the hour and minute by pressing the number buttons on the remote control.
9. Press the ENTER/OK button to confirm your setting.
Language
Country
Auto Store
Clock Set
: Select your language.
: Select your country.
: Automatically scans for and stores channels available in the local area.
: Sets the current time for the TV clock.
English - 9
Plug & Play
Start Plug & Play.
OK
Enter Exit
button.
◄
or ► buttons.
or ▼ buttons.
Page 12

If you want to reset this feature...
1. Press the MENU button to display the menu.
Press the ▲ or ▼ button to select "Setup", then press the
ENTER/OK button.
2. Press the ENTER/OK button again, to select "Plug & Play".
3. The message "Start Plug & Play" is displayed.
(Refer to page 9)
TV
Plug & Play
Language : English
Time
Game Mode : Off
Blue Screen : Off
Melody : Off
PC
More
Move Enter Return
Plug & Play
Start Plug & Play.
OK
Enter Return
Setup
Channel
- Storing Channels Automatically
- Storing Channels Manually
TV
Country : Belgium
Auto Store
Manual Store
Channel Manager
Sort
Name
Fine Tune
Move Enter Return
Storing Channels Automatically
You can scan for the frequency ranges available to you (and availability depends on your country).
Automatically allocated programme numbers may not correspond to actual or desired programme
numbers. However, you can sort numbers manually and clear any channels you do not wish to watch.
1. Press the MENU button to display the menu.
Press the ▲ or ▼ button to select "Channel", then press the ENTER/OK button.
2. Press the ENTER/OK
3. Select the appropriate country by pressing the
Press the ENTER/OK button to confirm your choice.
Even though you have changed the country setting in this menu, the country setting for DTV is not
changed. Use the Plug & Play function to change the country setting for DTV.
(Refer to page 9)
4. Press the
▲
5. Press the ENTER/OK
The TV will begin memorizing all of the available channels.
Press the ENTER/OK button at any time to interrupt the memorization process and return to the
"Channel" menu.
6. After all the available channels are stored, the "Sort" menu appears.
button to select "Country".
▲
or ▼ button.
or ▼ button to select "Auto Store", then press the ENTER/OK button.
button.
English - 10
Page 13
Storing Channels Manually
You can store up to 100 channels, including those received via cable networks.
When storing channels manually, you can choose:
Whether or not to store each of the channels found.
The programme number of each stored channel which you wish to identify.
1. Press the MENU button to display the menu.
Press the ▲ or ▼ button to select "Channel", then press the ENTER/OK button.
2. Press the ▲ or ▼ button to select "Manual Store", then press the ENTER/OK button.
3. Press the ENTER/OK
4. To assign a programme number to a channel, find the correct number by pressing the ▲ or ▼
button and then press the ENTER/OK button.
You can also set a programme number by pressing number buttons on the remote control.
5. Press the ▲ or ▼ button to select "Colour System", then press the ENTER/OK
6.
Select the colour standard required by pressing the ▲ or ▼ button then, press the ENTER/OK button.
7. Press the ▲ or ▼ button to select "Sound System", then press the ENTER/OK button.
8.
Select the sound standard required by pressing the ▲ or ▼ button, then press the ENTER/OK button.
If there is an abnormal sound or no sound, re-select the sound system required.
9. If you know the number of the channel to be stored, press the ▲ or ▼ button to select "Channel".
Press the ENTER/OK button. Select C (Air channel) or S (Cable channel) by pressing the 5 or 6
button. Press the button to select channel.
Select the required number by pressing the ▲ or ▼ button and then press the ENTER/OK button.
Channel mode: P (Programme mode), C (Air channel mode), S (Cable channel mode)
You can also set a channel number by pressing number buttons on the remote control.
10.
If you do not know the channel numbers, press the ▲ or ▼ button to select "Search".
Press the ENTER/OK button. Search by pressing the ▲ or ▼ button and then press the ENTER/OK button.
11. Press the ▲ or ▼ button to select "Store". Press the ENTER/OK button to select "OK".
12. Repeat steps 3 to 11 for each channel to be stored.
Programme: Selects a program number for the channel.
Colour System: Sets the colour supporting system.
Sound System: Sets the sound supporting system.
Channel: Selects a channel.
Search: Scans for the frequency value for the channel.
Store: Saves your settings.
button to select "Programme".
button.
English - 11
Page 14
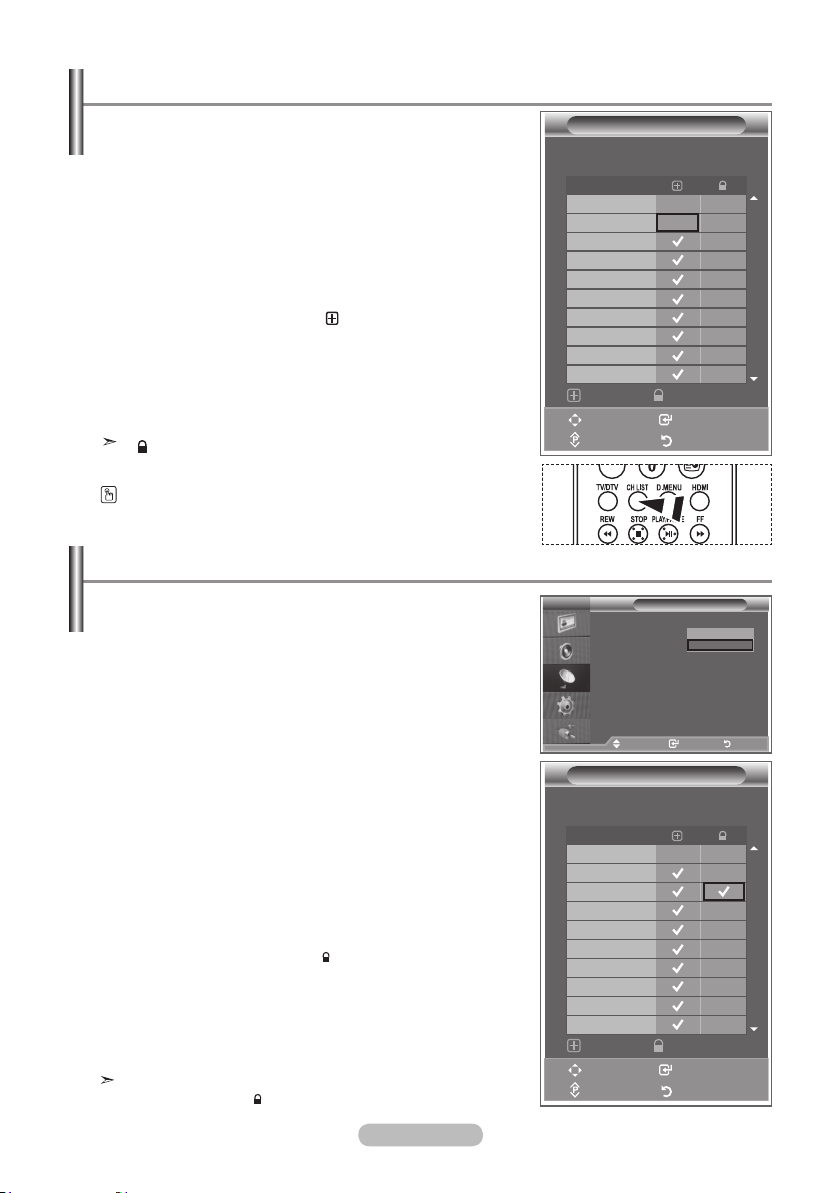
Setting the Channel Lists
Set the channels according to your preference.
You can easily delete, add, or lock the channel you want.
1. Press the MENU button to display the menu.
Press the ▲ or ▼ button to select "Channel", then press the
ENTER/OK button.
2. Press the ▲ or ▼ button to select "Channel Manager",
then press the ENTER/OK button.
3. Press the ENTER/OK button again, to select "Channel
List".
►
4. Press the
5. Press the
button to select " " line.
▲
or ▼ button to select the undesired channel,
then press the ENTER/OK button to cancel.
6. Repeat steps 5 for each channel to be selected or canceled
7. Press the EXIT
button to exit.
" " is active when "Child Lock" is selected to "On".
You can select these options by simply pressing the CH LIST
button on the remote control
Activating the Child Lock
This feature allows you to prevent unauthorized users, such
as children, from watching unsuitable programmes by muting
out video and audio.
Child Lock cannot be released using the buttons on the side.
Only the remote control can release the Child Lock setting,
so keep the remote control away from children.
1. Press the MENU button to display the menu.
Press the ▲ or ▼ button to select "Channel", then press the
ENTER/OK button.
2. Press the ▲ or ▼ button to select "Channel Manager",
then press the ENTER/OK button.
▲
3. Press the
the ENTER/OK button.
4. Press the
ENTER/OK button.
5. Press the
then press the ENTER/OK button.
6. Press the
7. Press the
lock, then press the ENTER/OK button.
8. Repeat steps
9. Press the EXIT button to exit.
Select "On" or "Off" in "Child Lock" to easily turn the channels
which selected on " " to be active or inactive.
or ▼ button to select "Child Lock", then press
▲
or ▼ button to select "On" or "Off". Press the
▲
or ▼ button to select "Channel List",
►
button to select " " line.
▲
or ▼ button to select the channels you want to
7 for each channel to be locked or unlocked.
Channel List
P 1 C3
Prog.
0 C--
1 C3
2 BBC 1
3 C74
4 C75
5 C76
6 S3
7 S4
8 S6
9 S7
Add Lock
Move Enter
Page Return
TV
P 2 C4 BBC1
Prog.
0 C-1 C3
2 BBC 1
3 C74
4 C75
5 C76
6 S3
7 S4
8 S6
9 S7
Add Lock
Move Enter
Page Return
Channel Manager
Channel List
Child Lock :
Move Enter Return
Channel Liat
Off
On
1 / 10
1 / 10
English - 12
Page 15
Sorting the Stored Channels
You can exchange the numbers of two channels, in order to:
Modify the numeric order in which the channels have
been automatically stored.
Give easily remembered numbers to the channels
that you watch most often.
1.
Press the MENU button to display the menu. Press the ▲ or ▼
TV
Country : Belgium
Auto Store
Manual Store
Channel Manager
Sort
Name
Fine Tune
button to select "Channel", then press the ENTER/OK button.
2. Press the ▲ or ▼ button to select "Sort", then press the
ENTER/OK button.
3. Select the channel number that you wish to change by press
▲
ing the
or ▼ button repeatedly. Press the ENTER/OK
button.
The selected channel number and name are moved to
right side.
4. Press the
▲
or ▼ button to move to the position in which you
would like to change and then press the ENTER/OK button.
Move Enter Return
TV
Prog. Ch. Name
0 C--
1 C23
2 C16
3 C3
4 S1
Move Enter Return
The selected channel is exchanged with the one
previously stored to the chosen number.
5. Repeat steps 3 to 4 for another channel to be sorted.
6. Press the EXIT
button to exit.
Assigning Channels Names
Channel names will be assigned automatically when channel
information is broadcast. These names can be changed,
allowing you to assign new names.
1. Press the MENU button to display the menu.
Press the ▲ or ▼ button to select "Channel", then press the
ENTER/OK button.
2. Press the ▲ or ▼ button to select "Name", then press the
ENTER/OK button.
3. If necessary, select the channel to be assigned to a new
name by pressing the ▲ or ▼ button. Press the ENTER/OK
button.
The selection bar is displayed around the name box.
4.
To...
Select a letter, number or symbol
Move on the next letter
Move back the previous letter
Confirm the name
Then...
Press the ▲ or ▼ button
Press the ► button
Press the ◄ button
Press the ENTER/OK button
The characters available are : Letters of the alphabet (A~Z) / Numbers (0~9) /
Special characters (space, /, *, -, +)
5. Repeat steps
6. Press the EXIT
3 to 4 for each channel to be assigned to a new name.
button to exit.
TV
Country : Belgium
Auto Store
Manual Store
Channel Manager
Sort
Name
Fine Tune
Move Enter Return
TV
Prog. Ch. Name
0 C-- -----
1 C23 -----
2 C16
3 C3
4 S1
Move Enter Return
Channel
Channel
Sort
Name
-----
-----
-----
English - 13
Page 16
Fine Tuning Channel Reception
Use fine tuning to manually adjust a particular channel for
optimal reception.
1. Use the number buttons to directly select the channel that
you want to fine tune.
2. Press the MENU button to display the menu.
Press the ▲ or ▼ button to select "Channel", then press the
ENTER/OK button.
3. Press the
▲
or ▼ button to select "Fine Tune", then press
the ENTER/OK button.
◄
4. Press the
Press the ENTER/OK button.
5. Press the EXIT
or ► button to adjust the fine tuning.
button to exit.
Fine tuned channels that have been saved are marked with
an asterisk "*" on the right-hand side of the channel number
in the channel banner. And the channel number turns red.
To reset the fine-tuning, select "Reset" by pressing the
▲ or ▼ button and then press the ENTER/OK button.
TV
Country : Belgium
Auto Store
Manual Store
Channel Manager
Sort
Name
Fine Tune
Move Enter Return
P 1
Adjust Save Return
Channel
Fine Tune
Reset
0
English - 14
Page 17
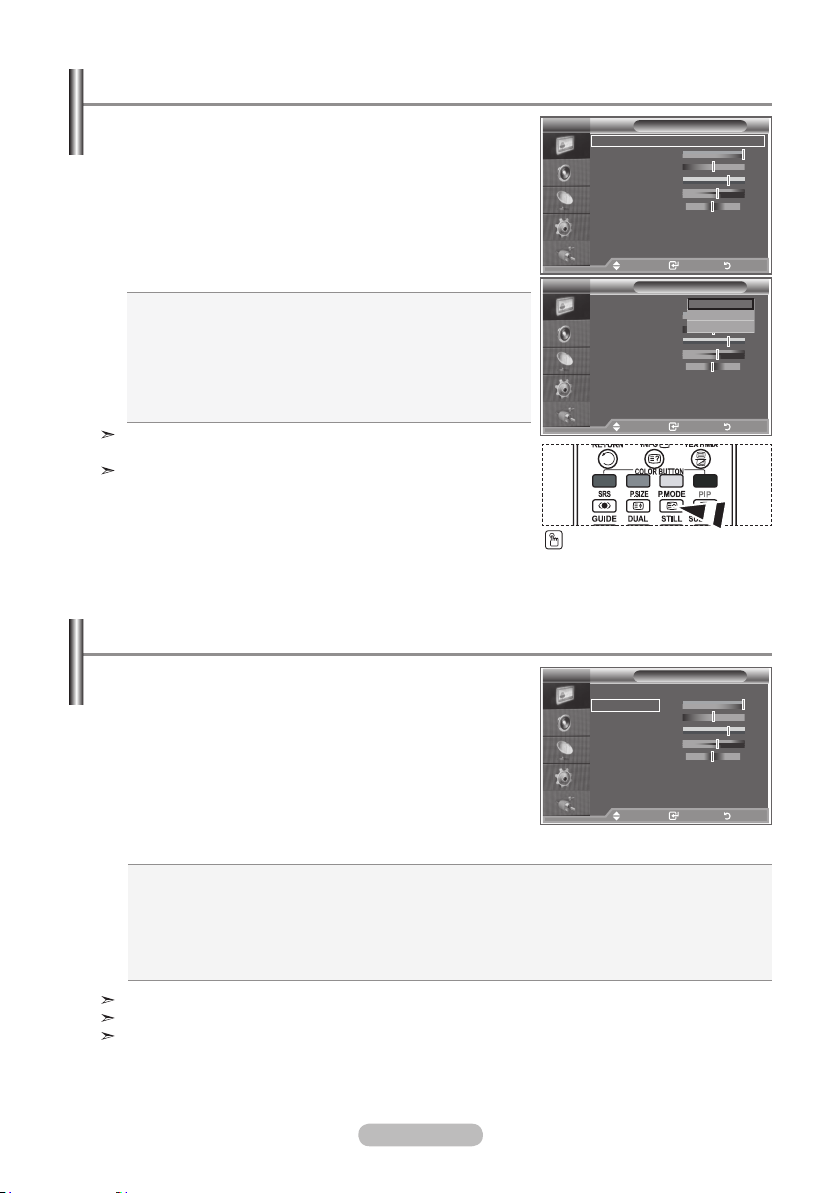
Changing the Picture Standard
You can select the type of picture which best corresponds to
your viewing requirements.
1. Press the MENU button to display the menu.
Press the ENTER/OK button, to select "Picture".
2. Press the ENTER/OK button again, to select "Mode".
3. Press the
▲
or ▼ button to select the desired picture effect.
Press the ENTER/OK button.
4. Press the EXIT
button to exit.
Dynamic: Selects the picture for high-definition in a bright
room.
Standard: Selects the picture for optimum display in a
normal environment.
Movie: Selects the picture for comfortable display in a
dark room.
The Picture mode must be adjusted separately for each input
source.
You can return to the factory defaults picture settings by
selecting the "Reset".
(Refer to "Resetting the Picture Settings to the Factory
Defaults" on page 19)
Adjusting the Custom Picture
Your set has several settings which allow you to control
picture quality.
1. To select the desired picture effect, follow the
"Changing the Picture Standard" instructions number 1 to 3.
2. Press the ▲ or ▼ button to select a particular item. Press the
ENTER/OK button.
◄
3. Press the
a particular item. Press the ENTER/OK button.
4. Press the EXIT
or ► button to decrease or increase the value of
button to exit.
TV
Mode : Dynamic
Contrast
Brightness
Sharpness
Colour
Tint G50 R50
Colour Tone : Cool1
Backlight : 10
More
Move Enter Return
TV
Mode : Dynamic
Contrast
Brightness
Sharpness
Colour
Tint G50 R50
Colour Tone : Cool1
Backlight : 10
More
Move Enter Return
Picture
Picture
Dynamic
Standard
Movie
You can also press the
P.MODE button on the remote
control to select one of the
picture settings.
TV
Mode : Dynamic
Contrast
Brightness
Sharpness
Colour
Tint G50 R50
Colour Tone : Cool1
Backlight : 10
More
Move Enter Return
Picture
100
45
75
55
100
45
75
55
100
45
75
55
Contrast: Adjusts the lightness and darkness between objects and the background.
Brightness: Adjusts the brightness of the whole screen.
Sharpness: Adjusts the outline of objects to either sharpen them or make them more dull.
Colour: Adjusts the colours, making them lighter or darker.
Tint (NTSC or DTV only):
Adjusts the colour of objects, making them more red or green for a more
natural look.
The adjusted values are stored according to the selected Picture mode.
In PC Mode, Only "Contrast" and "Brightness" can be adjusted.
“Tint” function is available only in “HDMI” and “Component” mode.
English - 15
Page 18

Changing the Colour Tone
You can select the most comfortable colour tone to your
eyes.
1. To select the desired picture effect, follow the
"Changing the Picture Standard" instructions number 1 to 3.
(On page 15)
2. Press the 5 or 6 button to select "Colour Tone", then press
the ENTER/OK button.
3. Press the
5 or 6 button to select the desired colour tone
setting. Press the ENTER/OKbutton.
4. Press the EXIT
button to exit
Cool2: Makes the colour temperature bluer than "Cool1"
menu.
Cool1: Makes whites bluish.
Normal: Keeps whites white.
Warm1: Makes whites reddish.
Warm2: Makes the colour temperature redder than
"Warm1" menu.
TV
Mode : Dynamic
Contrast
Brightness
Sharpness
Colour
Tint G50 R50
Colour Tone : Cool1
Backlight : 10
More
Move Enter Return
TV
Mode : Dynamic
Contrast
Brightness
Sharpness
Colour
Tint G50 R50
Colour Tone : Cool1
Backlight : 10
More
Move Enter Return
The adjusted values are stored according to the selected Picture mode.
When the picture mode is set to Dynamic or Standard, Warm1 and Warm2 cannot be selected.
Activating Backlight
You can adjust the screen brightness by adjusting the LCD
backlight brightness. (0~10)
1. To select the desired picture effect, follow the
"Changing the Picture Standard" instructions number 1 to 3.
(On page 15)
2. Press the ▲ or ▼ button to select “Backlight”, then press the
ENTER/OK button.
3. Press the ◄ or ► button to decrease or increase the value of
a particular item.
4. Press the ENTER/OK
Press the EXIT
button.
button to exit.
TV
Mode : Dynamic
Contrast
Brightness
Sharpness
Colour
Tint G50 R50
Colour Tone : Cool1
Backlight : 10
More
Move Enter Return
Backlight
Adjust Return
Picture
Picture
Picture
Cool 2
Cool 1
Normal
Warm 1
Warm 2
100
45
75
55
100
45
75
55
100
45
75
55
10
English - 16
Page 19

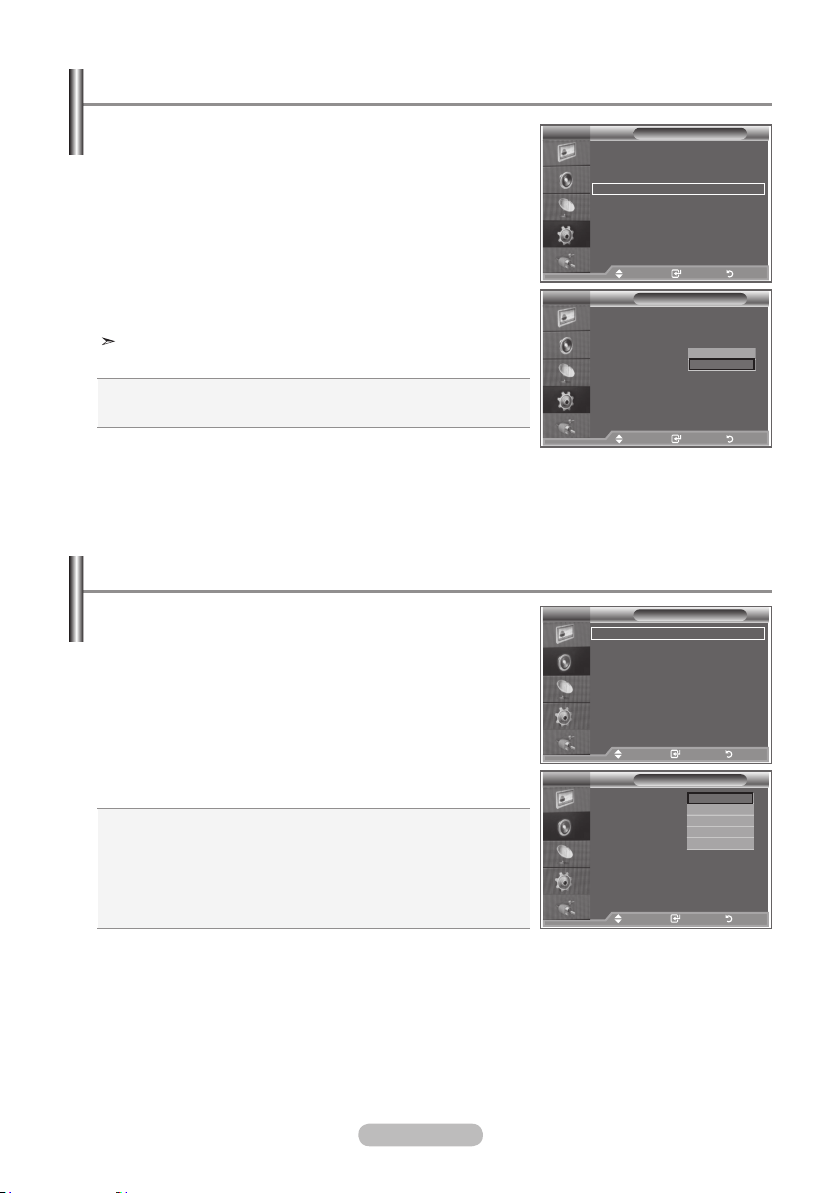
Conguring Detailed Settings on the Picture
You can set detailed picture settings.
Press the MENU button to display the menu.
1.
2.
Press the ENTER/OK button, to select "Picture".
3. Press the ▲ or ▼ button to select "Detailed Settings", then
press the ENTER/OK
button.
4. Select the required option by pressing the ▲ or ▼ button,
then press the ENTER/OK
button.
Available options: Black Adjust, Dynamic Contrast, Gamma,
Colour Space, White Balance, My Colour Control,
Edge Enhancement,
When you are satisfied with your setting, press the
5.
ENTER/OK button.
Press the EXIT button to exit.
6.
When the picture mode is set to Movie or Standard, Detailed
Settings can be selected.
More
Detailed Settings
Size : Auto Wide
Screen Mode : 16 : 9
Digital NR : Auto
Active Colour : Off
DNle : Off
Reset : OK
Move Enter Return
TV
Black Adjust : Off
Dynamic Contrast
Gamma : 0
Colour Space
White Balance
My Colour Control
Edge Enhancement
Move Enter Return
Picture
Detailed Settings
: Off
: Auto
: Off
If DNIe is Off, the Detailed Settings cannot be selected when
the Picture mode is in Standard mode.
Black Adjust: Off/Low/Medium/High
You can directly select the black level on the screen to adjust the screen depth.
Dynamic Contrast: Off/Low/Medium/High
You can adjust the screen contrast so that the optimal contrast is provided.
Gamma: -3 ~ +3
You can adjust the middle brightness of pictures.
Press the ◄ or ► button until you reach the optimal setting.
Colour Space: Auto/Wide
You can set the colour reproduction space for the input signal to Auto or Wide.
White Balance: R-Offset/G-Offset/B-Offset/R-Gain/G-Gain/B-Gain/Reset
You can adjust the colour temperature for more natural picture colours.
R-Offset/G-Offset/B-Offset/R-Gain/G-Gain/B-Gain: Changing the adjustment value will refresh the
adjusted screen.
Select the required option by pressing the ▲ or ▼ button, then press the ENTER/OK button.
Press the ◄ or ► button until you reach the optimal setting.
Reset: The previously adjusted white balance will be reset to the factory defaults.
My Colour Control: Pink/Green/Blue/White/Reset
This setting can be adjusted to suit your personal preferences.
Pink/Green/Blue/White: Changing the adjustment value will refresh the adjusted screen.
Select the required option by pressing the ▲ or ▼ button, then press the ENTER/OK button.
Press the ◄ or ► button until you reach the optimal setting.
Reset: The previously adjusted colours will be reset to the factory defaults.
Edge Enhancement: Off/On
You can emphasize object boundaries.
English - 17
Page 20

Changing the Picture Size
You can select the picture size which best corresponds to
your viewing requirements.
1. Press the MENU button to display the menu.
Press the ENTER/OK button, to select "Picture".
2. Press the ▲ or ▼ button to select "Size", then press the
ENTER/OK button.
▲
3. Select the required option by pressing the
or ▼ button.
Press the ENTER/OK button.
4. Press the EXIT
button to exit.
Auto Wide: Automatically adjusts the picture size to the "16:9"
aspect ratio.
16:9: Adjusts the picture size to 16:9 appropriate for DVDs or
wide broadcasting.
Wide Zoom: Magnify the size of the picture more than 4:3.
Zoom: Magnifies the 16:9 wide picture (in the vertical direction)
to fit the screen size.
4:3: This is the default setting for a video movie or normal
broadcasting.
Just Scan: Displays the input scenes as they are without any
cutoff when HDMI 720p,1080i signals are input.
"Auto Wide" function is available only in "TV", "Ext1", "Ext2",
"AV", "S-Video" and "DTV" mode.
In PC Mode, only "16:9" and "4:3" mode can be adjusted.
Zoom : Select by pressing the ◄ or ► buttons.
Use the ▲ or ▼ button to move the picture up and
down. After selecting , use the ▲ or ▼ button to
magnify or reduce the picture size in the vertical direction.
Wide Zoom : Move the screen up/down using the▲ or ▼ but-
tons after selecting the by pressing the ► or
ENTER/OK button.
TV
More
Detailed Settings
Size : Auto Wide
Screen Mode : 16 : 9
Digital NR : Off
Active Colour : Off
DNle : On
Reset : OK
Move Enter Return
TV
Auto Wide
16 : 9
Wide Zoom
Zoom
4 : 3
Just Scan
Move Enter Return
Picture
Size
You can select these options
by simply pressing the P.SIZE
button on the remote control.
English - 18
Page 21

Freezing the Current Picture
Press the STILL button to freeze a moving picture into a
still one. Press again to cancel.
Selecting the Screen Mode
When setting the picture size to Auto Wide in a 16:9 wide TV,
you can determine the picture size you want to see the 4:3
WSS (Wide Screen Service) image or nothing. Each individual
European country requires different picture size so this function is intended for users to select it.
1. Press the MENU button to display the menu.
Press the ENTER/OK button, to select “Picture”.
2. Press the ▲ or ▼ button to select "Screen Mode", then press
the ENTER/OK button.
3. Select the required option by pressing the
Press the ENTER/OK button.
Available options: 16:9, Wide Zoom, Zoom, 4:3
16:9: Sets the picture to 16:9 wide mode.
Wide Zoom: Magnify the size of the picture more than 4:3.
Zoom: Magnify the size of the picture vertically on screen.
4:3: Sets the picture to 4:3 normal mode.
4. Press the EXIT
button to exit.
Screen Mode is available in Auto Wide mode
This function is not available in PC, Component or HDMI mode.
▲
or ▼ button.
TV
More
Detailed Settings
Size : Auto Wide
Screen Mode : 16 : 9
Digital NR : Auto
Active Colour : On
DNle : On
Reset : OK
Move Enter Return
Move Enter Return
TV
More
Detailed Settings
Size : Auto Wide
Screen Mode : 16 : 9
Digital NR : Off
Active Colour : Off
DNle : Off
Reset : OK
Move Enter Return
Picture
Picture
Wide Zoom
16:9
Zoom
4:3
Resetting the Picture Settings to the Factory Defaults
You can return to the factory defaults picture settings.
1. To select the desired picture effect, follow the
"Changing the Picture Standard" instructions number 1 to 3
on page 15.
2. Press the ▲ or ▼ button to select "Reset", then press the
ENTER/OK button.
Press the ▲ or ▼ button to select "OK" or "Cancel".
3.
Press the ENTER/OK button.
4. Press the EXIT
button to exit.
The "Reset" will be set for each picture mode.
English - 19
TV
More
Detailed Settings
Size : Auto Wide
Screen Mode : 16 : 9
Digital NR : Auto
Active Colour : On
DNle : On
Reset : OK
Move Enter Return
TV
More
Detailed Settings
Size : Auto Wide
Screen Mode : 16 : 9
Digital NR : Auto
Active Colour : On
DNle : On
Reset : OK
Move Enter Return
Picture
Picture
OK
Cancel
Page 22

Digital NR / Active Colour / DNIe
If the broadcast signal received by your TV is weak, you can
activate the Digital Noise Reduction feature to help reduce
any static and ghosting that may appear on the screen.
1. Press the MENU button to display the menu.
Press the ENTER/OK button, to select “Picture”.
2. Select the required option by pressing the ▲ or ▼ button,
then press the ENTER/OK button.
Available options: Digital NR, Active Colour, DNIe.
3. When you are satisfied with your setting, press the ENTER/
OK
button.
4. Press the EXIT
button to exit.
Digital NR: Off/Low/Medium/High/Auto
If the signal received by the television is weak, you can activate this feature to reduce any static and
ghosting that may appear on the screen.
This function is not available in PC mode.
Active Colour: Off/On
If you turn on this option, the colours of the sky and grass will be stronger and clearer for a more
vivid on-screen picture.
This function is not available in PC mode.
This function is not available in Movie and Standard mode.
DNIe: Off/Demo/On
This TV includes the DNIe function so as to provide a high visual quality. If you set DNIe to on, you
can view the screen with the DNIe feature activated. If you set the DNIe to Demo, you can view the
applied DNIe and normal pictures on the screen, for demonstration purposes. Using this function,
you can view the difference in the visual quality.
DNIeTM (Digital Natural Image engine)
This feature brings you more detailed image with 3D noise reduction, detail enhancement, con-
trast enhancement and white enhancement. New image compensation Algorithm gives brighter,
clearer, more detailed image to you. DNIeTM technology will fit every signal into your eyes.
This function is not available in PC mode.
This function is not available in Movie mode
TV
More
Detailed Settings
Size : Auto Wide
Screen Mode : 16 : 9
Digital NR : Auto
Active Colour : On
DNle : On
Reset : OK
Move Enter Return
Picture
English - 20
Page 23

Viewing the Picture In Picture (PIP)
You can display a sub picture within the main picture of set
programme or video input. In this way, you can watch the
picture of set programme or video input from any connected
equipment while watching the main picture.
1. Press the MENU button to display the menu.
Press the ▲ or ▼ button to select "Setup", then press the
ENTER/OK button.
2. Press the ▲ or ▼ button to select "PIP", then press the
ENTER/OK button.
3. Press the ENTER/OK
Press the ▲ or ▼ button to select "On", then press
button again.
ENTER/OK button.
4. Press the ▲ or ▼ button to select "Source",then press
ENTER/OK button. Select a source of the sub picture by
pressing the ▲ or ▼ button and press the ENTER/OK
button.
The sub picture can serve different source selections
based on what the main picture is set to.
▲
5. Press the
or ▼ button to select "Size" of the sub picture
and then press the ENTER/OK button. Select a size of the
sub picture by pressing the ▲ or ▼ button and then press the
ENTER/OK button.
If main picture is in "PC" and “Component” mode, "Size" is
not available.
▲
6. Press the
or ▼ button to select "Position", then press the
ENTER/OK button.
Select the position of the sub picture by pressing the ▲ or ▼ button and then press the ENTER/OK
button.
7. Press the
▲
or ▼ button to select "Programme" and then press the ENTER/OK button.
You can select the channel that you want to view through sub picture by pressing the ▲ or ▼
button. Press the ENTER/OK button.
The "Programme" can be active when the sub picture is set to TV.
8. Press the EXIT
button to exit.
You may notice that the picture in the PIP window becomes slightly unnatural when you use the
main screen to view a game or karaoke.
Mode : Custom
TV
Equalizer
More
SRS TS XT : Off
Home Theatre PC : Off
Auto Volume : Off
Energy Saving : Off
Internal Mute : Off
HDMI Black Level : Low
Reset
PIP
Move Enter Return
Mode : Custom
TV
Equalizer
PIP : On
SRS TS XT : Off
Source : TV
Auto Volume : Off
Size :
Internal Mute : Off
Position :
Reset
Programme : P 1
Move Enter Return
Press the PIP button on the
remote control repeatedly to
activate or deactivate the "PIP".
Setup
Move Enter Return
PIP
Move Enter Return
Source: Used to select a source of the sub picture.
Size: Used to select a size of the sub picture.
Position: Used to move the sub picture.
Programme: Used to Change the sub picture.
PIP Settings
Sub
Main
Component
HDMI
PC
TV analog
Ext.1
O
O
O
Ext.2
O
O
O
O
O
O
AV
S-Video
O
O
O
English - 21
X
X
X
Component
X
X
X
O: PIP operates, X: PIP doesn’t operate
HDMI
X
X
X
PC
X
X
X
TV digital
X
X
X
Page 24
HDMI Black Level
You can directly select the black level on the screen to adjust
the screen depth.
1. Press the MENU button to display the menu.
Press the ▲ or ▼ button to select "Setup", then press the
ENTER/OK button.
2. Press the ▲ or ▼ button to select "HDMI Black Level", then
press the ENTER/OK button.
3. Press the ▲ or ▼ button to select "Normal" or "Low", then
press the ENTER/OK
4. Press the EXIT
button.
button to exit.
This function is active only when the external input connects
to HDMI (RGB signals).
Normal: The screen gets brighter.
Low: The screen gets darker.
Changing the Sound Standard
You can select the type of the special sound effect to be used
when watching a given broadcast.
1. Press the MENU button to display the menu.
Press the ▲ or ▼ button to select "Sound", then press the
ENTER/OK button.
2. Press the ENTER/OK button again, to select "Mode".
▲
3. Select the required sound effect by pressing the
button repeatedly and then press the ENTER/OK button.
4. Press the EXIT
button to exit.
Standard: Selects the normal sound mode.
Music: Emphasizes music over voices.
Movie: Provides live and full sound for movies.
Speech: Emphasizes voices over other sounds.
Custom: Selects your custom sound settings.
(Refer to "Adjusting the Sound Settings")
or ▼
Mode : Custom
TV
Equalizer
More
SRS TS XT : Off
Home Theatre PC : Off
Auto Volume : Off
Energy Saving : Off
Internal Mute : Off
HDMI Black Level : Low
Reset
PIP
Move Enter Return
Move Enter Return
Mode : Custom
TV
Equalizer
More
SRS TS XT : Off
Home Theatre PC : Off
Auto Volume : Off
Energy Saving : Off
Internal Mute : Off
HDMI Black Level : Low
Reset
PIP
Move Enter Return
Move Enter Return
TV
Mode : Custom
Equalizer
SRS TS XT : Off
Auto Volume : Off
Internal Mute : Off
Sound Select : Main
Reset
Move Enter Return
TV
Mode : Custom
Equalizer
SRS TS XT : Off
Auto Volume : Off
Internal Mute : Off
Sound Select : Main
Reset
Move Enter Return
Setup
Setup
Sound
Sound
Normal
Low
Standard
Music
Movie
Speech
Custom
English - 22
Page 25

Adjusting the Sound Settings
The sound settings can be adjusted to suit your personal
preferences.
1. Press the MENU button to display the menu.
Press the ▲ or ▼ button to select "Sound", then press the
ENTER/OK button.
2. Press the ▲ or ▼ button to select "Equalizer", then press the
ENTER/OK button.
3. Press the ◄ or ► button to select a particular item.
Press the ENTER/OK button.
4. Press the ▲ or ▼ button to reach the required setting.
Press the ENTER/OK button.
5. Press the EXIT
button to exit.
If you make any changes to these settings, the Sound Mode
is automatically switched to "Custom".
Setting the TruSurround XT (SRS TS XT)
TruSurround XT is a patented SRS technology that solves
the problem of playing 5.1 multichannel content over two
speakers. TruSurround delivers a compelling,virtual surround
sound experience through any two-speaker playback system,
including internal television speakers. It is fully compatible
with all multichannel formats.
1. Press the MENU button to display the menu.
Press the ▲ or ▼ button to select "Sound", then press the
ENTER/OK button.
2. Press the ▲ or ▼ button to select "SRS TS XT", then press
the ENTER/OK button.
3. Press the ▲ or ▼ button to select "On" or "Off". Press the
ENTER/OK button.
4. Press the EXIT
button to exit.
TruSurround XT, SRS and symbol are
trademarks of SRS Labs, Inc. TruSurround XT
technology is incorporated under license from
SRS Labs, Inc.
TV
Mode : Custom
Equalizer
SRS TS XT : Off
Auto Volume : Off
Internal Mute : Off
Sound Select : Main
Reset
Move Enter Return
TV
Balance 100Hz 300Hz 1kHz 3kHz 10kHz
Move Adjust Return
TV
Mode : Custom
Equalizer
SRS TS XT : Off
Auto Volume : Off
Internal Mute : Off
Sound Select : Main
Reset
Move Enter Return
TV
Mode : Custom
Equalizer
SRS TS XT : Off
Auto Volume : Off
Internal Mute : Off
Sound Select : Main
Reset
Move Enter Return
Sound
Equalizer
Sound
Sound
Off
On
English - 23
You can also set these options
simply by pressing the SRS
button on remote control.
Page 26

Connecting Headphones
You can connect a set of headphones to your set if you wish to
watch a TV programme without disturbing the other people in the
room.
When you insert the head set jack into the corresponding port, you
can operate only "Auto Volume" in Sound menu.
Prolonged use of headphones at a high volume may damage your
hearing.
You will not receive sound from the speakers when you connect headphones to the system.
The headphone volume and TV volume are adjusted differently.
Selecting the Sound Mode
You can set the sound mode by pressing the “DUAL” button.
When you press it, the current sound mode is displayed on the
screen.
Audio Type
FM
Stereo
NICAM
Stereo
Mono
Stereo
Dual
Mono
Stereo
Dual
If the stereo signal is weak and an automatic switching occurs, then switch to the Mono.
DUAL 1/2
MONO
STEREO ↔ MONO
DUAL 1 ↔ DUAL 2
MONO
MONO ↔ STEREO
MONO ↔ DUAL 1
DUAL 2
Default
Automatic
change
DUAL 1
Automatic
change
DUAL 1
You can also set these options
simply by pressing the DUAL
button on remote control.
Adjusting the Volume Automatically
Each broadcasting station has its own signal conditions, and
so it is not easy for you to adjust the volume every time the
channel is changed. This feature allows you to automatically
adjust the volume of the desired channel by lowering the
sound output when the modulation signal is high or by
raising the sound output when the modulation signal is low.
1. Press the MENU button to display the menu.
Press the ▲ or ▼ button to select "Sound", then press the
ENTER/OK button.
2. Press the ▲ or ▼ button to select "Auto Volume", then press
the ENTER/OK button.
3. Press the ▲ or ▼ button to select "On" or "Off". Press the
ENTER/OK button.
4. Press the EXIT
button to exit.
English - 24
TV
Mode : Custom
Equalizer
SRS TS XT : Off
Auto Volume : Off
Internal Mute : Off
Sound Select : Main
Reset
Move Enter Return
TV
Mode : Custom
Equalizer
SRS TS XT : Off
Auto Volume : Off
Internal Mute : Off
Sound Select : Main
Reset
Move Enter Return
Sound
Sound
Off
On
Page 27

Selecting the Internal Mute
If you want to hear the sound through separate speakers,
cancel the internal amplifier.
1. Press the MENU button to display the menu.
Press the ▲ or ▼ button to select "Sound", then press the
ENTER/OK button.
2. Press the ▲ or ▼ button to select "Internal Mute", then press
the ENTER/OK button.
3. Press the ▲ or ▼ button to select "On" or "Off". Press the
ENTER/OK button.
4. Press the EXIT
button to exit.
When "Internal Mute" is set to "On", the Sound menus except
for "Sound Select" (in PIP mode) cannot be adjusted.
TV
TV
Listening to the Sound of the Sub Picture
During the PIP features activation, you can listen to the sound
of the sub picture.
1. Press the MENU button to display the menu.
Press the ▲ or ▼ button to select "Sound", then press the
ENTER/OK button.
2. Press the ▲ or ▼ button to select "Sound Select", then press
the ENTER/OK button.
3. Press the ▲ or ▼ button to select "Sub".
Press the ENTER/OK button.
4. Press the EXIT
button to exit.
Main : Used to listen to the sound of the main picture.
Sub : Used to listen to the sound of the sub picture.
You can select this option when the “PIP” is set to “On”.
TV
TV
Mode : Custom
Equalizer
SRS TS XT : Off
Auto Volume : Off
Internal Mute : Off
Sound Select : Main
Reset
Move Enter Return
Mode : Custom
Equalizer
SRS TS XT : Off
Auto Volume : Off
Internal Mute : Off
Sound Select :
Reset
Move Enter Return
Mode : Custom
Equalizer
SRS TS XT : Off
Auto Volume : Off
Internal Mute : Off
Sound Select : Main
Reset
Move Enter Return
Mode : Custom
Equalizer
SRS TS XT : Off
Auto Volume : Off
Internal Mute : Off
Sound Select : Main
Reset
Move Enter Return
Sound
Sound
Off
Sound
Sound
On
Main
Sub
English - 25
Page 28

Resetting the Sound Settings to the Factory Defaults
If Game Mode is On, the Reset Sound function is activated.
Selecting the Reset function after setting the equalizer resets
the equalizer setting to the factory defaults.
1. Press the MENU button to display the menu.
Press the ▲ or ▼ button to select "Sound", then press the
ENTER/OK button.
2. Press the ▲ or ▼ button to select "Reset", then press the
ENTER/OK button.
3. Press the EXIT
You can select this option when the "Game Mode" is set to "On".
button to exit.
Setting and Displaying the Current Time
You can set the TV’s clock so that the current time is displayed when you press the INFO button. You must also set
the time if you wish to use the automatic On/Off timers.
1. Press the MENU button to display the menu.
Press the ▲ or ▼ button to select "Setup", then press the
ENTER/OK button.
2. Press the ▲ or ▼ button to select "Time", then press the
ENTER/OK button.
3. Press the ENTER/OK
4.
To...
Move to Month, Day, Year, Hour or Minute
Set the Month, Day, Year, Hour or Minute
Press the ENTER/OK button.
button to select "Clock Set".
Press the...
or button.
5
or 6 button.
TV
Mode : Custom
Equalizer
SRS TS XT : Off
Auto Volume : Off
Internal Mute : Off
Sound Select : Main
Reset
Move Enter Return
Mode : Custom
TV
Equalizer
Plug & Play
SRS TS XT : Off
Language : English
Auto Volume : Off
Time
Internal Mute : Off
Game Mode : Off
Reset
Blue Screen : Off
Melody : Off
PC
More
Move Enter Return
Move Enter Return
TV
Clock Set
Month
p
01
q
Hour00Minute
00
Sound
Setup
Day
01
Year
2007
5. Press the EXIT
button to exit.
Move Adjust Return
If you disconnect the power cord, you have to set the clock
again.
You can also set Year, Month, Day, Hour and Minute by pressing the number buttons on the
remote control.
English - 26
Page 29

Setting the Sleep Timer
You can select a time period of between 30 and 180 minutes
after which the television automatically switches to standby
mode.
1. Press the MENU button to display the menu.
Press the ▲ or ▼ button to select "Setup", then press the
ENTER/OK button.
2. Press the ▲ or ▼ button to select "Time", then press the
ENTER/OK button.
3. Press the ▲ or ▼ button to select "Sleep Timer", then press
the ENTER/OK
button.
4. Press the ▲ or ▼ button repeatedly until the desired time
appears (Off, 30, 60, 90, 120, 150, 180).
Press the ENTER/OK button.
5. Press the EXIT
button to exit.
The TV automatically switches to standby mode when the
timer reaches 0.
Mode : Custom
TV
Equalizer
Plug & Play
SRS TS XT : Off
Language : English
Auto Volume : Off
Time
Internal Mute : Off
Game Mode : Off
Reset
Blue Screen : Off
Melody : Off
PC
More
Move Enter Return
Move Enter Return
TV
Clock Set : 00 : 00
Sleep Timer :
Timer 1 :
Timer 2 :
Timer 3 :
Move Enter Return
Setup
Time
Off
30
60
90
120
150
180
Switching the Television On and Off Automatically
1. Press the MENU button to display the menu.
Press the ▲ or ▼ button to select "Setup", then press the
ENTER/OK button.
2. Press the ▲ or ▼ button to select "Time", then press the
ENTER/OK button.
3. Press the ▲ or ▼ button to select "Timer 1", "Timer 2",
"Timer 3", then press the ENTER/OK button.
4. Press the ▲ or ▼ buttons to adjust “Hour”, then press the ►
button to move to the next step.
Set other items using the same method as above.
Activate/Inactivate Press the ▲or▼ button
Repeat Select a Once, Everyday,
Press the ▲or▼ button
Mon-Fri, Mon-Sat, Sat-
Sun
Volume Adjust a 0~100 Press the ▲or▼ button
Programme
Adjust a Programme Press the ▲or▼ button
When finished, press the RETURN button to return.
• The current time will appear every time you press the INFO button.
• You can set the hour, minute, directly by pressing the number
buttons on the remote control.
5. Press the EXIT
button to exit.
Mode : Custom
TV
Equalizer
Plug & Play
SRS TS XT : Off
Language : English
Auto Volume : Off
Time
Internal Mute : Off
Game Mode : Off
Reset
Blue Screen : Off
Melody : Off
PC
More
Move Enter Return
Move Enter Return
TV
On Time
Off Time
Repeat
Volume
► Move Adjust Return
Timer 1
5
:
00
00
6
:
00 00 Inactivate
Once
10
Setup
Inactivate
Programme
1
English - 27
Page 30
Choosing Your Language
When you start using your set for the first time, you must
select the language which will be used for displaying menus
and indications.
1. Press the MENU button to display the on-screen menu.
Press the ▲ or ▼ button to select "Setup", then press the
ENTER/OK button.
2. Press the ▲ or ▼ button to select "Language", then press
the ENTER/OK button.
3. Select a particular language by pressing the ▲ or ▼ button
repeatedly.
Press the ENTER/OK button.
You can choose one of 21 languages.
4. Press the EXIT
button to exit.
Mode : Custom
TV
Equalizer
Plug & Play
SRS TS XT : Off
Language : English
Auto Volume : Off
Time
Internal Mute : Off
Game Mode : Off
Reset
Blue Screen : Off
Melody : Off
PC
More
Move Enter Return
Move Enter Return
Mode : Custom
TV
Equalizer
Plug & Play
SRS TS XT : Off
Language : English
Auto Volume : Off
Time
Internal Mute : Off
Game Mode : Off
Reset
Blue Screen : Off
Melody : Off
PC
More
Move Enter Return
Move Enter Return
Setup
Setup
English
Deutsch
Français
Italiano
Español
Nederlands
q
Using Game Mode
When connecting to a game console such as PlayStationTM or
XboxTM, you can enjoy a more realistic gaming experience by
selecting game menu.
1. Press the MENU button to display the menu.
Press the ▲ or ▼ button to select "Setup", then press the
ENTER/OK button.
2. Press the ▲ or ▼ button to select "Game Mode", then press
the ENTER/OK button.
3. Press the ▲ or ▼ button to select "On" or "Off". Press the
ENTER/OK button.
4. Press the EXIT
button to exit.
To disconnect the game console and connect another
external device, cancel game mode in the setup menu.
If you display the TV menu in Game mode, the screen
shakes slightly.
Game Mode is not available in TV mode.
If Game Mode is On:
• Picture Mode changes to Standard and Sound Mode changes to Custom automatically.
The user cannot change these to other modes.
• Sound Mode in the Sound menu is deactivated. Adjust the sound using the equalizer.
• The Reset Sound function is activated. Selecting the Reset function after setting the equalizer
resets the equalizer setting to the factory defaults.
Mode : Custom
TV
Equalizer
Plug & Play
SRS TS XT : Off
Language : English
Auto Volume : Off
Time
Internal Mute : Off
Game Mode : Off
Reset
Blue Screen : Off
Melody : Off
PC
More
Move Enter Return
Move Enter Return
Mode : Custom
TV
Equalizer
Plug & Play
SRS TS XT : Off
Language : English
Auto Volume : Off
Time
Internal Mute : Off
Game Mode : Off
Reset
Blue Screen : Off
Melody : Off
PC
More
Move Enter Return
Move Enter Return
Setup
Setup
Off
On
English - 28
Page 31

Setting the Blue Screen Mode / Selecting the Melody
Blue Screen:
If no signal is being received or the signal is very weak, a
blue screen automatically replaces the noisy picture background. If you wish to continue viewing the poor picture, you
must set the "Blue Screen" mode to "Off".
Melody:
You can hear melody sound when the television is powered
on or off.
1. Press the MENU button to display the menu.
Press the ▲ or ▼ button to select "Setup", then press the
ENTER/OK button.
2. Press the ▲ or ▼ button to select "Blue Screen" or "Melody".
Press the ENTER/OK button.
3. When you are satisfied with your setting,
press the ENTER/OK button.
Blue Screen: Off/On
Melody: Off/Low/Medium/High
4. Press the EXIT
button to exit.
Mode : Custom
TV
Equalizer
Plug & Play
SRS TS XT : Off
Language : English
Auto Volume : Off
Time
Internal Mute : Off
Game Mode : Off
Reset
Blue Screen : Off
Melody : Off
PC
More
Move Enter Return
Move Enter Return
Mode : Custom
TV
Equalizer
Plug & Play
SRS TS XT : Off
Language : English
Auto Volume : Off
Time
Internal Mute : Off
Game Mode : Off
Reset
Blue Screen : Off
Melody : Off
PC
More
Move Enter Return
Move Enter Return
Setting the Home Theatre PC
You can view higher quality pictures by configuring the
screen settings in PC Mode.
If you set the Home Theatre PC function to On, you can
configure the Detail Settings (when Picture Mode is
set to Standard or Movie) as in PC Mode.
1. Press the MENU button to display the menu.
Press the ▲ or ▼ button to select "Setup", then press the
ENTER/OK button.
2. Press the ▲ or ▼ button to select "Home Theatre PC".
Press the ENTER/OK button.
3. Press the ▲ or ▼ button to select "Off" or "On".
Press the ENTER/OK button.
4. Press the EXIT
button to exit.
This function is available only in PC mode.
Mode : Custom
TV
Equalizer
More
SRS TS XT : Off
Home Theatre PC : Off
Auto Volume : Off
Energy Saving : Off
Internal Mute : Off
HDMI Black Level : Low
Reset
PIP
Move Enter Return
Move Enter Return
Mode : Custom
TV
Equalizer
More
SRS TS XT : Off
Home Theatre PC : Off
Auto Volume : Off
Energy Saving : Off
Internal Mute : Off
HDMI Black Level : Low
Reset
PIP
Move Enter Return
Move Enter Return
Setup
Setup
Setup
Setup
Off
On
Off
Low
Medium
High
Off
On
English - 29
Page 32

Using the Energy Saving Feature
This function adjusts the brightness of the TV so as to reduce
power consumption. When you watching TV at night, set the
"Energy Saving " mode option to "High" so as to reduce the
dazzling of your eyes as well as the power consumption.
1. Press the MENU button to display the on-screen menu.
Press the ▲ or ▼ button to select "Setup", then press the
ENTER/OK button.
2. Press the ▲ or ▼ button to select "Energy Saving", then
press the ENTER/OK button.
3. Select the required option (Off, Low, Medium, High, Auto) by
pressing the ▲ or ▼ button. Press the ENTER/OK
4. Press the EXIT
button to exit.
button.
Mode : Custom
TV
Equalizer
More
SRS TS XT : Off
Home Theatre PC : Off
Auto Volume : Off
Energy Saving : Off
Internal Mute : Off
HDMI Black Level
Reset
PIP
Move Enter Return
TV
More
Home Theatre PC : Off
Energy Saving : Off
HDMI Black Level
PIP
Move Enter Return
: Low
Move Enter Return
: Off
Setup
Setup
Off
Low
Medium
High
Auto
English - 30
Page 33

Selecting the Source
You can select among external sources connected to your
TV’s input jacks.
1. Press the MENU button to display the menu.
Press the ▲ or ▼ button to select "Input", then press the
ENTER/OK button.
2. Press the ENTER/OK button again, to select "Source List".
When no external device is connected to your
set, only "TV", "Ext.1", "Ext.2", "DTV" are activated in the
"Source List". "AV", "S-Video", "Component", "PC",
"HDMI1", "HDMI2" are activated only when they are
connected to your set.
3. Select the required device by pressing the ▲ or ▼ button.
Press the ENTER/OK button.
Press the SOURCE button on the remote control to toggel
between all the available source.
TV mode can be selected by pressing the TV/DTV button,
number buttons(0~9), and the
P / button on the remote control. But it cannot be selected
using the SOURCE button.
Mode : Custom
TV
Equalizer
Source List : TV
SRS TS XT : Off
Edit Name
Auto Volume : Off
Internal Mute : Off
Reset
Move Enter Return
Move Enter Return
Mode : Custom
TV
Equalizer
TV
SRS TS XT : Off
Ext.1 : ----
Auto Volume : Off
Ext.2 : ----
Internal Mute : Off
AV : ----
Reset
S-Video : ---Component : ---PC : ----
More
Source List
Move Enter Return
Move Enter Return
Input
Editing the Input Source Names
Name the device connected to the input jacks to make your
input source selection easier.
1. Press the MENU button to display the menu.
Press the ▲ or ▼ button to select "Input", then press the
ENTER/OK button.
2. Press the ▲ or ▼ button to select "Edit Name", then press
the ENTER/OK button.
3. Press the
edit.
Press the ENTER/OK button.
4. Press the ▲ or ▼ button to select the required device.
Press the ENTER/OK button.
5. Press the EXIT
▲ or ▼ button to select the device that you wish to
button to exit.
English - 31
Mode : Custom
TV
Equalizer
Source List : TV
SRS TS XT : Off
Edit Name
Auto Volume : Off
Internal Mute : Off
Reset
Move Enter Return
Move Enter Return
Mode : Custom
TV
Equalizer
Ext.1 : ----
SRS TS XT : Off
Ext.2 : ----
Auto Volume : Off
AV : ----
Internal Mute : Off
S-Video : ----
Reset
Component : ----
PC : ----
HDMI1 : ----
HDMI2 : ----
Edit Name
Move Enter Return
Move Enter Return
Input
----
VCR
DVD
D-VHS
Cable STB
HD STB
Satellite STB
q
Page 34

Previewing the DTV Menu System
The company does not guarantee the normal
operation of the DTV menu for countries other
than the 8 supported countries (United Kingdom,
Germany, France, Sweden, Finland, Italy, Spain,
Austria) because only these country standards are
supported. In addition, when the country of the
broadcast stream differs from the country selected
by the current user, the string appearing in the
channel banner, Info, Guide, Channel Manager, etc.
may not be displayed properly.
Available in DTV mode. Preset to the DTV mode
by using the TV/DTV button on your remote
control. To help you navigate around the on screen menu system and adjust the various
settings available, refer to the following illustration.
Press the D.MENU button.
Guide
Now & Next Guide
Full Guide
Scheduled List
Default Guide
Channel
Auto Store
Manual Store
Edit Favourite Channels
Channel List
Setup
Menu Transparency
Parental Lock
Subtitle
Subtitle Mode
Audio Format
Digital Text
Time Zone
System
Language
Audio Language
Subtitle Language
Teletext Language
Preference
Now/Next, Full Guide
All, Favourites, Default
High, Medium, Low, Opaque
Enter PIN
Off, On
Normal, Hard of hearing
PCM, Dolby Digital
Disable, Enable
Product Information
Signal Information
Software Upgrade
Common Interface
Reset
Primary Audio Language
Secondary Audio Language
Primary Subtitle Language
Secondary Subtitle Language
Primary Teletext Language
Secondary Teletext Language
Mode : Custom
Equalizer
Now & Next Guide
SRS TS XT : Off
Full Guide
Auto Volume : Off
Scheduled List
Internal Mute : Off
Default Guide : Full Guide
Reset
Auto Store
Manual Store
Edit Favourite Channels
Channel List
Menu Transparency
Parental Lock
Subtitle : On
Subtitle Mode : Normal
Audio Format : PCM
Audio Language
Subtitle Language
Teletext Language
Preference
Guide
Move Enter Return
Move Enter Exit
Channel
Move Enter Return
Move Enter Exit
Setup
: Medium
Move Enter Return
Move Enter Exit
Language
Move Enter Return
Move Enter Exit
You can select these options
by simply pressing the
D.MENU button on the
remote control.
The sub-items of the CI Menu may vary depending on
the CAM model.
English - 32
Page 35

Updating the Channel List Automatically
You can update the channel list when the broadcaster
adds new Services or if you move the TV to a new
location.
1. Press the D.MENU button to display the DTV menu.
2. Press the
▲ or ▼
button to select "Channel", then press
the ENTER/OK button.
Press the ENTER/OK button again, to select "Auto Store".
3.
Press the ENTER/OK button.
4. When it has finished, the number of scanned services will
be displayed.
The existing favourite channel list will not be deleted when the channel list is updated.
To stop the scan before it has finished, press the ENTER/OK button with "STOP" selected.
5. Press the EXIT
If the signal status is poor, the "No Service found! Check the aerial connection" message is
button to exit.
displayed.
Mode : Custom
Equalizer
SRS TS XT : Off
Auto Volume : Off
Scanning for digital services...
Internal Mute : Off
Reset
Services found: 24 Channel: 38
Auto Store
Stop
Move Enter Return
Return
Updating the Channel List Manually
You can specify the channel for a fast channel search.
1. Press the D.MENU button to display the DTV menu.
2. Press the
▲ or ▼
button to select "Channel", then press
Channel
the ENTER/OK button.
3.
Press the
▲ or ▼
button to select "Manual Store", then
press the ENTER/OK button.
4.
Press the
▲ or ▼
button to select "Channel", then press
the ENTER/OK button.
• Channel: Channel "5" to "69" in sequence are displayed (depending on the country)
• Frequency:
• Bandwidth:
When it has finished, the number of scanned services will be displayed.
5.
6. Press the EXIT
The frequency available in the Channel group is displayed.
The available bandwidths are 7 and 8 MHz.
button to exit.
Manual Store
Frequency Bandwidth
▲
474000 8
65
▼
Search
Adjust Return
KHz
35%
MHz
English - 33
Page 36

Editing Your Favourite Channels
You can edit your favourite channels using the four colour
buttons.
1.
Press the D.MENU button to display the DTV menu.
2. Press the ▲ or ▼ button to select "Channel", then press the
ENTER/OK button.
3.
Press the ▲ or ▼ button to select "Edit Favourite Channels",
then press the ENTER/OK button.
4.
Press the red button to display all currently stored channels.
5.
Press the ▲ or ▼ button to select a channel you want.
Press the ENTER/OK button.
channel will be added to the favourite channel list.
•
• Preview: Displays (a) currently selected channel(s).
6.
Add
You can use this function when one or more favourite
channels have been selected.
1.
2. Press the ▲ or ▼ button to select "Channel", then press the
ENTER/OK button.
3.
then press the ENTER/OK button.
4.
To add more channels, refer to the step 5 on the previous
description.
5.
button.
red button.
• To remove all channels, press the green button.
• Preview : Displays (a) currently selected channel(s).
• Press the CH LIST button to display the favourite channel
manager.
" icon is shown next to the selected channel and the
A "
To undo, press the ENTER/OK button again.
•
Select All
•
Select None
The Favorite Channels settings have been completed.
Press the EXIT button to exit.
: Select all channels currently displayed.
: Deselect all selected channels.
Press the D.MENU button to display the DTV menu.
Press the ▲ or ▼ button to select "Edit Favourite Channels",
Press the red button in the "Edit Favourite Channels" menu.
If you want to check the channel to be stored, press RETURN
Press the EXIT button to exit.
• To add all channels to the favourite channel list, press the
Edit Favourite Channels
(no Channels)
Move Enter Return
Add Channels
Return
Edit Favourite Channels
5
1 BBC TWO
2 Five
3 BBC THREE
4 abc1
5 QVC
6
Move Enter Return
Select All Select None Preview
Move Select Return
Edit Favourite Channels
1 BBC TWO
3 BBC THREE
4 abc1
Add Renumber Prewiew Delete
Move Return
Edit Favourite Channels
5
1 BBC TWO
2 Five
3 BBC THREE
4 abc1
5 QVC
6
Move Enter Return
Select All Select None Preview
Move Select Return
★
★
★
★
★
★
English - 34
Page 37

Renumber
1.
Press the D.MENU button to display the DTV menu.
2. Press the ▲ or ▼ button to select "Channel", then press the
ENTER/OK button.
3.
Press the ▲ or ▼ button to select "Edit Favourite Channels",
then press the ENTER/OK button.
4.
Select the required channel using the 5 or 6 button.
5.
Press the green button.
The space for entering the number is a blank.
6.
Enter the new channel number. Press ENTER/OK button to
store or RETURN button to cancel.
Press the ◄ button to delete an entered digit.
If you enter a number already assigned to another
channel, the number is assigned to the selected channel
and the previous number assigned to the selected channel
is assigned to the other channel. That is, the two numbers
are exchanged.
The favorite channels are automatically sorted in
ascending order of channel numbers.
7.
Press the EXIT button to exit.
Edit Favourite Channels
1
BBC TWO ★
--- BBC THREE
4 abc1
Add Renumber Prewiew Delete
Edit Return Conrm
★
★
Preview
1.
In the "Edit Favourite Channels" menu,
select the channel to be previewed by pressing the ▲ or ▼
button.
2.
Press the yellow button.
The selected channel is displayed on the screen.
Delete
1. In the "Edit Favourite Channels" menu, select the channel to
be deleted from the favourite channels list by pressing the
▲ or ▼ button.
2.
Press the blue button.
The selected channel and number will be deleted.
To add a deleted channel back in to the favourite channel
list, see "Add" on page 34.
Edit Favourite Channels
1
BBC TWO ★
3 BBC THREE
4 abc1
Add Renumber Prewiew Delete
Move Return
Edit Favourite Channels
1 BBC TWO
3 BBC THREE
Add Renumber Prewiew Delete
Move Return
★
★
★
★
English - 35
Page 38

Selecting Channel List
You can exclude the channels you have chosen from the
channels you have scanned.When you scan through the
stored channels, those you have chosen to skip are not
displayed. All channels that you do not specifically choose to
skip are displayed during scanning.
1.
Press the D.MENU button to display the DTV menu.
2.
Press the ▲ or ▼ button to select "Channel", then press the
ENTER/OK button.
3.
Press the ▲ or ▼ button to select "Channel List".
Press the ENTER/OK button.
4.
Press the ▲ or ▼ button to select "All", "Favourites" or "Default".
Test Card M' v2.0
1 Test Card M'
3 Vida003b
4 Vida004b
5 vida005b
6 vida006b
15 Ch 15
16 QVC
17 UKTV Gold
Previous Page NextPage Favourites TV
Move Watch Return
Press the ENTER/OK button.
5.
Press the yellow button to toggle between your favourite channels and all channels.
Your favourite channels are only displayed if they were previously set in the "Editing Your
Favourite Channels" menu (refer to page 34).
6.
Press the red or green button to display the previous or next channel List page.
7.
Press the ▲ or ▼ button to select a channel to be tuned.
Press the ENTER/OK button.
The channel number, name and an icon are displayed in the top left corner while changing the
channel. The channel number and name are displayed if the channel is one of the all channels,
and a icon if the channel is one of the favourite channels.
8.
Press the blue button to toggle between your TV, Radio, Data/Other and All.
9.
Press the CH LIST button to exit from the channel List
Channel List
23 bid-up.tv
25 TCM
26 UKTV Style
27 Discovery
28 DiscoveryH&L
15 Cartoon Nwk
33 Boomerang
55 Ttext Holidays
All Channels
60 Television X
70 BBC Radio 1
72 BBC Radio 2
73 BBC Radio 3
74 BBC Radio 4
84 heat
91 MOJO
800 ARD-MHP-Data
6 More
Displaying Programme Information
1/2
While viewing a channel, additional information about the
current programme may be displayed.
1.
While viewing a programme, press the INFO button.
The programme information is displayed.
2.
To exit from banner information, press the INFO button.
English - 36
1 AFDO,16:9
AFDO 16:9
No Block
SD
Stereo
Subtitle
English
Exit
14:30 Set 1 Sep
AII Channels
A
14:30~14:33
Contains video with AFD O; coded frame
is 16:9
Move Enter Return
Page 39

Viewing the EPG (Electronic Programme Guide) Information
The EPG (Electronic Programme Guide) information is
provided by the broadcasters. Programme entries may
appear blank or out of date as a result of the information
broadcast on a given channel. The display will dynamically
update as soon as new information becomes available.
Now & Next Guide
For the six channels indicated in the left-hand column,
displays the Current programme and the Next programme
information.
Full Guide
Displays the programme information as time ordered One
hour segments. Two hours of programme information is
displayed which may be scrolled forwards or backwards in
time.
1.
Press the D.MENU button to display the DTV menu.
2.
Press the ENTER/OK button, to select "Guide".
3.
Press the ▲ or ▼ button to select "Now & Next Guide" or
"Full Guide".
Press the ENTER/OK button.
You can also display the guide menu simply by pressing
the GUIDE button.
4.
To... Then...
• Select a programme by pressing
Watch a programme in the EPG list
If the next program is selected, it is scheduled with the clock icon
displayed. If the ENTER/OK button is pressed again, the scheduling is
canceled with the clock icon gone. For details about scheduling
programmes, refer to the next page.
View programme information
Toggle between the "Now & Next
Guide" or "Full Guide"
Display the "Favourites" and the "All
Channels" list
Scrolls backwards quickly (24 hours). • Press the yellow button repeatedly.
Scrolls forward quickly (24 hours). • Press the blue button repeatedly.
Exit the guide • Press the EXIT button.
the 5, 6, , button.
• Press the ENTER/OK button.
• Select a programme of your choice by
pressing the 5, 6, , button.
• Press the INFO
programme of your choice is
highlighted.
• Press the red button repeatedly.
• Press the green button repeatedly.
button when the
All Channels
Extreme Machines: Armoured Cars
Now Next
Watch ExitFull Guide Favourites
Extreme Machines: Armoured Cars
13:00 14:00Today
Watch ExitNow/Next Favourites
Now & Next Guide
Full Guide
-24Hours +24Hours
13:28 Wed 16 Feb
INFO
Information
13:28 Wed 16 Feb
INFO
Information
The programme title is on the upper part of the screen center. Please click on INFO button for
the detailed information. Channel Number, Running Time, Status Bar, Parental Level, Video Quality
Information(HD/SD), Sound Modes, Subtitle or Teletext, Languages of Subtitle or Teletext, and
brief summary of the highlighted programme are included on the detailed information. "..." will be
appeared if the summary is long.
Six channels are displayed. To scroll between channels, move to a channel using the ▲ or ▼
button. To display page by page, use the P or button.
English - 37
Page 40

Using the Scheduled List
If you make a scheduled viewing list of programs you may
like to see, the channel will be automatically switched to the
scheduled program at the scheduled time even if you are
watching another program.
1.
Press the D.MENU button to display the DTV menu.
2.
Press the ENTER/OK button, to select "Guide".
3.
Press the ▲ or ▼ button to select "Scheduled List", then
press the ENTER/OK button.
4.
Press the red button.
The channel will be switched to the scheduled program.
5.
Press the ENTER/OK button to select an item and adjust with
the ◄ or ► button .
You can also set hour and minute by pressing the number
buttons on the remote control.
• Channel: Set the channel.
•
• Date: Set Year, Month and Day.
• Frequency: Set the frequency.
("Once", "Daily", or "Weekly")
6.
7.
• Cancel: Cancel the adjusted schedule.
• Delete: Delete the selected schedule.
Time:
Set the time.
After setting the schedule, Press the red button.
Press the EXIT button to exit.
•
Save: Save the adjusted schedule.
•
Add Programme
•
Edit
: Re-adjust the selected schedule.
: Add a new schedule.
Scheduled List
(No programmes)
Add Programme
Return
Scheduled List
Tuesday 22 Apr 15:30 ~ 16:00 Once
801 RaiTre
Add Programme
Move Return
Save Cancel
Adjust Move Return
Channel
Time
Date
Frequency
Edit Delete
Scheduled List
802 RaiUno
15 : 20 to -- : --
Tue 22 Apr 2007
Once
Setting the Default Guide
You can preset the default guide style.
1.
Press the D.MENU button to display the DTV menu.
2.
Press the ENTER/OK button, to select "Guide".
3.
Press the ▲ or ▼ button to select "Default Guide", then press
the ENTER/OK button.
4.
Select "Now/Next" or "Full Guide" using the ▲ or ▼ button,
and press the ENTER/OK button.
5.
Press the EXIT button to exit.
English - 38
Now & Next Guide
Full Guide
Scheduled List
Default Guide : Full Guide
Guide
Now/Next
Full Guide
Move Enter Return
Move Enter Return
You can select these options
by simply pressing the GUIDE
button on the remote control.
Page 41

Viewing All Channels and Favourite Channels
In the EPG menu, you can display all channels or favourite
channels.
1.
Press the D.MENU button to display the DTV menu.
2.
Press the ENTER/OK button again, to select "Guide".
3. Select the your required guide ("Now & Next Guide" or "Full
Guide") by pressing the
4.
Press the ENTER/OK button.
5.
Press the green button.
▲ or ▼ button.
All the channel lists and the favorite channel lists will be
toggled.
6.
Select a programme of your choice by pressing the ▲, ▼,
◄, or ► button.
7.
Press the INFO button to display information about the
highlighted programme.
8.
When the Edit Favourite Channels list has not been set up:
•
"The favourites list is empty.
Would you like to choose your favourites now?" message is
displayed.
•
Select "Yes".
The "Edit Favourite Channels" menu is displayed.
If you select "No", all channels will remain unchanged.
• To edit the favourite channels, refer to page 34 for more
details.
Press the EXIT button to exit.
9 .
All Channels" is the list of channels that have been scanned by
"
the channel list update.
All channels are displayed in the all channel mode.
Favourites" (favourite channels) is the list of channels that has
"
been set in the "Edit Favourite Channels" menu (refer to page 34).
All Channels
Extreme Machines: Armoured Cars
Watch ExitFull Guide Favourites
Extreme Machines: Armoured Cars
The favourites list is empty.
Would you like to choose your
favourites now?
Watch ExitNow/Next Favourites
Now & Next Guide
Now Next
Full Guide
13:00 14:00Today
Yes No
-24Hours +24Hours
13:28 Wed 16 Feb
INFO
Information
13:28 Wed 16 Feb
INFO
Information
English - 39
Page 42

Adjusting the Menu Translucency
You can set the translucency of the menu.
1.
Press the D.MENU button to display the DTV menu.
2.
Press the ▲ or ▼ button to select "Setup", then press
the ENTER/OK button.
3.
Press the ▲ or ▼ button to select "Menu Transparency"
then press the ENTER/OK button.
4. Select the required option ("High", "Medium", "Low", or
"Opaque") by pressing the
▲ or ▼ button, and press the
ENTER/OK button to change the setting.
5.
Press the EXIT button to exit.
Setting up the Parental Lock
Menu Transparency
Parental Lock
Subtitle : On
Subtitle Mode : Normal
Audio Format
▼
Setup
: Medium
High
Medium
Low
Opaque
Move Enter Return
This feature allows you to prevent unauthorized users, such
as children, from watching unsuitable programmes by a
4-digit PIN (Personal Identification Number) code that is
defined by the user. The on-screen menu will instruct you to
assign a PIN code (you can change it later, if necessary).
1.
Press the D.MENU button to display the DTV menu.
2.
Press the 5 or 6 button to select "Setup", then press
the ENTER/OK button.
3.
Press the 5 or 6 button to select "Parental Lock.", then
press the ENTER/OK button.
4.
The "Enter PIN" is displayed.
5. Enter your current 4-digit PIN code by using the numeric
buttons (0~9).
The options available in the "Parental Lock" group are
displayed with the "Parental Rating" selected.
The default PIN code for a new TV set is 0000.
If you enter an invalid PIN code,the "Invalid PIN code.
Please try again." message is displayed.
6.
Press the ENTER/OK button.
7.
Press the 5 or 6 button to select the age rating you want to
lock out.
Press the ENTER/OK button.
8. If you want to change the PIN code,select "Change PIN" by
pressing the
5 or 6 button. Press the ENTER/OK button.
The "Enter New PIN" is displayed.
9.
Enter your new PIN code by using the numeric buttons (0~9).
The "Confirm New PIN" is displayed.
10. Re-enter your new PIN code to confirm by using the numeric
buttons (0~9).
The Your PIN code has been changed successfully
message is displayed.
11.
Press the ENTER/OK button.
12.
Press the EXIT button to exit.
If you forget the PIN code, press the remote control buttons
in the following sequence, which resets the PIN to 0-0-0-0:
POWER (Off), MUTE, 8, 2, 4, POWER (On).
English - 40
Menu Transparency
Parental Lock
Subtitle : On
Subtitle Mode : Normal
Audio Format
▼
Enter PIN
Parental Rating: No Block
Change PIN
Confirm New PIN
Your PIN code has been changed successfully.
Setup
: Medium
Move Enter Return
Move Enter Return
Parental Lock
Enter PIN Return
Parental Lock
▲
No Block
No Block
3
4
5
6
7
Move Enter Return
Move Enter Return
Enter PIN Return
▼
Change PIN
OK
Page 43

Setting the Subtitle
You can activate and deactivate the subtitles.
1.
Press the D.MENU button to display the DTV menu.
2.
Press the ▲ or ▼ button to select "Setup", then press the
ENTER/OK button.
3.
Press the ▲ or ▼ button to select "Subtitle ", then press the
ENTER/OK button.
4.
Select "On" by pressing the ▲ or ▼ button. Press the
ENTER/OK button.
5.
Press the EXIT button to exit.
Setting the Subtitle Mode
Use this menu to set the Subtitle Mode. "Normal" under
the menu is the basic subtitle and "Hard of hearing" is the
subtitle for a hearing-impaired person.
1.
Press the D.MENU button to display the DTV menu.
2.
Press the ▲ or ▼ button to select "Setup", then press the
ENTER/OK button.
3. Press the ▲ or ▼ button to select "Subtitle Mode", then
press the ENTER/OK button.
4. Press the ▲ or ▼ button to select "Normal" or
"Hard of hearing". Press the ENTER/OK button.
5.
Press the EXIT button to exit.
If the programme you are watching does not support the
"Hard of hearing" function, "Normal" automatically activates
even though "Hard of hearing" mode is selected.
Menu Transparency
Parental Lock
Subtitle : On
Subtitle Mode : Normal
Audio Format
Menu Transparency
Parental Lock
Subtitle
Subtitle Mode : Normal
Audio Format
Setup
: Medium
Off
On
Move Enter Return
Move Enter Return
Setup
: Medium
: On
Normal
Hard of hearing
Move Enter Return
Move Enter Return
Selecting the Audio Format
You can only hear Dolby Digital sound through the audio
receiver connected through an optical cable. You can only
hear PCM sound through the main speaker.
When sound is emitted from both the main speaker and the
audio receiver, a sound echo may occur due to the decoding
speed difference between the main speaker and the audio
Menu Transparency
Parental Lock
Subtitle : On
Subtitle Mode : Normal
Audio Format : PCM
receiver. In this case, use the internal mute function.
1.
Press the D.MENU button to display the DTV menu.
2.
Press the ▲ or ▼ button to select "Setup", then press the
ENTER/OK button.
3.
Press the ▲ or ▼ button to select "Audio Format", then press the ENTER/OK button.
4. Press the ▲ or ▼ button to select "PCM" or "Dolby Digital". Press the ENTER/OK button.
5.
Press the EXIT button to exit.
The Audio Format appears according to the broadcasting signal.
Dolby digital sound is only available when the TV is connected with an external speaker using an
optical cable.
English - 41
Setup
: Medium
Move Enter Return
Page 44

Selecting the Digital Text (UK only)
If the programme is broadcast with digital text, this feature is
enabled.
1.
Press the D.MENU button to display the DTV menu.
2.
Press the ▲ or ▼ button to select "Setup", then press the
Digital Text : Enable
Time Zone
System
ENTER/OK button.
3.
Press the ▲ or ▼ button to select "Digital Text", then press
the ENTER/OK button.
4. Press the ▲ or ▼ button to select "Disable" or
"Enable". Press the ENTER/OK button.
5. Press the EXIT button to exit.
MHEG(Multimedia and Hypermedia Information Coding Experts Group) An International standard
for data encoding systems used in multimedia and hypermedia. This is at a higher level than the
MPEG system which includes data-linking hypermedia such as still images, character service,
animation, graphic and video files as well as multimedia data. MHEG is user runtime interaction
technology and is being applied to various fields including VOD (Video-On-Demand), ITV
(Interactive TV), EC (Electronic Commerce), tele-education, tele-conferencing, digital libraries and
network games.
Setup
Disable
Enable
Move Enter Return
Selecting the Time Zone (Spain only)
Select the time zone where locate
1.
Press the D.MENU button.
2. Press the ▲ or ▼ button to select "Setup", then press the
ENTER/OK button.
3.
Press the ▲ or ▼ button to select "Time Zone", then press
the ENTER/OK button.
4. Select the time zone where you locate by pressing the
▲ or ▼
button.
Press the ENTER/OK button.
The following options are available
The Iberian Peninsula and Balears Islands -
Canarian Islands
5. Press the EXIT button to exit.
Digital Text
Time Zone
System
The Iberian Peninsula and Balears Islands
Canarian Islands
Setup
Move Enter Return
Time Zone
Viewing Product Information
You can view your product information. For service or
repair, please contact a Samsung approved dealer.
1.
Press the D.MENU button to display the DTV menu.
2.
Press the ▲ or ▼ button to select "Setup", then press the
ENTER/OK button.
3. Press the
the ENTER/OK button.
4.
Press the ENTER/OK button again, to select "Product
Information".
- Software Version, Firmware Version
5.
Press the EXIT button to exit.
▲ or ▼
button to select "System", then press
The Product Information menu is selected.
English - 42
Adjust Enter Return
Product Information
Software Version: T_BDXPDEU00_1004
Firmware Version: T_ST1DEU7_1000
Return
Page 45

Checking the Signal Information
You can get information about the signal status.
1.
Press the D.MENU button to display the DTV menu.
2.
Press the ▲ or ▼ button to select "Setup", then press the
ENTER/OK button.
3.
Press the ▲ or ▼ button to select "System", then press the
ENTER/OK button.
4.
Press the ▲ or ▼ button to select "Signal Information",
then press the ENTER/OK button.
5.
Press the EXIT button to exit.
If the signal status is poor, the "No signal." message is
displayed.
Upgrading the Software
To keep your product up-to-date with new Digital Television
features then software upgrades are periodically broadcast
as part of the normal Television signal.
It will automatically detect these signals and display the
software upgrade banner. You are given the option to install
the upgrade.
1.
Press the D.MENU button to display the DTV menu.
2. Press the ▲ or ▼ button to select "Setup", then press the
ENTER/OK button.
3. Press the ▲ or ▼ button to select "System", then press the
ENTER/OK button.
4.
Press the ▲ or ▼ button to select "Software Upgrade",
then press the ENTER/OK button.
5.
Press the
"Manual Upgrade" or "Satandby Mode upgrade".
Press the ENTER/OK button.
Software Inforamtion
Press the ENTER/OK button, then the current software
version is shown. To display the software version
information, press the ENTER/OK button again.
Manual Upgrade
Press the ENTER/OK button to search for new software
from the currently broadcasting channels.
Standby Mode Upgrade : On / Off
Press the ENTER/OK button. To continue software
upgrade with master power on, Select On by pressing
the ▲ or ▼ button.
45 minutes after entering standby mode, a manual
upgrade is automatically conducted. Since the power
of the unit is turned on internally, the screen may be
on slightly for the LCD product. This phenomenon may
continue for more than 1 hour until the software upgrade
is completed.
6.
Press the EXIT button to exit.
▲ or ▼
button to select "Software Infomation",
Signal Information
Service: ?
Service ID:0000
Multiplex: ? (TSID 0000, ONID 0000)
Network: ? (ID 0000)
Bit error level: 10
Signal Strength: 0
Move Enter Return
Return
Product Information
Signal Information
Software Upgrade
Common Interface
Reset
Software Information
Manual Upgrade
Standby Mode upgrade : On
Software Information
Manual Upgrade
Standby Mode upgrade : On
Software Information
Manual Upgrade
Standby Mode upgrade : On
System
Move Enter Return
Software Upgrade
Move Enter Return
Software Upgrade
Move Enter Return
Software Upgrade
Move Enter Return
English - 43
Page 46

Viewing Common Interface
This contains information on CAM inserted in the CI slot and
displays it.
1.
Press the D.MENU button to display the DTV menu.
2. Press the ▲ or ▼ button to select "Setup", then press the
ENTER/OK button.
3. Press the ▲ or ▼ button to select "System", then press the
ENTER/OK button.
4.
Press the ▲ or ▼ button to select "Common Interface",
then press the ENTER/OK button.
5.
Press the ENTER/OK button to display the information for
your application.
6.
Press the EXIT button to exit.
The Application Info inserting is about the CI CARD.
You can install the CAM anytime whether the TV is ON or
OFF.
1. Purchase the CI CAM module by visiting your nearest dealer
or by phone.
2. Insert the CI CARD into the CAM in the direction of the
arrow until it fits.
3. Insert the CAM with the CI CARD installed into the common
interface slot.
(Insert the CAM in the direction of the arrow, right up to the end
so that it is parallel with the slot.)
4. Check if you can see a picture on a scrambled signal
channel.
Selecting the CI (Common Interface) Menu
This enables the user to select from the CAM-provided menu.
1.
Press the D.MENU button to display the DTV menu.
2. Press the ▲ or ▼ button to select "Setup", then press the
ENTER/OK button.
3. Press the ▲ or ▼ button to select "System", then press the
ENTER/OK button.
4.
Press the ▲ or ▼ button to select "Common Interface",
then press the ENTER/OK button.
5.
Select to "CI Menu" by pressing the ▲ or ▼ button, and
press the ENTER/OK button.
6.
Select the required option by pressing the ▲ or ▼ button,
and press the ENTER/OK button.
7.
Press the EXIT button to exit.
Select the CI Menu based on the menu PC Card.
Main menu
Press OK to select, or Exit to quit
Application Info
Type : CA
Manufacturer : Channel Plus
Info : Top Up TV
Return
CI Menu
Module informa tion
Smart card inf ormation
Language
Software Downl oad
Move Enter Exit
English - 44
Page 47

Resetting
You can reset the values stored to the factory default
values.
The Reset operation deletes all channel information and
Enter PIN
Reset
user preferences returning all values to their default
factory state.
1.
Press the D.MENU button to display the DTV menu.
2. Press the ▲ or ▼ button to select "Setup", then press the
ENTER/OK button.
3. Press the
▲ or ▼
button to select "System", then press
the ENTER/OK button.
4.
Press the
▲ or ▼
button to select "Reset", then press the
ENTER/OK button.
5.
The "Enter PIN" screen will appear.
Enter PIN Return
WARNING: All channel settings and user
preferences will be lost and returned to
the factory defaults. It is recommended
that a reset is performed only when
serious problems are experienced.
Reset
6. Enter your current 4-digit PIN code by using the numeric
buttons (0~9).
The warning message is displayed.All values will be
Return
reset by pressing the coloured buttons (red, green,
yellow, and blue)in turn.
7.
Press the EXIT button to exit.
Selecting the Preferred Language (Subtitle , Audio or Teletext)
You can change the default value for subtitle, audio teletext
languages.
Displays the language information for the incoming stream.
1.
Press the D.MENU button to display the DTV menu.
2.
Press the ▲ or ▼ button to select "Language", then press
the ENTER/OK button.
3.
Press the
▲ or ▼
button to select " Audio Language",
"Subtitle Language" or "Teletext Language".
Press the ENTER/OK button.
4. Select a particular language by pressing the ▲ or ▼ button
repeatedly.
Press the ENTER/OK button.
English is the default in cases where the selected
language is unavailable in the broadcast.
5.
Press the EXIT button to exit.
While viewing a programme, the subtitle can be selected.
While viewing a programme, audio languages can be
selected.
Audio Language
Subtitle Language
Teletext Language
Preference
Audio Language
Subtitle Language
Teletext Language
Preference
Audio Language
Subtitle Language
Teletext Language
Preference
Language
Move Enter Return
Language
Move Enter Return
Language
English - 45
Move Enter Return
Page 48

Preference
This menu consists of 6 sub-menus:
Primary Subtitle Language, Secondary Subtitle Language,
Primary Audio Language, Secondary Audio Language,
Primary Teletext Language, and Secondary Teletext
Language.
Using this feature, users can select one of the languages
(English, German, Italian, Swedish, French, Welsh, Gaelic,
Irish, Danish, Finnish, Norwegian, Spanish, Czech, and Greek).
The language selected here is the default when the user selects
Audio Language
Subtitle Language
Teletext Language
Preference
Language
Move Enter Return
Move Enter Return
a channel.
Press the ▲ or ▼ button to select required menu (Primary Subtitle Language, Secondary Subtitle
Language, Primary Audio Language, Secondary Audio Language, Primary Teletext Language, or
Secondary Teletext Language), then press the ENTER/OK button. The options of the selected menu
are displayed.
Press the ▲ or ▼ button to select required option (English, German, Italian, Swedish, French,
Welsh, Gaelic, Irish, Danish, Finnish, Norwegian, Spanish, Czech, or Greek), then press the
ENTER/OK button.
If you change the language setting, the Subtitle Language, Audio Language, and the Teletext
Language of the Language menu (refer to page 45) are automatically changed to the selected
language.
The Subtitle Language, Audio Language, and the Teletext Language of the Language menu
show a list of languages supported by the current channel and the selection is highlighted. If
you change this language setting, the new selection is only valid for the current channel. The
changed setting does not change the setting of the Primary Subtitle Language, Primary Audio
Language, or the Primary Teletext Language of the Preference menu.
Teletext Decoder
Most set channels carry " teletext ", pages of written
information that provide information such as:
Television programme times.
News bulletins and Weather forecasts.
Sports results.
Subtitles for the hard of hearing.
The teletext pages are organized according to six categories:
Part
A
B
C
D
E
F
Contents
Selected page number.
Broadcasting station identity.
Current page number or search status.
Date and time.
Text.
Status information.
English - 46
Page 49

Displaying the Teletext Information
You can display teletext information at any time, but signal
reception must be good. Otherwise:
Information may be missing.
Some pages may not be displayed.
To activate the teletext mode and display the contents page:
1. Using the P ( ) or P ( ) button, select the channel providing
the teletext service.
2. Press the TEXT/MIX ( ) button to activate the teletext mode.
The contents page is displayed. It can be redisplayed at any
time by pressing the MENU ( ) button.
3. Press the TEXT/MIX
( ) button again.
The actual broadcast will be displayed with "Teletext", "Double",
and "Mix" in order on the screen.
4. Press the TV/DTV
button to exit from the Text display.
If any broken character appears while Text is being viewed,
make sure that the Text language is identical with the language in the "Setup" menu mode. If
both languages are different, select the same language with the Text language on the "Setup"
menu.
Selecting a Specic Teletext Page
Press the number buttons on the remote control to enter the
page number directly:
1. Enter the three-digit page number listed in the contents by pressing
the corresponding numeric buttons.
2. If the selected page is linked with several secondary pages, the
secondary pages are displayed in sequence. To freeze the display
on a given page, press the PIP ( ) . Press the PIP ( ) button
again to resume.
3. Using the various display options:
To display...
Both teletext information and the normal broadcast
Hidden text (answers to quiz games, for example)
The normal screen
A secondary page, by entering its 4-digit number
The next page
The previous page
Double-size letters in the:
Upper half of the screen
Lower half of the screen
Normal screen
Press the...
TEXT/MIX (
)
INFO (
)
INFO (
PRE-CH (
P ( )
P
( )
P.SIZE
( )
Once
Twice
Three times
)
)
English - 47
Page 50

Using Fastext to Select a Teletext Page
The various topics included in the teletext pages are colour-coded,
and can be selected by pressing the coloured buttons on the remote
control.
1. Display the teletext contents page by pressing the TEXT/MIX ( )
button.
2. Press the coloured button corresponding to the topic that you wish to
select (The available topics are listed on the status information line).
3. Press the Red button to display the previous page.
Press the Green button to display the next page.
4. Press the TV/DTV
button to exit from the Text display.
Setting Up Your Remote Control
After it has been set up properly, your remote control can operate in five
different modes: TV, DVD, Cable, Set-Top Box, VCR. Pressing the corresponding button on the remote control allows you to switch between
these modes, and control whichever piece of equipment you choose.
The remote control might not be compatible with all DVD Players,
VCRs, Cable boxes, and Set-Top Boxes.
Setting Up the Remote to Operate Your VCR, CABLE, DVD and STB
1. Turn off your VCR, CABLE, DVD and STB.
2. Press the VCR, CABLE, DVD and STB button on your TV’s remote con-
trol.
3. Press the SET
4. Using the number buttons on your remote control, enter three digits of the
VCR code listed on pages 49~51 of this manual for your brand of VCR.
Make sure you enter three digits of the code, even if the first digit is a "0".
(If more than one code is listed, try the first one.)
5. Press the POWER
Your VCR should turn on if your remote is set up correctly.
If your VCR does not turn on after set up, repeat steps 2, 3, and 4, but try
one of the other codes listed for your brand of VCR.
If no other codes are listed, try each VCR code, 000 through 080.
button on your TV’s remote control.
button on the remote control.
English - 48
Page 51

Remote Control Codes
VCR
Brand Code
SAMSUNG 000 001 002 003 004 005 077 078 079
ADMIRAL 020
AIWA 025
AKAI 004 027 032
AUDIO DYNAMICS 007 026
BELL&HOWELL 018
BROKSONIC 022
CANDLE 002 003 006 008 015 055
CANON 021 056
CITIZEN 002 003 006 008 015 055
COLORTYME 007
CRAIG 002 024
CURTIS MATHES 002 007 008 017 021 025 056 064 066
DAEWOO 003 010 011 012 013 014 015 016
DB 007 026
DIMENSIA 017
DYNATECH 025
ELECTROHOME 034
EMERSON
FISHER 018 024 028 029 048 051 061
FUNAI 025
GENERAL ELECTRIC
GO VIDEO 002
HARMAN KARDON 007
HITACHI 019 025 041 042 074
INSTANT REPLAY 021
JC PENNEY
JCL 007 008 018 021 026 037
JVC 081 082 083
KENWOOD 007 008 018 021 026 037
KLH 070
KONIA 036
LG(Goldstar) 006 007 008 009 010
LIOYD 025
LOGIK 038
LXI 025
MAGNAVOX 021 056 059
MARANTZ 007 008 018 021 026 037 062
MARTA 006
MEI 021
MEMOREX 006 021 024 025
MGA 034
MIDLAND 005
MINOLTA 019 041 075
MITSUBISHI 019 034 041 046
001 003 006 021 022 025 030 032 034 040
047 050 052 060 063 065 066 067 069 073
002 005 017 021 056
002 007 018 019 021 026 037 041 054 056
Brand Code
MONTGOMERY WARD
MTC 002 025
MULTITECH 002 005 025 038
NEC 007 008 018 026 037 062 064
OPTIMUS 020
ORION 073 074 075 076
PANASONIC 021 056 071 072
PENTAX 019 041 075
PENTEX
RESEARCH+
PHILCO 021 056 059
PHILIPS 021 080
PIONEER 019 026 039 053
PORTLAND 015 049 055
PROSCAN 017
QUARTZ 018
QUASAR 021 056
RADIO SHACK/
REALISTIC
RCA
SANSUI 026
SANYO 018 024
SCOTT 003 047 052 067
SEARS 006 018 019 024 028 029 041 048 051
SHARP 020 034 045 015
SHIMTOM 027 033 038 058
SIGNATURE 025
SONY 027 033 044
SYLVANIA
SYMPHONIC 025
TANDY 018 025
TASHIKA 006
TATUNG 037
TEAC 025 037 068
TECHNICS 021
TEKNIKA 006 021 025 031
TMK 066
TOSHIBA 003 019 029 051 052
TOTEVISION 002 006
UNITECH 002
VECTOR RESEARCH
VICTOR 026
VIDEO CONCEPTS 007 026
VIDEOSONIC 002
WARDS
YAMAHA 007 008 018 026 037
ZENITH 023 027 033
020
008
006 018 020 021 024 025 029 034 048 056
002 017 019 021 035 041 043 057 068 076
021 025 056 059
007 026
002 003 006 019 020 021 024 025 034 038 041
English - 49
Page 52

CABLE BOX
Brand Code
SAMSUNG 000 001 002 003 004 005 006 007
GI 041
HAMLIN 003 024 031
HITACHI 025 030
JERROLD 038 039
MACOM 025 030
MAGNAVOX 019 023 028
OAK 026
PANASONIC 003 022 027 037 044
PHILIPS 019 021 023 028
PIONEER 004 018 020 044
RCA 014 022 040
REGAL 003
SAMSUNG DVD
Product Code
DVD 000 001 002
DVDR 003 004
BD Record 005 006
VCR COMBO 007 008 009 010 011
VCR Record 012
DHR COMBO 013
DVD
Brand Code
ANAM 030
AUDIOVOX 075
AUDIOLOGIC 085
ANABA 072
APEX DIGITAL 070 071 074 086 083 084 088 111 112
AIWA 114
BROKSONIC 062
BLAUPUNKT 074
B&K 122 123
CURTIS MATHES 027
CYBER HOME 077 078 079 082
CLARION 080 125
CIRRUS 081
CYBER HOME 065
CINEVISION 095
DAEWOO 066
DENON 146
FARENHEIT 067 068
FISHER
GPX 060
GO VIDEO 061 089 133 135
GE
GREENHILL 074
HITACHI 064 113
HITEKER 071
HOYO 073
HARMAN / KARDON 091 110
IRT 089
090
069 074
Brand Code
REGENCY 015 023
SA 042 043
SCIENTIFIC ATLAN 042 043
SPRUCER 022
STARGATE 2000 036
SYLVANIA 016
TEXSCAN 016
TOCOM 032
UNIVERSAL 033 034
VIEWSTAR 019 021 023 028
WAMER AMEX 046
ZENITH 017 029 035 037 045
Product Code
Home Theater VCR COMBO 014 015 016
HDD Recorder COMBO 017
TWIN TRAY COMBO 018
STB DVD COMBO 019
DVD Receiver 020
AV Receiver 021
Brand Code
INTEGRA 092
JBL 091
JVC 022 033 115 116
JATON 073
KENWOOD 051 108 109
KISS 073
KONKA 059 100 106 107
KLH 074 075
LG(Goldstar) 025 031
LOEWE 057
LASONIC 058
MOBILE
AUTHORITY
MEMOREX 055
MALATA 056
MAGNAVOX 076 093
MINTEK 074 094
MONYKA 073
NORCENT 048 049 050
NEXT BASE
NEC 053
NANTAUS 144
NESA
OPTOMEDIA
ELECTRONICS
OPTIVIEW 072
ONKYO 076 092 119
PHILCO 044 045
PRINCETON 046 047
PROSCAN 023
054
052
074
105
English - 50
Page 53

DVD
Brand Code
PANASONIC 024 034 124 134 136 137 138
PHILIPS 036 076
ROTEL 117 118
RIO 120
RCA 023 035 074 075 131 132
RAITE 073
ROWA 038
SAMPO 104
SONY 026 029 126 127 128 129 130 141
SHERWOOD 039 041
SVA 042
SYLVANIA 043 093
SHARP 140
SANSUI 062
SANYO 062 090
SHINSONIC 094
SAMSUNG SET-TOP BOX
Product Code
Ground wave STB 000 001 002 008 013
CABLE STB 000 004 008 013
Satellite STB 000 003 008 013
SET-TOP BOX
Brand Code
ALPHASTAR 023
ANAM 043
CHANNEL
MASTER
CROSSDIGITAL 019
CHAPARRAL 035
DIRECT TV 015 016 017 019 022 045 060 061 062
DAEWOO 074
DISH NETWORK
SYSTEM
DISHPRO 069
DRAKE 018 024 032
DX ANTENNA 027
ECHOSTAR 025 069 070 071
EXPRESSVU 069
GOI 069
GE 065
GENERAL INSTRUMENT
HTS 069
HOME CABLE 056
HITACHI
HUGHES NETWORK
IQ 020
IQ PRISM
JANEIL 059
JERROID 063
JVC 069 070
LG(Goldstar) 044 073
018 034
065 066 067 068
069 070
046 047 048 063 064
022
015 017
020
Brand Code
THOMSON 145
TOSHIBA 028 062 076
TECHNICS 139
TVIEW 072
TOKAI 073
TEAC 096
TECHWOOD 097
TREDEX 098 099 101
URBAN CONCEPTS
VENTURER 075
VOCOPRO 102
YAMAHA 032 063
YAMAKAWA 040 073
XWAVE 103
ZENITH 076 121
Brand Code
MAGNAVOX 016 021 036 038 039 040 041 042
MEMOREX 016
MOTOROLA 064
MACOM 018
MITSUBISHI 015
NEXT LEVEL 047 048 064
PHILIPS 015 016 017 021 033 036 038 039 040
PRIMESTAR
PANASONIC 058 059 061 062
PAYSAT 016
PROSCAN 065 066
RCA 051 052 053 065 066
RADIOSHACK 064
REALISTIC 057
STAR TRAK 026
STS
SKY 031
SKY LIFE 005 006 007
SHACK
STAR CHOICE
SONY 054 060
TOSHIBA
ULTIMATE TV 060 066
UNIDEN 016 021 037 055 056 057
ZENITH 024 031 068
076
041 042 067
046 049 050 063
020 027
064
064
015 017 028 029 030 072
English - 51
Page 54

Setting up Your PC Software (Based on Windows XP)
The Windows display-settings for a typical computer are shown below. The
actual screens on your PC may be different depending upon your particular
version of Windows and your particular video card. Even if your actual
screens look different, the same, basic set-up information will apply in almost
all cases. (If not, contact your computer manufacturer or Samsung Dealer.)
1. First, click on "Control Panel" on the Windows start menu.
2. When the control panel window appears, click on "Appearance and Themes"
and a display dialog-box will appear.
3. When the control panel window appears, click on "Display" and a display dia
-
log-box will appear.
4. Navigate to the "Settings" tab on the display dialog-box.
The correct size setting (resolution): Optimum- 1360 X 768
If a vertical-frequency option exists on your display settings dialog box, the correct value is
"60" or "60 Hz". Otherwise, just click "OK" and exit the dialog box.
Display Modes
Both screen position and size will vary depending on the type of PC monitor and its resolution.
The resolutions in the table are recommended. (All resolutions between the supported limits are
supported)
D-Sub Input
Mode
IBM
VESA
VESA GTF
Resolution
640×350
720×400
640×480
640×480
640×480
640×480
800×600
800×600
800×600
800×600
1024×768
1024×768
1024×768
1024×768
1360×768
1152×864
640×480
800×600
1024×768
31.469
31.469
31.469
37.861
37.500
43.269
37.879
48.077
46.875
53.674
48.363
56.476
68.677
60.023
47.712
53.783
35.000
43.750
57.672
Horizontal
Frequency (kHz)
Vertical
Frequency (Hz)
70.086
70.087
59.940
72.809
75.000
85.008
60.317
72.188
75.000
85.061
60.004
70.069
84.997
75.029
60.015
59.959
70.000
70.000
72.000
Pixel Clock
Frequency (MHz)
25.175
28.322
25.175
31.500
31.500
36.000
40.000
50.000
49.500
56.250
65.000
75.000
94.500
78.750
85.800
81.750
28.560
45.500
78.434
Sync Polarity
(H/V)
+/-
-/+
-/-
-/-
-/-
-/+/+
+/+
+/+
+/+
-/-
-/+/+
+ /+
+/+
-/+
-/+
-/+
-/-
HDMI/DVI Input
Mode
IBM
VESA
Resolution
640×350 31.469 70.086 25.175 +/720×400 31.469 70.087 28.322 -/+
640×480 31.469 59.940 25.175 -/800×600 37.879 60.317 40.000 +/+
1024×768 48.364 60.000 65.000 -/1360×768 47.712 60.015 85.800 +/+
Horizontal
Frequency (kHz)
Vertical
Frequency (Hz)
Pixel Clock
Frequency (MHz)
The interlace mode is not supported.
The set might operate abnormally if a non-standard video format is selected.
Separate and Composite modes are supported. SOG is not supported.
English - 52
Sync Polarity
(H/V)
Page 55

Setting the PC
Coarse and Fine Tuning of the Image (Image Lock):
The purpose of picture quality adjustment is to remove or
reduce picture noise.
If the noise is not removed by Fine-tuning alone, then adjust
the frequency as best as possible (coarse) and Fine-tune
again.
After the noise has been reduced, re-adjust the picture so that
it is aligned on the center of screen.
1. Preset: Press the SOURCE button to select PC mode.
2. Press the MENU button to display the menu.
Press the ▲ or ▼ button to select "Setup", then press the
ENTER/OK button.
3. Press the ▲ or ▼ button to select "PC", then press the ENTER/OK
4. Press the ENTER/OK
5. Press the
6. Press the
Press the ENTER/OK button.
▲ or ▼ button to select "Coarse" or "Fine", then press the ENTER/OK button.
◄
7. Press the EXIT
button to select "Image Lock".
or ► button to adjust the screen quality.
button to exit.
Changing the Image Position:
Adjust the PC’s screen positioning if it does not fit the TV
screen.
1. Follow the "Coarse and Fine Tuning of the Image
(Image Lock)"
instructions number 1 to 3.
2. Press the ▲ or ▼ button to select "Position", then press the
ENTER/OK button.
3. Press the ▲ or ▼ button to adjusting the Vertical-Position.
Press the ◄ or ► button to adjust the Horizontal-Position.
Press the ENTER/OK button.
4. Press the EXIT
button to exit.
Adjusting the PC Screen Automatically (Auto Adjustment):
Auto adjustment allows the PC screen of set to self-adjust to
the incoming PC video signal. The values of fine, coarse and
position are adjusted automatically.
1. Follow the "Coarse and Fine Tuning of the Image
(Image Lock)" instructions number 1 to 3.
2. Press the ▲ or ▼ button to select "Auto Adjustment", then
press the ENTER/OK button.
3. Press the EXIT
button to exit.
Initializing the Image Settings (Image Reset):
You can replace all image settings with the factory default
values.
1. Follow the "Coarse and Fine Tuning of the Image
(Image Lock)" instructions number 1 to 3.
2. Press the ▲ or ▼ button to select "Image Reset", then press
the ENTER/OK button.
3. Press the EXIT
button to exit.
Mode : Custom
TV
Equalizer
SRS TS XT : Off
Coarse 50
Auto Volume : Off
Fine 0
Internal Mute : Off
Reset
Image Lock
Move Enter Return
Move Enter Return
button.
TV
Move Enter Return
TV
Image Lock
Position
Auto Adjustment
Image Reset
Move Enter Return
TV
Image Lock
Position
Auto Adjustment
Image Reset
Move Enter Return
Position
PC
PC
English - 53
Page 56

Wall-Mount Adjustment (LE40S6) (Sold separately)
Once the wall mount is installed, the position of your TV can be easily adjustable.
1. Press the MENU button to display the menu.
Press the ▲ or ▼ button to select “Setup”, then press the
ENTER/OK button.
2. Press the ▲ or ▼ buttons to select “Wall-Mount Adjustment”,
then press the ENTER/OK button.
3.
Adjust to the desired position using the ▲,▼,◄,► buttons.
4.
Press the EXIT button to exit.
If you press an arrow button when no OSD is displayed on the
TV screen, the Adjustment screen appears.
When you turn the power off, your TV moves to the initial instal-
lation position.
When you turn the power on, your TV moves to the last
remembered position you adjusted.
Using the Remote Control Buttons
Button Operations
Wall-mount angle
adjustment
Reset Moves to the initial installation position
Tilt Up, Tilt Down, Move right, Move left
Mode : Custom
TV
Equalizer
More
SRS TS XT : Off
Home Theatre PC : Off
Auto Volume : Off
Wall-Mount Adjustment
Internal Mute : Off
Energy Saving : Off
Reset
HDMI Black Level : Low
PIP
Move Enter Return
Move Enter Return
Wall Mount Adjusment
Position1
Position 1 2 3
Adjust Center Exit
INFO
Setup
Remembering the
position and moving
to the remembered
position
Remembers 3 positions with the Red, Green and
Yellow buttons.
Moves to the remembered position using these 3
colour buttons.
For installation, refer to the Installation Manual provided.
For product installation and the installation and moving of the wall mount, make sure to consult a
specialized installation company.
This installation manual is to be used when attaching the wall mount to a wall.
When attaching to other building materials, please contact your nearest dealer
English - 54
Page 57

Using the Anti-Theft Kensington Lock
The Kensington lock is a device used to physically fix the system when using it in a public place.
The locking device has to be purchased separately. The appearance and locking method may differ from the illustration depending on the manufacturer. Please refer to the manual provided with
the Kensington lock for proper use.
1. Insert the locking device into
the Kensington slot on the
LCD TV (Figure 1), and turn it
in the locking direction
(Figure 2).
2. Connect the Kensington lock
cable.
3. Fix the Kensington lock to a
desk or a heavy stationary
object.
Cable
Figure 2
Figure 1
<Optional>
The place of the Kensington Lock may be
different depending on its model.
Troubleshooting: Before Contacting Service Personnel
No sound or picture
Normal picture but no sound
Screen is black and power
indicator light blinks steadily
No picture or black and
white picture
Sound and picture
interference
Blurred or snowy picture,
distorted sound
Remote control malfunctions
"Check signal cable."
message is displayed.
On PC mode, "Not Supported
Mode." message is displayed.
The TFT LCD panel uses a panel consisting of sub pixels (3,133,440) which require sophisticated technology to produce. However, there may be few bright or dark pixels on the screen. These pixels will have
no impact on the performance of the product.
Check that the mains lead has been connected to a wall socket.
Check that you have pressed the button on the front of the set.
Check the picture contrast and brightness settings.
Check the volume.
Check the volume.
Check whether the MUTE button has been pressed on the remote control.
Check if "Internal Mute" is off
On your computer check; Power, Signal Cable.
The TV is using its power management system.
Move the computer’s mouse or press any key on the keyboard.
Adjust the colour settings.
Check that the broadcast system selected is correct.
Try to identify the electrical appliance that is affecting the set and move it
further away.
Plug your set into a different mains socket.
Check the direction, location and connections of your aerial.
This interference is often due to the use of an indoor aerial.
Replace the remote control batteries.
Clean the upper edge of the remote control (transmission window).
Check the battery terminals.
Check that the signal cable is firmly connected to the PC or video sources.
Check that the PC or video sources are turned on.
Check the maximum resolution and the frequency of the video adaptor.
Compare these values with the data in the Display Modes.
English - 55
Page 58

Technical and Environmental Specications
Model Name LE32S6 LE37S6 LE40S6
Screen Size (Diagonal) 32 inch 37 inch 40 inch
PC Resolution
Sound
Output
Dimension (WxDxH)
Body
With stand
Weight
With stand
Environmental Considerations
Operating Temperature
Operating Humidity
Storage Temperature
Storage Humidity
Design and specifications are subject to change without prior notice.
This device is a Class B digital apparatus.
For the power supply and Power Consumption, refer to the label attached to the product.
1360 x 768 @ 60 Hz 1360 x 768 @ 60 Hz 1360 x 768 @ 60 Hz
10 W X 2
892.5 x 82.0 x 544.0 mm
892.5 x 249.0 x 615.0 mm
13.9 kg
10 °C to 40 °C (50 °F to 104 °F)
10 % to 80 %, non-condensing
-20 °C to 45 °C (-4 °F to 11 3 °F)
5 % to 95 %, non-condensing
1026.5 × 330.0 × 698.8 mm
10 °C to 40 °C (50 °F to 104 °F)
10 % to 80 %, non-condensing
-20 °C to 45 °C (-4 °F to 11 3 °F)
5 % to 95 %, non-condensing
10 W X 2
1026.5 × 94.1 × 626.1 mm
22.5 kg
10 °C to 40 °C (50 °F to 104 °F)
10 % to 80 %, non-condensing
-20 °C to 45 °C (-4 °F to 11 3 °F)
5 % to 95 %, non-condensing
1100.5 x 95.0 x 661.0 mm
1100.5 x 330.0 x 732.5 mm
10 W X 2
23.7 kg
English - 56
Page 59

This page is intentionally
left blank.
Page 60

Att tänka på vid visning av stillbild
Stillbilden kan orsaka permanenta skador på bildskärmen.
• Visa inte en stillbild på skärmen i mer än två timmar, eftersom det kan leda till att bilden ligger kvar på skärmen.
Att bilden på skärmen behålls kallas även “bildskärmsbränning”.
Du kan undvika att bilden behålls genom att minska på ljusstyrkan och kontrasten på bildskärmen när du visar stillbilder.
• Användning av LCD TV:n i 4:3-format under en längre tid kan lämna spår av kanterna till vänster, höger och mitt på skärmen
• Visning av stillbilder från tv-spel och datorer längre stunder kan skapa delvisa efterbilder.
För att förhindra detta ska du minska på ljusstyrka och kontrast vid visning av stillbilder.
vilket orsakas av skillnaden i ljusstrålning i skärmen. Uppspelning av en DVD eller tv-spel kan orsaka samma effekter på skärmen.
Skador som orsakas av det som beskrivs ovan täcks inte av garantin.
© 2007 Samsung Electronics Co., Ltd. All rights reserved.
Page 61

Innehåll
ANSLUTA OCH FÖRBEREDA TV-APPARATEN
Lista över delar ................................................... 3
Montera stativet .................................................. 3
Installera väggfäste ............................................ 3
Visa kontrollpanelen ........................................... 4
Visa anslutningspanelen .................................... 5
Översikt av fjärrkontrollen .................................. 7
Installering av batterier i fjärrkontrollen .............. 8
Slå på och stänga av .......................................... 8
Sätta tv:n i vänteläge .......................................... 8
Plug & Play ......................................................... 9
STÄLLA IN LJUDET
Ändra ljudstandard ........................................... 22
Ändra ljudinställningarna .................................. 23
Ställa in TruSurround XT (SRS TS XT) ............ 23
Ansluta hörlurar ................................................ 24
Välja ljudläge .................................................... 24
Justera volymen automatiskt ............................ 24
Välja intern avstängning ................................... 25
Lyssna på underbildens ljud ............................. 25
Återställa ljudinställningarna till
fabriksstandard ................................................. 26
Svenska
STÄLLA IN KANALER
Lagra kanaler automatiskt ................................ 10
Lagra kanaler manuellt ......................................11
Ställa in kanallistor ........................................... 12
Aktivera barnspärren ........................................ 12
Sortera de lagrade kanalerna ........................... 13
Namnge kanaler ............................................... 13
Fininställning av kanalmottagningen ................ 14
STÄLLA IN BILDEN
Ändra bildstandard ........................................... 15
Justera Egna bildinställningar .......................... 15
Ändra Färgton .................................................. 16
Aktivera bakgrundsljus ..................................... 16
Kongurera ninställningar för bilden ............... 17
Ändra Bildstorlek .............................................. 18
Frysa den aktuella bilden ................................. 19
Välja skärmläge ................................................ 19
Återställa bildinställningarna till
fabriksstandard ................................................. 19
Brusreducer. / Aktiv färg / DNIe ........................ 20
Visa bild-i-bild (BIB) .......................................... 21
HDMI svart ....................................................... 22
STÄLLA IN TIDEN
Ställa in och visa aktuell tid .............................. 26
Ställa in sovtimern ............................................ 27
Slå på och stänga av TV:n automatiskt ............ 27
BESKRIVNING AV FUNKTIONER
Välja språk ....................................................... 28
Använda Spelläge ............................................ 28
Ställa in läge för blå bakgrund/välja melodi ...... 29
Ställa in Bildinst. PC-läge ................................. 29
Använda energisparfunktionen ........................ 30
Välja källa ......................................................... 31
Redigera ingångskällornas namn .................... 31
Svenska - 1
Page 62

ANVÄNDA DTV-FUNKTIONEN
Förhandsvisa DTV-menysystemet ................... 32
Uppdatera kanallistan automatiskt ................... 33
Uppdatera kanallistan manuellt ........................ 33
Ändra dina favoritkanaler ................................. 34
Välja kanallista ................................................. 36
Visa programinformation .................................. 36
Visa Elektronisk programguide ......................... 37
Använda Schemalagda .................................... 38
Ställa in Standardguide .................................... 38
Visa Alla kanaler och Favourite Channels ....... 39
Ställa in menytransparens ................................ 40
Ställa in Barnlås ............................................... 40
Ställa in undertexter ......................................... 41
Ställa in läge för undertexter ............................ 41
Välja ljudformat ............................................... 41
Välja Digital Text (endast Storbritannien) ......... 42
Välja tidszon (endast Spanien) ........................ 42
Visa produktinformation .................................... 42
Kontrollera signalinformation ............................ 43
Uppgradera programvaran ............................... 43
Visa Common Interface .................................... 44
Välja AG-meny (Common Interface) ................ 44
Återställa .......................................................... 45
Välja önskat språk ........................................... 45
Inställning ........................................................ 46
ANVÄNDA TEXT-TV-FUNKTIONEN
Text-tv-dekoder ................................................ 46
Visa text-tv-information ..................................... 47
Välj en specik text-tv-sida ............................... 47
Använda Fastext (Snabbtext) för att välja
en text-tv-sida ................................................... 48
Ställa in fjärrkontrollen ...................................... 48
Koder för fjärrkontrollen .................................... 49
STÄLLA IN DATORN
Installera programvaran (baserad på
Windows XP) .................................................... 52
Bildskärmslägen ............................................... 52
Ställa in datorn ................................................. 53
Justering av väggfäste (LE40S6)
(säljs separat) ................................................. 54
REKOMMENDATIONER FÖR ANVÄNDNING
Använda Kensington-låset (stöldskydd) ........... 55
Felsökning: Innan du kontaktar
servicepersonal ................................................ 55
Tekniska och miljömässiga specikationer ....... 56
Symboler Tryck Viktigt Obs! Entrycksknapp
Svenska - 2
Page 63

Svenska - 3
Lista över delar
Försäkra dig om att följande delar följer med din LCD-TV.
Kontakta din återförsäljare om det saknas något.
M4 X L16
Fjärrkontroll
och batterier
(AAA x 2)
Användarhandbok
•
Garantibevis/ Säkerhetsmanual/Registreringskort (inte tillgänglig på alla platser)
➣
Stativet och stativskruvarna kanske inte medföljer beroende på modell.
➣
Nätsladd Nedre kåpa Stativskruv X4 Stativ Rengöringsduk
Garantibevis
•
Säkerhetsmanual
•
Montera stativet
Registreringskort
•
< 2 > < 3 >
Placera TV:n med framsidan nedåt på ett mjukt tyg eller en kudde på ett bord.
1.
För in stativet i hålet i TV:ns botten.
2.
Sätt i skruven i hålet enligt anvisning och dra åt.
3.
Stativet installeras för modeller med en skärmstorlek på 37 tum eller mer.
➣
Installera väggfästessatsen
Objekt för väggmontering (säljs separat) gör det möjligt för dig
att montera TV:n på väggen.
För detaljerad information om hur du utför en väggmontering, se
de medföljande anvisningarna för väggmontering. Kontakta en
tekniker för montering av väggfästet.
Samsung Electronics är inte ansvariga för skador på produkten
eller personlig skada på dig själv eller andra om du väljer att
montera TV:n själv.
Installera inte väggmonteringssatsen när TV:n är
påslagen. Det kan leda till personskada på grund av
elektriska stötar.
➣
Avlägsna ställningen, täck det nedre hålet med ett lock och
spänn fast med två skruvar.
Page 64

Visa kontrollpanelen
Produktens färg och form kan variera beroende på modell.
➣
SOURCE
1
Visar en meny över alla tillgängliga
indatakällor (TV, Ext.1, Ext.2, AV, S-Video,
Component, PC, HDMI1, HDMI2 och DTV). På
skärmmenyn används den här knappen när du
använder ENTER/OK på fjärrkontrollen.
MENU
2
Tryck här om du vill se en skärmmeny med TV:ns
funktioner.
I DTV-läget visas DTV-menyn.
3
Tryck här när du vill sänka eller höja volymen.
Använd de här knapparna i skärmmenyn
när du använder och på fjärrkontrollen.
Svenska - 4
4
5
6
7
8
Tryck här när du vill byta kanal.
Använd de här knapparna i
skärmmenyn när du använder och på
fjärrkontrollen.
(Om du inte använder fjärrkontrollen kan du
koppla på TV:n med hjälp av kanalknapparna.)
Högtalare
Mottagare för fjärrkontrollen
Rikta fjärrkontrollen mot den här punkten på
TV:n.
(Ström)
Tryck här när du ska slå på och stänga
av TV:n.
Strömindikator
Blinkar och stängs av när strömmen är på och
tänds i viloläge.
Page 65

Svenska - 5
Visa anslutningspanel
1 2 3 4
[Sidopanel]
5
6
Strömanslutning
Produktens färg och form kan variera beroende på modell.
➣
När du vill ansluta en extern enhet till TV:n ska du kontrollera att strömmen på enheten slås av.
➣
När du ansluter till en extern enhet skall du matcha färgen på anslutningen med den på kabeln.
➣
1
Ansluta digital-tv-box, videobandspelare eller DVD
Kontakt
EXT 1 O O O Enbart TV- eller DTV-utgången är tillgänglig.
EXT 2 O O Utgång som du kan välja.
Ingångar eller utgångar för externa enheter, t.ex. videobandspelare, DVD, videospelsenheter eller video
-
disc-spelare.
2
Ansluta AUDIO
Anslut RCA-ljudkablarna till ”R - AUDIO - L” på apparatens baksida och de andra ändarna till motsvarande
-
ljudutgångar på förstärkaren eller DVD-hemmabioanläggningen.
3 HDMI IN 1,HDMI IN 2
Stöd för anslutningar mellan HDMI-anslutningsaktiverade AV-enheter (digital-tv-boxar, DVD-spelare).
-
Ingen ytterligare ljudanslutning krävs för en HDMI till HDMI-anslutning.
-
Vad är HDMI?
➣
“High Denition Multimedia interface” gör det möjligt att överföra digital bildinformation av högdenitionstyp
-
och era kanaler med digitalt ljud (5,1 kanaler).
HDMI/DVI-terminalen stöder DVI-anslutning till en extra enhet med lämplig kabel (medföljer ej). Skillnaden
-
mellan HDMI och DVI är att HDMI-enheten är mindre till storleken, har HDCP(High Bandwidth Digital Copy
Protection)-kodning och stödjer erkanals digitalt ljud.
DVI IN (HDMI 2) (AUDIO R/L)
När du ansluter den här produkten via HDMI eller DVI till en digital-tv-box, DVD-spelare eller spelenhet
-
etc., kontrollera att den är inställd på kompatibelt video-utgångsläge enligt tabellen nedan. Om du inte gör
det kan det uppstå bildstörningar eller ingen bild alls.
Användning av HDMI-kabelanslutning kan endast ske från HDMI 2-terminalen.
-
Video Ljud (V/H) RGB Video + ljud (V/H)
Ingång Utgång
7890!@
Page 66

Du skall använda DVI-till-HDMI-kabeln eller DVI-HDMI-adapter för anslutningen
➣
och “R – AUDIO - L”-terminalen på DVI:n som ljudutgång.
Lägen som stöds för HDMI/DVI och Component
➣
HDMI/DVI 50Hz X X X O O O
HDMI/DVI 60Hz X O X X O O
Component O O O O O O
4
Ansluta en antenn eller ett kabel-TV-nät
För att du ska kunna visa tv-kanalerna ordentligt måste apparaten ta emot en signal från en av följande källor:
Utomhusantenn/nätverk/kabel-tv/nätverk/satellitmottagare
-
5
Ansluta CI-kort (Common Interface)
Om ”CI-kortet” inte sitter i visas ”Scrambled Signal” (”kodad signal”) på vissa kanaler på tv-skärmen.
-
Information som bland annat omfattar ett telefonnummer, CI-kortets ID, värd-ID visas i ungefär 2-3 minuter.
-
Om ett felmeddelande visas kontaktar du tjänsteleverantören.
När kongurationen av kanalinformationen slutförts visas meddelandet “Updating Completed”
-
(uppdateringen klar), vilket innebär att kanallistan uppdaterats.
Du behöver ett CI-kort från en lokal kabeltjänstleverantör.
➣
Ta ut CI-kortet genom att försiktigt dra ut det för hand. Om du tappar CI-kortet kan det skadas.
Sätt i CI-kortet i pilens riktning.
➣
7
Ansluta externa A/V-enheter
Anslut RCA- eller S-videokabeln till lämplig extern A/V-enhet som t.ex. videobandspelare, DVD-spelare
-
eller videokamera.
Anslut RCA-ljudkablarna till “R - AUDIO L” på apparatens baksida och de andra ändarna till motsvarande
-
ljudutgångar på A/V-enheten.
Hörlurar kan anslutas till hörlursuttaget (6) på apparatens baksida. När hörlurar är anslutna kopplas ljudet
-
från de inbyggda högtalarna bort.
8
Ansluta en dator
Anslut D-Sub-kabeln (tillval) till “PC (PC IN)” på baksidan av din enhet och den andra till grakkortet på din
-
dator.
Anslut stereokablarna till ”AUDIO (PC IN)” på baksidan av apparaten och den andra änden till ”Audio Out”
-
på datorns ljudkort.
9
DIGITAL AUDIO OUT (OPTICAL) (Digital ljudutgång – optisk)
Anslut till en digital ljudkomponent.
-
0
SERVICE
Serviceanslutning för kvalicerad servicetekniker.
-
!
Ansluta komponentenheter (DTV/DVD)
Anslut videokablarna (tillval) till komponentanslutningen (“PR”, “PB”, “Y”) på TV:ns baksida och de andra
-
ändarna till motsvarande videoutgång på DTV:n eller DVD:n.
Om du vill ansluta både en digital-TV-box och en DTV-spelare (eller DVD-spelare) ska du ansluta digital-
-
TV-boxen till DTV-spelaren (eller DVD-spelaren) och sedan ansluta denna till komponentanslutningen
(“PR”, “PB”, “Y”) på TV:n.
PR, PB och Y-anslutningarna på komponentenheterna (DTV eller DVD) är ibland märkta Y, B-Y och R-Y
-
eller Y, Cb och Cr.
Anslut RCA-ljudkablarna (tillval) till ”R - AUDIO - L” på apparatens baksida och de andra ändarna till
-
motsvarande ljudutgångar på DTV- eller DVD-spelaren.
Den här LCD-TV:n har optimal bildkvalitet i läget 720p.
-
Den här LCD-TV:n har optimal bildupplösning i läget 1080i.
-
@
Kensington-lås
Kensingtonlåset (tillval) är en enhet som används för att fysiskt låsa systemet när det används på en
-
allmän plats.
Om du vill använda en låsenhet, kontakta återförsäljaren där du köpte TV:n.
-
Placeringen av kensingtonlåset kan variera beroende på modell.
-
480i 480p 576i 576p 720p 1080i
Svenska - 6
Page 67

Svenska - 7
Översikt av fjärrkontrollen
Väljer vilken enhet som ska
1
kontrolleras med Samsungfjärrkontrollen (TV, DVD, STB,
CABLE, VCR)
(Se sidorna 49~51)
Standby-knapp för TV
2
Sifferknappar för direkt
3
åtkomst till kanaler
Välja en-/tvåsiffriga kanaler
4
Meddelandet “Kanallista” visas
5
på skärmen.
Väljer TV- och DTV-läge direkt
6
VIDEO-/DVD-funktioner
7
(snabbspolning bakåt,
stopp, uppspelning/paus,
snabbspolning framåt)
8
Öka volymen
Sänka volymen
Stänga av ljudet tillfälligt
9
Visa meny och ändra
0
bekräftelse
Går tillbaka till föregående
!
meny
SRS TS XT-val
@
Visar EPG (elektronisk
#
programguide)
Välja bildformat
$
Välja ljudeffekt
%
Justerar 5 separata enheter
^
– TV, DVD, STB, CABLE eller
VCR.
När du trycker på den här
&
knappen lyser ett antal
knappar på fjärrkontrollen
(t.ex. välja en målenhet, volym,
kanal) några sekunder, innan
de slocknar igen för att spara
ström. Den här funktionen
är bra när du ska använda
fjärrkontrollen i mörker.
Välja tillgängliga källor
*
Föregående kanal
(
Visar DTV-menyn
)
a
Väjer PC-läge direkt
b
P : Nästa kanal
P : Föregående kanal
c
Stäng OSD-meny
d
Flytta markören i menyn
e
Använd denna för att se
information om aktuell
sändning
g
Färgknappar: Tryck för att
lägga till eller ta bort kanaler
och för att lagra kanaler till
listan över favoritkanaler i
menyn “Kanallista”.
h
Bild-I-Bild På/Av
i
Visar digitala undertexter
j
Välja bildeffekt
k
Frysa bilden
l
Om fjärrkontrollen inte
fungerar byter du batteri och
trycker på knappen RESET i
2-3 sekunder innan du
använder den.
Text-tv funktioner
6
Lämna text-tv-visning
0
Index för text-tv
$
Text-tv välja storlek
*
Text-tv val av läge (LIST/FLOF
(Lista/Flof))
(
Underordnad Text-tv-sida
b
P : Text-tv nästa sida
P : Text-tv föregående sida
c
Avbryta text-tv
e
Text-tv visa
f
Välj alternativt Text-TV, Dubbel
eller Mix.
g
Text-tv Ämnesval
h
Text-tv lås
j
Text-tv lagra
Fjärrkontrollens funktion kan påverkas av starkt ljus.
➣
Detta är en speciell fjärrkontroll för synskadade, den har blindskrift på knappen Power samt
➣
knapparna Power, Channel, STOP, PLAY/PAUSE och volymknapparna.
Page 68

Installering av batterier i fjärrkontrollen
1. Lyft luckan på baksidan av fjärrkontrollen uppåt, se bilden.
2. Sätt i två stycken AAA-batterier.
Kontrollera att ”+” och ”–” på batterierna stämmer med bilden inuti facket.
➣
3. Sätt tillbaka skyddet.
Om du inte ska använda fjärrkontrollen under en längre tid kan du ta ur
➣
batterierna och förvara dem på en sval och torr plats. Fjärrkontrollen kan
användas på ett avstånd av upp till 7 meter från TV:n. (Vid normal användning
räcker batterierna i ungefär ett år.)
Kontrollera följande om fjärrkontrollen inte fungerar!
➣
1. Är TV:n påslagen?
2. Är plus- och minuspolerna på batteriet felvända?
3. Är batterierna tomma?
4. Är det strömavbrott eller är nätsladden urdragen?
5. Finns det något uorescerande ljus eller en neonskylt i närheten?
Slå på och stänga av
Nätsladden är fäst på baksidan av apparaten.
1. Sätt i nätkontakten i ett lämpligt vägguttag.
Indikatorn för vänteläge på enhetens framsida tänds.
➣
2. Tryck på knappen
Du kan även trycka på knappen POWER eller TV/DTV på fjärrkontrollen för att slå på TV:n.
➣
Kanalen du senast tittade på väljs automatiskt.
➣
3. Tryck på de numeriska knapparna (0~9) eller på en kanalväljarknapp (
eller på knappen på apparatens högersida.
När du slår på TV-apparaten för första gången ombeds du välja vilket språk som du vill att
➣
menyerna ska visas på.
4. Tryck på
POWER -knappen igen för att stänga av tv:n.
på apparatens framsida.
/ ) på fjärrkontrollen eller på
Sätta tv:n i vänteläge
Du kan sänka effektförbrukningen genom att ställa apparaten i vänteläge. Vänteläget är användbart
när du vill stänga av tillfälligt (t.ex. under en måltid).
1. Tryck på knappen
Bildskärmen släcks och en röd standby-lampa tänds på apparatens framsida.
➣
2. När du vill koppla på TV:n igen trycker du bara på
kanalväljarknapp ( / ).
Låt inte apparaten vara i vänteläget under en längre tid (t.ex. när du är på semester). Det bästa är
➣
att dra ur nät- och antennkontakterna.
POWER på fjärrkontrollen.
POWER , en siffra (0~9), TV/DTV eller en
Svenska - 8
Page 69

Svenska - 9
Plug & Play
När tv:n slås på för första gången visas era grundinställningar
automatiskt. Följande inställningar nns:
Alla funktioner som är kopplade till Digital TV (DVB) fungerar
➣
endast i länder eller områden där DVB-T (MPEG2) digitala
signaler sänds. Kontrollera hos din lokala återförsäljare om du
kan ta emot DVB-T-signaler. Trots att den här TV-skärmen följer
DVB-T-specikataionerna, garanteras inte kompatibilitet med
framtida digitala DVB-T-signaler. Flera funktioner kanske inte är
tillgängliga i vissa länder.
1. Tryck på
2. Välj lämpligt språk genom att trycka på
3. Använd knapparna ◄ eller ► för att välja “Butik” eller “Hem” och sedan
➣
➣
➣
4. Meddelandet “Kontr. antenningång.” visas med “OK” markerat.
➣
5. Välj lämpligt land genom att trycka på
6. Meddelandet “Vissa DTV-funktioner kanske inte är tillgängliga. Digital skan?” visas.
Den här funktionen stöds i alla länder utom följande 8 länder: Storbritannien, Österrike, Frankrike,
7. Menyn “Autolagra” visas med “Start” markerat. Tryck på knappen ENTER/OK.
➣
➣
➣
➣
8. Tryck på
➣
9. Tryck på ENTER/OK för att bekräfta inställningen.
POWER på fjärrkontrollen.
Meddelandet “Start Plug & Play” visas med “OK” valt.
eller .
Tryck på ENTER/OK för att bekräfta ditt val.
Du rekommenderas att ställa in din TV på läget Hemma för att få bästa bild för hemmiljö.
Läget Butik är endast avsett för användning i återförsäljarmiljö.
Om enheten oavsiktligt ställs in på Butiksläget och du vill återgå till Dynamiskt läge (hem) trycker
du på volymknappen och håller sedan ned knappen MENU i fem sekunder på TV:ns sidopanel.
Tryck på ENTER/OK.
Kontrollera att antennkabeln är korrekt ansluten.
eller .
Tryck på ENTER/OK för att bekräfta ditt val.
Tryck på knapparna ◄ eller ► för att välja “Ja” eller “Nej” och sedan på knappen ENTER/OK.
Ja: Först genomförs en ATV-sökning och sedan också en DTV-sökning.
Nej: Endast ATV-sökningen genomförs.
Tyskland, Italien, Spanien, Sverige och Finland.
Kanalsökningen börjar och avslutas automatiskt.
Kanalsökningsmenyn för DTV visas och DTV-kanalen uppdateras automatiskt.
Om DTV-kanalen upppdateras, ändras “Source” (”källa”) på källistan på ingångsmenyn automatiskt
till DTV.
Efter att de tillgängliga kanalerna är lagrade visas menyn “Ställ klockan”.
Tryck på ENTER/OK när som helst för att avbryta lagringsprocessen.
Detaljerad information om uppdatering av DTV-kanaler nns på sidan 33 i den här handboken.
Efter att alla tillgängliga digitala kanaler har lagrats väljer skärmen en tidszon som är
landsberoende.
ENTER/OK.
Välj “Månad”, “Datum”, “År”, “Tim” eller “Minut” genom att trycka på eller .
Ställ in “Månad”, “Datum”, “År”, “Tim” eller “Minut” genom att trycka på eller .
Du kan ställa in timmar och minuter genom att trycka på sifferknapparna på fjärrkontrollen.
Språk:Välj ditt språk.
Land: Välj ditt land.
Autolagra:Skannar automatiskt och lagrar de kanaler som är tillgängliga i ditt område.
Ställ klockan:Ställer in aktuell tid för TV-klockan.
Plug & Play
Start Plug & Play.
OK
Enter Exit
ENTER/OK.
Page 70

Om du vill återställa denna funktion ...
Tryck på MENU för att visa menyn.
1.
Tryck på eller för att välja “Inställning” och tryck sedan på
ENTER/OK.
Tryck på knappen ENTER/OK igen för att välja “Plug & Play”.
2.
Meddelandet att du skall “Starta Plug & Play” visas.
3.
(Läs mer om detta på sidan 9.)
TV
Plug & Play
Språk : Svenska
Tid
Spelläge : Av
Blå bakgrund : Av
Melodi : Av
PC
Mer
Inställning
Flytta Öppna Tillbaka
Plug & Play
Starta Plug & Play.
OK
Öppna
Tillbaka
Kanal
Lagra kanaler automatiskt
-
Lagra kanaler manuellt
-
TV
Land : Belgien
Autolagra
Lagra manuellt
Kanalhanteraren
Sortera
Namn
Fininst
Flytta Öppna Tillbaka
Lagra kanaler automatiskt
Du kan avsöka frekvensområdena som nns tillgängliga (tillgången beror på vilket land du bor i).
Automatiskt tilldelade programnummer överensstämmer kanske inte med faktiska eller önskade
programnummer. Du kan dock sortera nummer manuellt och ta bort de kanaler du inte vill titta på.
Tryck på knappen MENU när du vill visa menyn.
1.
Tryck på ▲ eller ▼ för att välja “Kanal” och sedan på ENTER/OK.
Tryck på knappen ENTER/OK för att välja “Land”.
2.
Välj lämpligt land genom att trycka på ▲ eller ▼.
3.
Tryck på ENTER/OK för att bekräfta ditt val.
Även om du har ändrat landsinställningarna i den här menyn ändras inte inställningarna för DTV.
➣
Använd funktionen Plug & Play för att ändra landsinställningarna för DTV.
(Läs mer om detta på sidan 9.)
Tryck på ▲ eller ▼ för att välja “Autolagra” och sedan på ENTER/OK.
1.
Tryck på knappen ENTER/OK.
2.
TV:n börjar memorisera alla tillgängliga kanaler.
➣
Tryck på ENTER/OK när som helst för att avbryta lagringsprocessen och återgå till “Kanal”-menyn.
➣
6.
Efter att de tillgängliga kanalerna är lagrade visas menyn “Sortera”.
Svenska - 10
Page 71

Svenska - 11
Lagra kanaler manuellt
Du kan lagra upp till 100 kanaler, inklusive de kanaler du tar emot från kabelnätet.
När du lagrar kanaler manuellt kan du välja:
Vare sig du vill lagra alla kanaler som hittas eller inte.
Programnumret som du vill tilldela varje lagrad kanal.
1. Tryck på
2. Tryck på
3. Tryck på
4. För att tilldela ett programnummer till en kanal, sök rätt nummer genom att trycka på
➣
5. Tryck på
6. Välj den färgstandard som krävs genom att trycka på
7. Tryck på
8. Välj den ljudstandard som krävs genom att trycka på
➣
9. Om du vet numret på den kanal som ska lagras trycker du på eller för att välja “Kanal”. Tryck på
➣
➣
10. Om du inte kan kanalnumren, tryck på
11. Tryck på
12. Upprepa steg 3 till 11 för varje kanal som ska lagras.
MENU för att visa menyn.
Tryck på eller för att välja “Kanal” och sedan på ENTER/OK.
eller för att välja “Lagra manuellt” och sedan på ENTER/OK.
ENTER/OK för att välja “Program”.
eller och
sedan på ENTER/OK.
Du kan ställa in ett programnummer genom att trycka på sifferknapparna på fjärrkontrollen.
eller för att välja “Färgsystem” och sedan på ENTER/OK.
eller och sedan på ENTER/OK.
eller för att välja “Ljudsystem” och sedan på ENTER/OK.
eller och sedan på ENTER/OK.
Om du inte hör något ljud eller om ljudet är onormalt väljer du ett annat ljudsystem.
knappen ENTER/OK. Välj C (antennkanal) eller S (kabelkanal) genom att trycka på eller . Tryck
på för att välja kanal. Välj önskat nummer genom att trycka på eller och sedan på ENTER/OK.
Kanalläge: P (programläge), C (antennläge), S (kabelkanalläge)
Du kan ställa in ett kanalnummer genom att trycka på sifferknapparna på fjärrkontrollen.
eller för att välja “Sök”. Tryck på knappen ENTER/OK. Sök
genom att trycka på eller och sedan på ENTER/OK.
eller för att välja “Lagra”. Tryck på knappen ENTER/OK för att välja “OK”.
Program: Väljer ett programnummer för kanalen.
Färgsystem: Ställer in supportsystemet för färger.
Ljudsystem: Ställer in supportsystemet för ljud.
Kanal: Väljer en kanal.
Sök: Skannar efter frekvensvärdet för kanalen.
Lagra: Sparar dina inställningar.
Page 72

Ställa in kanallistor
Ställer in kanalerna enligt dina önskemål.
Det är enkelt att ta bort, lägga till eller låsa den kanal du
önskar..
1. Tryck på
MENU för att visa menyn.
Tryck på eller för att välja “Kanal” och sedan på
ENTER/OK.
2. Tryck på
eller för att välja “Kanalhanteraren” och sedan på
ENTER/OK.
3. Tryck på
4. Tryck på
5. Tryck på
ENTER/OK igen för att välja “Kanallista”.
för att välja “ ”
eller för att välja den ej önskade kanalen och
sedan på ENTER/OK.
6.
Upprepa steg 5 för varje kanal som ska läggas till eller raderas.
7. Tryck på
➣
EXIT för att avsluta.
“ ” är aktiv när “Barnlås” är inställd på “På”.
Du kan välja dessa alternativ genom att trycka på knappen CH
LIST på fjärrkontrollen.
Aktivera barnspärren
Den här funktionen gör att du kan förhindra obehöriga
användare, t.ex. barn, från att titta på olämpliga program genom
att stänga av video och ljud. Barnspärren kan inte kopplas bort
med knapparna på sidopanelen.
Barnspärren kan bara kopplas bort med fjärrkontrollen. Håll
därför fjärrkontrollen borta från barn.
1. Tryck på
MENU för att visa menyn.
Tryck på eller för att välja “Kanal” och sedan på
ENTER/OK.
2. Tryck på
eller för att välja “Kanalhanteraren” och sedan på
ENTER/OK.
3. Tryck på
eller igen, för att välja “Barnlås” och sedan på
ENTER/OK.
4. Tryck på
eller igen för att välja “På” eller “Av”. Tryck på
knappen ENTER/OK.
5. Tryck på
eller för att välja “Kanallista” och sedan på
ENTER/OK.
6. Tryck på
7. Tryck på
för att välja “ ”
eller för att välja kanaler du vill låsa och sedan på
ENTER/OK.
8. Upprepa steg 7 för varje kanal som ska låsas eller låsas upp.
9. Tryck på EXIT för att avsluta.
➣
Välj “På” eller “Av” i “Barnlås” för att enkelt växla kanalerna som
valdes till “ ” till att vara aktiva eller inaktiva.
TV
Kanallista
P 1 C3
Prog.
0 C--
1 C3
2 BBC 1
3 C74
4 C75
5 C76
6 S3
7 S4
8 S6
9 S7
Lägg till Lås
Flytta
Sida
Kanallista
Barnlås :
Flytta Öppna Tillbaka
P 2 C4 BBC1
Prog.
0 C-1 C3
2 BBC 1
3 C74
4 C75
5 C76
6 S3
7 S4
8 S6
9 S7
Lägg till Lås
Flytta
Sida
Öppna
Tillbaka
Kanalhanteraren
Kanallista
Öppna
Tillbaka
1 / 10
Av
På
1 / 10
Svenska - 12
Page 73

Svenska - 13
Sortera de lagrade kanalerna
Du kan byta nummer på två kanaler för att:
Modiera nummerordningen i vilken kanalerna lagrats
automatiskt.
Ge de kanaler du tittar mest på nummer som är enkla att
komma ihåg.
1. Tryck på
MENU för att visa menyn.
Tryck på eller för att välja “Kanal” och sedan på ENTER/
OK.
2. Tryck på
eller för att välja “Sortera” och sedan på
ENTER/OK.
3. Välj det kanalnummer du vill ändra genom att trycka på
eller
era gånger. Tryck på knappen ENTER/OK.
➣
Numret på vald kanal och namnet yttas åt höger.
4. Tryck på
eller för att gå till den position där du vill göra
ändringen och tryck sedan på ENTER/OK.
➣
Den valda kanalen ersätter den som tidigare lagrats under
det valda numret.
5. Upprepa steg
6. Tryck på
3 till 4 för att lagra en annan kanal.
EXIT för att avsluta.
Namnge kanaler
Kanalerna namnges automatiskt när kanalinformation sänds.
Du kan ändra namnen.
1. Tryck på
2. Tryck på
3. Välj vid behov en kanal att tilldela till ett nytt namn genom att
➣
4.
MENU för att visa menyn.
Tryck på eller för att välja “Kanal” och sedan på
ENTER/OK.
eller för att välja “Namn” och sedan på
ENTER/OK.
trycka på eller . Tryck på knappen ENTER/OK.
Markören visas runt namnrutan.
Om du vill ... Så ...
Välja en bokstav, siffra eller
symbol
Flytta till nästa bokstav
Flytta till föregående bokstav
Tryck på eller
Tryck på
Tryck på
Bekräfta namnet Tryck på knappen ENTER/OK.
Land : Belgien
Autolagra
Lagra manuellt
Kanalhanteraren
Sortera
Namn
Fininst
Flytta Öppna Tillbaka
TV
Prog. Kanal. Namn
0 C--
1 C23
2 C16
3 C3
4 S1
TV
Land : Belgien
Autolagra
Lagra manuellt
Kanalhanteraren
Sortera
Namn
Fininst
TV
Flytta Öppna Tillbaka
Flytta Öppna Tillbaka
Prog. Kanal. Namn
0 C-- -----
1 C23 -----
2 C16
3 C3
4 S1
Flytta Öppna Tillbaka
KanalTV
Sortera
Kanal
Namn
-----
-----
-----
➣
Tillgängliga tecken är: Alfabetets bokstäver (A~Z) / Siffror (0~9) /
Specialtecken (mellanslag, /, *, –, +)
5. Upprepa steg
6. Tryck på
3 till 4 för varje kanal som ska tilldelas till ett nytt namn.
EXIT för att avsluta.
Page 74

Fininställning av kanalmottagningen
Använd ninställning för att manuellt justera en viss kanal för
optimal mottagning.
1. Välj en kanal som du vill njustera direkt med sifferknapparna.
2. Tryck på
3. Tryck på
4. Tryck på
5. Tryck på
➣
➣
MENU för att visa menyn.
Tryck på eller för att välja “Kanal” och sedan på ENTER/
OK.
eller för att välja “Fininst.” och sedan på ENTER/
OK.
eller för att göra ninställning.
Tryck på knappen ENTER/OK.
EXIT för att avsluta.
Fininställda kanaler som har sparats markeras med en asterisk
“*” till höger om kanalnumret i kanallisten. Kanalnumret ändras
till rött.
Om du vill återställa ninställningen väljer du “Återställ” genom
att trycka på knappen ▲ eller ▼ och sedan på knappen
ENTER/OK.
TV
Land : Belgien
Autolagra
Lagra manuellt
Kanalhanteraren
Sortera
Namn
Fininst
Flytta Öppna Tillbaka
P 1
Ändra Spara Tillbaka
Kanal
Fininst
Återställ
0
Svenska - 14
Page 75

Svenska - 15
Ändra bildstandard
Du kan välja den bildtyp som bäst motsvarar dina krav på TVtittandet.
1. Tryck på
MENU för att visa menyn.
Tryck på knappen ENTER/OK för att välja “Bild”.
2. Tryck på
3. Tryck på
ENTER/OK igen för att välja “Läge”.
eller för att välja önskad bildeffekt. Tryck på
knappen ENTER/OK.
4. Tryck på
➣
➣
EXIT för att avsluta.
Dynamisk:
Standard:
Film:
Väljer en mer högupplöst bild för ljus miljö.
Väljer en optimal bildkvalitet för normal miljö.
Väljer en optimal bildkvalitet för mörk miljö.
Bildläget måste justeras individuellt för varje ingångskälla.
Du kan återgå till standardinställningarna för bilden genom
att trycka på “Återställ”. (Se “Återställa bildinställningarna till
fabriksstandard” på sidan 19)
TV
Läge : Dynamisk
Kontrast 100
Ljusstyrka
Skärpa 75
Färg
Ton G50 R50
Färgton : Sval1
Bakgrundsljus : 10
Mer
Flytta Öppna Tillbaka
TV
Läge : Dynamisk
Kontrast 100
Ljusstyrka
Skärpa 75
Färg 55
Ton G50 R50
Färgton : Sval1
Bakgrundsljus : 10
Mer
Flytta Öppna Tillbaka
Bild
Bild
Dynamisk
Standard
Film
Du kan även trycka på knappen
P.MODE på fjärrkontrollen för att
välja en av följande
bildinställningar.
Justera Egna bildinställningar
Denna apparat har ett antal inställningsalternativ för att ange
bildkvaliteten:
1. För att välja önskad bildeffekt följer du anvisningarna 1 till 3 i
avsnittet “Ändra bildstandard”.
2. Tryck på
eller för att välja ett visst alternativ. Tryck på
knappen ENTER/OK.
3. Tryck på
eller för att öka eller minska värdet för ett visst
alternativ. Tryck på knappen ENTER/OK.
4. Tryck på
EXIT för att avsluta.
Kontrast: Justerar ljusstyrkan och mörkheten mellan motiv och bakgrund.
Ljusstyrka: Justerar hela skärmens ljusstyrka.
Skärpa: Justerar motiven så att de blir skarpare eller suddigare.
Färg: Justerar färgerna så att de blir ljusare eller mörkare.
Ton (endast NTSC eller DTV): Justerar färgen på objekt genom att göra dem mer röda eller gröna
för ett mer naturligt utseende.
De justerade värdena lagras enligt det valda bildläget.
➣
I läget för PC kan endast “Kontrast”, “Ljusstyrka” justeras.
➣
Funktionen “Ton” är endast tillgänglig i läge “HDMI” och “Component”.
➣
TV
Läge : Dynamisk
Kontrast 100
Ljusstyrka
Skärpa 75
Färg 55
Ton G50 R50
Färgton : Sval1
Ljusstyrka 45
Bakgrundsljus : 10
Mer
Flytta Öppna Tillbaka
Bild
45
55
45
45
Page 76

Ändra Färgton
Du kan välja den färgton som känns bekvämast.
1. För att välja önskad bildeffekt följer du anvisningarna 1 till 3 i
avsnittet “Ändra bildstandard”. (på sidan 15)
2. Tryck på
eller för att välja “Färgton” och sedan på ENTER/
OK.
3. Tryck på
eller för att välja önskad inställning för färgton.
Tryck på knappen ENTER/OK.
4. Tryck på
➣
➣
EXIT för att avsluta.
Sval2:
Sval1:
Normal:
Varm1:
Varm2:
Ger en blåare färgtemperatur än “Sval1”.
Ger det vita en blå ton.
Behåller det vita.
Ger det vita en röd ton.
Ger en rödare färgtemperatur än “Varm1”.
De justerade värdena lagras enligt det valda bildläget.
När bilden är inställd till Dynamisk eller Standard, kan Varm1
och Varm2 inte väljas.
Aktivera bakgrundsljus
Du kan justera skärmens ljusstyrka genom att ställa in
bakgrundsljuset. (0~10)
1. För att välja önskad bildeffekt följer du anvisningarna 1 till 3 i
avsnittet “Ändra bildstandard”. (på sidan 15)
2. Tryck på
3. Tryck på
4. Tryck på knappen
eller för att välja “Bakgrundsljus” och sedan på
ENTER/OK.
eller för att öka eller minska värdet för ett visst
alternativ.
ENTER/OK.
Tryck på EXIT för att avsluta.
TV
Läge : Dynamisk
Kontrast 100
Ljusstyrka
Skärpa
Färg
Ton G50 R50
Färgton : Sval1
Bakgrundsljus : 10
Mer
Flytta Öppna Tillbaka
TV
Läge : Dynamisk
Kontrast 100
Ljusstyrka
Skärpa 75
Färg
Ton G50 R50
Färgton : Sval1
Bakgrundsljus : 10
Mer
Flytta Öppna Tillbaka
TV
Läge : Dynamisk
Kontrast 100
Ljusstyrka
Skärpa 75
Färg 55
Ton G50 R50
Färgton : Sval1
Ljusstyrka 45
Bakgrundsljus : 10
Mer
Flytta Öppna Tillbaka
Bakgrundsljus
Bild
Bild
Bild
Sval2
Sval1
Normal
Varm1
Varm2
45
75
55
45
55
45
10
Svenska - 16
Ändra Tillbaka
Page 77

Svenska - 17
Kongurera ninställningar för bilden
Du kan välja den färgton som känns bekvämast.
1. Tryck på
2. Tryck på
3. Tryck på ▲ eller ▼ för att välja “Fininställningar” och sedan på
4. Välj alternativ genom att trycka på
MENU för att visa menyn.
ENTER/OK för att välja “Bild”.
ENTER/OK.
eller och sedan på
Mer
Fininställningar
Storlek : Auto Wide
Skärmläge : 16 : 9
Brusreducer : Auto
Aktiv färg : Av
DNIe : Av
Återställ : OK
ENTER/OK.
Tillgängliga alternativ: Justering av svart, Dynamisk kontr.,
Gamma, Färgområde, Vitbalans, Personlig färgjustering,
Kantförbättring.
5. När du är klar med inställningen trycker du på
6. Tryck på
➣
EXIT för att avsluta.
När bildläget är inställt på Film eller Standard, kan
ENTER/OK.
Fininställningar. väljas.
Om DNIe är inställd på Av går det inte att välja detaljerade
➣
inställningar när bildläget är i standardläge.
Justering av svart: Av/Låg/Medium/Hög
Flytta Öppna Tillbaka
TV
Justering av svart
Dynamisk kontr
Gamma : 0
Färgområde
Vitbalans
Personlig färgjustering
Kantförbättring
Flytta Öppna Tillbaka
Du kan direkt ange justering av svart på skärmen för att justera skärmdjupet.
Dynamisk kontr.: Av/Låg/Medium/Hög
Du kan justera skärmens kontrast så att du får optimal nivå.
Gamma: -3~ +3
Du kan justera ljusstyrkan i mitten av bilderna.
Tryck på ◄ eller ► tills du kommer till den optimala inställningen.
Färgområde: Auto/Wide
Du kan ställa in området för färgreproduktionen för ingånssignalen till Auto eller Wide.
Vitbalans: R-Offset/G-Offset/B-Offset/R-Gain/G-Gain/B-Gain/Återställ
Du kan justera färgtemperaturen för naturliga färger i bilderna.
R-Offset/G-Offset/B-Offset/R-Gain/G-Gain/B-Gain: Om du ändrar justeringsvärdet uppdateras den
modierade skärmen.
Välj önskat nummer genom att trycka på ▲ eller ▼ och tryck sedan på ENTER/OK.
Tryck på ◄ eller ► tills du kommer till den optimala inställningen.
Återställ: Den tidigare justerade vitbalansen återställs till fabriksstandard.
Personlig färgjustering: Rosa/Grön/Blå/Vit/Återställ
Inställningen kan ändras utifrån dina egna önskemål.
Rosa/Grön/Blå/Vit: Om du ändrar justeringsvärdet uppdateras den modierade skärmen.
Välj önskat nummer genom att trycka på ▲ eller ▼ och tryck sedan på ENTER/OK.
Tryck på ◄ eller ► tills du kommer till den optimala inställningen.
Återställ: De tidigare justerade färgerna återställs till fabriksstandard.
➣
Kantförbättring: Av/På
Du kan förstärka objektgränserna.
Bild
Fininställningar
: Av
: Av
: Auto
: Av
Page 78

Ändra Bildstorlek
Du kan välja det bildformat som stämmer bäst överens med
dina krav.
1. Tryck på
2. Tryck på
3. Välj önskat alternativ genom att trycka på
4. Tryck på
➣
➣
➣
➣
MENU för att visa menyn.
Tryck på knappen ENTER/OK för att välja “Bild”.
eller för att välja “Storlek” och sedan på ENTER/
OK.
eller . Tryck på
knappen ENTER/OK.
EXIT för att avsluta.
TV
Auto Wide:Justerar automatiskt bildstorleken till formatet
“16:9”.
16 :9:
Justerar bildstorleken till 16:9 som är riktigt för
DVD eller bredbildssändningar.
Bredzoom:Förstora bilden mer än 4:3.
Zoom:Förstorar 16:9-bredbilden (i vertikal riktning) för
att passa skärmstorleken.
4:3:
Detta är standardinställningen för en videolm
eller normal sändning.
Skanna:Visar ingångsskärmarna som de är utan
avstängning när signalerna HDMI 720p, 1080i
går in.
Funktionen “Auto Wide” (Automatisk vidvinkel) nns endast
tillgänglig i lägena “TV”, “Ext.1 “, “Ext.2”, “AV”, “S-Video” och
“DTV”.
Du kan välja de här alternativen
genom att trycka på knappen
P.SIZE på fjärrkontrollen.
I PC-läge kan endast “16:9” och “4:3” justeras.
Zoom: Välj det
genom att trycka på ◄ eller ►.
Använd knapparna ▲ eller ▼ för att ytta bilden upp eller ner. När du gjort valet användar
du knapparna ▲ eller ▼ för att förstora eller förminska bildstorleken vertikalt.
Bredzoom: Flytta skärmbilden uppåt/nedåt genom att använda ▲ eller ▼ efter att
genom att trycka på ► eller ENTER/OK.
Mer
Fininställningar
Storlek : Auto Wide
Skärmläge : 16 : 9
Brusreducer : Av
Aktiv färg : Av
DNIe : På
Återställ : OK
Flytta Öppna Tillbaka
Auto Wide
16 : 9
Bredzoom
Zoom
4 : 3
Skanna
Flytta Öppna Tillbaka
Bild
Storlek
du har gjort valet
Svenska - 18
Page 79

Svenska - 19
Frysa den aktuella bilden
Tryck på knappen STILL för att frysa en rörlig lm
till en stillbild. Tryck igen för att avbryta.
Välja skärmläge
Vid inställning av bildstorleken till Autobred (Auto Wide) i läget
16:9, kan du avgöra bildstorleken du vill visa för bilden 4:3
WSS (Wide Screen Service) eller ingenting. Varje separat land i
Europa kräver olika bildstorlek så den här funktionen är avsedd
för användare som väljer den.
1. Tryck på
2. Tryck på
3. Välj önskat alternativ genom att trycka på
Tillgängliga alternativ: 16:9, Bredzoom, Zoom, 4:3
4. Tryck på
➣
➣
MENU för att visa menyn.
Tryck på knappen ENTER/OK för att välja “Bild”.
eller för att välja “Skärmläge” och sedan på
ENTER/OK.
eller . Tryck på
knappen ENTER/OK.
16:9: Ställer in bilden i läge 16:9 wide.
Bredzoom: Förstora bilden mer än 4:3.
Zoom: Förstorar bilden lodrätt på bildskärmen.
4:3: Ställer in bilden i läge 4:3 normal.
EXIT för att avsluta.
Storlek är tillgänglig i läget Autobred
Funktionen är inte tillgänglig i PC, Component eller HDMI-läge.
TV
Mer
Fininställningar
Storlek : Auto Wide
Skärmläge : 16 : 9
Brusreducer :
Aktiv färg : På
DNIe : På
Återställ : OK
Flytta Öppna Tillbaka
Mer
Fininställningar
Storlek : Auto Wide
Skärmläge : 16 : 9
Brusreducer : Auto
Aktiv färg : På
DNIe : På
Återställ : OK
Flytta Öppna Tillbaka
Bild
Auto
Bild
16:9
Bredzoom
Zoom
4:3
Återställa bildinställningarna till fabriksstandard
Det går att återgå till fabriksinställningarna för bilden.
1. För att välja önskad bildeffekt följer du anvisningarna 1 till 3 i
avsnittet “Ändra bildstandard”. (på sidan 15)
2. Tryck på
eller för att välja “Återställ” och sedan på ENTER/
OK.
3. Tryck på ▲ eller ▼ för att välja “OK” eller “Avbryt”. Tryck på
knappen ENTER/OK.
4. Tryck på
➣
EXIT för att avsluta.
“Återställ” anges för varje bildläge.
TV
Mer
Fininställningar
Storlek : Auto Wide
Skärmläge : 16 : 9
Brusreducer : Auto
Aktiv färg : På
DNIe : På
Återställ : OK
Flytta Öppna Tillbaka
TV
Mer
Fininställningar
Storlek : Auto Wide
Skärmläge : 16 : 9
Brusreducer :
Aktiv färg : På
DNIe : På
Återställ : OK
Flytta Öppna Tillbaka
Bild
Bild
Auto
OK
Avbryt
Page 80

Brusreducer. / Aktiv färg / DNIe
Om sändningssignalen som mottas är svag kan du aktivera
funktionen Digital Noise Reduction för att minska bildstörningar
eller spökbilder som kan uppstå på skärmen.
1. Tryck på
MENU för att visa menyn.
Tryck på knappen ENTER/OK för att välja “Bild”.
2. Välj alternativ genom att trycka på
eller och sedan på
ENTER/OK.
Tillgängliga alternativ: Brusreducer., Aktiv färg, DNIe.
3. När du är klar med inställningen trycker du på
4. Tryck på
EXIT för att avsluta.
Brusreducer.: Av/Låg/Medium/Hög/Auto
ENTER/OK.
TV
Mer
Fininställningar
Storlek : Auto Wide
Skärmläge : 16 : 9
Brusreducer :
Aktiv färg : På
DNIe : På
Återställ : OK
Flytta Öppna Tillbaka
Om signalen som tv:n tar emot är svag kan du aktivera denna funktion för att reducera störningar och
spökbilder som kan uppträda på skärmen.
Funktionen är inte tillgänglig i PC-läge.
➣
Aktiv färg: Av / På
Om du aktiverar det här alternativet visas färgerna för himmel och gräs med starkare ton och klarare
för en mer levande bildkvalitet.
Funktionen är inte tillgänglig i PC-läge.
➣
Funktionen är inte tillgänglig i Filmläge och Standard.
➣
DNIe: Av / Demo / På
Den här TV:n är försedd med en DNIe-funktion så att du kan få högre bildkvalitet. Om du aktiverar
DNIe kan du visa bilden med DNIe-funktionen aktiverad. Om du ställer in DNIe på Demo, kan du visa
en DNIe-bild och en normal bild på skärmen i förhandsvisningssyfte. Använd den här funktionen om du
vill se skillnaden när det gäller bildkvalitet.
DNIeTM (Digital Natural Image engine)
➣
Denna funktion ger dig mer detaljerade bilder med 3D brusreducering, förbättring av detaljer,
kontrast och vithet. Ny algoritm för bildkompensation ger dig en skarpare, klarare och mer
detaljerad bild. DNIeTM-tekniken anpassar alla signaler efter din syn.
Funktionen är inte tillgänglig i PC-läge.
➣
Funktionen är inte tillgänglig i Filmläge.
➣
Bild
Auto
Svenska - 20
Page 81

Svenska - 21
Visa bild-i-bild (BIB)
Du kan visa en underbild inne i huvudbilden för ett TV-program
eller en videoingång. På det här sättet kan du titta på en bild
från valfri ansluten utrustning samtidigt som du tittar på
huvudbilden.
1. Tryck på
MENU för att visa menyn.
Tryck på eller för att välja “Inställning” och sedan på
ENTER/OK.
2. Tryck på
3. Tryck på
eller för att välja “BIB” och sedan på ENTER/OK.
ENTER/OK igen.
Tryck på eller för att välja “På” och sedan på ENTER/OK.
4. Tryck på
eller för att välja “Källa” och sedan på ENTER/OK.
Välj en källa för underbilden genom att trycka på eller och
tryck på ENTER/OK.
➣
Underbilden kan ta emot andra val av källor beroende på vad
huvudkällan är inställd på.
5. Tryck på
eller för att välja “Storlek” för underbilden och
sedan på ENTER/OK. Välj en storlek på underbilden genom
att trycka på eller och sedan på ENTER/OK.
➣
Om huvudbilden är i läget “PC” och “Component” är “Storlek”
inte tillgängligt.
6. Tryck på
eller för att välja “Position” och sedan på
ENTER/OK.
Välj en källa för underbilden genom att trycka på eller och
tryck på ENTER/OK.
7. Tryck på
eller för att välja “Program” och sedan på ENTER/
OK.
Du kan välja vilken kanal du vill titta på i den mindre bilden genom att trycka på knappen or .
Tryck på knappen ENTER/OK.
➣
“Program” kan aktiveras när underbilden är inställd på TV.
8. Tryck på
➣
EXIT för att avsluta.
Du kan märka en viss onaturlighet i underbildsfönstret när du använder huvudskärmen för att visa ett
spel eller karaoke.
Källa:
Storlek:
Position:
Program:
Används för att välja källa för underbilden.
Används för att välja storlek på underbilden.
Används för att ytta den mindre bilden.
Används för att ändra den mindre bilden.
Mode : Custom
TV
Equalizer
Mer
SRS TS XT : Off
Bildinst pc-läge : Av
Auto Volume : Off
Energispar : Av
Internal Mute : Off
HDMI svart : Låg
Reset
BIB
Flytta Öppna Tillbaka
Mode : Custom
TV
Equalizer
BIB : På
SRS TS XT : Off
Källa : TV
Auto Volume : Off
Storlek :
Internal Mute : Off
Position :
Reset
Program : P 1
Flytta Öppna Tillbaka
Inställning
Move Enter Return
BIB
Move Enter Return
Tryck upprepade gånger på
knappen PIP på
fjärrkontrollenför att aktivera
eller avaktivera “BIB”.
Inställningar för BIB
Underbild
Huvudbild
Component
HDMI
TV analog Ext.1 Ext.2 AV S-Video Component HDMI PC TV digital
O O O O X X X X X
O O O O X X X X X
PC
O O O O X X X X X
O : BIB används, X: BIB används inte
Page 82

HDMI svart
Du kan direkt ange justering av svart på skärmen för att justera
skärmdjupet.
1. Tryck på
MENU för att visa menyn.
Tryck på eller för att välja “Inställning” och sedan på
ENTER/OK.
2. Tryck på
eller för att välja “HDMI svart” och sedan på
ENTER/OK.
3. Tryck på
eller för att välja “Normal” eller “Låg” och sedan
på ENTER/OK.
4. Tryck på
➣
EXIT för att avsluta.
Den här funktionen är endast aktiv när den externa ingången
ansluter till HDMI och RGB-signalerna är ingångssignaler.
Normal:
Låg:
Skärmen blir ljusare.
Skärmen blir mörkare.
TV
TV
Ändra ljudstandard
Du kan välja vilken speciell ljudeffekt som ska användas när du
ser på ett visst TV-program.
1. Tryck på
2. Tryck på
3. Välj den ljudeffekt som krävs genom att trycka på
4. Tryck på
MENU för att visa menyn.
Tryck på eller för att välja “Ljud” och sedan på ENTER/OK.
ENTER/OK för att välja “Läge”.
eller era
gånger och sedan på ENTER/OK.
EXIT för att avsluta.
Standard:
Musik:
Film:
Tal:
Personlig:
Väljer normalt ljudläge.
Förstärker musiken över röster.
Ger levande ljud för lmer.
Förstärker röster i förhållande till andra ljud.
Väljer dina favoritinställningar för ljud.
(Se “Ändra ljudinställningarna”)
TV
Mode : Custom
Equalizer
Mer
SRS TS XT : Off
Bildinst pc-läge : Av
Auto Volume : Off
Energispar : Av
Internal Mute : Off
HDMI svart : Låg
Reset
BIB
Flytta Öppna Tillbaka
Mode : Custom
Equalizer
Mer
SRS TS XT : Off
Bildinst pc-läge : Av
Auto Volume : Off
Energispar : Av
Internal Mute : Off
HDMI svart : Låg
Reset
BIB
Flytta Öppna Tillbaka
TV
Läge : Personlig
Equalizer
SRS TS XT : Av
Auto volym : Av
Intern avst : Av
Ljudval : Huvudbild
Återställ
Flytta Öppna Tillbaka
Läge : Personlig
Equalizer
SRS TS XT : Av
Auto volym : Av
Intern avst : Av
Ljudval : Huvudbild
Återställ
Inställning
Move Enter Return
Inställning
Move Enter Return
Ljud
Ljud
Normal
Låg
Standard
Musik
Film
Tal
Personlig
Svenska - 22
Flytta Öppna Tillbaka
Page 83

Svenska - 23
Ändra ljudinställningarna
Du kan ställa in ljudet efter dina egna önskemål.
1. Tryck på
MENU för att visa menyn.
Tryck på eller för att välja “Ljud” och sedan på ENTER/OK.
2. Tryck på
eller för att välja “Equalizer” och sedan på ENTER/
OK.
3. Tryck på
eller för att välja ett visst alternativ. Tryck på
knappen ENTER/OK.
4. Tryck på
eller för att komma till inställningen. Tryck på
knappen ENTER/OK.
5. Tryck på
➣
EXIT för att avsluta.
Om du ändrar inställningarna ändras ljudläget automatiskt till
Personlig.
Ställa in TruSurround XT (SRS TS XT)
TruSurround XT är en patenterad SRS-teknik som gör
det möjligt att spela 5,1 erkanalsinnehåll i två högtalare.
TruSurround ger en påtagbar och virtuell ljudupplevelse
genom högtalarsystem med två högtalare, inklusive
inbyggda TV-högtalare. Det är helt kompatibelt med samtliga
erkanalsformat.
1. Tryck på
2. Tryck på
3. Tryck på
4. Tryck på
MENU för att visa menyn.
Tryck på eller för att välja “Ljud” och sedan på ENTER/OK.
eller för att välja “SRS TS XT” och sedan på
ENTER/OK.
eller igen för att välja “På” eller “Av”. Tryck på
knappen ENTER/OK.
EXIT för att avsluta.
TruSurround XT, SRS och symbolerna
är varumärken som tillhör SRS Labs, Inc.
TruSurround XT-tekniken används under licens
från SRS Labs, Inc.
TV
Läge : Personlig
Equalizer
SRS TS XT : Av
Auto volym : Av
Intern avst : Av
Ljudval : Huvudbild
Återställ
Flytta Öppna Tillbaka
TV
TV
Läge : Personlig
Equalizer
SRS TS XT : Av
Auto volym : Av
Intern avst : Av
Ljudval : Huvudbild
Återställ
TV
Läge : Personlig
Equalizer
SRS TS XT : Av
Auto volym : Av
Intern avst : Av
Ljudval : Huvudbild
Återställ
Equalizer
Balance 100Hz 300Hz 1kHz 3kHz 10kHz
Flytta Ändra Tillbaka
Flytta Öppna Tillbaka
Flytta Öppna Tillbaka
Ljud
Ljud
Ljud
Av
På
Du kan ställa in dessa alternativ
genom att trycka på knappen
SRS på fjärrkontrollen.
Page 84

Ansluta hörlurar
Du kan ansluta hörlurar till tv:n om du vill titta på ett tv-program utan
att störa andra personer i samma rum.
När du sätter i ett hörlursset i motsvarande port kan du endast
➣
använda “Auto volym” i ljudmenyn.
Långvarig användning av hörlurar på hög volym kan skada din hörsel.
➣
Du kan inte ta emot ljud från högtalarna när du ansluter hörlurarna till
➣
systemet.
Volymen i hörlurarna och TV-volymen justeras på olika sätt.
➣
Välja ljudläge
Du kan ställa in ljudläget genom att trycka på knappen “DUAL”.
När du trycker på den visas aktuellt ljudläge på skärmen.
Ljudtyp DUAL 1/2 Standard
Mono MONO
FM Stereo
NICAM Stereo
Om stereosignalen är svag och automatisk växling förekommer, byter du till Mono.
➣
Stereo
Dual
Mono MONO
Stereo
Dual
STEREO MONO
DUAL 1 DUAL 2
MONO STEREO
MONO DUAL 1
DUAL 2
Automatisk
ändring
DUAL 1
Automatisk
ändring
DUAL 1
Du kan ställa in dessa alternativ
genom att trycka på knappen
DUAL på fjärrkontrollen.
Justera volymen automatiskt
Varje program har sina egna signalförhållanden, vilket innebär
att du måste ändra volymen varje gång du byter kanal. Med
automatisk volyminställning justeras volymen automatiskt för
önskad kanal genom att sänka ljudet när modulationssignalen
är hög eller höja ljudet när modulationssignalen är låg.
1. Tryck på
2. Tryck på
3. Tryck på
4. Tryck på
MENU för att visa menyn.
Tryck på eller för att välja “Ljud” och sedan på ENTER/OK.
eller för att välja “Auto Volym” och sedan på
ENTER/OK.
eller igen för att välja “På” eller “Av”. Tryck på
ENTER/OK.
EXIT för att avsluta.
Svenska - 24
TV
Läge : Personlig
Equalizer
SRS TS XT : Av
Auto volym : Av
Intern avst : Av
Ljudval : Huvudbild
Återställ
Flytta Öppna Tillbaka
TV
Läge : Personlig
Equalizer
SRS TS XT : Av
Auto volym : Av
Intern avst : Av
Ljudval : Huvudbild
Återställ
Flytta Öppna Tillbaka
Ljud
Ljud
Av
På
Page 85

Svenska - 25
Välja intern avstängning
Koppla från den inbyggda förstärkaren om du vill höra ljudet
genom separata högtalare.
1. Tryck på
MENU för att visa menyn.
Tryck på eller för att välja “Ljud” och sedan på ENTER/OK.
2. Tryck på
eller för att välja “Intern avst.” och sedan på
ENTER/OK.
3. Tryck på
eller igen för att välja “På” eller “Av”. Tryck på
knappen ENTER/OK.
4. Tryck på
➣
EXIT för att avsluta.
När “Intern avst.” är inställd till “På’, kan ljudmenyerna för
“Ljudval” (i BIB-läge) inte justeras.
Lyssna på underbildens ljud
När funktionen PIP ( BIB) är aktiverad kan du lyssna på ljudet i
den underordnade bilden.
1. Tryck på
2. Tryck på ▲ eller ▼ för att välja “Ljudval” och sedan trycker du
3. Tryck på ▲ eller ▼ för att välja “Underbild”.
4. Tryck på
1.
➣
MENU för att visa menyn.
Tryck på ▲ eller ▼ för att välja “Ljud” och sedan ENTER/OK.
på ENTER/OK.
Tryck på ENTER/OK .
EXIT-knappen när du vill avsluta.
Huvudbild:
Underbild:
Används för att lyssna på huvudbildens ljud.
Används för att lyssna på den underordnade
bildens ljud.
Du kan välja detta alternativ när “BIB” är inställt på “På”.
TV
Läge : Personlig
Equalizer
SRS TS XT : Av
Auto volym : Av
Intern avst : Av
Ljudval : Huvudbild
Återställ
Flytta Öppna Tillbaka
TV
Läge : Personlig
Equalizer
SRS TS XT : Av
Auto volym : Av
Intern avst : Av
Ljudval : Huvudbild
Återställ
Flytta Öppna Tillbaka
TV
Läge : Personlig
Equalizer
SRS TS XT : Av
Auto volym : Av
Intern avst : Av
Ljudval : Huvudbild
Återställ
Flytta Öppna Tillbaka
TV
Läge : Personlig
Equalizer
SRS TS XT : Av
Auto volym : Av
Intern avst : Av
Ljudval : Huvudbild
Återställ
Flytta Öppna Tillbaka
Ljud
Ljud
Ljud
Ljud
Huvudbild
Underbild
Av
På
Page 86

Återställa ljudinställningarna till fabriksstandard
Om Spelläge är på aktiveras funktionen Reset Sound (Återställ
ljud). Genom att välja funktionen Återställ efter inställningar
av equalizern återställs inställningarna för equalizer till
fabriksstandard.
1. Tryck på
MENU för att visa menyn.
Tryck på eller för att välja “Ljud” och sedan på ENTER/OK.
2. Tryck på
eller för att välja “Återställ” och sedan på ENTER/
OK.
3. Tryck på
➣
EXIT för att avsluta.
Du kan välja detta alternativ när “Spelläge” är inställt på “På”.
TV
Läge : Personlig
Equalizer
SRS TS XT : Av
Auto volym : Av
Intern avst : Av
Ljudval : Huvudbild
Återställ
Flytta Öppna Tillbaka
Ställa in och visa aktuell tid
Du kan ställa in TV-klockan så att aktuell tid visas när du
trycker på knappen INFO. Du måste även ställa in tiden för att
kunna använda de automatiska på/av-inställningarna.
1. Tryck på
MENU för att visa menyn.
Tryck på eller för att välja “Inställning” och sedan på
ENTER/OK.
2. Tryck på
3. Tryck på
4.
eller för att välja “Tid” och sedan på ENTER/OK.
ENTER/OK för att välja “Ställ klockan”.
Om du vill ... Trycker du på ...
Gå vidare till “Månad”, “Datum”, “År”, “Tim”
eller
eller “Minut”
Ställa in “Månad”, “Datum”, “År”, “Tim” eller
eller
“Minut”
Tryck på knappen ENTER/OK.
5. Tryck på
➣
➣
EXIT för att avsluta.
Om du drar ur strömsladden måste du ställa klockan igen.
Du kan ställa in år, månad, datum, timmar och minuter genom att trycka på sifferknapparna på
fjärrkontrollen.
Mode : Custom
TV
Equalizer
Plug & Play
SRS TS XT : Off
Språk : Svenska
Auto Volume : Off
Tid
Internal Mute : Off
Spelläge : Av
Reset
Blå bakgrund : Av
Melodi : Av
PC
Mer
Flytta Öppna Tillbaka
TV
Flytta Ändra Tillbaka
Inställning
Move Enter Return
Ställ klockan
Månad01Datum
01
Tim00Minut
00
Ljud
År
2007
Svenska - 26
Page 87

Svenska - 27
Ställa in sovtimern
Du kan välja en tidsperiod på mellan 30 och 180 minuter innan
TV:n automatiskt ska gå över till standbyläge.
1. Tryck på
MENU för att visa menyn.
Tryck på eller för att välja “Inställning” och sedan på
ENTER/OK.
2. Tryck på
3. Tryck på
eller för att välja “Tid” och sedan på ENTER/OK.
eller för att välja “Sovtimer” och sedan på ENTER/
OK.
4. Tryck på
eller era gånger tills önskad tid visas (Av, 30, 60,
90, 120, 150, 180). Tryck på knappen ENTER/OK.
5. Tryck på
➣
EXIT för att avsluta.
TV:n går automatiskt över till viloläget (standby) när timern når
0.
Mode : Custom
TV
Equalizer
Plug & Play
SRS TS XT : Off
Språk :Svenska
Auto Volume : Off
Tid
Internal Mute : Off
Spelläge : Av
Reset
Blå bakgrund : Av
Melodi : Av
PC
Mer
Flytta Öppna Tillbaka
TV
Ställ klockan :
Sovtimer :
Timer 1 :
Timer 2 :
Timer 3 :
Flytta Öppna Tillbaka
Slå på och stänga av TV:n automatiskt
1. Tryck på MENU för att visa menyn.
Tryck på eller för att välja “Inställning” och sedan på
ENTER/OK.
2. Tryck på
3. Tryck på
eller för att välja “Tid” och sedan på ENTER/OK.
eller för att välja “Timer 1”, “Timer 2”, “Timer 3”
och sedan på ENTER/OK.
4. Tryck på
eller för att justera “Tim” och sedan på för att
gå till nästa steg.
Ange andra alternativ med samma metod som ovan.
Aktiverad/Inaktiverad
Upprepa
Volym Justera 0~100
Programme Justera Programme
När du är klar trycker du på knappen RETURN för att återgå.
➣
Välj en gång, Varje dag,
Mån-Fre, Mån-Lör, Lör-Sön
Tryck på eller
Tryck på eller
Tryck på eller
Tryck på eller
- Den aktuella tiden visas varje gång du trycker på knappen
INFO.
- Du kan ställa in timmar, minuter och kanal direkt genom att trycka på sifferknapparna på
fjärrkontrollen.
5. Tryck på
EXIT för att avsluta.
Mode : Custom
TV
Equalizer
Plug & Play
SRS TS XT : Off
Språk : Svenska
Auto Volume : Off
Tid
Internal Mute : Off
Spelläge : Av
Reset
Blå bakgrund : Av
Melodi : Av
PC
Mer
Flytta Öppna Tillbaka
TV
Påslagningstid
Avstängningstid
Upprepa
Volym
Flytta Ändra Tillbaka
Inställning
Move Enter Return
Tid
Av
30
60
90
120
150
180
Inställning
Move Enter Return
Timer 1
5
:
00
00
:
En gång
Nej
Program
01
6
00 00 Nej
10
Page 88

Välja språk
När du använder apparaten för första gången måste du
välja vilket språk som ska användas vid menyvisning och
indikeringar.
1. Tryck på
MENU för att visa menyn. Tryck på eller för att
välja “Inställning” och sedan på ENTER/OK.
2. Tryck på
eller för att välja “Språk” och sedan på ENTER/
OK.
3. Välj ett visst språk genom att trycka på
eller flera gånger.
Tryck på knappen ENTER/OK.
Du kan välja mellan 21 olika språk.
➣
4. Tryck på
EXIT för att avsluta.
Mode : Custom
TV
Equalizer
Plug & Play
SRS TS XT : Off
Språk : Svenska
Auto Volume : Off
Tid
Internal Mute : Off
Spelläge : Av
Reset
Blå bakgrund : Av
Melodi : Av
PC
Mer
Flytta Öppna Tillbaka
Mode : Custom
TV
Equalizer
Plug & Play
SRS TS XT : Off
Språk : English
Auto Volume : Off
Tid
Internal Mute : Off
Spelläge : Av
Reset
Blå bakgrund : Av
Melodi : Av
PC
Mer
Flytta Öppna Tillbaka
Inställning
Move Enter Return
Inställning
Move Enter Return
Türkçe
Svenska
Norsk
Dansk
Suomi
Använda Spelläge
När du ansluter till en spelenhet, t.ex. PlayStationTM eller
XboxTM, kan du njuta av en mer verklig upplevelse genom att
välja spelmenyn.
1. Tryck på
MENU för att visa menyn.
Tryck på eller för att välja “Inställning” och sedan på
ENTER/OK.
2. Tryck på
eller för att välja “Spelläge” och sedan på ENTER/
OK.
3. Tryck på
eller igen för att välja “På” eller “Av”. Tryck på
knappen ENTER/OK.
4. Tryck på
➣
EXIT för att avsluta.
Avbryt spelläget i setup-menyn för att koppla ur spelenheten
och ansluta till en annan extern enhet.
Om du visar TV-menyn i spelläget skakar skärmen något.
➣
Spelläge är inte tillgängligt i TV-läge.
➣
Om Spelläge är på:
➣
Bildläge ändras till Standard och Sound Mode ändras till
Custom automatiskt. Användaren kan inte ändra dessa till andra lägen.
Ljudläge i menyn Ljud avaktiveras. Justera ljudet med equalizern.
Funktionen för ljudåterställning aktiveras. Genom att välja funktionen Återställ efter inställningar av
equalizern återställs inställningarna för equalizer till fabriksstandard.
Mode : Custom
TV
Equalizer
Plug & Play
SRS TS XT : Off
Språk : Svenska
Auto Volume : Off
Tid
Internal Mute : Off
Spelläge : Av
Reset
Blå bakgrund : Av
Melodi : Av
PC
Mer
Flytta Öppna Tillbaka
Mode : Custom
TV
Equalizer
Plug & Play
SRS TS XT : Off
Språk : Svenska
Auto Volume : Off
Tid
Internal Mute : Off
Spelläge : Av
Reset
Blå bakgrund : Av
Melodi : Av
PC
Mer
Flytta Öppna Tillbaka
Inställning
Move Enter Return
Inställning
Move Enter Return
▲
Av
På
Svenska - 28
Page 89

Svenska - 29
Ställa in läge för blå bakgrund/välja melodi
Blå bakgrund:
En blå bakgrund ersätter automatiskt en bild med störningar
om inte någon signal tas emot eller om signalen är mycket
svag.
Om du vill visa bilden med störningar måste du stänga av läget
”Blå bakgrund”.
Melodi:
Du hör melodin när du sätter på eller stänger av TV:n.
1. Tryck på
MENU för att visa menyn.
Tryck på eller för att välja “Inställning” och sedan på
ENTER/OK.
2. Tryck på
eller för att välja “Blå bakgrund” eller “Melodi”.
Tryck på knappen ENTER/OK.
3. När du är klar med inställningen trycker du på
Blå bakgrund: Av/På
Melodi: Av/Låg/Medium/Hög
4. Tryck på
EXIT för att avsluta.
ENTER/OK.
Mode : Custom
TV
Equalizer
Plug & Play
SRS TS XT : Off
Språk : Svenska
Auto Volume : Off
Tid
Internal Mute : Off
Spelläge : Av
Reset
Blå bakgrund : Av
Melodi : Av
PC
Mer
Flytta Öppna Tillbaka
Mode : Custom
TV
Equalizer
Plug & Play
SRS TS XT : Off
Språk : Svenska
Auto Volume : Off
Tid
Internal Mute : Off
Spelläge : Av
Reset
Blå bakgrund : Av
Melodi : Av
PC
Mer
Flytta Öppna Tillbaka
Ställa in Bildinst. PC-läge
Du kan visa mer högkvalitativa bilder genom att kongurera
skärmens inställningar i PC-läge.
Om du ställer in Bildinst. PC-läge till På, kan du kongurera
ninställningar (när bildläget är inställt på Standard eller Film)
som i PC-läge.
1. Tryck på
MENU för att visa menyn.
Tryck på eller för att välja “Inställning” och sedan på
ENTER/OK.
2. Tryck på
eller för att välja “Bildinst. PC-läge”.
Tryck på knappen ENTER/OK.
3. Tryck på
eller igen för att välja “På” eller “Av”.
Tryck på knappen ENTER/OK.
4. Tryck på
➣
EXIT för att avsluta.
Funktionen är endast tillgänglig i PC-läge.
Mode : Custom
TV
Equalizer
Mer
SRS TS XT : Off
Bildinst pc-läge : Av
Auto Volume : Off
Energispar : Av
Internal Mute : Off
HDMI svart : Låg
Reset
BIB
Flytta Öppna Tillbaka
Mode : Custom
TV
Equalizer
Mer
SRS TS XT : Off
Bildinst pc-läge : Av
Auto Volume : Off
Energispar : Av
Internal Mute : Off
HDMI svart : Låg
Reset
BIB
Flytta Öppna Tillbaka
Inställning
Move Enter Return
Inställning
Move Enter Return
Inställning
Move Enter Return
Inställning
Move Enter Return
Av
På
Av
Låg
Medium
Hög
Av
På
Page 90

Använda energisparfunktionen
Den här funktionen används för att justera ljusstyrkan för TV:
n för att ge minskad energiförbrukning. När du tittar på TV på
kvällen ställer du in läget “Energispar” på “Hög” för att minska
energiförbrukningen.
1. Tryck på
2. Tryck på
3. Välj önskat alternativ (Av, Låg, Medium, Hög, Auto) genom att
4. Tryck på
MENU för att visa menyn.
Tryck på eller för att välja “Inställning” och sedan på
ENTER/OK.
eller för att välja “Energispar” och sedan på
ENTER/OK.
trycka på eller . Tryck på knappen ENTER/OK.
EXIT för att avsluta.
Mode : Custom
TV
Equalizer
Mer
SRS TS XT : Off
Bildinst pc-läge : Av
Auto Volume : Off
Energispar : Av
Internal Mute : Off
HDMI svart : Låg
Reset
BIB
Flytta Öppna Tillbaka
TV
Mer
Bildinst pc-läge : Av
Energispar : Av
HDMI svart : Låg
BIB
Flytta Öppna Tillbaka
Inställning
Move Enter Return
Inställning
Av
Låg
Medium
Hög
Auto
Svenska - 30
Page 91

Svenska - 31
Välja källa
Du kan välja bland externa källor som är anslutna till din TV:s
ingångar.
1. Tryck på
2. Tryck på
➣
3. Välj önskat alternativ genom att trycka på
Tryck på knappen SOURCE på fjärrkontrollen för att växla
MENU för att visa menyn.
Tryck på ▲ eller ▼ för att välja “Ingångar” och sedan på
ENTER/OK.
ENTER/OK för att välja “Källa”.
När inga externa enheter är anslutna till din TV är endast
“TV”, “Ext.1”, “Ext.2”, “DTV” aktiverade i “Källa”. “AV”, “SVideo”, “Component”, “PC”, “HDMI1”, “HDMI2” aktiveras
endast när de är anslutna till din TV.
or .
Tryck på knappen ENTER/OK.
mellan tillgängliga källor. TV-läge kan väljas genom att trycka
ned knappen TV/DTV, sifferknapparna (0~9) och knappen
P / fjärrkontrollen. Det kan inte väljas genom att använda
knappen SOURCE.
Mode : Custom
TV
Equalizer
Källa : TV
SRS TS XT : Off
Ändra namn
Auto Volume : Off
Internal Mute : Off
Reset
Flytta Öppna Tillbaka
Mode : Custom
TV
Equalizer
TV
SRS TS XT : Off
Ext.1 : ----
Auto Volume : Off
Ext.2 : ---Internal Mute : Off
AV : ---S-Video : ----
Reset
Component : ---PC : ----
Mer
Flytta Öppna Tillbaka
Ingångar
Move Enter Return
Move Enter Return
Källa
Redigera ingångskällornas namn
Namnge den enhet som är ansluten insignalingången för att
det skall bli lättare för dig att välja ingångskälla.
1. Tryck på
2. Tryck på
3. Tryck på
4. Tryck på
5. Tryck på
MENU för att visa menyn.
Tryck på knappen ENTER/OK för att välja “Ingångar”.
eller för att välja “Ändra namn” och sedan på
ENTER/OK.
eller för att välja den enhet du vill redigera. Tryck
på knappen ENTER/OK.
eller för att välja enhet.
Tryck på ENTER/OK.
EXIT för att avsluta.
Mode : Custom
TV
Equalizer
Källa : TV
SRS TS XT : Off
Ändra namn
Auto Volume : Off
Internal Mute : Off
Reset
Flytta Öppna Tillbaka
Mode : Custom
TV
Equalizer
Ext.1 : ----
SRS TS XT : Off
Ext.2 : ----
Auto Volume : Off
AV : ----
Internal Mute : Off
S-Video : ----
Component : ----
Reset
PC : ----
HDMI1 : ----
HDMI2 : ----
Flytta Öppna Tillbaka
Ingångar
Move Enter Return
Ändra namn
Move Enter Return
----
Video
DVD
D-VHS
Digitalbox
Sat./Hårddisk
Satellitmottagare
Page 92

Förhandsvisa DTV-menysystemet
Företaget garanterar inte normal användning av DTV-
➣
menyn för länder som inte innehåller något av de 8 språk
som stöds (Storbritannien, Tyskland, Frankrike, Sverige,
Finland, Italien, Spanien, Österrike), eftersom endast de här
ländernas standarder stöds. Dessutom är det så att när landet
där sändningen sker skiljer sig åt från landet som väljs av
den aktuella användaren, kanske inte strängen som visas i
kanalfältet, Info, Guide, Kanalhanterare etc. visas som den
skall.
Tillgängligt i DTV-läge. Förinställ till DTV-läge med knappen
➣
TV/DTV på fjärrkontrollen. Om du vill ha information om hur
du navigerar i menysystemet på skärmen och justerar olika
inställningar kan du titta på följande gur.
Mode : Custom
Equalizer
Guide - Nu & Nästa
SRS TS XT : Off
Hel guide
Auto Volume : Off
Schemalagda
Internal Mute : Off
Standardguide : Hel guide
Reset
Autolagra
Lagra manuellt
Ändra favoritkanaler
Kanallista
Guide
Move Enter Return
Flytta Öppna Avsluta
Kanal
Guide
Guide - Nu & Nästa
Hel guide
Schemalagda
Standardguide
Kanal
Autolagra
Lagra manuellt
Ändra favoritkanaler
Kanallista
Inställning
Menytransparens
Barnlås
Undertext
Läge för undertext
Ljudformat
Digital text
Tidszon
System
Språk
Språk för ljud
Textningsspråk
Text-TV-språk
Inställning
Nu/Nästa, Hel guide
Hela, Favoriter,Standard
Hög, Medium, Låg, Matt
Ange PIN
Av, På
Normal, Hörselskadad
PCM, Dolby Digital
Avaktivera, Aktivera
Produktinformation
Signalinformation
Programuppgradering
Common Interface
Återställ
Huvudspråk för ljud
Andraspråk för ljud
Huvudspråk för textning
Andraspråk för textning
Huvudspråk för text-tv
Andraspråk för text-tv
Move Enter Return
Flytta Öppna Avsluta
Menytransparens
Barnlås
Undertext : På
Läge för undertext
Ljudformat : PCM
Språk för ljud
Textningsspråk
Text-TV-språk
Inställning
Inställning
: Medium
: Normal
Move Enter Return
Flytta Öppna Avsluta
Språk
Move Enter Return
Flytta Öppna Avsluta
Du kan välja de här alternativen
genom att trycka på knappen
D.MENU på fjärrkontrollen.
Tryck på D.MENU.
Underposter på CI-menyn kan variera beroende på CAM-modell.
➣
Svenska - 32
Page 93

Svenska - 33
Uppdatera kanallistan automatiskt
Du kan uppdatera kanallistan när nya tjänster lanseras eller om
du yttar tv:n till en ny plats.
1. Tryck på
2. Tryck på
D.MENU för att visa DTV-menyn.
eller för att välja “Kanal” och sedan på ENTER/
OK.
3. Tryck på
ENTER/OK för att välja “Autolagra”.
Tryck på ENTER/OK.
4. När den slutförts visas antalet hittade tjänster.
Den bentliga favoritkanallistan tas inte bort när kanallistan
➣
uppdateras.
Om du vill avbryta sökningen innan den är avslutad, trycker du på ENTER/OK-knappen när “Stopp”
➣
är markerat.
5. Tryck på
➣
EXIT för att avsluta.
Om signalen är svag visas meddelandet “Ingen tjänst hittades! Kontrollera antennanslutningen.”.
Mode : Custom
Equalizer
SRS TS XT : Off
Auto Volume : Off
Söker digital tjänst…
Internal Mute : Off
Reset
Service hittades: 24 Kanal: 38
Autolagra
Stopp
Move Enter Return
Tillbaka
Uppdatera kanallistan manuellt
Du kan ange kanal för en snabbsökning efter kanaler.
1. Tryck på
2. Tryck på
D.MENU för att visa DTV-menyn.
eller för att välja “Kanal” och sedan på ENTER/
OK.
3. Tryck på
eller för att välja “Lagra manuellt” och sedan på
ENTER/OK.
4. Tryck på
eller för att välja “Kanal” och sedan på ENTER/
OK.
• Kanal:Kanal “5” till “69” visas på svenska. (Landsberoende)
➣
• Frekvens:Den tillgängliga frekvensen i kanalgruppen visas.
• Bandbredd:Tillgänglig bandbredd är 7 och 8 MHz.
5. När den slutförts visas antalet hittade tjänster.
6. Tryck på
EXIT för att avsluta.
Kanal
▲
65
▼
search
Sök
Ändra Tillbaka
Lagra manuellt
Frekvens Bandbredd
474000 8
KHz
35%
MHz
Page 94

Ändra dina favoritkanaler
Du kan redigera dina favoritkanaler genom att använda de fyra
färgknapparna.
1. Tryck på
2. Tryck på
3. Tryck på
4. Tryck på den röda knappen för att visa alla kanaler som lagrats.
5. Tryck på
➣
➣
➣
6. Tryck på
D.MENU för att visa DTV-menyn.
eller för att välja “Kanal” och sedan på ENTER/
OK.
eller för att välja “Ändra favoritkanaler” och sedan
på ENTER/OK.
eller för att välja en viss kanal. Tryck på knappen
ENTER/OK.
Ikonen “” visas bredvid den valda kanalen och kanalen
läggs till i favoritlistan.
För att ångra trycker du på ENTER/OK igen.
Markera alla:Välj alla kanaler som visas.
Välj ingen:Välj bort alla valda kanaler.
Förgr.:Visa alla kanaler som valts.
Inställningarna av favoritkanaler har slutförts.
EXIT för att avsluta.
Ändra favoritkanaler
(inga kanaler)
Add. Kanaler
Tillbaka
Ändra favoritkanaler
5
1 BBC TWO
2 Five
3 BBC THREE
4 abc1
5 QVC
6
Move Enter Return
Markera alla Välj ingen Förgr
Flytta Välj Tillbaka
Lägg till (Add)
Du kan använda den här funktionen när en eller er
favoritkanaler har valts.
1. Tryck på
2. Tryck på
D.MENU för att visa DTV-menyn.
eller för att välja “Kanal” och sedan på ENTER/
OK.
3. Tryck på
eller för att välja “Ändra favoritkanaler” och sedan
på ENTER/OK.
4.
Tryck på den röda knappen i menyn “Ändra favoritkanaler”
(Edit Favourite Channels). Om du vill lägga till er kanaler,
se steg 5 i föregående beskrivning.
5.
Om du vill kontrollera vilka kanaler som lagras trycker du på
knappen RETURN Tryck på EXIT-knappen när du vill avsluta.
Om du vill lägga till alla kanaler i favoritkanallistan trycker du
➣
på den röda knappen.
Tryck på den gröna knappen för att ta bort alla kanaler.
Förgr.:Visa alla kanaler som valts.
Tryck på knappen CH LIST för att öppna
favoritkanalhanteraren.
Ändra favoritkanaler
1 BBC TWO
3 BBC THREE
4 abc1
Lägg till Numrera om Förgr Ta bort
Flytta Tillbaka
Ändra favoritkanaler
5
1 BBC TWO
2 Five
3 BBC THREE
4 abc1
5 QVC
6
Move Enter Return
Markera alla Välj ingen Förgr
Flytta Välj Tillbaka
★
★
★
★
★
★
Svenska - 34
Page 95

Svenska - 35
Numrera om
1. Tryck på
2. Tryck på
OK.
3. Tryck på
D.MENU för att visa DTV-menyn.
eller för att välja “Kanal” och sedan på ENTER/
eller för att välja “Ändra favoritkanaler” och sedan
Ändra favoritkanaler
1
BBC TWO ★
--- BBC THREE
4 abc1
på ENTER/OK.
4. Välj önskad kanal genom att trycka på
5.
Tryck på den gröna knappen.
Området där numret anges är tomt.
➣
6. Ange det nya kanalnumret. Tryck på
eller .
ENTER/OK för att lagra
Lägg till Numrera om Förgr Ta bort
Redigering Tillbaka
och RETURN för att avbryta.
Tryck på knappen ◄ för att radera en angiven siffra.
➣
Om du anger ett nummer som redan tilldelats en annan kanal tilldelas den valda kanalen numret
➣
och det nummer som tidigare varit tilldelat kanalen tilldelas den andra kanalen. Detta innebär alltså
att de två numren växlar plats.
Favoritkanalerna sorteras automatiskt i stigande ordning enligt kanalnummer.
➣
7. Tryck på
EXIT för att avsluta.
★
★
Bekräfta
Förhandsvisa
1.
I menyn “Ändra favoritkanaler” väljer du den kanal som ska
förhandsvisas genom att trycka på knappen eller
2.
Tryck på den gula knappen.
Den valda kanalen visas på skärmen.
➣
Ta bort
1.
I menyn “Ändra favoritkanaler” väljer du den kanal som ska tas
bort genom att trycka på knappen
eller
2.
Tryck på den blå knappen.
Den valda kanalen och kanalnumret tas bort.
➣
Om du vill lägga till en kanal som tagits bort i
➣
favoritkanallistan, se “Lägg till” på sidan 34.
Ändra favoritkanaler
1
BBC TWO ★
3 BBC THREE
4 abc1
Lägg till Numrera om Förgr Ta bort
Flytta Tillbaka
Ändra favoritkanaler
1 BBC TWO
3 BBC THREE
Lägg till Numrera om Förgr Ta bort
Flytta Tillbaka
★
★
★
★
Page 96

Välja kanallista
Du kan utesluta kanaler du har valt från kanalerna du har sökt.
När du söker igenom lagrade kanaler visas inte du har valt. Alla
kanaler som du inte har hoppat över visas när du går igenom
dem.
1. Tryck på
2. Tryck på
D.MENU för att visa DTV-menyn.
eller för att välja “Kanal” och sedan på ENTER/
OK.
3. Tryck på
eller för att välja “Kanallista”. Tryck på knappen
ENTER/OK.
4. Tryck på
eller för att välja “Hela”, “Favoriter” eller “Standard”.
Test Card M' v2.0
1 Test Card M'
3 Vida003b
4 Vida004b
5 vida005b
6 vida006b
15 Ch 15
16 QVC
17 UKTV Gold
Föreg. sida Nästa sida Favoriter TV
Flytta Titta Tillbaka
Tryck på knappen ENTER/OK.
5.
Tryck på den gula knappen för att växla mellan favoritkanalerna och alla kanaler.
Dina favoritkanaler visas endast om de ställts in på menyn ”Ändra dina favoritkanaler”
➣
(se sidan 34).
6.
Tryck på den röda eller gröna knappen för att visa föregående eller nästa kanal i kanalhanteraren.
7. Tryck på
➣
eller för att välja en kanal som ska ninställas. Tryck sedan på ENTER/OK.
Kanalnumret, namnet och en ikon visas i det övre vänstra hörnet när kanalen ändras. Kanalnumret
och namnet visas om kanalen är en av alla kanaler och en ikon visas om kanalen är en av
favoritkanalerna.
8.
Tryck på den blåa knappen för att växla mellan TV, Radio, Data/other och All (tv, radio, data/övrigt och
alla).
9.
Tryck på den CH LIST-knappen för att avsluta kanalhanteraren.
Kanallista
23 bid-up.tv
25 TCM
26 UKTV Style
27 Discovery
28 DiscoveryH&L
15 Cartoon Nwk
33 Boomerang
55 Ttext Holidays
60 Television X
70 BBC Radio 1
72 BBC Radio 2
73 BBC Radio 3
74 BBC Radio 4
84 heat
91 MOJO
800 ARD-MHP-Data
6 Mer
Visa programinformation
När du tittar på en kanal kan du öppna mer information om det
aktuella programmet.
1. Tryck på
➣
2. För att gå ur en banderollinformation, trycker du på
INFO under visning av programmet.
Programinformationen visas.
INFO.
1 AFDO,16:9
AFDO 16:9
Utan spärr
SD
Stereo
Undertext
Engelska
Avsluta
14:30 Lör1 Sep
Alla kanaler
14:30~14:33
Contains video with AFD O; coded frame
is 16:9
Move Enter Return
Alla kanaler
1/2
A
Svenska - 36
Page 97

Svenska - 37
Visa Elektronisk programguide
EPG-information (elektronisk programguide) ställs till
förfogande av den som sänder kanalen. Programposter
kan visas tomma eller utan att vara uppdaterade beroende
på den information som sänds för en viss kanal. Visningen
uppdateras dynamiskt så snart ny information nns tillgänglig.
Guide – Nu & Nästa
Visar information om aktuellt program och om nästa program på
de sex kanaler som anges i kolumnen till vänster.
Hel guide
Visar programinformation i kronologiska segment i timmar. Två
timmars programinformation visas. Du kan bläddra bakåt och
framåt i informationen.
1. Tryck på
2. Tryck på
3. Tryck på
D.MENU för att visa DTV-menyn.
ENTER/OK för att välja “Guide”.
eller för att välja “Guide - Nu & Nästa” eller “Hel
Guide”. Tryck på knappen ENTER/OK.
➣
Du kan även visa guidemenyn genom att trycka på knappen
GUIDE.
4.
Om du vill ... Så ...
Välj ett program genom att trycka på
•
Titta på ett program i EPG-listan.
Om nästa program valts schemaläggs det med en klockikon. Om du trycker på
➣
ENTER/OK-knappen igen, tas schemläggningen bort och klockikonen visas inte
längre. För information om schemaläggning av program, se nästa sida.
Visa programinformation
Växla mellan “Guide - Nu & Nästa” och “Hel
Guide”
Visa “Favoriter” och “Alla kanaler”
Bläddra snabbt bakåt (24 timmar).
Bläddra snabbt framåt (24 timmar).
Avsluta guiden Tryck på EXIT-knappen.
, , , .
Tryck på knappen ENTER/OK.
•
Välj ett program genom att trycka på
•
, , , .
Tryck på INFO när programmet är
•
markerat
Tryck era gånger på den röda
•
knappen.
Tryck era gånger på den gröna
•
knappen.
Tryck era gånger på den gula
•
knappen.
Tryck era gånger på den blå
•
knappen.
•
All Channels
Guide - Nu & Nästa
Extreme Machines: Armoured Cars
Nu Nästa
Titta AvslutaHel guide Favoriter
Hel guide
Extreme Machines: Armoured Cars
13:00 14:00Idag
Titta
-24Timmar +24Timmar
13:28 Ons 16 Feb
INFO
Information
13:28 Ons 16 Feb
INFO
Information
AvslutaNu/Nästa Favoriter
➣
Programnamnet visas längst upp mitt på skärmen. Tryck på knappen INFO för mer information.
Bland informationen visas kanalnummer, programlängd, statusfält, föräldraklassicering, information
om bildkvalitet (HD/SD), ljudlägen, undertext eller text-tv, språk för undertexten eller text-tv och en
kortfattad sammanfattning av det valda programmet. “...” visas om sammanfattningen är lång.
➣
Sex kanaler visas. För att bläddra mellan kanalerna går du till en kanal med knappen eller . För
att visa sida för sida använder du knappen P eller .
Page 98

Använda Schemalagda
Om du skapar ett schema med program som du vill se kommer
du automatiskt till kanalen när det schemalagda programmet
inleds, även om du tittar på ett annat program.
1. Tryck på
2. Tryck på
3. Tryck på
4.
5. Tryck på
➣
6.
7. Tryck på
➣
D.MENU för att visa DTV-menyn.
ENTER/OK för att välja “Guide”.
eller för att välja “Schemalagda” och sedan på
ENTER/OK.
Tryck på den röda knappen. Du kommer automatiskt till det
schemalagda programmet.
ENTER/OK för att välja ett alternativ och justera det
med eller .
Du kan ställa in timmar och minuter genom att trycka på
sifferknapparna på fjärrkontrollen.
Kanal:Ställ in kanal.
Tid:Ställ in tid.
Datum:Ställ in år, månad och dag.
Frekvens:Ställ in hur ofta programmet visas.
“En gång”, “Dagligen” eller “Varje vecka”
När du ställt in schemat trycker du på den röda knappen.
EXIT för att avsluta.
Spara:Spara det justerade schemat.
Avbryt:Ångra ändringarna i schemat.
Lägg till program:Lägg till en ny schemapost.
Redigering:Redigera det valda schemat.
Ta bort:Ta bort det valda schemat.
Schemalagda
(Redigering)
Lägg till program
Tillbaka
Schemalagda
Tisdag 22 Apr 15:30 ~ 16:00 En gång
801 RaiTre
Lägg till program
Flytta Tillbaka
Spara Avbryt
Ändra Flytta Tillbaka
Kanal
Datum
Frekvens
Redigering Ta bort
Schemalagda
802 RaiUno
Tid
15 : 20 till-- : --
Tis 22 Apr 2007
En gång
Ställa in Standardguide
Du kan ställa in stilen på standardguiden.
1. Tryck på
2. Tryck på
3. Tryck på
4. Välj “Nu/Nästa” eller “Hel Guide” med knappen
5. Tryck på
D.MENU för att visa DTV-menyn.
ENTER/OK för att välja “Guide”.
eller för att välja “Standardguide” och sedan på
ENTER/OK.
eller och
tryck sedan på ENTER/OK.
EXIT för att avsluta.
Svenska - 38
Guide
Guide - Nu & Nästa
Hel guide
Schemalagda
Standardguide :
Move Enter Return
Flytta Öppna Tillbaka
Nu/Nästa
Hel guide
Du kan välja dessa alternativ
genom att trycka på knappen
GUIDE på fjärrkontrollen.
Page 99

Svenska - 39
Visa Alla kanaler och Favourite Channels
På EPG-menyn kan du visa alla kanaler eller favoritkanalerna.
1. Tryck på
2. Tryck på
3.
4. Tryck på
5.
6. Välj ett program genom att trycka på
7. Tryck på
8.
Om favoritlistan inte ställts in visas meddelandet:
“Listan över favoriter är tom. Vill du välja favoriter nu?”.
Välj “ja”.
Om du vill redigera favoritkanalerna, se sidan 34 för mer
9. Tryck på EXIT för att avsluta.
➣
➣
D.MENU för att visa DTV-menyn.
ENTER/OK för att välja “Guide”.
Välj guide (“Guide - Nu & Nästa” eller “Hel Guide”) genom att
trycka på knappen eller .
ENTER/OK igen.
Tryck på den gröna knappen. Listan med alla kanaler eller
All Channels
Guide - Nu & Nästa
Extreme Machines: Armoured Cars
Nu Nästa
favoritkanallistan visas.
, , , eller .
INFO för att visa information om det markerade
programmet.
Titta AvslutaHel guide Favoriter
Menyn “Ändra favoritkanaler” visas. Om du väljer “nej” förblir
alla kanaler oförändrade.
information.
”Alla kanaler” är listan med alla kanaler som hittades under
Extreme Machines: Armoured Cars
13:00 14:00Idag
Listan över favoriter är tom.
Vill du välja favoriter nu?
Ja Nej
uppdateringen av kanallistan. Alla kanaler visas i läget med alla
kanaler.
Titta
“Favoriter” är listan med de kanaler som ställts in på menyn “Ändra favoritkanaler” (se sidan 34).
13:28 Ons 16 Feb
INFO
Hel guide
13:28 Ons 16 Feb
INFO
-24Timmar +24Timmar
Information
Information
AvslutaNu/Nästa Favoriter
Page 100

Ställa in menytransparens
Du kan ställa in menytransparensen.
1. Tryck på
2. Tryck på
D.MENU för att visa DTV-menyn.
eller för att välja “Inställning” och sedan på
ENTER/OK.
3. Tryck på
eller för att välja “Menytransparens” och sedan på
ENTER/OK.
4. Välj önskat alternativ (“Hög”, “Medium”, “Låg”, eller “Matt”)
genom att trycka på eller och sedan på ENTER/OK för att
ändra inställning.
5. Tryck på
EXIT för att avsluta.
Ställa in Barnlås
Den här funktionen gör det möjligt att förhindra att obehöriga
användare, t.ex. barn, tittar på olämpliga program med en 4siffrig PIN-kod, som anges av användaren. Menyn på skärmen
uppmanar dig att ange en PIN-kod (du kan ändra den senare om
du vill).
1. Tryck på
2. Tryck på
3. Tryck på
4.
5.
➣
➣
6. Tryck på
7. Tryck på
8.
➣
9.
➣
10.
➣
11. Tryck på
12. Tryck på
➣
D.MENU för att visa DTV-menyn.
eller för att välja “Inställning” och sedan på
ENTER/OK.
eller för att välja “Barnlås” och sedan på ENTER/
OK.
“Ange PIN” visas.
Ange din nuvarande 4-siffriga PIN-kod med sifferknapparna (0-
9). Alternativen i gruppen “Barnlås” visas med “Låsnivå” valt.
Standard-PIN-koden för en ny tv är 0000.
Om du anger en ogiltig PIN-kod visas meddelandet “Ogiltig
PIN-kod. Försök igen”.
ENTER/OK igen.
eller för att välja en viss kanal. Tryck på knappen
ENTER/OK.
Om du vill ändra PIN-kod väljer du “Ändra PIN” med knappen
eller . Tryck på knappen ENTER/OK.
“Ange ny pin” visas.
Ange din nya PIN-kod med sifferknapparna (0-9).
“Bekräfta ny pin” visas.
Ange din nya PIN-kod igen med sifferknapparna (0-9) för att
bekräfta den.
Meddelandet “PIN-koden har ändrats.” visas.
ENTER/OK igen.
EXIT för att avsluta.
Om du har glömt PIN-koden trycker du på fjärrkontrollens
knappar i följande ordning, detta återställer PIN-koden till 0-0-0-
0. POWER (Off), MUTE, 8 , 2, 4, POWER (On).
Menytransparens
Barnlås
Undertext : På
Läge för undertext
Ljudformat
Menytransparens
Barnlås
Undertext : På
Läge för undertext
Ljudformat
Ange PIN
Låsnivå:
Ändra PIN
Bekräfta ny PIN
Setup
: Medium
Hög
Medium
Låg
: Normal
Matt
Flytta Öppna Tillbaka
Inställning
: Medium
: Normal
Move Enter Return
Flytta Öppna Tillbaka
Barnlås
Ange PIN Tillbaka
Barnlås
▲
Utan spärr
No Block
3
4
5
6
7
Move Enter Return
Flytta Öppna Tillbaka
PIN-koden har ändrats.
Ange PIN
▼
Ändra PIN
OK
Tillbaka
Svenska - 40
 Loading...