

Page 1
Contact SAMSUNG WORLD-WIDE
If you have any questions or comments relating to Samsung products,
please contact the SAMSUNG customer care centre.
Kapcsolatfelvétel: SAMSUNG WORLD-WIDE
Bármilyen észrevétele, vagy kérdése van Samsung termékekkel kapcsolatban, forduljon a
SAMSUNG ügyfélszolgálathoz.
Kontakt do SAMSUNG WORLD-WIDE
Jeżeli masz jakieś uwagi lub pytania w sprawie produktów marki Samsung, skontaktuj się z
naszą infolinią.
Επικοινωνήστε με τη SAMSUNG ΣΕ ΟΛΟ ΤΟΝ ΚΟΣΜΟ
Εάν έχετε σχόλια ή ερωτήσεις σχετικά με προϊόντα της Samsung, επικοινωνήστε με το κέντρο
εξυπηρέτησης πελατών της SAMSUNG.
Свържете се със SAMSUNG ПО ЦЕЛИЯ СВЯТ
Ако имате въпроси или коментари за продуктите на Samsung, се обърнете към центъра
за обслужване на клиенти на SAMSUNG.
Skontaktujte Celosvetový Samsung
Ak máte nejaké otázky alebo komentáre ohľadom produktov spoločnosti Samsung, prosím,
skontaktujte centrum starostlivosti o zákazníkov spoločnosti SAMSUNG.
Kontaktirajte SAMSUNG ŠIROM SVIJETA
Ako imate pitanja ili komentara u vezi s proizvodima tvrtke Samsung, obratite se centru za
brigu o kupcima tvrtke Samsung.
Kontaktujte Samsung po celém světě
Pokud máte dotazy nebo připomínky týkající se výrobků Samsung, kontaktujte středisko péče
o zákazníky společnosti SAMSUNG.
LCD TV
LE32N7
LE40N7
LE46N7
Owner’s Instructions
Before operating the unit,
please read this manual thoroughly,
and retain it for future reference.
Country
BELGIUM
CZECH REPUBLIC
DENMARK
FINLAND
FRANCE
GERMANY
HUNGARY
ITALIA
LUXEMBURG
NETHERLANDS
NORWAY
POLAND
PORTUGAL
RUSSIA
SLOVAKIA
SPAIN
SWEDEN
U.K
UKRAINE
Customer Care Center
02 201 2418
844 000 844
38 322 887
09 693 79 554
08 25 08 65 65 (€ 0,15/Min)
01805 - 121213 (€ 0,12/Min)
06 40 985 985
199 153 153
02 261 03 710
0900 20 200 88 (€ 0.10/Min)
231 627 22
0 801 801 881
80 8 200 128
8-800-200-0400
0850 123 989
902 10 11 30
08 585 367 87
0870 242 0303
8-800-502-0000
Web Site
www.samsung.com/be
www.samsung.com/cz
www.samsung.com/dk
www.samsung.com/fi
www.samsung.com/fr
www.samsung.de
www.samsung.com/hu
www.samsung.com/it
www.samsung.lu
www.samsung.com/nl
www.samsung.com/no
www.samsung.com/pl
www.samsung.com/pt
www.samsung.ru
www.samsung.com/sk
www.samsung.com/es
www.samsung.com/se
www.samsung.com/uk
www.samsung.com/ur
BN68-01047N-01
ON-SCREEN MENUS
PC DISPLAY
PICTURE IN PICTURE (PIP)
TELETEXT
Register your product at www.samsung.com/global/register
Page 2

Precautions When Displaying a Still Image
A still image may cause permanent damage to the TV screen.
• Do not display a still image on the LCD panel for more than 2 hours as it can cause screen image retention.
This image retention is also known as "screen burn".
To avoid such image retention, reduce the degree of brightness and contrast of the screen when displaying a still image.
• Watching the LCD TV in 4:3 format for a long period of time may leave traces of borders displayed on the left, right and center of the screen caused
• Displaying still images from Video games and PC for longer than a certain period of time may produce partial after-images.
Elővigyázatosság az állóképek megjelenítésével kapcsolatban.
Az állóképek a TV-képernyő maradandó károsodását okozhatják.
• Ne jelenítsen meg állóképeket az LCD-képernyőn 2 órát meghaladó időn túl, mert ilyenkor a megjelenített képek a képernyő „beégését” okozhatják.
• Az LCD TV huzamosabb ideig tartó, 4:3 képarányú módban történő használata esetén a kibocsátott fényerősség eltérése miatt a képernyő
• Videojátékok vagy számítógépek állóképeinek bizonyos időt meghaladó megjelenítése következtében a képernyőn részleges utókép jelenhet meg.
Środki ostrożności, które należy zachować przy odtwarzaniu nieruchomych obrazów.
Nieruchomy obraz może spowodować trwałe uszkodzenie ekranu telewizyjnego.
• Nieruchomych obrazów nie należy wyświetlać na ekranie LCD dłużej niż przez 2 godziny, gdyż może to spowodować utrwalenie obrazu na ekranie.
• Oglądanie obrazu w formacie 4:3 na ekranie telewizora LCD przez długi okres czasu może powodować pozostawanie śladów krawędzi po środku
• Wyświetlanie nieruchomych obrazów z konsoli do gier lub komputera przez długi okres czasu może powodować powstawanie obrazu szczątkowego.
Aby zapobiec powstawaniu tego zjawiska, należy przy wyświetlaniu nieruchomych obrazów zmniejszyć ‘jasność’ oraz ‘kontrast’.
Προφυλάξεις για την προβολή ακίνητης εικόνας
Η προβολή ακίνητης εικόνας πιθανόν να προκαλέσει ανεπανόρθωτη ζημιά στην οθόνη της τηλεόρασης.
• Μην προβάλλετε μια ακίνητη εικόνα στην οθόνη LCD για περισσότερο από 2 ώρες, καθώς αυτό μπορεί να προκαλέσει διατήρηση της εικόνας.
•
• Η προβολή στατικών εικόνων από βιντεοπαιχνίδια και υπολογιστές για μεγαλύτερο χρονικό διάστημα από το καθορισμένο, ενδέχεται να προκαλέσει μερικώς
Предпазни мерки при показване на неподвижен образ
Неподвижният образ може да доведе до перманентна повреда на екрана на телевизора.
• Не показвайте неподвижен образ на течнокристалния екран за повече от часа, тъй като това може да доведе до запазване на образа.
• Гледането на течнокристалния телевизор във формат 4:3 за продължителен период от време може да остави следи или рамки, пок азвани
• Показването на неподвижни образи на видео игри и компютър за по-дълъг период от време може да доведе до частични остатъчни изображения.
Bezpečnostné opatrenia pri zobrazení statického obrazu
Statický obraz môže spôsobiť trvalé poškodenie televíznej obrazovky.
• Statický obraz nezobrazujte na LCD paneli dlhšie ako 2 hodiny, pretože môže spôsobiť retenciu obrazu na obrazovke.
• Sledovanie LCD TV vo formáte 4:3 po dlhšiu dobu môže zanechať vľavo, vpravo a v strede obrazovky stopy po okrajoch, spôsobené
• Zobrazenie statických obrázkov z videohier a PC dlhšie ako určitý čas, môže vytvárať čiastočné pretrvávajúce obrazy.
Mjere opreza pri prikazivanju fotografije
Fotografija može uzrokovati trajna oštećenja na TV zaslonu.
• Ne prikazujte fotografiju na LCD zaslonu dulje od 2 sata jer to može uzrokovati zadržavanje slike na zaslonu.
• Gledanje LCD televizora u formatu 4:3 u dužem vremenskom periodu može dovesti do prikazivanja tragova obruba na lijevoj i desnoj strani
• Prikazivanje fotografija iz video igrica i računala u duljem vremenskom periodu od predvi?enog može dovesti do parcijalnih zaostalih slika.
Opatření při zobrazení statického obrazu
Statický obraz může způsobit trvalé poškození obrazovky televizoru.
• Neponechávejte statický obraz na panelu LCD po dobu delší než 2 hodiny, mohlo by dojít ke zhoršení obrazu.
• Sledování televizoru LCD při formátu zobrazení 4:3 po dlouhou dobu může na pravém a levém okraji a ve středu obrazovky zanechat stopy
• Zobrazení statického obrazu z videoher a PC po delší dobu může způsobit částečný efekt „afterimage“.
by the difference of light emission on the screen. Playing a DVD or a game console may cause a similar effect to the screen. Damages caused by
the above effect are not covered by the Warranty.
To prevent this effect, reduce the ‘brightness’ and ‘contrast’ when displaying still images.
Ezt a jelenséget „képernyőbeégésnek” is nevezik.
A képernyőbeégés elkerülése érdekében állókép megjelenítésekor csökkentse a kép fényerejét és kontrasztját.
közepén, valamint bal és jobb oldalán sávok alakulhatnak ki. DVD-filmek lejátszása és játékprogramok használata is hasonló jelenséget
okozhat. A garancia az ilyen esetekben keletkezett károkra nem terjed ki.
A jelenség megelőzése érdekében állóképek megjelenítése esetén csökkentse a fényerőt és kontrasztot.
Zjawisko utrwalania obrazu określa się także mianem „wypalania ekranu”.
Aby uniknąć tego zjawiska, należy przy wyświetlaniu nieruchomych obrazów zmniejszyć jasność oraz kontrast ekranu.
ekranu oraz po jego lewej i prawej stronie. Przyczyną tego zjawiska jest różnica w natężeniu emitowanego światła. Odtwarzanie płyty DVD lub
wyświetlanie obrazu z konsoli do gier może powodować powstawanie podobnego zjawiska. Wymienione powyżej objawy nie są objęte gwarancją
Αυτή η διατήρηση της εικόνας είναι γνωστή ως “κάψιμο της οθόνης”.
Για
να αποφύγετε τη διατήρηση της εικόνας, μειώστε τη φωτεινότητα και την αντίθεση της οθόνης όταν προβάλλετε στατικές εικόνες.
Η χρήση της τηλεόρασης πλάσματος σε μορφή 4:3 για παρατεταμένο χρονικό διάστημα μπορεί να οδηγήσει στην εμφάνιση αχνών περιγραμμάτων στα αριστερά,
στα δεξιά και στο κέντρο της οθόνης, λόγω διαφοράς στην εκπομπή φωτός στην οθόνη. Η αναπαραγωγή ενός δίσκου DVD ή η σύνδεση μιας κονσόλας
παιχνιδιών ενδέχεται να προκαλέσει το ίδιο φαινόμενο στην
εντυπωμένα είδωλα. Για να αποφύγετε αυτό το φαινόμενο, μειώστε τη φωτεινότητα και την αντίθεση όταν προβάλλετε στατικές εικόνες.
Това запазване на образа се нарича още “прогаряне на екрана”.
За да избегнете такова запазване на образа, намалете яркостта и контраста на екрана , когато показвате неподвижен образ.
отляво, отдясно и в центъра на екрана, предизвикани от разликата в светлинното излъчване на
конзола може да предизвика подобен ефект въ рху екрана. Повреди, предизвикани от горния ефек т, не се покриват от Гаранцията.
За да се предотврати този
Táto retencia obrazu je známa aj ako “vypálenie obrazovky”.
Aby ste zabránili takejto retencii obrazu, pri zobrazovaní statických obrázkov znížte stupeň jasu a kontrastu obrazovky.
Aby ste predišli takémuto efektu, počas zobrazenia statických obrázkov znížte “jas” a “kontrast”.
Ovo zadržavanje slike je poznato i kao “efekt izgaranja zaslona”.
Kako biste izbjegli zadržavanje slike, smanjite stupanj svjetline i kontrasta zaslona tijekom prikazivanja fotografije.
Kako bi to spriječili, smanjite ‘svjetlinu’ i ‘kontrast’ kod prikazivanja fotografija.
Toto zhoršení obrazovky se také označuje jako „vypálení obrazovky“.
Abyste zhoršení obrazu předešli, snižte při zobrazení statického obrazu nastavení jasu a kontrastu.
Tomuto efektu lze předejít snížením jasu a kontrastu při zobrazování statického obrazu.
ефект, намалете яркостта и контраста на екрана, когато показвате неподвижен образ.
rozdielnym vyžarovaním svetla na obrazovke. Prehrávanie DVD alebo hranie hier môže na obrazovke spôsobiť podobný efekt. Poškodenia,
spôsobené vyššie uvedeným efektom, nie sú chránené zárukou.
te središtu zaslona uzrokovanog razlikom emitiranja svjetla na zaslonu. Reprodukcija DVD-a ili igranje s igraćom konzolom može uzrokovati
sličan efekt na zaslonu. Pogreške uzrokovane gore navedenim efektom nisu pokrivene jamstvom.
po okrajích způsobené rozdíly ve vyzařování světla. Podobný efekt může na obrazovce zanechat přehrávání DVD nebo používání herní
konzole. Na poškození způsobené výše uvedeným efektem se nevztahuje záruka.
οθόνη. Οι βλάβες που προκαλούνται από το παραπάνω φαινόμενο δεν καλύπτονται από την εγγύηση.
екрана. Изпълнение на DVD или игрова
© 2006 Samsung Electronics Co., Ltd. All rights reserved.
.
Page 3
Contents
English
English
CONNECTING AND PREPARING YOUR TV
List of Parts....................................................................................... 2
Installing the Stand ................................................................. 2
Installing the Wall Mount Kit ................................................ 2
Viewing the Control Panel ......................................................... 3
Viewing the Connection Panel ................................................. 4
Viewing the Remote Control ..................................................... 6
Installing Batteries in the Remote Control ........................... 6
Switching On and Off .................................................................. 7
Placing Your Television in Standby Mode ............................. 7
Plug & Play ....................................................................................... 7
SETTING THE CHANNELS
Storing Channels Automatically .............................................. 8
Storing Channels Manually ........................................................ 8
Setting the Channel Manager .................................................. 9
Activating the Child Lock ...................................................... 10
Sorting the Stored Channels ..................................................... 10
Assigning Channels Names ....................................................... 11
Fine Tuning Channel Reception ............................................... 11
SETTING THE PICTURE
Changing the Picture Standard ................................................ 12
Adjusting the Custom Picture................................................... 12
Changing the Colour Tone ......................................................... 13
Adjusting the Color Tone with the Preferred
Color Component .......................................................................... 13
Resetting the Picture Settings to the
Factory Defaults ............................................................................. 14
Changing the Picture Size .......................................................... 14
Changing the Auto Wide (4:3) .................................................. 14
Freezing the Current Picture ..................................................... 15
Digital Noise Reduction .............................................................. 15
DNIe Demo (Digital Natural Image engine) ........................ 15
Changing the Colour Space....................................................... 15
Viewing the Picture In Picture (PIP) ........................................ 16
SETTING THE SOUND
Changing the Sound Standard ........................................... 17
Adjusting the Sound Settings ............................................. 17
Setting the TruSurround XT (SRS TSXT) ........................... 17
Adjusting the Volume Automatically ................................ 18
Selecting the Internal Mute .................................................. 18
Listening to the Sound of the Sub Picture...................... 18
Resetting the Sound Settings to the
Factory Defaults ........................................................................ 19
Connecting Headphones ...................................................... 19
Selecting the Sound Mode ................................................... 19
SETTING THE OTHERS
Choosing Your Language ...................................................... 21
Using Game Mode ................................................................... 21
Setting the Blue Screen Mode /
Selecting the Melody ............................................................. 22
Using the Energy Saving Feature ....................................... 22
Setting the Blue Eye ................................................................ 22
Selecting the Source ............................................................... 23
Editing the Input Source Names ........................................ 23
WISELINK
Using the WISELINK Function .............................................. 24
Using the WISELINK Menu .................................................... 25
Using the PHOTO (JPEG) List ................................................ 25
Viewing Photo File Information .......................................... 27
Selecting a Photo and Slide Show ..................................... 27
Rotating ....................................................................................... 28
Zooming-in ................................................................................. 29
Copying Image Files ................................................................ 30
Deleting Image Files................................................................ 30
Printing a Photo ........................................................................ 31
Using the MP3 List ................................................................... 31
Copying Music Files ................................................................. 32
Deleting Music Files ................................................................ 32
Using the Setup Menu ........................................................... 33
USING THE TELETEXT FEATURE
Teletext Decoder ...................................................................... 34
Displaying the Teletext Information .................................. 34
Selecting a Specific Teletext Page ...................................... 35
Using Fastext to Select a Teletext Page ............................ 35
Setting Up Your Remote Control ........................................ 36
Remote Control Codes ........................................................... 38
SETTING THE PC
Setting up Your PC Software
(Based on Windows XP) ......................................................... 41
Display Modes ........................................................................... 41
Setting the PC ............................................................................ 42
RECOMMENDATIONS FOR USE
Using the Anti-Theft Kensington Lock ............................. 42
Troubleshooting:
Before Contacting Service Personnel ............................... 42
Technical and Environmental Specifications ................ 44
SETTING THE TIME
Setting and Displaying the Current Time ........................ 20
Setting the Sleep Timer.......................................................... 21
Switching the Television
On and Off Automatically ..................................................... 21
Symbol Press Important Note One-Touch
English-1
Button
Page 4
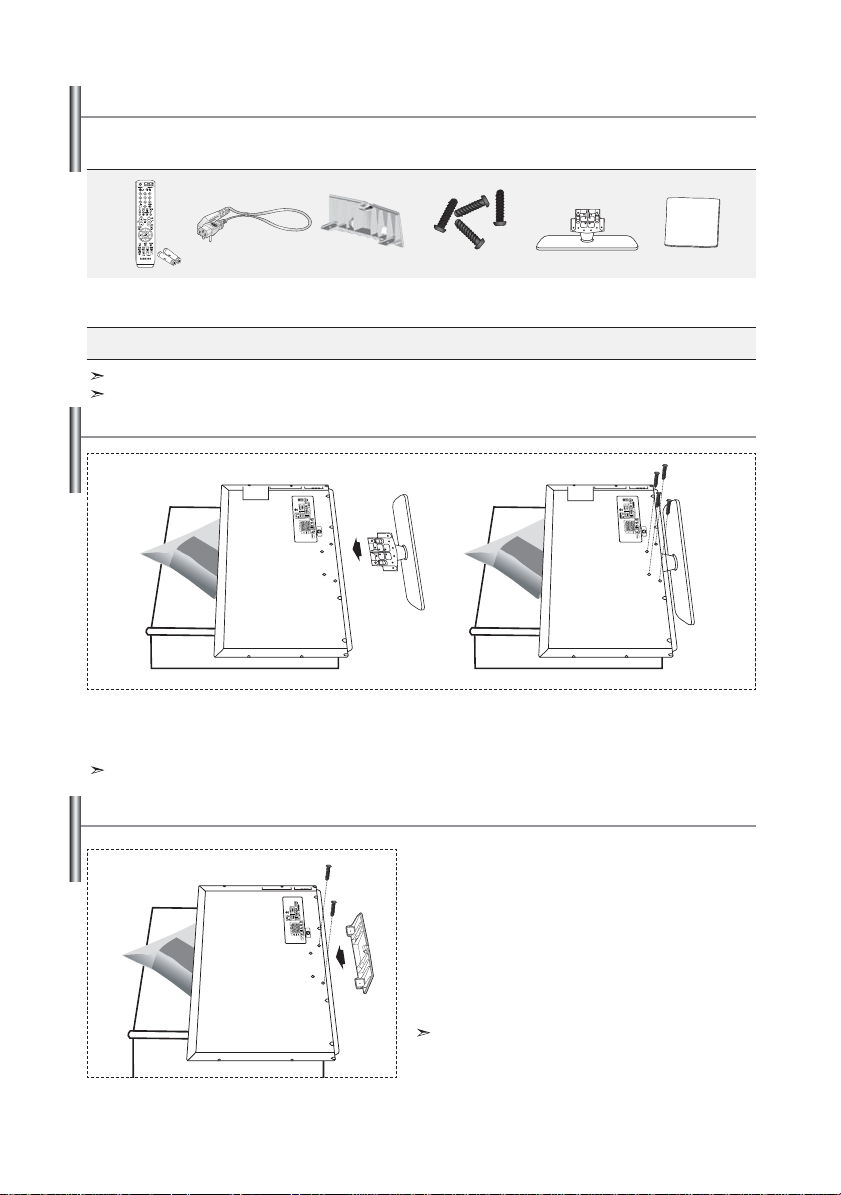
List of Parts
Please make sure the following items are included with your LCD TV.
If any items are missing, contact your dealer.
M4 X L16
Remote Control &
Batteries (AAA x 2)
Owner’s Instructions
Warranty card / Safety Guide / Registration Cards (Not available in all locations)
The stand and stand screw may not be included depending on the model.
Power Cord Cover-Bottom
Warranty card Safety Guide Registration Cards
Stand Screw X4 Stand
Installing the Stand
< 2 >< 3 >
1. Place the TV faced down on a soft cloth or cushion on a table.
2. Put the stand into the hole at the bottom of the TV.
3. Insert screw into the hole indicated and tighten.
The stand is installed for models with the screen size of 40 inch and above.
Cleaning Cloth
Installing the Wall Mount Kit
Wall mount items (sold separately) allow you to mount
the TV on the wall.
For detailed information on installing the wall mount,
see the instructions provided with the Wall Mount items.
Contact a technician for assistance when installing the
wall mounted bracket.
Samsung Electronics is not responsible for any damage to
the product or injury to yourself or others
if you elect to install the TV on your own.
Remove the stand and cover the bottom hole with a
cap and fasten with two screws.
English-2
Page 5

Viewing the Control Panel
The product colour and shape may vary depending on the model.
SOURCE
Toggles between all the available input sources
(TV, Ext.1, Ext.2, AV, S-Video, Component, PC,
HDMI1, HDMI2). In the on-screen menu,
use this button as you use the ENTER
on the remote control.
button
Press to change channels.
In the on-screen menu, use the
as you use the and buttons on the remote
control.
the TV by using the Channel buttons.)
(Without the Remote Control, you can turn on
buttons
MENU
Press to see an on-screen menu of
your TV’s features.
Press to decrease or increase the volume.
In the on-screen menu, use the
as you use the and buttons on the remote
control.
buttons
Speakers
(
Power)
Press to turn the TV on and off.
Power Indicator
Blinks and turns off when the power is on and lights
up in stand-by mode.
Remote Control Sensor
Aim the remote control towards this spot on the TV.
English-3
Page 6

Viewing the Connection Panel
[Rear Panel Jacks]
Power Input
Whenever you connect an external device to your TV, make sure that power on the unit is turned off.
When connecting an external device, match the colour of the connection terminal to the cable.
[Side Panel Jacks]
English-4
Page 7

Connecting an Aerial or Cable Television Network
To view television channels correctly, a signal must be received by the set from one of the following sources:
- An outdoor aerial / A cable television network / A satellite network
Connecting HDMI/DVI
-
Supports connections between HDMI-connection-enabled AV devices (Set-Top Boxes, DVD players, AV receivers and digital TVs).
- No additional Audio connection is needed for an HDMI to HDMI connection.
What is HDMI?
- “High Definition Multimedia Interface” allows the transmission of high definition digital video data and multiple
channels of digital audio ( 5.1 channels).
- The HDMI/DVI terminal supports DVI connection to an extended device with the appropriate cable (not supplied).
The difference between HDMI and DVI is that the HDMI device is smaller in size, has the HDCP
(High Bandwidth Digital Copy Protection) coding feature installed, and supports multi - channel digital audio.
You should use the DVI-to-HDMI cable or DVI-HDMI Adapter for the connection, and the “R - AUDIO - L” terminal
on DVI for sound output.
- When connecting this product via HDMI or DVI to a Set Top Box, DVD Player or Games Console etc, make sure that
it has been set to a compatible video output mode as shown in the table below.
Failure to observe this may result in picture distortion, image breakup or no picture.
Supported modes for DVI or HDMI
480i
50 Hz
60 Hz
- Do not attempt to connect the HDMI/DVI connector to a PC or Laptop Graphics Card.
(This will result in a blank screen being displayed)
- If you wish to connect both the Set-Top Box and VCR (or DVD), you should connect the Set-Top Box to the VCR (or DVD)
and connect the VCR (or DVD) to your set.
- Connect RCA audio cables to “R - AUDIO - L” on the rear of your set and the other ends to corresponding audio out
connectors on the A/V device.
- Headphone may be connected to the headphone output (
Component
Connecting Set-Top Box, VCR or DVD
-
Connect the VCR or DVD SCART cable to the SCART connector of the VCR or DVD.
Connecting External A/V Devices
- Connect RCA or S-VIDEO cable to an appropriate external A/V device such as VCR, DVD or Camcorder.
X
X
O
480p
O
O
O
While the headphone is connected, the sound from the built-in speakers will be disabled.
SERVICE
- Service connection for qualified service engineer.
Connecting AUDIO
- Connect RCA audio cables to “R - AUDIO - L” on the rear of your set and the other ends to corresponding audio in
connectors on the Amplifier or DVD Home Theater.
Connecting Computer
-
Connect the D- Sub cable (optional) to “PC (PC IN)” on the rear of your set and the other end to the Video Card of your computer.
- Connect the stereo audio cable (optional) to “AUDIO (PC IN)” on the rear of your set and the other end to “Audio Out” of the
sound card on your computer.
Connecting Component Devices (DTV/DVD)
- Connect component video cables (optional) to component connector (“PR”, “ P B”, “Y”) on the rear of your set and the other
ends to corresponding component video out connectors on the DTV or DVD.
- If you wish to connect both the Set-Top Box and DTV (or DVD), you should connect the Set-Top Box to the DTV (or DVD)
and connect the DTV (or DVD) to component connector (“P
-
The PR, PB and Y connectors on your component devices (DTV or DVD) are sometimes labeled Y, B-Y and R-Y or Y, Cb and Cr.
- Connect RCA audio cables (optional) to “R - AUDIO - L” on the rear of your set and the other ends to corresponding audio
out connectors on the DTV or DVD.
- This LCD TV displays its optimum picture resolution in 720p mode.
- This LCD TV displays its maximum picture resolution in 1080i mode.
Kensington Lock
- The Kensington lock (optional) is a device used to physically fix the system when used in a public place.
- If you want to use a locking device, contact the dealer where you purchased the TV.
-
The place of the Kensington Lock may be different depending on its model.
576i
X
X
O
) on the rear of your set.
R”, “ P B”, “Y”) on your set.
576p
O
X
O
720p
O
O
O
1080i
O
O
O
English-5
Page 8

Viewing the Remote Control
Selects a target device to be
controlled by the Samsung remote
control
(TV, DVD, STB, CABLE, VCR)
(Refer to page 36~40)
Television Standby button
Number buttons for direct
channel access
One/Two-digit channel selection
It displays "Channel Manager"
on the screen.
Selects the TV mode directly
VCR/DVD Functions
Rewind, Stop, Play/Pause,
Fast/Forward
Volume increase
Volume decrease
Temporary sound switch-off
Menu display and
change confirmation
Picture-In-Picture On / Off
Picture effect selection
Sound effect selection
Sound mode selection
SRS TSXT selection
SET: Adjusts 5 separate devices - TV,
DVD, STB, CABLE, or VCR.
RESET: When your remote does not
work, change the batteries and press
the “RESET” button for 2-3 seconds
before use.
Available source selection
When pressing this button, a number of
buttons on the remote control (e.g.
Selects a target device, volume, channel and
MUTE buttons) light up for a few seconds and
then turn off to save power. This function is
to conveniently use the remote control at
night or when dark.
The performance of the remote control may be affected by bright light.
This is a special remote control for the visually impaired, and has Braille points on the
Power, Channel and Volume buttons.
Installing Batteries in the Remote Control
1. Lift the cover at the back of the remote control upward as shown in the figure.
2. Install two AAA size batterie
Make sure to match the “+” and “–” ends of the batteries with the diagram inside the compartment.
3. Replace the cover.
Remove the batteries and store them in a cool, dry place if you won’t be using the remote control for a
long time. The remote control can be used up to about 23 feet from the TV.
(Assuming typical TV usage, the batteries last for about one year.)
If the remote control doesn’t work, check the following:
1. Is the TV power on?
2. Are the plus and minus ends of the batteries reversed?
3. Are the batteries drained?
4. Is there a power outage, or is the power cord unplugged?
5. Is there a special fluorescent light or neon sign nearby?
s.
English-6
Previous channel
Automatic Power-off
This function enables you to load saved
photo (JPEG) and audio files (MP3)
and to view or play them on the TV.
P : Next channel
P
: Previous channel
Exit the OSD
Control the cursor in the menu
Use to see information on the
current broadcast
Picture size selection
Selects the PC mode directly
Picture freeze
Input source selection
Teletext Functions
Exit from the Teletext display
Teletext index
Teletext hold
Teletext size selection
Teletext store
Teletext mode selection (LIST/FLOF)
Teletext sub page
P : Teletext next page
P
: Teletext previous page
Teletext cancel
Teletext reveal
Alternately select Teletext, Double, or Mix.
Fastext topic selection
Page 9

Switching On and Off
The mains lead is attached to the rear of your set.
1. Plug the mains lead into an appropriate socket.
The standby indicator lights up on the front of the set.
2. Press the button on the front of the set.
You also can press the POWER button or the
The programme that you were watching last is reselected automatically.
TV
( ) button on the remote control to turn the TV on.
3. Press the numeric button (0~9) or channel up/down ( / ) button on the remote control or
button on the right side of the set.
When you switch the set on for the very first time, you will be asked to choose language in which the menus are to be displayed.
4. To switch your set off, press the POWER button again.
Placing Your Television in Standby Mode
Your set can be placed in standby mode in order to reduce the power consumption. The standby mode can be useful
when you wish to interrupt viewing temporarily (during a meal, for example).
1. Press the POWER
The screen is turned off and a blue standby indicator appears on the front of your set.
button on the remote control.
2. To switch your set back on, simply press the POWER , numeric buttons (0~9) or channel
up/down (
It is best to unplug the set from the mains and aerial.
/ ) button again.
Do not leave your set in standby mode for long periods of time (when you are away on holiday, for example).
Plug & Play
When the TV is initially powered on, several basic settings proceed
automatically and subsequently. The following settings are available.
1. Press the POWER button on the remote control.
The message “Start Plug & Play” is displayed with “OK” selected.
2. Select the appropriate language by pressing the or button.
Press the ENTER button to confirm your choice.
3. The message “Check antenna input.” is displayed with “OK” selected.
Press the ENTER button.
Please check that the antenna cable is connected correctly.
4. Select the appropriate country by pressing the or button.
Press the ENTER button to confirm your choice.
5. The “Auto Store” menu is displayed with the “Start” selected.
Press the ENTER button.
The channel search will start and end automatically.
After all the available channels are stored, the “Clock Set” menu appears.
Press the
ENTER
6. Press the ENTER button.
Select the “Hour” or “Minute” by pressing the
Set the “Hour” or “Minute” by pressing the
You can also set the hour and minute by pressing the number buttons on the remote control.
7. Press the ENTER button to confirm your setting.
Language: Select your language.
Country: Select your country.
Auto Store: Automatically scans for and stores channels available in the local area.
Clock Set: Sets the current time for the TV clock.
button at any time to interrupt the memorization process.
or
or
English-7
button.
button.
Page 10

If you want to reset this feature...
1. Press the MENU button to display the menu.
Press the or
button
to select “Setup”, then press the
ENTER
button.
2. Press the ENTER button again, to select “Plug & Play”.
3. The message “Start Plug & Play” is displayed.
- Storing Channels Automatically
- Storing Channels Manually
Storing Channels Automatically
You can scan for the frequency ranges available to you (and availability depends on your country). Automatically
allocated programme numbers may not correspond to actual or desired programme
numbers. However, you can sort numbers manually and clear any channels you do not wish to watch.
1. Press the MENU button to display the menu.
Press the or button to select “Channel”, then press the
2. Press the ENTER button to select “Country”.
3. Select the appropriate country by pressing the or button.
Press the ENTER button to confirm your choice.
4. Press the or button to select “Auto Store”, then press the
5. Press the ENTER button.
The TV will begin memorizing all of the available channels.
Press the
ENTER
button at any time to interrupt the memorization process and return to the “Channel” menu.
6. After all the available channels are stored, the “Sort” menu appears.
ENTER button.
ENTER button.
Storing Channels Manually
You can store up to 100 channels, including those received via cable networks.
When storing channels manually, you can choose:
Whether or not to store each of the channels found.
The programme number of each stored channel which you wish to identify.
1. Press the MENU button to display the menu.
Press the or button to select “Channel”, then press the
2. Press the or button to select “Manual Store”, then press the
3. Press the
ENTER button to select “Programme”.
4. To assign a programme number to a channel, find the correct number by pressing the or button
and then press the
You can also set a programme number by pressing number buttons on the remote control.
ENTER button.
ENTER button.
ENTER button.
English-8
Page 11
5. Press the or button to select “Colour System”, then press the ENTER button.
6. Select the colour standard required by pressing the or button then, press the
7. Press the or button to select “Sound System”, then press the
ENTER button.
8. Select the sound standard required by pressing the or button, then press the
If there is an abnormal sound or no sound, re-select the sound system required.
9.
If you know the number of the channel to be stored, press the or button to select “Channel”. Press the ENTER button.
ENTER button.
ENTER button.
Select C (Air channel) or S (Cable channel) by pressing the or button. Press the button to select channel.
Select the required number by pressing the or button and then press the
Channel mode: P (Programme mode), C (Air channel mode), S (Cable channel mode)
You can also set a channel number by pressing number buttons on the remote control.
ENTER button.
10. If you do not know the channel numbers, press the or button to select “Search”.
Press the ENTER button. Search by pressing the or button and then press the ENTER button.
11. Press the or button to select “Store”. Press the ENTER button to select “OK”.
12. Repeat steps 3 to 11 for each channel to be stored.
Programme: Selects a program number for the channel.
Colour System: Sets the colour supporting system.
Sound System: Sets the sound supporting system.
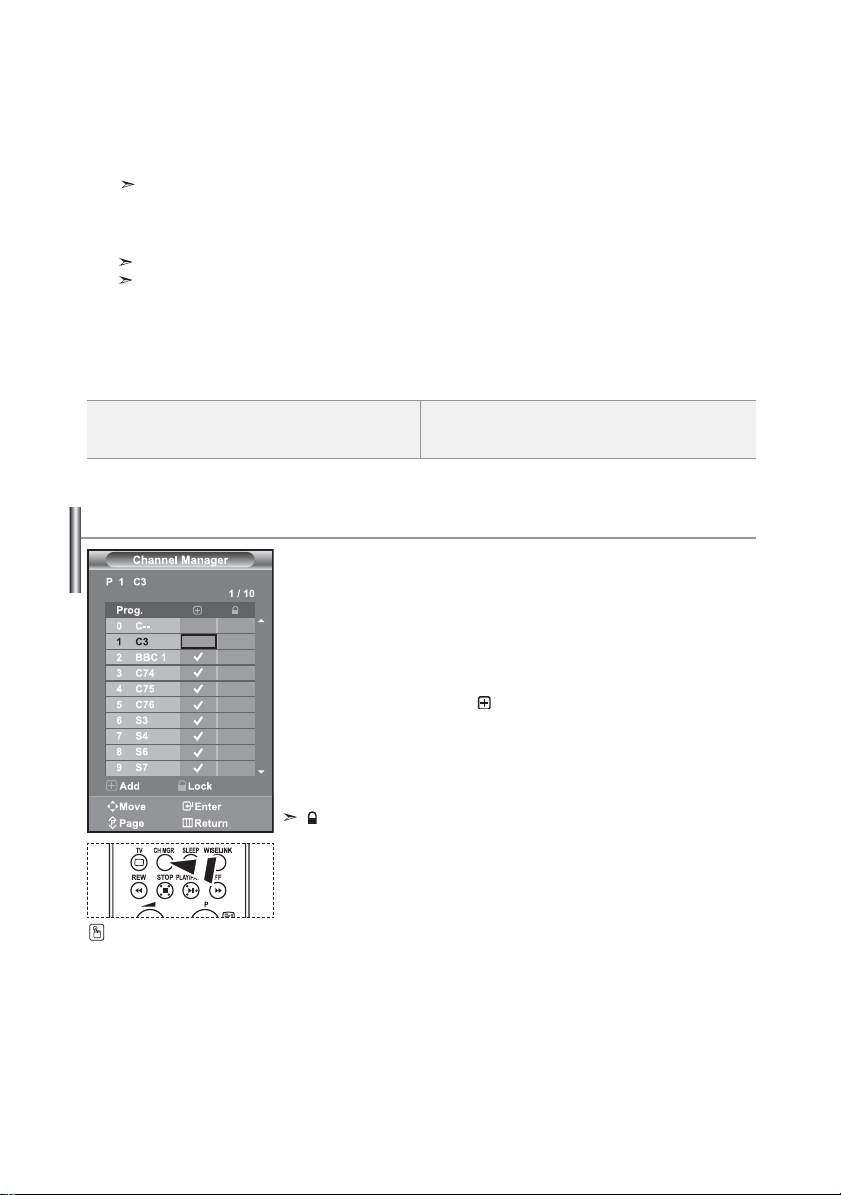
Setting the Channel Manager
Set the channels according to your preference.
You can easily delete, add, or lock the channel you want.
1. Press the MENU button to display the menu. Press the or button
to select “Channel”, then press the
2.
Press the or button to select “Channel Manager”,
then press the ENTER button.
3.
Press the ENTER button again, to select “Channel Manager”.
4
.
Press the button to select “ ” line.
5
.
Press the or button to select the undesired channel,
then press the ENTER button to cancel.
6. Repeat steps 5 for each channel to be selected or canceled
7. Press the EXIT button to exit.
“ ”
is active when “Child Lock” is selected to “On”.
You can select these options by
simply pressing the CH MGR
button on the remote control.
Channel: Selects a channel.
Search: Scans for the frequency value for the channel.
Store: Saves your settings.
ENTER button.
English-9
Page 12

Activating the Child Lock
This feature allows you to prevent unauthorized users, such as children, from
watching unsuitable programmes by muting out video and audio. Child Lock cannot be released using the buttons on the side.
Only the remote control can release the Child Lock setting, so keep the remote
control away from children.
1. Press the MENU button to display the menu. Press the or button
to select “Channel”, then press the
2.
then press the ENTER button.
3.
then press the ENTER button.
4.
5.
then press the
.
6
7
.
then press the ENTER button.
8. Repeat steps 7 for each channel to be locked or unlocked.
9. Press the EXIT button to exit.
selected on
Sorting the Stored Channels
You can exchange the numbers of two channels, in order to:
automatically stored.
most often.
1. Press the MENU button to display the menu. Press the or button
to select “Channel”, then press the
2.
3.
or button repeatedly. Press the ENTER button.
4.
change and then press the
number.
5.
6.
ENTER button.
Press the or button to select “Channel Manager”,
Press the or button to select “Child Lock”,
Press the or button to select “On”. Press the
ENTER
button.
Press the or button to select “Channel Manager”,
ENTER button.
Press the button to select “ ” line.
Press the or button to select the channels you want to lock,
Select “On” or “Off” in “Child Lock” to easily turn the channels which
Press the or button to select “Sort”, then press the
“ ”
to be active or inactive.
Modify the numeric order in which the channels have been
Give easily remembered numbers to the channels that you watch
ENTER button.
ENTER
Select channel number that you wish to change by pressing the
The selected channel number and name are moved to right side.
Press the
or
button to move to the position in which you would like to
ENTER
The selected channel is exchanged with the one previously stored to the chosen
button.
Repeat steps 3 to 4 for another channel to be sorted.
Press the EXIT button to exit.
button.
English-10
Page 13

Assigning Channels Names
Channel names will be assigned automatically when channel
information is broadcast.
These names can be changed, allowing you to assign new names.
1. Press the MENU button to display the menu. Press the or button
to select “Channel”, then press the
2.
Press the or button to select “Name”, then press the
3.
If necessary, select the channel to be assigned to a new name by
pressing the
4.
5.
Repeat steps 3 to 4 for each channel to be assigned to a new name.
Press the EXIT button to exit.
6.
Fine Tuning Channel Reception
Use fine tuning to manually adjust a particular channel for optimal reception.
1. Use the number buttons to directly select the channel that
you want to fine tune.
2. Press the MENU button to display the menu.
Press the or button to select “Channel”, then press the ENTER button.
3. Press the or button to select “Fine Tune”, then press the
4. Press the or button to adjust the fine tuning.
Press the
5. Press the EXIT button to exit.
Fine tuned channels that have been saved are marked with an asterisk “ * ” on the right-hand
side of the channel number in the channel banner. And the channel number turns red.
To reset the fine-tuning, select “Reset” by pressing the or button and then press the
ENTER button.
ENTER button.
ENTER
button.
or
The selection bar is displayed around the name box.
To. ..
Select a letter, number or symbol
Move on the next letter
Move back the previous letter
Confirm the name
The characters available are :
Letters of the alphabet (A~Z) / Numbers (0~9) / Special characters ( -, space)
ENTER
button. Press the ENTER button.
button.
Then...
or
button
button
ENTER button.
Press the
Press the button
Press the
Press the ENTER button
English-11
Page 14

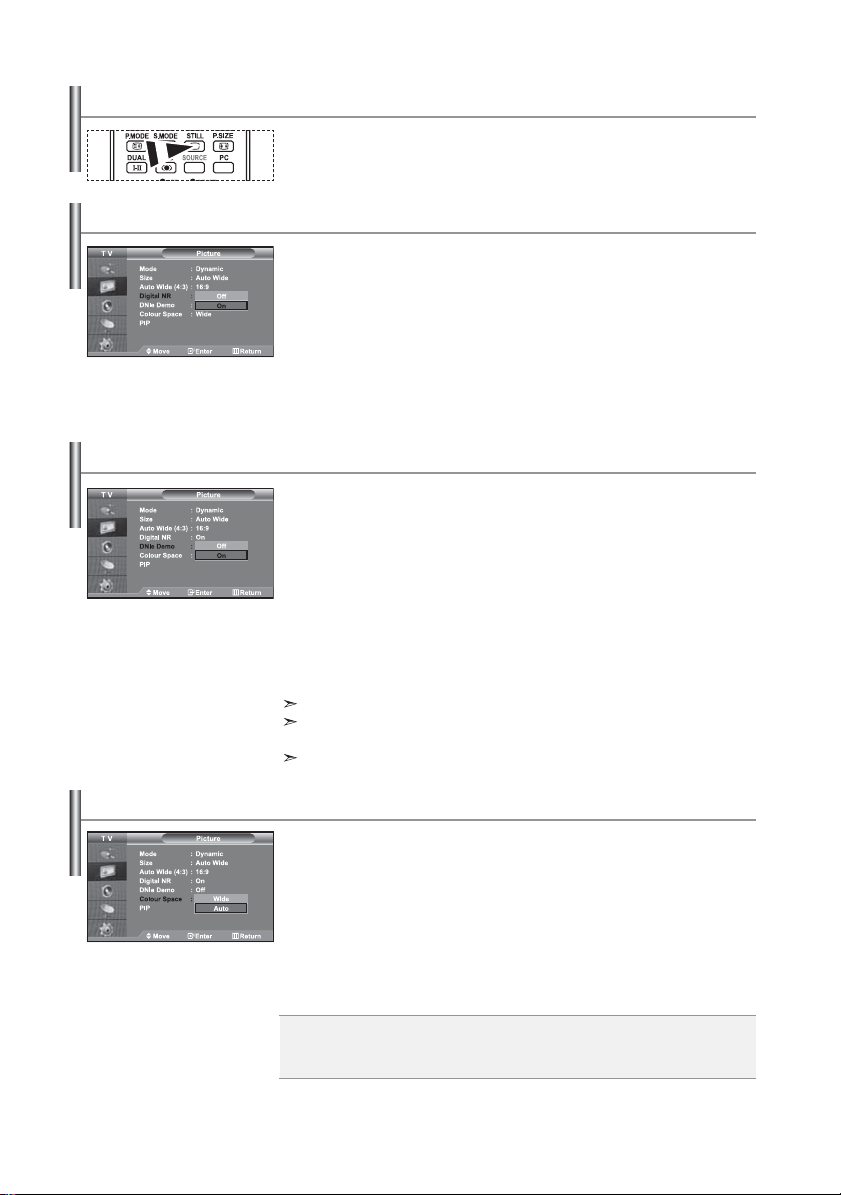
Changing the Picture Standard
You can select the type of picture which best corresponds to your viewing
requirements.
1. Press the MENU button to display the menu. Press the or
button to select “Picture”, then press the
2.
Press the ENTER button again, to select “Mode”.
Press the
3.
Press the
Press the
4.
Press the EXIT button to exit.
Dynamic: Selects the picture for high-definition in a bright room.
You can also press the
P.MODE button on the remote
control to select one of the
picture settings.
Standard: Selects the picture for optimum display in a normal environment.
Movie: Selects the picture for comfortable display in a dark room.
Custom: Select to view your favorite display settings.
(Refer to “Adjusting the Custom Picture”)
The Picture mode must be adjusted separately for each input source.
You can return to the factory defaults picture settings by selecting the “Reset”.
(Refer to “Resetting the Picture Settings to the Factory Defaults” on page 14)
Adjusting the Custom Picture
Your set has several settings which allow you to control picture quality.
1. To select the desired picture effect, follow the
“Changing the Picture Standard” instructions number 1 to 3.
2.
Press the
Press the
3.
Press the
particular item.
Press the EXIT button to exit.
4.
Contrast: Adjusts the lightness and darkness between objects and the background.
Brightness: Adjusts the brightness of the whole screen.
Sharpness: Adjusts the outline of objects to either sharpen them or make them more dull.
Colour: Adjusts the colours, making them lighter or darker.
Tint (NTSC only):
The adjusted values are stored according to the selected Picture mode.
In PC Mode, Only “Contrast”, “Brightness” and “Colour” can be adjusted
ENTER button.
ENTER button again.
or
button to select the desired picture effect.
ENTER
button.
or button
ENTER
or button
to select a particular item.
button.
to decrease or increase the value of a
Press the ENTER button.
Adjusts the colour of objects, making them more red or green for a more natural look.
English-12
Page 15

Changing the Colour Tone
You can select the most comfortable colour tone to your eyes.
1. To select the desired picture effect, follow the
“Changing the Picture Standard” instructions number 1 to 3 on page 12.
2.
Press the or button to select “Colour Tone”, then press the ENTER button.
3.
Press the
Press the
4.
Cool2: Makes the colour temperature bluer
than “Cool1” menu.
Cool1: Makes whites bluish.
Normal: Keeps whites white.
ENTER
Press the EXIT button to exit.
The adjusted values are stored according to the selected Picture mode.
or button
to select the desired colour tone setting.
button.
Warm1: Makes whites reddish.
Warm2: Makes the colour temperature
redder than “Warm1” menu.
Adjusting the Color Tone with the Preferred Color Component
You can adjust a picture’s color tone with your preferred color component.
1. To select the desired picture effect, follow the
“Changing the Picture Standard” instructions number 1 to 3 on page 12.
2.
Press the or button to select “Colour Manager”,
then press the ENTER button.
3.
Press the
Press the
4.
Press the
ENTER
or button
particular item.
5.
Press the EXIT button to exit.
or button
R Contrast:
the background.
G Contrast:
and the background.
B Contrast:
the background.
R Brightness:
G Brightness:
B Brightness:
Reset:
Lightens or intensifies the red component of the border between objects and
Lightens or intensifies the green component of the border between objects
Lightens or intensifies the blue component of the border between objects and
Adjusts the brightness of the red component for the entire screen.
Adjusts the brightness of the green component for the entire screen.
Adjusts the brightness of the blue component for the entire screen.
Resets all settings to the defaults.
to select a particular item.
button.
to decrease or increase the value of a
Press the ENTER button.
You cannot select a "Colour Tone" in the "Colour Manager".
English-13
Page 16

Resetting the Picture Settings to the Factory Defaults
You can return to the factory defaults picture settings.
1. To select the desired picture effect, follow the
“Changing the Picture Standard” instructions number 1 to 3 on page 12.
2. Press the or button to select “Reset”, then press the ENTER button.
3.
Press the EXIT button to exit.
The “Reset” will be set for each picture mode.
Changing the Picture Size
You can select the picture size which best corresponds to your
viewing requirements.
1. Press the MENU button to display the menu. Press the or button to
select “Picture”, then press the ENTER button.
2. Press the or button to select “Size”, then press the ENTER button.
3. Select the required option by pressing the or button.
Press the
ENTER
button.
4.
Press the EXIT button to exit.
Auto Wide: Automatically adjusts the picture size to the "16:9" aspect ratio.
You can select these options
by simply pressing the P.SIZE
button on the remote control.
16:9: Adjusts the picture size to 16:9 appropriate for DVDs or wide broadcasting.
WIDE 4:3 : Magnify the size of the picture more than 4:3.
Zoom: Magnifies the 16:9 wide picture (in the vertical direction) to fit the screen size.
4:3: This is the default setting for a video movie or normal broadcasting.
“Auto Wide” function is available only in "TV", "Ext1", "Ext2", "AV", and "S-Video" mode.
In PC Mode, only “16:9” and “4:3” mode can be adjusted.
Zoom : Select by pressing the or buttons. Use the or button to move the
picture up and down. After selecting , use the or button to magnify or
reduce the picture size in the vertical direction.
WIDE 4:3 : Move the screen up/down using the or button after selecting the
by pressing the or ENTER button.
Changing the Auto Wide (4:3)
Adjusts the display picture size to 4:3 appropriate for input signal
1. Press the MENU button to display the menu. Press the or button to
select “Picture”, then press the ENTER button.
2. Press the or button to select “Auto Wide (4:3)”, then press the
ENTER button.
3. Select the required option by pressing the or button.
4.
16:9: Adjusts the picture size to 16:9 appropriate for DVDs or wide broadcasting.
WIDE 4:3 : Magnify the size of the picture more than 4:3.
Zoom: Magnifies the 16:9 wide picture (in the vertical direction) to fit the screen size.
4:3: This is the default setting for a video movie or normal broadcasting.
Press the
ENTER
button.
Press the EXIT button to exit.
These functions don’t work in "Component", "PC", "HDMI1", and "HDMI2" mode.
English-14
Page 17
Freezing the Current Picture
Press the STILL button to freeze a moving picture into a still one.
Press again to cancel.
Digital Noise Reduction
If the broadcast signal received by your TV is weak, you can activate the Digital
Noise Reduction feature to help reduce any static and ghosting that may appear
on the screen.
1. Press the MENU button to display the menu. Press the or button to
select “Picture”, then press the ENTER button.
2. Press the or button to select “Digital NR”, then press the ENTER button.
3.
Press the or button to select “On” or “Off”. Press the
4. Press the EXIT button to exit.
DNIe Demo (Digital Natural Image engine)
Samsung’s new technology brings you more detailed images with
contrast and white enhancement. A new image compensation algorithm gives
viewers brighter and clearer images. DNIe technology will match every signal to
your eyes. You can see how DNIe improves the picture by setting DNIe Demo mode
to On.
1. Press the MENU button to display the menu. Press the or button to
select “Picture”, then press the ENTER button.
2. Press the or button to select “DNIe Demo”, then press the ENTER button.
3.
Press the or button to select “On” or “Off”. Press the
4. Press the EXIT button to exit.
These functions don’t work in PC mode.
The DNle Demo is designed to show the difference between the regular and
DNIe pictures.
By default, the product displays the picture with DNle applied.
ENTER
ENTER
button.
button.
Changing the Colour Space
Colour space is a colour matrix composed of red, green, and blue colours. Select
your favorite colour space and experience the world of natural colour.
1. Press the MENU button to display the menu. Press the or button to
select “Picture”, then press the ENTER button.
2. Press the or button to select “Colour Space”, then press the ENTER button.
3.
Press the
4. Press the EXIT button to exit.
Press the or button to select “Wide” or “Auto”.
ENTER
button.
Wide : Wide Colour Space offers deep and rich colour tone.
Auto : Auto Colour Space automatically adjusts to natural colour tone based on program
sources.
English-15
Page 18

Viewing the Picture In Picture (PIP)
You can display a sub picture within the main picture of set
programme or video input. In this way, you can watch the picture of set programme or video input from any connected equipment while watching the main
picture.
1. Press the MENU button to display the menu. Press the or button to
select “Picture”, then press the ENTER button.
2.
Press the or button to select “PIP”, then press the
3. Press the ENTER button again.
Press the or button to select “On”, then press ENTER button.
If the PIP is activated, the size of the main picture turns to “16:9”.
4. Press the or button to select “Source”,
Press the PIP button on the
remote control repeatedly to
activate or deactivate the “PIP”.
then press ENTER button. Select a source of the sub picture by
pressing the or button and press the ENTER button.
The sub picture can serve different source selections based on what the main picture is set to.
5. Press the or button to select “Swap”.
To interchange the main picture and the sub picture, select “Swap” option and
press the ENTER button.
The main picture and the sub picture are interchanged.
I
f main picture is in “PC” mode, “Swap” is not available.
6. Press the or button to select “Size” of the sub picture and then
press the ENTER button. Select a size of the sub picture by
pressing the or button and then press the ENTER button.
If main picture is in “PC” mode, “Size” is not available.
7. Press the or button to select “Position”, then press the ENTER
button. Select the position of the sub picture by pressing the or
button and then press the ENTER button.
8. Press the or button to select “Programme” and then press the ENTER
button. You can select the channel that you want to view through sub picture
by pressing the or button.
Press the ENTER button.
The “Programme” can be active when the sub picture is set to TV.
9. Press the EXIT button to exit.
You may notice that the picture in the PIP window becomes slightly unnatural when you use
the main screen to view a game or karaoke.
Source: Used to select a source of the sub picture.
Swap: Used to interchange the main picture and the
sub picture.
PIP Settings
Sub
TV
Ext.1
Ext.2
AV
S-Video
PC
HDMI1
HDMI2
TV
X
X
X
X
X
X
O
O
O
Main
Component
(O: PIP operates, X: PIP doesn’t operate)
Ext.1
Ext.2
X
X
X
X
X
X
X
X
X
X
X
X
O
O
O
O
O
O
ENTER
Size: Used to select a size of the sub picture.
Position: Used to move the sub picture.
Programme: Used to Change the sub picture.
AV
S-Video
X
X
X
X
X
X
O
O
O
Component
X
X
X
X
X
X
X
O
O
PC
X
X
X
X
X
X
X
O
O
X
X
X
X
X
X
X
X
X
button.
HDMI1
HDMI2
O
O
O
O
O
O
O
O
O
O
O
O
X
X
X
X
X
X
English-16
Page 19
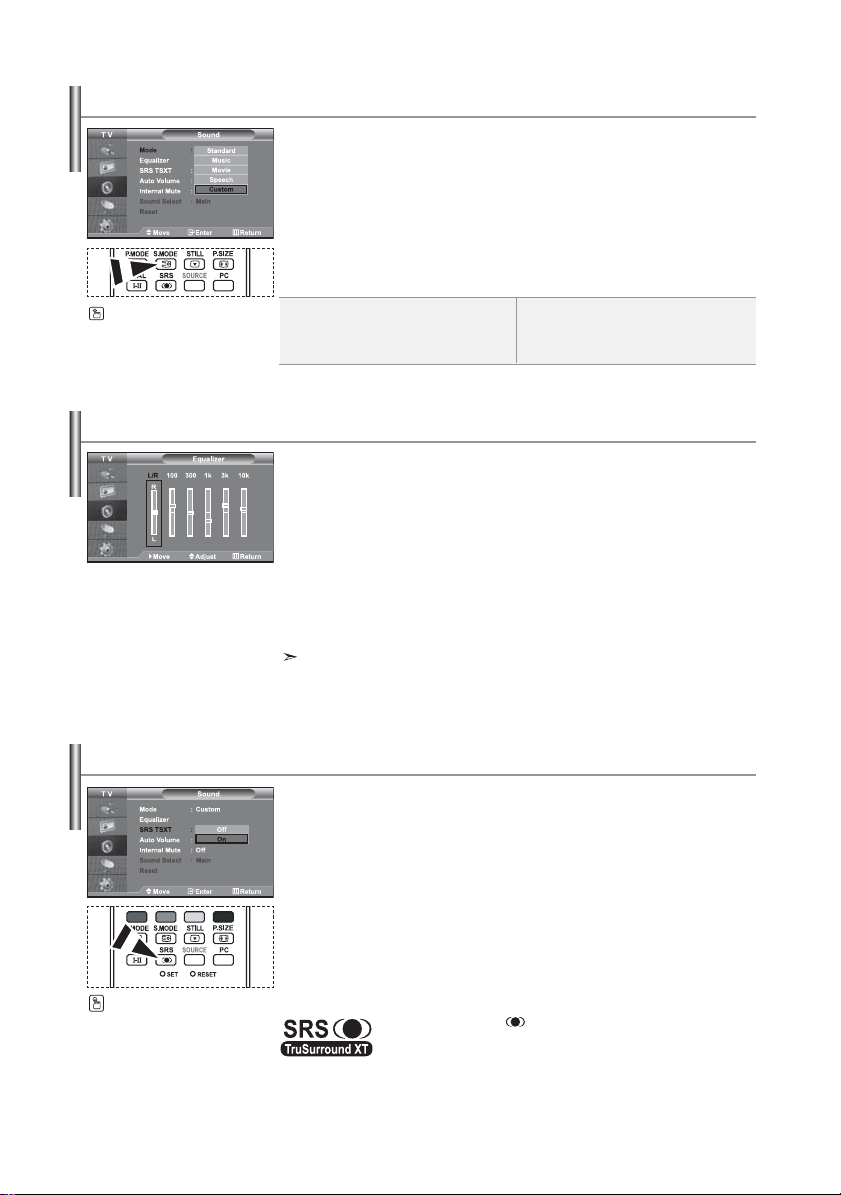
Changing the Sound Standard
You can select the type of the special sound effect to be used when watching a
given broadcast.
1. Press the MENU button to display the menu. Press the or button to
select “Sound”, then press the ENTER button.
2. Press the
3. Select the required sound effect by pressing the or button repeatedly
and then press the ENTER button.
4. Press the EXIT button to exit.
You can also select these options by
simply pressing the S.MODE button on
the remote control.
Standard: Selects the normal sound mode.
Music: Emphasizes music over voices.
Movie: Provides live and full sound for movies.
Speech: Emphasizes voices over other sounds.
Adjusting the Sound Settings
The sound settings can be adjusted to suit your personal preferences.
1. Press the MENU button to display the menu. Press the or button to
select “Sound”, then press the ENTER button.
2. Press the or button to select “Equalizer”, then press the ENTER button.
3.
Press the
Press the
4. Press the or button to reach the required setting.
Press the ENTER button.
5. Press the EXIT button to exit.
If you make any changes to these settings, the Sound Mode is automatically switched to
“Custom”.
ENTER button again, to select “Mode”.
Custom: Selects your custom sound settings.
(Refer to “Adjusting the Sound Settings”)
or button
ENTER
to select a particular item.
button.
Setting the TruSurround XT (SRS TSXT)
TruSurround XT is a patented SRS technology that solves the problem of playing
5.1 multichannel content over two speakers.
TruSurround delivers a compelling,virtual surround sound experience through any
two-speaker playback systems, including internal television speakers. It is fully
compatible with all multichannel formats.
1. Press the MENU button to display the menu. Press the or button to
select “Sound”, then press the ENTERbutton.
2. Press the or button to select “SRS TSXT”, then press the ENTER button.
3.
Press the or button to select “On” or “Off”. Press the
4. Press the EXIT button to exit.
You can also set these options
simply by pressing the SRS button on
remote control.
TruSurround XT, SRS and symbol are trademarks of
SRS Labs, Inc. TruSurround XT technology is incorporated under license
from SRS Labs, Inc.
English-17
ENTER
button.
Page 20

Adjusting the Volume Automatically
Each broadcasting station has its own signal conditions, and so it is not easy for
you to adjust the volume every time the channel is changed.
This feature allows you to automatically adjust the volume of the desired channel
by lowering the sound output when the modulation signal is high or by raising the
sound output when the modulation signal is low.
1. Press the MENU button to display the menu. Press the or button to
select “Sound”, then press the ENTER
2. Press the or button to select “Auto Volume”, then press the ENTER
3.
Press the or button to select “On” or “Off”. Press the
4. Press the EXIT button to exit.
Selecting the Internal Mute
If you want to hear the sound through separate speakers, cancel the internal
amplifier.
1. Press the MENU button to display the menu. Press the or button to
select “Sound”, then press the ENTER
2. Press the or button to select “Internal Mute”, then press the ENTER
Press the or button to select “On” or “Off”. Press the
3.
4. Press the EXIT button to exit.
When “Internal Mute” is set to “On’, the Sound menus except for
“Sound Select” (in PIP mode) cannot be adjusted.
button.
button.
ENTER
ENTER
button.
button.
button.
button.
Listening to the Sound of the Sub Picture
During the PIP features activation, you can listen to the sound of the sub picture.
1. Press the MENU button to display the menu. Press the or button to
select “Sound”, then press the ENTER button.
2. Press the or button to select “Sound Select”, then press the ENTER button.
3. Press the or button to select “Sub”. Press the ENTER button.
4. Press the EXIT button to exit.
Main: Used to listen to the sound of the main picture.
Sub: Used to listen to the sound of the sub picture.
You can select this option when the “PIP” is set to “On”.
English-18
Page 21

Resetting the Sound Settings to the Factory Defaults
If Game Mode is On, the Reset Sound function is activated. Selecting the Reset
function after setting the equalizer resets the equalizer setting to the factory
defaults.
1. Press the MENU button to display the menu. Press the or button to
select “Sound”, then press the ENTER button.
2. Press the or button to select “Reset”, then press the ENTER button.
3. Press the EXIT button to exit.
You can select this option when the “Game Mode” is set to “On”.
Connecting Headphones
You can connect a set of headphones to your set if you wish to watch a
TV programme without disturbing the other people in the room.
When you insert the head set jack into the corresponding port,
you can operate only "Internal Mute" and "Sound Select" (in PIP mode) in Sound menu.
(Refer to “Selecting the Internal Mute” on page 18)
Prolonged use of headphones at a high volume may damage your hearing.
You will not receive sound from the speakers when you connect headphones to the system.
Selecting the Sound Mode
You can set the sound mode by pressing the “DUAL” button.
When you press it, the current sound mode is displayed on the screen.
Audio Type
You can also set these options
simply by pressing the DUAL
button on remote control.
FM
Stereo
NICAM
Stereo
Mono
Stereo
Dual
Mono
Stereo
Dual
DUAL 1/2
MONO
STEREO ↔ MONO
DUAL 1 ↔ DUAL 2
MONO
MONO ↔ STEREO
MONO ↔ DUAL 1
DUAL 2
Default
Automatic
change
DUAL 1
Automatic
change
DUAL 1
Setting and Displaying the Current Time
You can set the TV’s clock so that the current time is displayed when you press
the INFO button. You must also set the time if you wish to use the automatic
On/Off timers.
1. Press the MENU button to display the menu. Press the or button to
select “Setup”, then press the ENTER button.
Press the or button to select “Time”, then press the
2.
3. Press the ENTER button to select “Clock Set”.
4.
To. ..
Move to “Hour” or “Minute”
Set the “Hour” or “Minute”
Press the ENTER button.
5. Press the EXIT button to exit.
If you disconnect the power cord, you have to set the clock again.
You can also set hour and minute by pressing the number buttons on the remote control.
English-19
ENTER
button.
Press the...
or button.
or button.
Page 22
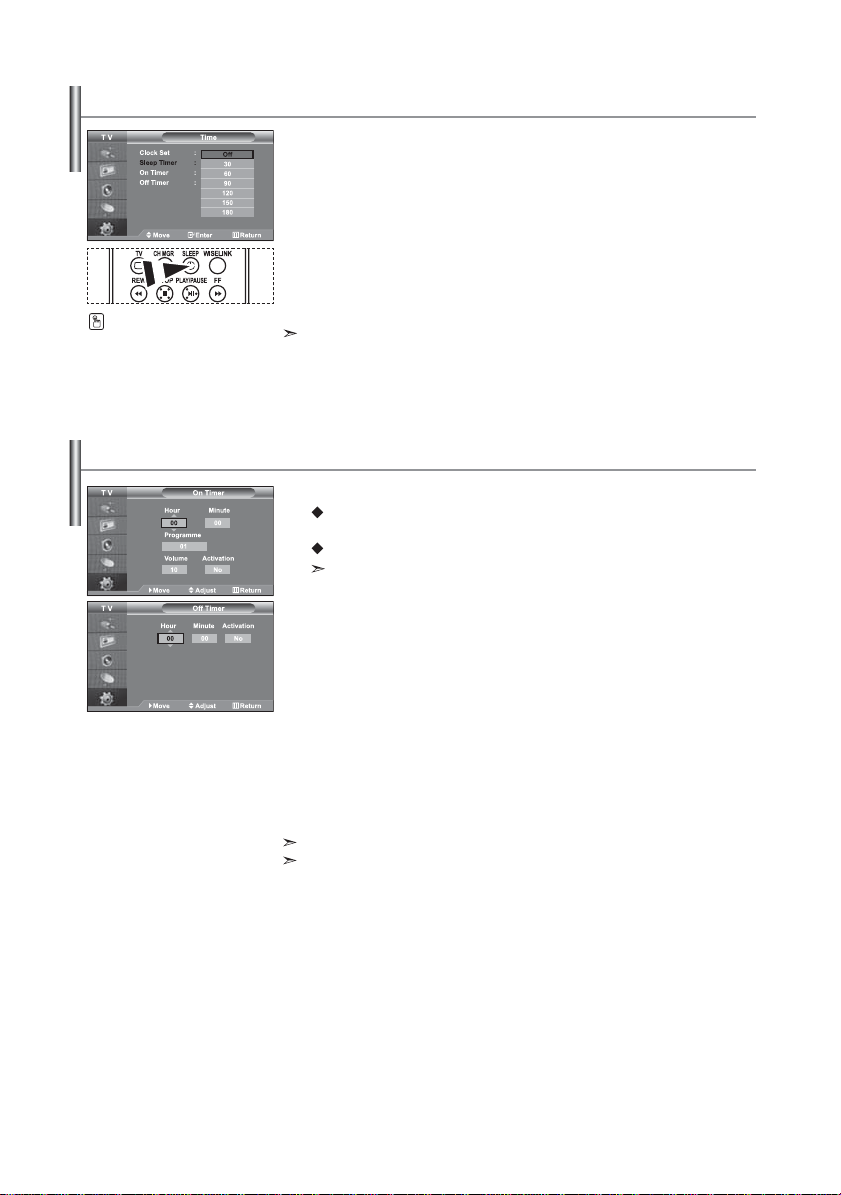
Setting the Sleep Timer
You can select a time period of between 30 and 180 minutes after which the television automatically switches to standby mode.
1. Press the MENU button to display the menu. Press the or button to
select “Setup”, then press the ENTER button.
2.
Press the or button to select “Time”, then press the
3. Press the or button to select “Sleep Timer”, then press the ENTER button.
4. Press the or button repeatedly until the desired time appears
(Off, 30, 60, 90, 120, 150, 180). Press the ENTER button.
Press the SLEEP button on the
remote control repeatedly until
the appropriate time interval
appears.
5. Press the EXIT button to exit.
The TV automatically switches to standby mode when the timer reaches 0.
Switching the Television On and Off Automatically
You can set the On/Off timers so that the set will:
Switch on automatically and tune to the channel of your choice at
the time you select.
Switch off automatically at the time you select.
The first step is to set the television’s clock.
1. Press the MENU button to display the menu. Press the or button to
select “Setup”, then press the ENTER
2. Press the or button to select “Time”, then press the ENTER
3. Press the or button to select “On Timer”, then press the ENTER
4. Press the or button to adjust “Hour”, then press the button to
move to the next step. Set other items using the same method as above.
When finished, press the ENTER button to return.
5. Press the or button to select “Off Timer”, then press the ENTER
6. Press the or button to adjust “Hour”, then press the button to
move to the next step. Set other items using the same method as above.
When finished, press the ENTER
7. Press the EXIT button to exit.
You can also set hour and minute by pressing the number buttons on the remote control.
The "Activation" setting must be set to "Yes" in order for the timers to work.
button.
button to return.
ENTER
button.
button.
button.
button.
English-20
Page 23
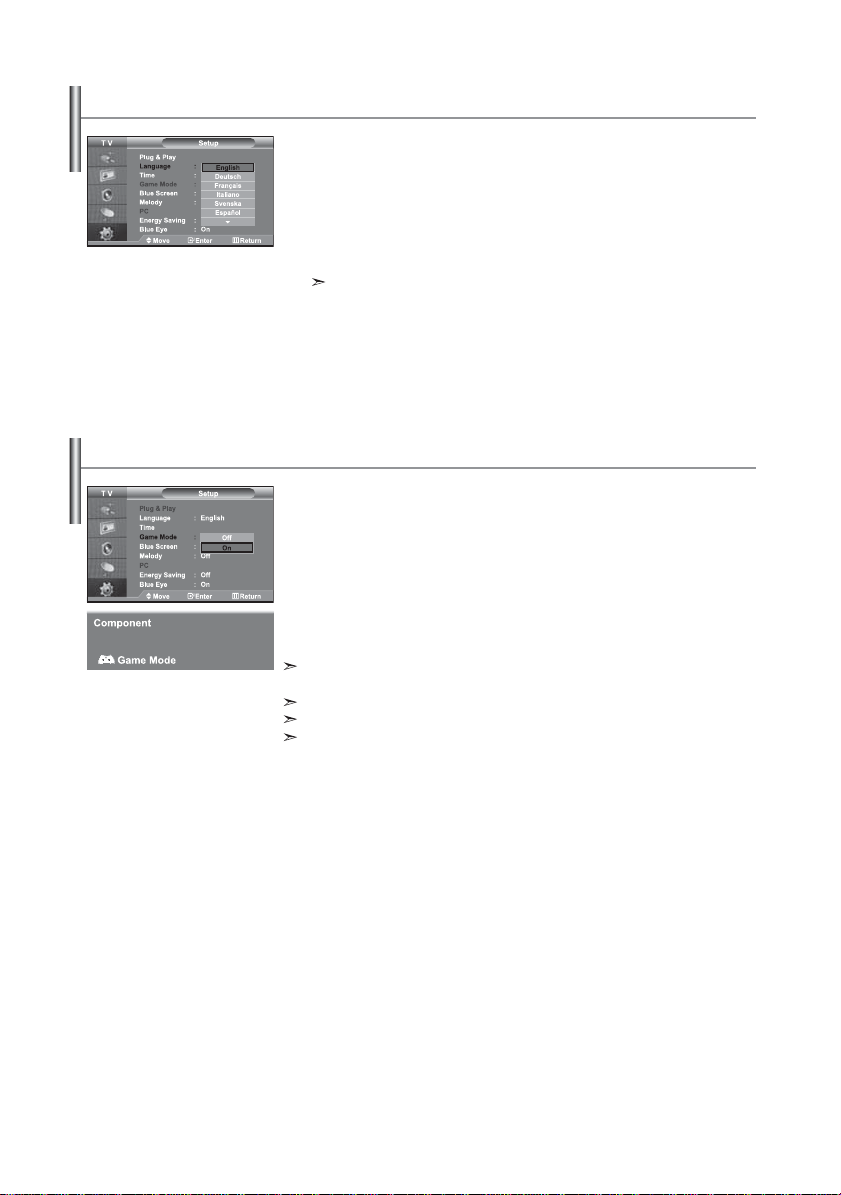
Choosing Your Language
Using Game Mode
When you start using your set for the first time, you must select the
language which will be used for displaying menus and indications.
1. Press the MENU button to display the on-screen menu.
Press the or button to select “Setup”, then press the
2. Press the or button to select “Language”, then press the
ENTER button.
ENTER button.
3. Select a particular language by pressing the or button repeatedly.
Press the
ENTER button.
You can choose one of 21 languages.
4. Press the EXIT button to exit.
When connecting to a game console such as PlayStationTM or XboxTM,
you can enjoy a more realistic gaming experience by selecting game menu.
1. Press the MENU button to display the menu. Press the or button to
select “Setup”, then press the ENTER button.
2. Press the or button to select “Game Mode”, then press the
ENTER button.
3.
Press the or button to select “On” or “Off”. Press the
ENTER
button.
4. Press the EXIT button to exit.
To disconnect the game console and connect another external device, set Game to Off in the
setup menu.
If you display the TV menu in Game mode, the screen shakes slightly.
Game Mode is not available in TV mode.
If Game Mode is On:
• Picture Mode and Sound Mode are automatically changed to Custom and users can
not change the mode.
• Adjust the sound using the equalizer.
• The Reset Sound function is activated. Selecting the Reset function after setting the
equalizer resets the equalizer setting to the factory defaults.
English-21
Page 24

Setting the Blue Screen Mode / Selecting the Melody
Blue Screen:
If no signal is being received or the signal is very weak, a blue screen automatically
replaces the noisy picture background. If you wish to continue viewing the poor picture, you must set the "Blue Screen" mode to "Off".
Melody:
You can hear melody sound when the television is powered on or off.
1. Press the MENU button to display the menu. Press the or button to
select “Setup”, then press the ENTER button.
2. Press the or button to select “Blue Screen” or “Melody”.
Press the ENTER button.
3.
Press the or button to select “On” or “Off”.
Press the
ENTER
button.
4. Press the EXIT button to exit.
Using the Energy Saving Feature
This function adjusts the brightness of the TV so as to reduce power consumption.
When you watching TV at night, set the "Energy Saving " mode option to "High" so
as to reduce the dazzling of your eyes as well as the power consumption.
1. Press the MENU button to display the on-screen menu.
Press the or button to select “Setup”, then press the
2. Press the or button to select “Energy Saving”,
then press the
3. Select the required option (Off, Low, Medium, High) by pressing
the or button. Press the
4. Press the EXIT button to exit.
ENTER button.
ENTER button.
ENTER button.
Setting the Blue Eye
You can set the power of Blue LED to be on. If the power is off when
Blue Eye TV is off, the Blue LED goes off. This will save power and reduce eye
fatigue.
1. Press the MENU button to display the on-screen menu.
Press the or button to select “Setup”, then press the
ENTER button.
2. Press the or button to select “Blue Eye”,
then press the
3.
Press the or button to select “On” or “Off”. Press the
On: LED(Blue) will come on after you turn the TV off.
ENTER button.
Off: LED(Blue) will not come on.
ENTER
button.
4. Press the EXIT button to exit.
English-22
Page 25
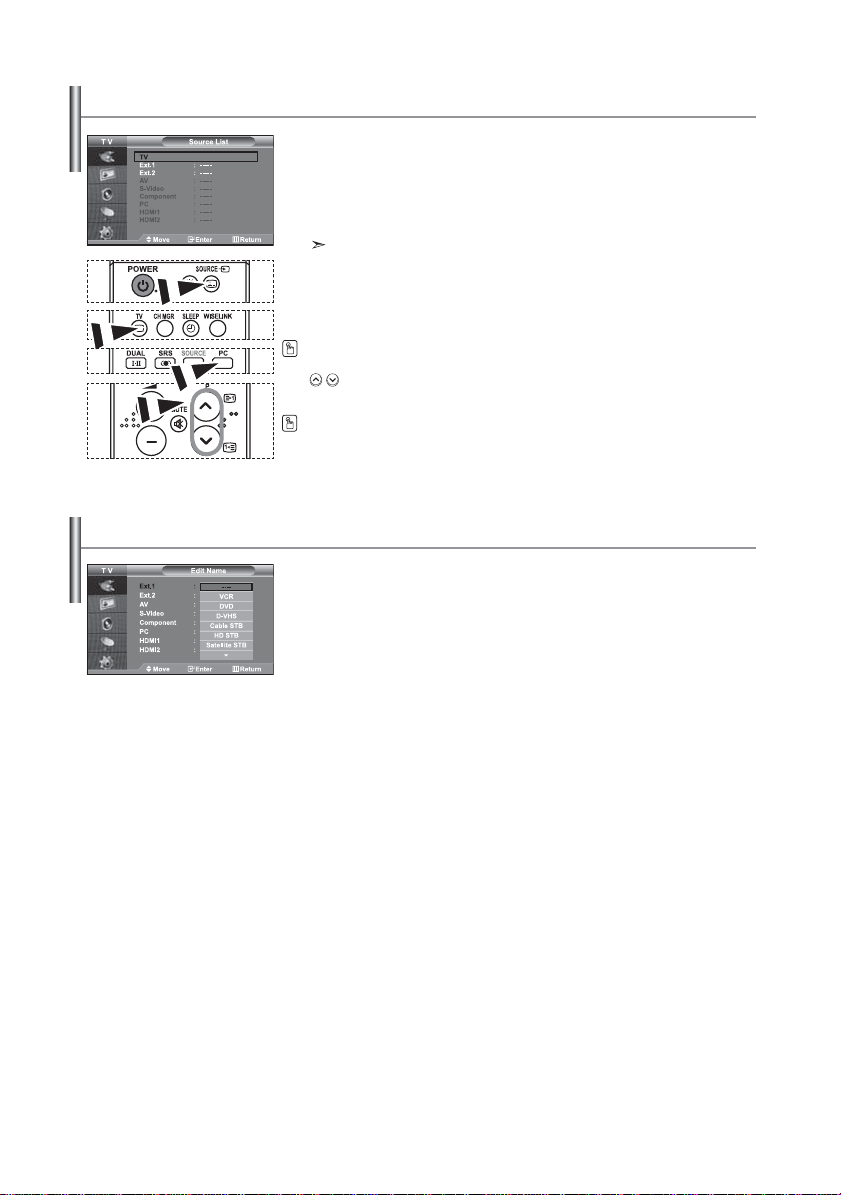
Selecting the Source
You can select among external sources connected to
your TV’s input jacks.
1. Press the MENU button to display the menu.
Press the ENTER button, to select “Input”.
2. Press the
activated in the “Source List”. “AV”, “S-Video”, “Component”, “PC”,
“HDMI1” , “HDMI2” are activated only when they are connected to your set.
3. Select the required device by pressing the or button.
Press the ENTER button.
Press the SOURCE button on the remote control to toggel between all the available source.
TV mode can be selected by pressing the TV button, number buttons(0~9), and the
P
/
You can select PC mode by simply pressing the PC button on the remote control.
Editing the Input Source Names
Name the device connected to the input jacks to make your input source selection easier.
1. Press the MENU button to display the menu.
Press the ENTER button, to select “Input”.
2. Press the or button to select “Edit Name”, then press the ENTER button.
3. Press the or button to select the device that you wish to edit.
Press the ENTER
4. Press the or button to select the required device.
Press the ENTER button.
5. Press the EXIT button to exit.
ENTER button again, to select “Source List”.
When no external device is connected to your set, only “TV”, “Ext.1”, “Ext.2” are
button on the remote control. But it cannot be selected using the SOURCE button.
button.
English-23
Page 26
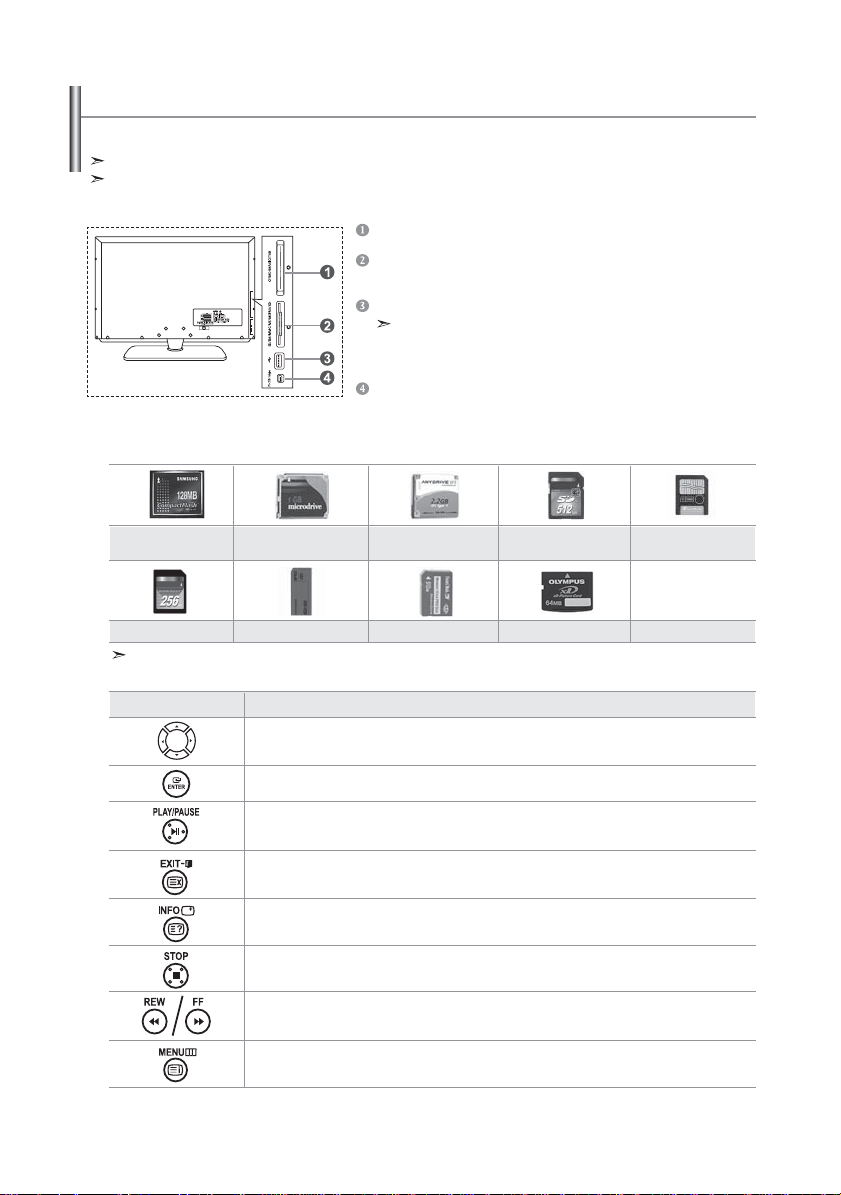
Using the WISELINK Function
You can view stored photos (JPEG files) or play music files (MP3) using a memory card or USB storage media.
The "Photo" menu supports image files in the JPEG format only.
The "Music" menu supports sound files in the MP3 format only.
Compact Flash (CF) / Micro Driver (MD) / MAGICSTOR
Secure Digital Card (SD Card) / Smart Media Card (SM) /
Multimedia Card (MMC) / Memory Stick / MSPRO / XD
USB Mass Storage Class
The USB hub type is not available becuase using the
Half-Speed USB can cause the hardware limitation.
(Only the Full-Speed USB is available.)
Photo Printer
1. First, connect the memory card or USB storage media containing your files to the WISELINK terminal
on the side of the TV.
Supported Memory Cards
Compact Flash (CF) Micro Driver (MD) MAGICSTOR Secure Digital Card
Multimedia Card (MMC) Memory Stick MSPRO XD
Some types of Memory Cards or USB hosts, depending on the manufacturer, may not be supported.
2. Using the Remote Control Button in WISELINK Menu
Button Operations
Move the cursor and select an item.
Select the currently selected item.
Play or pause the Slide Show or MP3 file.
Stop the current function and return to the previous high-level menu.
Run various functions from the Photo and Music menus.
Stop the current slide show or MP3 file.
Page Up or Down (file list item)
Return to the previous menu
English-24
(SD Card)
Smart Media Card
Page 27

Using the WISELINK Menu
This menu shows JPEG and MP3 files and folders saved on a memory card.
1. Press the MENU button to display the menu.
Press the ENTER button, to select “Input”.
2. Press the or button to select “WISELINK”, then press the ENTER button.
is correctly inserted into the WISELINK terminal on the side of the TV.
3. Press the or button to select the corresponding Memory Card,
then press the ENTER button.
Memory Card will be displayed.
4. Press the or button to move to an item,
then press the ENTER button.
5. To exit WISELINK, press the WISELINK button on the remote control.
You can select these options by simply pressing the WISELINK button on the
remote control.
Using the PHOTO (JPEG) List
This menu shows JPEG files and folders saved on a memory card.
1. Complete Steps 1 to 4 of "Using the WISELINK Menu".
2. Press the or button to select “Photo”, then press the ENTER button.
3. Press the ,, and buttons to select a file, then press the ENTER button.
photo in full screen.
4. Press the INFO button to configure the options.
"View", "Slide Show", "Copy", "Copy All files",
"Delete", "Delete All Files", "Print"
folder icon
photo icon
Move to the previous
folder stage icon
When a full screen is displayed:
"Slide Show", "Rotate", "Zoom", "Copy", "Delete", "Print", "List"
5. To exit WISELINK, press the WISELINK button on the remote control.
At this point, the icon will appear at the top left of the screen.
• This menu only shows files whose file extension is JPEG.
Files of other formats such as bmp or tiff will not be displayed.
• The files are displayed on a page. 15 thumbnail photos are displayed per page.
•
• Folders are displayed first and they are followed by all JPEG files in the current folder.
The folders and JPEG files are sorted in alphabetical order.
If the "Insert memory cards." message is displayed, check whether the memory card
A menu for selecting the format of the files saved on the selected
The saved file information is displayed as a folder or file.
Pressing the button over a photo icon shows the currently selected
Pressing the button over a folder icon shows the JPEG files included in the folder.
The Menu is displayed. Select the View option to display a photo in the aspect ratio.
When the Photo List screen is displayed:
• Moving to another photo may take a few seconds to load the file.
The thumbnails are numbered from left to right and from top to bottom, from 1 to 15.
You can select these options
by simply pressing the WISELINK
button on the remote control.
English-25
Page 28

Using the Options Menu
"Slide Show":
Starts a slide show.
(Refer to “Selecting a Photo and Slide Show” on page 27)
"Rotate":
You can rotate images in full screen mode.
Images are rotated in the order of 90°, 180°, 270° and 0° (original state).
(Refer to “Rotating” on page 28)
You cannot save a rotated image.
"Zoom":
You can zoom into images in full screen mode.
Images are zoomed in on in the order of X2, X3, X4 and X1 (original size).
(Refer to “Zooming-in” on page 29)
You cannot save a zoomed-in on image.
"Copy", "Copy All files":
You can copy image files to a different memory card.
(Refer to “Copying Image Files” on page 30)
"Delete", " Delete All Files":
You can delete selected image files.
(Refer to “Deleting Image Files” on page 30)
"Print":
You can print image files directly with your printer.
(Refer to “Printing a Photo” on page 31)
"List":
Displays the stored files and folders and file info.
The “File Error” message appears on the screen in the following situations:
When the file actually has an error
•
If the target memory cannot be writtien to when copying files
•
If the target memory has not enough space when copying files
•
English-26
Page 29

Viewing Photo File Information
When selecting a photo file, the photo file information is displayed on the left
in the TV screen, such as the resolution, the date modified and the order of the
file in the current directory.
Selecting a Photo and Slide Show
This menu shows JPEG files and folders saved on a memory card.
1. Complete Steps 1 to 4 of "Using the WISELINK Menu".
(Refer to page 25)
2. Press the or button to select “Photo”, then press the ENTER button.
The saved file information is displayed as a folder or file.
3. Press the INFO button.
4. Press the or
The Menu is displayed. Select the View option to display a photo in the aspect ratio.
• Slide Show all files in the selected folder at a predetermined interval.
• During the Slide Show, files are displayed in order from the currently shown file.
5. Press the INFO button during “Slide Show” to set the option
("Speed", "Background Music, "Background Music Setting", "List").
Press the
6. To change the sub option, press the INFO button again to open the options
You can select these options
by simply pressing the WISELINK
button on the remote control.
window and select option you want to change, then press the ENTER
button. Whenever you do this, the sub option on the screen is changed.
7. To exit WISELINK, press the WISELINK button on the remote control.
If the Slide Show feature is selected when a photo is displayed in full screen,
other photos are also in the full screen size during the Slide Show.
Such as the resolution
File size
Date modified
Order of the file in the current directory
button to select “Slide Show”, then press the ENTER button.
or
button to select the option, then press the
ENTER
button.
Using the Menu during a Slide Show
Normal
"Speed":
Select to control the slide show speed.
Press the ENTER button to select the option "Normal", "Slow", or "Fast".
When the Speed feature is set to the Fast option, usually it takes about 7 seconds to slide to
the next photo. The loading time may be longer depends on the size of the file.
On
"Background Music":
Select to determine whether to play an MP3 file during a slide show.
Press the ENTER button to select the option "On" or "Off".
Set the Background Music Seetings first to use the “On” or “Off ” function in this menu.
English-27
Page 30
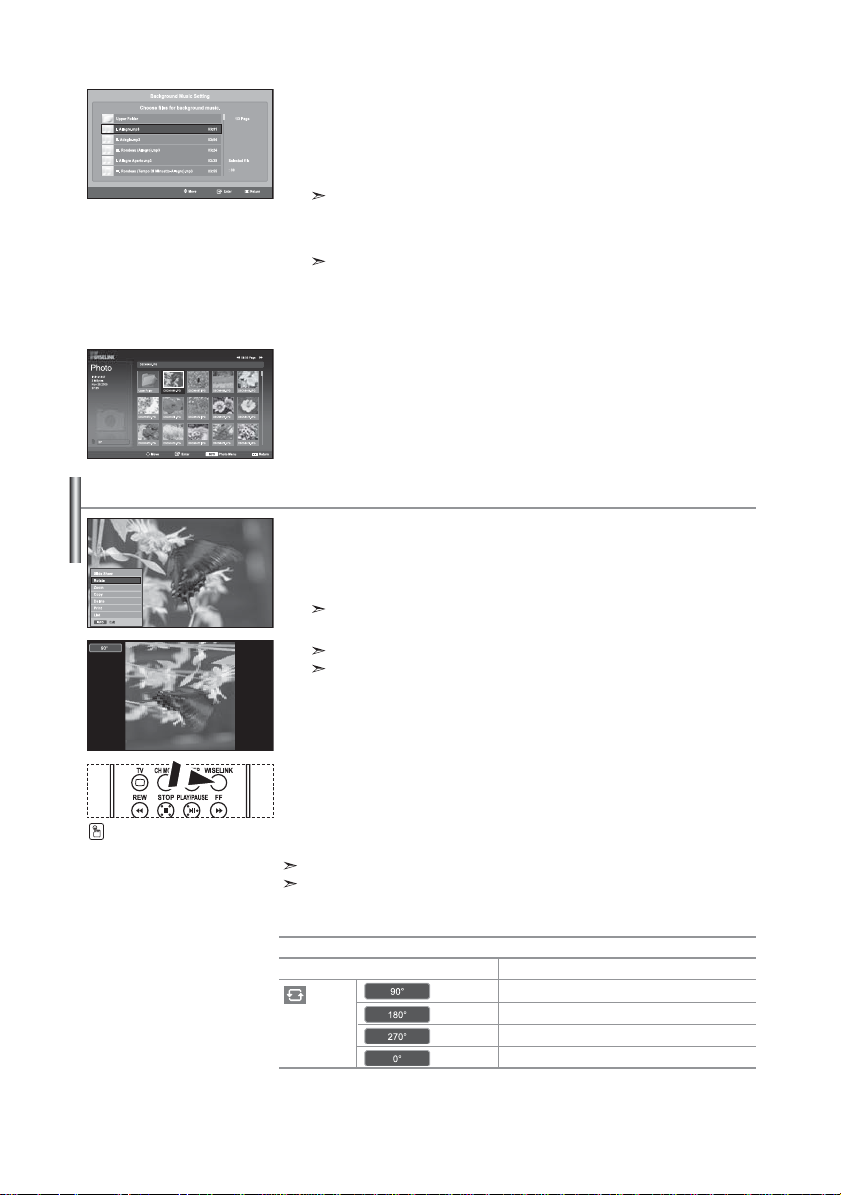
Rotating
You can select these options
by simply pressing the WISELINK
button on the remote control.
"Background Music Setting":
The saved file information is displayed as folder or MP3 file.
1. Select the "Background Music Settings" and press the ENTER button.
Navigate to the folder that contains the MP3 files to use as the
background music. Select an MP3 file and press ENTER button.
The selected file is displayed in yellow.
2. MENU button again to return to the Slide Show screen.
The selected background music is played.
• If you turn Off the Background Music, even if the Background Music Settings
have been set up, the background music will not be played.
• MP3 files can be automatically played during the Slide Show if the Default
Background Music is set to On. To enable this function, MP3 files and
other photo files must be located in the same folder.
"List":
Displays the stored files and folders and file info.
Displays a 90°, 180°, or 270° rotated image in full screen mode.
1. Complete Steps 1 to 4 of "Using the WISELINK Menu".
(Refer to page 25)
2. Press the or button to select “Photo”, then press the ENTER button.
The saved file information is displayed as a folder or file.
3. Press the ,, and buttons to select a file, then press the ENTER button.
Pressing the button over a photo thumbnail displays the photo in full screen.
The Menu is displayed. Select the View option to display a photo in the aspect ratio.
4. Press the INFO button to display the option
("Slide Show", "Rotate", "Zoom", "Copy", "Delete", "Print", "List").
Press the or button to select “Rotate”, then press the
ENTER button. Press the ENTER button to select the option
(90°, 180°, 270°, 0°(Original))
To rotate a photo, press the INFO button to open the options window,
select the “Rotate” option and press the ENTER button.
Whenever you do this, the photo on the screen is gradually rotated.
5. To exit WISELINK, press the WISELINK button on the remote control.
The rotated file is not saved.
This feature is also available for the photo in the aspect ratio.
The Rotating function information
Current OSD
English-28
Function
To rotate a photo by 90 degrees
To rotate a photo by 180 degrees
To rotate a photo by 270 degrees
To rotate a photo by original
Page 31

Zooming-in
You can select these options
by simply pressing the WISELINK
button on the remote control.
Displays a 2x, 3x or 4x zoomed-in image in full screen mode.
1. Complete Steps 1 to 4 of "Using the WISELINK Menu".
(Refer to page 25)
2. Press the or button to select “Photo”, then press the ENTER button.
The saved file information is displayed as a folder or file.
3. Press the ,, and buttons to select a file, then press the ENTER button.
Pressing the button over a photo thumbnail displays the photo in full screen.
The Menu is displayed. Select the View option to display a photo in the aspect ratio.
4. Press the INFO button to display the option
("Slide Show", "Rotate", "Zoom", "Copy", "Delete", "Print", "List").
Press the or button to select “Zoom”, then press the
ENTER button. Press the ENTER button to select the option
("X2", "X3", "X4", "X1").
To zoom into a photo, press the INFO button to open the Options window,
select the “Zoom” option and press the ENTER button.
Whenever you do this, the following zoom options are applied in
sequence.
• X2: Zoom-in to the photo X2.
• X3: Zoom-in to the photo X3.
• X4: Zoom-in to the photo X4.
• X1: Restore the photo to its original size.
To move to pan up/down/left/right, press the ,, and buttons.
5. To exit WISELINK, press the WISELINK button on the remote control.
Zoom function information
Current OSD
Button
Pan Down
Pan Up
Pan Right
Pan Left
This feature is also available for the photo in the aspect ratio.
Function
Zoom-in to a photo X2.
Zoom-in to a photo X3.
Zoom-in to a photo X4.
Restore a photo to its original size.
Function
Pan down to view the lower
part of a zoomed-in photo.
Pan up to view the upper part
of a zoomed-in photo.
Pan right to view the right side
of a zoomed-in photo.
Pan left to view the left side of a
zoomed-in photo.
English-29
Page 32

Copying Image Files
You can select these options
by simply pressing the WISELINK
button on the remote control.
Deleting Image Files
You can select these options
by simply pressing the WISELINK
button on the remote control.
You can copy image files to a different memory card.
1. Complete Steps 1 to 4 of "Using the WISELINK Menu".
(Refer to page 25)
2. Press the or button to select “Photo”, then press the ENTER button.
The saved file information is displayed as a folder or file.
3. Press the ,, and buttons to select a file, then press the ENTER button.
Pressing the button over a photo thumbnail displays the photo in full screen.
The Menu is displayed. Select the View option to display a photo in the aspect ratio.
4. Press the INFO button to display the option
("Slide Show", "Rotate", "Zoom", "Copy", "Delete", "Print", "List").
Press the or button to select “Copy”, then press the ENTER button.
To copy all photos, select the INFO button in the Photo List screen and
then select the "Copy All Files" menu.
If there is no target memory card inserted, the “There is no device connected.”
message is displayed and no operation follows.
5. To exit WISELINK, press the WISELINK button on the remote control.
You can delete selected image files.
1. Complete Steps 1 to 4 of "Using the WISELINK Menu".
(Refer to page 25)
2. Press the or button to select “Photo”, then press the ENTER button.
The saved file information is displayed as a folder or file.
3. Press the ,, and buttons to select a file, then press the ENTER button.
Pressing the button over a photo thumbnail displays the photo in full screen.
The Menu is displayed. Select the View option to display a photo in the aspect ratio.
4. Press the INFO button to display the option
("Slide Show", "Rotate", "Zoom", "Copy", "Delete", "Print", "List").
Press the or button to select “Delete”, then press the ENTER button.
To delete all photos, select the INFO button in the Photo List screen and
then select the "Delete All Files" menu.
When selecting the “Delete” or “Delete All Files” menu, an OSD screen
is displayed to confirm the deletion. To cancel the deletion, select “No.”
5. To exit WISELINK, press the WISELINK button on the remote control.
English-30
Page 33

Printing a Photo
You can select these options
by simply pressing the WISELINK
button on the remote control.
Using the MP3 List
folder icon
musical note icon
Move to the previous
folder stage icon
You can select these options
by simply pressing the WISELINK
button on the remote control.
You can print image files directly with your printer.
1. Complete Steps 1 to 4 of "Using the WISELINK Menu".
(Refer to page 25)
2. Press the or button to select “Photo”, then press the ENTER button.
The saved file information is displayed as a folder or file.
3. Press the ,, and buttons to select a file, then press the ENTER button.
Pressing the button over a photo thumbnail displays the photo in full screen.
The Menu is displayed. Select the View option to display a photo in the aspect ratio.
4. Press the INFO button to display the option
("Slide Show", "Rotate", "Zoom", "Copy", "Delete", "Print", "List").
Press the or button to select “Print”, then press the ENTER button.
If no printer is connected, the "Check the printer" message is displayed
and no operation follows.
5. To exit WISELINK, press the WISELINK button on the remote control.
Connect to the photo printer with the PictBridge feature to print pictures.
This menu shows MP3 files from among the files saved on the memory card.
1. Complete Steps 1 to 4 of "Using the WISELINK Menu".
(Refer to page 25)
2. Press the or button to select “Music”, then press the ENTER button.
The saved file information is displayed as a folder or file.
3. Press the or button to select a file, then press the ENTER button.
To select all files or a file, press the INFO button to display
the Music menus. ("Play", "Play All Files", "Copy", "Copy All Files",
"Delete", "Delete All Files")
Press the ENTER button to select “Play All Files” or “Play”.
• Pressing the ENTER button over a musical note icon immediately plays the music
file.
• Pressing the ENTER button over a folder icon shows the music files included
in the folder
.
To select a file on the next page, press the REW or FF button
to move to the next page.
4.
Press the PLAY/PAUSE button while playing an MP3 file to pause the file.
Press the STOP button to exit Play mode.
5. To exit WISELINK, press the WISELINK button on the remote control.
• This menu only shows files with the MP3 file extension. Files with other file
extensions are not displayed, even if they are saved on the same memory card.
• The selected file is displayed on the top with its playing time.
• To adjust the music volume, press the
To mute the sound, press the MUTE
English-31
or button on the remote control.
button on the remote control.
Page 34

Music function information
Current OSD
(Music) Play/Pause
Function
When pressing the PLAY/PAUSE button on the
remote control while music is playing.
Copying Music Files
You can select these options
by simply pressing the WISELINK
button on the remote control.
Deleting Music Files
(Music) Stop
When pressing the STOP
control when music is stopped.
button on the remote
You can copy music files to a different memory card.
1. Complete Steps 1 to 4 of "Using the WISELINK Menu". (Refer to page 25)
2. Press the or button to select “Music”, then press the ENTER button.
The saved file information is displayed as a folder or file.
3. Press the or button to select a file, then press the ENTER button.
To select all files or a file, press the INFO button to display
the Music menus. ("Play", "Play All Files", "Copy", "Copy All Files",
"Delete", "Delete All Files")
Press the ENTER button to select “Copy” or “Copy All Files”.
If no target memory card is inserted, the “There is no device connected.”
message is displayed and no operation follows.
4. To exit WISELINK, press the WISELINK button on the remote control.
You can delete selected music files.
1. Complete Steps 1 to 4 of "Using the WISELINK Menu". (Refer to page 25)
2. Press the or button to select “Music”, then press the ENTER button.
The saved file information is displayed as a folder or file.
3. Press the or button to select a file, then press the ENTER button.
To select all files or a file, press the INFO button to display
the Music menus. ("Play", "Play All Files", "Copy", "Copy All Files",
"Delete", "Delete All Files")
Press the ENTER button to select “Delete” or “Delete All Files”.
When selecting the “Delete” or “Delete All Files” menu, an OSD screen is
displayed to confirm the deletion. To cancel the deletion, select “No.”
4. To exit WISELINK, press the WISELINK button on the remote control.
You can select these options
by simply pressing the WISELINK
button on the remote control.
English-32
Page 35

Using the Setup Menu
You can select these options
by simply pressing the WISELINK
button on the remote control.
Setup displays the user settings of the WISELINK menu.
1. Complete Steps 1 to 4 of "Using the WISELINK Menu". (Refer to page 25)
2. Press the or button to select “Setup”, then press the ENTER button.
The saved file information is displayed as a folder or file.
3. Press the or button to select an item you want,
then press the ENTER button.
4. Press the or button to select the option, then press the ENTER button.
5. To exit WISELINK, press the WISELINK button on the remote control.
"Slide Show Speed":
Select to control the slide show speed.
"Slide Show Effect":
You can select effects to use with the slide show.
"Slide Show Repeat":
• On: Repeats the slide show from the beginning when all the files in the
folder have been displayed.
• Off: Exit a slide show.
To return to the Photo menu when all the files in the folder have been displayed.
"Music Repeat":
Select to determine whether to repeat playing the music when all MP3 files in the
current folder have been played.
"Background Music":
Select to determine whether to play an MP3 file during a slide show.
"Background Music Setting":
You can select the background music to play during a slide show.
You can also select the background music while a slide show is in process by pressing the INFO button and selecting the “Background Music Setting” menu.
"Screen Saver":
Select to set the waiting time before the screen saver is run
when no button is pressed.
English-33
Page 36

Teletext Decoder
Most set channels carry “ Teletext ”, pages of written
information that provide information such as:
Sports results.
The Teletext pages are organized according to six categories:
Displaying the Teletext Information
You can display Teletext information at any time, but signal reception must be
good. Otherwise:
Information may be missing.
Some pages may not be displayed.
To activate the Teletext mode and display the contents page:
Using the P ( ) or P ( ) button, select the channel providing the
1.
Teletext service.
2.
Press the TTX/MIX ( ) button to activate the Teletext mode.
The contents page is displayed. It can be redisplayed at any time by pressing the
MENU ( ) button.
3. Press the TTX/MIX ( ) button again.
The actual broadcast will be displayed with “Teletext”, “Double”, and “Mix” in order
on the screen.
4. Press the TV( ) button to exit from the Text display.
If any broken character appears while Text is being viewed, make sure that the
Text language is identical with the language in the “Setup” menu mode. If both languages are
different, select the same language with the Text language on the “Setup” menu.
Television programme times.
News bulletins and Weather forecasts.
Subtitles for the hard of hearing.
Part
A
B
C
D
E
F
Contents
Selected page number.
Broadcasting station identity.
Current page number or search status.
Date and time.
Tex t.
Status information.
English-34
Page 37

Selecting a Specific Teletext Page
Press the number buttons on the remote control to enter the page number
directly:
1.
Enter the three-digit page number listed in the contents by pressing the
corresponding numeric buttons.
2.
If the selected page is linked with several secondary pages, the secondary
pages are displayed in sequence. To freeze the display on a given page, press
the
PIP
3. Using the various display options:
To display...
Both Teletext information and the normal broadcast
Hidden text (answers to quiz games, for example)
The normal screen
A secondary page, by entering its 4-digit number
The next page
The previous page
Double-size letters in the:
Upper half of the screen
Lower half of the screen
Normal screen
( ) button. Press the
PIP
( ) button again to resume.
Press the...
TTX/MIX (
INFO ( )
INFO (
)
PRE-CH (
P
( )
P
( )
P.MODE
( )
Once
Twice
Three times
)
)
Using Fastext to Select a Teletext Page
The various topics included in the Teletext pages are colour-coded, and can be selected
by pressing the coloured buttons on the remote control.
1.
Display the Teletext contents page by pressing the
TTX/MIX ( )
2. Press the coloured button corresponding to the topic that you wish to
select (The available topics are listed on the status information line).
3. Press the Red button to display the previous page.
Press the Green button to display the next page.
4. Press the TV(
button.
) button to exit from the Text display.
English-35
Page 38

Setting Up Your Remote Control
After it has been set up properly, your remote control can operate in five different
modes: TV, DVD, Cable, Set-Top Box, VCR. Pressing the corresponding button on the
remote control allows you to switch between these modes, and control whichever piece
of equipment you choose.
The remote control might not be compatible with all DVD Players, VCRs, Cable boxes, and SetTop Boxes.
Setting Up the Remote to Operate Your VCR
1.
Turn off your VCR.
2. Press the VCR button on your TV’s remote control.
3. Press the SET button on your TV’s remote control.
Using the number buttons on your remote control, enter three digits of the VCR
4.
code listed on page 38 of this manual for your brand of VCR. Make sure you
enter three digits of the code, even if the first digit is a “0”.
(If more than one code is listed, try the first one.)
5.
Press the POWER button on the remote control.
Your VCR should turn on if your remote is set up correctly.
If your VCR does not turn on after set up, repeat steps 2, 3, and 4, but try one of
the other codes listed for your brand of VCR.
If no other codes are listed, try each VCR code, 000 through 080.
Note on Using Remote Control Modes: VCR
When your remote control is in “VCR” mode, the volume buttons still control your TV’s volume.
Setting Up the Remote to Operate Your Cable Box
1.
Turn off your cable box.
2. Press the
3. Press the SET button on your TV’s remote control.
Using the number buttons on your remote control, enter three digits of the
4.
cable box code listed on page 39 of this manual for your brand of cable box.
Make sure you enter three digits of the code, even if the first digit is a “0”. (If
there is more than one code listed, try the first one.)
5.
Press the POWER button on the remote control.
Your cable box should turn on if your remote is set up correctly.
If your cable box does not turn on after set up, repeat steps 2, 3, and 4, but try
one of the other codes listed for your brand of cable box. If no other codes are
listed, try each code, 000 through 046.
Note on Using Remote Control Modes: Cable Box
When your remote control is in “CABLE” mode, the volume buttons still control your TV’s volume.
CABLE
button on your TV’s remote control.
English-36
Page 39

Setting Up the Remote to Operate Your DVD
1.
Turn off your DVD.
2. Press the
DVD
button on your TV’s remote control.
3. Press the SET button on your TV’s remote control.
Using the number buttons on your remote control, enter three digits of the
4.
DVD code listed on page 39~40 of this manual for your brand of DVD.
Make sure you enter three digits of the code, even if the first digit is a “0”.
(If there is more than one code listed, try the first one.)
5.
Press the POWER button on the remote control.
Your DVD should turn on if your remote is set up correctly.
If your DVD does not turn on after set up, repeat steps 2, 3, and 4, but try one of
the other codes listed for your brand of DVD.
If no other codes are list-ed, try each code, 000 through 141.
Note on Using Remote Control Modes: DVD
When your remote control is in “DVD” mode, the volume buttons still control your TV’s volume.
Setting Up the Remote to Operate Your STB
1.
Turn off your STB.
2. Press the
STB
button on your TV’s remote control.
3. Press the SET button on your TV’s remote control.
4.
Using the number buttons on your remote control, enter three digits of the STB
code listed on page 40 of this manual for your brand of STB.
Make sure you enter three digits of the code, even if the first digit is a “0”.
(If there is more than one code listed, try the first one.)
5.
Press the POWER
button on the remote control.
Your STB should turn on if your remote is set up correctly.
If your STB does not turn on after set-up, repeat steps 2, 3 and 4, but try one of
the other codes listed for your brand of STB.
(If no other codes are listed, try each code, 000 through 074.)
Note on Using Remote Control Modes: STB
When your remote control is in “STB” mode, the volume buttons still control your TV’s volume.
English-37
Page 40

Remote Control Codes
VCR
Brand Code
SAMSUNG 000 001 002 003 004 005 077 078 079
ADMIRAL 020
AIWA 025
AKAI 004 027 032
AUDIO DYNAMICS 007 026
BELL&HOWELL 018
BROKSONIC 022
CANDLE 002 003 006 008 015 055
CANON 021 056
CITIZEN 002 003 006 008 015 055
COLORTYME 007
CRAIG 002 024
CURTIS MATHES 002 007 008 017 021 025 056 064 066
DAEWOO 003 010 011 012 013 014 015 016
DB 007 026
DIMENSIA 017
DYNATECH 025
ELECTROHOME 034
EMERSON
FISHER 018 024 028 029 048 051 061
FUNAI 025
GENERAL ELECTRIC
GO VIDEO 002
HARMAN KARDON 007
HITACHI 019 025 041 042 074
INSTANT REPLAY 021
JC PENNEY
JCL
JVC
KENWOOD
KLH
KONIA
LG(Goldstar)
LIOYD
LOGI K
LXI
MAGNAVOX
MARANTZ
MARTA
MEI
MEMOREX
MGA
MIDLAND
MINOLTA
MITSUBISHI
001 003 006 021 022 025 030 032 034 040 047
050 052 060 063 065 066 067 069 073
002 005 017 021 056
002 007 018 019 021 026 037 041 054 056
007 008 018 021 026 037
081 082 083
007 008 018 021 026 037
070
036
006 007 008 009 010
025
038
025
021 056 059
007 008 018 021 026 037 062
006
021
006 021 024 025
034
005
019 041 075
019 034 041 046
Brand Code
MONTGOMERY WARD
MTC 002 025
MULTITECH 002 005 025 038
NEC 007 008 018 026 037 062 064
OPTIMUS 020
ORION 073 074 075 076
PANASONIC 021 056 071 072
PENTAX 019 041 075
PENTEX RESEARCH+
PHILCO 021 056 059
PHILIPS 021 080
PIONEER 019 026 039 053
PORTLAND 015 049 055
PROSCAN 017
QUARTZ 018
QUASAR 021 056
RADIO SHACK/
REALISTIC
RCA
SANSUI 026
SANYO 018 024
SCOTT 003 047 052 067
SEARS 006 018 019 024 028 029 041 048 051
SHARP 020 034 045 015
SHIMTOM 027 033 038 058
SIGNATURE 025
SONY 027 033 044
SYLVANIA 021 025 056 059
SYMPHONIC 025
TANDY 018 025
TASHIKA 006
TATUNG 037
TEAC 025 037 068
TECHNICS 021
TEKNIKA 006 021 025 031
TMK 066
TOSHIBA 003 019 029 051 052
TOTEVISION 002 006
UNITECH 002
VECTOR RESEARCH
VICTOR 026
VIDEO CONCEPTS 007 026
VIDEOSONIC 002
WAR DS
YAMAHA 007 008 018 026 037
ZENITH 023 027 033
020
008
006 018 020 021 024 025 029 034 048 056
002 017 019 021 035 041 043 057 068 076
007 026
002 003 006 019 020 021 024 025 034 038 041
English-38
Page 41

CABLE BOX
Brand Code
SAMSUNG 000 001 002 003 004 005 006 007
GI 041
HAMLIN 003 024 031
HITACHI 025 030
JERROLD 038 039
MACOM 025 030
MAGNAVOX 019 023 028
OAK 026
PANASONIC 003 022 027 037 044
PHILIPS 019 021 023 028
PIONEER 004 018 020 044
RCA 014 022 040
REGAL 003
SAMSUNG DVD
Product Code
DVD 000 001 002
DVDR 003 004
BD Record 005 006
VCR COMBO 007 008 009 010 011
VCR Record 012
DHR COMBO 013
DVD
Brand Code
ANAM 030
AUDIOVOX 075
AUDIOLOGIC 085
ANABA 072
APEX DIGITAL 070 071 074 086 083 084 088 111 112
AIWA 114
BROKSONIC 062
BLAUPUNKT 074
B&K 122 123
CURTIS MATHES 027
CYBER HOME 077 078 079 082
CLARION 080 125
CIRRUS 081
CYBER HOME 065
CINEVISION 095
DAEWOO 066
DENON 146
FARENHEIT 067 068
FISHER 090
GPX 060
GO VIDEO 061 089 133 135
GE 069 074
GREENHILL 074
HITACHI 064 113
HITEKER 071
HOYO 073
HARMAN / KARDON
IRT 089
091 110
Brand Code
REGENCY 015 023
SA 042 043
SCIENTIFIC ATLAN 042 043
SPRUCER 022
STARGATE 2000 036
SYLVANIA 016
TEXSCAN 016
TOCOM 032
UNIVERSAL 033 034
VIEWSTAR 019 021 023 028
WARNER AMEX 046
ZENITH 017 029 035 037 045
Product Code
Home Theater VCR COMBO 014 015 016
HDD Recorder COMBO 017
TWIN TRAY COMBO 018
STB DVD COMBO 019
DVD Receiver 020
AV Receiver 021
Brand Code
INTEGRA 092
JBL 091
JVC 022 033 115 116
JATON 073
KENWOOD 051 108 109
KISS 073
KONKA 059 100 106 107
KLH 074 075
LG(Goldstar) 025 031
LOEWE 057
LASONIC 058
MOBILE AUTHORITY
MEMOREX 055
MALATA 056
MAGNAVOX 076 093
MINTEK 074 094
MONYKA 073
NORCENT 048 049 050
NEXT BASE 052
NEC 053
NANTAUS 144
NESA 074
OPTOMEDIA ELECTRONICS
OPTIVIEW 072
ONKYO 076 092 119
PHILCO 044 045
PRINCETON 046 047
PROSCAN 023
English-39
054
105
Page 42

DVD
Brand Code
PANASONIC 024 034 124 134 136 137 138
PHILIPS 036 076
ROTEL 117 118
RIO 120
RCA 023 035 074 075 131 132
RAITE 073
ROWA 038
SAMPO 104
SONY 026 029 126 127 128 129 130 141
SHERWOOD 039 041
SVA 042
SYLVANIA 043 093
SHARP 140
SANSUI 062
SANYO 062 090
SHINSONIC 094
SAMSUNG SET-TOP BOX
Product Code
Ground wave STB 001 002
Satellite STB 003
CABLE STB 004
STB DVD COMBO 008
Satellite STB HDD COMBO Standard 009
SET-TOP BOX
Brand Code
ALPHASTAR 023
ANAM 043
CHANNEL MASTER 018 034
CROSSDIGITAL 019
CHAPARRAL 035
DIRECT TV 015 016 017 019 022 045 060 061 062 065
DAEWOO 074
DISH NETWORK SYSTEM
DISHPRO 069
DRAKE 018 024 032
DX ANTENNA 027
ECHOSTAR 025 069 070 071
EXPRESSVU 069
GOI 069
GE 065
GENERAL INSTRUMENT
HTS 069
HOME CABLE 056
HITACHI 022
HUGHES NETWORK
IQ 020
IQ PRISM 020
JANEIL 059
JERROID 063
JVC 069 070
LG(Goldstar) 044 073
066 067 068
069 070
046 047 048 063 064
015 017
English-40
Brand Code
THOMSON 145
TOSHIBA 028 062 076
TECHNICS 139
TVIEW 072
TOKAI 073
TEAC 096
TECHWOOD 097
TREDEX 098 099 101
URBAN CONCEPTS
VENTURER 075
VOCOPRO 102
YAMAHA 032 063
YAMAKAWA 040 073
XWAVE 103
ZENITH 076 121
Product Code
Satellite STB HDD COMBO Premium 010
CABLE STB HDD COMBO Standard 011
CABLE STB HDD COMBO Premium 012
Ground wave STB HDD COMBO Standard 013
Ground wave STB HDD COMBO Premium 014
Brand Code
MAGNAVOX 016 021 036 038 039 040 041 042
MEMOREX 016
MOTOROLA 064
MACOM 018
MITSUBISHI 015
NEXT LEVEL 047 048 064
PHILIPS 015 016 017 021 033 036 038 039 040 041
PRIMESTAR 046 049 050 063
PANASONIC 058 059 061 062
PAYSAT 016
PROSCAN 065 066
RCA 051 052 053 065 066
RADIOSHACK 064
REALISTIC 057
STAR TRAK 026
STS 020 027
SKY 031
SKY LIFE 005 006 007
SHACK 064
STAR CHOICE 064
SONY 054 060
TOSHIBA 015 017 028 029 030 072
ULTIMATE TV 060 066
UNIDEN 016 021 037 055 056 057
ZENITH 024 031 068
076
042 067
Page 43

Setting up Your PC Software (Based on Windows XP)
The Windows display-settings for a typical computer are shown below. The actual screens on your PC may be different depending upon your particular version of Windows and your particular video card. Even if your actual screens
look different, the same, basic set-up information will apply in almost all cases. (If not, contact your computer manufacturer or Samsung Dealer.)
1. First, click on “Control Panel” on the Windows start menu.
2. When the control panel window appears, click on “Appearance and Themes” and a display
dialog-box will appear.
3. When the control panel window appears, click on “Display” and a display
dialog-box will appear.
4. Navigate to the “Settings” tab on the display dialog-box.
The correct size setting (resolution): Optimum- 1360 X 768
If a vertical-frequency option exists on your display settings dialog box, the correct value is
“60” or “60 Hz”. Otherwise, just click “OK” and exit the dialog box.
Display Modes
Both screen position and size will vary depending on the type of PC monitor and its resolution.
The resolutions in the table are recommended. (All resolutions between the supported limits are supported)
Mode
IBM
VESA
The inter face mode is not supported.
The set might operate abnormally if a non-standard video format is selected.
HDMI/DVI does not suppor t PC function.
Separate and Composite modes are supported. SOG is not supported.
Resolution
640 x 480
720 x 400
640 x 480
640 x 480
800 x 600
800 x 600
800 x 600
1024 x 768
1024 x 768
1024 x 768
1360 x 768
Horizontal
Frequency (kHz)
31.469
31.469
37.861
37.500
37.879
48.077
46.875
48.364
56.476
60.023
47.712
Vertical
Frequency (Hz)
59.940
70.087
72.809
75.000
60.317
72.188
75.000
60.000
70.069
75.029
60.015
Pixel Clock
Frequency (MHz)
25.175
28.322
31.500
31.500
40.000
50.000
49.500
65.000
75.000
78.750
85.800
Sync Polarity
(H/V)
- / -
- / +
- / -
- / + /+
+ /+
+ /+
- / -
- / + /+
+ /+
English-41
Page 44

Setting the PC
Press the PC button on the
remote control to select the PC
mode.
Coarse and Fine Tuning of the Image (Image Lock):
The purpose of picture quality adjustment is to remove or reduce picture noise. If the
noise is not removed by Fine-tuning alone, then adjust the
frequency as best as possible (coarse) and Fine-tune again. After the noise has been
reduced, re-adjust the picture so that it is aligned on the center of screen.
1. Preset: Press the PC button to select PC mode.
2. Press the MENU button to display the menu.
Press the or button to select “Setup”, then press the ENTER button.
3. Press the or button to select “PC”, then press the ENTER button.
4. Press the ENTER button to select “Image Lock”.
5. Press the or button to select “Coarse” or “Fine”,
then press the ENTER button.
6. Press the or button to adjust the screen quality.
Press the ENTER button.
7. Press the EXIT button to exit.
Changing the Image Position (Position):
Adjust the PC’s screen positioning if it does not fit the TV screen.
1. Follow the “Coarse and Fine Tuning of the Image (Image Lock)”
instructions number 1 to 3.
2. Press the or button to select “Position”, then press the
ENTER button.
3. Press the or button to adjusting the Vertical-Position.
Press the or button to adjust the Horizontal-Position.
Press the
ENTER button.
4. Press the EXIT button to exit.
Adjusting the PC Screen Automatically (Auto Adjustment):
Auto adjustment allows the PC screen of set to self-adjust to the
incoming PC video signal. The values of fine, coarse and position are adjusted
automatically.
1. Follow the “Coarse and Fine Tuning of the Image (Image Lock)”
instructions number 1 to 3.
2. Press the or button to select “Auto Adjustment”,
then press the
ENTER button.
3. Press the EXIT button to exit.
Initializing the Image Settings (Image Reset):
You can replace all image settings with the factory default values.
1. Follow the “Coarse and Fine Tuning of the Image (Image Lock)”
instructions number 1 to 3.
2. Press the or button to select “Image Reset”,
then press the
ENTER button.
3. Press the EXIT button to exit.
English-42
Page 45

Using the Anti-Theft Kensington Lock
The Kensington lock is a device used to physically fix the system when using it in a public place.
The locking device has to be purchased separately. The appearance and locking method may differ from the illustration
depending on the manufacturer. Please refer to the manual provided with the Kensington lock for proper use.
1. Insert the locking device into
the Kensington slot on the LCD
TV (Figure 1), and turn it in the
Cable
Figure 2
Figure 1
<Optional>
The place of the Kensington Lock may be different depending on its model.
locking direction (Figure 2).
2. Connect the Kensington lock
cable.
3. Fix the Kensington lock to a desk
or a heavy stationary object.
Troubleshooting: Before Contacting Service Personnel
No sound or picture
Normal picture but no sound
No picture or black and white picture
Sound and picture interference
Blurred or snowy picture,
distorted sound
Remote control malfunctions
“Check signal cable.”
message is displayed.
On PC mode, “Mode Not Supported.”
message is displayed.
The TFT LCD panel uses a panel consisting of sub pixels (3,147,264) which require sophisticated technology to produce.
However, there may be few bright or dark pixels on the screen. These pixels will have no impact on the performance of the product.
Check that the mains lead has been connected to a wall socket.
Check that you have pressed the
Check the pic ture contrast and brightness settings.
Check the volume.
Check the volume.
Check whether the MUTE
Check if “Internal Mute” is off
Adjust the colour settings.
Check that the broadcast system selected is correct.
Try to identify the electrical appliance that is affecting the set and move it further away.
Plug your set into a different mains socket.
Check the direction, location and connections of your aerial.
This interference is often due to the use of an indoor aerial.
Replace the remote control batteries.
Clean the upper edge of the remote control (transmission window).
Check the batter y terminals.
Check that the signal cable is firmly connected to the PC or video sources.
Check that the PC or video sources are turned on.
Check the maximum resolution and the frequency of the video adaptor.
Compare these values with the data in the Display Modes.
English-43
button on the front of the set.
button has been pressed on the remote control.
Page 46

Technical and Environmental Specifications
Model Name
Screen Size (Diagonal)
Power Supply
Power Consumption
PC Resolution
Sound
Output
Dimension (WxDxH)
Body
With stand
Weig ht
With stand
Environmental Considerations
Operating Temperature
Operating Humidity
Storage Temperature
Storage Humidity
LE32N7
32 inch
AC 220-240 V, 50 Hz
155 W
1360 x 768 @ 60 Hz
10 W x 2
803 x 88 x 539 mm
803 x 244 x 578mm
15.6 kg
10 °C to 40 °C (50 °F to 104 °F)
10 % to 80 %, non-condensing
-20 °C to 45 °C (-4 °F to 113 °F)
5 % to 95 %, non-condensing
Stand Swivel (Left / Right)
LE40N7
40 inch
AC 220-240 V, 50 Hz
210 W
1360 x 768 @ 60 Hz
10 W x 2
994 x 92 x 647 mm
994 x 290 x 696 mm
24.3 kg
10 °C to 40 °C (50 °F to 104 °F)
10 % to 80 %, non-condensing
-20 °C to 45 °C (-4 °F to 113 °F)
5 % to 95 %, non-condensing
-20˚ ~ 20˚
LE46N7
46 inch
AC 220-240 V, 50 Hz
275 W
1360 x 768 @ 60 Hz
10 W x 2
1129 x 106 x 732 mm
1129 x 320 x 788 mm
35.3 kg
10 °C to 40 °C (50 °F to 104 °F)
10 % to 80 %, non-condensing
-20 °C to 45 °C (-4 °F to 113 °F)
5 % to 95 %, non-condensing
Design and specifications are subject to change without prior notice.
This device is a Class B digital apparatus.
English-44
Page 47

Tartalomjegyzék
RÖGZÍTSE A KENSINGTON ZÁRAT AZ ÍRÓASZTALHOZ
VAGY EGY NEHÉZ, STABIL TÁRGYHOZ.
Tartozékok ........................................................................................ 2
A fali konzol felszerelése ........................................................ 2
A Vezérlőpult áttekintése ........................................................... 3
A csatlakozópanel áttekintése .................................................. 4
A távirányító áttekintése ............................................................. 6
Az elemek behelyezése a távvezérlőbe ................................ 6
Be- és kikapcsolás ......................................................................... 7
A televízió készenléti üzemmódba kapcsolása .................. 7
Plug & Play ....................................................................................... 7
CSATORNABEÁLLÍTÁS
Csatornák automatikus tárolása ............................................. 8
Csatornák manuális tárolása ..................................................... 8
A Csatornakezelő beállítása ....................................................... 9
A gyermekzár funkció aktiválása ........................................ 10
A tárolt csatornák sorrendbe állítása ..................................... 10
Csatornanevek hozzárendelése ............................................... 11
Finomhangolásos vétel ............................................................... 11
KÉPBEÁLLÍTÁS
Képtípus módosítása.................................................................... 12
Egyedi képbeállítás\ meghatározása ..................................... 12
A színtónus módosítása .............................................................. 13
A színtónus beállítása a preferált
színösszetevővel ............................................................................ 13
Képbeállítások visszalállítása
gyári alapbeállításra ..................................................................... 14
A képméret módosítása .............................................................. 14
Auto széles módosítása (4:3) ..................................................... 14
Az aktuális kép kimerevítése ..................................................... 15
Digitális zajcsökkentés ................................................................ 15
DNIe (Digital Natural Image engine) ...................................... 15
Színskála módosítása ................................................................... 15
A kép a képben megjelenítés (PIP) ......................................... 16
HANGBEÁLLÍTÁS
A hangnorma módosítása .................................................... 17
A hangbeállítások módosítása ............................................ 17
A TruSurround XT (SRS TSXT) beállítása .......................... 17
Hangerő automatikus beállítása ......................................... 18
A belső némítás beállítása .................................................... 18
Az alkép hangjának hallgatása ............................................ 18
Hangbeállítások visszaállítása
a gyári alapbeállításra ............................................................. 19
Fejhallgató csatlakoztatása ................................................... 19
A hangmód kiválasztása ........................................................ 19
EGYEBEK BEÁLLÍTÁSA
A nyelv kiválasztása ................................................................. 21
Játék mód használata ............................................................. 21
A Kék képernyőmód beállítása /
Dallam kiválasztása ............................................................... 22
Az Energiatakarékosság funkció használata .................. 22
A Kék képernyő mód beállítása .......................................... 22
Forrás kiválasztása ................................................................... 23
A bemeneti forrásnevek szerkesztése .............................. 23
WISELINK
A WISELINK funkció használata ........................................... 24
A WISELINK menü használata .............................................. 25
A fénykép (JPEG) lista használata ....................................... 25
Fényképfájlokra vonatkozó adatok
megjelenítése ............................................................................ 27
Fénykép és diavetítés kiválasztása ..................................... 27
Elforgatás ..................................................................................... 28
Nagyítás ...................................................................................... 29
Képfájlok másolása .................................................................. 30
Képfájlok törlése
Fénykép nyomtatása ............................................................... 31
Az MP3 lista használata .......................................................... 31
Zenefájlok másolása ................................................................ 32
Zenefájlok törlése ..................................................................... 32
A Beállítás menü használata ................................................ 33
....................................................................... 30
TELETEXT FUNKCIÓ HASZNÁLATA
Teletext dekóder ....................................................................... 34
A teletextes információ megjelenítése ............................ 34
Adott teletext-oldal kiválasztása ........................................ 35
Fastext használat
teletext-oldal kiválasztásához ............................................. 35
A távirányító beállítása ........................................................... 36
A távirányító kódjai .................................................................. 38
A SZÁMÍTÓGÉP BEÁLLÍTÁSA
A számítógépes szoftver telepítése
(Windows XP)............................................................................. 41
Kijelzési mód .............................................................................. 41
A számítógép beállítása ......................................................... 42
HASZNÁLATI ÚTMUTATÓ
A lopásgátló Kensington-zár használata ......................... 43
Hibakeresés:
Mielőtt szakemberhez fordulna .......................................... 43
Műszak i és környezetvédelmi adatok ............................... 44
Magyar
IDŐ BEÁLLÍTÁSA
Az aktuális idő beállítása és megjelenítése .................... 19
Az Auto ki. beállítása ............................................................... 20
A televízió automatikus be - és kikapcsolása.................. 20
Jelek Gomb Fontos Megjegyzés Nyomógomb
Magyar-1
Page 48

Tartozékok
Győződjön meg róla, hogy az LCD-televízió következő tartozékai rendelkezésre állnak.
Ha bármelyik tartozék hiányzik, forduljon a márkakereskedőhöz.
Távvezérlő és elemek
(2 db AAA)
Használati utasítás
Garanciakártya / Szervizhálózati útmutató / Biztonsági útmutató / Regisztrációs lapok (Egyes típusoknál)
Típustól függően előfordulhat, hogy az állvány és a csavar nincs felszerelve.
Hálózati kábel Takarólemez 4 db állványcsavar Állvány
Garanciakártya
Biztonsági útmutató
Regisztrációs lapok
Az állvány felszerelése
< 2 >
1. Helyezze a TV-t arccal lefelé az asztalra úgy, hogy egy puha ruhadarabot vagy párnát tesz alá.
2. Helyezze az állványt a TV alján lévő lyukba.
3. Helyezzen egy csavart a jelzett lyukba és húzza meg.
Az állvány a 40 hüvelykes és annál nagyobb képernyőméretű típusokra van felszerelve.
A fali konzol felszerelése
A falra szerelést biztosító elemek (külön megvásárolhatók) segítségével a TV falra is rögzíthető. A falra szerelést
biztosító elemek felszerelésével kapcsolatban olvassa el az
elemekhez mellékelt tájékoztatót.
A fali konzol felszereléséhez kérje szakember segítségét. A
Samsung Electronics nem vállal felelősséget semmilyen tárgyi
vagy személyi sérülésért, ha Ön úgy dönt, hogy saját maga szereli fel a televíziót.
Törlőkendő
Távolítsa el az állványt, takarja le sapkával az alsó
nyílást és rögzítse két csavarral.
Magyar-2
Page 49

A Vezérlőpult áttekintése
A termék színe és formája típusonként különbözhet.
SOURCE
Választhat az összes elérhető bemeneti
jelforrás közül. (TV, 1. Külső, 2. Külső, AV, S-Video,
Komponens, PC, HDMI1, HDMI2). A képernyőn megjelenő
menüben ezt a gombot úgy használja, ahogy a
távirányítón az ENTER gombot használja.
MENU
Nyomja meg, ha a képernyőmenüt kívánja
megjeleníteni.
Nyomja meg a hangerő csökkentéséhez vagy
a növeléséhez. A képernyőn megjelenő menüben
az
távirányítón az és az gombokat használja.
gombokat úgy használja, ahogy a
Ezt megnyomva lehet a csatornák között váltani.
A képernyőn megjelenő menüben az
gombokat úgy használja, ahogy a távirányítón az
és az gombokat használja.
(Távirányító nélkül a tévét bekapcsolhatja a
csatornaváltó gombokkal is.)
Hangszórók
(Bekapcsológomb)
A televízió be- és kikapcsolásához nyomja meg.
Tápfeszültségjelző
Villog és elalszik, ha a készülék be van kapcsolva,
készenléti állapotban pedig folyamatosan világít.
Távirányító érzékelője
A távvezérlőt a TV-nek erre a pontjára kell irányítani.
Magyar-3
Page 50

A csatlakozópanel áttekintése
[A hátlapon lévő
csatlakozók]
Hálózati áram bemenet
Ha külső eszközt csatlakoztat a TV-hez, győződjön meg róla, hogy az egység ki van kapcsolva.
Külső eszköz csatlakoztatása esetén ügyeljen a csatlakozó és a kábel színének egyeztetésére.
[Az oldallapon lévő
csatlakozók]
Magyar-4
Page 51

Antenna vagy kábeltelevíziós hálózat csatlakoztatása
A televíziós csatornák helyes vételéhez a készüléknek az alábbi jelforrások egyikéről jelet kell vennie:
- Kültéri antenna / Kábeles televíziós hálózat / Műholdas hálózat
HDMI / DVI csatlakoztatása
A HDMI-csatlakozóval ellátott eszközök (beltéri egységek, DVD-lejátszók, AV-vevőegységek és digitális televíziók) közötti
-
kapcsolatot támogatja.
- Nincs szükség kiegészítő hangkapcsolatra a HDMI–HDMI összeköttetésnél.
Mi az a HDMI?
- A „High Definition Multimedia Interface” (nagy felbontású multimédiás interfész) nagy felbontású digitális videoanyag és
digitális audiofelvételek többcsatornás átvitelét teszi lehetővé (5.1 csatorna).
-
A HDMI és a DVI között az a különbség, hogy a HDMI-eszköz kisebb, telepítve van hozzá a HDCP
(Nagy sávszélességű digitális másolásvédelem) kódolási funkció, valamint támogatja a többcsatornás digitális hangátvitelt is.
győződjön meg arról, hogy az alábbi táblázat szerinti kompatibilis videokimeneti módba állította be.
Ennek elmulasztása a kép torzulását, szétesését vagy hiányát idézheti elő.
- Ne próbálja csatlakoztatni a HDMI/DVI-csatlakozót a számítógép vagy laptop videokártyájához.
(Ekkor üres képernyő jelenik meg.)
- Ha a beltéri egységet és a videomagnót (vagy DVD-t) egyaránt csatlakoztatni kívánja, akkor először a beltéri egységet kösse össze
a videomagnóval (vagy a DVD-vel), majd ezután csatlakoztassa a videomagnót (vagy DVD-t) a készülékéhez.
- Csatlakoztassa az RCA audiokábeleket a készülék hátoldalán található „R - AUDIO - L” csatlakozóhoz, a másik végét pedig
az A/V készülék megfelelő audiokimeneti csatlakozójához.
- A fejhallgatót a készülék hátlapján lévő fejhallgató kimenethez ( ) lehet csatlakoztatni.
Fejhallgatócsatlakoztatása esetén a beépített hangszórók hangja le van tiltva
végét pedig az erősítőn vagy a DVD Házimozin található audiobemenethez.
számítógép videokártyájához.
- Csatlakoztassa a sztereó audiokábelt (opcionális) a készülék hátoldalán található „AUDIO (PC IN)” aljzathoz, a másik végét
pedig a számítógép hangkártyájának „Audio Out” csatlakozójához.
(“P
- Ha a beltéri egységet és a DTV-t (vagy DVD-t) egyaránt csatlakoztatni kívánja, akkor először a beltéri egységet kösse össze
a DTV-vel (vagy a DVD-vel), majd ezután készüléke komponensbemenetével (“PR”, “ P B”, “ Y”).
-
- Az RCA audiokábeleket (opcionális) a készüléke hátsó oldalán található „R - AUDIO - L” bemenethez csatlakoztassa,
a kábel másik végét pedig a DTV-n vagy DVD-n található audiokimenethez.
- Az LCD TV optimális képfelbontása 720p módban érhető el.
- Az LCD TV maximális képfelbontása 1080i módban érhető el.
- Ha zárszerkezetet szeretne használni, forduljon segítségért a tv-készülék eladójához.
-
A HDMI/DVI-csatlakozó támogatja a DVI-kapcsolatot egy kiterjesztett eszközre, a megfelelő kábelen keresztül (nincs mellékelve).
Hangkimenethez a DVI–HDMI vagy a DVI–HDMI hosszabbítókábelt és az „R - AUDIO - L” csatlakozón a DVI bemenetet használja.
- Ha a terméket HDMI- vagy DVI-kábellel beltéri egységhez, DVD-lejátszóhoz vagy játékkonzolhoz stb. csatlakoztatja,
Támogatott DVI- vagy HDMI-módok
480i
50 Hz
60 Hz
Komponens
Beltéri egység, videomagnó vagy DVD csatlakoztatása
-
Csatlakoztassa a videomagnó vagy DVD SCART kábelét a videomagnó vagy DVD SCART bemenetéhez.
Külső A/V készülékek csatlakoztatása
-
Csatlakoztassa az RCA- vagy S-VIDEO-kábelt a megfelelő külső A/V készülékhez, pl. videomagnóhoz, DVD-hez, vagy kamerához.
SZERVIZ
- Szervizcsatlakozás szakképzett mérnököknek.
AUDIOeszközök csatlakoztatása
- Az RCA audiok ábeleket a készüléke hátsó oldalán található „R - AUDIO - L” bememethez csatlakoztassa, a kábel másik
Számítógép csatlakoztatása
- Csatlakoztassa a D- Sub kábelt (opcionális) a készülék hátoldalán található „PC (PC IN)” aljzatba, a másik végét pedig a
Komponenskészülékek (DTV/DVD) csatlakoztatása
- A komponens videokábel (opcionális) egyik végét csatlakoztassa a készülék hátoldalán található komponensbemenethez
R”, “ P B”, “Y”), a másik végét pedig a DTV vagy DVD megfelelő videokimenetéhez.
X
X
O
480p
O
O
O
576i
X
X
O
576p
O
X
O
720p
O
O
O
1080i
A komponenseszközökön (DTV-n vagy DVD-n) az PR, PB és Y csatlakozókat néha Y, B-Y és R-Y vagy Y, Cb és Cr jelzéssel látják el.
Kensington zár
A Kensington-zár (opcionális) olyan eszköz, amellyel a rendszer fizikailag rögzíthető, ha a készüléket nyilvános helyen használják.
-
A Kensington zár elhelyezkedése a típustól függően különbözhet.
O
O
O
Magyar-5
Page 52

A távirányító áttekintése
Kiválasztja a Samsung távvezérlővel
DVD, STB, CABLE, VCR)
céleszközt
(Lásd a 36~40. oldalt)
Televízió készenléti gombja
Számgombok a csatornák közvetlen
eléréséhez
Egyjegyű/kétjegyű csatornaválasztás
A képernyőn megjelenik a
„Csatornakezelő” felirat.c
Közvetlenül TV módba vált.
VCR/DVD funkciók (visszacsévélés, leállítás,
lejátszás/szünet, előrecsévélés)
Hangerő csökkentése
Hangerő növelése
Hang ideiglenes kikapcsolása
Menü megjelenítése és a változtatás
jóváhagyása
Kép a képben (PIP) Ki/Be
Képjellemzők kiválasztása
Hanghatás kiválasztása
Hangmód kiválasztása
SRS TSXT kiválasztása
SET: 5 különböző eszköz – TV, DVD, STB,
kábel vagy videomagnó – beállítására
szolgál.
RESET: Ha a távvezérlője nem működik,
cserélje ki az elemeket, és használat
előtt 2-3 másodpercig tartsa lenyomva a
„RESET” gombot.
Választás az elérhető források közül
A gomb megnyomásával a távvezérlő több
gombja (pl. a Céleszköz kiválasztása, Hangerő , a
csatornaválasztó és a NÉMÍTÁS) néhány
másodpercre felvillan, majd kialszik, hogy
áramot takarítson meg. Ez a funkció éjjel és
sötétben is biztosítja a távvezérlő kényelmes
használatát
Az éles fény befolyásolhatja a távvezérlő teljesítményét.
Ez a különleges távirányító gyengénlátók számára készült,
és a Be-/kikapcsolás, a Csatorna és a Hangerő gomb Braille-írással jelölt.
irányítható
Előző csatorna
(TV,
Automatikus kikapcsolás
A funkció révén mentett
(JPEG formátumú) fényképeket és (MP3
formátumú) hangfájlokat tölthet a tvkészülékbe és tekinthet meg illetve
játszhat le azon.
: Következő csatorna
P
P
: Előző csatorna
Kilépés a képernyőmenüből
Kurzor irányítása a menüben
A sugárzott műsor információinak
megtekintésére szolgál
Képméret kiválasztása
Közvetlenül PC módba vált.
Kép kimerevítése
Bemeneti forrás kiválasztása
Teletext funkciók
Kilépés a teletext megjelenítési módból
Teletext tartalomjegyzék
Teletext kimerevítése
Teletext méretének
kiválasztása
Teletext tárolása
Teletext mód kiválasztása
(LIST/FLOF)
Teletext aloldal
P : Teletext következő oldala
P
: Teletext előző oldala
Teletext törlése
Teletext megjelenítése
Válasszon a Teletext, Double és Mix
opciók közül.
Fastext témaválasztás
Az elemek behelyezése a távvezérlőbe
1. Az ábrán látható módon tolja felfelé a távirányító hátlapját
2. Helyezzen be két AAA méretű elemet.
Ügyeljen arra, az elemeken lévő „+” és „–” jelzések illeszkedjenek az elemtartón belüli jelzésekhez.
3. Helyezze vissza a fedelet
Ha hosszabb ideig nem használja a távirányítót, akkor vegye ki az elemeket és tárolja azokat száraz,
hűvös helyen. A távirányító a tévétől legfeljebb 7 méteres távolságban használható. (Szokásos mértékű
tévézés mellett az elemek élettartama kb.egy év.)
Ha a távvezérlő nem működik, ellenőrizze a következőket:
1. A TV áram alatt van?
2. Az elemek plusz és mínusz végei megfelelõen helyezkednek el?
3. Lemerültek az elemek?
4. Áramszünet van, vagy nincs csatlakoztatva a tápkábel?
5. Van a közelben különleges foszforeszkáló fényforrás vagy neonfény?
Magyar-6
Page 53

Be- és kikapcsolás
A hálózati tápkábel a készülék hátlapjához csatlakozik.
1. Dugja a hálózati tápkábelt a megfelelő aljzatba.
A készülék elején található készenléti jelzés világítani kezd.
2. Nyomja meg a panel előoldalán található gombot.
A távirányító POWER
Automatikusan a legutoljára nézett csatornára áll be a készülék.
vagy TV ( ) gombjával is bekapcsolhatja a TV-készüléket.
3. Nyomja meg a numerikus (0~9) vagy a csatornaléptető ( / ) gombot a távvezérlőn,
vagy a
Amikor első alkalommal kapcsolja be a készüléket, meg kell határoznia, mely nyelven szeretné a menüket megjeleníteni
gombot a készülék jobb oldalán.
4. A készülék kikapcsolásához nyomja be újra a POWER gombot.
A televízió készenléti üzemmódba kapcsolása
A készülék készenléti üzemmódba is állítható, az alacsonyabb áramfelvétel érdekében. A készenléti üzemmód akkor
lehet hasznos, ha a nézést ideiglenesen fel kívánja függeszteni (pl. a vacsora idejére).
1. Nyomja meg a távirányítón lévő POWER
A képernyő elsötétül, és a készülék előlapján megjelenik a kék világító készenléti jelzőfény.
gombot.
2. A készülék újbóli bekapcsolásához nyomja be újra a POWER , gombot, valamelyik számjegy gombot
(0~9), vagy a csatornaváltó fel/le (
Ne hagyja a készüléket készenléti üzemmódban hosszú ideig (amikor például nyaralni megy).
Célszerű a készülék hálózati és antenna csatlakoztatását megszüntetni.
/ ) gombot.
Plug & Play
A TV-készülék legelső bekapcsolásakor több alapvető felhasználói beállítás végezhető
el egymás után automatikusan. A lehetőségek az alábbiak.
1. Nyomja meg a távirányítón lévő POWER gombot.
A „Start Plug & Play” üzenet jelenik meg az „OK” lehetőséggel.
2. Válassza ki a megfelelő nyelvet a vagy gomb lenyomásával.
A kiválasztott nyelv megerősítéséhez nyomja meg az ENTER gombot.
3. Megjelenik az „Ellenőrizze az antennabemenetet” üzenet, ahol is az „OK”
pont van kiválasztva. Nyomja meg az ENTER gombot.
Ellenőrizze az antennakábel megfelelő csatlakoztatását.
4. Válassza ki a megfelelő országot a vagy gomb lenyomásával.
A kiválasztott nyelv megerősítéséhez nyomja meg az ENTER gombot.
5.
Az „Automata tárolás” menü akkor jelenik meg, ha a „Start” menüpontot választja.
Nyomja meg az ENTER gombot.
A csatornakeresés automatikusan indul el és áll le.
Miután az összes csatorna elmentése megtörtént, megjelenik a „Órabeállítás” menü.
Egy tetszőleges időpontban az
folyamatát.
6. Nyomja meg az ENTER gombot.
Válassza ki az „Óra” vagy „Perc” a
Állítsa be az „Óra” és „Perc” a
A távvezérlőn található számgombok segítségével is beállíthatja az órát és a percet.
7. A beállítás megerősítéséhez nyomja meg az ENTER gombot.
Nyelv: A nyelv kiválasztása. .
Ország: Az ország kiválasztása.
Automata tárolás: Az adott területen elérhető csatornák automatikus megkeresése és tárolása.
Órabeállítás: A TV órájának automatikus beállítása.
ENTER
gomb lenyomásával szakítsa meg a memorizálás
vagy
vagy
gomb lenyomásával.
gomb lenyomásával.
Magyar-7
Page 54

Ha vissza kívánja állítani ezt a funkciót...
1. A menü megjelenítéséhez nyomja meg a MENU gombot.
A vagy
nyomja meg az
2.
A „Plug & Play” opció kiválasztáshoz ismételten nyomja meg az ENTER .
3. Megjelenik a „Plug & Play indítása” üzenet.
gomb megnyomásával jelölje ki a „Beállítás” pontot, majd
ENTER
gombot.
- Csatornák automatikus tárolása
- Csatornák manuális tárolása
Csatornák automatikus tárolása
A rendelkezésre álló frekvenciasávokon lehet keresést végezni (országonként más-más sávok állhatnak rendelkezésre). Az automatikusan kiosztott csatornaszámok nem feltétlenül egyeznek a tényleges vagy a kívánt csatornaszámokkal. A számok sorrendje azonban manuálisan is változtatható, és a nem kívánt csatornákat is törölheti.
1. A menü megjelenítéséhez nyomja meg a MENU gombot.
A vagy
2. A „Ország” opció kiválasztásához nyomja meg az ENTER gombot.
3. Válassza ki a megfelelő országot a vagy gomb lenyomásával.
A kiválasztott nyelv megerősítéséhez nyomja meg az ENTER gombot.
4.
A vagy gomb megnyomásával jelölje ki a „Automata tárolás” pontot, majd nyomja meg az ENTER gombot.
5. Nyomja meg az ENTER gombot.
6. Az összes elérhető csatorna tárolása után megjelenik a „Sorrend” menü.
gomb megnyomásával jelölje ki a „Csatorna” pontot, majd nyomja meg az ENTER
A készülék elkezdi az elérhető csatornák letárolását.
Az ENTER gomb megnyomásával bármikor megszakíthatja a letárolási folyamatot, és visszatérhet a „Csatorna” menühöz.
gombot.
Csatornák manuális tárolása
Összesen 100 csatornát lehet tárolni, ideértve a kábelhálózaton vett csatornákat is.
Csatornák manuális tárolása esetén döntse el:
Hogy az egyes megtalált csatornákat kívánja-e tárolni.
Az egyes tárolt csatornák számát, amellyel azt azonosítani kívánja.
1. A menü megjelenítéséhez nyomja meg a MENU gombot.
A vagy
2.
A vagy gomb megnyomásával jelölje ki a „Kézi tárolás” pontot, majd nyomja meg az ENTER gombot.
3. A „Program” opció kiválasztásához nyomja meg az ENTER gombot.
4. Ha egy számot szeretne egy csatornához rendelni, akkor a vagy gomb megnyomásával keresse
ki a megfelelő számot, majd nyomja meg az
gomb megnyomásával jelölje ki a „Csatorna” pontot, majd nyomja meg az ENTER
ENTER gombot.
A csatornaszámot a távirányító számgombjainak megnyomásával is beállíthatja.
Magyar-8
gombot.
Page 55

5.
A vagy gomb megnyomásával jelölje ki a „Színrendszer” pontot, majd nyomja meg az ENTER gombot.
6. Válassza ki a megfelelő alapszínt a vagy gomb ismételt lenyomásával, majd nyomja meg az ENTER gombot.
A vagy gomb megnyomásával jelölje ki a „Hangrendszer” pontot, majd nyomja meg az ENTER gombot.
7.
8.
Válassza ki a kívánt hangszabványt a vagy gomb ismételt lenyomásával, majd nyomja meg az ENTER gombot.
Ha nincs vagy nem megfelelő a hang, válasszon ki másik hangrendszert.
9. Ha tudja az eltárolni kívánt csatatorna számát, az vagy gomb megnyomásával válassza a „Csatorna”
lehetőséget. Nyomja meg az
ENTER gombot. Az vagy gomb megnyomásával válassza a
C (Légi, hagyományos csatorna) vagy az S (Kábelcsatorna) lehetőséget. A gomb lenyomásával
választhat csatornát. A vagy gomb megnyomásával válassza ki kívánt számot, majd nyomja meg az
ENTER
gombot.
Csatorna üzemmód: P (Program mód), C (Légi, hagyományos csatorna mód), S (Kábel csatorna mód)
A távvezérlőn található számgombok segítségével is kiválaszthatja a csatornát.
10.
Ha nem ismeri a csatornaszámokat a vagy gombbal válassza a „Keresés” lehetőséget. Nyomja meg az
ENTER gombot. A keresést a vagy gombbal végezheti el, majd nyomja meg az ENTER gombot.
11. A „Tárolás” kiválasztásához nyomja meg a vagy gombot.
A „OK” opció kiválasztásához nyomja meg az ENTER gombot.
12. Minden egyes tárolni kívánt csatornánál végezze el a 3 és 11 lépést.
Program:
Programszám választása az adott csatorna számára.
Színrendszer: A színes kép rendszerének beállítása.
Hangrendszer: A hang rendszerének beállítása.
A Csatornakezelő beállítása
Igény szerint állítsa be a csatornákat.
Könnyedén törölheti, hozzáadhatja vagy zárolhatja a kívánt csatornát.
1.
A menü megjelenítéséhez nyomja meg a MENU gombot.
A vagy gomb megnyomásával jelölje ki a „Csatorna” pontot, majd nyomja
meg az
2.
A vagy gomb megnyomásával jelölje ki a „Csatornakezelő” pontot,
majd nyomja meg az ENTER
3.
Nyomja meg ismét az ENTER gombot a „Csatornakezelő” funkció
kiválasztásához.
4
.
A gombbal lépjen a „ ” sorra.
.
A vagy gombbal válassza ki a nem kívánt csatornát, majd nyomja
5
meg az ENTER gombot.
6.
Minden kiválasztani vagy törölni kívánt csatornánál ismételje meg az 5. lépést.
7. A kilépéshez nyomja meg az EXIT gombot.
Ha a „Gyermekzár” be van kapcsolva, a
Ezeket az opciókat könnyedén
kiválaszthatja a távirányító
CH MGR gombjával is.
ENTER gombot.
Csatorna: Csatorna kiválasztása.
Keresés: A csatorna frekvenciájának megkeresése.
Tárolás: Beállítások mentése.
gombot.
”
“
aktív..
Magyar-9
Page 56

A gyermekzár funkció aktiválása
A kép eltüntetését és a hang némítását lehetővé tévő funkció segítségével megakadályozhatja, hogy illetéktelen személyek, például gyermekek nézhessék a számukra
nem megfelelő műsorokat. A Gyermekzár funkció a jobb alsó panel gombjaival nem
oldható fel. A funkció kizárólag a távvezérlővel oldható fel, ezért érdemes a távvezérlőt
gyermekektől elzárva tartani.
1.
A menü megjelenítéséhez nyomja meg a MENU gombot.
A vagy gomb megnyomásával jelölje ki a „Csatorna” pontot, majd nyomja
meg az
2.
ENTER gombot.
A vagy gomb megnyomásával jelölje ki a „Csatornakezelő” pontot,
majd nyomja meg az ENTER
3.
A vagy gomb megnyomásával jelölje ki a „Gyermekzár” pontot,
majd nyomja meg az ENTER
4.
A vagy gombbal jelölje ki az „Be” lehetőséget.
Nyomja meg az
5.
A vagy gomb megnyomásával jelölje ki a „Csatornakezelő” pontot,
majd nyomja meg az ENTER
6. A gomb lenyomásával választhatja ki a „” so rt .
7
.
A vagy gombbal válassza ki a zárolni kívánt csatornákat,
majd nyomja meg az ENTER gombot.
8. Minden zárolni vagy feloldani kívánt csatornánál ismételje meg a 7. lépést.
9. A kilépéshez nyomja meg az EXIT gombot.
A z „Gyermekzár” Be vagy Ki pozíciójával könnyedén válthat a
k iválasztott csatornák aktív és inaktív állása között.
A tárolt csatornák sorrendbe állítása
Bármely két csatorna számának felcserélésével:
Módosíthatja a csatornák automatikus tárolásának sorrendjét.
Könnyen megjegyezhető számot rendelhet a gyakran nézett
csatornákhoz.
1.
A menü megjelenítéséhez nyomja meg a MENU gombot.
A vagy gomb megnyomásával jelölje ki a „Csatorna” pontot, majd nyomja
meg az
2.
majd nyomja meg az ENTER
3.
csatornaszámot. Nyomja meg a ENTER gombot.
4.
5.
6.
ENTER gombot.
A vagy gomb megnyomásával jelölje ki a „Sorrend” pontot,
A vagy gomb ismételt lenyomásával válassza ki a módosítani kívánt
A kiválasztott csatorna száma és neve a jobb oldalra kerül.
Az
vagy
ENTER
gombot.
A kiválasztott csatorna helyet cserél az adott számon korábban tárolt csatornával.
Újabb csatorna tárolásához ismételje meg a 3. és 4. lépéseket.
A kilépéshez nyomja meg az EXIT gombot.
gombot.
gombot.
ENTER
gombot.
gombot.
„
”
helyen
gombot.
gombbal lépjen a módosítani kívánt helyre, és nyomja meg az
Magyar-10
Page 57

Csatornanevek hozzárendelése
A csatorna-információk sugárzásakor a készülék a csatornaneveket
automatikusan hozzárendeli a csatornákhoz. Ezek a nevek azonban
módosíthatók, tehát a csatornákhoz új neveket is hozzárendelhet.
1.
A menü megjelenítéséhez nyomja meg a MENU gombot.
A vagy gomb megnyomásával jelölje ki a „Csatorna” pontot,
majd nyomja meg az
2.
A vagy gomb megnyomásával jelölje ki a „Név” pontot,
majd nyomja meg az ENTER
3.
Igény szerint a
elnevezendő csatornát. Nyomja meg a ENTER gombot.
4.
Ehhez...
Betű, számvagy szimbólum kijelölése
A következő betűre lépés
Az előző betűre lépés
A név körül megjelenik a kijelölést jelző téglalap.
5.
Végezze el a 3. és 4. lépést minden olyan csatornánál, amelyhez nevet
szeretne megadni.
A kilépéshez nyomja meg az EXIT gombot.
6.
Finomhangolásos vétel
Kézi finomhangolással igazíthatja be egy adott csatorna optimális vételét.
1. A finomhangolni kívánt csatorna közvetlen kiválasztásához nyomja meg a
megfelelő számgombot.
2.
A menü megjelenítéséhez nyomja meg a MENU gombot.
A vagy gomb megnyomásával jelölje ki a „Csatorna” pontot,
majd nyomja meg az
3.
A vagy gomb megnyomásával jelölje ki a „Finomhangolás” pontot,
majd nyomja meg az
4. A finomhangolás beállításához nyomja meg a vagy gombot.
Nyomja meg az
5. A kilépéshez nyomja meg az EXIT gombot.
Az elmentett finomhangolt csatornák száma mellett, a csatornacímben, a jobb oldalon egy
csillag „ * ” szerepel. Majd a csatorna száma vörös lesz.
A finomhangolás visszaállításához a vagy gomb megnyomásával jelölje ki a „Reset”
pontot, majd nyomja meg az ENTER gombot.
ENTER gombot.
gombot.
vagy
A névmező körül megjelenik a kiválasztási sor.
A rendelkezésre álló karakterek:
Az ábécé betűi (A~Z) / Számok (0~9) / Különleges karakterek ( -, szóköz)
gomb megnyomásával választhatja ki az
ENTER gombot.
ENTER gombot.
ENTER gombot.
Majd...
vagy gombot
a
a gombot
gombot
a
a ENTER gombot
Magyar-11
Page 58

Képtípus módosítása
Kiválaszthatja, hogy mely típusú kép felel meg leginkább az Ön nézési követelményeinek.
1.
A menü megjelenítéséhez nyomja meg a MENU gombot. A vagy gomb
megnyomásával jelölje ki a „Kép” pontot, majd nyomja meg az
2.
Nyomja meg ismét az ENTER gombot a „Üzemmód” funkció kiválasztásához.
Nyomja meg ismét az ENTER gombot.
3.
Az
vagy
Nyomja meg az
4.
A kilépéshez nyomja meg az EXIT gombot.
Kiemelt: Nagy felbontású kép megjelenítése világos szobában.
Normál: Kép optimális megjelenítése normál környezetben.
Film: Kép kellemes megjelenítése sötét szobában.
A képbeállítás kiválasztásához a
távvezérlő P.MODE
(Kép mód) gombját is
használhatja.
Egyedi: Egyedi megjelenítési beállítások.
(Lásd az „Egyedi képbeállítás\ meghatározása”)
A Kép üzemmódot minden egyes bemeneti forrásra külön be kell állítani.
A „Visszaállítás” gomb megnyomásával visszatérhet a gyári képbeállítási alapértékekre.
(Lásd a „Képbeállítások visszalállítása gyári alapbeállításra” című részt a 14. oldalon.)
Egyedi képbeállítás\ meghatározása
A készülék számos olyan beállítással rendelkezik, amely a képminőség
szabályozására szolgál.
1. A megfelelő képhatás kiválasztásához kövesse a
„Képtípus módosítása” című rész 1-től 3. utasítását.
2. Az vagy gomb segítségével választhatja ki a kívánt elemeket.
Nyomja meg az
3. Az vagy gombok lenyomásával növelheti, illetve csökkentheti az
egyes beállítások értékét. Nyomja meg az ENTER gombot.
4. A kilépéshez nyomja meg az EXIT gombot.
Kontraszt: A tárgyak és a háttér világosságának és sötétségének beállítása.
Fényerő: A teljes képernyő fényerejének beállítása.
Élesség: A tárgyak kontúrjának élesítése, illetve elmosódottabbá tétele.
Szín: A színek világosabbá vagy sötétebbé tétele.
Árnyalat (Csak NTSC): A tárgyak színének beállítása, pirosabbá vagy zöldebbé téve azokat a ter-
A beállított ér tékeket a rendszer a kiválasztott képmódtól függően tárolja.
PC módban cask a „Kontraszt”, a „Fényerő” és a „Szín” beállítás módosítható
ENTER gombot.
gomb megnyomásával válassza ki a kívánt képhatást.
ENTER
gombot.
ENTER gombot.
mészetesebb hatás elérése érdekében.
Magyar-12
Page 59

A színtónus módosítása
Beállíthatja a szemének legkellemesebb színtónust is.
1. A megfelelő képhatás kiválasztásához kövesse a 12. oldalon található
„Képtípus módosítása” című rész 1-től 3. utasítását.
2. A vagy gomb megnyomásával jelölje ki a „Színtónus” pontot,
majd nyomja meg az ENTER gombot.
3. Az vagy gomb megnyomásával választhatja ki a megfelelő színtónus
beállítást.
Nyomja meg az
ENTER gombot.
4. A kilépéshez nyomja meg az EXIT gombot.
Hideg2: A színhőmérsékletet kékebbé teszi, mint
a „Hideg1” menü.
Hideg1: A fehér színeket kékes árnyalatúvá teszi.
Normál: A fehéret meghagyja fehérnek.
A beállított értékeket a rendszer a kiválasztott képmódtól függően tárolja.
A színtónus beállítása a preferált színösszetevővel
A képek színtónusát beállíthatja a preferált színösszetevővel.
1. A megfelelő képhatás kiválasztásához kövesse a 12. oldalon található
„Képtípus módosítása” című rész 1-től 3. utasítását.
2. A vagy gomb megnyomásával jelölje ki a „Színkezelő” pontot,
majd nyomja meg az ENTER gombot.
3. Az vagy gomb segítségével választhatja ki a kívánt elemeket.
Nyomja meg az ENTER gombot.
4. Az vagy gomb lenyomásával növelheti, illetve csökkentheti az egyes
beállítások értékét. Nyomja meg az ENTER gombot.
5. A kilépéshez nyomja meg az EXIT gombot.
V kontraszt:
Z kontraszt:
Kék kontraszt:
V fényerő:
Z fényerő:
Kék fényerő :
Visszaállítás:
Enyhíti illetve fokozza az objektumok és a háttér közötti határolóvonal vörös
összetevőjét.
Enyhíti illetve fokozza az objektumok és a háttér közötti határolóvonal zöld
összetevőjét.
Enyhíti illetve fokozza az objektumok és a háttér közötti határolóvonal kék
összetevőjét.
Itt állítható be a kép egésze vörös összetevőjének fényereje.
Itt állítható be a kép egésze zöld összetevőjének fényereje.
Itt állítható be a kép egésze kék összetevőjének fényereje.
Visszaállítja az alapértelmezett beállításokat.
Meleg1:
A fehér színeket piros árnyalatúvá teszi.
Meleg2:
A színhőmérsékletet pirosabbá teszi,
mint a Warm1 „Meleg1” menü.
A „Színkezelő” opciónál nem választható „Színtónus”.
Magyar-13
Page 60

Képbeállítások visszalállítása gyári alapbeállításra
Visszatérhet a gyári képbeállítási alapértékekre.
1. A megfelelő képhatás kiválasztásához kövesse a 12. oldalon található
„Képtípus módosítása” című rész 1-től 3. utasítását.
2. A vagy gomb megnyomásával jelölje ki a „Visszaállítás” pontot,
majd nyomja meg az ENTER gombot.
3. A kilépéshez nyomja meg az EXIT gombot.
A „Visszaállítás” minden képmódra érvényes.
A képméret módosítása
Beállíthatja az elvárásainak leginkább megfelelő képi képméretet.
1.
A menü megjelenítéséhez nyomja meg a MENU gombot. A vagy gomb
megnyomásával jelölje ki a „Kép” pontot, majd nyomja meg az
2. A vagy gomb megnyomásával jelölje ki a „Méret” pontot,
majd nyomja meg az ENTER gombot.
3. A vagy gomb ismételt megnyomásával válassza ki a kívánt értéket.
A távvezérlőn található P.SIZE
(Képméret) gomb segítségével
választhat alehetőségek közül.
Nyomja meg az
4. A kilépéshez nyomja meg az EXIT gombot.
Auto széles: A kép méretének automatikus beállítása
16:9:
A kép méretét a DVD-hez vagy a széles képernyős tévéadásokhoz megfelelő 16:9 képoldalarányhoz igazítja.
Sz. 4:3:
A 4:3-as aránynál jobban megnagyítja a képet.
Nagyítás:
4:3: Ez az alapértelmezett beállítás videó vagy normál tévéadás megtekintéséhez.
Az „Auto széles” funkció csak „TV”, „1. Külső“, „2. Külső”, „AV”, és „S-Video” módban elérhető.
PC-üzemmódban csak a „16:9” és a „4:3” üzemmódok állíthatók be.
Nagyítás : A a vagy gomb megnyomásával állítható be. A kép fel / le moz-
Sz. 4:3 : A vagy gomb megnyomásával válassza a(z) lehetőséget, majd a vagy
ENTER gombot.
A 16:9 szélességű képet (függőleges irányban) nagyítja, hogy kitöltse a képernyőt.
gatásához használja a vagy gombot. A kiválasztását követően használja
a vagy gombot a kép méretének függőleges nagyításához vagy kicsinyítéséhez.
ENTER gombbal mozgassa fel/le a képernyőt.
16:9
képoldalarányhoz.
ENTER gombot.
Auto széles módosítása (4:3)
4:3 arányra állítja a megjelenített kép méretét, a bemeneti jelnek megfelelően
1.
megnyomásával jelölje ki a „Kép” pontot, majd nyomja meg az
2. A vagy gomb megnyomásával jelölje ki a „Auto széles (4:3)” pontot,
majd nyomja meg az ENTER gombot.
3. A vagy gomb ismételt megnyomásával válassza ki a kívánt értéket.
4. A kilépéshez nyomja meg az EXIT gombot.
16:9:
Sz. 4:3:
Nagyítás:
4:3: Ez az alapértelmezett beállítás videó vagy normál tévéadás megtekintéséhez.
A menü megjelenítéséhez nyomja meg a MENU gombot. A vagy gomb
ENTER gombot.
Nyomja meg az
A forrás „Komponens", „PC", „HDMI1", „HDMI2" módjában ez a funkció nem működik.
A kép méretét a DVD-hez vagy a széles képernyős tévéadásokhoz megfelelő 16:9 képoldalarányhoz igazítja.
A 4:3-as aránynál jobban megnagyítja a képet.
ENTER gombot.
A 16:9 szélességű képet (függőleges irányban) nagyítja, hogy kitöltse a képernyőt.
Magyar-14
Page 61

Az aktuális kép kimerevítése
Mozgókép állóképbe merevítéséhez nyomja meg az STILL gombot.
A művelet visszavonásához nyomja meg ismét a gombot.
Digitális zajcsökkentés
Ha gyenge a készülék által fogott jel, akkor aktiválhatja a digitális zajcsökkentés
funkciót, mely segíti az esetleg megjelenő zaj és szellemképek csökkentését.
1.
A menü megjelenítéséhez nyomja meg a MENU gombot. A vagy gomb
megnyomásával jelölje ki a „Kép” pontot, majd nyomja meg az
2. A vagy gomb megnyomásával jelölje ki a „Dig. zajcsökk.” pontot,
majd nyomja meg az ENTER gombot.
A
vagy
3.
gomb megnyomásával jelölje ki a „Be” vagy „Ki” pontot.
Nyomja meg az
4. A kilépéshez nyomja meg az EXIT gombot.
DNIe (Digital Natural Image engine)
Mindegyik műsorszóró állomás saját jelkondícióval rendelkezik, ezért nem egyszerű
a hangerőt változtatni minden alkalommal, amikor csatornaváltásra kerül sor. Ezzel a
funkcióval automatikusan beállíthatja a kívánt csatorna hangerejét: amikor a modulációs
jel magas, a hangkimenetet alacsonyabbra állíthatja, illetve amikor a modulációs jel
alacsony, a hangkimenetet magasabbra állíthatja. Tekintse meg a DNIe Bemutató
segítségével a Samsung új képjavító technológiáját. A DNIe Bemutató módot bekapcsolva (On)
megvizsgálhatja, hogy a funkció mennyiben módosítja a kép minőségét.
1.
A menü megjelenítéséhez nyomja meg a MENU gombot. A vagy gomb
megnyomásával jelölje ki a „Kép” pontot, majd nyomja meg az
2. A vagy gomb megnyomásával jelölje ki a „DNIe Bemutató” pontot,
majd nyomja meg az ENTER gombot.
A
vagy
3.
4. A kilépéshez nyomja meg az EXIT gombot.
javított képek és az eredeti között.
gomb megnyomásával jelölje ki a „Be” vagy „Ki” pontot.
Nyomja meg az
A forrás PC módjában ez a funkció nem működik.
A DNIe Bemutató segítségével látható, mekkora különbség van a DNIe technológiával
Alapértelmezés szerint a terméken a DNIe-vel javított kép jelenik meg.
ENTER
ENTER
ENTER gombot.
gombot.
ENTER gombot.
gombot.
Színskála módosítása
A színskála vörös, zöld és kék színekből álló mátrix. Válassza ki kedvenc
színskálát és élvezze a természetes színvilágot.
1.
A menü megjelenítéséhez nyomja meg a MENU gombot. A vagy gomb
megnyomásával jelölje ki a „Kép” pontot, majd nyomja meg az
ENTER gombot.
2. A vagy gomb megnyomásával jelölje ki a „Színköz” pontot,
majd nyomja meg az ENTER gombot.
3.
A
vagy
gomb megnyomásával jelölje ki a „Széles” vagy „Auto.” pontot.
Nyomja meg az
ENTER
gombot.
4. A kilépéshez nyomja meg az EXIT gombot.
Széles: A Széles színskála mély és színgazdag tónust jelent.
Auto.: Az Automatikus színskála automatikusan beállítja a természetes színtónust a programforrások
alapján.
Magyar-15
Page 62

A kép a képben megjelenítés (PIP)
A beállított csatorna vagy videobemenet fõ képernyõjén belül egy kisebb képet is
megjeleníthet. Így a képernyõ nézése során nézheti a beállított csatorna vagy bármilyen
csatlakoztatott berendezés videóbemenetének képét.
1.
A menü megjelenítéséhez nyomja meg a MENU gombot. A vagy gomb
megnyomásával jelölje ki a „Kép” pontot, majd nyomja meg az
2. A vagy gomb megnyomásával jelölje ki a „PIP” pontot,
majd nyomja meg az ENTER gombot.
3.
Nyomja meg ismét az ENTER gombot. A vagy gomb megnyomásával
jelölje ki a „Be” pontot, majd nyomja meg az ENTER gombot.
Ha a PIP funkció aktív, a főkép mérete „16:9” arányban változik.
4. A vagy gomb megnyomásával jelölje ki a „Forrás” pontot,
A PIP funkció be- vagy
kikapcsolásához nyomja
meg többször egymás után
a távvezérlőn található „PIP”
gombot.
majd nyomja meg az ENTER gombot. Válassza ki az alkép forrását a
vagy , majd az ENTER gomb megnyomásával.
Az alkép a főképtől eltérő forrásbeállításokkal rendelkezhet.
5. A „Csere” tétel kiválasztásához nyomja meg a vagy gombot.
Ha fel kívánja cserélni a fő- és alképet, a „Csere” lehetőséget válassza ki, és
nyomja meg az ENTER gombot.
A főkép és az alkép felcserélődnek.
Ha a főkép „PC” módban van, a „Csere” lehetőség nem választható.
6. Az vagy gombbal válassza ki az alkép „Méret” jellemzőjét, és
nyomja meg az ENTER gombot. Válassza ki az alkép méretét az
vagy gombbal, majd nyomja meg az ENTER gombot.
Ha a főkép „PC” módban van, a „Méret” lehetőség nem választható.
7.
A vagy gomb megnyomásával jelölje ki a „Helyzet“ pontot, majd
nyomja meg az ENTER gombot. A vagy gomb megnyomásával
válassza ki a PIP kép pozícióját, majd nyomja meg az ENTER gombot.
8.
A vagy gomb megnyomásával jelölje ki a „Program” pontot, majd nyomja meg az
ENTER gombot. A vagy gomb nyomogatásával jelölheti ki azt a csatornát, amelyet
a PIP képen kíván nézni. Nyomja meg az ENTER gombot.
A „Program” funkció csak akkor lehet aktív, ha az alkép beállítása TV.
9. A kilépéshez nyomja meg az EXIT gombot.
Néha előfordulhat, hogy a PIP-ablakban látható alkép minősége valamelyest romlik, amikor a
főképernyőn játékot vagy karaokét néz.
Forrás: Az alkép forrásának kiválasztására szolgál.
Csere: A főkép és az alkép felcserélésére szolgál.
Méret: Az alkép méretének kiválasztására szolgál.
PIP-beállítások
Al
Fő
TV
1. Külső
2. Külső
AV
S-Video
Komponens
PC
HDMI1
HDMI2
(O: PIP-üzemmód bekapcsolva, X: A PIP nem működik)
TV
1. Külső
X
X
X
X
X
X
O
O
O
2. Külső
X
X
X
X
X
X
X
X
X
X
X
X
O
O
O
O
O
O
Helyzet: Az alkép mozgatására szolgál.
Program: Az alkép módosítására szolgál.
AV
S-Video
X
X
X
X
X
X
X
O
O
Komponens
X
X
X
X
X
X
X
O
O
X
X
X
X
X
X
O
O
O
ENTER gombot.
PC
HDMI1
X
O
X
O
X
O
X
O
X
O
X
O
X
X
X
X
X
X
HDMI2
O
O
O
O
O
O
X
X
X
Magyar-16
Page 63

A hangnorma módosítása
Kiválaszthatja, hogy egy adott műsor nézése közben milyen típusú különleges
hangeffektust kíván hallani.
1.
A menü megjelenítéséhez nyomja meg a MENU gombot. A vagy gomb
megnyomásával jelölje ki a „Hang” pontot, majd nyomja meg az
2.
Nyomja meg ismét az ENTER gombot a „Üzemmód” funkció kiválasztásához.
3. Válassza ki a kívánt hangszabványt a vagy gomb ismételt
lenyomásával, és nyomja meg az ENTER gombot.
4. A kilépéshez nyomja meg az EXIT gombot.
Ezeket az opciókat egyszerűen a
távvezérlő S.MODE
gombjának megnyomásával is
kiválaszthatja.
Normál: Normál hang mód.
Zene: A zenét a szöveghez képest kiemeli.
Film: A filmeknek élethű hangzást ad.
A hangbeállítások módosítása
A hangbeállítások egyéni ízlés szerint beállíthatók.
1.
A menü megjelenítéséhez nyomja meg a MENU gombot. A vagy gomb
megnyomásával jelölje ki a „Hang” pontot, majd nyomja meg az
2. A vagy gomb megnyomásával jelölje ki a „Hangszínszabályzó”
pontot, majd nyomja meg az ENTER gombot.
3. Az vagy gomb segítségével választhatja ki a kívánt elemeket.
Nyomja meg az
4. A vagy gomb megnyomásával állítható be a kívánt érték.
Nyomja meg az ENTER gombot.
5. A kilépéshez nyomja meg az EXIT gombot.
Ha ezen beállításokat bármilyen módon megváltoztatja, a hang mód
automatikusan „Egyedi” opcióra vált.
ENTER gombot.
ENTER gombot.
Beszéd: A szöveget az egyéb hangokhoz képest
kiemeli.
Egyedi: Egyedi hangbeállítások.
(Lásd az „A hangbeállítások módosítása”)
ENTER gombot.
A TruSurround XT (SRS TSXT) beállítása
A TruSurround XT szabadalmaztatott SRS technológia, amely megoldja az 5.1
többcsatornás tartalmak két hangsugárzón keresztül történő lejátszásának
problémáját. A TruSurround lenyűgöző virtuális térhatás élményét kínálja bármely két
hangszórós lejátszó rendszerrel, akár a televízió belső hangszóróin keresztül. A rendszer
teljesen kompatibilis az összes többcsatornás formátummal.
1.
A menü megjelenítéséhez nyomja meg a MENU gombot. A vagy gomb
megnyomásával jelölje ki a „Hang” pontot, majd nyomja meg az
2. A vagy gomb megnyomásával jelölje ki a „SRS TSXT” pontot,
majd nyomja meg az ENTER gombot.
3.
A
vagy
gomb megnyomásával jelölje ki a „Be” vagy „Ki” pontot.
TruSurround XT, az SRS és a
A TruSurround XT az SRS Labs, Inc. licence alapján került
felhasználásra.
A távvezérlőn található SRS gomb
segítségével is
beállíthatja ezeket a
lehetőségeket.
Nyomja meg az
4. A kilépéshez nyomja meg az EXIT gombot.
ENTER
Magyar-17
ENTER gombot.
gombot.
jel az SRS Labs, Inc. védjegye.
Page 64

Hangerő automatikus beállítása
Mindegyik műsorszóró állomás saját jelkondícióval rendelkezik, ezért nem egyszerű a
hangerőt változtatni minden alkalommal, amikor csatornaváltásra kerül sor. Ezzel a
funkcióval automatikusan beállíthatja a kívánt csatorna hangerejét: magas moduláló jel
esetén a hangkimenet csökkentésével, alacsony moduláló jel esetén pedig a hangkimenet
növelésével.
1.
A menü megjelenítéséhez nyomja meg a MENU gombot. A vagy gomb
megnyomásával jelölje ki a „Hang” pontot, majd nyomja meg az
2. A vagy gomb megnyomásával jelölje ki a „Automata hangerő”
pontot, majd nyomja meg az ENTER gombot.
A
3.
Nyomja meg az
4. A kilépéshez nyomja meg az EXIT gombot.
A belső némítás beállítása
Ha külön hangszórókból szeretné hallgatni a hangokat, kapcsolja ki a belső
erősítőt.
A menü megjelenítéséhez nyomja meg a MENU gombot. A vagy gomb
1.
megnyomásával jelölje ki a „Hang” pontot, majd nyomja meg az
2. A vagy gomb megnyomásával jelölje ki a „Belső némítás”
pontot, majd nyomja meg az ENTER gombot.
A
3.
Nyomja meg az
4. A kilépéshez nyomja meg az EXIT gombot.
Ha az „Belső némítás” be van kapcsolva „Be”, a hangmenüben csak a „Hangválasztás”
(PIP-módban) funkció állítható.
vagy
gomb megnyomásával jelölje ki a „Be” vagy „Ki” pontot.
ENTER
gombot.
vagy
gomb megnyomásával jelölje ki a „Be” vagy „Ki” pontot.
ENTER
gombot.
ENTER gombot.
ENTER gombot.
Az alkép hangjának hallgatása
Amíg a PIP funkció aktív, hallgathatja az alkép műsorának hangját.
1.
A menü megjelenítéséhez nyomja meg a MENU gombot. A vagy gomb
megnyomásával jelölje ki a „Hang” pontot, majd nyomja meg az
2. A vagy gomb megnyomásával jelölje ki a „Hangválasztás”
pontot, majd nyomja meg az ENTER gombot.
A
3.
Nyomja meg az
4. A kilépéshez nyomja meg az EXIT gombot.
Főkép
Alkép
Akkor választhatja ezt a beállítást, ha a „PIP” funkció „Be” állapotban van.
vagy
gomb megnyomásával jelölje ki a „Alkép” pontot.
ENTER
gombot.
: A főkép hangjának hallgatására használható.
: Az alkép hangjának hallgatására használható.
Magyar-18
ENTER gombot.
Page 65

Hangbeállítások visszaállítása a gyári alapbeállításra
Bekapcsolt Játék mód mellett a Hangvisszaállítás funkció aktív. Ha a
hangszínszabályzó beállítása után lép a Visszaállítás funkcióra, visszaáll a
hangszínszabályzó gyári alapbeállítása.
1.
A menü megjelenítéséhez nyomja meg a MENU gombot. A vagy gomb
megnyomásával jelölje ki a „Hang” pontot, majd nyomja meg az
2. A vagy gomb megnyomásával jelölje ki a „Reset”
pontot, majd nyomja meg az ENTER gombot.
3. A kilépéshez nyomja meg az EXIT gombot.
Akkor választhatja ezt a beállítást, ha a „Játék mód” funkció „Be” állapotban van.
Fejhallgató csatlakoztatása
A TV-készülékhez fejhallgatót csatlakoztathat, így a helyiségben tartózkodók
zavarása nélkül nézheti a TV-műsort.
Ha csatlakoztatja a fejhallgató csatlakozóját a megfelelő aljzatba, csak „Belső némítás"
és a „Hangválasztás" (PIP-módban) beállítások választhatók a hangmenüben.
(Lásd: „A belső némítás beállítása ”, 18. oldal)
A nagy hangerővel és hosszantartóan használt fejhallgató halláskárosodást okozhat.
Amikor fejhallgatót csatlakoztat a rendszerhez, akkor a hangszórók nem szólnak.
A hangmód kiválasztása
A hangmódot a „DUAL” gombbal állíthatja be.
Ha megnyomja, a képernyőn megjelenik az aktuális hangmód.
Audió típusa
Ezeket a lehetőségeket a
távvezérlőn található DUAL
gombbal is beállíthatja.
FM sztereó
NICAM sztereó
Monó
Sztereó
Duál
Monó
Sztereó
Duál
DUÁL 1/2
MONÓ
SZTEREÓ ↔ MONÓ
DUÁL 1 ↔ DUÁL 2
MONÓ
MONÓ ↔ SZTEREÓ
MONÓ ↔ DUÁL 1
DUÁL 2
ENTER gombot.
Alapértelmezett
Automatikus
váltás
DUÁL 1
Automatikus
váltás
DUÁL 1
Az aktuális idő beállítása és megjelenítése
Az INFO gomb megnyomásával beállíthatja, hogy a tévékészülék órája a
pontos időt mutassa. Akkor is be kell állítania az időt, amikor az automatikus
be-/kikapcsolás időzítőt szeretné használni.
1.
A menü megjelenítéséhez nyomja meg a MENU gombot. A vagy gomb
megnyomásával jelölje ki a „Beállítás” pontot, majd nyomja meg az
2. A vagy gomb megnyomásával jelölje ki a „Idő” pontot,
majd nyomja meg az ENTER gombot.
3. A „Órabeállítás” opció kiválasztásához nyomja meg az ENTER gombot.
4.
Ehhez...
Az „Óra” vagy „Perc” kiválasztani
Az „Óra” vagy „Perc” beállítása
Nyomja meg a ENTER gombot.
5. A kilépéshez nyomja meg az EXIT gombot.
Ha megszünteti a tápkábel csatlakoztatását, újra be kell állítania az órát.
A távvezérlőn található számgombok segítségével is beállíthatja az órát és a percet.
Magyar-19
ENTER gombot.
Nyomja meg...
A vagy gombot
A vagy gombot
Page 66

Az Auto ki. beállítása
Kiválaszthat egy tetszés szerinti időtartamot - 30 és 180 perc között - amely után a
tévékészülék automatikusan készenléti üzemmódra kapcsol.
1.
A menü megjelenítéséhez nyomja meg a MENU gombot. A vagy gomb
megnyomásával jelölje ki a „Beállítás” pontot, majd nyomja meg az
2. A vagy gomb megnyomásával jelölje ki a „Idő” pontot,
majd nyomja meg az ENTER gombot.
3. A vagy gomb megnyomásával jelölje ki a „Auto kikapcs.” pontot,
majd nyomja meg az ENTER gombot.
4.
Nyomja meg az vagy gombot többször egymás után addig, amíg a
Nyomja meg többször egymás
után a SLEEP gombot a
távvezérlőn, amíg a kívánt
időtartam meg nem jelenik.
megfelelő idő meg nem jelenik a kijelzőn. „Ki”, „30”, „60”, „90”, „120”, „150”,
„180” Nyomja meg az ENTER gombot.
5. A kilépéshez nyomja meg az EXIT gombot.
Amikor az időzítő 0-hoz ér, a TV-készülék automatikusan készenléti üzemmódba kapcsol.
A televízió automatikus be- és kikapcsolása
Beállíthatja a be-/kikapcsolás időzítőt úgy, hogy a TV-készülék:
A kiválasztott időpontban automatikusan bekapcsoljon, vagy a kívánt
csatornára hangoljon.
A kiválasztott időpontban automatikusan kikapcsoljon.
Az első lépés a televízió órájának beállítása
1.
A menü megjelenítéséhez nyomja meg a MENU gombot. A vagy gomb
megnyomásával jelölje ki a „Beállítás” pontot, majd nyomja meg az
2. A vagy gomb megnyomásával jelölje ki a „Idő” pontot,
majd nyomja meg az ENTER gombot.
3. A vagy gomb megnyomásával jelölje ki a „Időzítő be” pontot,
majd nyomja meg az ENTER gombot.
4. A „Óra” beállításához nyomja meg az vagy gombot, majd az
gomb megnyomásával lépjen a következő pontra. A többi elemet is a fenti
módszerrel adhatja meg. A beállítás befejezése után az ENTER
megnyomásával térhet vissza a korábbi képernyőhöz.
5. A vagy gomb megnyomásával jelölje ki a „Időzítő ki” pontot,
majd nyomja meg az ENTER gombot.
6. A „Óra” beállításához nyomja meg az vagy gombot, majd az
gomb megnyomásával lépjen a következő pontra. A többi elemet is a fenti
módszerrel adhatja meg. A beállítás befejezése után az ENTER
megnyomásával térhet vissza a korábbi képernyőhöz.
7. A kilépéshez nyomja meg az EXIT gombot.
A távvezérlőn található számgombok segítségével is beállíthatja az órát és a percet.
Az időzítők csak a „Aktiválás” beállítás „Igen” állapotában működnek.
ENTER gombot.
ENTER gombot.
gomb
gomb
Magyar-20
Page 67

A nyelv kiválasztása
Játék mód használata
A készülék első használata során válassza ki, hogy mely nyelven
jelenjenek meg a menük és a kijelzések.
1. A képernyőmenü megjelenítéséhez nyomja meg a MENU gombot.
A vagy gomb megnyomásával jelölje ki a „Beállítás” pontot,
majd nyomja meg az
ENTER gombot.
2. A vagy gomb megnyomásával jelölje ki a „Nyelv” pontot,
majd nyomja meg az ENTER gombot.
3. Válasszon ki egy nyelvet a vagy gomb ismételt lenyomásával.
Nyomja meg az
21 Nyelv közül választhat.
ENTER gombot.
4. A kilépéshez nyomja meg az EXIT gombot.
PlayStationTM vagy XboxTM jellegű játékokra csatlakozva a játékmenü
segítségével valószerűbb élményre tehet szert.
1.
A menü megjelenítéséhez nyomja meg a MENU gombot. A vagy gomb
megnyomásával jelölje ki a „Beállítás” pontot, majd nyomja meg az
ENTER gombot.
2. A vagy gomb megnyomásával jelölje ki a „Játék mód” pontot,
majd nyomja meg az ENTER gombot.
3.
A
vagy
gomb megnyomásával jelölje ki a „Be” vagy „Ki” pontot.
Nyomja meg az
ENTER
gombot.
4. A kilépéshez nyomja meg az EXIT gombot.
Ha lecsatlakozik a játékról, és másik külső eszközre szeretne váltani, kapcsolja ki a játékot a
Beállítás menüben.
Ha a TV menü Játék mód jeleníti meg, a képernyőkép enyhén megremeg.
A Játék mód TV üzemmódban nem elérhető.
Bekapcsolt Játék mód mellett:
A Kép és a Hang mód automatikusan Egyedi opcióra vált, és a felhasználó nem
módosíthatja a módbeállítást.
Állítsa be a hangot a hangszínszabályzóval.
A Hangvisszaállítás funkció aktiválódik. Ha a hangszínszabályzó beállítása után lép a
Visszaállítás funkcióra, visszaáll a hangszínszabályzó gyári alapbeállítása.
Magyar-21
Page 68

A Kék képernyőmód beállítása / Dallam kiválasztása
Kék képernyő:
Ha a készülék nem fogad jeleket, vagy ha a fogadott jelek igen gyengék, akkor a
zajos háttérkép helyett automatikusan a kék képernyő jelenik meg. Ha azonban
továbbra is a gyenge minőségű képet szeretné nézni, akkor kapcsolja „Ki” a „Kék
képernyő” módot.
Dallam:
Beállíthatja, hogy a TV-készülék be- és kikapcsoláskor dallamot játsszon.
1.
A menü megjelenítéséhez nyomja meg a MENU gombot. A vagy gomb
megnyomásával jelölje ki a „Beállítás” pontot, majd nyomja meg az
2. A vagy gomb megnyomásával jelölje ki a „Kék képernyő” vagy
„Dallam” pontot. Nyomja meg az ENTER
3.
A
vagy
gomb megnyomásával jelölje ki a „Be” vagy „Ki” pontot.
Nyomja meg az
ENTER
gombot.
4. A kilépéshez nyomja meg az EXIT gombot.
Az Energiatakarékosság funkció használata
A funkció úgy szabályozza a TV-képernyő fényerejét, hogy az energiafelhasználás
minimális legyen. Éjszakai TV-nézéskor az „Energiagazd.” mód opciót állítsa „Magas”
fokozatra, amivel a szemét érő sugárzást és az energiafogyasztást egyaránt csökkentheti.
1. A képernyőmenü megjelenítéséhez nyomja meg a MENU gombot.
A vagy gomb megnyomásával jelölje ki a „Beállítás” pontot,
majd nyomja meg az
2. A vagy gomb megnyomásával jelölje ki a „Energiagazd.” pontot,
majd nyomja meg az ENTER gombot.
3. Az vagy gomb megnyomásával választhatja ki a megfelelő opciót „Ki”,
„Alacsony”, „Közepes”, „Magas”. Nyomja meg az
4. A kilépéshez nyomja meg az EXIT gombot.
ENTER gombot.
ENTER gombot.
gombot.
ENTER gombot.
A Kék képernyő mód beállítása
A kék LED-kijelző bekapcsolására szolgál. Ha a készülék nincs áram alatt és a Kék
képernyő funkció nincs bekapcsolva, a kék LED-kijelző kikapcsol. Ezzel energiát
takarít meg és kevésbé fárasztja a szemét.
1. A képernyőmenü megjelenítéséhez nyomja meg a MENU gombot.
A vagy gomb megnyomásával jelölje ki a „Beállítás” pontot,
majd nyomja meg az
2. A vagy gomb megnyomásával jelölje ki a „Blue Eye” pontot,
majd nyomja meg az ENTER gombot.
3.
A
Ki: A LED-jelző (Kék képernyő) nem kapcsol be.
4. A kilépéshez nyomja meg az EXIT gombot.
ENTER gombot.
vagy
gomb megnyomásával jelölje ki a „Be” vagy „Ki” pontot.
Be: A LED-jelző (Kék képernyő) bekapcsol a TV-készülék kikapcsolása után.
Magyar-22
Page 69

Forrás kiválasztása
Választhat a TV kimeneti csatlakozóihoz csatlakoztatott külső
jelforrások közül.
1. A menü megjelenítéséhez nyomja meg a MENU gombot.
Az „Bemenet” opció kiválasztásához nyomja meg az ENTER gombot.
2. A „Forráslista” opció kiválasztásához nyomja meg az ENTER gombot.
Amennyiben nincs külső eszköz a készülékéhez csatlakoztatva, a „Forráslista” csak a „TV”,
„1. Külső” és a „2. Külső” van aktiválva. Az „AV”, „S-Video”, „Komponens”, „PC”, „HDMI1”,
„HDMI2” csak akkor van aktiválva, ha a csatlakoztatta a készülékéhez.
3. Válassza ki a kívánt eszközt a vagy gomb megnyomásával.
Nyomja meg az ENTER gombot.
A távirányítón lévő SOURCE gomb megnyomásával válthat az elérhető források között.
TV mód a távirányító TV gombja, a számgombok (0~9), és a
kiválasztható. A SOURCE gombbal azonban nem.
A PC módot egyszerűen kiválaszthatja a távirányító PC gombjának megnyomásával.
A bemeneti forrásnevek szerkesztése
A bemeneti csatlakozókhoz csatlakoztatott eszközök nevének megadásával a
bemeneti forrásválasztás megkönnyíthető.
1. A menü megjelenítéséhez nyomja meg a MENU gombot.
Az „Bemenet” opció kiválasztásához nyomja meg az ENTER gombot.
2. A vagy gomb megnyomásával jelölje ki a „Névszerkesztés” pontot,
majd nyomja meg az ENTER gombot.
3. A szerkeszteni kívánt eszközt az vagy gomb megnyomásával
választhatja ki. Nyomja meg az ENTER gombot.
4. Az vagy gomb megnyomásával választhatja ki a megfelelő eszközt.
Nyomja meg az ENTER gombot.
5. A kilépéshez nyomja meg az EXIT gombot.
P
/ gomb segítségével is
A
Magyar-23
Page 70

A WISELINK funkció használata
Lehetősége van egy memóriakártyán illetve USB tárolóeszközön tárolt fényképek (JPEG fájlok)
megjelenítésére és zenefájlok (MP3) lejátszására.
A „Photo” menüben csak JPEG formátumú képfájlok használhatók.
A „Music” menüben csak MP3 formátumú hangfájlok használhatók.
Compact Flash (CF) / Micro Driver (MD) / MAGICSTOR
Secure Digital Card (SD Card) / Smart Media Card (SM) /
Multimedia Card (MMC) / Memory Stick / MSPRO / XD
USB Mass Storage Class
Az USB elosztó típus nem választható, mert a fél-sebességű USB
hardver korlátozást okozhat.
(Csak a teljes sebességű USB választható.)
Fényképnyomtató
1. Először helyezze be a fájlokat tartalmazó memóriakártyát vagy USB tárolóeszközt a tv-készülék oldalán található
WISELINK csatlakozóba.
Támogatott memóriakártyák
Compact Flash (CF) Micro Driver (MD) MAGICSTOR Secure Digital Card
Multimedia Card (MMC) Memory Stick MSPRO XD
Gyártótól függően egyes memóriakártya- vagy USB-host típusok nem támogatottak.
2. A távvezérlő gombok használata a WISELINK menüben
Gomb Művelet
A kurzor mozgatása és elem kijelölése.
Az éppen kijelölt elem kiválasztása.
A diavetítés vagy MP3 fájl lejátszása illetve szüneteltetése.
A jelenlegi funkció leállítása és visszatérés az előző magasabb szintű menübe.
Különböző funkciók működtetése a Photo (Fénykép) és a Music(Zene) menüben.
Az aktuális diavetítés vagy MP3 fájl lejátszásának leállítása.
Lapozása le- és felfelé (a fájllista elemek között)
Visszatérés az előző menühöz
Magyar-24
(SD Card)
Smart Media Card (SM)
Page 71

A WISELINK menü használata
Ebben a menüben a memóriakártyára mentett JPEG és MP3 fájlok és mappák
jeleníthetők meg.
1. A menü megjelenítéséhez nyomja meg a MENU gombot.
Az „Bemenet” opció kiválasztásához nyomja meg az ENTER gombot.
2. A vagy gombbal jelölje ki a „WISELINK” lehetőséget,
majd nyomja meg az ENTER gombot.
Ha megjelenik a „Mem.kártyák behelyezése.” üzenet, ellenőrizze, hogy a memóriakártya
rendesen be van-e helyezve a tv-készülék oldalán található WISELINK csatlakozóba.
3. A vagy gombbal jelölje ki a megfelelő memóriakártyát,
majd nyomja meg az ENTER gombot.
Ekkor megjelenik a kijelölt memóriakártyára mentett fájlok formátumának
kiválasztására szolgáló menü.
4. A vagy gombbal lépjen a kívánt elemre, majd nyomja meg
az ENTER gombot.
5.
A WISELINK funkcióból kilépéshez nyomja meg a WISELINK gombot a távvezérlőn.
Ezeket az opciókat könnyedén kiválaszthatja a távvezérlő WISELINK gombjával is.
A fénykép (JPEG) lista használata
Ebben a menüben a memóriakártyára mentett JPEG fájlok és mappák jeleníthetők meg.
1.
Hajtsa végre a „A WISELINK menü használata” című részben ismertetett 1-4. lépést.
2. A vagy gombbal jelölje ki a „Photo” lehetőséget,
majd nyomja meg az ENTER gombot.
A mentett fájlra vonatkozó adatok mappaként vagy fájlként jelennek meg.
3. A ,, vagy gomb valamelyikével jelöljön ki egy fájlt,
majd nyomja meg az ENTER gombot.
Ha a gombot akkor nyomja meg, amikor a kurzor valamelyik fénykép ikonon áll,
az adott fénykép teljes képernyős nagyításban lesz látható.
Ha a gombot akkor nyomja meg, amikor a kurzor valamelyik mappa ikonon áll,
a mappában található JPEG fájlok fognak megjelenni.
Megjelenik a Menü. A Nézet opció kijelölésével a fényképet a megfelelő
képméretarányban jelenítheti meg.
Mappa ikon
Fénykép ikon
Az előző mappaszintre
lépés ikon
Ezeket az opciókat könnyedén
kiválaszthatja a távvezérlő
WISELINK gombjával is.
4. A beállítások konfigurálásához nyomja meg az INFO gombot.
Amikor a Fényképlista képernyő látható: „Nézet”, „Diavetítés”, „Másolás”,
„Összes fájl másolása”, „Törlés”, „Összes fájl törlése”, „Nyomtatás
Teljes képernyős megjelenítéskor:
„Diavetítés”, „Forgatás”, „Nagyítás”, „Másolás”, „Törlés”, „Nyomtatás”, „Lista
5.
A WISELINK funkcióból kilépéshez nyomja meg a WISELINK gombot a távvezérlőn.
• Amikor egy másik fényképre lép, beletelhet néhány másodpercbe, amíg a fájl betöltődik.
Ekkor a képernyő bal felső sarkában a ikon látható.
• A menüben csak a JPEG kiterjesztésű fájlok jelennek meg.
Más formátumú (pl. bmp vagy tiff) fájlok nem jelennek meg.
• A fájlok egy oldalon jelennek meg. Oldalanként 15 miniatűr fénykép látható.
• A miniatűrök balról jobbra, illetve fentről lefelé vannak számozva 1-től 15-ig.
• Elöl a mappák láthatók, ezeket követik az aktuális mappában található JPEG fájlok.
A mappák és JPEG fájlok betűrendbe vannak rendezve.
”
”
Magyar-25
Page 72

Az Opciók menü használata
„Diavetítés”:
Diavetítés indítása.
(Lásd a 27. oldalon található „Fénykép és diavetítés kiválasztása” című részt)
„Forgatás”:
A képek teljes képernyős módban elforgathatók.
A készülék rendre 90°, 180°, 270° és 0° (eredeti állapot) fokkal forgatja el a képeket.
(Lásd a 28. oldalon található „Elforgatás” című részt)
Az elforgatott képek nem menthetők el.
„Nagyítás”:
A képek teljes képernyős módban nagyíthatók.
A készülék rendre X2, X3, X4 és X1 (eredeti méretre) nagyítja a képeket.
(Lásd a 29. oldalon található „Nagyítás” című részt)
A nagyított képek nem menthetők el.
„Másolás”, „Összes fájl másolása”:
A képfájlok átmásolhatók másik memóriakártyára.
(Lásd a 30. oldalon található „Képfájlok másolása” című részt)
„Törlés”, „Összes fájl törlése”:
A kijelölt képfájlokat törölheti.
(Lásd a 30. oldalon található „Képfájlok törlése” című részt)
„Nyomtatás”:
A képfájlok közvetlenül kinyomtathatók a nyomtatóval.
(Lásd a 31. oldalon található „Fénykép nyomtatása” című részt)
„Lista”:
Megjeleníti a tárolt fájlokat és mappákat valamint a fájlokra vonatkozó adatokat.
Az alábbi esetekben megjelenik a képernyőn a „Fájlhiba” üzenet:
Amikor a fájl ténylegesen hibás
•
Ha a célmemória nem írható a fájlok másolása közben
•
Ha a célmemória nem rendelkezik elegendő hellyel a fájok másolása közben
•
Magyar-26
Page 73

Fényképfájlokra vonatkozó adatok megjelenítése
Fényképfájl kiválasztásakor a TV-képernyő bal oldalán láthatók a
fényképfájlra vonatkozó adatok, így annak felbontása, módosításának
dátuma és a fájl aktuális könyvárbeli sorszáma.
A felbontás
A fájlméret
A módosítás dátuma
A fájl aktuális könyvárbeli sorszáma
Fénykép és diavetítés kiválasztása
Ebben a menüben a memóriakártyára mentett JPEG fájlok és mappák jeleníthetők meg.
1. Hajtsa végre a „A WISELINK menü használata” című részben
ismertetett 1-4. lépést. (Lásd a 25. oldalt)
2. A vagy gombbal jelölje ki a „Photo” lehetőséget,
majd nyomja meg az ENTER gombot.
A mentett fájlra vonatkozó adatok mappaként vagy fájlként jelennek meg.
3. Nyomja meg az INFO gombot.
4. A vagy gombbal jelölje ki a „Diavetítés” lehetőséget,
majd nyomja meg az ENTER gombot.
Megjelenik a Menü. A Nézet opció kijelölésével a fényképet a megfelelő
képméretarányban jelenítheti meg.
• Előre meghatározott intervallum szerinti diavetítés a kijelölt mappában található összes fájlból.
• Diavetítéskor a fájlok a jelenleg látható fájltól kezdve kerülnek megjelenítésre.
5. „Diavetítés” közben az INFO gombbal adja meg a beállításokat
(„Sebesség”, „Háttérzene”, „Háttérzene beállítása”, „Lista”).
A
vagy
Ezeket az opciókat könnyedén
kiválaszthatja a távvezérlő
WISELINK gombjával is.
az
6.
Az opción belüli opció módosításához az INFO gombot ismét megnyomva nyissa
meg az opciókat tartalmazó ablakot, majd jelölje ki a módosítani kívánt opciót,
végül nyomja meg az ENTER gombot. Valahányszor végrehajtja ezt a műveletet, a
képernyőn megváltozik az opción belüli opció.
7.
A WISELINK funkcióból kilépéshez nyomja meg a WISELINK gombot a távvezérlőn.
Ha kijelöli a Diavetítés funkciót, amikor egy fénykép teljes nézetben van megjelenítve,
akkor a diavetítés során a többi kép is teljes nézetben jelenik meg.
gombbal jelölje ki a beállítani kívánt opciót, majd nyomja meg
ENTER
gombot.
A menü használata diavetítés közben
Normál
„Sebesség”:
A diavetítés sebességének kiválasztása.
Az ENTER gombbal válassza ki a kívánt opciót „Normál”, „Lassú” vagy „Gyors”
Ha a Sebesség funkció a Gyors lehetőségre van állítva, általában 7 másodperc alatt tud a következő
fényképhez léptetni. A betöltési idő a fájl méretétől függően hosszabb is lehet.
Be
„Háttérzene”:
Itt adhatja meg, hogy diavetítéskor kíván-e MP3 fájlt lejátszani.
Az ENTER gombbal válassza ki a kívánt opciót „Be” vagy „Ki”
Állítsa be először a menüben a Háttérzene beállításai lehetőséghez a „Be” vagy a „Ki” funkciót.
Magyar-27
Page 74

Elforgatás
Ezeket az opciókat könnyedén
kiválaszthatja a távvezérlő
WISELINK gombjával is.
„Háttérzene beállítása”:
A mentett fájlra vonatkozó adatok mappaként vagy MP3 fájlként jelennek meg.
1. Jelölje ki a „Háttérzene beállítása” lehetőséget, majd nyomja meg az
ENTER
gombot. Lépjen a háttérzeneként használni kívánt MP3 fájlokat
tartalmazó mappára. Jelöljön ki egy MP3 fájlt, majd nyomja meg az
ENTER
gombot.
A k ijelölt fájl sárga színnel van kiemelve.
2. A MENU gombot ismét megnyomva lépjen vissza a Diavetítés képernyőre.
A készülék lejátssza a kijelölt háttérzenét.
• Ha a Háttérzene funkciót kikapcsolja, a készülék nem játssza le a háttérzenét, hiába
adta meg a háttérzene beállításait.
• Az MP3 fájlok automatikusan lejátszhatók a diavetítés közben, ha az alapértelmezett
háttér zene funkció be van kapcsolva. Ahhoz, hogy ez a funkció működjön, az MP3
fájloknak és az egyéb fényképfájloknak azonos mappában kell lenniük.
„Lista”:
Megjeleníti a tárolt fájlokat és mappákat valamint a fájlokra vonatkozó adatokat.
Képek 90°, 180° vagy 270° fokkal elforgatott megjelenítése teljes képernyős módban.
1. Hajtsa végre a „A WISELINK menü használata” című részben
ismertetett 1-4. lépést. (Lásd a 25. oldalt)
2. A vagy gombbal jelölje ki a „Photo” lehetőséget,
majd nyomja meg az ENTER gombot.
A mentett fájlra vonatkozó adatok mappaként vagy fájlként jelennek meg.
3. A ,, vagy gomb valamelyikével jelöljön ki egy fájlt, majd
nyomja meg az ENTER gombot.
Ha a gombot akkor nyomja meg, amikor a kurzor valamelyik fénykép miniatűrjén áll,
az adott fénykép teljes képernyős nagyításban lesz látható.
Megjelenik a Menü. A Nézet opció kijelölésével a fényképet a megfelelő
képméretarányban jelenítheti meg.
4. Az INFO gombbal jelenítse meg a beállításokat („Diavetítés”, „Forgatás”,
„Nagyítás”, „Másolás”, „Törlés”, „Nyomtatás”, „Lista”).
A vagy gombbal jelölje ki az „Forgatás” lehetőséget, majd nyomja
meg az ENTER gombot. Az ENTER gombbal válassza ki a kívánt
opciót (90°, 180°, 270°, 0° (Eredeti))
Fénykép elforgatásához az INFO
gombot megnyomva nyissa meg az opciókat tartalmazó ablakot, majd
jelölje ki az „Forgatás” lehetőséget, végül nyomja meg az ENTER gombot.
Valahányszor végrehajtja ezt a műveletet, a képernyőn látható kép elfordul.
5.
A WISELINK funkcióból kilépéshez nyomja meg a WISELINK gombot a távvezérlőn.
Az elforgatott fájl nem lesz elmentve.
Ez a funkció is elérhető a fényképhez a képméretarányban.
Az Elforgatás funkcióra vonatkozó adatok
A képernyőn aktuálisan látható menüelem
Magyar-28
Funkció
Fénykép elforgatása 90 fokkal
Fénykép elforgatása 180 fokkal
Fénykép elforgatása 270 fokkal
Fénykép elforgatása eredeti állásába
Page 75

Nagyítás
Ezeket az opciókat könnyedén
kiválaszthatja a távvezérlő
WISELINK gombjával is.
Kép megjelenítése 2x, 3x vagy 4x-szeres nagyításban teljes képernyős módban.
1. Hajtsa végre a „A WISELINK menü használata” című részben
ismertetett 1-4. lépést. (Lásd a 25. oldalt)
2. A vagy gombbal jelölje ki a „Photo” lehetőséget,
majd nyomja meg az ENTER gombot.
A mentett fájlra vonatkozó adatok mappaként vagy fájlként jelennek meg.
3. A ,, vagy gomb valamelyikével jelöljön ki egy fájlt, majd
nyomja meg az ENTER gombot.
Ha a gombot akkor nyomja meg, amikor a kurzor valamelyik fénykép miniatűrjén áll,
az adott fénykép teljes képernyős nagyításban lesz látható.
Megjelenik a Menü. A Nézet opció kijelölésével a fényképet a megfelelő
képméretarányban jelenítheti meg.
4. Az INFO gombbal jelenítse meg a beállításokat („Diavetítés”, „Forgatás”,
„Nagyítás”, „Másolás”, „Törlés”, „Nyomtatás”, „Lista”).
A vagy gombbal jelölje ki az „Nagyítás” lehetőséget, majd nyomja
meg az ENTER gombot. Az ENTER gombbal válassza ki a kívánt
opciót ("X2", "X3", "X4", "X1").
Fénykép nagyításához az INFO gombot megnyomva nyissa meg az
opciókat tartalmazó ablakot, jelölje ki a „Nagyítás” lehetőséget, majd nyo
mja meg az ENTER gombot.
Valahányszor végrehajtja ezt a műveletet, a készülék az alábbi sorrend
szerint felnagyítja a képet.
• X2: A fénykép 2-szeres nagyítása.
• X3: A fénykép 3-szoros nagyítása.
• X4: A fénykép 4-szeres nagyítása.
• X1: A fénykép eredeti méretének visszaállítása.
A képet a ,, és gombbal tudja fel/le/balra/jobbra úsztatni.
5.
A WISELINK funkcióból kilépéshez nyomja meg a WISELINK gombot a távvezérlőn.
Nagyítási funkcióra vonatkozó adatok
A képernyőn aktuálisan látható menüelem
Gomb
Úsztatás lefelé
Úsztatás felfelé
Úsztatás jobbra
Úsztatás balra
Ez a funkció is elérhető a fényképhez a képméretarányban.
Magyar-29
Funkció
Fénykép 2-szeres nagyítása.
Fénykép 3-szoros nagyítása.
Fénykép 4-szeres nagyítása.
A fénykép eredeti méretének visszaállítása.
Funkció
A nagyított fénykép alsó részének megjelenítése
lefelé úsztatással.
A nagyított fénykép felső részének megjelenítése
felfelé úsztatással.
A nagyított fénykép jobb oldalának megjelenítése
jobbra úsztatással.
A nagyított fénykép bal oldalának
megjelenítése balra úsztatással.
Page 76

Képfájlok másolása
Ezeket az opciókat könnyedén
kiválaszthatja a távvezérlő
WISELINK gombjával is.
Képfájlok törlése
Ezeket az opciókat könnyedén
kiválaszthatja a távvezérlő
WISELINK gombjával is.
A képfájlok átmásolhatók másik memóriakártyára.
1. Hajtsa végre a „A WISELINK menü használata” című részben
ismertetett 1-4. lépést. (Lásd a 25. oldalt)
2. A vagy gombbal jelölje ki a „Photo” lehetőséget,
majd nyomja meg az ENTER gombot.
A mentett fájlra vonatkozó adatok mappaként vagy fájlként jelennek meg.
3. . A ,, vagy gomb valamelyikével jelöljön ki egy fájlt, majd
nyomja meg az ENTER gombot.
Ha a gombot akkor nyomja meg, amikor a kurzor valamelyik fénykép miniatűrjén áll,
az adott fénykép teljes képernyős nagyításban lesz látható.
Megjelenik a Menü. A Nézet opció kijelölésével a fényképet a megfelelő
képméretarányban jelenítheti meg.
4. Az INFO gombbal jelenítse meg a beállításokat („Diavetítés”, „Forgatás”,
„Nagyítás”, „Másolás”, „Törlés”, „Nyomtatás”, „Lista”).
A vagy gombbal jelölje ki az „Másolás” lehetőséget, majd nyomja
meg az ENTER gombot.
Az összes fénykép másolásához válassza az INFO gombot a Fényképlista
képernyőn, majd válassza a „Összes fájl másolása” menüt.
Ha nincs behelyezve cél memóriakártya, a „Nem csatlakozik eszköz.”
üzenet lesz olvasható, és a művelet nem lesz végrehajtva.
5.
A WISELINK funkcióból kilépéshez nyomja meg a WISELINK gombot a távvezérlőn.
A képfájlok átmásolhatók másik memóriakártyára.
1. Hajtsa végre a „A WISELINK menü használata” című részben
ismertetett 1-4. lépést. (Lásd a 25. oldalt)
2. A vagy gombbal jelölje ki a „Photo” lehetőséget,
majd nyomja meg az ENTER gombot.
A mentett fájlra vonatkozó adatok mappaként vagy fájlként jelennek meg.
3. A ,, vagy gomb valamelyikével jelöljön ki egy fájlt, majd
nyomja meg az ENTER gombot.
Ha a gombot akkor nyomja meg, amikor a kurzor valamelyik fénykép miniatűrjén áll,
az adott fénykép teljes képernyős nagyításban lesz látható.
Megjelenik a Menü. A Nézet opció kijelölésével a fényképet a megfelelő
képméretarányban jelenítheti meg.
4. Az INFO gombbal jelenítse meg a beállításokat („Diavetítés”, „Forgatás”,
„Nagyítás”, „Másolás”, „Törlés”, „Nyomtatás”, „Lista”).
A vagy gombbal jelölje ki az „Törlés” lehetőséget, majd nyomja
meg az ENTER gombot.
Az összes fénykép törléséhez válassza az INFO gombot a Fényképlista
képernyőn, majd válassza az „Összes fájl törlése” menüt.
Ha a „Törlés” vagy a „Összes fájl törlése” menüt választja, egy képernyőn
megjelenő ablakban hagyhatja jóvá szándékát.
A törlés visszavonásához válassza a „Nem” lehetőséget.
5.
A WISELINK funkcióból kilépéshez nyomja meg a WISELINK gombot a távvezérlőn.
Magyar-30
Page 77

Fénykép nyomtatása
Ezeket az opciókat könnyedén
kiválaszthatja a távvezérlő
WISELINK gombjával is.
Az MP3 lista használata
Mappa ikon
Zenei hang ikon
Az előző mappaszintre
lépés ikon
Ezeket az opciókat könnyedén
kiválaszthatja a távvezérlő
WISELINK gombjával is.
A képfájlok közvetlenül kinyomtathatók a nyomtatóval.
1. Hajtsa végre a „A WISELINK menü használata” című részben
ismertetett 1-4. lépést. (Lásd a 25. oldalt)
2. A vagy gombbal jelölje ki a „Photo” lehetőséget,
majd nyomja meg az ENTER gombot.
A mentett fájlra vonatkozó adatok mappaként vagy fájlként jelennek meg.
3. A ,, vagy gomb valamelyikével jelöljön ki egy fájlt, majd
nyomja meg az ENTER gombot.
Ha a gombot akkor nyomja meg, amikor a kurzor valamelyik fénykép miniatűrjén áll,
az adott fénykép teljes képernyős nagyításban lesz látható.
Megjelenik a Menü. A Nézet opció kijelölésével a fényképet a megfelelő
képméretarányban jelenítheti meg.
4.
Az INFO gombbal jelenítse meg a beállításokat („Diavetítés”, „Forgatás”,
„Nagyítás”, „Másolás”, „Törlés”, „Nyomtatás”, „Lista”). A vagy gombbal
jelölje ki az „Nyomtatás” lehetőséget, majd nyomja meg az ENTER gombot.
Ha a készülékhez nincs nyomtató csatlakoztatva, a „Nyomtató ellenőrzése”
üzenet lesz olvasható, és a művelet nem lesz végrehajtva.
5.
A WISELINK funkcióból kilépéshez nyomja meg a WISELINK gombot a távvezérlőn.
A képek nyomtatásához a PictBridge funkcióval csatlakoztassa a készüléket a
fényképnyomtatóhoz.
Ebben a menüben a memóriakártyára mentett MP3 fájlok jeleníthetők meg
1. Hajtsa végre a „A WISELINK menü használata” című részben
ismertetett 1-4. lépést. (Lásd a 25. oldalt)
2. A vagy gombbal jelölje ki a „Music” lehetőséget,
majd nyomja meg az ENTER gombot.
A mentett fájlra vonatkozó adatok mappaként vagy fájlként jelennek meg.
3. A vagy gombbal jelölje ki valamelyik fájlt, majd nyomja meg
az ENTER gombot. Adott fájl illetve az összes fájl kijelöléséhez az INFO
gombbal jelenítse meg a Zene menü opcióit.
(„Lejátsz”, „Összes fájl lejátsz.”, „Másolás”, „Összes fájl másolása”, „Törlés”, „Összes
fájl törlése”)
Az ENTER gombbal válassza a „Lejátsz” vagy a „Összes fájl lejátsz.” lehetőséget.
• Ha az ENTER gombot olyankor nyomja meg, amikor a kurzor egy zenei hang
ikonon áll, a készülék lejátssza a zenefájlt.
• Ha az ENTER gombot olyankor nyomja meg, amikor a kurzor egy mappa
ikonon áll, a készülék az abban a mappában lévő zenefájlt mutatja.
A következő oldalon található fájl kiválasztásához a REW vagy a FF
gombbal lépjen a következő oldalra.
4.
MP3 fájl lejátszása közben a PLAY/PAUSE gombbal szüneteltetheti
a lejátszást. A Lejátszás módból kilépéshez nyomja meg a
5.
A WISELINK funkcióból kilépéshez nyomja meg a WISELINK gombot a távvezérlőn.
• A menüben csak az MP3 kiterjesztésű fájlok jelennek meg. Más kiterjesztésű fájlok
nem jelennek meg, még ha az adott memóriakártyára vannak is mentve.
• A képernyő felső részén látható a kijelölt fájl és annak lejátszási ideje.
• A zene hangerejét a távvezérlő és gombjával módosíthatja.
A hang némításához nyomja meg a távvezérlő MUTE gombját.
Magyar-31
STOP
gombot.
Page 78

Zene funkcióra vonatkozó adatok
A képernyőn aktuálisan látható menüelem
(Zene) Lejátszás/szünet
Funkció
Amikor a zene lejátszása közben megnyomja a
távvezérlő PLAY/PAUSE
gombját.
Zenefájlok másolása
Ezeket az opciókat könnyedén
kiválaszthatja a távvezérlő
WISELINK gombjával is.
Zenefájlok törlése
Ezeket az opciókat könnyedén
kiválaszthatja a távvezérlő
WISELINK gombjával is.
(Zene) Leállítva
Amikor a leállított zenehallgatás közben
megnyomja a távvezérlő STOP
A zenefájlok átmásolhatók másik memóriakártyára.
1. Hajtsa végre a „A WISELINK menü használata” című részben
ismertetett 1-4. lépést. (Lásd a 25. oldalt)
2. A vagy gombbal jelölje ki a „Music” lehetőséget,
majd nyomja meg az ENTER gombot.
A mentett fájlra vonatkozó adatok mappaként vagy fájlként jelennek meg.
3. A vagy gombbal jelölje ki valamelyik fájlt, majd nyomja meg
az ENTER gombot. Adott fájl illetve az összes fájl kijelöléséhez az INFO
gombbal jelenítse meg a Zene menü opcióit.
(„Lejátsz”, „Összes fájl lejátsz.”, „Másolás”, „Összes fájl másolása”, „Törlés”, „Összes
fájl törlése”)
Az ENTER gombbal válassza a „Másolás” vagy a
„Összes fájl másolása” lehetőséget.
Ha nincs behelyezve cél memóriakártya, a „Nem csatlakozik eszköz.”
üzenet lesz olvasható, és a művelet nem lesz végrehajtva.
4.
A WISELINK funkcióból kilépéshez nyomja meg a WISELINK gombot a távvezérlőn.
A kijelölt zenefájlokat törölheti.
1. Hajtsa végre a „A WISELINK menü használata” című részben
ismertetett 1-4. lépést. (Lásd a 25. oldalt)
2. A vagy gombbal jelölje ki a „Music” lehetőséget,
majd nyomja meg az ENTER gombot.
A mentett fájlra vonatkozó adatok mappaként vagy fájlként jelennek meg.
3. A vagy gombbal jelölje ki valamelyik fájlt, majd nyomja meg
az ENTER gombot. Adott fájl illetve az összes fájl kijelöléséhez az INFO
gombbal jelenítse meg a Zene menü opcióit.
(„Lejátsz”, „Összes fájl lejátsz.”, „Másolás”, „Összes fájl másolása”, „Törlés”, „Összes
fájl törlése”)
Az ENTER gombbal válassza a „Törlés” vagy a „Összes fájl törlése” lehetőséget.
Ha a „Törlés” vagy a „Összes fájl törlése” menüt választja, egy képernyőn megjelenő
ablakban hagyhatja jóvá szándékát. A törlés visszavonásához válassza a „Nem”
lehetőséget.
4.
A WISELINK funkcióból kilépéshez nyomja meg a WISELINK gombot a távvezérlőn.
gombját.
Magyar-32
Page 79

A Beállítás menü használata
A Beállítás menüben a WISELINK menü felhasználói beállításai láthatók.
1. Hajtsa végre a „A WISELINK menü használata” című részben
ismertetett 1-4. lépést. (Lásd a 25. oldalt)
2. A vagy gombbal jelölje ki a „Setup” lehetőséget, majd nyomja meg az
ENTER gombot.
3. A vagy gombbal jelölje ki a kívánt elemet, majd nyomja meg
az ENTER gombot.
4. A vagy gombbal jelölje ki a beállítani kívánt opciót, majd nyomja
meg az ENTER gombot.
5.
„Diavetítés sebessége”:
A diavetítés sebességének kiválasztása.
Ezeket az opciókat könnyedén
kiválaszthatja a távvezérlő
WISELINK gombjával is.
„Képváltás hatás”:
A diavetítésben alkalmazandó effektusok kiválasztására szolgál.
„Diavetítés ismétlése”:
• Be: A mappa összes fájljának megjelenítését követően újrakezdi a diavetítést.
• Ki: Kilép a diavetítésből. A mappa összes fájljának megjelenítését követően visszatér
a Fénykép menühöz.
„Ismétlés”:
Itt adhatja meg, hogy az aktuális mappa összes MP3 fájljának lejátszását követően
újrakezdődjön-e azok lejátszása.
„Háttérzene”:
Itt adhatja meg, hogy diavetítéskor kíván-e MP3 fájlt lejátszani.
„Háttérzene beállítása”:
Itt adhatja meg a diavetítés közben lejátszandó háttérzenét. A háttérzenét a diavetítés közben is kiválaszthatja, ehhez nyomja meg az INFO gombot, majd válasza a
„Háttérzene beállítása” menüt.
„Képernyővédő”:
Itt adhatja meg azt a várakozási időt, amelynek leteltével elindul a képernyővédő, ha
közben egy gombot sem nyom meg.
A mentett fájlra vonatkozó adatok mappaként vagy fájlként jelennek meg.
A WISELINK funkcióból kilépéshez nyomja meg a WISELINK gombot a távvezérlőn.
Magyar-33
Page 80

Teletext dekóder
A TV-csatornák többsége olyan írott információkat tartalmazó „teletext” oldalakat hordoz, mint például:
Televízióműsorok időpontjai
Közérdekű közlemények és időjárás-jelentés
Sporteredmények
Feliratok nagyothallók számára.
A teletext oldalak hat kategóriába vannak sorolva:
Mező
A
B
C
D
E
F
A teletextes információ megjelenítése
Ha a jelvétel megfelelő, akkor a teletext-információkat bármikor
megjelenítheti. Egyébként:
Információvesztés léphet fel.
Egyes oldalak hiányozhatnak.
A teletext mód aktiválása és a tartalomjegyzék-oldal megjelenítése:
1.
A P ( ) vagy P ( ) gombbal válassza ki a teletext szolgáltatást nyújtó
csatornát.
2.
A teletext üzemmód bekapcsolásához nyomja meg a TTX/MIX ( ) gombot.
Megjelenik az információt tartalmazó oldal. Ez bármikor újra megjeleníthető az
MENU ( ) gomb megnyomásával.
3. Nyomja meg ismét az TTX/MIX ( ) gombot.
Az aktuális adás a „Teletext”, „Double”, és „Mix” képernyővel együtt jelenik meg.
4. A TV( ) gomb ismételt megnyomásával léphet ki a teletext (TTX)
megjelenítési módból.
Ha a szöveg megtekintésekor töredezett karaktereket lát, akkor ellenőrizze, hogy a szöveg nyelve
egyezik-e a „Beállítás” menüben megadott nyelvvel. Ha különböző nyelvek vannak beállítva,
válasszon azonos nyelvet a „Beállítás” menüben, a Szöveg nyelve menüpontban.
Tartalom
A kiválasztott oldalszám.
A műsorszóró-állomás azonosítója.
Az aktuális oldalszám vagy a keresés állapota.
Dátum és pontos idő
Szöveg.
Státusz információk
Magyar-34
Page 81

Adott teletext-oldal kiválasztása
Az oldalszám közvetlen megadásához nyomja meg a távirányító megfelelő
gombjait:
1.
Írja be a tartalmi részben szereplő háromjegyű oldalszámot a megfelelő
számgombok segítségével.
2.
Ha a kijelölt oldalhoz másodlagos oldalak is tartoznak, akkor ezek is
sorban megjelennek. Ha a képernyőt szeretné kimerevíteni egy adott
oldalon, akkor nyomja meg a PIP
nyomja meg ismét a PIP
3. A különféle képernyőopciók használata:
Ennek megjelenítéséhez...
A teletext-információk és a normál műsor
Rejtett szöveg (például vetélkedők válaszai)
A normál képernyő
Egy másodlagos oldal a négyjegyű számával megadva
A következő oldal
Az előző oldala
Duplaméretű betűket:
A képernyő felső felén
A képernyő alsó felén
A normál képernyő
( ) gombot. A továbblapozáshoz
( ) gombot.
Nyomja meg...
TTX/MIX (
INFO (
)
INFO (
)
PRE-CH ( )
P
( )
P
( )
P.MODE
( )
Egyszer
Kétszer
Háromszor
)
Fastext használat teletext-oldal kiválasztásához
A teletextes oldalakon található különböző témák színkódolva vannak.
Ezeket a távirányító színes gombjai megnyomásával lehet kiválasztani.
1. A TTX/MIX ( )
2. Nyomja meg a választani kívánt témakörnek megfelelő színes gombot (a
választható témakörök az állapot-információs sorban láthatók).
3. Az előző oldal megjelenítéséhez nyomja meg a piros gombot.
A következő oldal megjelenítéséhez nyomja meg a zöld gombot.
4. A teletext üzemmódból való kilépéshez nyomja meg újra a TV(
gombot.
gombbal jelenítse meg a teletext tartalomjegyzék oldalát.
Magyar-35
)
Page 82

A távirányító beállítása
Az előírás szerint üzembe helyezett távvezérlőt öt különböző üzemmódban
használhatja: televízió, videomagnó, kábeltelevíziós egység, DVD-lejátszó vagy beltéri
egység. A megfelelő gomb lenyomásával választhat a fent említett üzemmódok között,
és irányíthatja a kiválasztott berendezést.
Lehetséges, hogy a távvezérlő nem alkalmazható az összes DVD-lejátszóval, videomagnóval,
kábeltelevíziós egységgel és beltéri egységgel.
A távirányító beállítása a videomagnó működtetésére.
1.
Kapcsolja ki a videomagnót.
2. A televízió távirányítóján nyomja meg a VCR gombot.
3. A televízió távirányítóján nyomja meg a SET gombot.
A távirányító számgombjai segítségével írja be a videomagnó
4.
típusának megfelelő háromjegyű VCR-kódot, melyek listája a
kézikönyv 38. oldalán található. Okvetlenül három számjegyet
írjon be, akkor is, ha az első számjegy „0”.
(Ha több kód is szerepel a listán, próbálkozzon az elsővel.)
5.
Nyomja meg a távirányító POWER gombját.
Ha a távirányító beállítása megfelelő, a videomagnó bekapcsol.
Ha a videomagnó nem kapcsol be a beállítást követően, ismételje meg a 2., 3.
és 4. lépést, de most - a videomagnó típusának megfelelő - más kódot adjon
meg. Ha a listán nem talál másik kódot, próbálja végig az összes VCR-kódot
000-tól 080-ig.
Megjegyzés a távirányító üzemmódjainak használatához: VCR (videomagnó)
„VCR” üzemmódban a távirányító hangerőgombjai változatlanul a televízió hangerejét
szabályozzák.
A távirányító beállítása a kábeldoboz működtetésére
1. Kapcsolja ki a kábeldobozt.
2. A televízió távirányítóján nyomja meg a
CABLE
gombot.
3. A televízió távirányítóján nyomja meg a SET gombot.
A távirányító számgombjai segítségével írja be a kábeldoboz típusának
4.
megfelelő háromjegyű kábeldobozkódot, melyek listája a kézikönyv 39. oldalán
található.
Okvetlenül három számjegyet írjon be, akkor is, ha az első számjegy „0”.
(Ha több kód is szerepel a listán, próbálkozzon az elsővel.)
5.
Nyomja meg a távirányító POWER gombját.
Ha a távirányító beállítása megfelelő, a kábeldoboz bekapcsol.
Ha a kábeldoboz nem kapcsol be a beállítást követően, ismételje meg a 2., 3. és
4. lépést, de most - a kábeldoboz típusának megfelelő - más kódot adjon meg.
Ha a listán nem talál másik kódot, próbálja végig az összes kódot 000-tól 046-ig.
Megjegyzés a távirányító üzemmódjainak használatához: Cable Box (kábeldoboz) „CABLE”
üzemmódban a távirányító hangerőgombjai változatlanul a televízió hangerejét szabályozzák.
Magyar-36
Page 83

A távirányító beállítása DVD-lejátszó működtetésére
1.
Kapcsolja ki a DVD-t.
2. A televízió távirányítóján nyomja meg a DVD gombot.
3. A televízió távirányítóján nyomja meg a SET gombot.
A távirányító számgombjai segítségével írja be a DVD-lejátszó
4.
típusának megfelelő háromjegyű DVD-kódot, melyek listája a
kézikönyv 39~40. oldalán található.
Okvetlenül három számjegyet írjon be, akkor is, ha az első számjegy „0”.
(Ha több kód is szerepel a listán, próbálkozzon az elsővel.)
5.
Nyomja meg a távirányító POWER gombját.
Ha a távirányító beállítása megfelelő, a DVD-lejátszó bekapcsol.
Ha a DVD-lejátszó nem kapcsol be a beállítást követően, ismételje meg a 2., 3.
és 4. lépést, de most - a DVD-lejátszó típusának megfelelő - más kódot adjon
meg. Ha a listán nem talál másik kódot, próbálja végig az összes kódot 000-tól
141-ig.
Megjegyzés a távirányító üzemmódjainak használatához: DVD
„DVD” üzemmódban a távirányító hangerőgombjai változatlanul a televízió hangerejét szabályozzák.
A távirányító beállítása STB működtetésére
1.
Kapcsolja ki a STB.
2. A televízió távirányítóján nyomja meg a STB gombot.
3. A televízió távirányítóján nyomja meg a SET gombot.
4.
A távirányító számgombjai segítségével írja be a STB típusának megfelelő
háromjegyű STB-kódot, melyek listája a kézikönyv 40. oldalán található.
Okvetlenül három számjegyet írjon be, akkor is, ha az első számjegy „0”.
(Ha több kód is szerepel a listán, próbálkozzon az elsővel.)
5.
Nyomja meg a távirányító POWER gombját.
Ha a távirányító beállítása megfelelő, a STB bekapcsol.
Ha a STB nem kapcsol be a beállítást követően, ismételje meg a 2., 3. és 4.
lépést, de most - a STB típusának megfelelő - más kódot adjon meg. Ha a listán
nem talál másik kódot, próbálja végig az összes kódot 000-tól 074-ig.
Megjegyzés a távirányító üzemmódjainak használatához: STB
„STB” üzemmódban a távirányító hangerőgombjai változatlanul a televízió hangerejét
szabályozzák.
Magyar-37
Page 84

A távirányító kódjai
Videomagnó
Gyártmány Kód
SAMSUNG 000 001 002 003 004 005 077 078 079
ADMIRAL 020
AIWA 025
AKAI 004 027 032
AUDIO DYNAMICS 007 026
BELL&HOWELL 018
BROKSONIC 022
CANDLE 002 003 006 008 015 055
CANON 021 056
CITIZEN 002 003 006 008 015 055
COLORTYME 007
CRAIG 002 024
CURTIS MATHES 002 007 008 017 021 025 056 064 066
DAEWOO 003 010 011 012 013 014 015 016
DB 007 026
DIMENSIA 017
DYNATECH 025
ELECTROHOME 034
EMERSON
FISHER 018 024 028 029 048 051 061
FUNAI 025
GENERAL ELECTRIC
GO VIDEO 002
HARMAN KARDON 007
HITACHI 019 025 041 042 074
INSTANT REPLAY 021
JC PENNEY
JCL
JVC
KENWOOD
KLH
KONIA
LG(Goldstar)
LIOYD
LOGI K
LXI
MAGNAVOX
MARANTZ
MARTA
MEI
MEMOREX
MGA
MIDLAND
MINOLTA
MITSUBISHI
001 003 006 021 022 025 030 032 034 040 047
050 052 060 063 065 066 067 069 073
002 005 017 021 056
002 007 018 019 021 026 037 041 054 056
007 008 018 021 026 037
081 082 083
007 008 018 021 026 037
070
036
006 007 008 009 010
025
038
025
021 056 059
007 008 018 021 026 037 062
006
021
006 021 024 025
034
005
019 041 075
019 034 041 046
Gyártmány Kód
MONTGOMERY WARD
MTC 002 025
MULTITECH 002 005 025 038
NEC 007 008 018 026 037 062 064
OPTIMUS 020
ORION 073 074 075 076
PANASONIC 021 056 071 072
PENTAX 019 041 075
PENTEX RESEARCH+
PHILCO 021 056 059
PHILIPS 021 080
PIONEER 019 026 039 053
PORTLAND 015 049 055
PROSCAN 017
QUARTZ 018
QUASAR 021 056
RADIO SHACK/
REALISTIC
RCA
SANSUI 026
SANYO 018 024
SCOTT 003 047 052 067
SEARS 006 018 019 024 028 029 041 048 051
SHARP 020 034 045 015
SHIMTOM 027 033 038 058
SIGNATURE 025
SONY 027 033 044
SYLVANIA 021 025 056 059
SYMPHONIC 025
TANDY 018 025
TASHIKA 006
TATUNG 037
TEAC 025 037 068
TECHNICS 021
TEKNIKA 006 021 025 031
TMK 066
TOSHIBA 003 019 029 051 052
TOTEVISION 002 006
UNITECH 002
VECTOR RESEARCH
VICTOR 026
VIDEO CONCEPTS 007 026
VIDEOSONIC 002
WAR DS
YAMAHA 007 008 018 026 037
ZENITH 023 027 033
020
008
006 018 020 021 024 025 029 034 048 056
002 017 019 021 035 041 043 057 068 076
007 026
002 003 006 019 020 021 024 025 034 038 041
Magyar-38
Page 85

Kábeldoboz
Gyártmány Kód
SAMSUNG 000 001 002 003 004 005 006 007
GI 041
HAMLIN 003 024 031
HITACHI 025 030
JERROLD 038 039
MACOM 025 030
MAGNAVOX 019 023 028
OAK 026
PANASONIC 003 022 027 037 044
PHILIPS 019 021 023 028
PIONEER 004 018 020 044
RCA 014 022 040
REGAL 003
SAMSUNG DVD
Termék Kód
DVD 000 001 002
DVDR 003 004
BD Record 005 006
VCR COMBO 007 008 009 010 011
VCR Record 012
DHR COMBO 013
DVD
Gyártmány Kód
ANAM 030
AUDIOVOX 075
AUDIOLOGIC 085
ANABA 072
APEX DIGITAL 070 071 074 086 083 084 088 111 112
AIWA 114
BROKSONIC 062
BLAUPUNKT 074
B&K 122 123
CURTIS MATHES 027
CYBER HOME 077 078 079 082
CLARION 080 125
CIRRUS 081
CYBER HOME 065
CINEVISION 095
DAEWOO 066
DENON 146
FARENHEIT 067 068
FISHER 090
GPX 060
GO VIDEO 061 089 133 135
GE 069 074
GREENHILL 074
HITACHI 064 113
HITEKER 071
HOYO 073
HARMAN / KARDON
IRT 089
091 110
Magyar-39
Gyártmány Kód
REGENCY 015 023
SA 042 043
SCIENTIFIC ATLAN 042 043
SPRUCER 022
STARGATE 2000 036
SYLVANIA 016
TEXSCAN 016
TOCOM 032
UNIVERSAL 033 034
VIEWSTAR 019 021 023 028
WARNER AMEX 046
ZENITH 017 029 035 037 045
Termék Kód
Home Theater VCR COMBO 014 015 016
HDD Recorder COMBO 017
TWIN TRAY COMBO 018
STB DVD COMBO 019
DVD Receiver 020
AV Receiver 021
Gyártmány Kód
INTEGRA 092
JBL 091
JVC 022 033 115 116
JATON 073
KENWOOD 051 108 109
KISS 073
KONKA 059 100 106 107
KLH 074 075
LG(Goldstar) 025 031
LOEWE 057
LASONIC 058
MOBILE AUTHORITY
MEMOREX 055
MALATA 056
MAGNAVOX 076 093
MINTEK 074 094
MONYKA 073
NORCENT 048 049 050
NEXT BASE 052
NEC 053
NANTAUS 144
NESA 074
OPTOMEDIA ELECTRONICS
OPTIVIEW 072
ONKYO 076 092 119
PHILCO 044 045
PRINCETON 046 047
PROSCAN 023
054
105
Page 86

DVD
Gyártmány Kód
PANASONIC 024 034 124 134 136 137 138
PHILIPS 036 076
ROTEL 117 118
RIO 120
RCA 023 035 074 075 131 132
RAITE 073
ROWA 038
SAMPO 104
SONY 026 029 126 127 128 129 130 141
SHERWOOD 039 041
SVA 042
SYLVANIA 043 093
SHARP 140
SANSUI 062
SANYO 062 090
SHINSONIC 094
SAMSUNG STB
Termék Kód
Ground wave STB 001 002
Satellite STB 003
CABLE STB 004
STB DVD COMBO 008
Satellite STB HDD COMBO Standard 009
STB
Gyártmány Kód
ALPHASTAR 023
ANAM 043
CHANNEL MASTER 018 034
CROSSDIGITAL 019
CHAPARRAL 035
DIRECT TV 015 016 017 019 022 045 060 061 062 065
DAEWOO 074
DISH NETWORK SYSTEM
DISHPRO 069
DRAKE 018 024 032
DX ANTENNA 027
ECHOSTAR 025 069 070 071
EXPRESSVU 069
GOI 069
GE 065
GENERAL INSTRUMENT
HTS 069
HOME CABLE 056
HITACHI 022
HUGHES NETWORK
IQ 020
IQ PRISM 020
JANEIL 059
JERROID 063
JVC 069 070
LG(Goldstar) 044 073
066 067 068
069 070
046 047 048 063 064
015 017
Magyar-40
Gyártmány Kód
THOMSON 145
TOSHIBA 028 062 076
TECHNICS 139
TVIEW 072
TOKAI 073
TEAC 096
TECHWOOD 097
TREDEX 098 099 101
URBAN CONCEPTS
VENTURER 075
VOCOPRO 102
YAMAHA 032 063
YAMAKAWA 040 073
XWAVE 103
ZENITH 076 121
Termék Kód
Satellite STB HDD COMBO Premium 010
CABLE STB HDD COMBO Standard 011
CABLE STB HDD COMBO Premium 012
Ground wave STB HDD COMBO Standard 013
Ground wave STB HDD COMBO Premium 014
Gyártmány Kód
MAGNAVOX 016 021 036 038 039 040 041 042
MEMOREX 016
MOTOROLA 064
MACOM 018
MITSUBISHI 015
NEXT LEVEL 047 048 064
PHILIPS 015 016 017 021 033 036 038 039 040 041
PRIMESTAR 046 049 050 063
PANASONIC 058 059 061 062
PAYSAT 016
PROSCAN 065 066
RCA 051 052 053 065 066
RADIOSHACK 064
REALISTIC 057
STAR TRAK 026
STS 020 027
SKY 031
SKY LIFE 005 006 007
SHACK 064
STAR CHOICE 064
SONY 054 060
TOSHIBA 015 017 028 029 030 072
ULTIMATE TV 060 066
UNIDEN 016 021 037 055 056 057
ZENITH 024 031 068
076
042 067
Page 87

A számítógépes szoftver telepítése (Windows XP)
Az alábbiakban a Windows képernyőbeállításait láthatja egy szokványos számítógép esetében.
A saját számítógépén megjelenő képek azonban az adott Windows verziótól és a videokártyától függően
eltérhetnek az itt látottaktól. Ha a tényleges képernyők különböznek is, az esetek többségében
ugyanazok az alapbeállítási információk érvényesek. (Ellenkező esetben lépjen kapcsolatba a számítógép
gyártójával vagy a Samsung márkakereskedőjével.)
1. Először kattintson a Windows Start menüjének „Control Panel” sorára.
2. Amikor megjelenik a Vezérlőpult ablak,kattintson a „Appearance and Themes” ikonra.
Ekkor megjelenik egy párbeszédablak.
3. Amikor megjelenik a Vezérlőpult ablak,kattintson a „Display” ikonra.
Ekkor megjelenik egy párbeszédablak.
4. Az ablakban kattintson a „Settings” fülre.
A megfelelő képernyőterület (felbontás) beállítás Optimum - 1360 x 768
Ha van függőleges frekvenciaopció a képernyő-beállítások párbeszédablakában, annak
megfelelő értéke „60” vagy „60 Hz”. Egyébként kattintson az „OK” gombra, és lépjen ki a
párbeszédablakból.
Kijelzési mód
A képernyő pozíciója és mérete a számítógép monitorától és annak felbontásától függően egyaránt
változik. A táblázatban szereplő felbontásokat javasoljuk. (A támogatott határértékek közötti összes
felbontás támogatott.)
Mód
IBM
VESA
A váltott soros üzemmódot a rendszer nem támogatja.
Nem szabványos videoformátum kiválasztása esetén az egység működése rendellenes lehet.
A HDMI/DVI nem támogatja a PC funkciót.
A z önálló és az összetett módokat támogatja a készülék. Az SOG-módot nem támogatja.
Felbontás
640 x 480
720 x 400
640 x 480
640 x 480
800 x 600
800 x 600
800 x 600
1024 x 768
1024 x 768
1024 x 768
1360 x 768
Vízszintes frekven-
cia (kHz)
31,469
31,469
37,861
37,500
37,879
48,077
46,875
48,364
56,476
60,023
47,712
Függőleges
frekvencia (Hz)
59,940
70,087
72,809
75,000
60,317
72,188
75,000
60,000
70,069
75,029
60,015
Képpontóra-
frekvencia (MHz)
25,175
28,322
31,500
31,500
40,000
50,000
49,500
65,000
75,000
78,750
85,800
Szink. polaritás(V/
- / -
- / +
- / -
- / + /+
+ /+
+ /+
- / -
- / + /+
+ /+
F)
Magyar-41
Page 88

A számítógép beállítása
A PC üzemmód
kiválasztásához nyomja meg a
távirányítón a PC gombot.
A kép durva- finomhangolása (Képzár):
A képminőség szabályozás lényege, hogy megszüntesse, vagy csökkentse a
zavaró képhatásokat. Ha a zavar a finomhangolással nem szűnik meg, akkor a
lehető legmegfelelőbben (durva) állítsa be a frekvenciát, majd végezzen ismét
finomhangolást. A zavar csökkentése után igazítsa újra a képet úgy, hogy az a
képernyő közepére illeszkedjen.
1. Beállítás: A PC gomb megnyomásával válassza ki a PC-üzemmódot.
2. A menü megjelenítéséhez nyomja meg a MENU gombot.
A vagy gomb megnyomásával jelölje ki a „Beállítás” pontot,
majd nyomja meg az ENTER gombot.
3. A vagy gomb megnyomásával jelölje ki a „PC” pontot,
majd nyomja meg az ENTER gombot.
4. A „Képzár” opció kiválasztásához nyomja meg az ENTER gombot.
5.
A vagy gomb megnyomásával jelölje ki a „Durva” vagy „Finom” pontot,
majd nyomja meg az ENTER gombot.
6. A vagy gomb megnyomásával módosítható a képernyő minősége.
Nyomja meg az ENTER gombot.
7. A kilépéshez nyomja meg az EXIT gombot.
A kép elhelyezkedésének módosítása (Helyzet):
Módosítsa a PC-képernyő helyzetét, ha nem illeszkedik a TV-képernyőre.
1.
Kövesse a „A kép durva- finomhangolása (Képzár)” című rész 1-től 3. lépéseit.
2. A vagy gomb megnyomásával jelölje ki a „Helyzet“ pontot,
majd nyomja meg az
ENTER gombot.
3. A kép függőleges irányú igazításához nyomja meg a vagy gombot.
A kép vízszintes irányú igazításához nyomja meg a vagy gombot.
Nyomja meg az ENTER gombot.
4. A kilépéshez nyomja meg az EXIT gombot.
A PC képernyő automatikus beállítása (Autom. beállítás):
Az automatikus beállítás segítségével a készülék PC-képernyője önmagát állítja
be a bejövő videojel alapján. A finom, durva és a helyzet értékei automatikusan
vannak beállítva.
1.
Kövesse a „A kép durva- finomhangolása (Képzár)” című rész 1-től 3. lépéseit.
2. A vagy gomb megnyomásával jelölje ki a „Autom. beállítás“ pontot,
majd nyomja meg az
ENTER gombot.
3. A kilépéshez nyomja meg az EXIT gombot.
Az eredeti képbeállítások visszaállítása (Kép visszaáll.):
Valamennyi képbeállítást helyettesítheti a gyári alapbeállított értékekkel.
1.
Kövesse a „A kép durva- finomhangolása (Képzár)” című rész 1-től 3. lépéseit.
2. A vagy gomb megnyomásával jelölje ki a „Kép visszaáll.“ pontot,
majd nyomja meg az
ENTER gombot.
3. A kilépéshez nyomja meg az EXIT gombot.
Magyar-42
Page 89

A lopásgátló Kensington-zár használata
A Kensington zár olyan eszköz, amellyel fizikailag rögzíthet ő a rendszer nyilvános helyen.
A záróeszközt külön kell megvásárolni. A gyártótól függő en az ábrától eltér ő külalak és zárási módszer is elképzelhet ő. A
helyes használathoz olvassa el a Kensington zárhoz tartozó kézikönyvet.
1. Helyezze a záróeszközt az LCD
képerny ő n lév ő Kensington
résbe (1. Ábra),
kábel
2. Ábra
majd fordítsa el azt zárási
irányba (2. Ábra).
2. Csatlakoztassa a Kensington zár
kábelt.
1. Ábra
3. Rögzítse a Kensington zárat az
íróasztalhoz vagy egy nehéz,
<Opció>
A Kensington zár elhelyezkedése a típustól függően különbözhet.
stabil tárgyhoz.
Hibakeresés: Mielőtt szakemberhez fordulna
Nincs kép vagy hang
A kép normális, de nincs hang
Nincs kép vagy csak fekete-fehér
kép van
A hang vagy a kép interferál
Elmosódott vagy szemcsés kép illetve
torz hang tapasztalható.
A távirányító nem megfelelően működik
„Ellenőrizze a jelkábelt”
üzenet jelenik meg.
PC-üzemmódban a „Nem támogatott
üzemmód” üzenet jelenik meg.
A TFT LCD képernyõ alképpontokat tartalmazó panelt használ (
A képernyõn mégis lehet néhány világos vagy sötét képpontot.Ezek a képpontok nem befolyásolják a termék teljesítményét.
Ellenőrizze, hogy a tápfeszültség vezetéke be van-e dugva a fali csatlakozó aljzatba.
Ellenőrizze, hogy megnyomta-e a készülék elején található
Ellenőrizze a kép kontraszt és fényerő beállítását.
Ellenőrizze a hangerőt.
Ellenőrizze a hangerőt.
Ellenőrizze, hogy a távirányító MUTE
Ellenőrizze, hogy a „Belső némítás” funkció ki van-e kapcsolva.
Módosítson a színbeállításokon.
Ellenőrizze, hogy a kiválasztott műsorszóró rendszer megfeleloen muködik-e.
Próbálja beazonosítani a televízió működését befolyásoló elektromos készüléket, és vigye attól arrébb.
A televíziót csatlakoztassa egy másik tápfeszültség-aljzatba.
Ellenőrizze az antenna irányát, elhelyezését és csatlakozásait.
Ezt az inter ferenciát gyakran egy beltéri antenna okozza.
Cserélje ki a távirányító elemeit.
Tisztítsa meg a távirányító felső szélét (az átviteli ablakot).
Ellenőrizze, hogy az elemek a polaritásnak megfelelően vannak-e behelyezve.
A jelk ábel szorosan legyen a PC jelforrásokhoz csatlakoztatva.
A PC jelforrások legyenek bekapcsolva.
Ellenőrizze a videoadapter maximális felbontását és frekvenciáját.
Hasonlítsa össze ezeket az értékeket a Megjelenítési módok fejezet adataival.
3.147.264
Magyar-43
gombját nem nyomta-e meg.
), melynek gyártása kifinomult technológiát alkalmaz.
gombokat.
Page 90

Műszaki és környezetvédelmi adatok
Típus elnevezése
Képernyő mérete (képátló)
Tápegység
Fogyasztás
PC Felbontás
Hang
Kimenet
Méretek (Sz x H x M)
Készülékház
Állvánnyal
Súly
Súly
Környezeti adatok
Üzemi hőmérséklet
Üzemi páratartalom
Tárolási hőmérséklet
Tárolási páratartalom
LE32N7
32 hüvelyk
AC 220-240 V, 50 Hz
155 W
1360 x 768 @ 60 Hz
10 W x 2
803 x 88 x 539 mm
803 x 244 x 578 mm
15,6 kg
10 °C to 40 °C (50 °F to 104 °F)
10 % to 80 %, nem kondenzáló
-20 °C to 45 °C (-4 °F to 113 °F)
5 % to 95 %, nem kondenzáló
Forgótalp (bal/jobb)
LE40N7
40 hüvelyk
AC 220-240 V, 50 Hz
210 W
1360 x 768 @ 60 Hz
10 W x 2
994 x 92 x 647 mm
994 x 290 x 696 mm
24,3 kg
10 °C to 40 °C (50 °F to 104 °F)
10 % to 80 %, nem kondenzáló
-20 °C to 45 °C (-4 °F to 113 °F)
5 % to 95 %, nem kondenzáló
-20˚ ~ 20˚
LE46N7
46 hüvelyk
AC 220-240 V, 50 Hz
275 W
1360 x 768 @ 60 Hz
10 W x 2
1129 x 106 x 732 mm
1129 x 320 x 788 mm
35,3 kg
10 °C to 40 °C (50 °F to 104 °F)
10 % to 80 %, nem kondenzáló
-20 °C to 45 °C (-4 °F to 113 °F)
5 % to 95 %, nem kondenzáló
A műszaki adatok és a kivitel külön értesítés nélkül változhat.
Ez a készülék B osztályú digitális berendezés.
Magyar-44
Page 91

Treść
PODŁĄCZENIE I PRZYGOTOWANIE TELEWIZORA
Lista elementów............................................................................. 2
Instalowanie wspornika do montażu
naściennego ............................................................................... 2
Panel sterowania............................................................................ 3
Panel podłączeń ............................................................................. 4
Pilot (wszystkie funkcje oprócz teletekstu) .......................... 6
Wkładanie baterii do pilota ....................................................... 6
Włączanie i wyłączanie ................................................................ 7
Przestawianie telewizora w tryb gotowości ........................ 7
Plug & Play ....................................................................................... 7
USTAWIANIE KANAŁÓW
Automatyczne zapamiętywanie kanałów ............................ 8
Ręczne zapamiętywanie kanałów ........................................... 8
Programowanie Menedżera kanałów .................................... 9
Włączanie zabezpieczenia przed dziećmi ....................... 10
Sortowanie zapamiętanych kanałów ..................................... 10
Przypisywanie nazw kanałom .................................................. 11
Dostrajanie odbioru kanału ....................................................... 11
USTAWIANIE OBRAZU
Zmiana standardu obrazu .......................................................... 12
Regulacja opcji o braz niestand. .............................................. 12
Zmiana tonu kolorów .................................................................. 13
Zmiana temperatury kolorów za pomocą
wybranego składnika koloru ..................................................... 13
Przywracanie domyślnych ustawień
fabrycznych obrazu ...................................................................... 14
Zmiana rozmiaru obrazu ............................................................ 14
Zmiana opcji Automatyczna szerokość (4:3) ....................... 14
Zatrzymywanie wyświetlanego obrazu ................................ 15
Cyf. red. szumu ............................................................................... 15
DNIe Demo (Digital Natural Image engine) ........................ 15
Zmiana opcji Przestrzeń kolorów ............................................ 15
Wyświetlanie obrazu w obrazie (PIP) ..................................... 16
USTAWIANIE DŹWIĘKU
Zmiana standardu dźwięku .................................................. 17
Regulacja ustawień dź więku ................................................ 17
Ustawianie trybu TruSurround XT (SRS TSXT)
Automatyczna regulacja głośności .................................... 18
Włączanie wewnętrznego wyciszenia .............................. 18
Słuchanie dźwięku obrazu podrzędnego ....................... 18
Prz ywracanie domyślnych ustawień dźwięku ............... 19
Przyłączanie słuchawek.......................................................... 19
Wybór tr ybu dźwięku ............................................................. 19
.................... 17
USTAWIANIE CZASU
Ustawianie i wyświetlanie zegara ...................................... 19
Nastawianie automatycznego wyłączania ...................... 20
Automatyczne
włączanie i wyłączanie telewizora ..................................... 20
USTAWIANIE POZOSTAŁYCH FUNKCJI
Wybieranie źródła Język ........................................................ 21
Korzystanie z trybu Tryb gry ................................................ 21
Ustawianie trybu niebieskiego ekranu /
Wybieranie melodii ................................................................. 22
Korzystanie z funkcji oszczędności energii ..................... 22
Ustawianie Blue Eye (niebieskiej diody) .......................... 22
Wybieranie źródła sygnału.................................................... 23
Edycja nazw źródeł sygnału ................................................. 23
WISELINK
Korzystanie z funkcji WISELINK ........................................... 24
Korzystanie z menu WISELINK ............................................. 25
Korzystanie z listy zdjęć (plików JPEG) ............................. 25
Przeglądanie informacji o zdjęciach ................................. 27
Wybór zdjęć i pokazu slajdów ............................................. 27
Obracanie .................................................................................... 28
Powiększanie ............................................................................ 29
Kopiowanie plików obrazów .............................................. 30
Usuwanie plików obrazów ................................................... 30
Drukowanie zdjęć ................................................................... 31
Korzystanie z listy MP3 ........................................................... 31
Kopiowanie plików muzycznych ....................................... 32
Usuwanie plików muzycznych ........................................... 32
Korzystanie z menu konfiguracji ........................................ 33
KORZYSTANIE Z FUNKCJI TELEGAZETY
Dekoder telegazety ................................................................. 34
Wyświetlanie telegazety ........................................................ 34
Wybór ok reślonej strony telegazety ................................. 35
Wybór strony telegazety za pomocą
funkcji Fastext ............................................................................ 35
Konfiguracja pilota .................................................................. 36
Kody pilota .................................................................................. 38
USTAWIANIE PC
Konfigurowanie oprogramowania w komputerze
(z systemem Windows XP) .................................................... 41
Tryb ekranu................................................................................. 41
Ustawianie PC ............................................................................ 42
ZALECENIA DOTYCZĄCE UŻYTKOWANIA
Stosowanie blokady Kensington
przeciw kradzieży ..................................................................... 43
Rozwiązywanie problemów:
Zanim skontaktujesz się z serwisem ................................. 43
Parametry techniczne i ekologiczne ................................ 44
Symbole Naciśnij Ważne Uwaga
Przycisk
jednodotykowy
Polski
Polski-1
Page 92

Lista elementów
Należy sprawdzić, czy wraz z monitorem telewizyjnym LCD dostarczono wymienione poniżej elementy.
W przypadku braku któregokolwiek z elementów należy się skontaktować ze sprzedawcą.
Pilot i baterie
(AAA, 2 szt.)
Przewód zasilający Pokrywa - spód
Do podstawy
monitora (4 szt.)
Podstawa
Ściereczka do czyszc-
Instrukcja obsługi Gwarancja Instrukcje bezpieczeństwa Karta rejestracyjna
Gwarancja / Karta usług sieciowych / Instrukcje bezpieczeństwa / Karta rejestracyjna (Nie wszędzie dostępna).
Podstawa i wkręty mogą nie znajdować się w zestawie w przypadku niektórych modeli.
Montaż podstawy
< 2 >< 3 >
1. Umieść telewizor ekranem na miękkiej tkaninie lub poduszce na stole.
2. Umieść podstawę w otworze znajdującym się na spodzie telewizora.
3. Włóż wkręt do wskazanego otworu i dokręć go.
Podstawę instaluje się w przypadku modeli o co najmniej 40 calowym ekranie.
Instalowanie wspornika do montażu naściennego
Wspornik (sprzedawany oddzielnie) umożliwia zamontowanie telewizora na ścianie.
Szczegółowe informacje dotyczące instalacji wspornika można
znaleźć w instrukcji dołączonej do zestawu do montażu na ścianie.
W celu zamontowania telewizora na ścianie przy użyciu wspornika
należy skontaktować się z technikiem.
Firma Samsung Electronics nie ponosi odpowiedzialności za
uszkodzenia produktu lub obrażenia ciała powstałe w wyniku
samodzielnego instalowania telewizora.
zenia
Odłącz podstawę i zakryj nasadką otwór znajdujący
się na spodzie, dokręcając dwa wkręty.
Polski-2
Page 93

Panel sterowania
Kolor i kształt produktu mogą się różnić w zależności od modelu.
SOURCE
Służy do przełączania między wszystkimi dostępnymi
źródłami sygnału wejściowego.
(TV, Złącze1, Złącze2, AV, S-Video, Moduł, PC, HDMI1,
HDMI2). W menu ekranowym z przycisku tego korzysta
się podobnie jak z przycisk u ENTER
sterowania.
MENU
Naciśnięcie powoduje wyświetlenie menu
ekranowego z opcjami telewizora.
Naciśnij, aby zmniejszyć lub zwiększyć głośność.
W menu ekranowym z przycisków
korzysta się podobnie jak z przycisków i na
pilocie zdalnego sterowania.
na pilocie zdalnego
Służy do zmiany kanałów.
W menu ekranowym z przycisków
korzysta się podobnie jak z przycisków i
na pilocie zdalnego sterowania. (Przyciski Channel
umożliwiają włączenie odbiornika bez pomocy pilota.)
Głośniki
(Zasilanie)
Włączanie i wyłączanie telewizora.
Wskaźnik zasilania
Miga i wyłącza się, gdy telewizor jest włączony, a
zapala się w trybie gotowości.
Czujnik podczerwieni
Pilot zdalnego sterowania należy skierować w to
miejsce w telewizorze.
Polski-3
Page 94

Panel podłączeń
[Gniazda panelu tylnego]
Gniazdo zasilania
[Gniazda panelu
bocznego]
Przed podłączeniem zewnętrznego urządzenia należy upewnić się, że wyłączone zostało zasilanie telewizora.
Przy podłączaniu urządzenia zewnętrznego należy dopasować kolor gniazda do koloru kabla.
Polski-4
Page 95

Podłączanie anteny RTV lub telewizji kablowej
Aby prawidłowo odbierać kanały telewizyjne, odbiornik musi odbierać sygnał z jednego z następujących źródeł:
- Antena zewnętrzna / Sieć telewizji kablowej / Antena satelitarna
Podłączanie złączy HDMI/DVI
-
Urządzenie obsługuje połączone urządzenia audio-wideo obsługujące połączenia HDMI (przystawki, odtwarzacze DVD, odbiorniki
audio-wideo i telewizory cyfrowe).
- Połączenie HDMI nie wymaga dodatkowego połączenia doprowadzającego sygnał dźwięku.
Co to jest HDMI?
- „High Definition Multimedia Interface” (HDMI) to połączenie umożliwiające przesyłanie cyfrowego obrazu o wysokiej
rozdzielczości oraz wielokanałowego cyfrowego dźwięku (format 5.1).
- Interfejs HDMI/DVI służy do doprowadzania sygnału DVI do dodanego urządzenia za pomocą odpowiedniego
przewodu (dostępny oddzielnie). Różnica pomiędzy interfejsem HDMI i DVI polega na tym, że interfejs HDMI jest
mniejszy, ma zainstalowaną funkcje kodowania HDCP (High Bandwidth Digital Copy Protection) oraz obsługuje
wielokanałowy dź więk cyfrowy.
Do tego połączenia należy użyć kabla DVI-HDMI lub przedłużacza HDMI-DVI oraz złącza „R - AUDIO - L” wejścia DVI
jako źródła sygnału dźwiękowego.
-
należy upewnić się, że produkt został ustawiony w zgodny tryb wyjściowego sygnału wideo, tak jak przedstawiono w tabeli poniżej.
Niezastosowanie się do tego zalecenia może spowodować zniekształcenie, rozbicie na części lub brak obrazu.
-
- Jeśli chcesz mieć podłączoną zarówno przystawkę, jak i magnetowid (lub DVD), podłącz przystawkę do magnetowidu (lub DVD),
a magnetowid (lub DVD) do telewizora.
magnetowid, odtwarzacz DVD lub kamera wideo.
- Kable sygnału dźwięku RCA należy podłącz yć do złącza „R - AUDIO - L” z tyłu telewizora, a drugi koniec do odpowiednich
wyjść audio w zewnętrznym urządzeniu audio-wideo.
- Słuchawki można podłączyć do gniazda słuchawkowego (
z wbudowanych głośników zostanie wyłączony.
wzmacniaczu lub zestawie kina domowego.
- Kabel sygnału dźwięku stereofonicznego (opcjonalny) należy podłączyć do wejścia „AUDIO (PC IN)” z tyłu telewizora, a
drugi koniec do odpowiedniego wyjścia „Audio Out” karty dźwiękowej w komputerze.
tyłu telewizora, a pozostałe końce do odpowiednich wyjść wideo w dekoderze cyfrowym lub odtwarzaczu DVD.
-
cyfrowej (lub DVD), a odbiornik telewizji cyfrowej (lub DVD) do złącza rozdzielnych składowych sygnału („PR”, „ P B”, „Y”) w telewizorze.
-
- Kable sygnału dźwięku RCA (opcjonalne) należy podłącz yć do złącza „R - AUDIO - L” z tyłu telewizora, a drugi koniec do
odpowiednich wyjść audio w dekoderze cyfrowym lub odtwarzaczu DVD.
- Optymalny tryb wyświetlania obrazu dla tego telewizora LCD to 720p.
- Maksymalna rozdzielczość obrazu tego telewizora LCD jest dostępna w trybie 1080i.
- Informacje dotyczące korzystania z blokady można uzyskać w miejscu zakupu telewizora.
-
W przypadku wykorzystania złącza HDMI lub DVI do podłączania tego produktu do dekodera, odtwarzacza DVD lub konsoli do gier itp.
Obsługiwane tryby dla złączy DVI i HDMI
50 Hz
60 Hz
Rozdzielne
składowe sygnału
Nie należy podłączać złącza HDMI/DVI do komputera PC ani karty graficznej laptopa. (Spowoduje to wyświetlenie pustego ekranu).
Podłączanie dekodera, magnetowidu i odtwarzacza DVD
-
Kabel SCART magnetowidu lub odtwarzacza DVD należy podłączyć do złącza (opcjonalny) SCART w magnetowidzie lub odtwarzaczu DVD.
Podłączanie zewnętrznych urządzeń audio-wideo
- Kabel RCA lub S-VIDEO należy podłączyć do odpowiedniego zewnętrznego urządzenia audio-wideo, takiego jak
SERWIS
- Złącze serwisowe do użytku dla wykwalifikowanych pracowników serwisu.
Podłączanie złącza AUDIO
- Podłącz kable audio RCA do złączy „R - AUDIO - L” z tyłu telewizora, a ich drugie końce do odpowiednich wejść audio we
Podłączanie komputera
Kabel D-Sub (opcjonalny) należy podłączyć do wejścia „PC (PC IN)” z tyłu telewizora, a jego drugi koniec do karty wideo w komputerze.
-
Podłączanie urządzeń zewnętrznych (dekoder cyfrowy/DVD)
- Kable komponentowego sygnału wideo (opcjonalne) należy podłączyć do złączy sygnału komponentowego („PR”, „ P B”, „Y”) z
Jeśli chcesz mieć podłączoną zarówno przystawkę, jak i telewizję cyfrową (lub DVD), podłącz przystawkę do odbiornika telewizji
Czasami złącza Y, PB i PR są w urządzeniach cyfrowych (telewizja cyfrowa lub DVD) oznaczane jako Y, B-Y i R-Y lub Y, Cb i Cr.
Zabezpieczenie Kensington
Zabezpieczenie Kensington (opcjonalne) to mechanizm służący do fizycznego zablokowania urządzenia używanego w miejscach publicznych.
-
480i
X
X
O
480p
O
O
O
576i
X
X
O
) w tylnej części odbiornika. Po podłączenie słuchawek dźwięk
576p
O
X
O
720p
O
O
O
1080i
O
O
O
W zależności od modelu monitora umiejscowienie zabezpieczenia Kensington może być różne.
Polski-5
Page 96

Pilot (wszystkie funkcje oprócz teletekstu)
Wybór urządzenia docelowego, które ma
być sterowane za pomocą pilota firmy
Samsung (TV, DVD, STB, CABLE, VCR)
(Patrz strona 36~40)
Przycisk stanu gotowości TV
Przyciski numeryczne umożliwiające
bezpośrednie wybieranie kanałów
Wybór kanału jedno- lub dwuc yfrowego
Wyświetlanie na ekranie okno
„Menedżer Kanałów” .
Bezpośrednio przechodzi do trybu
Funkcje odtwarzacza wideo i DVD: REW
(wyszukiwanie do tyłu), STOP
(zatrzymywanie), PLAY/PAUSE
(odtwarzanie/wstrzymywanie), FF
(przewijanie do przodu)
Zmniejszanie głośności
Zwiększanie głośności
Chwilowe wyciszenie dźwięku
Wyświetlanie menu oraz
potwierdzanie zmian.
Włączanie/wyłączanie funkcji PIP (obraz
w obrazie)
Wybór efektów obrazu
Wybór efektu dźwiękowego
Wybór trybu dźwięku
Wybór opcji SRS TSXT
SET: Dostosowanie 5-ciu różnych
urządzeń - telewizora, odtwarzacza
DVD, dekodera telewizji satelitarnej,
dekodera telewizji kablowej lub
magnetowidu.
RESET: Gdy pilot nie działa, zmień
baterie i przed rozpoczęciem
korzystania z urządzenia przez 2-3
sekundy naciskaj przycisk „RESET”.
Wybieranie źródła sygnału wejściowego
Działanie pilota może być zakłócane przez jasne światło.
Pilot może być obsługiwany przez osoby niedowidzące, ponieważ umieszczono na nim wypukłości
w kodzie Braille’a przy przyciskach włączania i zmiany kanału oraz głośności.
Wkładanie baterii do pilota
1. Unieś do góry pokrywę z tyłu pilota w sposób przedstawiony na rysunku.
2. Włóż dwie baterie typu AAA.
Pamiętaj, aby dopasować bieguny „+” i „–” baterii zgodnie z rysunkiem wewnątrz komory.
3. Załóż pokrywę.
Jeśli nie planujesz używać pilota przez dłuższy czas, wyjmij baterie i przechowaj je w chłodnym, suchym miejscu. Pilota można używać w maksymalnej odległości ok. 23 stopy (7m) od odbiornika. (Przy standardowym
korzystaniu z odbiornika, baterie powinny wystarczyć na około jeden rok.)
Jeśli pilot nie działa poprawnie, należy sprawdzić następujące rzeczy:
1. Czy telewizor jest włączony?
2. Czy bieguny baterii zostały umieszczone odwrotnie?
3. Czy baterie są naładowane?
4. Czy nie wystąpiła awaria sieci elektrycznej lub czy nie odłączono kabla zasilania?
5. Czy w pobliżu znajduje się specjalne światło fluorescencyjne lub reklama neonowa?
Podczas naciskania tego przycisku różne
przyciski (np. wyboru sprzętu docelowego,
regulacji głośności i zmiany kanałów,
wyciszenia) świecą się przez kilka sekund, a
następnie wyłączają się w celu oszczędzania
energii. Funkcja ta umożliwia wygodne
korzystanie z pilota w nocy lub w warunkach
słabego oświetlenia.
Poprzedni kanał
Automatyczne wyłączenie
Funkcja ta umożliwia załadowanie
zapisanych zdjęć (JPEG) oraz plików
dźwiękowych (MP3) i ich oglądanie lub
odtwarzanie w telewizorze.
: Następny kanał
P
P
: Poprzedni kanał
Wyjście z menu ekranowego
Sterowanie kursorem w menu
Wyświetlanie informacji o aktualnie
oglądanym programie
Wybór rozmiaru obrazu
Bezpośrednio przechodzi do trybu (PC).
Stopklatka
Wybór źródła sygnału wejściowego
Funkcje Telegazety
Wyjście z telegazety
Indeks telegazety
Blokada telegazety
Wybór rozmiaru telegazety
Zapisywanie strony telegazety
Wybór trybu telegazety (LIST/FLOF)
Podstrona telegazety
P : Następna strona telegazety
P
: Poprzednia strona telegazety
Anulowanie teletekstu
Wyświetlanie ukrytego tekstu
Można również wybrać opcję Teletext,
Double oraz Mix.
Wybór tematu Fastext
Polski-6
Page 97

Włączanie i wyłączanie
Przewód zasilający jest podłączony z tyłu odbiornika.
1. Podłącz przewód zasilający do odpowiedniego gniazdka.
Wskaźnik trybu gotowości na panelu przednim telewizora zaczynie świecić.
2. Naciśnij przycisk POWER na panelu przednim telewizora.
TV
Możesz także nacisnąć przycisk
Zostanie automatycznie wybrany ostatnio oglądany kanał.
( ) zasilania POWER na pilocie, aby włączyć telewizor.
3. Użyj przycisków numerycznych (0~9) lub przycisków zmiany kanału w górę/w dół ( / ) na pilocie, lub też
przycisku
Przy pierwszym włączaniu odbiornika pojawi się prośba o wybranie języka, w którym mają być wyświetlane menu .
znajdującego się na prawym boku telewizora.
4. Aby wyłączyć odbiornik, ponownie naciśnij przycisk POWER .
Przestawianie telewizora w tryb gotowości
Możesz przełączyć odbiornik w tryb czuwania, aby zmniejszyć pobór prądu. Tryb czuwania może być przydatny do
chwilowej przerwy w oglądaniu telewizji (na przykład, podczas posiłku).
1. Naciśnij przycisk POWER
Ekran jest wyłączony i świeci się niebieskieg wskaźnik trybu gotowości na panelu przednim telewizora.
na pilocie.
2. Aby włączyć odbiornik wystarczy ponownie nacisnąć przycisk POWER , przycisk numeryczny (0~9) lub przycisk
zmiany kanałów góra/dół (
Nie zostawiaj odbiornika w trybie czuwania na dłuższy okres czasu (naprzykład, wyjeżdżając na wakacje) Najlepiej jest odłączyć
odbiornik od sieci i anteny.
/ ).
Plug & Play
W momencie gdy zasilanie telewizora jest włączane po raz pierwszy, pewne podstawowe ustawienia klienta są wybierane automatycznie w odpowiedniej kolejności.
Dostępne są następujące ustawienia.
1. Naciśnij przycisk zasilania POWER na pilocie.
Na ekranie pojawi się komunikat „Start Plug & Play” z zaznaczonym przyciskiem „OK”.
2. Wybierz odpowiedni język, naciskając przycisk lub .
Naciśnij przycisk ENTER aby potwierdzić wybór.
3. Pojawi się informacja „Sprawdź antenę”. z zaznaczonym przyciskiem „OK”.
Naciśnij przycisk ENTER.
Sprawdź, czy kabel antenowy został podłączony prawidłowo.
4. Wybierz odpowiedni kraj za pomocą przycisku lub .
Naciśnij przycisk ENTER aby potwierdzić wybór.
5.
Zostanie wyświetlone menu „Automat. zapam”. z zaznaczoną opcją „Uruchom”.
Naciśnij przycisk ENTER.
Wyszukiwanie kanałów rozpocznie się i zakończy automatycznie.
Po zapisaniu wszystkich dostępnych kanałów wyświetlane jest menu „Ust. zegara”.
Naciśnij przycisk ENTER w dowolnej chwili, aby przerwać proces programowania.
6. Naciśnij przycisk ENTER button.
Wybierz „godz.” i „Minuta”, nacisk ając pr zycisk
Ustaw „godz.” i „Minuta”, naciskając przycisk
Godziny i minuty można także ustawić za pomocą przycisków numerycznych na pilocie.
7. Naciśnij przycisk ENTER, aby zatwierdzić ustawienia.
Język: Wybór żądanego języka.
Kraj: Wybór żądanego kraju.
Automat. zapam.: Automatyczne wyszukiwanie i zapisywanie kanałów dostępnych na danym
Ust. zegara: Ustawianie aktualnego czasu w zegarze telewizora.
obszarze.
Polski-7
lub
lub
.
.
Page 98

Aby zresetować tę funkcję…
1. Naciśnij przycisk MENU, aby wyświetlić menu.
Aby wybrać opcję „Konfig.”, naciśnij przycisk lub
ENTER
.
2. Naciśnij ponownie przycisk ENTER w celu wybrania opcji „Plug & Play”.
3.
Na ekranie pojawi się komunikat „Inicjalizacja funkcji Plug&Play”.
, a następnie przycisk
- Automatyczne zapamiętywanie kanałów
- Ręczne zapamiętywanie kanałów
Automatyczne zapamiętywanie kanałów
Możesz przeszukać dostępne zakresy częstotliwości (ich dostępność zależy od kraju).
Przydzielane automatycznie numery programów mogą nie odpowiadać numerom preferowanym lub faktycznym.
1. Naciśnij przycisk MENU, aby wyświetlić menu.
Aby wybrać opcję „Kanał”, naciśnij przycisk lub
2. Naciśnij ponownie przycisk ENTER w celu wybrania opcji „Kraj”.
3. Wybierz odpowiedni kraj za pomocą przycisku lub .
Naciśnij przycisk ENTER aby potwierdzić wybór.
4.
Aby wybrać opcję „Automat. zapam.”, naciśnij przycisk lub
5. Naciśnij przycisk ENTER.
Rozpocznie się programowanie w telewizorze wszystkich dostępnych kanałów.
W d owolnym momencie naciśnij przycisk
6. Po zaprogramowaniu wszystkich dostępnych kanałów ponownie zostanie wyświetlone menu „Sortuj”.
, a następnie przycisk ENTER
, a następnie przycisk ENTER
ENTER
, aby przerwać programowanie i powrócić do menu „Kanał”.
.
.
Ręczne zapamiętywanie kanałów
Możesz ustawić do 100 kanałów, łącznie z kanałami odbieranymi przez sieć kablową.
Przy ręcznym zapamiętywaniu kanałów możesz:
Zdecydować, czy zostanie zapamiętany każdy znaleziony kanał.
Wybrać numer programu dla każdego zapamiętanego kanału, który ma zostać oznaczony .
1. Naciśnij przycisk MENU, aby wyświetlić menu.
Aby wybrać opcję „Kanał”, naciśnij przycisk lub
2.
Aby wybrać opcję „Pamięć ręczna”, naciśnij przycisk lub
3. Naciśnij ponownie przycisk ENTER w celu wybrania opcji „Program”.
4. Aby przypisać kanałowi numer programu, wyszukaj odpowiedni numer naciskając przycisk lub ,
a następnie naciśnij przycisk ENTER.
Możesz również ustawić numer programu za pomocą przycisków numerycznych na pilocie.
, a następnie przycisk ENTER
, a następnie przycisk ENTER
Polski-8
.
.
Page 99

5.
Aby wybrać opcję „System obrazu”, naciśnij przycisk lub
6.
Za pomocą przycisków lub zaznacz żądany standard kolorów, a następnie naciśnij przycisk ENTER.
7.
Aby wybrać opcję „System fonii”, naciśnij przycisk lub
8.
Za pomocą przycisków lub zaznacz żądany standard dźwięku, a następnie naciśnij przycisk ENTER.
Jeśli występują zakłócenia dźwięku lub nie ma dźwięku, wybierz inny system obsługi dźwięku.
9.
Jeśli znasz numer kanału, który chcesz zapamiętać, za pomocą przycisku lub wybierz opcję „Kanał”. Naciśnij przycisk
ENTER.
Wybierz C (kanał antenowy) lub S (kanał kablowy) za pomocą przycisku lub . Naciśnij przycisk , aby wybrać kanał.
Wybierz żądany numer, naciskając przycisk lub , a następnie przycisk
Tryb wybierania kanałów: P (Tryb programowy), C (tryb kanału antenowego), S (Tryb kanałów kablowych)
Kanał można także ustawić za pomocą przycisków numerycznych na pilocie.
, a następnie przycisk ENTER
, a następnie przycisk ENTER
ENTER.
.
.
10. Jeśli nie znasz numerów kanałów, za pomocą przycisków lub wybierz opcję „Szukaj”.
Naciśnij przycisk ENTER. Wyszukaj kanał za pomocą przycisków lub , a następnie naciśnij przycisk ENTER.
11. Naciśnij przycisk lub aby wybrać opcję „Zapisz”. Naciśnij ponownie przycisk ENTER w celu
wybrania opcji „OK”.
12. Powtarzaj czynności 3 do 11 dla każdego kanału, który ma zostać zapamiętany.
Program: Wybór numeru programu dla danego kanału.
System obrazu:
System fonii: Ustawianie obsługiwanego systemu dźwięku.
Ustawianie obsługiwanego systemu kolorów.
Kanał: Wybór kanału.
Szukaj: Wyszukiwanie częstotliwości danego kanału.
Zapisz: Zapisywanie ustawień.
Programowanie Menedżera kanałów
Ustaw kanały zgodnie z własnymi upodobaniami.
Można wtedy usuwać, dodawać lub blokować żądane kanały.
1. Naciśnij przycisk MENU, aby wyświetlić menu.
naciśnij przycisk lub
2.
Aby wybrać opcję „Menedżer Kanałów”, naciśnij przycisk lub
a następnie przycisk
3.
Naciśnij przycisk ENTER, aby wybrać opcję „Menedżer Kanałów”.
4
.
Naciśnij przycisk , aby wybrać linię „ ”.
5
.
Za pomocą przycisków lub zaznacz niechciany kanał,
, a następnie przycisk ENTER
ENTER
.
a następnie naciśnij przycisk ENTER, aby go usunąć.
Powtórz czynność opisaną w punkcie 5, aby usunąć lub dodać inne kanały.
6.
7. Naciśnij przycisk EXIT, aby zamknąć menu.
”
“
jest aktywna, jeśli opcja „Zab. p.dziećmi” jest ustawiona na „Wł”.
Ikona
Aby wybrać opcję „Kanał”,
.
,
Opcje te można ustawić również
za pomocą przycisku CH MGR na
pilocie.
Polski-9
Page 100

Włączanie zabezpieczenia przed dziećmi
Ta funkcja uniemożliwia osobom nieupoważnionym (np. dzieciom) oglądanie
nieodpowiednich programów przez wyłączenie obrazu i dźwięku. Zabezpieczenia
przed dziećmi nie można wyłączyć za pomocą przycisków po prawej dolnej
stronie panelu. Można je wyłączyć tylko przy użyciu pilota, dlatego pilota należy
przechowywać w miejscu niedostępnym dla dzieci.
1. Naciśnij przycisk MENU, aby wyświetlić menu.
naciśnij przycisk lub
2.
Aby wybrać opcję „Menedżer Kanałów”, naciśnij przycisk lub
a następnie przycisk
3.
Aby wybrać opcję „Zab. p.dziećmi”, naciśnij przycisk lub
a następnie przycisk
4. Naciśnij przycisk lub , aby wybrać „Wł”.
Naciśnij przycisk
5.
Aby wybrać opcję „Menedżer Kanałów”, naciśnij przycisk lub
a następnie przycisk
6. Za pomocą przycisku zaznacz wiersz w kolumnie “ ”.
7
.
Za pomocą przycisków i zaznacz kanały, które chcesz zablokować,
a następnie naciśnij przycisk ENTER.
8. Powtórz czynność opisaną w punkcie 7, aby zablokować lub odblokować
inne kanały.
9. Naciśnij przycisk EXIT, aby zamknąć menu.
Wybierz ustawienie „Wł” lub „Wył” dla opcji „Zabezpieczenia”, aby w prosty sposób
włącz yć lub wyłączyć kanały, dla których zaznaczono pole
Sortowanie zapamiętanych kanałów
, a następnie przycisk ENTER
ENTER
.
ENTER
.
ENTER
ENTER
.
Aby wybrać opcję „Kanał”,
.
,
,
,
“ ”
.
Możesz zamienić numery dwóch kanałów, aby:
Zmienić kolejność, w której zostały automatycznie zapamiętane.
Przypisać łatwe do zapamiętania numery kanałom, które oglądasz
najczęściej.
1. Naciśnij przycisk MENU, aby wyświetlić menu.
naciśnij przycisk lub
2.
Aby wybrać opcję „Sortuj”, naciśnij przycisk lub
a następnie przycisk
3.
Za pomocą przycisków lub wybierz numer kanału, który chcesz zmienić.
Naciśnij przycisk ENTER.
Wybrany numer kanału wraz z jego nazwą zostanie przeniesiony na prawą stronę.
4.
Za pomocą przycisków
przycisk
ENTER
Wybrany kanał został zamieniony na kanał zapamiętany poprzednio pod wybranym
numerem.
5.
Powtórz czynności 3 i 4, aby ustawić pozycję kolejnego kanału.
Naciśnij przycisk EXIT, aby zamknąć menu.
6.
, a następnie przycisk ENTER
ENTER
.
lub
.
Polski-10
przejdź do pozycji, którą chcesz zmienić i naciśnij
Aby wybrać opcję „Kanał”,
.
,
 Loading...