

Page 1
Contact SAMSUNG WORLDWIDE
If you have any questions or comments relating to Samsung products, please contact the SAMSUNG customer care centre.
Country
ARMENIA 0-800-05-555 AUSTRIA 0810 - SAMSUNG (7267864, € 0.07/min) www.samsung.com/at
AZERBAIJAN 088-55-55-555 BELARUS 810-800-500-55-500 -
BELGIUM 02-201-24-18
CZECH
DENMARK
800-7267 www.samsung.com
FINLAND
FRANCE www.samsung.com/fr
GERMANY 01805 - SAMSUNG(726-7864 € 0,14/Min) www.samsung.com/de
8-800-555-555 HUNGARY 06-80-SAMSUNG(726-7864) www.samsung.com/hu
EIRE 0818 717100 www.samsung.com/ie
ITALIA 800-SAMSUNG(726-7864) www.samsung.com/it
KAZAKHSTAN 8-10-800-500-55-500 KYRGYZSTAN 00-800-500-55-500 www.samsung.com
LATVIA 8000-7267 www.samsung.com
LITHUANIA 8-800-77777 www.samsung.com
LUXEMBURG www.samsung.com/lu
00-800-500-55-500 NETHERLANDS www.samsung.com/nl
815-56 480 www.samsung.com/no
80820-SAMSUNG(726-7864) www.samsung.com/pt
RUSSIA 8-800-555-55-55 www.samsung.com
0800-SAMSUNG(726-7864)
www.samsung.com/es
0771 726 7864 (SAMSUNG) www.samsung.com/se
0848 - SAMSUNG(7267864, CHF 0.08/min)
TADJIKISTAN 8-10-800-500-55-500 www.samsung.com
U.K 0845 SAMSUNG (7267864)
UKRAINE 0-800-502-000
UZBEKISTAN 8-10-800-500-55-500 www.samsung.com
Customer Care Centre
800 - SAMSUNG (800-726786) www.samsung.com/cz
0 801 1SAMSUNG(172678)
Web Site
www.samsung.com/be (Dutch)
www.samsung.com/be_fr (French)
www.samsung.com/pl
www.samsung.com/ch
www.samsung.com/ch_fr/(French)
www.samsung.ua
www.samsung.com/ua_ru
LCD TV user manual
LCD TV
user manual
imagine the possibilities
© 2010 Samsung Electronics Co., Ltd. All rights reserved.
Thank you for purchasing this Samsung product.
To receive more complete service, please register
your product at
www.samsung.com/register
Model _____________ Serial No. _____________
BN68-02808B-01
Page 2
Figures and illustrations in this User Manual are provided for reference only and may differ from actual product appearance.
Product design and specifications may be changed without notice.
Digital TV notice
1. Functionalities related to Digital TV (DVB) are only available in countries/areas where DVB-T (MPEG2 and MPEG4 AVC) digital terrestrial signals are
broadcasted or where you are able to access to a compatible DVB-C (MPEG2 and MPEG4 AAC) cable-TV service. Please check with your local
dealer the possibility to receive DVB-T or DVB-C signal.
2. DVB-T is the DVB European consortium standard for the broadcast transmission of digital terrestrial television and DVB-C is that for the broadcast
transmission of digital TV over cable. However, some differentiated features like EPG (Electric Programme Guide), VOD (Video On Demand) and so
on, are not included in this specification. So, they cannot be workable at this moment.
3. Although this TV set meets the latest DVB-T and DVB-C standards, as of [August, 2008], the compatibility with future DVB-T digital terrestrial and
DVB-C digital cable broadcasts cannot be guaranteed.
4. Depending on the countries/areas where this TV set is used some cable-TV providers may charge an additional fee for such a service and you may
be required to agree to terms and conditions of their business.
5. Some Digital TV functions might be unavailable in some countries or regions and DVB-C might not work correctly with some cable service providers.
6. For more information, please contact your local Samsung customer care centre.
The reception quality of TV may be affected due to differences in broadcasting method between the countries. Please check the TV
✎
performance in the local SAMSUNG Authorized Dealer, or the Samsung Call Centre whether it can be improved by reconfiguring TV setting or
not.
Still image warning
Avoid displaying still images (like jpeg picture files) or still image element (like TV programme logo, panorama or 4:3 image format, stock or news bar at
screen bottom etc.) on the screen. Constant displaying of still picture can cause ghosting of LCD screen, which will affect image quality. To reduce risk of
this effect, please follow below recommendations:
Avoid displaying the same TV channel for long periods.•
Always try do display any image on full screen, use TV set picture format menu for best possible match.•
Reduce brightness and contrast values to minimum required to achieve desired picture quality, exceeded values may speed up the burnout process.•
Frequently use all TV features designed to reduce image retention and screen burnout, refer to proper user manual section for details.•
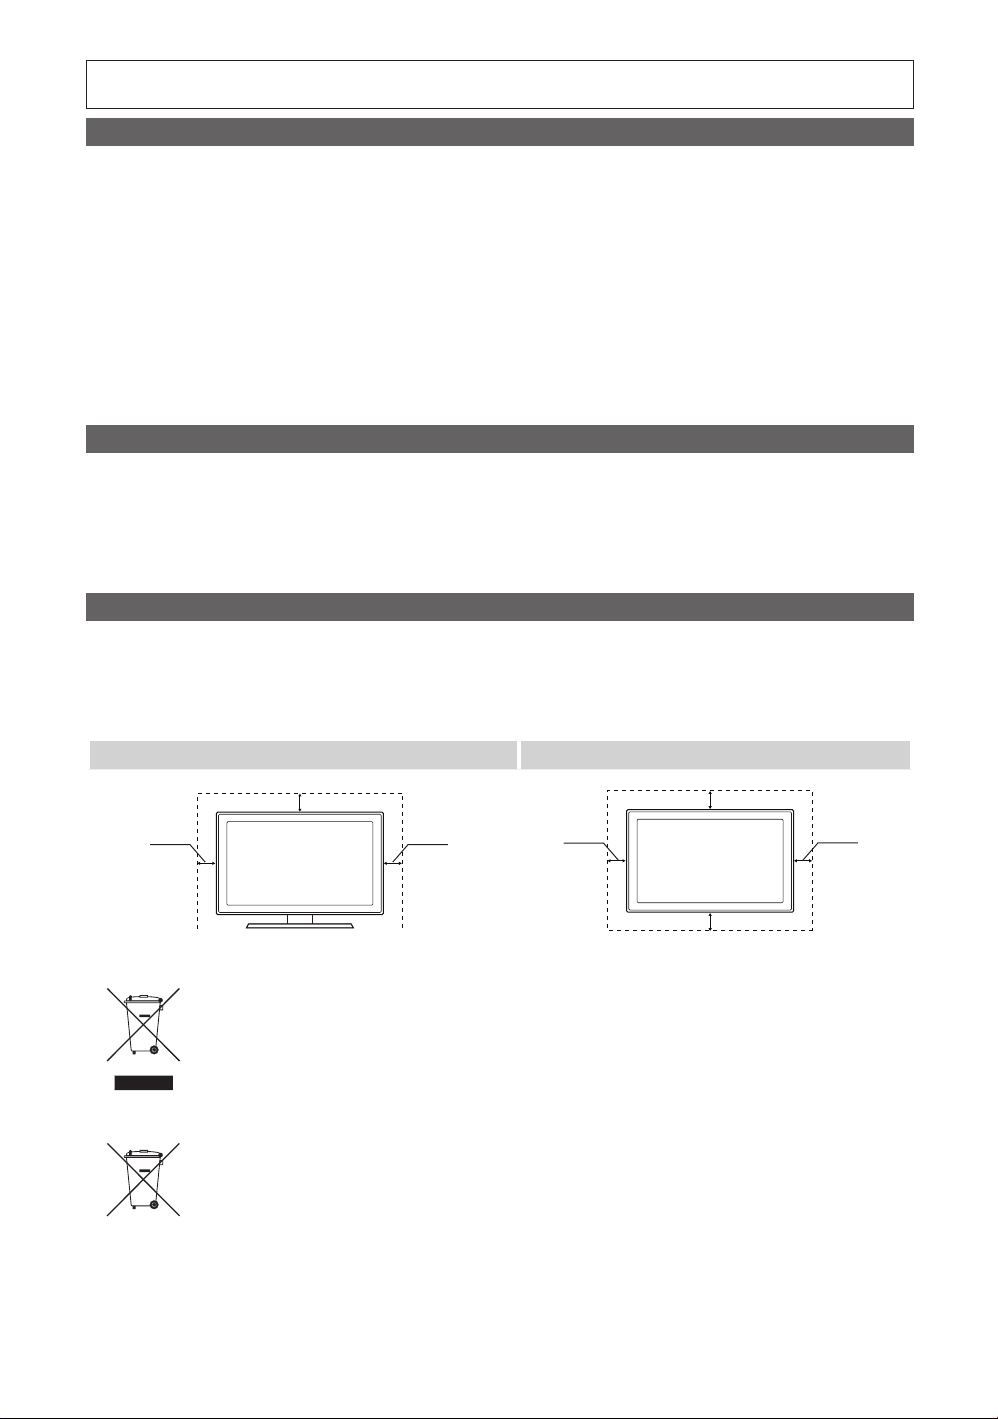
Securing the Installation Space
Keep the required distances between the product and other objects (e.g. walls) to ensure proper ventilation.
Failing to do so may result in fire or a problem with the product due to an increase in the internal temperature of the product.
When using a stand or wall-mount, use parts provided by Samsung Electronics only.
✎
If you use parts provided by another manufacturer, it may result in a problem with the product or an injury due to the product falling.
x
The appearance may differ depending on the product.
✎
Installation with a stand. Installation with a wall-mount.
2
10 cm
English
10 cm
10 cm
Correct Disposal of This Product (Waste Electrical & Electronic Equipment)
(Applicable in the European Union and other European countries with separate collection systems)
This marking on the product, accessories or literature indicates that the product and its electronic accessories (e.g. charger,
headset, USB cable) should not be disposed of with other household waste at the end of their working life. To prevent possible
harm to the environment or human health from uncontrolled waste disposal, please separate these items from other types of waste
and recycle them responsibly to promote the sustainable reuse of material resources. Household users should contact either the
retailer where they purchased this product, or their local government office, for details of where and how they can take these items
for environmentally safe recycling. Business users should contact their supplier and check the terms and conditions of the purchase
contract. This product and its electronic accessories should not be mixed with other commercial wastes for disposal.
Correct disposal of batteries in this product
(Applicable in the European Union and other European countries with separate battery return systems)
This marking on the battery, manual or packaging indicates that the batteries in this product should not be disposed of with other
household waste at the end of their working life. Where marked, the chemical symbols Hg, Cd or Pb indicate that the battery
contains mercury, cadmium or lead above the reference levels in EC Directive 2006/66. If batteries are not properly disposed of,
these substances can cause harm to human health or the environment. To protect natural resources and to promote material
reuse, please separate batteries from other types of waste and recycle them through your local, free battery return system.
10 cm
10 cm
10 cm
10 cm
Page 3

3
English
Contents
Getting Started
4
Connections
8
Basic Features
12
Advanced Features
27
4 Accessories
5 Viewing the Control Panel
6 Viewing the Remote Control
7 Connecting to an Antenna
7 Plug & Play (Initial Setup)
8 Connecting to an AV Device
10 Connecting to an Audio Device
11 Changing the Input Source
12 How to Navigate Menus
12 Using the INFO button (Now & Next guide)
12 Planning Your Viewing
14 Channel Menu
16 Picture Menu
21 Sound Menu
23 Setup Menu
25 Support Menu
27 Connecting to a PC
28 Network Connection
35 Media Play
44 Anynet+
48 Internet@TV
51 AllShare
Other Information
t
This function can be used by
pressing the TOOLS button on the
remote control.
53 Analogue Channel Teletext Feature
54 Installing the Wall Mount
55 Assembling the Cables
56 Anti-theft Kensington Lock
56 Securing the TV to the wall
57 Troubleshooting
60 Specifications
61 Index
Check the Symbol!
Note One-Touch Button
Page 4
Getting Started
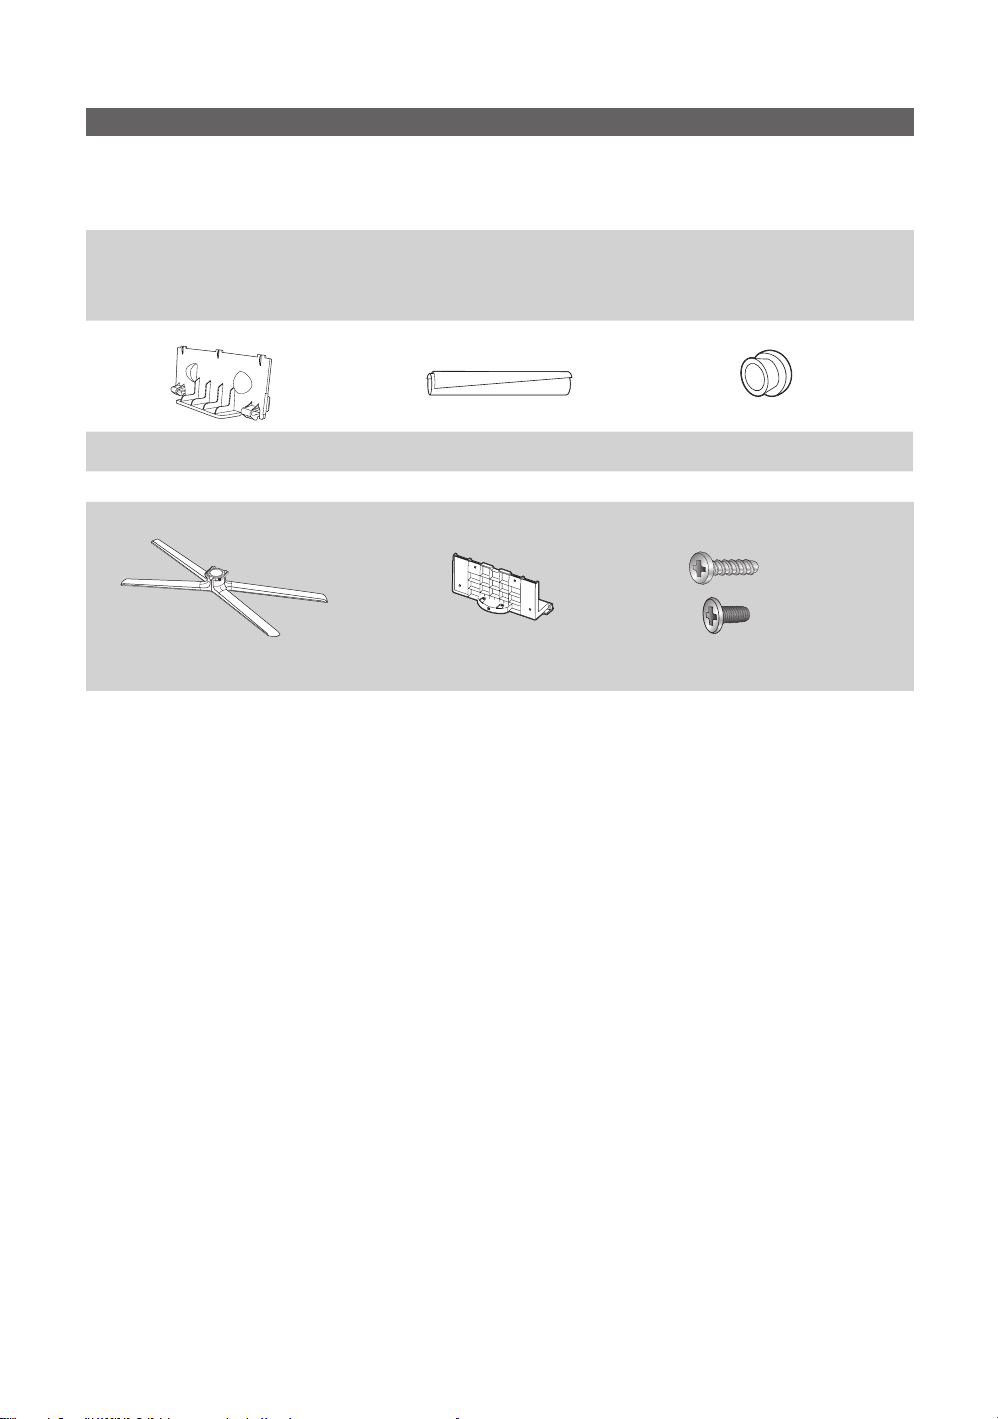
Accessories
Please make sure the following items are included with your LCD TV. If any items are missing, contact your dealer.
✎
The items’ colours and shapes may vary depending on the models.
✎
Remote Control & Batteries (AAA x 2) y
Owner’s Instructions y
Warranty Card / Safety Guide (Not available in some locations) y
Blanking Bracket y Cable tie y Holder-Ring (4ea) y
See separate guide for installing the stand.
Stand (1EA) y Guide Stand (1EA) y Screws y
Cleaning Cloth y
Power Cord y
(46 ~ 55 inch TVs)
(4EA) M4 X L12
(4EA) M4 X L8
4
English
Page 5
5
01 Getting Started
English
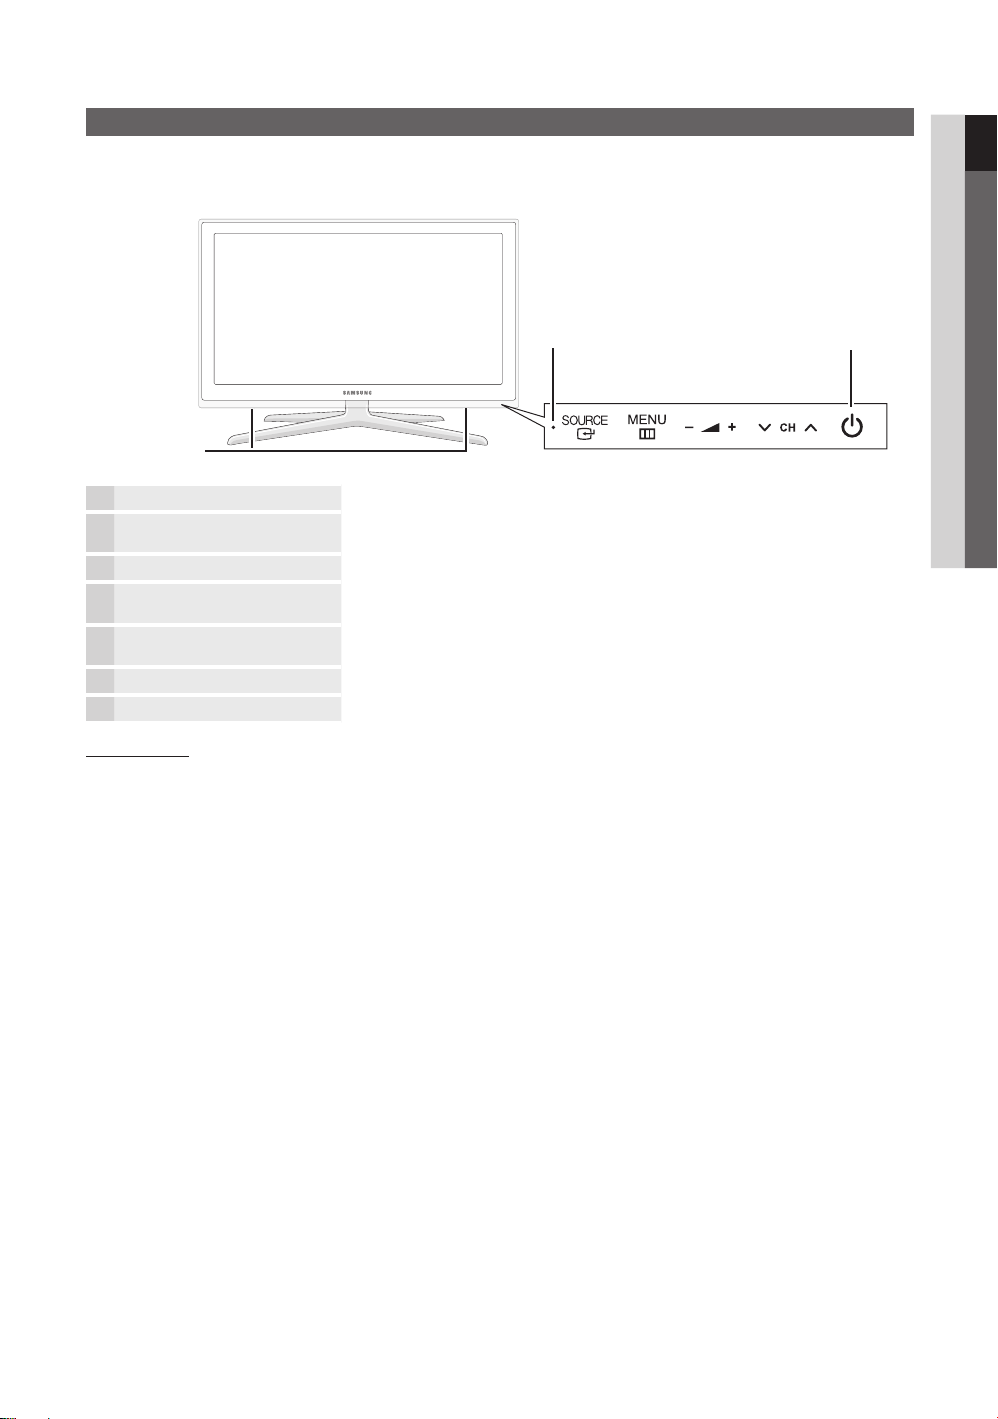
Viewing the Control Panel
The product colour and shape may vary depending on the model.
✎
Contact with objects or particles other than your finger may switch on the LCD light.
✎
Speakers
Remote control sensor Aim the remote control towards this spot on the TV.
SOURCE
MENU
Y
z
Power Indicator Blinks and turns off when the power is on and lights up in standby mode.
P
E
m
(Power)
Toggles between all the available input sources. In the on-screen menu, use this
button as you would use the ENTERE button on the remote control.
Displays an on-screen menu, the OSD (on screen display), of your TV’s features.
Adjusts the volume. In the OSD, use the
and ► buttons on the remote control.
Changes the channels. In the OSD, use the
and buttons on the remote control.
Turns the TV on or off.
Y
buttons as you would use the
z
buttons as you would use the
Power IndicatorRemote control sensor
Standby mode
Do not leave your TV in standby mode for long periods of time (when you are away on a holiday, for example). A small amount
of electric power is still consumed even when the power button is turned off. It is best to unplug the power cord.
Page 6
Getting Started
ABCD
Viewing the Remote Control
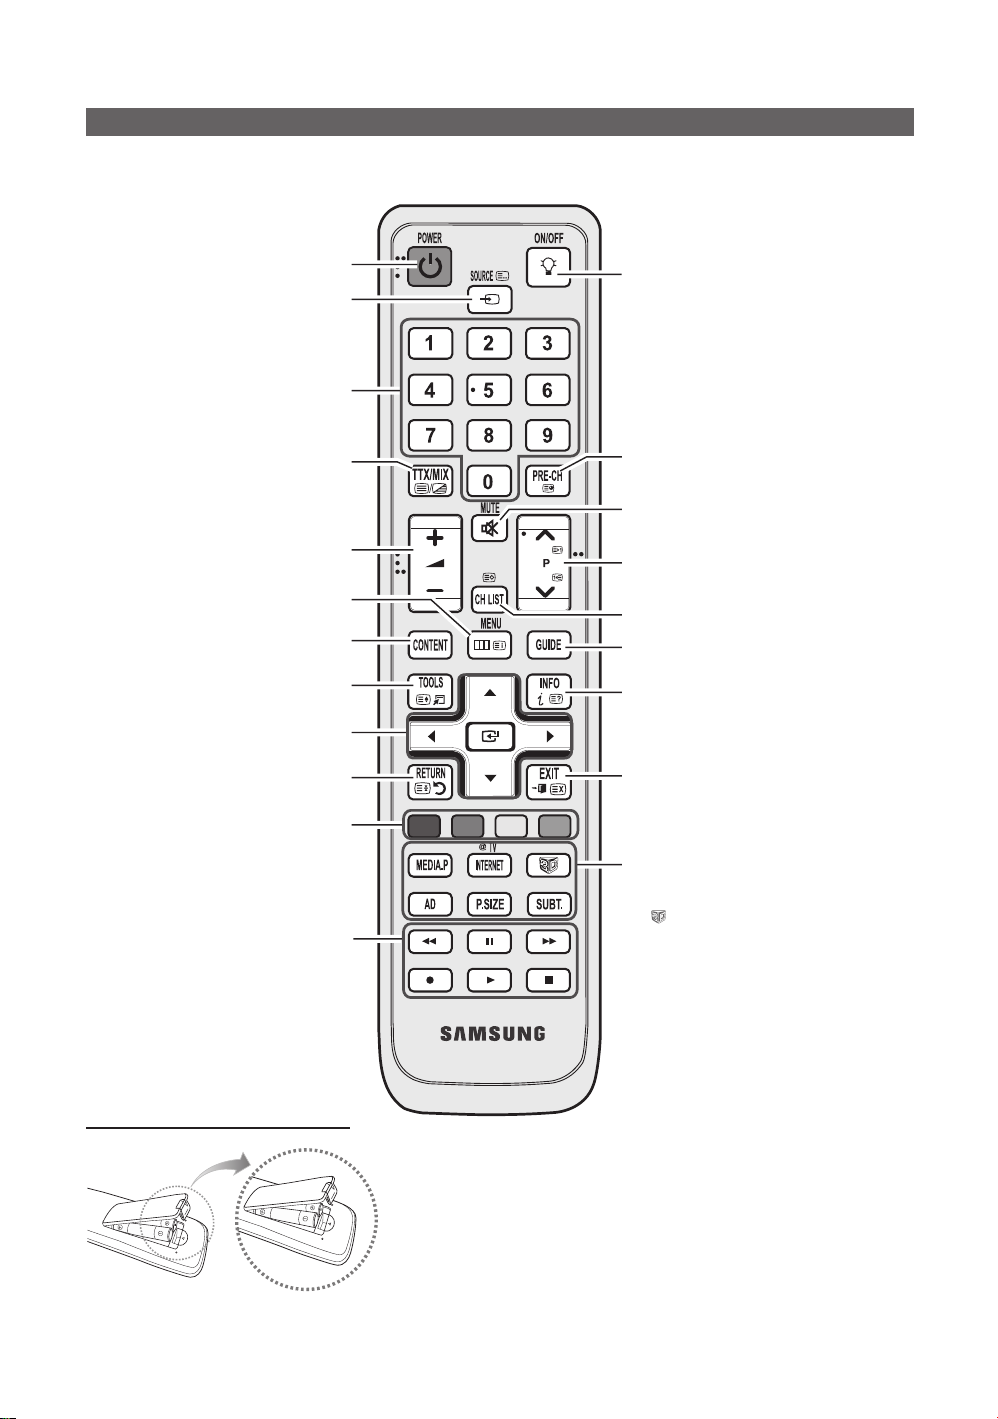
This is a special remote control for the visually impaired persons and has Braille points on the Power, Channel, and
✎
Volume buttons.
Turns the TV on and off. (P. 7)
Displays and selects the available video
sources. (P. 11)
Press to directly access to channels.
Alternately select Teletext ON, Double,
Mix or OFF.
Adjusts the volume.
Displays the main on-screen menu.
(P. 12)
Displays the Content View, which includes Guide,
3D, Internet@TV, Media Play, and AllShare.
Quickly selects frequently used functions.
Selects the on-screen menu items and changes
the values seen on the menu.
Returns to the previous menu.
Buttons in the Channel Manager, Internet@TV,
Media Play menu, etc.
Use these buttons in the Media Play and
Anynet+ modes. (P. 35, 44)
(�: controls recording on Samsung recorders
with the Anynet+ feature)
When the ON/OFF light button is set to ON and a
certain button is pressed, the remote control buttons
will be lit for a moment.
(Using the remote control with this button set to On
will reduce the battery usage time.)
Returns to the previous channel.
Cuts off the sound temporarily.
Changes channels.
Displays channel list on the screen. (P. 14)
Displays the EPG (Electronic Programme Guide).
(P. 12)
Displays information on the TV screen. (P. 12)
Exits the menu.
MEDIA.P: Views the Media play. (P. 35)
INTERNET: Links to various internet services.
(P. 48)
3D( ): Sets the video, which provided with 3D
signal. (P. 19)
AD: Audio Description selection. (Not available in
some locations) (P. 22)
P.SIZE: Choose the picture size. (P. 17)
SUBT.: Digital subtitle display (P. 24)
Installing batteries (Battery size: AAA)
English
6
NOTE
✎
Use the remote control within 23 feet from the TV.
x
Bright light may affect the performance of the remote
x
control. Avoid using nearby special fluorescent light or neon
signs.
The colour and shape may vary depending on the model.
x
Page 7
7
01 Getting Started
English
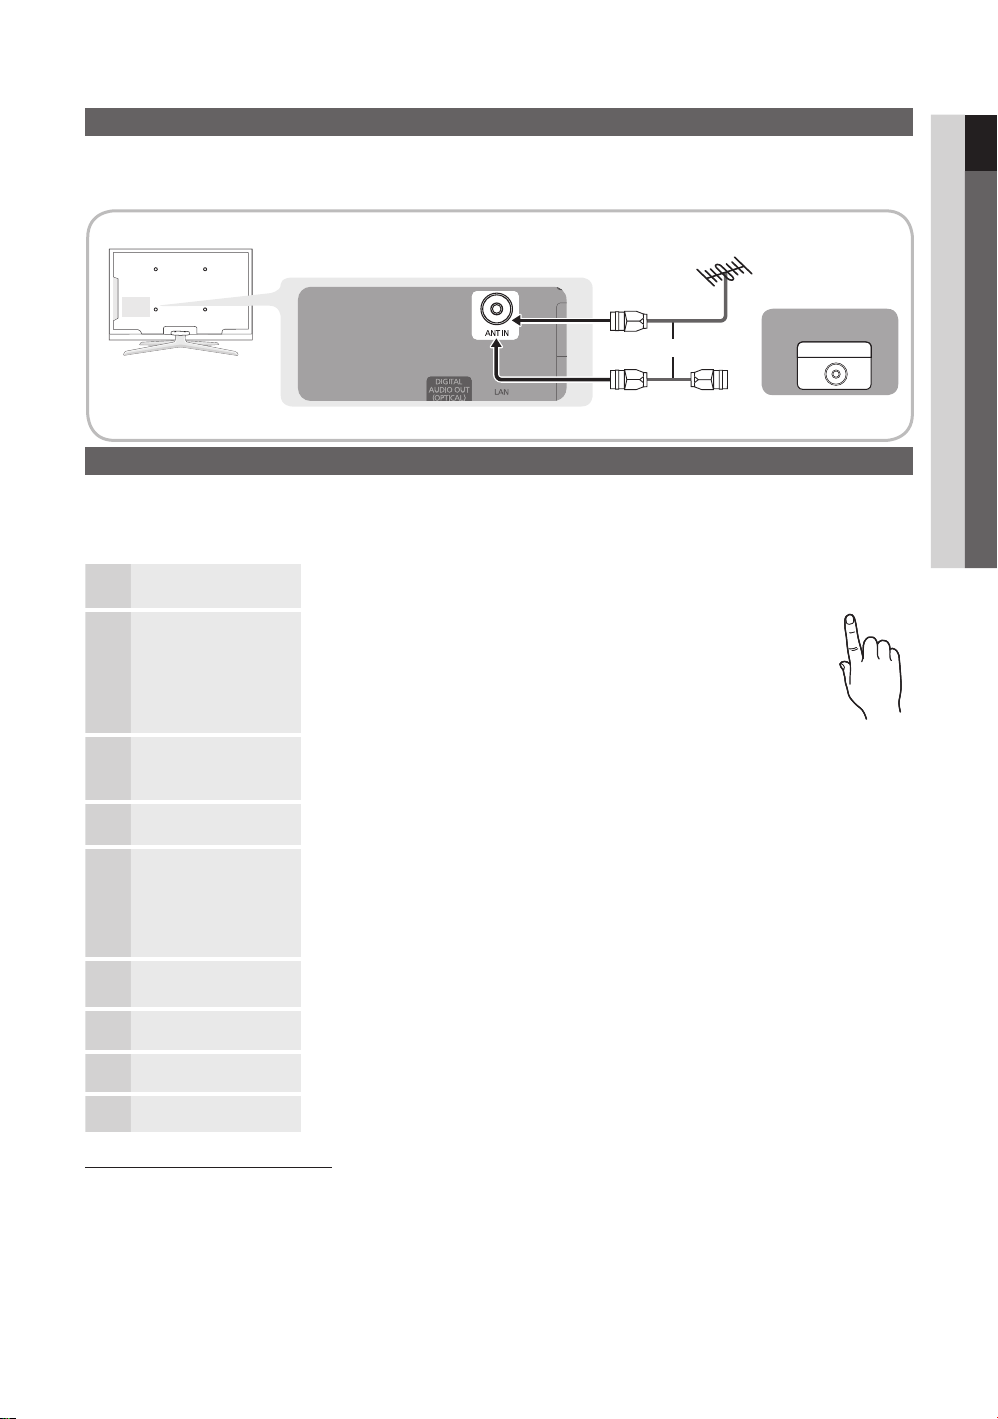
Connecting to an Antenna
P
POWER
When the TV is initially powered on, basic settings proceed automatically.
Preset: Connecting the mains and antenna.
✎
VHF/UHF Antenna
or
Plug & Play (Initial Setup)
When the TV is initially powered on, a sequence of on-screen prompts will assist in configuring basic settings. Press the
POWERP button. Plug & Play is available only when the Input source is set to TV.
To return to the previous step, press the Red button.
✎
Selecting a language
1
Selecting Store Demo
2
or Home Use
Selecting a country
3
Selecting an antenna
4
Selecting a channel
5
Setting the Clock
6
Mode
Time Zone
7
Viewing the HD
8
Connection Guide.
Enjoy your TV.
Press the or button, then press the ENTERE button.
Select the desired OSD (On Screen Display) language.
Press the or button, then press the ENTERE button.
Select the y Home Use mode. Store Demo Mode is for retail
environments.
Return the unit’s settings from y Store Demo to Home Use
(standard): Press the volume button on the TV. When the OSD
volume is displayed, press and hold MENU for 5 sec.
Press the or button, then press the ENTERE button.
Select the appropriate country. If the desired country does not exist on the menu, select
Others.
Press the or button, then press the ENTERE button.
Select Air or Cable.
Press the or button, then press the ENTERE button.
Select the channel source to memorise. When setting the antenna source to Cable, a step
appears allowing you to assign numerical values (channel frequencies) to the channels. For
more information, refer to Channel Auto Store (p. 14).
Press the ✎ENTERE button at any time to interrupt the memorization process.
Set the Clock Mode automatically or manually.
If you select the ✎Auto, select the time zone which you live.
Press the or button to select the your time zone, then press the ENTERE button.
(depending on the country)
The connection method for the best HD screen quality is displayed.
Press the ENTERE button.
Cable
ANT OUT
9
If You Want to Reset This Feature...
Select Setup - Plug & Play (Initial Setup). Enter your 4 digit PIN number. The default PIN number is “0-0-0-0.” If you want to
change the PIN number, use the Change PIN function.
Page 8
Connections
W R
W
G
RR
R-AUDIO-L
P
R PB Y
Connecting to an AV Device
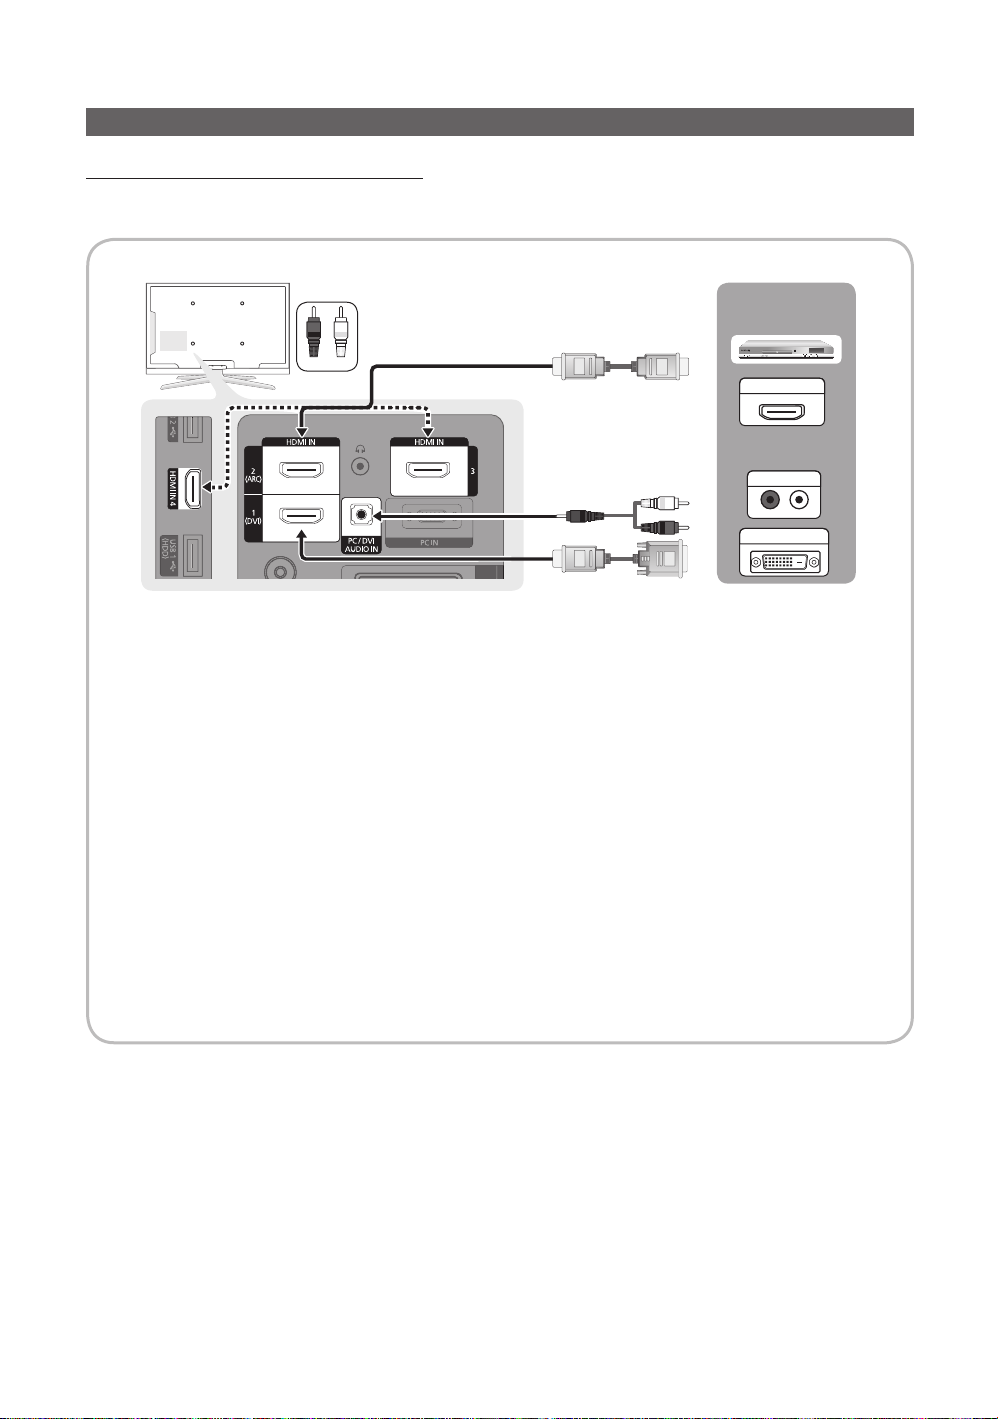
Using an HDMI or HDMI/DVI cable (up to 1080p)
Available devices: DVD, Blu-ray player, HD cable box, HD STB (Set-Top-Box) satellite receiver, cable box, STB satellite receiver
DVD / Blu-ray
player
Red White
HDMI OUT
AUDIO OUT
DVI OUT
HDMI IN 1(DVI) ✎, 2(ARC), 3, 4 / PC/DVI AUDIO IN
For better picture and audio quality, connect to a digital device using an HDMI cable.
x
An HDMI cable supports digital video and audio signals, and does not require an audio cable.xx
x
To connect the TV to a digital device that does not support HDMI output, use an HDMI/DVI and audio cables. –
The picture may not display normally (if at all) or the audio may not work if an external device that uses an
x
older xxversion of HDMI mode is connected to the TV. If such a problem occurs, ask the manufacturer of the
external device about the HDMI version and, if out of date, request an upgrade.
Be sure to purchase a certified HDMI cable. Otherwise, the picture may not display or a connection error may
x
oc cur.
A basic high-speed HDMI cable or one with ethernet is recommended. This product does not support the
x
ethernet function via HDMI.
This product supports the 3D and ARC (Audio Return Channel) functions via an HDMI cable. Note that the
x
ARC function is supported by the HDMI IN 2(ARC) port only.
If – 3D Auto View is set to On, some functions such as Internet@TV may be disabled. In this case, set
3D Auto View or 3D Mode to Off.
The ARC function allows digital audio to output via the xHDMI IN 2(ARC) port. It can be enabled only when the
TV is connected with an audio receiver that supports the ARC function.
English
8
Page 9
9
English
02 Connections
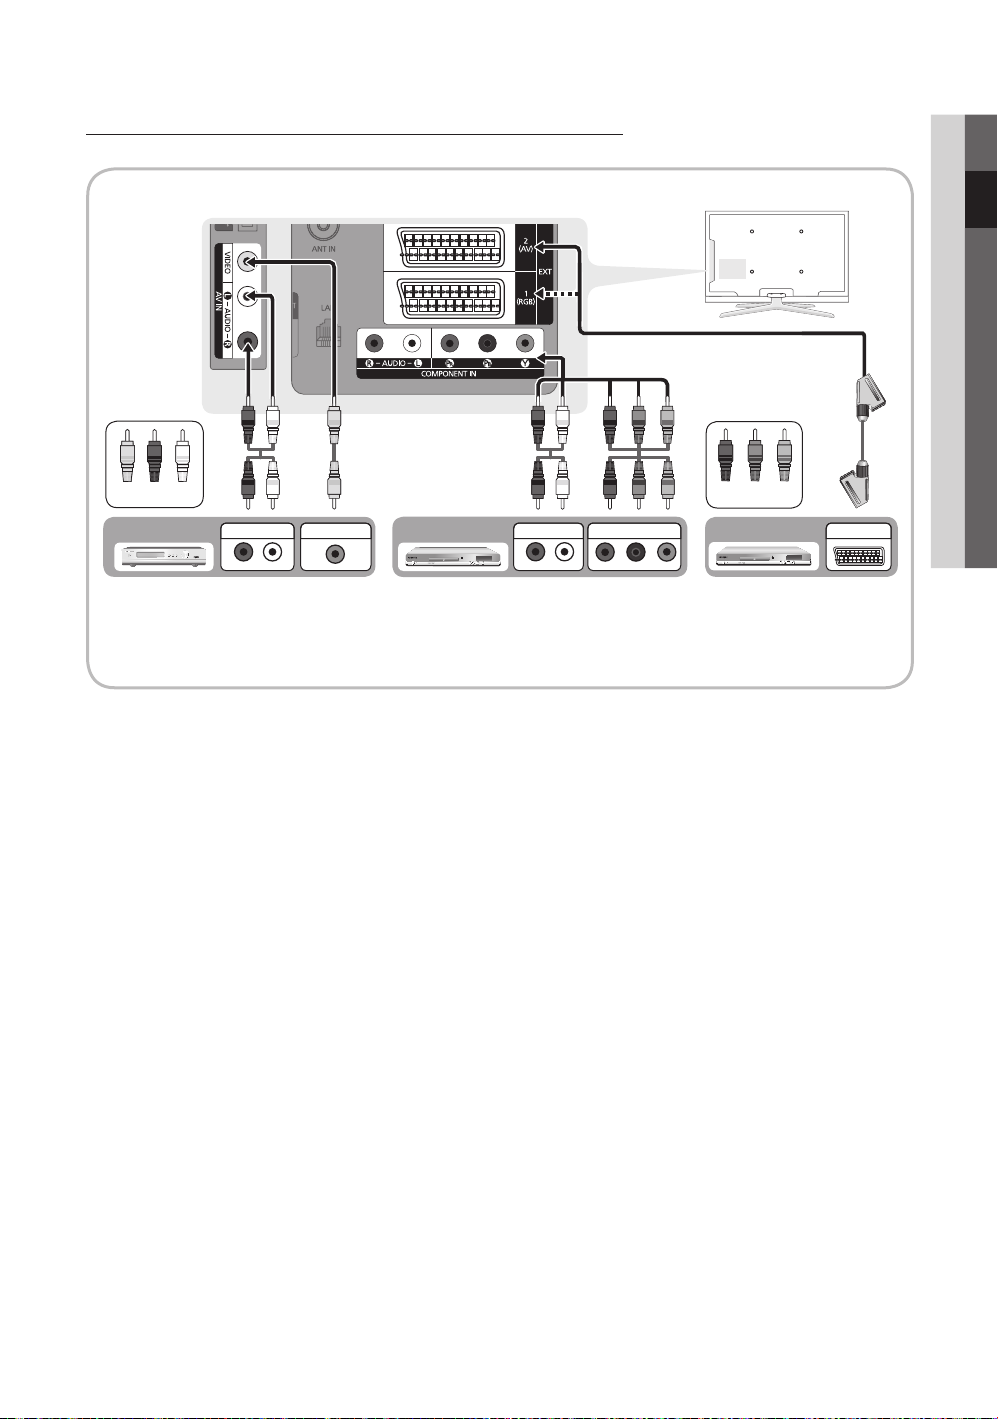
Using a Component (up to 1080p) or Audio/Video (480i only) and Scart Cable
RGB W R
W
R G
R
W R
B
R W
Y
Y
P
R PB Y
R-AUDIO-L
P
R PB Y
R-AUDIO-L
P
R PB Y
W
G
RRWY B
G
RR
Available devices: VCR, DVD, Blu-ray player, cable box, STB satellite receiver
Yellow Red White
AUDIO OUT
VIDEO OUT
Blu-ray player DVDVCR
AUDIO OUT
COMPONENT OUT
Red Blue Green
In ✎Ext. mode, DTV Out supports MPEG SD Video and Audio only.
To obtain the best picture quality, the Component connection is recommended over the A/V connection.
✎
EXT
Page 10
Connections
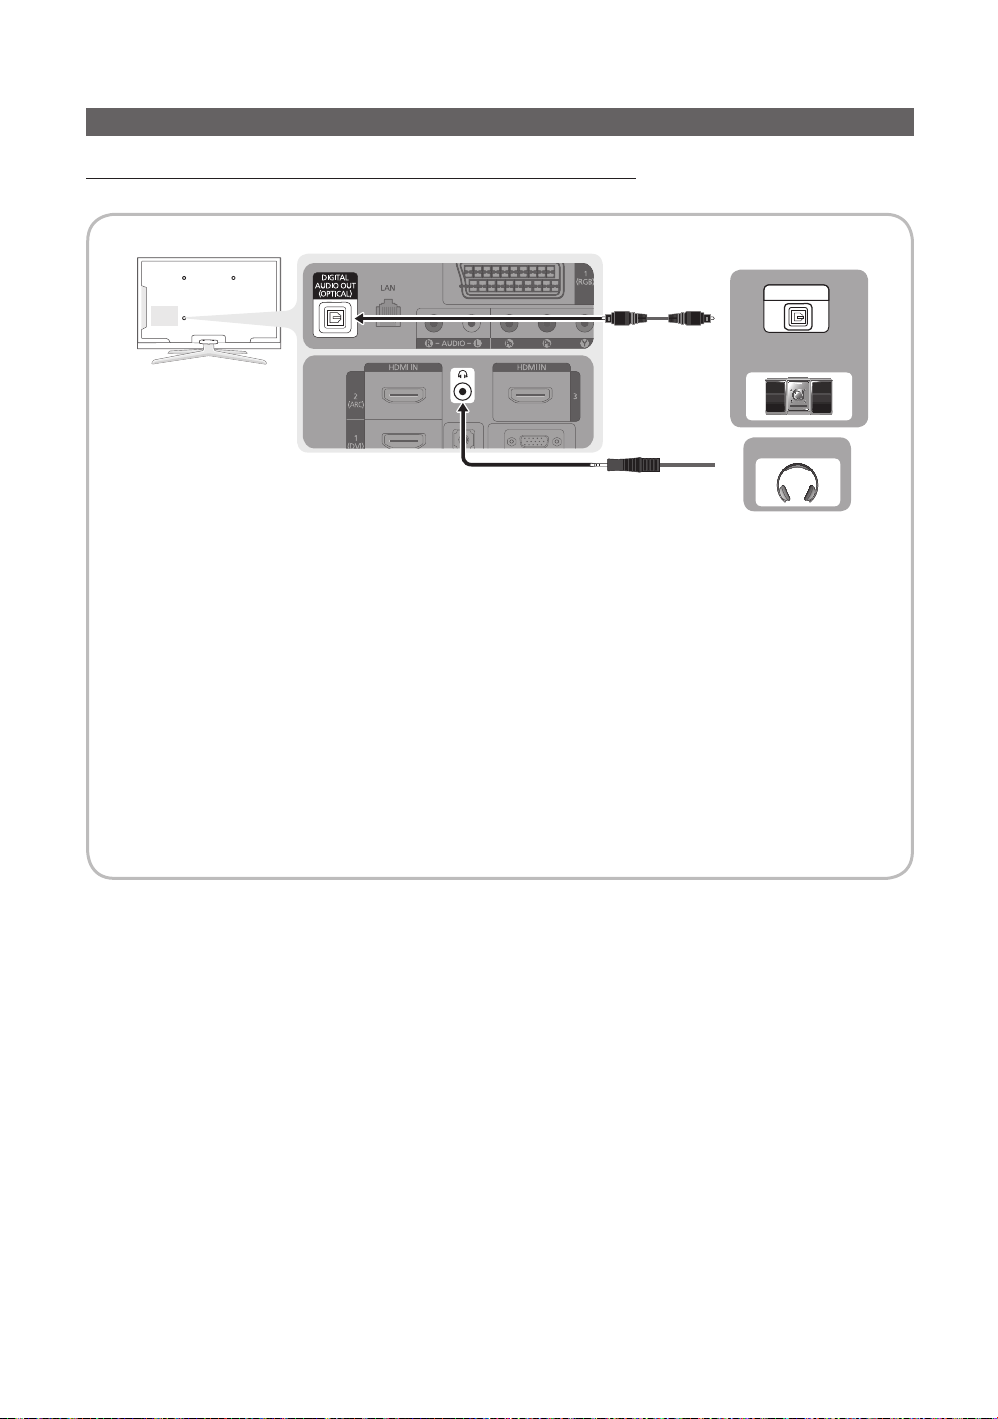
Connecting to an Audio Device
Using an Optical (Digital) or Audio (Analogue) Cable or Headphone Connection
Available devices: digital audio system, amplifier, DVD home theatre
DIGITAL AUDIO OUT (OPTICAL)
✎
When a digital audio system is connected to the xDIGITAL AUDIO OUT (OPTICAL) jack, decrease the volume
of both the TV and the system.
5.1 CH (channel) audio is available when the TV is connected to an external device supporting 5.1 CH.
x
When the receiver (home theatre) is set to on, you can hear sound output from the TV’s xoptical jack. When the
TV is receiving a DTV signal, the TV will send 5.1 CH sound to the home theatre receiver. When the source is
a digital component such as a DVD / Blu-ray player / cable box / STB (Set-Top-Box) satellite receiver and is
connected to the TV via HDMI, only 2 CH audio will be heard from the home theatre receiver. If you want to
hear 5.1 CH audio, connect the digital audio out jack from your DVD / Blu-ray player / cable box / STB satellite
receiver directly to an amplifier or home theatre.
✎
Headphones H: You can connect your headphones to the headphones output on your set. While the
headphones are connected, the sound from the built-in speakers will be disabled.
Sound function may be restricted when connecting headphones to the TV.
x
Headphone volume and TV volume are adjusted separately.
x
OPTICAL
Digital Audio
System
Headphone
10
English
Page 11
11
English
02 Connections
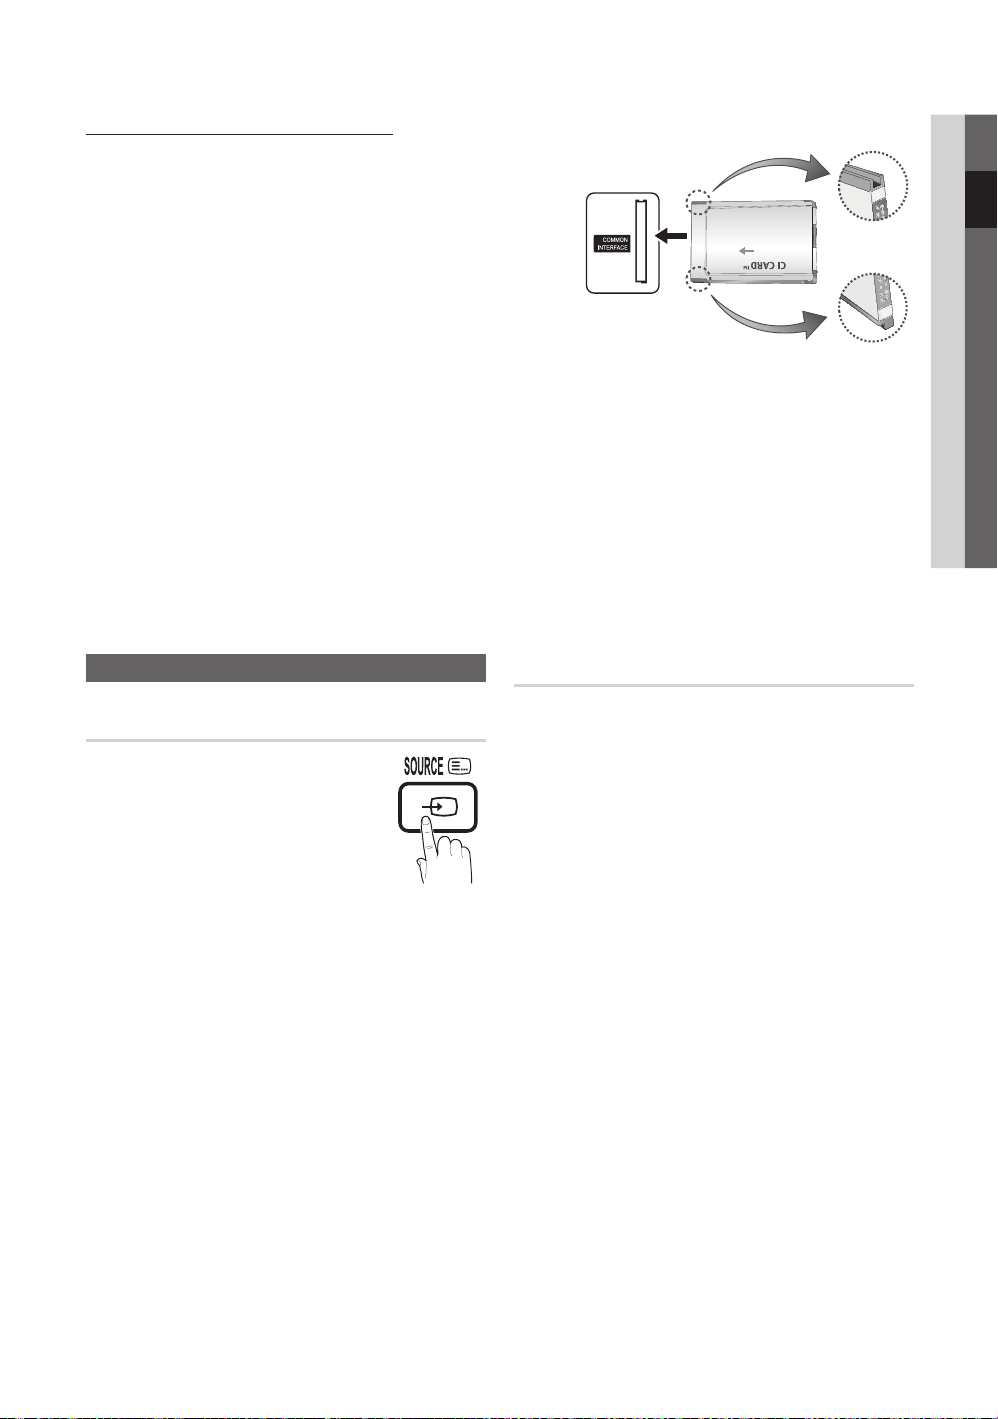
CONNECTIONS COMMON INTERFACE Slot
To watch paid channels, the “CI or CI+ CARD” must be inserted.
If you don’t insert the “CI or CI+ CARD,” some channels will y
display the message “Scrambled Signal”.
The pairing information containing a telephone number, the “CI or y
CI+ CARD” ID the Host ID and other information will be displayed
in about 2~3 minutes. If an error message is displayed, please
contact your service provider.
When the configuration of channel information has finished, the y
message “Updating Completed” is displayed, indicating the
channel list is updated.
NOTE
✎
You must obtain a “CI or CI+ CARD” from a local cable service provider.
x
When removing the “CI or CI+ CARD”, carefully pull it out with your hands since dropping the “CI or CI+ CARD” may
x
cause damage to it.
Insert the “CI or CI+ CARD” in the direction marked on the card.
x
The location of the xCOMMON INTERFACE slot may be different depending on the model.
“CI or CI+ CARD” is not supported in some countries and regions; check with your authorized dealer.
x
If you have any problems, please contact a service provider.
x
Changing the Input Source
Source List
Use to select TV or other external input
sources such as DVD / Blu-ray players /
cable box / STB satellite receiver connected
to the TV.
TV / Ext.1 / Ext.2 / PC / AV / ■
Component / HDMI1/DVI / HDMI2 /
HDMI3 / HDMI4 / USB
In the ✎Source List, connected
inputs will be highlighted.
Ext.1, Ext.2 ✎and PC always stay activated.
Edit Name
VCR / DVD / Cable STB / Satellite STB / PVR STB / ■
AV Receiver / Game / Camcorder / PC / DVI PC / DVI
Devices / TV / IPTV / Blu-ray / HD DVD / DMA: Name
the device connected to the input jacks to make your
input source selection easier.
When a PC with a resolution of 1920 x 1080 @
✎
60Hz is connected to the HDMI IN 1(DVI) port,
you should set to DVI PC mode under Edit Name.
When connecting an HDMI/DVI cable to the ✎HDMI
IN 1(DVI) port, you should set to DVI PC or DVI
Devices mode under Edit Name.
Page 12
Basic Features
DTV Air
15
DEF
18:00 ~ 6:00
18:11 Thu 6 Jan
Life On Venus Avenue
Unclassified
No Detaild Information
Information
E
Watch
DTV Air 800 five
Home and Away
18:00 - 18:30
Drama
Dani is devastated when scott makes clear his views on marriage...
27
28
800
24
16
6
Discovery
DiscoveryH&L
five
price-drop.tv
QVC
R4DTT
American Chopper
Programmes resume at 06:00
Home and...
No Information
QVC Selection
No Information
Tine Team
Fiv...
18:00 - 19:00 19:00 - 20:00
)
Family Affairs
)
Dark Angel
800 five
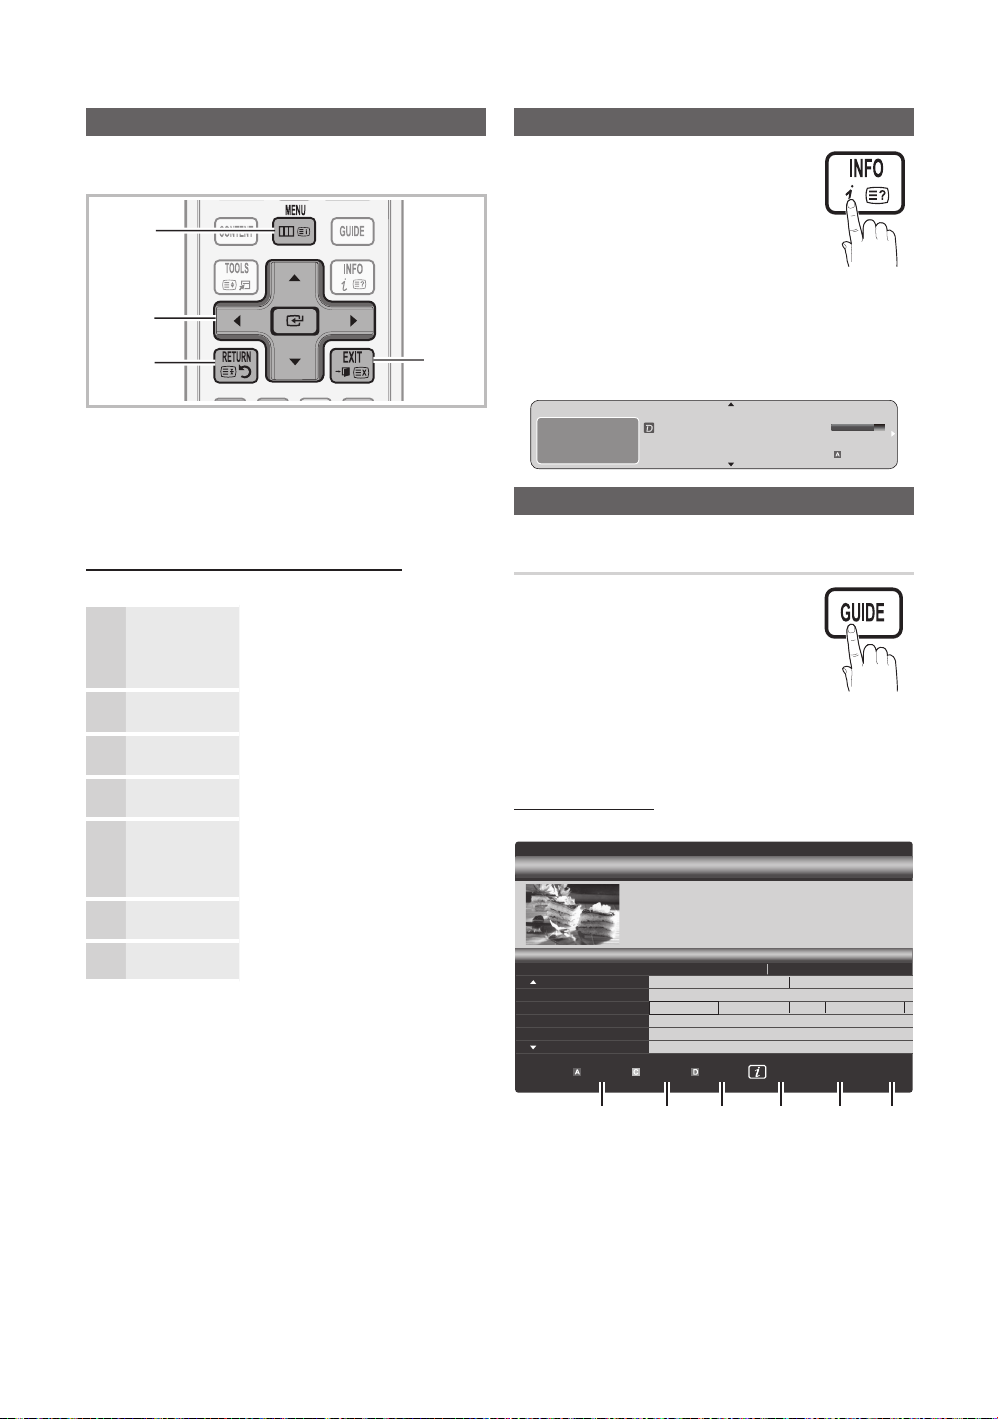
How to Navigate Menus
Before using the TV, follow the steps below to learn how to
navigate the menu and select and adjust different functions.
1
2
3
4
1 MENU button: Displays the main on-screen menu.
2 ENTERE / Direction button: Move the cursor and
select an item. Confirm the setting.
3 RETURN button: Returns to the previous menu.
4 EXIT button: Exits the on-screen menu.
How to Operate the OSD (On Screen Display)
The access step may differ depending on the selected menu.
1
MENU
m
The main menu options appear on
the screen:
Picture, Sound, Channel, Setup,
Input, Application, Support.
/ Select an icon with the or
2
ENTER
3
/
4
/
5
button.
E
Press ENTERE to access the
sub-menu.
Select the desired submenu with
the or button.
Adjust the value of an item with the
or button. The adjustment in
the OSD may differ depending on
the selected menu.
ENTER
E
6
EXIT
e
Press ENTERE to complete the
configuration.
Press EXIT.
7
Using the INFO button (Now & Next guide)
The display identifies the current channel
and the status of certain audio-video
settings.
The Now & Next guide shows daily TV
programme information for each channel
according to the broadcasting time.
Scroll y , to view information for a
desired programme while watching the
current channel.
Scroll y , to view information for other channels. If you
want to move to the currently selected channel, press
the ENTERE button.
Planning Your Viewing
Guide
The EPG (Electronic Programme Guide)
information is provided by broadcasters.
Using programme schedules provided
by broadcasters, you can specify
programmes you want to watch in
advance so that the channel automatically
changes to the selected programme
channel at the specified time. Programme
entries may appear blank or out of date depending on a
channel status.
Using Channel View
Guide
Channel View - TV
Today
2:10 Tue 1 Jun
12
English
View Mode +24 Hours Ch. Mode Information k E
1 2 3 4 5 6
Page 13
13
English
03 Basic Features
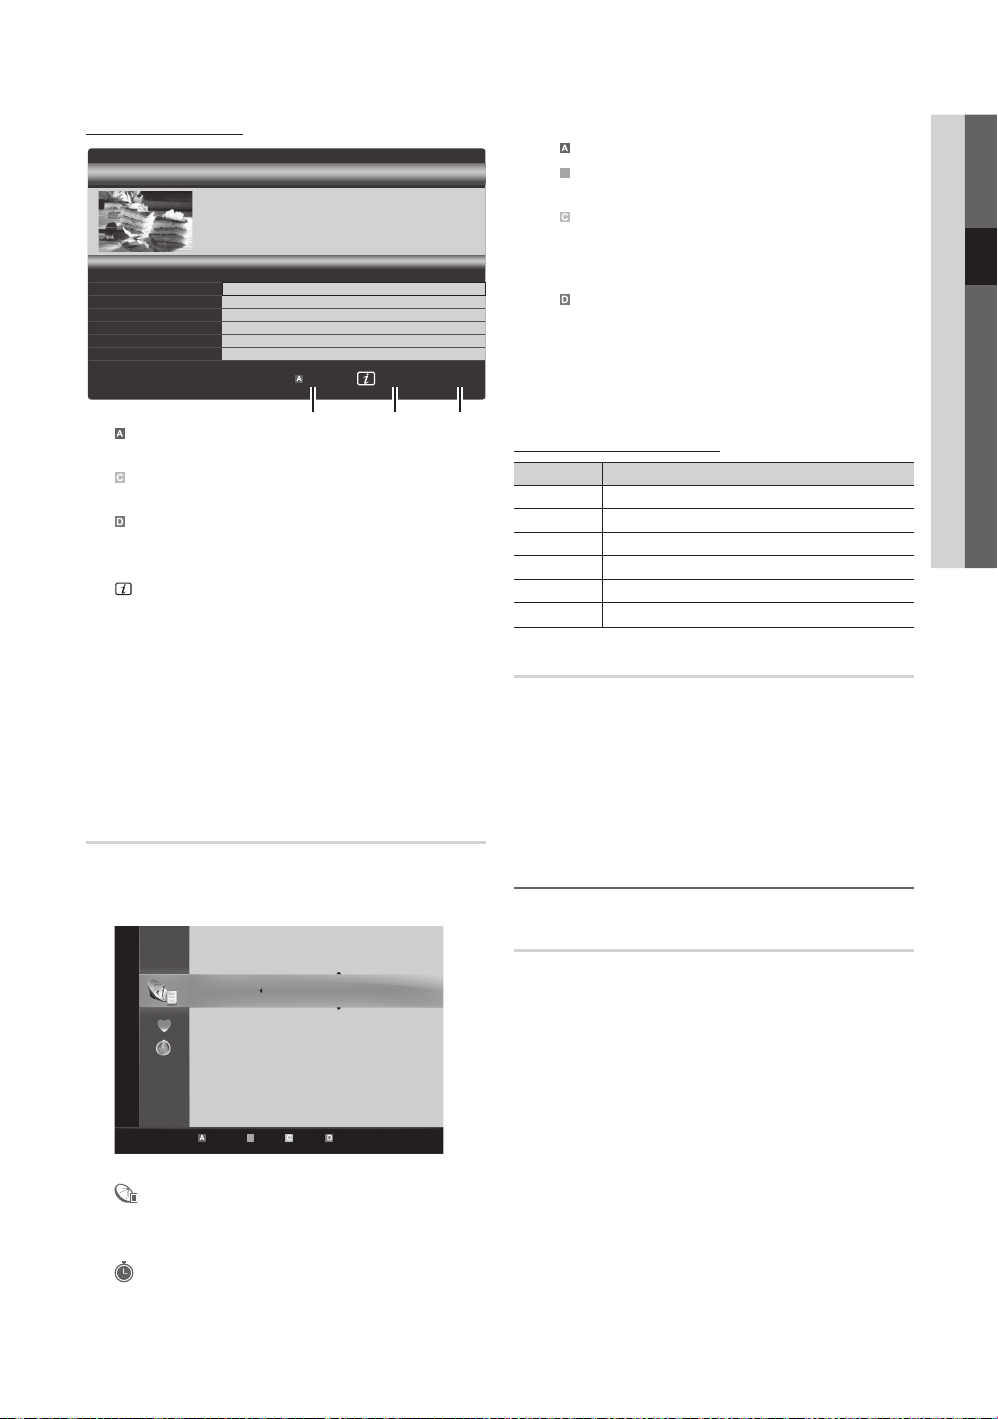
Using Scheduled View
B
c 1 1futech
2 * 24ore.tv
15 abc1
3 BBC World
23 bid-up.tv
33 Boonerang
32 Cartoon Nwk
5 Class News
4 \ Coming Soon
27 Discovery
All
TV
Radio
Data/Other
Analogue
r
DTV Air 800 five
Family Affairs
18:00 - 18:30
Drama
Tanya confesses all to a stunned Babs. Conrad is anxious to hear...
18:30
19:15
)
Family Affairs
)
Dark Angel
800
800
five
five
800 five
Guide
Scheduled View
Today
Today
View Mode Information
1 Red (View Mode): View the list of programmes that
1 4 6
2:10 Tue 1 Jun
E
Cancel
are playing now or coming up.
2 Yellow (+24 Hours): Viewing the list of programmes to
be broadcasted after 24 hours.
3 Blue (Ch. Mode): Select the type of channels you
want to display on the Channel View window.
–– The Ch. Mode differs according to the antenna source.
4 (Information): Displays details of the selected
programme.
5 k (Page): Move to next or previous page.
6 ENTERE button
– When selecting the current programme, you can
watch the selected programme.
When selecting the future programme, you can –
reserve to watch the selected programme. To cancel
the schedule, press the ENTERE button again and
select Cancel Schedules.
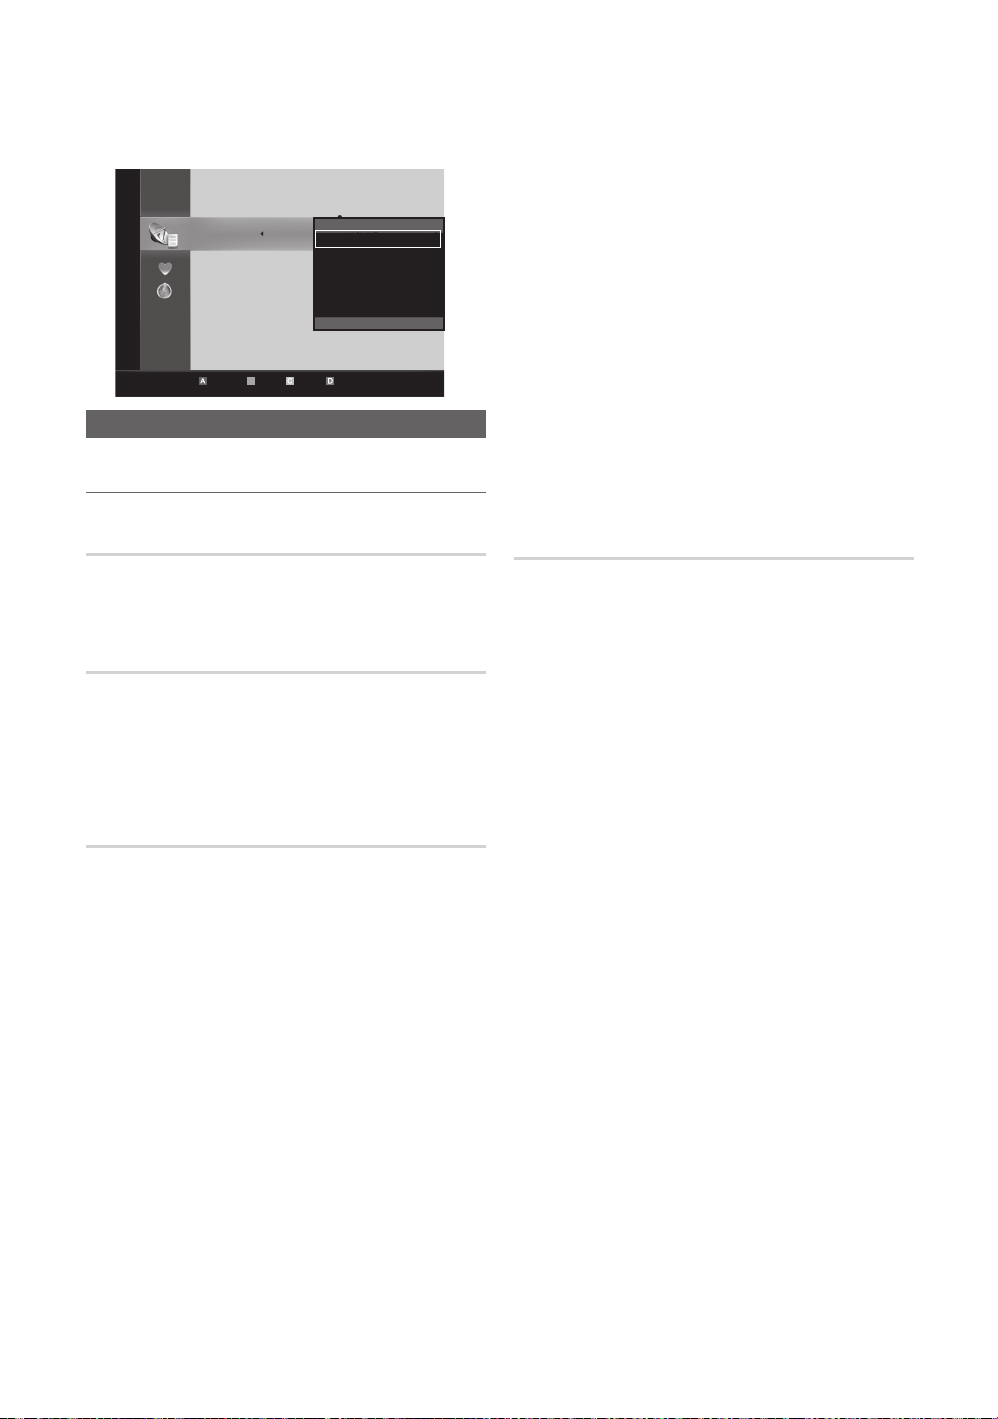
Channel Manager
Delete or set favourites channels and use the programme
guide for digital broadcasts. Select a channel in the
Channels, My Channels or Scheduled screen.
Using the colour buttons with the ✎Channel Manager
Red (Antenna): Toggle among Air or Cable.
x
Green (Zoom): Enlarges or shrinks a channel
x
number.
Yellow (Select): Select desired channels and press
x
the Yellow button to set all the selected channels at
the same time. The c mark appears to the left of
the selected channels.
Blue (Sort): Change the list ordered by channel
x
name or channel number.
k x(Page): Move to next or previous page.
T x (Tools): Displays the Channel Manager option
menu. (The options menus may differ depending on
the situation.)
Channel Status Display Icons
Icons Operations
An analogue channel.
A
A channel selected.
c
A channel set as a Favourite.
*
A programme currently being broadcast.
(
A locked channel.
\
A reserved programme.
)
Guide Type (Samsung / Guide Plus+)
(depending on the country)
You can select a different type of Guide.
Samsung ■ : Uses the guide programme by provided
samsung.
Guide Plus+ ■ : Uses the guide programme provided by
Rovi International Solutions. For more information, refer
to “www.europe.guideplus.com.”
Using Favourite Channels ¦
*
Channels
My Channels
(in Channel Manager)
Shows all favourite channels.
Edit My Channels ■
t
: You can set the selected
channels to desired my channels group.
The “
✎ *
” symbol will be displayed and the channel will
be set as a my channel.
1. Select a channel and press the TOOLS button.
Air Antenna B Zoom Select Sort kT Tools
■ Channels: Shows the channel list according to
■
■ Scheduled: Shows all the currently reserved
channel type.
*
programmes.
My Channels: Shows the group of the channel.
2. Add or delete a channel in the my channel groups
you want among 1, 2, 3 and 4.
One or more groups can be selected.
x
Page 14
Basic Features
c 1 1futech
2 * 24ore.tv
15 abc1
3 BBC World
23 bid-up.tv
33 Boonerang
32 Cartoon Nwk
5 Class News
4 \ Coming Soon
27 Discovery
All
TV
Radio
Data/Other
Analogue
r
3. After you have changed the settings, the channel list
for each group can be viewed in My channels.
Channels
Edit My Channels
Delete
Deselect All
Select All
d
Air Antenna B Zoom Select Sort kT Tools
Channel Menu
Retuning Channels ¦
Antenna (Air / Cable)
Before your television can begin memorizing the available
channels, you must specify the type of signal source that is
connected to the TV (i.e. an Air or a Cable system).
Country
The PIN input screen appears. Enter your 4 digit PIN number.
Digital Channel ■ : Change the country for digital
channels.
Analogue Channel ■ : Change the country for analogue
channels.
Auto Store
Scans for a channel automatically and stores in the TV.
Automatically allocated programme numbers may not
✎
correspond to actual or desired programme numbers. If
a channel is locked using the Child Lock function, the
PIN input window appears.
Antenna Source (Air / Cable) ■
antenna source to memorise.
t
: Select the
Channel Source (Digital & Analogue / Digital / ■
Analogue): Select the channel source to memorise.
When selecting Cable Digital & Analogue or Digital:
Provide a value to scan for cable channels.
Search Mode (Full / Network / Quick): Scans for all
channels with active broadcast stations and stores them
in the TV.
If you select ✎Quick, you can set up the Network,
Network ID, Frequency, Modulation and
Symbol Rate manually by pressing the button on
the remote control.
Network (Auto / Manual): Selects the Network ID
setting mode among Auto or Manual.
Network ID: When Network is Manual, you can set up
Network ID using the numeric buttons.
Frequency: Displays the frequency for the channel.
(differs in each country)
Modulation: Displays available modulation values.
Symbol Rate: Displays available symbol rates.
Manual Store
Scans for a channel manually and stores in the TV.
If a channel is locked using the ✎Child Lock function,
the PIN input window appears.
Digital Channel ■ : When scanning has finished, channels
are updated in the channel list.
When selecting ✎Antenna Air: Channel,
Frequency, Bandwidth
When selecting ✎Antenna Cable: Frequency,
Modulation, Symbol Rate
Analogue Channel (Programme, Colour System, ■
Sound System, Channel, Search, Store): If there
is abnormal sound or no sound, reselect the sound
standard required.
Channel mode
✎
P x (programme mode): When tuning is complete,
the broadcasting stations in your area have been
assigned to position numbers from P0 to P99. You
can select a channel by entering the position number
in this mode.
C x (aerial channel mode) / S (cable channel mode):
These two modes allow you to select a channel
by entering the assigned number for each aerial
broadcasting station or cable channel.
English
14
Page 15
15
English
03 Basic Features
Editing Channels ¦
Channel Manager Option Menu
(in Channel Manager)
1. Select a channel and press the TOOLS button.
2. Edit the channel name or number using the Edit
Channel Name or Edit Channel Number menu.
Edit Channel Name ■ (analogue channels only): Assign
your own channel name.
Other Features ¦
Channel Manager
Scheduled
(in Channel Manager)
You can view, modify or delete a show you have reserved to
watch.
Change Info ■ : Change a show you have reserved to
watch.
Cancel Schedules ■ : Cancel a show you have reserved
to watch.
Information ■ : Display a show you have reserved
to watch. (You can also change the reservation
information.)
Select All / Deselect All ■ : Select or deselect all reserved
programmes.
Channel Manager Option Menu
(in Channel Manager)
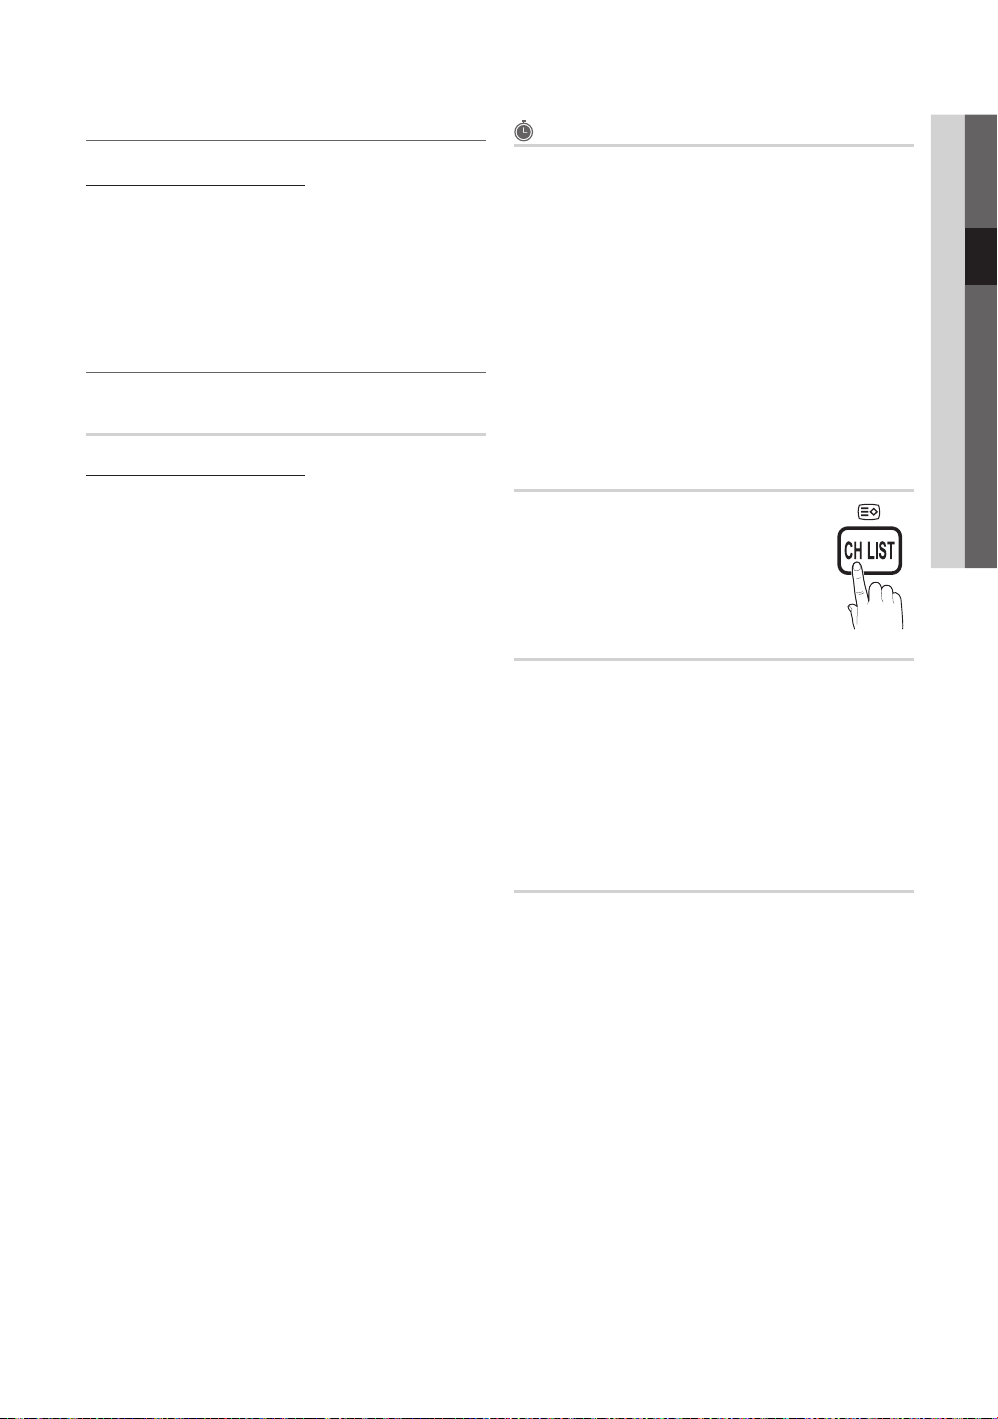
Set each channel using the Channel Manager menu options
(Lock / Unlock, Timer Recording, Timer Viewing, Sort,
Delete, Select All / Deselect All). Option menu items may
differ depending on the channel status.
1. Select a channel and press the TOOLS button.
2. Select a function and change its settings.
Lock / Unlock ■ : Lock a channel so that the channel
cannot be selected and viewed.
NOTE
✎
This function is available only when the xChild Lock
is set to On.
The PIN input screen appears. Enter your 4-digit PIN,
x
the default of which is “0-0-0-0”. Change the PIN
using the Change PIN option.
Timer Viewing ■ : You can set a desired channel to be
displayed automatically at the intended time. Set the
current time first to use this function.
When a digital channel is selected, press the ✎
button to view the digital Programme.
Sort ■ (analogue channels only): This operation allows
you to change the programme numbers of the stored
channels. This operation may be necessary after using
the auto store.
Delete ■ : You can delete a channel to display the channels
you want.
Select All / Deselect All ■ : Select all the channels
or deselect all the selected channels in the channel
manager.
Channel List
You can see all the channels searched.
Channel List Transfer
Imports or exports the channel map. You should connect a
USB storage to use this function.
The PIN number input screen appears. Enter your 4
✎
digit PIN number.
The default PIN number of a new TV set is ‘0-0-0-0’.
✎
Import from USB ■ : Import channel list from USB.
Export to USB ■ : Export channel list to USB.
Fine Tune
(analogue channels only)
If the signal is weak or distorted, fine tune the channel
manually.
Fine tuned channels are marked with an asterisk “*”.
✎
To reset the fine-tuning, select ✎Reset.
Page 16
Basic Features
Picture Menu
Changing the Preset Picture Mode ¦
Mode
Select your preferred picture type.
t
Dynamic ■ : Suitable for a bright room.
Standard ■ : Suitable for a normal environment.
Natural ■ : Suitable for reducing eye strain.
Natural ✎ is not available in PC mode.
Movie ■ : Suitable for watching movies in a dark room.
Adjusting Picture Settings ¦
Backlight / Contrast / Brightness /
Sharpness / Colour / Tint (G/R)
Your television has several setting options for picture quality
control.
NOTE
✎
In analogue xTV, Ext., AV modes of the PAL system,
the Tint (G/R) function is not available.
In PC mode, you can only make changes to
x
Backlight, Contrast and Brightness.
Settings can be adjusted and stored for each
x
external device connected to the TV.
Lowering picture brightness reduces power
x
consumption.
Economical Solutions ¦
Eco Solution
Energy Saving (Off / Low / Medium / High / Picture ■
Off / Auto)
TV in order to reduce power consumption. If you select
Picture Off, the screen is turned off, but the sound
remains on. Press any button except volume button to
turn on the screen.
Eco Sensor (Off / On) ■ : To enhance your power savings;
the picture settings will automatically adapt to the light
in the room.
Min Backlight: When Eco sensor is On, the minimum
screen brightness can be adjusted manually.
t
If you adjust the ✎Backlight, the Eco Sensor will
be set to Off.
If ✎Eco Sensor is On, the display brightness
may change (become slightly darker or brighter)
depending on the surrounding light intensity.
: This adjusts the brightness of the
No-Signal Power Off (Off / 15 min / 30 min / 60 min) ■ :
Activates the Stand-by mode, in the case of “No Signal”
or “Check Signal Cable” status for a certain period of
time defined by the user.
Disabled when the PC is in power saving mode.
✎
Changing the Picture Options ¦
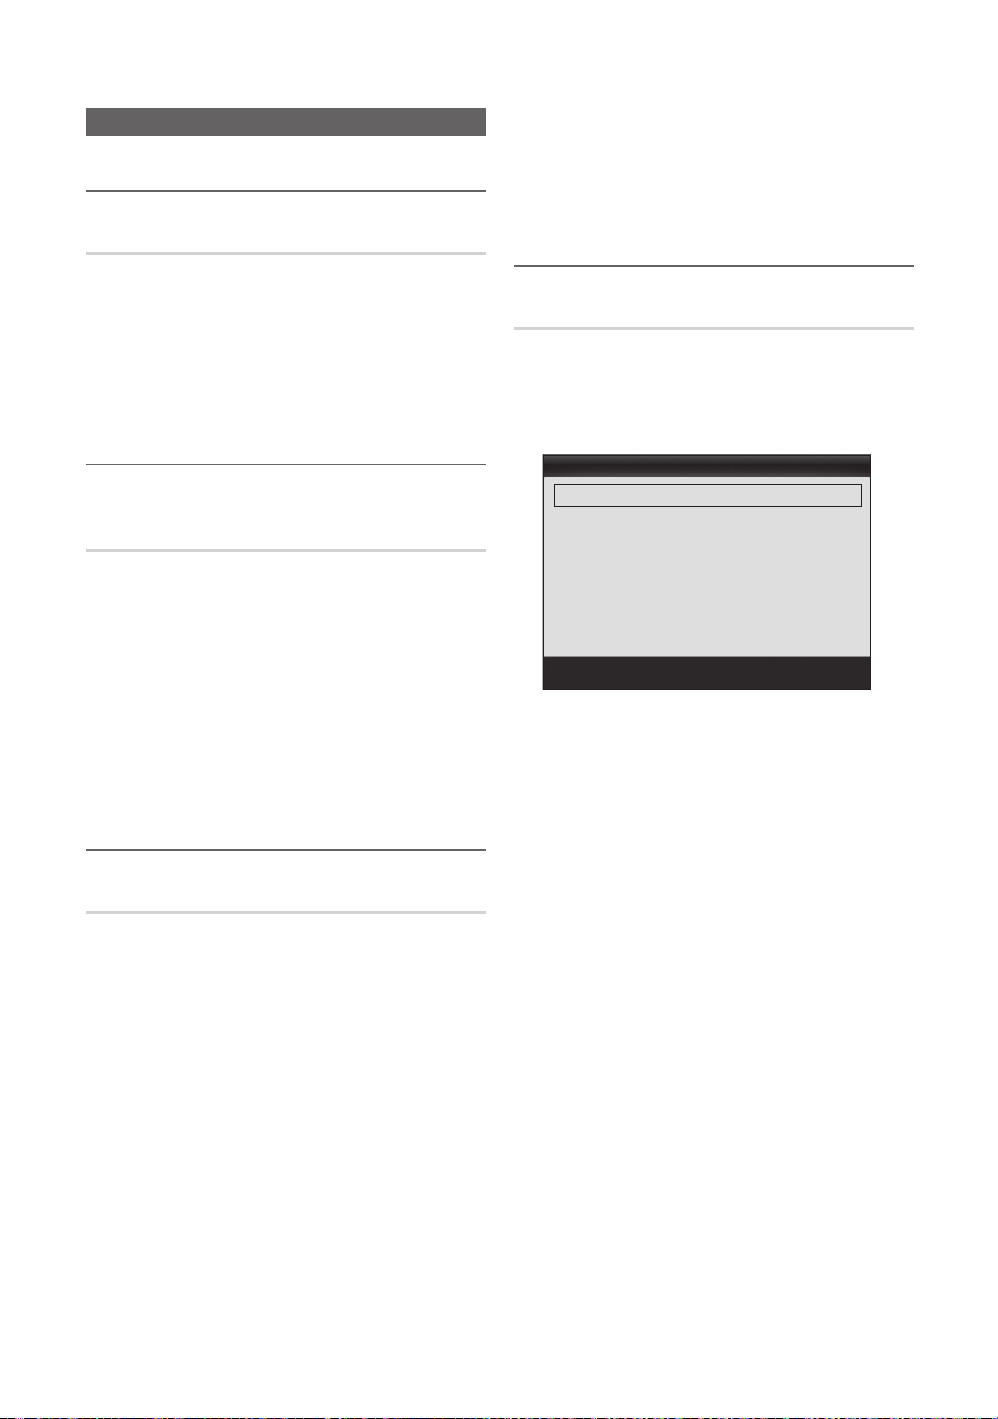
Advanced Settings
(available in Standard / Movie mode)
You can adjust the detailed setting for the screen including
colour and contrast.
In PC mode, you can only make changes to ✎Dynamic
Contrast, Gamma and White Balance.
Advanced Settings
Dynamic Contrast : Medium
Shadow Detail : -2
Gamma : 0
Colour Space : Native
Black Tone (Off / Dark / Darker / Darkest) ■ : Select the
black level to adjust the screen depth.
Dynamic Contrast (Off / Low / Medium / High) ■ : Adjust
the screen contrast.
Shadow Detail (-2~+2) ■ : Increase the brightness of dark
images.
Disabled under ✎PC mode.
Gamma ■ : Adjust the primary colour intensity.
Expert Pattern (Off / Pattern1 / Pattern2) ■ : By running
the Expert Pattern function, the picture can be
calibrated without a generator or filter. If the OSD menu
disappears or a menu other than the Picture menu is
opened, the calibration is saved and the Expert Pattern
window disappears.
While the ✎Expert Pattern is running, sound is not
outputted.
Only enabled on DTV, Component / HDMI models.
✎
RGB Only Mode (Off / Red / Green / Blue) ■ : You can
adjust Colour or Tint (G/R) of Red, Green or Blue for
the picture from an external device (DVD player, home
theatre, etc.).
Colour Space (Auto / Native / Custom) ■ : Adjust the
range of colours available to create the image. To adjust
Colour, Red, Green, Blue and Reset, set Colour
Space to Custom.
U
Move E Enter R Return
16
English
Page 17
17
English
03 Basic Features
White Balance ■ : Adjust the colour temperature for a
more natural picture.
R-Offset / G-Offset / B-Offset: Adjust each colour’s
(red, green, blue) darkness.
R-Gain / G-Gain / B-Gain: Adjust each colour’s (red,
green, blue) brightness.
Reset: Resets the White Balance to it’s default settings.
10p White Balance (Off / On) ■ : Controls the white
balance in 10 point interval by adjusting the red, green,
and blue brightness.
Available when the picture mode is set to ✎Movie
and when the external input is set to all input.
Some external devices may not support this
✎
function.
Interval: Select interval to adjust.
Red: Adjust the red level.
Green: Adjust the green level.
Blue: Adjust the blue level.
Reset: Resets the 10p White Balance to its default
settings.
Flesh Tone ■ : Emphasize pink Flesh Tone.
Edge Enhancement (Off / On) ■ : Emphasize object
boundaries.
xvYCC (Off / On) ■ : Setting the xvYCC mode on
increases detail and colour space when watching movies
from an external device (e.g. DVD player) connected to
the HDMI or Component IN jacks.
Available when the picture mode is set to ✎Movie
and when the external input is set to HDMI or
Component.
Some external devices may not support this
✎
function.
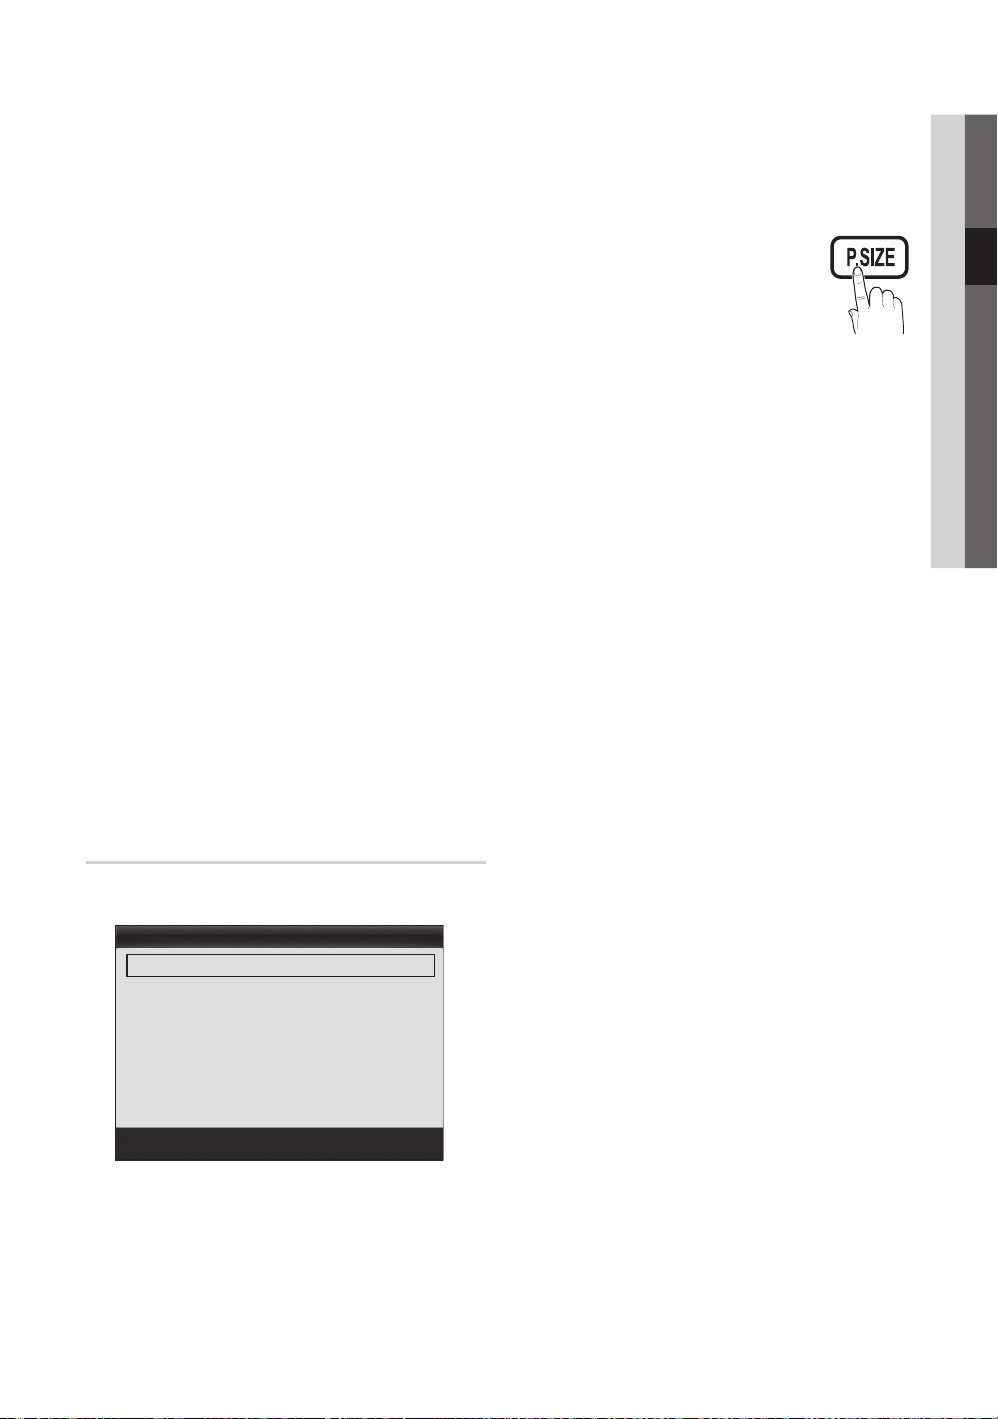
Picture Options
In PC mode, you can only make changes to the ✎Colour
Tone, Size and Auto Protection Time.
Picture Options
Digital Noise Filter : Auto
U
Move E Enter R Return
Colour Tone (Cool / Normal / Warm1 / Warm2) ■
Warm1 ✎or Warm2 will be deactivated when the
picture mode is Dynamic.
Settings can be adjusted and stored for each
✎
external device connected to an input on the TV.
Size ■ : Your cable box/satellite receiver
may have its own set of screen sizes as
well. However, we highly recommend
you use 16:9 mode most of the time.
Auto Wide: Automatically adjusts the
picture size to the 16:9 aspect ratio.
16:9: Adjusts the picture size to 16:9 for DVDs or wide
broadcasting.
Wide Zoom: Magnifies the picture size more than 4:3.
Adjusts the ✎Position by using , buttons.
Zoom: Magnifies the 16:9 wide pictures vertically to fit
the screen size.
Adjusts the ✎Position or Size by using ,
button.
4:3: The default setting for a movie or normal
broadcasting.
Do not watch in 4:3 format for a long time. Traces
✎
of borders displayed on the left, right and centre
of the screen may cause image retention(screen
burn) which are not covered by the warranty.
Screen Fit: Displays the full image without any cut-off
when HDMI (720p / 1080i / 1080p) or Component
(1080i / 1080p) signals are inputted.
NOTE
✎
After selecting xScreen Fit in HDMI (1080i / 1080p) or
Component (1080i / 1080p) mode, you may need to
center the picture:
1. Press the or button to select Position.
2. Press the ENTERE button.
3.
Press the , , or button to move the picture.
Depending on the input source, the picture size
x
options may vary.
The available items may differ depending on the
x
selected mode.
In PC mode, only x16:9 and 4:3 modes can be
adjusted.
Settings can be adjusted and stored for each
x
external device connected to an input on the TV.
If you use the xScreen Fit function with HDMI 720p
input, 1 line will be cut at the top, bottom, left and
right as in the overscan function.
Screen Mode (16:9 / Wide Zoom / Zoom / 4:3) ■ :
Available only when picture size is set to Auto Wide. You
can determine the desired picture size at the 4:3 WSS
(Wide Screen Service) size or the original size. Each
European country requires different picture size.
Not available in PC, Component or HDMI mode.
✎
Page 18
Basic Features
Digital Noise Filter (Off / Low / Medium / High / Auto ■
/ Auto Visualisation): When the broadcast signal is
weak, some static and ghosting may appear. Select one
of the options until the best picture is displayed.
Auto Visualisation: When changing analogue channels,
displays signal strength.
Only available for analogue channels.
✎
When bar is green, you are receiving the best
✎
possible signal.
MPEG Noise Filter (Off / Low / Medium / High / ■
Auto): Reduces MPEG noise to provide improved
picture quality.
Disabled under PC mode.
✎
HDMI Black Level (Normal / Low) ■ : Selects the black
level on the screen to adjust the screen depth.
Available only in HDMI mode (RGB signals).
✎
Film Mode (Off / Auto1 / Auto2) ■ : Sets the TV to
automatically sense and process film signals from all
sources and adjust the picture for optimum quality.
Available in AV, COMPONENT (480i / 1080i) and
✎
HDMI (480i / 1080i).
Motion Plus (Off / Clear / Standard / Smooth / ■
Custom / Demo) : Removes drag from fast scenes with
a lot of movement to provide a clearer picture.
If you enable ✎Motion Plus, noise may appear on
the screen. If this occurs, set Motion Plus to Off.
Blur Reduction: Adjusts the blur reduction level from
video sources.
Judder Reduction: Adjusts the judder reduction level
from video sources when playing films.
Reset: Reset the custom settings.
Auto Protection Time (2 hours / 4 hours / 8 hours ■
/ 10 hours / Off): If the same image remains on the
screen, Auto Screen Burn Protector will work.
Viewing TV using the 3D function ¦
IMPORTANT HEALTH AND SAFETY INFORMATION FOR
3D PICTURES.
Read and understand the following safety
information before using the TV’s 3D function.
[
WARING
Some viewers may experience discomfort while
x
viewing 3D TV such as dizziness, nausea and
headaches. If you experience any such symptom,
stop viewing 3D TV, remove 3D Active Glasses and
rest.
Watching 3D images for an extended period of time
x
may cause eye strain. If you feel eye strain, stop viewing
3D TV, remove your 3D Active Glasses and rest.
Watching 3D images for an extended period of time
x
may cause eye strain. If you feel eye strain, stop viewing
3D TV, remove your 3D Active Glasses and rest.
Do not use the 3D Active Glasses for other purposes
x
(such as general eyeglasses, sunglasses, protective
goggles, etc.)
Do not use the 3D function or 3D Active Glasses
x
while walking or moving around. Using the 3D
function or 3D Active Glasses while moving around
may result in injuries due to running into objects,
tripping, and/or falling.
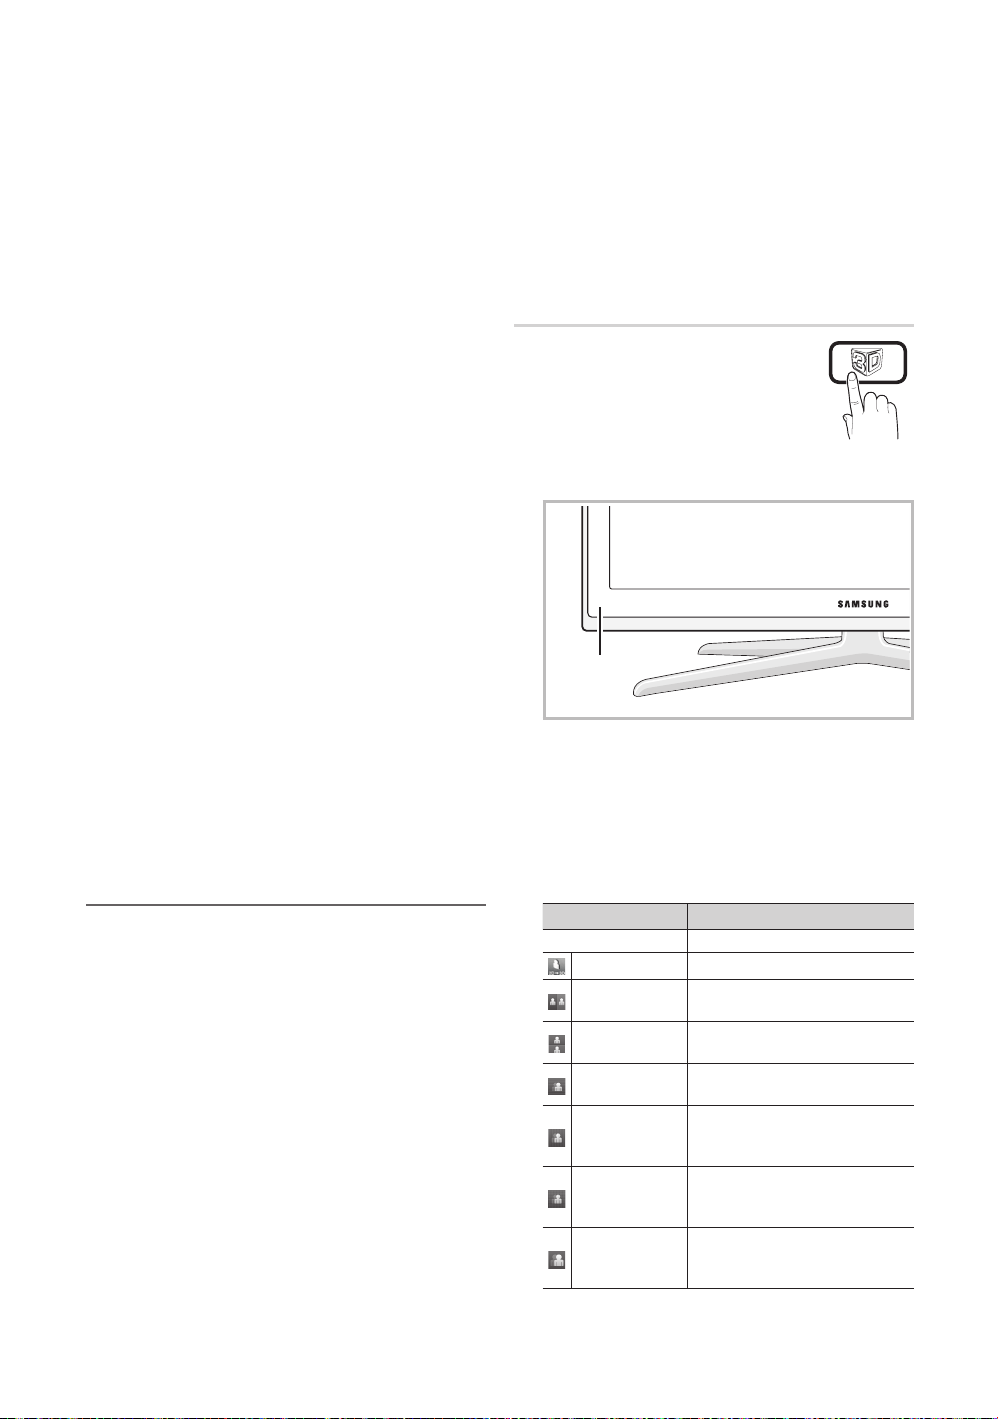
3D
This exciting new feature enables you to view
3D content. In order to fully enjoy this feature,
you must purchase a pair of Samsung 3D
Active Glasses (SSG-2100AB, SSG-2200AR,
SSG- 2200KR) to view 3D video.
Samsung 3D Active Glasses are sold
separately. For more detailed purchasing
information, contact the retailer where you purchased this TV.
3D emitter
If there is any obstacle between the emitter and 3D Active
✎
Glasses, the proper 3D effect may not be obtained.
3D Mode ■ : Select the 3D input format.
If you want to feel the 3D effect fully, please wear
✎
the 3D Active Glasses first, and then select 3D
mode from the list as below.
When watching 3D images, turn on 3D Active Glasses.
✎
3D Mode Operation
Off Turns the 3D function off.
2D 3D
Side by Side
Top & Bottom
Line by Line
Vertical Stripe
Checker
Board
Frequency
Changes a 2D image to 3D.
Displays two images next to
each other.
Displays one image above
another.
Displays the images for the left
and right eye alternately in rows.
Displays the images for the
left and right eye alternately in
columns.
Displays the images for the
left and right eye alternately in
pixels.
Displays the images for the
left and right eye alternately in
frames.
18
English
Page 19

19
English
03 Basic Features
“ ✎Side by Side” and “Top & Bottom” are available
when the resolution is 720p, 1080i and 1080p in
(DTV, HDMI and USB modes) or set to PC (HDMI
mode).
“Vertical Strip”, “Line by Line” and “Checker
✎
Board” are available when the resolution is set to
PC (HDMI mode).
“Frequency” displays the frequency (60Hz only)
✎
when the resolution is set to PC.
3D ■ 2D (Off / On): Displays the image for the left eye only.
This function is deactivated when ✎3D Mode is set
to “2D 3D” or Off.
3D View point: ■ The overall adjustment of 3D perspective.
This function is deactivated when ✎3D Mode is set
to “2D 3D” or Off.
Depth ■ : Adjusts focus / depth in “2D 3D” mode.
This function is only activated when the ✎3D Mode
is “2D 3D ”.
Picture Correction ■ : Adjusts the images for the left and
right eye.
3D Auto View (Off / On) ■ : If 3D Auto View is set to On,
a “Side-By-Side” format HDMI signal with one of the
resolutions below is automatically switched to 3D. Here,
correct 3D information must be sent from the Standard
HDMI 3D Format.
If a 3D failure occurs due to a 3D information error,
✎
set 3D Auto View to Off and manually select a 3D
Mode using the 3D( ) button or corresponding
menu.
Support resolution (16:9 only)
✎
Resolution Frequency (Hz)
1280 x 720p 50 / 60 Hz
1920 x 1080i 50 / 60 Hz
1920 x 1080p 24 / 30 / 50 / 60 Hz
3D Optimize ■ : The overall adjustment of 3D effect.
Resolution supported for HDMI PC mode
The resolution for HDMI PC mode is optimized to 1920 x
1080 input.
An input resolution other than 1920 x 1080 may not be
displayed properly in 3D display or full screen mode.
How to watch the 3D image
3D
press the power button on the glasses.
periods may cause eye fatigue and/or
dizziness
Cancel
U
Move E Enter R Exit
3D
select the icon suitable for the picture on screen.
select the icon suitable for the picture on screen.
U
Move E Enter R Exit
1. Press the CONTENT button, then the Content View
menu will appear.
2. Press the or button, then select 3D.
To watch in 3D, wear glasses and press the power
button on the glasses. Viewing 3D TV motion pictures
for long periods may cause eye fatigue and/or dizziness.
3. Select OK, then press the ENTERE button.
4. Using the or buttons on your remote control,
selects the 3D Mode of the image you want to view.
Some 3D modes may not be available depending
✎
on the format of the image source.
Supported formats and operating specifications for
Standard HDMI 3D
The 3D formats indicated below are recommended by
✎
the HDMI association and must be supported.
Source signal format Standard HDMI 1.4 3D
1920x1080p@24Hz x 2 1920x2205p@24Hz
1280x720p@60Hz x 2 1280x1470p@60Hz
1280x720p@50Hz x 2 1280x1470p@50Hz
The mode is automatically switched to 3D mode for the 3D
video input in one of the formats above.
For the Standard HDMI 3D format with 24Hz, the TV is
optimized as follows:
– Resolution First Display Mode: If Motion Plus is set
to Off, Clear or Standard, you can watch the video
at a high resolution optimized to the resolution of the
source video.
– Judder Reduction Display Mode: When Motion
Plus is set to Smooth or Custom, you can watch a
smooth picture without judder.
Page 20

Basic Features
Before using 3D function...
NOTE
✎
You may notice a small amount of screen flickering
x
when watching 3D images in poor light conditions
(from a strobe light, etc.), or under a fluorescent lamp
(50Hz ~ 60Hz) or 3 wavelength lamp. If so, dim the
light or turn the lamp off.
3D mode is automatically disabled in following cases:
x
when changing a channel or the input source, or
accessing Media Play or Internet@TV.
Some Picture functions are disabled in x3D mode.
PIP and data broadcast is not supported in 3D
x
mode.
3D Active Glasses from other manufacturers may not
x
be supported.
When the TV is initially powered on, may take some
x
time until the 3D display is optimized.
The 3D Active Glasses may not work properly if there
x
is any other 3D product or electronic devices turned
on near the glasses or TV. If there is a problem, keep
other electronic devices as far away as possible from
the 3D Active Glasses.
Photos of Media Play are shown in “2D 3D”
x
mode only.
If you lie on your side while watching TV with 3D
x
Active Glasses, the picture may look dark or may not
be visible.
Be sure to stay within the viewing angle and optimum
x
TV viewing distance when watching 3D pictures.
Otherwise, you may not be able to enjoy proper 3D –
effects.
The ideal viewing distance should be three times
x
or more the height of the screen. We recommend
sitting with viewer’s eyes on a level with the screen.
Picture Reset (OK / Cancel)
Resets your current picture mode to its default settings.
Setting up the TV with Your PC ¦
Set the input source to PC.
Auto Adjustment
Adjust frequency values/positions and fine tune the settings
automatically.
Not available when connecting with an HDMI/DVI cable.
✎
t
Screen
Coarse / Fine ■ : Removes or reduces picture noise. If the
noise is not removed by Fine-tuning alone, then adjust
the frequency as best as possible (Coarse) and Finetune again. After the noise has been reduced, readjust
the picture so that it is aligned to the centre of screen.
Position ■ : Adjust the PC screen position with direction
button ( / / / ).
Image Reset ■ : Resets the image to default settings.
Using Your TV as a Computer (PC) Display
Setting Up Your PC Software (Based on Windows XP)
Depending on the version of Windows and the video card,
the actual screens on your PC may differ in which case the
same basic set-up information will almost always be applied.
(If not, contact your computer manufacturer or Samsung
Dealer.)
1. Click on “Control Panel” on the Windows start menu.
2. Click on “Appearance and Themes” in the “Control
Panel” window and a display dialog-box will appear.
3. Click on “Display” and a display dialog box will appear.
4. Navigate to the “Settings” tab on the display dialog-box.
The correct size setting (resolution) [Optimum: 1920 X y
1080 pixels]
If a vertical-frequency option exists on your display y
settings dialog box, the correct value is “60” or “60 Hz”.
Otherwise, just click “OK” and exit the dialog box.
20
English
Page 21
21
English
03 Basic Features
Sound Menu
Changing the Preset Sound Mode ¦
SRS TheaterSound
Standard ■ : Selects the normal sound mode.
Music ■ : Emphasizes music over voices.
Movie ■ : Provides the best sound for movies.
Clear Voice ■ : Emphasizes voices over other sounds.
Amplify ■ : Increase the intensity of high-frequency sound
to allow a better listening experience for the hearing
impaired.
t
Adjusting Sound Settings ¦
Audio Language
(digital channels only)
Change the default value for audio languages.
The available language may differ depending on the
✎
broadcast.
Audio Format
(digital channels only)
When sound is emitted from both the main speaker and the
audio receiver, a sound echo may occur due to the decoding
speed difference between the main speaker and the audio
receiver. In this case, use the TV Speaker function.
Audio Format ✎ option may differ depending on the
broadcast. 5.1ch Dolby digital sound is only available
when connecting an external speaker through an
optical cable.
(MPEG / Dolby Digital 5.1)
Equalizer
Adjusts the sound mode (standard sound mode only).
Balance L/R ■ : Adjusts the balance between the right and
left speaker.
100Hz / 300Hz / 1kHz / 3kHz / 10kHz ■ (Bandwidth
Adjustment): Adjusts the level of specific bandwidth
frequencies.
Reset ■ : Resets the equalizer to its default settings.
Sound Systems, Etc. ¦
SRS TruSurround HD (Off / On)
(standard sound mode only)
This function provides a virtual 5.1 channel surround sound
experience through a pair of speakers or headphones using
HRTF (Head Related Transfer Function) technology.
t
SRS TruDialog (Off / On)
(standard sound mode only)
This function allows you to increase the intensity of a voice
over background music or sound effects so that dialog can
be heard more clearly when viewing a show.
Audio Description
(not available in all locations)
(digital channels only)
This function handles the Audio Stream
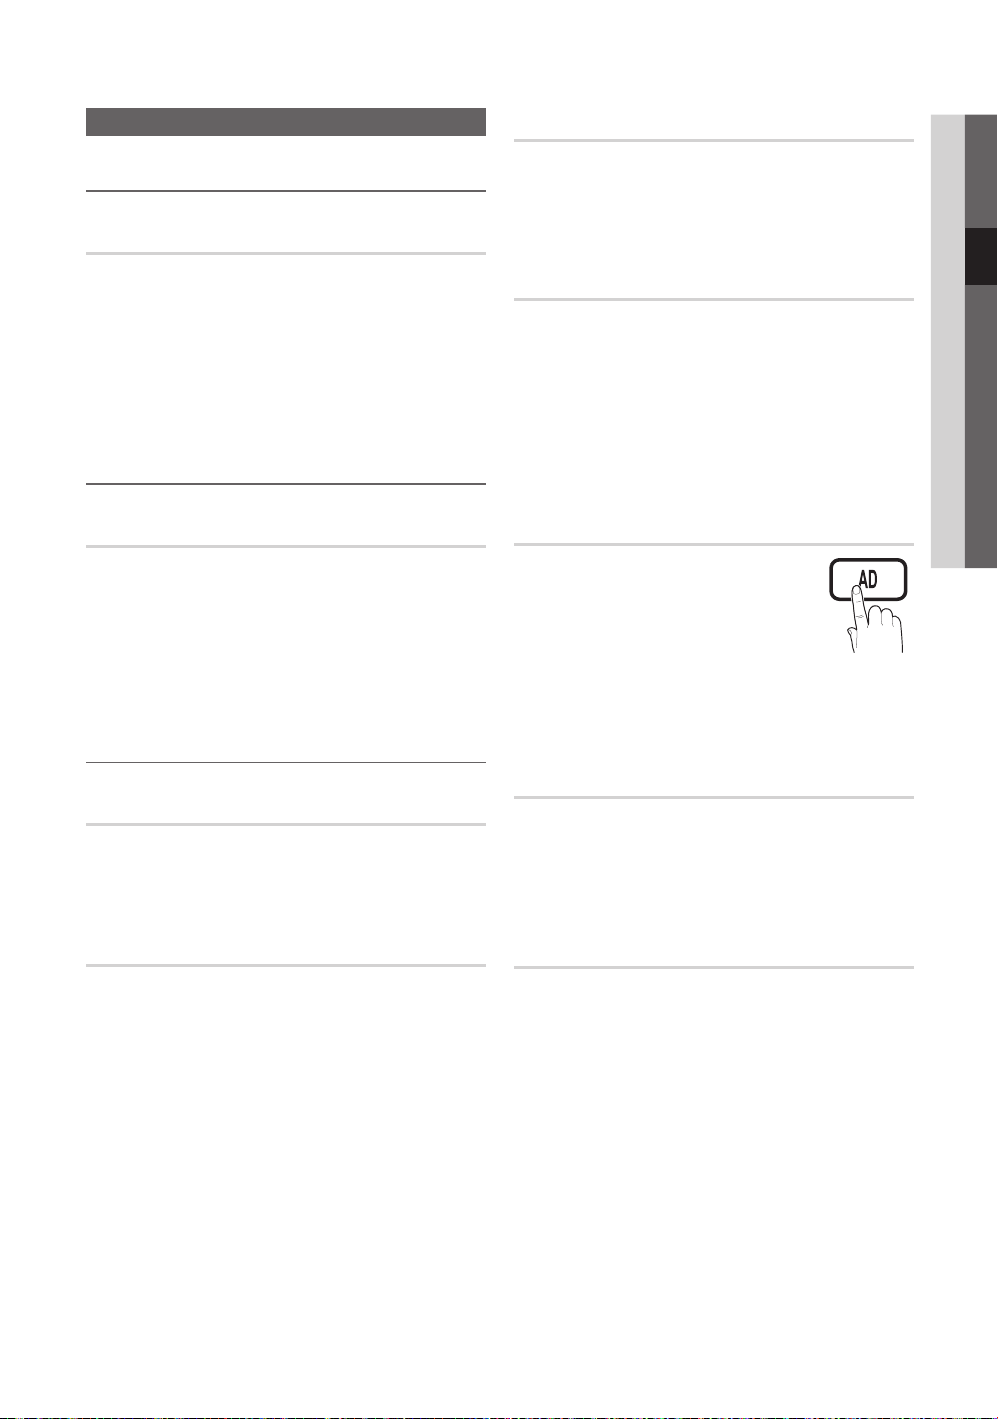
for the AD (Audio Description) which is
sent along with the Main audio from the
broadcaster.
Audio Description (Off / On) ■ : Turn the audio description
function on or off.
Volume ■ : Adjust the audio description volume.
Auto Volume (Off / Normal / Night)
To equalize the volume level on each channel, set to Normal.
Night ■ : This mode provides an improved sound
experience compared to Normal mode, making almost
no noise. It is useful at night.
Speaker Select
(External Speaker / TV Speaker)
A sound echo may occur due to a difference in decoding
speed between the main speaker and the audio receiver. In
this case, set the TV to External Speaker.
When ✎Speaker Select is set to External Speaker, you
should use these settings.
TV speaker: Off , External speaker: On
x
When ✎Speaker Select is set to TV Speaker, you
should use these settings
TV Speaker: On, External Speaker: On
x
If there is no video signal, both speakers will be mute.
✎
Page 22
Basic Features
Additional Setting
(digital channels only)
DTV Audio Level (MPEG / HE-AAC) ■ : This function
allows you to reduce the disparity of a voice signal
(which is one of the signals received during a digital TV
broadcast) to a desired level.
According to the type of broadcast signal, ✎MPEG
/ HE-AAC can be adjusted between -10dB and
0dB.
To increase or decrease the volume, adjust
✎
between the range 0 and -10 respectively.
SPDIF Output ■ : SPDIF (Sony Philips Digital InterFace)
is used to provide digital sound, reducing interference
going to speakers and various digital devices such as a
DVD player.
Audio Format: During the reception of a digital TV
broadcast, you can select the Digital Audio output
(SPDIF) format from the options PCM or Dolby Digital.
By connecting to 5.1ch speakers in a Dolby
✎
Digital setup, maximize your interactive 3D sound
experience.
Audio Delay: Correct audio-video sync problems, when
watching TV or video, and when listening to digital audio
output using an external device such as an AV receiver
(0ms ~ 250ms).
Dolby Digital Comp (Line / RF) ■ : This function minimizes
signal disparity between a dolby digital signal and a
voice signal (i.e. MPEG Audio, HE-AAC, ATV Sound).
Select ✎Line to obtain dynamic sound, and RF
to reduce the difference between loud and soft
sounds at night time.
Line: Set the output level for signals greater or less than
-31dB (reference) to either -20dB or -31dB.
RF: Set the output level for signals greater or less than
-20dB (reference) to either -10dB or -20dB.
If the stereo signal is weak and an automatic switching,
✎
occurs, then switch to the mono.
Only activated in stereo sound signal.
✎
Only available when the ✎Input source is set to TV.
Setup Menu
Setting the Time ¦
Time
Clock ■ : Setting the clock is for using various timer
features of the TV.
The current time will appear every time you press
O
the INFO button.
If you disconnect the power cord, you have to set
✎
the clock again.
Clock Mode (Auto / Manual)
Depending on the broadcast station and signal,
✎
the auto time set up may not be correct. In this
case, set the time manually.
The antenna must be connected in order to set
✎
the time automatically.
Clock Set: Set the Day, Month, Year, Hour and Minute
manually.
Available only when ✎Clock Mode is set to
Manual.
Time Zone: You can select your time zone.
This function is only available when Clock Mode is
✎
set to Auto.
Depending on the broadcast station and signal,
✎
the auto time may not be set correctly. If this
occurs, set the time manually.
Sound Reset (OK / Cancel)
Reset all sound settings to the factory defaults.
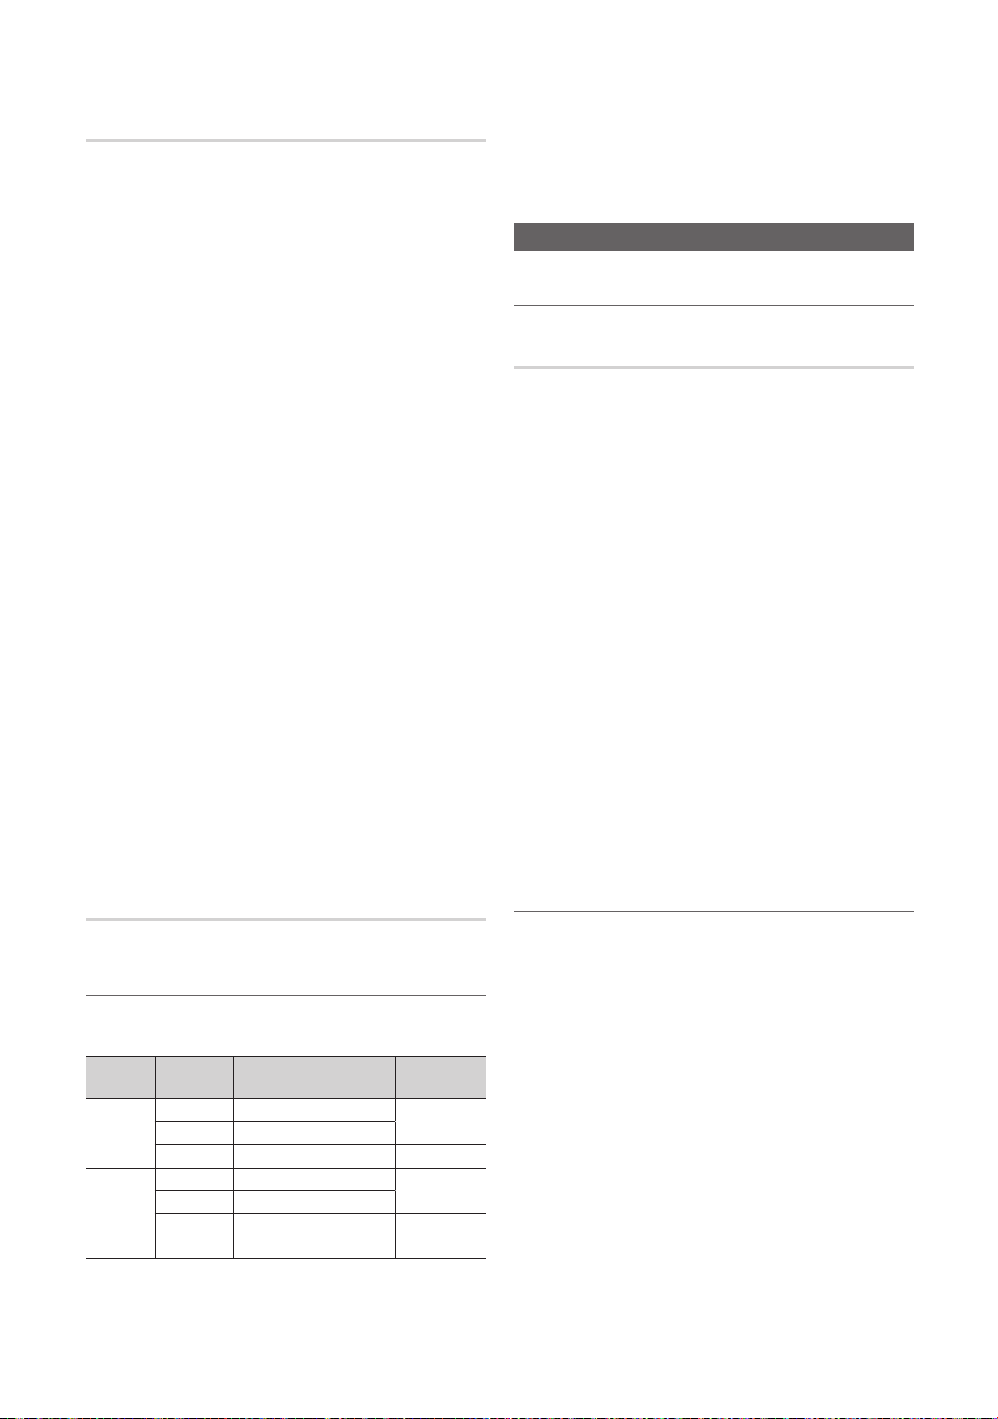
Selecting the Sound Mode ¦
When you set to Dual I-II, the current sound mode is
displayed on the screen.
Stereo
NICAM
Stereo
22
A2
Audio
Type
Mono Mono
Stereo
Dual
Mono Mono
Stereo
Dual
English
Dual I-II Default
Stereo Mono
Dual I Dual II
Mono Stereo
Mono Dual I
Dual II
t
Automatic
change
Dual I
Automatic
change
Dual I
Using the Sleep Timer ¦
Sleep Timer ■
after a preset period of time. (30, 60, 90, 120, 150 and
180 minutes).
t
To cancel ✎Sleep Timer, select Off.
: Automatically shuts off the TV
Page 23
23
English
03 Basic Features
Setting the On / Off Timer ¦
10 TV ATV1
00 00
▲
▼
00 00
▲
▼
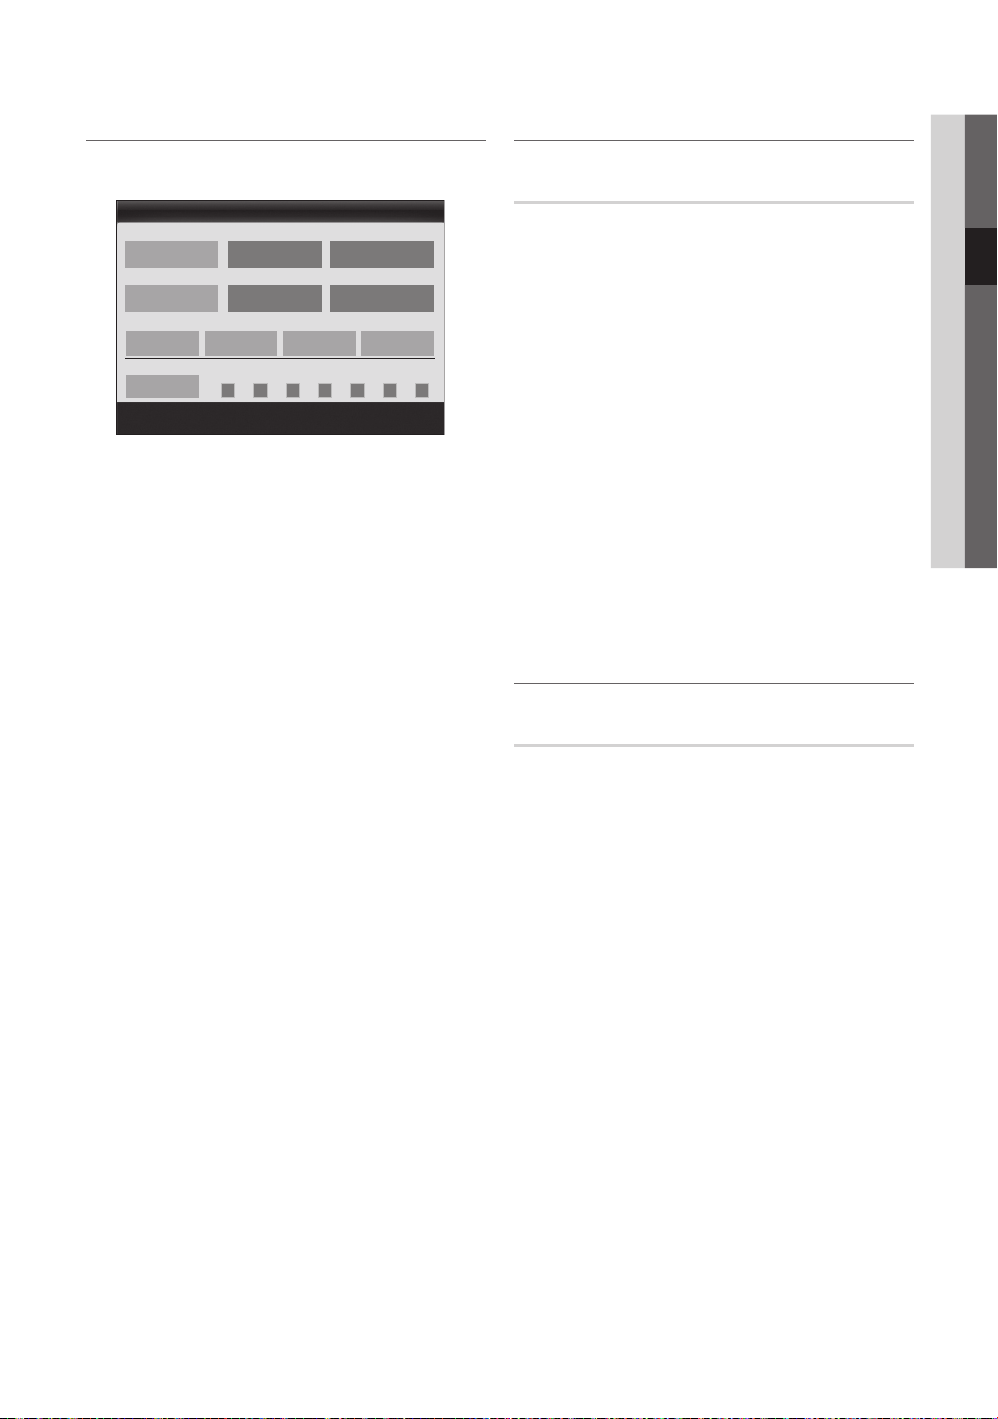
Timer 1 / Timer 2 / Timer 3 ■ : Three different on / off
timer settings can be made. You must set the clock first.
Inactivate
Inactivate
Volume
Repeat
On Time / Off Time: Set the hour, minute, and activate
/ inactivate. (To activate timer with the setting you’ve
chosen, set to Activate.)
Volume: Set the desired volume level.
Source: Select TV or USB content to be played when
the TV is turned on automatically. (USB can be selected
only when a USB device is connected to the TV)
Antenna (when the Source is set to TV): Select ATV or
DTV.
Channel (when the Source is set to TV): Select the
desired channel.
Contents (when the Source is set to USB): Select a
folder in the USB device containing music or photo files
to be played when the TV is turned on automatically.
NOTE
✎
If there is no music file on the USB device or the
x
folder containing a music file is not selected, the
Timer function does not operate correctly.
When there is only one photo file in the USB
x
device, the Slide Show will not play.
If a folder name is too long, the folder cannot be
x
selected.
Each USB you use is assigned its own folder.
x
When using more than one of the same type of
USB, make sure the folders assigned to each
USB have different names.
Repeat: Select Once, Everyday, Mon~Fri, Mon~Sat,
Sat~Sun or Manual to set at you convenience. If you
select Manual, you can set up the day you want to
activate the timer.
The
✎ c
Auto Power Off (available only when the TV is turned on
✎
by Timer): The TV will be automatically turned off after 3
hours of being left idle to prevent overheating.
Timer 1
Source Antenna Channel
Sun Mon Tue Thu Fri Sat
L
Move
U Adjust E
mark indicates the day is selected.
Enter R Return
Locking Programme ¦
Security
The PIN input screen appears before the setup screen.
✎
Enter your 4-digit PIN, the default of which is “0-0-0-0”.
✎
Change the PIN using the Change PIN option.
Child Lock (Off / On) ■ : Lock channels in Channel
Manager, to prevent unauthorized users, such as
children, from watching unsuitable programme.
Available only when the ✎Input source is set to TV.
Parental Lock ■ (Parental Rating):Prevent unauthorized
users, such as children, from watching unsuitable
programme with a user-defined 4-digit PIN code.
Allow All: Unlock all TV ratings.
The items of ✎Parental Lock differs depending on
the country.
Change PIN ■ : Change your personal ID number required
to set up the TV.
If you forget the PIN code, press the remote
✎
control buttons in the following sequence, which
resets the PIN to “0-0-0-0”: POWER (off)
MUTE 8 2 4 POWER (on).
Other Features ¦
Language
Menu Language ■ : Set the menu language.
Teletext Language ■ : Set a desired language for teletext.
English is the default in cases where the selected
✎
language is unavailable in the broadcast.
Preference (Primary Audio Language / Secondary ■
Audio Language / Primary Subtitle Language /
Secondary Subtitle Language / Primary Teletext
Language / Secondary Teletext Language): Select
a language, which will be the default language when a
channel is selected.
Page 24

Basic Features
Subtitle
Use this menu to set the Subtitle mode.
Subtitle feature does not work in
✎
Component and HDMI.
Subtitle (Off / On) ■ : Switches subtitles
on or off.
Mode (Normal / Hearing Impaired) ■ : Sets the subtitle
mode.
Subtitle Language ■ : Sets the subtitle language.
If the programme you are watching does not
✎
support the Hearing Impaired function, Normal
automatically activates even if the Hearing
Impaired mode is selected.
English is the default in cases where the selected
✎
language is unavailable in the broadcast.
Network (Network Type / Network Setup
/ Network Test / Samsung Wireless Link /
SWL connect)
For details on setting up options, refer to the “Network
Connection” instructions (p. 28).
General
Game Mode (Off / On) ■ : When connecting to a game
console such as PlayStation™ or Xbox™, you can enjoy
a more realistic gaming experience by selecting game
mode.
NOTE
✎
Precautions and limitations for x game mode
To disconnect the game console and connect –
another external device, set Game Mode to Off in
the setup menu.
If you display the TV menu in – Game Mode, the
screen shakes slightly.
Game Mode x is not available in PC and TV mode.
After connecting the game console, set xGame Mode
to On to prevent poor picture quality.
If xGame Mode is On: Picture mode is set to
Standard and Sound mode is set to Movie.
BD Wise (Off / On) ■ : Provides the optimal picture quality
for Samsung DVD, Blu-ray and Home Theatre products
which support BD Wise. When BD Wise is turned On,
the picture mode is automatically changed to the optimal
resolution.
Available when connecting Samsung products
✎
that support BD Wise through a HDMI cable.
Menu Transparency (Bright / Dark) ■ : Set the
Transparency of the menu.
Melody (Off / Low / Medium / High) ■ : Set so that a
melody plays when the TV is turned on or off.
FastStart (Off / On) ■ : When the TV is powered on, the
screen will come on quickly with this feature.
Melody ✎ is disabled when FastStart is On.
Common Interface
CI Menu ■ : This enables the user to select from the CAM-
provided menu. Select the CI Menu based on the menu
PC Card.
Application Info ■ : View information on the CAM inserted
into the CI slot and on the “CI or CI+ CARD” which is
inserted into the CAM. You can install the CAM anytime
whether the TV is on or off.
1. Purchase a CI CAM module at your nearest dealer or by
phone.
2. Firmly insert the “CI or CI+ CARD” into the CAM in the
direction of the arrow.
3. Insert the CAM with the “CI or CI+ CARD” into the
common interface slot, in the direction of the arrow so
that it aligns parallel with the slot.
4. Check if you can see a picture on a scrambled signal
channel.
Wireless Remote Control (Off/On)
Turn wireless remote controls on or off or give permission to
wireless remote controls.
Picture In Picture (PIP) ¦
t
PIP
You can watch the TV tuner and one external video source
simultaneously. PIP (Picture-in-Picture) does not function in
the same mode.
24
English
Page 25
25
English
03 Basic Features
NOTE
✎
If you turn the TV off while watching in xPIP mode, the
PIP window will disappear.
You may notice that the picture in the PIP window
x
becomes slightly unnatural when you use the main
screen to view a game or karaoke.
While xInternet@TV is in operation, the PIP function
cannot be used.
PIP settings
x
Main picture Sub picture
Component, HDMI1/DVI,
HDMI2, HDMI3, HDMI4, PCTV
PIP (Off / On) ■ : Activate or deactivate the PIP function.
Channel ■ : Select the channel for the sub-screen.
Size ( ■
Õ
/ Ã /
picture.
Position ( ■
sub-picture.
Sound Select (Main / Sub) ■ : You can choose the
desired sound (Main / Sub) in PIP mode.
À / Œ
Ã
/ – / — / œ): Select a position for the
): Select a size for the sub-
Support Menu
Self Diagnosis
Picture Test (Yes / No) ■ : Use to check for picture
problems and if the problem continues to occur check
the colour pattern.
Sound Test (Yes / No) ■ : Use the built-in melody sound to
check for sound problems.
If you hear no sound from the TV’s speakers,
✎
before performing the sound test, make sure
Speaker Select is set to TV Speaker in the
Sound menu.
The melody will be heard during the test even if
✎
Speaker Select is set to External Speaker or the
sound is muted by pressing the MUTE button.
Signal Information ■ : (digital channels only) HDTV
channel’s reception quality is either perfect or the
channels are unavailable. Adjust your antenna to
increase signal strength.
Troubleshooting ■ : If the TV seems to have a problem,
refer to this description.
If none of these troubleshooting tips apply, contact
✎
the Samsung customer service centre.
Software Upgrade
Software Upgrade can be performed via a broadcasting
signal or by network connection or downloading the latest
firmware from “www.samsung.com,” to a USB memory
device.
Current Version the software already installed in the TV.
Software is represented as “Year/Month/Day_Version”.
✎
Software Upgrade
Current Version 2010/01/18_000001
By Channel
Alternative Software ----/--/--_-----
U
Move E Enter R Return
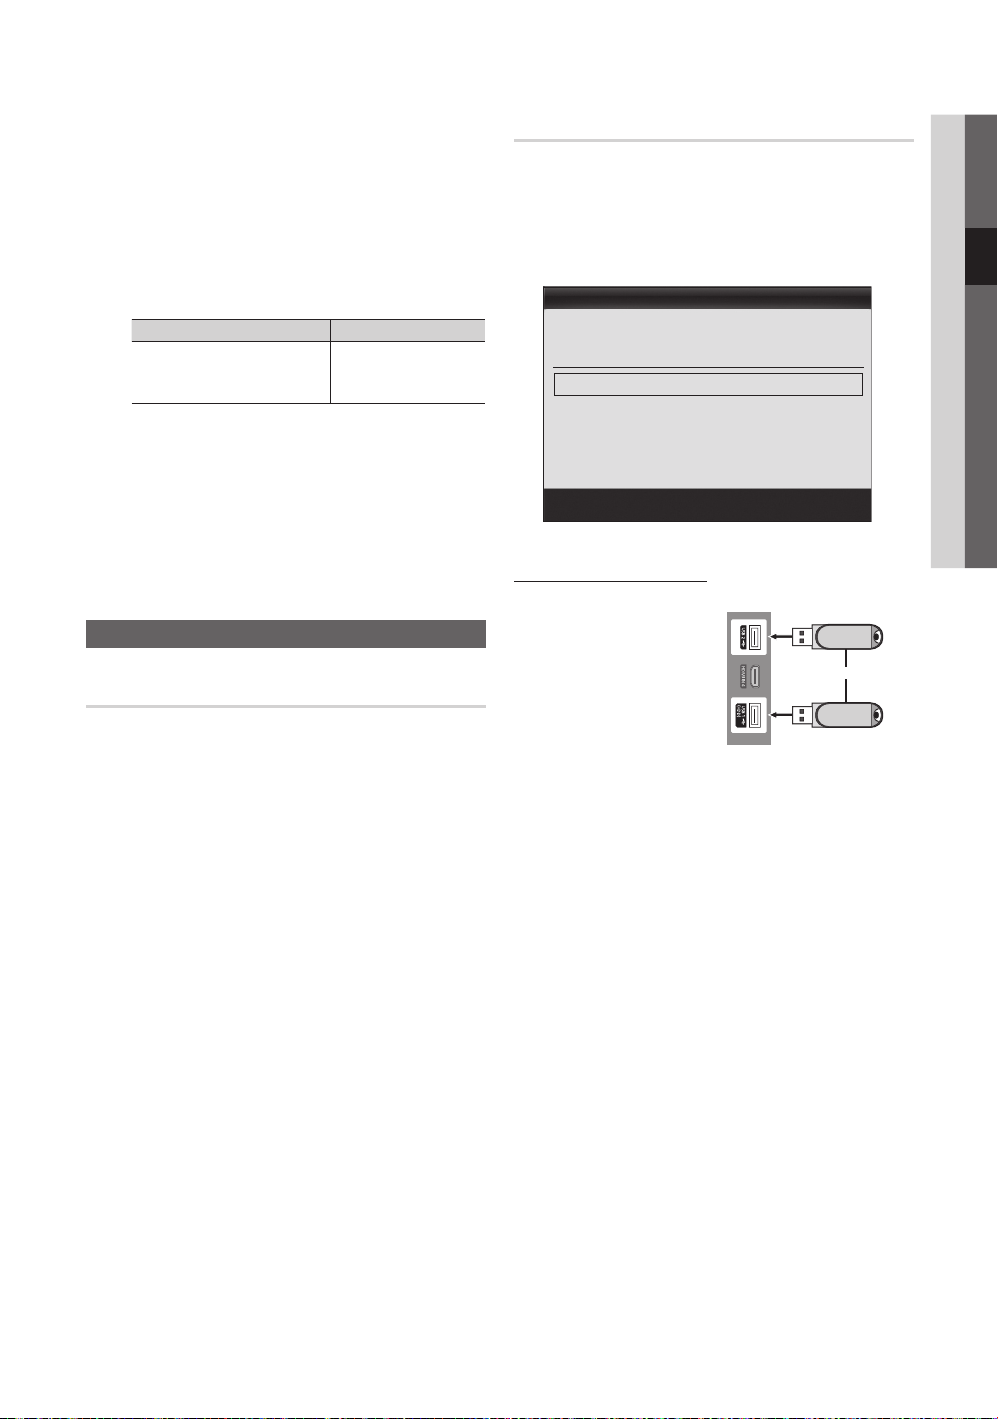
Installing the Latest Version
By USB ■ : Insert a USB
drive containing the
firmware upgrade file,
downloaded from
“www.samsung.com,”
into the TV. Please
be careful not to
disconnect the power
or remove the USB
drive until upgrades are
complete. The TV will be turned off and on automatically
after completing the firmware upgrade. When software is
upgraded, video and audio settings you have made will
return to their default settings. We advise you to to write
down your settings so that you can easily reset them
after the upgrade.
By Online ■ : Upgrade the software using the Internet.
First, configure your network. For detailed
✎
procedures on using the Network Setup, refer to
the “Network Connection” instructions.
If the internet connection doesn’t operate properly,
✎
the connection may be broken. Please retry
downloading. If the problem persists, download by
USB and upgrade.
TV Side Panel
or
USB Drive
Page 26

Basic Features
By Channel ■ : Upgrade the software using the
broadcasting signal.
If the function is selected during the software
✎
transmission period, software will be automatically
searched and downloaded.
The time required to download the software is
✎
determined by the signal status.
Standby Mode Upgrade ■ : A manual upgrade will be
automatically performed at selected time. Since the
power of the unit is turned on internally, the screen
may be turned on slightly for the LCD product. This
phenomenon may continue for more than 1 hour until
the software upgrade is complete.
Alternative Software ■ (backup): Displays the software
version downloaded through By Online. During the
software upgrading, When the Upgrade will discontinue
from last step, this function be activated.
HD Connection Guide
Refer to this information when connecting external devices
to the TV.
Contact Samsung
View this information when your TV does not work properly
or when you want to upgrade the software. You can find
information regarding our call centres, and how to download
products and software.
26
English
Page 27
27
English
Advanced Features
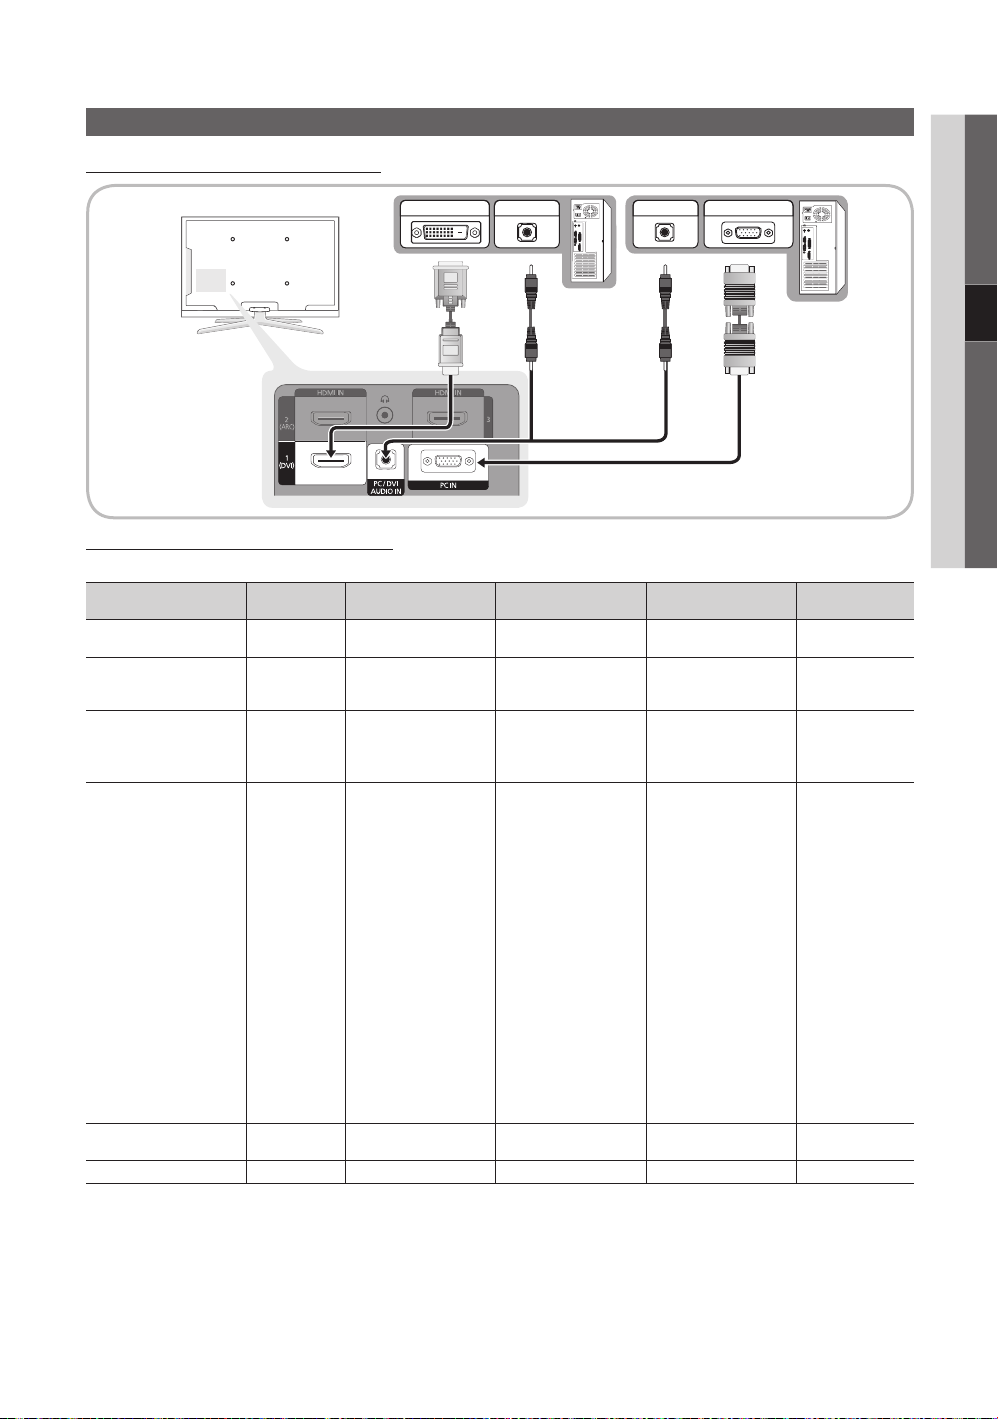
Using an HDMI/DVI Cable / a D-sub Cable
Connecting to a PC
04 Advanced Features
DVI OUT
AUDIO OUT
Display Modes (D-Sub and HDMI/DVI Input)
Optimal resolution is 1920 X 1080 @ 60 Hz.
Mode Resolution
IBM
MAC
VESA CVT
VESA DMT
VESA GTF
VESA DMT / DTV CEA
NOTE
✎
Horizontal Frequency
(KHz)
640 x 350
720 x 400
640 x 480
832 x 624
1152 x 870
720 x 576
1152 x 864
1280 x 720
1280 x 960
640 x 480
640 x 480
640 x 480
800 x 600
800 x 600
800 x 600
1024 x 768
1024 x 768
1024 x 768
1152 x 864
1280 x 1024
1280 x 1024
1280 x 720
1280 x 800
1280 x 800
1280 x 960
1360 x 768
1440 x 900
1440 x 900
1600 x 1200
1680 x 1050
1280 x 720
1280 x 1024
1920 x 1080p 67.500 60.000 148.500 +/+
31.469
31.469
35.000
49.726
68.681
35.910
53.783
56.456
75.231
31.469
37.861
37.500
37.879
48.077
46.875
48.363
56.476
60.023
67.500
63.981
79.976
45.000
49.702
62.795
60.000
47.712
55.935
70.635
75.000
65.290
52.500
74.620
Vertical Frequency
(Hz)
70.086
70.087
66.667
74.551
75.062
59.950
59.959
74.777
74.857
59.940
72.809
75.000
60.317
72.188
75.000
60.004
70.069
75.029
75.000
60.020
75.025
60.000
59.810
74.934
60.000
60.015
59.887
74.984
60.000
59.954
70.000
70.000
For HDMI/DVI cable connection, you must use the xHDMI IN 1(DVI) jack.
The interlace mode is not supported.
x
The set might operate abnormally if a non-standard video format is selected.
x
Separate and Composite modes are supported. SOG(Sync On Green) is not supported.
x
AUDIO OUT
Pixel Clock Frequency
PC OUT
(MHz)
25.175
28.322
30.240
57.284
100.000
32.750
81.750
95.750
130.000
25.175
31.500
31.500
40.000
50.000
49.500
65.000
75.000
78.750
108.000
108.000
135.000
74.250
83.500
106.500
108.000
85.500
106.500
136.750
162.000
146.250
89.040
128.943
Sync Polarity
(H / V)
+/-
-/+
-/-
-/-
-/-
-/+
-/+
-/+
-/+
-/-
-/-
-/+/+
+/+
+/+
-/-
-/+/+
+/+
+/+
+/+
+/+
-/+
-/+
+/+
+/+
-/+
-/+
+/+
-/+
-/+
-/-
Page 28
Advanced Features
Network Connection
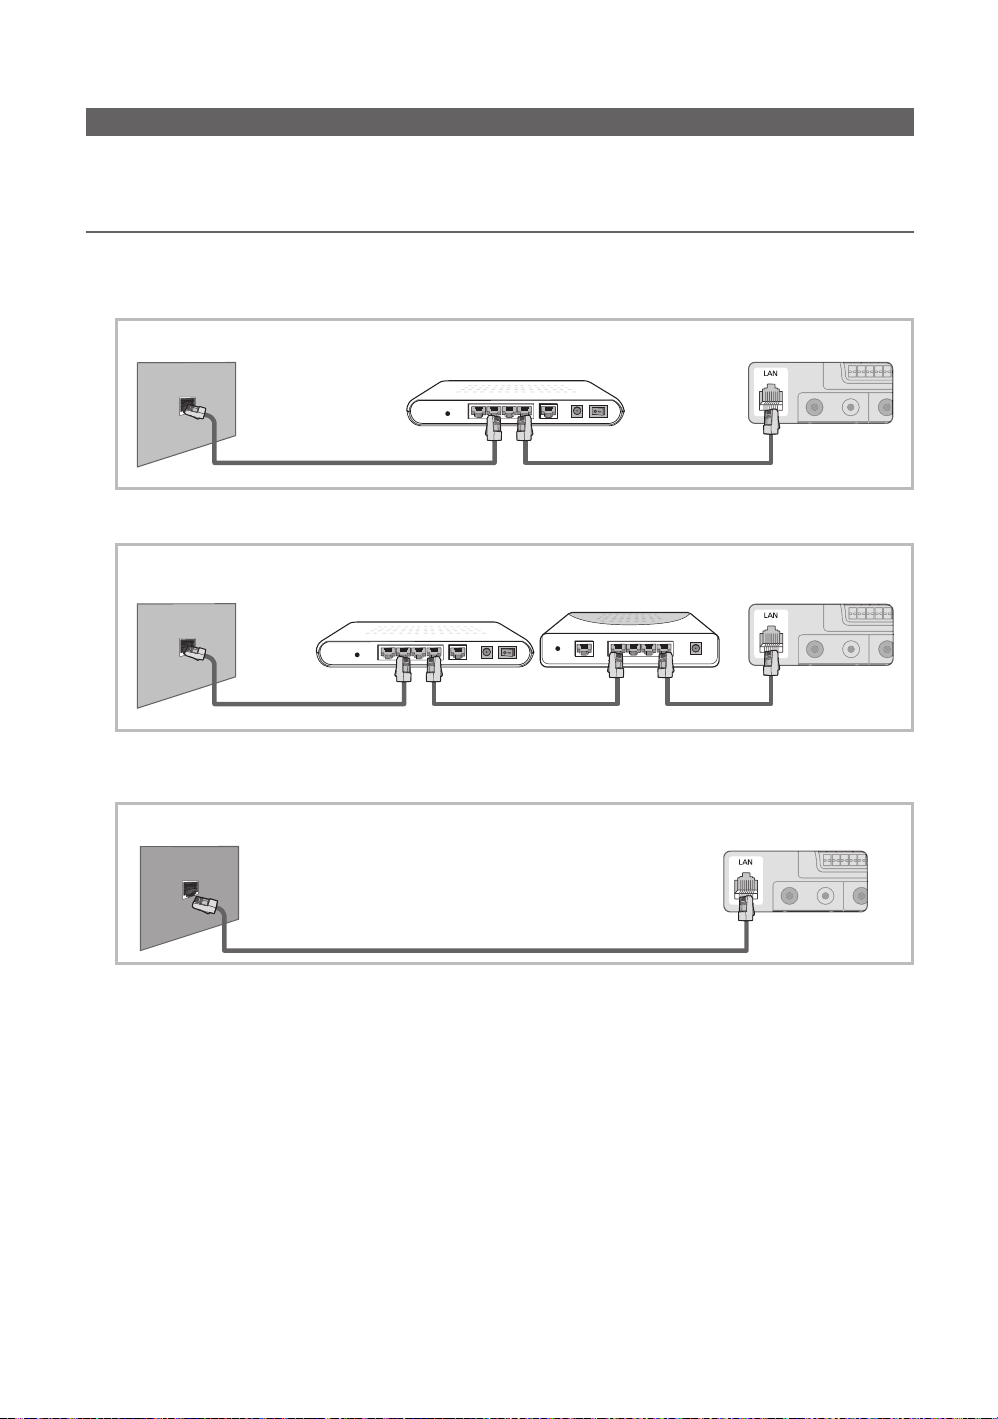
You can set up your TV so that it can access the Internet through your local area network (LAN) using a wired or wireless
connection.
Connecting to a Wired Network ¦
You can attach your TV to your LAN using cable in three ways:
You can attach your TV to your LAN by connecting the LAN port on the back of your TV to an external modem using a Cat y
5 cable. See the diagram below.
The Modem Port on the Wall
You can attach your TV to your LAN by connecting the LAN port on the back of your TV to a IP Sharer which is connected y
to an external modem. Use Cat 5 cable for the connection. See the diagram below.
The Modem Port on the Wall
Modem Cable
Depending on how your network is configured, you may be able to attach your TV to your LAN by connecting the LAN y
port on the back of your TV directly to a network wall outlet using a Cat 5 cable. See the diagram below. Note that the wall
outlet is attached to a modem or router elsewhere in your house.
The LAN Port on the Wall
External Modem
(ADSL / VDSL / Cable TV)
External Modem
(ADSL / VDSL / Cable TV)
LAN CableModem Cable
IP Sharer
(having DHCP server)
LAN Cable LAN Cable
TV Rear Panel
TV Rear Panel
TV Rear Panel
LAN Cable
If you have a Dynamic Network, you should use an ADSL modem or router that supports Dynamic Host Configuration
Protocol (DHCP). Modems and routers that support DHCP automatically provide the IP address, subnet mask, gateway,
and DNS values your TV needs to access the Internet so you don’t have to enter them manually. Most home networks are
Dynamic Networks.
Some networks require a Static IP address. If your network requires a Static IP address, you must enter the IP address,
subnet mask, gateway, and DNS values manually on your TV’s Cable Setup Screen when you set up the network
connection. To get the IP address, subnet mask, gateway, and DNS values, contact your Internet Service Provider (ISP). If
you have a Windows computer, you can also get these values through your computer.
You can use ADSL modems that support DHCP if your network requires a Static IP address. ADSL modems that
✎
support DHCP also let you use Static IP addresses.
English
28
Page 29
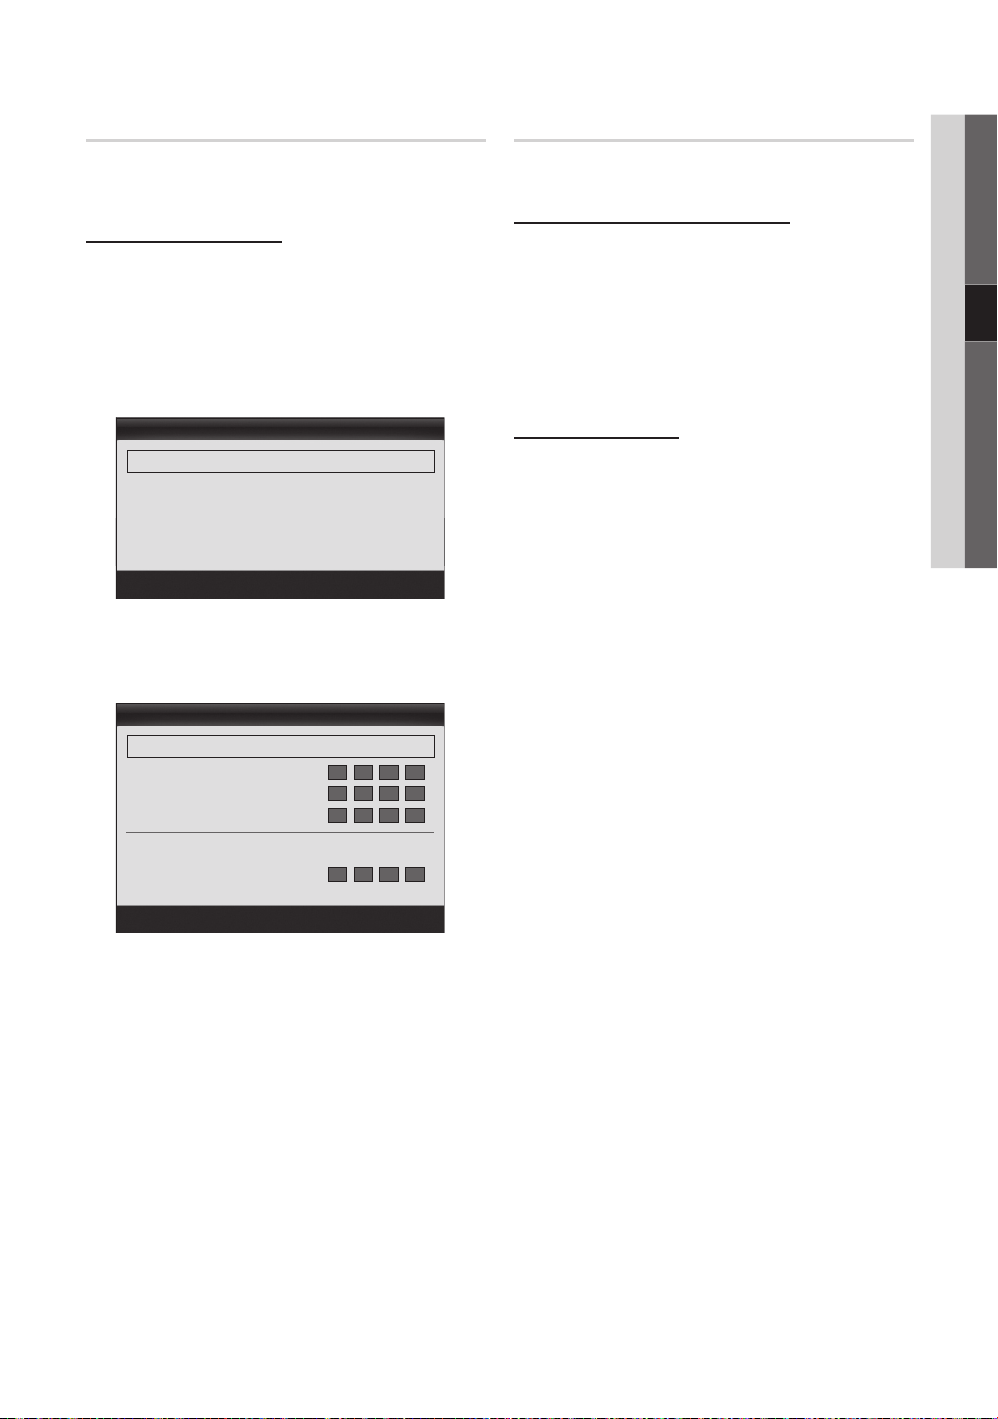
29
English
04 Advanced Features
Network Setup (Auto)
Use the Automatic Network Setup when connecting your
TV to a network that supports DHCP. To set up your TV’s
cable network connection automatically, follow these steps:
How to set up automatically
1. Connect your TV to your LAN as described in the
previous section.
2. Turn on your TV, press the MENU button on your
remote, use the or button to select Setup, and
then press the ENTERE button.
3. Use the or button to select Network in the Setup
menu, and then press the ENTERE button. The
Network screen appears.
Network
U
Move E Enter R Return
4. On the Network screen, select Network Type.
5. Set Network Type to Wired.
6. Select Network Setup. The Network Setup screen
appears.
Network Setup
Gateway :
DNS : Auto
DNS Server :
Network Setup (Manual)
Use the Manual Network Setup when connecting your TV to
a network that requires a Static IP address.
Getting the Network Connection Values
To get the Network connection values on most Windows
computers, follow these steps:
1. Right click the Network icon on the bottom right of the
screen.
2. In the pop-up menu that appears, click Status.
3. On the dialog that appears, click the Support tab.
4. On the Support Tab, click the Details button. The
Network connection values are displayed.
How to set up manually
To set up your TV’s cable network connection manually,
follow these steps:
1. Follow Steps 1 through 6 in the “How to set up
automatically” procedure.
2. Set Internet Protocol Setup to Manual.
3. Press the button on your remote to go to the first
entry field.
4. Enter the IP Address, Subnet Mask, Gateway, and
DNS Server values. Use the number buttons on your
remote to enter numbers and the arrow buttons to move
from one entry field to another.
5. When done, press the RETURN button on your remote.
6. Select Network Test to check the Internet connectivity.
U
Move E Enter R Return
7. Set Internet Protocol Setup to Auto.
8. Auto acquires and enters the needed Internet values
automatically.
9. When done, press the RETURN button on your remote.
10. Select Network Test to check the Internet connectivity.
11. If the Network Function has not acquired the network
connection values, go to the directions for Manual.
Page 30
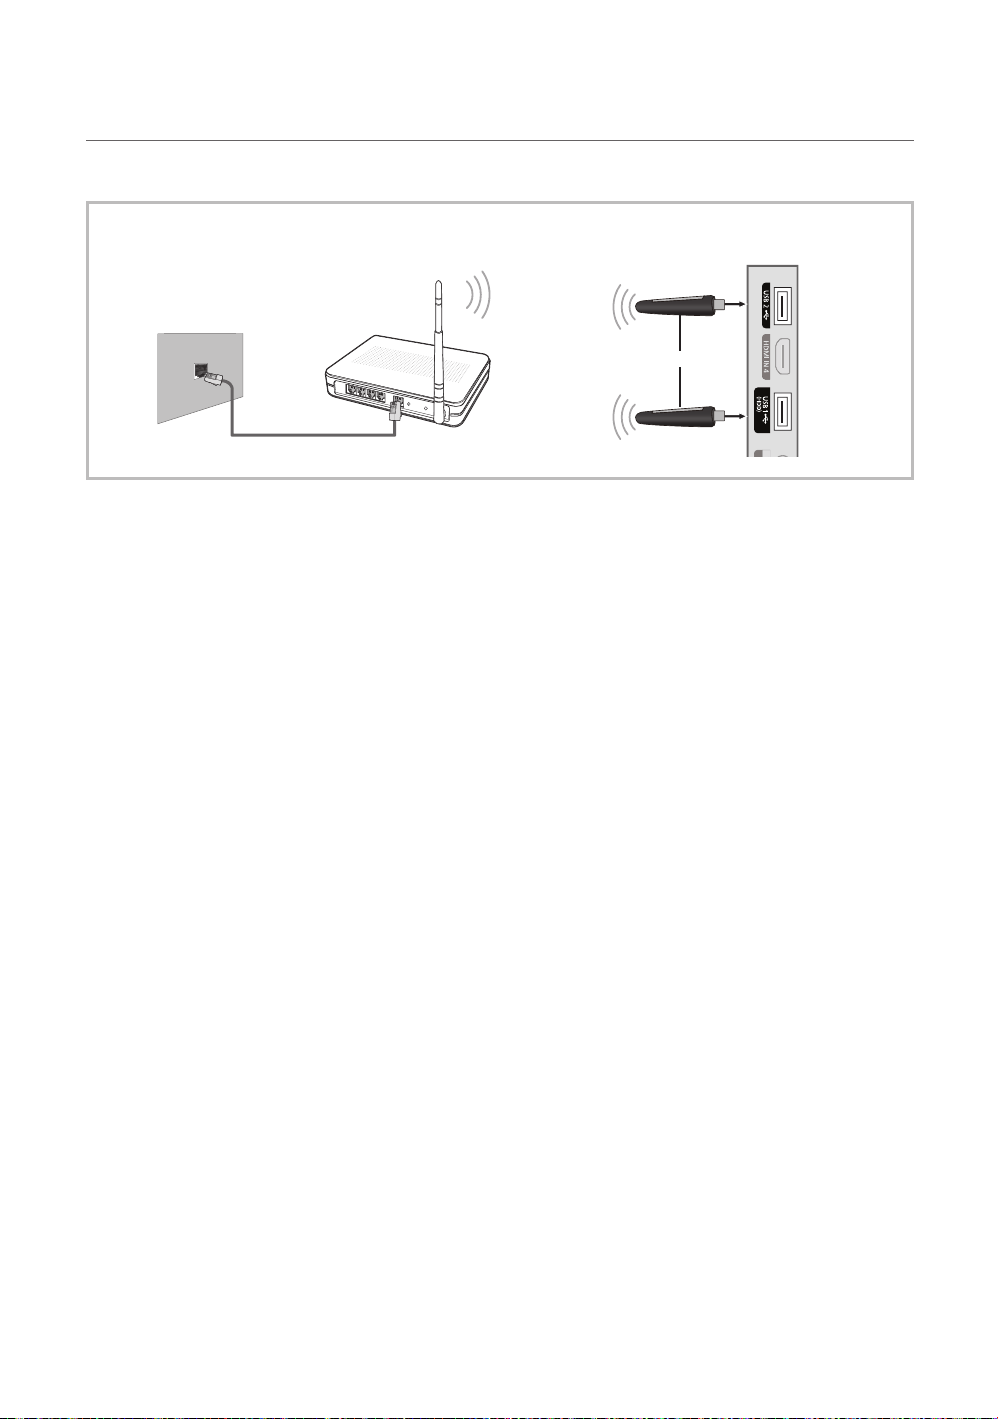
Advanced Features
Connecting to a Wireless Network ¦
To connect your TV to your network wirelessly, you need a wireless router or modem and a Samsung Wireless LAN Adapter
(WIS09ABGN, WIS09ABGN2, WIS10ABGN), which you connect to your TV’s back or side panel USB jack. See the illustration below.
To use the ✎SWL(Samsung Wireless Link) function, connect to the USB 1 (HDD) port.
TV Side Panel
The LAN Port on
the Wall
Wireless IP sharer
(AP having DHCP server)
Samsung Wireless
LAN Adapter
LAN Cable
Samsung’s Wireless LAN adapter is sold separately and is offered by select retailers, Ecommerce sites and Samsungparts.
com. Samsung’s Wireless LAN adapter supports the IEEE 802.11A/B/G and N communication protocols. Samsung
recommends using IEEE 802.11N. When you play the video over a IEEE 802.11B/G connection, the video may not play
smoothly.
✎
NOTE
You must use the “Samsung Wireless LAN Adapter” ( xWIS09ABGN, WIS09ABGN2, WIS10ABGN
network.
Samsung’s Wireless LAN adapter is sold separately. The xWIS09ABGN, WIS09ABGN2, WIS10ABGN
adapter is offered by select retailers, Ecommerce sites and Samsungparts.com.
To use a wireless network, your TV must be connected to a wireless IP sharer. If the wireless IP sharer supports
x
DHCP, your TV can use a DHCP or static IP address to connect to the wireless network.
Select a channel for the wireless IP sharer that is not currently being used. If the channel set for the wireless IP sharer
x
is currently being used by another device nearby, this will result in interference and communication failure.
If you apply a security system other than the systems listed below, it will not work with the TV.
x
If Pure High-throughput (Greenfield) 802.11n mode is selected and the Encryption type is set to WEP, TKIP or TKIP-
x
AES (WPS2Mixed) for your AP, Samsung TVs will not support a connection in compliance with new Wi-Fi certification
specifications.
If your AP supports WPS (Wi-Fi Protected Setup), you can connect to the network via PBC (Push Button
x
Configuration) or PIN (Personal Identification Number). WPS will automatically configure the SSID and WPA key in
either mode.
If your router, modem, or device isn’t certified, it may not connect to the TV via the “Samsung Wireless LAN Adapter.”
x
Connection Methods: You can setup the wireless network connection six ways.
x
Samsung Auto Configuration –
– PBC (WPS)
Auto Setup (Using the Auto Network Search function) –
Manual Setup –
– SWL(Samsung Wireless Link)
– Ad-Hoc
All of Samsung Wireless LAN Adapter should be connected directly to the TV's USB port. USB HUB are not
x
supported.
or
) to use a wireless
Wireless LAN
30
English
Page 31
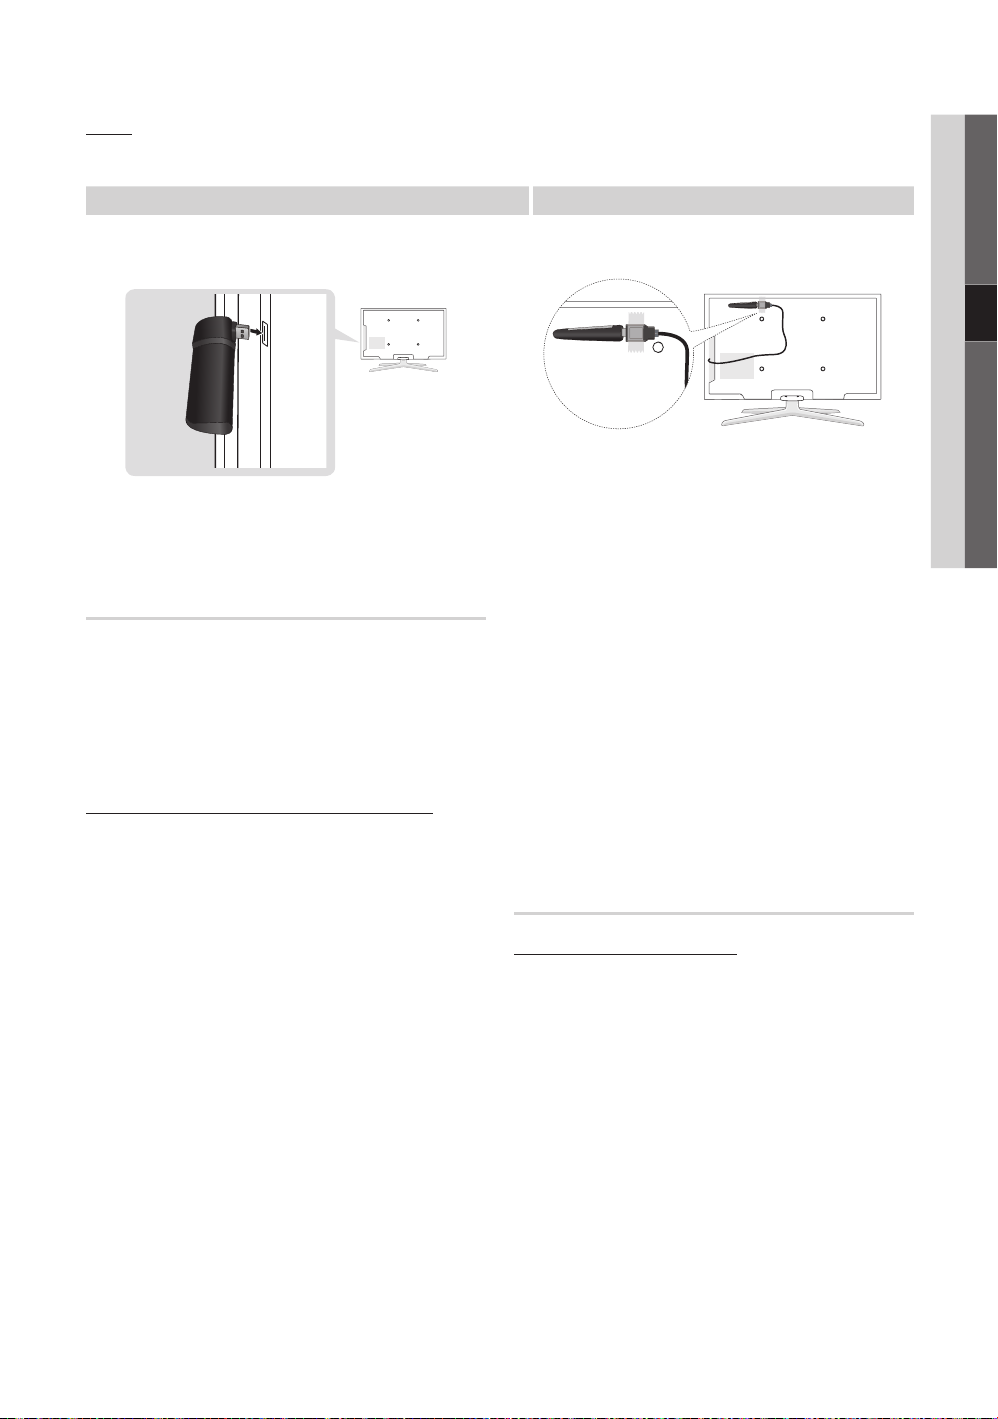
31
English
04 Advanced Features
Notice
The picture may appear corrupted for some channels when the TV is connected to the Samsung Wireless LAN Adapter. In
such case, establish a connection using one of the following methods:
Method 1 Method 2
Connect using the USB right angle adapter
Connect via an extension cable
Network Setup
(Samsung Auto Configuration)
This function is available in APs (Access Points) that support
Samsung Auto Configuration. If your AP does not, you can
connect through PBC (WPS), auto, or manually.
This function is available when ✎SWL(Samsung
Wireless Link) is set to Off.
You can check for equipment that supports Samsung
✎
Auto Configuration on www.samsung.com.
How to set up using Samsung Auto Configuration
1. Place the AP and TV next to each other and turn them
on.
Because the booting times of applications differ,
✎
you may have to wait for approximately 2 minutes.
If the LAN cable connected the WAN port of AP
✎
during Samsung Auto Configuration, you are able
to complete until internet connection test. If you
do not connect, Samsung Auto Configuration will
check only device connecting of AP (Not check
internet).
2. After 2 minutes, connect the Samsung Wireless LAN
Adapter to the TV. When the Samsung Wireless LAN
Adapter is established, the pop-up window appears.
3. As soon as a connection is established, place the AP in
parallel with the Samsung Wireless LAN Adapter giving a
gap no larger than 25cm.
4. Wait until the connection is automatically established.
If the connection fails, reset the AP and then try
✎
again.
If Samsung Auto Configuration does not connect
✎
your TV to your AP, a pop-up window appears
on the screen notifying you of the failure. Reset
the AP, and then try again. If the connection fails
again, choose one of the other connection setup
methods, PBC (WPS), auto, or manual.
5. After the connection is established, locate the sharer at
the desired location.
If the AP settings have been changed or it is the
✎
first time you use the new AP after purchase, you
need to set up again beginning from Step 1.
Network Setup (PBC (WPS))
How to set up using PBC (WPS)
If your router has a PBC (WPS) button, follow these steps:
1. Connect your TV to your LAN as described in the
previous section.
2. Turn on your TV, press the MENU button on your
remote, use the or button to select Setup, and
then press the ENTERE button.
3. Use the or button to select Network in the Setup
menu, and then press the ENTERE button.
4. On the Network screen, select Network Type.
5. Set Network Type to Wireless.
6. Select Network Setup. The Network Setup screen
appears.
Page 32
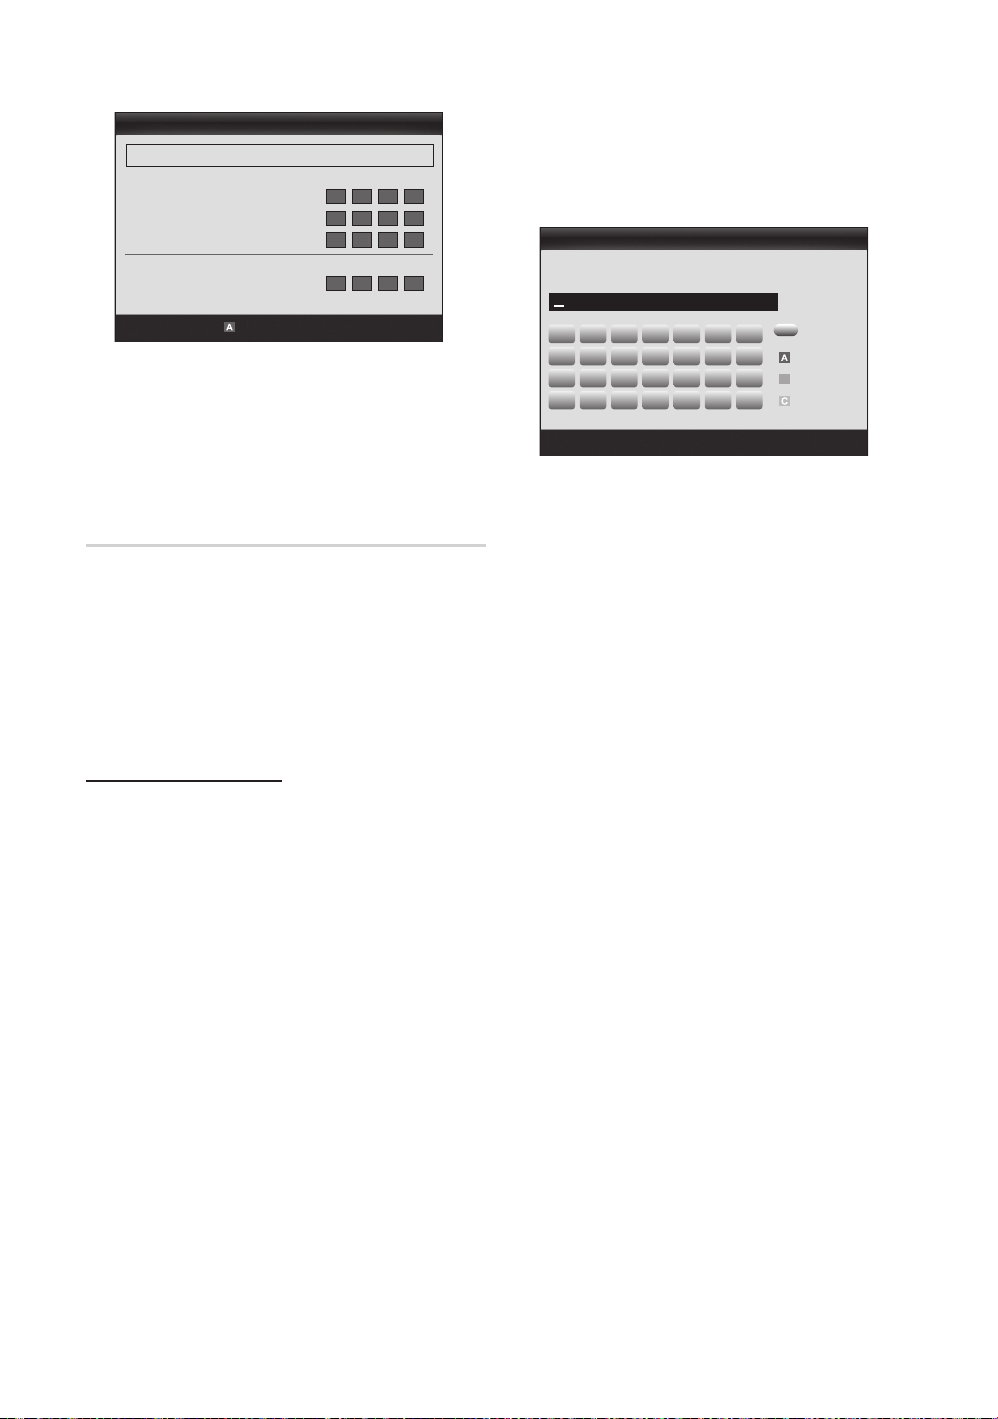
Advanced Features
A B C D E F G
H I J K L M N
O P Q R S T U
V W X Y Z
0~9
Network Setup
Gateway :
DNS : Auto
DNS Server :
U Move E Enter R Return
7. Press the Red button on your remote.
8. Press the PBC (WPS) button on your router within 2
minutes. Your TV player automatically acquires all the
network setting values it needs and connects to your
network.
9. After the network connection is set up, press the
RETURN button to exit the Network Setup screen.
Network Setup (Auto)
Most wireless networks have an optional security system
that requires devices that access the network to transmit
an encrypted security code called an Access or Security
Key. The Security Key is based on a Pass Phrase, typically
a word or a series of letters and numbers of a specified
length you were asked to enter when you set up security for
your wireless network. If you use this method of setting up
the network connection, and have a Security Key for your
wireless network, you will have to enter the Pass Phrase
during the setup process.
How to set up automatically
To set up the wireless connection automatically, follow these
steps:
1. Follow Steps 1 through 6 in the “How to set up using
PBC (WPS)” (p. 31).
2. Press the button to select Internet Protocol Setup,
and then press the ENTERE button. Press the or
button to select Auto, and then press the ENTERE
button.
3. Press the button to go to Select a Network, and
then press the ENTERE button. The Network function
searches for available wireless networks. When done, it
displays a list of the available networks.
4. In the list of networks, press the or button to select
a network, and then press the ENTERE button.
If the AP is set to Hidden (Invisible), you have
✎
to select Add Network and enter the correct
Network Name (SSID) and Security Key to
establish the connection.
5. If the Security/PIN pop-up appears, go to Step 6. If the
Network Connecting Screen appears, go to Step 10.
6. Press the or button to select Security or PIN. For
most home networks, you would select Security (for
Security Key). The Security Screen appears.
Select a network
Security Key
0 entered
Number
Lower case
B Delete
Space
n
Move E Enter R Return
7. On the Security screen, enter your network’s Pass
Phrase.
You should be able to find the Pass Phrase on
✎
one of the set up screens you used to set up your
router or modem.
8. To enter the Pass Phrase, follow these general
directions:
Press the number buttons on your remote to enter –
numbers.
Use the direction buttons on your remote to move –
from button to button on the Security Key screen.
Press the Red button to change case or display –
symbols/characters.
To a enter letter or symbol, move to the letter or –
symbol, and then press the ENTERE button.
To delete the last letter or number you entered, press –
the Green button on your remote.
9. When done, press the Blue button on your remote. The
Network Connecting screen appears.
10. Wait until the connection confirmation message is
displayed, and then press the ENTERE button. The
Network Setup screen re-appears.
11. To test the connection, press the RETURN button to
select Network Test, and then press the ENTERE
button.
32
English
Page 33

33
English
04 Advanced Features
Network Setup (Ad-Hoc)
You can connect to a mobile device without an access point
through the “Samsung Wireless LAN Adapter” by using a
peer to peer network.
This function is available when ✎SWL(Samsung
Wireless Link) is set to Off.
How to connect to new Ad-hoc device
1. Follow Steps 1 through 6 in the “How to set up using
PBC (WPS)” (p. 31).
2. Choose Select a network. A list of devices/networks
appears.
3. While in the device list, press the Blue button on the
remote.
The message ✎Ad-hoc is a direct WI-Fi
connection with cellphone or PC. The existing
network system may have limited functionality.
Do you want to change the network
connection? is displayed.
4. Input the generated Network Name (SSID) and
Security Key into the device you want to connect.
How to connect an existing Ad-hoc device
1. Follow Steps 1 through 6 in the “How to set up using
PBC (WPS)” (p. 31).
2. Choose Select a network. The Device/Network list
appears.
3. Select the device you want in the Device list.
4. If security key is required, input the security key.
If network doesn’t operate normally, check
✎
the Network Name (SSID) and Security Key
again. An incorrect Security Key may cause a
malfunction.
Network Setup (Manual)
If the other methods do not work, you need to enter the
Network setting values manually.
Getting the Network Connection Values
To get the Network connection values on most Windows
computers, follow these steps:
1. Right click the Network icon on the bottom right of the
screen.
2. In the pop-up menu, click Status.
3. On the dialog that appears, click the Support tab.
4. On the Support tab, click the Details button. The
Network settings are displayed.
How to set up manually
To enter the Network connection values manually, follow
these steps:
1. Follow Steps 1 through 6 in the “How to set up using
PBC (WPS)” (p. 31).
2. Press the button to select Internet Protocol Setup,
and then press the ENTERE button. Press the
or button to select Manual, and then press the
ENTERE button.
3. Press the button to go to the first entry field
(IP Address).
4. Use the number buttons to enter numbers.
5. When done with each field, use the button to move
successively to the next field. You can also use the other
arrow buttons to move up, down, and back.
6. Enter the IP Address, Subnet Mask, and Gateway
values.
7. Press the or button to go to DNS.
8. Press the button to go to the first DNS entry field.
Enter the numbers as above.
9. When done, press the button to go to Select a
Network. Select your network, and then press the
ENTERE button.
10. Go to Step 4 in the “How to set up automatically”
(p. 32), and follow the directions from that point on.
Page 34

Advanced Features
SWL(Samsung Wireless Link)
This function lets you connect a Samsung device that
supports the PBC (WPS) to your TV. You can connect
devices to the TV even if a sharer is not connected to the TV.
To use the Internet@TV, the AP (access point) must be
✎
connected to the wireless network.
If a Samsung Wireless ✎LAN Adapter is connected to the
USB 2 port, the network may not operate normally. We
recommend to connecting it to the USB 1 (HDD) port.
Only sharers using the 2.4 Ghz band are supported.
✎
Sharers using the 5 Ghz band are not supported.
SWL connect
You can directly connect a device that supports the PBC
(WPS) to the TV.
This function is available when ✎SWL(Samsung
Wireless Link) is set to On.
How to connect Samsung Wireless Link
For the procedures to establish a connection, refer to the
following:
1. Follow Steps 1 through 5 in the “How to set up using
PBC (WPS)” (p. 31).
2. Select SWL(Samsung Wireless Link) by using the
button and press the ENTERE button to turn it On.
3. Select SWL connect by using the button and press
the ENTERE button.
4. If the “
5. If the device is connected properly to the TV after
Press the PBC button on the PBC(WPS)
supported device to connect within 120 seconds.
message appears, press the PBC button on the device
to connect.
For more information, refer to the wireless network
✎
setup manual of the device to be connected.
starting count on message box then message box will
be disappeared automatically.
If the connection fails, please retry after 2 minutes.
✎
If Your TV Fails to Connect to the Internet
Your TV may not be able to connect to the Internet
because your ISP has permanently registered the
MAC address (a unique identifying number) of your
PC or modem, which it then authenticates each time
you connect to the Internet as a way of preventing
unauthorized access. As your TV has a different MAC
address, your ISP can not authenticate its MAC address,
and your TV can not connect.
To resolve this problem, ask your ISP about the
procedures required to connect devices other than a PC
(such as your TV) to the Internet.
If your Internet service provider requires an ID or password
to connect to the Internet, your TV may not be able to
connect to the Internet. If this is the case, you must enter
your ID or password when connecting to the Internet.
The internet connection may fail because of a firewall
problem. If this is the case, contact your Internet service
provider.
If you cannot connect to the Internet even after you have
followed the procedures of your Internet service provider,
please contact Samsung Electronics
”
34
English
Page 35
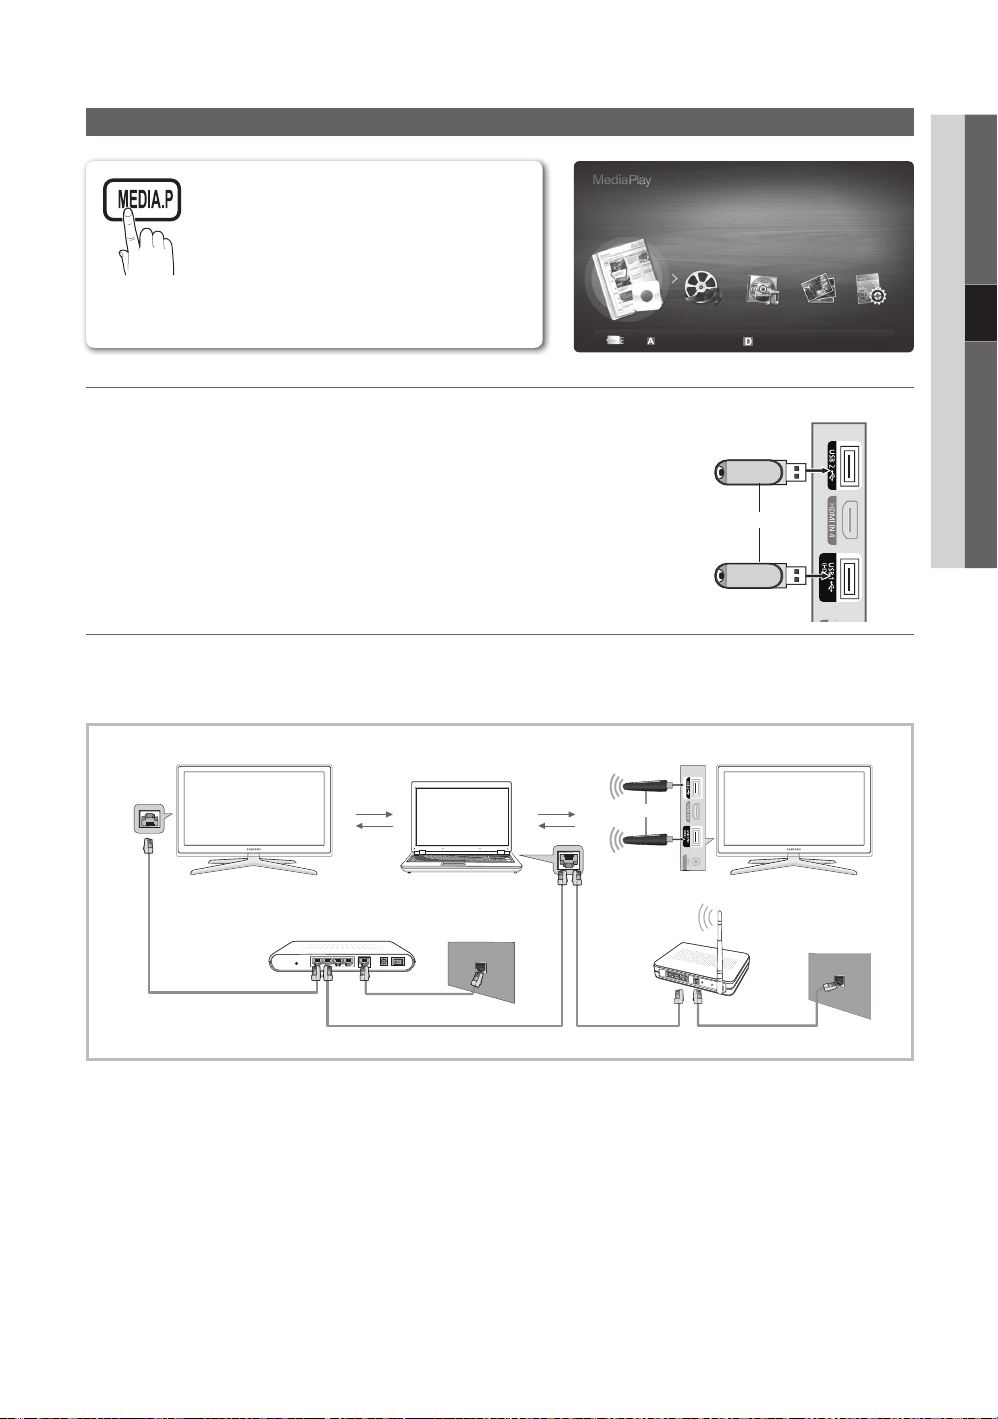
35
English
04 Advanced Features
Media Play
SUM
Enjoy recorded tv, photos, music and/or movie
files saved on a USB Mass Storage Class (MSC)
device and/or your PC.
Recorded TV
Change Device
Device Mode E Enter R Return
Connecting a USB Device ¦
1. Turn on your TV.
2. Connect a USB device containing recorded tv, photo, music and/or movie files to
the USB 1 (HDD) or USB 2 jack on the side of the TV.
3. When USB is connected to the TV, popup window appears. Then you can select
Media Play.
USB Drive
TV Side Panel
or
Connecting to the PC through network ¦
You can play pictures, music and videos saved on your PC through a network connection in the Media Play mode.
If you use ✎Media Play through saved file on your PC, you should download “PC Share Manager” and users manual from
“www.samsung.com.”
LAN
PC
External Modem
(ADSL/VDSL/Cable TV)
TV Side Panel
or
Samsung
Wireless
LAN
Adapter
Wireless IP
sharer
LAN Cable
1. For more information on how to configure your network, refer to “Network Connection” (p. 28).
You are recommended to locate both TV and PC in same subnet. The first 3 parts of the subnet address of the TV and –
the PC IP addresses should be the same and only the last part (the host address) should be changed. (e.g. IP Address:
123.456.789.**)
2. Using a LAN cable, connect between the external modem and the PC onto which the Samsung PC Share Manager
programme will be installed.
You can connect the TV to the PC directly without connecting it through a Sharer (Router). –
Page 36

Advanced Features
No supported functions when connecting to the PC through network:
✎
The xBackground Music and Background Music Setting functions.
Sorting files by preference in the xPhotos, Music, and Videos folders.
The x
(REW) or µ (FF) button while a movie is playing.
The Divx DRM, Multi-audio, embedded caption does not supported.
✎
Samsung PC Share manager should be permitted by the firewall programme on your PC.
✎
When you use ✎Media Play mode through a network connection, According to functions of the provided server:
The sorting method may vary.
x
The scene search function may not be supported.
x
The xPlay Continuously function, which resumes playing of a video, may not be supported.
The – Play Continuously function does not support multiple users. (It will have only memorised the point where the
most recent user stopped playing.)
The x or button may not work depending on the content information.
If you experience any file stuttering issue while playing a video over a wireless network, we recommend using a wired
x
network.
It might not work properly with unlicenced multimedia files.
✎
Need-to-Know List before using ✎Media Play
MTP (Media Transfer Protocol) is not supported.
x
The file system supports FAT16, FAT32 and NTFS.
x
Certain types of USB Digital camera and audio devices may not be compatible with this TV.
x
Media Play only supports USB Mass Storage Class (MSC) devices. MSC is a Mass Storage Class Bulk-Only
x
Transport device. Examples of MSC are Thumb drives, Flash Card Readers and USB HDD (USB HUB are not
supported). Devices should be connected directly to the TV’s USB port.
Before connecting your device to the TV, please back up your files to prevent them from damage or loss of data.
x
SAMSUNG is not responsible for any data file damage or data loss.
Connect a USB HDD to the dedicated port, xUSB 1 (HDD) port.
Do not disconnect the USB device while it is loading.
x
The higher the resolution of the image, the longer it takes to display on the screen.
x
The maximum supported JPEG resolution is 15360X8640 pixels.
x
For unsupported or corrupted files, the “Not Supported File Format” message is displayed.
x
If the files are sorted by Basic View, up to 1000 files can be displayed in each folder.
x
MP3 files with DRM that have been downloaded from a non-free site cannot be played. Digital Rights Management
x
(DRM) is a technology that supports the creation of content, the distribution and management of the content in an
integrated and comprehensive way, including the protection of the rights and interests of the content providers, the
prevention of the illegal copying of contents, as well as managing billings and settlements.
If more than 2 PTP devices are connected, you can only use one at a time.
x
If more than two MSC devices are connected, some of them may not be recognized. A USB device that requires high
x
power (more than 500mA or 5V) may not be supported.
If an over-power warning message is displayed while you are connecting or using a USB device, the device may not
x
be recognized or may malfunction.
If the TV has been no input during time set in xAuto Protection Time, the Screensaver will run.
The power-saving mode of some external hard disk drives may be released automatically when connected to the TV.
x
If a USB extension cable is used, the USB device may not be recognized or the files on the device may not be read.
x
If a USB device connected to the TV is not recognized, the list of files on the device is corrupted or a file in the list is
x
not played, connect the USB device to the PC, format the device and check the connection.
If a file deleted from the PC is still found when Media Play is run, use the “Empty the Recycle Bin” function on the PC
x
to permanently delete the file.
36
English
Page 37
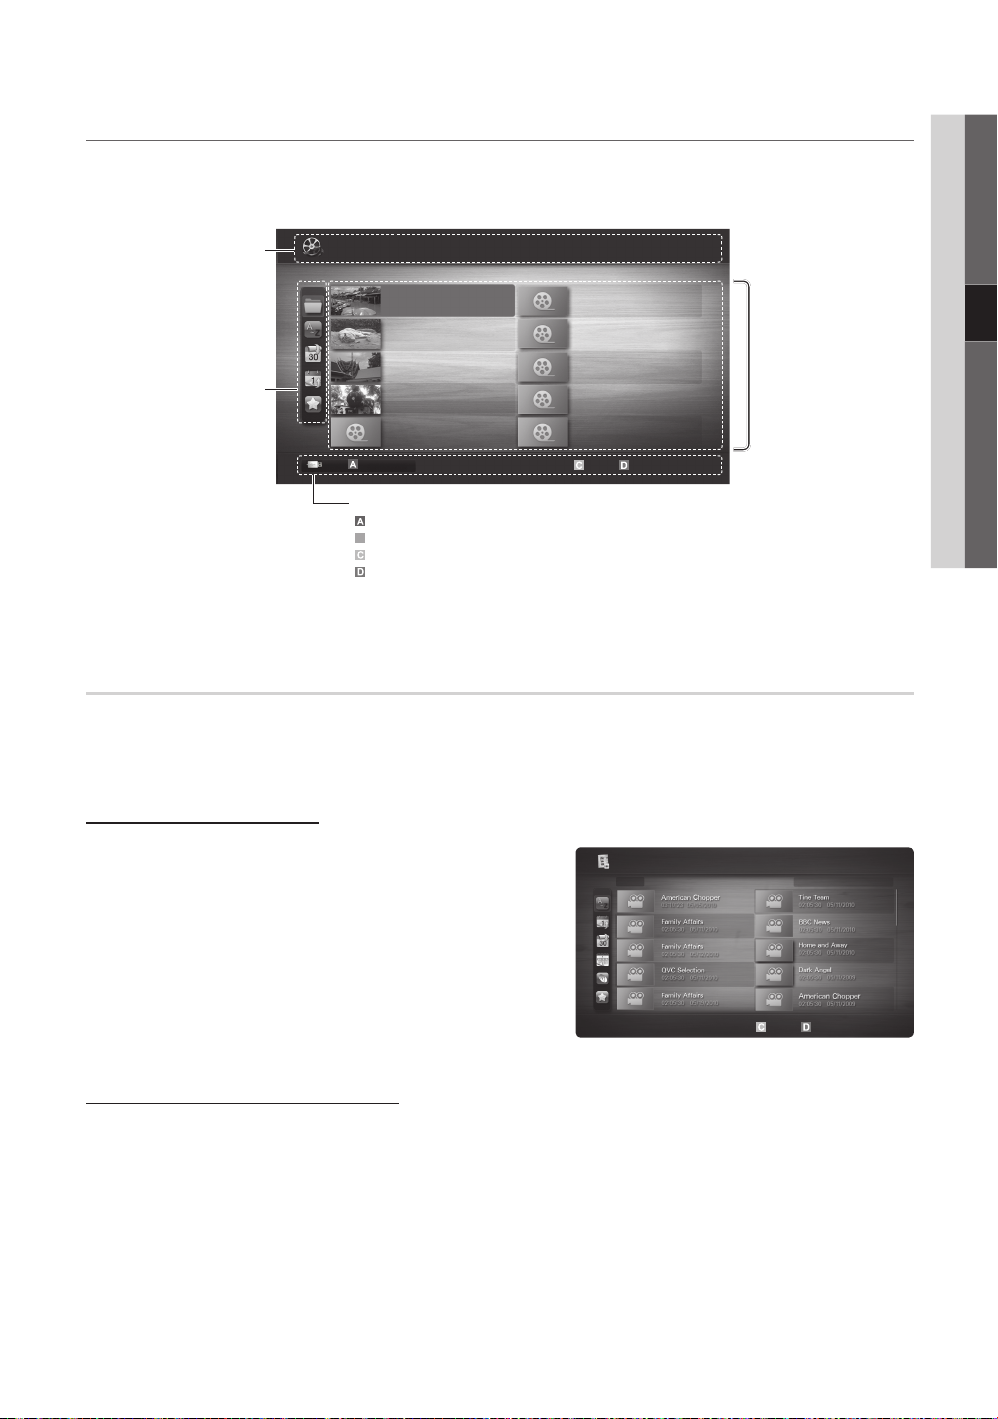
37
English
04 Advanced Features
Screen Display ¦
Jan.10.2010
Jan.10.2010
Jan.10.2010
Jan.10.2010
Jan.10.2010
Jan.10.2010
Jan.10.2010
Jan.10.2010
Jan.10.2010
Jan.10.2010
/Movie 01.avi 1/1
Movie 01.avi
SUM
Movie 03.avi
Movie 05.avi
Movie 07.avi
Movie 09.avi
Movie 02.avi
Movie 04.avi
Movie 06.avi
Movie 08.avi
Movie 10.avi
B
Move to the file you desired using the up/down/right/left buttons and then press the ENTERE or (Play) button. The file is
played.
Supports the ✎View Devices and Contents Mode in Media Play homepage.
You can ascertain the selected
file name and the number of files
Displays sorting standard.
Sorting standard is
✎
different depending on the
contents.
Information:
and page.
Sort List Section:
Videos
Page
File List Section:
You can confirm the files
and groups that is sorted by
each category.
Change Device
Select Sorting T Tools
Operation Buttons
Red (Change Device): Selects a connected device.
Green (Preference): Sets the file preference. (not supported in Basic view)
Yellow (Select): Selects multiple files from file list. Selected files are marked with a symbol.
Blue (Sorting): Selects the sort list.
T
Tools: Displays the option menu.
Using the ✎
(REW) or µ (FF) button, file list can move to next or previous page.
Recorded TV
To use the recording or Timeshift Mode function, the connected USB device must be available for recording. Device format is
recommended to use USB HDD.
During the Device formatting, do not disconnect the device while formatting is in progress. If you format the device, all
✎
files will be deleted.
Playing Recorded TV Programme
1. Press the or button to select Recorded TV, then press
the ENTERE button in the Media Play menu.
2. Press the /// button to select the desired file in the file
Recorded TV / .../ American Chopper
04/2010
list.
3. Press the ENTERE button or (Play) button.
The selected file is displayed on the top with its playing –
time.
During playing the recorded TV programme, you can search –
using the and button.
Using the Timeshift Mode function
t
Select Sorting T Tools
If you missed a live broadcast, you can see from the recorded broadcast using this feature.
When the Timeshift Mode is set to Auto, the TV stores the channel you watch currently to record automatically.
When the Timeshift Mode is set to Manual, if you press the (Play) button, the TV stores the channel from the point of
view you want to record.
Page 38

Advanced Features
✎
NOTE
Recorded videos are DRM (digital rights management) protected and cannot be played on a PC or other TVs, nor can
x
they be played when the main board of the TV is changed.
Data broadcasts cannot be recorded.
x
The availability of both recording and the xTimeshift Mode function may differ depending on picture quality and the
free space on the hard disk drive.
If you press the x or button, you can see the current channel being on air, or can see the start point the recorded
broadcast.
The xTimeshift Mode operates for a maximum of 90 minutes.
After the xTimeshift Mode function has run for the maximum time, the time information will be fixed to “00:00:00.”
Note that if you have paused the recording the TV will automatically resume playback.
If the 5% free memory space limit of the USB storage device is reached, the current recording process will be closed.
x
When recording is performed by both the PVR (Personal Video Recorder) function and a device that supports the
x
HDMI-CEC feature, recording by the PVR function takes precedence.
During a playback or the xTimeshift Mode, the picture will be displayed according to the display settings of the TV.
If you change the input source during recording, the screen will go blank until the change is completed.
x
An application which supports neither the recording nor the xTimeshift Mode function will close automatically if you
try to use it during either function.
A message may appear in front of the application window indicating that the recording or the xTimeshift Mode
function is closed.
Timeshift Mode x function is not supported for radio channels.
The recording and the xTimeshift Mode functions are disabled for channels locked with Child Lock.
If the USB device has failed the xDevice Performance Test, the USB device must go through the Device Format and
Device Performance Test again before you record with the Guide or Channel Manager.
The recording and xTimeshift Mode functions can only be used with a USB storage device that completed the
Device Performance Test.
If you attempt the recording or xTimeshift Mode function with a device that did not have the Device Performance
Test , the function will not start.
If a USB device dedicated to recording is connected, existing xTimeshift Mode or recording files that were saved
abnormally will automatically be deleted.
If you switch to external input mode during recording, the recording will continue but the
x
disabled.
If any function that turns off the TV ( xSleep Timer, Off timer, etc.) is set for a time that conflicts with recording, the TV
will be turned off once the recording is complete.
�
(REC) button will be
38
English
Page 39
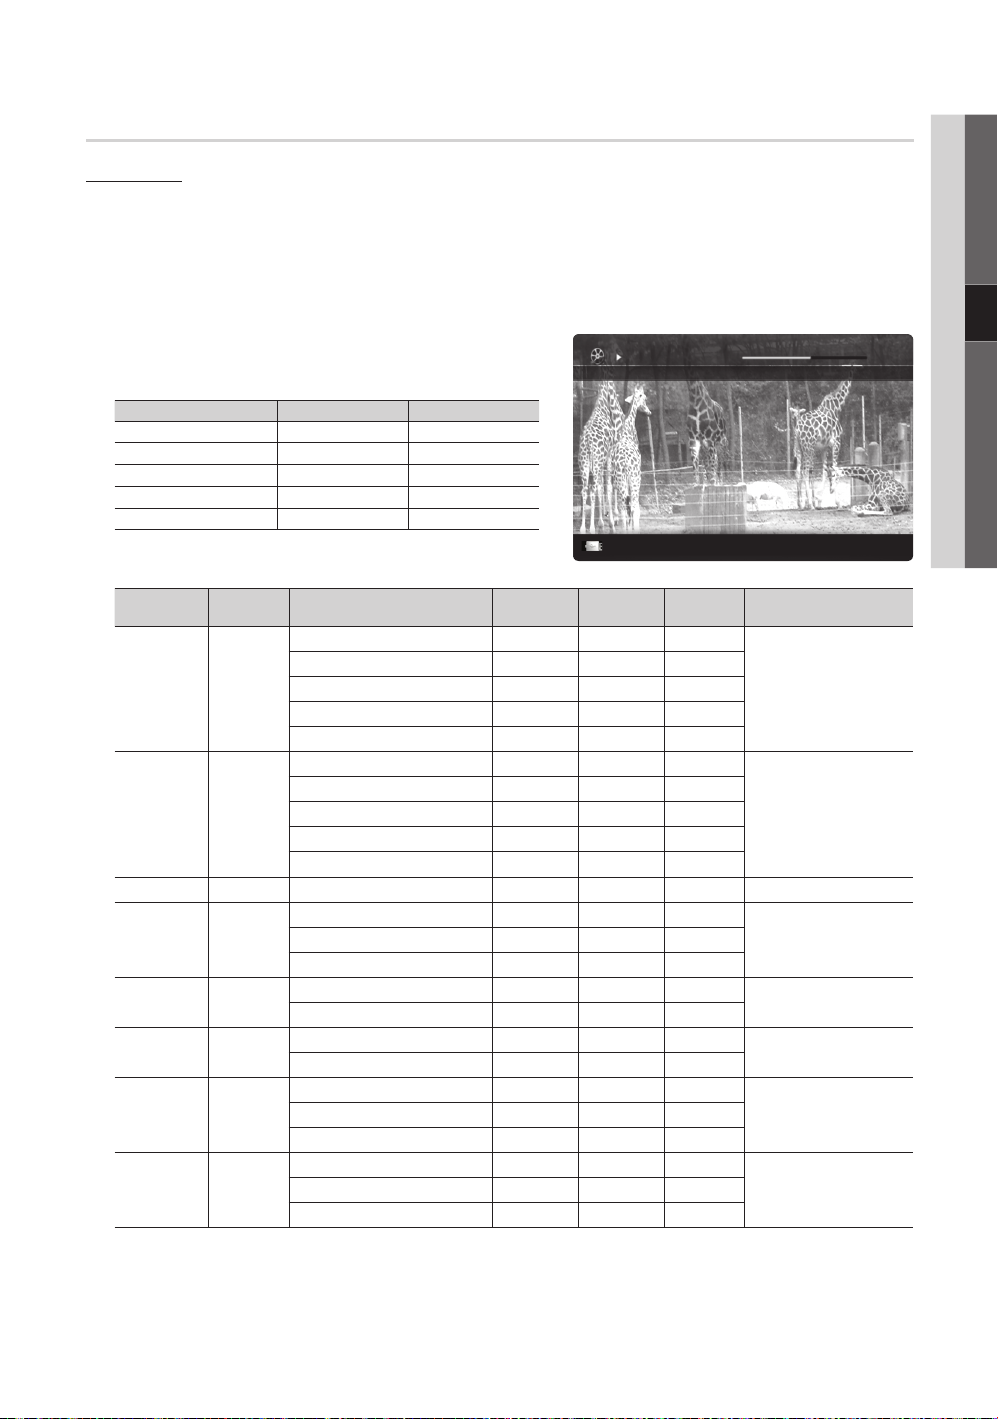
39
English
04 Advanced Features
Videos
Movie 01.avi
00:04:03 / 00:07:38 1/1
SUM
Playing Video
1. Press the or button to select Videos, then press the ENTERE button in the Media Play menu.
2. Press the /// button to select the desired file in the file list.
3. Press the ENTERE button or (Play) button.
The selected file is displayed on the top with its playing time. –
If video time information is unknown, play time and progress bar are not displayed. –
During playing the video, you can search using the – and button.
In this mode, you can enjoy movie clips contained on a Game,
✎
but you cannot play the Game itself.
Supported Subtitle Formats y
Name File extension Format
MPEG-4 time-based text .ttxt XML
SAMI .smi HTML
SubRip .srt string-based
SubViewer .sub string-based
Micro DVD .sub or .txt string-based
Supported Video Formats y
File Extension Container Video Codec Resolution
*.avi
*.mkv
*.asf ASF
*.wmv ASF Window Media Video v9 1920x1080 6 ~ 30 25 WMA
*.mp4 MP4
*.3gp 3GPP
*.vro
*.mpg
*.mpeg
*.ts
*.tp
*.trp
AVI
MKV
VRO
VOB
PS
TS
Divx 3.11 / 4.x / 5.1 / 6.0 1920x1080 6 ~ 30 8
XviD 1920x1080 6 ~ 30 8
H.264 BP / MP / HP 1920x1080 6 ~ 30 25
MPEG4 SP / ASP 1920x1080 6 ~ 30 8
Motion JPEG 800x600 6 ~ 30 8
Divx 3.11 / 4.x / 5.1 / 6.0 1920x1080 6 ~ 30 8
XviD 1920x1080 6 ~ 30 8
H.264 BP / MP / HP 1920x1080 6 ~ 30 25
MPEG4 SP / ASP 1920x1080 6 ~ 30 8
Motion JPEG 800x600 6 ~ 30 8
H.264 BP / MP / HP 1920x1080 6 ~ 30 25
XVID 1920x1080 6 ~ 30 8
H.264 BP / MP / HP 1920x1080 6 ~ 30 25
MPEG4 SP / ASP 1920x1080 6 ~ 30 8
MPEG1 1920x1080 24 / 25 / 30 30
MPEG2 1920x1080 24 / 25 / 30 30
MPEG1 1920x1080 24 / 25 / 30 30
H.264 1920x1080 6 ~ 30 25
MPEG2 1920x1080 24 / 25 / 30 30
H.264 1920x1080 6 ~ 30 25
VC1 1920x1080 6 ~ 30 25
Frame rate
(fps)
Bit rate
(Mbps)
E
Chaptering
L
Jump T Tools R Return
Audio Codec
MP3 / AC3 / LPCM /
ADPCM / DTS Core
MP3 / AC3 / LPCM /
ADPCM / WMA
MP3 / ADPCM / AACMPEG4 SP / ASP 1920x1080 6 ~ 30 8
ADPCM / AAC / HE-AAC
AC3 / MPEG / LPCM
AC3 / MPEG / LPCM / AACMPEG2 1920x1080 24 / 25 / 30 30
AC3 / AAC / MP3 / DD+ /
HE-AAC
Page 40
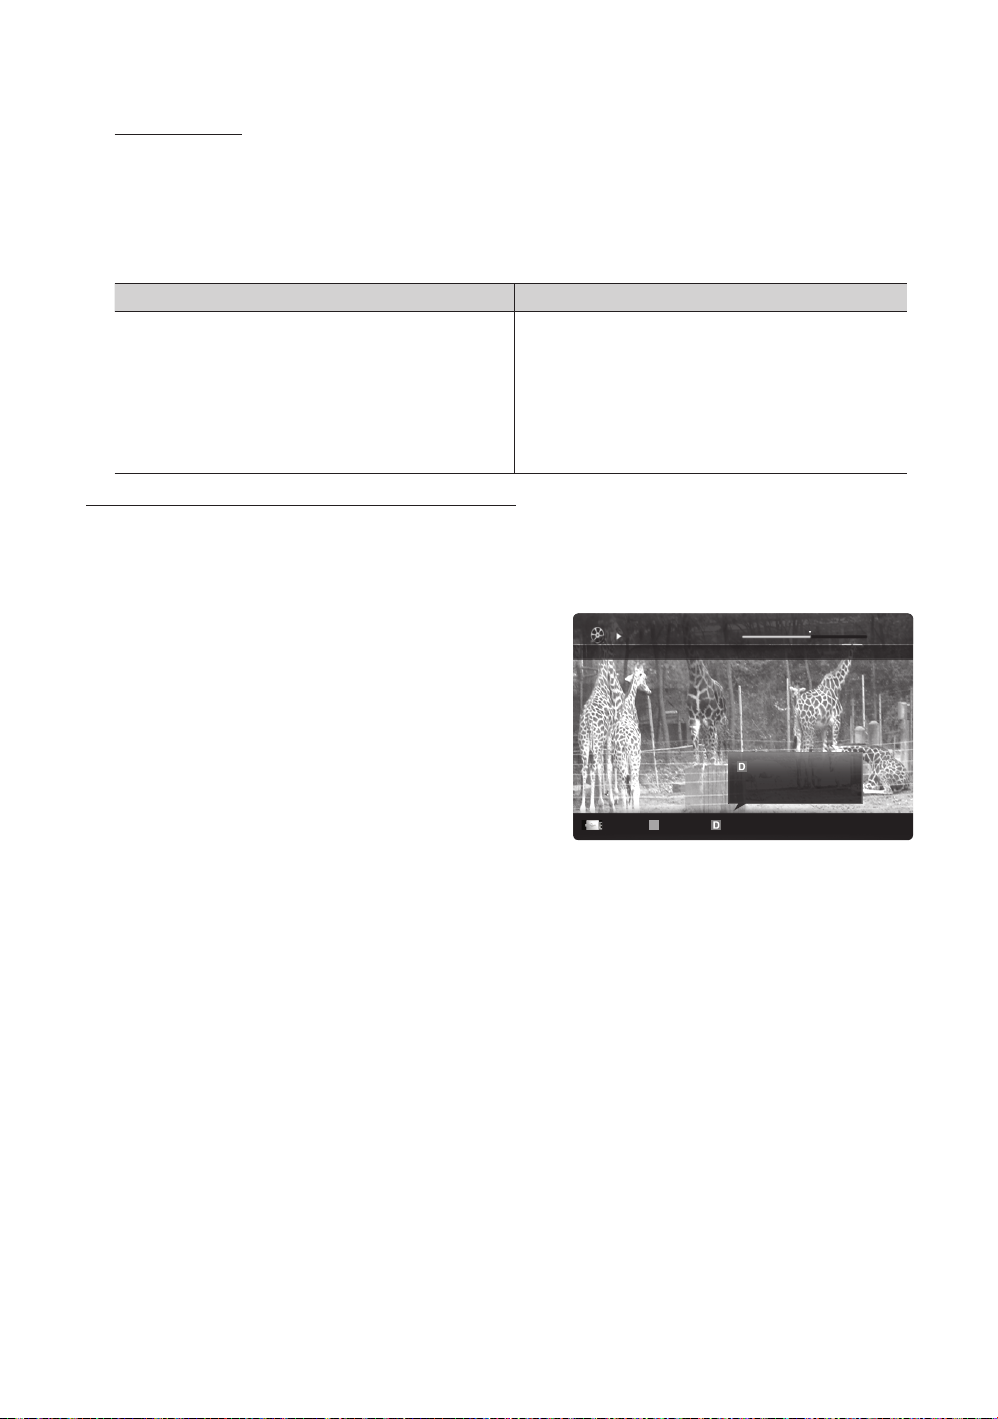
Advanced Features
Movie 01.avi
00:04:03 / 00:07:38 1/1
SUM
B
Other Restrictions
NOTE
✎
If there are problems with the contents of a codec, the codec will not be supported.
x
If the information for a Container is incorrect and the file is in error, the Container will not be able to play
x
correctly.
Sound or video may not work if the contents have a standard bitrate/frame rate above the compatible Frame/sec
x
listed in the table above.
Video Decoder Audio Decoder
Supports up to H.264, Level 4.1•
H.264 FMO / ASO / RS, VC1 SP / MP / AP L4 and AVCHD are not •
supported.
XVID, MPEG4 SP, ASP:•
Below 1280 x 720: 60 frame max –
Above 1280 x 720: 30 frame max –
GMC 2 over is not supported.•
H.263 is not supported.•
Only Samsung Techwin MJEPG is supported. •
Playing recorded TV or movie file continuously (Resume Play)
If you exit the playing Recorded TV or Videos function, it can be played later from the point where it was stopped.
If you press the ✎ENTERE button (Chaptering) during playing the file, you can explore scene divided into 5 chapters
you want.
If the index information is damaged or unsupported, you will not be able to use the ✎Chaptering function.
1. Select the movie file you want to play continuously by pressing
the or button to select it from the file list section.
2. Press the (Play) / ENTERE button.
3. Select Play Continuously (Resume Play) by pressing the Blue
button. The Movie will begin to play from where it was stopped.
The Blue button is available when resuming play.
✎
If the ✎Cont. movie play help function is set to On in the
Settings menu, a pop-up message will appear when you
resume play a movie file.
Supports up to WMA 7, 8, 9, STD•
WMA 9 PRO does not support 2 channel excess multi channel or •
lossless audio.
WMA sampling rate 22050Hz mono is not supported.•
Resumes playing from the last
viewed scene.
Section Repeat Play continuously E Chaptering
L
Jump T Tools
English
40
Page 41
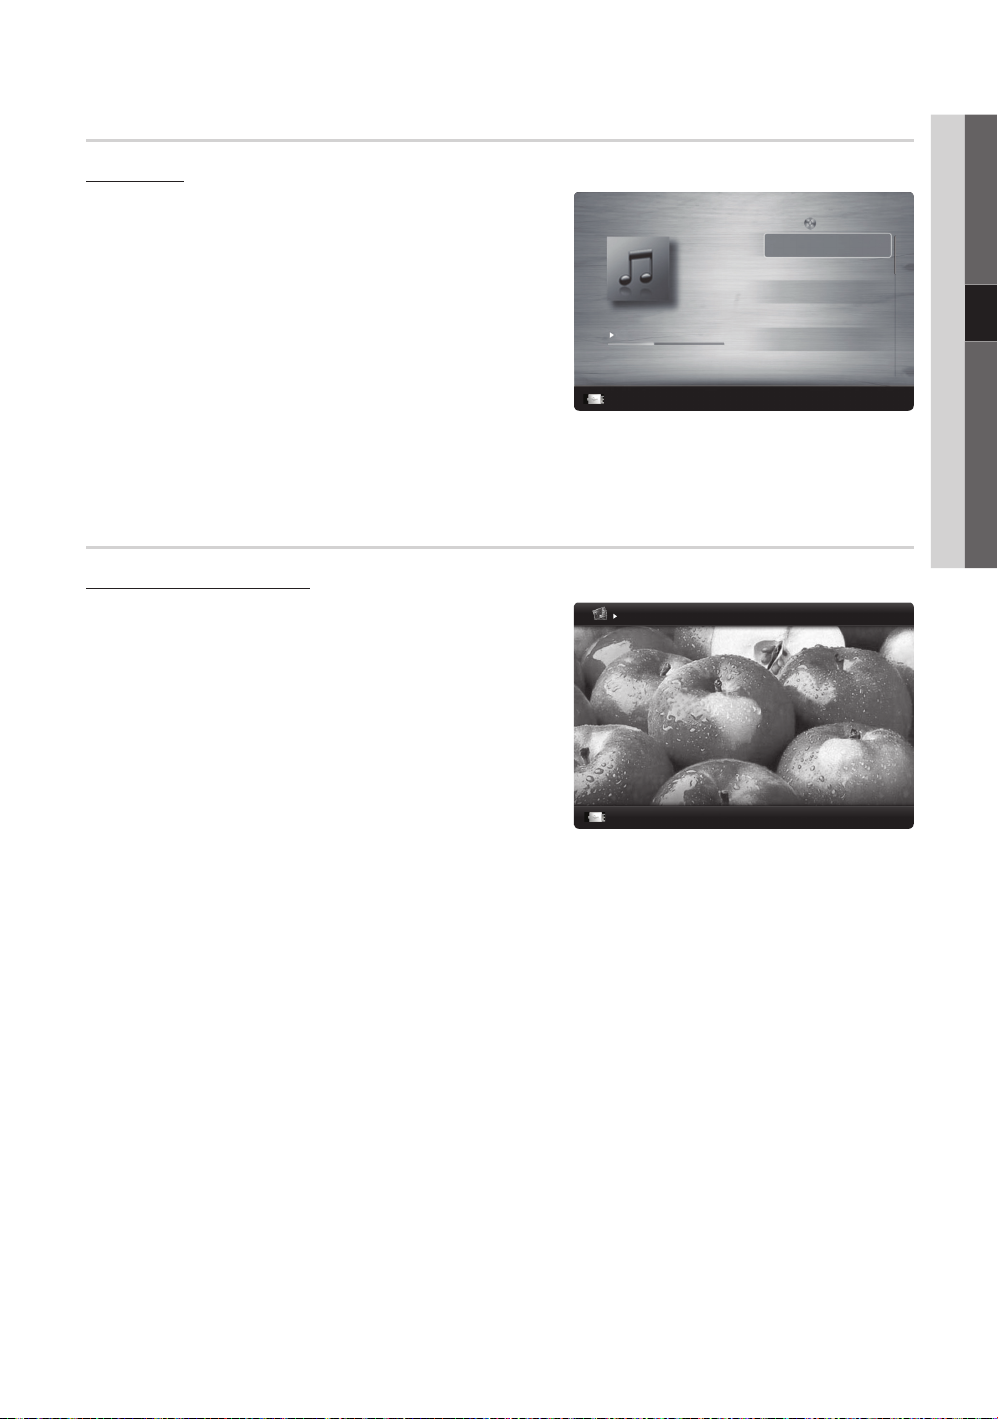
41
English
04 Advanced Features
Music
Image1024.jpg 1024x768 2010/2/1 3/15
SUM
3/15
I Love you
Jhon
Music 1
No Singer
Music 2
No Singer
Music 3
No Singer
Music 4
No Singer
Music 5
No Singer
I Love You
Jhon
1st Album
Pop
2010
4.2MB
01:10 / 04:02
SUM
Playing Music
1. Press the or button to select Music, then press the
ENTERE button in the Media Play menu.
2. Press the /// button to select the desired file in the file
list.
3. Press the ENTERE button or (Play) button.
– During playing the music, you can search using the and
button.
– (REW) and µ (FF) buttons do not function during play.
Only displays the files with MP3 and PCM file extension. Other
✎
file extensions are not displayed, even if they are saved on the
E
Pause L Jump T Tools R Return
same USB device.
If the sound is strange when playing MP3 files, adjust the ✎Equalizer in the Sound menu. (An over-modulated MP3 file
may cause a sound problem.)
You can create ✎My Playlist selecting the desired music in the file, and can play My Playlist.
Photos
Viewing a Photo (or Slide Show)
1. Press the or button to select Photos, then press the
ENTERE button in the Media Play menu.
2. Press the /// button to select the desired file in the file
list.
3. Press the ENTERE button or (Play) button.
While a photo list is displayed, press the –
(Play) /
ENTERE button on the remote control to start slide show.
All files in the file list section will be displayed in the slide show. –
During the slide show, files are displayed in order from –
currently being shown.
Music files can be automatically played during the Slide Show if
✎
the Background Music is set to On.
The ✎BGM Mode cannot be changed until the BGM has finished
loading.
Normal
E
Pause L Previous/Next T Tools R Return
Page 42
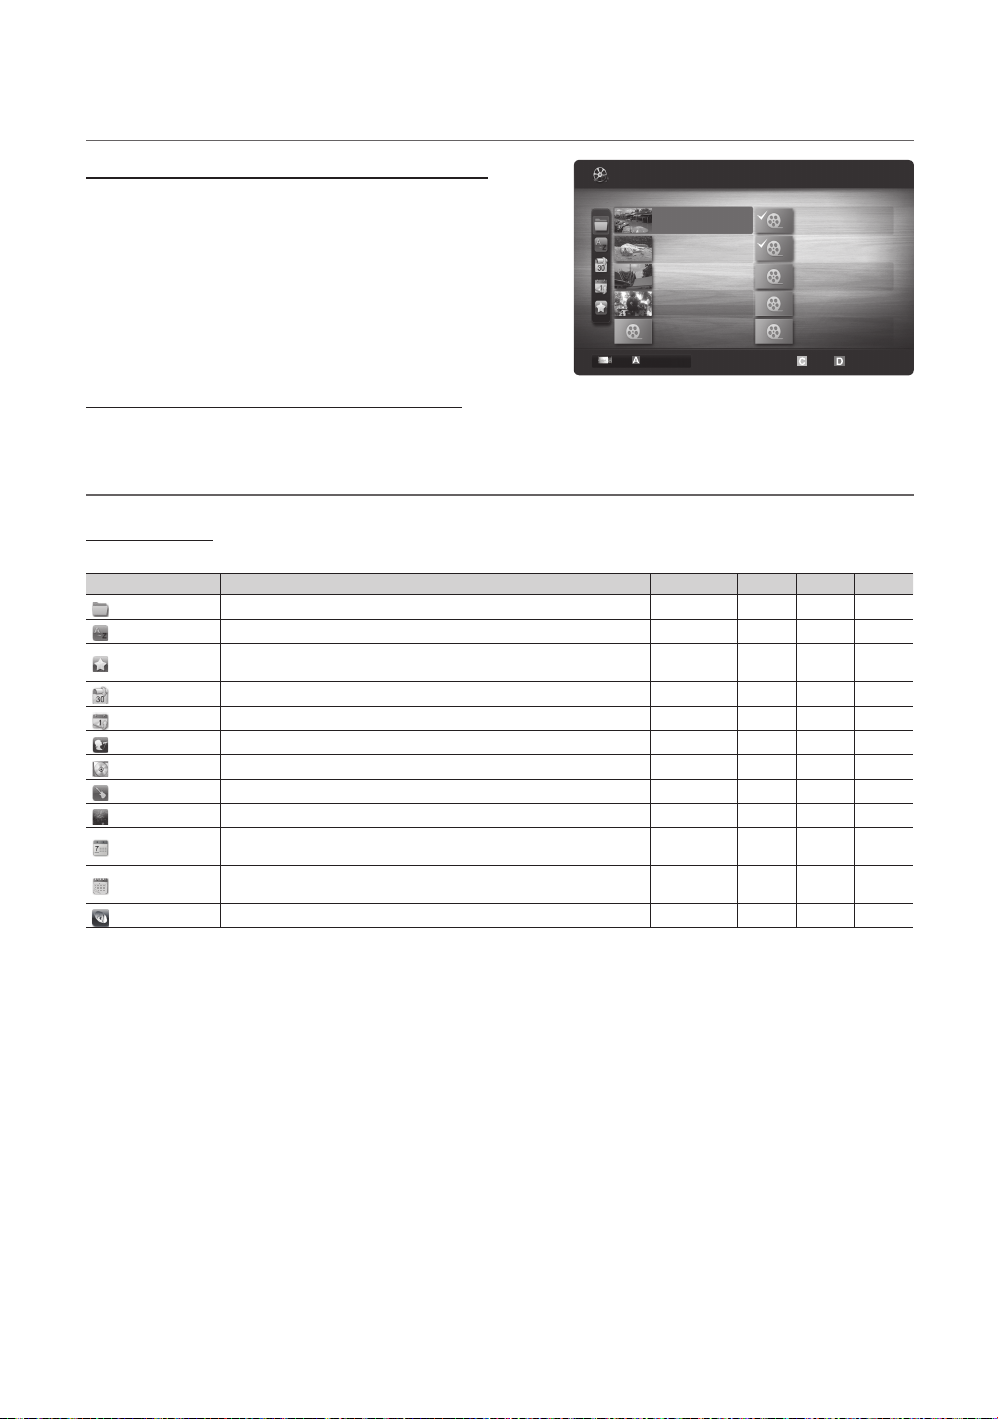
Advanced Features
1/1
/Movie 01.avi
SUM
Movie 01.avi
Jan.10.2010
Jan.10.2010
Jan.10.2010
Jan.10.2010
Jan.10.2010
Jan.10.2010
Jan.10.2010
Jan.10.2010
Jan.10.2010
Jan.10.2010
Movie 03.avi
Movie 05.avi
Movie 07.avi
Movie 09.avi
Movie 02.avi
Movie 04.avi
Movie 06.avi
Movie 08.avi
Movie 10.avi
Playing the Multiple Files ¦
Playing the selected recorded TV/video/music/photo files
1. Press the Yellow button in the file list to select the desired file.
Videos
2. Repeat the above operation to select multiple files.
NOTE
✎
The xc
mark appears to the left of the selected files.
To cancel a selection, press the Yellow button again.
x
To deselect all selected files, press the xTOOLS button
and select Deselect All.
3. Press the TOOLS button and select Play Selected Contents.
Change Device
Select Sorting T Tools
Playing the recorded TV/video/music/photo file group
1. While a file list is displayed, move to the any file in desired group.
2. Press the TOOLS button and select Play Current Group.
Media Play Additional Function ¦
Sorting the file list
Press the Blue button in the file list to sort the files.
Category Operations Recorded TV Videos Music Photos
Basic View
Title
Preference
Latest Date
Earliest Date
Artist
Album
Genre
Mood
Monthly
Weekly
Channel
It shows whole folder. You can view the photo by selecting the folder.
It sorts and displays the file title in Symbol/Number/Alphabet/Special order.
It sorts and displays the file by preference. You can change the file preference
in the file list section using the Green button.
It sorts and shows files by latest date.
It sorts and shows files by earliest date.
It sorts the music file by artist in alphabetical.
It sorts the music file by album in alphabetical order.
It sorts music files by the genre.
It sorts music files by the mood. You can change the music mood information.
It sorts and shows photo files by month. It sorts only by month (from January
to December) regardless of year.
It sorts and shows photo files by week. It sorts only by week (from Monday
to Sunday).
It sorts the recorded files by channel name.
c c c c
c c c c
c c c
c c c
c
c
c c c
c
c
c
c
c
42
English
Page 43
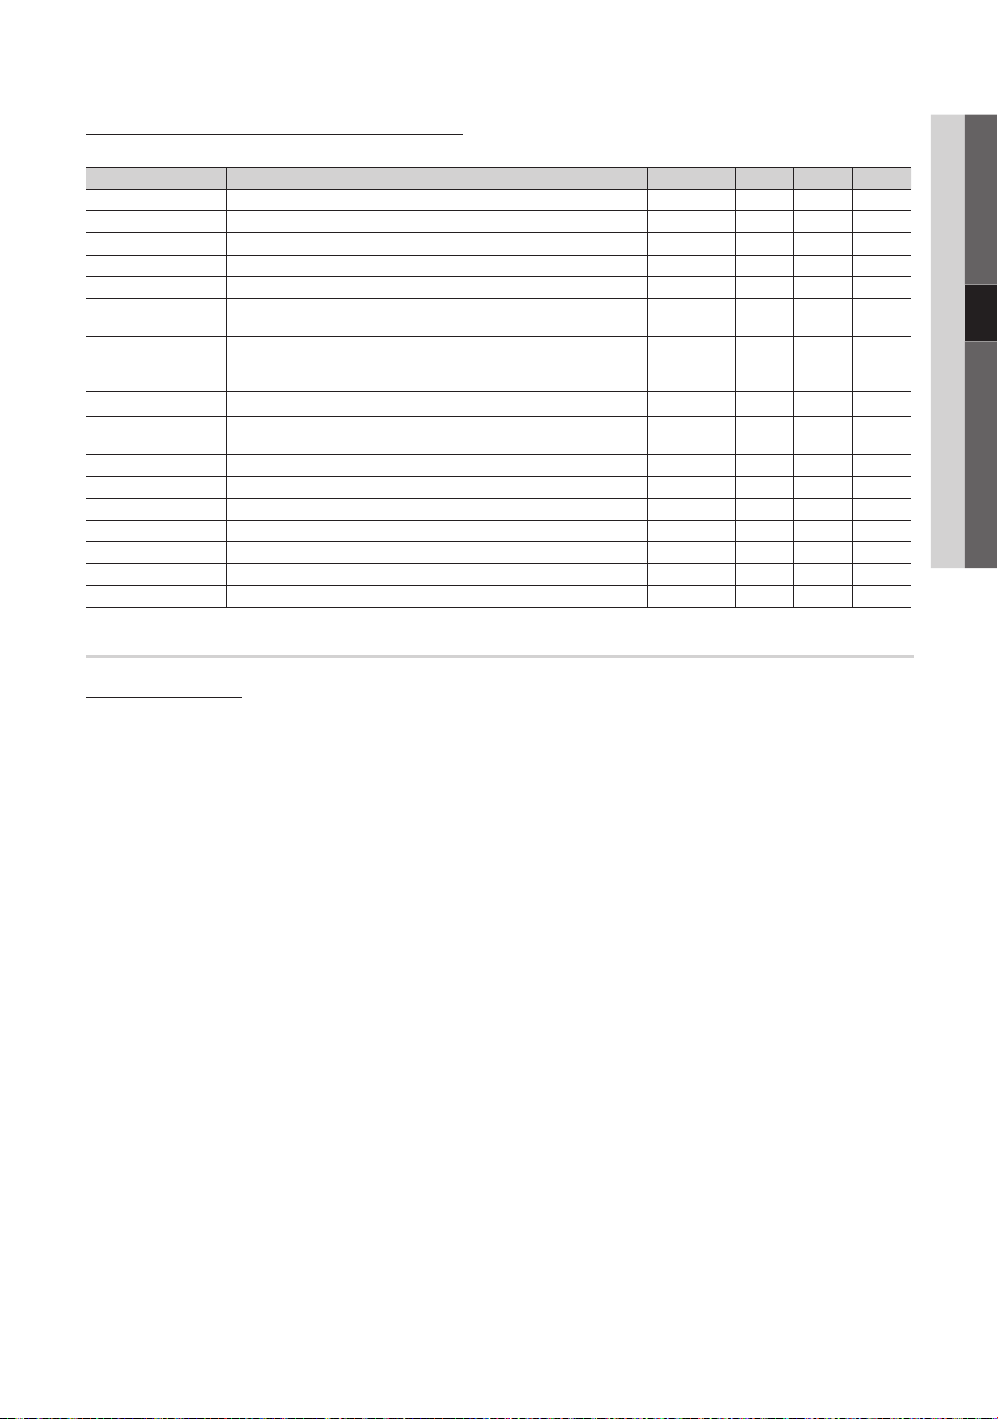
43
English
04 Advanced Features
Recorded TV/Videos/Music/Photos Play Option menu
During playing a file, press the TOOLS button.
Category Operations Recorded TV Videos Music Photos
Title You can move the other file directly.
Repeat Mode You can play recorded tv, movie and music files repeatedly.
Picture Size You can adjust the picture size for preference.
Picture Setting You can adjust the picture setting. (p. 16~21)
Sound Setting You can adjust the sound setting. (p. 21, 22)
Subtitle Setting You can play the video file with Subtitle. This function only works if the
Audio You can enjoy video in one of supported languages as required. The function
Audio Description You can adjust the audio description (p. 22).
Stop Slide Show /
Start Slide Show
Slide Show Speed You can select the slide show speed during the slide show.
Slide Show Effect You can set variously the slide show effect.
Background Music You can set and select background music when watching a slide show.
Zoom You can zoom into images in full screen mode.
Rotate You can rotate images in full screen mode.
Home Background You can move the file to the Media Play desktop.
Information You can see detailed information about the played file.
subtitles are the same file name as the video file.
is only enabled when stream-type files which support multiple audio formats
are played.
You can start or stop a slide show.
c c
c c c
c
c c c
c c c c
c c
c c
c
c c c c
c
c
c
c
c
c
c
c
Settings
Using the Setup Menu
Background Setting ■ : Select to display the background you want.
Cont. movie play help (Resume Play) (On / Off) ■ : Select to display the help pop-up message for continuous movie
playback.
Get the DivX ■
site and register the registration code with a personal account, you can download VOD registration file. If you play the VOD
registration using Media Play, the registration is completed.
✎
Get the DivX® VOD deactivation code ■ : When DivX® VOD is not registered, the registration deactivation code is
displayed. If you execute this function when DivX® VOD is registered, the current DivX® VOD registration is deactivated.
Information ■ : Select to view information about the connected device.
®
VOD registration code: Shows the registration code authorized for the TV. If you connect to the DivX web
For more information on DivX
®
VOD, visit “www.DivX.com.”
Page 44
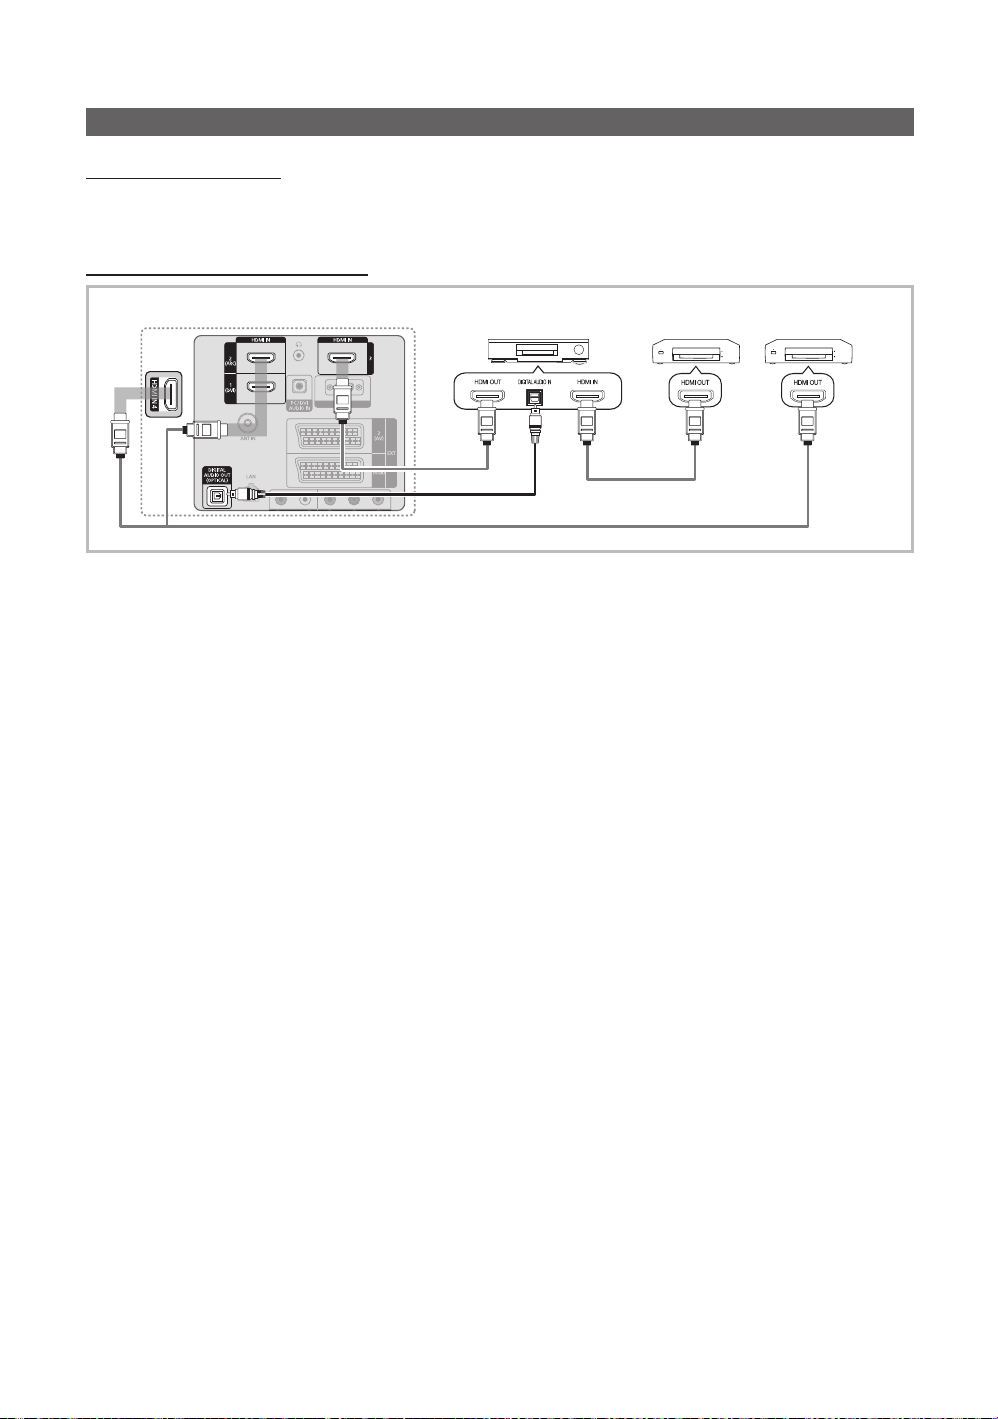
Advanced Features
Anynet+
What is Anynet+?
Anynet+ is a function that enables you to control all connected Samsung devices that support Anynet+ with your Samsung
TV’s remote. The Anynet+ system can be used only with Samsung devices that have the Anynet+ feature. To be sure your
Samsung device has this feature, check if there is an Anynet+ logo on it.
To connect to a Samsung Home Theatre
1. Connect the HDMI IN (1(DVI), 2(ARC), 3 or 4) jack on the TV and the HDMI OUT jack of the corresponding Anynet+
device using an HDMI cable.
2. Connect the HDMI IN jack of the home theatre and the HDMI OUT jack of the corresponding Anynet+ device using an
HDMI cable.
✎
NOTE
Connect the Optical cable between the xDIGITAL AUDIO OUT (OPTICAL) jack on your TV and the Digital Audio Input
on the Home Theatre.
The ARC function enables digital output of sound using the xHDMI IN 2(ARC) port and can only be operated when
the TV is connected to an audio receiver that supports the ARC function.
When following the connection above, the Optical jack only outputs 2 channel audio. You will only hear sound from
x
the Home Theatre’s Front, Left and Right speakers and the subwoofer. If you want to hear 5.1 channel audio, connect
the DIGITAL AUDIO OUT (OPTICAL) jack on the DVD / Satellite Box (i.e. Anynet Device 1 or 2) directly to the
Amplifier or Home Theatre, not the TV.
You can connect only one Home Theatre.
x
You can connect an Anynet+ device using the HDMI cable. Some HDMI cables may not support Anynet+ functions.
x
Anynet+ works when the AV device supporting Anynet+ is in the standby or on status.
x
Anynet+ supports up to 12 AV devices in total. Note that you can connect up to 3 devices of the same type.
x
t
TV
Home Theatre
Optical Cable
Anynet+ Device 1
HDMI Cable
HDMI Cable
Anynet+ Device 2, 3, 4
44
English
Page 45

45
English
04 Advanced Features
Anynet+ Menu
The Anynet+ menu changes depending on the type and status of the Anynet+ devices connected to the TV.
Anynet+ Menu Description
View TV Changes Anynet+ mode to TV broadcast mode.
Device List Shows the Anynet+ device list.
(device_name) MENU Shows the connected device menus. E.g. If a DVD recorder is connected, the disc menu of
(device_name) INFO Shows the play menu of the connected device. E.g. If a DVD recorder is connected, the
Recording: (*recorder) Starts recording immediately using the recorder. (This is only available for devices that
Stop Recording: (*recorder) Stops recording.
Receiver Sound is played through the receiver.
If more than one recording device is connected, they are displayed as (*recorder) and if only one recording device is
connected, it will be represented as (*device_name).
the DVD recorder will appear.
play menu of the DVD recorder will appear.
support the recording function.)
Setting Up Anynet+ ¦
Setup ■
Anynet+ (HDMI-CEC) (Off / On): To use the Anynet+ Function, Anynet+ (HDMI-CEC) must be set to On.
When the ✎Anynet+ (HDMI-CEC) function is disabled, all the Anynet+ related operations are deactivated.
Auto Turn Off (No / Yes): Setting an Anynet+ Device to turn off automatically when the TV is turned off.
The active source on the TV must be set to TV to use the Anynet+ function.
✎
Even if an external device is still recording, it may turn off.
✎
Switching between Anynet+ Devices ¦
1. Anynet+ devices connected to the TV are listed.
If you cannot find a device you want, press the Red button to refresh the list.
✎
2. Select a device and press the ENTERE button. You can switch to the selected device.
Only when you set ✎Anynet+ (HDMI-CEC) to On in the Application menu, the Device List menu appears.
Switching to the selected device may take up to 2 minutes. You cannot cancel the operation during the switching
x
operation.
If you have selected external input mode by pressing the xSOURCE button, you cannot use the Anynet+ function.
Make sure to switch to an Anynet+ device by using the Device List.
Recording ¦
You can make a recording of a TV Programme using a Samsung recorder.
1. Select Recording.
When there are more than two recording devices
✎
When multiple recording devices are connected, the recording devices are listed. Select one recording device in
x
the Device List.
When the recording device is not displayed, select ✎Device List and press the Red button to search devices.
2. Press the EXIT button to exit.
You can record the source streams by selecting ✎Recording: (device_name).
Pressing the
✎
another device, the video from the device is recorded.
Before recording, check whether the antenna jack is properly connected to the recording device. To properly
✎
connect an antenna to a recording device, refer to the recording device’s users manual.
(REC) button will record whatever you are currently watching. If you are watching video from
Page 46

Advanced Features
Listening through a Receiver ¦
You can listen to sound through a receiver (i.e Home Theatre) instead of the TV Speaker.
1. Select Receiver and set to On.
2. Press the EXIT button to exit.
If your receiver supports audio only, it may not appear in the device list.
✎
The receiver will work when you have properly connected the optical in jack of the receiver to the ✎DIGITAL AUDIO
OUT (OPTICAL) jack of the TV.
When the receiver (i.e Home Theatre) is set to On, you can hear sound output from the TV’s Optical jack. When the
✎
TV is displaying a DTV (aerial) signal, the TV will send out 5.1 channel sound to the receiver. When the source is a
digital component such as a DVD and is connected to the TV via HDMI, only 2 channel sound will be heard from
the receiver.
NOTE
✎
You can only control Anynet+ devices using the TV remote control, not the buttons on the TV.
x
The TV remote control may not work under certain conditions. If this occurs, reselect the Anynet+ device.
x
The Anynet+ functions do not operate with other manufacturers’ products.
x
Using the ARC function
You can listen to sound through a receiver connected HDMI cable without the need for a separate optical cable.
1. Select Receiver and set to On.
2. Press the EXIT button to exit.
To use the ARC function, a receiver which supports the HDMI-CEC and ARC features must be connected to the ✎HDMI
IN 2 (ARC) port.
To disable the ARC function, set the ✎Receiver to Off. Even if the TV transmits the ARC signal continuously, the receiver
will be blocked from receiving the signal.
46
English
Page 47

47
English
04 Advanced Features
Troubleshooting for Anynet+ ¦
Problem Possible Solution
Anynet+ does not work. Check if the device is an Anynet+ device. The Anynet+ system supports Anynet+ devices only.•
I want to start Anynet+. Check if the Anynet+ device is properly connected to the TV and check if the • Anynet+ (HDMI-CEC) is set to
I want to exit Anynet+. Select • View TV in the Anynet+ menu.
The message “Connecting to
Anynet+ device...” appears on the
screen.
The Anynet+ device does not play. You cannot use the play function when • Plug & Play (initial setup) is in progress.
Only one receiver (home theatre) can be connected.•
Check if the Anynet+ device power cord is properly connected.•
Check the Anynet+ device’s Video/Audio/HDMI cable connections.•
Check whether • Anynet+ (HDMI-CEC) is set to On in the Anynet+ setup menu.
Check whether the TV remote control is in TV mode.•
Check whether the remote control is Anynet+ compatible.•
Anynet+ doesn’t work in certain situations. (Searching channels, operating • Media Play or Plug & Play (initial
setup), etc.)
When connecting or removing the HDMI cable, please make sure to search devices again or turn your TV off •
and on again.
Check if the Anynet+ Function of Anynet+ device is set on.•
On in the Anynet+ Setup menu.
Press the • TOOLS button to display the Anynet+ menu and select a menu you want.
Press the • SOURCE button on the TV remote control and select a non- Anynet+ device.
Press• P >/<, and PRE-CH to change the TV mode. (Note that the channel button operates only when a
tuner-embedded Anynet+ device is not connected.)
You cannot use the remote control when you are configuring Anynet+ or switching to a view mode.•
Use the remote control when the Anynet+ setting or switching to view mode is complete.•
The connected device is not
displayed.
The TV Programme cannot be
recorded.
The TV sound is not output
through the receiver.
Check whether or not the device supports Anynet+ functions.•
Check whether or not the HDMI cable is properly connected.•
Check whether • Anynet+ (HDMI-CEC) is set to On in the Anynet+ setup menu.
Search Anynet+ devices again.•
You can connect an Anynet+ device using the HDMI cable only. Some HDMI cables may not support Anynet+ •
functions.
If connection is terminated because there has been a power interruption or the HDMI cable has been •
disconnected, please repeat the device scan.
Check whether the antenna jack on the recording device is properly connected.•
Connect the optical cable between TV and the receiver.•
The ARC function enables digital output of sound using the • HDMI IN 2(ARC) port and can only be operated
when the TV is connected to an audio receiver that supports the ARC function.
Page 48
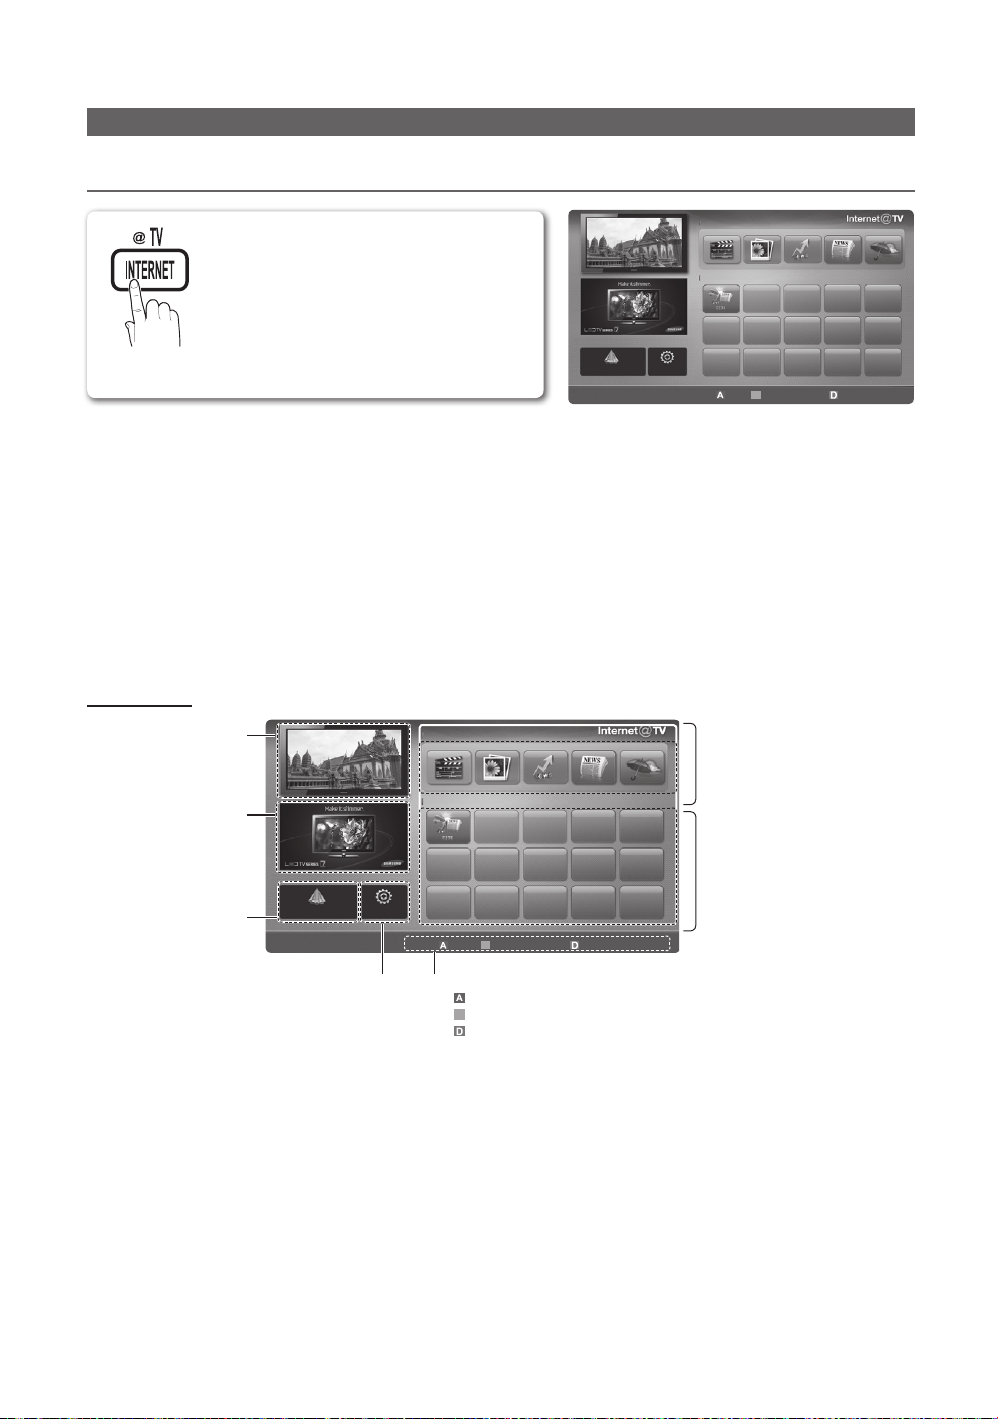
Advanced Features
B
Getting Started with Internet@TV ¦
Internet@TV
Internet@TV brings useful and entertaining
Recommended
contents and services directly from the web to
NOTE
✎
your TV.
Samsung Apps
My Applications
Settings
Login B Sort by R Return
Configure the network settings before using xInternet@TV. For more information, refer to “Network Connection”
(p. 28).
Unsupported fonts within the provider’s content will not display normally.
x
Slow responses and/or interruptions may occur, depending on your network conditions.
x
English may be only supported in application service depending on region.
x
This feature is not available in some locations.
x
If you experience a problem using a application, please contact the content provider.
x
According to circumstances of the contents provider, an application’s updates or the application itself may be
x
discontinued.
Depending on your country’s regulations, some applications may have limited service or not be supported.
x
Screen Display
Settings
Recommended
My Applications
Login B
Sort by R Return
Controls:
• Red (Login): To log in to to Internet@TV.
• Green (Mark as favourite): To mark the applications as a favourite.
• Blue (Sort by): To sort the applications.
•R Return: To return to the previous menu.
The colour buttons may work differently depending on the application.
✎
by Date 1/1
Recommended Applications:
Displays the recommended service by
Samsung. You are not able to add or
delete a service in this list.
Downloaded Applications:
Displays the downloaded applications
through the Samsung Apps.
Displays the current channel.
TV Screen:
Information:
Displays notices, new
applications, and
advertisemevnts brought to
you by Samsung product
introductions.
Application service:
You can experience
various service by provided
samsung.
Samsung Apps
Internet@TV Settings:
Edit and configure applications
and Internet@TV settings.
by Date 1/1
English
48
Page 49
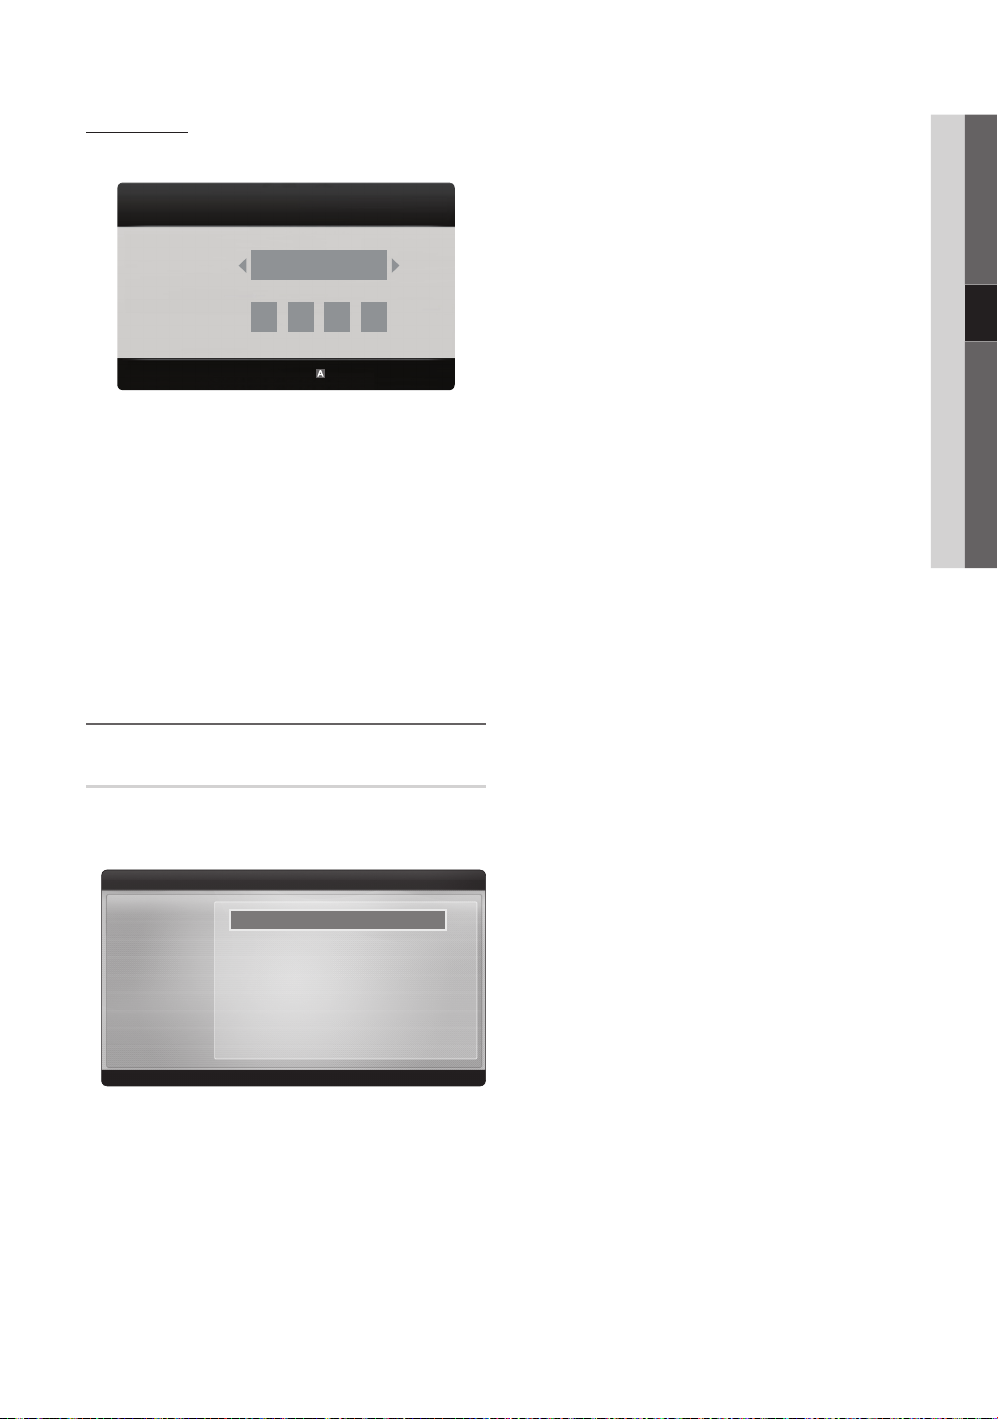
49
English
04 Advanced Features
Account Login
admin
For a application with multiple account, use and to
access the different account.
Login
User account:
Password:
R Cancel
For a more enjoyable application experience, register
✎
and log in to your account.
For instructions on creating an account, refer to ✎Setting
up Settings Internet@TV ID Create.
1. Press the Red button in Internet@TV home page.
2. Select desired User account, then press the ENTERE
button.
If you want create account, press Red button:
✎
then create account OSD window appear.
3. Enter the Password.
When login succeeds, ✎User account will be
displayed on the screen.
Setting up Internet@TV ¦
Settings
Create IDs and configure Internet@TV settings from this
screen. Highlight Settings using and buttons and press
the ENTERE button.
Settings
R Return
System Setup ■
Ticker Autorun (Off / On): Enable/disable ticker autorun
upon powering on the TV.
The ✎Ticker application provides useful News,
Weather, and Stock Market information. The
Ticker application on Internet@TV must be
downloaded to use this feature.
Depending on your country, ✎Ticker application
may have different service or not be supported.
Channel Bound Service (Off / On): Some channels
support applications as an Internet data service, allowing
you to access the Internet service while watching TV.
Only available if supported by the broadcaster.
✎
Reset: Resets Internet@TV settings to factory default
settings.
Change the Service Lock password
The default password set is “0-0-0-0.”
✎
If you forget the password, press the following
✎
sequence of remote control buttons to reset the
password to “0-0-0-0”: POWER (off) MUTE
8 2 4 POWER (on).
Internet@TV ID ■
You can use this menu when creating, deleting the
account. You can control your account including
contents site’s account information.
Account is only for internet@TV.
✎
Create: Create an account and link it with desired
service applications.
NOTE
✎
Account will be made less than 10.
x
Maximum number of characters is 8.
x
Manager
Service Site – : Register login information for service
sites.
Change Password – : Change account password.
Delete – : Delete the account.
Service Manager ■ : Delete and lock applications installed
to Internet@TV.
Lock: Lock the application.
Accessing a locked application requires the
✎
password.
Delete: Delete the application.
Properties ■ : Display information about Internet@TV. Use
the Check the speed of your internet connection
option to test your network connection.
Page 50
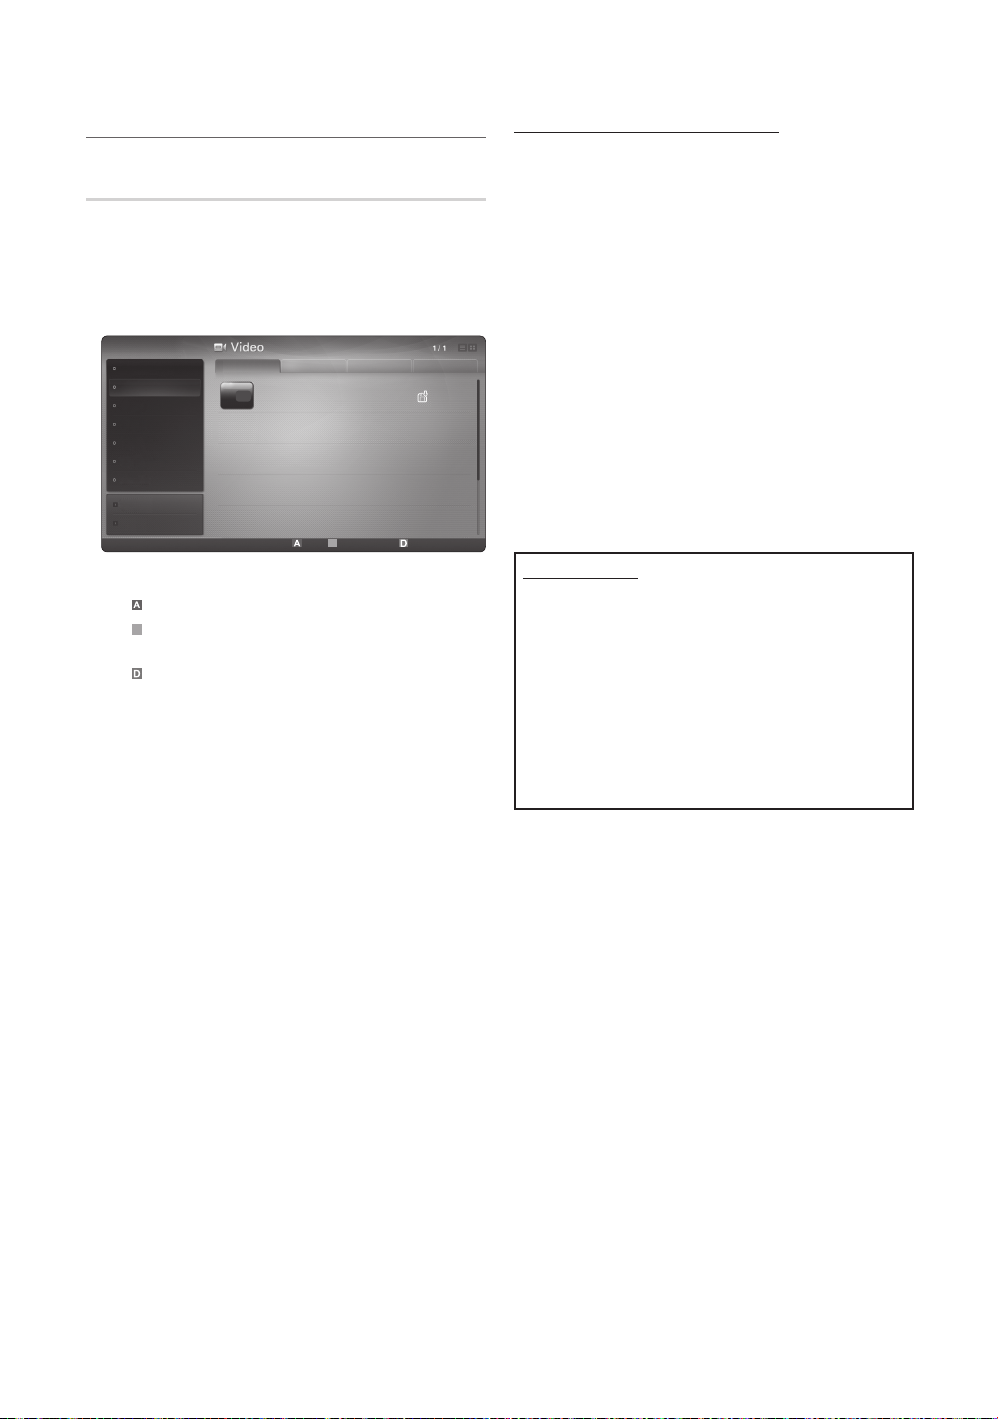
Advanced Features
B
You Tu be
Using the Internet@TV service ¦
Samsung Apps
Samsung Apps is a store for downloading applications to be
used on Samsung TV/AV equipment.
Users can enjoy a variety of contents like videos, music,
photos, games, useful information etc. using the downloaded
applications.
Additional applications will be available hereafter.
Samsung Apps
Video
Sports
Game
Lifestyle
Information
Help
Using the colour buttons with the ✎Samsung Apps.
Red (Login): To log in to the internet service.
x
Green (Thumbnail View): To change the view
x
mode.
Blue (Sort by): To sort the applications by
x
Featured, Most downloaded, Most recent or
Name.
R
Return: Moves to previous menu.
x
Featured Most downloaded Most recent Name
YouTube
TV store Test User002
Login B Thumbnail View Sort by R Return
Free
Using the Samsung Apps by category
The following categories are available:
y What’s New?: Displays newly registered applications.
y Video: Displays various video media such as movies, TV
shows and short length videos.
y Sports: Displays various sports media such as match
information, images and short length video.
y Game: Displays various games such as sudoku and
chess.
y Lifestyle: Includes various lifestyle media services such
as music, personal photo management tools and social
networking such as Facebook and Twitter.
y Information: Includes various information services such
as news, stocks and weather.
y Other: Includes other miscellaneous services.
y My Page: My Page offers information about already
installed applications on the TV like detailed information,
download contents etc.. It can allows delete or lock the
applications.
y Help: If you have questions about Internet@TV, check
this section first.
Legal Statement
Due to the various capabilities of products featuring
the Samsung Internet@TV - Content Service, as well
as limitations in the available content, certain features,
applications, and services may not be available on all
devices or in all territories. Some features on Internet@
TV may also require additional peripheral devices or
membership fees that are sold separately. Please visit
http://www.samsung.com for more information on specific
device information and content availability. The services
and availability of content through Internet@TV are subject
to change from time to time without prior notice.
English
50
Page 51
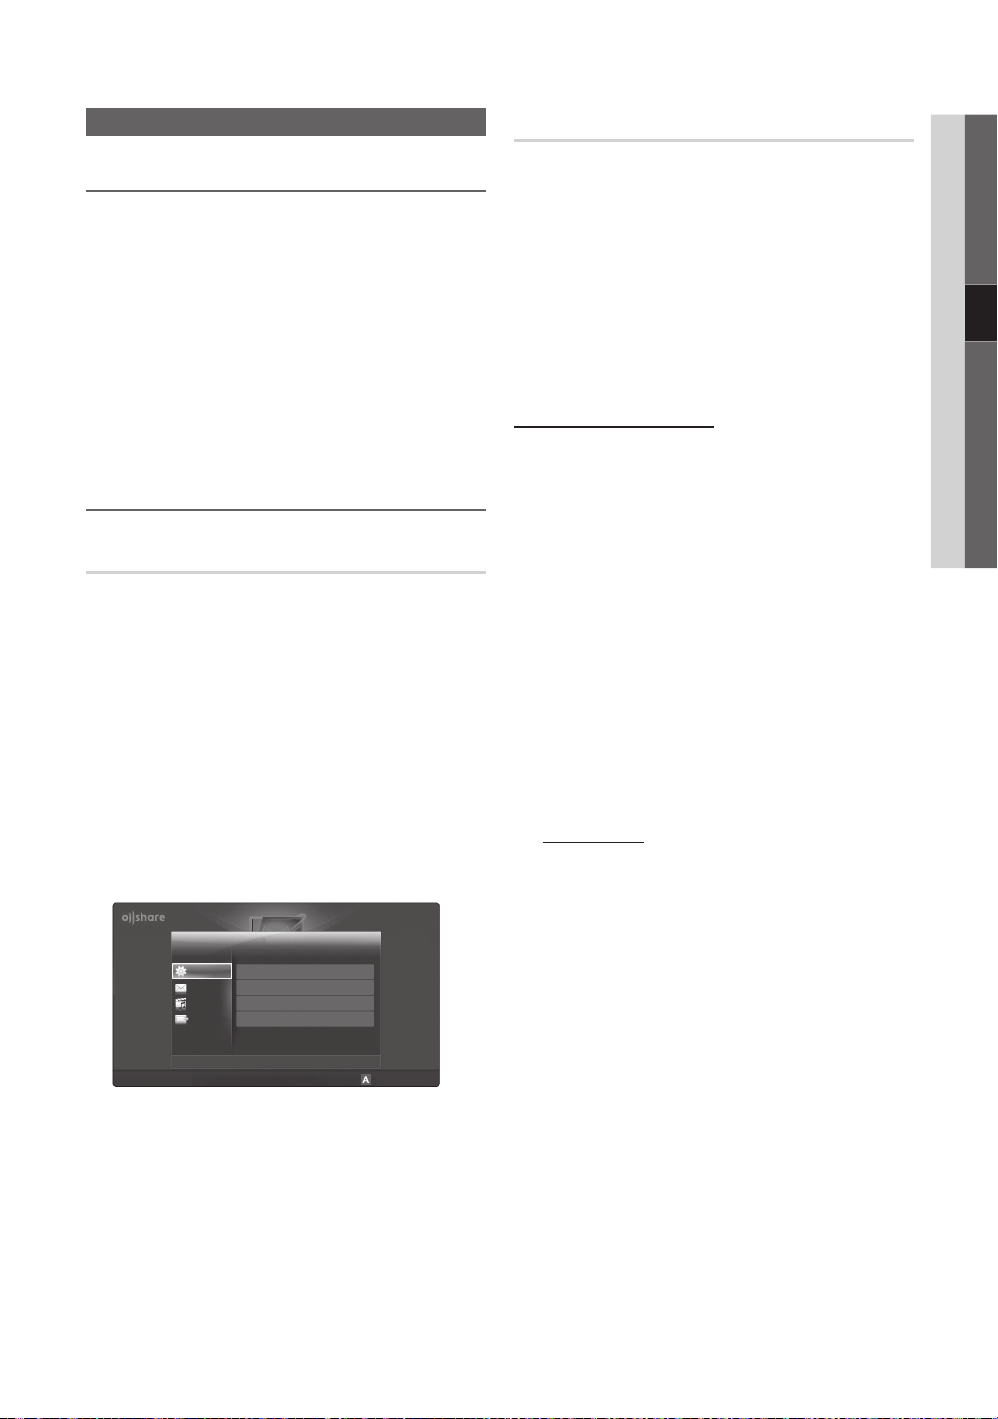
51
English
04 Advanced Features
AllShare
AllShare™
3/7
About AllShare ¦
AllShare connects your TV, mobile phones and other
devices which are compatible through a network. On your
TV, you can view call arrivals, SMS messages and schedules
set on your mobile phones. In addition, you can play media
contents including videos, photos and music saved on your
mobile phones or the other devices (such as your PC) by
controlling them on the TV via the network. Additionally, you
can use your TV as a monitor for your mobile when browsing
a web page.
For more information, visit “www.samsung.com” or
✎
contact the Samsung call centre. Mobile devices may
need additional software installation. For details, refer to
each device’s user’s guide.
Setting Up AllShare ¦
Setup
Message (On / Off) ■ : Enables or disables the message
function (for call arrivals, SMS messages and schedules
set on your mobile phones).
Media (On / Off) ■ : Enables or disables the media
function. When the media function is on, it plays videos,
photos and music from a mobile phone or other device
that supports AllShare.
ScreenShare (On / Off) ■ : Enables or disables the
ScreenShare function for using mobile phone as a
remote control.
TV name ■ : Sets the TV name so you can find it easily on
a mobile device.
If you select ✎User Input, you can type on the TV
using the OSK (On Screen Keyboard).
Setup
Setup
Message
Media
TV name : Home TV
ScreenShare
Message / Media / ScreenShare
Shows a list of mobile phones or connected devices which
have been set up with this TV for using the Message,
Media, or ScreenShare function.
The ✎Media function is available in all mobile devices
which support AllShare.
Allowed / Denied ■ : Allows/Blocks the mobile phone.
Delete ■ : Deletes the mobile phone from the list.
This function only deletes the name of the mobile
✎
from the list. If the deleted mobile device is turned
on or trys to connect to the TV, it may appear on
the list again.
Using the Message Function
Using this function, you view call arrivals, SMS messages
and schedules set on the mobile phone through the alarm
window while watching TV.
NOTE
✎
To disable the alarm window, set xMessage to Off in
Setup of AllShare.
If xOK is selected, or if OK is not selected after the
message has appeared three times, the message
will be deleted. The message is not deleted from the
mobile phone.
The alarm window can be displayed while using
x
some applications such as Media Play etc. To view
the contents of a message, switch to TV viewing
mode.
When a message from an unknown mobile phone is
x
displayed, select the mobile phone on the message
menu in AllShare and select Denied to block the
phone.
Message View
If a new SMS message arrives while you are
watching TV, the alarm window appears. If you click
the OK button, the contents of the message are
displayed.
You can configure the viewing settings for SMS
✎
messages on your mobile phones. For the
procedures, refer to the mobile phone manual.
Some types of characters may be displayed as
✎
blank or broken characters.
E
Select R Return e Exit
Setup R Return
Page 52
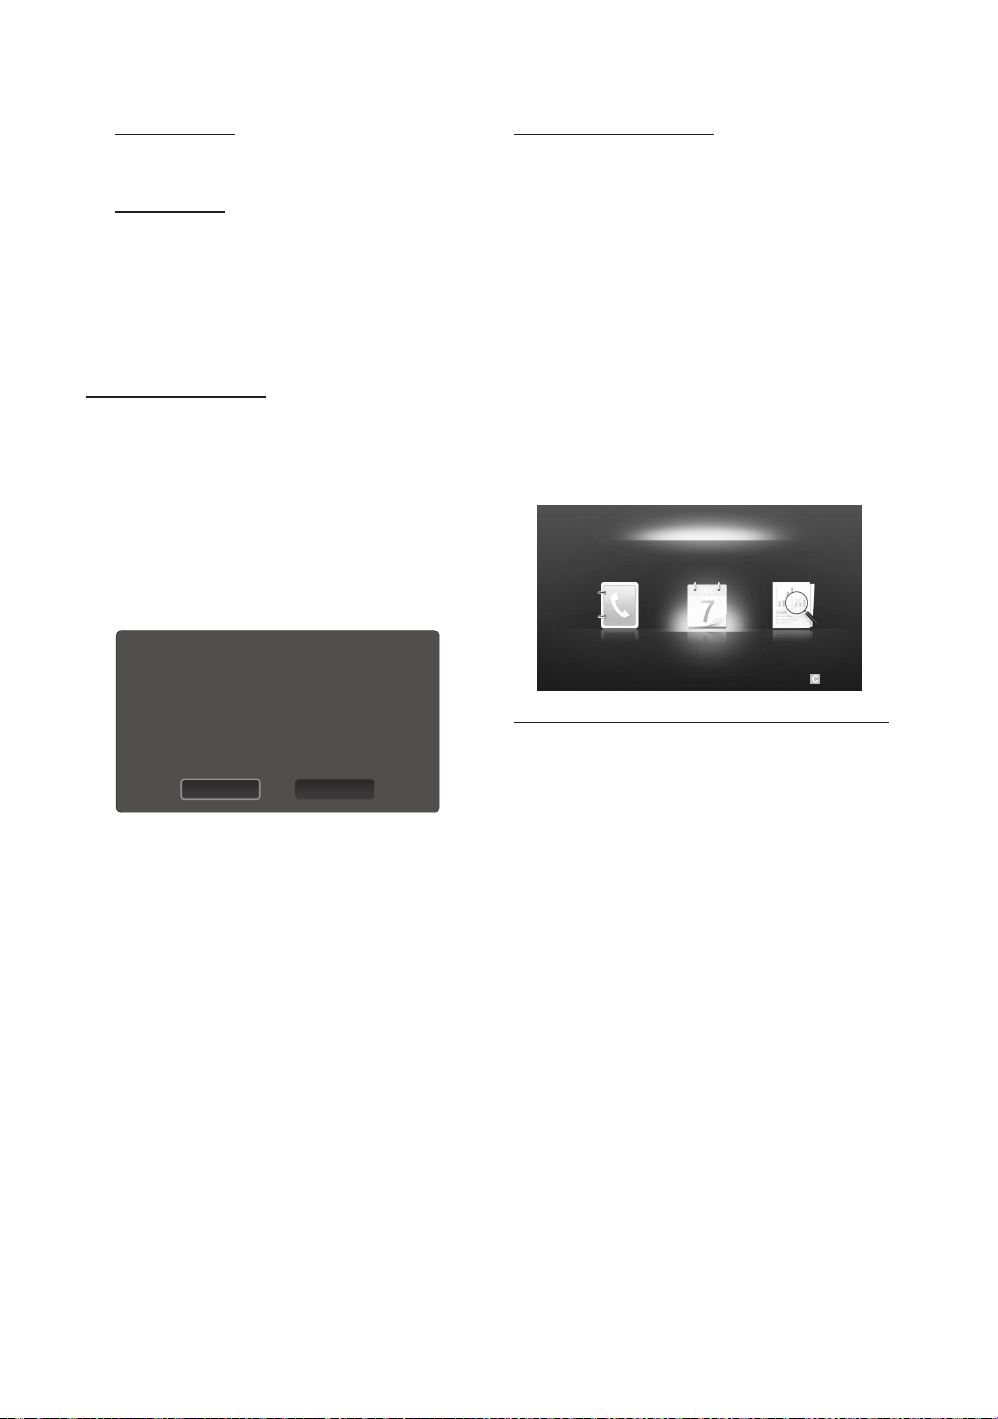
Advanced Features
Call Arrival Alarm
If a call arrives while you are watching TV, the alarm
window appears.
Schedule Alarm
While you are watching TV, the alarm window
appears to display the registered event.
You can configure viewing settings for schedule
✎
contents on your mobile phones. For the
procedures, refer to the mobile phone manual.
Some special characters may be displayed as
✎
blank or broken characters.
Using the Media Function
An alarm window appears informing the user that the media
contents (videos, photos, music) sent from a mobile phone
will be displayed on your TV. The contents are played
automatically 3 seconds after the alarm window appears.
If you press the RETURN or EXIT button when the alarm
window appears, the media contents are not played.
NOTE
✎
If the media function executes for the first time,
x
the warning popup windows appears. Press the
ENTERE button to select Allow, then you can use
Media function on that device.
You can also change the setting (or resetting) of this feature at “AllShare
DenyAllow
To turn off the media contents transmission from
x
the mobile phone, set Media to Off in the AllShare
setup.
Contents may not be played on your TV depending
x
on their resolution and format.
The xENTERE and / buttons may not work
depending on the type of media content.
Using the mobile device, you can control the media
x
playing. For details, refer to each mobile’s user’s
guide.
When you want to play media contents from
x
your PC, select the PC icon on the main display
of AllShare. Then the TV’s Media Play menu
automatically changes. For more detail information,
refer to “Media Play” (p. 35).
Using ScreenShare Function
Screenshare displays the same web page as provide in
mobile. Using ScreenShare, you can open the various
contents saved in a mobile phone. For example, the image
below displays an access page for contents from a mobile.
You can read the mobile’s various files and view the phone
book and calender on the TV. Also, in phone book, you can
make a call to other person, or can send to SMS.
✎
NOTE
In Samsung mobile, ScreenShare must be installed
x
and the supporting application must be executed;
then you can use the ScreenShare function.
Available buttons on your remote control may vary
x
for each page.
Doc Viewer can read files in doc format, but cannot
x
modify them.
The screen display may differ depending on the
x
connected device.
My Mobile
Contacts Calendar Doc Viewer
E
Select Return
Using your Samsung phone to control your TV Simply
Before you can use this feature, you must connect to
a Samsung mobile phone that supports ScreenShare
functions. When operating the TV with your mobile phone,
only the POWER,
supported.
Even if you keep pressing down on a control button
✎
(channel or volume) on the mobile phone, the value will
only go up or down by one unit.
Y
, P</> and MUTE buttons are
52
English
Page 53
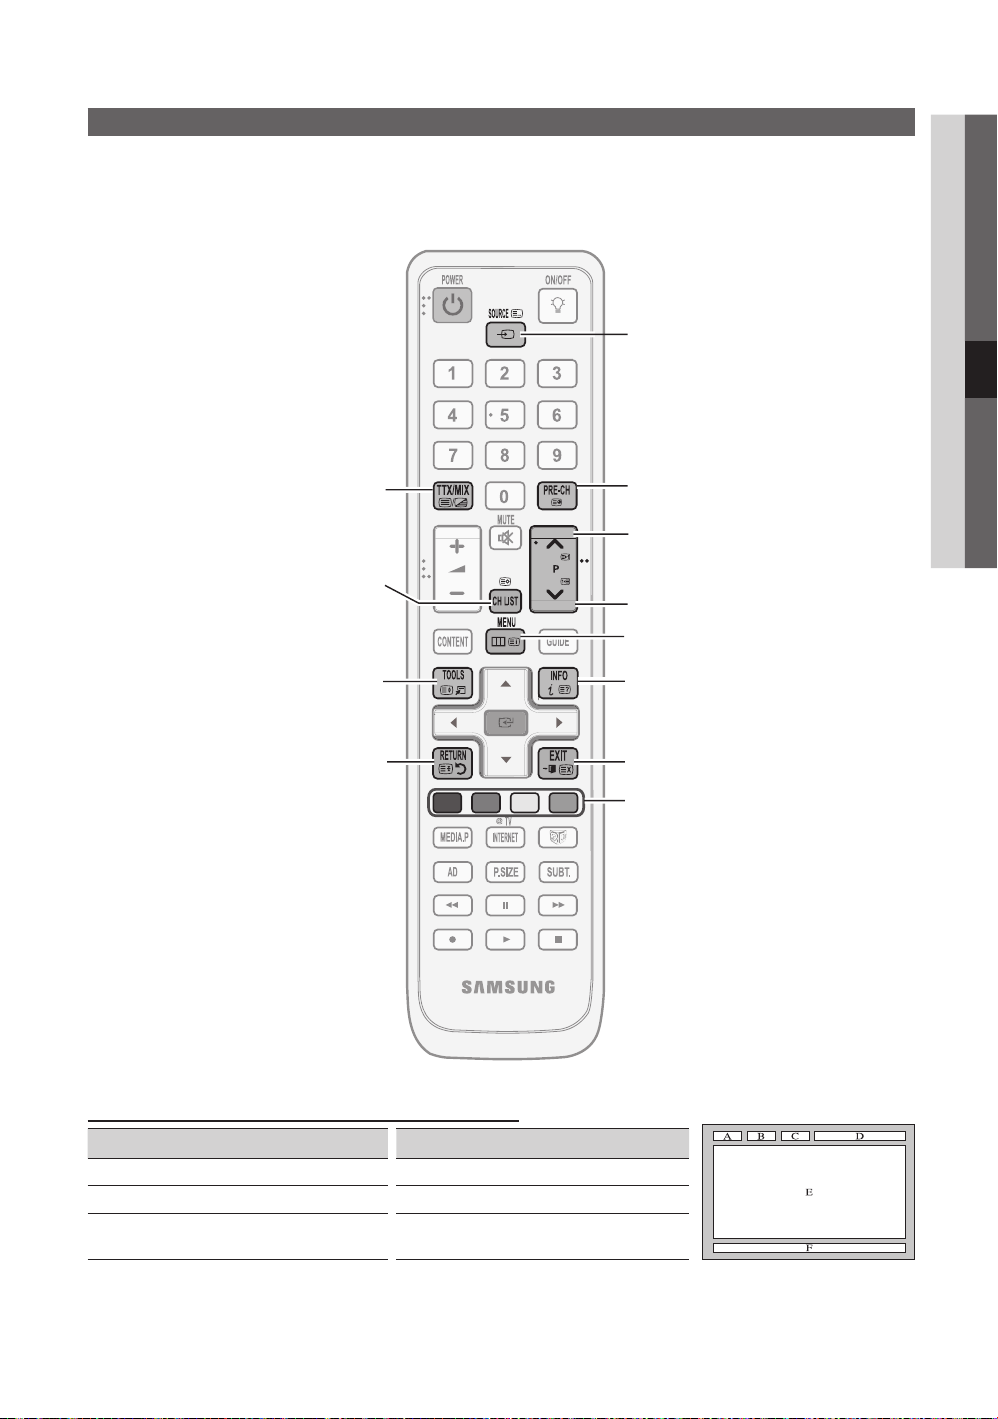
53
English
Other Information
ABCD
Analogue Channel Teletext Feature
The index page of the Teletext service gives you information on how to use the service. For Teletext information to be displayed
correctly, channel reception must be stable. Otherwise, information may be missing or some pages may not be displayed.
You can change Teletext pages by pressing the numeric buttons on the remote control.
✎
05 Other Information
1
/ (Teletext on/mix/off):
Activate the Teletext mode after
selecting the channel providing the
Teletext service. Press it twice to
overlap the Teletext mode with the
current broadcasting screen. Press
it one more time to exit teletext.
2
8 (store): Store the Teletext
pages.
3
4 (size): Display the double-
size letters on the upper half of the
screen. For the lower half of the
screen, press it again. To display
the normal screen, press it once
again.
4
9 (hold): Hold the display
on a given page if the selected
page is linked with several
secondary pages which follow on
automatically. To resume, press it
again
5
0 (mode): Select the Teletext
mode (LIST/ FLOF).
If you press this button in the LIST
mode, the mode is switched into
the List save mode. In the List save
mode, you can save a Teletext
page into list using the 8(store)
button.
1
2
3
4
2 (page up): Display the next
Teletext page.
5
3 (page down): Display the
previous Teletext page.
6 (index): Display the index
(contents) page at any time while
you are viewing Teletext.
5 (reveal): Display the hidden
text (answers to quiz games, for
6
example). To display the normal
7
7 (cancel): Display the current
broadcast when searching for a
8
9
system is used by a broadcasting
0
colour-coded and can be selected
by pressing the coloured buttons.
Press one of them corresponding
!
@
information that can be selected
in the same way. To display the
previous or next page, press the
corresponding coloured button.
screen, press it again.
Colour buttons (red/green/
yellow/blue): If the FASTEXT
company, the different topics
covered on a Teletext page are
to the required. The page is
displayed with other coloured
7
8
9
0
!
page.
@
6
1 (sub-page): Display the
available sub-page.
The Teletext pages are organized according to six categories:
Part Contents Part Contents
A Selected page number. D Date and time.
B Broadcasting channel identity. E Text.
Current page number or
C
search indications.
F
Status information. FASTEXT
information.
Page 54
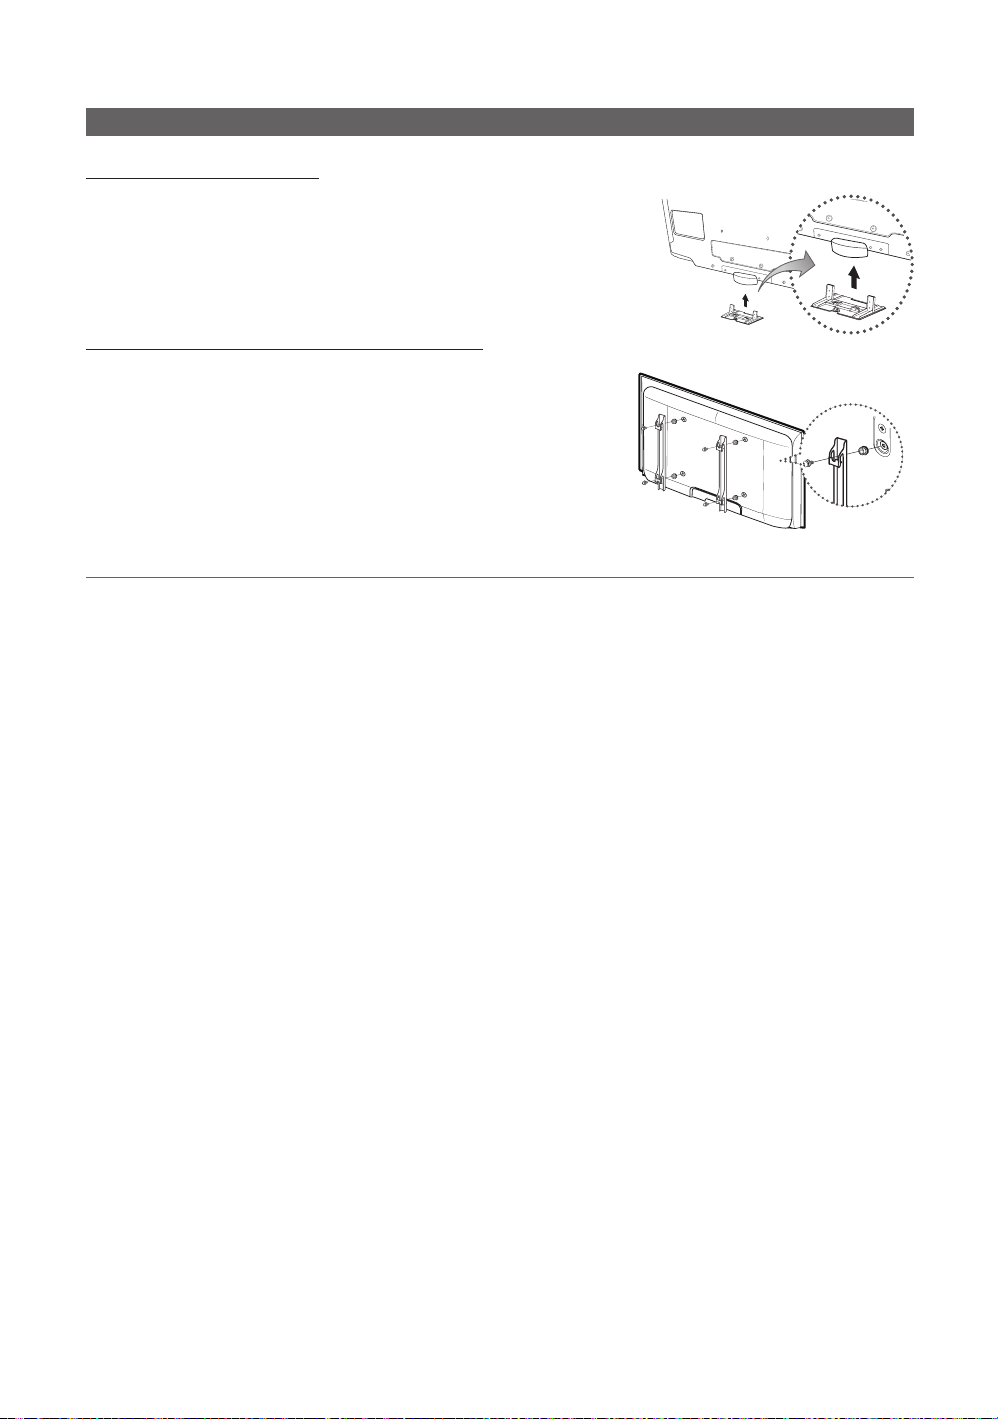
Other Information
Installing the Wall Mount
Assembling the Blanking Bracket
When installing the TV onto a wall, attach the Blanking Bracket as shown.
Blanking Bracket
Preparing before installing Wall-Mount (46 ~ 55 inch TVs)
To install a wall-mount from another manufacturer, use the Holder-Ring.
Installing the Wall Mount Kit ¦
Wall mount items (sold separately) allow you to mount the TV on the wall.
For detailed information on installing the wall mount, see the instructions provided with the Wall Mount items. Contact a
technician for assistance when installing the wall mount bracket.
Samsung Electronics is not responsible for any damage to the product or injury to yourself or others if you elect to install the
TV on your own.
54
English
Page 55
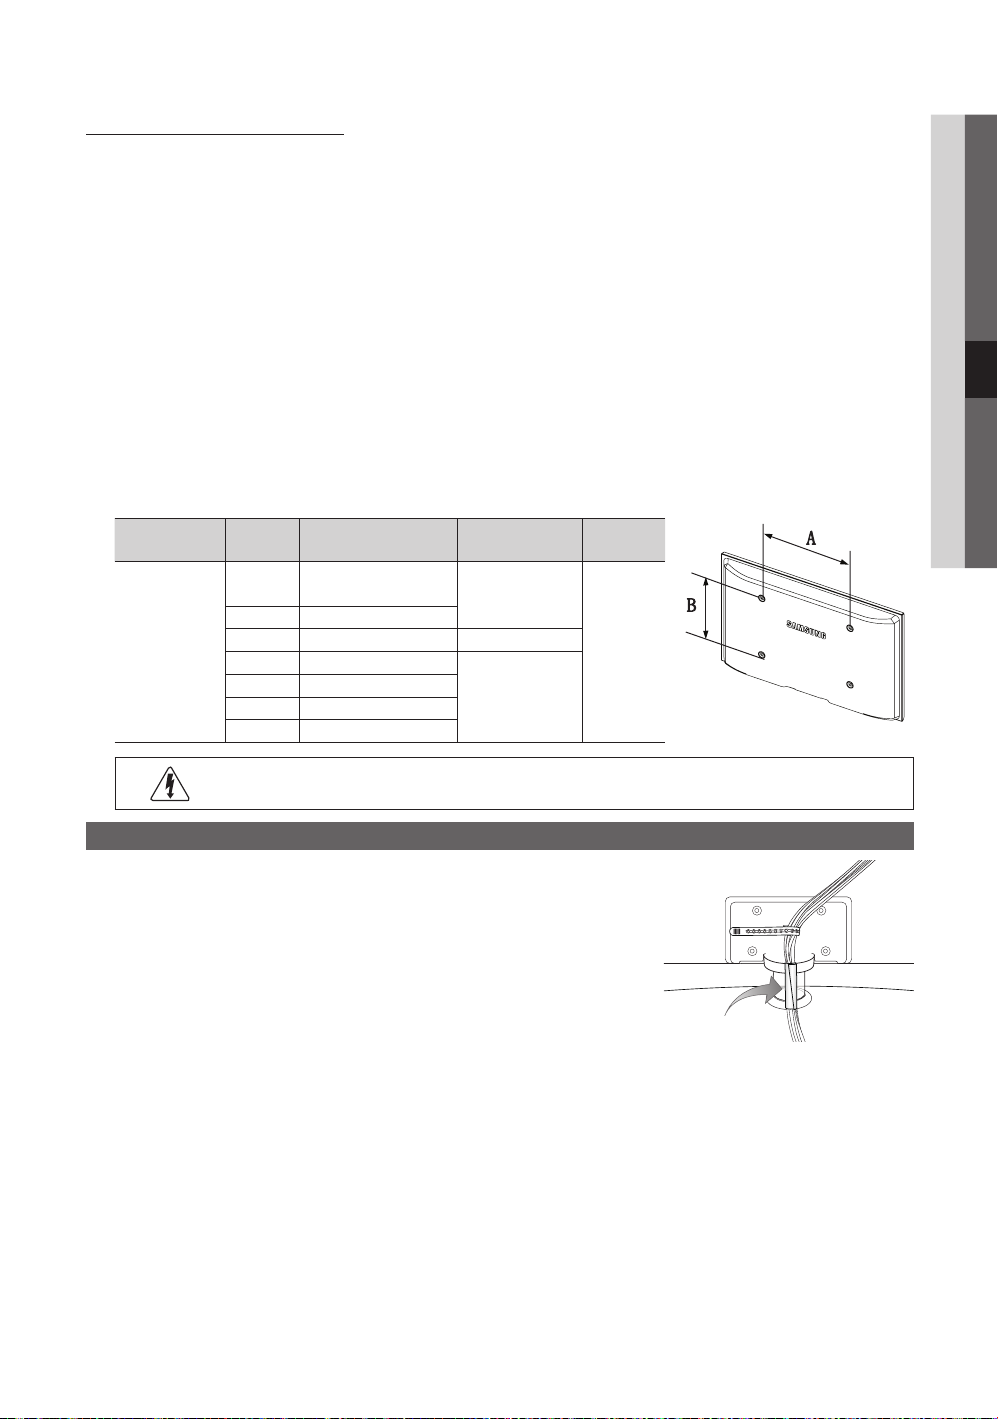
55
English
05 Other Information
Wall Mount Kit Specifications (VESA)
The wall mount kit ✎ is not supplied, but sold separately.
Install your wall mount on a solid wall perpendicular to the floor. When attaching to other building materials, please contact
your nearest dealer. If installed on a ceiling or slanted wall, it may fall and result in severe personal injury.
NOTE
✎
Standard dimensions for wall mount kits are shown in the table below.
x
When purchasing our wall mount kit, a detailed installation manual and all parts necessary for assembly are provided.
x
Do not use screws that do not comply with the VESA standard screw specifications.
x
Do not use screws that are longer than the standard dimension or do not comply with the VESA standard screw
x
specifications. Screws that are too long may cause damage to the inside of the TV set.
For wall mounts that do not comply with the VESA standard screw specifications, the length of the screws may differ
x
depending on the wall mount specifications.
Do not fasten the screws that are too xstrongly, this may damage the product or cause the product to fall, leading to
personal injury. Samsung is not liable for these kinds of accidents.
Samsung is not liable for product damage or personal injury when a non-VESA or non-specified wall mount is used or
x
the consumer fails to follow the product installation instructions.
Do not mount the TV at more than a 15 degree tilt.
x
Product
Family
LCD-TV
inches VESA Spec. (A * B) Standard Screw Quantity
19~22
23~29 200 X 100
30~40 200 X 200 M6
46~55 400 X 400
57~65 600 X 400
70~80 800 X 400
80~ 1400 X 800
75 X 75
100 X 100
M4
4
M8
Do not install your Wall Mount Kit while your TV is turned on. It may result in personal injury due to
electric shock.
Assembling the Cables
Enclose the cables in the Cable tie so that the cables are not visible through the
stand.
Cable tie
Page 56
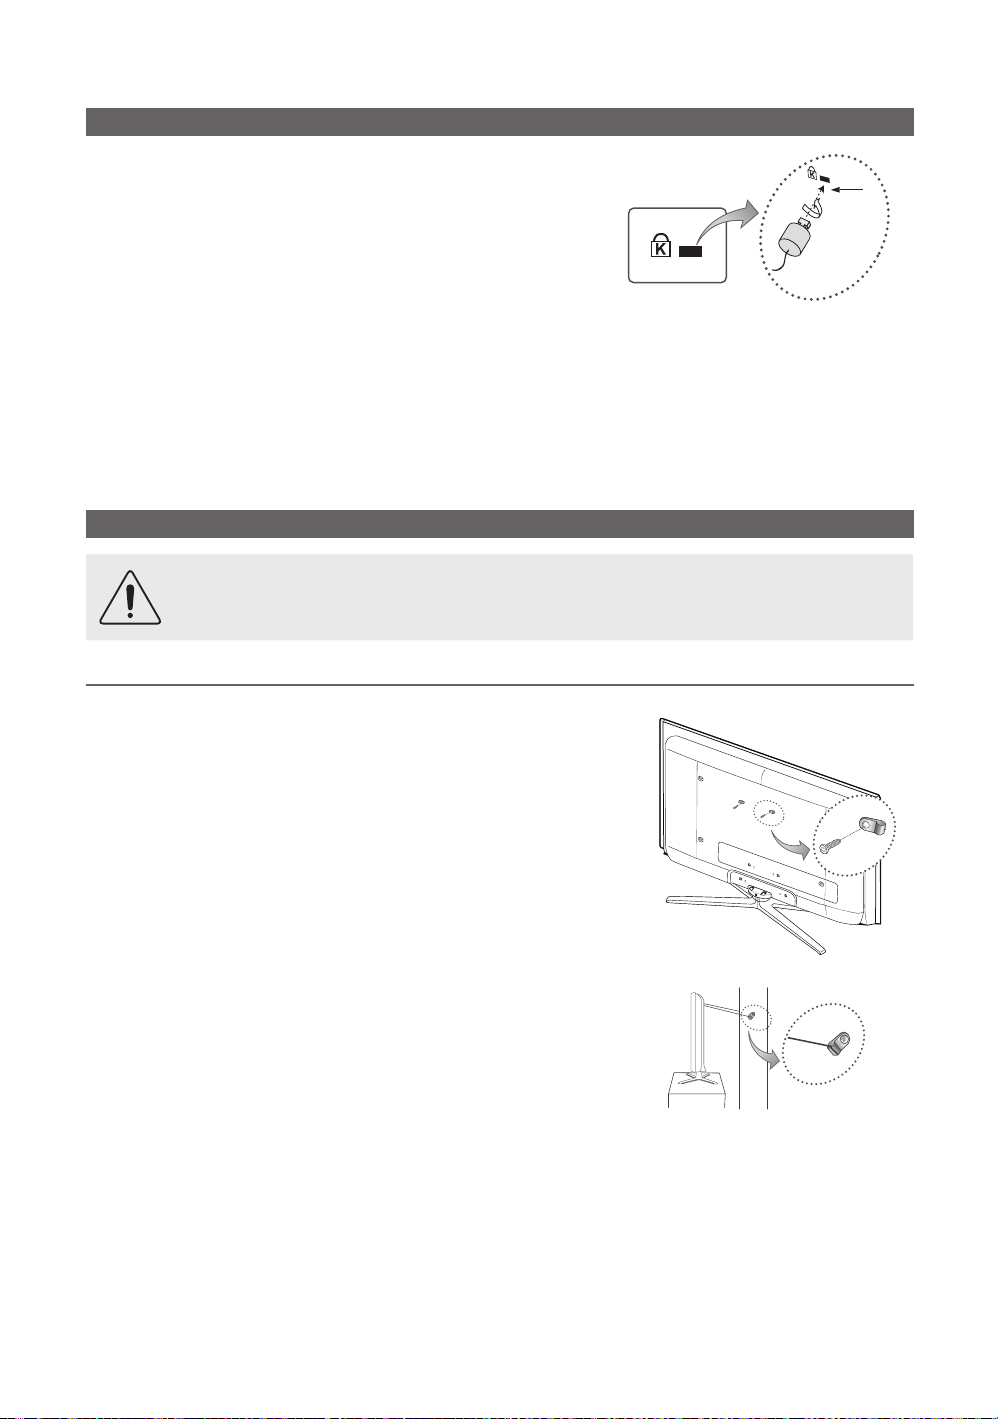
Other Information
1
Anti-theft Kensington Lock
The Kensington Lock is not supplied by Samsung. It is a device used to
physically fix the system when using it in a public place. The appearance and
locking method may differ from the illustration depending on the manufacturer.
Refer to the manual provided with the Kensington Lock for additional
information on proper use.
Please find a “
✎ K
the “K” icon.
To lock the product, follow these steps:
1. Wrap the Kensington lock cable around a large, stationary object such as desk or chair.
2. Slide the end of the cable with the lock attached through the looped end of the Kensington lock cable.
3. Insert the locking device into the Kensington slot on the product (1).
4. Lock the lock.
These are general instructions. For exact instructions, see the User manual supplied with the locking device.
✎
The locking device has to be purchased separately.
✎
The location of the Kensington slot may be different depending on the TV model.
✎
” icon on the rear of the TV. A kensington slot is beside
Securing the TV to the wall
Caution: Pulling, pushing, or climbing onto the TV may cause the TV to fall. In particular, ensure that your
children do not hang over or destabilize the TV; doing so may cause the TV to tip over, resulting in serious
injuries or death. Follow all safety precautions provided in the included Safety Flyer. For added stability and
safety, install the anti-fall device as follows.
<Optional>
To Avoid the TV from Falling ¦
1. Put the screws into the clamps and firmly fasten them onto the wall.
Confirm that the screws have been firmly installed onto the wall.
You may need additional material such as an anchor depending on
✎
the type of wall.
Since the necessary clamps, screws, and string are not supplied,
✎
please purchase these additionally.
2. Remove the screws from the back centre of the TV, put the screws into
the clamps, and then fasten the screws onto the TV again.
Screws may not be supplied with the product. In this case, please
✎
purchase the screws of the following specifications.
Screw Specifications
✎
For a 30 ~ 40 inch: M6
x
For a 46 ~ 55 inch: M8
x
3. Connect the clamps fixed onto the TV and the clamps fixed onto the wall
with a strong cable and then tie the string tightly.
NOTE
✎
Install the TV near to the wall so that it does not fall backwards.
x
It is safe to connect the string so that the clamps fixed on the
x
wall are equal to or lower than the clamps fixed on the TV.
Untie the string before moving the TV.
x
4. Verify all connections are properly secured. Periodically check
connections for any sign of fatigue for failure. If you have any doubt about
the security of your connections, contact a professional installer.
Wall
56
English
Page 57
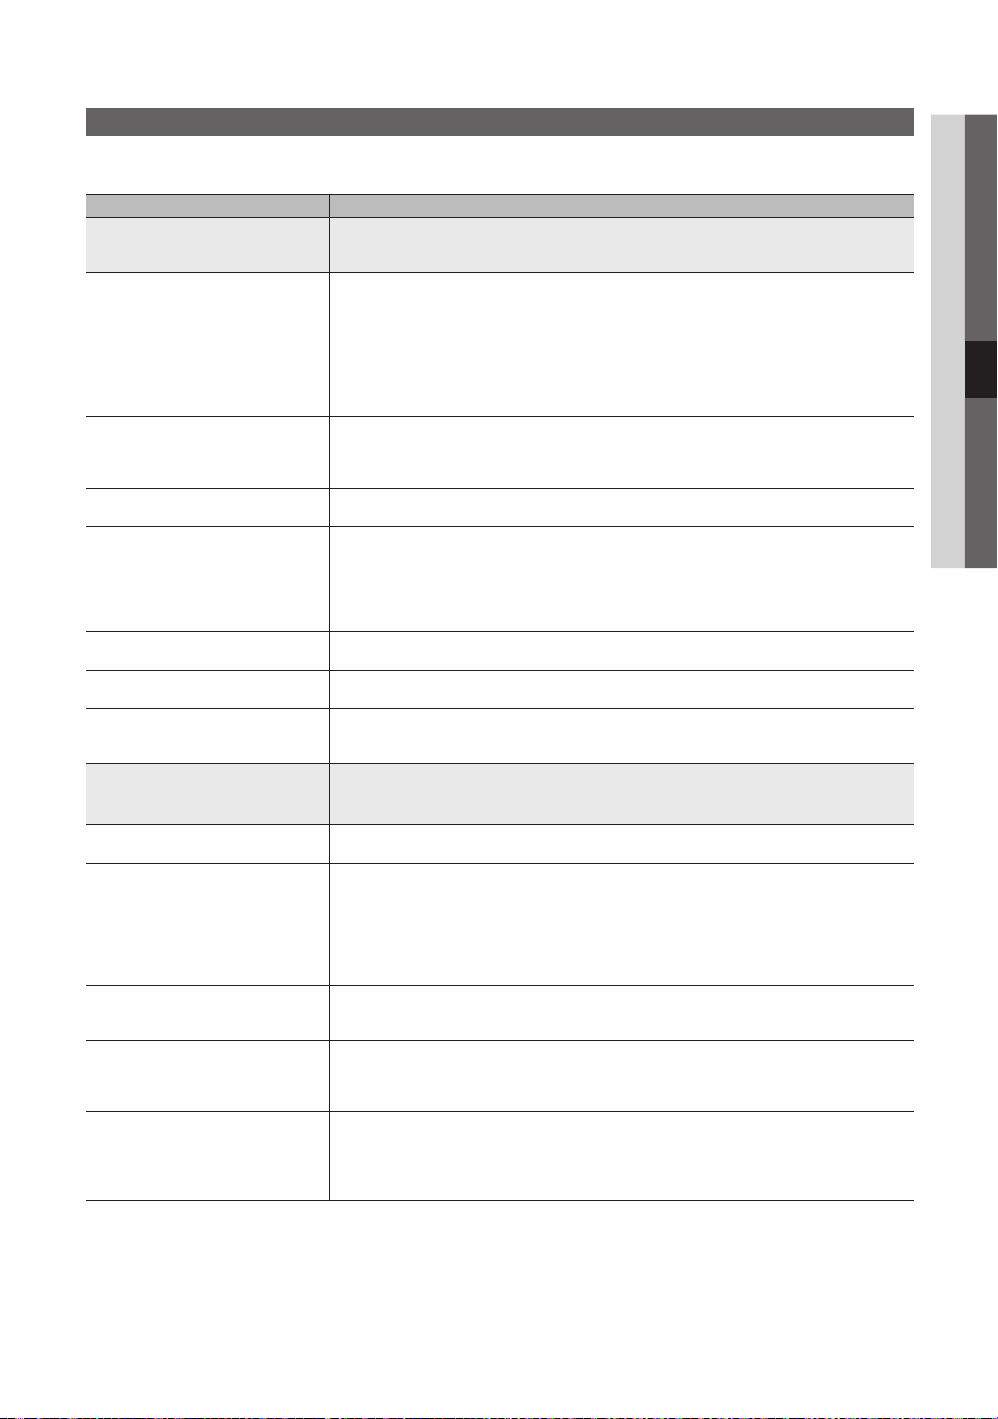
57
English
05 Other Information
Troubleshooting
If you have any questions about the TV, first refer to this list. If none of these troubleshooting tips apply, please visit “www.
samsung.com,” then click on Support, or contact the call centre listed on the back-cover of this manual.
Issues Solutions and Explanations
Picture Quality First of all, please perform the Picture Test and confirm that your TV is properly displaying test image.
The TV image does not look as good as it
did in the store.
The picture is distorted: macro block error,
small block, dots, pixelization
Colour is wrong or missing. If you’re using a component connection, make sure the component cables are connected to the •
There is poor colour or brightness. Adjust the • Picture options in the TV menu. (go to Picture mode / Colour / Brightness / Sharpness)
There is a dotted line on the edge of the
screen.
The picture is black and white. If you are using an AV composite input, connect the video cable (yellow) to the Green jack of •
When changing channels, the picture
freezes or is distorted or delayed.
Sound Quality First of all, please perform the Sound Test to confirm that your TV audio is properly operating.
There is no sound or the sound is too low
at maximum volume.
The picture is good but there is no sound. Set the • Speaker Select option to TV Speaker in the sound menu (p. 22).
The speakers are making an inappropriate
noise.
The TV will not turn on. Make sure the AC power cord is securely plugged in to the wall outlet and the TV.•
The TV turns off automatically. Ensure the • Sleep Timer is set to Off in the Setup menu (p. 23).
(go to MENU - Support - Self Diagnosis - Picture Test) (p. 25)
If the test image is properly displayed, the poor picture may caused by the source or signal.
If you have an analogue cable/set top box, upgrade to a digital set top box. Use HDMI or Component •
cables to deliver HD (high definition) picture quality.
Cable/Satellite subscribers: Try HD stations from the channel line up.•
Antenna connection: Try HD stations after performing Auto programme.•
Many HD channels are up scaled from SD(Standard Definition) contents.
✎
Adjust the Cable/Set top box video output resolution to 1080i or 720p.•
Make sure you are watching the TV at the minimum recommended distance based on the size and •
definition of the signal.
Compression of video contents may cause picture distortion especially in fast moving pictures such •
as sports and action movies.
Low signal level or bad quality can cause picture distortion. This is not a TV issue.•
Mobile phones used close to the TV (cca up to 1m) may cause noise in picture on analog and digital TV.•
correct jacks. Incorrect or loose connections may cause colour problems or a blank screen.
(p. 16)
Adjust • Energy Saving option in the TV menu. (go to MENU - Picture - Eco Solution - Energy
Saving) (p. 16)
Try resetting the picture to view the default picture settings. (go to • MENU - Picture - Picture Reset)
(p. 21).
If the picture size is set to • Screen Fit, change it to 16:9 (p. 17).
Change cable/set top box resolution.•
component input 1 on the TV.
If connected with a cable box, please try to reset the cable box. Reconnect the AC cord and wait until •
the cable box reboots. It may take up to 20 minutes.
Set the output resolution of the cable box to 1080i or 720p.•
(go to MENU - Support - Self Diagnosis - Sound Test) (p. 25)
If the audio is OK, the sound problem may caused by the source or signal.
Please check the volume the of external device connected to your TV.•
If you are using an external device, make sure the audio cables are connected to the correct audio •
input jacks on the TV.
If you are using an external device, check the device’s audio output option (ex. you may need to •
change your cable box’s audio option to HDMI when you have a HDMI connected to your TV).
If you are using a DVI to HDMI cable, a separate audio cable is required.•
If your TV has a headphone jack, make sure there is nothing plugged into it.•
Check the cable connections. Make sure a video cable is not connected to an audio input.•
For antenna or cable connections, check the signal strength. Low signal level may cause sound •
distortion.
Make sure the wall outlet is working.•
Try pressing the • POWER button on the TV to make sure the problem is not the remote. If the TV turns
on, refer to “The remote control does not work” below.
If your PC is connected to the TV, check your PC power settings.•
Make sure the AC power cord is plugged in securely to the wall outlet and the TV.•
When watching TV from an antenna or cable connection, the TV will turn off after 10 ~ 15 minutes if •
there is no signal.
Page 58

Other Information
Issues Solutions and Explanations
No Picture, No Video
There is picture/Video. Check cable connections (remove and reconnect all cables connected to the TV and external •
RF(Cable/Antenna) Connection
The TV is not receiving all channels. Make sure the Antenna cable is connected securely.•
The picture is distorted: macro block error
small block, dots, pixelization
PC Connection
A “Mode Not Supported” message
appears.
“PC” is always shown on the source list,
even if a PC is not connected.
The video is OK but there is no audio. If you are using a HDMI connection, check the audio output setting on your PC.•
Network Connection (Depending on Models)
Wireless network connection failed. Samsung Wireless USB dongle is required to use a wireless network.•
Others
The picture will not display in full screen. HD channels will have black bars on either side of the screen when displaying up scaled SD (4:3) •
The remote control does not work. Replace the remote control batteries with the poles (+/–) in the right direction.•
The cable/set top box remote control
doesn’t turn the TV on or off, or adjust the
volume.
A “Mode Not Supported” message
appears.
There is a plastic smell from the TV. This smell is normal and will dissipate over time.•
The TV Signal Information is unavailable
in the Self Diagnostic Test menu.
The TV is tilted to the side. Remove the base stand from the TV and reassemble it.•
The channel menu is greyed out.
(unavailable)
Your settings are lost after 30 minutes or
every time the TV is turned off.
You have intermittent loss of audio or
video.
devices).
Set your external devices’ (Cable/Set top Box, DVD, Blu-ray etc) video outputs to match the •
connections to the TV input. For example, if an external device’s output is HDMI, it should be connect
to an HDMI input on the TV.
Make sure your connected devices are powered on.•
Be sure to select the TV’s correct source by pressing the • SOURCE button on the TV remote.
Please try • Plug & Play (Initial setup) to add available channels to the channel list. Go to MENU -
Setup - Plug & Play (Initial setup) and wait for all available channels to be stored (p. 7).
Verify the Antenna is positioned correctly.•
Compression of video contents may cause picture distortion, especially with fast moving pictures •
such as sports and action movies.
A low signal can cause picture distortion. This is not a TV issue.•
Set your PC’s output resolution and frequency so they match the resolutions supported by the TV (p. •
27).
This is normal; “PC” is always shown on the source list, regardless of whether a PC is connected.•
Make sure the Network Connection is set to • Wireless (p. 30).
Make sure the TV is be connected to a wireless IP sharer (router).•
contents.
Black bars on the top and bottom will appear during movies that have aspect ratios different from •
your TV.
Adjust the picture size options on your external device or TV to full screen.•
Clean the sensor’s transmission window on the remote.•
Try pointing the remote directly at the TV from 5~6 feet away.•
Programme the Cable/Set top box remote control to operate the TV. Refer to the Cable/Set user •
manual for the SAMSUNG TV code.
Check the supported resolution of the TV, and adjust the external device’s output resolution •
accordingly. Refer to the resolution settings on page 26 of this manual.
This function is only available with digital channels from an Antenna / RF/Coax connection (p. 25). •
The • Channel menu is only available when the TV source is selected.
If the TV is in the • Store Demo mode, it will reset audio and picture settings every 30 minutes. Change
the settings from Store Demo mode to Home Use mode in the Plug & Play (Initial setup) procedure.
Press the SOURCE button to select TV mode, and go to MENU Setup Plug & Play (Initial
setup) ENTERE (p. 7).
Check the cable connections and reconnect them. •
Loss of audio or video can be caused by using overly rigid or thick cables. Make sure the cables are •
flexible enough for long term use. If mounting the TV to the wall, we recommend using cables with 90
degree connectors.
58
English
Page 59
59
English
05 Other Information
Issues Solutions and Explanations
You see small particles when you look
closely at the edge of the frame of the TV.
The PIP menu is not available. PIP• functionality is only available when you are using a HDMI, PC or components source (p. 25).
The message “Scramble signal” or “Weak
Signal/No Signal” appears.
You turned the TV off 45 minutes ago, and
it turned on again.
There are recurrent picture/sound issues. Check and change the signal/source.•
A reaction may occur between the rubber
cushion pads on the base stand and the
top finish of some furniture.
This TFT LCD panel uses a panel consisting of sub pixels which require sophisticated technology to produce. However,
✎
This is part of the product’s design and is not a defect.•
If you are using a CAM CARD (CI/CI+), check that it is installed into the common interface slot.•
If there is still a problem, pull the CAM CARD out of the TV and insert it into the slot again.•
It is normal. The TV operates the OTA (Over The Aerial) function itself to upgrade firmware •
downloaded whilst your watching TV.
To prevent this, use felt pads on any surface of the TV that comes in direct contact with furniture.•
there may be a few bright or dark pixels on the screen. These pixels will have no impact on the performance of the
product.
Licence ¦
TheaterSound, SRS and the symbol are trademarks of SRS Labs, Inc.
TheaterSound technology is incorporated under license from SRS Labs, Inc.
Manufactured under licence from Dolby Laboratories. Dolby and the double-D symbol are
trademarks of Dolby Laboratories.
Manufactured under license under U.S. Patent #’s: 5,451,942; 5,956,674; 5,974,380; 5,978,762;
6,487,535 & other U.S. and worldwide patents issued & pending. DTS and the Symbol are
registered trademarks. & DTS 2.0+ Digital Out and the DTS logos are trademarks of DTS, Inc.
Product Includes software. © DTS, Inc. All Rights Reserved.
DivX Certified to play DivX video up to HD 1080p, including premium content.
ABOUT DIVX VIDEO: DivX® is a digital video format created by DivX,Inc. This is an official DivX Certified device that
plays DivX video. Visit www.divx.com for more information and software tools to convert your files into DivX video.
ABOUT DIVX VIDEO-ON-DEMAND: This DivX Certified® device must be registered in order to play DivX Video-onDemand (VOD) content. To generate the registration code, locate the DivX VOD section in the device setup menu. Go
to vod.divx.com with this code to complete the registration process and learn more about DivX VOD.
Pat. 7,295,673; 7,460,688; 7,519,274
GUIDE Plus+ Trademark / License / Patent Notice
GUIDE Plus+ is (1) a registered trademark or trademark of, (2) manufactured under license from
and (3) subject of various international patents and patent applications owned by, or licensed to,
Gemstar-TV Guide International, Inc. and/or its related affiliates.
GUIDE Plus+ Legal Notice:
GEMSTAR-TV GUIDE INTERNATIONAL, INC. AND/OR ITS RELATED AFFILIATES ARE NOT IN ANY WAY LIABLE FOR
THE ACCURACY OF THE PROGRAM SCHEDULE INFORMATION PROVIDED BY THE GUIDE PLUS+ SYSTEM. IN NO
EVENT SHALL GEMSTAR-TV GUIDE INTERNATIONAL, INC. AND /OR ITS RELATED AFFILIATES BE LIABLE FOR ANY
AMOUNTS REPRESENTING LOSS OF PROFITS, LOSS OF BUSINESS, OR INDIRECT, SPECIAL, OR CONSEQUENTIAL
DAMAGES IN CONNECTION WITH THE PROVISION OR USE OF ANY INFORMATION, EQUIPMENT, OR SERVICES
RELATING TO THE GUIDE PLUS+ SYSTEM.
Open source licence notice
In the case of using open source software, Open Source Licences are available on the product menu.
Page 60
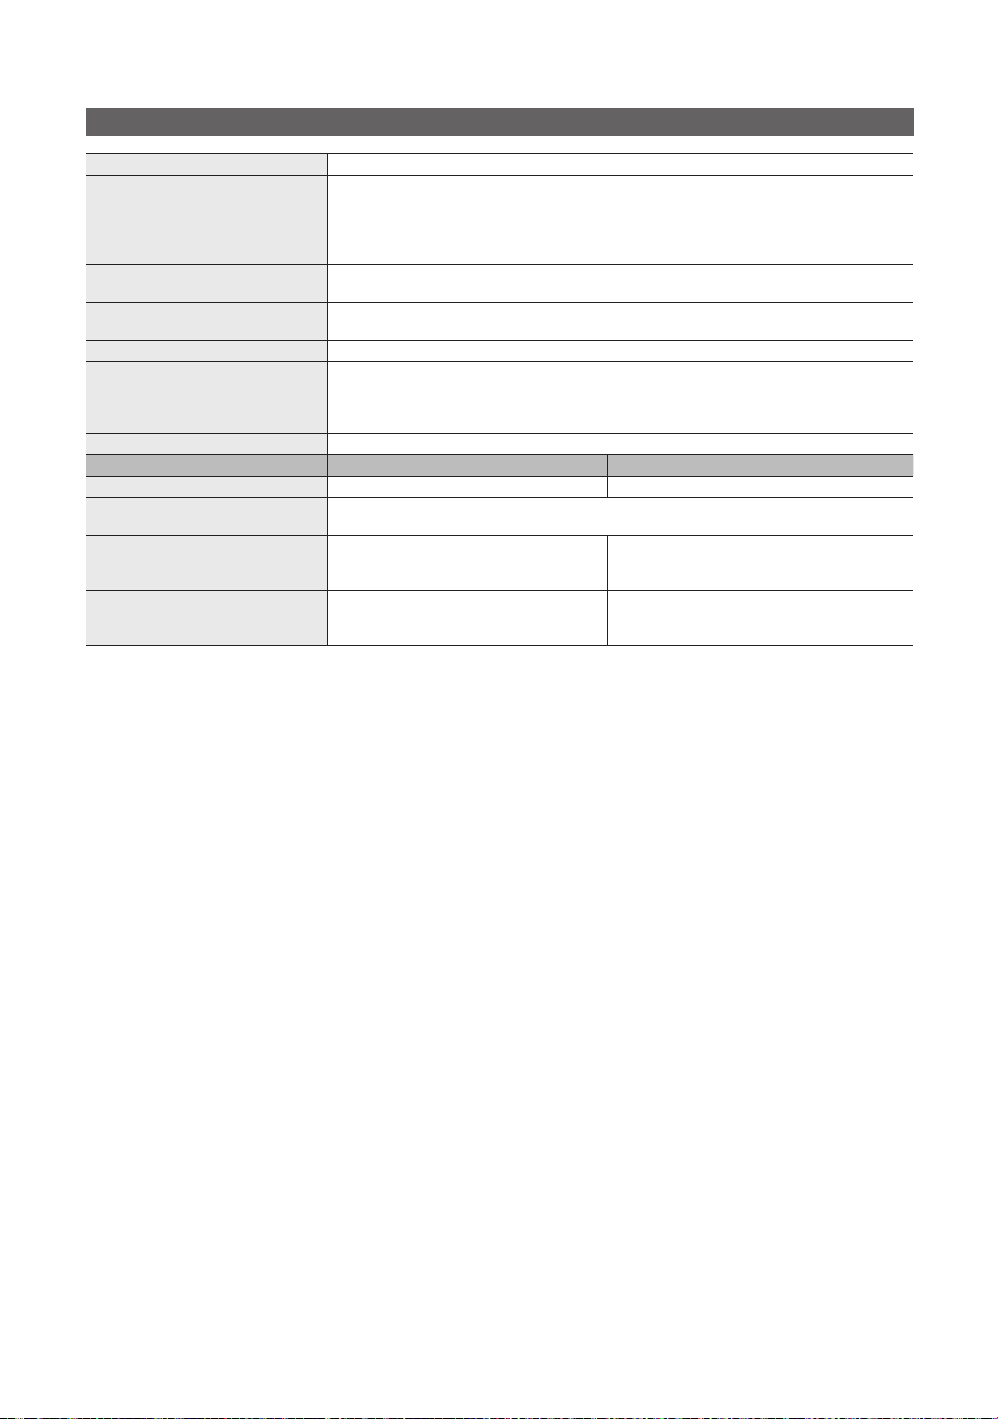
Other Information
Specifications
Panel native 1920 x 1080 @ 60 Hz
Environmental Considerations
Operating Temperature
Operating Humidity
Storage Temperature
Storage Humidity
TV System Analogue: B/G, D/K, L, I (Depending on your country selection)
Colour/Video System Analogue: PAL, SECAM, NTSC-4.43, NTSC-3.58, PAL60
Sound System BG. OK NICAM. MPEGl
HDMI IN 1 ~ 4 Video: 1080/24p, 1080p, 1080i, 720p, 576p, 576i, 480p, 480i
Stand Swivel (Left / Right) -20˚ ~ 20˚
Model Name LE40C755 LE46C755
Screen Size 40 inches 46 inches
Sound
(Output) 10 W X 2
Dimensions (WxDxH)
Body
With stand
Weight
Without Stand
With Stand
Digital: MPEG-2 MP@ML, MPEG-4, H.264/AVC MP@L3, [email protected], [email protected]
Audio: 2Ch Linear PCM 32/44.1/48kHz, 16/20/24bits.
986.7 X 80.4 X 603.9 mm
986.7 X 255.0 X 665.5 mm
13.9 kg
16.2 kg
10°C to 40°C (50°F to 104°F)
10% to 80%, non-condensing
-20°C to 45°C (-4°F to 113°F)
5% to 95%, non-condensing
Digital: DVB-T/DVB-C
Analogue audio input (HDMI IN1 only)
PC input (HDMI IN1 only)
1119.1 X 80.3 X 679.4 mm
1119.1 X 275.0 X 679.4 mm
17.6 kg
20.1 kg
Design and specifications are subject to change without prior notice.
✎
For information about power supply, and more about power consumption, refer to the label attached to the product.
✎
60
English
Page 61

61
English
05 Other Information
Index
A
AllShare 51
Amplify 21
Antenna 23
Anynet+ 44
AUDIO OUT 10
Auto Adjustment 21
Auto Volume 22
B
Background Music 43
Balance L/R 21
Basic View 42
Batteries 6
Black Tone 16
Blanking Bracket 54
Brightness 14
C
Cable Tie 4, 55
Change PIN 24
Channel Manager 13
Channel Menu 14
Clock 23
Colour Tone 17
Component 9
Connecting to a PC 27
Connecting to an Audio Device 10
D
DIGITAL AUDIO OUT 10, 44
DivX® VOD 43
D-sub 27
Dynamic 16
Dynamic Contrast 16
E
Eco Sensor 16
Edit Name 11
Editing Channels 15
Energy Saving 16
EPG (Electronic Programme Guide) 12
Equalizer 21
External Speaker 22
F
Fine Tune 15
Flesh Tone 17
Frequency 14
H
HDMI 8, 44
Headphones 10
Home Theater 10, 44
I
Installation Space 2
Internet@TV 48
L
Language 24
Licence 59
Lock 15
M
Media Play 35
Melody 25
Menu Transparency 25
Music 41
N
Navigate 12
Network Connection 28
Network Setup 29
Now & Next guide 12
O
ON/OFF button 6
Optimal resolution 27
P
Password 49
Photos 41
Picture Size 17, 43
PIP (Picture in Picture) 25
Plug & Play 7
Power Indicator 5
R
Receiver 46
Recording 45
Remote Control 6
Repeat Mode 43
RGB Only Mode 16
Rotate 43
S
Select All 15
Self Diagnosis 25
Sharpness 16
Signal Information 25
Sleep Timer 23
Slide Show 41
Software Upgrade 26
Source List 11
Speaker Select 22
Specifications 60
Standby mode 5
Subtitle 24
Symbol 3
T
Timer 23
Title 42
Tools 3
Troubleshooting 57
TV Speaker 22
U
USB Drive 26, 35
Using Channel View 12
Using Scheduled View 13
Using Favourite Channels 13
V
VCR 9
Video Formats 39
Videos 39
Volume 5
W
Wall Mount 55
Warm 17
White Balance 17
Page 62

This page is intentionally
left blank.
Page 63
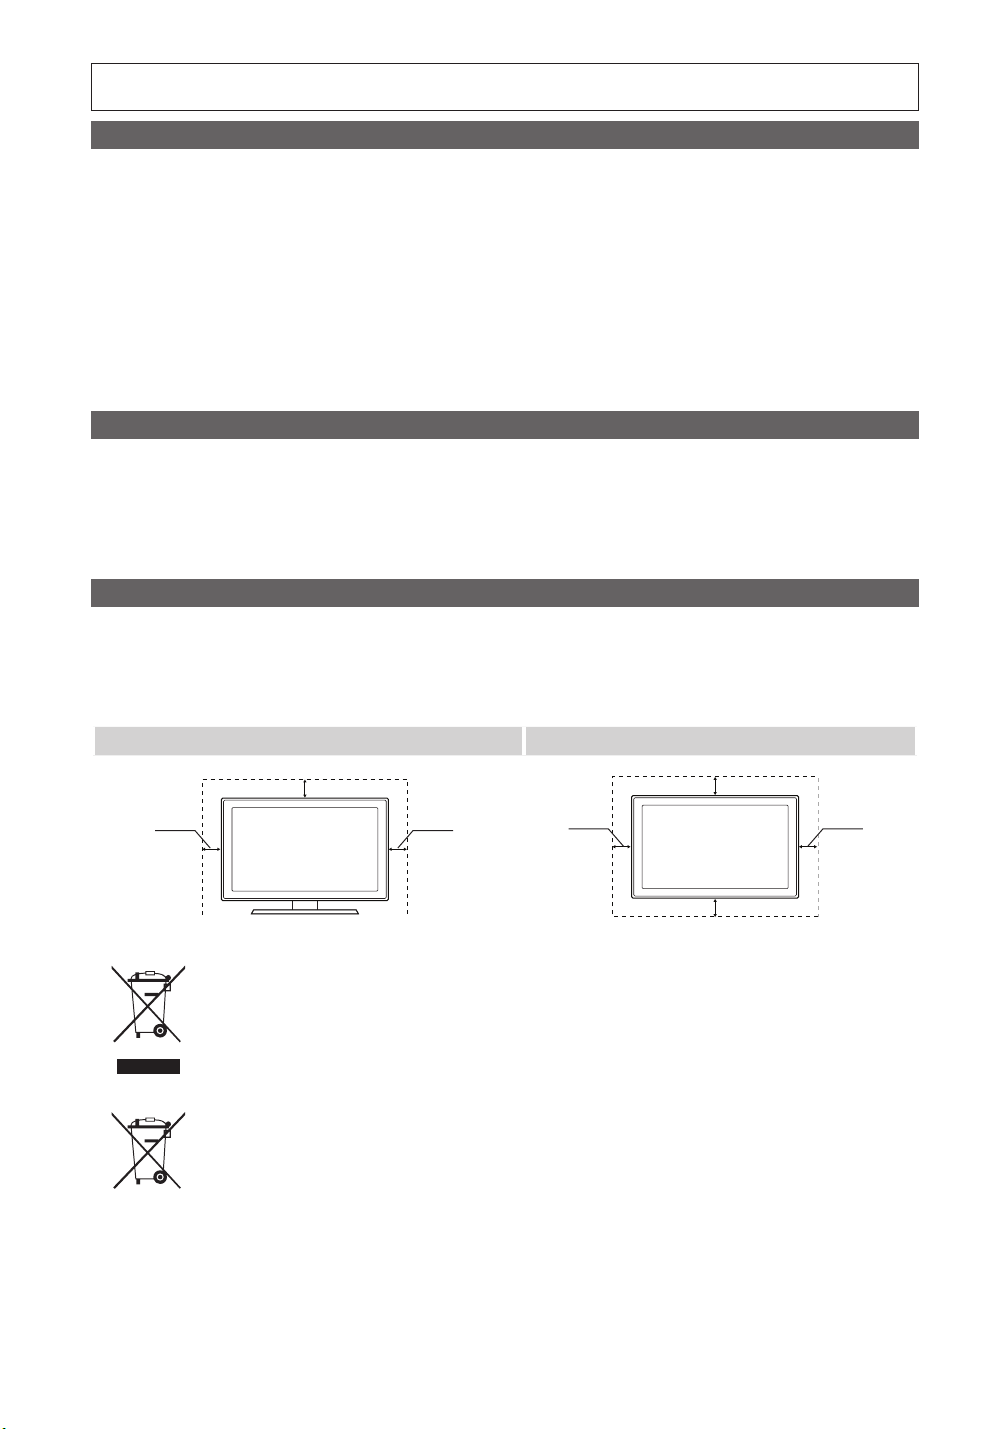
2
Svenska
Siffror och bilder i den här bruksanvisningen är endast för referens och kan skilja sig från den verkliga produkten.
Produktdesign och -specifikationer kan ändras utan föregående meddelande.
Digital-TV-meddelande
1. Funktionalitet som är relaterat till Digital TV(DVB) är endast tillgängligt i länder/områden där DVB-T (MPEG2 och MPEG4 AVC) digitala signaler sänds
eller där du har åtkomst till en kompatibel DVB-C(MPEG2 och MPEG4 AAC) kabel-TV-tjänst. Kontakta din lokala återförsäljare angående möjligheten
att ta emot DVB-T- och DVB-C-signal.
2. DVB-T är DVB EU-konsortiumstandard för sändningen av digital, satellit-tv och DVB-C är sändning av TV via kabel. Vissa differentierade funktioner
som EPG (Electric Programme Guide), VOD (Video On Demand) etc. är inte inkluderade i den här specifikationen. De fungerar inte just nu.
3. Även om den här TV:n uppfyller de senaste standarder för DVB-T och DVB-C [augusti, 2008] kan inte framtida kompatibilitet med DVB-T digital
markbunden sändning och DVB-C digitalkabelsändning inte garanteras.
4. Beroende på vilket land/område som TV:n används i kan vissa kabel-tv-leverantörer ta extra avgifter för en sådan tjänst och du kanske måste ingå ett
avtal med företaget.
5. Vissa digital-TV-funktioner kanske inte är tillgängliga i vissa länder eller regioner och DVB-C kanske inte fungerar som det ska med alla kabel-tvleverantörer.
6. För ytterligare information, kontakta ditt lokala kundcenter för Samsung.
TV:ns mottagningskvalitet kan variera beroende på olika sändningssätt i olika länder. Kontrollera TV:ns prestanda hos din lokala SAMSUNG-
✎
auktoriserade återförsäljare eller hos Samsungs kundcenter för att se om den kan förbättras genom att omkonfigurera TV-inställningarna.
Stillbildsvarning
Undvik att visa stillbilder (t.ex. jpeg-filer) eller andra objekt som ligger stilla på skärmen (t.ex. programlogotyper, bilformat med panorama eller 4:3, eller
aktieinformation längst ner på skärmen). Om stillbilder visas för länge kan skärmens fosfor slitas ojämnt och det kan påverka bildkvaliteten. För att minska
risken för detta ska du följa rekommendationerna nedan:
Titta inte på samma TV-kanal under längre perioder.•
Försök alltid att visa en bild i helskärm, används TV:ns inställning för bildformat för bästa möjliga matchning.•
Minska värdena för ljusstyrka och kontrast till minimikravet för att få önskad bildkvalitet, överdrivet höga värden kan skynda på brännprocessen.•
Använd de TV-funktioner som utformade speciellt för att minska bild- och skärmbränning, mer information finns i bruksanvisningen.•
Säkra installationsutrymmet
Se till att hålla angivet avstånd mellan produkten och andra föremål (t.ex. väggar) för att ventilationen ska vara tillräcklig.
Om detta inte följs kan det orsaka brand eller produktproblem på grund av för hög inre temperatur i produkten.
När du använder ett stativ eller ett väggstativ ska du endast använda delar som tillhandahålls av Samsung Electronics.
✎
Om du använder delar från en annan tillverkare kan det orsaka problem med produkten eller skador på grund av att produkten faller.
x
Utseendet kan skilja sig beroende på produkt.
✎
Installation med stativ. Installation med väggfäste.
10 cm
10 cm
10 cm
Korrekt avfallshantering av produkten (Elektriskt och elektroniskt avfall)
(Gäller i Europeiska unionen och andra länder i Europa med separata insamlingssystem)
Märkningen på produkten, tillbehören eller dokumentationen anger att produkten och dess elektroniska tillbehör (t.ex. laddare,
headset, USB-kabel) inte får slängas i hushållssoporna vid livsslut. För att förhindra skada på miljön eller den mänskliga hälsan
är det viktigt att sortera utrustningen från andra typer av avfall. Hemmaanvändare skall antingen kontakta sin återförsäljare, eller
den lokala renhållningsmyndigheten för att få information om hur och var de kan göra sig av med produkten på ett säkert sätt.
Företagsanvändare skall kontakta sina leverantörer och kontrollera vilka regler som anges på köpekontraktet. Den här produkten
och dess elektroniska tillbehör får inte blandas med andra kommersiella avfallstyper.
Korrekt avfallshantering av batterierna i produkten
(Gäller i Europeiska unionen och andra länder i Europa med separata batteriinsamlingssystem)
Märkningen på batteriet, bruksanvisningen eller förpackningen anger att batteriet i den här produkten inte får slängas bland
hushållssoporna vid livsslut. Om märkning med de kemiska symbolerna Hg, Cd eller Pb finns anger det att batteriet innehåller
kvicksilver, kadmium eller bly som överskrider referensnivåerna enligt EU-direktivet 2006/66. Om batterierna inte avfallshanteras på
rätt sätt kan de orsaka skador på miljön och på den mänskliga hälsan. För att skydda våra naturresurser och främja återvinning ska
batterierna lämnas till det lokala batteriinsamlingssystemet.
10 cm
10 cm
10 cm
10 cm
Page 64

3
Svenska
Innehåll
Komma igång
4
Anslutningar
8
Grundfunktioner
12
Avancerade funktioner
27
4 Tillbehör
5 Visa kontrollpanelen
6 Översikt av fjärrkontrollen
7 Ansluta till en antenn
7 Plug & Play (initial inställning)
8 Ansluta till en AV-enhet
10 Ansluta till en ljudenhet
11 Ändra ingångskällan
12 Navigera i menyerna
12 Använda INFO-knappen (Nu och nästa guide)
12 Planera tittandet
14 Kanalmeny
16 Bildmeny
21 Ljudmeny
23 Inställningsmeny
25 Stödmeny
27 Ansluta till en dator
28 Nätverksanslutning
35 Media Play
44 Anynet
48 Internet@TV
51 AllShare
+
Övrig information
53
t
Den här funktionen kan användas
genom att trycka på TOOLS-
knappen på fjärrkontrollen.
53 Text-tv-funktion för analog kanal
54 Installera väggfästessatsen
55 Montera kablarna
56 Antistöld Kensington-lås
56 Montera TV:n på väggen
57 Felsökning
60 Specifikationer
61 Index
Kontrollera symbolen!
Obs Steg-för-steg-guide
O
Page 65
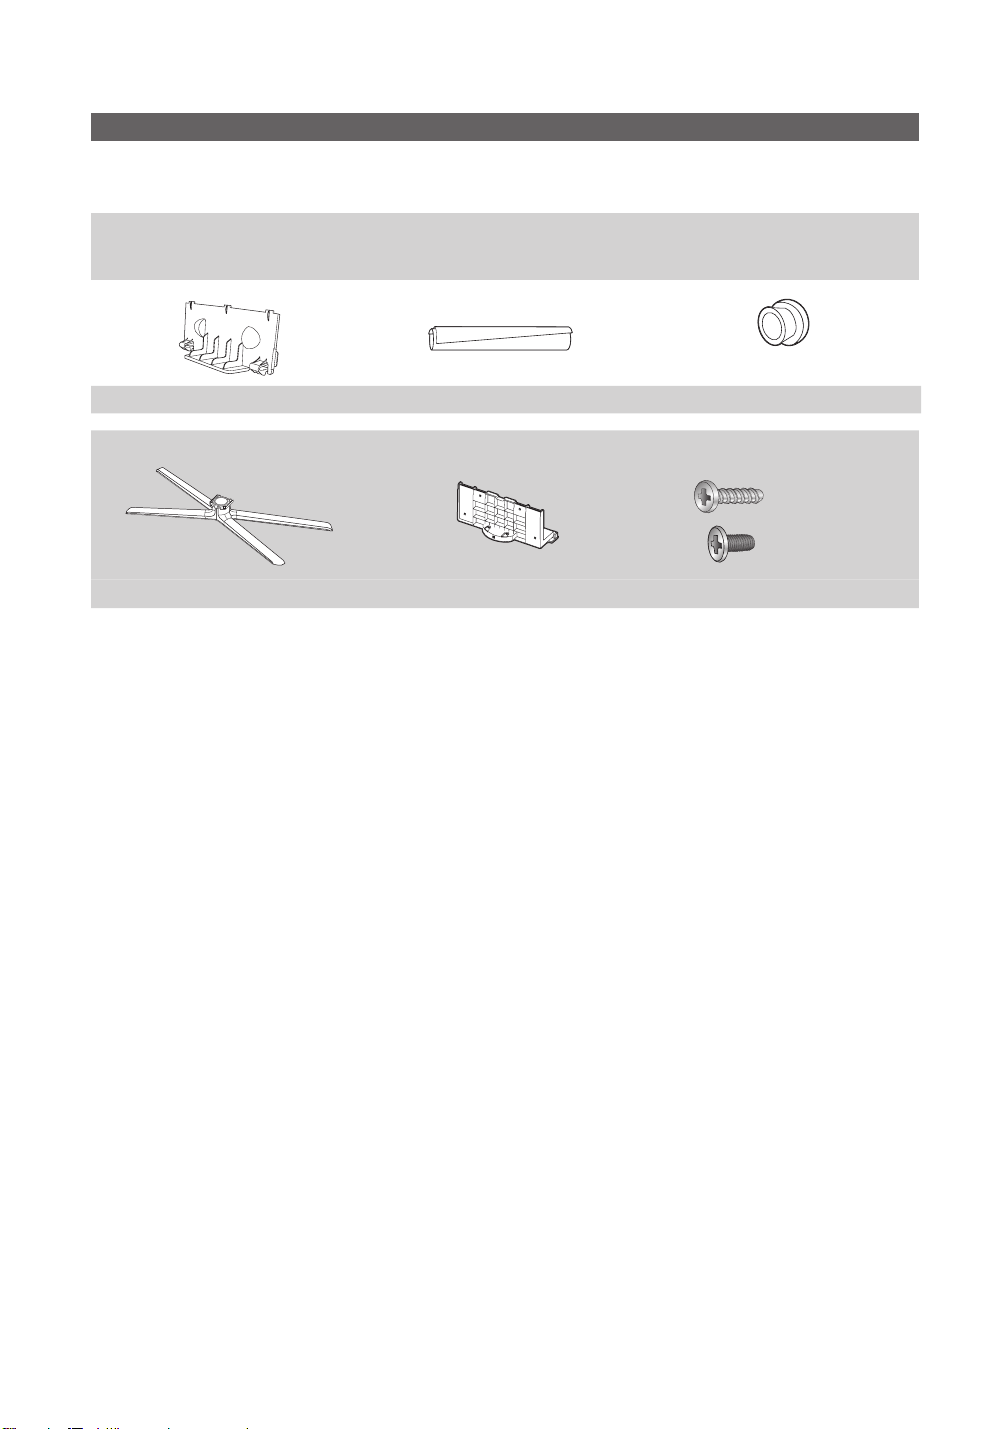
4
Svenska
Komma igång
Tillbehör
Försäkra dig om att följande delar följer med din LCD-TV. Kontakta din återförsäljare om det saknas något.
✎
Produktens färg och form kan variera beroende på modell.
✎
Fjärrkontroll och batterier (AAA x 2) y
Ägarens bruksanvisning y
Garantibevis / Säkerhetsmanual (inte tillgänglig på alla platser) y
Fäste y Kabelvinda y Hållarring (4ea) y
Se separat guide för installation av stativet.
Stativ y (1EA) Stativfäste y (1EA) Skruvar y
Rengöringstrasa y
Strömsladd y
(46 ~ 55 tums TVs)
(4EA) M4 X L12
(4EA) M4 X L8
Page 66
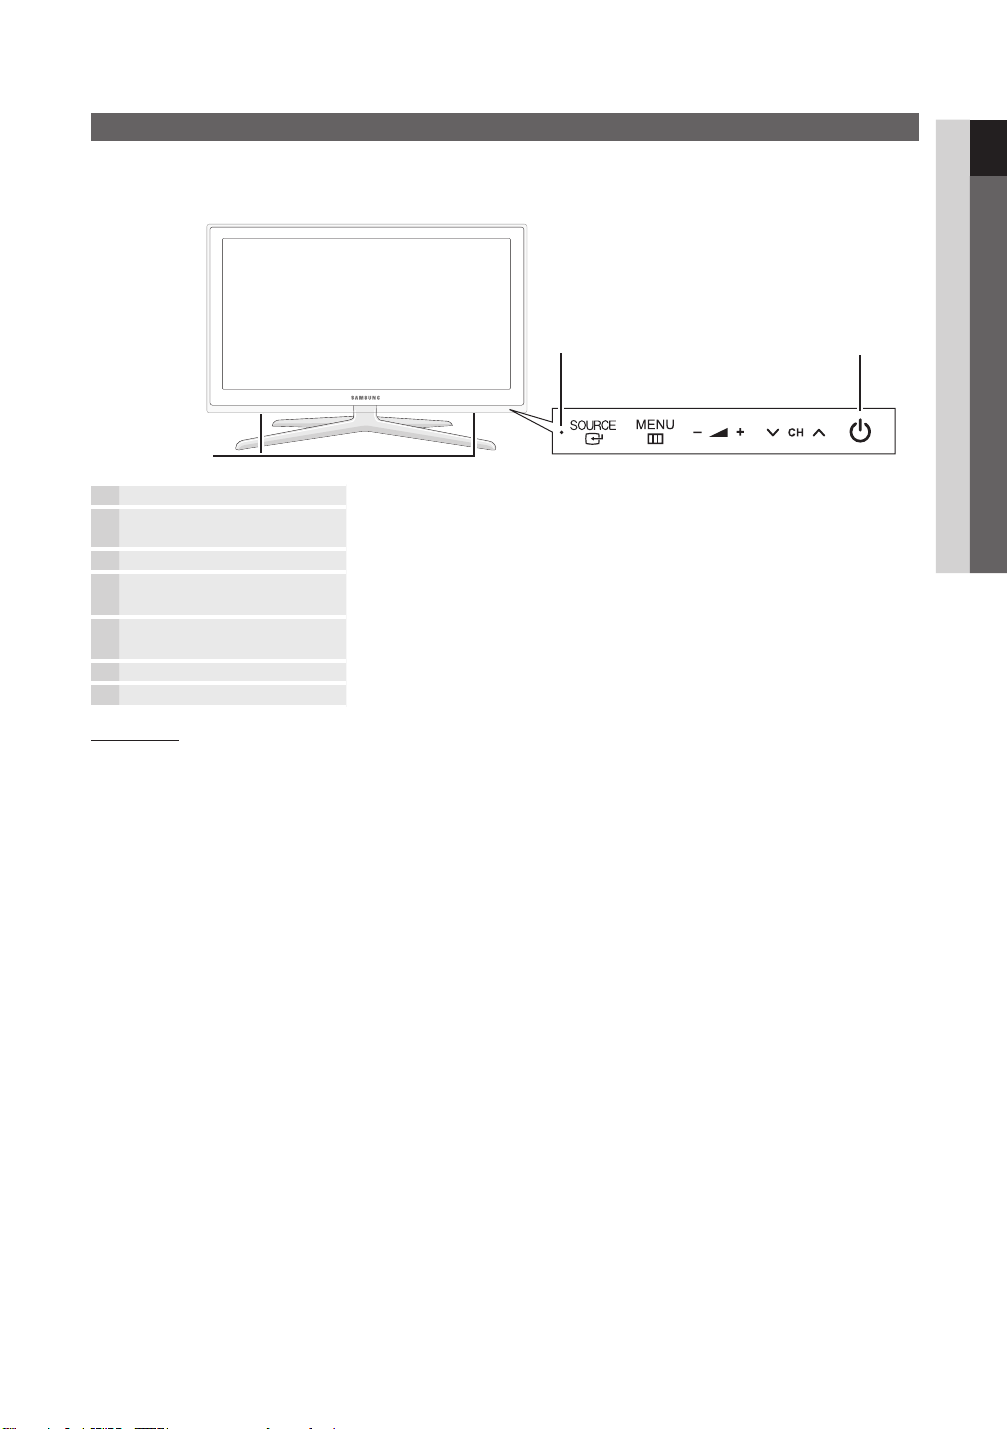
5
01 Komma igång
Svenska
Visa kontrollpanelen
Produktens färg och form kan variera beroende på modell.
✎
Kontakt med föremål eller partiklarl utom ditt finger kan slå på LCD-lampan.
✎
StrömindikatorMottagare för fjärrkontrollen
Högtalare
Mottagare för fjärrkontrollen Rikta fjärrkontrollen mot den här punkten på TV:n.
SOURCE
MENU
Y
z
Strömindikator Blinkar och stängs av när strömmen är på och tänds i standbyläge.
P
Standbyläge
Låt inte TV:n vara i standbyläget under en längre tid (t.ex. när du är på semester). Apparaten drar ström även när powerknappen är avstängd. Det bästa är att dra ur strömsladden.
E
m
(Power)
Växlar mellan alla tillgängliga ingångskällor. På skärmmenyn används den här knappen
när du använder ENTERE på fjärrkontrollen.
Visar skämmeny, OSD (on screen display) med TV:ns funktioner.
Justera volymen. I OSD använder du knapparna Y som du använder
knapparna ◄ och ► på fjärrkontrollen.
Byt kanal. I OSD använder du knapparna z som du använder knapparna
▼ och ▲ på fjärrkontrollen.
Slår på och stänger av TV:n.
Page 67
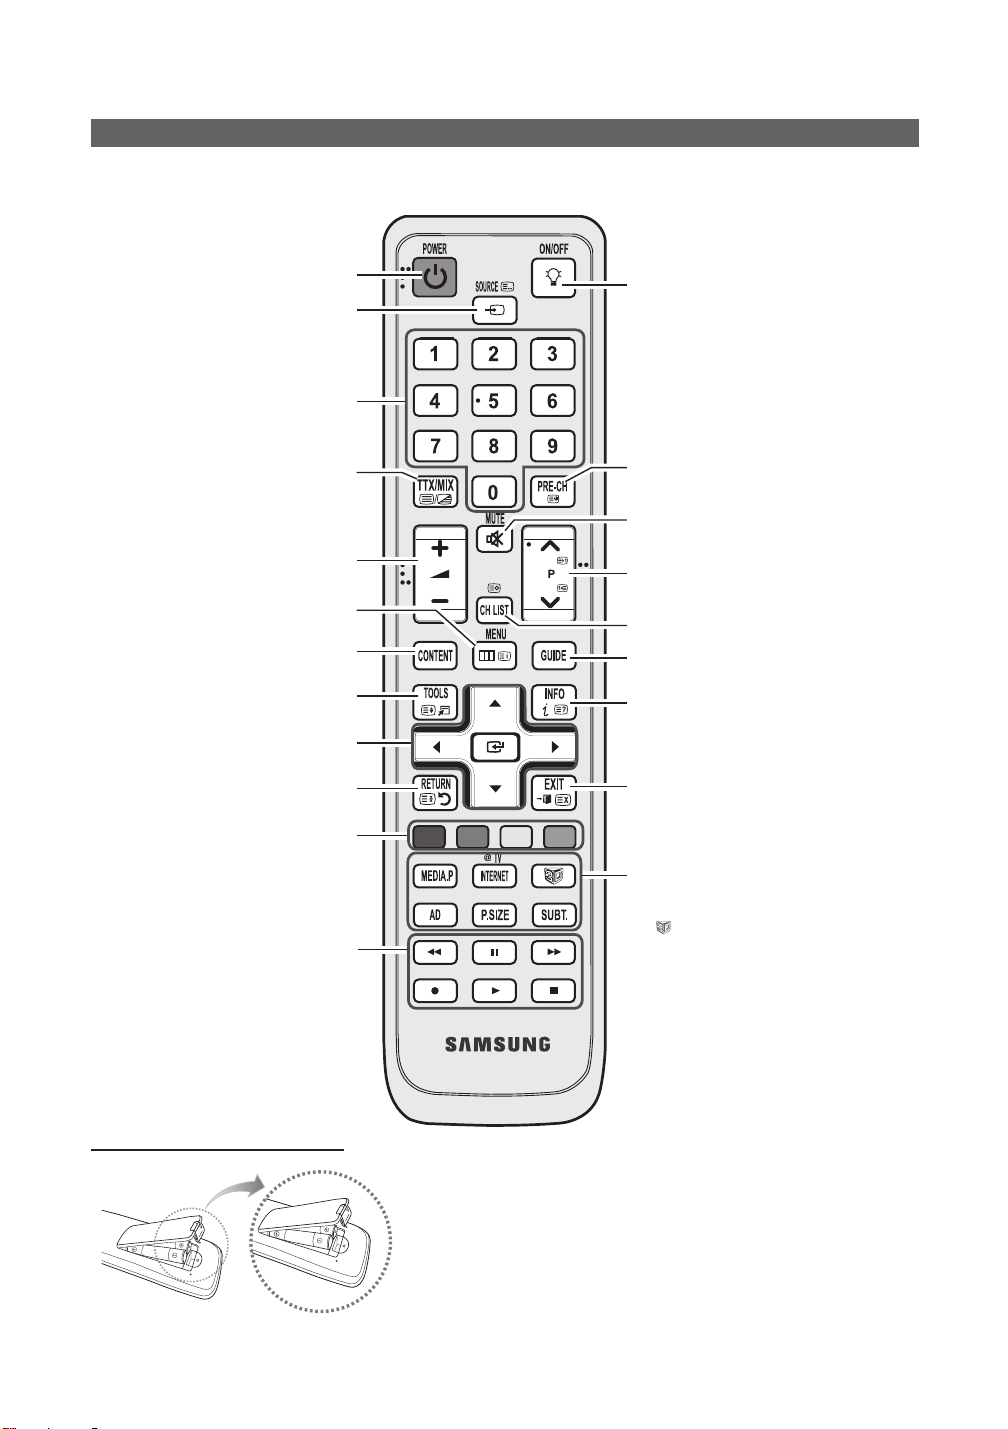
6
Komma igång
Svenska
ABCD
Översikt av fjärrkontrollen
Detta är en speciell fjärrkontroll för synskadade, den har blindskrift på knappen Power samt kanal- och
✎
volymknapparna.
Slå på och stänger av TV:n. (sid 7)
Visa och välja tillgängliga videokällor. (sid 11)
Tryck för direkt åtkomst till kanalerna.
Alternativt väljer du text-tv PÅ, dubbel,
Visar huvudmenyn på skärmen.
Visar Innehållsvy, som inkluderar Guide, 3D,
Internet@TV, Media Play och AllShare.
Välj enkelt funktioner som används ofta.
Välj poster i skärmmenyn och ändra
Gå tillbaka till föregående meny.
Knappar i menyn Kanalhantering, Internet@
Använd dessa knappar i lägena Media Play
och Anynet
(∏: styr inspelningen på inspelningsenheter
från Samsung med funktionen Anynet
mix eller AV.
Justera volymen.
(sid 12)
menyvärdena.
TV, Media Play etc.
+
. (sid 35, 44)
När ljusknappen ON/OFF är inställd på ON och en
viss knapp trycks in kommer fjärrkontrollens knappar
att lysa en liten stund.
(Vid användning av fjärrkontrollen med den här
knappen inställd på On minskas batteritiden.)
Gå tillbaka till föregående kanal.
Stänger av ljudet tillfälligt.
Byta kanal.
Visar kanallistan på skärmen. (sid 14)
Visa EPG-information (Elektronisk programguide).
(sid 12)
Visa information på TV-skärmen. (sid 12)
Stäng menyn.
MEDIA.P: Visa Media play. (sid 35)
INTERNET: Länk till olika Internet-tjänster.
3D(
AD: Val av ljudbeskrivning. (Inte tillgänglig på alla
+
)
P.SIZE: Välj bildstorlek. (sid 17)
SUBT.: Digital textning (sid 24)
(sid 48)
): Ställer in video, som erbjuds med 3D-
signal. (sid 19)
platser) (sid 22)
Sätta i batterier (batteristorlek: AAA)
OBS!
✎
Använd fjärrkontrollen inom x 23 feet från TV.
Starkt ljus kan påverka fjärrkontrollens prestanda. Undvik
x
att använda den nära speciellt fluorescerande ljus och
neonskyltar.
Produktens färg och form kan variera beroende på modell.
x
Page 68
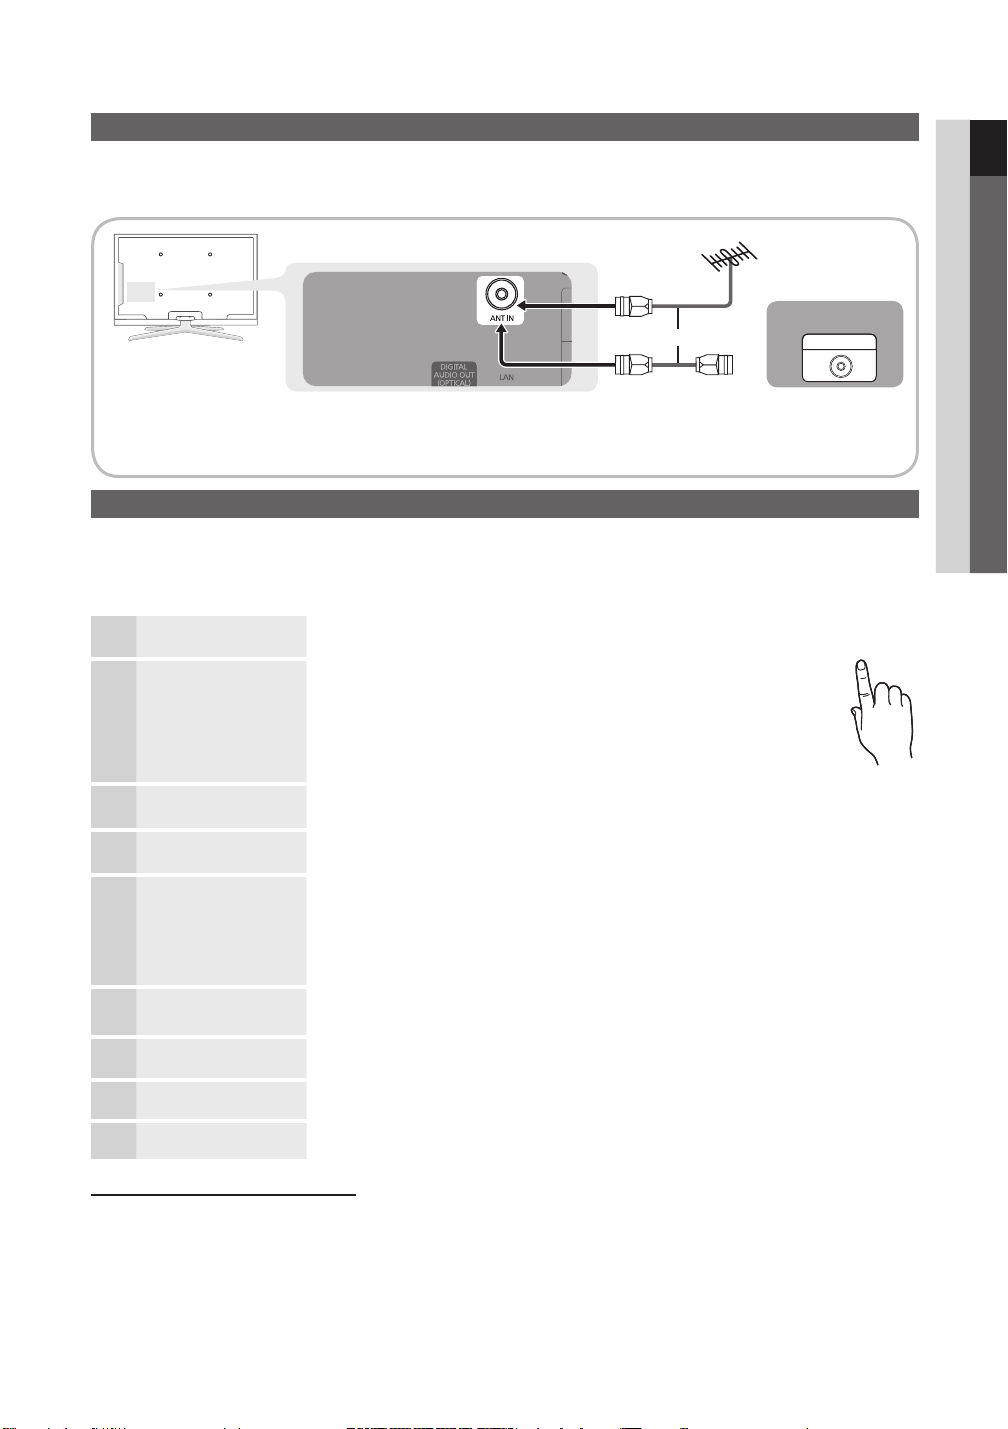
7
01 Komma igång
Svenska
Ansluta till en antenn
P
POWER
När TV:n slås på för första gången visas grundinställningar automatiskt.
✎
Förinställning: Ansluta ström och antenn.
VHF/UHF-antenn
eller
Utrustning som är kopplad till skyddsjord via jordat vägguttag och/eller via annan utrustning och samtidigt är kopplad
✎
till kabel-TV nät kan i vissa fall medfőra risk főr brand.
Plug & Play (initial inställning)
När TV:n slås på första gången visas en sekvens med uppmaningar på skärmen som hjälper dig att konfi gurera grundinställningarna.
Tryck på knappen POWERP. Plug & Play är endast tillgänglig när källan Input (Ingångar) är inställd på TV:n.
För att återgå till föregående steg trycker du på den röda knappen.
✎
Välja språk
1
Välja Butiksdemo eller
2
Hemmabruk
Välja land
3
Välj antenn
4
Välja kanal
5
Ställa in Klockläge Ställ in Klockläge automatiskt eller manuellt.
6
Tidszon
7
Visa HD
8
anslutningsguide.
Njut av TV-tittandet!
Använd knapparna ▲ och ▼ och tryck sedan på knappen ENTER
Välj önskat skärmspråk (OSD-språk).
Använd knapparna ◄ och ► och tryck sedan på knappen ENTER
Välj läget y Hemmabruk. Läget Butiksdemo är avsett för
återförsäljarmiljöer.
Återställ enhetens inställningar från y Butiksdemo till Hemmabruk
(standard): Tryck på volymknappen på TV:n. När skärmmenyn för
volym visas trycker du och håller ned knappen MENU i 5 sekunder.
Använd knapparna ▲ och ▼ och tryck sedan på knappen ENTER
Välj land. Om önskat land inte fi nns med i menyn väljer du Övrigt.
Använd knapparna ▲ och ▼ och tryck sedan på knappen ENTER
Välj Antenn eller Kabel.
Använd knapparna ▲ och ▼ och tryck sedan på knappen ENTERE.
Välj kanalkälla för memorering. Om du ställer in antennkällan som Kabel visas ett steg där
du kan tilldela kanalerna numeriska värden (kanalfrekvenser). Mer information fi nns under
Kanal → Autolagring (sid 14).
✎
Tryck på
✎
Om du väljer
Tryck på knapparna ▲ eller ▼ för att välja tidszon och tryck sedan på knappen ENTERE.
(landsberoende)
Anslutningssättet för bästa HD-skärmkvalitet visas.
Tryck på knappen ENTER
ENTERE när som helst för att avbryta lagringsprocessen.
Auto ska du välja den tidszon du bor i.
E
.
E
E
E
E
Kabel
ANT OUT
.
.
.
.
9
Om du vill återställa denna funktion ...
Välj Inställning - Plug & Play (initial inställning). Ange din 4-siffriga PIN-kod. Standard-PIN-koden är ”0-0-0-0”. Om du vill
ändra PIN-koden använder du funktionen Ändra PIN.
Page 69
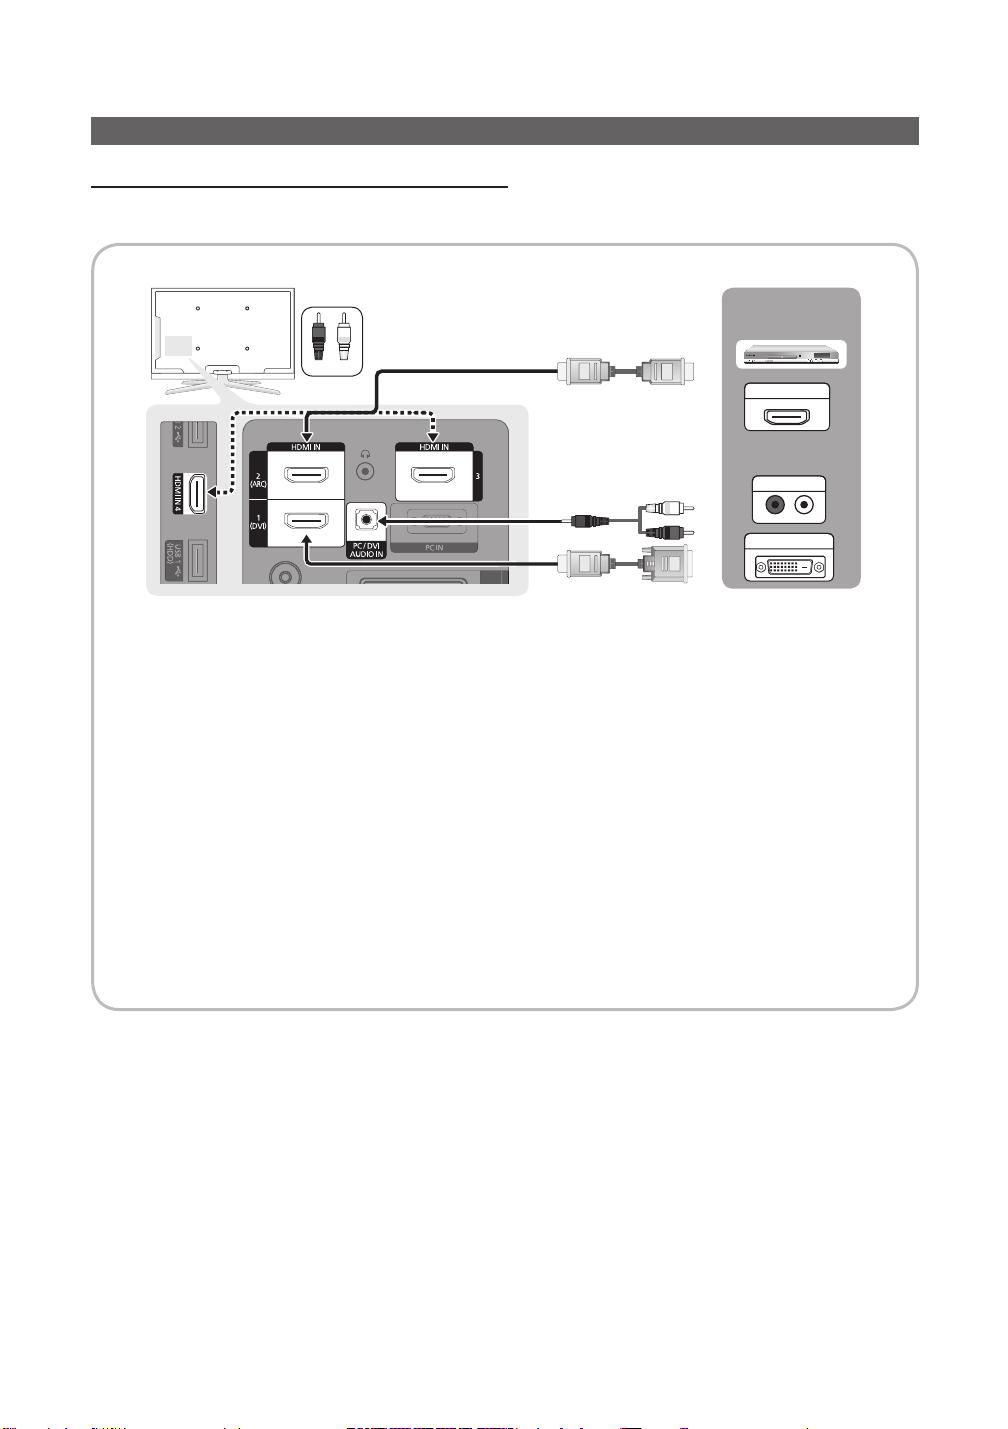
8
Svenska
Anslutningar
W R
W
G
RR
R-AUDIO-L
P
R PB Y
Ansluta till en AV-enhet
Använda en HDMI/DVI-kabel: HD-anslutning (upp till 1080p)
Tillgängliga enheter: DVD, Blu-ray-spelare, HD-kabelbox, HD STB (digital-TV-box) satellitmottagare, kabelbox, satellitmottagare (STB)
DVD / Blu-ray-
spelare
Röd Vit
HDMI OUT
DVD / Blu-ray
player
AUDIO OUT
DVI OUT
HDMI IN 1(DVI) ✎, 2(ARC), 3, 4 / PC/DVI AUDIO IN
Anslut till en digital enhet med en HDMI-kabel för att få bättre ljud- och bildkvalitet.
x
En HDMI-kabel stöder digitala video- och ljudsignaler, därför krävs ingen ljudkabel.
x
För att ansluta TV:n till en digital enhet som inte stöder HDMI ska du använda en HDMI/DVI och ljudkablar. –
Bilden kanske inte visas normalt (om den visas alls) eller så kanske inte ljudet fungerar om en extern enhet
x
med en äldre version av HDMI-läget ansluts till TV:n. Om detta problem uppstår ska du kontakta den externa
enhetens tillverkare och höra om det går att uppgradera HDMI-versionen.
Se till att du köper en certifierad HDMI-kabel. Annars kanske inte bilden visas eller så kan det inträffa ett
x
anslutningsfel.
En grund-höghastighets HDMI-kabel eller en med ethernet rekommenderas. Den här produkten stöder inte
x
ethernet-funktion via HDMI.
Den här produkten stöder 3D- och ARC-funktionerna (Audio Return Channel) via HDMI-kabel. Observera att
x
ARC-funktionen endast stöds av porten HDMI IN 2(ARC).
Om – 3D-autovisning är inställt på På, är vissa funktioner, såsom Internet@TV avaktiverade. Om så är fallet
ställer du in 3D-autovisnin eller 3D-läge till Av.
ARC-funktionen tillåter digitalt ljud att skickas via porten
x
TV:n är ansluten med en ljudmottagare som stöder ARC-funktionen.
HDMI IN 2(ARC). Detta kan endast aktiveras om
Page 70
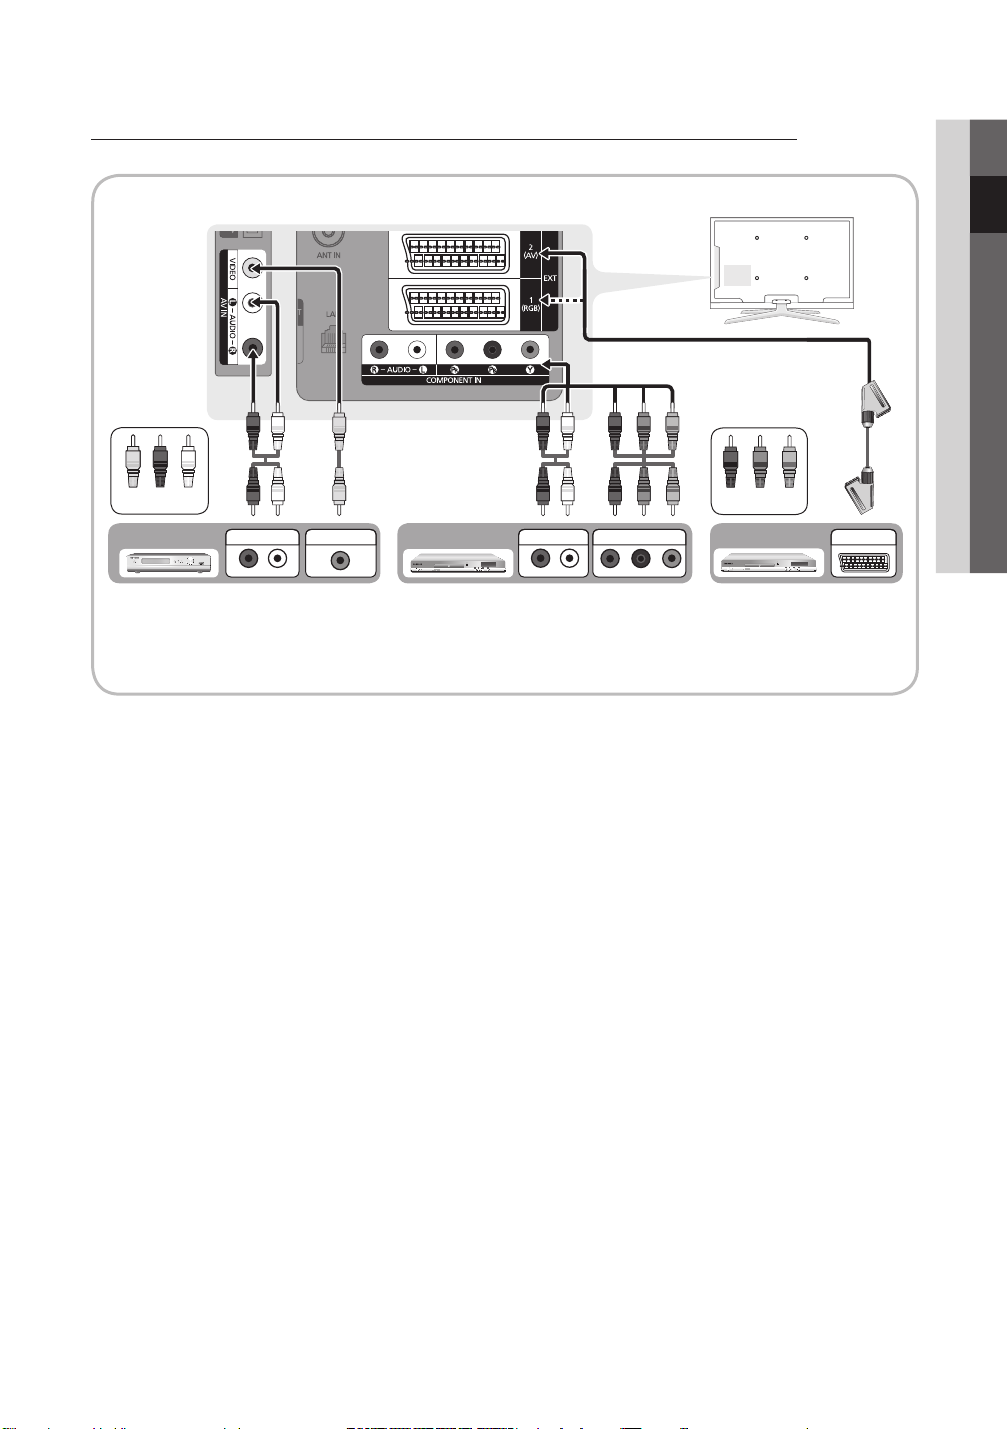
9
Svenska
02 Anslutningar
Använda en komponentkabel (upp till 1080p) eller A/V-kabel (endast 480i) och använda en scartkabel
RGB W R
W
R G
R
W R
B
R W
Y
Y
P
R PB Y
R-AUDIO-L
P
R PB Y
R-AUDIO-L
P
R PB Y
W
G
RRWY B
G
RR
Tillgängliga enheter: VCR, DVD, Blu-ray-spelare, kabelbox, STB satellitmottagare
Gul Röd Vit
Videobandspelare
✎
Ext.-läge stöder DTV Out endast MPEG SD Video och Audio.
I
För bästa bildkvalitet rekommenderas komponentanslutningen framför A/V-anslutningen.
✎
AUDIO OUT
VIDEO OUT
Blu-ray-spelare DVD
AUDIO OUT
COMPONENT OUT
Röd Blå Grön
EXT
Page 71
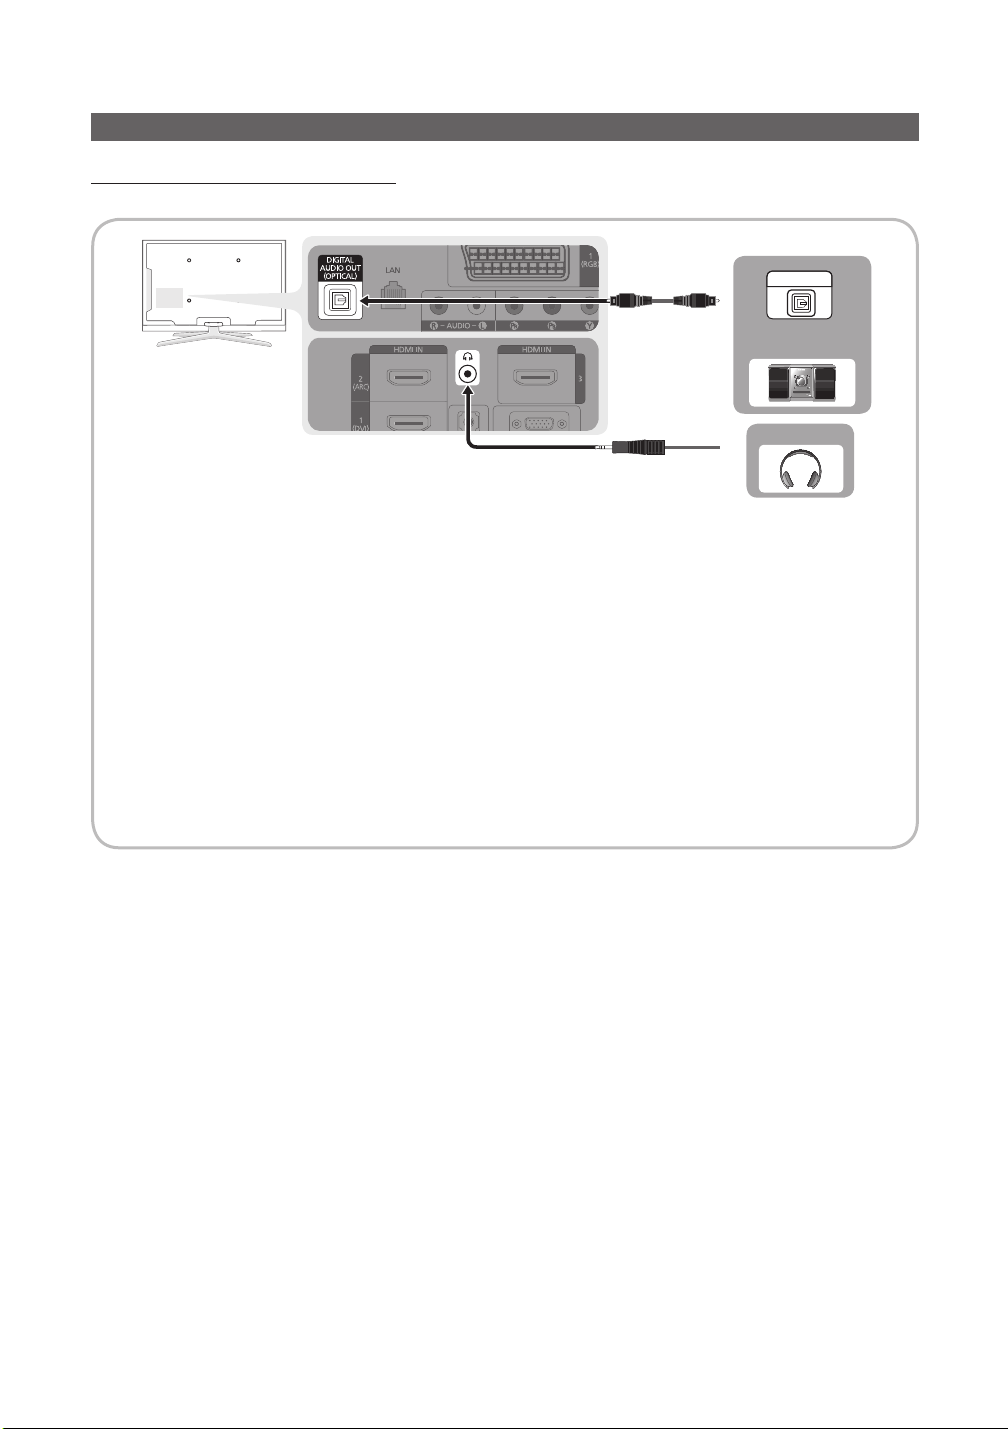
10
Svenska
Anslutningar
Ansluta till en ljudenhet
Använda en optisk eller ljudkabelanslutning
Tillgängliga enheter: digitalt ljudsystem, förstärkare, DVD-hemmabio
✎
DIGITAL AUDIO OUT (OPTICAL)
När ett digitalt ljudsystem ansluts till uttaget
x
och systemet.
5.1 CH (kanals) ljud är tillgängligt när TV:n är ansluten till en extern enheter som stöder 5.1 CH.
x
När mottagaren (hemmabion) är påslagen kommer ljud från TV:ns xoptiska uttag. När TV:n tar emot en DTVsignal skickar TV:n ut 5.1-kanalsljud till hemmabions mottagare. När källan är en digital komponent, såsom en
DVD/Blu-Ray-spelare/kabel-TV-box/STB (digital-TV-box) satellitmottagare och är ansluten till TV:n via HDMI
kommer endast 2-kanalsljud att höras från hemmabiomottagaren. Om du vill ha 5.1-kanalsljud ska du ansluta
den digitala ljudutgången från DVD/Blu-ray-spelare / kabelbox / STB satellitmottagare direkt till en förstärkare
eller hemmabio.
✎ H
Hörlurar
inbyggda högtalarna bort.
x
x
: Du kan ansluta hörlurarna till hörlursuttaget på setet. När hörlurar är anslutna kopplas ljudet från de
Ljudfunktionen kan vara begränsad vid anslutning av hörlurar till TV:n.
Volymen i hörlurarna och TV-volymen justeras på olika sätt.
DIGITAL AUDIO OUT (OPTICAL) sänks volymen på både TV:n
OPTICAL
Digitalt ljudsystem
Hörlurar
Page 72
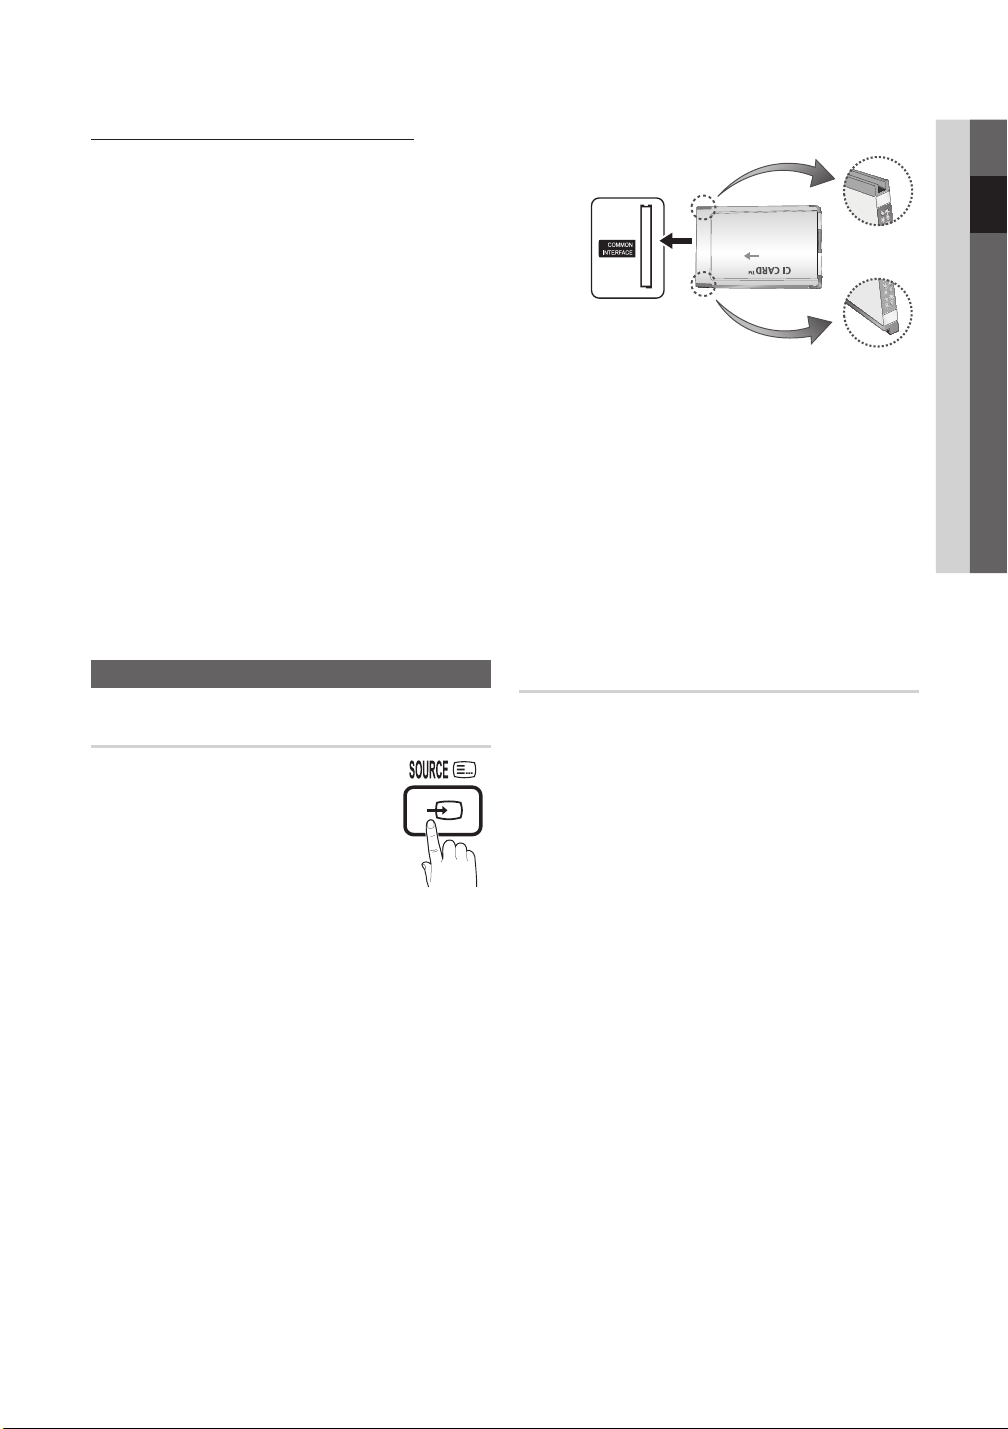
11
Svenska
02 Anslutningar
ANSLUTNINGAR COMMON INTERFACE-plats
För att kunna titta på betalkanaler måste ”CI eller CI+ CARD” matas in.
Om du inte matar in ”CI eller CI+ CARD” kommer vissa kanaler att y
visa meddelandet ”Förvrängd signal”.
Information som bland annat omfattar ett telefonnummer, y
”CI eller CI+ CARD” ID, värd-ID och annan information som visas
i ungefär 2-3 minuter. Om ett felmeddelande visas kontaktar du
tjänsteleverantören.
När konfigurationen av kanalinformationen slutförts visas y
meddelandet ”Uppdateringen klar”, vilket innebär att kanallistan
uppdaterats.
OBS!
✎
Du behöver ett ”CI eller CI+ CARD” från en lokal kabeltjänstleverantör.
x
Ta ut ”CI eller CI+ CARD” genom att försiktigt dra ut det för hand. Om du tappar ”CI eller CI+ CARD” kan det skadas.
x
Sätt i ”CI eller CI+ CARD” i pilens riktning på kortet.
x
Placeringen av platsen xCOMMON INTERFACE kan variera beroende på modell.
”CI eller CI+ CARD” stöds inte i alla länder och regioner, kontrollera med din auktoriserade återförsäljare.
x
Om du har några problem ska du kontakta ett serviceställe.
x
Ändra ingångskällan
Källa
Används för att välja TV eller annan extern
ingångskälla såsom DVD/Blu-ray-spelare/
kabelbox/STB satellitmottagare som är
ansluten till TV:n.
TV / Ext.1 / Ext.2 / PC / AV / ■
Component / HDMI1/DVI / HDMI2 /
HDMI3 / HDMI4 / USB
I
✎
Källa markeras ansluta
ingångar.
Ext.1
✎
, Ext.2 och PC är alltid aktiverade.
Ändra namn
VCR / DVD / Kabel-STB / Satellit-STB / PVR STB ■
/ AV-mottagare / Spel / Kamera / PC / DVI PC /
DVI-enheter / TV / IPTV / Blu-ray / HD DVD / DMA:
Namnge den enhet som är ansluten insignalingången för
att det skall bli lättare för dig att välja ingångskälla.
Om en dator med en upplösning på 1920 x 1080
✎
@ 60Hz ansluts till porten HDMI IN 1(DVI) ska
du ställa in porten till DVI PC-läge under Ändra
namn.
När du ansluter en HDMI-/DVI-kabel till porten ✎HDMI
IN 1(DVI) ska du ställa in DVI PC eller DVI-enheter
under Ändra namn.
Page 73
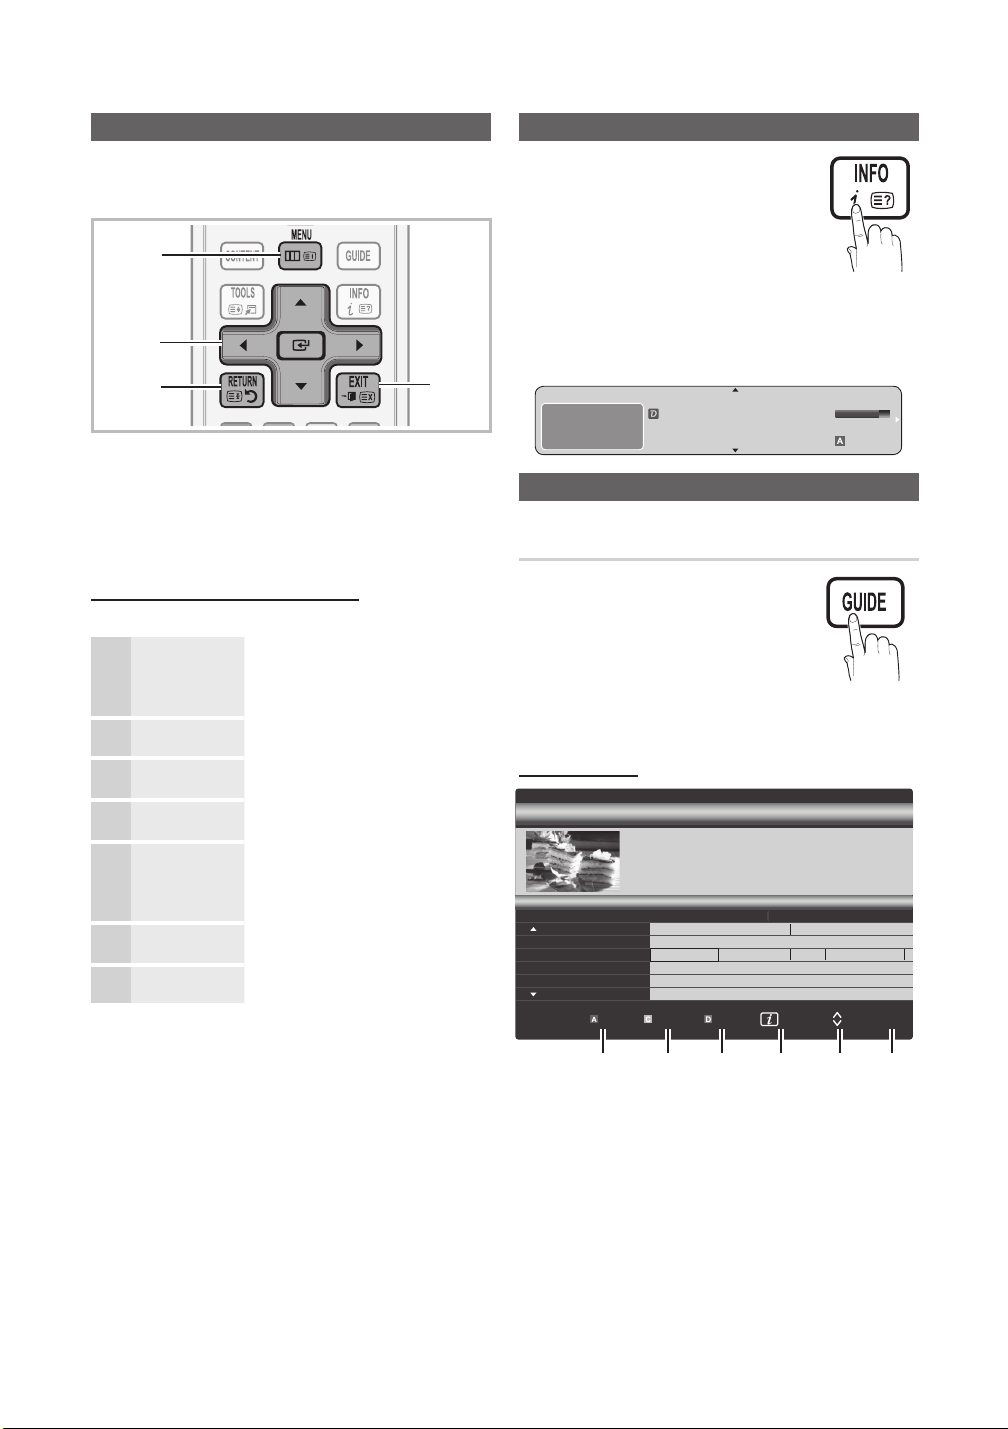
12
Svenska
Grundfunktioner
DTV Air 800 five
Home and Away
18:00 - 18:30
Drama
Dani is devastated when scott makes clear his views on marriage...
27
28
800
24
16
6
Discovery
DiscoveryH&L
five
price-drop.tv
QVC
R4DTT
American Chopper
Programmes resume at 06:00
Home and...
No Information
QVC Selection
No Information
Tine Team
Fiv...
Today 18:00 - 19:00 19:00 - 20:00
)
Family Affairs
)
Dark Angel
800 five
Navigera i menyerna
Innan du använder TV:n ska du följa stegen nedan för att
bekanta dig med hur du navigerar i menyn och välja och
ändra olika funktioner.
1
2
3
4
1 MENU-knapp: Visar huvudmenyn på skärmen.
2 ENTER
E
/ Pilknapp: Flytta markören och markera en
post. Bekräfta inställningen.
3 RETURN-knapp: Återgår till föregående meny.
4 EXIT-knapp: Stänger skärmmenyn.
Hur OSD (On Screen Display) används
Det tillgängliga steget kan variera beroende på vald meny.
1
MENU
m
Huvudmenyns alternativ visas på
skärmen:
Bild, Ljud, Kanal, Inställning,
Ingångar, Applikation, Support.
▲ / ▼
Välj en ikon med knappen ▲ eller ▼.
2
ENTER
3
E
▲ / ▼
4
◄ / ►
5
Tryck på ENTERE för att gå till
undermenyn.
Välj önskad undermeny men
knapparna ▲ och ▼.
Ändra värdet på en post med
knappen ◄ eller ►. Hur OSD
ändras kan variera beroende på
vald meny.
ENTER
6
EXIT
E
e
Tryck på ENTERE för att slutföra
konfi gureringen.
Tryck på EXIT.
7
Använda INFO-knappen (Nu och nästa guide)
Skärmen identifi erar aktuell kanal och status
för vissa inställningar av ljud och bild.
Nu och nästa guiden visar daglig
information om TV-program för varje kanal
ordnat efter sändningstid.
Bläddra med y ◄, ► för att visa
information om ett önskat program
medan du tittar på aktuell kanal.
Bläddra med y ▲, ▼ för att visa information om andra
kanaler. Om du vill gå till den kanal som är vald ska du
trycka på knappen ENTER
abc1
DTV Air
15
Life On Venus Avenue
Unclassified
No Detaild In formation
E
.
18:11 Thu 6 Jan
18:00 ~ 6:00
EWatch
Information
Planera tittandet
Guide
EPG-information (elektronisk
programguide) ställs till förfogande av
den som sänder kanalen. Med hjälp av
programscheman från den som sänder
kanalen kan du i förväg ställa in vilka
program du vill titta på så ändras kanalen
automatiskt till vald programkanal vid
angiven tidpunkt. Programposter kan vara
tomma eller inaktuella beroende på en kanalstatus.
Använda kanalvy
Guide
Channel View - TV
Visn.läge
+24 timmar Kanalläge
Information Sida
2:10 Tis 1 Juni
E
Titta
1 2 3 4 5 6
Page 74
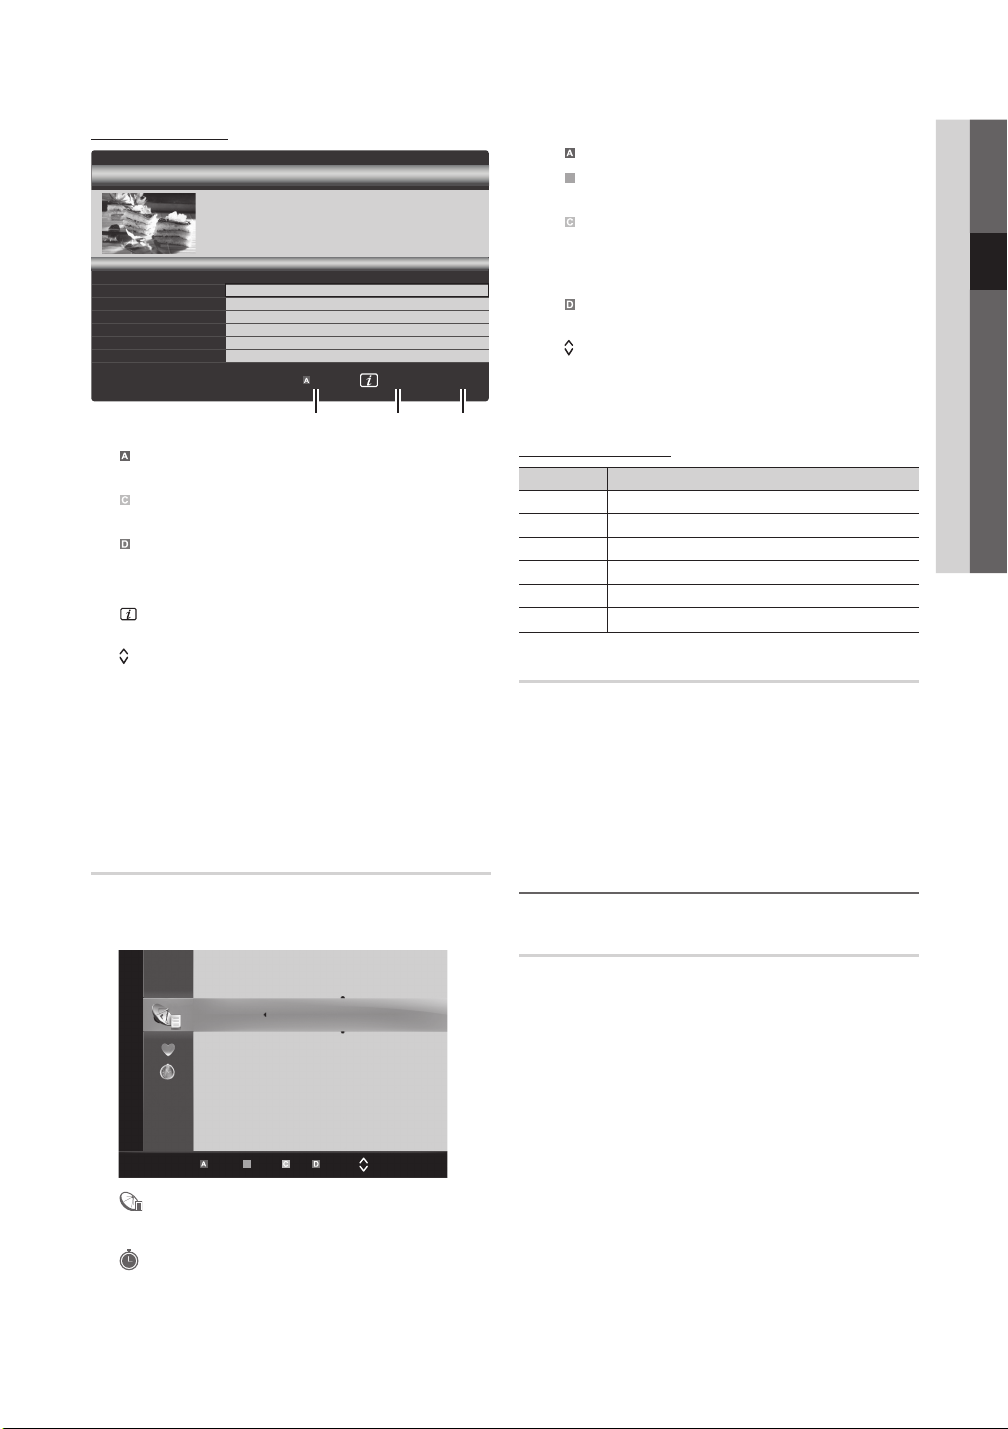
13
Svenska
03 Grundfunktioner
Använda schemavy
DTV Air 800 five
Family Affairs
18:00 - 18:30
Drama
Tanya confesses all to a stunned Babs. Conrad is anxious to hear...
18:30
19:15
Today
Today
)
Family Affairs
)
Dark Angel
800
800
five
five
800 five
B
c 1 1futech
2 * 24ore.tv
15 abc1
3 BBC World
23 bid-up.tv
33 Boonerang
32 Cartoon Nwk
5 Class News
4 \ Coming Soon
27 Discovery
All
TV
Radio
Data/Other
Analogue
r
Guide
Scheduled View
Visn.läge
2:10 Tis 1 Juni
Information
E
Avbryt
1 4 6
Röd (visningsläge): Visar en lista över program som
1
körs nu eller är kommande.
2
Gul (+24 timmar): Visar en lista med program som
kommer att sändas efter 24 timmar.
3
Blå (K-läge): Välj den typ av kanaler du vill visa i
fönstret Kanalvy.
K-läge varierar beroende på antennkälla. –
4 (Information): Visar detaljerad information om valt
program.
5
(sidan): Går till föregående/nästa sida.
6 ENTER
E
-knapp
När du väljer aktuellt program kan du titta på valt –
program.
När du väljer ett program som ska sändas senare –
kan du reservera det valda programmet. För att
avbryta schemat trycker du en gång till på knappen
E
ENTER
och väljer Avbryt scheman.
Kanalhanteraren
Ta bort eller ställ in favoritkanaler och använd programguiden
för digitala sändningar. Välj en kanal i skärmvisningen
Kanaler, Mina kanaler eller Schemalagd.
Kanaler
Antenn Antenn B Zoom Välj Sortera Sida T Verktyg
Använda färgknapparna med ✎Kanalhantering
Röd (Antenn): Växla mellan Antenn och Kabel.
x
Grön (Zoom): Förstorar eller förminskar ett
x
kanalnummer.
Gul (Välj): Välj önskade kanaler och tryck på
x
den gula knappen för att ange alla valda kanaler
samtidigt. Markeringen c visas till vänster om de
valda kanalerna.
Blå (Sortera): Ändra listans sortering, efter
x
kanalnamn eller kanalnummer.
(Sidan): Gå till nästa eller föregående sida.
x
T x (Verktyg): Visar menyn Kanalhantering.
(Alternativmenyn kan se olika ut beroende på
situation.)
Ikoner för kanalstatus
Ikoner Användning
En analog kanal.
A
c
En vald kanal.
En kanal som är inställd som favorit.
*
Ett program som sänds.
(
En låst kanal.
\
Ett reserverat program.
)
Guidetyp (Samsung / Guide Plus+)
(landsberoende)
Du kan välja en annan typ av guide.
Samsung ■ : Använd guideprogrammet som erbjuds av
Samsung.
Guide Plus+ ■ : Använd det här guideprogrammet som
erbjuds av Rovi International Solutions. Mer information
hittar du i “www.europe.guideplus.com.”
Använda favoritkanaler ¦
*
Mina kanaler
(i Kanalhantering)
Visar alla favoritkanaler.
Redigera mina kanaler ■
valda kanaler till önskad kanalgrupp.
✎ *
Symbolen ”
” visas och kanalen anges som favorit.
1. Välj en kanal och tryck på TOOLS-knappen.
2. Lägg till eller ta bort önskad kanal i mina
kanalgrupper 1, 2, 3 och 4.
Du kan välja en eller flera grupper.
x
t
: Du kan ställa in
■ Kanaler: Visar kanallistan enligt kanaltyp.
*
■
■ Schemalagd: Visar alla aktuella reserverade
Mina kanaler: Visar kanalgruppen.
program.
Page 75
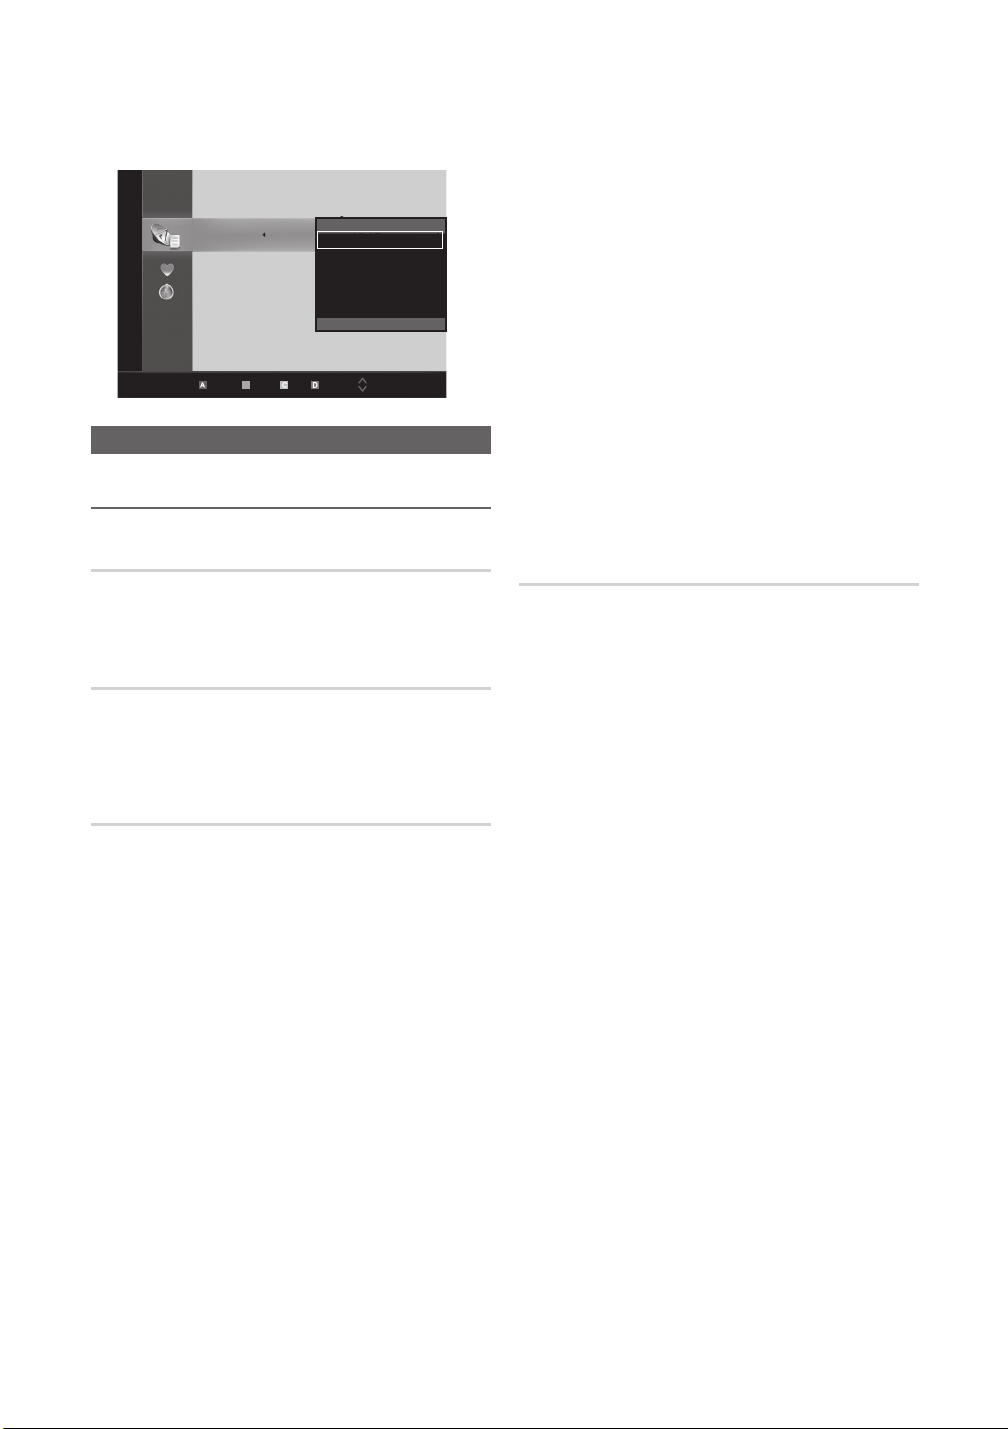
14
Svenska
Grundfunktioner
c 1 1futech
2 * 24ore.tv
15 abc1
3 BBC World
23 bid-up.tv
33 Boonerang
32 Cartoon Nwk
5 Class News
4 \ Coming Soon
27 Discovery
All
TV
Radio
Data/Other
Analogue
r
3. Efter att du ändrat inställningarna kan kanallistan för
varje grupp visas i Mina kanaler.
Kanaler
Ändra favoritkanaler
Lås
Ta bort
Avmarkera alla
Markera alla
d
Antenn Antenn B Zoom Välj Sortera Sida T Verktyg
Kanalmeny
Söka om kanaler ¦
Antenn (Antenn / Kabel)
Innan din TV kan börja memorera tillgängliga kanaler måste
du ange typ av signalkälla som är ansluten till TV:n (dvs.
antenn eller kabelsystem).
Land
PIN-inmatningsfönstret visas. Ange din 4-siffriga PIN-kod.
Digital kanal ■ : Byt land för digitala kanaler.
Analog kanal ■ : Byt land för analoga kanaler.
Autolagring
Söker efter kanaler och lagrar dem automatiskt i TV:n
✎
Automatiskt tilldelade programnummer
överensstämmer kanske inte med faktiska eller
önskade programnummer. Om en kanal är låst med
funktionen Barnlås visas PIN-inmatningsfönstret.
Antennkälla (Antenn / Kabel) ■
antennkälla för memorering.
t
: Välj
Kanalkälla (Digital och Analog / Digital / Analog) ■ : Välj
kanalkälla för memorering.
När du väljer Kabel → Digital och Analog eller Digital:
Ge ett sökvärde för kabelkanaler.
Sökläge (Full / Nätverk / Snabb): Söker alla kanaler
med aktiva sändningsstationer och lagrar dem i TV:n.
✎
Om du ställer in
Nätverk, Nätverks-ID, Frekvens, Modulering,
Symbolhastighet manuellt genom att trycka på
knappen på fjärrkontrollen.
Nätverk (Auto / Manuellt): Väljer inställningsläge för
Nätverks-ID, antingen Auto eller Manuellt.
Nätverks-ID: Om Nätverk är inställt på Manuellt kan du
ställa in Nätverks-ID med hjälp av sifferknapparna.
Frekvens: Visar kanalens frekvens. (Varierar beroende
på land)
Modulering: Visar tillgängliga moduleringsvärden.
Symbolhastighet: Visar tillgängliga symbolhastigheter.
Snabb kan du ställa in
Manuell lagring
Söker manuellt efter kanaler och lagrar dem i TV:n
✎
Om en kanal är låst med funktionen
PIN-inmatningsfönstret.
Digital kanal ■ : När sökningen är klar uppdateras
kanalerna i kanallistan.
När du väljer
✎
Frekvens, Bandbredd.
När du väljer
✎
Modulering, Symbolhastighet.
Analog kanal (program, färgsystem, ljudsystem, ■
kanal, sök, lagra): Om du inte hör något ljud eller om
ljudet är onormalt väljer du ett annat ljudsystem.
✎
Kanalläge
P x (programläge): När inställningen är klar har
sändarna i ditt område tilldelats positionsnummer
från P0 till maximalt P99. Du kan välja en kanal
genom att ange positionsnumret i det här läget.
C
(antennkanalläge) / S (kabelkanalläge): I dessa
x
två lägen kan du välja en kanal genom att ange
det tilldelade numret för antennsändaren eller
kabelkanalen.
Antenn → Antenn: Kanal,
Antenn → Kabel: Frekvens,
Barnlås visas
Page 76
15
Svenska
03 Grundfunktioner
Redigera kanaler ¦
Alternativmenyn för kanalhantering
(i Kanalhantering)
1. Välj en kanal och tryck på TOOLS-knappen.
2. Redigera kanalnamnet eller numret med hjälp av menyn
Redigera kanalnamn.
Redigera kanalnamn ■ (endast analoga kanaler): Tilldela
kanalen ett eget namn.
Övriga funktioner ¦
Kanalhantering
Alternativmenyn för kanalhantering
(i Kanalhantering)
Ställ in var och en av kanalerna med hjälp av menyalternativen
för Kanalhantering (Lås / Lås upp, Timervisning, Sortera,
Ta bort, Markera alla / Avmarkera alla). Alternativmenyn kan
variera beroende på kanalstatus.
1. Välj en kanal och tryck på TOOLS-knappen.
2. Välj en funktion och ändra inställningen för den.
Lås / Lås upp ■ : Låser en kanal så att kanalen inte kan
markeras och visas.
✎
OBS!
Den här funktionen är bara tillgänglig när xBarnlås är
inställt som På.
PIN-inmatningsfönstret visas. Ange den 4-siffriga
x
PIN-koden, standardkoden är ”0-0-0-0”. Ändra
PIN-koden med alternativet Ändra PIN.
Timervisning ■ : Du kan ställa in en valfri kanal som visas
automatiskt vid den angivna tiden. Ställ först in tiden
med den här funktionen.
När en digital kanal är vald trycker du på knappen
✎
► för att visa det digitala programmet.
Sortera ■ (endast analoga kanaler): Med den här
funktionen kan du ändra programnumren på lagrade
kanaler. Det kan vara nödvändigt när du har använt den
automatiska lagringen.
Ta bort ■ : Du kan ta bort en kanal för att visa de kanaler
du önskar.
Markera alla / Avmarkera alla ■ : Markera alla
kanaler eller avmarkera alla markerade kanaler i
kanalhanteringen.
Schemalagd
(i Kanalhantering)
Du kan visa, ändra eller ta bort ett program som du har
reserverat för att se.
Ändra info ■ : Ändra ett program som du har reserverat
för att se.
Avbryt scheman ■ : Avbryt ett program som du har
reserverat för att se.
Information ■ : Visa ett program som du har reserverat för
att se. (Du kan också ändra reservationsinformation.)
Markera alla / Avmarkera alla ■ : Markera eller avmarkera
alla reserverade program.
Kanallista
Du kan se alla kanaler som har sökts.
Överföring av kanallista
Inmatningsskärmen för PIN-kod visas. Ange din 4-siffriga
PIN-kod. Importerar eller exporterar kanalkartan. Anslut en
USB-lagringsenhet för att använda den här funktionen.
Inmatningsskärmen för PIN-kod visas. Ange din
✎
4-siffriga PIN-kod.
✎
Standard-PIN-koden för en ny TV är ‘0-0-0-0’.
Importera från USB ■ : Importera kanallista från USB.
Exportera till USB ■ : Exportera kanallista till USB.
Fininst.
(endast analoga kanaler)
Om signalen är svag eller det är störningar kan du finjustera
en kanal manuellt.
Fininställda kanaler markeras med en asterisk ”*”.
✎
Om du vill återställa fininställningen väljer du ✎Återställ.
Page 77
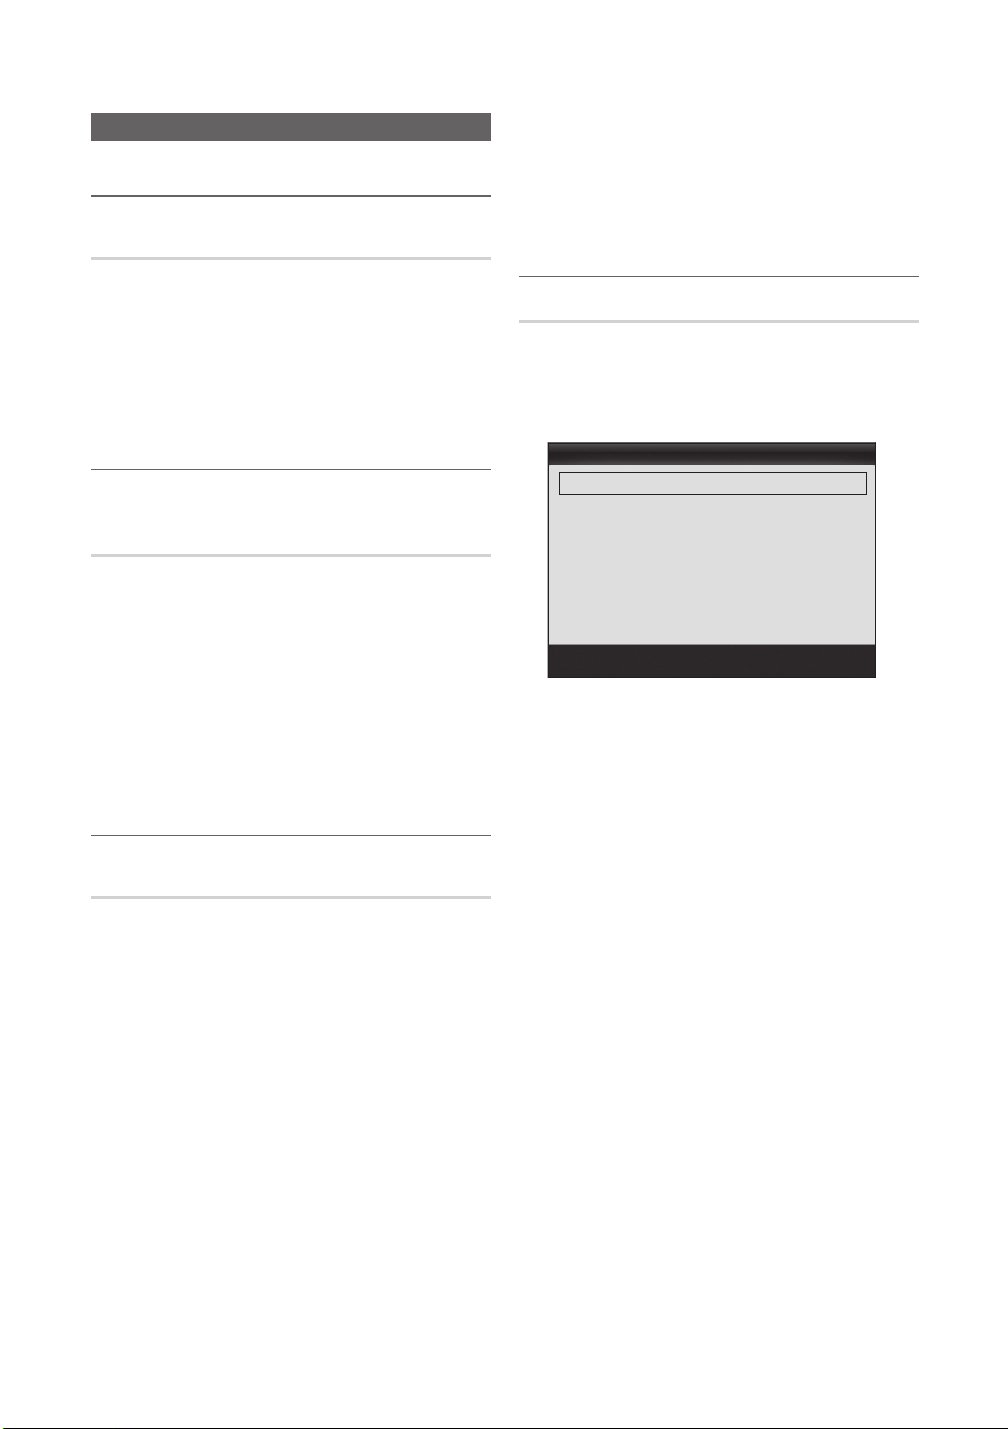
16
Svenska
Grundfunktioner
Bildmeny
Ändra det förinställda bildläget ¦
t
Läge
Välj önskad bildtyp.
Dynamisk ■ : Passar ett ljust rum.
Standard ■ : Passar i normala ljusförhållanden.
Naturlig ■ : Passar för att minska effekten av trötta ögon.
✎
Film ■ : Passar när du ska titta på film i ett mörkt rum.
är inte tillgängligt i PC-läge.
Naturlig
Ändra bildinställningar ¦
Bakgrundsljus / Kontrast / Ljusstyrka /
Skärpa / Färg / Ton (G/R)
TV:n har flera inställningsalternativ för bildkvalitetskontroll.
OBS!
✎
I analoga lägen, xTV, Ext., AV, i PAL-systemet är inte
funktionen Ton (G/R) tillgänglig.
I PC-läget kan de bara göra ändringar för
x
Bakgrundsljus, Kontrast och Ljusstyrka.
Inställningarna kan ändras och lagras för varje extern
x
enhet som är ansluten till TV:n
Om du sänker bildens ljusstyrka minskar
x
energiförbrukningen.
Ekonomiska lösningar ¦
Ekolösningar
Energispar (Av / Låg / Medium / Hög / Bild av / ■
t
Auto)
minskad energiförbrukning. Om du väljer Bild av stängs
skärmen av medan ljudet är på. Tryck på valfri knapp
förutom volymknappen för att slå på skärmen.
Ekosensor (av / på) ■ : Förbättrar energibesparing,
bildinställningarna anpassar sig automatiskt efter ljuset i
rummet.
✎
Om du justerar
in på Av.
Min bakgr.belysn: När Ekosensor är På kan
minimiljusstyrkan för skärmen ändras automatiskt.
Om ✎Ekosensor är inställd på På, kan skärmens
ljusstyrka ändras (bli lite mörkare eller ljusare)
beroende på omgivande ljusförhållanden.
: Justera ljusstyrkan för TV:n för att ge
Bakgrundsljus, ställs Ekosensor
Standby, ej sign. (Av / 15 min / 30 min / 60 min) ■ :
Aktiverar standbyläget i status ”Ingen signal” eller
”Kontrollera signalkabel” under en viss tidsperiod som
angivits av användaren.
Avaktiverad när datorn är i energisparläge.
✎
Ändra bildalternativen ¦
Avancerade inställningar
(tillgänglig i läget Standard / Film)
Du kan justera detaljerade inställningar för skärmen inklusive
färg och kontrast.
✎
I PC-läget kan du bara ändra
Gamma och Vitbalans.
Avancerade inställningar
Svärta : Av ►
Dynamisk kontrast : Medium
Skuggdetalj : -2
Gamma : 0
Expertmönster : Av
Läget Endast RGB : Av
Färgområde : Ursprunglig
Svärta (Av / Mörk / Mörkare / Mörkast) ■ : Välj
svärtningsnivå för att ändra skärmdjupet.
Dynamisk kontrast (Av / Låg / Medium / Hög) ■ : Justera
skärmens kontrast.
Skuggdetalj (-2~+2) ■ : Ökar ljusstyrkan på mörka bilder.
Avaktiverad i
✎
Gamma ■ : Ändrar primärfärgernas intensitet.
Expertmönster (Av / Mönster 1 / Mönster 2) ■ :
Genom att köra funktionen Expertmönster kan bilden
kalibreras utan en generator eller ett filter. Om OSD-menyn
försvinner eller en annan meny än Bild öppnas sparas
kalibreringen och fönstret Expertmönster stängs.
När ✎Expertmönster körs hörs inget ljud.
Endast aktiverat i lägena DTV, Component och
✎
HDMI.
Läget Endast RGB (Av / Röd / Grön / Blå) ■ : Du kan
ändra Färg eller To n för Röd, Grön eller Blå för bilden
från en extern enhet (DVD-spelare, hemmabio, etc.).
Färgområde (Auto / Ursprunglig / Anpassad) ■ : Ändra
den färgrymd som finns för att skapa bilden. För att
justera Färg, Röd, Grön, Blå och Återställ, ställer du in
Färgområde till Anpassa.
PC-laget.
Dynamisk kontrast,
▼
U
Flytta E Enter R Tillbaka
Page 78
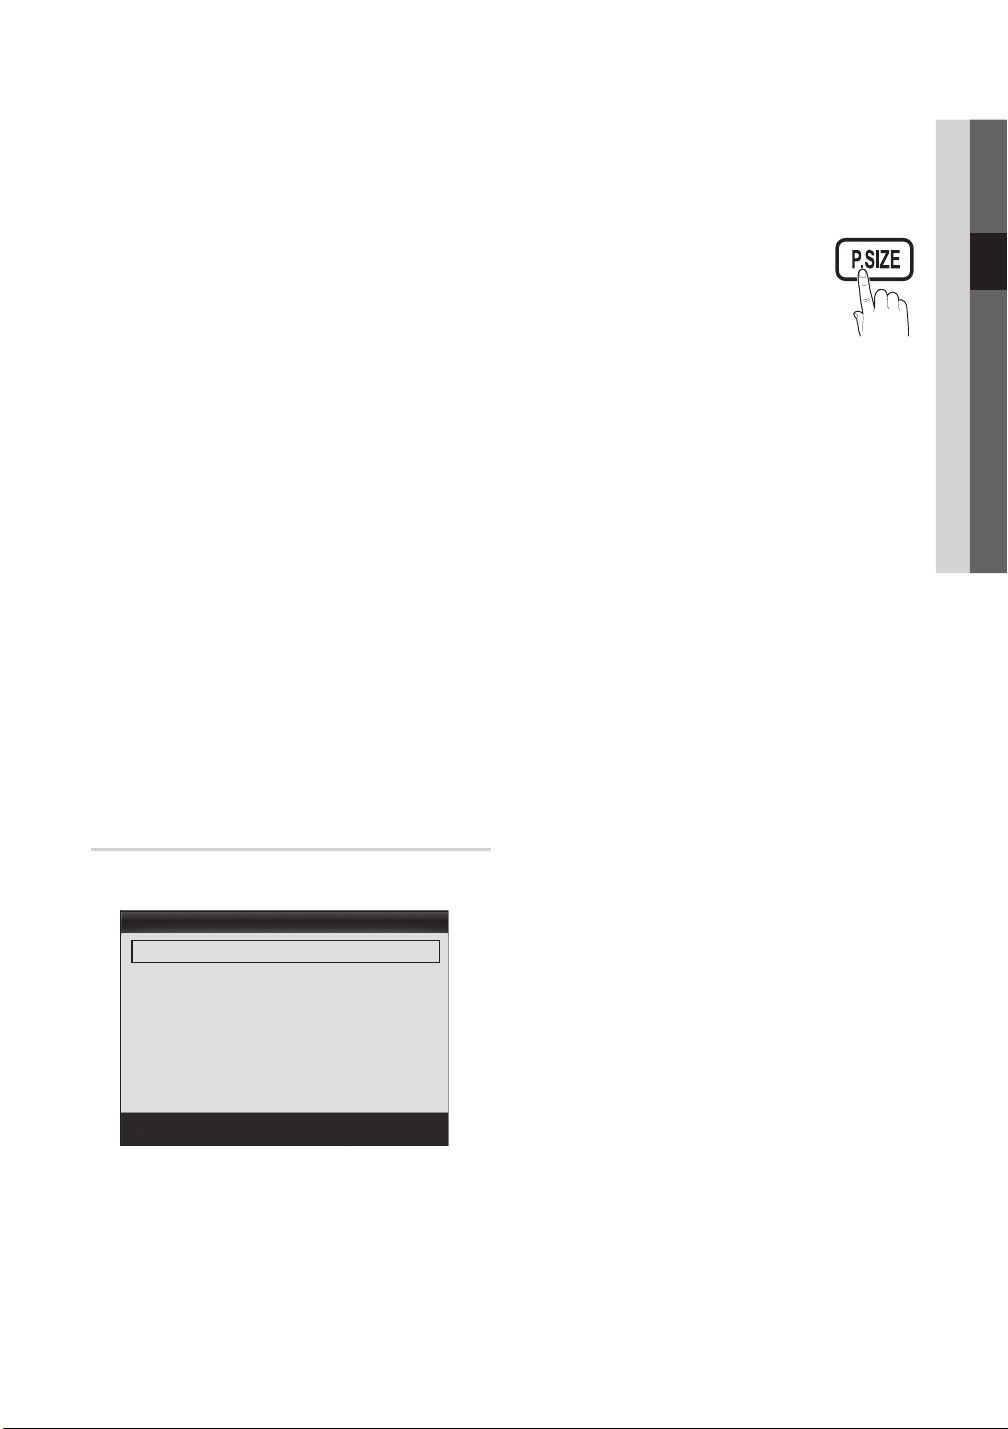
17
Svenska
03 Grundfunktioner
Vitbalans ■ : Ändra färgtemperaturen för mer naturlig bild.
R-Offset / G-Offset / B-Offset: Ändra respektive färgs
(röd, grön, blå) djup.
R-Gain / G-Gain / B-Gain: Ändra respektive färgs (röd,
grön, blå) ljusstyrka.
Återställ: Återställer Vitbalans till standardvärdena.
10 p vitbalans (Av / På) ■ : Kontrollerar vitbalansen i
10-punktsintervaller genom att justera röd, grön och blå
ljusstyrka.
Tillgänglig när bildläget är inställt på
✎
den externa ingången är inställd på alla ingångar.
Vissa externa enheter kanske inte stöder den här
✎
funktionen.
Intervall: Välj intervall att justera.
Röd: Justerar nivån för rött.
Grön: Justerar nivån för grönt.
Blå: Justerar nivån för blått.
Återställ: Återställer 10p vitbalans till standardvärdena.
Hudfärg ■ : Förstärker rosa ”Hudfärg”.
Kantförbättring (av / på) ■ : Förstärker objektets kanter.
xvYCC (Av / På) ■ : Om du aktiverar xvYCC-läget ökar
detalj- och färgområdet när du tittar på filmer från en
extern enhet (t.ex. en DVD-spelare) som är ansluten till
HDMI- eller Komponentingångarna.
✎
Tillgänglig när bildläget är inställt på
den externa ingången är inställd på HDMI eller
Komponent.
Vissa externa enheter kanske inte stöder den här
✎
funktionen.
Film och när
Film och när
Bildalternativ
I PC-läget kan du bara ändra ✎Färgton, Storlek och
Autoskyddstid.
Bildalternativ
Färgton : Normal ►
Storlek : Auto Wide
Skärmläge : 16:9
Filter för dig. brus : Auto
MPEG-bruslter : Auto
HDMI svärta : Normal
Filmläge : Av
▼
U
Flytta E Enter R Tillbaka
Färgton (Sval / Normal / Varm1 / Varm2) ■
Varm1
✎
och Varm2 avaktiveras när bildläget är
Dynamisk.
Inställningarna kan ändras och lagras för varje
✎
extern enhet som är ansluten till en ingång på TV:n.
Storlek ■ : Kabel-TV-boxen /
satellitmottagaren kan ha en egen
uppsättning skärmstorlekar. Dock
rekommenderar vi att du använder
läget 16:9 för det mesta.
Auto Wide: Justerar automatiskt
bildstorleken till förhållandet 16:9.
16:9 : Justerar bildstorleken till 16:9 för DVD eller
bredbildssändningar.
Wide Zoom: Förstorar bildstorleken mer än 4:3.
Ändrar positionen genom att använda knapparna
✎
▲, ▼.
Zoom: Förstorar bredbild i storleken 16:9 vertikalt för att
anpassas till skärmstorleken.
✎
Ändrar positionen eller storleken genom att
använda knapparna ▲, ▼.
4:3 : Standardinställningen för en film eller normal
sändning.
✎
Titta inte för läge i formatet 4:3. Spår av kanter
som visas till vänster, höger och i mitten på
skärmen kan brännas in i skärmen och det täcks
inte av garantin.
Anpassa till skärm: Visar hela bilden utan att beskära
när insignalen HDMI (720p / 1080i / 1080p) eller
Komponent (1080i / 1080p) används.
✎
OBS!
Efter att du valt att anpassa till skärm i läget HDMI
x
(1080i / 1080p) eller Komponent (1080i / 1080p) kan
du behöva centrera bilden:
1. Tryck på ◄ eller ► för att välja Position.
2. Tryck på knappen ENTER
3. Tryck på knappen ▲, ▼, ◄ eller ► för att flytta
bilden.
Alternativen för bildstorleken kan variera beroende
x
på storleken på källan för indata.
De tillgängliga alternativen kan variera beroende på
x
valt läge.
I PC-läget kan endast läget
x
Inställningarna kan ändras och lagras för varje extern
x
enhet som är ansluten till en ingång på TV:n
Om du använder funktionen
x
med HDMI 720p-ingång kommer 1 rad att bli
beskuren överst, nederst, till vänster och till höger
som i överskanningsfunktionen.
Skärmläge (16:9 / Wide Zoom / Zoom / 4:3) ■ :
Endast tillgängligt när bildstorleken är inställd på Auto
Wide. Du kan bestämma önskad bildstorlek som 4:3
WSS (Wide Screen Service) eller originalstorlek. Olika
europeiska länder kräver olika bildstorlekar.
Ej tillgängligt i läget PC, Component eller HDMI.
✎
E
.
16:9 och 4:3 ändras.
Anpassa till skärm
Page 79
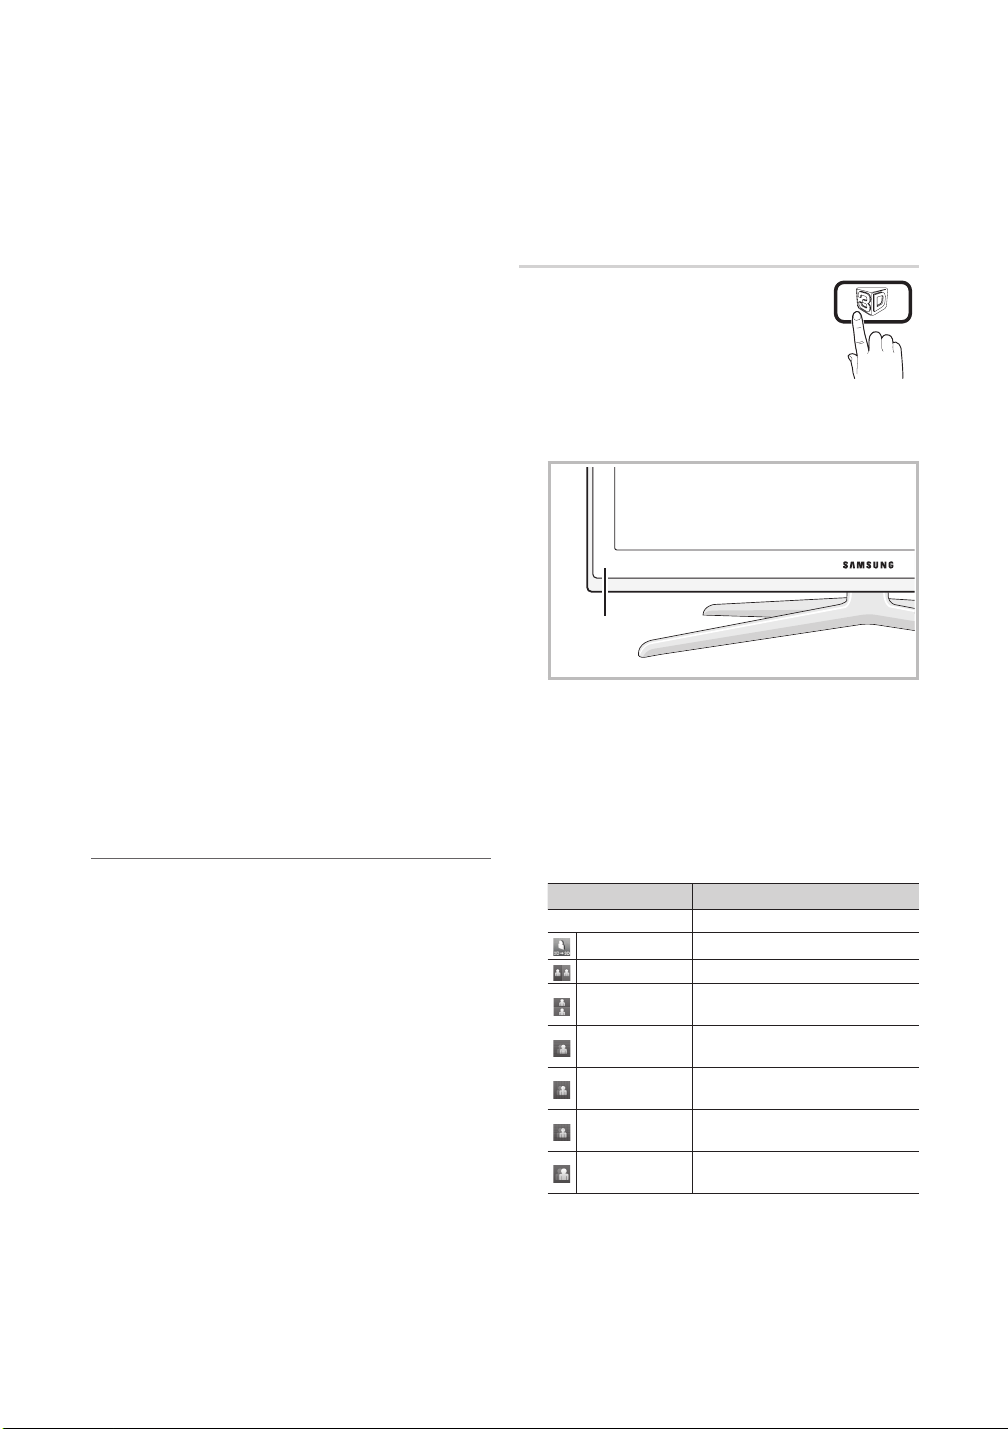
18
Svenska
Grundfunktioner
Filter för dig. brus (Av / Låg / Medium / Hög / Auto / ■
Autovisualisering): Om sändningssignalen är svag kan det
uppstå störningar eller spökbilder på skärmen. Välj vart och ett
av alternativen tills du får bästa bildkvaliteten.
Autovisualisering: När du ändrar analoga kanaler visas
signalljusstyrkan.
Endast tillgänglig för analoga kanaler.
✎
När fältet är grönt tar du emot bästa möjliga signal.
✎
MPEG-brusfilter (Av / Låg / Medium / Hög / Auto) ■ : Minskar
MPEG-bruset för att få bättre bildkvalitet.
Avaktiverad i PC-läget.
✎
HDMI svärta (Normal / Låg) ■ : Väljer svärtningsnivå på
skärmen för att justera skärmdjupet.
Endast tillgängligt i HDMI-läget (RGB-signaler).
✎
Filmläge (Av / Auto1 / Auto2) ■ : Ställer in TV:n för att
automatiskt känna av och bearbeta filmsignaler från alla källor
och justera till optimal bildkvalitet.
Tillgängligt i lägena TV, AV, COMPONENT (480i / 1080i)
✎
och HDMI (480i / 1080i).
Motion Plus (Av / Klar / Standard / Smooth /Anpassa / ■
Demo): Tar bort fördröjningar från snabba scener med mycket
rörelse för att ge en klarare bild.
✎
Om du aktiverar
skärmen. Om detta händer ska du ställa in Motion Plus
som Av.
Brusreducering: Ändrar brusreduceringsnivå för videokällor.
Skakreducering: Ändrar nivån på rörelseoskärpa för
videokällor när du spelar film.
Återställ: Återställ anpassade inställningar.
Autoskyddstid (2 timmar/4 timmar/8 timmar/10 timmar/ ■
Av): Om samma bild ligger kvar på skärmen fungerar det
automatiska skyddet mot bildskärmsbränning.
Motion Plus kan det uppstå brus på
TV-visning med 3D-funktion ¦
VIKTIG HÄLSO- OCH SÄKERHETSINFORMATION FÖR
3D-BILDER.
Läs och se till att du förstår följande
innan du använder TV:ns 3D-funktion.
[
VARNING
Vissa tittare kan uppleva att det känns obekvämt
x
när de tittar på 3D-TV och att de känner yrsel,
illamående och huvudvärk. Om du upplever sådana
symptom ska du omedelbart sluta titta på 3D-TV, ta
bort 3D-glasögonen och vila dig.
Om du tittar på 3D-bilder under en längre tid kan
x
det ge trötta ögon. Om du upplever att du blir trött i
ögongen ska du sluta titta på 3D-TV, ta bort 3Dglasögonen och vila dig.
En vuxen ska med jämna mellanrum titta till barn
x
som använder 3D-funktionen. Om de säger
sig känna av trötta ögon, huvudvärk, yrsel eller
illamående ska barnet sluta titta på 3D-TV och vila.
Använd inte 3D-glasögon i andra syften (exempelvis som
x
vanliga glasögon, solglasögon, skyddsglasögon etc).
säkerhetsinformation
Använd inte 3D-funktionen eller 3D-glasögon under
x
tiden du går eller rör dig. Om du använder 3Dfunktionen eller 3D-glasögon under tiden du rör dig
kan det orsaka skador på grund av att du kör på
föremål, snubblar och/eller faller.
3D
Den här spännande, nya funktionen gör det
möjligt för dig att visa 3D-innehåll. För att du
fullt ut ska kunna använda den här funktionen
måste du köpa ett par av Samsungs 3Dglasögon (SSG-2100AB, SSG-2200AR, SSG2200KR) för att kunna visa 3D-video.
Samsungs 3D-glasögon säljs separat. För
mer detaljerad inköpsinformation, kontakta återförsäljaren där
du köpte den här TV:n.
3D emitter
Om det finns ett hinder mellan sändaren och 3D-
✎
glasögongen kan du inte uppnå full 3D-effekt.
3D-läge ■ : Välj 3D-ingångsformat.
Om du vill uppleva 3D-effekten fullt ut ska du först
✎
ta på dig 3D-glasögonen och sedan välja 3D-läge
från listan för att få optimal 3D-upplevelse.
När du tittar på 3D-bilder ska du slå på 3D-
✎
glasögonen.
3D-läge Användning
Av Slår av funktionen 3D-effekt.
2D → 3D
Sida vid sida Visar två bilder intill varandra.
Överst och
nederst
Radvis
Vertikala
ränder
Schackrutigt
Frekvens
Ändrar en 2D-bild till 3D.
Visar en bild ovanför en annan.
Visar bilderna för vänster och
höger öga alternativt i rader.
Visar bilderna för vänster och
höger öga alternativt i kolumner.
Visar bilderna för vänster och
höger öga alternativt i pixlar.
Visar bilderna för vänster och
höger öga alternativt i ramar.
Page 80
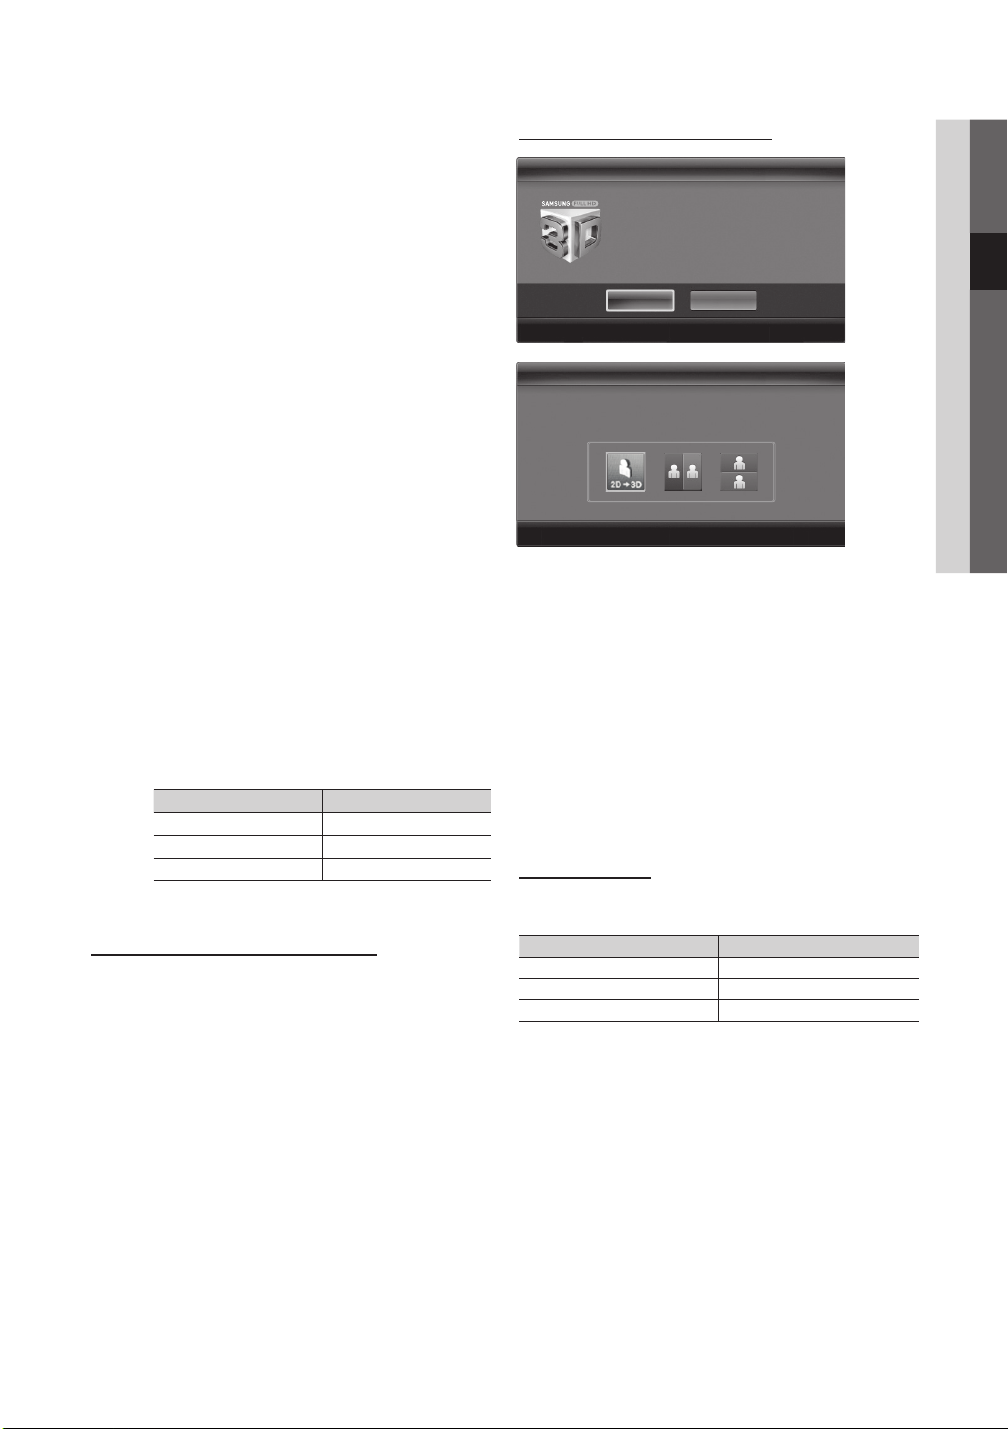
19
Svenska
03 Grundfunktioner
“ ✎Sida vid sida” och “Överst och nederst” är
tillgängliga när upplösningen är 720p, 1080i och
1080p i läget DTV, HDMI och USB är inställt med
anslutning via HDMI-/DVI-kabel.
“Vertikala ränder”, “Radvis” och “Schackrutigt”
✎
är tillgängliga när upplösningen är inställd på PCanslutning med HDMI-/DVI-kabel.
“Frekvens” visar frekvensen (endast 60Hz) när
✎
upplösningen är inställd på PC.
3D ■ → 2D (Av / På): Visar bilden enbart för vänster öga.
✎
Den här funktionen avaktiveras när
in till “2D → 3D” eller Av.
3D-synvinkel ■ : Generell justering av 3D-perspektiv.
Den här funktionen avaktiveras när ✎3D-läge ställs
in till “2D → 3D” eller Av.
Djup ■ : Justerar fokus/djup i läget “2D → 3D”.
✎
Den här funktionen avaktiveras när
“2D → 3D”.
Bildkorrigering ■ : Justerar bilder för vänster och höger
öga.
3D Autovisning (Av / På) ■ : Om 3D autovisning är inställt
på På, växlar formatet “Side-By-Side” (Sida vid sida)
för HDMI-signalen med en av upplösningarna nedan
mot 3D. Här måste korrekt 3D-information skickas från
standard-HDMI 3D-format.
✎
Om det inträffar ett 3D-fel till följd av ett 3Dinformationsfel ska du ställa in 3D Autovisning
till Av och manuellt välja ett 3D-läge med 3Dknappen eller motsvarande meny.
Upplösningsstöd (endast 16:9)
✎
Upplösning Frekvens (Hz)
1280 x 720p 50 / 60 Hz
1920 x 1080i 50 / 60 Hz
1920 x 1080p 24 / 30 / 50 / 60 Hz
3D-optimera ■ : Generell justering av 3D-effekt.
Upplösning som stöds för HDMI PC-läge
Upplösningen för HDMI PC-läget är optimerad till 1920 x
1080 ingång.
En ingående upplösning som inte är 1920 x 1080 kanske
inte visas korrekt i 3D-visning eller helskärmsläge.
3D-läge ställs
3D-läge är
(modellberoende) Titta på 3D-bilden
3D
Om du vill titta med 3D ska du ta på dig
glasögonen och trycka på strömknappen
på dem. Om du tittar på röliga 3D-bilder
på TV:n under längre perioder kan det
orsaka trötthet i ögonen och/eller yrsel.
OK
Avbryt
U
Flytta E Enter R Avsluta
3D
Välj önskad ikon för bild på skärmen med hjälp av
Välj önskad ikon för bild på skärmen med hjälp av
knapparna VÄNSTER / HÖGER på fjärrkontrollen.
knapparna VÄNSTER / HÖGER på fjärrkontrollen.
U
Flytta E Enter R Avsluta
1. Tryck på knappen CONTENT så visas menyn
Innehållsvy.
2. Tryck på knappen ◄ eller ► och välj sedan 3D.
Om du vill titta med 3D ska du ta på dig glasögonen och
trycka på strömknappen på dem. Om du tittar på röliga
3D-bilder på TV:n under längre perioder kan det orsaka
trötthet i ögonen och/eller yrsel.
3. Välj OK och tryck sedan på knappen ENTERE.
4. Genom att använda knapparna ◄ eller ► på
fjärrkontrollen väljer du 3D-läge för den bild du vill visa.
Vissa 3D-lägen kanske inte är tillgängliga
✎
beroende på format för bildkällan.
Format som stöds och användningsspecifikationer för
standard-HDMI 3D
✎
3D-formaten som anges nedan rekommenderas av
HDMI-sammanslutningen och måste stödjas.
Källsignalformat Standard HDMI 1.4 3D
1920x1080p@24Hz x 2 1920x2205p@24Hz
1280x720p@60Hz x 2 1280x1470p@60Hz
1280x720p@50Hz x 2 1280x1470p@50Hz
Läget växlar automatiskt till 3D-läge för 3D-videoingång i ett
av de format som anges ovan.
För standard-HDMI 3D-format med 24Hz, optimeras TV:n
enligt följande:
Visningsläge för upplösning först: Om Auto – Motion
Plus är inställt på Av, Klar eller Standard, kan du
titta på video med högsta, optimerade upplösning för
källvideons upplösning.
Judder Visningsläge för skakreducering: När Auto –
Motion Plus är inställd på Mjuk eller Personlig, kan
du titta på en mjuk bild utan skakningar.
Page 81

20
Svenska
Grundfunktioner
Innan du använder 3D-funktionen...
✎
OBS!
Vid visning av 3D-bilder under en fluorescerande
x
lampa (50Hz ~ 60Hz) eller 3 våglängdslampa, kan du
uppleva ett litet flimmer på skärmen. I så fall ska du
dämpa belysningen eller stänga av lampan.
3D-läget är automatiskt avaktiverat i följande fall:
x
när du ändrar kanal eller ingångskälla, eller öppnar
Media Play eller Internet@TV.
Vissa bildfunktioner är avaktiverade i
x
PIP (BIB)
x
3D-glasögon från andra tillverkare kanske inte stöds.
x
När TV:n initialt slås på, så kan det ta lite tid tills 3D-
x
visningen är optimerad.
3D-glasögonen kanske inte fungerar korrekt om
x
det finns en annan 3D-produkt eller elektronisk
enhet som har slagits på nära glasögonen eller
TV:n. Om det uppstår problem ska du förvara andra
elektroniska enheter på så långt avstånd som möjligt
från 3D-glasögonen.
Foto
x
Om du ligger på sidan under tiden du tittar på TV
x
med 3D-glasögon kan bilden bli mörk eller kanske
inte visas som den ska.
Se till att hålla dig inom visningsvinkeln och det
x
optimala TV-visningsavståndet när du tittar på 3Dbi lder.
Det optimala visningsavståndet ska vara tre gånger eller
x
mer över skärmens höjd. Vi rekommenderar att du sitter
med ögonen i en nivå där du tittar rakt på skärmen.
och datasändning stöds inte i 3D-läge.
för Media Play visas bara i läget “2D → 3D”.
Annars kanske du inte kan se ordentliga 3D- –
effekter.
3D-läge.
Bildåterställning (OK / Avbryt)
Återställer aktuellt bildläge till dess standardinställningar.
Installera TV: n med datorn ¦
Ställ in ingångskällan på datorn.
Autojustering
Ändrar frekvensvärden / positioner och fininställer
inställningar automatiskt.
✎
Ej tillgängligt vid anslutning via HDMI/DVI-kabel.
t
Skärm
Grov / Fin ■ : Tar bort eller minskar bildstörningar. Om
inte störningen försvinner vid fininställningen, justera
då frekvensinställningen (Grov) och gör sedan om
fininställningen. När störningen har reducerats, ställer du
in bilden igen så att den är placerad mitt på bildskärmen.
Position ■ : Ändra PC-skärmens position med
pilknapparna (▲ / ▼ / ◄ / ►).
Återställ bild ■ : Återställer bilden till standardinställningar.
Använda TV:n som datorskärm (PC)
Installera programvaran (baserad på Windows XP)
Hur det faktiskt ser ut på datorns skärm beror på vilken
Windows-version och vilket videokort datorn har, men
samma grundinställningar gäller nästan alltid. (Om inte
kontaktar du din datortillverkare eller din Samsungåterförsäljare.)
1. Klicka på ”Kontrollpanelen” i Windows startmeny.
2. Klicka på ”Utseende och teman” i fönstret
”Kontrollpanelen” för att öppna en dialogruta.
3. Klicka på ”Bildskärm” för att öppna en dialogruta.
4. Gå till fliken ”Inställningar” i den dialogruta som öppnats.
Rätt storleksinställning (upplösning) [Optimalt: 1920 X y
1080 pixlar]
Om det finns ett alternativ för vertikal frekvens i y
dialogrutan för bildskärmsinställningar är det korrekta
värdet ”60” eller ”60 Hz”. I annat fall klickar du bara på
”OK” och lämnar dialogrutan.
Page 82
21
Svenska
03 Grundfunktioner
Ljudmeny
Ändra förinställt ljudläge ¦
SRS TheaterSound
Standard ■ : Väljer normalt ljudläge.
Musik ■ : Förstärker musik och inte röst.
Film ■ : Ger det bästa filmljudet.
Klar röst ■ : Förstärker röster i förhållande till andra ljud.
Förstärk ■ : Ökar intensiteten på högfrekvensljud så att
personer med nedsatt hörsel kan höra bättre.
t
Ändra ljudinställningar ¦
Ljudspråk
(endast digitala kanaler)
Ändra standardinställning för ljudspråk.
Det tillgängliga språket kan skilja sig beroende på sändning.
✎
Ljudformat (MPEG / Dolby Digital 5.1)
(endast digitala kanaler)
När ljudet sänds ut från både huvudhögtalaren och
ljudmottagaren kan det uppstå ett eko på grund av
dekoderhastigheten mellan huvudhögtalare och
ljudmottagare. I så fall ska du använda funktionen
TV-högtalare.
Alternativet Ljudformat ✎ kan skilja sig beroende på
sändning. 5.1-kanals Dolby digitalljud är endast tillgängligt
vid anslutning till en extern högtalare med
enoptisk kabel.
Equalizer
Ändrar ljudläget (endast standardljudläge).
Balans V/H ■ : Ändrar balansen mellan höger och vänster
högtalare.
100Hz / 300Hz / 1kHz / 3kHz / 10kHz ■
(bandbreddsjustering): Ändrar nivån på specifika
bandbreddsfrekvenser.
Återställ ■ : Återställer equalizern till standardinställningar.
Ljudsystem, etc. ¦
SRS TruSurround HD (Av / På)
(endast standardljudläge)
Den här funktionen ger en virtuell 5.1-kanals
surroundljudsupplevelse via ett par högtalare eller hörlurar
tack vare HRTF-teknik (Head Related Transfer Function).
t
SRS TruDialog (Av / På)
(endast standardljudläge)
Med den här funktionen kan du öka intensiteten på en röst
i förhållande till bakgrundsmusik eller ljudeffekter så att
dialogen kan höras bättre under ett program.
Ljudbeskrivning
(ej tillgängligt på alla platser) (endast digitala
kanaler)
Funktionen hanterar ljudströmmen för
ljudbeskrivningen (AD) när den skickas med
huvudljudet från avsändaren.
Ljudbeskrivning (Av / På) ■ : Slår av och
på funktionen för ljudbeskrivning.
Volym ■ : Ändra volymen för ljudbeskrivning.
Autovolym (Av / Normal / Natt)
För equalize av volymnivå på respektive kanal, ställ in som
Normal.
Natt ■ : Det här läget ger en förbättrad ljudupplevelse
jämfört med läget Normal och ger nästan inget oljud.
Det är användbart på natten.
Högtalarval (Extern Högtalare /
TV-Högtalare)
Ett eko kan uppstå på grund av annan avkodningshastighet
mellan huvudhögtalaren och ljudmottagaren. I så fall ska du
ställa in TV:n till Extern Högtalare.
✎
Högtalarval är inställt på Extern Högtalare ska du
När
använda dessa inställningar.
TV-Högtalare: Av, Extern Högtalare: På
x
När ✎Högtalarval är inställt på TV-Högtalare ska du
använda dessa inställningar.
TV-Högtalare: På, Extern Högtalare: Av
x
Om det inte finns någon videosignal kommer båda
✎
högtalarna att vara tysta.
Page 83

22
Svenska
Grundfunktioner
Extra inställning
(endast digitala kanaler)
DTV-ljudnivå (MPEG / HE-AAC) ■ : Med den här
funktionen kan du minska skillnaderna för en röstsignal
(där en av signalerna tas emot under en digital TVsändning) till önskad nivå.
Beroende på typ av sändningssignal kan
✎
HE-AAC justeras mellan -10dB och 0dB.
Ändra i intervallet 0 och -10 för att öka eller minska
✎
volymen.
SPDIF-utmatning ■ : SPDIF (Sony Philips Digital InterFace)
används för att ge digitalt ljud, minska störningar till
högtalare och olika digitala enheter som exempelvis en
DVD-spelare.
Ljudformat: Under mottagning av en digital TV-sändning
kan du välja digitalt ljudformat (SPDIF) bland alternativen
PCM och Dolby Digital.
Genom att ansluta 5.1-kanals högtalare i en Dolby
✎
Digital-inställning kan du maximera den interaktiva
3D-ljudupplevelsen.
Ljudfördröjning: Justera skillnader mellan ljud och bild
när du tittar på TV eller video och lyssnar på digitalt ljud
via en extern enhet som exempelvis en AV-mottagare
(0ms ~ 250ms).
Dolby Digital-komp (Line / RF) ■ : Den här funktionen
minimerar signalskillnader mellan en dolby digital-signal
och en röstsignal (t.ex. MPEG-ljud, HE-AAC, ATV-ljud).
✎
Line för att få ett dynamiskt ljud och RF för
Välj
att minska skillnaden mellan högt och lågt ljud
nattetid.
Line: Ställ in utnivå för signaler som är högre eller mindre
än -31dB (referens) antingen till -20dB eller -31dB.
RF: Ställ in utnivå för signaler som är högre eller mindre
än -20dB (referens) antingen till -10dB eller -20dB.
MPEG /
Om stereosignalen är svag och automatisk växling
✎
förekommer, byter du till mono.
Endast aktiverad i stereoljudsignal.
✎
Endast tillgänglig när källan för ✎ingångar är inställt på TV.
Inställningsmeny
Ställa klockan ¦
Tid
Klocka ■ : Att ställa klockan är nödvändigt för att kunna
använda olika timerfunktioner på TV:n.
O
Den aktuella tiden visas varje gång du trycker på
knappen INFO.
✎
Om du drar ur strömsladden måste du ställa
klockan igen.
Klockläge (Auto / Manuellt)
Beroende på sändningsstation och -signal kanske
✎
den automatiska tiden inte ställs som den ska. I så
fall ska du ställa tiden manuellt.
Antennen måste anslutas för att ställa tiden
✎
automatiskt.
Ställ klockan: Ställ in Dag, Månad, År, Timme och
Minut manuellt.
✎
Endast tillgängligt när
Manuellt.
Tidszon: Du kan välja din tidszon.
✎
Den här funktionen är endast tillgänglig när
Klockläge är inställt på Auto.
Beroende på sändningsstation och -signal kanske
✎
den automatiska tiden inte ställs som den ska. Om
detta inträffar ska du ställa tiden manuellt.
Klockläge är inställt på
Ljudåterställning (OK / Avbryt)
Återställ alla ljudinställningar till fabriksstandard.
Välja ljudläge ¦
När du ställer in Dual l-ll visas det aktuella ljudläget på
skärmen.
Ljudtyp Dual l-ll Standard
A2
Stereo
NICAM
Stereo
Stereo
Stereo
t
Mono Mono
Stereo ↔ Mono
Dual
Mono Mono
Dual
Dual I ↔ Dual II
Mono ↔ Stereo
Mono → Dual I
Dual II
Automatisk
ändring
Dual I
Automatisk
ändring
Dual I
Använda sovtimern ¦
Sovtimer ■
en förinställd tidsperiod. (30, 60, 90, 120, 150 eller 180
minuter).
t
För att avbryta
✎
: Stänger automatiskt av TV:n efter
Sovtimer väljer du Av.
Page 84
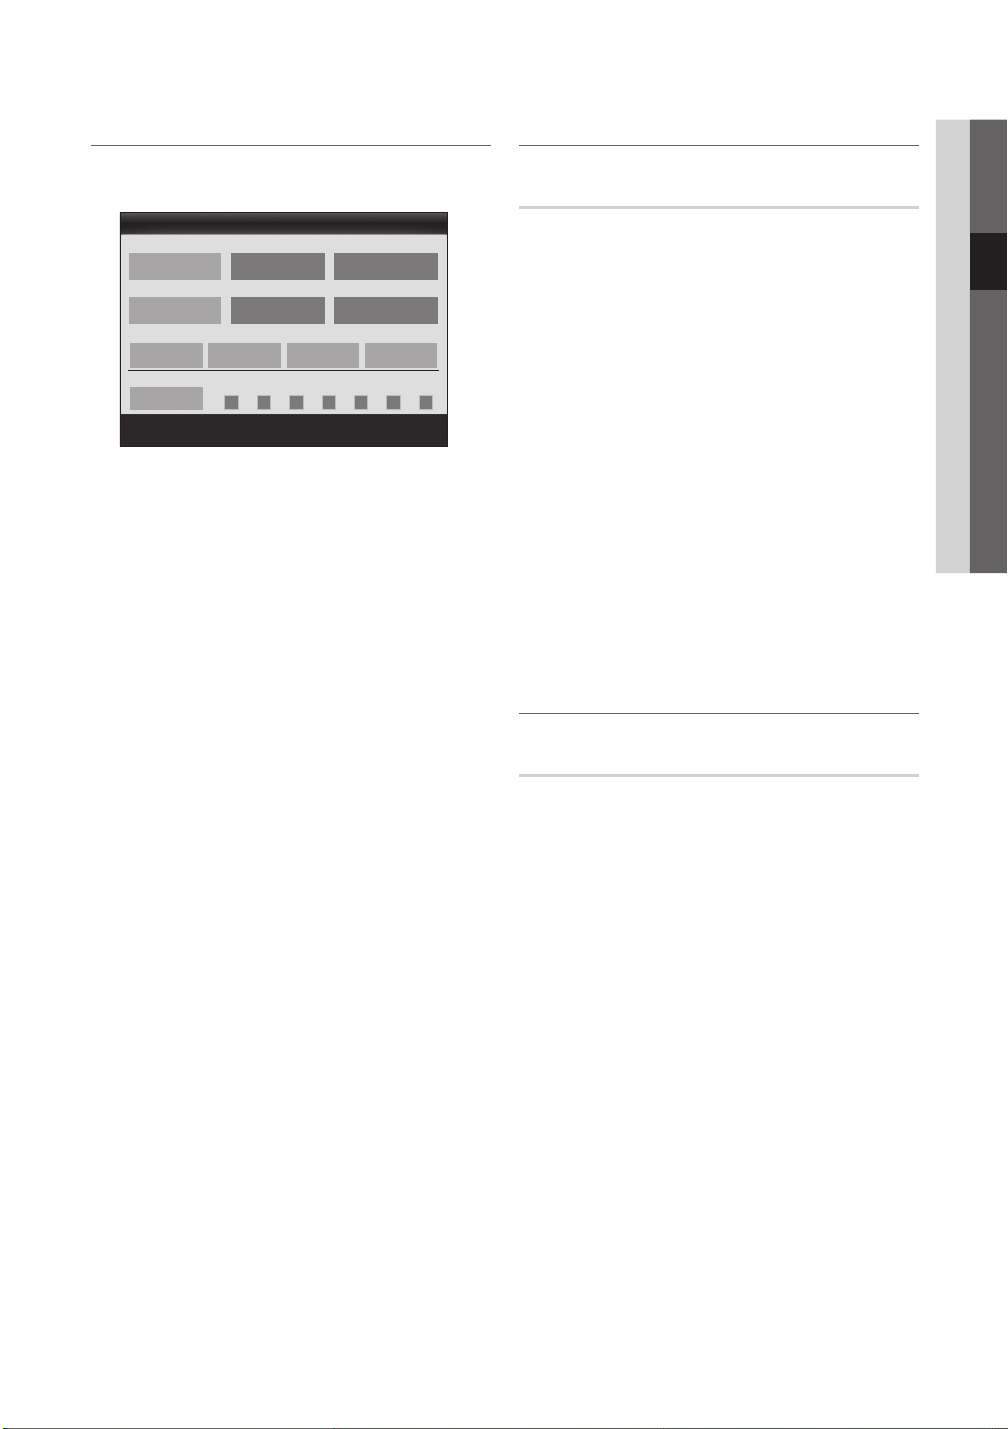
23
Svenska
03 Grundfunktioner
Ställa in timern som På / Av ¦
10 TV AT V1
00 00
▲
▼
00 00
▲
▼
Timer 1 / Timer 2 / Timer 3 ■ : Tre olika timerinställningar
kan göras för på/av. Ställ in klockan först!
Påslagningstid
Inaktivera
Avstängningstid
Inaktivera
Volym
Upprepa
Once
Påslagningstid / Avstängningstid: Välj timme, minut
och aktivera/inaktivera. (För att aktivera timern med
valda inställningar väljer du Aktivera.)
Volym: Välj önskad ljudnivå.
Källa: Välj TV- eller USB-innehåll som ska spelas när
TV:n slås på automatiskt. (USB kan bara väljas när en
USB-enhet är ansluten till TV:n)
Antenn (när Källa är inställt på TV): Välj ATV eller DTV.
Kanal (när Käll är inställt på TV): Välj önskad kanal.
Innehåll (när Källa är inställt på USB): Välj en mapp i
USB-enheten som innehåller musik- eller fotofiler som
ska spelas upp när TV:n slås på automatiskt.
✎
OBS!
Om det inte finns några musikfiler på USB-
x
enheten eller om mappen som innehåller
musikfiler inte har valt kommer inte
timerfunktionen att fungera som den ska.
Om det bara finns en fotofil på USB-
x
kan inget bildspel visas.
Om mappnamnet är för långt kan mappen inte
x
väljas.
Varje USB du använder tilldelas en egen mapp.
x
Om du använder mer än en USB av samma typ
ska du se till att mapparna som tilldelas USBenheterna har olika namn.
Upprepa: Välj En gång, Varje dag, Mån~Fre, Mån~Lör,
Lör~Sön eller Manuellt. Om du väljer Manuellt, kan du
ange den dag du vill aktivera timern.
Märket
✎ c
✎
Automatisk avstängning (endast tillgänglig när TV:n
slås på av timern): TV:n kommer att slås av automatiskt
efter 3 timmar, om den lämnas i viloläge, för att undvika
överhettning.
Timer 1
Källa Antenn Kanal
Sön Mån Tis Ons To r Fre Lör
L
Flytta
U Justera E
anger att dagen är vald.
Enter R Tillbaka
enheten
Låsprogram ¦
Säkerhet
Inmatning av PIN-kod visas innan inställningsskärmen.
✎
Ange den 4-siffriga PIN-koden, standardkoden är
✎
”0-0-0-0”. Ändra PIN-koden med alternativet Ändra
PIN.
Barnlås (Av / På) ■ : Lås kanaler i Kanalhantering för att
förhindra obehöriga användare, t.ex. barn, att titta på
olämpliga program.
Endast tillgänglig när källan för
✎
på TV.
Barnlås (Klassificering) ■ : Förhindrar med hjälp av
en användarinställd 4-siffrig PIN-kod att obehöriga
användare, t.ex. barn, tittar på olämpliga program.
Tillåt alla: Lås upp alla TV-klassificeringar.
Posterna för
✎
Ändra PIN ■ : Ända det personliga ID-numret som krävs
för TV-inställningar.
Om du har glömt PIN-numret trycker du på
✎
fjärrkontrollens knappar i följande ordning, vilket
återställer PIN-numret till ”0-0-0-0”: POWER (av)
→ MUTE → 8 → 2 → 4 → POWER (på).
Barnlås varierar beroende på land.
ingångar är inställt
Övriga funktioner ¦
Språk
Menyspråk ■ : Ställ in menyspråket.
Text-TV-språk ■ : Ställ in önskat språk för text-tv.
Engelska är standard om det valda språket saknas
✎
för sändningen.
Inställning (Huvudspråk för ljud / Andraspråk för ljud ■
/ Huvudspråk för textning / Andraspråk för textning /
Huvudspråk för text-tv / Andraspråk för text-tv): Välj
ett språk som kommer att vara standardspråket när en
kanal väljs.
Page 85

24
Svenska
Grundfunktioner
Undertext
Använd den här menyn för att ställa in läge
för Undertext.
✎
Undertextfunktionen fungerar inte i
läget Komponent eller HDMI.
Undertext (Av / På) ■ : Slår på och av
undertexter.
Läge (Normal / Nedsatt hörsel) ■ : Ställer in läge för
undertext.
Textningsspråk ■ : Ställer in språk för undertext.
✎
Om programmet du tittar på saknar stöd för
funktionen Nedsatt hörsel aktiveras Normal
automatiskt även om Nedsatt hörsel har valts.
Engelska är standard om det valda språket saknas
✎
för sändningen.
Nätverk (Nätverkstyp / Ställa in nätverk /
Nätverkstest / SWL(Samsung Wireless Link)
/ SWL-anslutning)
Mer information om hur du ställer in alternativ finns i
instruktionerna om nätverksanslutning (sid .28).
Allmänt
Spelläge (Av / På) ■ : När du ansluter till en spelenhet,
t.ex. PlayStation™ eller Xbox™, kan du njuta av en mer
verklig upplevelse genom att välja spelläget.
✎
OBS!
Säkerhetsföreskrifter och begränsningar i x spelläget
Om du vill koppla ur spelkonsolen och ansluta en –
annan extern enhet ska du ställa in Spelläge som
Av i inställningsmenyn.
Om du visar TV-menyn i – Spelläge kan skärmen
skaka något.
Spelläge
x
Efter att du anslutit
x
Spelläge som På för att förhindra dålig bildkvalitet.
Om
x
Standard och läget Ljud är inställt på Anpassa.
är inte tillgängligt i TV-läge och PC-läge.
spelkonsolen ska du ställa in
Spelläge är På: Läget Bild är inställt på
BD Wise (Av / På) ■ : Ger optimal bildkvalitet för Samsung
DVD, Blu-ray och hemmabioprodukter som stöder BD
Wise. Om BD Wise är inställt som På ändras bildläget
automatiskt till optimal upplösning.
Tillgängligt vid anslutning till Samsung-produkter
✎
som stöder BD Wise via en HDMI-kabel.
Menytransparens (Ljus / Mörk) ■ : Ställ in menyns
genomskinlighet.
Melodi (Av / Låg / Medium / Hög) ■ : Ställer in så att en
melodi spelas när TV:n slås på eller av.
FastStart (Av / På) ■ : När TV:n är påslagen slås skärmen
på snabbt med den här funktionen.
Melodi
✎
är avaktiverad när FastStart är På.
Common Interface
CI-meny ■ : Här kan användaren välja alternativ på CAM-
menyn. Välj CI-menyn från menyn PC Card (pc-kort).
Applikationsinfo ■ : Visa information på det CAM som
är isatt på CI-platsen och på ”CI eller CI+ CARD” som
är isatt i CAM. Du kan installera en CAM när som helst,
oavsett om TV:n är på eller av.
1. Köp en CI CAM-modul hos närmaste handlare eller
beställ den via telefon.
2. Sätt in ”CI eller CI+ CARD” i CAM i pilens riktning.
3. För in CAM med ”CI eller CI+ CARD” på Common
Interface-platsen i pilens riktning så att den passas in
parallellt med platsen.
4. Kontrollera om du kan se bilder på en kodad kanal.
Trådlös fjärrkontroll (Av / På)
Slå på eller av trådlösa fjärrkontroller eller ge behörighet för
trådlösa fjärrkontroller.
Visa bild i bild ¦ (PIP)
t
PIP
Titta simultant på TV:n och en extern videokälla. PIP (Bild i
bild) fungerar inte i samma läge.
Page 86
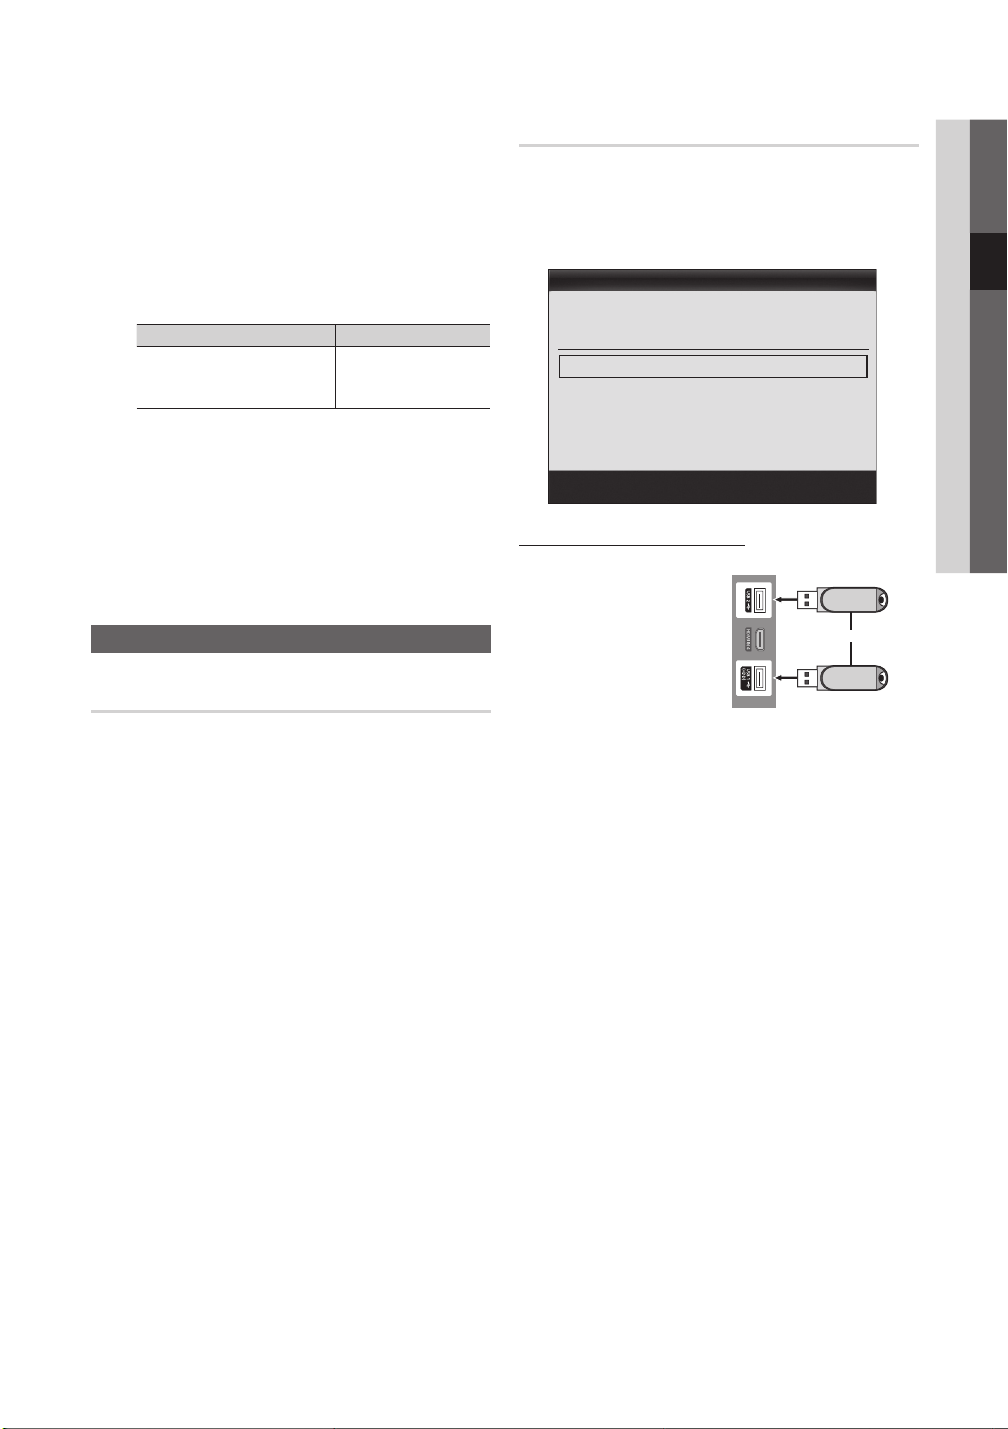
25
Svenska
03 Grundfunktioner
OBS!
✎
Om du slår av TV:n medan du är i läget xPIP (BIB)
försvinner BIB-fönstret.
Du kan märka en viss onaturlighet i
x
underbildsfönstret när du använder huvudskärmen
för att visa ett spel eller karaoke.
När
Internet@TV används kan inte funktionen PIP
x
(BIB) användas.
Inställningar för BIB
x
Huvudbild Underbild
Component, HDMI1/DVI,
HDMI2, HDMI3, HDMI4, PCTV
PIP (Av / På) ■ : Aktivera eller avaktivera BIB-funktionen.
Kanal ■ : Välj kanal för underskärmen.
Storlek ( ■
Õ
/ Ã /
underbilden.
Position ( ■
underbilden.
Ljudval (Huvudbild / Underbild) ■
ljud (Huvudbild / Underbild) i läget PIP.
Ã
À / Œ
/ – / — / œ): Välj en position för
): Välj en storlek för
: Du kan välja önskat
Stödmeny
Självdiagnos
Bildtest (Ja / Nej) ■ : Använd för att kontrollera
bildproblem och om problemet kvarstår ska du
kontrollera färgmönstret.
Ljudtest (Ja / Nej) ■ : Använd den inbyggda melodin för
att kontrollera ljudproblem.
Om du inte hör något ljud från TV-högtalarna ska
✎
du säkerställa att Högtalarval är inställt på TV-
högtalare i menyn Ljud.
Melodin blir svår att höra under testet även om
✎
Högtalarval är inställt på Extern högtalare
eller om ljudet tystas under tiden du trycker på
knappen MUTE.
Signalinformation ■ : (endast digitala kanaler) HDTV-
kanalsmottagningens kvalitet är antingen perfekt eller så
är kanalerna ej tillgängliga. Justera antennen för att öka
signalstyrkan.
Felsökning ■ : Om det är några problem med TV:n ska du
gå till den här beskrivningen.
Om inget av dessa felsökningstips är användbara
✎
ska du kontakta Samsungs kundcenter.
Programuppgradering
Programuppgradering kan utföras via en sändningssignal
eller genom att ladda ner senaste firmware från samsung.
com till ett USB-minne.
Aktuell version programmet är redan installerat på TV:n.
✎
Program visas som ”År / Månad / Dag_Version”.
Programuppgradering
Aktuell version 2010/01/18_000001
Via USB ►
Via online
Via kanal
Uppgradering i standbyläge : Av
Alternativt program ----/--/--/--_------
U
Flytta E Enter R Tillbaka
Installera den senaste versionen
Via USB ■ :
Sätt i en USB-enhet
som innehåller firmwareuppgraderingsfilen som
laddats ner från
www.samsung.com,
till TV:n. Var försiktig
så du inte kopplar ur
strömmen eller plockar
bort USB-enheten
tills uppgraderingen är klar. TV:n slås av och på
automatiskt efter att firmware-uppgraderingen är klar.
När programvaran har uppgraderats återgår video- och
audioinställningar till fabriksstandard. Vi rekommenderar
att du skriver ner de inställningar du har gjort så att du
enkelt kan återställa dem efter uppgraderingen.
Via online ■ : Uppgradera programvaran via Internet.
Konfigurera först nätverket. Mer
✎
detaljerade instruktioner om hur du
använder nätverksinställningen finns under
“Nätverksanslutning”.
Om Internet-anslutningen inte fungerar som den
✎
ska kan anslutningen brytas. Försök att ladda ner
igen. Om problemet kvarstår ska du ladda ner via
USB och uppgradera.
TV-sidopanel
eller
USB-enhet
Page 87

26
Svenska
Grundfunktioner
Via kanal ■ : Uppgradera programvaran med
sändningssignalen.
Om funktionen väljs under programöverföringen
✎
kommer programvaran att sökas automatiskt och
laddar ner.
Tiden som krävs för nedladdning av program
✎
bestäms av signalstatus.
Uppgradering i standbyläge ■ : En manuell uppgradering
utförs automatiskt vid vald tidpunkt. Eftersom enhetens
ström slås på internt, kan skärmen lysa svagt. Det
här fenomenet kan fortsätta i mer än 1 timme, tills
uppgraderingen är klar.
Alternativt program ■ (backup): Visar den programversion
som hämtats Via online. Under programuppgraderingen
kommer den här funktionen att vara aktiverad när
uppgraderingen avbryts från sista steget.
HD-anslutningsguide
Läs den här informationen när du ska ansluta externa
enheter till TV:n.
Kontakta Samsung
Visa den här informationen om TV:n inte fungerar som
den ska eller om du ska uppgradera programvaran. Du
hittar information om vår kundcenter och hur du laddar ner
produkter och program.
Page 88
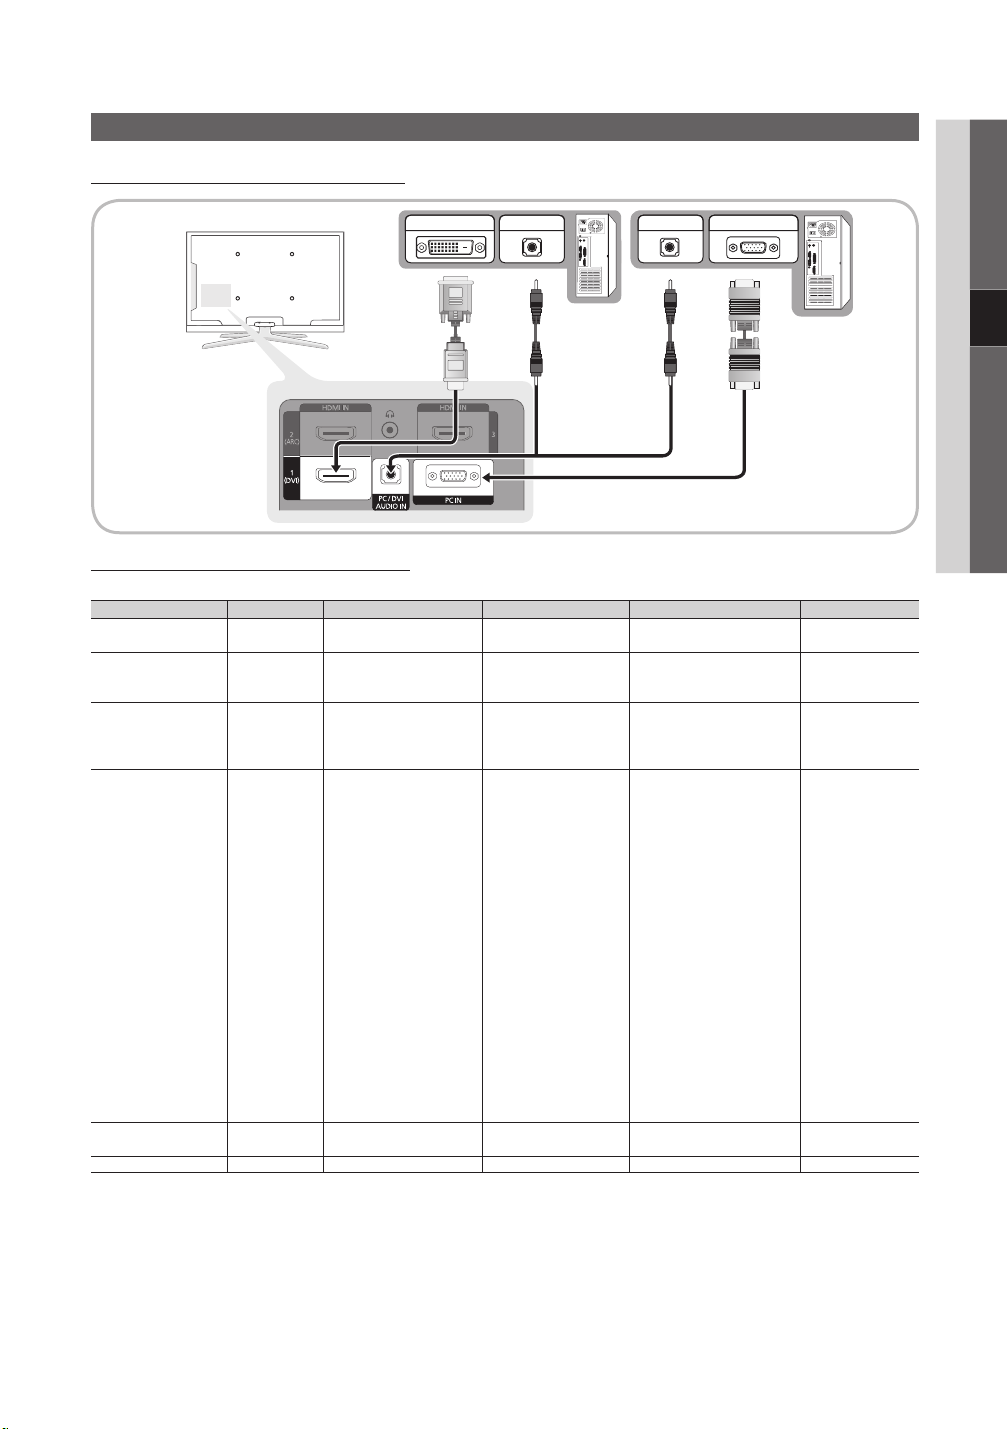
27
Svenska
Avancerade funktioner
Ansluta till en dator
Använda en HDMI/DVI-kabel/en D-sub-kabel
04 Avancerade funktioner
DVI OUT
AUDIO OUT
AUDIO OUT
PC OUT
Visningslägen (D-Sub- och HDMI/DVI-ingång)
Optimal upplösning är 1920 X 1080 @ 60 Hz.
Läge Upplösning Horisontal frekvens (kHz) Vertikal frekvens (Hz) Pixlar, klockhastighet (MHz) Synkpolaritet (H/V)
IBM
MAC
VESA CVT
VESA DMT
VESA GTF
VESA DMT / DTV CEA 1920 x 1080p 67.500 60.000 148.500 +/+
OBS!
✎
640 x 350 31.469 70.086 25.175 +/720 x 400 31.469 70.087 28.322 -/+
640 x 480 35.000 66.667 30.240 -/832 x 624 49.726 74.551 57.284 -/-
1152 x 870 68.681 75.062 100.000 -/-
720 x 576 35.910 59.950 32.750 -/+
1152 x 864 53.783 59.959 81.750 -/+
1280 x 720 56.456 74.777 95.750 -/+
1280 x 960 75.231 74.857 130.000 -/+
640 x 480 31.469 59.940 25.175 -/-
640 x 480 37.861 72.809 31.500 -/-
640 x 480 37.500 75.000 31.500 -/-
800 x 600 37.879 60.317 40.000 +/+
800 x 600 48.077 72.188 50.000 +/+
800 x 600 46.875 75.000 49.500 +/+
1024 x 768 48.363 60.004 65.000 -/1024 x 768 56.476 70.069 75.000 -/1024 x 768 60.023 75.029 78.750 +/+
1152 x 864 67.500 75.000 108.000 +/+
1280 x 1024 63.981 60.020 108.000 +/+
1280 x 1024 79.976 75.025 135.000 +/+
1280 x 800 49.702 59.810 83.500 -/+
1280 x 800 62.795 74.934 106.500 -/+
1280 x 960 60.000 60.000 108.000 +/+
1280 x 720 45.000 60.000 74.250 +/+
1360 x 768 47.712 60.015 85.500 +/+
1440 x 900 55.935 59.887 106.500 -/+
1440 x 900
1600 x 1200
1680 x 1050 65.290 59.954 146.250 -/+
1280 x 720 52.500 70.000 89.040 -/+
1280 x 1024 74.620 70.000 128.943 -/-
70.635
75.000
74.984
60.000
136.750
162.000
Vid en HDMI/DVI-kabelanslutning måste du använda xHDMI IN 1(DVI)-uttaget.
Läget för radsprång kan inte användas.
x
Om ett videoformat som inte är standard väljs, kan det hända att enheten inte fungerar som den ska.
x
Separat läge och kompositläge stöds. SOG(Sync On Green) stöds inte.
x
-/+
+/+
Page 89
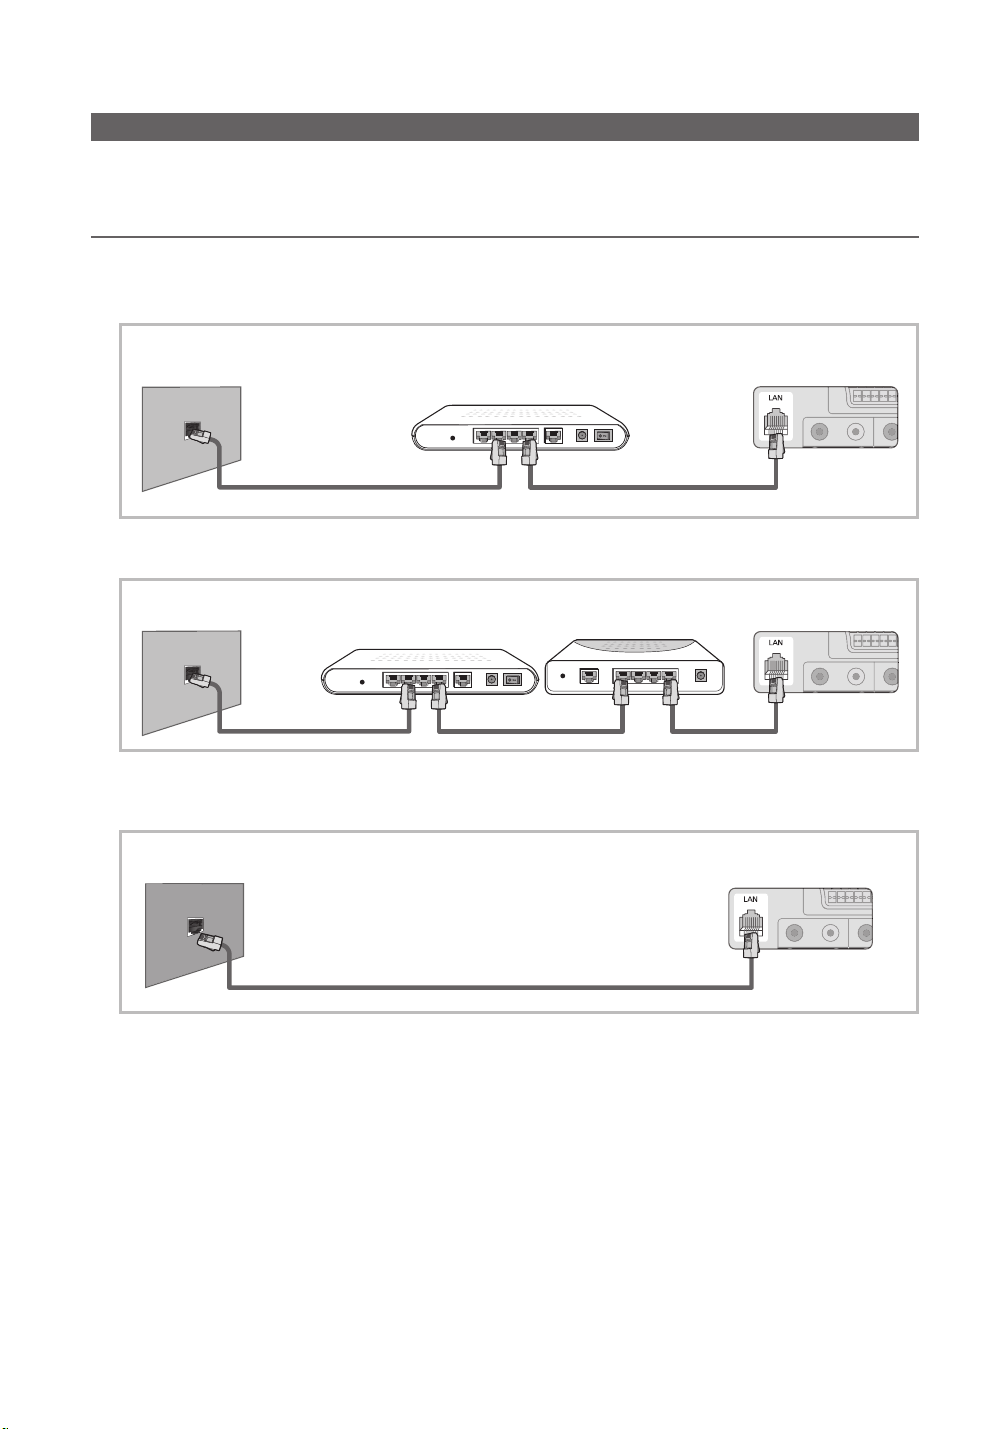
28
Svenska
Avancerade funktioner
Nätverksanslutning
Du kan ställa in din TV så att den kan få tillgång till Internet via ditt lokala nätverk (LAN) med en trådlös anslutning eller
anslutning via kabel.
Anslutning till ett nätverk via kabel ¦
Du kan koppla din TV till nätverket via kabel på tre sätt:
TV:n kan kopplas till nätverket genom att ansluta nätverksporten på TV:ns baksida till ett externt modem med en Cat y
5-kabel. Se diagrammet nedan.
Modemport på väggen
Modemkabel
Du kan koppla din TV till nätverket genom att ansluta nätverksporten på TV:ns baksida till en IP-delare som är ansluten till y
ett externt modem. Använd en Kategori 5 för anslutningen. Se diagrammet nedan.
Modemport på väggen
Modemkabel
Beroende på hur ditt nätverk är konfigurerat kanske du behöver koppla in din TV till nätverket genom att ansluta y
nätverksporten på baksidan av din TV direkt till ett vägguttag för nätverk med en kategori 5-kabel. Se diagrammet nedan.
Kontrollera att vägguttaget är inkopplat till ett modem eller en router någon annanstans i huset.
Nätverksport på väggen
Externt modem
(ADSL / VDSL / kabel-TV)
Externt modem
(ADSL / VDSL / kabel-TV)
(med DHCP-server)
Nätverkskabel
Nätverkskabel
IP-delare
Nätverkskabel
TV-apparatens baksida
TV-apparatens baksida
TV-apparatens baksida
Nätverkskabel
Om du har ett dynamiskt nätverk ska du använda ett ADSL-modem eller en router som stöder DHCP (Dynamic Host
Configuration Protocol). Modem och routrar som stöder DHCP anger automatiskt IP-adress, nätmask, gateway och
DNS-värden som din TV behöver för att få tillgång till Internet, så du inte behöver ange dem manuellt. De flesta nätverk i
hemmen är dynamiska.
Vissa nätverk kräver en fast IP-adress. Om ditt nätverk kräver en fast IP-adress måste du ange IP-adress, nätmask,
gateway och DNS-värden manuellt på kabelinställningsskärmen för din TV när du anger nätverksanslutning. Kontakta din
Internettjänstleverantör för att hämta IP-adress, nätmask, gateway och DNS-värden. Om du har en Windows-dator kan du
också hämta de här värdena via datorn.
Du kan använda ADSL-modem som stöder DHCP om nätverket kräver en fast IP-adress. ADSL-modem som
✎
stöder DHCP gör det också möjligt för dig att använda fasta IP-adresser.
Svenska
Page 90
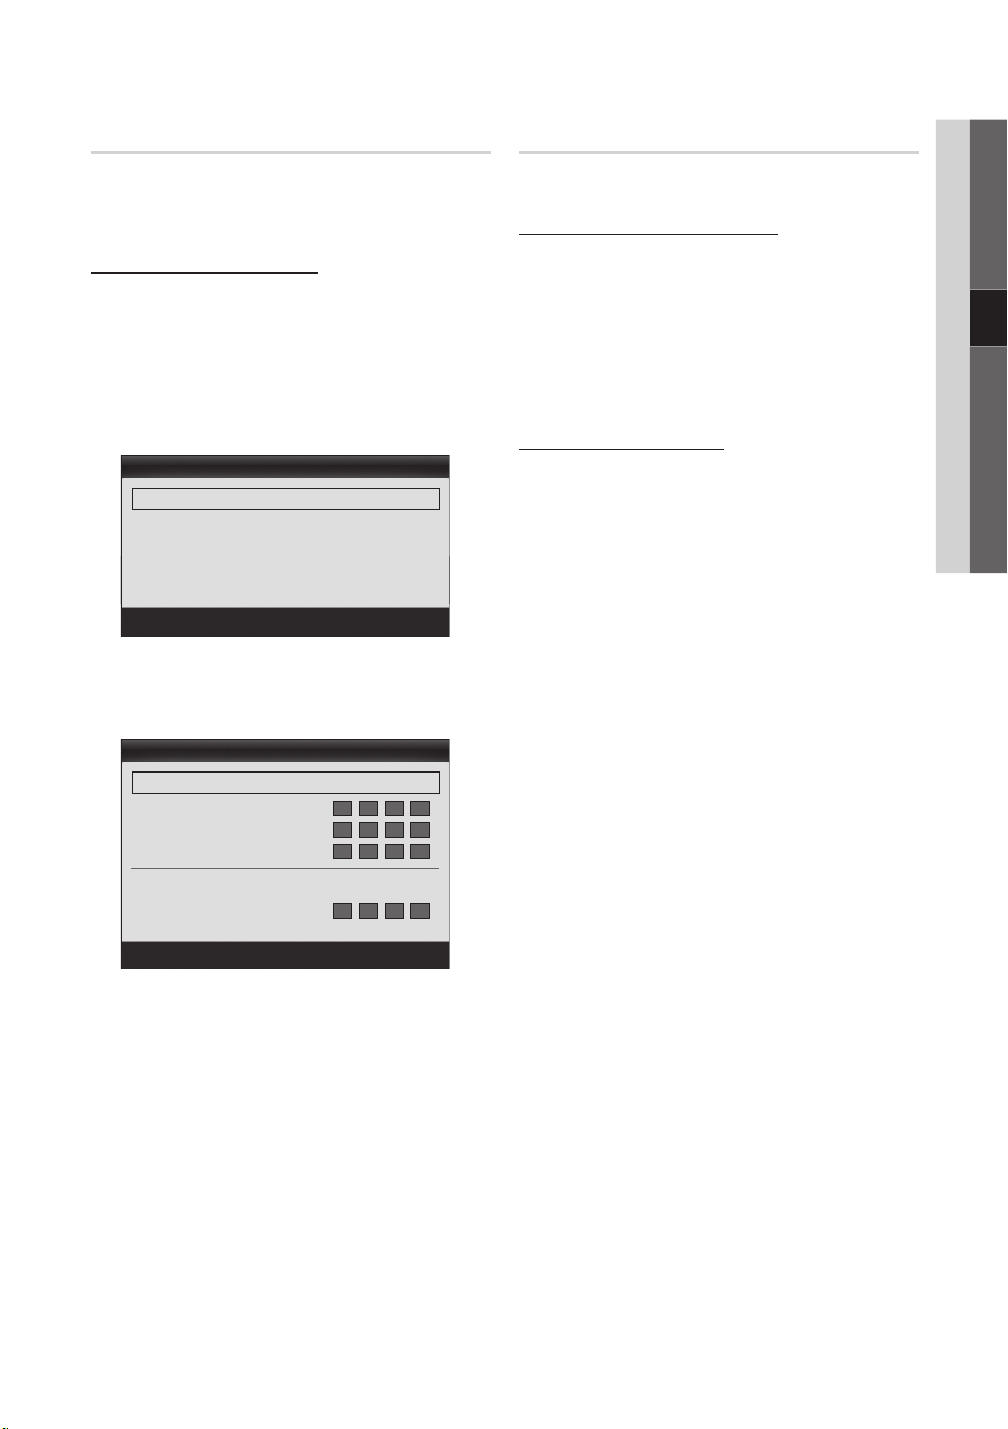
29
Svenska
04 Avancerade funktioner
Ställa in nätverk (Auto)
Använd den automatiska funktionen för Ställa in nätverk när
du ansluter din TV till ett nätverk som stöder DHCP. Om du
vill ställa in din kabelnätverksanslutning automatiskt för din
TV ska du följa stegen nedan:
Så här installerar du automatiskt
1. Anslut din TV till nätverket så som beskrivs i föregående
avsnitt.
2. Slå på TV:n, tryck på knappen MENU på fjärrkontrollen
och använd knappen ▲eller▼ för att välja Inställning
och tryck sedan på knappen ENTER
3. Använd knappen ▲ eller ▼ för att välja nätverk på
menyn Inställning och tryck sedan på knappen
ENTER
E
. Nätverksskärmen visas.
Nätverk
Nätverkstyp : Kabel ►
Ställa in nätverk
Nätverkstest
SWL(Samsung Wireless Link) : Av
SWL -anslutning
U
4. På skärmen för Nätverk väljer du Nätverkstyp.
5. Ställ in Nätverkstyp på Kabel.
6. Välj Ställa in nätverk. Skärmen Ställa in nätverk visas.
Ställa in nätverk
Internetprotokollinstall. : Auto. ►
IP-adress :
Nätmask :
Gateway :
DNS : Auto.
DNS Server :
E
.
Flytta E Enter R Tillbaka
Ställa in nätverk (Manuellt)
Använd den manuella funktionen för Ställa in nätverk när du
ansluter din TV till ett nätverk som stöder fast IP-adress.
Hämta värden för nätverksanslutning
För att hämta värden för nätverksanslutning på de flesta
Windows-datorer följer du stegen nedan:
1. Högerklicka på nätverksikonen längst ned till höger på
skärmen.
2. Klicka på Status i den popup-menyn som visas.
3. I den dialogruta som visas klickar du på fliken Support.
4. Klicka på knappen Details (Detaljer) på fliken Support.
Värdena för nätverksanslutning visas.
Så här installerar du manuellt
Om du vill ställa in kabelnätverksanslutningen manuellt för din
TV ska du följa stegen nedan:
1. Följ steg 1 till 6 i åtgärden för “Så här installerar du
automatiskt”.
2. Ställ in Internetprotokollinstall. på Manuellt.
3. Tryck på knappen ▼ på fjärrkontrallen för att gå till första
postfältet.
4. Ange värden för IP-adress, Nätmask, Gateway och
DNS-server. Använd sifferknapparna på fjärrkontrollen
för att ange nummer och pilknapparna för att gå från en
post till en annan.
5. När du är klar trycker du på knappen RETURN på
fjärrkontrollen.
6. Välj (Nätverkstest för att kontrollera Internetanslutningen.
U
Flytta E Enter R Tillbaka
7. Ställ in Internetprotokollinstall. som Auto.
8. Auto förvärvas och övergår till de Internet-värden som
behövs automatiskt.
9. Vänta i två minuter och tryck sedan på knappen
RETURN på fjärrkontrollen.
10.
Välj Nätverkstest för att kontrollera Internet-anslutningen.
11. Om funktionen för Nätverk inte har förvärvat några
värden för nätverksanslutning ska du gå till anvisningarna
för Manuellt.
Page 91
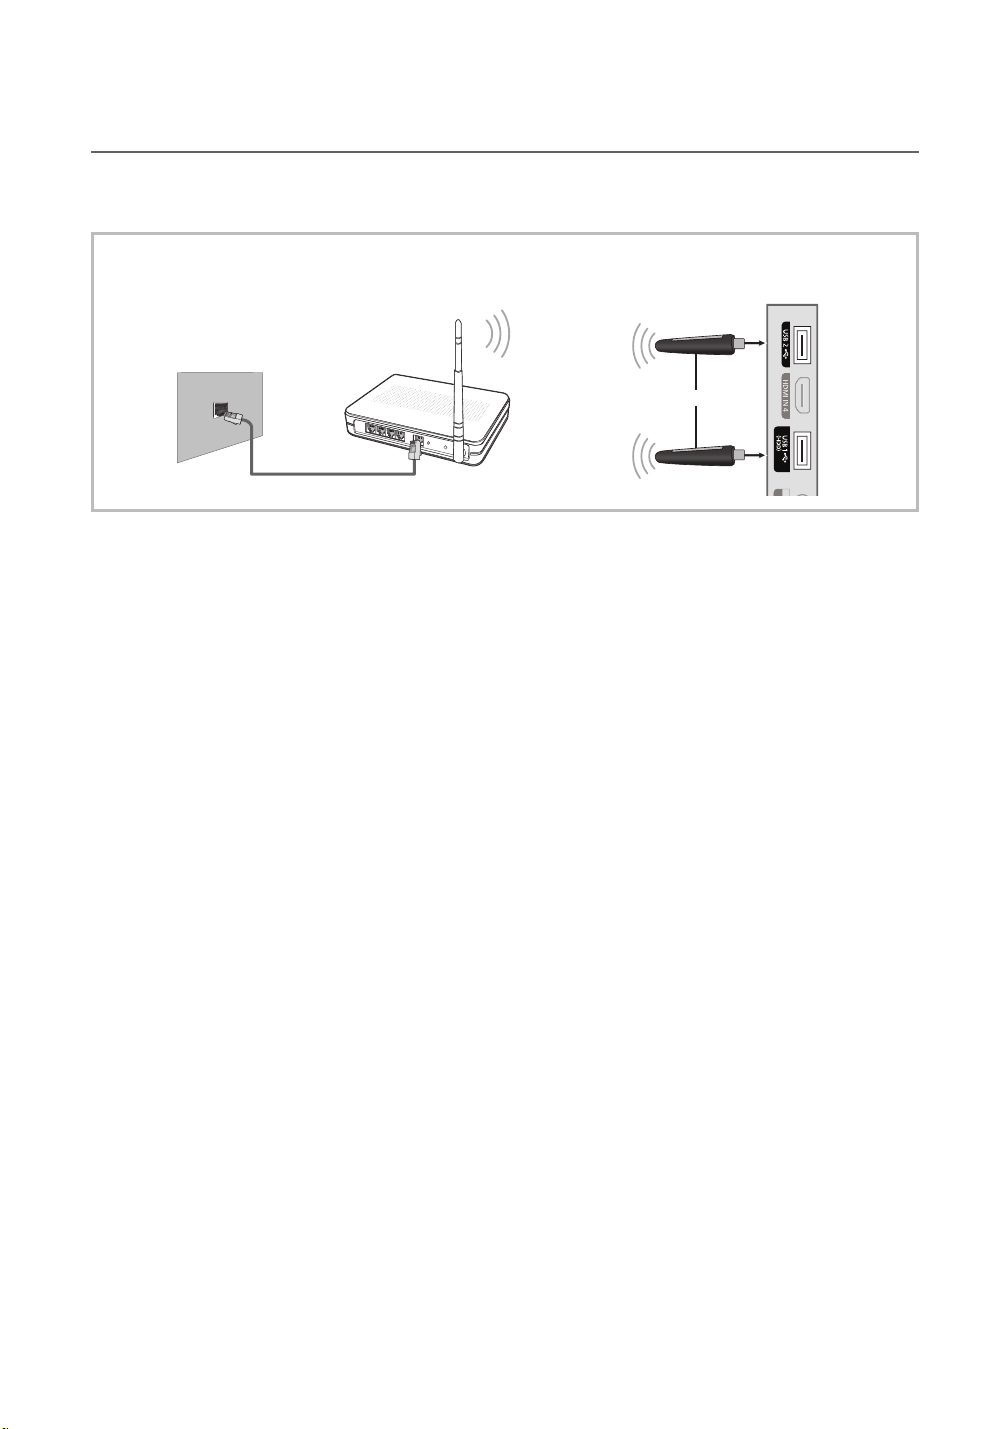
30
Svenska
Avancerade funktioner
Ansluta till trådlöst nätverk ¦
Om du vill ansluta din TV till nätverket trådlöst behöver du en trådlös router eller ett modem och en Samsung trådlös
nätverksadapter (WIS09ABGN, WIS09ABGN2, WIS10ABGN), som du ansluter till TV:ns baksida eller USB-uttaget på
sidopanelen. Se bilden nedan.
Om du vill använda ✎SWL-funktionen (Samsung Wireless Link), ansluter du till porten USB 1 (HDD).
TV-sidopanel
Nätverksport på
väggen
Trådlös IP-delare (AP
med DHCP-server)
Samsungs trådlösa
nätverksadapter
Nätverkskabel
Samsungs trådlösa nätverksadapter säljs separat och erbjuds av utvalda återförsäljare, E-handelsplatser och Samsungparts.
com. Samsungs trådlösa nätverksadapter stöder IEEE 802.11A/B/G och N-kommunikationsprotokoll. Samsung
rekommenderar användning av IEEE 802.11N. När du spelar video över en IEEE 802.11B/G-anslutning kanske inte videon
visas i så bra kvalitet.
✎
OBS!
Du måste använda “Samsungs trådlösa nätverksadapter” (WIS09ABGN) för att använda ett trådlöst nätverk.
x
Samsungs trådlösa nätverksadapter säljs separat. WIS09ABGN trådlös nätverksadapter hittar du om du väljer
x
återförsäljare, e-handelsplatser eller Samsungparts.com.
För att använda ett trådlöst nätverk måste din TV vara ansluten till en trådlös IP-delare. Om den trådlösa IP-delaren
x
stöder DHCP, kan din TV använda en DHCP eller fast IP-adress för att ansluta till det trådlösa nätverket.
Välj en kanal för trådlös IP-delare som inte används. Om kanalinställningen för den trådlösa IP-delaren används av en
x
annan enhet i närheten leder det till störningar och kommunikationsfel.
Om du verkställer ett annat säkerhetssystem än vad som anges nedan fungerar det inte med TV:n.
x
Om läget för Pure High-genomströmning (Greenfield) 802.11n väljs och krypteringstypen är inställd på WEP, TKIP eller
x
TKIPAES (WPS2Mixed) för din åtkomstpunkt så stöder inte Samsung-TV-apparater en anslutning i enlighet med nya
Wi-Fi-certifieringsspecifikationer.
Om åtkomstpunkten stöder WPS (Wi-Fi Protected Setup) kan du ansluta nätverket via PBC (Push Button
x
Configuration) eller PIN (Personal Identification Number). WPS kommer automatiskt att konfigurera SSID och WPAnyckeln i respektive läge.
Om routern, modemet eller enheten inte är certifierad kanske den inte kan ansluta till TV:n via ”Samsungs trådlösa
x
nätverksadapter”.
Anslutningsmetoder
x
Samsung autokonfigurering –
PBC (WPS) –
Automatisk installation (genom att använda funktionen för automatisk nätverssökning) –
Manuell installation –
SWL (Samsung Wireless Link) –
Ad-Hoc –
Alla trådlösa nätverksadaptrar från Samsung ska anslutas direkt till TV:ns USB-port. USB-HUBB stöds inte.
x
: Du kan ställa in den trådlösa nätverksanslutningen på sex olika sätt.
eller
Page 92
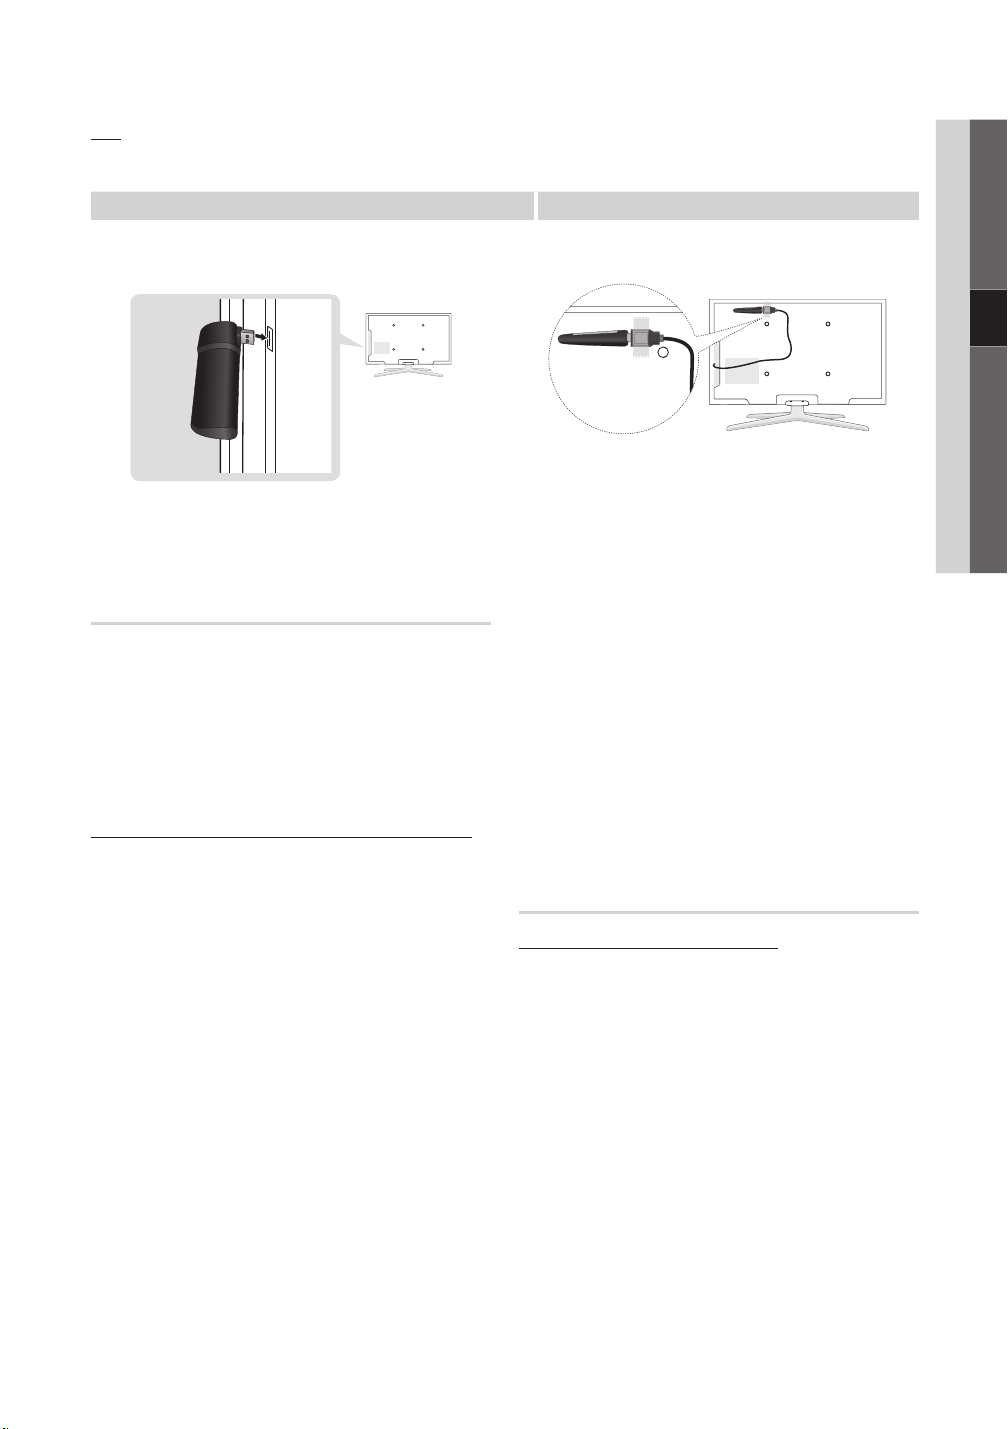
31
Svenska
04 Avancerade funktioner
Avis
L’image peut apparaître altérée pour certaines chaînes lorsque le téléviseur est connecté à l’adaptateur LAN sans fil Samsung.
Le cas échéant, établissez une connexion à l’aide de l’une des méthodes suivantes :
Méthode 1 Méthode 2
Connexion à l’aide de l’adaptateur USB à angle droit
Connexion via un câble d’extension
Nätverksinstallation
(Samsung autokonfigurering)
Den här funktionen är tillgänglig för alla AP (åtkomstpunkter)
som stöder Samsungs autokonfigurering. Om det inte finns
någon sådan åtkomstpunkt kan du ansluta via PBC (WPS)
eller manuellt.
✎
Den här funktionen är tillgänglig när
Wireless Link) är inställd på Av.
✎
Du kan undersöka utrustning som stöder Samsungs
autokonfiguration på www.samsung.com.
Så här installerar du med Samsungs autokonfiguration
1. Placera AP och TV intill varandra och slå på dem.
Eftersom starttiderna för programmen varierar kan
✎
du bli tvungen att vänta i omkring 2 minuter.
Om nätverkskabeln som är ansluten till den
✎
trådlösa nätverksporten för AP under Samsungs
autokonfigurering, kan du slutföra Internetanslutningstestet. Om du inte ansluter kontrollerar
bara Samsungs autokonfigurering enheten som är
ansluten för AP (ej kontroll på Internet).
2. Efter 2 minuter ansluter Samsungs trådlösa
nätverksadapter till TV:n. När Samsungs trådlösa
nätverksadapter upprättas visas popup-fönstret.
3. Så fort en anslutning har upprättats placerar du AP
parallellt med Samsungs trådlösa nätverksadapter som
ger ett mellanrum som är mindre än 25 cm.
SWL (Samsung
4. Vänta tills anslutningen upprättats automatiskt.
Om anslutningen misslyckas återställer du AP och
✎
försöker igen.
Om Samsungs autokonfigurering inte ansluter
✎
din TV till AP visas ett popup-fönster på skärmen
med information om felet. Återställ AP och försök
igen. Om anslutningen bryts igen väljer du en av
de andra installationssätten för anslutningen, PBC
(WPS), auto eller manuellt.
5. Efter att anslutningen har upprättats lokaliserar du
delaren på önskad plats.
Om AP-inställnignarna har ändrats eller det är
✎
första gången du använder AP efter köpet behöver
du ställa in på nytt igen med början från Steg 1.
Nätverksinstallation (PBC (WPS))
Så här installerar du med PBC (WPS)
Om din router har en PBC-knapp (WPS) följer du stegen
nedan:
1. Anslut din TV till nätverket så som beskrivs i föregående
avsnitt.
2. Slå på TV:n, tryck på knappen MENU på fjärrkontrollen
och använd knappen ▲eller▼ för att välja Inställning
och tryck sedan på knappen ENTER
3. Använd knappen ▲ eller ▼ för att välja Nätverk på
menyn Inställning och tryck på knappen ENTER
4. På skärmen för Nätverk väljer du Nätverkstyp.
5. Ställ in Nätverkstyp som Trådlös.
6. Välj Ställa in nätverk. Skärmen Ställa in nätverk visas.
E
.
E
.
Page 93
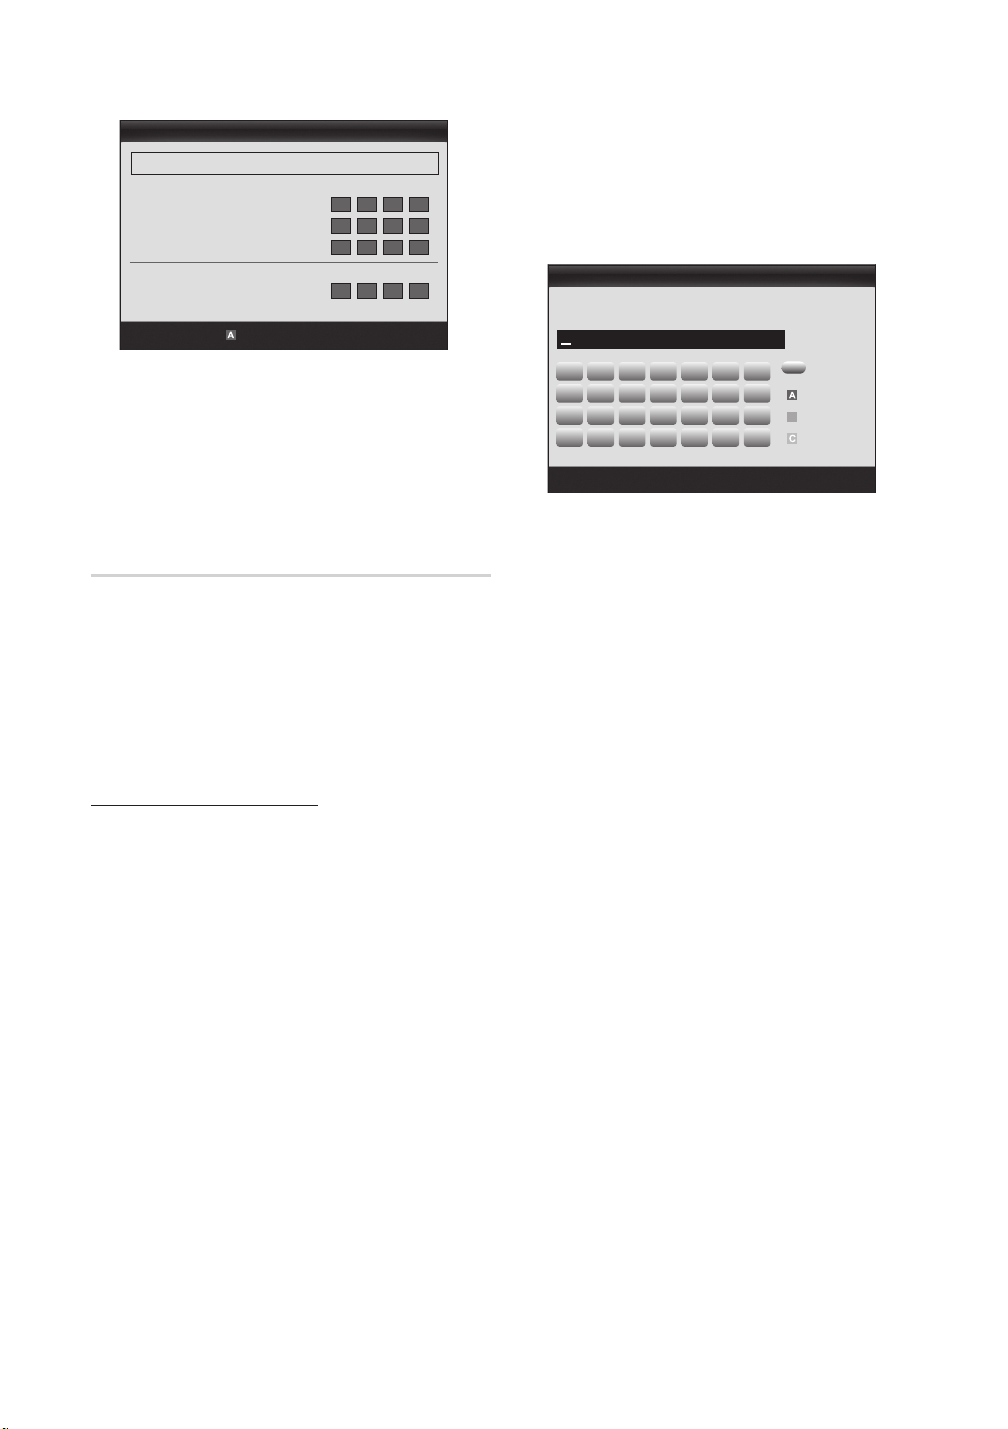
32
Svenska
Avancerade funktioner
A B C D E F G
H I J K L M N
O P Q R S T U
V W X Y Z
0~9
B
Ställa in nätverk
Välj ett nätverk : Ej vald ►
Internetprotokollinstall. : Auto.
IP-adress :
Nätmask :
Gateway :
DNS : Auto.
DNS-server :
PBC(WPS) U Flytta E Enter R Tillbaka
7. Tryck på den röda knappen på fjärrkontrollen.
8. Tryck på PBC-knappen (WPS) på routern inom 2
minuter. Din TV-spelare förvärvar automatiskt alla värden
för nätverksinställningar som behövs och ansluter till ditt
nätverk.
9. Efter att nätverksanslutningen har genomförts trycker du
på knappen RETURN för att stänga skärmen Ställa in
nätverk.
Ställa in nätverk (Auto)
De flesta trådlösa nätverk har ett tilläggssystem för säkerhet
som kräver att enheter som ska få åtkomst till nätverk ska
ange en krypterad säkerhetskod som kallas åtkomst- eller
säkerhetskod. Säkerhetskoden är baserad på en passerkod,
vanligen ett ord eller en bokstavs- och sifferkombination för
en angiven längd du ombads ange när du ställde in säkerhet
för ditt trådlösa nätverk. Om du använder den här metoden
för att ställa in en nätverksaslutning och har en säkerhetskod
för ditt trådlösa nätverk, måste du ange en passerkod under
installationsprocessen.
Så här installerar du automatiskt
För att installera en trådlös anslutning automatiskt följer du
stegen nedan:
1. Följ steg 1 till 6 i åtgärden för “Så här installerar du med
PBC (WPS)” ovan. ((sid 31)
2.
Tryck på knappen ▼ Internetprotokollinstall. och sedan
på knappen ENTERE. Tryck på knappen ▲ eller ▼ för att
välja Auto och tryck sedan på knappen ENTERE.
3. Tryck på knappen ▲ för att gå till Välj ett nätverk och
tryck sedan på knappen ENTERE. Funktionen för
Nätverk söker efter tillgängliga trådlösa nätverk. När du
är klar visas en lista över tillgängliga nätverk.
4. I listan över nätverk trycker du på knappen ▲ eller ▼ för
att välja ett nätverk och sedan trycker du på knappen
ENTER
E
.
Om AP är inställd på dold (osynlig), måste
✎
du välja Lägg till nätverk och ange korrekt
Nätverksnamn (SSID) och Säkerhetskod för att
upprätta anslutningen.
5. Om popup-fönstret för PIN/Säkerhet visas går du till steg
6. Om skärmen för nätverksanslutning visas går du till
steg 10.
6. Tryck på knappen ▲ eller ▼ för att välja Säkerhet
eller PIN. För de flesta nätverk i hemmet skulle du välja
säkerhet (för Säkerhetskod). Skärmen för Säkerhet
visas.
Välj ett nätverk
Säkerhetskod
0 angavs
Nummer
Gemen
Ta bort
Utrymme
n
Flytta E Enter R Tillbaka
7. På skärmen för Säkerhet anger du nätverkets
passerkod.
Du ska kunna söka upp passerkoden på en
✎
av installationsskärmarna du använde när du
installerade router eller modem.
8. Följ de allmänna riktlinjerna för att ange passerkod:
Tryck på sifferknapparna på fjärrkontrollen för att –
ange nummer.
Använd riktningsknapparna på fjärrkontrollen för att –
gå från den ena knappen till den andra på skärmen
för Säkerhetskod.
Tryck på den röda knappen för att ändra typ eller –
visa symboler/tecken.
Om du vill ange en bokstav eller symbol ska du gå –
rill bokstaven eller symbolen och sedan trycka på
knappen ENTER
För att radera den sista bokstaven eller siffran du –
matade in trycker du på den gröna knappen på
fjärrkontrollen.
9. När du är klar trycker du på den blå knappen på
fjärrkontrollen. Nätverksanslutningsskärmen visas.
10. Vänta tills meddelandet för anslutningsbekräftelse visas
och tryck sedan på knappen ENTER
Ställa in nätverk visas igen.
11. För att testa anslutningen trycker du på knappen
RETURN för att välja Nätverkstest och sedan trycker
du på knappen ENTER
E
.
E
E
. Skärmen
.
Page 94

33
Svenska
04 Avancerade funktioner
Ställa in nätverk (Ad-Hoc)
Du kan ansluta till en mobil enhet utan en åtkomstpunkt via
”Samsungs trådlösa nätverksadapter” genom att använda ett
peer-to-peer nätverk.
Den här funktionen är tillgänglig när
✎
Wireless Link) är inställd på Av.
Så här ansluter du till en ny Ad-hoc
1. Följ steg 1 till 6 i åtgärden för “Så här installerar du med
PBC (WPS)”. (sid 31 )
2. Välj Välj ett nätverk. En lista över enheter/nätverk visas.
3. Under tiden du är i enhetslistan trycker du på den blå
knappen på fjärrkontrollen.
Meddelandet
✎
anslutning med mobiltelefon eller dator.
Meddelandet Det befintliga nätverkssystemet
kan ha begränsad funktionalitet. Vill du ändra
nätverksanslutningen? visas.
4. Mata in genererat Nätverksnamn (SSID) och
Säkerhetskod för den enhet du vill ansluta.
Så här ansluter du till en befintlig Ad-hoc-enhet
1. Följ steg 1 till 6 i åtgärden för “Så här installerar du med
PBC (WPS)”. (sid 31 )
2. Välj Välj ett nätverk. Enhetslistan visas.
3. Välj önskad enhet i enhetslistan.
4. Om det finns en säkerhetsnyckel ska du mata in den.
Om nätverket inte fungerar som det ska,
✎
kontrollera Nätverksnamn (SSID) och
Säkerhetskod igen. En felaktig Säkerhetskod
kan orsaka ett tekniskt fel.
Ad-hoc är en direkt WI-Fi-
SWL (Samsung
Ställa in nätverk (Manuellt)
Om de andra metoderna inte fungerar behöver du ange
nätverksinställningsvärden manuellt.
Hämta värden för nätverksanslutning
För att hämta nätverksinställningar på de flesta Windowsdatorer följer du stegen nedan:
1. Högerklicka på nätverksikonen längst ned till höger på
skärmen.
2. Klicka på Status i den popup-menyn som visas.
3. I den dialogruta som visas klickar du på fliken Support.
4. Klicka på knappen Detaljer på fliken Support.
Nätverksinställningarna visas.
Så här installerar du manuellt
Följ stegen nedan för att ange nätverksinställningar för din TV:
1. Följ steg 1 till 6 i åtgärden för “Så här installerar du med
PBC (WPS)”. (sid 31 )
2. Tryck på knappen ▼ för att väljaInternetprotokollinstall.
och tryck sedan på knappen ENTER
knappen ▲ eller ▼ för att välja Manuellt och tryck
sedan på knappen ENTERE.
3. Tryck på knappen ▼ för att gå till första inmatningsfältet
(IP-adress).
4. Använd sifferknapparna för att ange nummer.
5. När du är klar med varje fält använder du knappen ►
för att gå till nästa fält. Du kan också använda övriga
pilknappar för att gå uppåt, nedåt och bakåt.
6. Ange värden för IP-adress, Nätmask och Gateway.
7. Tryck på knappen ▲ eller ▼ för att gå till DNS.
8. Tryck på knappen ▼ för att gå till första DNS-
inmatningsfältet. Ange numren enligt ovan.
9. När du är klar trycker du på knappen ▲ för att gå till Välj
ett nätverk. Välj nätverket och tryck sedan på knappen
ENTER
E
.
10. Gå till steg 4 i åtgärden för "Så här installerar du
automatiskt" (sid. 32) och följ anvisningarna därifrån.
E
. Tryck på
Page 95

34
Svenska
Avancerade funktioner
SWL (Samsung Wireless Link)
Den här funktionen gör det möjligt för dig att ansluta en
enhet från Samsung som stöder PBC (WPS) för din TV.
Du kan ansluta enheter till TV:n även om en delare inte är
ansluten till TV:n.
✎
För att använda Internet på TV:n, måste AP
(åtkomstpunkten) anslutas till trådlöst nätverk.
✎
Om en trådlös nätverksadapter från Samsung ansluts
till porten USB 2 så kanske nätverket inte fungerar
normalt. Vi rekommenderar att du ansluter till porten
USB 1 (HDD).
✎
Endast delare som använder 2.4 Ghz band stöds.
Delare som använder 5 Ghz band stöds inte.
SWL-anslutning
Du kan ansluta en enhet som stöder PBC (WPS) direkt till
TV:n.
✎
Den här funktionen är tillgänglig när
Wireless Link) är inställd på På.
Så här ansluter du till Samsung Wireless Link
För åtgärder när det gäller att upprätta en anslutning, ska du
läsa följande:
1. Följ steg 1 till 5 i åtgärden för “Så här installerar du med
PBC (WPS)”. (sid 31)
2. Välj Samsung Wireless Link genom att använda
knappen ▼ och tryck på knappen ENTER
på den.
3. Välj SWL-anslutning genom att använda knappen
▼ och tryck på knappen ENTER
4. Om meddelandet “Tryck på PBC-knappen på
åtkomstpunkten inom 120 sekunder.” visas ska du
trycka på PBC-knappen på enheten för att ansluta.
Mer information hittar du i bruksanvisningen för
✎
trådlöst nätverk för den enhet som ska anslutas.
5. Om enheten ansluts korrekt till TV:n efter att
meddelanderutan har börjat räkna så döljs
meddelanderutan automatiskt.
Om anslutningen bryts kan du försöka igen efter
✎
2 minuter.
SWL (Samsung
E
E
.
för att slå
Om TV:n inte kan ansluta till Internet
Din TV kanske inte kan ansluta till Internet, på grund av
att din ISP permanent har registrerat MAC-adressen
(ett unikt nummer) för din PC eller ditt modem, som det
sedan autentiserar varje gång du ansluter till Internet, som
ett sätt att förhindra obehörig åtkomst. Eftersom din TV
har en annan MAC-adress kan ISP inte autentisera dess
MAC-adress och din TV kan inte ansluta.
För att lösa problemet ska du fråga ISP om metoderna
för att ansluta andra enheter än din dator (exempelvis din
TV) till Internet.
Om Internetleverantören kräver ett ID eller lösenord för
att ansluta till Internet kanske din TV inte kan ansluta
till Internet. Om detta är fallet måste du ange ID eller
lösenord när du ansluter till Internet.
Internetanslutningen kanske misslyckas på grund av
brandväggen. I så fall ska du kontakta din Internet-
leverantör.
Om du inte kan ansluta till Internet trots att du har följt
anvisningarna från Internetleverantören ska du kontakta
Samsung Electronics på.
Page 96
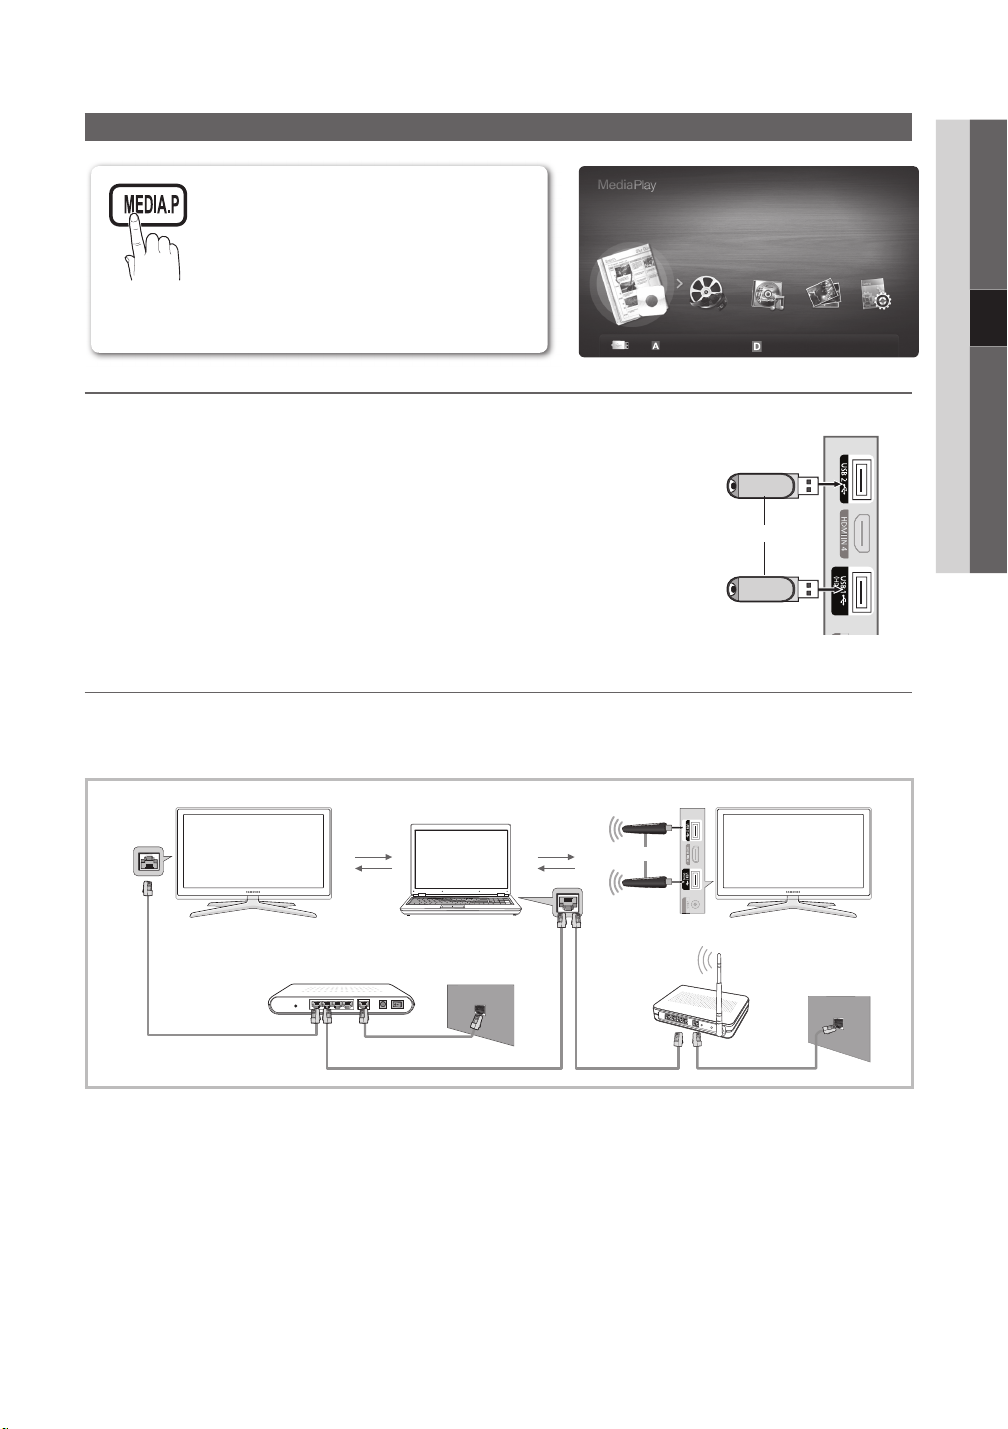
35
Svenska
Media Play
SUM
04 Avancerade funktioner
Titta på bilder, musik och / eller fi lmfi ler som fi nns
sparat på en USB-lagringsenhet (MSC) och / eller
din dator.
Inspelad TV
Ändra enhet
Enhetsläge E Enter R Tillbaka
Ansluta en USB-enhet ¦
1. Slå på tv:n.
TV Sidopanel
2. Anslut en USB-enhet som innehåller foton, musik och/eller fi lmfi ler till uttaget USB
1(HDD) eller USB 2 på TV:ns sida.
3. När USB är ansluten till TV:n visas popupfönstret. Sedan kan du välja Media Play.
eller
USB-enhet
Ansluta till datorn via nätverket ¦
Du kan titta på bilder, musik och videor som är sparade på datorn på din TV via en nätverksanslutning i läget Media Play.
✎
Om du använder
från “www.samsung.com.”
LAN
Media Play via den sparade filen på datorn ska du hämta “PC Share Manager” och bruksanvisningen
PC
Externt modem
(ADSL / VDSL / kabel-TV)
TV Sidopanel
eller
Samsungs
trådlösa
nätverksadapter
Trådlös IP-delare
Nätverkskabel
1. För mer information om hur du konfi gurerar nätverket, se ”Nätverksanslutning”. (sid 28)
Vi rekommenderar att du har både TV:n och datorn i samma delnät. De första 3 delarna av delnätsadressen för TV:n –
och datorns IP-adresser ska överensstämma och endast den sista delen (värdadressen) ska ändras. Exempelvis
IP-adress: 123.456.789.**)
2. Anslut nätverkskabeln och anslut mellan det externa modemet och datorn där Samsung PC Share Manager är installerat.
Du kan ansluta en TV eller en PC direkt utan att ansluta den visa en delare (Router). –
Page 97

36
Svenska
Avancerade funktioner
Funktioner som inte stöds vid anslutning till en dator via ett nätverk:
✎
Funktioner för xBakgrundsmusik och Inställningar för bakgrundsmusik.
Sortering av filer enligt inställning i mapparna för
x
Knappen
x
Divx DRM, Multi-audio, inbyggd text stöds inte.
✎
Samsung PC Share manger måste vara tillåtet av datorns brandvägg.
✎
När du använder ✎Media Play via en nätverksanslutning, enligt funktionerna för den server som erbjuds:
Sorteringssättet kan variera.
x
Scensökningsfunktionen kanske inte stöds.
x
Funktionen xSpela kontinuerligt som återupptar uppspelningen av en video, kanske inte stöds.
Knappen
x
Om du upplever problem med instabila filer under uppspelning av en video över ett trådlöst nätverk rekommenderar
x
vi att du använder nätverket via kabel istället.
Det kanske inte fungerar med olicensierade multimediefiler.
✎
Vad du behöver veta före användning av ✎Media Play
MTP (Media Transfer Protocol) stöds inte.
x
Filsystem som stöds är FAT16, FAT32 och NTFS.
x
Vissa typer av USB-digitalkameror och ljudenheter är kanske inte kompatibla med den här TV:n.
x
Media Play stöder endast USB-lagringsenheter (MSC). MSC står för Mass Storage Class Bulk-Only Transport device.
x
Exempel på MSC är Thumb-enheter, flashkortläsare och USB-hårddisk (USB-hubb stöds inte). Enheter ska anslutas
direkt till TV:ns USB-port.
Innan du ansluter enheten till TV:n ska du säkerhetskopiera dina filer för att förhindra dataförlust eller att de skadas.
x
SAMSUNG ansvarar inte för skada på datafiler eller dataförluster.
Anslut en USB-hårddisk till den anvisade porten
x
Koppla inte ur USB-enheten när den laddas.
x
Ju högre bildupplösning desto längre tid tar det att visa bilden på skärmen.
x
Maximal JPEG-upplösning som stöds är 15360X8640 pixlar.
x
För filer som inte stöds eller är korrupta visas meddelandet “Not Supported File Format”.
x
Om filerna sorteras enligt grundvy kan upp till 1000 filer visas i varje mapp.
x
MP3-filer med DRM som har laddats ned från en icke-gratis plats kan inte spelas. DRM (Digital Rights Management)
x
är en teknik som stöder skapande av innehåll, distribution och hantering av innehållet på ett integrerat och mångsidigt
sätt, inklusive skydd av olika rättigheter, skydd mot illegal kopiering liksom betalnings- och villkorshantering.
Om fler än 2 PTP-enheter ansluts kan du bara använda en åt gången.
x
Om fler än två MSC-enheter ansluts kanske vissa av dem inte känns igen. Om en USB-enhet kräver högspänning
x
(mer än 500mA eller 5V) kanske den inte stöds.
Om ett varningsmeddelande om överspänning visas när du ansluter eller använder en USB-enhet kanske enheten
x
inte känns igen eller inte fungerar som den ska.
Om TV:n inte har haft någon ingång under tidsinställning i
x
Energisparläget för vissa hårddiskar kan avaktiveras automatiskt när de ansluts till TV:n.
x
Om en USB-förlängningskabel används kanske USB-enheten inte identifieras eller så kanske filerna på enheten inte
x
läses.
Om en USB-enhet som är ansluten till TV:n inte identifieras, fillistan på enheten är korrupt eller en fil i listan inte spelas
x
ansluter du USB-enheten till datorn, formaterar enheten och kontrollerar anslutningen.
Om en fil som raderas från datorn hittas när Media Play körs använder du funktionen “Töm papperskorgen” på datorn
x
för att permanent radera filen.
(REW) eller µ (FF) under tiden en film spelas.
Funktionen – Spela kontinuerligt stöder inte flera användare. (Den kommer bara att ha en memorerad punkt, där den
senaste användaren slutade spela upp).
◄ eller ► kanske inte fungerar beroende på innehållsinformation.
Foto, Musik och Film.
USB1 (HDD).
Tid för autoskydd, så slås skärmsläckaren på.
Page 98
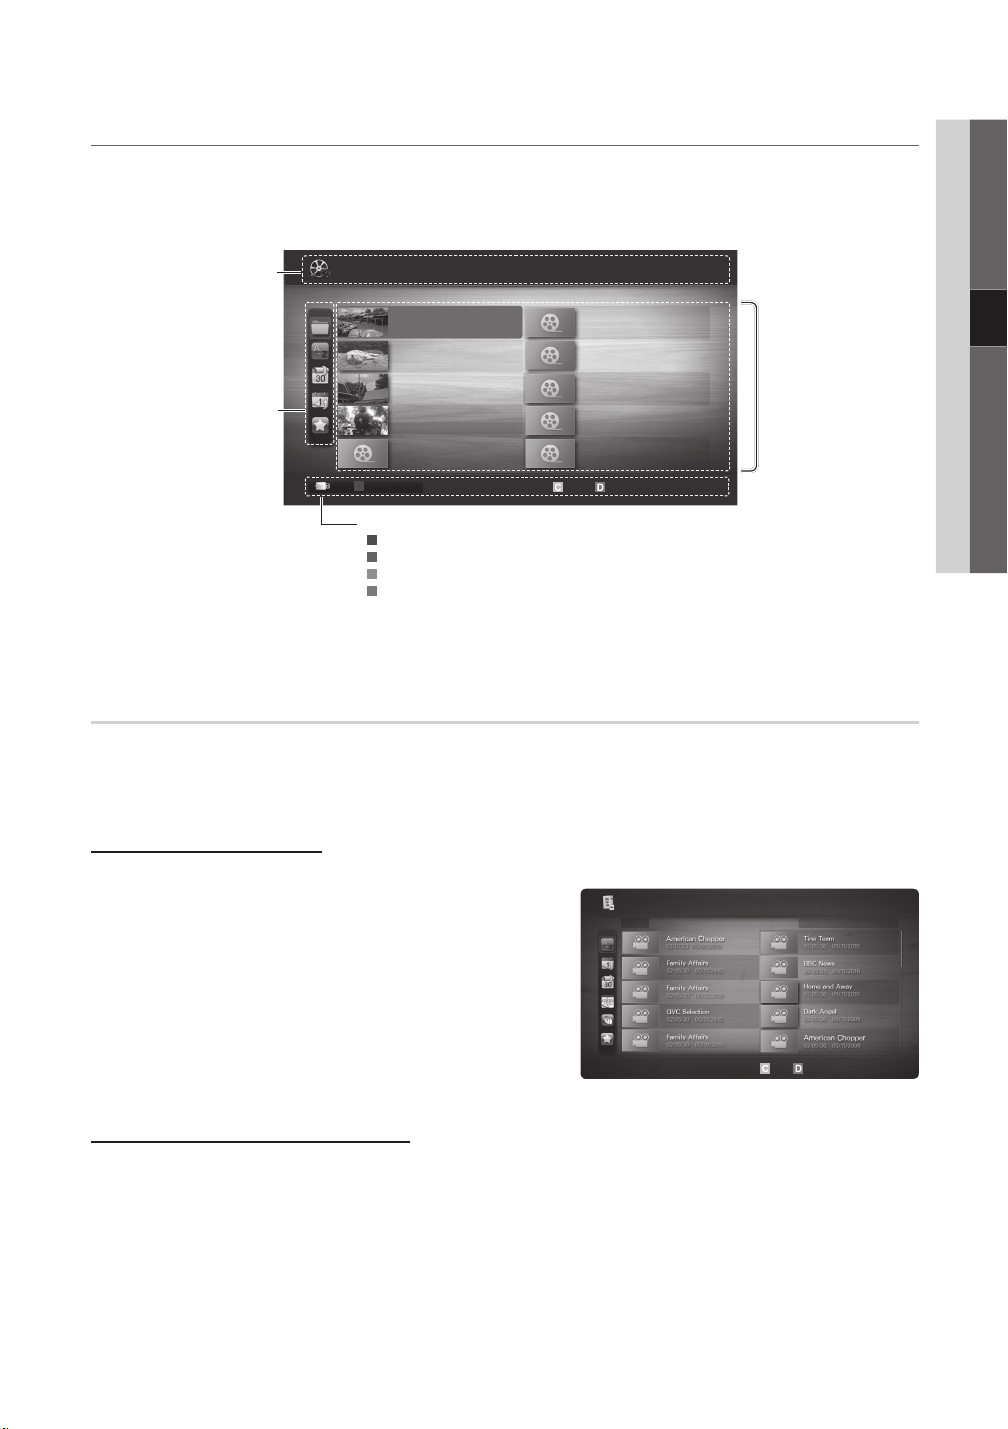
37
Svenska
04 Avancerade funktioner
Bildskärm ¦
Jan.10.2010
Jan.10.2010
Jan.10.2010
Jan.10.2010
Jan.10.2010
Jan.10.2010
Jan.10.2010
Jan.10.2010
Jan.10.2010
Jan.10.2010
/Movie 01.avi 1/1
Movie 01.avi
SUM
Movie 03.avi
Movie 05.avi
Movie 07.avi
Movie 09.avi
Movie 02.avi
Movie 04.avi
Movie 06.avi
Movie 08.avi
Movie 10.avi
Gå till filen du vill ha med pilknapparna upp/ned/höger/vänster och tryck sedan på knappen ENTERE eller (spela).
Filen spelas upp.
✎
Enhetsläge och Innehållsläge på hemsidan för Media Play.
Stöder
Du kan säkerställa det valda
filnamnet och antalet filer samt
Avsnittet för att sortera lista:
Visar sorteringsstandard.
Sorteringsstandard varierar
✎
beroende på innehåll.
Information:
sidan.
Videos
A
Ändra enhet
Knappanvändning
A
Röd (Ändra enhet): Väljer en ansluten enhet.
B
Grön (Inställning): Ställer in filinställning. (stöds ej i grundvyn)
C
Gul (Välj): Markerar flera filer från fillistan. Valda filer markeras med en symbol
D
Blå (Sortera): Markera sorteringslistan
T
Verktyg: Visar alternativmenyn.
När du använder knappen
✎
Välj Sorterar T Verktyg
eller µ kan fillistan flytta till nästa eller föregående sida.
Sida
Fillistavsnitt:
Du kan bekräfta filer och
grupper som sorteras enligt
kategori.
Inspelad TV
Om du vill använda funktionen för inspelning eller tidsväxling måste den anslutna USB-enheten vara tillgänglig för inspelning.
Device format (Enhetsformat) rekommenderas för användning av USB HDD.
✎
Under enhetsformateringen ska du inte koppla från enheten när formateringen pågår. Om du formaterar enheten
kommer alla filer att raderas.
Spela upp inspelade TV-program
1. Tryck på knappen ◄ eller ► för att välja Inspelad TV och
tryck sedan på knappen ENTER
2. Tryck på knappen ◄/►/▲/▼ för att välja önskad fil i fillistan.
3. Tryck på knappen ENTER
Den valda filen visas överst, med sin speltid. –
Under uppspelning av inspelade TV-program kan du söka –
med knappen ◄ och ►.
Använda funktionen Timeshift läge.
Om du har missat ett live-program kan du se den inspelade sändningen med den här funktionen.
När Timeshift läge. är inställt på Auto, lagrar TV:n den kanal du tittar på för automatisk inspelning.
När Timeshift läge. är inställt på Manuellt, och om du trycker på knappen
du vill börja inspelningen.
E
i menyn Media Play.
E
eller knappen (Spela upp).
t
Inspelad TV / .../ American Chopper
04/2010
Välj Sorterar T Verktyg
(Spela) så lagrar TV:n kanalen från den punkt
1/8 Sida
Page 99

38
Svenska
Avancerade funktioner
✎
OBS!
Inspelade videor är DRM-skyddade (digital rights management) och kan inte spelas upp på en dator eller andra TV-
x
apparater och inte heller kan de spelas upp när huvudkortet på TV:n byts.
Datasändningar kan inte spelas in.
x
Tillgången för både inspelning och funktionen xTimeshift läge. kan variera beroende på bildkvalitet och ledigt
utrymme på hårddisken.
Om du trycker på knappen
x
inspelade sändningen.
Funktionen
x
Efter att funktionen
x
att om du har pausat inspelningen återupptar TV:n automatiskt uppspelningen.
Om gränsen för 5 % ledigt minnesutrymme för USB-lagringsenheten har uppnåtts så stängs inspelningsprocessen.
x
När inspelningen utförs med både PVR-funktionen (Personal Video Recorder) och en enhet som stöder HDMI-CEC-
x
funktionen kommer PVR-funktionen att få företräde.
Under uppspelning eller användning av
x
Om du ändrar ingångskälla under inspelningen blir skärmen blank fram till att ändringen har slutförts.
x
Ett program som varken stöder inspelning eller funktionen xTimeshift läge. stängs automatiskt om du försöker
använda det under någon av funktionerna.
Ett meddelande kan visas framför programfönstret om att inspelning eller funktionen
x
Timeshift läge.
x
Inspelningen och funktionerna för
x
Om USB-enheten har misslyckats med
x
Test av enh. Prestanda igen innan du spelar in med Guide eller Kanalhantering.
Funktionerna för
x
Test av enh. Prestanda.
Om du försöker använda inspelning eller funktionen
x
Test av enh. Prestanda, så startar inte funktionen.
Om en USB-enhet som är dedikerad för inspelning är ansluten kommer befintlig
x
som har sparats på fel sätt automatiskt att raderas.
Om du växlar till externt inmatningsläge under inspelningen kommer inspelningen att fortsätta men
x
knappen avaktiveras.
Om någon funktion som slår av TV:n (
x
slås TV:n av så fort inspelningen är klar.
Timeshift läge. fungerar i max 90 minuter.
stöds inte för radiokanaler.
Timeshift läge. kan bara användas med en USB-lagringsenhet som är försedd med
▲ eller ▼ kan du se den aktuella kanalen som sänds, eller se startpunkten för den
Timeshift läge. har körts maximal tillåten tid ändras tidsinformationen till “00:00:00.” Observera
Timeshift läge., så visas bilden enligt skärminställningarna för TV:n.
Timeshift läge. är stängd.
Timeshift läge. är avaktiverade för kanaler som har låsts med Barnlås.
Test av enh. Prestanda, måste USB-enheten gå igenom Enhetsformat och
Timeshift läge. med en enhet som inte har
Timeshift läge. eller inspelade filer
Sovtimer, Av etc.) är inställd under en tid som är i konflikt med inspelningen så
(REC)-
Page 100
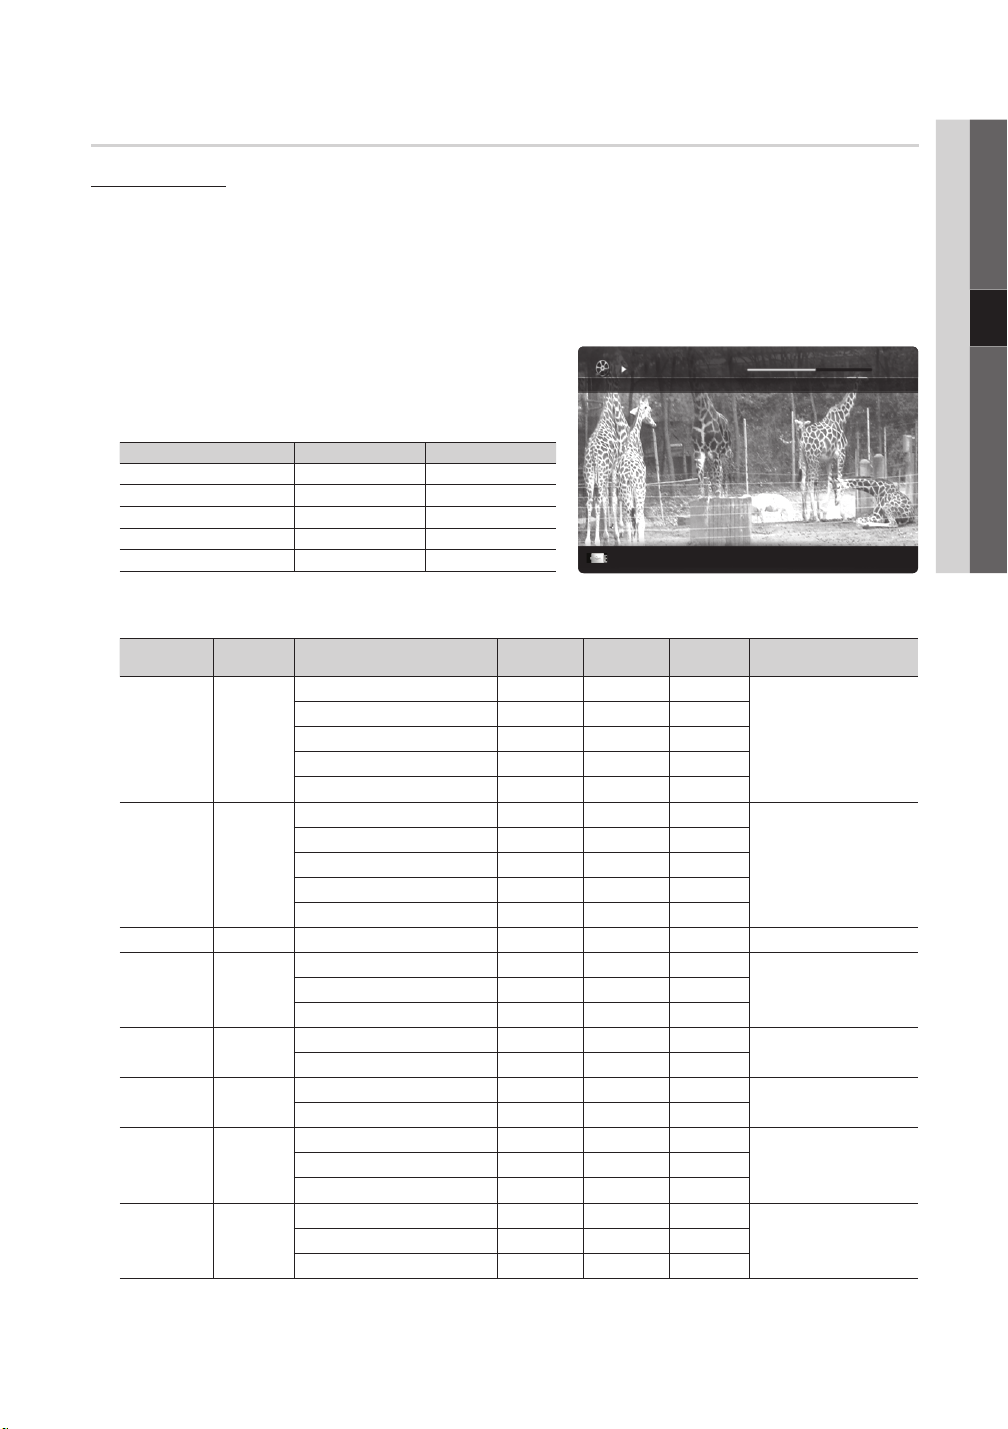
39
Svenska
04 Avancerade funktioner
Videor
Movie 01.avi
00:04:03 / 00:07:38 1/1
Spela upp en video
1. Tryck på knappen ◄ eller ► för att välja Videor och tryck sedan på knappen ENTER
2. Tryck på knappen ◄/►/▲/▼ för att välja önskad video i fillistan.
3. Tryck på knappen ENTER
Den valda filen visas överst, med sin speltid. –
Om videotidsinformationen är okänd visas inte förloppsindikatorn för uppspelningstid. –
Under videouppspelning kan du söka med knappen – ◄ och ►.
✎
I det här läget kan du titta på filmklipp som finns med i ett spel,
men du kan inte spela själva spelet.
Textningsformat som stöds y
Namn Filtillägg Formatera
MPEG-4 tidsbaserad text .ttxt XML
SubRip .srt strängbaserad
SubViewer .sub strängbaserad
Micro DVD .sub eller .txt strängbaserad
Videoformat som stöds y
Filtillägg Innehåll Video Codec Upplösning
*.avi
*.mkv
*.asf ASF
*.wmv ASF Window Media Video v9 1920x1080 6 ~ 30 25 WMA
*.mp4 MP4
*.3gp 3GPP
*.vro
*.mpg
*.mpeg
*.ts
*.tp
*.trp
SAMI .smi HTML
AVI
MKV
VRO
VOB
PS
TS
E
eller knappen (spela).
Divx 3.11 / 4.x / 5.1 / 6.0 1920x1080 6 ~ 30 8
XviD 1920x1080 6 ~ 30 8
H.264 BP / MP / HP 1920x1080 6 ~ 30 25
MPEG4 SP / ASP 1920x1080 6 ~ 30 8
Motion JPEG 800x600 6 ~ 30 8
Divx 3.11 / 4.x / 5.1 / 6.0 1920x1080 6 ~ 30 8
XviD 1920x1080 6 ~ 30 8
H.264 BP / MP / HP 1920x1080 6 ~ 30 25
MPEG4 SP / ASP 1920x1080 6 ~ 30 8
Motion JPEG 800x600 6 ~ 30 8
H.264 BP / MP / HP 1920x1080 6 ~ 30 25
XVID 1920x1080 6 ~ 30 8
H.264 BP / MP / HP 1920x1080 6 ~ 30 25
MPEG4 SP / ASP 1920x1080 6 ~ 30 8
MPEG1 1920x1080 24 / 25 / 30 30
MPEG2 1920x1080 24 / 25 / 30 30
MPEG1 1920x1080 24 / 25 / 30 30
H.264 1920x1080 6 ~ 30 25
MPEG2 1920x1080 24 / 25 / 30 30
VC1 1920x1080 6 ~ 30 25
Enhetsnamn
Ramhastighet
(fps)
E
i menyn Media Play.
Markering
E
Bithastighet
(Mbps)
Hoppa
L
MP3 / ADPCM / AACMPEG4 SP / ASP 1920x1080 6 ~ 30 8
ADPCM / AAC / HE-AAC
AC3 / MPEG / LPCM
AC3 / MPEG / LPCM / AACMPEG2 1920x1080 24 / 25 / 30 30
AC3 / AAC / MP3 / DD+H.264 1920x1080 6 ~ 30 25
Verktyg
R
Tillbaka
T
Audio Codec
MP3 / AC3 / LPCM /
ADPCM / DTS HD
MP3 / AC3 / LPCM /
ADPCM / WMA
 Loading...