

Page 1
LCD TV
- AFTER SALES SERVICE
- Do not hesitate to contact your retailer or service agent if a
change in the performance of your product indicates that a faulty
condition may be present.
LE23T5
LE27T5
LE32T5
Owner’s Instructions
Before operating the unit,
please read this manual thoroughly,
and retain it for future reference.
Correct Disposal of This Product
(Waste Electrical & Electronic Equipment)
(Applicable in the European Union and other European countries with
separate collection systems)
This marking shown on the product or its literature, indicates that it
should not be disposed with other household wastes at the end of its working life.
To prevent possible harm to the environment or human health from uncontrolled
waste disposal, please separate this from other types of wastes and recycle
it responsibly to promote the sustainable reuse of material resources.
Household users should contact either the retailer where they purchased this
product, or their local government office, for details of where and how they can take
this item for environmentally safe recycling.
Business users should contact their supplier and check the terms and conditions of
the purchase contract. This product should not be mixed with other commercial
wastes for disposal.
BN68-00860D-00
ON-SCREEN MENUS
PC DISPLAY
PICTURE IN PICTURE (PIP)
TELETEXT
This device is a Class B digital apparatus.
Register your product at www.samsung.com/global/register
Page 2

Precautions When Displaying a Still Image
A still image may cause permanent damage to the TV screen.
• Do not display a still image on the LCD panel for more than 2 hours as it can cause screen image retention.
This image retention is also known as "screen burn".
To avoid such image retention, reduce the degree of brightness and contrast of the screen when displaying a still image.
• Watching the LCD TV in 4:3 format for a long period of time may leave traces of borders displayed on the left, right and center
of the screen caused by the difference of light emission on the screen.
Playing a DVD or a game console may cause a similar effect to the screen.
Damages caused by the above effect are not covered by the Warranty.
• Displaying still images from Video games and PC for longer than a certain period of time may produce partial after-images.
To prevent this effect, reduce the ‘brightness’ and ‘contrast’ when displaying still images.
Att tänka på vid visning av stillbild
Stillbilden kan orsaka permanenta skador på bildskärmen.
• Visa inte en stillbild på skärmen i mer än två timmar, eftersom det kan leda till att bilden ligger kvar på skärmen.
Att bilden på skärmen behålls kallas även "bildskärmsbränning".
Du kan undvika att bilden behålls genom att minska på ljusstyrkan och kontrasten på bildskärmen när du visar stillbilder.
• Användning av LCD TV:n i 4:3-format under en längre tid kan lämna spår av kanterna till vänster, höger och mitt på skärmen
vilket orsakas av skillnaden i ljusstrålning i skärmen.
Uppspelning av en DVD eller tv-spel kan orsaka samma effekter på skärmen.
Skador som orsakas av det som beskrivs ovan täcks inte av garantin.
• Visning av stillbilder från tv-spel och datorer längre stunder kan skapa delvisa efterbilder.
För att förhindra detta ska du minska på ljusstyrka och kontrast vid visning av stillbilder.
Forholdsregler for visning af et stillbillede
Et stillbillede kan medføre permanent beskadigelse af tv-skærmen.
• Vis ikke et stillbillede på LCD-panelet i mere end to timer, da det kan medføre billedindbrænding.
Denne billedindbrænding kaldes også "screen burn".
For at undgå dette skal lysstyrken og kontrasten ved visning af et stillbillede reduceres.
• Hvis du ser LCD-tv i 4:3-format i lang tid, kan der opstå kanter, der vises til venstre, højre og på midten af skærmen.
Dette skyldes den forskellige lyspåvirkning af skærmen.
Afspilning af dvd eller brug af en spillekonsol kan medføre en tilsvarende effekt på skærmen.
Beskadigelse forårsaget af ovenstående dækkes ikke af forsikringen.
• Visning af stillbilleder fra videospil og pc i længere end en bestemt tid kan medføre delvise after-billeder.
For at forhindre dette kan du reducere ‘lysstyrke’ og ‘kontrast’, når du afspiller stillbilleder i længere tid.
Forholdsregler ved visning av et stillbilde
Et stillbilde kan forårsake permanent skade på TV-skjermen.
• La ikke et stillbilde vises på LCD-panelet i mer enn 2 timer, da det kan forårsake et ekkobilde.
Denne effekten er også kjent som "screen burn", det vil si at skjermbildet brenner seg fast.
Du kan unngå dette ved å redusere lysstyrken og kontrastnivået på skjermen når du viser stillbilder.
• Dersom LCD-skjermen brukes til visning i 4:3-format over lengre tid, kan dette føre til at det oppstår linjer til høyre, venstre og i
midten av skjermen. Dette på grunn av forskjeller mellom lysstrålingen på de forskjellige stedene på skjermen.
Dersom skjermen brukes til videospill og visning av DVDer kan dette gi liknende resultater.
Skader forårsaket av effekten ovenfor, dekkes ikke av garantien.
• Dersom spill og annet settes på pause i en lengre periode enn det som er anbefalt, kan dette gi en etterbildeeffekt
Denne virkningen kan forebygges ved at 'lysstyrke' og 'kontrast' reduseres ved visning av stillbilder.
Varoituksia pysäytyskuvan käytöstä
Pysäytyskuva voi vaurioittaa television kuvaruutua pysyvästi.
• Älä pidä nestekidetelevision kuvaruudussa pysäytyskuvaa 2 tuntia kauempaa, koska tällöin kuva voi jäädä ruutuun pysyväksi jäännöskuvaksi.
Jäännöskuvaa kuvataan myös "kuvan palamiseksi kuvaruutuun".
Kun kuvaruudussa on pysäytyskuva, vähennä kirkkautta ja kontrastia, jottei jäännöskuvaa pääsisi muodostumaan.
• LCD-television pitkäaikainen katselu 4:3 kuvasuhteella saattaa jättää kuvaruudulle reunuksia, jotka johtuvat valon säteilyn
eroavuudesta kuvaruudulla.
DVD:n tai pelin toisto saattaa aiheuttaa samanlaisen vaikutuksen näytöllä.
Takuu ei kata tästä syystä syntyneitä vaurioita.
• Videopelien ja pc:n still-kuvien määrätyn ajan ylittävä näyttö saattaa aiheuttaa osittaisia jälkikuvia.
Voit estää tämän ilmiön vähentämällä kuvaruudun kirkkautta ja kontrastia, jos katselet pitkään pysäytyskuvia.
Sabit Görüntünün Gösterilmesiyle ilgili Önlemler
Sabit görüntü TV ekran›nda kal›c› hasara neden olabilir.
• LCD ekran panelinde sabit bir görüntüyü 2 saatten fazla tutmay›n.
Bu, ekran görüntüsünde tak›lmaya neden olabilir. Bu görüntü tak›lmas›na, "ekran yanmas›" da denir. Bu tür bir kal›c› görüntüyü önlemek için
hareketsiz bir görüntü ekrandayken parlakl›k ve kontrast de¤erlerini düflük bir seviyeye ayarlay›n›z.
• LCD televizyonu uzun süre 4:3 format›nda izlemek, farkl› ›fl›k emisyonundan dolay› ekran›n solunda, sa¤›nda ve ortas›nda çizgi
fleklinde izler b›rakabilir.
DVD ya da oyun konsolunu oynatmak da benzer etkiye yol açabilir.
Yukar›daki etkilerin neden oldu¤u hasarlar Garanti kapsam›nda de¤ildir.
•Video oyunlar›ndan ve bilgisayardan uzun süre dura¤an resimlerin görüntülenmesi k›smi görüntü izi oluflturabilir.
Bu etkiyi önlemek için, dura¤an görüntüleri ekranda tutarken ‘parlakl›k’ ve ‘kontrast’ derecelerini azalt›n.
Page 3

English-1
English
Contents
CONNECTING AND PREPARING YOUR TV
List of Parts .............................................................. 2
Installing the Stand .................................................. 2
Installing the Wall Mount Kit ................................ 2
Viewing the Control Panel ........................................ 3
Viewing the Connection Panel.................................. 4
Viewing the Remote Control .................................... 5
Installing Batteries in the Remote Control................ 6
Switching On and Off................................................ 6
Placing Your Television in Standby Mode ................ 6
Plug & Play .............................................................. 6
SETTING THE CHANNELS
Storing Channels Automatically................................ 7
Storing Channels Manually ...................................... 8
Editing the Channels ................................................ 8
SETTING THE PICTURE
Changing the Picture Standard ................................ 9
Adjusting the Custom Picture .................................. 9
Changing the Colour Tone ........................................ 10
Resetting the Picture Settings to the
Factory Defaults........................................................ 10
Changing the Picture Size........................................10
Digital Noise Reduction / Dynamic Contrast ............ 11
Viewing the Picture In Picture (PIP) ........................ 11
SETTING THE SOUND
Changing the Sound Standard ............................ 12
Adjusting the Sound Settings ..............................12
Adjusting the Volume Automatically ....................12
Listening to the Sound of the Sub Picture............13
SETTING THE TIME
Setting and Displaying the Current Time..............13
Setting the Sleep Timer........................................ 13
Switching the Television
On and Off Automatically......................................14
SETTING THE OTHERS
Choosing Your Language .................................... 14
Using the Energy Saving Feature ........................15
Setting the Blue Screen Mode /
Selecting the Melody .......................................... 15
Selecting the Source ............................................15
Editing the Input Source Names ..........................16
USING THE TELETEXT FEATURE
Teletext Decoder ..................................................16
Displaying the Teletext Information ......................17
Selecting a Specific Teletext Page ......................17
Using Fastext to Select a Teletext Page ..............18
SETTING THE PC
Setting up Your PC Software
(Based on Windows XP) ......................................18
Display Modes ......................................................18
Setting the PC ......................................................19
RECOMMENDATIONS FOR USE
Troubleshooting:
Before Contacting Service Personnel ..................20
Technical and Environmental Specifications ......20
Symbol Press Important Note One-Touch
Button
Page 4

English-2
CONNECTING AND PREPARING YOUR TV
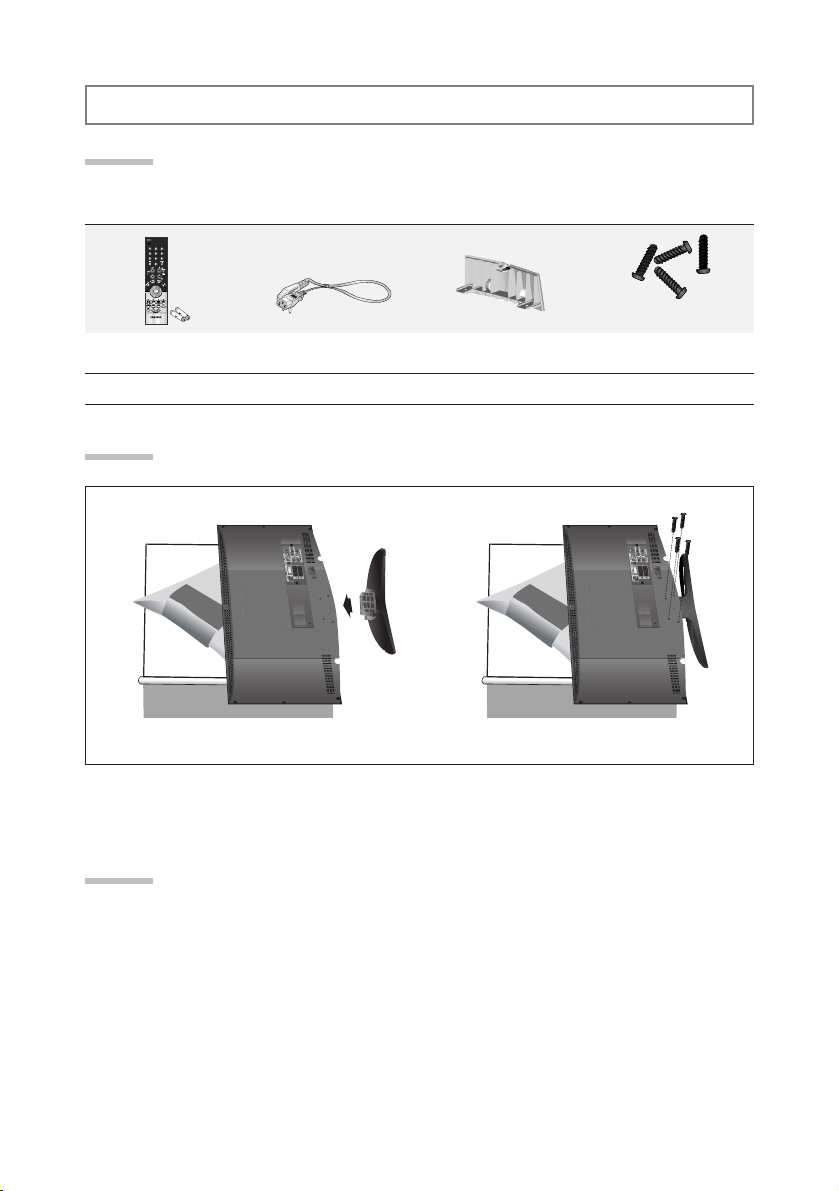
List of Parts
Please make sure the following items are included with your LCD TV.
If any items are missing, contact your dealer.
M4 X L16
Remote Control &
Batteries (AAA x 2)
Power Cord Cover-Bottom Stand Screw X 4
Owner’s Instructions
Warranty card
Service Network Card
Safety Guide Registration Cards
< 2 >< 3 >
1. Place the TV faced down on a soft cloth or cushion on a table.
2. Put the stand into the hole at the bottom of the TV.
3. Insert screw into the hole indicated and tighten.
Installing the Stand
Wall mount items (sold separately) allow you to mount the TV on the wall.
For detailed information on installing the wall mount, see the instructions provided with the Wall Mount
items. Contact a technician for assistance when installing the wall mounted bracket.
Samsung Electronics is not responsible for any damage to the product or injury to yourself or others
if you elect to install the TV on your own.
Installing the Wall Mount Kit
Page 5

English-3
Viewing the Control Panel
SOURCE
Toggles between all the available input sources
(TV, Ext.1, Ext.2, AV, S-Video, Component, PC,
DVI). In the on-screen menu, use this button as you
use the
ENTER button on the remote control.
MENU
Press to see an on-screen menu of
your TV’s features.
Press to decrease or increase the volume.
In the on-screen menu, use the buttons
as you use the and buttons on the remote
control.
Press to change channels.
In the on-screen menu, use the buttons
as you use the
and buttons on the remote
control. (Without the Remote Control, You can turn
on TV by using the Channel buttons.)
(HEADPHONE JACK)
Connect a set of external headphones to this jack
for private listening.
(Power)
Press to turn the TV on and off.
Power Indicator
Blinks and turns off when the power is on and lights
up in stand-by mode.
Speakers
Remote Control Sensor
Aim the remote control towards this spot on the TV.
The product colour and shape may vary depending on the model.
Page 6

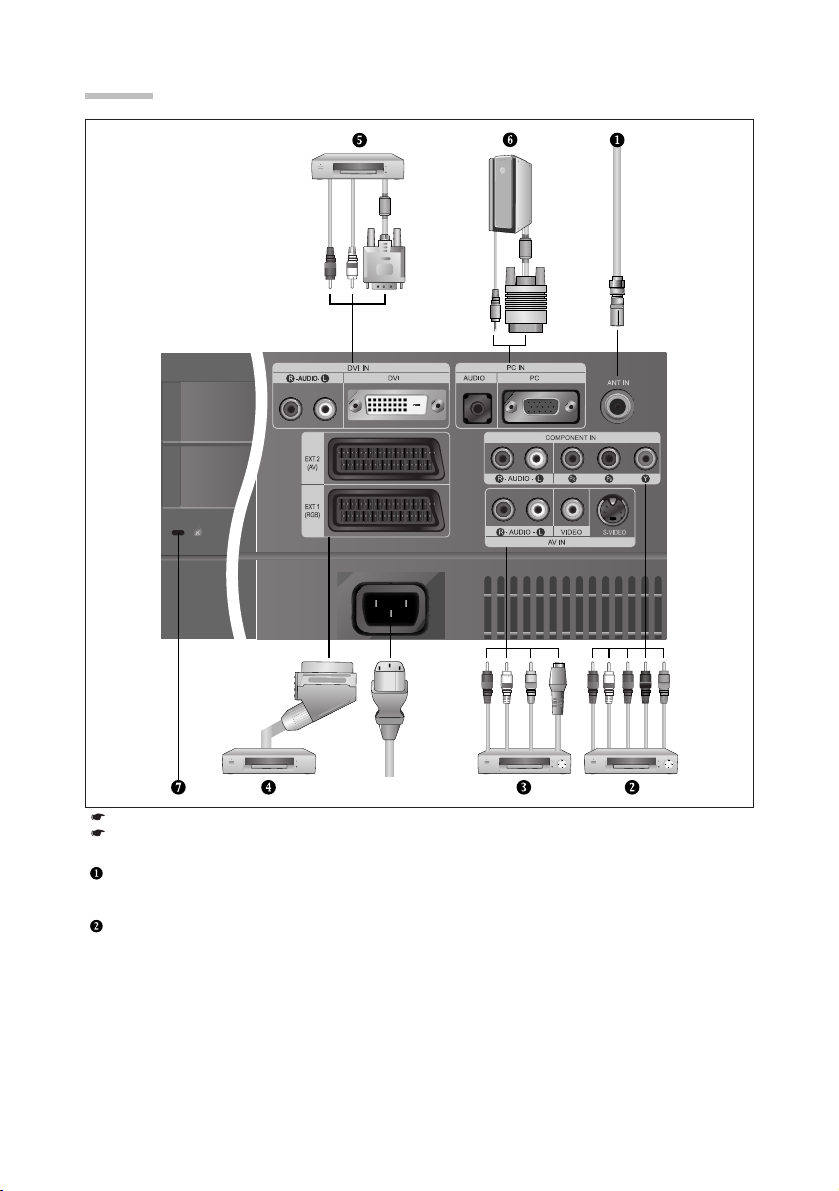
Connecting an Aerial or Cable Television Network
To view television channels correctly, a signal must be received by the set from one of the following sources:
- An outdoor aerial / A cable television network / A satellite network
Connecting Component Devices (DTV/DVD)
- Connect component video cables (optional) to component connector (“PR”, “PB”, “Y”) on the rear of your set and the other
ends to corresponding component video out connectors on the DTV or DVD.
- If you wish to connect both the Set-Top Box and DTV (or DVD), you should connect the Set-Top Box to the DTV (or DVD)
and connect the DTV (or DVD) to component connector (“P
R”, “PB”, “Y”) on your set.
- The P
R, PB and Y connectors on your component devices (DTV or DVD) are sometimes labeled Y, B-Y and
R-Y or Y, Cb and Cr.
- Connect RCA audio cables (optional) to “R - AUDIO - L” on the rear of your set and the other ends to corresponding audio
out connectors on the DTV or DVD.
- This LCD TV displays the optimum picture in 720p mode.
English-4
Viewing the Connection Panel
Power Input
Whenever you connect an external device to your TV, make sure that power on the unit is turned off.
When connecting an external device, match the colour of the connection terminal to the cable.
Page 7

English-5
Connecting External A/V Devices
-
Connect RCA (optional) or S-VIDEO cable (optional) to an appropriate external A/V device such as VCR, DVD or Camcorder.
- Connect RCA audio cables (optional) to “R - AUDIO - L” on the rear of your set and the other ends to corresponding audio
out connectors on the A/V device.
Connecting Set-Top Box, VCR or DVD
- Connect the VCR or DVD SCART cable (optional) to the SCART connector of the VCR or DVD.
Connecting DVI
- Connect the DVI connector to the DVD connector.
- Connect the stereo audio cable (optional) to "R - AUDIO - L" on the rear of your set and the other ends to the corresponding
audio out connectors on the A/V device.
- DVI does not support PC function.
- This LCD TV displays the optimum picture in 720p mode.
Connecting Computer
- Connect the D- Sub cable (optional) to “PC (PC IN)” on the rear of your set and the other end to the
Video Card of your computer.
- Connect the stereo audio cable (optional) to “AUDIO (PC IN)” on the rear of your set and the other end to “Audio Out” of the
sound card on your computer.
Kensington Lock
- The Kensington lock (optional) is a device used to physically fix the system when used in a public place.
- If you want to use a locking device, contact the dealer where you purchased the TV.
Television Standby button
Number buttons for direct
channel access
One/Two-digit channel selection
Volume increase
Volume decrease
Temporary sound switch-off
Displays the main on-screen menu
Sound mode selection
Sound effect selection
Press to automatically store
selected TV/cable channels
Use to store and delete
channels to/from memory
Picture freeze
Selects the TV mode directly
Previous channel
P: Next channel
P: Previous channel
Available source selection
Use to see information on the
current broadcast
Exit the on-screen menu
Control the cursor in the menu
Picture size selection
Picture effect selection
Picture-In-Picture On/Off
Automatic Power-off
Selects the PC mode directly
Teletext Functions
Teletext hold
Teletext display/mix both
teletext information and the
normal broadcast
Teletext index
Teletext store
Teletext sub page
Exit from the teletext display
P: Teletext next page
P: Teletext previous page
Teletext mode selection (LIST/FLOF)
Teletext reveal
Teletext cancel
Teletext size selection
Fastext topic selection
The performance of the remote control may be affected by bright light.
Viewing the Remote Control
Page 8
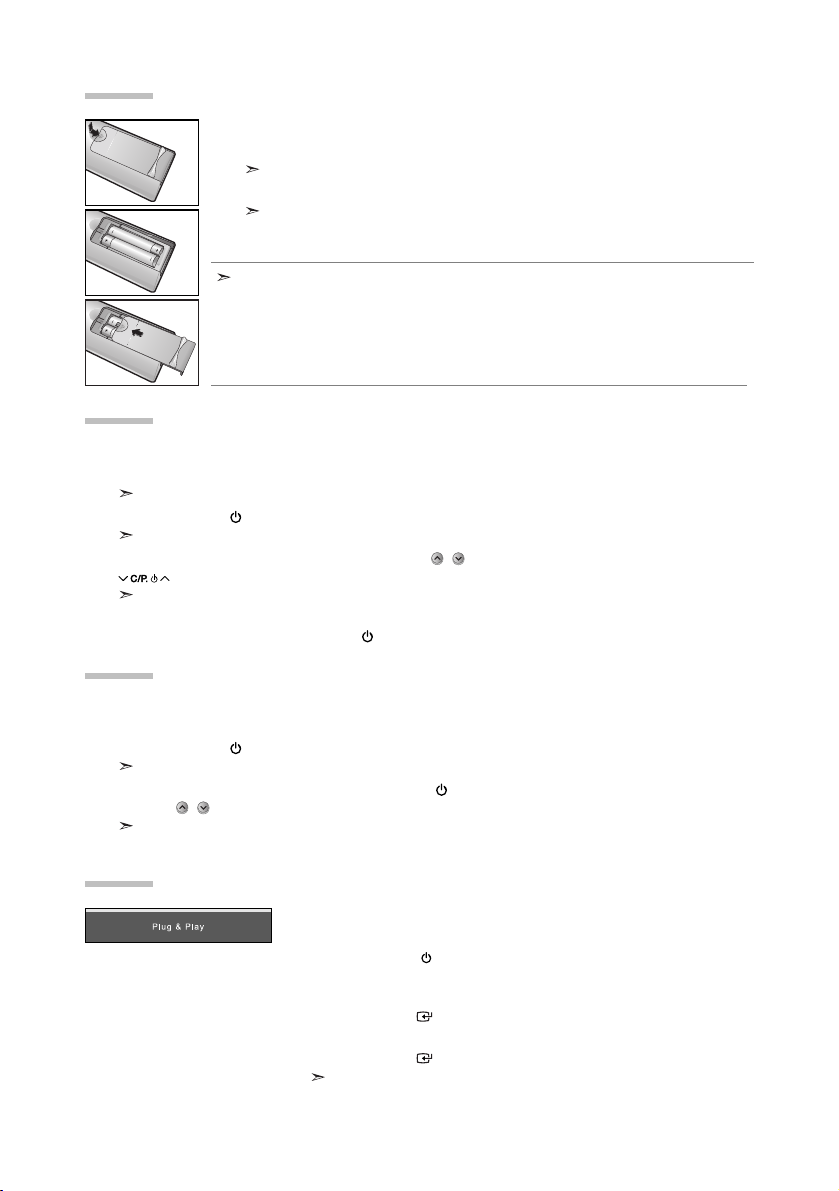
The mains lead is attached to the rear of your set.
1. Plug the mains lead into an appropriate socket.
The standby indicator lights up on the front of the set.
2. Press the POWER button on the front of the set.
The programme that you were watching last is reselected automatically.
3. Press the numeric button (0~9) or channel up/down ( / ) button on the remote control or
button on the right side of the set.
When you switch the set on for the very first time, you will be asked to choose language in which the menus
are to be displayed.
4. To switch your set off, press the POWER button again.
Your set can be placed in standby mode in order to reduce the power consumption. The standby mode
can be useful when you wish to interrupt viewing temporarily (during a meal, for example).
1. Press the POWER button on the remote control.
The screen is turned off and a red standby indicator appears on the front of your set.
2. To switch your set back on, simply press the POWER , numeric buttons (0~9) or channel
up/down ( / ) button again.
Do not leave your set in standby mode for long periods of time (when you are away on holiday, for example).
It is best to unplug the set from the mains and aerial.
Switching On and Off
Placing Your Television in Standby Mode
When the TV is initially powered on, several basic settings proceed
automatically and subsequently. The following settings are available.
1. Press the POWER button on the remote control.
The message “Plug & Play” is displayed.
2. Select the appropriate language by pressing the or button.
Press the
ENTER button to confirm your choice.
3. The message “Check antenna input.” is displayed with “OK” selected.
Press the
ENTER button.
Please check that the antenna cable is connected correctly.
Plug & Play
English-6
1. Slide the cover out completely.
2. Install two AAA size batteries.
Make sure to match the “+” and “–” ends of the batteries with the diagram inside the compartment.
3. Replace the cover.
Remove the batteries and store them in a cool, dry place if you won’t be using the
remote control for a long time. The remote control can be used up to about 23 feet from
the TV. (Assuming typical TV usage, the batteries last for about one year.)
If the remote control doesn’t work, check the following:
1. Is the TV power on?
2. Are the plus and minus ends of the batteries reversed?
3. Are the batteries drained?
4. Is there a power outage, or is the power cord unplugged?
5. Is there a special fluorescent light or neon sign nearby?
Installing Batteries in the Remote Control
Page 9

English-7
Language: Select your language.
Country: Select your country.
Auto Store: Automatically scans for and stores channels available in the local area.
Clock Set: Sets the current time for the TV clock.
SETTING THE CHANNELS
- Storing Channels Automatically (Refer to page 7)
- Storing Channels Manually (Refer to page 8)
- Editing the Channels (Refer to page 8)
If you want to reset this feature...
1. Press the MENU button to display the menu.
Press the or
button
to select “Setup”, then press the ENTER button.
2. Press the ENTER button again, to select “Plug & Play”.
3. This will change or reset the settings.
You can scan for the frequency ranges available to you (and availability depends on your country).
Automatically allocated programme numbers may not correspond to actual or desired programme
numbers. However, you can sort numbers manually and clear any channels you do not wish to watch.
1. Press the MENU button to display the menu.
Press the
or button to select “Channel”, then press the ENTER button.
2. Press the ENTER button to select “Country”.
3. Select the appropriate country by pressing the or button.
Press the
ENTER button to confirm your choice.
4. Press the or button to select “Auto Store”, then press the ENTER button.
5. Press the ENTER button.
The TV will begin memorizing all of the available channels.
Press the ENTER button at any time to interrupt the memorization process and return to the “Channel” menu.
6. After all the available channels are stored, the “Sort” menu appears.
Storing Channels Automatically
4. Select the appropriate country by pressing the or button.
Press the
ENTER button to confirm your choice.
5. The “Auto Store” menu is displayed with the “Start” selected.
Press the
ENTER button.
The channel search will start and end automatically.
After all the available channels are stored, the “Clock Set” menu appears.
Press the ENTER button at any time to interrupt the memorization process.
6. Press the ENTER button.
Select the “Hour” or “Minute” by pressing the
or
button.
Set the “Hour” or “Minute” by pressing the
or
button.
You can also set the hour and minute by pressing the number buttons on the
remote control.
7. Press the ENTER button to confirm your setting.
Channels can be stored automatically by simply pressing the AUTO PROG. button on
the remote control.
Page 10

English-8
You can store up to 100 channels, including those received via cable networks.
When storing channels manually, you can choose:
Whether or not to store each of the channels found.
The programme number of each stored channel which you wish to identify.
1. Press the MENU button to display the menu.
Press the
or button to select “Channel”, then press the ENTER button.
2. Press the or button to select “Manual Store”, then press the ENTER button.
3. Press the ENTER button to select “Programme”.
4. To assign a programme number to a channel, find the correct number by pressing the or button
and then press the
ENTER button.
You can also set a programme number by pressing number buttons on the remote control.
5. Press the or button to select “Colour System”, then press the ENTER button.
6. Select the colour standard required by pressing the or button then, press the ENTER button.
7. Press the or button to select “Sound System”, then press the ENTER button.
8. Select the sound standard required by pressing the or button, then press the ENTER button.
If there is an abnormal sound or no sound, re-select the sound system required.
9. If you know the number of the channel to be stored, press the or button to select “Channel”.
Press the
ENTER button. Select C (Air channel) or S (Cable channel) by pressing the or button.
Press the
button to select channel. Select the required number by pressing the or button and then
press the
ENTER button.
Channel mode: P (Programme mode), C (Air channel mode), S (Cable channel mode)
You can also set a channel number by pressing number buttons on the remote control.
10. If you do not know the channel numbers, press the or button to select “Search”. Press the
ENTER button. Search by pressing the or button and then press the ENTER button.
11. Press the or button to select “Store”. Press the ENTER button to select “OK”.
12. Repeat steps 3 to 11 for each channel to be stored.
Programme: Selects a program number for the channel.
Colour System: Sets the colour supporting system.
Sound System: Sets the sound supporting system.
Channel: Selects a channel.
Search: Scans for the frequency value for the channel.
Store: Saves your settings.
Storing Channels Manually
You can exclude the channels you chose from the channels you scanned. When you scan through
the stored channels, those you have chosen to skip are not displayed.
All channels that you do not specifically choose to skip are displayed during scanning.
1. Use the number buttons to directly select the channel that will be added or deleted.
2. Press the MENU button to display the menu.
Press the
or button to select “Channel”, then press the ENTER button.
3. Press the or button to select “Add/Delete”, then press the ENTER button.
4. Repeatedly pressing the ENTER button will alternate between add channel and delete channel.
5. Press the P/ buttons to switch to the appropriate channel, then repeat above.
6. Press the EXIT button to exit.
You can view any channel (including an erased channel) by using the number buttons on the remote control.
Editing the Channels
You can also add or delete channel by simply pressing the ADD/DEL button on the
remote control.
Page 11
English-9
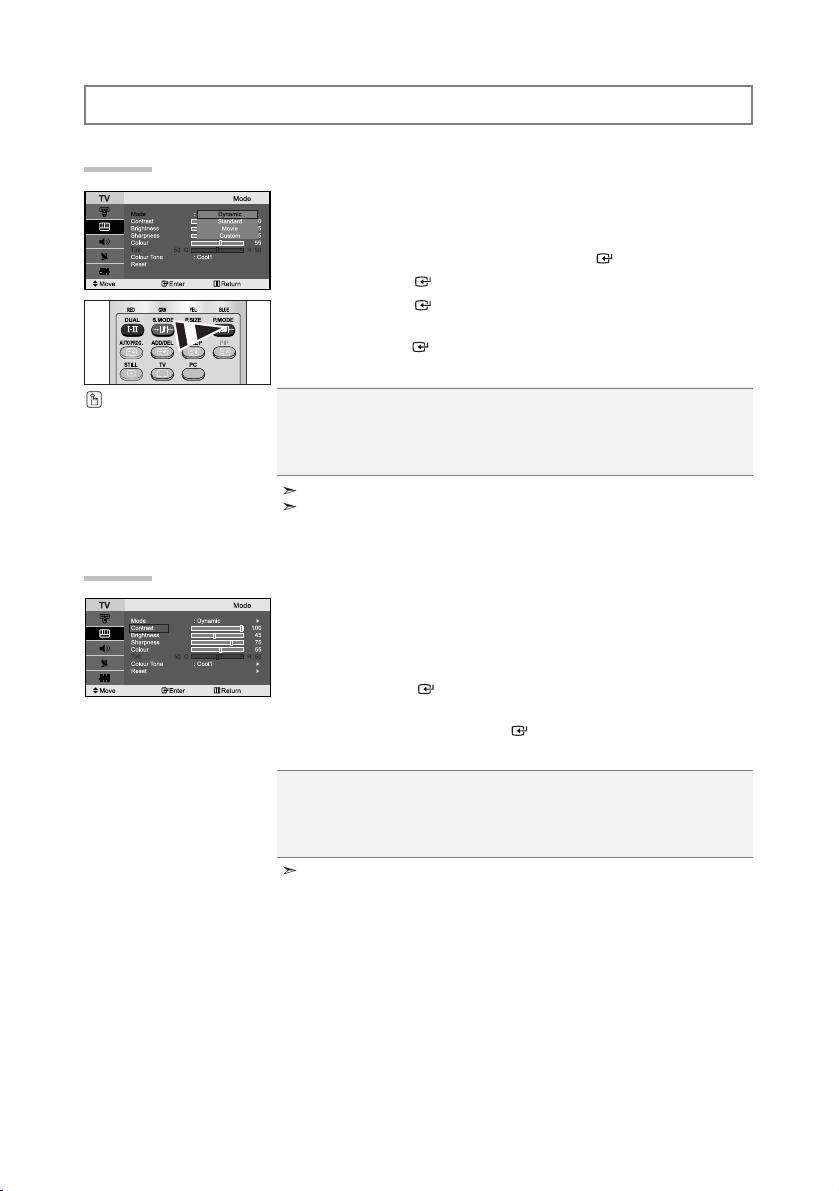
SETTING THE PICTURE
You can select the type of picture which best corresponds to your
viewing requirements.
1. Press the MENU button to display the menu. Press the or
button to select “Picture”, then press the ENTER button.
2.
Press the ENTER button again, to select “Mode”.
3.
Press the ENTER button again, to select “Mode”.
4.
Press the
or
button to select the desired picture effect.
Press the
ENTER
button.
5.
Press the EXIT button to exit.
Dynamic: Selects the picture for high-definition in a bright room.
Standard: Selects the picture for optimum display in a normal environment.
Movie: Selects the picture for comfortable display in a dark room.
Custom: Select to view your favorite display settings.
(Refer to “Adjusting the Custom Picture” on page 9)
You can also press the
P.MODE button on the remote
control to select one of the
picture settings.
The Picture mode must be adjusted separately for each input source.
You can return to the factory defaults picture settings by selecting the “Reset”.
(Refer to “Resetting the Picture Settings to the Factory Defaults” on page 10)
Changing the Picture Standard
Contrast: Adjusts the lightness and darkness between objects and the background.
Brightness: Adjusts the brightness of the whole screen.
Sharpness: Adjusts the outline of objects to either sharpen them or make them more dull.
Colour: Adjusts the colours, making them lighter or darker.
Tint: Adjusts the colour of objects, making them more red or green for a more natural look.
Your set has several settings which allow you to control picture quality.
1. To select the desired picture effect, follow the
“Changing the Picture Standard” instructions number 1 to 4 on page 9.
2.
Press the
or button
to select a particular item.
Press the
ENTER
button.
3.
Press the
or button
to decrease or increase the value of a
particular item.
Press the ENTER button.
4.
Press the EXIT button to exit.
Adjusting the Custom Picture
The adjusted values are stored according to the selected Picture mode.
Page 12

English-10
You can return to the factory defaults picture settings.
1. To select the desired picture effect, follow the
“Changing the Picture Standard” instructions number 1 to 4 on page 9.
2. Press the or button to select “Reset”, then press the
ENTER button.
3.
Press the EXIT button to exit.
The “Reset” will be set for each picture mode.
Resetting the Picture Settings to the Factory Defaults
In PC Mode, only “16:9” and “4:3” mode can be adjusted.
Select by pressing the or buttons.
Use the or button to move the picture up and down.
After selecting , use the or button to magnify or reduce the picture size in
the vertical direction.
Auto Wide: Automatically adjusts the picture size to the "16:9" aspect ratio.
16:9: Adjusts the picture size to 16:9 appropriate for DVDs or wide broadcasting.
Panorama: Adjusts 16:9 to 4:3 in a natural way as for normal broadcasting.
Zoom: Magnifies the 16:9 wide picture (in the vertical direction) to fit the screen size.
4:3: This is the default setting for a video movie or normal broadcasting.
You can select the picture size which best corresponds to your
viewing requirements.
1. Press the MENU button to display the menu. Press the or button to
select “Picture”, then press the
ENTER button.
2. Press the or button to select “Size”, then press the
ENTER button.
3. Select the required option by pressing the or button.
Press the
ENTER
button.
4.
Press the EXIT button to exit.
Changing the Picture Size
You can select the most comfortable colour tone to your eyes.
1. To select the desired picture effect, follow the
“Changing the Picture Standard” instructions number 1 to 4 on page 9.
2. Press the or button to select “Colour Tone”, then press the
ENTER button.
3.
Press the
or button
to select the desired colour tone setting.
Press the
ENTER
button.
4.
Press the EXIT button to exit.
Changing the Colour Tone
Cool2: Makes the colour temperature
bluer than “Cool1” menu.
Cool1: Makes whites bluish.
Normal: Keeps whites white.
Warm1: Makes whites reddish.
Warm2: Makes the colour temperature
redder than “Warm1” menu.
The adjusted values are stored according to the selected Picture mode.
You can select these options
by simply pressing the
P.SIZE
button on the remote control.
Page 13
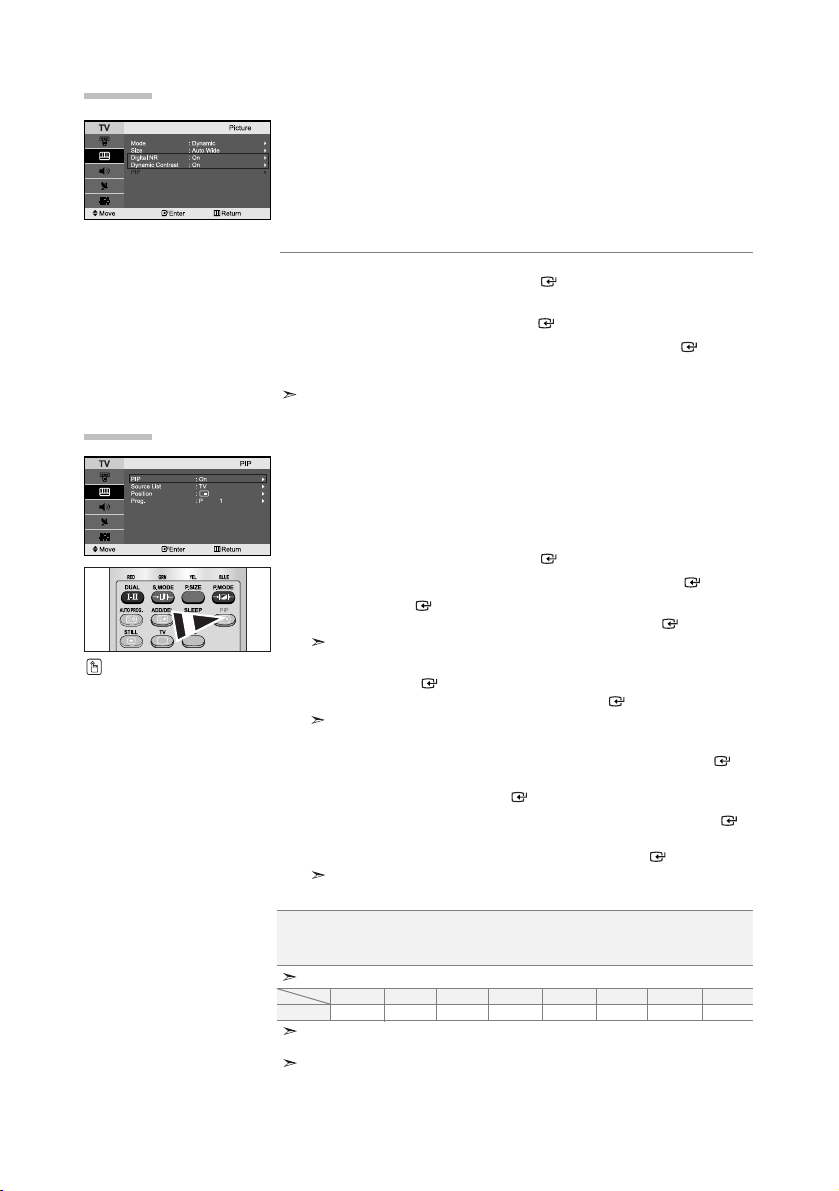
English-11
You can display a sub picture within the main picture of set
programme or video input. In this way, you can watch the picture of set
programme or video input from any connected equipment while watching
the main picture.
1. Press the MENU button to display the menu. Press the or button to
select “Picture”, then press the
ENTER button.
2.
Press the or button to select “PIP”, then press the ENTER button.
3. Press the ENTER button again.
Press the
or button to select “On”, then press ENTER button.
PIP is available only in PC mode and will be unavailable for other modes.
4. Press the or button to select “Source List”,
then press
ENTER button. Select a source of the sub picture by
pressing the
or button and press the ENTER button.
The sub picture can serve different source selections based on what the main
picture is set to.
5. Press the or button to select “Position”, then press the ENTER
button. Select the position of the sub picture by pressing the or
button and then press the ENTER button.
6. Press the or button to select “Prog.” and then press the ENTER
button. You can select the channel that you want to view through sub
picture by pressing the
or button. Press the ENTER button.
The “Prog.” can be active when the sub picture is set to TV.
7. Press the EXIT button to exit.
Viewing the Picture In Picture (PIP)
Source List:
Selecting a signal source (external A/V) for PIP.
Position: Used to move the sub picture.
Prog.: Used to Change the sub picture.
Digital NR:
If the broadcast signal received by your TV is weak, you can activate the
Digital Noise Reduction feature to help reduce any static and ghosting
that may appear on the screen.
Dynamic Contrast:
Dynamic Contrast detects the visual signal input and adjusts to create
optimum contrast.
1. Press the MENU button to display the menu. Press the or button to
select “Picture”, then press the
ENTER button.
2. Press the or button to select “Digital NR” or
“Dynamic Contrast”. Press the
ENTER button.
3.
Press the or button to select “On” or “Off”. Press the ENTER button.
4. Press the EXIT button to exit.
These functions don’t work in PC mode.
Digital Noise Reduction / Dynamic Contrast
PIP Settings
(O: PIP operates, X: PIP doesn’t operate)
Press the PIP button on the
remote control repeatedly to
activate or deactivate the “PIP”.
PC
TVOExt.1OExt.2OAVOS-VideoOComponentXPCXDVI
X
Sub
Main
When the main picture is PC, the sub picture only supports “TV”, “Ext.1”, “Ext.2”, “AV”
and “S-Video”. The sub picture does not support other input sources in this case.
You may notice that the picture in the PIP window becomes slightly unnatural
when you use the main screen to view a game or karaoke.
Page 14
English-12
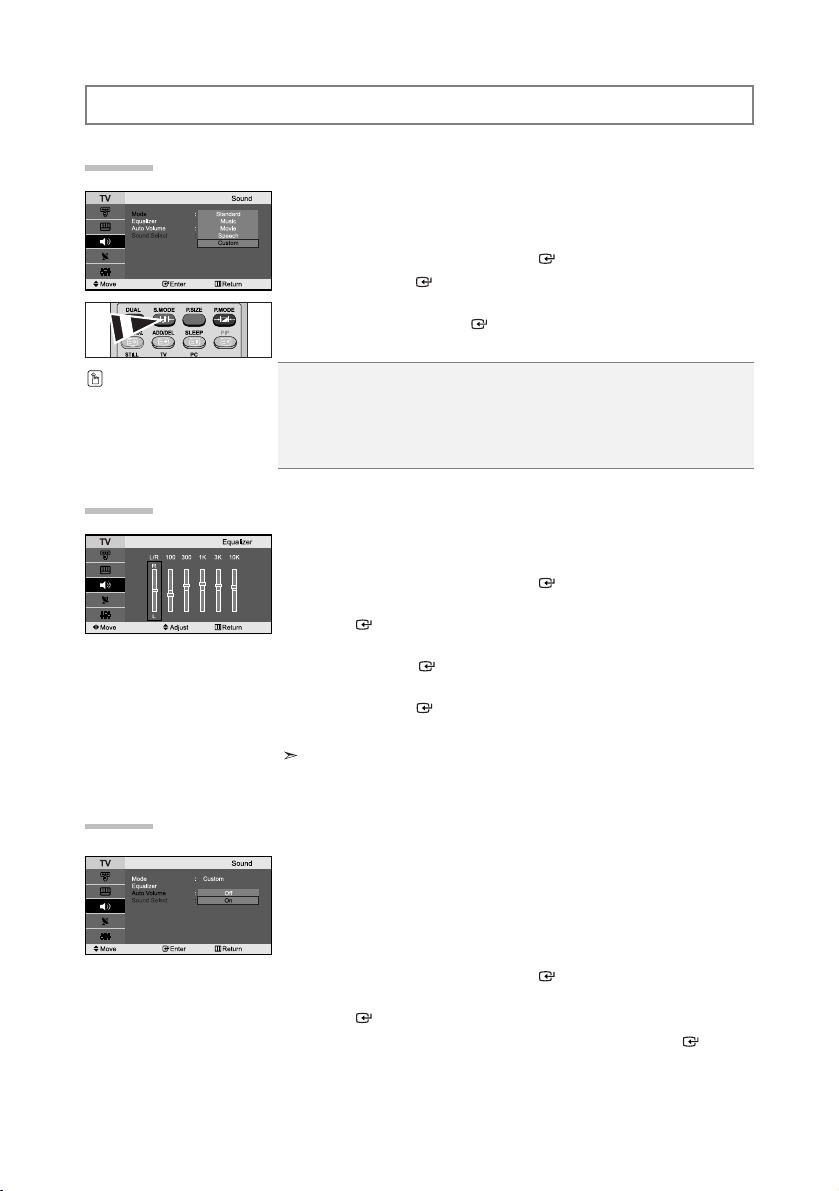
Each broadcasting station has its own signal conditions, and so it is not
easy for you to adjust the volume every time the channel is changed.
This feature let you automatically adjust the volume of the desired
channel by lowering the sound output when the modulation signal is
high or by raising the sound output when the modulation signal is low.
1. Press the MENU button to display the menu. Press the or button to
select “Sound”, then press the
ENTER button.
2. Press the or button to select “Auto Volume”, then press the
ENTER button.
3.
Press the or button to select “On” or “Off”. Press the ENTER button.
4. Press the EXIT button to exit.
Adjusting the Volume Automatically
The sound settings can be adjusted to suit your personal preferences.
1. Press the MENU button to display the menu. Press the or button to
select “Sound”, then press the
ENTER button.
2. Press the or button to select “Equalizer”, then press the
ENTER button.
3.
Press the
or button
to select a particular item.
Press the
ENTER
button.
4. Press the or button to reach the required setting.
Press the
ENTER button.
5. Press the EXIT button to exit.
If you make any changes to these settings, the Sound Mode is automatically
switched to “Custom”.
Adjusting the Sound Settings
SETTING THE SOUND
You can select the type of the special sound effect to be used when
watching a given broadcast.
1. Press the MENU button to display the menu. Press the or button to
select “Sound”, then press the
ENTER button.
2. Press the ENTER button again, to select “Mode”.
3. Select the required sound effect by pressing the or button repeatedly
and then press the
ENTER button.
4. Press the EXIT button to exit.
Standard: Selects the normal sound mode.
Music: Emphasizes music over voices.
Movie: Provides live and full sound for movies.
Speech: Emphasizes voices over other sounds.
Custom: Selects your custom sound settings.
(Refer to “Adjusting the Sound Settings” on page 12)
Changing the Sound Standard
You can also select these
options by simply pressing the
S.MODE button on the remote
control.
Page 15

English-13
During the PIP feature is activating, you can listen to the sound of the
sub picture.
1. Press the MENU button to display the menu. Press the or button to
select “Sound”, then press the
ENTER button.
2. Press the or button to select “Sound Select”, then press the
ENTER button.
3. Press the or button to select “Sub”. Press the ENTER button.
4. Press the EXIT button to exit.
You can select this option when the “PIP” is set to “On”.
Listening to the Sound of the Sub Picture
Main: Used to listen to the sound of the main picture.
Sub: Used to listen to the sound of the sub picture.
SETTING THE TIME
You can set the TV’s clock so that the current time is displayed when
you press the INFO button. You must also set the time if you wish to
use the automatic On/Off timers.
1. Press the MENU button to display the menu. Press the or button to
select “Setup”, then press the
ENTER button.
2.
Press the or button to select “Time”, then press the ENTER button.
3. Press the ENTER button to select “Clock Set”.
4.
5.
Press the EXIT button to exit.
If you disconnect the power cord, you have to set the clock again.
You can also set hour and minute by pressing the number buttons on the remote control.
To...
Move to “Hour” or “Minute”
Set the “Hour” or “Minute”
Press the
ENTER button.
Press the...
or button.
or button.
Setting and Displaying the Current Time
You can select a time period of between 30 and 180 minutes after which
the television automatically switches to standby mode.
1. Press the MENU button to display the menu. Press the or button to
select “Setup”, then press the
ENTER button.
2.
Press the or button to select “Time”, then press the ENTER button.
3. Press the or button to select “Sleep Timer”, then press the
ENTER button.
4. Press the or button repeatedly until the desired time appears
(Off, 30, 60, 90, 120, 150, 180). Press the
ENTER
button.
5. Press the EXIT button to exit.
The TV automatically switches to standby mode when the timer reaches 0.
Setting the Sleep Timer
Press the SLEEP button on
the remote control repeatedly
until the appropriate time
interval appears.
Page 16

English-14
You can set the On/Off timers so that the set will:
Switch on automatically and tune to the channel of your choice at
the time you select.
Switch off automatically at the time you select.
1. Press the MENU button to display the menu. Press the or button to
select “Setup”, then press the
ENTER button.
2. Press the or button to select “Time”, then press the
ENTER button.
3. Press the or button to select “On Timer”, then press the
ENTER button.
4. Press the or button to adjust “Hour”, then press the button to
move to the next step. Set other items using the same method as above.
When finished, press the
ENTER button to return.
5. Press the or button to select “Off Timer”,
then press the
ENTER button.
6. Press the or button to adjust “Hour”, then press the button to
move to the next step. Set other items using the same method as above.
When finished, press the
ENTER button to return.
7. Press the EXIT button to exit.
The first step is to set the television’s clock.
You can also set hour and minute by pressing the number buttons on the remote control.
The "Setup" setting must be set to "On" in order for the timers to work.
Switching the Television On and Off Automatically
SETTING THE OTHERS
When you start using your set for the first time, you must select the
language which will be used for displaying menus and indications.
1. Press the MENU button to display the on-screen menu.
Press the
or button to select “Setup”, then press the
ENTER button.
2. Press the or button to select “Language”,
then press the
ENTER button.
3. Select a particular language by pressing the or button repeatedly.
Press the
ENTER button.
You can choose one of 21 languages.
4. Press the EXIT button to exit.
Choosing Your Language
Page 17

English-15
This feature adjusts the brightness of TV so as to reduce the power
consumption. When you watching TV at night, set the "Energy Saving "
mode option to "High" so as to reduce the dazzling of your eyes as well
as the power consumption.
1. Press the MENU button to display the on-screen menu.
Press the
or button to select “Setup”, then press the
ENTER button.
2. Press the or button to select “Energy Saving”,
then press the
ENTER button.
3. Select the required option (Off, Low, Medium, High) by pressing
the
or button.
Press the
ENTER button.
4. Press the EXIT button to exit.
This function does not work in PC mode.
Using the Energy Saving Feature
Blue Screen:
If no signal is being received or the signal is very weak, a blue screen
automatically replaces the noisy picture background. If you wish to
continue viewing the poor picture, you must set the "Blue Screen"
mode to "Off".
Melody:
You can hear melody sound when the television is powered on or off.
1. Press the MENU button to display the menu. Press the or button to
select “Setup”, then press the
ENTER button.
2. Press the or button to select “Blue Screen” or “Melody”.
Press the
ENTER button.
3.
Press the or button to select “On” or “Off”.
Press the
ENTER button.
4. Press the EXIT button to exit.
Setting the Blue Screen Mode / Selecting the Melody
You can select among external sources connected to
your TV’s input jacks.
1. Press the MENU button to display the menu.
Press the
ENTER button, to select “Input”.
2. Press the ENTER button again, to select “Source List”.
When no external device is connected to your set, only “TV”, “Ext.1”, “Ext.2”
are activated in the “Source List”. “AV”, “S-Video”, “Component”, “PC”, “DVI”
are activated only when they are connected to your set.
3. Select the required device by pressing the or button.
Press the
ENTER button.
Selecting the Source
Press the SOURCE button on the remote control to toggel between all the available
source. TV mode can be selected by pressing the
TV or P / button on the
remote control but you cannot select it by pressing the
SOURCE button.
Page 18

English-16
USING THE TELETEXT FEATURE
Most set channels carry “ teletext ”, pages of written
information that provide information such as:
Television programme times.
News bulletins and Weather forecasts.
Sports results.
Subtitles for the hard of hearing.
The teletext pages are organized according to six categories:
Part
A
B
C
D
E
F
Contents
Selected page number.
Broadcasting station identity.
Current page number or search status.
Date and time.
Text.
Status information.
Teletext Decoder
Name the device connected to the input jacks to make your input
source selection easier.
1. Press the MENU button to display the menu.
Press the
ENTER button, to select “Input”.
2. Press the or button to select “Edit Name”, then press the
ENTER button.
3. Press the or button to select the device that you wish to edit.
Press the
ENTER button.
4. Press the or button to select the required device.
Press the
ENTER button.
5. Press the EXIT button to exit.
Editing the Input Source Names
Page 19

English-17
You can display teletext information at any time, but signal reception
must be good. Otherwise:
Information may be missing.
Some pages may not be displayed.
To activate the teletext mode and display the contents page:
1.
Using the P () or P () button, select the channel providing the
teletext service.
2.
Press the TTX/MIX () button to activate the teletext mode.
The contents page is displayed. It can be redisplayed at any time by pressing
the MENU () button.
3. Press the TTX/MIX () button again.
The actual broadcast will be displayed simultaneously with the teletext page
on the screen.
4. Press the TV() button again to exit from the Text display.
If any broken character appears while Text is being viewed, make sure that the
Text language is identical with the language in the “Setup” menu mode. If both languages
are different, select the same language with the Text language on the “Setup” menu.
Displaying the Teletext Information
Press the number buttons on the remote control to enter the page
number directly:
1.
Enter the three-digit page number listed in the contents by pressing the
corresponding numeric buttons.
2.
If the selected page is linked with several secondary pages, the secondary
pages are displayed in sequence. To freeze the display on a given page,
press the
()
. Press the
()
button again to resume.
3. Using the various display options:
To display...
Both teletext information and the normal broadcast
Hidden text (answers to quiz games, for example)
The normal screen
A secondary page, by entering its 4-digit number
The next page
The previous page
Double-size letters in the:
Upper half of the screen
Lower half of the screen
Normal screen
Press the...
TTX/MIX ( )
INFO ( )
INFO ( )
ADD/DEL ( )
P
()
P
()
SLEEP
()
Once
Twice
Three times
Selecting a Specific Teletext Page
Page 20

English-18
The various topics included in the teletext pages are colour-coded, and can
be selected by pressing the coloured buttons on the remote control.
1.
Display the teletext contents page by pressing the
TTX/MIX ()
button.
2. Press the coloured button corresponding to the topic that you wish to
select (The available topics are listed on the status information line).
3. Press the Red button to display the previous page.
Press the Green button to display the next page.
4. Press the TV() button again to exit from the Text display.
Using Fastext to Select a Teletext Page
SETTING THE PC
The Windows display-settings for a typical computer are shown below. The actual screens on your PC
may be different depending upon your particular version of Windows and your particular video card.
Even if your actual screens look different, the same, basic set-up information will apply in almost all
cases. (If not, contact your computer manufacturer or Samsung Dealer.)
1. First, click on “Control Panel” on the Windows start menu.
2. When the control panel window appears, click on “Appearance and Themes” and a
display dialog-box will appear.
3. When the control panel window appears, click on “Display” and a display
dialog-box will appear.
4. Navigate to the “Settings” tab on the display dialog-box.
The correct size setting (resolution): Optimum- 1360 X 768
If a vertical-frequency option exists on your display settings dialog box, the correct
value is “60” or “60 Hz”. Otherwise, just click “OK” and exit the dialog box.
Setting up Your PC Software (Based on Windows XP)
The interlace mode is not supported.
The set might operate abnormally if a non-standard video format is selected.
DVI does not support PC function.
Separate and Composite modes are supported. SOG is not supported.
Display Modes
Both screen position and size will vary depending on the type of PC monitor and its resolution.
The resolutions in the table are recommended. (All resolutions between the supported limits are supported)
Mode
IBM
VESA
Resolution
640 x 480
720 x 400
640 x 480
640 x 480
800 x 600
800 x 600
800 x 600
1024 x 768
1024 x 768
1024 x 768
1360 x 768
Horizontal
Frequency (kHz)
31.469
31.469
37.861
37.500
37.879
48.077
46.875
48.364
56.476
60.023
47.712
Vertical
Frequency (Hz)
59.940
70.087
72.809
75.000
60.317
72.188
75.000
60.000
70.069
75.029
60.015
Pixel Clock
Frequency (MHz)
25.175
28.322
31.500
31.500
40.000
50.000
49.500
65.000
75.000
78.750
85.800
Sync Polarity
(H/V)
- / -
- / +
- / -
- / + /+
+ /+
+ /+
- / -
- / + /+
+ /+
Page 21

English-19
Setting the PC
Coarse and Fine Tuning of the Image (Image Lock):
The purpose of picture quality adjustment is to remove or reduce picture
noise. If the noise is not removed by Fine-tuning alone, then adjust the
frequency as best as possible (coarse) and Fine-tune again. After the noise
has been reduced, re-adjust the picture so that it is aligned on the center of
screen.
1. Preset: Press the PC button to select PC mode.
2. Press the MENU button to display the menu.
Press the
or button to select “Setup”,
then press the
ENTER button.
3. Press the or button to select “PC”, then
press the
ENTER button.
4. Press the ENTER button to select “Image Lock”.
5. Press the or button to select “Coarse” or “Fine”,
then press the
ENTER button.
6. Press the or button to adjust the screen quality.
Press the
ENTER button.
7. Press the EXIT button to exit.
Changing the Image Position (Position):
Adjust the PC’s screen positioning if it does not fit the TV screen.
1. Follow the “Coarse and Fine Tuning of the Image (Image Lock)”
instructions number 1 to 3.
2. Press the or button to select “Position”,
then press the
ENTER button.
3. Press the or button to adjusting the Vertical-Position.
Press the
or button to adjust the Horizontal-Position.
Press the
ENTER button.
4. Press the EXIT button to exit.
Initializing the Image Settings (Image Reset):
You can replace all image settings with the factory default values.
1. Follow the “Coarse and Fine Tuning of the Image (Image Lock)”
instructions number 1 to 3.
2. Press the or button to select “Image Reset”,
then press the
ENTER button.
3. Press the EXIT button to exit.
Adjusting the PC Screen Automatically (Auto Adjustment):
Auto adjustment allows the PC screen of set to self-adjust to the
incoming PC video signal. The values of fine, coarse and position are
adjusted automatically.
1. Follow the “Coarse and Fine Tuning of the Image (Image Lock)”
instructions number 1 to 3.
2. Press the or button to select “Auto Adjustment”,
then press the
ENTER button.
3. Press the EXIT button to exit.
Press the PC button on the
remote control to select the
PC mode.
Page 22

English-20
Technical and Environmental Specifications
RECOMMENDATIONS FOR USE
No sound or picture
Normal picture but no sound
No picture or black and white picture
Sound and picture interference
Blurred or snowy picture,
distorted sound
Remote control malfunctions
“Check signal cable.”
message is displayed.
On PC mode, “Not Supported Mode.”
message is displayed.
The TFT LCD panel uses a panel consisting of sub pixels (3,133,440) which require sophisticated technology to produce.
However, there may be few bright or dark pixels on the screen. These pixels will have no impact on the performance of the product.
Check that the mains lead has been connected to a wall socket.
Check that you have pressed the POWER buttons on the front of the set.
Check the picture contrast and brightness settings.
Check the volume.
Check the volume.
Check whether the MUTE button has been pressed on the remote control.
Adjust the colour settings.
Check that the broadcast system selected is correct.
Try to identify the electrical appliance that is affecting the set and move it further away.
Plug your set into a different mains socket.
Check the direction, location and connections of your aerial.
This interference is often due to the use of an indoor aerial.
Replace the remote control batteries.
Clean the upper edge of the remote control (transmission window).
Check the battery terminals.
Check that the signal cable is firmly connected to the PC or video sources.
Check that the PC or video sources are turned on.
Check the maximum resolution and the frequency of the video adaptor.
Compare these values with the data in the Display Modes.
Troubleshooting: Before Contacting Service Personnel
Model Name
Panel
Size
Display Size
Pixel Pitch
Frequency
Horizontal / Vertical
PC Resolution (Optimum)
Power Supply (Input)
Power Consumption
Normal / Power Saving
Dimension (WxDxH)
Body
With stand
Weight
With stand
Environmental Considerations
Operating Temperature
Operating Humidity
Storage Temperature
Storage Humidity
Sound
Output
LE23T5
23” Diagonal (16:9)
508.125 (H) x 285.696 (V) mm
0.372 (H) x 0.372 (V) mm
30~61 kHz / 60~75 Hz
1360 x 768 @ 60 Hz
AC 100 ~ 240 V, 60/50 Hz ±3 Hz
100 W / < 2.0 W
675.9 x 85.0 x 393.40 mm
675.9 x 203.8 x 439.5 mm
8.0 kg (17.64 lbs)
10 °C to 40 °C (50 °F to 104 °F)
10 % to 80 %, non-condensing
-20 °C to 45 °C (-4 °F to 113 °F)
5 % to 95 %, non-condensing
3 W X 2
LE27T5
27” Diagonal (16:9)
603.22 (H) x 341.98 (V) mm
0.1460 (H) x 0.4365 (V) mm
30~61 kHz / 60~75 Hz
1360 x 768 @ 60 Hz
AC 100 ~ 240 V, 60/50 Hz ±3 Hz
140 W / < 2.0 W
766.5 x 96.0 x 459.0 mm
766.5 x 203.8 x 505.5 mm
12.0 kg (26.46 lbs)
10 °C to 40 °C (50 °F to 104 °F)
10 % to 80 %, non-condensing
-20 °C to 45 °C (-4 °F to 113 °F)
5 % to 95 %, non-condensing
5 W X 2
LE32T5
32” Diagonal (16:9)
697.68 (H) x 392.26 (V) mm
0.51075 (H) x 0.51075 (V) mm
30~61 kHz / 60~75 Hz
1360 x 768 @ 60 Hz
AC 100 ~ 240 V, 60/50 Hz ±3 Hz
170 W / < 2.0 W
914.5 x 104.0 x 528.8 mm
914.5 x 247.5 x 591.5 mm
15.0 kg (33.07 lbs)
10 °C to 40 °C (50 °F to 104 °F)
10 % to 80 %, non-condensing
-20 °C to 45 °C (-4 °F to 113 °F)
5 % to 95 %, non-condensing
7.5 W X 2
Page 23

Svenska-1
Svenska
Innehåll
ANSLUTA OCH FÖRBEREDA DIN TV
Lista över delar ........................................................ 2
Installera stativet ...................................................... 2
Installera väggfästessatsen ...................................... 2
Översikt ver kontrollpanelen .................................... 3
Översikt ver anslutningspanelen .............................. 4
Översikt ver fjärrkontrollen........................................ 5
Sätta i batterierna i fjärrkontrollen ............................ 6
Sätta på och stänga av TVn .................................... 6
Sätta tv i vänteläge .................................................. 6
Plug & Play .............................................................. 6
STÄLLA IN KANALERNA
Lagra kanaler automatiskt ........................................ 7
Lagra kanaler manuellt ............................................ 8
Redigera kanaler ...................................................... 8
STÄLLA IN BILDEN
Ändra bildstandard.................................................... 9
Ändra bildinställningarna .......................................... 9
Ändra Färgton .......................................................... 10
Återställa bildinställningarna till
fabriksinställningarna ..............................................10
Välja bildstorlek.......................................................... 10
Använda funktionen Brusreducer. /
Dynamisk kontrast .................................................. 11
Visa bild-i-bilden (BIB) .............................................. 11
STÄLLA IN LJUDET
Ändra ljudstandard.................................................... 12
Justera ljudinställningar ............................................12
Justera volymen automatiskt .................................. 12
Lyssna på underbildens ljud .................................... 13
STÄLLA IN TIDEN
Ställa in och visa aktuell tid ......................................13
Ställa in sovtimern ....................................................13
Slå på och stänga av tv:n automatiskt .................... 14
STÄLLA IN ÖVRIGA
Välja språk................................................................14
Att använda energisparfunktionen............................ 15
Ställa in läget blå bakrund / Välja Melodi ................ 15
Välja källa ................................................................ 15
Redigera ingångskällornas namn ............................16
ANVÄNDA TEXT-TV-FUNKTIONEN
Text-tv-dekoder ........................................................ 16
Visa text-tv-information ............................................ 17
Välj en specifik text-tv-sida ...................................... 17
Använda Fastext (Snabbtext)
för att välja en text-tv-sida ........................................18
STÄLLA IN PATORN
Installera programvaran (baserad på XP) ................18
Visningsläge ............................................................18
Ställa in datorn.......................................................... 19
REKOMMENDATIONER FÖR ANVÄNDNING
Felsökning: Innan du kontaktar servicepersonal ......20
Tekniska och miljömässiga specifikationer ..............20
Symboler Tryck Viktigt Obs!
Entrycksknapp
Page 24
Svenska-2
ANSLUTA OCH FÖRBEREDA DIN TV
Lista över delar
Försäkra dig om att följande delar följer med din LCD TV.
Kontakta din återförsäljare om det saknas något.
M4 X L16
Fjärrkontroll och batterier
(AAA x 2)
Nätsladd Nedre kåpa Stativskruvar X 4
Användarhandbok Garantikort Servicenätverkskort Säkerhetsguide Registreringskort
< 2 >< 3 >
1. Placera TV:n med rutan neråt på ett mjukt tyg eller en kudde på ett bord.
2. För in stativet i hålet i TV:ns botten.
3. Sätt i skruven i hålet enligt anvisning och dra åt.
Installera stativet
Väggmonteringsdetaljer (säljs separat) gör att du kan montera TV:n på väggen.
För detaljerad information om installation av väggfästet skall du titta i instruktionerna som medföljer
väggmonteringsdetaljerna. Kontakta en tekniker för att få hjälp vid installation av väggfästet.
Samsung Electronics är inte ansvariga för skador på produkten eller personlig skada på dig själv eller andra
om du väljer att montera TV:n själv.
Installera väggfästessatsen
Page 25

Svenska-3
Översikt ver kontrollpanelen
SOURCE
Växlar mellan alla tillgängliga ingångskällor.
(TV, Ext.1, Ext.2, AV, S-Video, Component, PC,
DVI). Använd den här knappen på skärmmenyn
när du använder knappen
ENTER på
fjärrkontrollen.
MENU
Tryck här om du vill se en skärmmeny med TV:ns
funktioner.
Tryck för att sänka eller höja volymen.
På skärmmenyn använder du knapparna
när du använder knapparna och på
fjärrkontrollen.
Tryck här när du vill byta kanal. På skärmmenyn
använder du knapparna när du använder
knapparna
och på fjärrkontrollen.
(Om du inte använder fjärrkontrollen kan du koppla
på TV:n med hjälp av kanalknapparna.)
(HÖRLURSINGÅNG)
Anslut externa hörlurar till den här ingången för att
lyssna för dig själv.
(Ström)
Tryck här när du ska slå på och stänga av TV:n.
Strömindikator
Blinkar och stängs av när strömmen är på och
tänds i viloläge.
Högtalare
Mottagare för fjärrkontrollen
Rikta fjärrkontrollen mot den här punkten på TV:n.
Produktens färg och form kan variera beroende på model.
Page 26
Ansluta en antenn eller ett kabel-TV-nät
För att TV-kanaler ska visas på rätt sätt måste enheten ta emot en signal från någon av följande källor:
- En utomhusantenn / Ett kabel-TV-nätverk / Ett satellitnätverk
Ansluta komponentenheter (DTV/DVD)
- Anslut videokablarna (tillval) till komponentanslutningen ("PR", "PB", "Y") på TV:ns baksida och de andra ändarna till
motsvarande videoutgång på DTV:n eller DVD:n.
- Om du vill ansluta både en digital-TV-box och en DTV-spelare (eller DVD-spelare) ska du ansluta digital-TV-boxen till
DTV-spelaren (eller DVD-spelaren) och sedan ansluta denna till komponentanslutningen ("P
R", "PB", "Y") på TV:n.
-Y, P
R och PB-anslutningarna på komponentenheterna (DTV eller DVD) är ibland märkta Y, B-Y och R-Y eller Y, Cb och Cr.
- Anslut RCA-ljudkablarna (tillval) till "R - AUDIO - L" på apparatens baksida och de andra ändarna till motsvarande
ljudutgångar på DTV- eller DVD-spelaren.
- Den här LCD-TV:n har optimal bildkvalitet i läget 720p.
Svenska-4
Översikt ver anslutningspanelen
Strömingång
När du vill ansluta en extern enhet till din TV skall du se till att enheten är avstängd.
Vid anslutning till en extern enhet är det viktigt att kablarnas färger överensstämmer.
Page 27

Svenska-5
Ansluta externa A/V-enheter
-
Anslut RCA- eller S-videokabeln (tillval) till lämplig extern A/V-enhet som t.ex. videobandspelare, DVD-spelare eller videokamera.
- Anslut RCA-ljudkablarna (tillval) till "R - AUDIO L" på apparatens baksida och de andra ändarna till motsvarande ljudutgångar
på A/V-enheten.
Ansluta digital-tv-box, videobandspelare eller DVD
- Anslut DTV-, VCR- eller DVD SCART-kabeln (tillval) till SCART-uttaget på videobandspelaren eller DVD-spelaren.
Ansluta DVI
- Anslut DVI -anslutningen till DVD -anslutningen.
- Anslut stereoljudkablarna (tillval) till "R - AUDIO - L" på apparatens baksida och de andra ändarna till motsvarande
ljudutgångar på A/V-enheten.
- DVI stöder inte PC-funktion.
- Den här LCD-TV:n har optimal bildkvalitet i läget 720p.
Ansluta en dator
- Anslut D-Sub-kabeln (tillval) till "PC (PC IN)" på baksidan av din enhet och den andra till grafikkortet på din dator.
- Anslut stereo-audiokabeln (tillval) till "AUDIO (PC IN)" på baksidan av din enhet och den andra änden till "Audio Out" till
ljudkortet på din dator.
Kensingtonlå
- Kensingtonlåset (tillval) är en enhet som används för att fysiskt låsa systemet när det används på en allmän plats.
- Om du vill använda en låsenhet skall du kontakta återförsäljaren där du köpte TV:n.
Tv:ns väntlägesknapp
Sifferknappar för direktåtkomst
till kanaler
Kanalval för en-/två-siffriga kanaler
Öka volymen
Minska volymen
Stänga av ljudet tillfälligt
Visar menyn för skärmmenyn
Välja ljudläge
Välja ljudeffekt
Tryck för att automatiskt lagra valda
TV/kabel-kanaler
Använd för att lagra och ta bort
kanaler i minnet.
Frysa bilden
Öppnar läget (TV) direkt
Föregående kanal
P: Nästa kanal
P: Föregående kanal
Välja tillgängliga källor
Visa inställningsinformation
Avsluta skärmmenyn
Styra menymarkören
Välja bildformat
Välja bildeffekt
Bild-I-Bild På/Avv
Automatisk avstängning
Öppnar läget (PC) direkt
Text-TV-funktioner
Text-tv håll
Text-tv visning/blanda både
text-tv-information och normalt
tv-program
Index för text-tv
Text-tv lagra
Underordnad Text-tv-sida
Lämna text-tv-visning
P: Text-tv nästa sida
P: Text-tv föregående sida
Lägesval för text-tv (LIST/FLOF)
Text-tv visa
Avbryta text-TV
Text-tv välja storlek
Text-tv ämnesval
Fjärrkontrollens funktion kan påverkas av starkt ljus.
Översikt ver fjärrkontrollen
Page 28

Strömkabeln är ansluten baktill på din anläggning.
1. Anslut strömkabeln till lämpligt uttag.
Indikatorn för vänteläge på enhetens framsida tänds.
2. Tryck på knappen POWER på apparatens framsida.
Det program du senast tittade på väljs automatiskt igen.
3. Tryck på de numeriska knapparna (0~9) eller på en kanalväljarknapp upp/ner ( / ) på fjärrkontrollen
eller på eller på knappen på apparatens högersida.
När du slår på TV-apparaten för första gången ombeds du välja vilket språk som du vill att menyerna ska visas på.
4. När du vill stänga av apparaten trycker du på POWER igen.
Du kan försätta anläggningen i standby-läge för att spara ström. Standby-läget är användbart när du vill
sluta titta en kortare stund (tex för att äta middag).
1. Tryck på knappenPOWER på apparatens framsida.
Bildskärmen släcks och en röd standby-lampa tänds på apparatens framsida.
2. När du vill koppla på TV:n igen trycker du bara på POWER ,
en siffra (0~9 ) eller en kanalväljarknapp ( / ).
Lämna inte anläggningen i standby-läge under längre perioder (tex när du åker bort på semester).
Det är bäst att koppla ur strömsladd och antenn från enheten.
Sätta på och stänga av TVn
Sätta tv i vänteläge
När TV:n sätts på för första gången startar flera inställningar automatiskt och
kontinuerligt. Följande inställningar finns:
1. Tryck på knappenPOWER på apparatens framsida.
Meddelandet “Plug & Play”.
2. Välj språk genom att trycka på knappen eller .
Tryck på knappen
ENTER för att bekräfta valet.
3. Meddelandet “Kontr. antenningång.” visas och “OK” är markerat.
Tryck på knappen
ENTER .
Kontrollera att antennkabeln är riktigt ansluten.
Plug & Play
Svenska-6
1. Skjut undan locket helt.
2. Sätt i två stycken AAA-batterier.
Kontrollera att "+" och "-" på batterierna stämmer med bilden inuti facket.
3. Sätt tillbaka locket.
Om du inte ska använda fjärrkontrollen under en längre tid kan du ta ur batterierna och
förvara dem på en sval och torr plats.Fjärrkontrollen kan användas på ett avstånd av
upp till 7 meter från TV:n.(Vid normal användning räcker batterierna i ungefär ett år.)
Kontrollera följande om fjärrkontrollen inte fungerar:
1. Är TV-strömmen på?
2. Är batteriernas plus-och minuspoler felvända?
3. Är batterierna uttjänta?
4. Är det strömavbrott eller är nätsladden utdragen?
5. Finns det något fluorescerande ljus eller en neonskylt i närheten?
Sätta i batterierna i fjärrkontrollen
Page 29

Svenska-7
Språk: Välj ditt språk.
Land: Välj ditt land.
Autolagra: Skannar automatiskt och lagrar de kanaler som är tillgängliga i ditt område.
Ställ klockan: Ställer in aktuell tid för TV-klockan.
STÄLLA IN KANALERNA
- Lagra kanaler automatiskt (Se sidan 7)
- Lagra kanaler manuellt (Se sidan 8)
- Redigera kanaler (Se sidan 8)
Om du vill återställa denna funktion ...
1. Tryck på knappen MENU för att visa menyn.
Tryck på knappen eller för att välja “Inställning” och tryck på ENTER .
2. Tryck på knappen ENTER igen för att välja "Plug & Play".
3. Detta ändrar eller återställer inställningar.
Du kan söka efter tillgängliga frekvenser (tillgängligheten beror på vilket land du befinner dig i).
Automatiskt tilldelade programnumer matchar inte alltid faktiska eller önskade programnummer.
Du kan dock ordna numren manuellt och ta bort alla oönskade kanaler.
1. Tryck på knappen MENU för att visa menyn.
Tryck på knappen
eller för att välja “Kanal” och tryck på ENTER .
2. Tryck på knappen ENTER igen för att välja "Land".
3. Välj land genom att trycka på knappen eller .
Tryck på knappen
ENTER för att bekräfta valet.
4. Tryck på knappen eller för att välja “Autolagra” och tryck på ENTER .
5. Tryck på knappen ENTER .
TV:n påbörjar memorisering av alla tillgängliga kanaler.
Tryck på knappen
ENTER
när som helst för att avbryta memoriseringen och återgå till menyn "Kanal".
6. Efter att de tillgängliga kanalerna är lagrade visas menyn "Sortera".
Lagra kanaler automatiskt
4. Välj land genom att trycka på knappen eller .
Tryck på knappen
ENTER för att bekräfta valet.
5. Menyn “Autolagra” visas med alternativet “Start” markerat.
Tryck på knappen
ENTER .
Kanalsökningen börjar och avslutas automatiskt.
När alla tillgängliga kanaler är lagrade visas menyn "Ställ klockan".
Tryck på knappen ENTER när som helst för att avbryta memoriseringsprocessen.
6. Tryck på knappen ENTER .
Välj “Tim” eller “Minut” genom att trycka på knappen
eller
.
Ställ in “Tim” eller “Minut” genom att trycka på knappen
eller
.
Du kan också ställa in timmar och minuter genom att trycka på fjärrkontrollens
sifferknappar.
7. Tryck på knappen ENTER för att bekräfta.
Kanaler kan lagras automatiskt genom att du trycker på knappen AUTO PROG. på
fjärrkontrollen.
Page 30

Svenska-8
Du kan lagra upp till 100 kanaler, inklusive de som tas emot via kabelnätverk. När du lagrar kanaler
manuellt kan du välja:
Huruvida du vill lagra de enskilda kanaler som har hittats.
Programnummer för varje lagrad kanal som du vill identifiera.
1. Tryck på knappen MENU för att visa menyn.
Tryck på knappen
eller för att välja “Kanal” och tryck på ENTER .
2. Tryck på knappen eller för att välja “Lagra manuellt” och tryck på ENTER .
3. Tryck på knappen ENTER igen för att välja "Program".
4. När du vill tilldela ett programnummer till en kanal söker du efter rätt nummer genom att först trycka på
knappen
eller och sedan på ENTER .
Du kan også vælge programnummer ved at trykke på de numeriske taster på fjernbetjeningen.
5. Tryck på knappen eller för att välja “Färgsystem” och tryck på ENTER .
6. Välj önskad färgstandard genom att trycka på knappen eller upprepade gånger och tryck sedan
på knappen
ENTER .
7. Tryck på knappen eller för att välja “Ljudsystem” och tryck på ENTER .
8. Välj önskad Ljudsystem genom att trycka på knapp eller flera gånger och sedan på ENTER .
Om ljudet är onormalt eller om det inte hörs något ljud alls ska du göra ett nytt val för ljudsystem.
9. Om du vet siffran på den kanal som skall lagras trycker du på knapparna eller för att välja "Kanal".
Tryck på knappen
ENTER . Välj C (luftburen kanal) eller S (kabelkanal) genom att trycka på knappen
eller . Tryck på knappen för att välja kanal.
Välj önskat nummer genom att trycka på knappen
eller och sedan på ENTER .
Kanalläge: P (Programläge), C (Luftburet kanalläge), S (Kabelkanalläge)
Du kan också välja kanalnumret genom att trycka på fjärrkontrollens sifferknappar.
10. Om du inte känner till kanalnumren väljer du “Sök” genom att trycka på knappen eller . Tryck på
knappen
ENTER . Sök genom att trycka på knappen eller och sedan p åknappen ENTER .
11. Tryck på knappen eller för att välja “Lagra”. Tryck på knappen ENTER igen för att välja "OK"
12. Upprepa steg 3 till 11 för varje kanal som ska lagras.
Program: Väljer ett programnummer för kanalen.
Färgsystem: Ställer in supportsystemet för färger.
Ljudsystem: Ställer in supportsystemet för ljud.
Kanal: Väljer en kanal.
Sök: Skannar efter frekvensvärdet för kanalen.
Lagra: Sparar dina inställningar.
Lagra kanaler manuellt
Du kan utesluta valda kanaler bland de kanaler du avsökte. När du avsöker de lagrade kanalerna, visas
inte de kanaler du har uteslutit. Alla kanaler som du inte specifikt väljer att utesluta visas under
avsökningen.
1. Använd sifferknapparna för att direkt välja den kanal som du vill lägga till eller ta bort.
2. Tryck på knappen MENU för att visa menyn.
Tryck på knappen
eller för att välja “Kanal” och tryck på ENTER .
3. Tryck på knappen eller för att välja “Lägg till/Ta bort” och tryck på ENTER .
4.
Tryck på knappen ENTER upprepade gånger för att växla mellan alternativet lägg till eller ta bort en kanal.
5. Tryck på knapparna P/ för att växla till rätt kanal och upprepa sedan stegen ovan.
6. Tryck på knappen EXIT för att avsluta.
Du kan visa alla kanaler (inklusive raderade kanaler) genom att använda sifferknapparna på fjärrkontrollen.
Redigera kanaler
Du kan även lägga till eller ta bort kanaler genom att trycka på knappen ADD/DEL på
fjärrkontrollen.
Page 31

Svenska-9
STÄLLA IN BILDEN
Du kan välja den bildstandard som passar bäst till dina
visningsbehov.
1. Tryck på knappen MENU för att visa menyn. Tryck på knappen eller
för att välja “Bild” och tryck på ENTER .
2.
Tryck på knappen ENTER igen för att välja "Läge".
3.
Tryck på knappen ENTER igen för att välja "Läge".
4.
Tryck på knappen eller för att välja önskad bildeffekt.
Tryck på knappen
ENTER .
5. Tryck på knappen EXIT för att avsluta
.
Dynamisk: Väljer en mer högupplöst bild för ljus miljö.
Standard: Väljer en optimal bildkvalitet för normal miljö.
Film: Väljer en optimal bildkvalitet för mörk miljö.
Personlig: Väljer dina favoritinställningar.
(Se "Ändra bildinställningarna" på sidan 9)
Du kan också trycka på
knappen
P.MODE på
fjärrkontrollen för att välja en
av bildinställningarna.
Bildläget måste justeras separat för alla ingångskällor.
Det går att återställa fabrikens standardinställningar för bilden genom att välja
"Återställ". (Se "Återställa bildinställningarna till fabriksinställningarna " på sidan 10)
Ändra bildstandard
Kontrast: Justerar ljusstyrkan och mörkheten mellan motiv och bakgrund.
Ljusstyrka: Justerar hela skärmens ljusstyrka.
Skärpa: Justerar motiven så att de blir skarpare eller suddigare.
Färg: Justerar färgerna så att de blir ljusare eller mörkare.
Ton: Justerar färgen på objekt genom att göra dem mer röda eller gröna för ett mer
naturligt utseende.
Din anläggning har åtskilliga inställningar med vilka du kan justera bildkvaliteten.
1. För att välja önskad bildeffekt skall du följa instruktionerna
"Ändra bildstandard" nummer 1 till 4 på sidan 9.
2.
Tryck på knappen
eller
för att välja en post.
Tryck på knappen ENTER .
3.
Tryck på knappen
eller
för att minska eller öka värdet för en post.
Tryck på knappen ENTER .
4.
Tryck på knappen EXIT för att avsluta.
Ändra bildinställningarna
De justerade värdena lagras tillsammans med det valda bildläget.
Page 32

Svenska-10
Det går att återställa fabrikens standardinställningar för bilden.
1. För att välja önskad bildeffekt skall du följa instruktionerna
"Ändra bildstandard" nummer 1 till 4 på sidan 9.
2. Tryck på knappen eller för att välja “Återställ” och tryck
på
ENTER .
3.
Tryck på knappen EXIT för att avsluta.
"Återställ" kommer att ställas in för varje bildläge.
Återställa bildinställningarna till fabriksinställningarna
I datorläget går det bara att justera lägena "16:9" och "4:3".
Välj genom att trycka på knapparna eller .
Använd knappen eller för att flytta bilden upp och ned.
Efter att du har valt , använder du knappen eller för att förstora eller
förminska bilden i lodrät riktning.
Auto Wide: Justerar automatiskt bildstorleken till formatet "16:9".
16:9: Justerar bildstorleken till 16:9 som är riktigt för DVD eller bredbildssändningar.
Panorama: Justerar 16:9 till 4:3 på ett naturligt sätt för normal sändning.
Zoom: Förstorar 16:9-bredbilden (i vertikal riktning) för att passa skärmstorleken.
4:3: Detta är standardinställningen för en videofilm eller normal sändning.
Du kan välja den bildstorlek som stämmer bäst överens med dina krav.
1. Tryck på knappen MENU för att visa menyn. Tryck på knappen eller
för att välja “Bild” och tryck på ENTER .
2. Tryck på knappen eller för att välja “Storlek” och tryck
på
ENTER .
3. Välj önskat alternativ genom att trycka på knappen eller .
Tryck på knappen
ENTER .
4.
Tryck på knappen EXIT för att avsluta.
Välja bildstorlek
Du kan välja den mest bekväma färgtonen för dina ögon.
1. För att välja önskad bildeffekt skall du följa instruktionerna
"Ändra bildstandard" nummer 1 till 4 på sidan 9.
2. Tryck på knappen eller för att välja “Färgton” och tryck
på
ENTER .
3. Tryck på knappen eller för att välja önskad inställning för färgtonen.
Tryck på knappen
ENTER .
4.
Tryck på knappen EXIT för att avsluta.
Ändra Färgton
Sval2: Ger en blåare färgtemperatur än
“Sval1”.
Sval1: Ger det vita en blå ton.
Normal: Behåller det vita.
Varm1: Ger det vita en röd ton.
Varm2: Ger en rödare färgtemperatur än
“Varm1”.
De justerade värdena lagras tillsammans med det valda bildläget.
Du kan välja de här alternativen
genom att trycka på knappen
för bildformat,
P.SIZE på
fjärrkontrollen.
Page 33

Svenska-11
Du kan visa en underbild i huvudbilden i ett inställt program eller
videoingång. På detta vis kan du titta på bilden hos ett inställt program
eller videoingång från vilken ansluten utrustning som helst, samtidigt
som du tittar på huvudbilden.
1. Tryck på knappen MENU för att visa menyn. Tryck på knappen eller
för att välja “Bild” och tryck på ENTER .
2. Tryck på knappen eller för att välja “BIB” och tryck på ENTER .
3. Tryck på knappen ENTER igen.
Tryck på knappen
eller för att välja “På” och tryck på ENTER .
BIB är endast tillgängligt i PC-läge och kommer att vara otillgängligt i andra lägen.
4. Tryck på knappen eller för att välja “Källa” och tryck på ENTER .
Välj en källa för underbilden genom att trycka på knapp
eller och
sedan på
ENTER .
Den mindre bilden kan fungera för flera olika val av källor beroende på vad
huvudbilden är inställd på.
5. Tryck på knappen eller för att välja “Position” och tryck på
ENTER . Välj position för underbilden genom att trycka på knapp
eller och sedan på ENTER .
6. Tryck på knappen eller för att välja “Prog.” och tryck på ENTER .
Du kan välja vilken kanal du vill titta på i underbilden genom att trycka på
knappen
eller . Tryck på knappen ENTER .
"Prog." kan vara aktivt när underbilden är inställd på TV.
7.
Tryck på knappen EXIT för att avsluta
.
Visa bild-i-bilden (BIB)
Källa:
Att välja en signalkälla (extern A/V) för BIB.
Position: Används för att flytta den mindre bilden.
Prog.: Används för att ändra den mindre bilden.
Brusreducer.:
Om sändarsignalen som din TV tar emot är svag kan du aktivera den
digitala brusreduceringen för att reducera störningar och spökbilder
som kan uppträda på skärmen.
Dynamisk kontr.:
Dynamisk kontrast känner av den visuella insignalen och justerar för att
skapa optimal kontrast.
1. Tryck på knappen MENU för att visa menyn. Tryck på knappen eller
för att välja “Bild” och tryck på ENTER .
2. Tryck på knappen eller för att välja “Brusreducer.” eller
“Dynamisk kontr.”. Tryck på knappen
ENTER .
3.
Tryck på knappen eller för att välja “På” eller “Av”. Tryck på knappen ENTER .
4.
Tryck på knappen EXIT för att avsluta
.
De här funktionerna fungerar inte i PC-läge.
Använda funktionen Brusreducer. / Dynamisk kontrast
Inställningar för BIB
(O: BIB är aktiverat, X: BIB är ej aktiverat)
Tryck upprepade gånger på
knappen
PIP på fjärrkontrollen
för att aktivera eller avaktivera
"BIB".
PC
TVOExt.1OExt.2OAVOS-VideoOComponentXPCXDVI
X
Underbild
Huvudbild
När huvudbilden är PC, stöder underbilden endast "TV", "Ext.1", "Ext.2", "AV" och
"S-Video". Underbilden stöder inga andra ingångskällor i det här fallet.
Du kan upptäcka att bilden i BIB-fönstret blir lätt onaturlig när du använder
huvudfönstret för att visa ett spel eller karaoke.
Page 34

Svenska-12
Varje utsändningsstation har egna signalförhållanden, och det är inte så
lätt för dig att justera volymen varje gång kanalen ändras.
Denna funktion låter dig automatiskt justera volymen för önskad kanal
genom att sänka ljudutgången när moduleringssignalen är hög eller
genom att höja ljudutgången när moduleringssignalen är låg.
1. Tryck på knappen MENU för att visa menyn. Tryck på knappen eller
för att välja “Ljud” och tryck på ENTER .
2. Tryck på knappen eller för att välja “Auto volym”
och tryck på
ENTER .
3.
Tryck på knappen
eller
för att välja “På”
eller “Av”
.
Tryck på knappen ENTER .
4.
Tryck på knappen EXIT för att avsluta
.
Justera volymen automatiskt
Ljudinställningarna kan justeras efter din personliga smak.
1. Tryck på knappen MENU för att visa menyn. Tryck på knappen eller
för att välja “Ljud” och tryck på ENTER .
2. Tryck på knappen eller för att välja “Equalizer”
och tryck på
ENTER .
3.
Tryck på knappen
eller
för att välja en post.
Tryck på knappen ENTER .
4. Tryck på knappen eller för att komma till önskad inställning.
Tryck på knappen
ENTER .
5.
Tryck på knappen EXIT för att avsluta
.
Om du ändrar dessa inställningar, ändras läget Sound automatiskt till “Personlig”.
Justera ljudinställningar
STÄLLA IN LJUDET
Du kan välja vilken typ av speciell ljudeffekt som ska användas när du
tittar på en viss utsändning.
1. Tryck på knappen MENU för att visa menyn. Tryck på knappen eller
för att välja “Ljud” och tryck på ENTER .
2. Tryck på knappen ENTER igen för att välja "Läge".
3. Välj önskad ljudeffekt genom att trycka på knappen eller upprepade
gånger och tryck sedan på knappen
ENTER .
4.
Tryck på knappen EXIT för att avsluta
.
Standard: Väljer normalt ljudläge.
Musik: Förstärker musiken över röster.
Film: Ger levande ljud för filmer.
Tal: Förstärker röster i förhållande till andra ljud.
Personlig: Väljer dina favoritinställningar för ljud.
(Se "Justera ljudinställningar" på sidan 12)
Ändra ljudstandard
Du kan välja de här
alternativen genom att trycka
på knappen
S.MODE på
fjärrkontrollen.
Page 35

Svenska-13
När funktionen BIB är aktiverad kan du lyssna på ljudet i den
underordnade bilden.
1. Tryck på knappen MENU för att visa menyn. Tryck på knappen eller
för att välja “Ljud” och tryck på ENTER .
2.
Tryck på knappen eller för att välja “Ljudval” och tryck på ENTER .
3. Tryck på knappen eller för att välja “Underbild”.
Tryck på knappen
ENTER .
4.
Tryck på knappen EXIT för att avsluta
.
Du kan välja det här alternativet när "BIB" är i inställt på "På".
Lyssna på underbildens ljud
Huvudbild: Används för att lyssna på huvudbildens ljud.
Underbild: Används för att lyssna på den underordnade bildens ljud.
STÄLLA IN TIDEN
Du kan ställa in TV-klockan så att aktuell tid visas när du trycker på
knappen "INFO". Du måste även ställa in tiden för att kunna använda
de automatiska på/av-inställningarna.
1. Tryck på knappen MENU för att visa menyn. Tryck på knappen eller
för att välja “Inställning” och tryck på ENTER .
2. Tryck på knappen eller för att välja “Tid” och tryck på ENTER .
3. Tryck på knappen ENTER igen för att välja "Ställ klockan".
4.
5.
Tryck på knappen EXIT för att avsluta
.
Om du drar ur strömsladden måste du ställa om klockan.
Du kan ställa in timmar och minuter genom att trycka på sifferknapparna på fjärrkontrollen.
Om du vill ...
Gå vidare till “Tim” eller “Minut”
Ställa in “Tim” eller “Minut”
Tryck på knappen ENTER .
Trycker du på ...
Knappen eller .
Knappen eller .
Ställa in och visa aktuell tid
Du kan välja en tidsperiod på mellan 30 och 180 minuter innan TV:n
automatiskt ska gå över till standby-läge.
1. Tryck på knappen MENU för att visa menyn. Tryck på knappen eller
för att välja “Inställning” och tryck på ENTER .
2. Tryck på knappen eller för att välja “Tid” och tryck på ENTER .
3. Tryck på knappen eller för att välja “Sovtimer”
och tryck på
ENTER .
4. Tryck på knappen
eller
upprepade gånger tills den önskade
tiden visas. (Av, 30, 60, 90, 120, 150, 180). Tryck på knappen
ENTER .
5.
Tryck på knappen EXIT för att avsluta
.
Tv växlar automatiskt till vänteläget när timern når 0.
Ställa in sovtimern
Tryck på knappen SLEEP på
fjärrkontrollen tills lämpligt
tidsintervall visas.
Page 36

Svenska-14
Du kan ställa in timerfunktionen för på/av så att tv:n:
Slås på automatiskt och ställer in önskad kanal vid vald tidpunkt.
Stänger av automatiskt vid vald tidpunkt.
1. Tryck på knappen MENU för att visa menyn. Tryck på knappen eller
för att välja “Inställning” och tryck på ENTER .
2. Tryck på knappen eller för att välja “Tid” och tryck på ENTER .
3. Tryck på knappen eller för att välja “Starttid”
och tryck på
ENTER .
4. Tryck på knappen eller för att ändra "Tim", och tryck sedan på
knappen
för att gå till nästa steg.
Ställ in andra funktioner med samma metod som ovan.
När du är färdig trycker du på knappen
ENTER för att återgå.
5. Tryck på knappen eller för att välja “Sluttid”
och tryck på
ENTER .
6. Tryck på knappen eller för att ändra "Tim", och tryck sedan på
knappen
för att gå till nästa steg.
Ställ in andra funktioner med samma metod som ovan.
När du är färdig trycker du på knappen
ENTER för att återgå.
7.
Tryck på knappen EXIT för att avsluta
.
Första steget är att ställa in TV:ns klocka.
Du kan också ställa in timmar och minuter genom att trycka på fjärrkontrollens
sifferknappar.
Inställningen "Inställning" måste vara inställd till "På" för att timern skall fungera.
Slå på och stänga av tv:n automatiskt
STÄLLA IN ÖVRIGA
När du använder anläggningen för första gången, måste du välja språk för
menyer och indikeringar.
1. Tryck på knappen MENU för att visa skärmmenyn.
Tryck på knappen
eller för att välja “Inställning”
och tryck på
ENTER .
2. Tryck på knappen eller för att välja “Språk”
och tryck på
ENTER .
3. Välj ett visst språk genom att trycka flera gånger på knappen eller .
Tryck på knappen
ENTER .
Du kan välja mellan 21 olika språk.
4.
Tryck på knappen EXIT för att avsluta
.
Välja språk
Page 37

Svenska-15
Den här funktionen justerar ljusstyrkan på TV:n för att minska
energiförbrukningen. När du tittar på TV på natten skall du ställa in
lägesalternativet "Energispar" på "Hög" för att reducera bländningen
såväl som energiförbrukningen.
1. Tryck på knappen MENU för att visa skärmmenyn.
Tryck på knappen
eller för att välja “Inställning”
och tryck på
ENTER .
2. Tryck på knappen eller för att välja “Energispar”
och tryck på
ENTER .
3. Välj önskat alternativ (“Av”, “Låg”, “Medel”, “Hög”) genom att trycka på
knappen
eller .
Tryck på knappen
ENTER .
4.
Tryck på knappen EXIT för att avsluta
.
Den här funktionen fungerar inte i PC-läge.
Att använda energisparfunktionen
Blå bakgrund:
En blå bakrund ersätter automatiskt en bild med störningar om inte
någon signal tas emot eller om signalen är mycket svag. Om du vill visa
bilden med störningar måste du stänga av läget "Blå bakgrund".
Melodi:
Du kan höra melodiljud när TV:n är på eller av med fjärrkontrollen.
1. Tryck på knappen MENU för att visa menyn. Tryck på knappen eller
för att välja “Inställning” och tryck på ENTER .
2.
Tryck på knappen
eller
för att välja “Blå bakgrund”
eller “Melodi”
.
Tryck på knappen ENTER .
3.
Tryck på knappen
eller
för att välja “På”
eller “Av”
.
Tryck på knappen ENTER .
4.
Tryck på knappen EXIT för att avsluta
.
Ställa in läget blå bakrund / Välja Melodi
Du kan välja mellan externa källor som är anslutna till din TV:s
ingångar.
1. Tryck på knappen MENU för att visa menyn.
Tryck på knappen
ENTER igen för att välja "Ingångar".
2. Tryck på knappen ENTER igen för att välja "Källa".
När ingen extern enhet är ansluten är endast “TV”, “Ext.1”, “Ext.2” och
aktiverade i “Källa”. “AV”, “S-Video”, ”Component”, “PC”, “DVI” är endast
aktiverade när de är anslutna till utrustningen.
3. Välj enhet genom att trycka på knappen eller .
Tryck på knappen
ENTER .
Välja källa
Tryck på knappen SOURCE på fjärrkontrollen för att växla mellan alla tillgängliga
källor. TV-läget kan väljas genom att du trycker på knappen
TV eller P / på
fjärrkontrollen, men du kan inte välja det genom att trycka på knappen
SOURCE.
Page 38

Svenska-16
ANVÄNDA TEXT-TV-FUNKTIONEN
De flesta tv-kanaler har "text-tv-sidor" med information såsom:
Tider för tv-program.
Nyhetsbulletiner och väderleksrapporter.
Sportresultat.
Textning för döva.
Denna information är uppdelad på numrerade sidor (se bilden).
Del
A
B
C
D
E
F
Innehåll
Valt sidnummer.
Tv-sändarens identitet.
Aktuella sidonummer och sökstatus.
Datum och tid.
Text.
Statusinformation. FASTEXT-information.
Text-tv-dekoder
Namnge den enhet som är ansluten insignalingången för att det skall
bli lättare för dig att välja ingångskälla.
1. Tryck på knappen MENU för att visa menyn.
Tryck på knappen
ENTER igen för att välja "Ingångar".
2. Tryck på knappen eller för att välja “Ändra namn”
och tryck på
ENTER .
3. Tryck på knappen eller för att välja den enhet som du vill redigera.
Tryck på knappen
ENTER .
4. Tryck på knappen eller för att välja önskad enhet.
Tryck på knappen
ENTER .
5.
Tryck på knappen EXIT för att avsluta
.
Redigera ingångskällornas namn
Page 39

Svenska-17
Du kan visa text-tv-information när som helst,
men signalmottagningen måste vara god. Annars:
Kan information saknas.
Visas kanske inte alla sidor.
Aktivera läget text-tv och visa innehållssidan genom att:
1.
Använda knappen P () eller P () och välja kanal som har
text-tv-service.
2.
Trycka på knappen TTX/MIX () för att aktivera läget text-tv.
Innehållssidan visas. Den visas när du trycker på knappen MENU ().
3. Tryk på knappen
TTX/MIX ()
igen.
Den aktuella sändningen visas samtidigt som text-tv-sidan på skärmen.
4. Tryck på knappen TV() igen för att gå ur TTX- fönstret.
Om halva tecken förekommer när text visas, se till att språket för text är detsamma som i
menyläget "Inställning".
Om språken inte är desamma väljer du samma språk i menyn "Inställning".
Visa text-tv-information
Tryck på sifferknapparna på fjärrkontrollen för att ange sidonumret
direkt:
1.
Ange det tresiffriga sidnumret i innehållsförteckningen genom att trycka på
motsvarande sifferknappar.
2.
Om den valda sidan hänger ihop med fler sidor, visas de andra sidorna i
ordningsföljd. Om du vill frysa en sida trycker du ned
()
.
Tryck på
()
igen för att fortsätta.
3. Använd de olika bildskärmsalternativen:
Om du vill visa ...
Både text-tv-information och normal tv-sändning
Dold text (t.ex. svar på frågetävlingar)
Normal bildskärm
En underordnad sida genom att ange dess fyrsiffriga nummer
Nästa sida
Föregående sida
Dubbelt så stora bokstäver i:
Den övre halvan av skärmen
Den nedre halvan av skärmen
Normal skärm
Trycker du på ...
TTX/MIX ( )
INFO ( )
INFO ( )
ADD/DEL ( )
P
()
P
()
SLEEP
()
En gång
Två gånger
Tre gånger
Välj en specifik text-tv-sida
Page 40

Svenska-18
De olika ämnena på teletext sidorna är färgkodade, och kan väljas genom att
du trycker på de färgade knapparna på fjärrkontrollen.
1.
Visa innehållssidan på text-tv:n genom att trycka på knappen
TTX/MIX ()
.
2. Tryck på den färgade knapp som överensstämmer med ditt val av
ämne (tillgängliga ämnen visas i statusinformationen).
3. Tryck på den röda knappen för att visa föregående sida.
Tryck på den gröna knappen för att visa nästa sida.
4. Tryck på knappen TV() igen för att avsluta textvisningen.
Använda Fastext (Snabbtext) för att välja en text-tv-sida
STÄLLA IN PATORN
Windows skärminställningar för en normal dator visas nedan. Rutorna på din dator kan skilja beroende
på vilken version av Windows du använder och vilket grafikkort du har. Även om dina rutor ser olika ut
är det i grunden samma inställningsinformation som visas i de flesta fall.
(Om inte skall du kontakta din datortillverkare eller Samsung-återförsäljare).
1. Klicka först på “Control Panel” i Windows startmeny.
2. När fönstret för kontrollpanelen visas klickar du på “Appearance and Themes”,
En dialogruta för bildskärmen visas.
3. När fönstret för kontrollpanelen visas klickar du på "Display".
En dialogruta för bildskärmen visas.
4. Gå till fliken "Settings" i bildskärmens dialogruta.
Korrekt storleksinställning (upplösning): Optimal - 1360 X 768
Om det finns ett alternativ för vertikal frekvens i dialogrutan för
bildskärmsinställningar, är det korrekta värdet "60" eller "60 Hz".
I annat fall klickar du bara på “OK” och lämnar dialogrutan.
Installera programvaran (baserad på XP)
Sammanflätat läge stöds inte.
Om ett videoformat som inte är standard väljs, kan det hända att enheten inte fungerar som den ska.
DVI stöder inte PC-funktion.
Det finns stöd för lägena Separat och Komposit. Det finns inte stöd för SOG.
Visningsläge
Både bildskärmsläge och format varierar beroende på vilken datorbildskärm som används och på dess upplösning.
Upplösningen i tabellen rekommenderas. (stöd finns för alla upplösningar mellan de gränser som visas )
Läge
IBM
VESA
Upplösning
640 x 480
720 x 400
640 x 480
640 x 480
800 x 600
800 x 600
800 x 600
1024 x 768
1024 x 768
1024 x 768
1360 x 768
Horisontell
frekvens (kHz)
31,469
31,469
37,861
37,500
37,879
48,077
46,875
48,364
56,476
60,023
47,712
Vertikal
frekvens (Hz)
59,940
70,087
72,809
75,000
60,317
72,188
75,000
60,000
70,069
75,029
60,015
Pixlar, klock
hastighet (MHz)
25,175
28,322
31,500
31,500
40,000
50,000
49,500
65,000
75,000
78,750
85,800
Synkpolaritet
(H/V)
- / -
- / +
- / -
- / + /+
+ /+
+ /+
- / -
- / + /+
+ /+
Page 41

Svenska-19
Ställa in datorn
Grov- och fininställning av bilden (Bildlås):
Meningen med inställningen av bildkvaliteten är att avlägsna eller reducera
bildbrus. Om inte störningen försvinner vid fininställningen, justera då
frekvensinställningen (grov) och gör sedan om fininställningen.
När störningen har reducerats, ställer du in bilden igen så att den är placerad
mitt på bildskärmen.
1. Förinställning: Tryck på knappen PC för att välja PC-läge.
2. Tryck på knappen MENU för att visa menyn.
Tryck på knappen
eller för att välja “Inställning”
och tryck på
ENTER .
3. Tryck på knappen eller för att välja “PC” och tryck på ENTER .
4. Tryck på knappen ENTER för att välja “Bildlås”.
5. Tryck på knappen eller för att välja “Grov” eller “Fin”
och tryck på
ENTER .
6. Tryck på knappen eller för att justera skärmkvaliteten.
Tryck på knappen
ENTER .
7.
Tryck på knappen EXIT för att avsluta
.
Ändra bildposition (Position):
Justera PC:ns skärmläge om den inte stämmer överens med TV-skärmen.
1. Följ instruktionerna "Grov- och fininställning av bilden (Bildlås)"
nummer 1 till 3.
2. Tryck på knappen eller för att välja “Position”
och tryck på
ENTER .
3. Justera horisontalläget genom att trycka på knappen eller .
Justera vertikalläget genom att trycka på knappen
eller .
Tryck på knappen
ENTER .
4.
Tryck på knappen EXIT för att avsluta
.
Initialisera bildinställningar (Återställ bild):
Alla bildinställningar kan ersättas med fabriksinställningarna.
1. Följ instruktionerna "Grov- och fininställning av bilden (Bildlås)"
nummer 1 till 3.
2. Tryck på knappen eller för att välja “Återställ bild”
och tryck på
ENTER .
3.
Tryck på knappen EXIT för att avsluta
.
Justera PC-skärmen automatiskt (Autojustering):
Med funktionen autojustering kan PC-skärmen ställa in sig automatiskt
efter den ingående PC- videosignalen. Värdena för fint, grovt och position
justeras automatiskt.
1. Följ instruktionerna "Grov- och fininställning av bilden (Bildlås)"
nummer 1 till 3.
2. Tryck på knappen eller för att välja “Autojustering”
och tryck på
ENTER .
3.
Tryck på knappen EXIT för att avsluta
.
Tryck på knappen PC på
fjärrkontrollen och välj
PC-läge.
Page 42

Svenska-20
Tekniska och miljömässiga specifikationer
REKOMMENDATIONER FÖR ANVÄNDNING
Inget ljud eller bild
Normal bild men inget ljud
Ingen bild eller svartvit bild
Störningar på ljud och bild
Suddig eller snöig bild, förvrängt ljud
Fjärrkontrollen fungerar bristfälligt
Meddelandet "Kontr. signalkabel."
visas.
I PC-läge, visas meddelandet
"Ej tillgängligt läge".
TFT-nestekidenäytössä käytetään alipikseleistä koostuvaa näyttöä (3.133.440), jonka valmistus edellyttää edistyksellistä tekniikkaa.
Siitä huolimatta näytössä voi näkyä joitakin kirkkaita tai tummia pikseleitä. Nämä pikselit eivät vaikuta tuotteen suorituskykyyn.
Kontrollera att strömkabeln är ansluten till ett vägguttag.
Kontrollera att du har tryckt på knapparna POWER på enhetens framsida.
Kontrollera inställningar för bildens kontrast och ljusstyrka.
Kontrollera volymen.
Kontrollera volymen.
Kontrollera om MUTE -knappen har tryckts in på fjärrkontrollen.
Justera färginställningarna.
Kontrollera att rätt utsändningsystem är valt.
Försök identifiera vilken elektrisk apparat som påverkar anläggningen och flytta den längre bort.
Anslut anläggningen till ett annat vägguttag.
Kontrollera riktning, placering och anslutning för antennen.
Denna störning beror ofta på att en inomhusantenn används.
Byt ut batterierna i fjärrkontrollen.
Rengör överdelen av fjärrkontrollen (överföringsfönstret).
Kontrollera batterianslutningarna.
Kontrollera att signalkabeln är ordentligt ansluten till PC:n eller videokällan.
Kontrollera att PC:n eller videokällan är påslagen.
Kontrollera videoadapterns maximala upplösning och frekvens.
Jämför dessa värden med data i bildskärmslägena.
Felsökning: Innan du kontaktar servicepersonal
Modellnamn
Panel
Strl
Storlek på bildskärm
Bildpunktstopp
Frekvens
Vågrät / Lodrät
Upplösning PC (Optimal)
Nätanslutning (Ingång)
Strömförbrukning
Normal / Strömbesparing
Mått (B x D x H)
Kropp
Med stativ
Vikt
Med stativ
Miljöfaktorer
Drifttemperatur
Driftfuktighet
Lagringstemperatur
Lagringsfuktighet
Ljud
Utgång
LE23T5
23” tums diagonal (16:9)
508,125 (H) x 285,696 (V) mm
0,372 (H) x 0,372 (V) mm
30~61 kHz / 60~75 Hz
1360 x 768 @ 60 Hz
AC 100 ~ 240 V, 60/50 Hz ± 3 Hz
100 W / < 2,0 W
675,9 x 85,0 x 393,40 mm
675,9 x 203,8 x 439,5 mm
8,0 kg (17,64 lbs)
10 °C till 40 °C (50 °F till 104 °F)
10 % till 80 %, icke-kondenserande
-20 °C till 45 °C (-4 °Ftill 113 °F)
5 % till 95 %, icke-kondenserande
3 W X 2
LE27T5
27” tums diagonal (16:9)
603,22 (H) x 341,98 (V) mm
0,1460 (H) x 0,4365 (V) mm
30~61 kHz / 60~75 Hz
1360 x 768 @ 60 Hz
AC 100 ~ 240 V, 60/50 Hz ± 3 Hz
140 W / < 2,0 W
766,5 x 96,0 x 459,0 mm
766,5 x 203,8 x 505,5 mm
12,0 kg (26,46 lbs)
10 °C till 40 °C (50 °F till 104 °F)
10 % till 80 %, icke-kondenserande
-20 °C till 45 °C (-4 °Ftill 113 °F)
5 % till 95 %, icke-kondenserande
5 W X 2
LE32T5
32” tums diagonal (16:9)
697,68 (H) x 392,26 (V) mm
0,51075 (H) x 0,51075 (V) mm
30~61 kHz / 60~75 Hz
1360 x 768 @ 60 Hz
AC 100 ~ 240 V, 60/50 Hz ± 3 Hz
170 W / < 2,0 W
914.5 x 104,0 x 528,8 mm
914.5 x 247,5 x 591,5 mm
15,0 kg (33,07 lbs)
10 °C till 40 °C (50 °F till 104 °F)
10 % till 80 %, icke-kondenserande
-20 °C till 45 °C (-4 °Ftill 113 °F)
5 % till 95 %, icke-kondenserande
7,5 W X 2
Page 43

Dansk-1
Dansk
Indholdsfortegnelse
TILSLUTNING OG FORBEREDELSE AF TV’ET
Stykliste .................................................................... 2
Installering af soklen ................................................ 2
Installering
af vægbeslag ...................................... 2
Beskrivelse af kontrolpanelet.................................... 3
Beskrivelse af tilslutningspanelet.............................. 4
Beskrivelse af fjernbetjeningen ................................ 5
Udskiftning af fjernbetjeningens batterier ................ 6
Tænd og sluk fjernsynet .......................................... 6
Sådan sættes fjernsynet i standby .......................... 6
Plug & Play .............................................................. 6
INDSTILLING AF KANALERNE
Automatisk lagring af kanaler .................................. 7
Manuel lagring af kanaler ........................................ 8
Redigering af kanaler .............................................. 8
INDSTILLING AF BILLEDET
Ændring af billedstandard ........................................ 9
Justering af det brugerdefinerede billede ................ 9
Ændring af farvetonen ..............................................10
Nulstilling af indstillinger for billedet til
standardindstillingerne.............................................. 10
Ændring af billedstørrelsen ......................................10
Brug af Digital NR-funktionen / Dynamisk kontrast .. 11
Visning af PIP (Billede i billede) .............................. 11
SNDSTILLING AF LYD
Ændring af lydstandard ........................................12
Angivelse af lydindstillingerne ..............................12
Automatisk justering af lydstyrken ......................12
Lytning til lyden af underbilledet .......................... 13
INDSTILLING AF TID
Indstilling og visning af klokkeslæt ......................13
Indstilling af sleep-timer........................................13
Sådan tændes og slukkes
fjernsynet automatisk............................................14
INDSTILLING AF ANDRE
Valg af sprog ........................................................14
Brug af energibesparende funktion ......................15
Indstilling af blå skærm /
Valg af Melody (Melodi)........................................15
Valg af kilden........................................................15
Redigering af navne på indgangskilder................ 16
ANVENDELSE AF TEKST-TV
Tekst-tv-dekoder ..................................................16
Visning af tekst-tv ................................................17
Valg af en bestemt tekst-tv-side .......................... 17
Anvendelse af Fastext til valg af tekst-tv-sider ....18
INDSTILLING AF COMOUTEREN
Installation af PC'ens software
(baseret på Windows XP) ....................................18
Visningstilstand ....................................................18
Indstilling af pc......................................................19
ANBEFALINGER TIL BRUG
Fejlfinding:
Før du kontakter serviceafdelingen......................20
Tekniske og miljømæssige specifikationer ..........20
Symboler Tryk Vigtigt Bemærk One-Touch-
knap
Page 44

Dansk-2
TILSLUTNING OG FORBEREDELSE AF TV’ET
Stykliste
Kontrollér, at følgende dele leveres sammen med dit LCD-tv.
Kontakt din forhandler, hvis der mangler nogle dele.
M4 X L16
Fjernbetjening og
batterier (AAA x 2)
Netledning Dækselbund Sokkelskrue x 4
Brugervejledning Garantikort
Servicekort
Sikkerhedsguide Registreringskort
< 2 >< 3 >
1. Placer tv'et med forsiden nedad på et blødt klæde eller en pude på et bord.
2. Anbring soklen i hullet nederst på tv’et.
3. Indsæt skruen i det indikerede hul, og stram.
Installering af soklen
Med komponenter til vægmontering (sælges separat) kan du montere tv’et på væggen.
For detaljerede informationer om installation af vægmonteringen skal du se de instruktioner, der følger med
komponenterne til vægmontering. Kontakt en tekniker for hjælp, når vægmonteringsbeslaget skal monteres.
Samsung Electronics er ikke ansvarlig for nogen skade på produktet eller personskade, hvis du vælger at
installere tv’et selv.
Installering af vægbeslag
Page 45

Dansk-3
Beskrivelse af kontrolpanelet
SOURCE
Skifter mellem alle tilgængelige indgangskilder
(TV, Ekstern1, Ekstern2, AV, S-Video, Komponent,
PC, DVI). Brug denne knap på skærmmenuen,
som når du trykker på knappen
ENTER på
fjernbetjeningen.
MENU
Tryk for at se en menu på skærmen med TV'ets
funktioner.
Tryk her for at øge eller mindske lydstyrken.
Brug knapperne på skærmmenuen,
som når du bruger knapperne og på
fjernbetjeningen.
Tryk her for at skifte kanaler.
Brug knapperne på skærmmenuen,
som når du bruger knapperne
og på
fjernbetjeningen. (Uden fjernbetjeningen kan du
tænde for tv'et ved at bruge kanalknapperne).
(HOVEDTELEFONSTIK)
Tilslut et sæt eksterne højttalere til dette stik for
privat lytning.
(Strøm)
Tryk på knappen for at tænde og slukke fjernsynet.
Strømindikator
Blinker og slukkes når der er tændt, og lyser i
standby-modus.
Højttalere
Fjernbetjeningssensor
Ret fjernbetjeningen mod dette sted på fjernsynet.
Produktets farve og form kan variere afhængigt af modellen.
Page 46

Tilslutning til antenne eller kabel-tv-netværk
Hvis du ønsker, at fjernsynskanalerne skal vises korrekt, kræver det, at fjernsynet kan modtage et signal fra en af følgende kilder:
- En udendørs antenne / Et fjernsynskabelnetværk / Et satellitnetværk
Tilslutning af komponentenheder (DTV/dvd)
-Tilslut komponentvideokabler (ekstraudstyr) til komponentstikket (“PR”, “PB”, “Y”) på bagsiden af dit apparat og de andre
ender til de tilhørende videoudgangsstik på DTV’et eller dvd’en.
- Hvis du ønsker at tilsluttet både Set-Top-boks og DTV (eller DVD), skal du tilslutte Set-Top-boksen til DTV'et
(eller DVD) og tilslutte DTV'et (eller DVD'en) til komponentstikket (“P
R”, “PB”, “Y”) på apparatet.
-Y-, P
B- og PR-stikkene på dine komponentenheder (DTV eller DVD) betegnes nogle gange Y, B-Y og R-Y eller Y, Cb og Cr.
-Tilslut RCA-lydkabler (ekstraudstyr) til “R - AUDIO - L” på bagsiden af apparatet og de andre ender til de tilhørende
lydudgangsstik på din DTV eller dvd.
- På dette LCD-fjernsyn vises det optimale billede i tilstanden 720p.
Dansk-4
Beskrivelse af tilslutningspanelet
Strøminput
Når som helst du tilslutter en ekstern enhed til dit tv, skal du sørge for, at strømmen til enheden er afbrudt.
Når du tilslutter en ekstern enhed, skal du passe farverne på stikkene sammen med kablet.
Page 47

Dansk-5
Tilslutning af eksterne A/V-enheder
-
Tilslut RCA- eller S-VIDEO-kablet (ekstraudstyr) til en relevant ekstern A/V-enhed, som f.eks. videobåndoptager, dvd eller videokamera.
- Tilslut RCA-lydkabler (ekstraudstyr) til “R - AUDIO L” på bagsiden af apparatet og de andre ender til de tilhørende lydudgangsstik
på A/V-enheden.
Tilslutning af Set-Top Box, videobåndoptager eller dvd
-Tilslut videobåndoptager- eller dvd-SCART-kablet til SCART-stikket på videobåndoptageren eller dvd’en.
Tilslutning af en DVI
-Tilslut DVI-stikket til DVD-indgangsstikket.
-Tilslut stereolydkablet (ekstraudstyr) “R - AUDIO - L” på bagsiden af dit apparat og de andre ender til de tilsvarende
lydudgangsstik på A/V-enheden.
- DVI understøtter ikke PC-funktionen.
- På dette LCD-fjernsyn vises det optimale billede i tilstanden 720p.
Tilslutning af computer
-Tilslut D-Sub-kablet (ekstraudstyr) til “PC (PC IN)” på bagsiden af dit apparat og den anden ende til din computers grafikkort.
-Tilslut stereolydkablet (ekstraudstyr) til “AUDIO (PC IN)” på bagsiden af dit apparat og den anden ende til “Audio Out” på din
computers lydkort.
Kensington-lås
- Kensington-låsen (ekstraudstyr) bruges til fysisk at fastlåse systemet, når det anvendes et offentligt sted.
- Hvis du ønsker at anvende en lås, skal du kontakte den forhandler, hvor du købte dit tv.
Standby-knap for fjernsyn
Numeriske knapper til direkte
kanaladgang
Kanalvalg, ét/to cifre
Lydstyrke op
Lydstyrke ned
Midlertidig frakobling af lyden
Viser hovedskærmmenuen
Valg af lydeffekt
Lydstandardvælger
Tryk for automatisk at lagre
valgte TV-/kabelkanaler
Bruges til at lagre og slette
kanaler til/fra hukommelse
Fastfrysning af billede
Vælg tv-tilstanden direkte
Forrige kanel
P: Næste kanal
P: Foregående kanal
Valg af videoinputkilde
Visning af oplysninger (Aktuelle
kanal-og audio/video-indstillinger)
Forlad skærmmenuen
Kontroller markøren i menuen
Valg af billedstørrelse
Billedstandardvælger
Billede-i-billede Til/Fra
Automatisk slukning
Vælg til PC-tilstand direkte
Tekst-tv-funktioner
Tekst-tv - hold
Visning af tekst-tv/bland både
tekst-tv-oplysninger og normal
udsendelse
Tekst-tv-indeks
Tekst-tv - gem
Tekst-tv - underside
Afslut visning af tekst-tv
P: Tekst-tv - næste side
P: Tekst-tv - foregående side
Valg af tekst-tv-tilstand (LIST/FLOF)
Tekst-tv - afslør
Tekst-tv - annuller
Valg af tekst-tv-størrelse
Valg af Fastext-emne
Fjernbetjeningens signal kan blive påvirket af skarpt lys.
Beskrivelse af fjernbetjeningen
Page 48

Strømledningen er placeret bag på fjernsynet .
1. Tilslut strømledningen i et tilsvarende strømstik.
Standby-indikatoren på forsiden af apparatet tændes.
2. Tryk på knappen POWER på forsiden af apparatet.
Det program, du så sidst, vælges automatisk igen.
3. Tryk på de numeriske knapper (0~9) eller knappen kanal op/ned ( / ) på fjernbetjeningen eller på
knapperne på apparatets højre side.
Når du tænder for tv'et for første gang, bliver du bedt om at vælge det sprog, menuerne skal vises på
4. Hvis du vil slå tv'et fra, skal du trykke på POWER igen.
Du kan indstille fjernsynet til Standby-tilstand for at mindske strømforbruget. Standby-tilstand kan være
nyttig, når du vil afbryde visningen midlertidigt (f.eks. under et måltid).
1. Tryk på knappen POWER på fjernbetjeningen.
Skærmen slukkes, og en rød standby-indikator vises foran på dit apparat.
2. Hvis du vil tænde for tv'et igen, skal du blot trykke på knappen POWER ,
de numeriske knapper (0-9) eller kanal op/ned-knappen ( / ) igen.
Undgå at lade fjernsynet stå i Standby-tilstand i længere perioder (f.eks. når du er væk på ferie).
Det er bedste at frakoble strøm- og antenneforbindelsen.
Tænd og sluk fjernsynet
Sådan sættes fjernsynet i standby
Når der tændes for tv’et, videreføres en række grundlæggende
brugerindstillinger derefter. Følgende indstillinger er tilgængelige.
1. Tryk på knappen POWER på fjernbetjeningen.
Meddelelsen “Plug & Play” vises.
2. Vælg det ønskede sprog ved at trykke på knappen eller .
Tryk på knappen
ENTER for at bekræfte dit valg.
3. Meddelelsen “Kontr. ant.input” vises. Vælg “OK”.
Tryk på knappen
ENTER .
Kontrollér, at antennekablet er korrekt tilsluttet.
Plug & Play
Dansk-6
1. Tag dækslet helt af.
2. Isæt to AAA-batterier.
Kontroller, at plus- og minuspolerne på batterierne passer sammen med diagrammet inde i rummet.
3. Udskift dækslet.
Fjern batterierne, og gem dem et køligt tørt sted, hvis du ikke skal bruge
fjernbetjeningen i lang tid. Fjernbetjeningen kan også bruges op til ca. 7 m fra tv'et.
(Batterierne kan holde i ca. et år ved almindelig brug af tv'et).
Hvis fjernbetjeningen ikke fungerer, skal du kontrollere følgende:
1. Er strømmen til Tv’et tændt?
2. Er der byttet om på batteriets plus- og minuspoler?
3. Er batterierne brugt op?
4. Er der strømafbrydelse, eller er netledningen taget fra?
5. Er der et særligt fluorescerende lys eller et neonskilt i nærheden?
Udskiftning af fjernbetjeningens batterier
Page 49

Dansk-7
Sprog: Vælg dit sprog.
Land: Vælg dit land.
Auto-lagring:
Scanner efter og gemmer automatisk kanaler, der er til rådighed i det lokale område.
Indstil ur: Indstiller aktuel tid på tv-uret.
INDSTILLING AF KANALERNE
- Automatisk lagring af kanaler (se på side 7)
- Manuel lagring af kanaler (se på side 8)
- Redigering af kanaler (se på side 8)
Hvis du ønsker at nulstille denne funktion...
1. Tryk på knappen MENU for at vise menuen. Tryk på knappen eller
for at vælge “Indstillinger” og tryk derefter på knappe ENTER .
2. Tryk på knappen ENTER igen for at vælge “Plug & Play”.
3. Dette ændrer eller nulstiller indstillingerne.
Du kan scanne efter de tilgængelige frekvensområder (som afhænger aflandet). De programnumre,
der tildeles automatisk, svarer muligvis ikke til de faktiske eller ønskede programnumre.
Du kan imidlertid sortere numrene manuelt og fjerne alle kanaler, som du ikke vil se.
1. Tryk på knappen MENU for at vise menuen.
Tryk på knappen
eller for at vælge “Kanal” og tryk derefter på knappe ENTER .
2. Tryk på knappen ENTER for at vælge “Land”.
3. Vælg det ønskede land ved at trykke på knappen eller .
Tryk på knappen
ENTER for at bekræfte dit valg.
4. Tryk på knappen eller for at vælge “Auto-lagring” og tryk derefter på knappe ENTER .
5. Tryk på knappen ENTER .
Tv’et starter med at lagre alle tilgængelige kanaler.
Tryk når som helst på knappen
ENTER
for at afbryde lagringsprocessen og vende tilbage til menuen “Kanal”.
6. Når alle de tilgængelige kanaler er gemt, vises menuen “Sorter”.
Automatisk lagring af kanaler
4. Vælg det ønskede land ved at trykke på knappen eller .
Tryk på knappen
ENTER for at bekræfte dit valg.
5. Menuen “Auto-lagring” vises med “Start” valgt.
Tryk på knappen
ENTER .
Kanalsøgningen starter og slutter automatisk.
Når alle tilgængelige kanaler er lagret, vises menuen “Indstil ur”.
Tryk når som helst på knappen
ENTER
for at afbryde lagringsprocessen.
6. Tryk på knappen ENTER .
Vælg “Time” eller “Minut” ved at trykke på knappen
eller
.
Indstil “Time” eller “Minut” ved at trykke på knappen
eller
.
Du kan også indstille time og minut ved at trykke på de numeriske knapper på
fjernbetjeningen.
7. Tryk på knappen ENTER for at bekræfte dit valg.
Kanaler kan lagres automatisk ved blot at trykke på knappen AUTO PROG. på
fjernbetjeningen.
Page 50

Dansk-8
Du kan gemme op til 100 kanaler, herunder dem der modtages via kabelnetværk.
Når du gemmer kanaler manuelt, kan du vælge:
Om du vil gemme de enkelte fundne kanaler.
Et programnummer for hver gemt kanal for at identificere kanalen.
1. Tryk på knappen MENU for at vise menuen.
Tryk på knappen
eller for at vælge “Kanal” og tryk derefter på knappe ENTER .
2. Tryk på knappen eller for at vælge “Manuel lagring” og tryk derefter på knappe ENTER .
3. Tryk på knappen ENTER for at vælge “Program”.
4. Hvis du vil tildele et programnummer til en kanal, skal du søge efter det korrekte nummer ved at trykke på
knappen
eller og derefter trykke på knappen ENTER .
Du kan også vælge programnummer ved at trykke på de numeriske taster på fjernbetjeningen.
5. Tryk på knappen eller for at vælge “Farvesystem” og tryk derefter på knappe ENTER .
6.
Vælg den ønskede farvestandard ved at trykke på knappen eller flere gange og derefter trykke på knappen ENTER .
7. Tryk på knappen eller for at vælge “Lydsystem” og tryk derefter på knappe ENTER .
8.
Vælg den ønskede lydstandard ved at trykke på knappen eller gentagne gange, og tryk derefter på knappenENTER .
Hvis lyden er unormal eller mangler, skal du vælge det ønskede lydsystem igen.
9. Hvis du kender nummeret på den kanal, der skal lageres, skal du trykke på knappen eller for at
vælge “Kanal”. Tryk på knappen
ENTER . Vælg C (luftantennekanal) eller S (kabelkanal) ved at trykke
på knappen
eller . Tryk på knappen for at vælge kanal. Vælg det ønskede nummer ved at trykke
på knappen
eller og tryk derefter på knappen ENTER .
Kanavatila: P (Programtilstand), C (Luftantennetilstand), S (kabelkanaltilstand)
Du kan også indstille kanalen ved at trykke på de numeriske knapper på fjernbetjeningen.
10.
Hvis du ikke kender kanalnumrene, skal du trykke på knappen
eller
for at vælge “Søg”. Tryk på knappen
ENTER
. Søg ved at trykke på knappen
eller
, og tryk derefter på knappen
ENTER
.
11. Tryk på knappen eller for at vælge indstillingen “Gem”. Tryk på knappen ENTER for at vælge “OK”.
12. Gentag trin 3 til 11 for hver kanal, du vil gemme.
Program: Vælger et programnummer til kanalen.
Farvesystem: Vælger farvesystemet.
Lydsystem: Vælger lydsystemet.
Kanal: Vælger en kanal.
Søg: Scanner efter kanalens frekvensværdi.
Gem: Gemmer dine indstillinger.
Manuel lagring af kanaler
Du kan udelukke udvalgte kanaler blandt de scannede kanaler. Når du scanner gennem de lagrede
kanaler, bliver de kanaler, du har valgt at udelukke, ikke vist.
Alle kanaler, som du ikke vælger at udelukke, bliver vist under scanningen.
1. Brug de numeriske knapper til direkte at vælge den kanal, der skal tilføjes eller slettes,
2. Tryk på knappen MENU for at vise menuen.
Tryk på knappen
eller for at vælge “Kanal” og tryk derefter på knappe ENTER .
3. Tryk på knappen eller for at vælge “Tilføj/slet” og tryk derefter på knappe ENTER .
4. Tryk flere gange på knappen ENTER for at skifte mellem tilføjelse og sletning af kanal.
5. Tryk på knapperne P/ for at skifte til den relevante kanal, og gentag derefter ovenstående.
6. Tryk på knappen EXIT for at afslutte.
Du kan vise enhver kanal (herunder en slettet kanal) ved at bruge de numeriske knapper på fjernbetjeningen.
Redigering af kanaler
Du kan også tilføje eller slette en kanal ved blot at trykke på knappen ADD/DEL på
fjernbetjeningen.
Page 51

Dansk-9
INDSTILLING AF BILLEDET
Du kan vælge den type billede, som passer bedst til dine ønsker til
visningen.
1. Tryk på knappen MENU for at vise menuen. Tryk på knappen eller
for at vælge “Billede” og tryk derefter på knappe ENTER .
2.
Tryk på knappen ENTER igen for at vælge “Tilstand”.
3.
Tryk på knappen ENTER igen for at vælge “Tilstand”.
4.
Tryk på knappen eller for at vælge den ønskede billedeffekt.
Tryk på knappen
ENTER .
5.
Tryk på knappen EXIT for at afslutte.
Dynamisk: Vælger billedet til højopløsning i et lyst rum.
Standard: Vælger billedet til den bedste visning i normale omgivelser.
Film: Vælger billedet til behagelig visning i et mørkt rum.
Brugertilpasset: Vælges for at vise med dine foretrukne indstillinger.
(Se “Justering af det brugerdefinerede billede” på side 9)
Du kan også trykke på knappen
P.MODE på fjernbetjeningen
for at vælge en af
billedindstillingerne.
Billedtilstanden skal justeres separat for hver indgangskilde.
Du kan gendanne standardbilledindstillingerne ved at vælge “Nulstil”.
(Se “Nulstilling af indstillinger for billedet til standardindstillingerne” på side 10)
Ændring af billedstandard
Kontrast: Justerer lys og mørke mellem objekter og baggrunden.
Lysstyrke: Justerer hele skærmens lysstyrke.
Skarphed: Justerer objekters konturer for at gøre dem skarpere eller gøre dem mere svage.
Farve: Justerer farverne og gør dem lysere eller mørkere.
Farvetone:
Justerer objekters farve og gør dem mere røde eller grønne for et mere naturligt udseende.
Du kan angive flere indstillinger, der gør det muligt at kontrollere
billedkvaliteten.
1. For at vælge den ønskede billedeffekt skal du følge
“Ændring af billedstandard”, punkterne 1 til 4 på side 9.
2.
Tryk på knappen eller for at vælge et bestemt emne.
Tryk på knappen ENTER .
3.
Tryk på knappen eller for at formindske eller forhøje et bestemt
emnes værdi.
Tryk på knappen ENTER .
4. Tryk på knappen EXIT for at afslutte
.
Justering af det brugerdefinerede billede
De justerede værdier gemmes i overensstemmelse med den valgte billedtilstand.
Page 52

Dansk-10
Du kan gendanne standardindstillingerne for billedet.
1. For at vælge den ønskede billedeffekt skal du følge
“Ændring af billedstandard”, punkterne 1 til 4 på side 9.
2. Tryk på knappen
eller
for at vælge “Nulstil” og tryk derefter på
knappe
ENTER .
3. Tryk på knappen EXIT for at afslutte
.
“Nulstil” bliver anvendt for hver billedtilstand.
Nulstilling af indstillinger for billedet til standardindstillingerne
I tilstanden PC kan kun tilstandene “16:9” og “4:3” justeres.
Vælg ved at trykke på knapperne eller .
Brug knappen eller til at flytte billedet op og ned.
Når du har valgt , skal du bruge knappen eller til at forstørre eller for
mindske billedstørrelsen i lodret retning.
Auto - Bred: Justerer automatisk billedstørrelsen til “16:9”.
16:9:
Justerer billedstørrelsen til 16:9, der passer til dvd eller tv-udsendelser i bredformat.
Panorama:
Justerer 16:9 til 4:3 på en normal måde som ved almindelige tv-udsendelser.
Zoom: Forstørrer 16:9-billedet (lodret) for at passe til skærmstørrelsen.
4:3: Dette er standardindstillingen for videofilm eller almindelige tv-udsendelser.
Du kan vælge den billedstørrelse, der er bedst egnet, til det program,
du ser.
1. Tryk på knappen MENU for at vise menuen. Tryk på knappen eller
for at vælge “Billede” og tryk derefter på knappe ENTER .
2. Tryk på knappen
eller
for at vælge “Størrelse” og tryk derefter på
knappe
ENTER .
3. Marker den ønskede indstilling ved at trykke på knappen
eller
flere
gange. Tryk på knappen
ENTER .
4. Tryk på knappen EXIT for at afslutte
.
Ændring af billedstørrelsen
Du kan vælge den farvetone, der er mest bekvem for dine øjne.
1. For at vælge den ønskede billedeffekt skal du følge
“Ændring af billedstandard”, punkterne 1 til 4 på side 9.
2. Tryk på knappen
eller
for at vælge Farvetone, og tryk derefter på
knappen
ENTER .
3.
Tryk på knappen eller for at vælge den ønskede
farvetoneindstilling.
Tryk på knappen ENTER .
4. Tryk på knappen EXIT for at afslutte
.
Ændring af farvetonen
Kold2: Gør farvetemperaturen mere blålig
end menuen “Kold1”.
Kold1: Gør hvide farver blålige.
Normal: Bevarer hvide farver hvide.
Varm1: r hvide farver rødlige.
Varm2: Gør farvetemperaturen mere
rødlig end menuen “Varm1”.
De justerede værdier gemmes i overensstemmelse med den valgte billedtilstand.
Du kan vælge indstillingerne
ved blot at trykke på knappen
P.SIZE på fjernbetjeningen.
Page 53

Dansk-11
Du kan få vist et underbillede i hovedbilledet for programmet eller
videoinput. Du kan på den måde se billedet fra det valgte program eller
videoinput fra andet tilsluttet udstyr, mens du ser på hovedbilledet.
1. Tryk på knappen MENU for at vise menuen. Tryk på knappen eller
for at vælge “Billede” og tryk derefter på knappe ENTER .
2.
Tryk på knappen eller for at vælge “PIP” og tryk derefter på knappe ENTER .
3. Tryk på knappen ENTER igen.
Tryk på knappen eller for at vælge “Til” og tryk derefter på knappe ENTER .
PIP er kun tilgængelig i PC-tilstand og er ikke tilgængelig i andre tilstande.
4. Tryk på knappen eller for at vælge “Kilde” og tryk derefter på knappe
ENTER . Vælg en kilde til underbilledet ved at trykke på knappen
eller og trykke på knappen ENTER .
Underbilledet kan vise forskellige kilder baseret på det, hovedbilledet er indstillet til.
5. Tryk på knappen eller for at vælge “Position”, og tryk derefter på
knappen
ENTER . Vælg en placering til underbilledet ved at trykke på
knappen
eller og tryk derefter på knappen ENTER .
6. Tryk på knappen eller for at vælge indstillingen “Program”.
Tryk på knappen
ENTER . Du kan vælge den kanal, du vil se, via
underbilledet ved at trykke på knappen
eller .
Tryk på knappen
ENTER .
“Program” kan være aktiv, når underbilledet er indstillet til TV.
7. Tryk på knappen EXIT for at afslutte.
Visning af PIP (Billede i billede)
Kilde: Vælger en signalkilde (ekstern A/V) til PIP.
Position: Bruges til at flytte underbilledet.
Program: Bruges til at ændre underbilledet.
Digital NR:
Hvis det signal, der modtages af dit tv, er svagt, kan du aktivere den
digitale støjreduktionsfunktion for at reducere mulig statisk støj og
skyggeeffekter på skærmen.
Dynamisk kontrast:
Dynamisk kontrast detekterer det visuelle signalinput og justerer for at
skabe bedste kontrast.
1. Tryk på knappen MENU for at vise menuen. Tryk på knappen eller
for at vælge “Billede” og tryk derefter på knappe ENTER .
2. Tryk på knappen eller for at vælge “Digital NR” eller
“Dynamisk kontrast”. Tryk på knappen
ENTER .
3.
Tryk på knappen eller for at vælge “Til” eller “Fra”. Tryk på knappen ENTER .
4. Tryk på knappen EXIT for at afslutte.
Disse funktioner virker ikke i PC-tilstand.
Brug af Digital NR-funktionen / Dynamisk kontrast
PIP-indstillinger
(O: PIP fungerer, X: PIP fungerer ikke)
Tryk på knappen PIP på
fjernbetjeningen for at aktivere
eller deaktivere “PIP”.
PC
TVOEkstern1OEkstern2OAVOS-VideoOKomponentXPCXDVI
X
Under
Hoved
Når hovedbilledet er pc, understøtter underbilledet kun “TV”, “Ekstern1”, “Ekstern2”,
“AV” og “S-Video”. I dette tilfælde understøtter underbilledet ikke andre indgangskilder.
Du vil muligvis se, at billedet i PIP-vinduet bliver en anelse unaturligt, når du bruger
hovedvinduet til spil eller karaoke.
Page 54

Dansk-12
Hver udsendelsesstation har sine særskilte signalbetingelser, så det er
ikke let at justere lydstyrken, hver gang du skifter kanal. Med denne
funktion kan du automatisk justere lydstyrken for den ønskede kanal ved
at mindske lydoutputtet, når modulationssignalet er højt, eller ved at øge
lydoutputtet, når modulationssignalet er lavt.
1. Tryk på knappen MENU for at vise menuen. Tryk på knappen eller
for at vælge “Lyd” og tryk derefter på knappe ENTER .
2. Tryk på knappen eller for at vælge “Auto-lydstyrke” og tryk derefter
på knappe
ENTER .
3.
Tryk på knappen eller for at vælge “Til” eller “Fra”. Tryk på knappen ENTER .
4. Tryk på knappen EXIT for at afslutte.
Automatisk justering af lydstyrken
Du kan tilpasse lydindstillingerne, så de passer til dine personlige ønsker.
1. Tryk på knappen MENU for at vise menuen. Tryk på knappen eller
for at vælge “Lyd” og tryk derefter på knappe ENTER .
2. Tryk på knappen eller for at vælge “Equalizer” og tryk derefter på
knappe
ENTER .
3.
Tryk på knappen eller for at vælge et bestemt emne.
Tryk på knappen ENTER .
4. Tryk på knappen eller for at angive den ønskede indstilling.
Tryk på knappen
ENTER .
5. Tryk på knappen EXIT for at afslutte.
Hvis du ændrer disse indstillinger, skifter Sound-tilstanden automatisk til
“Brugertilpasset”.
Angivelse af lydindstillingerne
SNDSTILLING AF LYD
Du kan vælge de særlige lydeffekter, du vil bruge, når du ser en
bestemt udsendelse.
1. Tryk på knappen MENU for at vise menuen. Tryk på knappen eller
for at vælge “Lyd” og tryk derefter på knappe ENTER .
2. Tryk på knappen ENTER igen for at vælge “Tilstand”.
3. Vælg den ønskede lydeffekt ved at trykke på knappen eller flere
gange og derefter trykke på knappen
ENTER .
4. Tryk på knappen EXIT for at afslutte.
Standard: Vælger normal lydtilstand.
Musik: Fremhæver musik over stemmer.
Film: Giver liv og komplet lyd til film.
Tale: Fremhæver stemmer over andre lyde.
Brugertilpasset: Vælger dine brugerdefinerede lydindstillinger.
(Se “Angivelse af lydindstillingerne” på side 12)
Ændring af lydstandard
Du kan vælge indstillingerne
ved blot at trykke på knappen
S.MODE på fjernbetjeningen.
Page 55

Dansk-13
Når PIP-funktionen aktiveres, kan du lytte til lyden af underbilledet.
1. Tryk på knappen MENU for at vise menuen. Tryk på knappen eller
for at vælge “Lyd” og tryk derefter på knappe ENTER .
2. Tryk på knappen eller for at vælge “Lydvalg” og tryk derefter på
knappe
ENTER .
3. Tryk på knappen eller for at vælge indstillingen “Under”.
Tryk på knappen
ENTER .
4. Tryk på knappen EXIT for at afslutte.
Du kan vælge denne indstilling, når “PIP” er indstillet til “Til”.
Lytning til lyden af underbilledet
Hoved: Anvendes til at lytte til lyden fra hovedbilledet.
Under: Anvendes til at lytte til lyden fra underbilledet.
INDSTILLING AF TID
Du kan indstille tv'ets ur, så det aktuelle klokkeslæt vises, når du
trykker på knappen INFO. Du skal også indstille tiden, hvis du ønsker
at bruge automatisk tænd/sluk.
1. Tryk på knappen MENU for at vise menuen. Tryk på knappen eller
for at vælge “Indstillinger” og tryk derefter på knappe ENTER .
2.
Tryk på knappen eller for at vælge “Tid” og tryk derefter på knappe ENTER .
3. Tryk på knappen ENTER for at vælge “Indstil ur”.
4.
5.
Tryk på knappen EXIT for at afslutte.
Hvis du tager netledningen ud, skal du indstille uret igen.
Du kan også indstille timer og minutter ved at trykke på de numeriske knapper på fjernbetjeningen.
For at...
Flyt til “Time” eller “Minut”
Indstil “Time” eller “Minut”
Tryk på knappen ENTER .
Skal du trykke på...
Knappen eller
Knappen eller
Indstilling og visning af klokkeslæt
Du kan vælge en tidsperiode på mellem 30 og 180 minutter, hvorefter tv'et
automatisk skifter til standbytilstand.
1. Tryk på knappen MENU for at vise menuen. Tryk på knappen eller
for at vælge “Indstillinger” og tryk derefter på knappe ENTER .
2.
Tryk på knappen eller for at vælge “Tid” og tryk derefter på knappe ENTER .
3. Tryk på knappen eller for at vælge “Sleep-timer” og tryk derefter på
knappe
ENTER .
4. Tryk på knappen eller flere gange, indtil det ønskede tidspunkt vises
(Fra, 30, 60, 90, 120, 150, 180). Tryk på knappen
ENTER .
5. Tryk på knappen EXIT for at afslutte.
Fjernsynet går automatisk i standby, når tælleren når til 0.
Indstilling af sleep-timer
Tryk på knappen SLEEP på
fjernbetjeningen flere gange,
indtil det ønskede tidsinterval
vises.
Page 56

Dansk-14
Du kan indstille tænd/sluk-funktionen, så fjernsynet:
Tændes automatisk og stilles ind på den valgte kanal på det
valgte tidspunkt.
Slukkes automatisk på det valgte tidspunkt.
1. Tryk på knappen MENU for at vise menuen. Tryk på knappen eller
for at vælge “Indstillinger” og tryk derefter på knappe ENTER .
2. Tryk på knappen eller for at vælge “Tid” og tryk derefter på
knappe
ENTER .
3. Tryk på knappen eller for at vælge “Tændetidspunkt” og tryk derefter
på knappe
ENTER .
4. Tryk på knapperne eller for at justere “Time”, og tryk derefter på
knappen
for at flytte til næste trin.
Indstil andre emner med samme metode som ovenstående.
Tryk på knappen
ENTER for at vende tilbage, når du er færdig.
5. Tryk på knappen eller for at vælge “Slukketidspunkt” og tryk derefter
på knappe
ENTER .
6. Tryk på knapperne eller for at justere “Time”, og tryk derefter på
knappen
for at flytte til næste trin.
Indstil andre emner med samme metode som ovenstående.
Tryk på knappen
ENTER for at vende tilbage, når du er færdig.
7. Tryk på knappen EXIT for at afslutte.
Det første trin er at indstille tv'ets ur.
Du kan også indstille time og minut ved at trykke på de numeriske knapper på
fjernbetjeningen.
Indstillingen “Indstillinger” skal være indstillet til “Til” for at timerne fungerer.
Sådan tændes og slukkes fjernsynet automatisk
INDSTILLING AF ANDRE
Når du vil bruge fjernsynet for første gang, skal du vælge det sprog, som
menuerne og visningerne skal vises i.
1. Tryk på knappen MENU for at vise menuen. Tryk på knappen eller
for at vælge “Indstillinger” og tryk derefter på knappe ENTER .
2. Tryk på knappen eller for at vælge “Sprog” og tryk derefter på
knappe
ENTER .
3. Vælg et bestemt sprog ved at trykke på knappen eller flere gange.
Tryk på knappen
ENTER .
Du kan vælge mellem 21 sprog.
4. Tryk på knappen EXIT for at afslutte.
Valg af sprog
Page 57

Dansk-15
Denne funktion justerer tv’ets lysstyrke og nedsætter strømforbruget. Når
du ser tv om aftenen, kan du indstille “Strøm sparer” til “Høj” for at skåne
dine øjne og nedsætte strømforbruget.
1. Tryk på knappen MENU for at vise skærmmenuen.
Tryk på knappen
eller for at vælge “Indstillinger” og tryk derefter på
knappe
ENTER .
2. Tryk på knappen eller for at vælge “Strøm sparer” og tryk derefter på
knappe
ENTER .
3. Vælg den ønskede indstilling (Fra, Lav, Medium, Høj) ved at trykke på
knappen
eller .
Tryk på knappen
ENTER .
4. Tryk på knappen EXIT for at afslutte.
Denne funktion fungerer ikke i PC-tilstand.
Brug af energibesparende funktion
Blå skærm:
Hvis der ikke modtages noget signal, eller hvis signalet er meget svagt,
erstatter en blå skærm automatisk den støjende billedbaggrund.
Hvis du alligevel ønsker at se det dårlige billede, skal du slå tilstanden
“Blå skærm” fra.
Melodi:
Du kan høre en melodi, når tv'et tændes eller slukkes.
1. Tryk på knappen MENU for at vise menuen. Tryk på knappen eller
for at vælge “Indstillinger” og tryk derefter på knappe ENTER .
2. Tryk på knappen eller for at vælge “Blå skærm” eller “Melodi”.
Tryk på knappen
ENTER .
3. Tryk på knappen eller for at vælge “Til” eller “Fra”.
Tryk på knappen
ENTER .
4. Tryk på knappen EXIT for at afslutte.
Indstilling af blå skærm / Valg af Melodi
Du kan vælge blandt eksterne kilder tilsluttet indgangsstikkene
på dit tv.
1. Tryk på knappen MENU for at vise menuen.
Tryk på knappen
ENTER for at vælge “Input”.
2. Tryk på knappen ENTER igen for at vælge “Liste over kilder”.
Når der ikke er nogen ekstern enhed tilsluttet til apparatet, er det kun “TV”,
“Ekstern1”, “Ekstern2”, der er aktiveret på “Liste over kilder”. “AV”, “S-Video”,
“Komponent”, “PC”, “DVI” er kun aktiveret, når de er tilsluttet til apparatet.
3. Vælg den ønskede enhed ved at trykke på knappen eller .
Tryk på knappen
ENTER .
Valg af kilden
Tryk på knappen SOURCE på fjernbetjeningen for at skifte mellem alle tilgængelige
kilder. TV-tilstand kan vælges ved at trykke på knappen
TV eller P / på
fjernbetjeningen, men du kan vælge det ved at trykke på knappen
SOURCE.
Page 58

Dansk-16
ANVENDELSE AF TEKST-TV
De fleste tv-kanaler har tekst-tv; sider med skriftlig information,
der blandt andet oplyser om:
Programtidspunkter
Nyheder og vejrudsigter
Sportsresultater
Undertekster for hørehæmmede
Tekst-tv-siderne er inddelt i seks kategorier:
Del
A
B
C
D
E
F
Indhold
Det valgte sidenummer.
Tv-/radiostations identitet.
Aktuelt sidenummer eller søgestatus.
Dato og klokkeslæt.
Tekst.
Statusoplysninger.
Tekst-tv-dekoder
Giv enheden tilsluttet indgangsstikkene et navn for at gøre det lettere
at vælge en indgangskilde.
1. Tryk på knappen MENU for at vise menuen.
Tryk på knappen
ENTER for at vælge “Input”.
2. Tryk på knappen eller for at vælge “Rediger navn” og tryk derefter på
knappe
ENTER .
3. Tryk på knappen eller for at vælge den enhed, du vil redigere.
Tryk på knappen
ENTER .
4. Tryk på knappen eller for at vælge den ønskede enhed.
Tryk på knappen
ENTER .
5. Tryk på knappen EXIT for at afslutte.
Redigering af navne på indgangskilder
Page 59

Dansk-17
Du kan når som helst få vist tekst-tv-information, men
signalmodtagelsen skal være i orden. I modsat fald:
Kan der mangle informationer.
Vises nogle sider muligvis ikke.
Sådan aktiverer du tekst-tv og får vist indholdsfortegnelsen:
1.
Brug knappen P () eller P () til at vælge en kanal,
der har tekst-tv.
2.
Tryk på knappen TTX/MIX () for at aktivere tilstanden til Tekst-tv.
Indholdsfortegnelsen vises. Du kan altid få den vist igen ved at trykke på
knappen MENU ().
3. Tryk på knappen
TTX/MIX ()
igen.
Den kørende udsendelse vises samtidigt med tekst-TV-siden på skærmen.
4. Tryk igen på TV () for at afslutte tekst-tv.
Hvis der vises brudte tegn, mens der vises tekst, skal du kontrollere, at tekstsproget er det
samme som det sprog, der er valgt i menuen “Indstillinger”. Hvis sprogene ikke er ens, skal
du vælge det samme sprog i menuen “Indstillinger”.
Visning af tekst-tv
Brug tallene på fjernbetjeningen til at komme direkte til en side:
1.
Angiv det trecifrede sidenummer, der er anført i indholdsfortegnelsen,
ved at trykke på de tilsvarende numeriske knapper.
2.
Hvis den valgte side er forbundet med flere andre sider (tillægssider),
vises de andre sider i rækkefølge. Tryk på
()
. for at fastfryse en
side. Tryk på
()
igen, når du er klar til at fortsætte.
3. Anvendelse af de forskellige visninger:
For at få vist...
Både tekst-tv-information og udsendelse
Skjult tekst (f.eks. svar på spørgsmål i konkurrencer)
Normal visning
En tillægsside (ved at indtaste det 4-cifrede sidetal)
Næste side
Foregående side
Dobbelt skriftstørrelse i:
øverste halvdel af skærmen
nederste halvdel af skærmen
Normal visning
Skal du trykke på...
TTX/MIX ( )
INFO ( )
INFO ( )
ADD/DEL ( )
P
()
P
()
SLEEP
()
Én gang
To gange
Tre gange
Valg af en bestemt tekst-tv-side
Page 60

Dansk-18
De forskellige emner på Tekst-TV er farvekodede, og du kan vælge den
ønskede side ved at trykke på den tilsvarende farvede knap på
fjernbetjeningen.
1.
Få vist tekst-tv's indholdsfortegnelse ved at trykke på
TTX/MIX ()
.
2. Tryk på den farvede knap, der svarer til det emne, du ønsker at vælge
(de tilgængelige emner vises på statusinformationslinien).
3. Tryk på den røde knap for at vise forrige side.
Tryk på den grønne knap for at vise næste side.
4. Tryk på knappen TV () igen for at afslutte tekst-tv-visning.
Anvendelse af Fastext til valg af tekst-tv-sider
INDSTILLING AF COMOUTEREN
Windows’ skærmindstillinger for en typisk com-pu-ter er vist herunder. Billederne fra din pc kan være
anderledes. Det afhænger af den konkrete Windows-version og det konkrete skærmkort. Selvom dine
billeder ser anderledes ud, gælder de samme grundlæggende informationer i næsten alle tilfælde.
(Hvis ikke skal du kontakte din com-pu-ter- eller Samsung-forhandler.)
1. Klik først på “Settings” i startmenuen i Windows. Når “Settings” er fremhævet, skal du
bevæge markøren, så “Control panel” fremhæves.
2. Når kontrolpanelet vises, vælger du “Appearance and Themes”,
hvorefter en dialogboks vises.
3. Når kontrolpanelet vises, vælger du “Display”, hvorefter en dialogboks vises.
4.
Vælg fanen “Settings” i denne dialogboks.
Den korrekte indstilling af størrelse (opløsning): Optimal- 1360 X 768
Hvis der i denne dialogboks er mulighed for indstilling af vertikal frekvens, skal den korrekte
værdi være “60” eller “60 Hz”. Ellers klikker du bare på “OK” og forlader dialogboksen.
Installation af PC'ens software (baseret på Windows XP)
Tilstanden Interlace understøttes ikke.
Apparatet kan vise et unormalt billede, hvis der vælges andet end et standardvideoformat.
DVI understøtter ikke funktionen PC.
Tilstandene Separat og Komposit er understøttet. SOG understøttes ikke.
Visningstilstand
Både skærmens placering og størrelse kan være forskellig afhængigt af pc-skærmen og dens opløsning.
Opløsningerne i tabellen anbefales. (Alle opløsninger mellem de understøttede grænser understøttes)
Tilstand
IBM
VESA
Opløsning
640 x 480
720 x 400
640 x 480
640 x 480
800 x 600
800 x 600
800 x 600
1024 x 768
1024 x 768
1024 x 768
1360 x 768
Horisontal
frekvens (kHz)
31,469
31,469
37,861
37,500
37,879
48,077
46,875
48,364
56,476
60,023
47,712
Vertikal
frekvens (Hz)
59,940
70,087
72,809
75,000
60,317
72,188
75,000
60,000
70,069
75,029
60,015
Pixel Clock
-frekvens (MHz)
25,175
28,322
31,500
31,500
40,000
50,000
49,500
65,000
75,000
78,750
85,800
Synkroniserings
polaritet (H/V)
- / -
- / +
- / -
- / + /+
+ /+
+ /+
- / -
- / + /+
+ /+
Page 61

Dansk-19
Indstilling af pc
Grov- og finjustering af billedet (Motivlås):
Formålet med justering af billedkvaliteten er at fjerne eller reducere billedstøj.
Hvis støjen ikke går væk ved hjælp af finindstilling alene, justerer du
frekvensen så godt som muligt og finindstiller igen. Når støjen er reduceret,
justeres billedet igen, så det er rettet ind på midten af skærmen.
1. Forudindstilling: Tryk på knappen PC for at vælge tilstanden PC.
2. Tryk på knappen MENU for at vise menuen.
Tryk på knappen
eller for at vælge “Indstillinger” og tryk derefter på
knappe
ENTER .
3. Tryk på knappen eller for at vælge “PC” og tryk derefter på
knappe
ENTER .
4. Tryk på knappen ENTER for at vælge “Motivlås”.
5. Tryk på knappen eller for at vælge “Grov” eller “Fin” og tryk derefter
på knappe
ENTER .
6. Tryk på knappen eller for at justere skærmkvaliteten.
Tryk på knappen
ENTER .
7. Tryk på knappen EXIT for at afslutte.
Ændring af billedets placering (Position):
Juster pc’ens skærmplacering, hvis den ikke passer til tv-skærmen.
1. Følg punkterne 1 til 3 i “Grov- og finjustering af billedet (Motivlås)”.
2. Tryk på knappen eller for at vælge “Position” og tryk derefter på
knappe
ENTER .
3. Tryk på knappen eller for at justere den vandrette placering.
Tryk på knappen
eller for at justere den lodrette placering.
Tryk på knappen
ENTER .
4. Tryk på knappen EXIT for at afslutte.
Initialisering af billedindstillingerne (Nulstil billede):
Du kan erstatte alle billedindstillingerne med fabriksstandardværdierne.
1. Følg punkterne 1 til 3 i “Grov- og finjustering af billedet (Motivlås)”.
2. Tryk på knappen eller for at vælge “Nulstil billede” og tryk derefter på
knappe
ENTER .
3. Tryk på knappen EXIT for at afslutte.
Automatisk indstilling af PC-skærmen (Autojustering):
Med autojustering kan pc-skærmen indstilles til selv at justere det
indkommende pc-videodignal. Værdierne for fin, grov og position justeres
automatisk.
1. Følg punkterne 1 til 3 i “Grov- og finjustering af billedet (Motivlås)”.
2. Tryk på knappen eller for at vælge “Autojustering” og tryk derefter på
knappe
ENTER .
3. Tryk på knappen EXIT for at afslutte.
Tryk på knappen PC på
fjernbetjeningen for at vælge
PC-tilstand.
Page 62

Dansk-20
Tekniske og miljømæssige specifikationer
ANBEFALINGER TIL BRUG
Ingen lyd eller intet billede
Normalt billede, men ingen lyd
Intet billede eller sort/hvidt billede
Forstyrrelser af lyd og billede
Sløret billede eller “sne” på
skærmen, forvrænget lyd
Fjernbetjeningen fungerer ikke
Meddelelsen “Kontr. sign.kab.” vises.
Meddelelsen “Understøttes ikke”
vises i PC-tilstand.
TFT-skærmens LCD-konsol bruger en konsol, der består af under-pixels (3.133.440) som detkræver raffineret teknologi at frembringe.
Dog kan der forekomme nogle enkelte lyse eller mørke pixels på skærmen. Disse pixels har ikke nogen indflydelse på produktets ydeevne.
Kontroller, at strømledningen er tilsluttet i stikkontakten.
Kontrollér, at du har trykket på knappen POWER på apparatets forside.
Kontroller indstillingerne for billedets kontrast og lysstyrke.
Kontroller lydstyrken.
Kontroller lydstyrken.
Kontroller, om du har trykket på knappen MUTE på fjernbetjeningen.
Tilpas farveindstillingerne.
Kontroller, at du har valgt det korrekte udsendelsessystem.
Forsøg at finde det elektriske udstyr, der påvirker fjernsynet, og flyt det længere væk.
Tilslut fjernsynet i en anden stikkontakt.
Kontroller antennens retning, placering og forbindelser.
Denne interferens skyldes ofte brugen af en indendørs antenne.
Udskift batterierne i fjernbetjeningen.
Rengør den øverste ende af fjernbetjeningen (transmissionsvinduet).
Kontroller batteriets terminaler.
Kontroller, at signalkablet er tilsluttet korrekt i PC'en eller videokilderne.
Sammenlign disse værdier med dataene i Skærmtilstande.
Kontroller den maksimale opløsning og frekvens for video- adapteren.
Sammenlign disse værdier med dataene i Display Modes Timing Chart
(Indstillingsdiagram for visningstilstande).
Fejlfinding: Før du kontakter serviceafdelingen
Modelnavn
Panel
Format
Skærmstørrelse
Pixelpitch
Frekvens
Horisontal / Vertikal
Opløsning (PC) (Optimal)
Strømforsyning (Indgang)
Strømforbrug
Normal / Strømbesparelse
Mål (B x D x H)
Hoveddel
Med stativ
Vægt
Med stativ
Omgivelser
Driftstemperatur
Driftsfugtighed
Opbevaringstemperatur
Opbevaringsfugtighed
Lyd
Udgang
LE23T5
23” diagonalt (16:9)
508,125 (H) x 285,696 (V) mm
0,372 (H) x 0,372 (V) mm
30~61 kHz / 60~75 Hz
1360 x 768 @ 60 Hz
AC 100 ~ 240 V, 60/50 Hz ± 3 Hz
100 W / < 2,0 W
675,9 x 85,0 x 393,40 mm
675,9 x 203,8 x 439,5 mm
8,0 kg (17,64 lbs)
10 °C til 40 °C (50 °F til 104 °F)
10 % til 80 %, ikke-kondenserende
-25 °C til 45 °C (-13 °F til 113 °F)
5 % til 95 %, ikke-kondenserende
3 W X 2
LE27T5
27” diagonalt (16:9)
603,22 (H) x 341,98 (V) mm
0,1460 (H) x 0,4365 (V) mm
30~61 kHz / 60~75 Hz
1360 x 768 @ 60 Hz
AC 100 ~ 240 V, 60/50 Hz ± 3 Hz
140 W / < 2,0 W
766,5 x 96,0 x 459,0 mm
766,5 x 203,8 x 505,5 mm
12,0 kg (26,46 lbs)
10 °C til 40 °C (50 °F til 104 °F)
10 % til 80 %, ikke-kondenserende
-25 °C til 45 °C (-13 °F til 113 °F)
5 % til 95 %, ikke-kondenserende
5 W X 2
LE32T5
32” diagonalt (16:9)
697,68 (H) x 392,26 (V) mm
0,51075 (H) x 0,51075 (V) mm
30~61 kHz / 60~75 Hz
1360 x 768 @ 60 Hz
AC 100 ~ 240 V, 60/50 Hz ± 3 Hz
170 W / < 2,0 W
914,5 x 104,0 x 528,8 mm
914,5 x 247,5 x 591,5 mm
15,0 kg (33,07 lbs)
10 °C til 40 °C (50 °F til 104 °F)
10 % til 80 %, ikke-kondenserende
-25 °C til 45 °C (-13 °F til 113 °F)
5 % til 95 %, ikke-kondenserende
7,5 W X 2
Page 63

Norsk-1
Norsk
Innhold
BRUKE TEKST-TV-FUNKSJONEN
Deleliste .................................................................... 2
Installere stativet ...................................................... 2
Montering av veggfestesettet .............................. 2
Kontrollpanelet.......................................................... 3
Tilkoblingspanelet .................................................... 4
Fjernkontrollen ........................................................ 5
Sette inn batterier i fjernkontrollen............................ 6
Slå på og av.............................................................. 6
Sette TV-apparatet i standby-modus........................ 6
Plug & Play .............................................................. 6
STILLE INN KANALER
Lagre kanaler automatisk ........................................ 7
Sortere kanaler manuelt .......................................... 8
Redigere kanaler ...................................................... 8
STILLE INN BILDET
Endre bildestandarden.............................................. 9
Justere tilpasset bilde .............................................. 9
Endre fargetone........................................................10
Tilbakestille bildeinnstillingene til
fabrikkinnstillinger .................................................... 10
Endre bildestørrelsen................................................ 10
Bruke funksjonen Digital NR / Dynamisk kontrast.... 11
Bilde i bilde (PIP eller Picture In Picture) ................ 11
STILLE INN LYDEN
Endre lydstandarden ............................................12
Justere lydinnstillingene ...................................... 12
Justere volumet automatisk..................................12
Høre på lyden til det lille bildet ............................13
STILLE TNN TIDEN
Stille inn og vise gjeldende klokkeslett ................13
Stille inn funksjonen Standby-modus ..................13
Slå fjernsynsapparatet på og av automatisk ........14
STILLE INN ANDREP
Velge språk ..........................................................14
Bruke energisparingsfunksjonen ..........................15
Stille inn blåskjermmodus / Velge Melodi ............15
Velge kilde ............................................................15
Redigere navn på inndatakilde ............................16
BRUKE TEKST-TV-FUNKSJONEN
Tekst-tv-dekoder ..................................................16
Vise tekst-TV-informasjon ....................................17
Velge en bestemt tekst-tv-side ............................17
Bruke hurtigtekst for å velge en tekst-tv-side ...... 18
STILLE INN PC-EN
Slik installerer du programvaren til PC-en
(Basert på Widows XP) ........................................18
Skjermmodus........................................................18
Stille inn datamaskinen ........................................19
ANBEFALINGER FOR BRUK
Feilsøking: Før du kontakter servicepersonale ....20
Tekniske og miljømessige spesifikasjoner............20
Symboler Trykk Hold nede Merk
Ettrykksknapp
Page 64

Norsk-2
BRUKE TEKST-TV-FUNKSJONEN
Deleliste
Vennligst kontroller at følgende deler følger med LCD-TVen.
Kontakt forhandleren hvis det mangler noen deler.
M4 X L16
Fjernkontroll og
batterier (AAA x 2)
Strømledning Deksel nedre del Skrue til stativ X 4
Brukerveiledning Garantikort
Kort for servicenettverkSikkerhetsveiledning
Registreringskort
< 2 >< 3 >
1. Legg TV-apparatet med fronten ned på en myk pute eller et pledd på et bord.
2. Sett stativet i hullet nederst på TV-apparatet.
3. Sett skruen i det viste hullet, og stram.
Installere stativet
Med veggfestene (selges separat) kan TV-apparatet monteres på veggen.
Du finner detaljert informasjon om hvordan veggfestene monteres i anvisningen som følger med
veggfestekomponentene. Rådfør deg med en tekniker før du monterer veggbraketten.
Samsung Electronics er ikke ansvarlig for skader som måtte oppstå på produktet, eller personskader, som
følge av at du selv installerer TV-apparatet.
Montering av veggfestesettet
Page 65

Norsk-3
Kontrollpanelet
SOURCE
Veksler mellom alle de tilgjengelige
inngangskildene (TV, Ext.1, Ext.2, AV, S-Video,
Komponent, PC, DVI). På skjermmenyen bruker du
denne knappen slik du bruker
ENTER -knappen
på fjernkontrollen.
MENU
Trykk for å se en skjermmeny med TV-funksjonene.
Trykk for å stille volumet opp eller ned.
På skjermmenyen bruker du -knappene
slik du bruker
- og -knappene på
fjernkontrollen.
Trykk for å skifte kanal.
På skjermmenyen bruker du -knappene
slik du bruker
- og -knappene på
fjernkontrollen. (Uten fjernkontrollen kan du slå på
TV-apparatet ved hjelp av kanalknappene.)
(KONTAKT FOR HODETELEFON)
Koble ekstern hodetelefon til denne kontakten hvis
du ikke ønsker at andre skal høre lyden.
(Strøm)
Trykk for å slå fjernsynsapparatet på og av.
Strømindikator
Blinker og slukker når strømmen er på, og lyser i
standby-modus.
Høyttalere
Sensor for fjernkontroll
Rett fjernkontrollen mot dette punktet på
fjernsynsapparatet.
Produktets farge og utforming kan variere, avhengig av modell.
Page 66

Koble til en antenne eller et kabelnettverk.
For å kunne vise TV-kanaler på riktig måte, må apparatet motta et signal fra en av følgende kilder:
- En utendørs antenne / Et kabel-TV-nettverk / Et satellittnettverk
Koble til komponentenheter (DTV/DVD)
- Koble komponentvideokablene (tilleggsutstyr) til komponentkontakten (“PR”, “PB”, “Y”) bak på TV-apparatet, og de andre
endene til respektive komponent-videoutgang på digital-TV eller DVD.
- Hvis du vil koble til både digitalboks og DTV (eller DVD), må du koble digitalboksen til DTVen (eller DVDen) og koble DTVen
(eller DVDen) til komponentkontakten (“P
R”, “PB”, “Y”) på settet.
- Kontaktene Y, P
B og PR på komponentenhetene (DTV eller DVD) er noen ganger merket Y, B-Y og R-Y eller Y, Cb og Cr.
- Koble RCA-lydkablene (tilleggsutstyr) til "R - AUDIO - L" bak på settet, og de andre endene til tilsvarende
lydutgangskontakter på DTVen eller DVDen.
- Med denne LCD-skjermen får du best bildekvalitet i 720p-modus.
Norsk-4
Tilkoblingspanelet
Strøminngang
Husk å kontrollere at strømmen er slått av før du kobler en ekstern enhet til TV-apparatet.
Pass på at fargen på tilkoblingskontakten samsvarer med kabelen når du kobler til en ekstern enhet.
Page 67

Norsk-5
Koble til eksterne A/V-enheter
- Koble RCA- eller S-VIDEO-kabelen (tilleggsutstyr) til det aktuelle eksterne A/V-utstyret, for eksempel videospiller,
DVD-spiller eller videokamera.
- Koble RCA-audiokablene (tilleggsutstyr) til "R – AUDIO - L" bak på TV-apparatet og de andre endene til tilsvarende
lyduttak på A/V-enheten.
Koble til digitalboks, videospiller eller DVD-spiller.
-
Koble SCART-kabelen for videospilleren eller DVD-spilleren (tilleggsutstyr) til SCART-kontakten på video- eller DVD-spilleren.
Koble til en DVI
- Koble DVI-kontakten til DVD -kontakten.
- Koble stereo-audiokabelen (tilleggsutstyr) til "R – AUDIO - L" bak på TV-apparatet og de andre endene til tilsvarende
lyduttak på A/V-enheten.
- DVI støtter ikke PC-funksjonen.
- Med denne LCD-skjermen får du best bildekvalitet i 720p-modus.
Koble til en datamaskin
- Koble D-Sub-kabelen (tilleggsutstyr) til "PC (PC IN)" bak på TV-apparatet, og koble den andre enden av kabelen til
datamaskinens videokort.
- Koble stereolydkabelen (tilleggsutstyr) til "AUDIO (PC IN)" bak på TV-apparatet og den andre enden til "Audio Out"
på lydkortet på datamaskinen.
Kensington-lås
- Kensington-låsen (tilleggsutstyr) er en innretning som brukes til å feste systemet når det er plassert på et offentlig sted.
- Kontakt forhandleren du kjøpte TV-apparatet hos hvis du ønsker å bruke en låseinnretning.
Standby-knapp for fjernsyn
Nummerknapper for direkte kanalvalg
Ett/to-sifret kanalvalg
Volumøkning
Volumreduksjon
Midlertidig demping av lyden
Vise hovedmenyen på skjermen.
Velge lydmodus
Valg av lydeffekt
Trykk for å lagre valgte TV- eller
kabel-TV-kanaler automatisk
Bruk til å lagre og slette
kanaler til/fra minne
Fryse bilde
Velg TV-modus direkte
Forrige kanal
P: Neste kanal
P: Forrige kanal
Valg av tilgjengelige kilder
Brukes til å se informasjon om
gjeldende sending
Avslutte skjermmenyen
Kontrollere markøren på menyen
Velge bildestørrelse
Valg av bildeeffekt
Slå på/av bilde-i-bilde (PIP)
Slå av automatisk
Velg PC -modus direkte
Funksjoner for tekst-TV
Holde tekst-TV-side
Tekst-TV-visning /
Vise både tekst-TV og
normal sending samtidig
Tekst-TV-indeks
Lagre tekst-TV
Tekst-TV-underside
Gå ut av tekst-TV-visning
P: Tekst-TV neste side
P: Forrige tekst-TV-side
Valg av tekst-TV-modus (LIST/FLOF)
Vise skjult tekst-TV-tekst
Avbryt Tekst-TV
Størrelsesvalg for tekst-TV
Valg av hurtigtekstemne
Funksjonen til fjernkontrollen kan bli påvirket av sterkt lys.
Fjernkontrollen
Page 68

Strømkontakten kobles til på baksiden av apparatet.
1. Sett strømkontakten inn i en egnet stikkontakt.
Standby-indikatoren foran på apparatet tennes.
2. Trykk på POWER -knappen foran på apparatet.
Programmet du så på sist, blir valgt automatisk.
3. Trykk på en nummertast (0~9) eller kanal opp/ned ( / ) på fjernkontrollen eller -knappen
på høyre side av apparatet.
Når du slår på apparatet for første gang, blir du bedt om å velge hvilket språk menyene skal vises på.
4. For å slå av TV-apparatet trykker du på POWER igjen.
TV-vastaanotin voidaan asettaa valmiustilaan virran säästämiseksi.
TV-vastaanotin voidaan jättää valmiustilaan, kun katseleminen keskeytetään joksikin aikaa.
1. Paina kaukosäätimen POWER -painiketta.
Skjermen slås av, og en rød standby-indikator vises foran på apparatet.
2. For å slå på apparatet igjen, trykker du bare på POWER
,
talltastene (0~9) eller kanal
opp/ned ( / ) igjen.
Ikke la apparatet stå i standby-modus over lengre tid (for eksempel når du er på ferie).
Det er best å koble fra strømforsyningen og antennen på apparatet.
Slå på og av
Sette TV-apparatet i standby-modus
Første gang TV-apparatet slås PÅ, blir flere grunnleggende innstillinger utført
automatisk. Følgende innstillinger er tilgjengelige:
1. Paina kaukosäätimen POWER -painiketta.
Meldingen “Plug & Play” blir vist.
2. Velg ønsket språk ved å trykke på eller .
Trykk på knappene
ENTER for å bekrefte valget.
3. Meldingen “Kontroller antenneinngang” vises når du velger “OK”.
Trykk på knappene
ENTER .
Kontroller at antennekabelen er riktig tilkoblet.
Plug & Play
Norsk-6
1. Skyv dekselet helt ut.
2. Sett inn to AAA-batterier.
Kontroller at “+” og “-” endene på batteriene samsvarer med diagrammet inne i batterihuset.
3. Sett på dekselet igjen.
Ta ut batteriene og oppbevar dem på et tørt og kjølig sted hvis du ikke skal bruke
fjernkontrollen over lengre tid. Fjernkontrollen kan brukes opptil ca.
7 meter fra TV-apparatet. (Ved vanlig TV-bruk vil batteriene vare i om lag ett år.)
Hvis fjernkontrollen ikke fungerer, må du kontrollere følgende:
1. Er strømmen til TV-apparatet på?
2. Er pluss- og minuspolene på batteriene snudd?
3. Er batteriene utladet?
4. Er strømmen brutt eller strømledningen trukket ut?
5. Finnes det et spesielt lysstoffrør eller et neonskilt i nærheten?
Sette inn batterier i fjernkontrollen
Page 69

Norsk-7
Språk: Velg språk.
Land: Velg land.
Autolagring:
Automatisk søk etter og lagring av kanaler som er tilgjengelig i det lokale området.
Still klokke: Stiller inn gjeldende klokkeslett for TV-klokken.
STILLE INN KANALER
- Lagre kanaler automatisk (se side 7)
- Sortere kanaler manuelt (se side 8)
- Redigere kanaler (se side 8)
Slik tilbakestiller du denne funksjonen...
1. Trykk på MENU-knappen for å vise menyen. Trykk på knappene
eller for å velge “Innstilling” og trykk deretter på ENTER .
2. Trykk på
ENTER
–knappen igjen for å velge "Plug & Play".
3. Dette vil endre eller nullstille innstillingen.
Du kan søke etter frekvensområdene som er tilgjengelige (tilgjengeligheten varierer fra land til land).
Det kan hende at programnumre som er tildelt automatisk, ikke samsvarer med de faktiske eller ønskede
programnumrene. Men du kan sortere numrene manuelt og fjerne kanaler som du ikke ønsker å se på.
1. Trykk på MENU-knappen for å vise menyen.
Trykk på knappene
eller for å velge “Kanal” og trykk deretter på ENTER .
2. Trykk på ENTER –knappen igjen for å velge "Land".
3. Velg ønsket land ved å trykke på eller .
Trykk på knappene
ENTER for å bekrefte valget.
4. Trykk på knappene eller for å velge “Autolagring” og trykk deretter på ENTER .
5. Trykk på knappene ENTER .
TV-apparatet starter lagring av alle de tilgjengelige kanalene.
Trykk på
ENTER
-knappen når som helst for å avbryte lagringen og gå tilbake til "Kanal"-menyen.
6. Når du har lagret alle tilgjengelige kanaler, vises "Sorter"-menyen.
Lagre kanaler automatisk
4. Velg ønsket land ved å trykke på
eller
.
Trykk på knappene
ENTER for å bekrefte valget.
5. Menyen “Autolagring” vises, og “Start” er valgt.
Trykk på knappene
ENTER .
Kanalsøket starter og slutter automatisk.
"Still klokke"-menyen vises etter at alle tilgjengelige kanaler er lagret.
Dersom du vil avbryte lagringsprosessen, trykker du på
ENTER
-knappen.
6. Trykk på knappene ENTER .
Velg “Time” eller “min” ved å trykke på eller .
Angi “Time” eller “min” ved å trykke på
eller .
Du kan også stille inn time og minutt ved å trykke på nummertastene på
fjernkontrollen.
7. Trykk på
ENTER
for å bekrefte innstillingen.
Kanalene kan lagres automatisk ved å trykke på AUTO PROG. på fjernkontrollen.
Page 70

Norsk-8
Du kan lagre opptil 100 kanaler, inklusive de du får inn via kabelnettverk.
Når du lagrer kanaler manuelt, kan du velge dette:
Om alle kanalene som blir funnet, skal lagres.
Programnummeret til hver lagret kanal som du vil identifisere.
1. Trykk på MENU-knappen for å vise menyen.
Trykk på knappene
eller for å velge “Kanal” og trykk deretter på ENTER .
2. Trykk på knappene eller for å velge “Manuell lagring” og trykk deretter på ENTER .
3. Trykk på ENTER –knappen igjen for å velge "Program".
4. For å tildele et programnummer til en kanal, finner du riktig nummer ved å trykke på eller ,
og deretter trykker du på
ENTER .
Du kan også angi kanalen ved å trykke på nummertastene på fjernkontrollen.
5. Trykk på knappene eller for å velge “Fargesystem” og trykk deretter på ENTER .
6. Velg fargestandard ved å trykke gjentatte ganger på eller , og trykk deretter på ENTER .
7. Trykk på knappene eller for å velge “Lydsystem” og trykk deretter på ENTER .
8. Velg ønsket lydstandard ved å trykke på eller flere ganger, og trykk deretter på ENTER .
Hvis du hører en unormal lyd eller ingen lyd, velger du lydsystemet på nytt.
9. Hvis du vet hvilken kanal du vil lagre, trykker du på knappen eller for å velge “Kanal”.
Trykk på knappene
ENTER . Velg C (etersendt kanal) eller S (kabel-tv-kanal) ved å trykke på knappen
eller . Trykk på for å velge kanal. Velg ønsket nummer ved å trykke på eller flere ganger, og
trykk deretter på
ENTER .
Kanal modus: P (programmodus), C (Modus for etersendt kanal), S (kabelkanalmodus)
Du kan også angi kanalen ved å trykke på nummertastene på fjernkontrollen.
10. Hvis du ikke vet numrene på kanalene du leter etter, velger du “Søk” ved å trykke på eller .
Trykk deretter på
ENTER . Start søket ved å trykke på eller og deretter på ENTER .
11. Trykk på knappene eller for å velge “Lagre”. Trykk på knappene ENTER for å velge “OK”.
12. Gjenta trinn 3 til 11 for hver kanal du vil lagre.
Program: Velger et programnummer for kanalen.
Fargesystem: Velger støttesystem for farge.
Lydsystem: Velger støttesystem for lyd.
Kanal: Velger en kanal.
Søk: Søker etter kanalens frekvensverdi.
Lagre: Lagrer innstillingene dine.
Sortere kanaler manuelt
Du kan velge å fjerne de kanalene du ikke vil beholde fra kanalene som ble funnet. Når du blar
gjennom de lagrede kanalene, vises ikke de kanalene du har valgt å hoppe over.
Alle kanalene du ikke spesifikt velger å hoppe over, vises når du blar.
1. Bruk disse talltastene for direkte valg av kanalen som skal legges til eller slettes.
2. Trykk på MENU-knappen for å vise menyen.
Trykk på knappene
eller for å velge “Kanal” og trykk deretter på ENTER .
3. Trykk på knappene eller for å velge “Tilføy/Slett” og trykk deretter på ENTER .
4. Trykk flere ganger på ENTER -knappen for å veksle mellom å legge til og slette kanal.
5. Trykk på P/-knappene for å veksle til aktuell kanal, og gjenta prosedyren over.
6. Trykk på EXIT-knappen for å avbryte.
Du kan se alle kanaler (inkludert eventuelle slettede kanaler) ved bruk av talltastene på fjernkontrollen.
Redigere kanaler
Du kan også angi kanalen ved å trykke på ADD/DEL på fjernkontrollen.
Page 71

Norsk-9
STILLE INN BILDET
Du kan velge den bildetypen som passer best til dine behov.
1. Trykk på MENU-knappen for å vise menyen. Trykk på knappene
eller for å velge “Bilde” og trykk deretter på ENTER .
2.
Trykk på ENTER –knappen igjen for å velge “Modus”.
3.
Trykk på ENTER –knappen igjen for å velge “Modus”.
4.
Trykk på
eller
for å velge ønsket bildeeffekt.
Trykk på knappene ENTER .
5.
Trykk på EXIT-knappen for å avbryte.
Dynamisk: Velger bildet for høydefinisjon i et lyst rom.
Standard: Velger bildet for optimal visning i vanlige omgivelser.
Film: Velger bildet for komfortabel visning i et mørkt rom.
Tilpasset: Velg for å vise dine favorittinnstillinger for skjermen.
(
Se "Justere tilpasset bilde" på side 9)
Du kan også trykke på
P.MODE-knappen på
fjernkontrollen for å velge
en av bildeinnstillingene.
Bildemodus må stilles inn separat for hver innsignalkilde.
Du kan tilbakestille bildeinnstillingene til fabrikkinnstillinger ved å trykke på
"Tilbakestill". (Se "Tilbakestille bildeinnstillingene til fabrikkinnstillinger" på side 10)
Endre bildestandarden
Kontrast: Justerer lysheten og mørkheten mellom objektene og bakgrunnen.
Lysstyrke: Justerer lysstyrken på hele skjermen.
Skarphet: Justerer objektenes omriss slik at skarpheten økes/minskes.
Farge: Justerer fargene slik at de blir lysere eller mørkere.
Nyanse:
Justerer fargen på objekter slik at de blir rødere eller grønnere og får et mer naturlig utseende.
Det er flere innstillinger på apparatet som kan brukes til å kontrollere
bildekvaliteten.
1. Velg ønsket bildeeffekt ved å følge anvisningene i punkt 1 til 4 under
"Endre bildestandarden" på side 9.
2.
Trykk på
eller
for å velge et alternativ.
Trykk på knappene ENTER .
3.
Trykk på
eller
for å redusere eller øke verdien til et bestemt
punkt.
Trykk på knappene ENTER .
4. Trykk på EXIT-knappen for å avbryte
.
Justere tilpasset bilde
De justerte verdiene lagres i tilknytning til valgt bildemodus.
Page 72

Norsk-10
Du kan gå tilbake til fabrikkinnstillingene for bildeinnstillinger
1. Velg ønsket bildeeffekt ved å følge anvisningene i punkt 1 til 4 under
"Endre bildestandarden" på side 9.
2. Trykk på knappene eller for å velge “Tilbakestill” og trykk deretter
på
ENTER .
3. Trykk på EXIT-knappen for å avbryte
.
"Tilbakestill" angis for hver bildemodus.
Tilbakestille bildeinnstillingene til fabrikkinnstillinger
I PC-modus kan bare "16:9"-modus og "4:3"-modus justeres.
Velg ved å trykke på eller .
Trykk på eller for å flytte bildet opp- eller nedover.
Etter at du har valgt trykker du på eller for å forstørre eller redusere
bildestørrelsen i loddrett retning.
Autobredde: Justerer automatisk bildestørrelsen til formatet "16:9"
16:9:
Justerer bildestørrelsen til omtrent 16:9 som passer for DVDer eller bredskjermkringkasting.
Panorama: Justerer 16:9 til 4:3 på en naturlig måte som for vanlig kringkasting.
Zoom:
Forstørrer 16:9-bredskjermbildet (i loddrett retning) for å passe til skjermstørrelsen.
4:3: Dette er standardinnstilling for en videofilm eller normal kringkasting.
Du kan velge det bildestørrelsen som best passer overens med dine
behov.
1. Trykk på MENU-knappen for å vise menyen. Trykk på knappene
eller for å velge “Bilde” og trykk deretter på ENTER .
2. Trykk på knappene eller for å velge “Størrelse” og trykk deretter
på
ENTER .
3. Velg ønsket alternativ ved å trykke på knappene eller flere ganger.
Trykk på knappene
ENTER .
4. Trykk på EXIT-knappen for å avbryte
.
Endre bildestørrelsen
Velg fargetonen som er mest komfortabel for øynene dine.
1. Velg ønsket bildeeffekt ved å følge anvisningene i punkt 1 til 4 under
"Endre bildestandarden" på side 9.
2. Trykk på knappene eller for å velge “Fargetone” og trykk deretter
på
ENTER .
3.
Trykk på
eller
for å velge ønsket fargetoneinnstilling.
Trykk på knappene ENTER .
4. Trykk på EXIT-knappen for å avbryte
.
Endre fargetone
Kjølig2: Gjør fargetemperaturen blåere
enn med “Kjølig1”-menyen.
Kjølig1: Gjør hvite farger blåaktige.
Normal: Holder det hvite hvitt.
Varm1: Gjør hvite farger rødaktige.
Varm2: Gjør fargetemperaturen rødere
enn med “Varm1”-menyen.
De justerte verdiene lagres i tilknytning til valgt bildemodus.
Du kan velge disse
alternativene ved å trykke
på knappen
P.SIZE på
fjernkontrollen.
Page 73

Norsk-11
Du kan vise et mindre bilde inne i hovedbildet for et TV-program eller et
videosignal. På denne måten kan du følge med på et valgt program eller
overvåke signalet fra en vilkårlig videokilde mens du ser på hovedbildet.
1. Trykk på MENU-knappen for å vise menyen. Trykk på knappene
eller for å velge “Bilde” og trykk deretter på ENTER .
2.
Trykk på knappene eller for å velge “PIP” og trykk deretter på ENTER .
3. Trykk på ENTER igjen.
Trykk på knappene eller for å velge “På” og trykk deretter på ENTER .
PIP (bilde i bilde) er bare tilgjengelig i PC-modus.
4. Trykk på knappene eller for å velge “Kildeliste” og trykk deretter
på
ENTER . Velg en Kilde for underbildet ved å trykke på eller ,
og trykk på
ENTER .
Underbildet kan ha forskjellige kildevalg basert på hva hovedbildet er satt til.
5. Trykk på knappene eller for å velge “Plassering” og trykk deretter
på
ENTER . Velg en Størrelse for det lille bildet ved å trykke på
eller og trykk deretter på ENTER .
6. Trykk på knappene eller for å velge “Prog.” og trykk deretter
på
ENTER . Du kan velge kanalen du vil vise via det lille bildet, ved å
trykke på by
eller . Trykk på knappene ENTER .
"Prog." kan aktiveres når underbildet er stilt inn på TV.
7. Trykk på EXIT-knappen for å avbryte.
Bilde i bilde (PIP eller Picture In Picture)
Kilde:
Velge en signalkilde (ekstern A/V) for PIP.
Plassering: Brukes til å flytte underbildet.
Prog.: Brukes til å endre underbildet.
Digital NR:
Hvis kringkastingssignalet du mottar er svakt, kan du aktivere funksjonen
Digital Noise Reduction for å redusere støy eller skygger på skjermen.
Dynamisk kontrast:
Dynamisk kontrast registrerer automatisk den visuelle signalinngangen
og justerer for å oppnå optimal kontrast.
1. Trykk på MENU-knappen for å vise menyen. Trykk på knappene
eller for å velge “Bilde” og trykk deretter på ENTER .
2. Trykk på knappene eller for å velge “Digital NR” eller
“Dynamisk kontrast”. Trykk på knappene
ENTER .
3. Trykk på knappene eller for å velge “På” eller “Av”.
Trykk på knappene
ENTER .
4. Trykk på EXIT-knappen for å avbryte.
Disse funksjonene virker ikke i PC-modus.
Bruke funksjonen Digital NR / Dynamisk kontrast
PIP-innstillinger
(O: PIP brukes, X: PIP brukes ikke)
Trykk på PIP på fjernkontrollen
gjentatte ganger for å aktivere
eller deaktivere "PIP".
PC
TVOExt.1OExt.2OAVOS-VideoOKomponentXPCXDVI
X
Sub
Hoved
Når hovedbildet er PC, støtter underbildet bare "TV", "Ext.1", "Ext.2", "AV" og
"S-Video". Underbildet støtter ikke andre inngangskilder i dette tilfellet.
Det kan hende at bildet i PIP-vinduet ser litt unaturlig ut når du bruker hovedskjermen
for å vise spill eller karaoke.
Page 74

Norsk-12
Hver kringkastingsstasjon har sine egne signalforhold, og derfor er det
ikke lett for deg å justere volumet hver gang du skifter kanal.
Denne funksjonen gjør at du kan justere volumet på en kanal automatisk
ved å senke lyden når modulasjonssignalet er høyt, eller øke lyden når
modulasjonssignalet er lavt.
1. Trykk på MENU-knappen for å vise menyen. Trykk på knappene
eller for å velge “Lyd” og trykk deretter på ENTER .
2. Trykk på knappene eller for å velge “Auto-volum” og trykk deretter
på
ENTER .
3.
Trykk på knappene eller for å velge “På” eller “Av”.
Trykk på knappene ENTER .
4. Trykk på EXIT-knappen for å avbryte.
Justere volumet automatisk
Du kan justere lydinnstillingene etter dine egne, personlige ønsker.
1. Trykk på MENU-knappen for å vise menyen. Trykk på knappene
eller for å velge “Lyd” og trykk deretter på ENTER .
2. Trykk på knappene eller for å velge “Equalizer” og trykk deretter
på
ENTER .
3.
Trykk på
eller
for å velge et alternativ.
Trykk på knappene ENTER .
4. Trykk på knappene eller for å finne ønsket innstilling.
Trykk på knappene
ENTER .
5. Trykk på EXIT-knappen for å avbryte.
Hvis du endrer disse innstillingene,blir Sound automatisk endret til “Tilpasset”.
Justere lydinnstillingene
STILLE INN LYDEN
Du kan velge hva slags spesielle lydeffekter som skal brukes når du
ser på en bestemt sending.
1. Trykk på MENU-knappen for å vise menyen. Trykk på knappene
eller for å velge “Lyd” og trykk deretter på ENTER .
2.
Trykk på ENTER –knappen igjen for å velge “Modus”.
3. Velg nødvendig lydeffekt ved å trykke gjentatte ganger på eller , og
trykk deretter på
ENTER .
4. Trykk på EXIT-knappen for å avbryte.
Standard: Velger den normale lydmodusen.
Musikk: Fremhever musikk over stemmer.
Film: Gir levende og full lyd for filmer.
Tale: Fremhever stemmer over andre lyder.
Tilpasset: Velger dine egendefinerte lydinnstillinger.
(Se "Justere lydinnstillingene" på side 12)
Endre lydstandarden
Du kan enkelt velge disse
alternativene ved å trykke på
S.MODE på fjernkontrollen.
Page 75

Norsk-13
Mens PIP-funksjonen er aktivert, kan du høre lyden til det lille bildet.
1. Trykk på MENU-knappen for å vise menyen. Trykk på knappene
eller for å velge “Lyd” og trykk deretter på ENTER .
2. Trykk på knappene eller for å velge “Lydvalg” og trykk deretter
på
ENTER .
3. Trykk på knappene eller for å velge “Sub”.
Trykk på knappene
ENTER .
4. Trykk på EXIT-knappen for å avbryte.
Du kan velge dette alternativet når “PIP” er “På”.
Høre på lyden til det lille bildet
Hoved: Brukes til å lytte til lyden på hovedbildet.
Sub: Brukes til å lytte til lyden på underbildet.
STILLE TNN TIDEN
Du kan stille klokken på TV-apparatet slik at gjeldende klokkeslett
vises når du trykker på INFO-knappen. Du må også stille inn klokken
hvis du vil bruke tidsuret for å slå av og på automatisk.
1. Trykk på MENU-knappen for å vise menyen. Trykk på knappene
eller for å velge “Innstilling” og trykk deretter på ENTER .
2.
Trykk på knappene eller for å velge “Klokkesl.” og trykk deretter på ENTER .
3. Trykk på ENTER –knappen igjen for å velge "Still klokke ".
4.
5.
Trykk på EXIT-knappen for å avbryte.
Hvis du kopler strømledningen fra, må du stille klokken på nytt.
Du kan også angi time og minutt ved å trykke talltastene på fjernkontrollen.
For å...
Flytt til “Time” eller “min”
Still inn “Time” eller “min”
Trykk på knappene ENTER .
Trykker du på...
eller -knappen
eller -knappen
Stille inn og vise gjeldende klokkeslett
Du kan velge et tidsrom mellom 30 og 180 minutter, slik at TV-apparatet
automatisk skifter til Standby-modus etter dette tidsrommet.
1. Trykk på MENU-knappen for å vise menyen. Trykk på knappene
eller for å velge “Innstilling” og trykk deretter på ENTER .
2.
Trykk på knappene eller for å velge “Klokkesl.” og trykk deretter på ENTER .
3. Trykk på knappene eller for å velge “Deakt.timer” og trykk deretter
på
ENTER .
4. Trykk på eller flere ganger til ønsket tid vises.
(Av, 30, 60, 90, 120, 150, 180). Trykk på knappene
ENTER .
5. Trykk på EXIT-knappen for å avbryte.
TV-apparatet slås av automatisk når tidsuret når 0.
Stille inn funksjonen Standby-modus
Trykk gjentatte ganger på
SLEEP på fjernkontrollen til
riktig tidsintervall blir vist.
Page 76

Norsk-14
Du kan stille inn Av/På-tidsuret slik at set-apparatet vil:
Slås på automatisk og stilles inn på den kanalen du har valgt,
på det tidspunktet du har valgt.
Slås av automatisk på det tidspunktet du har valgt.
1. Trykk på MENU-knappen for å vise menyen. Trykk på knappene
eller for å velge “Innstilling” og trykk deretter på ENTER .
2. Trykk på knappene eller for å velge “Klokkesl.”
og trykk deretter på
ENTER .
3. Trykk på knappene eller for å velge “Timer på”
og trykk deretter på
ENTER .
4. Trykk på eller for å justere "Time", og trykk deretter på for å flytte
til neste trinn. Still inn de andre verdiene på samme måte.
Trykk på
ENTER for å gå tilbake når du er ferdig.
5. Trykk på knappene eller for å velge “Timer av”
og trykk deretter på
ENTER .
6. Trykk på eller for å justere "Time", og trykk deretter på for å flytte
til neste trinn. Still inn de andre verdiene på samme måte.
Trykk på
ENTER for å gå tilbake når du er ferdig.
7. Trykk på EXIT-knappen for å avbryte.
Første trinn er å stille klokken på TV-apparatet.
Du kan også stille time og minutt ved å trykke på siffertastene på fjernkontrollen.
"Innstilling"-innstillingen må stå på "På" for at tidsurene skal fungere.
Slå fjernsynsapparatet på og av automatisk
STILLE INN ANDREP
Første gang du bruker apparatet, må du velge språket du ønsker på
menyer og symboler.
1. Trykk på MENU-knappen for å vise menyen på skjermen.
Trykk på knappene
eller for å velge “Innstilling” og trykk deretter
på
ENTER .
2. Trykk på knappene eller for å velge “Språk”
og trykk deretter på
ENTER .
3. Velg et språk ved å trykke flere ganger på eller .
Trykk på knappene
ENTER .
Du kan velge mellom 21 språk.
4. Trykk på EXIT-knappen for å avbryte.
Velge språk
Page 77

Norsk-15
Denne funksjonen justerer lysstyrken på TV-apparatet for å redusere
strømforbruket. Hvis du ser på TV om natten, stiller du
"Energisparing"-modus (strømsparemodus) på "Høy" for å redusere både
blendingen og strømforbruket.
1. Trykk på MENU-knappen for å vise menyen på skjermen.
Trykk på knappene
eller for å velge “Innstilling” og trykk deretter
på
ENTER .
2. Trykk på knappene eller for å velge “Energisparing”
og trykk deretter på
ENTER .
3. Velg ønsket alternativ (Av, Lav, Middels, Høy) ved å trykke på
knappen
eller . Trykk på knappene ENTER .
4. Trykk på EXIT-knappen for å avbryte.
Denne funksjonen fungerer ikke i PC-modus.
Bruke energisparingsfunksjonen
Blå skjerm:
Hvis det ikke mottas noe signal, eller hvis signalet er meget svakt,
erstatter en blå skjerm automatisk den støyende bildebakgrunnen.
Hvis du vil fortsette å se på det dårlige bildet må du angi
“Biå skjerm”-modus til “Av”.
Melodi:
Du kan höra en melodi när TV:n stängs av ellerpå.
1. Trykk på MENU-knappen for å vise menyen. Trykk på knappene
eller for å velge “Innstilling” og trykk deretter på ENTER .
2.
Trykk på knappene eller for å velge “Blå skjerm” eller “Melodi”.
Trykk på knappene ENTER .
3.
Trykk på knappene eller for å velge “På” eller “Av”.
Trykk på knappene ENTER .
4. Trykk på EXIT-knappen for å avbryte.
Stille inn blåskjermmodus / Velge Melodi
Du kan velge blant de eksterne kildene som er koblet til TV-apparatets
innganger.
1. Trykk på MENU-knappen for å vise menyen.
Trykk på
ENTER –knappen igjen for å velge "Inndata".
2. Trykk på ENTER –knappen igjen for å velge “Kildeliste”.
Hvis ingen eksterne enheter er koblet til fjernsynsapparatet, er bare “TV”,
“Ext.1”, “Ext.2”, aktivert i “Kildeliste”. “AV”, “S-Video”, “Komponent”, “PC”,
“DVI” er bare aktivert når de er koblet til fjernsynsapparatet.
3. Velg ønsket enhet ved å trykke på eller .
Trykk på knappene
ENTER .
Velge kilde
Trykk på SOURCE på fjernkontrollen for å veksle mellom alle tilgjengelige kilder.
Du kan velge TV-modus ved å trykke på
TV eller P / på fjernkontrollen, men du
kan ikke velge TV-modus ved å trykke på
SOURCE.
Page 78

Norsk-16
BRUKE TEKST-TV-FUNKSJONEN
De fleste TV-kanaler har tekst-tv-sider med skrevet informasjon
som f. eks.:
Sendetidspunkt for fjernsynsprogrammer
Nyheter og værmeldinger
Sportsresultater
Teksting for hørselshemmede
Tekst-tv-sidene er organisert i seks kategorier:
Del
A
B
C
D
E
F
Innhold
Valgt sidenummer.
TV-/radiostasjonsidentitet.
Gjeldende sidenummer eller søkestatus.
Dato og klokkeslett.
Tekst.
Statusinformasjon.
Tekst-tv-dekoder
Navngi enheten som er koblet til inngangene, så blir det lettere å
velge inngangskilde.
1. Trykk på MENU-knappen for å vise menyen.
Trykk på
ENTER –knappen igjen for å velge "Inndata".
2. Trykk på knappene eller for å velge “Rediger navn”
og trykk deretter på
ENTER .
3. Trykk på eller for å velge enheten du ønsker å endre.
Trykk på knappene
ENTER .
4. Trykk på eller for å velge ønsket enhet.
Trykk på knappene
ENTER .
5. Trykk på EXIT-knappen for å avbryte.
Redigere navn på inndatakilde
Page 79

Norsk-17
Du kan vise tekst-tv-informasjon når som helst, men signalmottaket
må være bra. Ellers:
Manglende informasjon
Enkelte sider kan ikke vises
For å aktivere tekst-tv-modusen og vise innholdssiden:
1.
Bruk knappen P () eller P () til å velge kanalen som leverer
tekst-tv-tjenesten.
2.
Trykk på knappen
TTX/MIX ()
for å aktivere tekst-TV-modus.
Innholdssiden blir vist. Den kan vises på nytt når som helst ved å trykke på
knappen MENU ().
3. Trykk på TTX/MIX () igjen.
Den aktuelle sendingen blir vist samtidig som tekst-tv-siden på en skjerm
4. Trykk på knappen TV() igjen for å gå ut av tekst-tv-modusen.
Hvis det vises brutte tegn under visning av tekst, må du kontrollere at tekstspråket er
identisk med språket i menymodusen “Innstilling”. Hvis de to språkene er
ulike, velger du samme språk med tekstspråket i menyen “Innstilling”.
Vise tekst-TV-informasjon
Trykk på talltastene på fjernkontrollen for å angi sidenummeret
direkte:
1.
Tast inn det tresifrede sidenummeret som er angitt i innholdet,
ved å trykke på de tilsvarende talltastene.
2.
Hvis den valgte siden er koblet til flere tilleggsider, vises disse etter
hverandre. For å fryse skjermen på en bestemt side, tykker du
()
.
Trykk
()
en gang til for å fortsette.
3. Bruke de ulike skjermalternativene:
For å vise...
Både tekst-tv-informasjon og vanlig sending
Skjult tekst (svar på spørrekonkurranser for eksempel)
Vanlig skjerm
En tilleggsside ved å taste, inn et 4-sifret nummer
Neste side
Forrige side
Dobbel skriftstørrelse i:
Øvre halvdel av skjermen
Nedre halvdel av skjermen
Normal skjerm
Trykker du på...
TTX/MIX ( )
INFO ( )
INFO ( )
ADD/DEL ( )
P
()
P
()
SLEEP
()
Én gang
To ganger
Tre ganger
Velge en bestemt tekst-tv-side
Page 80

Norsk-18
De ulike emnene som er inkludert på tekst-tv-sidene, er fargekodet, og kan
velges ved å trykke på de fargede knappene på fjernkontrollen.
1.
Vis innholdssiden for tekst-tv ved å trykke på knappen
TTX/MIX ()
.
2. Trykk på fargeknappen som tilhører det emnet du vil velge.
(De tilgjengelige emnene finnes i en liste på statusinformasjonslisten.)
3. Trykk på den røde knappen for å vise forrige side.
Trykk på den grønne knappen for å vise neste side.
4. Trykk på TV( )-knappen igjen for å gå ut av tekstvisningen.
Bruke hurtigtekst for å velge en tekst-tv-side
STILLE INN PC-EN
Nedenfor vises Windows-innstillinger for en vanlig datamaskin. Bildene som faktisk vises på PCen, kan se
annerledes ut, avhengig av hvilken Windows-versjon og hvilket videokort du har. Selv om skjermbildet ser
annerledes ut hos deg, gjelder den samme grunnleggende informasjonen om oppsett i nesten alle tilfeller.
(Hvis ikke, kan du ta kontakt med datamaskinprodusenten eller Samsung-forhandleren.)
1. Først klikker du på “Control panel” i startmenyen i Windows.
2. Når kontrollpanelskjermbildet vises, klikker du på “Appearance and Themes” Det
kommer frem en skjermdialogboks.
3. Når kontrollpanelskjermbildet vises, klikker du på “Display” Det kommer frem en
skjermdialogboks.
4. Gå til kategorien “Settings” ti skjermdialogboksen.
Riktig størrelsesinnstilling (oppløsning): Optimalt - 1360 X 768
Hvis det er et alternativ for vertikal frekvens i dialogboksen skjerminnstillinger, skal
den korrekte verdien være “60“ eller “60 Hz”. Ellers klikker du bare på “OK” og
går ut av dialogboksen.
Slik installerer du programvaren til PC-en (Basert på Widows XP)
Det er ikke støtte for linjesprang-modus.
Det kan hende at systemet ikke fungerer normalt hvis du velger et videoformat som ikke er standard.
DVI støtter ikke PC-funksjon.
Støtter separat og sammensatt modus. SOG støttes ikke.
Skjermmodus
Skjermbildets posisjon og størrelse er avhengig av typen PC-skjerm og hvilken oppløsning den har.
Oppløsningene i tabellen anbefales. (Alle oppløsninger mellom de støttede grensene, støttes)
Modus
IBM
VESA
Oppløsning
640 x 480
720 x 400
640 x 480
640 x 480
800 x 600
800 x 600
800 x 600
1024 x 768
1024 x 768
1024 x 768
1360 x 768
Horisontal
frekvens (kHz)
31,469
31,469
37,861
37,500
37,879
48,077
46,875
48,364
56,476
60,023
47,712
Vertikal
frekvens (Hz)
59,940
70,087
72,809
75,000
60,317
72,188
75,000
60,000
70,069
75,029
60,015
Klokkefrekvens
for piksler (MHz)
25,175
28,322
31,500
31,500
40,000
50,000
49,500
65,000
75,000
78,750
85,800
Synk.polaritet
(H/V)
- / -
- / +
- / -
- / + /+
+ /+
+ /+
- / -
- / + /+
+ /+
Page 81

Norsk-19
Stille inn datamaskinen
Grov- og fininnstilling av bildet (Bildelås):
Hensikten med justering av bildekvaliteten er å fjerne eller redusere bildestøy.
Hvis støyen ikke fjernes av fininnstillingen, justerer du frekvensen så godt
som mulig og finjusterer igjen. Etter at støyen har blitt redusert, må du justere
bildet igjen slik at det er rettet inn på midten av skjermen.
1. Forhåndsinnstilt: Trykk på PC-knappen for å velge PC-modus.
2. Trykk på MENU-knappen for å vise menyen.
Trykk på knappene
eller for å velge “Innstilling” og trykk deretter
på
ENTER .
3. Trykk på knappene eller for å velge “PC” og trykk deretter
på
ENTER .
4. Trykk på ENTER –knappen igjen for å velge "Bildelås".
5. Trykk på knappene eller for å velge “Grov” eller “Fin” og trykk
deretter på
ENTER .
6. Trykk på knappene eller for å justere skjermkvaliteten.
Trykk på knappene
ENTER .
7. Trykk på EXIT-knappen for å avbryte.
Endre bildeplasseringen (Plassering):
Juster datamaskinens skjermposisjon hvis den ikke passer på
TV-skjermen.
1. Følg instruksene i punkt 1 til 3 under
"Grov- og fininnstilling av bildet (Bildelås)".
2. Trykk på knappene eller for å velge “Plassering” og trykk deretter
på
ENTER .
3. Trykk på eller for å justere den vertikale innstillingen.
Trykk på
eller for å justere den horisontale innstillingen.
Trykk på knappene
ENTER .
4. Trykk på EXIT-knappen for å avbryte.
Initialisere bildeinnstillinger (Tilb.still bilde):
Du kan bytte ut alle bildeinnstillingene med fabrikkstandardene.
1. Følg instruksene i punkt 1 til 3 under
"Grov- og fininnstilling av bildet (Bildelås)".
2. Trykk på knappene eller for å velge “Tilb.still bilde” og trykk
deretter på
ENTER .
3. Trykk på EXIT-knappen for å avbryte.
Justere PC-skjermen automatisk (Autojustering):
Med automatisk justering kan skjermen på datamaskinen justere seg selv
etter det innkommende PC-videosignalet. Verdiene for fin, grov og
plassering justeres automatisk.
1. Følg instruksene i punkt 1 til 3 under
"Grov- og fininnstilling av bildet (Bildelås)".
2. Trykk på knappene eller for å velge “Autojustering” og trykk
deretter på
ENTER .
3. Trykk på EXIT-knappen for å avbryte.
Trykk på PC -knappen på
fjernkontrollen for å velge
PC-modus.
Page 82

Norsk-20
Tekniske og miljømessige spesifikasjoner
ANBEFALINGER FOR BRUK
Ingen lyd eller bilde
Normalt bilde, men ingen lyd
Ikke bilde, eller svart/hvitt-bilde
Forstyrrelser på lyd og bilde
Uskarpt eller snø på bildet,
forvrengt lyd.
Fjernkontrollen virker ikke riktig
Meldingen “Kontroller signalkabel”
vises.
I PC-modus vises meldingen
“Modus støttes ikke“ vises.
TFT-nestekidenäytössä käytetään alipikseleistä koostuvaa näyttöä (3.33.440), jonka valmistus edellyttää edistyksellistä tekniikkaa.
Siitä huolimatta näytössä voi näkyä joitakin kirkkaita tai tummia pikseleitä. Nämä pikselit eivät vaikuta tuotteen suorituskykyyn.
Sjekk at strømledningen er koblet til en stikkontakt.
Kontroller at du har trykt på POWER –knappene foran på apparatet.
Kontroller innstillingene for bildekontrast og lysstyrke.
Sjekk volumet.
Sjekk volumet.
Sjekk om MUTE -har blitt trykket på fjernkontrollen.
Juster fargeinnstillingene.
Sjekk at det valgte kringkastingssystemet er riktig.
Prøv å identifisere det elektriske apparatet som påvirker TV-apparatet, og flytt det lenger unna.
Koble TV-apparatet til en annen stikkontakt.
Sjekk retningen, plasseringen og tilkoblingene for antennen.
Årsaken til slik interferens er ofte at innendørs antenne brukes.
Skift batteriene i fjernkontrollen.
Rengjør øvre kant av fjernkontrollen (overføringsvinduet).
Kontroller batteripolene.
Sjekk at signalkabelen er godt tilkoblet til PC- eller videokildene.
Kontroller at PC- eller videokildene er slått på.
Kontroller den høyeste oppløsningen og frekvensen for video-adapteren.
Sammenlikne disse verdiene med dataene i tabellen for visningsmoduser.
Feilsøking: Før du kontakter servicepersonale
Modellnavn
Panel
Størrelse
Skjermstørrelse
Pikselfrekvens
Frekvens
Horisontal / Vertikal
Oppløsning (PC) (Optimalt)
Strømforsyning (Innsignal)
Strømforbruk
Normal / Strømsparing
Mål (B x D x H)
Hoveddel
Med stativ
Vekt
Med stativ
Audioegenskaper
Driftstemperatur
Luftfuktighet ved drift
Lagringstemperatur
Luftfuktighet ved lagring
Lyd
Utsignal
LE23T5
23” Diagonal (16:9)
508,125 (H) x 285,696 (V) mm
0,372 (H) x 0,372 (V) mm
30~61 kHz / 60~75 Hz
1360 x 768 @ 60 Hz
AC 100 ~ 240 V, 60/50 Hz ±3 Hz
100 W / < 2,0 W
675,9 x 85,0 x 393,40 mm
675,9 x 203,8 x 439,5 mm
8,0 kg (17,64 pund)
10 °C til 40 °C (50 °F til 104 °F)
10 % til 80 %, ikke-kondenserende
-20 °C til 45 °C (-4° F til 113 °F)
5 % til 95 %, ikke-kondenserende
3 W X 2
LE27T5
27” Diagonal (16:9)
603,22 (H) x 341,98 (V) mm
0,1460 (H) x 0,4365 (V) mm
30~61 kHz / 60~75 Hz
1360 x 768 @ 60 Hz
AC 100 ~ 240 V, 60/50 Hz ±3 Hz
140 W / < 2,0 W
766,5 x 96,0 x 459,0 mm
766,5 x 203,8 x 505,5 mm
12,0 kg (26,46 pund)
10 °C til 40 °C (50 °F til 104 °F)
10 % til 80 %, ikke-kondenserende
-20 °C til 45 °C (-4° F til 113 °F)
5 % til 95 %, ikke-kondenserende
5 W X 2
LE32T5
32” Diagonal (16:9)
697,68 (H) x 392,26 (V) mm
0,51075 (H) x 0,51075 (V) mm
30~61 kHz / 60~75 Hz
1360 x 768 @ 60 Hz
AC 100 ~ 240 V, 60/50 Hz ±3 Hz
170 W / < 2,0 W
914,5 x 104,0 x 528,8 mm
914,5 x 247,5 x 591,5 mm
15,0 kg (33,07 pund)
10 °C til 40 °C (50 °F til 104 °F)
10 % til 80 %, ikke-kondenserende
-20 °C til 45 °C (-4° F til 113 °F)
5 % til 95 %, ikke-kondenserende
7,5 W X 2
Page 83

Suomi-1
Suomi
Sisältö
TELEVISION KYTKEMINEN JA KÄYTTÖÖNOTTO
Osaluettelo................................................................ 2
Jalustan asentaminen .............................................. 2
Seinätelineen asentaminen .................................. 2
Ohjauspaneeli .......................................................... 3
Liitäntäpaneeli .......................................................... 4
Kaukosäädin ............................................................ 5
Paristojen asettaminen kaukosäätimeen.................. 6
TV-vastaanottimen kytkeminen päälle ja pois .......... 6
Television kytkeminen valmiustilaan ........................ 6
Plug & Play .............................................................. 6
KANAVIEN MÄÄRITTÄMINEN
Kanavien automaattinen tallentaminen .................... 7
Kanavien manuaalinen tallentaminen ...................... 8
Kanavien muokkaaminen ........................................ 8
KUVAN MÄÄRITTÄMINEN
Kuvastandardin muuttaminen .................................. 9
Omien kuva-asetusten muuttaminen........................ 9
Värin sävyn muuttaminen ........................................10
Kuva-asetusten palauttaminen tehdasasetuksiksi.... 10
Kuvakoon muuttaminen............................................10
Digitaalinen kohinanvaimennus-ominaisuuden käyttäminen. /
Dynaaminen kontrasti
...................................................... 11
Kuva kuvassa (PIP) -toiminnon käyttäminen............ 11
ÄÄNEN MÄÄRITTÄMINEN
Äänistandardin muuttaminen................................ 12
Ääniasetusten muokkaaminen ............................ 12
Äänen säätäminen automaattisesti ....................12
Pikkukuvan äänen kuunteleminen........................13
AJAN MÄÄRITTÄMINEN
Kellonajan asettaminen ja näyttäminen................13
Uniajastimen asettaminen ....................................13
Television virran automaattinen
kytkeminen ja katkaiseminen................................14
KUVAN ASETTAMINEN
Kielen valitseminen ..............................................14
Virransäästötoiminnon käyttö ..............................15
Sinisen TV-kuvan asettaminen /
Melodia -äänen valitseminen................................15
Kuvalähteen valitseminen ....................................15
Kuvalähteiden nimien muokkaaminen..................16
TEKSTI-TV
Tekstitelevision dekooderi ....................................16
Tekstitelevision tietojen näyttäminen....................17
Tekstitelevision sivun valitseminen ......................17
Tekstitelevision sivun valitseminen
Fastext-toiminnolla................................................18
PC:N ASETTAMINEN
Tietokoneen asetusten
määrittäminen(Windows XP) ................................18
Näyttötila ..............................................................18
PC-asetusten määrittäminen ................................19
KÄYTTÖSUOSITUKSIA
Vianetsintä:
ennen yhteydenottoa huoltohenkilöstöön ............ 20
Tekniset tiedot ja muita käyttöön liittyviä tietoja ..20
Symbolit Paina Tärkeää Huomaa Kerran
painettava
näppäin
Page 84

Suomi-2
TELEVISION KYTKEMINEN JA KÄYTTÖÖNOTTO
Osaluettelo
Varmista, että nestekidetelevision mukana toimitetaan seuraavat osat.
Jos osia puuttuu, ota yhteys jälleenmyyjään.
M4 X L16
Kaukosäädin ja
paristot (AAA, 2 kpl)
Virtajohto Alaosan suojalevy Jalustan ruuvit, 4 kpl
Omistajan käyttöopas
Takuukortti Huoltoverkostokortti Turvallisuusopas Rekisteröintikortit
< 2 >< 3 >
1. Aseta televisio näyttö alaspäin pehmeän kankaan tai pehmusteen päälle pöydälle.
2. Työnnä teline television pohjassa olevaan reikään.
3. Aseta ruuvi kuvassa osoitettuun reikään ja kiristä se.
Jalustan asentaminen
Televisio voidaan kiinnittää seinään seinätelineen (myydään erikseen) avulla.
Lisätietoa seinätelineen asentamisesta löytyy seinätelineen ohjeesta.
Pyydä apua asentajalta seinätelinettä asennettaessa. Samsung Electronics ei vastaa tuotteiden vaurioista
tai sinun tai muiden henkilöiden vammoista, jos asennat television itse.
Seinätelineen asentaminen
Page 85

Suomi-3
Ohjauspaneeli
SOURCE
Vaihtaa käytettävissä olevia tulolähteitä (TV, Ulk.1,
Ulk.2, AV, S-Video, Komponentti, PC, DVI).
Käytä tätä painiketta kuvaruutuvalikossa kuten
kaukosäätimen
ENTER -painiketta.
MENU
Paina katsoaksesi TV:n ominaisuuksia
näyttövalikosta.
Voit lisätä tai vähentää äänenvoimakkuutta
painamalla tätä. Käytä painikkeita
kuvaruutuvalikossa kuten kaukosäätimen
- ja -painikkeita.
Painamalla näitä painikkeita voit siirtyä
kanavapaikalta toiseen.
Käytä painikkeita kuvaruutuvalikossa
kuten kaukosäätimen
- ja -painikkeita.
(Kun käytössäsi ei ole kaukosäädintä, voit kytkeä
televisioon virran näiden painikkeiden avulla.)
(KUULOKKEIDEN LIITIN)
Kytke ulkoiset kuulokkeet tähän liittimeen yksityistä
kuuntelua varten.
(virtapainike)
Kytke tai katkaise television virta painamalla
virtapainiketta.
Virtavalo
Virtavalo vilkkuu ja sammuu, kun televisioon
kytketään virta, ja syttyy valmiustilassa.
Kaiuttimet
Kaukosäätimen infrapuna-anturi
Suuntaa kaukosäädin tähän kohtaan.
Tuotteen väri ja muoto saattaa vaihdella tuotteesta riippuen.
Page 86

Kytkeminen antenni- tai kaapelitelevisioverkkoon
TV-kanavien katseleminen edellyttää kuvasignaalin vastaanottamista jostakin seuraavista lähteistä:
- Ulkoantenni / Kaapelitelevisioverkko/ Satelliittitelevisioverkko
Kytkeminen komponenttilaitteisiin (digisovittimeen/DVD-laitteeseen)
- Kytke komponenttivideojohdot (lisävaruste) television takapaneelin komponenttituloliittimiin (“PR”, “PB”, “Y”) ja toiset päät
digisovittimen tai DVD-laitteen vastaaviin komponenttilähtöliittimiin.
- Jos haluat liittää sekä TV-sovittimen että DTV- (tai DVD) laitteen, on TV-sovitin liitettävä DTV- (tai DVD) laitteeseen ja
DTV- (tai DVD) laite televisiosi (“P
R”, “PB”, “Y”) komponenttiliittimeen.
- Erillislaitteiden (DTV tai DVD) Y-, P
B- ja PR-liittimet on joskus merkitty merkein Y, B-Y ja R-Y tai Y, Cb ja Cr.
- Kytke RCA-äänijohdot (lisävaruste) television takapaneelin “R - AUDIO - L” -liittimiin ja toiset päät digisovittimen tai DVD-lait
teen vastaaviin äänilähtöliittimiin.
- Tämän nestekidetelevision kuva on optimaalinen 720p-tilassa.
Suomi-4
Liitäntäpaneeli
Virtajohto
Varmista, että laitteen virta on katkaistu aina kun kytket ulkoisen laitteen televisioon.
Kun kytket televisioon ulkoisen laitteen, yhdistä samanvärinen liitin ja johto.
Page 87

Suomi-5
Kytkeminen ulkoisiin AV-laitteisiin
-
Kytke RCA- tai S-VIDEO-johto (lisävaruste) ulkoiseen AV-laitteeseen, kuten videonauhuriin, DVD-laitteeseen tai videokameraan.
- Kytke RCA-äänijohdot (lisävaruste) television takapaneelin R - AUDIO - L -liittimiin ja toiset päät ulkoisen AV-laitteen
vastaaviin äänilähtöliittimiin.
Kytkeminen digisovittimeen, videonauhuriin tai DVD-laitteeseen
- Kytke videonauhurin tai DVD-laitteen SCART-johto (lisävaruste) videonauhurin tai DVD-laitteen SCART-liittimeen.
DVI yhdistäminen
- Yhdistä DVI-liitin DVD-liitäntään.
- Liitä stereo-audiokaapeli (lisävaruste) televisiosi taustapuolen kohtaan "R - AUDIO - L" ja kaapelien toiset päät vastaaviin
A/V-laitteen audio out -liittimiin.
- DVI ei tue PC-toimintoa.
- Tämän nestekidetelevision kuva on optimaalinen 720p-tilassa.
Kytkeminen tietokoneeseen
- Kytke D-Sub-johto (lisävaruste) television takapaneelin PC (PC IN) -liittimeen ja toinen pää tietokoneen videokorttiin.
- Kytke stereoäänijohto (lisävaruste) television takapaneelin AUDIO (PC IN) -liittimeen ja toinen pää tietokoneen äänikortin
äänilähtöön.
Kensington-lukko
- Kensington-lukko (lisävaruste) on laite, jolla televisio voidaan lukita kiinni julkisissa paikoissa.
- Jos haluat käyttää lukkolaitetta, ota yhteys jälleenmyyjääsi.
Television valmiustila-painike
Yksi-/kaksinumeroisen
kanavan valinta
Yksi- tai kaksinumeroisen
kanavan valinta
Äänen voimakkuuden lisääminen
Äänen voimakkuuden vähentäminen
Äänen väliaikainen mykistys
Näyttää pääkuvaruutuvalikon
Äänen tilan valinta
Äänitehosteiden valinta
Paina tallentaaksesi
TV/kaapeli-kanavat automaattisesti
Käytä kanavien tallentamiseen tai
poistamiseen muistista
Pysäytyskuva
Siirtyy suoraan TV-tilaan
Edellinen kanava
P: Seuraava kanava
P: Edellinen kanava
Kuvalähteen valinta
Tietoja nykyisestä lähetyksestä
Sulkee kuvaruutuvalikon
Kohdistimen toiminnot
kuvaruutuvalikkoa käytettäessä
Kuvan koon valinta
Kuvatehosteiden valinta
Kuva kuvassa (PIP) käytössä /
poissa käytöstä
Automaattinen virran katkaisu
Siirtyy suoraan PC-tilaan
Teksti-TV:n toiminnot
Tekstitelevision pito
Tekstitelevision katselu /
tekstitelevision ja tavallisen
lähetyksen katselu samanaikaisesti
Tekstitelevision hakemisto
Tekstitelevision tallennus
Tekstitelevision alasivu
Poistuminen tekstitelevisiosta
P: Tekstitelevision seuraava sivu
P: Tekstitelevision edellinen sivu
Tekstitelevision tilan valinta
(LIST/FLOF)
Tekstitelevision paljastus
Teksti-TV:n katselun lopetus
Tekstitelevision koon valinta
Aiheen pikavalinta (Fastext)
Kirkas valo saattaa vaikuttaa kaukosäätimen toimintaan.
Kaukosäädin
Page 88

Virtajohto on asennettu TV-vastaanottimen takaosaan.
1. Yhdistä virtajohto pistorasiaan.
Television etupaneelin valmiustilan merkkivalo syttyy.
2. Paina television etupaneelin POWER -virtapainiketta.
TV-vastaanotin valitsee automaattisesti viimeksi katsellun kanavapaikan.
3. Paina kaukosäätimen numeropainikkeita (0–9) tai seuraavan/edellisen kanavan painikkeita ( / ) tai
television oikeanpuoleisen sivupaneelin -painikkeita.
Kun kytket TV-vastaanottimeen virran ensimmäistä kertaa, voit valita kuvaruutuvalikoissa käytettävän kielen.
4. Kytke TV-vastaanottimesta virta painamalla POWER -painiketta uudelleen.
TV-vastaanotin voidaan asettaa valmiustilaan virran säästämiseksi.
TV-vastaanotin voidaan jättää valmiustilaan, kun katseleminen keskeytetään joksikin aikaa.
1. Paina kaukosäätimen POWER -painiketta.
Kuvaruutu pimenee, ja television etupaneelin punainen valmiustilan merkkivalo syttyy.
2. Voit kytkeä TV-vastaanottimen uudelleen päälle painamalla POWER -painiketta,
numeropainikkeita (0~9) tai kanavapaikan vaihtopainikkeita ( / ).
Älä jätä TV-vastaanotinta valmiustilaan pitkäksi aikaa (esimerkiksi lomamatkan ajaksi).
On suositeltavaa irrottaa virta- ja antennijohto.
TV-vastaanottimen kytkeminen päälle ja pois
Television kytkeminen valmiustilaan
Kun televisioon kytketään virta ensimmäisen kerran, käyttäjän on määritettävä
ensin useita perusasetuksia. Asetukset tulevat kuvaruutuun automaattisesti.
Määritettävät asetukset ovat seuraavat:
1. Paina kaukosäätimen POWER -painiketta.
Kuvaruutuun tulee sanoma “Plug & Play”.
2. Valitse kieli painamalla tai -näppäintä.
Vahvista valinta painamalla
ENTER -painiketta.
3. Kuvaruutuun tulee sanoma “Tarkista antennitulo.” ja “OK” näkyy valittuna.
Paina
ENTER -painiketta.
Tarkista, että antennijohto on kytketty oikein.
Plug & Play
Suomi-6
1. Irrota kansi kokonaan.
2. Aseta kaksi paristoa (koko AAA) paikalleen.
Varmista, että paristojen napaisuus vastaa paristolokeron "+" ja "–" –merkintöjä.
3. Aseta kansi paikalleen.
Jos et käytä kaukosäädintä pitkään aikaan, poista paristot ja säilytä niitä viileässä ja
kuivassa paikassa. Kaukosäätimen toimintasäde on suunnilleen 7 metriä.
(Paristot kestävät tavanomaisessa käytössä noin vuoden ajan.)
Jos kaukosäädin ei toimi, tarkista seuraavat kohdat:
1. Onko TV-vastaanottimeen kytketty virta?
2. Onko paristot asetettu paikoilleen napaisuuden suhteen väärin?
3. Onko paristojen lataus vähissä?
4. Onko verkossa sähkökatkos, vai onko virtajohto irti pistorasiasta?
5. Onko TV:n läheisyydessä erityistä fluorisoivaa valoa tai neonvaloa?
Paristojen asettaminen kaukosäätimeen
Page 89

Suomi-7
Kieli: Valitse haluamasi kieli.
Maa: Valitse maa.
Automaattinen tallennus:
Televisio hakee ja tallentaa automaattisesti alueella vastaanotettavat kanavat.
Kellon asetus: Aseta television kellonaika.
KANAVIEN MÄÄRITTÄMINEN
- Kanavien automaattinen tallentaminen (lisätietoja on sivulla 7)
- Kanavien manuaalinen tallentaminen (lisätietoja on sivulla 8)
- Kanavien muokkaaminen (lisätietoja on sivulla 8)
Jos haluat palauttaa tämän toiminnon...
1. Näytä valikko painamalla MENU -painiketta.
Valitse “Asetukset” painamalla
tai
-painiketta ja paina sitten
ENTER -painiketta.
2. Valitse “Kytke ja käytä” painamalla ENTER -painiketta uudelleen.
3. Tämä muuttaa tai palauttaa asetukset.
Voit selata käytettävissä olevia taajuusalueita (taajuudet ovat maakohtaisia).
Automaattisesti tallennetut kanavanumerot eivät aina vastaa todellisia tai haluttuja kanavanumeroita.
Voit kuitenkin lajitella kanavanumerot manuaalisesti ja poistaa kaikki ne kanavat, joita et halua katsella.
1. Näytä valikko painamalla MENU -painiketta.
Valitse “Kanava” painamalla
tai
-painiketta ja paina sitten ENTER -painiketta.
2. Valitse “Maa” painamalla ENTER -painiketta.
3. Valitse haluamasi maa painamalla
tai
-näppäintä.
Vahvista valinta painamalla
ENTER -painiketta.
4. Valitse “Automaattinen tallennus” painamalla
tai
-painiketta ja paina sitten ENTER -painiketta.
5. Paina ENTER -painiketta.
Televisio alkaa tallentamaan muistiin kaikkia vastaanotettavia kanavia.
Keskeytä muistiin tallennus painamalla
ENTER
–painiketta ja palaa "Kanava" –valikkoon.
6. Kun kaikki näkyvät kanavat on tallennettu, kuvaruutuun tulee "Lajittelu" -valikko.
Kanavien automaattinen tallentaminen
4. Valitse haluamasi maa painamalla
tai
-näppäintä.
Vahvista valinta painamalla
ENTER -painiketta.
5. “Automaattinen tallennus”-valikko tulee esiin valittaessa “Aloita”.
Paina
ENTER -painiketta.
Kanavahaku käynnistyy ja päättyy automaattisesti. Kun kaikki vastaanotettavat
kanavat on tallennettu, "Kellon asetus"-valikko tulee näkyviin.
Keskeytä muistiin tallennus milloin tahansa painamalla ENTER –painiketta.
6. Paina ENTER -painiketta.
Valitse “Tunti” tai “Minuutti” painamalla tai -painiketta.
Määritä “Tunti” tai “Minuutti” painamalla
tai -painiketta.
Voit asettaa tunnin ja minuutin myös painamalla kaukosäätimen numeronäppäimiä.
7. Vahvista asetukset painamalla ENTER -painiketta.
Kanavat voidaan tallentaa automaattisesti painamalla kaukosäätimen
AUTO PROG. -näppäintä.
Page 90

Suomi-8
Voit tallentaa kaikkiaan 100 TV-kanavaa kaapelikanavat mukaan luettuna.
Kun tallennat kanavia manuaalisesti, voit:
Valita löytyneistä kanavista ne, jotka haluat tallentaa.
Valita, mihin kanavapaikkaan kukin kanava tallennetaan.
1. Näytä valikko painamalla MENU -painiketta.
Valitse “Kanava” painamalla
tai
-painiketta ja paina sitten ENTER -painiketta.
2. Valitse “Manuaalinen tallennus” painamalla
tai
-painiketta ja paina sitten ENTER -painiketta.
3. Valitse “Muistipaikka” painamalla ENTER -painiketta.
4. Voit määrittää kanavalle ohjelmanumeron etsimällä haluamasi numeron
tai
-painikkeilla ja painamalla
sitten
ENTER -painiketta.
Voit valita muistipaikkanumeron myös painamalla kaukosäätimen numeropainikkeita.
5. Valitse “Värijärjestelmä” painamalla
tai
-painiketta ja paina sitten ENTER -painiketta.
6. Valitse vakioväri painamalla toistuvasti
tai
-näppäintä ja paina sitten ENTER -näppäintä.
7. Valitse “Äänijärjestelmä” painamalla
tai
-painiketta ja paina sitten ENTER -painiketta.
8.
Valitse haluamasi äänistandardi painamalla
tai
-painiketta useita kertoja ja painamalla sitten ENTER -painiketta.
Jos ääni on epänormaali tai sitä ei kuulu, valitse uudelleen oikea äänijärjestelmä.
9. Jos tiedät tallennettavan kanavan numeron, valitse "Kanava" painamalla tai .
Paina
ENTER -painiketta. Valitse C (Maanpäällinen kanava) tai S (Kaapelikanava) painamalla
tai -painiketta. Paina -näppäintä valitaksesi kanavan. Valitse haluamasi numero painamalla
tai -painiketta ja painamalla sitten ENTER -painiketta.
Kanavatila: P (ohjelmatila), C (Maanpäällisten kanavien tila), S (kaapelikanavatila)
Voit asettaa kanavan myös painamalla kaukosäätimen numeronäppäimiä.
10. Jos et tiedä kanavanumeroita, valitse “Haku” painamalla tai -painiketta. Paina ENTER -painiketta.
Hae kanavat painamalla
tai -painiketta ja paina sitten ENTER -painiketta.
11. Valitse “Tallennus” painamalla tai -painiketta. Valitse “OK” painamalla ENTER -painiketta.
12. Toista kohda 3-11, kun haluat tallentaa seuraavan kanavan jollekin kanavapaikalle.
Muistipaikka: Valitse kanavan kanavapaikkanumero.
Värijärjestelmä: Valitse yhteensopiva värijärjestelmä.
Äänijärjestelmä: Valitse yhteensopiva äänijärjestelmä.
Kanava: Valitse kanava.
Haku: Televisio hakee kanavan taajuuden.
Tallennus: Tallenna määrittämäsi asetukset.
Kanavien manuaalinen tallentaminen
Voit poistaa kanavan hakutoiminnon tallentamat tarpeettomat kanavat.
Kun käyt läpi allennettuja kanavia, poisjätettäväksi määritettyjä kanavia ei näy.
Esiin tulevat kaikki kanavat, joita et nimenomaisesti valinnut poisjätettäviksi.
1. Valitse lisättävä tai poistettava kanava numeronäppäimillä.
2. Näytä valikko painamalla MENU -painiketta.
Valitse “Kanava” painamalla
tai
-painiketta ja paina sitten ENTER -painiketta.
3. Valitse “Lisäys/poisto” painamalla
tai
-painiketta ja paina sitten ENTER -painiketta.
4. Painamalla toistuvasti ENTER –painiketta, voit siirtyä lisää kanava ja poista kanava –tilojen välillä.
5. Siirry asianmukaiselle kanavalle painamalla P/–painikkeita ja toista yllä olevat vaiheet.
6. Poistu painamalla EXIT -painiketta.
Voit katsella mitä tahansa kanavaa (myös poistettuja kanavia) painamalla kaukosäätimen numeronäppäimiä.
Kanavien muokkaaminen
Voit myös lisätä tai poistaa kanavan painamalla kaukosäätimen ADD/DEL-näppäintä.
Page 91

Suomi-9
KUVAN MÄÄRITTÄMINEN
Voit valita kuvatyypin, joka vastaa katseluvaatimuksiasi parhaiten.
1. Näytä valikko painamalla MENU -painiketta. Valitse “Kuva” painamalla
tai
-painiketta ja paina sitten ENTER -painiketta.
2.
Valitse "Tila" painamalla ENTER -painiketta.
3.
Valitse "Tila" painamalla ENTER -painiketta.
4.
Valitse haluttu kuvatehoste painamalla
tai
–painiketta.
Paina ENTER -painiketta.
5.
Poistu painamalla EXIT -painiketta.
Dynaaminen: Teräväpiirtokuva, joka sopii kirkkaaseen huonevaloon.
Vakio: Optimaalinen kuva, joka sopii normaaliin huonevaloon.
Elokuva: Kuva, jota on miellyttävä katsella pimeässä huoneessa.
Muunneltu: Kuvatila, jossa voit valita mieleisesi kuva-asetukset.
(Katso kohta "Omien kuva-asetusten muuttaminen" sivulla 9)
Kuva-asetus voidaan valita
myös painamalla
kaukosäätimen
P.MODE
–painiketta.
Kuvan tila on säädettävä erikseen jokaiselle tulolähteelle.
Kuva-asetukset voi palauttaa tehdasasetuksiksi valitsemalla "Palauta".
(Katso "Kuva-asetusten palauttaminen tehdasasetuksiksi" sivulla 10)
Kuvastandardin muuttaminen
Kontrasti: Tällä asetuksella voit säätää kohteiden ja taustan välistä kirkkaus- ja
tummuuseroa.
Kirkkaus: Tällä asetuksella voit säätää koko kuvaruudun kirkkautta.
Terävyys: Tällä asetuksella voit tarkentaa tai sumentaa kohteiden ääriviivoja.
Väri: Tällä asetuksella voit säätää värejä vaaleammiksi tai tummemmiksi.
Sävy: llä asetuksella voit säätää kohteiden sävyä punaisemmaksi tai vihreämmäksi,
jotta kuva on luonnollisempi.
Voit muuttaa televisiosi kuvanlaatua useilla asetuksilla.
1. Valitse haluttu kuvatehoste seuraamalla "Kuvastandardin muuttaminen"
–ohjeen vaiheita 1-4 sivulla 9.
2.
Valitse tietty vaihtoehto painamalla
tai
–painiketta.
Paina ENTER -painiketta.
3.
Pienennä tai suurenna valitun vaihtoehdon arvoa painamalla
tai
–painiketta.
Paina ENTER -painiketta.
4. Poistu painamalla EXIT -painiketta
.
Omien kuva-asetusten muuttaminen
Säädetyt arvot tallennetaan valitun kuvan tilan mukaan.
Page 92

Suomi-10
Kuva-asetukset voi palauttaa tehdasasetuksiksi
1. Valitse haluttu kuvatehoste seuraamalla "Kuvastandardin muuttaminen"
–ohjeen vaiheita 1-4 sivulla 9.
2. Valitse “Palauta” painamalla
tai
-painiketta ja paina sitten
ENTER -painiketta.
3. Poistu painamalla EXIT -painiketta
.
"Palauta" asetetaan jokaisessa kuvatilassa erikseen.
Kuva-asetusten palauttaminen tehdasasetuksiksi
PC-tilassa voidaan säätää vain "16:9" ja "4:3" –kuvasuhteita.
Valitse painamalla tai -näppäintä.
Käytä tai -näppäintä liikuttaaksesi kuvaa ylös tai alas.
Valittuasi , käytä tai -näppäintä suurentaaksesi tai pienentääksesi kuvan
kokoa pystysuunnassa.
Autom. leveys: Kuvasuhde muuttuu automaattisesti “16:9”-laajakuvasuhteeksi.
16:9: Kuvasuhde 16:9, jota käytetään DVD-elokuvissa tai laajakuvalähetyksissä.
Panoraama: Muuttaa kuvasuhteen 16:9 luonnollisella tavalla kuvasuhteeksi 4:3,
jota käytetään normaalissa televisiolähetyksessä.
Zoom: Suurentaa laajakuvasuhteessa 16:9 näkyvän kuvan (pystysuunnassa)
kuvaruudun kokoiseksi.
4:3: Tämä on videoelokuvan tai normaalin televisiolähetyksen oletuskuvasuhde.
Voit valita kuvakoon, joka parhaiten vastaa katseluvaatimuksiasi.
1. Näytä valikko painamalla MENU -painiketta. Valitse “Kuva” painamalla
tai
-painiketta ja paina sitten ENTER -painiketta.
2. Valitse “Koko” painamalla
tai
-painiketta ja paina sitten
ENTER -painiketta.
3. Valitse haluamasi vaihtoehto painamalla
tai
-painiketta useita kertoja.
Paina
ENTER -painiketta.
4. Poistu painamalla EXIT -painiketta
.
Kuvakoon muuttaminen
Voit valita silmillesi sopivimman värisävyn.
1. Valitse haluttu kuvatehoste seuraamalla "Kuvastandardin muuttaminen"
–ohjeen vaiheita 1-4 sivulla 9.
2. Valitse “Värisävy” painamalla
tai
-painiketta ja paina sitten
ENTER -painiketta.
3.
Valitse haluttu väriasetus painamalla
tai
–painiketta.
Paina ENTER -painiketta.
4. Poistu painamalla EXIT -painiketta
.
Värin sävyn muuttaminen
Viileä2: Tämä asetus tekee väristä
sinisemmän kuin “Viileä1”.
Viileä1: Tämä asetus tekee valkoisesta
väristä sinertävän.
Normaali: Tämä asetus näyttää valkoisen
värin valkoisena.
Lämmin1: Tämä asetus tekee valkoisesta
väristä punertavan.
Lämmin2: Tämä asetus tekee väristä
punaisemman kuin “Lämmin1”.
Säädetyt arvot tallennetaan valitun kuvan tilan mukaan.
Voit valita haluamasi kuvatyypin
painamalla kaukosäätimen
P.SIZE näppäintä.
Page 93

Suomi-11
Voit tuoda näyttöön varsinaisen kuvan päälle pikkukuvan.
Tällä tavalla voit katsella varsinaisen kuvan päällä olevassa pikkukuvassa
jonkin ohjelmakanavan ohjelmatarjontaa tai videokuvaa mistä tahansa
kytketystä laitteesta.
1. Näytä valikko painamalla MENU -painiketta. Valitse “Kuva” painamalla
tai
-painiketta ja paina sitten ENTER -painiketta.
2.
Valitse “PIP” painamalla
tai
-painiketta ja paina sitten ENTER -painiketta.
3. Paina uudelleen ENTER -näppäintä.
Valitse “Käytössä” painamalla
tai
-painiketta ja paina sitten ENTER -painiketta.
PIP on käytettävissä vain PC-tilassa, ei missään muussa tilassa.
4. Valitse “Lähde” painamalla
tai
-painiketta ja paina sitten
ENTER -painiketta. Valitse alakuvan lähde painamalla
tai
-näppäintä ja paina ENTER -näppäintä.
Alakuvan lähteeksi voidaan valita useita vaihtoehtoja sen mukaan, mikä kuvalähde
pääkuvalle on valittu.
5. Valitse “Sijainti” painamalla
tai
-painiketta ja paina sitten
ENTER -painiketta. Valitse pikkukuvan paikka painamalla
tai
-painiketta ja paina sitten ENTER painiketta.
6. Valitse “Muistip.” painamalla
tai
-painiketta ja paina sitten
ENTER -painiketta. Voit valita pikkukuvassa näkyvän kanapaikan
numeron painamalla
tai
-painiketta. Paina ENTER -painiketta.
“Muistip.” voi olla aktiivinen vain kun alakuvan asetus on TV.
7. Poistu painamalla EXIT -painiketta.
Kuva kuvassa (PIP) -toiminnon käyttäminen
Lähde:
PIP:n tulosignaalin (ulkoinen A/V) valinta.
Sijainti: Siirrä alakuvan paikkaa.
Muistip.: Vaihda alakuvan kuvalähdettä.
Digit. koh.vaim.:
Jos televisiosi vastaanottama signaali on heikko, voit aktivoida digitaalinen
kohinanvaimennus -toiminnon vähentämään ruudun staattisuutta tai häivekuvia.
Dynaam. kontrasti:
Dynaaminen kontrasti havaitsee visuaalisen tulosignaalin ja mukautuu
luomaan optimaalisen kontrastin.
1. Näytä valikko painamalla MENU -painiketta. Valitse “Kuva” painamalla
tai
-painiketta ja paina sitten ENTER -painiketta.
2. Valitse “Digit. koh.vaim.” tai “Dynaam. kontrasti” painamalla
tai -painiketta. Paina ENTER -painiketta.
3. Valitse “Käytössä” tai “Pois käyt.” painamalla tai -painiketta.
Paina
ENTER -painiketta.
4. Poistu painamalla EXIT -painiketta.
Nämä toiminnot eivät toimi PC-tilassa.
Digitaalinen kohinanvaimennus-ominaisuuden käyttäminen. / Dynaaminen kontrasti
PIP-asetukset
(O: PIP toimii, X: PIP ei toimi)
Aktivoi "PIP"-toiminto tai poista
se käytöstä painamalla
kaukosäätimen
PIP –näppäintä.
PC
TVOUlk.1OUlk.2OAVOS-VideoOKomponenttiXPCXDVI
X
Alakuva
Pääkuva
Kun pääkuva on PC, alakuva tukee vain "TV", "Ulk.1", "Ulk.2", "AV" ja "S-Video" -tiloja.
Alakuva ei tue muita tulolähteitä tässä tapauksessa.
Saatat havaita, että PIP-ikkunan kuva on hieman luonnoton kun käytät päänäyttöä pelin
katseluun tai karaokeen.
Page 94

Suomi-12
Kukin asema lähettää ohjelmaa omien asetustensa mukaisesti, ja käyttäjä
joutuu joskus säätämään ääntä joka kerran kanavanvaihdon jälkeen. Tämän
ominaisuuden avulla voit säätää haluamasi kanavan äänenvoimakkuutta
automaattisesti. Toiminto joko lisää tai vähentää äänenvoimakkuutta
TV-vastaanottimen vastaanottaman signaalin tasosta riippuen.
1. Näytä valikko painamalla MENU -painiketta. Valitse “Ääni” painamalla
tai
-painiketta ja paina sitten ENTER -painiketta.
2. Valitse “Autom. äänenvoim.” painamalla
tai
-painiketta ja paina sitten
ENTER -painiketta.
3. Valitse “Käytössä” tai “Pois käyt.” painamalla tai -painiketta.
Paina
ENTER -painiketta.
4. Poistu painamalla EXIT -painiketta.
Äänen säätäminen automaattisesti
Voit muokata TV-vastaanottimen äänen omien mieltymystesi mukaiseksi.
1. Näytä valikko painamalla MENU -painiketta. Valitse “Ääni” painamalla
tai
-painiketta ja paina sitten ENTER -painiketta.
2. Valitse “Taajuuskorjain” painamalla
tai
-painiketta ja paina sitten
ENTER -painiketta.
3.
Valitse tietty vaihtoehto painamalla
tai
–painiketta.
Paina ENTER -painiketta.
4. Siirry haluamasi asetuksen kohdalle painamalla
tai
-painiketta.
Paina
ENTER -painiketta.
5. Poistu painamalla EXIT -painiketta.
Jos muutat näitä asetuksia, käytössä olevan Ääni-vaihtoehtodon arvoksi vaihtuu
automaattisesti “Muunneltu”.
Ääniasetusten muokkaaminen
ÄÄNEN MÄÄRITTÄMINEN
Voit valita katseltavaan ohjelmaan sopivan äänistandardin, jonka
avulla voit korostaa tämän ohjelmatyypin äänitehosteita.
1. Näytä valikko painamalla MENU -painiketta. Valitse “Ääni” painamalla
tai
-painiketta ja paina sitten ENTER -painiketta.
2. Valitse "Tila" painamalla ENTER -painiketta.
3. Valitse ääni painamalla toistuvasti
tai
-näppäintä ja paina sitten
ENTER -näppäintä.
4. Poistu painamalla EXIT -painiketta.
Vakio: Normaali äänitila.
Musiikki: Korostaa musiikkia enemmän kuin puheääntä.
Elokuva: Elävä ja täyteläinen ääni elokuvien katseluun.
Puhe: Korostaa puheääntä enemmän kuin muita ääniä.
Muunneltu: Äänitila, jossa voit valita omat mukautetut ääniasetukset.
(Katso kohta "Ääniasetusten muokkaaminen" sivulla 12)
Äänistandardin muuttaminen
Voit valita nämä ominaisuudet
painamalla kaukosäätimen
S.MODE -näppäintä.
Page 95

Suomi-13
Voit kuunnella pikkukuvan lähetyksen ääntä, kun PIP-toiminto on
käytössä.
1. Näytä valikko painamalla MENU -painiketta. Valitse “Ääni” painamalla
tai
-painiketta ja paina sitten ENTER -painiketta.
2. Valitse “Äänivalinta” painamalla
tai
-painiketta ja paina sitten
ENTER -painiketta.
3. Valitse “Ala” painamalla
tai
-painiketta. Paina ENTER -painiketta.
4. Poistu painamalla EXIT -painiketta.
Voit valita tämän vaihtoehdon, kun "PIP" -toiminnolle on valittu asetus "Käytössä".
Pikkukuvan äänen kuunteleminen
Pää: Toistaa pääkuvan äänen.
Ala: Toistaa alakuvan äänen.
AJAN MÄÄRITTÄMINEN
Voit asettaa TV-vastaanottimen kellon näyttämään tämänhetkistä aikaa.
Saat kellonajan esiin painamalla INFO-painiketta. Aika on asetettava myös
silloin, jos haluat käyttää automaattisia On/Off -ajastimia.
1. Näytä valikko painamalla MENU -painiketta. Valitse “Asetukset”
painamalla
tai
-painiketta ja paina sitten ENTER -painiketta.
2.
Valitse “Aika” painamalla
tai
-painiketta ja paina sitten ENTER -painiketta.
3. Valitse "Kellon asetus" painamalla ENTER -painiketta.
4.
5.
Poistu painamalla EXIT -painiketta.
Jos irrotat virtajohdon, kello on asetettava uudelleen oikeaan aikaan.
Voit valita tunnit ja minuutit myös painamalla kaukosäätimen numeropainikkeita.
Kun haluat...
“Tunti” tai “Minuutti” kohdalle
Aseta “Tunti” tai “Minuutti”
Paina ENTER -painiketta.
Paina...
Painamalla painiketta
tai
Painamalla painiketta
tai
Kellonajan asettaminen ja näyttäminen
Voit valita jokin ajan (30 - 180 min), jonka jälkeen TV-vastaanotin
kytkeytyy automaattisesti pois päältä ja siirtyy valmiustilaan.
1. Näytä valikko painamalla MENU -painiketta. Valitse “Asetukset”
painamalla
tai
-painiketta ja paina sitten ENTER -painiketta.
2.
Valitse “Aika” painamalla
tai
-painiketta ja paina sitten ENTER -painiketta.
3. Valitse “Uniajastin” painamalla
tai
-painiketta ja paina sitten
ENTER -painiketta.
4. Paina
tai
–painiketta toistuvasti kunnes haluttu aika ilmestyy.
(Pois käyt., 30, 60, 90, 120, 150, 180). Paina
ENTER -painiketta.
5. Poistu painamalla EXIT -painiketta.
Vastaanotin siirtyy automaattisesti valmiustilaan, kun ajastin näyttää nollaa.
Uniajastimen asettaminen
Paina kaukosäätimen
SLEEP -näppäintä toistuvasti,
kunnes kuvaruudussa näkyy
haluamasi aika.
Page 96

Suomi-14
Voit asettaa On/Off (Päälle/Pois-ajastimet) siten, että TV-vastaanotin:
Kytkeytyy päälle ja valitsee haluamasi kanavan ajankohtana,
jonka olet itse määrittänyt.
Kytkeytyy automaattisesti pois päältä määräämänäsi ajankohtana.
1. Näytä valikko painamalla MENU -painiketta. Valitse “Asetukset”
painamalla
tai
-painiketta ja paina sitten ENTER -painiketta.
2. Valitse “Aika” painamalla
tai
-painiketta ja paina sitten
ENTER -painiketta.
3. Valitse “Käynnistysajastin” painamalla
tai
-painiketta ja paina sitten
ENTER -painiketta.
4. Säädä "Tunti" painamalla
tai
–painiketta ja siirry seuraavaan
vaiheeseen painamalla
–painiketta. Aseta muita vaihtoehtoja yllä
olevalla tavalla. Lopetettuasi, palaa painamalla
ENTER -painiketta.
5. Valitse “Sammutusajastin” painamalla
tai
-painiketta ja paina sitten
ENTER -painiketta.
6. Säädä "Tunti" painamalla
tai
–painiketta ja siirry seuraavaan
vaiheeseen painamalla
–painiketta. Aseta muita vaihtoehtoja yllä
olevalla tavalla. Lopetettuasi, palaa painamalla
ENTER -painiketta.
7. Poistu painamalla EXIT -painiketta.
Ensimmäiseksi on asetettava TV-vastaanottimen kello.
Voit asettaa tunnin ja minuutin myös painamalla kaukosäätimen numeronäppäimiä.
"Asetukset" –asetus on oltava "Käytössä" –tilassa, jotta ajastimet toimivat.
Television virran automaattinen kytkeminen ja katkaiseminen
KUVAN ASETTAMINEN
Valitse television ensimmäisellä käyttökerralla kieli, jota käytetään
kuvaruutuvalikoissa ja toiminnoissa.
1. Näytä kuvaruutuvalikko painamalla MENU -painiketta.
Valitse “Asetukset” painamalla
tai
-painiketta ja paina sitten
ENTER -painiketta.
2. Valitse “Kieli” painamalla
tai
-painiketta ja paina sitten
ENTER -painiketta.
3. Valitse haluamasi kieli painamalla
tai
-painiketta tarvittavan monta
kertaa. Paina
ENTER -painiketta.
Valittavissa on 21 eri kieltä.
4. Poistu painamalla EXIT -painiketta.
Kielen valitseminen
Page 97

Suomi-15
Tämä toiminto säätää television kirkkautta virrankulutuksen
säästämiseksi. Kun katsot televisiota yöllä, aseta "Energiansäästö" tilaan
"Suuri" häikäisyn ja virrankulutuksen vähentämiseksi.
1. Näytä kuvaruutuvalikko painamalla MENU -painiketta.
Valitse “Asetukset” painamalla
tai
-painiketta ja paina sitten
ENTER -painiketta.
2. Valitse “Energiansäästö” painamalla
tai
-painiketta ja paina sitten
ENTER -painiketta.
3. Valitse haluamasi vaihtoehto (“Pois käyt.”, “Pieni”, “Keski”, “Suuri”)
painamalla
tai
-painiketta.
Paina
ENTER -painiketta.
4. Poistu painamalla EXIT -painiketta.
Tämä toiminto ei toimi PC-tilassa.
Virransäästötoiminnon käyttö
Sininen ruutu:
Jos signaalia ei vastaanoteta tai jos se on heikko, sininen näyttökuva
korvaa automaattisesti häiriökuvan. Määritä vaihtoehdon “Sininen ruutu”
arvoksi “Pois käyt.”, jos et halua sinisen näytön korvaavan häiriökuvaa.
Melodia:
Voit kuulla melodian, kun televisioon kytketään virta tai kun televisiosta
katkaistaan virta.
1. Näytä valikko painamalla MENU -painiketta. Valitse “Asetukset”
painamalla
tai
-painiketta ja paina sitten ENTER -painiketta.
2. Valitse “Sininen ruutu” tai “Melodia” painamalla tai -painiketta.
Paina
ENTER -painiketta.
3. Valitse “Käytössä” tai “Pois käyt.” painamalla tai -painiketta.
Paina
ENTER -painiketta.
4. Poistu painamalla EXIT -painiketta.
Sinisen TV-kuvan asettaminen / Melodia -äänen valitseminen
Voit valita ulkoisista liitännöistä, jotka on kytketty television
tuloliittimiin.
1. Näytä valikko painamalla MENU -painiketta.
Valitse “Tulo” painamalla
ENTER -painiketta.
2. Valitse "Lähdeluettelo" painamalla ENTER -painiketta.
Kun televisioosi ei ole liitetty ulkoista laitetta, vain “TV”, “Ulk.1”, “Ulk.2” on
aktivoitu “Lähdeluettelo”-luettelossa. “AV”, “S-video”, “Komponentti”, “PC” ja
“DVI” on aktivoitu ainoastaan silloin, kun ne ovat liitettyinä televisioosi.
3. Valitse haluamasi laite painamalla tai -näppäintä.
Paina
ENTER -painiketta.
Kuvalähteen valitseminen
Voit selata käytettävissä olevia kuvalähteitä painamalla kaukosäätimen
SOURCE -näppäintä. TV-tila voidaan valita painamalla kaukosäätimen
TV- tai P / -näppäintä, mutta sitä ei voida valita painamalla
SOURCE -näppäintä.
Page 98

Suomi-16
TEKSTI-TV
Useimmilla kanavilla on tekstitelevisio eli tekstisivuja, joilla on
muun muassa seuraavia tietoja:
Television ohjelmatiedot ja -ajat
Uutisartikkeleita ja säätietoja
Urheilutuloksia
Tekstitykset huonokuuloisille.
Teletext-sivut ryhmitellään kuuteen luokkaan:
Osa
A
B
C
D
E
F
Sisältö
Valitun sivun numero.
Lähetysaseman tunnus.
Näytössä olevan sivun numero tai hakutilanne.
Päivämäärä ja kellonaika.
Teksti.
Tilatiedot -tietoja.
Tekstitelevision dekooderi
Nimeä tuloliittimiin kytketyt laitteet, jotta kuvalähteen valitseminen on
helpompaa.
1. Näytä valikko painamalla MENU -painiketta.
Valitse “Tulo” painamalla
ENTER -painiketta.
2. Valitse “Nimen muokkaus” painamalla
tai
-painiketta ja paina sitten
ENTER -painiketta.
3. Valitse muokattava laite painamalla
tai
–painiketta.
Paina
ENTER -painiketta.
4. Valitse haluttu laite painamalla
tai
–painiketta.
Paina
ENTER -painiketta.
5. Poistu painamalla EXIT -painiketta.
Kuvalähteiden nimien muokkaaminen
Page 99

Suomi-17
Voit saada tekstisivutietoja näkyviin mihin vuorokauden aikaan
tahansa, mutta signaalin vastaanoton on oltava hyvä. Muuten:
Ja joitakin tietoja voi puuttua sivuilta.
Lisäksi jotkin sivut eivät ehkä tule näkyviin.
Käynnistääksesi teletext-moodin, ja saadaksesi näkyviin sisältösivun:
1.
Näppäimiä P () tai P () käyttäen, valitse teletext-palvelua
tarjoava kanava.
2.
Aktivoi Teksti- painamalla
TTX/MIX ()
-painiketta.
Kuvaruutuun tulee Teksti-TV:n sisällys. Saat sisällysluettelon esiin milloin
tahansa painamalla MENU ( )-painiketta.
3.
Aktivoi Teksti- painamalla
TTX/MIX ()
-painiketta.
Televisiolähetys näkyy näytöllä samanaikaisesti tekstitelevision kanssa.
4. Paina näppäintä TV () uudelleen poistuaksesi TTX-näytöstä.
Jos tekstiä katsellessa ilmenee katkonaisia merkkejä, varmista, että tekstin kieli on
sama kuin "Asetukset"-valikon kieli. Jos kieli on eri, valitse sama kieli asetusvalikon
kohdasta Text language.
Tekstitelevision tietojen näyttäminen
Paina kaukosäätimen numeronäppäimiä päästäksesi suoraan
määrätylle sivulle:
1.
Kirjoita sisällysluettelossa näkyvä kolminumeroinen luku painamalla
kaukosäätimen vastaavia numeronäppäimiä.
2.
Jos valittuun sivuun liittyy muita alisivuja, ne tulevat näkyviin peräjälkeen.
Jos haluat pysäyttää jonkin sivun, paina näppäintä
()
.
()
-näppäimen painaminen uudelleen peruuttaa toiminnon.
3. Eri näyttövaihtoehtojen käyttö:
Kun haluat saada näkyviin...
Sekä tekstisivun että TV-lähetyksen
Piilotetun tekstin (esimerkiksi tietokilpailun vastaukset)
Normaalinäyttö
Alisivun, syöttämällä sen nelinumeroisen koodin
Seuraavan sivu
Edellisen sivun
Kaksi kertaa suurennetut kirjaimet:
Kuvaruudun yläpuoliskolla
Kuvaruudun alapuoliskolla
Normaalinäyttö
Paina...
TTX/MIX ( )
INFO ( )
INFO ( )
ADD/DEL ( )
P
()
P
()
SLEEP
()
Kerran
Kaksi kertaa
Kolme kertaa
Tekstitelevision sivun valitseminen
Page 100

Suomi-18
Teksti-TV:n monet otsikot on merkitty eri värein ja niitä voidaan valita
kätevästi painamalla kaukosäätimen vastaavanvärisiä painikkeita.
1.
Paina näppäintä
TTX/MIX ()
saadaksesi näkyviin tekstisivujen
sisällysluettelon.
2. Paina sitä värinäppäintä, jota vastaavan aiheen haluat valita
(Valittavissa olevat aiheet on lueteltu tilatietorivillä).
3. Näytä edellinen sivu painamalla punaista painiketta.
Näytä seuraava sivu painamalla vihreää painiketta.
4. Poistu tekstinäytöstä painamalla TV () –painiketta.
Tekstitelevision sivun valitseminen Fastext-toiminnolla
PC:N ASETTAMINEN
Tyypillisen tietokoneen Windows-näyttöasetukset näkyvät alla. Tietokoneen näytöt saattavat vaihdella
riippuen Windows-versiosta ja videokortista. Vaikka näytöt näyttävät erilaisilta, samoja perusasetuksia
sovelletaan lähes kaikissa tapauksissa. (Mikäli näin ei ole, ota yhteyttä tietokoneen valmistajaan tai
Samsung jälleenmyyjään.)
1. Valitse Käynnistä ja “ Control Panel”.
2. Kun Ohjauspaneeli näkyy näytössä, valitse “Appearance and Themes” Esiin tulee
näytön asetusten valintaikkuna.
3. Kun Ohjauspaneeli näkyy näytössä, valitse “Display” Esiin tulee näytön asetusten valintaikkuna.
4. Siirry kohtaan “Settings”.
Näytön oikea kokoasetus (erottelutarkkuus): Optimaalinen- 1360 X 768
Jos näytön asetuksiin sisältyy pystysuoran taajuuden arvo, oikea arvo 60 tai 60 Hz.
Muussa tapauksessa valitse OK, ja poistu valintaruudusta.
Tietokoneen asetusten määrittäminen (Windows XP)
Juovalomittelutilaa ei tueta.
Televisio ei välttämättä toimi oikein, jos videoformaatiksi valitaan jokin muu kuin standardiformaatti.
DVI ei tue PC-toimintoa.
Erillisiä ja komposiittitiloja ei tueta. SOG:tä ei tueta.
Näyttötila
Sekä kuvan paikka että koko vaihtelevat tietokoneen näytön ja sen erottelutarkkuuden (resoluution) mukaan.
Suositellut erottelutarkkuudet on annettu taulukossa.
(Kaikki tuetuissa rajoissa olevat erottelutarkkuudet ovat yhteensopivia.)
Tila
IBM
VESA
Piirtotarkkuus
640 x 480
720 x 400
640 x 480
640 x 480
800 x 600
800 x 600
800 x 600
1024 x 768
1024 x 768
1024 x 768
1360 x 768
Poikkisuora
taajuus (kHz)
31,469
31,469
37,861
37,500
37,879
48,077
46,875
48,364
56,476
60,023
47,712
Pystysuora
taajuus (Hz)
59,940
70,087
72,809
75,000
60,317
72,188
75,000
60,000
70,069
75,029
60,015
Kuvapisteen
kellotaajuus (MHz)
25,175
28,322
31,500
31,500
40,000
50,000
49,500
65,000
75,000
78,750
85,800
Synk. napaisuus
(H/V)
- / -
- / +
- / -
- / + /+
+ /+
+ /+
- / -
- / + /+
+ /+
 Loading...