

Page 1
Contact SAMSUNG WORLDWIDE
If you have any questions or comments relating to Samsung products,
please contact the SAMSUNG customer care centre.
Country
AUSTRIA 0800-SAMSUNG (726-7864) www.samsung.com/at
BELGIUM 0032 (0)2 201 24 18 www.samsung.com/be
CZECH REPUBLIC
DENMARK 70 70 19 70 www.samsung.com/dk
EIRE 0818 717 100 www.samsung.com/ie
FINLAND 030-6227 515 www.samsung.com/
FRANCE
GERMANY 01805 - SAMSUNG (726-7864) (€ 0,14/Min) www.samsung.com
HUNGARY 06-80-SAMSUNG (726-7864) www.samsung.com
ITALIA 800-SAMSUNG (726-7864) www.samsung.com
LUXEMBURG 0035 (0)2 261 03 710 www.samsung.com/be
NETHERLANDS 0900-SAMSUNG (726-7864) (€ 0,10/Min) www.samsung.com/nl
NORWAY 815-56 480 www.samsung.com/no
POLAND
PORTUGAL 80820-SAMSUNG (726-7864) www.samsung.com/pt
SLOVAKIA 0800-SAMSUNG (726-7864) www.samsung.com/sk
SPAIN 902 10 11 30 www.samsung.com
SWEDEN 0771-400 200 www.samsung.com/se
SWITZERLAND 0800-SAMSUNG (726-7864) www.samsung.com/ch
U.K 0845 SAMSUNG (7267864) www.samsung.com
TURKEY 444 77 11 www.samsung.com
ESTONIA 800-7267 www.samsung.ee
LATVIA 800-7267 www.samsung.com/lv
LITHUANIA 8-800-77777 www.samsung.lt
KAZAHSTAN 8-10-800-500-55-500 www.samsung.kz
KYRGYZSTAN 00-800-500-55-500 RUSSIA 8-800-555-55-55 www.samsung.ru
TADJIKISTAN 8-10-800-500-55-500 UKRAINE 8-800-502-0000 www.samsung.com
UZBEKISTAN 8-10-800-500-55-500 www.samsung.uz
Customer Care Centre
844 000 844 www.samsung.com/cz
Distributor pro Českou republiku:
Samsung Zrt., česka organizační složka Vyskočilova 4, 14000 Praha 4
3260 SAMSUNG (€ 0,15/Min)
08 25 08 65 65 (€ 0,15/Min)
0 801 801 881
022-607-93-33
Web Site
www.samsung.com
www.samsung.com/pl
LCD TV
user manual
BN68-01464A-00
imagine the possibilities
Thank you for purchasing this Samsung product.
To receive more complete service, please register
your product at
www.samsung.com/global/register
Model Serial No.
Page 2

Contact SAMSUNG WORLDWIDE
If you have any questions or comments relating to Samsung products, please contact the SAMSUNG
customer care centre.(See back cover for more information)
Precautions When Displaying a Still Image
A still image may cause permanent damage to the TV screen.
• Do not display a still image on the LCD panel for more than 2 hours as it can cause screen
image retention.
This image retention is also known as "screen burn".
To avoid such image retention, reduce the degree of brightness and contrast of the screen when
displaying a still image.
• Watching the LCD TV in 4:3 format for a long period of time may leave traces of
effect to the screen. Damages caused by the above effect are not covered by the Warranty.
•
Displaying still images from Video games and PC for longer than a certain period of time may
produce partial after-images.
To prevent this effect, reduce the ‘brightness’ and ‘contrast’ when displaying still images.
© 2008 Samsung Electronics Co., Ltd. All rights reserved.
borders displayed on the left, right and center of the screen caused by the difference
of light emission on the screen. Playing a DVD or a game console may cause a similar
Page 3

Contents
CONNECTING AND PREPARING YOUR TV
List of Parts ........................................................ 2
Installing the Stand ............................................. 2
Installing the Wall Mount Kit ............................... 2
Viewing the Control Panel .................................. 3
Viewing the Connection Panel ........................... 4
Viewing the Remote Control ............................... 7
Installing Batteries in the Remote Control .......... 8
Switching On and Off ......................................... 8
Placing Your Television in Standby Mode........... 8
Viewing the Menus ............................................. 9
Using the TOOLS Button .................................... 9
Plug & Play ....................................................... 10
SETTING THE CHANNELS
Storing Channels Automatically ........................11
Storing Channels Manually .............................. 12
Adding / Locking Channels .............................. 13
Sorting the Stored Channels ............................ 14
Assigning Channels Names ............................. 14
Fine Tuning Channel Reception ....................... 15
LNA (Low Noise Amplier) ............................... 15
SETTING THE PICTURE
Changing the Picture Standard ........................ 16
Adjusting the Custom Picture ........................... 17
Conguring Detailed Settings on the Picture ... 17
Resetting the Picture Settings to the
Factory Defaults ...............................................
Changing the Picture Options .......................... 19
SETTING THE SOUND
Sound Features ................................................ 21
Selecting the Sound Mode ............................... 22
Connecting Headphones (Sold separately) ..... 22
SETTING THE TIME
Setting and Displaying the Current Time .......... 23
Setting the Sleep Timer .................................... 23
Switching the Television On and Off
Automatically ....................................................
FUNCTION DESCRIPTION
Choosing Your Language ................................. 24
Melody / Entertainment / Energy Saving ......... 25
Selecting the Source ........................................ 26
Editing the Input Source Names ...................... 27
Symbol Press Note One-Touch
18
24
Button
USING THE DTV FEATURE
Previewing the DTV Menu System .................. 28
Updating the Channel List Automatically .......... 29
Updating the Channel List Manually ................ 29
Editing Your Favourite Channels ...................... 30
Selecting Channel List ..................................... 32
Displaying Programme Information .................. 32
Viewing the EPG (Electronic Programme
Guide) Information ...........................................
Using the Scheduled List ................................. 34
Setting the Default Guide ................................. 34
Viewing All Channels and Favourite Channels
Adjusting the Menu Transparency .................... 35
Setting up the Parental Lock ............................ 36
Setting the Subtitle ........................................... 37
Setting the Subtitle Mode ................................. 37
Selecting the Audio Format .............................. 37
Selecting the Audio Description ....................... 38
Selecting the Digital Text (UK only) .................. 38
Selecting the Time Zone (Spain only) .............. 39
Viewing Product Information ............................ 39
Checking the Signal Information ...................... 40
Upgrading the Software ................................... 40
Viewing Common Interface .............................. 41
Selecting the CI (Common Interface) Menu ..... 41
Resetting .......................................................... 42
Selecting the Preferred Language
(Subtitle,
Preference ........................................................... 43
Teletext) ..............................
Audio or
33
.... 35
42
SETTING THE PC
Setting up Your PC Software
(Based on Windows XP) ..................................
Display Modes .................................................. 44
Setting up the TV with your PC ........................ 45
ABOUT ANYNET
What is Anynet+? ............................................ 46
Connecting Anynet+ Devices ........................... 46
Setting Up Anynet
Scanning and Switching between Anynet+
Devices ............................................................
Recording ......................................................... 50
Listening through a Receiver ........................... 50
Check Points before Requesting Service ......... 51
+
+ ..........................................
44
47
48
RECOMMENDATIONS FOR USE
Teletext Feature ............................................... 52
Wall-Mount Adjustment (Sold separately)
(depending on the model) ................................ 54
Using the Anti-Theft Kensington Lock
(depending on the model) ................................
Troubleshooting: Before Contacting
Service Personnel ............................................
Technical and Environmental Specications ... 57
55
56
English
English - 1
Page 4

List of Parts
Please make sure the following items are included with your LCD TV.
If any items are missing, contact your dealer.
M4XL16
Remote Control
& Batteries
(AAA x 2)
Owner’s Instructions Warranty card Safety Guide Registration Cards
Warranty card / Safety Guide /
➣
➣
The stand and stand screw may not be included depending on the model.
Power Cord Cover-Bottom
Registration Cards (Not available in all locations)
Stand Screw
X 4
Stand Cleaning Cloth
Installing the Stand
2
1
1. Connect your LCD TV and the stand.
Two or more people should carry the TV.
➣
Make sure to distinguish between the front and back of the stand when assembling them.
➣
2
two screws at position 1 and then fasten two screw at position 2.
. Fasten
Stand the product up and fasten the screws. If you fasten the screws with the LCD TV placed
➣
down, it may lean to one side.
The stand is installed for models with the screen size of 37 inch and above.
➣
Installing the Wall Mount Kit
Wall mount items (sold separately) allow you to mount the TV on
the wall.
For detailed information on installing the wall mount, see the
instructions provided with the Wall Mount items. Contact a
technician for assistance when installing the wall mounted bracket.
Samsung Electronics is not responsible for any damage to the
product or injury to yourself or others if you elect to install the TV on
your own.
Do not install your Wall Mount Kit while your TV is turned
on. It may result in personal injury due to electric shock.
Remove the stand and cover the bottom hole with a
➣
cap and fasten with two screws.
English - 2
Page 5

Viewing the Control Panel
The product colour and shape may vary depending on the model.
Side Panel buttons
1
2
3
4
55 6
1 SOURCE
Toggles between all the available input
sources (TV, Ext.1, Ext. 2, AV, S-Video,
Component, PC, HDMI1, HDMI2, HDMI3,
DTV). In the on-screen menu, use this button
as you use the ENTER
remote control.
2 MENU
Press to
features.
3
Press to decrease or increase the volume.
In the on-screen menu, use the
buttons as you use the ◄ and ► buttons on
the remote control.
4
Press to change channels. In the on-screen
see an on-screen menu of your TV’s
menu, use the buttons as you use
the ▲ and ▼ buttons on the remote control.
(Without the Remote Control, you can turn on
the TV by using the Channel buttons.)
button on the
English - 3
5 Speakers
(Power)
6
Press to turn the TV on and off.
Remote Control Sensor
Aim
the TV.
Power Indicator
Blinks and
lights up in stand-by mode.
remote control towards this spot on
the
turns off when the power is on and
Page 6
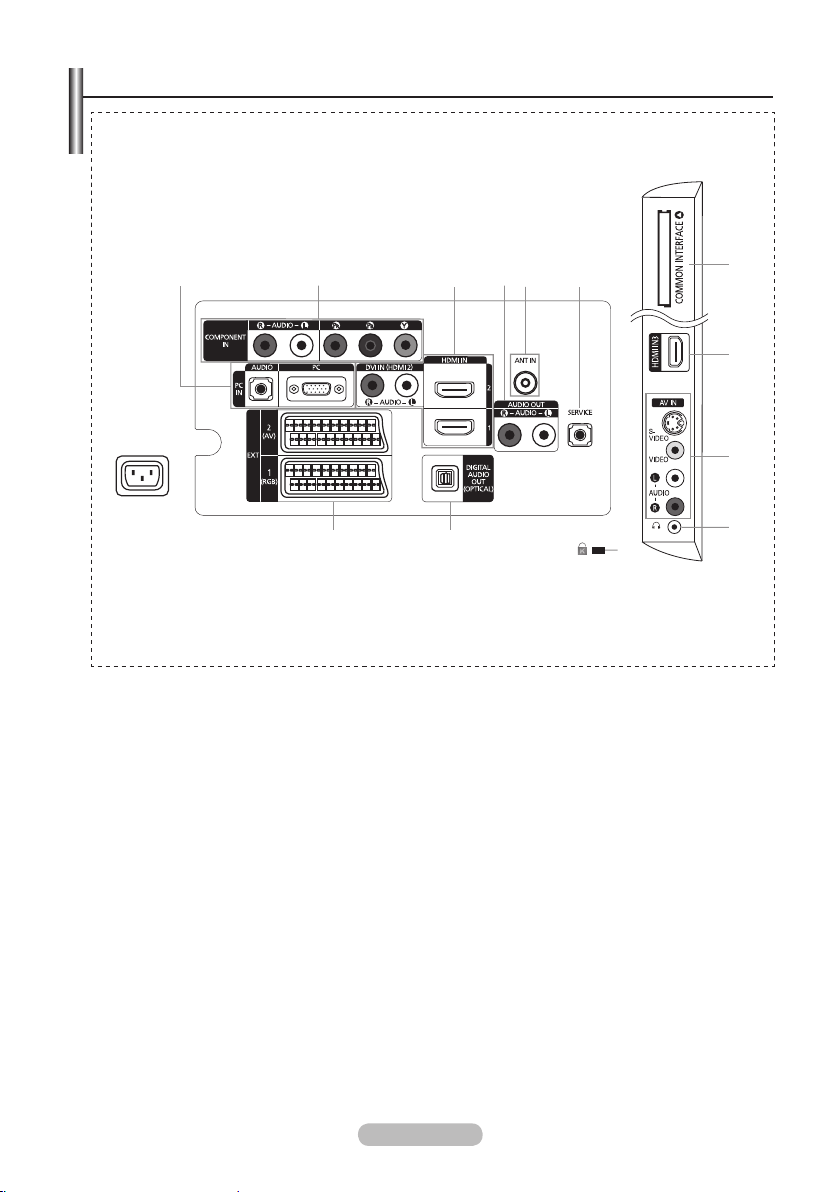
Viewing the Connection Panel
[TV Rear Panel]
2 3 54 61
Power Input
!@
The product colour and shape may vary depending on the model.
➣
[TV Side Panel]
7
3
8
9
0
Whenever you connect an external device to your TV, make sure that power on the unit is turned off.
➣
➣
When connecting an external device, match the colour of the connection terminal to the cable.
1 PC IN [PC] / [AUDIO]
Connect to the video and audio output jack on your PC.
-
2 COMPONENT IN
Connect component video cables (optional) to component connector ("PR", "PB", "Y") on the rear of
-
your set and the other ends to corresponding component video out connectors on the DTV or DVD.
If you wish to connect both the Set-Top Box and DTV (or DVD), you should connect the Set-Top Box to
-
the DTV (or DVD) and connect the DTV (or DVD) to component connector ("P
-
The P
R, PB and Y connectors on your component devices (DTV or DVD) are sometimes labeled Y, B-Y
R", "PB", "Y") on your set.
and R-Y or Y, Cb and Cr.
Connect RCA audio cables (optional) to "R - AUDIO - L" on the rear of your set and the other ends to
-
corresponding audio out connectors on the DTV or DVD.
English - 4
Page 7

3 HDMI IN 1, HDMI IN 2, HDMI IN 3
Supports connections between HDMI-connection-enabled AV devices (Set-Top Boxes, DVD
-
players)
No additional Audio connection is needed for an HDMI to HDMI connection.
-
When using an HDMI/DVI cable connection, you must use the HDMI IN 2 jack.
-
What is HDMI?
➣
-
“High Denition Multimedia interface” allows the transmission of high denition digital video data
and multiple channels of digital audio.
-
The HDMI/DVI terminal supports DVI connection to an extended device with the a
ppropriate cable
(not supplied). The difference between HDMI and DVI is that the HDMI device is smaller in size, has
the HDCP (High Bandwidth Digital Copy Protection) coding feature installed, and supports
multi - channel digital audio.
DVI IN(HDMI2) [R-AUDIO-L]
-
DVI audio outputs for external devices.
Supported modes for HDMI/DVI and Component
➣
HDMI/DVI 50Hz
HDMI/DVI 60Hz
Component
4 AUDIO OUT [R-AUDIO-L]
Connect RCA audio cables to AUDIO OUT [R-AUDIO-L] on the rear of your set and the other ends
-
480i 480p 576i 576p 720p 1080i
X X X O O O
X O X X O O
O O O O O O
to corresponding audio in connectors on the Amplier or DVD Home Theatre.
5 ANT IN
To view television channels correctly, a signal must be received by the set from one of the following
sources:
-
An outdoor aerial / A cable television network / A satellite network
6 SERVICE
-
Connector for SERVICE only.
Connect this to the jack on the optional wall mount bracket. This will allow you to adjust the TV viewing
-
angle using your remote control.
7 COMMON INT
When CI Card isn’t inserted in some channels, "Scrambled
-
ERFACE Slot
Signal" is displayed on the screen.
The pairing information containing a telephone number, CI
-
Card ID, Host ID and other information will be displayed in
about 2~3 minutes. If an error message is displayed, please
contact your service provider.
When the channel information conguration has nished, the
-
message "Updating Completed" is displayed, indicating that
the channel list is now updated.
You must obtain a CI Card from a local cable service provider.
➣
Remove the CI Card by carefully pulling it out with your hands since dropping the CI Card may
cause damage to it.
➣
Insert the CI-Card in the direction marked on it.
➣
The place of the COMMON INTERFACE Slot may be different depending on its model.
English - 5
Page 8

8 S-VIDEO or VIDEO / R-AUDIO-L
Connect RCA or S-VIDEO cable to an appropriate external A/V device such as VCR, DVD or
-
Camcorder.
Connect RCA audio cables to "R-AUDIO-L" on your set and the other ends to corresponding audio
-
out connectors on the A/V device.
9 Headphones jack
Headphone may be connected to the headphone output on your set. While the head phone is
-
connected, the sound from the built-in speakers will be disabled.
0 Kensington Lock (depending on the model)
The Kensington lock (optional) is a device used to physically x the system when used in a public
-
place.
If you want to use a locking device, contact the dealer where you purchased the TV.
-
The location of the kensington lock may be different depending on its model.
-
! DIGITAL
AUDIO OUT (OPTICAL)
Connect to a Digital Audio Component.
-
When the HDMI IN jacks are connected, the DIGITAL AUDIO OUT (OPTICAL) jack on the TV
➣
outputs 2 channel audio only. If you want to hear 5.1 channel audio, connect the Optical jack on
the DVD player or Cable/Satellite Box directly to an Amplier or Home Theater, not the TV.
@ EXT 1, EXT 2
Connector
EXT 1
EXT 2
Video Audio (L/R) RGB Video + Audio (L/R)
Input Output
O O O
O O
Only TV or DTV output is available.
Output you can choose.
-Inputs or outputs for external devices, such as VCR, DVD, video game device or video disc players.
English - 6
Page 9

TOOLS
Viewing the Remote Control
1 Television Standby button
2 Selects the TV and DTV
mode
directly
3 Number buttons for direct
channel access
4
One/Two-digit channel
selection
5 +: Volume increase
: Volume decrease
6 Temporary sound switch-off
7 Electronic
(EPG) display
8 Use to quickly select
frequently used functions.
9 Use
the
0 Colour buttons :
Use these buttons in the
Channel list, etc.
@
Press
display and sound modes for
sports, cinema and games.
# Use
DMA, and Anynet+.
(
used to control recording on
Samsung recorders with the
Anynet+ feature)
$ Available source selection
% Previous channel
^ P
P
& Displays the main on-screen
menu
* Displays the Channel List on
screen
( Returns
menu
)
Control the cursor in the
menu
Program
to see information on
current broadcast
to select the optional
these buttons in the
: This remote can be
: Next channel
: Previous channel
to the previous
Guide
a
Exit the on-screen menu
b Use this when connecting
a SAMSUNG DMA (Digital
Media Adapter) device
through an HDMI interface
and switching to DMA
mode.(The DMA button is
optional.)
For more information on the
operating procedures, refer to
the user manual of the DMA.
This button is available when
+
“Anynet
(HDMI-CEC)" is “On”
(see page 47)
c Picture size selection
d Digital subtitle display
e Selects the HDMI mode
directly.
Teletext
Functions
from the teletext display
2 Exit
7 Teletext store
8 Teletext size selection
9 Teletext reveal
0 Fastext topic selection
! Alternately
Double, or Mix.
$ Teletext mode selection
(LIST/FLOF)
% T
eletext sub page
^ P
: Teletext next page
P
: Teletext previous page
& Teletext index
( Teletext hold
a Teletext cancel
select
Teletext,
The performance of the remote control may be affected by bright light.
➣
English - 7
Page 10

Installing Batteries in the Remote Control
1. Lift the cover at the back of the remote control upward as shown in the
figure.
2. Install two AAA size batteries.
Make sure to match the "+" and "–" ends of the batteries with the
➣
diagram inside the compartment.
3
Replace the cover.
.
➣
Remove the batteries and store them in a cool, dry place if you won’t
be using the remote control for a long time.
If the remote control doesn’t work, check the following:
➣
1. Is the TV power on?
2. Are the plus and minus ends of the batteries reversed?
3. Are the batteries drained?
4. Is there a power outage, or is the power cord unplugged?
5. Is there a special uorescent light or neon sign nearby?
Switching On and Off
The mains lead is attached to the rear of your set.
1. Plug the mains lead into an appropriate socket.
The standby indicator lights up on your set.
➣
2
. Press the
➣
➣
3.
Press
button on your set.
➣
4. To switch your set off, press the POWER button again.
button on your set.
You also can press the POWER
the TV on.
The channel that you were watching last is reselected automatically.
the numeric button (0~9) or channel up/down ( / ) button on the remote control or
When you switch the set on for the very rst time, you will be asked to choose language in which the
menus are to be displayed.
button or the TV/DTV button on the remote control to turn
Placing Your Television in Standby Mode
Your set can be placed in standby mode in order to reduce the power consumption. The standby
mode can be useful when you wish to interrupt viewing temporarily (during a meal, for example).
1. Press the POWER
➣
The screen is turned off and a red standby indicator appears on your set.
o switch your set back on, simply press the POWER
2. T
channel up/down ( / ) button again.
➣
Do not leave your set in standby mode for long periods of time (when you are away on holiday,
for example).
It is best to unplug the set from the mains and aerial.
button on the remote control.
, numeric buttons (0~9), TV/DTV button or
English - 8
Page 11

Viewing the Menus
1. With the power on, press the MENU button.
The main menu appears on the screen. The menu’ s left side
has icons: Picture, Sound, Channel, Setup, Input, Digital Menu.
2. Press the ▲ or ▼ button to select one of the icons.
Then press the ENTER
menu.
3. Press
the EXIT
button to exit.
The on-screen menus disappear from the screen after about
one minute.
button to access the icon’s sub-
Using the TOOLS Button
You can use the TOOLS button to select your frequently
used functions quickly and easily. The “Tools” menu change
depending on which external input mode you are viewing.
1. Press the TOOLS button.
The “Tools” menu will appear.
2
Press the ▲ or ▼ button to select a menu.
.
3.
Press the ▲/▼/◄/►/ENT
use the selected items. For a more detailed description of each
function, refer to the corresponding page.
• Anynet+ (HDMI-CEC), see page 47
• Picture Mode, see page 16
• Sound Mode, see page 21
• Sleep Timer, see page 23
• SRS TS XT, see page 21
• Energy Saving, see page 26
• Dual l-ll, see page 22
• Auto Adjustment, see page 45
buttons to display, change, or
ER
TV
Mode : Standard
Backlight 7
Contrast 95
Brightness 45
Sharpness 50
Colour
Tint G 50 R 50
Detailed Settings
Picture Options
Reset : OK
Move Enter Return
Anynet+ (HDMI-CEC)
Picture Mode : Standard
Sound Mode : Custom
Sleep Timer : Off
SRS TS XT : Off
Energy Saving : Off
Dual l-ll : Mono
Move Enter Exit
Picture
50
Tools
English - 9
Page 12
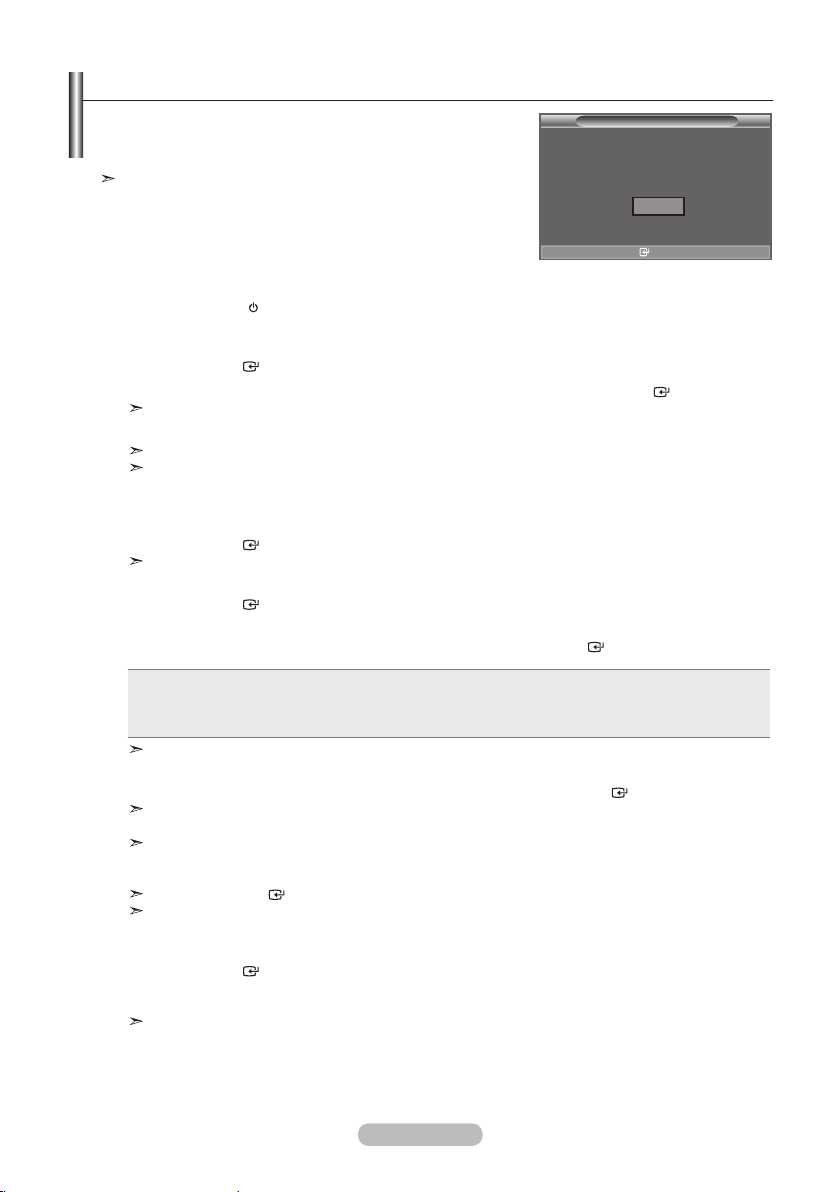
Plug & Play
When the TV is initially powered on, several basic settings
proceed automatically and subsequently. The following
settings are available.
Any functions related to Digital TV (DVB) will only work in
countries or areas where DVB-T (MPEG2) digital terrestrial
signals are broadcasted. Please confirm with your local
dealer if you can receive DVB-T signals. Although this TV set
follows the DVB-T specification, maintaining compatibility with
the future coming DVB-T digital terrestrial broadcasts is not
guaranteed. Several functions may not be available in some countries.
1. Press
The message "Start Plug & Play
.
2
Press the
3.
the POWER button on the remote control.
." is displayed with "OK" selected.
▲
Select the appropriate language by pressing the
ENTER
button to confirm your choice.
or ▼ button.
Press the ◄ or ► button to select “Store Demo” or “Home Use”, then the ENTER
We recommend setting the TV to "Home Use" mode for the best picture in your home
environment.
"Store Demo" mode is only intended for use in retail environments.
If the unit is accidentally set to “Store Demo” mode and you want to return to “Home Use”
(Standard): Press the Volume button on the TV. When the volume OSD is displayed, press and
hold the MENU button on the TV for 5 seconds.
4
. The message "Check antenna input." is displayed with "OK" selected.
Press the
EN
Please check that the antenna cable is connected correctly.
TER
button.
5. Select the appropriate country by pressing the ▲ or ▼ button.
Press the
6.
The message “Some DTV functions may not be available. Digital Scan?” is displayed.
ENTER
Press the ◄ or ► button to select “Yes” or “No”, then press the EN
Yes
:
First an Analogue TV search is performed and then a Digital TV ch. auto search is per-
button to confirm your choice.
ER
T
formed.
No:
Only an Analogue TV search is performed.
This function is supported for all countries except for the following countries: France, Germany,
Italy, Netherlands, Spain, Switzerland, United Kingdom, Austria.
7
The "Auto Store" menu is displayed with the "Start" selected. Press the
.
The channel search will start and end automatically.
ENTER button.
The DTV channel scan menu appears and the DTV channel is automatically updated.
If the DTV channel is updated, the Source in the source list of the Input menu is automatically
changed to DTV.
After all the available channels are stored, the "Clock Set" menu appears.
Press the ENTER
For detailed descriptions about DTV channel update, refer to page 29 of this manual.
button at any time to interrupt the memorization process.
After all the available digital channels are stored, the screen to select a time zone is displayed
depending
8. Press the ENTER
Select the
Set the "Month", "Day", "Year", "Hour", or
You can also set the “Month”, “Day”, “Year”, “Hour” and "Min" by pressing the number buttons on
on the country.
button.
"Month", "Day", "Year", "Hour", or
"Min" by pressing the
"Min" by pressing the
▲
◄
or ▼ button.
the remote control.
Plug & Play
Start Plug & Play.
button.
or ► button.
OK
Enter
button.
English - 10
Page 13

9. Press the ENTER
When you have finished, press the ENTER
Even if the ENTER
several seconds.
Language
Country
: Select your country.
Auto Store
Clock Set
button to confirm your setting. The message “Enjoy your viewing” is displayed.
button is not pressed, the message will automatically disappear after
: Select your language.
: Automatically scans for and stores channels available in the local area.
: Sets the current time for the TV clock.
button.
If you want to reset this feature...
1. Press
the MENU
button to display the menu.
Press the ▲ or ▼ button to select "Setup" then press the
ENTER button.
2. Press the
ENTER
For further details on setting up options, refer to the page 10.
The “Plug & Play” feature is only available in the TV mode.
➣
button again, to select "Plug & Play".
TV
Plug & Play
Language : English
Time
Melody : Off
Entertainment : Off
Energy Saving : Off
Move Enter Return
Setup
Storing Channels Automatically
You can scan for the frequency ranges available to you (and
availability depends on your country).
Automatically allocated programme numbers may not correspond
to actual or desired programme numbers. However, you can sort
numbers manually and clear any channels you do not wish to
watch.
TV
Country : United Kingdom
Auto Store
Manual Store
Channel Manager
Sort
Name
Fine Tune
LNA : Off
1. Press the MENU button to display the menu.
Press the ▲ or ▼ button to select "Channel", then press the
ENTER
2.
Press the
3.
Select the appropriate country by pressing the
Press the ENTER
➣
button.
ENTER
button to select "Country".
▲
button to confirm your choice.
or ▼ button.
Even though you have changed the country setting in this menu, the country setting for DTV is
Move Enter Return
not changed. (Refer to page 29)
▲
4.
Press the
5.
Press the
➣
➣
6.
After all the available channels are stored, the "Sort" menu appears. (refer to page
or ▼ button to select "Auto Store", then press the ENTER
ENTER
button.
The TV will begin memorizing all of the available channels.
Press the ENTER
"Channel" menu.
button at any time to interrupt the memorization process and return to the
Channel
button.
14)
English - 11
Page 14

Storing Channels Manually
Not available in DTV or external input mode.
You can store television channels, including those received
via cable networks.
When storing channels manually, you can choose:
♦ Whether or not to store each of the channels found.
♦ The programme number of each stored channel which you wish
TV
Country : United Kingdom
Auto Store
Manual Store
Channel Manager
Sort
Name
Fine Tune
LNA : Off
Channel
to identify.
Press
1.
2.
3.
4.
5.
the MENU button to display the menu.
Press the ▲ or ▼ button to select "Channel", then press the
ENTER
button.
Press the ▲ or ▼ button to select "Manual Store", then press
the ENTER
button.
Select the required option by pressing the ▲ or ▼ button,
then press the ENTER
When you are satisfied with your setting, press the
ENTER
Press the EXIT button to exit.
button.
button.
Move Enter Return
TV
Programme : P 1
Colour System : Auto
Sound System : BG
Channel : S 6
Search : 140 MHz
Store : ?
Manual Store
Move Enter Return
♦ Programme (Programme number to be assigned to a channel)
− Press the ▲ or ▼ button until you find the correct number.
You can also select the channel number directly by pressing the numeric buttons (0~9).
♦ Colour
♦ Sound System: B
System: Auto/PAL/SECAM/NTSC4.43
−
Press the ▲ or ▼ button to select the required colour standard.
G/DK/I/L
− Press the ▲ or ▼ button to select the required sound standard.
♦ Channel (When you know the number of the channel to be stored)
− Press the ▲ or ▼ button to select C (Air channel) or S (Cable channel).
− Press the ► button, then press the ▲ or ▼ button to select the required number.
You can also select the channel number directly by pressing the numeric buttons (0~9).
If there is abnormal sound or no sound, re-select the sound standard required.
♦ Search (When you do not know the channel numbers)
− Press the ▲ or ▼ button to start the search.
tuner
− The
scans the frequency range until the first channel or the channel that you selected is
received on the screen.
♦ Store (When you store the channel and associated programme number)
− Set to "OK" by pressing the ENTER
button.
Channel mode
− P (Programme mode): When completing tuning, the broadcasting stations in your area have been
assigned to position numbers from P00 to P99. You can select a channel by entering the position
number in this mode.
− C (Air channel mode): You can select a channel by entering the assigned number to each air
broadcasting station in this mode.
− S (Cable channel mode): You can select a channel by entering the assigned number for each
cable channel in this mode.
English - 12
Page 15

Adding / Locking Channels
Not available in DTV or external input mode.
➣
Using the Channel Manager, you can conveniently lock or add
channels.
1. Press
the MENU
Press the ▲ or ▼ button to select "Channel", then press the
ENTER
2.
Press the
then press the ENTER
♦ Adding
Using the
3. Select "Channel List" by pressing the ENTER
4.
Move to the (
button, select a channel to be added, and press the
ENTER
If you press the ENTER
➣
next to the channel disappears and the channel is not
added.
"
" is active when "Child Lock" is selected to "On".
➣
♦ Locking channels
feature allows you to prevent unauthorized users, such
This
as children, from watching unsuitable programmes by muting
out video and audio.
5. Press the
the ENTER
6.
Select "On" by pressing the ▲ or ▼ button, then press the
ENTER
7.
Press the
then press the ENTER
8.
Move to the "
select a channel to be locked, and press the ENTER
button.
If you press the ENTER
➣
next to the channel disappears and the channel lock is
cancelled.
A blue screen is displayed when "Child Lock" is activated.
➣
9. Press
the EXI
➣
Select "On" or "Off" in "Child Lock" to easily turn the channels which selected on "
or inactive.
button to display the menu.
button.
▲
or ▼ button to select "Channel Manager",
button.
channels
Channel List, you can add channels.
button.
) field by pressing the ▲, ▼, ◄ or ►
button to add the channel.
button again, the (
▲
or ▼ button to select "Child Lock", then press
button.
button.
▲
or ▼ button to select "Channel List",
button.
" field by pressing the ▲, ▼, ◄ or ► button,
button again, the (
T button to exit.
) symbol
) symbol
TV
Country : United Kingdom
Auto Store
Manual Store
Channel Manager
Sort
Name
Fine Tune
LNA : Off
Move Enter Return
TV
Channel List
Child Lock : Off
Move Enter Return
P 1 C3
Prog.
0 C-1 C3
2
BBC 1
3 C74
4 C75
5 C76
6 S3
7 S4
8 S6
9 S7
Add Lock
Move Enter
Page
Channel
Channel Manager
Channel List
Return
1 / 10
" to be active
You can select these options by simply pressing the CH LIST
button on the remote control.
English - 13
Page 16
Sorting the Stored Channels
This operation allows you to change the programme numbers
of the stored channels.
This operation may be necessary after using the auto store.
Not available in DTV or external input mode.
➣
1. Press
the MENU button to display the menu.
Press the ▲ or ▼ button to select "Channel", then press the
ENTER
2.
Press the
ENTER
3.
Select the channel number that you wish to change by
pressing the
Press the ENTER
➣
button.
▲
or ▼ button to select "Sort", then press the
button.
▲
or ▼ button repeatedly.
button.
The selected channel number and name are moved to
right side.
4.
Press the
would like to change and then press the ENTER
5.
Repeat steps 3 to 4 for another channel to be sorted.
6.
Press the EXIT button to exit.
▲
or ▼ button to move to the position in which you
button.
Assigning Channels Names
Channel names will be assigned automatically when channel
information is broadcast. These names can be changed,
allowing you to assign new names.
Not available in DTV or external input mode.
➣
1. Press the MENU button to display the menu.
Press the ▲ or ▼ button to select "Channel", then press the
ENTER
2.
Press the
ENTER
3.
If necessary, select the channel to be assigned to a new
name
button.
➣
4.
To...
Select a letter, number or symbol
Move on the next letter
Move back the previous letter
Confirm the name
➣
5
. Repeat steps 3
6. Press the EXIT
button.
▲
or ▼ button to select "Name", then press the
button.
pressing the ▲ or ▼ button. Press the ENTER
by
The selection bar is displayed around the name box.
Then...
Press the ▲ or ▼ button
Press the ► button
Press the ◄ button
Press the ENTER
button
The following characters are available: Letters of the alphabet (A~Z) / Numbers
(0~9) / Special characters (+, -, *, /, space)
to 4 for each channel to be assigned to a new name.
button to exit.
TV
Country : United Kingdom
Auto Store
Manual Store
Channel Manager
Sort
Name
Fine Tune
LNA : Off
Move Enter Return
TV
Prog. Ch. Name
0 C- 1 C23 -----
2 S0
3 S07 ---- 4 S09 ---- 5 S12 ---- 6 S13 ---- 7 S14 ---- 8 S17 ---- 9 C21 -----
Move Enter Return
TV
Country : United Kingdom
Auto Store
Manual Store
Channel Manager
Sort
Name
Fine Tune
LNA : Off
Move Enter Return
TV
Prog. Ch. Name
0 C--
1 C23 -----
2 S06 -----
3 S07 ---- 4 S09 ---- 5 S12 ---- 6 S13 ---- 7 S14 ---- 8 S17 ---- 9 C21 -----
Move Enter Return
Channel
Sort
-----
6 -----
Channel
Name
-----
English - 14
Page 17
Fine Tuning Channel Reception
Use fine tuning to manually adjust a particular channel for
optimal reception.
Not available in DTV or external input mode.
➣
1. Use the number buttons to directly select the channel that
want to fine tune.
you
2. Press the
Press
ENTER
3.
Press the
the ENTER
4.
Press the
Press the ENTER
5.
Press the EXIT button to exit.
➣
MENU button to display the menu.
the ▲ or ▼ button to select "Channel", then press the
button.
▲
or ▼ button to select "Fine Tune", then press
button.
◄
or ► button to adjust the fine tuning.
button.
Fine tuned channels that have been saved are marked
with an asterisk "
number in the channel banner. And the channel number
" on the right-hand side of the channel
*
turns red.
To reset the ne-tuning, select "Reset" by pressing the
➣
▲
or ▼ button and then press the ENTER
button.
LNA (Low Noise Amplier)
If the TV is operating in a weak-signal area, the LNA function
can improve the reception (a low-noise preamplifier boosts
the incoming signal).
➣
Not available in DTV or external input mode.
1. Press
the MENU
Press the ▲ or ▼ button to select "Channel", then press the
ENTER
2.
Press the
ENTER
3.
Press the
Press the ENTER
4.
Press the EXIT
button to display the menu.
button.
▲
or ▼ button to select "LNA", then press the
button.
▲
or ▼ button to select "Off" or "On".
button.
button to exit.
TV
Country : United Kingdom
Auto Store
Manual Store
Channel Manager
Sort
Name
Fine Tune
LNA : Off
Move Enter Return
P 1
Adjust Save Return
TV
Country : United Kingdom
Auto Store
Manual Store
Channel Manager
Sort
Name
Fine Tune
LNA : Off
Move Enter Return
TV
Country : United Kingdom
Auto Store
Manual Store
Channel Manager
Sort
Name
Fine Tune
LNA : Off
Channel
Fine Tune
Reset
Channel
Channel
0
Off
On
English - 15
Move Enter Return
Page 18

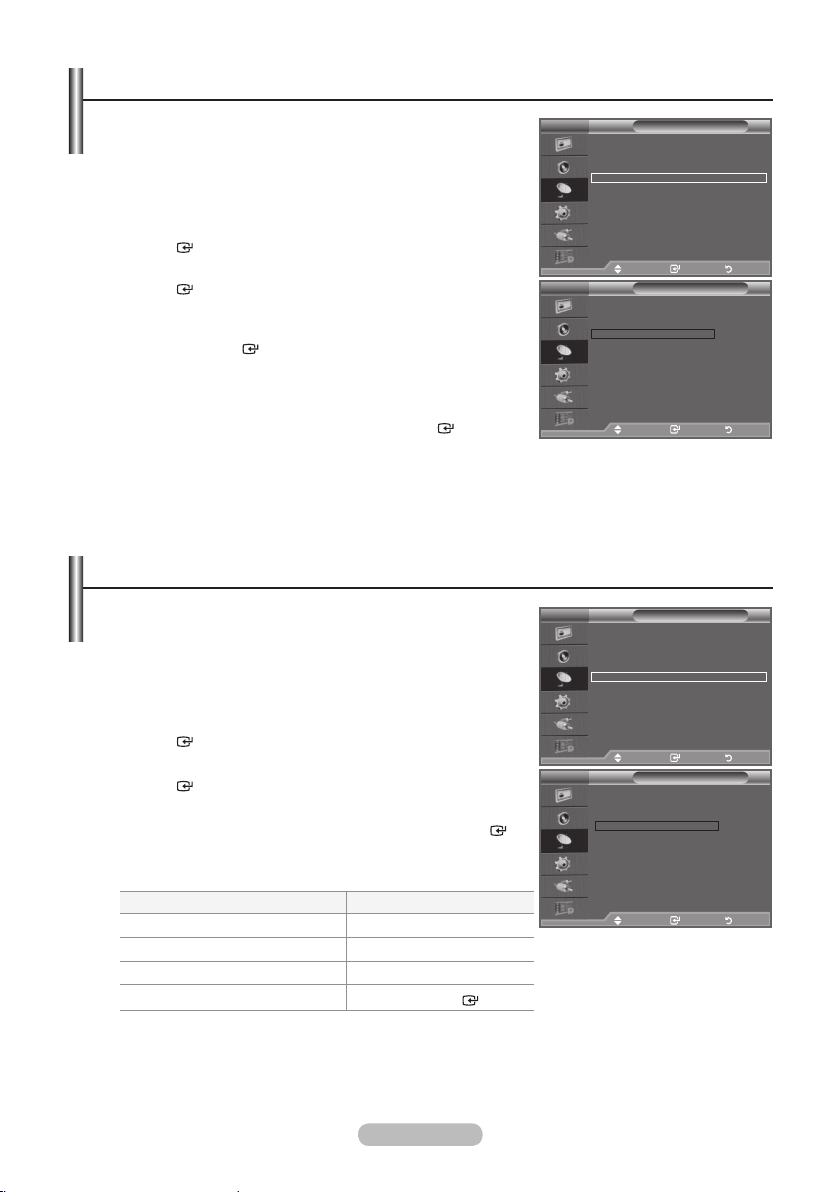
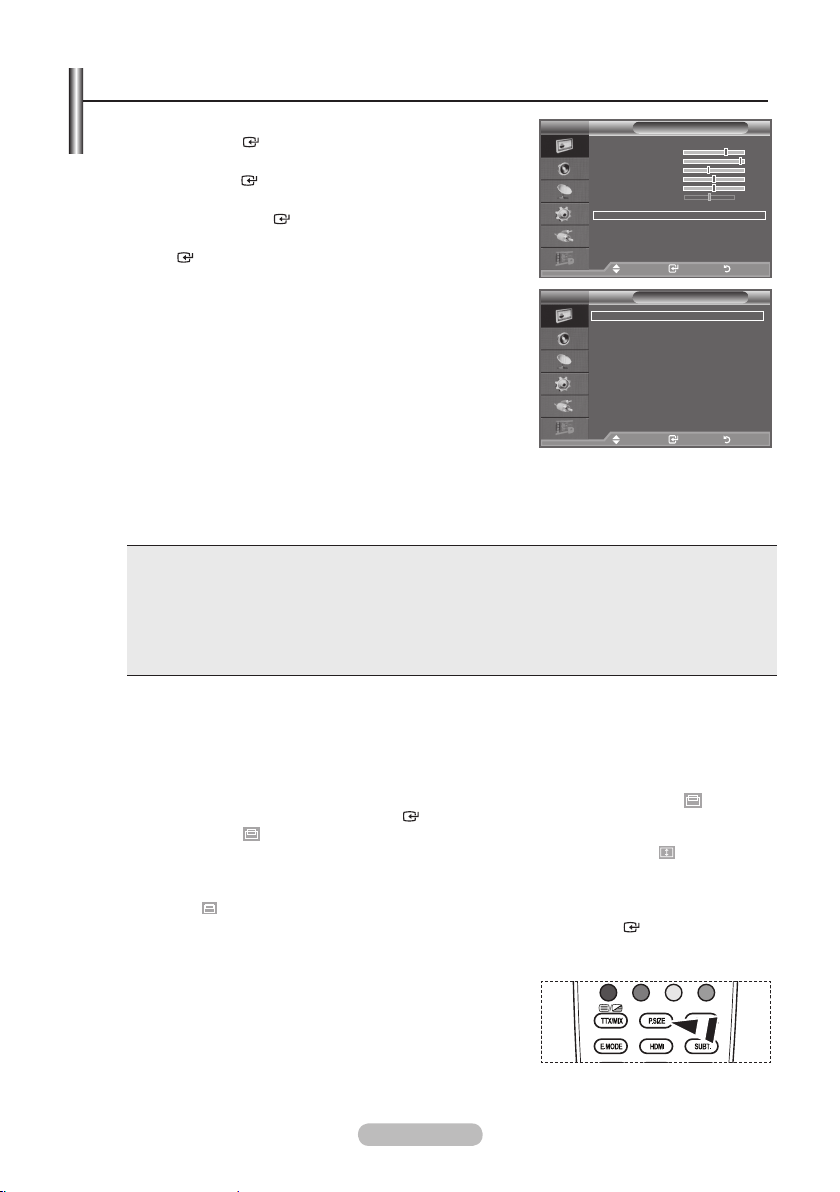
Changing the Picture Standard
You can select the type of picture which best corresponds to
your viewing requirements.
1. Press the MENU
Press the ENTER
2.
Press the ENTER
3.
Press the
Press the ENTER
4.
Press the EXIT
♦ Dynamic: Selects the picture for high-definition in a bright
♦ Standard: Selects
♦ Movie: Selects
The Picture mode must be adjusted separately for each
input source.
button to display the menu.
button, to select "Picture".
button again, to select "Mode".
▲
or ▼ button to select the desired picture effect.
button.
button to exit.
room.
the
picture for optimum display in a
normal environment.
the
picture for comfortable display in a
dark room.
TV
Mode : Standard
Backlight 7
Contrast
Brightness 45
Sharpness 50
Colour
Tint G 50 R 50
Detailed Settings
Picture Options
Reset : OK
Move Enter Return
TV
Mode : Standard
Backlight 7
Contrast
Brightness 45
Sharpness 50
Colour
Tint G 50 R 50
Detailed Settings
Picture Options
Reset : OK
Move Enter Return
Picture
Picture
95
50
Dynamic
Standard
95
Movie
50
Easy Setting
1. Press
the TOOLS
button on the remote control.
2. Press the ▲ or ▼ button to select "Picture Mode".
3. Press the ◄ or ► button to select the required option.
4. Press the EXIT
or TOOLS button to exit.
Tools
Anynet+ (HDMI-CEC)
Picture Mode ◄ Standard ►
Sound Mode : Custom
Sleep Timer : Off
SRS TS XT : Off
Energy Saving : Off
Dual l-ll : Mono
Move Adjust Exit
English - 16
Page 19

Adjusting the Custom Picture
Your set has several settings which allow you to control
picture quality.
1. To select the desired picture effect, follow the
"Changing
the Picture Standard" instructions number 1 to 3.
(On page 16)
2. Press the
ENTER
3.
Press the
a particular item. Press the ENTER
4.
Press the EXIT button to exit.
▲
or ▼ button to select a particular item. Press the
button.
◄
or ► button to decrease or increase the value of
button.
♦ Backlight: Adjusts the screen brightness by adjusting the
LCD backlight brightness. (0~10)
♦ Contrast: Adjusts
the lightness and darkness between
objects and the background.
♦ B
rightness: Adjusts the brightness of the whole screen.
♦ Sharpness: Adjusts
outline of objects to either
the
sharpen them or make them more dull.
♦ Colour: Adjusts the colours, making them lighter or
darker
♦ Tint:
Adjusts the colour of objects, making them more red or
.
green for a more natural look.
The adjusted values are stored according to the selected Picture mode.
In PC mode, you can only make changes to "Backlight", "Contrast" and "Brightness".(32, 37 inch)
In PC mode, you can only make changes to "Contrast" and "Brightness". (40 inch)
In Analogue TV, Ext., AV, S-Video modes of the PAL system, you cannot use the "Tint" Function.
You can return to the factory defaults picture settings by selecting the "Reset".
(Refer to "Resetting the Picture Settings to the Factory Defaults" on page 18)
TV
Mode : Standard
Backlight 7
Contrast 95
Brightness 45
Sharpness
Colour
Tint G 50 R 50
Detailed Settings
Picture Options
Reset : OK
Move Enter Return
▲
Backlight
▼
Move Adjust Return
Picture
50
50
7
Conguring Detailed Settings on the Picture
You can set detailed picture settings.
1. Press the MENU button to display the menu.
Press the ENTER
2. Press
the ENTER
Press the ▲ or ▼ button to select “Standard” or “Movie”, then
press the EN
button, to select "Picture".
button to select “Mode”.
T
button.
ER
3. Press the ▲ or ▼ button to select "Detailed Settings", then
press
the
ENTER
button.
4. Select the required option by pressing the ▲ or ▼ button,
then
press the
ENTER
button.
5. When you are satisfied with your setting, press the
ENTER
6. Press the EXIT
➣
button.
button to exit.
"Detailed Settings" is available in "Standard" or "Movie"
mode.
In PC mode, you can only make changes to
➣
“Dynamic Contrast”, “Gamma” and “White Balance” from
among the “Detailed Settings” items.
English - 17
TV
Mode : Standard
Backlight 7
Contrast
Brightness 45
Sharpness 50
Colour
Tint G 50 R 50
Detailed Settings
Picture Options
Reset : OK
Move Enter Return
TV
Black Adjust : Off
Dynamic Contrast
Gamma : 0
Colour Space
White Balance
Flesh Tone
Edge Enhancement : On
Move Enter Return
Picture
95
50
Detailed Settings
: Medium
: Native
: 0
Page 20

♦ Black Adjust: Off/Low/Medium/High
You can directly select the black level on the screen to adjust the screen depth.
♦ Dynamic Contrast:
Off/Low/Medium/High
You can adjust the screen contrast so that the optimal contrast is provided.
♦ Gamma: -
You can adjust the Primary
Press
♦ Colour Space:
3 ~ +3
Colour (Red, Green, Blue) Intensity.
the
◄ or ► button until you reach the optimal setting.
Auto/Native/Custom
Colour space is a Colour matrix composed of red, green and blue colours.
Select your favourite Colour space to experience the most natural Colour.
♦ Auto: Auto Color Space automatically adjusts to the most natural color tone based on program
sources.
♦ Native: Native Color Space offers deep and rich color tone.
♦ Custom: Adjusts the color range to suit your preference.
Customizing the Colour Space
Colour: Red/Green/Blue/Yellow/Cyan/Magenta
Adjusts the Colour range to suit your preference.
“Colour” is available when “Colour Space” is set to “Custom”.
Press the ▲ or ▼ button to select “Red”, “Green”, “Blue”, “Yellow”, “Cyan” or “Magenta”.
Press the EN
Red/Green/Blue
Press the ▲ or ▼ button to select "Red", "Green" or "Blue" to change it. Press the ENTER
button.
ER button.
T
: In "Colour", you can adjust the RGB values for the selected colour.
Press the ◄ or ► button to decrease or increase the value of a particular item.
Press the EN
TER button.
Reset: Resets the colour space to the default values.
♦ White Balance: R-Offset/G-Offset/B-Offset/R-Gain/G-Gain/B-Gain/Reset
You can adjust the colour temperature for more natural picture colours.
R-Offset/G-Offset/B-Offset/R-Gain/G-Gain/B-Gain: Changing the adjustment value will refresh the
adjusted screen.
Select
the
Press the
required option by pressing the ▲ or ▼ button, then press the
◄ or ► button until you reach the optimal setting.
ENTER
button.
Reset: The previously adjusted white balance will be reset to the factory defaults.
♦ Flesh Tone: -1
5 ~ +15
You can emphasize the pink 'flesh tone' in the picture.
Press the ◄ or ► button until you reach the optimal setting.
Changing the adjustment value will refresh the adjusted screen.
♦ Edge Enhancement: Off/On
Y
ou can emphasize object boundaries in the picture.
Resetting the Picture Settings to the Factory Defaults
You can return to the factory defaults picture settings.
T
o select the desired picture effect, follow the
1.
"Changing the Picture Standard" instructions number 1 to 3
on page 16.
▲
2. Press the
ENTER
Press
3.
Press the ENTER
4.
Press the EXIT
or ▼ button to select "Reset", then press the
button.
the
▲
or ▼ button to select "OK" or "Cancel".
button.
button to exit.
The "Reset" will be set for each Picture mode.
English - 18
TV
Mode : Standard
Backlight 7
Contrast 95
Brightness 45
Sharpness
Colour 50
Tint G 50 R 50
Detailed Settings
Picture Options
Reset : OK
Move Enter Return
Picture
50
OK
Cancel
Page 21
Changing the Picture Options
1. Press the MENU button to display the menu.
Press the ENTER
2.
Press the ▲ or ▼ button to select “Picture Options”, then
press the ENT
3. Select
the required option by pressing the ▲ or ▼ button,
then press the ENTER
4. When
ENT
5.
you are satisfied with your setting, press the
button.
ER
Press the EXIT button to exit.
➣
In PC mode, you can only make changes to the
button, to select "Picture".
button.
ER
button.
“Colour Tone” and “Size” from among the items in “Picture
Options”.
♦ Colour Tone:
2/Cool1/Normal/Warm1/Warm2
Cool
TV
Mode : Standard
Backlight 7
Contrast 95
Brightness 45
Sharpness 50
Colour
Tint G 50 R 50
Detailed Settings
Picture Options
Reset : OK
Move Enter Return
TV
Colour Tone : Normal
Size : Auto Wide
Screen Mode : 1
Digital NR : Auto
DNle : Off
HDMI Black Level
Blue Only Mode : Off
Picture
Picture Options
: Normal
You can select the most comfortable colour tone to your eyes.
The adjusted values are stored according to the selected
➣
Picture mode.
“Warm1” or “Warm2” is only activated when the picture mode is "Movie".
➣
Move Enter Return
♦ Size: Auto Wide/16:9/Wide Zoom/Zoom/4:3/Just Scan
You can select the picture size which best corresponds to your viewing requirements.
♦ Auto Wide: Automatically adjusts the picture size to the "16:9" aspect ratio.
♦ 16
:9: Adjusts the picture size to 16:9 appropriate for DVDs or wide broadcasting.
♦ Wide Zoom: Magnify the size of the picture more than 4:3.
♦ Zoom: Magnifies the
♦ 4:
3: This is the default setting for a video movie or normal broadcasting.
16:9 wide picture (in the vertical direction) to fit the screen size.
♦ Just Scan: Use the function to see the full image without any cutoff when HDMI (720p/1080i) or
Component (1080i) signals are input.
"Auto Wide" function is available only in "TV", "DTV", "Ext.1", "Ext.2", "AV", and "S-Video" mode.
➣
In PC Mode, only "16:9" and "4:3" mode can be adjusted.
➣
Settings can be adjusted and stored for each external device you have connected to an input of
➣
the TV.
Temporary image retention may occur when viewing a static image on the set for more than two
➣
hours.
Wide Zoom:
➣
Zoom:
➣
Move the screen up/down using the ▲ or ▼ button after selecting the
pressing the ► or ENTER
Select
by pressing the ◄ or ►button.
button.
Use the ▲ or ▼button to move the picture up and down. After selecting
,
use the ▲ or ▼ button to magnify or reduce the picture size in the vertical direction.
➣
After selecting “Just Scan” in HDMI (1080i) or Component (1080i) mode:
Select
by pressing the ◄ or ►button. Use the ▲, ▼, ◄ or ► button to move the picture.
Reset: Press the ◄ or ► button to select “Reset”, then press the ENTER button.
You can initialize the setting.
50
6:9
by
O You can select these options by simply pressing the P.SIZE
button on the remote control.
English - 19
Page 22

♦ Screen Mode
: 16:9/ Wide Zoom/Zoom/4:3
When setting the picture size to "Auto Wide" in a 16:9 wide TV, you can determine the picture size
you want to see the 4:3 WSS (Wide Screen Service) image or nothing. Each individual European
country requires different picture size so this function is intended for users to select it.
♦ 16:9: Sets the picture to 16:9 wide mode
♦ Wide Zoom: Magnify the size of the picture more than 4:3.
♦ Zoom: Magnify the
♦ 4:
3: Sets the picture to 4:3 normal mode.
size of the picture vertically on screen.
This function is available in "Auto Wide" mode.
This function is not available in "Component" or "HDMI" mode.
♦
Digital NR: Off/Low/Medium/High/Auto
If the broadcast signal received by your TV is weak, you can activate the Digital Noise Reduction
feature to help reduce any static and ghosting that may appear on the screen.
When the signal is weak, select one of the other options until the best picture is displayed.
♦
DNIe: Off/Demo/On
This
TV includes the DNIe function so as to provide a high visual quality. If you set DNIe to on, you
view the screen with the DNIe feature activated. If you set the DNIe to Demo, you can view the
can
applied DNIe and normal pictures on the screen, for demonstration purposes. Using this function,
you can view the difference in the visual quality.
DNIe™ (Digital Natural Image engine)
This feature brings you more detailed image with 3D noise reduction, detail enhancement,
contrast enhancement and white enhancement. New image compensation Algorithm gives
brighter, clearer, more detailed image to you. DNIe™ technology will fit every signal into your eyes.
“DNIe” is only available in “Dynamic” mode.
♦ HDMI Black Level: Normal/Low
Y
ou can select the black level on the screen to adjust the screen depth.
This function is active only when the external input connects to HDMI(RGB signals).
♦ Blue Only Mode: Off/On
This function is for AV device measurement experts. This function displays the blue signal only by
removing the red and green signals from the video signal so as to provide a Blue Filter effect that is
used to adjust the Colour and Tint of video equipment such as DVD players, Home Theaters, etc.
this function, you can adjust the Colour and Tint to preferred values appropriate to the signal
Using
level of each video device using the Red/Green/Blue/Cyan/Magenta/Yellow Colour Bar Patterns,
without using an additional Blue Filter.
“Blue Only Mode” is available when the picture mode is set to “Movie” or “Standard”.
English - 20
Page 23

Sound Features
1. Press the MENU button to display the menu.
Press the ▲ or ▼ button to select "Sound", then press the
ENTER button.
2. Select the required option by pressing the ▲ or ▼ button,
then press the ENTER
button.
3. When you are satisfied with your setting, press the ENTER
button.
4. Press the EXIT
Mode:
♦
button to exit.
Standard/Music/Movie/Speech/Custom
You can select the type of special sound effect to be used
when watching a given broadcast.
Easy Setting
1. Press the TOOLS button on the remote control.
the ▲ or ▼ button to select "Sound Mode".
2. Press
3.
Press the ◄ or ► button to select the desired sound mode.
4.
Press the EXIT
or TOOLS button to exit.
♦ Equalizer: Balance/100Hz/300Hz/1kHz/3kHz/10kHz
The sound settings can be adjusted to suit your personal
TV
Mode : Custom
Equalizer
SRS TS XT : Off
Auto Volume : Off
TV Speaker : On
Move Enter Return
Anynet+ (HDMI-CEC)
Picture Mode : Standard
Sound Mode ◄ Custom ►
Sleep Timer : Off
SRS TS XT : Off
Energy Saving : Off
Dual l-ll : Mono
Move Adjust Exit
TV
R
Sound
Tools
Equalizer
preferences.
➣
If you make any changes to these settings, the sound
mode is automatically switched to "Custom".
L
Balance 100Hz 300Hz 1kHz 3kHz 10kHz
Move Adjust Return
♦ SRS
TS XT: Off/On
TruSurround XT is a patented SRS technology that solves the problem of playing 5.1 multichannel
content over two speakers. TruSurround delivers a compelling, virtual surround sound experience
through any two-speaker playback system, including internal television speakers. It is fully
compatible with all multichannel formats.
Easy Setting
1. Press
the TOOLS
button on the remote control.
2. Press the ▲ or ▼ button to select "SRS TS XT".
3. Press the ◄ or ► button to select the "Off" or "On".
4. Press the EXIT or TOOLS button to exit.
Anynet+ (HDMI-CEC)
Picture Mode : Standard
Sound Mode : Custom
Sleep Timer : Off
SRS TS XT ◄ Off ►
Energy Saving : Off
Dual l-ll : Mono
Tools
Move Adjust Exit
TruSurround XT, SRS and Symbol are trademarks of SRS Labs,
Inc.TruSurround XT technology is incorporated under license from
SRS Labs, Inc.
English - 21
Page 24

♦ Auto Volume: Off/On
Each broadcasting station has its own signal conditions, and so it is not easy to adjust the volume
every time the channel is changed. This feature lets you automatically adjust the volume of the
desired channel by lowering the sound output when the modulation signal is high or by raising the
sound output when the modulation signal is low.
♦ TV
Speaker: Off/On
If you want to hear the sound through separate speakers, cancel the internal amplifier.
➣
➣
+, - and MUTE buttons do not operate when the "TV Speaker" is set to "Off".
The
When "TV Speaker" is set to "Off", the Sound menus cannot be adjusted.
Manufactured under license from Dolby Laboratories. Dolby and the
double-D symbol are trademarks of Dolby Laboratories.
Selecting the Sound Mode
You can set the sound mode in the "Tools" menu.
When you set to "Dual I-II", the current sound mode is
displayed on the screen.
1. Press
the TOOLS
button on the remote control.
2. Press the ▲ or ▼ button to select “Dual I-II".
3. Press the ◄ or ► button to select required option.
4. Press the ENTER
Audio Type Dual
A2
Stereo
NICAM
Stereo
button.
Mono MONO
Stereo STEREO
Dual DUAL
Mono MONO
Stereo MONO
Dual
MONO
↔
1 ↔
↔
↔
DUAL
1/2
MONO
DUAL
2
STEREO
DUAL
1
2
Default
Automatic
change
DUAL 1
Automatic
change
DUAL 1
If the stereo signal is weak and an automatic switching occurs,
then switch to the Mono.
This function is only activated in stereo sound signal.
It is deactivated in mono sound signal.
This function is only available in Analogue TV mode.
Anynet+ (HDMI-CEC)
Picture Mode : Standard
Sound Mode : Custom
Sleep Timer : Off
SRS TS XT : Off
Energy Saving : Off
Dual l-ll ◄ Mono ►
Move Adjust Exit
Tools
Connecting Headphones (Sold separately)
You can connect a set of headphones to your set if you wish to
watch a TV programme without disturbing the other people in the
room.
When you insert the head set jack into the corresponding port, you
➣
can operate only "Auto Volume" in Sound menu.
Prolonged use of headphones at a high volume may damage your
➣
hearing.
You will not receive sound from the speakers when you connect headphones to the system.
➣
The headphone volume and TV volume are adjusted differently.
➣
English - 22
TV Side Panel
Page 25

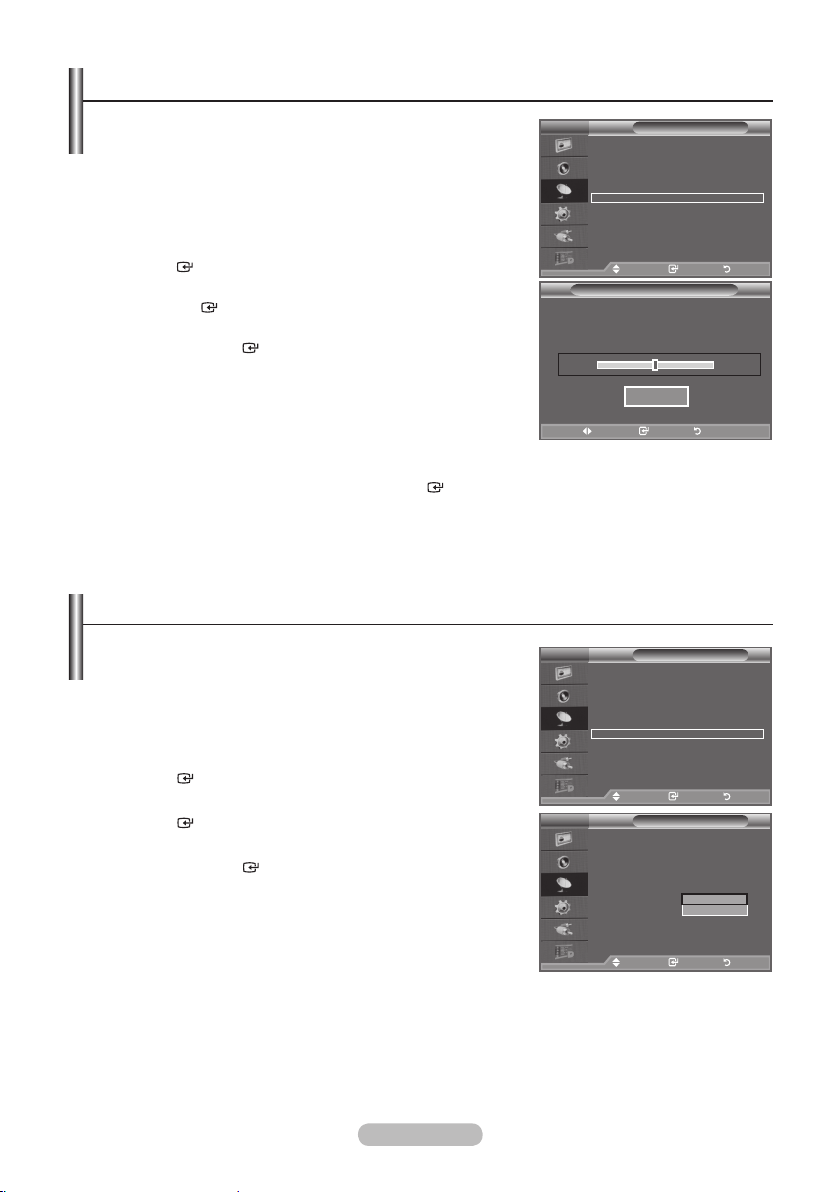
Setting and Displaying the Current Time
You can set the TV’s clock so that the current time is
displayed when you press the INFO button. You must also set
the time if you wish to use the automatic On/Off timers.
1. Press the MENU
button to display the menu.
Press the ▲ or ▼ button to select "Setup", then press the
ENTER
2.
Press the ▲ or ▼ button to select "Time", then press the
ENTER
3.
Press the
4.
To... Press the...
Move to "Month", "Day", "Year", "Hour" or
"Minute"
Set the "Month", "Day", "Year", "Hour" or
"Minute"
Confirm the setting
button.
button.
ENTER
button to select "Clock Set".
◄ or ► button.
▲ or ▼ button.
ENTER button.
5. Press the EXIT button to exit.
If you disconnect the power cord, you have to set the clock again.
You can also set "Year", "Month", "Day", "Hour" and "Minute" by pressing the number buttons on
the remote control.
TV
Plug & Play
Language : English
Time
Melody : Off
Entertainment : Off
Energy Saving : Off
Move Enter Return
TV
Month01Day
p
01
q
Hour00Minute
00
Move Adjust Return
Setting the Sleep Timer
Setup
Clock Set
Year
2008
You can select a time period of between 30 and 180 minutes
after which the television automatically switches to standby
mode.
1. Press the MENU
button to display the menu.
Press the ▲ or ▼ button to select "Setup", then press the
ENTER
2.
Press the ▲ or ▼ button to select "Time", then press the
ENTER
3.
Press the ▲ or ▼ button to select "Sleep Timer", then press
the ENTER
4.
Press the ▲ or ▼ button repeatedly until the desired time
button.
button.
button.
appears (Off, 30, 60, 90, 120, 150, 180).
Press the EN
5.
Press the EXIT button to exit.
TER
button.
The TV automatically switches to standby mode when the
timer reaches 0.
Easy Setting
1. Press the TOOLS
button on the remote control.
2. Press the ▲ or ▼ button to select “Sleep Timer”.
3. Press the ◄ or ► button to select the minute.
4. Press the EXIT
or TOOLS button to exit.
English - 23
TV
Plug & Play
Language : English
Time
Melody : Off
Entertainment : Off
Energy Saving : Off
Move Enter Return
TV
Clock Set : 00 : 00
Sleep Timer :
Timer 1 :
Timer 2 :
Timer 3 :
Move Enter Return
Anynet+ (HDMI-CEC)
Picture Mode : Standard
Sound Mode : Custom
Sleep Timer ◄ Off ►
SRS TS XT : Off
Energy Saving : Off
Dual l-ll : Mono
Move Adjust Exit
Tools
Setup
Time
Off
30
60
90
0
12
150
180
Page 26

Switching the Television On and Off Automatically
1. Press the MENU button to display the menu.
Press the ▲ or ▼ button to select "Setup", then press the
ENTER
2.
Press the ▲ or ▼ button to select "Time", then press the
ENTER
3.
Press the ▲ or ▼ button to select "Timer 1", "Timer 2",
"Timer 3", then press the ENTER
Three different On/Off Timer Settings can be made.
➣
4.
Press the ◄ or ► button to select the required item below.
button.
button.
You must set the clock first.
button.
Press the ▲ or ▼ button to adjust to the setting satisfied.
♦ On
Time: Select hour, minute, and "On"/"Off". (To activate
timer with the setting satisfied, set to "On".)
♦ Off
Time: Select hour, minute, and "On"/"Off". (To activate
timer with the setting satisfied, set to "On".)
♦ Repeat: Select
"Everyday", "Mon~Fri", "Mon~Sat",
"Once",
TV
Plug & Play
Language : English
Time
Melody : Off
Entertainment : Off
Energy Saving : Off
Move Enter Return
TV
On Time
5
6
Off Time
Repeat
Volume
►
Timer 1
:
00 00 Off
:
00 Off
00
Once
10
Move Adjust Return
or "Sat~Sun".
♦ Volume: Select the desired turn on volume level.
You can set the hour and minute directly by pressing the number buttons on the remote control.
Auto Power Off
When you set the timer On, the TV will eventually turn off, if no controls are operated for 3 hours
after the TV was turned on by timer. This function is only available in timer On mode and prevents
overheating, which may occur if a TV is on for too long time.
Choosing Your Language
Setup
When you start using your set for the first time, you must
select the language which will be used for displaying menus
and indications.
1. Press
the MENU
button to display the on-screen menu.
Press the ▲ or ▼ button to select "Setup", then press the
ENTER
2.
Press the ▲ or ▼ button to select "Language", then press
the ENTER
3.
Select a particular language by pressing the ▲ or ▼ button
repeatedly.
Press
4.
Press the EXIT
the EN
button.
button.
TER
button to exit.
button.
English - 24
TV
Plug & Play
Language : English
Time
Melody : Off
Entertainment : Off
Energy Saving : Off
Move Enter Return
Setup
Page 27

Melody / Entertainment / Energy Saving
1. Press the MENU button to display the menu.
Press the ▲ or ▼ button to select "Setup", then press the
ENTER
2.
Select the required option by pressing the ▲ or ▼ button,
then press the ENTER
3.
When you are satisfied with your setting, press the
ENTER
4.
Press the EXIT
Melody:
♦
The TV
➣
button.
button.
button.
button to exit.
Off/Low/Medium/High
power on/off melody sound can be adjusted.
The Melody does not play
- When no sound is output from the TV because the MUT
TV
Plug & Play
Language : English
Time
Melody : Off
Entertainment : Off
Energy Saving : Off
Move Enter Return
Setup
E button has been pressed.
- When no sound is output from the TV because the (Volume) button has been pressed.
- When the TV is turned off by Sleep Timer function.
♦ Entertainment:
Off/Sports/Cinema/Game
The “Entertainment” mode enables you to select the optimal display and sound for sports, cinema
and games.
Off: Switch the "Entertainment" function off.
-
- Sports: Provides
optimal picture and sound quality for sports. You can enjoy more thrilling
the
Colour and sound.
-
Cinema: Provides
the
optimal picture and sound quality for cinema. You can experience a richer
picture and enhanced sound.
Game: Provides
-
optimal picture and sound quality for games. This mode accelerates the
the
playing speed when using an external game console connected to the TV.
If you set any of the three “Entertainment” modes to On, the settings will be locked and can not
➣
be adjusted. If you want to make Picture and Sound mode adjustments, the “Entertainment”
mode must be turned off.
➣
The “Entertainment” settings are saved for each input source.
➣
If you set any of the three “Entertainment” modes to On, “SRS TS XT” function is not available.
O You can press the E.MODE button on the remote control
repeatedly to change the “Entertainment” setting.
English - 25
Page 28

♦ Energy Saving: Off/Low/Medium/High/Auto
This feature adjusts the screen brightness depending on the surrounding lighting conditions.
- Off: Turns off the energy saving function.
- Low: Sets the TV to low energy saving mode.
- Medium: Sets the TV to medium energy saving mode.
- High: Sets the TV to high energy saving mode.
- Auto: Automatically adjusts the brightness of the TV screen in accordance with the scenes.
Easy Setting
1. Press the TOOLS button on the remote control.
Press the ▲ or ▼ button to select “Energy Saving”.
2.
3. Press the ◄ or ► button to select the "Off","Low",
"Medium", "High" or "Auto".
4.
Press the EXIT
or TOOLS button to exit.
This function is not available in "PC" mode.(40 inch)
Selecting the Source
You can select among external sources connected to your
TV’s input jacks.
1. Press the MENU
Press the ▲ or ▼ button to select "Input", then press the
ENTER
2.
Press the
Available signal sources: TV, Ext.1, Ext.2, AV, S-Video,
Component, PC, HDMI1, HDMI2, HDMI3, DTV.
You can choose only those external devices that are
connected to the TV.
3. Select the required device by pressing the ▲ or ▼ button.
Press the ENTER
O Press
the SOURCE button on the remote control to toggle
between all the available source.
TV mode can be selected by pressing the TV/DTV button,
number buttons(0~9), and the P / button on the remote
control.
button to display the menu.
button.
ENTER
button again, to select "Source List".
button.
Tools
Anynet+ (HDMI-CEC)
Picture Mode : Standard
Sound Mode : Custom
Sleep Timer : Off
SRS TS XT : Off
Energy Saving ◄ Off ►
Dual l-ll : Mono
Move Adjust Exit
TV
Source List : TV
Edit Name
Anynet+(H
Move Enter Return
TV
TV
Ext.1 : ---Ext.2 : ----
AV : ---S-Video : ---Component : ---PC : ---HDMI1 : ---HDMI2 : ---HDMI3 : ----
DTV
Move Enter Return
Input
DMI-CEC)
Source List
O Y
ou can also watch HDMI mode simply by pressing the HDMI
button on the remote control.
English - 26
Page 29

Editing the Input Source Names
Name the device connected to the input jacks to make your
input source selection easier.
1. Press
the MENU
button to display the menu.
Press the ▲ or ▼ button to select "Input", then press the
TER
▲ or ▼
button.
button.
button to select the device that you wish to
button.
button.
button to exit.
ENTER
2.
Press the ▲ or ▼ button to select "Edit Name", then press
the EN
3.
Press the
edit.
Press the ENTER
4.
Press the ▲ or ▼ button to select the required device.
Press the ENTER
5.
Press the EXIT
TV
Source List : TV
Edit Name
Anynet+(HDMI-CEC)
Move Enter Return
TV
Ext.1 : ----
Ext.2 : ----
AV : ----
S-Video : ----
Component : ----
PC : ----
HDMI1 : ----
HDMI2 : ----
HDMI3 : ----
Edit Name
Move Enter Return
Input
----
VCR
DVD
Cable STB
Satellite S
PVR STB
AV Receiver
Game
q
TB
English - 27
Page 30

Previewing the DTV Menu System
♦ The company does not guarantee the normal operation of the
DTV menu for countries other than the supported countries
(France, Germany, Italy, Netherlands, Spain, Switzerland, United
Kingdom, Austria) because only these country standards are
supported.
In addition, when the country of the broadcast stream differs from
the country selected by the current user, the string appearing in
the channel banner, Info, Guide, Channel Manager, etc. may not
be displayed properly.
vailable in DTV mode. Preset to the DTV mode by using the
♦ A
TV/DTV button on your remote control. To help you navigate
around the on-screen menu system and adjust the various
DTV
settings available, refer to the following illustration.
Press the MENU button to display the menu.
Press the ▲ or ▼ button to select "Digital Menu", then press the
ER button.
ENT
Guide
Now & Next Guide
Full Guide
Scheduled List
Default Guide
Now/Next, Full Guide
DTV
Channel
Country
Auto Store
Manual Store
Edit Favourite Channels
Channel List
Setup
Menu Transparency
All, Favourites, Default
High, Medium, Low, Opaque
DTV
Change PIN
Parental Lock
Subtitle
Subtitle Mode
Audio Format
Audio Description
Digital Text
Time Zone
Common Interface
System
Off, On
Normal, Hard of hearing
PCM, Dolby Digital
Audio Description Off, On
Volume
Disable, Enable
Application Info, CI Menu
Product Information
DTV
Signal Information
Software Upgrade
Reset
Language
Audio Language
Subtitle Language
Teletext Language
Preference
Primary Audio Language
Secondary Audio Language
Primary Subtitle Language
Secondary Subtitle Language
Primary Teletext Language
Secondary Teletext Language (depending on the country)
The sub-items of the CI Menu may vary depending on the CAM model.
➣
TV
Guide
Digital Channel
Setup
Language
Now & Next Guide
Full Guide
Scheduled List
Default Guide :
Country :
Auto Store
Manual Store
Edit Favourite Channels
Channel List
Menu Transparency
Change PIN
Parental Lock
Subtitle :
Subtitle Mode
Audio Language
Subtitle Language
Teletext Language
Preference
Digital Menu
Move Enter Return
Guide
Move Enter Return
Channel
Move Enter Return
Setup
: Medium
Move Enter Return
Language
Move Enter Return
Full Guide
United Kingdom
Off
English - 28
Page 31

Updating the Channel List Automatically
You can update the channel list when the broadcaster adds new
Services or if you move the TV to a new location.
1. Press the MENU button to display the menu.
Press the ▲ or ▼ button to select "Digital Menu", then press
the ENT
ER button.
2. Press the
▲ or ▼
button to select "Channel", then press the
ENTER button.
3. Press the ENTER
button again, to select "Country".
4. Select the appropriate country by pressing the ▲ or ▼ button.
Press the ENTER button to conrm your choice.
Even though you have changed the country setting in this
➣
menu, the country setting for Analogue TV is not changed.
(Refer to page 11)
5. Press the
▲ or ▼
button again, to select "Auto Store".
Press the ENTER button.
➣
When it has nished, the number of scanned services will
be displayed.
The existing favourite channel list will not be deleted when the channel list is updated.
➣
To stop the scan before it has nished, press the EN
➣
6. Press the EXIT button to exit.
➣
If the signal status is poor, the "No Service found! Check the aerial connection" message is
displayed.
DTV
Country :
Auto Store
Manual Store
Edit Favourite Channels
Channel List
Move Enter Return
Mode : Custom
DTV
Equalizer
S XT : Off
SRS T
Auto Volume
Scanning for digital services...
Internal Mute :
Reset
Services found: 24 Channel: 38
Move
Return
ER button with "STOP" selected.
T
Updating the Channel List Manually
You can specify the channel for a fast channel search.
1. Press the MENU button to display the menu.
Press the ▲ or ▼ button to select "Digital Menu", then press
the ENTER button.
2. Press the
ENTER
3. Press the
▲ or ▼
button to select "Channel", then press the
button.
▲ or ▼
button to select "Manual Store", then press
the ENTER button.
4. Press the
➣
▲ or ▼
button to select the required option, then press the ENTER button.
− Channel : Channel "5" to "69" in sequence are displayed (depending on the country)
− Frequency : The frequency available in the Channel group is displayed.
− Bandwidth : The available bandwidths are 7 and 8 MHz.
Press the red button to start the scan for digital services.
➣
When it has finished, channels are updated in the channel list.
5.
When it has nished, the number of scanned services will be displayed.
6. Press the EXIT button to exit.
DTV
Channel
▲
5
▼
Search
Adjust Return
Channel
United Kingdom
Auto Store
: Off
Off
35%
Stop
Enter Return
Manual Store
Frequency Bandwidth
KHz MHz
177500
7
English - 29
Page 32

Editing Your Favourite Channels
You can edit your favourite channels using the four colour
buttons.
1. Press the MENU button to display the menu.
Press the ▲ or ▼ button to select "Digital Menu", then press the
ER button.
ENT
2. Press the ▲ or ▼ button to select "Channel", then press the
ENTER
3. Press the ▲ or ▼ button to select "Edit Favourite Channels",
then press the ENT
4. Press the red button to display all currently stored channels.
5.
Press the ▲ or ▼ button to select a channel you want.
Press the ENT
➣
➣
➣
6.
Press the EXIT
♦ Add
You can use this function when one or more favourite channels
have been selected.
1.
Press the MENU button to display the menu.
Press the ▲ or ▼ button to select "Digital Menu", then press the
ENT
2. Press the ▲ or ▼ button to select "Channel", then press the
ENTER
3. Press the ▲ or ▼ button to select "Edit Favourite Channels",
then press the ENT
4. Press the red button in the "Edit Favourite Channels" menu.
To add more channels, refer to the step 5 on the previous
5.
If you want to check the channel to be stored, press RET
button.
Press the EXIT
➣
button.
ER button.
ER button.
A "" icon is shown next to the selected channel and the
channel will be added to the favourite channel list.
•
To undo, press the EN
•
Select All: Select all channels currently displayed.
•
Select None: Deselect all selected channels.
•
Preview: Displays (a) currently selected channel(s).
ER button again.
T
The Favourite Channels settings have been completed.
ER
button to exit.
button.
button.
ER button.
description.
URN
button to exit.
• To add all channels to the favourite channel list, press the
red button.
• To remove all channels, press the green button.
• Preview : Displays (a) currently selected channel(s).
• P
ress the CH LIST button to display the favourite channel
manager.
DTV
DTV
DTV
DTV
Edit Favourite Channels
(no channels)
Move Enter Return
Add Channels
Return
Edit Favourite Channels
5
BBC TWO
2
5 Five
7 BBC THREE
15 abc1
16 QVC
6
Move Enter Return
Select All Select None Preview
Move Select Return
Edit Favourite Channels
2 BBC TWO ★
7
BBC THREE ★
15
abc1 ★
Move Enter Return
Add
Move Return
Edit Favourite Channels
5
BBC TWO ★
2
5 Five
BBC THREE ★
7
abc1 ★
15
QVC
16
6
Move Enter Return
Select All Select None Preview
Move Select Return
Renumber
Preview Delete
English - 30
Page 33

♦ Renumber (depending on the country)
1. Press the MENU button to display the menu.
Press the ▲ or ▼ button to select "Digital Menu", then press the
ER button.
ENT
2. Press the ▲ or ▼ button to select "Channel", then press the
ENT
ER button.
3. Press the ▲ or ▼ button to select "Edit Favourite Channels",
then press the ENT
ER button.
4. Select the required channel using the ▲ or ▼ button.
5.
Press the green button.
The space for entering the number is a blank.
➣
6.
Enter the new channel number. Press ENTER button to store
or RETURN button to cancel.
Press the ◄ button to delete an entered digit.
➣
If you enter a number already assigned to another channel,
➣
the number is assigned to the selected channel and the
previous number assigned to the selected channel is
assigned to the other channel.
That is, the two numbers are exchanged.
The Favourite Channels are automatically sorted in
➣
ascending order of channel numbers.
7.
Press the EXIT button to exit.
DTV
2
BBC TWO ★
BB
-- 15
abc1 ★
Move Enter Return
Edit Favourite Channels
C THREE ★
Edit Return Conrm
♦ Preview
1. In the "Edit Favourite Channels" menu, select the channel to be
previewed by pressing the ▲ or ▼ button.
Press the yellow button.
2.
The selected channel is displayed on the screen.
➣
♦ Delete
1. In the "Edit Favourite Channels" menu, select the channel to be
deleted from the favourite channels list by pressing the
▲ or ▼ button.
Press the blue button.
2.
The selected channel and number will be deleted.
➣
To add a deleted channel back in to the favourite channel
➣
list, see "Add" on page 30.
English - 31
DTV
DTV
Edit Favourite Channels
2
BBC TWO ★
7 BBC THREE ★
15
abc1 ★
Add
Move Return
Edit Favourite Channels
2 BBC TWO ★
7
BBC THREE ★
Add
Move Return
Renumber
Preview Delete
Renumber
Preview Delete
Page 34

Selecting Channel List
You can exclude the channels you have chosen from the
channels you have scanned.When you scan through the
stored channels, those you have chosen to skip are not
displayed. All channels that you do not specifically choose to
skip are displayed during scanning.
1. Press the MENU button to display the menu.
Press the ▲ or ▼ button to select "Digital Menu", then press
ER button.
the ENT
2. Press the ▲ or ▼ button to select "Channel", then press the
EN
TER button.
Test Card M' v2.0
1 Test Card M' v2.0
3 Vida003b
4 Vida004b
5 vida005b
6 vida006b
15 Ch 15
16 QVC
17 UKTV Gold
Previous Page Next/Page Favourites TV
3. Press the ▲ or ▼ button to select "Channel List".
Press the ENT
4.
Press the ▲ or ▼ button to select "All", "Favourites" or "Default".
Press the ENTER button.
5. Press the yellow button to toggle between your favourite channels
ER button.
It can be displayed simply by
pressing the CH LIST button.
and all channels.
Your favourite channels are only displayed if they were
➣
previously set in the "Editing Your Favourite Channels" menu
(refer to page 30).
6.
Press the red or green button to display the previous or next channel List page.
7.
Press the ▲ or ▼ button to select a channel to be tuned.
Press the ENT
The channel number, name and an icon are displayed in the top left corner while changing the
➣
ER button.
channel. The channel number and name are displayed if the channel is one of the all channels,
and a icon if the channel is one of the favourite channels.
8.
Press the blue button to toggle between your "TV", "Radio", "Data/Other" and "All".
9. Press the
CH
LIST button to exit from the channel List.
Channel List
23 bid-up.tv
25 TCM
26 UKTV Style
27 Discovery
28 DiscoveryH&L
15 Cartoon Nwk
33 Boomerang
55 Ttext Holidays
Move Watch Return
All Channels-All
60 Television X
70 BBC Radio 1
72 BBC Radio 2
73 BBC Radio 3
74 BBC Radio 4
84 heat
91 MOJO
800
ARD-MHP-Data
6 More
1/2
Displaying Programme Information
While viewing a channel, additional information about the current programme may be displayed.
1. While viewing a programme, press the INFO button.
➣
The programme information is displayed.
To exit from banner information, press the INFO button.
2.
The information is displayed:
➣
− Parental Rating
− Video Type: SD, HD, Radio
− Audio Type: Mono, Stereo, Dual, Dolby Digital
− Existence of Teletext or DVB Subtitle
− Audio Language
English - 32
1 AFDO,16:9
AFDO 16:9
No Block
SD
Stereo
Subtitle
English
Exit
14:30 Sat 1 Sep
AII Channels
14:30~14:33
Contains video with AFD O; coded frame
is 16:9
Move Enter Return
A
Page 35

Viewing the EPG (Electronic Programme Guide) Information
The EPG (Electronic Programme Guide) information is provided
by the broadcasters. Programme entries may appear blank or
out of date as a result of the information broadcast on a given
channel. The display will dynamically update as soon as new
information becomes available.
♦ Now & Next Guide
six channels indicated in the left-hand column,
For the
displays the Current programme and the Next programme
information.
♦ Full Guide
Displays the
hour segments. Two hours of programme information is
programme information as time ordered One
displayed which may be scrolled forwards or backwards in
time.
1. Press the MENU button to display the menu.
Press the ▲ or ▼ button to select "Digital Menu", then press the
ER button.
ENT
2. Press the ENT
ER button, to select "Guide".
3. Press the ▲ or ▼ button to select "Now & Next Guide" or
"Full Guide".
Press the ENT
You can also display the guide menu simply by pressing
➣
ER button.
the GUIDE button.
4.
To... Then...
Watch a programme in the EPG list
If the next programme is selected, it is scheduled with the clock icon
displayed. If the ENT
cancelled with the clock icon gone. For details about scheduling
programmes, refer to the next page.
View programme information
Toggle between the "Now & Next
Guide" or "Full Guide"
Display the "Favourites" and the "All
Channels" list
Scrolls backwards quickly (24 hours). • Press the yellow button repeatedly.
Scrolls forward quickly (24 hours). • Press the blue button repeatedly.
Exit the guide • Press the EXI
ER button is pressed again, the scheduling is
• Select a programme by pressing
the ▲, ▼, ◄, ► button.
• Press the ENT
• Select a programme of your choice by
pressing the ▲, ▼, ◄, ► button.
•
ress the INFO button when the
P
programme of your choice is
highlighted.
• Press the red button repeatedly.
• Press the green button repeatedly.
ER button.
button.
T
All Channels
Watch
Watch
Now/Next Favourites -24Hours +24Hours Exit
Now & Next Guide
Full Guide
13:28 Wed 16 Feb
13:28 Wed 16 Feb
INFO
27 Discovery
Extreme Machines: Armoured Cars
Now Next
Full Guide Favourites Exit
27 Discovery
Extreme Machines: Armoured Cars
13:00 14:00Today
INFO
➣
The programme title is on the upper part of the screen center. Please click on INFO button for
the detailed information. Channel Number, Running Time, Status Bar, Parental Level, Video Quality
Information(HD/SD), Sound Modes, Subtitle or Teletext, Languages of Subtitle or Teletext, and
brief summary of the highlighted programme are included on the detailed information. "..." will be
appeared if the summary is long.
➣
Six channels are displayed. To scroll between channels, move to a channel using the ▲ or ▼ button.
To display page by page, use the P
<
or P> button.
English - 33
Page 36

Using the Scheduled List
If you make a scheduled viewing list of programs you may like to
see, the channel will be automatically switched to the scheduled
programme at the scheduled time even if you are watching another
programme.
1. Press the MENU button to display the menu.
Press the ▲ or ▼ button to select "Digital Menu", then press the
ER button.
ENT
2. Press the ENT
3. Press the ▲ or ▼ button to select "Scheduled List", then press
the ENT
4. Press the red button.
The channel will be switched to the scheduled programme.
5.
Press the ENT
▲ or ▼ button .
You can also set hour and minute by pressing the number
➣
buttons on the remote control.
•
•
•
•
6.
After setting the schedule, Press the red button.
Press the EXIT
7.
•
➣
Save: Save the adjusted schedule.
•
Cancel: Cancel the adjusted schedule.
•
Add Programme: Add a new schedule.
•
Edit: Readjust the selected schedule.
•
Delete: Delete the selected schedule.
ER button, to select "Guide".
ER button.
ER button to select an item and adjust with the
Channel: Set the channel.
Tim
e: Set the time.
Date: Set Year, Month and Day.
Fr
equency: Set the frequency.
("Once", "Daily", or "Weekly")
button to exit.
DTV
(No programmes)
Add Programme
Return
DTV
Tuesday 22 Apr 15:30 ~ 16:00 Once
801 RaiTre
Add Programme Edit Delete
Move Return
DTV
Channel
Time
Date
Frequency
Save Cancel
Adjust Move Return
Scheduled List
Scheduled List
Scheduled List
80
2 RaiUno
15 : 20 to -- : --
Tue 22 Apr 2007
Once
Setting the Default Guide
You can preset the default guide style.
1. Press the MENU button to display the menu.
Press the ▲ or ▼ button to select "Digital Menu", then press the
ER button.
ENT
2. Press the ENT
3. Press the ▲ or ▼ button to select "Default Guide", then press
the ENT
4. Select "Now/Next" or "Full Guide" using the ▲ or ▼ button,
and press the ENT
5. Press the EXIT
ER button, to select "Guide".
ER button.
ER button.
button to exit.
English - 34
DTV
Now & Next Guide
Full Guide
Scheduled List
Default Guide : Full Guide
Guide
Now/Next
Full Guide
Move Enter Return
Move Enter Return
You can select these options
by simply pressing the GUIDE
button on the remote control.
Page 37

Viewing All Channels and Favourite Channels
In the EPG menu, you can display all channels or favourite
channels.
1. Press the MENU
Press the ▲ or ▼ button to select "Digital Menu", then press the
ENTER button.
2. Press the ENTER
3. Select the your required guide ("Now & Next Guide" or "Full
Guide") by pressing the ▲ or ▼ button.
4.
Press the ENTER
5. Press the green button.
All the channel lists and the Favourite Channel lists will be
toggled.
6. Select a programme of your choice by pressing the ▲, ▼, ◄, or
► button.
7.
Press the INFO button to display information about the
highlighted programme.
8. When the Edit Favourite Channels list has not been set up:
•
"
The favourites list is empty.
Wo
uld you like to choose your favourites now?" message is
displayed.
• Select "Yes".
Th
e "Edit Favourite Channels" menu is displayed.
If you select "No", all channels will remain unchanged.
• To edit the favourite channels, refer to page 30 for more
details.
9 . Press the
All Channels" is the list of channels that have been scanned by the channel list update.
➣
"
All channels are displayed in the all channel mode.
Favourites" (favourite channels) is the list of channels that has been set in the "Edit Favourite Channels"
➣
"
menu (refer to page 30).
button to display the menu.
button again, to select "Guide".
button.
EXIT
button to exit.
27 Discovery
All Channels
Watch
Extreme Machines: Armoured Cars
Now Next
Watch
Full Guide Favourites Exit
27 Discovery
Extreme Machines: Armoured Cars
The favourites list is empty.
Today
Would you like to choose your
favourites now?
Yes No
Now/Next Favourites -24Hours +24Hours Exit
Now & Next Guide
Full Guide
13:28 Wed 16 Feb
INFO
13:28 Wed 16 Feb
INFO
Adjusting the Menu Transparency
You can set the Transparency of the menu.
1. Press the MENU
Press the ▲ or ▼ button to select "Digital Menu", then press the
ENTER button.
2. Press the ▲ or ▼ button to select "Setup", then press the
ENTER
3. Press the ▲ or ▼ button to select "Menu Transparency" then
press the ENT
4. Select the required option ("High", "Medium", "Low", or
"Opaque") by pressing the ▲ or ▼ button, and press the
ENT
ER button to change the setting.
5. Press the EXIT button to exit.
button to display the menu.
button.
ER button.
English - 35
DTV
Menu Transparency
Change PIN
Parental Lock
Subtitle : On
Subtitle Mode
Move Enter Return
Setup
: Medium
High
Medium
Low
Opaque
Page 38

Setting up the Parental Lock
This feature allows you to prevent unauthorized users, such
as children, from watching unsuitable programmes by a 4-digit
PIN (Personal Identification Number) code that is defined by the
user. The on-screen menu will instruct you to assign a PIN code
(you can change it later, if necessary).
1. Press the MENU button to display the menu.
Press the ▲ or ▼ button to select "Digital Menu", then press the
ER button.
ENT
2. Press the ▲ or ▼ button to select "Setup", then press
the ENT
ER button.
3. Press the ▲ or ▼ button to select "Parental Lock.", then
press the ENT
4.
The "Enter PIN" is displayed.
Enter your current 4-digit PIN code by using the numeric
5.
ER button.
buttons (0~9).
The default PIN code for a new TV set is 0000.
➣
➣
If you enter an invalid PIN code,the "Invalid PIN code.
Please try again." message is displayed.
6.
Press the ENT
ER button.
7. Press the ▲ or ▼ button to select the age rating you want to
lock out.
Press the ENT
♦ Change
1.
Press the MENU button to display the menu.
ER button.
PIN
Press the ▲ or ▼ button to select "Digital Menu", then press the
ENT
ER button.
2. Press the ▲ or ▼ button to select "Setup", then press
the ENT
ER button.
3. Press the ▲ or ▼ button to select "Change PIN", then
press the ENT
➣
The "Enter PIN" is displayed.
Enter your current 4-digit PIN code by using the numeric
4.
ER button.
buttons (0~9).
➣
The “Enter New PIN” is displayed.
5.
Enter your new PIN code by using the numeric buttons (0~9)
The "Conrm New PIN" is displayed.
➣
6.
Re-enter your new PIN code to conrm by using the numeric
buttons (0~9).
The Your PIN code has been changed successfully message
➣
is displayed.
7.
Press the ENT
8. Press the EXIT
If you forget the PIN code, press the remote control buttons in the following sequence, which
➣
resets the PIN to 0-0-0-0: POWER (Off), MUT
ER button.
button to exit.
E, 8, 2, 4, POWER (On).
DTV
Menu Transparency
Change PIN
Parental Lock
Subtitle :
Subtitle Mode
DTV
Enter PIN
DTV
Parental Rating: No Block
DTV
Menu Transparency
Change PIN
Parental Lock
Subtitle :
Subtitle Mode
DTV
Confirm New PIN
Your PIN code has been changed successfully.
Setup
: Medium
Off
Move Enter Return
Move Enter Return
Parental Lock
Enter PIN Return
Parental Lock
▲
No Block
No Block
3
4
5
6
7
Setup
: Medium
Off
Change PIN
OK
▼
Move Enter Return
Move Enter Return
Move Enter Return
Move Enter Return
Enter PIN Return
English - 36
Page 39

Setting the Subtitle
You can activate and deactivate the subtitles.
1. Press the MENU button to display the menu.
Press the ▲ or ▼ button to select "Digital Menu", then press the
ER button.
ENT
2. Press the ▲ or ▼ button to select "Setup", then press the
ENTER button.
3. Press the ▲ or ▼ button to select "Subtitle ", then press the
ENTER button.
4. Select "On" by pressing the ▲ or ▼ button. Press the ENT
ER
button.
5. Press the EXIT
button to exit.
You can select these options simply by pressing the
SUBT. button on the remote control.
DT
V
Menu Transparency
Change PIN
Parental Lock
Subtitle : On
Subtitle Mode : Normal
Move Enter Return
Move Enter Return
Setting the Subtitle Mode
Use this menu to set the Subtitle Mode. "Normal" under the
menu is the basic subtitle and "Hard of hearing" is the subtitle
for a hearing-impaired person.
1. Press the MENU button to display the menu.
Press the ▲ or ▼ button to select "Digital Menu", then press the
ER button.
ENT
2. Press the ▲ or ▼ button to select "Setup", then press the
ENT
ER button.
3. Press the ▲ or ▼ button to select "Subtitle Mode", then press
the ENT
ER button.
4. Press the ▲ or ▼ button to select "Normal" or "Hard of hearing". Press the ENT
5. Press the EXIT
If the programme you are watching does not support the "Hard of hearing" function, "Normal"
➣
button to exit.
automatically activates even though "Hard of hearing" mode is selected.
DT
V
Menu Transparency
Change PIN
Parental Lock
Subtitle : On
Subtitle Mode : Normal
Move Enter Return
Move Enter Return
ER button.
Setup
: Medium
Off
On
Setup
: Medium
Normal
Hard of hearing
Selecting the Audio Format
You can only hear Dolby Digital sound through the audio
receiver connected through an optical cable. You can only hear
PCM sound through the main speaker.
When sound is emitted from both the main speaker and the
audio receiver, a sound echo may occur due to the decoding
speed difference between the main speaker and the audio
receiver. In this case, use the internal mute function.
1. Press the MENU button to display the menu.
Press the ▲ or ▼ button to select "Digital Menu", then press the
ER button.
ENT
2. Press the ▲ or ▼ button to select "Setup", then press the ENT
3. Press the ▲ or ▼ button to select "Audio Format", then press the ENT
4. Press the ▲ or ▼ button to select "PCM" or "Dolby Digital". Press the ENT
5. Press the EXIT
The Audio Format appears according to the broadcasting signal.
➣
button to exit.
Dolby digital sound is only available when the TV is connected with an external speaker using an
optical cable.
English - 37
DTV
Audio Format : PCM
Audio Description
Digital
Time Zone
Common Interfece
ER button.
ER button.
Setup
Text
: Enable
Move Enter Return
ER button.
Page 40

Selecting the Audio Description
This is an auxiliary audio function that provides an additional
audio track for visually challenged persons. This function
handles the Audio Stream for the AD (Audio Description),
when it is sent along with the Main audio from the broadcaster.
Users can turn the Audio Description On or Off and control the
volume.
1. Press the MENU button to display the menu.
Press the ▲ or ▼ button to select "Digital Menu", then press the
ER button.
ENT
2. Press the ▲ or ▼ button to select "Setup", then press the
ENT
ER button.
3. Press the ▲ or ▼ button to select "Audio Description", then
press the ENT
ER button.
4. Press the ▲ or ▼ button to select "On", then press the
ENT
ER
button.
5. Press the ▲ or ▼ button to select "Volume", then press the
ENTER
➣
6.
Press the ◄ or ► button until you reach the optimal setting.
Press the ENT
button.
"Volume" is active when "Audio Description" is set to "On".
ER button.
7. Press the EXIT button to exit.
DTV
DTV
Audio Format : PCM
Audio Description
Text
: Enable
Digital
Time Zone
Common Interfece
Move Enter Return
DTV
DTV
Audio Description
Audio Description
Volume
Move Enter Return
Audio Description
Audio Description
Volume
Move Enter Return
Setup
: On
: On
Off
On
Selecting the Digital Text (UK only)
If the programme is broadcast with digital text, this feature is
enabled.
1. Press the MENU button to display the menu.
Press the ▲ or ▼ button to select "Digital Menu", then press the
ER button.
ENT
2. Press the ▲ or ▼ button to select "Setup", then press the
DT
V
Audio Format : PCM
Audio Description
Digital
Time Zone
Common Interfece
ENTER button.
3. Press the ▲ or ▼ button to select "Digital T
ext", then press
the ENTER button.
4. Press the ▲ or ▼ button to select "Disable" or "Enable". Press the ENT
5. Press the EXIT
MHEG(Multimedia and Hypermedia Information Coding Experts Group) An International standard for data
➣
button to exit.
ER button.
encoding systems used in multimedia and hypermedia. This is at a higher level than the MPEG system
which includes data-linking hypermedia such as still images, character service, animation, graphic and video
files as well as multimedia data. MHEG is user runtime interaction technology and is being applied to various
fields including VOD (Video-On-Demand), ITV (Interactive TV), EC (Electronic Commerce), tele-education,
tele-conferencing, digital libraries and network games.
Setup
Text : E
Move Enter Return
nable
Disable
Enable
100
100
English - 38
Page 41

Selecting the Time Zone (Spain only)
Select the local time zone.
1.
Press the MENU button to display the menu.
Press the ▲ or ▼ button to select "Digital Menu", then press the
ENT
ER button.
2. Press the ▲ or ▼ button to select "Setup", then press the
ENT
ER button.
3. Press the ▲ or ▼ button to select "Time Zone", then press the
ENT
ER button.
4. Select the time zone where you locate by pressing the
▲ or ▼
button.
Press the ENTER button.
➣
The following options are available
The Iberian Peninsula and Balearic Islands -
Canary Islands
T
5. Press the EXI
button to exit.
Viewing Product Information
You can view your product information. For service or repair,
please contact a Samsung approved dealer.
1.
Press the MENU button to display the menu.
Press the ▲ or ▼ button to select "Digital Menu", then press the
ENTER button.
2.
Press the ▲ or ▼ button to select "Setup", then press the
ENTER button.
3. Press the
the ENTER button.
4. Press the ENT
Information".
➣
5. Press the EXIT
▲ or ▼
button to select "System", then press
ER button again, to select "Product
The Product Information menu is selected.
- Software Version, Firmware Version
button to exit.
DTV
Audio Format : PCM
Audio Description
: Enable
Digital Text
Time Zone
Common Interfece
Move Enter Return
DTV
The Iberian Peninsula and Balearic Islands
Canary Islands
DTV
Software Version: T-PERLDEUC-0010
Firmware Version: T-EMMA2DEUB-0105
Time Zone
Adjust Enter Return
Product Information
Return
Setup
English - 39
Page 42

Checking the Signal Information
You can get information about the signal status.
1. Press the MENU button to display the menu.
Press the ▲ or ▼ button to select "Digital Menu", then press the
ER button.
ENT
2.
Press the ▲ or ▼ button to select "Setup", then press the
ENTER button.
3. Press the ▲ or ▼ button to select "System", then press the
ENTER
button.
4. Press the ▲ or ▼ button to select "Signal Information", then press the ENT
5. Press the EXIT
If the signal status is poor, the "No signal." message is displayed.
➣
button to exit.
DTV
Signal Information
Service: ?
Service ID:0000
Multiplex: ? (TSID 0000, ONID 0000)
Network: ? (ID 0000)
Bit error level: 10
Signal Strength: 0
Move Enter Return
Return
ER button.
Upgrading the Software
To keep your product up-to-date with new Digital Television
features then software upgrades are periodically broadcast as
part of the normal Television signal.
It will automatically detect these signals and display the
software upgrade banner. You are given the option to install the
upgrade.
1. Press the MENU button to display the menu.
Press the ▲ or ▼ button to select "Digital Menu", then press the
ER button.
ENT
2. Press the ▲ or ▼ button to select "Setup", then press the
ENTER
button.
3. Press the ▲ or ▼ button to select "System", then press the
EN
TER button.
4. Press the ▲ or ▼ button to select "Software Upgrade",
then press the ENT
5.
Press the
▲ or ▼
ER button.
button to select “Software Information”,
“Manual Upgrade” or “Standby Mode upgrade”.
Press the ENTER button.
♦ Software Information
Press the ENTER button, then the current software version is shown. To display the software
version information, press the ENTER button again.
To switch to an alternative version, press the red button.
Press the blue button to reset, activate the upgrade and restart.
♦ Manual
Upgrade
Press the ENTER button to search for new software from the currently broadcasting channels.
♦ Standby
Mode Upgrade: On / Off
Press the ENTER button. To continue software upgrade with master power on, Select On
by pressing the ▲ or ▼ button. 45 minutes after entering standby mode, a manual upgrade is
automatically conducted. Since the power of the unit is turned on internally, the screen may be on
slightly for the LCD product. This phenomenon may continue for more than 1 hour until the software
upgrade is completed.
6. Press the EXIT
button to exit.
DTV
Product Information
Signal Information
Software Upgrade
Reset
DTV
Software Information
Manual Upgrade
Standby Mode upgrade : On
System
Move Enter Return
Software Upgrade
Move Enter Return
English - 40
Page 43

Viewing Common Interface
This contains information on CAM inserted in the CI slot and
displays it.
1. Press the MENU button to display the menu.
Press the ▲ or ▼ button to select "Digital Menu", then press the
ER button.
ENT
2. Press the ▲ or ▼ button to select "Setup", then press the
EN
TER button.
3. Press the ▲ or ▼ button to select "Common Interface", then
press the ENT
4. Press the ENT
ER button.
ER button to display the information for
your application.
5. Press the EXIT
The Application Info inserting is about the CI CARD.
➣
You can install the CAM anytime whether the
button to exit.
TV is ON or
OFF.
1. Purchase
or by phone.
2.
Insert the CI CARD into the CAM in the direction of the
the CI CAM module by visiting your nearest dealer
arrow until it fits.
3.
Insert the CAM with the CI CARD installed into the common
interface slot.
(Insert the CAM in the direction of the arrow, right up to the
end so that it is parallel with the slot.)
4.
Check if you can see a picture on a scrambled signal channel.
DTV
Type : CA
Manufacturer : Channel Plus
Info : Top Up
Selecting the CI (Common Interface) Menu
This enables the user to select from the CAM-provided menu.
1. Press the MENU button to display the menu.
Press the ▲ or ▼ button to select "Digital Menu", then press the
ER button.
ENT
2. Press the ▲ or ▼ button to select "Setup", then press the
ENTER button.
3. Press the ▲ or ▼ button to select "Common Interface",
then press the ENT
ER button.
4. Select to "CI Menu" by pressing the ▲ or ▼ button, and press the
ENT
ER button.
5. Select the required option by pressing the ▲ or ▼ button, and press the ENT
6. Press the EXIT
Select the CI Menu based on the menu PC Card.
➣
button to exit.
Main menu
Module informa tion
Smart card inf ormation
Language
Software Downl oad
Press OK to select, or Exit to quit
Move Enter Exit
Application Info
TV
Return
CI Menu
ER button.
English - 41
Page 44

Resetting
You can reset the values stored to the factory default values.
The Reset operation deletes all channel information and
➣
user preferences returning all values to their default factory
state.
1.
Press the MENU button to display the menu.
Press the ▲ or ▼ button to select "Digital Menu", then press the
ENTER button.
2. Press the ▲ or ▼ button to select "Setup", then press the
EN
TER button.
3. Press the
the ENT
4. Press the
▲ or ▼
button to select "System", then press
ER button.
▲ or ▼
button to select "Reset", then press the
ENTER button.
5. The "Enter PIN" screen will appear.
6.
Enter your current 4-digit PIN code by using the numeric
buttons (0~9).
The warning message is displayed. All values will be reset
➣
by pressing the coloured buttons (red, green, yellow, and
blue) in turn.
7. Press the EXIT button to exit.
DTV
Enter PIN
DTV
WARNING: All channel settings and user
preferences will be lost and returned to the factory
defaults. It is recommended that a reset is performed
only when serious problems are experienced.
Reset
Enter PIN Return
Reset
Return
Selecting the Preferred Language (Subtitle, Audio or Teletext)
You can change the default value for subtitle, audio teletext
languages.
Displays the language information for the incoming stream.
1. Press the MENU button to display the menu.
Press the ▲ or ▼ button to select "Digital Menu", then press the
ER button.
ENT
2. Press the ▲ or ▼ button to select "Language", then press
the ENT
ER button.
3.
Press the
▲ or ▼
button to select "Audio Language",
"Subtitle Language" or "Teletext Language".
Press the ENTER button.
4. Select a particular language by pressing the ▲ or ▼ button
repeatedly.
Press the ENTER button.
English is the default in cases where the selected
➣
language is unavailable in the broadcast.
5.
Press the EXIT
While viewing a programme, the subtitle can be selected
➣
button to exit.
While viewing a programme, audio languages can be
selected.
DTV
Audio Language
Subtitle Language
Teletext Language
Preference
DTV
Audio Language
Subtitle Language
Teletext Language
Preference
DTV
Audio Language
Subtitle Language
Teletext Language
Preference
Language
Move Enter Return
Language
Move Enter Return
Language
English - 42
Move Enter Return
Page 45

Preference
This menu consists of 6 sub-menus:
Primary Audio Language, Secondary Audio Language, Primary
Subtitle Language, Secondary Subtitle Language, Primary
Teletext Language, Secondary Teletext Language.
Using this feature, users can select one of the languages
(English, German, Italian, Swedish, French, Welsh, Gaelic, Irish,
Danish, Finnish, Spanish, Dutch). The language selected here is the
default when the user selects a channel.
♦ Press
the ▲ or ▼ button to select required menu (Primary
Audio Language, Secondary Audio Language, Primary Subtitle Language, Secondary Subtitle
Language, Primary Teletext Language, Secondary Teletext Language), then press the ENT
button. The options of the selected menu are displayed.
♦ Select the appropriate language by pressing the ▲ or ▼ button.
Press the ENT
➣
If you change the language setting, the Subtitle Language, Audio Language, and the Teletext
ER button to confirm your choice.
Language of the Language menu (refer to page 42) are automatically changed to the selected
language.
➣
The Subtitle Language, Audio Language, and the Teletext Language of the Language menu show a
list of languages supported by the current channel and the selection is highlighted. If you change this
language setting, the new selection is only valid for the current channel. The changed setting does not
change the setting of the Primary Subtitle Language, Primary Audio Language, or the Primary Teletext
Language of the Preference menu.
DTV
Audio Language
Subtitle Language
Teletext Language
Preference
Language
Move Enter Return
Move Enter Return
ER
English - 43
Page 46

Setting up Your PC Software (Based on Windows XP)
The Windows display-settings for a typical computer are shown below. The
actual screens on your PC may be different depending upon your particular
version of Windows and your particular video card. Even if your actual
screens look different, the same, basic set-up information will apply in almost
all cases. (If not, contact your computer manufacturer or Samsung Dealer.)
1. First,
2
click on "Control Panel" on the Windows start menu.
. When the control panel window appears, click on "Appearance and Themes"
and a display dialog-box will appear.
3. When the control panel window appears, click on "Display" and a display
dialog-box will appear.
4
Navigate to the "Settings" tab on the display dialog-box.
.
The correct
a
If
"60"
size setting (resolution): Optimum-
1360 X 768
vertical-frequency option exists on your display settings dialog box, the correct value is
or
"60 Hz". Otherwise, just click "OK" and exit the dialog box.
Display Modes
Both screen position and size will vary depending on the type of PC monitor and its resolution.
The resolutions in the table are recommended.
D-Sub Input
Mode
IBM
VESA
HDMI/DVI Input
Mode
VESA
Resolution
640×350
720×400
640×480
640×480
640×480
800×600
800×600
800×600
1024×768
1024×768
1024×768
1360×768
Resolution
640×480
800×600
1024×768
1360×768
Horizontal
Frequency (kH
31.469
31.469
31.469
37.861
37.500
37.879
48.077
46.875
48.363
56.476
60.023
47.712
Horizontal
Frequency (kH
31.469
37.879
48.363
47.712
z)
Frequency (Hz)
z)
Frequency (Hz)
Vertical
70.086
70.087
59.940
72.809
75.000
60.317
72.188
75.000
60.004
70.069
75.029
60.015
Vertical
59.940
60.317
60.004
60.015
Pixel Clock
Frequency (MHz)
25.175
28.322
25.175
31.500
31.500
40.000
50.000
49.500
65.000
75.000
78.750
85.500
Pixel Clock
Frequency (MHz)
25.175
40.000
65.000
85.500
Sync Polarity
(H/V)
+/-
-/+
-/-
-/-
-/+/+
+/+
+/+
-/-
-/+/+
+/+
Sync Polarity
(H/V)
-/+/+
-/+/+
When using an HDMI/DVI cable connection, you must use the HDMI IN 2 jack.
➣
➣
The interlace mode is not supported.
➣
The set might operate abnormally if a non-standard video format is selected.
➣
Separate and Composite modes are supported. SOG is not supported.
English - 44
Page 47

Setting up the TV with your PC
Preset: Press the SOURCE button to select PC mode.
1. Press
2.
3.
4. Press
the MENU button to display the menu.
Press the EN
button, to select "Picture".
ER
T
Select the required option by pressing the ▲ or ▼ button,
button.
then press the ENT
ER
When you are satisfied with your setting, press the
ENT
ER
button.
the EXIT
button to exit.
♦ Auto
Adjustment
Auto adjustment allows the PC screen of set to self-adjust to
the incoming PC video signal. The values of fine, coarse and
position are adjusted automatically.
Easy Setting
1. Press the TOOLS button on the remote control.
.
Press the ▲ or ▼ button to select “Auto Adjustment”, then
2
press the ENTER button.
♦ Screen
Adjustment:
Coarse/Fine
The purpose of picture quality adjustment is to remove or
reduce picture noise. If the noise is not removed by Finetuning alone, then adjust the frequency as best as possible
(coarse) and Fine-tune again. After the noise has been
reduced, re-adjust the picture so that it is aligned on the
center of screen.
Press the ▲ or ▼ button to select "Coarse" or "Fine", then
ER
button.
button.
press the ENTER
Press the ◄ or ► button to adjust the screen quality.
Press the ENT
TV
Mode : Standard
Backlight 7
Contrast 95
Brightness 45
Sharpness 50
Auto Adjustment
Screen Adjustment
Detailed Settings
Picture Options
Reset : OK
Move Enter Return
Auto Adjustment in progress
Anynet+ (HDMI-CEC)
Picture Mode : Standard
Sound Mode : Custom
Sleep Timer : Off
SRS TS XT : Off
Energy Saving : Off
Auto Adjustment
Move Enter Exit
TV
Coarse 50
Fine 34
Position
Image Reset
Move Enter Return
TV
Picture
Please wait.
Tools
Screen Adjustment
Position
Position
Adjust the PC’s screen positioning if it does not fit the TV
screen.
Press the ▲ or ▼ button to adjusting the Vertical-Position.
Press the ◄ or ► button to adjust the Horizontal-Position.
Press the ENTER
Image Reset
button.
You can replace all image settings with the factory default
values.
English - 45
Move Enter Return
TV
Screen Adjustment
Coarse 50
Fine 34
Position
Image Reset
Move Enter Return
Page 48

What is Anynet+?
Anynet+ is an AV network system that enables an easy-to-use AV interface for users by controlling
all connected AV devices through the Anynet+ menu when Samsung Electronics AV devices are
connected.
Connecting Anynet+ Devices
The Anynet+ system supports AV devices supporting Anynet+ only.
Check if there is an Anynet+ mark on the AV device to be connected to the TV.
TV
Anynet+ Device 1 Anynet+ Device 2 Anynet+ Device 3
To directly connect to TV
Connect the [HDMI 1], [HDMI
2] or [HDMI 3] jack on the TV
and the HDMI OUT jack of the
corresponding Anynet+ device
using the HDMI cable.
HDMI Cable
TV
HDMI Cable
DMI Cable
H
To connect to
H
ome Theater
1. Connect the [HDMI 1],
[HDMI 2] or [HDMI 3]
Anynet+ Device 1 Anynet+ Device 2
jack on the TV and the
HDMI OUT jack of the
corresponding Anynet+
device using the HDMI
cable.
2
.
HDMI Cable
Home Theatre
HDMI Cable
Anynet+ Device
Connect the HDMI IN jack
of the home theatre and
the HDMI OUT jack of the
corresponding Anynet+
3
device using the HDMI
cable.
Optical Cable
HDMI Cable
H
DMI Cable
Connect only the optical cable between [Digital Audio Out (Optical)] on your TV and Digital Audio
➣
Input on the receiver.
Connect only one receiver.
➣
You can listen to 5.1 channel sound through the home theatre’s speakers. Otherwise, you can only
➣
listen to 2 channel stereo sound in other cases. Make sure to connect the Digital Audio IN (Optical) of
the home theatre and the TV correctly to listen to TV sound through the home theatre. However, you
cannot listen to sound from the BD recorder that is sent to the home theatre via the TV in 5.1 channel
sound because the TV outputs only 2 channel stereo sound. Please see the manual for the home
theatre.
You can connect an Anynet+ device using the HDMI cable. Some HDMI cables may not support
➣
Anynet+ functions.
Anynet+ works when the AV device supporting Anynet+ is in the Standby or On status.
➣
Anynet+ supports up to 8 AV devices in total.
➣
English - 46
Page 49

Setting Up Anynet
+
The following settings are to use Anynet+ functions.
Using the Anynet+ Function
1. Press The TOOLS button. Then Press the ENTER
to select "Anynet+(HDMI-CEC)".
Press the ▲ or ▼ button to select "Setup", then press the
ENTER
2.
Press the ENTER
then press the ENTER
3.
Press the ▲ or ▼ button to select "On", then press the
ENTER
➣
The "Anynet+ (HDMI-CEC)" function is enabled.
➣
If you select "Off", "Anynet+ (HDMI-CEC)" is disabled.
➣
When the "Anynet+ (HDMI-CEC)" function is disabled, all the
button.
button.
button to select "Anynet+ (HDMI-CEC)",
button.
Anynet+ related operations are deactivated.
button
Tools
Anynet+ (HDMI-CEC)
Picture Mode : Standard
Sound Mode : Custom
Sleep Timer : Off
SRS TS XT : Off
Energy Saving : Off
Dual l-ll : Mono
Move Enter Exit
TV P9
View TV
Select Device
Record
Menu on Device
Device Operation
Receiver :Off
Setup
Move Enter
Return
Setup
Anynet+ (HDMI-CEC)
Auto Turn Off
Searching Connections
Move Enter Return
: Off
: Off
Off
On
Turning an Anynet+ Device Off
Automatically when the TV is Turned Off
1. Press the ▲ or ▼ button to select "Auto Turn Off", then press
the ENTER
2.
Press the ▲ or ▼ button to select "Yes", then press the
ENTER
➣
The Auto turn off function is enabled.
➣
If you select "No", the Auto turn off function is cancelled.
Press the EXI
➣
The Select Device setting of the TV remote control is to be set
button.
button.
T button to exit.
to TV to use the Anynet+ function.
➣
If you set "Auto Turn Off" to "No", connected external devices
are also turned off when the TV is turned off. However, if the
device is recording, it may not be turned off.
English - 47
Setup
Anynet+ (HDMI-CEC)
Auto Turn Off
Searching Connections
Move Enter Return
: On
: Off
No
Yes
Page 50

Scanning and Switching between Anynet+ Devices
1. Press the TOOLS button. Then press the ENTER button to
select "Anynet+(HDMI-CEC)".
2. Press the ▲ or ▼ button to select "Select Device", then press
the ENTER button.
3. Press the ▲ or ▼ button to select to a particular device and
press the ENTER button. It is switched to the selected
device.
4. If you cannot find a device you want, press the ▲ or ▼ button
to select "Setup", then press the ENTER button.
5. Press the ▲ or ▼ button to select "Searching Connections",
then press the ENTER button.
The message "Configuring Anynet+ connection..." is displayed.
When searching devices completes, the connected devices are
listed in the Anynet+ menu.
Switching to the selected devices may take up to 2 minutes.
➣
You cannot cancel the operation during the switching operation.
The time required to scan for devices is determined by the
➣
number of connected devices.
When the device scan is complete, the number of found
➣
devices is not displayed.
Although the TV automatically scans devices when it is turned on using the POWER button, devices
➣
connected when the TV is on or under a specic circumstance are not displayed in the device list.
Therefore select "Searching Connections" menu to search devices.
If you have selected external input mode by pressing the SOURCE button, you cannot use the
➣
Anynet+ function. Make sure to switch to an Anynet+ device by using the TOOLS button.
TV P9
View TV
Select Device
Record
Menu on Device
Device Operation
Receiver :Off
Setup
Move Enter
Move Enter Return
Return
Setup
Anynet+ (HDMI-CEC)
Auto Turn Off
Searching Connections
Move Enter Return
: On
: Yes
English - 48
Page 51

Anynet+ Menu
The Anynet+ menu changes depending on the type and status of the Anynet+ devices connected
to the TV.
Anynet+ Menu Description
View TV Switches from Anynet+ to TV broadcast mode.
Select Device Your TV connects to the corresponding device.
Record Starts a recording. (This menu works only for a device supporting
Menu on Device Shows the menu of the connected device.
Device Operation Shows the play control menu of the connected device.
Receiver Sound is output through the receiver.
Setup You can set the environment for using Anynet+.
recording.)
Example. When a DVD Recorder is connected, the DVD Recorder’s
title menu appears.
Example. When a DVD Recorder is connected, the play control
menu of the DVD Recorder appears.
V Remote Control
T
Device Type Operating Status Available Buttons
Anynet+ Device
Device with built-in Tuner
Audio Device When Receiver is activated
➣
The Anynet+ function only works when the remote control is set to TV.
➣
The
➣
You cannot control Anynet+ devices using the buttons on the TV. You can control Anynet+ devices
only using the TV remote control.
The TV remote control may not work under certain conditions. In this case, re-select the Anynet+
➣
device.
The Anynet+ functions don’t operate for the products from other manufacturers.
➣
In Anynet+ mode, the colour buttons may not work properly.
➣
The
➣
Buttons Available in Anynet+ Mode
After switching to the
device, when the menu of
the corresponding device is
displayed on the screen.
After switching to the device,
while playing a file
After switching to the device,
when you are watching a TV
programme
button works only while in the recordable state.
, operations may differ depending on the device.
Numeric buttons
▲/▼/◄/►/ENTER
Colour buttons EXIT button
(Backward search)/
(Forward search)/
(Stop)/ (Play)
(Pause)
P</>button
+/- button/
MUTE button
buttons
English - 49
Page 52

Recording
You can make a recording of a TV programme using a recorder.
Press the
Recording begins. (Only when the Anynet+ enabled recording device is connected.)
The current TV programme is recorded in the Watching TV status. If you are watching video from
➣
another device, the video from the device is recorded.
You can also record the source streams by selecting "Record" after pressing the TOOLS button.
➣
Before recording, check whether the antenna jack is properly connected to the recording device. For
➣
the antenna connection to the recording device, refer to its user manual.
button.
Listening through a Receiver
You can listen to sound through a receiver instead of the TV speaker.
1. Press The TOOLS button. Then Press the ENT
to select "Anynet+(HDMI-CEC)".
Press the ▲ or ▼ button to select "Receiver", then press the
ENTER
2.
Press the ◄ or ► button to select to "On", then press the
ENTER
Now you can listen to sound through the receiver.
3
Press the EXIT button to exit.
.
➣
When the receiver is set to On, you can listen to the TV sound
through the 2-channel receiver.
If the receiver is exclusively for a home theatre only
➣
(supporting audio only), it may not appear in the device list.
➣
Only when you have connected the optical jack of the TV and the receiver properly, does Receiver
work.
In case of a content with copyright problem, listening through the receiver may not properly operate.
➣
If there is a power interruption to the TV when the “Receiver” is set to “On” (by disconnecting the
➣
power cord or a power failure), the “TV Speaker” may be set to “Off” when you turn the
(see page 22)
button.
button.
ER
button
TV P9
View TV
Select Device
Record
Menu on Device
Device Operation
Receiver :Off
Setup
Move Enter
Return
TV on again.
English - 50
Page 53

Check Points before Requesting Service
Symptom Solution
Anynet+ does not
work.
I want to start
Anynet+.
I want to exit Anynet+. ■
he Configuring
T
Anynet+ connection
message appears on
the screen.
The
Anynet+ device
does not play.
The connected device
is not displayed.
he TV programme
T
cannot be recorded.
he
TV sound is not
T
output through the
receiver.
■ Check if the device is an
devices only.
■ Connect only one receiver.
■ Check if the Anynet+ device power cord is properly connected.
■ Check the Anynet+ device’s Video/Audio/
■ Check whether Anynet+ (HDMI-CEC) is set to On in the Anynet+ setup menu.
■ Check whether the TV remote control is in TV mode.
■ Check whether it is Anynet+ exclusive remote control.
■ Anynet+ doesn’t work at a certain condition. (
etc.)
When connecting or removing the HDMI cable, please make sure to search
■
devices again or restart your
Check if the
■
■ Check if the
Anynet+ (HDMI-CEC) is set to On in the Anynet+ Setup menu.
■ Press the TV/DTV button on the TV remote control to switch to TV. Then press
the TOOLS button to show the Anynet+ menu and select a menu you want.
Select
■ Press the SOURCE button on the TV remote control and select a device other
than Anynet+ devices.
Press any of
■
TV mode. (Note that the channel button operates only when a tuner-embedded
Anynet+ device is not connected.)
ou cannot use the remote control when you are configuring Anynet+ or
■ Y
switching to a view mode.
■ Use the remote control when the
complete.
You cannot use the play function when Plug & Play is in progress.
■ Check whether or not the device supports
■ Check whether or not the HDMI cable is properly connected.
■ Check whether Anynet+ (HDMI-CEC) is set to On in the Anynet+ setup menu.
■ Search Anynet+ devices again.
■ You can connect an Anynet+ device using the
cables may not support Anynet+ functions.
■ If it is terminated by an abnormal situation such as disconnecting the HDMI cable
or power cord or a power failure, please repeat the device scan.
Check whether the antenna jack on the recording device is properly connected.
Connect the optical cable between TV and the receiver.
Anynet+ Function of Anynet+ device is set on.
Anynet+ device is properly connected to the TV and check if the
View TV in Anynet+ menu.
P / , CH LIST, PRE-CH, and such to change to the
Anynet+ device. The Anynet+ system supports Anynet+
HDMI cable connections.
Searching channels, Plug & Play,
TV.
Anynet+ setting or switching to view mode is
Anynet+ functions.
HDMI cable only. Some HDMI
English - 51
Page 54

Teletext Feature
Most television stations provide written information services via Teletext. The index page of
the teletext service gives you information on how to use the service. In addition, you can select
various options to suit your requirements by using the remote control buttons.
For teletext information to be displayed correctly, channel reception must be stable. Otherwise,
information may be missing or some pages may not be displayed.
(exit)
1.
Exit from the teletext display
2 6 (index)
Used to display the index (contents) page at any time while you
are viewing teletext.
3 8 (store)
Used to store the teletext pages.
4 4 (size)
Press to display the double-size letters in the upper half of the
screen. For lower half of the screen, press it again. To display
normal screen, press it once again.
5 5 (reveal)
Used to display the hidden text (answers to quiz games, for
example). To display normal screen, press it again.
6 / (teletext on/mix)
Press to activate teletext mode after selecting the channel
providing the teletext service. Press it twice to overlap the teletext
with the current broadcasting screen.
7 0 (mode)
Press to select the teletext mode (LIST/FLOF). If you press it
in the LIST mode, it switches into the List save mode. In the
List save mode, you can save teletext page into list using the
8(store) button.
8 1 (sub-page)
Used to display the available sub-page.
9 2 (page up)
Used to display the next teletext page.
0 3 (page down)
Used to display the previous teletext page.
! 9 (hold)
Used to hold the display on a given page if the selected page is linked with several secondary
pages which follow on automatically. To resume, press it again.
@ 7 (cancel)
Used to display the broadcast when searching for a page.
# Colour buttons (red/green/yellow/blue)
If the FASTEXT system is used by a broadcasting company, the different topics covered on a
teletext page are colour-coded and can be selected by pressing the coloured buttons. Press one
of them corresponding to the required. The page is displayed with other coloured information that
can be selected in the same way. To display the previous or next page, press the corresponding
coloured button.
1
2
3
4
5
6
7
8
9
0
!
@
#
You can change teletext pages by pressing the numeric buttons on
the remote control.
English - 52
Page 55

The teletext pages are organized according to six categories:
Part Contents
A Selected page number.
B Broadcasting station identity.
C Current page number or search status.
D Date and time.
E Text.
F Status information.
FASTEXT information.
Teletext information is often divided between several pages displayed in sequence, which can be
accessed by:
♦ Entering the page number
♦ Selecting a title in a list
♦ Selecting a coloured heading (FASTEXT system)
Press the TV/DTV button to exit from the teletext display.
English - 53
Page 56

Wall-Mount Adjustment (Sold separately) (depending on the model)
Once the auto wall mount is installed, your TV’s position can be easily adjusted.
TV Rear Panel Auto Wall-Mount
SERVICE Cable (Not supplied)
Entering the menu
1. Press the ▲, ▼, ◄ or ► button on your remote control.
The Wall Mount Adjustment screen is displayed.
➣
If the Wall Mount Adjustment screen is not displayed when
➣
clicking on a direction button while watching your TV, use
the menu to display that screen.
•
Press the MENU
butt on to display the menu.
Press the ▲ or ▼ button to select “Setup”, then press the
ENT
ER
button.
• Press the ▲ or ▼ button to select “W
then press the ENT
ER
button.
all-Mount Adjustment”,
TV
Plug & Play
Language : English
Time
Wall-Mount
Melody : Off
Entertainment : Off
Energy Saving : Off
Move Enter Return
Setup
Adjustment
Remembering the Position
2
Adjust to the desired position using the ▲,▼,◄,► buttons.
.
If you press an arrow button when no OSD is displayed on
➣
the TV screen, the Adjustment screen appears.
Press the INFO button to reset. Press the ◄ or ► button to
➣
select “Yes”, then press the EN
The position is initialized to the default setting.
3.
Press the blue button.
button.
ER
T
Press the ▲ and ▼ buttons to select a save mode from either
Position 1, Position 2 or Position 3 in order to save the current
position.
To not save the current position, press the RE
➣
When selecting a save mode, you cannot use the Colour
➣
URN button.
T
buttons.
4.
Press the ENT
When Position1 is selected, the message "Current position
➣
button to save.
ER
saved as Position1" is displayed.
5.
Press the ENT
The saved Position appears on the left side of the OSD.
➣
ER
button.
English - 54
Wall-Mount Adjustment
Position 1 2 3
Adjust Save Center
Select a mode to Save.
Position1
Position2
Position3
Move Enter Return
INFO
Save
Page 57

Moving to the remembered position
1. Complete Step 1 of “Entering the menu”.
2.
Pressing a Colour (Red, Green, Yellow) button moves the auto
wall mount to the saved position.
You can move the wall mount to one of the 3 pre-set
➣
positions by pressing the Red (Position 1),
Green (Position 2) or Yellow (Position 3) buttons.
If you adjust the Position after moving to a pre-set position,
➣
the position display will disappear.
For installation, refer to the Installation Manual provided with the wall mount.
➣
For product installation and the installation and moving of the wall mount, make sure to consult a
➣
specialized installation company.
This installation manual is to be used when attaching the wall mount to a wall. When attaching to
➣
other building materials, please contact your nearest dealer.
The auto wall mount will not work when Anynet+ is operating.
➣
37 and 40 inch models are not compatible with the old electrically powered wall mount model
➣
(WMN5090A*).
Wall-Mount Adjusment
Position1
Position 1 2 3
Adjust Save Center
INFO
Using the Anti-Theft Kensington Lock (depending on the model)
The Kensington lock is a device used to physically fix the system when using it in a public place.
The appearance and locking method may differ from the illustration depending on the manufacturer.
Refer to the manual provided with the Kensington lock for proper use. The locking device has to be
purchased separately.
1. Insert the locking device into the Kensington
slot on the LCD TV (Figure 1), and turn it in the
locking direction (Figure 2).
2. Connect the Kensington lock cable.
3. Fix the Kensington lock to a desk or a heavy
stationary object.
The location of the Kensington Lock may be
➣
different depending on its model.
Cable
Figure 2
Figure 1
<Optional>
English - 55
Page 58

Troubleshooting: Before Contacting Service Personnel
No sound or picture.
Normal picture but no
sound.
Screen is black and power
indicator light blinks steadily.
No picture or black and
white picture.
Sound and picture
interference.
Blurred or snowy picture,
distorted sound.
Remote control malfunctions.
'Check signal cable.'
message is displayed.
On PC mode, 'Not Supported
Mode.' message is displayed.
The damaged picture appears
in the corner of the screen.
The 'Resets all settings to
the default values' message
appears.
The TFT LCD panel uses a panel consisting of sub pixels (3 133 440) which require sophisticated
technology to produce. However, there may be few bright or dark pixels on the screen. These pixels will
have no impact on the performance of the product.
Check that the mains lead has been connected to a wall socket.
Check that you have pressed the
Check the picture contrast and brightness settings.
Check the volume.
Check the volume.
Check whether the MUTE
Check if "TV Speaker" is on.
On your computer check; Power, Signal Cable.
The TV is using its power management system.
Move the computer’s mouse or press any key on the keyboard.
Adjust the colour settings.
Check that the broadcast system selected is correct.
Try to identify the electrical appliance that is affecting the set and move it
further away.
Plug your set into a different mains socket.
Check the direction, location and connections of your aerial.
This interference is often due to the use of an indoor aerial.
Replace the remote control batteries.
Clean the upper edge of the remote control (transmission window).
Check the battery terminals.
Check that the signal cable is firmly connected to the PC or video sources.
Check that the PC or video sources are turned on.
Check the maximum resolution and the frequency of the video adaptor.
Compare these values with the data in the Display Modes.
If "Just Scan" is selected in some external devices, the damaged picture
may appear in the corner of the screen. This symptom is caused by external
devices, not TV.
This appears when you press and hold the EXI
The product settings are reset to the factory defaults.
button on your set.
button has been pressed on the remote control.
T
button for a while.
English - 56
Page 59

Technical and Environmental Specications
Model Name
Screen Size (Diagonal)
PC Resolution
Sound
Output
Dimensions (WxDxH)
Body
With stand
Weight
With stand
Environmental Considerations
Operating Temperature
Operating Humidity
Storage Temperature
Storage Humidity
Stand Swivel
(Left / Right)
LE32A436/LE32A437 LE37A436/LE37A437
32 inch 37 inch
1360 X 768 @ 60 Hz 1360 X 768 @ 60 Hz
10W x 2 10W x 2
796 X 79 X 531 mm
796 X 252 X 580 mm
13 kg 18 kg
10 °C to 40 °C (50 °F to 104 °F)
10 % to 80 %, non-condensing
-20 °C to 45 °C (-4 °F to 113 °F)
5 % to 95 %, non-condensing
-20˚ ~ 20˚ -20˚ ~ 20˚
916 X 87 X 572 mm
916 X 300 X 652 mm
10 °C to 40 °C (50 °F to 104 °F)
10 % to 80 %, non-condensing
-20 °C to 45 °C (-4 °F to 113 °F)
5 % to 95 %, non-condensing
Model Name
Screen Size (Diagonal)
PC Resolution
Sound
Output
Dimensions (WxDxH)
Body
With stand
Weight
With stand
Environmental Considerations
Operating Temperature
Operating Humidity
Storage Temperature
Storage Humidity
Stand Swivel
(Left / Right)
Design and specifications are subject to change without prior notice.
This device is a Class B digital apparatus.
For the power supply and Power Consumption, refer to the label attached to the product.
LE40A436/LE40A437
40 inch
1360 X 768 @ 60 Hz
10W x 2
971 X 87 X 628 mm
971 X 300 X 687 mm
21 kg
10 °C to 40 °C (50 °F to 104 °F)
10 % to 80 %, non-condensing
-20 °C to 45 °C (-4 °F to 113 °F)
5 % to 95 %, non-condensing
-20˚ ~ 20˚
English - 57
Page 60

Comment contacter Samsung dans le monde
Si vous avez des suggestions ou des questions concernant les produits Samsung, veuillez contacter le
Service Consommateurs Samsung. (Voir la quatrième de couverture pour plus d’informations.)
Précautions à prendre lors de l’affichage d’une image fixe
Une image fixe peut causer des dommages irrémédiables à l’écran du téléviseur.
• N’affichez pas une image fixe sur l’écran LCD plus de 2 heures. Cela pourrait provoquer une
rémanence de l’image à l’écran.
Cette rémanence de l’image est également appelée “brûlure de l’écran”.
Pour éviter une telle rémanence de l’image à l’écran, réduisez la luminosité et le contraste de
l’écran lorsque vous laissez une image fixe affichée.
•
console de jeu peut avoir un effet similaire sur l’écran. Les dommages provoqués par les effets qui
précèdent ne sont pas couverts par la garantie.
• L’affichage d’images fixes de jeux vidéo et d’ordinateurs pendant plus longtemps qu’une période
spécifique peut provoquer des rémanences.
Pour éviter cela, réduisez la “luminosité” et le “contraste” lors de l’affichage d’images fixes.
© 2008 Samsung Electronics Co., Ltd. All rights reserved.
Regarder l’écran LCD du téléviseur en format 4:3 pendant une longue période peut
laisser des traces de bordures à gauche, à droite et au centre de l’écran, à cause de la
différence d’émission de lumière sur l’écran. La lecture d’un DVD ou l’utilisation d’une
Page 61

Sommaire
BRANCHEMENT ET INSTALLATION DE VOTRE TELEVISEUR
Liste des pièces ................................................. 2
Installation du support ........................................ 2
Installation du support mural .............................. 2
Présentation du panneau de comman ............... 3
Présentation du panneau de branchement ........ 4
Présentation de la télécommande ...................... 7
Insertion des piles dans la télécommande ......... 8
Mise en marche et arrêt ..................................... 8
Mise en mode veille de votre téléviseur ............. 8
Afchage des menus .......................................... 9
Utilisation du bouton TOOLS .............................. 9
Plug & Play ....................................................... 10
REGLAGE DES CANAUX
Mémorisation automatique des canaux ............11
Mémorisation manuelle des canaux ................. 12
Ajout/Verrouillage de canaux ........................... 13
Organisation des canaux mémorisés ............... 14
Attribution de noms aux canaux ....................... 14
Réception des canaux grâce à la syntonisation ne
LNA (Amplicateur à faible bruit) ...................... 15
15
REGLAGE DE L’IMAGE
Changement de la norme Image ...................... 16
Réglage de l’image personnalisée ................... 17
Réglages des détails de l’image ...................... 17
Reinitialisation des paramètres d’image
à leur valeur par défaut. ................................... 18
Conguration de l’option Image ....................... 19
UTILISATION DE LA FONCTION DTV
Aperçu du Système Menu DTV ........................ 28
Mise à jour automatique de la liste des chaînes
Mise à jour manuelle de la liste des chaînes ... 29
Modication de vos canaux favoris .................. 30
Sélection de la liste des chaînes ...................... 32
Afchage des informations relatives aux
programmes ..................................................... 32
Afchage des informations relatives au Guide
de programme électronique (GPE) .................. 33
Utilisation de la liste réglée .............................. 34
Congurer le Guide par défaut ......................... 34
Visualisation de tous les canaux et des
canaux favoris .................................................. 35
Réglage de la transparence du menu .............. 35
Conguration du contrôle parental ................... 36
Conguration des sous-titres ........................... 37
Conguration du Mode Sous-titres ................... 37
Sélection du format sonore .............................. 37
Sélection de la description audio ..................... 38
Sélection du texte numérique
(Royaume-Uni uniquement) ............................. 38
Sélection du fuseau horaire
(Espagne uniquement) ..................................... 39
Afchage des informations relatives au produit
Vérication des informations relatives au signal
Mise à jour du logiciel ....................................... 40
Visualisation de l’interface commune ............... 41
Sélection du Menu CI(Interface commune) ...... 41
Réinitialisation .................................................. 42
Sélection de la langue
(Sous-titres, Audio ou Teletext) ........................ 42
Préférence ........................................................ 43
29
.. 39
.. 40
Français
REGLAGE DU SON
Fonctions audio ................................................ 21
Sélection du mode Son .................................... 22
Branchement du casque (vendu séparément) . 22
REGLAGE DE L’HEURE
Réglage et afchage de l’heure actuelle .......... 23
Réglage du minuteur de mise en veille ............ 23
Mises en marche et arrêt automatiques
de votre téléviseur ............................................ 24
DESCRIPTION DES FONCTIONS
Choix de la langue ........................................... 24
Mélodie / Divertissement / Mode éco. .............. 25
Sélection de la source ...................................... 26
Modication du nom de la source d’entrée ...... 27
Symboles Appuyer Remarque Bouton
d’accès
rapide
Français - 1
Français - 1
REGLAGE DU PC
Conguration de votre logiciel PC
(basée sur Windows XP) ................................. 44
Modes d’afchage ............................................ 44
Conguration du téléviseur avec le PC ............ 45
ANNEXE
Qu’est-ce que Anynet+ ? .................................. 46
Connexion d’appareils Anynet+ ........................ 46
Conguration d’Anynet+ ................................... 47
Recherche d’appareils Anynet+ et
basculement entre des appareils ..................... 48
Enregistrement ................................................. 50
Ecoute via un récepteur ................................... 50
Vérications avant de faire appel au service
d’assistance ..................................................... 51
RECOMMANDATIONS D’UTILISATION
Fonction de télétexte ........................................ 52
Ajustement xation murale
(en fonction du modèle) ................................... 54
Utilisation du verrouillage Kensington antivol
(en fonction du modèle) ................................... 55
Dépannage : Avant de contacter le personnel
du service d’assistance .................................... 56
Spécications techniques et environnementales
(vendu séparément)
57
Page 62

Liste des pièces
Vériez que les éléments suivants sont inclus avec votre téléviseur LCD.
S’il manque des éléments, contactez votre revendeur.
M4XL16
Télécommande
/ Piles
(AAA x 2)
♦ Manuel d’utilisation ♦ Carte de garantie ♦ Manuel de sécurité ♦ Cartes d’enregistrement
➣
Carte de garantie/ Manuel de sécurité / Cartes d’enregistrement (Non disponibles dans tous les pays)
Selon le modèle, il se peut que le socle et les vis ne soient pas inclus.
➣
Cordon
d’alimentation
Bouchon - Base
Vis de pied
X 4
Support
Chiffon de
nettoyage
Installation du support
2
1
1. Connectez votre téléviseur LCD et le support.
Le téléviseur doit être soulevé par plusieurs personnes.
➣
➣
Assurez-vous de distinguer la partie avant de la partie arrière du support lorsque vous les
assemblez.
2. Fixez deux vis à l’emplacement 1 puis deux autres à l’emplacement 2.
➣
Mettez le produit à la verticale et serrez les vis. Si vous serrez les vis alors que le téléviseur LCD
est à l’horizontale, il est possible qu’il penche d’un côté.
➣
Le socle est installé pour les modèles dont la taille de l’écran est de 37 pouces ou plus.
Installation du support mural
Les élements du support mural (vendus séparément) permettent de
xer le téléviseur au mur.
Pour plus d’informations sur l’installation du support mural, reportez-
vous aux instructions fournies avec les élements du support mural.
Faites appel à un technicien pour installer la xation murale.
Samsung Electronics ne saurait être tenu responsable de tout
dommage sur le produit ni de toute blessure subie par vous ou
par d’autres personnes si vous choisissez d’effectuer l’installation
murale.
N’installez pas votre kit de montage mural lorsque votre
téléviseur est en fonctionnement. Une blessure par choc
électrique pourrait en résulter.
Enlevez le support, bouchez l’orice de la base et fermez à
➣
l’aide de deux vis.
Français - 2
Page 63

Présentation du panneau de comman
Boutons du panneau
latéral
1
2
3
4
5
La couleur et la forme du produit peuvent varier en fonction du modèle.
➣
1
SOURCE
Afche un menu de toutes les sources d’entrée
disponibles (TV, Ext.1, Ext.2, AV, S-Vidéo,
Composant, PC, HDMI1, HDMI2 et HDMI3, DTV).
Dans le menu à l’écran, untilisez ce bouton de la
même façon que le bouton ENTER
télécommande.
2
MENU
Permet d’afcher le menu des fonctions de votre
téléviseur sur l’écran.
3
Permet d’augmenter ou de baisser le volume.
Dans le menu à l’écran, utiliser les boutons
de la même façon que les boutons
et de la télécommande.
4
Permet de changer de canal.
Dans le menu à l’écran, utiliser les boutons
de la même façon que les boutons
▲ et ▼ de la télécommande.
(Vous pouvez allumer votre téléviseur sans votre
télécommande à l’aide de ces boutons.)
6 5
5
Haut-parleurs
6
(Alimentation)
Permet d’allumer et d’éteindre le téléviseur.
de votre
Témoin d’alimentation
Clignote et s’éteint lorsqu’il est sous tension et
s’allume en mode Veille.
Capteur de la télécommande
Dirigez la télécommande vers ce point du
téléviseur.
Français - 3
Page 64

Présentation du panneau de branchement
[
Panneau latéral du téléviseur
]
[Panneau arrière du téléviseur]
2 3 54 61
Entrée de
l’alimentation
La couleur et la forme du produit peuvent varier en fonction du modèle.
➣
Lorsque vous branchez un périphérique externe à votre téléviseur, assurez-vous que celui-ci est éteint.
➣
➣
Lorsque vous branchez un périphérique externe, faites correspondre les couleurs de la borne de connexion et
!@
0
du câble.
1
PC IN [PC] / [AUDIO]
Pour raccorder la prise de sortie vidéo et audio de votre PC.
-
2
COMPONENT IN
-
Branchez les câbles composants vidéo (en option) au connecteur de composant
("PR", "PB", "Y")
de votre téléviseur et les autres extrémités aux connecteurs de sortie vidéo du composant correspondants
sur le téléviseur numérique ou le lecteur DVD.
Si vous souhaitez brancher à la fois le boîtier décodeur et le téléviseur numérique (ou lecteur DVD), vous
-
devez brancher le boîtier décodeur au téléviseur numérique (ou lecteur DVD) et le téléviseur numérique (ou
lecteur DVD) au connecteur de composant
-
Les connecteurs
PR, PB
ou Y et de vos appareils composants (téléviseur numérique ou lecteur DVD) sont
("PR", "PB", "Y")
de votre téléviseur.
parfois désignés par les lettres Y, B-Y et R-Y ou Y, Cb et Cr.
-
Branchez les câbles audio RCA (en option) sur la prise “R - AUDIO - L” située à l’arrière du téléviseur et
leurs autres extrémités sur les prises de sortie audio correspondantes du téléviseur numérique ou du lecteur
DVD.
7
3
8
9
à l’arrière
Français - 4
Page 65

3 HDMI IN 1, HDMI IN 2, HDMI IN 3
-
Prend en charge les connexions entre des périphériques audio/vidéo compatibles HDMI (boîtiers décodeurs,
lecteurs DVD).
-
Aucune connexion audio supplémentaire n’est nécessaire pour une connexion HDMI - HDMI.
-
Lorsque vous utilisez une connexion avec câble HDMI/DVI, vous devez utiliser la borne HDMI IN2.
Qu’
➣
est-ce que HDMI ?
-
“High Denition Multimedia interface” permet la transmission de données vidéo numériques haute dénition
et plusieurs canaux de son numérique.
-
Le terminal HDMI/DVI prend en charge la connexion DVI vers un périphérique raccordé avec le câble
adéquat (non fourni). La différence entre HDMI et DVI est que le périphérique HDMI est plus petit, est
équipé de la fonction de codage HDCP (High Bandwidth Digital Copy Protection), et gère le son numérique
multicanal.
D
VI
IN(HDMI2) [R-AUDIO-L]
-
Sorties audio DVI pour périphériques externes.
Modes pris en charge pour HDMI/DVI et Composant
➣
HDMI/DVI 50Hz X X X O O O
HDMI/DVI 60Hz X O X X O O
Composant O O O O O O
4 AUDIO OUT [R-AUDIO-L]
-
Branchez les câbles audio RCA au connecteur AUDIO OUT [R-AUDIO-L] situé à l’arrière de votre poste et
aux connecteurs d’entrée audio correspondants sur l’amplicateur ou le système Home Cinema.
5
ANT IN
An de retransmettre correctement les canaux de télévision, le téléviseur doit recevoir un signal depuis l’une
des sources suivantes :
-
une antenne extérieure / un réseau de télévision câblée / un réseau par satellite.
6
SERVICE
-
Prise pour MAINTENANCE uniquement.
-
Connectez-le à la prise du support de montage mural en option. Cette fonction vous permet d’ajuster l’angle
de visualisation du téléviseur à l’aide de la télécommande.
480i 480p 576i 576p 720p 1080i
7
Emplacement pour COMMON INTERFACE
-
Si la carte d’interface commune n’est pas insérée dans certains
canaux, “Signal brouillé” s’afche sur l’écran.
-
Les informations de pairage contenant un numéro de téléphone,
l’ID de la CI CARD, l’ID de l’hôte et d’autres informations
s
fcheront dans 2 ou 3 minutes. Si un message d’erreur s’afche,
’a
contactez votre prestataire de service.
-
Lorsque la conguration des informations sur les canaux est
terminée, le message “Mise à jour terminée” s’afche, indiquant
que la liste des chaînes est dorénavant mise à jour.
Vous devez obtenir une carte d’interface commune provenant d’un fournisseur local de diffusion par
➣
câble. Retirez la carte d’interface commune en la tirant délicatement avec vos mains. Sa chute pourrait
l’endommager.
Insérez la carte d’interface commune (CI-C ard) dans le sens indiqué sur celle-ci.
➣
L’emplacement du logement pour COMMON INTERFACE peut varier en fonction du modèle.
➣
Français - 5
Page 66

8
S-VIDEO ou VIDEO / R-AUDIO-L
-
Branchez un câble RCA ou S-VIDEO à un périphérique audio/vidéo externe approprié tel qu’un magnétoscope,
un lecteur DVD ou un Caméscope.
-
Branchez les câbles audio RCA sur la prise “R - AUDIO – L” du téléviseur et leurs autres extrémités sur les
prises de sortie audio correspondantes du périphérique audio/vidéo.
9
Prise casque
-
Vous pouvez brancher un casque à la prise casque du téléviseur. Lorsque le casque est branché, les
haut-parleurs intégrés n’émettent plus de son.
0 Verrouillage Kensington (en fonction du modèle)
-
Le verrouillage Kensington (en option) est un dispositif utilisé pour xer physiquement le système dans le cas
d’une utilisation dans un endroit public.
-
Si vous désirez utiliser un dispositif de verrouillage, contactez le revendeur où vous avez acheté le téléviseur.
-
L’emplacement du verrou Kensington peut varier en fonction du modèle.
!
DIGITAL AUDIO OUT (OPTICAL)
-
A connecter à un composant audio numérique.
➣
Lorsque les prises HDMI IN sont branchées, la prise DIGITAL AUDIO OUT (OPTICAL) du téléviseur alimente
uniquement un périphérique audio 2 canaux. Pour écouter des chaînes audio 5.1, branchez la prise optique du
lecteur DVD ou du décodeur câble/récepteur satellite directement sur un amplicateur ou sur un système home
cinéma, et non sur le téléviseur.
@ E
EXT 2
XT 1,
Connecteur
EXT 1 O O O Seule la sortie TV ou DTV est disponible.
EXT 2 O O Sortie que vous pouvez sélectionner.
Entrées ou sorties pour périphériques tels que des magnétoscopes, des lecteurs DVD, des consoles de jeux
-
Vidéo Audio (L/R) RGB Vidéo + Audio (L/R)
Entrée Sortie
vidéo ou des lecteurs de vidéodisques.
Français - 6
Page 67

Présentation de la télécommande
TOOLS
1 Bouton de mise en veille du
téléviseur.
2 Permet de sélectionner
directement le mode TV et
DTV.
3 Pavé numérique pour
l’accès direct aux canaux.
4 Sélection de canaux à 1 ou
2 chiffres.
5 +:
Augmentation du volume.
-: Réduction du volume.
6 Arrêt temporaire du son.
fichage EPG (Guide
7 Af
électronique des
programmes).
8
Permet de sélectionner
rapidement les fonctions
fréquemment utilisées.
9 Af
fiche les informations
relatives au programme en
cours.
0
Boutons de couleur :
Utilisez ces boutons dans la
liste des canaux, etc.
@ Permet de sélectionner
l’affichage et les modes son
en option pour le sport, le
cinéma et les jeux.
# Utilisez ces boutons en
mode DMA et Anynet+.
(
: cette télécommande
peut être utilisée pour
contrôler les enregistreurs
Samsung avec la fonction
Anynet+.)
$
Sélection de la source
disponible.
%
Chaîne précédente.
P<: chaîne suivante.
^
P>: chaîne précédente.
& Pour af
*
( Revient au menu précédent.
) Permet de commander le
ficher le menu
principal à l’écran.
Afche la liste de canaux à
l’écran
curseur dans le menu.
a Permet de quitter le menu
affiché à l’écran.
b Permet de connecter un
appareil SAMSUNG DMA
(Digital Media Adapter) à
l’aide d’une interface HDMI
et de passer en mode
DMA (le bouton DMA est
facultatif).
Pour plus d’informations
sur les procédures de
fonctionnement, reportez-
vous au manuel d’utilisation
de l’appareil DMA.
Ce bouton est disponible
si la fonction “Anynet+
(HDMI-CEC)” est réglée sur
“Marche” (voir page 47)
c Sélection de la taille de
l’image.
d Af
fichage numérique des
sous-titres.
Sélectionne directement le
e
mode HDMI.
Fonctions télétexte
2
Quitte l’afchage télétexte.
7 Mémorisation télétexte.
8 Sélection de la taille du
télétexte.
9 Activation du télétexte.
0 Sélection des rubriques
Fastext.
! Choisissez
ou Mix.
$ Sélection du mode télétexte.
(LIST/FLOF)
% Page secondaire télétexte.
<: page télétexte
^ P
>: page télétexte
P
&
Index télétexte.
( Pause télétexte.
a Annulation du télétexte.
Teletext, Double,
suivante.
précédente.
Une lumière intense peut affecter le bon fonctionnement de la télécommande.
➣
Français - 7
Page 68

Insertion des piles dans la télécommande
1. Soulevez le couvercle situé à l’arrière de la télécommande comme indiqué sur
la gure.
2. Placez-y deux piles AAA.
Assurez-vous que les pôles “+” et “-” des piles correspondent au schéma
➣
situé à l’intérieur du compartiment.
3.
Remettez le couvercle en place.
Retirez les piles et stockez-les dans un endroit frais et sec si vous n’utilisez
➣
pas la télécommande pendant longtemps.
Si la télécommande ne fonctionne pas
➣
1. Le téléviseur est-il sous tension ?
2. Les bornes + et - des piles ne sont-elles pas inversées ?
3. Les piles sont-elles déchargées ?
4. Le cordon d’alimentation est-il débranché ou y a-t-il une panne de courant ?
5. Une lampe uorescente ou néon est-elle allumée à proximité ?
:
Mise en marche et arrêt
Le câble relié au secteur est xé à l’arrière du téléviseur/moniteur.
1. Branchez le cordon d’alimentation sur une prise secteur appropriée.
Le voyant de veille s’allume sur le téléviseur.
➣
2.
Appuyez sur le bouton
Vous pouvez également appuyer sur le bouton POWER
➣
télécommande pour allumer le téléviseur.
Le dernier canal que vous avez regardé est automatiquement re-sélectionné.
➣
3. Appuyez sur le bouton numérique (de 0 à 9) ou le bouton canal suivant/précédent (
télécommande ou sur le bouton de votre téléviseur.
Lorsque vous allumez le téléviseur pour la première fois, vous devrez choisir la langue dans
➣
laquelle vous souhaitez que les menus s’afchent.
4.
Pour éteindre votre téléviseur, appuyez de nouveau sur le bouton POWER
de votre téléviseur.
ou sur le bouton TV/DTV de votre
</>) de la
.
Mise en mode veille de votre téléviseur
Vous pouvez mettre votre téléviseur en mode Veille an de réduire la consommation électrique.
Le mode veille peut être utile si vous souhaitez éteindre votre téléviseur temporairement (pendant
un repas par exemple).
1. Appuyez sur le bouton POWER
➣
L’écran s’éteint et un voyant de veille rouge apparaît sur votre téléviseur.
2.
Pour rallumer le téléviseur, appuyez de nouveau sur le bouton POWER
0 à 9), le bouton TV/DTV ou les boutons canal suivant/précédent (</>).
➣
Ne laissez pas le téléviseur en mode Veille pendant de longues périodes (lorsque vous êtes en
vacances par exemple). Il est conseillé de débrancher le téléviseur du secteur et de l’antenne.
de la télécommande.
, les boutons numériques (de
Français - 8
Page 69

Afchage des menus
1. Une fois l’appareil allumé, appuyez sur le bouton MENU.
Le menu principal apparaît à l’écran. Plusieurs icônes
s’afchent sur le côté gauche du menu: Image, Son, Canal,
Conguration, Entrée, Menu numérique.
2.
Appuyez sur le bouton ▲ ou ▼ pour sélectionner l’une des
icônes.
Appuyez ensuite sur le bouton ENTER
pour accéder au
sous-menu de l’icône.
3. Appuyez sur le bouton EXIT pour quitter le menu.
Les menus disparaissent de l’écran après environ une
➣
minute.
Utilisation du bouton TOOLS
Vous pouvez utiliser le bouton TOOLS pour sélectionner
simplement et rapidement les fonctions que vous utilisez le
plus souvent. Le menu “Outils” change en fonction du mode
d’entrée externe affiché.
1. Utilisation du bouton TOOLS.
Le menu “Outils” s’afche.
Appuyez sur le bouton ▲ ou ▼ pour sélectionner un menu.
2.
3. Appuyez sur les boutons ▲/▼/◄/►/ENTER
changer ou utiliser les éléments sélectionnés. Pour une
description plus détaillée de chaque fonction, reportez-vous à la
page correspondante.
Anynet+ (HDMI-CEC), Reportez-vous aux pages 47
♦
Mode Image , Reportez-vous aux pages 16
♦
Mode Son, Reportez-vous aux pages 21
♦
Veille, Reportez-vous aux pages 23
♦
SRS TS XT, Reportez-vous aux pages 21
♦
Mode éco., Reportez-vous aux pages 26
♦
Dual l-ll, Reportez-vous aux pages 22
♦
Réglage Automatique, Reportez-vous aux pages 45
♦
pour afcher,
TV
Mode : Standard
Rétroéclairage 7
Contraste 95
Luminosité 45
Netteté 50
Couleur
Teinte G 50 R 50
Réglages des détails
Options d’image
Réinitialiser : OK
Déplacer Entrer Retour
Anynet+ (HDMI-CEC)
Mode Image : Standard
Mode Son : Personnalisé
Veille : Arrêt
SRS TS XT : Arrêt
Mode éco. : Arrêt
Dual l-ll : Mono
Déplacer Entrer Quitter
Image
50
Outils
Français - 9
Page 70

Plug & Play
Lorsque vous allumez le téléviseur pour la première fois,
plusieurs réglages de base s’effectuent l’un après l’autre
de manière automatique. Les réglages disponibles sont les
suivants :
Toute fonction relative à la télévision numérique (DVB) ne peut
➣
fonctionner que dans un pays ou une région où des signaux
terrestres numériques de type DVB-T (MPEG2) sont diffusés.
Consultez votre revendeur pour savoir si vous pouvez recevoir des
signaux DVB-T. Bien que ce téléviseur soit conforme à la norme
DVB-T, il n’est pas garanti qu’il soit compatible avec les futures émissions terrestres numériques DVB-T. Il se
peut que certaines fonctions ne soient pas disponibles dans certains pays.
1. Appuyez sur le bouton POWER de la télécommande.
Le message “Start Plug & Play” s’afche et la mention “OK” est sélectionnée.
2. Sélectionnez la langue souhaitée en appuyant sur le bouton
Appuyez sur le bouton ENTER
Appuyez sur les boutons ou pour sélectionner “Enr. démo” ou “Util. domicile”, puis sur le bouton ENTER .
3.
Nous vous recommandons de régler le téléviseur sur le mode “Util. domicile” pour une meilleure
➣
qualité d’image dans votre environnement personnel.
Le mode “Enr. démo” n’est prévu que pour un usage en magasins.
➣
Si l’unité est accidentellement dénie sur le mode “Enr. démo” et que vous souhaitez revenir au
➣
mode “Util. domicile” (Standard): Appuyez sur le bouton Volume du téléviseur. Lorsque l’OSD du
volume s’afche, appuyez pendant 5 secondes sur le bouton MENU du téléviseur.
4
Le message “Vérier l’entrée de l’antenne.” s’afche s’afche et la mention “OK” est alors sélectionnée.
.
Appuyer sur le bouton ENTER
Veuillez vérier que le câble de l’antenne est correctement branché.
➣
5.
Sélectionnez le pays souhaité en appuyant sur le bouton
Appuyez sur le bouton ENTER
6. Le message “Il est possible que certaines fonctions DTV ne soient pas disponibles. Balayage
numérique ?” s’afche. Appuyez sur le bouton ◄ ou ► pour sélectionner “Oui” ou “Non”, puis sur le
bouton ENTER
Oui : Une recherche ATV est d’abord lancée, suivie d’une recherche automatique des canaux DTV.
Non : Seule la recherche ATV est effectuée.
➣
Cette fonction est prise en charge dans tous les pays, à l’exception des suivants : France,
Allemagne, Italie, Pays-Bas, Espagne, Suisse, Royaume-Uni, Autriche.
Le menu “Mémorisation Auto” s’afche et l’option “Démarrer” est sélectionnée. Appuyez sur le bouton
7.
ENTER
La recherche de canaux démarrera et se terminera automatiquement.
➣
Le menu de balayage du canal DTV s’afche et le canal DTV est automatiquement mis à jour.
Si le canal DTV est mis à jour, la source dans la liste correspondante du menu Entrée est
➣
automatiquement réglée sur DTV.
Une fois que tous les canaux disponibles sont mémorisés, le menu “Réglage Horloge” s’afche.
Appuyez sur le bouton ENTER
➣
Pour des descriptions détaillées sur la mise à jour des canaux DTV, reportez-vous à la page 29 de
➣
ce manuel. Une fois tous les canaux numériques disponibles mémorisés, l’écran de sélection du
fuseau horaire s’afche, en fonction du pays.
8.
Appuyez sur le bouton
Sélectionnez “Mois”, “Date”, “Année”, “Heure” ou “Min.” en appuyant sur le bouton ou .
Sélectionnez les “Mois”, “Date”, “Année”, “Heure” ou “Min.” en appuyant sur le bouton ou .
Vous pouvez également dénir les paramètres “Mois”, “Date”, “Année”, “Heure” et “Min.” à l’aide du
➣
pavé numérique de la télécommande.
.
.
ENTER
pour conrmer votre choix.
.
pour conrmer votre choix.
à tout moment pour interrompre la mémorisation.
.
Français - 10
ou .
ou .
Plug & Play
Start Plug & Play.
OK
Enter
Page 71

9. Appuyez sur le bouton ENTER pour conrmer votre réglage. Le message “Protez de votre
visionnage” s’afche. Lorsque vous avez terminé, appuyez sur le bouton ENTER
Même sans pression sur le bouton ENTER
➣
, le message disparaît automatiquement après
.
quelques secondes.
Langue : Sélectionnez votre langue.
Pays: Sélectionnez votre pays.
Mémorisation Auto :
Réglage Horloge : Pour régler l’heure actuelle du téléviseur.
Si vous souhaitez réinitialiser cette fonction...
1. Appuyez sur le bouton MENU pour afcher le menu.
Appuyez sur le bouton ou pour sélectionner “Conguration”
puis appuyez sur le bouton ENTER
2. Appuyez de nouveau sur le bouton ENTER
le mode “Plug & Play”.
Balaie et mémorise automatiquement tous les canaux disponibles dans votre zone.
TV
Plug & Play
Langue : Français
Horloge
.
Mélodie :
Divertissement : Arrêt
Mode éco. : Arrêt
Configuration
Arrêt
pour sélectionner
Pour plus d’informations concernant le réglage des options,
reportez-vous à la page 10.
➣
La fonction “Plug & Play” est uniquement disponible en
Déplacer Entrer Retour
mode TV.
Mémorisation automatique des canaux
Vous pouvez chercher les plages de fréquence disponibles par
balayage (leur disponibilité dépend de votre pays).
Il est possible que les numéros de programme attribués
automatiquement ne correspondent pas aux numéros de
programme souhaités ou réels. Vous pouvez toutefois trier les
numéros manuellement et supprimer les canaux que vous ne
souhaitez pas regarder.
TV
Pays : Royaume-Uni
Mémorisation Auto
Mémorisation Manuelle
Gestionnaire de Chaînes
Tri des canaux
Nom station
Réglage fin
LNA : Arrêt
1. Appuyez sur le bouton MENU pour afcher le menu.
Appuyez sur les boutons ou pour sélectionner “Canal” puis
appuyez sur le bouton ENTER
2. Appuyez sur le bouton ENTER
.
pour sélectionner “Pays”.
Déplacer Entrer Retour
3. Sélectionnez le pays approprié en appuyant sur les boutons ou .
Appuyez sur le bouton ENTER
➣
Même si vous avez modié le paramètre de pays dans ce menu, le paramètre de pays pour DTV
pour conrmer votre choix.
reste le même. (Reportez-vous aux pages 29)
4.
Appuyez sur les boutons ou pour sélectionner “Mémorisation Auto” puis appuyez sur le bouton
ENTER
5. Appuyez sur le bouton ENTER
➣
➣
.
.
Le téléviseur commence à mémoriser tous les canaux disponibles.
Appuyez sur le bouton ENTER
à tout moment pour interrompre le processus de mémorisation et
retourner au menu “Canal”.
6. Une fois que tous les canaux disponibles sont mémorisés, le menu “Tri des canaux” s’afche.
(Reportez-vous aux pages 14
)
Canal
Français - 11
Page 72

Mémorisation manuelle des canaux
Non disponible en mode DTV ou en mode d’entrée externe.
Vous pouvez mémoriser les canaux de télévision, y compris
ceux reçus via les réseaux câblés. Lors de la mémorisation
manuelle des canaux, vous pouvez choisir :
♦ de mémoriser ou non chaque canal trouvé ;
♦ le numéro du programme qui vous servira à identifier chaque
TV
Pays : Royaume-Uni
Mémorisation Auto
Mémorisation Manuelle
Gestionnaire de Chaînes
Tri des canaux
Nom station
Réglage fin
LNA : Arrêt
canal mémorisé.
1. Appuyez sur le bouton
Appuyez sur le bouton ▲ ou ▼ pour sélectionner “Canal”, puis
appuyez sur le bouton ENTER
2. Appuyez sur le bouton ▲ ou ▼ pour sélectionner
“Mémorisation Manuelle”, puis appuyez sur le bouton
ENTER
.
3. Sélectionnez l’option désirée en appuyant sur le bouton
▲ ou ▼, puis appuyez sur le bouton ENTER
4. Lorsque vous êtes satisfait du réglage, appuyez sur le
bouton ENTER
5.
Appuyez sur le bouton EXIT pour quitter le menu.
MENU pour afficher le menu.
.
.
Déplacer Entrer Retour
TV
Programme : P 1
Système de Couleur : Auto.
Système Sonore : BG
Canal : S
Recherche : 140 MHz
Mémoriser : ?
.
Déplacer Entrer Retour
♦ Programme (numéro de programme à attribuer à une chaîne)
− Appuyez sur le bouton ▲ ou ▼ jusqu’à ce que vous trouviez le numéro correct.
Vous pouvez également sélectionner le numéro de canal directement en appuyant sur le pavé
numérique (0~9).
de
♦ Système
Couleur: Auto./PAL/SECAM/NTSC4.43
− Appuyez sur le bouton ▲ ou ▼ pour sélectionner la norme de couleurs désirée.
♦ Système Sonore: BG/DK/I/L
− Appuyez sur le bouton ▲ ou ▼ pour sélectionner la norme audio désirée.
♦ Canal (si vous connaissez le numéro de la chaîne à mémoriser)
− Appuyez sur le bouton ▲ ou ▼ pour sélectionner C (canal hertzien) ou S (canal câblé).
− Appuyez sur le bouton ►, puis sur le bouton ▲ ou ▼ pour sélectionner le numéro de votre choix.
Vous pouvez également sélectionner le numéro de canal directement en appuyant sur le pavé
numérique (0~9).
S’il n’y a aucun son ou si le son est anormal, re-sélectionnez la norme son désirée.
♦ Recherche (lorsque vous ne connaissez pas les numéros de chaîne)
− Appuyez sur le bouton ▲ ou ▼ pour démarrer la recherche.
syntoniseur
− Le
balaie la plage de fréquences jusqu’à ce que vous receviez la première chaîne ou
la chaîne que vous avez sélectionnée à l’écran.
♦ Mémoriser
− Sélectionnez “OK” en appuyant sur le bouton ENTER
(permet de mémoriser la chaîne et le numéro de programme correspondant)
.
Mode Canal
−
P (Mode Programme) : A la fin du réglage, des numéros de position compris entre P00 et P99 sont
attribués aux stations de radiodiffusion de votre zone. Dans ce mode, vous pouvez
sélectionner un canal en saisissant son numéro de position.
C (mode chaîne hertzienne) : dans ce mode, vous pouvez sélectionner un canal en saisissant le
−
numéro attribué à chacune des stations de télédiffusion.
− S (mode chaîne câblée) : dans ce mode, vous pouvez sélectionner un canal en saisissant le
numéro attribué à chacun des canaux câblés.
Canal
Mémorisation Manuelle
6
Français - 12
Page 73

Ajout/Verrouillage de canaux
Non disponible en mode DTV ou en mode d’entrée externe.
➣
A l’aide de la fonction Gestionnaire de Chaînes, vous pouvez
aisément verrouiller ou ajouter des canaux.
1.
Appuyez sur le bouton MENU pour afcher le menu.
Appuyez sur le bouton ▲ ou ▼ pour sélectionner “Canal”, puis
appuyez sur le bouton ENTER
2. Appuyez sur le bouton ▲ ou ▼ pour sélectionner “Gestionnaire
de Chaînes”, puis appuyez sur le bouton ENTER
♦ Ajout de canaux
A
l’aide de la fonction “Liste des chaînes”, vous pouvez
aisément ajouter des canaux.
3. Sélectionnez “Liste des chaînes” en appuyant sur le bouton
ENTER
4. Passez au champ (
.
) en appuyant sur les boutons
▲, ▼, ◄ ou ►, sélectionnez un canal à ajouter et appuyez sur
le bouton ENTER pour l’ajouter.
Si vous appuyez à nouveau sur le bouton ENTER
➣
symbole (
) à côté du canal disparaît et le canal n’est pas
ajouté.
” est actif lorsque “Verrouillage Parental” est dénie sur
➣
“
“Marche”.
♦ Verrouillage de canaux
Cette fonction, qui bloque la vidéo et coupe le son, vous permet
d’éviter toute utilisation non autorisée, par des enfants par
exemple, qui pourraient visionner des programmes ne leur
étant pas destinés.
Appuyez sur le bouton ▲ ou ▼ pour sélectionner “Verrouillage
5.
Parental”, puis appuyez sur le bouton ENTER
6. Sélectionnez “Marche” en appuyant sur le bouton ▲ ou ▼,
puis appuyez sur le bouton ENTER
7. Appuyez sur le bouton ▲ ou ▼ pour sélectionner “Liste des
chaînes”, puis appuyez sur le bouton ENTER
8. Passez au champ “
” en appuyant sur les boutons
▲, ▼, ◄ ou ►, sélectionnez un canal à verrouiller et appuyez
sur le bouton ENTER pour l’ajouter.
Si vous appuyez à nouveau sur le bouton ENTER
➣
le symbole (
) à côté du canal disparaît et le verrouillage du
canal est annulé.
Un écran bleu s’afche lorsque le verrouillage parental est
➣
activé.
9.
Appuyez sur le bouton EXIT pour quitter le menu.
Sélectionnez “Marche” ou “Arrêt” dans “Verrouillage Parental”
➣
pour que les canaux dénis sur “
.
.
, le
.
.
.
,
” soient actifs ou inactifs.
TV
TV
Pays : Royaume-Uni
Mémorisation Auto
Mémorisation Manuelle
Gestionnaire de Chaînes
Tri des canaux
Nom station
Réglage fin
LNA : Arrêt
Déplacer Entrer Retour
Liste des chaînes
Verrouillage Parental : Arrêt
Déplacer Entrer Retour
Liste des chaînes
P 1 C3
Prog.
0 C-1 C
3
2 BBC 1
3 C74
4 C75
5 C76
6 S3
7 S4
8 S6
9 S7
Ajouter Verrouil.
Déplacer Entrer
Retour
Page
Canal
Gestionnaire de Chaînes
1 / 10
Vous pouvez sélectionner ces options en appuyant sur le bouton
CH LIST de votre télécommande.
Français - 13
Page 74

Organisation des canaux mémorisés
Cette opération vous permet de changer les numéros de
programme des canaux mémorisés.
Cette opération peut s’avérer nécessaire après l’utilisation de
la mémorisation automatique.
Non disponible en mode DTV ou en mode d’entrée externe.
➣
1.
Appuyez sur le bouton MENU pour afcher le menu.
Appuyez sur le bouton ou pour sélectionner “Canal” puis
appuyez sur le bouton ENTER
.
2. Appuyez sur le bouton ou pour sélectionner “Tri des
canaux” puis appuyez sur le bouton ENTER
.
3. Sélectionnez le numéro de canal que vous souhaitez modier en
appuyant à plusieurs reprises sur le bouton ou . Appuyez
sur le bouton ENTER
➣
Le numéro du canal sélectionné et le nom passent au côté
.
droit.
4.
Appuyez sur le bouton ou pour passer à la position que
vous souhaitez modier puis appuyez sur le bouton ENTER
5. Répétez les étapes 3 à 4 pour enregistrer un autre canal.
6.
Appuyez sur le bouton EXIT pour quitter le menu.
TV
Pays : Royaume-Uni
Mémorisation Auto
Mémorisation Manuelle
Gestionnaire de Chaînes
Tri des canaux
Nom station
Réglage fin
LNA : Arrêt
Déplacer Entrer Retour
TV
Prog. Ch. Nom station
0 C- 1 C23 -----
2 S06 ---- 3 S07 ---- 4 S09 ---- 5 S12 ---- 6 S13 ---- 7 S14 ---- 8 S17 ---- 9 C21 -----
.
Déplacer Entrer Retour
Attribution de noms aux canaux
Les noms de canaux sont attribués automatiquement lorsque
des informations sur les canaux sont diffusées. Ces noms
peuvent être modiés, ce qui vous permet d’attribuer ceux de
votre choix.
➣
Non disponible en mode DTV ou en mode d’entrée externe.
1.
Appuyez sur le bouton MENU pour afcher le menu.
Appuyez sur le bouton ou pour sélectionner “Canal” puis
appuyez sur le bouton ENTER
.
2. Appuyez sur le bouton ou pour sélectionner “Nom station”
puis appuyez sur le bouton ENTER
.
3. Si nécessaire, sélectionnez le canal auquel vous souhaitez
attribuer un nouveau nom en appuyant sur le bouton ou .
Appuyez sur le bouton ENTER
➣
La barre de sélection s’afche autour de la case du nom.
4.
Pour… Alors…
Sélectionner une lettre, un
nombre ou un symbole
Passer à la lettre suivante
Revenir à la lettre précédente
.
Appuyez sur le bouton
ou
Appuyez sur le bouton
Appuyez sur le bouton
Conrmer le nom Appuyez sur le bouton
ENTER
➣
Les caractères suivants sont disponibles : Les lettres de l’alphabet (A~Z) / les no
.
caractères spéciaux (+, -, *, /, espace)
Répétez les étapes 3 à 4 pour chaque canal auquel attribuer un nouveau nom.
5.
6.
Appuyez sur le bouton EXIT pour quitter le menu.
Français - 14
TV
Pays : Royaume-Uni
Mémorisation Auto
Mémorisation Manuelle
Gestionnaire de Chaînes
Tri des canaux
Nom station
Réglage fin
LNA : Arrêt
Déplacer Entrer Retour
TV
Prog. Ch. Nom station
0 C--
1 C23 -----
2 S06 ---- 3 S07 ---- 4 S09 ---- 5 S12 ---- 6 S13 ---- 7 S14 ---- 8 S17 ---- 9 C21 -----
Déplacer Entrer Retour
Canal
Tri des canaux
-----
Canal
Nom station
-----
mbres (0~9) / les
Page 75

Réception des canaux grâce à la syntonisation ne
Utilisez la syntonisation précise pour régler manuellement un
canal spécique en vue d’une réception optimale.
Non disponible en mode DTV ou en mode d’entrée externe.
➣
1.
Utilisez le pavé numérique pour sélectionner directement le canal
à régler.
2.
Appuyez sur le bouton MENU pour afcher le menu.
TV
Pays : Royaume-Uni
Mémorisation Auto
Mémorisation Manuelle
Gestionnaire de Chaînes
Tri des canaux
Nom station
Réglage fin
LNA : Arrêt
Appuyez sur le bouton ou pour sélectionner “Canal” puis
appuyez sur le bouton ENTER
.
Déplacer Entrer Retour
3. Appuyez sur le bouton ou pour sélectionner “Réglage n”
puis appuyez sur le bouton ENTER
4. Appuyez sur le bouton ou pour effectuer une syntonisation
précise.
Appuyez sur le bouton ENTER
.
P 1
.
5. Appuyez sur le bouton EXIT pour quitter le menu.
Les canaux réglés et mémorisés sont repérés par un astérisque
➣
“*” placé à droite de leur numéro dans la bannière des canaux.
Régler Sauvegarder Retour
Le numéro du canal devient rouge.
Pour réinitialiser le réglage, sélectionnez “Réinitialiser” à l’aide du bouton ou , puis appuyez sur
➣
le bouton ENTER
.
Canal
Réglage fin
Réinitialiser
LNA (Amplicateur à faible bruit)
Si le téléviseur fonctionne dans une zone où le signal est
faible, la fonction LNA peut parfois améliorer la réception (un
préamplicateur à faible bruit augmente le signal d’arrivée).
Non disponible en mode DTV ou en mode d’entrée externe.
➣
1.
Appuyez sur le bouton MENU pour afcher le menu.
Appuyez sur le bouton ou pour sélectionner “Canal” puis
appuyez sur le bouton ENTER
.
2. Appuyez sur le bouton ou pour sélectionner “LNA” puis
appuyez sur le bouton ENTER
.
3. Appuyez sur le bouton ou pour sélectionner “Marche” ou
“Arrêt”.
Appuyez sur le bouton ENTER
.
4. Appuyez sur le bouton EXIT pour quitter le menu.
TV
Pays : Royaume-Uni
Mémorisation Auto
Mémorisation Manuelle
Gestionnaire de Chaînes
Tri des canaux
Nom station
Réglage fin
LNA : Arrêt
Déplacer Entrer Retour
TV
Pays : Royaume-Uni
Mémorisation Auto
Mémorisation Manuelle
Gestionnaire de Chaînes
ri des canaux
T
Nom station
Réglage fin
LNA : Off
Canal
Canal
Marche
0
Arrêt
Français - 15
Déplacer Entrer Retour
Page 76

Changement de la norme Image
Vous pouvez sélectionner le type d’image qui correspond le
mieux à vos exigences d’afchage.
1. Appuyez sur le bouton MENU pour afcher le menu.
Appuyez sur le bouton ENTER
2. Appuyez de nouveau sur le bouton ENTER
“Mode”.
Appuyez sur le bouton ou pour sélectionner l’effet d’image
3.
souhaité. Appuyez sur le bouton ENTER
4. Appuyez sur le bouton EXIT pour quitter le menu.
♦ Dynamique : Sélectionnez l’image pour un afchage haute
dénition dans une pièce claire.
♦ Standard : Sélectionnez l’image pour un afchage optimal
dans un environnement normal.
♦
Cinéma : Sélectionnez l’image pour un afchage agréable
dans une pièce sombre.
Le mode Image doit être réglé séparément pour chaque source
➣
d’entrée.
Réglage
simple
1.
Appuyez sur le bouton TOOLS de la télécommande.
Appuyez sur le bouton ou pour sélectionner “Mode
2.
Image”.
3. Appuyez
sur le bouton ◄ ou ► pour sélectionner l’option de
votre choix.
4. Appuyez sur
le bouton EXIT ou TOOLS pour quitter le menu.
pour sélectionner “Image”.
pour sélectionner
.
TV
Mode : Standard
Rétroéclairage 7
Contraste 95
Luminosité
Netteté 50
Couleur
Teinte G 50 R 50
Réglages des détails
Options d’image
Réinitialiser : OK
Déplacer Entrer Retour
TV
Mode : Standard
Rétroéclairage 7
Contraste
Luminosité 45
Netteté 50
Couleur
Teinte G 50 R 50
Réglages des détails
Options d’image
Réinitialiser : OK
Déplacer Entrer Retour
Anynet+ (HDMI-CEC)
Mode Image ◄ Standard ►
Mode Son : Personnalisé
Veille : Arrêt
SRS TS XT : Arrêt
Mode éco. : Arrêt
Dual l-ll : Mono
Déplacer Régler Quitter
Outils
Image
45
50
Image
Dynamique
Standard
95
Cinéma
50
Français - 16
Page 77

Réglage de l’image personnalisée
Votre téléviseur dispose de plusieurs réglages qui vous
permettent de contrôler la qualité de l’image.
1. Pour sélectionner l’effet d’image requis, suivez les instructions
1 à 3 du chapitre “Changement de la norme Image”.
(à la page
16.)
2. Appuyez sur le bouton ou pour sélectionner un élément
spécique. Appuyez sur le bouton ENTER .
3. Appuyez sur le bouton ou pour augmenter ou diminuer la
valeur d’un élément spécique.
Appuyez sur le bouton ENTER
.
4. Appuyez sur le bouton EXIT pour quitter le menu.
♦ Rétroéclairage : Permet de régler la luminosité de l’écran en réglant la luminosité du rétroéclairage LCD. (0~10)
♦ Contraste : Permet de régler la luminosité et les ombres entre les objets et l’arrière plan.
♦ Luminosité
♦ Netteté
: Règle la luminosité de l’écran.
: Permet de régler les contours de l’objet pour les rendre plus nets ou plus ternes.
♦ Couleur : Permet de régler les couleurs, les éclaircit ou les assombrit.
♦ T
einte : Permet d’ajuster la couleur des objets, de les rendre plus rouges ou verts pour un air plus nat
Les valeurs réglées sont mémorisées en fonction du mode Image sélectionné.
➣
En mode PC, vous ne pouvez modier que les options “Rétroéclairage”, “Contraste” et “Luminosité”.
➣
(32, 37
pouces)
En mode PC, vous ne pouvez modier que les options “Contraste” et “Luminosité”. (40 pouces)
➣
En mode TV analogique, Ext., AV et S-Vidéo du système PAL, vous ne pouvez pas utiliser la fonction
“Teinte”.
➣
Vous pouvez réinitialiser la valeur par défaut des paramètres d’image en sélectionnant “Réinitialiser”.
(Voir “Reinitialisation des paramètres d’image à leur valeur par défaut” à la page 18)
TV
Mode : Standard
Rétroéclairage 7
Contraste 95
Luminosité
Netteté 50
Couleur 50
Teinte G 50 R 50
Réglages des détails
Options d’image
Réinitialiser : OK
Déplacer Entrer Retour
▲
Rétroéclairage
▼
Déplacer Régler Retour
Image
45
urel.
7
Réglages des détails de l’image
Vous pouvez sélectionner la nuance de couleur la plus agréable
au regard.
1. Appuyez sur le bouton MENU pour afcher le menu.
Appuyez sur le bouton ENTER
2. Appuyez sur le bouton ENTER
pour sélectionner “Image”.
pour sélectionner “Mode”.
Appuyez sur le bouton ▲ ou ▼ pour sélectionner “Standard” ou
“Cinéma”, puis appuyez sur le bouton ENTER .
3. Appuyez sur le bouton ou pour sélectionner “Réglages des
détails” puis appuyez sur le bouton ENTER
.
4. Sélectionnez l’option requise en appuyant sur le bouton ou
puis appuyez sur le bouton ENTER
.
5. Lorsque vous êtes satisfait de la conguration, appuyez sur le
bouton ENTER
.
6. Appuyez sur le bouton EXIT pour quitter le menu.
La fonction “Réglage des détails” est disponible en mode
➣
“Standard” ou “Cinéma”.
En mode PC, vous ne pouvez modier que les options
➣
“Contraste Dynam.”, “Gamma” et “Balance blancs” dans le
menu “Réglages des détails”.
Français - 17
TV
TV
Mode : Standard
Rétroéclairage 7
Contraste
Luminosité 45
Netteté 50
Couleur
Teinte G 50 R 50
Réglages des détails
Options d’image
Réinitialiser : OK
Déplacer Entrer Retour
Réglage des noirs : Arrêt
Contraste Dynam.
Gamma : 0
Espace de couleur
Balance blancs
Carnation : 0
Amélioration bords :
Déplacer Entrer Retour
Image
95
50
Réglages des détails
: Moyen
: Natif
Marche
Page 78

Réglage des noirs : Arrêt/Bas/Moyen/Elevé
♦
Vous pouvez directement sélectionner le niveau de noir sur l’écran pour régler la profondeur de l’écran.
Contraste Dynam. : Arrêt/Bas/Moyen/Elevé
♦
Vous pouvez régler le contraste de l’écran pour obtenir un contraste optimal.
Gamma : -3
♦
~ +3
Vous pouvez régler l’intensité des couleurs primaires (rouge, vert, bleu).
Appuyez sur le bouton ou pour obtenir le réglage qui convient.
Espace de couleur: Auto./Natif/Personnalisé
♦
L’espace de couleur est une matrice de couleurs composée de rouge, de vert et de bleu.
Sélectionnez votre espace de couleur préféré et appréciez la couleur la plus naturelle.
♦ Auto.: La commande Auto de Espace couleur permet d’obtenir automatiquement les tons les
plus naturels en fonction des sources de programme.
♦ Natif: La commande Standard de Espace couleur offre des tons riches.
♦ Personnalisé: Règle la gamme des couleurs selon la préférence.
Personnalisation de l’espace de couleur
➣
Couleur: Rouge/Vert/Bleu/jaune/Cyan/Magenta
Permet de régler la gamme de couleurs en fonction de vos préférences
“Couleur” est disponible lorsque l’option “Espace de couleur” est dénie sur “Personnalisé”.
Appuyez sur le bouton ▲ ou ▼ pour sélectionner “Rouge”, “Vert”, “Bleu”, “jaune”, “Cyan” ou
“Magenta”. Appuyez sur le bouton ENTER
.
Rouge/Vert/Bleu : Dans “Couleur”, vous pouvez régler les valeurs RVB pour la couleur
sélectionnée.
Appuyez sur le bouton ▲ ou ▼ pour sélectionner la couleur “Rouge”, “Vert” ou “Bleu” an de la
modier. Appuyez sur le bouton ENTER
.
Appuyez sur le bouton ◄ ou ► pour réduire ou augmenter la valeur d’un élément spécique.
Appuyez sur le bouton ENTER
Réinitialiser
♦
Balance blancs : Aj. Rouge/Aj. Vert/Aj. Bleu/Regl. Rouge/Regl. vert/Regl. bleu/Réinitialiser
: rétablit les valeurs par défaut de l’espace de couleur
.
.
Vous pouvez régler la température des couleurs pour que celles-ci soient plus naturelles.
Aj. Rouge/Aj. Vert/Aj. Bleu/Regl. Rouge/Regl. vert/Regl. bleu : La modication des valeurs de
réglage permet d’actualiser l’écran que vous venez de retoucher.
Sélectionnez l’option de votre choix en appuyant sur le bouton ou puis appuyez sur le bouton
ENTER
.
Appuyez sur le bouton ou pour obtenir le réglage qui convient.
Réinitialiser
♦
Carnation: -15 ~ +15
: La balance des blancs réglée précédemment est ramenée à sa valeur par défaut.
Vous pouvez accentuer le “Carnation” de l’image.
Appuyez sur le bouton ◄ ou ► pour obtenir le réglage qui convient.
La modication des valeurs de réglage permet d’actualiser l’écran que vous venez de retoucher
♦
Amélioration bords :
Arrêt/Marche
.
Vous pouvez faire ressortir la bordure des objets sur l’image.
Reinitialisation des paramètres d’image à leur valeur par défaut.
Vous pouvez réinitialiser la valeur par défaut des paramètres
d’image.
1.
Pour sélectionner l’effet d’image souhaité, suivez les instructions
1 à 3 du chapitre “Changement de la norme Image” à la page 16.
2. Appuyez sur le bouton ou pour sélectionner “Réinitialiser”
puis appuyez sur le bouton ENTER .
3. Appuyez sur le bouton ou pour sélectionner “OK” ou
“Annuler”. Appuyez sur le bouton ENTER
.
4. Appuyez sur le bouton EXIT pour quitter le menu.
La fonction “Réinitialiser” est congurée pour tous les modes d’image.
➣
Français - 18
TV
TV
Mode : Standard
Rétroéclairage 7
Contraste
Luminosité 45
Netteté 50
Couleur 50
Teinte G 50 R 50
Réglages des détails
Options d’image
Réinitialiser : OK
Déplacer Entrer Retour
Image
95
OK
Annuler
Page 79

Conguration de l’option Image
1. Appuyez sur le bouton MENU pour afcher le menu.
Appuyez sur le bouton ENTER pour sélectionner “Image”.
2
Appuyez sur le bouton ou pour sélectionner "Options
.
d’image" puis appuyez sur le bouton ENTER
.
3. Sélectionnez l’option requise en appuyant sur le bouton ou
puis appuyez sur le bouton ENTER
.
4. Lorsque vous êtes satisfait de la conguration, appuyez sur le
bouton ENTER
.
5. Appuyez sur le bouton EXIT pour quitter le menu.
➣
En mode PC, vous ne pouvez modifier que les options
“Nuance Coul.” et “Taille” dans le menu “Options d’image”.
Nuance Coul.: Froide2
♦
/Froide1/Normal/Chaude1/Chaude2
Vous pouvez sélectionner la nuance de couleur la plus agréable
au regard.
➣
Les valeurs réglées sont mémorisées en fonction du mode
Image sélectionné.
“Chaude1” ou “Chaude2” est activé uniquement lorsque le mode d’image est déni sur “Cinéma”.
➣
♦
16/9 auto/16:9/Zoom large/Zoom/4:3/Scan uniquement
Taille:
Vous pouvez sélectionner la taille d’image qui correspond le mieux à vos besoins d’affichage.
16/9 auto : Règle automatiquement la taille de l’image au format “16:9”.
♦
16:9 : Règle la taille de l’image sur 16:9 de façon appropriée pour les DVD ou la diffusion au format
♦
cinémascope.
Zoom large : Donnez à l’image une taille supérieure à 4:3.
♦
Zoom : Agrandit l’image en 16:9 (dans la direction verticale) pour l’adapter à la taille de l’écran.
♦
4:3: C’est le paramètre par défaut pour un lm cinéma ou de la diffusion normale.
♦
Scan uniquement : Utilisez la fonction pour voir l’intégralité de l’image sans coupure lors de les signaux HDMI
♦
La fonction “16/9 auto” est uniquement disponible en mode “TV”, “DTV”, “Ext1”, “Ext2”, “AV” et “S-Vidéo”.
➣
➣
En mode PC, seuls les modes “16:9” et “4:3” peuvent être sélectionnés.
➣
Vous pouvez effectuer des réglages pour chaque appareil externe connecté à une entrée du téléviseur et
(720p/1080i) ou Composant
(1080i) sont entrés.
les enregistrer.
Une rémanence temporaire peut se produire lorsque vous afchez une image statique pendant une ou
➣
deux heures sur l’écran du téléviseur.
Zoom large: Déplacez l’image vers le haut ou vers le bas à l’aide du bouton ▲ ou ▼ après avoir
➣
sélectionné
Zoom: Sélectionnez
➣
l’image en haut et en bas. Après avoir sélectionné
en appuyant sur le bouton ► ou
ENTER .
en appuyant sur le bouton ◄ ou ►. Utilisez le bouton ▲ ou ▼ pour déplacer
, utilisez le bouton ▲ ou ▼ pour agrandir ou
réduire la hauteur de l’image.
Après avoir sélectionné l’option “Scan uniquement” en mode HDMI (1080i) ou Composant (1080i):
➣
Sélectionnez
à l’aide du bouton ◄ ou ►. Utilisez le bouton ▲, ▼, ◄ ou ► pour déplacer
l’image.
Réinitialiser: appuyez sur le bouton ◄ ou ► pour sélectionner “Réinitialiser”, puis sur le bouton
ENTER
. Vous pouvez initialiser le réglage.
TV
Mode : Standard
Rétroéclairage 7
Contraste 95
Luminosité
Netteté 50
Couleur 50
Teinte G 50 R 50
Réglages des détails
Options d’image
Réinitialiser : OK
Déplacer Entrer Retour
TV
Nuance Coul. : Normal
Taille : 16/9 auto
Mode écran : 16:9
NR numérique : Auto.
DNle : Marche
HDMI Black Level
Mode bleu uniquement : Arrêt
Déplacer Entrer Retour
Image
45
Options d’image
: Normal
Vous pouvez sélectionner ces options simplement en appuyant
sur le bouton P.SIZE de votre télécommande.
Français - 19
Page 80

Mode écran: 16:9/Zoom large/Zoom/4:3
♦
Lorsque vous fixez la taille de l’image à 16/9 auto sur un téléviseur 16:9, vous pouvez déterminer la
taille selon laquelle vous voulez afficher une image 4:3 WSS (Wide Screen Service, service d’écran
large) ou rien. Chaque pays européen emploie une taille d’image ; cette fonction permet aux
utilisateurs de sélectionner la leur.
16:9: Pour régler l’image en mode 16:9 large.
♦
Zoom large: Donnez à l’image une taille supérieure à 4:3.
♦
Zoom: Agrandit la taille de l’image sur l’écran dans le sens vertical.
♦
4:
♦
3: Règle l’image en mode Normal, c’est-à-dire en 4:3.
Cette fonction est uniquement disponible en mode “16/9 auto” .
➣
Cette fonction n’est pas disponible en mode “Composant” ou “HDMI”.
➣
♦
NR numérique: Arrêt/Bas/Moyen/Elevé/Auto.
Si le signal de radiodiffusion reçu est faible, vous pouvez activer la fonction Digital Noise Reduction
pour favoriser la réduction d’images fantômes ou statiques qui peuvent apparaître à l’écran.
Lorsque le signal est faible, sélectionnez une autre option jusqu’à obtention de la meilleure image
➣
possible.
♦
DNIe: Arrêt/ Démo/Marche
Pour offrir une grande qualité d’image, ce téléviseur est doté de la fonction DNIe. Si vous activez
l’option DNIe, la fonction DNIe sera activée à l’écran. Lorsque vous activez le mode Démo de la
fonction DNIe, une image normale et une image avec la fonction DNIe appliquée s’affichent à l’écran à
des fins de démonstration. Cette fonction vous permet de constater la différence de qualité d’affichage.
DNIe™ (Digital Natural Image engine - Moteur d’images numériques d’aspect naturel)
➣
Cette fonction vous apporte une image plus détaillée tout en permettant une réduction de bruit
3D et une amélioration des détails, des contrastes et des blancs. Le nouvel algorithme de
compensation d’images vous offre une image plus lumineuse, plus claire et plus détaillée. La
technologie DNIe™ adaptera tous les signaux à votre vue, quels qu’ils soient.
“DNIe” n’est disponible qu’en mode “Dynamique”.
➣
Niveau noir HDMI: Normal/Bas
♦
Vous pouvez choisir le niveau de noir sur l’écran pour régler la profondeur de l’écran.
Cette fonction n’est active que lorsque l’entrée externe se connecte à HDMI (signaux RVB).
➣
Mode bleu uniquement: Arrêt/Marche
♦
Cette fonction est destinée aux spécialistes de mesure des appareils AV. Cette fonction affiche le
signal bleu en supprimant simplement les signaux rouge et vert du signal vidéo, de manière à fournir
un effet Filtre bleu utilisé pour régler la couleur et la teinte de l’équipement vidéo, tel que des lecteurs
de DVD, systèmes de cinéma à domicile, etc.
Cette fonction permet de régler la couleur et la teinte sur des valeurs appropriées au niveau de
signal de chaque dispositif vidéo à l’aide des modèles de barres de couleurs Rouge/Vert/Bleu/Cyan/
Magenta/Jaune, sans utiliser de filtre bleu supplémentaire.
➣
L’option “Mode bleu uniquement” n’est disponible que si le mode Image est déni sur “Cinéma” ou
“Standard”.
Français - 20
Page 81

Fonctions audio
1. Appuyez sur le bouton MENU pour afficher le menu.
Appuyez sur le bouton ▲ ou ▼ pour sélectionner “Son”, puis
appuyez sur le bouton
2. Sélectionnez l’option désirée en appuyant sur le bouton ▲ ou ▼,
puis appuyez sur le bouton
3. Lorsque vous êtes satisfait du réglage, appuyez sur le bouton
ENTER
.
4. Appuyez sur le bouton EXIT pour quitter le menu.
ENTER
ENTER
.
.
TV
Mode : Personnalisé
Egaliseur
SRS TS XT : Arrêt
: Arrêt
Volume auto
TV Speaker : Marche
Déplacer Entrer Retour
Son
♦ Mode: Standard/Musique/Cinéma/Parole/Personnalisé
Vous pouvez sélectionner le type d’effet sonore souhaité lorsque
vous regardez un programme donné.
Réglage simple
1. Appuyez
2.
Appuyez sur le bouton ▲ ou ▼ pour sélectionner “Mode Son”.
3.
sur le bouton TOOLS de la télécommande.
Appuyez sur le bouton ◄ ou ► pour sélectionner le mode de
Anynet+ (HDMI-CEC)
Mode Image : Standard
Mode Son ◄ Personnalisé ►
Veille : Arrêt
SRS TS XT : Arrêt
Mode éco. : Arrêt
Dual l-ll : Mono
Déplacer Régler Quitter
Outils
son souhaité.
4. Appuyez
♦ Egaliseur:
Le téléviseur dispose de plusieurs paramètres qui vous
sur le bouton EXIT ou TOOLS pour quitter le menu.
100Hz/300Hz/1kHz/3kHz/10kHz
Balance/
TV
D
Egaliseur
permettent de régler la qualité du son.
Si vous modiez de quelque façon que ce soit ces
➣
paramètres, le mode de son bascule automatiquement sur
“Personnalisé”.
G
Balance 100Hz 300Hz 1kHz 3kHz 10kHz
Déplacer Régler Retour
♦ SRS TS XT: Arrêt/Marche
Le TruSurround XT est une technologie SRS brevetée qui remédie au problème de la lecture du
contenu d’un disque multicanal 5,1 sur deux haut-parleurs. Le TurSurround produit un son surround
virtuel fascinant au moyen de n’importe quel système de lecture à deux haut-parleurs, dont les
hautparleurs internes du téléviseur. Il s’adapte parfaitement à tous les formats multicanaux.
Réglage simple
1. Appuyez
2.
sur le bouton TOOLS de la télécommande.
Appuyez sur le bouton ▲ ou ▼ pour sélectionner “SRS TS XT”.
3. Appuyez sur le bouton ◄ ou ► pour sélectionner “Arrêt” ou
“Marche”.
Anynet+ (HDMI-CEC)
Mode Image : Standard
Mode Son : Personnalisé
Veille : Arrêt
SRS TS XT ◄ Arrêt ►
Mode éco. : Arrêt
Dual l-ll : Mono
Outils
4. Appuyez sur le bouton EXIT ou TOOLS pour quitter le menu.
Déplacer Régler Quitter
TruSurround XT, SRS et le symbole sont des marques déposées de
SRS Labs, Inc. La technologie TruSurround XT est protégée par la licence
de SRS Labs, Inc.
Français - 21
Page 82

♦ Volume auto: Arrêt/Marche
Chaque station d’émission possède ses propres conditions de signal et il n’est donc pas facile de régler le
volume chaque fois que vous changez de chaîne. Cette fonction vous permet de régler
automatiquement le volume du canal désiré en réduisant la puissance sonore lorsque le signal de
modulation est élevé ou en augmentant la puissance sonore lorsque le signal de modulation est faible.
♦ TV Speaker: Arrêt/Marche
Pour entendre le son par l’intermédiaire de haut-parleurs séparés, désactivez l’amplificateur interne.
➣
Les boutons
“Arrêt”.
Lorsque la fonction “TV Speaker” est réglée sur “Arrêt”, aucun des menus Son ne peut être réglé.
➣
+, - et MUTE ne fonctionnent pas lorsque le paramètre “TV Speaker” est déni sur
Fabriqué sous licence de Dolby Laboratories. Dolby et le symbole du double
D sont des marques déposées des laboratoires Dolby.
Sélection du mode Son
Vous pouvez configurer le mode sonore dans le menu “Outils”.
Lorsque vous réglez cette option sur “Dual I-II”, le mode
sonore actuel est affiché à l’écran.
1. Appuyez sur le bouton
.
Appuyez sur le bouton ▲ ou ▼ pour sélectionner “Dual I-II".
2
TOOLS de la télécommande.
3. Appuyez sur le bouton ◄ ou ► pour sélectionner l’option de
Anynet+ (HDMI-CEC)
Mode Image : Standard
Mode Son : Personnalisé
Veille : Arrêt
SRS TS XT : Arrêt
Mode éco. : Arrêt
Dual l-ll ◄ Mono ►
votre choix.
Appuyez sur le bouton ENTER
4.
Type Audio DUAL 1/2 Par défaut
Mono MONO
Stéréo A2
NICAM Stéréo
Si le signal stéréo est faible et qu’une permutation automatique se produit, passez alors en Mono.
➣
Cette fonction n’est activée qu’en son stéréo. Elle est désactivée en mode mono.
➣
Cette fonction est uniquement disponible en mode TV analogique.
➣
Stéréo
Dual
Mono MONO
Stéréo
Dual
.
STEREO MONO
DUAL 1 DUAL 2
MONO STEREO
MONO ↔ DUAL 1
DUAL 2
Changement
automatique
DUAL 1
Changement
automatique
DUAL 1
Déplacer Régler Quitter
Outils
Branchement du casque (vendu séparément)
Vous pouvez brancher un casque à votre téléviseur, si vous
souhaitez regarder un programme sur votre téléviseur sans déranger
les autres personnes présentes dans la pièce.
Lorsque vous insérez la prise casque dans le port correspondant,
➣
vous pouvez utiliser uniquement les options “Volume auto” dans le
menu Son.
L’utilisation prolongée d’un casque à un niveau sonore élevé peut
➣
endommager l’ouïe.
Aucun son n’est émis depuis les enceintes lorsque vous connectez le casque à l’appareil.
➣
Le volume du casque et celui du téléviseur sont réglés différemment.
➣
Français - 22
Panneau latéral du téléviseur
Page 83

Réglage et afchage de l’heure actuelle
Vous pouvez régler l’horloge du téléviseur de telle sorte que
l’heure actuelle s’afche lorsque vous appuyez sur le bouton
INFO. Vous devez également régler l’heure si vous souhaitez
utiliser les minuteurs de mise sous/hors tension.
1
Appuyez sur le bouton MENU pour afcher le menu.
.
Appuyez sur le bouton ou pour sélectionner “Conguration”
puis appuyez sur le bouton ENTER
.
2. Appuyez sur le bouton ou pour sélectionner “Horloge” puis
appuyez sur le bouton ENTER
3. Appuyez sur le bouton ENTER
.
pour sélectionner l’élément
“Réglage Horloge”.
4
.
Pour… Appuyez sur...
Naviguer entre les
“Année”, “Heure” ou “Minute”
Régler les
“Heure” ou “Minute”
Conrmer le paramètre
“Mois”, “Date”,
“Mois”, “Date”, “Année”,
Bouton ou
Bouton ou
Bouton ENTER
.
TV
TV
Plug & Play
Langue : Français
Horloge
Mélodie :
Divertissement : Arrêt
Mode éco. : Arrêt
Configuration
Arrêt
Déplacer Entrer Retour
Réglage Horloge
Mois01Date
01
Heure00Minute
00
Déplacer Adjust Retour
Année
2008
. Appuyez sur le bouton
5
Si vous débranchez le cordon d’alimentation, vous devrez régler à nouveau l’horloge.
➣
Vous pouvez également dénir l’année, les mois, la date, les heures et les minutes en appuyant
➣
EXIT pour quitter le menu.
sur le pavé numérique de la télécommande.
Réglage du minuteur de mise en veille
Vous pouvez sélectionner une durée (entre 30 et 180 minutes)
à l’issue de laquelle le téléviseur passe automatiquement en
mode veille.
1. Appuyez sur le bouton MENU pour afcher le menu.
Appuyez sur le bouton ou pour sélectionner “Conguration”
puis appuyez sur le bouton ENTER
.
2. Appuyez sur le bouton ou pour sélectionner “Horloge” puis
appuyez sur le bouton ENTER
.
3. Appuyez sur le bouton ou pour sélectionner “Veille” puis
appuyez sur le bouton ENTER
.
4. Appuyez à plusieurs reprises sur le bouton ou jusqu’à ce
que l’heure souhaitée apparaisse (Arrêt, 30, 60, 90, 120, 150,
180). Appuyez sur le bouton ENTER
.
5. Appuyez sur le bouton EXIT pour quitter le menu.
Le téléviseur passe automatiquement en mode veille lorsque le
➣
minuteur atteint 0.
Réglage simple
1.
Appuyez sur le bouton TOOLS de la télécommande.
2.
Appuyez sur le bouton ▲ ou ▼ pour sélectionner “Veille”.
3. Appuyez sur le bouton ◄ ou ► pour sélectionner les minutes.
4. Appuyez sur le bouton EXIT ou TOOLS pour quitter le menu.
TV
Plug & Play
Langue : Français
Horloge
Mélodie :
Divertissement : Arrêt
Mode éco. :
Déplacer Entrer Retour
TV
Réglage Horloge : 00 : 00
Veille :
Minuteur 1 :
Minuteur 2 :
Minuteur 3 :
Déplacer Entrer Retour
Outils
Anynet+ (HDMI-CEC)
Mode Image : Standard
Mode Son : Personnalisé
Veille ◄ Arrêt ►
SRS TS XT : Arrêt
Mode éco. : Arrêt
Dual l-ll : Mono
Configuration
Arrêt
Arrêt
Horloge
Arrêt
30
60
90
120
150
180
Français - 23
Déplacer Régler Quitter
Page 84

Mises en marche et arrêt automatiques de votre téléviseur
1. Appuyez sur le bouton MENU pour afcher le menu.
Appuyez sur le bouton ou pour sélectionner “Conguration”
puis appuyez sur le bouton ENTER
.
2. Appuyez sur le bouton ou pour sélectionner “Horloge” puis
appuyez sur le bouton ENTER
.
TV
Plug & Play
Langue : Français
Horloge
Mélodie :
Divertissement : Arrêt
Mode éco. : Arrêt
3. Appuyez sur le bouton ou pour sélectionner “Minuteur 1”,
“Minuteur 2” ou “Minuteur 3” puis appuyez sur le bouton
ENTER
Trois réglages différents de la minuterie Marche/Arrêt peuvent
être effectués.
➣
4.
Appuyez sur le bouton ◄ ou ► pour sélectionner l’élément
.
Vous devez préalablement régler l’horloge.
TV
5
6
désiré ci-dessous.
Appuyez sur le bouton ▲ ou ▼ pour valider le réglage.
♦ Période d’activation : Sélectionnez les heures et les minutes
ainsi que “Marche”/”Arrêt”. (Pour activer le minuteur selon les
réglages définis, choisissez “Marche”.)
♦ Période de désactivation : Sélectionnez les heures et les minutes ainsi que “Marche”/”Arrêt”. (Pour
activer le minuteur selon les réglages définis, choisissez “Marche”.)
♦ Répétition
: Choisissez
“Une fois”, “Tous les jours”, “Lun - Ven”, “Lun - Sam” ou “Sam - Dim”.
♦ Volume : Sélectionnez le niveau du volume désiré lorsque le téléviseur s’allume.
Vous pouvez régler les heures et les minutes directement à l’aide du pavé numérique de la télécom-
mande.
Mise hors tension automatique
Lorsque vous réglez la minuterie sur “Marche”, le téléviseur s’éteint si aucune commande n’est
activée dans les 3 heures qui suivent sa mise sous tension par la minuterie. Cette fonction est
disponible uniquement lorsque la minuterie est définie sur “Marche”; elle permet d’éviter toute
surchauffe occasionnée par une utilisation prolongée du téléviseur.
Configuration
Arrêt
Déplacer Entrer Retour
Minuteur 1
Période d’activation
:
00 00 Arrêt
Période de désactivation
:
00 Arrêt
00
Répétition
Une fois
Volume
10
►
Déplacer Régler Retour
Choix de la langue
Lorsque vous utilisez le téléviseur/moniteur pour la première
fois, vous devez sélectionner la langue utilisée pour afcher les
menus et les indications.
1. Appuyez sur le bouton MENU pour afcher le menu à l’écran.
Appuyez sur le bouton ou pour sélectionner “Conguration”
puis appuyez sur le bouton ENTER
.
2. Appuyez sur le bouton ou pour sélectionner “Langue” puis
appuyez sur le bouton ENTER
.
3. Sélectionnez la langue souhaitée en appuyant de façon répétée
sur le bouton ou . Appuyez sur le bouton ENTER
.
4. Appuyez sur le bouton EXIT pour quitter le menu.
Français - 24
TV
Plug & Play
Langue : Français
Horloge
Mélodie : Arrêt
Divertissement :
Mode éco. : Arrêt
Configuration
Arrêt
Déplacer Entrer Retour
Page 85

Mélodie / Divertissement / Mode éco.
1. Appuyez sur le bouton MENU pour afficher le menu.
Appuyez sur le bouton ▲ ou ▼ pour sélectionner
“Configuration”, puis appuyez sur le bouton ENTER .
2. Sélectionnez l’option désirée en appuyant sur le bouton
▲ ou ▼, puis appuyez sur le bouton ENTER
.
3. Lorsque vous êtes satisfait du réglage, appuyez sur le
bouton ENTER
.
4. Appuyez sur le bouton EXIT pour quitter le menu.
♦
Mélodie: Arrêt/Bas/Moyen/Elevé
La mélodie de mise sous/hors tension du téléviseur peut être ajustée.
Aucune mélodie n’est lue dans les cas suivants :
➣
− Aucun
− Aucun
son n’est émis par le téléviseur car le bouton MUTE a été enfoncé.
son n’est émis par le téléviseur car le bouton
- (Volume) a été enfoncé.
− Lorsque la commande Mise en veille met le téléviseur hors tension.
Divertissement: Arrêt/Sports/Cinéma/Jeu
♦
Le mode “Divertissement” vous permet de sélectionner les valeurs d’affichage et de son optimales
pour le sport, le cinéma et les jeux.
− Arrêt: désactive la fonction “Divertissement”.
− Sports: fournit une
− Cinéma: fournit une
− Jeu: fournit une
➣
➣
➣
qualité sonore et visuelle saisissante.
image plus belle et d’un son encore meilleur.
lecture lorsqu’une console de jeu est reliée au téléviseur.
Si vous activez l’un des trois modes “Divertissement”, les paramètres seront verrouillés
empêchant toute modication. Si vous souhaitez régler les modes Image et Son, le mode
“Divertissement” doit être désactivé.
Les réglages du mode “Divertissement” sont enregistrés pour chaque source d’entrée.
Si on règle l’un des trois modes “Divertissement” à Marche, la fonction “SRS TS XT” n’est pas
disponible.
qualité d’image et de son optimale pour le sport. Vous disposez ainsi d’une
qualité d’image et de son optimale pour le cinéma. Vous pouvez profiter d’une
qualité d’image et de son optimale pour les jeux. Ce mode accélère la vitesse de
Vous pouvez appuyer plusieurs fois sur le bouton E.MODE de
la télécommande pour modifier le paramètre “Divertissement”.
TV
Plug & Play
Langue : Français
Horloge
Mélodie :
Divertissement : Arrêt
Mode éco. :
Configuration
Déplacer Entrer Retour
Arrêt
Arrêt
Français - 25
Page 86

Mode éco.: Arrêt/Bas/Moyen/Elevé/ Auto.
♦
Cette fonction règle la luminosité en fonction des conditions d’éclairage.
− Arrêt: Désactive la fonction d’économie d’énergie.
− Bas: Met le téléviseur en mode d’économie d’énergie basse.
− Moyen: Met le téléviseur en mode d’économie d’énergie moyenne.
− Elevé: Met le téléviseur en mode d’économie d’énergie élevée.
− Auto.: Règle automatiquement la luminosité de l’écran du téléviseur en fonction de la scène.
Réglage simple
Appuyez sur le bouton TOOLS de la télécommande.
1.
2.
Appuyez sur le bouton ▲ ou ▼ pour sélectionner “Mode éco.”.
3. Appuyez sur le bouton ◄ ou ► pour sélectionner "Arrêt", "Bas",
"Moyen", "Elevé" ou "Auto.".
4.
Appuyez sur le bouton EXIT ou TOOLS pour quitter le menu.
Cette fonction n’est pas disponible en mode “PC”. (40
➣
pouces)
Sélection de la source
Vous pouvez sélectionner parmi les sources extérieures
connectées aux prises d’entrée du téléviseur.
1. Appuyez sur le bouton MENU pour afcher le menu.
Appuyez sur le bouton ou pour sélectionner “Entrée” puis
appuyez sur ENTER
2. Appuyez à nouveau sur le bouton ENTER
“Liste Source”.
Sources de signal disponibles: TV, Ext.1, Ext.2, AV, S-Vidéo,
➣
Composant, PC, HDMI1, HDMI2, HDMI3, DTV.
Vous ne pouvez sélectionner que les appareils externes
➣
connectés au téléviseur.
3. Sélectionnez l’option souhaitée en appuyant sur le bouton
ou .
Appuyez sur le bouton ENTER
Appuyez sur le bouton SOURCE de votre télécommande pour
passer d’une source disponible à l’autre. Le Mode TV peut être
sélectionné en appuyant sur le bouton TV/DTV, les boutons
numériques (de 0 à 9) ou les boutons canal suivant/précédent
P </> de la télécommande.
.
pour sélectionner
Outils
Anynet+ (HDMI-CEC)
Mode Image : Standard
Mode Son : Personnalisé
Veille : Arrêt
SRS TS XT : Arrêt
Mode éco. ◄Arrêt ►
Dual l-ll : Mono
Déplacer Régler Quitter
TV
Liste Source : TV
Modif. Nom
Anynet+(HDMI-CEC)
Déplacer Entrer Retour
TV
TV
Ext.1 : ---Ext.2 : ----
AV : ---S-Vidéo : ---Composant : ---PC : ---HDMI1 : ---HDMI2 : ---HDMI3 : ----
DTV
Déplacer Entrer Retour
Entrée
Liste Source
Vous pouvez également regarder le mode HDMI en appuyant
simplement sur le bouton HDMI de votre télécommande.
Français - 26
Page 87

Modication du nom de la source d’entrée
Nommez le périphérique connecté aux prises d’entrée pour
rendre la sélection des sources d’entrée plus facile.
1. Appuyez sur le bouton MENU pour afcher le menu.
Appuyez sur le bouton ou pour sélectionner “Entrée” puis
appuyez sur le bouton ENTER
.
2. Appuyez sur le bouton ou pour sélectionner “Modif. Nom”
puis appuyez sur le bouton ENTER
.
3. Appuyez sur le bouton ou pour sélectionner le périphérique
que vous souhaitez éditer. Appuyez sur le bouton ENTER
.
4. Appuyez sur le bouton ou pour sélectionner le
périphérique requis.
Appuyez sur le bouton ENTER
.
5. Appuyez sur le bouton EXIT pour quitter le menu.
TV
Liste Source : TV
Modif. Nom
Anynet+(HDMI-CEC)
TV
Ext.1 : ----
Ext.2 : ----
AV : ----
S-Vidéo : ----
Composant : ----
PC : ----
HDMI1 : ----
HDMI2 : ----
HDMI3 : ----
Entrée
Déplacer Entrer Retour
Modif. Nom
----
Magnétoscope
DVD
Décodeur Câble
Décodeur satellite
Décodeur PVR
Récepteur AV
Jeu
Déplacer Entrer Retour
Français - 27
Page 88

Aperçu du Système Menu DTV
La société ne peut pas garantir l’utilisation normale du menu
♦
DTV pour les pays autres que ceux pris en charge (France,
Allemagne, Italie, Pays-Bas, Espagne, Suisse, Royaume-Uni,
Autriche) car seules les normes de ces pays sont prises en
charge. De plus, lorsque le pays du flot d’émission diffère du
pays sélectionné par l’utilisateur, la bande apparaissant dans
la bannière des canaux, Info, Guide, Gestionnaire de Chaînes,
etc. ne peut être affichée correctement.
Disponible en mode TV. Préréglez le mode DTV à l’aide du
♦
bouton TV/DTV de votre télécommande. Pour vous aider à
naviguer dans le système de menu à l’écran et à régler les
différents paramètres disponibles, voir l’illustration suivante.
Appuyez sur le bouton MENU pour afcher le menu.
Appuyez sur le bouton ou pour sélectionner “Menu
numérique” puis appuyez sur le bouton ENTER
Guide
Guide Now & Next
Guide Complet
Liste en annexe
Par défaut
Guide Complet, Main./Après
Canal
Pays
Mémorisation Auto
Mémorisation Manuelle
Modif. les canaux favoris
Liste des chaînes
Tous, Favoris, Défaut
Configuration
Transparence du menu
Modifier PIN
Elevé, Moyen, Bas, Opaque
Verrouillage parental
Sous-titres
Mode Sous-titres
Format Audio
Description audio
Texte numérique
Marche , Arrêt
Normal, Malentendants
PCM/Dolby Digital
Description audio
Volume
Désactiver, Activer
Fuseau Horaire
Interface commune
Système
Infos sur application, CI Menu
Informations sur le produit
Informations de signal
Mise à niveau du logiciel
Réinitialiser
Langue
Langue audio
Langue des sous-titres
Langue du télétexte
Préférence
Première Langue Audio
Deuxième Langue Audio
Première Langue de Sous-titres
Deuxième langue de Sous-titres
Première Langue Télétexte
Deuxième Langue Télétexte (en fonction du pays)
.
Arrêt, Marche
Mode : Personnalisé
TV
DTV
DTV
DTV
DTV
Menu numérique
Guide
Equalizer
Chaîne numérique
SRS TS XT :
Auto Volume
Configuration
Internal Mute :
Langue
Reset
Mode : Personnalisé
Guide Now & Next
Equalizer
Guide Complet
SRS TS XT :
Liste en annexe
Auto Volume
Par défaut :Guide Complet
Internal Mute :
Reset
Pays :Royaume-Uni
Mémorisation Auto
Mémorisation Manuelle
Modif. les canaux favoris
Liste des chaînes
Transparence du menu
Modifier PIN
Verrouillage parental
Sous-titres
Mode Sous-titres
Langue audio
Langue des sous-titres
Langue du télétexte
Préférence
: Off
Entrer Return
Move
Déplacer
: Off
Entrer Return
Move
Déplacer
Move Entrer
Déplacer
Configuration
Move Entrer Return
Déplacer
Langue
Move Entrer Return
Déplacer
Off
Off
Retour
Entrer
Guide
Off
Off
Retour
Entrer
Canal
Return
Retour
Entrer
: Moyen
: Arrêt
Retour
Entrer
Retour
Entrer
Les éléments secondaires du menu CI peuvent être différents selon le modèle CAM.
➣
Français - 28
Page 89

Mise à jour automatique de la liste des chaînes
Vous pouvez mettre à jour la liste des chaînes lorsque
l’émetteur ajoute de nouveaux services ou si vous déplacez
votre téléviseur.
1. Appuyez sur le bouton MENU pour afcher le menu.
Appuyez sur le bouton ou pour sélectionner
“Menu numérique” puis appuyez sur le bouton ENTER
.
2. Appuyez sur le bouton ou pour sélectionner “Canal”, puis
appuyez sur le bouton ENTER
3. Appuyez sur le bouton ENTER
.
pour sélectionner “Pays”.
4. Sélectionnez le pays correspondant en appuyant sur les
boutons ▲ ou ▼. Appuyez sur le bouton ENTER
pour
conrmer votre choix.
Même si vous avez modifié le paramètre de pays dans ce
menu, le paramètre de pays pour la télévision analogique
reste le même (reportez-vous à la page 11).
5. Appuyez à nouveau sur le bouton
ou pour sélectionner
“Mémorisation Auto”.
Appuyez sur le bouton ENTER
Lorsque c’est terminé, le nombre de services balayés s’afche.
➣
La liste existante des chaînes préférées n’est pas effacée lorsque la liste des chaînes est mise à jour.
➣
Pour arrêter la recherche avant la n, appuyez sur la touche ENTER
➣
.
“Arrêter”.
6. Appuyez sur le bouton EXIT pour quitter le menu.
Si l’état du signal est faible, le message “Aucun service trouvé! Contrôlez câble antenne” s’afche.
➣
DTV
Pays :Royaume-Uni
Mémorisation Auto
Mémorisation Manuelle
Modif. les canaux favoris
Liste des chaînes
Déplacer
Mode : Personnalisé
DTV
Equalizer
SRS TS XT :
Recherche de services numériques...
Auto Volume
Internal Mute :
Reset
Service trouvé: 24 Canal: 38
Canal
Entrer
Mémorisation Auto
Off
: Off
Off
Arrêter
Entrer Return
Move
Retour
après avoir sélectionné
Mise à jour manuelle de la liste des chaînes
Vous pouvez spécier le canal pour une recherche rapide.
1. Appuyez sur le bouton MENU pour afcher le menu.
Appuyez sur le bouton ou pour sélectionner
“Menu numérique” puis appuyez sur le bouton ENTER
.
2. Appuyez sur le bouton ou pour sélectionner “Canal”, puis
appuyez sur le bouton ENTER
3.
Appuyez sur le bouton ou pour sélectionner “Mémorisation
.
Manuelle” puis appuyez sur le bouton ENTER .
4. Appuyez sur le bouton ou pour sélectionner l’option
souhaitée, puis appuyez sur le bouton ENTER .
-
Canal : Les canaux 5 à 69 sont afchés l’un après l’autre au
➣
Rouyaume-Uni. (En fonction du pays)
-
Fréquence : La fréquence disponible dans le menu Canal s’affiche.
-
Bande passante : Les bandes passantes disponibles sont 7 et 8 MHz.
Appuyez sur le bouton rouge pour démarrer la recherche de services numériques. Au terme
➣
de la recherche, les chaînes de la liste sont mises à jour.
5. Lorsque c’est terminé, le nombre de services balayés s’afche.
6. Appuyez sur le bouton EXIT pour quitter le menu.
DTV
Mémorisation Manuelle
Canal
Fréquence
▲
5
177500
▼
Recherche
Régler Retour
KHz MHz
Retour
35%
Bande passante
7
Français - 29
Page 90

Modication de vos canaux favoris
Vous pouvez modier vos canaux favoris à l’aide des quatre
boutons de couleur.
1. Appuyez sur le bouton MENU pour afcher le menu.
Appuyez sur le bouton ou pour sélectionner
“Menu numérique” puis appuyez sur le bouton ENTER
.
2. Appuyez sur le bouton ou pour sélectionner “Canal”, puis
appuyez sur le bouton ENTER
.
3. Appuyez sur le bouton ou pour sélectionner “Modif. les
canaux favoris” puis appuyez sur le bouton ENTER
.
4. Appuyez sur le bouton rouge pour afcher l’ensemble des canaux
actuellement mémorisés.
5.
Appuyez sur le bouton ou pour sélectionner le canal
souhaité. Appuyez sur le bouton ENTER
L’icône “” est afchée près du canal sélectionné et cette
➣
.
dernière sera ajoutée à la liste des chaînes favorites.
Pour annuler
➣
, appuyez une nouvelle fois sur le bouton
ENTER .
Sélectionner tout
: Sélectionne tous les canaux
actuellement afchés.
Sélectionner aucun
Aperçu
Le réglage des canaux favoris est terminé.
➣
6.
Appuyez sur le bouton EXIT pour quitter le menu.
♦
Ajouter
: Afche les canaux actuellement sélectionnés.
: Désélectionne tous les canaux.
Utilisez cette fonction lorsqu’au moins un canal favori est
sélectionné.
Appuyez sur le bouton MENU pour afcher le menu.
1.
Appuyez sur le bouton ou pour sélectionner
“Menu numérique” puis appuyez sur le bouton ENTER
.
2. Appuyez sur le bouton ou pour sélectionner “Canal”, puis
appuyez sur le bouton ENTER
.
3. Appuyez sur le bouton ou pour sélectionner “Modif. les
canaux favoris” puis appuyez sur le bouton ENTER
.
4. Appuyez sur le bouton rouge dans le menu “Modif. les canaux
favoris”. Pour ajouter d’autres canaux, reportez-vous à l’étape 5
de la description précédente.
5.
Pour savoir si le canal est bien mémorisé, appuyez sur le bouton
RETURN. Appuyez sur le bouton EXIT pour quitter le menu.
Pour ajouter tous les canaux à la liste des chaînes favorites,
➣
appuyez sur le bouton rouge.
Pour supprimer tous les canaux, appuyez sur le bouton vert.
: Afche les canaux actuellement sélectionnés.
Aperçu
Appuyez sur le bouton CH LIST pour afcher le gestionnaire
des canaux favoris.
DTV
DTV
DTV
DTV
Modif. les canaux favoris
(Aucun canal)
Ajouter des chaînes
Retour
Modif. les canaux favoris
5
2 BBC TWO
Five
5
7 BBC THREE
15 abc1
16 QVC
6
Move Entrer Return
Sélectionner tout
Sélectionner aucun
★
Renuméroter
Aperçu Sup.
★
Sélectionner aucun
Aperçu
Aperçu
Déplacer Sélect Retour
Modif. les canaux favoris
2 BBC TWO ★
7 BBC THREE
15 abc
1 ★
Move Entrer Re-
Ajouter
Déplacer Return
Modif. les canaux favoris
5
2 BBC TWO
5 Five
BBC THREE ★
7
1 ★
15 abc
16 QVC
6
Move Entrer Return
Sélectionner tout
Déplacer Sélect Retour
Français - 30
Page 91

Renuméroter (En fonction du pays)
♦
1. Appuyez sur le bouton MENU pour afcher le menu.
Appuyez sur le bouton ou pour sélectionner
“Menu numérique” puis appuyez sur le bouton ENTER
.
2. Appuyez sur le bouton ou pour sélectionner “Canal”, puis
appuyez sur le bouton ENTER
.
3. Appuyez sur le bouton ou pour sélectionner “Modif. les
canaux favoris” puis appuyez sur le bouton ENTER
.
4. Sélectionnez le canal souhaité en appuyant sur le bouton
ou .
5.
Appuyez sur le bouton vert.
La zone d’entrée du numéro est vide.
➣
6.
Entrez le nouveau numéro de chaine. Appuyez sur ENTER
pour le mémoriser ou sur RETURN pour annuler.
➣
Appuyez sur le bouton ◄ pour supprimer un chiffre saisi.
Si vous saisissez un numéro déjà attribué à une autre
➣
chaîne, celui-ci sera attribué à la chaîne sélectionnée et
l’ancien numéro de la chaîne sélectionnée sera attribué à
l’autre chaîne. Les deux numéros seront donc échangés.
Les chaînes favorites sont automatiquement triées par ordre
➣
croissant des numéros de chaîne.
7
Appuyez sur le bouton EXIT pour quitter le menu.
.
DTV
Modif. les canaux favoris
2
BBC TWO ★
--- BBC THREE ★
15 abc
1 ★
Move Entrer Return
Editer
Retour
Conrmer
Aperçu
♦
1.
Dans le menu “Modif. les canaux favoris”, sélectionnez le canal
à prévisualiser en appuyant sur le bouton ou .
2.
Appuyez sur le bouton jaune.
Le canal actuellement sélectionné s’afche.
➣
Sup.
♦
1
Dans le menu “Modif. les canaux favoris”, sélectionnez le canal
.
à supprimer de la liste des canaux favoris en appuyant sur le
bouton ou .
2.
Appuyez sur le bouton bleu.
Le canal et le numéro sélectionnés seront supprimés.
➣
Pour réintégrer un canal supprimé dans la liste des chaînes
➣
favorites, reportez-vous à “Ajouter”, à la page
30
.
DTV
DTV
Modif. les canaux favoris
2
BBC TWO ★
7 BBC THREE ★
15 abc
1 ★
Move Entrer Return
Ajouter
Déplacer Retour
Modif. les canaux favoris
2 BBC TWO ★
7 BBC THREE
Move Entrer Return
Ajouter
Déplacer Retour
Renuméroter
Aperçu Sup.
★
Renuméroter
Aperçu Sup.
Français - 31
Page 92

Sélection de la liste des chaînes
Vous pouvez exclure les canaux que vous avez choisis
des canaux que vous avez balayés. Lors du balayage des
canaux mémorisés, ceux que vous avez choisi d’ignorer ne
s’afchent pas. Tous les canaux que vous ne choisissez pas
spéciquement d’ignorer s’afchent lors du balayage.
Appuyez sur le bouton MENU pour afcher le menu.
1.
Appuyez sur le bouton ou pour sélectionner
“Menu numérique” puis appuyez sur le bouton ENTER
.
Test Card M' v2.0
1 Test Card M’ v2.0
3 Vida003b
4 Vida004b
5 vida005b
6 vida006b
15 Ch 15
16 QVC
17 UKTV Gold
2. Appuyez sur le bouton ou pour sélectionner “Canal”, puis
appuyez sur le bouton ENTER
.
3. Appuyez sur le bouton ou pour sélectionner “Liste des
chaînes”.
Appuyez sur le bouton ENTER
.
4. Appuyez sur le bouton ou pour sélectionner “Tous”,
“Favoris” ou “Par défaut”.
Appuyez sur le bouton ENTER
.
5. Appuyez sur le bouton jaune pour passer de vos canaux favoris
aux autres.
Vos canaux favoris ne sont afchés que si ils ont été préalablement dénis dans le menu “Modif.
➣
les canaux favoris” (reportez-vous à la page 30
).
6. Appuyez sur le bouton rouge ou vert pour afcher la page précédente ou suivante de la liste des
chaînes.
7.
Appuyez sur le bouton ou pour sélectionner un canal à régler.
Appuyez sur le bouton ENTER
➣
Le numéro, le nom et l’icône du canal sont afchés dans l’angle en haut à gauche de l’écran
.
lorsque vous en changez. Le numéro et le nom du canal sont afchés si le canal fait partie de tous
les canaux, et une icônes’afche si il fait partie des canaux favoris.
8.
Appuyez sur le bouton bleu pour basculer entre “TV”, “Radio”, “Data/Other” et “All”.
9. Pour fermer la liste des chaînes, appuyez sur le bouton sur CH LIST.
Liste des chaînes
23 bid-up.tv
25 TCM
26 UKTV Style
27 Discovery
28 DiscoveryH&L
15 Cartoon Nwk
33 Boomerang
55 Ttext Holidays
Page préc. Page suiv. Favoris TV
Déplacer Regarder
Tous les canaux-Tous
60 Television X
70 BBC Radio 1
72 BBC Radio 2
73 BBC Radio 3
74 BBC Radio 4
84 heat
91 MOJO
800 ARD-MHP-Data
6 Plus
Retour
Elles peuvent être affichées
simplement en appuyant sur le
bouton CH LIST.
1/2
Afchage des informations relatives aux programmes
Lorsque vous regardez un canal, des informations
supplémentaires sur le programme en cours peuvent être
afchées.
1. Durant un programme, appuyez sur le bouton INFO.
Les informations relatives au programme sont afchées.
➣
2.
Pour quitter le bandeau, appuyez sur le bouton INFO.
Les informations relatives au programme sont afchées.
➣
− Classement parental
− Type vidéo: SD, HD, Radio
− Type Audio: Mono, Stéréo, Dual, Dolby Digital
− Existence de télétexte ou de sous-titres DVB
− Langue audio
Français - 32
1 AFDO,16:9
AFDO 16:9
Aucun bloc
SD
Stéréo
Sous-titres
Anglais
Quitter
14:30 Sam1 Sept
Tous les canaux
14:30~14:33
Contains video with AFD O; coded frame
is 16:9
Move Entrer Return
A
Page 93

Afchage des informations relatives au Guide de programme électronique (GPE)
Les informations relatives au Guide de programme
électronique (GPE) sont fournies par les émetteurs. Les
entrées de programmes peuvent apparaître en blanc ou ne
pas être à jour en raison de l’information diffusée sur un
canal donné. L’afchage fera une mise à jour automatique dès
qu’une nouvelle information sera disponible.
Guide Now & Next
♦
Pour les six canaux indiqués dans la colonne de gauche,
les informations relatives au programme actuel et au
programme suivant sont afchées.
Guide complet
♦
Afche les informations relatives au programme toutes les
heures. Des informations sur deux heures de programme
sont afchées et peuvent être parcourues en avançant ou
en remontant dans le temps.
1
Appuyez sur le bouton MENU pour afcher le menu.
.
Appuyez sur le bouton ou pour sélectionner
“Menu numérique” puis appuyez sur le bouton ENTER
2. Appuyez sur le bouton ENTER
pour sélectionner “Guide”.
.
3. Appuyez sur le bouton ou pour sélectionner “Guide Now &
Next” ou “Guide complet”. Appuyez sur le bouton ENTER
Vous pouvez aussi afcher le guide en appuyant tout
➣
.
simplement sur le bouton GUIDE.
4.
Pour… Alors…
Sélectionnez un programme en
•
Regarder un programme de la liste EPG
Si le programme suivant est sélectionné, il est réglé avec l’icône de l’horloge
➣
afché. Si vous appuyez à nouveau sur le bouton ENTER
est annulé et l’icône de l’horloge disparaît. Pour plus d’informations sur les
programmes réglés, voir page suivante.
Voir les informations relatives aux
programmes
Choisissez entre “Guide Now & Next” et
“Guide complet”
Afcher les listes “Favoris” et “Tous les
canaux”
Permet de reculer rapidement (24 heures).
Permet d’avncer rapidement (24 heures).
Quitter le guide Appuyez sur le bouton EXIT.
appuyant sur le bouton , , , .
Appuyez sur le bouton ENTER
•
le réglage
Sélectionnez un programme de votre
•
choix en appuyant sur le bouton ,
, , .
Appuyez sur le bouton INFO lorsque
•
le programme souhaité est surligné.
Appuyez à plusieurs reprises sur le
•
bouton rouge.
Appuyez à plusieurs reprises sur le
•
bouton vert.
Appuyez à plusieurs reprises sur le
•
bouton jaune.
Appuyez à plusieurs reprises sur le
•
bouton bleu.
•
.
All Channels
Regarder Guide Complet Favoris Quit
Regarder Main/Aprés Favoris
Guide Now & Next
27 Discovery
Extreme Machines: Armoured Cars
Maintenant Suivant
Guide Complet
27 Discovery
Extreme Machines: Armoured Cars
13:00 14:00Aujourd’hui
- 24Heures
13:28 Mer 16 Fév
INFO
13:28 Mer 16 Fév
INFO
+24Heures
Quit
Le titre du programme se trouve sur la partie haute du centre de l’écran. V
➣
euillez appuyer sur le
bouton INFO pour plus d’informations. Numéro de canal, temps de fonctionnement du programme,
barre d’état, niveau de contrôle parental, informations sur la qualité vidéo (HD/SD), modes sonores,
sous-titres ou Teletext, Langue des sous-titres ou du Teletext et bref résumé du programme surligné
font partie des informations supplémentaires. “...” apparaitra si le résumé est long.
Six canaux sont afchés. Pour vous déplacer entre les canaux, passez de l’un à l’autre en appuyant
➣
sur le bouton ou . Pour passer d’une page à l’autre, appuyez sur le bouton P
Français - 33
<
ou P>.
Page 94

Utilisation de la liste réglée
Si vous créez une liste réglée de visionnage de programmes
que vous souhaitez regarder, le canal passera automatiquement
au programme programmé à l’heure programmée même si vous
en regardez un autre.
Appuyez sur le bouton MENU pour afcher le menu.
1.
Appuyez sur le bouton ou pour sélectionner
“Menu numérique” puis appuyez sur le bouton ENTER
2. Appuyez sur le bouton ENTER
pour sélectionner “Guide”.
.
3. Appuyez sur le bouton ou pour sélectionner “Liste en
annexe”, puis appuyez sur le bouton ENTER
.
4. Appuyez sur le bouton rouge. Le canal passera au programme
programmé.
5.
Appuyez sur le bouton ENTER
pour sélectionner un élément
et régler avec le bouton ou .
Vous pouvez également dénir les heures et les minutes en
➣
appuyant sur le pavé numérique de la télécommande.
Canal : Réglez le canaux d’enregistement.
Horloge
: Réglez l’heure.
Date : Réglez l’année, le mois et le jour.
Fréquence : Réglez la fréquence.
(“Une fois”, “Quotidien quotidien” ou “Chaque semaine
hebdomadaire”)
6.
Après avoir conguré la programmation, appuyez sur le bouton
rouge.
7.
Appuyez sur le bouton EXIT pour quitter le menu.
Enregistrer Enregistrer la programmation.
➣
Annuler : Annuler la programmation.
Ajouter programme
: Ajouter une nouvelle programmation.
Modier : Modier la programmation.
Sup. : Supprimer la programmation.
DTV
DTV
DTV
Liste en annexe
(Aucun programme)
Ajouter prog.
Retour
Liste en annexe
Mardi 22 Avr 15:30 ~ 16:00 Une fois
801 RaiTre
Ajouter prog. Editer Sup.
Déplacer Retour
Liste en annexe
Canal
80
2 RaiUno
Horloge
15 : 20 à -- : --
Date
Mar 22 Avr 2008
Fréquence
Une fois
Sauveg Annuler
Régler Déplacer Retour
Congurer le Guide par défaut
Vous pouvez programmer le style du Guide par défaut.
1. Appuyez sur le bouton MENU pour afcher le menu.
Appuyez sur le bouton ou pour sélectionner
“Menu numérique” puis appuyez sur le bouton ENTER
2. Appuyez sur le bouton ENTER
pour sélectionner “Guide”.
3. Appuyez sur le bouton ou pour sélectionner “Par défaut”
puis appuyez sur le bouton ENTER
.
4. Sélectionnez “Main./Après” ou “Guide complet” en appuyant sur
le bouton ou , puis appuyez sur le bouton ENTER
5. Appuyez sur le bouton EXIT pour quitter le menu.
Français - 34
.
.
Vous pouvez sélectionner ces
DTV
Guide Now & Next
Guide Complet
Liste en annexe
Par défaut :
Guide
FNow
Main./Après
Guide Complet
Move Entrer Return
Déplacer Entrer Retour
options en appuyant sur le
bouton GUIDE de votre
télécommande.
Page 95

Visualisation de tous les canaux et des canaux favoris
Dans le menu EPG, vous pouvez afcher tous les canaux ou les
canaux favoris.
1. Appuyez sur le bouton MENU pour afcher le menu.
Appuyez sur le bouton ou pour sélectionner
“Menu numérique” puis appuyez sur le bouton ENTER
2. Appuyez sur le bouton ENTER
pour sélectionner “Guide”.
.
All Channels
3. Sélectionnez l’option requise (“Guide Now & Next” ou “Guide
complet”) en appuyant sur le bouton ou .
4.
Appuyez de nouveau sur le bouton ENTER
.
5. Appuyez sur le bouton vert. Toutes les listes de chaînes et les
listes de chaînes favorites sont balayées.
6.
Sélectionnez un programme de votre choix en appuyant sur le
Regarder Guide Complet Favoris Quit
bouton , , ou .
7.
Appuyez sur le bouton INFO pour afcher les informations
relatives au programme surligné.
8.
Lorsque la liste “Modif. les canaux favoris” n’a pas été congurée :
Le message “La liste des favoris est vide. Souhaitez-vous
choisir vos favoris maintenant ?” s’afche.
Sélectionnez “Oui”
Le menu “Modif. les canaux favoris” s’afche. Si vous
sélectionnez “Non”, les canaux restent inchangés.
Pour modier vos canaux préférés, reportez-vous à la page
30 pour plus d’informations.
9.
Appuyez sur le bouton EXIT pour quitter le menu.
“Tous les canaux” est une liste des chaînes qui ont été balayées pendant la mise à jour de la liste des
➣
Regarder Main/Aprés Favoris
chaînes. Tous les canaux sont afchés en mode tous canaux.
Vos canaux “favoris” ne sont afchés que si ils ont été préalablement dénis dans le menu “Modif. les
➣
canaux favoris” (reportez-vous à la page 30).
Guide Now & Next
27 Discovery
Extreme Machines: Armoured Cars
Maintenant Suivant
Guide Complet
27 Discovery
Extreme Machines: Armoured Cars
13:00 14:00Aujourd’hui
La liste des favoris est vide.
Voulez-vous choisir vos favoris
maintenant
?
Oui Non
- 24Heures
13:28 Mer 16 Fév
13:28 Mer 16 Fév
+24Heures
INFO
INFO
Quit
Réglage de la transparence du menu
Vous pouvez régler la transparence du menu.
1. Appuyez sur le bouton MENU pour afcher le menu.
Appuyez sur le bouton ou pour sélectionner
“Menu numérique” puis appuyez sur le bouton ENTER
2. Appuyez sur le bouton ou pour sélectionner “Conguration”
puis appuyez sur le bouton ENTER
.
3. Appuyez sur le bouton ou pour sélectionner “Transp. menu”
puis appuyez sur le bouton ENTER
.
4. Sélectionnez l’option de votre choix (“Elevé”, “Moyen”, “Bas” ou
“Opaque”) en appuyant sur le bouton ou puis appuyez sur
le bouton ENTER
pour changer la conguration.
5. Appuyez sur le bouton EXIT pour quitter le menu.
Français - 35
.
DTV
Transparence du menu : Moyen
Modifier PIN
Verrouillage parental
Sous-titres : Marche
Mode Sous-titres
Déplacer Entrer Retour
Configuration
Elevé
Moyen
Bas
Opaque
Page 96

Conguration du contrôle parental
Cette fonction vous permet d’éviter toute utilisation non
autorisée, par des enfants par exemple, qui pourraient visionner
des programmes ne leur étant pas destinés par un code
PIN à chiffres (Code d’identication personnelle) déni par
l’utilisateur. Le menu à l’écran vous demandera d’attribuer un
code PIN (vous pouvez le changer ultérieurement si nécessaire).
1. Appuyez sur le bouton MENU pour afcher le menu.
Appuyez sur le bouton ou pour sélectionner
“Menu numérique” puis appuyez sur le bouton ENTER
.
2. Appuyez sur le bouton ou pour sélectionner “Conguration”
puis appuyez sur le bouton ENTER
.
3. Appuyez sur le bouton ou pour sélectionner “Verrouillage
Parental”, puis appuyez sur le bouton ENTER
.
4. Le message “Saisir le code PIN” s’afche.
5. Entrez votre code PIN à quatre chiffres en utilisant les boutons
numériques (0 à 9).
Le code PIN par défaut d’un nouvel écran à plasma est “0000”.
➣
Si vous entrer un code PIN non-valable, le message “Code
➣
PIN non-valable. Veuillez réessayer.” s’afche.
6
Appuyez de nouveau sur le bouton ENTER
.
.
7. Appuyez sur le bouton ou pour sélectionner l’âge auquel
vous souhaitez que le verrouillage s’active. Appuyez sur le
bouton ENTER
♦
Modier PIN
.
Appuyez sur le bouton MENU pour afcher le menu.
1
.
Appuyez sur le bouton ou pour sélectionner
“Menu numérique” puis appuyez sur le bouton ENTER
.
2. Appuyez sur le bouton ou pour sélectionner “Conguration”
puis appuyez sur le bouton ENTER
.
3. Appuyez sur le bouton ou pour sélectionner “Modifier PIN”,
puis appuyez sur le bouton ENTER
Le message “Saisir le code PIN” s’afche.
➣
4.
Entrez votre code PIN à quatre chiffres en utilisant les boutons
.
numériques (0 à 9).
“Entrer le nouveau code PIN” s’afche.
➣
5.
Entrez votre nouveau code PIN en utilisant les boutons
numériques (0 à 9).
Le message “Conrmer Nouveau Code PIN” s’afche.
➣
6.
Entrez à nouveau le nouveau code PIN pour conrmer en
utilisant les boutons numériques (0 à 9).
Le message Votre code PIN a été modié avec succès
➣
s’afche.
7.
Appuyez de nouveau sur le bouton ENTER
.
8. Appuyez sur le bouton EXIT pour quitter le menu.
Si vous avez oublié le code PIN, appuyez sur les boutons de la télécommande dans l’ordre
➣
suivant, ce qui remet le code PIN à 0-0-0-0: POWER (Arrêt), MUET,
DTV
Transparence du menu : Moyen
Modifier PIN
Verrouillage parental
Sous-titres : Arrêt
Mode Sous-titres
DTV
Saisir le code PIN
DTV
Classement parental
DTV
Transparence du menu : Moyen
Modifier PIN
Verrouillage parental
Sous-titres : Arrêt
Mode Sous-titres
DTV
Confirmer Nouveau Code PIN
Votre code PIN a été modifié avec succès.
8, 2, 4, POWER (Marche).
Configuration
Move Entrer Return
Déplacer Entrer Retour
Verrouillage parental
Saisir le code PIN
Verrouillage parental
Déplacer Entrer Retour
Déplacer Entrer Retour
Saisir le code PIN
Retour
▲
: No Block
Aucun bloc
3
4
5
6
7
▼
Configuration
Modifier PIN
OK
Retour
Français - 36
Page 97

Conguration des sous-titres
Vous pouvez activer ou désactiver la fonction sous-titres.
1. Appuyez sur le bouton MENU pour afcher le menu.
Appuyez sur le bouton ou pour sélectionner
“Menu numérique” puis appuyez sur le bouton ENTER
.
2. Appuyez sur le bouton ou pour sélectionner “Conguration”
puis appuyez sur le bouton ENTER
.
3. Appuyez sur le bouton ou pour sélectionner “Sous-titres”
puis appuyez sur le bouton ENTER
.
4. Sélectionnez “Marche” en appuyant sur le bouton ou .
Appuyez sur le bouton ENTER
.
5. Appuyez sur le bouton EXIT pour quitter le menu.
Vous pouvez sélectionner ces options en appuyant sur le
bouton SUBT. de la télécommande.
DTV
Transparence du menu : Moyen
Modifier PIN
Verrouillage parental
Sous-titres : Marche
Mode Sous-titres
Move Entrer Return
Déplacer Entrer Retour
Configuration
Arrêt
: Normal
Marche
Conguration du Mode Sous-titres
Utilisez ce menu pour congurer le Mode Sous-titres.
“Normal” s’afche sous le menu pour les sous-titres de base
et “Malentendants” sont les sous-titres pour les personnes
malentendantes.
1
Appuyez sur le bouton MENU pour afcher le menu.
.
Appuyez sur le bouton ou pour sélectionner
“Menu numérique” puis appuyez sur le bouton ENTER
.
2. Appuyez sur le bouton ou pour sélectionner “Conguration”
puis appuyez sur le bouton ENTER
.
3. Appuyez sur le bouton ou pour sélectionner
“Mode Sous-titres” puis appuyez sur le bouton ENTER
.
4. Appuyez sur le bouton ou pour sélectionner “Normal” ou “Malentendants”. Appuyez sur le bouton
ENTER
.
5. Appuyez sur le bouton EXIT pour quitter le menu.
➣
Si le programme que vous regardez ne prend pas en charge la fonction “Malentendants”, la fonction
“Normal” est activée automatiquement même si le mode “Malentendants” est sélectionné.
DTV
Transparence du menu : Moyen
Modifier PIN
Verrouillage parental
Sous-titres : Marche
Mode Sous-titres : Normal
Déplacer Entrer Retour
Configuration
Normal
Malentendants
Sélection du format sonore
Le son Dolby Digital ne peut être entendu que via un récepteur
audio connecté par un câble optique. Le son PCM ne peut être
entendu que via le haut-parleur principal.
Lorsque le son est émis à la fois par le haut-parleur principal
et le récepteur audio, un effet d’écho peut se produire en
raison de la différence de vitesse de décodage entre le hautparleur principal et le récepteur audio. Dans ce cas, utilisez la
fonction de sourdine interne.
1
Appuyez sur le bouton MENU pour afcher le menu.
.
Appuyez sur le bouton ou pour sélectionner
“Menu numérique” puis appuyez sur le bouton ENTER
.
2. Appuyez sur le bouton ou pour sélectionner “Conguration” puis appuyez sur le bouton
ENTER
Appuyez sur le bouton ou pour sélectionner “Format Audio” puis appuyez sur le bouton ENTER .
3.
.
4. Appuyez sur le bouton ou pour sélectionner “PCM” ou “Dolby Digital”.
Appuyez sur le bouton ENTER
.
5. Appuyez sur le bouton EXIT pour quitter le menu.
➣
Le Format sonore s’afche en fonction du signal de l’émetteur. Le son Dolby Digital est uniquement
disponible lorsque le téléviseur est connecté à une enceinte externe via un câble optique.
Français - 37
DTV
Format audio : PCM
Audio Descrition
Texte numérique : Enable
Fuseau Horaire
terface commune
In
Move Entrer Return
Déplacer Entrer Retour
Configuration
Page 98

Sélection de la description audio
Il s’agit d’une fonction audio auxiliaire qui fournit une piste
audio supplémentaire à l’intention des personnes malvoyantes.
Cette fonction traite le flux audio relatif à la Description
audio (AD) lorsqu’il est envoyé avec le son principal par le
radiodiffuseur. Les utilisateurs peuvent activer ou désactiver la
description audio (Description audio) et régler le volume.
1. Appuyez sur le bouton MENU pour afcher le menu.
Appuyez sur le bouton ▲ ou ▼ pour sélectionner "Menu
numérique", puis appuyez sur le bouton ENTER
2. Appuyez sur le bouton ▲ ou ▼ pour sélectionner
"Conguration", puis appuyez sur le bouton ENTER
3. Appuyez sur le bouton ▲ ou ▼ pour sélectionner "Description
audio", puis appuyez sur le bouton ENTER
4. Appuyez sur le bouton ▲ ou ▼ pour sélectionner "Marche",
puis appuyez sur le bouton ENTER
.
5. Appuyez sur le bouton ▲ ou ▼ pour sélectionner "Volume",
puis appuyez sur le bouton ENTER
“Volume” est actif lorsque la fonction “Description audio” est
➣
.
dénie sur “Marche”.
6.
Appuyez sur le bouton ◄ ou ► pour obtenir le réglage qui
convient.
Appuyez sur le bouton ENTER
.
7. Appuyez sur le bouton EXIT pour quitter le menu.
.
.
.
DTV
DTV
Format audio : PCM
Audio Descrition
Texte numérique : Enable
Fuseau Horaire
In
DTV
Description audio
Volume
DTV
Description audio
Volume
Configuration
terface commune
Déplacer Entrer Retour
Description audio
Déplacer Entrer Retour
Description audio
Déplacer Entrer Retour
: Marche
Arrêt
Marche
: Marche
100
100
Sélection du texte numérique (Royaume-Uni uniquement)
Si le programme est diffusé avec du texte numérique, cette
fonction est activée.
1
Appuyez sur le bouton MENU pour afcher le menu.
.
Appuyez sur le bouton ou pour sélectionner
“Menu numérique” puis appuyez sur le bouton ENTER
.
2. Appuyez sur le bouton ou pour sélectionner
“Conguration” puis appuyez sur le bouton ENTER
.
3. Appuyez sur le bouton ou pour sélectionner “Texte
numérique” puis appuyez sur le bouton ENTER
.
4. Appuyez sur le bouton ou pour sélectionner “Désactiver”
ou “Activer”. Appuyez sur le bouton ENTER
.
5. Appuyez sur le bouton EXIT pour quitter le menu.
➣
MHEG (Multimedia and Hypermedia Information Coding Experts Group) Norme internationale pour
les systèmes de codage des données utilisés avec le multimédia et l’hypermédia. Niveau supérieur à
celui du système MPEG, qui inclut de l’hypermédia à liaison de données tel que des images xes, le
service de caractères, l’animation, les chiers graphiques et vidéo et les données multimédia. MHEG
est une technologie utilisateur d’interaction de durée d’utilisation appliquée à divers domaines, dont la
vidéo à la demande (VOD), la télévision interactive (ITV), le commerce électronique, la téléformation,
la téléconférence, les bibliothèques numériques et les jeux en réseau.
Français - 38
DTV
Format audio : PCM
Audio Descrition
Texte numérique : Enable
Fuseau Horaire
terface commune
In
Move Entrer Return
Déplacer Entrer Retour
Configuration
Désactiver
Activer
Page 99

Sélection du fuseau horaire (Espagne uniquement)
Sélection du fuseau horaire où vous vous trouvez.
1. Appuyez sur le bouton MENU pour afcher le menu.
Appuyez sur le bouton ou pour sélectionner
“Menu numérique” puis appuyez sur le bouton ENTER
.
2. Appuyez sur le bouton ou pour sélectionner “Conguration”
puis appuyez sur le bouton ENTER
.
3. Appuyez sur le bouton ou pour sélectionner “Fuseau
Horaire” puis appuyez sur le bouton ENTER
.
4. Sélectionnez le fuseau où vous vous trouvez en appuyant sur le
bouton ou . Appuyez sur le bouton ENTER
➣
Les options suivantes sont disponibles.
.
Péninsule ibérique et Iles Baléares - Iles Canaries
5.
Appuyez sur le bouton EXIT pour quitter le menu.
DTV
Format audio : PCM
Audio Descrition
T
Fuseau Horaire
In
DTV
Configuration
exte numérique
terface commune
Move Entrer Return
Déplacer Entrer Retour
Fuseau Horaire
Péninsule ibérique et Iles Baléares
Iles Canaries
Régler Entrer Retour
: Enable
Afchage des informations relatives au produit
Vous pouvez visualiser les informations relatives à votre
produit. Pour toute intervention sur le téléviseur, veuillez
contacter un revendeur Samsung agréé.
1
. Appuyez sur le bouton MENU pour afcher le menu.
Appuyez sur le bouton ou pour sélectionner
“Menu numérique” puis appuyez sur le bouton ENTER
.
2. Appuyez sur le bouton ou pour sélectionner
“Conguration” puis appuyez sur le bouton ENTER
.
3. Appuyez sur le bouton ou pour sélectionner “Système”
puis appuyez sur le bouton ENTER
4. Appuyez à nouveau sur le bouton ENTER
➣
Le menu des informations relatives au produit est sélectionné.
.
pour sélectionner “Informations sur le produit”.
- Version logicielle, Version du micrologiciel
.
Appuyez sur le bouton EXIT pour quitter le menu.
5
DTV
Product Information
Version logicielle :
Version du micrologiciel
Retour
T-PERLDEUC-0202
: T-EMMA2DEUB-0106
Français - 39
Page 100

Vérication des informations relatives au signal
Vous pouvez obtenir des informations relatives à l’état du
signal.
DTV
1. Appuyez sur le bouton MENU pour afcher le menu.
Appuyez sur le bouton ou pour sélectionner
“Menu numérique” puis appuyez sur le bouton ENTER
.
2. Appuyez sur le bouton ou pour sélectionner
“Conguration” puis appuyez sur le bouton ENTER
.
3. Appuyez sur le bouton ou pour sélectionner “Système”
puis appuyez sur le bouton ENTER
.
4. Appuyez sur le bouton ou pour sélectionner “Informations de signal” puis appuyez sur le bouton
ENTER
.
5. Appuyez sur le bouton EXIT pour quitter le menu.
Si l’état du signal est faible, le message “Aucun signal” s’afche.
➣
Informations de signal
Service: ?
ID service:0000
Multiplex: ? (TSID 0000, ONID 0000)
Réseau: ? (ID 0000)
Niv. d’erreur de bit: 10
Intensité du signal: 0
Move Entrer Return
Retour
Mise à jour du logiciel
Pour garder le produit à jour avec les options Digital Television,
les mises à jour logiciel sont régulièrement diffusées dans le
signal télévision normal.
Le téléviseur détecte automatiquement ces signaux et afche le
bandeau de mise à jour logiciel. Vous avez le choix d’installer
DTV
Informations sur le produit
Informations de signal
Mise à niveau du logiciel
Réinitialiser
ou non la mise à jour.
1. Appuyez sur le bouton MENU pour afcher le menu.
Appuyez sur le bouton ou pour sélectionner
“Menu numérique” puis appuyez sur le bouton ENTER
2. Appuyez sur le bouton ou pour sélectionner “Conguration”
puis appuyez sur le bouton ENTER
.
3. Appuyez sur le bouton ou pour sélectionner “Système” puis
appuyez sur le bouton ENTER
.
.
DTV
Informations relatives au logiciel
Mise à jour manuelle
Mise à jour du mode Veille
4. Appuyez sur le bouton ou pour sélectionner “Mise à niveau
du logiciel”, puis appuyez sur le bouton ENTER
.
5. Appuyez sur le bouton ou pour sélectionner “Informations
relatives au logiciel”, “Mise à jour manuelle” ou “Mise à jour du
mode Veille”. Appuyez sur le bouton ENTER
Informations relatives au logiciel.
♦
Appuyez sur le bouton ENTER
. La version actuelle du logiciel s’afche. Pour afcher les information
.
relatives à la version du logiciel, appuyez de nouveau sur le bouton ENTER .
Pour passer à une autre version, appuyez sur le bouton rouge.
Appuyez sur le bouton bleu pour réinitialiser l’appareil, activer la mise à jour et redémarrer.
Mise à jour manuelle
♦
Appuyez sur le bouton ENTER
pour rechercher le nouveau logiciel parmi les canaux émettant
actuellement.
♦
Mise à jour du mode Veille: Marche/Arrêt
Appuyez sur le bouton ENTER
. Pour poursuivre la mise à jour du logiciel en gardant le téléviseur
sous tension, sélectionnez Actif en appuyant sur le bouton ou . 45 minutes après que le mode
veille a été activé, une mise à jour manuelle est réalisée automatiquement. Etant donné que le courant
est activé de façon interne, l’écran peut s’allumer brièvement pour les produits LCD. Le phénomène
peut se poursuivre durant une heure jusqu’à ce que la mise à jour logiciel soit terminée.
6. Appuyez sur le bouton EXIT pour quitter le menu.
Système
Déplacer Entrer Retour
Mise à niveau du logiciel
: Marche
Déplacer Entrer Retour
Français - 40
 Loading...