

Page 1
Связывайтесь с SAMSUNG по всему миру
Если у вас есть предложения или вопросы по продуктам Samsung, связывайтесь с информационным центром Samsung.
Страна
ESTONIA 800-7267 www.samsung.com/ee
LATVIA 8000-7267 www.samsung.com/lv
LITHUANIA 8-800-77777 www.samsung.com/lt
KAZAHSTAN 8-10-800-500-55-500 www.samsung.com/kz_ru
KYRGYZSTAN 00-800-500-55-500 -
RUSSIA 8-800-555-55-55 www.samsung.ru
TADJIKISTAN 8-10-800-500-55-500 -
UKRAINE 8-800-502-0000 www.samsung.ua
UZBEKISTAN 8-10-800-500-55-500 www.samsung.com/kz_ru
Центр поддержки покупателей
Веб-узел
LE26B460B
LE32B460B
ЖК-ТЕЛЕВИЗОР
руководство пользователя
BN68-02190G-01
удивительные возможности
Благодарим за приобретение продукции компании
Samsung. Для получения полного обслуживания
зарегистрируйте свое устройство по адресу
www.samsung.ru/club/registration
Модель Серийный номер
Page 2

Digital TV Notice
❑
1. Functionalities related to Digital TV(DVB) are only available in countries/areas where DVB-T (MPEG2 and MPEG4 AVC) digital
terrestrial signals are broadcasted or where you are able to access to a compatible DVB-C(MPEG2 and MPEG4 AAC) cableTV service. Please check with your local dealer the possibility to receive DVB-T or DVB-C signal.
2. DVB-T is the DVB European consortium standard for the broadcast transmission of digital terrestrial television and DVB-
C is that for the broadcast transmission of digital TV over cable. However, some differentiated features like EPG (Electric
Programme Guide), VOD (Video on Demand) and so on, are not included in this specification. So, they cannot be workable at
this moment.
3. Although this TV set meets the latest DVB-T and DVB-C standards, as of [August, 2008], the compatibility with future DVB-T
digital terrestrial and DVB-C digital cable broadcasts cannot be guaranteed.
4. Depending on the countries/areas where this TV set is used some cable-TV providers may charge an additional fee for such a
service and you may be required to agree to terms and conditions of their business.
5. Some Digital TV functions might be unavailable in some countries or regions and DVB-C might not work correctly with some
cable service providers.
6. For more information, please contact your local Samsung customer care centre.
Precautions When Displaying a Still Image
❑
A still image may cause permanent damage to the TV screen
Do not display a still image and partially still on the LCD panel for more than 2 hours as it can cause screen image retention.
●
This image retention is also known as “screen burn”. To avoid such image retention, reduce the degree of brightness and
contrast of the screen when displaying a still image.
●
Displaying still images from Video games and PC for longer than a certain period of time may produce partial after-images. To
●
prevent this effect, reduce the ‘brightness’ and ‘contrast’ when displaying still images.
Watching the LCD TV in 4:3 format for a long period of time may leave traces of borders displayed on the
left, right and centre of the screen caused by the difference of light emission on the screen. Playing a DVD or
a game console may cause a similar effect to the screen. Damages caused by the above effect are not
covered by the Warranty.
© 2009 Samsung Electronics Co., Ltd. All rights reserved.
Page 3

CONTENTS
English
GENERAL INFORMATION
Viewing the Control Panel ................................................................. 2
■
Accessories ....................................................................................... 3
■
Viewing the Connection Panel ........................................................... 4
■
Remote Control ................................................................................. 6
■
Installing Batteries in the Remote Control ......................................... 6
■
OPERATION
Viewing the menus ............................................................................ 7
■
Placing Your Television in Standby Mode .......................................... 8
■
Plug & Play Feature ........................................................................... 8
■
CHANNEL CONTROL
Conguring the Channel Menu .......................................................... 9
■
Managing Channels .........................................................................11
■
PICTURE CONTROL
Conguring the Picture Menu .......................................................... 13
■
Using Your TV as a Computer (PC) Display .................................... 15
■
Setting up the TV with your PC........................................................ 16
■
SOUND CONTROL
Conguring the Sound Menu ........................................................... 17
■
Selecting the Sound Mode .............................................................. 18
■
SETUP
Conguring the Setup Menu ............................................................ 19
■
INPUT / SUPPORT
Conguring the Input Menu ............................................................. 22
■
Conguring the Support Menu ......................................................... 22
■
RECOMMENDATIONS FOR USE
Teletext Feature ............................................................................... 24
■
Installing the Stand .......................................................................... 25
■
Installing the Wall Mount Kit ............................................................ 25
■
Using the Anti-Theft Kensington Lock ............................................. 25
■
Securing the Installation Space ....................................................... 26
■
Securing the TV to the Wall ............................................................. 26
■
Troubleshooting: Before Contacting Service Personnel .................. 27
■
Specications .................................................................................. 27
■
❑
❑
License
TruSurround HD, SRS and symbol are trademarks of SRS Labs, Inc. TruSurround HD technology is
incorporated under license from SRS Labs, Inc.
Manufactured under license from Dolby Laboratories. Dolby and the double-D symbol are trademarks of
Dolby Laboratories.
Symbol
N O T
Note One-Touch Button TOOLS Button Press
English - 1
Page 4

GENERAL INFORMATION
4
1
2
3
5
6
7
88
POWER
4
1
2
3
5
6
7
88
POWER
Figures and illustrations in this User Manual are provided for reference only and may differ from actual product appearance.
N
Product design and specications may be changed without notice in order to enhance product performance.
Viewing the Control Panel
¦
The product colour and shape may vary depending on the model.
N
The front panel buttons can be activated by touching them with your nger.
N
1
SOURCE E: Toggles between all the available input sources. In the on-screen menu, use this button as you would use the
ENTERE button on the remote control.
2
MENU: Press to see an on-screen menu of your TV’s features.
3 Y
4 z
5
REMOTE CONTROL SENSOR: Aim the remote control towards this spot on the TV.
6 P
7
POWER INDICATOR: Blinks and turns off when the power is on and lights up in stand-by mode.
8
SPEAKERS
: Press to increase or decrease the volume.
In the on-screen menu, use the
: Press to change channels. In the on-screen menu, use the
buttons on the remote control.
POWER: Press to turn the TV on and off.
Y
buttons as you would use the ◄ and ► buttons on the remote control.
English - 2
z
buttons as you would use the ▼ and ▲
Page 5
English - 3
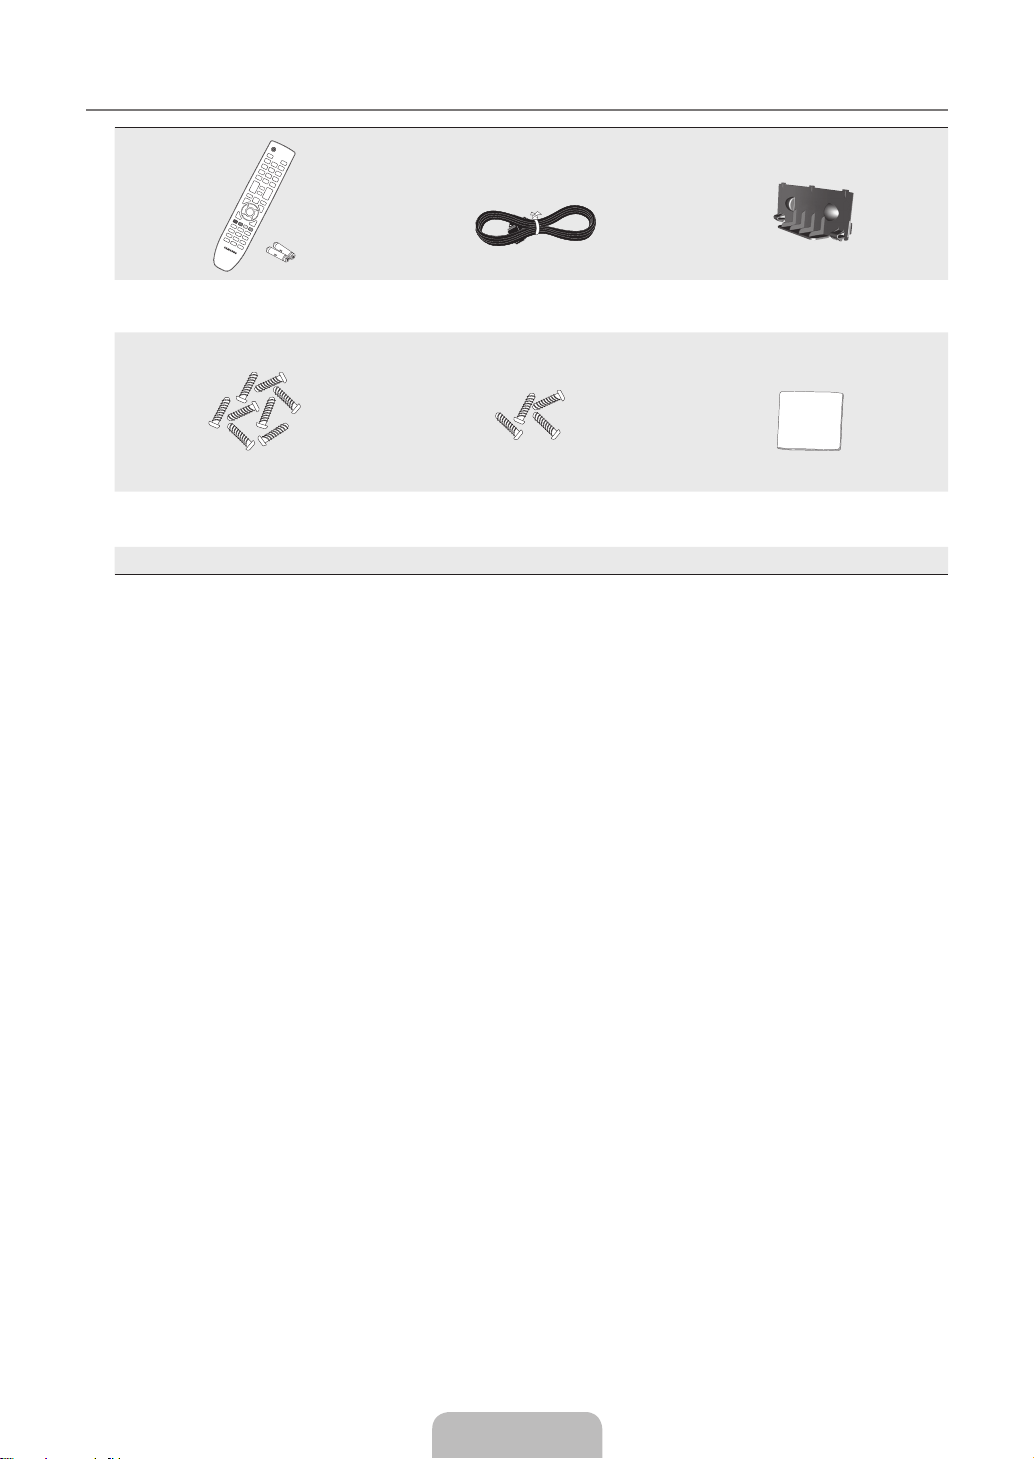
Accessories
¦
Remote Control &
Batteries (AAA x 2)
(M4 X L16) (M4 X L16)
Stand Screw X 8
(32 inch model only)
Owner’s Instructions
●
Please make sure the following items are included with your LCD TV. If any items are missing, contact your dealer.
N
Warranty card / Safety Guide (Not available in all locations)
N
The items colour and shape may vary depending on the model.
N
Power Cord Cover-Bottom
Stand Screw X 4
(26 inch model only)
Warranty card
●
Cleaning Cloth
Safety Guide
●
Page 6

Viewing the Connection Panel
9
7
6
8
1 2 3 4 5 6
0! @
¦
Power Input
[TV Rear Panel]
[TV Side Panel]
The product colour and shape may vary depending on the model.
N
Whenever you connect an external device to your TV, make sure that power on the unit is turned off.
N
When connecting an external device, match the colour of the connection terminal to the cable.
N
1
DIGITAL AUDIO OUT (OPTICAL)
Connects to a Digital Audio component such as a Home theatre receiver.
–
When the HDMI IN jacks are connected, the DIGITAL AUDIO OUT (OPTICAL) jack on the TV outputs 2 channel audio
N
only. If you want to hear 5.1 channel audio, connect the Optical jack on the DVD / Blu-ray player or Cable / Satellite Box
directly to an Amplier or Home Theatre, not the TV.
2
PC IN
Connect to the video output jack on your PC.
–
3
ANT IN
Connects to an antenna or cable TV system.
–
4
PC / DVI AUDIO IN
Connect to the audio output jack on your PC.
–
DVI audio outputs for external devices.
–
5
AUDIO OUT [R-AUDIO-L]
Connect RCA audio cables to AUDIO OUT [R-AUDIO-L] on the rear of your set and the other ends to corresponding
–
audio in connectors on the Amplier or DVD Home Theatre.
6
HDMI IN 1 (DVI), 2, 3
Supports connections between HDMI-connection-enabled AV devices (Set-Top Boxes, DVD / Blu-ray player)
–
No additional Audio connection is needed for an HDMI to HDMI connection.
–
The HDMI IN 1 (DVI) jack can be used to connect a PC.
–
What is HDMI?
N
‘High Denition Multimedia interface’ allows the transmission of high denition digital video data and multiple channels of
digital audio.
The HDMI / DVI terminal supports DVI connection to an extended device with the appropriate cable (not supplied).
The difference between HDMI and DVI is that the HDMI device is smaller in size, has the HDCP (High Bandwidth Digital
Copy Protection) coding feature installed, and supports multi - channel digital audio.
English - 4
Page 7

English - 5
7
COMMON INTERFACE Slot
When not inserting ‘CI CARD’ in some channels, ‘Scrambled Signal’ is displayed on the screen.
–
The pairing information containing a telephone number, CI CARD ID, Host ID and other information will be displayed in
–
about 2~3 minutes. If an error message is displayed, please contact your service provider.
When the channel information conguration has nished, the message ‘Updating Completed’ is displayed, indicating that
–
the channel list is now updated.
You must obtain a CI CARD from a local cable service provider. Remove the CI CARD by carefully pulling it out with your
N
hands since dropping the CI CARD may cause damage to it.
Insert the CI-Card in the direction marked on it.
N
The place of the COMMON INTERFACE Slot may be different depending on its model.
N
CAM is not supported in some countries and regions, check with your authorized dealer.
N
8
AV IN [VIDEO] / [R-AUDIO-L]
Connect RCA cable to an appropriate external A/V device such as VCR, DVD or Camcorder.
–
Connect RCA audio cables to [R-AUDIO-L] on your set and the other ends to corresponding audio out connectors on the
–
A/V device.
9
KENSINGTON LOCK (depending on the model)
The Kensington Lock (optional) is a device used to physically x the system when used in a public place. If you want to
–
use a locking device, contact the dealer where you purchased the TV.
The location of the Kensington Lock may be different depending on its model.
N
0
COMPONENT IN
Connect component video cables (optional) to component connector (PR, PB, Y) on the rear of your set and the other ends
–
to corresponding component video out connectors on the DTV or DVD.
If you wish to connect both the Set-Top Box and DTV (or DVD), you should connect the Set-Top Box to the DTV (or DVD)
–
and connect the DTV (or DVD) to component connector (PR, PB, Y) on your set.
The PR, PB and Y connectors on your component devices (DTV or DVD) are sometimes labelled Y, B-Y and R-Y or Y, Cb
–
and Cr.
Connect RCA audio cables (optional) to [R-AUDIO-L] on the rear of your set and the other ends to corresponding audio
–
out connectors on the DTV or DVD.
!
EXT
Connector
EXT O O O Only TV or DTV output is available.
Inputs or outputs for external devices, such as VCR, DVD, video game device or video disc players.
–
@
SERVICE
Connector for software upgrades.
–
Video Audio (L / R) RGB Video + Audio (L / R)
Input Output
Page 8

1
2
3
4
5
6
7
8
9
0
!
@
#
$
&
*
(
)
a
%
^
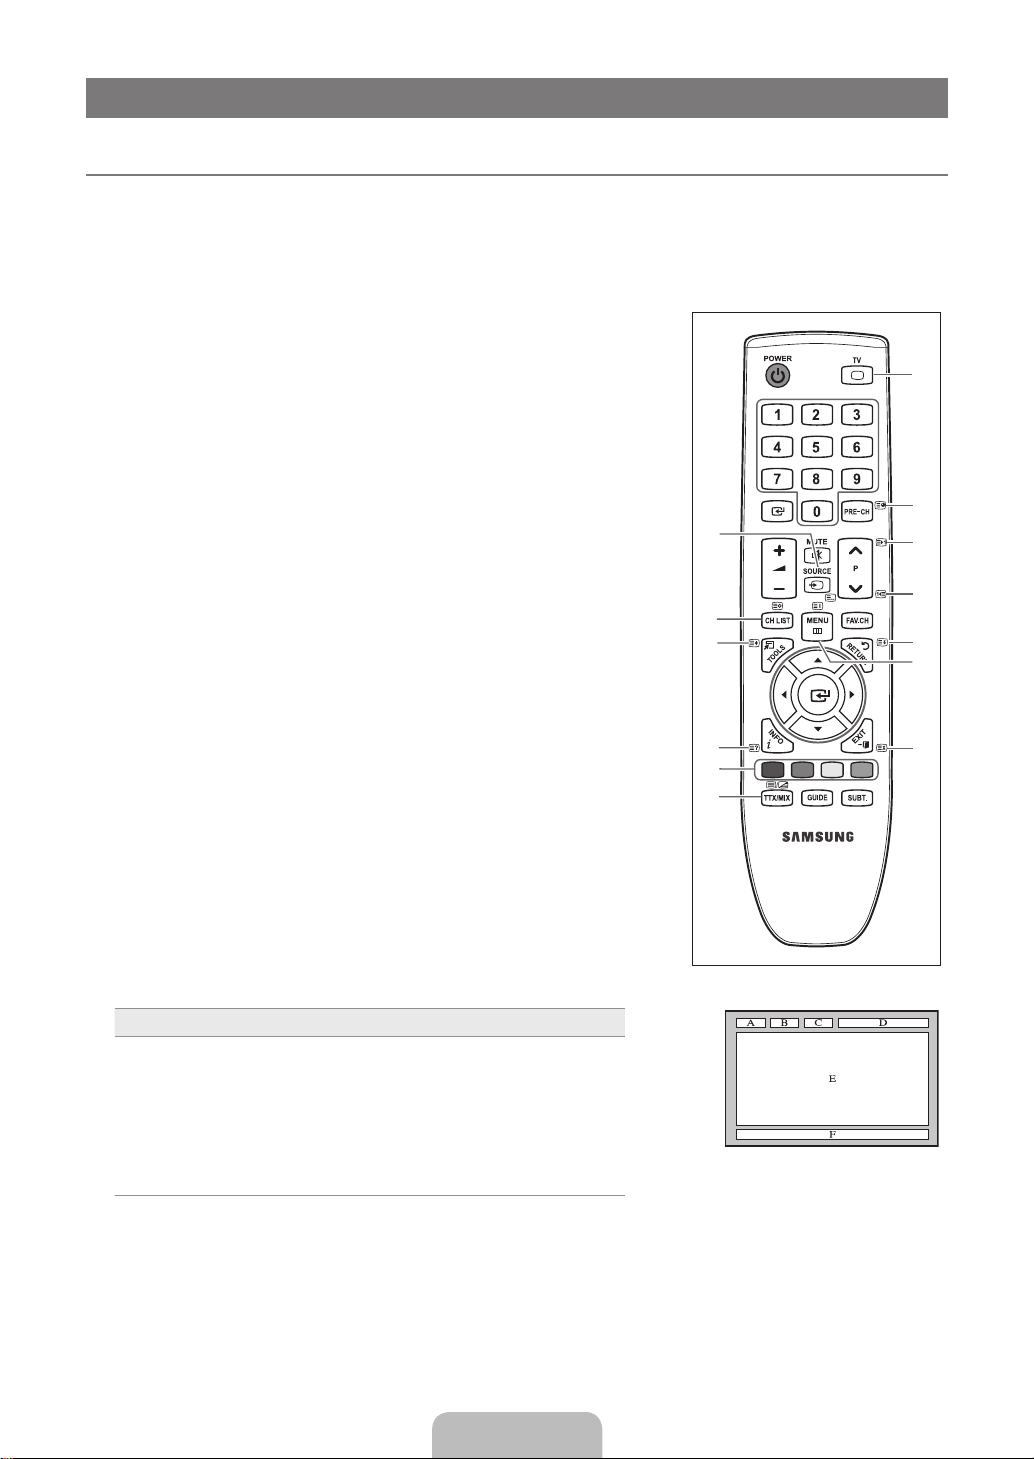
Remote Control
¦
You can use the remote control up to a distance of about 23 feet from the TV.
N
The performance of the remote control may be affected by bright light.
N
The product colour and shape may vary depending on the model.
N
1
POWER : Television Standby
button.
2
NUMERIC BUTTONS : Press to
change the channel.
3 E
: Performs the same function
as the ENTERE key of the
directional keys. When switching
channels with the numeric
buttons, and you press the
channel number and then the
ENTERE key, the channel is
immediately switched.
4 Y
5
SOURCE: Press to display
6
CH LIST: Displays the Channel
7
TOOLS: Use to quickly select
8
INFO: Press to display
9
COLOURS BUTTONS: Use
!
TV: Selects the TV mode directly.
@
PRE-CH: Enables you to return
#
MUTE M: Press to temporarily
$
P </P >: Press to change
: Press to increase or
decrease the volume.
and select the available video
sources.
List on screen
frequently used functions.
information on the TV screen.
these buttons in the Channel list
menus etc.
to the previous channel you were
watching.
cut off the sound.
channels.
%
MENU: Displays the main on-
screen menu
^
FAV.CH: Used to display
Favourites Channel Lists on the
screen.
&
RETURN: Returns to the
previous menu
*
UP▲ / DOWN▼ / LEFT◄ /
RIGHT► / ENTERE: Use to
select on-screen menu items and
change menu values.
(
EXIT: Press to exit the menu.
)
SUBT.: Digital subtitle display
a
GUIDE: Electronic Programme
Guide (EPG) display
Teletext Functions
5 0
: Teletext mode selection
(LIST / FLOF)
6 8
: Teletext store
7 4
: Teletext size selection
8 5
: Teletext reveal
9
Fastext topic selection
0 /
! :
@ 1
$ 2
% 6
& 9
( 7
: Alternately select
Teletext, Double, or Mix.
: Exit from the teletext display
: Teletext sub page
: Teletext next page
3
: Teletext previous page
: Teletext index
: Teletext hold
: Teletext cancel
Installing Batteries in the Remote Control
¦
1. Lift the cover at the back of the remote control upward as shown in the gure.
2. Install two AAA size batteries.
Make sure to match the ‘+’ and ‘–’ ends of the batteries with the diagram inside the
N
compartment.
3. Replace the cover.
Remove the batteries and store them in a cool, dry place if you won’t be using the
N
remote control for a long time.
If the remote control doesn’t work, check the following:
N
Is the TV power on?
–
Are the plus and minus ends of the batteries reversed?
–
Are the batteries drained?
–
Is there a power outage or is the power cord unplugged?
–
Is there a special uorescent light or neon sign nearby?
–
English - 6
Page 9
English -
OPERATION
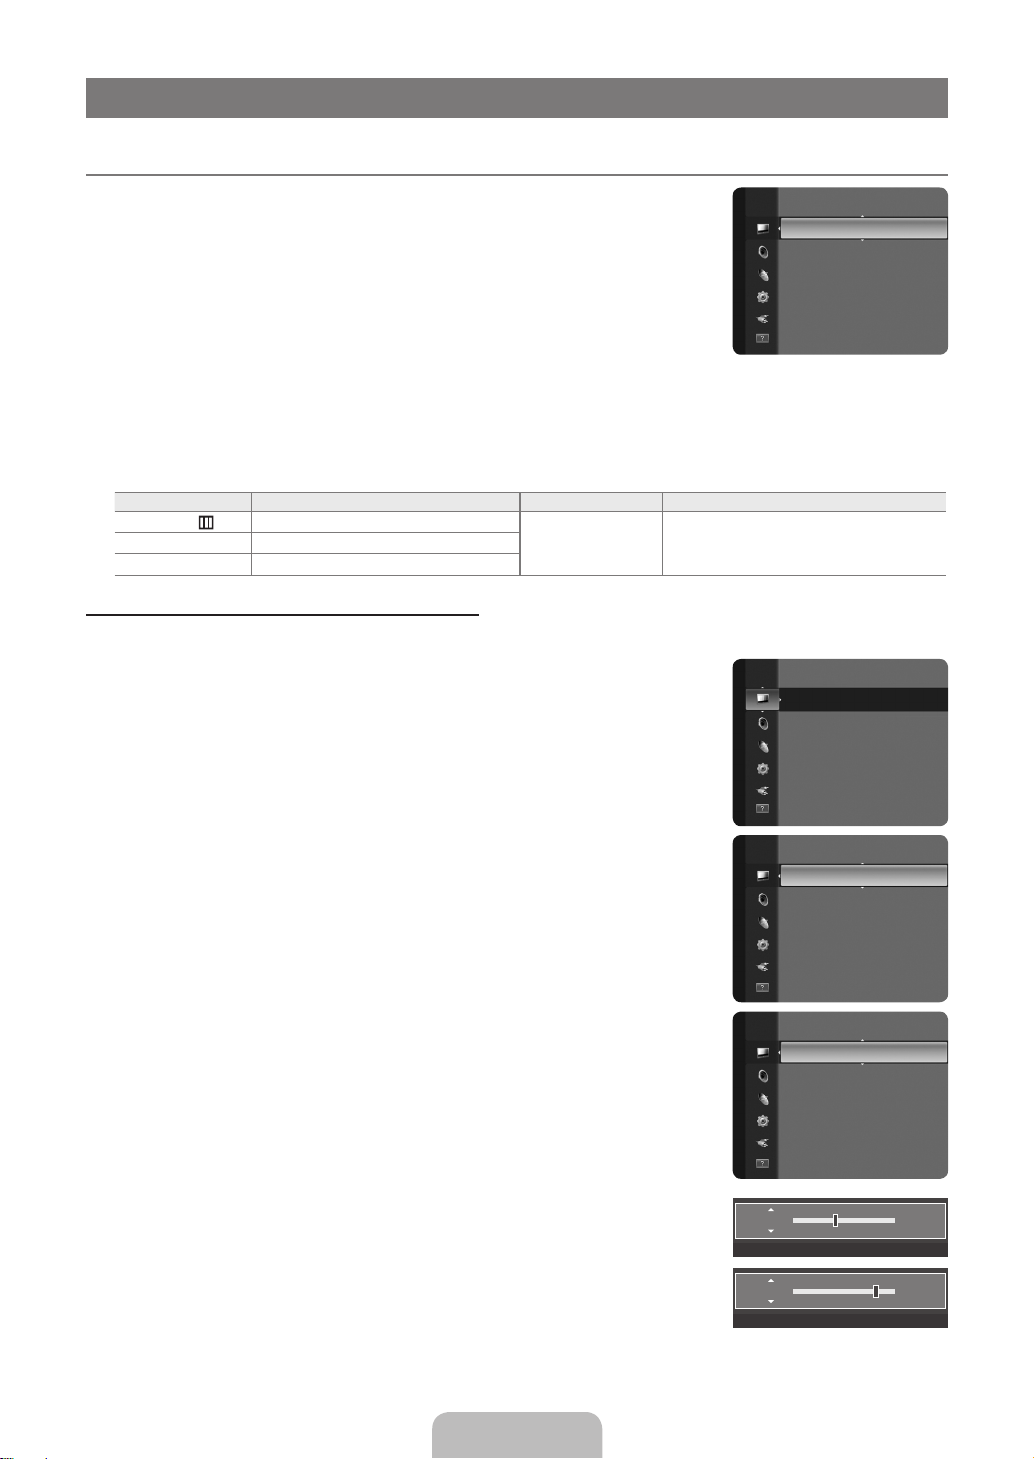
Viewing the menus
¦
Before using the TV, follow the steps below to learn how to navigate the menu in order to select
and adjust different functions.
1. Press the MENU button.
The main menu is displayed on the screen. Its left side has icons: Picture, Sound,
Channel , Setup, Input, Support.
2. Press the ▲ or ▼ button to select one of the icons.
Press the ◄ or ► button to access the icon’s sub-menu.
3. Press the ▲ or ▼ button to move to items in the menu.
Press the ENTERE button to enter items in the menu.
4. Press the ▲/▼/◄/► button to change the selected items.
Press the RETURN button to return to the previous menu.
N
5. Press the EXIT button to exit from the menu.
Using the remote control buttons
Button Operations Button Operations
MENU
RETURN
EXIT
e
Display the main on-screen menu.
Return to the previous menu.
R
Exit the on-screen menu.
▲/▼/◄/►/
ENTER
E
Example: Setting the TV’s Brightness in the Picture Menu
Adjusting the Brightness to 80
1. Press the MENU button to display the menu.
Picture
Mode : Standard ►
Backlight : 8
Contrast : 95
Brightness : 45
Sharpness : 50
Colour : 50
Tint (G / R) : G50 / R50
Move the cursor and select an item.
Select the currently selected item.
Conrm the setting.
Picture
Mode : Standard
Backlight : 8
Contrast : 95
Brightness : 45
Sharpness : 50
Color : 50
Tint (G/R) : G50/R50
2. Press the ENTERE button to select Picture.
3. Press the ▲ or ▼ button to select Brightness.
4. Press the ENTERE button.
5. Press the ◄ or ► button until the brightness becomes 80.
6. Press the ENTERE button.
Press the EXIT button to exit from the menu.
N
Picture
Mode : Standard ►
Backlight : 8
Contrast : 95
Brightness : 45
Sharpness : 50
Color : 50
Tint (G/R) : G50/R50
Backlight : 8
Picture
Contrast : 95
Brightness : 45 ►
Sharpness : 50
Color : 50
Tint (G/R) : G50/R50
Advanced Settings
Picture Options
Picture Reset
Brightness 45
U
Move L Adjust E Enter R Return
Brightness 80
U
Move L Adjust E Enter R Return
Page 10

Placing Your Television in Standby Mode
¦
Your set can be placed in standby mode in order to reduce the power consumption. The standby mode can be useful when you
wish to interrupt viewing temporarily (during a meal, for example).
1. Press the POWERP button on the remote control.
The screen is turned off and a standby indicator appears on your set.
N
2. To switch your set back on, simply press the POWERP button again.
Do not leave your set in standby mode for long periods of time (when you are away on holiday, for example). It is best to
N
unplug the set from the mains and aerial.
Plug & Play Feature
¦
When the TV is initially powered on, basic settings proceed automatically and subsequently.
1. Press the POWER button on the remote control. control. The message Можно
установить язык меню. is displayed.
2. Select the appropriate language by pressing the ▲ or ▼ button. Press the ENTERE
button to conrm your choice.
Можно установить язык меню.
Язык : Русский ►
Plug & Play
E
3. Press the ◄ or ► button to select Store Demo or Home Use, then the ENTERE button.
We recommend setting the TV to Home Use mode for the best picture in your home environment.
N
Store Demo mode is only intended for use in retail environments.
N
If the unit is accidentally set to Store Demo mode and you want to return to Home Use (Standard): Press the Volume
N
button on the TV. When the volume OSD is displayed, press and hold the MENU button on the TV for 5 seconds.
4. Press the ENTERE button. Select the appropriate country by pressing the ▲ or ▼ button. Press the ENTERE button to
conrm your choice.
5. Press the ▲ or ▼ button to select Air or Cable, then press the ENTERE button.
Air: Air antenna signal.
N
Cable: Cable antenna signal.
6. Press the ▲ or ▼ button to select the channel source to memorize. Press the ENTERE button to select Start.
Digital & Analogue: Digital and Analogue channels.
N
Digital: Digital channels.
Analogue: Analogue channels.
When setting the antenna source to Cable, a step appears allowing you to set a value for the digital channel search. For
N
more information, refer to Channel → Auto Store.
The channel search will start and end automatically.
N
Press the ENTERE button at any time to interrupt the memorization process.
N
After all the available channels are stored, the message Set the Clock Mode. is displayed.
N
. Press the ENTERE button. Press the ▲ or ▼ button to select Auto, then Press the ENTERE button.
If you select Manual, Set current date and time is displayed.
N
If you have received a digital signal, the time will be set automatically. If not, select Manual to set the clock. (refer to page
N
19)
8. The connection method to provide the best quality HD is offered. After conrming the method, press the ENTERE button.
9. The message Enjoy Your TV is displayed. When you have nished, press the ENTERE button.
Вход
If you want to reset this feature...
1. Press the MENU button to display the menu. Press the ▲ or ▼ button to select Setup, then press the ENTERE button.
2. Press the ENTERE button again to select Plug & Play.
3. Enter your 4 digit PIN number. The default PIN number of a new TV set is ‘0-0-0-0’.
If you want to change PIN number, use the Change PIN function. (refer to page 20)
N
The Plug & Play feature is only available in the TV mode.
N
English - 8
Page 11

English - 9
CHANNEL CONTROL
Conguring the Channel Menu
¦
Country
❑
The PIN number input screen appears. Enter your 4 digit PIN number.
N
Analogue Channel
You can change the country for analogue channels.
Digital Channel
You can change the country for digital channels.
Auto Store
❑
You can scan for the frequency ranges available to you (and availability depends on your
country). Automatically allocated programme numbers may not correspond to actual or desired programme numbers.
If a channel is locked using the Child Lock function, the PIN input window appears.
N
Air / Cable
Antenna source to memorize
Digital & Analogue: Digital and Analogue channels.
●
Digital: Digital channels.
●
Analogue: Analogue channels.
●
When selecting Cable → Digital & Analogue or Cable → Digital
Provide a value to scan for cable channels.
Search Mode → Full / Network / Quick
●
Quick
N
Network ID: Displays the network identication code.
–
Frequency: Displays the frequency for the channel. (Differs in each country)
–
Modulation: Displays available modulation values.
–
Symbol Rate: Displays available symbol rates.
–
Scans for all channels with active broadcast stations and stores them in the TV’s memory.
N
If you want to stop Auto Store, press the
N
Select Yes by pressing the ◄ or ► button, then press the
ENTERE button. The Stop Auto Store? message will be displayed.
ENTERE button.
Channel
Country ►
Auto Store
Manual Store
Cable Search Option
Now & Next Guide
Full Guide
Default Guide : Full Guide
Manual Store
❑
Scans for a channel manually and stores it in the TV’s memory.
N
If a channel is locked using the Child Lock function, the PIN input window appears.
N
Digital Channel
Manual store for digital channels.
Digital Channel is only available in DTV mode.
N
Channel: Set the Channel number using the ▲, ▼ or number (0~9) buttons.
●
Frequency: Set the frequency using the number buttons.
●
Bandwidth: Set the bandwidth using the ▲, ▼ or number (0~9) buttons.
●
When it has nished, channels are updated in the channel list.
N
Page 12

Analogue Channel
Manual store for analogue channel.
Programme (Programme number to be assigned to a channel): Sets the programme number using the ▲, ▼ or number (0~9)
●
buttons.
Colour System → Auto / PAL / SECAM / NTSC4.43: Sets the colour system value using the ▲ or ▼ button.
●
Sound System → BG / DK / I / L: Sets the sound system value using the ▲ or ▼ button.
●
Channel (When you know the number of the channel to be stored): Press the ▲ or ▼ button to select C (Air channel) or S
●
(Cable channel). Press the ► button, then press the ▲, ▼ or number (0~9) buttons to select the required number.
You can also select the channel number directly by pressing the number (0~9) buttons.
N
If there is abnormal sound or no sound, reselect the sound standard required.
N
Search (When you do not know the channel numbers): Press the ▲ or ▼ button to start the search. The tuner scans the
●
frequency range until the rst channel or the channel that you selected is received on the screen.
Store (When you store the channel and associated programme number): Set to OK by pressing the
●
Channel mode
N
P (Programme mode): When completing tuning, the broadcasting stations in your area have been assigned to position
–
numbers from P00 to P99. You can select a channel by entering the position number in this mode.
C (Air channel mode): You can select a channel by entering the assigned number to each air broadcasting station in this
–
mode.
S (Cable channel mode): You can select a channel by entering the assigned number for each cable channel in this mode.
–
Cable Search Option (depending on the country)
❑
Sets additional search options such as the frequency and symbol rate for cable network searches.
Frequency (Start ~ Stop): Displays the frequency for the channel.
●
Modulation: Displays available modulation values.
●
Symbol Rate: Displays available symbol rates.
●
Now & Next Guide / Full Guide
❑
The EPG (Electronic Programme Guide) information is provided by the broadcasters. Programme entries may appear blank or out
of date as a result of the information broadcast on a given channel. The display will dynamically update as soon as new information
becomes available.
For detailed procedures on using Now & Next Guide and Full Guide, refer to the descriptions on page 11.
N
You can also display the guide menu simply by pressing the GUIDE button. (To congure the Default Guide, refer to the
O
descriptions.)
Now & Next Guide
For the six channels indicated in the left-hand column, displays the Current programme and the Next programme information.
Full Guide
Displays the programme information as time ordered One hour segments. Two hours of programme information is displayed which
may be scrolled forwards or backwards in time.
ENTERE button.
Default Guide → Now & Next Guide / Full Guide
❑
You can decide whether to display either the Now & Next Guide or the Full Guide when the GUIDE button on the remote control
is pressed.
Channel List
❑
For detailed procedures on using the Channel List, refer to the ‘Managing Channels’ instructions.
You can select these options by simply pressing the CH LIST button on the remote control.
O
Channel Mode
❑
When press the P >/< button, Channels will be switched within the selected channel list.
Added Ch.
Channels will be switched within the memorized channel list.
Favourite Ch.
Channels will be switched within the favourite channel list.
Fine Tune
❑
If the reception is clear, you do not have to ne tune the channel, as this is done automatically during the search and store
operation. If the signal is weak or distorted, you may have to ne tune the channel manually.
Fine tuned channels that have been saved are marked with an asterisk “*” on the right-hand side of the channel number in the
N
channel banner.
To reset the ne-tuning, select Reset by pressing the ▲ or ▼ button and then press the ENTERE button.
N
Only Analogue TV channels can be ne tuned.
N
English - 10
Page 13
English - 11
Using the Now & Next Guide / Full Guide
Now & Next Guide
1 f tn
2 ITV Play
3 Kerrang!
4 Kiss
5 oneword
6 Smash Hits!
▼
DTV Cable 900 f tn 2:10 Tue 1 Jun
Freshmen On Campus
2:00 - 2:30
No Detailed Information
Freshmen O..
Mint Extra
Loaded
Fresh 40 with Dynamite MC
The Distillery
Smash Hits! Sunday
Watch Information
Now Next
Street Hypn..
No Information
No Information
Kisstory
No Information
◄◄ ►►
Page ■ Full Guide ■ Exit
Full Guide
1 f tn
2 ITV Play
3 Kerrang!
4 Kiss
5 oneword
6 Smash Hits!
▼
Watch Information
DTV Cable 900 f tn 2:10 Tue 1 Jun
Freshmen On Campus
2:00 - 2:30
No Detailed Information
Today 16:00 - 17:00 17:00 - 18:00
Freshmen O..
Street Hypn..
Mint Extra
Loaded
Fresh 40 with Dynamite MC
The Distillery
Smash Hits! Sunday
◄◄ ►►
No Information
No Information
Kisstory
No Information
Page ■ Now / Next ■ +24 Hours ■ Exit
To... Then...
Watch a programme in the EPG list Select a programme by pressing the ▲, ▼, ◄, ► button.
Exit the guide Press the blue button
If the next programme is selected, it is scheduled with the clock icon displayed. If the ENTERE button is pressed again, press
the ◄, ► button to select Cancel Schedules, the scheduling is cancelled with the clock icon gone.
View programme information Select a programme of your choice by pressing the ▲, ▼, ◄, ► button.
Then press the INFO button when the programme of your choice is
highlighted.
The programme title is on the upper part of the screen centre.
Please click on INFO button for detailed information. Channel Number, Running Time, Status Bar, Parental Level, Video Quality
Information (HD / SD), Sound Modes, Subtitle or Teletext, languages of Subtitle or Teletext and brief summary of the highlighted
programme are included on the detailed information. “...” will be appeared if the summary is long.
Toggle between the Now & Next Guide and Full
Press the red button repeatedly.
Guide
In Full Guide
Scrolls backwards quickly (24 hours).
Scrolls forwards quickly (24 hours).
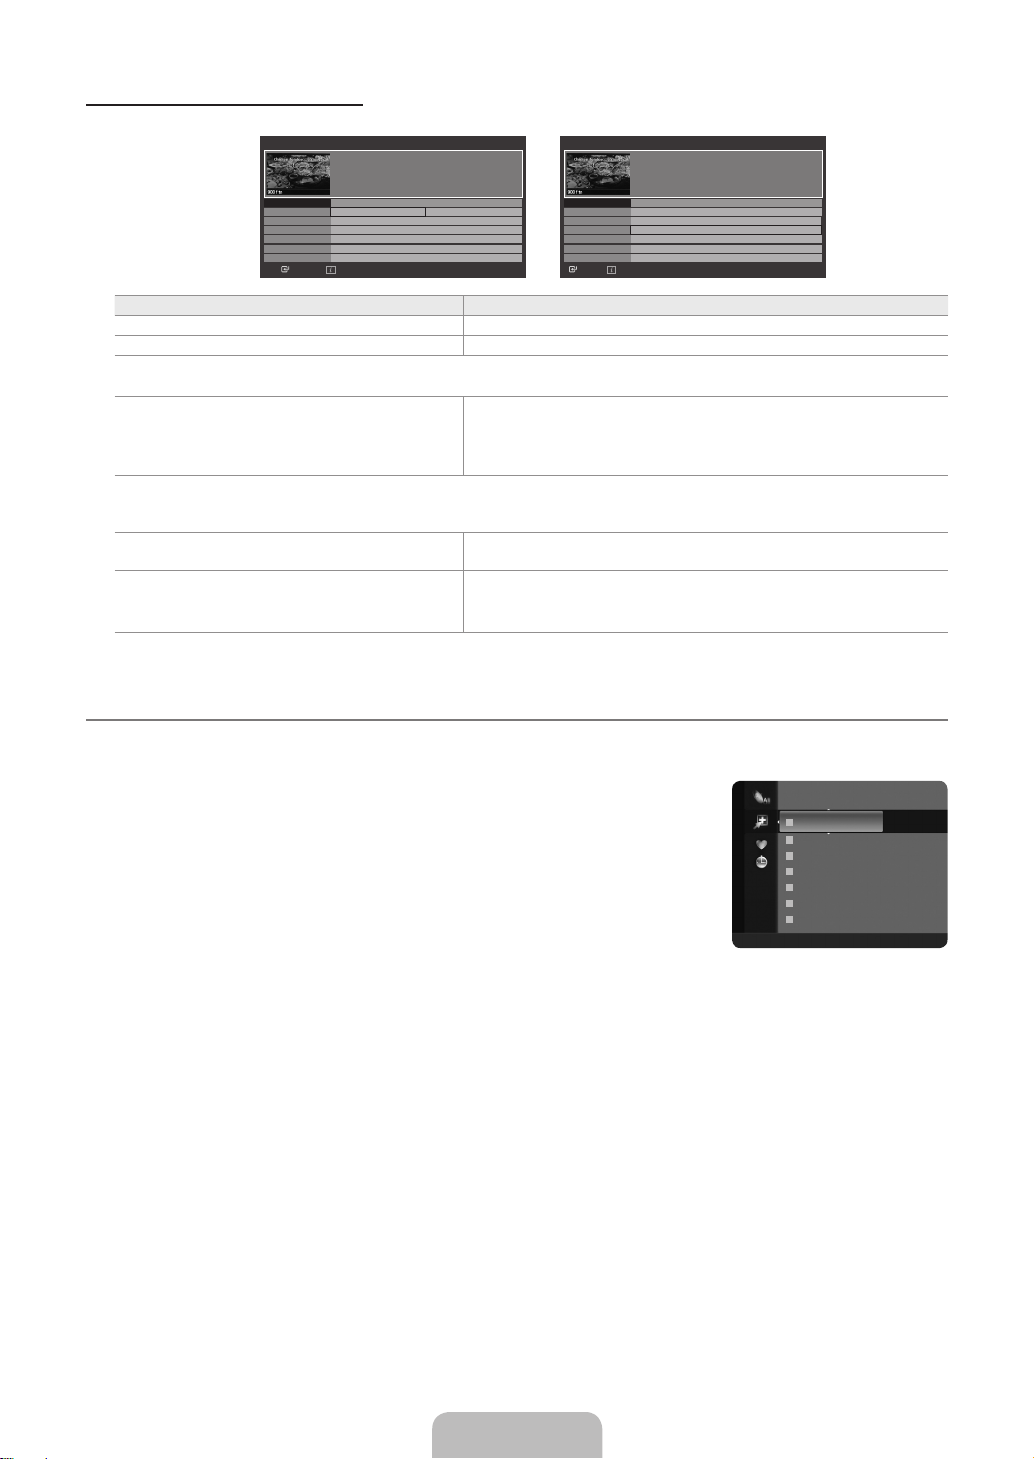
Managing Channels
¦
Press the green button repeatedly.
Press the yellow button repeatedly.
Using this menu, you can Add / Delete or set Favourite channels and use the programme guide for digital broadcasts.
All Channels
Shows all currently available channels.
Added Channels
Shows all added channels.
Favourites
Shows all favourite channels.
To select the Favourites channels you have set up, press the FAV.CH button on the remote
O
control.
Programmed
824 UKTV Gold
Added Channels
825 UKTV style
A
1 C --
A
2 C --
A
3 ♥ C --
A
4 C --
A
5 C --
A
6 C --
A
7 C --
All ■ Channel Type ■ Zoom ■ Select T Tools
Shows all current reserved programmes.
Select a channel in the All Channels, Added Channels or Favourites screen by pressing the ▲ / ▼ buttons, and pressing
N
the ENTERE button. Then you can watch the selected channel.
Using the Colour buttons with the Channel List
N
Red (Channel Type): Toggle between your TV, Radio, Data / Other and All.
–
Green (Zoom): Enlarges or shrinks a channel number.
–
Yellow (Select): Selects multiple channel lists. You can perform the add / delete, add to Favourites / delete from
–
Favourites, or lock / unlock function for multiple channels at the same time. Select the required channels and press the
yellow button to set all the selected channels at the same time. The c mark appears to the left of the selected channels.
TOOLS (Tools): Displays the Delete (or Add), Add to Favourite (or Delete from Favourite), Lock (or Unlock), Timer
–
Viewing, Edit Channel Name, Sort, Edit Channel Number, Select All (or Deselect All), Auto Store menu. (The
Options menus may differ depending on the situation.)
Page 14
Channel Status Display Icons
N
A
: An analogue channel.
●
c
: A channel selected by pressing the yellow button.
●
*
: A channel set as a Favourite.
●
(
: A programme currently being broadcast.
●
\
: A locked channel.
●
)
: A reserved programme
●
Channel List Option Menu (in All Channels / Added Channels / Favourites)
Press the TOOLS button to use the option menu.
N
Option menu items may differ depending on the channel status.
N
Add / Delete
You can delete or add a channel to display the channels you want.
All deleted channels will be shown on All Channels menu.
N
A gray-coloured channel indicates the channel has been deleted.
N
The Add menu only appears for deleted channels.
N
You can also delete a channel from the Added Channels or Favourite menu in the same
N
manner.
Add to Favourite / Delete from Favourite
You can set channels you watch frequently as favourites.
Press the TOOLS button to display the Tools menu. You can also set the add to (or delete
T
from) Favourite by selecting Tools → Add to Favourite (or Delete from Favourite).
The ‘*’ symbol will be displayed and the channel will be set as a favourite.
N
All favourite channels will be shown on Favourite menu.
N
Timer Viewing
If you reserve a programme you want to watch, the channel is automatically switched to the reserved channel in the Channel List;
even when you are watching another channel. To reserve a programme, set the current time rst. (See page 19.)
Only memorized channels can be reserved.
N
You can set the channel, day, month, year, hour and minute directly by pressing the number buttons on the remote control.
N
Reserving a programme will be shown in the Programmed menu.
N
Digital Programme Guide and Viewing Reservation
N
When a digital channel is selected, and you press the ► button, the Programme Guide for the channel appears. You can
reserve a programme according to the procedures described above.
Edit Channel Name (analog channels only)
Channels can labelled so that their call letters appear whenever the channel is selected.
The names of digital broadcasting channels are automatically assigned and cannot be labelled.
N
Edit Channel Number (digital channels only)
You can also edit the channel number by pressing the number buttons on the remote control.
Sort (analogue channels only)
This operation allows you to change the programme numbers of the stored channels. This operation may be necessary after using
the auto store.
Lock / Unlock
You can lock a channel so that the channel cannot be selected and viewed. This function is available only when the Child Lock is
set to On. (see page 20)
The PIN number input screen appears. Enter your 4 digit PIN number.
N
The default PIN number of a new TV set is “0-0-0-0”. You can change the PIN, by selecting Change PIN from the menu.
N
The ‘\’ symbol will be displayed and the channel will be locked.
N
Select All / Deselect All
Select All: You can select all the channels in the channel list.
●
Deselect All: You can deselect all the selected channels.
●
You can only select Deselect All when there is a selected channel.
N
Auto Store
For further details on setting up options, refer to page 9.
N
If a channel is locked using the Child Lock function, the PIN input window appears.
N
824 UKTV Gold
Added Channels
825 UKTV style
A
1 C --
A
2 C --
A
3 ♥ C --
A
4 C --
A
5 C --
A
6 C --
A
7 C --
All ■ Channel Type ■ Zoom ■ Select T Tools
Delete
Add to Favourite
Timer Viewing
Edit Channel Name
Sort
Lock
▼
English - 12
Page 15

English - 13
Channel List Option Menu (in Programmed )
You can view, modify or delete a reservation.
Press the TOOLS button to use the option menu.
N
Change Info
Select to change a viewing reservation.
Cancel Schedules
Select to cancel a viewing reservation.
Information
Select to view a viewing reservation. (You can also change the reservation information.)
Select All
Select all reserved programmes.
PICTURE CONTROL
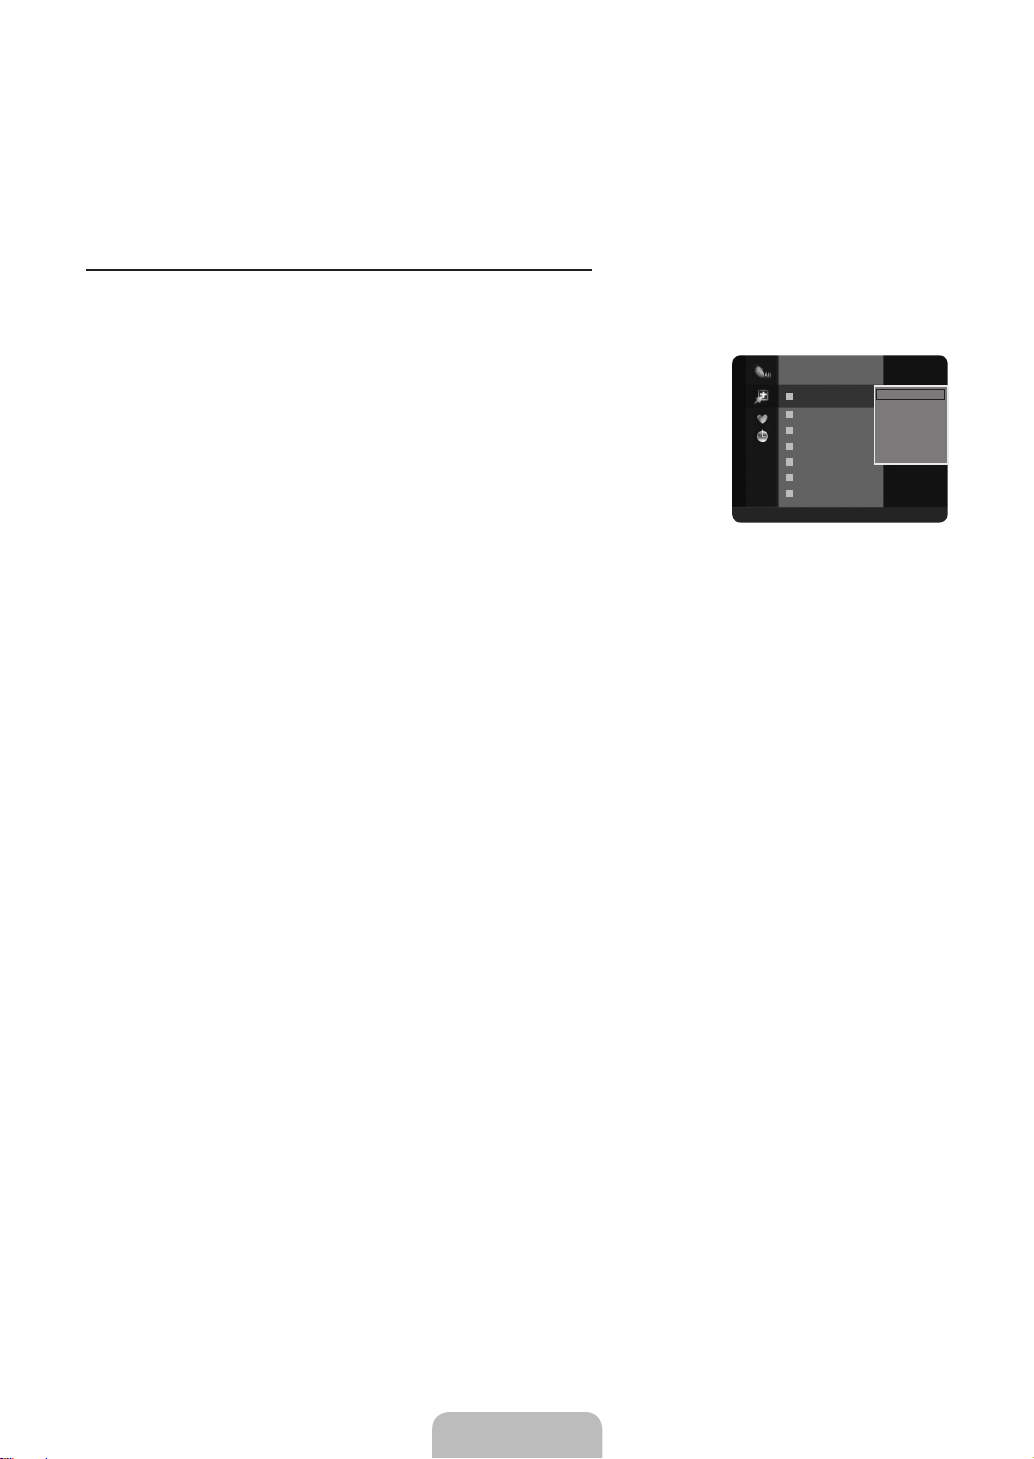
Conguring the Picture Menu
¦
Mode
❑
You can select the type of picture which best corresponds to your viewing requirements.
Press the TOOLS button to display the Tools menu. You can also set the picture mode by
T
selecting Tools → Picture Mode.
Dynamic
Selects the picture for high-denition in a bright room.
Standard
Selects the picture for the optimum display in a normal environment.
Movie
Selects the picture for viewing movies in a dark room.
Programmed
1 / 1 / 2009
13:59 5 TV1 Quincy, M.E
18:59 2 TV3 The Equalizer
20:59 2 TV3 McMillan & Wife
All ■ Zoom ■ Select T Tools E Information
Picture
Mode : Standard ►
Backlight : 7
Contrast : 95
Brightness : 45
Sharpness : 50
Colour : 50
Tint (G / R) : G50 / R50
Change Info
Cancel Schedules
Information
Select All
Backlight / Contrast / Brightness / Sharpness / Colour / Tint(G/R)
❑
Your television has several setting options that allow you to control the picture quality.
Backlight: Adjusts the brightness of LCD back light.
●
Contrast: Adjusts the contrast level of the picture.
●
Brightness: Adjusts the brightness level of the picture
●
Sharpness: Adjusts the edge denition of the picture.
●
Colour: Adjusts colour saturation of the picture.
●
Tint(G/R): Adjusts the colour tint of the picture.
●
Select a picture mode to be adjusted rst. The adjusted values are saved for each picture mode.
N
When you make changes to Backlight, Contrast, Brightness, Sharpness, Colour or Tint(G/R), the OSD will be adjusted
N
accordingly.
In analogue TV, Ext., AV modes of the PAL system, you cannot use the Tint(G/R) Function.
N
In PC mode, you can only make changes to Backlight, Contrast and Brightness.
N
Settings can be adjusted and stored for each external device you have connected to an input of the TV.
N
The energy consumed during use can be signicantly reduced if the brightness level of the picture is reduced, which will
N
reduce the overall running cost.
Advanced Settings
❑
Samsung’s new TVs allow you to make even more precise picture settings than previous
models. See below to adjust detailed picture settings.
Advanced Settings is available in Standard or Movie mode.
N
In PC mode, you can only make changes to Gamma and White Balance from among the
N
Advanced Settings items.
Black Tone → Off / Dark / Darker / Darkest
Colour : 50
Tint (G / R) : G50 / R50
Picture
Advanced Settings ►
Picture Options
Picture Reset
You can select the black level on the screen to adjust the screen depth.
Page 16

Dynamic Contrast → Off / Low / Medium / High
You can adjust the screen contrast so that the optimal contrast is provided.
Gamma
You can adjust the Primary Colour (Red, Green, Blue) Intensity.
Colour Space
Colour Space is a colour matrix composed of red, green and blue colours. Select your favourite Colour Space to experience the
most natural colour.
Native: Native Colour Space offers deep and rich colour tone.
●
Auto: Auto Colour Space automatically adjusts to the most natural colour tone based on programme sources.
●
White Balance
You can adjust the colour temperature for more natural picture colours.
R-Offset / G-Offset / B-Offset / R-Gain / G-Gain / B-Gain: You can adjust the Colour ‘temperature’ in the light areas by
●
changing the values of R, G, B. Recommended for advanced users only.
Reset: The previously adjusted white balance will be reset to the factory defaults.
●
Flesh Tone
You can emphasize the pink ‘esh tone’ in the picture.
Changing the adjustment value will refresh the adjusted screen.
N
Edge Enhancement → Off / On
You can emphasize object boundaries in the picture.
Picture Options
❑
In PC mode, you can only make changes to the Colour Tone and Size from among the items in Picture Options.
N
Colour Tone → Cool / Normal / Warm1 / Warm2
You can select the most comfortable colour tone to your eyes.
Settings can be adjusted and stored for each external device you have connected to an input of the TV.
N
Warm1 or Warm2 is only activated when the picture mode is Movie.
N
Size
You can select the picture size which best corresponds to your viewing requirements.
Press the TOOLS button to display the Tools menu. You can also set the size by selecting Tools → Picture Size.
T
Auto Wide: Automatically adjusts the picture size to the 16:9 aspect ratio.
●
16:9: Adjusts the picture size to 16:9 appropriate for DVDs or wide broadcasting.
●
Wide Zoom: Magnify the size of the picture more than 4:3.
●
Zoom: Magnies the 16:9 wide picture (in the vertical direction) to t the screen size.
●
4:3: This is the default setting for a video movie or normal broadcasting.
●
Screen Fit: Use the function to see the full image without any cut-off when HDMI (720p / 1080i) or Component (1080i) signals
●
are input.
Depending on the input source, the picture size options may vary.
N
The items available may differ depending on the selected mode.
N
In PC Mode, only 16:9 and 4:3 mode can be adjusted.
N
Settings can be adjusted and stored for each external device you have connected to an input of the TV.
N
Temporary image retention may occur when viewing a static image on the set for more than two hours.
N
Wide Zoom: Press the ► button to Select Position, then press the ENTERE button. Press the ▲ or ▼ button to move the
N
picture up / down. Then press the ENTERE button.
Zoom: Press the ► button to Select Position, then press the ENTERE button. Press the ▲ or ▼ button to move the picture
N
up and down. Then press the ENTERE button. Press the ► button to Select Size, then press the ENTERE button. Press
the ▲ or ▼ button to magnify or reduce the picture size in the vertical direction. Then press the ENTERE button.
After selecting Screen Fit in HDMI (1080i) or Component (1080i) mode: Select Position by pressing the ◄ or ►button. Use
N
the ▲, ▼, ◄ or ► button to move the picture.
Reset: Press the ◄ or ► button to select Reset, then press the ENTERE button. You can initialize the setting.
If you use the Screen Fit function with HDMI 720p input, 1 line will be cut at the top, bottom, left and right as in the Overscan
N
function.
English - 14
Page 17

English - 15
Screen Mode → 16:9 / Wide Zoom / Zoom / 4:3
When setting the picture size to Auto Wide in a 16:9 wide TV, you can determine the picture size you want to see the 4:3 WSS
(Wide Screen Service) image or nothing. Each individual European country requires different picture size so this function is
intended for users to select it.
16:9: Sets the picture to 16:9 wide mode.
●
Wide Zoom: Magnify the size of the picture more than 4:3.
●
Zoom: Magnify the size of the picture vertically on screen.
●
4:3: Sets the picture to 4:3 normal mode.
●
This function is available in Auto Wide mode.
N
This function is not available in PC, Component or HDMI mode.
N
Digital NR → Off / Low / Medium / High / Auto
If the broadcast signal received by your TV is weak, you can activate the Digital Noise Reduction feature to help reduce any static
and ghosting that may appear on the screen.
When the signal is weak, select one of the other options until the best picture is displayed.
N
HDMI Black Level → Normal / Low
You can directly select the black level on the screen to adjust the screen depth.
This function is active only when the external input connects to HDMI (RGB signals).
N
Film Mode → Off / Auto
The TV can be set to automatically sense and process lm signals from all sources and adjust the picture for optimum quality.
Film Mode is supported in TV, AV, COMPONENT (480i / 1080i) and HDMI (480i / 1080i).
N
Picture Reset → Reset Picture Mode / Cancel
❑
Resets all picture settings to the default values.
Select a picture mode to be reset. The reset is performed for each picture mode.
N
Reset Picture Mode: Current picture values return to default settings.
●
Using Your TV as a Computer (PC) Display
¦
Setting Up Your PC Software (Based on Windows XP)
The Windows display-settings for a typical computer are shown below. The actual screens on your PC will probably be different,
depending upon your particular version of Windows and your particular video card. However, even if your actual screens look
different, the same basic set-up information will apply in almost all cases. (If not, contact your computer manufacturer or Samsung
Dealer.)
1. First, click on ‘Control Panel’ on the Windows start menu.
2. When the control panel window appears, click on ‘Appearance and Themes’ and a display dialog-box will appear.
3. When the control panel window appears, click on ‘Display’ and a display dialogbox will appear.
4. Navigate to the ‘Settings’ tab on the display dialog-box.
The correct size setting (resolution): Optimum-1360 X 768 pixels
If a vertical-frequency option exists on your display settings dialog box, the correct value is ‘60’ or ‘60 Hz’. Otherwise, just click
‘OK’ and exit the dialog box.
Page 18
Display Modes
Both screen position and size will vary depending on the type of PC monitor and its resolution. The resolutions in the table are
recommended.
D-Sub and HDMI/DVI Input
Mode Resolution
Horizontal Frequency
(KHz)
Vertical Frequency
(Hz)
IBM 640 x 350 31.469 70.086 25.175 +/-
720 x 400 31.469 70.087 28.322 -/+
MAC 640 x 480 35.000 66.667 30.240 -/-
832 x 624 49.726 74.551 57.284 -/-
VESA CVT 720 x 576 35.910 59.950 32.750 -/+
1280 x 720 44.772 59.855 74.500 -/+
1280 x 720 56.456 74.777 95.750 -/+
VESA DMT 640 x 480 31.469 59.940 25.175 -/-
640 x 480 37.500 75.000 31.500 -/640 x 480 37.861 72.809 31.500 -/800 x 600 37.879 60.317 40.000 +/+
800 x 600 46.875 75.000 49.500 +/+
800 x 600 48.077 72.188 50.000 +/+
1024 x 768 48.363 60.004 65.000 -/1024 x 768 56.476 70.069 75.000 -/1024 x 768 60.023 75.029 78.750 +/+
1360 x 768 47.712 60.015 85.500 +/+
VESA GTF 1280 x 720 52.500 70.000 89.040 -/+
When using an HDMI / DVI cable connection, you must use the HDMI IN 1 (DVI) jack.
N
The interlace mode is not supported.
N
The set might operate abnormally if a non-standard video format is selected.
N
Separate and Composite modes are supported. SOG is not supported.
N
Pixel Clock Frequency
(MHz)
Sync Polarity
(H / V)
Setting up the TV with your PC
¦
Preset: Press the SOURCE button to select PC mode.
N
Auto Adjustment
❑
Auto Adjustment allows the PC screen of set to self-adjust to the incoming PC video signal.
The values of ne, coarse and position are adjusted automatically.
This function does not work in DVI-HDMI mode.
N
Press the TOOLS button to display the Tools menu. You can also set the Auto Adjustment
T
by selecting Tools → Auto Adjustment.
Screen
❑
Coarse / Fine
Brightness : 45
Sharpness : 50
Picture
Auto Adjustment ►
Screen
Advanced Settings
Picture Options
Picture Reset
The purpose of picture quality adjustment is to remove or reduce picture noise. If the noise is not removed by Fine-tuning alone,
then adjust the frequency as best as possible (Coarse) and Fine-tune again. After the noise has been reduced, readjust the picture
so that it is aligned on the centre of screen.
PC Position
Adjust the PC’s screen positioning if it does not t the TV screen. Press the ▲ or ▼ button to adjusting the Vertical-Position. Press
the ◄ or ► button to adjust the Horizontal-Position.
Image Reset
You can replace all image settings with the factory default values.
English - 16
Page 19

English - 1
SOUND CONTROL
Conguring the Sound Menu
¦
Mode → Standard / Music / Movie / Clear Voice / Custom
❑
You can select a sound mode to suit your personal preferences.
Press the TOOLS button to display the Tools menu. You can also congure the sound
T
mode by selecting Tools → Sound Mode.
Standard
Selects the normal sound mode.
Music
Emphasizes music over voices.
Movie
Provides the best sound for movies.
Clear Voice
Emphasizes voice over other sounds.
Custom
Recalls your customized sound settings.
Equalizer
❑
The sound settings can be adjusted to suit your personal preferences.
Mode
You can select a sound mode to suit your personal preferences.
Balance
Controls the balance between the right and left speakers.
100Hz / 300Hz / 1KHz / 3KHz / 10KHz (Bandwidth Adjustment)
To adjust the level of different bandwidth frequencies
Reset
Resets the equalizer settings to the default values.
Sound
Mode : Custom ►
Equalizer
SRS TruSurround HD : Off
Audio Language : - - -
Audio Format : - - -
Audio Description
Auto Volume : Off
SRS TruSurround HD → Off / On
❑
SRS TruSurround HD is a patented SRS technology that solves the problem of playing 5.1 multichannel content over two
speakers. TruSurround delivers a compelling, virtual surround sound experience through any two-speaker playback system,
including internal television speakers. It is fully compatible with all multichannel formats.
Press the TOOLS button to display the Tools menu. You can also set the SRS TruSurround HD by selecting Tools → SRS TS
T
HD.
Audio Language (digital channels only)
❑
You can change the default value for audio languages. Displays the language information for the incoming stream.
You can only select the language among the actual languages being broadcast.
N
Audio Format → MPEG / Dolby Digital (digital channels only)
❑
When sound is emitted from both the main speaker and the audio receiver, a sound echo may occur due to the decoding speed
difference between the main speaker and the audio receiver. In this case, use the TV Speaker function.
The Audio Format appears according to the broadcasting signal.
N
Page 20

Audio Description (digital channels only)
❑
This is an auxiliary audio function that provides an additional audio track for visually challenged persons. This function handles the
Audio Stream for the AD (Audio Description), when it is sent along with the Main audio from the broadcaster. Users can turn the
Audio Description On or Off and control the volume.
Audio Description → Off / On
Turn the audio description function on or off.
Volume
You can adjust the audio description volume.
Volume is active when Audio Description is set to On.
N
Auto Volume → Off / On
❑
Each broadcasting station has its own signal conditions, and so it is not easy to adjust the volume every time the channel is
changed. This feature lets you automatically adjust the volume of the desired channel by lowering the sound output when the
modulation signal is high or by raising the sound output when the modulation signal is low.
Auto Volume is not available in Component and HDMI mode.
N
Speaker Select → External Speaker / TV Speaker
❑
If you want to hear the sound through separate speakers, cancel the internal amplier.
The volume and MUTE buttons do not operate when the Speaker Select is set to External Speaker.
N
If you select External Speaker in the Speaker Select menu, the sound settings will be limited.
N
Sound Reset → Reset All / Reset Sound Mode / Cancel
❑
You can restore the Sound settings to the factory defaults.
Selecting the Sound Mode
¦
You can set the sound mode in the Tools menu. When you set to Dual l ll, the current sound mode is displayed on the screen.
Audio Type Dual 1 / 2 Default
A2 Stereo
NICAM
Stereo
Mono MONO
Stereo STEREO ↔ MONO
Dual DUAL 1 ↔ DUAL 2 DUAL 1
Mono MONO
Stereo MONO ↔ STEREO
Dual
MONO ↔ DUAL 1
DUAL 2
Automatic change
Automatic change
DUAL 1
If the stereo signal is weak and an automatic switching occurs, then switch to the mono.
N
This function is only activated in stereo sound signal. It is deactivated in mono sound signal.
N
This function is only available in TV mode.
N
English - 18
Page 21

English - 19
SETUP
Conguring the Setup Menu
¦
Language
❑
You can set the menu language.
Time
❑
Clock
Setting the clock is necessary in order to use the various timer features of the TV.
The current time will appear every time you press the INFO button.
N
If you disconnect the power cord, you have to set the clock again.
N
Clock Mode
●
You can set up the current time manually or automatically.
Auto: Set the current time automatically using the time from the digital broadcast.
–
Manual: Set the current time to a manually specied time.
–
Depending on the broadcast station and signal, the auto time may not be set correctly.
N
If this occurs, set the time manually.
The Antenna or cable must be connected in order to set the time automatically.
N
Clock Set
●
You can set the current time manually.
Set up this item when you have set Clock Mode to Manual.
N
You can set the day, month, year, hour and minute directly by pressing the number buttons on the remote control.
N
Sleep Timer → Off / 30 min / 60 min / 90 min / 120 min / 150 min / 180 min
The sleep timer automatically shuts off the TV after a preset time (30, 60, 90, 120, 150 and 180 minutes).
The TV automatically switches to standby mode when the timer reaches 0.
N
To cancel the Sleep Timer function, select Off.
N
Press the TOOLS button to display the Tools menu. You can also set the sleep timer by selecting Tools → Sleep Timer.
T
Timer 1 / Timer 2 / Timer 3
Three different on / off timer settings can be made. You must set the clock rst.
On Time: Set the hour, minute, and activate / inactivate. (To activate the timer with the setting you’ve chosen, set to Activate.)
●
Off Time: Set the hour, minute, and activate / inactivate. (To activate the timer with the setting you’ve chosen, set to Activate.)
●
Volume: Select the desired turn on volume level.
●
Antenna: Select Air or Cable.
●
Channel: Select the desired channel.
●
Repeat: Select Once, Everyday, Mon~Fri, Mon~Sat, Sat~Sun, or Manual.
●
When Manual is selected, press the ► button to select the desired day of the week. Press the ENTERE button over the
N
desired day and the c mark will appear.
You can set the hour, minute and channel by pressing the number buttons on the remote control.
N
Auto Power Off
N
When you set the timer On, the television will eventually turn off, if no controls are operated for 3 hours after the TV was
turned on by the timer. This function is only available in timer On mode and prevents overheating, which may occur if a TV is
on for too long time.
Plug & Play
Setup
Language : English ►
Time
Game Mode : Off
Child Lock : On
Change PIN
Parental Lock
Subtitle
Subtitle
Teletext Language : - - -
Setup
Preference ►
Digital Text : Enable
Melody : Medium
Energy Saving : Off
Common Interface
Game Mode → Off / On
❑
When connecting to a game console such as PlayStation™ or Xbox™, you can enjoy a more realistic gaming experience by
selecting the game menu.
To disconnect the game console and connect another external device, cancel game mode in the setup menu. If you display
N
the TV menu in Game Mode, the screen shakes slightly.
Game Mode is not available in regular TV and PC mode.
N
If Game Mode is On:
N
Picture mode is automatically changed to Standard and users cannot change the mode.
–
Sound mode is automatically changed to Custom and users cannot change the mode. Adjust the sound using the
–
equalizer.
The Reset Sound function is activated. Selecting the Reset function after setting the equalizer resets the equalizer
–
settings to the factory defaults.
Page 22

Child Lock → Off / On
❑
This feature allows you to prevent unauthorized users, such as children, from watching unsuitable programme by muting out video
and audio.
Before the setup screen appears, the PIN number input screen appears. Enter your 4 digit PIN number.
N
The default PIN number of a new TV set is “0-0-0-0”. You can change the PIN by selecting Change PIN from the menu.
N
You can lock some channels in Channel List. (refer to page 12)
N
Child Lock is available only in TV mode.
N
Change PIN
❑
You can change your personal ID number that is required to set up the TV.
Before the setup screen appears, the PIN number input screen appears. Enter your 4 digit PIN number.
N
The default PIN number of a new TV set is “0-0-0-0”.
N
If you forget the PIN code, press the remote control buttons in the following sequence, which resets the PIN to 0-0-0-0:
N
POWER (Off) → MUTE → 8 → 2 → 4 → POWER (On).
Parental Lock
❑
This feature allows you to prevent unauthorized users, such as children, from watching unsuitable programme by a 4-digit PIN
(Personal Identication Number) code that is dened by the user.
The Parental Rating item differs depending on the country.
N
Before the setup screen appears, the PIN number input screen appears. Enter your 4 digit PIN number.
N
The default PIN number of a new TV set is “0-0-0-0”. You can change the PIN by selecting Change PIN from the menu.
N
When the parental ratings are set, the \ symbol is displayed.
N
Allow All: Press to unlock all TV ratings.
N
Block All: Press to lock all TV ratings.
Subtitle
❑
You can activate and deactivate the subtitles. Use this menu to set the Subtitle Mode. Normal under the menu is the basic subtitle
and Hard of hearing is the subtitle for a hearing-impaired person.
Subtitle → Off / On : Switches subtitles on or off.
●
Mode → Normal / Hard of hearing: Sets the subtitle mode.
●
Subtitle Language: Set the subtitle language.
●
If the programme you are watching does not support the Hard of hearing function, Normal automatically activates even
N
though Hard of hearing mode is selected.
English is the default in cases where the selected language is unavailable in the broadcast.
N
You can select these options simply by pressing the SUBT. button on the remote control.
O
Teletext Language
❑
You can set the Teletext language by selecting the language type.
English is the default in cases where the selected language is unavailable in the broadcast.
N
Preference
❑
Primary Audio Language / Secondary Audio Language / Primary Subtitle Language / Secondary Subtitle Language /
Primary Teletext Language / Secondary Teletext Language
Using this feature, users can select one of the languages. The language selected here is the default when the user selects a
channel.
If you change the language setting, the Subtitle Language, Audio Language, and the Teletext Language of the Language menu are
automatically changed to the selected language.
The Subtitle Language, Audio Language, and the Teletext Language of the Language menu show a list of languages supported
by the current channel and the selection is highlighted. If you change this language setting, the new selection is only valid for the
current channel. The changed setting does not change the setting of the Primary Subtitle Language, Primary Audio Language, or
the Primary Teletext Language of the Preference menu.
Digital Text → Disable / Enable (UK only)
❑
If the programme is broadcast with digital text, this feature is enabled.
MHEG (Multimedia and Hypermedia Information Coding Experts Group)
N
An International standard for data encoding systems used in multimedia and hypermedia. This is at a higher level than the
MPEG system which includes data-linking hypermedia such as still images, character service, animation, graphic and video
les as well as multimedia data. MHEG is user runtime interaction technology and is being applied to various elds including
VOD (Video-On-Demand), ITV (Interactive TV), EC (Electronic Commerce), tele-education, tele-conferencing, digital libraries
and network games.
English - 20
Page 23

English - 21
Melody → Off / Low / Medium / High
❑
A melody sound can be set to come on when the TV is powered On or Off.
The Melody does not play
N
When no sound is output from the TV because the MUTE button has been pressed.
–
When no sound is output from the TV because the (–) Volume button has been pressed.
–
When the TV is turned off by Sleep Timer function.
–
Energy Saving → Off / Low / Medium / High / Auto
❑
This feature adjusts the brightness of the TV in order to reduce power consumption. When watching TV at night, set the Energy
Saving mode option to High to reduce eye fatigue as well as power consumption.
Press the TOOLS button to display the Tools menu. You can also set the Energy Saving option by selecting Tools → Energy
T
Saving.
Common Interface
❑
CI Menu
This enables the user to select from the CAM-provided menu. Select the CI Menu based on the menu PC Card.
Application Info.
This contains information on CAM inserted in the CI slot and displays it.
The Application Info inserting is about the CI CARD. You can install the CAM anytime whether the TV is ON or OFF.
N
1. Purchase the CI CAM module by visiting your nearest dealer or by phone.
2. Insert the CI CARD into the CAM in the direction of the arrow until it ts.
3. Insert the CAM with the CI CARD installed into the common interface slot. (Insert the CAM in the direction of the arrow, right
up to the end so that it is parallel with the slot.)
4. Check if you can see a picture on a scrambled signal channel.
CAM is not supported in some countries and regions, check with your authorized dealer.I
N
Page 24
INPUT / SUPPORT
Conguring the Input Menu
¦
Source List
❑
Use to select TV or other external input sources such as DVD / Blu-ray players / Satellite
receivers (Set-Top Box) connected to the TV. Use to select the input source of your choice.
TV / Ext. / AV / Component / PC / HDMI1/DVI / HDMI 2 / HDMI 3
You can choose only those external devices that are connected to the TV. In the Source
N
List, connected inputs will be highlighted and sorted to the top. Inputs that are not
connected will be sorted to the bottom.
PC always stays activated.
N
TOOLS (Tools): Displays the Edit Name and Information menus.
N
Press the SOURCE button on the remote control to view an external signal source. TV
O
mode can be selected by pressing the TV button.
Edit Name
❑
Name the device connected to the input jacks to make your input source selection easier.
VCR / DVD / Cable STB / Satellite STB / PVR STB / AV Receiver / Game / Camcorder / PC / DVI PC / DVI / TV / IPTV / Blu-
ray / HD DVD / DMA
When connecting an HDMI/DVI cable to the HDMI IN 1(DVI) port, you should set the HDMI1/DVI mode to DVI or DVI PC in
N
the Edit Name of the Input mode. In this case, a separate sound connection is required.
Conguring the Support Menu
¦
Self Diagnosis
❑
Picture Test
If you think you have a picture problem, perform the picture test. Check the colour pattern on
the screen to see if the problem still exists.
Yes: If the test pattern does not appear or there is noise in the test pattern, select Yes.
●
There may be a problem with the TV. Contact Samsung’s call centre for assistance.
No: If the test pattern is properly displayed, select No. There may be a problem with your
●
external equipment. Please check your connections. If the problem still persists, refer to
the external device’s user manual.
Sound Test
If you think you have a sound problem, please perform the sound test. You can check the sound by playing a built-in melody sound
through the TV. ‘Does the problem still exist with this sound test?’ appears on the screen.
If you hear no sound from the TV’s speakers, before performing the sound test, make sure Speaker Select is set to TV
N
speaker in the Sound menu.
The melody will be heard during the test even if Speaker Select is set to External Speaker or the sound is muted by pressing
N
the MUTE button.
Yes: If during the sound test you can hear sound only from one speaker or not at all, select Yes. There may be a problem with
●
the TV. Contact Samsung’s call centre for assistance.
No: If you can hear sound from the speakers, select No. There may be a problem with your external equipment. Please check
●
your connections. If the problem still persists, refer to the external device’s user manual.
Signal Information (digital channels only)
Unlike analogue channels, which can vary in reception quality from ‘snowy’ to clear, digital (HDTV) channels have either perfect
reception quality or you will not receive them at all. So, unlike analogue channels, you cannot ne tune a digital channel. You can,
however, adjust your antenna to improve the reception of available digital channels.
If the signal strength meter indicates that the signal is weak, physically adjust your antenna to increase the signal strength.
N
Continue to adjust the antenna until you nd the best position with the strongest signal.
Input
Source List
Edit Name
Support
Self Diagnosis ►
Software Upgrade
HD Connection Guide
Contact Samsung
English - 22
Page 25

English - 23
Software Upgrade
❑
To keep your product up-to-date with new Digital Television features then software upgrades
are periodically / broadcast as part of the normal Television signal. It will automatically detect
these signals and display the software upgrade banner. You are given the option to install the
upgrade.
BY USB
TV Rear Panel
Insert a USB drive containing the rmware upgrade into TV. Please be careful to not disconnect
the power or remove the USB drive while upgrades are being applied. The TV will turn off and
turn on automatically after completing the rmware upgrade. Please check the rmware version
USB Drive
after the update is completed. When software is upgraded, video and audio settings you have
made will return to their default (factory) settings.
We recommend you write down your settings so that you can easily reset them after the upgrade.
BY Channel
Upgrades the software using the broadcasting signal.
Standby Mode Upgrade
To continue software upgrade with master power on, Select On by pressing the ▲ or ▼ button. 45 minutes after entering standby
mode, a manual upgrade is automatically conducted. Since the power of the unit is turned on internally, the screen may be on
slightly for the LCD product. This phenomenon may continue for more than 1 hour until the software upgrade is completed.
Alternative Software
To display the software version information.
HD Connection Guide
❑
This menu presents the connection method that provides the optimal quality for the HD TV.
Refer to this information when connecting external devices to the TV.
Contact Samsung
❑
View this information when your TV does not work properly or when you want to upgrade the software.
You can view the information regarding the call centre, product and software le download method.
Page 26
RECOMMENDATIONS FOR USE
1
2
3
4
5
6
7
8
9
0
!
#
@
Teletext Feature
¦
Most television stations provide written information services via Teletext. The index page of the Teletext service gives you
information on how to use the service. In addition, you can select various options to suit your requirements by using the remote
control buttons.
For Teletext information to be displayed correctly, channel reception must be stable. Otherwise, information may be missing or
N
some pages may not be displayed.
You can change Teletext pages by pressing the numeric buttons on the remote control.
N
1 0
(mode)
Press to select the Teletext mode
(LIST/FLOF). If you press it in the
LIST mode, it switches into the List
save mode. In the List save mode,
you can save Teletext page into list
using the 8 (store) button.
2 8
(store)
Used to store the Teletext pages.
3 4
(size)
Press to display the double-size
letters in the upper half of the screen.
For lower half of the screen, press
it again. To display normal screen,
press it once again.
4 5
(reveal)
Used to display the hidden text
(answers to quiz games, for
example). To display normal screen,
press it again.
5
Colour buttons (red/green/yellow/
blue)
If the FASTEXT system is used
by a broadcasting company, the
different topics covered on a
Teletext page are colour-coded
and can be selected by pressing
the coloured buttons. Press one of
them corresponding to the required.
The page is displayed with other
coloured information that can be
selected in the same way. To display
the previous or next page, press the
corresponding coloured button.
6 /
7 :
8 1
9 2
0 3
! 9
@ 6
# 7
(Teletext on/mix)
Press to activate Teletext mode after
selecting the channel providing the
Teletext service. Press it twice to
overlap the Teletext with the current
broadcasting screen.
(exit)
Exit from the Teletext display.
(sub-page)
Used to display the available subpage.
(page up)
Used to display the next Teletext page.
(page down)
Used to display the previous Teletext
page.
(hold)
Used to hold the display on a given
page if the selected page is linked with
several secondary pages which follow
on automatically. To resume, press it
again.
(index)
Used to display the index (contents)
page at any time while you are viewing
Teletext.
(cancel)
Used to display the broadcast when
searching for a page.
The Teletext pages are organized according to six categories:
Part Contents
A Selected page number.
B Broadcasting channel identity.
C Current page number or search indications.
D Date and time.
E Text.
F Status information.
FASTEXT information.
English - 24
Page 27

English - 25
Teletext information is often divided between several pages displayed in sequence, which can be accessed by:
N
Entering the page number
–
Selecting a title in a list
–
Selecting a coloured heading (FASTEXT system)
–
Teletext level supported by the TV is version 2.5 which is capable of displaying additional graphics or text.
N
Depending upon the transmission, blank side panels can occur when displaying Teletext.
N
In these cases, additional graphics or text is not transmitted.
N
Older TV’s which do not support version 2.5 are not capable of displaying any additional graphics or text, regardless of the
N
Teletext transmission.
Press the TV button to exit from the Teletext display.
O
Teletext 16:9, picture is 16:9.
O
Installing the Stand
¦
Preset: Place the Guide Stand and Cover Neck onto the stand and fasten it using the
N
screws. Applicable to 32 inch model only.
Front
1. Attach your LCD TV to the stand.
Two or more people should carry the TV.
N
Make sure to distinguish between the front and back of the stand when assembling
N
them.
To make sure the TV is installed on the stand at a proper level, do not apply excess
N
downward pressure to the upper left of right sides of the TV.
Back
2. Fasten two screws at position 1 and then fasten two screw at position 2.
Stand the product up and fasten the screws. If you fasten the screws with the LCD TV
N
placed down, it may lean to one side.
Installing the Wall Mount Kit
¦
Wall mount items (sold separately) allow you to mount the TV on the wall.
For detailed information on installing the wall mount, see the instructions provided with the
Wall Mount items. Contact a technician for assistance when installing the wall mounted
bracket.
Samsung Electronics is not responsible for any damage to the product or injury to yourself or
others if you elect to install the TV on your own.
Do not install your Wall Mount Kit while your TV is turned on. It may result in personal
injury due to electric shock.
Using the Anti-Theft Kensington Lock
¦
The Kensington Lock is a device used to physically x the system when using it in a public
place. The appearance and locking method may differ from the illustration depending on the
manufacturer. Refer to the manual provided with the Kensington Lock for proper use. The
locking device has to be purchased separately. The location of the Kensington Lock may be
different depending on its model.
1. Insert the locking device into the Kensington slot on the LCD TV (1) and turn it in the
locking direction (2).
2. Connect the Kensington Lock cable (3).
3. Fix the Kensington Lock to a desk or a heavy stationary object.
3
2
1
Page 28

Securing the Installation Space
¦
Keep the required distances between the product and other objects (e.g. walls) to ensure proper ventilation.
Failing to do so may result in re or a problem with the product due to an increase in the internal temperature of the product.
Install the product so the required distances shown in the gure are kept.
When using a stand or wall-mount, use parts provided by Samsung Electronics only.
N
If you use parts provided by another manufacturer, it may result in a problem with the product or an injury due to the
–
product falling.
If you use parts provided by another manufacturer, it may result in a problem with the product or re due to an increase in
–
the internal temperature of the product due to poor ventilation.
The appearance may differ depending on the product.
N
When installing the product with a stand
When installing the product with a wall-mount
10 cm
10 cm
Securing the TV to the Wall
¦
10 cm
10 cm
Caution: Pulling, pushing, or climbing on the TV may cause the TV to fall. In particular, ensure your children do
not hang over or destabilize the TV; doing so may cause the TV to tip over, causing serious injuries or death.
Follow all safety precautions provided on the included Safety Flyer. For added stability, install the anti-fall device
for safety purposes, as follows.
To avoid the TV from falling:
1. Put the screws into the clamps and rmly fasten them onto the wall. Conrm that the
screws have been rmly installed onto the wall.
You may need additional material such as an anchor depending on the type of wall.
N
Since the necessary clamps, screws, and string are not supplied, please purchase
N
these additionally.
10 cm
10 cm
10 cm
Wall
2. Remove the screws from the centre back of the TV, put the screws into the clamps, and
then fasten the screws onto the TV again.
Screws may not be supplied with the product. In this case, please purchase the
N
screws of the following specications.
Screw Specications
N
For a 17 ~ 29 Inch LCD TV: M4 X L15 / For a 32 ~ 40 Inch LCD TV: M6 X L15
–
3. Connect the clamps xed onto the TV and the clamps xed onto the wall with a strong
string and then tie the string tightly.
Install the TV near to the wall so that it does not fall backwards.
N
It is safe to connect the string so that the clamps xed on the wall are equal to or
N
lower than the clamps xed on the TV.
Untie the string before moving the TV.
N
4. Verify all connections are properly secured. Periodically check connections for any
sign of fatigue for failure. If you have any doubt about the security of your connections,
contact a professional installer.
English - 26
Wall
Page 29

English - 2
Troubleshooting: Before Contacting Service Personnel
¦
No sound or picture Check that the mains lead has been connected to a wall socket.
Normal picture but no sound Check the volume.
Screen is black and power indicator
light blinks steadily
No picture or black and white picture Adjust the colour settings.
Sound and picture interference Try to identify the electrical appliance that is affecting the set and move it further away.
Blurred or snowy picture, distorted
sound
Remote control malfunctions Replace the remote control batteries.
‘Check signal cable.’ message is
displayed
On PC mode, ‘Not Supported Mode.’
message is displayed
The damaged picture appears in the
corner of the screen
The ‘Resets all settings to the default
values.’ message appears.
You may see small particles if you
look closely at the edge of the bezel
surrounding the TV screen.
The TFT LCD panel uses a panel consisting of sub pixels (3 133 440) which require sophisticated technology to produce.
N
However, there may be few bright or dark pixels on the screen. These pixels will have no impact on the performance of the
product.
●
Check that you have pressed the button on your set.
●
Check the picture contrast and brightness settings.
●
Check the volume.
●
●
Check whether the MUTEM button has been pressed on the remote control.
●
Check the Speaker Select settings.
●
On your computer check; Power, Signal Cable.
●
The TV is using its power management system.
●
Move the computer’s mouse or press any key on the keyboard.
●
●
Check that the broadcast system selected is correct.
●
●
Plug your set into a different mains socket.
●
Check the direction, location and connections of your aerial.
●
This interference is often due to the use of an indoor aerial.
●
●
Clean the upper edge of the remote control (transmission window).
●
Check the battery terminals.
●
Check that the signal cable is rmly connected to the PC or video sources.
●
Check that the PC or video sources are turned on.
●
Check the maximum resolution and the frequency of the video adaptor.
●
Compare these values with the data in the Display Modes.
●
If Screen Fit is selected in some external devices, the damaged picture may appear in
the corner of the screen. This symptom is caused by external devices, not TV.
This appears when you press and hold the EXIT button for a while. The product settings
are reset to the factory defaults.
This is part of the product’s design and is not a defect.
Specications
¦
Model Name LE26B460B LE32B460B
Screen Size
(Diagonal) 26 inch 32 inch
PC Resolution
(Optimum) 1360 x 768 @ 60Hz 1360 x 768 @ 60Hz
Sound
(Output) 5W X 2 5W X 2
Dimensions (WxDxH)
Body
With stand
Weight
With Stand 8 kg 12 kg
Environmental Considerations
Operating Temperature
Operating Humidity
Storage Temperature
Storage Humidity
Stand Swivel
Left / Right 0˚ -20˚ ~ 20˚
Design and specications are subject to change without prior notice.
N
This device is a Class B digital apparatus.
N
For the power supply and Power Consumption, refer to the label attached to the product.
N
668 x 77 x 446 mm
668 x 216 x 493 mm
10°C to 40°C (50°F to 104°F)
10% to 80%, non-condensing
-20°C to 45°C (-4°F to 113°F)
5% to 95%, non-condensing
798 x 77 x 519 mm
798 x 240 x 579 mm
10°C to 40°C (50°F to 104°F)
10% to 80%, non-condensing
-20°C to 45°C (-4°F to 113°F)
5% to 95%, non-condensing
Page 30

Цифровое телевещание. Примечание
❑
1. Функции цифрового телевидения (DVB) доступны только в тех странах и регионах, где передаются цифровые наземные
сигналы DVB-T (MPEG2 и MPEG4 AVC) или где имеется доступ к совместимой услуге кабельного телевидения DVB-C
(MPEG2 и MPEG4 AAC). Узнайте у местного дилера о возможности приема сигнала DVB-T или DVB-C.
2. DVB-T это стандарт цифрового наземного телевещания, принятый консорциумом европейских организаций DVB, а DVB-C
это стандарт цифрового кабельного телевидения. Однако некоторые дифференцированные функции, такие как EPG (Electric
Program Guide), VOD (Video on Demand) и другие, не входят в эту спецификацию. Поэтому в настоящее время они не
работают.
3. Несмотря на то, что данный телевизор поддерживает последние стандарты DVB-T и DVB-C [с августа 2008 года], компания не
гарантирует совместимость с последующими стандартами цифрового наземного ТВ-вещания DVB-T и цифрового кабельного
вещания DVB-C.
4. В зависимости от того, в какой стране или регионе используется телевизор, некоторые поставщики услуг кабельного
телевидения могут взимать отдельную плату за данную услугу. При этом пользователю необходимо будет принять условия
предоставления услуги.
5. Некоторые функции цифрового ТВ могут быть недоступны в отдельных странах или регионах, кроме того, не все поставщики
услуг кабельного телевидения могут обеспечить правильную работу DVB-C.
6. Для получения более подробной информации обратитесь в местный центр по обслуживанию клиентов Samsung.
Меры предосторожности при отображении неподвижного изображения.
❑
Неподвижное изображение может серьезно повредить экран телевизора.
Не следует оставлять неподвижное или частично неподвижное изображение на ЖК-панели более двух часов,
●
поскольку это может привести к возникновению эффекта остаточного изображения. Подобное остаточное изображение
также известно как “выгорание экрана”. Во избежание такого эффекта уменьшите уровень яркости и контрастности
экрана при отображении неподвижных изображений.
●
Повреждения, вызванные вышеуказанным эффектом, не подлежат гарантийному ремонту.
Длительное отображение неподвижных изображений, например, при подключении экрана к видеоигре и компьютеру,
●
может вызвать появление остаточных изображений. Во избежание возникновения подобного эффекта, при
отображении неподвижных изображений уменьшите уровень параметров “яркости” и “контрастности”.
При длительном просмотре ЖК-телевизора в формате 4:3 в его правой, левой и центральной части
могут появиться следы границ изображения, что объясняется продолжительной неравномерностью
светового излучения в разных областях экрана. Использование телевизора для воспроизведения
DVD-дисков или подключение игровой приставки может оказать подобное воздействие на экран.
© Корпорация Samsung Electronics Ltd., 2009. Все права защищены.
Page 31

СОДЕРЖАНИЕ
ОБЩАЯ ИНФОРМАЦИЯ
Панель управления .......................................................................... 2
■
Принадлежности .............................................................................. 3
■
Соединительная панель .................................................................. 4
■
Пульт дистанционного управления ................................................. 6
■
Установка батарей в пульт дистанционного управления .............. 6
■
ЭКСПЛУАТАЦИЯ
Просмотр меню ................................................................................ 7
■
Перевод телевизора в режим ожидания ........................................ 8
■
Функция Plug & Play ......................................................................... 8
■
УПРАВЛЕНИЕ КАНАЛАМИ
Настройка меню каналов ................................................................ 9
■
Управление каналами ...................................................................11
■
УПРАВЛЕНИЕ ИЗОБРАЖЕНИЯМИ
Настройка меню изображений ...................................................... 13
■
Использование телевизора в качестве экрана компьютера ....... 15
■
Настройка подключения телевизора к компьютеру .................... 16
■
УПРАВЛЕНИЕ ЗВУКОМ
Настройка меню звука ................................................................... 17
■
Выбор режима звука ...................................................................... 18
■
УСТАНОВКА
Меню настройки ............................................................................. 19
■
ВХОД / ПОДДЕРЖКА
Настройка меню входного сигнала ............................................... 22
■
Настройка меню поддержки .......................................................... 22
■
РЕКОМЕНДАЦИИ ПО ИСПОЛЬЗОВАНИЮ
Функция телетекста ....................................................................... 24
■
Установка подставки ...................................................................... 25
■
Установка набора для настенного монтажа ................................ 25
■
Использование замка Kensington для защиты от краж ............... 25
■
Выбор пространства для установки ............................................. 26
■
Крепление телевизора на стене ................................................... 26
■
Поиск и устранение неисправностей:
■
перед обращением в службу технической поддержки ................ 27
Характеристики .............................................................................. 27
■
Русский
Лицензия
❑
TruSurround HD, SRS и символ являются товарными знаками корпорации SRS Labs, Inc.символ являются товарными знаками корпорации SRS Labs, Inc.
Технология TruSurround HD использована по лицензии корпорации SRS Labs, Inc.
Произведено по лицензии Dolby Laboratories. Dolby и символ двойного D являются торговыми знаками
Dolby Laboratories.
Символ
❑
N O T
Примечание Кнопка одного нажатия Кнопка TOOLS
Нажмите
Русский - 1
Page 32

ОБЩАЯ ИНФОРМАЦИЯ
4
1
2
3
5
6
7
88
POWER
4
1
2
3
5
6
7
88
POWER
Рисунки и иллюстрации в данном руководстве пользователя представлены только для справки. Они могут отличаться от реального
N
внешнего вида устройства. Конструкция и характеристики устройства могут изменяться с целью повышения его производительности
без предварительного уведомления.
Панель управления
¦
Цвет и форма устройства могут различаться в зависимости от модели.
N
Кнопки передней панели работают при прикосновении пальцем.
N
1
SOURCE E: Переключение между всеми доступными источниками входящего сигнала. Эта кнопка в экранном меню
выполняет те же функции, что и кнопка ENTERE на пульте дистанционного управления.
2
MENU: Нажмите для просмотра экранного меню функций телевизора.
3 Y
4 z
5
ДАТЧИК ПУЛЬТА ДИСТАНЦИОННОГО УПРАВЛЕНИЯ: Направляйте пульт дистанционного управления в эту точку на панели
6 P
7
ИНДИКАТОР ПИТАНИЯ: Мигает и отключается при включении питания и горит в режиме ожидания.
8
ГРОМКОГОВОРИТЕЛИ
: Используется для увеличения или уменьшения громкости.
Кнопки
Y
управления.
и ▲ на пульте дистанционного управления.
управления телевизора.
POWER: используется для включения и выключения питания.
в экранном меню выполняют те же функции, что и кнопки ◄ и ► на пульте дистанционного
: используется для смены каналов. Кнопки
Русский - 2
z
в экранном меню выполняют те же функции, что и кнопки ▼
Page 33

Русский - 3
Принадлежности
¦
Пульт дистанционного управления и 2 батареи
(только для модели с экраном 32 дюйма)
Убедитесь, что следующие принадлежности прилагаются к телевизору с ЖК-экраном. Если какой-либо элемент комплекта
N
отсутствует, обратитесь к дилеру.
Гарантийный талон/инструкция по технике безопасности (прилагается не во всех странах).
N
Цвет и форма принадлежностей могут различаться в зависимости от модели.
N
(размер AAA)
(M4 X L16) (M4 X L16)
Винт – 8 шт.
Руководство пользователя
●
(только для модели с экраном 26 дюйма)
Кабель питания Крышка (нижняя)
Винт – 4 шт.
Гарантийный талон
●
●
Ткань для очистки
Инструкция по технике безопасности
Page 34

Соединительная панель
9
7
6
8
1 2 3 4 5 6
0! @
¦
[Задняя панель телевизора]
Разъем для шнура
питания
Цвет и форма устройства могут различаться в зависимости от модели.
N
При подключении внешнего устройства к телевизору убедитесь, что питание данного устройства выключено.
N
Подключая внешнее устройство, проследите, чтобы цвет соединительного разъема совпадал с цветом кабеля.
N
1
DIGITAL AUDIO OUT (OPTICAL)
Подключение к цифровому аудиоустройству, например приемнику домашнего кинотеатра.
–
При подключении гнезд HDMI IN через гнездо DIGITAL AUDIO OUT (OPTICAL) на телевизоре выполняется вывод только
N
двухканального звука. Если требуется 5.1-канальный звук, подключите оптическое гнездо на DVD-проигрывателе/проигрывателе
дисков Blu-ray или декодере кабельного/спутникового телевидения непосредственно к усилителю или системе домашнего
кинотеатра, а не к телевизору.
2
PC IN
Подсоединение к гнезду видеовыхода ПК.
–
3
ANT IN
Подключение к антенне или системе кабельного телевидения.
–
4
PC / DVI AUDIO IN
Подсоединение к гнезду аудиовыхода ПК.
–
Аудиовыходы DVI для подключения внешних устройств.
–
5
AUDIO OUT [R-AUDIO-L]
Соедините с помощью аудиокабелей RCA разъемы AUDIO OUT [R-AUDIO-L], расположенные на задней
–
панели телевизора, с соответствующими разъемами аудиовхода усилителя или домашнего кинотеатра с DVDпроигрывателем.
6
HDMI IN 1 (DVI), 2, 3
Поддержка AV-устройства с возможностью подключения через интерфейс HDMI (приставки, проигрыватели DVD/
–
проигрыватели дисков Blu-ray).
При соединении двух устройств с помощью разъема HDMI дополнительный аудиокабель не требуется.
–
Гнездо HDMI IN 1 (DVI) можно использовать для подключения компьютера.
–
Что такое HDMI?
N
Интерфейс HDMI (High Denition Multimedia Interface) позволяет передавать цифровые видеоданные высокого
разрешения и многоканальные цифровые аудиосигналы.
Разъем HDMI/DVI обеспечивает DVI-соединение с дополнительным устройством с помощью соответствующего
кабеля (в комплект не входит).
Различие между HDMI и DVI состоит в том, что устройство HDMI меньше по размеру, оснащено технологией
защиты от незаконного копирования HDCP (High Bandwidth Digital Copy Protection), а также поддерживает
многоканальные цифровые аудиосигналы.
[Боковая панель
телевизора]
Русский - 4
Page 35

Русский - 5
7
Гнездо COMMON INTERFACE
Если в гнездо стандартного интерфейса не вставлена карта, при приёме некоторых каналов может появиться
–
надпись “Зашифрованный сигнал”.
Сопровождающая информация, содержащая телефонный номер, идентификационный номер карты CI CARD,
–
идентификационный номер хоста будет выведена на экран через 2-3 минуты. Если появится сообщение об
ошибке, обратитесь к поставщику услуг цифрового телевидения.
После завершения конфигурирования информации о каналах на экране отобразится сообщение “Обновление
–
завершено”, означающее, что список каналов обновлен.
Карту CI CARD необходимо получить у местного поставщика услуг цифрового телевидения. Извлеките карту CI CARD, аккуратно
N
придерживая ее, поскольку падение карты может привести к ее повреждению.
Вставьте карту CI-Card в направлении, указанном на ней.
N
Размещение гнезда COMMON INTERFACE может отличаться в зависимости от его модели.
N
Во многих странах и регионах модуль CAM не поддерживается. Уточните данную информацию у официального дилера.
N
8
AV IN [VIDEO] / [R-AUDIO-L]
Подключите кабель RCA к соответствующему внешнему аудио/видеоустройству, например, видеомагнитофону,
–
DVD-проигрывателю или видеокамере.
Соедините с помощью аудиокабелей RCA разъемы [R-AUDIO-L] на телевизоре с соответствующими разъемами
–
аудиовыхода аудио/видеоустройства.
9
KENSINGTON LOCK (в зависимости от модели)
Замок Kensington (не входит в комплект) – это устройство для крепления системы при использовании в
–
общественных местах. Если необходимо использовать блокировочное устройство, обратитесь к продавцу
телевизора.
Размещение замка Kensington может отличаться в зависимости от его модели.
N
0
COMPONENT IN
Подсоедините один конец компонентного видеокабеля (поставляется дополнительно) к компонентному
–
разъему (PR, PB, Y) на задней панели телевизора, а другой конец - к соответствующему компонентному разъему
видеовыхода устройства DTV или DVD-проигрывателя.
Если требуется подключить к телевизору одновременно видеоприставку и устройство DTV (или DVD-
–
проигрыватель), необходимо подключить видеоприставку к устройству DTV (или DVD-проигрывателю), после чего
подключить устройство DTV (или DVD-проигрыватель) к компонентному разъему (PR, PB, Y) телевизора.
Разъемы PR, PB и Y компонентных устройств (DTV или DVD) иногда имеют маркировку Y, B-Y и R-Y или Y, Cb и Cr.
–
Соедините с помощью аудиокабелей RCA (поставляется дополнительно) разъемы [R-AUDIO-L] расположенные
–
на задней панели телевизора, с соответствующими разъемами аудиовыхода устройства DTV или DVDпроигрывателя.
!
EXT
Разъем
EXT O O O Доступен только выход телевизионного сигнала или сигнала DTV.
Входные и выходные разъемы для внешних устройств, таких как видеомагнитофон, DVD-проигрыватель, игровая
–
приставка или проигрыватели видеодисков.
@
SERVICE
Разъем для обновления программного обеспечения.
–
Видео Аудио (Л/П) RGB Видео + аудио (Л/П)
Вход Выход
Page 36

1
2
3
4
5
6
7
8
9
0
!
@
#
$
&
*
(
)
a
%
^
Пульт дистанционного управления
¦
Пульт дистанционного управления можно использовать на расстоянии не более 7 метров от телевизора.
N
На работу пульта ДУ может влиять яркий свет.
N
Цвет и форма устройства могут различаться в зависимости от модели.
N
1
POWER: Кнопка режима
ожидания телевизора.
2
ЦИФРОВЫЕ КНОПКИ:
Используются для смены
каналов.
3 E
: Выполняет ту же функцию,
что и кнопка ENTERE
кнопок со стрелками. Если
при переключении каналов с
помощью номерных кнопок
набрать номер канала, а затем
нажать кнопку ENTERE, будет
немедленно выбран нужный
канал.
4 Y
5
SOURCE: Используется
6
CH LIST: Используется для
7
TOOLS: Используется для
8
INFO: Используется для
9
ЦВЕТНЫЕ КНОПКИ:
!
TV: Используется
@
PRE-CH: Используется
#
MUTE M: Нажмите для
$
P </P >: Используется для
: Используется для
увеличения или уменьшения
громкости.
для отображения и выбора
доступных источников
видеосигнала.
отображения списка каналов на
экране.
быстрого выбора часто
используемых функций.
отображения информации на
экране телевизора.
Используйте эти кнопки в меню
списка каналов и т.д.
непосредственно для
выбора режима просмотра
телепрограмм.
для возврата к ранее
просматриваемому каналу.
временного отключения звука.
смены каналов.
%
MENU: Используется для
отображения главного экранного
меню.
^
FAV.CH: Используется для
отображения списков избранных
каналов на экране.
&
RETURN: Используется для
возврата к предыдущему меню.
*
ВВЕРХ▲ / ВНИЗ▼ / ВЛЕВО◄
/ ВПРАВО► / ENTERE:
Используются для выбора
элементов меню и изменения
значений параметров.
(
EXIT: Используется для выхода
из меню.
)
SUBT.: Отображение субтитров.
a
GUIDE: Отображение
электронного справочника по
программам (EPG).
Функции телетекста
5 0
: выбор режима телетекста
(LIST/FLOF)
6 8
: сохранение телетекста
7 4
: выбор размера телетекста
8 5
: открытие телетекста
9
Выбор темы Fastext
0 /
! :
@ 1
$ 2
% 6
& 9
( 7
: или выберите Teletext,
Double или Mix.
: выход из режима телетекста
: дополнительная страница
телетекста
: следующая страница
телетекста
3
: предыдущая страница
телетекста
: указатель телетекста
: удержание страницы
телетекста
: отмена телетекста
Установка батарей в пульт дистанционного управления
¦
1. Снимите крышку на задней панели пульта дистанционного управления, подняв ее вверх, как
показано на рисунке.
2. Установите две батареи размера AAA.
Убедитесь, что полюсы ‘+’ и ‘–’ батареи соответствуют полюсам на рисунке внутри отделения.
N
3. Вставьте крышку обратно.
Если пульт дистанционного управления не используется в течение долгого времени,
N
извлеките батареи и храните их в прохладном сухом месте.
Если пульт дистанционного управления не работает, проверьте следующее:
N
Включен ли телевизор?
–
Правильно ли установлены положительный и отрицательный полюсы батареи?
–
Не разряжены ли батареи?
–
Возможно, отключено питание или отсоединен кабель питания?
–
Нет ли поблизости люминесцентного излучения или неоновой вывески?
–
Русский - 6
Page 37

Русский -
ЭКСПЛУАТАЦИЯ
Просмотр меню
¦
Перед использованием телевизора выполните описанные ниже шаги, чтобы узнать о том,
как осуществляется навигация по меню для выбора и настройки различных функций.
1. Нажмите кнопку MENU.
На экране появится главное меню. В левой части меню имеются значки:
Изображение, Звук, Канал, Установка, Вход, Поддержка.
2. Выберите значок, нажимая кнопку ▲ или ▼.
Нажмите кнопку ◄ или ► для открытия подменю значка.
3. Для перехода к пунктам меню нажмите кнопку ▲ или ▼.
Нажимайте кнопку ENTERE для открытия пунктов меню.
4. Для изменения выбранных пунктов используйте кнопку ▲/▼/◄/►.
Для возврата к предыдущему меню используйте кнопку RETURN.
N
5. Для выхода из меню нажмите кнопку EXIT.
Использование кнопок на пульте дистанционного управления
Кнопка
MENU
Функция
Отображение главного экранного
Кнопка
меню.
RETURN
EXIT
e
Возврат к предыдущему меню.
R
Выход из экранного меню.
▲/▼/◄/►/ ENTER
E
Пример. Настройка Яркость телевизора в меню Изображение
Настройка уровня Яркость 80
1. Для отображения меню нажмите кнопку MENU.
Изображение
Режим : Стандартный ►
Подсветка : 8
Контраст : 95
Яркость : 45
Четкость : 50
Цвет : 50
Тон (З/К) : З50 / К50
Функция
Перемещение курсора для выбора
пункта меню.
Выбор элемента, на который наведен
курсор.
Подтверждение настройки.
Изображение
Режим : Стандартный
Подсветка : 8
Контраст : 95
Яркость : 45
Четкость : 50
Цвет : 50
Тон (З/К) : З50 / К50
2. Нажмите кнопку ENTERE для выбора пункта Изображение.
3. Нажмите кнопку ▲ или ▼ для выбора пункта Яркость.
4. Нажмите кнопку ENTERE.
5. Нажимайте кнопку ◄ или ► до тех пор, пока для параметра яркости не будет выбрано
значение 80.
6. Нажмите кнопку ENTERE.
Для выхода из меню нажмите кнопку EXIT.
N
Изображение
Режим : Стандартный ►
Подсветка : 8
Контраст : 95
Яркость : 45
Четкость : 50
Цвет : 50
Тон (З/К) : З50 / К50
Подсветка : 8
Изображение
Контраст : 95
Яркость : 45 ►
Четкость : 50
Цвет : 50
Тон (З/К) : З50 / К50
Дополнительные параметры
Параметры изображения
Сброс настроек изображения
Яркость 45
U
Перем. L Настр. E Вход R Возврат
Яркость 80
U
Перем. L Настр. E Вход R Возврат
Page 38

Перевод телевизора в режим ожидания
¦
Чтобы уменьшить количество энергии, потребляемой телевизором, можно перевести его в режим ожидания. Режим
ожидания удобно использовать, если необходимо временно прервать просмотр (например на время обеда).
1. Нажмите кнопку POWERP на пульте дистанционного управления.
Экран погаснет, и на телевизоре загорится индикатор режима ожидания.
N
2. Чтобы снова включить телевизор, повторно нажмите кнопку POWERP.
Не оставляйте телевизор в режиме ожидания надолго (например, уезжая в отпуск). Лучше всего отсоединить шнур питания
N
телевизора и антенну.
Функция Plug & Play
¦
При первом включении телевизора автоматически и поочередно устанавливаются
основные параметры.
1. Нажмите кнопку POWER на пульте дистанционного управления. Появится сообщение
Можно установить язык меню.
Можно установить язык меню.
Язык : Русский ►
Plug & Play
2. Выберите соответствующий язык, нажав кнопку ▲ или ▼. Нажмите кнопку ENTERE для
подтверждения выбора.
3. Нажмите кнопку ◄ или ► для выбора пункта Демонстрация или Домашний, затем нажмите кнопку ENTERE.
Для получения наилучшего изображения в домашних условиях рекомендуется перевести телевизор в режим (Домашний).
N
Демонстрация предназначена только для точек розничной торговли.
N
Если для устройства случайно выбран режим Демонстрация и нужно вернуться в режим Домашний (Стандартный), нажмите
N
кнопку регулировки громкости на телевизоре. При отображении экранного меню громкости нажмите на телевизоре кнопку MENU
и удерживайте ее в течение 5 секунд.
4. Нажмите кнопку ENTERE. Выберите страну, нажав кнопку ▲ или ▼. Нажмите кнопку ENTERE для подтверждения
выбора. Для России и стран СНГ выберите Другое.
5. С помощью кнопки ▲ или ▼ выберите Антенна или Кабель, затем нажмите кнопку ENTERE.
Антенна: внешней антенны.
N
Кабель: кабельной антенны.
6. Нажмите кнопку ▲ или ▼ для выбора источника канала для сохранения. Нажмите кнопку ENTERE для выбора пункта
Пуск.
Цифровые и аналоговые: цифровые и аналоговые каналы.
N
Цифровые: цифровые каналы.
Аналоговые: аналоговые каналы.
Если в качестве источника антенны выбрать пункт Кабель, появится возможность дополнительного действия: настройки
N
значения для поиска цифровых каналов. Для получения дополнительных сведений выберите Канал → Автонастройка.
Поиск каналов начнется и закончится автоматически.
N
Нажмите кнопку ENTERE в любой момент времени, чтобы прервать процесс сохранения.
N
После сохранения всех доступных каналов на экране отобразится сообщение Режим установки времени.
N
. Нажмите кнопку ENTERE. С помощью кнопки ▲ или ▼ выберите пункт Авто, затем нажмите кнопку ENTERE.
Если выбрано значение Ручной, отобразится сообщение Установка времени и даты.
N
При приеме цифрового канала время будет установлено автоматически. Если время не будет установлено автоматически,
N
выберите Ручной для настройки часов. (См. стр. 19).
8. Отобразится метод подключения, обеспечивающий наилучшее качество отображения на экране высокой четкости. После
подтверждения метода нажмите кнопку ENTERE.
9. Появится сообщение Смотрите ТВ. После завершения процедуры нажмите кнопку ENTERE.
E
Вход
Сброс настроек этой функции
1. Для отображения меню нажмите кнопку MENU. С помощью кнопки ▲ или ▼ выберите пункт Установка, затем нажмите
кнопку ENTERE.
2. Нажмите кнопку ENTERE еще раз, чтобы выбрать пункт Plug & Play.
3. Введите 4-значный PIN-код. По умолчанию для телевизора используется PIN-код '0-0-0-0'.
Если требуется изменить PIN-код, используйте функцию Изменение PIN.
N
Функция Plug & Play доступна только в режиме просмотра телепрограмм.
N
(См. стр. 20).
Русский - 8
Page 39

Русский - 9
УПРАВЛЕНИЕ КАНАЛАМИ
Настройка меню каналов
¦
Страна
❑
Отобразится окно ввода PIN-кода. Введите 4-значный PIN-код.
N
Аналоговый канал
Изменение страны для приема аналоговых каналов.
Цифровой канал
Изменение страны для приема цифровых каналов.
Автонастройка
❑
Можно произвести поиск каналов в доступных частотных диапазонах (диапазоны
частот зависят от страны). Автоматически присвоенные номера программ могут не
соответствовать реальным или желаемым номерам программ.
Если канал заблокирован с помощью функции Замок, отобразится окно ввода PIN-кода.
N
Антенна / Кабель
Сигнал антенны для сохранения.
Цифровые и аналоговые: цифровые и аналоговые каналы.
●
Цифровые: цифровые каналы.
●
Аналоговые: аналоговые каналы.
●
При выборе меню Кабель → Цифровые и аналоговые или Кабель → Цифровые
Укажите значение для поиска кабельных каналов.
Режим поиска → Полный / Сеть / Быстрый
●
Быстрый
N
Network ID: отображение идентификатора сети.
–
Частота: отображение частоты канала. (Различаются в зависимости от страны.)
–
Модуляция: отображение доступных значений модуляции.
–
Скорость передачи: отображение допустимых значений скорости потока.
–
Сканирование всех каналов действующих телевизионных станций и сохранение их в памяти телевизора.
N
Если необходимо остановить выполнение функции Auto Store, нажмите кнопку
N
автонастройку? .
Выберите Да, нажав кнопку ◄ или ►, затем нажмите кнопку
ENTERE.
ENTERE. Отобразится сообщение Остановить
Канал
Страна ►
Автонастройка
Ручная настройка
Параметр поиска кабельной сети
Полн. руков.
Мини гид
Гид по умолч. : Полн. руков.
Ручная настройка
❑
Сканирование каналов вручную и сохранение их в памяти телевизора.
N
Если канал заблокирован с помощью функции Замок, отобразится окно ввода PIN-кода.
N
Цифровой канал
Сохранение цифровых каналов вручную.
Цифровой канал доступен только в режиме DTV.
N
Канал: установка номеров каналов с помощью кнопок ▲, ▼ или цифровых кнопок (0~9).
●
Частота: установка частоты с помощью цифровых кнопок.
●
Полоса пропуск.: установка полосы пропускания с помощью кнопок ▲, ▼ или цифровых кнопок (0~9).
●
После завершения этой процедуры список каналов обновляется.
N
Page 40

Аналоговый канал
Сохранение аналоговых каналов вручную.
Программа (номер программы, присвоенный каналу): установка номера программы с помощью кнопок ▲, ▼ или
●
цифровых кнопок (0~9).
Система цвета → Авто / PAL / SECAM / NTSC4.43: установка значений цветовой системы системы с помощью
●
помощью кнопки ▲ или ▼.
Система звука → BG / DK / I / L: установка значений звуковой системы с помощью кнопки ▲ или ▼.
●
Канал (если номер сохраняемого канала известен): нажмите кнопку ▲ или ▼ для выбора C (канал с антенны) или S
●
(кабельный канал). Нажмите кнопку ►, затем с помощью кнопки ▲, ▼ или цифровых кнопок (0~9) выберите желаемый
номер.
Также можно выбрать номер канала напрямую, нажимая цифровые кнопки (0~9).
N
Если слышен странный звук или звук не слышен вообще, еще раз выберите стандарт звука.
N
Поиск (если номера каналов неизвестны): Чтобы начать поиск, нажмите кнопку ▲ или ▼. Тюнер будет вести поиск в
●
диапазоне частот, пока изображение первого канала или выбранного канала не отобразится на экране.
Сохранить (при сохранении канала и соответствующего номера программы): Выберите OK, нажав кнопку
●
Режимы каналов
N
P (Режим программы): По окончании настройки всем станциям телевещания в регионе присваиваются номера
–
программ от P00 до P99. В этом режиме можно выбрать канал, введя присвоенный ему номер программы.
C (Режим каналов с антенны): В этом режиме можно выбрать канал посредством ввода номера, присвоенного для
–
конкретной станции.
S (Режим кабельных каналов): В этом режиме можно выбрать канал, введя номер, присвоенный каналу
–
кабельного телевидения.
Параметр поиска в кабельной сети (в зависимости от страны)
❑
Задание дополнительных параметров поиска, таких как частота и скорость передачи символов для поиска кабельной сети.
Частота (начальная ~ конечная): отображение частоты канала.
●
Модуляция: отображение доступных значений модуляции.
●
Скорость передачи: отображение допустимых значений скорости потока.
●
Текущие и следующие / Полн. руков.
❑
Данные справочника по программам (EPG) представляются вещательными компаниями. В зависимости от передаваемой
информации по определенному каналу могут отображаться устаревшие сведения по программам или совсем не
отображаться. Данные на экране обновляются автоматически при появлении новой информации.
Для получения подробных сведений об использовании Полн. руков. и Текущие и следующие см. описание на стр. 11.
N
Для отображения меню гида можно также нажать кнопку GUIDE. (Чтобы настроить Гид по умолч., см. описание.)
N
Текущие и следующие
Для шести каналов, указанных в левом столбце, отображается информация о текущих и следующих программах.
Полн. руков.
Отображение информации о программах передач в ближайший час. Можно настроить отображение сведений о
программах в ближайшие два часа. Для просмотра информации можно выполнять прокрутку вперед и назад.
ENTERE.
Гид по умолч. → Текущие и следующие / Полн. руков.
❑
Пользователь может выбрать, какой вариант документа: Текущие и следующие или Полн. руков. будет отображаться при
нажатии кнопки GUIDE на пульте дистанционного управления.
Список каналов
❑
Для получения подробных сведений об использовании меню Список каналов см. инструкции раздела ‘Управление
каналами’.
Эти параметры можно также установить, нажав кнопку CH LIST на пульте дистанционного управления.
O
Режимы каналов
❑
С помощью кнопок P >/< можно переключать каналы, сохраненные в выбранном списке каналов.
Добавл.каналы
Переключение каналов, сохраненных в списке каналов.
Любимые каналы
Переключение каналов, сохраненных в списке избранных каналов.
Точная настройка
❑
Если принимается четкий сигнал без помех, то нет необходимости производить точную настройку, т.к. это уже было
выполнено автоматически во время поиска и сохранения каналов. Если сигнал слабый или искаженный, то можно
выполнить точную настройку на принимаемый сигнал канала вручную.
В строке канала справа от номера сохраненного канала, настроенного с помощью функции точной настройки, появится звездочка '*'.
N
Чтобы сбросить точную настройку, выберите пункт Сброс, нажав кнопку ▲ или ▼, а затем кнопку ENTERE.
N
Точную настройку можно производить только для аналоговых каналов.
N
Русский - 10
Page 41

Русский - 11
Использование полного руководства/мини-руководства
Текущие и следующие
1 f tn
2 ITV Play
3 Kerrang!
4 Kiss
5 oneword
6 Smash Hits!
▼
DTV Кабель 900 f tn 2:10 Tue 1 Jun
Freshmen On Campus
2:00 - 2:30
Нет подробной информации
Street Hypn..
Mint Extra
Loaded
Fresh 40 with Dynamite MC
The Distillery
Smash Hits! Sunday
Часы Информация
Текущая Следующая
Нет информации
Нет информации
Kisstory
Нет информации
◄◄ ►►
Страница ■ Полн. руков. ■ Выход
Полн. руков.
1 f tn
2 ITV Play
3 Kerrang!
4 Kiss
5 oneword
6 Smash Hits!
▼
Часы Информация ◄◄ ►► Страница ◄◄ ►► Страница ■ Текущая/Следующая ■ +24 часачаса ■ Выход
DTV Кабель 900 f tn 2:10 Tue 1 Jun
Freshmen On Campus
2:00 - 2:30
Нет подробной информации
Сегодня 2:00 - 3:00 3:00 - 4:00
Freshmen O..
Mint Extra
Loaded
Fresh 40 with Dynamite MC
The Distillery
Smash Hits! Sunday
Нет информации
Требуемая операция... Необходимые действия...
Просмотр программы из списка EPG Выберите программу, нажав кнопку ▲, ▼, ◄, ►.
Закрытие окна гида Нажмите синюю кнопку
Если выбрать следующую программу, она будет включена в расписание, и появится значок часов. При повторном
нажатии кнопки ENTERE нажмите кнопку ◄, ► для выбора функции отмены программирования каналов;
программирование будет отключено, значок часов исчезнет.
Просмотр информации о программе
Выберите нужную программу, нажав кнопку ▲, ▼, ◄, ►.
Выделив нужную программу, нажмите кнопку INFO.
Название программы отображается в верхней части экрана по центру.
Для получения подробной информации нажмите кнопку INFO. Доступна подробная информация о следующих функциях:
номер канала, время работы, строка состояния, уровень родительского ограничения, качество видео (HD/SD), режимы
звука, субтитры или телетекст, языки субтитров или телетекста, краткое описание выделенной программы. “...”
отображается, если описание слишком длинное.
Переключение между режимами отображения
Несколько раз нажмите красную кнопку.
программы передач Текущие и следующие и
Полн. руков.
В режиме полного руководства:
быстрая прокрутка назад (24 часа)
быстрая прокрутка вперед (24 часа)
Управление каналами
¦
Несколько раз нажмите зеленую кнопку.
Несколько раз нажмите желтую кнопку.
С помощью данного меню можно добавлять/удалять или выбирать избранные каналы, а также использовать руководство
по программам цифрового телевещания.
Все каналы
Отображение всех доступных каналов.
Добавленные каналы
Отображение всех добавленных каналов.
Избранные
Отображение всех избранных каналов.
Для выбора каналов, определенных как избранные, используйте кнопку FAV.CH на пульте
O
дистанционного управления.
Запрограммированный
824 UKTV Gold
Добавленные каналы
825 UKTV style
1 C --
A
A
2 C --
A
3 ♥ C --
A
4 C --
A
5 C --
A
6 C --
A
7 C --
Все
■ Тип канала ■ Увел. ■ Выбрать T Инструменты
Отображение всех сохраненных программ.
Выберите канал на экране Все каналы, Добавленные каналы или Избранные с помощью кнопок ▲ / ▼ и нажмите кнопку
N
ENTERE. После этого можно смотреть выбранный канал.
Использование цветных кнопок со списком каналов
N
Красная (Тип канала): переключение между элементами ТВ, Радио, Данные/ДР. и Все
–
Зеленая (Увел.): увеличение или уменьшение шрифта.
–
Желтая (Выбрать): выбор нескольких списков каналов. Можно Добавить / Удалить, Добавить к избранному /
–
Удалить из избранного или Блокировка / Разблокировка несколько каналов одновременно. Выберите нужные
каналы и нажмите желтую кнопку, чтобы настроить выбранные каналы одновременно. Слева от выбранных
каналов отобразится метка c.
TOOLS (Инструменты): отображение меню Удалить (или Добавить), Добавить к избранному (или Удалить
–
из избранного), Блокировка (или Разблокировка), Просмотр по таймеру, Изменить название канала,
Сортировка, Изменение номера канала, Выбрать все (или Отменить все), Автонастройка. (Меню параметров
может отличаться в зависимости от ситуации.)
Page 42

Отображаемые значки состояния каналов
N
A
: аналоговый канал.
●
c
: канал, выбранный с помощью нажатия желтой кнопки.
●
*
: избранный канал.
●
(
: принимаемая в текущий момент программа.
●
\
: заблокированный канал.
●
)
: сохраненная программа.
●
Меню параметров списка каналов (в меню Все каналы / Добавленные каналы / Избранные)
Нажмите кнопку TOOLS, чтобы открыть меню параметров.
N
Элементы меню параметров могут отличаться в зависимости от состояния каналов.
N
Добавить / Удалить
Можно удалять или добавлять каналы в список для отображения желаемых каналов.
Все удаленные каналы можно найти в меню Все каналы.
N
Каналы, выделенные серым цветом, удалены.
N
Для удаленных каналов отображается только меню Добавить.
N
Таким же образом можно удалить канал из меню Добавленные каналы или Избранные.
N
Добавить к избранному / Удалить из избранного
Часто просматриваемые каналы можно обозначить как избранные.
Нажмите кнопку TOOLS для отображения меню Инструменты. Можно также задать
T
добавление или удаление из списка избранных каналов, выбрав Инструменты → Добавить к
избранному (или Удалить из избранного).
Отобразится символ '*', и канал будет добавлен в список избранных.
N
Все избранные каналы будут добавлены в меню Избранные.
N
Просмотр по таймеру
Если вы сохранили программу, которую хотите посмотреть, телевизор автоматически переключится на канал сохраненной
программы, содержащийся в списке каналов, даже если вы в текущий момент смотрите другой канал. Для сохранения
программы сначала необходимо установить текущее время (см. стр. 19).
Можно сохранять программы, транслируемые только на сохраненных в памяти телевизора каналах.
N
Можно установить канал, день, месяц, год, часы и минуты непосредственно с помощью цифровых кнопок на пульте дистанционного
N
управления.
Сохраненные программы будут отображаться в меню Запрограммированный.
N
Гид для программ цифровых каналов и сохранение программ для просмотра
N
При просмотре цифрового канала нажмите кнопку ►, чтобы на экране отобразилось окно гида по программам канала.
Можно сохранить программу в соответствии с процедурами, описанными выше.
Изменить название канала (только для аналоговых каналов)
Можно присваивать каналам имена, которые отображаются на экране при каждом выборе канала.
Имена для цифровых каналов присваиваются автоматически, их нельзя изменять.
N
Изменение номера канала (только для цифровых каналов)
Также можно изменять номера каналов с помощью цифровых кнопок на пульте дистанционного управления.
Сортировка (только для аналоговых каналов)
Эта функция позволяет изменять номера программ сохраненных каналов. Использование этой функции может быть
необходимым после выполнения процедуры автоматического сохранения каналов.
Блокировка / Разблокировка
Можно заблокировать канал, при этом его нельзя будет выбрать и смотреть. Эта функция доступна, только если для
параметра Замок установлено значение Вкл. (См. стр. 20).
Отобразится окно ввода PIN-кода. Введите 4-значный PIN-код.
N
По умолчанию на новом телевизоре установлен PIN-код '0-0-0-0'. Можно изменить PIN-код, выбрав в меню пункт Изменение PIN.
N
Для заблокированного канала будет отображаться символ '\'.
N
Выбрать все / Отменить все
Выбрать все: выбор всех каналов в списке каналов.
●
Отменить все: отмена выбора всех выбранных каналов в списке.
●
Функцию Отменить все можно выбрать, только когда выбран канал.
N
Автонастройка
Для получения дополнительной информации о настройке параметров см. стр. 9.
N
Если канал заблокирован с помощью функции Замок, отобразится окно ввода PIN-кода.
N
824 UKTV Gold
Добавленные каналы
825 UKTV style
1 C --
A
A
2 C --
A
3 ♥ C --
A
4 C --
A
5 C --
A
6 C --
A
7 C --
Все
■ Тип канала ■ Увел. ■ Выбрать T Инструменты
Удалить
Добавить к избранному
Просмотр по таймеру
Изменить название
канала
Сортировка
Блокировка
▼
Русский - 12
Page 43

Русский - 13
Меню параметров списка каналов (в меню “Запрограммированный”)
Можно просматривать, изменять или удалять сохраненные программы.
Нажмите кнопку TOOLS, чтобы открыть меню параметров.
N
Изменение информации
Изменение сохраненных для просмотра программ.
Отмена расписаний
Отмена выбранных для просмотра программ.
Информация
Просмотр выбранных программ. (Также можно изменить сведения о сохраненной для
просмотра программы.)
Выбрать все
Выбор всех сохраненных для просмотра программ.
УПРАВЛЕНИЕ ИЗОБРАЖЕНИЯМИ
Настройка меню изображений
¦
Режим
❑
Можно выбрать тип изображения для просмотра каналов, который максимально
соответствует вкусам пользователя.
Нажмите кнопку TOOLS для отображения меню Инструменты. Режим отображения можно
T
также задать, выбрав Инструменты → Реж. изображения.
Динамический
Выбор изображения высокой четкости для просмотра в комнате с ярким освещением.
Стандартный
Выбор изображения для оптимального отображения в нормальных условиях.
Кино
Выбор изображения для просмотра фильмов в темной комнате.
Запрограммированный
1 / 1 / 2009
13:59 5 TV1 Quincy, M.E
18:59 2 TV3 The Equalizer
20:59 2 TV3 McMillan & Wife
Все ■ Увел. ■ Выбрать T Инструменты E Информация
Изображение
Режим : Стандартный ►
Подсветка : 7
Контраст : 95
Яркость : 45
Четкость : 50
Цвет : 50
Тон (З/К) : З50 / К50
Изменение информации
Отмена расписаний
Информация
Выбрать все
Подсветка / Контраст / Яркость / Четкость / Цвет / Тон(З/К)
❑
Несколько регулируемых параметров телевизора позволяют пользователю настроить качество изображения.
Подсветка: регулировка яркости подсветки ЖК-экрана.
●
Контраст: регулировка контрастности изображения.
●
Яркость: регулировка яркости изображения.
●
Четкость: регулировка резкости края изображения.
●
Цвет: регулировка насыщенности цвета изображения.
●
Тон(З/К): регулировка оттенков изображения.
●
Сначала нужно выбрать режим изображения для регулировки. Отрегулированные значения будут сохранены для каждого режима
N
изображения.
При изменении параметра Подсветка, Контраст, Яркость, Четкость, Цвет или Тон(З/К) экранное меню будет изменяться
N
соответственно.
В режимах ТВ, Внешний, AV в системе PAL функция Тон(З/К) не доступна.
N
В режиме ПК можно изменять только значения параметров Подсветка, Контраст и Яркость.
N
Можно изменять и сохранять настройки для каждого внешнего устройства, подключенного к входу телевизора.
N
Потребление энергии во время работы устройства можно существенно уменьшить, если уменьшить уровень яркости изображения.
N
Это приведет к уменьшению общих эксплуатационных затрат.
Дополнительные параметры
❑
Новые телевизоры Samsung позволяют делать более точные настройки изображения,
чем в моделях, выпускавшихся ранее. Для выполнения более точных настроек
изображения см. описание ниже.
Дополнительные параметры доступно в режиме Стандартный или Кино.
N
В режиме ПК в меню Дополнительные параметры можно изменять только параметры Гамма
N
Цвет : 50
Тон (З/К) : З50 / К50
Изображение
Дополнительные параметры ►
Параметры изображения
Сброс настроек изображения
и Баланс белого.
Черный тон → Выкл. / Темный / Темнее / Самый темный
Для настройки глубины экрана можно выбрать желаемый уровень черного.
Page 44

Автоконтраст → Выкл. / Низкий / Средний / Высокий
Можно настроить оптимальную контрастность экрана.
Гамма
Можно отрегулировать интенсивность главных цветов (красный, зеленый, синий).
Цвет. интервал
Цветовое пространство – это цветовая матрица, состоящая из красного, зеленого и синего цветов. Выберите
предпочитаемое цветовое пространство, чтобы цвета отображались наиболее естественно.
Исходный: в режиме исходного цветового пространства обеспечивается глубина и насыщенность цветов.
●
Авто: автоматическая настройка цветового пространства позволяет установить наиболее естественное отображение
●
цветовых оттенков на основе источников программы.
Баланс белого
Можно отрегулировать цветовую температуру для более естественного отображения цветов.
К: смещ. / З: смещ. / С: смещ. / К: усил. / З: усил. / С: усил.: Можно настроить цветовую «температуру» светлых
●
областей, изменив значения R, G, B. Рекомендуется использовать только опытным пользователям.
Сброс: ранее настроенные установки баланса белого будут заменены на установки по умолчанию.
●
Телесн. оттенок
Можно выделить розовый оттенок изображения.
При изменении значения регулировки изображение на экране будет обновлено.
N
Улучшение кромок → Выкл. / Вкл.
Можно выделить границы объекта на изображении.
Параметры изображения
❑
В режиме ПК можно изменять только параметры Оттенок и Размер в меню Параметры изображения.
N
Оттенок → Хол. / Норм. / Теплый1 / Теплый2
Можно выбрать оттенок, наилучшим образом отвечающий предпочтениям пользователя.
Можно изменять и сохранять настройки для каждого внешнего устройства, подключенного к входу телевизора.
N
Теплый1 или Теплый2 активен, только если в качестве режима изображения выбран режим Кино.
N
Размер
Можно выбрать размер изображения, который максимально соответствует предпочтениям просмотра.
Нажмите кнопку TOOLS для отображения меню Инструменты. Размер можно также установить, выбрав Инструменты → Разм.
T
изображения.
Широкий aвто: автоматическая настройка размера изображения в формате 16:9.
●
16:9: Настройка размера изображения в формате 16:9, походит для DVD или широковещательной трансляции.
●
Ш/экр.увл: увеличение формата изображения более чем 4:3.
●
Увел.: увеличение изображения в формате 16:9 (в вертикальном направлении) по размеру экрана.
●
4:3: это настройка по умолчанию для режима видео или обычного телевещания.
●
По разм. экрана: используйте эту функцию для просмотра полноразмерного изображения без обрезки при входных
●
сигналах HDMI (720p/1080i) или Component (1080i).
В зависимости от источника входного сигнала размер изображения может отличаться.
N
Набор доступных элементов зависит от того, какой режим выбран.
N
В режиме ПК можно настраивать только режимы 16:9 и 4:3.
N
Можно изменять и сохранять настройки для каждого внешнего устройства, подключенного к входу телевизора.
N
При просмотре статического изображения более двух часов может появляться временное остаточное изображение.
N
Ш/экр.увл: нажмите кнопку ► для выбора пункта Позиция, затем нажмите кнопку ENTERE. Нажмите кнопку ▲ или ▼ для
N
перемещения изображения вверх и вниз. Затем нажмите кнопку ENTERE.
Увел.: нажмите кнопку ► для выбора пункта Позиция, затем нажмите кнопку ENTERE. Нажмите кнопку ▲ или ▼ для
N
перемещения изображения вверх и вниз. Затем нажмите кнопку ENTERE. Нажмите кнопку ► для выбора пункта Размер, затем
нажмите кнопку ENTERE. Нажмите кнопку ▲ или ▼ для увеличения или уменьшения размера изображения по вертикали. Затем
нажмите кнопку ENTERE.
После выбора параметра По разм. экрана в режиме HDMI (1080i) или Component (1080i): выберите Позиция, нажав кнопку ◄ или
N
►. С помощью кнопок ▲, ▼, ◄ или ► переместите изображение.
Сброс: нажмите кнопку ◄ или ► для выбора пункта Сброс, затем нажмите кнопку ENTERE . Также можно
установить исходные значения.
При использовании функции По разм. экрана, когда выбран вход HDMI 720p, 1 строка будет обрезана сверху, снизу, слева и справа,
N
как при использовании функции нерабочей области.
Русский - 14
Page 45

Русский - 15
Режим экрана → 16:9 / Ш/экр.увл / Увел. / 4:3
При установке для размера изображения значения Широкий aвто в широкоэкранном режиме 16:9 можно задать размер
изображения, если необходим просмотр широкоформатного изображения 4:3, или не задавать его. Во всех странах
Европы требуются различные размеры изображений, поэтому предусмотрен выбор этой функции пользователем.
16:9: установка широкоэкранного формата изображения 16:9.
●
Ш/экр.увл: увеличение формата изображения более чем 4:3.
●
Увел.: увеличение размера изображения в вертикальном направлении.
●
4:3: установка обычного формата изображения 4:3.
●
Эта функция доступна в режиме Широкий aвто.
N
Эта функция недоступна в режиме PC, Component или HDMI.
N
Цифр. ш/под → Выкл. / Низкий / Средний / Высокий / Авто
Если телевизор принимает слабый сигнал, можно включить функцию цифрового подавления шумов, которая позволяет
снизить уровень радиопомех и устранить двоение изображения.
Если сигнал слабый, выберите другой параметр, чтобы улучшить изображение.
N
ЧерныйHDMI → Норм. / Низкий
Можно непосредственно выбрать уровень черного на экране, чтобы настроить глубину экрана.
Эта функция активна, только если источник внешнего сигнала подключается к HDMI (сигналы RGB).
N
Режим фильм → Выкл. / Авто
Можно выполнить настройку телевизора для автоматического распознавания и обработки видеосигналов со всех
источников и регулировки оптимального качества изображения.
Режим фильм поддерживается при выборе TV, AV, COMPONENT (480i/1080i) и HDMI (480i/1080i).
N
Сброс настроек изображения → Сброс настроек / Отмена
❑
Сброс всех параметров изображения до значений по умолчанию.
Выберите режим изображения для сброса. Функция сброса будет выполнена для каждого режима изображения.
N
Сброс настроек: будут восстановлены значения по умолчанию для текущих параметров изображения.
●
Использование телевизора в качестве экрана компьютера
¦
Установка программного обеспечения компьютера (на основе Windows XP)
Параметры экрана Windows для обычного компьютера приведены ниже. В зависимости от установленной версии
Windows и видеокарты изображение на экране компьютера может выглядеть иначе. Однако даже если экран выглядит
иначе, основные инструкции по настройке параметров экрана применимы почти во всех случаях. (В противном случае,
обратитесь к производителю компьютера или дилеру компании Samsung).
1. Сначала выберите ‘Панель управления’ в меню ‘Пуск’ Windows.
2. В открывшемся окне ‘Панель управления’ выберите ‘Оформление и темы’, чтобы открыть диалоговое окно.
3. В открывшемся окне ‘Панель управления’ выберите ‘Экран’, чтобы открыть диалоговое окно.
4. В диалоговом окне ‘Экран’ перейдите на вкладку ‘Параметры’.
Настройка размера (разрешение) - оптимальный размер 1360 х 768 пикселей
Если в диалоговом окне параметров экрана есть параметр частоты вертикальной развертки, то правильным
значением будет «60» или «60 Гц». В проитвном случае нажмите кнопку ‘OK’ и закройте диалоговое окно.
Page 46

Режимы экрана
Положение изображения и его размер могут изменяться в зависимости от выбранного типа монитора компьютера и его
разрешения. Рекомендуются разрешения, указанные в таблице.
Вход D-Sub и HDMI/DVI
Режим Разрешение
Частота горизонтальной
развертки (кГц)
Частота вертикальной
развертки
(Гц)
Частота синхронизации пикселей
(МГц)
IBM 640 x 350 31,469 70,086 25,175 +/-
720 x 400 31,469 70,087 28,322 -/+
MAC 640 x 480 35,000 66,667 30,240 -/-
832 x 624 49,726 74,551 57,284 -/-
VESA CVT 720 x 576 35,910 59,950 32,750 -/+
1280 x 720 44,772 59,855 74,500 -/+
1280 x 720 56,456 74,777 95,750 -/+
VESA DMT 640 x 480 31,469 59,940 25,175 -/-
640 x 480 37,500 75,000 31,500 -/640 x 480 37,861 72,809 31,500 -/800 x 600 37,879 60,317 40,000 +/+
800 x 600 46,875 75,000 49,500 +/+
800 x 600 48,077 72,188 50,000 +/+
1024 x 768 48,363 60,004 65,000 -/1024 x 768 56,476 70,069 75,000 -/1024 x 768 60,023 75,029 78,750 +/+
1360 x 768 47,712 60,015 85,500 +/+
VESA GTF 1280 x 720 52,500 70,000 89,040 -/+
При использовании кабеля HDMI/DVI подключение следует выполнять через гнездо HDMI IN 1 (DVI).
N
Режим чересстрочной развертки не поддерживается.
N
При выборе нестандартного видеоформата устройство может работать неправильно.
N
Поддерживаются режимы раздельной и композитной синхронизации. Режим SOG не поддерживается.
N
Полярность
синхронизации
(Г/В)
Настройка подключения телевизора к компьютеру
¦
Предварительная настройка: для выбора режима ПК нажмите кнопку SOURCE.
N
Автоподстройка
❑
Функция автоподстройки обеспечивает выполнение экраном телевизора самостоятельной
регулировки входящего видеосигнала с компьютера. Настройка параметров грубой
и точной настройки, а также настройка положения изображения производится
автоматически.
Эта функция не работает в режиме DVI-HDMI.
N
Нажмите кнопку TOOLS для отображения меню Инструменты. Можно также установить
T
функцию автоподстройки, выбрав Инструменты → Автоподстройка.
Экран
❑
Грубо / Точно
Яркость : 45
Четкость : 50
Изображение
Автоподстройка ►
Экран
Дополнительные параметры
Параметры изображения
Сброс настроек изображения
С помощью функции настройки качества изображения можно снизить уровень помех в изображении или избавиться от
них полностью. Если уровень помех не удалось снизить с помощью функции точной настройки, настройте частоты как
можно лучше в грубом режиме, а затем повторите точную настройку. После того, как уровень помех был снижен, настройте
изображение таким образом, чтобы оно располагалось по центру экрана.
Положение ПК
Настройте положение экрана компьютера, если оно не умещается на экране телевизора. Для настройки вертикального
положения используйте кнопку ▲ или ▼. Для настройки горизонтального положения используйте кнопку ◄ или ►.
Сброс настр.
Можно восстановить значения параметров изображения, установленные изготовителем.
Русский - 16
Page 47

Русский - 1
УПРАВЛЕНИЕ ЗВУКОМ
Настройка меню звука
¦
Режим → Стандартный / Музыка / Кино / Четкий голос / Польз.
❑
Можно выбрать режим звука в соответствии со своими предпочтениями.
Нажмите кнопку TOOLS для отображения меню Инструменты. Можно также выполнить
T
настройку режима звука, выбрав Инструменты → Режим звука.
Стандартный
Выбор обычного режима звука.
Музыка
Усиление музыки по сравнению со звуком голоса.
Кино
Обеспечение наивысшего качества звучания при просмотре фильмов.
Четкий голос
Усиление звука голоса по сравнению с другими звуками.
Польз.
Восстановление пользовательских настроек звука.
Эквалайзер
❑
Можно настроить параметры звука в соответствии со своими предпочтениями.
Режим
Можно выбрать режим звука в соответствии со своими предпочтениями.
Баланс
Регулировка баланса между правым и левым громкоговорителями.
100Гц / 300Гц / 1кГц / 3кГц / 10кГц (регулировка полосы пропускания)
Служит для регулировки уровня звука в разных частотных диапазонах.
Сброс
Сброс настроек эквалайзера до значений по умолчанию.
Звук
Режим : Польз. ►
Эквалайзер
SRS TruSurround HD : Выкл.
Язык аудио : - - -
Аудиоформат : - - -
Описание аудио
Громкость авто : Выкл.
SRS TruSurround HD → Выкл. / Вкл.
❑
SRS TruSurround HD является запатентованной технологией SRS, которая позволяет воспроизводить звук многоканального
(5.1) телевидения через два громкоговорителя. Функция TruSurround обеспечивает воспроизведение захватывающего
виртуального объемного звучания через систему с двумя громкоговорителями, включая встроенные громкоговорители
телевизора. Функция работает со всеми многоканальными форматами.
Нажмите кнопку TOOLS для отображения меню Инструменты. Можно также установить функцию SRS TruSurround HD, выбрав
T
Инструменты → SRS TS HD.
Язык аудио (только для цифровых каналов)
❑
Можно изменить установленный по умолчанию язык аудио. Отображение сведений о языке входящего потока.
Можно выбрать язык только среди языков, на которых транслируются программы.
N
Аудиоформат → MPEG / Dolby Digital (только для цифровых каналов)
❑
При выводе звука через главный громкоговоритель и аудиоресивер может возникать эффект эха из-за различий в скорости
декодирования этих устройств. В этом случае используйте функцию громкоговорителя телевизора.
Появится аудиоформат в соответствии с транслируемым сигналом.
N
Page 48

Описание аудио (только для цифровых каналов)
❑
Это вспомогательная функция аудио, которая обеспечивает дополнительную аудиодорожку для людей с ослабленным
зрением. Эта функция обрабатывает аудиопоток для AD (описание аудио), когда он отправляется вещательной компанией
вместе с основным аудио. Пользователи могут включить или выключить описание аудио и регулировать громкость.
Описание аудио → Выкл. / Вкл.
Используется для включения/выключения функции описания аудио.
Громкость
Можно настроить громкость описания аудио.
Громкость активен, если для параметра Описание аудио установлено значение Вкл..
N
Громкость авто → Выкл. / Вкл.
❑
Звук, транслируемый разными телевизионными станциями, имеет различные характеристики. По этой причине при каждом
переключении канала приходится регулировать громкость, что не очень удобно. Данная функция позволяет выполнять
автоматическое регулирование громкости звука канала, уменьшая ее в случае сильного модуляционного сигнала и
увеличивая, если модуляционный сигнал слишком слабый.
Функция Громкость авто недоступна в режиме Компонент и HDMI.
N
Выбрать громкогов. → Внешний / Громкогов. ТВ
❑
В случае необходимости прослушивать звук через внешние громкоговорители отключите внутренний усилитель.
Кнопка регулировки громкости и кнопка MUTE не работают, если для параметра Выбрать громкогов. установлено значение
N
Внешний.
Если выбран параметр Внешний в меню Выбрать громкогов., настройки звука будут ограничены.
N
Сброс звука → Для всех режимов / Для текущего режима / Отмена
❑
Можно восстановить заводские настройки по умолчанию для параметров звука.
Выбор режима звука
¦
Режим звука можно настроить в меню Инструменты. При выборе параметра Двойной l ll на экране отобразится текущий
режим звука.
Тип звука Двойной 1/2 По умолчанию
Моно МОНО
A2 стерео
NICAM стерео
Если стереосигнал слишком слабый и происходит автоматическое переключение режимов, выберите режим “Моно”.
N
Эта функция активизируется только для стереосигнала. При монофоническом сигнале она отключается.
N
Эта функция доступна только в режиме телевизора.
N
Стерео СТЕРЕО ↔ МОНО
Двойной ДВОЙНОЙ 1 ↔ ДВОЙНОЙ 2 ДВОЙНОЙ 1
Моно МОНО
Стерео МОНО ↔ СТЕРЕО
Двойной
МОНО ↔ ДВОЙНОЙ 1
ДВОЙНОЙ 2
Автоматическое изменение
Автоматическое изменение
ДВОЙНОЙ 1
Русский - 18
Page 49

Русский - 19
УСТАНОВКА
Меню настройки
¦
Язык
❑
Можно установить язык меню.
Время
❑
Часы
Для использования различных функций таймера в телевизоре необходима установка
часов.
Текущее время будет отображаться каждый раз при нажатии кнопки INFO.
N
После отключения кабеля питания часы потребуется установить заново.
N
Режим часов
●
Можно установить текущее время вручную или автоматически.
Авто: установка текущего времени автоматически с использованием значения
–
времени в цифровом вещании.
Ручной: установка текущего времени вручную.
–
В зависимости от телевизионной станции и сигнала автоматическое время может быть
N
установлено неверно. В этом случае установите время вручную.
Для автоматической установки времени необходимо подключить антенну или кабель.
N
Установка часов
●
Можно установить текущее время вручную.
Выполните настройку данной функции, установив для параметра Режим часов значение Ручной.
N
Можно установить день, месяц, год, час и минуту с помощью цифровых кнопок на пульте дистанционного управления.
N
Таймер сна → Выкл. / 30 мин / 60 мин / 90 мин / 120 мин / 150 мин / 180 мин
Таймер сна автоматически выключает телевизор после определенного времени (30, 60, 90, 120, 150 и 180 минут).
Телевизор автоматически переключится в режим ожидания, как только выбранный интервал времени истечет.
N
Для отмены функции Таймер сна выберите значение Выкл..
N
Нажмите кнопку TOOLS для отображения меню Инструменты. Можно также установить функцию таймера сна, выбрав
T
Инструменты → Таймер сна.
Таймер 1 / Таймер 2 / Таймер 3
Можно выполнить три различные настройки включения/отключения таймера. Сначала необходимо установить часы.
Время вкл.: установка часов, минут и включение/отключение. (Чтобы включить таймер с выбранными параметрами,
●
задайте значение Включить.)
Время выкл.: установка часов, минут и включение/отключение. (Чтобы включить таймер с выбранными параметрами,
●
задайте значение Включить.)
Громкость: выбор нужного уровня громкости включения.
●
Антенна: выберите Антенна или Кабель.
●
Канал: выбор необходимого канала.
●
Повтор: выберите Один раз, Ежедневно, Пн~Пт, Пн~Сб, Сб~Вс или Ручной.
●
Если выбран параметр Ручной, нажмите кнопку ► для выбора необходимого дня недели. Нажмите кнопку ENTERE, наведя
N
курсор на нужный день, после чего отобразится значок c.
Можно также установить значение времени (часы и минуты) и канал с помощью цифровых кнопок на пульте дистанционного
N
управления.
Автоматическое выключение питания
N
Когда включен таймер, телевизор выключится автоматически, если в течение 3 часов с момента включения
телевизора таймером не было выполнено ни одной команды. Данная функция применяется, только когда таймер
включен. Она предотвращает возможный перегрев телевизора при его продолжительной работе.
Plug & Play
Установка
Язык : Русский ►
Время
Игровой режим : Выкл.
Замок : Вкл.
Изменение PIN
Родит. блокировка
Субтитры
Субтитры
Язык телетекста : - - -
Установка
Предпочтение ►
Цифровой текст : Включить
Мелодия : Средний
Экон. энергии : Выкл.
Общий интерфейc
Игровой режим → Выкл / Вкл.
❑
При подключении игровой консоли, например PlayStation™ или Xbox™, можно выбрать меню игры для получения более
реалистичных эффектов.
Чтобы отсоединить игровую консоль и подключить другое внешнее устройство, отключите игровой режим в меню настройки. При
N
отображении меню TV в режиме Игровой режим изображение слегка подрагивает на экране.
Игровой режим недоступен в обычном режиме ТВ и ПК.
N
Если Игровой режим включен:
N
Для режима изображения автоматически устанавливается значение Стандартный, и пользователи не смогут изменить режим.
–
Для режима звука автоматически устанавливается значение Польз., и пользователи не смогут изменить режим. Отрегулируйте
–
звук с помощью эквалайзера.
Включится функция сброса звука. Если после установки эквалайзера будет выбрана функция Сброс, то для эквалайзера будут восстановлены
–
заводские настройки.
Page 50

Замок → Выкл. / Вкл.
❑
С помощью этой функции можно ограничить доступ определенных пользователей (например, детей) к неподходящим
программам посредством отключение звука и изображения.
Перед отображением экрана настройки появится экран для ввода PIN-кода. Введите 4-значный PIN-код.
N
По умолчанию на новом телевизоре установлен PIN-код “0-0-0-0”. Можно изменить PIN-код, выбрав в меню пункт Изменение PIN.
N
Некоторые каналы из списка каналов можно заблокировать. (См. стр. 12).
N
Функция Замок доступна только в режиме телевизора.
N
Изменение PIN
❑
Можно изменить персональный идентификационный номер, необходимый для установки телевизора.
Перед отображением экрана настройки появится экран для ввода PIN-кода. Введите 4-значный PIN-код.
N
По умолчанию на новом телевизоре установлен PIN-код “0-0-0-0”.
N
Если вы забыли PIN-код, нажимайте кнопки пульта дистанционного управления в следующей последовательности для возвращения
N
значения по умолчанию – 0-0-0-0: POWER (Выкл.)
Родит. блокировка
❑
С помощью этой функции можно ограничить доступ определенных пользователей (например, детей) к неподходящим
программам с помощью 4-значного PIN-кода, определенного пользователем.
Настройки параметра Родит. ограничения зависят от страны, в которой используется устройство.
N
Перед отображением экрана настройки появится экран для ввода PIN-кода. Введите 4-значный PIN-код.
N
По умолчанию на новом телевизоре установлен PIN-код '0-0-0-0'. Можно изменить PIN-код, выбрав в меню пункт Изменение PIN.
N
После установки родительских оценок отобразится символ \.
N
Разр. все: нажмите, чтобы снять блокировку всех оценок ТВ.
N
Блок.все: нажмите, чтобы заблокировать все оценки ТВ.
Субтитры
❑
Субтитры можно включать и отключать. Это меню используется для настройки режима субтитров. Норм. в этом меню
соответствуют обычным субтитрам, а Расстр. слуха – субтитрам для людей с ослабленным слухом.
Субтитры → Выкл. / Вкл. : используется для включения или выключения субтитров.
●
Режим → Норм. / Расстр. слуха: используется для установки режима субтитров.
●
Язык субтитров: используется для установки языка субтитров.
●
Если просматриваемая программа не поддерживает функцию Расстр. слуха, автоматически будет выбран режим Норм., даже
N
если ранее был выбран режим Расстр. слуха.
Если выбранный язык не транслируется, по умолчанию устанавливается английский язык.
N
Эти параметры можно также установить, нажав кнопку SUBT на пульте дистанционного управления.
O
→
MUTE
→ 8 → 2 → 4 →
POWER (Вкл.).
Язык телетекста
❑
Можно установить язык телетекста, выбрав тип языка.
Если выбранный язык не транслируется, по умолчанию устанавливается английский язык.
N
Предпочтение
❑
Основной язык аудио / Язык дополнительного аудио / Первичный язык субтитров / Вторичный язык субтитров /
Основной язык телетекста / Дополнительный язык телетекста
Используя эту функцию, пользователи могут выбрать один из языков. Выбранный язык используется по умолчанию, когда
пользователь выбирает канал.
Если изменить настройку языка, то параметры Язык субтитров, Язык аудио и Язык телетекста меню Язык автоматически
изменятся на выбранный язык.
В подменю Язык субтитров, Язык субтитров и Язык телетекста в меню Язык отображается список языков, которые
поддерживаются на текущем канале, а выбранные языки выделены цветом. При изменении этого параметра языка новый
вариант действителен только для текущего канала. Измененный параметр не используется в подменю Первичный язык
субтитров, Основной язык аудио или Основной язык телетекста меню Предпочтение.
Цифровой текст → Отключить / Включить (только для Великобритании)
❑
Эта функция включается, если программа передается с цифровым текстом.
MHEG (Multimedia and Hypermedia Information Coding Experts Group)
N
международный стандарт для систем кодирования данных, который используется для мультимедиа и гипермедиа.
Это система более высокого уровня, чем MPEG и включает гипермедиа связанных данных, например неподвижные
изображения, службу символов, анимацию, графические и видеофайлы, а также данные мультимедиа. MHEG – это
технология интерактивной работы пользователя в реальном времени. Она применяется в различных областях,
включая функции VOD (видео по запросу), ITV (интерактивное ТВ), EC (электронная коммерция), телеобучение,
телеконференции, цифровые библиотеки и сетевые игры.
Русский - 20
Page 51

Русский - 21
Мелодия → Выкл. / Низкий / Средний / Высокий
❑
Можно установить мелодию, которая будет воспроизводиться при включении или выключении телевизора.
Мелодия не воспроизводится
N
Когда звук не воспроизводится на телевизоре, поскольку нажата кнопка MUTE.
–
Когда звук не воспроизводится на телевизоре, поскольку нажата кнопка (–) регулировки громкости.
–
Когда телевизор выключается с помощью функции таймера.
–
Экон. энергии → Выкл. / Низкий / Средний / Высокий / Авто
❑
С помощью этой функции настраивается яркость телевизора для снижения потребления энергии. При просмотре
телевизора в ночное время установите для режима Экон. энергии значение Высокий, чтобы снизить утомляемость глаз,
а также уменьшить потребление энергии.
Нажмите кнопку TOOLS для отображения меню Инструменты. Параметр Экон. энергии можно также установить, выбрав
T
Инструменты → Экон. энергии.
Общий интерфейc
❑
Меню CI
Эта функция позволяет пользователям выбрать параметры в меню модуля CAM. Выберите пункт Меню CI в меню платы
PC Card.
Инфо о приложении
Здесь приведены сведения о модуле CAM, подключенном к гнезду CI.
Приложение отображает сведения о карте CI CARD. Можно установить CAM независимо от того, включен телевизор или нет.
N
1. Можно приобрести модуль CI CAM, посетив ближайшего дилера, или по телефону.
2. Вставьте карту CI CARD в модуль CAM в направлении, указанном стрелкой.
3. Вставьте модуль CAM с установленной картой CI CARD в гнездо стандартного интерфейса. (Вставьте модуль CAM в
направлении, указанном стрелкой, до упора, так, чтобы модуль был параллелен гнезду.)
4. Убедитесь, что на канале с зашифрованным сигналом можно видеть изображение.
Во многих странах и регионах модуль CAM не поддерживается. Уточните данную информацию у официального дилера.
N
Page 52

ВХОД / ПОДДЕРЖКА
Настройка меню входного сигнала
¦
Список источников
❑
Используется для выбора телевизора или других внешних источников ввода, например
DVD-проигрывателей/проигрывателей дисков Blu-ray/приемников спутникового
телевидения (телеприставок), подключенных к телевизору. Используется для выбора
нужного источника входного сигнала.
ТВ / Внешний / AV / Компонентный / ПК / HDMI1/DVI / HDMI 2 / HDMI 3
Можно выбрать только те внешние устройства, которые подключены к телевизору. В меню
N
Список источников подключенные устройства входных сигналов будут выделены и будут
отображаться вверху списка. Устройства входных сигналов, которые не подключены, будут
отображаться внизу списка.
Компьютер всегда остается включенным.
N
TOOLS (Инструменты): отображение меню Редактир. назв. и Информация.
N
Нажмите кнопку SOURCE на пульте дистанционного управления для просмотра сигнала от внешнего источника.
O
Режим TV можно выбрать с помощью кнопки TV.
Редактир. назв.
❑
Укажите название устройства, подключенного к входным разъемам, для упрощения процедуры выбора источника.
VHS / DVD / Кабельное ТВ / Спутн.прист. / PVR / АV ресивер / Игра / Камера / ПК / DVI PC / DVI / ТВ / IPTV / Blu- ray /
HD DVD / DMA
Если кабель HDMI/DVI подключен к порту HDMI IN 1(DVI), необходимо выбрать для режима HDMI1/DVI значение DVI или DVI PC в
N
поле Редактир. назв. режима Вход. В этом случае потребуется отдельное подключение для звука.
Настройка меню поддержки
¦
Вход
Список источников
Редактир. назв.
Самодиагностика
❑
Тест изображения
В случае возникновения проблемы с изображением выполните его тестирование. Проверьте
цветовую схему на экране, чтобы посмотреть, устранена ли неполадка.
Да: Если тестовое изображение не отображается, или на нем присутствует шум, выберите
●
Да. Возможно, неисправен телевизор. Обратитесь за поддержкой в операторский центр
Samsung.
Нет: Если тестовое изображение отображается правильно, выберите Нет. Возможно,
●
неисправно внешнее устройство. Проверьте подключения. Если неполадку не удается
устранить, см. руководство пользователя, прилагаемое к внешнему устройству.
Звуковой тест
В случае возникновения проблемы со звуком выполните его тестирование. Звук можно проверить, выполнив воспроизведение
встроенной мелодии на телевизоре. На экране отобразится сообщение ‘Does the problem still exist with this sound test?’
При отсутствии звука из громкоговорителей телевизора перед выполнением проверки звука убедитесь, что для параметра
N
Выбрать громкогов. установлено значение Громкогов. ТВ в меню звука.
Во время проверки будет воспроизводиться мелодия, даже если для параметра Выбрать громкогов. установлено значение
N
Внешний, или звук отключен с помощью кнопки MUTE.
Да: Если во время проверки звук выводится только из одного громкоговорителя или совсем отсутствует, выберите Да.
●
Возможно, неисправен телевизор. Обратитесь за поддержкой в операторский центр Samsung.
Нет: Если звук выводится из громкоговорителей выберите Нет. Возможно, неисправно внешнее устройство. Проверьте
●
подключения. Если неполадку не удается устранить, см. руководство пользователя, прилагаемое к внешнему устройству.
Информ. о сигнале (только для цифровых каналов)
В отличие от аналоговых каналов, на которых изображение может быть разным от «снега» до четкого, цифровые каналы
(HDTV) могут быть либо безупречного качества, либо совсем не приниматься. Поэтому в отличие от аналоговых каналов,
точная настройка цифрового канала невозможна. Однако для улучшения качества приема доступных цифровых каналов можно
отрегулировать антенну.
Если счетчик уровня сигнала свидетельствует о слабом сигнале, отрегулируйте антенну, чтобы увеличить уровень сигнала.
N
Продолжайте регулировать антенну до тех пор, пока не будет найдено наилучшее положение для приема самого высокого
уровня сигнала.
Поддержка
Самодиагностика ►
Обновл. ПО
Руководство по соединению c ТВЧ
Обращение в Samsung
Русский - 22
Page 53

Русский - 23
Обновл. ПО
❑
Для обновления устройства и поддержки функций нового цифрового телевидения, вместе с
обычным телевизионным сигналом периодически передается обновление для программного
обеспечения. Устройство автоматически обнаружит эти сигналы и отобразит баннер
Диск USB
обновления программного обеспечения. При этом можно установить обновление.
По USB
Вставьте диск USB с обновлением микропрограммы в гнездо телевизора. Не отсоединяйте
Задняя панель
телевизора
питание и не извлекайте диск USB, когда выполняется обновление. После завершения
обновления микропрограммы телевизор автоматически выключится и снова включится. После
выполнения обновления проверьте версию микропрограммы. По завершении обновления для
всех настроек видео и аудио будут восстановлены значения по умолчанию (заводские).
Рекомендуется записывать свои настройки, чтобы их можно было легко восстановить после обновления.
По каналу
Обновление программного обеспечения через транслируемый сигнал.
Обновление в реж. ожидан.
Чтобы продолжить обновление программного обеспечения при включении основного питания, выберите пункт Вкл, нажав кнопку
▲ или ▼. Через 45 мин. после перехода в режим ожидания автоматически будет запущен мастер обновления вручную. Поскольку
питание устройства включается автоматически, экран может слегка мигать. Этот эффект может продолжаться более 1 часа до тех
пор, пока не будет завершено обновление программного обеспечения.
Альтернативное ПО
Отображение информации о версии программного обеспечения.
Руководство по соединению c ТВЧ
❑
В этом меню представлен метод подключения, обеспечивающий оптимальное качество отображения на экране телевизора
высокой четкости.
Используйте данную информацию при подключении к телевизору внешних устройств.
Обращение в Samsung
❑
Просмотрите данную информацию, когда телевизор работает неправильно или требуется обновить программное обеспечение.
В этом меню представлена информация о центрах обслуживания клиентов, самом устройстве, а также о способах загрузки файла
с программным обеспечением.
Page 54

1
2
3
4
5
6
7
8
9
0
!
#
@
РЕКОМЕНДАЦИИ ПО ИСПОЛЬЗОВАНИЮ
Функция телетекста
¦
Большинство телевизионных станций предлагают для просмотра текстовую информацию через услугу телетекста. Информацию об использовании
услуги телетекста можно найти на главной странице службы телетекста. К тому же, при помощи кнопок пульта дистанционного управления можно
выбрать различные параметры настроек в соответствии с вашим вкусом.
Для правильного отображения информации телетекста необходимо обеспечить стабильность приема сигнала. Иначе информация может
N
отображаться не полностью или некоторые страницы могут быть пропущены.
Можно изменить страницы телетекста с помощью кнопок с цифрами на пульте дистанционного управления.
N
1 0
(режим)
Нажмите, чтобы выбрать
режим телетекста (LIST/
FLOF). При выборе режима
LIST устанавливается режим
сохранения списка. В режиме
сохранения списка можно
сохранять страницы телетекста
в список с помощью кнопки
8
(сохранить).
2 8
(сохранить)
Используется для сохранения
страниц телетекста.
3 4
(размер)
Нажмите, чтобы увеличить шрифт
в верхней половине экрана в два
раза. Для уменьшения размера
экрана в два раза нажмите снова.
Для отображения нормального
экрана нажмите еще раз.
4 5
(открыть)
Используется для отображения
скрытого текста (например, ответы
на вопросы викторины). Для
отображения нормального экрана
нажмите еще раз.
5
Цветные кнопки (красная/зеленая/
желтая/синяя)
Если телевещательная компания
использует систему FASTEXT,
то различные разделы страницы
телетекста будут обозначены
цветами, и их можно будет
выбрать, нажимая цветные
кнопки. Нажмите одну из них в
соответствии с необходимостью.
Отображается соответствующая
страница, где другим цветом
выделена информация,
которую тоже можно выбрать
аналогичным образом. Чтобы
отобразить предыдущую или
следующую страницу, нажмите
соответствующую цветную кнопку.
Информация на страницах телетекста делится на шесть категорий.
Элемент
A
B
C
D
E
F
Содержание
Номер выбранной страницы.
Название канала вещания.
Номер текущей страницы или результаты поиска.
Дата и время.
Текст.
Информация о состоянии.
Информация FASTEXT.
6 /
7 :
8 1
9 2
0 3
! 9
@ 6
# 7
(отображение телетекста/
совмещение)
Используется для активации
режима телетекста после выбора
канала, который предлагает услугу
телетекста. Нажмите кнопку дважды,
чтобы наложить телетекст на
изображение на телеэкране.
(выход)
Выход из режима телетекста.
(дополнительная страница)
Используется для отображения
доступной дополнительной
страницы.
(страница вверх)
Используется для отображения
следующей страницы телетекста.
(страница вниз)
Используется для отображения
предыдущей страницы телетекста.
(задержка)
Используется для сохранения на
экране соответствующей страницы;
если выбранная страница связана
с несколькими дополнительными
страницами, они будут отображаться
одна за другой. Для возобновления
нажмите снова.
(главная страница)
Используется для отображения
главной страницы (содержания) в
любой момент во время просмотра
телетекста.
(отмена)
Используется для показа
телевизионной передачи во время
поиска страницы.
Русский - 24
Page 55

Русский - 25
Информация телетекста часто распределяется на несколько страниц, которые отображаются в последовательном порядке. Чтобы
N
открыть эти страницы:
введите номер страницы;
–
выберите название страницы из списка;
–
выберите цветное заглавие (система FASTEXT).
–
Уровень телетекста, поддерживаемый телевизором – версия 2.5, которая позволяет отображать дополнительную графику или текст.
N
В зависимости от передаваемого сигнала, во время отображения телетекста могут отображаться пустые боковые панели.
N
В подобных случаях дополнительная графика или текст не передаются.
N
Телевизоры предыдущих поколений, которые не поддерживают телетекст версии 2.5, не могут отображать дополнительную графику
N
или текст независимо от передачи данных телетекста.
Нажмите кнопку TV для выхода из режима телетекста.
O
Телетекст 16:9, изображение – 16:9.
O
Установка подставки
¦
Предварительная настройка: Поместите направляющую подставки и защитную насадку на
N
подставку и закрепите их с помощью винтов. Относится только к моделям с экраном 32 дюйма.
Передняя часть
1. Прикрепите подставку к ЖК-экрану телевизора.
Переносить телевизор должны несколько человек.
N
Во время сборки не перепутайте лицевую и обратную стороны подставки.
N
Убедитесь, что телевизор установлен на подставке на надлежащем уровне. Не нажимайте
N
слишком сильно на верхние углы экрана телевизора слева и справа.
Передняя
часть
2. Закрепите два винта в положении 1, а затем закрепите два винта в положении 2.
Поставьте устройство и закрепите винты. Если при закреплении винтов телевизор
N
находится в положении ЖК-экраном вниз, он может наклониться на один бок.
Установка набора для настенного монтажа
¦
С помощью деталей для настенного крепления (продаются отдельно) можно крепить
телевизор на стене.
Для получения дополнительной информации относительно установки настенного
крепления см. инструкции, прилагаемые к деталям для настенного крепления. Для
получения помощи при установке настенного кронштейна обратитесь к специалисту
технической поддержки.
Samsung Electronics не несет ответственности за любые повреждения изделия или
травмы, возникшие в случае самостоятельной установки телевизора покупателем.
Не выполняйте установку набора для настенного монтажа, когда телевизор
включен. Это может привести к травме вследствие поражения электрическим
током.
Использование замка Kensington для защиты от краж
¦
Замок Kensington – это устройство, используемое для физического закрепления
системы, когда она используется в общественных местах. Внешний вид и способ
блокировки могут отличаться от изображения в зависимости от производителя. Для
получения сведений об использовании замка Kensington см. прилагаемое руководство
пользователя. Такое устройство приобретается дополнительно. Размещение замка
Kensington может отличаться в зависимости от его модели.
1. Вставьте устройство защиты в гнездо для замка Kensington, расположенное на ЖКэкране телевизора (рисунок 1), и поверните его по часовой стрелке (рисунок 2).
2. Подсоедините кабель замка Kensington (рисунок 3).
3. Прикрепите замок Kensington к столу или тяжелому стационарному предмету.
3
2
1
Page 56

Выбор пространства для установки
¦
Соблюдайте требуемое расстояние между устройством и другими объектами (например, стенами) для обеспечения
достаточной вентиляции.
Несоблюдение этого правила может привести к возгоранию или поломке устройства из-за перегрева.
Установите устройство, соблюдая расстояния, указанные на рисунке.
В качестве подставки или настенного крепления используйте только те детали, которые поставляются Samsung Electronics.
N
При использовании деталей других производителей устройство может упасть и сломаться или нанести травму.
–
При использовании деталей других производителей устройство может перегреться из-за недостаточной
–
вентиляции, что приведет к возгоранию или поломке.
Внешний вид устройства зависит от модели.
N
Установка на подставку
Настенное крепление устройства
10 см
10 см
Крепление телевизора на стене
¦
10 см
10 см
Внимание: Нельзя тянуть, толкать или приподнимать телевизор, поскольку телевизор может упасть. В
особенности убедитесь в том, что дети не повисают на телевизоре или не нарушают его равновесие; это
может привести к опрокидыванию телевизора, что может повлечь за собой получение серьезных травм
или смертельный исход. Соблюдайте все меры предосторожности, описанные в прилагаемой брошюре
по безопасности. Для обеспечения дополнительной устойчивости в целях безопасности установите
приспособление против скольжения, как описано далее.
Во избежание падения телевизора следует выполнить следующие действия:
1. Вставьте винты в зажимы и надежно закрепите их на стене. Убедитесь, что винты
надежно закреплены в стене.
В зависимости от типа стены может потребоваться дополнительный материал,
N
например, дюбель.
Поскольку необходимые зажимы, винты и трос не входят в комплект поставки, их
N
необходимо приобретать отдельно.
10 см
10 см
10 см
Стена
2. Удалите винты из середины задней панели телевизора, вставьте винты в зажимы,
затем снова закрепите винты на телевизоре.
Винты могут не входить в комплект поставки телевизора. В этом случае необходимо
N
приобрести винты со следующими характеристиками.
Характеристики винтов
N
Для телевизоров с ЖК-экраном 17 ~ 29 дюймов: M4 X L15/для телевизоров с
–
ЖК-экраном 32 ~ 40 дюймов: M6 X L15
3. Закрепите зажимы, прикрепленные к телевизору, и зажимы, прикрепленные к стене, с
помощью крепкого троса, а затем надежно завяжите его.
Установите телевизор рядом со стеной, чтобы он не упал назад.
N
Прикрепление троса будет безопасным, если зажимы на стене будут находиться на
N
одном уровне или ниже зажимов на телевизоре.
Перед тем, как перемещать телевизор, развяжите трос.
N
4. Убедитесь, что все соединения зафиксированы надлежащим образом. Периодически
проверяйте соединения на предмет каких-либо признаков неисправности. Если
у вас возникают сомнения по поводу безопасности соединений, обратитесь к
квалифицированному специалисту по установке.
Русский - 26
Стена
Page 57

Русский - 2
Поиск и устранение неисправностей: перед обращением в службу технической поддержки
¦
Отсутствуют звук или изображение
Изображение нормальное, но звук
отсутствует
Экран остается черным, а
индикатор питания мигает
Нет изображения или изображение
черно-белое
Помехи в звуке и изображении
Размытое или рябящее
изображение и искаженный звук
Неисправности в работе пульта
дистанционного управления
Отображается сообщение
‘Проверьте сигнальный кабель’.
В режиме ПК отображается
сообщение ‘Режим не
поддерживается’.
В углу экрана отображается
искаженное изображение
Отображается сообщение
‘Восстановление значений по
умолчанию для всех настроек’.
Если посмотреть на край панели
вокруг экрана телевизора с
близкого расстояния, можно
заметить небольшие частицы.
ЖК-панель с TFT-матрицей состоит из множества подпикселов (3 133 440), и ее изготовление требует использования наиболее
N
совершенных технологий. Однако на экране может быть несколько темных или светлых пикселов. Эти отдельные пикселы не влияют
на качество работы устройства.
Проверьте надежность подсоединения шнура электропитания.
●
Проверьте, нажата ли на телевизоре кнопка включения питания.
●
Проверьте значения параметров контрастности и яркости.
●
Проверьте уровень громкости.
●
Проверьте уровень громкости.
●
Проверьте, не была ли нажата кнопка MUTEM на пульте дистанционного управления.
●
Проверьте настройки Выбрать громкогов..
●
Проверьте на компьютере: питание, сигнальный кабель.
●
В телевизоре применяется система управления питанием.
●
Переместите мышь или нажмите любую клавишу на клавиатуре.
●
Отрегулируйте настройки цвета.
●
Убедитесь, что выбрана правильная система телевещания.
●
Попытайтесь найти электрическое устройство, которое влияет на телевизор, и переставьте
●
это устройство подальше.
Подсоедините телевизор к другой розетке сети питания.
●
Проверьте направление, месторасположение и подключение своей антенны.
●
Подобные помехи часто возникают при использовании комнатной антенны.
●
Замените батареи в пульте дистанционного управления.
●
Почистите верхнюю грань пульта дистанционного управления (окно передачи сигнала).
●
Проверьте контакты батарей.
●
Убедитесь, что сигнальный кабель надежно подсоединен к компьютеру или другому
●
источнику видеосигнала.
Убедитесь, что компьютер или другой источник видеосигнала включен.
●
Проверьте максимальное значение разрешения и частоту видеоадаптера.
●
Сравните эти величины с данными, которые отображаются в режимах дисплея.
●
Если на некоторых внешних устройствах выбран параметр По разм. экрана, в углах
экрана изображение может быть искаженным. Этот симптом связан с внешними
устройствами, а не телевизором.
Отображается при нажатии кнопки EXIT и удержании ее в течение некоторого
времени. Для параметров устройства восстанавливаются заводские настройки по
умолчанию.
Это является особенностью конструкции и не свидетельствует о дефекте.
Характеристики
¦
Название модели
Размер экрана
(диагональ)
Разрешение экрана ПК
(оптимальное)
Звук
(Выход)
Размеры (ШxГxВ)
Корпус
С подставкой
Вес
С подставкой
Условия окружающей среды
Рабочая температура
Относительная влажность при работе
Температура хранения
Влажность воздуха в помещении для хранения
Шарнирная подставка
Левая / правая
Конструкция и характеристики устройства могут изменяться без предварительного уведомления.
N
Данное устройство является цифровым устройством класса В.
N
Характеристики электропитания и потребления электроэнергии указаны на наклейке на корпусе устройства.
N
Подлежит использованию по назначению в нормальных условиях.
N
Срок службы : 7лет
От 10°C до 40°C (от 50°F до 104°F)
От -20°C до 45°C (от -4°F до 113°F)
LE26B460B LE32B460B
26 дюймов 32 дюймов
1360 x 768 при частоте 60 Гц 1360 x 768 при частоте 60 Гц
5 Вт X 2Вт X 2 X 2 5 Вт X 2Вт X 2 X 2
668 x 77 x 446 mm
668 x 216 x 493 mm
8 kgkg 12 kgkg
10% – 80%, без конденсации
5% – 95%, без конденсации
0˚ -20˚ ~ 20˚
798 x 77 x 519 mm
798 x 240 x 579 mm
От 10°C до 40°C (от 50°F до 104°F)
10% – 80%, без конденсации
От -20°C до 45°C (от -4°F до 113°F)
5% – 95%, без конденсации
Page 58

Примітка щодо цифрового телебачення
❑
1. Функції, пов’язані з цифровим телебаченням (DVB), доступні лише в тих країнах/регіонах, де транслюються наземні
цифрові канали DVB-T (MPEG2 і MPEG4 AVC) або де існує доступ до сумісних зі стандартом DVB-C (MPEG2 і MPEG4
AAC) послуг кабельного телебачення. Дізнайтеся у місцевого торгового представника про можливість отримання
сигналу DVB-T або DVB-C.
2. DVB-T - це стандарт європейського консорціуму DVB для передачі цифрового наземного телевізійного сигналу, і
DVB-C - це стандарт для передачі цифрового телевізійного сигналу через кабель. Проте, деякі функції, такі як EPG
(електронний довідник програм), VOD (відео за запитом) тощо, не передбачені цими характеристиками. Тому, на цей
момент вони не підтримуються.
3. Хоча цей телевізор відповідає останнім стандартам DVB-T і DVB-C [серпень 2008 р.], ми не можемо гарантувати
сумісність із майбутніми функціями цифрового наземного сигналу DVB-T і цифрового кабельного сигналу DVB-C.
4. Залежно від країни чи регіону, де встановлено телевізор, деякі постачальники послуг кабельного телебачення можуть
впроваджувати додаткову плату за такі послуги і, можливо, Вам потрібно буде погодитись з умовами і положеннями
щодо користування такими послугами.
5. Деякі функції цифрового телебачення можуть бути недоступними в деяких країнах або регіонах, і мовлення DVB-C
може не працювати належним чином з деяким постачальниками послуг кабельного телебачення.
6. По докладнішу інформацію звертайтеся до місцевого центру обслуговування клієнтів компанії Samsung.
Запобіжні заходи під час відтворення нерухомого зображення.
❑
Відтворення нерухомого зображення може спричинити непоправне пошкодження екрану телевізора.
Не слід залишати нерухоме і частково нерухоме зображення на РК екрані більше двох годин, оскільки це може
●
спричинити появу залишкового зображення. Ефект залишкового зображення також відомий як “вигоряння екрану”.
Щоб уникнути такого ефекту, слід зменшувати рівень яскравості та контрастності на час відтворення нерухомого
зображення.
●
гарантійного обслуговування не поширюються на пошкодження, пов’язані з виникненням вищевказаного ефекту.
Довготривале відображення нерухомих об’єктів, наприклад, з комп’ютера чи ігрової приставки, може спричинити
●
появу на екрані залишкових зображень. Щоб уникнути цього, слід зменшувати значення параметрів яскравості та
контрастності, коли на екрані знаходиться нерухоме зображення.
Внаслідок перегляду зображення у форматі 4:3 протягом тривалого часу, зліва, справа і посередині на
РК екрані можуть виникати сліди меж цього формату, що пояснюється нерівномірністю світлового
випромінювання у різних частинах екрана. Подібний ефект може виникати за умови частого
використання телевізора для перегляду DVD-дисків чи підключення ігрової приставки. Умови
© Samsung Electronics Co., Ltd., 2009 Усі права захищено.
Page 59

ЗМІСТ
ЗАГАЛЬНА ІНФОРМАЦІЯ
Огляд панелі керування ...................................................................2
■
Приладдя .......................................................................................... 3
■
Огляд панелі з’єднань...................................................................... 4
■
Пульт дистанційного керування ...................................................... 6
■
Встановлення батарей у пульт дистанційного керування ............. 6
■
ВИКОРИСТАННЯ
Перегляд меню ................................................................................. 7
■
Переведення телевізора в режим очікування ................................ 8
■
Функція Plug & Play .......................................................................... 8
■
КЕРУВАННЯ КАНАЛАМИ
Налаштування меню каналів .......................................................... 9
■
Управління каналами .....................................................................11
■
КЕРУВАННЯ ЗОБРАЖЕННЯМ
Налаштування меню зображення ................................................. 13
■
Використання телевізора як монітора для комп'ютера ............... 15
■
Налаштування телевізора для роботи з ПК ................................. 16
■
КЕРУВАННЯ ЗВУКОМ
Налаштування меню звуку ............................................................ 17
■
Вибір режиму звуку ........................................................................ 18
■
НАЛАШТУВАННЯ
Параметри меню налаштування ................................................... 19
■
МЕНЮ ВХІДНОГО СИГНАЛУ ТА ПІДТРИМКИ
Налаштування меню вхідного сигналу ......................................... 22
■
Налаштування меню підтримки .................................................... 22
■
РЕКОМЕНДАЦІЇ З ВИКОРИСТАННЯ
Функція телетексту ......................................................................... 24
■
Встановлення підставки ................................................................ 25
■
Встановлення комплекту настінного кріплення ........................... 25
■
Використання замка “Кенсінгтон” для захисту від крадіжок ....... 25
■
Забезпечення безпеки у місці встановлення ...............................26
■
Кріплення телевізора на настінному кронштейні......................... 26
■
Усунення несправностей: перед тим, як звернутися до центру
■
обслуговування .............................................................................. 27
Технічні характеристики ................................................................ 27
■
Українська
Ліцензія
❑
Позначення
❑
Примітка
TruSurround HD, SRS та символ є зареєстрованими торговельними марками компанії SRS Labs,символ є зареєстрованими торговельними марками компанії SRS Labs,
Inc. Технологія TruSurround HD використовується згідно з ліцензією компанії SRS Labs, Inc.
Виготовлено за ліцензією компанії Dolby Laboratories. Dolby та логотип із подвійною літерою D є
торговельними марками компанії Dolby Laboratories.
N O T
Кнопка виклику
одним натисненням
Кнопка TOOLS Натиснути
Українська - 1
Page 60

ЗАГАЛЬНА ІНФОРМАЦІЯ
4
1
2
3
5
6
7
88
POWER
4
1
2
3
5
6
7
88
POWER
Малюнки та ілюстрації у цьому посібнику користувача подані лише для довідки і можуть відрізнятися від дійсного
N
вигляду виробу. Дизайн виробу і технічні характеристики можуть бути змінені без попередження задля покращення
ефективності роботи виробу.
Огляд панелі керування
¦
Форма і колір виробу можуть бути різними, залежно від моделі.
N
Щоб увімкнути кнопки на передній панелі, натисніть їх пальцем.
N
1
SOURCE E: Дозволяє перемикати між усіма доступними джерелами вхідного сигналу. В екранному меню ця кнопка
виконує ті самі функції, що й кнопка ENTERE на пульті дистанційного керування (ДК).
2
MENU: Використовується для виклику екранного меню телевізора.
3 Y
4 z
5
СЕНСОР ДИСТАНЦІЙНОГО КЕРУВАННЯ: Спрямовуйте пульт ДК на цю точку на телевізорі.
6 P
7
ІНДИКАТОР ЖИВЛЕННЯ: Блимає один раз і вимикається, коли вмикається живлення; світиться в режимі очікування.
8
ГУЧНОМОВЦІ
: Використовуються для збільшення або зменшення рівня гучності.
В екранному меню кнопки
: Використовуються для зміни каналів. В екранному меню кнопки
кнопки ▼ та ▲ на пульті дистанційного керування.
POWER: Використовується для увімкнення та вимкнення телевізора.
Y
виконують ті самі функції, що й кнопки ◄ та ► на пульті дистанційного керування.
Українська - 2
z
виконують ті самі функції, що й
Page 61

Українська - 3
Приладдя
¦
Пульт дистанційного керування (ДК) і
батареї (ААА, 2 шт.)
(M4 X L16) (M4 X L16)
Гвинти для підставки – 8 шт.
(лише для 32-дюймової моделі)
● Посібник користувача ● Гарантійний талон ● Інструкція з техніки безпеки
Перевірте наявність усіх перелічених елементів, які постачаються з РК-телевізором. Якщо якогось із елементів бракує,
N
зверніться за місцем придбання виробу.
Гарантійний талон / інструкція з техніки безпеки (додаються не у всіх країнах)
N
Форма і колір додаткових елементів можуть бути дещо іншими, залежно від моделі.
N
Кабель живлення Нижня кришка
Гвинти для підставки – 4 шт.
(лише для 26-дюймової моделі)
Ганчірка для очищення
Page 62

Огляд панелі з’єднань
9
7
6
8
1 2 3 4 5 6
0! @
¦
Вхід для кабелю
живлення
[Задня панель телевізора]
[Бічна панель телевізора]
Форма і колір виробу можуть бути різними, залежно від моделі.
N
Перед тим, як під’єднати зовнішній пристрій до телевізора, вимкніть живлення телевізора.
N
Під’єднуючи зовнішній пристрій, пам’ятайте, що кольори кабелів повинні відповідати кольорам роз’ємів.
N
1
DIGITAL AUDIO OUT (OPTICAL)
Використовується для підключення до цифрового аудіопристрою, наприклад домашнього кінотеатру.
–
Коли до роз’ємів HDMI IN під’єднано зовнішній пристрій, роз’єм DIGITAL AUDIO OUT (OPTICAL) телевізора може
N
подавати лише 2-канальний звук. Щоб слухати 5.1-канальний звук, під’єднайте DVD-програвач чи програвач дисків
Blu-ray або декодер кабельного чи супутникового телебачення за допомогою оптичного кабелю до підсилювача
або системи домашнього кінотеатру, не телевізора.
2
PC IN
Використовується для підключення до вихідного відеороз’єму комп’ютера.
–
3
ANT IN
Використовується для підключення антени чи кабелю.
–
4
PC / DVI AUDIO IN
Використовується для підключення до вихідного аудіороз’єму комп’ютера.
–
Вихідні аудіороз’єми DVI для підключення зовнішніх пристроїв.
–
5
AUDIO OUT [R-AUDIO-L]
Під’єднайте аудіокабелі RCA до роз’єму AUDIO OUT [R-AUDIO-L] на задній панелі телевізора, а інші їх кінці – до
–
відповідних вхідних гнізд підсилювача чи системи домашнього DVD-кінотеатру.
6
HDMI IN 1 (DVI), 2, 3
Підтримує підключення аудіовідеопристроїв, які мають вихід HDMI (приймачі супутникових каналів, DVD/Blu-ray-
–
програвачі).
За умови з’єднання HDMI - HDMI, додаткове з’єднання для передачі звуку не потрібне.
–
Для під'єднання до комп'ютера можна використати роз'єм HDMI IN 1 (DVI).
–
Що таке HDMI?
N
Інтерфейс HDMI (High Denition Multimedia Interface) дозволяє передавати відео сигнал високої чіткості та
багатоканальний цифровий звук.
Роз’єм HDMI / DVI можна використовувати для з’єднання із зовнішніми пристроями з виходом DVI, за умови
наявності відповідного кабелю (не входить в комплект).
Різниця між пристроями з інтерфейсом HDMI та DVI у тому, що пристрої HDMI менші за розмірами, мають
вбудовану функцію кодування HDCP (High Bandwidth Digital Copy Protection) та підтримують багатоканальний
цифровий звук.
Українська - 4
Page 63

Українська - 5
7
Гніздо COMMON INTERFACE
Для перегляду окремих каналів потрібно вставити картку CI CARD, інакше на екрані з’являтиметься повідомлення
–
"Scrambled Signal".
На екрані протягом 2-3 хвилин відображатиметься наступна інформація: номер телефону, ідентифікатор
–
карти CI CARD, ідентифікатор головного вузла та ін. Якщо з’явиться повідомлення про помилку, зверніться до
постачальника послуг.
Після завершення налаштування інформації каналу з’явиться повідомлення “Updating Completed”. Це означає, що
–
список каналів оновлено.
Карту CI CARD можна придбати в місцевого постачальника послуг кабельного телебачення. Виймаючи карту CI
N
CARD, будьте обережні, оскільки від падіння карта може вийти з ладу.
Вставляйте карту CI CARD відповідно до позначок на ній.
N
Розташування гнізда COMMON INTERFACE може бути дещо інакшим, залежно від моделі.
N
Роз'єм CAM не передбачений для деяких країн та регіонів. Докладніше запитуйте в місцевого уповноваженого
N
дилера.
8
AV IN [VIDEO] / [R-AUDIO-L]
Під’єднайте кабель RCA до відповідного зовнішнього аудіовідеопристрою, наприклад відеомагнітофона,
–
програвача DVD-дисків або відеокамери.
Під’єднайте аудіокабелі RCA до роз’єму [R-AUDIO-L] на телевізорі, а інші їх кінці – до відповідних аудіовиходів
–
аудіовідеопристрою.
9
ЗАМОК КЕНСІНГТОН (залежно від моделі)
Замок Кенсінгтон (постачається додатково) – це пристрій, який використовується для фізичного закріплення
–
системи під час використання у громадському місці. Щоб дізнатися більше про використання замка, зверніться до
торгового представника, у якого Ви придбали телевізор.
Розташування замка “Кенсінгтон” може різнитися залежно від моделі.
N
0
COMPONENT IN
Під’єднайте компонентні відеокабелі (постачаються додатково) до компонентного роз’єму (PR, PB, Y) на задній
–
панелі телевізора, а інші їх кінці – до відповідних компонентних відеовиходів цифрового телеприймача або
програвача DVD-дисків.
Якщо потрібно під’єднати до одного телевізора і декодер цифрових каналів, і цифровий телеприймач (або
–
DVD- програвач), під’єднайте декодер до цифрового телеприймача (або DVD-програвача), а приймач (або DVDпрогравач) – до компонентного (PR, PB, Y) роз’єму телевізора.
Роз’єми PR, PB та Y на пристроях із компонентним інтерфейсом (таких як приймач цифрового телебачення чи DVD-
–
програвач) можуть часом бути позначені як Y, B-Y і R-Y або Y, Cb і Cr.
Під’єднайте аудіокабелі RCA (постачаються додатково) до роз’єму [R-AUDIO-L] на задній панелі телевізора, а їх
–
інші кінці – до відповідних аудіовиходів цифрового телеприймача або програвача DVD-дисків.
!
EXT
Роз’єм
EXT O O O
Входи/виходи для підключення зовнішніх пристроїв, наприклад відеомагнітофона, DVD-програвача, ігрової
–
приставки чи програвачів відеодисків.
@
SERVICE
Роз'єм для оновлення вбудованого програмного забезпечення.
–
Відео Аудіо (Л / П) RGB Відео + аудіо (Л / П)
Input звук
Можливий вихід лише аналогового або цифрового сигналу
телевізора.
Page 64

1
2
3
4
5
6
7
8
9
0
!
@
#
$
&
*
(
)
a
%
^
Пульт дистанційного керування
¦
Пультом дистанційного керування можна користуватися на віддалі до 7 м від телевізора.
N
На роботу пульта дистанційного керування може впливати яскраве освітлення.
N
Форма і колір виробу можуть бути різними, залежно від моделі.
N
1
POWER: Кнопка режиму
очікування.
2
КНОПКИ З ЦИФРАМИ:
Використовуються для зміни
каналів.
3 E
: Виконує ті самі функції,
що й кнопка ENTERE серед
кнопок вибору напрямку.
Якщо перемикати канали за
допомогою кнопок із цифрами
і натиснути номер каналу, а
тоді кнопку ENTERE, канал
відразу перемкнеться.
4 Y
5
SOURCE: Використовується
6
CH LIST: Використовується
7
TOOLS: Використовується
8
INFO: Використовується для
9
КОЛЬОРОВІ КНОПКИ: Ці
!
TV: Безпосередній вибір
@
PRE-CH: Використовується для
#
MUTE M: Використовується
$
P </P >: Використовуються
: Використовуються
для збільшення або зменшення
рівня гучності.
для виклику списку та вибору
джерела відеосигналу.
для виклику списку наявних
каналів.
для швидкого вибору часто
застосовуваних функцій.
виведення інформації на екран
телевізора.
кнопки використовуються для
навігації в меню списку каналів
та в деяких інших випадках.
режиму телевізійного
мовлення.
повернення до попереднього
вибраного каналу.
для тимчасового вимкнення
звуку.
для зміни каналів.
%
MENU: Відображення
основного екранного меню
^
FAV.CH: використовується для
відображення списків вибраних
каналів.
&
RETURN: Повернення до
попереднього меню
*
ВГОРУ ▲ / ВНИЗ ▼ / ЛІВОРУЧ
◄ / ПРАВОРУЧ ► / ENTERE:
Використовуються для вибору
пунктів екранного меню і зміни
значень меню.
(
EXIT: Використовується для
виходу з меню.
)
SUBT.: Відображення субтитрів
у цифровому режимі.
a
GUIDE: Відображення
електронного довідника з
програм (Electronic Program
Guide - EPG).
Функції телетексту
5 0
: Вибір режиму
відображення телетексту (LIST
/ FLOF)
6 8
: Збереження телетексту
7 4
: Вибір розміру телетексту
8 5
: Показ телетексту
9
Кнопки вибору теми Fastext
0 /
! :
@ 1
$ 2
% 6
& 9
( 7
: Можна почергово
вибирати режим Teletext,
Double або Mix.
: Кнопка виходу з режиму
телетексту
: Допоміжна сторінка
телетексту
: Наступна сторінка
телетексту
3
: Попередня сторінка
телетексту
: Сторінка змісту телетексту
: Утримування телетексту
: Приховання телетексту
Встановлення батарей у пульт дистанційного керування
¦
1. Відкрийте кришку на зворотній стороні пульта ДК, як показано на малюнку.
2. Вставте дві батареї типу ААА.
Слідкуйте за тим, щоб полюси "+" та "-" батарей були розташовані відповідно до
N
позначень на стінках відділення.
3. Закрийте кришку.
Якщо пульт ДК не використовуватиметься протягом тривалого часу, вийміть батареї
N
та зберігайте їх у прохолодному, сухому місці.
Якщо пульт дистанційного керування не працює, перевірте таке:
N
Чи увімкнено живлення телевізора?
–
Чи правильно розташовані полюси батарей?
–
Чи не розрядилися батареї?
–
Можливо, стався збій в енергопостачанні або кабель живлення не підключений до розетки?
–
Чи немає поблизу флуоресцентної лампи або неонової вивіски?
–
Українська - 6
Page 65

Українська -
ВИКОРИСТАННЯ
Перегляд меню
¦
Перш ніж користуватись телевізором, виконайте вказівки нижче, щоб дізнатися як
управляти меню для вибору і налаштування різних функцій.
1. Натисніть кнопку MENU.
На екрані з'явиться головне меню. Ліворуч будуть такі піктограми: Изображение,
Звук, Канал, Установка, Вход, Поддержка.
2. За допомогою кнопок ▲ або ▼ виберіть одну з піктограм.
За допомогою кнопок ◄ або ► виберіть підменю піктограми.
3. Переходьте до потрібних пунктів меню за допомогою кнопок ▲ або ▼.
Натисніть кнопку ENTERE, щоб відкрити потрібні пункти меню.
4. Щоб змінювати вибрані пункти, використовуйте кнопки ▲/▼/◄/►.
Натисніть кнопку RETURN, щоб повернутись до попереднього меню.
N
5. Натисніть кнопку EXIT, щоб вийти з меню.
Користування кнопками пульта дистанційного керування
Кнопка Дії Кнопка Дії
MENU
RETURN
EXIT
e
Відображення головного екранного
меню.
Повернення до попереднього меню.
R
Вихід з екранного меню.
▲/▼/◄/►/
ENTER
Наприклад: налаштування пункту Яркость у меню зображення
Встановлення значення "80" для параметра Яркость
1. Натисніть кнопку MENU, щоб відкрити меню.
E
Изображение
Режим :
Подсветка : 8
Контраст : 95
Яркость : 45
Четкость : 50
Цвет : 50
Тон (З/К) : З50 / К50
Стандартный
Переміщення курсору і вибір певного
пункту меню.
Вибір поточного пункту меню.
Підтвердження налаштування.
Изображение
Режим : Стандартный
Подсветка : 8
Контраст : 95
Яркость : 45
Четкость : 50
Цвет : 50
Тон (З/К) : З50 / К50
►
2. Натисніть кнопку ENTERE, щоб вибрати пункт Изображение.
3. За допомогою кнопок ▲ або ▼ виберіть пункт Яркость.
4. Натисніть кнопку ENTERE.
5. Натискайте кнопки ◄ або ►, доки не отримаєте значення яскравості "80".
6. Натисніть кнопку ENTERE.
Натисніть кнопку EXIT, щоб вийти з меню.
N
Изображение
Режим :
Подсветка : 8
Контраст : 95
Яркость : 45
Четкость : 50
Цвет : 50
Тон (З/К) : З50 / К50
Подсветка : 8
Изображение
Контраст : 95
Яркость : 45 ►
Четкость : 50
Цвет : 50
Тон (З/К) : З50 / К50
Дополнительные параметры
Параметры изображения
Сброс настроек изображения
Яркость 45
U
Перем. L Настр. E Вход R Возврат
Яркость 80
U
Перем. L Настр. E Вход R Возврат
Стандартный
►
Page 66

Переведення телевізора в режим очікування
¦
Щоб зменшити споживання електроенергії, телевізор можна перевести в режим очікування. Режим очікування може бути
корисним, якщо Ви бажаєте тимчасово перервати перегляд (наприклад, на час обіду).
1. Натисніть кнопку POWERP на пульті ДК.
Екран буде вимкнено і на панелі телевізора засвітиться індикатор режиму очікування.
N
2. Щоб знову увімкнути виріб, просто ще раз натисніть кнопку POWERP.
Не залишайте телевізор у режимі очікування на тривалий час (наприклад, вирушаючи у відпустку). Рекомендується
N
також відключати телевізор від мережі живлення та від’ єднувати антену.
Функція Plug & Play
¦
Під час першого увімкнення телевізора автоматично послідовно відображаються основні
меню налаштувань, які здійснюються користувачем.
1. Натисніть кнопку POWER на пульті ДК. З'явиться повідомлення Можно установить
язык меню..
Можно установить язык меню.
Язык : Русский ►
Plug & Play
2. Виберіть потрібну мову за допомогою кнопок ▲ або ▼. Для підтвердження вибору
натисніть кнопку ENTERE.
3. За допомогою кнопок ◄ та ► виберіть режим Демонстрация або Домашний і натисніть кнопку ENTERE.
Для отримання оптимального зображення вдома радимо встановити режим Домашний.
N
Демонстрация призначений лише для використання в магазинах.
N
Якщо для виробу випадково встановлено режим Демонстрация і потрібно повернутися до режиму Домашний
N
(Стандартный): натисніть кнопку регулювання гучності на панелі телевізора. Коли на екрані з'явиться індикатор
гучності, натисніть і утримуйте кнопку MENU на панелі телевізора упродовж 5 секунд.
4. Натисніть кнопку ENTERE. Виберіть потрібну країну за допомогою кнопок ▲ або ▼. Для підтвердження вибору
натисніть кнопку ENTERE.
5. За допомогою кнопок ▲ або ▼ виберіть пункт Антенна або Кабель, а тоді натисніть кнопку ENTERE.
Антенна: сигнал з антени.
N
Кабель: сигнал з кабелю.
6. За допомогою кнопок ▲ або ▼ виберіть джерело, з якого потрібно виконати пошук каналів. Виберіть пункт Пуск і
натисніть кнопку ENTERE.
Цифровые и аналоговые: цифрові й аналогові канали.
N
Цифровые: цифрові канали.
Аналоговые: аналогові канали.
Якщо для джерела сигналу встановити пункт Кабель, з'явиться крок, що дозволить налаштувати значення для
N
пошуку цифрових каналів. Детальніше див. Канал → Автонастройка.
Пошук каналів розпочнеться і завершиться автоматично.
N
Перервати процес збереження можна в будь-який момент натисненням кнопки ENTERE.
N
Коли всі доступні канали будуть збережені, з'явиться повідомлення Режим установки времени..
N
. Натисніть кнопку ENTERE. За допомогою кнопок ▲ або ▼ виберіть пункт Авто і натисніть кнопку ENTERE.
Якщо вибрати пункт Ручной, з'явиться повідомлення із проханням встановити дату і час Установка времени и
N
даты.
Якщо телевізор уже прийняв цифровий сигнал, час буде встановлено автоматично. Якщо цього не сталося,
N
виберіть пункт Ручной, щоб встановити годинник. (Див. стор. 19).
8. Буде запропоновано спосіб з'єднання для забезпечення найкращої якості високої чіткості. Перевіривши
запропонований спосіб, натисніть кнопку ENTERE.
9. З’явиться повідомлення з побажанням приємного користування телевізором: Смотрите ТВ. Завершивши
налаштування, натисніть кнопку ENTERE.
E
Вход
Як скинути параметри цієї функції...
1. Натисніть кнопку MENU, щоб відкрити меню. За допомогою кнопок ▲ або ▼ виберіть пункт Установка, а тоді натисніть
кнопку ENTERE .
2. Натисніть кнопку ENTERE ще раз, щоб вибрати пункт Plug & Play.
3. Введіть чотиризначний PIN-код. PIN-код за замовчуванням для нових телевізорів – "0-0-0-0".
Щоб змінити PIN-код, скористайтеся функцією Изменение PIN у меню. (Див. стор. 20).
N
Функція Plug & Play доступна лише в режимі перегляду телевізійних програм.
N
Українська - 8
Page 67

Українська - 9
КЕРУВАННЯ КАНАЛАМИ
Налаштування меню каналів
¦
Страна
❑
З'явиться вікно для введення PIN-коду. Введіть чотиризначний PIN-код.
N
Аналоговый канал
дозволяє змінити країну для аналогових каналів.
Цифровой канал
дозволяє змінити країну для цифрових каналів.
Автонастройка
❑
Можна виконати сканування діапазонів доступних частот, які різняться залежно від країни.
Автоматично призначені номери каналів можуть не відповідати дійсним або бажаним номерам.
Якщо канал заблоковано за допомогою функції Замок, відкриється вікно для введення PIN-коду.
N
Антенна / Кабель
Джерело для пошуку каналів
Цифровые и аналоговые: цифрові й аналогові канали.
●
Цифровые: цифрові канали.
●
Аналоговые: аналогові канали.
●
Якщо вибрано пункт Кабель → Цифровые и аналоговые або Кабель → Цифровые
Подайте значення сканування для кабельних каналів.
Режим поиска → Полный / Сеть / Быстрый
●
Быстрый
N
Network ID: відображення ідентифікаційного коду мережі.
–
Частота: відображення частоти каналу (значення частот різні в кожній країні).
–
Модуляция: відображення доступних значень модуляції.
–
Скорость передачи: відображення доступних значень символьної швидкості.
–
Ця функція виконує автоматичний пошук усіх каналів, які зараз транслюються у Вашій місцевості, та зберігає їх у
N
пам’яті телевізора.
Щоб припинити автоматичний пошук, натисніть кнопку
N
потрібно зупинити автоматичне збереження: Остановить автонастройку?.
За допомогою кнопок ◄ або ► виберіть пункт "Да ", а тоді натисніть кнопку
ENTERE. На екрані з'явиться повідомлення із запитанням, чи
ENTERE.
Канал
Страна ►
Автонастройка
Ручная настройка
Параметр поиска кабельной сети
Текущие и следующие
Полн. руков.
Гид по умолч. : Полн. руков.
Ручная настройка
❑
За допомогою цієї функції можна вручну виконати пошук каналів та зберегти їх у пам’яті телевізора.
N
Якщо канал заблоковано за допомогою функції Замок, відкриється вікно для введення PIN-коду.
N
Цифровой канал
Збереження цифрових каналів вручну.
Цифровой канал доступний лише у режимі цифрового телевізійного мовлення.
N
Канал: дозволяє вибрати номер каналу за допомогою кнопок ▲, ▼ чи кнопок із цифрами (0~9).
●
Частота: дозволяє встановити частоту за допомогою кнопок із цифрами.
●
Полоса пропуск.: дозволяє встановити швидкість передачі даних за допомогою кнопок ▲, ▼ чи кнопок із цифрами
●
(0~9).
Після завершення пошуку список каналів буде оновлено.
N
Page 68

Аналоговый канал
Збереження аналогових каналів вручну.
Программа (номер програми, який присвоюється каналу): дозволяє встановити номер для програми за допомогою
●
кнопок ▲, ▼ чи кнопок із цифрами (0-9).
Система цвета → Авто / PAL / SECAM / NTSC4.43
●
Система звука → BG / DK / I / L: дозволяє вибрати систему звуку за допомогою кнопок ▲ або ▼.
●
Канал (якщо Ви знаєте номер каналу, який необхідно зберегти): за допомогою кнопок ▲ або ▼ виберіть C (ефірний
●
канал) або S (кабельний канал). Натисніть кнопку ►, а потім виберіть потрібний номер за допомогою кнопок ▲, ▼ чи
кнопок із цифрами (0-9).
Можна також ввести номер каналу безпосередньо за допомогою кнопок із цифрами (0-9).
N
Якщо звук незвичайний або взагалі відсутній, виберіть інший стандарт звуку.
N
Поиск (якщо номери каналів невідомі): натисніть кнопку ▲ або ▼, щоб розпочати пошук. Тюнер скануватиме діапазон
●
частот, доки на екрані не з’явиться зображення першого або вибраного Вами каналу.
Сохранить (для збереження каналу та відповідного номеру програми): виберіть значення OK натисненням кнопки
●
ENTERE.
Режими каналів
N
P (режим програм): після завершення налаштування кожній знайденій телевізійній станції призначається
–
порядковий номер від P00 до P99. У цьому режимі для вибору каналу достатньо ввести номер його позиції.
C (режим ефірних каналів): у цьому режимі канал можна вибрати шляхом введення призначеного номера для
–
кожної телевізійної станції.
S (режим кабельних каналів): у цьому режимі канал можна вибрати шляхом введення призначеного номера для
–
кожного кабельного каналу.
Параметр поиска в кабельной сети (залежно від країни)
❑
Дозволяє встановити додаткові можливості пошуку, наприклад частоту і швидкість передачі символів для пошуку у
кабельній мережі.
Частота (начальная ~ конечная): відображення частоти каналу.
●
Модуляция: відображення доступних значень модуляції.
●
Скорость передачи: відображення доступних значень символьної швидкості.
●
: дозволяє вибрати систему кольору за допомогою кнопок ▲ або ▼.
Текущие и следующие / Полн. руков.
❑
Відомості для електронного довідника програм надаються телевізійними компаніями. На деяких каналах дані про програми
можуть бути відсутні або застарілі. Після отримання нової інформації дані на екрані автоматично оновлюються.
Докладніше про користування довідником у режимах Текущие и следующие і Полн. руков. дивіться на стор. 11.
N
Меню довідника можна також відкрити просто натисненням кнопки GUIDE. (Щоб налаштувати параметр Гид по
O
умолч., див. пояснення нижче).
Текущие и следующие
Для шести каналів, вказаних у стовпчику ліворуч, відображає інформацію про поточну та наступну програму.
Полн. руков.
інформація про програми подається впорядкованою погодинно. На екрані відображається програма на дві години з
можливістю прокручування вперед або назад.
Гид по умолч. → Текущие и следующие / Полн. руков.
❑
За допомогою цієї функції можна вибрати посібник, який буде відображатися: Текущие и следующие або Полн. руков.,
коли користувач натискатиме на пульті ДК кнопку GUIDE.
Список каналов
❑
Докладніше про користування параметром Список каналов читайте у розділі "Управління каналами".
Цей список можна також викликати просто натисненням кнопки CH LIST на пульті дистанційного керування.
O
Режимы каналов
❑
Натисненням кнопок P >/< можна перемикати канали в межах вибраного списку каналів.
Добавл.каналы
Канали перемикатимуться в межах збереженого списку каналів.
Любимые каналы
Канали перемикатимуться в межах списку вибраних каналів.
Точная настройка
❑
Якщо зображення є чітким, точне налаштування каналу не потрібне, оскільки воно здійснюється автоматично під час
пошуку та збереження. Якщо сигнал є слабким або спотвореним, можна виконати точне налаштування каналу вручну.
Збережені після додаткового точного налаштування канали позначено зірочкою “*” праворуч від номера каналу на
N
панелі каналів.
Щоб скинути результат точного налаштування, виберіть за допомогою кнопок ▲ або ▼ пункт Сброс і натисніть кнопку ENTERE.
N
Точне налаштування можна виконати лише для аналогових телевізійних каналів.
N
Українська - 10
Page 69

Українська - 11
Користування довідниками Текущие и следующие / Полн. руков.
Текущие и следующие
1 f tn
2 ITV Play
3 Kerrang!
4 Kiss
5 oneword
6 Smash Hits!
▼
Часы Информация
DTV Кабель 900 f tn 2:10 Tue 1 Jun
Freshmen On Campus
2:00 - 2:30
No Detailed Information
Текущая Следующая
Street Hypn..
Mint Extra
Loaded
Fresh 40 with Dynamite MC
The Distillery
Smash Hits! Sunday
◄◄ ►►
Нет информации
Нет информации
Kisstory
Нет информации
Страница ■ Полн. руков. ■ Выход
Щоб... Потрібно…
Дивитися програму у списку ЕДП Виберіть програму за допомогою кнопок ▲, ▼, ◄, ►.
Закрити довідник Натисніть синю кнопку
Якщо вибрати наступну програму, вона буде занесена у графік і відображатиметься зі значком годинника. Якщо
натиснути кнопку ENTERE ще раз, можна за допомогою кнопок ◄ і ► вибрати пункт Отмена расписаний, після чого
графік буде скасовано і значок годинника зникне.
Подивитись інформацію про програму Виберіть потрібну програму за допомогою кнопок ▲, ▼, ◄, ►.
Виділіть потрібну програму і натисніть кнопку INFO.
Назва програми знаходиться вгорі екрана посередині.
Щоб отримати докладну інформацію, натисніть кнопку INFO. Детальна інформація містить такі дані: номер каналу,
тривалість, рядок стану, рівень батьківського контролю, інформацію про якість відео (високої чіткості/стандартної
чіткості), режими звуку, субтитри або телетекст, мови субтитрів або телетексту, а також коротку інформацію про вибрану
програму. “...” з’являється, якщо інформація надто довга.
Перемикати режими Текущие и следующие i
Натискайте червону кнопку.
Полн. руков.
У повному довіднику
Швидка прокрутка назад (24 год.).
Швидка прокрутка вперед (24 год.).
Натискайте зелену кнопку.
Натискайте жовту кнопку.
Полн. руков.
1 f tn
2 ITV Play
3 Kerrang!
4 Kiss
5 oneword
6 Smash Hits!
▼
Часы Информация ◄◄ ►► Страница ◄◄ ►► Страница ■ Текущая/Следующая ■ +24 часачаса ■ Выход
DTV Кабель 900 f tn 2:10 Tue 1 Jun
Freshmen On Campus
2:00 - 2:30
No Detailed Information
Сегодня 2:00 - 3:00 3:00 - 4:00
Freshmen O..
Mint Extra
Loaded
Fresh 40 with Dynamite MC
The Distillery
Smash Hits! Sunday
Нет информации
Управління каналами
¦
За допомогою цього меню можна додавати / видаляти або налаштовувати вибрані канали, а також користуватися
довідником з програм для цифрових телеканалів.
Все каналы
Відображає усі наявні канали.
Добавленные каналы
Відображає всі додані канали.
Избранные
Відображає всі вибрані канали.
Щоб вибрати канали зі списку вибраного, натисніть кнопку FAV.CH на пульті ДК.
O
Запрограммированный
824 UKTV Gold
Добавленные каналы
825 UKTV style
1 C --
A
A
2 C --
A
3 ♥ C --
A
4 C --
A
5 C --
A
6 C --
A
7 C --
Все ■ Тип канала ■ Увел. ■ Выбрать T Инструменты
Відображає всі поточні збережені програми.
Щоб вибрати канал у списку Все каналы, Добавленные каналы або Избранные, використовуйте кнопки ▲ / ▼ і
N
ENTERE. Таким чином можна перейти до перегляду вибраного каналу.
Використання кольорових кнопок у списку каналів
N
Червона (Тип канала): дозволяє перемикати між значеннями ТВ, Радио, Данные/ДР. i Все.
–
Зелена (Увел.): збільшує або зменшує номер каналу.
–
Жовта (Выбрать): дозволяє вибрати кілька списків каналів. Операції додавання/видалення, додавання до списку
–
вибраного і видалення з цього списку, а також блокування / розблокування можна виконувати для кількох каналів
одночасно. Виберіть потрібні канали і натисніть жовту кнопку, щоб виконати потрібну дію для всіх вибраних каналів
одночасно. Ліворуч від вибраних каналів з’явиться позначкаc.
TOOLS (Tools): викликає меню Удалить (або Добавить), Добавить к избранному (або Удалить из избранного),
–
Блокировка (або Разблокировка), Просмотр по таймеру, Изменить название канала, Сортировка,
Изменение номера канала, Выбрать все (або Отменить все), Автонастройка. (Доступні меню можливостей
будуть різними, залежно від ситуації).
Page 70

Піктограми відображення стану каналу
N
A
: аналоговий канал.
●
c
: канал, який вибрано за допомогою жовтої кнопки.
●
*
: канал, встановлений як улюблений.
●
(
: програма, яка зараз транслюється.
●
\
: заблокований канал.
●
)
: збережена програма
●
Меню додаткових можливостей для списку каналів (у списках Все каналы / Добавленные каналы / Избранные)
Для виклику меню додаткових можливостей натисніть кнопку TOOLS.
N
Доступні меню можливостей будуть різними, залежно від стану каналу.
N
Добавить / Удалить
Можна редагувати список, видаляючи або додаючи канали.
Усі видалені канали залишатимуться в меню Все каналы.
N
Позначення сірим кольором означає, що канал було видалено.
N
Меню Добавить відображається тільки для видалених каналів.
N
Таким же чином можна видалити канал у списках Добавленные каналы або
N
Избранные.
Добавить к избранному / Удалить из избранного
Канали, які переглядаються часто, можна позначити як улюблені.
Натисніть кнопку TOOLS, щоб відкрити меню Инструменты. Додати (або видалити)
T
канал зі списку вибраного можна також за допомогою пунктів Инструменты → Добавить к избранному (або Удалить
из избранного).
З'явиться позначка “*” і канал буде встановлено як вибраний.
N
Усі улюблені канали відображаються у списку Избранные.
N
Просмотр по таймеру
Якщо Ви зберегли програму у графік, канал автоматично перемкнеться на запрограмований у списку каналів, навіть якщо
ви дивитеся інший канал. Щоб запрограмувати перегляд програми, встановіть спершу поточний час. (Див. стор. 19).
Можна програмувати лише збережені канали.
N
Встановити канал, день, місяць, рік, години і хвилини можна також безпосередньо за допомогою кнопок з цифрами на
N
пульті ДК.
Програмування перегляду програми буде відображено у списку Запрограммированный.
N
Довідник цифрових програм і програмування перегляду
N
Якщо вибрати цифровий канал і натиснути кнопку ►, з'явиться довідник програм для цього каналу. Запрограмувати
перегляд програми можна відповідно до інструкцій, наведених вище.
Изменить название канала (лише аналогові канали)
Каналам можна надати назви для полегшення їх ідентифікації.
Назви цифрових каналів призначаються автоматично і не можуть бути змінені.
N
Изменение номера канала (лише цифрові канали)
Також можна змінити номер каналу за допомогою кнопок із цифрами на пульті ДК.
Сортировка (лише аналогові канали)
Ця функція дозволяє змінювати порядкові номери збережених каналів. Таке впорядкування може бути необхідним після
автоматичного збереження каналів.
Блокировка / Разблокировка
Канал можна заблокувати, щоб його не можна було вибрати або переглядати. Ця функція доступна лише тоді, коли для
пункту Замок встановлено значення Вкл.. (Див. стор. 20).
З'явиться вікно для введення PIN-коду. Введіть чотиризначний PIN-код.
N
PIN-код за замовчуванням для нових телевізорів – “0-0-0-0”. Змінити PIN-код можна, вибравши в меню пункт
N
Изменение PIN.
З’явиться позначка "\", і канал буде заблоковано.
N
Выбрать все / Отменить все
Выбрать все: можна вибрати всі канали у списку.
●
Отменить все: можна скасувати вибір усіх вибраних каналів.
●
Пункт Отменить все можна вибрати лише тоді, коли вибрано принаймні один канал.
N
Автонастройка
Детальніше про налаштування параметрів читайте на стор. 9.
N
Якщо канал заблоковано за допомогою функції Замок, відкриється вікно для введення PIN-коду.
N
824 UKTV Gold
Добавленные каналы
825 UKTV style
1 C --
A
A
2 C --
A
3 ♥ C --
A
4 C --
A
5 C --
A
6 C --
A
7 C --
Все ■ Тип канала ■ Увел. ■ Выбрать T Инструменты
Удалить
Добавить к избранному
Просмотр по таймеру
Изменить название
канала
Сортировка
Блокировка
▼
Українська - 12
Page 71

Українська - 13
Меню додаткових можливостей для списку каналів (у списку Запрограммированный)
Можна переглядати, змінювати або видаляти програмування.
Для виклику меню додаткових можливостей натисніть кнопку TOOLS.
N
Изменение информации
Цей пункт дає змогу змінити програмування перегляду.
Отмена расписаний
Дозволяє скасувати програмування перегляду.
Информация
Виберіть цей пункт, щоб переглянути програмування перегляду (за потреби інформацію
можна змінити).
Выбрать все
Вибір усіх запрограмованих для перегляду програм.
КЕРУВАННЯ ЗОБРАЖЕННЯМ
Налаштування меню зображення
¦
Режим
❑
Можна вибрати тип зображення, який максимально відповідає Вашим потребам у
конкретній ситуації.
Натисніть кнопку TOOLS, щоб відкрити меню Инструменты. Режим зображення
T
також можна встановити, вибравши пункт Инструменты → Реж. изображения.
Динамический
Зображення високої чіткості для перегляду в яскраво освітленому приміщенні.
Стандартный
Зображення оптимальної якості за звичайних умов.
Кино
Зображення для перегляду фільмів у темному приміщенні.
Запрограммированный
1 / 1 / 2009
13:59 5 TV1 Quincy, M.E
18:59 2 TV3 The Equalizer
20:59 2 TV3 McMillan & Wife
Все ■ Увел. ■ Выбрать T Инструменты E Вход
Изображение
Режим :
Подсветка : 7
Контраст : 95
Яркость : 45
Четкость : 50
Цвет : 50
Тон (З/К) : З50 / К50
Изменение информации
Отмена расписаний
Информация
Выбрать все
Стандартный
►
Подсветка / Контраст / Яркость / Четкость / Цвет / Тон(З/К)
❑
Цей телевізор має декілька регульованих параметрів, які дозволяють коригувати якість зображення.
Подсветка: регулює яскравість підсвітки рідкокристалічного екрана.
●
Контраст: регулює рівень контрастності зображення.
●
Яркость: регулює рівень яскравості зображення.
●
Четкость: регулює чіткість країв у зображенні.
●
Цвет: регулює насиченість кольорів у зображенні.
●
Тон(З/К): регулює відтінок кольорів у зображенні.
●
Для початку виберіть режим зображення, який потрібно відрегулювати. Налаштування зберігаються окремо для
N
кожного режиму зображення.
Результат регулювання значень параметрів Подсветка, Контраст, Яркость, Четкость, Цвет або Тон(З/К) одразу
N
відображатиметься на екрані.
У системі PAL, в аналогових режимах ТВ, Внешний, AV, регулювання параметра Тон(З/К) неможливе.
N
У режимі ПК можна змінювати значення лише для параметрів Подсветка, Контраст i Яркость.
N
Налаштування можна регулювати і зберігати окремо для кожного зовнішнього пристрою, підключеного до телевізора.
N
Зменшення яскравості зображення дозволяє суттєво знизити рівень енергоспоживання під час перегляду телевізійних
N
програм та заощадити на електроенергії.
Дополнительные параметры
❑
У новому телевізорі Samsung є можливість виконання ще точніших налаштувань
зображення, ніж у попередніх моделях. Нижче подано короткі інструкції щодо
використання детальних налаштувань зображення.
Дополнительные параметры доступне в режимах Стандартный або Кино.
N
У режимі ПК можна змінювати значення параметрів Гамма і Баланс белого у меню
N
Цвет : 50
Тон (З/К) : З50 / К50
Изображение
Дополнительные параметры ►
Параметры изображения
Сброс настроек изображения
Дополнительные параметры.
Черный тон → Выкл. / Темный / Темнее / Самый темный
Можна вибрати рівень чорного, щоб налаштувати глибину екрана.
Page 72

Автоконтраст → Выкл. / Низкий / Средний / Высокий
Можна налаштувати оптимальний рівень контрастності зображення.
Гамма
Можна налаштувати насиченість основних кольорів (червоного, зеленого і синього).
Цвет. интервал
Палітра кольорів – це матриця, яка складається з червоного, зеленого та синього кольорів. Виберіть палітру кольорів за
своїм смаком, щоб отримати максимально природні кольори.
Исходный: природна палітра кольорів забезпечує глибокі та насичені відтінки кольору.
●
Авто: автоматична палітра кольорів автоматично налаштовується на відображення найбільш природних відтінків
●
кольору, залежно від джерела програми.
Баланс белого
Можна налаштувати температуру кольору, щоб отримати природніші кольори.
К: смещ. / З: смещ. / С: смещ. / К: усил. / З: усил. / С: усил.: Можна налаштувати "температуру" кольору у світлих
●
областях, змінюючи значення R, G, B. Радимо застосовувати це налаштування тільки досвідченим користувачам.
Сброс: встановлені раніше значення балансу білого буде замінено на стандартні заводські налаштування.
●
Телесн. оттенок
За допомогою цього параметра можна підсилити рожевий тон тілесних кольорів зображення.
Після кожної зміни налаштування зображення на екрані буде оновлено.
N
Улучшение кромок → Выкл. / Вкл.
За допомогою цього параметра можна підкреслити контури об’єктів зображення.
Параметры изображения
❑
У режимі ПК в меню Параметры изображения можна регулювати тільки параметри Оттенок і Размер.
N
Оттенок → Хол. / Норм. / Теплый1 / Теплый2
Можна вибрати найбільш приємні для перегляду відтінки кольорів.
Налаштування можна регулювати і зберігати окремо для кожного зовнішнього пристрою, підключеного до телевізора.
N
Теплый1 та Теплый2 активні лише в режимі зображення Кино.
N
Размер
Можна вибрати розмір зображення, який максимально відповідає Вашим потребам у конкретній ситуації.
Натисніть кнопку TOOLS, щоб відкрити меню Инструменты. Також встановити розмір можна, вибравши в меню пункт
T
Инструменты → Разм.изображения.
Широкий aвто: автоматично налаштовує розмір зображення до співвідношення 16:9.
●
16:9: налаштовує розмір зображення до стандарту 16:9 , який підходить для перегляду вмісту DVD та програм
●
широкого формату.
Ш/экр.увл: збільшує зображення до формату, що перевищує 4:3.
●
Увел.: збільшує зображення широкого формату 16:9 (у вертикальному напрямку) до розміру екрана.
●
4:3: цей параметр встановлюється за замовчуванням для відеозображення або звичайного режиму перегляду
●
телепрограм.
По разм. экрана: користуйтеся цією функцією, щоб побачити зображення у повний розмір без обрізування для
●
вхідного сигналу в режимі HDMI (720p/1080i) або Component (1080i).
Параметри режиму вибору розміру зображення можуть відрізнятися залежно від джерела вхідного сигналу.
N
Доступні параметри можуть відрізнятися залежно від вибраного режиму.
N
У режимі ПК можна налаштувати лише режими 16:9 та 4:3.
N
Налаштування можна регулювати і зберігати окремо для кожного зовнішнього пристрою, підключеного до телевізора.
N
Внаслідок перегляду нерухомого зображення впродовж більше 2 годин на екрані можуть з'являтися тимчасові
N
залишкові зображення.
Ш/экр.увл: за допомогою кнопки ► виберіть пункт Позиция і натисніть кнопку ENTERE. Щоб перемістити
N
зображення вниз чи вгору, використовуйте кнопки ▲ та ▼. Потім натисніть кнопку ENTERE.
Увел.: за допомогою кнопки ► виберіть пункт Позиция і натисніть кнопку ENTERE. Щоб перемістити зображення
N
вгору чи вниз, використовуйте кнопки ▲ та ▼. Потім натисніть кнопку ENTERE . За допомогою кнопки ► виберіть
пункт Размер, а тоді натисніть кнопку ENTERE. Використовуйте кнопки ▲ та ▼, щоб збільшити або зменшити
зображення у вертикальному напрямку. Потім натисніть кнопку ENTERE .
Вибравши параметр По разм. экрана у режимах "HDMI (1080i)" або "Component (1080i)": за допомогою кнопок ◄ або
N
► виберіть параметр Позиция. Використовуйте кнопки ▲, ▼, ◄ та ► для переміщення зображення.
Сброс: за допомогою кнопок ◄ або ► виберіть пункт Сброс і натисніть кнопку ENTERE . Таким чином можна
відновити початкові налаштування.
Якщо використовувати функцію По разм. экрана із джерелом вхідного сигналу HDMI 720p, 1 рядок буде обрізаний
N
вгорі, внизу, ліворуч та праворуч, як у режимі обрізання кадру.
Українська - 14
Page 73

Українська - 15
Режим экрана → 16:9 / Ш/экр.увл / Увел. / 4:3
Вибираючи значення Широкий aвто на телевізорі з екраном формату 16:9, можна встановити розмір зображення для
перегляду як широкоформатне зображення 4:3 (Wide Screen Service - WSS) або не встановлювати жодних особливих
налаштувань. Розміри зображення дещо відрізняються у різних країнах Європи, тому користувач має самостійно виконати
налаштування цієї функції.
16:9: встановлення формату зображення 16:9.
●
Ш/экр.увл: збільшення зображення до формату, що перевищує 4:3.
●
Увел.: збільшення розміру зображення на екрані у вертикальному напрямку.
●
4:3: встановлення формату зображення 4:3.
●
Ця функція доступна лише в режимі Широкий aвто.
N
Ця функція недоступна в режимах ПК, компонентному режимі та режимі HDMI.
N
Цифр. ш/под → Выкл. / Низкий / Средний / Высокий / Авто
Якщо телевізор приймає надто слабкий сигнал, можна увімкнути функцію цифрового пониження шуму, щоб знизити рівень
шумів та фантомних зображень на екрані телевізора.
Якщо сигнал слабкий, спробуйте інші можливості, щоб отримати оптимальну якість зображення.
N
ЧерныйHDMI → Норм. / Низкий
Можна безпосередньо вибрати рівень чорного, щоб налаштувати глибину зображення.
Ця функція доступна лише коли до входу HDMI (сигнал RGB) під’єднано зовнішнє джерело сигналу.
N
Режим фильм → Выкл. / Авто
Телевізор можна налаштувати таким чином, що він автоматично розпізнаватиме відеосигнал з різних джерел і автоматичне
регулюватиме зображення для отримання оптимальної якості.
Режим фильм підтримується у режимах TV, AV, COMPONENT(480i/1080i) і HDMI(480i/1080i).
N
Сброс настроек изображения → Сброс настроек / Отмена
❑
Використовується для відновлення всіх налаштувань зображення до стандартних заводських значень.
Виберіть режим зображення, для якого потрібно відновити налаштування. Відновлення налаштувань виконується для
N
кожного режиму зображення.
Сброс настроек: поточні значення зображення повертаються до налаштувань за замовчуванням.
●
Використання телевізора як монітора для комп'ютера
¦
Налаштування програмного забезпечення на ПК (для операційної системи Windows)
Нижче подано параметри налаштування зображення у системі Windows для типового комп’ютера. Зображення на вашому
ПК може бути дещо іншим, залежно від встановленої версії операційної системи Windows та відеокарти комп’ютера. Але
навіть якщо вікна на екрані ПК матимуть інший вигляд, основна інформація відносно налаштування буде ідентичною майже
в усіх випадках. (В іншому випадку, зверніться до виробника комп’ютера або торгового представника компанії Samsung).
1. Виберіть пункт "Панель керування" у меню пуску Windows.
2. Коли вікно панелі керування відкриється, клацніть на "Оформлення й теми". Відкриється діалогове вікно.
3. Коли вікно панелі керування відкриється, клацніть "Дисплей". Відкриється діалогове вікно налаштувань дисплея.
4. Перейдіть до вкладки "Параметри".
Правильне налаштування розміру (роздільної здатності): 1360 X 768 пікселів (оптимально).
Якщо в діалоговому вікні є змога налаштувати вертикальну частоту, правильне значення буде "60" або "60 Гц". В
іншому випадку, просто натисніть "OK" і закрийте діалогове вікно.
Page 74

Режими відображення
Положення та розмір зображення можуть відрізнятися залежно від типу монітора та його роздільної здатності. Радимо
використовувати значення роздільної здатності, подані у таблиці.
Вхідний сигнал D-Sub та HDMI/DVI
Mode
Роздільна
здатність
Горизонтальна частота
(КГц)
Вертикальна частота
(Гц)
Частота піксельної
синхронізації
(МГц)
IBM 640 x 350 31,469 70,086 25,175 +/-
720 x 400 31,469 70,087 28,322 -/+
MAC 640 x 480 35,000 66,667 30,240 -/-
832 x 624 49,726 74,551 57,284 -/-
VESA CVT 720 x 576 35,910 59,950 32,750 -/+
1280 x 720 44,772 59,855 74,500 -/+
1280 x 720 56,456 74,777 95,750 -/+
VESA DMT 640 x 480 31,469 59,940 25,175 -/-
640 x 480 37,500 75,000 31,500 -/640 x 480 37,861 72,809 31,500 -/800 x 600 37,879 60,317 40,000 +/+
800 x 600 46,875 75,000 49,500 +/+
800 x 600 48,077 72,188 50,000 +/+
1024 x 768 48,363 60,004 65,000 -/1024 x 768 56,476 70,069 75,000 -/1024 x 768 60,023 75,029 78,750 +/+
1360 x 768 47,712 60,015 85,500 +/+
VESA GTF 1280 x 720 52,500 70,000 89,040 -/+
Для з’єднання за допомогою кабелю HDMI / DVI слід використовувати вхід HDMI IN 1 (DVI).
N
Режим черезрядкової розгортки не підтримується.
N
У разі вибору нестандартного відеоформату зображення може не відображатися належним чином.
N
Підтримуються роздільний та композитний режими. SOG не підтримується.
N
Полярність
синхронізації
(Г/В)
Налаштування телевізора для роботи з ПК
¦
Попереднє налаштування: натисніть кнопку SOURCE та виберіть режим ПК.
N
Автоподстройка
❑
Автоматичне налаштування дозволяє екрану пристрою самостійно налаштуватися на
вхідний відеосигнал ПК. Грубе, точне налаштування та положення встановлюються
автоматично.
Ця функція не працює, якщо сигнал надходить в режимі DVI-HDMI.
N
Натисніть кнопку TOOLS, щоб відкрити меню Инструменты. Режим автоматичного
T
налаштування також можна увімкнути, вибравши в меню пункт Инструменты →
Автоподстройка.
Экран
❑
Грубо / Точно
Яркость : 45
Четкость : 50
Изображение
Автоподстройка ►
Экран
Дополнительные параметры
Параметры изображения
Сброс настроек изображения
Налаштування якості зображення дозволяє усунути або зменшити шуми зображення. Якщо шуми не вдається усунути за
допомогою самого лише точного налаштування, тоді необхідно відрегулювати оптимальну частоту (за допомогою функції
грубого налаштування) і ще раз виконати точне налаштування. Знизивши рівень шумів, ще раз відрегулюйте положення
зображення за центром екрана.
Положение ПК
Відрегулюйте положення зображення екрана ПК, якщо воно не збігається з екраном телевізора. За допомогою кнопок
▲ або ▼ відрегулюйте положення зображення по вертикалі. За допомогою кнопок ◄ або ► відрегулюйте положення
зображення по горизонталі.
Сброс настр.
Усі налаштування зображення можна відновити до стандартних заводських значень.
Українська - 16
Page 75

Українська - 1
КЕРУВАННЯ ЗВУКОМ
Налаштування меню звуку
¦
Режим → Стандартный / Музыка / Кино / Четкий голос / Польз.
❑
Режим звуку можна вибрати відповідно до власних уподобань.
Натисніть кнопку TOOLS, щоб відкрити меню Инструменты. Режим звуку також
T
можна налаштувати, вибравши в меню пункт Инструменты → Режим звука.
Стандартный
Дозволяє вибрати нормальний режим звуку.
Музыка
Дозволяє виділити музику над голосом.
Кино
Забезпечує найкращий звук для перегляду фільмів.
Четкий голос
Дозволяє виділити голос над музикою.
Польз.
Дозволяє відновити налаштовані параметри звуку.
Эквалайзер
❑
Параметри відтворення звуку можна налаштувати відповідно до Ваших індивідуальних уподобань.
Режим
Режим звуку можна вибрати відповідно до власних уподобань.
Баланс
Цей параметр регулює баланс правого та лівого гучномовців.
100Hz / 300Hz / 1KHz / 3KHz / 10KHz (регулювання частотного діапазону)
Можна окремо регулювати силу звуку в різних частотних діапазонах.
Сброс
Відновлення заводських налаштувань еквалайзера.
Звук
Режим : Польз. ►
Эквалайзер
SRS TruSurround HD : Выкл.
Язык аудио : - - -
Аудиоформат : - - -
Описание аудио
Громкость авто : Выкл.
SRS TruSurround HD → Выкл. / Вкл.
❑
SRS TruSurround HD є запатентованою технологією компанії SRS, що дозволяє вирішити проблему відтворення 5.1канального звуку через два гучномовці. TruSurround відтворює неперевершене віртуальне об’ємне звучання через будь-яку
систему, що складається з двох гучномовців, включаючи внутрішні гучномовці телевізора. Вона повністю сумісна з усіма
багатоканальними форматами.
Натисніть кнопку TOOLS, щоб відкрити меню Инструменты. Технологію SRS TruSurround HD можна також увімкнути,
T
вибравши в меню пункт Инструменты → SRS TS HD.
Язык аудио (лише для цифрових каналів)
❑
Можна змінити мову звукового супроводу за замовчуванням. Відображається інформація про мову для вхідного сигналу.
Можна вибрати лише ту мову, яка вказана у переліку мов трансляції.
N
Аудиоформат → MPEG / Dolby Digital (лише для цифрових каналів)
❑
Якщо звук лунає і через головний гучномовець, і через аудіоприймач, то через різницю у швидкості декодування між
головним гучномовцем та аудіоприймачем може виникати ефект відлуння. У такому разі рекомендуємо увімкнути звук
тільки через гучномовці телевізора.
Аудіоформат відображається відповідно до сигналу мовлення.
N
Page 76

Описание аудио (лише для цифрових каналів)
❑
Це допоміжна функція, котра забезпечує додатковий аудіосупровід для людей із вадами зору. Вона забезпечує звуковий
опис того, що відбувається на екрані, паралельно із основним звуковим сигналом трансляції. Функцію звукового опису
можна вмикати і вимикати, а також регулювати її гучність.
Описание аудио → Выкл. / Вкл.
Увімкнення або вимкнення функції звукового опису.
Громкость
Регулювання гучності звукового опису.
Громкость активний, коли для пункту Описание аудио вибрано значення Вкл..
N
Громкость авто → Выкл. / Вкл.
❑
Кожна телестанція має власні параметри передавання сигналу, тому може виникнути необхідність регулювати гучність
кожного разу під час зміни каналу, що не надто зручно. Ця функція дозволяє виконувати автоматичне регулювання гучності
звуку каналу, зменшуючи її в разі виявлення сильного модуляційного сигналу, та збільшуючи, коли модуляційний сигнал
надто слабкий.
Режим Громкость авто недоступний у компонентному і HDMI режимах.
N
Выбрать громкогов. → Внешний / Громкогов. ТВ
❑
Якщо Ви бажаєте слухати звук через зовнішню аудіосистему, відключіть внутрішній підсилювач.
Кнопки регулювання гучності і кнопка MUTE не працюють, якщо для пункту Выбрать громкогов. встановлено
N
значення Внешний.
Якщо вибрати пункт Внешний у меню Выбрать громкогов., можливості регулювання звуку будуть обмежені.
N
Сброс звука → Для всех режимов / Для текущего режима / Отмена
❑
Налаштування звуку можна відновити до стандартних заводських значень.
Вибір режиму звуку
¦
Режим звуку можна налаштувати у меню Инструменты. Якщо встановити пункт Двойной l ll, на екрані відобразиться
поточний режим звуку.
Тип аудіозвучання Dual 1 / 2 За замовчуванням
Моно MONO
A2 стерео
NICAM
стерео
Якщо стереосигнал є слабким, але цей режим все одно активується автоматично, перемкніться у режим
N
монофонічного звуку.
Ця функція доступна лише для стереосигналу. Вона недоступна для монофонічного сигналу.
N
Ця функція доступна лише в режимі телевізійного мовлення.
N
Стерео STEREO ↔ MONO
Подвійне DUAL 1 ↔ DUAL 2 DUAL 1
Моно MONO
Стерео MONO ↔ STEREO
Подвійне
MONO ↔ DUAL 1
DUAL 2
Автоматична зміна
Автоматична зміна
DUAL 1
Українська - 18
Page 77

Українська - 19
НАЛАШТУВАННЯ
Параметри меню налаштування
¦
Язык
❑
Можна вибрати мову меню.
Время
❑
Часы
Для користування різноманітними функціями телевізора, пов'язаними з таймером,
потрібно налаштувати годинник.
Поточний час відображатиметься щоразу після натиснення кнопки INFO.
N
Після від’єднання кабелю живлення годинник потрібно буде налаштовувати знову.
N
Режим часов
●
Встановити поточний час можна вручну або автоматично.
Авто: використовується для автоматичного встановлення поточного часу на
–
основі даних сигналу цифрового телебачення.
Ручной: використовується для встановлення поточного часу вручну.
–
Інколи після автоматичного встановлення час може відображатися неправильно
N
–
це залежить від отриманого телевізійного сигналу. У такому разі налаштуйте час вручну.
Для автоматичного налаштування часу до телевізора має бути підключена
N
антена або кабель цифрового телебачення.
Установка часов
●
Дозволяє вручну встановити поточний час.
Цей параметр використовується, якщо для пункту Режим часов встановлено значення Ручной.
N
Встановити день, місяць, рік, години і хвилини можна безпосередньо за допомогою кнопок із цифрами на пульті ДК.
N
Таймер сна → Выкл. / 30 мин / 60 мин / 90 мин / 120 мин / 150 мин / 180 мин
Таймер режиму сну автоматично вимикає телевізор через заданий проміжок часу (30, 60, 90, 120, 150 і 180 хвилин).
Коли таймер доходить до 0, телевізор автоматично переходить в режим очікування.
N
Щоб вимкнути функцію Таймер сна, виберіть значення Выкл..
N
Натисніть кнопку TOOLS, щоб відкрити меню Инструменты. Таймер режиму сну можна також встановити, вибравши в
T
меню пункт Инструменты → Таймер сна.
Таймер 1 / Таймер 2 / Таймер 3
Можна зберегти три різні налаштування для таймера увімкнення/вимкнення. Спершу необхідно налаштувати годинник.
Время вкл.: встановіть години, хвилини і увімкніть / вимкніть цей таймер. (Щоб увімкнути таймер із вибраними
●
налаштуваннями, натисніть пункт Активировать).
Время выкл.: встановіть години, хвилини і увімкніть / вимкніть цей таймер. (Щоб увімкнути таймер із вибраними
●
налаштуваннями, натисніть пункт Активировать).
Громкость: Налаштуйте потрібний рівень гучності на час увімкнення телевізора.
●
Антенна: виберіть Антенна або Кабель.
●
Канал: виберіть потрібний канал.
●
Повтор: виберіть Один раз, Ежедневно, Пн~Пт, Пн~Сб, Сб~Вс або Ручной.
●
Якщо встановлено значення Ручной, натисніть кнопку ►, щоб вибрати потрібний день тижня. Вибравши потрібний
N
день, натисніть кнопку ENTERE, після чого з’явиться позначка c.
Встановити години, хвилини і канал можна безпосередньо за допомогою кнопок із цифрами на пульті ДК.
N
Автоматичне вимкнення живлення
N
Коли телевізор вмикається за таймером ввімкнення, він автоматично вимкнеться, якщо протягом 3 годин після ввімкнення
він не отримає жодної команди від користувача. Ця функція доступна лише коли таймер увімкнення активовано; вона
запобігає перенагріванню, яке може трапитися, якщо телевізор залишається увімкненим протягом надто тривалого часу.
Plug & Play
Установка
Язык : Русский ►
Время
Игровой режим : Выкл.
Замок : Вкл.
Изменение PIN
Родит. блокировка
Субтитры
Субтитры
Язык телетекста : - - -
Установка
Предпочтение ►
Цифровой текст : Включить
Мелодия : Средний
Экон. энергии : Выкл.
Общий интерфейc
Игровой режим → Выкл / Вкл.
❑
Підключаючи до телевізора ігрову приставку, таку як PlayStation™ або Xbox™, можна додатково увімкнути ігровий режим.
Щоб від'єднати ігрову приставку і під'єднати інший зовнішній пристрій, скасуйте ігровий режим у меню налаштування.
N
Якщо викликати меню телевізора в режимі Игровой режим, може спостерігатися легке тремтіння зображення.
Игровой режим недоступний у режимах ТВ і ПК.
N
Коли пункт Игровой режим увімкнено:
N
режим зображення автоматично змінюється на Стандартный без можливості регулювання користувачем.
–
режим звуку автоматично змінюється на Польз. без можливості регулювання користувачем. Для регулювання
–
звуку можна скористатися еквалайзером.
Увімкнеться функція відновлення заводських налаштувань звуку. Якщо вибрати функцію відновлення після
–
налаштування параметрів еквалайзера, для них буде відновлено заводські значення.
Page 78

Замок → Выкл. / Вкл.
❑
За допомогою цієї функції можна обмежити перегляд окремих програм певній категорії глядачів, наприклад дітям, шляхом
блокування зображення та звуку.
Перш ніж з’явиться екран налаштування, відобразиться екран для введення PIN-коду. Введіть чотиризначний PIN-код.
N
PIN-код за замовчуванням для нових телевізорів – “0-0-0-0”. Змінити PIN-код можна, вибравши в меню пункт
N
Изменение PIN.
Після цього можна заблокувати певні канали у списку каналів (Див. стор. 12).
N
Замок доступна тільки в режимі перегляду телевізійних програм.
N
Изменение PIN
❑
Можна змінити особистий PIN-код, потрібний для налаштування телевізора.
Перш ніж з’явиться екран налаштування, відобразиться екран для введення PIN-коду. Введіть чотиризначний PIN-код.
N
PIN-код за замовчуванням для нових телевізорів – “0-0-0-0”.
N
Якщо Ви забудете PIN-код, натисніть кнопки на пульті дистанційного керування у такій послідовності, щоб скинути PIN-
N
код до 0-0-0-0: POWER (вимк.) → MUTE → 8 → 2 → 4 → POWER (увімк.).
Родит. блокировка
❑
Ця функція дозволяє запобігти перегляду небажаних телепрограм певною категорією користувачів, наприклад дітьми,
шляхом встановлення 4-значного цифрового PIN-коду.
Налаштування функції батьківського контролю відрізняється, залежно від країни.
N
Перш ніж з’явиться екран налаштування, відобразиться екран для введення PIN-коду. Введіть чотиризначний PIN-код.
N
PIN-код за замовчуванням для нових телевізорів – “0-0-0-0”. Змінити PIN-код можна, вибравши в меню пункт
N
Изменение PIN.
Після завершення налаштування батьківських обмежень буде відображатися символ \.
N
Разр. все: розблокувати всі канали, незалежно від рейтингу.
N
Блок.все: заблокувати всі канали, незалежно від рейтингу.
Субтитры
❑
На телевізорі можна вмикати та вимикати субтитри. Щоб налаштувати режим субтитрів, користуйтеся цим меню. Режим
Норм. у цьому меню – це основні субтитри, а режим Расстр. слуха – це субтитри для людей з вадами слуху.
Субтитры → Выкл. / Вкл.: увімкнення або вимкнення субтитрів.
●
Режим → Норм. / Расстр. слуха: встановлення режиму субтитрів.
●
Язык субтитров: вибір мови субтитрів.
●
Якщо програма, яку Ви переглядаєте, не підтримує режим субтитрів Расстр. слуха, автоматично увімкнеться режим
N
Норм., навіть якщо вибрано режим Расстр. слуха.
Якщо вибрати мову, яка недоступна на цьому каналі, за замовчуванням буде встановлено англійську мову.
N
Ці налаштування також можна вибрати простим натисненням кнопки SUBT. на пульті дистанційного керування.
O
Язык телетекста
❑
Мову телетексту також можна вибрати.
Якщо вибрати мову, яка недоступна на цьому каналі, за замовчуванням буде встановлено англійську мову.
N
Предпочтение
❑
Основной язык аудио / Язык дополнительного аудио / Первичный язык субтитров / Вторичный язык субтитров /
Основной язык телетекста / Дополнительный язык телетекста
За допомогою цієї функції можна вибрати потрібну мову. Вибрана тут мова використовується за замовчуванням під час
вибору користувачем певного каналу.
Якщо змінити налаштування мови, то мова субтитрів, звукового супроводу та телетексту в меню вибору мови автоматично
зміниться на вибране значення.
У підменю вибору мови субтитрів, звукового супроводу та телетексту показано перелік мов, які підтримуються поточним
каналом; вибрані пункти меню виділено. Якщо змінити налаштування мови, нове налаштування буде дійсним лише для
вибраного каналу. Змінене налаштування не змінює значень основної мови субтитрів, звукового супроводу та телетексту,
що встановлюються в меню Preference.
Цифровой текст → Отключить / Включить (лише для Великобританії)
❑
Ця функція вмикається, якщо програма транслюється із цифровим текстом.
MHEG (Multimedia and Hypermedia Information Coding Experts Group)
N
Міжнародний стандарт систем кодування даних, який використовується для мультимедійних та гіпермедійних
файлів. Це вищий рівень кодування, ніж той, що використовується системою MPEG, і включає гіпермедійні файли,
як наприклад фотографії, інформаційні послуги, анімацію, графіку та відео, а також мультимедійні дані. MHEG
– це інтерактивна технологія, яка використовується у різних областях, серед яких: VOD (відео за запитом), ITV
(інтерактивне телебачення), EC (електронна комерція), телеосвіта, телеконференції, цифрові бібліотеки та мережеві
ігри.
Українська - 20
Page 79

Українська - 21
Мелодия → Выкл. / Низкий / Средний / Высокий
❑
Можна налаштувати мелодію для ввімкнення або вимкнення телевізора.
Мелодія не відтворюється
N
коли звук телевізора вимкнений кнопкою MUTE;
–
коли гучність звуку телевізора зменшено до нуля за допомогою кнопки (–) регулювання гучності;
–
коли телевізор вимкнено за допомогою таймера сну.
–
Экон. энергии → Выкл. / Низкий / Средний / Высокий / Авто
❑
За допомогою цієї функції можна налаштувати яскравість екрана, щоб зменшити споживання електроенергії. Якщо Ви
дивитесь телевізор увечері, встановіть для режиму Экон. энергии значення Высокий, щоб зменшити навантаження на зір
та заощадити електроенергію.
Натисніть кнопку TOOLS, щоб відкрити меню Инструменты. Режим енергозбереження також можна встановити,
T
вибравши в меню пункт Инструменты → Экон. энергии.
Общий интерфейc
❑
Меню CI
Дозволяє користувачу вибирати між пунктами меню САМ. Виберіть меню стандартного інтерфейсу на основі меню карти
ПК.
Инфо о приложении
В цьому екрані подано інформацію про модуль CAM, вставлений у гніздо модуля стандартного інтерфейсу.
Відображається інформація про модуль стандартного інтерфейсу. Модуль CAM можна вставити будь-коли, незалежно
N
від того, чи телевізор увімкнено, чи вимкнено.
1. Придбати модуль стандартного інтерфейсу CAM можна в найближчого торгового представника або по телефону.
2. Вставте карту стандартного інтерфейсу до кінця у модуль CAM у напрямку, що вказаний стрілкою.
3. Вставте модуль CAM із картою стандартного інтерфейсу у гніздо для модуля стандартного інтерфейсу. (Вставте
модуль CAM у напрямку стрілки до кінця, щоб він був повністю втоплений у гніздо).
4. Перевірте наявність зображення на каналі з кодованим сигналом.
Роз'єм CAM не передбачений для деяких країн та регіонів. Докладніше запитуйте в місцевого уповноваженого дилера.
N
Page 80

МЕНЮ ВХІДНОГО СИГНАЛУ ТА ПІДТРИМКИ
Налаштування меню вхідного сигналу
¦
Список источников
❑
Використовується для вибору телевізора або інших зовнішніх джерел сигналу, наприклад
DVD-програвача або програвача дисків Blu-Ray чи супутникових приймачів, підключених
до телевізора. Таким чином можна вибирати потрібне джерело сигналу.
ТВ / Внешний / AV / Компонентный / ПК / HDMI1/DVI / HDMI 2 / HDMI 3
Можна вибрати тільки ті зовнішні пристрої, які під’єднані до телевізора. У пункті
N
Список источников підключені пристрої будуть виділені і подані вгорі списку.
Пристрої, які зараз не підключені, будуть подані в кінці списку.
Режим ПК завжди увімкнено.
N
TOOLS (Инструменты): відображення меню Редактир. назв. та Информация.
N
Щоб переглянути наявні зовнішні джерела сигналу, натисніть на пульті ДК кнопку SOURCE. Режим перегляду
O
телевізійних програм можна вибрати натисненням кнопки TV.
Редактир. назв.
❑
Для полегшення вибору джерела вхідного сигналу призначте назви пристроям, підключеним до вхідних роз’ємів.
VHS / DVD / Кабельное ТВ / Спутн.прист. / PVR / АV ресивер / Игра / Камера / ПК / DVI PC / DVI / ТВ / IPTV / Blu- ray /
HD DVD / DMA
У разі під’єднання кабелю HDMI/DVI до входу HDMI IN 1(DVI) у меню Редактир. назв. режиму Вход для пункту HDMI1/
N
DVI слід встановити значення DVI або DVI PC. У такому випадку необхідне окреме з’єднання для передачі звуку.
Налаштування меню підтримки
¦
Вход
Список источников
Редактир. назв.
Самодиагностика
❑
Тест изображения
Якщо Вам здається, що якість зображення незадовільна, можна виконати перевірку
зображення. Подивіться на кольоровий тестовий малюнок і визначте, чи справді має
місце проблема з якістю зображення.
Да
: Якщо тестовий малюнок не з'являється або відображається з шумами, виберіть
●
пункт Да. Можливо, телевізор несправний. Зателефонуйте у центр обслуговування
клієнтів компанії Samsung.
Нет
: Якщо тестовий малюнок відображається добре, виберіть варіант
●
проблема пов'язана з підключеними пристроями. Перевірте підключення. Якщо
проблема не зникає, дивіться посібник користувача для зовнішнього пристрою, що
спричиняє проблему.
Звуковой тест
Якщо Вам здається, що якість звуку незадовільна, можна виконати перевірку звуку. Для перевірки звуку прослухайте
тестову мелодію, записану в пам'яті телевізора. На екрані з'явиться запитання: "Существует ли проблема с этим звуковым
тестом?"
Якщо Ви не чуєте звуку з гучномовців телевізора, перед запуском тесту перевірте, чи в меню звуку для параметра
N
Выбрать громкогов
Тестова мелодія лунатиме навіть якщо для параметра
N
вимкнено кнопкою MUTE.
Да
: якщо під час перевірки Ви не почули тестової мелодії або почули її тільки з одного гучномовця, виберіть відповідь
●
Да
. Можливо, телевізор несправний. Зателефонуйте у центр обслуговування клієнтів компанії Samsung.
Нет
: якщо тестова мелодія нормально відтворюється з обох гучномовців, виберіть
●
з підключеними пристроями. Перевірте підключення. Якщо проблема не зникає, дивіться посібник користувача для
зовнішнього пристрою, що спричиняє проблему.
Информ. о сигнале
На відміну від аналогових каналів, які телевізор може приймати із сильними шумами, цифрові (HDTV) канали приймаються
з ідеальною якістю або не приймаються взагалі. Тому цифровий канал, на відміну від аналогового, неможливо точно
налаштувати. Проте можна відрегулювати положення антени для покращення прийому наявних цифрових каналів.
Якщо покажчик сили сигналу вказує на те, що сигнал слабкий, спробуйте відрегулювати положення антени таким
N
чином, щоб покращити прийом сигналу. Таким чином можна знайти оптимальне положення антени, в якому сила
сигналу, що приймається, буде максимальною.
вибрано значення
(лише для цифрових каналів)
Громкогов. ТВ
.
Выбрать громкогов
Нет
. Можливо,
вибрано значення
Поддержка
Самодиагностика ►
Обновл. ПО
Руководство по соединению c ТВЧ
Обращение в Samsung
Внешний
Нет
. Можливо, проблема пов'язана
або звук
Українська - 22
Page 81

Українська - 23
Обновл. ПО
❑
Щоб мати змогу отримувати нові функції цифрового телебачення, час від часу разом зі
звичайним телевізійним сигналом передаються оновлення програмного забезпечення.
Ці сигнали виявляються автоматично, після чого відображається екран із запитом на
оновлення програмного забезпечення. Ви можете погодитися на встановлення оновлення
або відмовитися.
По USB
Вставте в телевізор USB-пристрій, на якому міститься оновлення вбудованого
програмного забезпечення. Не вимикайте живлення і не виймайте USB-пристрій, поки
Диск USB
Задняя панель
телевизора
застосовуються оновлення. Телевізор вимкнеться і увімкнеться автоматично після
завершення оновлення програмного забезпечення. Після завершення оновлення
перевірте версію вбудованого програмного забезпечення. Коли оновлення програмного
забезпечення буде завершено, буде відновлено заводські налаштування зображення і звуку.
Радимо записати Ваші налаштування, щоб швидко відновити їх після оновлення.
По каналу
Оновлення програмного забезпечення за допомогою телевізійного сигналу.
Обновление в реж. ожидан.
Щоб продовжити оновлення програмного забезпечення з увімкненим живленням, виберіть значення "On" натисненням
кнопки ▲ або ▼. Через 45 хвилин після переходу в режим очікування буде автоматично виконано оновлення вручну.
Оскільки живлення пристрою вмикається внутрішньо, РК екран може легко світитися. Це може тривати понад годину, доки
не завершиться оновлення програмного забезпечення.
Альтернативное ПО
Відображення інформації про версію програмного забезпечення.
Руководство по соединению c ТВЧ
❑
Це меню представляє спосіб з'єднання, який забезпечує оптимальну якість зображення для телевізорів високої чіткості.
У разі під'єднання зовнішніх пристроїв до телевізора див. цю інформацію.
Обращение в Samsung
❑
Перегляньте цю інформацію, якщо телевізор не працює належним чином або якщо потрібно оновити програмне
забезпечення.
Можна переглянути інформацію щодо центру обслуговування, виробу і способу завантаження програмного забезпечення.
Page 82

1
2
3
4
5
6
7
8
9
0
!
#
@
РЕКОМЕНДАЦІЇ З ВИКОРИСТАННЯ
Функція телетексту
¦
Більшість телевізійних станцій пропонують для перегляду текстову інформацію через послугу телетексту. На головній
сторінці телетексту подано інформацію про правила користування послугою. Крім того, можна вибрати різні параметри
відповідно до потреб за допомогою пульта ДК.
Для правильного відображення інформації телетексту необхідно забезпечити стабільність приймання сигналу. В
N
іншому випадку інформація може бути відсутня або можуть не відображатися деякі сторінки.
Сторінки телетексту можна змінювати за допомогою кнопок із цифрами на пульті дистанційного керування.
N
1 0
(режим)
Натисніть, щоб вибрати режим
телетексту (LIST/FLOF). Якщо
натиснути кнопку в режимі LIST,
відбудеться перехід у режим
зберігання до списку. У режимі
зберігання до списку можна
зберегти сторінку телетексту у
список сторінок за допомогою
кнопки 8 (зберегти).
2 8
(зберегти)
Використовується для зберігання
сторінок телетексту.
3 4
(розмір)
Натисніть, щоб вдвічі збільшити
шрифт у верхній половині екрана.
Для нижньої половини екрана
натисніть кнопку ще раз. Щоб
повернутись до звичайного екрана,
натисніть кнопку ще раз.
4 5
(показати)
Використовується для
відображення прихованого тексту
(наприклад, відповідей на питання
вікторин). Щоб повернутись до
звичайного екрана, натисніть
кнопку ще раз.
5
Кольорові кнопки (червона/
зелена/жовта/синя)
Якщо телевізійна компанія
підтримує систему FASTEXT,
різноманітні тематичні розділи,
які відображаються на сторінці
телетексту, матимуть свій кодовий
колір; розділи можна вибирати за
допомогою кольорових кнопок.
Натисніть одну з відповідних
кнопок. Відображається відповідна
сторінка, де кольором виділено
іншу інформацію, яку також можна
вибрати аналогічним чином.
Щоб відобразити попередню
або наступну сторінку, натисніть
відповідну кольорову кнопку.
Інформація на сторінках телетексту поділяється на шість категорій:
Частина Зміст
A Номер вибраної сторінки
B Назва каналу мовлення
C Номер поточної сторінки або результати пошуку
D Дата і час
E Текст
F Інформація про стан
Інформація FASTEXT
6 /
7 :
8 1
9 2
0 3
! 9
@ 6
# 7
(телетекст увімк./зміш.)
Натисніть, щоб увімкнути режим
телетексту, попередньо вибравши
канал, який пропонує послугу
телетексту. Натисніть кнопку
двічі, щоб накласти телетекст на
зображення на екрані.
(вийти)
Дозволяє вийти з режиму телетексту.
(допоміжна сторінка)
Використовується для відображення
наявної допоміжної сторінки.
(наступна сторінка)
Використовується для відображення
наступної сторінки телетексту.
(попередня сторінка)
Використовується для відображення
попередньої сторінки телетексту.
(утримувати)
Дозволяє зберегти на екрані
відповідну сторінку; якщо вибрана
сторінка пов’язана з кількома
додатковими сторінками, вони
відображатимуться одна за одною.
Щоб перейти до попереднього
вигляду екрана, натисніть кнопку
ще раз.
(зміст)
Використовується для відображення
головної сторінки (змісту) у будьякий момент під час перегляду
телетексту.
(скасувати)
Використовується для відображення
телевізійної програми під час пошуку
сторінки.
Українська - 24
Page 83

Українська - 25
Інформація телетексту часто розбивається на декілька сторінок, які відображаються послідовно. Щоб відкрити ці
N
сторінки:
введіть номер сторінки
–
виберіть назву сторінки зі списку
–
виберіть кольоровий заголовок (система FASTEXT)
–
Телевізор підтримує рівень версії телетексту 2.5, що робить можливим відображення додаткової графіки чи тексту.
N
Залежно від умов передавання сигналу, під час відображення телетексту бічні панелі можуть бути порожніми.
N
У такому випадку додаткова графіка чи текст не будуть передані.
N
Телевізори старіших моделей, які не підтримують версію 2.5, не можуть відображати будь-яку додаткову графіку чи
N
текст, незалежно від телетексту, що передається.
Натисніть кнопку TV, щоб вийти з режиму телетексту.
O
Телетекст 16:9, формат зображення 16:9.
O
Встановлення підставки
¦
Попереднє налаштування: вставте напрямну підставку і насадку на підставку і
N
закріпіть їх за допомогою гвинтів. Стосується тільки 32-дюймових моделей.
Передня панель
1. Встановіть телевізор із рідкокристалічним екраном на підставку.
Для перенесення телевізора потрібно щонайменше двоє людей.
N
Зверніть увагу, що передня і задня частини підставки різняться, і під час монтажу
N
їх слід розміщувати відповідним чином.
Щоб упевнитися, що телевізор встановлено на підставку на належному рівні, не
N
тисніть надміру на верхню ліву чи праву сторону телевізора.
Задня панель
2. Вкрутіть два гвинти у положення 1, а тоді інші два у положення 2.
Встановіть виріб вертикально і закрутіть гвинти. Якщо вкручувати гвинти,
N
розмістивши телевізор у лежачому положенні, він може бути прикріплений із
певним нахилом.
Встановлення комплекту настінного кріплення
¦
Комплект настінного кріплення (продається окремо) дозволяє монтувати телевізор на
стіну.
Щоб отримати детальну інформацію про встановлення настінного кріплення, див.
посібник, який додається. Якщо під час встановлення настінного кронштейна у Вас
виникнуть додаткові запитання, зверніться до спеціаліста технічної служби.
Компанія Samsung Electronics не несе відповідальності за ушкодження виробу або
травми, що їх можуть отримати користувачі у випадку самостійного встановлення
телевізора.
Не встановлюйте комплект настінного кріплення, коли телевізор увімкнено. Це
може призвести до травмування внаслідок ураження електричним струмом.
Використання замка “Кенсінгтон” для захисту від крадіжок
¦
Замок “Кенсінгтон” – це пристрій, який використовується для захисту системи під
час використання її у громадському місці. Вигляд замка та спосіб фіксації можуть
відрізнятися від зображеного на малюнку залежно від виробника. Інформацію щодо
належного використання замка “Кенсінгтон” див. у посібнику, який додається. Цей
пристрій продається окремо. Розташування замка “Кенсінгтон” може різнитися залежно
від моделі.
1. Вставте замок в отвір для замка “Кенсінгтон” на РК екрані (1) і поверніть його у
напрямку блокування (2).
2. Під’єднайте кабель замка “Кенсінгтон” (3).
3. Прикріпіть замок “Кенсінгтон” до столу або важкого нерухомого предмета.
3
2
1
Page 84

Забезпечення безпеки у місці встановлення
¦
Забезпечення безпеки у місці встановлення
Дотримуйтесь потрібної відстані між виробом та іншими об’єктами (наприклад стіною) для забезпечення належної
вентиляції.
Недотримання цієї вимоги може призвести до проблем із виробом чи пожежі через підвищення внутрішньої температури
виробу.
Встановлюйте виріб із дотриманням відповідних відстаней, як зазначено на малюнку.
Використовуйте лише підставку і настінне кріплення, які надаються компанією Samsung Electronics.
N
Використання деталей, наданих іншим виробником, може призвести до проблем із виробом чи травмування
–
користувача через падіння виробу.
Використання деталей, наданих іншим виробником, може призвести до проблем із виробом чи пожежі через
–
підвищення внутрішньої температури виробу, що пов’язано з недостатньою вентиляцією.
Вигляд може бути дещо іншим залежно від виробу.
N
У разі встановлення виробу з підставкою
У разі встановлення виробу з настінним кріпленням
10 cm
10 cm
Кріплення телевізора на настінному кронштейні
¦
10 cm
10 cm
Увага. Не тягніть, не штовхайте і не залазьте на телевізор, інакше він може впасти. Особливо зверніть
увагу на те, щоб діти не виснули на телевізорі чи у інший спосіб не розхитували його; в іншому разі
телевізор може перевернутись і призвести до серйозної травми чи смерті. Дотримуйтесь усіх заходів
безпеки, зазначених на листівці з правилами з техніки безпеки. Для додаткової стабільності та задля
безпеки скористайтесь засобом проти падіння, як вказано нижче.
Щоб запобігти падінню телевізора:
1. Вставте гвинти у затискачі і надійно зафіксуйте їх на стіні. Перевірте, чи гвинти
надійно зафіксовані на стіні.
Залежно від типу стіни, можуть знадобитися додаткові засоби, наприклад
N
анкери.
Оскільки затискачі, гвинти і шнурок не додаються, придбайте їх додатково.
N
2. Викрутіть гвинти посередині на задній панелі телевізора, вставте гвинти у
затискачі і знову вкрутіть гвинти.
Гвинти можуть не постачатися разом із виробом. У такому разі, придбайте
N
гвинти, які відповідають поданим далі технічним характеристикам.
Технічні характеристики гвинтів
N
Для 17 – 29-дюймового телевізора з РК екраном: M4 X L15 / для 32 – 40-
–
дюймового телевізора з РК екраном: M6 X L15
10 cm
10 cm
10 cm
Стіна
3. З’єднайте затискачі на телевізорі із затискачами на стіні за допомогою міцного
шнурка, після чого надійно зав’яжіть шнурок.
Встановіть телевізор біля стіни, щоб він не впав назад.
N
Задля безпеки протягніть шнурок так, щоб затискачі на стіні були на одному
N
рівні або нижче затискачів на телевізорі.
Розв’яжіть шнурок, перш ніж пересувати телевізор.
N
4. Перевірте, чи усі з’єднання виконано належним чином. Час від часу перевіряйте
з’єднання на наявність пошкодження чи послаблення. Якщо у вас виникли сумніви
щодо надійності з’єднань, зверніться до професійного монтажника.
Українська - 26
Стіна
Page 85

Українська - 2
Усунення несправностей: перед тим, як звернутися до центру обслуговування
¦
Немає звуку або зображення Перевірте підключення кабелю живлення до настінної розетки.
Зображення нормальне, але звуку
немає
Екран темний, індикатор живлення
постійно миготить
Зображення немає або
зображення чорно-біле
Перешкоди у звучанні та
зображенні
Розпливчасте або нечітке
зображення, спотворений звук
Неправильна робота пульта ДК Замініть батареї у пульті ДК.
З’являється повідомлення про
необхідність перевірки кабелю
передачі сигналу "Проверьте
сигнальный кабель’".
У режимі ПК з’являється
повідомлення про те, що режим
не підтримується "Режим не
поддерживается".
В куті екрана відображається
пошкоджене зображення
З'являється повідомлення про
скидання усіх налаштувань
до заводських значень
"Восстановление значений по
умолчанию для всех настроек".
Якщо впритул подивитись на
край панелі, яка оточує екран
телевізора, можна побачити
маленькі часточки.
Телевізор із TFT-екраном містить підпіксели 3 133 440 і його виготовлення потребує застосування складних сучасних
N
технологій. Проте на екрані можуть з’явитися декілька світлих чи темних пікселів. Такі поодинокі піксели не впливають
на якість роботи виробу.
●
Упевніться, що Ви натиснули кнопку на передній панелі телевізора.
●
Перевірте рівень контрастності та яскравості зображення.
●
Перевірте рівень гучності.
●
Перевірте рівень гучності.
●
Перевірте, чи не було натиснуто кнопку MUTEM на пульті ДК.
●
Перевірте налаштування Выбрать громкогов..
●
Перевірте на комп’ютері: живлення, кабель передачі сигналу.
●
У телевізорі спрацювала система заощадження енергії.
●
Поворухніть мишкою або натисніть будь-яку клавішу на клавіатурі комп’ютера.
●
Відрегулюйте параметри кольору.
●
Перевірте правильність вибору системи мовлення.
●
Дізнайтесь, який саме електричний пристрій впливає на роботу телевізора, та
●
відсуньте його трохи далі.
Під’єднайте телевізор до іншої розетки живлення.
●
Перевірте напрямок, розташування та під’єднання антени.
●
Перешкоди часто з’являються внаслідок використання кімнатної антени.
●
●
Очистьте вікно проходження сигналу пульта ДК (верхній край пульта).
●
Перевірте контакти батарей.
●
Перевірте, чи кабель передачі сигналу добре під’єднаний до комп’ютера чи
●
джерела відеосигналу.
Перевірте, чи комп’ютер або джерело відеосигналу увімкнено.
●
Перевірте максимальну роздільну здатність і частоту відеоадаптера.
●
Порівняйте ці значення з даними режимів зображення.
●
Якщо в деяких зовнішніх пристроях вибрано налаштування По разм. экрана,
то зображення в куті екрана може бути пошкоджено. Причиною цього є зовнішні
пристрої, а не телевізор.
Це повідомлення з’являється, якщо натиснути і утримувати кнопку EXIT.
Налаштування виробу буде скинуто до заводських значень.
Це є частиною дизайну виробу і не є несправністю.
Технічні характеристики
¦
Модель LE26B460B LE32B460B
Розмір екрана
(по діагоналі) 26 дюймівдюймів 32 дюймівдюймів
Роздільна здатність ПК
(оптимальна) 1360 x 768 за частоти 60 Гц 1360 x 768 за частоти 60 Гц
звук
(Вихідний) 5 Вт X 2Вт X 2 X 2 5 Вт X 2Вт X 2 X 2
Розміри (ШxГxВ)
Корпус
З підставкою
Вага
З підставкою 8 кгкг 12 кгкг
Вимоги щодо навколишнього середовища
Робоча температура
Робоча вологість
Температура зберігання
Вологість зберігання
Поворотна підставка
Ліворуч / праворуч 0˚ -20˚ ~ 20˚
Конструкція та технічні характеристики можуть бути змінені без попередження.
N
Цей пристрій належить до цифрових пристроїв класу В.
N
Номінальні параметри живлення і потужності для цього виробу вказані на наклейці.
N
668 x 77 x 446 мм
668 x 216 x 493 мм
10°C – 40°C (50°F– 104°F)
10% – 80% без конденсації
-20°C – 45°C (-4°F– 113°F)
5% – 95% без конденсації
798 x 77 x 519 мм
798 x 240 x 579 мм
10°C – 40°C (50°F– 104°F)
10% – 80% без конденсації
-20°C – 45°C (-4°F– 113°F)
5% – 95% без конденсації
 Loading...