

Samsung LCD TV LE26R52BD, LE32R52BD Owner's Instructions Manual
LCD TV
LE26R52BD
LE32R52BD
Owner’s Instructions
Before operating the unit,
please read this manual thoroughly,
and retain it for future reference.
-
AFTER SALES SERVICE
-
Do not hesitate to contact your retailer or service agent if a
change in the performance of your product indicates that a
faulty condition may be present.
BN68-00966A-00
ON-SCREEN MENUS
PC DISPLAY
PICTURE IN PICTURE (PIP)
TELETEXT
This device is a Class B digital apparatus.
Register your product at
www.samsung.com/global/register
Correct Disposal of This Product
(Waste Electrical & Electronic Equipment)
(Applicable in the European Union and other European
countries with separate collection systems)
This marking shown on the product or its literature,
indicates that it should not be disposed with other
household wastes at the end of its working life. To prevent possible
harm to the environment or human health from uncontrolled waste
disposal, please separate this from other types of wastes and recycle
it responsibly to promote the sustainable reuse of material resources.
Household users should contact either the retailer where they
purchased this product, or their local government office, for details of
where and how they can take this item for environmentally safe
recycling.
Business users should contact their supplier and check the terms and
conditions of the purchase contract. This product should not be mixed
with other commercial wastes for disposal.
BN68-00966A-00Cover.qxd 10/4/05 3:05 PM Page 1
Precautions When Displaying a Still Image
A still image may cause permanent damage to the TV screen.
WARNINGS:
Image retention, commonly known as screen burn-in, can occur on most types of television if the same image is
displayed continuously.
The most common causes of image retention are logos that remain stationary on the TV screen. These logos are
common on many programmes received via a Setop Box. To reduce this risk, avoid displaying still images for long
durations and lower the brightness or contrast settings to decrease the intensity of the picture.
Extended viewing of movies and programs in aspect ratios that are different from the aspect ratio of the TV may
cause image retention. Always endevour to avoid black borders top or bottom by using the zoom function. This will
help eliminate the black borders and fit the picture to the entire area of the screen.
Using a video game console may cause image retention and is not recommended.
When using a PC input, avoid displaying still images for long durations and reduce the brightness or contrast
settings to decrease the intensity of the picture.
IMPORTANT:
Image retention issues are not covered by your Samsung® warranty.
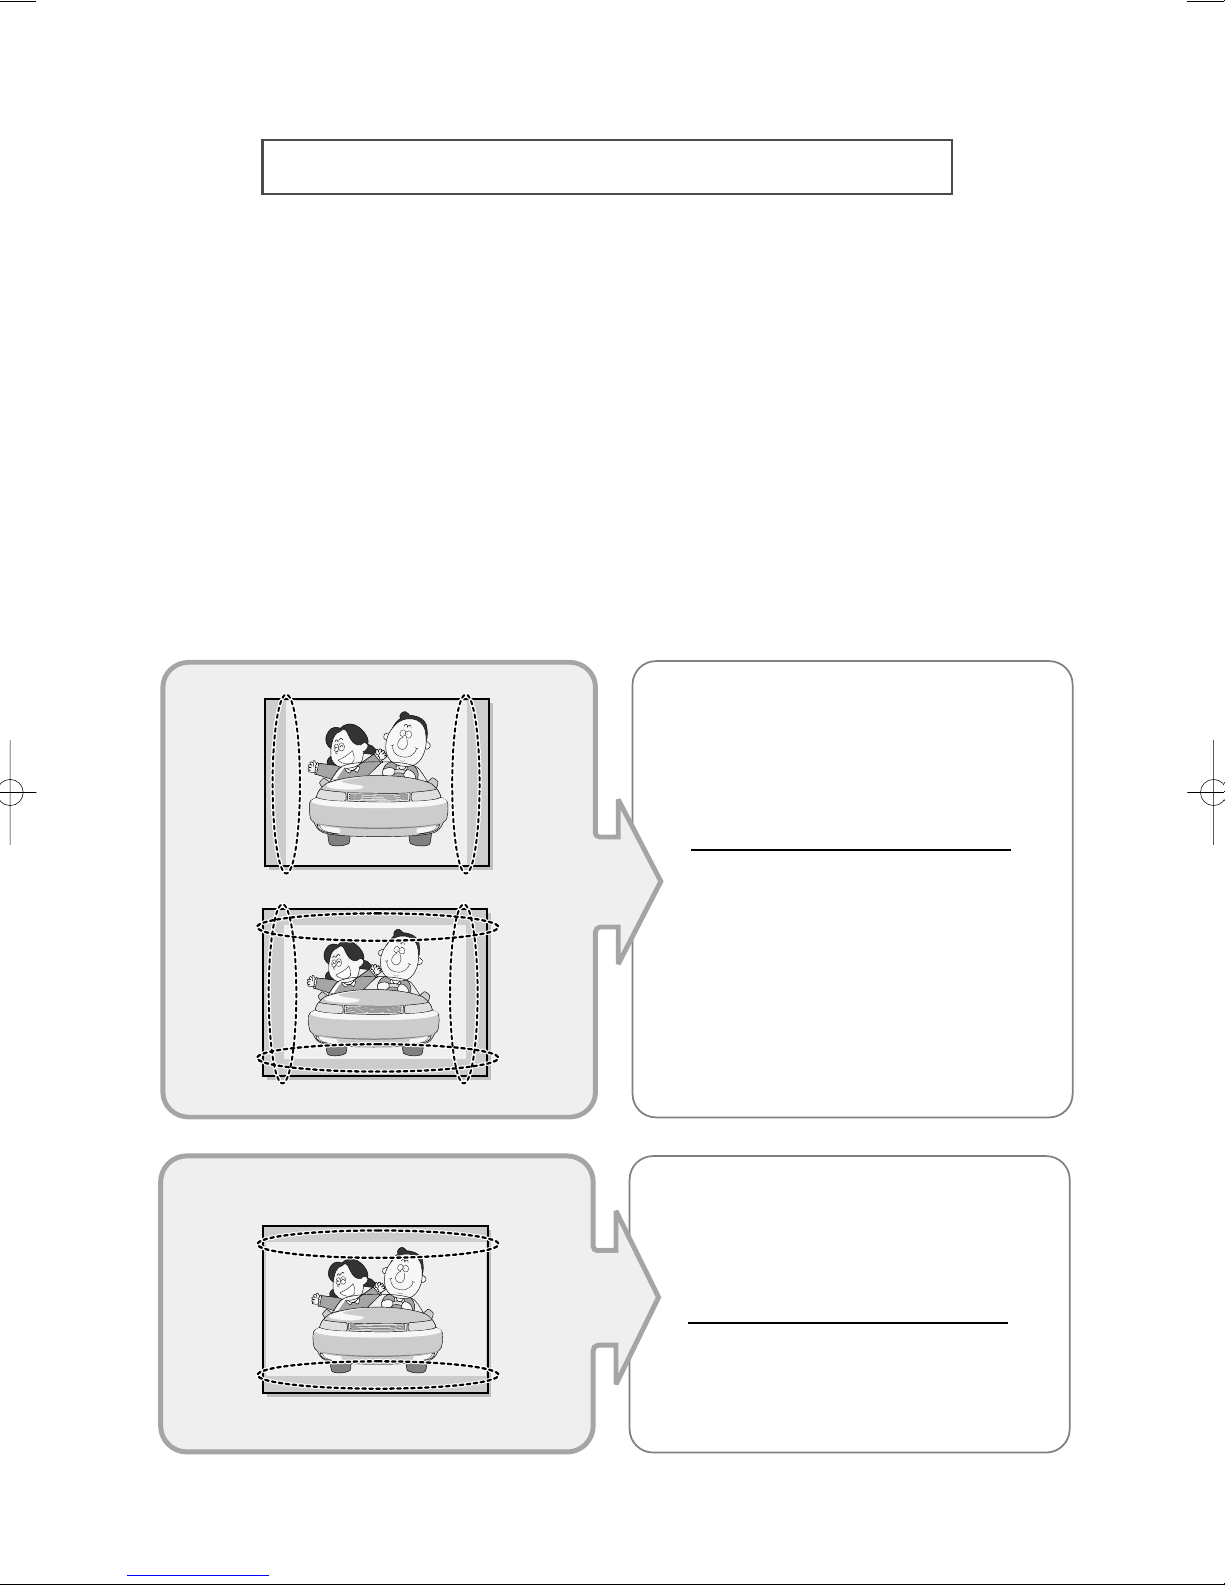
Note : If there are borders around the
displayed picture (top or sides), then
extended viewing could result in the
border leaving a trace image on the
screen.
Do not leave the screen in pause mode for
extended periods of time as you may
experience temporary or permanent image
burn.
Note : If there are borders around the
displayed picture (top or sides), then
extended viewing could result in the
border leaving a trace image on the
screen.
Do not leave the screen in pause mode for
extended periods of time as you may
experience temporary or permanent image
burn.

Note : If there are borders around the
displayed picture (top or sides), then
extended viewing could result in the
border leaving a trace image on the
screen.
Do not leave the screen in pause mode for
extended periods of time as you may
experience temporary or permanent image
burn.
Note : If the borders at the left, right and the
center of the screen remain fixed for
an extended period of time, the
amount of light transmission will also
remain varied and as a result the
borders may leave traces.
Do not leave the screen in pause mode for
extended periods of time as you may
experience temporary or permanent image
burn.
Remote Control/
AAA Batteries
Cleaning Cloth
Cover-Bottom
Warranty Card /
Registration Card
Power Cord
Owner’s Instructions
Stand / Stand Screw
Safety Guide
Checking Parts
RF Cable
D-Sub Cable
PC Audio Cable
Sold Separately
Component Cables
DVI Cable
S-VIDEO Cable
(RCA)
HDMI Cable
Scart Cable
Contents
CONNECTING AND
Viewing the Control Panel ............................................................................................................................... 4
Viewing the Connection Panel......................................................................................................................... 5
- Connecting an Aerial or Cable Television Network .................................................................................... 6
- Connecting Component Devices (DVD) ..................................................................................................... 6
- Connecting External A/V Devices ............................................................................................................... 6
- SERVICE ..................................................................................................................................................... 6
- Connecting Set-Top Box, VCR or DVD ...................................................................................................... 6
- Connecting HDMI/DVI ................................................................................................................................. 7
- Connecting Computer ................................................................................................................................. 7
- Connecting AUDIO...................................................................................................................................... 7
- Kensington Lock .......................................................................................................................................... 7
- Connecting CI (Common Interface) Card................................................................................................... 8
- Service Post................................................................................................................................................. 8
Viewing the Remote Control (All Functions Except Teletext)......................................................................... 9
Viewing the Remote Control (Teletext Functions) .......................................................................................... 10
Installing Batteries in the Remote Control....................................................................................................... 11
Switching On and Off ....................................................................................................................................... 12
Placing Your Television in Standby Mode ....................................................................................................... 12
Becoming Familiar with the Remote Control .................................................................................................. 13
Plug and Play ................................................................................................................................................... 14
Choosing Your Language ................................................................................................................................ 15
PREPARING YOUR TV
SETTING THE CHANNELS
Storing Channels Automatically....................................................................................................................... 16
Storing Channels Manually.............................................................................................................................. 17
Editing the Channels ........................................................................................................................................ 19
Sorting the Stored Channels ........................................................................................................................... 20
Assigning Channels Names ............................................................................................................................ 21
Fine Tuning Channel Reception ...................................................................................................................... 22
LNA (Low Noise Amplifier)............................................................................................................................... 23
SETTING THE
PICTURE
Changing the Picture Standard ....................................................................................................................... 24
Adjusting the Custom Picture .......................................................................................................................... 25
Changing the Colour Tone............................................................................................................................... 26
Resetting the Picture Settings to the Factory Defaults ................................................................................... 26
Changing the Picture Size ............................................................................................................................... 27
Freezing the Current Picture ........................................................................................................................... 28
Using the Digital NR (Digital Noise Reduction) Feature ................................................................................. 28
DNIe (Digital Natural Image engine) ............................................................................................................... 29
My Colour Control ............................................................................................................................................ 30
Dynamic Contrast............................................................................................................................................. 31
Brightness Sensor............................................................................................................................................ 32
Viewing the Picture In Picture (PIP) ................................................................................................................ 33
SETTING THE SOUND
Adjusting the Volume ....................................................................................................................................... 35
Switching the Sound Off Temporarily .............................................................................................................. 36
Selecting the Sound Mode .............................................................................................................................. 36
Changing the Sound Standard ........................................................................................................................ 37
Adjusting the Sound Settings .......................................................................................................................... 37
Setting the TruSurround XT (SRS TSXT) ...................................................................................................... 38
Adjusting the Volume Automatically ................................................................................................................ 39
Connecting Headphones ................................................................................................................................ 40
Selecting the Internal Mute .............................................................................................................................. 40
Listening to the Sound of the Sub Picture ...................................................................................................... 41
SETTING THE TIME
Setting and Displaying the Current Time ........................................................................................................ 42
Setting the Sleep Timer .................................................................................................................................... 43
Switching the Television On and Off Automatically ........................................................................................ 44
English-2

Contents
SETTING THE OTHERS
Activating the Child Lock ........................................................................................................................ 45
Setting the Blue Screen Mode ................................................................................................................ 46
Selecting the Melody .............................................................................................................................. 46
Colour Weakness .................................................................................................................................... 47
Selecting a Device from External Sources ............................................................................................ 48
Viewing Pictures from External Sources ................................................................................................ 49
USING THE
DTV FEATURE
Previewing the DTV Menu System ........................................................................................................ 50
Updating the Channel List Automatically ................................................................................................ 51
Updating the Channel List Manually ...................................................................................................... 52
Editing Your Favourite Channels ............................................................................................................ 53
Selecting Channel List ............................................................................................................................ 55
Viewing Channel Lists ............................................................................................................................ 55
Displaying Programme Information ........................................................................................................ 56
Viewing the EPG (Electronic Programme Guide) Information .............................................................. 57
Using the Scheduled List ........................................................................................................................ 59
Setting the Default Guide ........................................................................................................................ 60
Viewing All Channels and Favourite Channels ...................................................................................... 61
Selecting Language ................................................................................................................................ 62
Adjusting the Translucency Level .......................................................................................................... 63
Setting up the Parental Lock .................................................................................................................. 64
Setting the Subtitle .................................................................................................................................. 65
Selecting the Preferred Language (Subtitle or Audio) .......................................................................... 66
Viewing Product Information .................................................................................................................. 67
Checking the Signal Information ............................................................................................................ 68
Upgrading the Software (Option) ............................................................................................................ 69
Viewing Common Interface .................................................................................................................... 70
Selecting the CI (Common Interface)Menu .......................................................................................... 71
Resetting.................................................................................................................................................. 72
SETTING THE PC
Setting up Your PC Software (Based on Windows XP) ........................................................................ 73
Adjusting the PC Screen Automatically .................................................................................................. 74
Coarse and Fine Tuning of the Image .................................................................................................... 75
Changing the Image Position .................................................................................................................. 76
Initializing the Image Settings ................................................................................................................ 77
USING THE TELETEXT FEATURE
Teletext Decoder...................................................................................................................................... 78
Displaying the Teletext Information ........................................................................................................ 78
Selecting a Specific Teletext Page.......................................................................................................... 79
Using Fastext to Select a Teletext Page ................................................................................................ 80
RECOMMENDATIONS FOR USE
Troubleshooting: Before Contacting Service Personnel ........................................................................ 81
Installing the Wall Mount Kit (LE26R52BD)............................................................................................ 82
Installing the Wall Mount Kit (LE32R52BD)............................................................................................ 84
Installing the Stand .................................................................................................................................. 86
Using the Anti-Theft Kensington Lock .................................................................................................. 87
Technical and Environmental Specifications .......................................................................................... 88
Display Mode (PC) .................................................................................................................................. 89
Pin Configurations .................................................................................................................................. 90
Symbols
Press Important Note
English-3

Viewing the Control Panel
SOURCE
Displays a menu of all of the available input
sources (TV, DTV, Ext.1, Ext.2, AV, S-Video,
Component, PC, HDMI).
In the on-screen menu, use this button as you
use the ENTER button on the remote control.
MENU
Press to see an on-screen menu of
your TV’s features.
In case of DTV mode, the DTV menu appears.
-
+
Press to decrease or increase the volume.
In the on-screen menu, use the
as you use the
control.
Press to change channels.
In the on-screen menu, use the
buttons as you use the and buttons on the
remote control.
English-4
and buttons on the remote
(Power)
Press to turn the TV on and off.
Power Indicator
Blinks and turns off when the power is on and
lights up in stand-by mode.
Light Detecting Sensor
Adjusts brightness of screen automatically by
detecting brightness of surrounding
environment. This sensor works when
Brightness Sensor is on.
-
+
buttons
Remote Control Sensor
Aim the remote control towards this spot
on the TV.
Speakers

Viewing the Connection Panel
Power Input
Whenever you connect an audio or video system to your set, ensure that all elements are
switched of
When connecting an external device, match the color of the connection terminal to the cable.
f.
English-5

Viewing the Connection Panel
Connecting an Aerial or Cable Television Network
To view television channels correctly, a signal must be received by the set from one of the following sources:
- An outdoor aerial
- A cable television network
- A satellite network
Connecting Component Devices (DVD)
- Connect component video cables to component connectors (“PR”, “PB”, “Y”) on the rear of your set and
the other ends to corresponding component video out connectors on the DVD.
- The P
- Connect RCA audio cables to “R - AUDIO - L” on the rear of your set and the other ends to
Connecting External A/V Devices
- Connect RCA or S-VIDEO cable to an appropriate external A/V device such as VCR, DVD or Camcorder.
- Connect RCA audio cables to “R - AUDIO - L” on the rear of your set and the other ends to
- Headphone may be connected to the headphone output ( ) on the rear of your set. While the
R, PB and Y connectors on your component devices or DVD are sometimes labeled Y, B-Y
and R-Y or Y, Cb and Cr.
corresponding audio out connectors on the DVD.
corresponding audio out connectors on the A/V device.
headphone is connected, the sound from the built-in speakers will be disabled.
SERVICE
- Connectors for engineer.
Connecting Set-Top Box, VCR or DVD
- Connect the VCR or DVD SCART cable to the SCART connectors of the VCR or DVD.
- If you wish to connect both the Set-Top Box and VCR (or DVD), you should connect the Set-Top Box
to the VCR (or DVD) and connect the VCR (or DVD) to your set.
Input/Output Specification
Connector
SCART 1 (EXT 1)
SCART 2 (EXT 2)
Video Audio (R/L) S-Video RGB Video+Audio (R/L)
Input Output
TV/DTV AV
Monitor Out
(TV/DTV AV/Ext. 1/Ext. 2/AV/S-VHS)
English-6

Viewing the Connection Panel
Connecting HDMI/DVI
- Supports connections between HDMI-connection-enabled AV devices (set top boxes, DVD players and
AV receivers).
- No additional sound connection is needed for a HDMI to HDMI link
What is HDMI?
- HDMI, or high-definition multimedia interface, is a next-generation interface that enables the
transmission of digital audio and video signals using a single cable without compression.
- “Multimedia interface” is a more accurate name for it especially because it allows multiple channels of
digital audio (5.1 channels).The difference between HDMI and DVI is that the HDMI device is smaller
in size, has the HDCP (High Bandwidth Digital Copy Protection) coding feature installed, and
supports multi - channel digital audio.
- Use the HDMI/DVI terminal for DVI connection to an extended device.
You should use the DVI-to-HDMI cable or DVI-HDMI adapter for the connection, and the
“R - AUDIO - L” terminal on DVI for sound output.
Connecting Computer
- Connect the D-Sub cable to “PC (PC IN)” on the rear of your set and the other end to the D-Sub connector
of the Video Card on your computer.
- Connect the stereo audio cable to “AUDIO (PC IN)” on the rear of your set and the other end to
“Audio Out” of the sound card on your computer.
Connecting AUDIO
- Connect RCA audio cables to “R - AUDIO - L” on the rear of your set and the other ends to corresponding
Audio In connectors on the Amplifier or DVD Home Theater.
Speaker SCART2 Out & Audio Out
DTV-AV,Scart,AV,S-Video
Sound Output
Sound Output
Sound Output
Component,PC,HDMI
Sound Output
Sound Output
Sound Output
Internal Mute Off
Internal Mute On
Video No Signal
TV
Speaker Output
Mute
Mute
DTV-AV,Scart,AV,S-Video
Speaker Output
Mute
Mute
Component,PC,HDMI
Speaker Output
Mute
Mute
Sound Output
Sound Output
TV
Mute
DIGITAL AUDIO OUT (OPTICAL)
- Using an optical digital audio cable, this jack allows you to connect your WIRELESS HOME AV CENTER
to a Home Theater or A/V receiver with an optical digital audio input.
Kensington Lock
- Refer to “Using the Anti-Theft Kensington Lock” on page 87.
< LE26R52BD > < LE32R52BD >
English-7

Viewing the Connection Panel
TV Rear Panel
CI Card
Please insert
the card as shown
Connecting CI (Common Interface) Card
- When not inserting “CI Card” in some channels, “Scramble Signal” is displayed on
the screen.
- The pairing information containing a telephone number, CI CARD ID, Host ID,
and other information will be displayed in about 2~3 minutes. If an error message is
displayed, please contact your service provider.
- When the channel information configuration has finished, the message "Updating
Completed" is displayed, indicating that the channel list is now updated.
You must obtain a CI CARD from a local cable service provider.
Remove the CI CARD by carefully pulling it out with your hands since
dropping the CI CARD may cause damage to it.
Service Post
- Connectors for engineer.
English-8

Viewing the Remote Control (All Functions Except Teletext)
Television Standby button
(Refer to page 12)
Selects the TV mode directly
Number buttons for
direct channel access
Electronic Program Guide (EPG) display
Temporary sound switch-off
(Refer to page 36)
-Volume increase
-Volume decrease
(Refer to page 35)
DTV menu display
Displays the main on-screen menu.
(Refer to page 13)
DTV MHEG menu display
Selects the DTV mode directly
DTV Channel list display
Previous channel
Available source selection
(Refer to page 48)
-Next channel
-Previous channel
(Refer to page 13)
Use to see information on the
current broadcast.
(Refer to page 42)
Exit the OSD
(Refer to page 13)
Picture size selection
(Refer to page 27)
Digital subtitle display
Sound effect selection
(Refer to page 37)
Sound mode selection
(Refer to page 36)
DNIe Demo On/Off
(Refer to page 29)
Picture freeze
(Refer to page 28)
The performance of the remote control may be affected by bright light.
Control the cursor in the menu
(Refer to page 13)
Automatic Power-off
(Refer to page 43)
Picture effect selection
(Refer to page 24)
PIP functions; (
PIP : PIP On/Off
P / : PIP channel selection
SWAP : Interchange the main and
Refer to pages 33~34
sub picture
)
English-9

Viewing the Remote Control (Teletext Functions)
Teletext display/Mix both teletext
information and he normal broadcast
Teletext hold
P : Teletext next page
P : Teletext previous page
Teletext index
Teletext size selection
Teletext store
Teletext mode selection
LIST/FASTEXT
Teletext reveal
Teletext sub page
Teletext cancel
English-10
Teletext Function : Refer to pages 78-80 for details
Installing Batteries in the Remote Control
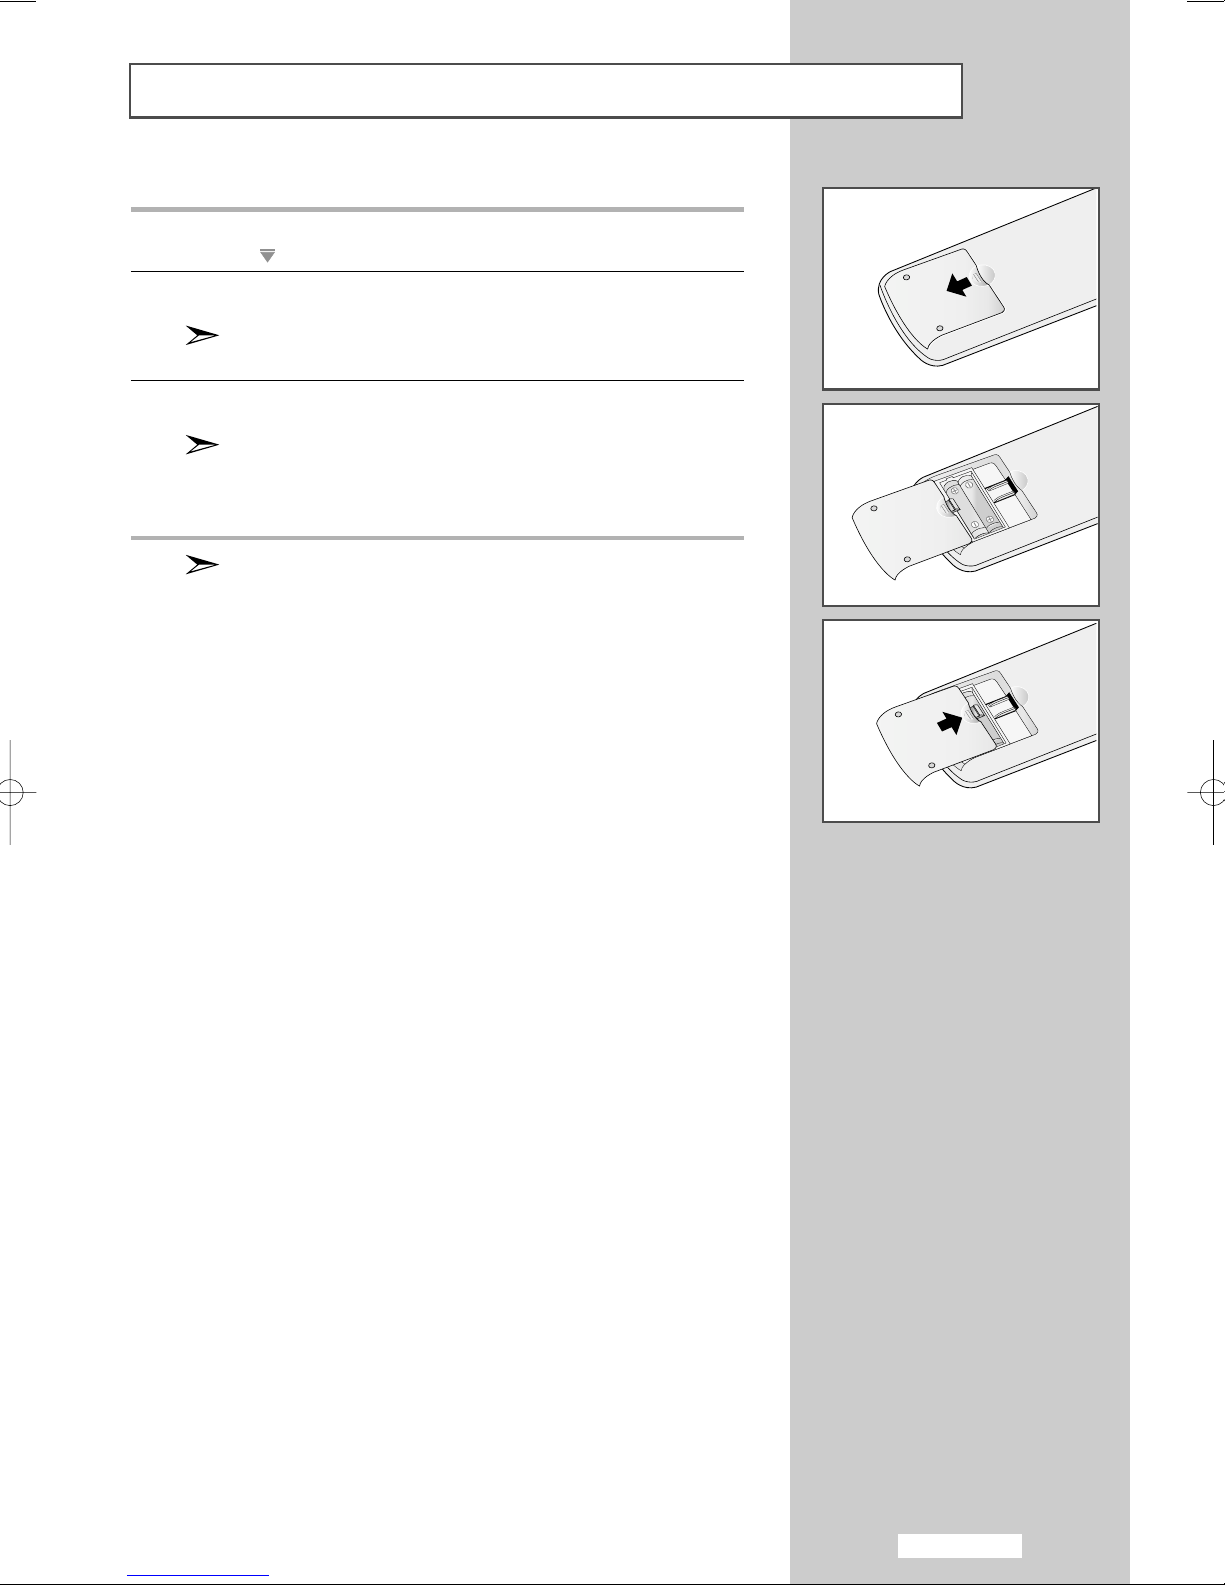
1 Remove the cover on the rear of the remote control by pressing the
symbol ( ) downwards and then pulling firmly to remove it.
2 Install two AAA size batteries.
Make
sure to match the “+” and “–” ends of the batteries with
the diagram inside the compartment.
3 Replace the cover.
Remove the batteries and store them in a cool, dry place
if you won’t be using the remote control for a long time.
The remote control can be used up to about 23 feet from the TV.
(Assuming typical TV usage, the batteries last for about one year.)
If the remote control doesn’t work!
Check the following:
1. Is the TV power on?
2. Are the plus and minus ends of the batteries reversed?
3. Are the batteries drained?
4. Is there a power cut, or is the power cord unplugged?
5. Is there a special fluorescent light or a neon sign nearby?
English-11

Switching On and Off
The mains lead is attached to the rear of your set.
1 Plug the mains lead into an appropriate socket.
Result
:
The standby indicator lights up on the front panel.
The main voltage is indicated on the rear of your set and the
frequency is 50 or 60Hz.
2 Press the
Result
POWER
:
The programme that you were watching last is reselected
automatically.
button on the front of the panel.
3 Press the numeric button (0~9) or channel up/down ( / ) button
on the remote control or button on the right side of
the panel.
4 To switch your set off, press the
POWER
Placing Your Television in Standby Mode
Your set can be placed in standby mode in order to reduce the power
consumption. The standby mode can be useful when you wish to
interrupt viewing temporarily (during a meal, for example).
button again.
English-12
1 Press the
Result
POWER
:
The screen is turned off and a red standby indicator
appears on the front of your set.
button on the remote control.
2 To switch your set back on, simply press the
buttons (0~9) or channel up/down ( / ) button again.
Do not leave your set in standby mode for long periods of time (when you are
away on holiday, for example).
It is best to unplug the set from the mains and aerial.
POWER
, number
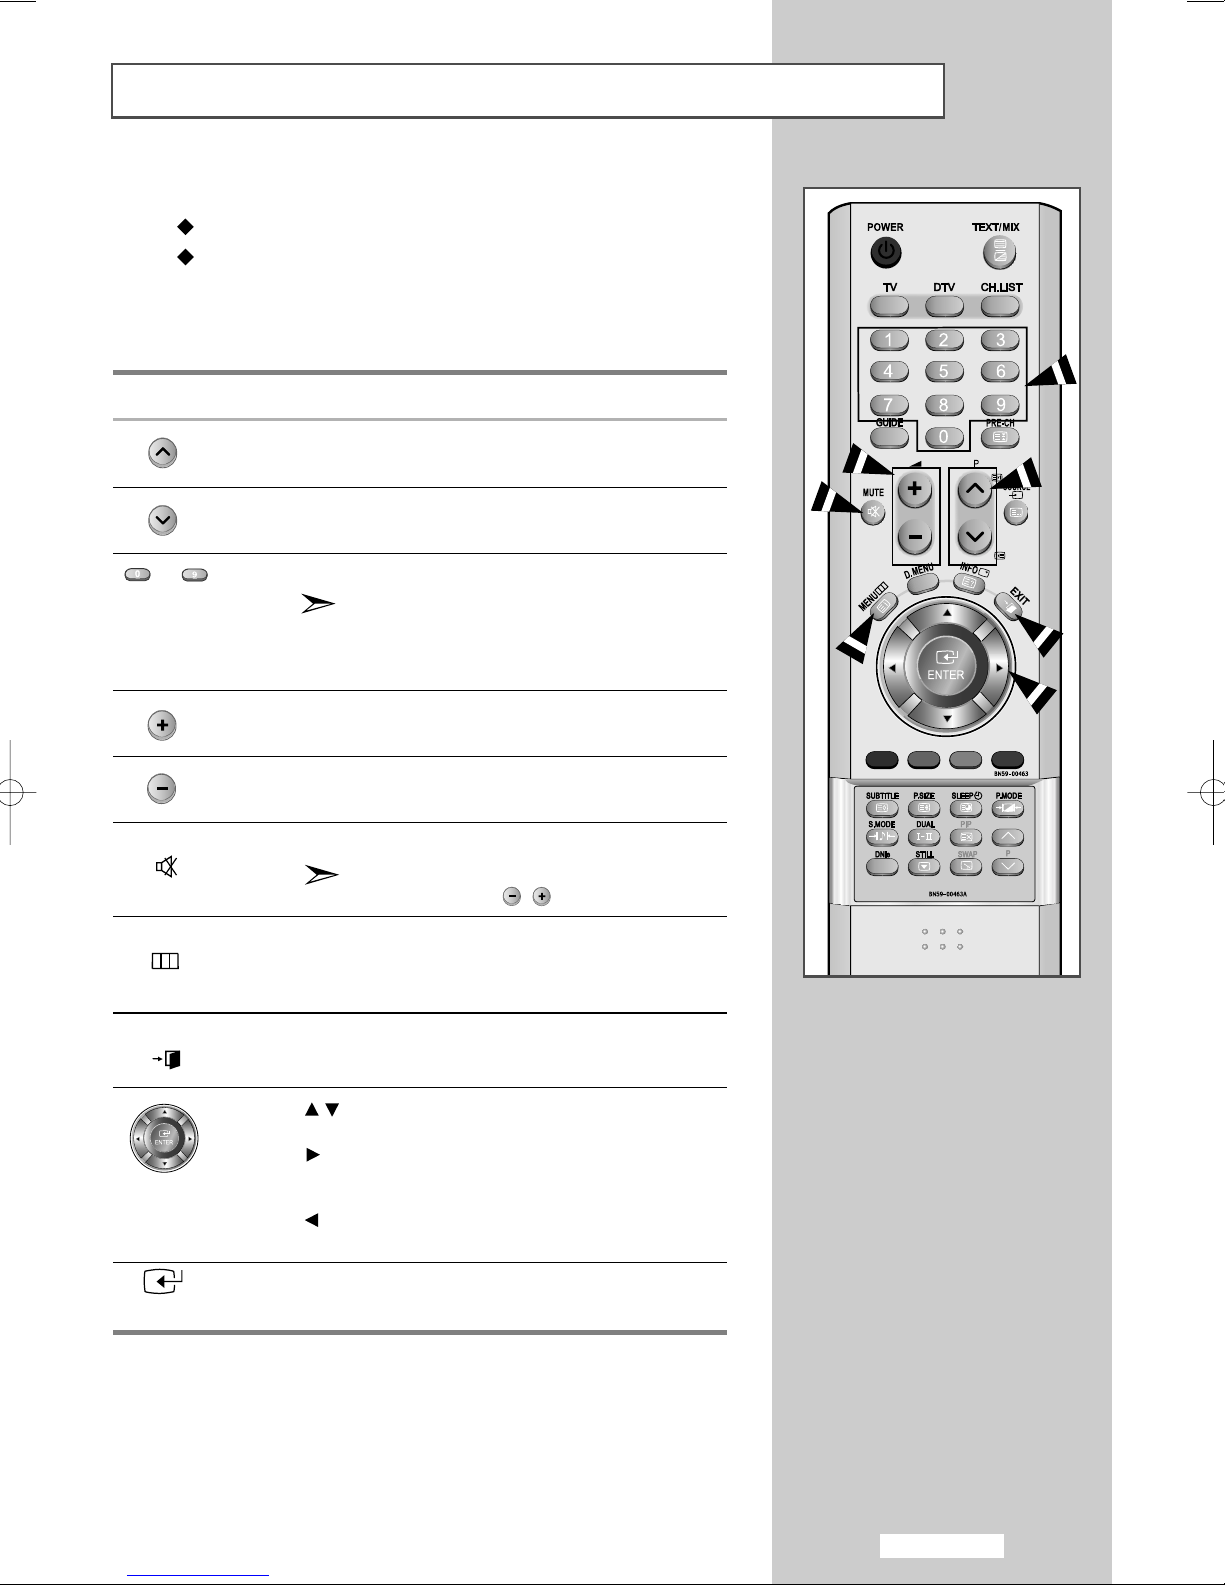
Becoming Familiar with the Remote Control
The remote control is used mainly to:
Change channels and adjust the volume.
Set up your set using the on-screen menu system.
The following table presents the most frequently used buttons and
their functions.
Button Viewing Function Menu Function
Used to display the
next stored channel.
Used to display the
previous stored channel.
to Used to display the corresponding channels.
For double digit channels, the second digit
must be pushed immediately after the first.
Failure to do this will result in a single digit
channel being displayed.
Used to increase the
volume.
Used to decrease the
volume.
MUTE
MENU
Used to switch the sound off temporarily.
To turn the sound back on, press this button
again, or press the / button.
Used to display the Used to return to the
on-screen menu system. previous menu or
normal viewing.
-
-
-
-
EXIT
ENTER
Used to exit the on-screen menu system.
Used to move among the menu items.
Used to select a menu item or increase
the value of the selected item.
Used to return to the previous menu item or
decrease the value of the selected item.
-
Used to confirm your
choice.
English-13
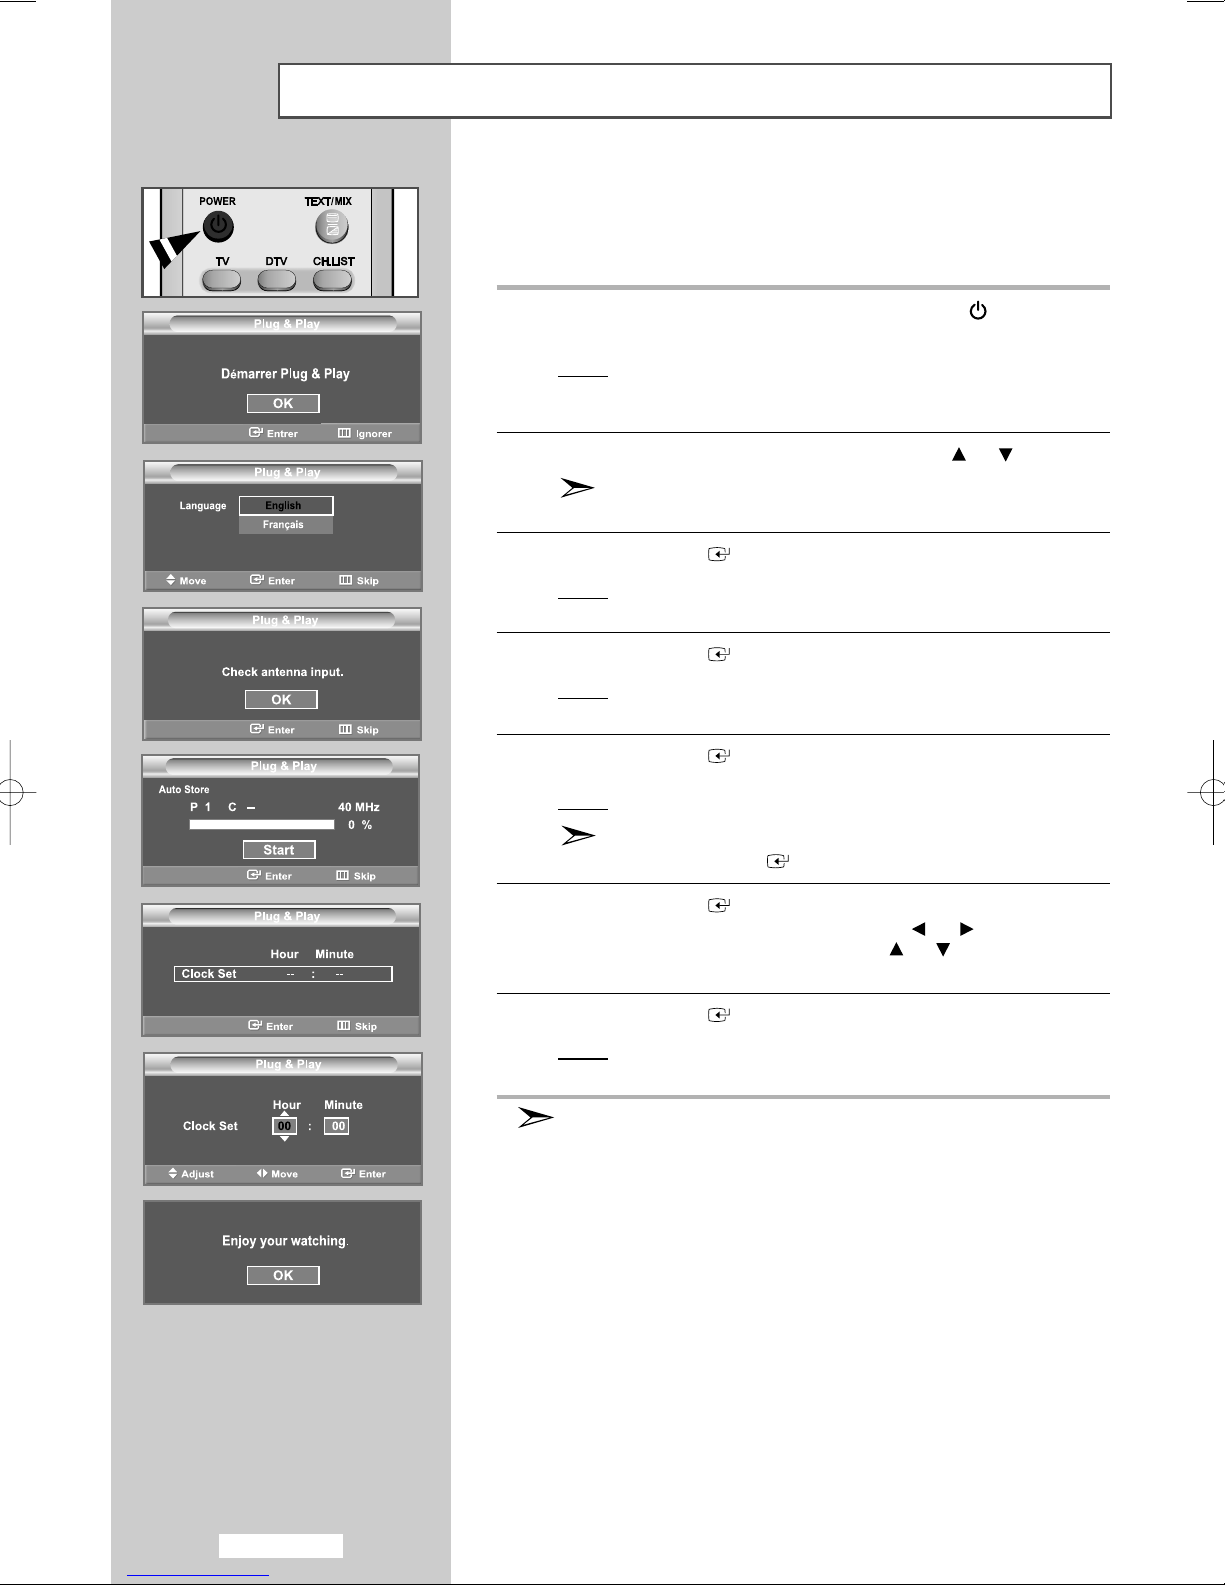
Plug and Play
When the set is initially powered ON, several basic customer settings
proceed automatically and subsequently.
The following settings are available.
1 If the set is in standby mode, press the
remote control.
Result
: The message
appears for a little while, and then the
is automatically displayed.
2 Select the appropriate
The available languages are listed
You can choose one of 2 languages.
3 Press the
Result: The message
4 Press the
Result
5 Press the
Result
ENTER
the
OK
ENTER
:
:
To stop the search before it has finished,
press the
Auto Store
The
selected.
ENTER
The channel search will start and end automatically.
ENTER
Démarrer Plug & Play
language
button to confirm your choice.
selected.
button.
button.
by pressing the or button.
Check antenna input.
menu is displayed with the Start
button with Stop selected.
POWER
.
button on the
is displayed. It
Language
is displayed with
menu
6 Press the
Select the
Set the
(Refer to “Setting and Displaying the Current Time” on page 42)
7 Press the
Result
ENTER
Hour
Hour
or
ENTER
:
The
then the channel which has been stored will be activated.
You can also set hour and minute by pressing the number buttons
on the remote control.
button.
or
Minute
Minute
message
by pressing the or button.
by pressing the or button.
button to confirm your setting.
Enjoy your watching.
is displayed, and
English-14
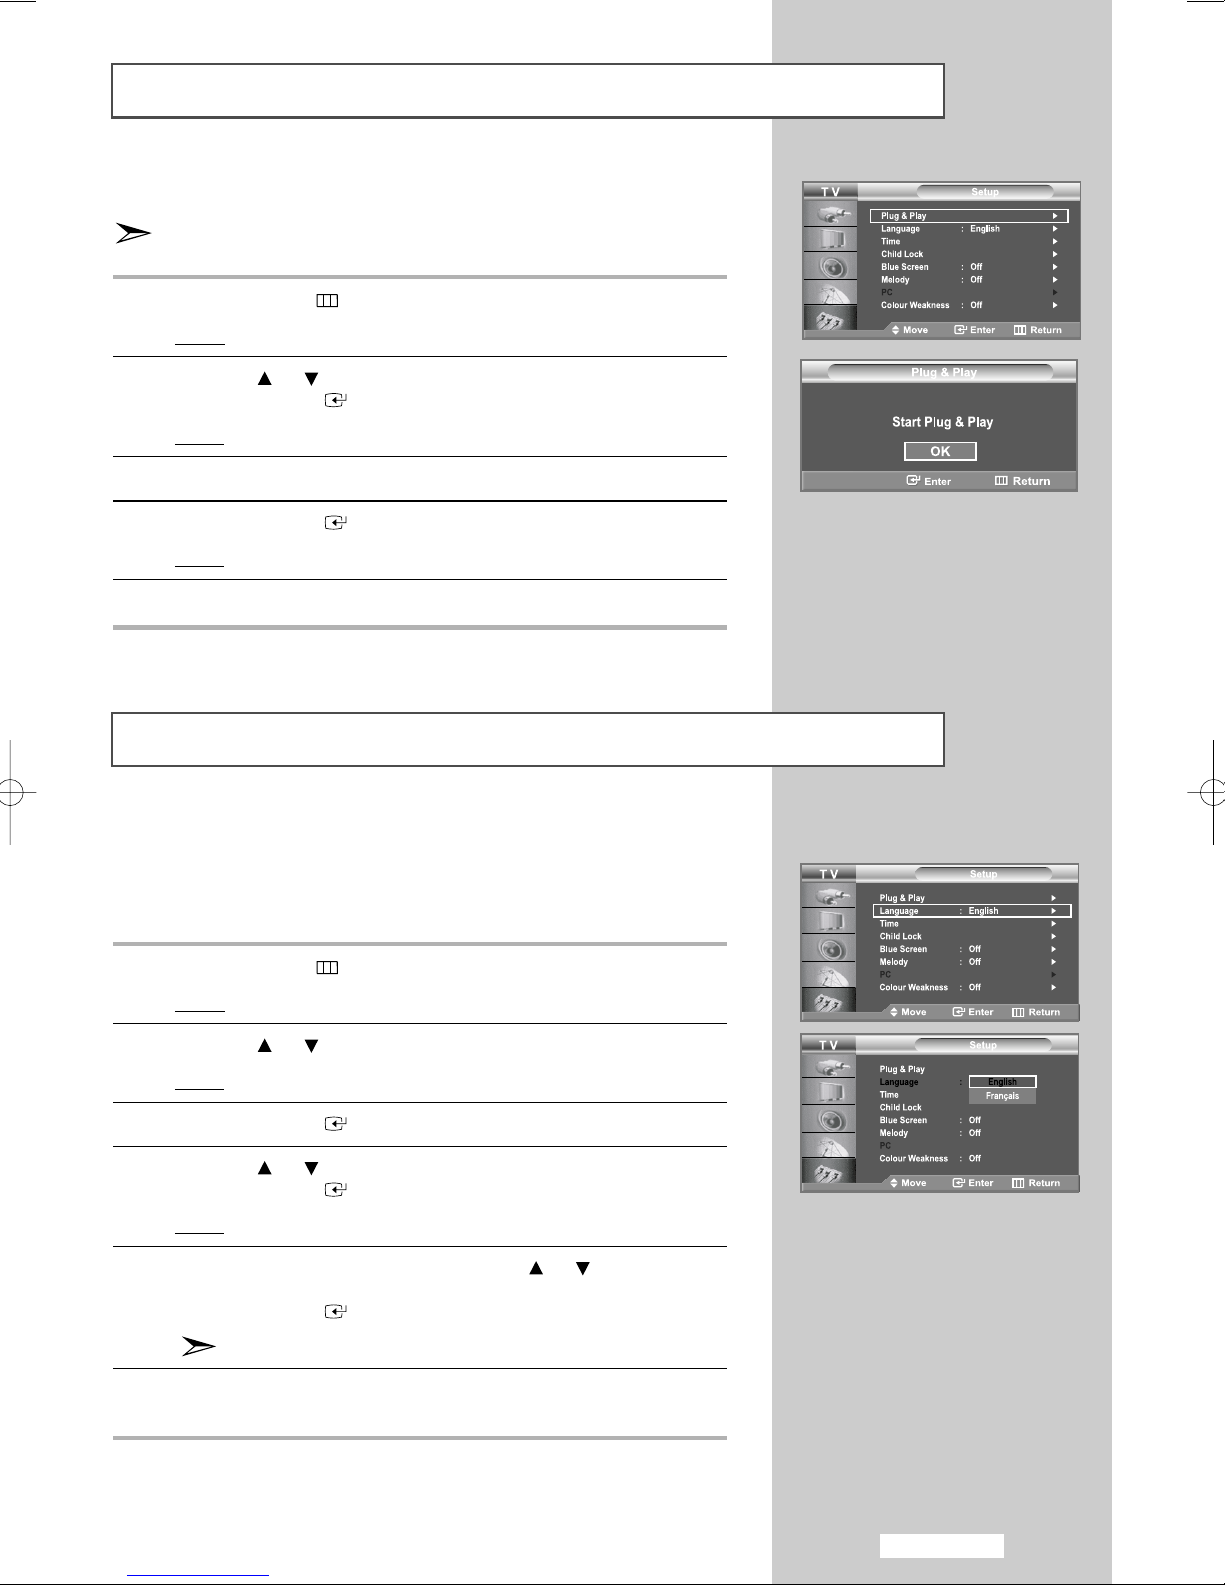
Plug and Play
If you want to reset this feature...
In the case of DTV mode, Plug&Play can not be selected.
1 Press the
Result
2 Press the or button to select
Press the
Result:
3
The
4 Press the
Result:
MENU
:
The main menu is displayed.
ENTER
The options available in the
Plug & Play
ENTER
The message
button.
button
is selected.
button
Setup
.
.
Setup
.
Start Plug & Play
group are displayed.
is displayed.
5 For further details on how to set, refer to the previous page.
Choosing Your Language
When you start using your set for the first time, you must select the
language which will be used for displaying menus and indications.
1 Press the
Result
MENU
:
The main menu is displayed.
button.
2 Press the or button to select
Result
:
The options available in the
3 Press the
ENTER
button
.
4 Press the or button to select
Press the
Result:
ENTER
The available
button
.
languages
5 Select a particular language by pressing the or button
repeatedly.
Press the
ENTER
You can choose one of 2 languages.
button
.
6 When you are satisfied with your choice, press the
return to normal viewing.
Setup
.
Setup
Language
are listed.
group are displayed.
.
EXIT
button to
English-15
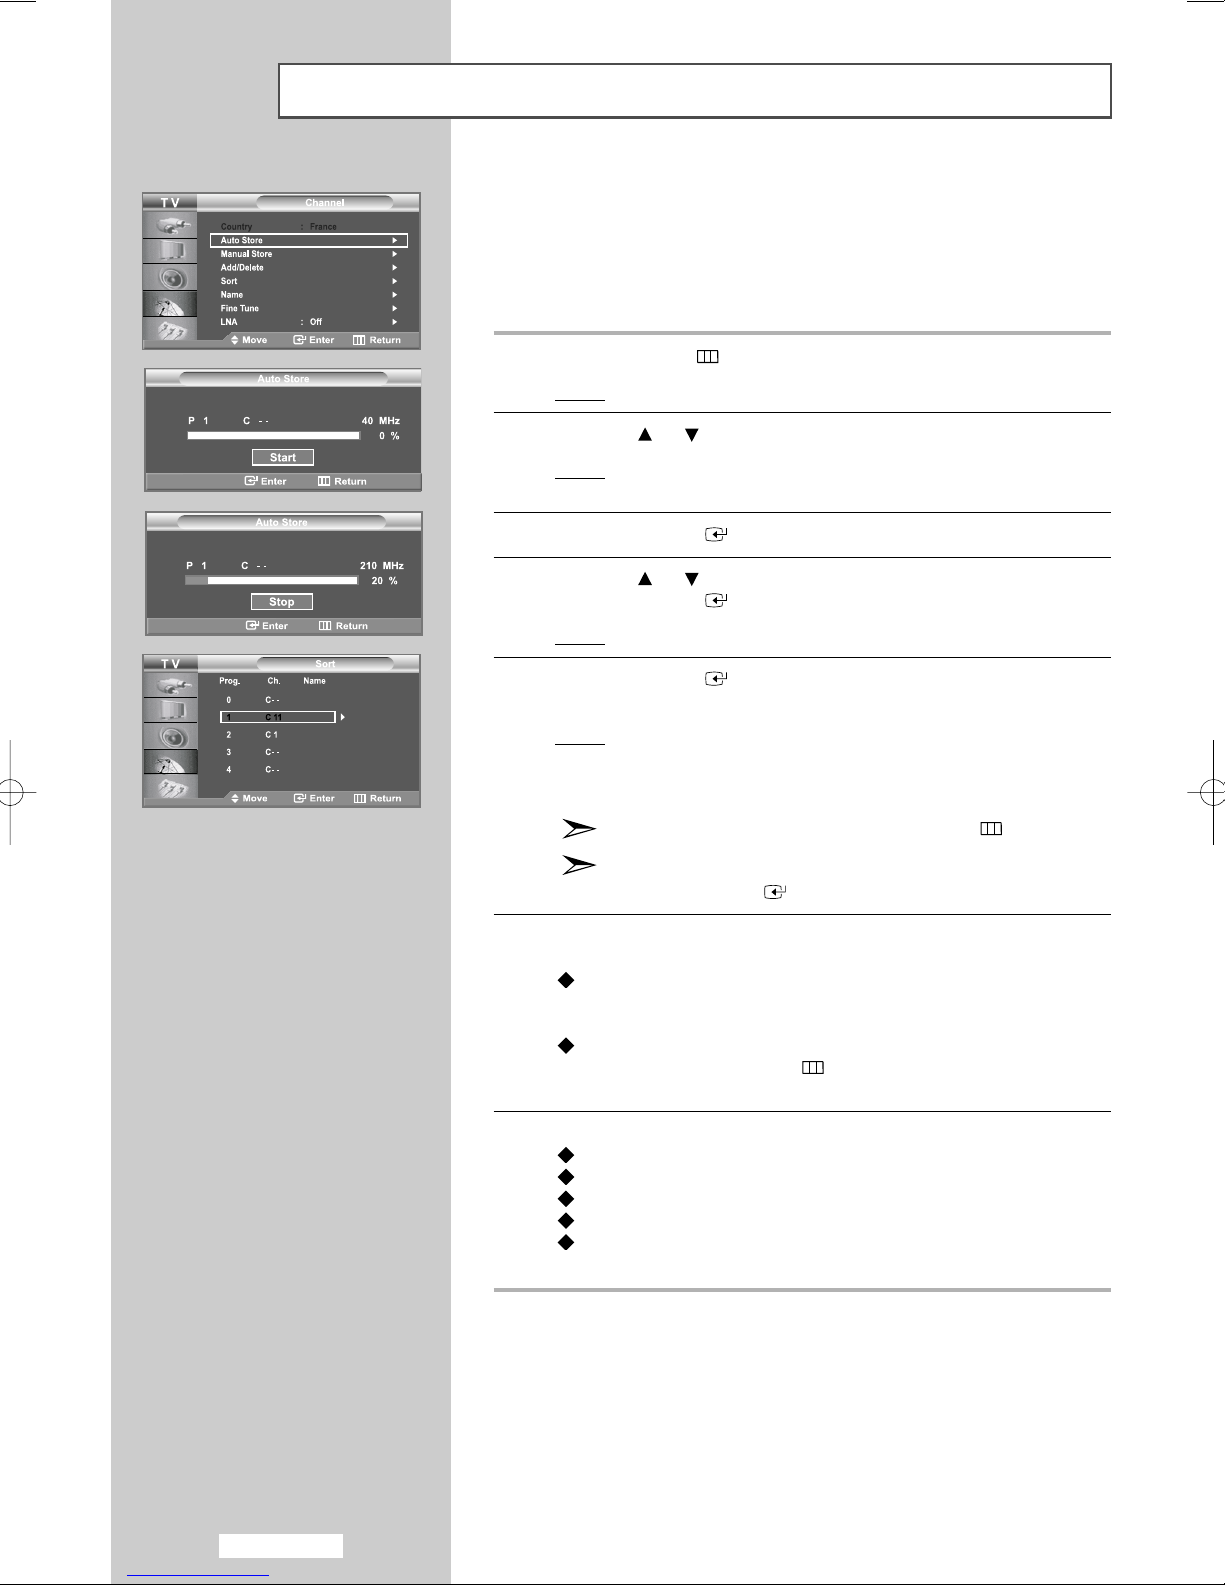
Storing Channels Automatically
You can scan for the frequency ranges available to you (and availability
depends on your country). Automatically allocated programme numbers
may not correspond to actual or desired programme numbers. However,
you can sort numbers manually and clear any channels you do not wish
to watch.
1 Press the
Result
2 Press the or button to select
Result
3 Press the
4 Press the or button to select
Press the
Result: The Auto Store menu is displayed with the Start selected.
5 Press the
is changed from
Result
MENU
:
The main menu is displayed.
:
The options available in the
displayed.
ENTER
ENTER
ENTER
: The search will end automatically. Channels are sorted
and stored in an order which reflects their position in the
frequency range (with lowest first and highest last).
The programme originally selected is then displayed.
To return to the previous menu, press the MENU button.
To stop the search before it has finished,
press the
button.
Channel
button
.
Auto Store
button
.
button to search the channels. The sub menu
StarttoStop
ENTER
with channel search started.
button with Stop selected.
.
Channel
group are
.
6 When searching and storing are complete, the Sort menu is
displayed.
To sort the stored channels into the desired numerical order,
go to step 4 of the “Sorting the Stored Channels”
procedure on page 20.
To exit from the channel store function without sorting the
channels, press the MENU( ) button repeatedly until the
menus disappear
.
7 When the channels have been stored, you can:
Sort them in the order required (refer to page 20)
Assign names to the stored channels (refer to page 21)
Add or delete the channels (refer to page 19)
Fine tune channel reception if necessary (refer to page 22)
Activate/deactivate the LNA (Low Noise Amplifier) feature
(See page 23)
English-16

Storing Channels Manually
You can store up to 100 channels, including those received via cable
networks. When storing channels manually, you can choose:
Whether or not to store each of the channels found.
The programme number of each stored channel which you
wish to identify.
1 Press the
Result
2 Press the or button to select
Result:
3 Press the
4 Press the or button
Press the
Result
5 Press the
To assign a programme number to a channel, find the correct
number by pressing the or button and then press the
ENTER
6 Press the or button to select
the
Select the
repeatedly and then press the
MENU
:
The main menu is displayed.
The options available in the
displayed.
ENTER
ENTER
: The options available in the
displayed with
ENTER
button
You can also set a programme number by pressing number
buttons on the remote control.
ENTER
colour
button.
Channel
button
.
to
select
Manual Store
button.
Programme
button again.
.
Colour System
button.
standard required by pressing the or button
ENTER
.
Channel
Manual Store
selected.
button.
group are
.
menu are
and then press
Result
: The colour standards are displayed in the following order:
AUTO - PAL - SECAM - NTSC 4.43
7 Press the or button to select
the
ENTER
Select the sound standard required by pressing the or button
repeatedly and then press the
Result
: The sound standards are displayed in the following order:
button.
BG - DK - I - L
8 For all the channels to move to the required channel numbers,
repeat steps 5 to 7 after selecting
the
or button
.
Sound System
ENTER
Programme
and then press
button.
by pressing
English-17

Storing Channels Manually
9 If you know the number of the channel to be stored,
Press the or button to select
ENTER
button.
Channel
and then press the
Select C (Air channel) or S (Cable channel) by pressing the
or button.
Press the button to select channel.
Select the required number by pressing the or button and
then press the
ENTER
button.
If there is an abnormal sound or no sound, re-select the sound
system required.
You can also set a
channel
by pressing number buttons on the
remote control.
10 If you do not know the channel numbers, press the or button
to select
Search
ENTER
Result
11 Press the or button to select
Select
Result
Search
by pressing
and then press the
the
or button and then press the
ENTER
button.
button.
: The tuner scans the frequency range until the first
channel or the channel that you selected is received on
your screen.
Store
.
Ok
by pressing the
ENTER
button.
: The channel and associated programme number are
stored.
12 Repeat steps 9 to 11 for each channel to be stored.
13 Press the
the
MENU
EXIT
button to return to normal viewing.
button to return to the previous menu or press
Channel mode
P
(Programme mode): When tuning is completed, the
broadcasting stations in your area will have been assigned
to position numbers from P00 to P99. You can select a
channel by entering the position number in this mode.
C (Real channel mode): You can select a channel by
entering the assigned number to each broadcast station in
this mode.
S (Cable channel mode): You can select a channel by
entering the assigned number to each cable channel in this
mode.
English-18

Editing the Channels
You can exclude the channels you chose from the channels you
scanned. When you scan through the stored channels, those you
have chosen to skip are not displayed.
All channels that you do not specifically choose to skip are
displayed during scanning.
1 Press the
Result
2 Press the or button to select
Press the
Result:
3 Press the or button to select
Press the
Result
4 Press the / button to select the
add
Result
5 Press the
MENU
:
The main menu is displayed.
ENTER
The options available in the
displayed.
ENTER
:
The state of the current
or
delete
:
If the channel that you wish to edit is not in memory,
the
Otherwise, if the channel that you wish to edit is in
memory, the
ENTER
button.
button
.
button.
.
Add
is selected and displayed.
Delete
button to
Channel
Add/Delete
channel
is selected and displayed.
add
or
Channel
is displayed.
channel
delete
.
that you wish to
group are
.
channel.
6 Repeat steps 4 and 5 for each channel to be added or deleted.
7 Press the
press the
MENU
EXIT
button to return to the previous menu or
button to return to normal viewing.
English-19
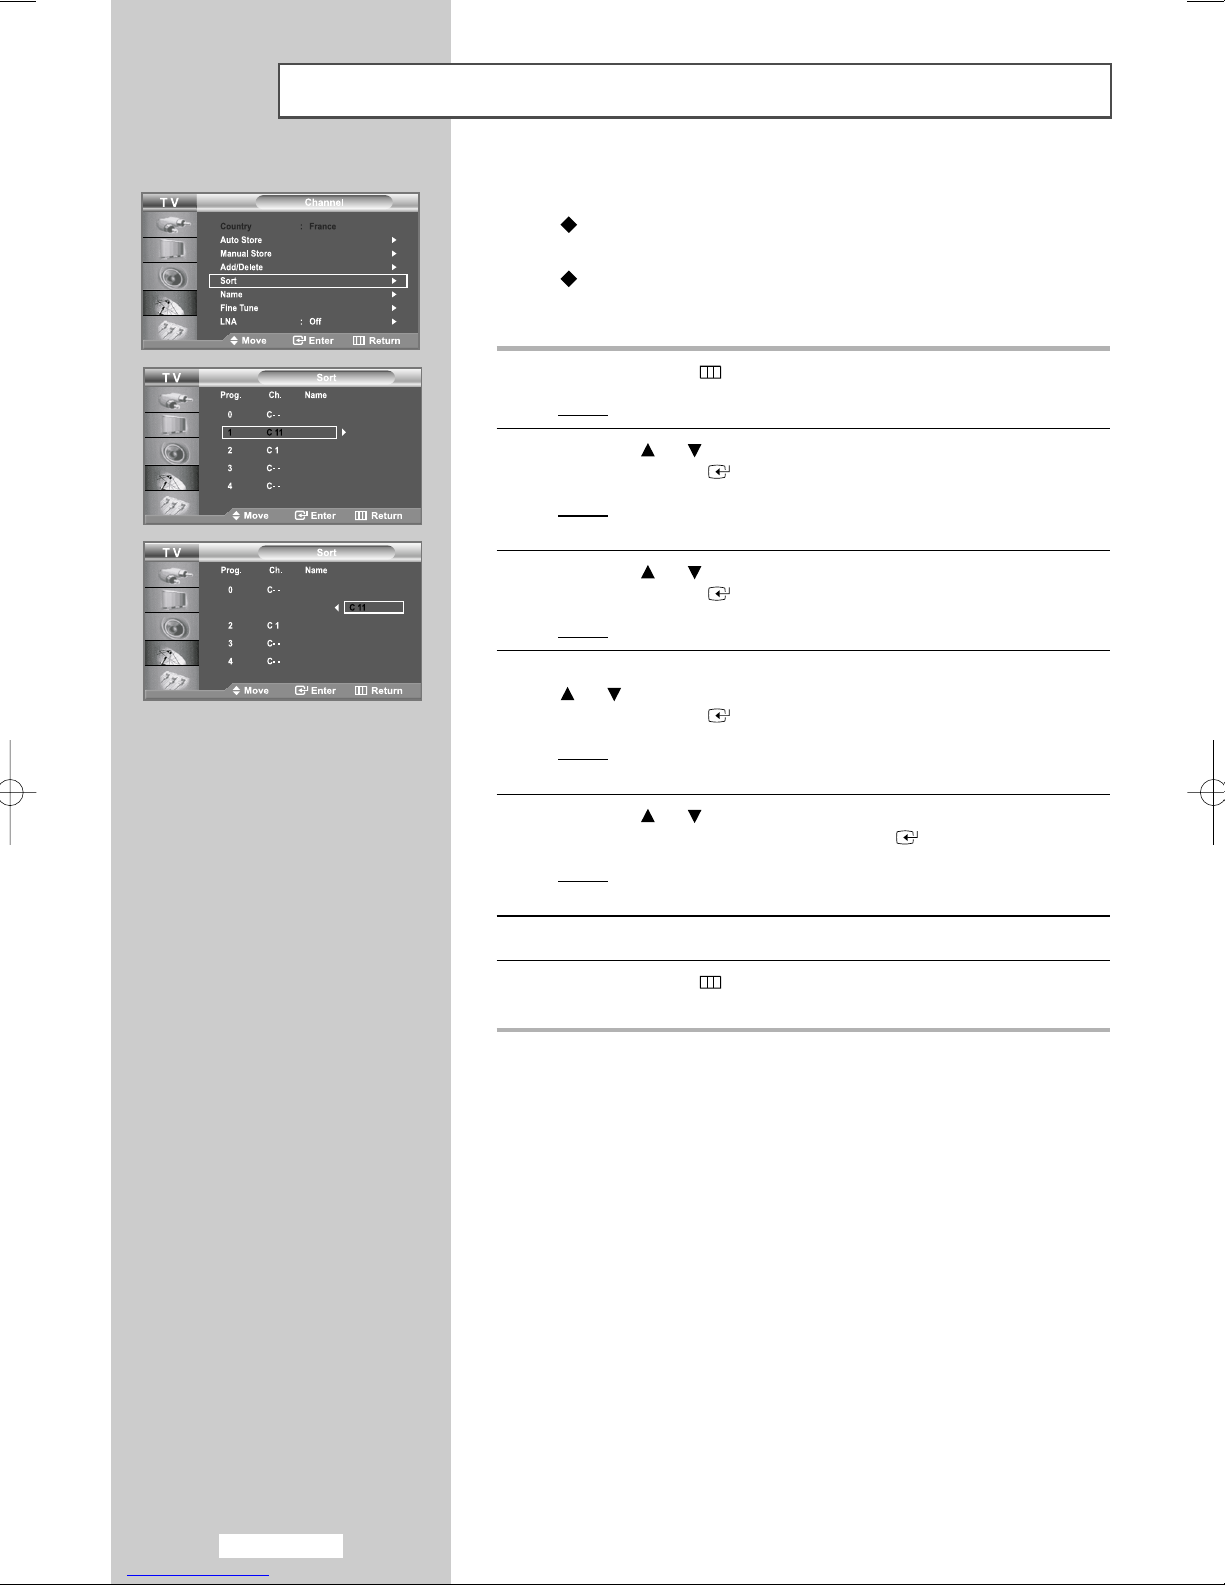
Sorting the Stored Channels
You can exchange the numbers of two channels, in order to:
Modify the numeric order in which the channels have been
automatically stored.
Give easily remembered numbers to the channels that you
watch most often.
1 Press the
Result
2 Press the or button to select
Press the
Result:
3 Press the or button to select
Press the
Result
4 Select the
Press the
Result: The selected
MENU
:
The main menu is displayed.
ENTER
The options available in the
displayed.
ENTER
: The
channel
or button repeatedly.
ENTER
right side.
button.
button
button.
Prog., Ch.
number that you wish to change by pressing the
button
.
and
.
channel
Channel
Channel
Sort
.
Name
are
number and
.
group are
displayed.
name
are moved to
5 Press the or button to move to the position in which you would
like to change and then press the
Result
: The selected channel is exchanged with the one
previously stored to the chosen number
ENTER
button.
.
6 Repeat steps 4 to 5 for another channel to be sorted.
English-20
7 Press the
the
EXIT
MENU
button to return to normal viewing.
button to return to the previous menu or press
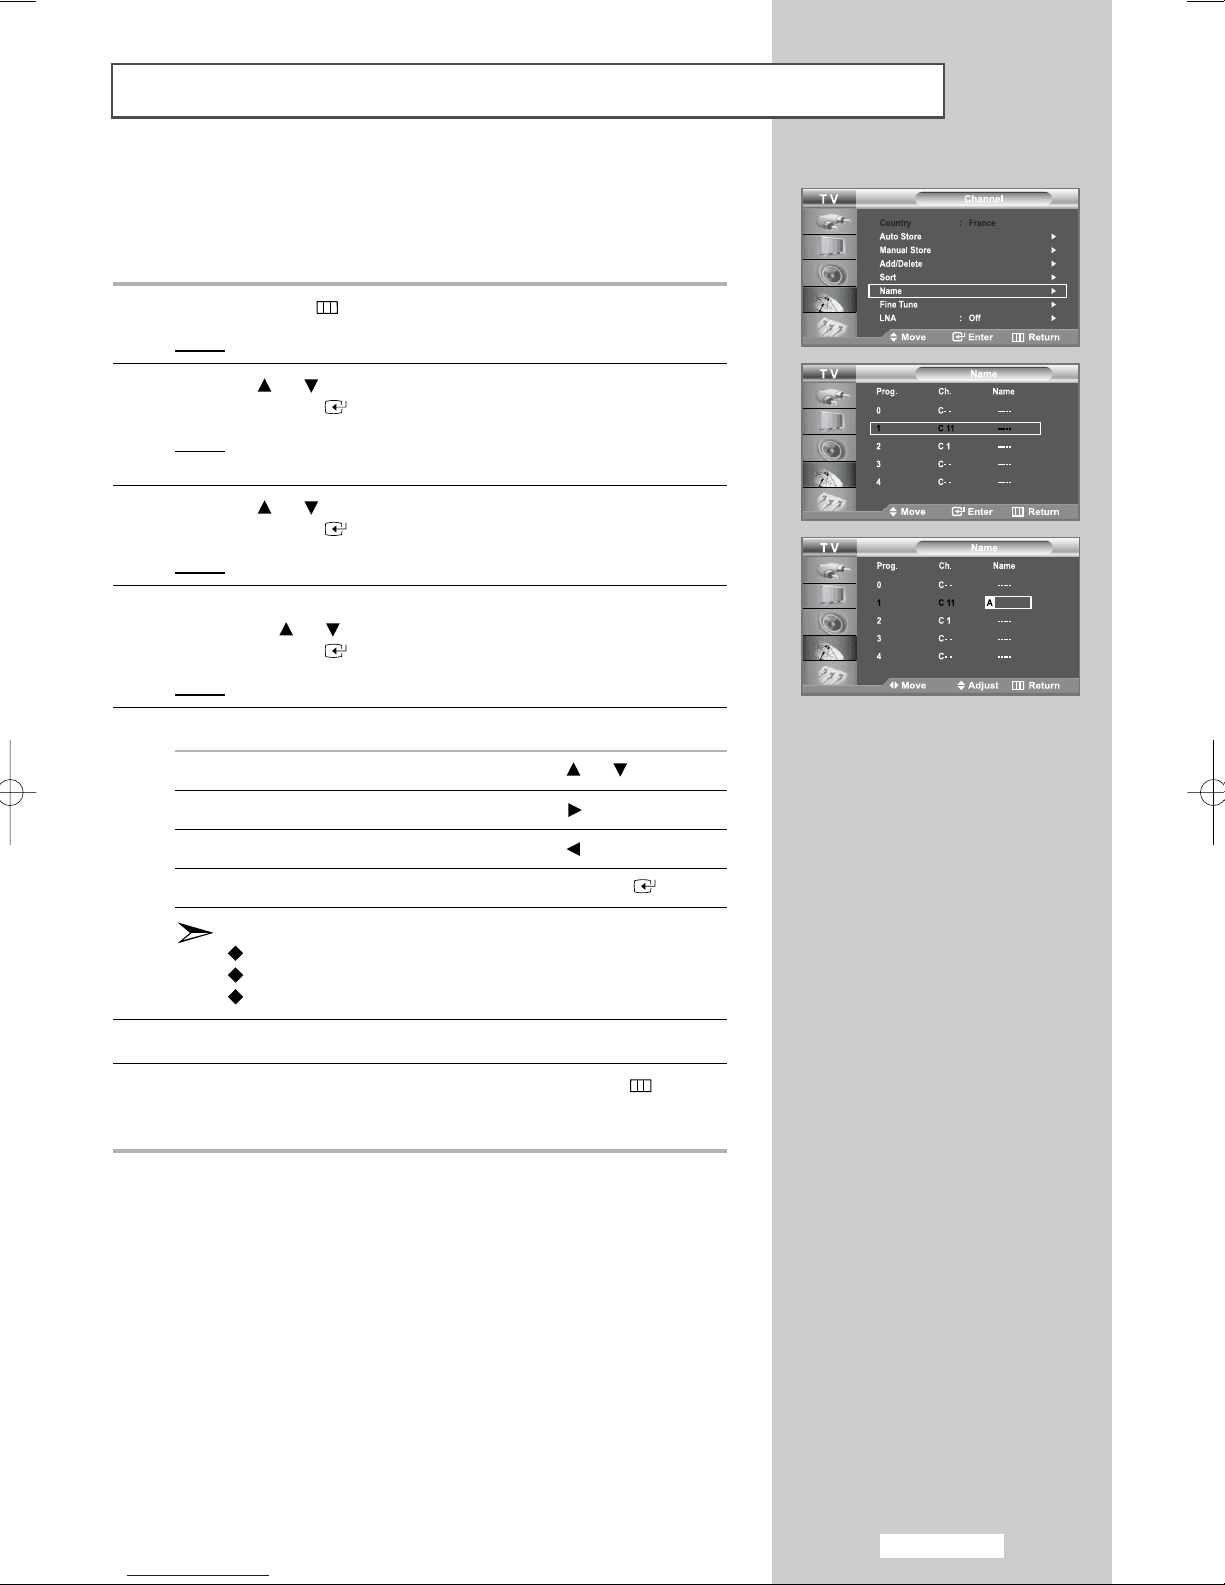
Assigning Channels Names
Channel names will be assigned automatically when channel
information is broadcast.
These names can be changed, allowing you to assign new names.
1 Press the
Result
2 Press the or button to select
Press the
Result: The options available in the
3 Press the or button to select
Press the
Result
MENU
: The main menu is displayed.
ENTER
displayed.
ENTER
: The current
button.
button
button.
Prog., Ch.
Channel
.
Name
and
.
Channel
.
Name
group are
are displayed.
4 If necessary, select the channel to be assigned to a new name by
pressing the or button.
Press the
Result
ENTER
: The selection bar is displayed around the name box.
button.
5 To... Then...
Select a letter, number or symbol Press the or button
Move on the next letter Press the button
Move back the previous letter Press the button
Confirm the name Press the
ENTER
button
The characters available are :
Letters of the alphabet (A~Z)
Numbers (0~9)
Special characters ( _, space)
6
Repeat steps 4to 5for each channel to be assigned to a new name.
7 When you are satisfied with the setting, press the
to return to the previous menu or press the
normal viewing.
MENU
EXIT
button to return to
button
English-21

Fine Tuning Channel Reception
If the reception is clear, you do not have to fine-tune the channel,
as this is done automatically during the search and store operation.
If however, the signal is weak or distorted, you may have to fine-tune
the channel manually.
Select the channel that you want to fine tune.
1 Press the
Result
2 Press the or button to select
Press the
Result: The options available in the
3 Press the or button to select
Press the
Result: The horizontal bar is displayed.
MENU
: The main menu is displayed.
ENTER
displayed.
ENTER
button.
button
button
Channel
.
Fine Tune
.
.
Channel
.
group are
4 Press the or button to reach the required setting.
Press the
Result: An asterisk “*” appears on the right-hand side of the
5 When you are satisfied with the setting, press the
to return to the previous menu or press the
normal viewing.
Fine tuned channels that have been saved are marked with an
asterisk “*” on the right-hand side of the channel number in the
channel banner. And the channel number turns red.
ENTER
channel number. The channel number turns red.
To reset the fine-tuning, select
button and then press the
button
.
Reset
ENTER
by pressing
button
EXIT
.
MENU
button to return to
the
or
button
English-22

LNA (Low Noise Amplifier)
If the Set is operating in a weak-signal area, sometimes the LNA
function can improve the reception.
1 Press the
Result
MENU
:
button.
The main menu is displayed.
2 Press the or button to select
Press the
Result:
ENTER
The options available in the
displayed.
button
.
3 Press the or button to select
Press the
Result:
4 Select
Press the
Result:
5 When it has finished, press the
viewing.
ENTER
The
On
by pressing or button.
ENTER
Amplifies signals when antenna reception is poor.
However if incoming signals are interfering with each
other, tune off
button
LNA
menu is displayed.
button
LNA
.
.
as it may malfunction.
EXIT
Channel
LNA
.
Channel
.
button to return to normal
group are
English-23

Changing the Picture Standard
You can select the type of picture which best corresponds to your
viewing requirements.
1 Press the
Result
2 Press the or button to select
Result
3 Press the
4 Press the
Result: The options available in the
5 Press the
Result
MENU
: The main menu is displayed.
: The options available in the
displayed.
ENTER
ENTER
ENTER
: The
button.
Mode
Picture
button.
button again.
button.
is selected.
.
Picture
Mode
group are
group are displayed.
6 Select the required picture effect by pressing the or button
repeatedly.
Press the
Result
7 When you are satisfied with the setting, press the
to return to the previous menu or press the
normal viewing.
ENTER
: The following picture effects are available:
Dynamic - Standard - Movie - Custom
button.
MENU
EXIT
button to return to
button
Dynamic
You can also display by simply pressing the
(Picture Mode) button.
P.MODE
English-24

Adjusting the Custom Picture
Your set has several settings which allow you to control picture quality.
1 Press the
Result
2 Press the or button to select
Result
3 Press the
4 Press the
Result
5 Select the option (
Tint
Press the
Result
MENU
: The main menu is displayed.
: The options available in the
displayed.
ENTER
ENTER
: The options available in the
) to be adjusted by pressing the or button.
ENTER
: The horizontal bar is displayed.
button.
Picture
button.
button again.
Contrast, Brightness, Sharpness, Colour,
button.
.
Picture
Mode
group are
group are displayed.
6 Press the or button to reach the required setting.
7 When you are satisfied with the setting, press the
to return to the previous menu or press the
normal viewing.
The adjusted values are stored according to the selected Picture
mode.
Each adjusted setting will be stored separately according to its
input mode.
The Tint is "inactivated" as following cases.
• Analog mode (RF, Scart, Video, S-Video)
In case of an input signal setting to PAL-50, PAL-CN,
and SECAM.
• Componen, DVI, and HDMI mode
In case of a input signal setting to 60 Hz; 480i, 480p,
720p @ 60 Hz, 1080i @ 60 Hz.
MENU
EXIT
button to return to
button
English-25
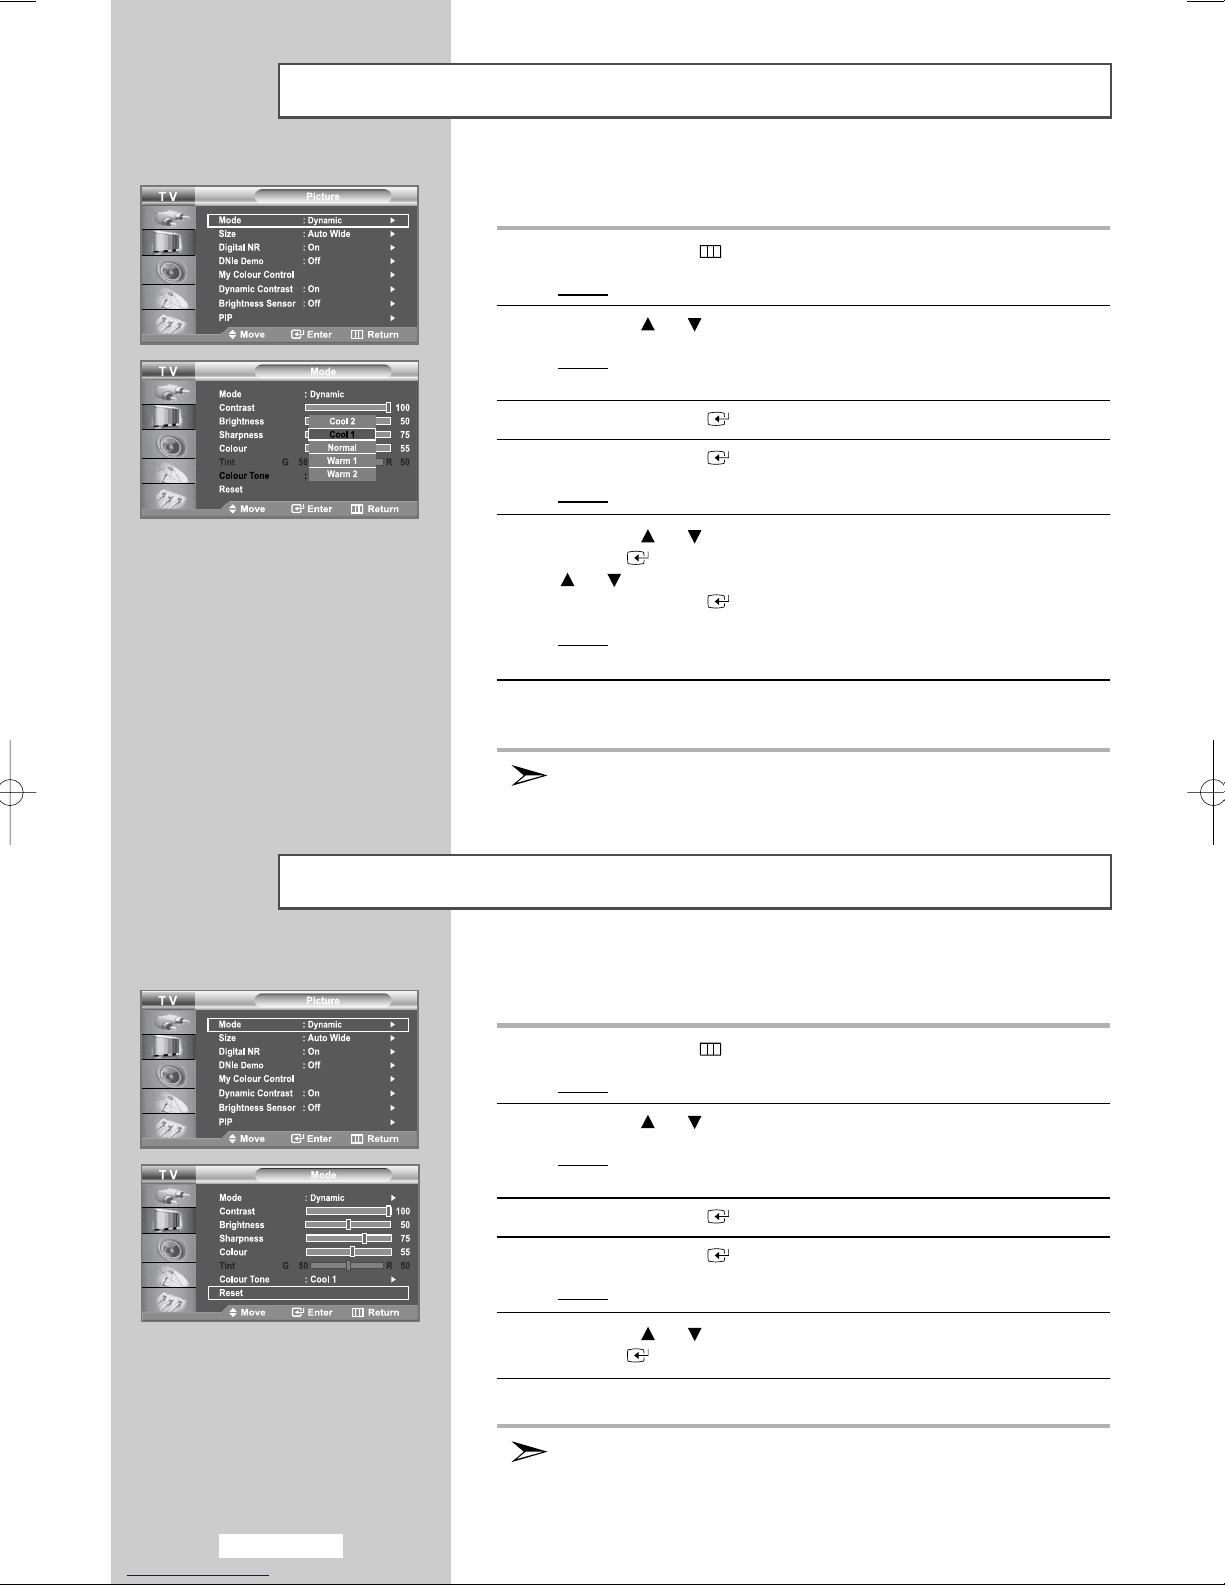
Changing the Colour Tone
You can select the most comfortable colour tone to your eye.
1 Press the
Result
2 Press the or button to select
Result
3 Press the
4 Press the
Result
5 Press the or button to select
ENTER
Press the
Result
6 When you are satisfied with your choice, press the
return to normal viewing
The adjusted values are stored according to the selected Picture
mode.
MENU
: The main menu is displayed.
: The options available in the
displayed.
ENTER
ENTER
: The options available in the
button. Select the required option by pressing the
or button repeatedly.
ENTER
: The following options are available:
Cool2 - Cool1 - Normal - Warm1 - Warm2
button.
Picture
button.
button again.
Colour Tone
button.
.
.
Picture
Mode
group are
group are displayed.
and press the
EXIT
button to
Resetting the Picture Settings to the Factory Defaults
You can return to the factory defaults picture settings.
1 Press the
Result
2 Press the or button to select
Result
3 Press the
4 Press the
Result
5 Press the or buttons to select Reset, then press the
ENTER
6 Press the
The Reset will be set in each Picture mode.
MENU
: The main menu is displayed.
: The options available in the
displayed.
ENTER
ENTER
: The options available in the
button.
EXIT
button.
Picture
button.
button again.
button to return to normal viewing.
.
Picture
Mode
group are
group are displayed.
English-26

Changing the Picture Size
You can select the picture size which best corresponds to your viewing
requirements.
1 Press the
Result
2 Press the or button to select
Result
MENU
button.
: The main menu is displayed.
Picture
: The options available in the
.
Picture
group are
displayed.
3 Press the
4 Press
ENTER
the
or button to select
button.
Size
and press the
ENTER
button.
5 Select the required option by pressing the or button
repeatedly.
Press the
Result
Auto Wide: Automatically adjusts the picture size to the “Wide”
•
Wide: Adjusts the picture size to 16:9 appropriate for DVDs or
•
Panorama: Adjusts 16:9 to 4:3 in a natural way as for normal
•
Zoom:
•
4:3: This is the default setting for a video movie or normal
•
ENTER
button.
: The following options are available:
Auto Wide-Wide-Panorama-Zoom-4:3
aspect ratio.
wide broadcasting.
broadcasting.
Magnifies the size of the picture on the screen.
[Positioning and Sizing the screen using Zoom]
• Resizing the screen using the Zoom enables
the positioning and sizing of the screen to
up/down direction using the
well as the screen size.
• Move the screen up/down using the
button after selecting the by pressing the
or button.
• Resize the screen vertically using the
or button as
button after selecting the by pressing the
or
button. (Pressing the button extends it
upward and pressing the button extends it
downward.)
broadcasting.
or
or
You can select these options by simply pressing the
P.SIZE
(Picture Size) button under the remote’s cover.
In PC Mode, only Wide and 4:3 mode can be adjusted.
English-27
 Loading...