

Samsung LASERMFP1600N Users Manual

Dell
Click the links to the left for information on the features, options, and operation of your
machine. For information on other documentation included with your machine, see
"Finding Information" on page 3.
To order replacement toner cartridges or supplies from Dell:
TM
Laser MFP 1600n User’s Guide
1 Double-click the what icon (????) on your desktop.
kGHH
2 Visit Dell's website, or order Dell printer supplies by phone.
www.dell.com/supplies
For best service, have your Dell printer Service Tag available.
For help locating your Service Tag number, see page 3.
1

Notes, Notices, and Cautions
NOTE: A NOTE indicates important information that helps you make better use of your
machine.
NOTICE: A NOTICE indicates either potential damage to hardware or loss of data and tells you
how to avoid the problem.
CAUTION: A CAUTION indicates a potential for property damage, personal
injury, or death.
____________________
Information in this document is subject to change without notice.
© 2003 Dell Inc.. All right s reserv ed.
Reproduction in any manner whatsoever without the written permission of Dell Inc.is
strictly forbidden.
Trademarks used in this text:
and
Windows
are registered trademarks of Microsoft Corporation.
Dell
and
DELL
logo are trademarks of Dell Inc.;
Microsoft
Other trademarks and trade names may be used in this document to refer to either the
entities claiming the marks and names of their products. Dell Inc. disclaims any proprietary
interest in trademarks and trade names other than its own.
____________________
UNITED STATES GOVERNMENT RESTRICTED RIGHTS
This software and documentation are provided with RESTRICTED RIGHTS. Use,
duplication or disclosure by the Government is subject to restrictions as set forth in
subparagraph (c)(1)(ii) of the Rights in Technical Data and Computer Software clause at
DFARS 252.227-7013 and in applicable FAR provisions: Dell Inc., One Dell Way, Round
Rock, Texas, 78682, USA.
2

Finding Information
What are You Looking for? Find It Here
• Drivers for my machine
•My User’s Guide
• Safety information
• How to use my machine
• Warranty information
How to set up my machine Setup Diagram
Driver and Utilities CD
You can use the CD to install/uninstall/reinstall drivers or access your
User’s Guide. For details, see "Software Overview" on page 33.
Readme files may be included on your CD to provide last-minute
updates about technical changes to your machine or advanced
technical reference material for experienced users or technicians.
Owner's Manual
CAUTION: Read and follow all safety instructions in
your Owner's Manual prior to setting up and
operating your machine.
Express Service Code and
Service Tag number w
Express Service Code and Service Tag number.
wGG
GU
3

What are You Looking for? Find It Here
•Latest drivers for my
machine
• Answers to technical service
and support questions
• Documentation for my
machine
Dell Support Website
The Dell Support Website provides several online tools, including:
• Solutions - Troubleshooting hints and tips, articles from
technicians, and online courses
• Upgrades - Upgrade information for components, such as
memory
• Customer Care - Contact information, order status, warranty, and
repair information
•Downloads - Drivers
• Reference - Machine documentation and product specifications
You can access Dell Support at support.dell.com. Select your region
on the WELCOME TO DELL SUPPORT page, and fill in the
requested details to access help tools and information.
Fonts
Screen Fonts are fonts you install in Windows to match your printer scalable resident fonts.
Selecting resident printer fonts improves printing performance. The screen fonts allow the
documents displayed on the computer screen to match the output from your printer. When
you install the screen fonts, you will have access to the full set of resident printer fonts by
Windows programs for PCL emulation. Choose your printer model when prompted, and
the program automatically installs the TrueType
® screen fonts for your printer in Windows.
Your machine has the following fonts:
• ?????
• ?????
• ?????
• ?????
• ?????
Detailed information required, if this “Fonts”
section is necessary!!!!
4

Dell Printer Configuration Web Tool
Have you ever sent a print job to the network printer down the hall, only to find it didn't
print because of a paper jam or an empty paper tray? One of the features of the Dell Printer
Configuration Web Tool is the Email Alert Setup, which sends you, or the key operator, an
email when the printer needs supplies or intervention.
If you fill out printer inventory reports requiring the asset tag number of all of the printers
in your area, the Dell Printer Configuration Web Tool has a Printer Information feature that
makes it easy. Just type the IP address of each printer on the network to display the asset tag
number.
The Dell Printer Configuration Web Tool feature also lets you change printer settings and
keep track of printing trends. If you are a network administrator, you can easily copy the
printer's settings to one or all printers on the network-right from your Web browser.
To launch the Dell Printer Configuration Web Tool, just type your network printer's IP
address in your Web browser. You can also launch the Dell Printer Configuration Web Tool
from the Network Status Monitor Center. For details, see page 85.
If you do not know what your printer's IP address is, print a network setup page, which lists
the IP address:
1 Press <Menu> until you see “Network Setup”on the bottom line of the display.
2 Press the scroll button ( or )until you see “Print Sys. Data” displays on the
bottom line.
3 Press <Select>. The first menu item, “Yes” displays on the bottom line.
4 Press <Select> to print a network configuration page.
If the IP address shows 0.0.0.0. (the factory default), an IP address has not been assigned. To
assign one for your printer, see "Configuring TCP/IP" on page 143.
Use the Dell Printer Configuration Web Tool for:
Printer Status
Get immediate feedback on printer supply status. When toner is running low, click the
toner supplies link on the first screen to order additional toner cartridges.
Printer Settings
Change printer settings, view the operator panel remotely, and update the print server
firmware.
5

Copy Printer Settings
Quickly clone the printer's settings to another printer or printers on the network just by
typing each printer's IP address.
NOTE: You must be a network administrator to use this feature.
Printing Statistics
Keep track of printing trends, such as paper usage and types of jobs being printed.
Printer Information
Get the information you need for service calls, inventory reports, or the status of current
memory and engine code levels.
Email Alert Setup
Receive an email when the printer needs supplies or intervention. Type your name or the
key operator's name in the email list box to be notified.
Set Password
Lock the operator panel with a password so that other users don't inadvertently change the
printer settings you have selected.
NOTE: You must be a network administrator to use this feature.
Online Help
Click Help to visit the Dell website for machine troubleshooting.
NOTE: For more information about the All-In-One Main page, View Saved Images page, or the
Maintain/Troubleshoot page, click the Help link located in the upper right corner of the screen.
6
Unpacking Your Machine
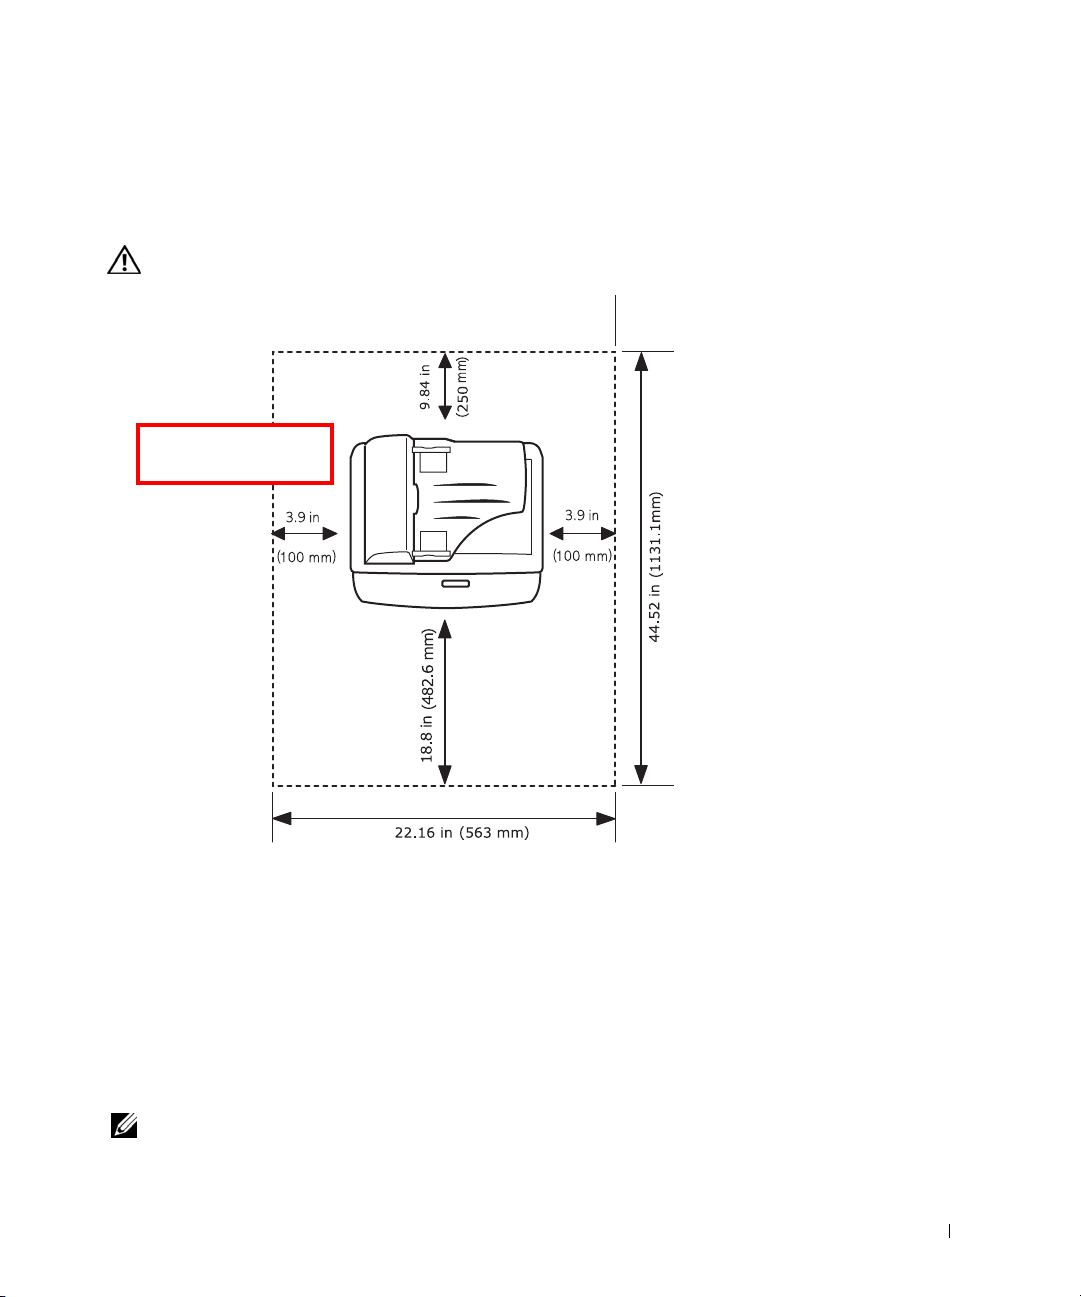
1 Select a location for your machine.
CAUTION: The machine requires at least two people to lift it safely.
{GG
HH
• Leave enough room to open the machine tray, covers, doors, and options. It is also
important to allow enough space around the machine for proper ventilation.
• Provide the proper environment:
• A firm, level surface
• Away from the direct airflow of air conditioners, heaters, or ventilators
• Away from sunlight, extreme humidity, or high fluctuations in temperature
• A clean, dry, and dust free location
NOTE: Leave the machine in the box until you are ready to install it.
7

2 Remove all items from the box except the machine. Make sure you have the following
items.
If there is a missing item,
contact the retailer where you bought the machine:
3K Cartridge
Owner's Manual
Operator Panel Cover
a. The appearance of the power cord and the telephone line cord may differ according to your
country’s specifications.
b. The CD-ROM contains a Dell MFP GDI/PCL/PS printer drivers, Scan drivers, Printer Settings
Utility, Status Monitor, Paper Port and an HTML User’s Guide.
c. These items are only provided in some countries.
c
AC Power Cord
Teleph o n e Line C o r d
Te r mi n a t or
a
a
c
Driver and Utility CD
Setup Diagram
b
NOTE: You should use the telephone line cord which is supplied with your machine. If you are
replacing it with another vendor’s, it should be an AWG #26 or a lower gage.
NOTE: The power cord must be plugged into a grounded power socket
3 Save the carton and packing material in case you need to repack the machine.
8
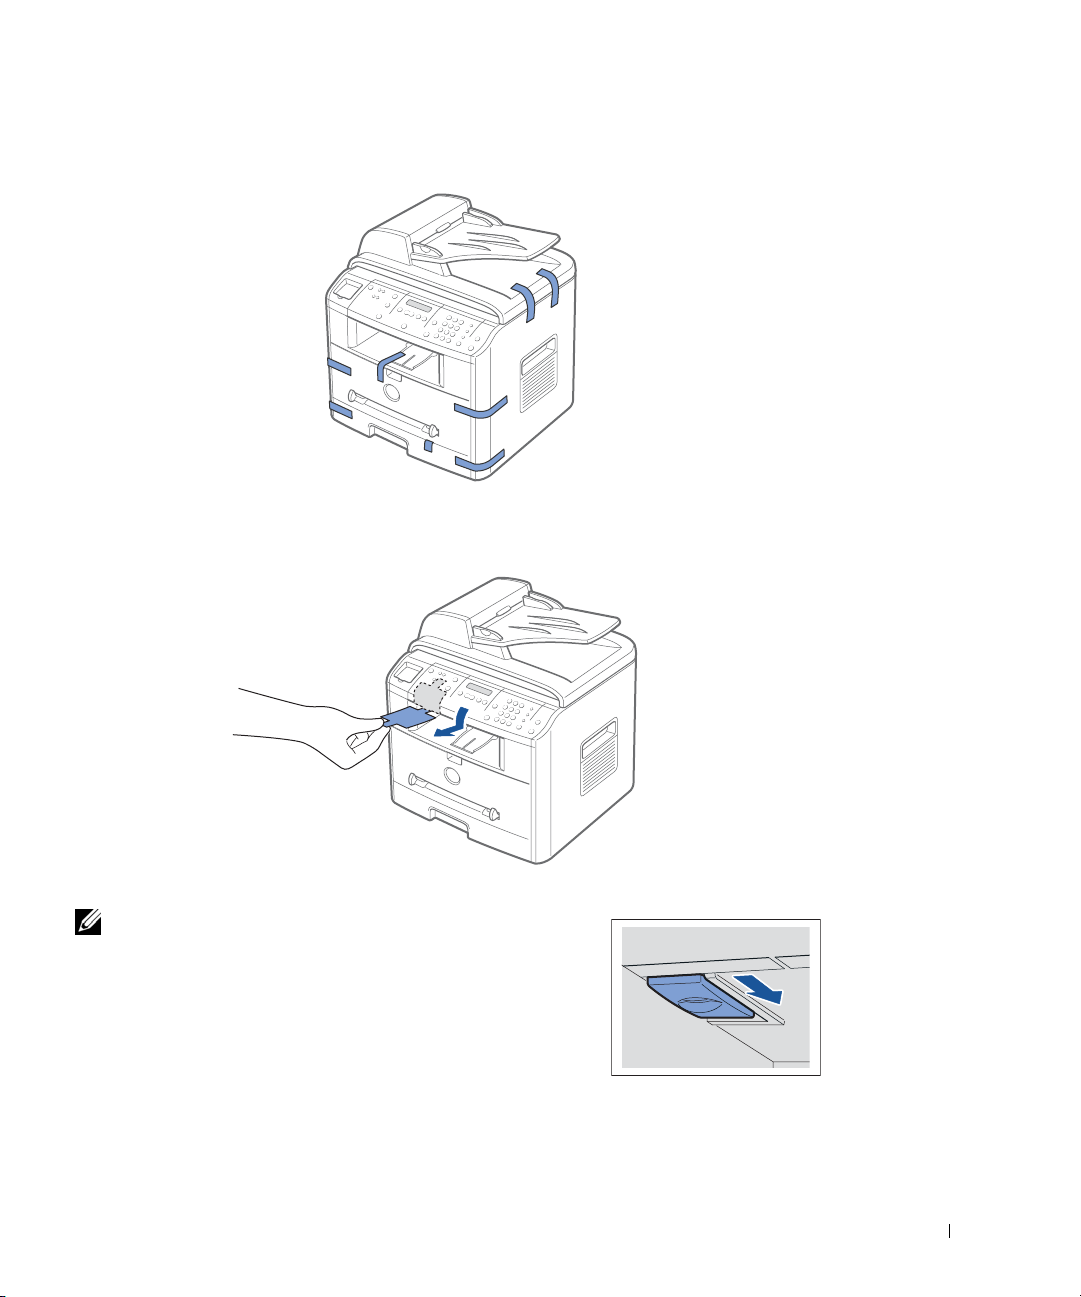
4 Remove the packing tape from the front, back and sides of the machine.
5 Remove the label completely from the scanner module by gently pulling it. The scan
unlock switch automatically moves FORWARD to the unlock position.
NOTE: When you are moving the machine
or do not intend to use it for a long period of time,
move the switch BACKWARD to the lock position, as shown.
To scan or copy a document, the switch must be unlocked.
9
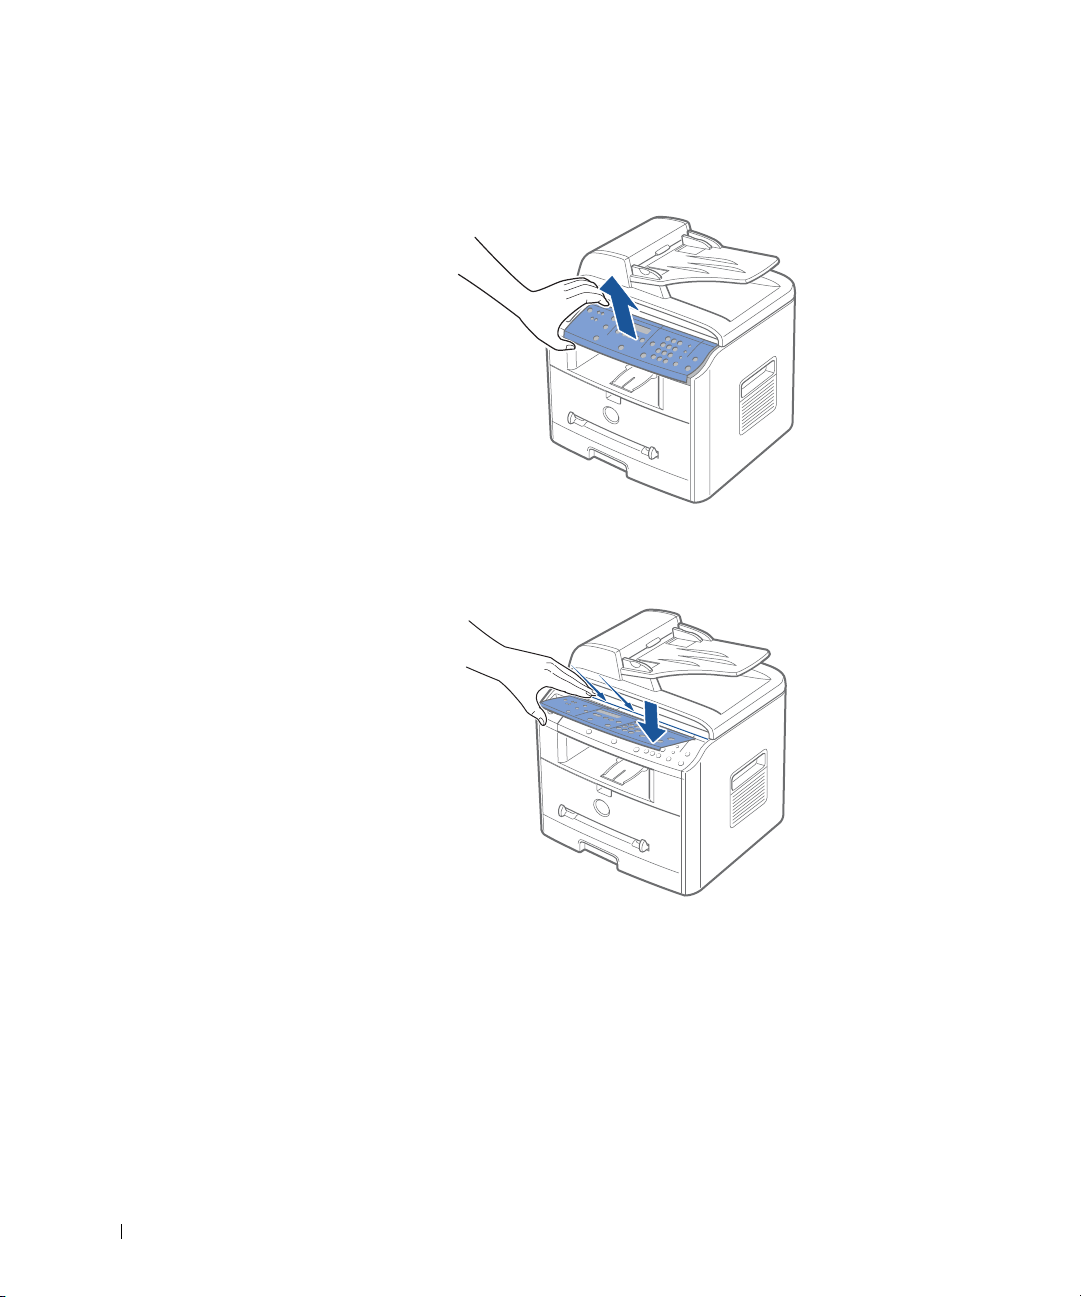
6 If your language is not already displayed on the operator panel, remove the attached
English operator panel cover from the machine, by gently pulling it upwards, as shown.
7 Place the supplied operator panel cover, according to your country, gently on the
operator panel.
10

About Your Machine
These are the main components of your machine. The following illustrations show the
standard Dell Laser MFP 1600n and an optional Tray 2 attached:
Front View
Automatic
Document Feeder
Operator Panel
(See page 13.)
Document
Guides
Document
Input Tray
Document
Cover
Scanner Glass
Paper Output
Extension
Tray 1
(250-sheet paper feeder)
Bypass Tray
ADF Output
Tray
Front Output Tray
(Face Down)
Front Co ver
Optional Tray2
(250-sheet paper feeder)
11
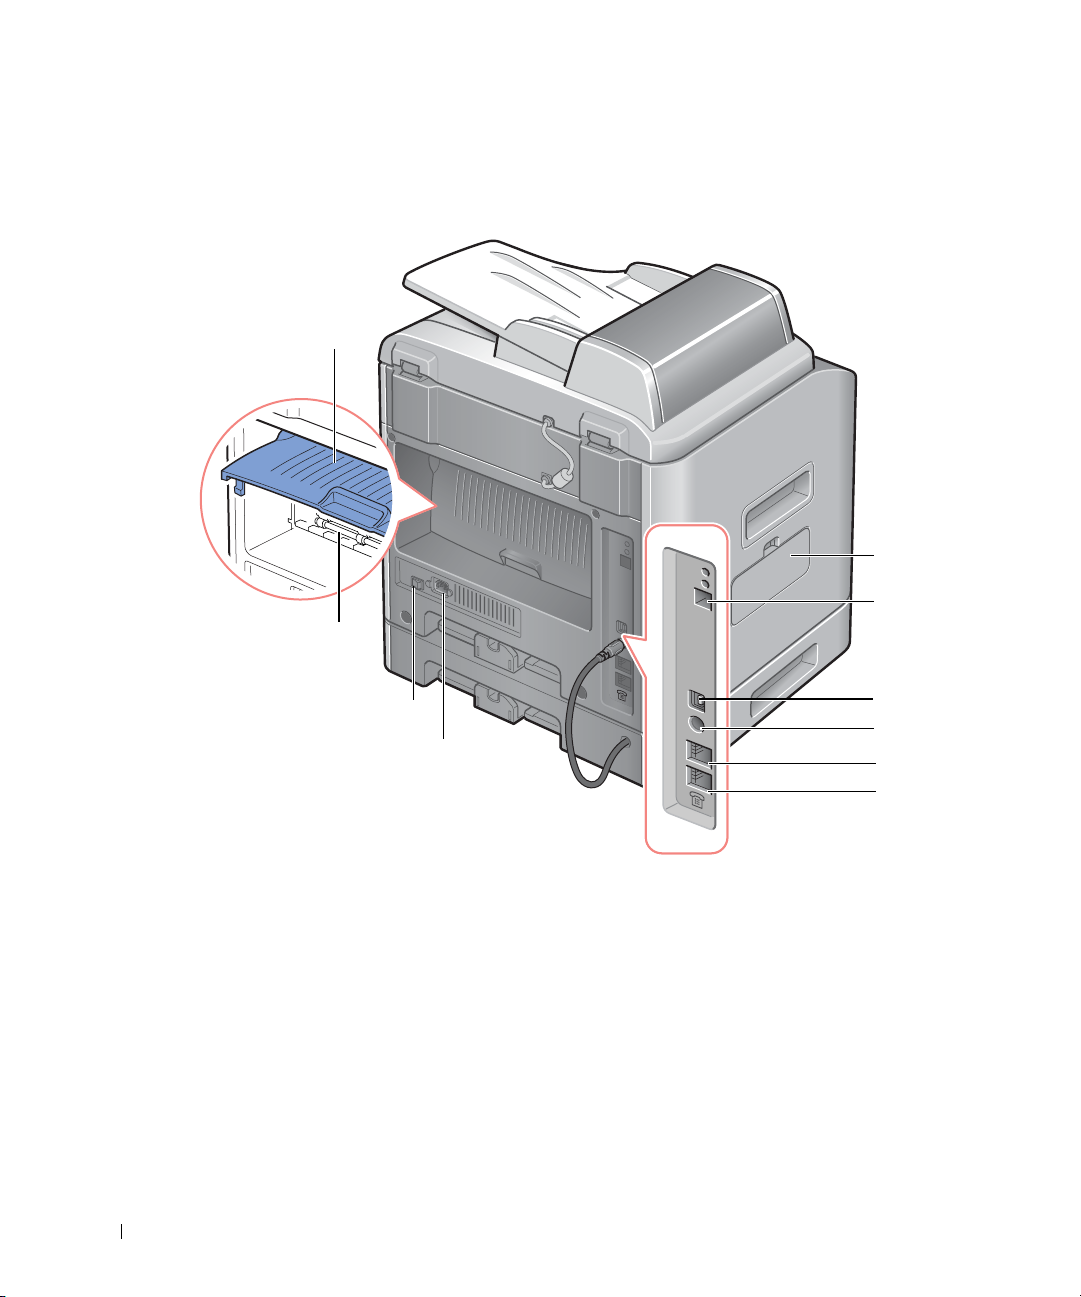
Rear View
P
h
Control B
Rear Cover
Rear Output
Slot (Face Up)
oard
Cover
Network Port
12
ower Switc
AC power Cord
Connector
a
If you use this machine in
the serial countries, such as
Germany and Sweden, this
socket may not be blocked.
Optional Tray2
Cable Connector
FAX Jack
Phone Jack
a
USB Connector

Operator Panel Button Functions
❶
❶ Copy Keys
Copy
❷ Common Keys
Allows you to use copy layout features, such as Auto Fit, Clone,
Collation, 2-sided, 2/4 Up (multiple pages on a sheet), and Poster
copying.
Selects the number of copies.
Makes a copy smaller or larger than the original document.
Adjusts the copy quality.
❸ Fax Keys
123
456
89
7
0
*
❹ Scan Keys
#
❷
Adjusts the brightness of the documents for the current copy job.
Starts a copy.
Displays the current status and prompts during an operation.
Scrolls through the options available for the selected menu item.
13

❷
❸
Enters Menu mode and scrolls through the menus available.
Confirms the selection on the display.
Exits the menu and returns to Standby mode.
Stops an operation at any time.
In Standby Mode, clears/cancels the copy options, such as the
contrast, the image quality, the copy size, and the number of copies.
Allows you to store frequently-dialed fax numbers using a one, two or
three-digit speed dial or group number for automatic dialing and
edit the stored numbers.
It also allows you to print a Phonebook list.
Sends a fax.
Dials a number or enters alphanumeric characters.
Allows you to send a fax to multiple destinations.
14
❹
Adjusts the resolution of the documents for the current fax job.
Redials the last number in Standby mode or inserts a pause into a fax
number in edit mode.
Engages the telephone line.
Accesses a list of software programs that an image can be scanned to.
You must configure the scan list using the software prior to this
feature.
Starts a scan.
Installing the Toner Cartridge
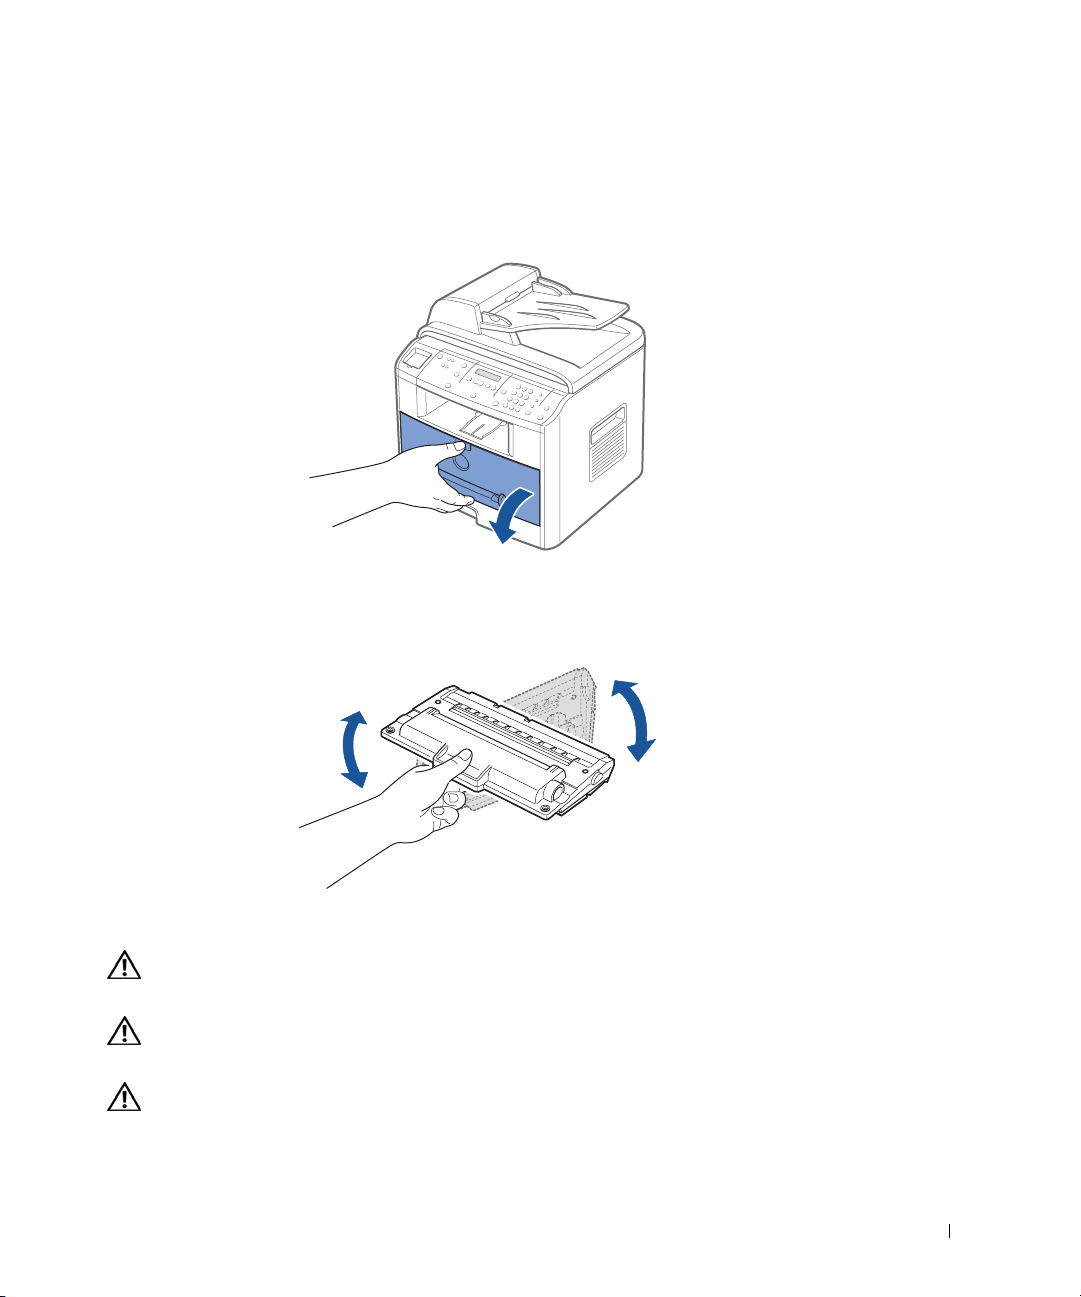
1 Open the front cover.
2 Remove the 3K Cartridge from its bag. Hold the toner cartridge by the handle and
gently shake it from side-to-side to distribute the toner.
Thoroughly rolling the cartridge will assure the maximum copies per cartridge.
CAUTION: To prevent damage, do not expose the toner cartridge to light for more
than a few minutes.
CAUTION:
paper.
CAUTION:
wash your clothing in cold water. Hot water may set the toner into the fabric.
If left exposed for more than a few minutes,
If any toner gets on your clothing,
wipe it off with a dry cloth and
cover it with a piece of
15
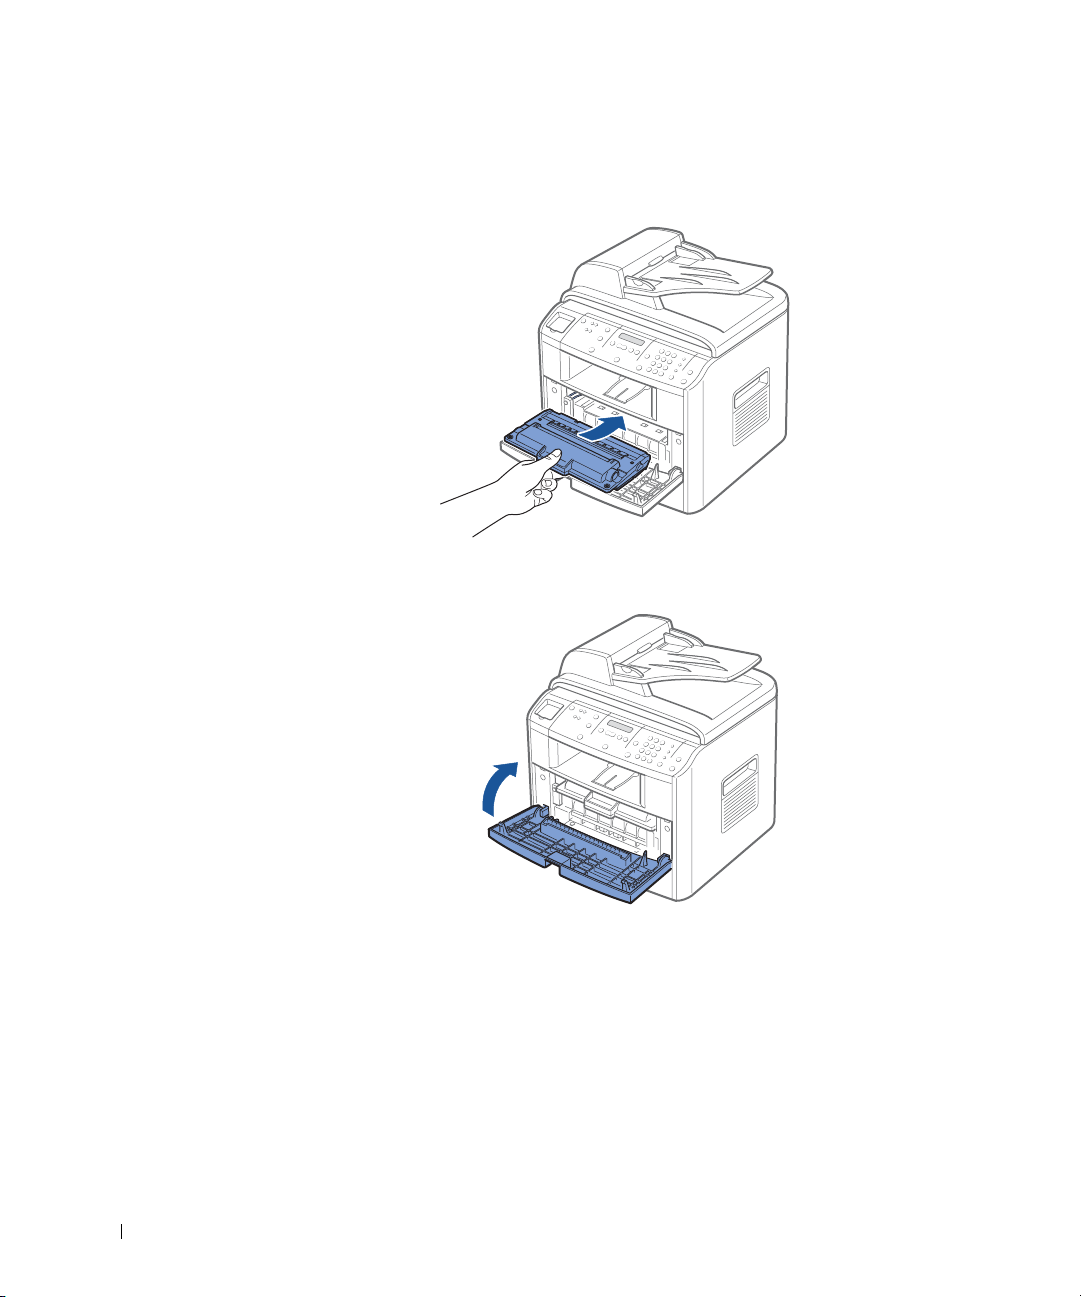
3 Slide the toner cartridge into the machine aligning it with the labeled arrows, until it
locks firmly into place.
4 Close the front cover.
16
Loading Paper
You can load approximately 250 sheets of plain paper in the paper tray. For faxing, you can
use A4-, Letter-, Legal sized paper only. For copying or PC-printing, you can use many
different types and sizes of paper; see "Paper Handling" on page 37.
NOTE: After you load the paper, you need to set up your machine for the paper type and size you
loaded. See page 56 and page 57 for the paper used in copying and faxing, or page 65 for
PC-printing.
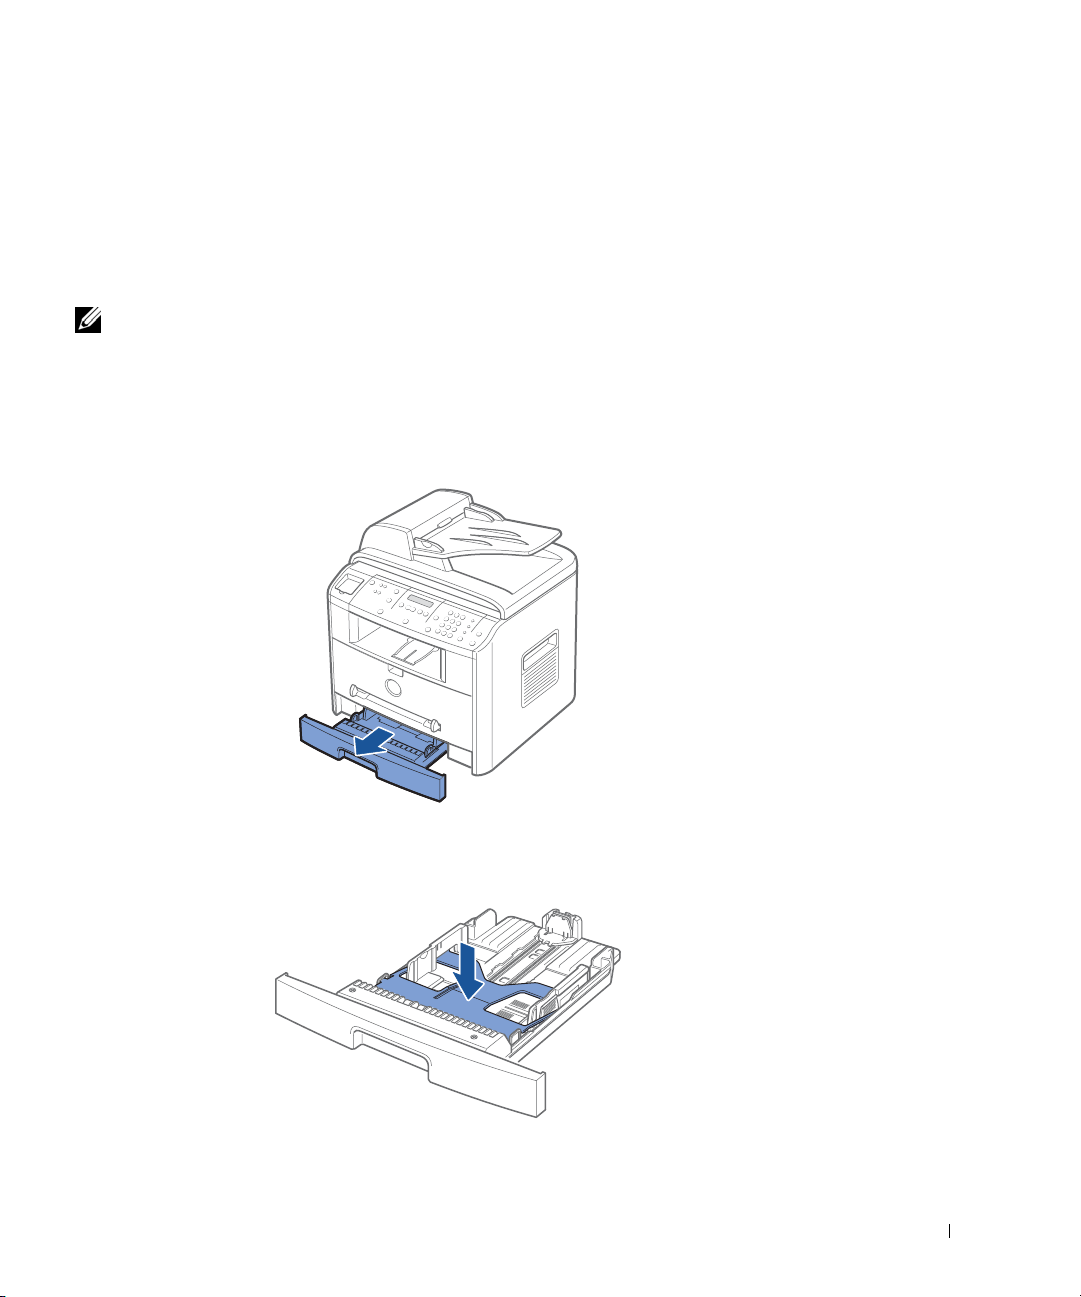
To load paper:
1 Pull open the paper tray and remove it from the machine.
2 Push down on the pressure plate until it locks into place.
17

3 If you load longer sizes of paper, such as Legal-sized paper, press and unlatch the guide
lock, and then slide the paper length guide out completely to extend the paper tray to
its full length.
4 Flex the sheets back and forth to loosen them, and then fan them out. Do not fold or
crease the print media. Align the edges on a level surface.
18
5 Insert the paper stack into the paper tray with the side you want to print facing down.
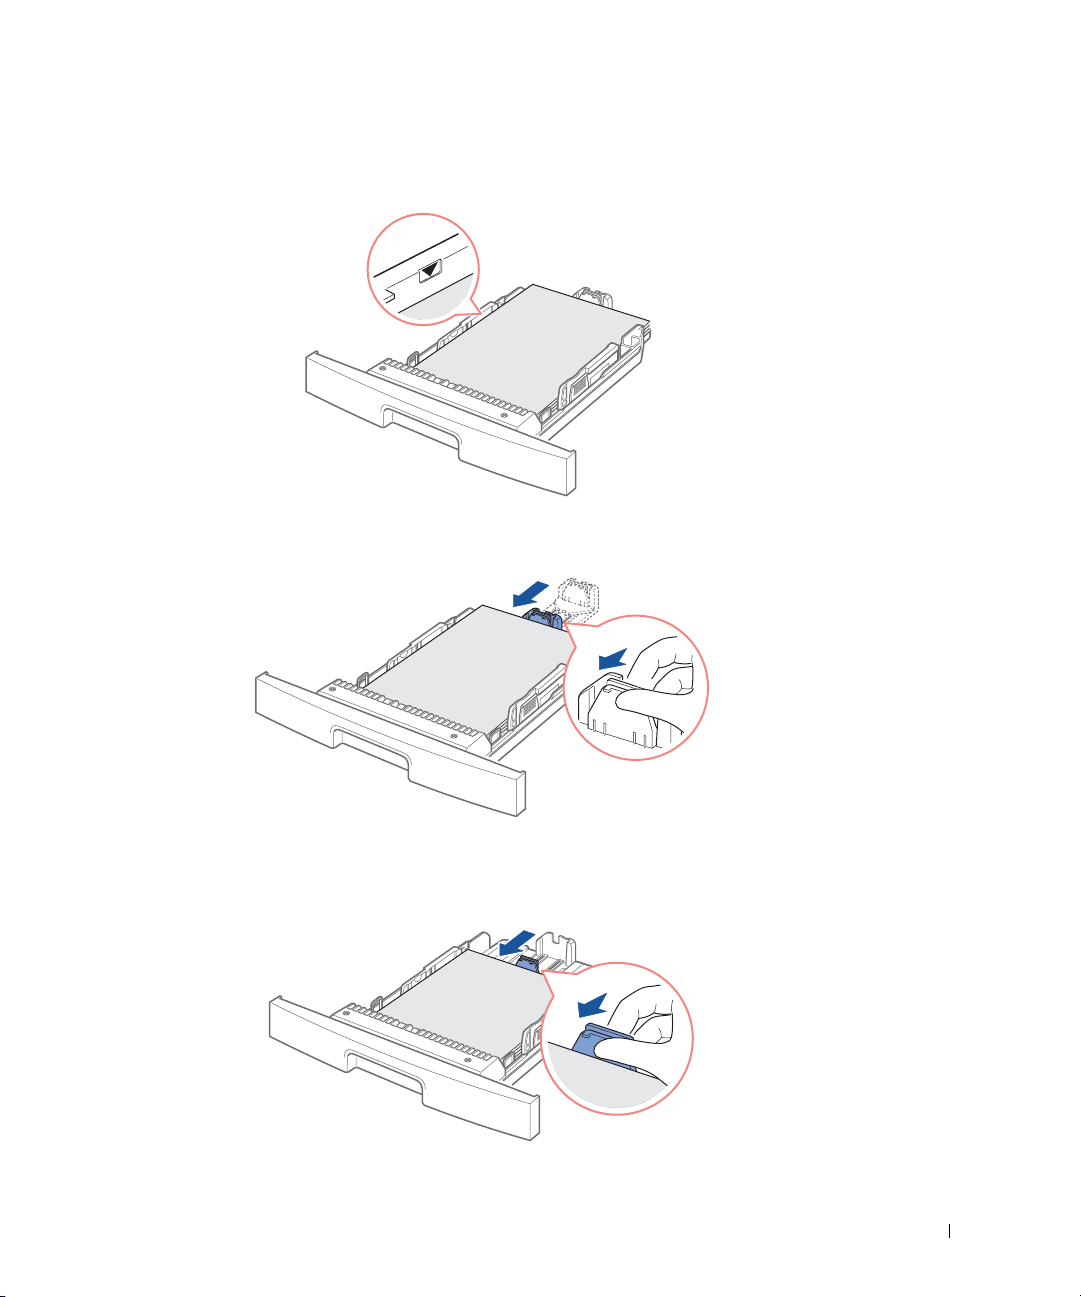
6 Do not exceed the maximum stack height indicated by the paper limit mark on the
left side wall of the tray. Paper overloading may cause paper jams.
7 Slide in the length guide until it lightly touches the end of the paper stack.
For paper smaller than Letter size, adjust the inner paper length guide so that it lightly
touches the paper stack.
19
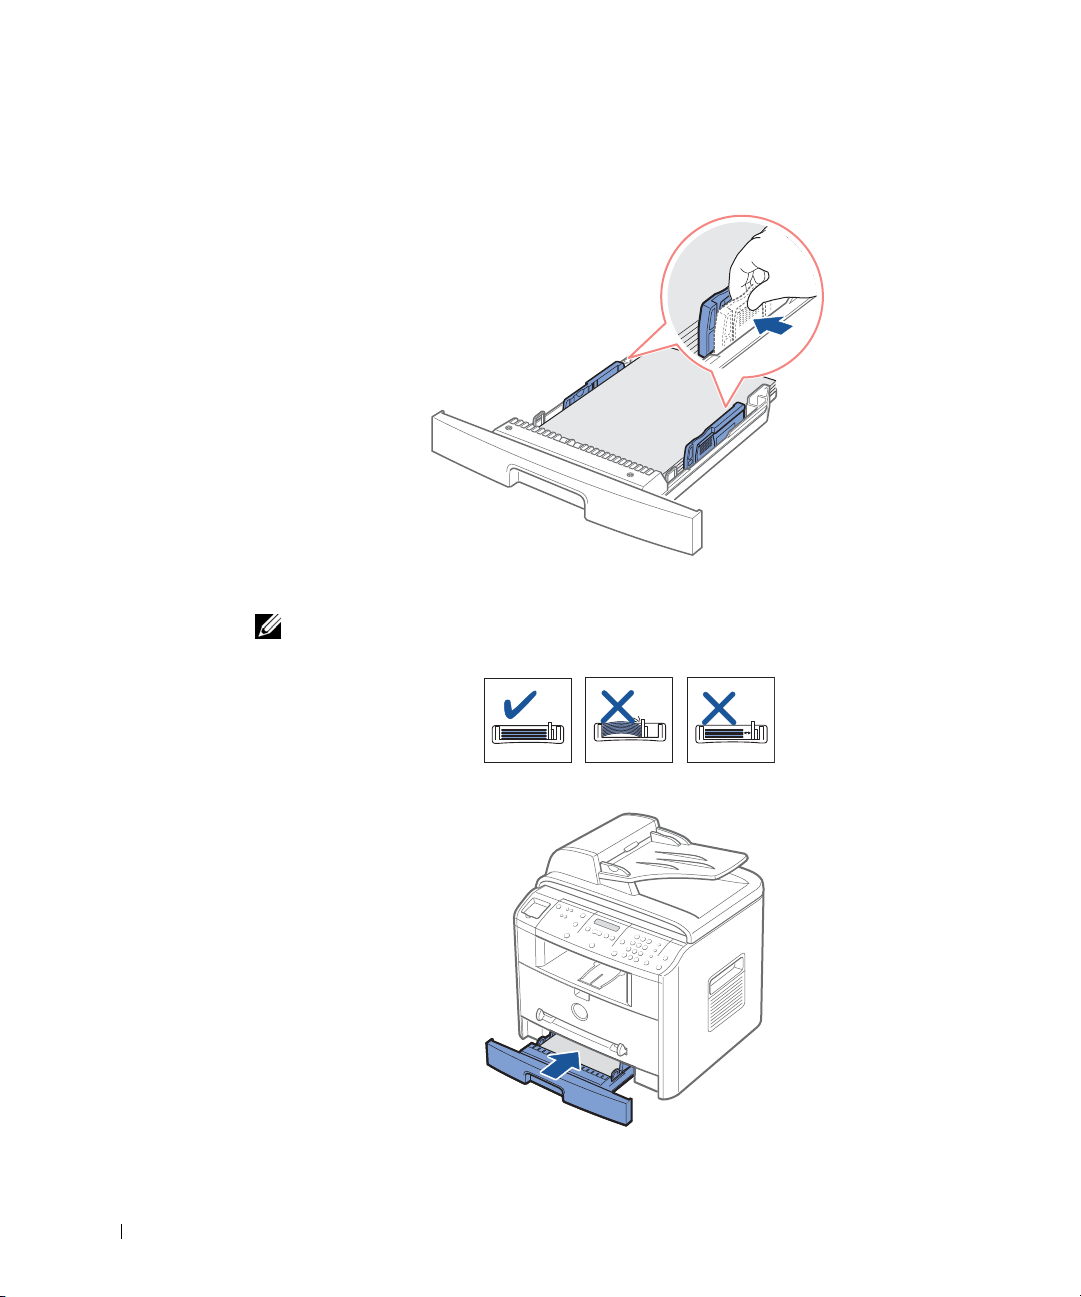
8 Pinch the paper width guide, as shown, and move it towards the stack of paper until it
lightly touches the side of the stack.
NOTE: Do not push the paper width guide far enough to cause the materials to warp. If you do
not adjust the paper width guide, it may cause paper jams.
20
9 Insert and slide the paper tray back into the machine.
Making Connections
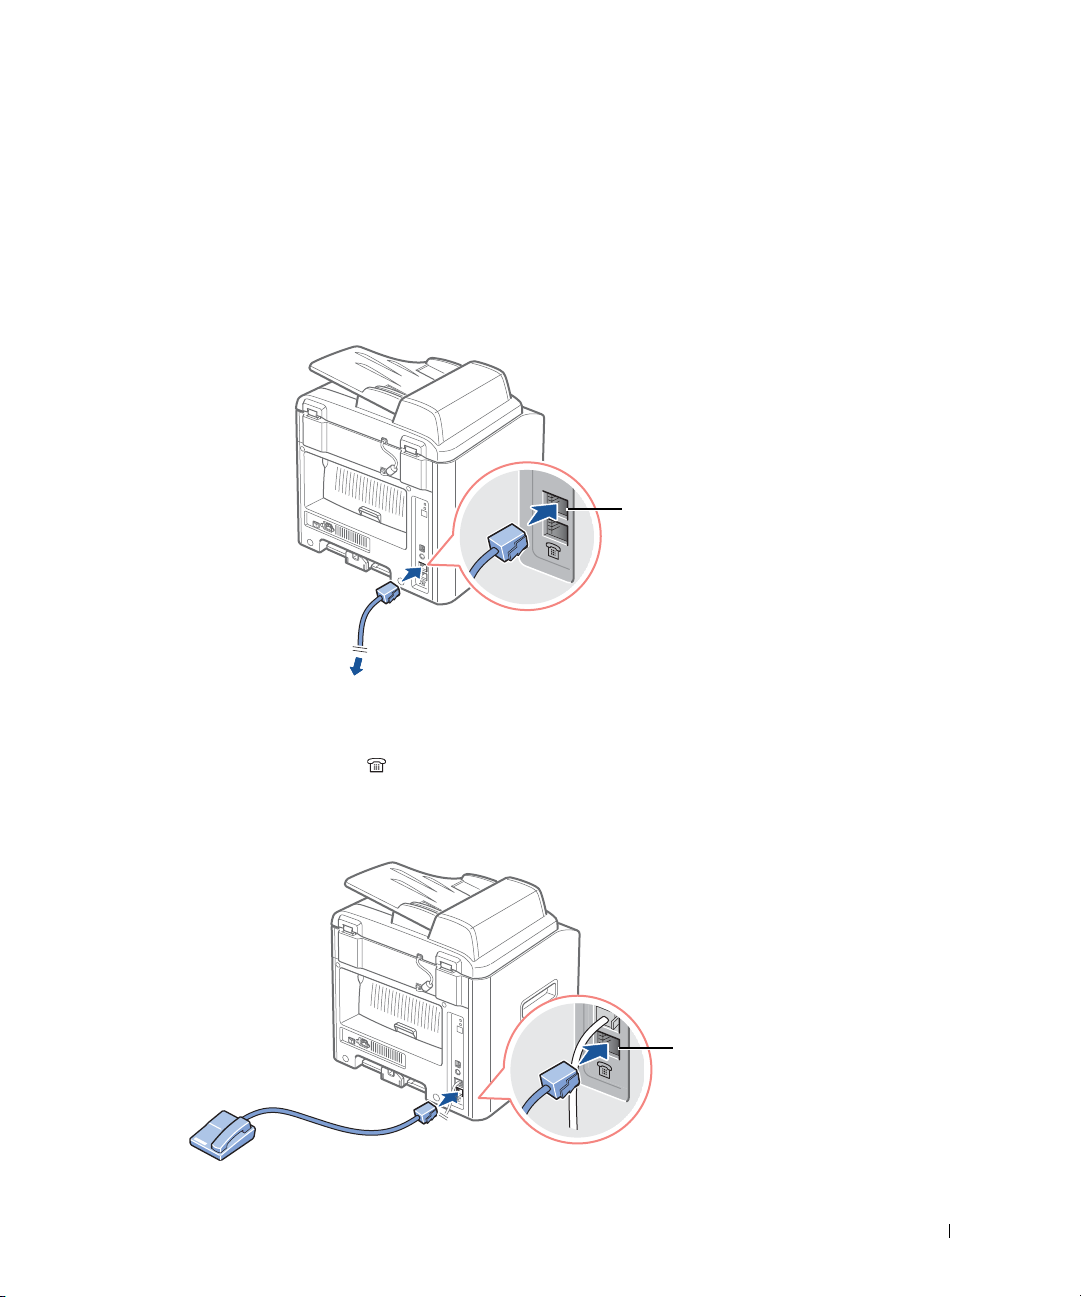
Connecting the Telephone Line
1 Plug one end of a telephone line cord into the FAX Jack and the other end into an
active wall jack.
FAX Jack
To the wall jack
To connect a telephone and/or answering machine to your machine, remove the
dummy from the Phone Jack ( ) and plug the telephone or answering machine into
the Phone Jack.
To an extension phone or
answering machine
Phone Jack
21
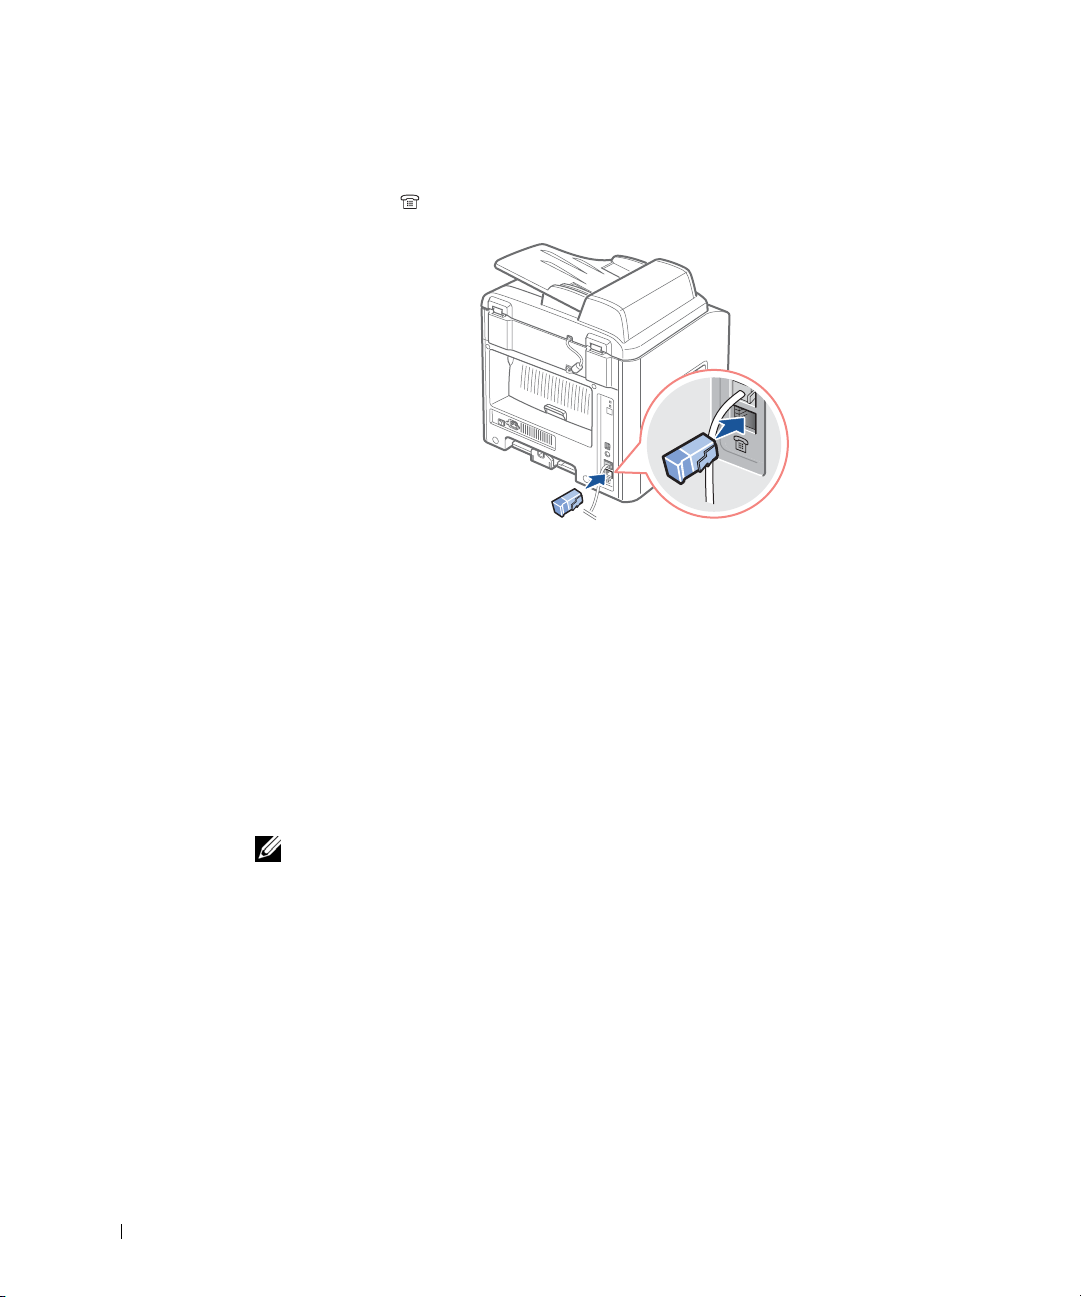
If you use this machine in the serial countries, such as Germany, Sweden, Denmark,
Austria, Belgium, Italy, France or Switzerland, you must remove the dummy from the
Phone Jack ( ) and insert the supplied terminator.
Connecting the Printer Cable
Connecting the Printer Locally
22
A local printer is a printer connected to your computer using a USB cable.
attached to a network instead of your computer,
skip this step and go on to "Connecting the
If your printer is
Printer to the Network" on page 23.
A USB cable doesn’t come with your printer. You must purchase a USB cable from a nearby
computer store.
NOTE: Connecting the printer to the USB port of the computer requires a certified USB cable.
You will need to buy a USB 2.0 compliant cable that is about 3 m in length.
To connect the printer to a computer:
1 Make sure the printer, computer, and any other attached devices are turned off and
unplugged.

2 Connect a USB cable to the USB connector on your printer.
3 Plug the other end of the cable into a USB port on the back of the computer, not the
USB keyboard.
Connecting the Printer to the Network
1 Make sure the printer, computer, and any other attached devices are turned off and
unplugged.
2 Plug one end of the Ethernet cable into the Ethernet network port on the printer.
3 Plug the other end of the cable into a network LAN drop or hub. The printer
automatically adjusts for the network speed.
NOTE: After connecting the printer you need to configure the network parameters on the
operator panel. See page 143.
23

Turning the Machine On
CAUTION: The fusing area at the rear part of the inside of your machine becomes
hot once the machine is turned on.
CAUTION: Be careful not to be burned when you access this area.
CAUTION: Do not disassemble the machine when it is turned on. If you do, it may
give you an electric shock.
To turn the machine on:
1 Plug one end of the power cord into the socket at the back of the machine and the
other end into a properly grounded outlet.
2 Press the power switch to turn the machine on. “Warming Up Please Wait” appears
on the display indicating that the machine is now on.
24
To view your display text in another language, see page 25.

Changing the Display Language
To change the language that displays the operator panel display, follow these steps:
1 Press <Menu> until “Printer Setup” appears on the top line of the display.
2 Press the scroll button ( or ) until “Language” appears on the bottom line of the
display.
3 Press <Select>. The current setting appears on the bottom line of the display.
4 Press the scroll button ( or ) until the language you want appears on the display.
The available languages are English, French, German, Italian, Spanish, Portuguese,
Dutch and Russian.
5 Press <Select> to save the selection.
6 To return to Standby mode, press <Return>.
Toner Save Mode
The Toner Save mode allows your machine to use less toner on each page. Activating this
mode extends the life of the toner cartridge longer than the normal mode, but it reduces
the print quality.
NOTE: For PC-printing, you can also turn on or off the Toner Save mode in the printer
properties. See page 67.
To turn the Toner Save mode on:
1 Press <Menu> until “Printer Setup” appears on the top line of the bottom line.
Press <Select>.
2 Press the scroll button ( or ) until you see “Toner Save” appears on the bottom
line. Press <Select>.
3 Press the scroll button ( or ) to display “On” on the bottom line and press
<Select>.
Selecting “Off” means that the Toner Save mode is turned off.
4 To return to Standby mode, press <Return>.
25

Power Save Mode
The Power Save mode allows your machine to reduce power consumption when it is not in
actual use. You can turn this mode on by selecting the length of time for which the machine
waits after a job is printed before it switches to a reduced power state.
1 Press <Menu> until “Printer Setup” appears on the top line of the display.
2 Press the scroll button ( or ) until “Power Save” appears on the bottom line.
Press <Select>.
3 Press the scroll button ( or ) to display “On” on the bottom line and press
<Select>.
Selecting “Off” means that the Power Save mode is turned off.
4 Press the scroll button ( or ) until the time settings you want appears.
5 The available options are 5, 10, 15, 30 and 45 (minutes).
6 Press <Select> to save the selection.
7 To return to Standby mode, press <Return>.
CCD Power Save Mode
26
The scan lamp under the scanner glass automatically turns off when it is not in actual use
during a preset period to reduce power consumption and extend the lamp life. The lamp
automatically turns-on and the warm-up cycle begins whenever any key pressed or the
document cover is opened or a document is deleted in the ADF.
You can set the length of time for which the scan lamp waits after a scan job is completed
before it switches to the Power Save mode.
1 Press <Menu> until “Printer Setup” appears on top line of the display.
2 Press the scroll button ( or ) until “CCD Power Save” appears on the bottom
line. Press <Select>.
3 Press the scroll button ( or ) until the time setting you want appears on the bottom
line.
The available time options are 1, 4, 8, and 12 (hours).
4 Press <Select> to save the selection.
5 To return to Standby mode, press <Return>.

Software Overview
After setting up your machine and connecting it your computer, you must install the
drivers. The drivers are available on the CD packaged with your machine. The CD-ROM
contains the following:
•Dell MFP drivers- lets your computer communicate with your printer. To use your
machine as a printer in Windows, you must install the MFP driver(s). For information
about installing the MFP drivers in Windows, see page 34.
• Printer Settings Utility - allows you to set up the fax phonebook entries and additional
system options on your desktop. You can also configure the destination which launches
automatically when you press the Select Software button on the operator panel, and
update the firmware of your machine.
• Status Monitor - displays the status of the printer and the name of the job when you
send a job to print. The Status Monitor window also displays the level of toner and
allows you to order replacement toner cartridges.
• Paper Port - allows you to scan documents and edit the scanned images. Paper Port
provides improved scanning features and supports annotations on all image types.
Paper Port’s enhanced search feature allows you to find items by specific item
properties.
• Scan Driver - TWAIN or WIA driver is available for scanning documents on your
machine.
• User’s Guide - HTML documentation provides a detailed information about using
your multi-function printer.
Installing Dell Software
Before you begin, ensure that your system meets the minimum requirements. (Correct
information required!!!)
NOTE: For Windows NT 4.0/2000/XP, the system administrator should install Dell software.
Supported Operating Systems
• Windows 98/98 SE/Me/NT 4 Workstation or Server with Service Pack 3
• Windows 2000 Professional or Advanced Server
• Windows XP Home edition or Professional.
Minimum Requirements
• Disk space: 120 MB for installation
33
• Memory: 64 MB
• CPU: Pentium II 233 or higher
• Required software: Internet Explorer 4.01
Recommended
• Disk space: 220 MB for installation
• Memory: 128 MB
• CPU: Pentium II 400 or higher
• Required software: Internet Explorer 5.5
Installing Dell Software for Local Printing
A local printer is a printer attached to your computer using a USB cable.
attached to a network instead of your computer,
skip this step and go to "Installing Dell
Software for Network Printing" on page 35.
A printer driver is software that lets your computer communicate with your printer. The
procedure to install drivers depends on the operating system you are using.
NOTE: If you attach a USB printer cable while your printer and computer are turned on, the
Windows hardware wizard launches immediately. You may answer the plug and play screen or
cancel the screen and use the drivers CD to install the Dell software.
If your printer is
34
1 Make sure that the printer is connected to your computer and powered on. Close all
unnecessary programs.
NOTE: If the printer is not connected to your computer when you install the CD-ROM, the No
Printer Found screen appears. Follow the instructions to install the software.
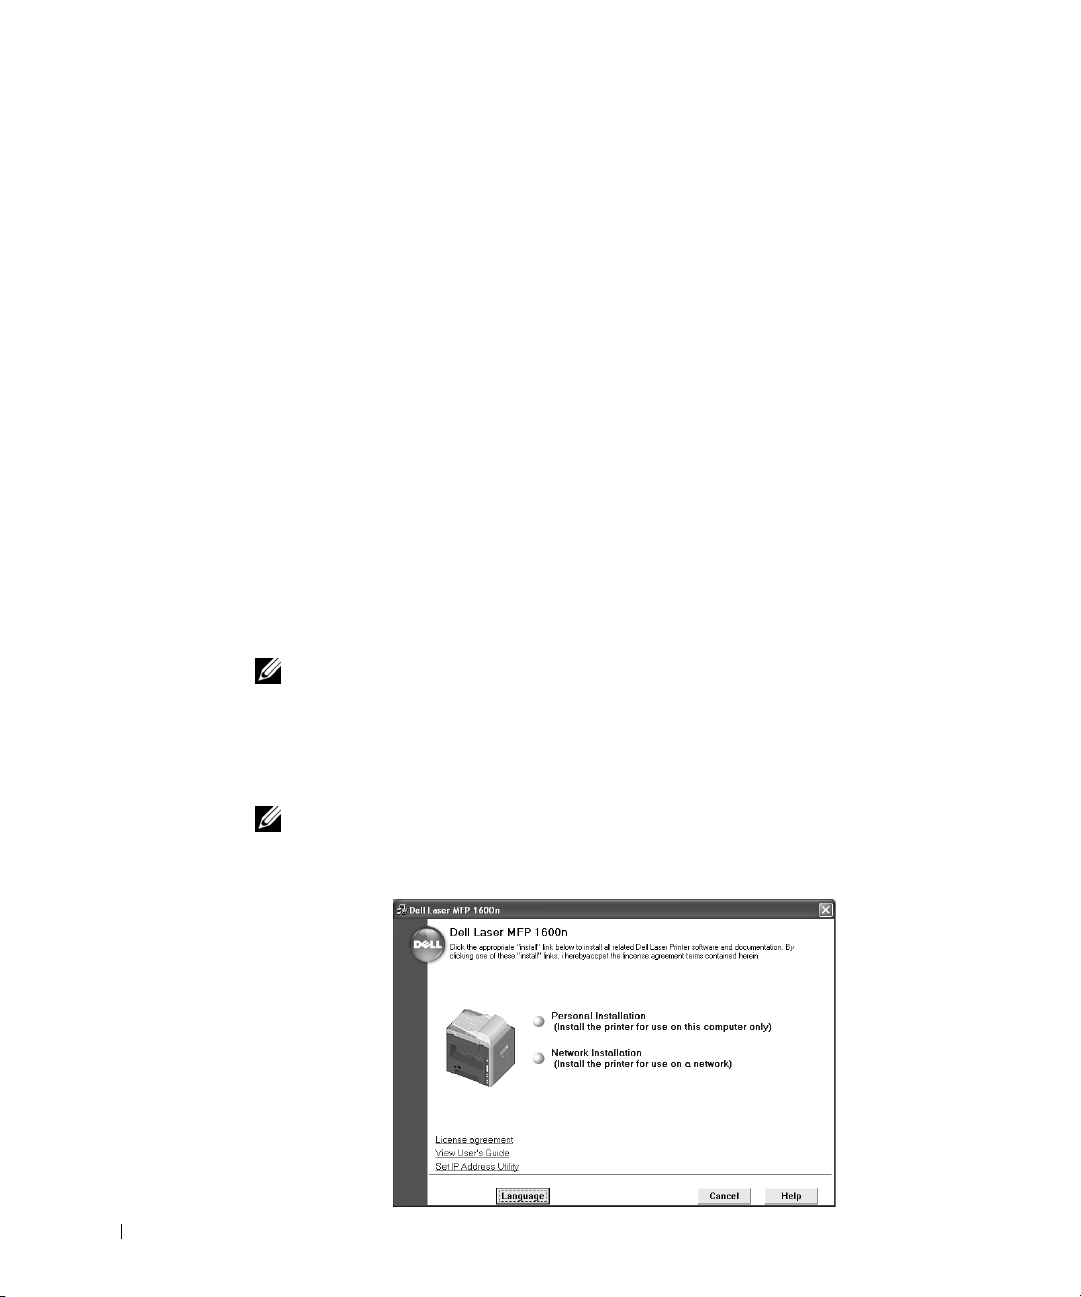
2
Insert the supplied Dell software CD into the CD-ROM drive in your computer.
3 If necessary, select a language by pressing the Language button on the main screen.
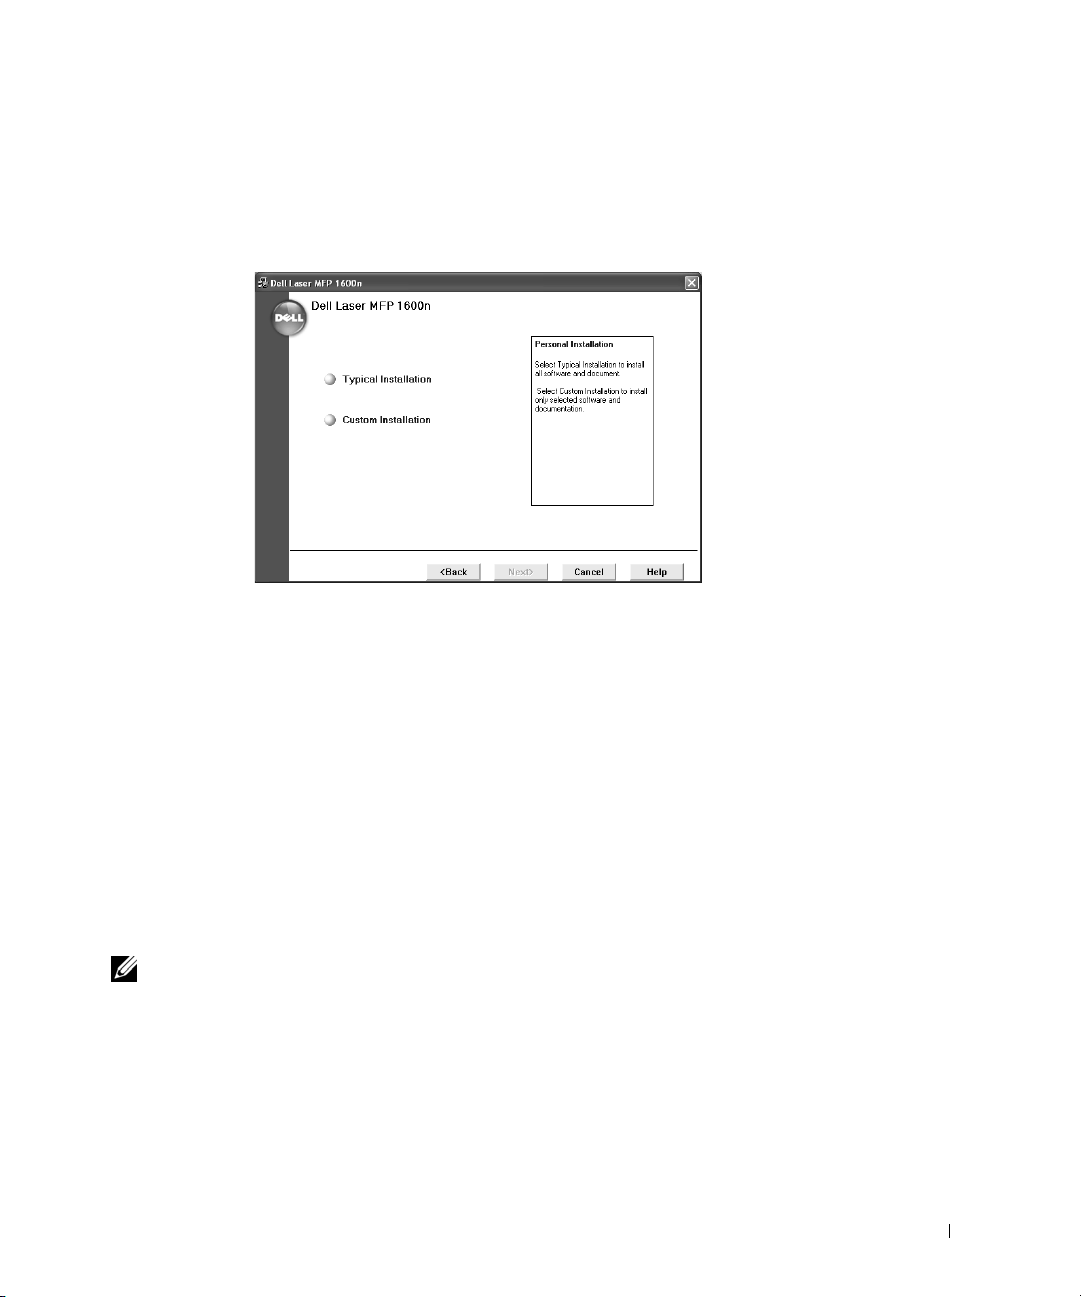
4 Select Personal Installation.
5 Select Typical Installation to install the MFP drivers for printing and scanning, and
user’s guide as default settings.
To install only selected software, select Custom Installation. If you want to use a PS
driver, select Custom Installation. You can change the destination directly.
6 When the installation is completed, you may print a test page. Click Finish to
complete the installation and close the wizard. You are now ready to print.
Installing Dell Software for Network Printing
(Correct introduction required!!)
When you connect your printer to the network, you must first configure the TCP/IP
settings for the printer. After you have assigned and verified the TCP/IP settings, you are
ready to install the Dell software on each network computer.
You can install the Dell software on the network computers locally or remotely.
NOTE: You need administrative access to install printer drivers on the network computers.
1
Make sure that the printer is connected to your network and powered on. Close all
unnecessary programs.
35
2 Insert the supplied Dell software CD.
3 If necessary, select a language by pressing the Language button on the main screen.
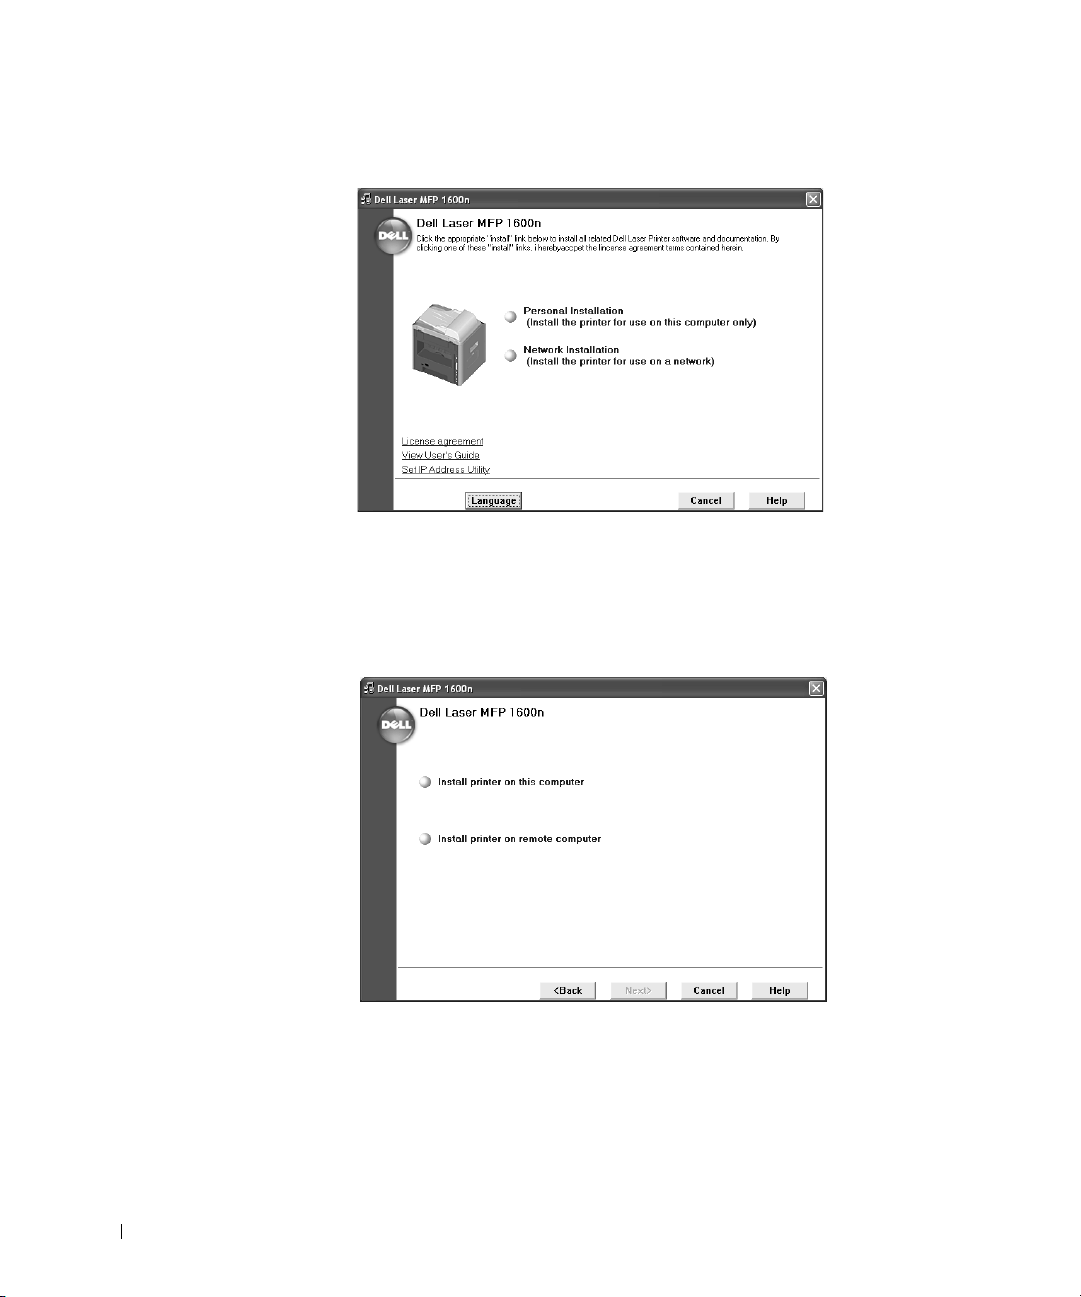
4 Select Network Installation.
5 If you want to install the printer on this computer or network server, select Install
printer on this computer, and click Next.
36
If you want to install the Dell software in the remote computers on the same network,
select Install printer on remote computer. The network administrator’s ID and
password are required. Select the client computer(s) and click Next.
 Loading...