

Samsung LA46D550, LA40D551, LA32D550, LA40D550 User Manual

LCD TV
E-MANUAL
User Manual
imagine the possibilities
Thank you for purchasing this Samsung product.
To receive more complete service, please register
your product at
www.samsung.com/register
Model _____________ Serial No. _____________
For more information on how to use e-Manual (P.11)
Figures and illustrations in this User Manual are provided for reference only and may differ from actual product appearance.
Product design and specifications may be changed without notice.
Still image warning
Avoid displaying still images (like jpeg picture files) or still image element (like TV programme logo, panorama or 4:3 image
format, stock or news bar at screen bottom etc.) on the screen. Constant displaying of still picture can cause ghosting of LCD
screen, which will affect image quality. To reduce risk of this effect, please follow below recommendations:
• Avoid displaying the same TV channel for long periods.
• Always try do display any image on full screen, use TV set picture format menu for best possible match.
• Reduce brightness and contrast values to minimum required to achieve desired picture quality, exceeded values may speed
up the burnout process.
• Frequently use all TV features designed to reduce image retention and screen burnout, refer to proper user manual section
for details.
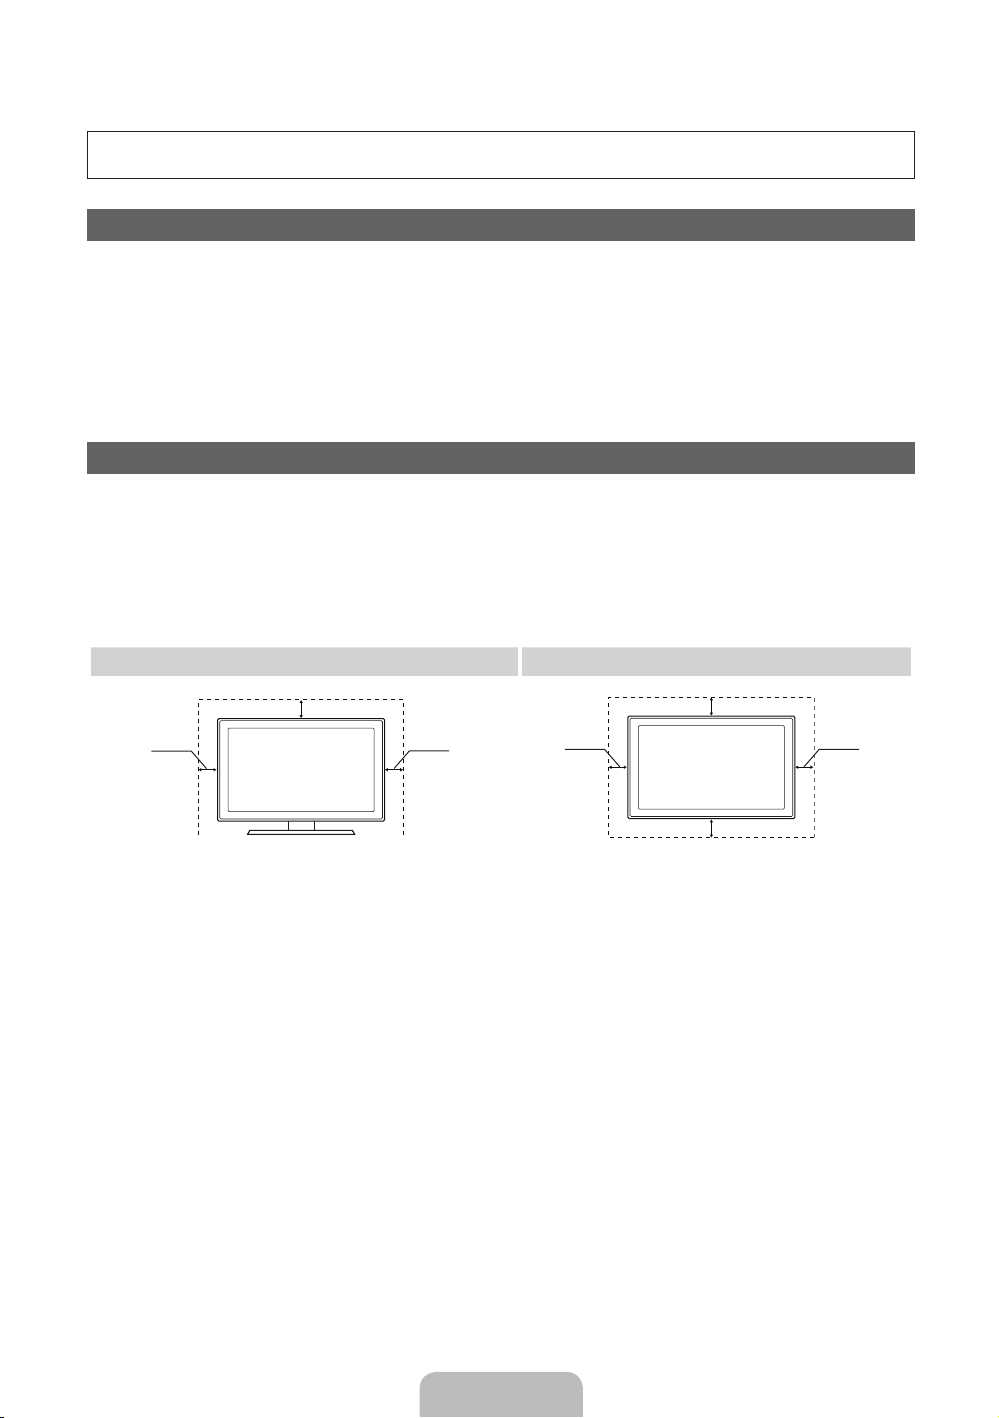
Securing the Installation Space
Keep the required distances between the product and other objects (e.g. walls) to ensure proper ventilation.
Failing to do so may result in fire or a problem with the product due to an increase in the internal temperature of the product.
When using a stand or wall-mount, use parts provided by Samsung Electronics only.
✎
• If you use parts provided by another manufacturer, it may result in a problem with the product or an injury due to the
product falling.
The appearance may differ depending on the product.
✎
Be careful when you contact the TV because some parts can be somewhat hot.
✎
Installation with a stand. Installation with a wall-mount.
10 cm
10 cm
10 cm10 cm
10 cm
10 cm
10 cm
English - 2

Accessories
✎
Please make sure the following items are included with your T V. If any items are missing, contact your dealer.
✎
The items’ colours and shapes may vary depending on the models.
y Remote Control & Batteries (AAA x 2)
y Owner’s Instructions
y Warranty Card / Safety Guide (Not available in some locations)
y Cleaning Cloth
y Power Cord
Viewing the Control Panel
✎
The product colour and shape may vary depending on the model.
Control Panel
Speakers
Remote control sensor Aim the remote control towards this spot on the TV.
Power Indicator Blinks and turns off when the power is on and lights up in standby mode.
SOURCE
MENU Displays an on-screen menu, the OSD (on screen display) of your TV’s features.
y
z
P
E
(Power)
Toggles between all the available input sources. In the on-screen menu, use this
button as you would use the ENTERE button on the remote control.
Adjusts the volume. In the OSD, use the
and ► buttons on the remote control.
Changes the channels. In the OSD, use the
▼ and ▲ buttons on the remote control.
Turns the TV on or off.
y
z
buttons as you would use the ◄
buttons as you would use the
Standby mode
Do not leave your TV in standby mode for long periods of time (when you are away on a holiday, for example). A small amount
of electric power is still consumed even when the power button is turned off. It is best to unplug the power cord.
English - 3
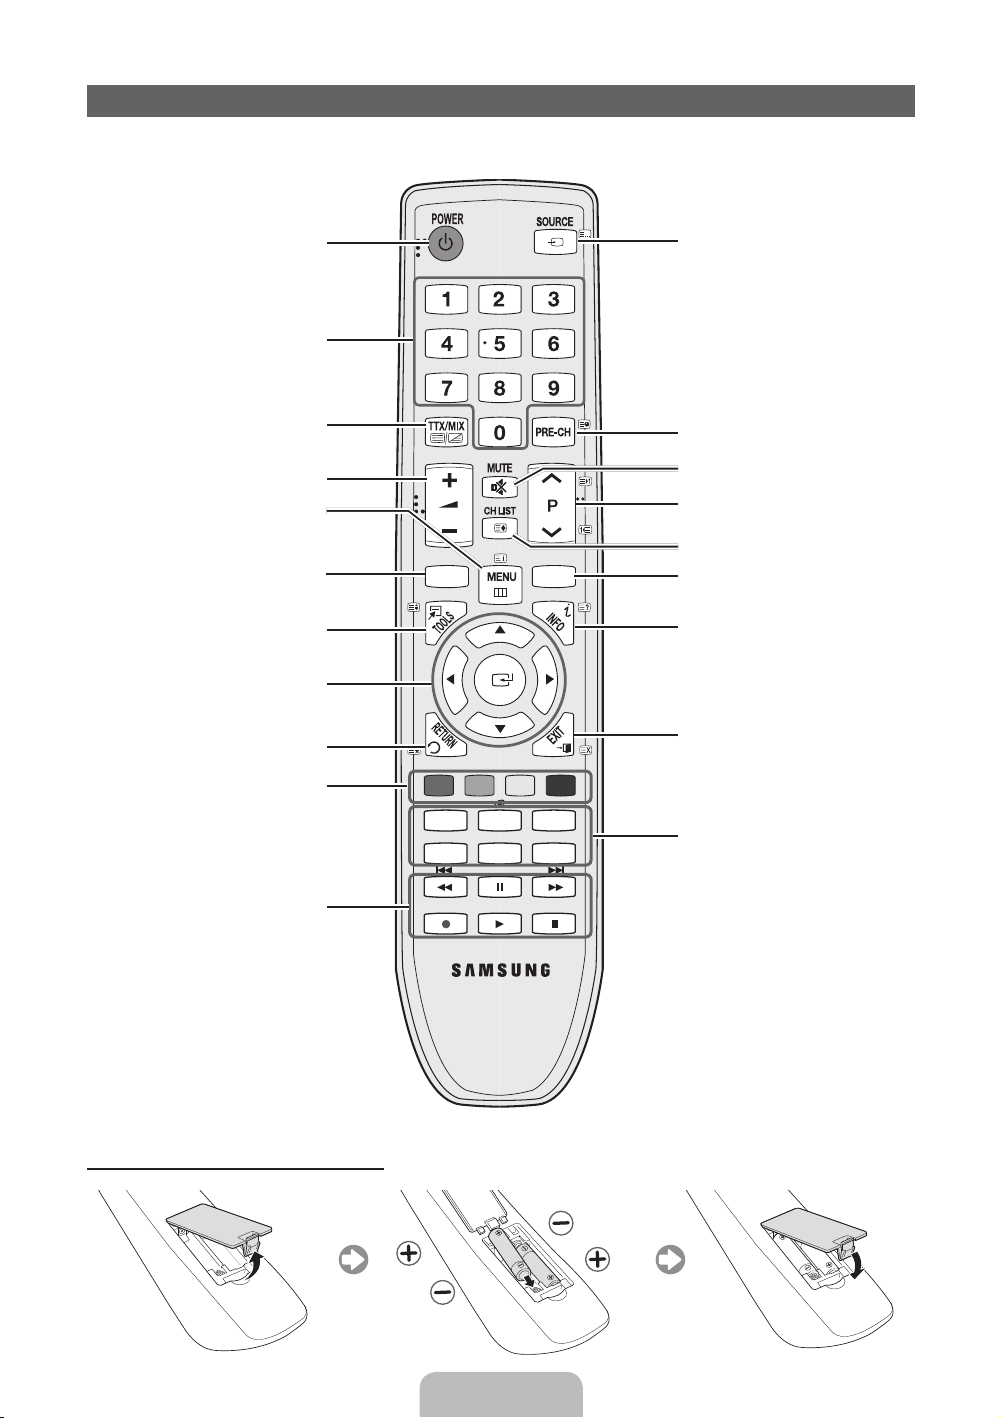
Viewing the Remote Control
✎
This is a special remote control for the visually impaired persons and has Braille points on the Power,
Channel, and Volume buttons.
Turns the TV on and off.
Have direct access to channels.
Alternately select Teletext ON,
Double, Mix or OFF.
Adjusts the volume.
Displays the main on-screen menu.
Displays the My Downloads,
Watch TV and Source.
Quickly select frequently used
functions.
Selects the on-screen menu items
and changes the values seen on the
menu.
Returns to the previous menu.
Buttons used in the Channel List,
Channel Manager, My Downloads,
Network, AllShare™ menu, etc.
Use these buttons in My
Downloads and Anynet+ modes.
CONTENT
A B C D
P.MODE
SRS
P.SIZE
E-MANUAL
GUIDE
DUAL I-II
AD/SUBT.
Displays and selects the available
video sources.
Returns to the previous channel.
Cuts off the sound temporarily.
Changes channels.
Displays channel lists on the screen.
Displays the EPG (Electronic
Programme Guide).
Displays information on the TV
screen.
Exits the menu.
P.MODE: Selects picture mode.
SRS: Selects the SRS TruSurround
HD mode.
DUAL I-II: Select Dual sound mode.
E-MANUAL: Displays the e-Manual
guide.
P.SIZE: Selects the picture size.
AD: Audio Description selection.
(Not available in some locations)
SUBT.: Displays digital subtitles.
Installing batteries (Battery size: AAA)
English - 4
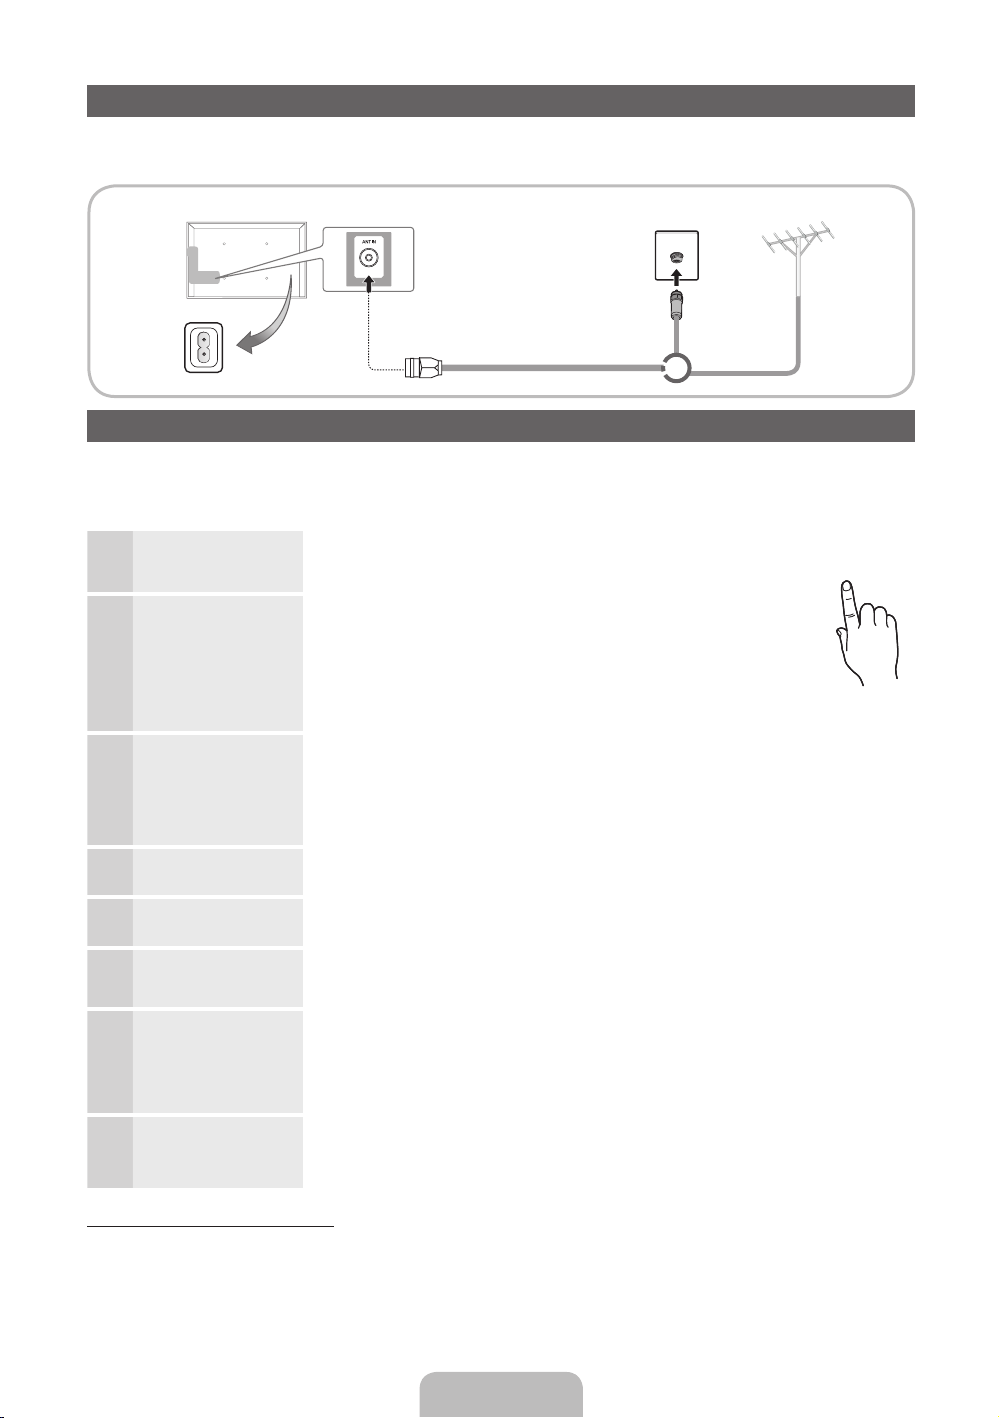
Connecting to an Antenna
When the TV is initially powered on, basic settings proceed automatically.
✎
Preset: Connecting the mains and antenna.
VHF/UHF AntennaCable
Power Input
or
Plug & Play (Initial Setup)
When the TV is initially powered on, a sequence of on-screen prompts will assist in configuring basic settings. Press the
POWERP button. Plug & Play is available only when the Source is set to TV.
✎
To return to the previous step, press the Red button.
Selecting a language
1
Selecting Store Demo or
Home Use
Selecting a country
2
Selecting an area
Setting the Clock Mode Set the Clock Mode automatically or manually.
3
Selecting an antenna
4
Selecting a channel
5
Enjoy your TV.
6
Press the ▲ or ▼ button, then press the ENTERE button.
Select the desired OSD (On Screen Display) language.
(Not available in some locations)
Press the ◄ or ► button, then press the ENTERE button.
Select the Home Use mode. Store Demo mode is for retail environments.
To return the unit’s settings from Store Demo to Home Use (standard):
Press the volume button on the TV. When the OSD volume is displayed,
press and hold MENU for 5 sec.
Store Demo is only for shop display. If you select it, several functions are not
able to use. Please select Home Use when you watch at home.
Press the ▲ or ▼ button, then press the ENTERE button.
Select the appropriate country. (Not available in some locations)
✎
After selecting the countr y in the Country menu, some models may proceed with an
additional option to setup the pin number.
✎
When you input the PIN number, 0-0-0-0 is not available.
Press the ▲ or ▼ button, then press the ENTERE button.
Select the appropriate area. (Not available in some locations)
✎
If you select the Auto, select the time zone which you live. (Australia only)
Press the ▲ or ▼ button, then press the ENTERE button.
Select Air (Digital & Analogue/Digital/Analogue) or Cable (Digital & Analogue/Digital/
Analogue).
Press the ▲ or ▼ button, then press the ENTERE button.
Select the channel source to memorise. When setting the antenna source to Cable, a step
appears allowing you to assign numerical values (channel frequencies) to the channels. For more
information, refer to Channel → Auto Tuning.
Press the ENTERE button at any time to interrupt the memorisation process.
Select the Watch TV. Press the ENTERE button.
✎
If you select the Network Settings, set the network. For more information, refer to
“Network menu” in the e-Manual.
POWER
P
If You Want to Reset This Feature...
Select System - Plug & Play (Initial Setup). Enter your 4 digit PIN number. The default PIN number is “0-0-0-0.” If you want to
change the PIN number, use the Change PIN function.
You should do Plug & Play (MENU → System) again at home although you did in shop.
✎
If you forget the PIN code, press the remote control buttons in the following sequence in Standby mode, which resets
the PIN to “0-0-0-0” : MUTE → 8 → 2 → 4 → POWER (on)
English - 5
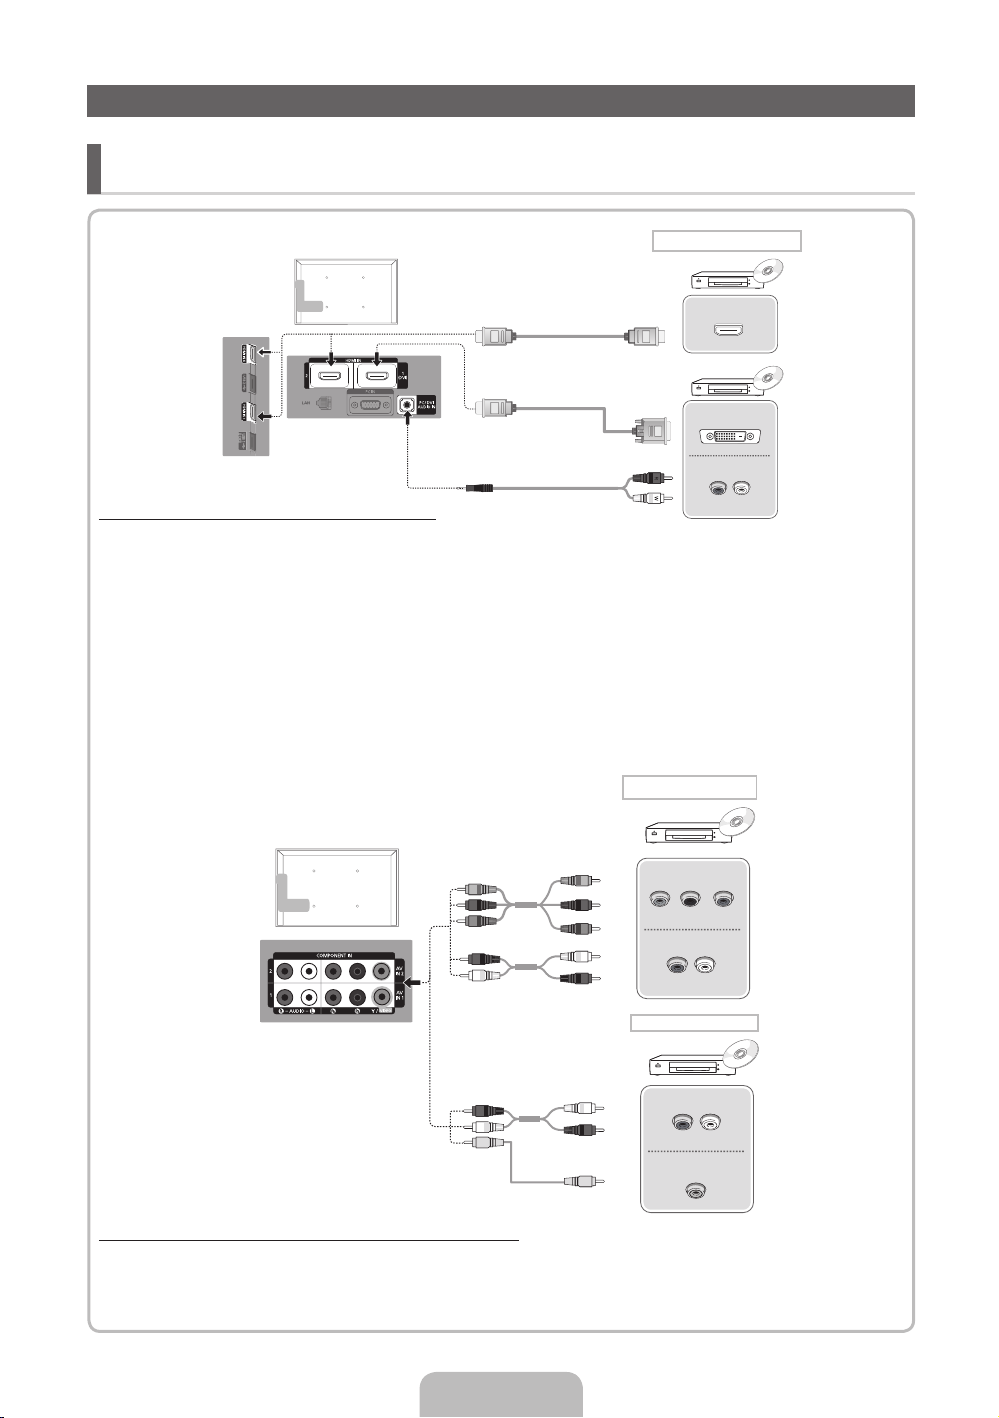
Connecting to an AV devices
¦ Available devices: DVD, Blu-ray player, HD cable box, HD STB (Set-Top-Box) satellite
receiver, VCR, Digital Audio System, Amplifier, DVD Home Theatre, PC
* It may differ depending on the model.
Using an HDMI or HDMI/DVI cable (up to 1080p)
✎
HDMI IN 1(DVI), 2, 3, 4, PC/DVI AUDIO IN
For better picture and audio quality, connect to a digital device using an HDMI cable.
x
An HDMI cable supports digital video and audio signals, and does not require an audio cable.
x
HDMI connection
HDMI OUT
DVI OUT
AUDIO OUT
R-AUDIO-L
– To connect the TV to a digital device that does not support HDMI output, use an HDMI/DVI and audio cables.
The picture may not display normally (if at all) or the audio may not work if an external device that uses an older
x
version of HDMI mode is connected to the TV. If such a problem occurs, ask the manufacturer of the external
device about the HDMI version and, if out of date, request an upgrade.
Be sure to purchase a certified HDMI cable. Otherwise, the picture may not display or a connection error may
x
occur.
A basic high-speed HDMI cable or one with ethernet is recommended. This product does not support the
x
ethernet function via HDMI.
Component connection
G
B
R
R
W
G
B
R
W
R
COMPONENT OUT
PRPBY
AUDIO OUT
R-AUDIO-L
AV connection
R
W
Y
W
R
Y
AUDIO OUT
R-AUDIO-L
VIDEO OUT
Using a Component (up to 1080p) or Audio/Video (480i only)
✎
When connecting to AV IN 1, 2, the colour of the AV IN 1, 2 [Y/VIDEO] jack (Green) does not match the colour of the
video cable (Yellow).
✎
To obtain the best picture quality, the Component connection is recommended over the A/V connection.
English - 6
 Loading...