

Samsung LA15S51BP, LA20S51BP, LS17M24CP User Manual

LCD TV
Contact SAMSUNG WORLD-WIDE
If you have any questions or comments relating to Samsung products,
please contact the SAMSUNG customer care centre.
Country
AUSTRALIA
CHINA
HONG KONG
INDIA
INDONESIA
JAPAN
MALAYSIA
PHILIPPINES
SINGAPORE
SOUTH AFRICA
TAIWAN
THAILAND
U.A.E
VIETNAM
Customer Care Center
1300 362 603
800-810-5858, 010- 6475 1880
2862 6001
3030 8282, 1600 1100 11
0800-112-8888
0120-327-527
1800-88-9999
1800-10-SAMSUNG (7267864)
1800-SAMSUNG (7267864)
0860 7267864 (SAMSUNG)
0800-329-999
1800-29-3232, 02-689-3232
800SAMSUNG (7267864)
1 800 588 889
Web Site
www.samsung.com/au
www.samsung.com.cn
www.samsung.com/hk
www.samsung.com/in
www.samsung.com/id
www.samsung.com/jp
www.samsung.com/my
www.samsung.com/ph
www.samsung.com/sg
www.samsung.com/za
www.samsung.com/tw
www.samsung.com/th
www.samsung.com/mea
www.samsung.com/vn
LA15S51BP
LA20S51BP
LS17M24CP
Owner’s Instructions
Before operating the unit,
please read this manual thoroughly,
and retain it for future reference.
BN68-01013B-00
ON-SCREEN MENUS
PC DISPLAY
TELETEXT
This device is a Class B digital apparatus.
Register your product at www.samsung.com/global/register

Pencegahan Saat Menampilkan Gambar Diam
Gambar diam dapat menyebabkan kerusakan permanen pada layar TV.
• Jangan menampilkan gambar diam pada panel LCD lebih dari 2 jam karena dapat menyebabkan penyimpanan gambar layar.
Penyimpanan gambar ini juga dikenal sebagai "layar terbakar".
Untuk menghindari penyimpanan gambar tersebut, kurangi tingkat kecerahan dan kontras pada layar apabila menampilkan gambar diam.
• Menyaksikan TV LCD pada format 4:3 dalam waktu lama dapat meninggalkan bekas garis tepi di bagian kiri,kanan
• Menampilkan gambar diam dari Video game dan PC lebih lama dari jangka waktu tertentu dapat menghasilkan jejak potongan gambar.
Untuk mencegah efek ini,kurangi ‘brightness ('terang)'dan ‘contrast (kontras)' apabila menampilkan gambar diam.
dan tengah layar yang disebabkan oleh perbedaan pancaran cahaya pada layar.
Memutar DVD atau konsol game dapat menyebabkan efek yang serupa pada layar.
Kerusakan yang disebabkan oleh efek di atas tidak dicakup dalam Garansi.
Contents
CONNECTING AND PREPARING YOUR TV
List of Parts .............................................................. 2
How to Adjust the Stand .......................................... 2
How to Adjust the Angle of the TV ...................... 3
Installing the Wall Mount Kit .................................... 3
Installing VESA compliant mounting devices .......... 3
Viewing the Control Panel ........................................ 4
Viewing the Connection Panel.................................. 5
Viewing the Remote Control .................................... 6
Installing Batteries in the Remote Control................ 6
Switching On and Off................................................ 7
Placing Your Television in Standby Mode ................ 7
Plug & Play .............................................................. 7
SETTING THE CHANNELS
Storing Channels Automatically................................ 8
Storing Channels Manually ...................................... 9
Editing the Channels ................................................ 10
Sorting the Stored Channels .................................... 10
Assigning Channels Names .................................... 11
Fine Tuning Channel Reception .............................. 11
English
SETTING THE OTHERS
Choosing Your Language .................................... 15
Setting the Blue Screen Mode..............................16
Selecting the Source ............................................16
Editing the Input Source Names ..........................16
USING THE TELETEXT FEATURE
Teletext Decoder ..................................................17
Displaying the Teletext Information ......................17
Selecting a Specific Teletext Page ......................18
Using Fastext to Select a Teletext Page ..............18
Storing Teletext Pages..........................................18
SETTING THE PC
Setting up Your PC Software
(Based on Windows XP) ...................................... 19
Display Modes ......................................................19
Setting the PC ......................................................20
SETTING THE PICTURE
Changing the Picture Standard ................................ 12
Adjusting the Custom Picture .................................. 12
Changing the Colour Tone........................................ 13
SETTING THE SOUND
Changing the Sound Standard ............................13
Adjusting the Volume Automatically ....................13
SETTING THE TIME
Setting and Displaying the Current Time..............14
Setting the Sleep Timer ........................................14
Switching the Television
On and Off Automatically...................................... 15
Symbol Press Important Note One-Touch
Button
RECOMMENDATIONS FOR USE
Troubleshooting:
Before Contacting Service Personnel .................. 21
Technical and Environmental Specifications ......21
English-1

List of Parts
Please make sure the following items are included with your LCD TV.
If any items are missing, contact your dealer.
17”
15”, 20”
Remote Control
& Batteries (AAA x 2)
Power Cord Wall Mount kit Owner’s Instructions
Warranty card Service Network Card Safety Guide Registration Cards
Warranty card / Service Network Card / Safety Guide / Registration Cards (Not available in all locations)
How to Adjust the Stand
(1) (2)
The product colour and shape may vary depending on the model.
1. Place the front of the TV onto a soft cloth or cushion on a table as in Figure (1).
- Align the TV bottom along the table edge.
2. Press on the center of the TV back.
Adjust the stand as in Figure (2) while pressing the “PUSH” button on the back of the stand.
3. Place the TV on the table so that the TV sits safely.
When you adjust the stand, press the “PUSH" button on the back of the stand.
PUSH button
English-2
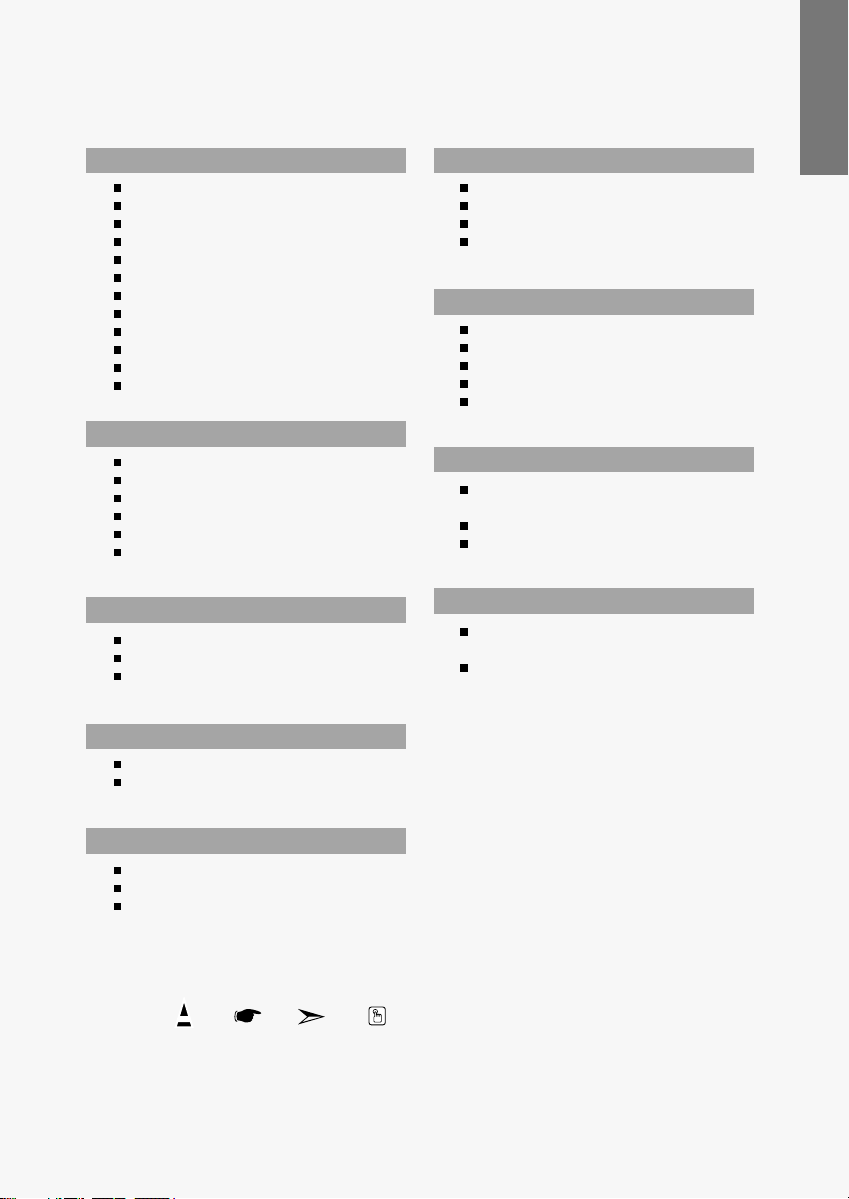
How to Adjust the Angle of the TV
(1) Angle adjustment when using the
TV on its stand.
The product colour and shape may vary depending on the model.
When you adjust the stand, press the “PUSH" button on the back of the stand.
(2) Angle adjustment when converting
from Stand to Wall mount (1 3, 3 1)
(3) Angle adjustment when LCD TV
is wall-mounted
1. Figure (1) shows the adjustment angle (0°~13°) when you use the LCD on its stand .
Excessive tilting can turn the LCD TV over which may cause damage.
2.
Figure (2) shows the adjustment angle (13°~80°) when you convert the LCD from stand-based use to wall-mount.
3. Figure (3) shows the adjustment angle (0°~10°) when you mount the LCD TV to a wall.
You will hear a “Click ” sound when changing the angle from 1 to 2 or 3 to 2.
Installing the Wall Mount Kit
Wall mount items (sold separately) allow you to mount the TV on the wall. For detailed information on
installing the wall mount, see the instructions provided with the Wall Mount items. Contact a technician for
assistance when installing the wall mounted bracket. Samsung Electronics is not responsible for any
damage to the product or injury to yourself or others if you elect to install the TV on your own.
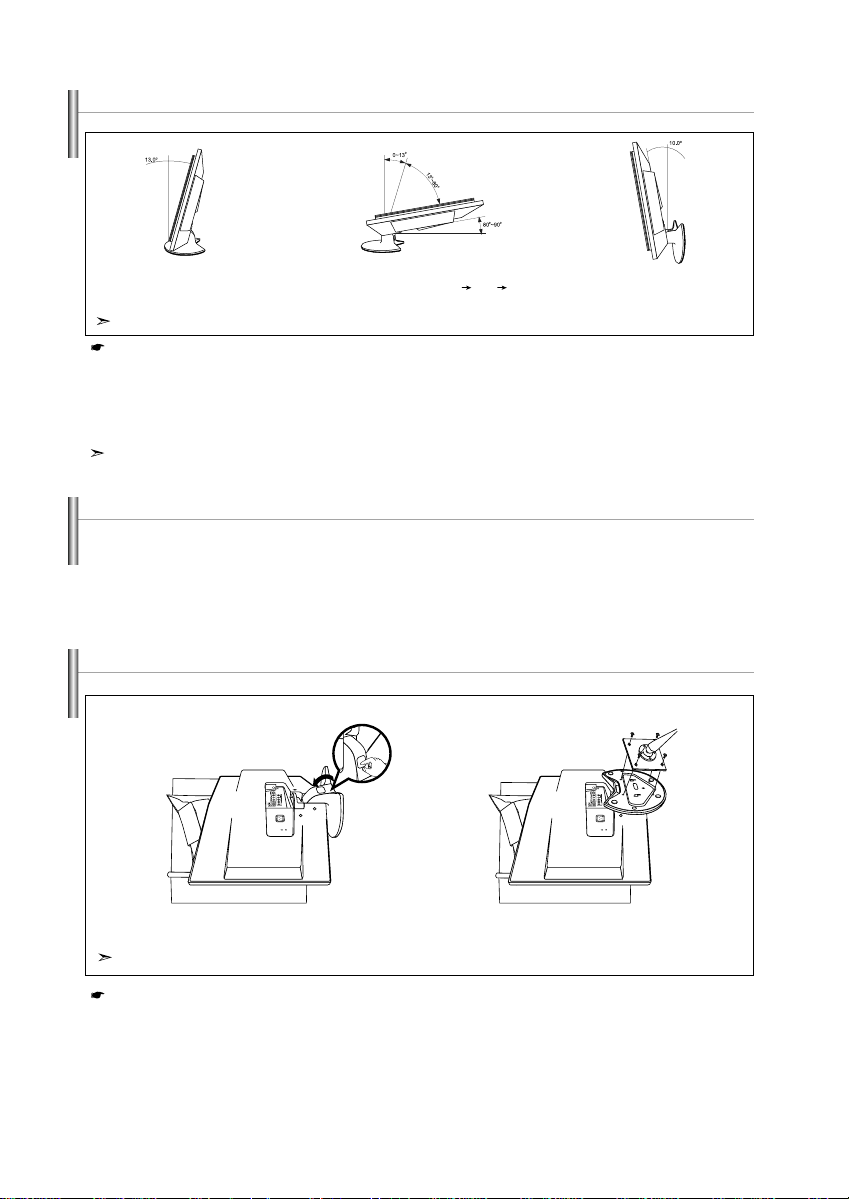
Installing VESA compliant mounting devices
PUSH button
Mounting pad
(sold separately)
(2)
The product colour and shape may vary depending on the model.
When you adjust the stand, press the “PUSH" button on the back of the stand.
(3)
1. Place the TV faced down on a soft cloth or cushion on a table.
2. Adjust the stand, pressing the "PUSH" button on the back of the stand.
3. Align the mounting interface pad (not supplied) with the holes in the stand bottom and secure it with the four
screws that come with the arm-type base, wall mount hanger or other bases (not supplied).
English-3

Viewing the Control Panel
LA15S51BP
LA20S51BP
LS17M24CP
The product colour and shape may vary depending on the model.
SOURCE
Toggles between all the available input sources
(TV - AV - S-Video - Component - PC).
In the on-screen menu, use this button as you use the
ENTER button on the remote control.
MENU
Press to see an on-screen menu of your TV’s features.
Press to decrease or increase the volume.
In the on-screen menu, use the buttons
as you use the
Press to change channels. In the on-screen menu, use the
on the remote control. (Without the Remote Control, You
can turn on the TV by using the Channel buttons.)
and buttons on the remote control
buttons as you use the and buttons
English-4
POWER
Press to turn the TV on and off.
Speakers
(Headphone Jack)
Connect a set of external headphones to this jack for private
listening.
Remote Control Sensor
Aim the remote control towards this spot on the TV.
Power Indicator
Blinks and turns off when the power is on and lights up in
stand-by mode.

Viewing the Connection Panel
Power Input
The product colour and shape may vary depending on the model.
Whenever you connect an external device to your TV, make sure that power on the unit is turned off.
When connecting an external device, match the colour of the connection terminal to the cable.
Connecting an Aerial or Cable Television Network
To view television channels correctly, a signal must be received by the set from one of the following sources:
- An outdoor aerial / A cable television network / A satellite network
Connecting External A/V Devices
-
Connect RCA (optional) or S-VIDEO cable (optional) to an appropriate external A/V device such as VCR, DVD or Camcorder.
- Connect RCA audio cables (optional) to “L - AUDIO - R” on the rear of your set and the other ends to corresponding audio
out connectors on the A/V device.
Connecting Component Devices (DTV/DVD)
- Connect component video cables (optional) to component connector (“Y”, “PB”, “PR”) on the rear of your set and the other
ends to corresponding component video out connectors on the DTV or DVD.
- If you wish to connect both the Set-Top Box and DTV (or DVD), you should connect the Set-Top Box to the DTV (or DVD)
and connect the DTV (or DVD) to component connector (“Y”, “P
- The P
R, PB and Y connectors on your component devices (DTV or DVD) are sometimes labeled Y, B-Y and
R-Y or Y, Cb and Cr.
- Connect RCA audio cables (optional) to “L - AUDIO - R” on the rear of your set and the other ends to corresponding audio
out connectors on the DTV or DVD.
Connecting Computer
- Connect the D- Sub cable (optional) to “PC IN” on the rear of your set and the other end to the
Video Card of your computer.
- Connect the stereo audio cable (optional) to “PC AUDIO IN” on the rear of your set and the other end to “Audio Out” of the
sound card on your computer.
Kensington Lock
- The Kensington lock (optional) is a device used to physically fix the system when used in a public place.
- If you want to use a locking device, contact the dealer where you purchased the TV.
- The place of the Kensington Lock may be different depending on its model.
B”, “PR”) on your set.
English-5

Viewing the Remote Control
Television Standby button
Number buttons for direct
channel access
One/Two-digit channel selection
: Volume increase
: Volume decrease
Temporary sound switch-off
Selects the TV mode directly
Displays the main on-screen menu
Sound effect selection
Previous channel
P : Next channel
P : Previous channel
Available source selection
Use to see information on the
current broadcast
Exit the on-screen menu
Control the cursor in the menu
Automatic Power-off
Picture effect selection
Sound mode selection
The performance of the remote control may be affected by bright light.
For details, refer to further instructions.
Teletext Functions
Teletext hold
Exit from the teletext display
Teletext index
Teletext sub page
Teletext display/mix both teletext
information and the normal broadcast
Fastext topic selection
P : Teletext next page
P : Teletext previous page
Teletext mode selection (LIST/FLOF)
Teletext reveal
Teletext store
Teletext size selection
Installing Batteries in the Remote Control
1. Slide the cover out completely.
2. Install two AAA size batteries.
Make sure to match the “+” and “–” ends of the batteries with the diagram inside the compartment.
3. Replace the cover.
Remove the batteries and store them in a cool, dry place if you won’t be using the
remote control for a long time. The remote control can be used up to about 23 feet from
the TV. (Assuming typical TV usage, the batteries last for about one year.)
If the remote control doesn’t work, check the following:
1. Is the TV power on?
2. Are the plus and minus ends of the batteries reversed?
3. Are the batteries drained?
4. Is there a power outage, or is the power cord unplugged?
5. Is there a special fluorescent light or neon sign nearby?
English-6
 Loading...