

Page 1

FULL MANUAL
HW-Q70T
Imagine the possibilities
Thank you fo r purchasing this Samsung product.
To receive more complete s ervice, please register
your product at www.samsung.com/register
Page 2

SAFETY INFORMATION
SAFETY WARNINGS
TO REDUCE THE RISK OF ELECTRIC SHOCK, DO
NOT REMOVE THE COVER (OR BACK).
NO USER-SERVICEABLE PARTS ARE INSIDE.
REFER SERVICING TO QUALIFIED SERVICE
PERSONNEL.
Refer to the table below for an explanation of
symbols which may be on your Samsung product.
CAUTION
RISK OF E LECTRIC S HOCK.
DO NOT OP EN.
This symbol indicates that high voltage
is present inside. It is dangerous to
make any kind of contact with any
internal part of this product.
This symbol indicates that this product
has included important literature
concerning operation and maintenance.
Class II product : This symbol indicates
that it does not require a safety
connection to electrical ear th (ground).
If this symbol is not present on a
product with a power cord, the product
MUST have a reliable connection to
protective ear th (ground).
WARNING
• To reduce the risk of re or electric shock, do
not expose this appliance to rain or moisture.
CAUTION
• TO PREVENT ELECTRIC SHOCK, MATCH WIDE
BLADE OF PLUG TO WIDE SLOT, FULLY INSERT.
• This apparatus shall always be connected to a
AC outlet with a protective grounding
connection.
• To disconnect the apparatus from the mains,
the plug must be pulled out from the mains
socket, therefore the mains plug shall be
readily operable.
• Do not expose this apparatus to dripping or
splashing. Do not put objects lled with
liquids, such as vases on the apparatus.
• To turn this apparatus off completely, you
must pull the power plug out of the wall
socket. Consequently, the power plug must
be easily and readily accessible at all times.
AC voltage : This symbol indicates that
the rated voltage marked with the
symbol is AC voltage.
DC voltage : This symbol indicates that
the rated voltage marked with the
symbol is DC voltage.
Caution, Consult instructions for use :
This symbol instruct s the user to
consult the user manual for further
safety related information.
ENG - 2
Page 3

PRECAUTIONS
1. Ensure that the AC power supply in your
house complies with the power
requirements listed on the identication
sticker located on the bottom of your
product. Install your product horizontally, on
a suitable base (furniture), with enough
space around it for ventilation (7~10 cm).
Make sure the ventilation slots are not
covered. Do not place the unit on ampliers
or other equipment which may become hot.
This unit is designed for continuous use. To
fully turn off the unit, disconnect the AC plug
from the wall outlet. Unplug the unit if you
intend to leave it unused for a long period of
time.
2. During thunderstorms, disconnect the AC
plug from the wall outlet. Voltage peaks due
to lightning could damage the unit.
3. Do not expose the unit to direct sunlight or
other heat sources. This could lead to
overheating and cause the unit to
malfunction.
4. Protect the product from moisture (i.e.
vases), and excess heat (e.g. a replace) or
equipment creating strong magnetic or
electric elds. Unplug the power cable from
the AC wall socket if the unit malfunctions.
Your product is not intended for industrial
use. It is for personal use only. Condensation
may occur if your product has been stored in
cold temperatures. If transporting the unit
during the winter, wait approximately
2 hours until the unit has reached room
temperature before using.
5. The battery used with this product contains
chemicals that are harmful to the
environment. Do not dispose of the battery
in the general household trash. Do not
expose the battery to excess heat, direct
sunlight, or re. Do not short circuit,
disassemble, or overheat the battery.
Danger of explosion if the battery is replaced
incorrectly. Replace only with the same or
equivalent type.
ENG - 3
Page 4

CONTENTS
01 Checking the Components 6
02 Product Overview 7
Front Panel / Top Panel of the Soundbar ------------------------- 7
Bottom Panel of the Soundbar ------------------------- 8
03 Using the Soundbar Remote Control 9
Inserting Batteries before using the Remote Control (AA batteries X 2) ------------------------- 9
How to Use the Remote Control
Using the Hidden Buttons (Buttons with more than one function)
Output specications for the different sound effect modes
Adjusting the Soundbar volume with a TV remote control ------------------------- 13
04 Connecting the Soundbar 14
-------------------------
-------------------------
-------------------------
9
12
12
Connecting the power and units
– Manually connecting the Subwoofer
– LED Indicator Lights on the Rear of Subwoofer
Connecting an SWA-9000S (Sold Separately) to your Soundbar
-------------------------
-------------------------
-------------------------
-------------------------
05 Using a wired connection to the TV 20
Method 1. Connecting with HDMI
– Connecting the TV that supports HDMI ARC (Audio Return Channel)
Method 2. Connecting using an Optical Cable
-------------------------
-------------------------
-------------------------
20
20
06 Using a wireless connection to the TV 23
Connecting via Bluetooth
-------------------------
23
07 Connecting an External Device 25
Method 1. Connecting using an HDMI Cable
(Capable of Dolby Atmos decoding and playback)
Method 2. Connecting using an Optical Cable
-------------------------
ENG - 4
-------------------------
25
26
14
15
17
18
21
Page 5

08 Connecting a Mobile Device 27
Method 1. Connecting via Bluetooth
Method 2. Connecting via Wi-Fi (Wireless Network)
-------------------------
-------------------------
30
09 Connecting an Amazon product 31
Connect and use with an Amazon product (Amazon Echo) ------------------------- 31
Use voice commands to control the Soundbar
Using the Tap Sound
-------------------------
-------------------------
32
10 Installing the Wall Mount 33
Installation Precautions
Wallmount Components
-------------------------
-------------------------
33
33
11 Installing the Soundbar above a TV Stand 35
Component
-------------------------
35
12 Software Update 36
Auto Update
USB Update
Initialisation
-------------------------
-------------------------
-------------------------
36
36
37
13 Troubleshooting 38
27
31
14 Licence 40
15 Open Source Licence Notice 40
16 Important Notes About Service 40
17 SpecicationsandGuide 41
Specications
-------------------------
ENG - 5
41
Page 6

01 CHECKING THE COMPONENTS
PAIR
SOUND
MODE
VOL WOOFER
SOUNDBAR
Soundbar Main Unit Soundbar Remote Control /
Subwoofer
Batteries
x 2
Power Cord
(Subwoofer, Soundbar)
AC/DC Adapter
(Soundbar)
x 2
HDMI Cable
x 2
(M4 x L10)
Wall Mount Guide Holder-Screw Screw
x 2
x 4
Bracket-Wall Mount Rubber-Foot
• For more information about the power supply and power consumption, refer to the label attached
to the product. (Label: Bottom of the Soundbar Main Unit)
• To purchase additional components or optional cables, contact a Samsung Service Centre or
Samsung Customer Care.
• For more information about the wallmount or rubber-foot, see pages 33~35.
• Design, specications, and App screen are subject to change without prior notice.
• The appearance of the accessories may differ slightly from the illustrations above.
ENG - 6
Page 7

02 PRODUCT OVERVIEW
Front Panel / Top Panel of the Soundbar
Position the product so that
the SAMSUNG logo is
located on the top.
(Power) Button
Turns the power on and off.
(Vol ume) But ton
Adjusts the volume.
(Source) But ton
Selects the source input mode.
Optical Digital input D.IN
ARC (HDMI OUT) input D.IN TV ARC (Auto conversion)
BLUETOOTH mode BT
Input mode Display
HDMI input HDMI
Wi-Fi mode WIFI
Top P ane l
Display
Displays the product’s status and current mode.
D.IN HDMI Wi-Fi BT
• When you plug in the AC cord, the power button will begin working in 4 to 6 seconds.
• When you turn on this unit, there will be a 4 to 5 second delay before it produces sound.
• If you hear sounds from both the TV and Soundbar, go to the Settings menu for the TV audio and
change the TV speaker to External Speaker.
ENG - 7
Page 8
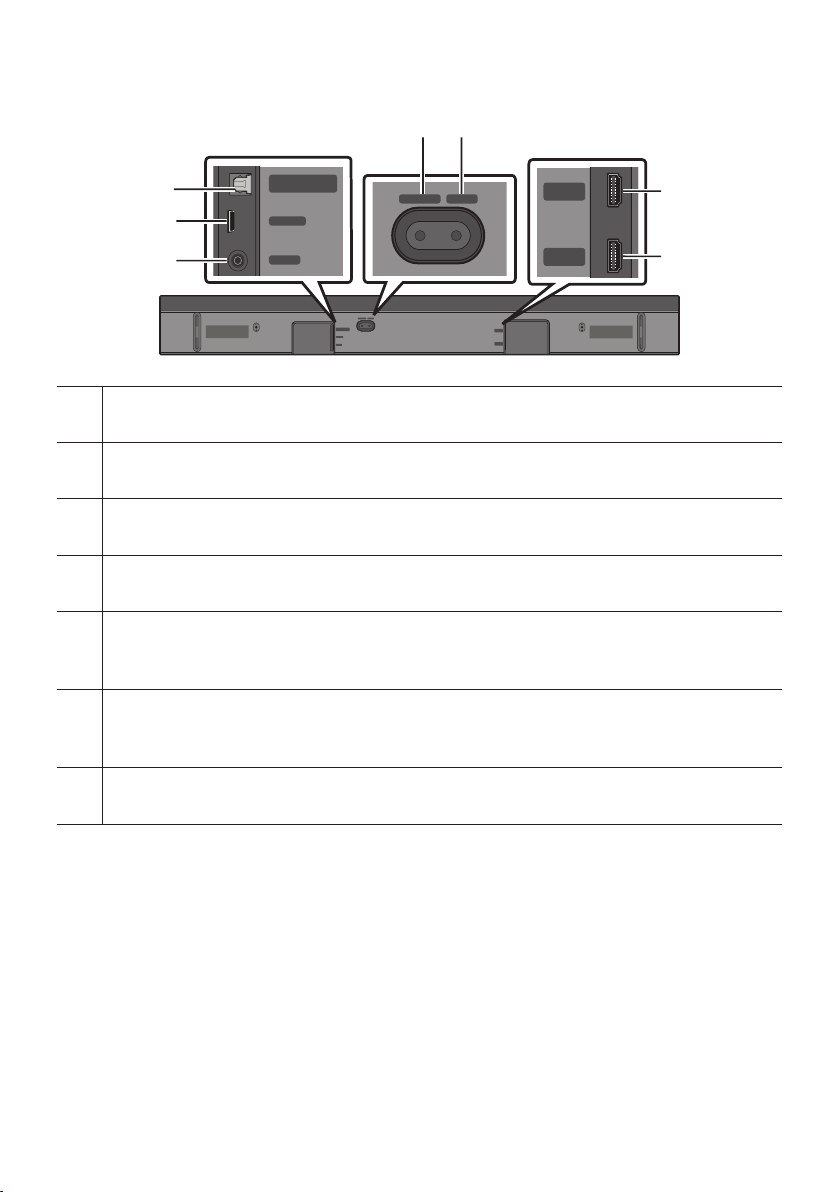
Bottom Panel of the Soundbar
DIGITAL AUDIO IN
(OPTICAL)
SERVICE
DC 19V
HDMI
NETWORK ID SET
NETWORK ID SET
HDMI TO TV
(eARC/ARC)
HDMI IN
HDMI OUT
(TV-ARC)
HDMI
HDMI TO TV
(eARC/ARC)
HDMI
NETWORK ID SET
HDMI TO TV
(eARC/ARC)
HDMI IN
HDMI OUT
(TV-ARC)
HDMI
HDMI TO TV
(eARC/ARC)
DIGITAL AUDIO IN
DIGITAL AUD IO IN (OPTIC AL)
Connect to the digital (optical) output of an external device. (See page 26)
SERVICE
Connect a USB storage device to upgrade the product's software.
DC 19V (Power Supply In)
Connect the AC/DC power adapter. (See page 14)
NETWORK
Press to connect to a wireless network (Wi-Fi) via the SmartThings app.
(OPTICAL)
SERVICE
DC 19V
NETWORK ID SET
NETWORK ID SET
DIGITAL AUDIO IN
(OPTICAL)
SERVICE
DC 19V
HDMI
HDMI TO TV
(eARC/ARC)
ID SET
Press to connect the Soundbar to surround speakers and a subwoofer wirelessly. (The surround speaker is
sold separa tely.)
HDMI
HDMI TO TV
(eARC/ARC)
HDMI
Inputs digital video and audio signals simultaneously using an HDMI cable.
Connect to the HDMI output of an external device. (See page 25)
HDMI TO T V (eARC/ARC)
Connect to the HDMI jack on a T V. (See page 20)
• When disconnecting the power cable of the AC/DC power adaptor from a wall outlet, pull the plug.
Do not pull the cable.
• Do not connect this unit or other components to an AC outlet until all connections between
components are complete.
ENG - 8
Page 9

03 USING THE SOUNDBAR REMOTE
PAIR
CONTROL
Inserting Batteries before using the Remote Control (AA batteries X 2)
Slide the back cover in the direction of the arrow
until it is completely removed. Insert 2 AA batteries
(1.5V) oriented so that their polarity is correct. Slide
the back cover back into position.
How to Use the Remote Control
PAIR
SOUND
MODE
VOL WOOFER
SOUNDBAR
Power
Source
Mute
Turns the Soundbar on and off.
• Auto Power Down Function
The unit turns off automatically in the
following situations:
– In D.IN / HDMI / Wi-Fi / BT mode if
there is no audio signal for 18 minutes.
Press to select a source connected to the
Soundbar.
Press the (Mute) button to mute the
sound.
Press it again to unmute the sound.
ENG - 9
Page 10

PAIR
SOUND
MODE
SOUND MODE
You can selec t the desired sound mode by choosing STANDARD, SURROUND, GAME
PRO, or ADAPTIVE SOUND.
• STANDARD
Outputs the original sound.
• SURROUND SOUND
Provides a wider sound eld than standard.
• GAME PRO
Provides stereoscopic sound to immerse you in the action while gaming.
• ADAPTIVE SOUND
Analyzes the content in real time and automatically provides the optimal sound eld
based on the characteristics of the content.
PAIR
Bluetooth
PAIR
Play / Pau se
Up/Down/
Left/Right
Switch the Soundbar to Bluetooth pairing mode. Press the button and wait for the “BT
PAIRING” screen to connect to a new Bluetooth device.
You can also play or pause music by pressing the button.
Press the indicated areas to select Up/Down/Left/Right.
Press Up/Down/Left /Right on the button to select or set functions.
• Music Skip
Press the Right button to select the next music le. Press the Left button to select
the previous music le.
• ID SET
Use this option when the Subwoofer or Surround Speakers are not connected or need
reconnection.
While powered off, press and hold the Up button for 5 seconds to perform ID SET.
(See page 16.)
ENG - 10
Page 11

PAIR
SOUNDBAR
SOUNDBAR
SOUND
MODE
PAIR
SOUND
MODE
VOL
WOOFER
SOUNDBAR
SOUND
MODE
VOL
WOOFER
SOUNDBAR
SOUNDBAR
SOUNDBAR
Sound Control
When pressed, the setting items such as TREBLE, BASS, SYNC, CENTER LEVEL, FRONT
TOP LEVEL, and VIRTUAL ON/OFF are displayed in sequence. The desired item can be
adjusted using the Up/Down buttons.
– To control the volume of the treble or bass sound, selec t TREBLE or BASS in Sound
Settings, and then adjus t the volume between -6~+6 by using the Up/Down buttons.
– Press and hold the (Sound Control) button for about 5 seconds to adjust the
sound for each frequency band. 150Hz, 300Hz, 600Hz, 1.2kHz, 2.5kHz, 5kHz, and
10kHz are select able using the Left/Right buttons and each can be adjusted to a
setting between -6 to +6 using the Up/Down buttons.
(Make sure the Sound mode is set to “STANDARD”.)
– To control the volume of the each speaker selec t CENTER LEVEL, or FRONT TOP
LEVEL in Sound Settings, and then adjust the volume between -6~+6 by using the
Up/Down buttons.
– If the video on the TV and audio from the Soundbar are not synchronised, select
SYNC in Sound Control, and then set the audio delay between 0~300 milliseconds by
using the Up/Down buttons.
– SYNC is only supported for some functions.
– If Surround Speakers are connected, select REAR LEVEL and then use the Up/Down
buttons to adjust the volume within a -6 to +6 range.
– The VIRTUAL Speaker function can be turned ON/OFF by using the Up/Down
buttons.
WOOFER
(BASS) LEVEL
VOLUME
SOUND
MODE
WOOFER
VOL
SOUND
MODE
WOOFER
VOL
Push the button up or down to adjust the level of the woofer (bass) to -12 or between -6
to +6. To set the woofer (bass) volume level to 0 (Default), press the button.
SOUND
MODE
WOOFER
VOL
SOUND
MODE
WOOFER
VOL
Push the button up or down to adjust the volume.
• Mute
Press the VOL but ton to mute the sound. Press it again to unmute the sound.
ENG - 11
Page 12

Using the Hidden Buttons (Buttons with more than one function)
Hidden Button
Remote Control Button Function
WOOFER (Up) TV remote control On/Off (Standby) page 13
Up ID SET page 16
(Sound Control)
7 Band EQ page 11
Reference page
Outputspecicationsforthedifferentsoundeffectmodes
Output
Effect Input
STANDARD
SURROUND
GAME PRO
ADAPTIVE SOUND
2.0 ch 2.1 ch 2.1 ch
5.1 ch 3.1 ch 5.1 ch
2.0 ch 3.1.2 ch 5.1.2 ch
5.1 ch 3.1.2 ch 5 .1.2 c h
2.0 ch 3.1.2 ch 5.1.2 ch
5.1 ch 3.1.2 ch 5 .1.2 c h
2.0 ch 3.1.2 ch 5.1.2 ch
5.1 ch 3.1.2 ch 5 .1.2 c h
With Subwoofer Only
• For input sources Dolby Atmos and DTS:X, the effect modes that can be selected using the
SOUND MODE button will not be available. (See above for the effect modes.)
• When the input source is Dolby Atmos®, the Subwoofer-only setup provides 3.1.2 channel audio,
while the Subwoofer & Wireless Rear Speaker Kit setup provides 5.1.2 channel audio.
• The Samsung Wireless Rear Speaker Kit can be purchased separately. To purchase a Kit or the
Subwoofer, contact the vendor you purchased the Soundbar from.
• The Surround Speakers will not produce sounds for 2 channel output while STANDARD mode is
in use. To enable sound for the Surround Speakers, change the effect mode to SURROUND.
With Subw oofer & Wireles s
Rear Spe aker Kit
ENG - 12
Page 13

Adjusting the Soundbar volume with a TV remote control
VOL
WOOFER
WOOFER
VOL
WOOFER
Adjust the Soundbar volume using the TV’s remote control.
• This function can be used with IR remote controls only. Bluetooth remote controls (remote
controls that require pairing) are not supported.
• Set the TV speaker to External Speaker to use this function.
• Manufacturers supporting this function:
VIZIO, LG, Sony, Sharp, PHILIPS, PANASONIC, TOSHIBA, Hisense, RCA
1. Turn Off the Soundbar.
2. Push up and hold the WOOFER button for 5 seconds.
Each time you push the WOOFER button up and hold it for 5 seconds, the mode switches in the
following order: “SAMSUNG-TV REMOTE” (Default mode), “OFF-TV REMOTE”, “ALL-TV REMOTE”.
Remote Control Button Display Status
(Default mode)
SOUND
MODE
5 Sec
SAMSUNG-TV REMOTE
Enable a Samsung TV’s IR remote
control.
SOUND
MODE
SOUND
MODE
5 Sec
VOL
5 Sec
OFF-TV REMOTE
ALL-TV REMOTE
Disable the TV remote control.
Enable a third-party TV’s IR remote
control.
ENG - 13
Page 14

04 CONNECTING THE SOUNDBAR
HDMI
HDMI TO TV
(eARC/ARC)
DIGITAL AUDIO IN
(OPTICAL)
SERVICE
DC 19V
HDMI
NETWORK ID SET
NETWORK ID SET
HDMI TO TV
(eARC/ARC)
HDMI IN
HDMI OUT
(TV-ARC)
DIGITAL AUDIO IN
(OPTICAL)
SERVICE
HDMI
HDMI TO TV
(eARC/ARC)
DC 19V
Connecting the power and units
Use the power components to connect the Subwoofer and Soundbar to an electrical outlet in the following
order:
• For more information about the required electrical power and power consumption, refer to the
label attached to the product. (Label: Bottom of the Soundbar Main Unit)
1. Connect the Power cord to the Subwoofer.
Power Cord
POWER
Rear of Subwoofer
2. First connect the power cable to the AC/DC adapter.
Connect the AC/DC adapter (with the power cable) to the Soundbar.
NETWORK ID SET
DIGITAL AUDIO IN
DC 19V
Power Cord
Bott om of the Soundb ar
AC/DC Adapter
(OPTICAL)
SERVICE
DC 19V
Main Unit
3. Connect power to the Soundbar and Subwoofer. The Subwoofer is automatically connected when
the Soundbar is turned on.
ENG - 14
Blue is On
Page 15

NOTES
• Connect the Subwoofer power before connecting to the Soundbar.
The Subwoofer will be automatically connected when turning on the Soundbar.
• If you unplug and reconnect the power cord when the product is turned on, the Soundbar turns on
automatically.
• Make sure to rest the AC/DC Adapter at on a table or the oor. If you place the AC/DC Adapter so
that it is hanging with the AC cord input facing upwards, water or other foreign substances could
enter the Adapter and cause the Adapter to malfunction.
Manually connecting the Subwoofer
Before per forming the manual connection procedure below:
• Check whether the power cables for the Soundbar and subwoofer are connected properly.
• Make sure that the Soundbar is turned off.
1. Turn off the Soundbar main.
2. Press and hold ID SET on the rear of the subwoofer for at least 5 seconds.
• The red indicator on the rear of the subwoofer turns off and the blue indicator blinks.
5 Sec
Rear of Subwoofer Rear of Subwoofer
ENG - 15
Blinking blue
fast
Page 16

3. Press the Up button on the remote control for 5 seconds.
• The ID SET message appears on the display of the Soundbar for a moment, and then it
disappears.
• The Soundbar will automatically power on when ID SET is complete.
PAIR
5 Sec
4. Check if the LINK LED is solid blue (connection complete).
The LINK LED indicator stops blinking and
glows a solid blue when a connection is
established between the Soundbar and the
Wireless Subwoofer.
Blue is On
ID SET
ENG - 16
Page 17
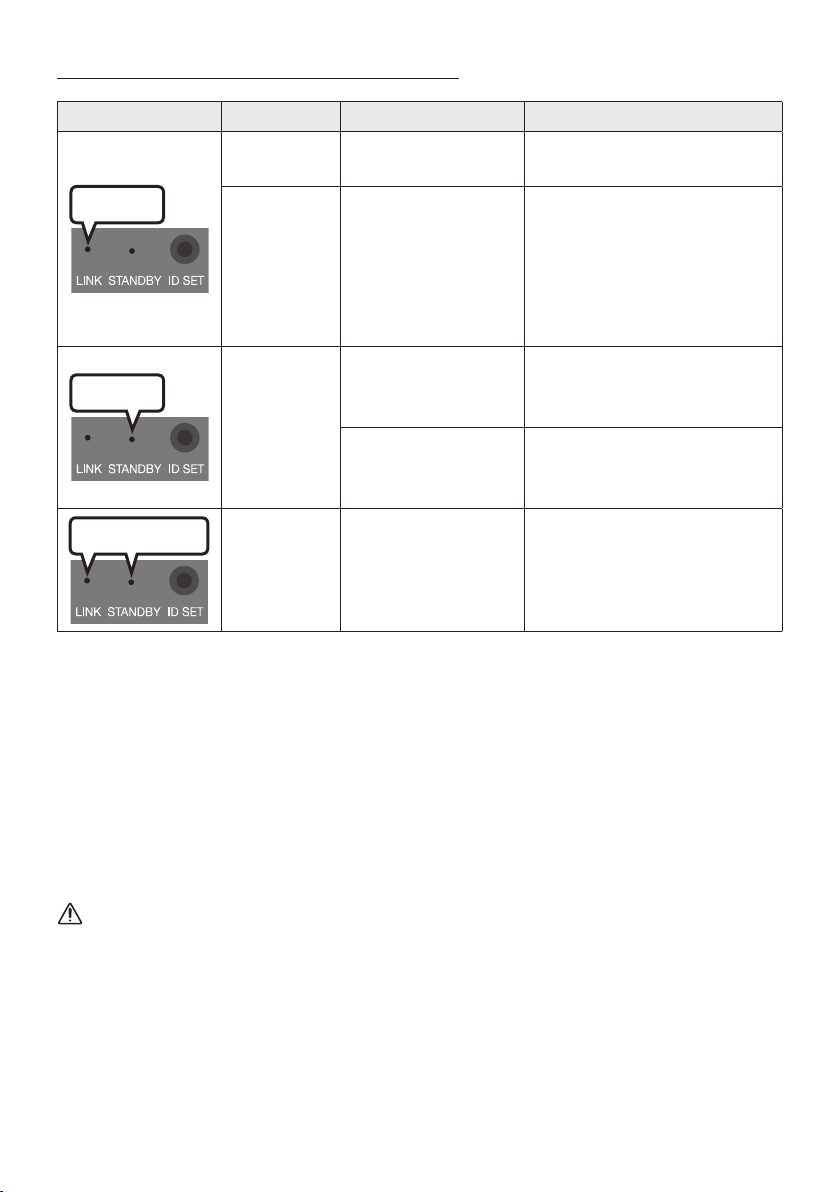
LED Indicator Lights on the Rear of Subwoofer
LED Status Description Resolution
On
Blue
Blinking
Red
On
Successfully connected
(normal operation)
Recovering the
connection
Standby (with the
Soundbar main unit
turned off)
Connection failed
-
Check if the power cable attached
to the main Soundbar unit is
connected properly or wait about
5 minutes. If blinking persists, try
manually connecting the
subwoofer. See page 15.
Check if the power cable attached
to the main Soundbar unit is
connected properly.
Connect again. See the
instructions for manual
connection on page 15.
Red and blue
Blinking Malfunction
NOTES
• If the main unit is powered off, the wireless subwoofer will go into stand-by mode and the
STANDBY LED on the rear of the sub-woofer will turn red after blinking in blue several times.
• If you use a device that uses the same frequency (5.8GHz) as the Soundbar near the Soundbar,
interference may cause some sound interruption.
• The maximum transmission distance of the main unit’s wireless signal is about 10 m, but may vary
depending on your operating environment. If a steel-concrete or metallic wall is between the main
unit and the wireless subwoofer, the system may not operate at all because the wireless signal
cannot penetrate metal.
See the contact information for
the Samsung Service Centre in
this manual.
CAUTION
• Wireless receiving antennas are built into the wireless subwoofer. Keep the unit away from water
and moisture.
• For optimal listening performance, make sure that the area around the wireless subwoofer and the
Wireless Receiver Module (sold separately) is clear of any obstructions.
ENG - 17
Page 18

Connecting an SWA-9000S (Sold Separately) to your Soundbar
L
R
POWER
ID SET
LINK
Expand to true wireless surround sound by connecting the Samsung Wireless Rear Speaker Kit
(SWA-9000S, sold separately) to your Soundbar.
1. Connect the Wireless Receiver Module to 2 Surround Speakers.
– The speaker cables are colour coded.
L
R
SURROUND SPEAKERS OUT
SPEAKER IMPEDANCE : 3Ω
SURROUND-LEFT SURROUND-RIGHT
ID SET
SURROUND-LEFT
POWER
SURROUND-RIGHT
2. Check the standby status of the Wireless Receiver Module after plugging it into an electrical outlet.
• The LINK LED indicator (blue) on the Wireless Receiver Module should be blinking. If the
indicator does not blink, use a narrow pin to press and hold the ID SET button for 5 seconds or
longer. See the SWA-9000S user guide for more details.
L
SURROUND SPEAKERS OUT
SPEAKER IMPEDANCE : 3Ω
R
ID SET
POWER
5 Sec
STANDBY
LINK
Blue blinking
ENG - 18
Page 19

3. Press the Up button on the remote control for 5 seconds.
LINK
• The ID SET message appears on the display of the Soundbar for a moment, and then it
disappears.
• The Soundbar will automatically power on when ID SET is complete.
ID SET
CAUTION
PAIR
5 Sec
• If your Soundbar was playing music when it connects to the SWA-9000S, you may hear some
stuttering from the woofer as the connection nalises.
4. Check if the LINK LED is solid blue (connection complete).
The LINK LED indicator stops blinking and
STANDBY
LINK
glows a solid blue when a connection is
established between the Soundbar and the
Wireless Receiver Module.
Blue is On
5. If the SWA-9000S is not connected, repeat the procedure from Step 2.
ENG - 19
Page 20

05 USING A WIRED CONNECTION TO THE TV
Method 1. Connecting with HDMI
CAUTION
• When both the HDMI cable and optical cable are connected, the HDMI signal is received rst.
• To connect the HDMI cable between the TV and Soundbar, be sure to connect the terminals
marked ARC. Otherwise, the TV sound may not be output.
• Be sure to use the cable with the premium HDMI certication logo. In addition, make sure that
the cable is a certied Type A, high-speed HDMI Ethernet cable. (HIGH SPEED HDMI CABLE
WITH ETHERNET)
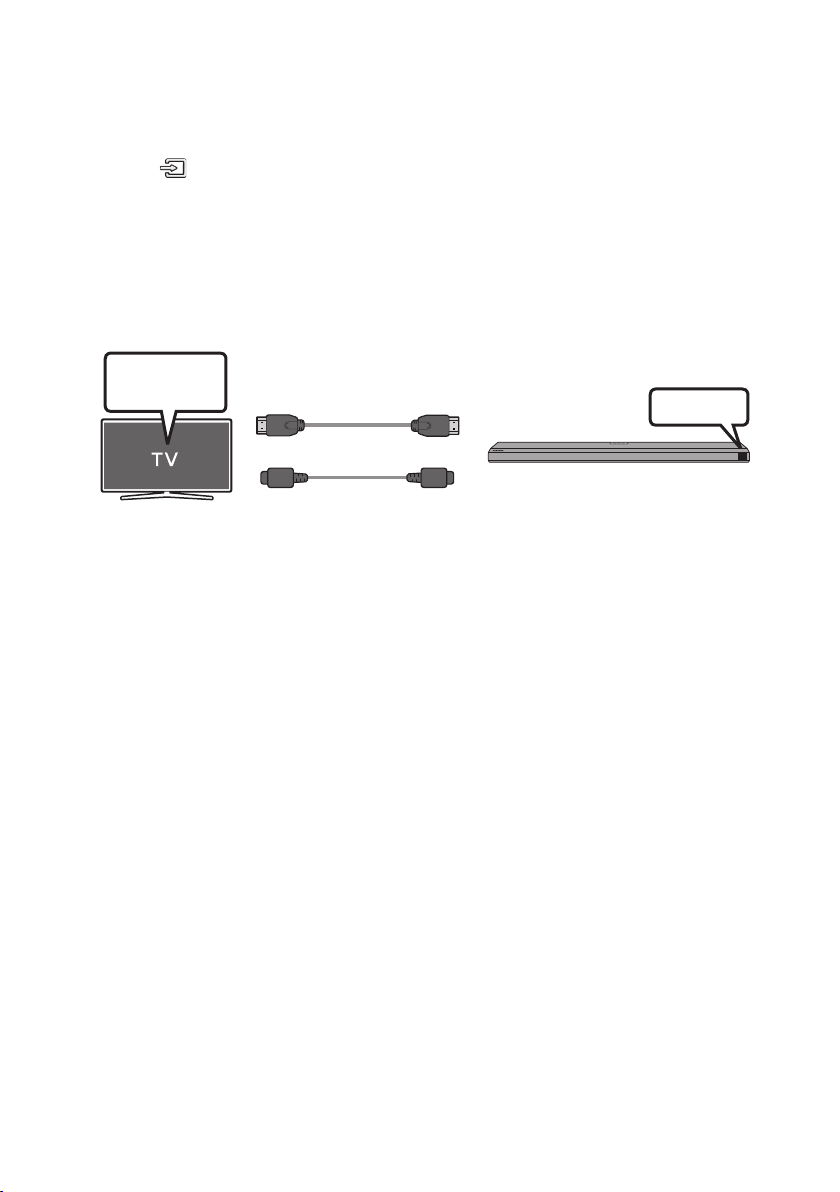
Connecting the TV that supports HDMI ARC (Audio Return Channel)
Connec t to the HDMI TO T V
Connec t to the HDMI IN
(ARC) p ort of your T V.
(eARC/ARC ) port of the So undbar
main unit.
HDMI IN
(ARC)
HDMI Cable
Top of the Soun dbar
HDMI TO TV
(eARC/ARC)
Bott om of the Soundba r
TV ARC
1. With the Soundbar and TV turned off, connect the HDMI cable as shown in the gure.
2. Turn on the Soundbar and TV.
3. “TV ARC ” appears in the display window of the Soundbar main unit and the Soundbar plays TV
sound.
• If TV sound is inaudible, press the (Source) button on the remote control or on the top of
the Soundbar to switch to “D.IN” mode. The screen displays “D.IN” and “TV ARC” in sequence,
and TV sound is played.
ENG - 20
Page 21

• When connecting a Samsung TV that supports the eARC function, “eARC” appears on the
display and the sound is heard.
• If “T V ARC” does not appear in the display window of the Soundbar main unit, conrm that the
HDMI cable is connected to the correct port.
• Use the volume buttons on the TV’s remote control to change the volume on the Soundbar.
NOTES
• When you connect the TV that supports the HDMI ARC (Audio Return Channel) to the Soundbar
with an HDMI cable, you can transmit the digital video and audio data without connecting a
separate optical cable.
• We recommend you use a coreless HDMI cable if possible. If you use a cored HDMI cable, use one
whose diameter is less than 14 mm.
• This function is not available if the HDMI cable does not support ARC.
• When the audio in a broadcast is encoded in Dolby Digital and the “Digital Output Audio Format ” on
your TV is set to PCM, we recommend that you change the setting to Dolby Digital. When the
setting on the TV is changed, you will experience better sound quality. (The TV menu may use
different words for Dolby Digital and PCM depending on the TV manufacturer.)
Method 2. Connecting using an Optical Cable
Pre-connection Checklist
• When both the HDMI cable and optical cable are connected, the HDMI signal is received rst.
• When you use an optical cable and the terminals have covers, be sure to remove the covers.
OPTICAL OUT
Optic al Cable
(not supplied)
Top of the Soun dbar
ENG - 21
Bott om of the Soundba r
DIGITAL AUDIO IN
(OPTICAL)
D.IN
Page 22
1. With the TV and Soundbar turned off, connect the DIGITAL AUDIO IN (OPTICAL) port on the
Soundbar and the OPTICAL output port on the TV with the optical cable (not supplied), as shown in
the gure.
2. Turn on the Soundbar and TV.
3. Press the (Source) button on the top panel or remote control, and then select the “D.IN” mode.
4. The TV sound is output from the Soundbar.
Using the Q-Symphony Function
For Q-Symphony, the Soundbar syncs with a Samsung TV to output sound through two devices for
optimum surround effect. When the Soundbar is connected, the menu, “TV+Soundbar” appears under
the Sound Output menu of the TV. Select the corresponding menu.
TV menu
HDMI Cable
OR
Optical Cable (not supplied)
• TV menu example: TV series name + [ AV] Soundbar series name (HDMI)
NOTES
• It can operate according to the Codec supported by TV.
• This function is supported only when the HDMI Cable or Optical Cable (not supplied) is connected.
• This function is available in Samsung TVs released in 2020 and some Soundbar models.
D.IN
ENG - 22
Page 23

06 USING A WIRELESS CONNECTION TO THE TV
Connecting via Bluetooth
When a Samsung TV is connected using Bluetooth, you can hear stereo sound without the hassle of
cabling.
• Only one Samsung TV can be connected at a time.
• Samsung TV that supports Bluetooth can be connected. Check the specications of your TV.
Top of the Soun dbar
5 Sec
OR
BT PAIRING
The initial connection
1. Press the PAIR button on the Soundbar remote control to enter the “BT PAIRING” mode.
(OR)
a. Press the (Source) button on the top panel and then select “BT”.
“BT” changes to “BT PAIRING” in a few seconds automatically or changes to “BT READY” if
there is a connect record.
b. When “BT READY” appears, press and hold the (Source) button on the top panel of the
Soundbar for more than 5 seconds to display “BT PAIRING”.
2. Select Bluetooth mode on the Samsung TV.
(e.g. Home ( ) Settings ( ) Sound Sound Output Bluetooth Speaker List
[AV] Samsung Soundbar Q70T (Bluetooth))
3. Select “[AV] Samsung Soundbar Q70T” from the list on TV’s screen.
An available Soundbar is indicated with “Need Pairing” or “Paired” on the TV’s Bluetooth device
list. To connect the Samsung TV to the Soundbar, select the message, and then establish a
connection.
• When the Samsung TV is connected, [T V Name] → “BT” appears on the Soundbar’s front display.
4. You can now hear Samsung TV sound from the Soundbar.
• After you have connected the Soundbar to your Samsung TV the rst time, use the “BT READY”
mode to reconnect.
PAIR
ENG - 23
Page 24

If the device fails to connect
• If you have an existing Soundbar (e.g., [AV] Samsung Soundbar Q70T) on the list of speakers on
the Samsung TV, delete it.
• Then repeat steps 1 through 3.
Disconnecting the Soundbar from the Samsung TV
Press the (Source)
• Disconnecting takes time because the Samsung TV must receive a response from the Soundbar.
(The time required may differ, depending on the Samsung TV model.)
button on the top panel or on the remote control and switch to any mode but “BT”.
What is the difference between BT READY and BT PAIRING?
• BT READY : In this mode, you can reconnect any Samsung TV or mobile device that was
connected before.
• BT PAIRING : In this mode, you can connect a new device to the Soundbar.
(Press the PAIR button on the Soundbar remote control or press and hold the (Source)
button on the top of the Soundbar for more than 5 seconds while the Soundbar is in “BT” mode.)
Notes on Bluetooth connection
• Locate a new device within 1 m to connect via Bluetooth communication.
• If asked for a PIN code when connecting a Bluetooth device, enter <0000>.
• The Soundbar automatically turns off after 18 minutes in the Ready state.
• The Soundbar may not perform Bluetooth search or connection correctly under the following
circumstances:
– If there is a strong electrical eld around the Soundbar.
– If several Bluetooth devices are simultaneously paired with the Soundbar.
– If the Bluetooth device is turned off, not in place, or malfunctions.
• Electronic devices may cause radio interference. Devices that generate electromagnetic waves
must be kept away from the Soundbar main unit - e.g., microwaves, wireless LAN devices, etc.
ENG - 24
Page 25

07 CONNECTING AN EXTERNAL DEVICE
Method 1. Connecting using an HDMI Cable (Capable of Dolby Atmos decoding and playback)
Pre-connection Checklist
• Dolby Atmos® and DTS:X are supported in HDMI mode only.
• If the Audio Output options include Secondary Audio, make sure Secondary Audio is set to Off.
• Make sure that the content supports Dolby Atmos®.
Top of the Soun dbar
HDMI
External Dev ice
HDMI
HDMI OUT
HDMI IN
(ARC)
HDMI Cable
HDMI Cable
HDMI TO TV
(eARC/ARC)
Bott om of the Soundba r
1. Use an HDMI cable to connect the HDMI OUT port on the external device and the HDMI port on the
bottom of the Soundbar.
2. Use an HDMI cable to connect the HDMI IN port of the TV and the HDMI TO TV (eARC/ARC) port on
the bottom of the Soundbar.
3. Turn on the Soundbar, TV, and the external device.
4. Press the (Source) button on the top panel or on the remote control, and then select “HDMI”.
5. The Soundbar display indicates that “HDMI” mode is currently selected and the Soundbar will start
playing sounds.
ENG - 25
Page 26

NOTES
• When you use Dolby Atmos®: If the input source is Dolby Atmos®, 5.1.2 channels are outputted.
When Dolby Atmos® is active, the Soundbar’s sound effect modes controlled by the SOUND
MODE button are not available.
• When Dolby Atmos® is activated, “DOLBY ATMOS” appears in the front display.
• ConguringDolbyAtmos®onyourBDplayerorotherdevice.
Open the audio output options on the settings menu of your BD player or other device and make
sure that “No Encoding” is selected for Bitstream. For example, on a Samsung BD Player, go to
Home Menu → Sound → Digital Output and then select Bitstream (unprocessed).
Method 2. Connecting using an Optical Cable
Top of the Soun dbar
BD / DVD playe r / Set-top
box / Game con sole
D.IN
DIGITAL AUDIO IN
(OPTICAL)
OPTICAL OUT
Optic al Cable
(not supplied)
Bott om of the Soundba r
1. Use an optical cable (not supplied) to connect the DIGITAL AUDIO IN (OPTICAL) on the Soundbar
main and the OPTICAL OUT port on the external device.
2. Turn on the Soundbar and external device.
3. Select “D.IN” mode by pressing the (Source) button on the top panel or on the remote control.
4. Your Soundbar will play sounds from the external device.
ENG - 26
Page 27

08 CONNECTING A MOBILE DEVICE
Method 1. Connecting via Bluetooth
When a mobile device is connected using Bluetooth, you can hear stereo sound without the hassle of
cabling.
• When you connect a paired Bluetooth device with the Soundbar off, the Soundbar automatically
turns on.
Top of the Soun dbar
5 Sec
Mobile device
OR
BT PAIRING
The initial connection
• When connecting to a new Bluetooth device, make sure the device is within 1 m distance.
1. Press the PAIR button on the Soundbar remote control to enter the “BT PAIRING” mode.
(OR)
a. Press the (Source) button on the top panel and then select “BT”.
“BT” changes to “BT PAIRING” in a few seconds automatically or changes to “BT READY” if
there is a connect record.
b. When “BT READY” appears, press and hold the (Source) button on the top panel of the
Soundbar for more than 5 seconds to display “BT PAIRING”.
2. On your device, select “[ AV] Samsung Soundbar Q70T” from the list that appears.
• When the Soundbar is connected to the Mobile device, [Mobile Device Name] → “BT” appears in
the front display.
3. Play music les from the device connected via Bluetooth through the Soundbar.
• After you have connected the Soundbar to your mobile device the rst time, use the “BT
READY” mode to reconnect.
If the device fails to connect
• If you have an existing Soundbar (e.g., “[AV] Samsung Soundbar Q70T”) in the list of speakers on
the Mobile device, delete it.
• Repeat steps 1 and 2.
PAIR
ENG - 27
Page 28

What is the difference between BT READY and BT PAIRING?
• BT READY : In this mode, you can reconnect any Samsung TV or mobile device that was
connected before.
• BT PAIRING : In this mode, you can connect a new device to the Soundbar.
(Press the PAIR button on the Soundbar remote control or press and hold the (Source)
button on the top of the Soundbar for more than 5 seconds while the Soundbar is in “BT” mode.)
Notes on Bluetooth connection
• Locate a new device within 1 m to connect via Bluetooth communication.
• If asked for a PIN code when connecting a Bluetooth device, enter <0000>.
• The Soundbar automatically turns off after 18 minutes in the Ready state.
• The Soundbar may not perform Bluetooth search or connection correctly under the following
circumstances:
– If there is a strong electrical eld around the Soundbar.
– If several Bluetooth devices are simultaneously paired with the Soundbar.
– If the Bluetooth device is turned off, not in place, or malfunctions.
• Electronic devices may cause radio interference. Devices that generate electromagnetic waves
must be kept away from the Soundbar main unit - e.g., microwaves, wireless LAN devices, etc.
• The Soundbar supports SBC data (44.1kHz, 48kHz).
• Connect only to a Bluetooth device that supports the A2DP (AV) function.
• You cannot connect the Soundbar to a Bluetooth device that supports only the HF (Hands Free)
function.
• When connecting the Soundbar to a Bluetooth device, place them as close to each other as possible.
• The farther the Soundbar and Bluetooth device are from each other, the lower the sound quality
will become.
The Bluetooth connection may break when the devices are out of the effective range.
• The Bluetooth connection may not function as intended in areas with poor reception.
• A Bluetooth device may experience noise or malfunction under in the following conditions:
– When the body is in contact with the signal transceiver on the Bluetooth device or Soundbar
– In corners or when there is an obstacle in proximity, such as a wall or partition, where electrical
changes may occur.
– When exposed to radio interferences by other products operating on the same frequency
ranges, such as medical equipment, microwave ovens, and wireless LAN devices.
– Obstacles such as doors and walls may still impact the sound quality even when the devices
are within the effective range.
ENG - 28
Page 29

• Note that your Soundbar cannot be paired with other Bluetooth devices while using the Bluetooth
option.
• This wireless device may cause electrical interference during operation.
Disconnecting the Bluetooth device from a Soundbar
You can disconnect a Bluetooth device from the Soundbar. For instructions, see the Bluetooth device’s
user manual.
• The Soundbar will be disconnected.
• When the Soundbar is disconnected from the Bluetooth device, the Soundbar will display
“BT DISCONNECTED” on the front display.
Disconnecting the Soundbar from the Bluetooth device
Press the (Source) button on the top panel or on the remote control, and then change to any mode
except “BT”.
• Disconnecting takes time because the Bluetooth device must receive a response from the
Soundbar. (Disconnection time may differ, depending on the Bluetooth device)
• When the Soundbar is disconnected from the Bluetooth device, the Soundbar will display
“BT DISCONNECTED” on the front display.
ENG - 29
Page 30

Method 2. Connecting via Wi-Fi (Wireless Network)
To connect a Soundbar to a mobile device via a wireless network (Wi-Fi), the SmartThings app is
required.
The initial connection
1. Install and launch the SmartThings app from your mobile device (smartphone or tablet).
2. On the app, follow the screen instructions to add the Soundbar.
• The automatic pop-up (the second screenshot below) may not show on some devices.
If the pop-up window does not appear, press “ ” on the Home screen. The Soundbar is added
to the app.
SmartThings
App
Launch App Add deviceAuto pop-up
ENG - 30
Page 31
09 CONNECTING AN AMAZON PRODUCT
• This feature may not be available in some countries.
• This service is provided by Amazon and can be terminated at any time. Samsung does not assume
responsibility for service availability.
• Amazon Alexa app screen is subject to change without prior notice.
Connect and use with an Amazon product (Amazon Echo)
Use an Amazon Echo product to control your Soundbar and enjoy music services provided by Amazon
Echo.
NOTE
• Conrm that the Soundbar is connected to Wi-Fi. (Refer to “Method 2. Connecting via Wi-Fi
(Wireless Network)”)
Use voice commands to control the Soundbar
• The Amazon Echo service you can use with your Soundbar is limited to music. Other services
provided by Amazon Echo, such as news and weather, can only be accessed through your
Amazon Echo product.
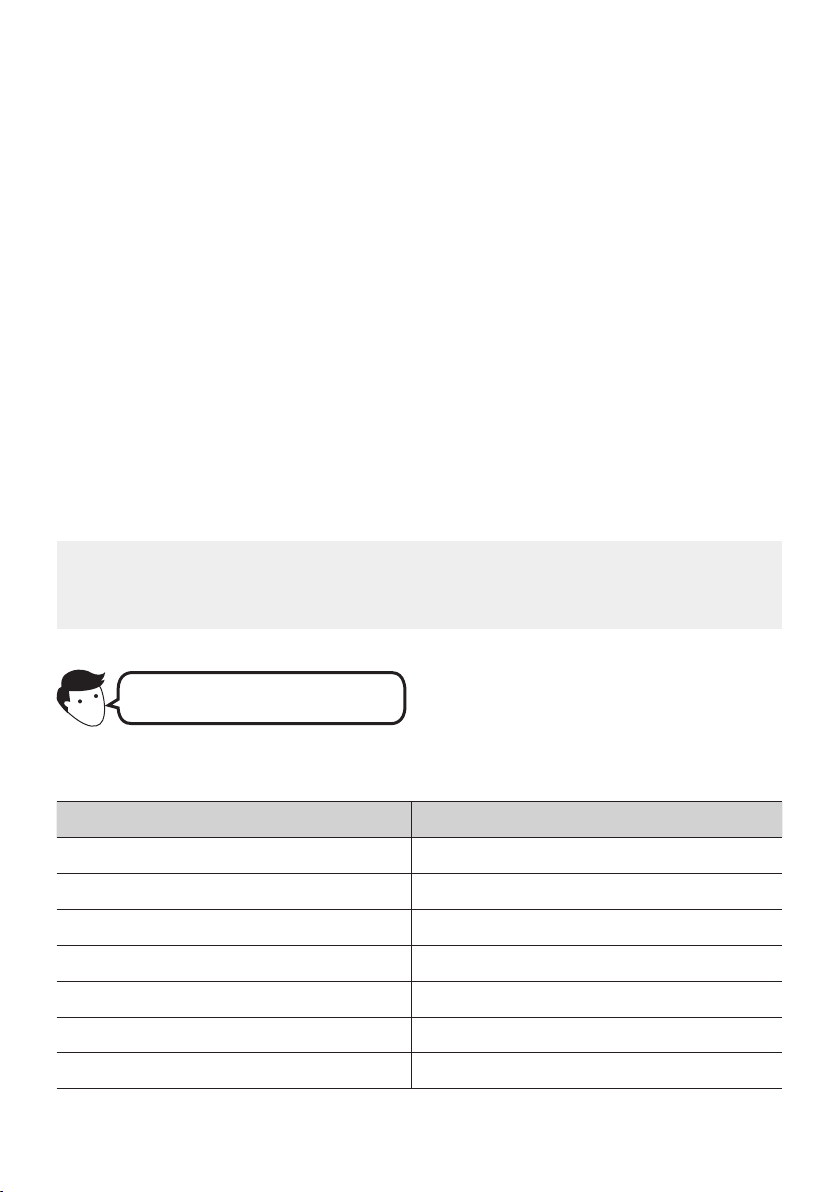
Trigger + Command + Speaker name
* To use voice commands for the Soundbar named “Living room”
Action Voice Command
To set the volume level to 5 "Alexa Se t the volume to 5 on Living room"
To increase the volume level "Alexa Volume up on Living room"
To mute the sound "Alexa Mute on Living room"
To listen to a radio station named KISS FM "Alexa Play Kiss FM on Living room"
To play the next song "Ale xa Next song on Living room"
To stop the audio "Alexa Stop on Living room"
To turn the audio off "Alexa Turn off on Living room"
ENG - 31
Page 32

Using the Tap Sound
Tap the Soundbar with your mobile device to play the sound of content on the mobile device through
the Soundbar.
• This function may not be supported, depending on the mobile device.
• This function is only compatible with Samsung mobile devices with Android 8.1 or later.
SmartThings App
Mobile device
1. Turn on the Ta p So und function on your mobile device.
• For details on how to turn on the function, refer to “Setting the Tap Sound func tion” below.
2. Tap the Soundbar with the mobile device. Select “Start now” in the displayed message window.
A connection is established between the mobile device and Soundbar via Bluetooth.
3. Play the sound of content on the mobile device through the Soundbar.
• This function connects a mobile device to the Soundbar via Bluetooth by detecting vibration
that occurs when the device touches the Soundbar.
• Make sure the mobile device does not tap a sharp corner of the Soundbar. The Soundbar or
mobile device may become scratched or damaged.
• It is recommended that the mobile device be covered with a case. Lightly tap the wide area in
the upper portion of the Soundbar, without using excessive force.
• To use this function, update the SmartThings app to the latest version.
The function may not be supported, depending on the app version.
Top of the Soun dbar
Setting the Tap Sound function
Use the SmartThings app to turn on the Tap View, Tap Sound function.
1. On the mobile device, run the SmartThings app.
2. Select ( → ) in the SmartThings app screen displayed on the mobile device.
3. Set “Tap View, Tap Sound” to On to allow the function to work when a mobile device moves close to
the Soundbar. The function is turned on.
NOTES
• When the mobile device is in power-saving mode, the Tap S oun d function does not work.
• The Tap So und function may not work if there are devices near the Soundbar that cause radio
interference such as electric devices. Make sure devices that may cause radio interference are
placed at a sufcient distance away from the Soundbar.
ENG - 32
Page 33

10 INSTALLING THE
WALL MOUNT
Wallmount Components
Wall Mount Guide
Installation Precautions
• Install on a vertical wall only.
• Do not install in a place with high
temperature or humidity.
• Verify whether the wall is strong enough to
support the product’s weight. If not, reinforce
the wall or choose another installation point.
• Purchase and use the xing screws or
anchors appropriate for the kind of wall you
have (plaster board, iron board, wood, etc.). If
possible, x the support screws into wall
studs.
• Purchase wall mounting screws according to
the type and thickness of the wall you want to
mount the Soundbar on.
– Diameter: M5
– Length: 35 mm or longer recommended.
• Connect cables from the unit to external
devices before you install the Soundbar on
the wall.
• Make sure the unit is turned off and
unplugged before you install it. Otherwise, it
may cause an electric shock.
x 2
Holder-Screw Screw
x 2
Bracket-Wall Mount
1. Place the Wall Mount Guide against the wall
surface.
• The Wall Mount Guide must be level.
• If your TV is mounted on the wall, install
the Soundbar at least 5 cm below the TV.
5 cm or more
x 2
(M4 x L10)
ENG - 33
Page 34

2. Align the Wall Mount Guide’s Centre Line
with the centre of your TV (if you are
mounting the Soundbar below your TV), and
then x the Wall Mount Guide to the wall
using tape.
• If you are not mounting below a TV, place
the Centre Line in the centre of the
installation area.
Centre Line
3. Push a pen tip or sharpened pencil tip
through the centre of the A-TYPE images on
each end of the Guide to mark the holes for
the supporting screws, and then remove the
Wall Mount Guide.
5. Push a screw (not supplied) through each
Holder-Screw, and then screw each screw
rmly into a support screw hole.
6. Install the 2 Bracket-Wall Mounts in the
correct orientation on the bottom of the
Soundbar using 2 Screws.
4. Using an appropriately sized drill bit, drill a
hole in the wall at each marking.
• If the markings do not correspond to the
positions of studs, make sure you insert
appropriate anchors or mollies into the
holes before you insert the support
screws. If you use anchors or mollies,
make sure the holes you drill are large
enough for the anchors or mollies you
use.
• When assembling, make sure the hanger
part of the Bracket-Wall Mounts are
located behind the rear of the Soundbar.
Rear of S oundbar
Right end o f Soundbar
ENG - 34
Page 35

7. Install the Soundbar with the attached
Bracket-Wall Mounts by hanging the
Bracket-Wall Mounts on the Holder-Screws
on the wall.
11 INSTALLING THE
SOUNDBAR
ABOVE A TV
STAND
Component
8. Slide the Soundbar down as shown below so
that the Bracket-Wall Mounts rest securely
on the Holder-Screws.
• Insert the Holder-Screws into the wide
(bottom) part of the Bracket-Wall
Mounts, and then slide the Bracket-Wall
Mounts down so that the Bracket-Wall
Mounts rest securely on the
Holder-Screws.
x 4
Rubber-Foot
To install, attach the Rubber-Feet to the bottom
of the Soundbar before placing it in position
above the TV stand. Make sure you attach the
Rubber-Feet so that they are beyond the outside
edges of the TV stand. Refer to the gure below.
Rubber-Foot
ENG - 35
Page 36

Place the Soundbar on a TV stand.
HDMI IN
DIGITAL AUDIO IN
(OPTICAL)
As illustrated in the image, align the center of the
Soundbar with the center of the TV, carefully
place the Soundbar onto the TV stand.
12 SOFTWARE
UPDATE
Auto Update
When the Soundbar is connected to the Internet,
software updates automatically occur even when
the Soundbar is turned off.
• To use the Auto Update function, the
Soundbar must be connected to the Internet.
The Wi-Fi connection to the Soundbar will be
terminated if the Soundbar ’s power cord is
disconnected or the power is cut off. If the
power is cut off, when the power comes back
on or you reconnect the power cord, turn on
the Soundbar, and then reconnect it to the
Internet.
NOTES
• Make sure the Soundbar is placed on a at
and solid surface.
• Insufcient gap from the TV may cause
acoustic problem.
USB Update
Bott om of the Soundba r
NETWORKID SET
DIGITAL AUDIO IN
(OPTICAL)
SERVICE
DC 19V
SERVICE
Micro USB t o
USB adap ter Cable
(not supplied)
Samsung may offer updates for the Soundbar’s
systemrmwareinthefuture.
When an update is available, you can update the
Soundbar by connecting the USB drive that
contains the update rmware to the SERVICE
port of the Soundbar.
ENG - 36
HDMI
HDMI TO TV
(eARC/ARC)
Page 37

1. Go to the Samsung website
(www.samsung.com) → search for the model
name from the customer support menu
option.
• For more information about update, refer
to Upgrade Guide.
2. Download the upgrade le (USB type).
3. Unzip the le to create a folder with the le
name.
4. Store the created folder in a USB and then
connect it to the Soundbar.
5. Turn on the Soundbar. Then the product is
updated within 3 minutes with displaying the
message, “UPDATE ”.
• During update, do not turn it off or
remove the USB.
• If “UPDATE ” does not appear on the
display window, remove the power cord
from the Soundbar and then reconnect it.
• When the latest version is installed, no
update is performed.
• Depending on the USB type, update may
not be supported.
Initialisation
Top of the Soun dbar
INIT
With the Soundbar on, press the (Volume)
buttons on the body at the same time for at least
5 seconds. “INIT” appears on the display and then
the Soundbar is initialised.
CAUTION
• All the settings of the Soundbar are
initialised. Be sure to perform this only when
initialisation is required.
ENG - 37
Page 38

13 TROUBLESHOOTING
Before seeking assistance, check the following.
In case the power is not turned on
; Check whether the power cord of the
Soundbar is correctly inserted into the
outlet.
In case the functions do not work properly
; After removing the power cord, insert it
again.
; Remote the power cord from the external
device and try again.
; If there is no signal, the Soundbar
automatically turns off after a certain
period of time. Turn on the power. (See
page 9.)
In case the remote control does not work
; Operate the remote control noting the
Soundbar closely.
; Replace the batteries with new ones.
In case the Soundbar sound is not output
; The volume of the Soundbar is too low or
muted. Adjust the volume.
; When any external device (STB, Bluetooth
device, mobile device, etc.) is connected,
adjust the volume of the external device.
; For sound output of the TV, select
Soundbar. (Samsung TV: Home ( ) →
Settings ( ) → Sound → Sound Output →
Select Soundbar)
; The cable connection to the Soundbar may
not be loose. Remove the cable and
connect again.
; Remove the power cord completely,
reconnect, and turn the power on.
; Initialise the product and try again.
(See page 37.)
In case the sound of the Subwoofer speaker is
not output
; Check whether the LED indicator on the
rear of the Subwoofer is on in blue.
Reconnect the Soundbar and Subwoofer if
the indicator is blinking in blue or turned
red. (See page 15.)
; You may experience an issue if there is an
obstacle between the Soundbar and
Subwoofer. Move devices to an area away
from obstacles.
; Other devices sending radio frequency
signals in proximity may interrupt the
connection.
Keep your speaker away from such devices.
; Remove and reconnect the power plug.
The Subwoofer volume is too low
; The original volume of the content you are
playing may be low. Try adjusting the
Subwoofer level. (See page 11.)
; Bring the Subwoofer speaker closer to you.
ENG - 38
Page 39

In case the TV is not connected via HDMI TO
TV (eARC/ARC)
; Check whether the HDMI cable is correctly
connected to the ARC terminal.
(See page20.)
; Connection may not be possible due to the
connected external device (set-top box,
game machine, etc.). Directly connect the
Soundbar.
; HDMI-CEC may not be activated on the TV.
Turn on the CEC on the TV menu. (Samsung
TV: Home ( ) → Settings ( ) → General
→ External Device Manager → Anynet+
(HDMI-CEC) ON)
There is no sound in when connecting to the
TV in HDMI TO TV (eARC /ARC) mode
; Your device is unable to play the input
signal. Change the TV’s audio output to
PCM or Dolby Digital.
(For a Samsung TV: Home ( ) → Settings
( ) → Sound → Expert Settings → Digital
Output Audio Format)
In case Bluetooth connection is not possible
; When connecting a new device, switch to
“BT PAIRING” for connection. (Press the
PAIR button on the remote control or
press the (Source) button on the body
for at least 5 seconds.)
; If the Soundbar is connected to another
device, disconnect that device rst to
switch the device.
; Reconnect it after removing the Bluetooth
speaker list on the device to connect.
(Samsung TV: Home ( ) → Settings ( )
→ Sound → Sound Output → Bluetooth
Speaker List)
; The automatic TV connection may be
disabled. While the Soundbar is in “BT
READY”, press and hold the p button on
the Soundbar remote control for 5 seconds
to select ON-TV CONNECT. If you see
OFF-TV CONNECT, press and hold p button
again for 5 seconds to switch the selection.
; Remove and reconnect the power plug,
then try again.
; Initialise the product and try again.
(See page 37.)
In case Bluetooth sound breaking occurs
; Sounds may be breaking due to
interference by radio frequency or
electronic devices nearby. Keep such
devices away from the Soundbar to avoid
radio interference. Example: microwave
ovens.
; Because the device to connect is far away
from the Soundbar, sound breaking may
occur. Move the device near the Soundbar.
; If a part of your body is in contact with the
Bluetooth transceiver or the product is
installed on metal furniture, sound
breaking may occur. Check the installation
environment and conditions for use.
In case Wi-Fi connection is not possible
; Check whether your wireless router is on.
; Turn off the router, turn it back on, and then
try again.
; When the signal of the wireless router is
too weak, connection may not be possible.
Move the router near the Soundbar or
adjust the installed position with no
obstacles.
; If your wireless router is new, you will need
to recongure the speaker’s network
settings.
In case the Soundbar is not turned on as soon
as the TV is turned on
; When you turn off the Soundbar while
watching TV, power synchronization with
the TV is disabled. First turn off the TV.
ENG - 39
Page 40

14 LICENCE
Manufactured under license from Dolby
Laboratories. Dolby, Dolby Atmos, Dolby Audio,
Dolby Digital Plus, Pro Logic, and the double-D
symbol are trademarks of Dolby Laboratories.
15 OPEN SOURCE
LICENCE NOTICE
To send inquiries and requests for questions
regarding open sources, contact Samsung Open
Source (http://opensource.samsung.com)
16 IMPORTANT
NOTES ABOUT
For DTS patents, see http://patents.dts.com.
Manufactured under license from DTS Licensing
Limited. DTS, the Symbol, & DTS and the Symbol
together, DTS:X, and the DTS:X logo are
registered trademarks and/or trademarks of
DTS, Inc. in the United States and/or other
countries. © DTS, Inc. All Rights Reserved.
The terms HDMI and HDMI High-Denition
Multimedia Interface, and the HDMI Logo are
trademarks or registered trademarks of HDMI
Licensing LLC in the United States and other
countries.
• The Spotify Software is subject to third
party licenses found here :
www.spotify.com/connect/third-partylicenses.
• For more information about Spotify
Connect, please visit www.spotify.com/
connect
SERVICE
• Figures and illustrations in this User Manual
are provided for reference only and may differ
from actual product appearance.
• An administration fee may be charged if
either
(a) an engineer is called out at your request
and there is no defect with the product (i.e.
where the user manual has not been read).
(b) you bring the unit to a repair centre and
there is no defect with the product (i.e.
where the user manual has not been read).
• You will be informed of the administration fee
amount before a technician visits.
ENG - 40
Page 41

17 SPECIFICATIONS AND GUIDE
Specications
Model Name HW-Q70T
Weight 3.6 kg
Dimensions (W x H x D) 980.0 x 60.0 x 115.0 mm
Operating Temperature Range +5°C to +35°C
Operating Humidity Range 10 % ~ 75 %
AMPLIFIER
Rated Output power (30W x 4) + (20W x 2) + 10W + 160W
Supported play formats
WIRELESS DEVICE OUTPUT POWER
Wi-Fi max transmitter power
WIRELESS DEVICE OUTPUT POWER
BT max transmitter power
WIRELESS DEVICE OUTPUT POWER
SRD max transmitter power
Subwoofer Name PS-WR65BC
Weight 6.2 kg
Dimensions (W x H x D) 205.0 x 353.0 x 303.0 mm
AMPLIFIER
Rated Output power 160W
WIRELESS DEVICE OUTPUT POWER
SRD max transmitter power
Dolby Atmos (True HD / Digital Plus), Dolby
Digital, DTS Master Audio, DTS:X, DTS
100mW at 2.4GHz – 2.4835GHz, 200mW at
5.15GHz – 5.25GHz, 100mW at 5.25GHz –
5.35GHz & 5.47GHz – 5.725GHz
100mW at 2.4GHz – 2.4835GHz
25mW at 5.725GHz – 5.825GHz
25mW at 5.725GHz – 5.825GHz
ENG - 41
Page 42

NOTES
• Samsung Electronics Co., Ltd reserves the right to change the specications without notice.
• Weight and dimensions are approximate.
Precaution : The Soundbar will restart automatically if you turn on/turn off Wi-Fi.
Overall Standby Power
Consumption (W)
Wi-Fi
Port deactivation method
Bluetooth
Port deactivation method
• Hereby, Samsung, declares that this equipment is in compliance with Directive
2014/53/EU.
The full text of the EU declaration of conformity is available at the following
internet address: http://www.samsung.com go to Support > Search Product
Support and enter the model name.
This equipment may be operated in all EU countries.
The 5GHz WLAN(Wi-Fi or SRD) function of this equipment may only be operated
indoors.
Press the ID SET button on the bottom panel of the Soundbar for
30 seconds to turn Wi-Fi On / Off.
Press the NETWORK button on the bottom panel of the Soundbar
for 30 seconds to turn Bluetooth On / Off.
5.2W
ENG - 42
Page 43

[Correct disposal of bat teries in this product]
(Applicable in countries with separate collec tion systems)
This marking on the battery, manual or packaging indicates that the batteries in this product should not be
disposed of with other household waste at the end of their working life. Where marked, the chemical
symbols Hg, Cd or Pb indicate that the battery contains mercury, cadmium or lead above the reference
levels in EC Directive 2006/66.
If batteries are not properly disposed of, these substances can cause harm to human health or the
environment.
To protect natural resources and to promote material reuse, please separate batteries from other types of
waste and recycle them through your local, free battery return system.
Correc t Disposal of This Produc t
(Waste Electrical & Electronic Equipment)
(Applicable in countries with separate collec tion systems)
This marking on the product, accessories or literature indicates that the product and its electronic
accessories (e.g. charger, headset, USB cable) should not be disposed of with other household waste at the
end of their working life. To prevent possible harm to the environment or human health from uncontrolled
waste disposal, please separate these items from other types of waste and recycle them responsibly to
promote the sustainable reuse of material resources.
Household users should contac t either the retailer where they purchased this product, or their local
government ofce, for details of where and how they can take these items for environmentally safe
recycling.
Business users should contact their supplier and check the terms and conditions of the purchase contract.
This product and its electronic accessories should not be mixed with other commercial wastes for disposal.
For information on Samsung’s environmental commitments and product specic regulatory obligations
e.g. REACH, WEEE, Batteries, visit:
http://www.samsung.com/uk/aboutsamsung/samsungelectronics/corporatecitizenship/data_corner.html
COMMISSION REGULATION (EU) 2019/1782
Ecodesign requirements for external power supplies :
www.samsung.com/global/ecodesign_component
ENG - 43
Page 44

ИНФОРМАЦИЯ ЗА БЕЗОПАСНОСТ
МЕРКИ ЗА БЕЗОПАСНОСТ
ЗА ДА НАМАЛИТЕ РИСКА ОТ ТОКОВ УДАР, НЕ
СВАЛЯЙТЕ КАПАКА (ИЛИ ЗАДНИЯ КАПАК).
ВЪТРЕ НЯМА ЧАСТИ, ПРЕДНАЗНАЧЕНИ ЗА
ОБСЛУЖВАНЕ ОТ ПОТРЕБИТЕЛЯ. ЗА
СЕРВИЗНО ОБСЛУЖВАНЕ СЕ ОБРЪЩАЙТЕ
КЪМ КВАЛИФИЦИРАН СЕРВИЗЕН ПЕРСОНАЛ.
Вижте таблицата по-долу за обяснение на
символите, които може да са на вашия продукт
Samsung.
ВНИМАНИЕ
РИСК ОТ ТОКОВ УДАР ДА
НЕ СЕ ОТВАРЯ
Този символ показва, че вътре има
високо напрежение. Опасно е да
осъществявате какъвто и да е било
контакт с вътрешната част на продукта.
Този символ показва, че в продукта е
включена важна документация за
работата и поддръжката.
Продукт от клас II: Този символ показва,
че не е необходима връзка за
безопасност към земята (заземяване).
Ако този символ не присъства на
продукт със захранващ кабел,
продуктът ТРЯБВА да бъде надеждно
свързан към защитно заземяване.
AC напрежение: Този символ показва,
че номиналното напрежение,
маркирано с този символ, е AC
напрежение.
DC напрежение: Този символ показва,
че номиналното напрежение,
маркирано с този символ, е DC
напрежение.
Внимание, направете справка в
инструкциите за използване: Този
символ инструктира потребителя да
направи справка в ръководството на
потребителя за допълнителна
информация за безопасността.
ПРЕДУПРЕЖДЕНИЕ
• За да намалите риска от пожар или
електрически шок, не излагайте
апаратурата на дъжд или влага.
ВНИМАНИЕ
• ЗА ДА ИЗБЕГНЕТЕ ТОКОВ УДАР,
ПОСТАВЕТЕ ЩЕПСЕЛА В ПОДХОДЯЩ
КОНТАКТ, КАТО ГО ВКЛЮЧИТЕ ДОКРАЙ.
• Апаратурата трябва винаги да бъде
свързана към променливотоков източник
на захранване със защитна заземителна
връзка.
• За да изключите прибора от захранването,
издърпайте щепсела от контакта. Поради
тази причина, контактът трябва да бъде
удобен.
• Апаратът не бива да бъде излаган на
капене или пръски. Не поставяйте
предмети, пълни с течности, напр. вази,
върху уреда.
• За да изключите напълно уреда, трябва да
извадите щепсела на захранващия кабел
от контакта. Следователно щепселът на
захранващия кабел трябва да бъде лесно
достъпен по всяко време.
BUL - 2
Page 45

ПРЕДПАЗНИ МЕРКИ
1. Уверете се, че AC захранването в дома ви
съответства на изискванията за
електрозахранване, изброени върху
идентификационния стикер, разположен
от долната страна на продукта.
Инсталирайте своя продукт хоризонтално,
върху подходяща основа (мебел), с
достатъчно място около него за
вентилация 7~10 см. Внимавайте да не
бъдат покрити вентилационните отвори.
Не поставяйте устройството върху
усилватели или друго оборудване, което
може да се нагорещи. Устройството е
предназначено за непрекъсната
употреба. За да изключите напълно
устройството, извадете адаптера за
променлив ток от стенния контакт.
Извадете щепсела на устройството от
контакта, ако възнамерявате да не го
използвате дълъг период от време.
2. По време на гръмотевични бури
изваждайте щепсела на
електрозахранването от контакта. Пикове
на напрежение, дължащи се на мълнии,
могат да повредят уреда.
3. Не излагайте уреда на пряка слънчева
светлина или други източници на топлина.
Това може да доведе до прегряване и
неизправност на уреда.
4. Пазете уреда от влага (напр. вази) и
прекомерна топлина (напр. камина), или
оборудване, което създава силни
магнитни или електрически полета.
Извадете щепсела от контакта на
електрозахранването. Продуктът не е
предназначен за промишлена употреба.
Използвайте този продукт само за лично
ползване. Ако продуктът или дискът са
били съхранявани на студено, възможно е
да се образува конденз. Ако
транспортирате уреда през зимата,
изчакайте приблизително 2 часа докато
уредът достигне стайна температура,
преди да го използвате.
5. Батериите, които се използват в този
продукт, съдържат химикали, които са
вредни за околната среда. Не изхвърляйте
батериите с общите домакински отпадъци.
Не изхвърляйте батериите в огън. Не
създавайте късо напрежение, не
разглобявайте и не прегрявайте батериите.
Ако батериите не се сменят правилно, има
опасност от експлозия. Сменяйте само със
същия тип или еквивалентни.
BUL - 3
Page 46

СЪДЪРЖАНИЕ
01 Проверка на компонентите 6
02 Описание на продукта 7
Челен панел / Горен панел на Soundbar ------------------------- 7
Долен панел на Soundbar ------------------------- 8
03 Използване на дистанционното управление
на Soundbar 9
Поставяне на батериите преди използване на дистанционното
управление (2 батерии размер AA) ------------------------- 9
Начин на работа с дистанционното управление
Използване на скритите бутони (бутони с повече от една функция)
Изходни спецификации за различните режими за звукови ефекти
Регулиране на силата на звука на Soundbar с дистанционното
управление на телевизора ------------------------- 13
04 Свързване на Soundbar 14
-------------------------
-------------------------
-------------------------
9
12
12
05
06
Включване на захранването и устройствата
– Ръчно свързване на субуфера
– Светодиодни индикатори от задната страна на субуфера
Свързване на SWA-9000S (продава се отделно) към Soundbar
-------------------------
-------------------------
-------------------------
-------------------------
Използване на кабелна връзка към телевизора
Метод 1. Свързване с HDMI
– Свързване на телевизор, който поддържа HDMI ARC
(канал за обратен звук)
Метод 2. Свързване с помощта на оптичен кабел
-------------------------
-------------------------
-------------------------
Използване на безжична връзка към телевизора
Свързване през Bluetooth
-------------------------
20
23
14
18
20
20
21
23
07 Свързване към външно устройство 25
Метод 1. Свързване посредством HDMI кабел (с възможност за
декодиране и възпроизвеждане на Dolby Atmos)
Метод 2. Свързване с помощта на оптичен кабел
BUL - 4
-------------------------
-------------------------
25
26
15
17
Page 47

08 Свързване към мобилно устройство 27
Метод 1. Свързване през Bluetooth
Метод 2. Свързване през Wi-Fi (безжична мрежа)
-------------------------
-------------------------
27
30
09 Свързване на продукт на Amazon 31
Свързване и работа с продукт на Amazon (Amazon Echo) ------------------------- 31
Използване на гласови команди за управление на високоговорители
Използване на Tap Sound
-------------------------
-------------------------
31
32
10 Монтиране на стенната стойка 33
Предупреждения във връзка с монтажа
Компоненти за стенен монтаж
-------------------------
-------------------------
33
33
11 Монтиране на Soundbar над стойка за
телевизор 35
Компонент
-------------------------
35
12 Актуализация на софтуер 36
Автоматична актуализация
Актуализация чрез USB
Инициализация
-------------------------
-------------------------
-------------------------
36
36
37
13 Отстраняване на неизправности 38
14 Лиценз 40
15 Бележка за лиценза за отворен код 40
16 Важни бележки за обслужването 40
17 Спецификации и ръководство 41
Спецификация
-------------------------
BUL - 5
41
Page 48

01 ПРОВЕРКА НА КОМПОНЕНТИТЕ
PAIR
SOUND
MODE
VOL WOOFER
SOUNDBAR
Основно устройс тво на Soundbar Дистанционно управление/
Субуфер
батерии за Soundbar
x 2
Захранващ кабел
(Субуфер, Soundbar)
AC/DC ад аптер
(Soundbar)
x 2
HDMI кабел
x 2
(M4 x L10)
Водач за стенна стойка Държач-винт Винт
x 2
x 4
Скоба за стенна стойка Гумен крак
• За допълнителна информация относно захранването и потреблението на електроенергия
направете справка с етикета, поставен на продукта. (Етикет: долна страна на основното
устройство на Soundbar)
• За да закупите допълнителни компоненти или незадължителни кабели, свържете се с
Център за обслужване на Samsung или с Център за обслужване на клиенти на Samsung.
• За повече информация относно стенната стойка или гумения крак вижте стр. 33~35.
• Дизайнът, спецификациите и екранът на приложенията подлежат на промяна без
предизвестие.
• Видът на аксесоарите може да се различава от представения на илюстрациите по-горе.
BUL - 6
Page 49

02 ОПИСАНИЕ НА ПРОДУКТА
Челен панел / Горен панел на Soundbar
Позиционирайте
продукта така, че логото
SAMSUNG да е
разположено отгоре.
Бутон (Захранване)
Включва и изключва захранването.
Бутон (Сила на звука)
Регулира силата на звука.
Бутон (Източник)
Избира режима за въвеждане на източник.
Входящ режим Дисплей
Оптичен цифров вход D.IN
ARC (HDMI OUT) вход D.IN TV ARC (Автоматично преобразуване)
HDMI вход HDMI
Wi-Fi режим WIFI
BLUETOOTH режим BT
Горен панел
Дисплей
Извежда състоянието и текущия режим на продукта.
D.IN HDMI Wi-Fi BT
• Когато включите AC кабела, бутонът за захранването ще заработи след 4 до 6 секунди.
• Когато включите това устройство, ще минат 4 до 5 секунди, преди то да издаде звук.
• Ако се чува звук както от телевизора, така и от Soundbar, отидете на меню Настройки, за да
регулирате звука на телевизора и да подмените високоговорителя на телевизора с Външ.
висок..
BUL - 7
Page 50

Долен панел на Soundbar
DIGITAL AUDIO IN
(OPTICAL)
SERVICE
DC 19V
HDMI
NETWORK ID SET
NETWORK ID SET
HDMI TO TV
(eARC/ARC)
HDMI IN
HDMI OUT
(TV-ARC)
HDMI
HDMI TO TV
(eARC/ARC)
HDMI
NETWORK ID SET
HDMI TO TV
(eARC/ARC)
HDMI IN
HDMI OUT
(TV-ARC)
HDMI
HDMI TO TV
(eARC/ARC)
DIGITAL AUDIO IN
DIGITAL AUDIO IN (OPTICAL)
Свържете към цифровия (оптичен) изход на външно устройство. (Вижте страница 26)
SERVICE
Свържете USB памет за актуализиране на софтуера на продукта.
DC 19V
(Вход на захранване)
Свържете AC/DC адаптера.
NETWORK
Натиснете, за да свържете към безжична мрежа (Wi-Fi) през приложението SmartThings.
(OPTICAL)
SERVICE
DC 19V
NETWORK ID SET
DIGITAL AUDIO IN
(OPTICAL)
SERVICE
DC 19V
(Вижте страница 14)
NETWORK ID SET
HDMI
HDMI TO TV
(eARC/ARC)
ID SET
Натиснете, за да свържете безжично Soundbar към съраунд високоговорителите и субуфера.
(Съраунд високоговорителят се продава отделно.)
HDMI
HDMI TO TV
(eARC/ARC)
HDMI
Предава едновременно цифрови видео и аудио сигнали през HDMI кабел.
Свържете към HDMI изход на външно устройство. (Вижте страница 25)
HDMI TO TV (eARC/ARC)
Свържете към HDMI жак на телевизор. (Вижте страница 20)
• Когато изключвате захранващия кабел на AC/DC адаптера от стенния контакт, хващайте
щепсела. Не дърпайте кабела.
• Свържете това устройство или други компоненти към променливотоков контакт само след като
са установени всички връзки между компонентите.
BUL - 8
Page 51

03 ИЗПОЛЗВАНЕ НА ДИСТАНЦИОННОТО
PAIR
УПРАВЛЕНИЕ НА SOUNDBAR
Поставяне на батериите преди използване на дистанционното управление (2 батерии размер AA)
Плъзнете задния капак по посока на стрелката,
докато не го свалите изцяло. Поставете
2 батерии AA (1,5 V), като ги ориентирате така, че
поляритетът им да е правилен. Плъзнете задния
капак отново на мястото му.
Начин на работа с дистанционното управление
PAIR
SOUND
MODE
VOL WOOFER
SOUNDBAR
Включване/
изключване
Източник
Заглушаване
Включва и изключва Soundbar.
• Функция Auto Power Down
Устройството се изключва автоматично
в следните ситуации:
– В D.IN / HDMI / Wi-Fi / BT режим, ако
няма аудио сигнал в рамките на
18 минути.
Натиснете, за да изберете източник,
свързан към Soundbar.
Натиснете бутона (Заглушаване), за да
заглушите звука.
Натиснете го отново, за да отмените
заглушаването.
BUL - 9
Page 52

PAIR
SOUND
MODE
SOUND MODE
Можете да изберете желания режим на звука с избор на STANDARD, SURROUND,
GAME PRO или ADAPTIVE SOUND.
• STANDARD
Извежда оригиналния звук.
• SURROUND SOUND
Осигурява звуково поле, по-широко от стандартното.
• GAME PRO
Предоставя стереоскопичен звук, който ви потапя в действието по време на
игра.
• ADAPTIVE SOUND
Анализира съдържанието в реално време и автоматично предоставя оптимално
звуково поле в зависимост от характеристиките на съдържанието.
Възпроизвеждане/
PAIR
Bluetooth
PAIR
Пауза
Нагоре/
Надолу/
Наляво/
Надясно
Включете Soundbar в режим за сдвояване през Bluetooth. Натиснете бутона и
изчакайте екрана „BT PAIRING“, за да свържете с ново Bluetooth устройство.
Можете също да възпроизвеждате или да поставяте музика на пауза с натискането
на бутона.
Натиснете обозначените области, за да избер ете
Нагоре/Надолу/Наляво/Надясно.
Натиснете Нагоре/Надолу/Наляво/Надясно на бутона, за да изберете или
настроите функции.
• Прескачане на музика
Натиснете бутона Надясно, за да изберете следващия музикален файл.
Натиснете бутона Наляво, за да изберете с предходния музикален файл.
• ID SET
Използвайте тази опция, когато субуферът или съраунд високоговорителите не
са свързани или трябва да бъдат свързани отново.
Докато са изключени, натиснете и задръжте бутона Нагоре за 5 секунди, за да
извършите ID SET. (Вижте страница 16.)
BUL - 10
Page 53

PAIR
SOUNDBAR
SOUNDBAR
SOUND
MODE
PAIR
SOUND
MODE
VOL
WOOFER
SOUNDBAR
SOUND
MODE
VOL
WOOFER
SOUNDBAR
SOUNDBAR
SOUNDBAR
Контрол на
звука
Когато се натисне, последователно се показват настройваните елементи, като
например TREBLE, BASS, SYNC, CENTER LEVEL, FRONT TOP LEVEL и VIRTUAL ON/OFF.
Желаният елемент може да се регулира с помощта на бутоните Нагоре/Надолу.
– За да управлявате силата на звука на високите или басовите тонове, изберете
TREBLE или BASS в Настройки на звука и след това регулирайте звука в
диапазона -6~+6, като използвате бутоните Нагоре/Надолу.
– Натиснете и задръжте бутона (Контрол на звука) за около 5 секунди, за да
регулирате звука за всяка радиочестотна лента. Можете да избирате измежду
150Hz, 300Hz, 600Hz, 1,2KHz, 2,5KHz, 5kHz и 10kHz, като използвате бутоните
Наляво/Надясно и всяка честота може да се регулира до настройка от -6 до +6
с помощта на бутоните Нагоре/Надолу.
(Уверете се, че режим на звука е с настройка „STANDARD“.)
– За да управлявате силата на звука на всеки от високоговорителите, изберете
CENTER LEVEL или FRONT TOP LEVEL в Настройки на звука и след това
регулирайте силата на звука до настройка в диапазона -6~+6 с помощта на
бутоните Нагоре/Надолу.
– Ако картината на телевизора и звукът от Soundbar не са синхронизирани,
изберете SYNC в Контрол на звука и след това задайте забавяне на звука от
0~300 милисекунди с помощта на бутоните Нагоре/Надолу.
– SYNC се поддържа само за някои функции.
– Ако са свързани съраунд високоговорители, изберете RE AR LEVEL и след това
използвайте бутоните Нагоре/Надолу, за да регулирате силата на звука в
диапазона от -6 до +6.
– Функцията на високоговорителя VIRTUAL може да бъде ON/OFF с помощта на
бутоните Нагоре/Надолу.
НИВО НА
WOOFER
(БАСИТЕ)
СИЛА НА
ЗВУКА
SOUND
MODE
WOOFER
VOL
SOUND
MODE
WOOFER
VOL
Натиснете бутона нагоре или надолу, за да регулирате нивото на звука на уфера
(басите) до -12 или между -6 и +6. За да зададете ниво 0 (по подразбиране) за силата
на звука на уфера (басите), натиснете бутона.
SOUND
MODE
WOOFER
VOL
SOUND
MODE
WOOFER
VOL
Натиснете бутона нагоре или надолу, за да регулирате силата на звука.
• Заглушаване
Натиснете бутона VOL, за да заглушите звука. Натиснете го отново, за да
отмените заглушаването.
BUL - 11
Page 54

Използване на скритите бутони (бутони с повече от една функция)
Скрит бутон
Бутон на дистанционното
управление
WOOFER (Нагоре)
Нагоре ID SET Страница 16
(Контрол на звука)
Функция
Включване/изключване на
дистанционното управление на
телевизора (Готовност)
7-лентов EQ Страница 11
Страница за справки
Страница 13
Изходни спецификации за различните режими за звукови ефекти
Изход
Ефект Вход
STANDARD
SURROUND
GAME PRO
ADAPTIVE SOUND
Само съ с субуфер
2.0 канала 2.1 канала 2.1 канала
5.1 канала 3.1 канала 5.1 канала
2.0 канала 3.1.2 канала 5.1.2 канала
5.1 канала 3.1.2 канала 5.1.2 канала
2.0 канала 3.1.2 канала 5.1.2 канала
5.1 канала 3.1.2 канала 5.1.2 канала
2.0 канала 3.1.2 канала 5.1.2 канала
5.1 канала 3.1.2 канала 5.1.2 канала
С комплек т субуфер и
безжични задни
високоговорители
• За входни източници Dolby Atmos и DTS:X режимите за ефектите, които могат да се
избират с бутона SOUND MODE, няма да са налични. (Вижте по-горе за режимите за
ефектите.)
• Когато входният източник е Dolby Atmos®, настройката само за субуфера осигурява
3.1.2-канален звук, докато установката на комплекта субуфер и безжичен заден
високоговорител осигурява 5.1.2-канален звук.
• Комплектът от безжични задни високоговорители Samsung може да бъде закупен
отделно. За закупуване на комплект или субуфер се обърнете към търговеца, от който сте
закупили своя Soundbar.
• Съраунд високоговорителите няма да издават звук през 2-каналния изход, докато се
използва режим STANDARD. За да включите звука на съраунд високоговорителите,
променете режима на ефектите на SURROUND.
BUL - 12
Page 55

Регулиране на силата на звука на Soundbar с дистанционното
VOL
WOOFER
WOOFER
VOL
WOOFER
управление на телевизора
Регулирайте силата на звука на Soundbar с дистанционното управление на телевизора.
• Тази функция може да се използва само с ИЧ дистанционно управление. Bluetooth
дистанционни управления (дистанционни управления, при които се изисква сдвояване)
не се поддържат.
• Задайте за високоговорителя на телевизора настройка Външ. висок., за да използвате
тази функция.
• Производители, които поддържат тази функция:
VIZIO, LG, Sony, Sharp, PHILIPS, PANASONIC, TOSHIBA, Hisense, RCA
1. Изключете Soundbar.
2. Натиснете и задръжте бутона WOOFER за 5 секунди.
При всяко натискане и задържане на бутона WOOFER за 5 секунди режимът се променя, като
последователността е следната: „SAMSUNG-TV REMOTE“ (Режим по подразбиране), „OFF-TV
REMOTE“, „ALL-TV REMOTE“.
Бутон на дистанционното
управление
SOUND
MODE
SOUND
MODE
SOUND
MODE
5 Sec
5 Sec
VOL
5 Sec
Дисплей Статус
(Режим по подразбиране)
SAMSUNG-TV REMOTE
OFF-TV REMOTE
ALL-TV REMOTE
Активирайте ИЧ дистанционно
управление на телевизора
Samsung.
Деактивирайте дистанционното
управление на телевизора.
Активирайте ИЧ дистанционно
управление на телевизора на трета
страна.
BUL - 13
Page 56

04 СВЪРЗВАНЕ НА SOUNDBAR
HDMI
HDMI TO TV
(eARC/ARC)
DIGITAL AUDIO IN
(OPTICAL)
SERVICE
DC 19V
HDMI
NETWORK ID SET
NETWORK ID SET
HDMI TO TV
(eARC/ARC)
HDMI IN
HDMI OUT
(TV-ARC)
DIGITAL AUDIO IN
(OPTICAL)
SERVICE
HDMI
HDMI TO TV
(eARC/ARC)
DC 19V
Включване на захранването и устройствата
Използвайте захранващите компоненти, за да свържете субуфера и Soundbar към електрически
контакт в следния ред:
• За допълнителна информация относно захранването и потреблението на електроенергия
направете справка с етикета, поставен на продукта. (Етикет: долна страна на основното
устройство на Soundbar)
1. Включете захранващия кабел към субуфера.
2. Първо включете захранващия кабел към AC/DC адаптера.
Включете AC/DC адаптера (със захранващия кабел) към Soundbar.
Задна страна на
субуфера
POWER
Захранващ кабел
NETWORK ID SET
DIGITAL AUDIO IN
DC 19V
Захранващ кабел
(OPTICAL)
SERVICE
DC 19V
Долна страна на основното
AC/DC ад аптер
устройство на Soundbar
3. Свържете захранването със Soundbar и субуфера. Субуферът се свързва автоматично, когато
се включи Soundbar.
BUL - 14
Синият
светодиоден
индикатор
означава вкл.
Page 57

БЕЛЕЖКИ
• Свържете захранването на субуфера преди свързване със Soundbar.
Субуферът ще бъде автоматично свързан при включване на Soundbar.
• Ако извадите и поставите отново захранващия кабел в контакта, докато продуктът е
включен, Soundbar се включва автоматично.
• Уверете се, че AC/DC адаптерът е поставен да лежи върху маса или на пода. Ако поставите
AC/DC адаптера така, че да виси с входа за AC кабела ориентиран нагоре, в адаптера може да
влязат вода или други чужди частици и това да причини неизправност на адаптера.
Ръчно свързване на субуфера
Преди извършване на процедурата по ръчно свързване по-долу:
• Проверете дали захранващите кабели на Soundbar и субуфера са свързани правилно.
• Уверете се, че Soundbar е изключен.
1. Изключете основното устройство Soundbar.
2. Натиснете и задръжте ID SET в задната част на субуфера за най-малко 5 секунди.
• Червеният индикатор на гърба на субуфера се изключва и синият индикатор премигва.
5 Sec
Мигащ бързо син
светодиоден
индикатор
Задна страна на
субуфера
Задна страна на
субуфера
BUL - 15
Page 58

3. Натиснете бутона Нагоре на дистанционното управление за 5 секунди.
• На дисплея на Soundbar за момент се извежда съобщението ID SET и след това изчезва.
• Soundbar се включва автоматично, когато ID SET завърши.
PAIR
5 Sec
ID SET
4. Проверете дали светодиодният индикатор за връзка LINK свети постоянно в синьо (връзката
е осъществена).
Светодиодният индикатор за връзка LINK
спира да премигва и светва постоянно в
Синият
светодиоден
индикатор
означава вкл.
синьо, когато е установена връзка между
Soundbar и безжичния субуфер.
BUL - 16
Page 59

Светодиодни индикатори от задната страна на субуфера
Светодиоден
индикатор
Син
Червен
Червен и син
Статус Описание Разделителна способност
Вкл.
Мига
Вкл.
Мига Неизправност
Успешно свързване
(нормална работа)
Връзката се
възстановява
Готовност (при
изключено основно
устройство на
Soundbar)
Неуспешно свързване
-
Проверете дали захранващият
кабел, свързан към основното
устройство Soundbar, е включен
правилно или изчакайте около
5 минути. Ако мигането
продължи, опитайте ръчно да
свържете със субуфера. Вижте
страница 15.
Проверете дали захранващият
кабел, свързан към основното
устройство Soundbar, е включен
правилно.
Свържете отново. Вижте
инструкциите за ръчно
свързване на стр. 15.
Вижте информацията за
контакт за Центъра за
обслужване на Samsung в това
ръководство.
БЕЛЕЖКИ
• Ако основният модул е изключен, безжичният субуфер ще премине в режим на готовност и
светодиодът STANDBY в задната част ще светне в червено, след като е премигнал няколко
пъти в синьо.
• Ако използвате устройство, което използва същата честота (5,8 GHz), както Soundbar, в
близост до Soundbar, смущенията могат да причинят прекъсване на звука.
• Максималното разстояние на предаване на безжичния сигнал на основния модул е около 10
метра, но може да варира в зависимост от вашата работна среда. Ако между основния модул
и безжичния субуфер има стоманобетонна или метална стена, системата може изобщо да не
работи, защото безжичният сигнал не може да проникне през метал.
ВНИМАНИЕ
• В безжичния субуфер има вградени антени за приемане на безжичен сигнал. Съхранявайте
модулите далеч от вода и влага.
• За да си осигурите оптимално качество при слушане, уверете се, че в зоната около
безжичния високоговорител за ниски честоти и модула на безжичния приемник (продава се
отделно) няма препятствия.
BUL - 17
Page 60

Свързване на SWA-9000S (продава се отделно) към Soundbar
L
R
POWER
ID SET
LINK
За да постигнете истински безжичен съраунд звук, свържете комплекта от безжични задни
високоговорители на Samsung (SWA-9000S - продава се отделно) към Soundbar.
1. Свържете безжичния приемащ модул към 2 съраунд високоговорителя.
– Кабелите на високоговорителите са цветно кодирани.
L
R
SURROUND SPEAKERS OUT
SPEAKER IMPEDANCE : 3Ω
SURROUND-LEFT SURROUND-RIGHT
ID SET
SURROUND-LEFT
POWER
SURROUND-RIGHT
2. След включване на безжичния приемащ модул в електрически контакт проверете дали е в
състояние на изчакване.
• Светодиодният индикатор LINK (син) на модула на безжичния приемник би трябвало да
мига. Ако индикаторът не мига, използвайте тънка карфица, за да натиснете и задържите
бутона ID SET за 5 или повече секунди. Вижте ръководството на потребителя SWA-9000S
за повече подробности.
L
SURROUND SPEAKERS OUT
SPEAKER IMPEDANCE : 3Ω
R
ID SET
POWER
5 Sec
STANDBY
LINK
Премигване в синьо
BUL - 18
Page 61

3. Натиснете бутона Нагоре на дистанционното управление за 5 секунди.
LINK
• На дисплея на Soundbar за момент се извежда съобщението ID SET и след това изчезва.
• Soundbar се включва автоматично, когато ID SET завърши.
PAIR
5 Sec
ID SET
ВНИМАНИЕ
• Ако вашият Soundbar изпълнява музика, докато се свързва към SWA-9000S, може да
чувате известни смущения от басовия високоговорител, докато се установи връзката.
4. Проверете дали LED индикаторът за свързване свети постоянно в синьо (завършено свързване).
LED индикаторът за свързване спира да
STANDBY
LINK
премигва и светва постоянно в синьо,
когато се установи връзка между
Soundbar и безжичния приемащ модул.
Свети в синьо
5. Ако SWA-9000S не се свърже, повторете процедурата от стъпка 2.
BUL - 19
Page 62

05 ИЗПОЛЗВАНЕ НА КАБЕЛНА ВРЪЗКА
КЪМ ТЕЛЕВИЗОРА
Метод 1. Свързване с HDMI
ВНИМАНИЕ
• Когато HDMI кабелът и оптичният кабел са свързани, първо се получава HDMI сигналът.
• За да свържете с HDMI кабела телевизора и Soundbar, уверете се, че сте свързали
изводите, обозначени с ARC. В противен случай телевизорът може да не издава звук.
• Уверете се, че използвате кабел с лого за най-висока сертификация за HDMI. Освен това,
уверете се, че кабелът е сертифициран високоскоростен HDMI Ethernet кабел от тип А.
(ВИСОКОСКОРОСТЕН HDMI КАБЕЛ С ETHERNET)
Свързване на телевизор, който поддържа HDMI ARC (канал за обратен звук)
Свържете порта HDMI TO TV
Свържете с порта HDMI IN
(ARC) на вашия телевизор.
(eARC/ARC) на основното
устройство на Soundbar.
HDMI IN
(ARC)
HDMI кабел
Горна страна на Soundbar
HDMI TO TV
(eARC/ARC)
Долна страна на
Soundbar
TV ARC
1. При изключени Soundbar и телевизор свържете HDMI кабела, както е показано на фигурата.
2. Включете Soundbar и телевизора.
3. „TV ARC“ се появява на прозореца на дисплея на основното устройство на Soundbar и
Soundbar възпроизвежда звук от телевизора.
• Ако звукът от телевизора не се чува, натиснете бутон (Източник) на дистанционното
управление или на горната страна на Soundbar, за да превключите в режим „D.IN“. На екрана
последователно се показват „D.IN“ и „TV ARC“ и звукът от телевизора се възпроизвежда.
BUL - 20
Page 63

• При свързване на телевизор Samsung, който поддържа функцията eARC, „eARC“ се
появява на дисплея и се чува звук.
• Ако „TV ARC“ не се покаже на прозореца на дисплея на основното устройство на Soundbar,
проверете дали HDMI кабелът е свързан към правилния порт.
• Използвайте бутоните за сила на звука на дистанционното управление на телевизора, за
да промените силата на звука на Soundbar.
БЕЛЕЖКИ
• Когато свържете чрез HDMI кабел телевизор, поддържащ HDMI ARC (канал за обратен звук),
към Soundbar, можете да предавате цифрови видео и аудио данни, без използване на
отделен оптичен кабел.
• Препоръчваме по възможност да използвате безжилен HDMI кабел. Ако HDMI кабелът е с
жила, използвайте кабел с диаметър под 14 mm.
• Тази функция не е на разположение, ако HDMI кабелът не поддържа ARC.
• Когато звукът на предаването е кодиран в Dolby Digital и „Формат за цифров аудио изход“ на
вашия телевизор е зададен на PCM, препоръчваме да промените настройката на Dolby
Digital. Когато настройката на телевизора се промени, качеството на звука ще се повиши.
(Телевизионното меню може да използва различни думи за Dolby Digital и PCM в зависимост
от производителя на телевизора.)
Метод 2. Свързване с помощта на оптичен кабел
Контролен списък за проверка преди свързване
• Когато HDMI кабелът и оптичният кабел са свързани, първо се получава HDMI сигналът.
• Когато използвате оптичен кабел и клемите имат покритие, уверете се, че сте премахнали
покритията.
OPTICAL OUT
Оптичен кабел
(не е доставен)
Горна страна на Soundbar
BUL - 21
Долна страна на Soundbar
DIGITAL AUDIO IN
(OPTICAL)
D.IN
Page 64

1. При изключени телевизор и Soundbar свържете порта на Soundbar DIGITAL AUDIO IN
(OPTICAL) и порта OPTICAL на телевизора с оптичния кабел (не е доставен), както е показано
на фигурата.
2. Включете Soundbar и телевизора.
3. Натиснете бутона (Източник) на горния панел или на дистанционното управление, след
това изберете режим „D.IN“.
4. Звукът от телевизора се възпроизвежда от Soundbar.
Използване на функцията Q-Symphony
При Q-Symphony Soundbar се синхронизира с телевизора Samsung, за да се извежда звук от две
устройства за оптимален съраунд ефект. Когато се свърже Soundbar, се отваря менюто
„TV+Soundbar“ под менюто Звуков изход на телевизора. Изберете съответното меню.
Телевизионно
меню
• Пример на телевизионно меню: TV име на серията + [AV] Soundbar име на серията (HDMI)
БЕЛЕЖКИ
• Може да работи според кодека, поддържан от телевизора.
• Тази функция се поддържа само когато е свързан HDMI кабел или оптичен кабел (не е
доставен).
• Тази функция е налична в телевизори Samsung, пуснати в продажба през 2020 г. и някои
модели Soundbar.
HDMI Кабел
ИЛИ
Оптичен кабел (не е достав ен)
D.IN
BUL - 22
Page 65

06 ИЗПОЛЗВАНЕ НА БЕЗЖИЧНА ВРЪЗКА
КЪМ ТЕЛЕВИЗОРА
Свързване през Bluetooth
Когато телевизор Samsung е свързан през Bluetooth, можете да чуете стерео звука, без при това
да се нуждаете от кабел.
• Може да се свърже само по един телевизор Samsung.
• Може да се свърже телевизор на Samsung, който поддържа Bluetooth. Проверете
спецификациите на вашия телевизор.
Горна страна на Soundbar
5 Sec
ИЛИ
PAIR
BT PAIRING
Първоначално свързване
1. Натиснете бутона PAIR на дистанционното управление на Soundbar, за да влезете в режим
„BT PAIRING“.
(ИЛИ)
2. Изберете режим Bluetooth на телевизора Samsung.
3. Изберете „[AV] Samsung Soundbar Q70T“ от списъка на екрана на телевизора.
4. А сега можете да чуете звука на телевизора Samsung през Soundbar.
a. Натиснете бутона (Източник) на горния панел, след което изберете „BT“.
„BT“ автоматично се променя на „BT PAIRING“ след няколко секунди или се
променя на „BT READY“, ако има запаметена връзка.
b. Когато се изведе „BT READY“, натиснете и задръжте бутона (Източник) на
горния панел Soundbar за повече от 5 секунди, за да изведете „BT PAIRING“.
(например Начало ( ) Настройки ( ) Звук Звуков изход Списък на Bluetooth
високоговорители [AV] Samsung Soundbar Q70T (Bluetooth))
Наличен Soundbar е показан с „Необходимост от сдвояване“ или „Сдвоен“ на списъка с
Bluetooth устройства. За свързване на телевизор Samsung със Soundbar изберете
съобщението и след това установете връзка.
• Когато телевизор на Samsung е свързан, [Име на телевизор] → „BT“ се появява на предния
дисплей на Soundbar.
• След като свържете Soundbar към своя телевизор Samsung за първи път, използвайте
режима „BT READY“ за повторно свързване.
BUL - 23
Page 66

Ако устройството не успее да се свърже
• Ако имате съществуващ Soundbar (например [AV] Samsung Soundbar Q70T) в списъка с
високоговорители на телевизора Samsung, изтрийте го.
• След това повторете стъпки от 1 до 3.
Прекъсване на връзката на Soundbar към телевизора Samsung
Натиснете бутона (Източник) на горния панел или на дистанционното управление, и
превключете на режим, различен от „BT“.
• Прекъсването на връзката отнема време, тъй като телевизорът Samsung трябва да получи
отговор от Soundbar.
(Необходимото време може да се различава в зависимост от модела телевизор Samsung.)
Каква е разликата между BT READY и BT PAIRING?
• BT READY: В този режим можете да се свържете отново с всеки телевизор Samsung или
мобилно устройство, с който(което) сте установявали връзка преди.
• BT PAIRING: В този режим можете да свържете ново устройство към Soundbar. (Натиснете
бутона PAIR на дистанционното управление на Soundbar или натиснете и задръжте
бутона
е в режим „BT“.)
(Източник)
в горната част на Soundbar за повече от 5 секунди, докато Soundbar
Бележки относно свързване през Bluetooth
• Разположете ново устройство в диаметър от 1 m, за да установите връзка през Bluetooth.
• Ако ви бъде поискан ПИН код при свързване с Bluetooth устройство, въведете <0000>.
• Soundbar автоматично се изключва след 18 минути в състояние на готовност.
• Soundbar може да не извършва правилно търсене на Bluetooth или свързване при следните
обстоятелства:
– Ако около Soundbar има силно електрическо поле.
– Ако няколко Bluetooth устройства едновременно са сдвоени със Soundbar.
– Ако Bluetooth устройството е изключено, не е на мястото си или е в неизправност.
• Електронните устройства може да предизвикат радиосмущения. Устройствата, които
създават електромагнитни вълни, например микровълнови фурни, безжични LAN
устройства и др., трябва да бъдат държани далеч от основното устройство на Soundbar.
BUL - 24
Page 67

07 СВЪРЗВАНЕ КЪМ ВЪНШНО
УСТРОЙСТВО
Метод 1. Свързване посредством HDMI кабел (с възможност за декодиране и възпроизвеждане на Dolby Atmos)
Контролен списък за проверка преди свързване
• Dolby Atmos® и DTS:X се поддържат само в режим HDMI.
• Ако опциите за Аудио изход включват Вторичен звук, уверете се, че Вторичен звук) е
изключен Изкл..
• Уверете се, че съдържанието поддържа Dolby Atmos®.
Горна страна на Soundbar
Външно
HDMI
устройство
HDMI
HDMI OUT
HDMI IN
(ARC)
1. Използвайте HDMI кабел, за да свържете порта HDMI OUT на външното устройство и порта
HDMI, разположен на долната страна на Soundbar.
2. Използвайте HDMI кабел, за да свържете порта HDMI ВХОД на телевизора и порта HDMI TO
TV (eARC/ARC), разположен на долната страна на Soundbar.
3. Включете Soundbar, телевизора и външното устройство.
4. Натиснете бутона (Източник) на горния панел или на дистанционното управление, след
което изберете „HDMI“.
5. Дисплеят на Soundbar показва, че в момента е избран режим „HDMI“ и Soundbar ще започне
да възпроизвежда звуци.
HDMI кабел
HDMI кабел
HDMI TO TV
(eARC/ARC)
Долна страна на Soundbar
BUL - 25
Page 68

БЕЛЕЖКИ
• Когато започнете да използвате Dolby Atmos®:
Ако входният източник е Dolby Atmos®, се извеждат 5.1.2-канални звуци. Когато Dolby
Atmos® е активен, режимите за звукови ефекти на Soundbar, управлявани с бутона
SOUND MODE, не са достъпни.
• Когато се активира Dolby Atmos®, на предния дисплей се появява „DOLBY ATMOS“.
• Конфигуриране на Dolby Atmos® на вашия BD плейър или друго устройство
Отворете опциите за аудио изход в менюто за настройки на вашия BD плейър или друго
устройство и се уверете, че за Bitstream е избрана опция „Без кодиране“. Например в BD
плейъра Samsung отидете в Меню Начало → Звук → Цифров изход, след което изберете
Битов поток (необработен).
Метод 2. Свързване с помощта на оптичен кабел
BD/DVD плейър/
декодер за телевизия/
Игрова конзола
Горна страна на Soundbar
D.IN
DIGITAL AUDIO IN
(OPTICAL)
OPTICAL OUT
1. Използвайте оптичен кабел (не се предоставя), за да свържете DIGITAL AUDIO IN (OPTICAL)
към основното тяло на Soundbar и порта OPTICAL OUT към външното устройство.
2. Включете Soundbar и външното устройство.
3. Изберете режим „D.IN“, като натиснете бутона (Източник) на горния панел или на
дистанционното управление.
4. Вашият Soundbar ще възпроизведе звуци от външното устройство.
Оптичен кабел
(не е доставен)
Долна страна на Soundbar
BUL - 26
Page 69

08 СВЪРЗВАНЕ КЪМ МОБИЛНО
УСТРОЙСТВО
Метод 1. Свързване през Bluetooth
Когато мобилно устройство е свързано през Bluetooth, можете да чуете стерео звука, без при
това да се нуждаете от кабел.
• Когато свържете сдвоено Bluetooth устройство при изключен Soundbar, последният се
изключва автоматично.
Горна страна на Soundbar
PAIR
Мобилно устройство
5 Sec
ИЛИ
BT PAIRING
Първоначално свързване
• Когато се свържете към ново Bluetooth устройство, уверете се, че устройството е на
разстояние от 1 m.
1. Натиснете бутона PAIR на дистанционното управление на Soundbar, за да влезете в режим
„BT PAIRING“.
(ИЛИ)
2. На вашето устройство изберете „[AV] Samsung Soundbar Q70T“ от списъка, който се появява.
3. Възпроизвеждайте музикални файлове от устройството, свързано през Bluetooth към Soundbar.
a. Натиснете бутона (Източник) на горния панел, след което изберете „BT“.
„BT“ автоматично се променя на „BT PAIRING“ след няколко секунди или се
променя на „BT READY“, ако има запаметена връзка.
b. Когато се изведе „BT READY“, натиснете и задръжте бутона (Източник) на
горния панел Soundbar за повече от 5 секунди, за да изведете „BT PAIRING“.
• Когато Soundbar бъде свързан към мобилното устройство, на предния дисплей се
появява [Име на мобилно устройство] → „BT“.
• След като свържете Soundbar към своето мобилно устройство за първи път, използвайте
режима „BT READY“, за повторно свързване.
Ако устройството не успее да се свърже
• Ако имате съществуващ Soundbar (например „[AV] Samsung Soundbar Q70T“) в списъка с
високоговорители на мобилното устройство, го изтрийте.
• Повторете стъпки 1 и 2.
BUL - 27
Page 70

Каква е разликата между BT READY и BT PAIRING?
• BT READY: В този режим можете да се свържете отново с всеки телевизор Samsung или
мобилно устройство, с който(което) сте установявали връзка преди.
• BT PAIRING: В този режим можете да свържете ново устройство към Soundbar. (Натиснете
бутона PAIR на дистанционното управление на Soundbar или натиснете и задръжте
бутона
е в режим „BT“.)
(Източник)
в горната част на Soundbar за повече от 5 секунди, докато Soundbar
Бележки относно свързване през Bluetooth
• Разположете ново устройство в диаметър от 1 m, за да установите връзка през Bluetooth.
• Ако ви бъде поискан ПИН код при свързване с Bluetooth устройство, въведете <0000>.
• Soundbar автоматично се изключва след 18 минути в състояние на готовност.
• Soundbar може да не извършва правилно търсене на Bluetooth или свързване при следните
обстоятелства:
– Ако около Soundbar има силно електрическо поле.
– Ако няколко Bluetooth устройства едновременно са сдвоени със Soundbar.
– Ако Bluetooth устройството е изключено, не е на мястото си или е в неизправност.
• Електронните устройства може да предизвикат радиосмущения. Устройствата, които
създават електромагнитни вълни, например микровълнови фурни, безжични LAN
устройства и др., трябва да бъдат държани далеч от основното устройство на Soundbar.
• Soundbar поддържа SBC данни (44,1kHz, 48kHz).
• вържете само към Bluetooth устройство, което поддържа функцията A2DP (AV).
• Не можете да свързвате Soundbar към Bluetooth устройство, което поддържа само функцията
HF (хендсфри).
• Когато свързвате Soundbar към Bluetooth устройство, разположете устройствата възможно
най-близо едно до друго.
• Колкото по-далеч се намира Soundbar от Bluetooth устройството, толкова по-лошо ще е
качеството на звука. Bluetooth връзката може да бъде прекъсната, когато устройствата са
извън ефективния обхват.
• Bluetooth връзката може и да не функционира според предназначението в зони със слаб
сигнал.
• Bluetooth устройство може да излъчи шум или да не функционира правилно в следните
условия:
– Когато корпусът е в контакт с приемника на сигнала на Bluetooth устройството или
Soundbar.
– По ъгли или в близост до препятствие, като например стена или преграда, при което
може да настъпят промени в електрическия сигнал.
– Когато е изложено на радиосмущения поради факта, че в същите честотни диапазони
работят и други продукти, като медицинско оборудване, микровълнови печки и
безжични LAN устройства.
– Препятствия, като например врати и стени, може да повлияят на качеството на звука,
дори когато устройствата се намират в пределите на ефективния обхват.
BUL - 28
Page 71

• Имайте предвид, че вашият Soundbar няма да може да бъде сдвоен с други Bluetooth
устройства, докато се използва опцията Bluetooth.
• Това безжично устройство може да предизвика електрически смущения по време на
работата си.
Разкачете Bluetooth устройството от Soundbar
Можете да прекъснете връзката на Bluetooth устройството с Soundbar. За инструкции, проверете
ръководството за потребителя на Bluetooth устройството.
• Връзката с Soundbar ще бъде прекъсната.
• Когато Soundbar се разкачи от Bluetooth устройството, Soundbar ще изведе „BT DISCONNECTED“
на предния дисплей.
Прекъсване на връзката на Soundbar към Bluetooth устройството
Натиснете бутона (Източник) на горния панел или на дистанционното управление, след
което превключете на режим, различен от “BT”.
• Разкачването отнема време, защото Bluetooth устройството трябва да получи отговор от
Soundbar. (Времето за разкачване може да е различно в зависимост от Bluetooth
устройството)
• Когато Soundbar се разкачи от Bluetooth устройството, Soundbar ще изведе „BT DISCONNECTED“
на предния дисплей.
BUL - 29
Page 72

Метод 2. Свързване през Wi-Fi (безжична мрежа)
За да свържете Soundbar към мобилно устройство през безжична мрежа (Wi-Fi), се изисква
приложение SmartThings.
Първоначално свързване
1. Инсталирайте и пуснете приложението SmartThings през вашето мобилно устройство
(смартфон или таблет).
2. Следвайте инструкциите на екрана на приложението, за да добавите Soundbar.
• Възможно е на някои устройства да не се появи автоматичният изскачащ прозорец
(втората екранна снимка по-долу).
Ако изскачащият прозорец не се появи, натиснете „ “ на екран Home. Soundbar е
добавен към приложението.
Приложение
SmartThings
Стартиране на
приложението
Автоматичен
изскачащ
прозорец
BUL - 30
Добавяне на
устройство
Page 73

09 СВЪРЗВАНЕ НА ПРОДУКТ НА AMAZON
• Тази функция може да не е достъпна в някои държави.
• Тази услуга се предоставя от Amazon и може да бъде прекратена по всяко време, Samsung не
носи отговорност за наличността на услугата.
• Екранът на приложението Amazon Alexa може да бъде променян без предварително известие.
Свързване и работа с продукт на Amazon (Amazon Echo)
Използвайте Amazon Echo за управление на Soundbar и се наслаждавайте на музикалните услуги
от Amazon Echo.
ЗАБЕЛЕЖКА
• Проверете дали Soundbar е свързан към безжичната мрежа. (направете справка в „Метод 2.
Свързване през Wi-Fi (безжична мрежа)“)
Използване на гласови команди за управление на високоговорители
• Услугата Amazon Echo, която можете да използвате с Soundbar, е ограничена само до
слушане на музика. Други услуги, предоставяни от Amazon Echo, например новини и
времето, могат да бъдат достъпни през вашия продукт с Amazon Echo.
Име на приложението + Команда + Име на високоговорителя
* За да използвате гласови команди за Soundbar, наречен „Хол“
Действие Гласова команда
За задаване на ниво 5 за силата на звука „Alexa, задай сила на звука 5 в хола“
За увеличаване на силата на звука „Alexa, увеличи силата на звука в хола“
За изключване на звука „Alexa, изключи звука в хола“
За слушане на радиостанция KISS FM „Alexa, пусни радио Kiss FM в хола“
За пускане на следващата песен „Alexa, пусни следващата песен в хола“
За спиране на музиката „Alexa, спри музиката в хола“
За изключване на аудио системата „Alexa, изключи аудио устройството в хола“
BUL - 31
Page 74

Използване на Tap Sound
Докоснете Soundbar с мобилното си устройство, за да се възпроизведе звукът на съдържанието
на мобилното устройство през Soundbar.
• В зависимост от мобилното устройство тази функция може да не се поддържа.
• Тази функция е съвместима само с мобилни устройства Samsung с Android 8.1 или по-нова версия.
Приложение
SmartThings
Мобилно устройство
1. Включете функцията Tap Sound на мобилното устройство.
• За подробности относно включването на функцията вижте „Настройка на функцията Tap
Sound“ по-долу.
2. Докоснете Soundbar с мобилното устройство. Изберете „Започни сега“ в изведения
прозорец със съобщение.
Чрез Bluetooth се установява връзка между мобилното устройство и Soundbar.
3. Възпроизвеждайте звука на съдържанието на мобилното устройство през Soundbar.
• Тази функция свързва чрез Bluetooth мобилно устройство към Soundbar чрез
разпознаване на вибрацията, която възниква при контакт на устройството със Soundbar.
• Уверете се, че мобилното устройство не докосва остър ъгъл на Soundbar. Soundbar или
мобилното устройство може да се надраскат или повредят.
• Препоръчва се мобилното устройство да бъде покрито с калъф. Леко натиснете широката
площ в горната част на Soundbar, без да прилагате прекомерна сила.
• За да използвате тази функция, актуализирайте приложението SmartThings до най-новата
версия. В зависимост от версията на приложението функцията може да не се поддържа.
Настройка на функцията Tap Sound
Използвайте приложението SmartThings, за да включите функцията Tap View, Tap Sound.
1. On the mobile device, run the SmartThings app.
2. Изберете ( → ) от екрана на приложението SmartThings, отворен на мобилното устройство.
3. За „Tap View, Tap Sound“ задайте Вкл., за да работи функцията, когато до Soundbar се
приближи мобилно устройство. Функцията е включена.
БЕЛЕЖКИ
• Когато мобилното устройство е в енергоспестяващ режим, функцията Tap Sound не работи.
• Функцията Tap Sound може да не работи, ако в близост до Soundbar има устройства, които
причиняват радиосмущения, например електрически устройства. Устройствата, които причиняват
радиосмущения, трябва да бъдат поставяни на достатъчно разстояние от Soundbar.
Горна страна на Soundbar
BUL - 32
Page 75

10 МОНТИРАНЕ НА
СТЕННАТА
Компоненти за стенен монтаж
СТОЙКА
Предупреждения във връзка с монтажа
• Монтирайте само на вертикална стена.
• Не монтирайте на място с висока
температура или влажност.
• Проверете дали стената е достатъчно
здрава, за да издържи теглото на продукта.
Ако не е, подсилете я или изберете друго
място за монтаж.
• Купете и използвайте закрепващи винтове
или дюбели, подходящи за вашия тип
стена (мазилка, метал, дърво и т.н.). Ако е
възможно, закрепете опорните винтове
към греди в стената.
• Закупете винтове за стенен монтаж в
съответствие с типа и дебелината на
стената, на която желаете да монтирате
Soundbar.
– Диаметър: M5
– Дължина: препоръчва се дължина от
35 mm или по-голяма.
• Свържете кабелите от устройството към
външни устройства, преди да монтирате
Soundbar на стената.
• Преди да монтирате устройството, уверете
се, че то е изключено и щепселът му е
изваден от контакта. В противен случай
може да се получи електрически удар.
Водач за стенна стойка
x 2
Държач-винт Винт
x 2
Скоба за стенна стойка
1. Поставете Водач за стенна стойка върху
повърхността на стената.
• Водач за стенна стойка трябва да е
равен.
• Ако телевизорът ви е монтиран към
стената, монтирайте Soundbar наймалко на 5 см под телевизора.
5 см или повече
x 2
(M4 x L10)
BUL - 33
Page 76

2. Подравнете Централната линия на Водач
за стенна стойка с центъра на Вашия
телевизор (ако монтирате Soundbar под
телевизора) и след това фиксирайте
Водач за стенна стойка на стената с
помощта на тиксо.
• Ако не монтирате под телевизор,
поставете Централна линия в центъра
на зоната за монтиране.
Централна линия
3. Пъхнете върха на химикал или подострен
молив през центъра на изображенията
A-TYPE във всеки край на водача, за да
маркирате отворите за поддържащите
винтове, след това махнете Водач за
стенна стойка.
5. Вкарайте винт (не е доставен) през всеки
Държач-винт и след това завинтете всеки
винт здраво в отвора за опорен винт.
6. Монтирайте 2 Скоба за стенна стойка в
правилната ориентация от долната страна
на Soundbar, като използвате 2 Винта.
4. размер, пробийте отвор в стената върху
всяка маркировка.
• Ако маркировките не съвпадат на
позициите на гредите, поставете
подходящи анкери или дюбели в
отворите, преди да поставите опорните
винтове. Ако използвате анкери или
дюбели, уверете се, че отворите, които
пробивате, са достатъчно големи за
анкерите или дюбелите, които
ползвате.
• При сглобяването се уверете, че
закачалката на Скоби за стенна стойка
е разположена зад задната част на
Soundbar.
Задна страна на
Soundbar
Десен край на Soundbar
BUL - 34
Page 77

Монтирайте Soundbar с прикрепените
Скоби за стенна стойка, като закачите
Скоби за стенна стойка на Държачвинтовете на стената.
11 МОНТИРАНЕ НА
SOUNDBAR НАД
СТОЙКА ЗА
ТЕЛЕВИЗОР
Компонент
7. Плъзнете Soundbar надолу, както е
показано по-долу, така че Скоби за стенна
стойка да застанат стабилно във Държачвинтовете.
• Поставете Държач-винтовете в
широката (долна) част на Скоби за
стенна стойка и след това
приплъзнете надолу Скоби за стенна
стойка, за да могат Скоби за стенна
стойка стабилно да легнат на Държачвинтовете.
x 4
Гумен крак
За монтажа прикрепете Гумени крака към
долната страна на Soundbar, преди да го
поставите на позиция над стойката за телевизор.
Уверете се, че прикрепяте Гумени крака така, че
да бъдат извън външните ръбове на стойката за
телевизор. Вижте фигурата по-долу.
Гумен крак
BUL - 35
Page 78

Поставете Soundbar на стойка за телевизор.
HDMI IN
DIGITAL AUDIO IN
(OPTICAL)
Както е показано на фигурата, подравнете
центъра на Soundbar спрямо центъра на
телевизора и внимателно поставете Soundbar
на стойката за телевизора.
12 АКТУАЛИЗАЦИЯ
НА СОФТУЕР
Автоматична актуализация
Когато през Soundbar се установи връзка с
интернет, софтуерните актуализации се
извършват автоматично, дори когато Soundbar
е изключен.
• За да се използва функцията Автоматична
актуализация, Soundbar трябва да е с
установена връзка с интернет.
Wi-Fi връзката със Soundbar ще бъде
прекъсната при изключване на захранващия
кабел на Soundbar или при прекъсване на
захранването. Ако захранването бъде
прекъснато, когато се възстанови или когато
включите отново захранващия кабел,
включете Soundbar и след това установете
отново връзка с интернет.
БЕЛЕЖКИ
• Уверете се, че Soundbar е поставен върху
хоризонтална и стабилна повърхност.
• Недостатъчното отстояние от телевизора
може да причини проблеми от акустичен
характер.
Актуализация чрез USB
Долна страна на Soundbar
NETWORKID SET
DIGITAL AUDIO IN
(OPTICAL)
SERVICE
DC 19V
SERVICE
Micro USB към
кабел на USB адаптер
(не е доставен)
Възможно е в бъдеще Samsung да предлага
актуализации за фърмуера на системата
Soundbar.
Когато има налична актуализация, можете да
актуализирате Soundbar чрез свързване на
USB флаш паметта, съдържаща
актуализирания фърмуер, към порта SERVICE
на Soundbar.
BUL - 36
HDMI
HDMI TO TV
(eARC/ARC)
Page 79

1. Отидете на уебсайта на Samsung
(www.samsung.com) → потърсете името на
модела от опцията на менюто за
поддръжка на клиенти.
• За повече информация относно
актуализациите вижте Ръководството
за надграждане.
2. Изтеглете файла за надграждане (USB тип).
3. Разархивирайте файла, за да създадете
папка с името на файла.
4. Запазете създадената папка на USB
носител и след това го свържете към
Soundbar.
5. Включете Soundbar. След това продуктът
се актуализира в продължение на
максимум 3 минути, като се извежда
съобщението „UPDATE“.
• По време на актуализацията не го
изключвайте и не вадете USB
носителя.
• Ако на прозореца на дисплея не се
появи „UPDATE“, извадете
захранващия кабел от Soundbar и след
това го включете отново.
• Когато е била инсталирана най-новата
версия, не се извършва никаква
актуализация.
• В зависимост от типа USB има вероятност
да не се поддържат актуализации.
Инициализация
Горна страна на Soundbar
INIT
При включен Soundbar натиснете
едновременно бутоните (Сила на звука)
на устройството за поне 5 секунди. На дисплея
се извежда „INIT“ и Soundbar се инициализира.
ВНИМАНИЕ
• Всички настройки на Soundbar са
инициализирани. Уверете се, че сте
извършили това само ако се налага
инициализация.
BUL - 37
Page 80

13 ОТСТРАНЯВАНЕ НА НЕИЗПРАВНОСТИ
Преди да потърсите помощ, проверете следното.
В случай че не се включва
; Проверете дали захранващият кабел на
Soundbar е поставен правилно в
контакта.
Ако функциите не работят правилно
; Извадете захранващия кабел и го
поставете отново.
; Извадете захранващия кабел от
външното устройство и опитайте отново.
; Ако няма сигнал, Soundbar автоматично
се изключва след определен период от
време. Включете го от бутона за
включване/изключване. (Вижте
страница 9.)
В случай че дистанционното управление
не работи
; Опитайте да използвате дистанционното
управление, като обърнете внимание, че
Soundbar трябва да е наблизо.
; Подменете батериите с нови.
В случай че Soundbar не възпроизвежда
звука
; Звукът от Soundbar е прекалено слаб или
заглушен. Регулирайте силата на звука.
; Когато е свързано външно устройство
(декодер за телевизия, Bluetooth
устройство, мобилно устройство и т.н.),
регулирайте силата на звука на
външното устройство.
; За изходящ звук от телевизора изберете
Soundbar. (Телевизор Samsung:
Начало ( ) → Настройки ( ) → Звук →
Звуков изход → Изберете Soundbar)
; Свързването на кабела към Soundbar не
бива да е хлабаво. Извадете кабела и го
свържете отново.
; Извадете захранващия кабел изцяло,
свържете отново и включете
захранването.
; Стартирайте продукта и опитайте
отново. (Вижте страница 37.)
В случай че не се възпроизвежда звук през
високоговорителя на субуфера
; Проверете дали светодиодният
индикатор на гърба на субуфера свети в
синьо. Свържете Soundbar и субуфера,
ако индикаторът мига в синьо или е
светнал в червено. (Вижте страница
15.)
; Може да възникне проблем, ако между
Soundbar и субуфера има препятствие.
Преместете устройствата на място,
далеч от препятствия.
; Други разположени наблизо устройства,
които изпращат радиочестотни сигнали,
могат да прекъснат връзката. Дръжте
високоговорителя далеч от такива
устройства.
; Извадете щепсела и го поставете отново.
Силата на звука на високоговорителя на
субуфера е прекалено ниска
; Първоначалната сила на звука на
съдържанието, което възпроизвеждате,
може да е ниска. Опитайте да
регулирате нивото на субуфера. (Вижте
страница 11.)
; Поставете високоговорителя на
субуфера по-близо до вас.
BUL - 38
Page 81

В случай че телевизорът не е свързан през
HDMI TO TV (eARC/ARC)
; Проверете дали HDMI кабелът е
правилно свързан с ARC клемата.
(Вижте страница20.)
; Възможно е да не може да бъде
установена връзка заради свързаното
външно устройство (декодер за
телевизия, телевизионна игрова конзола
и т.н.). Свържете директно към Soundbar.
; HDMI-CEC може и да не се активира на
телевизора. Включете CEC от менюто на
телевизора. (Телевизор Samsung:
Начало ( ) → Настройки ( ) → Общи
→ Диспечер на външни устройства →
Anynet+ (HDMI-CEC) ВКЛ.)
Няма звук при включване на телевизора в
режим HDMI TO TV (eARC/ARC)
; Вашето устройство не може да
възпроизведе входния сигнал.
Променете аудио изхода на телевизора
на PCM или Dolby Digital. (За телевизор
Samsung: Начало ( ) → Настройки
( ) → Звук → Експертни настройки →
Формат за цифров аудио изход)
В случай че не е възможно да се установи
връзка през Bluetooth
; Когато се свързва ново устройство, за
установяване на връзка включете „BT
PAIRING“. (Натиснете бутона PAIR на
дистанционното управление или
натиснете бутона (Източник) на
устройството поне за 5 секунди.)
; Ако Soundbar е свързан към друго
устройство, първо прекъснете връзката на
това устройство, за да смените устройството.
; Свържете го отново, като за да
установите връзка трябва да премахнете
списъка с високоговорители, свързани
през Bluetooth. (Телевизор Samsung:
Начало ( ) → Настройки ( ) → Звук →
Звуков изход → Списък на Bluetooth
високоговорители)
; Автоматичното свързване на телевизор
може да е деактивирано. Докато Soundbar е
в режим „BT READY“, натиснете и задръжте
бутона p на дистанционното управление
на Soundbar за 5 секунди, за да изберете
ON-TV CONNECT. Ако видите OFF-TV
CONNECT, натиснете и задръжте бутона p
за 5 секунди, за да промените избора.
; Извадете щепсела и го поставете отново,
след това опитайте пак.
; Стартирайте продукта и опитайте
отново. (Вижте страница 37.)
В случай на накъсване на звука, предаван
през Bluetooth
; Звукът може да се накъсва поради
смущения, предизвикани от радио
честоти или електронни устройства,
намиращи се наблизо. Такива
устройства трябва да се намират далеч
от Soundbar, за да се избегнат
радиосмущения. Пример: микровълнови
печки.
; Тъй като устройството, което е свързано, се
намира далеч от Soundbar, звукът може да
се накъса. Преместете устройството близо
до Soundbar.
; Ако част от вашето тяло е в контакт с
Bluetooth предавател или продуктът е
монтиран на метална повърхност,
възможно е звукът да се накъса. Проверете
монтажната среда и условията за употреба.
В случай че не е възможно да се установи
Wi-Fi връзка
; Проверете дали безжичният рутер е
включен.
; Изключете рутера, включете го и след
това опитайте отново.
; When the signal of the wireless router is
too weak, connection may not be possible.
Move the router near the Soundbar or
adjust the installed position with no
obstacles.
; Ако безжичният рутер е нов, ще трябва
да преконфигурирате мрежовите
настройки на високоговорителя.
В случай че Soundbar не се включи веднага
след включването на телевизора
; Когато изключите Soundbar, докато
гледате телевизия, се деактивира
синхронизирането на захранването с
телевизора. Първо изключете телевизора.
BUL - 39
Page 82

14 ЛИЦЕНЗ
15 БЕЛЕЖКА ЗА
ЛИЦЕНЗА ЗА
ОТВОРЕН КОД
Manufactured under license from Dolby
Laboratories. Dolby, Dolby Atmos, Dolby Audio,
Dolby Digital Plus, Pro Logic, and the double-D
symbol are trademarks of Dolby Laboratories.
For DTS patents, see http://patents.dts.com.
Manufactured under license from DTS
Licensing Limited. DTS, the Symbol, & DTS and
the Symbol together, DTS:X, and the DTS:X logo
are registered trademarks and/or trademarks
of DTS, Inc. in the United States and/or other
countries. © DTS, Inc. All Rights Reserved.
The terms HDMI and HDMI High-Denition
Multimedia Interface, and the HDMI Logo are
trademarks or registered trademarks of HDMI
Licensing LLC in the United States and other
countries.
• Софтуерът Spotify е предмет на лицензи
от трети страни, които се намират тук:
Лицензи за www.spotify.com/connect/
third-party-licenses.
• За повече информация за Spotify
Connect посетете www.spotify.com/
connect
За да изпратите запитвания и заявки по
въпроси, свързани с отворените кодове,
свържете се със Samsung Open Source
(http://opensource.samsung.com)
16 ВАЖНИ
БЕЛЕЖКИ ЗА
ОБСЛУЖВАНЕТО
• Цифрите и илюстрациите в това
ръководство за потребителя са
предоставени само за справка и могат да
се различават от действителния изглед на
изделието.
• Же да се начисли такса за
администриране, ако:
(a) е извикан техник по ваше настояване и
няма дефект в продукта (т.е. не сте
прочели ръководството за потребителя)
(b) занесете уреда в сервизен център и
няма дефект в продукта (т.е. не сте
прочели ръководството за
потребителя).
• Сумата за тази такса за администриране
ще ви бъде съобщена, преди да се
извърши каквато и да е било работа или
посещение вкъщи.
BUL - 40
Page 83

17 СПЕЦИФИКАЦИИ И РЪКОВОДСТВО
Спецификация
Наименование на модела HW-Q70T
Тегло 3,6 кг
Размери (Ш x В x Д) 980,0 x 60,0 x 115,0 мм
Диапазон на работна температура +5 °C до +35 °C
Диапазон на работна влажност 10 % до 75 %
УСИЛВАТЕ Л
Изходяща мощност
(30W x 4) + (20W x 2) + 10W + 160W
Поддържани формати за възпроизвеждане
ИЗХОДНА МОЩНОСТ НА БЕЗЖИЧНОТО УСТРОЙСТВО
Макс. мощност на предавателя при Wi-Fi връзка
ИЗХОДНА МОЩНОСТ НА БЕЗЖИЧНОТО УСТРОЙСТВО
Макс. мощност на предавателя при BT връзка
ИЗХОДНА МОЩНОСТ НА БЕЗЖИЧНОТО УСТРОЙСТВО
Макс. мощност на предавателя при SRD връзка
Наименование на субуфера PS-WR65BC
Тегло 6,2 кг
Размери (Ш x В x Д) 205,0 x 353,0 x 303,0 мм
УСИЛВАТЕ Л
Изходяща мощност
ИЗХОДНА МОЩНОСТ НА БЕЗЖИЧНОТО УСТРОЙСТВО
Макс. мощност на предавателя при SRD връзка
Dolby Atmos (True HD / Digital Plus), Dolby
Digital, DTS Master Audio, DTS:X, DTS
100 mW при 2,4 GHz – 2,4835 GHz, 200mW
при 5,15 GHz – 5,25 GHz, 100 mW при
5,25GHz – 5,35 GHz и 5,47 GHz – 5,725GHz
100 mW при 2,4 GHz – 2,4835 GHz
25 mW при 5,725 GHz – 5,825 GHz
160W
25 mW при 5,725 GHz – 5,825 GHz
BUL - 41
Page 84

БЕЛЕЖКИ
• Samsung Electronics Co., Ltd си запазва правото да променя спецификацията без
предизвестие.
• Теглото и размерите са приблизителни.
Предпазни мерки: Ако включите/изключите Wi-Fi, Soundbar ще се рестартира
автоматично.
Обща консумация на енергия в
режим на готовност (W)
Wi-Fi
Метод за деактивиране на порт
Bluetooth
Метод за деактивиране на порт
• С настоящото Samsung декларира, че това оборудване съответства на
Директива 2014/53/EС.
Пълният текст на ЕС декларацията за съответствие можете да намерите на
следния интернет адрес: http://www.samsung.com – отворете Поддръжка>
Търсене в „Поддръжка на продуктите“ и въведете името на модела. С това
оборудване може да се работи във всички държави от ЕС.
WLAN (Wi-Fi или SRD) функцията при 5 GHz на това оборудване може да се
използва само на закрито.
Натиснете бутона ID SET на долния панел на Soundbar за
30 секунди, за да включите или изключите Wi-Fi.
Натиснете бутона NETWORK на долния панел на Soundbar
за 30 секунди, за да включите или изключите Bluetooth.
5,2W
BUL - 42
Page 85

[Правилно изхвърляне на батериите в този продукт]
(Налично в страни със системи за разделно сметосъбиране)
Това обозначение върху батерията, ръководството или опаковката, показва, че батериите в този
продукт не бива да се изхвърлят с другите битови отпадъци в края на техния полезен живот. Където
са маркирани, химическите символи Hg, Cd или Pb показват, че батерията съдържа живак, кадмий
или олово над контролните нива в Директива 2006/66 на ЕО.
Ако батериите не се изхвърлят правилно, тези вещества могат да предизвикат увреждане на
човешкото здраве или на околната среда.
За да предпазите природните ресурси и за да съдействате за многократната употреба на
материалните ресурси, моля отделяйте батериите от другите видове отпадъчни продукти и ги
рециклирайте посредством Вашата локална система за безплатно връщане на батерии.
Правилно третиране на изделието след края на експлоатационния му живот
(Отпадъци, представляващи електрическо и електронно оборудване)
(Налично в страни със системи за разделно сметосъбиране)
Tози знак, поставен върху изделието, негови принадлежности или печатни материали, означава, че
продуктът и принадлежностите (например зарядно устройство, слушалки, USB кабел) не бива да се
изхвърлят заедно с другите битови отпадъци, когато изтече експлоатационният му живот. Отделяйте
тези устройства от другите видови отпадъци и ги предавайте за рециклиране. Спазвайки това
правило не излагате на опасност здравето на други хора и предпазвате околната среда от
замърсяване, предизвикано от безконтролно изхвърляне на отпадъци. Освен това, подобно
отговорно поведение създава възможност за повторно (екологично съобразно) използване на
материалните ресурси.
Домашните потребители трябва да се свържат с търговеца на дребно, от когото са закупили
изделието, или със съответната местна държавна агенция, за да получат подробни инструкции къде
и кога могат да занесат тези устройства за рециклиране, безопасно за околната среда.
Корпоративните потребители следва да се свържат с доставчика си и да проверят условията на
договора за покупка. Това изделие и неговите електронни принадлежности не бива да се сместват с
другите отпадъци на търговското предприятие.
За информация относно ангажиментите на Samsung по отношение на околната среда и
специфичните за продукта регулаторни задължения, например REACH, WEEE, батерии, посетете:
http://www.samsung.com/uk/aboutsamsung/samsungelectronics/corporatecitizenship/data_corner.html
РЕГЛАМЕНТ (ЕС) 2019/1782 НА КОМИСИЯТА
Изисквания за екопроектиране за външни електрозахранващи устройства :
www.samsung.com/global/ecodesign_component
BUL - 43
Page 86

SIGURNOSNE INFORMACIJE
SIGURNOSNA UPOZORENJA
DA BISTE SMANJILI OPASNOST OD ELEKTRIČNOG
UDARA, NE ODSTRANJUJTE POKLOPAC (ILI
POLEĐINU).
U UNUTRAŠNJOSTI NEMA DIJELOVA KOJE MOŽE
SERVISIRATI KORISNIK. PREPUSTITE
SERVISIRANJE KVALIFICIRANOM SERVISNOM
OSOBLJU.
Objašnjenje simbola koji se mogu nalaziti na vašem
proizvodu Samsung potražite u donjoj tablici.
OPREZ
OPASNOST OD
ELEK TRIČNOG UDAR A NE
OTVARAJTE
Ovaj simbol znači da je struja u
unutrašnjosti visokog napona. Opasno je
dolaziti u bilo kakav doticaj s unutarnjim
sklopovima proizvoda.
Ovaj simbol naznačuje da je uz uređaj
priložena važna dokumentacija o
njegovom radu i održavanju.
Proizvod II. razreda: Ovaj simbol
označava da nije potrebna sigurnosna
veza s uzemljenjem. Ako se taj simbol ne
nalazi na proizvodu s kabelom za
napajanje, proizvod MORA imati
pouzdan spoj na zaštitno uzemljenje.
UPOZORENJE
• Da biste smanjili opasnost od požara ili
električnog udara, ne izlažite uređaj kiši ili
vlazi.
OPREZ
• DA BISTE SPRIJEČILI ELEKTRIČNI UDAR,
NAMJESTITE ŠIROKE KONTAKTE UTIKAČA U
ŠIROK UTOR, UMETNUT DO KRAJA.
• Ovaj uređaj treba uvijek biti spojen na utičnicu
izmjenične struje sa zaštitnim uzemljenjem.
• Da biste isključili uređaj iz struje, morate
izvući utikač iz strujne utičnice. Stoga strujni
utikač treba biti spreman za rad.
• Ne izlažite ovaj uređaj kapanju ili prskanju
tekućina. Ne stavljajte predmete pune
tekućine, poput vaza, na uređaj.
• Da biste potpuno isključili ovaj uređaj, morate
izvući utikač za napajanje iz zidne utičnice.
Stoga utikač mora uvijek biti lako dostupan.
AC napon: Ovaj simbol označava da
nazivni napon označen navedenim
simbolom predstavlja AC napon.
DC napon: Ovaj simbol označava da
nazivni napon označen navedenim
simbolom predstavlja DC napon.
Oprez, pogledajte upute za upotrebu:
Ovaj simbol upućuje korisnika da potraži
dodatne informacije u pogledu
sigurnosti u korisničkom priručniku.
CRO - 2
Page 87

MJERE OPREZA
1. Osigurajte da napajanje izmjeničnom strujom
u kući bude kompatibilno sa zahtjevima
napajanja navedenim na identikacijskoj
naljepnici na dnu proizvoda. Proizvod
postavite vodoravno na prikladnu površinu
(namještaj) s dovoljno prostora za ventilaciju
7~10 cm. Pobrinite se da ventilacijski otvori
ne budu prekriveni. Ne postavljajte jedinicu
na pojačala ili drugu opremu koja se grije.
Ova jedinica dizajnirana je za neprekidnu
uporabu. Za potpuno isključivanje jedinice
izvucite strujni utikač iz zidne utičnice. Ako
ne namjeravate upotrebljavati jedinicu dulje
vrijeme, izvucite utikač.
2. Za vrijeme olujnog nevremena izvucite
utikač za napajanje izmjeničnom strujom iz
zidne utičnice. Vršni naponi zbog munja
mogu oštetiti uređaj.
3. Ne izlažite uređaj izravnoj sunčevoj svjetlosti
ili drugim izvorima topline. To može dovesti
do pregrijavanja i kvara uređaja.
4. Zaštitite proizvod od vlage (npr. vaze) i
prekomjerne topline (npr. kamin) ili od
opreme koja stvara jaka magnetska ili
električna polja. Isključite kabel za napajanje
iz izvora napajanja izmjeničnom strujom ako
jedinica neispravno radi. Proizvod nije
namijenjen za industrijsku uporabu. On je
namijenjen samo za osobnu uporabu. Ako su
proizvod ili disk pohranjeni na niskim
temperaturama, može doći do kondenzacije.
Ako tijekom zime prenosite jedinicu,
pričekajte oko 2 sata kako bi jedinica prije
uporabe dosegnula sobnu temperaturu.
5. Baterije korištene s ovim proizvodom
sadržavaju kemikalije koje su štetne za
okoliš. Ne odlažite baterije s otpadom
kućanstva. Baterije nemojte bacati u vatru.
Nemojte kratko spajati, rastavljati, ili
pregrijavati baterije. U slučaju zamjene
neodgovarajućim baterijama postoji
opasnost od eksplozije. Baterije mijenjajte
samo baterijama iste ili ekvivalentne vrste.
CRO - 3
Page 88

SADRŽAJ
01 Provjeravanje sastavnih dijelova 6
02 Prikaz proizvoda 7
Prednja ploča / gornja ploča sustava Soundbar ------------------------- 7
Donja ploča sustava Soundbar ------------------------- 8
03 Upotreba daljinskog upravljača za Soundbar 9
Umetanje baterija prije upotrebe daljinskog upravljača
(AA baterije X 2) ------------------------- 9
Način upotrebe daljinskog upravljača
Uporaba skrivenih gumba (gumba s više funkcija)
Izlazne specikacije za različite načine rada sa zvučnim efektima
Podešavanje glasnoće sustava Soundbar s pomoću daljinskog
upravljača televizora ------------------------- 13
04 Povezivanje sustava Soundbar 14
-------------------------
-------------------------
-------------------------
9
12
12
Povezivanje napajanja i uređaja
– Ručno povezivanje subwoofera
– LED indikator svijetli straga na subwooferu
Povezivanje kompleta SWA-9000S (prodaje se zasebno) sa sustavom
Soundbar
-------------------------
-------------------------
-------------------------
-------------------------
14
18
05 Žično povezivanje s televizorom 20
Metoda 1 Povezivanje s pomoću HDMI kabela
– Povezivanje televizora koji podržava HDMI ARC (Kanal za povrat zvuka)
Metoda 2 Povezivanje s pomoću optičkog kabela
-------------------------
-------------------------
-------------------------
20
20
21
06 Bežično povezivanje s televizorom 23
Povezivanje putem Bluetooth veze
-------------------------
23
07 Povezivanje vanjskog uređaja 25
Metoda 1 Povezivanje s pomoću HDMI kabela (koji omogućuje
dekodiranje i reprodukciju Dolby Atmos)
Metoda 2 Povezivanje s pomoću optičkog kabela
-------------------------
CRO - 4
-------------------------
25
26
15
17
Page 89

08 Povezivanje s mobilnim uređajem 27
Metoda 1 Povezivanje putem Bluetooth veze
Metoda 2 Povezivanje putem Wi-Fi veze (bežične mreže)
-------------------------
-------------------------
27
30
09 Povezivanje s proizvodom Amazon 31
Povezivanje i uporaba s proizvodom Amazon (Amazon Echo) ------------------------- 31
Uporaba glasovnih naredbi za upravljanje zvučnicima
Upotreba funkcije Tap Sound
-------------------------
-------------------------
31
32
10 Postavljanje zidnog nosača 33
Mjere opreza prilikom postavljanja
Sastavni dijelovi zidnog nosača
-------------------------
-------------------------
33
33
11 Postavljanje sustava Soundbar iznad postolja
televizora 35
Sastavni dio
-------------------------
35
12 Ažuriranje softvera 36
Automatsko ažuriranje
USB ažuriranje
Inicijalizacija
-------------------------
-------------------------
-------------------------
36
36
37
13 Rješavanje problema 38
14 Licenca 40
15 Obavijest o Licenci za Uporabu Softvera
Otvorenog Koda 40
16 Važna Napomena Vezana uz Servis 40
17 Tehnički Podaci i Vodič 41
Tehnički podaci
-------------------------
CRO - 5
41
Page 90

01 PROVJERAVANJE SASTAVNIH DIJELOVA
PAIR
SOUND
MODE
VOL WOOFER
SOUNDBAR
Glavna jedinica sus tava Soundbar Daljinski upravljač /
Subwoofer
baterije sustava Soundbar
x 2
Kabel napajanja
(Subwoofer, Soundbar)
Prilagodnik AC/DC napajanja
(Soundbar)
x 2
HDMI kabel
x 2
(M4 x L10)
Vodič za zidni nosač Vijak držača Vijak
x 2
x 4
Zidni nosač Gumene nožice
• Trebate li više informacija o napajanju i potrošnji energije, pogledajte naljepnicu na proizvodu.
(Naljepnica: donja strana glavne jedinice sustava Soundbar)
• Kako biste kupili dodatne sastavne dijelove ili opcijske kabele, obratite se Servisnom centru
Samsung ili Korisničkoj podršci Samsung.
• Trebate li više informacija o zidnom nosaču ili gumenim nožicama, pogledajte stranice 33~35.
• Dizajn, specikacije i zaslon aplikacije mogu biti promijenjeni bez prethodne najave.
• Izgled dodataka može se neznatno razlikovati od izgleda na prethodnim ilustracijama.
CRO - 6
Page 91

02 PRIKAZ PROIZVODA
Prednja ploča / gornja ploča sustava Soundbar
Namjestite proizvod tako
da logotip SAMSUNG bude
na vrhu.
Gumb (Napajanje)
Uključuje i isključuje napajanje.
Gumb (Glasnoća)
Podešava glasnoću.
Gumb (Izvor)
Odabire način rada ulaza izvora.
Optički digitalni ulaz D.IN
Unos ARC (HDMI OUT) D.IN TV ARC (Automatska pretvorba)
Način BLUETOOTH BT
Način unosa Zaslon
Unos HDMI HDMI
Način Wi-Fi WIFI
Gornja ploča
Zaslon
Prikazuje status proizvoda i trenutni način rada.
D.IN HDMI Wi-Fi BT
• Kad priključite AC kabel, gumb napajanja počet će raditi za četiri do šest sekundi.
• Kad uključite ovaj uređaj, nastupit će odgoda od četiri do pet sekundi prije nego što se emitira zvuk.
• Ako se zvuk emitira i iz televizora i iz sustava Soundbar, idite na izbornik Postavke za zvuk televizora
i promijenite zvučnik televizora u Vanjski zvučnik.
CRO - 7
Page 92

Donja ploča sustava Soundbar
DIGITAL AUDIO IN
(OPTICAL)
SERVICE
DC 19V
HDMI
NETWORK ID SET
NETWORK ID SET
HDMI TO TV
(eARC/ARC)
HDMI IN
HDMI OUT
(TV-ARC)
HDMI
HDMI TO TV
(eARC/ARC)
HDMI
NETWORK ID SET
HDMI TO TV
(eARC/ARC)
HDMI IN
HDMI OUT
(TV-ARC)
HDMI
HDMI TO TV
(eARC/ARC)
DIGITAL AUDIO IN
DIGITAL AUD IO IN (OPTIC AL)
Povežite sa digitalnim (optičkim) izlazom vanjskog uređaja. (pogledajte stranicu 26)
SERVICE
Povežite s USB uređajem za pohranu kako biste nadogradili softver proizvoda.
DC 19V (ulaz napajanja)
Povežite prilagodnik AC/DC napajanja. (pogledajte stranicu 14)
NETWORK
Pritisnite za povezivanje s bežičnom mrežom (Wi-Fi) putem aplikacije SmartThings.
ID SET
Pritisnite za bežično povezivanja sustava Soundbar sa surround zvučnicima i subwooferom.
(Sustav zvučnika surround prodaje se zasebno.)
(OPTICAL)
SERVICE
DC 19V
NETWORK ID SET
HDMI TO TV
(eARC/ARC)
NETWORK ID SET
DIGITAL AUDIO IN
(OPTICAL)
SERVICE
DC 19V
HDMI
HDMI TO TV
(eARC/ARC)
HDMI
HDMI
Istodobno unosi digitalne videosignale i audiosignale s pomoću HDMI kabela.
Povežite s HDMI izlazom vanjskog uređaja. (pogledajte stranicu 25)
HDMI TO TV (eARC/ARC)
Povežite s HDMI priključkom na televizoru. (pogledajte stranicu 20)
• Prilikom isključivanja kabela za napajanje prilagodnika AC/DC napajanja iz zidne utičnice, povucite
utikač. Ne povlačite kabel.
• Ne spajajte ovaj uređaj ili druge komponente u AC utičnicu dok ne povežete sve komponente.
CRO - 8
Page 93

03 UPOTREBA DALJINSKOG UPRAVLJAČA
PAIR
ZA SOUNDBAR
Umetanje baterija prije upotrebe daljinskog upravljača (AA baterije X 2)
Gurnite stražnji poklopac u smjeru strelice dok se
potpuno ne ukloni. Umetnite 2 AA baterije (1,5 V)
usmjerene tako da im je polaritet ispravan. Vratite
stražnji poklopac natrag na mjesto.
Način upotrebe daljinskog upravljača
PAIR
SOUND
MODE
VOL WOOFER
SOUNDBAR
Napajanje
Izvor
Prigušivanje
Uključuje i isključuje sustav Soundbar.
• Funkcija Auto Power Down
Jedinica se automatski isključuje u
sljedećim situacijama:
– U načinu rada D.IN / HDMI / Wi-Fi / BT
ako nema audiosignala 18 minuta.
Pritisnite za odabir izvora povezanog sa
sustavom Soundbar.
Za isključivanje zvuka pritisnite gumb
(Prigušivanje).
Za uključivanje zvuka pritisnite ga ponovo.
CRO - 9
Page 94

PAIR
SOUND
MODE
SOUND MODE
Željeni način rada zvuka možete odabrati među opcijama STANDARD, SURROUND,
GAME P RO ili ADAPTIVE SOUND.
• STANDARD
Reproducira izvorni zvuk.
• SURROUND SOUND
Pruža šire zvučno polje od standardnog zvuka.
• GAM E PRO
Pruža stereoskopski zvuk kako biste utonuli u akciju dok igrate igrice.
• ADAPTIVE SOUND
Analizira sadržaj u stvarnom vremenu i automatski pruža optimalno zvučno polje na
temelju sadržaja.
PAIR
Bluetooth
PAIR
Reprodukcija/
Pauza
Gore/Dolje/
Lijevo/Desno
Prebacite sustav Soundbar na Bluetooth način rada za uparivanje. Pritisnite gumb i
pričekajte na povezivanje zaslona „BT PAIRING” s novim Bluetooth uređajem.
Pritiskom tog gumba možete reproducirati ili pauzirati glazbu.
Pritisnite označene površine za odabir Gore/Dolje/Lijevo/Desno.
Pritisnite Gore/Dolje/Lijevo/Desno na gumbu kako biste odabrali ili postavili funkcije.
• Preskak anje glazbe
Pritisnite gumb Desno za odabir sljedeće glazbene datoteke. Pritisnite gumb Lijevo za
odabir prethodne glazbene datoteke.
• ID SET
Upotrijebite ovu opciju kad subwoofer ili zvučnici Surround nisu povezani ili im je
potrebno ponovno povezivanje.
Dok je napajanje isključeno, pritisnite i zadržite gumb Gore na pet sekundi kako biste
izvršili radnju ID SET. (pogledajte stranicu 16.)
CRO - 10
Page 95

PAIR
SOUNDBAR
SOUNDBAR
SOUND
MODE
PAIR
SOUND
MODE
VOL
WOOFER
SOUNDBAR
SOUND
MODE
VOL
WOOFER
SOUNDBAR
SOUNDBAR
SOUNDBAR
Upravljanje
zvukom
Kada je pritisnuto, opcije postavki kao što su TREBLE, BASS, SYNC, CENTER LEVEL, FRONT
TOP LEVEL i VIRTUAL ON/OFF prikazuju se jedna za drugom. Željenu opciju možete prilagoditi
s pomoću gumba Gore/Dolje.
– Za upravljanje glasnoćom visokih ili dubokih tonova odaberite TREBLE ili BASS u
opciji Postavke zvuka, a zatim podesite glasnoću između -6~+6 s pomoću gumba
Gore/Dolje
.
– Pritisnite i zadržite gumb (Upravljanje zvukom) oko pet sekundi kako biste
podesili zvuk na svakom frekvencijskom pojasu. Mogu se odabrati 150 Hz, 300 Hz,
600 Hz, 1,2 kHz, 2,5 kHz, 5 kHz i 10 kHz s pomoću gumba Lijevo/Desno i svaka stavka
može se podesiti na postavku između -6 do +6 s pomoću gumba
Gore/Dolje
.
(Vodite računa da je način rada zvuka postavljen na „STANDARD”.)
– Za upravljanje glasnoćom pojedinačnih zvučnika odaberite CENTER LEVEL ili FRONT
TOP LEVEL u opciji Postavke zvuka, a zatim podesite glasnoću između -6~+6 s
pomoću gumba
Gore/Dolje
.
– Ako video na televizoru i audio iz sustava Soundbar nisu sinkronizirani, u opciji
Upravljanje zvukom odaberite SYNC, a zatim namjestite odgodu zvuka između
0~300 milisekundi s pomoću gumba
Gore/Dolje
.
– SYNC je podržano samo na nekim funkcijama.
– Ako su povezani zvučnici Surround, odaberite REAR LEVEL i pritišćite gumbe
Dolje
kako biste prilagodili zvuk u rasponu od -6 do +6.
– Funkcija VIRTUAL zvučnik može se postaviti na ON/OFF s pomoću gumba
Dolje
.
Gore/
Gore/
RAZINA
WOOFER
(BAS)
ZVUČNIKA
GLASNOĆA
SOUND
MODE
WOOFER
VOL
SOUND
MODE
WOOFER
VOL
Pritisnite gumb gore ili dolje za podešavanje razine woofer (bas) zvučnika na -12 ili između
-6 i +6. Za postavljanje razine glasnoće woofer (bas) zvučnika na 0 (zadana vrijednost),
pritisnite gumb.
SOUND
MODE
WOOFER
VOL
SOUND
MODE
WOOFER
VOL
Gurnite gumb prema dolje ili prema gore kako bistre prilagodili glasnoću.
• Prigušivanje
Pritisnite gumb VOL da isključite zvuk. Kako biste uključili zvuk, pritisnite ga ponovno.
CRO - 11
Page 96

Uporaba skrivenih gumba (gumba s više funkcija)
Skriveni gumb
Gumb daljinskog upravljača Funkcija
WOOFER (Gore)
Gore ID SET Stranica 16
(Upravljanje zvukom)
Daljinskom upravljaču televizora
Uključeno/Isključeno (Stanje čekanja)
7 Pojas EQ Stranica 11
Referentna stranica
Stranica 13
Izlazne specikacije za različite načine rada sa zvučnim efektima
Izlaz
Efekt Ulaz
STANDARD
SURROUND
GAME PRO
ADAPTIVE SOUND
Samo sa subwooferom
2.0 kanal 2.1 kanal 2.1 kanal
5.1 kanal 3.1 kanal 5.1 kanal
2.0 kanal 3.1.2 kanal 5.1.2 kanal
5.1 kanal 3.1.2 kanal 5.1.2 kanal
2.0 kanal 3.1.2 kanal 5.1.2 kanal
5.1 kanal 3.1.2 kanal 5.1.2 kanal
2.0 kanal 3.1.2 kanal 5.1.2 kanal
5.1 kanal 3.1.2 kanal 5.1.2 kanal
Sa subwooferom i bežičnim
kompletom sa stražnjim
zvučnikom
• Kod ulaznih izvora Dolby Atmos i DTS:X, načini rada efekta koji se mogu odabrati s pomoću
gumba SOUND MODE neće biti dostupni. (Iznad pogledajte načine rada efekta.)
• Kada je ulazni izvor Dolby Atmos®, postavljanje samo subwoofera pruža zvuk 3.1.2 kanala, dok
podešavanje subwoofera i kompleta bežičnog stražnjeg zvučnika pruža 5.1.2 kanala.
• Samsungov komplet bežičnog stražnjeg zvučnika može se kupiti zasebno. Informacije u vezi s
kupnjom kompleta ili subwoofera možete dobiti od prodavača kod kojeg ste kupili sustav
Soundbar.
• Zvučnici Surround neće emitirati zvuk za dvokanalni izlaz dok se upotrebljava način rada
STANDARD. Kako biste omogućili zvuk za zvučnike Surround, promijenite način rada efekta u
SURROUND.
CRO - 12
Page 97

Podešavanje glasnoće sustava Soundbar s pomoću daljinskog
VOL
WOOFER
WOOFER
VOL
WOOFER
upravljača televizora
Podesite glasnoću sustava Soundbar s pomoću daljinskog upravljača televizora.
• Ova se funkcija može upotrebljavati samo uz IC daljinski upravljač. Daljinski upravljači s
tehnologijom Bluetooth (daljinski upravljači koji zahtijevaju uparivanje) nisu podržani.
• Postavite zvučnik televizora na Vanjski zvučnik kako biste upotrijebili ovu funkciju.
• Proizvođači koji imaju podržanu ovu funkciju:
VIZIO, LG, Sony, Sharp, PHILIPS, PANASONIC, TOSHIBA, Hisense, RCA
1. Isključite sustav Soundbar.
2. Pritisnite i zadržite gumb WOOFER pet sekundi.
Svaki put kad gurnete gumb WOOFER prema gore i zadržite ga pet sekundi, način rada mijenja se
sljedećim redoslijedom: „SAMSUNG-TV REMOTE” (zadani način rada), „OFF-TV REMOTE”, „ALL-T V
REMOTE”.
Gumb daljinskog upravljača Zaslon Status
(Zadani način rada)
SOUND
MODE
5 Sec
SAMSUNG-TV REMOTE
Omogućite IC daljinski upravljač
Samsung TV-a.
SOUND
MODE
SOUND
MODE
5 Sec
VOL
5 Sec
OFF-TV REMOTE
ALL-TV REMOTE
Onemogućite daljinski upravljač
televizora.
Omogućite IC daljinski upravljač treće
strane.
CRO - 13
Page 98

04 POVEZIVANJE SUSTAVA SOUNDBAR
HDMI
HDMI TO TV
(eARC/ARC)
DIGITAL AUDIO IN
(OPTICAL)
SERVICE
DC 19V
HDMI
NETWORK ID SET
NETWORK ID SET
HDMI TO TV
(eARC/ARC)
HDMI IN
HDMI OUT
(TV-ARC)
DIGITAL AUDIO IN
(OPTICAL)
SERVICE
HDMI
HDMI TO TV
(eARC/ARC)
DC 19V
Povezivanje napajanja i uređaja
Upotrijebite komponente napajanja za spajanje subwoofera i sustava Soundbar s električnom utičnicom
sljedećim redoslijedom:
• Trebate li više informacija o potrebnom napajanju i potrošnji električne energije, pogledajte
naljepnicu na proizvodu. (Naljepnica: donja strana glavne jedinice sustava Soundbar)
1. Povežite kabel napajanja i subwoofer.
2. Najprije povežite kabel za napajanje s AC/DC prilagodnikom.
Povežite AC/DC prilagodnik (s kabelom za napajanje) sa Soundbar sustavom.
POWER
Stražnja strana
subwoofera
Kabel napajanja
NETWORK ID SET
DIGITAL AUDIO IN
DC 19V
Kabel napajanja
(OPTICAL)
SERVICE
DC 19V
Podnožje glavne
Prilagodnik AC/DC
jedinice Soundbar
napajanja
3. Povežite napajanje sa sustavom Soundbar i subwooferom. Subwoofer se automatski povezuje kad
se uključi Soundbar.
CRO - 14
Pokazatelj
svijet li u plavoj
boji
Page 99

NAPOMENE
• Prije povezivanja sa sustavom Soundbar, povežite napajanje subwoofera.
Subwoofer će se automatski povezati kad uključite sustav Soundbar.
• Ako isključite i ponovno uključite kabel napajanja kad je proizvod uključen, Soundbar se automatski
uključuje.
• Prilagodnik AC/DC napajanja mora biti vodoravno položen na stol ili pod. Ako prilagodnik AC/DC
napajanja postavite tako da visi s ulazom AC kabela usmjerenim prema gore, voda ili drugi strani
predmeti mogu ući u prilagodnik i uzrokovati kvar.
Ručno povezivanje subwoofera
Prije provođenja postupka ručnog povezivanja u nastavku:
• Provjerite jesu li kabeli napajanja sustava Soundbar i subwoofera pravilno povezani.
• Vodite računa da je sustav Soundbar isključen.
1. Isključite napajanje sustava Soundbar.
2. Pritisnite i držite ID SET straga na subwooferu najmanje pet sekundi.
• Crveni indikator straga na subwooferu isključuje se, a plavi indikator trepće.
5 Sec
Pokazatelj
brzo tr eperi u
plavoj boji
Stražnja strana
subwoofera
Stražnja strana
subwoofera
CRO - 15
Page 100

3. Na daljinskom upravljaču držite pritisnutim gumb Gore pet sekundi.
• Poruka ID SET nakratko se prikazuje na zaslonu uređaja Soundbar, a zatim nestaje.
• Soundbar će se automatski uključiti nakon dovršetka postupka
ID SET
.
PAIR
5 Sec
4. Provjerite svijetli li LINK LED postojano plavo (povezivanje je završeno).
Indikator LINK LED prestat će treptati i počet
će postojano svijetliti plavo nakon
uspostavljanja veze između sustava
Soundbar i bežičnog subwoofera.
Pokazatelj svijetli u
plavoj boji
ID SET
CRO - 16
 Loading...