

Page 1

FULL MANUAL
HW-Q70R
Imagine the possibilities
Thank you fo r purchasing this Samsung product .
To receive more complete service, please register
your product at www.samsung.com/register
Page 2
SAFETY INFORMATION
SAFETY WARNINGS
TO REDUCE THE RISK OF ELECTRIC SHOCK, DO
NOT REMOVE THE COVER (OR BACK).
NO USER-SERVICEABLE PARTS ARE INSIDE.
REFER SERVICING TO QUALIFIED SERVICE
PERSONNEL.
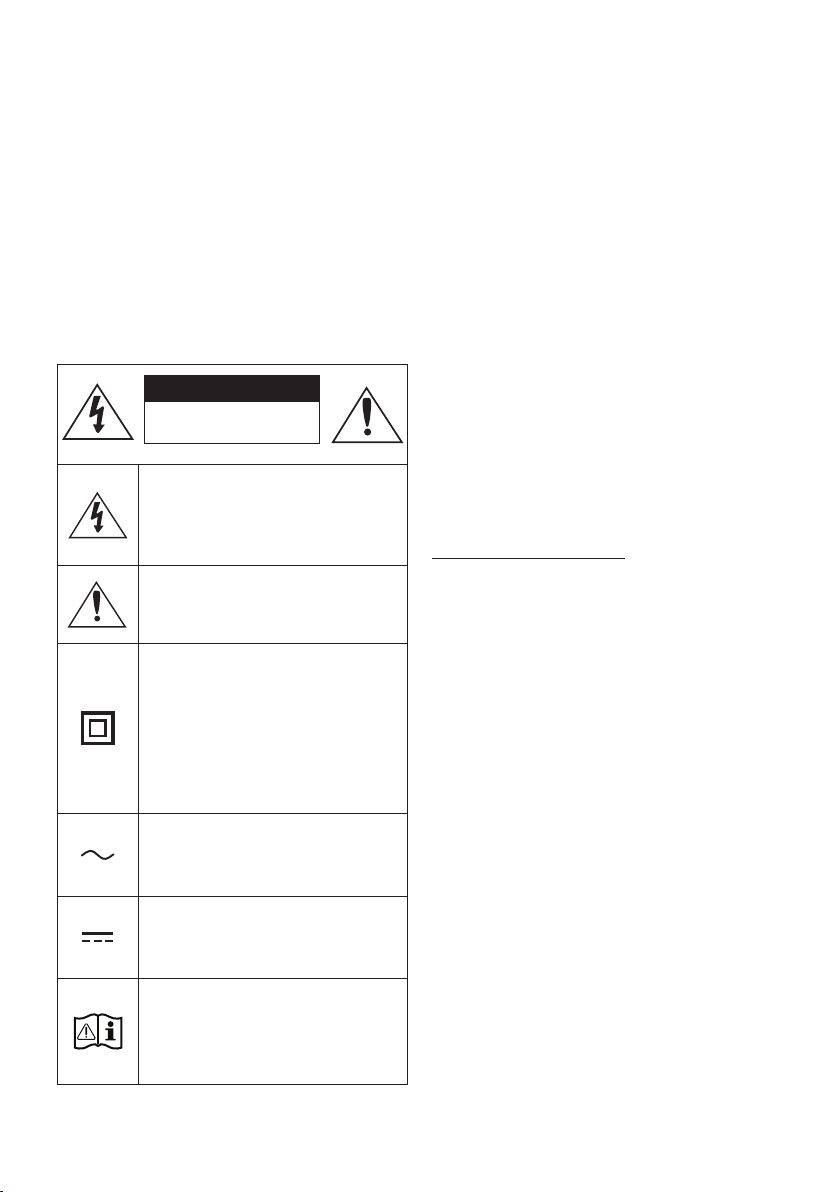
Refer to the table below for an explanation of
symbols which may be on your Samsung product.
CAUTION
RISK OF E LECTRIC S HOCK.
DO NOT OP EN.
This symbol indicates that high voltage
is present inside. It is dangerous to
make any kind of contact with any
internal part of this produc t.
This symbol indicates that this produc t
has included important literature
concerning operation and maintenance.
Class II product : This symbol indicates
that it does not require a safety
connection to electrical ear th (ground).
If this symbol is not present on a
product with a power cord, the product
MUST have a reliable connection to
protective ear th (ground).
AC voltage : This symbol indicates that
the rated voltage marked with the
symbol is AC voltage.
DC voltage : This symbol indicates that
the rated voltage marked with the
symbol is DC voltage.
Caution, Consult instruc tions for use :
This symbol instruct s the user to
consult the user manual for further
safety related information.
WARNING
• To reduce the risk of re or electric shock, do
not expose this appliance to rain or moisture.
• To prevent injury, this apparatus must be
securely attached to the oor/wall in
accordance with the installation instructions.
CAUTION
• Do not expose this apparatus to dripping or
splashing. Do not put objects lled with
liquids, such as vases, on the apparatus.
• To turn this apparatus off completely, you
must pull the power plug out of the wall
socket. Consequently, the power plug must
be easily and readily accessible at all times.
CAUTION (for Canada)
This device contains licence-exempt
transmitter(s)/receiver(s) that comply with
Innovation, Science and Economic Development
Canada’s licence-exempt RSS(s). Operation is
subject to the following two conditions:
(1) This device may not cause interference.
(2) This device must accept any interference,
including interference that may cause undesired
operation of the device.
This device and its antenna(s) must not be colocated or operation in conjunction with any other
antenna or transmitter.
This device may automatically discontinue
transmission if there is no information to
transmit, or an operational failure. Note that this
is not intended to prohibit the transmission of
control or signaling information or the use of
repetitive codes where required by the
technology.
This Class B digital apparatus complies with
Canadian ICES-003.
ENG - ii
Page 3

Radiation Exposure Statement
This equipment complies with IC RSS-102
radiation exposure limits set forth for an
uncontrolled environment. This equipment should
be installed and operated with minimum distance
20 cm between the radiator & your body.
Important Safety Instructions
Read these operating instructions carefully
before using the unit. Follow all the safety
instructions listed below. Keep these operating
instructions handy for future reference.
1. Read these instructions.
2. Keep these Instructions.
3. Heed all warnings.
4. Follow all instructions.
5. Do not use this apparatus near water.
6. Clean only with dry cloth.
7. Do not block any ventilation openings.
Install in accordance with the manufacturer’s
instructions.
8. Do not install near any heat sources such as
radiators, heat registers, stoves, or other
apparatus (including ampliers) that produce
heat.
9. Do not defeat the safety purpose of the
polarized or grounding-type plug.
A polarized plug has two blades with one
wider than the other. A grounding type plug
has two blades and a third grounding prong.
The wide blade or the third prong are
provided for your safety. If the provided plug
does not t into your outlet, consult an
electrician for replacement of the obsolete
outlet.
10. Protect the power cord from being walked
on or pinched particularly at plugs,
convenience receptacles, and the point
where they exit from the apparatus.
11. Only use attachments/accessories specied
by the manufacturer.
12. Use only with the cart, stand,
tripod, bracket, or table
specied by the manufacturer,
or sold with the apparatus.
When a cart is used, use caution when
moving the cart/apparatus combination to
avoid injury from tip-over.
13. Unplug this apparatus during lightning
storms or when unused for long periods of
time.
14. Refer all servicing to qualied service
personnel. Servicing is required when the
apparatus has been damaged in any way,
such as power-supply cord or plug is
damaged, liquid has been spilled or objects
have fallen into the apparatus, the apparatus
has been exposed to rain or moisture, does
not operate normally, or has been dropped.
ENG - iii
Page 4

PRECAUTIONS
1. Ensure that the AC power supply in your
house complies with the power
requirements listed on the identication
sticker located on the bottom of your
product. Install your product horizontally, on
a suitable base (furniture), with enough
space around it for ventilation (3~4 inches).
Make sure the ventilation slots are not
covered. Do not place the unit on ampliers
or other equipment which may become hot.
This unit is designed for continuous use.
To fully turn off the unit, disconnect the AC
plug from the wall outlet. Unplug the unit if
you intend to leave it unused for a long
period of time.
2. During thunderstorms, disconnect the AC
plug from the wall outlet. Voltage peaks due
to lightning could damage the unit.
3. Do not expose the unit to direct sunlight or
other heat sources. This could lead to
overheating and cause the unit to
malfunction.
4. Protect the product from moisture (i.e.
vases), and excess heat (e.g. a replace) or
equipment creating strong magnetic or
electric elds. Unplug the power cable from
the AC wall socket if the unit malfunctions.
Your product is not intended for industrial
use. It is for personal use only. Condensation
may occur if your product has been stored in
cold temperatures. If transporting the unit
during the winter, wait approximately
2 hours until the unit has reached room
temperature before using.
5. The battery used with this product contains
chemicals that are harmful to the
environment. Do not dispose of the battery
in the general household trash. Do not
expose the battery to excess heat, direct
sunlight, or re. Do not short circuit,
disassemble, or overheat the battery.
Danger of explosion if the battery is replaced
incorrectly. Replace only with the same or
equivalent type.
ENG - iv
Page 5
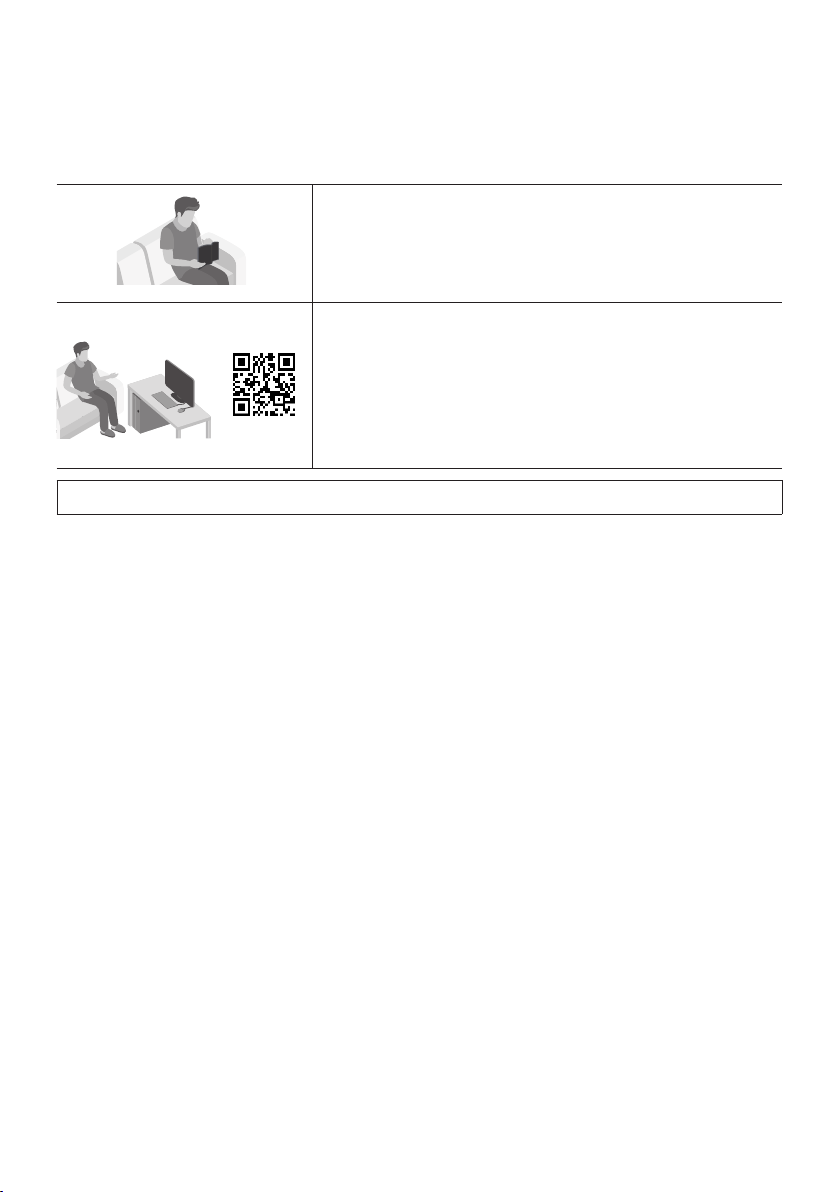
ABOUT THIS MANUAL
The user manual has two parts: this simple paper USER MANUAL and a detailed FULL MANUAL you can
download.
USER MANUAL
See this manual for safety instructions, product installation,
components, connections, and product specications.
FULL MANUAL
You can access the FULL MANUAL on Samsung’s on-line
customer support center by scanning the QR code on the left.
To see the manual on your PC or mobile device, download the
manual in document format from Samsung’s website.
(http://www.samsung.com/support)
Design, specications, and App screen are subject to change without prior notice.
ENG - v
Page 6

CONTENTS
01 Checking the Components 2
Inserting Batteries before using the Remote Control (AA batteries X 2) ------------------------- 2
02 Product Overview 3
Front Panel / Right Side Panel of the Soundbar ------------------------- 3
Bottom Panel of the Soundbar ------------------------- 4
03 Connecting the Soundbar 5
Connecting Electrical Power
Connecting the Soundbar to the Subwoofer
– Automatic connection between the Subwoofer and the Soundbar
– Manually connecting the Subwoofer if automatic connection fails
Connecting an SWA-8500S (Sold Separately) to your Soundbar
-------------------------
-------------------------
-------------------------
-------------------------
-------------------------
04 Connecting to your TV 10
Method 1. Connecting with a Cable
– Connecting a TV using an HDMI Cable
– Connecting using an Optical Cable
Method 2. Connecting Wirelessly
– Connecting a TV via Bluetooth
– Connecting via Wi-Fi
-------------------------
-------------------------
-------------------------
-------------------------
-------------------------
-------------------------
05 Connecting an External Device 16
Connecting using an HDMI Cable (Capable of Dolby Atmos decoding
and playback)
Connecting using an HDMI Cable
Connecting using an Optical Cable
-------------------------
-------------------------
-------------------------
5
6
6
7
8
10
10
11
12
12
14
16
17
18
06 Connecting a Mobile Device 19
Connecting via Bluetooth
Connecting via Wi-Fi (Wireless Network)
-------------------------
-------------------------
ENG - vi
19
22
Page 7

07 Connecting an Amazon product 24
Connect and use with an Amazon product (Amazon Echo) ------------------------- 24
Use voice commands to control the Soundbar
-------------------------
08 Using the Remote Control 27
26
How to Use the Remote Control
Adjusting the Soundbar volume with a TV remote control
Using the Hidden Buttons (Buttons with more than one function)
Output specications for the different sound effect modes
-------------------------
-------------------------
-------------------------
-------------------------
30
09 Installing the Wall Mount 32
Installation Precautions
Wallmount Components
-------------------------
-------------------------
32
32
10 Installing the Holder-Feet 34
Holder-Feet Components
-------------------------
34
11 Software Update 35
12 Troubleshooting 36
13 License 37
14 Open Source License Notice 38
27
31
31
15 Important Notes About Service 38
16 SpecicationsandGuide 39
Specications
-------------------------
ENG - vii
39
Page 8
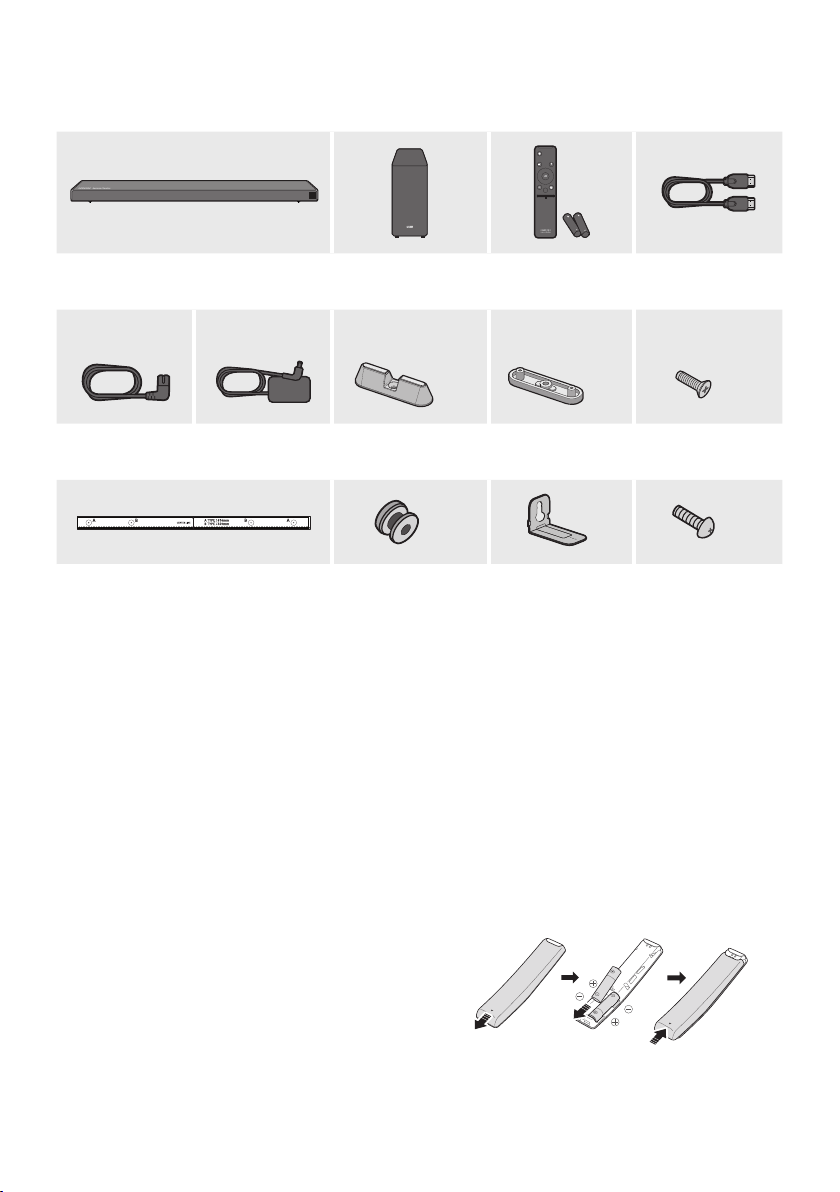
01 CHECKING THE COMPONENTS
PAIR
SOUND
MODE
VOL WOOFER
SOUNDBAR
Soundbar Main Unit Subwoofer Remote Control /
1
2
x 2
Power Cord
(Subwoofer)
AC/DC Adapter
(Main Unit)
Holder-Foot Holder-Support Screw (Holder-Foot)
x 2
Wall Mount Guide Holder-Screw
Batteries
x 2
x 2
Bracket-Wall Mount
HDMI Cable
x 2
x 2
Screw
(Wall Mount)
• For more information about the power supply and power consumption, refer to the label attached
to the product. (Label: Bottom of the Soundbar Main Unit)
• The power components are labelled (1, 2). For more information about power connections, see
page 5.
• To purchase additional components or optional cables, contact a Samsung Service Center or
Samsung Customer Care.
• Depending on the region, the appearance of the AC plug may differ from the plug displayed above,
or it may be supplied integrated with the AC/DC adapter.
• The appearance of the accessories may differ slightly from the illustrations above.
Inserting Batteries before using the Remote Control (AA batteries X 2)
Slide the battery cover in the direction of the arrow
until it is completely removed. Insert 2 AA batteries
(1.5V) oriented so that their polarity is correct. Slide
the battery cover back into position.
ENG - 2
Page 9
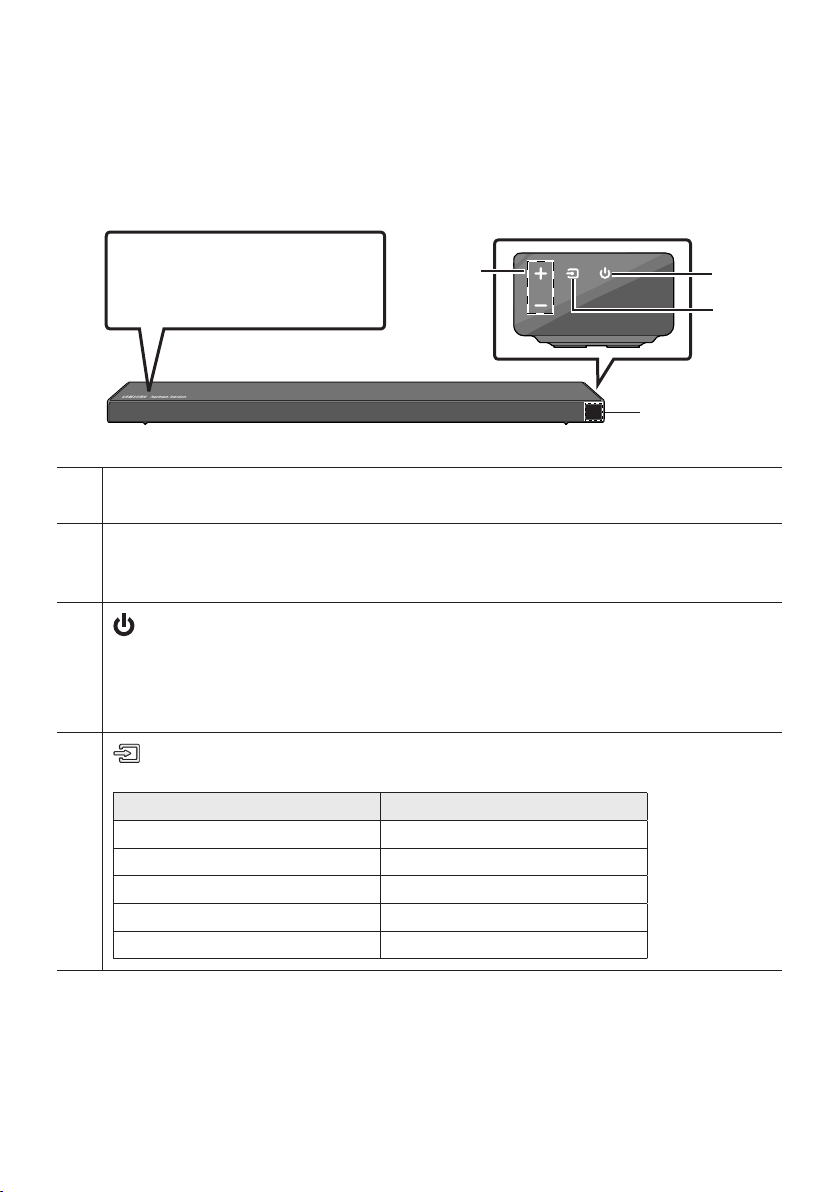
02 PRODUCT OVERVIEW
Front Panel / Right Side Panel of the Soundbar
Right Sid e of the Soundba r
Position the product so that the
"Samsung Harman Kardon" logo is
located on the top.
Display
Displays the product’s status and current mode.
+/- (Volume) But ton
Adjusts the volume.
• When adjusted, the volume level appears on the Soundbar’s front display.
(Power) Button
Turns the power on and off.
• Auto Power Down Function
The unit turns off automatically in the following situations:
– In D.IN / HDMI / WIFI / BT mode if there is no audio signal for 18 minutes.
(Source) But ton
Selects the source input mode.
Input mode Display
Optical Digital input D.IN
• When you plug in the AC cord, the power button will begin working in 4 to 6 seconds.
• When you turn on this unit, there will be a 4 to 5 second delay before it produces sound.
• If you want to enjoy sound only from the Soundbar, you must turn off the TV’s speakers in the Audio
Setup menu of your TV. Refer to the owner’s manual supplied with your TV.
ARC (HDMI OUT) input D.IN TV ARC (Auto conversion)
HDMI input HDMI
Wi-Fi mode WIFI
BLUETOOTH mode BT
ENG - 3
Page 10
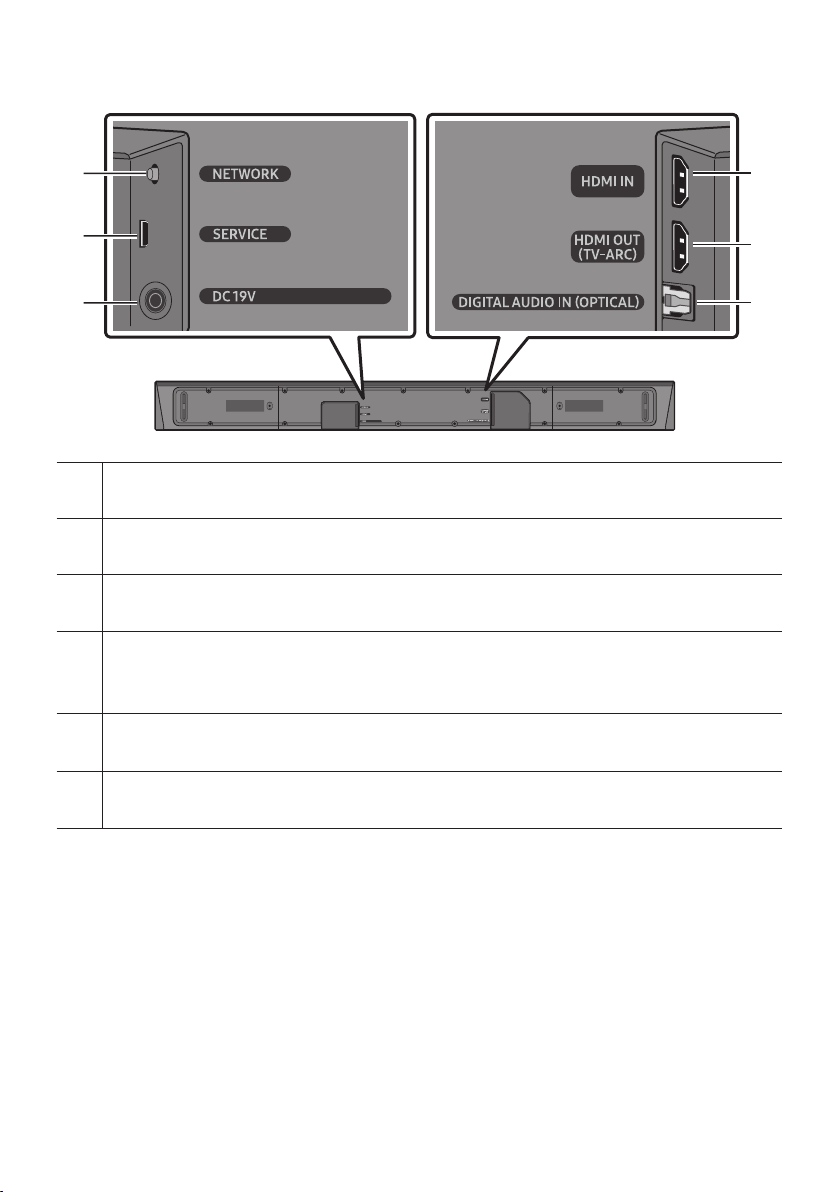
Bottom Panel of the Soundbar
NETWORK
Press to connect to a wireless network (Wi-Fi) via the SmartThings app.
SERVICE
Connect a USB storage device to upgrade the product's software.
DC 19V (Powe r Supply In)
Connect the AC/DC power adapter.
HDMI IN
Inputs digital video and audio signals simultaneously using an HDMI cable.
Connect to the HDMI output of an external device.
HDMI OUT (TV-ARC)
Connect to the HDMI (ARC) jack on a TV.
DIGITAL AUD IO IN (OPTIC AL)
Connect to the digital (optical) output of an external device.
• When disconnecting the power cable of the AC/DC power adaptor from a wall outlet, pull the plug.
Do not pull the cable.
• Do not connect this unit or other components to an AC outlet until all connections between
components are complete.
ENG - 4
Page 11
03 CONNECTING THE SOUNDBAR
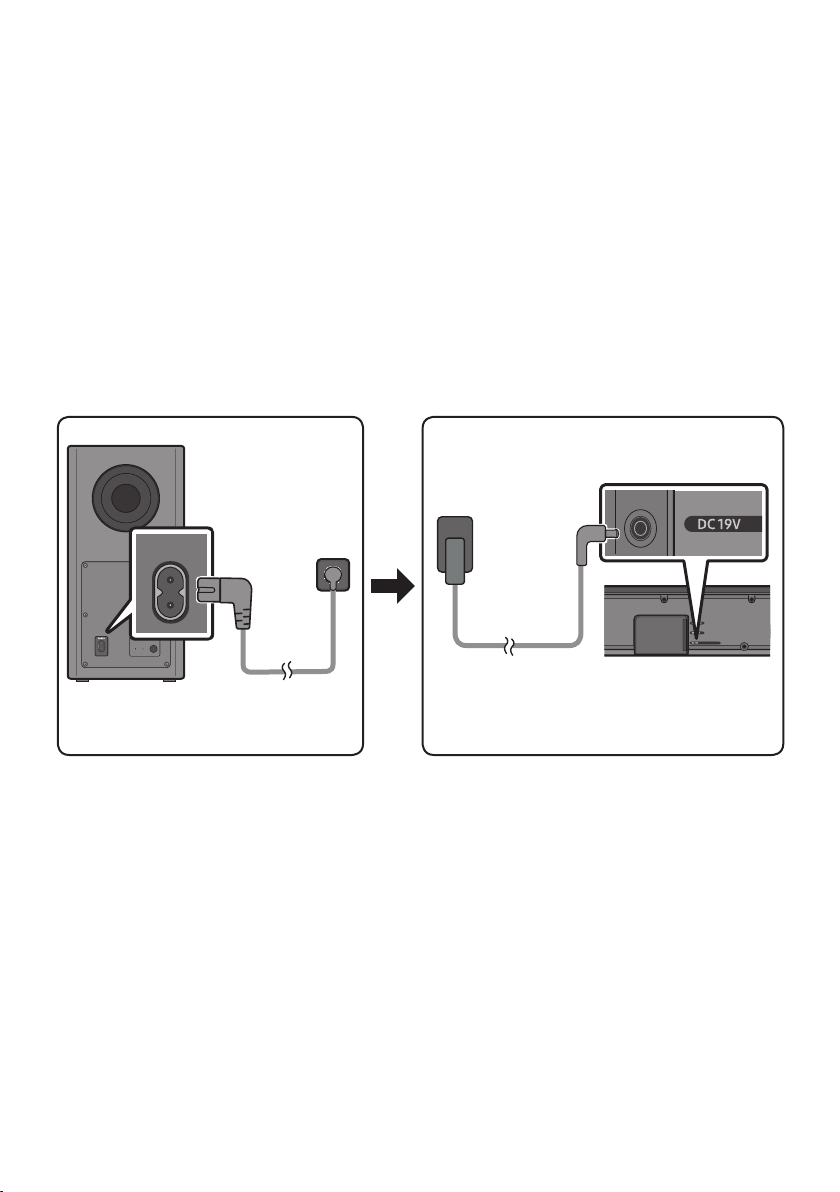
Connecting Electrical Power
Use the power components (1, 2) to connect the Subwoofer and Soundbar to an electrical outlet in the
following order:
1 Connect the power cord to the Subwoofer.
2
Connect the power adapter to the Soundbar and then to a wall socket.
See the illustrations below.
• For more information about the required electrical power and power consumption, refer to the
label attached to the product. (Label: Bottom of the Soundbar Main Unit)
2 AC/DC Adapter
POWER
Rear of Subwoofer
1 Power Cord
Connecting
Electric al Power
DC 19V
(Power Jack)
Bott om of the
Soundbar Main Unit
ENG - 5
Page 12

Connecting the Soundbar to the Subwoofer
When the subwoofer is connected, you can enjoy rich bass sound.
Automatic connection between the Subwoofer and the Soundbar
When you turn the power on after connecting the power cables to the Soundbar and subwoofer, the
subwoofer is automatically connected to the Soundbar.
• When auto pairing is complete, the blue indicators at the rear of the subwoofer turn on.
LED Indicator Lights on the Rear of Subwoofer
LED Status Description Resolution
Successfully connected
(normal operation)
Standby (with the Soundbar
main unit turned off)
Connection failed
-
Check if the power cable attached to the
main Soundbar unit is connected properly
or wait about 5 minutes. If blinking persists,
try manually connecting the subwoofer.
See page 7.
Check if the power cable attached to the
main Soundbar unit is connected properly.
Connect again. See the instructions for
manual connection on page 7.
See the contact information for the
Samsung Service Center in this manual.
Blue
Red On
Red and
blue
On
Blinking Recovering the connection
Blinking Malfunction
ENG - 6
Page 13
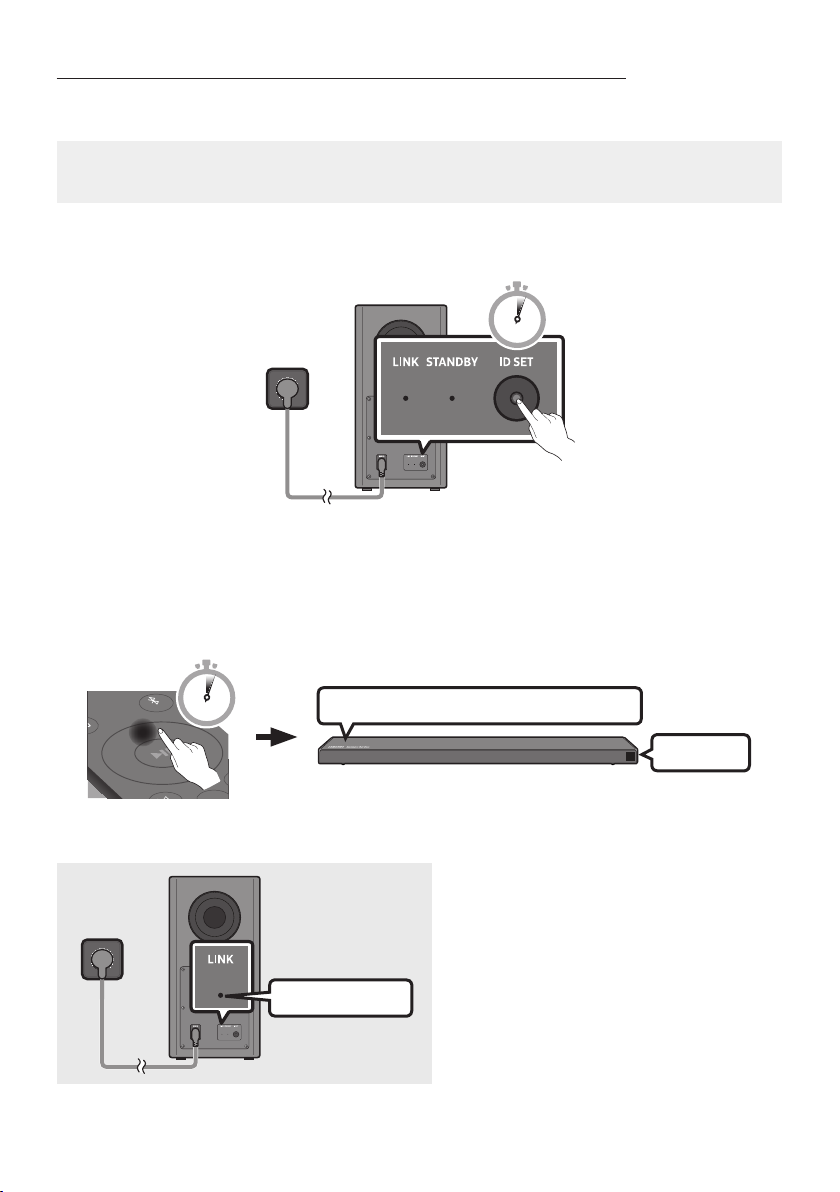
Manually connecting the Subwoofer if automatic connection fails
Before per forming the manual connection procedure below:
• Check whether the power cables for the Soundbar and subwoofer are connected properly.
• Make sure that the Soundbar is turned on.
1. Press and hold ID SET on the rear of the subwoofer for at least 5 seconds.
• The red indicator on the rear of the subwoofer turns off and the blue indicator blinks.
5 Sec
Rear of Subwoofer
2. Press and hold the Up button on the remote control for at least 5 seconds.
• The ID SET message appears on the display of the Soundbar for a moment, and then it
disappears.
• The Soundbar will automatically power on when ID SET is complete.
PAIR
5 Sec
“Sam sung Harman Kard on” logo is on the top
3. Check if the LINK LED is solid blue (connection complete).
The LINK LED indicator stops blinking and
glows a solid blue when a connection is
established between the Soundbar and the
Wireless Subwoofer.
Blue is On
ENG - 7
ID SET
Page 14
NOTES
L
R
• Do not connect the power cord of this product or your TV to a wall outlet until all connections
between components are complete.
• Before moving or installing this product, be sure to turn off the power and disconnect the power cord.
• If the main unit is powered off, the wireless subwoofer will go into stand-by mode and the
STANDBY LED on the rear of the sub-woofer will turn red after blinking in blue several times.
• If you use a device that uses the same frequency (5.8GHz) as the Soundbar near the Soundbar,
interference may cause some sound interruption.
• The maximum transmission distance of the main unit’s wireless signal is about 32.8 ft, but may vary
depending on your operating environment. If a steel-concrete or metallic wall is between the main
unit and the wireless subwoofer, the system may not operate at all because the wireless signal
cannot penetrate metal.
PRECAUTIONS
• Wireless receiving antennas are built into the wireless subwoofer. Keep the unit away from water
and moisture.
• For optimal listening performance, make sure that the area around the wireless subwoofer and the
Wireless Receiver Module (sold separately) is clear of any obstructions.
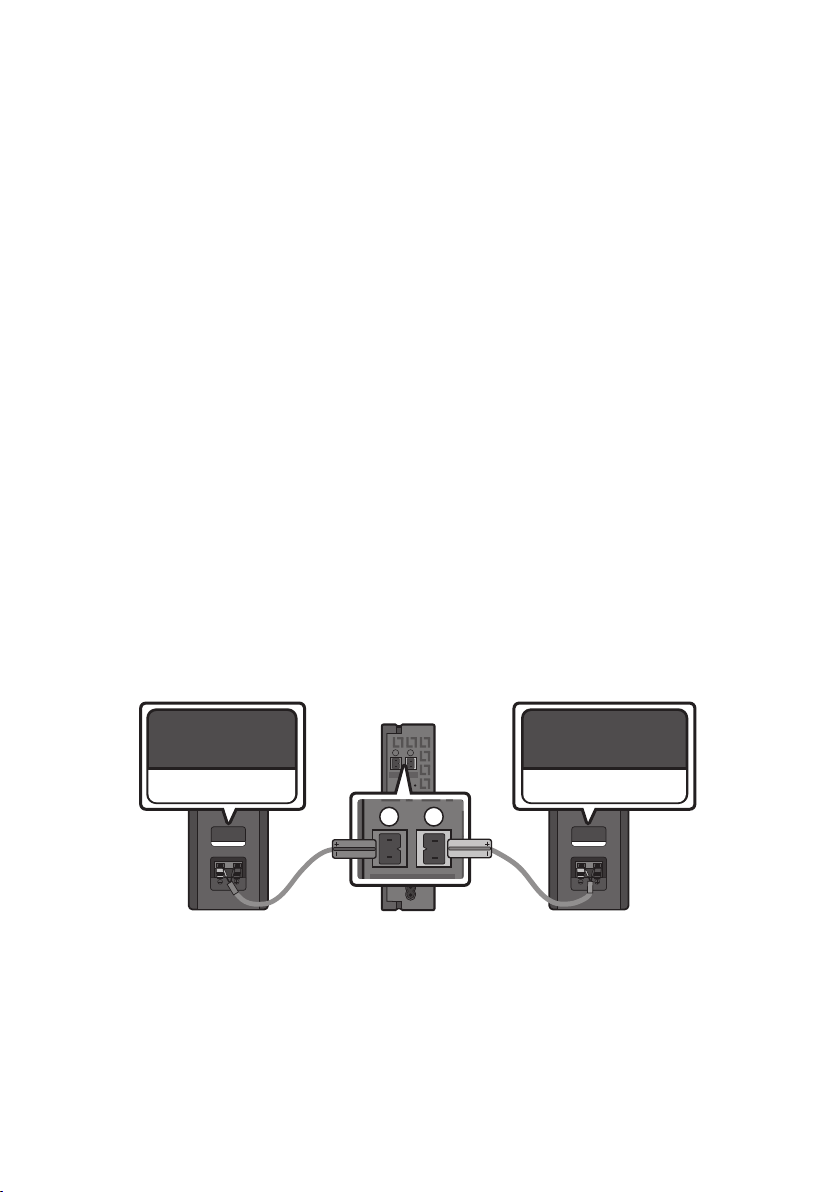
Connecting an SWA-8500S (Sold Separately) to your Soundbar
Expand to true wireless surround sound by connecting the Samsung Wireless Rear Speaker Kit
(SWA-8500S, sold separately) to your Soundbar.
1. Connect the Wireless Receiver Module to 2 Surround Speakers.
– The speaker cables are color coded.
L
R
SURROUND SPEAKERS OUT
SPEAKER IMPEDANCE : 3Ω
SURROUND-LEFT SURROUND-RIGHT
SURROUND-LEFT
ID SET
POWER
ENG - 8
SURROUND-RIGHT
Page 15

2. Check the standby status of the Wireless Receiver Module after plugging it into an electrical outlet.
LINK
POWER
ID SET
LINK
• The LINK LED indicator (blue LED) on the Wireless Receiver Module blinks. If the LED does not
blink, press the ID SET button on the back of the Wireless Receiver Module with a pen tip for
5~6 seconds until the LINK LED indicator blinks (in Blue). For more about the LED, please refer
to the SWA-8500S user manual.
L
SURROUND SPEAKERS OUT
SPEAKER IMPEDANCE : 3Ω
R
ID SET
5 Sec
STANDBY
LINK
Blue blinking
POWER
3. Press and hold the Up button on the remote control for at least 5 seconds.
• The ID SET message appears on the display of the Soundbar for a moment, and then it disappears.
• The Soundbar will automatically power on when ID SET is complete.
PAIR
5 Sec
“Sam sung Harman Kard on” logo is on the top
CAUTION
• If your Soundbar was playing music when it connects to the SWA-8500S, you may hear some
stuttering from the woofer as the connection nalizes.
4. Check if the LINK LED is solid blue (connection complete).
The LINK LED indicator stops blinking and
STANDBY
LINK
glows a solid blue when a connection is
established between the Soundbar and the
Wireless Receiver Module.
Blue is On
5. If the SWA-8500S is not connected, repeat the procedure from Step 2.
ENG - 9
ID SET
Page 16
04 CONNECTING TO YOUR TV
Hear TV sound from your Soundbar through wired or wireless connections.
• When the Soundbar is connected to selected Samsung TVs, the Soundbar can be controlled using
the TV’s remote control.
– This feature is available on 2017 and later Samsung Smart TVs that support Bluetooth when
the Soundbar is connected to the TV using an optical cable.
– This function also allows you to use the TV menu to adjust the sound eld and various settings
as well as the volume and mute.
Method 1. Connecting with a Cable
When the audio in a broadcast is encoded in Dolby Digital and the “Digital Output Audio Format” on
your TV is set to PCM, we recommend that you change the setting to Dolby Digital. When the setting on
the TV is changed, you will experience better sound quality. (The TV menu may use different words for
Dolby Digital and PCM depending on the TV manufacturer.)
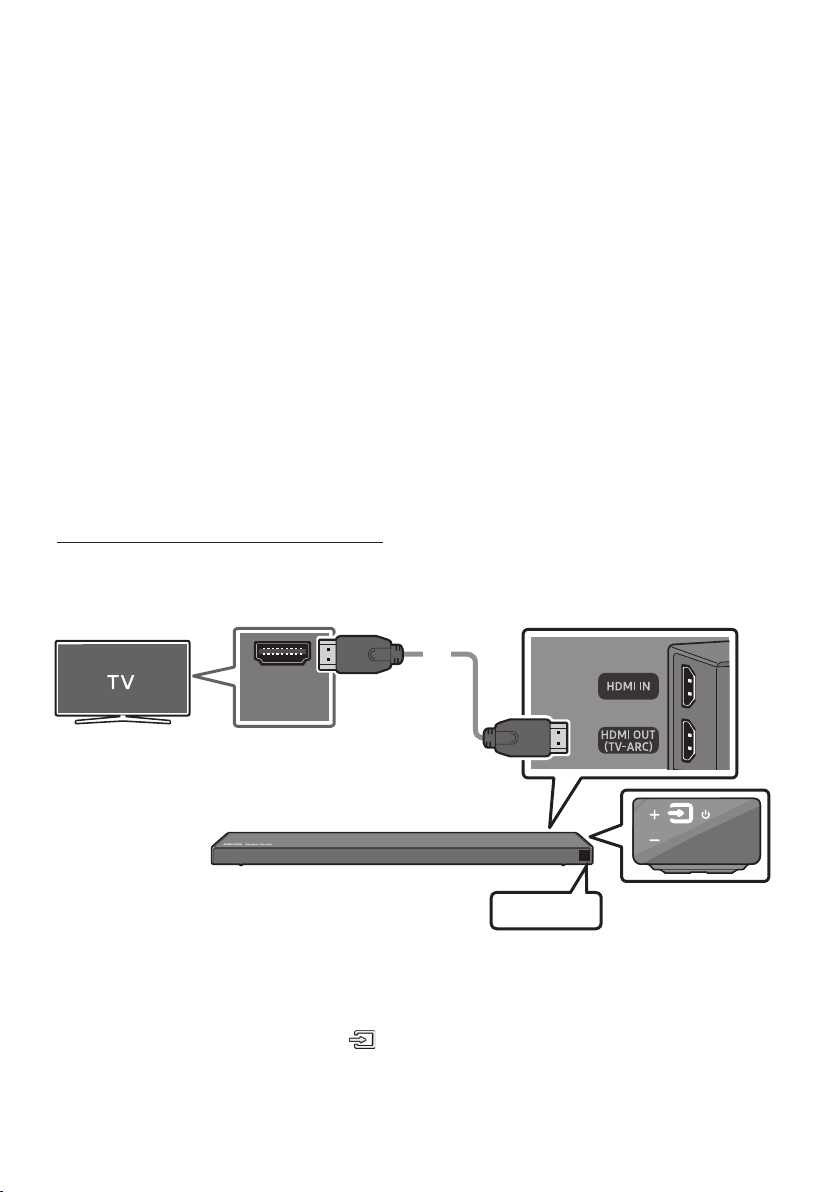
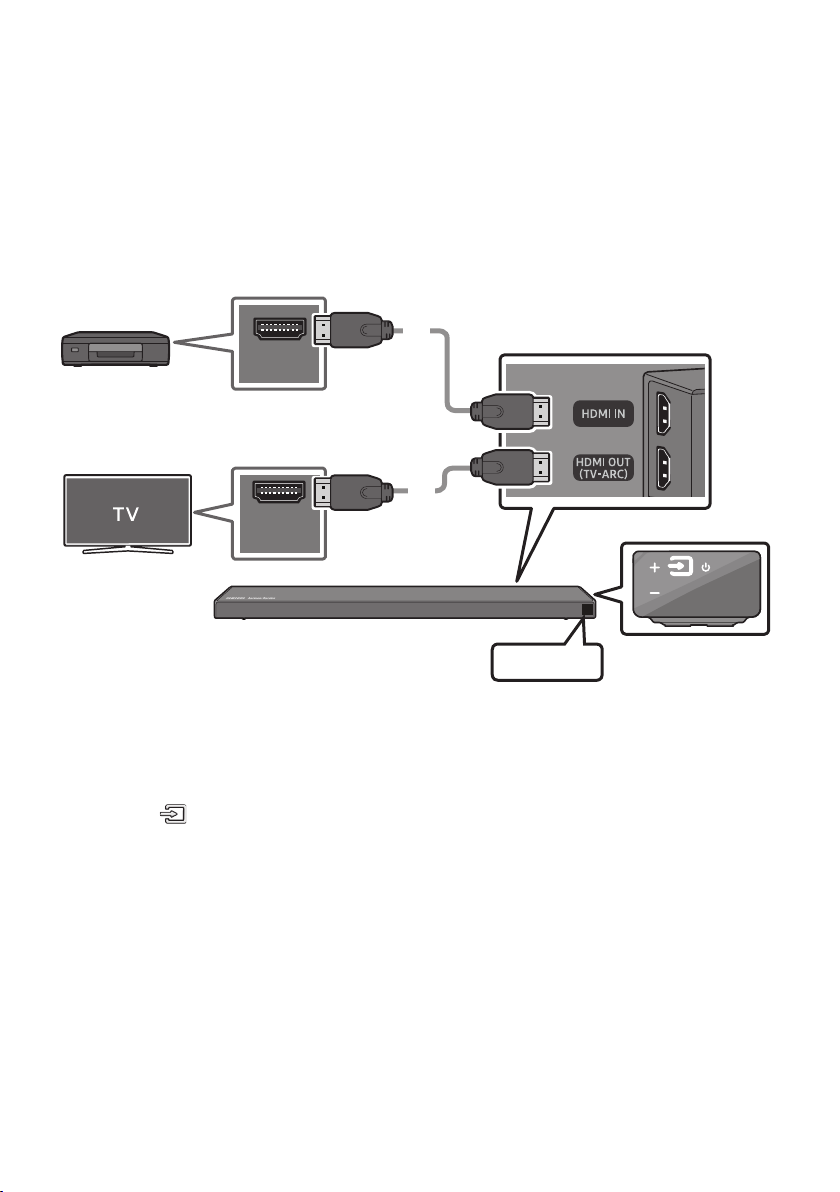
Connecting a TV using an HDMI Cable
Connec t to the HDMI IN
(ARC) p ort of your T V.
HDMI IN
(ARC)
HDMI Cable
Bott om of the Soundba r
Connec t to the HDMI OUT ( TV-ARC)
port o f the Soundbar mai n unit.
TV ARC
1. With the Soundbar and TV turned on, connect the HDMI cable as shown in the gure.
2. “TV ARC” appears in the display window of the Soundbar main unit and the Soundbar plays TV
sound.
• If TV sound is inaudible, press the (Source) button on the remote control or on the right side
of the Soundbar to switch to “D.IN” mode. The screen displays “D.IN” and “TV ARC” in sequence,
and TV sound is played.
ENG - 10
Right Sid e of the Soundbar
Page 17
• If “T V ARC” does not appear in the display window of the Soundbar main unit, conrm that the
HDMI cable is connected to the correct port.
• Use the volume buttons on the TV’s remote control to change the volume on the Soundbar.
NOTES
• HDMI is an interface that enables the digital transmission of video and audio data with just a single
connector.
• If the TV provides an ARC port, connect the HDMI cable to the HDMI IN (ARC) port.
• We recommend you use a coreless HDMI cable if possible. If you use a cored HDMI cable, use one
whose diameter is less than 0.55 inches.
• Anynet+ must be turned on.
• This function is not available if the HDMI cable does not support ARC.
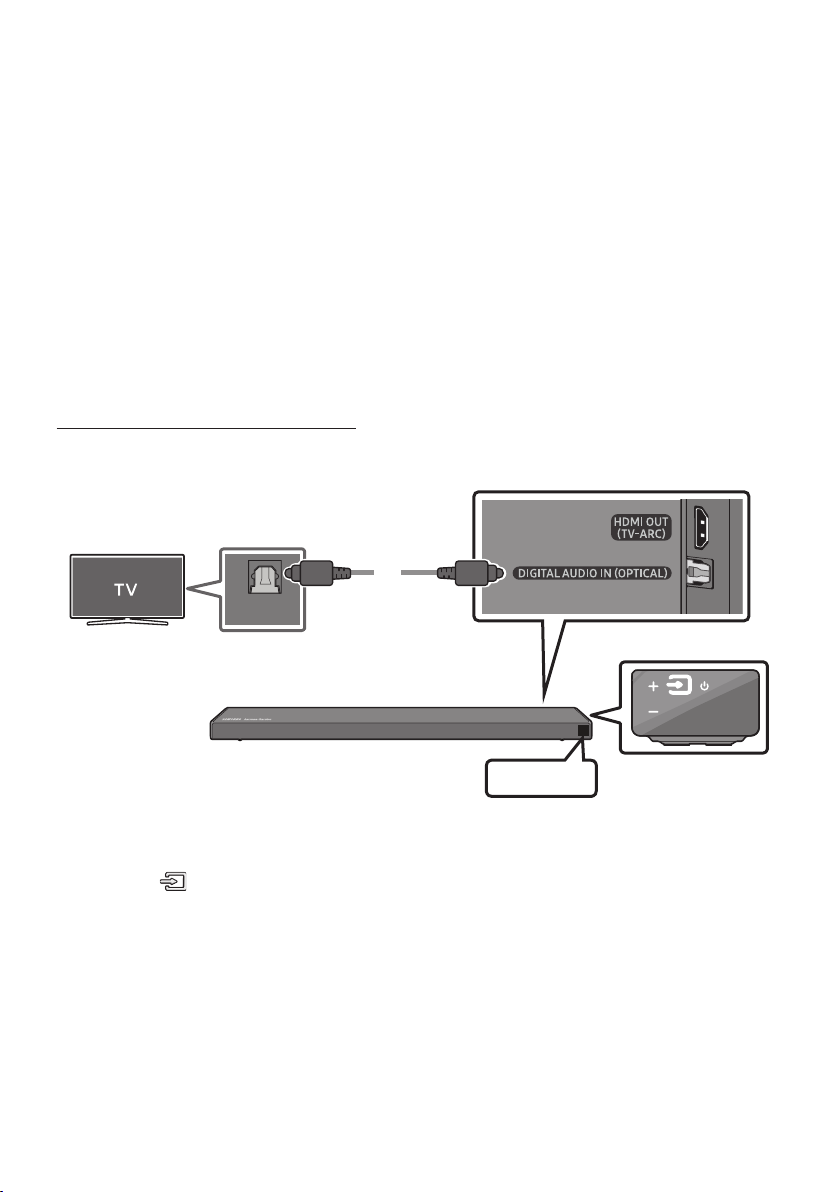
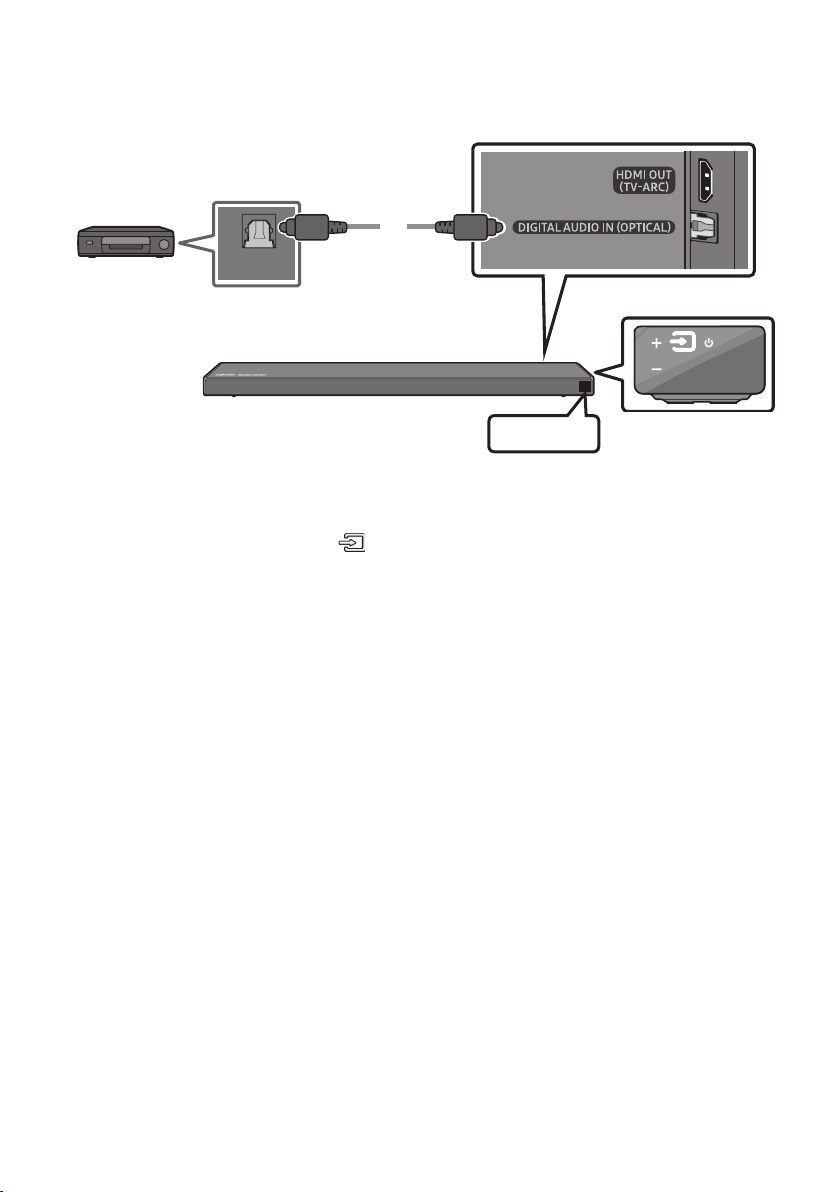
Connecting using an Optical Cable
Bott om of the Soundba r
OPTICAL OUT
Optic al Cable
(not supplied)
D.IN
1. Connect the DIGITAL AUDIO IN (OPTIC AL) jack on the Soundbar to the OPTICAL OUT jack of the TV
with a digital optical cable.
2. Press the (Source) button on the right side panel or remote control, and then select the “D.IN”
mode.
ENG - 11
Right Sid e of the Soundbar
Page 18
Auto Power Link
Auto Power Link automatically turns on the Soundbar when the TV is turned on.
1. Connect the Soundbar and a TV with a digital optical cable (not supplied).
2. Press the Left button on the remote control for 5 seconds to turn Auto Power
Link on or off.
• Auto Power Link is set to ON by default.
(To turn off this function, press the Left button on the remote for 5 seconds.)
• Depending on the connected device, Auto Power Link may not function.
• This function is only available in the “D.IN” mode.
Method 2. Connecting Wirelessly
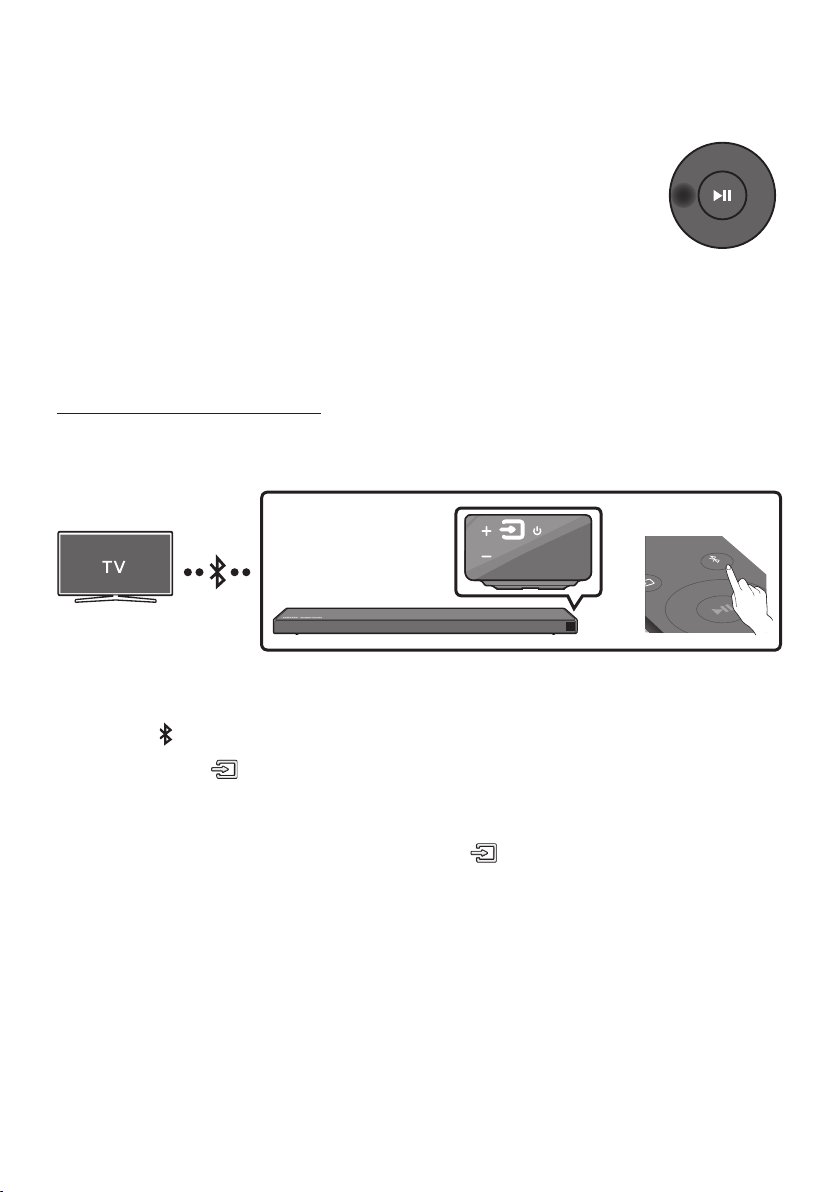
Connecting a TV via Bluetooth
When a TV is connected using Bluetooth, you can hear stereo sound without the hassle of cabling.
• Only one TV can be connected at a time.
PAIR
OR
The initial connection
1. Press the PAIR button on the remote control to enter the “BT PAIRING” mode.
(OR)
a. Press the (Source) button on the right side panel and then select “BT”.
“BT” changes to “BT READY” in a few seconds automatically if there is no Bluetooth device
connected to the Soundbar.
b. When “BT READY” appears, press and hold the (Source) button on the right side panel
of the Soundbar for more than 5 seconds to display “BT PAIRING”.
2. Select Bluetooth mode on the TV. (For more information, see the TV’s manual.)
3. Select “[AV] Samsung Soundbar Q70R” from the list on TV’s screen.
An available Soundbar is indicated with “Need Pairing” or “Paired” on the TV’s Bluetooth device
list. To connect the TV to the Soundbar, select the message, and then establish a connection.
• When the TV is connected, [TV Name] → “BT” appears on the Soundbar’s front display.
4. You can now hear TV sound from the Soundbar.
ENG - 12
Page 19

If the device fails to connect
• If a previously connected Soundbar (e.g. “[ AV] Samsung Soundbar Q70R”) appears in the list, delete
it.
• Then repeat steps 1 through 3.
NOTE
• After you have connected the Soundbar to your TV the rst time, use the “BT READY” mode to
reconnect.
Disconnecting the Soundbar from the TV
Press the (Source) button on the right side panel or on the remote control and switch to any mode
but “BT”.
• Disconnecting takes time because the TV must receive a response from the Soundbar.
(The time required may differ, depending on the TV model.)
• To cancel the automatic Bluetooth connection between the Soundbar and TV, press the
p (Play/Pause) button on the remote control for 5 seconds with the Soundbar in “BT READY” status.
(Toggle On → Off)
What is the difference between BT READY and BT PAIRING?
• BT READY : In this mode, you can search for previously connected TVs or connect a previously
connected mobile device to the Soundbar.
• BT PAIRING : In this mode, you can connect a new device to the Soundbar. (Press the PAIR button
on the remote control or press and hold the (Source) button on the right side of the Soundbar
for more than 5 seconds while the Soundbar is in “BT” mode.)
NOTES
• If asked for a PIN code when connecting a Bluetooth device, enter <0000>.
• In Bluetooth connection mode, the Bluetooth connection will be lost if the distance between the
Soundbar and the Bluetooth device exceeds 32.8 ft.
• The Soundbar automatically turns off after 18 minutes in the Ready state.
• The Soundbar may not perform Bluetooth search or connection correctly under the following
circumstances:
– If there is a strong electrical eld around the Soundbar.
– If several Bluetooth devices are simultaneously paired with the Soundbar.
– If the Bluetooth device is turned off, not in place, or malfunctions.
• Electronic devices may cause radio interference. Devices that generate electromagnetic waves
must be kept away from the Soundbar main unit - e.g., microwaves, wireless LAN devices, etc.
ENG - 13
Page 20
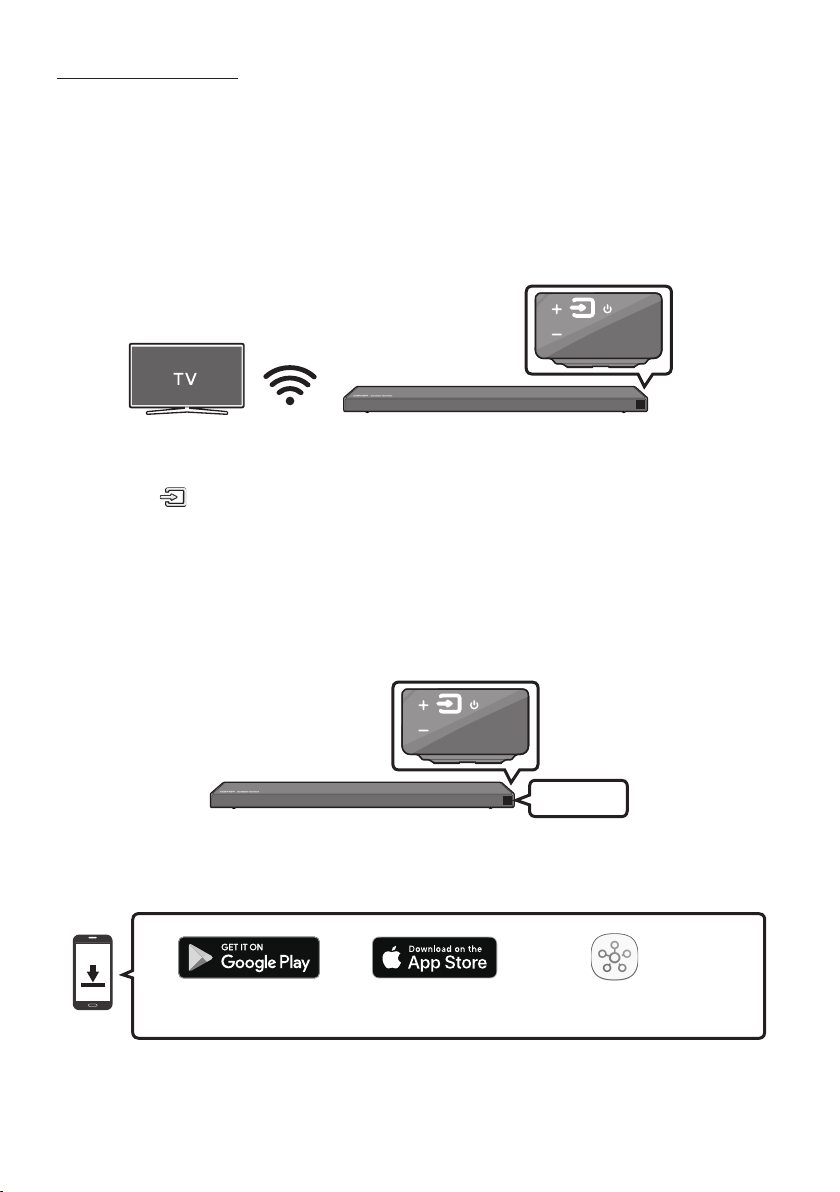
Connecting via Wi-Fi
Pre-connection Checklist
1. Conrm that your Samsung Smar t TV was released after 2013. This function is compatible only
with Samsung Smart TVs released after 2013.
2. Make sure your Wireless router (Wi-Fi) is ready and working.
3. Make sure that the TV is connected to the Wireless router (your Wi-Fi network).
Right Sid e of the Soundbar
Step 1 : Connecting the Soundbar to Wi-Fi
1. Press the (Source) button on the right side of the Soundbar or on the remote control to select
“WIFI” mode.
• When using selected Samsung TVs (2016 ~ 2018 Samsung Smart TVs that support Bluetooth.)
– If you select “WIFI” mode when the TV is turned on, the TV screen displays a pop-up
window providing instructions on how to automatically connect the Soundbar to a wireless
router (Wi-Fi). Refer to the instructions in the pop-up window of the TV.
Right Sid e of the Soundbar
WIFI
2. Connect your mobile device (smartphone, tablet, etc.) to the Wi-Fi network the TV is connected to.
3. Install and launch the SmartThings app on your mobile device (smartphone, tablet, etc.).
iOSAndroid
4. Follow the instructions in the app screen on the mobile device to connect the Soundbar to your
Wi-Fi network.
ENG - 14
SmartThings app
Page 21

Step2:ConguringSettingsontheTV
• If the TV disconnects from your wireless network after you change the input source to the
Soundbar, use the TV menu to connect the TV to the network again.
For TVs released in 2019
Home ( ) Settings ( ) Sound Sound Output [AV] Samsung Soundbar Q70R (Wi-Fi)
For TVs released in 2018
Home ( ) Settings ( ) Sound Sound Output [AV] Samsung Soundbar Q70R (Wi-Fi)
For TVs released in 2017
Home ( ) Settings ( ) Sound Sound Output [AV] Samsung Soundbar Q70R (Wi-Fi)
For TVs released in 2016
Home ( ) Settings ( ) Sound Select Speaker [AV] Samsung Soundbar Q70R (Wi-Fi)
For TVs released in 2015
Menu Sound Speaker List
For TVs released in 2014
Menu Sound Speaker Settings Multiroom Link - Settings
NOTES
• The TV and Soundbar must be connected to the same wireless network (Wi-Fi).
• If your wireless router (Wi-Fi) uses a DFS channel, you will not be able to establish a Wi-Fi
connection between the TV and Soundbar. Contact your Internet service provider for details.
• If the 5GHz Wi-Fi connection is not smooth, use the 2.4GHz bandwidth.
• Because the menus may differ depending on the year of manufacture, refer to your TV manual.
ENG - 15
Page 22

05 CONNECTING AN EXTERNAL DEVICE
Connect to an external device via a wired or wireless network to play the external device’s sound
through the Soundbar.
Connecting using an HDMI Cable (Capable of Dolby Atmos decoding and playback)
• When you use Dolby Atmos®: If the input source is Dolby Atmos®, 3.1.2 channels are outputted.
When Dolby Atmos® is active, the Soundbar’s sound effect modes controlled by the SOUND MODE
button are not available.
• Important: This product supports Dolby Atmos® only in HDMI mode.
Bott om of the Soundba r
External Dev ice
HDMI OUT
HDMI Cable
HDMI IN
(ARC)
1. Connect an HDMI cable from the HDMI IN jack on the back of the product to the HDMI OUT jack on
your digital device.
2. Connect an HDMI cable from the HDMI OUT (TV-ARC) jack on the back of the product to the HDMI
IN jack on your TV.
3. Press the (Source) button on the right side panel or on the remote control, and then select
“HDMI”.
4. “HDMI” mode is displayed on the Soundbar display panel and sound plays.
NOTE
• When Dolby Atmos® is activated, “DOLBY ATMOS” appears in the front display.
HDMI Cable
HDMI
Right Sid e of the Soundbar
ENG - 16
Page 23
ConguringDolbyAtmos®onyourBDplayerorotherdevice.
• Open the audio output options on the settings menu of your BD player or other device and make
sure that “No Encoding” is selected for Bitstream. For example, on a Samsung BD Player, go to
Home Menu → Sound → Digital Output and then select Bitstream (unprocessed).
• If the Audio Output options include Secondary Audio, make sure Secondary Audio is set to Off.
• Make sure that the content supports Dolby Atmos®.
Connecting using an HDMI Cable
Bott om of the Soundba r
External Dev ice
HDMI OUT
HDMI Cable
HDMI IN
(ARC)
1. Connect an HDMI cable from the HDMI IN jack on the back of the product to the HDMI OUT jack on
your digital device.
2. Connect an HDMI cable from the HDMI OUT (TV-ARC) jack on the back of the product to the HDMI
IN jack on your TV.
3. Press the (Source) button on the right side panel or on the remote control, and then select
“HDMI”.
4. “HDMI” mode is displayed on the Soundbar display panel and sound plays.
HDMI Cable
HDMI
Right Sid e of the Soundbar
ENG - 17
Page 24
Connecting using an Optical Cable
BD / DVD play er /
Set-top b ox /
Game cons ole
OPTICAL OUT
Optic al Cable
(not supplied)
Bott om of the Soundba r
D.IN
1. Connect DIGITAL AUDIO IN (OP TICAL) on the main unit to the OPTICAL OUT jack of the Source
Device using a digital optical cable (not supplied).
2. Select “D.IN” mode by pressing the (Source) button on the right side panel or on the remote
control.
Right Sid e of the Soundbar
ENG - 18
Page 25

06 CONNECTING A MOBILE DEVICE
Connecting via Bluetooth
When a mobile device is connected using Bluetooth, you can hear stereo sound without the hassle of
cabling.
• You cannot connect more than one Bluetooth device at a time.
PAIR
Bluetooth device
OR
The initial connection
1. Press the PAIR button on the remote control to enter the “BT PAIRING” mode.
(OR)
a. Press the (Source) button on the right side panel and then select “BT”.
“BT” changes to “BT READY” in a few seconds automatically if there is no Bluetooth device
connected to the Soundbar.
b. When “BT READY” appears, press and hold the (Source) button on the right side panel
of the Soundbar for more than 5 seconds to display “BT PAIRING”.
2. On your device, select “[ AV] Samsung Soundbar Q70R” from the list that appears.
• When the Soundbar is connected to the Bluetooth device, [Bluetooth Device Name] → “BT”
appears in the front display.
3. Play music les from the device connected via Bluetooth through the Soundbar.
If the device fails to connect
• If a previously connected Soundbar (e.g. “[ AV] Samsung Soundbar Q70R”) appears in the list, delete
it.
• Then repeat steps 1 and 2.
NOTE
• After you have connected the Soundbar to your mobile device the rst time, use the “BT READY”
mode to reconnect.
ENG - 19
Page 26

What is the difference between BT READY and BT PAIRING?
• BT READY : In this mode, you can search for previously connected TVs or connect a previously
connected mobile device to the Soundbar.
• BT PAIRING : In this mode, you can connect a new device to the Soundbar. (Press the PAIR button
on the remote control or press and hold the (Source) button on the right side of the Soundbar
for more than 5 seconds while the Soundbar is in “BT” mode.)
NOTES
• If asked for a PIN code when connecting a Bluetooth device, enter <0000>.
• In Bluetooth connection mode, the Bluetooth connection will be lost if the distance between the
Soundbar and the Bluetooth device exceeds 32.8 ft.
• The Soundbar automatically turns off after 18 minutes in the Ready state.
• The Soundbar may not perform Bluetooth search or connection correctly under the following
circumstances:
– If there is a strong electrical eld around the Soundbar.
– If several Bluetooth devices are simultaneously paired with the Soundbar.
– If the Bluetooth device is turned off, not in place, or malfunctions.
• Electronic devices may cause radio interference. Devices that generate electromagnetic waves
must be kept away from the Soundbar main unit - e.g., microwaves, wireless LAN devices, etc.
• The Soundbar supports SBC data (44.1kHz, 48kHz).
• Connect only to a Bluetooth device that supports the A2DP (AV) function.
• You cannot connect the Soundbar to a Bluetooth device that supports only the HF (Hands Free)
function.
• Once you have paired the Soundbar to a Bluetooth device, selecting “[ AV] Samsung Soundbar
Q70R” from the device’s scanned devices list will automatically change the Soundbar to “BT” mode.
– Available only if the Soundbar is listed among the Bluetooth device’s paired devices.
(The Bluetooth device and the Soundbar must have been previously paired at least once.)
• The Soundbar will appear in the Bluetooth device’s searched devices list only when the Soundbar is
displaying “BT READY”.
• The Soundbar cannot be paired to another Bluetooth device if already in Bluetooth mode and
paired to a Bluetooth device.
ENG - 20
Page 27

Disconnecting the Bluetooth device from a Soundbar
You can disconnect a Bluetooth device from the Soundbar. For instructions, see the Bluetooth device’s
user manual.
• The Soundbar will be disconnected.
• When the Soundbar is disconnected from the Bluetooth device, the Soundbar will display
“BT DISCONNECTED” on the front display.
Disconnecting the Soundbar from the Bluetooth device
Press the (Source) button on the right side panel or on the remote control, and then change to any
mode except “BT”.
• Disconnecting takes time because the Bluetooth device must receive a response from the
Soundbar. (Disconnection time may differ, depending on the Bluetooth device)
• When the Soundbar is disconnected from the Bluetooth device, the Soundbar will display
“BT DISCONNECTED” on the front display.
NOTES
• In Bluetooth connection mode, the Bluetooth connection will be lost if the distance between the
Soundbar and the Bluetooth device exceeds 32.8 ft.
• The Soundbar automatically turns off after 18 minutes in the Ready state.
More About Bluetooth
Bluetooth is a technology that enables Bluetooth-compliant devices to interconnect easily with each
other using a short wireless connection.
• A Bluetooth device may cause noise or malfunction, depending on usage, if:
– A part of your body is in contact with the receiving/transmitting system of the Bluetooth
device or the Soundbar.
– It is subject to electrical variation from obstructions caused by a wall, corner, or ofce partition.
– It is exposed to electrical interference from same frequency-band devices including medical
equipment, microwave ovens, and wireless LANs.
• Pair the Soundbar with the Bluetooth device while they are close together.
• The further the distance between the Soundbar and Bluetooth device, the worse the quality is.
If the distance exceeds the Bluetooth operational range, the connection is lost.
• In poor reception areas, the Bluetooth connection may not work properly.
• The Bluetooth connection only works when it is close to the unit. The connection will be
automatically cut off if the Bluetooth device is out of range. Even within range, the sound quality
may be degraded by obstacles such as walls or doors.
• This wireless device may cause electric interference during its operation.
ENG - 21
Page 28
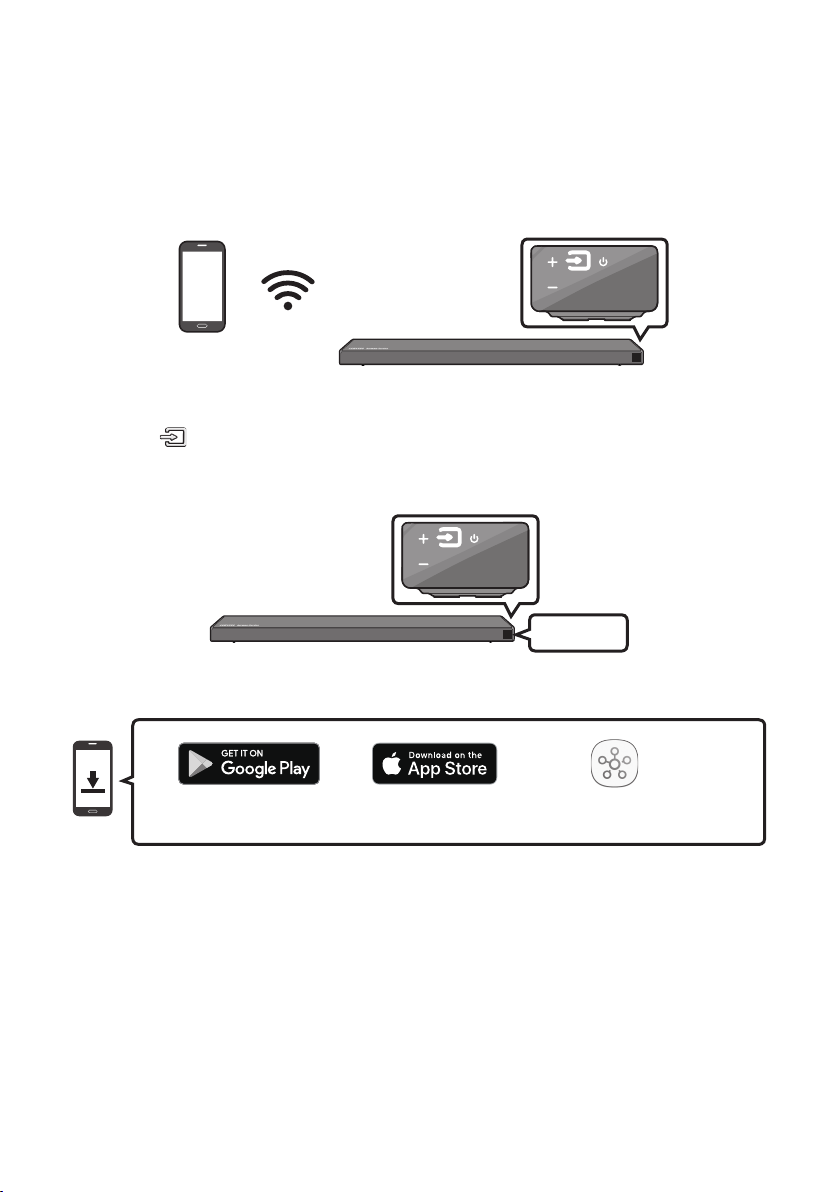
Connecting via Wi-Fi (Wireless Network)
• Connect a single Soundbar to Wi-Fi to access a variety of music streaming services and Internet
radio. Connect multiple Soundbars to Wi-Fi to use grouped playback or the stereo sound mode.
• To connect a Soundbar to a mobile device via a wireless network (Wi-Fi), the SmartThings app is
required.
Right Sid e of the Soundbar
Mobile device
The initial connection
1. Press the (Source) button on the right side of the Soundbar or on the remote control to select
“WIFI” mode.
Right Sid e of the Soundbar
WIFI
2. Install and launch the SmartThings app on your mobile device (e.g. smartphone or tablet).
iOSAndroid
ENG - 22
SmartThings app
Page 29
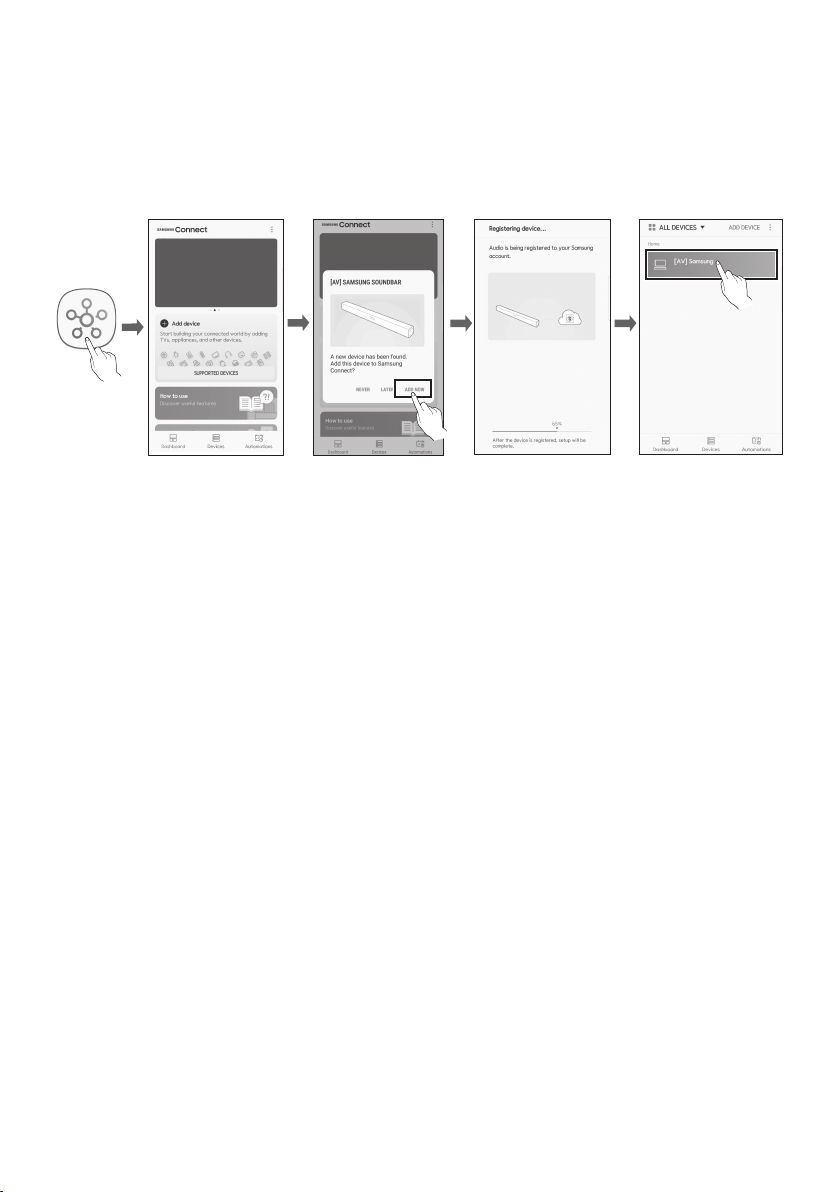
3. Launch the app, and then follow the instructions on the screen to register (add) your Soundbar in
the app.
• The automatic pop-up (the third illustration below) may not be available on some mobile
devices.
If this is the case, select and complete “Add device” from the app menu. Your Soundbar is now
added to the app.
Launch App Add speakersAuto pop-up
NOTE
• To connect an additional SWA-8500S wireless rear speaker kit (not supplied), disconnect the
Samsung wireless speakers from the Soundbar to disable the surround sound system. (If you
connect the surround speakers without disconnecting the SWA-8500S speakers, sound is played
via both the Samsung wireless speaker and the Surround speaker.)
ENG - 23
Page 30

07 CONNECTING AN AMAZON PRODUCT
• This feature may not be available in some countries.
• This service is provided by Amazon and can be terminated at any time. Samsung does not assume
responsibility for service availability.
• Amazon Alexa app screen is subject to change without prior notice.
Connect and use with an Amazon product (Amazon Echo)
Use an Amazon Echo product to control your Soundbar and enjoy music services provided by Amazon Echo.
NOTE
• Conrm that the Soundbar is connected to Wi-Fi. (Refer to “Connecting via Wi-Fi (Wireless
Network)”)
1. In the SmartThings app, change your Soundbar’s name to one that can be recognized by your
Amazon device.
(Example: Samsung, Soundbar, Living Room, Family Room, Bedroom, Ofce, etc.)
CAUTION
• Amazon devices may not recognize names that contain elements such as special characters.
Select speakers
ENG - 24
Change name
SaveSelect Edit
Page 31

2. In the Alexa app, search “Samsung Wireless Audio” in Skills, and then select “ENABLE”.
• Skip this step if you have Skills set up already.
Amazon Alexa app
Select Skills Search Enable
ENG - 25
Page 32

Use voice commands to control the Soundbar
• The Amazon Echo service you can use with your Soundbar is limited to music. Other services
provided by Amazon Echo, such as news and weather, can only be accessed through your
Amazon Echo product.
Trigger + Command + Speaker name
Use the Speaker name you changed in the SmartThings app. (Refer to “Connect and use
with an Amazon product (Amazon Echo)”)
Action Voice Command
To search an audio device added to the
SmartThings account connected to the
Amazon Alexa account
* To use voice commands for the Soundbar named “Living room”
Action Voice Command
To set the volume level to 5 "Alexa Set the volume to 5 on Living room"
To increase the volume level "Alexa Volume up on Living room"
"Alexa Discover devices"
To mute the sound "Alexa Mute on Living room"
To listen to a radio station named KISS FM "Alexa Play Kiss FM on Living room"
To play the next song "Ale xa Next song on Living room"
To stop the audio "Alexa Stop on Living room"
To turn the audio on "Alexa Turn on Living room"
To turn the audio off "Alexa Turn off Living room"
To change the input source "Alexa Switch to Bluetooth on Living room"
ENG - 26
Page 33

08 USING THE REMOTE CONTROL
PAIR
PAIR
How to Use the Remote Control
PAIR
SOUND
MODE
VOL WOOFER
SOUNDBAR
SOUND MODE
Power
Source
Mute
SOUND
MODE
Turns the Soundbar on and off.
Press to select a source connected to the
Soundbar.
Press the (Mute) button to mute the sound.
Press it again to unmute the sound.
You can selec t the desired sound mode by
choosing STANDARD, SURROUND, GAME PRO,
or ADAPTIVE SOUND.
Select the STANDARD mode if you want to enjoy
the original sound.
• GAME PRO mode
Immerse yourself in the scene with a
dedicated setting that optimizes sounds
specically for gaming.
• ADAPTIVE SOUND mode
Automatically analyzes content and gives
you optimized sound and automatically
enhances voice clarity on low volumes.
PAIR
Bluetooth
PAIR
ENG - 27
Press the PAIR button. “BT PAIRING” appears
in the Soundbar ’s display.
You can connec t the Soundbar to a new
Bluetooth device in this mode by selecting the
Soundbar from the Bluetooth device's search
list.
Page 34

Play / Pau se
(BT/Wi -Fi )
Up/Down/
Left/Right
Press the p button to pause a music le temporarily.
When you press the button again, the music le plays.
Press the indicated areas to select Up/Down/Left/Right.
Press Up/Down/Left/Right on the but ton to select or set functions.
• Music Skip
Press the Right button to select the next music le. Press the Left button to select the
previous music le.
• Anynet+ / Auto P ower Link
You can turn Anynet+ and Auto Power Link on or off.
Anynet+ and Auto Power Link are turned on and turned of f by the Right and Left
buttons respectively.
– Anynet+ : If the Soundbar is connected to a Samsung TV through an HDMI cable,
you can control your Soundbar with a Samsung TV remote control.
Press and hold the Right but ton for 5 seconds to toggle Anynet+ ON and OFF.
– Auto Power Link : If the Soundbar is connected to your TV through a digital optical
cable, the Soundbar can automatically turn on when you turn on your TV. Press
and hold the Left button for 5 seconds to toggle Auto Power Link ON and OFF.
– Anynet+ / Auto Power Link are set to ON by default.
• ID SET
Press and hold the Up button for 5 seconds to complete ID SET (when connecting to an
accessary item).
ENG - 28
Page 35

PAIR
SOUNDBAR
SOUNDBAR
SOUND
MODE
PAIR
SOUND
MODE
VOL
WOOFER
SOUNDBAR
SOUND
MODE
VOL
WOOFER
SOUNDBAR
SOUNDBAR
SOUNDBAR
Sound Control
You can selec t TREBLE, BASS, SYNC, CENTER LEVEL, SIDE LEVEL, FRONT TOP
LEVEL,REAR LEVEL, and VIRTUAL ON/OFF.
– To control the volume of the treble or bass sound, selec t TREBLE or BASS in Sound
Settings, and then adjust the volume between -6~+6 by using the Up/Down buttons.
– Press and hold the (Sound Control) button for about 5 seconds to adjust the sound
for each frequency band. 150Hz, 300Hz, 600Hz, 1.2kHz, 2.5kHz, 5kHz, and 10kHz are
selectable using the Left/Right buttons and each can be adjusted to a set ting
between -6 to +6 using the Up/Down buttons.
– To control the volume of the each speaker selec t CENTER LEVEL, SIDE LEVEL or
FRONT TOP LEVEL in Sound Settings, and then adjus t the volume between -6~+6 by
using the Up/Down buttons.
– If the video on the TV and audio from the Soundbar are not synchronized, selec t SYNC
in Sound Control, and then set the audio delay between 0~300 milliseconds by using
the Up/Down buttons.
– If Surround Speakers are connected, select REAR LEVEL and then use the Up/Down
buttons to adjust the volume within a -6 to +6 range. The VIRTUAL Speaker function
can be turned ON/OFF by using the Up/Down buttons.
– SYNC is only supported for some functions.
• Initialize
With the Soundbar turned off, press and hold the (Sound Control) button for more
than 5 seconds until the speaker turns on. “INIT” appears on the display and the
Soundbar is initialized.
WOOFER
VOL
SOUND
MODE
WOOFER
VOL
SOUND
MODE
WOOFER
VOL
Push the button up or down to adjust the volume of the subwoofer to -12 or bet ween -6 to
+6. To set the subwoofer volume level to 0, press the button.
SOUND
MODE
WOOFER
VOL
SOUND
MODE
WOOFER
VOL
Push the button up or down to adjust the volume.
• Mute
Press the VOL but ton to mute the sound. Press it again to unmute the sound.
ENG - 29
Page 36

Adjusting the Soundbar volume
SOUNDBAR
SOUNDBAR
SOUNDBAR
with a TV remote control
If you have a Samsung TV, you can adjust
the Soundbar’s volume using the IR remote
control that came with your Samsung TV.
First use the TV menu to set the TV audio on your
Samsung TV to external speakers, then use your
Samsung remote to control the Soundbar’s
volume. For more information, see the TV’s user
manual. The default mode for this function is
control by a Samsung TV remote. If your TV is not
a Samsung TV, follow the directions below to
change the settings of this function.
1. Turn Off the Soundbar.
BYE
2. If you do not want to use this function, push
up and hold the WOOFER button for
5 seconds repeatedly until “OFF-TV
REMOTE” appears in the display.
4. If you want to return the Soundbar to the
default mode (control by a Samsung TV
remote), push up and hold the WOOFER
button for 5 seconds repeatedly until
“SAMSUNG-TV REMOTE” appears in the
display.
SOUND
MODE
5 Sec
WOOFER
VOL
(Default mode)
SAMSUNG-TV REMOTE
– Each time you push the WOOFER button
up and hold it for 5 seconds, the mode
switches in the following order:
“SAMSUNG-TV REMOTE” (Default mode)
→ “OFF‑TV REMOTE” → “ALL‑TV REMOTE”.
– This function may not be available,
depending on the remote control.
– Manufacturers supporting this function:
VIZIO, LG, Sony, Sharp, PHILIPS,
PANASONIC, TOSHIBA, GRUNDIG,
Hisense, RCA
SOUND
MODE
5 Sec
WOOFER
VOL
OFF-TV REMOTE
3. If you want to control the Soundbar with
your TV’s remote, push up and hold the
WOOFER button for 5 seconds repeatedly
until “ALL-TV REMOTE” appears in the
display. Then, use your TV’s menu to select
external speakers.
5 Sec
WOOFER
VOL
ALL-TV REMOTE
SOUND
MODE
ENG - 30
Page 37

Using the Hidden Buttons (Buttons with more than one function)
Hidden Button
Remote Control Button Function
WOOFER TV remote control On/Off (Standby) page 30
Left Auto Power Link ON/OFF page 28
Right Anynet+ ON/OFF page 28
Up ID SET page 28
(Sound Control)
7 Band EQ page 29
Initialize (Standby) page 29
Reference page
Outputspecicationsforthedifferentsoundeffectmodes
Output
Effect Input
STANDARD
SURROUND
GAME PRO
ADAPTIVE SOUND
With Subwoofer Only
2.0 ch 2.1 ch 2.1 ch
5.1 ch 3.1 ch 5.1 ch
2.0 ch 3.1.2 ch 5.1 .2 ch
5.1 ch 3.1.2 ch 5.1 .2 ch
2.0 ch 3.1.2 ch 5.1 .2 ch
5.1 ch 3.1.2 ch 5.1 .2 ch
2.0 ch 3.1.2 ch 5.1 .2 ch
5.1 ch 3.1.2 ch 5.1 .2 ch
With Subw oofer & Wireles s
Rear Spe aker Kit
• If the input source is Dolby Atmos®, 3.1.2 channels are outputted. The sound effect modes
controlled by the SOUND MODE button and listed above are not available.
• The Samsung Wireless Rear Speaker Kit can be purchased separately. To purchase a Kit, contact the
vendor you purchased the Soundbar from.
ENG - 31
Page 38

09 INSTALLING THE
WALL MOUNT
Wallmount Components
Installation Precautions
• Install on a vertical wall only.
• Do not install in a place with high
temperature or humidity.
• Verify whether the wall is strong enough to
support the product’s weight. If not, reinforce
the wall or choose another installation point.
• Purchase and use the xing screws or
anchors appropriate for the kind of wall you
have (plaster board, iron board, wood, etc.). If
possible, x the support screws into wall
studs.
• Purchase wall mounting screws according to
the type and thickness of the wall you want to
mount the Soundbar on.
– Diameter: M5
– Length: 1 3/8 inches or longer
recommended.
• Connect cables from the unit to external
devices before you install the Soundbar on
the wall.
• Make sure the unit is turned off and
unplugged before you install it. Otherwise, it
may cause an electric shock.
Wall Mount Guide
x 2
Holder-Screw Screw
x 2
Bracket-Wall Mount
1. Place the Wall Mount Guide against the wall
surface.
• The Wall Mount Guide must be level.
• If your TV is mounted on the wall, install
the Soundbar at least 2 inches (5 cm)
below the TV.
2 inches or more
x 2
ENG - 32
Page 39

2. Align the Wall Mount Guide’s Center Line
with the center of your TV (if you are
mounting the Soundbar below your TV), and
then x the Wall Mount Guide to the wall
using tape.
• If you are not mounting below a TV, place
the Center Line in the center of the
installation area.
Center Line
3. Push a pen tip or sharpened pencil tip
through the center of the A-TYPE images on
each end of the Guide to mark the holes for
the supporting screws, and then remove the
Wall Mount Guide.
5. Push a screw (not supplied) through each
Holder-Screw, and then screw each screw
rmly into a support screw hole.
6. Install the 2 Bracket-Wall Mounts in the
correct orientation on the bottom of the
Soundbar using 2 Screws.
4. Using an appropriately sized drill bit, drill a
hole in the wall at each marking.
• If the markings do not correspond to the
positions of studs, make sure you insert
appropriate anchors or mollies into the
holes before you insert the support
screws. If you use anchors or mollies,
make sure the holes you drill are large
enough for the anchors or mollies you
use.
• Remove the Holder-Feet and
Holder-Supports if they are attached.
• When assembling, make sure the hanger
part of the Bracket-Wall Mounts are
located behind the rear of the Soundbar.
Rear of S oundbar
Right end o f Soundbar
ENG - 33
Page 40

7. Install the Soundbar with the attached
Bracket-Wall Mounts by hanging the
Bracket-Wall Mounts on the Holder-Screws
on the wall.
10 INSTALLING THE
HOLDER-FEET
Holder-Feet Components
x 2 x 2
8. Slide the Soundbar down as shown below so
that the Bracket-Wall Mounts rest securely
on the Holder-Screws.
• Insert the Holder-Screws into the wide
(bottom) part of the Bracket-Wall
Mounts, and then slide the Bracket-Wall
Mounts down so that the Bracket-Wall
Mounts rest securely on the
Holder-Screws.
Holder-Foot Holder-Support
x 2
Screw
• The Holder-Feet raise the Soundbar so you
can install the Soundbar in front of your TV
and above the legs of the TV’s stand. See the
illustration below.
• You can set the Holder-Feet to one of three
different heights.
• Using the Holder-Feet, you can adjust the
distance between the Soundbar and your TV
to t your TV stand’s shape.
TV
ENG - 34
Page 41

Raising the Soundbar 0.6 inches
(15 mm)
1. Use the 2 supplied Screws to x the two
Holder-Feet to the wall mount assembly on
the bottom panel of the Soundbar.
Raising the Soundbar 0.8 inches
(20 mm)
1. Attach the two Holder-Feet to the two
Holder-Supports, as shown in the gure
below.
11 SOFTWARE
UPDATE
When the Soundbar is connected to the Internet,
software updates automatically occur even when
the Soundbar is turned off.
• To use the Auto Update function, the
Soundbar must be connected to the Internet.
The Wi-Fi connection to the Soundbar will be
terminated if the Soundbar’s power cord is
disconnected or the power is cut off. If the
power is cut off, when the power comes back
on or you reconnect the power cord, turn on
the Soundbar, and then reconnect it to the
Internet.
2. Use the 2 supplied Screws to x the two
Holder-Feet to the Wall Mount assembly on
the bottom panel of the Soundbar.
ENG - 35
Page 42

12 TROUBLESHOOTING
Before seeking assistance, check the following.
The unit will not turn on.
Is the power cord plugged into the outlet?
; Connect the power plug to the outlet.
A function does not work when the button
is pressed.
Is there static electricity in the air?
; Disconnect the power plug and connect it
again.
Sound dropouts occur in BT mode.
; See the Bluetooth connection sections on
pages 12 and 19.
Sound is not produced.
Is the Mute function on?
; Press the (Mute) button to cancel the
mute function.
Is the volume set to minimum?
; Adjust the Volume.
The remote control does not work.
Are the batteries drained?
; Replace with new batteries.
Is the distance between the remote control and
Soundbar main unit too far?
; Move the remote control closer to the
Soundbar main unit.
The red LED on the subwoofer blinks and
the subwoofer is not producing sound.
This issue can occur if the subwoofer is not
connected to the Soundbar main unit.
; Try to connect your subwoofer again.
(See page 6.)
The subwoofer drones and vibrates
noticeably.
Try to adjust the vibration of your subwoofer.
; Push the WOOFER button on your remote
control up or down to adjust the subwoofer
volume. (to -12, or between -6 ~ +6).
Cannot connect to the TV.
If connected via a wired network
; Check if the cable is connected correctly.
– Check the port name to make sure
that the cable is connected to the
correct port. For instructions, see the
page explaining each connection
method.
; Press the (Source) button on the right
side panel of the Soundbar or on the
remote control to check if the mode is
correct.
If connected via a wireless net work
; Connected via Bluetooth
1. Switch the Soundbar to “BT PAIRING”
mode, and then use the TV to search
again. (See page 12 for details.)
ENG - 36
Page 43

; Connected via Wi-Fi
1. Check if the TV is a compatible model.
• Only Samsung Smart T Vs released
after 2013 are supported.
2. Check if the TV is connected to Wi-Fi.
• If the TV is not connected to Wi-Fi, use
the network menu on the TV to
establish a connection. (See the TV
user manual.)
3. Check if the Soundbar is connected to
Wi-Fi.
• When the Soundbar is connected, you
can nd it in the list of speakers on
your mobile device when you run the
SmartThings app. See page 22 for
details.
4. Check for a DFS channel.
• If your wireless router (Wi-Fi) is using a
DFS channel, you cannot establish a
Wi-Fi connection between the TV and
Soundbar. Contact your Internet
service provider for details.
13 LICENSE
Manufactured under license from Dolby
Laboratories. Dolby, Dolby Atmos, Dolby Audio,
Dolby Digital Plus, Pro Logic, and the double-D
symbol are trademarks of Dolby Laboratories.
For DTS patents, see http://patents.dts.com.
Manufactured under license from DTS
Licensing Limited. DTS, the Symbol, & DTS and
the Symbol together, DTS:X, and the DTS:X logo
are registered trademarks and/or trademarks
of DTS, Inc. in the United States and/or other
countries. © DTS, Inc. All Rights Reserved.
The terms HDMI and HDMI High-Denition
Multimedia Interface, and the HDMI Logo are
trademarks or registered trademarks of HDMI
Licensing LLC in the United States and other
countries.
ENG - 37
• The Spotify Software is subject to third
party licenses found here :
www.spotify.com/connect/third-partylicenses.
• For more information about Spotify
Connect, please visit www.spotify.com/
connect
Page 44

14 OPEN SOURCE
LICENSE NOTICE
For further information on Open Sources used in
this product, please visit the website:
http://opensource.samsung.com
15 IMPORTANT
NOTES ABOUT
SERVICE
Figures and illustrations in this User Manual are
provided for reference only and may differ from
actual product appearance.
ENG - 38
Page 45

16 SPECIFICATIONS AND GUIDE
Specications
Model Name HW-Q70R
Weight 7.9 lbs (3.6 kg)
Dimensions (W x H x D)
Operating Temperature Range +41°F to +95°F (+5°C to +35°C)
Operating Humidity Range 10 % ~ 75 %
AMPLIFIER
Rated Output power 30W x 5 + 10W x 2, 6ohm x 4 + 4ohm x 3
Supported play formats
Subwoofer Name PS-WR75B
Weight 21.6 lbs (9.8 kg)
Dolby Atmos (True HD / Digital Plus), DTS:X
43.3 x 2.3 x 3.9 inches
(1100.0 x 59.0 x 100.0 mm)
LPCM 8ch, Dolby Digital,
Dimensions (W x H x D)
AMPLIFIER
Rated Output power 160W
8.1 x 15.9 x 15.9 inches
(205.0 x 403.0 x 403.0 mm)
NOTES
• Samsung Electronics Co., Ltd reserves the right to change the specications without notice.
• Weight and dimensions are approximate.
Precaution : The Soundbar will restart automatically if you turn on/turn off Wi-Fi.
Wi-Fi
Port deactivation method
Bluetooth
Port deactivation method
Press at the center of the WOOFER (or BASS) button on the remote
control for 30 seconds or longer to turn the Wi-Fi On / Off.
Press the NETWORK button on the bottom panel of the Soundbar
for 30 seconds to turn Bluetooth On / Off.
ENG - 39
Page 46

LIMITED WARRANTY TO ORIGINAL PURCHASER
Samsung Electronics Canada Inc.(SECA), warrants that this product is free from
defective material and workmanship.
SECA further warrants that if this product falls to operate properly within the specied
warranty period and the failure is due to improper workmanship or defective
materials, SECA will repair or replace the product at its option.
All warranty repairs must be performed by a SECA Authorized Service Center. (The name and
address of the location nearest you can be obtained by calling toll free: 1- 800- SAMSUNG)
LABOR
One year (Carry- in)
On carry-in models, transportation to and from the service center is the customer’s
responsibility.
The original dated sales receipt must be retained by the customer and is the only
acceptable proof of purchase. It must be presented to the authorized service center at
the time service is requested.
PARTS
One year
EXCLUSIONS (WHAT IS NOT COVERED)
This warranty does not cover damage due to accident, re, ood and/ or other acts of
God; misuse, incorrect line voltage, improper installation, improper or unauthorized
repairs, commercial use or damage that occurs in shipping. Exterior and interior nish,
lamps, glass are not covered under this warranty. Customer adjustments which are
explained in the instruction manual are not covered under the terms of this warranty.
This warranty will automatically be voided for any unit found with a missing or altered
serial number. This warranty is valid only on products purchased and used in Canada.
Samsung Electronics Canada Inc
2050 Derr y Rd West
Mississauga, On. L5N 0B9
Tel: 1-800-SAMSUNG (726-7864)
Fax: (905) 542- 1199
Website: www.samsung.com/ca
Page 47

© 2019 Sams ung Electronics Co., Ltd. All rig hts reser ved.
Contact SAMSUNG WORLD WIDE
If you h ave any question s or comments rel ating to Samsun g products , please contact the S AMSUNG custo mer
care Center.
HEADQUARTERS
Samsun g Electronic s Canada Inc. 20 50 Derry Roa d West , Mississauga , Ontario L5N 0B9 Canada
TEL: 1-800-SAMSUNG (1-800-726-7864)
www.samsung.com/ca/support
Country Contact Center
`
North America
CANADA 1-800-SAMSUNG (726-7864)
U.S.A 1-800-SAMSUNG (726-7864) www.samsung.com/us/support
Web Site
www.samsung.com/ca/support (English)
www.samsung.com/ca_fr/support (French)
Page 48

MANUEL COMPLET
HW-Q70R
Imaginez les possibilités
Merci d’avoir choisi un appareil S amsung.
Pour recevoir une as sistance plus complète,
veuillez enregistrer votre produit sur
www.samsung.com/register
Page 49

INFORMATIONS RELATIVES À LA SÉCURITÉ
AVERTISSEMENTS
POUR ÉVITER LES RISQUES DE CHOC
ÉLECTRIQUE, NE DÉMONTEZ PAS LE CAPOT.
L’APPAREIL NE CONTIENT PAS DE PIÈCES
RÉPARABLES PAR L’UTILISATEUR. S’ADRESSER À
UN SERVICE APRÈS-VENTE QUALIFIÉ.
Reportez-vous au tableau ci-dessous pour
comprendre les symboles pouvant gurer sur
votre produit Samsung.
MISE EN GARDE
RISQU E DE CHOC
ÉLEC TRIQUE NE PAS
OUVRIR
Ce symbole indique la présence d'une
haute tension à l'intérieur. Tout contact
avec une pièce interne de l'appareil
présente un danger.
Ce symbole vous informe qu'une
documentation importante relative au
fonctionnement et à l'entretien est
fournie avec le produit.
Produit de catégorie II: Ce symbole
indique qu'il ne nécessite pas une
connextion de sécurité à la terre
(masse). Si ce symbole n'es t pas présent
sur un produit équipé d'un cordon
d'alimentation, le produit DOIT être
raccordé à la terre de manière able à
des ns de protection.
Tension CA: Ce symbole indique que la
tension nominale est la tension C A.
Tension CC : Ce symbole indique que la
tension nominale est la tension CC.
Attention, consultez les instructions aux
ns d'utilisation : Ce symbole indique à
l'utilisateur qu'il doit consulter le guide
d'utilisation pour avoir de l'information
au sujet de la sécurité.
AVERTISSEMENT
• An de diminuer les risques d’incendie ou de
choc électrique, n’exposez pas cet appareil à
la pluie ou à l’humidité.
• Pour éviter des blessures, cet appareil doit
être solidement xé au plancher/au mur
conformément aux directives d’installation.
MISE EN GARDE
• Veillez à éviter toute projection sur l’appareil.
Ne placez jamais de récipients contenant un
liquide (ex. : vase) dessus.
• La prise d’alimentation fait ofce de système
de déconnexion. Elle doit donc rester
disponible en permanence.
ATTENTION (Pour le Canada)
L’émetteur/récepteur exempt de licence contenu
dans le présent appareil est conforme aux CNR
d’Innovation, Sciences et Développement
économique Canada applicables aux appareils
radio exempts de licence. L’exploitation est
autorisée aux deux conditions suivantes :
1) L’appareil ne doit pas produire de brouillage;
2) L’appareil doit accepter tout brouillage
radioélectrique subi, même si le brouillage est
susceptible d’en compromettre le fonctionnement.
Cet appareil et son ou ses antennes ne doivent
pas etre installés a proximité ou etre utilisés
conjointement avec une autre antenne ou un
autre émetteur.
Le dispositif pourrait automatiquement cesser
d’émettre en cas d’absence d’informations à
transmettre, ou une défaillance opérationnelle.
Notez que ce n’est pas l’intention d’interdire la
transmission des informations de contrôle ou de
signalisation ou l’utilisation de codes répétitifs
lorsque requis par la technologie.
Cet appareil numerique de l a classe B est
conforme a la norme NMB -003 du Canada.
FRA - ii
Page 50

Declaration d’exposition aux radiations:
Cet equipement est conforme aux limites
d’exposition aux rayonnements IC RSS-102
etablies pour un environnement non controle.
Cet equipement doit etre installe et utilise avec
un minimum de 20 cm de distance entre la source
de rayonnement et votre corps.
Consignes de sécurité importantes
Lisez attentivement ces consignes avant d’utiliser
l’appareil. Veillez à respecter toutes les consignes
répertoriées ci-après. Conservez ces instructions à
portée de main pour vous y référer ultérieurement.
1. Lisez attentivement ces consignes.
2. Conservez-les précieusement.
3. Tenez compte de tous les avertissements
mentionnés.
4. Respectez toutes les instructions sans
exception.
5. N’utilisez pas cet appareil à proximité de
l’eau.
6. Nettoyez-le à l’aide d’un tissu sec.
7. Ne bloquez pas les ouvertures de ventilation.
Installez l’appareil conformément aux
instructions du fabricant.
8. N’installez pas le lecteur à proximité d’une
source de chaleur de type radiateur, registre
de chaleur, cuisinière ou tout autre appareil
(y compris les récepteurs AV) générateur de
chaleur.
9. Ne désactivez pas le dispositif de sécurité de
la che de mise à la terre ou de la che
polarisée. Une che polarisée comporte
deux lames dont l’une est plus large que
l’autre. Une che de mise à la terre comporte
deux lames et une troisième broche de mise
à la terre. La lame la plus large et la
troisième broche sont destinées à assurer
votre sécurité. Si la che fournie ne s’insère
pas dans la prise utilisée, faites appel à un
électricien pour faire remplacer celle-ci.
10. Placez le cordon d’alimentation de sorte qu’il
ne puisse être ni piétiné ni pincé,
particulièrement au niveau de la che, de la
prise de courant et du point de sortie de
l’appareil.
11. Utilisez exclusivement les xations/
accessoires spéciés par le fabricant.
12. Utilisez exclusivement le
meuble à roulettes, le socle, le
trépied, le support ou la table
recommandés par le fabricant
ou vendus avec l’appareil.
Si l’appareil est posé sur un meuble à
roulettes, déplacez l’ensemble avec
précaution pour éviter de faire tomber le
lecteur et de vous blesser.
13. Débranchez l’appareil en cas d’orage ou
lorsqu’il est inutilisé pendant une période
prolongée.
14. Conez toutes les réparations à un technicien
qualié. Votre appareil doit impérativement
être réparé lorsqu’il a été endommagé de
quelque manière que ce soit :
du cordon ou de la che d’alimentation,
projection de liquide sur l’appareil, chute
d’objets à l’intérieur de l’appareil, exposition
à la pluie ou à l’humidité, dysfonctionnement,
chute.
détérioration
FRA - iii
Page 51

PRÉCAUTIONS
1. Assurez-vous que le bloc d’alimentation CA
chez vous est conforme aux exigences de
puissance gurant sur la plaque
d’identication située à l’arrière de votre
produit. Installez votre produit
horizontalement, sur un socle approprié
(meuble), en laissant un espace sufsant
pour la ventilation sur le pourtour 3~4 po.
Faites attention à ne pas obstruer les orices
de ventilation. Ne posez pas l’ensemble sur
un amplicateur ou un autre appareil
susceptible de chauffer. Cet ensemble est
conçu pour une utilisation en continu.
Pour éteindre totalement l’appareil,
débranchez la che c.a. de la prise murale.
Débranchez l’appareil si vous prévoyez une
longue période d’inactivité.
2. En cas d’orage, débranchez la che de
l’appareil de la prise murale. Les surtensions
occasionnées par l’orage pourraient
endommager votre appareil.
3. N’exposez pas l’ensemble aux rayons directs
du soleil ou à toute autre source de chaleur.
Cela pourrait causer une surchauffe du l et
causer un dysfonctionnement de l’unité.
4.
Protégez le produit de l’humidité (comme les
vases) et d’une chaleur excessive (comme une
cheminée) ou de tout équipement capable de
créer des champs magnétiques ou électriques.
Débranchez le câble d’alimentation en cas de
dysfonctionnement. Votre produit n’est pas
prévu pour un usage industriel. Ce produit ne
peut être utilisé qu’à des ns personnelles.
Une condensation peut se former si le produit
ou un disque a été stocké à basse
température. Si vous devez transporter
l’ensemble pendant l’hiver, attendez environ
2 heures que l’appareil ait atteint la
température de la pièce avant de l’utiliser.
5. Les piles utilisées dans ce produit peuvent
contenir des produits chimiques dangereux
pour l’environnement. Ne jetez pas les piles
dans votre poubelle habituelle. Ne vous
débarrassez pas des piles en les faisant
brûler. Les piles ne doivent pas être courtcircuitées, démontées ou subir de surchauffe.
Le remplacement incorrect des piles peut
entraîner un danger d’explosion.
Remplacez-les uniquement par des produits
similaires ou équivalents.
FRA - iv
Page 52

À PROPOS DE CE MANUEL
Le manuel utilisateur se compose de deux éléments : la version papier simpliée du MANUEL
D’UTILISATEUR et un MANUEL COMPLET détaillé que vous pouvez télécharger.
MANUEL D’UTILISATEUR
Consultez ce manuel pour obtenir des instructions relatives à la
sécurité, ainsi que des informations sur l’installation du produit,
les composants, les connexions et les caractéristiques du
produit.
MANUEL COMPLET
Vous pouvez accéder au MANUEL COMPLET sur le centre
d’assistance à la clientèle en ligne de Samsung en scannant le
code QR sur la gauche. Pour visualiser le manuel sur votre
ordinateur ou appareil mobile, téléchargez-le au format
document depuis le site Web de Samsung.
(http://www.samsung.com/support)
La conception, les spécications techniques et l’écran Application sont susceptibles d'être modiés sans préavis.
FRA - v
Page 53

SOMMAIRE
01 VéricationdesComposants 2
Insertion des piles avant d’utiliser la télécommande (2 piles AA) ------------------------- 2
02 Présentation du Produit 3
Face avant/Face latérale droite du Soundbar
Partie inférieure du panneau du Soundbar ------------------------- 4
-------------------------
03 Branchement du Soundbar 5
Branchement de l’alimentation
Raccordement du Soundbar au caisson de basses
– Raccordement automatique du caisson des basses et du Soundbar
– Connexion manuelle du caisson des basses en cas d’échec de la
connexion automatique
Raccordement du module SWA-8500S (vendu séparément) au Soundbar
-------------------------
-------------------------
-------------------------
-------------------------
-------------------------
04 Branchement à votre Téléviseur 10
Méthode 1. Branchement avec un câble
– Branchement d’un téléviseur à l’aide d’un câble HDMI
– Branchement à l’aide d’un câble optique
Méthode 2. Connexion sans l
– Connexion d’un téléviseur par Bluetooth
– Connexion via Wi-Fi
-------------------------
-------------------------
-------------------------
-------------------------
-------------------------
-------------------------
05 Branchement d’un Périphérique Externe 16
3
5
6
6
7
8
10
10
11
12
12
14
Connexion à l’aide d’un câble HDMI (décodage et lecture
Dolby Atmos possible)
Branchement à l’aide d’un câble HDMI
Branchement à l’aide d’un câble optique
-------------------------
-------------------------
-------------------------
06 Branchement d’un Appareil Mobile 19
Connexion par Bluetooth
Connexion par Wi-Fi (réseau sans l)
-------------------------
-------------------------
FRA - vi
22
16
17
18
19
Page 54

07 Connecter un produit Amazon 24
Connecter et utiliser avec un produit Amazon (Amazon Echo) ------------------------- 24
Contrôler votre Soundbar grâce à un périphérique Amazon
-------------------------
08 Utlisation de la Télécommande 27
26
Procédure d’utilisation de la télécommande
Réglage du volume du Soundbar à l’aide d’une télécommande de téléviseur
Utilisation des boutons masqués (boutons ayant plusieurs fonctions)
Caractéristiques de sortie pour les différents modes d’effets sonores
-------------------------
---------------------------
-------------------------
-------------------------
30
09 Installation du Support Mural 32
Précautions d’installation
Composantes murales
-------------------------
-------------------------
32
32
10 Installation du pied de support 34
Composants du pied de support
-------------------------
34
11 Mise à jour Logicielle 35
12 Dépannage 36
13 Licence 37
14 Avis de Licences Libres 38
27
31
31
15 Remarque Importante Concernant le Service 38
16 Caractéristiques et Guide 39
Spécications
-------------------------
FRA - vii
39
Page 55

01 VÉRIFICATION DES COMPOSANTS
PAIR
SOUND
MODE
VOL WOOFER
SOUNDBAR
Unité principale du Soundb ar Caisson de basses Télécommande/
1
2
x 2
Cordon
d’alimentation
(Caisson de basses)
Adapta teur CA/CC
(Unité principale)
Pied de support Support Vis (Pie d de support )
x 2
Guide de montage mural Vis de support
Support mural
Piles
x 2
x 2
Câble HDMI
x 2
x 2
Vis
(Support mural)
• Pour obtenir de l’information sur la source d’alimentation et la consommation électrique, veuillez vous
reporter à l’étiquette apposée sur le produit. (Étiquette : Partie inférieure de l’unité principale du
Soundbar)
• Les étapes de connexion d’alimentation sont numérotées (1, 2). Pour plus d’informations sur les
connexions d’alimentation, reportez-vous à la page 5.
• Pour acheter des composants supplémentaires ou des câbles en option, veuillez contacter un
centre de service Samsung ou le service clientèle Samsung.
• Selon votre zone géographique, la prise CA peut avoir différents aspects et peut être fournie avec
l’adaptateur CA/CC intégré.
• Les accessoires pourraient légèrement différer de ceux gurant sur la photo ci-dessus.
Insertion des piles avant d’utiliser la télécommande (2 piles AA)
Faites glisser le couvercle des piles dans la
direction de la èche jusqu’à son retrait complet.
Insérez 2 piles AA (1,5V) dans le bon sens (polarité
correcte). Remettez le couvercle en place.
FRA - 2
Page 56

02 PRÉSENTATION DU PRODUIT
Face avant/Face latérale droite du Soundbar
Face droite d u Soundbar
Placez le produit de sorte que le
logo «Samsung Harman Kardon»
soit situé sur le dessus.
Afchage
Afche le statut et le mode actuel du produit.
Bouton +/- (Volum e)
Permet de régler le volume.
• Une fois réglé, le volume apparaît sur l’afchage avant du Soundbar.
Bouton (Alimentation)
Permet d'allumer et d'éteindre l'appareil.
• Fonction Auto Power Down
L’unité se met automatiquement hors tension dans les situations suivantes.
– Mode D.IN / HDMI / WIFI / BT: si, pendant 18 minutes, aucun signal audio n’est émis.
Bouton (Source)
Permet de sélec tionner le mode d'entrée source.
Mode d’entrée Afchage
Entrée numérique optique D.IN
Entrée ARC (HDMI OUT) D.IN TV ARC (Conversion automatique)
Entrée HDMI HDMI
Mode Wi-Fi WIFI
Mode BLUETOOTH BT
• Lorsque vous branchez le cordon c.a., la touche de mise en fonction s’activera dans un délai de 4 à
6 secondes.
• Lorsque vous mettez cet appareil sous tension, un délai de 4 à 5 secondes précède l’émission du son.
• Si vous souhaitez restituer le son uniquement du Soundbar, vous devez mettre les haut-parleurs du
téléviseur hors fonction dans le menu de réglage du son de votre téléviseur. Reportez-vous au
manuel fourni avec votre téléviseur.
FRA - 3
Page 57

Partie inférieure du panneau du Soundbar
NETWORK
Appuyez sur ce bouton pour connecter le produit à un réseau sans l (Wi-Fi) par le biais de l'application
SmartThings.
SERVICE
Connectez un périphérique de stockage USB pour mettre à niveau le logiciel du produit.
DC 19V (Entrée d'alimentation)
Se branche à l'adaptateur d'alimentation CA/CC.
HDMI IN
Permet d'entrer simultanément des signaux vidéo et audio numériques à l'aide d'un câble HDMI.
Se branche à la sor tie HDMI d'un périphérique ex terne.
HDMI OUT (TV-ARC)
Se branche au raccord HDMI (ARC) d'un téléviseur.
DIGITAL AUD IO IN (OPTIC AL)
Se branche à la sor tie numérique (optique) d'un périphérique ex terne.
• Lorsque vous débranchez d’une prise murale le câble d’alimentation de l’adaptateur CC/CA, tirez sur
la che. Ne tirez pas sur le câble.
• Ne raccordez pas cette unité ou d’autres composants à une prise secteur CA tant que tous les
composants ne sont pas connectés.
FRA - 4
Page 58

03 BRANCHEMENT DU SOUNDBAR
Branchement de l’alimentation
Utilisez les composants d’alimentation (
dans une prise électrique dans l’ordre suivant :
1 Raccordez le cordon d’alimentation au caisson de basses.
2 Connectez l’adaptateur d’alimentation à la Soundbar, puis à une prise murale.
Reportez-vous aux illustrations ci-dessous.
• Pour obtenir de l’information sur la source d’alimentation et la consommation électrique, veuillez
vous reporter à l’étiquette apposée sur le produit. (Étiquette : Partie inférieure de l’unité principale
du Soundbar)
1 Cordon
POWER
Arrièr e du caisson
des basses
d’alimentation
Branchement de
l’alimentation
1, 2
) an de brancher le caisson de basses et le Soundbar
2 Adaptateur C A/CC
DC 19V
(Prise
électrique)
Partie inférieure de
l’unité principale du
Soundbar
FRA - 5
Page 59

Raccordement du Soundbar au caisson de basses
Une fois le caisson des basses raccordé, protez de basses exceptionnelles.
Raccordement automatique du caisson des basses et du Soundbar
Lorsque vous allumez le produit après avoir branché les câbles d’alimentation sur le Soundbar et le
caisson des basses, ce dernier est automatiquement raccordé au Soundbar.
• Une fois l’appariement automatique terminé, les voyants bleus à l’arrière du caisson des basses
s’allument.
Voyants DEL à l’arrière du caisson des basses
DEL Statut Description Résolution
Activé
Bleu
Clignotant
Rouge Activé
Rouge et
bleu
Clignotant Dysfonctionnement
Connexion établie
(fonctionnement normal)
Récupération de la
connexion
Veille (unité principale du
Soundbar éteinte)
Échec de la connexion
-
Vériez si le câble d’alimentation branché à
l’unité principale du Soundbar est bien
connecté ou patientez 5 minutes. Si le
clignotement persiste, essayez de
connecter manuellement le caisson de
basses. Voir page 7.
Vériez que le câble d’alimentation est bien
branché sur l’unité principale du Soundbar.
Rebranchez le produit. Reportez-vous aux
instructions relatives au branchement
manuel à la page 7.
Recherchez les coordonnées du Centre de
service Samsung dans le manuel.
FRA - 6
Page 60

Connexion manuelle du caisson des basses en cas d’échec de la connexion automatique
Avant d’effectuer la procédure de connexion manuelle ci-dessous :
• Vériez que les câbles d’alimentation sont correctement branchés sur le Soundbar et le caisson
des basses.
• Assurez-vous que le Soundbar est allumé.
1. Appuyez sur le bouton ID SET situé à l’arrière du caisson des basses et maintenez-le appuyé
pendant au moins 5 secondes.
• Le voyant rouge situé à l’arrière du caisson des basses s’éteint et le voyant bleu clignote.
5 Sec
Arrièr e du caisson des b asses
2. Appuyez sur la touche Haut de la télécommande et maintenez-le enfoncé pendant au moins
5 secondes.
• Le message ID SET apparaît sur l’écran du Soundbar pendant un moment, puis disparaît.
• Le Soundbar est mis sous tension automatiquement lorsque ID SET est terminé.
PAIR
5 Sec
Le logo « Samsung Harma n Kardon» est
situé sur le dessus.
3. Vériez que le voyant LINK est bleu xe (connexion établie).
Le voyant LINK cesse de clignoter et s’allume
en bleu xe lorsqu’une connexion est établie
entre le Soundbar et le caisson de basses
sans l.
Le voyant b leu est
allumé
FRA - 7
ID SET
Page 61

REMARQUES
L
R
• Ne branchez pas le cordon d’alimentation de ce produit ou de votre téléviseur à une prise murale
tant que tous les composants ne sont pas connectés.
• Avant de déplacer ou d’installer ce produit, veillez à couper l’alimentation et à débrancher le cordon
d’alimentation.
• Si l’unité principale est mise hors tension, le caisson des basses sans l passe en mode veille, et la
DEL de STANDBY à l’arrière devient rouge après avoir clignoté en bleu plusieurs fois.
• Si vous utilisez un dispositif qui utilise la même fréquence (5,8 GHz) que le Soundbar près du
Soundbar, des interférences peuvent provoquer des interruptions du son.
• La distance maximale de transmission du signal sans l de l’unité principale est d’environ 32,8 pi,
mais peut varier en fonction de votre environnement d’utilisation. Si un mur métallique ou en béton
armé se trouve entre l’unité principale et le caisson des basses sans l, il est possible que le
système ne fonctionne pas, car le signal sans l ne peut pas traverser le métal.
PRÉCAUTIONS
• Les antennes de réception sans l sont intégrées au caisson des basses sans l. Maintenez les
unités à l’écart de l’eau et de l’humidité.
• Pour des performances d’écoute optimales, assurez-vous que la zone entourant le caisson des
basses sans l et le module récepteur sans l (vendu séparément) soit libre de tout obstacle.
Raccordement du module SWA-8500S (vendu séparément) au Soundbar
Passez à un véritable son ambiophonique sans l en connectant le nécessaire de haut-parleur arrière
sans l Samsung (SWA-8500S, vendu séparément) à votre Soundbar.
1. Connectez le module récepteur sans l à deux haut-parleurs surround.
– Les câbles du haut-parleur utilisent un code couleur.
L
R
SURROUND SPEAKERS OUT
SPEAKER IMPEDANCE : 3Ω
SURROUND-LEFT SURROUND-RIGHT
SURROUND-LEFT
ID SET
SURROUND-RIGHT
POWER
FRA - 8
Page 62

2. Vériez le statut de veille du module récepteur sans l après l’avoir branché dans une prise électrique.
LINK
POWER
ID SET
LINK
• Le voyant LED LINK (voyant bleu) du module récepteur sans l clignote. Si le voyant ne clignote
pas, appuyez sur le bouton ID SET à l’arrière du module de réception sans l à l’aide de la pointe
d’un stylo pendant 5 à 6 secondes, jusqu’à ce que le voyant LED LINK clignote (en bleu).
Pour plus d’information sur le voyant LED, veuillez consulter le manuel utilisateur SWA-8500S.
L
SURROUND SPEAKERS OUT
SPEAKER IMPEDANCE : 3Ω
R
ID SET
5 Sec
STANDBY
LINK
Le voyant cl ignote
POWER
en bleu
3. Appuyez sur la touche Haut de la télécommande et maintenez-le enfoncé pendant au moins
5 secondes.
• Le message ID SET apparaît sur l’écran du Soundbar pendant un moment, puis disparaît.
• Le Soundbar est mis sous tension automatiquement lorsque ID SET est terminé.
PAIR
5 Sec
situé sur le dessus.
MISE EN GARDE
• Si votre Soundbar est en train de lire de la musique lorsqu’il est connecté au module
SWA-8500S, vous entendrez probablement des grésillements provenant du haut-parleur lors
de la nalisation de la connexion.
4. Vériez que le voyant LINK est bleu xe (connexion établie).
Le voyant LINK cesse de clignoter et s’allume
en bleu xe lorsqu’une connexion est établie
Le logo « Samsung Harma n Kardon» est
STANDBY
LINK
entre le Soundbar et le module récepteur
sans l.
Le voyant b leu est
allumé
5. Si le module SWA-8500S n’est pas connecté, répétez la procédure décrite à l’étape 2.
FRA - 9
ID SET
Page 63

04 BRANCHEMENT À VOTRE TÉLÉVISEUR
Diffusez le son de votre téléviseur par le Soundbar à l’aide de connexion laires ou sans l.
• Lorsque le Soundbar est connecté à un téléviseur Samsung sélectionné, il peut être contrôlé à l’aide
de la télécommande du téléviseur.
– Cette fonction est prise en charge par les téléviseurs Samsung Smart sortis en 2017 ou après et
qui prennent en charge le Bluetooth lors de la connexion du Soundbar au téléviseur à l’aide d’un
câble optique.
– Cette fonction vous permet également d’utiliser le menu du téléviseur pour régler le son et
d’autres paramètres, ainsi que le volume et la mise en sourdine.
Méthode 1. Branchement avec un câble
Lorsque le son d’une diffusion est encodé en Dolby Digital et que le paramètre «Format audio de sortie
numérique» est déni sur PCM sur votre téléviseur, nous recommandons de changer ce paramètre en le
dénissant sur Dolby Digital. Une fois que vous avez modié le paramètre sur le téléviseur, vous pouvez
proter d’une meilleure qualité sonore. (Le menu du téléviseur peut utiliser différents termes pour
Dolby Digital et PCM, selon le fabricant du téléviseur.)
Branchement d’un téléviseur à l’aide d’un câble HDMI
VéricationduportHDMIIN
(ARC) de votre téléviseur.
Partie inférieure du panneau du Soundbar
HDMI IN
(ARC)
VériezleportHDMIOUT(TV-ARC)
sur l'unité principale du Soundbar.
1. Allumez le Soundbar et le téléviseur, puis branchez le câble HDMI comme indiqué sur l’image.
2. «TV ARC» s’afche sur l’écran d’afchage de l’unité principale du Soundbar et le son du téléviseur
est diffusé.
• Si le son du téléviseur est inaudible, appuyez sur le bouton (Source) situé sur la
télécommande ou sur la face droite du Soundbar pour passer en mode «D.IN». L’écran afche à
la suite «D.IN» et «TV ARC», et le son du téléviseur est diffusé.
Câble HDMI
FRA - 10
TV ARC
Face droite du S oundbar
Page 64

• Si l’option « TV ARC » ne s’afche pas sur l’écran du Soundbar, vériez que le câble HDMI est
connecté au bon port.
• Utilisez les boutons de volume de la télécommande du téléviseur pour régler le volume du
Soundbar.
REMARQUES
• HDMI est une interface qui permet la transmission numérique de données vidéo et audio avec un
seul connecteur.
• Si le téléviseur dispose d’un port ARC, connectez le câble HDMI au port HDMI IN (ARC).
• Nous vous recommandons d’utiliser un câble HDMI sans noyau si possible. Si vous utilisez un câble
HDMI avec noyau, utilisez-en un dont le diamètre est inférieur à 0,55 po.
• La fonction Anynet+ doit être activée.
• Cette fonction n’est pas disponible si le câble HDMI ne prend pas en charge l’ARC.
Branchement à l’aide d’un câble optique
Partie inférieure du panneau du Soundbar
OPTICAL OUT
Câble optique
(non fourni)
D.IN
1. Branchez le connecteur DIGITAL AUDIO IN (OP TICAL) du Soundbar sur le connecteur OPTICAL
OUT du téléviseur avec un câble optique (non fourni) numérique.
2. Appuyez sur le bouton (Source) situé sur la face latérale droite ou sur la télécommande, puis
sélectionnez le mode «D.IN».
FRA - 11
Face droite du S oundbar
Page 65

Auto Power Link
La fonction Auto Power Link active le Soundbar lorsque le téléviseur est allumé.
1. Connectez le Soundbar et un téléviseur à l’aide d’un câble optique (non fourni) numérique.
2. Appuyez sur la touche Gauche de la télécommande pendant 5 secondes pour
activer ou désactiver la fonction Auto Power Link.
• La fonction Auto Power Link est ON par défaut.
(Pour désactiver cette fonction, appuyez sur la touche Gauche de la
télécommande pendant 5 secondes).
• En fonction du périphérique branché, il se peut que la fonction Auto Power
Link ne fonctionne pas.
• Cette fonction est uniquement disponible en mode «D.IN».
Méthode2.Connexionsansl
Connexion d’un téléviseur par Bluetooth
Lorsqu’un téléviseur est connecté par Bluetooth, vous pouvez proter du son stéréo sans vous
encombrer avec des câbles.
• Un seul téléviseur peut être connecté à la fois.
OU
PAIR
Connexion initiale
1. Appuyez sur le bouton PAIR de la télécommande pour accéder au mode «BT PAIRING».
a. Appuyez sur le bouton (Source) sur le panneau à droite puis sélectionnez «BT».
(OU)
«BT» devient «BT READY» automatiquement en quelques secondes si aucun dispositif
Bluetooth n’est connecté au Soundbar.
b. Lorsque «BT READY» apparaît, appuyez sur le bouton (Source) sur le panneau droit
du Soundbar et maintenez-le enfoncé pendant plus de 5 secondes jusqu’à ce que
«BT PAIRING» apparaisse.
2. Sélectionnez le mode Bluetooth sur le téléviseur. (Pour plus d’informations, reportez-vous au
manuel du téléviseur.)
3. Sélectionnez «[AV] Samsung Soundbar Q70R» dans la liste afchée sur l’écran du téléviseur.
Lorsqu’un Soundbar est disponible, il a le statut «Need Pairing» ou «Paired» dans la liste des
périphériques Bluetooth du téléviseur. Pour se connecter au Soundbar, sélectionnez le message et
établissez une connexion.
• Lorsque le téléviseur est connecté, [Nom du téléviseur] → «BT» s’afche sur l’écran situé à
l’avant du Soundbar.
4. Le son du téléviseur est désormais diffusé sur le Soundbar.
FRA - 12
Page 66

En cas d’échec de la connexion du périphérique
• Si l’entrée correspondant au Soundbar précédemment connecté (par ex., «[AV] Samsung Soundbar
Q70R») gure dans la liste, supprimez-la.
• Répétez ensuite les étapes 1 à 3.
REMARQUE
• Une fois que vous avez connecté le Soundbar à votre téléviseur la première fois, utilisez le mode
«BT READY» pour la reconnexion.
Déconnexion du Soundbar du téléviseur
Appuyez sur le bouton (Source) situé sur la face latérale droite ou sur la télécommande, puis
sélectionnez un autre mode que «BT».
• La déconnexion prend du temps car le téléviseur doit recevoir une réponse du Soundbar.
(Le temps requis peut différer en fonction du modèle du téléviseur.)
• Pour annuler la connexion Bluetooth automatique entre le Soundbar et le téléviseur, appuyez sur la
touche p (Lecture/Pause) de la télécommande pendant 5 secondes en mode «BT READY».
(La fonction passe de Activé à Désactivé)
Quelle est la différence entre BT READY et BT PAIRING ?
• BT READY : Dans ce mode, vous pouvez rechercher les téléviseurs connectés précédemment ou
brancher un appareil mobile précédemment connecté dans le Soundbar.
• BT PAIRING : Dans ce mode, vous pouvez connecter un nouvel appareil au Soundbar (Appuyez sur
la touche PAIR de la télécommande et maintenez la touche (Source) enfoncée pendant plus
de 5 secondes pendant que le Soundbar est en mode «BT».).
REMARQUES
• Si vous êtes invité à saisir un code PIN lors de la connexion à un périphérique Bluetooth, entrez
<0000>.
• En mode de connexion Bluetooth, la connexion Bluetooth est perdue si la distance entre le
Soundbar et le périphérique Bluetooth est supérieure à 32,8 pi.
• Le Soundbar se désactive automatiquement après avoir passé 18 minutes à l’état Prêt.
• Il se peut que le Soundbar n’effectue pas correctement la recherche ou la connexion Bluetooth
dans les cas suivants :
– En présence d’un champ électrique puissant dans l’environnement du Soundbar.
– En cas d’appariement simultané de plusieurs périphériques Bluetooth avec le Soundbar.
– En cas de désactivation, de mauvais positionnement ou de dysfonctionnement du périphérique
Bluetooth.
• Les appareils électroniques peuvent créer des interférences radio. Les appareils produisant des
ondes électromagnétiques doivent être gardés à distance de l’unité principale du Soundbar, par
exemple les micro-ondes, les appareils de réseau sans l, etc.
FRA - 13
Page 67

Connexion via Wi-Fi
Liste de contrôle avant la connexion
1. Vériez que votre téléviseur Samsung Smar t a été mis en marché après 2013. Cette fonction est
compatible uniquement avec les téléviseurs Samsung Smart mis en marché après 2013.
2. Assurez-vous que votre routeursansl(Wi-Fi) est prêt et qu’il fonctionne.
3. Assurez-vous que le téléviseurestconnectéaurouteursansl(votreréseauWi-Fi).
Face droite du S oundbar
Étape1:ConnexiondelaSoundbarauWi-Fi
1. Appuyez sur le bouton
sélectionner le mode «WIFI».
• Lors de l’utilisation des téléviseurs Samsung sélectionnés (téléviseurs intelligents Samsung de
2016 à 2018 prenant en charge le Bluetooth).
– Si vous sélectionnez le mode «WIFI» lorsque le téléviseur est allumé, l’écran du téléviseur
afche une fenêtre surgissante fournissant des instructions sur la connexion automatique
de la Soundbar à un routeur sans l (Wi-Fi). Suivez les instructions de la fenêtre surgissante
sur le téléviseur.
(Source)
sur le côté droit du Soundbar ou sur la télécommande pour
Face droite du S oundbar
WIFI
2. Connectez votre appareil mobile (téléphone intelligent, tablette, etc) au réseau Wi-Fi auquel le
téléviseur est connecté.
3. Installez et lancez l’application SmartThings sur votre appareil mobile (téléphone intelligent,
tablette, etc).
iOSAndroid
4. Suivez les instructions de l’application à l’écran sur l’appareil mobile pour connecter la Soundbar à
votre réseau Wi-Fi.
FRA - 14
Application SmartThings
Page 68

Étape2:Congurationdesréglagessurletéléviseur
• Si le téléviseur se déconnecte de votre réseau sans l après que vous avez basculé la source
d’entrée sur la Soundbar, utilisez le menu du téléviseur pour reconnecter celui-ci au réseau.
Pour les téléviseurs sortis en 2019
Accueil ( ) Paramètres ( ) Son Sortie audio [AV] Samsung Soundbar Q70R (Wi-Fi)
Pour les téléviseurs sortis en 2018
Accueil ( ) Paramètres ( ) Son Sortie audio [AV] Samsung Soundbar Q70R (Wi-Fi)
Pour les téléviseurs sortis en 2017
Accueil ( ) Paramètres ( ) Son Sortie audio [AV] Samsung Soundbar Q70R (Wi-Fi)
Pour les téléviseurs sortis en 2016
Accueil ( ) Paramètres ( ) Son Sélectionner le haut-parleur [AV] Samsung Soundbar Q70R
(Wi-Fi)
Pour les téléviseurs sortis en 2015
Menu Son Liste des haut-parleurs
Pour les téléviseurs sortis en 2014
Menu Son Paramètres haut-parleur Multiroom Link - Paramètres
REMARQUES
• Le téléviseur et la Soundbar doivent être connectés au même réseau sans l (Wi-Fi).
• Si votre routeur sans l (Wi-Fi) utilise un canal DFS, vous ne serez pas en mesure d’établir une
connexion Wi-Fi entre le téléviseur et la Soundbar. Contactez votre fournisseur de services Internet
pour plus de détails.
• Si la connexion Wi-Fi 5 GHz n’est pas uide, utilisez la bande passante de 2,4 GHz.
• Étant donné que les menus peuvent varier selon l’année de fabrication, consultez le manuel de
votre téléviseur.
FRA - 15
Page 69

05 BRANCHEMENT D’UN PÉRIPHÉRIQUE
EXTERNE
Établissez une connexion à un périphérique externe à l’aide d’un réseau laire ou sans l an de diffuser
le son de celui-ci sur le Soundbar.
Connexion à l’aide d’un câble HDMI (décodage et lecture Dolby Atmos possible)
• Lorsque vous utilisez Dolby Atmos® : Si la source d’entrée est Dolby Atmos®, la sortie sont fait par
le canaux 3.1.2. Lorsque Dolby Atmos® est actif, les modes d’effets sonores des Soundbar contrôlés
par le bouton SOUND MODE ne sont pas disponibles.
• Important: Ce produit prend en charge le Dolby Atmos® uniquement en mode HDMI.
Partie inférieure du panneau du
Soundbar
Périphérique
externe
HDMI OUT
HDMI IN
(ARC)
Câble HDMI
Câble HDMI
HDMI
1. Branchez un câble HDMI entre le connecteur HDMI IN situé à l’arrière du produit et le connecteur
HDMI OUT de votre périphérique numérique.
2. Branchez un câble HDMI entre le connecteur HDMI OUT (TV-ARC) situé à l’arrière du produit et le
connecteur HDMI IN de votre téléviseur.
3. Appuyez sur le bouton (Source) situé sur la face latérale droite ou sur la télécommande, puis
sélectionnez le mode «HDMI».
4. Le mode «HDMI» est afché sur l’écran d’afchage du Soundbar et le son est diffusé.
REMARQUE
• Lorsque le Dolby Atmos® est activé, «DOLBY ATMOS» s’afche sur l’écran avant.
FRA - 16
Face droite du S oundbar
Page 70

CongurerleDolbyAtmos®survotrelecteurBlu-rayouautreappareil.
• Ouvrez les options de sortie audio dans le menu des paramètres de votre lecteur Blu-ray ou d’un
autre appareil et vériez que «Aucun encodage» est sélectionné pour le Bitstream. Par exemple,
sur un lecteur Blu-ray Samsung, accédez à Menu Accueil → Son → Sortie numérique et sélectionnez
Bitstream (non traité).
• Si les options de sortie audio incluent une sortie audio secondaire, vériez que la sortie audio
secondaire est désactivée.
• Vériez que le contenu prend en charge le Dolby Atmos®.
Branchement à l’aide d’un câble HDMI
Partie inférieure du panneau du
Soundbar
Périphérique
externe
HDMI OUT
Câble HDMI
HDMI IN
(ARC)
Câble HDMI
HDMI
1. Branchez un câble HDMI entre le connecteur HDMI IN situé à l’arrière du produit et le connecteur
HDMI OUT de votre périphérique numérique.
2. Branchez un câble HDMI entre le connecteur HDMI OUT (TV-ARC) situé à l’arrière du produit et le
connecteur HDMI IN de votre téléviseur.
3. Appuyez sur le bouton (Source) situé sur la face latérale droite ou sur la télécommande, puis
sélectionnez le mode «HDMI».
4. Le mode «HDMI» est afché sur l’écran d’afchage du Soundbar et le son est diffusé.
FRA - 17
Face droite du S oundbar
Page 71

Branchement à l’aide d’un câble optique
Lect eur BD/DVD /
Décode ur /
Console d e jeu
OPTICAL OUT
Câble optique
(non fourni)
Partie inférieure du panneau du Soundbar
D.IN
1. Branchez le connecteur DIGITAL AUDIO IN (OP TICAL) de l’unité principale sur le connecteur
OPTICAL OUT du périphérique source à l’aide d’un câble optique (non fourni) numérique.
2. Sélectionnez le mode «D.IN» en appuyant sur le bouton (Source) sur la face latérale droite ou
sur la télécommande.
Face droite du S oundbar
FRA - 18
Page 72

06 BRANCHEMENT D’UN APPAREIL MOBILE
Connexion par Bluetooth
Lorsqu’un appareil mobile est connecté par Bluetooth, vous pouvez proter du son stéréo sans vous
encombrer avec des câbles.
• Vous ne pouvez pas connecter plusieurs périphériques Bluetooth simultanément.
PAIR
Périphérique Bluetooth
OU
Connexion initiale
1. Appuyez sur le bouton PAIR de la télécommande pour accéder au mode «BT PAIRING».
(OU)
a. Appuyez sur le bouton (Source) sur le panneau à droite puis sélectionnez «BT».
«BT» devient «BT READY» automatiquement en quelques secondes si aucun dispositif
Bluetooth n’est connecté au Soundbar.
b. Lorsque «BT READY» apparaît, appuyez sur le bouton (Source) sur le panneau droit
du Soundbar et maintenez-le enfoncé pendant plus de 5 secondes jusqu’à ce que
«BT PAIRING» apparaisse.
2. Sur votre appareil, sélectionnez «
• Lorsqu’un Soundbar est connecté au périphérique Bluetooth, [Nom du périphérique Bluetooth]
→ «BT» apparaît sur l’écran situé à l’avant.
3. Lisez des morceaux depuis le périphérique, connecté par Bluetooth, via le Soundbar.
[AV] Samsung Soundbar Q70R
» dans la liste qui apparaît.
En cas d’échec de la connexion du périphérique
• Si l’entrée correspondant au Soundbar précédemment connecté (par ex., «[AV] Samsung Soundbar
Q70R») gure dans la liste, supprimez-la.
• Répétez ensuite les étapes 1 et 2.
REMARQUE
• Une fois que vous avez connecté le Soundbar à votre appareil mobile la première fois, utilisez le
mode «BT READY» pour la reconnexion.
FRA - 19
Page 73

Quelle est la différence entre BT READY et BT PAIRING ?
• BT READY : Dans ce mode, vous pouvez rechercher les téléviseurs connectés précédemment ou
brancher un appareil mobile précédemment connecté dans le Soundbar.
• BT PAIRING : Dans ce mode, vous pouvez connecter un nouvel appareil au Soundbar. (Appuyez sur
la touche PAIR sur la télécommande, ou appuyez sur la touche (Source) sur le panneau droit
du Soundbar et maintenez-la enfoncée pendant plus de 5 secondes en mode «BT».)
REMARQUES
• Si vous êtes invité à saisir un code PIN lors de la connexion à un périphérique Bluetooth, entrez
<0000>.
• En mode de connexion Bluetooth, la connexion Bluetooth est perdue si la distance entre le
Soundbar et le périphérique Bluetooth est supérieure à 32,8 pi.
• Le Soundbar se désactive automatiquement après avoir passé 18 minutes à l’état Prêt.
• Il se peut que le Soundbar n’effectue pas correctement la recherche ou la connexion Bluetooth
dans les cas suivants :
– En présence d’un champ électrique puissant dans l’environnement du Soundbar.
– En cas d’appariement simultané de plusieurs périphériques Bluetooth avec le Soundbar.
– En cas de désactivation, de mauvais positionnement ou de dysfonctionnement du périphérique
Bluetooth.
• Les appareils électroniques peuvent créer des interférences radio. Les appareils produisant des
ondes électromagnétiques doivent être gardés à distance de l’unité principale du Soundbar, par
exemple les micro-ondes, les appareils de réseau sans l, etc.
• Le Soundbar prend en charge les données SBC (44,1kHz, 48kHz).
• La connexion est possible uniquement sur un périphérique Bluetooth compatible avec la fonction
A2DP (AV).
• Vous ne pouvez pas brancher le Soundbar à un dispositif Bluetooth qui prend seulement en charge
la fonction HF (Hands Free).
• Une fois l’appariement du Soundbar avec un périphérique Bluetooth réalisé, la sélection de
«[AV ] Samsung Soundbar Q70R» dans la liste des périphériques numérisés de l’appareil fera
automatiquement passer le Soundbar en mode «BT».
– Accessible seulement si le Soundbar est énuméré dans la liste des dispositifs Bluetooth
appariés. (Le dispositif Bluetooth et le Soundbar doivent avoir été appariés précédemment au
moins une fois.)
• Soundbar apparaîtra dans la liste des appareils recherchés du dispositif Bluetooth seulement si le
Soundbar afche la mention «BT READY».
• Le Soundbar ne peut pas être associé à un autre appareil Bluetooth s’il est déjà en mode Bluetooth
et qu’il est déjà associé à un appareil Bluetooth.
FRA - 20
Page 74

Déconnexion d’un périphérique Bluetooth d’un Soundbar
Vous pouvez déconnecter le périphérique Bluetooth à partir du système Soundbar. Pour des directives,
consultez le manuel d’utilisation du périphérique Bluetooth.
• Le système Soundbar sera déconnecté.
• Lorsque le système Soundbar est déconnecté du périphérique Bluetooth, Soundbar afche le
message «BT DISCONNECTED» sur le panneau avant.
Déconnexion du Soundbar du périphérique Bluetooth
Appuyez sur le bouton (Source) situé sur la face latérale droite ou sur la télécommande, puis
sélectionnez un autre mode que «BT».
• La déconnexion prend du temps car le périphérique Bluetooth doit recevoir une réponse du
Soundbar. (Le temps de déconnexion requis peut différer en fonction du périphérique Bluetooth.)
• Lorsque le Soundbar est déconnecté du périphérique Bluetooth, le message
«BT DISCONNECTED» s’afche sur l’écran à l’avant du Soundbar.
REMARQUES
• En mode de connexion Bluetooth, la connexion Bluetooth sera perdue si la distance entre Soundbar
et l’appareil dépasse 32,8 pi.
• Le périphérique s’éteint automatiquement au bout de 18 minutes dans l’état Prêt.
Davantage d’information sur la technologie Bluetooth
Bluetooth est une technologie facilitant l’interconnexion d’appareils compatibles Bluetooth via une
connexion sans l à faible distance.
• Un appareil Bluetooth peut engendrer des bruits ou un dysfonctionnement selon les conditions
d’utilisation:
– Si une partie du corps est en contact avec le système de réception/transmission du
périphérique Bluetooth ou du système Soundbar.
– Variations électriques dues à un brouillage du signal par un mur, un coin ou une cloison de
bureau.
– Interférences électriques causées par des appareils fonctionnant sur la même bande de
fréquence, notamment équipements médicaux, fours à micro-ondes et réseaux locaux sans l.
• Maintenez la distance la plus courte possible lorsque vous jumelez le système Soundbar avec le
périphérique Bluetooth.
• La qualité diminue parallèlement à la distance entre le système Soundbar et le périphérique
Bluetooth. Si la distance excède la portée opérationnelle du périphérique Bluetooth, la connexion
est perdue.
• La connexion Bluetooth peut s’avérer déciente dans les zones à faible réception.
• La connexion Bluetooth ne fonctionne que lorsque l’appareil concerné est à proximité de l’unité. La
connexion sera automatiquement interrompue si la distance excède la portée. Même dans les limites
de cette portée, des obstacles tels que des murs ou des portes peuvent dégrader la qualité sonore.
• Le fonctionnement de ce périphérique sans l peut engendrer un brouillage électrique.
FRA - 21
Page 75

ConnexionparWi-Fi(réseausansl)
• Connectez une seule Soundbar au Wi-Fi pour accéder à toute une gamme de services de diffusion
de musique en continu et à la radio sur Internet. Connectez plusieurs Soundbars au Wi-Fi pour
utiliser la lecture groupée ou le mode de son stéréo.
• Pour connecter une Soundbar à un appareil mobile via un réseau sans l (Wi-Fi), l’application
SmartThings est nécessaire.
Face droite du S oundbar
Appareil mobile
Connexion initiale
1. Appuyez sur le bouton
sélectionner le mode «WIFI».
(Source)
sur le côté droit du Soundbar ou sur la télécommande pour
Face droite du S oundbar
WIFI
2. Installez et lancez l’application SmartThings sur votre appareil mobile (par exemple, téléphone
intelligent ou tablette).
iOSAndroid
FRA - 22
Application SmartThings
Page 76

3. Lancez l’application puis suivez les instructions à l’écran pour enregistrer (ajouter) votre Soundbar
dans l’application.
• La fenêtre contextuelle automatique (troisième illustration ci-dessous) peut ne pas être
disponible sur certains dispositifs mobiles.
Si c’est le cas, sélectionnez et complétez «Add device» à partir du menu de l’application. Votre
Soundbar a été ajouté à l’application.
Lancez
l’application
REMARQUE
• Pour connecter un haut-parleur arrière sans l SWA-8500S supplémentaire (non fourni),
débranchez les haut-parleurs sans l Samsung du Soundbar pour désactiver le système de son
ambiophonique. (Si vous connectez les haut-parleurs ambiophoniques sans déconnecter les
haut-parleurs SWA-8500S, le son provient du haut-parleur sans l Samsung et du haut-parleur
ambiophonique.)
Notication
automatique
Ajoutez des haut-
parleurs
FRA - 23
Page 77

07 CONNECTER UN PRODUIT AMAZON
• Cette fonction peut ne pas être disponible dans certains pays.
• Ce service est fourni par Amazon et peut être résilié à tout moment. Samsung n’assume pas la
responsabilité de la disponibilité du service.
• L’écran de l’application Amazon Alexa peut faire l’objet d’une modication sans préavis.
Connecter et utiliser avec un produit Amazon (Amazon Echo)
Utilisez un produit Amazon Echo pour contrôler votre Soundbar et proter des services musicaux fournis
par Amazon Echo.
REMARQUE
• Vériez que votre Soundbar est connecté au Wi-Fi. (reportez-vous à «Connexion par Wi-Fi (réseau
sans l)»)
1. Dans l’application SmartThings, modiez le nom de votre Soundbar pour qu’il soit reconnu par
votre périphérique Amazon.
(Exemple : Samsung, Soundbar, Salon, Séjour, Chambre, Bureau, etc.)
MISE EN GARDE
• Les périphériques Amazon peuvent ne pas reconnaître les noms contenant des caractères
spéciaux.
Sélectionnez les
haut-parleurs
FRA - 24
Modiez le nom
EnregistrezSélectionnez Edit
Page 78

2. Dans l’application Alexa, recherchez «Samsung Wireless Audio» dans Skills, puis sélectionnez
«ENABLE».
• Ignorez cette étape si vous avez déjà conguré l’option Skills.
Application
Amazon Alexa
Sélectionnez
Skills
Recherchez Activez
FRA - 25
Page 79

Contrôler votre Soundbar grâce à un périphérique Amazon
• Le service Amazon Echo que vous pouvez utiliser avec votre Soundbar est limité à la musique.
Vous pouvez accéder à d’autres services fournis par Amazon Echo, comme les informations et la
météo, grâce à votre produit Amazon Echo.
Déclencheur + Commande + Nom du haut-parleur
Utilisezlenomduhaut-parleurquevousavezmodiédansl’applicationSmartThings.
(reportez-vous à «Connecter et utiliser avec un produit Amazon (Amazon Echo)»)
Action Commande vocale
Pour rechercher un périphérique audio ajouté
au compte SmartThings relié au compte
Amazon Alexa
* Pour utiliser les commandes vocales pour le Soundbar nommé « Salon»
Action Commande vocale
Pour régler le volume sur 5 «Alexa Régler le volume sur 5 dans le Salon»
« Alexa Découvrir les périphériques »
Pour augmenter le volume «Alexa Augmenter le volume au Salon»
Pour couper le son «Alexa Couper le son au Salon»
Pour écouter une station de radio appelée KISS FM
Pour lire la chanson suivante «Alexa Chanson suivante au Salon»
Pour arrêter l’audio « Alexa Stop au Salon»
Pour allumer l’audio «Alexa Allumer au Salon»
Pour éteindre l’audio «Alexa Éteindre au Salon»
Modier la source d’entrée «Alexa Passer en Bluetooth dans le Salon»
«Alexa Jouer Kiss FM au Salon»
FRA - 26
Page 80

08 UTLISATION DE LA TÉLÉCOMMANDE
PAIR
PAIR
Procédure d’utilisation de la télécommande
PAIR
SOUND
MODE
VOL WOOFER
SOUNDBAR
Alimentation
SOUND MODE
Source
Mise en
sourdine
SOUND
MODE
Permet d'allumer et d'éteindre le Soundbar.
Appuyez sur ce bouton pour sélectionner une
source connectée au Soundbar.
Appuyez sur la touche (Mise en sourdine)
pour désactiver le son. Appuyez de nouveau sur
la touche pour activer le son.
Vous pouvez sélectionner le mode audio de
votre choix : STANDARD, SURROUND, GAME
PRO ou ADAPTIVE SOUND.
Sélectionnez le mode «STANDARD» si vous
voulez proter du son d'origine.
• Mode GAME PRO
Plongez dans l’action grâce à une
conguration dédiée à l’optimisation du son,
en particulier pour les jeux.
• Mode ADAPTIVE SOUND
Ce mode analyse automatiquement le
contenu et vous garantit un son optimisé
pour votre utilisation il améliore
automatiquement la clarté des voix sur les
volumes bas.
PAIR
Bluetooth
PAIR
FRA - 27
Appuyez sur la touche PAIR. «BT PAIRING»
apparaît sur l'écran du Soundbar.
Vous pouvez connecter le Soundbar à un nouvel
appareil Bluetooth dans ce mode en
sélectionnant le Soundbar dans la lis te de
recherche de l'appareil Bluetooth.
Page 81

Lecture/Pause
(BT/Wi -Fi )
Haut/Bas/
Gauche/
Droite
Appuyez sur le bouton p pour mettre temporairement un morceau en pause.
Si vous appuyez à nouveau sur le bouton, le morceau est lu.
Appuye z sur les zones indiq uées pour séle ctionner le bou ton
du Haut/Bas/Gauche/Droite.
Appuyez sur le bouton du Haut/Bas/Gauche/Droite pour sélectionner ou dénir des
fonctions.
• Passer un morce au
Appuyez sur le bouton de Droite pour sélectionner le prochain morceau. Appuyez sur
le bouton de Gauche pour sélectionner le morceau précédent.
• Anynet+ / Auto P ower Link
Vous pouvez activer ou désactiver la fonction Anynet+ ou Auto Power Link.
Les fonc tions Anynet+ et Auto Power Link peuvent être respectivement activées et
désac tivées à l’aide des boutons Droite et Gauche.
– Anynet+ : si le Soundbar est relié à un téléviseur Samsung par un câble HDMI, vous
pouvez le commander à l’aide de la télécommande du téléviseur.
Appuyez sur le bouton de Droite et maintenez-le enfoncé pendant 5 secondes
pour régler la fonction Anynet+ sur ON ou OFF.
– Auto Power Link : si le Soundbar est connecté à votre téléviseur par le biais d’un
câble optique numérique, le Soundbar peut s’activer automatiquement lorsque
vous allumez votre téléviseur. Appuyez sur le bouton de Gauche et maintenez-le
enfoncé pendant 5 secondes pour régler la fonction Auto Power Link sur ON ou
OFF.
– Les fonctions Anynet+/Auto Power Link sont réglées sur ON par défaut.
• ID SET
Maintenez le bouton Haut enfoncé pendant 5 secondes pour terminer ID SET (lors de la
connexion d’un accessoire).
FRA - 28
Page 82

PAIR
SOUNDBAR
SOUNDBAR
SOUND
MODE
PAIR
SOUND
MODE
VOL
WOOFER
SOUNDBAR
SOUND
MODE
VOL
WOOFER
SOUNDBAR
SOUNDBAR
SOUNDBAR
Contrôle du son
Vous pouvez sélectionner TREBLE, BASS, SYNC, CENTER LEVEL, SIDE LEVEL, FRONT TOP
LEVEL, REAR LEVEL et VIRTUAL ON/OFF.
– Pour contrôler le volume du son des aigus ou des basses, sélectionnez TREBLE ou
BASS dans les réglages sonores puis réglez le volume entre -6 et +6 à l’aide des
boutons Haut/Bas.
– Maintenez le bouton (Contrôle du son) enfoncé environ 5 secondes pour régler le
son pour chaque bande de fréquence. Vous pouvez utiliser les boutons Gauche/
Droite pour sélectionner les fréquences suivantes : 150 Hz, 300 Hz, 600 Hz, 1,2 kHz,
2,5 kHz, 5 kHz et 10 kHz. Vous pouvez également dénir chaque fréquence sur une
valeur allant de -6 à +6 à l’aide des touches Haut/Bas.
– Pour contrôler le volume de chaque haut-parleur, sélectionnez CENT ER LEVEL, SIDE
LEVEL ou FRONT TOP LEVEL dans Réglages sonores puis réglez le volume entre -6 et
+6 à l’aide des boutons Haut/Bas.
– Si la vidéo de la télévision et l’audio du Soundbar ne sont pas synchronisés,
sélectionnez SYNC dans Réglages sonores, puis réglez le retard de l’audio entre 0 et
300 millisecondes à l’aide des boutons Haut/Bas.
– Si des hauts-parleurs ambiophoniques sont connectés, sélectionnez REAR LEVEL et
utilisez les touches Haut/Bas pour régler le volume sur la plage de réglage allant de
-6 à +6. La fonction de haut-parleur VIRTUAL peut être ON/OFF à l’aide des touches
Haut/Bas.
– L’option SYNC n’est prise en charge que pour certaines fonctions.
• Initialiser
Une fois le Soundbar désactivé, maintenez la touche (Contrôle du son) enfoncée
pendant plus de 5 secondes jusqu’à ce que le haut-parleur s’allume.
Le message «INIT» apparaît sur l’écran et le Soundbar s’initialise.
WOOFER
VOL
SOUND
MODE
WOOFER
VOL
SOUND
MODE
WOOFER
VOL
Utilisez la touche Haut ou Bas pour régler le volume du caisson de basses jusqu'à -12, ou de
-6 à +6. Pour régler le niveau de volume du caisson de basses sur 0, appuyez sur la touche.
SOUND
MODE
WOOFER
VOL
SOUND
MODE
WOOFER
VOL
Appuyez sur le bouton vers le haut ou vers le bas pour régler le volume.
• Mise en sourdine
Appuyez sur le bouton VOL pour couper le son. Appuyez à nouveau sur le bouton pour
rétablir le son.
FRA - 29
Page 83

Réglage du volume du Soundbar à
SOUNDBAR
SOUNDBAR
SOUNDBAR
l’aide d’une télécommande de
téléviseur
Si vous avez un téléviseur Samsung, vous
pouvez régler son volume à l’aide de la
télécommande infrarouge fournie avec ce
même téléviseur.
Premièrement, utilisez le menu du téléviseur
Samsung pour congurer la sortie du son vers
des haut-parleurs externes, puis utilisez votre
télécommande Samsung pour contrôler le
volume du Soundbar. Pour plus d’informations,
consultez le manuel d’utilisation du téléviseur. Par
défaut, le Soundbar est contrôlé par la
télécommande d’un téléviseur Samsung. Si votre
téléviseur n’est pas de marque Samsung, suivez
les instructions ci-dessous pour modier les
paramètres de cette fonction.
1. Éteignez le Soundbar.
BYE
2. Si vous ne souhaitez pas utiliser cette
fonction, poussez le bouton WOOFER vers le
haut et maintenez-le dans cette position
pendant 5 secondes, jusqu’à ce que
«OFF-TV REMOTE» apparaisse sur l’écran.
4. Si vous souhaitez retourner au mode par
défaut du Soundbar (contrôlé par une
télécommande de téléviseur Samsung),
poussez le bouton WOOFER vers le haut et
maintenez-le pendant 5 secondes jusqu’à ce
que «SAMSUNG-TV REMOTE» apparaisse
sur l’écran.
SOUND
MODE
5 Sec
WOOFER
VOL
(mode par défaut)
SAMSUNG-TV REMOTE
– Chaque fois que vous appuyez sur la
touche WOOFER vers le haut et la
maintenez enfoncée pendant 5 secondes,
le mode change, dans l’ordre suivant :
«SAMSUNG-TV REMOTE» (mode par
défaut) → «OFF-TV REMOTE» →
«ALL-TV REMOTE».
– Cette fonction peut ne pas être
disponible en fonction de la
télécommande.
– Fabricants qui utilisent cette fonction:
VIZIO, LG, Sony, Sharp, PHILIPS,
PANASONIC, TOSHIBA, GRUNDIG,
Hisense, RCA
SOUND
MODE
5 Sec
WOOFER
VOL
OFF-TV REMOTE
3. Si vous souhaitez contrôler le Soundbar à l’aide
de la télécommande de votre téléviseur
Samsung, poussez le bouton
WOOFER
vers le
haut et maintenez-le pendant 5 secondes
jusqu’à ce que
«ALL-TV REMOTE»
apparaisse
sur l’écran. Ensuite, utilisez le menu du
téléviseur pour sélectionner les haut-parleurs
externes.
5 Sec
WOOFER
VOL
ALL-TV REMOTE
SOUND
MODE
FRA - 30
Page 84

Utilisation des boutons masqués (boutons ayant plusieurs fonctions)
Bouton masqué
Bouton de la télécommande Fonction
WOOFER
Gauche Auto Power Link ON/OFF page 28
Droite Anynet+ ON/OFF page 28
Haut ID SET page 28
(Contrôle du son)
Activer/Désactiver la fonction Télécommande
de votre téléviseur (mode veille)
EQ 7 bandes page 29
Initialiser (mode veille) page 29
Page de référence
page 30
Caractéristiques de sortie pour les différents modes d’effets sonores
Sortie
Effet Entrée
STANDARD
SURROUND
GAME PRO
ADAPTIVE SOUND
2.0 canaux 2.1 canaux 2.1 canaux
5.1 canaux 3.1 canaux 5.1 c anau x
2.0 canaux 3.1.2 c anaux 5.1.2 canaux
5.1 canaux 3.1. 2 canau x 5.1.2 canaux
2.0 canaux 3.1.2 c anaux 5.1.2 canaux
5.1 canaux 3.1. 2 canau x 5.1.2 canaux
2.0 canaux 3.1.2 c anaux 5.1.2 canaux
5.1 canaux 3.1. 2 canau x 5.1.2 canaux
Avec le cais son de basses
uniquement
Avec cais son des basse s et
haut-parleurarrièresansl
• Si la source d’entrée est Dolby Atmos®, la sortie sont fait par le canaux 3.1.2. Les modes d’effets
sonores contrôlés par le bouton SOUND MODE et énumérés ci-dessus ne sont pas disponibles.
• Le haut-parleur arrière sans l Samsung peut être acheté séparément. Pour vous en procurer un,
contactez le fournisseur auprès duquel vous avez acheté le Soundbar.
FRA - 31
Page 85

09 INSTALLATION
DU SUPPORT
Composantes murales
MURAL
Précautions d’installation
• Effectuez l’installation sur un mur vertical
uniquement.
• N’installez pas le produit dans un endroit où
la température ou l’humidité sont élevées.
• Vériez si le mur est sufsamment solide
pour supporter le poids du produit. Sinon,
renforcez le mur ou choisissez un autre
endroit pour l’installation.
• Achetez et utilisez les chevilles ou les vis de
xation adaptées au type de mur (plâtre,
métal, bois, etc.). Si possible, xez les vis de
support sur les montants des murs.
• Achetez des vis de montage mural en
fonction du type et de l’épaisseur du mur sur
lequel vous souhaitez installer le Soundbar.
– Diamètre: M5
– Longueur : 1 3/8 pouces ou plus long.
• Raccordez les câbles de l’unité à des
périphériques externes avant de xer le
Soundbar au mur.
• Assurez-vous que l’unité est éteinte et
débranchée avant de procéder à l’installation.
Dans le cas contraire, des chocs électriques
pourraient survenir.
Guide de montage mural
x 2
Vis de support Vis
x 2
Support mural
1. Placez le Guide de montage mural contre la
surface du mur.
• Le Guide de montage mural doit être à
niveau.
• Si votre téléviseur est xé au mur,
installez le Soundbar au moins 2 pouces
(5 cm) en dessous du téléviseur.
2 pouces o u plus
x 2
FRA - 32
Page 86

2. Alignez la Ligne Centrale du Guide de
montage mural sur le centre de votre
téléviseur (si vous montez le Soundbar sous
ce dernier), puis xez le Guide de montage
mural au mur avec du ruban adhésif.
• Si vous ne l’installez pas sous un
téléviseur, placez la Ligne Centrale au
centre de la zone d’installation.
Ligne Centrale
3. Poussez une pointe de stylo ou une pointe de
crayon bien taillé au centre des images
A-TYPE à chaque extrémité du guide pour
marquer les trous des vis de support, puis
retirez le Guide de montage mural.
5. Poussez une vis (non fournie) dans chaque
Vis de support, puis vissez fermement
chaque vis dans un trou de vis de support.
6. Installez les 2 Supportdexationmurale
selon l’orientation correcte en bas de la
Soundbar, à l’aide de 2 Vis.
4. À l’aide d’un foret de taille appropriée, percez
un trou dans le mur à chaque marque.
• Si les marques ne correspondent pas aux
positions des montants de la cloison,
veillez à insérer les chevilles ou les
chevilles Molly appropriées dans les trous
avant d’insérer les vis de support. Si vous
utilisez des chevilles ou des chevilles
Molly, assurez-vous que les trous que
vous percez sont assez grands pour
recevoir celles-ci.
FRA - 33
• Retirez le Pieds de support et le Supports
s’ils sont xés.
• Lors du montage, assurez-vous que
l’étrier des Supportdexationmurale
est situé à l’arrière du Soundbar.
Arrière du Soundbar
Extrémité droite du Soundbar
Page 87

7. Installez le Soundbar à l’aide des Support de
xationmurale en accrochant ces derniers
sur les Vis de support xées au mur.
10 INSTALLATION
DU PIED DE
SUPPORT
Composants du pied de support
8. Faites glisser la Soundbar vers le bas, comme
illustré ci-dessous, an que les Équerres de
support mural reposent fermement sur les
Vis de support.
• Insérez les Vis de support dans la partie
large (inférieure) des Supportdexation
murale, puis faites glisser les Suppor t de
xationmurale vers le bas an que les
Supportdexationmurale reposent
fermement sur les Vis de support.
x 2 x 2
Pied de support Support
x 2
Vis
• Les pieds de support permettent d’élever le
Soundbar an que vous puissiez l’installer
devant votre téléviseur et au-dessus des
pieds de son support. Voir l’illustration
ci-dessous.
• Vous pouvez régler les pieds de support sur
trois hauteurs différentes.
• Les pieds de support permettent d’ajuster la
distance entre le Soundbar et votre téléviseur
en fonction de la forme du support de votre
téléviseur.
TV
FRA - 34
Page 88

Relever le Soundbar de 0,6 pouce
(15mm)
1. Utilisez les deux Vis fournies pour xer les
deux Pieds de support à l’assemblage de
montage mural dans le panneau inférieur de
la Soundbar.
Relever le Soundbar de 0,8 pouce
(20mm)
1. Fixez les deux Pieds de support aux deux
Supports, comme indiqué dans la gure
ci-dessous.
11 MISE À JOUR
LOGICIELLE
Lorsque la Soundbar est connectée à Internet,
des mises à jour logicielles se font
automatiquement, même lorsque la Soundbar est
éteinte.
• Pour utiliser la fonction de mise à jour
automatique, la Soundbar doit être connectée
à Internet. La connexion Wi-Fi à la Soundbar
sera interrompue si son cordon d’alimentation
est débranché ou si l’alimentation est coupée.
Si l’alimentation est coupée, lorsque
l’alimentation revient ou que vous branchez le
câble d’alimentation, mettez le Soundbar
sous tension et reconnectez-le.
2. Utilisez les deux Vis fournies pour xer les
deux Pieds de support à l’assemblage de
montage mural dans le panneau inférieur de
la Soundbar.
FRA - 35
Page 89

12 DÉPANNAGE
Avant de contacter l’assistance, effectuez les vérications suivantes.
L’unité ne s’allume pas.
Le cordon d’alimentation est-il branché sur la
prise?
; Branchez le cordon d’alimentation sur la
prise.
Lorsque j’appuie sur un bouton, la fonction
ne s’active pas.
Y’a-t-il de l’électricité statique dans l’air?
; Débranchez le cordon d’alimentation et
rebranchez-le.
Le son est interrompu en mode BT.
; Reportez-vous aux sections relatives à la
connexion Bluetooth aux pages 12 et 19.
Il n’y a pas de son.
La fonc tion Mise en sourdine est-elle activée?
; Appuyez sur la touche (Mise en sourdine)
pour désactiver la fonction silence.
Le volume est-il réglé au minimum?
; Réglez le volume.
La télécommande ne fonctionne pas.
Les piles sont-elles déchargées?
; Remplacez-les par de nouvelles piles.
La distance entre la télécommande et l’unité
principale du Soundbar est-elle trop grande?
; Approchez la télécommande de l’unité
principale du Soundbar.
Le voyant rouge sur le caisson de basses
clignote et le caisson de basses n’émet
aucun son.
Ce problème peut arriver lorsque le caisson
des basses n’est pas connec té à l’unité
principale du Soundbar.
; Essayez à nouveau de connecter votre
caisson de basses. (Voir page 6)
Le caisson de basses émet un
bourdonnement et vibre sensiblement.
Essayez de régler les vibrations de votre
caisson de basses.
; Poussez le bouton WOOFER vers le haut ou
le bas pour régler le volume du caisson de
basses. (jusqu’à -12, ou entre -6 et +6)
Impossible de se connecter au téléviseur.
En cas de connexion via un réseau câblé
; Vériezsilecâbleestconnecté
correctement.
– Vériez le nom du port pour vous
assurer que le câble est connecté au
bon port. Pour des instructions,
reportez-vous à la page expliquant
chaque méthode de connexion.
; Appuyez sur le bouton (Source) sur le
panneau de droite du Soundbar ou sur la
télécommande pour vérier que le mode
est correct.
Encasdeconnexionviaunréseausansl
; Connexion via Bluetooth
1. Passez la Soundbar en mode “BT
PAIRING”, puis utilisez le téléviseur pour
relancer la recherche. (Voir la page 12
pour plus de détails.)
FRA - 36
Page 90

; Connexion via Wi-Fi
1. Vériez si le téléviseur est un modèle
compatible.
• Seuls les Téléviseurs Samsung Smart
mis en marché après 2013 sont pris en
charge.
2. Vériez si le téléviseur est connecté au
Wi-Fi.
• Si le téléviseur n’est pas connecté au
Wi-Fi, utilisez le menu de réseau du
téléviseur pour établir une connexion.
(Voir le manuel utilisateur du téléviseur.)
3. Vériez si la Soundbar est connectée au
Wi-Fi.
• Une fois le Soundbar connecté, il
gurera dans la liste des haut-parleurs
sur votre appareil mobile lorsque vous
exécuterez l’application SmartThings.
Voir la page 22 pour plus de détails.
4. Recherchez un canal DFS.
• Si votre routeur sans l (Wi-Fi) utilise
un canal DFS, vous ne pouvez pas
établir une connexion Wi-Fi entre le
téléviseur et la Soundbar. Contactez
votre fournisseur de services Internet
pour plus de détails.
13 LICENCE
Manufactured under license from Dolby
Laboratories. Dolby, Dolby Atmos, Dolby Audio,
Dolby Digital Plus, Pro Logic, and the double-D
symbol are trademarks of Dolby Laboratories.
For DTS patents, see http://patents.dts.com.
Manufactured under license from DTS
Licensing Limited. DTS, the Symbol, & DTS and
the Symbol together, DTS:X, and the DTS:X logo
are registered trademarks and/or trademarks
of DTS, Inc. in the United States and/or other
countries. © DTS, Inc. All Rights Reserved.
The terms HDMI and HDMI High-Denition
Multimedia Interface, and the HDMI Logo are
trademarks or registered trademarks of HDMI
Licensing LLC in the United States and other
countries.
FRA - 37
• Le logiciel Spotify est assujetti à des
licences de tiers que vous trouverez ici :
www.spotify.com/connect/third-partylicenses.
• Pour en savoir plus sur Spotify Connect,
veuillez visiter www.spotify.com/connect
Page 91

14 AVIS DE
LICENCES LIBRES
Pour de plus amples renseignements sur les
licences libres utilisées pour ce produit, veuillez
visiter le site Web :
http://opensource.samsung.com
15 REMARQUE
IMPORTANTE
CONCERNANT LE
SERVICE
Les chiffres et les illustrations contenus dans ce
Guide d’utilisation sont fournis à titre de référence
uniquement et pourraient ne pas représenter
exactement le produit.
FRA - 38
Page 92

16 CARACTÉRISTIQUES ET GUIDE
Spécications
Nom de modèle HW-Q70R
Poids 7,9 lbs (3,6 kg)
Dimensions (L x H x P)
Plage de températures en fonctionnement +41°F à +95°F (+5°C à +35°C)
43,3 x 2,3 x 3,9 po
(1100,0 x 59,0 x 100,0 mm)
Plage d’humidité en fonctionnement
AMPLIFICATEUR
Puissance de sortie nominale 30W x 5 + 10W x 2, 6ohm x 4 + 4ohm x 3
Formats de lecture pris en charge
Nom du caisson de basses PS-WR75B
Poids 21,6 lbs (9,8 kg)
Dimensions (L x H x P)
AMPLIFICATEUR
Puissance de sortie nominale 160W
LPCM 8ch, Dolby Digital, Dolby Atmos
(True HD / Digital Plus), DTS:X
10 % ~ 75 %
8,1 x 15,9 x 15,9 po
(205,0 x 403,0 x 403,0 mm)
REMARQUES
• Samsung Electronics Co., Ltd se réserve le droit de modier les caractéristiques sans préavis.
• Le poids et les dimensions sont approximatifs.
Précaution : Le Soundbar redémarre automatiquement si vous activez/désactivez le Wi-Fi.
Wi-Fi
Méthode de désactivation du port
Pour activer ou désactiver le Wi-Fi, appuyez au centre du
bouton WOOFER (ou BASS) de la télécommande pendant
30secondes ou plus.
Bluetooth
Méthode de désactivation du port
Appuyez sur le bouton NETWORK sur le panneau inférieur du
Soundbar pendant 30 secondes pour activer/désactiver le
Bluetooth.
FRA - 39
Page 93

GARANTIE LIMITÉE À L’ACHETEUR INITIAL
Samsung Electronics Canada Inc. (SECA) garantit ce produit contre tout défaut de fabrication.
SECA garantit aussi que si cet appareil ne fonctionne pas convenablement durant la
période de garantie SECA se réservera le droit de réparer ou de remplacer l’appareil
défectueux.
Toutes les réparations sous garantie doivent être effectuées par un Centre de service
autorisé SECA. Le nom et l’adresse du Centre de service le plus près de chez vous peut
être obtenu en composant sans frais le 1- 800- SAMSUNG ou en visitant notre site web
au www.samsung.ca
MAIN-D’OEUVRE
UN (1) AN (AU COMPTOIR)
Pour tous les modèles portatifs, le transport de l’appareil sera la responsabilité du client.
Le reçu de vente original doit être conservé par le client car cela constitue la seule preuve
d’achat acceptée. Le client doit le présenter au Centre de service agréé au moment où il
fait la demande d’une réparation sous garantie.
PIÈCES
UN (1) AN
EXCLUSIONS (CE QUI N’EST PAS COUVERT)
Cette garantie ne couvre pas les dommages causés par un accident, un incendie, une
inondation, un cas de force majeure, un mauvais usage ou une tension incorrecte.
La garantie ne couvre pas une mauvaise installation, une mauvaise réparation, une
réparation non autorisée et tout usage commercial ou dommages survenus durant le
transport. Le ni extérieur et intérieur de même que les lampes ne sont pas couverts par
cette garantie. Les ajustements par le client qui sont expliqués dans le guide de l’utilisateur
ne sont pas couverts en vertu de cette garantie. Cette garantie sera automatiquement
annulée pour tout appareil qui aurait un numéro de série manquant ou modié. Cette
garantie est valable seulement sur les appareils achetés et utilisés au Canada.
Samsung Electronics Canada Inc
2050 Derr y Rd West
Mississauga, On. L5N 0B9
Tel: 1-800-SAMSUNG (726-7864)
Fax: (905) 542- 1199
Website: http://www.samsung.com/ca_fr
Page 94

© 2019 Sams ung Electronics Co., Ltd. Tous droit s réservé s.
Comment c ontacter S amsung dans le m onde
Si vous avez d es suggesti ons ou des ques tions concernant les pro duits Samsung, veuille z contacter le S ervice
Consommateurs Samsung.
SIÈGE S OCIAL
Samsun g Electronic s Canada Inc. 20 50 Derry Roa d West , Mississauga , Ontario L5N 0B9 Canada
TEL: 1-800-SAMSUNG (1-800-726-7864)
www.samsung.com/ca_fr/support
Country Contact Center
`
North America
CANADA 1-800-SAMSUNG (726-7864)
U.S.A 1-800-SAMSUNG (726-7864) www.samsung.com/us/support
Web Site
www.samsung.com/ca/support (English)
www.samsung.com/ca_fr/support (French)
 Loading...